Adobe ActionScript 3.0 Developer’s Guide Action Script As3 Dev
User Manual: adobe ActionScript - 3.0 - Developer’s Guide Free User Guide for Adobe Flash Software, Manual
Open the PDF directly: View PDF ![]() .
.
Page Count: 1110 [warning: Documents this large are best viewed by clicking the View PDF Link!]
- Contents
- Chapter 1: Working with dates and times
- Chapter 2: Working with strings
- Chapter 3: Working with arrays
- Chapter 4: Handling errors
- Basics of error handling
- Types of errors
- Error handling in ActionScript 3.0
- Working with the debugger versions of Flash runtimes
- Handling synchronous errors in an application
- Creating custom error classes
- Responding to error events and status
- Comparing the Error classes
- Handling errors example: CustomErrors application
- Chapter 5: Using regular expressions
- Chapter 6: Working with XML
- Chapter 7: Handling events
- Chapter 8: Working with application domains
- Chapter 9: Display programming
- Basics of display programming
- Core display classes
- Advantages of the display list approach
- Working with display objects
- Manipulating display objects
- Animating objects
- Stage orientation
- Loading display content dynamically
- Display object example: SpriteArranger
- Chapter 10: Working with geometry
- Chapter 11: Using the drawing API
- Chapter 12: Working with bitmaps
- Chapter 13: Filtering display objects
- Chapter 14: Working with Pixel Bender shaders
- Chapter 15: Working with movie clips
- Chapter 16: Working with inverse kinematics
- Chapter 17: Working in three dimensions (3D)
- Chapter 18: Basics of Working with text
- Chapter 19: Using the TextField class
- Chapter 20: Using the Flash Text Engine
- Chapter 21: Using the Text Layout Framework
- Chapter 22: Working with sound
- Basics of working with sound
- Understanding the sound architecture
- Loading external sound files
- Working with embedded sounds
- Working with streaming sound files
- Working with dynamically generated audio
- Playing sounds
- Security considerations when loading and playing sounds
- Controlling sound volume and panning
- Working with sound metadata
- Accessing raw sound data
- Capturing sound input
- Sound example: Podcast Player
- Chapter 23: Working with video
- Basics of video
- Understanding video formats
- Understanding the Video class
- Loading video files
- Controlling video playback
- Playing video in full-screen mode
- Streaming video files
- Understanding cue points
- Writing callback methods for metadata and cue points
- Using cue points and metadata
- Advanced topics for video files
- Video example: Video Jukebox
- Using the StageVideo class for hardware-accelerated rendering
- Chapter 24: Working with cameras
- Chapter 25: Using digital rights management
- Chapter 26: Adding PDF content in AIR
- Chapter 27: Basics of user interaction
- Chapter 28: Keyboard input
- Chapter 29: Mouse input
- Chapter 30: Touch, multitouch and gesture input
- Chapter 31: Copy and paste
- Chapter 32: Accelerometer input
- Chapter 33: Drag and drop in AIR
- Basics of drag and drop in AIR
- Supporting the drag-out gesture
- Supporting the drag-in gesture
- Drag and drop in HTML
- Dragging data out of an HTML element
- Dragging data into an HTML element
- Example: Overriding the default HTML drag-in behavior
- Handling file drops in non-application HTML sandboxes
- Dropping file promises
- Chapter 34: Working with menus
- Chapter 35: Taskbar icons in AIR
- Chapter 36: Working with the file system
- Using the FileReference class
- Using the AIR file system API
- AIR file basics
- Working with File objects in AIR
- About the File class
- Paths of File objects
- Common directory locations
- Directory view for AIR for TV applications
- Pointing a File object to a directory
- Pointing a File object to a file
- Modifying File paths
- Supported AIR URL schemes
- Finding the relative path between two files
- Obtaining canonical versions of file names
- Working with packages and symbolic links
- Determining space available on a volume
- Opening files with the default system application
- Getting file system information
- Working with directories
- Working with files
- Working with storage volumes
- Reading and writing files
- Chapter 37: Storing local data
- Chapter 38: Working with local SQL databases in AIR
- About local SQL databases
- Creating and modifying a database
- Manipulating SQL database data
- Using synchronous and asynchronous database operations
- Using encryption with SQL databases
- Strategies for working with SQL databases
- Chapter 39: Working with byte arrays
- Chapter 40: Basics of networking and communication
- Chapter 41: Sockets
- Chapter 42: HTTP communications
- Chapter 43: Communicating with other Flash Player and AIR instances
- Chapter 44: Communicating with native processes in AIR
- Chapter 45: Using the external API
- Basics of using the external API
- External API requirements and advantages
- Using the ExternalInterface class
- External API example: Communicating between ActionScript and JavaScript in a web browser
- External API example: Communicating between ActionScript and a desktop application that uses the ActiveX control
- Chapter 46: XML signature validation in AIR
- Chapter 47: Client system environment
- Chapter 48: AIR application invocation and termination
- Chapter 49: Working with AIR runtime and operating system information
- Chapter 50: Working with AIR native windows
- Basics of native windows in AIR
- Creating windows
- Managing windows
- Getting a NativeWindow instance
- Activating, showing, and hiding windows
- Changing the window display order
- Closing a window
- Allowing cancellation of window operations
- Maximizing, minimizing, and restoring a window
- Example: Minimizing, maximizing, restoring and closing a window
- Resizing and moving a window
- Example: Resizing and moving windows
- Listening for window events
- Displaying full-screen windows
- Chapter 51: Display screens in AIR
- Chapter 52: Printing
- Chapter 53: Geolocation
- Chapter 54: Internationalizing applications
- Chapter 55: Localizing applications
- Chapter 56: About the HTML environment
- Overview of the HTML environment
- AIR and WebKit
- JavaScript in AIR
- HTML Sandboxes
- JavaScript eval() function
- Function constructors
- Loading external scripts
- The XMLHttpRequest object
- Cookies
- The Clipboard object
- Drag and Drop
- innerHTML and outerHTML properties
- Document.write() and Document.writeln() methods
- Document.designMode property
- unload events (for body and frameset objects)
- JavaScript Window object
- air.NativeApplication object
- The JavaScript URL scheme
- HTML in AIR
- CSS in AIR
- WebKit features not supported in AIR
- JavaScript in AIR
- Chapter 57: Programming HTML and JavaScript in AIR
- About the HTMLLoader class
- Avoiding security-related JavaScript errors
- Causes of security-related JavaScript errors
- Mapping application content to a different sandbox
- eval() function
- Assigning properties to an object
- Creating a function with variables available in context
- Creating an object using the name of the class as a string parameter
- setTimeout() and setInterval()
- Function constructor
- javascript: URLs
- Event callbacks assigned through onevent attributes in innerHTML and outerHTML statements
- Loading JavaScript files from outside the application installation directory
- document.write() and document.writeln()
- Synchronous XMLHttpRequests before the load event or during a load event handler
- Dynamically created script elements
- Accessing AIR API classes from JavaScript
- About URLs in AIR
- Making ActionScript objects available to JavaScript
- Accessing HTML DOM and JavaScript objects from ActionScript
- Embedding SWF content in HTML
- Using ActionScript libraries within an HTML page
- Converting Date and RegExp objects
- Manipulating an HTML stylesheet from ActionScript
- Cross-scripting content in different security sandboxes
- Chapter 58: Scripting the AIR HTML Container
- Display properties of HTMLLoader objects
- Scrolling HTML content
- Accessing the HTML history list
- Setting the user agent used when loading HTML content
- Setting the character encoding to use for HTML content
- Defining browser-like user interfaces for HTML content
- About extending the HTMLHost class
- Example: Extending the HTMLHost class
- Handling changes to the window.location property
- Handling JavaScript calls to window.moveBy(), window.moveTo(), window.resizeTo(), window.resizeBy()
- Handling JavaScript calls to window.open()
- Handling JavaScript calls to window.close()
- Handling changes of the window.status property
- Handling changes of the window.document.title property
- Handling JavaScript calls to window.blur() and window.focus()
- Creating windows with scrolling HTML content
- Creating subclasses of the HTMLLoader class
- Chapter 59: Handling HTML-related events in AIR
- Chapter 60: Displaying HTML content in mobile apps
- Chapter 61: Security
- Flash Platform security overview
- Security sandboxes
- Permission controls
- Restricting networking APIs
- Full-screen mode security
- Loading content
- Cross-scripting
- Accessing loaded media as data
- Loading data
- Loading embedded content from SWF files imported into a security domain
- Working with legacy content
- Setting LocalConnection permissions
- Controlling outbound URL access
- Shared objects
- Camera, microphone, clipboard, mouse, and keyboard access
- AIR security
- Chapter 62: How to Use ActionScript Examples
- Chapter 63: SQL support in local databases
- Chapter 64: SQL error detail messages, ids, and arguments

ACTIONSCRIPT® 3.0
Developer’s Guide

Last updated 3/21/2011
Copyright
© 2011 Adobe Systems Incorporated and its licensors. All rights reserved.
ActionScript® 3.0 Developer’s Guide
This guide is protected under copyright law, furnished for informational use only, is subject to change without notice, and should not be construed as a
commitment by Adobe Systems Incorporated. Adobe Systems Incorporated assumes no responsibility or liability for any errors or inaccuracies that may appear
in the informational content contained in this guide.
This guide is licensed for use under the terms of the Creative Commons Attribution Non-Commercial 3.0 License. This License allows users to copy, distribute,
and transmit the guide for noncommercial purposes only so long as (1) proper attribution to Adobe is given as the owner of the guide; and (2) any reuse or
distribution of the guide contains a notice that use of the guide is governed by these terms. The best way to provide notice is to include the following link. To
view a copy of this license, visit http://creativecommons.org/licenses/by-nc-sa/3.0/
Adobe, the Adobe logo, Acrobat, Acrobat Capture, Acrobat Connect, Acrobat Messenger, Acrobat 3D Capture, ActionScript, ActiveTest, Adobe ActionSource,
Adobe AIR, Adobe AIR logo, Adobe Audition, Adobe Caslon, Adobe Connect, Adobe DataWarehouse, Adobe Dimensions, Adobe Discover, Adobe Financial
Services, Adobe Garamond, Adobe Genesis, Adobe Griffo, Adobe Jenson, Adobe Kis, Adobe OnLocation, Adobe Originals logo, Adobe PDF logo, Adobe
Premiere, AdobePS, Adobe SiteSearch, Adobe Type Manager, Adobe Wave, Adobe Wave logo , Adobe WebType, Adobe Wood Type, After Effects, AIR , Alexa,
Andreas, Arno, ATM, Authorware, Balzano, Banshee, Benson Scripts, Better by Adobe. , Bickham Script, Birch, Blackoak, Blue Island, Brioso, BusinessCatalyst,
Buzzword, Caflisch Script, Cairngorm, Calcite, Caliban, Captivate, Carta, Chaparral, Charlemagne, Cheq, Classroom in a Book, ClickMap, Co-Author,
ColdFusion, ColdFusion Builder, Conga Brava, Contribute, Copal, Coriander, Cottonwood, Creative Suite, Critter, Cronos, CS Live, Custom Insight,
CustomerFirst, Cutout, Digital Pulse, Director, Distiller, DNG logo, Dreamweaver, DV Rack, Encore, Engaging beyond the Enterprise, ePaper, Ex Ponto,
Fireworks, Flash, Flash logo, Flash Access, Flash Access logo, Flash Builder, Flash Cast , FlashCast, Flash Catalyst, FlashHelp, Flash Lite, Flash on., FlashPaper,
Flash Platform Services logo , Flex, Flex Builder, Flood, Font Folio, Frame , FrameCenter, FrameConnections, FrameMaker, FrameManager, FrameViewer,
FreeHand, Fusaka, Galahad, Giddyup, Giddyup Thangs, GoLive, GoodBarry, Graphite, HomeSite, HBX, HTML Help Studio, HTTP Dynamic Streaming logo ,
Hypatia, Illustrator, ImageReady, Immi 505, InCopy, InDesign, Ironwood, Jimbo, JRun, Juniper, Kazuraki, Kepler, Kinesis, Kozuka Gothic, Kozuka Mincho,
Kuler, Leander Script, Lens Profile Creator logo , Lightroom, Lithos, LiveCycle, Macromedia, Madrone, Mercado, Mesquite, Mezz, Minion, Mojo, Montara,
Moonglow, MXML, Myriad, Mythos, Nueva, Nyx, 1-Step RoboPDF, Omniture, Open Screen Project, Open Source Media Framework logo, OpenType logo,
Ouch!, Ovation, PageMaker, PageMaker Portfolio, PDF JobReady, Penumbra, Pepperwood, Photoshop, Photoshop logo, Pixel Bender, Poetica, Ponderosa,
Poplar, Postino, PostScript, PostScript logo, PostScript 3, PostScript 3i, Powered by XMP, Prana, PSPrinter, Quake, Rad, Reader, Real-Time Analytics, Reliq,
RoboEngine, RoboHelp, RoboHTML, RoboLinker, RoboPDF, RoboScreenCapture, RoboSource Control, Rosewood, Roundtrip HTML, Ryo, Sanvito, Sava,
Scene7, See What’s Possible , Script Teaser, Shockwave, Shockwave Player logo, Shuriken Boy, Silentium, Silicon Slopes, SiteCatalyst, SiteCatalyst NetAverages,
Software Video Camera, Sonata, Soundbooth, SoundEdit, Strumpf, Studz, Tekton, Test&Target, 360Code, Toolbox, Trajan, TrueEdge, Type Reunion, Ultra,
Utopia, Vector Keying, Version Cue, VirtualTrak, Visual Call, Visual Communicator, Visual Sciences, Visual Sensor, Visual Server, Viva, Voluta , Warnock,
Waters Titling, Wave , Willow, XMP logo, Zebrawood are either registered trademarks or trademarks of Adobe Systems Incorporated in the United States and/or
other countries.
Android is a trademark of Google Inc. ActiveX and Windows are either registered trademarks or trademarks of Microsoft Corporation in the United States and
other countries. Macintosh is a trademark of Apple Inc., registered in the United States and other countries. Java is a trademark or registered trademark of Sun
Microsystems, Inc. in the United States and other countries. All other trademarks are the property of their respective owners.
Updated Information/Additional Third Party Code Information available at http://www.adobe.com/go/thirdparty.
Portions include software under the following terms:
This product includes software developed by the Apache Software Foundation (http://www.apache.org/).
MPEG Layer-3 audio compression technology licensed by Fraunhofer IIS and Thomson Multimedia (http://www.mp3licensing.com).
This software is based in part on the work of the Independent JPEG Group.
Speech compression and decompression technology licensed from Nellymoser, Inc. (www.nellymoser.com).
Video in Flash Player is powered by On2 TrueMotion video technology. © 1992-2005 On2 Technologies, Inc. All Rights Reserved. http://www.on2.com.
This product contains either BSAFE and/or TIPEM software by RSA Security, Inc.
Sorenson Spark™ video compression and decompression technology licensed from Sorenson Media, Inc.
Adobe Systems Incorporated, 345 Park Avenue, San Jose, California 95110, USA
Notice to U.S. Government End Users: The Software and Documentation are “Commercial Items,” as that term is defined at 48 C.F.R. §2.101, consisting of
“Commercial Computer Software” and “Commercial Computer Software Documentation,” as such terms are used in 48 C.F.R. §12.212 or 48 C.F.R. §227.7202,
as applicable. Consistent with 48 C.F.R. §12.212 or 48 C.F.R. §§227.7202-1 through 227.7202-4, as applicable, the Commercial Computer Software and
Commercial Computer Software Documentation are being licensed to U.S. Government end users (a) only as Commercial Items and (b) with only those rights
as are granted to all other end users pursuant to the terms and conditions herein. Unpublished-rights reserved under the copyright laws of the United States.
Adobe agrees to comply with all applicable equal opportunity laws including, if appropriate, the provisions of Executive Order 11246, as amended, Section 402
of the Vietnam Era Veterans Readjustment Assistance Act of 1974 (38 USC 4212), and Section 503 of the Rehabilitation Act of 1973, as amended, and the
regulations at 41 CFR Parts 60-1 through 60-60, 60-250, and 60-741. The affirmative action clause and regulations contained in the preceding sentence shall be
incorporated by reference.

iii
Last updated 3/21/2011
Contents
Chapter 1: Working with dates and times
Managing calendar dates and times . . . . . . . . . . . . . . . . . . . . . . . . . . . . . . . . . . . . . . . . . . . . . . . . . . . . . . . . . . . . . . . . . . . . . . . . . . . . . . . . . . . . 1
Controlling time intervals . . . . . . . . . . . . . . . . . . . . . . . . . . . . . . . . . . . . . . . . . . . . . . . . . . . . . . . . . . . . . . . . . . . . . . . . . . . . . . . . . . . . . . . . . . . . . . 4
Date and time example: Simple analog clock . . . . . . . . . . . . . . . . . . . . . . . . . . . . . . . . . . . . . . . . . . . . . . . . . . . . . . . . . . . . . . . . . . . . . . . . . . . 6
Chapter 2: Working with strings
Basics of strings . . . . . . . . . . . . . . . . . . . . . . . . . . . . . . . . . . . . . . . . . . . . . . . . . . . . . . . . . . . . . . . . . . . . . . . . . . . . . . . . . . . . . . . . . . . . . . . . . . . . . . 10
Creating strings . . . . . . . . . . . . . . . . . . . . . . . . . . . . . . . . . . . . . . . . . . . . . . . . . . . . . . . . . . . . . . . . . . . . . . . . . . . . . . . . . . . . . . . . . . . . . . . . . . . . . . 11
The length property . . . . . . . . . . . . . . . . . . . . . . . . . . . . . . . . . . . . . . . . . . . . . . . . . . . . . . . . . . . . . . . . . . . . . . . . . . . . . . . . . . . . . . . . . . . . . . . . . . 12
Working with characters in strings . . . . . . . . . . . . . . . . . . . . . . . . . . . . . . . . . . . . . . . . . . . . . . . . . . . . . . . . . . . . . . . . . . . . . . . . . . . . . . . . . . . . 12
Comparing strings . . . . . . . . . . . . . . . . . . . . . . . . . . . . . . . . . . . . . . . . . . . . . . . . . . . . . . . . . . . . . . . . . . . . . . . . . . . . . . . . . . . . . . . . . . . . . . . . . . . . 13
Obtaining string representations of other objects . . . . . . . . . . . . . . . . . . . . . . . . . . . . . . . . . . . . . . . . . . . . . . . . . . . . . . . . . . . . . . . . . . . . . 14
Concatenating strings . . . . . . . . . . . . . . . . . . . . . . . . . . . . . . . . . . . . . . . . . . . . . . . . . . . . . . . . . . . . . . . . . . . . . . . . . . . . . . . . . . . . . . . . . . . . . . . . 14
Finding substrings and patterns in strings . . . . . . . . . . . . . . . . . . . . . . . . . . . . . . . . . . . . . . . . . . . . . . . . . . . . . . . . . . . . . . . . . . . . . . . . . . . . . 15
Converting strings between uppercase and lowercase . . . . . . . . . . . . . . . . . . . . . . . . . . . . . . . . . . . . . . . . . . . . . . . . . . . . . . . . . . . . . . . . . 19
Strings example: ASCII art . . . . . . . . . . . . . . . . . . . . . . . . . . . . . . . . . . . . . . . . . . . . . . . . . . . . . . . . . . . . . . . . . . . . . . . . . . . . . . . . . . . . . . . . . . . . . 19
Chapter 3: Working with arrays
Basics of arrays . . . . . . . . . . . . . . . . . . . . . . . . . . . . . . . . . . . . . . . . . . . . . . . . . . . . . . . . . . . . . . . . . . . . . . . . . . . . . . . . . . . . . . . . . . . . . . . . . . . . . . . 25
Indexed arrays . . . . . . . . . . . . . . . . . . . . . . . . . . . . . . . . . . . . . . . . . . . . . . . . . . . . . . . . . . . . . . . . . . . . . . . . . . . . . . . . . . . . . . . . . . . . . . . . . . . . . . . 26
Associative arrays . . . . . . . . . . . . . . . . . . . . . . . . . . . . . . . . . . . . . . . . . . . . . . . . . . . . . . . . . . . . . . . . . . . . . . . . . . . . . . . . . . . . . . . . . . . . . . . . . . . . 37
Multidimensional arrays . . . . . . . . . . . . . . . . . . . . . . . . . . . . . . . . . . . . . . . . . . . . . . . . . . . . . . . . . . . . . . . . . . . . . . . . . . . . . . . . . . . . . . . . . . . . . . 41
Cloning arrays . . . . . . . . . . . . . . . . . . . . . . . . . . . . . . . . . . . . . . . . . . . . . . . . . . . . . . . . . . . . . . . . . . . . . . . . . . . . . . . . . . . . . . . . . . . . . . . . . . . . . . . . 42
Extending the Array class . . . . . . . . . . . . . . . . . . . . . . . . . . . . . . . . . . . . . . . . . . . . . . . . . . . . . . . . . . . . . . . . . . . . . . . . . . . . . . . . . . . . . . . . . . . . . 43
Arrays example: PlayList . . . . . . . . . . . . . . . . . . . . . . . . . . . . . . . . . . . . . . . . . . . . . . . . . . . . . . . . . . . . . . . . . . . . . . . . . . . . . . . . . . . . . . . . . . . . . . 48
Chapter 4: Handling errors
Basics of error handling . . . . . . . . . . . . . . . . . . . . . . . . . . . . . . . . . . . . . . . . . . . . . . . . . . . . . . . . . . . . . . . . . . . . . . . . . . . . . . . . . . . . . . . . . . . . . . . 52
Types of errors . . . . . . . . . . . . . . . . . . . . . . . . . . . . . . . . . . . . . . . . . . . . . . . . . . . . . . . . . . . . . . . . . . . . . . . . . . . . . . . . . . . . . . . . . . . . . . . . . . . . . . . 53
Error handling in ActionScript 3.0 . . . . . . . . . . . . . . . . . . . . . . . . . . . . . . . . . . . . . . . . . . . . . . . . . . . . . . . . . . . . . . . . . . . . . . . . . . . . . . . . . . . . . 55
Working with the debugger versions of Flash runtimes . . . . . . . . . . . . . . . . . . . . . . . . . . . . . . . . . . . . . . . . . . . . . . . . . . . . . . . . . . . . . . . . 57
Handling synchronous errors in an application . . . . . . . . . . . . . . . . . . . . . . . . . . . . . . . . . . . . . . . . . . . . . . . . . . . . . . . . . . . . . . . . . . . . . . . . 58
Creating custom error classes . . . . . . . . . . . . . . . . . . . . . . . . . . . . . . . . . . . . . . . . . . . . . . . . . . . . . . . . . . . . . . . . . . . . . . . . . . . . . . . . . . . . . . . . . 62
Responding to error events and status . . . . . . . . . . . . . . . . . . . . . . . . . . . . . . . . . . . . . . . . . . . . . . . . . . . . . . . . . . . . . . . . . . . . . . . . . . . . . . . . 63
Comparing the Error classes . . . . . . . . . . . . . . . . . . . . . . . . . . . . . . . . . . . . . . . . . . . . . . . . . . . . . . . . . . . . . . . . . . . . . . . . . . . . . . . . . . . . . . . . . . 66
Handling errors example: CustomErrors application . . . . . . . . . . . . . . . . . . . . . . . . . . . . . . . . . . . . . . . . . . . . . . . . . . . . . . . . . . . . . . . . . . . 70
Chapter 5: Using regular expressions
Basics of regular expressions . . . . . . . . . . . . . . . . . . . . . . . . . . . . . . . . . . . . . . . . . . . . . . . . . . . . . . . . . . . . . . . . . . . . . . . . . . . . . . . . . . . . . . . . . . 76
Regular expression syntax . . . . . . . . . . . . . . . . . . . . . . . . . . . . . . . . . . . . . . . . . . . . . . . . . . . . . . . . . . . . . . . . . . . . . . . . . . . . . . . . . . . . . . . . . . . . 77
Methods for using regular expressions with strings . . . . . . . . . . . . . . . . . . . . . . . . . . . . . . . . . . . . . . . . . . . . . . . . . . . . . . . . . . . . . . . . . . . . 90
Regular expressions example: A Wiki parser . . . . . . . . . . . . . . . . . . . . . . . . . . . . . . . . . . . . . . . . . . . . . . . . . . . . . . . . . . . . . . . . . . . . . . . . . . . 91

iv
ACTIONSCRIPT 3.0 DEVELOPER’S GUIDE
Contents
Last updated 3/21/2011
Chapter 6: Working with XML
Basics of XML . . . . . . . . . . . . . . . . . . . . . . . . . . . . . . . . . . . . . . . . . . . . . . . . . . . . . . . . . . . . . . . . . . . . . . . . . . . . . . . . . . . . . . . . . . . . . . . . . . . . . . . . . 95
The E4X approach to XML processing . . . . . . . . . . . . . . . . . . . . . . . . . . . . . . . . . . . . . . . . . . . . . . . . . . . . . . . . . . . . . . . . . . . . . . . . . . . . . . . . . 98
XML objects . . . . . . . . . . . . . . . . . . . . . . . . . . . . . . . . . . . . . . . . . . . . . . . . . . . . . . . . . . . . . . . . . . . . . . . . . . . . . . . . . . . . . . . . . . . . . . . . . . . . . . . . . . 99
XMLList objects . . . . . . . . . . . . . . . . . . . . . . . . . . . . . . . . . . . . . . . . . . . . . . . . . . . . . . . . . . . . . . . . . . . . . . . . . . . . . . . . . . . . . . . . . . . . . . . . . . . . . 102
Initializing XML variables . . . . . . . . . . . . . . . . . . . . . . . . . . . . . . . . . . . . . . . . . . . . . . . . . . . . . . . . . . . . . . . . . . . . . . . . . . . . . . . . . . . . . . . . . . . . 103
Assembling and transforming XML objects . . . . . . . . . . . . . . . . . . . . . . . . . . . . . . . . . . . . . . . . . . . . . . . . . . . . . . . . . . . . . . . . . . . . . . . . . . . 104
Traversing XML structures . . . . . . . . . . . . . . . . . . . . . . . . . . . . . . . . . . . . . . . . . . . . . . . . . . . . . . . . . . . . . . . . . . . . . . . . . . . . . . . . . . . . . . . . . . . 106
Using XML namespaces . . . . . . . . . . . . . . . . . . . . . . . . . . . . . . . . . . . . . . . . . . . . . . . . . . . . . . . . . . . . . . . . . . . . . . . . . . . . . . . . . . . . . . . . . . . . . 110
XML type conversion . . . . . . . . . . . . . . . . . . . . . . . . . . . . . . . . . . . . . . . . . . . . . . . . . . . . . . . . . . . . . . . . . . . . . . . . . . . . . . . . . . . . . . . . . . . . . . . . 111
Reading external XML documents . . . . . . . . . . . . . . . . . . . . . . . . . . . . . . . . . . . . . . . . . . . . . . . . . . . . . . . . . . . . . . . . . . . . . . . . . . . . . . . . . . . 112
XML in ActionScript example: Loading RSS data from the Internet . . . . . . . . . . . . . . . . . . . . . . . . . . . . . . . . . . . . . . . . . . . . . . . . . . . . . 113
Chapter 7: Handling events
Basics of handling events . . . . . . . . . . . . . . . . . . . . . . . . . . . . . . . . . . . . . . . . . . . . . . . . . . . . . . . . . . . . . . . . . . . . . . . . . . . . . . . . . . . . . . . . . . . . 117
How ActionScript 3.0 event handling differs from earlier versions . . . . . . . . . . . . . . . . . . . . . . . . . . . . . . . . . . . . . . . . . . . . . . . . . . . . . 119
The event flow . . . . . . . . . . . . . . . . . . . . . . . . . . . . . . . . . . . . . . . . . . . . . . . . . . . . . . . . . . . . . . . . . . . . . . . . . . . . . . . . . . . . . . . . . . . . . . . . . . . . . . 121
Event objects . . . . . . . . . . . . . . . . . . . . . . . . . . . . . . . . . . . . . . . . . . . . . . . . . . . . . . . . . . . . . . . . . . . . . . . . . . . . . . . . . . . . . . . . . . . . . . . . . . . . . . . . 122
Event listeners . . . . . . . . . . . . . . . . . . . . . . . . . . . . . . . . . . . . . . . . . . . . . . . . . . . . . . . . . . . . . . . . . . . . . . . . . . . . . . . . . . . . . . . . . . . . . . . . . . . . . . . 126
Event handling example: Alarm Clock . . . . . . . . . . . . . . . . . . . . . . . . . . . . . . . . . . . . . . . . . . . . . . . . . . . . . . . . . . . . . . . . . . . . . . . . . . . . . . . . 132
Chapter 8: Working with application domains
Chapter 9: Display programming
Basics of display programming . . . . . . . . . . . . . . . . . . . . . . . . . . . . . . . . . . . . . . . . . . . . . . . . . . . . . . . . . . . . . . . . . . . . . . . . . . . . . . . . . . . . . . . 143
Core display classes . . . . . . . . . . . . . . . . . . . . . . . . . . . . . . . . . . . . . . . . . . . . . . . . . . . . . . . . . . . . . . . . . . . . . . . . . . . . . . . . . . . . . . . . . . . . . . . . . 146
Advantages of the display list approach . . . . . . . . . . . . . . . . . . . . . . . . . . . . . . . . . . . . . . . . . . . . . . . . . . . . . . . . . . . . . . . . . . . . . . . . . . . . . . 148
Working with display objects . . . . . . . . . . . . . . . . . . . . . . . . . . . . . . . . . . . . . . . . . . . . . . . . . . . . . . . . . . . . . . . . . . . . . . . . . . . . . . . . . . . . . . . . 150
Manipulating display objects . . . . . . . . . . . . . . . . . . . . . . . . . . . . . . . . . . . . . . . . . . . . . . . . . . . . . . . . . . . . . . . . . . . . . . . . . . . . . . . . . . . . . . . . 164
Animating objects . . . . . . . . . . . . . . . . . . . . . . . . . . . . . . . . . . . . . . . . . . . . . . . . . . . . . . . . . . . . . . . . . . . . . . . . . . . . . . . . . . . . . . . . . . . . . . . . . . . 183
Stage orientation . . . . . . . . . . . . . . . . . . . . . . . . . . . . . . . . . . . . . . . . . . . . . . . . . . . . . . . . . . . . . . . . . . . . . . . . . . . . . . . . . . . . . . . . . . . . . . . . . . . . 186
Loading display content dynamically . . . . . . . . . . . . . . . . . . . . . . . . . . . . . . . . . . . . . . . . . . . . . . . . . . . . . . . . . . . . . . . . . . . . . . . . . . . . . . . . 189
Display object example: SpriteArranger . . . . . . . . . . . . . . . . . . . . . . . . . . . . . . . . . . . . . . . . . . . . . . . . . . . . . . . . . . . . . . . . . . . . . . . . . . . . . . 192
Chapter 10: Working with geometry
Basics of geometry . . . . . . . . . . . . . . . . . . . . . . . . . . . . . . . . . . . . . . . . . . . . . . . . . . . . . . . . . . . . . . . . . . . . . . . . . . . . . . . . . . . . . . . . . . . . . . . . . . 199
Using Point objects . . . . . . . . . . . . . . . . . . . . . . . . . . . . . . . . . . . . . . . . . . . . . . . . . . . . . . . . . . . . . . . . . . . . . . . . . . . . . . . . . . . . . . . . . . . . . . . . . . 200
Using Rectangle objects . . . . . . . . . . . . . . . . . . . . . . . . . . . . . . . . . . . . . . . . . . . . . . . . . . . . . . . . . . . . . . . . . . . . . . . . . . . . . . . . . . . . . . . . . . . . . 202
Using Matrix objects . . . . . . . . . . . . . . . . . . . . . . . . . . . . . . . . . . . . . . . . . . . . . . . . . . . . . . . . . . . . . . . . . . . . . . . . . . . . . . . . . . . . . . . . . . . . . . . . . 205
Geometry example: Applying a matrix transformation to a display object . . . . . . . . . . . . . . . . . . . . . . . . . . . . . . . . . . . . . . . . . . . . . 206
Chapter 11: Using the drawing API
Basics of the drawing API . . . . . . . . . . . . . . . . . . . . . . . . . . . . . . . . . . . . . . . . . . . . . . . . . . . . . . . . . . . . . . . . . . . . . . . . . . . . . . . . . . . . . . . . . . . . 211
The Graphics class . . . . . . . . . . . . . . . . . . . . . . . . . . . . . . . . . . . . . . . . . . . . . . . . . . . . . . . . . . . . . . . . . . . . . . . . . . . . . . . . . . . . . . . . . . . . . . . . . . . 212
Drawing lines and curves . . . . . . . . . . . . . . . . . . . . . . . . . . . . . . . . . . . . . . . . . . . . . . . . . . . . . . . . . . . . . . . . . . . . . . . . . . . . . . . . . . . . . . . . . . . . 212
Drawing shapes using built-in methods . . . . . . . . . . . . . . . . . . . . . . . . . . . . . . . . . . . . . . . . . . . . . . . . . . . . . . . . . . . . . . . . . . . . . . . . . . . . . . 215
Creating gradient lines and fills . . . . . . . . . . . . . . . . . . . . . . . . . . . . . . . . . . . . . . . . . . . . . . . . . . . . . . . . . . . . . . . . . . . . . . . . . . . . . . . . . . . . . . 216
Using the Math class with drawing methods . . . . . . . . . . . . . . . . . . . . . . . . . . . . . . . . . . . . . . . . . . . . . . . . . . . . . . . . . . . . . . . . . . . . . . . . . 220

v
ACTIONSCRIPT 3.0 DEVELOPER’S GUIDE
Contents
Last updated 3/21/2011
Animating with the drawing API . . . . . . . . . . . . . . . . . . . . . . . . . . . . . . . . . . . . . . . . . . . . . . . . . . . . . . . . . . . . . . . . . . . . . . . . . . . . . . . . . . . . . 221
Drawing API example: Algorithmic Visual Generator . . . . . . . . . . . . . . . . . . . . . . . . . . . . . . . . . . . . . . . . . . . . . . . . . . . . . . . . . . . . . . . . . . 222
Advanced use of the drawing API . . . . . . . . . . . . . . . . . . . . . . . . . . . . . . . . . . . . . . . . . . . . . . . . . . . . . . . . . . . . . . . . . . . . . . . . . . . . . . . . . . . . 224
Chapter 12: Working with bitmaps
Basics of working with bitmaps . . . . . . . . . . . . . . . . . . . . . . . . . . . . . . . . . . . . . . . . . . . . . . . . . . . . . . . . . . . . . . . . . . . . . . . . . . . . . . . . . . . . . . 232
The Bitmap and BitmapData classes . . . . . . . . . . . . . . . . . . . . . . . . . . . . . . . . . . . . . . . . . . . . . . . . . . . . . . . . . . . . . . . . . . . . . . . . . . . . . . . . . . 234
Manipulating pixels . . . . . . . . . . . . . . . . . . . . . . . . . . . . . . . . . . . . . . . . . . . . . . . . . . . . . . . . . . . . . . . . . . . . . . . . . . . . . . . . . . . . . . . . . . . . . . . . . 235
Copying bitmap data . . . . . . . . . . . . . . . . . . . . . . . . . . . . . . . . . . . . . . . . . . . . . . . . . . . . . . . . . . . . . . . . . . . . . . . . . . . . . . . . . . . . . . . . . . . . . . . . 238
Making textures with noise functions . . . . . . . . . . . . . . . . . . . . . . . . . . . . . . . . . . . . . . . . . . . . . . . . . . . . . . . . . . . . . . . . . . . . . . . . . . . . . . . . 239
Scrolling bitmaps . . . . . . . . . . . . . . . . . . . . . . . . . . . . . . . . . . . . . . . . . . . . . . . . . . . . . . . . . . . . . . . . . . . . . . . . . . . . . . . . . . . . . . . . . . . . . . . . . . . . 241
Taking advantage of mipmapping . . . . . . . . . . . . . . . . . . . . . . . . . . . . . . . . . . . . . . . . . . . . . . . . . . . . . . . . . . . . . . . . . . . . . . . . . . . . . . . . . . . 242
Bitmap example: Animated spinning moon . . . . . . . . . . . . . . . . . . . . . . . . . . . . . . . . . . . . . . . . . . . . . . . . . . . . . . . . . . . . . . . . . . . . . . . . . . 243
Asynchronous decoding of bitmap images . . . . . . . . . . . . . . . . . . . . . . . . . . . . . . . . . . . . . . . . . . . . . . . . . . . . . . . . . . . . . . . . . . . . . . . . . . . 253
Chapter 13: Filtering display objects
Basics of filtering display objects . . . . . . . . . . . . . . . . . . . . . . . . . . . . . . . . . . . . . . . . . . . . . . . . . . . . . . . . . . . . . . . . . . . . . . . . . . . . . . . . . . . . . 255
Creating and applying filters . . . . . . . . . . . . . . . . . . . . . . . . . . . . . . . . . . . . . . . . . . . . . . . . . . . . . . . . . . . . . . . . . . . . . . . . . . . . . . . . . . . . . . . . . 256
Available display filters . . . . . . . . . . . . . . . . . . . . . . . . . . . . . . . . . . . . . . . . . . . . . . . . . . . . . . . . . . . . . . . . . . . . . . . . . . . . . . . . . . . . . . . . . . . . . . 263
Filtering display objects example: Filter Workbench . . . . . . . . . . . . . . . . . . . . . . . . . . . . . . . . . . . . . . . . . . . . . . . . . . . . . . . . . . . . . . . . . . 280
Chapter 14: Working with Pixel Bender shaders
Basics of Pixel Bender shaders . . . . . . . . . . . . . . . . . . . . . . . . . . . . . . . . . . . . . . . . . . . . . . . . . . . . . . . . . . . . . . . . . . . . . . . . . . . . . . . . . . . . . . . 288
Loading or embedding a shader . . . . . . . . . . . . . . . . . . . . . . . . . . . . . . . . . . . . . . . . . . . . . . . . . . . . . . . . . . . . . . . . . . . . . . . . . . . . . . . . . . . . . 290
Accessing shader metadata . . . . . . . . . . . . . . . . . . . . . . . . . . . . . . . . . . . . . . . . . . . . . . . . . . . . . . . . . . . . . . . . . . . . . . . . . . . . . . . . . . . . . . . . . . 291
Specifying shader input and parameter values . . . . . . . . . . . . . . . . . . . . . . . . . . . . . . . . . . . . . . . . . . . . . . . . . . . . . . . . . . . . . . . . . . . . . . . 293
Using a shader . . . . . . . . . . . . . . . . . . . . . . . . . . . . . . . . . . . . . . . . . . . . . . . . . . . . . . . . . . . . . . . . . . . . . . . . . . . . . . . . . . . . . . . . . . . . . . . . . . . . . . 298
Chapter 15: Working with movie clips
Basics of movie clips . . . . . . . . . . . . . . . . . . . . . . . . . . . . . . . . . . . . . . . . . . . . . . . . . . . . . . . . . . . . . . . . . . . . . . . . . . . . . . . . . . . . . . . . . . . . . . . . . 310
Working with MovieClip objects . . . . . . . . . . . . . . . . . . . . . . . . . . . . . . . . . . . . . . . . . . . . . . . . . . . . . . . . . . . . . . . . . . . . . . . . . . . . . . . . . . . . . 311
Controlling movie clip playback . . . . . . . . . . . . . . . . . . . . . . . . . . . . . . . . . . . . . . . . . . . . . . . . . . . . . . . . . . . . . . . . . . . . . . . . . . . . . . . . . . . . . . 311
Creating MovieClip objects with ActionScript . . . . . . . . . . . . . . . . . . . . . . . . . . . . . . . . . . . . . . . . . . . . . . . . . . . . . . . . . . . . . . . . . . . . . . . . 314
Loading an external SWF file . . . . . . . . . . . . . . . . . . . . . . . . . . . . . . . . . . . . . . . . . . . . . . . . . . . . . . . . . . . . . . . . . . . . . . . . . . . . . . . . . . . . . . . . . 316
Movie clip example: RuntimeAssetsExplorer . . . . . . . . . . . . . . . . . . . . . . . . . . . . . . . . . . . . . . . . . . . . . . . . . . . . . . . . . . . . . . . . . . . . . . . . . . 318
Chapter 16: Working with inverse kinematics
Basics of Inverse Kinematics . . . . . . . . . . . . . . . . . . . . . . . . . . . . . . . . . . . . . . . . . . . . . . . . . . . . . . . . . . . . . . . . . . . . . . . . . . . . . . . . . . . . . . . . . 322
Animating IK Armatures Overview . . . . . . . . . . . . . . . . . . . . . . . . . . . . . . . . . . . . . . . . . . . . . . . . . . . . . . . . . . . . . . . . . . . . . . . . . . . . . . . . . . . 323
Getting information about an IK armature . . . . . . . . . . . . . . . . . . . . . . . . . . . . . . . . . . . . . . . . . . . . . . . . . . . . . . . . . . . . . . . . . . . . . . . . . . . . 325
Instantiating an IK Mover and Limiting Its Movement . . . . . . . . . . . . . . . . . . . . . . . . . . . . . . . . . . . . . . . . . . . . . . . . . . . . . . . . . . . . . . . . . 325
Moving an IK Armature . . . . . . . . . . . . . . . . . . . . . . . . . . . . . . . . . . . . . . . . . . . . . . . . . . . . . . . . . . . . . . . . . . . . . . . . . . . . . . . . . . . . . . . . . . . . . . 326
Using Springs . . . . . . . . . . . . . . . . . . . . . . . . . . . . . . . . . . . . . . . . . . . . . . . . . . . . . . . . . . . . . . . . . . . . . . . . . . . . . . . . . . . . . . . . . . . . . . . . . . . . . . . 327
Using IK Events . . . . . . . . . . . . . . . . . . . . . . . . . . . . . . . . . . . . . . . . . . . . . . . . . . . . . . . . . . . . . . . . . . . . . . . . . . . . . . . . . . . . . . . . . . . . . . . . . . . . . . 327
Chapter 17: Working in three dimensions (3D)
Basics of 3D . . . . . . . . . . . . . . . . . . . . . . . . . . . . . . . . . . . . . . . . . . . . . . . . . . . . . . . . . . . . . . . . . . . . . . . . . . . . . . . . . . . . . . . . . . . . . . . . . . . . . . . . . 329
Understanding the 3D features of Flash Player and the AIR runtime . . . . . . . . . . . . . . . . . . . . . . . . . . . . . . . . . . . . . . . . . . . . . . . . . . . 330

vi
ACTIONSCRIPT 3.0 DEVELOPER’S GUIDE
Contents
Last updated 3/21/2011
Creating and moving 3D objects . . . . . . . . . . . . . . . . . . . . . . . . . . . . . . . . . . . . . . . . . . . . . . . . . . . . . . . . . . . . . . . . . . . . . . . . . . . . . . . . . . . . . 331
Projecting 3D objects onto a 2D view . . . . . . . . . . . . . . . . . . . . . . . . . . . . . . . . . . . . . . . . . . . . . . . . . . . . . . . . . . . . . . . . . . . . . . . . . . . . . . . . 333
Example: Perspective projection . . . . . . . . . . . . . . . . . . . . . . . . . . . . . . . . . . . . . . . . . . . . . . . . . . . . . . . . . . . . . . . . . . . . . . . . . . . . . . . . . . . . . 335
Performing complex 3D transformations . . . . . . . . . . . . . . . . . . . . . . . . . . . . . . . . . . . . . . . . . . . . . . . . . . . . . . . . . . . . . . . . . . . . . . . . . . . . . 338
Using triangles for 3D effects . . . . . . . . . . . . . . . . . . . . . . . . . . . . . . . . . . . . . . . . . . . . . . . . . . . . . . . . . . . . . . . . . . . . . . . . . . . . . . . . . . . . . . . . 341
Chapter 18: Basics of Working with text
Chapter 19: Using the TextField class
Displaying text . . . . . . . . . . . . . . . . . . . . . . . . . . . . . . . . . . . . . . . . . . . . . . . . . . . . . . . . . . . . . . . . . . . . . . . . . . . . . . . . . . . . . . . . . . . . . . . . . . . . . . 351
Selecting and manipulating text . . . . . . . . . . . . . . . . . . . . . . . . . . . . . . . . . . . . . . . . . . . . . . . . . . . . . . . . . . . . . . . . . . . . . . . . . . . . . . . . . . . . . 355
Capturing text input . . . . . . . . . . . . . . . . . . . . . . . . . . . . . . . . . . . . . . . . . . . . . . . . . . . . . . . . . . . . . . . . . . . . . . . . . . . . . . . . . . . . . . . . . . . . . . . . . 356
Restricting text input . . . . . . . . . . . . . . . . . . . . . . . . . . . . . . . . . . . . . . . . . . . . . . . . . . . . . . . . . . . . . . . . . . . . . . . . . . . . . . . . . . . . . . . . . . . . . . . . 357
Formatting text . . . . . . . . . . . . . . . . . . . . . . . . . . . . . . . . . . . . . . . . . . . . . . . . . . . . . . . . . . . . . . . . . . . . . . . . . . . . . . . . . . . . . . . . . . . . . . . . . . . . . 358
Advanced text rendering . . . . . . . . . . . . . . . . . . . . . . . . . . . . . . . . . . . . . . . . . . . . . . . . . . . . . . . . . . . . . . . . . . . . . . . . . . . . . . . . . . . . . . . . . . . . 362
Working with static text . . . . . . . . . . . . . . . . . . . . . . . . . . . . . . . . . . . . . . . . . . . . . . . . . . . . . . . . . . . . . . . . . . . . . . . . . . . . . . . . . . . . . . . . . . . . . 364
TextField Example: Newspaper-style text formatting . . . . . . . . . . . . . . . . . . . . . . . . . . . . . . . . . . . . . . . . . . . . . . . . . . . . . . . . . . . . . . . . . . 365
Chapter 20: Using the Flash Text Engine
Creating and displaying text . . . . . . . . . . . . . . . . . . . . . . . . . . . . . . . . . . . . . . . . . . . . . . . . . . . . . . . . . . . . . . . . . . . . . . . . . . . . . . . . . . . . . . . . . 375
Handling Events in FTE . . . . . . . . . . . . . . . . . . . . . . . . . . . . . . . . . . . . . . . . . . . . . . . . . . . . . . . . . . . . . . . . . . . . . . . . . . . . . . . . . . . . . . . . . . . . . . 379
Formatting text . . . . . . . . . . . . . . . . . . . . . . . . . . . . . . . . . . . . . . . . . . . . . . . . . . . . . . . . . . . . . . . . . . . . . . . . . . . . . . . . . . . . . . . . . . . . . . . . . . . . . 383
Working with fonts . . . . . . . . . . . . . . . . . . . . . . . . . . . . . . . . . . . . . . . . . . . . . . . . . . . . . . . . . . . . . . . . . . . . . . . . . . . . . . . . . . . . . . . . . . . . . . . . . . 387
Controlling text . . . . . . . . . . . . . . . . . . . . . . . . . . . . . . . . . . . . . . . . . . . . . . . . . . . . . . . . . . . . . . . . . . . . . . . . . . . . . . . . . . . . . . . . . . . . . . . . . . . . . 389
Flash Text Engine example: News layout . . . . . . . . . . . . . . . . . . . . . . . . . . . . . . . . . . . . . . . . . . . . . . . . . . . . . . . . . . . . . . . . . . . . . . . . . . . . . 395
Chapter 21: Using the Text Layout Framework
Overview of the Text Layout Framework . . . . . . . . . . . . . . . . . . . . . . . . . . . . . . . . . . . . . . . . . . . . . . . . . . . . . . . . . . . . . . . . . . . . . . . . . . . . . 404
Using the Text Layout Framework . . . . . . . . . . . . . . . . . . . . . . . . . . . . . . . . . . . . . . . . . . . . . . . . . . . . . . . . . . . . . . . . . . . . . . . . . . . . . . . . . . . . 405
Structuring text with TLF . . . . . . . . . . . . . . . . . . . . . . . . . . . . . . . . . . . . . . . . . . . . . . . . . . . . . . . . . . . . . . . . . . . . . . . . . . . . . . . . . . . . . . . . . . . . 410
Formatting text with TLF . . . . . . . . . . . . . . . . . . . . . . . . . . . . . . . . . . . . . . . . . . . . . . . . . . . . . . . . . . . . . . . . . . . . . . . . . . . . . . . . . . . . . . . . . . . . 414
Importing and exporting text with TLF . . . . . . . . . . . . . . . . . . . . . . . . . . . . . . . . . . . . . . . . . . . . . . . . . . . . . . . . . . . . . . . . . . . . . . . . . . . . . . . 415
Managing text containers with TLF . . . . . . . . . . . . . . . . . . . . . . . . . . . . . . . . . . . . . . . . . . . . . . . . . . . . . . . . . . . . . . . . . . . . . . . . . . . . . . . . . . . 415
Enabling text selection, editing, and undo with TLF . . . . . . . . . . . . . . . . . . . . . . . . . . . . . . . . . . . . . . . . . . . . . . . . . . . . . . . . . . . . . . . . . . . 416
Event handling with TLF . . . . . . . . . . . . . . . . . . . . . . . . . . . . . . . . . . . . . . . . . . . . . . . . . . . . . . . . . . . . . . . . . . . . . . . . . . . . . . . . . . . . . . . . . . . . . 417
Positioning images within text . . . . . . . . . . . . . . . . . . . . . . . . . . . . . . . . . . . . . . . . . . . . . . . . . . . . . . . . . . . . . . . . . . . . . . . . . . . . . . . . . . . . . . . 417
Chapter 22: Working with sound
Basics of working with sound . . . . . . . . . . . . . . . . . . . . . . . . . . . . . . . . . . . . . . . . . . . . . . . . . . . . . . . . . . . . . . . . . . . . . . . . . . . . . . . . . . . . . . . . 419
Understanding the sound architecture . . . . . . . . . . . . . . . . . . . . . . . . . . . . . . . . . . . . . . . . . . . . . . . . . . . . . . . . . . . . . . . . . . . . . . . . . . . . . . . 420
Loading external sound files . . . . . . . . . . . . . . . . . . . . . . . . . . . . . . . . . . . . . . . . . . . . . . . . . . . . . . . . . . . . . . . . . . . . . . . . . . . . . . . . . . . . . . . . . 421
Working with embedded sounds . . . . . . . . . . . . . . . . . . . . . . . . . . . . . . . . . . . . . . . . . . . . . . . . . . . . . . . . . . . . . . . . . . . . . . . . . . . . . . . . . . . . 424
Working with streaming sound files . . . . . . . . . . . . . . . . . . . . . . . . . . . . . . . . . . . . . . . . . . . . . . . . . . . . . . . . . . . . . . . . . . . . . . . . . . . . . . . . . . 425
Working with dynamically generated audio . . . . . . . . . . . . . . . . . . . . . . . . . . . . . . . . . . . . . . . . . . . . . . . . . . . . . . . . . . . . . . . . . . . . . . . . . . 426
Playing sounds . . . . . . . . . . . . . . . . . . . . . . . . . . . . . . . . . . . . . . . . . . . . . . . . . . . . . . . . . . . . . . . . . . . . . . . . . . . . . . . . . . . . . . . . . . . . . . . . . . . . . . 428
Security considerations when loading and playing sounds . . . . . . . . . . . . . . . . . . . . . . . . . . . . . . . . . . . . . . . . . . . . . . . . . . . . . . . . . . . . 432
Controlling sound volume and panning . . . . . . . . . . . . . . . . . . . . . . . . . . . . . . . . . . . . . . . . . . . . . . . . . . . . . . . . . . . . . . . . . . . . . . . . . . . . . . 433
Working with sound metadata . . . . . . . . . . . . . . . . . . . . . . . . . . . . . . . . . . . . . . . . . . . . . . . . . . . . . . . . . . . . . . . . . . . . . . . . . . . . . . . . . . . . . . . 434

vii
ACTIONSCRIPT 3.0 DEVELOPER’S GUIDE
Contents
Last updated 3/21/2011
Accessing raw sound data . . . . . . . . . . . . . . . . . . . . . . . . . . . . . . . . . . . . . . . . . . . . . . . . . . . . . . . . . . . . . . . . . . . . . . . . . . . . . . . . . . . . . . . . . . . 435
Capturing sound input . . . . . . . . . . . . . . . . . . . . . . . . . . . . . . . . . . . . . . . . . . . . . . . . . . . . . . . . . . . . . . . . . . . . . . . . . . . . . . . . . . . . . . . . . . . . . . 439
Sound example: Podcast Player . . . . . . . . . . . . . . . . . . . . . . . . . . . . . . . . . . . . . . . . . . . . . . . . . . . . . . . . . . . . . . . . . . . . . . . . . . . . . . . . . . . . . . 445
Chapter 23: Working with video
Basics of video . . . . . . . . . . . . . . . . . . . . . . . . . . . . . . . . . . . . . . . . . . . . . . . . . . . . . . . . . . . . . . . . . . . . . . . . . . . . . . . . . . . . . . . . . . . . . . . . . . . . . . 452
Understanding video formats . . . . . . . . . . . . . . . . . . . . . . . . . . . . . . . . . . . . . . . . . . . . . . . . . . . . . . . . . . . . . . . . . . . . . . . . . . . . . . . . . . . . . . . . 453
Understanding the Video class . . . . . . . . . . . . . . . . . . . . . . . . . . . . . . . . . . . . . . . . . . . . . . . . . . . . . . . . . . . . . . . . . . . . . . . . . . . . . . . . . . . . . . . 456
Loading video files . . . . . . . . . . . . . . . . . . . . . . . . . . . . . . . . . . . . . . . . . . . . . . . . . . . . . . . . . . . . . . . . . . . . . . . . . . . . . . . . . . . . . . . . . . . . . . . . . . 457
Controlling video playback . . . . . . . . . . . . . . . . . . . . . . . . . . . . . . . . . . . . . . . . . . . . . . . . . . . . . . . . . . . . . . . . . . . . . . . . . . . . . . . . . . . . . . . . . . 457
Playing video in full-screen mode . . . . . . . . . . . . . . . . . . . . . . . . . . . . . . . . . . . . . . . . . . . . . . . . . . . . . . . . . . . . . . . . . . . . . . . . . . . . . . . . . . . . 459
Streaming video files . . . . . . . . . . . . . . . . . . . . . . . . . . . . . . . . . . . . . . . . . . . . . . . . . . . . . . . . . . . . . . . . . . . . . . . . . . . . . . . . . . . . . . . . . . . . . . . . 463
Understanding cue points . . . . . . . . . . . . . . . . . . . . . . . . . . . . . . . . . . . . . . . . . . . . . . . . . . . . . . . . . . . . . . . . . . . . . . . . . . . . . . . . . . . . . . . . . . . 463
Writing callback methods for metadata and cue points . . . . . . . . . . . . . . . . . . . . . . . . . . . . . . . . . . . . . . . . . . . . . . . . . . . . . . . . . . . . . . . 464
Using cue points and metadata . . . . . . . . . . . . . . . . . . . . . . . . . . . . . . . . . . . . . . . . . . . . . . . . . . . . . . . . . . . . . . . . . . . . . . . . . . . . . . . . . . . . . . 469
Advanced topics for video files . . . . . . . . . . . . . . . . . . . . . . . . . . . . . . . . . . . . . . . . . . . . . . . . . . . . . . . . . . . . . . . . . . . . . . . . . . . . . . . . . . . . . . . 479
Video example: Video Jukebox . . . . . . . . . . . . . . . . . . . . . . . . . . . . . . . . . . . . . . . . . . . . . . . . . . . . . . . . . . . . . . . . . . . . . . . . . . . . . . . . . . . . . . . 481
Using the StageVideo class for hardware-accelerated rendering . . . . . . . . . . . . . . . . . . . . . . . . . . . . . . . . . . . . . . . . . . . . . . . . . . . . . . 486
Chapter 24: Working with cameras
Understanding the Camera class . . . . . . . . . . . . . . . . . . . . . . . . . . . . . . . . . . . . . . . . . . . . . . . . . . . . . . . . . . . . . . . . . . . . . . . . . . . . . . . . . . . . . 495
Displaying camera content on screen . . . . . . . . . . . . . . . . . . . . . . . . . . . . . . . . . . . . . . . . . . . . . . . . . . . . . . . . . . . . . . . . . . . . . . . . . . . . . . . . 496
Designing your camera application . . . . . . . . . . . . . . . . . . . . . . . . . . . . . . . . . . . . . . . . . . . . . . . . . . . . . . . . . . . . . . . . . . . . . . . . . . . . . . . . . . 496
Connecting to a user’s camera . . . . . . . . . . . . . . . . . . . . . . . . . . . . . . . . . . . . . . . . . . . . . . . . . . . . . . . . . . . . . . . . . . . . . . . . . . . . . . . . . . . . . . . 497
Verifying that cameras are installed . . . . . . . . . . . . . . . . . . . . . . . . . . . . . . . . . . . . . . . . . . . . . . . . . . . . . . . . . . . . . . . . . . . . . . . . . . . . . . . . . . 497
Detecting permissions for camera access . . . . . . . . . . . . . . . . . . . . . . . . . . . . . . . . . . . . . . . . . . . . . . . . . . . . . . . . . . . . . . . . . . . . . . . . . . . . . 498
Maximizing camera video quality . . . . . . . . . . . . . . . . . . . . . . . . . . . . . . . . . . . . . . . . . . . . . . . . . . . . . . . . . . . . . . . . . . . . . . . . . . . . . . . . . . . . 500
Monitoring camera status . . . . . . . . . . . . . . . . . . . . . . . . . . . . . . . . . . . . . . . . . . . . . . . . . . . . . . . . . . . . . . . . . . . . . . . . . . . . . . . . . . . . . . . . . . . 501
Chapter 25: Using digital rights management
Understanding the protected content workflow . . . . . . . . . . . . . . . . . . . . . . . . . . . . . . . . . . . . . . . . . . . . . . . . . . . . . . . . . . . . . . . . . . . . . . 503
DRM-related members and events of the NetStream class . . . . . . . . . . . . . . . . . . . . . . . . . . . . . . . . . . . . . . . . . . . . . . . . . . . . . . . . . . . . 508
Using the DRMStatusEvent class . . . . . . . . . . . . . . . . . . . . . . . . . . . . . . . . . . . . . . . . . . . . . . . . . . . . . . . . . . . . . . . . . . . . . . . . . . . . . . . . . . . . . 510
Using the DRMAuthenticateEvent class . . . . . . . . . . . . . . . . . . . . . . . . . . . . . . . . . . . . . . . . . . . . . . . . . . . . . . . . . . . . . . . . . . . . . . . . . . . . . . 511
Using the DRMErrorEvent class . . . . . . . . . . . . . . . . . . . . . . . . . . . . . . . . . . . . . . . . . . . . . . . . . . . . . . . . . . . . . . . . . . . . . . . . . . . . . . . . . . . . . . 514
Using the DRMManager class . . . . . . . . . . . . . . . . . . . . . . . . . . . . . . . . . . . . . . . . . . . . . . . . . . . . . . . . . . . . . . . . . . . . . . . . . . . . . . . . . . . . . . . . 515
Using the DRMContentData class . . . . . . . . . . . . . . . . . . . . . . . . . . . . . . . . . . . . . . . . . . . . . . . . . . . . . . . . . . . . . . . . . . . . . . . . . . . . . . . . . . . . 516
Updating Flash Player to support Flash Access . . . . . . . . . . . . . . . . . . . . . . . . . . . . . . . . . . . . . . . . . . . . . . . . . . . . . . . . . . . . . . . . . . . . . . . 517
Chapter 26: Adding PDF content in AIR
Detecting PDF Capability . . . . . . . . . . . . . . . . . . . . . . . . . . . . . . . . . . . . . . . . . . . . . . . . . . . . . . . . . . . . . . . . . . . . . . . . . . . . . . . . . . . . . . . . . . . . 518
Loading PDF content . . . . . . . . . . . . . . . . . . . . . . . . . . . . . . . . . . . . . . . . . . . . . . . . . . . . . . . . . . . . . . . . . . . . . . . . . . . . . . . . . . . . . . . . . . . . . . . . 519
Scripting PDF content . . . . . . . . . . . . . . . . . . . . . . . . . . . . . . . . . . . . . . . . . . . . . . . . . . . . . . . . . . . . . . . . . . . . . . . . . . . . . . . . . . . . . . . . . . . . . . . 519
Known limitations for PDF content in AIR . . . . . . . . . . . . . . . . . . . . . . . . . . . . . . . . . . . . . . . . . . . . . . . . . . . . . . . . . . . . . . . . . . . . . . . . . . . . . 521

viii
ACTIONSCRIPT 3.0 DEVELOPER’S GUIDE
Contents
Last updated 3/21/2011
Chapter 27: Basics of user interaction
Capturing user input . . . . . . . . . . . . . . . . . . . . . . . . . . . . . . . . . . . . . . . . . . . . . . . . . . . . . . . . . . . . . . . . . . . . . . . . . . . . . . . . . . . . . . . . . . . . . . . . 523
Managing focus . . . . . . . . . . . . . . . . . . . . . . . . . . . . . . . . . . . . . . . . . . . . . . . . . . . . . . . . . . . . . . . . . . . . . . . . . . . . . . . . . . . . . . . . . . . . . . . . . . . . . 524
Discovering input types . . . . . . . . . . . . . . . . . . . . . . . . . . . . . . . . . . . . . . . . . . . . . . . . . . . . . . . . . . . . . . . . . . . . . . . . . . . . . . . . . . . . . . . . . . . . . 525
Chapter 28: Keyboard input
Capturing keyboard input . . . . . . . . . . . . . . . . . . . . . . . . . . . . . . . . . . . . . . . . . . . . . . . . . . . . . . . . . . . . . . . . . . . . . . . . . . . . . . . . . . . . . . . . . . . 527
Using the IME class . . . . . . . . . . . . . . . . . . . . . . . . . . . . . . . . . . . . . . . . . . . . . . . . . . . . . . . . . . . . . . . . . . . . . . . . . . . . . . . . . . . . . . . . . . . . . . . . . . 529
Virtual keyboards . . . . . . . . . . . . . . . . . . . . . . . . . . . . . . . . . . . . . . . . . . . . . . . . . . . . . . . . . . . . . . . . . . . . . . . . . . . . . . . . . . . . . . . . . . . . . . . . . . . . 534
Chapter 29: Mouse input
Capturing mouse input . . . . . . . . . . . . . . . . . . . . . . . . . . . . . . . . . . . . . . . . . . . . . . . . . . . . . . . . . . . . . . . . . . . . . . . . . . . . . . . . . . . . . . . . . . . . . . 542
Mouse input example: WordSearch . . . . . . . . . . . . . . . . . . . . . . . . . . . . . . . . . . . . . . . . . . . . . . . . . . . . . . . . . . . . . . . . . . . . . . . . . . . . . . . . . . 544
Chapter 30: Touch, multitouch and gesture input
Basics of touch input . . . . . . . . . . . . . . . . . . . . . . . . . . . . . . . . . . . . . . . . . . . . . . . . . . . . . . . . . . . . . . . . . . . . . . . . . . . . . . . . . . . . . . . . . . . . . . . . 549
Touch support discovery . . . . . . . . . . . . . . . . . . . . . . . . . . . . . . . . . . . . . . . . . . . . . . . . . . . . . . . . . . . . . . . . . . . . . . . . . . . . . . . . . . . . . . . . . . . . 551
Touch event handling . . . . . . . . . . . . . . . . . . . . . . . . . . . . . . . . . . . . . . . . . . . . . . . . . . . . . . . . . . . . . . . . . . . . . . . . . . . . . . . . . . . . . . . . . . . . . . . 552
Touch and drag . . . . . . . . . . . . . . . . . . . . . . . . . . . . . . . . . . . . . . . . . . . . . . . . . . . . . . . . . . . . . . . . . . . . . . . . . . . . . . . . . . . . . . . . . . . . . . . . . . . . . 555
Gesture event handling . . . . . . . . . . . . . . . . . . . . . . . . . . . . . . . . . . . . . . . . . . . . . . . . . . . . . . . . . . . . . . . . . . . . . . . . . . . . . . . . . . . . . . . . . . . . . . 556
Troubleshooting . . . . . . . . . . . . . . . . . . . . . . . . . . . . . . . . . . . . . . . . . . . . . . . . . . . . . . . . . . . . . . . . . . . . . . . . . . . . . . . . . . . . . . . . . . . . . . . . . . . . 560
Chapter 31: Copy and paste
Basics of copy-and-paste . . . . . . . . . . . . . . . . . . . . . . . . . . . . . . . . . . . . . . . . . . . . . . . . . . . . . . . . . . . . . . . . . . . . . . . . . . . . . . . . . . . . . . . . . . . . 563
Reading from and writing to the system clipboard . . . . . . . . . . . . . . . . . . . . . . . . . . . . . . . . . . . . . . . . . . . . . . . . . . . . . . . . . . . . . . . . . . . . 564
HTML copy and paste in AIR . . . . . . . . . . . . . . . . . . . . . . . . . . . . . . . . . . . . . . . . . . . . . . . . . . . . . . . . . . . . . . . . . . . . . . . . . . . . . . . . . . . . . . . . . 564
Clipboard data formats . . . . . . . . . . . . . . . . . . . . . . . . . . . . . . . . . . . . . . . . . . . . . . . . . . . . . . . . . . . . . . . . . . . . . . . . . . . . . . . . . . . . . . . . . . . . . . 566
Chapter 32: Accelerometer input
Checking accelerometer support . . . . . . . . . . . . . . . . . . . . . . . . . . . . . . . . . . . . . . . . . . . . . . . . . . . . . . . . . . . . . . . . . . . . . . . . . . . . . . . . . . . . 572
Detecting accelerometer changes . . . . . . . . . . . . . . . . . . . . . . . . . . . . . . . . . . . . . . . . . . . . . . . . . . . . . . . . . . . . . . . . . . . . . . . . . . . . . . . . . . . 572
Chapter 33: Drag and drop in AIR
Basics of drag and drop in AIR . . . . . . . . . . . . . . . . . . . . . . . . . . . . . . . . . . . . . . . . . . . . . . . . . . . . . . . . . . . . . . . . . . . . . . . . . . . . . . . . . . . . . . . . 575
Supporting the drag-out gesture . . . . . . . . . . . . . . . . . . . . . . . . . . . . . . . . . . . . . . . . . . . . . . . . . . . . . . . . . . . . . . . . . . . . . . . . . . . . . . . . . . . . 577
Supporting the drag-in gesture . . . . . . . . . . . . . . . . . . . . . . . . . . . . . . . . . . . . . . . . . . . . . . . . . . . . . . . . . . . . . . . . . . . . . . . . . . . . . . . . . . . . . . 579
Drag and drop in HTML . . . . . . . . . . . . . . . . . . . . . . . . . . . . . . . . . . . . . . . . . . . . . . . . . . . . . . . . . . . . . . . . . . . . . . . . . . . . . . . . . . . . . . . . . . . . . . 582
Dragging data out of an HTML element . . . . . . . . . . . . . . . . . . . . . . . . . . . . . . . . . . . . . . . . . . . . . . . . . . . . . . . . . . . . . . . . . . . . . . . . . . . . . . 585
Dragging data into an HTML element . . . . . . . . . . . . . . . . . . . . . . . . . . . . . . . . . . . . . . . . . . . . . . . . . . . . . . . . . . . . . . . . . . . . . . . . . . . . . . . . 586
Example: Overriding the default HTML drag-in behavior . . . . . . . . . . . . . . . . . . . . . . . . . . . . . . . . . . . . . . . . . . . . . . . . . . . . . . . . . . . . . . 587
Handling file drops in non-application HTML sandboxes . . . . . . . . . . . . . . . . . . . . . . . . . . . . . . . . . . . . . . . . . . . . . . . . . . . . . . . . . . . . . . 589
Dropping file promises . . . . . . . . . . . . . . . . . . . . . . . . . . . . . . . . . . . . . . . . . . . . . . . . . . . . . . . . . . . . . . . . . . . . . . . . . . . . . . . . . . . . . . . . . . . . . . 590
Chapter 34: Working with menus
Menu basics . . . . . . . . . . . . . . . . . . . . . . . . . . . . . . . . . . . . . . . . . . . . . . . . . . . . . . . . . . . . . . . . . . . . . . . . . . . . . . . . . . . . . . . . . . . . . . . . . . . . . . . . . 599
Creating native menus (AIR) . . . . . . . . . . . . . . . . . . . . . . . . . . . . . . . . . . . . . . . . . . . . . . . . . . . . . . . . . . . . . . . . . . . . . . . . . . . . . . . . . . . . . . . . . 606
About context menus in HTML (AIR) . . . . . . . . . . . . . . . . . . . . . . . . . . . . . . . . . . . . . . . . . . . . . . . . . . . . . . . . . . . . . . . . . . . . . . . . . . . . . . . . . 608
Displaying pop-up native menus (AIR) . . . . . . . . . . . . . . . . . . . . . . . . . . . . . . . . . . . . . . . . . . . . . . . . . . . . . . . . . . . . . . . . . . . . . . . . . . . . . . . 609

ix
ACTIONSCRIPT 3.0 DEVELOPER’S GUIDE
Contents
Last updated 3/21/2011
Handling menu events . . . . . . . . . . . . . . . . . . . . . . . . . . . . . . . . . . . . . . . . . . . . . . . . . . . . . . . . . . . . . . . . . . . . . . . . . . . . . . . . . . . . . . . . . . . . . . 610
Native menu example: Window and application menu (AIR) . . . . . . . . . . . . . . . . . . . . . . . . . . . . . . . . . . . . . . . . . . . . . . . . . . . . . . . . . . 611
Chapter 35: Taskbar icons in AIR
About taskbar icons . . . . . . . . . . . . . . . . . . . . . . . . . . . . . . . . . . . . . . . . . . . . . . . . . . . . . . . . . . . . . . . . . . . . . . . . . . . . . . . . . . . . . . . . . . . . . . . . . 615
Dock icons . . . . . . . . . . . . . . . . . . . . . . . . . . . . . . . . . . . . . . . . . . . . . . . . . . . . . . . . . . . . . . . . . . . . . . . . . . . . . . . . . . . . . . . . . . . . . . . . . . . . . . . . . . 616
System Tray icons . . . . . . . . . . . . . . . . . . . . . . . . . . . . . . . . . . . . . . . . . . . . . . . . . . . . . . . . . . . . . . . . . . . . . . . . . . . . . . . . . . . . . . . . . . . . . . . . . . . 616
Window taskbar icons and buttons . . . . . . . . . . . . . . . . . . . . . . . . . . . . . . . . . . . . . . . . . . . . . . . . . . . . . . . . . . . . . . . . . . . . . . . . . . . . . . . . . . 618
Chapter 36: Working with the file system
Using the FileReference class . . . . . . . . . . . . . . . . . . . . . . . . . . . . . . . . . . . . . . . . . . . . . . . . . . . . . . . . . . . . . . . . . . . . . . . . . . . . . . . . . . . . . . . . 620
Using the AIR file system API . . . . . . . . . . . . . . . . . . . . . . . . . . . . . . . . . . . . . . . . . . . . . . . . . . . . . . . . . . . . . . . . . . . . . . . . . . . . . . . . . . . . . . . . . 634
Chapter 37: Storing local data
Shared objects . . . . . . . . . . . . . . . . . . . . . . . . . . . . . . . . . . . . . . . . . . . . . . . . . . . . . . . . . . . . . . . . . . . . . . . . . . . . . . . . . . . . . . . . . . . . . . . . . . . . . . 668
Encrypted local storage . . . . . . . . . . . . . . . . . . . . . . . . . . . . . . . . . . . . . . . . . . . . . . . . . . . . . . . . . . . . . . . . . . . . . . . . . . . . . . . . . . . . . . . . . . . . . . 677
Chapter 38: Working with local SQL databases in AIR
About local SQL databases . . . . . . . . . . . . . . . . . . . . . . . . . . . . . . . . . . . . . . . . . . . . . . . . . . . . . . . . . . . . . . . . . . . . . . . . . . . . . . . . . . . . . . . . . . . 681
Creating and modifying a database . . . . . . . . . . . . . . . . . . . . . . . . . . . . . . . . . . . . . . . . . . . . . . . . . . . . . . . . . . . . . . . . . . . . . . . . . . . . . . . . . . 685
Manipulating SQL database data . . . . . . . . . . . . . . . . . . . . . . . . . . . . . . . . . . . . . . . . . . . . . . . . . . . . . . . . . . . . . . . . . . . . . . . . . . . . . . . . . . . . . 692
Using synchronous and asynchronous database operations . . . . . . . . . . . . . . . . . . . . . . . . . . . . . . . . . . . . . . . . . . . . . . . . . . . . . . . . . . 720
Using encryption with SQL databases . . . . . . . . . . . . . . . . . . . . . . . . . . . . . . . . . . . . . . . . . . . . . . . . . . . . . . . . . . . . . . . . . . . . . . . . . . . . . . . . 725
Strategies for working with SQL databases . . . . . . . . . . . . . . . . . . . . . . . . . . . . . . . . . . . . . . . . . . . . . . . . . . . . . . . . . . . . . . . . . . . . . . . . . . . 742
Chapter 39: Working with byte arrays
Reading and writing a ByteArray . . . . . . . . . . . . . . . . . . . . . . . . . . . . . . . . . . . . . . . . . . . . . . . . . . . . . . . . . . . . . . . . . . . . . . . . . . . . . . . . . . . . . 745
ByteArray example: Reading a .zip file . . . . . . . . . . . . . . . . . . . . . . . . . . . . . . . . . . . . . . . . . . . . . . . . . . . . . . . . . . . . . . . . . . . . . . . . . . . . . . . . 751
Chapter 40: Basics of networking and communication
Network interfaces . . . . . . . . . . . . . . . . . . . . . . . . . . . . . . . . . . . . . . . . . . . . . . . . . . . . . . . . . . . . . . . . . . . . . . . . . . . . . . . . . . . . . . . . . . . . . . . . . . 758
Network connectivity changes . . . . . . . . . . . . . . . . . . . . . . . . . . . . . . . . . . . . . . . . . . . . . . . . . . . . . . . . . . . . . . . . . . . . . . . . . . . . . . . . . . . . . . . 759
Domain Name System (DNS) records . . . . . . . . . . . . . . . . . . . . . . . . . . . . . . . . . . . . . . . . . . . . . . . . . . . . . . . . . . . . . . . . . . . . . . . . . . . . . . . . . 761
Chapter 41: Sockets
TCP sockets . . . . . . . . . . . . . . . . . . . . . . . . . . . . . . . . . . . . . . . . . . . . . . . . . . . . . . . . . . . . . . . . . . . . . . . . . . . . . . . . . . . . . . . . . . . . . . . . . . . . . . . . . 764
UDP sockets (AIR) . . . . . . . . . . . . . . . . . . . . . . . . . . . . . . . . . . . . . . . . . . . . . . . . . . . . . . . . . . . . . . . . . . . . . . . . . . . . . . . . . . . . . . . . . . . . . . . . . . . 775
IPv6 addresses . . . . . . . . . . . . . . . . . . . . . . . . . . . . . . . . . . . . . . . . . . . . . . . . . . . . . . . . . . . . . . . . . . . . . . . . . . . . . . . . . . . . . . . . . . . . . . . . . . . . . . 777
Chapter 42: HTTP communications
Loading external data . . . . . . . . . . . . . . . . . . . . . . . . . . . . . . . . . . . . . . . . . . . . . . . . . . . . . . . . . . . . . . . . . . . . . . . . . . . . . . . . . . . . . . . . . . . . . . . 778
Web service requests . . . . . . . . . . . . . . . . . . . . . . . . . . . . . . . . . . . . . . . . . . . . . . . . . . . . . . . . . . . . . . . . . . . . . . . . . . . . . . . . . . . . . . . . . . . . . . . . 787
Opening a URL in another application . . . . . . . . . . . . . . . . . . . . . . . . . . . . . . . . . . . . . . . . . . . . . . . . . . . . . . . . . . . . . . . . . . . . . . . . . . . . . . . . 794
Chapter 43: Communicating with other Flash Player and AIR instances
About the LocalConnection class . . . . . . . . . . . . . . . . . . . . . . . . . . . . . . . . . . . . . . . . . . . . . . . . . . . . . . . . . . . . . . . . . . . . . . . . . . . . . . . . . . . . 797
Sending messages between two applications . . . . . . . . . . . . . . . . . . . . . . . . . . . . . . . . . . . . . . . . . . . . . . . . . . . . . . . . . . . . . . . . . . . . . . . . 799
Connecting to content in different domains and to AIR applications . . . . . . . . . . . . . . . . . . . . . . . . . . . . . . . . . . . . . . . . . . . . . . . . . . 801

x
ACTIONSCRIPT 3.0 DEVELOPER’S GUIDE
Contents
Last updated 3/21/2011
Chapter 44: Communicating with native processes in AIR
Overview of native process communications . . . . . . . . . . . . . . . . . . . . . . . . . . . . . . . . . . . . . . . . . . . . . . . . . . . . . . . . . . . . . . . . . . . . . . . . . 804
Launching and closing a native process . . . . . . . . . . . . . . . . . . . . . . . . . . . . . . . . . . . . . . . . . . . . . . . . . . . . . . . . . . . . . . . . . . . . . . . . . . . . . . 805
Communicating with a native process . . . . . . . . . . . . . . . . . . . . . . . . . . . . . . . . . . . . . . . . . . . . . . . . . . . . . . . . . . . . . . . . . . . . . . . . . . . . . . . 806
Security considerations for native process communication . . . . . . . . . . . . . . . . . . . . . . . . . . . . . . . . . . . . . . . . . . . . . . . . . . . . . . . . . . . 807
Chapter 45: Using the external API
Basics of using the external API . . . . . . . . . . . . . . . . . . . . . . . . . . . . . . . . . . . . . . . . . . . . . . . . . . . . . . . . . . . . . . . . . . . . . . . . . . . . . . . . . . . . . . 809
External API requirements and advantages . . . . . . . . . . . . . . . . . . . . . . . . . . . . . . . . . . . . . . . . . . . . . . . . . . . . . . . . . . . . . . . . . . . . . . . . . . . 812
Using the ExternalInterface class . . . . . . . . . . . . . . . . . . . . . . . . . . . . . . . . . . . . . . . . . . . . . . . . . . . . . . . . . . . . . . . . . . . . . . . . . . . . . . . . . . . . . 813
External API example: Communicating between ActionScript and JavaScript in a web browser . . . . . . . . . . . . . . . . . . . . . . . . 817
External API example: Communicating between ActionScript and a desktop application that uses the ActiveX control . . 823
Chapter 46: XML signature validation in AIR
Basics of XML signature validation . . . . . . . . . . . . . . . . . . . . . . . . . . . . . . . . . . . . . . . . . . . . . . . . . . . . . . . . . . . . . . . . . . . . . . . . . . . . . . . . . . . 829
About XML signatures . . . . . . . . . . . . . . . . . . . . . . . . . . . . . . . . . . . . . . . . . . . . . . . . . . . . . . . . . . . . . . . . . . . . . . . . . . . . . . . . . . . . . . . . . . . . . . . 834
Implementing the IURIDereferencer interface . . . . . . . . . . . . . . . . . . . . . . . . . . . . . . . . . . . . . . . . . . . . . . . . . . . . . . . . . . . . . . . . . . . . . . . . 836
Chapter 47: Client system environment
Basics of the client system environment . . . . . . . . . . . . . . . . . . . . . . . . . . . . . . . . . . . . . . . . . . . . . . . . . . . . . . . . . . . . . . . . . . . . . . . . . . . . . . 844
Using the System class . . . . . . . . . . . . . . . . . . . . . . . . . . . . . . . . . . . . . . . . . . . . . . . . . . . . . . . . . . . . . . . . . . . . . . . . . . . . . . . . . . . . . . . . . . . . . . . 845
Using the Capabilities class . . . . . . . . . . . . . . . . . . . . . . . . . . . . . . . . . . . . . . . . . . . . . . . . . . . . . . . . . . . . . . . . . . . . . . . . . . . . . . . . . . . . . . . . . . 846
Capabilities example: Detecting system capabilities . . . . . . . . . . . . . . . . . . . . . . . . . . . . . . . . . . . . . . . . . . . . . . . . . . . . . . . . . . . . . . . . . . 847
Chapter 48: AIR application invocation and termination
Application invocation . . . . . . . . . . . . . . . . . . . . . . . . . . . . . . . . . . . . . . . . . . . . . . . . . . . . . . . . . . . . . . . . . . . . . . . . . . . . . . . . . . . . . . . . . . . . . . 851
Capturing command line arguments . . . . . . . . . . . . . . . . . . . . . . . . . . . . . . . . . . . . . . . . . . . . . . . . . . . . . . . . . . . . . . . . . . . . . . . . . . . . . . . . 852
Invoking an AIR application on user login . . . . . . . . . . . . . . . . . . . . . . . . . . . . . . . . . . . . . . . . . . . . . . . . . . . . . . . . . . . . . . . . . . . . . . . . . . . . 855
Invoking an AIR application from the browser . . . . . . . . . . . . . . . . . . . . . . . . . . . . . . . . . . . . . . . . . . . . . . . . . . . . . . . . . . . . . . . . . . . . . . . . 857
Application termination . . . . . . . . . . . . . . . . . . . . . . . . . . . . . . . . . . . . . . . . . . . . . . . . . . . . . . . . . . . . . . . . . . . . . . . . . . . . . . . . . . . . . . . . . . . . . 858
Chapter 49: Working with AIR runtime and operating system information
Managing file associations . . . . . . . . . . . . . . . . . . . . . . . . . . . . . . . . . . . . . . . . . . . . . . . . . . . . . . . . . . . . . . . . . . . . . . . . . . . . . . . . . . . . . . . . . . . 860
Getting the runtime version and patch level . . . . . . . . . . . . . . . . . . . . . . . . . . . . . . . . . . . . . . . . . . . . . . . . . . . . . . . . . . . . . . . . . . . . . . . . . . 861
Detecting AIR capabilities . . . . . . . . . . . . . . . . . . . . . . . . . . . . . . . . . . . . . . . . . . . . . . . . . . . . . . . . . . . . . . . . . . . . . . . . . . . . . . . . . . . . . . . . . . . . 861
Tracking user presence . . . . . . . . . . . . . . . . . . . . . . . . . . . . . . . . . . . . . . . . . . . . . . . . . . . . . . . . . . . . . . . . . . . . . . . . . . . . . . . . . . . . . . . . . . . . . . 861
Chapter 50: Working with AIR native windows
Basics of native windows in AIR . . . . . . . . . . . . . . . . . . . . . . . . . . . . . . . . . . . . . . . . . . . . . . . . . . . . . . . . . . . . . . . . . . . . . . . . . . . . . . . . . . . . . . 863
Creating windows . . . . . . . . . . . . . . . . . . . . . . . . . . . . . . . . . . . . . . . . . . . . . . . . . . . . . . . . . . . . . . . . . . . . . . . . . . . . . . . . . . . . . . . . . . . . . . . . . . 870
Managing windows . . . . . . . . . . . . . . . . . . . . . . . . . . . . . . . . . . . . . . . . . . . . . . . . . . . . . . . . . . . . . . . . . . . . . . . . . . . . . . . . . . . . . . . . . . . . . . . . . 879
Listening for window events . . . . . . . . . . . . . . . . . . . . . . . . . . . . . . . . . . . . . . . . . . . . . . . . . . . . . . . . . . . . . . . . . . . . . . . . . . . . . . . . . . . . . . . . 888
Displaying full-screen windows . . . . . . . . . . . . . . . . . . . . . . . . . . . . . . . . . . . . . . . . . . . . . . . . . . . . . . . . . . . . . . . . . . . . . . . . . . . . . . . . . . . . . . 889
Chapter 51: Display screens in AIR
Basics of display screens in AIR . . . . . . . . . . . . . . . . . . . . . . . . . . . . . . . . . . . . . . . . . . . . . . . . . . . . . . . . . . . . . . . . . . . . . . . . . . . . . . . . . . . . . . . 892
Enumerating the screens . . . . . . . . . . . . . . . . . . . . . . . . . . . . . . . . . . . . . . . . . . . . . . . . . . . . . . . . . . . . . . . . . . . . . . . . . . . . . . . . . . . . . . . . . . . . 893

xi
ACTIONSCRIPT 3.0 DEVELOPER’S GUIDE
Contents
Last updated 3/21/2011
Chapter 52: Printing
Basics of printing . . . . . . . . . . . . . . . . . . . . . . . . . . . . . . . . . . . . . . . . . . . . . . . . . . . . . . . . . . . . . . . . . . . . . . . . . . . . . . . . . . . . . . . . . . . . . . . . . . . . 896
Printing a page . . . . . . . . . . . . . . . . . . . . . . . . . . . . . . . . . . . . . . . . . . . . . . . . . . . . . . . . . . . . . . . . . . . . . . . . . . . . . . . . . . . . . . . . . . . . . . . . . . . . . . 897
Flash runtime tasks and system printing . . . . . . . . . . . . . . . . . . . . . . . . . . . . . . . . . . . . . . . . . . . . . . . . . . . . . . . . . . . . . . . . . . . . . . . . . . . . . . 898
Setting size, scale, and orientation . . . . . . . . . . . . . . . . . . . . . . . . . . . . . . . . . . . . . . . . . . . . . . . . . . . . . . . . . . . . . . . . . . . . . . . . . . . . . . . . . . . 900
Advanced printing techniques . . . . . . . . . . . . . . . . . . . . . . . . . . . . . . . . . . . . . . . . . . . . . . . . . . . . . . . . . . . . . . . . . . . . . . . . . . . . . . . . . . . . . . . 902
Printing example: Multiple-page printing . . . . . . . . . . . . . . . . . . . . . . . . . . . . . . . . . . . . . . . . . . . . . . . . . . . . . . . . . . . . . . . . . . . . . . . . . . . . 904
Printing example: Scaling, cropping, and responding . . . . . . . . . . . . . . . . . . . . . . . . . . . . . . . . . . . . . . . . . . . . . . . . . . . . . . . . . . . . . . . . . 906
Printing example: Page setup and print options . . . . . . . . . . . . . . . . . . . . . . . . . . . . . . . . . . . . . . . . . . . . . . . . . . . . . . . . . . . . . . . . . . . . . . 908
Chapter 53: Geolocation
Detecting geolocation changes . . . . . . . . . . . . . . . . . . . . . . . . . . . . . . . . . . . . . . . . . . . . . . . . . . . . . . . . . . . . . . . . . . . . . . . . . . . . . . . . . . . . . . 910
Chapter 54: Internationalizing applications
Basics of internationalizing applications . . . . . . . . . . . . . . . . . . . . . . . . . . . . . . . . . . . . . . . . . . . . . . . . . . . . . . . . . . . . . . . . . . . . . . . . . . . . . . 913
Overview of the flash.globalization package . . . . . . . . . . . . . . . . . . . . . . . . . . . . . . . . . . . . . . . . . . . . . . . . . . . . . . . . . . . . . . . . . . . . . . . . . . 914
Determining the locale . . . . . . . . . . . . . . . . . . . . . . . . . . . . . . . . . . . . . . . . . . . . . . . . . . . . . . . . . . . . . . . . . . . . . . . . . . . . . . . . . . . . . . . . . . . . . . 915
Formatting numbers . . . . . . . . . . . . . . . . . . . . . . . . . . . . . . . . . . . . . . . . . . . . . . . . . . . . . . . . . . . . . . . . . . . . . . . . . . . . . . . . . . . . . . . . . . . . . . . . 917
Formatting currency values . . . . . . . . . . . . . . . . . . . . . . . . . . . . . . . . . . . . . . . . . . . . . . . . . . . . . . . . . . . . . . . . . . . . . . . . . . . . . . . . . . . . . . . . . . 919
Formatting dates and times . . . . . . . . . . . . . . . . . . . . . . . . . . . . . . . . . . . . . . . . . . . . . . . . . . . . . . . . . . . . . . . . . . . . . . . . . . . . . . . . . . . . . . . . . . 921
Sorting and comparing strings . . . . . . . . . . . . . . . . . . . . . . . . . . . . . . . . . . . . . . . . . . . . . . . . . . . . . . . . . . . . . . . . . . . . . . . . . . . . . . . . . . . . . . . 923
Case conversion . . . . . . . . . . . . . . . . . . . . . . . . . . . . . . . . . . . . . . . . . . . . . . . . . . . . . . . . . . . . . . . . . . . . . . . . . . . . . . . . . . . . . . . . . . . . . . . . . . . . . 924
Example: Internationalizing a stock ticker application . . . . . . . . . . . . . . . . . . . . . . . . . . . . . . . . . . . . . . . . . . . . . . . . . . . . . . . . . . . . . . . . . 925
Chapter 55: Localizing applications
Choosing a locale . . . . . . . . . . . . . . . . . . . . . . . . . . . . . . . . . . . . . . . . . . . . . . . . . . . . . . . . . . . . . . . . . . . . . . . . . . . . . . . . . . . . . . . . . . . . . . . . . . . 930
Localizing Flex content . . . . . . . . . . . . . . . . . . . . . . . . . . . . . . . . . . . . . . . . . . . . . . . . . . . . . . . . . . . . . . . . . . . . . . . . . . . . . . . . . . . . . . . . . . . . . . 931
Localizing Flash content . . . . . . . . . . . . . . . . . . . . . . . . . . . . . . . . . . . . . . . . . . . . . . . . . . . . . . . . . . . . . . . . . . . . . . . . . . . . . . . . . . . . . . . . . . . . . 931
Localizing AIR applications . . . . . . . . . . . . . . . . . . . . . . . . . . . . . . . . . . . . . . . . . . . . . . . . . . . . . . . . . . . . . . . . . . . . . . . . . . . . . . . . . . . . . . . . . . 931
Localizing dates, times, and currencies . . . . . . . . . . . . . . . . . . . . . . . . . . . . . . . . . . . . . . . . . . . . . . . . . . . . . . . . . . . . . . . . . . . . . . . . . . . . . . . 931
Chapter 56: About the HTML environment
Overview of the HTML environment . . . . . . . . . . . . . . . . . . . . . . . . . . . . . . . . . . . . . . . . . . . . . . . . . . . . . . . . . . . . . . . . . . . . . . . . . . . . . . . . . 934
AIR and WebKit . . . . . . . . . . . . . . . . . . . . . . . . . . . . . . . . . . . . . . . . . . . . . . . . . . . . . . . . . . . . . . . . . . . . . . . . . . . . . . . . . . . . . . . . . . . . . . . . . . . . . . 937
Chapter 57: Programming HTML and JavaScript in AIR
About the HTMLLoader class . . . . . . . . . . . . . . . . . . . . . . . . . . . . . . . . . . . . . . . . . . . . . . . . . . . . . . . . . . . . . . . . . . . . . . . . . . . . . . . . . . . . . . . . . 952
Avoiding security-related JavaScript errors . . . . . . . . . . . . . . . . . . . . . . . . . . . . . . . . . . . . . . . . . . . . . . . . . . . . . . . . . . . . . . . . . . . . . . . . . . . 954
Accessing AIR API classes from JavaScript . . . . . . . . . . . . . . . . . . . . . . . . . . . . . . . . . . . . . . . . . . . . . . . . . . . . . . . . . . . . . . . . . . . . . . . . . . . . 958
About URLs in AIR . . . . . . . . . . . . . . . . . . . . . . . . . . . . . . . . . . . . . . . . . . . . . . . . . . . . . . . . . . . . . . . . . . . . . . . . . . . . . . . . . . . . . . . . . . . . . . . . . . . 960
Making ActionScript objects available to JavaScript . . . . . . . . . . . . . . . . . . . . . . . . . . . . . . . . . . . . . . . . . . . . . . . . . . . . . . . . . . . . . . . . . . 960
Accessing HTML DOM and JavaScript objects from ActionScript . . . . . . . . . . . . . . . . . . . . . . . . . . . . . . . . . . . . . . . . . . . . . . . . . . . . . . 962
Embedding SWF content in HTML . . . . . . . . . . . . . . . . . . . . . . . . . . . . . . . . . . . . . . . . . . . . . . . . . . . . . . . . . . . . . . . . . . . . . . . . . . . . . . . . . . . 963
Using ActionScript libraries within an HTML page . . . . . . . . . . . . . . . . . . . . . . . . . . . . . . . . . . . . . . . . . . . . . . . . . . . . . . . . . . . . . . . . . . . . 966
Converting Date and RegExp objects . . . . . . . . . . . . . . . . . . . . . . . . . . . . . . . . . . . . . . . . . . . . . . . . . . . . . . . . . . . . . . . . . . . . . . . . . . . . . . . . . 968
Manipulating an HTML stylesheet from ActionScript . . . . . . . . . . . . . . . . . . . . . . . . . . . . . . . . . . . . . . . . . . . . . . . . . . . . . . . . . . . . . . . . . 968
Cross-scripting content in different security sandboxes . . . . . . . . . . . . . . . . . . . . . . . . . . . . . . . . . . . . . . . . . . . . . . . . . . . . . . . . . . . . . . . 970

xii
ACTIONSCRIPT 3.0 DEVELOPER’S GUIDE
Contents
Last updated 3/21/2011
Chapter 58: Scripting the AIR HTML Container
Display properties of HTMLLoader objects . . . . . . . . . . . . . . . . . . . . . . . . . . . . . . . . . . . . . . . . . . . . . . . . . . . . . . . . . . . . . . . . . . . . . . . . . . . 974
Scrolling HTML content . . . . . . . . . . . . . . . . . . . . . . . . . . . . . . . . . . . . . . . . . . . . . . . . . . . . . . . . . . . . . . . . . . . . . . . . . . . . . . . . . . . . . . . . . . . . . 977
Accessing the HTML history list . . . . . . . . . . . . . . . . . . . . . . . . . . . . . . . . . . . . . . . . . . . . . . . . . . . . . . . . . . . . . . . . . . . . . . . . . . . . . . . . . . . . . . 978
Setting the user agent used when loading HTML content . . . . . . . . . . . . . . . . . . . . . . . . . . . . . . . . . . . . . . . . . . . . . . . . . . . . . . . . . . . . . 978
Setting the character encoding to use for HTML content . . . . . . . . . . . . . . . . . . . . . . . . . . . . . . . . . . . . . . . . . . . . . . . . . . . . . . . . . . . . . . 979
Defining browser-like user interfaces for HTML content . . . . . . . . . . . . . . . . . . . . . . . . . . . . . . . . . . . . . . . . . . . . . . . . . . . . . . . . . . . . . . . 979
Creating subclasses of the HTMLLoader class . . . . . . . . . . . . . . . . . . . . . . . . . . . . . . . . . . . . . . . . . . . . . . . . . . . . . . . . . . . . . . . . . . . . . . . . 990
Chapter 59: Handling HTML-related events in AIR
HTMLLoader events . . . . . . . . . . . . . . . . . . . . . . . . . . . . . . . . . . . . . . . . . . . . . . . . . . . . . . . . . . . . . . . . . . . . . . . . . . . . . . . . . . . . . . . . . . . . . . . . . 991
Handling DOM events with ActionScript . . . . . . . . . . . . . . . . . . . . . . . . . . . . . . . . . . . . . . . . . . . . . . . . . . . . . . . . . . . . . . . . . . . . . . . . . . . . . 991
Responding to uncaught JavaScript exceptions . . . . . . . . . . . . . . . . . . . . . . . . . . . . . . . . . . . . . . . . . . . . . . . . . . . . . . . . . . . . . . . . . . . . . . 992
Handling runtime events with JavaScript . . . . . . . . . . . . . . . . . . . . . . . . . . . . . . . . . . . . . . . . . . . . . . . . . . . . . . . . . . . . . . . . . . . . . . . . . . . . . 994
Chapter 60: Displaying HTML content in mobile apps
StageWebView objects . . . . . . . . . . . . . . . . . . . . . . . . . . . . . . . . . . . . . . . . . . . . . . . . . . . . . . . . . . . . . . . . . . . . . . . . . . . . . . . . . . . . . . . . . . . . . . 997
Content . . . . . . . . . . . . . . . . . . . . . . . . . . . . . . . . . . . . . . . . . . . . . . . . . . . . . . . . . . . . . . . . . . . . . . . . . . . . . . . . . . . . . . . . . . . . . . . . . . . . . . . . . . . . . 998
Navigation events . . . . . . . . . . . . . . . . . . . . . . . . . . . . . . . . . . . . . . . . . . . . . . . . . . . . . . . . . . . . . . . . . . . . . . . . . . . . . . . . . . . . . . . . . . . . . . . . . . . 999
History . . . . . . . . . . . . . . . . . . . . . . . . . . . . . . . . . . . . . . . . . . . . . . . . . . . . . . . . . . . . . . . . . . . . . . . . . . . . . . . . . . . . . . . . . . . . . . . . . . . . . . . . . . . . . 1000
Focus . . . . . . . . . . . . . . . . . . . . . . . . . . . . . . . . . . . . . . . . . . . . . . . . . . . . . . . . . . . . . . . . . . . . . . . . . . . . . . . . . . . . . . . . . . . . . . . . . . . . . . . . . . . . . . 1001
Bitmap capture . . . . . . . . . . . . . . . . . . . . . . . . . . . . . . . . . . . . . . . . . . . . . . . . . . . . . . . . . . . . . . . . . . . . . . . . . . . . . . . . . . . . . . . . . . . . . . . . . . . . .1003
Displaying ads . . . . . . . . . . . . . . . . . . . . . . . . . . . . . . . . . . . . . . . . . . . . . . . . . . . . . . . . . . . . . . . . . . . . . . . . . . . . . . . . . . . . . . . . . . . . . . . . . . . . . 1005
Chapter 61: Security
Flash Platform security overview . . . . . . . . . . . . . . . . . . . . . . . . . . . . . . . . . . . . . . . . . . . . . . . . . . . . . . . . . . . . . . . . . . . . . . . . . . . . . . . . . . . . 1008
Security sandboxes . . . . . . . . . . . . . . . . . . . . . . . . . . . . . . . . . . . . . . . . . . . . . . . . . . . . . . . . . . . . . . . . . . . . . . . . . . . . . . . . . . . . . . . . . . . . . . . . . 1010
Permission controls . . . . . . . . . . . . . . . . . . . . . . . . . . . . . . . . . . . . . . . . . . . . . . . . . . . . . . . . . . . . . . . . . . . . . . . . . . . . . . . . . . . . . . . . . . . . . . . . 1014
Restricting networking APIs . . . . . . . . . . . . . . . . . . . . . . . . . . . . . . . . . . . . . . . . . . . . . . . . . . . . . . . . . . . . . . . . . . . . . . . . . . . . . . . . . . . . . . . . . 1021
Full-screen mode security . . . . . . . . . . . . . . . . . . . . . . . . . . . . . . . . . . . . . . . . . . . . . . . . . . . . . . . . . . . . . . . . . . . . . . . . . . . . . . . . . . . . . . . . . .1023
Loading content . . . . . . . . . . . . . . . . . . . . . . . . . . . . . . . . . . . . . . . . . . . . . . . . . . . . . . . . . . . . . . . . . . . . . . . . . . . . . . . . . . . . . . . . . . . . . . . . . . . 1024
Cross-scripting . . . . . . . . . . . . . . . . . . . . . . . . . . . . . . . . . . . . . . . . . . . . . . . . . . . . . . . . . . . . . . . . . . . . . . . . . . . . . . . . . . . . . . . . . . . . . . . . . . . . .1027
Accessing loaded media as data . . . . . . . . . . . . . . . . . . . . . . . . . . . . . . . . . . . . . . . . . . . . . . . . . . . . . . . . . . . . . . . . . . . . . . . . . . . . . . . . . . . .1030
Loading data . . . . . . . . . . . . . . . . . . . . . . . . . . . . . . . . . . . . . . . . . . . . . . . . . . . . . . . . . . . . . . . . . . . . . . . . . . . . . . . . . . . . . . . . . . . . . . . . . . . . . . .1033
Loading embedded content from SWF files imported into a security domain . . . . . . . . . . . . . . . . . . . . . . . . . . . . . . . . . . . . . . . . .1036
Working with legacy content . . . . . . . . . . . . . . . . . . . . . . . . . . . . . . . . . . . . . . . . . . . . . . . . . . . . . . . . . . . . . . . . . . . . . . . . . . . . . . . . . . . . . . . 1036
Setting LocalConnection permissions . . . . . . . . . . . . . . . . . . . . . . . . . . . . . . . . . . . . . . . . . . . . . . . . . . . . . . . . . . . . . . . . . . . . . . . . . . . . . . . 1037
Controlling outbound URL access . . . . . . . . . . . . . . . . . . . . . . . . . . . . . . . . . . . . . . . . . . . . . . . . . . . . . . . . . . . . . . . . . . . . . . . . . . . . . . . . . . . 1037
Shared objects . . . . . . . . . . . . . . . . . . . . . . . . . . . . . . . . . . . . . . . . . . . . . . . . . . . . . . . . . . . . . . . . . . . . . . . . . . . . . . . . . . . . . . . . . . . . . . . . . . . . . 1039
Camera, microphone, clipboard, mouse, and keyboard access . . . . . . . . . . . . . . . . . . . . . . . . . . . . . . . . . . . . . . . . . . . . . . . . . . . . . . .1040
AIR security . . . . . . . . . . . . . . . . . . . . . . . . . . . . . . . . . . . . . . . . . . . . . . . . . . . . . . . . . . . . . . . . . . . . . . . . . . . . . . . . . . . . . . . . . . . . . . . . . . . . . . . . 1041
Chapter 62: How to Use ActionScript Examples
Types of Examples . . . . . . . . . . . . . . . . . . . . . . . . . . . . . . . . . . . . . . . . . . . . . . . . . . . . . . . . . . . . . . . . . . . . . . . . . . . . . . . . . . . . . . . . . . . . . . . . . . 1061
Running ActionScript 3.0 examples in Flash Professional . . . . . . . . . . . . . . . . . . . . . . . . . . . . . . . . . . . . . . . . . . . . . . . . . . . . . . . . . . . . . 1062
Running ActionScript 3.0 examples in Flash Builder . . . . . . . . . . . . . . . . . . . . . . . . . . . . . . . . . . . . . . . . . . . . . . . . . . . . . . . . . . . . . . . . . . 1063
Running ActionScript 3.0 examples on mobile devices . . . . . . . . . . . . . . . . . . . . . . . . . . . . . . . . . . . . . . . . . . . . . . . . . . . . . . . . . . . . . . . 1064

xiii
ACTIONSCRIPT 3.0 DEVELOPER’S GUIDE
Contents
Last updated 3/21/2011
Chapter 63: SQL support in local databases
Supported SQL syntax . . . . . . . . . . . . . . . . . . . . . . . . . . . . . . . . . . . . . . . . . . . . . . . . . . . . . . . . . . . . . . . . . . . . . . . . . . . . . . . . . . . . . . . . . . . . . . 1069
Data type support . . . . . . . . . . . . . . . . . . . . . . . . . . . . . . . . . . . . . . . . . . . . . . . . . . . . . . . . . . . . . . . . . . . . . . . . . . . . . . . . . . . . . . . . . . . . . . . . . . 1089
Chapter 64: SQL error detail messages, ids, and arguments

1
Last updated 3/21/2011
Chapter 1: Working with dates and times
Flash Player 9 and later, Adobe AIR 1.0 and later
Timing might not be everything, but it's usually a key factor in software applications. ActionScript 3.0 provides
powerful ways to manage calendar dates, times, and time intervals. Two main classes provide most of this timing
functionality: the Date class and the new Timer class in the flash.utils package.
Dates and times are a common type of information used in ActionScript programs. For instance, you might need to
know the current day of the week or to measure how much time a user spends on a particular screen, among many
other possibilities. In ActionScript, you can use the Date class to represent a single moment in time, including date and
time information. Within a Date instance are values for the individual date and time units, including year, month, date,
day of the week, hour, minutes, seconds, milliseconds, and time zone. For more advanced uses, ActionScript also
includes the Timer class, which you can use to perform actions after a certain delay or at repeated intervals.
More Help topics
Date
flash.utils.Timer
Managing calendar dates and times
Flash Player 9 and later, Adobe AIR 1.0 and later
All of the calendar date and time management functions in ActionScript 3.0 are concentrated in the top-level Date
class. The Date class contains methods and properties that let you handle dates and times in either Coordinated
Universal Time (UTC) or in local time specific to a time zone. UTC is a standard time definition that is essentially the
same as Greenwich Mean Time (GMT).
Creating Date objects
Flash Player 9 and later, Adobe AIR 1.0 and later
The Date class boasts one of the most versatile constructor methods of all the core classes. You can invoke it four
different ways.
First, if given no parameters, the Date() constructor returns a Date object containing the current date and time, in
local time based on your time zone. Here’s an example:
var now:Date = new Date();
Second, if given a single numeric parameter, the Date() constructor treats that as the number of milliseconds since
January 1, 1970, and returns a corresponding Date object. Note that the millisecond value you pass in is treated as
milliseconds since January 1, 1970, in UTC. However, the Date object shows values in your local time zone, unless you
use the UTC-specific methods to retrieve and display them. If you create a new Date object using a single milliseconds
parameter, make sure you account for the time zone difference between your local time and UTC. The following
statements create a Date object set to midnight on the day of January 1, 1970, in UTC:

2
ACTIONSCRIPT 3.0 DEVELOPER’S GUIDE
Working with dates and times
Last updated 3/21/2011
var millisecondsPerDay:int = 1000 * 60 * 60 * 24;
// gets a Date one day after the start date of 1/1/1970
var startTime:Date = new Date(millisecondsPerDay);
Third, you can pass multiple numeric parameters to the Date() constructor. It treats those parameters as the year,
month, day, hour, minute, second, and millisecond, respectively, and returns a corresponding Date object. Those input
parameters are assumed to be in local time rather than UTC. The following statements get a Date object set to midnight
at the start of January 1, 2000, in local time:
var millenium:Date = new Date(2000, 0, 1, 0, 0, 0, 0);
Fourth, you can pass a single string parameter to the Date() constructor. It will try to parse that string into date or
time components and then return a corresponding Date object. If you use this approach, it’s a good idea to enclose the
Date() constructor in a try..catch block to trap any parsing errors. The Date() constructor accepts a number of
different string formats (which are listed in the ActionScript 3.0 Reference for the Adobe Flash Platform). The
following statement initializes a new Date object using a string value:
var nextDay:Date = new Date("Mon May 1 2006 11:30:00 AM");
If the Date() constructor cannot successfully parse the string parameter, it will not raise an exception. However, the
resulting Date object will contain an invalid date value.
Getting time unit values
Flash Player 9 and later, Adobe AIR 1.0 and later
You can extract the values for various units of time within a Date object using properties or methods of the Date class.
Each of the following properties gives you the value of a time unit in the Date object:
•The fullYear property
•The month property, which is in a numeric format with 0 for January up to 11 for December
•The date property, which is the calendar number of the day of the month, in the range of 1 to 31
•The day property, which is the day of the week in numeric format, with 0 standing for Sunday
•The hours property, in the range of 0 to 23
•The minutes property
•The seconds property
•The milliseconds property
In fact, the Date class gives you a number of ways to get each of these values. For example, you can get the month
value of a Date object in four different ways:
•The month property
•The getMonth() method
•The monthUTC property
•The getMonthUTC() method
All four ways are essentially equivalent in terms of efficiency, so you can use whichever approach suits your
application best.
The properties just listed all represent components of the total date value. For example, the milliseconds property
will never be greater than 999, since when it reaches 1000 the seconds value increases by 1 and the milliseconds
property resets to 0.

3
ACTIONSCRIPT 3.0 DEVELOPER’S GUIDE
Working with dates and times
Last updated 3/21/2011
If you want to get the value of the Date object in terms of milliseconds since January 1, 1970 (UTC), you can use
the getTime() method. Its counterpart, the setTime() method, lets you change the value of an existing Date
object using milliseconds since January 1, 1970 (UTC).
Performing date and time arithmetic
Flash Player 9 and later, Adobe AIR 1.0 and later
You can perform addition and subtraction on dates and times with the Date class. Date values are kept internally in
terms of milliseconds, so you should convert other values to milliseconds before adding them to or subtracting them
from Date objects.
If your application will perform a lot of date and time arithmetic, you might find it useful to create constants that hold
common time unit values in terms of milliseconds, like the following:
public static const millisecondsPerMinute:int = 1000 * 60;
public static const millisecondsPerHour:int = 1000 * 60 * 60;
public static const millisecondsPerDay:int = 1000 * 60 * 60 * 24;
Now it is easy to perform date arithmetic using standard time units. The following code sets a date value to one hour
from the current time using the getTime() and setTime() methods:
var oneHourFromNow:Date = new Date();
oneHourFromNow.setTime(oneHourFromNow.getTime() + millisecondsPerHour);
Another way to set a date value is to create a new Date object using a single milliseconds parameter. For example, the
following code adds 30 days to one date to calculate another:
// sets the invoice date to today's date
var invoiceDate:Date = new Date();
// adds 30 days to get the due date
var dueDate:Date = new Date(invoiceDate.getTime() + (30 * millisecondsPerDay));
Next, the millisecondsPerDay constant is multiplied by 30 to represent 30 days’ time and the result is added to the
invoiceDate value and used to set the dueDate value.
Converting between time zones
Flash Player 9 and later, Adobe AIR 1.0 and later
Date and time arithmetic comes in handy when you want to convert dates from one time zone to another. So does the
getTimezoneOffset() method, which returns the value in minutes by which the Date object’s time zone differs from
UTC. It returns a value in minutes because not all time zones are set to even-hour increments—some have half-hour
offsets from neighboring zones.
The following example uses the time zone offset to convert a date from local time to UTC. It does the conversion by
first calculating the time zone value in milliseconds and then adjusting the Date value by that amount:
// creates a Date in local time
var nextDay:Date = new Date("Mon May 1 2006 11:30:00 AM");
// converts the Date to UTC by adding or subtracting the time zone offset
var offsetMilliseconds:Number = nextDay.getTimezoneOffset() * 60 * 1000;
nextDay.setTime(nextDay.getTime() + offsetMilliseconds);

4
ACTIONSCRIPT 3.0 DEVELOPER’S GUIDE
Working with dates and times
Last updated 3/21/2011
Controlling time intervals
Flash Player 9 and later, Adobe AIR 1.0 and later
When you develop applications using Adobe Flash CS4 Professional, you have access to the timeline, which provides
a steady, frame-by-frame progression through your application. In pure ActionScript projects, however, you must rely
on other timing mechanisms.
Loops versus timers
Flash Player 9 and later, Adobe AIR 1.0 and later
In some programming languages, you must devise your own timing schemes using loop statements like for or
do..while.
Loop statements generally execute as fast as the local machine allows, which means that the application runs faster on
some machines and slower on others. If your application needs a consistent timing interval, you need to tie it to an
actual calendar or clock time. Many applications, such as games, animations, and real-time controllers, need regular,
time-driven ticking mechanisms that are consistent from machine to machine.
The ActionScript 3.0 Timer class provides a powerful solution. Using the ActionScript 3.0 event model, the Timer class
dispatches timer events whenever a specified time interval is reached.
The Timer class
Flash Player 9 and later, Adobe AIR 1.0 and later
The preferred way to handle timing functions in ActionScript 3.0 is to use the Timer class (flash.utils.Timer), which
can be used to dispatch events whenever an interval is reached.
To start a timer, you first create an instance of the Timer class, telling it how often to generate a timer event and how
many times to do so before stopping.
For example, the following code creates a Timer instance that dispatches an event every second and continues for 60
seconds:
var oneMinuteTimer:Timer = new Timer(1000, 60);
The Timer object dispatches a TimerEvent object each time the given interval is reached. A TimerEvent object’s event
type is timer (defined by the constant TimerEvent.TIMER). A TimerEvent object contains the same properties as a
standard Event object.
If the Timer instance is set to a fixed number of intervals, it will also dispatch a timerComplete event (defined by the
constant TimerEvent.TIMER_COMPLETE) when it reaches the final interval.
Here is a small sample application showing the Timer class in action:

5
ACTIONSCRIPT 3.0 DEVELOPER’S GUIDE
Working with dates and times
Last updated 3/21/2011
package
{
import flash.display.Sprite;
import flash.events.TimerEvent;
import flash.utils.Timer;
public class ShortTimer extends Sprite
{
public function ShortTimer()
{
// creates a new five-second Timer
var minuteTimer:Timer = new Timer(1000, 5);
// designates listeners for the interval and completion events
minuteTimer.addEventListener(TimerEvent.TIMER, onTick);
minuteTimer.addEventListener(TimerEvent.TIMER_COMPLETE, onTimerComplete);
// starts the timer ticking
minuteTimer.start();
}
public function onTick(event:TimerEvent):void
{
// displays the tick count so far
// The target of this event is the Timer instance itself.
trace("tick " + event.target.currentCount);
}
public function onTimerComplete(event:TimerEvent):void
{
trace("Time's Up!");
}
}
}
When the ShortTimer class is created, it creates a Timer instance that will tick once per second for five seconds. Then
it adds two listeners to the timer: one that listens to each tick, and one that listens for the timerComplete event.
Next, it starts the timer ticking, and from that point forward, the onTick() method executes at one-second intervals.
The onTick() method simply displays the current tick count. After five seconds have passed, the
onTimerComplete() method executes, telling you that the time is up.
When you run this sample, you should see the following lines appear in your console or trace window at the rate of
one line per second:
tick 1
tick 2
tick 3
tick 4
tick 5
Time's Up!
6
ACTIONSCRIPT 3.0 DEVELOPER’S GUIDE
Working with dates and times
Last updated 3/21/2011
Timing functions in the flash.utils package
Flash Player 9 and later, Adobe AIR 1.0 and later
ActionScript 3.0 contains a number of timing functions similar to those that were available in ActionScript 2.0. These
functions are provided as package-level functions in the flash.utils package, and they operate just as they did in
ActionScript 2.0.
These functions remain in ActionScript 3.0 for backward compatibility. Adobe does not recommend that you use them
in new ActionScript 3.0 applications. In general, it is easier and more efficient to use the Timer class in your
applications.
Date and time example: Simple analog clock
Flash Player 9 and later, Adobe AIR 1.0 and later
A simple analog clock example illustrates these two date and time concepts:
•Getting the current date and time and extracting values for the hours, minutes, and seconds
•Using a Timer to set the pace of an application
To get the application files for this sample, see www.adobe.com/go/learn_programmingAS3samples_flash. The
SimpleClock application files can be found in the folder Samples/SimpleClock. The application consists of the
following files:
Function Description
clearInterval(id:uint):void Cancels a specified setInterval() call.
clearTimeout(id:uint):void Cancels a specified setTimeout() call.
getTimer():int Returns the number of milliseconds that have elapsed since Adobe® Flash® Player
or Adobe® AIR™ was initialized.
setInterval(closure:Function,
delay:Number, ... arguments):uint
Runs a function at a specified interval (in milliseconds).
setTimeout(closure:Function,
delay:Number, ... arguments):uint
Runs a specified function after a specified delay (in milliseconds).
File Description
SimpleClockApp.mxml
or
SimpleClockApp.fla
The main application file in Flash (FLA) or Flex (MXML).
com/example/programmingas3/simpleclock/SimpleClock.as The main application file.
com/example/programmingas3/simpleclock/AnalogClockFace.as Draws a round clock face and hour, minute, and seconds
hands based on the time.

7
ACTIONSCRIPT 3.0 DEVELOPER’S GUIDE
Working with dates and times
Last updated 3/21/2011
Defining the SimpleClock class
Flash Player 9 and later, Adobe AIR 1.0 and later
The clock example is simple, but it’s a good idea to organize even simple applications well so you could easily expand
them in the future. To that end, the SimpleClock application uses the SimpleClock class to handle the startup and time-
keeping tasks, and then uses another class named AnalogClockFace to actually display the time.
Here is the code that defines and initializes the SimpleClock class (note that in the Flash version, SimpleClock extends
the Sprite class instead):
public class SimpleClock extends UIComponent
{
/**
* The time display component.
*/
private var face:AnalogClockFace;
/**
* The Timer that acts like a heartbeat for the application.
*/
private var ticker:Timer;
The class has two important properties:
•The face property, which is an instance of the AnalogClockFace class
•The ticker property, which is an instance of the Timer class
The SimpleClock class uses a default constructor. The initClock() method takes care of the real setup work,
creating the clock face and starting the Timer instance ticking.
Creating the clock face
Flash Player 9 and later, Adobe AIR 1.0 and later
The next lines in the SimpleClock code create the clock face that is used to display the time:
/**
* Sets up a SimpleClock instance.
*/
public function initClock(faceSize:Number = 200)
{
// creates the clock face and adds it to the display list
face = new AnalogClockFace(Math.max(20, faceSize));
face.init();
addChild(face);
// draws the initial clock display
face.draw();
The size of the face can be passed in to the initClock() method. If no faceSize value is passed, a default size of 200
pixels is used.
Next, the application initializes the face and then adds it to the display list using the addChild() method inherited
from the DisplayObjectContainer class. Then it calls the AnalogClockFace.draw() method to display the clock face
once, showing the current time.

8
ACTIONSCRIPT 3.0 DEVELOPER’S GUIDE
Working with dates and times
Last updated 3/21/2011
Starting the timer
Flash Player 9 and later, Adobe AIR 1.0 and later
After creating the clock face, the initClock() method sets up a timer:
// creates a Timer that fires an event once per second
ticker = new Timer(1000);
// designates the onTick() method to handle Timer events
ticker.addEventListener(TimerEvent.TIMER, onTick);
// starts the clock ticking
ticker.start();
First this method instantiates a Timer instance that will dispatch an event once per second (every 1000 milliseconds).
Since no second repeatCount parameter is passed to the Timer() constructor, the Timer will keep repeating
indefinitely.
The SimpleClock.onTick() method will execute once per second when the timer event is received:
public function onTick(event:TimerEvent):void
{
// updates the clock display
face.draw();
}
The AnalogClockFace.draw() method simply draws the clock face and hands.
Displaying the current time
Flash Player 9 and later, Adobe AIR 1.0 and later
Most of the code in the AnalogClockFace class involves setting up the clock face’s display elements. When the
AnalogClockFace is initialized, it draws a circular outline, places a numeric text label at each hour mark, and then
creates three Shape objects, one each for the hour hand, the minute hand, and the second hand on the clock.
Once the SimpleClock application is running, it calls the AnalogClockFace.draw() method each second, as follows:
/**
* Called by the parent container when the display is being drawn.
*/
public override function draw():void
{
// stores the current date and time in an instance variable
currentTime = new Date();
showTime(currentTime);
}
This method saves the current time in a variable, so the time can’t change in the middle of drawing the clock hands.
Then it calls the showTime() method to display the hands, as the following shows:

9
ACTIONSCRIPT 3.0 DEVELOPER’S GUIDE
Working with dates and times
Last updated 3/21/2011
/**
* Displays the given Date/Time in that good old analog clock style.
*/
public function showTime(time:Date):void
{
// gets the time values
var seconds:uint = time.getSeconds();
var minutes:uint = time.getMinutes();
var hours:uint = time.getHours();
// multiplies by 6 to get degrees
this.secondHand.rotation = 180 + (seconds * 6);
this.minuteHand.rotation = 180 + (minutes * 6);
// Multiply by 30 to get basic degrees, then
// add up to 29.5 degrees (59 * 0.5)
// to account for the minutes.
this.hourHand.rotation = 180 + (hours * 30) + (minutes * 0.5);
}
First, this method extracts the values for the hours, minutes, and seconds of the current time. Then it uses these values
to calculate the angle for each hand. Since the second hand makes a full rotation in 60 seconds, it rotates 6 degrees each
second (360/60). The minute hand rotates the same amount each minute.
The hour hand updates every minute, too, so it can show some progress as the minutes tick by. It rotates 30 degrees
each hour (360/12), but it also rotates half a degree each minute (30 degrees divided by 60 minutes).

10
Last updated 3/21/2011
Chapter 2: Working with strings
Flash Player 9 and later, Adobe AIR 1.0 and later
The String class contains methods that let you work with text strings. Strings are important in working with many
objects. The methods described here are useful for working with strings used in objects such as TextField, StaticText,
XML, ContextMenu, and FileReference objects.
Strings are sequences of characters. ActionScript 3.0 supports ASCII and Unicode characters.
More Help topics
String
RegExp
parseFloat()
parseInt()
Basics of strings
Flash Player 9 and later, Adobe AIR 1.0 and later
In programming parlance, a string is a text value—a sequence of letters, numbers, or other characters strung together
into a single value. For instance, this line of code creates a variable with the data type String and assigns a literal string
value to that variable:
var albumName:String = "Three for the money";
As this example shows, in ActionScript you can denote a string value by surrounding text with double or single
quotation marks. Here are several more examples of strings:
"Hello"
"555-7649"
"http://www.adobe.com/"
Any time you manipulate a piece of text in ActionScript, you are working with a string value. The ActionScript String
class is the data type you can use to work with text values. String instances are frequently used for properties, method
parameters, and so forth in many other ActionScript classes.
Important concepts and terms
The following reference list contains important terms related to strings that you will encounter:
ASCII A system for representing text characters and symbols in computer programs. The ASCII system supports the
26-letter English alphabet, plus a limited set of additional characters.
Character The smallest unit of text data (a single letter or symbol).
Concatenation Joining multiple string values together by adding one to the end of the other, creating a new string
value.

11
ACTIONSCRIPT 3.0 DEVELOPER’S GUIDE
Working with strings
Last updated 3/21/2011
Empty string A string that contains no text, white space, or other characters, written as "". An empty string value is
different from a String variable with a null value—a null String variable is a variable that does not have a String instance
assigned to it, whereas an empty string has an instance with a value that contains no characters.
String A textual value (sequence of characters).
String literal (or “literal string”) A string value written explicitly in code, written as a text value surrounded by double
quotation marks or single quotation marks.
Substring A string that is a portion of another string.
Unicode A standard system for representing text characters and symbols in computer programs. The Unicode system
allows for the use of any character in any writing system.
Creating strings
Flash Player 9 and later, Adobe AIR 1.0 and later
The String class is used to represent string (textual) data in ActionScript 3.0. ActionScript strings support both ASCII
and Unicode characters. The simplest way to create a string is to use a string literal. To declare a string literal, use
straight double quotation mark (") or single quotation mark (') characters. For example, the following two strings are
equivalent:
var str1:String = "hello";
var str2:String = 'hello';
You can also declare a string by using the new operator, as follows:
var str1:String = new String("hello");
var str2:String = new String(str1);
var str3:String = new String(); // str3 == ""
The following two strings are equivalent:
var str1:String = "hello";
var str2:String = new String("hello");
To use single quotation marks (') within a string literal defined with single quotation mark (') delimiters, use the
backslash escape character (\). Similarly, to use double quotation marks (") within a string literal defined with double
quotation marks (") delimiters, use the backslash escape character (\). The following two strings are equivalent:
var str1:String = "That's \"A-OK\"";
var str2:String = 'That\'s "A-OK"';
You may choose to use single quotation marks or double quotation marks based on any single or double quotation
marks that exist in a string literal, as in the following:
var str1:String = "ActionScript <span class='heavy'>3.0</span>";
var str2:String = '<item id="155">banana</item>';
Keep in mind that ActionScript distinguishes between a straight single quotation mark (') and a left or right single
quotation mark (' or ' ). The same is true for double quotation marks. Use straight quotation marks to delineate
string literals. When pasting text from another source into ActionScript, be sure to use the correct characters.
As the following table shows, you can use the backslash escape character (\) to define other characters in string literals:

12
ACTIONSCRIPT 3.0 DEVELOPER’S GUIDE
Working with strings
Last updated 3/21/2011
The length property
Flash Player 9 and later, Adobe AIR 1.0 and later
Every string has a length property, which is equal to the number of characters in the string:
var str:String = "Adobe";
trace(str.length); // output: 5
An empty string and a null string both have a length of 0, as the following example shows:
var str1:String = new String();
trace(str1.length); // output: 0
str2:String = '';
trace(str2.length); // output: 0
Working with characters in strings
Flash Player 9 and later, Adobe AIR 1.0 and later
Every character in a string has an index position in the string (an integer). The index position of the first character is
0. For example, in the following string, the character y is in position 0 and the character w is in position 5:
"yellow"
You can examine individual characters in various positions in a string using the charAt() method and the
charCodeAt() method, as in this example:
var str:String = "hello world!";
for (var i:int = 0; i < str.length; i++)
{
trace(str.charAt(i), "-", str.charCodeAt(i));
}
Escape sequence Character
\b Backspace
\f Form feed
\n Newline
\r Carriage return
\t Tab
\unnnn The Unicode character with the character code specified by the hexadecimal number nnnn; for
example, \u263a is the smiley character.
\\xnn The ASCII character with the character code specified by the hexadecimal number nn
\' Single quotation mark
\" Double quotation mark
\\ Single backslash character

13
ACTIONSCRIPT 3.0 DEVELOPER’S GUIDE
Working with strings
Last updated 3/21/2011
When you run this code, the following output is produced:
h - 104
e - 101
l - 108
l - 108
o - 111
- 32
w - 119
o - 111
r - 114
l - 108
d - 100
! - 33
You can also use character codes to define a string using the fromCharCode() method, as the following example
shows:
var myStr:String = String.fromCharCode(104,101,108,108,111,32,119,111,114,108,100,33);
// Sets myStr to "hello world!"
Comparing strings
Flash Player 9 and later, Adobe AIR 1.0 and later
You can use the following operators to compare strings: <, <=, !=, ==, =>, and >. These operators can be used with
conditional statements, such as if and while, as the following example shows:
var str1:String = "Apple";
var str2:String = "apple";
if (str1 < str2)
{
trace("A < a, B < b, C < c, ...");
}
When using these operators with strings, ActionScript considers the character code value of each character in the
string, comparing characters from left to right, as in the following:
trace("A" < "B"); // true
trace("A" < "a"); // true
trace("Ab" < "az"); // true
trace("abc" < "abza"); // true
Use the == and != operators to compare strings with each other and to compare strings with other types of objects, as
the following example shows:
var str1:String = "1";
var str1b:String = "1";
var str2:String = "2";
trace(str1 == str1b); // true
trace(str1 == str2); // false
var total:uint = 1;
trace(str1 == total); // true

14
ACTIONSCRIPT 3.0 DEVELOPER’S GUIDE
Working with strings
Last updated 3/21/2011
Obtaining string representations of other objects
Flash Player 9 and later, Adobe AIR 1.0 and later
You can obtain a String representation for any kind of object. All objects have a toString() method for this purpose:
var n:Number = 99.47;
var str:String = n.toString();
// str == "99.47"
When using the + concatenation operator with a combination of String objects and objects that are not strings, you do
not need to use the toString() method. For details on concatenation, see the next section.
The String() global function returns the same value for a given object as the value returned by the object calling the
toString() method.
Concatenating strings
Flash Player 9 and later, Adobe AIR 1.0 and later
Concatenation of strings means taking two strings and joining them sequentially into one. For example, you can use
the + operator to concatenate two strings:
var str1:String = "green";
var str2:String = "ish";
var str3:String = str1 + str2; // str3 == "greenish"
You can also use the += operator to the produce the same result, as the following example shows:
var str:String = "green";
str += "ish"; // str == "greenish"
Additionally, the String class includes a concat() method, which can be used as follows:
var str1:String = "Bonjour";
var str2:String = "from";
var str3:String = "Paris";
var str4:String = str1.concat(" ", str2, " ", str3);
// str4 == "Bonjour from Paris"
If you use the + operator (or the += operator) with a String object and an object that is not a string, ActionScript
automatically converts the nonstring object to a String object in order to evaluate the expression, as shown in this
example:
var str:String = "Area = ";
var area:Number = Math.PI * Math.pow(3, 2);
str = str + area; // str == "Area = 28.274333882308138"
However, you can use parentheses for grouping to provide context for the + operator, as the following example shows:
trace("Total: $" + 4.55 + 1.45); // output: Total: $4.551.45
trace("Total: $" + (4.55 + 1.45)); // output: Total: $6

15
ACTIONSCRIPT 3.0 DEVELOPER’S GUIDE
Working with strings
Last updated 3/21/2011
Finding substrings and patterns in strings
Flash Player 9 and later, Adobe AIR 1.0 and later
Substrings are sequential characters within a string. For example, the string "abc" has the following substrings: "",
"a", "ab", "abc", "b", "bc", "c". You can use ActionScript methods to locate substrings of a string.
Patterns are defined in ActionScript by strings or by regular expressions. For example, the following regular expression
defines a specific pattern—the letters A, B, and C followed by a digit character (the forward slashes are regular
expression delimiters):
/ABC\d/
ActionScript includes methods for finding patterns in strings and for replacing found matches with replacement
substrings. These methods are described in the following sections.
Regular expressions can define intricate patterns. For more information, see “Using regular expressions” on page 76.
Finding a substring by character position
Flash Player 9 and later, Adobe AIR 1.0 and later
The substr() and substring() methods are similar. Both return a substring of a string. Both take two parameters.
In both methods, the first parameter is the position of the starting character in the given string. However, in the
substr() method, the second parameter is the length of the substring to return, and in the substring() method, the
second parameter is the position of the character at the end of the substring (which is not included in the returned
string). This example shows the difference between these two methods:
var str:String = "Hello from Paris, Texas!!!";
trace(str.substr(11,15)); // output: Paris, Texas!!!
trace(str.substring(11,15)); // output: Pari
The slice() method functions similarly to the substring() method. When given two non-negative integers as
parameters, it works exactly the same. However, the slice() method can take negative integers as parameters, in
which case the character position is taken from the end of the string, as shown in the following example:
var str:String = "Hello from Paris, Texas!!!";
trace(str.slice(11,15)); // output: Pari
trace(str.slice(-3,-1)); // output: !!
trace(str.slice(-3,26)); // output: !!!
trace(str.slice(-3,str.length)); // output: !!!
trace(str.slice(-8,-3)); // output: Texas
You can combine non-negative and negative integers as the parameters of the slice() method.
Finding the character position of a matching substring
Flash Player 9 and later, Adobe AIR 1.0 and later
You can use the indexOf() and lastIndexOf() methods to locate matching substrings within a string, as the
following example shows:
var str:String = "The moon, the stars, the sea, the land";
trace(str.indexOf("the")); // output: 10
Notice that the indexOf() method is case-sensitive.

16
ACTIONSCRIPT 3.0 DEVELOPER’S GUIDE
Working with strings
Last updated 3/21/2011
You can specify a second parameter to indicate the index position in the string from which to start the search, as
follows:
var str:String = "The moon, the stars, the sea, the land"
trace(str.indexOf("the", 11)); // output: 21
The lastIndexOf() method finds the last occurrence of a substring in the string:
var str:String = "The moon, the stars, the sea, the land"
trace(str.lastIndexOf("the")); // output: 30
If you include a second parameter with the lastIndexOf() method, the search is conducted from that index position
in the string working backward (from right to left):
var str:String = "The moon, the stars, the sea, the land"
trace(str.lastIndexOf("the", 29)); // output: 21
Creating an array of substrings segmented by a delimiter
Flash Player 9 and later, Adobe AIR 1.0 and later
You can use the split() method to create an array of substrings, which is divided based on a delimiter. For example,
you can segment a comma-delimited or tab-delimited string into multiple strings.
The following example shows how to split an array into substrings with the ampersand (&) character as the delimiter:
var queryStr:String = "first=joe&last=cheng&title=manager&StartDate=3/6/65";
var params:Array = queryStr.split("&", 2); // params == ["first=joe","last=cheng"]
The second parameter of the split() method, which is optional, defines the maximum size of the array that is
returned.
You can also use a regular expression as the delimiter character:
var str:String = "Give me\t5."
var a:Array = str.split(/\s+/); // a == ["Give","me","5."]
For more information, see “Using regular expressions” on page 76 and the ActionScript 3.0 Reference for the Adobe
Flash Platform.
Finding patterns in strings and replacing substrings
Flash Player 9 and later, Adobe AIR 1.0 and later
The String class includes the following methods for working with patterns in strings:
•Use the match() and search() methods to locate substrings that match a pattern.
•Use the replace() method to find substrings that match a pattern and replace them with a specified substring.
These methods are described in the following sections.
You can use strings or regular expressions to define patterns used in these methods. For more information on regular
expressions, see “Using regular expressions” on page 76.
Finding matching substrings
The search() method returns the index position of the first substring that matches a given pattern, as shown in this
example:

17
ACTIONSCRIPT 3.0 DEVELOPER’S GUIDE
Working with strings
Last updated 3/21/2011
var str:String = "The more the merrier.";
// (This search is case-sensitive.)
trace(str.search("the")); // output: 9
You can also use regular expressions to define the pattern to match, as this example shows:
var pattern:RegExp = /the/i;
var str:String = "The more the merrier.";
trace(str.search(pattern)); // 0
The output of the trace() method is 0, because the first character in the string is index position 0. The i flag is set in
the regular expression, so the search is not case-sensitive.
The search() method finds only one match and returns its starting index position, even if the g (global) flag is set in
the regular expression.
The following example shows a more intricate regular expression, one that matches a string in double quotation marks:
var pattern:RegExp = /"[^"]*"/;
var str:String = "The \"more\" the merrier.";
trace(str.search(pattern)); // output: 4
str = "The \"more the merrier.";
trace(str.search(pattern)); // output: -1
// (Indicates no match, since there is no closing double quotation mark.)
The match() method works similarly. It searches for a matching substring. However, when you use the global flag in
a regular expression pattern, as in the following example, match() returns an array of matching substrings:
var str:String = "bob@example.com, omar@example.org";
var pattern:RegExp = /\w*@\w*\.[org|com]+/g;
var results:Array = str.match(pattern);
The results array is set to the following:
["bob@example.com","omar@example.org"]
For more information on regular expressions, see “Using regular expressions” on page 76.
Replacing matched substrings
You can use the replace() method to search for a specified pattern in a string and replace matches with the specified
replacement string, as the following example shows:
var str:String = "She sells seashells by the seashore.";
var pattern:RegExp = /sh/gi;
trace(str.replace(pattern, "sch")); //sche sells seaschells by the seaschore.
Note that in this example, the matched strings are not case-sensitive because the i (ignoreCase) flag is set in the
regular expression, and multiple matches are replaced because the g (global) flag is set. For more information, see
“Using regular expressions” on page 76.
You can include the following $ replacement codes in the replacement string. The replacement text shown in the
following table is inserted in place of the $ replacement code:

18
ACTIONSCRIPT 3.0 DEVELOPER’S GUIDE
Working with strings
Last updated 3/21/2011
For example, the following shows the use of the $2 and $1 replacement codes, which represent the first and second
capturing group matched:
var str:String = "flip-flop";
var pattern:RegExp = /(\w+)-(\w+)/g;
trace(str.replace(pattern, "$2-$1")); // flop-flip
You can also use a function as the second parameter of the replace() method. The matching text is replaced by the
returned value of the function.
var str:String = "Now only $9.95!";
var price:RegExp = /\$([\d,]+.\d+)+/i;
trace(str.replace(price, usdToEuro));
function usdToEuro(matchedSubstring:String, capturedMatch1:String, index:int,
str:String):String
{
var usd:String = capturedMatch1;
usd = usd.replace(",", "");
var exchangeRate:Number = 0.853690;
var euro:Number = parseFloat(usd) * exchangeRate;
const euroSymbol:String = String.fromCharCode(8364);
return euro.toFixed(2) + " " + euroSymbol;
}
When you use a function as the second parameter of the replace() method, the following arguments are passed to
the function:
•The matching portion of the string.
•Any capturing parenthetical group matches. The number of arguments passed this way will vary depending on the
number of parenthetical matches. You can determine the number of parenthetical matches by checking
arguments.length - 3 within the function code.
•The index position in the string where the match begins.
•The complete string.
$ Code Replacement Text
$$ $
$& The matched substring.
$` The portion of the string that precedes the matched substring. This code uses the straight left single quotation
mark character (`), not the straight single quotation mark (') or the left curly single quotation mark (' ).
$' The portion of the string that follows the matched substring. This code uses the straight single quotation mark (' ).
$nThe nth captured parenthetical group match, where n is a single digit, 1-9, and $n is not followed by a decimal digit.
$nn The nnth captured parenthetical group match, where nn is a two-digit decimal number, 01–99. If the nnth capture
is undefined, the replacement text is an empty string.

19
ACTIONSCRIPT 3.0 DEVELOPER’S GUIDE
Working with strings
Last updated 3/21/2011
Converting strings between uppercase and lowercase
Flash Player 9 and later, Adobe AIR 1.0 and later
As the following example shows, the toLowerCase() method and the toUpperCase() method convert alphabetical
characters in the string to lowercase and uppercase, respectively:
var str:String = "Dr. Bob Roberts, #9."
trace(str.toLowerCase()); // dr. bob roberts, #9.
trace(str.toUpperCase()); // DR. BOB ROBERTS, #9.
After these methods are executed, the source string remains unchanged. To transform the source string, use the
following code:
str = str.toUpperCase();
These methods work with extended characters, not simply a–z and A–Z:
var str:String = "José Barça";
trace(str.toUpperCase(), str.toLowerCase()); // JOSÉ BARÇA josé barça
Strings example: ASCII art
Flash Player 9 and later, Adobe AIR 1.0 and later
This ASCII Art example shows a number of features of working with the String class in ActionScript 3.0, including the
following:
•The split() method of the String class is used to extract values from a character-delimited string (image
information in a tab-delimited text file).
•Several string-manipulation techniques, including split(), concatenation, and extracting a portion of the string
using substring() and substr(), are used to capitalize the first letter of each word in the image titles.
•The getCharAt() method is used to get a single character from a string (to determine the ASCII character
corresponding to a grayscale bitmap value).
•String concatenation is used to build up the ASCII art representation of an image one character at a time.
The term ASCII art refers to a text representations of an image, in which a grid of monospaced font characters, such
as Courier New characters, plots the image. The following image shows an example of ASCII art produced by the
application:

20
ACTIONSCRIPT 3.0 DEVELOPER’S GUIDE
Working with strings
Last updated 3/21/2011
The ASCII art version of the graphic is shown on the right.
To get the application files for this sample, see www.adobe.com/go/learn_programmingAS3samples_flash. The
ASCIIArt application files can be found in the folder Samples/AsciiArt. The application consists of the following files:
Extracting tab-delimited values
Flash Player 9 and later, Adobe AIR 1.0 and later
This example uses the common practice of storing application data separate from the application itself; that way, if the
data changes (for example, if another image is added or an image’s title changes), there is no need to recreate the SWF
file. In this case, the image metadata, including the image title, the URL of the actual image file, and some values that
are used to manipulate the image, are stored in a text file (the txt/ImageData.txt file in the project). The contents of the
text file are as follows:
File Description
AsciiArtApp.mxml
or
AsciiArtApp.fla
The main application file in Flash (FLA) or Flex (MXML)
com/example/programmingas3/asciiArt/AsciiArtBuilder.as The class that provides the main functionality of the
application, including extracting image metadata from a text
file, loading the images, and managing the image-to-text
conversion process.
com/example/programmingas3/asciiArt/BitmapToAsciiConverter.as A class that provides the parseBitmapData() method for
converting image data into a String version.
com/example/programmingas3/asciiArt/Image.as A class which represents a loaded bitmap image.
com/example/programmingas3/asciiArt/ImageInfo.as A class representing metadata for an ASCII art image (such as
title, image file URL, and so on).
image/ A folder containing images used by the application.
txt/ImageData.txt A tab-delimited text file, containing information on the
images to be loaded by the application.

21
ACTIONSCRIPT 3.0 DEVELOPER’S GUIDE
Working with strings
Last updated 3/21/2011
FILENAMETITLEWHITE_THRESHHOLDBLACK_THRESHHOLD
FruitBasket.jpgPear, apple, orange, and bananad810
Banana.jpgA picture of a bananaC820
Orange.jpgorangeFF20
Apple.jpgpicture of an apple6E10
The file uses a specific tab-delimited format. The first line (row) is a heading row. The remaining lines contain the
following data for each bitmap to be loaded:
•The filename of the bitmap.
•The display name of the bitmap.
•The white-threshold and black-threshold values for the bitmaps. These are hex values above which and below
which a pixel is to be considered completely white or completely black.
As soon as the application starts, the AsciiArtBuilder class loads and parses the contents of the text file in order to
create the “stack” of images that it will display, using the following code from the AsciiArtBuilder class’s
parseImageInfo() method:
var lines:Array = _imageInfoLoader.data.split("\n");
var numLines:uint = lines.length;
for (var i:uint = 1; i < numLines; i++)
{
var imageInfoRaw:String = lines[i];
...
if (imageInfoRaw.length > 0)
{
// Create a new image info record and add it to the array of image info.
var imageInfo:ImageInfo = new ImageInfo();
// Split the current line into values (separated by tab (\t)
// characters) and extract the individual properties:
var imageProperties:Array = imageInfoRaw.split("\t");
imageInfo.fileName = imageProperties[0];
imageInfo.title = normalizeTitle(imageProperties[1]);
imageInfo.whiteThreshold = parseInt(imageProperties[2], 16);
imageInfo.blackThreshold = parseInt(imageProperties[3], 16);
result.push(imageInfo);
}
}
The entire contents of the text file are contained in a single String instance, the _imageInfoLoader.data property.
Using the split() method with the newline character ("\n") as a parameter, the String instance is divided into an
Array (lines) whose elements are the individual lines of the text file. Next, the code uses a loop to work with each of
the lines (except the first, because it contains only headers rather than actual content). Inside the loop, the split()
method is used once again to divide the contents of the single line into a set of values (the Array object named
imageProperties). The parameter used with the split() method in this case is the tab ("\t") character, because the
values in each line are delineated by tab characters.

22
ACTIONSCRIPT 3.0 DEVELOPER’S GUIDE
Working with strings
Last updated 3/21/2011
Using String methods to normalize image titles
Flash Player 9 and later, Adobe AIR 1.0 and later
One of the design decisions for this application is that all the image titles are displayed using a standard format, with
the first letter of each word capitalized (except for a few words that are commonly not capitalized in English titles).
Rather than assume that the text file contains properly formatted titles, the application formats the titles while they’re
being extracted from the text file.
In the previous code listing, as part of extracting individual image metadata values, the following line of code is used:
imageInfo.title = normalizeTitle(imageProperties[1]);
In that code, the image’s title from the text file is passed through the normalizeTitle() method before it is stored in
the ImageInfo object:
private function normalizeTitle(title:String):String
{
var words:Array = title.split(" ");
var len:uint = words.length;
for (var i:uint; i < len; i++)
{
words[i] = capitalizeFirstLetter(words[i]);
}
return words.join(" ");
}
This method uses the split() method to divide the title into individual words (separated by the space character),
passes each word through the capitalizeFirstLetter() method, and then uses the Array class’s join() method
to combine the words back into a single string again.
As its name suggests, the capitalizeFirstLetter() method actually does the work of capitalizing the first letter of
each word:

23
ACTIONSCRIPT 3.0 DEVELOPER’S GUIDE
Working with strings
Last updated 3/21/2011
/**
* Capitalizes the first letter of a single word, unless it's one of
* a set of words that are normally not capitalized in English.
*/
private function capitalizeFirstLetter(word:String):String
{
switch (word)
{
case "and":
case "the":
case "in":
case "an":
case "or":
case "at":
case "of":
case "a":
// Don't do anything to these words.
break;
default:
// For any other word, capitalize the first character.
var firstLetter:String = word.substr(0, 1);
firstLetter = firstLetter.toUpperCase();
var otherLetters:String = word.substring(1);
word = firstLetter + otherLetters;
}
return word;
}
In English, the initial character of each word in a title is not capitalized if it is one of the following words: “and,” “the,”
“in,” “an,” “or,” “at,” “of,” or “a.” (This is a simplified version of the rules.) To execute this logic, the code first uses a
switch statement to check if the word is one of the words that should not be capitalized. If so, the code simply jumps
out of the switch statement. On the other hand, if the word should be capitalized, that is done in several steps, as
follows:
1The first letter of the word is extracted using substr(0, 1), which extracts a substring starting with the character
at index 0 (the first letter in the string, as indicated by the first parameter 0). The substring will be one character in
length (indicated by the second parameter 1).
2That character is capitalized using the toUpperCase() method.
3The remaining characters of the original word are extracted using substring(1), which extracts a substring
starting at index 1 (the second letter) through the end of the string (indicated by leaving off the second parameter
of the substring() method).
4The final word is created by combining the newly capitalized first letter with the remaining letters using string
concatenation: firstLetter + otherLetters.
Generating the ASCII art text
Flash Player 9 and later, Adobe AIR 1.0 and later
The BitmapToAsciiConverter class provides the functionality of converting a bitmap image to its ASCII text
representation. This process is performed by the parseBitmapData() method, which is partially shown here:

24
ACTIONSCRIPT 3.0 DEVELOPER’S GUIDE
Working with strings
Last updated 3/21/2011
var result:String = "";
// Loop through the rows of pixels top to bottom:
for (var y:uint = 0; y < _data.height; y += verticalResolution)
{
// Within each row, loop through pixels left to right:
for (var x:uint = 0; x < _data.width; x += horizontalResolution)
{
...
// Convert the gray value in the 0-255 range to a value
// in the 0-64 range (since that's the number of "shades of
// gray" in the set of available characters):
index = Math.floor(grayVal / 4);
result += palette.charAt(index);
}
result += "\n";
}
return result;
This code first defines a String instance named result that will be used to build up the ASCII art version of the bitmap
image. Next, it loops through individual pixels of the source bitmap image. Using several color-manipulation
techniques (omitted here for brevity), it converts the red, green, and blue color values of an individual pixel to a single
grayscale value (a number from 0 to 255). The code then divides that value by 4 (as shown) to convert it to a value in
the 0-63 scale, which is stored in the variable index. (The 0-63 scale is used because the “palette” of available ASCII
characters used by this application contains 64 values.) The palette of characters is defined as a String instance in the
BitmapToAsciiConverter class:
// The characters are in order from darkest to lightest, so that their
// position (index) in the string corresponds to a relative color value
// (0 = black).
private static const palette:String =
"@#$%&8BMW*mwqpdbkhaoQ0OZXYUJCLtfjzxnuvcr[]{}1()|/?Il!i><+_~-;,. ";
Since the index variable defines which ASCII character in the palette corresponds to the current pixel in the bitmap
image, that character is retrieved from the palette String using the charAt() method. It is then appended to the
result String instance using the concatenation assignment operator (+=). In addition, at the end of each row of pixels,
a newline character is concatenated to the end of the result String, forcing the line to wrap to create a new row of
character “pixels.”

25
Last updated 3/21/2011
Chapter 3: Working with arrays
Flash Player 9 and later, Adobe AIR 1.0 and later
Arrays allow you to store multiple values in a single data structure. You can use simple indexed arrays that store values
using fixed ordinal integer indexes or complex associative arrays that store values using arbitrary keys. Arrays can also
be multidimensional, containing elements that are themselves arrays. Finally, you can use a Vector for an array whose
elements are all instances of the same data type.
More Help topics
Array
Vector
Basics of arrays
Flash Player 9 and later, Adobe AIR 1.0 and later
Often in programming you’ll need to work with a set of items rather than a single object. For example, in a music player
application, you might want to have a list of songs waiting to be played. You wouldn’t want to have to create a separate
variable for each song on that list. It would be preferable to have all the Song objects together in a bundle, and be able
to work with them as a group.
An array is a programming element that acts as a container for a set of items, such as a list of songs. Most commonly
all the items in an array are instances of the same class, but that is not a requirement in ActionScript. The individual
items in an array are known as the array’s elements. You can think of an array as a file drawer for variables. Variables
can be added as elements in the array, which is like placing a folder into the file drawer. You can work with the array
as a single variable (like carrying the whole drawer to a different location). You can work with the variables as a group
(like flipping through the folders one by one searching for a piece of information). You can also access them
individually (like opening the drawer and selecting a single folder).
For example, imagine you’re creating a music player application where a user can select multiple songs and add them
to a playlist. In your ActionScript code, you have a method named addSongsToPlaylist(), which accepts a single
array as a parameter. No matter how many songs you want to add to the list (a few, a lot, or even only one), you call
the addSongsToPlaylist() method only one time, passing it the array containing the Song objects. Inside the
addSongsToPlaylist() method, you can use a loop to go through the array’s elements (the songs) one by one and
actually add them to the playlist.
The most common type of ActionScript array is an indexed array. In an indexed array each item is stored in a
numbered slot (known as an index). Items are accessed using the number, like an address. Indexed arrays work well
for most programming needs. The Array class is one common class that’s used to represent an indexed array.
Often, an indexed array is used to store multiple items of the same type (objects that are instances of the same class).
The Array class doesn’t have any means for restricting the type of items it contains. The Vector class is a type of indexed
array in which all the items in a single array are the same type. Using a Vector instance instead of an Array instance
can also provide performance improvements and other benefits. The Vector class is available starting with Flash Player
10 and Adobe AIR 1.5.

26
ACTIONSCRIPT 3.0 DEVELOPER’S GUIDE
Working with arrays
Last updated 3/21/2011
A special use of an indexed array is a multidimensional array. A multidimensional array is an indexed array whose
elements are indexed arrays (which in turn contain other elements).
Another type of array is an associative array, which uses a string key instead of a numeric index to identify individual
elements. Finally, ActionScript 3.0 also includes the Dictionary class, which represents a dictionary. A dictionary is an
array that allows you to use any type of object as a key to distinguish between elements.
Important concepts and terms
The following reference list contains important terms that you will encounter when programming array and vector
handling routines:
Array An object that serves as a container to group multiple objects.
Array access ([]) operator A pair of square brackets surrounding an index or key that uniquely identifies an array
element. This syntax is used after an array variable name to specify a single element of the array rather than the entire
array.
Associative array An array that uses string keys to identify individual elements.
Base type The data type of the objects that a Vector instance is allowed to store.
Dictionary An array whose items consist of pairs of objects, known as the key and the value. The key is used instead
of a numeric index to identify a single element.
Element A single item in an array.
Index The numeric “address” used to identify a single element in an indexed array.
Indexed array The standard type of array that stores each element in a numbered position, and uses the number
(index) to identify individual elements.
Key The string or object used to identify a single element in an associative array or a dictionary.
Multidimensional array An array containing items that are arrays rather than single values.
T The standard convention that’s used in this documentation to represent the base type of a Vector instance, whatever
that base type happens to be. The T convention is used to represent a class name, as shown in the Type parameter
description. (“T” stands for “type,” as in “data type.”).
Type parameter The syntax that’s used with the Vector class name to specify the Vector’s base type (the data type of
the objects that it stores). The syntax consists of a period (.), then the data type name surrounded by angle brackets
(<>). Put together, it looks like this: Vector.<T>. In this documentation, the class specified in the type parameter is
represented generically as T.
Vector A type of array whose elements are all instances of the same data type.
Indexed arrays
Flash Player 9 and later, Adobe AIR 1.0 and later
Indexed arrays store a series of one or more values organized such that each value can be accessed using an unsigned
integer value. The first index is always the number 0, and the index increments by 1 for each subsequent element added
to the array. In ActionScript 3.0, two classes are used as indexed arrays: the Array class and the Vector class.
Indexed arrays use an unsigned 32-bit integer for the index number. The maximum size of an indexed array is 232 - 1
or 4,294,967,295. An attempt to create an array that is larger than the maximum size results in a run-time error.

27
ACTIONSCRIPT 3.0 DEVELOPER’S GUIDE
Working with arrays
Last updated 3/21/2011
To access an individual element of an indexed array, you use the array access ([]) operator to specify the index position
of the element you wish to access. For example, the following code represents the first element (the element at index
0) in an indexed array named songTitles:
songTitles[0]
The combination of the array variable name followed by the index in square brackets functions as a single identifier.
(In other words, it can be used in any way a variable name can). You can assign a value to an indexed array element by
using the name and index on the left side of an assignment statement:
songTitles[1] = "Symphony No. 5 in D minor";
Likewise, you can retrieve the value of an indexed array element by using the name and index on the right side of an
assignment statement:
var nextSong:String = songTitles[2];
You can also use a variable in the square brackets rather than providing an explicit value. (The variable must contain
a non-negative integer value such as a uint, a positive int, or a positive integer Number instance). This technique is
commonly used to “loop over” the elements in an indexed array and perform an operation on some or all the elements.
The following code listing demonstrates this technique. The code uses a loop to access each value in an Array object
named oddNumbers. It uses the trace() statement to print each value in the form “oddNumber[index] = value”:
var oddNumbers:Array = [1, 3, 5, 7, 9, 11];
var len:uint = oddNumbers.length;
for (var i:uint = 0; i < len; i++)
{
trace("oddNumbers[" + i.toString() + "] = " + oddNumbers[i].toString());
}
The Array class
The first type of indexed array is the Array class. An Array instance can hold a value of any data type. The same Array
object can hold objects that are of different data types. For example, a single Array instance can have a String value in
index 0, a Number instance in index 1, and an XML object in index 2.
The Vector class
Another type of indexed array that’s available in ActionScript 3.0 is the Vector class. A Vector instance is a typed array,
which means that all the elements in a Vector instance always have the same data type.
Note: The Vector class is available starting with Flash Player 10 and Adobe AIR 1.5.
When you declare a Vector variable or instantiate a Vector object, you explicitly specify the data type of the objects
that the Vector can contain. The specified data type is known as the Vector’s base type. At run time and at compile time
(in strict mode), any code that sets the value of a Vector element or retrieves a value from a Vector is checked. If the
data type of the object being added or retrieved doesn’t match the Vector’s base type, an error occurs.
In addition to the data type restriction, the Vector class has other restrictions that distinguish it from the Array class:
•A Vector is a dense array. An Array object may have values in indices 0 and 7 even if it has no values in positions 1
through 6. However, a Vector must have a value (or null) in each index.
•A Vector can optionally be fixed-length. This means that the number of elements the Vector contains can’t change.
•Access to a Vector’s elements is bounds-checked. You can never read a value from an index greater than the final
element (length - 1). You can never set a value with an index more than one beyond the current final index. (In
other words, you can only set a value at an existing index or at index [length].)

28
ACTIONSCRIPT 3.0 DEVELOPER’S GUIDE
Working with arrays
Last updated 3/21/2011
As a result of its restrictions, a Vector has three primary benefits over an Array instance whose elements are all
instances of a single class:
•Performance: array element access and iteration are much faster when using a Vector instance than when using an
Array instance.
•Type safety: in strict mode the compiler can identify data type errors. Examples of such errors include assigning a
value of the incorrect data type to a Vector or expecting the wrong data type when reading a value from a Vector.
At run time, data types are also checked when adding data to or reading data from a Vector object. Note, however,
that when you use the push() method or unshift() method to add values to a Vector, the arguments’ data types
are not checked at compile time. When using those methods the values are still checked at run time.
•Reliability: runtime range checking (or fixed-length checking) increases reliability significantly over Arrays.
Aside from the additional restrictions and benefits, the Vector class is very much like the Array class. The properties
and methods of a Vector object are similar—for the most part identical—to the properties and methods of an Array.
In most situations where you would use an Array in which all the elements have the same data type, a Vector instance
is preferable.
Creating arrays
Flash Player 9 and later, Adobe AIR 1.0 and later
You can use several techniques to create an Array instance or a Vector instance. However, the techniques to create each
type of array are somewhat different.
Creating an Array instance
Flash Player 9 and later, Adobe AIR 1.0 and later
You create an Array object by calling the Array() constructor or by using Array literal syntax.
The Array() constructor function can be used in three ways. First, if you call the constructor with no arguments, you
get an empty array. You can use the length property of the Array class to verify that the array has no elements. For
example, the following code calls the Array() constructor with no arguments:
var names:Array = new Array();
trace(names.length); // output: 0
Second, if you use a number as the only parameter to the Array() constructor, an array of that length is created, with
each element’s value set to undefined. The argument must be an unsigned integer between the values 0 and
4,294,967,295. For example, the following code calls the Array() constructor with a single numeric argument:
var names:Array = new Array(3);
trace(names.length); // output: 3
trace(names[0]); // output: undefined
trace(names[1]); // output: undefined
trace(names[2]); // output: undefined
Third, if you call the constructor and pass a list of elements as parameters, an array is created, with elements
corresponding to each of the parameters. The following code passes three arguments to the Array() constructor:
var names:Array = new Array("John", "Jane", "David");
trace(names.length); // output: 3
trace(names[0]); // output: John
trace(names[1]); // output: Jane
trace(names[2]); // output: David

29
ACTIONSCRIPT 3.0 DEVELOPER’S GUIDE
Working with arrays
Last updated 3/21/2011
You can also create arrays with Array literals. An Array literal can be assigned directly to an array variable, as shown
in the following example:
var names:Array = ["John", "Jane", "David"];
Creating a Vector instance
Flash Player 10 and later, Adobe AIR 1.5 and later
You create a Vector instance by calling the Vector.<T>() constructor. You can also create a Vector by calling the
Vector.<T>() global function. That function converts a specified object to a Vector instance. In Flash
Professional
CS5 and later, Flash Builder 4 and later, and Flex 4 and later, you can also create a vector instance by using
Vector literal syntax.
Any time you declare a Vector variable (or similarly, a Vector method parameter or method return type) you specify
the base type of the Vector variable. You also specify the base type when you create a Vector instance by calling the
Vector.<T>() constructor. Put another way, any time you use the term Vector in ActionScript, it is accompanied by
a base type.
You specify the Vector’s base type using type parameter syntax. The type parameter immediately follows the word
Vector in the code. It consists of a dot (.), then the base class name surrounded by angle brackets (<>), as shown in
this example:
var v:Vector.<String>;
v = new Vector.<String>();
In the first line of the example, the variable v is declared as a Vector.<String> instance. In other words, it represents
an indexed array that can only hold String instances. The second line calls the Vector() constructor to create an
instance of the same Vector type (that is, a Vector whose elements are all String objects). It assigns that object to v.
Using the Vector.<T>() constructor
If you use the Vector.<T>() constructor without any arguments, it creates an empty Vector instance. You can test
that a Vector is empty by checking its length property. For example, the following code calls the Vector.<T>()
constructor with no arguments:
var names:Vector.<String> = new Vector.<String>();
trace(names.length); // output: 0
If you know ahead of time how many elements a Vector initially needs, you can pre-define the number of elements in
the Vector. To create a Vector with a certain number of elements, pass the number of elements as the first parameter
(the length parameter). Because Vector elements can’t be empty, the elements are filled with instances of the base
type. If the base type is a reference type that allows null values, the elements all contain null. Otherwise, the elements
all contain the default value for the class. For example, a uint variable can’t be null. Consequently, in the following
code listing the Vector named ages is created with seven elements, each containing the value 0:
var ages:Vector.<uint> = new Vector.<uint>(7);
trace(ages); // output: 0,0,0,0,0,0,0
Finally, using the Vector.<T>() constructor you can also create a fixed-length Vector by passing true for the second
parameter (the fixed parameter). In that case the Vector is created with the specified number of elements and the
number of elements can’t be changed. Note, however, that you can still change the values of the elements of a fixed-
length Vector.

30
ACTIONSCRIPT 3.0 DEVELOPER’S GUIDE
Working with arrays
Last updated 3/21/2011
Using the Vector literal syntax constructor
In Flash Professional CS5 and later, Flash Builder 4 and later, and Flex 4 and later, you can pass a list of values to the
Vector.<T>() constructor to specify the Vector’s initial values:
// var v:Vector.<T> = new <T>[E0, ..., En-1 ,];
// For example:
var v:Vector.<int> = new <int>[0,1,2,];
The following information applies to this syntax:
•The trailing comma is optional.
•Empty items in the array are not supported; a statement such as var v:Vector.<int> = new <int>[0,,2,]
throws a compiler error.
•You can't specify a default length for the Vector instance. Instead, the length is the same as the number of elements
in the initialization list.
•You can't specify whether the Vector instance has a fixed length. Instead, use the fixed property.
•Data loss or errors can occur if items passed as values don't match the specified type. For example:
var v:Vector.<int> = new <int>[4.2]; // compiler error when running in strict mode
trace(v[0]); //returns 4 when not running in strict mode
Using the Vector.<T>() global function
In addition to the Vector.<T>() and Vector literal syntax constructors, you can also use the Vector.<T>() global
function to create a Vector object. The Vector.<T>() global function is a conversion function. When you call the
Vector.<T>() global function you specify the base type of the Vector that the method returns. You pass a single
indexed array (Array or Vector instance) as an argument. The method then returns a Vector with the specified base
type, containing the values in the source array argument. The following code listing shows the syntax for calling the
Vector.<T>() global function:
var friends:Vector.<String> = Vector.<String>(["Bob", "Larry", "Sarah"]);
The Vector.<T>() global function performs data type conversion on two levels. First, when an Array instance is
passed to the function, a Vector instance is returned. Second, whether the source array is an Array or Vector instance
the function attempts to convert the source array’s elements to values of the base type. The conversion uses standard
ActionScript data type conversion rules. For example, the following code listing converts the String values in the source
Array to integers in the result Vector. The decimal portion of the first value ("1.5") is truncated, and the non-numeric
third value ("Waffles") is converted to 0 in the result:
var numbers:Vector.<int> = Vector.<int>(["1.5", "17", "Waffles"]);
trace(numbers); // output: 1,17,0
If any of the source elements can’t be converted, an error occurs.
When code calls the Vector.<T>() global function, if an element in the source array is an instance of a subclass of the
specified base type, the element is added to the result Vector (no error occurs). Using the Vector.<T>() global
function is the only way to convert a Vector with base type T to a Vector with a base type that’s a superclass of T.
Inserting array elements
Flash Player 9 and later, Adobe AIR 1.0 and later
The most basic way to add an element to an indexed array is to use the array access ([]) operator. To set the value of
an indexed array element, use the Array or Vector object name and index number on the left side of an assignment
statement:

31
ACTIONSCRIPT 3.0 DEVELOPER’S GUIDE
Working with arrays
Last updated 3/21/2011
songTitles[5] = "Happy Birthday";
If the Array or Vector doesn’t already have an element at that index, the index is created and the value is stored there.
If a value exists at that index, the new value replaces the existing one.
An Array object allows you to create an element at any index. However, with a Vector object you can only assign a
value to an existing index or to the next available index. The next available index corresponds to the Vector object’s
length property. The safest way to add a new element to a Vector object is to use code like this listing:
myVector[myVector.length] = valueToAdd;
Three of the Array and Vector class methods—push(), unshift(), and splice()—allow you to insert elements into
an indexed array. The push() method appends one or more elements to the end of an array. In other words, the last
element inserted into the array using the push() method will have the highest index number. The unshift() method
inserts one or more elements at the beginning of an array, which is always at index number 0. The splice() method
will insert any number of items at a specified index in the array.
The following example demonstrates all three methods. An array named planets is created to store the names of the
planets in order of proximity to the Sun. First, the push() method is called to add the initial item, Mars. Second, the
unshift() method is called to insert the item that belongs at the front of the array, Mercury. Finally, the splice()
method is called to insert the items Venus and Earth after Mercury, but before Mars. The first argument sent to
splice(), the integer 1, directs the insertion to begin at index 1. The second argument sent to splice(), the integer
0, indicates that no items should be deleted. Finally, the third and fourth arguments sent to splice(), Venus and
Earth, are the items to be inserted.
var planets:Array = new Array();
planets.push("Mars"); // array contents: Mars
planets.unshift("Mercury"); // array contents: Mercury,Mars
planets.splice(1, 0, "Venus", "Earth");
trace(planets); // array contents: Mercury,Venus,Earth,Mars
The push() and unshift() methods both return an unsigned integer that represents the length of the modified array.
The splice() method returns an empty array when used to insert elements, which may seem strange, but makes more
sense in light of the splice() method’s versatility. You can use the splice() method not only to insert elements into
an array, but also to remove elements from an array. When used to remove elements, the splice() method returns
an array containing the elements removed.
Note: If a Vector object’s fixed property is true, the total number of elements in the Vector can’t change. If you try to
add a new element to a fixed-length Vector using the techniques described here, an error occurs.
Retrieving values and removing array elements
Flash Player 9 and later, Adobe AIR 1.0 and later
The simplest way to retrieve the value of an element from an indexed array is to use the array access ([]) operator. To
retrieve the value of an indexed array element, use the Array or Vector object name and index number on the right
side of an assignment statement:
var myFavoriteSong:String = songTitles[3];
It’s possible to attempt to retrieve a value from an Array or Vector using an index where no element exists. In that case,
an Array object returns the value undefined and a Vector throws a RangeError exception.

32
ACTIONSCRIPT 3.0 DEVELOPER’S GUIDE
Working with arrays
Last updated 3/21/2011
Three methods of the Array and Vector classes—pop(), shift(), and splice()—allow you to remove elements. The
pop() method removes an element from the end of the array. In other words, it removes the element at the highest
index number. The shift() method removes an element from the beginning of the array, which means that it always
removes the element at index number 0. The splice() method, which can also be used to insert elements, removes
an arbitrary number of elements starting at the index number specified by the first argument sent to the method.
The following example uses all three methods to remove elements from an Array instance. An Array named oceans
is created to store the names of large bodies of water. Some of the names in the Array are lakes rather than oceans, so
they need to be removed.
First, the splice() method is used to remove the items Aral and Superior, and insert the items Atlantic and
Indian. The first argument sent to splice(), the integer 2, indicates that the operation should start with the third
item in the list, which is at index 2. The second argument, 2, indicates that two items should be removed. The
remaining arguments, Atlantic and Indian, are values to be inserted at index 2.
Second, the pop() method is used to remove last element in the array, Huron. And third, the shift() method is used
to remove the first item in the array, Victoria.
var oceans:Array = ["Victoria", "Pacific", "Aral", "Superior", "Indian", "Huron"];
oceans.splice(2, 2, "Arctic", "Atlantic"); // replaces Aral and Superior
oceans.pop(); // removes Huron
oceans.shift(); // removes Victoria
trace(oceans);// output: Pacific,Arctic,Atlantic,Indian
The pop() and shift() methods both return the item that was removed. For an Array instance, the data type of the
return value is Object because arrays can hold values of any data type. For a Vector instance, the data type of the return
value is the base type of the Vector. The splice() method returns an Array or Vector containing the values removed.
You can change the oceans Array example so that the call to splice() assigns the returned Array to a new Array
variable, as shown in the following example:
var lakes:Array = oceans.splice(2, 2, "Arctic", "Atlantic");
trace(lakes); // output: Aral,Superior
You may come across code that uses the delete operator on an Array object element. The delete operator sets the
value of an Array element to undefined, but it does not remove the element from the Array. For example, the
following code uses the delete operator on the third element in the oceans Array, but the length of the Array remains
5:
var oceans:Array = ["Arctic", "Pacific", "Victoria", "Indian", "Atlantic"];
delete oceans[2];
trace(oceans);// output: Arctic,Pacific,,Indian,Atlantic
trace(oceans[2]); // output: undefined
trace(oceans.length); // output: 5
You can truncate an Array or Vector using an array’s length property. If you set the length property of an indexed
array to a length that is less than the current length of the array, the array is truncated, removing any elements stored
at index numbers higher than the new value of length minus 1. For example, if the oceans array were sorted such that
all valid entries were at the beginning of the array, you could use the length property to remove the entries at the end
of the array, as shown in the following code:
var oceans:Array = ["Arctic", "Pacific", "Victoria", "Aral", "Superior"];
oceans.length = 2;
trace(oceans); // output: Arctic,Pacific
Note: If a Vector object’s fixed property is true, the total number of elements in the Vector can’t change. If you try to
remove an element from or truncate a fixed-length Vector using the techniques described here, an error occurs.

33
ACTIONSCRIPT 3.0 DEVELOPER’S GUIDE
Working with arrays
Last updated 3/21/2011
Sorting an array
Flash Player 9 and later, Adobe AIR 1.0 and later
There are three methods—reverse(), sort(), and sortOn()—that allow you to change the order of an indexed
array, either by sorting or reversing the order. All of these methods modify the existing array. The following table
summarizes these methods and their behavior for Array and Vector objects:
The reverse() method
The reverse() method takes no parameters and does not return a value, but allows you to toggle the order of your
array from its current state to the reverse order. The following example reverses the order of the oceans listed in the
oceans array:
var oceans:Array = ["Arctic", "Atlantic", "Indian", "Pacific"];
oceans.reverse();
trace(oceans); // output: Pacific,Indian,Atlantic,Arctic
Basic sorting with the sort() method (Array class only)
For an Array instance, the sort() method rearranges the elements in an array using the default sort order. The default
sort order has the following characteristics:
•The sort is case-sensitive, which means that uppercase characters precede lowercase characters. For example, the
letter D precedes the letter b.
•The sort is ascending, which means that lower character codes (such as A) precede higher character codes (such as B).
•The sort places identical values adjacent to each other but in no particular order.
•The sort is string-based, which means that elements are converted to strings before they are compared (for example,
10 precedes 3 because the string "1" has a lower character code than the string "3" has).
You may find that you need to sort your Array without regard to case, or in descending order, or perhaps your array
contains numbers that you want to sort numerically instead of alphabetically. The Array class’s sort() method has an
options parameter that allows you to alter each characteristic of the default sort order. The options are defined by a
set of static constants in the Array class, as shown in the following list:
•Array.CASEINSENSITIVE: This option makes the sort disregard case. For example, the lowercase letter b precedes
the uppercase letter D.
•Array.DESCENDING: This reverses the default ascending sort. For example, the letter B precedes the letter A.
•Array.UNIQUESORT: This causes the sort to abort if two identical values are found.
•Array.NUMERIC: This causes numerical sorting, so that 3 precedes 10.
The following example highlights some of these options. An Array named poets is created that is sorted using several
different options.
Method Array behavior Vector behavior
reverse() Changes the order of the elements so that the last element becomes the
first element, the penultimate element becomes the second, and so on
Identical to Array behavior
sort() Allows you to sort the Array’s elements in a variety of predefined ways,
such as alphabetical or numeric order. You can also specify a custom
sorting algorithm.
Sorts the elements according to the custom
sorting algorithm that you specify
sortOn() Allows you to sort objects that have one or more common properties,
specifying the property or properties to use as the sort keys
Not available in the Vector class

34
ACTIONSCRIPT 3.0 DEVELOPER’S GUIDE
Working with arrays
Last updated 3/21/2011
var poets:Array = ["Blake", "cummings", "Angelou", "Dante"];
poets.sort(); // default sort
trace(poets); // output: Angelou,Blake,Dante,cummings
poets.sort(Array.CASEINSENSITIVE);
trace(poets); // output: Angelou,Blake,cummings,Dante
poets.sort(Array.DESCENDING);
trace(poets); // output: cummings,Dante,Blake,Angelou
poets.sort(Array.DESCENDING | Array.CASEINSENSITIVE); // use two options
trace(poets); // output: Dante,cummings,Blake,Angelou
Custom sorting with the sort() method (Array and Vector classes)
In addition to the basic sorting that’s available for an Array object, you can also define a custom sorting rule. This
technique is the only form of the sort() method that is available for the Vector class. To define a custom sort, you
write a custom sort function and pass it as an argument to the sort() method.
For example, if you have a list of names in which each list element contains a person’s full name, but you want to sort
the list by last name, you must use a custom sort function to parse each element and use the last name in the sort
function. The following code shows how this can be done with a custom function that is used as a parameter to the
Array.sort() method:
var names:Array = new Array("John Q. Smith", "Jane Doe", "Mike Jones");
function orderLastName(a, b):int
{
var lastName:RegExp = /\b\S+$/;
var name1 = a.match(lastName);
var name2 = b.match(lastName);
if (name1 < name2)
{
return -1;
}
else if (name1 > name2)
{
return 1;
}
else
{
return 0;
}
}
trace(names); // output: John Q. Smith,Jane Doe,Mike Jones
names.sort(orderLastName);
trace(names); // output: Jane Doe,Mike Jones,John Q. Smith
The custom sort function orderLastName() uses a regular expression to extract the last name from each element to
use for the comparison operation. The function identifier orderLastName is used as the sole parameter when calling
the sort() method on the names array. The sort function accepts two parameters, a and b, because it works on two
array elements at a time. The sort function’s return value indicates how the elements should be sorted:
•A return value of -1 indicates that the first parameter, a, precedes the second parameter, b.
•A return value of 1 indicates that the second parameter, b, precedes the first, a.
•A return value of 0 indicates that the elements have equal sorting precedence.

35
ACTIONSCRIPT 3.0 DEVELOPER’S GUIDE
Working with arrays
Last updated 3/21/2011
The sortOn() method (Array class only)
The sortOn() method is designed for Array objects with elements that contain objects. These objects are expected to
have at least one common property that can be used as the sort key. The use of the sortOn() method for arrays of any
other type yields unexpected results.
Note: The Vector class does not include a sortOn() method. This method is only available for Array objects.
The following example revises the poets Array so that each element is an object instead of a string. Each object holds
both the poet’s last name and year of birth.
var poets:Array = new Array();
poets.push({name:"Angelou", born:"1928"});
poets.push({name:"Blake", born:"1757"});
poets.push({name:"cummings", born:"1894"});
poets.push({name:"Dante", born:"1265"});
poets.push({name:"Wang", born:"701"});
You can use the sortOn() method to sort the Array by the born property. The sortOn() method defines two
parameters, fieldName and options. The fieldName argument must be specified as a string. In the following
example, sortOn() is called with two arguments, "born" and Array.NUMERIC. The Array.NUMERIC argument is used
to ensure that the sort is done numerically instead of alphabetically. This is a good practice even when all the numbers
have the same number of digits because it ensures that the sort will continue to behave as expected if a number with
fewer or more digits is later added to the array.
poets.sortOn("born", Array.NUMERIC);
for (var i:int = 0; i < poets.length; ++i)
{
trace(poets[i].name, poets[i].born);
}
/* output:
Wang 701
Dante 1265
Blake 1757
cummings 1894
Angelou 1928
*/
Sorting without modifying the original array (Array class only)
Generally, the sort() and sortOn() methods modify an Array. If you wish to sort an Array without modifying the
existing array, pass the Array.RETURNINDEXEDARRAY constant as part of the options parameter. This option directs
the methods to return a new Array that reflects the sort and to leave the original Array unmodified. The Array returned
by the methods is a simple Array of index numbers that reflects the new sort order and does not contain any elements
from the original Array. For example, to sort the poets Array by birth year without modifying the Array, include the
Array.RETURNINDEXEDARRAY constant as part of the argument passed for the options parameter.
The following example stores the returned index information in an Array named indices and uses the indices array
in conjunction with the unmodified poets array to output the poets in order of birth year:

36
ACTIONSCRIPT 3.0 DEVELOPER’S GUIDE
Working with arrays
Last updated 3/21/2011
var indices:Array;
indices = poets.sortOn("born", Array.NUMERIC | Array.RETURNINDEXEDARRAY);
for (var i:int = 0; i < indices.length; ++i)
{
var index:int = indices[i];
trace(poets[index].name, poets[index].born);
}
/* output:
Wang 701
Dante 1265
Blake 1757
cummings 1894
Angelou 1928
*/
Querying an array
Flash Player 9 and later, Adobe AIR 1.0 and later
Four methods of the Array and Vector classes—concat(), join(), slice(), and toString()—all query the array
for information, but do not modify the array. The concat() and slice() methods both return new arrays, while the
join() and toString() methods both return strings. The concat() method takes a new array or list of elements as
arguments and combines it with the existing array to create a new array. The slice() method has two parameters,
aptly named startIndex and an endIndex, and returns a new array containing a copy of the elements “sliced” from
the existing array. The slice begins with the element at startIndex and ends with the element just before endIndex.
That bears repeating: the element at endIndex is not included in the return value.
The following example uses concat() and slice() to create new arrays using elements of other arrays:
var array1:Array = ["alpha", "beta"];
var array2:Array = array1.concat("gamma", "delta");
trace(array2); // output: alpha,beta,gamma,delta
var array3:Array = array1.concat(array2);
trace(array3); // output: alpha,beta,alpha,beta,gamma,delta
var array4:Array = array3.slice(2,5);
trace(array4); // output: alpha,beta,gamma
You can use the join() and toString() methods to query the array and return its contents as a string. If no
parameters are used for the join() method, the two methods behave identically—they return a string containing a
comma-delimited list of all elements in the array. The join() method, unlike the toString() method, accepts a
parameter named delimiter, which allows you to choose the symbol to use as a separator between each element in
the returned string.
The following example creates an Array called rivers and calls both join() and toString() to return the values in
the Array as a string. The toString() method is used to return comma-separated values (riverCSV), while the
join() method is used to return values separated by the + character.
var rivers:Array = ["Nile", "Amazon", "Yangtze", "Mississippi"];
var riverCSV:String = rivers.toString();
trace(riverCSV); // output: Nile,Amazon,Yangtze,Mississippi
var riverPSV:String = rivers.join("+");
trace(riverPSV); // output: Nile+Amazon+Yangtze+Mississippi

37
ACTIONSCRIPT 3.0 DEVELOPER’S GUIDE
Working with arrays
Last updated 3/21/2011
One issue to be aware of with the join() method is that any nested Array or Vector instances are always returned with
comma-separated values, no matter what separator you specify for the main array elements, as the following example
shows:
var nested:Array = ["b","c","d"];
var letters:Array = ["a",nested,"e"];
var joined:String = letters.join("+");
trace(joined); // output: a+b,c,d+e
Associative arrays
Flash Player 9 and later, Adobe AIR 1.0 and later
An associative array, sometimes called a hash or map, uses keys instead of a numeric index to organize stored values.
Each key in an associative array is a unique string that is used to access a stored value. An associative array is an
instance of the Object class, which means that each key corresponds to a property name. Associative arrays are
unordered collections of key and value pairs. Your code should not expect the keys of an associative array to be in a
specific order.
ActionScript 3.0 also includes an advanced type of associative array called a dictionary. Dictionaries, which are
instances of the Dictionary class in the flash.utils package, use keys that can be of any data type. In other words,
dictionary keys are not limited to values of type String.
Associative arrays with string keys
Flash Player 9 and later, Adobe AIR 1.0 and later
There are two ways to create associative arrays in ActionScript 3.0. The first way is to use an Object instance. By using
an Object instance you can initialize your array with an object literal. An instance of the Object class, also called a
generic object, is functionally identical to an associative array. Each property name of the generic object serves as the
key that provides access to a stored value.
The following example creates an associative array named monitorInfo, using an object literal to initialize the array
with two key and value pairs:
var monitorInfo:Object = {type:"Flat Panel", resolution:"1600 x 1200"};
trace(monitorInfo["type"], monitorInfo["resolution"]);
// output: Flat Panel 1600 x 1200
If you do not need to initialize the array at declaration time, you can use the Object constructor to create the array, as
follows:
var monitorInfo:Object = new Object();
After the array is created using either an object literal or the Object class constructor, you can add new values to the
array using either the array access ([]) operator or the dot operator (.). The following example adds two new values
to monitorArray:
monitorInfo["aspect ratio"] = "16:10"; // bad form, do not use spaces
monitorInfo.colors = "16.7 million";
trace(monitorInfo["aspect ratio"], monitorInfo.colors);
// output: 16:10 16.7 million

38
ACTIONSCRIPT 3.0 DEVELOPER’S GUIDE
Working with arrays
Last updated 3/21/2011
Note that the key named aspect ratio contains a space character. This is possible with the array access ([]) operator,
but generates an error if attempted with the dot operator. Using spaces in your key names is not recommended.
The second way to create an associative array is to use the Array constructor (or the constructor of any dynamic class)
and then use either the array access ([]) operator or the dot operator (.) to add key and value pairs to the array. If you
declare your associative array to be of type Array, you cannot use an object literal to initialize the array. The following
example creates an associative array named monitorInfo using the Array constructor and adds a key called type and
a key called resolution, along with their values:
var monitorInfo:Array = new Array();
monitorInfo["type"] = "Flat Panel";
monitorInfo["resolution"] = "1600 x 1200";
trace(monitorInfo["type"], monitorInfo["resolution"]);
// output: Flat Panel 1600 x 1200
There is no advantage in using the Array constructor to create an associative array. You cannot use the Array.length
property or any of the methods of the Array class with associative arrays, even if you use the Array constructor or the
Array data type. The use of the Array constructor is best left for the creation of indexed arrays.
Associative arrays with object keys (Dictionaries)
Flash Player 9 and later, Adobe AIR 1.0 and later
You can use the Dictionary class to create an associative array that uses objects for keys rather than strings. Such arrays
are sometimes called dictionaries, hashes, or maps. For example, consider an application that determines the location
of a Sprite object based on its association with a specific container. You can use a Dictionary object to map each Sprite
object to a container.
The following code creates three instances of the Sprite class that serve as keys for the Dictionary object. Each key is
assigned a value of either GroupA or GroupB. The values can be of any data type, but in this example both GroupA and
GroupB are instances of the Object class. Subsequently, you can access the value associated with each key with the array
access ([]) operator, as shown in the following code:

39
ACTIONSCRIPT 3.0 DEVELOPER’S GUIDE
Working with arrays
Last updated 3/21/2011
import flash.display.Sprite;
import flash.utils.Dictionary;
var groupMap:Dictionary = new Dictionary();
// objects to use as keys
var spr1:Sprite = new Sprite();
var spr2:Sprite = new Sprite();
var spr3:Sprite = new Sprite();
// objects to use as values
var groupA:Object = new Object();
var groupB:Object = new Object();
// Create new key-value pairs in dictionary.
groupMap[spr1] = groupA;
groupMap[spr2] = groupB;
groupMap[spr3] = groupB;
if (groupMap[spr1] == groupA)
{
trace("spr1 is in groupA");
}
if (groupMap[spr2] == groupB)
{
trace("spr2 is in groupB");
}
if (groupMap[spr3] == groupB)
{
trace("spr3 is in groupB");
}
Iterating with object keys
You can iterate through the contents of a Dictionary object with either a for..in loop or a for each..in loop. A
for..in loop allows you to iterate based on the keys, whereas a for each..in loop allows you to iterate based on the
values associated with each key.
Use the for..in loop for direct access to the object keys of a Dictionary object. You can also access the values of the
Dictionary object with the array access ([]) operator. The following code uses the previous example of the groupMap
dictionary to show how to iterate through a Dictionary object with the for..in loop:
for (var key:Object in groupMap)
{
trace(key, groupMap[key]);
}
/* output:
[object Sprite] [object Object]
[object Sprite] [object Object]
[object Sprite] [object Object]
*/
Use the for each..in loop for direct access to the values of a Dictionary object. The following code also uses the
groupMap dictionary to show how to iterate through a Dictionary object with the for each..in loop:

40
ACTIONSCRIPT 3.0 DEVELOPER’S GUIDE
Working with arrays
Last updated 3/21/2011
for each (var item:Object in groupMap)
{
trace(item);
}
/* output:
[object Object]
[object Object]
[object Object]
*/
Object keys and memory management
Adobe® Flash® Player and Adobe® AIR™ use a garbage collection system to recover memory that is no longer used.
When an object has no references pointing to it, the object becomes eligible for garbage collection, and the memory is
recovered the next time the garbage collection system executes. For example, the following code creates a new object
and assigns a reference to the object to the variable myObject:
var myObject:Object = new Object();
As long as any reference to the object exists, the garbage collection system will not recover the memory that the object
occupies. If the value of myObject is changed such that it points to a different object or is set to the value null, the
memory occupied by the original object becomes eligible for garbage collection, but only if there are no other
references to the original object.
If you use myObject as a key in a Dictionary object, you are creating another reference to the original object. For
example, the following code creates two references to an object—the myObject variable, and the key in the myMap
object:
import flash.utils.Dictionary;
var myObject:Object = new Object();
var myMap:Dictionary = new Dictionary();
myMap[myObject] = "foo";
To make the object referenced by myObject eligible for garbage collection, you must remove all references to it. In this
case, you must change the value of myObject and delete the myObject key from myMap, as shown in the following code:
myObject = null;
delete myMap[myObject];
Alternatively, you can use the useWeakReference parameter of the Dictionary constructor to make all of the
dictionary keys weak references. The garbage collection system ignores weak references, which means that an object
that has only weak references is eligible for garbage collection. For example, in the following code, you do not need to
delete the myObject key from myMap in order to make the object eligible for garbage collection:
import flash.utils.Dictionary;
var myObject:Object = new Object();
var myMap:Dictionary = new Dictionary(true);
myMap[myObject] = "foo";
myObject = null; // Make object eligible for garbage collection.

41
ACTIONSCRIPT 3.0 DEVELOPER’S GUIDE
Working with arrays
Last updated 3/21/2011
Multidimensional arrays
Flash Player 9 and later, Adobe AIR 1.0 and later
Multidimensional arrays contain other arrays as elements. For example, consider a list of tasks that is stored as an
indexed array of strings:
var tasks:Array = ["wash dishes", "take out trash"];
If you want to store a separate list of tasks for each day of the week, you can create a multidimensional array with one
element for each day of the week. Each element contains an indexed array, similar to the tasks array, that stores the
list of tasks. You can use any combination of indexed or associative arrays in multidimensional arrays. The examples
in the following sections use either two indexed arrays or an associative array of indexed arrays. You might want to try
the other combinations as exercises.
Two indexed arrays
Flash Player 9 and later, Adobe AIR 1.0 and later
When you use two indexed arrays, you can visualize the result as a table or spreadsheet. The elements of the first array
represent the rows of the table, while the elements of the second array represent the columns.
For example, the following multidimensional array uses two indexed arrays to track task lists for each day of the week.
The first array, masterTaskList, is created using the Array class constructor. Each element of the array represents a
day of the week, with index 0 representing Monday, and index 6 representing Sunday. These elements can be thought
of as the rows in the table. You can create each day’s task list by assigning an array literal to each of the seven elements
that you create in the masterTaskList array. The array literals represent the columns in the table.
var masterTaskList:Array = new Array();
masterTaskList[0] = ["wash dishes", "take out trash"];
masterTaskList[1] = ["wash dishes", "pay bills"];
masterTaskList[2] = ["wash dishes", "dentist", "wash dog"];
masterTaskList[3] = ["wash dishes"];
masterTaskList[4] = ["wash dishes", "clean house"];
masterTaskList[5] = ["wash dishes", "wash car", "pay rent"];
masterTaskList[6] = ["mow lawn", "fix chair"];
You can access individual items on any of the task lists using the array access ([]) operator. The first set of brackets
represents the day of the week, and the second set of brackets represents the task list for that day. For example, to
retrieve the second task from Wednesday’s list, first use index 2 for Wednesday, and then use index 1 for the second
task in the list.
trace(masterTaskList[2][1]); // output: dentist
To retrieve the first task from Sunday’s list, use index 6 for Sunday and index 0 for the first task on the list.
trace(masterTaskList[6][0]); // output: mow lawn

42
ACTIONSCRIPT 3.0 DEVELOPER’S GUIDE
Working with arrays
Last updated 3/21/2011
Associative array with an indexed array
Flash Player 9 and later, Adobe AIR 1.0 and later
To make the individual arrays easier to access, you can use an associative array for the days of the week and an indexed
array for the task lists. Using an associative array allows you to use dot syntax when referring to a particular day of the
week, but at the cost of extra run-time processing to access each element of the associative array. The following
example uses an associative array as the basis of a task list, with a key and value pair for each day of the week:
var masterTaskList:Object = new Object();
masterTaskList["Monday"] = ["wash dishes", "take out trash"];
masterTaskList["Tuesday"] = ["wash dishes", "pay bills"];
masterTaskList["Wednesday"] = ["wash dishes", "dentist", "wash dog"];
masterTaskList["Thursday"] = ["wash dishes"];
masterTaskList["Friday"] = ["wash dishes", "clean house"];
masterTaskList["Saturday"] = ["wash dishes", "wash car", "pay rent"];
masterTaskList["Sunday"] = ["mow lawn", "fix chair"];
Dot syntax makes the code more readable by making it possible to avoid multiple sets of brackets.
trace(masterTaskList.Wednesday[1]); // output: dentist
trace(masterTaskList.Sunday[0]);// output: mow lawn
You can iterate through the task list using a for..in loop, but you must use the array access ([]) operator instead of
dot syntax to access the value associated with each key. Because masterTaskList is an associative array, the elements
are not necessarily retrieved in the order that you may expect, as the following example shows:
for (var day:String in masterTaskList)
{
trace(day + ": " + masterTaskList[day])
}
/* output:
Sunday: mow lawn,fix chair
Wednesday: wash dishes,dentist,wash dog
Friday: wash dishes,clean house
Thursday: wash dishes
Monday: wash dishes,take out trash
Saturday: wash dishes,wash car,pay rent
Tuesday: wash dishes,pay bills
*/
Cloning arrays
Flash Player 9 and later, Adobe AIR 1.0 and later
The Array class has no built-in method for making copies of arrays. You can create a shallowcopy of an array by calling
either the concat() or slice() methods with no arguments. In a shallow copy, if the original array has elements that
are objects, only the references to the objects are copied rather than the objects themselves. The copy points to the same
objects as the original does. Any changes made to the objects are reflected in both arrays.
In a deep copy, any objects found in the original array are also copied so that the new array does not point to the same
objects as does the original array. Deep copying requires more than one line of code, which usually calls for the creation
of a function. Such a function could be created as a global utility function or as a method of an Array subclass.

43
ACTIONSCRIPT 3.0 DEVELOPER’S GUIDE
Working with arrays
Last updated 3/21/2011
The following example defines a function named clone() that does deep copying. The algorithm is borrowed from a
common Java programming technique. The function creates a deep copy by serializing the array into an instance of
the ByteArray class, and then reading the array back into a new array. This function accepts an object so that it can be
used with both indexed arrays and associative arrays, as shown in the following code:
import flash.utils.ByteArray;
function clone(source:Object):*
{
var myBA:ByteArray = new ByteArray();
myBA.writeObject(source);
myBA.position = 0;
return(myBA.readObject());
}
Extending the Array class
Flash Player 9 and later, Adobe AIR 1.0 and later
The Array class is one of the few core classes that is not final, which means that you can create your own subclass of
Array. This section provides an example of how to create a subclass of Array and discusses some of the issues that can
arise during the process.
As mentioned previously, arrays in ActionScript are not typed, but you can create a subclass of Array that accepts
elements of only a specific data type. The example in the following sections defines an Array subclass named
TypedArray that limits its elements to values of the data type specified in the first parameter. The TypedArray class is
presented merely as an example of how to extend the Array class and may not be suitable for production purposes for
several reasons. First, type checking occurs at run time rather than at compile time. Second, when a TypedArray
method encounters a mismatch, the mismatch is ignored and no exception is thrown, although the methods can be
easily modified to throw exceptions. Third, the class cannot prevent the use of the array access operator to insert values
of any type into the array. Fourth, the coding style favors simplicity over performance optimization.
Note: You can use the technique described here to create a typed array. However, a better approach is to use a Vector
object. A Vector instance is a true typed array, and provides performance and other improvements over the Array class
or any subclass. The purpose of this discussion is to demonstrate how to create an Array subclass.
Declaring the subclass
Use the extends keyword to indicate that a class is a subclass of Array. A subclass of Array should use the dynamic
attribute, just as the Array class does. Otherwise, your subclass will not function properly.
The following code shows the definition of the TypedArray class, which contains a constant to hold the data type, a
constructor method, and the four methods that are capable of adding elements to the array. The code for each method
is omitted in this example, but is delineated and explained fully in the sections that follow:

44
ACTIONSCRIPT 3.0 DEVELOPER’S GUIDE
Working with arrays
Last updated 3/21/2011
public dynamic class TypedArray extends Array
{
private const dataType:Class;
public function TypedArray(...args) {}
AS3 override function concat(...args):Array {}
AS3 override function push(...args):uint {}
AS3 override function splice(...args) {}
AS3 override function unshift(...args):uint {}
}
The four overridden methods all use the AS3 namespace instead of the public attribute because this example assumes
that the compiler option -as3 is set to true and the compiler option -es is set to false. These are the default settings
for Adobe Flash Builder and for AdobeFlashProfessional.
If you are an advanced developer who prefers to use prototype inheritance, you can make two minor changes to the
TypedArray class to make it compile with the compiler option -es set to true. First, remove all occurrences of the
override attribute and replace the AS3 namespace with the public attribute. Second, substitute Array.prototype for
all four occurrences of super.
TypedArray constructor
The subclass constructor poses an interesting challenge because the constructor must accept a list of arguments of
arbitrary length. The challenge is how to pass the arguments on to the superconstructor to create the array. If you pass
the list of arguments as an array, the superconstructor considers it a single argument of type Array and the resulting
array is always 1 element long. The traditional way to handle pass-through argument lists is to use the
Function.apply() method, which takes an array of arguments as its second parameter but converts it to a list of
arguments when executing the function. Unfortunately, the Function.apply() method cannot be used with
constructors.
The only option left is to recreate the logic of the Array constructor in the TypedArray constructor. The following code
shows the algorithm used in the Array class constructor, which you can reuse in your Array subclass constructor:

45
ACTIONSCRIPT 3.0 DEVELOPER’S GUIDE
Working with arrays
Last updated 3/21/2011
public dynamic class Array
{
public function Array(...args)
{
var n:uint = args.length
if (n == 1 && (args[0] is Number))
{
var dlen:Number = args[0];
var ulen:uint = dlen;
if (ulen != dlen)
{
throw new RangeError("Array index is not a 32-bit unsigned integer ("+dlen+")");
}
length = ulen;
}
else
{
length = n;
for (var i:int=0; i < n; i++)
{
this[i] = args[i]
}
}
}
}
The TypedArray constructor shares most of the code from the Array constructor, with only four changes to the code.
First, the parameter list includes a new required parameter of type Class that allows specification of the array’s data
type. Second, the data type passed to the constructor is assigned to the dataType variable. Third, in the else
statement, the value of the length property is assigned after the for loop so that length includes only arguments that
are the proper type. Fourth, the body of the for loop uses the overridden version of the push() method so that only
arguments of the correct data type are added to the array. The following example shows the TypedArray constructor
function:

46
ACTIONSCRIPT 3.0 DEVELOPER’S GUIDE
Working with arrays
Last updated 3/21/2011
public dynamic class TypedArray extends Array
{
private var dataType:Class;
public function TypedArray(typeParam:Class, ...args)
{
dataType = typeParam;
var n:uint = args.length
if (n == 1 && (args[0] is Number))
{
var dlen:Number = args[0];
var ulen:uint = dlen
if (ulen != dlen)
{
throw new RangeError("Array index is not a 32-bit unsigned integer ("+dlen+")")
}
length = ulen;
}
else
{
for (var i:int=0; i < n; i++)
{
// type check done in push()
this.push(args[i])
}
length = this.length;
}
}
}
TypedArray overridden methods
The TypedArray class overrides the four methods of the Array class that are capable of adding elements to an array. In
each case, the overridden method adds a type check that prevents the addition of elements that are not the correct data
type. Subsequently, each method calls the superclass version of itself.
The push() method iterates through the list of arguments with a for..in loop and does a type check on each
argument. Any argument that is not the correct type is removed from the args array with the splice() method. After
the for..in loop ends, the args array contains values only of type dataType. The superclass version of push() is then
called with the updated args array, as the following code shows:
AS3 override function push(...args):uint
{
for (var i:* in args)
{
if (!(args[i] is dataType))
{
args.splice(i,1);
}
}
return (super.push.apply(this, args));
}
The concat() method creates a temporary TypedArray named passArgs to store the arguments that pass the type
check. This allows the reuse of the type check code that exists in the push() method. A for..in loop iterates through
the args array, and calls push() on each argument. Because passArgs is typed as TypedArray, the TypedArray
version of push() is executed. The concat() method then calls its own superclass version, as the following code
shows:

47
ACTIONSCRIPT 3.0 DEVELOPER’S GUIDE
Working with arrays
Last updated 3/21/2011
AS3 override function concat(...args):Array
{
var passArgs:TypedArray = new TypedArray(dataType);
for (var i:* in args)
{
// type check done in push()
passArgs.push(args[i]);
}
return (super.concat.apply(this, passArgs));
}
The splice() method takes an arbitrary list of arguments, but the first two arguments always refer to an index
number and the number of elements to delete. This is why the overridden splice() method does type checking only
for args array elements in index positions 2 or higher. One point of interest in the code is that there appears to be a
recursive call to splice() inside the for loop, but this is not a recursive call because args is of type Array rather than
TypedArray, which means that the call to args.splice() is a call to the superclass version of the method. After the
for..in loop concludes, the args array contains only values of the correct type in index positions 2 or higher, and
splice() calls its own superclass version, as shown in the following code:
AS3 override function splice(...args):*
{
if (args.length > 2)
{
for (var i:int=2; i< args.length; i++)
{
if (!(args[i] is dataType))
{
args.splice(i,1);
}
}
}
return (super.splice.apply(this, args));
}
The unshift() method, which adds elements to the beginning of an array, also accepts an arbitrary list of arguments.
The overridden unshift() method uses an algorithm very similar to that used by the push() method, as shown in
the following example code:
AS3 override function unshift(...args):uint
{
for (var i:* in args)
{
if (!(args[i] is dataType))
{
args.splice(i,1);
}
}
return (super.unshift.apply(this, args));
}
}

48
ACTIONSCRIPT 3.0 DEVELOPER’S GUIDE
Working with arrays
Last updated 3/21/2011
Arrays example: PlayList
Flash Player 9 and later, Adobe AIR 1.0 and later
The PlayList example demonstrates techniques for working with arrays, in the context of a music playlist application
that manages a list of songs. These techniques are:
•Creating an indexed array
•Adding items to an indexed array
•Sorting an array of objects by different properties, using different sorting options
•Converting an array to a character-delimited string
To get the application files for this sample, see www.adobe.com/go/learn_programmingAS3samples_flash. The
PlayList application files can be found in the Samples/PlayList folder. The application consists of the following files:
PlayList class overview
Flash Player 9 and later, Adobe AIR 1.0 and later
The PlayList class manages a set of Song objects. It has public methods with functionality for adding a song to the
playlist (the addSong() method) and sorting the songs in the list (the sortList() method). In addition, the class
includes a read-only accessor property, songList, which provides access to the actual set of songs in the playlist.
Internally, the PlayList class keeps track of its songs using a private Array variable:
public class PlayList
{
private var _songs:Array;
private var _currentSort:SortProperty = null;
private var _needToSort:Boolean = false;
...
}
In addition to the _songs Array variable, which is used by the PlayList class to keep track of its list of songs, two other
private variables keep track of whether the list needs to be sorted (_needToSort) and which property the song list is
sorted by at a given time (_currentSort).
As with all objects, declaring an Array instance is only half the job of creating an Array. Before accessing an Array
instance’s properties or methods, it must be instantiated, which is done in the PlayList class’s constructor.
File Description
PlayList.mxml
or
PlayList.fla
The main application file in Flash (FLA) or Flex (MXML).
com/example/programmingas3/playlist/PlayList.as A class representing a list of songs. It uses an Array to store the list,
and manages the sorting of the list’s items..
com/example/programmingas3/playlist/Song.as A value object representing information about a single song. The
items that are managed by the PlayList class are Song instances.
com/example/programmingas3/playlist/SortProperty.as A pseudo-enumeration whose available values represent the
properties of the Song class by which a list of Song objects can be
sorted.

49
ACTIONSCRIPT 3.0 DEVELOPER’S GUIDE
Working with arrays
Last updated 3/21/2011
public function PlayList()
{
this._songs = new Array();
// Set the initial sorting.
this.sortList(SortProperty.TITLE);
}
The first line of the constructor instantiates the _songs variable, so that it is ready to be used. In addition, the
sortList() method is called to set the initial sort-by property.
Adding a song to the list
Flash Player 9 and later, Adobe AIR 1.0 and later
When a user enters a new song into the application, the code in the data entry form calls the PlayList class’s addSong()
method.
/**
* Adds a song to the playlist.
*/
public function addSong(song:Song):void
{
this._songs.push(song);
this._needToSort = true;
}
Inside addSong(), the _songs array’s push() method is called, adding the Song object that was passed to addSong()
as a new element in that array. With the push() method, the new element is added to the end of the array, regardless
of any sorting that might have been applied previously. This means that after the push() method has been called, the
list of songs is likely to no longer be sorted correctly, so the _needToSort variable is set to true. In theory, the
sortList() method could be called immediately, removing the need to keep track of whether the list is sorted or not
at a given time. In practice, however, there is no need for the list of songs to be sorted until immediately before it is
retrieved. By deferring the sorting operation, the application doesn’t perform sorting that is unnecessary if, for
example, several songs are added to the list before it is retrieved.
Sorting the list of songs
Flash Player 9 and later, Adobe AIR 1.0 and later
Because the Song instances that are managed by the playlist are complex objects, users of the application may wish to
sort the playlist according to different properties, such as song title or year of publication. In the PlayList application,
the task of sorting the list of songs has three parts: identifying the property by which the list should be sorted, indicating
what sorting options need to be used when sorting by that property, and performing the actual sort operation.
Properties for sorting
A Song object keeps track of several properties, including song title, artist, publication year, filename, and a user-
selected set of genres in which the song belongs. Of these, only the first three are practical for sorting. As a matter of
convenience for developers, the example includes the SortProperty class, which acts as an enumeration with values
representing the properties available for sorting.
public static const TITLE:SortProperty = new SortProperty("title");
public static const ARTIST:SortProperty = new SortProperty("artist");
public static const YEAR:SortProperty = new SortProperty("year");

50
ACTIONSCRIPT 3.0 DEVELOPER’S GUIDE
Working with arrays
Last updated 3/21/2011
The SortProperty class contain three constants, TITLE, ARTIST, and YEAR, each of which stores a String containing the
actual name of the associated Song class property that can be used for sorting. Throughout the rest of the code,
whenever a sort property is indicated, it is done using the enumeration member. For instance, in the PlayList
constructor, the list is sorted initially by calling the sortList() method, as follows:
// Set the initial sorting.
this.sortList(SortProperty.TITLE);
Because the property for sorting is specified as SortProperty.TITLE, the songs are sorted according to their title.
Sorting by property and specifying sort options
The work of actually sorting the list of songs is performed by the PlayList class in the sortList() method, as follows:
/**
* Sorts the list of songs according to the specified property.
*/
public function sortList(sortProperty:SortProperty):void
{
...
var sortOptions:uint;
switch (sortProperty)
{
case SortProperty.TITLE:
sortOptions = Array.CASEINSENSITIVE;
break;
case SortProperty.ARTIST:
sortOptions = Array.CASEINSENSITIVE;
break;
case SortProperty.YEAR:
sortOptions = Array.NUMERIC;
break;
}
// Perform the actual sorting of the data.
this._songs.sortOn(sortProperty.propertyName, sortOptions);
// Save the current sort property.
this._currentSort = sortProperty;
// Record that the list is sorted.
this._needToSort = false;
}
When sorting by title or artist, it makes sense to sort alphabetically, but when sorting by year, it’s most logical to
perform a numeric sort. The switch statement is used to define the appropriate sorting option, stored in the variable
sortOptions, according to the value specified in the sortProperty parameter. Here again the named enumeration
members are used to distinguish between properties, rather than hard-coded values.
With the sort property and sort options determined, the _songs array is actually sorted by calling its sortOn()
method, passing those two values as parameters. The current sort property is recorded, as is the fact that the song list
is currently sorted.

51
ACTIONSCRIPT 3.0 DEVELOPER’S GUIDE
Working with arrays
Last updated 3/21/2011
Combining array elements into a character-delimited string
Flash Player 9 and later, Adobe AIR 1.0 and later
In addition to using an array to maintain the song list in the PlayList class, in this example arrays are also used in the
Song class to help manage the list of genres to which a given song belongs. Consider this snippet from the Song class’s
definition:
private var _genres:String;
public function Song(title:String, artist:String, year:uint, filename:String, genres:Array)
{
...
// Genres are passed in as an array
// but stored as a semicolon-separated string.
this._genres = genres.join(";");
}
When creating a new Song instance, the genres parameter that is used to specify the genre (or genres) the song
belongs to is defined as an Array instance. This makes it convenient to group multiple genres together into a single
variable that can be passed to the constructor. However, internally the Song class maintains the genres in the private
_genres variable as a semicolon-separated String instance. The Array parameter is converted into a semicolon-
separated string by calling its join() method with the literal string value ";" as the specified delimiter.
By the same token, the genres accessors allow genres to be set or retrieved as an Array:
public function get genres():Array
{
// Genres are stored as a semicolon-separated String,
// so they need to be transformed into an Array to pass them back out.
return this._genres.split(";");
}
public function set genres(value:Array):void
{
// Genres are passed in as an array,
// but stored as a semicolon-separated string.
this._genres = value.join(";");
}
The genresset accessor behaves exactly the same as the constructor; it accepts an Array and calls the join() method
to convert it to a semicolon-separated String. The get accessor performs the opposite operation: the _genres
variable’s split() method is called, splitting the String into an array of values using the specified delimiter (the literal
string value ";" as before).

52
Last updated 3/21/2011
Chapter 4: Handling errors
Flash Player 9 and later, Adobe AIR 1.0 and later
To “handle” an error means that you build logic into your application to respond to, or fix, an error. Errors are
generated either when an application is compiled or when a compiled application is running. When your application
handles errors, something occurs as a response when the error is encountered, as opposed to no response (when
whatever process created the error fails silently). Used correctly, error handling helps shield your application and its
users from otherwise unexpected behavior.
However, error handling is a broad category that includes responding to many kinds of errors that are thrown during
compilation or while an application is running. This discussion focuses on how to handle run-time errors (thrown
while an application is running), the different types of errors that can be generated, and the advantages of the error-
handling system in ActionScript 3.0.
Basics of error handling
Flash Player 9 and later, Adobe AIR 1.0 and later
A run-time error is something that goes wrong in your ActionScript code that stops the ActionScript content from
running as intended. To ensure that your ActionScript code runs smoothly for users, write code in your application
that handles the error—that fixes it, works around it, or at least lets the user know that it has happened. This process
is called error handling.
Error handling is a broad category that includes responding to many kinds of errors that are thrown during
compilation or while an application is running. Errors that happen at compile time are often easier to identify— fix
them to complete the process of creating a SWF file.
Run-time errors can be more difficult to detect, because in order for them to occur the erroneous code must actually
be run. If a segment of your program has several branches of code, like an if..then..else statement, test every
possible condition, with all the possible input values that real users might use, to confirm that your code is error-free.
Run-time errors can be divided into two categories: program errors are mistakes in your ActionScript code, such as
specifying the wrong data type for a method parameter; logical errors are mistakes in the logic (the data checking and
value manipulation) of your program, such as using the wrong formula to calculate interest rates in a banking
application. Again, both of these types of errors can often be detected and corrected ahead of time by diligently testing
your application.
Ideally, you’ll want to identify and remove all errors from your application before it is released to end users. However,
not all errors can be foreseen or prevented. For example, suppose your ActionScript application loads information
from a particular website that is outside your control. If at some point that website isn’t available, the part of your
application that depends on that external data won’t behave correctly. The most important aspect of error handling
involves preparing for these unknown cases and handling them gracefully. Users need to continue to use your
application, or at least get a friendly error message explaining why it isn’t working.

53
ACTIONSCRIPT 3.0 DEVELOPER’S GUIDE
Handling errors
Last updated 3/21/2011
Run-time errors are represented in two ways in ActionScript:
•Error classes: Many errors have an error class associated with them. When an error occurs, the Flash runtime (such
as Flash Player or Adobe AIR) creates an instance of the specific error class that is associated with that particular
error. Your code can use the information contained in that error object to make an appropriate response to the
error.
•Error events: Sometimes an error occurs when the Flash runtime would normally trigger an event. In those cases,
an error event is triggered instead. Each error event has a class associated with it, and the Flash runtime passes an
instance of that class to the methods that are subscribed to the error event.
To determine whether a particular method can trigger an error or error event, see the method’s entry in the
ActionScript 3.0 Reference for the Adobe Flash Platform.
Important concepts and terms
The following reference list contains important terms for programming error handling routines:
Asynchronous A program command such as a method call that doesn’t provide an immediate result; instead it gives
a result (or error) in the form of an event.
Catch When an exception (a run-time error) occurs and your code becomes aware of the exception, that code is said
to catch the exception. Once an exception is caught, the Flash runtime stops notifying other ActionScript code of the
exception.
Debugger version A special version of the Flash runtime, such as the Flash Player dubugger version or the AIR Debug
Launcher (ADL), that contains code for notifying users of run-time errors. In the standard version of Flash Player or
Adobe AIR (the one that most users have), errors that aren’t handled by your ActionScript code are ignored. In the
debugger versions (which are included with Adobe Flash CS4 Professional and Adobe Flash Builder), a warning
message appears when an unhandled error happens.
Exception An error that happens while an application is running and that the Flash runtime can’t resolve on its own.
Re-throw When your code catches an exception, the Flash runtime no longer notifies other objects of the exception.
If it’s important for other objects to receive the exception, your code must re-throw the exception to start the
notification process again.
Synchronous A program command, such as a method call, that provides an immediate result (or immediately throws
an error), meaning that the response can be used within the same code block.
Throw The act of notifying a Flash runtime (and consequently, notifying other objects and ActionScript code) that an
error has occurred is known as throwing an error.
Types of errors
Flash Player 9 and later, Adobe AIR 1.0 and later
When you develop and run applications, you encounter different types of errors and error terminology. The following
list introduces the major error types and terms:
•Compile-time errors are raised by the ActionScript compiler during code compilation. Compile-time errors occur
when syntactical problems in your code prevent your application from being built.

54
ACTIONSCRIPT 3.0 DEVELOPER’S GUIDE
Handling errors
Last updated 3/21/2011
•Run-time errors occur when you run your application after you compile it. Run-time errors represent errors that
are caused while a SWF file plays in a Flash runtime (such as Adobe Flash Player or Adobe AIR). In most cases, you
handle run-time errors as they occur, reporting them to the user and taking steps to keep your application running.
If the error is a fatal error, such as not being able to connect to a remote website or load required data, you can use
error handling to allow your application to finish, gracefully.
•Synchronous errors are run-time errors that occur at the time a function is called—for example, when you try to use
a specific method and the argument you pass to the method is invalid, so the Flash runtime throws an exception.
Most errors occur synchronously—at the time the statement executes—and the flow of control passes immediately
to the most applicable catch statement.
For example, the following code excerpt throws a run-time error because the browse() method is not called before
the program attempts to upload a file:
var fileRef:FileReference = new FileReference();
try
{
fileRef.upload(new URLRequest("http://www.yourdomain.com/fileupload.cfm"));
}
catch (error:IllegalOperationError)
{
trace(error);
// Error #2037: Functions called in incorrect sequence, or earlier
// call was unsuccessful.
}
In this case, a run-time error is thrown synchronously because Flash Player determined that the browse() method
was not called before the file upload was attempted.
For detailed information on synchronous error handling, see “Handling synchronous errors in an application” on
page 58.
•Asynchronouserrors are run-time errors that occur at various points during runtime; they generate events and event
listeners catch them. An asynchronous operation is one in which a function initiates an operation, but doesn’t wait
for it to complete. You can create an error event listener to wait for the application or user to try some operation.
If the operation fails, you catch the error with an event listener and respond to the error event. Then, the event
listener calls an event handler function to respond to the error event in a useful manner. For example, the event
handler could launch a dialog box that prompts the user to resolve the error.
Consider the file-upload synchronous error example presented earlier. If you successfully call the browse()
method before beginning a file upload, Flash Player would dispatch several events. For example, when an upload
starts, the open event is dispatched. When the file upload operation completes successfully, the complete event is
dispatched. Because event handling is asynchronous (that is, it does not occur at specific, known, predesignated
times), use the addEventListener() method to listen for these specific events, as the following code shows:

55
ACTIONSCRIPT 3.0 DEVELOPER’S GUIDE
Handling errors
Last updated 3/21/2011
var fileRef:FileReference = new FileReference();
fileRef.addEventListener(Event.SELECT, selectHandler);
fileRef.addEventListener(Event.OPEN, openHandler);
fileRef.addEventListener(Event.COMPLETE, completeHandler);
fileRef.browse();
function selectHandler(event:Event):void
{
trace("...select...");
var request:URLRequest = new URLRequest("http://www.yourdomain.com/fileupload.cfm");
request.method = URLRequestMethod.POST;
event.target.upload(request);
}
function openHandler(event:Event):void
{
trace("...open...");
}
function completeHandler(event:Event):void
{
trace("...complete...");
}
For detailed information on asynchronous error handling, see “Responding to error events and status” on page 63.
•Uncaught exceptions are errors thrown with no corresponding logic (like a catch statement) to respond to them.
If your application throws an error, and no appropriate catch statement or event handler can be found at the
current or higher level to handle the error, the error is considered an uncaught exception.
When an uncaught error happens, the runtime dispatches an uncaughtError event. This event is also known as a
“global error handler.” This event is dispatched by the SWF’s UncaughtErrorEvents object, which is available
through the LoaderInfo.uncaughtErrorEvents property. If no listeners are registered for the uncaughtError
event, the runtime ignores uncaught errors and tries to continue running, as long as the error doesn’t stop the SWF.
In addition to dispatching the uncaughtError event, debugger versions of the Flash runtime respond to uncaught
errors by terminating the current script. Then, they display the uncaught error in trace statement output or
writing the error message to a log file. If the exception object is an instance of the Error class or one of its subclasses,
the getStackTrace() method is called. The stack trace information is also displayed in trace statement output or
in a log file. For more information about using the debugger version of Flash runtimes, see “Working with the
debugger versions of Flash runtimes” on page 57.
Note: While processing an uncaughtError event, if an error event is thrown from an uncaughtError handler, the event
handler is called multiple times. This results in an infinite loop of exceptions. It is recommended that you avoid such
a scenario.
Error handling in ActionScript 3.0
Flash Player 9 and later, Adobe AIR 1.0 and later
Since many applications can run without building the logic to handle errors, developers are tempted to postpone
building error handling into their applications. However, without error handling, an application can easily stall or
frustrate the user if something doesn’t work as expected. ActionScript 2.0 has an Error class that allows you to build
logic into custom functions to throw an exception with a specific message. Because error handling is critical for making
a user-friendly application, ActionScript 3.0 includes an expanded architecture for catching errors.

56
ACTIONSCRIPT 3.0 DEVELOPER’S GUIDE
Handling errors
Last updated 3/21/2011
Note: While the ActionScript 3.0 Reference for the Adobe Flash Platform documents the exceptions thrown by many
methods, it might not include all possible exceptions for each method. A method might throw an exception for syntax
errors or other problems that are not noted explicitly in the method description, even when the description does list some
of the exceptions a method throws.
ActionScript 3.0 error-handling elements
Flash Player 9 and later, Adobe AIR 1.0 and later
ActionScript 3.0 includes many tools for error handling, including:
•Error classes. ActionScript 3.0 includes a broad range of Error classes to expand the scope of situations that can
produce error objects. Each Error class helps applications handle and respond to specific error conditions, whether
they are related to system errors (like a MemoryError condition), coding errors (like an ArgumentError condition),
networking and communication errors (like a URIError condition), or other situations. For more information on
each class, see “Comparing the Error classes” on page 66.
•Fewer silent failures. In earlier versions of Flash Player, errors were generated and reported only if you explicitly
used the throw statement. For Flash Player 9 and later Flash runtimes, native ActionScript methods and properties
throw run-time errors. These errors allow you to handle these exceptions more effectively when they occur, then
react to each exception, individually.
•Clear error messages displayed during debugging. When you are using the debugger version of a Flash runtime,
problematic code or situations generate robust error messages, which help you easily identify reasons why a
particular block of code fails. These messages make fixing errors more efficient. For more information, see
“Working with the debugger versions of Flash runtimes” on page 57.
•Precise errors allow for clear error messages displayed to users. In previous versions of Flash Player, the
FileReference.upload() method returned a Boolean value of false if the upload() call was unsuccessful,
indicating one of five possible errors. If an error occurs when you call the upload() method in ActionScript 3.0,
four specific errors help you display more accurate error messages to end users.
•Refined error handling. Distinct errors are thrown for many common situations. For example, in ActionScript 2.0,
before a FileReference object has been populated, the name property has the value null (so, before you can use or
display the name property, ensure that the value is set and not null). In ActionScript 3.0, if you attempt to access
the name property before it has been populated, Flash Player or AIR throws an IllegalOperationError, which
informs you that the value has not been set, and you can use try..catch..finally blocks to handle the error. For
more information see “Using try..catch..finally statements” on page 58.
•No significant performance drawbacks. Using try..catch..finally blocks to handle errors takes little or no
additional resources compared to previous versions of ActionScript.
•An ErrorEvent class that allows you to build listeners for specific asynchronous error events. For more information
see “Responding to error events and status” on page 63.
Error-handling strategies
Flash Player 9 and later, Adobe AIR 1.0 and later
As long as your application doesn’t encounter a problematic condition, it can still run successfully if you don’t build
error-handling logic into your code. However, if you don’t actively handle errors and your application does encounter
a problem, your users will never know why your application fails when it does.

57
ACTIONSCRIPT 3.0 DEVELOPER’S GUIDE
Handling errors
Last updated 3/21/2011
There are different ways you can approach error handling in your application. The following list summarizes the three
major options for handling errors:
•Use try..catch..finally statements. These statements catch synchronous errors as they occur. You can nest
your statements into a hierarchy to catch exceptions at various levels of code execution. For more information, see
“Using try..catch..finally statements” on page 58.
•Create your own custom error objects. You can use the Error class to create your own custom error objects to track
specific operations in your application that are not covered by built-in error types. Then you can use
try..catch..finally statements on your custom error objects. For more information see “Creating custom
error classes” on page 62.
•Write event listeners and handlers to respond to error events. By using this strategy, you can create global error
handlers that let you handle similar events without duplicating much code in try..catch..finally blocks. You
are also more likely to catch asynchronous errors using this approach. For more information, see “Responding to
error events and status” on page 63.
Working with the debugger versions of Flash runtimes
Flash Player 9 and later, Adobe AIR 1.0 and later
Adobe provides developers with special editions of the Flash runtimes to assist debugging efforts. You obtain a copy
of the debugger version of Flash Player when you install Adobe Flash Professional or Adobe Flash Builder. You also
obtain a utility for the debugging of Adobe AIR applications, which is called ADL, when you install either of those
tools, or as part of the Adobe AIR SDK.
There is a notable difference in how the debugger versions and the release versions of Flash Player and Adobe AIR
indicate errors. The debugger versions shows the error type (such as a generic Error, IOError, or EOFError), error
number, and a human-readable error message. The release versions shows only the error type and error number. For
example, consider the following code:
try
{
tf.text = myByteArray.readBoolean();
}
catch (error:EOFError)
{
tf.text = error.toString();
}
If the readBoolean() method throws an EOFError in the debugger version of Flash Player, the following message
displays in the tf text field: “EOFError: Error #2030: End of file was encountered.”
The same code in a release version of Flash Player or Adobe AIR would display the following text: “EOFError: Error
#2030.”
Note: The debugger players broadcast an event named "allComplete"; avoid creating custom events with the name
“allComplete”. Otherwise, you will encounter unpredictable behavior when debugging.
To keep resources and size to a minimum in the release versions, error message strings are not present. You can look
up the error number in the documentation (the appendixes of the ActionScript 3.0 Reference for the Adobe Flash
Platform) to correlate to an error message. Alternatively, you can reproduce the error using the debugger versions of
Flash Player and AIR to see the full message.

58
ACTIONSCRIPT 3.0 DEVELOPER’S GUIDE
Handling errors
Last updated 3/21/2011
Handling synchronous errors in an application
Flash Player 9 and later, Adobe AIR 1.0 and later
The most common error handling is synchronous error-handling logic, where you insert statements into your code to
catch synchronous errors while an application is running. This type of error handling lets your application notice and
recover from run-time errors when functions fail. The logic for catching a synchronous error includes
try..catch..finally statements, which literally try an operation, catch any error response from the Flash runtime,
and finally execute some other operation to handle the failed operation.
Using try..catch..finally statements
Flash Player 9 and later, Adobe AIR 1.0 and later
When you work with synchronous run-time errors, use the try..catch..finally statements to catch errors. When
a run-time error occurs, the Flash runtime throws an exception, which means that it suspends normal execution and
creates a special object of type Error. The Error object is then thrown to the first available catch block.
The try statement encloses statements that have the potential to create errors. You always use the catch statement
with a try statement. If an error is detected in one of the statements in the try statement block, the catch statements
that are attached to that try statement run.
The finally statement encloses statements that run whether an error occurs in the try block. If there is no error, the
statements within the finally block execute after the try block statements complete. If there is an error, the
appropriate catch statement executes first, followed by the statements in the finally block.
The following code demonstrates the syntax for using the try..catch..finally statements:
try
{
// some code that could throw an error
}
catch (err:Error)
{
// code to react to the error
}
finally
{
// Code that runs whether an error was thrown. This code can clean
// up after the error, or take steps to keep the application running.
}
Each catch statement identifies a specific type of exception that it handles. The catch statement can specify only error
classes that are subclasses of the Error class. Each catch statement is checked in order. Only the first catch statement
that matches the type of error thrown runs. In other words, if you first check the higher-level Error class and then a
subclass of the Error class, only the higher-level Error class matches. The following code illustrates this point:

59
ACTIONSCRIPT 3.0 DEVELOPER’S GUIDE
Handling errors
Last updated 3/21/2011
try
{
throw new ArgumentError("I am an ArgumentError");
}
catch (error:Error)
{
trace("<Error> " + error.message);
}
catch (error:ArgumentError)
{
trace("<ArgumentError> " + error.message);
}
The previous code displays the following output:
<Error> I am an ArgumentError
To correctly catch the ArgumentError, make sure that the most specific error types are listed first and the more generic
error types are listed later, as the following code shows:
try
{
throw new ArgumentError("I am an ArgumentError");
}
catch (error:ArgumentError)
{
trace("<ArgumentError> " + error.message);
}
catch (error:Error)
{
trace("<Error> " + error.message);
}
Several methods and properties in the ActionScript API throw run-time errors if they encounter errors while they
execute. For example, the close() method in the Sound class throws an IOError if the method is unable to close the
audio stream, as demonstrated in the following code:
var mySound:Sound = new Sound();
try
{
mySound.close();
}
catch (error:IOError)
{
// Error #2029: This URLStream object does not have an open stream.
}
As you become more familiar with the ActionScript 3.0 Reference for the Adobe Flash Platform, you’ll notice which
methods throw exceptions, as detailed in each method’s description.

60
ACTIONSCRIPT 3.0 DEVELOPER’S GUIDE
Handling errors
Last updated 3/21/2011
The throw statement
Flash Player 9 and later, Adobe AIR 1.0 and later
Flash runtimes throw exceptions when they encounter errors in your running application. In addition, you can
explicitly throw exceptions yourself using the throw statement. When explicitly throwing errors, Adobe recommends
that you throw instances of the Error class or its subclasses. The following code demonstrates a throw statement that
throws an instance of the Error class, MyErr, and eventually calls a function, myFunction(), to respond after the error
is thrown:
var MyError:Error = new Error("Encountered an error with the numUsers value", 99);
var numUsers:uint = 0;
try
{
if (numUsers == 0)
{
trace("numUsers equals 0");
}
}
catch (error:uint)
{
throw MyError; // Catch unsigned integer errors.
}
catch (error:int)
{
throw MyError; // Catch integer errors.
}
catch (error:Number)
{
throw MyError; // Catch number errors.
}
catch (error:*)
{
throw MyError; // Catch any other error.
}
finally
{
myFunction(); // Perform any necessary cleanup here.
}
Notice that the catch statements are ordered so that the most specific data types are listed first. If the catch statement
for the Number data type is listed first, neither the catch statement for the uint data type nor the catch statement for
the int data type is ever run.
Note: In the Java programming language, each function that can throw an exception must declare this fact, listing the
exception classes it can throw in a throws clause attached to the function declaration. ActionScript does not require you
to declare the exceptions thrown by a function.
Displaying a simple error message
Flash Player 9 and later, Adobe AIR 1.0 and later
One of the biggest benefits of the new exception and error event model is that it allows you to tell users when and why
an action has failed. Your part is to write the code to display the message and offer options in response.
The following code shows a simple try..catch statement to display the error in a text field:

61
ACTIONSCRIPT 3.0 DEVELOPER’S GUIDE
Handling errors
Last updated 3/21/2011
package
{
import flash.display.Sprite;
import flash.text.TextField;
public class SimpleError extends Sprite
{
public var employee:XML =
<EmpCode>
<costCenter>1234</costCenter>
<costCenter>1-234</costCenter>
</EmpCode>;
public function SimpleError()
{
try
{
if (employee.costCenter.length() != 1)
{
throw new Error("Error, employee must have exactly one cost center assigned.");
}
}
catch (error:Error)
{
var errorMessage:TextField = new TextField();
errorMessage.autoSize = TextFieldAutoSize.LEFT;
errorMessage.textColor = 0xFF0000;
errorMessage.text = error.message;
addChild(errorMessage);
}
}
}
}
Using a wider range of error classes and built-in compiler errors, ActionScript 3.0 offers more information than
previous versions of ActionScript about why something has failed. This information enables you to build more stable
applications with better error handling.
Rethrowing errors
Flash Player 9 and later, Adobe AIR 1.0 and later
When you build applications, there are several occasions in which you need to rethrow an error if you are unable to
handle the error properly. For example, the following code shows a nested try..catch block, which rethrows a
custom ApplicationError if the nested catch block is unable to handle the error:

62
ACTIONSCRIPT 3.0 DEVELOPER’S GUIDE
Handling errors
Last updated 3/21/2011
try
{
try
{
trace("<< try >>");
throw new ApplicationError("some error which will be rethrown");
}
catch (error:ApplicationError)
{
trace("<< catch >> " + error);
trace("<< throw >>");
throw error;
}
catch (error:Error)
{
trace("<< Error >> " + error);
}
}
catch (error:ApplicationError)
{
trace("<< catch >> " + error);
}
The output from the previous snippet would be the following:
<< try >>
<< catch >> ApplicationError: some error which will be rethrown
<< throw >>
<< catch >> ApplicationError: some error which will be rethrown
The nested try block throws a custom ApplicationError error that is caught by the subsequent catch block. This
nested catch block can try to handle the error, and if unsuccessful, throw the ApplicationError object to the enclosing
try..catch block.
Creating custom error classes
Flash Player 9 and later, Adobe AIR 1.0 and later
You can extend one of the standard Error classes to create your own specialized error classes in ActionScript. There
are a number of reasons to create your own error classes:
•To identify specific errors or groups of errors that are unique to your application.
For example, take different actions for errors thrown by your own code, in addition to those errors trapped by a
Flash runtime. You can create a subclass of the Error class to track the new error data type in try..catch blocks.
•To provide unique error display capabilities for errors generated by your application.
For example, you can create a new toString() method that formats your error messages in a certain way. You can
also define a lookupErrorString() method that takes an error code and retrieves the proper message based on
the user’s language preference.
A specialized error class must extend the core ActionScript Error class. Here is an example of a specialized AppError
class that extends the Error class:

63
ACTIONSCRIPT 3.0 DEVELOPER’S GUIDE
Handling errors
Last updated 3/21/2011
public class AppError extends Error
{
public function AppError(message:String, errorID:int)
{
super(message, errorID);
}
}
The following shows an example of using AppError in your project:
try
{
throw new AppError("Encountered Custom AppError", 29);
}
catch (error:AppError)
{
trace(error.errorID + ": " + error.message)
}
Note: If you want to override the Error.toString() method in your subclass, give it one ...(rest) parameter. The
ECMAScript language specification on which ActionScript 3.0 is based defines the Error.toString() method that way,
and ActionScript 3.0 defines it the same way for backward compatibility. Therefore, when you override the
Error.toString() method, match the parameters exactly. You do not want to pass any parameters to your
toString() method at runtime, because those parameters are ignored.
Responding to error events and status
Flash Player 9 and later, Adobe AIR 1.0 and later
One of the most noticeable improvements to error handling in ActionScript 3.0 is the support for error event handling
for responding to asynchronous errors while an application is running. (For a definition of asynchronous errors, see
“Types of errors” on page 53.)
You can create event listeners and event handlers to respond to the error events. Many classes dispatch error events
the same way they dispatch other events. For example, an instance of the XMLSocket class normally dispatches three
types of events: Event.CLOSE, Event.CONNECT, and DataEvent.DATA. However, when a problem occurs, the
XMLSocket class can dispatch the IOErrorEvent.IOError or the SecurityErrorEvent.SECURITY_ERROR. For
more information about event listeners and event handlers, see “Handling events” on page 117.
Error events fit into one of two categories:
•Error events that extend the ErrorEvent class
The flash.events.ErrorEvent class contains the properties and methods for managing errors related to networking
and communication operations in a running application. The AsyncErrorEvent, IOErrorEvent, and
SecurityErrorEvent classes extend the ErrorEvent class. If you’re using the debugger version of a Flash runtime, a
dialog box informs you at run-time of any error events without listener functions that the player encounters.
•Status-based error events
The status-based error events are related to the netStatus and status properties of the networking and
communication classes. If a Flash runtime encounters a problem when reading or writing data, the value of the
netStatus.info.level or status.level properties (depending on the class object you’re using) is set to the
value "error". You respond to this error by checking if the level property contains the value "error" in your
event handler function.

64
ACTIONSCRIPT 3.0 DEVELOPER’S GUIDE
Handling errors
Last updated 3/21/2011
Working with error events
Flash Player 9 and later, Adobe AIR 1.0 and later
The ErrorEvent class and its subclasses contain error types for handling errors dispatched by Flash runtimes as they
try to read or write data.
The following example uses both a try..catch statement and error event handlers to display any errors detected
while trying to read a local file. You can add more sophisticated handling code to provide a user with options or
otherwise handle the error automatically in the places indicated by the comment “your error-handling code here”:
package
{
import flash.display.Sprite;
import flash.errors.IOError;
import flash.events.IOErrorEvent;
import flash.events.TextEvent;
import flash.media.Sound;
import flash.media.SoundChannel;
import flash.net.URLRequest;
import flash.text.TextField;
import flash.text.TextFieldAutoSize;
public class LinkEventExample extends Sprite
{
private var myMP3:Sound;
public function LinkEventExample()
{
myMP3 = new Sound();
var list:TextField = new TextField();
list.autoSize = TextFieldAutoSize.LEFT;
list.multiline = true;
list.htmlText = "<a href=\"event:track1.mp3\">Track 1</a><br>";
list.htmlText += "<a href=\"event:track2.mp3\">Track 2</a><br>";
addEventListener(TextEvent.LINK, linkHandler);
addChild(list);
}
private function playMP3(mp3:String):void
{
try
{
myMP3.load(new URLRequest(mp3));
myMP3.play();
}
catch (err:Error)

65
ACTIONSCRIPT 3.0 DEVELOPER’S GUIDE
Handling errors
Last updated 3/21/2011
{
trace(err.message);
// your error-handling code here
}
myMP3.addEventListener(IOErrorEvent.IO_ERROR, errorHandler);
}
private function linkHandler(linkEvent:TextEvent):void
{
playMP3(linkEvent.text);
// your error-handling code here
}
private function errorHandler(errorEvent:IOErrorEvent):void
{
trace(errorEvent.text);
// your error-handling code here
}
}
}
Working with status change events
Flash Player 9 and later, Adobe AIR 1.0 and later
Flash runtimes dynamically change the value of the netStatus.info.level or status.level properties for the
classes that support the level property while an application is running. The classes that have the
netStatus.info.level property are NetConnection, NetStream, and SharedObject. The classes that have the
status.level property are HTTPStatusEvent, Camera, Microphone, and LocalConnection. You can write a handler
function to respond to the change in level value and track communication errors.
The following example uses a netStatusHandler() function to test the value of the level property. If the level
property indicates that an error has been encountered, the code traces the message “Video stream failed”.
package
{
import flash.display.Sprite;
import flash.events.NetStatusEvent;
import flash.events.SecurityErrorEvent;
import flash.media.Video;
import flash.net.NetConnection;
import flash.net.NetStream;
public class VideoExample extends Sprite
{
private var videoUrl:String = "Video.flv";
private var connection:NetConnection;
private var stream:NetStream;
public function VideoExample()
{
connection = new NetConnection();
connection.addEventListener(NetStatusEvent.NET_STATUS, netStatusHandler);
connection.addEventListener(SecurityErrorEvent.SECURITY_ERROR, securityErrorHandler);
connection.connect(null);
}

66
ACTIONSCRIPT 3.0 DEVELOPER’S GUIDE
Handling errors
Last updated 3/21/2011
private function netStatusHandler(event:NetStatusEvent):void
{
if (event.info.level == "error")
{
trace("Video stream failed")
}
else
{
connectStream();
}
}
private function securityErrorHandler(event:SecurityErrorEvent):void
{
trace("securityErrorHandler: " + event);
}
private function connectStream():void
{
var stream:NetStream = new NetStream(connection);
var video:Video = new Video();
video.attachNetStream(stream);
stream.play(videoUrl);
addChild(video);
}
}
}
Comparing the Error classes
Flash Player 9 and later, Adobe AIR 1.0 and later
ActionScript provides a number of predefined Error classes. But, you can also use the same Error classes in your own
code. There are two main types of Error classes in ActionScript 3.0: ActionScript core Error classes and flash.error
package Error classes. The flash.error package contains additional classes to aid ActionScript 3.0 application
development and debugging.
Core Error classes
Flash Player 9 and later, Adobe AIR 1.0 and later
The core error classes include the Error, ArgumentError, EvalError, RangeError, ReferenceError, SecurityError,
SyntaxError, TypeError, URIError, and VerifyError classes. Each of these classes are located in the top-level
namespace.

67
ACTIONSCRIPT 3.0 DEVELOPER’S GUIDE
Handling errors
Last updated 3/21/2011
Class name Description Notes
Error The Error class is for throwing exceptions, and is the
base class for the other exception classes defined in
ECMAScript: EvalError, RangeError, ReferenceError,
SyntaxError, TypeError, and URIError.
The Error class serves as the base class for all run-time errors,
and is the recommended base class for any custom error
classes.
ArgumentError The ArgumentError class represents an error that
occurs when the parameter values supplied during a
function call do not match the parameters defined for
that function.
Some examples of argument errors include the following:
•Too few or too many arguments are supplied to a method.
•An argument was expected to be a member of an
enumeration and was not.
EvalError An EvalError exception is thrown if any parameters
are passed to the Function class’s constructor or if
user code calls the eval() function.
In ActionScript 3.0, support for the eval() function has been
removed and attempts to use the function result in an error.
Earlier versions of Flash Player used the eval() function to
access variables, properties, objects, or movie clips by name.
RangeError A RangeError exception is thrown if a numeric value
falls outside an acceptable range.
For example, a RangeError is thrown by the Timer class if a delay
was either negative or was not finite. A RangeError could also be
thrown if you attempted to add a display object at an invalid
depth.
ReferenceError A ReferenceError exception is thrown when a
reference to an undefined property is attempted on a
sealed (nondynamic) object. Versions of the
ActionScript compiler before ActionScript 3.0 did not
throw an error when access was attempted to a
property that was undefined. However ActionScript
3.0 throws the ReferenceError exception in this
condition.
Exceptions for undefined variables point to potential bugs,
helping you improve software quality. However, if you are not
used to having to initialize your variables, this new ActionScript
behavior requires some changes in your coding habits.
SecurityError The SecurityError exception is thrown when a security
violation takes place and access is denied.
Some examples of security errors include the following:
•An unauthorized property access or method call is made
across a security sandbox boundary.
•An attempt was made to access a URL not permitted by the
security sandbox.
•A socket connection was attempted to a port but the
necessary socket policy file wasn’t present.
•An attempt was made to access the user's camera or
microphone, and the user denide the access to the device .
SyntaxError A SyntaxError exception is thrown when a parsing
error occurs in your ActionScript code.
A SyntaxError can be thrown under the following
circumstances:
•ActionScript throws SyntaxError exceptions when the
RegExp class parses an invalid regular expression.
•ActionScript throws SyntaxError exceptions when the
XMLDocument class parses invalid XML.

68
ACTIONSCRIPT 3.0 DEVELOPER’S GUIDE
Handling errors
Last updated 3/21/2011
flash.error package Error classes
Flash Player 9 and later, Adobe AIR 1.0 and later
The flash.error package contains Error classes that are considered part of the Flash runtime API. In contrast to the
Error classes described, the flash.error package communicates errors events that are specific to Flash runtimes (such
as Flash Player and Adobe AIR).
TypeError The TypeError exception is thrown when the actual
type of an operand is different from the expected
type.
A TypeError can be thrown under the following circumstances:
•An actual parameter of a function or method could not be
coerced to the formal parameter type.
•A value is assigned to a variable and cannot be coerced to the
variable’s type.
•The right side of the is or instanceof operator is not a
valid type.
•The super keyword is used illegally.
•A property lookup results in more than one binding, and is
therefore ambiguous.
•A method is called on an incompatible object. For example, a
TypeError exception is thrown if a method in the RegExp class
is “grafted” onto a generic object and then called.
URIError The URIError exception is thrown when one of the
global URI handling functions is used in a way that is
incompatible with its definition.
A URIError can be thrown under the following circumstances:
An invalid URI is specified for a Flash Player API function that
expects a valid URI, such as Socket.connect().
VerifyError A VerifyError exception is thrown when a malformed
or corrupted SWF file is encountered.
When a SWF file loads another SWF file, the parent SWF file can
catch a VerifyError generated by the loaded SWF file.
Class name Description Notes

69
ACTIONSCRIPT 3.0 DEVELOPER’S GUIDE
Handling errors
Last updated 3/21/2011
Class name Description Notes
EOFError An EOFError exception is thrown when you
attempt to read past the end of the available data.
For example, an EOFError is thrown when one of the
read methods in the IDataInput interface is called and
there is insufficient data to satisfy the read request.
IllegalOperationError An IllegalOperationError exception is thrown
when a method is not implemented or the
implementation doesn't cover the current usage.
Examples of illegal operation error exceptions include
the following:
•A base class, such as DisplayObjectContainer,
provides more functionality than the Stage can
support. For example, if you attempt to get or set a
mask on the Stage (using stage.mask), the Flash
runtime throws an IllegalOperationError with the
message “The Stage class does not implement this
property or method.”
•A subclass inherits a method it does not require and
does not want to support.
•Certain accessibility methods are called when Flash
Player is compiled without accessibility support.
•Authoring-only features are called from a run-time
version of Flash Player.
•You attempt to set the name of an object placed on
the timeline.
IOError An IOError exception is thrown when some type of
I/O exception occurs.
You get this error, for example, when a read-write
operation is attempted on a socket that is not
connected or that has become disconnected.
MemoryError A MemoryError exception is thrown when a
memory allocation request fails.
By default, ActionScript Virtual Machine 2 does not
impose a limit on how much memory an ActionScript
program allocates. On a desktop system, memory
allocation failures are infrequent. You see an error
thrown when the system is unable to allocate the
memory required for an operation. So, on a desktop
system, this exception is rare unless an allocation
request is extremely large; for example, a request for 3
billion bytes is impossible because a 32-bit Microsoft®
Windows® program can access only 2 GB of address
space.
ScriptTimeoutError A ScriptTimeoutError exception is thrown when a
script timeout interval of 15 seconds is reached. By
catching a ScriptTimeoutError exception, you can
handle the script timeout more gracefully. If there
is no exception handler, the uncaught exception
handler displays a dialog box with an error
message.
To prevent a malicious developer from catching the
exception and staying in an infinite loop, only the first
ScriptTimeoutError exception thrown in the course of
a particular script can be caught. A subsequent
ScriptTimeoutError exception cannot be caught by
your code and immediately goes to the uncaught
exception handler.
StackOverflowError The StackOverflowError exception is thrown when
the stack available to the script has been
exhausted.
A StackOverflowError exception might indicate that
infinite recursion has occurred.

70
ACTIONSCRIPT 3.0 DEVELOPER’S GUIDE
Handling errors
Last updated 3/21/2011
Handling errors example: CustomErrors application
Flash Player 9 and later, Adobe AIR 1.0 and later
The CustomErrors application demonstrates techniques for working with custom errors when building an
application. These techniques are:
•Validating an XML packet
•Writing a custom error
•Throwing custom errors
•Notifying users when an error is thrown
To get the application files for this sample, see www.adobe.com/go/learn_programmingAS3samples_flash. The
CustomErrors application files can be found in the Samples/CustomError folder. The application consists of the
following files:
CustomErrors application overview
Flash Player 9 and later, Adobe AIR 1.0 and later
When the application loads, the initApp() method is called for Flex applications or the timeline (non-function) code
is executed for Flash Professional applications. This code defines a sample XML packet to be verified by the Validator
class. The following code is run:
employeeXML =
<employee id="12345">
<firstName>John</firstName>
<lastName>Doe</lastName>
<costCenter>12345</costCenter>
<costCenter>67890</costCenter>
</employee>;
}
The XML packet is later displayed in a TextArea component instance on the Stage. This step allows you to modify the
XML packet before attempting to revalidate it.
File Description
CustomErrors.mxml
or
CustomErrors.fla
The main application file in Flash (FLA) or Flex (MXML)
com/example/programmingas3/errors/ApplicationError.as A class that serves as the base error class for both the FatalError and
WarningError classes.
com/example/programmingas3/errors/FatalError.as A class that defines a FatalError errorthrown by the application. This class
extends the custom ApplicationError class.
com/example/programmingas3/errors/Validator.as A class that defines a single method that validates a user-supplied
employee XML packet.
com/example/programmingas3/errors/WarningError.as A class that defines a WarningError error thrown by the application. This
class extends the custom ApplicationError class.

71
ACTIONSCRIPT 3.0 DEVELOPER’S GUIDE
Handling errors
Last updated 3/21/2011
When the user clicks the Validate button, the validateData() method is called. This method validates the employee
XML packet using the validateEmployeeXML() method in the Validator class. The following code shows the
validateData() method:
function validateData():void
{
try
{
var tempXML:XML = XML(xmlText.text);
Validator.validateEmployeeXML(tempXML);
status.text = "The XML was successfully validated.";
}
catch (error:FatalError)
{
showFatalError(error);
}
catch (error:WarningError)
{
showWarningError(error);
}
catch (error:Error)
{
showGenericError(error);
}
}
First, a temporary XML object is created using the contents of the TextArea component instance xmlText. Next, the
validateEmployeeXML() method in the custom Validator class (com.example.programmingas3/errors/Validator.as)
is called and passes the temporary XML object as a parameter. If the XML packet is valid, the status Label component
instance displays a success message and the application exits. If the validateEmployeeXML() method throws a
custom error (that is, a FatalError, WarningError, or a generic Error occurs), the appropriate catch statement
executes and calls either the showFatalError(), showWarningError(), or showGenericError() methods. Each of
these methods displays an appropriate message in a text area named statusText to notify the user of the specific error
that occurred. Each method also updates the status Label component instance with a specific message.
If a fatal error occurs during an attempt to validate the employee XML packet, the error message is displayed in the
statusText text area, and the xmlText TextArea component instance and validateBtn Button component instance
are disabled, as the following code shows:
function showFatalError(error:FatalError):void
{
var message:String = error.message + "\n\n";
var title:String = error.getTitle();
statusText.text = message + " " + title + "\n\nThis application has ended.";
this.xmlText.enabled = false;
this.validateBtn.enabled = false;
hideButtons();
}
If a warning error instead of a fatal error occurs, the error message is displayed in the statusText TextArea instance,
but the xmlText TextField and Button component instances aren’t disabled. The showWarningError() method
displays the custom error message in the statusText text area. The message also asks the user to decide if they want
to proceed with validating the XML or cancel the script. The following excerpt shows the showWarningError()
method:

72
ACTIONSCRIPT 3.0 DEVELOPER’S GUIDE
Handling errors
Last updated 3/21/2011
function showWarningError(error:WarningError):void
{
var message:String = error.message + "\n\n" + "Do you want to exit this application?";
showButtons();
var title:String = error.getTitle();
statusText.text = message;
}
When the user clicks either the Yes or No button, the closeHandler() method is called. The following excerpt shows
the closeHandler() method:
function closeHandler(event:CloseEvent):void
{
switch (event.detail)
{
case yesButton:
showFatalError(new FatalError(9999));
break;
case noButton:
statusText.text = "";
hideButtons();
break;
}
}
If the user chooses to cancel the script by clicking Yes, a FatalError is thrown, causing the application to terminate.
Building a custom validator
Flash Player 9 and later, Adobe AIR 1.0 and later
The custom Validator class contains a single method, validateEmployeeXML(). The validateEmployeeXML()
method takes a single argument, employee, which is the XML packet that you want to validate. The
validateEmployeeXML() method is as follows:
public static function validateEmployeeXML(employee:XML):void
{
// checks for the integrity of items in the XML
if (employee.costCenter.length() < 1)
{
throw new FatalError(9000);
}
if (employee.costCenter.length() > 1)
{
throw new WarningError(9001);
}
if (employee.ssn.length() != 1)
{
throw new FatalError(9002);
}
}
To be validated, an employee must belong to one (and only one) cost center. If the employee doesn’t belong to any cost
centers, the method throws a FatalError, which bubbles up to the validateData() method in the main application
file. If the employee belongs to more than one cost center, a WarningError is thrown. The final check in the XML
validator is that the user has exactly one social security number defined (the ssn node in the XML packet). If there is
not exactly one ssn node, a FatalError error is thrown.

73
ACTIONSCRIPT 3.0 DEVELOPER’S GUIDE
Handling errors
Last updated 3/21/2011
You can add additional checks to the validateEmployeeXML() method—for example, to ensure that the ssn node
contains a valid number, or that the employee has at least one phone number and e-mail address defined, and that both
values are valid. You can also modify the XML so that each employee has a unique ID and specifies the ID of their
manager.
Defining the ApplicationError class
Flash Player 9 and later, Adobe AIR 1.0 and later
The ApplicationError class serves as the base class for both the FatalError and WarningError classes. The
ApplicationError class extends the Error class, and defines its own custom methods and properties, including defining
an error ID, severity, and an XML object that contains the custom error codes and messages. This class also defines
two static constants that are used to define the severity of each error type.
The ApplicationError class’s constructor method is as follows:
public function ApplicationError()
{
messages =
<errors>
<error code="9000">
<![CDATA[Employee must be assigned to a cost center.]]>
</error>
<error code="9001">
<![CDATA[Employee must be assigned to only one cost center.]]>
</error>
<error code="9002">
<![CDATA[Employee must have one and only one SSN.]]>
</error>
<error code="9999">
<![CDATA[The application has been stopped.]]>
</error>
</errors>;
}
Each error node in the XML object contains a unique numeric code and an error message. Error messages can be easily
looked up by their error code using E4X, as seen in the following getMessageText() method:
public function getMessageText(id:int):String
{
var message:XMLList = messages.error.(@code == id);
return message[0].text();
}
The getMessageText() method takes a single integer argument, id, and returns a string. The id argument is the error
code for the error to look up. For example, passing an id of 9001 retrieves the error saying that employees must be
assigned to only one cost center. If more than one error has the same error code, ActionScript returns the error
message only for the first result found (message[0] in the returned XMLList object).
The next method in this class, getTitle(), doesn’t take any parameters and returns a string value that contains the
error ID for this specific error. This value is used to help you easily identify the exact error that occurred during
validation of the XML packet. The following excerpt shows the getTitle() method:
public function getTitle():String
{
return "Error #" + id;
}

74
ACTIONSCRIPT 3.0 DEVELOPER’S GUIDE
Handling errors
Last updated 3/21/2011
The final method in the ApplicationError class is toString(). This method overrides the function defined in the
Error class so that you can customize the presentation of the error message. The method returns a string that identifies
the specific error number and message that occurred.
public override function toString():String
{
return "[APPLICATION ERROR #" + id + "] " + message;
}
Defining the FatalError class
Flash Player 9 and later, Adobe AIR 1.0 and later
The FatalError class extends the custom ApplicationError class and defines three methods: the FatalError constructor,
getTitle(), and toString(). The first method, the FatalError constructor, takes a single integer argument,
errorID, and sets the error’s severity using the static constant values defined in the ApplicationError class, and gets
the specific error’s error message by calling the getMessageText() method in the ApplicationError class. The
FatalError constructor is as follows:
public function FatalError(errorID:int)
{
id = errorID;
severity = ApplicationError.FATAL;
message = getMessageText(errorID);
}
The next method in the FatalError class, getTitle(), overrides the getTitle() method defined earlier in the
ApplicationError class, and appends the text “-- FATAL” in the title to inform the user that a fatal error has occurred.
The getTitle() method is as follows:
public override function getTitle():String
{
return "Error #" + id + " -- FATAL";
}
The final method in this class, toString(), overrides the toString() method defined in the ApplicationError class.
The toString() method is
public override function toString():String
{
return "[FATAL ERROR #" + id + "] " + message;
}
Defining the WarningError class
Flash Player 9 and later, Adobe AIR 1.0 and later
The WarningError class extends the ApplicationError class and is nearly identical to the FatalError class, except for a
couple minor string changes and sets the error severity to ApplicationError.WARNING instead of
ApplicationError.FATAL, as seen in the following code:

75
ACTIONSCRIPT 3.0 DEVELOPER’S GUIDE
Handling errors
Last updated 3/21/2011
public function WarningError(errorID:int)
{
id = errorID;
severity = ApplicationError.WARNING;
message = super.getMessageText(errorID);
}

76
Last updated 3/21/2011
Chapter 5: Using regular expressions
Flash Player 9 and later, Adobe AIR 1.0 and later
A regular expression describes a pattern that is used to find and manipulate matching text in strings. Regular
expressions resemble strings, but they can include special codes to describe patterns and repetition. For example, the
following regular expression matches a string that starts with the character A followed by one or more sequential digits:
/A\d+/
The following topics describe the basic syntax for constructing regular expressions. However, regular expressions can
have many complexities and nuances. You can find detailed resources on regular expressions on the web and in
bookstores. Keep in mind that different programming environments implement regular expressions in different ways.
ActionScript 3.0 implements regular expressions as defined in the ECMAScript edition 3 language specification
(ECMA-262).
More Help topics
RegExp
Basics of regular expressions
Flash Player 9 and later, Adobe AIR 1.0 and later
A regular expression describes a pattern of characters. Regular expressions are typically used to verify that a text value
conforms to a particular pattern (such as verifying that a user-entered phone number has the proper number of digits)
or to replace portions of a text value that matches a particular pattern.
Regular expressions can be simple. For example, suppose you wanted to confirm that a particular string matches
“ABC,” or wanted to replace every occurrence of “ABC” in a string with some other text. In that case, you could use
the following regular expression, which defines the pattern consisting of the letters A, B, and C in sequence:
/ABC/
Note that the regular expression literal is delineated with the forward slash (/) character.
Regular expression patterns can also be complex, and sometimes cryptic in appearance, such as the following
expression to match a valid e-mail address:
/([0-9a-zA-Z]+[-._+&])*[0-9a-zA-Z]+@([-0-9a-zA-Z]+[.])+[a-zA-Z]{2,6}/
Most commonly you will use regular expressions to search for patterns in strings and to replace characters. In those
cases, you will create a regular expression object and use it as a parameter for one of several String class methods. The
following methods of the String class take regular expressions as parameters: match(), replace(), search(), and
split(). For more information on these methods, see “Finding patterns in strings and replacing substrings” on
page 16.
The RegExp class includes the following methods: test() and exec(). For more information, see “Methods for using
regular expressions with strings” on page 90.

77
ACTIONSCRIPT 3.0 DEVELOPER’S GUIDE
Using regular expressions
Last updated 3/21/2011
Important concepts and terms
The following reference list contains important terms that are relevant to this feature:
Escape character A character indicating that the character that follows should be treated as a metacharacter rather
than a literal character. In regular expression syntax, the backslash character (\) is the escape character, so a backslash
followed by another character is a special code rather than just the character itself.
Flag A character that specifies some option about how the regular expression pattern should be used, such as whether
to distinguish between uppercase and lowercase characters.
Metacharacter A character that has special meaning in a regular expression pattern, as opposed to literally
representing that character in the pattern.
Quantifier A character (or several characters) indicating how many times a part of the pattern should repeat. For
example, a quantifier would be used to designate that a United States postal code should contain five or nine numbers.
Regular expression A program statement defining a pattern of characters that can be used to confirm whether other
strings match that pattern or to replace portions of a string.
Regular expression syntax
Flash Player 9 and later, Adobe AIR 1.0 and later
This section describes all of the elements of ActionScript regular expression syntax. As you’ll see, regular expressions
can have many complexities and nuances. You can find detailed resources on regular expressions on the web and in
bookstores. Keep in mind that different programming environments implement regular expressions in different ways.
ActionScript 3.0 implements regular expressions as defined in the ECMAScript edition 3 language specification
(ECMA-262).
Generally, you use regular expressions that match more complicated patterns than a simple string of characters. For
example, the following regular expression defines the pattern consisting of the letters A, B, and C in sequence followed
by any digit:
/ABC\d/
The \d code represents “any digit.” The backslash (\) character is called the escape character, and combined with the
character that follows it (in this case the letter d), it has special meaning in the regular expression.
The following regular expression defines the pattern of the letters ABC followed by any number of digits (note the
asterisk):
/ABC\d*/
The asterisk character (*) is a metacharacter. A metacharacter is a character that has special meaning in regular
expressions. The asterisk is a specific type of metacharacter called a quantifier, which is used to quantify the amount
of repetition of a character or group of characters. For more information, see “Quantifiers” on page 82.
In addition to its pattern, a regular expression can contain flags, which specify how the regular expression is to be
matched. For example, the following regular expression uses the i flag, which specifies that the regular expression
ignores case sensitivity in matching strings:
/ABC\d*/i
For more information, see “Flags and properties” on page 87.

78
ACTIONSCRIPT 3.0 DEVELOPER’S GUIDE
Using regular expressions
Last updated 3/21/2011
You can use regular expressions with the following methods of the String class: match(), replace(), and search().
For more information on these methods, see “Finding patterns in strings and replacing substrings” on page 16.
Creating an instance of a regular expression
Flash Player 9 and later, Adobe AIR 1.0 and later
There are two ways to create a regular expression instance. One way uses forward slash characters (/) to delineate the
regular expression; the other uses the new constructor. For example, the following regular expressions are equivalent:
var pattern1:RegExp = /bob/i;
var pattern2:RegExp = new RegExp("bob", "i");
Forward slashes delineate a regular expression literal in the same way as quotation marks delineate a string literal. The
part of the regular expression within the forward slashes defines the pattern. The regular expression can also include
flags after the final delineating slash. These flags are considered to be part of the regular expression, but they are
separate from its pattern.
When using the new constructor, you use two strings to define the regular expression. The first string defines the
pattern, and the second string defines the flags, as in the following example:
var pattern2:RegExp = new RegExp("bob", "i");
When including a forward slash within a regular expression that is defined by using the forward slash delineators, you
must precede the forward slash with the backslash (\) escape character. For example, the following regular expression
matches the pattern 1/2:
var pattern:RegExp = /1\/2/;
To include quotation marks within a regular expression that is defined with the new constructor, you must add
backslash (\) escape character before the quotation marks (just as you would when defining any String literal). For
example, the following regular expressions match the pattern eat at "joe's":
var pattern1:RegExp = new RegExp("eat at \"joe's\"", "");
var pattern2:RegExp = new RegExp('eat at "joe\'s"', "");
Do not use the backslash escape character with quotation marks in regular expressions that are defined by using the
forward slash delineators. Similarly, do not use the escape character with forward slashes in regular expressions that
are defined with the new constructor. The following regular expressions are equivalent, and they define the pattern 1/2
"joe's":
var pattern1:RegExp = /1\/2 "joe's"/;
var pattern2:RegExp = new RegExp("1/2 \"joe's\"", "");
var pattern3:RegExp = new RegExp('1/2 "joe\'s"', '');
Also, in a regular expression that is defined with the new constructor, to use a metasequence that begins with the
backslash (\) character, such as \d (which matches any digit), type the backslash character twice:
var pattern:RegExp = new RegExp("\\d+", ""); // matches one or more digits
You must type the backlash character twice in this case, because the first parameter of the RegExp() constructor
method is a string, and in a string literal you must type a backslash character twice to have it recognized as a single
backslash character.
The sections that follow describe syntax for defining regular expression patterns.
For more information on flags, see “Flags and properties” on page 87.

79
ACTIONSCRIPT 3.0 DEVELOPER’S GUIDE
Using regular expressions
Last updated 3/21/2011
Characters, metacharacters, and metasequences
Flash Player 9 and later, Adobe AIR 1.0 and later
The simplest regular expression is one that matches a sequence of characters, as in the following example:
var pattern:RegExp = /hello/;
However, the following characters, known as metacharacters, have special meanings in regular expressions:
^ $ \ . * + ? ( ) [ ] { } |
For example, the following regular expression matches the letter A followed by zero or more instances of the letter B
(the asterisk metacharacter indicates this repetition), followed by the letter C:
/AB*C/
To include a metacharacter without its special meaning in a regular expression pattern, you must use the backslash (\)
escape character. For example, the following regular expression matches the letter A followed by the letter B, followed
by an asterisk, followed by the letter C:
var pattern:RegExp = /AB\*C/;
A metasequence, like a metacharacter, has special meaning in a regular expression. A metasequence is made up of more
than one character. The following sections provide details on using metacharacters and metasequences.
About metacharacters
The following table summarizes the metacharacters that you can use in regular expressions:
Metacharacter Description
^ (caret) Matches at the start of the string. With the m (multiline) flag set, the caret matches the start of a line as
well (see “Flags and properties” on page 87). Note that when used at the start of a character class, the caret
indicates negation, not the start of a string. For more information, see “Character classes” on page 81.
$(dollar sign) Matches at the end of the string. With the m (multiline) flag set, $ matches the position before a newline
(\n) character as well. For more information, see “Flags and properties” on page 87.
\ (backslash) Escapes the special metacharacter meaning of special characters.
Also, use the backslash character if you want to use a forward slash character in a regular expression literal,
as in /1\/2/ (to match the character 1, followed by the forward slash character, followed by the character
2).
. (dot) Matches any single character.
A dot matches a newline character (\n) only if the s (dotall) flag is set. For more information, see “Flags
and properties” on page 87.
* (star) Matches the previous item repeated zero or more times.
For more information, see “Quantifiers” on page 82.
+ (plus) Matches the previous item repeated one or more times.
For more information, see “Quantifiers” on page 82.
? (question mark) Matches the previous item repeated zero times or one time.
For more information, see “Quantifiers” on page 82.
80
ACTIONSCRIPT 3.0 DEVELOPER’S GUIDE
Using regular expressions
Last updated 3/21/2011
About metasequences
Metasequences are sequences of characters that have special meaning in a regular expression pattern. The following
table describes these metasequences:
( and ) Defines groups within the regular expression. Use groups for the following:
•To confine the scope of the | alternator: /(a|b|c)d/
•To define the scope of a quantifier: /(walla.){1,2}/
•In backreferences. For example, the \1 in the following regular expression matches whatever matched
the first parenthetical group of the pattern:
•/(\w*) is repeated: \1/
For more information, see “Groups” on page 84.
[ and ] Defines a character class, which defines possible matches for a single character:
/[aeiou]/ matches any one of the specified characters.
Within character classes, use the hyphen (-) to designate a range of characters:
/[A-Z0-9]/ matches uppercase A through Z or 0 through 9.
Within character classes, insert a backslash to escape the ] and
- characters:
/[+\-]\d+/ matches either + or - before one or more digits.
Within character classes, other characters, which are normally metacharacters, are treated as normal
characters (not metacharacters), without the need for a backslash:
/[$]/£ matches either $or £.
For more information, see “Character classes” on page 81.
| (pipe) Used for alternation, to match either the part on the left side or the part on the right side:
/abc|xyz/ matches either abc or xyz.
Metasequence Description
{n}
{n,}
and
{n,n}
Specifies a numeric quantifier or quantifier range for the previous item:
/A{27}/ matches the character A repeated 27 times.
/A{3,}/ matches the character A repeated 3 or more times.
/A{3,5}/ matches the character A repeated 3 to 5 times.
For more information, see “Quantifiers” on page 82.
\b Matches at the position between a word character and a nonword character. If the first or last character in
the string is a word character, also matches the start or end of the string.
\B Matches at the position between two word characters. Also matches the position between two nonword
characters.
\d Matches a decimal digit.
\D Matches any character other than a digit.
\f Matches a form feed character.
\n Matches the newline character.
Metacharacter Description
81
ACTIONSCRIPT 3.0 DEVELOPER’S GUIDE
Using regular expressions
Last updated 3/21/2011
Character classes
Flash Player 9 and later, Adobe AIR 1.0 and later
You use character classes to specify a list of characters to match one position in the regular expression. You define
character classes with square brackets ( [ and ] ). For example, the following regular expression defines a character
class that matches bag, beg, big, bog, or bug:
/b[aeiou]g/
Escape sequences in character classes
Most metacharacters and metasequences that normally have special meanings in a regular expression do not have
those same meanings inside a character class. For example, in a regular expression, the asterisk is used for repetition,
but this is not the case when the asterisk appears in a character class. The following character class matches the asterisk
literally, along with any of the other characters listed:
/[abc*123]/
However, the three characters listed in the following table do function as metacharacters, with special meaning, in
character classes:
For any of these characters to be recognized as literal characters (without the special metacharacter meaning), you
must precede the character with the backslash escape character. For example, the following regular expression includes
a character class that matches any one of four symbols ($, \, ], or -):
/[$\\\]\-]/
In addition to the metacharacters that retain their special meanings, the following metasequences function as
metasequences within character classes:
\r Matches the return character.
\s Matches any white-space character (a space, tab, newline, or return character).
\S Matches any character other than a white-space character.
\t Matches the tab character.
\unnnn Matches the Unicode character with the character code specified by the hexadecimal number nnnn. For
example, \u263a is the smiley character.
\v Matches a vertical feed character.
\w Matches a word character (AZ–, az–, 0-9, or _). Note that \w does not match non-English characters, such
as é , ñ , or ç .
\W Matches any character other than a word character.
\\xnn Matches the character with the specified ASCII value, as defined by the hexadecimal number nn.
Metacharacter Meaning in character classes
]Defines the end of the character class.
-Defines a range of characters (see the following section “Ranges of characters in character classes”).
\Defines metasequences and undoes the special meaning of metacharacters.
Metasequence Description
82
ACTIONSCRIPT 3.0 DEVELOPER’S GUIDE
Using regular expressions
Last updated 3/21/2011
Other regular expression metasequences and metacharacters are treated as normal characters within a character class.
Ranges of characters in character classes
Use the hyphen to specify a range of characters, such as A-Z, a-z, or 0-9. These characters must constitute a valid range
in the character set. For example, the following character class matches any one of the characters in the range a-z or
any digit:
/[a-z0-9]/
You can also use the \\xnn ASCII character code to specify a range by ASCII value. For example, the following
character class matches any character from a set of extended ASCII characters (such as é and ê ):
\\x
Negated character classes
When you use a caret (^) character at the beginning of a character class, it negates that class—any character not listed
is considered a match. The following character class matches any character except for a lowercase letter (az–) or a digit:
/[^a-z0-9]/
You must type the caret (^) character at the beginning of a character class to indicate negation. Otherwise, you are
simply adding the caret character to the characters in the character class. For example, the following character class
matches any one of a number of symbol characters, including the caret:
/[!.,#+*%$&^]/
Quantifiers
Flash Player 9 and later, Adobe AIR 1.0 and later
You use quantifiers to specify repetitions of characters or sequences in patterns, as follows:
Metasequence Meaning in character classes
\n Matches a newline character.
\r Matches a return character.
\t Matches a tab character.
\unnnn Matches the character with the specified Unicode code point value (as defined by the hexadecimal number
nnnn).
\\xnn Matches the character with the specified ASCII value (as defined by the hexadecimal number nn).
Quantifier metacharacter Description
* (star) Matches the previous item repeated zero or more times.
+ (plus) Matches the previous item repeated one or more times.
? (question mark) Matches the previous item repeated zero times or one time.
{n}
{n,}
and
{n,n}
Specifies a numeric quantifier or quantifier range for the previous item:
/A{27}/ matches the character A repeated 27 times.
/A{3,}/ matches the character A repeated 3 or more times.
/A{3,5}/ matches the character A repeated 3 to 5 times.

83
ACTIONSCRIPT 3.0 DEVELOPER’S GUIDE
Using regular expressions
Last updated 3/21/2011
You can apply a quantifier to a single character, to a character class, or to a group:
•/a+/ matches the character a repeated one or more times.
•/\d+/ matches one or more digits.
•/[abc]+/ matches a repetition of one or more character, each of which is either a, b, or c.
•/(very, )*/ matches the word very followed by a comma and a space repeated zero or more times.
You can use quantifiers within parenthetical groupings that have quantifiers applied to them. For example, the
following quantifier matches strings such as word and word-word-word:
/\w+(-\w+)*/
By default, regular expressions perform what is known as greedy matching. Any subpattern in the regular expression
(such as .*) tries to match as many characters in the string as possible before moving forward to the next part of the
regular expression. For example, consider the following regular expression and string:
var pattern:RegExp = /<p>.*<\/p>/;
str:String = "<p>Paragraph 1</p> <p>Paragraph 2</p>";
The regular expression matches the entire string:
<p>Paragraph 1</p> <p>Paragraph 2</p>
Suppose, however, that you want to match only one <p>...</p> grouping. You can do this with the following:
<p>Paragraph 1</p>
Add a question mark (?) after any quantifier to change it to what is known as a lazy quantifier. For example, the
following regular expression, which uses the lazy *? quantifier, matches <p> followed by the minimum number of
characters possible (lazy), followed by </p>:
/<p>.*?<\/p>/
Keep in mind the following points about quantifiers:
•The quantifiers {0} and {0,0} do not exclude an item from a match.
•Do not combine multiple quantifiers, as in /abc+*/.
•The dot (.) does not span lines unless the s (dotall) flag is set, even if it is followed by a * quantifier. For example,
consider the following code:
var str:String = "<p>Test\n";
str += "Multiline</p>";
var re:RegExp = /<p>.*<\/p>/;
trace(str.match(re)); // null;
re = /<p>.*<\/p>/s;
trace(str.match(re));
// output: <p>Test
// Multiline</p>
For more information, see “Flags and properties” on page 87.
Alternation
Flash Player 9 and later, Adobe AIR 1.0 and later
Use the | (pipe) character in a regular expression to have the regular expression engine consider alternatives for a
match. For example, the following regular expression matches any one of the words cat, dog, pig, rat:

84
ACTIONSCRIPT 3.0 DEVELOPER’S GUIDE
Using regular expressions
Last updated 3/21/2011
var pattern:RegExp = /cat|dog|pig|rat/;
You can use parentheses to define groups to restrict the scope of the | alternator. The following regular expression
matches cat followed by nap or nip:
var pattern:RegExp = /cat(nap|nip)/;
For more information, see “Groups” on page 84.
The following two regular expressions, one using the | alternator, the other using a character class (defined with [ and
] ), are equivalent:
/1|3|5|7|9/
/[13579]/
For more information, see “Character classes” on page 81.
Groups
Flash Player 9 and later, Adobe AIR 1.0 and later
You can specify a group in a regular expression by using parentheses, as follows:
/class-(\d*)/
A group is a subsection of a pattern. You can use groups to do the following things:
•Apply a quantifier to more than one character.
•Delineate subpatterns to be applied with alternation (by using the | character).
•Capture substring matches (for example, by using \1 in a regular expression to match a previously matched group,
or by using $1 similarly in the replace() method of the String class).
The following sections provide details on these uses of groups.
Using groups with quantifiers
If you do not use a group, a quantifier applies to the character or character class that precedes it, as the following shows:
var pattern:RegExp = /ab*/ ;
// matches the character a followed by
// zero or more occurrences of the character b
pattern = /a\d+/;
// matches the character a followed by
// one or more digits
pattern = /a[123]{1,3}/;
// matches the character a followed by
// one to three occurrences of either 1, 2, or 3
However, you can use a group to apply a quantifier to more than one character or character class:

85
ACTIONSCRIPT 3.0 DEVELOPER’S GUIDE
Using regular expressions
Last updated 3/21/2011
var pattern:RegExp = /(ab)*/;
// matches zero or more occurrences of the character a
// followed by the character b, such as ababab
pattern = /(a\d)+/;
// matches one or more occurrences of the character a followed by
// a digit, such as a1a5a8a3
pattern = /(spam ){1,3}/;
// matches 1 to 3 occurrences of the word spam followed by a space
For more information on quantifiers, see “Quantifiers” on page 82.
Using groups with the alternator (|) character
You can use groups to define the group of characters to which you want to apply an alternator (|) character, as follows:
var pattern:RegExp = /cat|dog/;
// matches cat or dog
pattern = /ca(t|d)og/;
// matches catog or cadog
Using groups to capture substring matches
When you define a standard parenthetical group in a pattern, you can later refer to it in the regular expression. This is
known as a backreference, and these sorts of groups are known as capturing groups. For example, in the following
regular expression, the sequence \1 matches whatever substring matched the capturing parenthetical group:
var pattern:RegExp = /(\d+)-by-\1/;
// matches the following: 48-by-48
You can specify up to 99 of these backreferences in a regular expression by typing \1, \2, ... , \99.
Similarly, in the replace() method of the String class, you can use $1$99– to insert captured group substring matches
in the replacement string:
var pattern:RegExp = /Hi, (\w+)\./;
var str:String = "Hi, Bob.";
trace(str.replace(pattern, "$1, hello."));
// output: Bob, hello.
Also, if you use capturing groups, the exec() method of the RegExp class and the match() method of the String class
return substrings that match the capturing groups:
var pattern:RegExp = /(\w+)@(\w+).(\w+)/;
var str:String = "bob@example.com";
trace(pattern.exec(str));
// bob@example.com,bob,example,com
Using noncapturing groups and lookahead groups
A noncapturing group is one that is used for grouping only; it is not “collected,” and it does not match numbered
backreferences. Use (?: and ) to define noncapturing groups, as follows:
var pattern = /(?:com|org|net);
For example, note the difference between putting (com|org) in a capturing versus a noncapturing group (the exec()
method lists capturing groups after the complete match):

86
ACTIONSCRIPT 3.0 DEVELOPER’S GUIDE
Using regular expressions
Last updated 3/21/2011
var pattern:RegExp = /(\w+)@(\w+).(com|org)/;
var str:String = "bob@example.com";
trace(pattern.exec(str));
// bob@example.com,bob,example,com
//noncapturing:
var pattern:RegExp = /(\w+)@(\w+).(?:com|org)/;
var str:String = "bob@example.com";
trace(pattern.exec(str));
// bob@example.com,bob,example
A special type of noncapturing group is the lookahead group, of which there are two types: the positive lookahead group
and the negative lookahead group.
Use (?= and ) to define a positive lookahead group, which specifies that the subpattern in the group must match at the
position. However, the portion of the string that matches the positive lookahead group can match remaining patterns
in the regular expression. For example, because (?=e) is a positive lookahead group in the following code, the
character e that it matches can be matched by a subsequent part of the regular expression—in this case, the capturing
group, \w*):
var pattern:RegExp = /sh(?=e)(\w*)/i;
var str:String = "Shelly sells seashells by the seashore";
trace(pattern.exec(str));
// Shelly,elly
Use (?! and ) to define a negative lookahead group that specifies that the subpattern in the group must not match at
the position. For example:
var pattern:RegExp = /sh(?!e)(\w*)/i;
var str:String = "She sells seashells by the seashore";
trace(pattern.exec(str));
// shore,ore
Using named groups
A named group is a type of group in a regular expression that is given a named identifier. Use (?P<name> and ) to
define the named group. For example, the following regular expression includes a named group with the identifier
named digits:
var pattern = /[a-z]+(?P<digits>\d+)[a-z]+/;
When you use the exec() method, a matching named group is added as a property of the result array:
var myPattern:RegExp = /([a-z]+)(?P<digits>\d+)[a-z]+/;
var str:String = "a123bcd";
var result:Array = myPattern.exec(str);
trace(result.digits); // 123
Here is another example, which uses two named groups, with the identifiers name and dom:
var emailPattern:RegExp =
/(?P<name>(\w|[_.\-])+)@(?P<dom>((\w|-)+))+\.\w{2,4}+/;
var address:String = "bob@example.com";
var result:Array = emailPattern.exec(address);
trace(result.name); // bob
trace(result.dom); // example
Note: Named groups are not part of the ECMAScript language specification. They are an added feature in ActionScript 3.0.

87
ACTIONSCRIPT 3.0 DEVELOPER’S GUIDE
Using regular expressions
Last updated 3/21/2011
Flags and properties
Flash Player 9 and later, Adobe AIR 1.0 and later
The following table lists the five flags that you can set for regular expressions. Each flag can be accessed as a property
of the regular expression object.
Note that these properties are read-only. You can set the flags (g, i, m, s, x) when you set a regular expression variable,
as follows:
var re:RegExp = /abc/gimsx;
However, you cannot directly set the named properties. For instance, the following code results in an error:
var re:RegExp = /abc/;
re.global = true; // This generates an error.
By default, unless you specify them in the regular expression declaration, the flags are not set, and the corresponding
properties are also set to false.
Additionally, there are two other properties of a regular expression:
•The lastIndex property specifies the index position in the string to use for the next call to the exec() or test()
method of a regular expression.
•The source property specifies the string that defines the pattern portion of the regular expression.
The g (global) flag
When the g (global) flag is not included, a regular expression matches no more than one match. For example, with
the g flag not included in the regular expression, the String.match() method returns only one matching substring:
var str:String = "she sells seashells by the seashore.";
var pattern:RegExp = /sh\w*/;
trace(str.match(pattern)) // output: she
When the g flag is set, the Sting.match() method returns multiple matches, as follows:
var str:String = "she sells seashells by the seashore.";
var pattern:RegExp = /sh\w*/g;
// The same pattern, but this time the g flag IS set.
trace(str.match(pattern)); // output: she,shells,shore
The i (ignoreCase) flag
By default, regular expression matches are case-sensitive. When you set the i (ignoreCase) flag, case sensitivity is
ignored. For example, the lowercase s in the regular expression does not match the uppercase letter S, the first
character of the string:
Flag Property Description
g global Matches more than one match.
i ignoreCase Case-insensitive matching. Applies to the A—Z and a—z characters, but not to extended characters
such as É and é .
m multiline With this flag set, $ and ^ can match the beginning of a line and end of a line, respectively.
s dotall With this flag set, . (dot) can match the newline character (\n).
x extended Allows extended regular expressions. You can type spaces in the regular expression, which are ignored
as part of the pattern. This lets you type regular expression code more legibly.

88
ACTIONSCRIPT 3.0 DEVELOPER’S GUIDE
Using regular expressions
Last updated 3/21/2011
var str:String = "She sells seashells by the seashore.";
trace(str.search(/sh/)); // output: 13 -- Not the first character
With the i flag set, however, the regular expression does match the capital letter S:
var str:String = "She sells seashells by the seashore.";
trace(str.search(/sh/i)); // output: 0
The
i
flag ignores case sensitivity only for the
A
–
Z
and
a
–
z
characters, but not for extended characters such as
É
and
é
.
The m (multiline) flag
If the m (multiline) flag is not set, the ^ matches the beginning of the string and the $ matches the end of the string.
If the m flag is set, these characters match the beginning of a line and end of a line, respectively. Consider the following
string, which includes a newline character:
var str:String = "Test\n";
str += "Multiline";
trace(str.match(/^\w*/g)); // Match a word at the beginning of the string.
Even though the g (global) flag is set in the regular expression, the match() method matches only one substring, since
there is only one match for the ^—the beginning of the string. The output is:
Test
Here is the same code with the m flag set:
var str:String = "Test\n";
str += "Multiline";
trace(str.match(/^\w*/gm)); // Match a word at the beginning of lines.
This time, the output includes the words at the beginning of both lines:
Test,Multiline
Note that only the \n character signals the end of a line. The following characters do not:
•Return (\r) character
•Unicode line-separator (\u2028) character
•Unicode paragraph-separator (\u2029) character
The s (dotall) flag
If the s (dotall or “dot all”) flag is not set, a dot (.) in a regular expression pattern does not match a newline character
(\n). So for the following example, there is no match:
var str:String = "<p>Test\n";
str += "Multiline</p>";
var re:RegExp = /<p>.*?<\/p>/;
trace(str.match(re));
However, if the s flag is set, the dot matches the newline character:
var str:String = "<p>Test\n";
str += "Multiline</p>";
var re:RegExp = /<p>.*?<\/p>/s;
trace(str.match(re));
In this case, the match is the entire substring within the <p> tags, including the newline character:
<p>Test
Multiline</p>

89
ACTIONSCRIPT 3.0 DEVELOPER’S GUIDE
Using regular expressions
Last updated 3/21/2011
The x (extended) flag
Regular expressions can be difficult to read, especially when they include a lot of metasymbols and metasequences. For
example:
/<p(>|(\s*[^>]*>)).*?<\/p>/gi
When you use the x (extended) flag in a regular expression, any blank spaces that you type in the pattern are ignored.
For example, the following regular expression is identical to the previous example:
/ <p (> | (\s* [^>]* >)) .*? <\/p> /gix
If you have the x flag set and do want to match a blank space character, precede the blank space with a backslash. For
example, the following two regular expressions are equivalent:
/foo bar/
/foo \ bar/x
The lastIndex property
The lastIndex property specifies the index position in the string at which to start the next search. This property
affects the exec() and test() methods called on a regular expression that has the g flag set to true. For example,
consider the following code:
var pattern:RegExp = /p\w*/gi;
var str:String = "Pedro Piper picked a peck of pickled peppers.";
trace(pattern.lastIndex);
var result:Object = pattern.exec(str);
while (result != null)
{
trace(pattern.lastIndex);
result = pattern.exec(str);
}
The lastIndex property is set to 0 by default (to start searches at the beginning of the string). After each match, it is
set to the index position following the match. Therefore, the output for the preceding code is the following:
0
5
11
18
25
36
44
If the global flag is set to false, the exec() and test() methods do not use or set the lastIndex property.
The match(), replace(), and search() methods of the String class start all searches from the beginning of the string,
regardless of the setting of the lastIndex property of the regular expression used in the call to the method. (However,
the match() method does set lastIndex to 0.)
You can set the lastIndex property to adjust the starting position in the string for regular expression matching.
The source property
The source property specifies the string that defines the pattern portion of a regular expression. For example:
var pattern:RegExp = /foo/gi;
trace(pattern.source); // foo

90
ACTIONSCRIPT 3.0 DEVELOPER’S GUIDE
Using regular expressions
Last updated 3/21/2011
Methods for using regular expressions with strings
Flash Player 9 and later, Adobe AIR 1.0 and later
The RegExp class includes two methods: exec() and test().
In addition to the exec() and test() methods of the RegExp class, the String class includes the following methods
that let you match regular expressions in strings: match(), replace(), search(), and splice().
The test() method
Flash Player 9 and later, Adobe AIR 1.0 and later
The test() method of the RegExp class simply checks the supplied string to see if it contains a match for the regular
expression, as the following example shows:
var pattern:RegExp = /Class-\w/;
var str = "Class-A";
trace(pattern.test(str)); // output: true
The exec() method
Flash Player 9 and later, Adobe AIR 1.0 and later
The exec() method of the RegExp class checks the supplied string for a match of the regular expression and returns
an array with the following:
•The matching substring
•Substring matches for any parenthetical groups in the regular expression
The array also includes an index property, indicating the index position of the start of the substring match.
For example, consider the following code:
var pattern:RegExp = /\d{3}\-\d{3}-\d{4}/; //U.S phone number
var str:String = "phone: 415-555-1212";
var result:Array = pattern.exec(str);
trace(result.index, " - ", result);
// 7-415-555-1212
Use the exec() method multiple times to match multiple substrings when the g (global) flag is set for the regular
expression:
var pattern:RegExp = /\w*sh\w*/gi;
var str:String = "She sells seashells by the seashore";
var result:Array = pattern.exec(str);
while (result != null)
{
trace(result.index, "\t", pattern.lastIndex, "\t", result);
result = pattern.exec(str);
}
//output:
// 0 3 She
// 10 19 seashells
// 27 35 seashore

91
ACTIONSCRIPT 3.0 DEVELOPER’S GUIDE
Using regular expressions
Last updated 3/21/2011
String methods that use RegExp parameters
Flash Player 9 and later, Adobe AIR 1.0 and later
The following methods of the String class take regular expressions as parameters: match(), replace(), search(),
and split(). For more information on these methods, see “Finding patterns in strings and replacing substrings” on
page 16.
Regular expressions example: A Wiki parser
Flash Player 9 and later, Adobe AIR 1.0 and later
This simple Wiki text conversion example illustrates a number of uses for regular expressions:
•Converting lines of text that match a source Wiki pattern to the appropriate HTML output strings.
•Using a regular expression to convert URL patterns to HTML <a> hyperlink tags.
•Using a regular expression to convert U.S. dollar strings (such as "$9.95") to euro strings (such as "8.24 €").
To get the application files for this sample, see www.adobe.com/go/learn_programmingAS3samples_flash. The
WikiEditor application files can be found in the folder Samples/WikiEditor. The application consists of the following
files:
Defining the WikiParser class
Flash Player 9 and later, Adobe AIR 1.0 and later
The WikiParser class includes methods that convert Wiki input text into the equivalent HTML output. This is not a
very robust Wiki conversion application, but it does illustrate some good uses of regular expressions for pattern
matching and string conversion.
The constructor function, along with the setWikiData() method, simply initializes a sample string of Wiki input text,
as follows:
public function WikiParser()
{
wikiData = setWikiData();
}
File Description
WikiEditor.mxml
or
WikiEditor.fla
The main application file in Flash (FLA) or Flex (MXML).
com/example/programmingas3/regExpExamples/WikiParser.as A class that includes methods that use regular expressions
to convert Wiki input text patterns to the equivalent HTML
output.
com/example/programmingas3/regExpExamples/URLParser.as A class that includes methods that use regular expressions
to convert URL strings to HTML <a> hyperlink tags.
com/example/programmingas3/regExpExamples/CurrencyConverter.as A class that includes methods that use regular expressions
to convert U.S. dollar strings to euro strings.

92
ACTIONSCRIPT 3.0 DEVELOPER’S GUIDE
Using regular expressions
Last updated 3/21/2011
When the user clicks the Test button in the sample application, the application invokes the parseWikiString()
method of the WikiParser object. This method calls a number of other methods, which in turn assemble the resulting
HTML string.
public function parseWikiString(wikiString:String):String
{
var result:String = parseBold(wikiString);
result = parseItalic(result);
result = linesToParagraphs(result);
result = parseBullets(result);
return result;
}
Each of the methods called—parseBold(), parseItalic(), linesToParagraphs(), and parseBullets()—uses
the replace() method of the string to replace matching patterns, defined by a regular expression, in order to
transform the input Wiki text into HTML-formatted text.
Converting boldface and italic patterns
The parseBold() method looks for a Wiki boldface text pattern (such as '''foo''') and transforms it into its HTML
equivalent (such as <b>foo</b>), as follows:
private function parseBold(input:String):String
{
var pattern:RegExp = /'''(.*?)'''/g;
return input.replace(pattern, "<b>$1</b>");
}
Note that the (.?*) portion of the regular expression matches any number of characters (*) between the two defining
''' patterns. The ? quantifier makes the match nongreedy, so that for a string such as '''aaa''' bbb '''ccc''',
the first matched string will be '''aaa''' and not the entire string (which starts and ends with the ''' pattern).
The parentheses in the regular expression define a capturing group, and the replace() method refers to this group
by using the $1 code in the replacement string. The g (global) flag in the regular expression ensures that the
replace() method replaces all matches in the string (not simply the first one).
The parseItalic() method works similarly to the parseBold() method, except that it checks for two apostrophes
('') as the delimiter for italic text (not three):
private function parseItalic(input:String):String
{
var pattern:RegExp = /''(.*?)''/g;
return input.replace(pattern, "<i>$1</i>");
}
Converting bullet patterns
As the following example shows, the parseBullet() method looks for the Wiki bullet line pattern (such as * foo)
and transforms it into its HTML equivalent (such as <li>foo</li>):
private function parseBullets(input:String):String
{
var pattern:RegExp = /^\*(.*)/gm;
return input.replace(pattern, "<li>$1</li>");
}
The ^ symbol at the beginning of the regular expression matches the beginning of a line. The m (multiline) flag in the
regular expression causes the regular expression to match the ^ symbol against the start of a line, not simply the start
of the string.

93
ACTIONSCRIPT 3.0 DEVELOPER’S GUIDE
Using regular expressions
Last updated 3/21/2011
The \* pattern matches an asterisk character (the backslash is used to signal a literal asterisk instead of a * quantifier).
The parentheses in the regular expression define a capturing group, and the replace() method refers to this group
by using the $1 code in the replacement string. The g (global) flag in the regular expression ensures that the
replace() method replaces all matches in the string (not simply the first one).
Converting paragraph Wiki patterns
The linesToParagraphs() method converts each line in the input Wiki string to an HTML <p> paragraph tag. These
lines in the method strip out empty lines from the input Wiki string:
var pattern:RegExp = /^$/gm;
var result:String = input.replace(pattern, "");
The ^ and $ symbols the regular expression match the beginning and end of a line. The m (multiline) flag in the
regular expression causes the regular expression to match the ^ symbol against the start of a line, not simply the start
of the string.
The
replace()
method replaces all matching substrings (empty lines) with an empty string (
""
). The
g
(
global
) flag
in the regular expression ensures that the
replace()
method replaces all matches in the string (not simply the first one).
Converting URLs to HTML <a> tags
Flash Player 9 and later, Adobe AIR 1.0 and later
When the user clicks the Test button in the sample application, if the user selected the urlToATag check box, the
application calls the URLParser.urlToATag() static method to convert URL strings from the input Wiki string into
HTML <a> tags.
var protocol:String = "((?:http|ftp)://)";
var urlPart:String = "([a-z0-9_-]+\.[a-z0-9_-]+)";
var optionalUrlPart:String = "(\.[a-z0-9_-]*)";
var urlPattern:RegExp = new RegExp(protocol + urlPart + optionalUrlPart, "ig");
var result:String = input.replace(urlPattern, "<a href='$1$2$3'><u>$1$2$3</u></a>");
The RegExp() constructor function is used to assemble a regular expression (urlPattern) from a number of
constituent parts. These constituent parts are each strings that define part of the regular expression pattern.
The first part of the regular expression pattern, defined by the protocol string, defines an URL protocol: either
http:// or ftp://. The parentheses define a noncapturing group, indicated by the ? symbol. This means that the
parentheses are simply used to define a group for the | alternation pattern; the group will not match backreference
codes ($1, $2, $3) in the replacement string of the replace() method.
The other constituent parts of the regular expression each use capturing groups (indicated by parentheses in the
pattern), which are then used in the backreference codes ($1, $2, $3) in the replacement string of the replace()
method.
The part of the pattern defined by the urlPart string matches at least one of the following characters: a-z, 0-9, _, or
-. The + quantifier indicates that at least one character is matched. The \. indicates a required dot (.) character. And
the remainder matches another string of at least one of these characters: a-z, 0-9, _, or -.
The part of the pattern defined by the optionalUrlPart string matches zero or more of the following: a dot (.)
character followed by any number of alphanumeric characters (including _ and -). The * quantifier indicates that zero
or more characters are matched.
The call to the replace() method employs the regular expression and assembles the replacement HTML string, using
backreferences.

94
ACTIONSCRIPT 3.0 DEVELOPER’S GUIDE
Using regular expressions
Last updated 3/21/2011
The urlToATag() method then calls the emailToATag() method, which uses similar techniques to replace e-mail
patterns with HTML <a> hyperlink strings. The regular expressions used to match HTTP, FTP, and e-mail URLs in
this sample file are fairly simple, for the purposes of exemplification; there are much more complicated regular
expressions for matching such URLs more correctly.
Converting U.S. dollar strings to euro strings
Flash Player 9 and later, Adobe AIR 1.0 and later
When the user clicks the Test button in the sample application, if the user selected the dollarToEuro check box, the
application calls the CurrencyConverter.usdToEuro() static method to convert U.S. dollar strings (such as
"$9.95") to euro strings (such as "8.24 €"), as follows:
var usdPrice:RegExp = /\$([\d,]+.\d+)+/g;
return input.replace(usdPrice, usdStrToEuroStr);
The first line defines a simple pattern for matching U.S. dollar strings. Notice that the $ character is preceded with the
backslash (\) escape character.
The replace() method uses the regular expression as the pattern matcher, and it calls the usdStrToEuroStr()
function to determine the replacement string (a value in euros).
When a function name is used as the second parameter of the replace() method, the following are passed as
parameters to the called function:
•The matching portion of the string.
•Any captured parenthetical group matches. The number of arguments passed this way varies depending on the
number of captured parenthetical group matches. You can determine the number of captured parenthetical group
matches by checking arguments.length - 3 within the function code.
•The index position in the string where the match begins.
•The complete string.
The usdStrToEuroStr() method converts U.S. dollar string patterns to euro strings, as follows:
private function usdToEuro(...args):String
{
var usd:String = args[1];
usd = usd.replace(",", "");
var exchangeRate:Number = 0.828017;
var euro:Number = Number(usd) * exchangeRate;
trace(usd, Number(usd), euro);
const euroSymbol:String = String.fromCharCode(8364); // €
return euro.toFixed(2) + " " + euroSymbol;
}
Note that args[1] represents the captured parenthetical group matched by the usdPrice regular expression. This is
the numerical portion of the U.S. dollar string: that is, the dollar amount without the $ sign. The method applies an
exchange rate conversion and returns the resulting string (with a trailing € symbol instead of a leading $ symbol).

95
Last updated 3/21/2011
Chapter 6: Working with XML
Flash Player 9 and later, Adobe AIR 1.0 and later
ActionScript 3.0 includes a group of classes based on the ECMAScript for XML (E4X) specification (ECMA-357
edition 2). These classes include powerful and easy-to-use functionality for working with XML data. Using E4X, you
will be able to develop code with XML data faster than was possible with previous programming techniques. As an
added benefit, the code you produce will be easier to read.
More Help topics
XML class
Processing XML with E4X tutorial at mozilla
ECMA-357 specification
Basics of XML
Flash Player 9 and later, Adobe AIR 1.0 and later
XML is a standard way of representing structured information so that it is easy for computers to work with and
reasonably easy for people to write and understand. XML is an abbreviation for eXtensible Markup Language. The
XML standard is available at www.w3.org/XML/.
XML offers a standard and convenient way to categorize data, to make it easier to read, access, and manipulate. XML
uses a tree structure and tag structure that is similar to HTML. Here is a simple example of XML data:
<song>
<title>What you know?</title>
<artist>Steve and the flubberblubs</artist>
<year>1989</year>
<lastplayed>2006-10-17-08:31</lastplayed>
</song>
XML data can also be more complex, with tags nested in other tags as well as attributes and other structural
components. Here is a more complex example of XML data:

96
ACTIONSCRIPT 3.0 DEVELOPER’S GUIDE
Working with XML
Last updated 3/21/2011
<album>
<title>Questions, unanswered</title>
<artist>Steve and the flubberblubs</artist>
<year>1989</year>
<tracks>
<song tracknumber="1" length="4:05">
<title>What do you know?</title>
<artist>Steve and the flubberblubs</artist>
<lastplayed>2006-10-17-08:31</lastplayed>
</song>
<song tracknumber="2" length="3:45">
<title>Who do you know?</title>
<artist>Steve and the flubberblubs</artist>
<lastplayed>2006-10-17-08:35</lastplayed>
</song>
<song tracknumber="3" length="5:14">
<title>When do you know?</title>
<artist>Steve and the flubberblubs</artist>
<lastplayed>2006-10-17-08:39</lastplayed>
</song>
<song tracknumber="4" length="4:19">
<title>Do you know?</title>
<artist>Steve and the flubberblubs</artist>
<lastplayed>2006-10-17-08:44</lastplayed>
</song>
</tracks>
</album>
Notice that this XML document contains other complete XML structures within it (such as the song tags with their
children). It also demonstrates other XML structures such as attributes (tracknumber and length in the song tags),
and tags that contain other tags rather than containing data (such as the tracks tag).
Getting started with XML
If you have little or no experience with XML, here is a brief description of the most common aspects of XML data. XML
data is written in plain-text form, with a specific syntax for organizing the information into a structured format.
Generally, a single set of XML data is known as an XML document. In XML format, data is organized into elements
(which can be single data items or containers for other elements) using a hierarchical structure. Every XML document
has a single element as the top level or main item; inside this root element there may be a single piece of information,
although there are more likely to be other elements, which in turn contain other elements, and so forth. For example,
this XML document contains the information about a music album:
<song tracknumber="1" length="4:05">
<title>What do you know?</title>
<artist>Steve and the flubberblubs</artist>
<mood>Happy</mood>
<lastplayed>2006-10-17-08:31</lastplayed>
</song>
Each element is distinguished by a set of tags—the element’s name wrapped in angle brackets (less-than and greater-
than signs). The opening tag, indicating the start of the element, has the element name:
<title>
The closing tag, which marks the end of the element, has a forward slash before the element’s name:
</title>

97
ACTIONSCRIPT 3.0 DEVELOPER’S GUIDE
Working with XML
Last updated 3/21/2011
If an element contains no content, it can be written as an empty element (sometimes called a self-closing element). In
XML, this element:
<lastplayed/>
is identical to this element:
<lastplayed></lastplayed>
In addition to the element’s content contained between the opening and closing tags, an element can also include other
values, known as attributes, defined in the element’s opening tag. For example, this XML element defines a single
attribute named length, with the value "4:19" :
<song length="4:19"></song>
Each XML element has content, which is either a single value, one or more XML elements, or nothing (for an empty
element).
Learning more about XML
To learn more about working with XML, there are a number of additional books and resources for learning more about
XML, including these web sites:
•W3Schools XML Tutorial: http://w3schools.com/xml/
•XMLpitstop tutorials, discussion lists, and more: http://xmlpitstop.com/
ActionScript classes for working with XML
ActionScript 3.0 includes several classes that are used for working with XML-structured information. The two main
classes are as follows:
•XML: Represents a single XML element, which can be an XML document with multiple children or a single-value
element within a document.
•XMLList: Represents a set of XML elements. An XMLList object is used when there are multiple XML elements that
are “siblings” (at the same level, and contained by the same parent, in the XML document’s hierarchy). For instance,
an XMLList instance would be the easiest way to work with this set of XML elements (presumably contained in an
XML document):
<artist type="composer">Fred Wilson</artist>
<artist type="conductor">James Schmidt</artist>
<artist type="soloist">Susan Harriet Thurndon</artist>
For more advanced uses involving XML namespaces, ActionScript also includes the Namespace and QName classes.
For more information, see “Using XML namespaces” on page 110.
In addition to the built-in classes for working with XML, ActionScript 3.0 also includes several operators that provide
specific functionality for accessing and manipulating XML data. This approach to working with XML using these
classes and operators is known as ECMAScript for XML (E4X), as defined by the ECMA-357 edition 2 specification.
Important concepts and terms
The following reference list contains important terms you will encounter when programming XML handling routines:
Element A single item in an XML document, identified as the content contained between a starting tag and an ending
tag (including the tags). XML elements can contain text data or other elements, or can be empty.
Empty element An XML element that contains no child elements. Empty elements are often written as self-closing
tags (such as <element/>).

98
ACTIONSCRIPT 3.0 DEVELOPER’S GUIDE
Working with XML
Last updated 3/21/2011
Document A single XML structure. An XML document can contain any number of elements (or can consist only of a
single empty element); however, an XML document must have a single top-level element that contains all the other
elements in the document.
Node Another name for an XML element.
Attribute A named value associated with an element that is written into the opening tag of the element in
attributename="value" format, rather than being written as a separate child element nested inside the element.
The E4X approach to XML processing
Flash Player 9 and later, Adobe AIR 1.0 and later
The ECMAScript for XML specification defines a set of classes and functionality for working with XML data. These
classes and functionality are known collectively as E4X. ActionScript 3.0 includes the following E4X classes: XML,
XMLList, QName, and Namespace.
The methods, properties, and operators of the E4X classes are designed with the following goals:
•Simplicity—Where possible, E4X makes it easier to write and understand code for working with XML data.
•Consistency—The methods and reasoning behind E4X are internally consistent and consistent with other parts of
ActionScript.
•Familiarity—You manipulate XML data with well-known operators, such as the dot (.) operator.
Note: There is a different XML class in ActionScript 2.0. In ActionScript 3.0 that class has been renamed as
XMLDocument, so that the name does not conflict with the ActionScript 3.0 XML class that is part of E4X. In
ActionScript 3.0, the legacy classes—XMLDocument, XMLNode, XMLParser, and XMLTag—are included in the
flash.xml package primarily for legacy support. The new E4X classes are core classes; you need not import a package to
use them. For details on the legacy ActionScript 2.0 XML classes, see the flash.xml packagein the ActionScript 3.0
Reference for the Adobe Flash Platform.
Here is an example of manipulating data with E4X:
var myXML:XML =
<order>
<item id='1'>
<menuName>burger</menuName>
<price>3.95</price>
</item>
<item id='2'>
<menuName>fries</menuName>
<price>1.45</price>
</item>
</order>
Often, your application will load XML data from an external source, such as a web service or a RSS feed. However, for
clarity, the code examples provided here assign XML data as literals.
As the following code shows, E4X includes some intuitive operators, such as the dot (.) and attribute identifier (@)
operators, for accessing properties and attributes in the XML:
trace(myXML.item[0].menuName); // Output: burger
trace(myXML.item.(@id==2).menuName); // Output: fries
trace(myXML.item.(menuName=="burger").price); // Output: 3.95

99
ACTIONSCRIPT 3.0 DEVELOPER’S GUIDE
Working with XML
Last updated 3/21/2011
Use the appendChild() method to assign a new child node to the XML, as the following snippet shows:
var newItem:XML =
<item id="3">
<menuName>medium cola</menuName>
<price>1.25</price>
</item>
myXML.appendChild(newItem);
Use the @ and . operators not only to read data, but also to assign data, as in the following:
myXML.item[0].menuName="regular burger";
myXML.item[1].menuName="small fries";
myXML.item[2].menuName="medium cola";
myXML.item.(menuName=="regular burger").@quantity = "2";
myXML.item.(menuName=="small fries").@quantity = "2";
myXML.item.(menuName=="medium cola").@quantity = "2";
Use a for loop to iterate through nodes of the XML, as follows:
var total:Number = 0;
for each (var property:XML in myXML.item)
{
var q:int = Number(property.@quantity);
var p:Number = Number(property.price);
var itemTotal:Number = q * p;
total += itemTotal;
trace(q + " " + property.menuName + " $" + itemTotal.toFixed(2))
}
trace("Total: $", total.toFixed(2));
XML objects
Flash Player 9 and later, Adobe AIR 1.0 and later
An XML object may represent an XML element, attribute, comment, processing instruction, or text element.
An XML object is classified as having either simple content or complex content. An XML object that has child nodes is
classified as having complex content. An XML object is said to have simple content if it is any one of the following: an
attribute, a comment, a processing instruction, or a text node.
For example, the following XML object contains complex content, including a comment and a processing instruction:

100
ACTIONSCRIPT 3.0 DEVELOPER’S GUIDE
Working with XML
Last updated 3/21/2011
XML.ignoreComments = false;
XML.ignoreProcessingInstructions = false;
var x1:XML =
<order>
<!--This is a comment. -->
<?PROC_INSTR sample ?>
<item id='1'>
<menuName>burger</menuName>
<price>3.95</price>
</item>
<item id='2'>
<menuName>fries</menuName>
<price>1.45</price>
</item>
</order>
As the following example shows, you can now use the comments() and processingInstructions() methods to
create new XML objects, a comment and a processing instruction:
var x2:XML = x1.comments()[0];
var x3:XML = x1.processingInstructions()[0];
XML properties
Flash Player 9 and later, Adobe AIR 1.0 and later
The XML class has five static properties:
•The ignoreComments and ignoreProcessingInstructions properties determine whether comments or
processing instructions are ignored when the XML object is parsed.
•The ignoreWhitespace property determines whether white space characters are ignored in element tags and
embedded expressions that are separated only by white space characters.
•The prettyIndentand prettyPrinting properties are used to format the text that is returned by the toString()
and toXMLString() methods of the XML class.
For details on these properties, see the ActionScript 3.0 Reference for the Adobe Flash Platform.
XML methods
Flash Player 9 and later, Adobe AIR 1.0 and later
The following methods allow you to work with the hierarchical structure of XML objects:
•appendChild()
•child()
•childIndex()
•children()
•descendants()
•elements()
•insertChildAfter()
•insertChildBefore()

101
ACTIONSCRIPT 3.0 DEVELOPER’S GUIDE
Working with XML
Last updated 3/21/2011
•parent()
•prependChild()
The following methods allow you to work with XML object attributes:
•attribute()
•attributes()
The following methods allow you to you work with XML object properties:
•hasOwnProperty()
•propertyIsEnumerable()
•replace()
•setChildren()
The following methods are for working with qualified names and namespaces:
•addNamespace()
•inScopeNamespaces()
•localName()
•name()
•namespace()
•namespaceDeclarations()
•removeNamespace()
•setLocalName()
•setName()
•setNamespace()
The following methods are for working with and determining certain types of XML content:
•comments()
•hasComplexContent()
•hasSimpleContent()
•nodeKind()
•processingInstructions()
•text()
The following methods are for conversion to strings and for formatting XML objects:
•defaultSettings()
•setSettings()
•settings()
•normalize()
•toString()
•toXMLString()

102
ACTIONSCRIPT 3.0 DEVELOPER’S GUIDE
Working with XML
Last updated 3/21/2011
There are a few additional methods:
•contains()
•copy()
•valueOf()
•length()
For details on these methods, see the ActionScript 3.0 Reference for the Adobe Flash Platform.
XMLList objects
Flash Player 9 and later, Adobe AIR 1.0 and later
An XMLList instance represents an arbitrary collection of XML objects. It can contain full XML documents, XML
fragments, or the results of an XML query.
The following methods allow you to work with the hierarchical structure of XMLList objects:
•child()
•children()
•descendants()
•elements()
•parent()
The following methods allow you to work with XMLList object attributes:
•attribute()
•attributes()
The following methods allow you to you work with XMLList properties:
•hasOwnProperty()
•propertyIsEnumerable()
The following methods are for working with and determining certain types of XML content:
•comments()
•hasComplexContent()
•hasSimpleContent()
•processingInstructions()
•text()
The following are for conversion to strings and for formatting the XMLList object:
•normalize()
•toString()
•toXMLString()
There are a few additional methods:
•contains()

103
ACTIONSCRIPT 3.0 DEVELOPER’S GUIDE
Working with XML
Last updated 3/21/2011
•copy()
•length()
•valueOf()
For details on these methods, see the ActionScript 3.0 Reference for the Adobe Flash Platform.
For an XMLList object that contains exactly one XML element, you can use all properties and methods of the XML
class, because an XMLList with one XML element is treated the same as an XML object. For example, in the following
code, because doc.div is an XMLList object containing one element, you can use the appendChild() method from
the XML class:
var doc:XML =
<body>
<div>
<p>Hello</p>
</div>
</body>;
doc.div.appendChild(<p>World</p>);
For a list of XML properties and methods, see “XML objects” on page 99.
Initializing XML variables
Flash Player 9 and later, Adobe AIR 1.0 and later
You can assign an XML literal to an XML object, as follows:
var myXML:XML =
<order>
<item id='1'>
<menuName>burger</menuName>
<price>3.95</price>
</item>
<item id='2'>
<menuName>fries</menuName>
<price>1.45</price>
</item>
</order>
As the following snippet shows, you can also use the new constructor to create an instance of an XML object from a
string that contains XML data:
var str:String = "<order><item id='1'><menuName>burger</menuName>"
+ "<price>3.95</price></item></order>";
var myXML:XML = new XML(str);
If the XML data in the string is not well formed (for example, if a closing tag is missing), you will see a run-time error.
You can also pass data by reference (from other variables) into an XML object, as the following example shows:

104
ACTIONSCRIPT 3.0 DEVELOPER’S GUIDE
Working with XML
Last updated 3/21/2011
var tagname:String = "item";
var attributename:String = "id";
var attributevalue:String = "5";
var content:String = "Chicken";
var x:XML = <{tagname} {attributename}={attributevalue}>{content}</{tagname}>;
trace(x.toXMLString())
// Output: <item id="5">Chicken</item>
To load XML data from a URL, use the URLLoader class, as the following example shows:
import flash.events.Event;
import flash.net.URLLoader;
import flash.net.URLRequest;
var externalXML:XML;
var loader:URLLoader = new URLLoader();
var request:URLRequest = new URLRequest("xmlFile.xml");
loader.load(request);
loader.addEventListener(Event.COMPLETE, onComplete);
function onComplete(event:Event):void
{
var loader:URLLoader = event.target as URLLoader;
if (loader != null)
{
externalXML = new XML(loader.data);
trace(externalXML.toXMLString());
}
else
{
trace("loader is not a URLLoader!");
}
}
To read XML data from a socket connection, use the XMLSocket class. For more information, see the XMLSocket class
in the ActionScript 3.0 Reference for the Adobe Flash Platform.
Assembling and transforming XML objects
Flash Player 9 and later, Adobe AIR 1.0 and later
Use the prependChild() method or the appendChild() method to add a property to the beginning or end of an XML
object’s list of properties, as the following example shows:
var x1:XML = <p>Line 1</p>
var x2:XML = <p>Line 2</p>
var x:XML = <body></body>
x = x.appendChild(x1);
x = x.appendChild(x2);
x = x.prependChild(<p>Line 0</p>);
// x == <body><p>Line 0</p><p>Line 1</p><p>Line 2</p></body>
Use the insertChildBefore() method or the insertChildAfter() method to add a property before or after a
specified property, as follows:

105
ACTIONSCRIPT 3.0 DEVELOPER’S GUIDE
Working with XML
Last updated 3/21/2011
var x:XML =
<body>
<p>Paragraph 1</p>
<p>Paragraph 2</p>
</body>
var newNode:XML = <p>Paragraph 1.5</p>
x = x.insertChildAfter(x.p[0], newNode)
x = x.insertChildBefore(x.p[2], <p>Paragraph 1.75</p>)
As the following example shows, you can also use curly brace operators ( { and } ) to pass data by reference (from other
variables) when constructing XML objects:
var ids:Array = [121, 122, 123];
var names:Array = [["Murphy","Pat"], ["Thibaut","Jean"], ["Smith","Vijay"]]
var x:XML = new XML("<employeeList></employeeList>");
for (var i:int = 0; i < 3; i++)
{
var newnode:XML = new XML();
newnode =
<employee id={ids[i]}>
<last>{names[i][0]}</last>
<first>{names[i][1]}</first>
</employee>;
x = x.appendChild(newnode)
}
You can assign properties and attributes to an XML object by using the = operator, as in the following:
var x:XML =
<employee>
<lastname>Smith</lastname>
</employee>
x.firstname = "Jean";
x.@id = "239";
This sets the XML object x to the following:
<employee id="239">
<lastname>Smith</lastname>
<firstname>Jean</firstname>
</employee>
You can use the + and += operators to concatenate XMLList objects:
var x1:XML = <a>test1</a>
var x2:XML = <b>test2</b>
var xList:XMLList = x1 + x2;
xList += <c>test3</c>
This sets the XMLList object xList to the following:
<a>test1</a>
<b>test2</b>
<c>test3</c>

106
ACTIONSCRIPT 3.0 DEVELOPER’S GUIDE
Working with XML
Last updated 3/21/2011
Traversing XML structures
Flash Player 9 and later, Adobe AIR 1.0 and later
One of the powerful features of XML is its ability to provide complex, nested data via a linear string of text characters.
When you load data into an XML object, ActionScript parses the data and loads its hierarchical structure into memory
(or it sends a run-time error if the XML data is not well formed).
The operators and methods of the XML and XMLList objects make it easy to traverse the structure of XML data.
Use the dot (.) operator and the descendent accessor (..) operator to access child properties of an XML object. Consider
the following XML object:
var myXML:XML =
<order>
<book ISBN="0942407296">
<title>Baking Extravagant Pastries with Kumquats</title>
<author>
<lastName>Contino</lastName>
<firstName>Chuck</firstName>
</author>
<pageCount>238</pageCount>
</book>
<book ISBN="0865436401">
<title>Emu Care and Breeding</title>
<editor>
<lastName>Case</lastName>
<firstName>Justin</firstName>
</editor>
<pageCount>115</pageCount>
</book>
</order>
The object myXML.book is an XMLList object containing child properties of the myXML object that have the name book.
These are two XML objects, matching the two book properties of the myXML object.
The object myXML..lastName is an XMLList object containing any descendent properties with the name lastName.
These are two XML objects, matching the two lastName of the myXML object.
The object myXML.book.editor.lastName is an XMLList object containing any children with the name lastName
of children with the name editor of children with the name book of the myXML object: in this case, an XMLList object
containing only one XML object (the lastName property with the value "Case").
Accessing parent and child nodes
Flash Player 9 and later, Adobe AIR 1.0 and later
The parent() method returns the parent of an XML object.
You can use the ordinal index values of a child list to access specific child objects. For example, consider an XML object
myXML that has two child properties named book. Each child property named book has an index number associated
with it:
myXML.book[0]
myXML.book[1]

107
ACTIONSCRIPT 3.0 DEVELOPER’S GUIDE
Working with XML
Last updated 3/21/2011
To access a specific grandchild, you can specify index numbers for both the child and grandchild names:
myXML.book[0].title[0]
However, if there is only one child of x.book[0] that has the name title, you can omit the index reference, as follows:
myXML.book[0].title
Similarly, if there is only one book child of the object x, and if that child object has only one title object, you can omit
both index references, like this:
myXML.book.title
You can use the child() method to navigate to children with names based on a variable or expression, as the following
example shows:
var myXML:XML =
<order>
<book>
<title>Dictionary</title>
</book>
</order>;
var childName:String = "book";
trace(myXML.child(childName).title) // output: Dictionary
Accessing attributes
Flash Player 9 and later, Adobe AIR 1.0 and later
Use the @ symbol (the attribute identifier operator) to access attributes in an XML or XMLList object, as shown in the
following code:
var employee:XML =
<employee id="6401" code="233">
<lastName>Wu</lastName>
<firstName>Erin</firstName>
</employee>;
trace(employee.@id); // 6401
You can use the * wildcard symbol with the @ symbol to access all attributes of an XML or XMLList object, as in the
following code:
var employee:XML =
<employee id="6401" code="233">
<lastName>Wu</lastName>
<firstName>Erin</firstName>
</employee>;
trace(employee.@*.toXMLString());
// 6401
// 233
You can use the attribute() or attributes() method to access a specific attribute or all attributes of an XML or
XMLList object, as in the following code:

108
ACTIONSCRIPT 3.0 DEVELOPER’S GUIDE
Working with XML
Last updated 3/21/2011
var employee:XML =
<employee id="6401" code="233">
<lastName>Wu</lastName>
<firstName>Erin</firstName>
</employee>;
trace(employee.attribute("id")); // 6401
trace(employee.attribute("*").toXMLString());
// 6401
// 233
trace(employee.attributes().toXMLString());
// 6401
// 233
Note that you can also use the following syntax to access attributes, as the following example shows:
employee.attribute("id")
employee["@id"]
employee.@["id"]
These are each equivalent to employee.@id. However, the syntax employee.@id is the preferred approach.
Filtering by attribute or element value
Flash Player 9 and later, Adobe AIR 1.0 and later
You can use the parentheses operators— ( and ) —to filter elements with a specific element name or attribute value.
Consider the following XML object:
var x:XML =
<employeeList>
<employee id="347">
<lastName>Zmed</lastName>
<firstName>Sue</firstName>
<position>Data analyst</position>
</employee>
<employee id="348">
<lastName>McGee</lastName>
<firstName>Chuck</firstName>
<position>Jr. data analyst</position>
</employee>
</employeeList>
The following expressions are all valid:
•x.employee.(lastName == "McGee")—This is the second employee node.
•x.employee.(lastName == "McGee").firstName—This is the firstName property of the second employee node.
•x.employee.(lastName == "McGee").@id—This is the value of the id attribute of the second employee node.
•x.employee.(@id == 347)—The first employee node.
•x.employee.(@id == 347).lastName—This is the lastName property of the first employee node.
•x.employee.(@id > 300)—This is an XMLList with both employee properties.
•x.employee.(position.toString().search("analyst") > -1)—This is an XMLList with both position
properties.
If you try to filter on attributes or elements that do not exist, an exception is thrown. For example, the final line of the
following code generates an error, because there is no id attribute in the second p element:

109
ACTIONSCRIPT 3.0 DEVELOPER’S GUIDE
Working with XML
Last updated 3/21/2011
var doc:XML =
<body>
<p id='123'>Hello, <b>Bob</b>.</p>
<p>Hello.</p>
</body>;
trace(doc.p.(@id == '123'));
Similarly, the final line of following code generates an error because there is no b property of the second p element:
var doc:XML =
<body>
<p id='123'>Hello, <b>Bob</b>.</p>
<p>Hello.</p>
</body>;
trace(doc.p.(b == 'Bob'));
To avoid these errors, you can identify the properties that have the matching attributes or elements by using the
attribute() and elements() methods, as in the following code:
var doc:XML =
<body>
<p id='123'>Hello, <b>Bob</b>.</p>
<p>Hello.</p>
</body>;
trace(doc.p.(attribute('id') == '123'));
trace(doc.p.(elements('b') == 'Bob'));
You can also use the hasOwnProperty() method, as in the following code:
var doc:XML =
<body>
<p id='123'>Hello, <b>Bob</b>.</p>
<p>Hello.</p>
</body>;
trace(doc.p.(hasOwnProperty('@id') && @id == '123'));
trace(doc.p.(hasOwnProperty('b') && b == 'Bob'));
Using the for..in and the for each..in statements
Flash Player 9 and later, Adobe AIR 1.0 and later
ActionScript 3.0 includes the for..in statement and the for each..in statement for iterating through XMLList
objects. For example, consider the following XML object, myXML, and the XMLList object, myXML.item. The XMLList
object, myXML.item, consists of the two item nodes of the XML object.
var myXML:XML =
<order>
<item id='1' quantity='2'>
<menuName>burger</menuName>
<price>3.95</price>
</item>
<item id='2' quantity='2'>
<menuName>fries</menuName>
<price>1.45</price>
</item>
</order>;
The for..in statement lets you iterate over a set of property names in an XMLList:

110
ACTIONSCRIPT 3.0 DEVELOPER’S GUIDE
Working with XML
Last updated 3/21/2011
var total:Number = 0;
for (var pname:String in myXML.item)
{
total += myXML.item.@quantity[pname] * myXML.item.price[pname];
}
The for each..in statement lets you iterate through the properties in the XMLList:
var total2:Number = 0;
for each (var prop:XML in myXML.item)
{
total2 += prop.@quantity * prop.price;
}
Using XML namespaces
Flash Player 9 and later, Adobe AIR 1.0 and later
Namespaces in an XML object (or document) identify the type of data that the object contains. For example, in sending
and delivering XML data to a web service that uses the SOAP messaging protocol, you declare the namespace in the
opening tag of the XML:
var message:XML =
<soap:Envelope xmlns:soap="http://schemas.xmlsoap.org/soap/envelope/"
soap:encodingStyle="http://schemas.xmlsoap.org/soap/encoding/">
<soap:Body xmlns:w="http://www.test.com/weather/">
<w:getWeatherResponse>
<w:tempurature >78</w:tempurature>
</w:getWeatherResponse>
</soap:Body>
</soap:Envelope>;
The namespace has a prefix, soap, and a URI that defines the namespace,
http://schemas.xmlsoap.org/soap/envelope/.
ActionScript 3.0 includes the Namespace class for working with XML namespaces. For the XML object in the previous
example, you can use the Namespace class as follows:
var soapNS:Namespace = message.namespace("soap");
trace(soapNS); // Output: http://schemas.xmlsoap.org/soap/envelope/
var wNS:Namespace = new Namespace("w", "http://www.test.com/weather/");
message.addNamespace(wNS);
var encodingStyle:XMLList = message.@soapNS::encodingStyle;
var body:XMLList = message.soapNS::Body;
message.soapNS::Body.wNS::GetWeatherResponse.wNS::tempurature = "78";
The XML class includes the following methods for working with namespaces: addNamespace(),
inScopeNamespaces(), localName(), name(), namespace(), namespaceDeclarations(), removeNamespace(),
setLocalName(), setName(), and setNamespace().
The default xml namespace directive lets you assign a default namespace for XML objects. For example, in the
following, both x1 and x2 have the same default namespace:

111
ACTIONSCRIPT 3.0 DEVELOPER’S GUIDE
Working with XML
Last updated 3/21/2011
var ns1:Namespace = new Namespace("http://www.example.com/namespaces/");
default xml namespace = ns1;
var x1:XML = <test1 />;
var x2:XML = <test2 />;
XML type conversion
Flash Player 9 and later, Adobe AIR 1.0 and later
You can convert XML objects and XMLList objects to String values. Similarly, you can convert strings to XML objects
and XMLList objects. Also, keep in mind that all XML attribute values, names, and text values are strings. The
following sections discuss all these forms of XML type conversion.
Converting XML and XMLList objects to strings
Flash Player 9 and later, Adobe AIR 1.0 and later
The XML and XMLList classes include a toString() method and a toXMLString() method. The toXMLString()
method returns a string that includes all tags, attributes, namespace declarations, and content of the XML object. For
XML objects with complex content (child elements), the toString() method does exactly the same as the
toXMLString() method. For XML objects with simple content (those that contain only one text element), the
toString() method returns only the text content of the element, as the following example shows:
var myXML:XML =
<order>
<item id='1' quantity='2'>
<menuName>burger</menuName>
<price>3.95</price>
</item>
<order>;
trace(myXML.item[0].menuName.toXMLString());
// <menuName>burger</menuName>
trace(myXML.item[0].menuName.toString());
// burger
If you use the trace() method without specifying toString() or toXMLString(), the data is converted using the
toString() method by default, as this code shows:
var myXML:XML =
<order>
<item id='1' quantity='2'>
<menuName>burger</menuName>
<price>3.95</price>
</item>
<order>;
trace(myXML.item[0].menuName);
// burger
When using the trace() method to debug code, you will often want to use the toXMLString() method so that the
trace() method outputs more complete data.

112
ACTIONSCRIPT 3.0 DEVELOPER’S GUIDE
Working with XML
Last updated 3/21/2011
Converting strings to XML objects
Flash Player 9 and later, Adobe AIR 1.0 and later
You can use the new XML() constructor to create an XML object from a string, as follows:
var x:XML = new XML("<a>test</a>");
If you attempt to convert a string to XML from a string that represents invalid XML or XML that is not well formed,
a run-time error is thrown, as follows:
var x:XML = new XML("<a>test"); // throws an error
Converting attribute values, names, and text values from strings
Flash Player 9 and later, Adobe AIR 1.0 and later
All XML attribute values, names, and text values are String data types, and you may need to convert these to other data
types. For example, the following code uses the Number() function to convert text values to numbers:
var myXML:XML =
<order>
<item>
<price>3.95</price>
</item>
<item>
<price>1.00</price>
</item>
</order>;
var total:XML = <total>0</total>;
myXML.appendChild(total);
for each (var item:XML in myXML.item)
{
myXML.total.children()[0] = Number(myXML.total.children()[0])
+ Number(item.price.children()[0]);
}
trace(myXML.total); // 4.95;
If this code did not use the Number() function, the code would interpret the + operator as the string concatenation
operator, and the trace() method in the last line would output the following:
01.003.95
Reading external XML documents
Flash Player 9 and later, Adobe AIR 1.0 and later
You can use the URLLoader class to load XML data from a URL. To use the following code in your applications, replace
the XML_URL value in the example with a valid URL:

113
ACTIONSCRIPT 3.0 DEVELOPER’S GUIDE
Working with XML
Last updated 3/21/2011
import flash.events.Event;
import flash.net.URLLoader;
var myXML:XML = new XML();
var XML_URL:String = "http://www.example.com/Sample3.xml";
var myXMLURL:URLRequest = new URLRequest(XML_URL);
var myLoader:URLLoader = new URLLoader(myXMLURL);
myLoader.addEventListener(Event.COMPLETE, xmlLoaded);
function xmlLoaded(event:Event):void
{
myXML = XML(myLoader.data);
trace("Data loaded.");
}
You can also use the XMLSocket class to set up an asynchronous XML socket connection with a server. For more
information, see the ActionScript 3.0 Reference for the Adobe Flash Platform.
XML in ActionScript example: Loading RSS data from the
Internet
Flash Player 9 and later, Adobe AIR 1.0 and later
The RSSViewer sample application shows a number of features of working with XML in ActionScript, including the
following:
•Using XML methods to traverse XML data in the form of an RSS feed.
•Using XML methods to assemble XML data in the form of HTML to use in a text field.
The RSS format is widely used to syndicate news via XML. A simple RSS data file may look like the following:

114
ACTIONSCRIPT 3.0 DEVELOPER’S GUIDE
Working with XML
Last updated 3/21/2011
<?xml version="1.0" encoding="UTF-8" ?>
<rss version="2.0" xmlns:dc="http://purl.org/dc/elements/1.1/">
<channel>
<title>Alaska - Weather</title>
<link>http://www.nws.noaa.gov/alerts/ak.html</link>
<description>Alaska - Watches, Warnings and Advisories</description>
<item>
<title>
Short Term Forecast - Taiya Inlet, Klondike Highway (Alaska)
</title>
<link>
http://www.nws.noaa.gov/alerts/ak.html#A18.AJKNK.1900
</link>
<description>
Short Term Forecast Issued At: 2005-04-11T19:00:00
Expired At: 2005-04-12T01:00:00 Issuing Weather Forecast Office
Homepage: http://pajk.arh.noaa.gov
</description>
</item>
<item>
<title>
Short Term Forecast - Haines Borough (Alaska)
</title>
<link>
http://www.nws.noaa.gov/alerts/ak.html#AKZ019.AJKNOWAJK.190000
</link>
<description>
Short Term Forecast Issued At: 2005-04-11T19:00:00
Expired At: 2005-04-12T01:00:00 Issuing Weather Forecast Office
Homepage: http://pajk.arh.noaa.gov
</description>
</item>
</channel>
</rss>
The SimpleRSS application reads RSS data from the Internet, parses the data for headlines (titles), links, and
descriptions, and returns that data. The SimpleRSSUI class provides the UI and calls the SimpleRSS class, which does
all of the XML processing.
To get the application files for this sample, see www.adobe.com/go/learn_programmingAS3samples_flash. The
RSSViewer application files can be found in the folder Samples/RSSViewer. The application consists of the following
files:
File Description
RSSViewer.mxml
or
RSSViewer.fla
The main application file in Flash (FLA) or Flex (MXML).
com/example/programmingas3/rssViewer/RSSParser.as A class that contains methods that use E4X to traverse RSS (XML) data and
generate a corresponding HTML representation.
RSSData/ak.rss A sample RSS file. The application is set up to read RSS data from the web, at
a Flex RSS feed hosted by Adobe. However, you can easily change the
application to read RSS data from this document, which uses a slightly
different schema than that of the Flex RSS feed.

115
ACTIONSCRIPT 3.0 DEVELOPER’S GUIDE
Working with XML
Last updated 3/21/2011
Reading and parsing XML data
Flash Player 9 and later, Adobe AIR 1.0 and later
The RSSParser class includes an xmlLoaded() method that converts the input RSS data, stored in the rssXML variable,
into an string containing HTML-formatted output, rssOutput.
Near the beginning of the method, code sets the default XML namespace if the source RSS data includes a default
namespace:
if (rssXML.namespace("") != undefined)
{
default xml namespace = rssXML.namespace("");
}
The next lines then loop through the contents of the source XML data, examining each descendant property named item:
for each (var item:XML in rssXML..item)
{
var itemTitle:String = item.title.toString();
var itemDescription:String = item.description.toString();
var itemLink:String = item.link.toString();
outXML += buildItemHTML(itemTitle,
itemDescription,
itemLink);
}
The first three lines simply set string variables to represent the title, description and link properties of the item
property of the XML data. The next line then calls the buildItemHTML() method to get HTML data in the form of an
XMLList object, using the three new string variables as parameters.
Assembling XMLList data
Flash Player 9 and later, Adobe AIR 1.0 and later
The HTML data (an XMLList object) is of the following form:
<b>itemTitle</b>
<p>
itemDescription
<br />
<a href="link">
<font color="#008000">More...</font>
</a>
</p>
The first lines of the method clear the default xml namespace:
default xml namespace = new Namespace();
The default xml namespace directive has function block-level scope. This means that the scope of this declaration
is the buildItemHTML() method.
The lines that follow assemble the XMLList, based on the string arguments passed to the function:

116
ACTIONSCRIPT 3.0 DEVELOPER’S GUIDE
Working with XML
Last updated 3/21/2011
var body:XMLList = new XMLList();
body += new XML("<b>" + itemTitle + "</b>");
var p:XML = new XML("<p>" + itemDescription + "</p>");
var link:XML = <a></a>;
link.@href = itemLink; // <link href="itemLinkString"></link>
link.font.@color = "#008000";
// <font color="#008000"></font></a>
// 0x008000 = green
link.font = "More...";
p.appendChild(<br/>);
p.appendChild(link);
body += p;
This XMLList object represents string data suitable for an ActionScript HTML text field.
The xmlLoaded() method uses the return value of the buildItemHTML() method and converts it to a string:
XML.prettyPrinting = false;
rssOutput = outXML.toXMLString();
Extracting the title of the RSS feed and sending a custom event
Flash Player 9 and later, Adobe AIR 1.0 and later
The xmlLoaded() method sets a rssTitle string variable, based on information in the source RSS XML data:
rssTitle = rssXML.channel.title.toString();
Finally, the xmlLoaded() method generates an event, which notifies the application that the data is parsed and
available:
dataWritten = new Event("dataWritten", true);

117
Last updated 3/21/2011
Chapter 7: Handling events
Flash Player 9 and later, Adobe AIR 1.0 and later
An event-handling system allows programmers to respond to user input and system events in a convenient way. The
ActionScript 3.0 event model is not only convenient, but also standards-compliant, and well integrated with the
display list. Based on the Document Object Model (DOM) Level 3 Events Specification, an industry-standard event-
handling architecture, the new event model provides a powerful yet intuitive event-handling tool for ActionScript
programmers.
The ActionScript 3.0 event-handling system interacts closely with the display list. To gain a basic understanding of the
display list, read “Display programming” on page 143.
More Help topics
flash.events package
Document Object Model (DOM) Level 3 Events Specification
Basics of handling events
Flash Player 9 and later, Adobe AIR 1.0 and later
You can think of events as occurrences of any kind in your SWF file that are of interest to you as a programmer. For
example, most SWF files support user interaction of some sort—whether it's something as simple as responding to a
mouse click or something more complex, such as accepting and processing data entered into a form. Any such user
interaction with your SWF file is considered an event. Events can also occur without any direct user interaction, such
as when data has finished loading from a server or when an attached camera has become active.
In ActionScript 3.0, each event is represented by an event object, which is an instance of the Event class or one of its
subclasses. An event object not only stores information about a specific event, but also contains methods that facilitate
manipulation of the event object. For example, when Flash Player or AIR detects a mouse click, it creates an event
object (an instance of the MouseEvent class) to represent that particular mouse click event.
After creating an event object, Flash Player or AIR dispatches it, which means that the event object is passed to the
object that is the target of the event. An object that serves as the destination for a dispatched event object is called an
event target. For example, when an attached camera becomes active, Flash Player dispatches an event object directly to
the event target, which in this case is the object that represents the camera. If the event target is on the display list,
however, the event object is passed down through the display list hierarchy until it reaches the event target. In some
cases, the event object then “bubbles” back up the display list hierarchy along the same route. This traversal of the
display list hierarchy is called the event flow.
You can “listen” for event objects in your code using event listeners. Event listeners are the functions or methods that
you write to respond to specific events. To ensure that your program responds to events, you must add event listeners
either to the event target or to any display list object that is part of an event object’s event flow.
Any time you write event listener code, it follows this basic structure (elements in bold are placeholders you’d fill in
for your specific case):

118
ACTIONSCRIPT 3.0 DEVELOPER’S GUIDE
Handling events
Last updated 3/21/2011
function eventResponse(eventObject:EventType):void
{
// Actions performed in response to the event go here.
}
eventTarget.addEventListener(EventType.EVENT_NAME, eventResponse);
This code does two things. First, it defines a function, which is the way to specify the actions that will be performed in
response to the event. Next, it calls the addEventListener() method of the source object, in essence “subscribing”
the function to the specified event so that when the event happens, the function’s actions are carried out. When the
event actually happens, the event target checks its list of all the functions and methods that are registered as event
listeners. It then calls each one in turn, passing the event object as a parameter.
You need to alter four things in this code to create your own event listener. First, you must change the name of the
function to the name you want to use (this must be changed in two places, where the code says eventResponse).
Second, you must specify the appropriate class name of the event object that is dispatched by the event you want to
listen for (EventType in the code), and you must specify the appropriate constant for the specific event
(EVENT_NAME in the listing). Third, you must call the addEventListener() method on the object that will
dispatch the event (eventTarget in this code). Optionally, you can change the name of the variable used as the
function’s parameter (eventObject in this code).
Important concepts and terms
The following reference list contains important terms that you will encounter when writing event-handling routines:
Bubbling Bubbling occurs for some events so that a parent display object can respond to events dispatched by its
children.
Bubbling phase The part of the event flow in which an event propagates up to parent display objects. The bubbling
phase occurs after the capture and target phases.
Capture phase The part of the event flow in which an event propagates down from the most general target to the most
specific target object. The capture phase occurs before the target and bubbling phases.
Default behavior Some events include a behavior that normally happens along with the event, known as the default
behavior. For example, when a user types text in a text field, a text input event is raised. The default behavior for that
event is to actually display the character that was typed into the text field—but you can override that default behavior
(if for some reason you don’t want the typed character to be displayed).
Dispatch To notify event listeners that an event has occurred.
Event Something that happens to an object that the object can tell other objects about.
Event flow When events happen to an object on the display list (an object displayed on the screen), all the objects that
contain the object are notified of the event and notify their event listeners in turn. This process starts with the Stage
and proceeds through the display list to the actual object where the event occurred, and then proceeds back to the Stage
again. This process is known as the event flow.
Event object An object that contains information about a particular event’s occurrence, which is sent to all listeners
when an event is dispatched.
Event target The object that actually dispatches an event. For example, if the user clicks a button that is inside a Sprite
that is in turn inside the Stage, all those objects dispatch events, but the event target is the one where the event actually
happened—in this case, the clicked button.
Listener An object or function that has registered itself with an object, to indicate that it should be notified when a
specific event takes place.

119
ACTIONSCRIPT 3.0 DEVELOPER’S GUIDE
Handling events
Last updated 3/21/2011
Target phase The point of the event flow at which an event has reached the most specific possible target. The target
phase occurs between the capture and the bubbling phases.
How ActionScript 3.0 event handling differs from earlier
versions
Flash Player 9 and later, Adobe AIR 1.0 and later
The most noticeable difference between event handling in ActionScript 3.0 and event handling in previous versions of
ActionScript is that in ActionScript 3.0 there is only one system for event handling, whereas in previous versions of
ActionScript there are several different event-handling systems. This section begins with an overview of how event
handling worked in previous versions of ActionScript, and then discusses how event handling has changed for
ActionScript 3.0.
Event handling in previous versions of ActionScript
Flash Player 9 and later, Adobe AIR 1.0 and later
Versions of ActionScript before ActionScript 3.0 provided a number of different ways to handle events:
•on() event handlers that can be placed directly on Button and MovieClip instances
•onClipEvent() handlers that can be placed directly on MovieClip instances
•Callback function properties, such as XML.onload and Camera.onActivity
•Event listeners that you register using the addListener() method
•The UIEventDispatcher class that partially implemented the DOM event model.
Each of these mechanisms presents its own set of advantages and limitations. The on() and onClipEvent() handlers
are easy to use, but make subsequent maintenance of projects more difficult because code placed directly on buttons
and movie clips can be difficult to find. Callback functions are also simple to implement, but limit you to only one
callback function for any given event. Event listeners are more difficult to implement—they require not only the
creation of a listener object and function, but also the registration of the listener with the object that generates the
event. This increased overhead, however, enables you to create several listener objects and register them all for the
same event.
The development of components for ActionScript 2.0 engendered yet another event model. This new model,
embodied in the UIEventDispatcher class, was based on a subset of the DOM Events Specification. Developers who
are familiar with component event handling will find the transition to the new ActionScript 3.0 event model relatively
painless.
Unfortunately, the syntax used by the various event models overlap in various ways, and differ in others. For example,
in ActionScript 2.0, some properties, such as TextField.onChanged, can be used as either a callback function or an
event listener. However, the syntax for registering listener objects differs depending on whether you are using one of
the six classes that support listeners or the UIEventDispatcher class. For the Key, Mouse, MovieClipLoader, Selection,
Stage, and TextField classes, you use the addListener() method, but for components event handling, you use a
method called addEventListener().
Another complexity introduced by the different event-handling models was that the scope of the event handler
function varied widely depending on the mechanism used. In other words, the meaning of the this keyword was not
consistent among the event-handling systems.

120
ACTIONSCRIPT 3.0 DEVELOPER’S GUIDE
Handling events
Last updated 3/21/2011
Event handling in ActionScript 3.0
Flash Player 9 and later, Adobe AIR 1.0 and later
ActionScript 3.0 introduces a single event-handling model that replaces the many different event-handling
mechanisms that existed in previous versions of the language. The new event model is based on the Document Object
Model (DOM) Level 3 Events Specification. Although the SWF file format does not adhere specifically to the
Document Object Model standard, there are sufficient similarities between the display list and the structure of the
DOM to make implementation of the DOM event model possible. An object on the display list is analogous to a node
in the DOM hierarchical structure, and the terms display list object and node are used interchangeably throughout this
discussion.
The Flash Player and AIR implementation of the DOM event model includes a concept named default behaviors. A
default behavior is an action that Flash Player or AIR executes as the normal consequence of certain events.
Default behaviors
Developers are usually responsible for writing code that responds to events. In some cases, however, a behavior is so
commonly associated with an event that Flash Player or AIR automatically executes the behavior unless the developer
adds code to cancel it. Because Flash Player or AIR automatically exhibits the behavior, such behaviors are called
default behaviors.
For example, when a user enters text into a TextField object, the expectation that the text will be displayed in that
TextField object is so common that the behavior is built into Flash Player and AIR. If you do not want this default
behavior to occur, you can cancel it using the new event-handling system. When a user inputs text into a TextField
object, Flash Player or AIR creates an instance of the TextEvent class to represent that user input. To prevent Flash
Player or AIR from displaying the text in the TextField object, you must access that specific TextEvent instance and
call that instance’s preventDefault() method.
Not all default behaviors can be prevented. For example, Flash Player and AIR generate a MouseEvent object when a
user double-clicks a word in a TextField object. The default behavior, which cannot be prevented, is that the word
under the cursor is highlighted.
Many types of event objects do not have associated default behaviors. For example, Flash Player dispatches a connect
event object when a network connection is established, but there is no default behavior associated with it. The API
documentation for the Event class and its subclasses lists each type of event and describes any associated default
behavior, and whether that behavior can be prevented.
It is important to understand that default behaviors are associated only with event objects dispatched by Flash Player
or AIR, and do not exist for event objects dispatched programmatically through ActionScript. For example, you can
use the methods of the EventDispatcher class to dispatch an event object of type textInput, but that event object will
not have a default behavior associated with it. In other words, Flash Player and AIR will not display a character in a
TextField object as a result of a textInput event that you dispatched programmatically.
What’s new for event listeners in ActionScript 3.0
For developers with experience using the ActionScript 2.0 addListener() method, it may be helpful to point out the
differences between the ActionScript 2.0 event listener model and the ActionScript 3.0 event model. The following list
describes a few major differences between the two event models:
•To add event listeners in ActionScript 2.0, you use addListener() in some cases and addEventListener() in
others, whereas in ActionScript 3.0, you use addEventListener() in all situations.
•There is no event flow in ActionScript 2.0, which means that the addListener() method can be called only on the
object that broadcasts the event, whereas in ActionScript 3.0, the addEventListener() method can be called on
any object that is part of the event flow.

121
ACTIONSCRIPT 3.0 DEVELOPER’S GUIDE
Handling events
Last updated 3/21/2011
•In ActionScript 2.0, event listeners can be either functions, methods, or objects, whereas in ActionScript 3.0, only
functions or methods can be event listeners.
The event flow
Flash Player 9 and later, Adobe AIR 1.0 and later
Flash Player or AIR dispatches event objects whenever an event occurs. If the event target is not on the display list,
Flash Player or AIR dispatches the event object directly to the event target. For example, Flash Player dispatches the
progress event object directly to a URLStream object. If the event target is on the display list, however, Flash Player
dispatches the event object into the display list, and the event object travels through the display list to the event target.
The event flow describes how an event object moves through the display list. The display list is organized in a hierarchy
that can be described as a tree. At the top of the display list hierarchy is the Stage, which is a special display object
container that serves as the root of the display list. The Stage is represented by the flash.display.Stage class and can only
be accessed through a display object. Every display object has a property named stage that refers to the Stage for that
application.
When Flash Player or AIR dispatches an event object for a display list-related event, that event object makes a round-
trip journey from the Stage to the target node. The DOM Events Specification defines the target node as the node
representing the event target. In other words, the target node is the display list object where the event occurred. For
example, if a user clicks on a display list object named child1, Flash Player or AIR will dispatch an event object using
child1 as the target node.
The event flow is conceptually divided into three parts. The first part is called the capture phase; this phase comprises
all of the nodes from the Stage to the parent of the target node. The second part is called the target phase, which consists
solely of the target node. The third part is called the bubbling phase. The bubbling phase comprises the nodes
encountered on the return trip from the parent of the target node back to the Stage.
The names of the phases make more sense if you conceive of the display list as a vertical hierarchy with the Stage at the
top, as shown in the following diagram:
Stage
Parent Node
Child1 Node Child2 Node

122
ACTIONSCRIPT 3.0 DEVELOPER’S GUIDE
Handling events
Last updated 3/21/2011
If a user clicks on Child1 Node, Flash Player or AIR dispatches an event object into the event flow. As the following
image shows, the object’s journey starts at Stage, moves down to Parent Node, then moves to Child1 Node, and
then “bubbles” back up to Stage, moving through Parent Node again on its journey back to Stage.
In this example, the capture phase comprises Stage and Parent Node during the initial downward journey. The target
phase comprises the time spent at Child1 Node. The bubbling phase comprises Parent Node and Stage as they are
encountered during the upward journey back to the root node.
The event flow contributes to a more powerful event-handling system than that previously available to ActionScript
programmers. In previous versions of ActionScript, the event flow does not exist, which means that event listeners can
be added only to the object that generates the event. In ActionScript 3.0, you can add event listeners not only to a target
node, but also to any node along the event flow.
The ability to add event listeners along the event flow is useful when a user interface component comprises more than
one object. For example, a button object often contains a text object that serves as the button’s label. Without the ability
to add a listener to the event flow, you would have to add a listener to both the button object and the text object to
ensure that you receive notification about click events that occur anywhere on the button. The existence of the event
flow, however, allows you to place a single event listener on the button object that handles click events that occur either
on the text object or on the areas of the button object that are not obscured by the text object.
Not every event object, however, participates in all three phases of the event flow. Some types of events, such as the
enterFrame and init event types, are dispatched directly to the target node and participate in neither the capture
phase nor the bubbling phase. Other events may target objects that are not on the display list, such as events dispatched
to an instance of the Socket class. These event objects will also flow directly to the target object, without participating
in the capture and bubbling phases.
To find out how a particular event type behaves, you can either check the API documentation or examine the event
object's properties. Examining the event object’s properties is described in the following section.
Event objects
Flash Player 9 and later, Adobe AIR 1.0 and later
Event objects serve two main purposes in the new event-handling system. First, event objects represent actual events
by storing information about specific events in a set of properties. Second, event objects contain a set of methods that
allow you to manipulate event objects and affect the behavior of the event-handling system.
To facilitate access to these properties and methods, the Flash Player API defines an Event class that serves as the base
class for all event objects. The Event class defines a fundamental set of properties and methods that are common to all
event objects.
Stage
Parent Node
Child1 Node Child2 Node
Capture
Phase
Bubbling
Phase
Target Phase

123
ACTIONSCRIPT 3.0 DEVELOPER’S GUIDE
Handling events
Last updated 3/21/2011
This section begins with a discussion of the Event class properties, continues with a description of the Event class
methods, and concludes with an explanation of why subclasses of the Event class exist.
Understanding Event class properties
Flash Player 9 and later, Adobe AIR 1.0 and later
The Event class defines a number of read-only properties and constants that provide important information about an
event object.The following are especially important:
•Event object types are represented by constants and stored in the Event.type property.
•Whether an event’s default behavior can be prevented is represented by a Boolean value and stored in the
Event.cancelable property.
•Event flow information is contained in the remaining properties.
Event object types
Every event object has an associated event type. Event types are stored in the Event.type property as string values. It
is useful to know the type of an event object so that your code can distinguish objects of different types from one
another. For example, the following code specifies that the clickHandler() listener function should respond to any
mouse click event objects that are passed to myDisplayObject:
myDisplayObject.addEventListener(MouseEvent.CLICK, clickHandler);
Some two dozen event types are associated with the Event class itself and are represented by Event class constants,
some of which are shown in the following excerpt from the Event class definition:
package flash.events
{
public class Event
{
// class constants
public static const ACTIVATE:String = "activate";
public static const ADDED:String= "added";
// remaining constants omitted for brevity
}
}
These constants provide an easy way to refer to specific event types. You should use these constants instead of the
strings they represent. If you misspell a constant name in your code, the compiler will catch the mistake, but if you
instead use strings, a typographical error may not manifest at compile time and could lead to unexpected behavior that
could be difficult to debug. For example, when adding an event listener, use the following code:
myDisplayObject.addEventListener(MouseEvent.CLICK, clickHandler);
rather than:
myDisplayObject.addEventListener("click", clickHandler);
Default behavior information
Your code can check whether the default behavior for any given event object can be prevented by accessing the
cancelable property. The cancelable property holds a Boolean value that indicates whether or not a default
behavior can be prevented. You can prevent, or cancel, the default behavior associated with a small number of events
using the preventDefault() method. For more information, see Cancelling default event behavior under
“Understanding Event class methods” on page 125.

124
ACTIONSCRIPT 3.0 DEVELOPER’S GUIDE
Handling events
Last updated 3/21/2011
Event flow information
The remaining Event class properties contain important information about an event object and its relationship to the
event flow, as described in the following list:
•The bubbles property contains information about the parts of the event flow in which the event object participates.
•The eventPhase property indicates the current phase in the event flow.
•The target property stores a reference to the event target.
•The currentTarget property stores a reference to the display list object that is currently processing the event
object.
The bubbles property
An event is said to bubble if its event object participates in the bubbling phase of the event flow, which means that the
event object is passed from the target node back through its ancestors until it reaches the Stage. The Event.bubbles
property stores a Boolean value that indicates whether the event object participates in the bubbling phase. Because all
events that bubble also participate in the capture and target phases, any event that bubbles participates in all three of
the event flow phases. If the value is true, the event object participates in all three phases. If the value is false, the
event object does not participate in the bubbling phase.
The eventPhase property
You can determine the event phase for any event object by investigating its eventPhase property. The eventPhase
property contains an unsigned integer value that represents one of the three phases of the event flow. The Flash Player
API defines a separate EventPhase class that contains three constants that correspond to the three unsigned integer
values, as shown in the following code excerpt:
package flash.events
{
public final class EventPhase
{
public static const CAPTURING_PHASE:uint = 1;
public static const AT_TARGET:uint = 2;
public static const BUBBLING_PHASE:uint= 3;
}
}
These constants correspond to the three valid values of the eventPhase property. You can use these constants to make
your code more readable. For example, if you want to ensure that a function named myFunc() is called only if the event
target is in the target stage, you can use the following code to test for this condition:
if (event.eventPhase == EventPhase.AT_TARGET)
{
myFunc();
}
The target property
The target property holds a reference to the object that is the target of the event. In some cases, this is straightforward,
such as when a microphone becomes active, the target of the event object is the Microphone object. If the target is on
the display list, however, the display list hierarchy must be taken into account. For example, if a user inputs a mouse
click on a point that includes overlapping display list objects, Flash Player and AIR always choose the object that is
farthest away from the Stage as the event target.

125
ACTIONSCRIPT 3.0 DEVELOPER’S GUIDE
Handling events
Last updated 3/21/2011
For complex SWF files, especially those in which buttons are routinely decorated with smaller child objects, the
target property may not be used frequently because it will often point to a button’s child object instead of the button.
In these situations, the common practice is to add event listeners to the button and use the currentTarget property
because it points to the button, whereas the target property may point to a child of the button.
The currentTarget property
The currentTarget property contains a reference to the object that is currently processing the event object. Although
it may seem odd not to know which node is currently processing the event object that you are examining, keep in mind
that you can add a listener function to any display object in that event object's event flow, and the listener function can
be placed in any location. Moreover, the same listener function can be added to different display objects. As a project
increases in size and complexity, the currentTarget property becomes more and more useful.
Understanding Event class methods
Flash Player 9 and later, Adobe AIR 1.0 and later
There are three categories of Event class methods:
•Utility methods, which can create copies of an event object or convert it to a string
•Event flow methods, which remove event objects from the event flow
•Default behavior methods, which prevent default behavior or check whether it has been prevented
Event class utility methods
There are two utility methods in the Event class. The clone() method allows you to create copies of an event object.
The toString() method allows you to generate a string representation of the properties of an event object along with
their values. Both of these methods are used internally by the event model system, but are exposed to developers for
general use.
For advanced developers creating subclasses of the Event class, you must override and implement versions of both
utility methods to ensure that the event subclass will work properly.
Stopping event flow
You can call either the Event.stopPropagation() method or the Event.stopImmediatePropagation() method
to prevent an event object from continuing on its way through the event flow. The two methods are nearly identical
and differ only in whether the current node’s other event listeners are allowed to execute:
•The Event.stopPropagation() method prevents the event object from moving on to the next node, but only after
any other event listeners on the current node are allowed to execute.
•The Event.stopImmediatePropagation() method also prevents the event object from moving on to the next
node, but does not allow any other event listeners on the current node to execute.
Calling either of these methods has no effect on whether the default behavior associated with an event occurs. Use the
default behavior methods of the Event class to prevent default behavior.
Cancelling default event behavior
The two methods that pertain to cancelling default behavior are the preventDefault() method and the
isDefaultPrevented() method. Call the preventDefault() method to cancel the default behavior associated with
an event. To check whether preventDefault() has already been called on an event object, call the
isDefaultPrevented() method, which returns a value of true if the method has already been called and false
otherwise.

126
ACTIONSCRIPT 3.0 DEVELOPER’S GUIDE
Handling events
Last updated 3/21/2011
The preventDefault() method will work only if the event’s default behavior can be cancelled. You can check
whether this is the case by referring to the API documentation for that event type, or by using ActionScript to examine
the cancelable property of the event object.
Cancelling the default behavior has no effect on the progress of an event object through the event flow. Use the event
flow methods of the Event class to remove an event object from the event flow.
Subclasses of the Event class
Flash Player 9 and later, Adobe AIR 1.0 and later
For many events, the common set of properties defined in the Event class is sufficient. Other events, however, have
unique characteristics that cannot be captured by the properties available in the Event class. For these events,
ActionScript 3.0 defines several subclasses of the Event class.
Each subclass provides additional properties and event types that are unique to that category of events. For example,
events related to mouse input have several unique characteristics that cannot be captured by the properties defined in
the Event class. The MouseEvent class extends the Event class by adding ten properties that contain information such
as the location of the mouse event and whether specific keys were pressed during the mouse event.
An Event subclass also contains constants that represent the event types that are associated with the subclass. For
example, the MouseEvent class defines constants for several mouse event types, include the click, doubleClick,
mouseDown, and mouseUp event types.
As described in the section on Event class utility methods under “Event objects” on page 122, when creating an Event
subclass you must override the clone() and toString() methods to provide functionality specific to the subclass.
Event listeners
Flash Player 9 and later, Adobe AIR 1.0 and later
Event listeners, which are also called event handlers, are functions that Flash Player and AIR execute in response to
specific events. Adding an event listener is a two-step process. First, you create a function or class method for Flash
Player or AIR to execute in response to the event. This is sometimes called the listener function or the event handler
function. Second, you use the addEventListener() method to register your listener function with the target of the
event or any display list object that lies along the appropriate event flow.
Creating a listener function
Flash Player 9 and later, Adobe AIR 1.0 and later
The creation of listener functions is one area where the ActionScript 3.0 event model deviates from the DOM event
model. In the DOM event model, there is a clear distinction between an event listener and a listener function: an event
listener is an instance of a class that implements the EventListener interface, whereas a listener function is a method
of that class named handleEvent(). In the DOM event model, you register the class instance that contains the listener
function rather than the actual listener function.
In the ActionScript 3.0 event model, there is no distinction between an event listener and a listener function.
ActionScript 3.0 does not have an EventListener interface, and listener functions can be defined outside a class or as
part of a class. Moreover, listener functions do not have to be named handleEvent()—they can be named with any
valid identifier. In ActionScript 3.0, you register the name of the actual listener function.

127
ACTIONSCRIPT 3.0 DEVELOPER’S GUIDE
Handling events
Last updated 3/21/2011
Listener function defined outside of a class
The following code creates a simple SWF file that displays a red square shape. A listener function named
clickHandler(), which is not part of a class, listens for mouse click events on the red square.
package
{
import flash.display.Sprite;
public class ClickExample extends Sprite
{
public function ClickExample()
{
var child:ChildSprite = new ChildSprite();
addChild(child);
}
}
}
import flash.display.Sprite;
import flash.events.MouseEvent;
class ChildSprite extends Sprite
{
public function ChildSprite()
{
graphics.beginFill(0xFF0000);
graphics.drawRect(0,0,100,100);
graphics.endFill();
addEventListener(MouseEvent.CLICK, clickHandler);
}
}
function clickHandler(event:MouseEvent):void
{
trace("clickHandler detected an event of type: " + event.type);
trace("the this keyword refers to: " + this);
}
When a user interacts with the resulting SWF file by clicking on the square, Flash Player or AIR generates the following
trace output:
clickHandler detected an event of type: click
the this keyword refers to: [object global]
Notice that the event object is passed as an argument to clickHandler(). This allows your listener function to
examine the event object. In this example, you use the event object's type property to ascertain that the event is a click
event.
The example also checks the value of the this keyword. In this case, this represents the global object, which makes
sense because the function is defined outside of any custom class or object.
Listener function defined as a class method
The following example is identical to the previous example that defines the ClickExample class except that the
clickHandler() function is defined as a method of the ChildSprite class:

128
ACTIONSCRIPT 3.0 DEVELOPER’S GUIDE
Handling events
Last updated 3/21/2011
package
{
import flash.display.Sprite;
public class ClickExample extends Sprite
{
public function ClickExample()
{
var child:ChildSprite = new ChildSprite();
addChild(child);
}
}
}
import flash.display.Sprite;
import flash.events.MouseEvent;
class ChildSprite extends Sprite
{
public function ChildSprite()
{
graphics.beginFill(0xFF0000);
graphics.drawRect(0,0,100,100);
graphics.endFill();
addEventListener(MouseEvent.CLICK, clickHandler);
}
private function clickHandler(event:MouseEvent):void
{
trace("clickHandler detected an event of type: " + event.type);
trace("the this keyword refers to: " + this);
}
}
When a user interacts with the resulting SWF file by clicking on the red square, Flash Player or AIR generates the
following trace output:
clickHandler detected an event of type: click
the this keyword refers to: [object ChildSprite]
Note that the this keyword refers to the ChildSprite instance named child. This is a change in behavior from
ActionScript 2.0. If you used components in ActionScript 2.0, you may remember that when a class method was passed
in to UIEventDispatcher.addEventListener(), the scope of the method was bound to the component that
broadcast the event instead of the class in which the listener method was defined. In other words, if you used this
technique in ActionScript 2.0, the this keyword would refer to the component broadcasting the event instead of the
ChildSprite instance.
This was a significant issue for some programmers because it meant that they could not access other methods and
properties of the class containing the listener method. As a workaround, ActionScript 2.0 programmers could use the
mx.util.Delegate class to change the scope of the listener method. This is no longer necessary, however, because
ActionScript 3.0 creates a bound method when addEventListener() is called. As a result, the this keyword refers
to the ChildSprite instance named child, and the programmer has access to the other methods and properties of the
ChildSprite class.

129
ACTIONSCRIPT 3.0 DEVELOPER’S GUIDE
Handling events
Last updated 3/21/2011
Event listener that should not be used
There is a third technique in which you create a generic object with a property that points to a dynamically assigned
listener function, but it is not recommended. It is discussed here because it was commonly used in ActionScript 2.0,
but should not be used in ActionScript 3.0. This technique is not recommended because the this keyword will refer
to the global object instead of your listener object.
The following example is identical to the previous ClickExample class example, except that the listener function is
defined as part of a generic object named myListenerObj:
package
{
import flash.display.Sprite;
public class ClickExample extends Sprite
{
public function ClickExample()
{
var child:ChildSprite = new ChildSprite();
addChild(child);
}
}
}
import flash.display.Sprite;
import flash.events.MouseEvent;
class ChildSprite extends Sprite
{
public function ChildSprite()
{
graphics.beginFill(0xFF0000);
graphics.drawRect(0,0,100,100);
graphics.endFill();
addEventListener(MouseEvent.CLICK, myListenerObj.clickHandler);
}
}
var myListenerObj:Object = new Object();
myListenerObj.clickHandler = function (event:MouseEvent):void
{
trace("clickHandler detected an event of type: " + event.type);
trace("the this keyword refers to: " + this);
}
The results of the trace will look like this:
clickHandler detected an event of type: click
the this keyword refers to: [object global]
You would expect that this would refer to myListenerObj and that the trace output would be [object Object],
but instead it refers to the global object. When you pass in a dynamic property name as an argument to
addEventListener(), Flash Player or AIR is unable to create a bound method. This is because what you are passing
as the listener parameter is nothing more than the memory address of your listener function, and Flash Player and
AIR have no way to link that memory address with the myListenerObj instance.

130
ACTIONSCRIPT 3.0 DEVELOPER’S GUIDE
Handling events
Last updated 3/21/2011
Managing event listeners
Flash Player 9 and later, Adobe AIR 1.0 and later
You can manage your listener functions using the methods of the IEventDispatcher interface. The IEventDispatcher
interface is the ActionScript 3.0 version of the EventTarget interface of the DOM event model. Although the name
IEventDispatcher may seem to imply that its main purpose is to send (or dispatch) event objects, the methods of this
class are actually used much more frequently to register event listeners, check for event listeners, and remove event
listeners. The IEventDispatcher interface defines five methods, as shown in the following code:
package flash.events
{
public interface IEventDispatcher
{
function addEventListener(eventName:String,
listener:Object,
useCapture:Boolean=false,
priority:Integer=0,
useWeakReference:Boolean=false):Boolean;
function removeEventListener(eventName:String,
listener:Object,
useCapture:Boolean=false):Boolean;
function dispatchEvent(eventObject:Event):Boolean;
function hasEventListener(eventName:String):Boolean;
function willTrigger(eventName:String):Boolean;
}
}
The Flash Player API implements the IEventDispatcher interface with the EventDispatcher class, which serves as a
base class for all classes that can be event targets or part of an event flow. For example, the DisplayObject class inherits
from the EventDispatcher class. This means that any object on the display list has access to the methods of the
IEventDispatcher interface.
Adding event listeners
The addEventListener() method is the workhorse of the IEventDispatcher interface. You use it to register your
listener functions. The two required parameters are type and listener. You use the type parameter to specify the
type of event. You use the listener parameter to specify the listener function that will execute when the event occurs.
The listener parameter can be a reference to either a function or a class method.
Do not use parentheses when you specify the listener parameter. For example, the clickHandler() function is
specified without parentheses in the following call to the addEventListener() method:
addEventListener(MouseEvent.CLICK, clickHandler)
The useCapture parameter of the addEventListener() method allows you to control the event flow phase on which
your listener will be active. If useCapture is set to true, your listener will be active during the capture phase of the
event flow. If useCapture is set to false, your listener will be active during the target and bubbling phases of the event
flow. To listen for an event during all phases of the event flow, you must call addEventListener() twice, once with
useCapture set to true, and then again with useCapture set to false.

131
ACTIONSCRIPT 3.0 DEVELOPER’S GUIDE
Handling events
Last updated 3/21/2011
The priority parameter of the addEventListener() method is not an official part of the DOM Level 3 event model.
It is included in ActionScript 3.0 to provide you with more flexibility in organizing your event listeners. When you call
addEventListener(), you can set the priority for that event listener by passing an integer value as the priority
parameter. The default value is 0, but you can set it to negative or positive integer values. The higher the number, the
sooner that event listener will be executed. Event listeners with the same priority are executed in the order that they
were added, so the earlier a listener is added, the sooner it will be executed.
The useWeakReference parameter allows you to specify whether the reference to the listener function is weak or
normal. Setting this parameter to true allows you to avoid situations in which listener functions persist in memory
even though they are no longer needed. Flash Player and AIR use a technique called garbage collection to clear objects
from memory that are no longer in use. An object is considered no longer in use if no references to it exist. The garbage
collector disregards weak references, which means that a listener function that has only a weak reference pointing to
it is eligible for garbage collection.
Removing event listeners
You can use the removeEventListener() method to remove an event listener that you no longer need. It is a good
idea to remove any listeners that will no longer be used. Required parameters include the eventName and listener
parameters, which are the same as the required parameters for the addEventListener() method. Recall that you can
listen for events during all event phases by calling addEventListener() twice, once with useCapture set to true,
and then again with it set to false. To remove both event listeners, you would need to call removeEventListener()
twice, once with useCapture set to true, and then again with it set to false.
Dispatching events
The dispatchEvent() method can be used by advanced programmers to dispatch a custom event object into the
event flow. The only parameter accepted by this method is a reference to an event object, which must be an instance
of the Event class or a subclass of the Event class. Once dispatched, the target property of the event object is set to
the object on which dispatchEvent() was called.
Checking for existing event listeners
The final two methods of the IEventDispatcher interface provide useful information about the existence of event
listeners. The hasEventListener() method returns true if an event listener is found for a specific event type on a
particular display list object. The willTrigger() method also returns true if a listener is found for a particular
display list object, but willTrigger() checks for listeners not only on that display object, but also on all of that display
list object’s ancestors for all phases of the event flow.
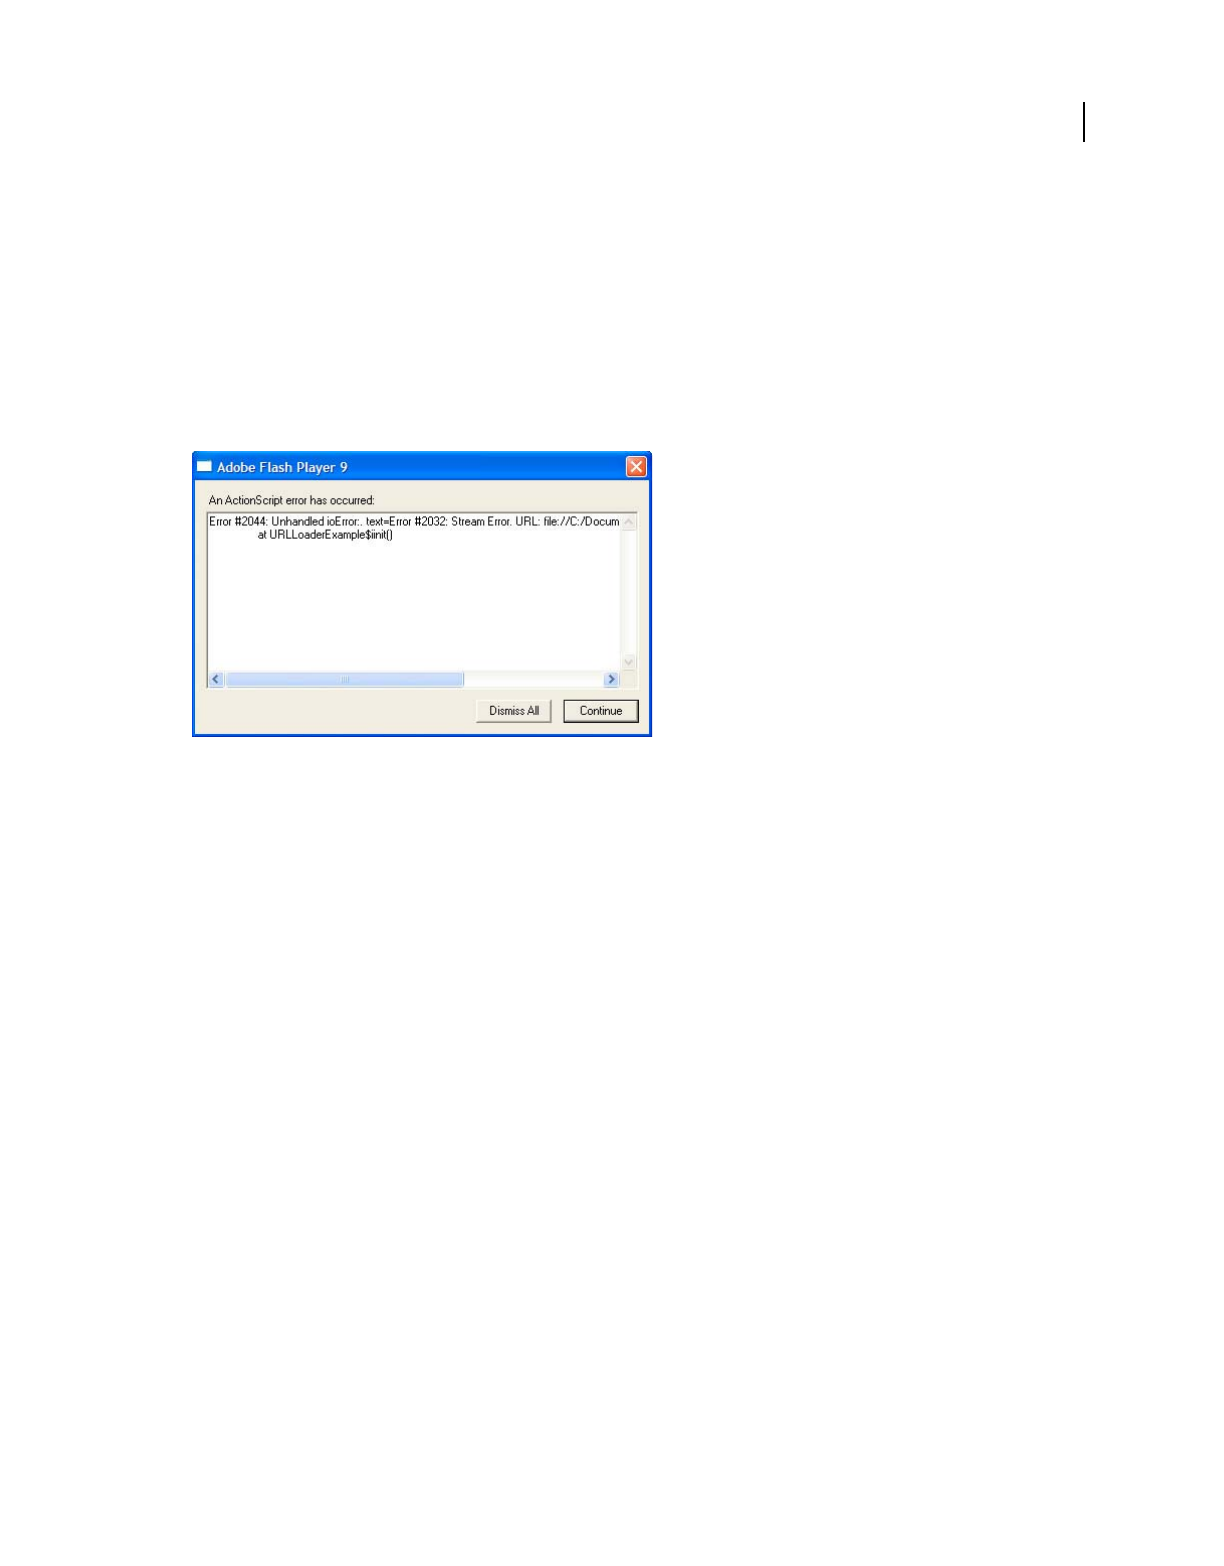
132
ACTIONSCRIPT 3.0 DEVELOPER’S GUIDE
Handling events
Last updated 3/21/2011
Error events without listeners
Flash Player 9 and later, Adobe AIR 1.0 and later
Exceptions, rather than events, are the primary mechanism for error handling in ActionScript 3.0, but exception
handling does not work for asynchronous operations such as loading files. If an error occurs during such an
asynchronous operation, Flash Player and AIR dispatch an error event object. If you do not create a listener for the
error event, the debugger versions of Flash Player and AIR will bring up a dialog box with information about the error.
For example, the debugger version of Flash Player produces the following dialog box describing the error when the
application attempts to load a file from an invalid URL:
Most error events are based on the ErrorEvent class, and as such will have a property named text that is used to store
the error message that Flash Player or AIR displays. The two exceptions are the StatusEvent and NetStatusEvent
classes. Both of these classes have a level property (StatusEvent.level and NetStatusEvent.info.level).
When the value of the level property is "error", these event types are considered to be error events.
An error event will not cause a SWF file to stop running. It will manifest only as a dialog box on the debugger versions
of the browser plug-ins and stand-alone players, as a message in the output panel in the authoring player, and as an
entry in the log file for Adobe Flash Builder. It will not manifest at all in the release versions of Flash Player or AIR.
Event handling example: Alarm Clock
Flash Player 9 and later, Adobe AIR 1.0 and later
The Alarm Clock example consists of a clock that allows the user to specify a time at which an alarm will go off, as well
as a message to be displayed at that time. The Alarm Clock example builds on the SimpleClock application from
“Working with dates and times” on page 1 Alarm Clock illustrates several aspects of working with events in
ActionScript 3.0, including:
•Listening and responding to an event
•Notifying listeners of an event
•Creating a custom event type
To get the Flash Professional application files for this sample, see
http://www.adobe.com/go/learn_programmingAS3samples_flash. To get the Flex application files for this sample, see
http://www.adobe.com/go/as3examples. The Alarm Clock application files can be found in the Samples/AlarmClock
folder. The application includes these files:

133
ACTIONSCRIPT 3.0 DEVELOPER’S GUIDE
Handling events
Last updated 3/21/2011
Alarm Clock overview
Flash Player 9 and later, Adobe AIR 1.0 and later
The primary functionality of the clock in this example, including tracking the time and displaying the clock face, reuses
the SimpleClock application code, which is described in “Date and time example: Simple analog clock” on page 6. The
AlarmClock class extends the SimpleClock class from that example by adding the functionality required for an alarm
clock, including setting the alarm time and providing notification when the alarm “goes off.”
Providing notification when something happens is the job that events are made for. The AlarmClock class exposes the
Alarm event, which other objects can listen for in order to perform desired actions. In addition, the AlarmClock class
uses an instance of the Timer class to determine when to trigger its alarm. Like the AlarmClock class, the Timer class
provides an event to notify other objects (an AlarmClock instance, in this case) when a certain amount of time has
passed. As with most ActionScript applications, events form an important part of the functionality of the Alarm Clock
sample application.
Triggering the alarm
Flash Player 9 and later, Adobe AIR 1.0 and later
As mentioned previously, the only functionality that the AlarmClock class actually provides relates to setting and
triggering the alarm. The built-in Timer class (flash.utils.Timer) provides a way for a developer to define code that will
be executed after a specified amount of time. The AlarmClock class uses a Timer instance to determine when to set off
the alarm.
File Description
AlarmClockApp.mxml
or
AlarmClockApp.fla
The main application file in Flash (FLA) or Flex (MXML).
com/example/programmingas3/clock/AlarmClock.as A class which extends the SimpleClock class, adding alarm clock
functionality.
com/example/programmingas3/clock/AlarmEvent.as A custom event class (a subclass of flash.events.Event) which serves as
the event object for the AlarmClock class’s alarm event.
com/example/programmingas3/clock/AnalogClockFace.as Draws a round clock face and hour, minute, and seconds hands based
on the time (described in the SimpleClock example).
com/example/programmingas3/clock/SimpleClock.as A clock interface component with simple timekeeping functionality
(described in the SimpleClock example).

134
ACTIONSCRIPT 3.0 DEVELOPER’S GUIDE
Handling events
Last updated 3/21/2011
import flash.events.TimerEvent;
import flash.utils.Timer;
/**
* The Timer that will be used for the alarm.
*/
public var alarmTimer:Timer;
...
/**
* Instantiates a new AlarmClock of a given size.
*/
public override function initClock(faceSize:Number = 200):void
{
super.initClock(faceSize);
alarmTimer = new Timer(0, 1);
alarmTimer.addEventListener(TimerEvent.TIMER, onAlarm);
}
The Timer instance defined in the AlarmClock class is named alarmTimer. The initClock() method, which
performs necessary setup operations for the AlarmClock instance, does two things with the alarmTimer variable.
First, the variable is instantiated with parameters instructing the Timer instance to wait 0 milliseconds and only trigger
its timer event one time. After instantiating alarmTimer, the code calls that variable’s addEventListener() method
to indicate that it wants to listen to that variable’s timer event. A Timer instance works by dispatching its timer event
after a specified amount of time has passed. The AlarmClock class will need to know when the timer event is
dispatched in order to set off its own alarm. By calling addEventListener(), the AlarmClock code registers itself as
a listener with alarmTimer. The two parameters indicate that the AlarmClock class wants to listen for the timer event
(indicated by the constant TimerEvent.TIMER), and that when the event happens, the AlarmClock class’s onAlarm()
method should be called in response to the event.
In order to actually set the alarm, the AlarmClock class’s setAlarm() method is called, as follows:

135
ACTIONSCRIPT 3.0 DEVELOPER’S GUIDE
Handling events
Last updated 3/21/2011
/**
* Sets the time at which the alarm should go off.
* @param hour The hour portion of the alarm time.
* @param minutes The minutes portion of the alarm time.
* @param message The message to display when the alarm goes off.
* @return The time at which the alarm will go off.
*/
public function setAlarm(hour:Number = 0, minutes:Number = 0, message:String = "Alarm!"):Date
{
this.alarmMessage = message;
var now:Date = new Date();
// Create this time on today's date.
alarmTime = new Date(now.fullYear, now.month, now.date, hour, minutes);
// Determine if the specified time has already passed today.
if (alarmTime <= now)
{
alarmTime.setTime(alarmTime.time + MILLISECONDS_PER_DAY);
}
// Stop the alarm timer if it's currently set.
alarmTimer.reset();
// Calculate how many milliseconds should pass before the alarm should
// go off (the difference between the alarm time and now) and set that
// value as the delay for the alarm timer.
alarmTimer.delay = Math.max(1000, alarmTime.time - now.time);
alarmTimer.start();
return alarmTime;
}
This method does several things, including storing the alarm message and creating a Date object (alarmTime)
representing the actual moment in time when the alarm is to go off. Of most relevance to the current discussion, in the
final several lines of the method, the alarmTimer variable’s timer is set and activated. First, its reset() method is
called, stopping the timer and resetting it in case it is already running. Next, the current time (represented by the now
variable) is subtracted from the alarmTime variable’s value to determine how many milliseconds need to pass before
the alarm goes off. The Timer class doesn’t trigger its timer event at an absolute time, so it is this relative time
difference that is assigned to the delay property of alarmTimer. Finally, the start() method is called to actually start
the timer.
Once the specified amount of time has passed, alarmTimer dispatches the timer event. Because the AlarmClock class
registered its onAlarm() method as a listener for that event, when the timer event happens, onAlarm() is called.
/**
* Called when the timer event is dispatched.
*/
public function onAlarm(event:TimerEvent):void
{
trace("Alarm!");
var alarm:AlarmEvent = new AlarmEvent(this.alarmMessage);
this.dispatchEvent(alarm);
}

136
ACTIONSCRIPT 3.0 DEVELOPER’S GUIDE
Handling events
Last updated 3/21/2011
A method that is registered as an event listener must be defined with the appropriate signature (that is, the set of
parameters and return type of the method). To be a listener for the Timer class’s timer event, a method must define
one parameter whose data type is TimerEvent (flash.events.TimerEvent), a subclass of the Event class. When the Timer
instance calls its event listeners, it passes a TimerEvent instance as the event object.
Notifying others of the alarm
Flash Player 9 and later, Adobe AIR 1.0 and later
Like the Timer class, the AlarmClock class provides an event that allows other code to receive notifications when the
alarm goes off. For a class to use the event-handling framework built into ActionScript, that class must implement the
flash.events.IEventDispatcher interface. Most commonly, this is done by extending the flash.events.EventDispatcher
class, which provides a standard implementation of IEventDispatcher (or by extending one of EventDispatcher’s
subclasses). As described previously, the AlarmClock class extends the SimpleClock class, which (through a chain of
inheritance) extends the EventDispatcher class. All of this means that the AlarmClock class already has built-in
functionality to provide its own events.
Other code can register to be notified of the AlarmClock class’s alarm event by calling the addEventListener()
method that AlarmClock inherits from EventDispatcher. When an AlarmClock instance is ready to notify other code
that its alarm event has been raised, it does so by calling the dispatchEvent() method, which is also inherited from
EventDispatcher.
var alarm:AlarmEvent = new AlarmEvent(this.alarmMessage);
this.dispatchEvent(alarm);
These lines of code are taken from the AlarmClock class’s onAlarm() method (shown in its entirety previously). The
AlarmClock instance’s dispatchEvent() method is called, which in turn notifies all the registered listeners that the
AlarmClock instance’s alarm event has been triggered. The parameter that is passed to dispatchEvent() is the event
object that will be passed along to the listener methods. In this case, it is an instance of the AlarmEvent class, an Event
subclass created specifically for this example.
Providing a custom alarm event
Flash Player 9 and later, Adobe AIR 1.0 and later
All event listeners receive an event object parameter with information about the particular event being triggered. In
many cases, the event object is an instance of the Event class. However, in some cases it is useful to provide additional
information to event listeners. A common way to accomplish this is to define a new class, a subclass of the Event class,
and use an instance of that class as the event object. In this example, an AlarmEvent instance is used as the event object
when the AlarmClock class’s alarm event is dispatched. The AlarmEvent class, shown here, provides additional
information about the alarm event, specifically the alarm message:

137
ACTIONSCRIPT 3.0 DEVELOPER’S GUIDE
Handling events
Last updated 3/21/2011
import flash.events.Event;
/**
* This custom Event class adds a message property to a basic Event.
*/
public class AlarmEvent extends Event
{
/**
* The name of the new AlarmEvent type.
*/
public static const ALARM:String = "alarm";
/**
* A text message that can be passed to an event handler
* with this event object.
*/
public var message:String;
/**
*Constructor.
*@param message The text to display when the alarm goes off.
*/
public function AlarmEvent(message:String = "ALARM!")
{
super(ALARM);
this.message = message;
}
...
}
The best way to create a custom event object class is to define a class that extends the Event class, as shown in the
preceding example. To supplement the inherited functionality, the AlarmEvent class defines a property message that
contains the text of the alarm message associated with the event; the message value is passed in as a parameter in the
AlarmEvent constructor. The AlarmEvent class also defines the constant ALARM, which can be used to refer to the
specific event (alarm) when calling the AlarmClock class’s addEventListener() method.
In addition to adding custom functionality, every Event subclass must override the inherited clone() method as part
of the ActionScript event-handling framework. Event subclasses can also optionally override the inherited
toString() method to include the custom event’s properties in the value returned when the toString() method is
called.

138
ACTIONSCRIPT 3.0 DEVELOPER’S GUIDE
Handling events
Last updated 3/21/2011
/**
* Creates and returns a copy of the current instance.
* @return A copy of the current instance.
*/
public override function clone():Event
{
return new AlarmEvent(message);
}
/**
* Returns a String containing all the properties of the current
* instance.
* @return A string representation of the current instance.
*/
public override function toString():String
{
return formatToString("AlarmEvent", "type", "bubbles", "cancelable", "eventPhase",
"message");
}
The overridden clone() method needs to return a new instance of the custom Event subclass, with all the custom
properties set to match the current instance. In the overridden toString() method, the utility method
formatToString() (inherited from Event) is used to provide a string with the name of the custom type, as well as the
names and values of all its properties.

139
Last updated 3/21/2011
Chapter 8: Working with application
domains
Flash Player 9 and later, Adobe AIR 1.0 and later
The purpose of the ApplicationDomain class is to store a table of ActionScript 3.0 definitions. All code in a SWF file
is defined to exist in an application domain. You use application domains to partition classes that are in the same
security domain. This allows multiple definitions of the same class to exist and also lets children reuse parent
definitions.
You can use application domains when loading an external SWF file written in ActionScript 3.0 using the Loader class
API. (Note that you cannot use application domains when loading an image or SWF file written in ActionScript 1.0 or
ActionScript 2.0.) All ActionScript 3.0 definitions contained in the loaded class are stored in the application domain.
When loading the SWF file, you can specify that the file be included in the same application domain as that of the
Loader object, by setting the applicationDomain parameter of the LoaderContext object to
ApplicationDomain.currentDomain. By putting the loaded SWF file in the same application domain, you can
access its classes directly. This can be useful if you are loading a SWF file that contains embedded media, which you
can access via their associated class names, or if you want to access the loaded SWF file’s methods.
The following example assumes it has access to a separate Greeter.swf file that defines a public method named
welcome():

140
ACTIONSCRIPT 3.0 DEVELOPER’S GUIDE
Working with application domains
Last updated 3/21/2011
package
{
import flash.display.Loader;
import flash.display.Sprite;
import flash.events.*;
import flash.net.URLRequest;
import flash.system.ApplicationDomain;
import flash.system.LoaderContext;
public class ApplicationDomainExample extends Sprite
{
private var ldr:Loader;
public function ApplicationDomainExample()
{
ldr = new Loader();
var req:URLRequest = new URLRequest("Greeter.swf");
var ldrContext:LoaderContext = new LoaderContext(false,
ApplicationDomain.currentDomain);
ldr.contentLoaderInfo.addEventListener(Event.COMPLETE, completeHandler);
ldr.load(req, ldrContext);
}
private function completeHandler(event:Event):void
{
var myGreeter:Class = ApplicationDomain.currentDomain.getDefinition("Greeter") as
Class;
var myGreeter:Greeter = Greeter(event.target.content);
var message:String = myGreeter.welcome("Tommy");
trace(message); // Hello, Tommy
}
}
}
Also see the ApplicationDomain class example of the ActionScript 3.0 Reference for the Adobe Flash Platform.
Other things to keep in mind when you work with application domains include the following:
•All code in a SWF file is defined to exist in an application domain. The current domain is where your main
application runs. The system domain contains all application domains, including the current domain, which means
that it contains all Flash Player classes.
•All application domains, except the system domain, have an associated parent domain. The parent domain for your
main application's application domain is the system domain. Loaded classes are defined only when their parent
doesn't already define them. You cannot override a loaded class definition with a newer definition.
The following diagram shows an application that loads content from various SWF files within a single domain,
domain1.com. Depending on the content you load, different application domains can be used. The text that follows
describes the logic used to set the appropriate application domain for each SWF file in the application.
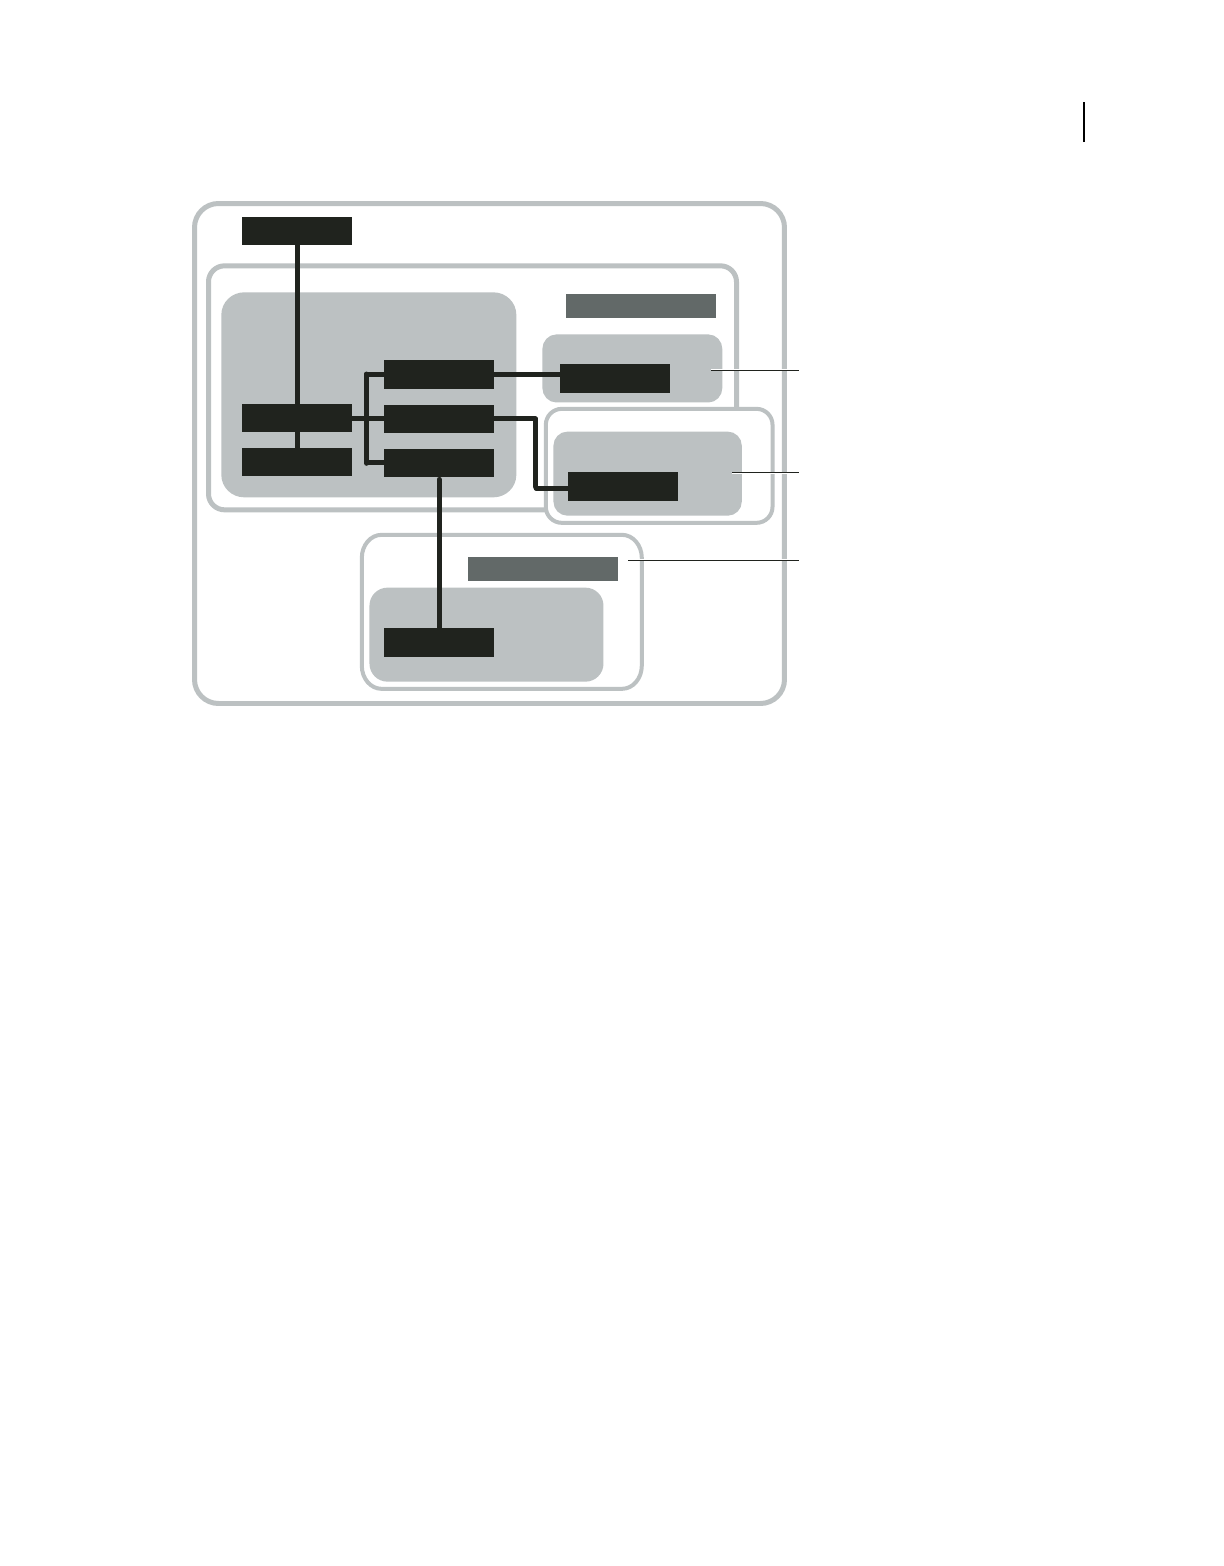
141
ACTIONSCRIPT 3.0 DEVELOPER’S GUIDE
Working with application domains
Last updated 3/21/2011
A. Usage A B. Usage B C. Usage C
The main application file is application1.swf. It contains Loader objects that load content from other SWF files. In this
scenario, the current domain is Application domain 1. Usage A, usage B, and usage C illustrate different techniques
for setting the appropriate application domain for each SWF file in an application.
Usage A Partition the child SWF file by creating a child of the system domain. In the diagram, Application domain 2
is created as a child of the system domain.The application2.swf file is loaded in Application domain 2, and its class
definitions are thus partitioned from the classes defined in application1.swf.
One use of this technique is to have an old application dynamically loading a newer version of the same application
without conflict. There is no conflict because although the same class names are used, they are partitioned into
different application domains.
The following code creates an application domain that is a child of the system domain, and starts loading a SWF using
that application domain:
var appDomainA:ApplicationDomain = new ApplicationDomain();
var contextA:LoaderContext = new LoaderContext(false, appDomainA);
var loaderA:Loader = new Loader();
loaderA.load(new URLRequest("application2.swf"), contextA);
Usage B: Add new class definitions to current class definitions. The application domain of module1.swf is set to the
current domain (Application domain 1). This lets you add to the application’s current set of class definitions with new
class definitions. This could be used for a run-time shared library of the main application. The loaded SWF is treated
as a remote shared library (RSL). Use this technique to load RSLs by a preloader before the application starts.
The following code loads a SWF, setting its application domain to the current domain:
Loader
Loader
Loader
Application
Loader
Stage
Module
Module
Application domain 1
Security domain: domain1.com
module1.swf
module3.swf
Application domain 3
A
C
B
Module
application2.swf
application1.swf
Application domain 2
mx.core.Application
mx.core.Application

142
ACTIONSCRIPT 3.0 DEVELOPER’S GUIDE
Working with application domains
Last updated 3/21/2011
var appDomainB:ApplicationDomain = ApplicationDomain.currentDomain;
var contextB:LoaderContext = new LoaderContext(false, appDomainB);
var loaderB:Loader = new Loader();
loaderB.load(new URLRequest("module1.swf"), contextB);
Usage C: Use the parent’s class definitions by creating a new child domain of the current domain. The application
domain of module3.swf is a child of the current domain, and the child uses the parent's versions of all classes. One use
of this technique might be a module of a multiple-screen rich Internet application (RIA), loaded as a child of the main
application, that uses the main application's types. If you can ensure that all classes are always updated to be backward
compatible, and that the loading application is always newer than the things it loads, the children will use the parent
versions. Having a new application domain also allows you to unload all the class definitions for garbage collection, if
you can ensure that you do not continue to have references to the child SWF.
This technique lets loaded modules share the loader's singleton objects and static class members.
The following code creates a new child domain of the current domain, and starts loading a SWF using that application
domain:
var appDomainC:ApplicationDomain = new ApplicationDomain(ApplicationDomain.currentDomain);
var contextC:LoaderContext = new LoaderContext(false, appDomainC);
var loaderC:Loader = new Loader();
loaderC.load(new URLRequest("module3.swf"), contextC);
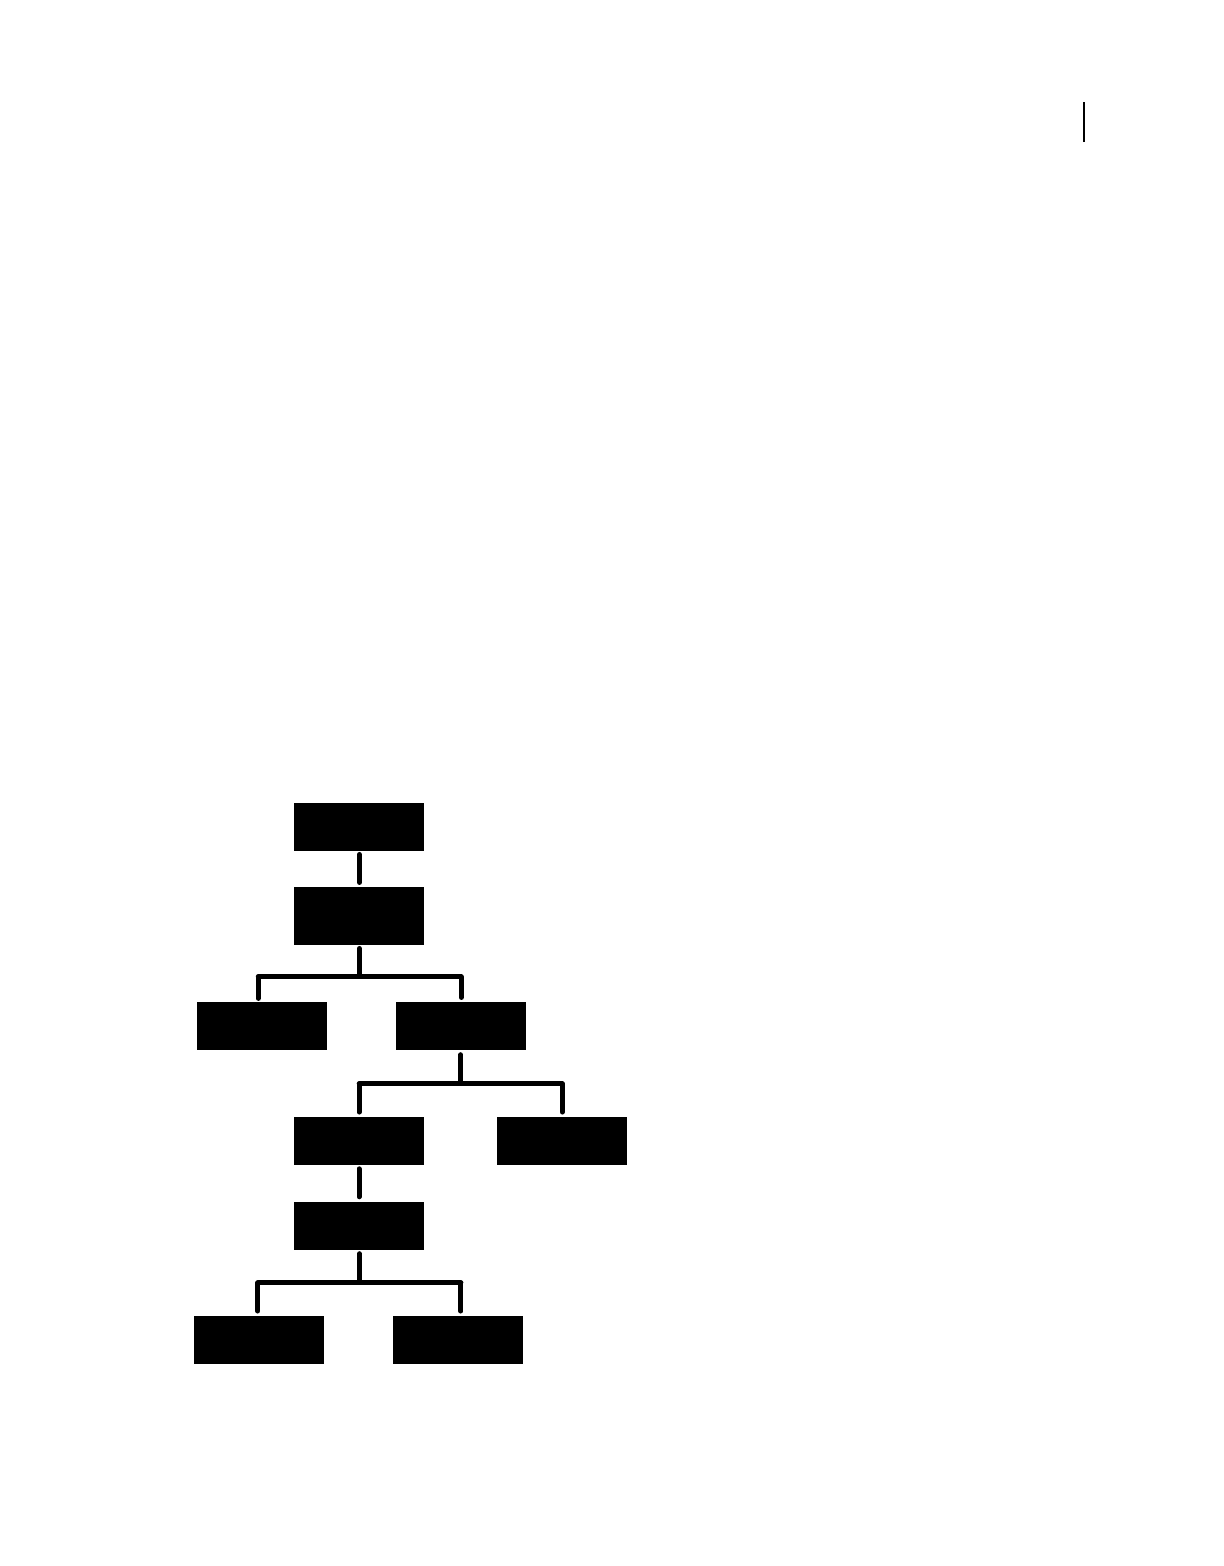
143
Last updated 3/21/2011
Chapter 9: Display programming
Flash Player 9 and later, Adobe AIR 1.0 and later
Visual elements are programmed in Adobe® ActionScript® 3.0 by working with display objects on the display stage. For
example, you can add, move, remove, and order display objects, apply filters and masks, draw vector and bitmap
graphics, and perform three-dimensional transformations using the ActionScript display programming API. The
primary classes used for display programming are part of the flash.display package.
Note: Adobe® AIR™ provides the HTMLoader object for rendering and displaying HTML content. The HTMLLoader
renders the visual elements of the HTML DOM as a single display object. You cannot access the individual elements of
the DOM directly through the ActionScript display list hierarchy. Instead, you access these DOM elements using the
separate DOM API provided by the HTMLLoader.
Basics of display programming
Flash Player 9 and later, Adobe AIR 1.0 and later
Each application built with ActionScript 3.0 has a hierarchy of displayed objects known as the display list, illustrated
below. The display list contains all the visible elements in the application.
Display Object
Container
Display Object
Display Object
Container
Display Object
Container
Instance of
the main class of
the SWF le
Stage
Stage
Display Object
Container
Display Object
Display Object

144
ACTIONSCRIPT 3.0 DEVELOPER’S GUIDE
Display programming
Last updated 3/21/2011
As the illustration shows, display elements fall into one or more of the following groups:
•The Stage
The Stage is the base container of display objects. Each application has one Stage object, which contains all on-
screen display objects. The Stage is the top-level container and is at the top of the display list hierarchy:
Each SWF file has an associated ActionScript class, known as the main class of the SWF file. When a SWF file opens
in Flash Player or Adobe AIR, Flash Player or AIR calls the constructor function for that class and the instance that
is created (which is always a type of display object) is added as a child of the Stage object. The main class of a SWF
file always extends the Sprite class (for more information, see “Advantages of the display list approach” on
page 148).
You can access the Stage through the stage property of any DisplayObject instance. For more information, see
“Setting Stage properties” on page 156.
•Display objects
In ActionScript 3.0, all elements that appear on screen in an application are types of display objects. The
flash.display package includes a DisplayObject class, which is a base class extended by a number of other classes.
These different classes represent different types of display objects, such as vector shapes, movie clips, and text fields,
to name a few. For an overview of these classes, see “Advantages of the display list approach” on page 148.
•Display object containers
Display object containers are special types of display objects that, in addition to having their own visual
representation, can also contain child objects that are also display objects.
The DisplayObjectContainer class is a subclass of the DisplayObject class. A DisplayObjectContainer object can
contain multiple display objects in its childlist. For example, the following illustration shows a type of
DisplayObjectContainer object known as a Sprite that contains various display objects:
A. A SimpleButton object. This type of display object has different “up,” “down,” and “over” states. B. A Bitmap object. In this case, the
Bitmap object was loaded from an external JPEG through a Loader object. C. A Shape object. The “picture frame” contains a rounded
rectangle that is drawn in ActionScript. This Shape object has a Drop Shadow filter applied to it. D. A TextField object.
In the context of discussing display objects, DisplayObjectContainer objects are also known as display object
containers or simply containers. As noted earlier, the Stage is a display object container.
A
B
DC

145
ACTIONSCRIPT 3.0 DEVELOPER’S GUIDE
Display programming
Last updated 3/21/2011
Although all visible display objects inherit from the DisplayObject class, the type of each is of a specific subclass of
DisplayObject class. For example, there is a constructor function for the Shape class or the Video class, but there is
no constructor function for the DisplayObject class.
Important concepts and terms
The following reference list contains important terms that you will encounter when programming ActionScript
graphics:
Alpha The color value representing the amount of transparency (or more correctly, the amount of opacity) in a color.
For example, a color with an alpha channel value of 60% only shows 60% of its full strength, and is 40% transparent.
Bitmap graphic A graphic that is defined in the computer as a grid (rows and columns) of colored pixels. Commonly
bitmap graphics include digital photos and similar images.
Blending mode A specification of how the contents of two overlapping images should interact. Commonly an opaque
image on top of another image simply blocks the image underneath so that it isn’t visible at all; however, different
blending modes cause the colors of the images to blend together in different ways so the resulting content is some
combination of the two images.
Display list The hierarchy of display objects that will be rendered as visible screen content by Flash Player and AIR.
The Stage is the root of the display list, and all the display objects that are attached to the Stage or one of its children
form the display list (even if the object isn’t actually rendered, for example if it’s outside the boundaries of the Stage).
Display object An object which represents some type of visual content in Flash Player or AIR. Only display objects can
be included in the display list, and all display object classes are subclasses of the DisplayObject class.
Display object container A special type of display object which can contain child display objects in addition to
(generally) having its own visual representation.
Main class of the SWF file The class that defines the behavior for the outermost display object in a SWF file, which
conceptually is the class for the SWF file itself. For instance, in a SWF created in Flash authoring, the main class is the
document class. It has a “main timeline” which contains all other timelines; the main class of the SWF file is the class
of which the main timeline is an instance.
Masking A technique of hiding from view certain parts of an image (or conversely, only allowing certain parts of an
image to display). The portions of the mask image become transparent, so content underneath shows through. The
term is related to painter’s masking tape that is used to prevent paint from being applied to certain areas.
Stage The visual container that is the base or background of all visual content in a SWF.
Transformation An adjustment to a visual characteristic of a graphic, such as rotating the object, altering its scale,
skewing or distorting its shape, or altering its color.
Vector graphic A graphic that is defined in the computer as lines and shapes drawn with particular characteristics
(such as thickness, length, size, angle, and position).

146
ACTIONSCRIPT 3.0 DEVELOPER’S GUIDE
Display programming
Last updated 3/21/2011
Core display classes
Flash Player 9 and later, Adobe AIR 1.0 and later
The ActionScript 3.0 flash.display package includes classes for visual objects that can appear in Flash Player or AIR.
The following illustration shows the subclass relationships of these core display object classes.
The illustration shows the class inheritance of display object classes. Note that some of these classes, specifically
StaticText, TextField, and Video, are not in the flash.display package, but they still inherit from the DisplayObject class.
All classes that extend the DisplayObject class inherit its methods and properties. For more information, see
“Properties and methods of the DisplayObject class” on page 150.
You can instantiate objects of the following classes contained in the flash.display package:
•Bitmap—You use the Bitmap class to define bitmap objects, either loaded from external files or rendered through
ActionScript. You can load bitmaps from external files through the Loader class. You can load GIF, JPG, or PNG
files. You can also create a BitmapData object with custom data and then create a Bitmap object that uses that data.
You can use the methods of the BitmapData class to alter bitmaps, whether they are loaded or created in
ActionScript. For more information, see “Loading display objects” on page 189 and “Working with bitmaps” on
page 232.
•Loader—You use the Loader class to load external assets (either SWF files or graphics). For more information, see
“Loading display content dynamically” on page 189.
•Shape—You use the Shape class to create vector graphics, such as rectangles, lines, circles, and so on. For more
information, see “Using the drawing API” on page 211.
•SimpleButton—A SimpleButton object is the ActionScript representation of a button symbol created in the Flash
authoring tool. A SimpleButton instance has four button states: up, down, over, and hit test (the area that responds
to mouse and keyboard events).
•Sprite—A Sprite object can contain graphics of its own, and it can contain child display objects. (The Sprite class
extends the DisplayObjectContainer class). For more information, see “Working with display object containers” on
page 151 and “Using the drawing API” on page 211.
MorphShape
DisplayObject
AVM1Movie Shape StaticText Video
DisplayObjectContainer TextField
Bitmap InteractiveObject
SimpleButton
StageLoader
MovieClip
Sprite

147
ACTIONSCRIPT 3.0 DEVELOPER’S GUIDE
Display programming
Last updated 3/21/2011
•MovieClip—A MovieClip object is the ActionScript form of a movie clip symbol created in the Flash authoring
tool. In practice, a MovieClip is similar to a Sprite object, except that it also has a timeline. For more information,
see “Working with movie clips” on page 310.
The following classes, which are not in the flash.display package, are subclasses of the DisplayObject class:
•The TextField class, included in the flash.text package, is a display object for text display and input. For more
information, see “Basics of Working with text” on page 349.
•The TextLine class, included in the flash.text.engine package, is the display object used to display lines of text
composed by the Flash Text Engine and the Text Layout Framework. For more information, see “Using the Flash
Text Engine” on page 375 and “Using the Text Layout Framework” on page 404.
•The Video class, included in the flash.media package, is the display object used for displaying video files. For more
information, see “Working with video” on page 452.
The following classes in the flash.display package extend the DisplayObject class, but you cannot create instances of
them. Instead, they serve as parent classes for other display objects, combining common functionality into a single
class.
•AVM1Movie—The AVM1Movie class is used to represent loaded SWF files that are authored in ActionScript 1.0
and 2.0.
•DisplayObjectContainer—The Loader, Stage, Sprite, and MovieClip classes each extend the
DisplayObjectContainer class. For more information, see “Working with display object containers” on page 151.
•InteractiveObject—InteractiveObject is the base class for all objects used to interact with the mouse and keyboard.
SimpleButton, TextField, Loader, Sprite, Stage, and MovieClip objects are all subclasses of the InteractiveObject
class. For more information on creating mouse and keyboard interaction, see “Basics of user interaction” on
page 523.
•MorphShape—These objects are created when you create a shape tween in the Flash authoring tool. You cannot
instantiate them using ActionScript, but they can be accessed from the display list.
•Stage—The Stage class extends the DisplayObjectContainer class. There is one Stage instance for an application,
and it is at the top of the display list hierarchy. To access the Stage, use the stage property of any DisplayObject
instance. For more information, see “Setting Stage properties” on page 156.
Also, the StaticText class, in the flash.text package, extends the DisplayObject class, but you cannot create an instance
of it in code. Static text fields are created only in Flash.
The following classes are not display objects or display object containers, and do not appear in the display list, but do
display graphics on the stage. These classes draw into a rectangle, called a viewport, positioned relative to the stage.
•StageVideo—The StageVideo class displays video content, using hardware acceleration, when possible. This class
is available starting in Flash Player 10.2 and AIR 2.5 (in the AIR for TV profiles). For more information, see “Using
the StageVideo class for hardware-accelerated rendering” on page 486.
•StageWebView—The StageWebView class displays HTML content. This class is available starting in AIR 2.5. For
more infromation, see “StageWebView objects” on page 997.

148
ACTIONSCRIPT 3.0 DEVELOPER’S GUIDE
Display programming
Last updated 3/21/2011
Advantages of the display list approach
Flash Player 9 and later, Adobe AIR 1.0 and later
In ActionScript 3.0, there are separate classes for different types of display objects. In ActionScript 1.0 and 2.0, many
of the same types of objects are all included in one class: the MovieClip class.
This individualization of classes and the hierarchical structure of display lists have the following benefits:
•More efficient rendering and reduced memory usage
•Improved depth management
•Full traversal of the display list
•Off-list display objects
•Easier subclassing of display objects
More efficient rendering and smaller file sizes
Flash Player 9 and later, Adobe AIR 1.0 and later
In ActionScript 1.0 and 2.0, you could draw shapes only in a MovieClip object. In ActionScript 3.0, there are simpler
display object classes in which you can draw shapes. Because these ActionScript 3.0 display object classes do not
include the full set of methods and properties that a MovieClip object includes, they are less taxing on memory and
processor resources.
For example, each MovieClip object includes properties for the timeline of the movie clip, whereas a Shape object does
not. The properties for managing the timeline can use a lot of memory and processor resources. In ActionScript 3.0,
using the Shape object results in better performance. The Shape object has less overhead than the more complex
MovieClip object. Flash Player and AIR do not need to manage unused MovieClip properties, which improves speed
and reduces the memory footprint the object uses.
Improved depth management
Flash Player 9 and later, Adobe AIR 1.0 and later
In ActionScript 1.0 and 2.0, depth was managed through a linear depth management scheme and methods such as
getNextHighestDepth().
ActionScript 3.0 includes the DisplayObjectContainer class, which has more convenient methods and properties for
managing the depth of display objects.
In ActionScript 3.0, when you move a display object to a new position in the child list of a DisplayObjectContainer
instance, the other children in the display object container are repositioned automatically and assigned appropriate
child index positions in the display object container.
Also, in ActionScript 3.0 it is always possible to discover all of the child objects of any display object container. Every
DisplayObjectContainer instance has a numChildren property, which lists the number of children in the display object
container. And since the child list of a display object container is always an indexed list, you can examine every object
in the list from index position 0 through the last index position (numChildren - 1). This was not possible with the
methods and properties of a MovieClip object in ActionScript 1.0 and 2.0.

149
ACTIONSCRIPT 3.0 DEVELOPER’S GUIDE
Display programming
Last updated 3/21/2011
In ActionScript 3.0, you can easily traverse the display list sequentially; there are no gaps in the index numbers of a
child list of a display object container. Traversing the display list and managing the depth of objects is much easier than
was possible in ActionScript 1.0 and 2.0. In ActionScript 1.0 and 2.0, a movie clip could contain objects with
intermittent gaps in the depth order, which could make it difficult to traverse the list of object. In ActionScript 3.0,
each child list of a display object container is cached internally as an array, resulting in very fast lookups (by index).
Looping through all children of a display object container is also very fast.
In ActionScript 3.0, you can also access children in a display object container by using the getChildByName() method
of the DisplayObjectContainer class.
Full traversal of the display list
Flash Player 9 and later, Adobe AIR 1.0 and later
In ActionScript 1.0 and 2.0, you could not access some objects, such as vector shapes, that were drawn in the Flash
authoring tool. In ActionScript 3.0, you can access all objects on the display list—both those created using ActionScript
and all display objects created in the Flash authoring tool. For details, see “Traversing the display list” on page 155.
Off-list display objects
Flash Player 9 and later, Adobe AIR 1.0 and later
In ActionScript 3.0, you can create display objects that are not on the visible display list. These are known as off-list
display objects. A display object is added to the visible display list only when you call the addChild() or
addChildAt() method of a DisplayObjectContainer instance that has already been added to the display list.
You can use off-list display objects to assemble complex display objects, such as those that have multiple display object
containers containing multiple display objects. By keeping display objects off-list, you can assemble complicated
objects without using the processing time to render these display objects. You can then add an off-list display object
to the display list when it is needed. Also, you can move a child of a display object container on and off the display list
and to any desired position in the display list at will.
Easier subclassing of display objects
Flash Player 9 and later, Adobe AIR 1.0 and later
In ActionScript 1.0 and 2.0, you would often have to add new MovieClip objects to a SWF file to create basic shapes
or to display bitmaps. In ActionScript 3.0, the DisplayObject class includes many built-in subclasses, including Shape
and Bitmap. Because the classes in ActionScript 3.0 are more specialized for specific types of objects, it is easier to
create basic subclasses of the built-in classes.
For example, in order to draw a circle in ActionScript 2.0, you could create a CustomCircle class that extends the
MovieClip class when an object of the custom class is instantiated. However, that class would also include a number
of properties and methods from the MovieClip class (such as totalFrames) that do not apply to the class. In
ActionScript 3.0, however, you can create a CustomCircle class that extends the Shape object, and as such does not
include the unrelated properties and methods that are contained in the MovieClip class. The following code shows an
example of a CustomCircle class:

150
ACTIONSCRIPT 3.0 DEVELOPER’S GUIDE
Display programming
Last updated 3/21/2011
import flash.display.*;
public class CustomCircle extends Shape
{
var xPos:Number;
var yPos:Number;
var radius:Number;
var color:uint;
public function CustomCircle(xInput:Number,
yInput:Number,
rInput:Number,
colorInput:uint)
{
xPos = xInput;
yPos = yInput;
radius = rInput;
color = colorInput;
this.graphics.beginFill(color);
this.graphics.drawCircle(xPos, yPos, radius);
}
}
Working with display objects
Flash Player 9 and later, Adobe AIR 1.0 and later
Now that you understand the basic concepts of the Stage, display objects, display object containers, and the display list,
this section provides you with some more specific information about working with display objects in ActionScript 3.0.
Properties and methods of the DisplayObject class
Flash Player 9 and later, Adobe AIR 1.0 and later
All display objects are subclasses of the DisplayObject class, and as such they inherit the properties and methods of the
DisplayObject class. The properties inherited are basic properties that apply to all display objects. For example, each
display object has an x property and a y property that specifies the object’s position in its display object container.
You cannot create a DisplayObject instance using the DisplayObject class constructor. You must create another type
of object (an object that is a subclass of the DisplayObject class), such as a Sprite, to instantiate an object with the new
operator. Also, if you want to create a custom display object class, you must create a subclass of one of the display object
subclasses that has a usable constructor function (such as the Shape class or the Sprite class). For more information,
see the DisplayObject class description in the ActionScript 3.0 Reference for the Adobe Flash Platform.
Adding display objects to the display list
Flash Player 9 and later, Adobe AIR 1.0 and later
When you instantiate a display object, it will not appear on-screen (on the Stage) until you add the display object
instance to a display object container that is on the display list. For example, in the following code, the myText
TextField object would not be visible if you omitted the last line of code. In the last line of code, the this keyword must
refer to a display object container that is already added to the display list.

151
ACTIONSCRIPT 3.0 DEVELOPER’S GUIDE
Display programming
Last updated 3/21/2011
import flash.display.*;
import flash.text.TextField;
var myText:TextField = new TextField();
myText.text = "Buenos dias.";
this.addChild(myText);
When you add any visual element to the Stage, that element becomes a child of the Stage object. The first SWF file
loaded in an application (for example, the one that you embed in an HTML page) is automatically added as a child of
the Stage. It can be an object of any type that extends the Sprite class.
Any display objects that you create without using ActionScript—for example, by adding an MXML tag in a Flex MXML
file or by placing an item on the Stage in Flash Professional—are added to the display list. Although you do not add
these display objects through ActionScript, you can access them through ActionScript. For example, the following
code adjusts the width of an object named button1 that was added in the authoring tool (not through ActionScript):
button1.width = 200;
Working with display object containers
Flash Player 9 and later, Adobe AIR 1.0 and later
If a DisplayObjectContainer object is deleted from the display list, or if it is moved or transformed in some other way,
each display object in the DisplayObjectContainer is also deleted, moved, or transformed.
A display object container is itself a type of display object—it can be added to another display object container. For
example, the following image shows a display object container, pictureScreen, that contains one outline shape and
four other display object containers (of type PictureFrame):

152
ACTIONSCRIPT 3.0 DEVELOPER’S GUIDE
Display programming
Last updated 3/21/2011
A. A shape defining the border of the pictureScreen display object container B. Four display object containers that are children of the
pictureScreen object
In order to have a display object appear in the display list, you must add it to a display object container that is on the
display list. You do this by using the addChild() method or the addChildAt() method of the container object. For
example, without the final line of the following code, the myTextField object would not be displayed:
var myTextField:TextField = new TextField();
myTextField.text = "hello";
this.root.addChild(myTextField);
In this code sample, this.root points to the MovieClip display object container that contains the code. In your actual
code, you may specify a different container.
Use the addChildAt() method to add the child to a specific position in the child list of the display object container.
These zero-based index positions in the child list relate to the layering (the front-to-back order) of the display objects.
For example, consider the following three display objects. Each object was created from a custom class called Ball.
A B

153
ACTIONSCRIPT 3.0 DEVELOPER’S GUIDE
Display programming
Last updated 3/21/2011
The layering of these display objects in their container can be adjusted using the addChildAt() method. For example,
consider the following code:
ball_A = new Ball(0xFFCC00, "a");
ball_A.name = "ball_A";
ball_A.x = 20;
ball_A.y = 20;
container.addChild(ball_A);
ball_B = new Ball(0xFFCC00, "b");
ball_B.name = "ball_B";
ball_B.x = 70;
ball_B.y = 20;
container.addChild(ball_B);
ball_C = new Ball(0xFFCC00, "c");
ball_C.name = "ball_C";
ball_C.x = 40;
ball_C.y = 60;
container.addChildAt(ball_C, 1);
After executing this code, the display objects are positioned as follows in the container DisplayObjectContainer
object. Notice the layering of the objects.
To reposition an object to the top of the display list, simply re-add it to the list. For example, after the previous code,
to move ball_A to the top of the stack, use this line of code:
container.addChild(ball_A);
This code effectively removes ball_A from its location in container’s display list, and re-adds it to the top of the list—
which has the end result of moving it to the top of the stack.
You can use the getChildAt() method to verify the layer order of the display objects. The getChildAt() method
returns child objects of a container based on the index number you pass it. For example, the following code reveals
names of display objects at different positions in the child list of the container DisplayObjectContainer object:
trace(container.getChildAt(0).name); // ball_A
trace(container.getChildAt(1).name); // ball_C
trace(container.getChildAt(2).name); // ball_B
If you remove a display object from the parent container’s child list, the higher elements on the list each move down a
position in the child index. For example, continuing with the previous code, the following code shows how the display
object that was at position 2 in the container DisplayObjectContainer moves to position 1 if a display object that is
lower in the child list is removed:

154
ACTIONSCRIPT 3.0 DEVELOPER’S GUIDE
Display programming
Last updated 3/21/2011
container.removeChild(ball_C);
trace(container.getChildAt(0).name); // ball_A
trace(container.getChildAt(1).name); // ball_B
The removeChild() and removeChildAt() methods do not delete a display object instance entirely. They simply
remove it from the child list of the container. The instance can still be referenced by another variable. (Use the delete
operator to completely remove an object.)
Because a display object has only one parent container, you can add an instance of a display object to only one display
object container. For example, the following code shows that the display object tf1 can exist in only one container (in
this case, a Sprite, which extends the DisplayObjectContainer class):
tf1:TextField = new TextField();
tf2:TextField = new TextField();
tf1.name = "text 1";
tf2.name = "text 2";
container1:Sprite = new Sprite();
container2:Sprite = new Sprite();
container1.addChild(tf1);
container1.addChild(tf2);
container2.addChild(tf1);
trace(container1.numChildren); // 1
trace(container1.getChildAt(0).name); // text 2
trace(container2.numChildren); // 1
trace(container2.getChildAt(0).name); // text 1
If you add a display object that is contained in one display object container to another display object container, it is
removed from the first display object container’s child list.
In addition to the methods described above, the DisplayObjectContainer class defines several methods for working
with child display objects, including the following:
•contains(): Determines whether a display object is a child of a DisplayObjectContainer.
•getChildByName(): Retrieves a display object by name.
•getChildIndex(): Returns the index position of a display object.
•setChildIndex(): Changes the position of a child display object.
•swapChildren(): Swaps the front-to-back order of two display objects.
•swapChildrenAt(): Swaps the front-to-back order of two display objects, specified by their index values.
For more information, see the relevant entries in the ActionScript 3.0 Reference for the Adobe Flash Platform.
Recall that a display object that is off the display list—one that is not included in a display object container that is a
child of the Stage—is known as an off-list display object.
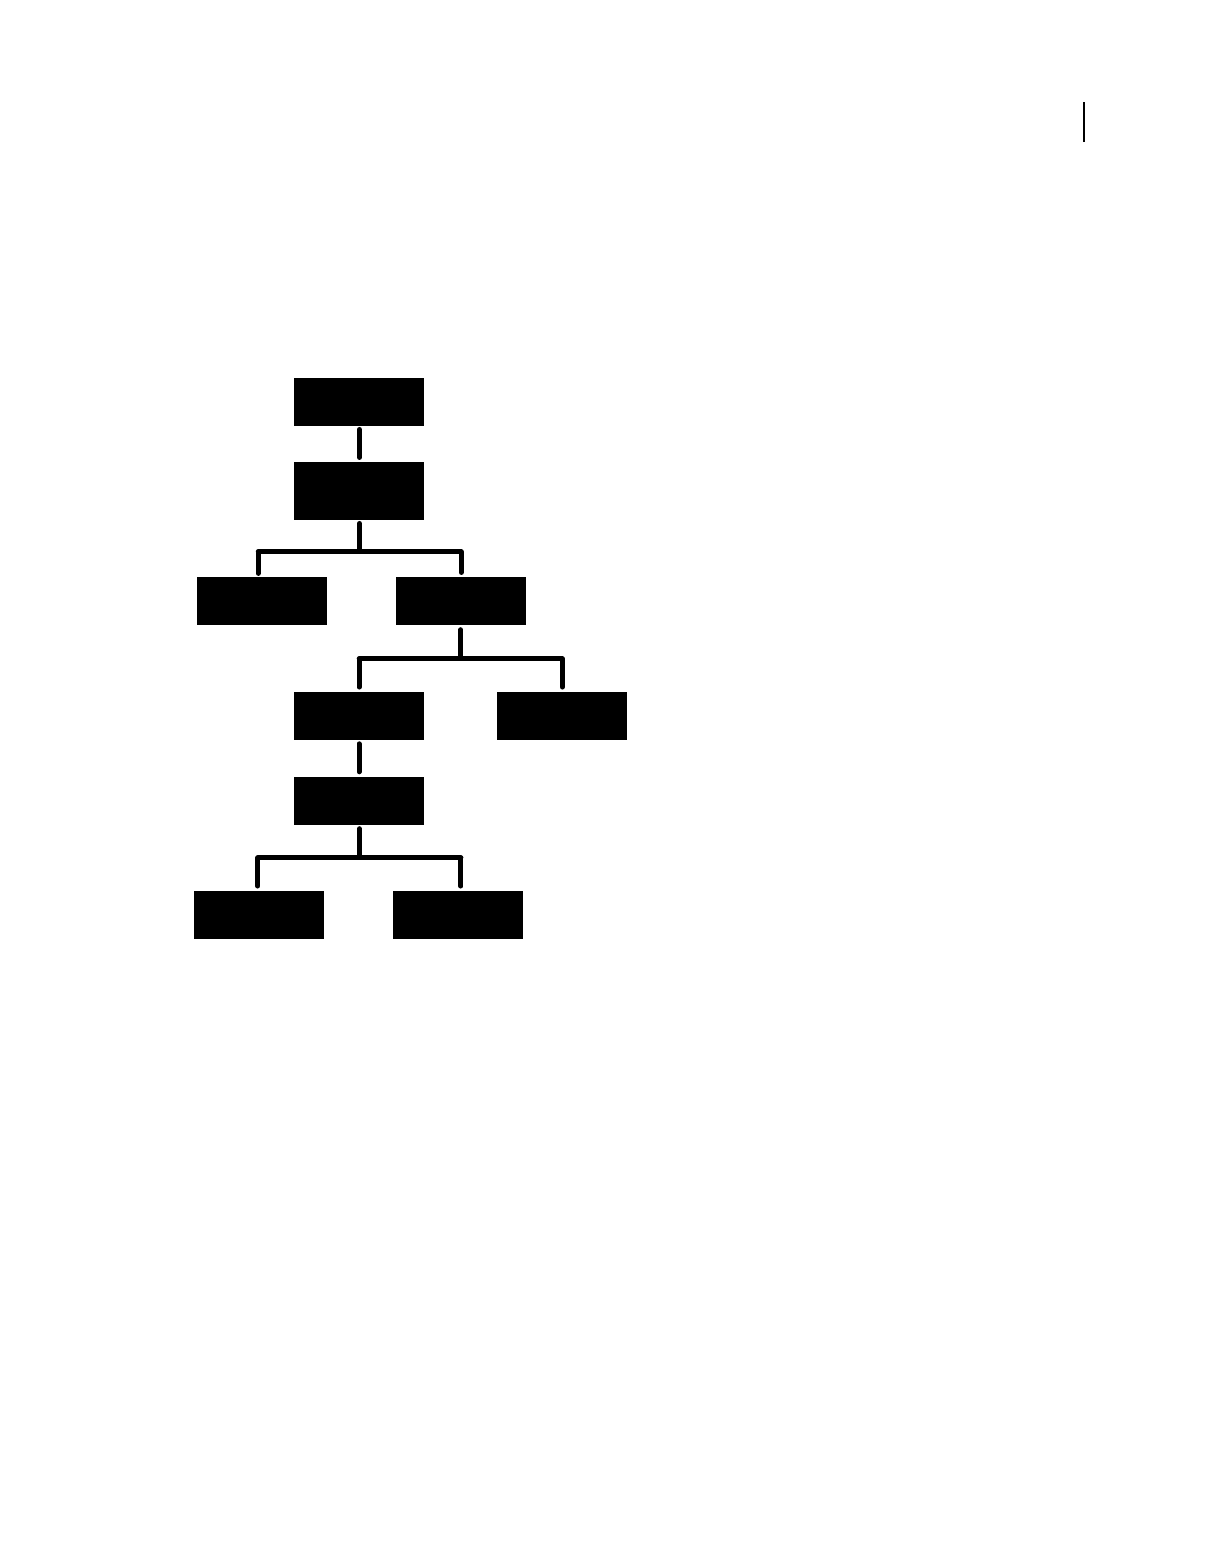
155
ACTIONSCRIPT 3.0 DEVELOPER’S GUIDE
Display programming
Last updated 3/21/2011
Traversing the display list
Flash Player 9 and later, Adobe AIR 1.0 and later
As you’ve seen, the display list is a tree structure. At the top of the tree is the Stage, which can contain multiple display
objects. Those display objects that are themselves display object containers can contain other display objects, or display
object containers.
The DisplayObjectContainer class includes properties and methods for traversing the display list, by means of the child
lists of display object containers. For example, consider the following code, which adds two display objects, title and
pict, to the container object (which is a Sprite, and the Sprite class extends the DisplayObjectContainer class):
var container:Sprite = new Sprite();
var title:TextField = new TextField();
title.text = "Hello";
var pict:Loader = new Loader();
var url:URLRequest = new URLRequest("banana.jpg");
pict.load(url);
pict.name = "banana loader";
container.addChild(title);
container.addChild(pict);
The getChildAt() method returns the child of the display list at a specific index position:
trace(container.getChildAt(0) is TextField); // true
You can also access child objects by name. Each display object has a name property, and if you don’t assign it, Flash
Player or AIR assigns a default value, such as "instance1". For example, the following code shows how to use the
getChildByName() method to access a child display object with the name "banana loader":
Display Object
Container
Display Object
Display Object
Container
Display Object
Container
Instance of
the main class of
the SWF le
Stage
Stage
Display Object
Container
Display Object
Display Object

156
ACTIONSCRIPT 3.0 DEVELOPER’S GUIDE
Display programming
Last updated 3/21/2011
trace(container.getChildByName("banana loader") is Loader); // true
Using the getChildByName() method can result in slower performance than using the getChildAt() method.
Since a display object container can contain other display object containers as child objects in its display list, you can
traverse the full display list of the application as a tree. For example, in the code excerpt shown earlier, once the load
operation for the pict Loader object is complete, the pict object will have one child display object, which is the
bitmap, loaded. To access this bitmap display object, you can write pict.getChildAt(0). You can also write
container.getChildAt(0).getChildAt(0) (since container.getChildAt(0) == pict).
The following function provides an indented trace() output of the display list from a display object container:
function traceDisplayList(container:DisplayObjectContainer,indentString:String = ""):void
{
var child:DisplayObject;
for (var i:uint=0; i < container.numChildren; i++)
{
child = container.getChildAt(i);
trace(indentString, child, child.name);
if (container.getChildAt(i) is DisplayObjectContainer)
{
traceDisplayList(DisplayObjectContainer(child), indentString + "")
}
}
}
Adobe Flex
If you use Flex, you should know that Flex defines many component display object classes, and these classes override
the display list access methods of the DisplayObjectContainer class. For example, the Container class of the mx.core
package overrides the addChild() method and other methods of the DisplayObjectContainer class (which the
Container class extends). In the case of the addChild() method, the class overrides the method in such a way that you
cannot add all types of display objects to a Container instance in Flex. The overridden method, in this case, requires
that the child object that you are adding be a type of mx.core.UIComponent object.
Setting Stage properties
Flash Player 9 and later, Adobe AIR 1.0 and later
The Stage class overrides most properties and methods of the DisplayObject class. If you call one of these overridden
properties or methods, Flash Player and AIR throw an exception. For example, the Stage object does not have x or y
properties, since its position is fixed as the main container for the application. The x and y properties refer to the
position of a display object relative to its container, and since the Stage is not contained in another display object
container, these properties do not apply.
Note: Some properties and methods of the Stage class are only available to display objects that are in the same security
sandbox as the first SWF file loaded. For details, see “Stage security” on page 1029.
Controlling the playback frame rate
Flash Player 9 and later, Adobe AIR 1.0 and later
The frameRate property of the Stage class is used to set the frame rate for all SWF files loaded into the application.
For more information, see the ActionScript 3.0 Reference for the Adobe Flash Platform.

157
ACTIONSCRIPT 3.0 DEVELOPER’S GUIDE
Display programming
Last updated 3/21/2011
Controlling Stage scaling
Flash Player 9 and later, Adobe AIR 1.0 and later
When the portion of the screen representing Flash Player or AIR is resized, the runtime automatically adjusts the Stage
contents to compensate. The Stage class’s scaleMode property determines how the Stage contents are adjusted. This
property can be set to four different values, defined as constants in the flash.display.StageScaleMode class:
•StageScaleMode.EXACT_FIT scales the SWF to fill the new stage dimensions without regard for the original
content aspect ratio. The scale factors might not be the same for width and height, so the content can appear
squeezed or stretched if the aspect ratio of the stage is changed.
•StageScaleMode.SHOW_ALL scales the SWF to fit entirely within the new stage dimensions without changing the
content aspect ratio. This scale mode displays all of the content, but can result in “letterbox” borders, like the black
bars that appear when viewing a wide-screen movie on a standard television.
•StageScaleMode.NO_BORDER scales the SWF to entirely fill the new stage dimensions without changing the aspect
ratio of the content. This scale mode makes full use of the stage display area, but can result in cropping.
•StageScaleMode.NO_SCALE — does not scale the SWF. If the new stage dimensions are smaller, the content is
cropped; if larger, the added space is blank.
In the StageScaleMode.NO_SCALE scale mode only, the stageWidth and stageHeight properties of the Stage class
can be used to determine the actual pixel dimensions of the resized stage. (In the other scale modes, the stageWidth
and stageHeight properties always reflect the original width and height of the SWF.) In addition, when
scaleMode is set to StageScaleMode.NO_SCALE and the SWF file is resized, the Stage class’s resize event is
dispatched, allowing you to make adjustments accordingly.
Consequently, having scaleMode set to StageScaleMode.NO_SCALE allows you to have greater control over how
the screen contents adjust to the window resizing if you desire. For example, in a SWF containing a video and a
control bar, you might want to make the control bar stay the same size when the Stage is resized, and only change
the size of the video window to accommodate the Stage size change. This is demonstrated in the following example:

158
ACTIONSCRIPT 3.0 DEVELOPER’S GUIDE
Display programming
Last updated 3/21/2011
// videoScreen is a display object (e.g. a Video instance) containing a
// video; it is positioned at the top-left corner of the Stage, and
// it should resize when the SWF resizes.
// controlBar is a display object (e.g. a Sprite) containing several
// buttons; it should stay positioned at the bottom-left corner of the
// Stage (below videoScreen) and it should not resize when the SWF
// resizes.
import flash.display.Stage;
import flash.display.StageAlign;
import flash.display.StageScaleMode;
import flash.events.Event;
var swfStage:Stage = videoScreen.stage;
swfStage.scaleMode = StageScaleMode.NO_SCALE;
swfStage.align = StageAlign.TOP_LEFT;
function resizeDisplay(event:Event):void
{
var swfWidth:int = swfStage.stageWidth;
var swfHeight:int = swfStage.stageHeight;
// Resize the video window.
var newVideoHeight:Number = swfHeight - controlBar.height;
videoScreen.height = newVideoHeight;
videoScreen.scaleX = videoScreen.scaleY;
// Reposition the control bar.
controlBar.y = newVideoHeight;
}
swfStage.addEventListener(Event.RESIZE, resizeDisplay);
Setting the stage scale mode for AIR windows
The stage scaleMode property determines how the stage scales and clips child display objects when a window is
resized. Only the noScale mode should be used in AIR. In this mode, the stage is not scaled. Instead, the size of the
stage changes directly with the bounds of the window. Objects may be clipped if the window is resized smaller.
The stage scale modes are designed for use in a environments such as a web browser where you don't always have
control over the size or aspect ratio of the stage. The modes let you choose the least bad compromise when the stage
does not match the ideal size or aspect ratio of your application. In AIR, you always have control of the stage, so in
most cases re-laying out your content or adjusting the dimensions of your window will give you better results than
enabling stage scaling.
In the browser and for the initial AIR window, the relationship between the window size and the initial scale factor is
read from the loaded SWF file. However, when you create a NativeWindow object, AIR chooses an arbitrary
relationship between the window size and the scale factor of 72:1. Thus, if your window is 72x72 pixels, a 10x10
rectangle added to the window is drawn the correct size of 10x10 pixels. However, if the window is 144x144 pixels, then
a 10x10 pixel rectangle is scaled to 20x20 pixels. If you insist on using a scaleMode other than noScale for a window
stage, you can compensate by setting the scale factor of any display objects in the window to the ratio of 72 pixels to
the current width and height of the stage. For example, the following code calculates the required scale factor for a
display object named client:

159
ACTIONSCRIPT 3.0 DEVELOPER’S GUIDE
Display programming
Last updated 3/21/2011
if(newWindow.stage.scaleMode != StageScaleMode.NO_SCALE){
client.scaleX = 72/newWindow.stage.stageWidth;
client.scaleY = 72/newWindow.stage.stageHeight;
}
Note: Flex and HTML windows automatically set the stage scaleMode to noScale. Changing the scaleMode disturbs
the automatic layout mechanisms used in these types of windows.
Working with full-screen mode
Flash Player 9 and later, Adobe AIR 1.0 and later
Full-screen mode allows you to set a movie’s stage to fill a viewer’s entire monitor without any container borders or
menus. The Stage class’s displayState property is used to toggle full-screen mode on and off for a SWF. The
displayState property can be set to one of the values defined by the constants in the flash.display.StageDisplayState
class. To turn on full-screen mode, set the displayState property to StageDisplayState.FULL_SCREEN:
stage.displayState = StageDisplayState.FULL_SCREEN;
In Flash Player, full-screen mode can only be initiated through ActionScript in response to a mouse click (including
right-click) or keypress. AIR content running in the application security sandbox does not require that full-screen
mode be entered in response to a user gesture.
To exit full-screen mode, set the displayState property to StageDisplayState.NORMAL.
stage.displayState = StageDisplayState.NORMAL;
In addition, a user can choose to leave full-screen mode by switching focus to a different window or by using one of
several key combinations: the Esc key (all platforms), Control-W (Windows), Command-W (Mac), or Alt-F4
(Windows).
Enabling full-screen mode in Flash Player
To enable full-screen mode for a SWF file embedded in an HTML page, the HTML code to embed Flash Player must
include a param tag and embed attribute with the name allowFullScreen and value true, like this:
<object>
...
<param name="allowFullScreen" value="true" />
<embed ... allowfullscreen="true" />
</object>
In the Flash authoring tool, select File -> Publish Settings and in the Publish Settings dialog box, on the HTML tab,
select the Flash Only - Allow Full Screen template.
In Flex, ensure that the HTML template includes <object> and <embed> tags that support full screen.
If you are using JavaScript in a web page to generate the SWF-embedding tags, you must alter the JavaScript to add the
allowFullScreen param tag and attribute. For example, if your HTML page uses the AC_FL_RunContent() function
(which is used in HTML pages generated by Flash Professional and Flash Builder), you should add the
allowFullScreen parameter to that function call as follows:
AC_FL_RunContent(
...
'allowFullScreen','true',
...
); //end AC code

160
ACTIONSCRIPT 3.0 DEVELOPER’S GUIDE
Display programming
Last updated 3/21/2011
This does not apply to SWF files running in the stand-alone Flash Player.
Note: If you set the Window Mode (wmode in the HTML) to Opaque Windowless (opaque) or Transparent Windowless
(transparent), the full-screen window is always opaque
There are also security-related restrictions for using full-screen mode with Flash Player in a browser. These restrictions
are described in “Security” on page 1008.
Full screen stage size and scaling
The Stage.fullScreenHeight and Stage.fullScreenWidth properties return the height and the width of the
monitor that’s used when going to full-screen size, if that state is entered immediately. These values can be incorrect
if the user has the opportunity to move the browser from one monitor to another after you retrieve these values but
before entering full-screen mode. If you retrieve these values in the same event handler where you set the
Stage.displayState property to StageDisplayState.FULL_SCREEN, the values are correct.For users with multiple
monitors, the SWF content expands to fill only one monitor. Flash Player and AIR use a metric to determine which
monitor contains the greatest portion of the SWF, and uses that monitor for full-screen mode. The fullScreenHeight
and fullScreenWidth properties only reflect the size of the monitor that is used for full-screen mode. For more
information, see Stage.fullScreenHeight and Stage.fullScreenWidth in the ActionScript 3.0 Reference for the
Adobe Flash Platform.
Stage scaling behavior for full-screen mode is the same as under normal mode; the scaling is controlled by the Stage
class’s scaleMode property. If the scaleMode property is set to StageScaleMode.NO_SCALE, the Stage’s stageWidth
and stageHeight properties change to reflect the size of the screen area occupied by the SWF (the entire screen, in
this case); if viewed in the browser the HTML parameter for this controls the setting.
You can use the Stage class’s fullScreen event to detect and respond when full-screen mode is turned on or off. For
example, you might want to reposition, add, or remove items from the screen when entering or leaving full-screen
mode, as in this example:
import flash.events.FullScreenEvent;
function fullScreenRedraw(event:FullScreenEvent):void
{
if (event.fullScreen)
{
// Remove input text fields.
// Add a button that closes full-screen mode.
}
else
{
// Re-add input text fields.
// Remove the button that closes full-screen mode.
}
}
mySprite.stage.addEventListener(FullScreenEvent.FULL_SCREEN, fullScreenRedraw);
As this code shows, the event object for the fullScreen event is an instance of the flash.events.FullScreenEvent class,
which includes a fullScreen property indicating whether full-screen mode is enabled (true) or not (false).
Keyboard support in full-screen mode
When Flash Player runs in a browser, all keyboard-related ActionScript, such as keyboard events and text entry in
TextField instances, is disabled in full-screen mode. The exceptions (the keys that are enabled) are:
•Selected non-printing keys, specifically the arrow keys, space bar, and tab key

161
ACTIONSCRIPT 3.0 DEVELOPER’S GUIDE
Display programming
Last updated 3/21/2011
•Keyboard shortcuts that terminate full-screen mode: Esc (Windows and Mac), Control-W (Windows), Command-
W (Mac), and Alt-F4
These restrictions are not present for SWF content running in the stand-alone Flash Player or in AIR. AIR supports
an interactive full-screen mode that allows keyboard input.
Hardware scaling in full-screen mode
You can use the Stage class’s fullScreenSourceRect property to set Flash Player or AIR to scale a specific region of
the stage to full-screen mode. Flash Player and AIR scale in hardware, if available, using the graphics and video card
on a user's computer, and generally display content more quickly than software scaling.
To take advantage of hardware scaling, you set the whole stage or part of the stage to full-screen mode. The following
ActionScript 3.0 code sets the whole stage to full-screen mode:
import flash.geom.*;
{
stage.fullScreenSourceRect = new Rectangle(0,0,320,240);
stage.displayState = StageDisplayState.FULL_SCREEN;
}
When this property is set to a valid rectangle and the displayState property is set to full-screen mode, Flash Player
and AIR scale the specified area. The actual Stage size in pixels within ActionScript does not change. Flash Player and
AIR enforce a minimum limit for the size of the rectangle to accommodate the standard “Press Esc to exit full-screen
mode” message. This limit is usually around 260 by 30 pixels but can vary depending on platform and Flash Player
version.
The fullScreenSourceRect property can only be set when Flash Player or AIR is not in full-screen mode. To use
this property correctly, set this property first, then set the displayState property to full-screen mode.
To enable scaling, set the fullScreenSourceRect property to a rectangle object.
stage.fullScreenSourceRect = new Rectangle(0,0,320,240);
To disable scaling, set the fullScreenSourceRect property to null.
stage.fullScreenSourceRect = null;
To take advantage of all hardware acceleration features with Flash Player, enable it through the Flash Player Settings
dialog box. To load the dialog box, right-click (Windows) or Control-click (Mac) inside Flash Player content in your
browser. Select the Display tab, which is the first tab, and click the checkbox: Enable hardware acceleration.
Direct and GPU-compositing window modes
Flash Player 10 introduces two window modes, direct and GPU compositing, which you can enable through the
publish settings in the Flash authoring tool. These modes are not supported in AIR. To take advantage of these modes,
you must enable hardware acceleration for Flash Player.
Direct mode uses the fastest, most direct path to push graphics to the screen, which is advantageous for video playback.
GPU Compositing uses the graphics processing unit on the video card to accelerate compositing. Video compositing
is the process of layering multiple images to create a single video image. When compositing is accelerated with the
GPU it can improve the performance of YUV conversion, color correction, rotation or scaling, and blending. YUV
conversion refers to the color conversion of composite analog signals, which are used for transmission, to the RGB
(red, green, blue) color model that video cameras and displays use. Using the GPU to accelerate compositing reduces
the memory and computational demands that are otherwise placed on the CPU. It also results in smoother playback
for standard-definition video.

162
ACTIONSCRIPT 3.0 DEVELOPER’S GUIDE
Display programming
Last updated 3/21/2011
Be cautious in implementing these window modes. Using GPU compositing can be expensive for memory and CPU
resources. If some operations (such as blend modes, filtering, clipping or masking) cannot be carried out in the GPU,
they are done by the software. Adobe recommends limiting yourself to one SWF file per HTML page when using these
modes and you should not enable these modes for banners. The Flash Test Movie facility does not use hardware
acceleration but you can use it through the Publish Preview option.
Setting a frame rate in your SWF file that is higher than 60, the maximum screen refresh rate, is useless. Setting the
frame rate from 50 through 55 allows for dropped frames, which can occur for various reasons from time to time.
Using direct mode requires Microsoft DirectX 9 with VRAM 128 MB on Windows and OpenGL for Apple Macintosh,
Mac OS X v10.2 or higher. GPU compositing requires Microsoft DirectX 9 and Pixel Shader 2.0 support on Windows
with 128 MB of VRAM. On Mac OS X and Linux, GPU compositing requires OpenGL 1.5 and several OpenGL
extensions (framebuffer object, multitexture, shader objects, shading language, fragment shader).
You can activate direct and gpu acceleration modes on a per-SWF basis through the Flash Publish Settings dialog
box, using the Hardware Acceleration menu on the Flash tab. If you choose None, the window mode reverts to
default, transparent, or opaque, as specified by the Window Mode setting on the HTML tab.
Handling events for display objects
Flash Player 9 and later, Adobe AIR 1.0 and later
The DisplayObject class inherits from the EventDispatcher class. This means that every display object can participate
fully in the event model (described in “Handling events” on page 117). Every display object can use its
addEventListener() method—inherited from the EventDispatcher class—to listen for a particular event, but only if
the listening object is part of the event flow for that event.
When Flash Player or AIR dispatches an event object, that event object makes a round-trip journey from the Stage to
the display object where the event occurred. For example, if a user clicks on a display object named child1, Flash
Player dispatches an event object from the Stage through the display list hierarchy down to the child1 display object.
The event flow is conceptually divided into three phases, as illustrated in this diagram:
For more information, see “Handling events” on page 117.
One important issue to keep in mind when working with display object events is the effect that event listeners can have
on whether display objects are automatically removed from memory (garbage collected) when they’re removed from
the display list. If a display object has objects subscribed as listeners to its events, that display object will not be removed
from memory even when it’s removed from the display list, because it will still have references to those listener objects.
For more information, see “Managing event listeners” on page 130.
Stage
Parent Node
Child1 Node Child2 Node
Capture
Phase
Bubbling
Phase
Target Phase

163
ACTIONSCRIPT 3.0 DEVELOPER’S GUIDE
Display programming
Last updated 3/21/2011
Choosing a DisplayObject subclass
Flash Player 9 and later, Adobe AIR 1.0 and later
With several options to choose from, one of the important decisions you’ll make when you’re working with display
objects is which display object to use for what purpose. Here are some guidelines to help you decide. These same
suggestions apply whether you need an instance of a class or you’re choosing a base class for a class you’re creating:
•If you don’t need an object that can be a container for other display objects (that is, you just need one that serves as
a stand-alone screen element), choose one of these DisplayObject or InteractiveObject subclasses, depending on
what it will be used for:
•Bitmap for displaying a bitmap image.
•TextField for adding text.
•Video for displaying video.
•Shape for a “canvas” for drawing content on-screen. In particular, if you want to create an instance for drawing
shapes on the screen, and it won’t be a container for other display objects, you’ll gain significant performance
benefits using Shape instead of Sprite or MovieClip.
•MorphShape, StaticText, or SimpleButton for items created by the Flash authoring tool. (You can’t create
instances of these classes programmatically, but you can create variables with these data types to refer to items
created using the Flash authoring tool.)
•If you need a variable to refer to the main Stage, use the Stage class as its data type.
•If you need a container for loading an external SWF file or image file, use a Loader instance. The loaded content
will be added to the display list as a child of the Loader instance. Its data type will depend on the nature of the loaded
content, as follows:
•A loaded image will be a Bitmap instance.
•A loaded SWF file written in ActionScript 3.0 will be a Sprite or MovieClip instance (or an instance of a subclass
of those classes, as specified by the content creator).
•A loaded SWF file written in ActionScript 1.0 or ActionScript 2.0 will be an AVM1Movie instance.
•If you need an object to serve as a container for other display objects (whether or not you’ll also be drawing onto
the display object using ActionScript), choose one of the DisplayObjectContainer subclasses:
•Sprite if the object will be created using only ActionScript, or as the base class for a custom display object that
will be created and manipulated solely with ActionScript.
•MovieClip if you’re creating a variable to refer to a movie clip symbol created in the Flash authoring tool.
•If you are creating a class that will be associated with a movie clip symbol in the Flash library, choose one of these
DisplayObjectContainer subclasses as your class’s base class:
•MovieClip if the associated movie clip symbol has content on more than one frame
•Sprite if the associated movie clip symbol has content only on the first frame

164
ACTIONSCRIPT 3.0 DEVELOPER’S GUIDE
Display programming
Last updated 3/21/2011
Manipulating display objects
Flash Player 9 and later, Adobe AIR 1.0 and later
Regardless of which display object you choose to use, there are a number of manipulations that all display objects have
in common as elements that are displayed on the screen. For example, they can all be positioned on the screen, moved
forward or backward in the stacking order of display objects, scaled, rotated, and so forth. Because all display objects
inherit this functionality from their common base class (DisplayObject), this functionality behaves the same whether
you’re manipulating a TextField instance, a Video instance, a Shape instance, or any other display object. The
following sections detail several of these common display object manipulations.
Changing position
Flash Player 9 and later, Adobe AIR 1.0 and later
The most basic manipulation to any display object is positioning it on the screen. To set a display object’s position,
change the object’s x and y properties.
myShape.x = 17;
myShape.y = 212;
The display object positioning system treats the Stage as a Cartesian coordinate system (the common grid system with
a horizontal x axis and vertical y axis). The origin of the coordinate system (the 0,0 coordinate where the x and y axes
meet) is at the top-left corner of the Stage. From there, x values are positive going right and negative going left, while
(in contrast to typical graphing systems) y values are positive going down and negative going up. For example, the
previous lines of code move the object myShape to the x coordinate 17 (17 pixels to the right of the origin) and y
coordinate 212 (212 pixels below the origin).
By default, when a display object is created using ActionScript, the x and y properties are both set to 0, placing the
object at the top-left corner of its parent content.
Changing position relative to the Stage
It’s important to remember that the x and y properties always refer to the position of the display object relative to the
0,0 coordinate of its parent display object’s axes. So for a Shape instance (such as a circle) contained inside a Sprite
instance, setting the Shape object’s x and y properties to 0 will place the circle at the top-left corner of the Sprite, which
is not necessarily the top-left corner of the Stage. To position an object relative to the global Stage coordinates, you can
use the globalToLocal() method of any display object to convert coordinates from global (Stage) coordinates to local
(display object container) coordinates, like this:

165
ACTIONSCRIPT 3.0 DEVELOPER’S GUIDE
Display programming
Last updated 3/21/2011
// Position the shape at the top-left corner of the Stage,
// regardless of where its parent is located.
// Create a Sprite, positioned at x:200 and y:200.
var mySprite:Sprite = new Sprite();
mySprite.x = 200;
mySprite.y = 200;
this.addChild(mySprite);
// Draw a dot at the Sprite's 0,0 coordinate, for reference.
mySprite.graphics.lineStyle(1, 0x000000);
mySprite.graphics.beginFill(0x000000);
mySprite.graphics.moveTo(0, 0);
mySprite.graphics.lineTo(1, 0);
mySprite.graphics.lineTo(1, 1);
mySprite.graphics.lineTo(0, 1);
mySprite.graphics.endFill();
// Create the circle Shape instance.
var circle:Shape = new Shape();
mySprite.addChild(circle);
// Draw a circle with radius 50 and center point at x:50, y:50 in the Shape.
circle.graphics.lineStyle(1, 0x000000);
circle.graphics.beginFill(0xff0000);
circle.graphics.drawCircle(50, 50, 50);
circle.graphics.endFill();
// Move the Shape so its top-left corner is at the Stage's 0, 0 coordinate.
var stagePoint:Point = new Point(0, 0);
var targetPoint:Point = mySprite.globalToLocal(stagePoint);
circle.x = targetPoint.x;
circle.y = targetPoint.y;
You can likewise use the DisplayObject class’s localToGlobal() method to convert local coordinates to Stage
coordinates.
Moving display objects with the mouse
You can let a user move display objects with mouse using two different techniques in ActionScript. In both cases, two
mouse events are used: when the mouse button is pressed down, the object is told to follow the mouse cursor, and when
it’s released, the object is told to stop following the mouse cursor.
The first technique, using the startDrag() method, is simpler, but more limited. When the mouse button is pressed,
the startDrag() method of the display object to be dragged is called. When the mouse button is released, the
stopDrag() method is called. The Sprite class defines these two functions, so the object moved must be a Sprite or one
of its subclasses.

166
ACTIONSCRIPT 3.0 DEVELOPER’S GUIDE
Display programming
Last updated 3/21/2011
// This code creates a mouse drag interaction using the startDrag()
// technique.
// square is a MovieClip or Sprite instance).
import flash.events.MouseEvent;
// This function is called when the mouse button is pressed.
function startDragging(event:MouseEvent):void
{
square.startDrag();
}
// This function is called when the mouse button is released.
function stopDragging(event:MouseEvent):void
{
square.stopDrag();
}
square.addEventListener(MouseEvent.MOUSE_DOWN, startDragging);
square.addEventListener(MouseEvent.MOUSE_UP, stopDragging);
This technique suffers from one fairly significant limitation: only one item at a time can be dragged using
startDrag(). If one display object is being dragged and the startDrag() method is called on another display object,
the first display object stops following the mouse immediately. For example, if the startDragging() function is
changed as shown here, only the circle object will be dragged, in spite of the square.startDrag() method call:
function startDragging(event:MouseEvent):void
{
square.startDrag();
circle.startDrag();
}
As a consequence of the fact that only one object can be dragged at a time using startDrag(), the stopDrag()
method can be called on any display object and it stops whatever object is currently being dragged.
If you need to drag more than one display object, or to avoid the possibility of conflicts where more than one object
might potentially use startDrag(), it’s best to use the mouse-following technique to create the dragging effect. With
this technique, when the mouse button is pressed, a function is subscribed as a listener to the mouseMove event of the
Stage. This function, which is then called every time the mouse moves, causes the dragged object to jump to the x, y
coordinate of the mouse. Once the mouse button is released, the function is unsubscribed as a listener, meaning it is
no longer called when the mouse moves and the object stops following the mouse cursor. Here is some code that
demonstrates this technique:

167
ACTIONSCRIPT 3.0 DEVELOPER’S GUIDE
Display programming
Last updated 3/21/2011
// This code moves display objects using the mouse-following
// technique.
// circle is a DisplayObject (e.g. a MovieClip or Sprite instance).
import flash.events.MouseEvent;
var offsetX:Number;
var offsetY:Number;
// This function is called when the mouse button is pressed.
function startDragging(event:MouseEvent):void
{
// Record the difference (offset) between where
// the cursor was when the mouse button was pressed and the x, y
// coordinate of the circle when the mouse button was pressed.
offsetX = event.stageX - circle.x;
offsetY = event.stageY - circle.y;
// tell Flash Player to start listening for the mouseMove event
stage.addEventListener(MouseEvent.MOUSE_MOVE, dragCircle);
}
// This function is called when the mouse button is released.
function stopDragging(event:MouseEvent):void
{
// Tell Flash Player to stop listening for the mouseMove event.
stage.removeEventListener(MouseEvent.MOUSE_MOVE, dragCircle);
}
// This function is called every time the mouse moves,
// as long as the mouse button is pressed down.
function dragCircle(event:MouseEvent):void
{
// Move the circle to the location of the cursor, maintaining
// the offset between the cursor's location and the
// location of the dragged object.
circle.x = event.stageX - offsetX;
circle.y = event.stageY - offsetY;
// Instruct Flash Player to refresh the screen after this event.
event.updateAfterEvent();
}
circle.addEventListener(MouseEvent.MOUSE_DOWN, startDragging);
circle.addEventListener(MouseEvent.MOUSE_UP, stopDragging);
In addition to making a display object follow the mouse cursor, it is often desirable to move the dragged object to the
front of the display, so that it appears to be floating above all the other objects. For example, suppose you have two
objects, a circle and a square, that can both be moved with the mouse. If the circle happens to be below the square on
the display list, and you click and drag the circle so that the cursor is over the square, the circle will appear to slide
behind the square, which breaks the drag-and-drop illusion. Instead, you can make it so that when the circle is clicked,
it moves to the top of the display list, and thus always appears on top of any other content.

168
ACTIONSCRIPT 3.0 DEVELOPER’S GUIDE
Display programming
Last updated 3/21/2011
The following code (adapted from the previous example) allows two display objects, a circle and a square, to be moved
with the mouse. Whenever the mouse button is pressed over either one, that item is moved to the top of the Stage’s
display list, so that the dragged item always appears on top. (Code that is new or changed from the previous listing
appears in boldface.)
// This code creates a drag-and-drop interaction using the mouse-following
// technique.
// circle and square are DisplayObjects (e.g. MovieClip or Sprite
// instances).
import flash.display.DisplayObject;
import flash.events.MouseEvent;
var offsetX:Number;
var offsetY:Number;
var draggedObject:DisplayObject;
// This function is called when the mouse button is pressed.
function startDragging(event:MouseEvent):void
{
// remember which object is being dragged
draggedObject = DisplayObject(event.target);
// Record the difference (offset) between where the cursor was when
// the mouse button was pressed and the x, y coordinate of the
// dragged object when the mouse button was pressed.
offsetX = event.stageX - draggedObject.x;
offsetY = event.stageY - draggedObject.y;
// move the selected object to the top of the display list
stage.addChild(draggedObject);
// Tell Flash Player to start listening for the mouseMove event.
stage.addEventListener(MouseEvent.MOUSE_MOVE, dragObject);
}
// This function is called when the mouse button is released.
function stopDragging(event:MouseEvent):void
{
// Tell Flash Player to stop listening for the mouseMove event.
stage.removeEventListener(MouseEvent.MOUSE_MOVE, dragObject);
}

169
ACTIONSCRIPT 3.0 DEVELOPER’S GUIDE
Display programming
Last updated 3/21/2011
// This function is called every time the mouse moves,
// as long as the mouse button is pressed down.
function dragObject(event:MouseEvent):void
{
// Move the dragged object to the location of the cursor, maintaining
// the offset between the cursor's location and the location
// of the dragged object.
draggedObject.x = event.stageX - offsetX;
draggedObject.y = event.stageY - offsetY;
// Instruct Flash Player to refresh the screen after this event.
event.updateAfterEvent();
}
circle.addEventListener(MouseEvent.MOUSE_DOWN, startDragging);
circle.addEventListener(MouseEvent.MOUSE_UP, stopDragging);
square.addEventListener(MouseEvent.MOUSE_DOWN, startDragging);
square.addEventListener(MouseEvent.MOUSE_UP, stopDragging);
To extend this effect further, such as for a game where tokens or cards are moved among piles, you could add the
dragged object to the Stage’s display list when it’s “picked up,” and then add it to another display list—such as the “pile”
where it is dropped—when the mouse button is released.
Finally, to enhance the effect, you could apply a drop shadow filter to the display object when it is clicked (when you
start dragging it) and remove the drop shadow when the object is released. For details on using the drop shadow filter
and other display object filters in ActionScript, see “Filtering display objects” on page 255.
Panning and scrolling display objects
Flash Player 9 and later, Adobe AIR 1.0 and later
If you have a display object that is too large for the area in which you want it to display it, you can use the scrollRect
property to define the viewable area of the display object. In addition, by changing the scrollRect property in
response to user input, you can cause the content to pan left and right or scroll up and down.
The scrollRect property is an instance of the Rectangle class, which is a class that combines the values needed to
define a rectangular area as a single object. To initially define the viewable area of the display object, create a new
Rectangle instance and assign it to the display object’s scrollRect property. Later, to scroll or pan, you read the
scrollRect property into a separate Rectangle variable, and change the desired property (for instance, change the
Rectangle instance’s x property to pan or y property to scroll). Then you reassign that Rectangle instance to the
scrollRect property to notify the display object of the changed value.
For example, the following code defines the viewable area for a TextField object named bigText that is too tall to fit
in the SWF file’s boundaries. When the two buttons named up and down are clicked, they call functions that cause the
contents of the TextField object to scroll up or down by modifying the y property of the scrollRect Rectangle
instance.

170
ACTIONSCRIPT 3.0 DEVELOPER’S GUIDE
Display programming
Last updated 3/21/2011
import flash.events.MouseEvent;
import flash.geom.Rectangle;
// Define the initial viewable area of the TextField instance:
// left: 0, top: 0, width: TextField's width, height: 350 pixels.
bigText.scrollRect = new Rectangle(0, 0, bigText.width, 350);
// Cache the TextField as a bitmap to improve performance.
bigText.cacheAsBitmap = true;
// called when the "up" button is clicked
function scrollUp(event:MouseEvent):void
{
// Get access to the current scroll rectangle.
var rect:Rectangle = bigText.scrollRect;
// Decrease the y value of the rectangle by 20, effectively
// shifting the rectangle down by 20 pixels.
rect.y -= 20;
// Reassign the rectangle to the TextField to "apply" the change.
bigText.scrollRect = rect;
}
// called when the "down" button is clicked
function scrollDown(event:MouseEvent):void
{
// Get access to the current scroll rectangle.
var rect:Rectangle = bigText.scrollRect;
// Increase the y value of the rectangle by 20, effectively
// shifting the rectangle up by 20 pixels.
rect.y += 20;
// Reassign the rectangle to the TextField to "apply" the change.
bigText.scrollRect = rect;
}
up.addEventListener(MouseEvent.CLICK, scrollUp);
down.addEventListener(MouseEvent.CLICK, scrollDown);
As this example illustrates, when you work with the scrollRect property of a display object, it’s best to specify that
Flash Player or AIR should cache the display object’s content as a bitmap, using the cacheAsBitmap property. When
you do so, Flash Player and AIR don’t have to re-draw the entire contents of the display object each time it is scrolled,
and can instead use the cached bitmap to render the necessary portion directly to the screen. For details, see “Caching
display objects” on page 173.
Manipulating size and scaling objects
Flash Player 9 and later, Adobe AIR 1.0 and later
You can measure and manipulate the size of a display object in two ways, using either the dimension properties (width
and height) or the scale properties (scaleX and scaleY).
Every display object has a width property and a height property, which are initially set to the size of the object in
pixels. You can read the values of those properties to measure the size of the display object. You can also specify new
values to change the size of the object, as follows:

171
ACTIONSCRIPT 3.0 DEVELOPER’S GUIDE
Display programming
Last updated 3/21/2011
// Resize a display object.
square.width = 420;
square.height = 420;
// Determine the radius of a circle display object.
var radius:Number = circle.width / 2;
Changing the height or width of a display object causes the object to scale, meaning its contents stretch or squeeze
to fit in the new area. If the display object contains only vector shapes, those shapes will be redrawn at the new scale,
with no loss in quality. Any bitmap graphic elements in the display object will be scaled rather than redrawn. So, for
example, a digital photo whose width and height are increased beyond the actual dimensions of the pixel information
in the image will be pixelated, making it look jagged.
When you change the width or height properties of a display object, Flash Player and AIR update the scaleX and
scaleY properties of the object as well.
Note: TextField objects are an exception to this scaling behavior. Text fields need to resize themselves to accommodate
text wrapping and font sizes, so they reset their scaleX or scaleY values to 1 after resizing. However, if you adjust the scaleX
or scaleY values of a TextField object, the width and height values change to accommodate the scaling values you provide.
These properties represent the relative size of the display object compared to its original size. The scaleX and scaleY
properties use fraction (decimal) values to represent percentage. For example, if a display object’s width has been
changed so that it’s half as wide as its original size, the object’s scaleX property will have the value .5, meaning 50
percent. If its height has been doubled, its scaleY property will have the value 2, meaning 200 percent.
// circle is a display object whose width and height are 150 pixels.
// At original size, scaleX and scaleY are 1 (100%).
trace(circle.scaleX); // output: 1
trace(circle.scaleY); // output: 1
// When you change the width and height properties,
// Flash Player changes the scaleX and scaleY properties accordingly.
circle.width = 100;
circle.height = 75;
trace(circle.scaleX); // output: 0.6622516556291391
trace(circle.scaleY); // output: 0.4966887417218543
Size changes are not proportional. In other words, if you change the height of a square but not its width, its
proportions will no longer be the same, and it will be a rectangle instead of a square. If you want to make relative
changes to the size of a display object, you can set the values of the scaleX and scaleY properties to resize the object,
as an alternative to setting the width or height properties. For example, this code changes the width of the display
object named square, and then alters the vertical scale (scaleY) to match the horizontal scale, so that the size of the
square stays proportional.
// Change the width directly.
square.width = 150;
// Change the vertical scale to match the horizontal scale,
// to keep the size proportional.
square.scaleY = square.scaleX;

172
ACTIONSCRIPT 3.0 DEVELOPER’S GUIDE
Display programming
Last updated 3/21/2011
Controlling distortion when scaling
Flash Player 9 and later, Adobe AIR 1.0 and later
Normally when a display object is scaled (for example, stretched horizontally), the resulting distortion is spread equally
across the object, so that each part is stretched the same amount. For graphics and design elements, this is probably
what you want. However, sometimes it’s preferable to have control over which portions of the display object stretch
and which portions remain unchanged. One common example of this is a button that’s a rectangle with rounded
corners. With normal scaling, the corners of the button will stretch, making the corner radius change as the button
resizes.
However, in this case it would be preferable to have control over the scaling—to be able to designate certain areas
which should scale (the straight sides and middle) and areas which shouldn’t (the corners)—so that scaling happens
without visible distortion.
You can use 9-slice scaling (Scale-9) to create display objects where you have control over how the objects scale. With
9-slice scaling, the display object is divided into nine separate rectangles (a 3 by 3 grid, like the grid of a tic-tac-toe
board). The rectangles aren’t necessarily the same size—you designate where the grid lines are placed. Any content that
lies in the four corner rectangles (such as the rounded corners of a button) will not be stretched or compressed when
the display object scales. The top-center and bottom-center rectangles will scale horizontally but not vertically, while
the left-middle and right-middle rectangles will scale vertically but not horizontally. The center rectangle will scale
both horizontally and vertically.
Keeping this in mind, if you’re creating a display object and you want certain content to never scale, you just have to
make sure that the dividing lines of the 9-slice scaling grid are placed so that the content ends up in one of the corner
rectangles.
In ActionScript, setting a value for the scale9Grid property of a display object turns on 9-slice scaling for the object
and defines the size of the rectangles in the object’s Scale-9 grid. You use an instance of the Rectangle class as the value
for the scale9Grid property, as follows:
myButton.scale9Grid = new Rectangle(32, 27, 71, 64);

173
ACTIONSCRIPT 3.0 DEVELOPER’S GUIDE
Display programming
Last updated 3/21/2011
The four parameters of the Rectangle constructor are the x coordinate, y coordinate, width, and height. In this
example, the rectangle’s top-left corner is placed at the point x: 32, y: 27 on the display object named myButton. The
rectangle is 71 pixels wide and 64 pixels tall (so its right edge is at the x coordinate 103 on the display object and its
bottom edge is at the y coordinate 92 on the display object).
The actual area contained in the region defined by the Rectangle instance represents the center rectangle of the Scale-
9 grid. The other rectangles are calculated by Flash Player and AIR by extending the sides of the Rectangle instance, as
shown here:
In this case, as the button scales up or down, the rounded corners will not stretch or compress, but the other areas will
adjust to accommodate the scaling.
A. myButton.width = 131;myButton.height = 106; B. myButton.width = 73;myButton.height = 69; C. myButton.width = 54;myButton.height
= 141;
Caching display objects
Flash Player 9 and later, Adobe AIR 1.0 and later
As your designs in Flash grow in size, whether you are creating an application or complex scripted animations, you
need to consider performance and optimization. When you have content that remains static (such as a rectangle Shape
instance), Flash Player and AIR do not optimize the content. Therefore, when you change the position of the rectangle,
Flash Player or AIR redraws the entire Shape instance.
You can cache specified display objects to improve the performance of your SWF file. The display object is a surface,
essentially a bitmap version of the instance’s vector data, which is data that you do not intend to change much over the
course of your SWF file. Therefore, instances with caching turned on are not continually redrawn as the SWF file plays,
letting the SWF file render quickly.
Note: You can update the vector data, at which time the surface is recreated. Therefore, the vector data cached in the
surface does not need to remain the same for the entire SWF file.
Setting a display object’s cacheAsBitmap property to true makes the display object cache a bitmap representation of
itself. Flash Player or AIR creates a surface object for the instance, which is a cached bitmap instead of vector data. If
you change the bounds of the display object, the surface is recreated instead of resized. Surfaces can nest within other
surfaces. The child surface copies its bitmap onto its parent surface. For more information, see “Enabling bitmap
caching” on page 175.
CBA

174
ACTIONSCRIPT 3.0 DEVELOPER’S GUIDE
Display programming
Last updated 3/21/2011
The DisplayObject class’s opaqueBackground property and scrollRect property are related to bitmap caching using
the cacheAsBitmap property. Although these three properties are independent of each other, the opaqueBackground
and scrollRect properties work best when an object is cached as a bitmap—you see performance benefits for the
opaqueBackground and scrollRect properties only when you set cacheAsBitmap to true. For more information
about scrolling display object content, see “Panning and scrolling display objects” on page 169. For more information
about setting an opaque background, see “Setting an opaque background color” on page 176.
For information on alpha channel masking, which requires you to set the cacheAsBitmap property to true, see
“Masking display objects” on page 181.
When to enable caching
Flash Player 9 and later, Adobe AIR 1.0 and later
Enabling caching for a display object creates a surface, which has several advantages, such as helping complex vector
animations to render fast. There are several scenarios in which you will want to enable caching. It might seem as
though you would always want to enable caching to improve the performance of your SWF files; however, there are
situations in which enabling caching does not improve performance, or can even decrease it. This section describes
scenarios in which caching should be used, and when to use regular display objects.
Overall performance of cached data depends on how complex the vector data of your instances are, how much of the
data you change, and whether or not you set the opaqueBackground property. If you are changing small regions, the
difference between using a surface and using vector data could be negligible. You might want to test both scenarios
with your work before you deploy the application.
When to use bitmap caching
The following are typical scenarios in which you might see significant benefits when you enable bitmap caching.
•Complex background image: An application that contains a detailed and complex background image of vector data
(perhaps an image where you applied the trace bitmap command, or artwork that you created in Adobe
Illustrator®). You might animate characters over the background, which slows the animation because the
background needs to continuously regenerate the vector data. To improve performance, you can set the
opaqueBackground property of the background display object to true. The background is rendered as a bitmap
and can be redrawn quickly, so that your animation plays much faster.
•Scrolling text field: An application that displays a large amount of text in a scrolling text field. You can place the
text field in a display object that you set as scrollable with scrolling bounds (the scrollRect property). This enables
fast pixel scrolling for the specified instance. When a user scrolls the display object instance, Flash Player or AIR
shifts the scrolled pixels up and generates the newly exposed region instead of regenerating the entire text field.
•Windowing system: An application with a complex system of overlapping windows. Each window can be open or
closed (for example, web browser windows). If you mark each window as a surface (by setting the cacheAsBitmap
property to true), each window is isolated and cached. Users can drag the windows so that they overlap each other,
and each window doesn’t need to regenerate the vector content.
•Alpha channel masking: When you are using alpha channel masking, you must set the cacheAsBitmap property
to true. For more information, see “Masking display objects” on page 181.
Enabling bitmap caching in all of these scenarios improves the responsiveness and interactivity of the application by
optimizing the vector graphics.
In addition, whenever you apply a filter to a display object, cacheAsBitmap is automatically set to true, even if you
explicitly set it to false. If you clear all the filters from the display object, the cacheAsBitmap property returns to the
value it was last set to.

175
ACTIONSCRIPT 3.0 DEVELOPER’S GUIDE
Display programming
Last updated 3/21/2011
When to avoid using bitmap caching
Using this feature in the wrong circumstances can negatively affect the performance of your SWF file. When you use
bitmap caching, remember the following guidelines:
•Do not overuse surfaces (display objects with caching enabled). Each surface uses more memory than a regular
display object, which means that you should only enable surfaces when you need to improve rendering
performance.
A cached bitmap can use significantly more memory than a regular display object. For example, if a Sprite instance
on the Stage is 250 pixels by 250 pixels in size, when cached it might use 250 KB instead of 1 KB when it’s a regular
(un-cached) Sprite instance.
•Avoid zooming into cached surfaces. If you overuse bitmap caching, a large amount of memory is consumed (see
previous bullet), especially if you zoom in on the content.
•Use surfaces for display object instances that are largely static (non-animating). You can drag or move the instance,
but the contents of the instance should not animate or change a lot. (Animation or changing content are more likely
with a MovieClip instance containing animation or a Video instance.) For example, if you rotate or transform an
instance, the instance changes between the surface and vector data, which is difficult to process and negatively
affects your SWF file.
•If you mix surfaces with vector data, it increases the amount of processing that Flash Player and AIR (and
sometimes the computer) need to do. Group surfaces together as much as possible—for example, when you create
windowing applications.
•Do not cache objects whose graphics change frequently. Every time you scale, skew, rotate the display object,
change the alpha or color transform, move child display objects, or draw using the graphics property, the bitmap
cache is redrawn. If this happens every frame, the runtime must draw the object into a bitmap and then copy that
bitmap onto the stage—which results in extra work compared to just drawing the uncached object to the stage. The
performance tradeoff of caching versus update frequency depends on the complexity and size of the display object
and can only be determined by testing the specific content.
Enabling bitmap caching
Flash Player 9 and later, Adobe AIR 1.0 and later
To enable bitmap caching for a display object, you set its cacheAsBitmap property to true:
mySprite.cacheAsBitmap = true;
After you set the cacheAsBitmap property to true, you might notice that the display object automatically pixel-snaps
to whole coordinates. When you test the SWF file, you should notice that any animation performed on a complex
vector image renders much faster.
A surface (cached bitmap) is not created, even if cacheAsBitmap is set to true, if one or more of the following occurs:
•The bitmap is greater than 2880 pixels in height or width.
•The bitmap fails to allocate (because of an out-of-memory error).
Cached bitmap transform matrices
Adobe AIR 2.0 and later (mobile profile)
In AIR applications for mobile devices, you should set the cacheAsBitmapMatrix property whenever you set the
cacheAsBitmap property. Setting this property allows you to apply a wider range of transformations to the display
object without triggering rerendering.

176
ACTIONSCRIPT 3.0 DEVELOPER’S GUIDE
Display programming
Last updated 3/21/2011
mySprite.cacheAsBitmap = true;
mySprite.cacheAsBitmapMatrix = new Matrix();
When you set this matrix property, you can apply the following additional transformation to the display object without
recaching the object:
•Move or translate without pixel-snapping
•Rotate
•Scale
•Skew
•Change alpha (between 0 and 100% transparency)
These transformations are applied directly to the cached bitmap.
Setting an opaque background color
Flash Player 9 and later, Adobe AIR 1.0 and later
You can set an opaque background for a display object. For example, when your SWF has a background that contains
complex vector art, you can set the opaqueBackground property to a specified color (typically the same color as the
Stage). The color is specified as a number (commonly a hexadecimal color value). The background is then treated as a
bitmap, which helps optimize performance.
When you set cacheAsBitmap to true, and also set the opaqueBackground property to a specified color, the
opaqueBackground property allows the internal bitmap to be opaque and rendered faster. If you do not set
cacheAsBitmap to true, the opaqueBackground property adds an opaque vector-square shape to the background of
the display object. It does not create a bitmap automatically.
The following example shows how to set the background of a display object to optimize performance:
myShape.cacheAsBitmap = true;
myShape.opaqueBackground = 0xFF0000;
In this case, the background color of the Shape named myShape is set to red (0xFF0000). Assuming the Shape instance
contains a drawing of a green triangle, on a Stage with a white background, this would show up as a green triangle with
red in the empty space in the Shape instance’s bounding box (the rectangle that completely encloses the Shape).
Of course, this code would make more sense if it were used with a Stage with a solid red background. On another
colored background, that color would be specified instead. For example, in a SWF with a white background, the
opaqueBackground property would most likely be set to 0xFFFFFF, or pure white.

177
ACTIONSCRIPT 3.0 DEVELOPER’S GUIDE
Display programming
Last updated 3/21/2011
Applying blending modes
Flash Player 9 and later, Adobe AIR 1.0 and later
Blending modes involve combining the colors of one image (the base image) with the colors of another image (the
blend image) to produce a third image—the resulting image is the one that is actually displayed on the screen. Each
pixel value in an image is processed with the corresponding pixel value of the other image to produce a pixel value for
that same position in the result.
Every display object has a blendMode property that can be set to one of the following blending modes. These are
constants defined in the BlendMode class. Alternatively, you can use the String values (in parentheses) that are the
actual values of the constants.
•BlendMode.ADD ("add"): Commonly used to create an animated lightening dissolve effect between two images.
•BlendMode.ALPHA ("alpha"): Commonly used to apply the transparency of the foreground on the background.
(Not supported under GPU rendering.)
•BlendMode.DARKEN ("darken"): Commonly used to superimpose type. (Not supported under GPU rendering.)
•BlendMode.DIFFERENCE ("difference"): Commonly used to create more vibrant colors.
•BlendMode.ERASE ("erase"): Commonly used to cut out (erase) part of the background using the foreground
alpha. (Not supported under GPU rendering.)
•BlendMode.HARDLIGHT ("hardlight"): Commonly used to create shading effects. (Not supported under GPU
rendering.)
•BlendMode.INVERT ("invert"): Used to invert the background.
•BlendMode.LAYER ("layer"): Used to force the creation of a temporary buffer for precomposition for a particular
display object. (Not supported under GPU rendering.)
•BlendMode.LIGHTEN ("lighten"): Commonly used to superimpose type. (Not supported under GPU rendering.)
•BlendMode.MULTIPLY ("multiply"): Commonly used to create shadows and depth effects.
•BlendMode.NORMAL ("normal"): Used to specify that the pixel values of the blend image override those of the base
image.
•BlendMode.OVERLAY ("overlay"): Commonly used to create shading effects. (Not supported under GPU
rendering.)
•BlendMode.SCREEN ("screen"): Commonly used to create highlights and lens flares.
•BlendMode.SHADER ("shader"): Used to specify that a Pixel Bender shader is used to create a custom blending
effect. For more information about using shaders, see “Working with Pixel Bender shaders” on page 288. (Not
supported under GPU rendering.)
•BlendMode.SUBTRACT ("subtract"): Commonly used to create an animated darkening dissolve effect between
two images.

178
ACTIONSCRIPT 3.0 DEVELOPER’S GUIDE
Display programming
Last updated 3/21/2011
Adjusting DisplayObject colors
Flash Player 9 and later, Adobe AIR 1.0 and later
You can use the methods of the ColorTransform class (flash.geom.ColorTransform) to adjust the color of a display
object. Each display object has a transform property, which is an instance of the Transform class, and contains
information about various transformations that are applied to the display object (such as rotation, changes in scale or
position, and so forth). In addition to its information about geometric transformations, the Transform class also
includes a colorTransform property, which is an instance of the ColorTransform class, and provides access to make
color adjustments to the display object. To access the color transformation information of a display object, you can use
code such as this:
var colorInfo:ColorTransform = myDisplayObject.transform.colorTransform;
Once you’ve created a ColorTransform instance, you can read its property values to find out what color
transformations have already been applied, or you can set those values to make color changes to the display object. To
update the display object after any changes, you must reassign the ColorTransform instance back to the
transform.colorTransform property.
var colorInfo:ColorTransform = myDisplayObject.transform.colorTransform;
// Make some color transformations here.
// Commit the change.
myDisplayObject.transform.colorTransform = colorInfo;
Setting color values with code
Flash Player 9 and later, Adobe AIR 1.0 and later
The color property of the ColorTransform class can be used to assign a specific red, green, blue (RGB) color value to
the display object. The following example uses the color property to change the color of the display object named
square to blue, when the user clicks a button named blueBtn:
// square is a display object on the Stage.
// blueBtn, redBtn, greenBtn, and blackBtn are buttons on the Stage.
import flash.events.MouseEvent;
import flash.geom.ColorTransform;
// Get access to the ColorTransform instance associated with square.
var colorInfo:ColorTransform = square.transform.colorTransform;
// This function is called when blueBtn is clicked.
function makeBlue(event:MouseEvent):void
{
// Set the color of the ColorTransform object.
colorInfo.color = 0x003399;
// apply the change to the display object
square.transform.colorTransform = colorInfo;
}
blueBtn.addEventListener(MouseEvent.CLICK, makeBlue);

179
ACTIONSCRIPT 3.0 DEVELOPER’S GUIDE
Display programming
Last updated 3/21/2011
Note that when you change a display object’s color using the color property, it completely changes the color of the
entire object, regardless of whether the object previously had multiple colors. For example, if there is a display object
containing a green circle with black text on top, setting the color property of that object’s associated ColorTransform
instance to a shade of red will make the entire object, circle and text, turn red (so the text will no longer be
distinguishable from the rest of the object).
Altering color and brightness effects with code
Flash Player 9 and later, Adobe AIR 1.0 and later
Suppose you have a display object with multiple colors (for example, a digital photo) and you don’t want to completely
recolor the object; you just want to adjust the color of a display object based on the existing colors. In this scenario, the
ColorTransform class includes a series of multiplier and offset properties that you can use to make this type of
adjustment. The multiplier properties, named redMultiplier, greenMultiplier, blueMultiplier, and
alphaMultiplier, work like colored photographic filters (or colored sunglasses), amplifying or diminishing certain
colors in the display object. The offset properties (redOffset, greenOffset, blueOffset, and alphaOffset) can be
used to add extra amounts of a certain color to the object, or to specify the minimum value that a particular color can
have.
These multiplier and offset properties are identical to the advanced color settings that are available for movie clip
symbols in the Flash authoring tool when you choose Advanced from the Color pop-up menu on the Property
inspector.
The following code loads a JPEG image and applies a color transformation to it, which adjusts the red and green
channels as the mouse pointer moves along the x axis and y axis. In this case, because no offset values are specified, the
color value of each color channel displayed on screen will be a percentage of the original color value in the image—
meaning that the most red or green displayed in any given pixel will be the original amount of red or green in that pixel.

180
ACTIONSCRIPT 3.0 DEVELOPER’S GUIDE
Display programming
Last updated 3/21/2011
import flash.display.Loader;
import flash.events.MouseEvent;
import flash.geom.Transform;
import flash.geom.ColorTransform;
import flash.net.URLRequest;
// Load an image onto the Stage.
var loader:Loader = new Loader();
var url:URLRequest = new URLRequest("http://www.helpexamples.com/flash/images/image1.jpg");
loader.load(url);
this.addChild(loader);
// This function is called when the mouse moves over the loaded image.
function adjustColor(event:MouseEvent):void
{
// Access the ColorTransform object for the Loader (containing the image)
var colorTransformer:ColorTransform = loader.transform.colorTransform;
// Set the red and green multipliers according to the mouse position.
// The red value ranges from 0% (no red) when the cursor is at the left
// to 100% red (normal image appearance) when the cursor is at the right.
// The same applies to the green channel, except it's controlled by the
// position of the mouse in the y axis.
colorTransformer.redMultiplier = (loader.mouseX / loader.width) * 1;
colorTransformer.greenMultiplier = (loader.mouseY / loader.height) * 1;
// Apply the changes to the display object.
loader.transform.colorTransform = colorTransformer;
}
loader.addEventListener(MouseEvent.MOUSE_MOVE, adjustColor);
Rotating objects
Flash Player 9 and later, Adobe AIR 1.0 and later
Display objects can be rotated using the rotation property. You can read this value to find out whether an object has
been rotated, or to rotate the object you can set this property to a number (in degrees) representing the amount of
rotation to be applied to the object. For instance, this line of code rotates the object named square 45 degrees (one
eighth of one complete revolution):
square.rotation = 45;
Alternatively, you can rotate a display object using a transformation matrix, described in “Working with geometry” on
page 199.
Fading objects
Flash Player 9 and later, Adobe AIR 1.0 and later
You can control the transparency of a display object to make it partially (or completely transparent), or change the
transparency to make the object appear to fade in or out. The DisplayObject class’s alpha property defines the
transparency (or more accurately, the opacity) of a display object. The alpha property can be set to any value between
0 and 1, where 0 is completely transparent, and 1 is completely opaque. For example, these lines of code make the
object named myBall partially (50 percent) transparent when it is clicked with the mouse:

181
ACTIONSCRIPT 3.0 DEVELOPER’S GUIDE
Display programming
Last updated 3/21/2011
function fadeBall(event:MouseEvent):void
{
myBall.alpha = .5;
}
myBall.addEventListener(MouseEvent.CLICK, fadeBall);
You can also alter the transparency of a display object using the color adjustments available through the
ColorTransform class. For more information, see “Adjusting DisplayObject colors” on page 178.
Masking display objects
Flash Player 9 and later, Adobe AIR 1.0 and later
You can use a display object as a mask to create a hole through which the contents of another display object are visible.
Defining a mask
To indicate that a display object will be the mask for another display object, set the mask object as the mask property
of the display object to be masked:
// Make the object maskSprite be a mask for the object mySprite.
mySprite.mask = maskSprite;
The masked display object is revealed under all opaque (nontransparent) areas of the display object acting as the mask.
For instance, the following code creates a Shape instance containing a red 100 by 100 pixel square and a Sprite instance
containing a blue circle with a radius of 25 pixels. When the circle is clicked, it is set as the mask for the square, so that
the only part of the square that shows is the part that is covered by the solid part of the circle. In other words, only a
red circle will be visible.
// This code assumes it's being run within a display object container
// such as a MovieClip or Sprite instance.
import flash.display.Shape;
// Draw a square and add it to the display list.
var square:Shape = new Shape();
square.graphics.lineStyle(1, 0x000000);
square.graphics.beginFill(0xff0000);
square.graphics.drawRect(0, 0, 100, 100);
square.graphics.endFill();
this.addChild(square);
// Draw a circle and add it to the display list.
var circle:Sprite = new Sprite();
circle.graphics.lineStyle(1, 0x000000);
circle.graphics.beginFill(0x0000ff);
circle.graphics.drawCircle(25, 25, 25);
circle.graphics.endFill();
this.addChild(circle);
function maskSquare(event:MouseEvent):void
{
square.mask = circle;
circle.removeEventListener(MouseEvent.CLICK, maskSquare);
}
circle.addEventListener(MouseEvent.CLICK, maskSquare);

182
ACTIONSCRIPT 3.0 DEVELOPER’S GUIDE
Display programming
Last updated 3/21/2011
The display object that is acting as a mask can be draggable, animated, resized dynamically, and can use separate shapes
within a single mask. The mask display object doesn’t necessarily need to be added to the display list. However, if you
want the mask object to scale when the Stage is scaled or if you want to enable user interaction with the mask (such as
user-controlled dragging and resizing), the mask object must be added to the display list. The actual z-index (front-to-
back order) of the display objects doesn’t matter, as long as the mask object is added to the display list. (The mask
object will not appear on the screen except as a mask.) If the mask object is a MovieClip instance with multiple frames,
it plays all the frames in its timeline, the same as it would if it were not serving as a mask. You can remove a mask by
setting the mask property to null:
// remove the mask from mySprite
mySprite.mask = null;
You cannot use a mask to mask another mask. You cannot set the alpha property of a mask display object. Only fills
are used in a display object that is used as a mask; strokes are ignored.
AIR 2
If a masked display object is cached by setting the cacheAsBitmap and cacheAsBitmapMatrix properties, the mask
must be a child of the masked display object. Similarly, if the masked display object is a descendent of a display object
container that is cached, both the mask and the display object must be descendents of that container. If the masked
object is a descendent of more than one cached display object container, the mask must be a descendent of the cached
container closest to the masked object in the display list.
About masking device fonts
You can use a display object to mask text that is set in a device font. When you use a display object to mask text set in
a device font, the rectangular bounding box of the mask is used as the masking shape. That is, if you create a non-
rectangular display object mask for device font text, the mask that appears in the SWF file is the shape of the
rectangular bounding box of the mask, not the shape of the mask itself.
Alpha channel masking
Alpha channel masking is supported if both the mask and the masked display objects use bitmap caching, as shown here:
// maskShape is a Shape instance which includes a gradient fill.
mySprite.cacheAsBitmap = true;
maskShape.cacheAsBitmap = true;
mySprite.mask = maskShape;
For instance, one application of alpha channel masking is to use a filter on the mask object independently of a filter
that is applied to the masked display object.
In the following example, an external image file is loaded onto the Stage. That image (or more accurately, the Loader
instance it is loaded into) will be the display object that is masked. A gradient oval (solid black center fading to
transparent at the edges) is drawn over the image; this will be the alpha mask. Both display objects have bitmap caching
turned on. The oval is set as a mask for the image, and it is then made draggable.

183
ACTIONSCRIPT 3.0 DEVELOPER’S GUIDE
Display programming
Last updated 3/21/2011
// This code assumes it's being run within a display object container
// such as a MovieClip or Sprite instance.
import flash.display.GradientType;
import flash.display.Loader;
import flash.display.Sprite;
import flash.geom.Matrix;
import flash.net.URLRequest;
// Load an image and add it to the display list.
var loader:Loader = new Loader();
var url:URLRequest = new URLRequest("http://www.helpexamples.com/flash/images/image1.jpg");
loader.load(url);
this.addChild(loader);
// Create a Sprite.
var oval:Sprite = new Sprite();
// Draw a gradient oval.
var colors:Array = [0x000000, 0x000000];
var alphas:Array = [1, 0];
var ratios:Array = [0, 255];
var matrix:Matrix = new Matrix();
matrix.createGradientBox(200, 100, 0, -100, -50);
oval.graphics.beginGradientFill(GradientType.RADIAL,
colors,
alphas,
ratios,
matrix);
oval.graphics.drawEllipse(-100, -50, 200, 100);
oval.graphics.endFill();
// add the Sprite to the display list
this.addChild(oval);
// Set cacheAsBitmap = true for both display objects.
loader.cacheAsBitmap = true;
oval.cacheAsBitmap = true;
// Set the oval as the mask for the loader (and its child, the loaded image)
loader.mask = oval;
// Make the oval draggable.
oval.startDrag(true);
Animating objects
Flash Player 9 and later, Adobe AIR 1.0 and later
Animation is the process of making something move, or alternatively, of making something change over time. Scripted
animation is a fundamental part of video games, and is often used to add polish and useful interaction clues to other
applications.

184
ACTIONSCRIPT 3.0 DEVELOPER’S GUIDE
Display programming
Last updated 3/21/2011
The fundamental idea behind scripted animation is that a change needs to take place, and that change needs to be
divided into increments over time. It’s easy to make something repeat in ActionScript, using a common looping
statement. However, a loop will run through all its iterations before updating the display. To create scripted animation,
you need to write ActionScript that performs some action repeatedly over time and also updates the screen each time
it runs.
For example, imagine you want to create a simple animation, such as making a ball travel across the screen.
ActionScript includes a simple mechanism that allows you to track the passage of time and update the screen
accordingly—meaning you could write code that moves the ball a small amount each time, until it reaches its
destination. After each move the screen would update, making the cross-Stage motion visible to the viewer.
From a practical standpoint, it makes sense to synchronize scripted animation with the SWF file’s frame rate (in other
words, make one animation change each time a new frame displays or would display), since that defines how
frequently Flash Player or AIR updates the screen. Each display object has an enterFrame event that is dispatched
according to the frame rate of the SWF file—one event per frame. Most developers who create scripted animation use
the enterFrame event as a way to create actions that repeat over time. You could write code that listens to the
enterFrame event, moving the animated ball a certain amount each frame, and as the screen is updated (each frame),
the ball would be redrawn in its new location, creating motion.
Note: Another way to perform an action repeatedly over time is to use the Timer class. A Timer instance triggers an event
notification each time a specified amount of time has past. You could write code that performs animation by handling
the Timer class’s timer event, setting the time interval to a small one (some fraction of a second). For more information
about using the Timer class, see “Controlling time intervals” on page 4.
In the following example, a circle Sprite instance, named circle, is created on the Stage. When the user clicks the
circle, a scripted animation sequence begins, causing circle to fade (its alpha property is decreased) until it is
completely transparent:

185
ACTIONSCRIPT 3.0 DEVELOPER’S GUIDE
Display programming
Last updated 3/21/2011
import flash.display.Sprite;
import flash.events.Event;
import flash.events.MouseEvent;
// draw a circle and add it to the display list
var circle:Sprite = new Sprite();
circle.graphics.beginFill(0x990000);
circle.graphics.drawCircle(50, 50, 50);
circle.graphics.endFill();
addChild(circle);
// When this animation starts, this function is called every frame.
// The change made by this function (updated to the screen every
// frame) is what causes the animation to occur.
function fadeCircle(event:Event):void
{
circle.alpha -= .05;
if (circle.alpha <= 0)
{
circle.removeEventListener(Event.ENTER_FRAME, fadeCircle);
}
}
function startAnimation(event:MouseEvent):void
{
circle.addEventListener(Event.ENTER_FRAME, fadeCircle);
}
circle.addEventListener(MouseEvent.CLICK, startAnimation);
When the user clicks the circle, the function fadeCircle() is subscribed as a listener of the enterFrame event,
meaning it begins to be called once per frame. That function fades circle by changing its alpha property, so once per
frame the circle’s alpha decreases by .05 (5 percent) and the screen is updated. Eventually, when the alpha value is 0
(circle is completely transparent), the fadeCircle() function is removed as an event listener, ending the animation.
The same code could be used, for example, to create animated motion instead of fading. By substituting a different
property for alpha in the function that is an enterFrame event listener, that property will be animated instead. For
example, changing this line
circle.alpha -= .05;
to this code
circle.x += 5;
will animate the x property, causing the circle to move to the right across the Stage. The condition that ends the
animation could be changed to end the animation (that is, unsubscribe the enterFrame listener) when the desired x
coordinate is reached.

186
ACTIONSCRIPT 3.0 DEVELOPER’S GUIDE
Display programming
Last updated 3/21/2011
Stage orientation
AIR 2.0 and later
Mobile devices typically re-orient the user interface to keep the display upright when the user rotates the device. If you
enable auto-orientation in your application, the device keeps the display properly oriented, but it is up to you to make
sure that your content looks okay when the aspect ratio of the stage changes. If you disable auto-orientation, then the
device display remains fixed unless you change the orientation manually.
AIR applications run on a number of different mobile devices and operating systems. The underlying orientation
behavior can vary across operating systems, and even across different devices on the same operating system. A simple
design strategy, that works well across all devices and operating systems, is to enable auto-orientation and to listen for
Stage resize events to determine when you need to refresh the application layout.
Alternately, if your application only supports the portrait aspect ratio or only supports the landscape aspect ratio, you
can turn off auto-orientation and set the supported aspect ratio in the AIR application descriptor. This design strategy
provides consistent behavior and selects the “best” orientation for the selected aspect ratio. For example, if you specify
the landscape aspect ratio, the orientation chosen is appropriate for devices with landscape-mode, slide-out keyboards.
Getting the current Stage orientation and aspect ratio
Orientation is reported relative to the normal position of the device. On most devices there is a clear, upright position.
This position is considered the default orientation. The other three possible orientations are then: rotated left, rotated
right, and upside down. The StageOrientation class defines string constants to use when setting or comparing
orientation values.
The Stage class defines two properties that report orientation:
•Stage.deviceOrientation — Reports the physical orientation of the device relative to the default position.
Note: The deviceOrientation is not always available when your application first starts up or when the device is lying
flat. In these cases, the device orientation is reported as unknown.
•Stage.orientation — Reports the orientation of the Stage relative to the default position. When auto-orientation is
enabled, the stage rotates in the opposite direction as the device to remain upright. Thus, the right and left positions
reported by the orientation property are the opposite of those reported by the deviceOrientation property.
For example, when deviceRotation reports rotated right, orientation reports rotated left.
The aspect ratio of the stage can be derived by simply comparing the current width and height of the stage:
var aspect:String = this.stage.stageWidth >= this.stage.stageHeight ?
StageAspectRatio.LANDSCAPE : StageAspectRatio.PORTRAIT;
Automatic orientation
When auto-orientation is on and a user rotates their device, the operating system re-orients the entire user interface,
including the system taskbar and your application. As a result, the aspect ratio of the stage changes from portrait to
landscape or landscape to portrait. When the aspect ratio changes, the stage dimensions also change.
Enable or disable auto-orientation at runtime, by setting the Stage autoOrients property to true or false. You can
set the initial value of this property in the AIR application descriptor with the <autoOrients> element. (Note that
prior to AIR 2.6, autoOrients is a read-only property and can only be set in the application descriptor.)

187
ACTIONSCRIPT 3.0 DEVELOPER’S GUIDE
Display programming
Last updated 3/21/2011
Stage dimension changes
When the stage dimensions change, the stage contents are scaled and repositioned as specified by the scaleMode and
align properties of the Stage object. In most cases, relying on the automatic behavior provided by the Stage
scaleMode settings does not produce good results. Instead you must re-layout or redraw your graphics and
components to support more than one aspect ratio. (Providing flexible layout logic also means that your application
will work better across devices with different screen sizes and aspect ratios.)
The following illustration demonstrates the effects of the different scaleMode settings when rotating a typical mobile
device:
Rotation from landscape to portrait aspect ratio
The illustration demonstrates the scaling behavior that occurs when rotating from a landscape aspect ratio to a portrait
aspect ratio with different scale modes. Rotating from portrait to landscape causes a similar set of effects.
Orientation change events
The Stage object dispatches two types of events that you can use to detect and react to orientation changes. Both stage
resize and orientationChange events are dispatched when auto-orientation is enabled.
The resize event is the best event to use when you are relying on auto-orientation to keep the display upright. When
the stage dispatches a resize event, relayout or redraw your content, as needed. The resize event is only dispatched
when the stage scale mode is set to noScale.
The orientationChange event can also be used to detect orientation changes. The orientationChange event is only
dispatched when auto-orientation is enabled.
Note: On some mobile platforms, the stage dispatches a cancelable orientationChanging event before dispatching the
resize or orientationChange events. Since the event is not supported on all platforms, avoid relying on it.

188
ACTIONSCRIPT 3.0 DEVELOPER’S GUIDE
Display programming
Last updated 3/21/2011
Manual orientation
AIR 2.6 and later
You can control the stage orientation using the Stage setOrientation() or setAspectRatio() methods.
Setting the stage orientation
You can set the stage orientation at runtime using the setOrientation() method of the Stage object. Use the string
constants defined by the StageOrientation class to specify the desired orientation:
this.stage.setOrientation( StageOrientation.ROTATED_RIGHT );
Not every device and operating system supports every possible orientation. For example, Android 2.2 does not support
programmatically choosing the rotated-left orientation on portrait-standard devices and does not support the upside-
down orientation at all. The supportedOrientations property of the stage provides a list of the orientations that can
be passed to the setOrientation() method:
var orientations:Vector.<String> = this.stage.supportedOrientations;
for each( var orientation:String in orientations )
{
trace( orientation );
}
Setting the stage aspect ratio
If you are primarily concerned about the aspect ratio of the stage, you can set the aspect ratio to portrait or landscape.
You can set the aspect ratio in either the AIR application descriptor or, at run time, using the Stage setAspectRatio()
method:
this.stage.setAspectRatio( StageAspectRatio.LANDSCAPE );
The runtime chooses one of the two possible orientations for the specified aspect ratio. This may not match the current
device orientation. The default orientation is chosen in preference to the upside-down orientation. The orientation
appropriate for the slide-out keyboard is chosen in preference to the opposite orientation.
Example: Setting the stage orientation to match the device orientation
The following example illustrates a function that updates the stage orientation to match the current device orientation.
The stage deviceOrientation property indicates the physical orientation of the device, even when auto-orientation
is turned off.

189
ACTIONSCRIPT 3.0 DEVELOPER’S GUIDE
Display programming
Last updated 3/21/2011
function refreshOrientation( theStage:Stage ):void
{
switch ( theStage.deviceOrientation )
{
case StageOrientation.DEFAULT:
theStage.setOrientation( StageOrientation.DEFAULT );
break;
case StageOrientation.ROTATED_RIGHT:
theStage.setOrientation( StageOrientation.ROTATED_LEFT );
break;
case StageOrientation.ROTATED_LEFT:
theStage.setOrientation( StageOrientation.ROTATED_RIGHT );
break;
case StageOrientation.UPSIDE_DOWN:
theStage.setOrientation( StageOrientation.UPSIDE_DOWN );
break;
default:
//No change
}
}
The orientation change is asynchronous. You can listen for the orientationChange event dispatched by the stage to
detect the completion of the change. If an orientation is not supported on a device, the setOrientation() call fails
without throwing an error.
Loading display content dynamically
Flash Player 9 and later, Adobe AIR 1.0 and later
You can load any of the following external display assets into an ActionScript 3.0 application:
•A SWF file authored in ActionScript 3.0—This file can be a Sprite, MovieClip, or any class that extends Sprite. In
AIR applications on iOS, only SWF files that do not contain ActionScript bytecode can be loaded. This means that
SWF files containing embedded data, such as images and sound can be loaded, but not SWF files containing
executable code.
•An image file—This includes JPG, PNG, and GIF files.
•An AVM1 SWF file—This is a SWF file written in ActionScript 1.0 or 2.0. (not supported in mobile AIR
applications)
You load these assets by using the Loader class.
Loading display objects
Flash Player 9 and later, Adobe AIR 1.0 and later
Loader objects are used to load SWF files and graphics files into an application. The Loader class is a subclass of the
DisplayObjectContainer class. A Loader object can contain only one child display object in its display list—the display
object representing the SWF or graphic file that it loads. When you add a Loader object to the display list, as in the
following code, you also add the loaded child display object to the display list once it loads:
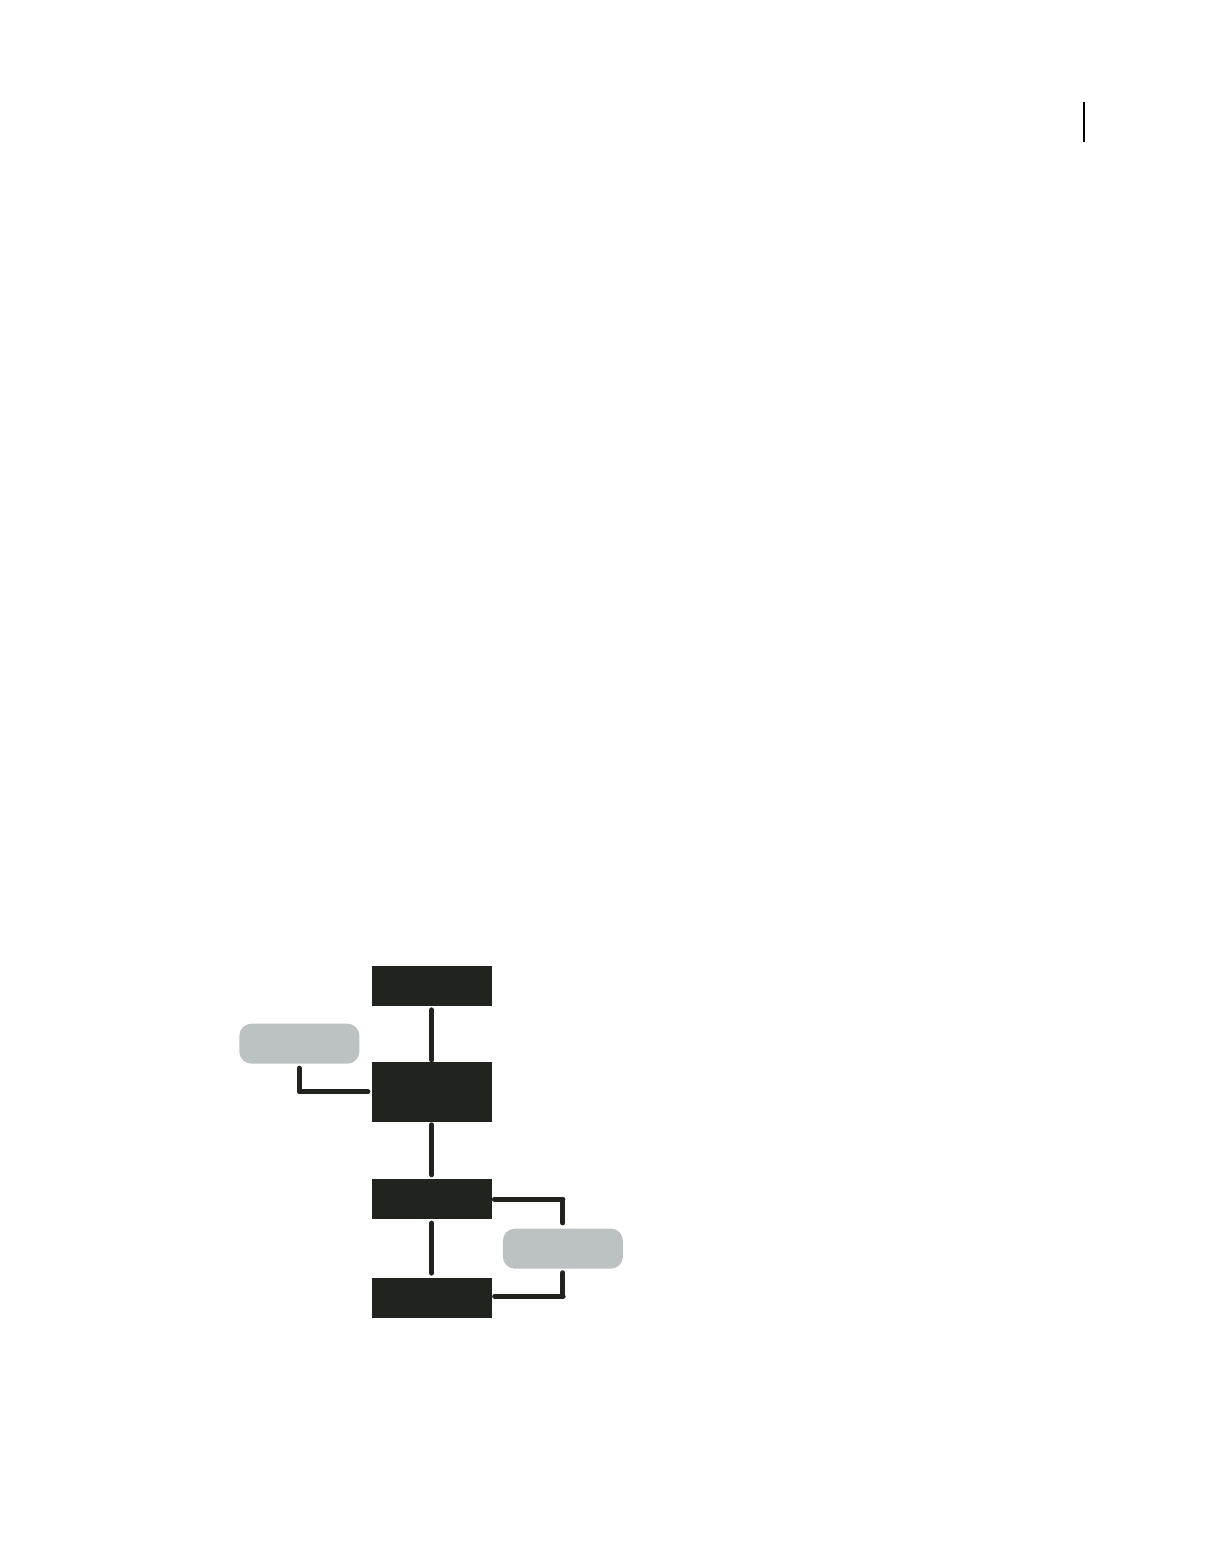
190
ACTIONSCRIPT 3.0 DEVELOPER’S GUIDE
Display programming
Last updated 3/21/2011
var pictLdr:Loader = new Loader();
var pictURL:String = "banana.jpg"
var pictURLReq:URLRequest = new URLRequest(pictURL);
pictLdr.load(pictURLReq);
this.addChild(pictLdr);
Once the SWF file or image is loaded, you can move the loaded display object to another display object container, such
as the container DisplayObjectContainer object in this example:
import flash.display.*;
import flash.net.URLRequest;
import flash.events.Event;
var container:Sprite = new Sprite();
addChild(container);
var pictLdr:Loader = new Loader();
var pictURL:String = "banana.jpg"
var pictURLReq:URLRequest = new URLRequest(pictURL);
pictLdr.load(pictURLReq);
pictLdr.contentLoaderInfo.addEventListener(Event.COMPLETE, imgLoaded);
function imgLoaded(event:Event):void
{
container.addChild(pictLdr.content);
}
Monitoring loading progress
Flash Player 9 and later, Adobe AIR 1.0 and later
Once the file has started loading, a LoaderInfo object is created. A LoaderInfo object provides information such as load
progress, the URLs of the loader and loadee, the number of bytes total for the media, and the nominal height and width
of the media. A LoaderInfo object also dispatches events for monitoring the progress of the load.
The following diagram shows the different uses of the LoaderInfo object—for the instance of the main class of the SWF
file, for a Loader object, and for an object loaded by the Loader object:
Stage
Instance of
the main class of
the SWF le
Loader object
LoaderInfo object
content
contentLoaderInfo
property
loaderInfo
property
LoaderInfo object
loaderInfo
property

191
ACTIONSCRIPT 3.0 DEVELOPER’S GUIDE
Display programming
Last updated 3/21/2011
The LoaderInfo object can be accessed as a property of both the Loader object and the loaded display object. As soon
as loading begins, the LoaderInfo object can be accessed through the contentLoaderInfo property of the Loader
object. Once the display object has finished loading, the LoaderInfo object can also be accessed as a property of the
loaded display object through the display object’s loaderInfo property. The loaderInfo property of the loaded
display object refers to the same LoaderInfo object as the contentLoaderInfo property of the Loader object. In other
words, a LoaderInfo object is shared between a loaded object and the Loader object that loaded it (between loader and
loadee).
In order to access properties of loaded content, you will want to add an event listener to the LoaderInfo object, as in
the following code:
import flash.display.Loader;
import flash.display.Sprite;
import flash.events.Event;
var ldr:Loader = new Loader();
var urlReq:URLRequest = new URLRequest("Circle.swf");
ldr.load(urlReq);
ldr.contentLoaderInfo.addEventListener(Event.COMPLETE, loaded);
addChild(ldr);
function loaded(event:Event):void
{
var content:Sprite = event.target.content;
content.scaleX = 2;
}
For more information, see “Handling events” on page 117.
Specifying loading context
Flash Player 9 and later, Adobe AIR 1.0 and later
When you load an external file into Flash Player or AIR through the load() or loadBytes() method of the Loader
class, you can optionally specify a context parameter. This parameter is a LoaderContext object.
The LoaderContext class includes three properties that let you define the context of how the loaded content can be
used:
•checkPolicyFile: Use this property only when loading an image file (not a SWF file). If you set this property to
true, the Loader checks the origin server for a policy file (see “Website controls (policy files)” on page 1017). This
is necessary only for content originating from domains other than that of the SWF file containing the Loader object.
If the server grants permission to the Loader domain, ActionScript from SWF files in the Loader domain can access
data in the loaded image; in other words, you can use the BitmapData.draw() command to access data in the
loaded image.
Note that a SWF file from other domains than that of the Loader object can call Security.allowDomain() to
permit a specific domain.
•securityDomain: Use this property only when loading a SWF file (not an image). Specify this for a SWF file from
a domain other than that of the file containing the Loader object. When you specify this option, Flash Player checks
for the existence of a policy file, and if one exists, SWF files from the domains permitted in the cross-policy file can
cross-script the loaded SWF content. You can specify flash.system.SecurityDomain.currentDomain as this
parameter.

192
ACTIONSCRIPT 3.0 DEVELOPER’S GUIDE
Display programming
Last updated 3/21/2011
•applicationDomain: Use this property only when loading a SWF file written in ActionScript 3.0 (not an image or
a SWF file written in ActionScript 1.0 or 2.0). When loading the file, you can specify that the file be included in the
same application domain as that of the Loader object, by setting the applicationDomain parameter to
flash.system.ApplicationDomain.currentDomain. By putting the loaded SWF file in the same application
domain, you can access its classes directly. This can be useful if you are loading a SWF file that contains embedded
media, which you can access via their associated class names. For more information, see “Working with application
domains” on page 139.
Here’s an example of checking for a policy file when loading a bitmap from another domain:
var context:LoaderContext = new LoaderContext();
context.checkPolicyFile = true;
var urlReq:URLRequest = new URLRequest("http://www.[your_domain_here].com/photo11.jpg");
var ldr:Loader = new Loader();
ldr.load(urlReq, context);
Here’s an example of checking for a policy file when loading a SWF from another domain, in order to place the file in
the same security sandbox as the Loader object. Additionally, the code adds the classes in the loaded SWF file to the
same application domain as that of the Loader object:
var context:LoaderContext = new LoaderContext();
context.securityDomain = SecurityDomain.currentDomain;
context.applicationDomain = ApplicationDomain.currentDomain;
var urlReq:URLRequest = new URLRequest("http://www.[your_domain_here].com/library.swf");
var ldr:Loader = new Loader();
ldr.load(urlReq, context);
For more information, see the LoaderContext class in the ActionScript 3.0 Reference for the Adobe Flash Platform.
Display object example: SpriteArranger
Flash Player 9 and later, Adobe AIR 1.0 and later
The SpriteArranger sample application builds upon the Geometric Shapes sample application described separately in
Learning ActionScript 3.0.
The SpriteArranger sample application illustrates a number of concepts for dealing with display objects:
•Extending display object classes
•Adding objects to the display list
•Layering display objects and working with display object containers
•Responding to display object events
•Using properties and methods of display objects
To get the application files for this sample, see www.adobe.com/go/learn_programmingAS3samples_flash. The
SpriteArranger application files can be found in the folder Examples/SpriteArranger. The application consists of the
following files:

193
ACTIONSCRIPT 3.0 DEVELOPER’S GUIDE
Display programming
Last updated 3/21/2011
Defining the SpriteArranger classes
Flash Player 9 and later, Adobe AIR 1.0 and later
The SpriteArranger application lets the user add a variety of display objects to the on-screen “canvas.”
The DrawingCanvas class defines a drawing area, a type of display object container, to which the user can add on-
screen shapes. These on-screen shapes are instances of one of the subclasses of the GeometricSprite class.
The DrawingCanvas class
In Flex, all child display objects added to a Container object must be of a class that descends from the
mx.core.UIComponent class. This application adds an instance of the DrawingCanvas class as a child of an
mx.containers.VBox object, as defined in MXML code in the SpriteArranger.mxml file. This inheritance is defined in
the DrawingCanvas class declaration, as follows:
File Description
SpriteArranger.mxml
or
SpriteArranger.fla
The main application file in Flash (FLA) or Flex
(MXML).
com/example/programmingas3/SpriteArranger/CircleSprite.as A class defining a type of Sprite object that renders
a circle on-screen.
com/example/programmingas3/SpriteArranger/DrawingCanvas.as A class defining the canvas, which is a display
object container that contains GeometricSprite
objects.
com/example/programmingas3/SpriteArranger/SquareSprite.as A class defining a type of Sprite object that renders
a square on-screen.
com/example/programmingas3/SpriteArranger/TriangleSprite.as A class defining a type of Sprite object that renders
a triangle on-screen.
com/example/programmingas3/SpriteArranger/GeometricSprite.as A class that extends the Sprite object, used to
define an on-screen shape. The CircleSprite,
SquareSprite, and TriangleSprite each extend this
class.
com/example/programmingas3/geometricshapes/IGeometricShape.as The base interface defining methods to be
implemented by all geometric shape classes.
com/example/programmingas3/geometricshapes/IPolygon.as An interface defining methods to be implemented
by geometric shape classes that have multiple
sides.
com/example/programmingas3/geometricshapes/RegularPolygon.as A type of geometric shape that has sides of equal
length positioned symmetrically around the
shape’s center.
com/example/programmingas3/geometricshapes/Circle.as A type of geometric shape that defines a circle.
com/example/programmingas3/geometricshapes/EquilateralTriangle.as A subclass of RegularPolygon that defines a
triangle with all sides the same length.
com/example/programmingas3/geometricshapes/Square.as A subclass of RegularPolygon defining a rectangle
with all four sides the same length.
com/example/programmingas3/geometricshapes/GeometricShapeFactory.as A class containing a “factory method” for creating
shapes given a shape type and size.

194
ACTIONSCRIPT 3.0 DEVELOPER’S GUIDE
Display programming
Last updated 3/21/2011
public class DrawingCanvas extends UIComponent
The UIComponent class inherits from the DisplayObject, DisplayObjectContainer, and Sprite classes, and the code in
the DrawingCanvas class uses methods and properties of those classes.
The DrawingCanvas class extends the Sprite class, and this inheritance is defined in the DrawingCanvas class
declaration, as follows:
public class DrawingCanvas extends Sprite
The Sprite class is a subclass of the DisplayObjectContainer and DisplayObject classes, and the DrawingCanvas class
uses methods and properties of those classes.
The DrawingCanvas() constructor method sets up a Rectangle object, bounds, which is property that is later used in
drawing the outline of the canvas. It then calls the initCanvas() method, as follows:
this.bounds = new Rectangle(0, 0, w, h);
initCanvas(fillColor, lineColor);
AS the following example shows, the initCanvas() method defines various properties of the DrawingCanvas object,
which were passed as arguments to the constructor function:
this.lineColor = lineColor;
this.fillColor = fillColor;
this.width = 500;
this.height = 200;
The initCanvas() method then calls the drawBounds() method, which draws the canvas using the DrawingCanvas
class’s graphics property. The graphics property is inherited from the Shape class.
this.graphics.clear();
this.graphics.lineStyle(1.0, this.lineColor, 1.0);
this.graphics.beginFill(this.fillColor, 1.0);
this.graphics.drawRect(bounds.left - 1,
bounds.top - 1,
bounds.width + 2,
bounds.height + 2);
this.graphics.endFill();
The following additional methods of the DrawingCanvas class are invoked based on user interactions with the
application:
•The addShape() and describeChildren() methods, which are described in “Adding display objects to the
canvas” on page 195
•The moveToBack(), moveDown(), moveToFront(), and moveUp() methods, which are described in “Rearranging
display object layering” on page 197
•The onMouseUp() method, which is described in “Clicking and dragging display objects” on page 196
The GeometricSprite class and its subclasses
Each display object the user can add to the canvas is an instance of one of the following subclasses of the
GeometricSprite class:
•CircleSprite
•SquareSprite
•TriangleSprite
The GeometricSprite class extends the flash.display.Sprite class:

195
ACTIONSCRIPT 3.0 DEVELOPER’S GUIDE
Display programming
Last updated 3/21/2011
public class GeometricSprite extends Sprite
The GeometricSprite class includes a number of properties common to all GeometricSprite objects. These are set in
the constructor function based on parameters passed to the function. For example:
this.size = size;
this.lineColor = lColor;
this.fillColor = fColor;
The geometricShape property of the GeometricSprite class defines an IGeometricShape interface, which defines the
mathematical properties, but not the visual properties, of the shape. The classes that implement the IGeometricShape
interface are defined in the GeometricShapes sample application described in Learning ActionScript 3.0.
The GeometricSprite class defines the drawShape() method, which is further refined in the override definitions in
each subclass of GeometricSprite. For more information, see the “Adding display objects to the canvas” section, which
follows.
The GeometricSprite class also provides the following methods:
•The onMouseDown() and onMouseUp() methods, which are described in “Clicking and dragging display objects”
on page 196
•The showSelected() and hideSelected() methods, which are described in “Clicking and dragging display
objects” on page 196
Adding display objects to the canvas
Flash Player 9 and later, Adobe AIR 1.0 and later
When the user clicks the Add Shape button, the application calls the addShape() method of the DrawingCanvas class.
It instantiates a new GeometricSprite by calling the appropriate constructor function of one of the GeometricSprite
subclasses, as the following example shows:
public function addShape(shapeName:String, len:Number):void
{
var newShape:GeometricSprite;
switch (shapeName)
{
case "Triangle":
newShape = new TriangleSprite(len);
break;
case "Square":
newShape = new SquareSprite(len);
break;
case "Circle":
newShape = new CircleSprite(len);
break;
}
newShape.alpha = 0.8;
this.addChild(newShape);
}
Each constructor method calls the drawShape() method, which uses the graphics property of the class (inherited
from the Sprite class) to draw the appropriate vector graphic. For example, the drawShape() method of the
CircleSprite class includes the following code:

196
ACTIONSCRIPT 3.0 DEVELOPER’S GUIDE
Display programming
Last updated 3/21/2011
this.graphics.clear();
this.graphics.lineStyle(1.0, this.lineColor, 1.0);
this.graphics.beginFill(this.fillColor, 1.0);
var radius:Number = this.size / 2;
this.graphics.drawCircle(radius, radius, radius);
The second to last line of the addShape() function sets the alpha property of the display object (inherited from the
DisplayObject class), so that each display object added to the canvas is slightly transparent, letting the user see the
objects behind it.
The final line of the addChild() method adds the new display object to the child list of the instance of the
DrawingCanvas class, which is already on the display list. This causes the new display object to appear on the Stage.
The interface for the application includes two text fields, selectedSpriteTxt and outputTxt. The text properties of
these text fields are updated with information about the GeometricSprite objects that have been added to the canvas
or selected by the user. The GeometricSprite class handles this information-reporting task by overriding the
toString() method, as follows:
public override function toString():String
{
return this.shapeType + " of size " + this.size + " at " + this.x + ", " + this.y;
}
The shapeType property is set to the appropriate value in the constructor method of each GeometricSprite subclass.
For example, the toString() method might return the following value for a CircleSprite instance recently added to
the DrawingCanvas instance:
Circle of size 50 at 0, 0
The describeChildren() method of the DrawingCanvas class loops through the canvas’s child list, using the
numChildren property (inherited from the DisplayObjectContainer class) to set the limit of the for loop. It generates
a string listing each child, as follows:
var desc:String = "";
var child:DisplayObject;
for (var i:int=0; i < this.numChildren; i++)
{
child = this.getChildAt(i);
desc += i + ": " + child + '\n';
}
The resulting string is used to set the text property of the outputTxt text field.
Clicking and dragging display objects
Flash Player 9 and later, Adobe AIR 1.0 and later
When the user clicks on a GeometricSprite instance, the application calls the onMouseDown() event handler. As the
following shows, this event handler is set to listen for mouse down events in the constructor function of the
GeometricSprite class:
this.addEventListener(MouseEvent.MOUSE_DOWN, onMouseDown);
The onMouseDown() method then calls the showSelected() method of the GeometricSprite object. If it is the first
time this method has been called for the object, the method creates a new Shape object named selectionIndicator
and it uses the graphics property of the Shape object to draw a red highlight rectangle, as follows:

197
ACTIONSCRIPT 3.0 DEVELOPER’S GUIDE
Display programming
Last updated 3/21/2011
this.selectionIndicator = new Shape();
this.selectionIndicator.graphics.lineStyle(1.0, 0xFF0000, 1.0);
this.selectionIndicator.graphics.drawRect(-1, -1, this.size + 1, this.size + 1);
this.addChild(this.selectionIndicator);
If this is not the first time the onMouseDown() method is called, the method simply sets the selectionIndicator
shape’s visible property (inherited from the DisplayObject class), as follows:
this.selectionIndicator.visible = true;
The hideSelected() method hides the selectionIndicator shape of the previously selected object by setting its
visible property to false.
The onMouseDown() event handler method also calls the startDrag() method (inherited from the Sprite class),
which includes the following code:
var boundsRect:Rectangle = this.parent.getRect(this.parent);
boundsRect.width -= this.size;
boundsRect.height -= this.size;
this.startDrag(false, boundsRect);
This lets the user drag the selected object around the canvas, within the boundaries set by the boundsRect rectangle.
When the user releases the mouse button, the mouseUp event is dispatched. The constructor method of the
DrawingCanvas sets up the following event listener:
this.addEventListener(MouseEvent.MOUSE_UP, onMouseUp);
This event listener is set for the DrawingCanvas object, rather than for the individual GeometricSprite objects. This is
because when the GeometricSprite object is dragged, it could end up behind another display object (another
GeometricSprite object) when the mouse is released. The display object in the foreground would receive the mouse up
event but the display object the user is dragging would not. Adding the listener to the DrawingCanvas object ensures
that the event is always handled.
The onMouseUp() method calls the onMouseUp() method of the GeometricSprite object, which in turn calls the
stopDrag() method of the GeometricSprite object.
Rearranging display object layering
Flash Player 9 and later, Adobe AIR 1.0 and later
The user interface for the application includes buttons labeled Move Back, Move Down, Move Up, and Move to Front.
When the user clicks one of these buttons, the application calls the corresponding method of the DrawingCanvas class:
moveToBack(), moveDown(), moveUp(), or moveToFront(). For example, the moveToBack() method includes the
following code:
public function moveToBack(shape:GeometricSprite):void
{
var index:int = this.getChildIndex(shape);
if (index > 0)
{
this.setChildIndex(shape, 0);
}
}
The method uses the setChildIndex() method (inherited from the DisplayObjectContainer class) to position the
display object in index position 0 in the child list of the DrawingCanvas instance (this).

198
ACTIONSCRIPT 3.0 DEVELOPER’S GUIDE
Display programming
Last updated 3/21/2011
The moveDown() method works similarly, except that it decrements the index position of the display object by 1 in the
child list of the DrawingCanvas instance:
public function moveDown(shape:GeometricSprite):void
{
var index:int = this.getChildIndex(shape);
if (index > 0)
{
this.setChildIndex(shape, index - 1);
}
}
The moveUp() and moveToFront() methods work similarly to the moveToBack() and moveDown() methods.

199
Last updated 3/21/2011
Chapter 10: Working with geometry
Flash Player 9 and later, Adobe AIR 1.0 and later
The flash.geom package contains classes that define geometric objects such as points, rectangles, and transformation
matrixes. You use these classes to define the properties of objects that are used in other classes.
More Help topics
flash.geom package
Basics of geometry
Flash Player 9 and later, Adobe AIR 1.0 and later
The flash.geom package contains classes that define geometric objects such as points, rectangles, and transformation
matrixes. These classes don’t necessarily provide functionality by themselves; however, they are used to define the
properties of objects that are used in other classes.
All the geometry classes are based around the notion that locations on the screen are represented as a two-dimensional
plane. The screen is treated like a flat graph with a horizontal (x) axis and a vertical (y) axis. Any location (or point) on
the screen can be represented as a pair of x and y values—the coordinates of that location.
Every display object, including the Stage, has its own coordinate space. The coordinate space is an object’s own graph
for plotting the locations of child display objects, drawings, and so on. The origin is at coordinate location 0, 0 (where
the x and y-axes meet), and is placed at the upper-left corner of the display object. While this origin location is always
true for the Stage, it is not necessarily true for other display objects. Values on the x-axis get bigger going toward the
right, and smaller going toward the left. For locations to the left of the origin, the x coordinate is negative. However,
contrary to traditional coordinate systems, Flash runtime coordinate values on the y-axis get bigger going down the
screen and smaller going up the screen. Values above the origin have a negative y coordinate value). Since the upper-
left corner of the Stage is the origin of its coordinate space, most objects on the Stage have an x coordinate greater than
0 and smaller than the Stage width. And the same object has a y coordinate larger than 0 and smaller than the Stage
height.
You can use Point class instances to represent individual points in a coordinate space. You can create a Rectangle
instance to represent a rectangular region in a coordinate space. For advanced users, you can use a Matrix instance to
apply multiple or complex transformations to a display object. Many simple transformations, such as rotation,
position, and scale changes, can be applied directly to a display object using that object’s properties. For more
information on applying transformations using display object properties, see “Manipulating display objects” on
page 164.
Important concepts and terms
The following reference list contains important geometry terms:
Cartesian coordinates Coordinates are commonly written as a pair of number (like 5, 12 or 17, -23). The two numbers
are the x coordinate and the y coordinate, respectively.
Coordinate space The graph of coordinates contained in a display object, on which its child elements are positioned.

200
ACTIONSCRIPT 3.0 DEVELOPER’S GUIDE
Working with geometry
Last updated 3/21/2011
Origin The point in a coordinate space where the x-axis meets the y-axis. This point has the coordinate 0, 0.
Point A single location in a coordinate space. In the 2-d coordinate system used in ActionScript, the location along
the x-axis and the y-axis (the point’s coordinates) define the point.
Registration point In a display object, the origin (0, 0 coordinate) of its coordinate space.
Scale The size of an object relative to its original size. When used as a verb, to scale an object means to change its size
by stretching or shrinking the object.
Translate To change a point’s coordinates from one coordinate space to another.
Transformation An adjustment to a visual characteristic of a graphic, such as rotating the object, altering its scale,
skewing or distorting its shape, or altering its color.
X-axis The horizontal axis in the 2-d coordinate system used in ActionScript.
Y-axis The vertical axis in the 2-d coordinate system used in ActionScript.
Using Point objects
Flash Player 9 and later, Adobe AIR 1.0 and later
A Point object defines a Cartesian pair of coordinates. It represents location in a two-dimensional coordinate system,
where x represents the horizontal axis and y represents the vertical axis.
To define a Point object, you set its x and y properties, as follows:
import flash.geom.*;
var pt1:Point = new Point(10, 20); // x == 10; y == 20
var pt2:Point = new Point();
pt2.x = 10;
pt2.y = 20;
Finding the distance between two points
Flash Player 9 and later, Adobe AIR 1.0 and later
You can use the distance() method of the Point class to find the distance between two points in a coordinate space.
For example, the following code finds the distance between the registration points of two display objects, circle1 and
circle2, in the same display object container:
import flash.geom.*;
var pt1:Point = new Point(circle1.x, circle1.y);
var pt2:Point = new Point(circle2.x, circle2.y);
var distance:Number = Point.distance(pt1, pt2);
Translating coordinate spaces
Flash Player 9 and later, Adobe AIR 1.0 and later
If two display objects are in different display object containers, they can be in different coordinate spaces. You can use
the localToGlobal() method of the DisplayObject class to translate the coordinates to the same (global) coordinate
space, that of the Stage. For example, the following code finds the distance between the registration points of two
display objects, circle1 and circle2, in the different display object containers:

201
ACTIONSCRIPT 3.0 DEVELOPER’S GUIDE
Working with geometry
Last updated 3/21/2011
import flash.geom.*;
var pt1:Point = new Point(circle1.x, circle1.y);
pt1 = circle1.localToGlobal(pt1);
var pt2:Point = new Point(circle2.x, circle2.y);
pt2 = circle2.localToGlobal(pt2);
var distance:Number = Point.distance(pt1, pt2);
Similarly, to find the distance of the registration point of a display object named target from a specific point on the
Stage, use the localToGlobal() method of the DisplayObject class:
import flash.geom.*;
var stageCenter:Point = new Point();
stageCenter.x = this.stage.stageWidth / 2;
stageCenter.y = this.stage.stageHeight / 2;
var targetCenter:Point = new Point(target.x, target.y);
targetCenter = target.localToGlobal(targetCenter);
var distance:Number = Point.distance(stageCenter, targetCenter);
Moving a display object by a specified angle and distance
Flash Player 9 and later, Adobe AIR 1.0 and later
You can use the polar() method of the Point class to move a display object a specific distance by a specific angle. For
example, the following code moves the myDisplayObject object 100 pixels by 60°:
import flash.geom.*;
var distance:Number = 100;
var angle:Number = 2 * Math.PI * (90 / 360);
var translatePoint:Point = Point.polar(distance, angle);
myDisplayObject.x += translatePoint.x;
myDisplayObject.y += translatePoint.y;
Other uses of the Point class
Flash Player 9 and later, Adobe AIR 1.0 and later
You can use Point objects with the following methods and properties:
Class Methods or properties Description
DisplayObjectContainer areInaccessibleObjectsUnderPoint()getObject
sUnderPoint()
Used to return a list of objects under a point in
a display object container.
BitmapData hitTest() Used to define the pixel in the BitmapData
object as well as the point that you are
checking for a hit.

202
ACTIONSCRIPT 3.0 DEVELOPER’S GUIDE
Working with geometry
Last updated 3/21/2011
Using Rectangle objects
Flash Player 9 and later, Adobe AIR 1.0 and later
A Rectangle object defines a rectangular area. A Rectangle object has a position, defined by the x and y coordinates of
its upper-left corner, a width property, and a height property. You can define these properties for a new Rectangle
object by calling the Rectangle() constructor function, as follows:
import flash.geom.Rectangle;
var rx:Number = 0;
var ry:Number = 0;
var rwidth:Number = 100;
var rheight:Number = 50;
var rect1:Rectangle = new Rectangle(rx, ry, rwidth, rheight);
Resizing and repositioning Rectangle objects
Flash Player 9 and later, Adobe AIR 1.0 and later
There are a number of ways to resize and reposition Rectangle objects.
You can directly reposition the Rectangle object by changing its x and y properties. This change has no effect on the
width or height of the Rectangle object.
import flash.geom.Rectangle;
var x1:Number = 0;
var y1:Number = 0;
var width1:Number = 100;
var height1:Number = 50;
var rect1:Rectangle = new Rectangle(x1, y1, width1, height1);
trace(rect1) // (x=0, y=0, w=100, h=50)
rect1.x = 20;
rect1.y = 30;
trace(rect1); // (x=20, y=30, w=100, h=50)
BitmapData applyFilter()
copyChannel()
merge()
paletteMap()
pixelDissolve()
threshold()
Used to define the positions of rectangles that
define the operations.
Matrix deltaTransformPoint()
transformPoint()
Used to define points for which you want to
apply a transformation.
Rectangle bottomRight
size
topLeft
Used to define these properties.
Class Methods or properties Description

203
ACTIONSCRIPT 3.0 DEVELOPER’S GUIDE
Working with geometry
Last updated 3/21/2011
As the following code shows, when you change the left or top property of a Rectangle object, the rectangle is
repositioned. The rectangle’s x and y properties match the left and top properties, respectively. However, the
position of the lower-left corner of the Rectangle object does not change, so it is resized.
import flash.geom.Rectangle;
var x1:Number = 0;
var y1:Number = 0;
var width1:Number = 100;
var height1:Number = 50;
var rect1:Rectangle = new Rectangle(x1, y1, width1, height1);
trace(rect1) // (x=0, y=0, w=100, h=50)
rect1.left = 20;
rect1.top = 30;
trace(rect1); // (x=20, y=30, w=80, h=20)
Similarly, as the following example shows, if you change the bottom or right property of a Rectangle object, the
position of its upper-left corner does not change. The rectangle is resized accordingly:
import flash.geom.Rectangle;
var x1:Number = 0;
var y1:Number = 0;
var width1:Number = 100;
var height1:Number = 50;
var rect1:Rectangle = new Rectangle(x1, y1, width1, height1);
trace(rect1) // (x=0, y=0, w=100, h=50)
rect1.right = 60;
trect1.bottom = 20;
trace(rect1); // (x=0, y=0, w=60, h=20)
You can also reposition a Rectangle object by using the offset() method, as follows:
import flash.geom.Rectangle;
var x1:Number = 0;
var y1:Number = 0;
var width1:Number = 100;
var height1:Number = 50;
var rect1:Rectangle = new Rectangle(x1, y1, width1, height1);
trace(rect1) // (x=0, y=0, w=100, h=50)
rect1.offset(20, 30);
trace(rect1); // (x=20, y=30, w=100, h=50)
The offsetPt() method works similarly, except that it takes a Point object as its parameter, rather than x and y offset
values.
You can also resize a Rectangle object by using the inflate() method, which includes two parameters, dx and dy.
The dx parameter represents the number of pixels that the left and right sides of the rectangle moves from the center.
The dy parameter represents the number of pixels that the top and bottom of the rectangle moves from the center:
import flash.geom.Rectangle;
var x1:Number = 0;
var y1:Number = 0;
var width1:Number = 100;
var height1:Number = 50;
var rect1:Rectangle = new Rectangle(x1, y1, width1, height1);
trace(rect1) // (x=0, y=0, w=100, h=50)
rect1.inflate(6,4);
trace(rect1); // (x=-6, y=-4, w=112, h=58)

204
ACTIONSCRIPT 3.0 DEVELOPER’S GUIDE
Working with geometry
Last updated 3/21/2011
The inflatePt() method works similarly, except that it takes a Point object as its parameter, rather than dx and dy
values.
Finding unions and intersections of Rectangle objects
Flash Player 9 and later, Adobe AIR 1.0 and later
You use the union() method to find the rectangular region formed by the boundaries of two rectangles:
import flash.display.*;
import flash.geom.Rectangle;
var rect1:Rectangle = new Rectangle(0, 0, 100, 100);
trace(rect1); // (x=0, y=0, w=100, h=100)
var rect2:Rectangle = new Rectangle(120, 60, 100, 100);
trace(rect2); // (x=120, y=60, w=100, h=100)
trace(rect1.union(rect2)); // (x=0, y=0, w=220, h=160)
You use the intersection() method to find the rectangular region formed by the overlapping region of two
rectangles:
import flash.display.*;
import flash.geom.Rectangle;
var rect1:Rectangle = new Rectangle(0, 0, 100, 100);
trace(rect1); // (x=0, y=0, w=100, h=100)
var rect2:Rectangle = new Rectangle(80, 60, 100, 100);
trace(rect2); // (x=120, y=60, w=100, h=100)
trace(rect1.intersection(rect2)); // (x=80, y=60, w=20, h=40)
You use the intersects() method to find out whether two rectangles intersect. You can also use the intersects()
method to find out whether a display object is in a certain region of the Stage. For the following code example, assume
the coordinate space of the display object container that contains the circle object is the same as that of the Stage.
The example shows how to use the intersects() method to determine if a display object, circle, intersects specified
regions of the Stage, defined by the target1 and target2 Rectangle objects:
import flash.display.*;
import flash.geom.Rectangle;
var circle:Shape = new Shape();
circle.graphics.lineStyle(2, 0xFF0000);
circle.graphics.drawCircle(250, 250, 100);
addChild(circle);
var circleBounds:Rectangle = circle.getBounds(stage);
var target1:Rectangle = new Rectangle(0, 0, 100, 100);
trace(circleBounds.intersects(target1)); // false
var target2:Rectangle = new Rectangle(0, 0, 300, 300);
trace(circleBounds.intersects(target2)); // true
Similarly, you can use the intersects() method to find out whether the bounding rectangles of two display objects
overlap. Use the getRect() method of the DisplayObject class to include any additional space that the strokes of a
display object add to a bounding region.
Other uses of Rectangle objects
Flash Player 9 and later, Adobe AIR 1.0 and later
Rectangle objects are used in the following methods and properties:

205
ACTIONSCRIPT 3.0 DEVELOPER’S GUIDE
Working with geometry
Last updated 3/21/2011
Using Matrix objects
Flash Player 9 and later, Adobe AIR 1.0 and later
The Matrix class represents a transformation matrix that determines how to map points from one coordinate space to
another. You can perform various graphical transformations on a display object by setting the properties of a Matrix
object, applying that Matrix object to the matrix property of a Transform object, and then applying that Transform
object as the transform property of the display object. These transformation functions include translation (x and y
repositioning), rotation, scaling, and skewing.
Although you could define a matrix by directly adjusting the properties (a, b, c, d, tx, ty) of a Matrix object, it is easier
to use the createBox() method. This method includes parameters that let you directly define the scaling, rotation,
and translation effects of the resulting matrix. For example, the following code creates a Matrix object that scales an
object horizontally by 2.0, scales it vertically by 3.0, rotates it by 45°, moving (translating) it 10 pixels to the right, and
moving it 20 pixels down:
var matrix:Matrix = new Matrix();
var scaleX:Number = 2.0;
var scaleY:Number = 3.0;
var rotation:Number = 2 * Math.PI * (45 / 360);
var tx:Number = 10;
var ty:Number = 20;
matrix.createBox(scaleX, scaleY, rotation, tx, ty);
You can also adjust the scaling, rotation, and translation effects of a Matrix object by using the scale(), rotate(),
and translate() methods. Note that these methods combine with the values of the existing Matrix object. For
example, the following code sets a Matrix object that scales an object by a factor of 4 and rotates it 60°, since the
scale() and rotate() methods are called twice:
Class Methods or properties Description
BitmapData applyFilter(), colorTransform(),
copyChannel(), copyPixels(), draw(),
fillRect(), generateFilterRect(),
getColorBoundsRect(), getPixels(), merge(),
paletteMap(), pixelDissolve(), setPixels(),
and threshold()
Used as the type for some parameters to define a region
of the BitmapData object.
DisplayObject getBounds(), getRect(), scrollRect,
scale9Grid
Used as the data type for the property or the data type
returned.
PrintJob addPage() Used to define the printArea parameter.
Sprite startDrag() Used to define the bounds parameter.
TextField getCharBoundaries() Used as the return value type.
Transform pixelBounds Used as the data type.

206
ACTIONSCRIPT 3.0 DEVELOPER’S GUIDE
Working with geometry
Last updated 3/21/2011
var matrix:Matrix = new Matrix();
var rotation:Number = 2 * Math.PI * (30 / 360); // 30°
var scaleFactor:Number = 2;
matrix.scale(scaleFactor, scaleFactor);
matrix.rotate(rotation);
matrix.scale(scaleX, scaleY);
matrix.rotate(rotation);
myDisplayObject.transform.matrix = matrix;
To apply a skew transformation to a Matrix object, adjust its b or c property. Adjusting the b property skews the matrix
vertically, and adjusting the c property skews the matrix horizontally. The following code skews the myMatrix Matrix
object vertically by a factor of 2:
var skewMatrix:Matrix = new Matrix();
skewMatrix.b = Math.tan(2);
myMatrix.concat(skewMatrix);
You can apply a Matrix transformation to the transform property of a display object. For example, the following code
applies a matrix transformation to a display object named myDisplayObject:
var matrix:Matrix = myDisplayObject.transform.matrix;
var scaleFactor:Number = 2;
var rotation:Number = 2 * Math.PI * (60 / 360); // 60°
matrix.scale(scaleFactor, scaleFactor);
matrix.rotate(rotation);
myDisplayObject.transform.matrix = matrix;
The first line sets a Matrix object to the existing transformation matrix used by the myDisplayObject display object
(the matrix property of the transformation property of the myDisplayObject display object). This way, the Matrix
class methods that you call have a cumulative effect on the display object’s existing position, scale, and rotation.
Note: The ColorTransform class is also included in the flash.geometry package. This class is used to set the
colorTransform property of a Transform object. Since it does not apply any geometrical transformation, it is not
discussed, in detail, here. For more information, see the ColorTransform class in the ActionScript 3.0 Reference for the
Adobe Flash Platform.
Geometry example: Applying a matrix transformation
to a display object
Flash Player 9 and later, Adobe AIR 1.0 and later
The DisplayObjectTransformer sample application shows a number of features of using the Matrix class to transform
a display object, including the following:
•Rotating the display object
•Scaling the display object
•Translating (repositioning) the display object
•Skewing the display object
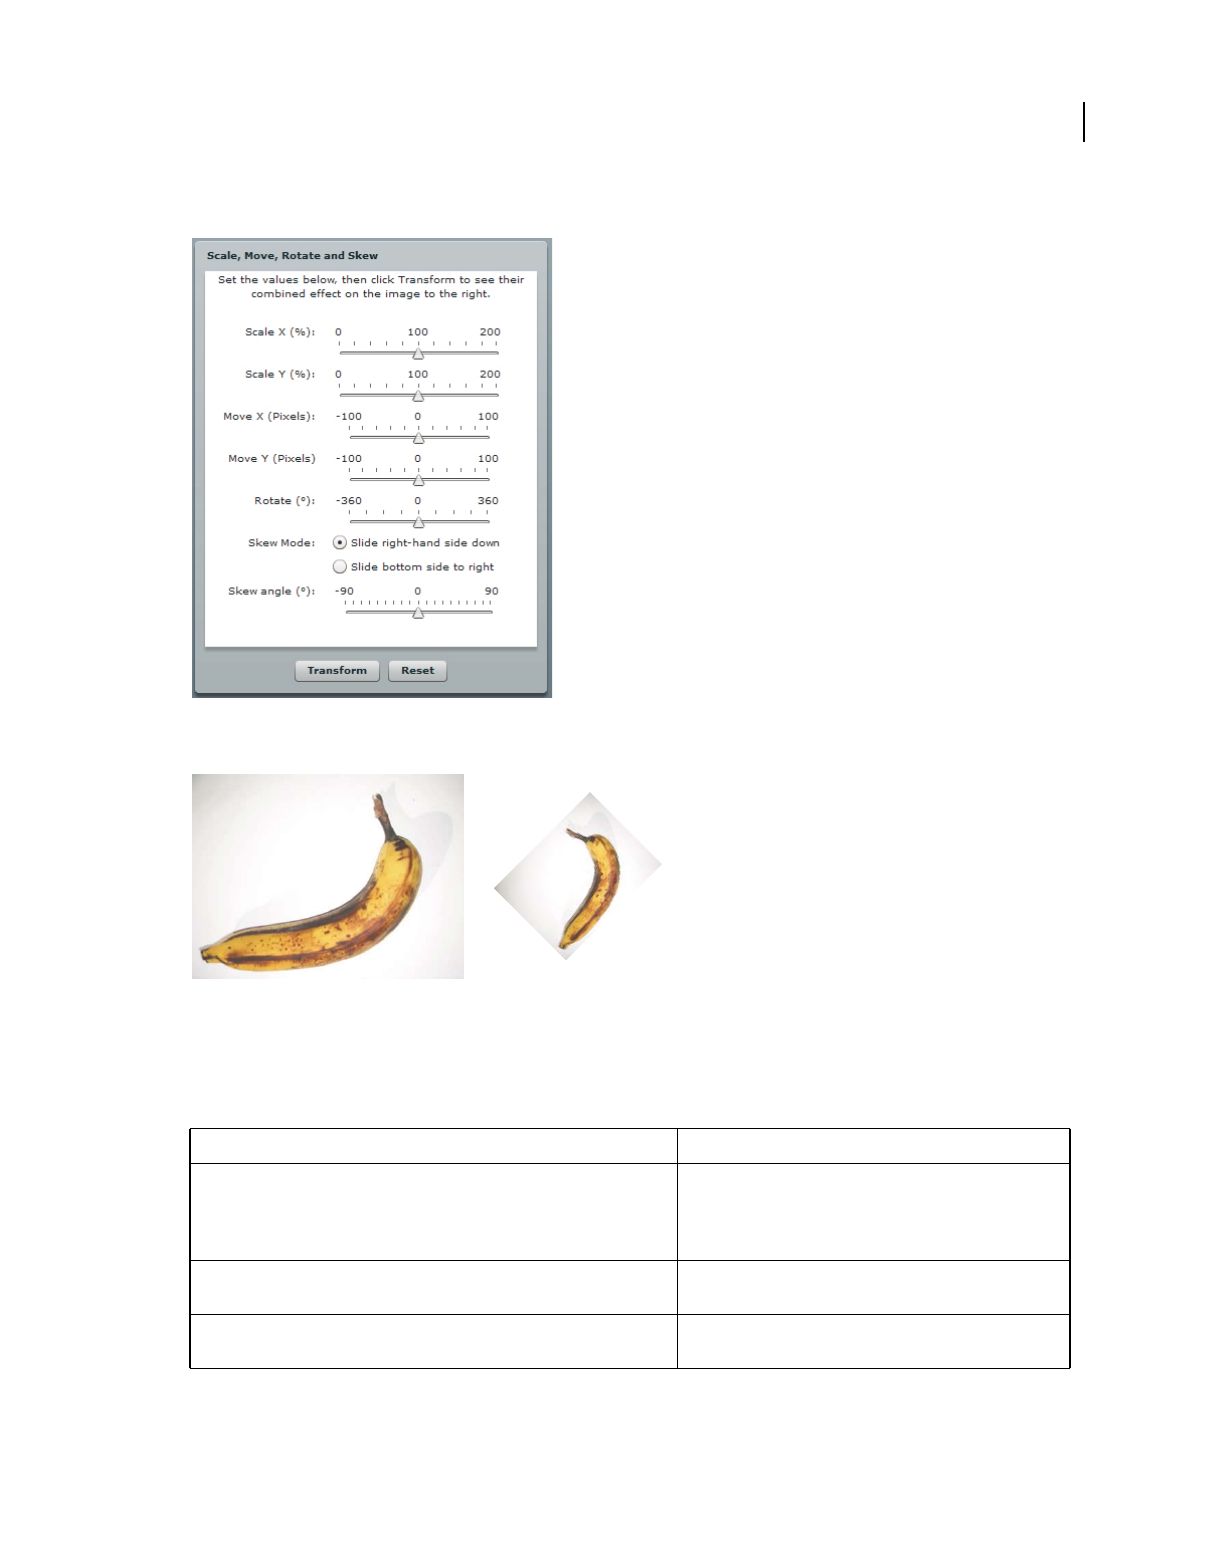
207
ACTIONSCRIPT 3.0 DEVELOPER’S GUIDE
Working with geometry
Last updated 3/21/2011
The application provides an interface for adjusting the parameters of the matrix transformation, as follows:
When the user clicks the Transform button, the application applies the appropriate transformation.
The original display object, and the display object rotated by -45° and scaled by 50%
To get the application files for this sample, see www.adobe.com/go/learn_programmingAS3samples_flash. The
DisplayObjectTransformer application files can be found in the folder Samples/DisplayObjectTransformer. The
application consists of the following files:
File Description
DisplayObjectTransformer.mxml
or
DisplayObjectTransformer.fla
The main application file in Flash (FLA) or Flex (MXML)
com/example/programmingas3/geometry/MatrixTransformer.as A class that contains methods for applying matrix
transformations.
img/ A directory containing sample image files used by the
application.

208
ACTIONSCRIPT 3.0 DEVELOPER’S GUIDE
Working with geometry
Last updated 3/21/2011
Defining the MatrixTransformer class
Flash Player 9 and later, Adobe AIR 1.0 and later
The MatrixTransformer class includes static methods that apply geometric transformations of Matrix objects.
The transform() method
The transform() method includes parameters for each of the following:
•sourceMatrix—The input matrix, which the method transforms
•xScale and yScale—The x and y scale factor
•dx and dy—The x and y translation amounts, in pixels
•rotation—The rotation amount, in degrees
•skew—The skew factor, as a percentage
•skewType—The direction in which the skew, either "right" or "left"
The return value is the resulting matrix.
The transform() method calls the following static methods of the class:
•skew()
•scale()
•translate()
•rotate()
Each returns the source matrix with the applied transformation.
The skew() method
The skew() method skews the matrix by adjusting the b and c properties of the matrix. An optional parameter, unit,
determines the units used to define the skew angle, and if necessary, the method converts the angle value to radians:
if (unit == "degrees")
{
angle = Math.PI * 2 * angle / 360;
}
if (unit == "gradients")
{
angle = Math.PI * 2 * angle / 100;
}
A skewMatrix Matrix object is created and adjusted to apply the skew transformation. Initially, it is the identity
matrix, as follows:
var skewMatrix:Matrix = new Matrix();
The skewSide parameter determines the side to which the skew is applied. If it is set to "right", the following code
sets the b property of the matrix:
skewMatrix.b = Math.tan(angle);
Otherwise, the bottom side is skewed by adjusting the c property of the Matrix, as follows:
skewMatrix.c = Math.tan(angle);

209
ACTIONSCRIPT 3.0 DEVELOPER’S GUIDE
Working with geometry
Last updated 3/21/2011
The resulting skew is then applied to the existing matrix by concatenating the two matrixes, as the following example
shows:
sourceMatrix.concat(skewMatrix);
return sourceMatrix;
The scale() method
The following example shows the scale() method adjusts the scale factor if it is provided as a percentage, first, and
then uses the scale() method of the matrix object:
if (percent)
{
xScale = xScale / 100;
yScale = yScale / 100;
}
sourceMatrix.scale(xScale, yScale);
return sourceMatrix;
The translate() method
The translate() method simply applies the dx and dy translation factors by calling the translate() method of the
matrix object, as follows:
sourceMatrix.translate(dx, dy);
return sourceMatrix;
The rotate() method
The rotate() method converts the input rotation factor to radians (if it is provided in degrees or gradients), and then
calls the rotate() method of the matrix object:
if (unit == "degrees")
{
angle = Math.PI * 2 * angle / 360;
}
if (unit == "gradients")
{
angle = Math.PI * 2 * angle / 100;
}
sourceMatrix.rotate(angle);
return sourceMatrix;
Calling the MatrixTransformer.transform() method from the application
Flash Player 9 and later, Adobe AIR 1.0 and later
The application contains a user interface for getting the transformation parameters from the user. It then passes these
values, along with the matrix property of the transform property of the display object, to the Matrix.transform()
method, as follows:

210
ACTIONSCRIPT 3.0 DEVELOPER’S GUIDE
Working with geometry
Last updated 3/21/2011
tempMatrix = MatrixTransformer.transform(tempMatrix,
xScaleSlider.value,
yScaleSlider.value,
dxSlider.value,
dySlider.value,
rotationSlider.value,
skewSlider.value,
skewSide );
The application then applies the return value to the matrix property of the transform property of the display object,
triggering the transformation:
img.content.transform.matrix = tempMatrix;

211
Last updated 3/21/2011
Chapter 11: Using the drawing API
Flash Player 9 and later, Adobe AIR 1.0 and later
Although imported images and artwork are important, the functionality known as the drawing API, which allows you
to draw lines and shapes in ActionScript, gives you the freedom to start an application with the computer equivalent
of a blank canvas, on which you can create whatever images you wish. The ability to create your own graphics opens
up broad possibilities for your applications. With the techniques covered here you can create a drawing program, make
animated, interactive art, or programmatically create your own user interface elements, among many possibilities.
More Help topics
flash.display.Graphics
Basics of the drawing API
Flash Player 9 and later, Adobe AIR 1.0 and later
The drawing API is the name for the functionality built into ActionScript that allows you to create vector graphics—
lines, curves, shapes, fills, and gradients—and display them on the screen using ActionScript. The
flash.display.Graphics class provides this functionality. You can draw with ActionScript on any Shape, Sprite, or
MovieClip instance, using the graphics property defined in each of those classes. (Each of those classes’ graphics
property is in fact an instance of the Graphics class.)
If you’re just getting started with drawing with code, the Graphics class includes several methods that make it easy to
draw common shapes like circles, ellipses, rectangles, and rectangles with rounded corners. You can draw them as
empty lines or filled shapes. When you need more advanced functionality, the Graphics class also includes methods
for drawing lines and quadratic Bézier curves, which you can use in conjunction with the trigonometry functions in
the Math class to create any shape you need.
Flash runtimes (such as Flash Player 10 and Adobe AIR 1.5 and later versions) add an additional API for drawing,
which allow you to programmatically draw entire shapes with a single command. Once you’re familiar with the
Graphics class and tasks covered in “Basics of using the drawing API”, continue to “Advanced use of the drawing API”
on page 224 to learn more about these drawing API features.
Important concepts and terms
The following reference list contains important terms that you will encounter while using the drawing API:
Anchor point One of the two end points of a quadratic Bézier curve.
Control point The point that defines the direction and amount of curve of a quadratic Bézier curve. The curved line
never reaches the control point; however, the line curves as though being drawn toward the control point.
Coordinate space The graph of coordinates contained in a display object, on which its child elements are positioned.
Fill The solid inner portion of a shape that has a line filled in with color, or all of a shape that has no outline.
Gradient A color that consists of a gradual transition from one color to one or more other colors (as opposed to a solid
color).

212
ACTIONSCRIPT 3.0 DEVELOPER’S GUIDE
Using the drawing API
Last updated 3/21/2011
Point A single location in a coordinate space. In the 2-d coordinate system used in ActionScript, a point is defined by
its location along the x axis and the y axis (the point’s coordinates).
Quadratic Bézier curve A type of curve defined by a particular mathematical formula. In this type of curve, the shape
of the curve is calculated based on the positions of the anchor points (the end points of the curve) and a control point
that defines the amount and direction of the curve.
Scale The size of an object relative to its original size. When used as a verb, to scale an object means to change its size
by stretching or shrinking the object.
Stroke The outline portion of a shape that has a line filled in with color, or the lines of an un-filled shape.
Translate To change a point’s coordinates from one coordinate space to another.
X axis The horizontal axis in the 2-d coordinate system used in ActionScript.
Y axis The vertical axis in the 2-d coordinate system used in ActionScript.
The Graphics class
Flash Player 9 and later, Adobe AIR 1.0 and later
Each Shape, Sprite, and MovieClip object has a graphics property, which is an instance of the Graphics class. The
Graphics class includes properties and methods for drawing lines, fills, and shapes. If you want a display object to use
solely as a canvas for drawing content, you can use a Shape instance. A Shape instance will perform better than other
display objects for drawing, because it doesn’t have the overhead of the additional functionality in the Sprite and
MovieClip classes. If you want a display object on which you can draw graphical content and also want that object to
contain other display objects, you can use a Sprite instance. For more information on determining which display object
to use for various tasks, see “Choosing a DisplayObject subclass” on page 163.
Drawing lines and curves
Flash Player 9 and later, Adobe AIR 1.0 and later
All drawing that you do with a Graphics instance is based on basic drawing with lines and curves. Consequently, all
ActionScript drawing must be performed using the same series of steps:
•Define line and fill styles
•Set the initial drawing position
•Draw lines, curves, and shapes (optionally moving the drawing point)
•If necessary, finish creating a fill

213
ACTIONSCRIPT 3.0 DEVELOPER’S GUIDE
Using the drawing API
Last updated 3/21/2011
Defining line and fill styles
Flash Player 9 and later, Adobe AIR 1.0 and later
To draw with the graphics property of a Shape, Sprite, or MovieClip instance, you must first define the style (line size
and color, fill color) to use when drawing. Just like when you use the drawing tools in Adobe® Flash® Professional or
another drawing application, when you’re using ActionScript to draw you can draw with or without a stroke, and with
or without a fill color. You specify the appearance of the stroke using the lineStyle() or lineGradientStyle()
method. To create a solid line, use the lineStyle() method. When calling this method, the most common values
you’ll specify are the first three parameters: line thickness, color, and alpha. For example, this line of code tells the
Shape named myShape to draw lines that are 2 pixels thick, red (0x990000), and 75% opaque:
myShape.graphics.lineStyle(2, 0x990000, .75);
The default value for the alpha parameter is 1.0 (100%), so you can leave that parameter off if you want a completely
opaque line. The lineStyle() method also accepts two additional parameters for pixel hinting and scale mode; for
more information about using those parameters see the description of the Graphics.lineStyle() method in the
ActionScript 3.0 Reference for the Adobe Flash Platform.
To create a gradient line, use the lineGradientStyle() method. This method is described in “Creating gradient lines
and fills” on page 216.
If you want to create a filled shape, you call the beginFill(), beginGradientFill(), beginBitmapFill(), or
beginShaderFill() methods before starting the drawing. The most basic of these, the beginFill() method, accepts
two parameters: the fill color, and (optionally) an alpha value for the fill color. For example, if you want to draw a shape
with a solid green fill, you would use the following code (assuming you’re drawing on an object named myShape):
myShape.graphics.beginFill(0x00FF00);
Calling any fill method implicitly ends any previous fill before starting a new one. Calling any method that specifies a
stroke style replaces the previous stroke, but does not alter a previously specified fill, and vice versa.
Once you have specified the line style and fill properties, the next step is to indicate the starting point for your drawing.
The Graphics instance has a drawing point, like the tip of a pen on a piece of paper. Wherever the drawing point is
located, that is where the next drawing action will begin. Initially a Graphics object begins with its drawing point at the
point 0, 0 in the coordinate space of the object on which it’s drawing. To start the drawing at a different point, you can
first call the moveTo() method before calling one of the drawing methods. This is analogous to lifting the pen tip off
of the paper and moving it to a new position.
With the drawing point in place you draw using a series of calls to the drawing methods lineTo() (for drawing
straight lines) and curveTo() (for drawing curved lines).
While you are drawing, you can call the moveTo() method at any time to move the drawing point to a new position
without drawing.
While drawing, if you have specified a fill color, you can close off the fill by calling the endFill() method. If you have
not drawn a closed shape (in other words, if at the time you call endFill() the drawing point is not at the starting
point of the shape), when you call the endFill() method the Flash runtime automatically closes the shape by drawing
a straight line from the current drawing point to the location specified in the most recent moveTo() call. If you have
started a fill and not called endFill(), calling beginFill() (or one of the other fill methods) closes the current fill
and starts the new one.

214
ACTIONSCRIPT 3.0 DEVELOPER’S GUIDE
Using the drawing API
Last updated 3/21/2011
Drawing straight lines
Flash Player 9 and later, Adobe AIR 1.0 and later
When you call the lineTo() method, the Graphics object draws a straight line from the current drawing point to the
coordinates you specify as the two parameters in the method call, drawing with the line style you have specified. For
example, this line of code puts the drawing point at the point 100, 100 then draws a line to the point 200, 200:
myShape.graphics.moveTo(100, 100);
myShape.graphics.lineTo(200, 200);
The following example draws red and green triangles with a height of 100 pixels:
var triangleHeight:uint = 100;
var triangle:Shape = new Shape();
// red triangle, starting at point 0, 0
triangle.graphics.beginFill(0xFF0000);
triangle.graphics.moveTo(triangleHeight / 2, 0);
triangle.graphics.lineTo(triangleHeight, triangleHeight);
triangle.graphics.lineTo(0, triangleHeight);
triangle.graphics.lineTo(triangleHeight / 2, 0);
// green triangle, starting at point 200, 0
triangle.graphics.beginFill(0x00FF00);
triangle.graphics.moveTo(200 + triangleHeight / 2, 0);
triangle.graphics.lineTo(200 + triangleHeight, triangleHeight);
triangle.graphics.lineTo(200, triangleHeight);
triangle.graphics.lineTo(200 + triangleHeight / 2, 0);
this.addChild(triangle);
Drawing curves
Flash Player 9 and later, Adobe AIR 1.0 and later
The curveTo() method draws a quadratic Bézier curve. This draws an arc that connects two points (called anchor
points) while bending toward a third point (called the control point). The Graphics object uses the current drawing
position as the first anchor point. When you call the curveTo() method, you pass four parameters: the x and y
coordinates of the control point, followed by the x and y coordinates of the second anchor point. For example, the
following code draws a curve starting at point 100, 100 and ending at point 200, 200. Because the control point is at
point 175, 125, this creates a curve that moves to the right and then downward:
myShape.graphics.moveTo(100, 100);
myShape.graphics.curveTo(175, 125, 200, 200);
The following example draws red and green circular objects with a width and height of 100 pixels. Note that due to the
nature of the quadratic Bézier equation, these are not perfect circles:

215
ACTIONSCRIPT 3.0 DEVELOPER’S GUIDE
Using the drawing API
Last updated 3/21/2011
var size:uint = 100;
var roundObject:Shape = new Shape();
// red circular shape
roundObject.graphics.beginFill(0xFF0000);
roundObject.graphics.moveTo(size / 2, 0);
roundObject.graphics.curveTo(size, 0, size, size / 2);
roundObject.graphics.curveTo(size, size, size / 2, size);
roundObject.graphics.curveTo(0, size, 0, size / 2);
roundObject.graphics.curveTo(0, 0, size / 2, 0);
// green circular shape
roundObject.graphics.beginFill(0x00FF00);
roundObject.graphics.moveTo(200 + size / 2, 0);
roundObject.graphics.curveTo(200 + size, 0, 200 + size, size / 2);
roundObject.graphics.curveTo(200 + size, size, 200 + size / 2, size);
roundObject.graphics.curveTo(200, size, 200, size / 2);
roundObject.graphics.curveTo(200, 0, 200 + size / 2, 0);
this.addChild(roundObject);
Drawing shapes using built-in methods
Flash Player 9 and later, Adobe AIR 1.0 and later
For convenience when drawing common shapes such as circles, ellipses, rectangles, and rectangles with rounded
corners, ActionScript 3.0 has methods that draw these common shapes for you. These are the drawCircle(),
drawEllipse(), drawRect(), and drawRoundRect() methods of the Graphics class. These methods may be used in
place of the lineTo() and curveTo() methods. Note, however, that you must still specify line and fill styles before
calling these methods.
The following example recreates the example of drawing red, green, and blue squares with width and height of 100
pixels. This code uses the drawRect() method, and additionally specifies that the fill color has an alpha of 50% (0.5):
var squareSize:uint = 100;
var square:Shape = new Shape();
square.graphics.beginFill(0xFF0000, 0.5);
square.graphics.drawRect(0, 0, squareSize, squareSize);
square.graphics.beginFill(0x00FF00, 0.5);
square.graphics.drawRect(200, 0, squareSize, squareSize);
square.graphics.beginFill(0x0000FF, 0.5);
square.graphics.drawRect(400, 0, squareSize, squareSize);
square.graphics.endFill();
this.addChild(square);
In a Sprite or MovieClip object, the drawing content created with the graphics property always appears behind all
child display objects that are contained by the object. Also, the graphics property content is not a separate display
object so it does not appear in the list of a Sprite or MovieClip object’s children. For example, the following Sprite
object has a circle drawn with its graphics property, and it has a TextField object in its list of child display objects:

216
ACTIONSCRIPT 3.0 DEVELOPER’S GUIDE
Using the drawing API
Last updated 3/21/2011
var mySprite:Sprite = new Sprite();
mySprite.graphics.beginFill(0xFFCC00);
mySprite.graphics.drawCircle(30, 30, 30);
var label:TextField = new TextField();
label.width = 200;
label.text = "They call me mellow yellow...";
label.x = 20;
label.y = 20;
mySprite.addChild(label);
this.addChild(mySprite);
Note that the TextField appears on top of the circle drawn with the graphics object.
Creating gradient lines and fills
Flash Player 9 and later, Adobe AIR 1.0 and later
The graphics object can also draw strokes and fills with gradients rather than solid colors. A gradient stroke is created
with the lineGradientStyle() method and a gradient fill is created with the beginGradientFill() method.
Both methods accept the same parameters. The first four are required: type, colors, alphas, and ratios. The remaining
four are optional but are useful for advanced customizing.
•The first parameter specifies the type of gradient you are creating. Acceptable values are GradientType.LINEAR or
GradientType.RADIAL.
•The second parameter specifies the array of the color values to use. In a linear gradient, the colors will be arranged
from left to right. In a radial gradient, they will be arranged from inside to outside. The order of the colors of the
array represents the order that the colors will be drawn in the gradient.
•The third parameter specifies the alpha transparency values of the corresponding colors in the previous parameter.
•The fourth parameter specifies ratios, or the emphasis each color has within the gradient. Acceptable values range
from 0-255. These values do not represent any width or height, but rather the position within the gradient; 0
represents the beginning of the gradient, 255 represents the end of the gradient. The array of ratios must increase
sequentially and have the same number of entries as both the color and alpha arrays specified in the second and
third parameters.
Although the fifth parameter, the transformation matrix, is optional, it is commonly used because it provides an easy
and powerful way to control the gradient’s appearance. This parameter accepts a Matrix instance. The easiest way to
create a Matrix object for a gradient is to use the Matrix class’s createGradientBox() method.
Defining a Matrix object for use with a gradient
Flash Player 9 and later, Adobe AIR 1.0 and later
You use the beginGradientFill() and lineGradientStyle() methods of the flash.display.Graphics class to define
gradients for use in shapes. When you define a gradient, you supply a matrix as one of the parameters of these methods.
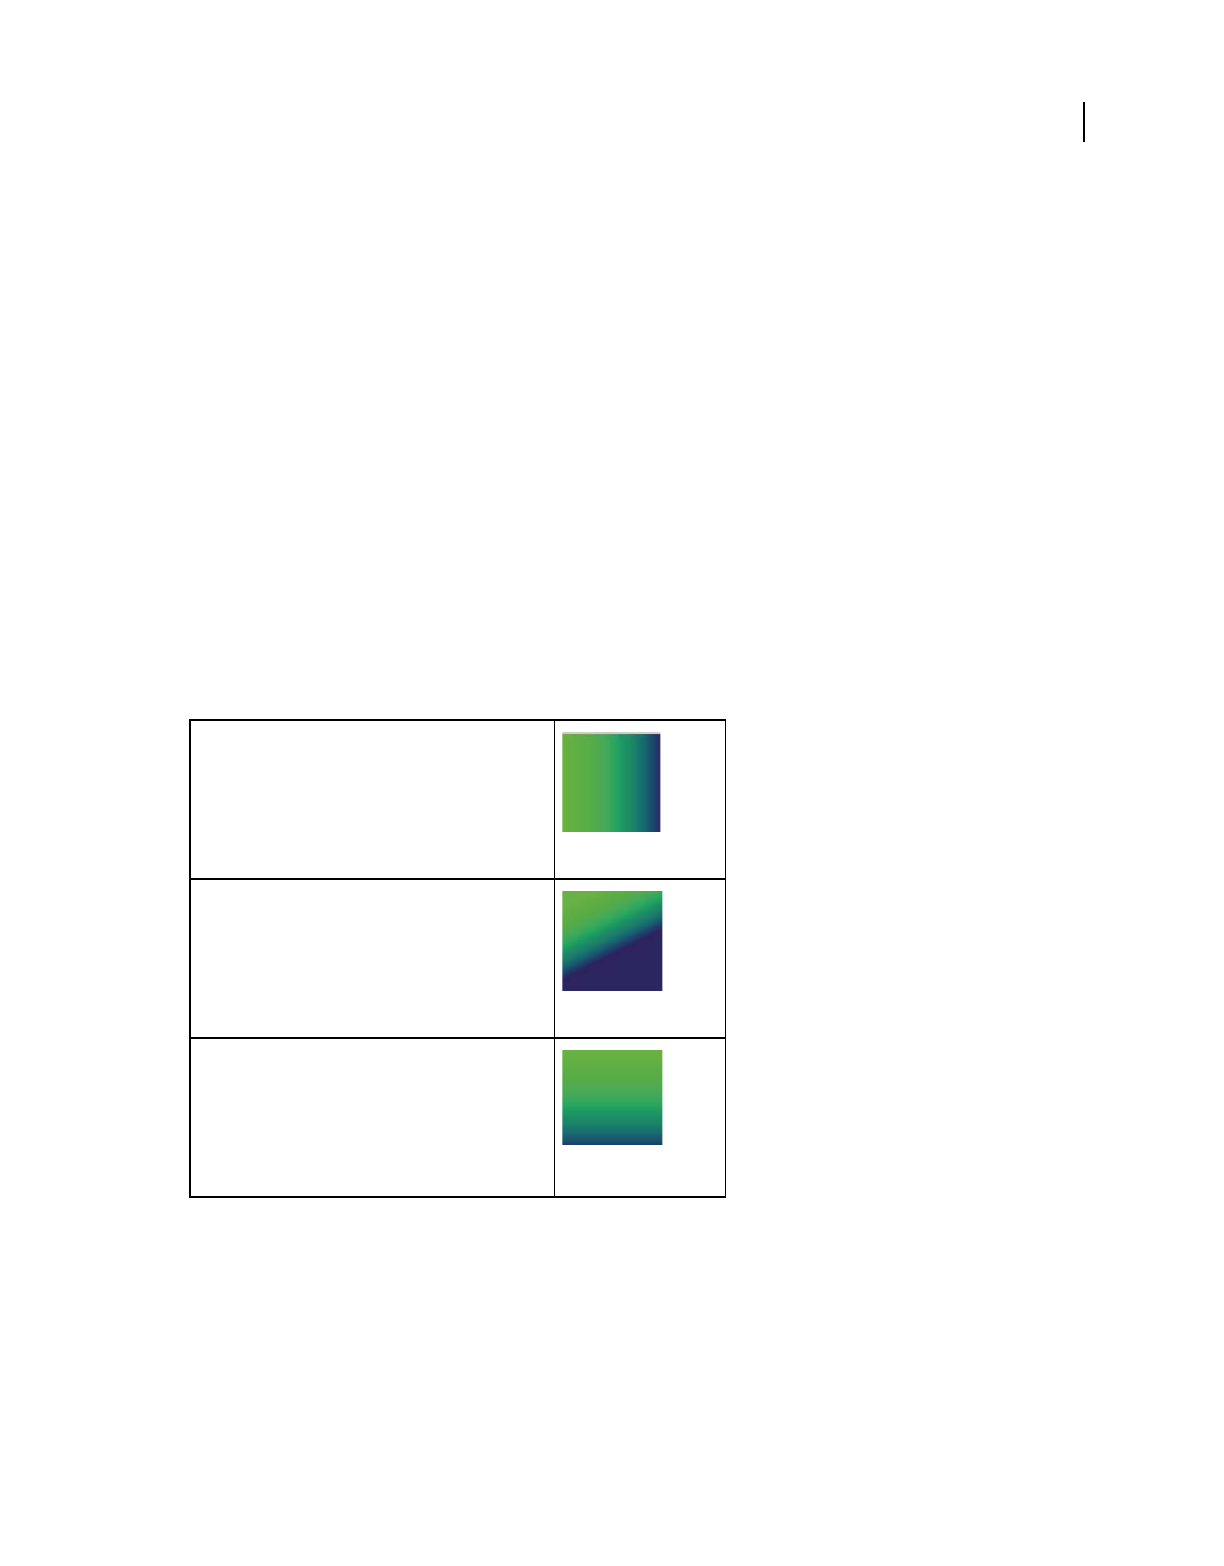
217
ACTIONSCRIPT 3.0 DEVELOPER’S GUIDE
Using the drawing API
Last updated 3/21/2011
The easiest way to define the matrix is by using the Matrix class’s createGradientBox() method, which creates a
matrix that is used to define the gradient. You define the scale, rotation, and position of the gradient using the
parameters passed to the createGradientBox() method. The createGradientBox() method accepts the following
parameters:
•Gradient box width: the width (in pixels) to which the gradient will spread
•Gradient box height: the height (in pixels) to which the gradient will spread
•Gradient box rotation: the rotation (in radians) that will be applied to the gradient
•Horizontal translation: how far (in pixels) the gradient is shifted horizontally
•Vertical translation: how far (in pixels) the gradient is shifted vertically
For example, consider a gradient with the following characteristics:
•GradientType.LINEAR
•Two colors, green and blue, with the ratios array set to [0, 255]
•SpreadMethod.PAD
•InterpolationMethod.LINEAR_RGB
The following examples show gradients in which the rotation parameter of the createGradientBox() method
differs as indicated, but all other settings stay the same:
The following examples show the effects on a green-to-blue linear gradient in which the rotation, tx, and ty
parameters of the createGradientBox() method differ as indicated, but all other settings stay the same:
width = 100;
height = 100;
rotation = 0;
tx = 0;
ty = 0;
width = 100;
height = 100;
rotation = Math.PI/4; // 45°
tx = 0;
ty = 0;
width = 100;
height = 100;
rotation = Math.PI/2; // 90°
tx = 0;
ty = 0;

218
ACTIONSCRIPT 3.0 DEVELOPER’S GUIDE
Using the drawing API
Last updated 3/21/2011
The width, height, tx, and ty parameters of the createGradientBox() method affect the size and position of a
radial gradient fill as well, as the following example shows:
The following code produces the last radial gradient illustrated:
width = 50;
height = 100;
rotation = 0;
tx = 0;
ty = 0;
width = 50;
height = 100;
rotation = 0
tx = 50;
ty = 0;
width = 100;
height = 50;
rotation = Math.PI/2; // 90°
tx = 0;
ty = 0;
width = 100;
height = 50;
rotation = Math.PI/2; // 90°
tx = 0;
ty = 50;
width = 50;
height = 100;
rotation = 0;
tx = 25;
ty = 0;

219
ACTIONSCRIPT 3.0 DEVELOPER’S GUIDE
Using the drawing API
Last updated 3/21/2011
import flash.display.Shape;
import flash.display.GradientType;
import flash.geom.Matrix;
var type:String = GradientType.RADIAL;
var colors:Array = [0x00FF00, 0x000088];
var alphas:Array = [1, 1];
var ratios:Array = [0, 255];
var spreadMethod:String = SpreadMethod.PAD;
var interp:String = InterpolationMethod.LINEAR_RGB;
var focalPtRatio:Number = 0;
var matrix:Matrix = new Matrix();
var boxWidth:Number = 50;
var boxHeight:Number = 100;
var boxRotation:Number = Math.PI/2; // 90°
var tx:Number = 25;
var ty:Number = 0;
matrix.createGradientBox(boxWidth, boxHeight, boxRotation, tx, ty);
var square:Shape = new Shape;
square.graphics.beginGradientFill(type,
colors,
alphas,
ratios,
matrix,
spreadMethod,
interp,
focalPtRatio);
square.graphics.drawRect(0, 0, 100, 100);
addChild(square);
Note that the width and height of the gradient fill is determined by the width and height of the gradient matrix rather
than the width or height that is drawn using the Graphics object. When drawing with the Graphics object, you draw
what exists at those coordinates in the gradient matrix. Even if you use one of the shape methods of a Graphics object
such as drawRect(), the gradient does not stretch itself to the size of the shape that is drawn—the gradient’s size must
be specified in the gradient matrix itself.
The following illustrates the visual difference between the dimensions of the gradient matrix and the dimensions of
the draw itself:
var myShape:Shape = new Shape();
var gradientBoxMatrix:Matrix = new Matrix();
gradientBoxMatrix.createGradientBox(100, 40, 0, 0, 0);
myShape.graphics.beginGradientFill(GradientType.LINEAR, [0xFF0000, 0x00FF00, 0x0000FF], [1,
1, 1], [0, 128, 255], gradientBoxMatrix);
myShape.graphics.drawRect(0, 0, 50, 40);
myShape.graphics.drawRect(0, 50, 100, 40);
myShape.graphics.drawRect(0, 100, 150, 40);
myShape.graphics.endFill();
this.addChild(myShape);
This code draws three gradients with the same fill style, specified with an equal distribution of red, green, and blue.
The gradients are drawn using the drawRect() method with pixel widths of 50, 100, and 150 respectively. The gradient
matrix which is specified in the beginGradientFill() method is created with a width of 100 pixels. This means that
the first gradient will encompass only half of the gradient spectrum, the second will encompass all of it, and the third
will encompass all of it and have an additional 50 pixels of blue extending to the right.

220
ACTIONSCRIPT 3.0 DEVELOPER’S GUIDE
Using the drawing API
Last updated 3/21/2011
The lineGradientStyle() method works similarly to beginGradientFill() except that in addition to defining the
gradient, you must specify the thickness of the stroke using the lineStyle() method before drawing. The following
code draws a box with a red, green, and blue gradient stroke:
var myShape:Shape = new Shape();
var gradientBoxMatrix:Matrix = new Matrix();
gradientBoxMatrix.createGradientBox(200, 40, 0, 0, 0);
myShape.graphics.lineStyle(5, 0);
myShape.graphics.lineGradientStyle(GradientType.LINEAR, [0xFF0000, 0x00FF00, 0x0000FF], [1,
1, 1], [0, 128, 255], gradientBoxMatrix);
myShape.graphics.drawRect(0, 0, 200, 40);
this.addChild(myShape);
For more information on the Matrix class, see “Using Matrix objects” on page 205.
Using the Math class with drawing methods
Flash Player 9 and later, Adobe AIR 1.0 and later
A Graphics object draws circles and squares, but can also draw more complex forms, particularly when the drawing
methods are used in combination with the properties and methods of the Math class. The Math class contains
constants of common mathematical interest, such as Math.PI (approximately 3.14159265...), a constant for the ratio
of the circumference of a circle to its diameter. It also contains methods for trigonometry functions, including
Math.sin(), Math.cos(), and Math.tan() among others. Drawing shapes using these methods and constants create
more dynamic visual effects, particularly when used with repetition or recursion.
Many methods of the Math class expect circular measurements in units of radians rather than degrees. Converting
between these two types of units is a common use of the Math class:
var degrees = 121;
var radians = degrees * Math.PI / 180;
trace(radians) // 2.111848394913139
The following example creates a sine wave and a cosine wave, to highlight the difference between the Math.sin() and
Math.cos() methods for a given value.
var sinWavePosition = 100;
var cosWavePosition = 200;
var sinWaveColor:uint = 0xFF0000;
var cosWaveColor:uint = 0x00FF00;
var waveMultiplier:Number = 10;
var waveStretcher:Number = 5;
var i:uint;
for(i = 1; i < stage.stageWidth; i++)
{
var sinPosY:Number = Math.sin(i / waveStretcher) * waveMultiplier;
var cosPosY:Number = Math.cos(i / waveStretcher) * waveMultiplier;
graphics.beginFill(sinWaveColor);
graphics.drawRect(i, sinWavePosition + sinPosY, 2, 2);
graphics.beginFill(cosWaveColor);
graphics.drawRect(i, cosWavePosition + cosPosY, 2, 2);
}

221
ACTIONSCRIPT 3.0 DEVELOPER’S GUIDE
Using the drawing API
Last updated 3/21/2011
Animating with the drawing API
Flash Player 9 and later, Adobe AIR 1.0 and later
One advantage of creating content with the drawing API is that you are not limited to positioning your content once.
What you draw can be modified by maintaining and modifying the variables you use to draw. You can convey
animation by changing variables and redrawing, either over a period of frames or with a timer.
For example, the following code changes the display with each passing frame (by listening to the Event.ENTER_FRAME
event), incrementing the current degree count, and directs the graphics object to clear and redraw with the updated
position.
stage.frameRate = 31;
var currentDegrees:Number = 0;
var radius:Number = 40;
var satelliteRadius:Number = 6;
var container:Sprite = new Sprite();
container.x = stage.stageWidth / 2;
container.y = stage.stageHeight / 2;
addChild(container);
var satellite:Shape = new Shape();
container.addChild(satellite);
addEventListener(Event.ENTER_FRAME, doEveryFrame);
function doEveryFrame(event:Event):void
{
currentDegrees += 4;
var radians:Number = getRadians(currentDegrees);
var posX:Number = Math.sin(radians) * radius;
var posY:Number = Math.cos(radians) * radius;
satellite.graphics.clear();
satellite.graphics.beginFill(0);
satellite.graphics.drawCircle(posX, posY, satelliteRadius);
}
function getRadians(degrees:Number):Number
{
return degrees * Math.PI / 180;
}
To produce a significantly different result, you can experiment by modifying the initial seed variables at the beginning
of the code, currentDegrees, radius, and satelliteRadius. For example, try shrinking the radius variable and/or
increasing the totalSatellites variable. This is only one example of how the drawing API can create a visual display
whose complexity conceals the simplicity of its creation.

222
ACTIONSCRIPT 3.0 DEVELOPER’S GUIDE
Using the drawing API
Last updated 3/21/2011
Drawing API example: Algorithmic Visual Generator
Flash Player 9 and later, Adobe AIR 1.0 and later
The Algorithmic Visual Generator example dynamically draws to the stage several “satellites”, or circles moving in a
circular orbit. Among the features explored are:
•Using the drawing API to draw a basic shape with dynamic appearances
•Connecting user interaction with the properties that are used in a draw
•Conveying animation by clearing the stage on each frame and redrawing
The example in the previous subsection animated a solitary “satellite” using the Event.ENTER_FRAME event. This
example expands upon this, building a control panel with series of sliders that immediately update the visual display
of several satellites. This example formalizes the code into external classes and wraps the satellite creation code into a
loop, storing a reference to each satellite in a satellites array.
To get the application files for this sample, see www.adobe.com/go/learn_programmingAS3samples_flash. The
application files can be found in the folder Samples/AlgorithmicVisualGenerator. This folder contains the following
files:
Setting the listeners
Flash Player 9 and later, Adobe AIR 1.0 and later
The application first creates three listeners. The first listens for a dispatched event from the control panel that a rebuild
of the satellites is necessary. The second listens to changes to the size of the SWF file’s stage. The third listens for each
passing frame in the SWF file and to redraw using the doEveryFrame() function.
Creating the satellites
Flash Player 9 and later, Adobe AIR 1.0 and later
Once these listeners are set, the build() function is called. This function first calls the clear() function, which
empties the satellites array and clears any previous draws to the stage. This is necessary since the build() function
could be recalled whenever the control panel sends an event to do so, such as when the color settings have been
changed. In such a case, the satellites must be removed and recreated.
File Description
AlgorithmicVisualGenerator.fla The main application file in Flash Professional (FLA).
com/example/programmingas3/algorithmic/AlgorithmicVisualGenerator.as The class that provides the main functionality of the
application, including drawing satellites on the stage
and responding to events from the control panel to
update the variables that affect the drawing of
satellites.
com/example/programmingas3/algorithmic/ControlPanel.as A class that manages user interaction with several
sliders and dispatching events when this occurs.
com/example/programmingas3/algorithmic/Satellite.as A class which represents the display object that rotates
in an orbit around a central point and contains
properties related to its current draw state.

223
ACTIONSCRIPT 3.0 DEVELOPER’S GUIDE
Using the drawing API
Last updated 3/21/2011
The function then creates the satellites, setting the initial properties needed for creation, such as a the position
variable, which starts at a random position in the orbit, and the color variable, which in this example does not change
once the satellite has been created.
As each satellite is created, a reference to it is added to the satellites array. When the doEveryFrame() function is
called, it will update to all satellites in this array.
Updating the satellite position
Flash Player 9 and later, Adobe AIR 1.0 and later
The doEveryFrame() function is the heart of the application’s animation process. It is called for every frame, at a rate
equal the framerate of the SWF file. Because the variables of the draw change slightly, this conveys the appearance of
animation.
The function first clears all previous draws and redraws the background. Then, it loops through each satellite container
and increments the position property of each satellite, and updates the radius and orbitRadius properties that
may have changed from user interaction with the control panel. Finally, the satellite updates to its new position by
calling the draw() method of the Satellite class.
Note that the counter, i, only increments up to the visibleSatellites variable. This is because if the user has
limited the amount of satellites that are displayed through the control panel, the remaining satellites in the loop should
not be redrawn but should instead be hidden. This occurs in a loop which immediately follows the loop responsible
for drawing.
When the doEveryFrame() function completes, the number of visibleSatellites update in position across the
screen.
Responding to user interaction
Flash Player 9 and later, Adobe AIR 1.0 and later
User interaction occurs via the control panel, which is managed by the ControlPanel class. This class sets a listener
along with the individual minimum, maximum, and default values of each slider. As the user moves these sliders, the
changeSetting() function is called. This function updates the properties of the control panel. If the change requires
a rebuild of the display, an event is dispatched which is then handled in the main application file. As the control panel
settings change, the doEveryFrame() function draws each satellite with the updated variables.
Customizing further
Flash Player 9 and later, Adobe AIR 1.0 and later
This example is only a basic schematic of how to generate visuals using the drawing API. It uses relatively few lines of
code to create an interactive experience that appears quite complex. Even so, this example could be extended with
minor changes. A few ideas:
•The doEveryFrame() function could increment the color value of the satellite.
•The doEveryFrame() function could shrink or expand the satellite radius over time.
•The satellite radius does not have to be circular; it could use the Math class to move according to a sine wave, for
example.
•Satellites could use hit detection with other satellites.

224
ACTIONSCRIPT 3.0 DEVELOPER’S GUIDE
Using the drawing API
Last updated 3/21/2011
The drawing API can be used as an alternative to creating visual effects in the Flash authoring environment, drawing
basic shapes at run time. But it can also be used to create visual effects of a variety and scope that are not possible to
create by hand. Using the drawing API and a bit of mathematics, the ActionScript author can give life to many
unexpected creations.
Advanced use of the drawing API
Flash Player 10 and later, Adobe AIR 1.5 and later
Flash Player 10, Adobe AIR 1.5, and later Flash runtimes, support an advanced set of drawing features. The drawing
API enhancements for these runtimes expand upon the drawing methods from previous releases so you can establish
data sets to generate shapes, alter shapes at runtime, and create three-dimensional effects. The drawing API
enhancements consolidate existing methods into alternative commands. These commands leverage vector arrays and
enumeration classes to provide data sets for drawing methods. Using vector arrays allows for more complex shapes to
render quickly and for developers to change the array values programmatically for dynamic shape rendering at
runtime.
The drawing features introduced in Flash Player 10 are described in the following sections: “Drawing Paths” on
page 225, “Defining winding rules” on page 227, “Using graphics data classes” on page 229, and “About using
drawTriangles()” on page 231.
The following tasks are things you’ll likely want to accomplish using the advanced drawing API in ActionScript:
•Using Vector objects to store data for drawing methods
•Defining paths for drawing shapes programmatically
•Defining winding rules to determine how overlapping shapes are filled
•Using graphics data classes
•Using triangles and drawing methods for three-dimensional effects
Important concepts and terms
The following reference list contains important terms that you will encounter in this section:
•Vector: An array of values all of the same data type. A Vector object can store an array of values that drawing
methods use to construct lines and shapes with a single command. For more information on Vector objects, see
“Indexed arrays” on page 26.
•Path: A path is made up of one or more straight or curved segments. The beginning and end of each segment are
marked by coordinates, which work like pins holding a wire in place. A path can be closed (for example, a circle),
or open, with distinct endpoints (for example, a wavy line).
•Winding: The direction of a path as interpreted by the renderer; either positive (clockwise) or negative (counter-
clockwise).
•GraphicsStroke: A class for setting the line style. While the term “stroke” isn’t part of the drawing API
enhancements, the use of a class to designate a line style with its own fill property is part of the new drawing API.
You can dynamically adjust a line’s style using the GraphicsStroke class.
•Fill object: Objects created using display classes like flash.display.GraphicsBitmapFill and
flash.display.GraphicsGradientFill that are passed to the drawing command Graphics.drawGraphicsData(). Fill
objects and the enhanced drawing commands introduce a more object-oriented programming approach to
replicating Graphics.beginBitmapFill() and Graphics.beginGradientFill().

225
ACTIONSCRIPT 3.0 DEVELOPER’S GUIDE
Using the drawing API
Last updated 3/21/2011
Drawing Paths
Flash Player 10 and later, Adobe AIR 1.5 and later
The section on drawing lines and curves (see “Drawing lines and curves” on page 212) introduced the commands for
drawing a single line (Graphics.lineTo()) or curve (Graphics.curveTo()) and then moving the line to another
point (Graphics.moveTo()) to form a shape. Some of the ActionScript drawing API enhancements, like
Graphics.drawPath() and Graphics.drawTriangles(), utilize the existing drawing commands as parameters. So,
you can provide a series of Graphics.lineTo(), Graphics.curveTo(), or Graphics.moveTo() commands for the
Flash runtime to execute in a single statement.
Two of the drawing API enhancements allow Graphics.drawPath() and Graphics.drawTriangles() to
consolidate existing commands:
•The GraphicsPathCommand enumeration class: The GraphicsPathCommand class associates several drawing
commands with constant values. You use a series of these values as parameters for the Graphics.drawPath()
method. Then with a single command, you can render an entire shape, or several shapes. You can also dynamically
alter the values passed to these methods to change an existing shape.
•Vector arrays: Vector arrays contain a series of values of a specific data type. So, you store a series of
GraphicsPathCommand constants in a Vector object, and a series of coordinates in another Vector object.
Graphics.drawPath() or Graphics.drawTriangles() assigns those values together to generate a drawing path
or shape.
You no longer need separate commands for each segment of a shape. For example, the Graphics.drawPath()
method consolidates Graphics.moveTo(), Graphics.lineTo(), and Graphics.curveTo() into a single method.
Instead of each method called separately, they are abstracted into numeric identifiers as defined in the
GraphicsPathCommand class. A moveTo() operation is signified by a 1, while a lineTo() operation is a 2. Store an
array of these values in a Vector.<int> object for use in the commands parameter. Then, create another array containing
coordinates in a Vector.<Number> object for the data parameter. Each GraphicsPathCommand value corresponds to
the coordinate values stored in the data parameter where two consecutive numbers define a location in the target
coordinate space.
Note: The values in the vector are not Point objects; the vector is a series of numbers where each group of two numbers
represents an x/y coordinate pair.
The Graphics.drawPath() method matches each command with its respective point values (a collection of two or
four numbers) to generate a path in the Graphics object:

226
ACTIONSCRIPT 3.0 DEVELOPER’S GUIDE
Using the drawing API
Last updated 3/21/2011
package{
import flash.display.*;
public class DrawPathExample extends Sprite {
public function DrawPathExample(){
var square_commands:Vector.<int> = new Vector.<int>(5,true);
square_commands[0] = 1;//moveTo
square_commands[1] = 2;//lineTo
square_commands[2] = 2;
square_commands[3] = 2;
square_commands[4] = 2;
var square_coord:Vector.<Number> = new Vector.<Number>(10,true);
square_coord[0] = 20; //x
square_coord[1] = 10; //y
square_coord[2] = 50;
square_coord[3] = 10;
square_coord[4] = 50;
square_coord[5] = 40;
square_coord[6] = 20;
square_coord[7] = 40;
square_coord[8] = 20;
square_coord[9] = 10;
graphics.beginFill(0x442266);//set the color
graphics.drawPath(square_commands, square_coord);
}
}
}
In the above example, each command and coordinate pair is assigned individually to show their position in the array,
but they can be assigned in a single statement. The following example draws the same star by assigning the values for
each array in a single push() statement:
package{
import flash.display.*;
public class DrawPathExample extends Sprite {
public function DrawPathExample(){
var square_commands:Vector.<int> = new Vector.<int>();
square_commands.push(1, 2, 2, 2, 2);
var square_coord:Vector.<Number> = new Vector.<Number>();
square_coord.push(20,10, 50,10, 50,40, 20,40, 20,10);
graphics.beginFill(0x442266);
graphics.drawPath(square_commands, square_coord);
}
}
}
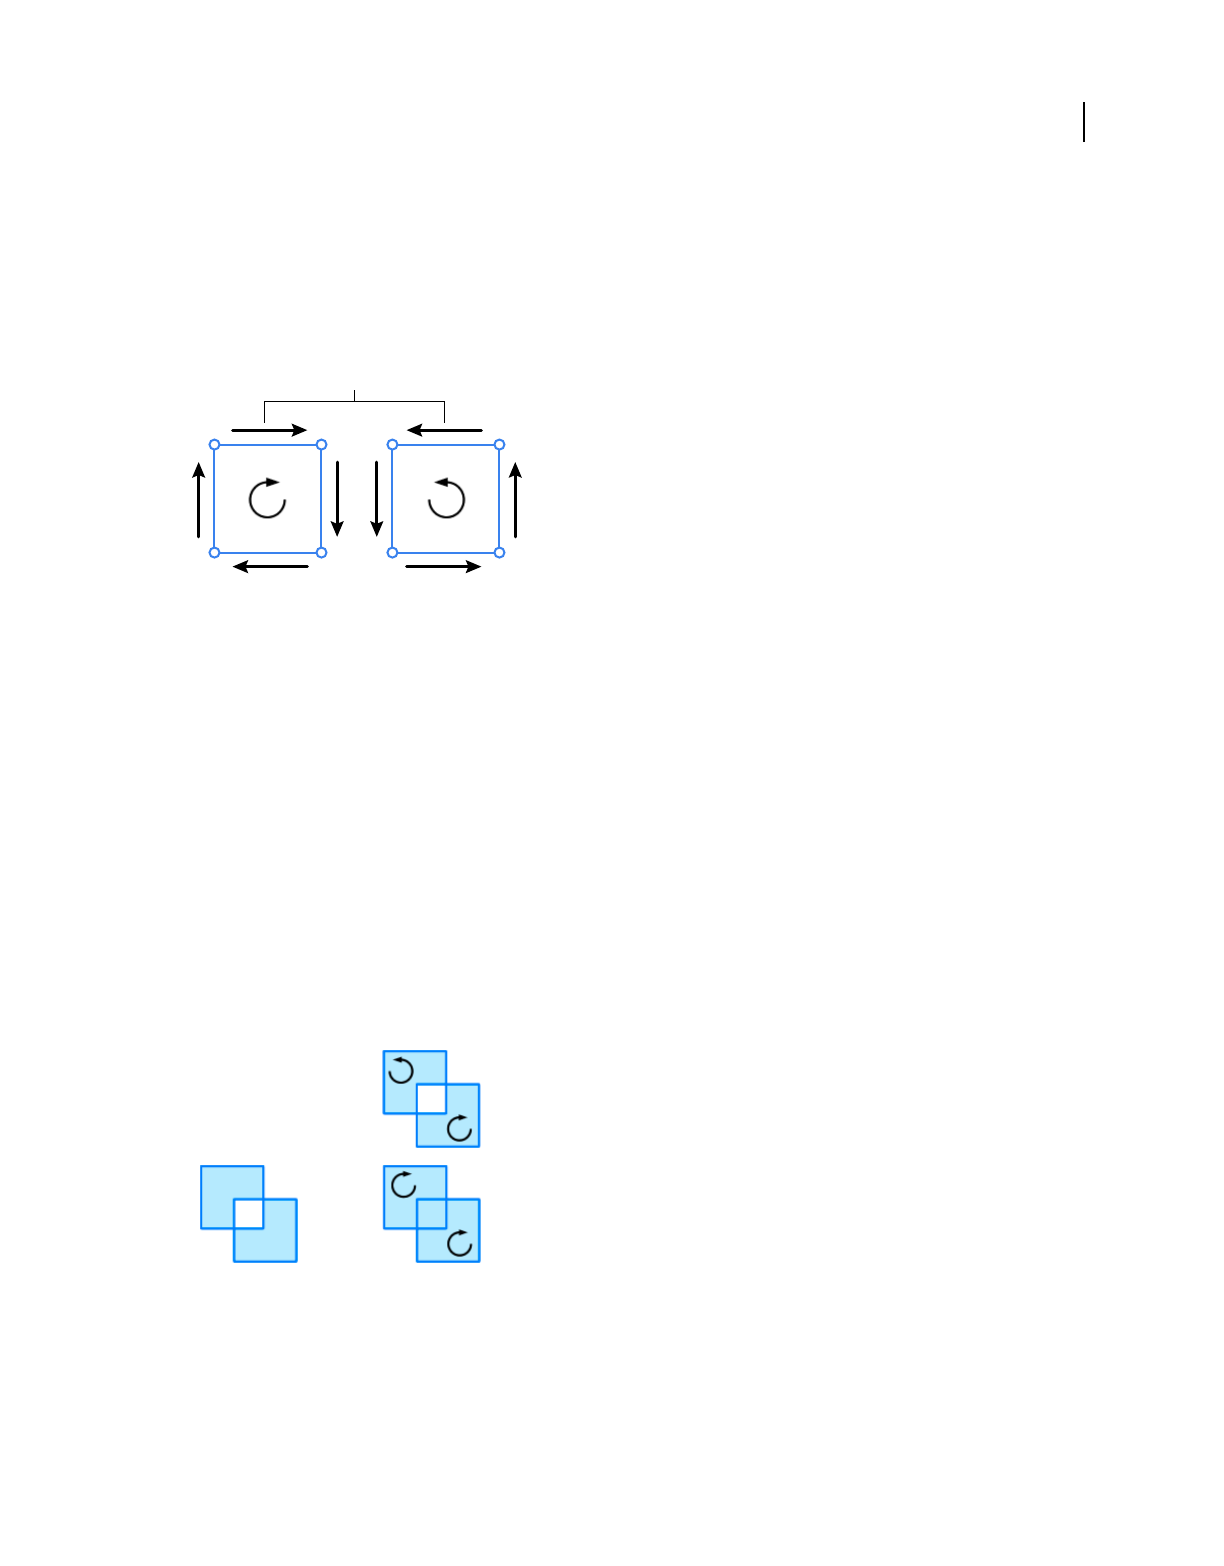
227
ACTIONSCRIPT 3.0 DEVELOPER’S GUIDE
Using the drawing API
Last updated 3/21/2011
Defining winding rules
Flash Player 10 and later, Adobe AIR 1.5 and later
The enhanced drawing API also introduces the concept of path “winding”: the direction for a path. The winding for a
path is either positive (clockwise) or negative (counter-clockwise). The order in which the renderer interprets the
coordinates provided by the vector for the data parameter determines the winding.
Positive and negative winding
A. Arrows indicate drawing direction B. Positively wound (clockwise) C. Negatively wound (counter-clockwise)
Additionally, notice that the Graphics.drawPath() method has an optional third parameter called “winding”:
drawPath(commands:Vector.<int>, data:Vector.<Number>, winding:String = "evenOdd"):void
In this context, the third parameter is a string or a constant that specifies the winding or fill rule for intersecting paths.
(The constant values are defined in the GraphicsPathWinding class as GraphicsPathWinding.EVEN_ODD or
GraphicsPathWinding.NON_ZERO.) The winding rule is important when paths intersect.
The even-odd rule is the standard winding rule and is the rule used by the legacy drawing API. The Even-odd rule is
also the default rule for the Graphics.drawPath() method. With the even-odd winding rule, any intersecting paths
alternate between open and closed fills. If two squares drawn with the same fill intersect, the area in which the
intersection occurs is filled. Generally, adjacent areas are neither both filled nor both unfilled.
The non-zero rule, on the other hand, depends on winding (drawing direction) to determine whether areas defined by
intersecting paths are filled. When paths of opposite winding intersect, the area defined is unfilled, much like with
even-odd. For paths of the same winding, the area that would be unfilled is filled:
Winding rules for intersecting areas
A. Even-odd winding rule B. Non-zero winding rule
B
1
23
0
12
30
C
A
AB
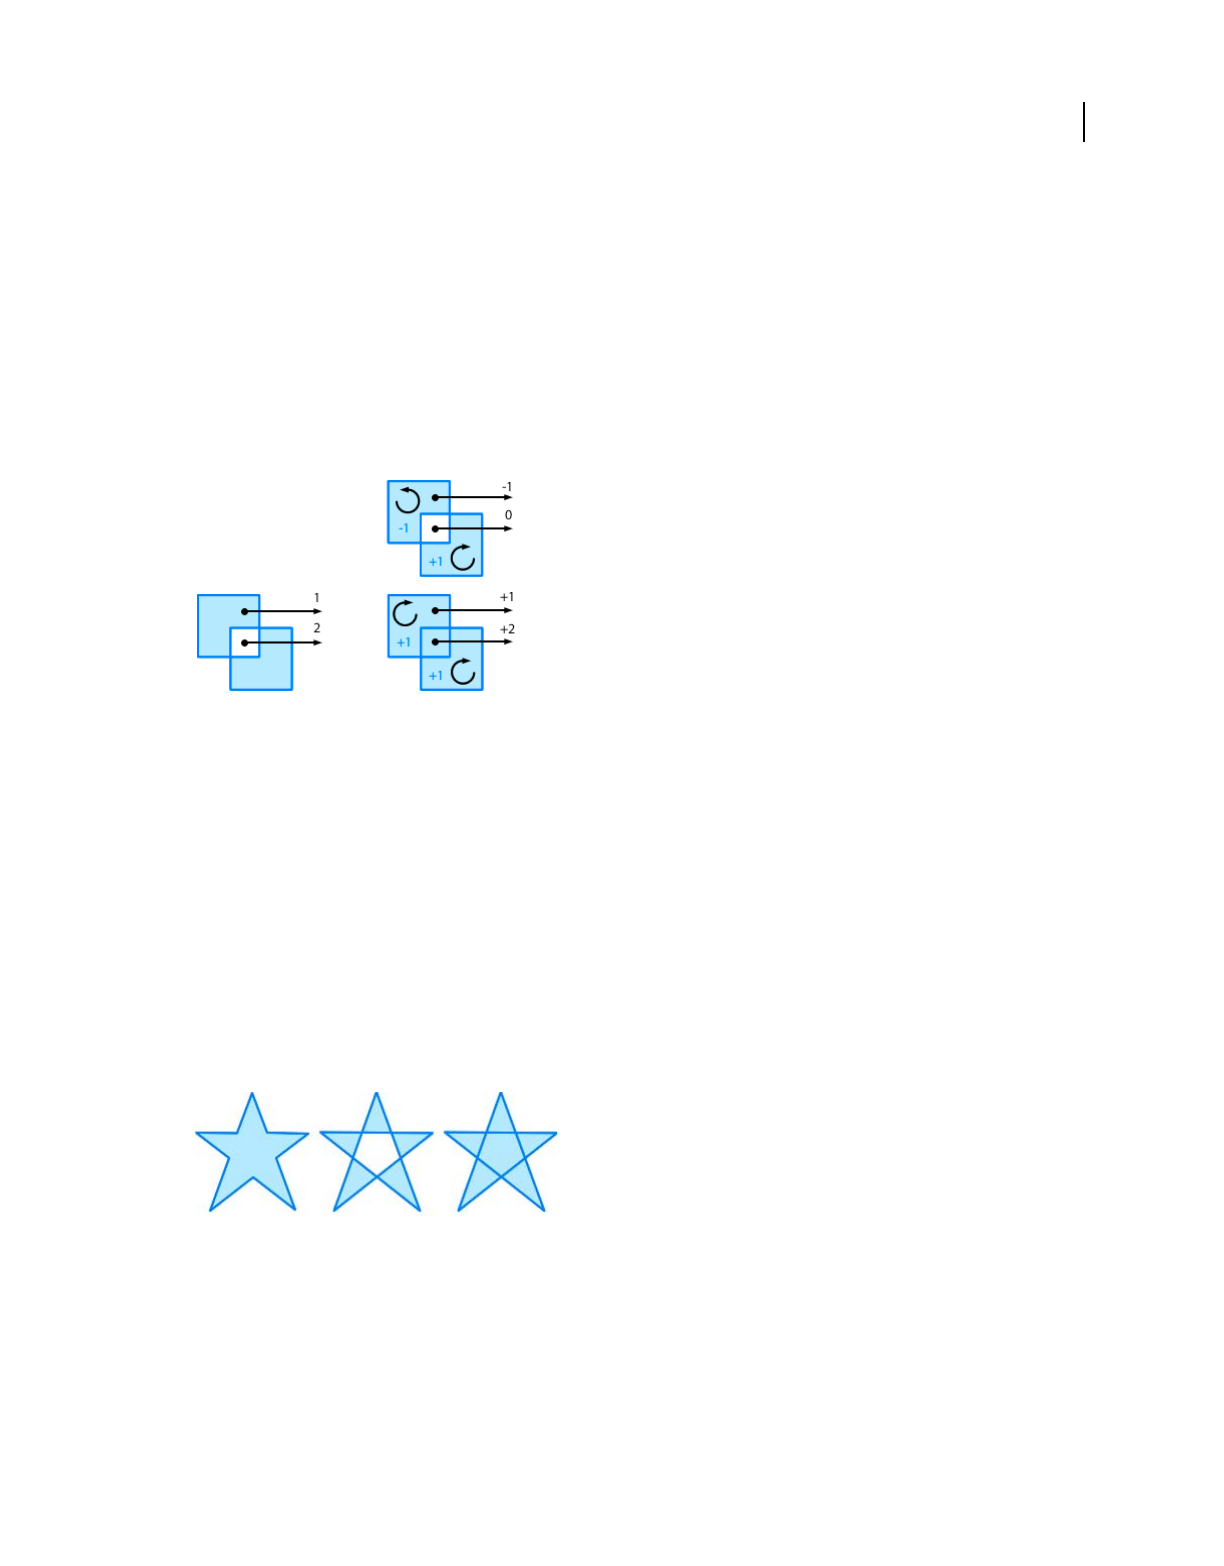
228
ACTIONSCRIPT 3.0 DEVELOPER’S GUIDE
Using the drawing API
Last updated 3/21/2011
Winding rule names
Flash Player 10 and later, Adobe AIR 1.5 and later
The names refer to a more specific rule that defines how these fills are managed. Positively wound paths are assigned
a value of +1; negatively wound paths are assigned a value of -1. Starting from a point within an enclosed area of a
shape, draw a line from that point extending out indefinitely. The number of times that line crosses a path, and the
combined values of those paths, are used to determine the fill. For even-odd winding, the count of times the line crosses
a path is used. When the count is odd, the area is filled. For even counts, the area is unfilled. For non-zero winding, the
values assigned to the paths are used. When the combined values of the path are not 0, the area is filled. When the
combined value is 0, the area is unfilled.
Winding rule counts and fills
A. Even-odd winding rule B. Non-zero winding rule
Using winding rules
Flash Player 10 and later, Adobe AIR 1.5 and later
These fill rules are complicated, but in some situations they are necessary. For example, consider drawing a star shape.
With the standard even-odd rule, the shape would require ten different lines. With the non-zero winding rule, those
ten lines are reduced to five. Here is the ActionScript for a star with five lines and a non-zero winding rule:
graphics.beginFill(0x60A0FF);
graphics.drawPath( Vector.<int>([1,2,2,2,2]), Vector.<Number>([66,10, 23,127, 122,50, 10,49,
109,127]), GraphicsPathWinding.NON_ZERO);
And here is the star shape:
A star shape using different winding rules
A. Even-odd 10 lines B. Even-odd 5 lines C. Non-zero 5 lines
And, as images are animated or used as textures on three-dimensional objects and overlap, the winding rules become
more important.
AB
ABC

229
ACTIONSCRIPT 3.0 DEVELOPER’S GUIDE
Using the drawing API
Last updated 3/21/2011
Using graphics data classes
Flash Player 10 and later, Adobe AIR 1.5 and later
The enhanced drawing API introduces a collection of classes in the flash.display package of the type IGraphicsData
(an interface each of the classes implement). The classes that implement the IGraphicsData interface serve as data
containers for the methods of the drawing API.
The following classes implement the IGraphicsData interface:
•GraphicsBitmapFill
•GraphicsEndFill
•GraphicsGradientFill
•GraphicsPath
•GraphicsShaderFill
•GraphicsSolidFill
•GraphicsStroke
•GraphicsTrianglePath
With these classes, you can store complete drawings in a vector object array of IGraphicsData type
(Vector.<IGraphicsData>) that can be reused as the data source for other shape instances or to store drawing
information for later use.
Notice you have multiple fill classes for each style of fill, but only one stroke class. ActionScript has only one stroke
IGraphicsData class because the stroke class uses the fill classes to define its style. So every stroke is actually the stroke
class and a fill class. Otherwise, the API for these graphics data classes mirror the methods they represent in the
flash.display.Graphics class:
Graphics Method Data Class
beginBitmapFill() GraphicsBitmapFill
beginFill() GraphicsSolidFill
beginGradientFill() GraphicsGradientFill
beginShaderFill() GraphicsShaderFill
lineBitmapStyle() GraphicsStroke + GraphicsBitmapFill
lineGradientStyle() GraphicsStroke + GraphicsGradientFill
lineShaderStyle() GraphicsStroke + GraphicsShaderFill
lineStyle() GraphicsStroke + GraphicsSolidFill
moveTo()
lineTo()
curveTo()
drawPath()
GraphicsPath
drawTriangles() GraphicsTrianglePath

230
ACTIONSCRIPT 3.0 DEVELOPER’S GUIDE
Using the drawing API
Last updated 3/21/2011
In addition, the GraphicsPath class has its own GraphicsPath.moveTo(), GraphicsPath.lineTo(),
GraphicsPath.curveTo(), GraphicsPath.wideLineTo(), and GraphicsPath.wideMoveTo() utility methods to
easily define those commands for a GraphicsPath instance. These utility methods ease defining or updating the
commands and data values directly.
Once you have a collection of IGraphicsData instances, use Graphics.drawGraphicsData() method to render the
graphics. The Graphics.drawGraphicsData() method runs a vector of IGraphicsData instances through the
drawing API in sequential order:
// stroke object
var stroke:GraphicsStroke = new GraphicsStroke(3);
stroke.joints = JointStyle.MITER;
stroke.fill = new GraphicsSolidFill(0x102020);// solid stroke
// fill object
var fill:GraphicsGradientFill = new GraphicsGradientFill();
fill.colors = [0x0000FF, 0xEEFFEE];
fill.matrix = new Matrix();
fill.matrix.createGradientBox(70,70, Math.PI/2);
// path object
var path:GraphicsPath = new GraphicsPath(new Vector.<int>(), new Vector.<Number>());
path.commands.push(1,2,2);
path.data.push(125,0, 50,100, 175,0);
// combine objects for complete drawing
var drawing:Vector.<IGraphicsData> = new Vector.<IGraphicsData>();
drawing.push(stroke, fill, path);
// draw the drawing
graphics.drawGraphicsData(drawing);
By modifying one value in the path used by the drawing in the example, the shape can be redrawn multiple times for
a more complex image:
// draw the drawing multiple times
// change one value to modify each variation
graphics.drawGraphicsData(drawing);
path.data[2] += 200;
graphics.drawGraphicsData(drawing);
path.data[2] -= 150;
graphics.drawGraphicsData(drawing);
path.data[2] += 100;
graphics.drawGraphicsData(drawing);
path.data[2] -= 50;graphicsS.drawGraphicsData(drawing);
Though IGraphicsData objects can define fill and stroke styles, the fill and stroke styles are not a requirement. In other
words, Graphics class methods can be used to set styles while IGraphicsData objects can be used to draw a saved
collection of paths, or vice-versa.
Note: Use the Graphics.clear() method to clear out a previous drawing before starting a new one; unless you're adding
on to the original drawing, as seen in the example above. As you change a single portion of a path or collection of
IGraphicsData objects, redraw the entire drawing to see the changes.
When using graphics data classes, the fill is rendered whenever three or more points are drawn, because the shape is
inherently closed at that point. Even though the fill closes, the stroke does not, and this behavior is different than when
using multiple Graphics.lineTo() or Graphics.moveTo() commands.

231
ACTIONSCRIPT 3.0 DEVELOPER’S GUIDE
Using the drawing API
Last updated 3/21/2011
About using drawTriangles()
Flash Player 10 and later, Adobe AIR 1.5 and later
Another advanced method introduced in Flash Player 10 and Adobe AIR 1.5, Graphics.drawTriangles(), is like the
Graphics.drawPath() method. The Graphics.drawTriangles() method also uses a Vector.<Number> object to
specify point locations for drawing a path.
However, the real purpose for the Graphics.drawTriangles() method is to facilitate three-dimensional effects
through ActionScript. For information about using Graphics.drawTriangles() to produce three-dimensional
effects, see “Using triangles for 3D effects” on page 341.

232
Last updated 3/21/2011
Chapter 12: Working with bitmaps
Flash Player 9 and later, Adobe AIR 1.0 and later
In addition to its vector drawing capabilities, ActionScript 3.0 includes the ability to create bitmap images or
manipulate the pixel data of external bitmap images that are loaded into a SWF. With the ability to access and change
individual pixel values, you can create your own filter-like image effects and use the built-in noise functions to create
textures and random noise.
Basics of working with bitmaps
Flash Player 9 and later, Adobe AIR 1.0 and later
When you work with digital images, you’re likely to encounter two main types of graphics: bitmap and vector. Bitmap
graphics, also known as raster graphics, are composed of tiny squares (pixels) that are arranged in a rectangular grid
formation. Vector graphics are composed of mathematically generated geometric shapes such as lines, curves, and
polygons.
Bitmap images are defined by the width and height of the image, measured in pixels, and the number of bits contained
in each pixel, which represents the number of colors a pixel can contain. In the case of a bitmap image that utilizes the
RGB color model, the pixels are made up of three bytes: red, green, and blue. Each of these bytes contains a value
ranging from 0 to 255. When the bytes are combined within the pixel, they produce a color similar to an artist mixing
paint colors. For example, a pixel containing byte values of red-255, green-102 and blue-0 would produce a vibrant
orange color.
The quality of a bitmap image is determined by combining the resolution of the image with its color depth bit value.
Resolution relates to the number of pixels contained within an image. The greater the number of pixels, the higher the
resolution and the finer the image appears. Color depth relates to the amount of information a pixel can contain. For
example, an image that has a color depth value of 16 bits per pixel cannot represent the same number of colors as an
image that has a color depth of 48 bits. As a result, the 48-bit image will have smoother degrees of shading than its 16-
bit counterpart.
Because bitmap graphics are resolution-dependent, they don’t scale very well. This is most noticeable when bitmap
images are scaled up in size. Scaling up a bitmap usually results in a loss of detail and quality.
Bitmap file formats
Bitmap images are grouped into a number of common file formats. These formats use different types of compression
algorithms to reduce file size, as well as optimize image quality based on the end purpose of the image. The bitmap
image formats supported by Adobe runtimes are BMP, GIF, JPG, PNG, and TIFF.
BMP
The BMP (bit mapped) format is a default image format used by the Microsoft Windows operating system. It does not
use any form of compression algorithm and as such usually results in large file sizes.

233
ACTIONSCRIPT 3.0 DEVELOPER’S GUIDE
Working with bitmaps
Last updated 3/21/2011
GIF
The Graphics Interchange Format (GIF) was originally developed by CompuServe in 1987 as a means to transmit
images with 256 colors (8-bit color). The format provides small file sizes and is ideal for web-based images. Because of
this format’s limited color palette, GIF images are generally not suitable for photographs, which typically require high
degrees of shading and color gradients. GIF images permit single-bit transparency, which allows colors to be mapped
as clear (or transparent). This results in the background color of a web page showing through the image where the
transparency has been mapped.
JPEG
Developed by the Joint Photographic Experts Group (JPEG), the JPEG (often written JPG) image format uses a lossy
compression algorithm to allow 24-bit color depth with a small file size. Lossy compression means that each time the
image is saved, the image loses quality and data but results in a smaller file size. The JPEG format is ideal for
photographs because it is capable of displaying millions of colors. The ability to control the degree of compression
applied to an image allows you to manipulate image quality and file size.
PNG
The Portable Network Graphics (PNG) format was produced as an open-source alternative to the patented GIF file
format. PNGs support up to 64-bit color depth, allowing for up to 16 million colors. Because PNG is a relatively new
format, some older browsers don’t support PNG files. Unlike JPGs, PNGs use lossless compression, which means that
none of the image data is lost when the image is saved. PNG files also support alpha transparency, which allows for up
to 256 levels of transparency.
TIFF
The Tagged Image File Format (TIFF) was the cross-platform format of choice before the PNG was introduced. The
drawback with the TIFF format is that because of the many different varieties of TIFF, there is no single reader that
can handle every version. In addition, no web browsers currently support the format. TIFF can use either lossy or
lossless compression, and is able to handle device-specific color spaces (such as CMYK).
Transparent bitmaps and opaque bitmaps
Bitmap images that use either the GIF or PNG formats can have an extra byte (alpha channel) added to each pixel. This
extra pixel byte represents the transparency value of the pixel.
GIF images allow single-bit transparency, which means that you can specify a single color, from a 256-color palette, to
be transparent. PNG images, on the other hand, can have up to 256 levels of transparency. This function is especially
beneficial when images or text are required to blend into backgrounds.
ActionScript 3.0 replicates this extra transparency pixel byte within the BitmapData class. Similar to the PNG
transparency model, ActionScript offers up to 256 levels of transparency.
Important concepts and terms
The following list contains important terms that you will encounter when learning about bitmap graphics:
Alpha The level of transparency (or more accurately, opacity) in a color or an image. The amount of alpha is often
described as the alpha channel value.
ARGB color A color scheme where each pixel’s color is a mixture of red, green, and blue color values, and its
transparency is specified as an alpha value.
Color channel Commonly, colors are represented as a mixture of a few basic colors—usually (for computer graphics)
red, green, and blue. Each basic color is considered a color channel; the amount of color in each color channel, mixed
together, determines the final color.

234
ACTIONSCRIPT 3.0 DEVELOPER’S GUIDE
Working with bitmaps
Last updated 3/21/2011
Color depth Also known as bit depth, this refers to the amount of computer memory that is devoted to each pixel,
which in turn determines the number of possible colors that can be represented in the image.
Pixel The smallest unit of information in a bitmap image—essentially a dot of color.
Resolution The pixel dimensions of an image, which determines the level of fine-grained detail contained in the
image. Resolution is often expressed in terms of width and height in number of pixels.
RGB color A color scheme where each pixel’s color is represented as a mixture of red, green, and blue color values.
The Bitmap and BitmapData classes
Flash Player 9 and later, Adobe AIR 1.0 and later
The main ActionScript 3.0 classes for working with bitmap images are the Bitmap class, which is used to display
bitmap images on the screen, and the BitmapData class, which is used to access and manipulate the raw image data of
a bitmap.
More Help topics
flash.display.Bitmap
flash.display.BitmapData
Understanding the Bitmap class
Flash Player 9 and later, Adobe AIR 1.0 and later
As a subclass of the DisplayObject class, the Bitmap class is the main ActionScript 3.0 class used for displaying bitmap
images. These images may have been loaded via the flash.display.Loader class or created dynamically using the
Bitmap() constructor. When loading an image from an external source, a Bitmap object can only use GIF, JPEG, or
PNG format images. Once instantiated, the Bitmap instance can be considered a wrapper for a BitmapData object that
needs to be rendered to the Stage. Because a Bitmap instance is a display object, all the characteristics and functionality
of display objects can be used to manipulate a Bitmap instance as well. For more information about working with
display objects, see “Display programming” on page 143.
Pixel snapping and smoothing
Flash Player 9 and later, Adobe AIR 1.0 and later
In addition to the functionality common to all display objects, the Bitmap class provides some additional features that
are specific to bitmap images.
The pixelSnapping property of the Bitmap class determines whether or not a Bitmap object snaps to its nearest pixel.
This property accepts one of three constants defined in the PixelSnapping class: ALWAYS, AUTO, and NEVER.
The syntax for applying pixel snapping is as follows:
myBitmap.pixelSnapping = PixelSnapping.ALWAYS;
Often, when bitmap images are scaled, they become blurred and distorted. To help reduce this distortion, use the
smoothing property of the BitmapData class. This Boolean property, when set to true, smooths, or anti-aliases, the
pixels within the image when it is scaled. This gives the image a clearer and more natural appearance.

235
ACTIONSCRIPT 3.0 DEVELOPER’S GUIDE
Working with bitmaps
Last updated 3/21/2011
Understanding the BitmapData class
Flash Player 9 and later, Adobe AIR 1.0 and later
The BitmapData class, which is in the flash.display package, can be likened to a photographic snapshot of the pixels
contained within a loaded or dynamically created bitmap image. This snapshot is represented by an array of pixel data
within the object. The BitmapData class also contains a series of built-in methods that are useful for creation and
manipulation of pixel data.
To instantiate a BitmapData object, use the following code:
var myBitmap:BitmapData = new BitmapData(width:Number, height:Number, transparent:Boolean,
fillColor:uinit);
The width and height parameters specify the size of the bitmap. In AIR 1.5 and Flash Player 10, the maximum size
for a BitmapData object is 8,191 pixels in width or height, and the total number of pixels cannot exceed 16,777,215
pixels. (So, if a BitmapData object is 8,191 pixels wide, it can only be 2,048 pixels high.) In Flash Player 9 and earlier
and AIR 1.1 and earlier, the limitation is 2,880 pixels in height and 2,880 in width.
The transparent parameter specifies whether the bitmap data includes an alpha channel (true) or not (false). The
fillColor parameter is a 32-bit color value that specifies the background color, as well as the transparency value (if
it has been set to true). The following example creates a BitmapData object with an orange background that is 50
percent transparent:
var myBitmap:BitmapData = new BitmapData(150, 150, true, 0x80FF3300);
To render a newly created BitmapData object to the screen, assign it to or wrap it in a Bitmap instance. To do this, you
can either pass the BitmapData object as a parameter of the Bitmap object’s constructor, or you can assign it to the
bitmapData property of an existing Bitmap instance. You must also add the Bitmap instance to the display list by
calling the addChild() or addChildAt() methods of the display object container that will contain the Bitmap
instance. For more information on working with the display list, see “Adding display objects to the display list” on
page 150.
The following example creates a BitmapData object with a red fill, and displays it in a Bitmap instance:
var myBitmapDataObject:BitmapData = new BitmapData(150, 150, false, 0xFF0000);
var myImage:Bitmap = new Bitmap(myBitmapDataObject);
addChild(myImage);
Manipulating pixels
Flash Player 9 and later, Adobe AIR 1.0 and later
The BitmapData class contains a set of methods that allow you to manipulate pixel data values.
Manipulating individual pixels
Flash Player 9 and later, Adobe AIR 1.0 and later
When changing the appearance of a bitmap image at a pixel level, you first need to get the color values of the pixels
contained within the area you wish to manipulate. You use the getPixel() method to read these pixel values.

236
ACTIONSCRIPT 3.0 DEVELOPER’S GUIDE
Working with bitmaps
Last updated 3/21/2011
The getPixel() method retrieves an RGB value from a set of x, y (pixel) coordinates that are passed as a parameter.
If any of the pixels that you want to manipulate include transparency (alpha channel) information, you need to use the
getPixel32() method. This method also retrieves an RGB value, but unlike with getPixel(), the value returned by
getPixel32() contains additional data that represents the alpha channel (transparency) value of the selected pixel.
Alternatively, if you simply want to change the color or transparency of a pixel contained within a bitmap, you can use
the setPixel() or setPixel32() method. To set a pixel’s color, simply pass in the x, y coordinates and the color
value to one of these methods.
The following example uses setPixel() to draw a cross on a green BitmapData background. It then uses getPixel()
to retrieve the color value from the pixel at the coordinate 50, 50 and traces the returned value.
import flash.display.Bitmap;
import flash.display.BitmapData;
var myBitmapData:BitmapData = new BitmapData(100, 100, false, 0x009900);
for (var i:uint = 0; i < 100; i++)
{
var red:uint = 0xFF0000;
myBitmapData.setPixel(50, i, red);
myBitmapData.setPixel(i, 50, red);
}
var myBitmapImage:Bitmap = new Bitmap(myBitmapData);
addChild(myBitmapImage);
var pixelValue:uint = myBitmapData.getPixel(50, 50);
trace(pixelValue.toString(16));
If you want to read the value of a group of pixels, as opposed to a single pixel, use the getPixels() method. This
method generates a byte array from a rectangular region of pixel data that is passed as a parameter. Each of the
elements of the byte array (in other words, the pixel values) are unsigned integers—32-bit, unmultiplied pixel values.
Conversely, to change (or set) the value of a group of pixels, use the setPixels() method. This method expects two
parameters (rect and inputByteArray), which are combined to output a rectangular region (rect) of pixel data
(inputByteArray).
As data is read (and written) out of the inputByteArray, the ByteArray.readUnsignedInt() method is called for
each of the pixels in the array. If, for some reason, the inputByteArray doesn't contain a full rectangle worth of pixel
data, the method stops processing the image data at that point.
It's important to remember that, for both getting and setting pixel data, the byte array expects 32-bit alpha, red, green,
blue (ARGB) pixel values.
The following example uses the getPixels() and setPixels() methods to copy a group of pixels from one
BitmapData object to another:

237
ACTIONSCRIPT 3.0 DEVELOPER’S GUIDE
Working with bitmaps
Last updated 3/21/2011
import flash.display.Bitmap;
import flash.display.BitmapData;
import flash.utils.ByteArray;
import flash.geom.Rectangle;
var bitmapDataObject1:BitmapData = new BitmapData(100, 100, false, 0x006666FF);
var bitmapDataObject2:BitmapData = new BitmapData(100, 100, false, 0x00FF0000);
var rect:Rectangle = new Rectangle(0, 0, 100, 100);
var bytes:ByteArray = bitmapDataObject1.getPixels(rect);
bytes.position = 0;
bitmapDataObject2.setPixels(rect, bytes);
var bitmapImage1:Bitmap = new Bitmap(bitmapDataObject1);
addChild(bitmapImage1);
var bitmapImage2:Bitmap = new Bitmap(bitmapDataObject2);
addChild(bitmapImage2);
bitmapImage2.x = 110;
Pixel-level collision detection
Flash Player 9 and later, Adobe AIR 1.0 and later
The BitmapData.hitTest() method performs pixel-level collision detection between the bitmap data and another
object or point.
The BitmapData.hitTest() method accepts five parameters:
•firstPoint (Point): This parameter refers to the pixel position of the upper-left corner of the first BitmapData
upon which the hit test is being performed.
•firstAlphaThreshold (uint): This parameter specifies the highest alpha channel value that is considered opaque
for this hit test.
•secondObject (Object): This parameter represents the area of impact. The secondObject object can be a
Rectangle, Point, Bitmap, or BitmapData object. This object represents the hit area on which the collision detection
is being performed.
•secondBitmapDataPoint (Point): This optional parameter is used to define a pixel location in the second
BitmapData object. This parameter is used only when the value of secondObject is a BitmapData object. The
default is null.
•secondAlphaThreshold (uint): This optional parameter represents the highest alpha channel value that is
considered opaque in the second BitmapData object. The default value is 1. This parameter is only used when the
value of secondObject is a BitmapData object and both BitmapData objects are transparent.
When performing collision detection on opaque images, keep in mind that ActionScript treats the image as though it
were a fully opaque rectangle (or bounding box). Alternatively, when performing pixel-level hit testing on images that
are transparent, both of the images are required to be transparent. In addition to this, ActionScript uses the alpha
threshold parameters to determine at what point the pixels change from being transparent to opaque.
The following example creates three bitmap images and checks for pixel collision using two different collision points
(one returns false, the other true):

238
ACTIONSCRIPT 3.0 DEVELOPER’S GUIDE
Working with bitmaps
Last updated 3/21/2011
import flash.display.Bitmap;
import flash.display.BitmapData;
import flash.geom.Point;
var bmd1:BitmapData = new BitmapData(100, 100, false, 0x000000FF);
var bmd2:BitmapData = new BitmapData(20, 20, false, 0x00FF3300);
var bm1:Bitmap = new Bitmap(bmd1);
this.addChild(bm1);
// Create a red square.
var redSquare1:Bitmap = new Bitmap(bmd2);
this.addChild(redSquare1);
redSquare1.x = 0;
// Create a second red square.
var redSquare2:Bitmap = new Bitmap(bmd2);
this.addChild(redSquare2);
redSquare2.x = 150;
redSquare2.y = 150;
// Define the point at the top-left corner of the bitmap.
var pt1:Point = new Point(0, 0);
// Define the point at the center of redSquare1.
var pt2:Point = new Point(20, 20);
// Define the point at the center of redSquare2.
var pt3:Point = new Point(160, 160);
trace(bmd1.hitTest(pt1, 0xFF, pt2)); // true
trace(bmd1.hitTest(pt1, 0xFF, pt3)); // false
Copying bitmap data
Flash Player 9 and later, Adobe AIR 1.0 and later
To copy bitmap data from one image to another, you can use several methods: clone(), copyPixels(),
copyChannel(), and draw().
As its name suggests, the clone() method lets you clone, or sample, bitmap data from one BitmapData object to
another. When called, the method returns a new BitmapData object that is an exact clone of the original instance it
was copied from.
The following example clones a copy of an orange (parent) square and places the clone beside the original parent
square:

239
ACTIONSCRIPT 3.0 DEVELOPER’S GUIDE
Working with bitmaps
Last updated 3/21/2011
import flash.display.Bitmap;
import flash.display.BitmapData;
var myParentSquareBitmap:BitmapData = new BitmapData(100, 100, false, 0x00ff3300);
var myClonedChild:BitmapData = myParentSquareBitmap.clone();
var myParentSquareContainer:Bitmap = new Bitmap(myParentSquareBitmap);
this.addChild(myParentSquareContainer);
var myClonedChildContainer:Bitmap = new Bitmap(myClonedChild);
this.addChild(myClonedChildContainer);
myClonedChildContainer.x = 110;
The copyPixels() method is a quick and easy way of copying pixels from one BitmapData object to another. The
method takes a rectangular snapshot (defined by the sourceRect parameter) of the source image and copies it to
another rectangular area (of equal size). The location of the newly “pasted” rectangle is defined within the destPoint
parameter.
The copyChannel() method samples a predefined color channel value (alpha, red, green, or blue) from a source
BitmapData object and copies it into a channel of a destination BitmapData object. Calling this method does not affect
the other channels in the destination BitmapData object.
The draw() method draws, or renders, the graphical content from a source sprite, movie clip, or other display object
on to a new bitmap. Using the matrix, colorTransform, blendMode, and destination clipRect parameters, you can
modify the way in which the new bitmap is rendered. This method uses the vector renderer in Flash Player and AIR
to generate the data.
When you call draw(), you pass the source object (sprite, movie clip, or other display object) as the first parameter, as
demonstrated here:
myBitmap.draw(movieClip);
If the source object has had any transformations (color, matrix, and so forth) applied to it after it was originally loaded,
these transformations are not copied across to the new object. If you want to copy the transformations to the new
bitmap, then you need to copy the value of the transform property from the original object to the transform property
of the Bitmap object that uses the new BitmapData object.
Making textures with noise functions
Flash Player 9 and later, Adobe AIR 1.0 and later
To modify the appearance of a bitmap, you can apply a noise effect to it, using either the noise() method or the
perlinNoise() methods. A noise effect can be likened to the static that appears on an untuned television screen.
To apply a noise effect to a a bitmap, use the noise() method. This method applies a random color value to pixels
within a specified area of a bitmap image.
This method accepts five parameters:
•randomSeed (int): The random seed number that determines the pattern. Despite its name, this number actually
creates the same results if the same number is passed. To get a true random result, use the Math.random() method
to pass a random number for this parameter.

240
ACTIONSCRIPT 3.0 DEVELOPER’S GUIDE
Working with bitmaps
Last updated 3/21/2011
•low (uint): This parameter refers to the lowest value to be generated for each pixel (0 to 255). The default value is
0. Setting this value lower results in a darker noise pattern, while setting it to a higher value results in a brighter
pattern.
•high (uint): This parameter refers to the highest value to be generated for each pixel (0 to 255). The default value
is 255. Setting this value lower results in a darker noise pattern, while setting it to a higher value results in a brighter
pattern.
•channelOptions (uint): This parameter specifies to which color channel of the bitmap object the noise pattern will
be applied. The number can be a combination of any of the four color channel ARGB values. The default value is 7.
•grayScale (Boolean): When set to true, this parameter applies the randomSeed value to the bitmap pixels,
effectively washing all color out of the image. The alpha channel is not affected by this parameter. The default value
is false.
The following example creates a bitmap image and applies a blue noise pattern to it:
import flash.display.Bitmap;
import flash.display.BitmapData;
var myBitmap:BitmapData = new BitmapData(250, 250,false, 0xff000000);
myBitmap.noise(500, 0, 255, BitmapDataChannel.BLUE,false);
var image:Bitmap = new Bitmap(myBitmap);
addChild(image);
If you want to create a more organic-looking texture, use the perlinNoise() method. The perlinNoise() method
produces realistic, organic textures that are ideal for smoke, clouds, water, fire, or even explosions.
Because it is generated by an algorithm, the perlinNoise() method uses less memory than bitmap-based textures.
However, it can still have an impact on processor usage, slowing down your content and causing the screen to be
redrawn more slowly than the frame rate, especially on older computers. This is mainly due to the floating-point
calculations that need to occur to process the perlin noise algorithms.
The method accepts nine parameters (the first six are required):
•baseX (Number): Determines the x (size) value of patterns created.
•baseY (Number): Determines the y (size) value of the patterns created.
•numOctaves (uint): Number of octaves or individual noise functions to combine to create this noise. Larger
numbers of octaves create images with greater detail but also require more processing time.
•randomSeed (int): The random seed number works exactly the same way as it does in the noise() function. To get
a true random result, use the Math.random() method to pass a random number for this parameter.
•stitch (Boolean): If set to true, this method attempts to stitch (or smooth) the transition edges of the image to
create seamless textures for tiling as a bitmap fill.
•fractalNoise (Boolean): This parameter relates to the edges of the gradients being generated by the method. If
set to true, the method generates fractal noise that smooths the edges of the effect. If set to false, it generates
turbulence. An image with turbulence has visible discontinuities in the gradient that can make it better approximate
sharper visual effects, like flames and ocean waves.
•channelOptions (uint): The channelOptions parameter works exactly the same way as it does in the noise()
method. It specifies to which color channel (of the bitmap) the noise pattern is applied. The number can be a
combination of any of the four color channel ARGB values. The default value is 7.
•grayScale (Boolean): The grayScale parameter works exactly the same way as it does in the noise() method. If
set to true, it applies the randomSeed value to the bitmap pixels, effectively washing all color out of the image. The
default value is false.

241
ACTIONSCRIPT 3.0 DEVELOPER’S GUIDE
Working with bitmaps
Last updated 3/21/2011
•offsets (Array): An array of points that correspond to x and y offsets for each octave. By manipulating the offset
values, you can smoothly scroll the layers of the image. Each point in the offset array affects a specific octave noise
function. The default value is null.
The following example creates a 150 x 150 pixel BitmapData object that calls the perlinNoise() method to generate
a green and blue cloud effect:
import flash.display.Bitmap;
import flash.display.BitmapData;
var myBitmapDataObject:BitmapData = new BitmapData(150, 150, false, 0x00FF0000);
var seed:Number = Math.floor(Math.random() * 100);
var channels:uint = BitmapDataChannel.GREEN | BitmapDataChannel.BLUE
myBitmapDataObject.perlinNoise(100, 80, 6, seed, false, true, channels, false, null);
var myBitmap:Bitmap = new Bitmap(myBitmapDataObject);
addChild(myBitmap);
Scrolling bitmaps
Flash Player 9 and later, Adobe AIR 1.0 and later
Imagine you have created a street mapping application where each time the user moves the map you are required to
update the view (even if the map has been moved by just a few pixels).
One way to create this functionality would be to re-render a new image containing the updated map view each time
the user moves the map. Alternatively, you could create a large single image and use the scroll() method.
The scroll() method copies an on-screen bitmap and then pastes it to a new offset location—specified by (x, y)
parameters. If a portion of the bitmap happens to reside off-stage, this gives the effect that the image has shifted. When
combined with a timer function (or an enterFrame event), you can make the image appear to be animating or
scrolling.
The following example takes the previous perlin noise example and generates a larger bitmap image (three-fourths of
which is rendered off-stage). The scroll() method is then applied, along with an enterFrame event listener that
offsets the image by one pixel in a diagonally downward direction. This method is called each time the frame is entered
and as a result, the off screen portions of the image are rendered to the Stage as the image scrolls down.

242
ACTIONSCRIPT 3.0 DEVELOPER’S GUIDE
Working with bitmaps
Last updated 3/21/2011
import flash.display.Bitmap;
import flash.display.BitmapData;
var myBitmapDataObject:BitmapData = new BitmapData(1000, 1000, false, 0x00FF0000);
var seed:Number = Math.floor(Math.random() * 100);
var channels:uint = BitmapDataChannel.GREEN | BitmapDataChannel.BLUE;
myBitmapDataObject.perlinNoise(100, 80, 6, seed, false, true, channels, false, null);
var myBitmap:Bitmap = new Bitmap(myBitmapDataObject);
myBitmap.x = -750;
myBitmap.y = -750;
addChild(myBitmap);
addEventListener(Event.ENTER_FRAME, scrollBitmap);
function scrollBitmap(event:Event):void
{
myBitmapDataObject.scroll(1, 1);
}
Taking advantage of mipmapping
Flash Player 9 and later, Adobe AIR 1.0 and later
MIP maps (also known as mipmaps), are bitmaps grouped together and associated with a texture to increase runtime
rendering quality and performance. Flash Player 9.115.0 and later versions and AIR implement this technology (the
process is called mipmapping), by creating optimized versions of varying scale of each bitmap (starting at 50%).
MIP maps are created for the following types of bitmaps:
•a bitmap (JPEG, GIF, or PNG files) displayed using the ActionScript 3.0 Loader class
•a bitmap in the library of a Flash Professional document
•a BitmapData object
•a bitmap displayed using the ActionScript 2.0 loadMovie() function
MIP maps are not applied to filtered objects or bitmap-cached movie clips. However, MIP maps are applied if you have
bitmap transformations within a filtered display object, even if the bitmap is within masked content.
Mipmapping happens automatically, but you can follow a few guidelines to make sure your images take advantage of
this optimization:
•For video playback, set the smoothing property to true for the Video object (see the Video class).
•For bitmaps, the smoothing property does not have to be set to true, but the quality improvements are more
visible when bitmaps use smoothing.
•Use bitmap sizes that are divisible by 4 or 8 for two-dimensional images (such as 640 x 128, which can be reduced
as follows: 320
x 64 > 160 x 32 > 80 x 16 > 40 x 8 > 20 x 4 > 10 x 2 > 5 x 1) and 2^n for three-dimensional textures.
MIP maps are generated from bitmaps that have a width and height that are 2^n (such as 256 x 256, 512 x 512, 1024
x 1024). Mipmapping does not occur for bitmap content with an odd width or height.

243
ACTIONSCRIPT 3.0 DEVELOPER’S GUIDE
Working with bitmaps
Last updated 3/21/2011
Bitmap example: Animated spinning moon
Flash Player 9 and later, Adobe AIR 1.0 and later
The Animated spinning moon example demonstrates techniques for working with Bitmap objects and bitmap image
data (BitmapData objects). The example creates an animation of a spinning, spherical moon using a flat image of the
moon’s surface as the raw image data. The following techniques are demonstrated:
•Loading an external image and accessing its raw image data
•Creating animation by repeatedly copying pixels from different parts of a source image
•Creating a bitmap image by setting pixel values
To get the application files for this sample, see www.adobe.com/go/learn_programmingAS3samples_flash. The
Animated spinning moon application files can be found in the Samples/SpinningMoon folder. The application
consists of the following files:
Loading an external image as bitmap data
Flash Player 9 and later, Adobe AIR 1.0 and later
The first main task this sample performs is loading an external image file, which is a photograph of the moon’s surface.
The loading operation is handled by two methods in the MoonSphere class: the MoonSphere() constructor, where the
loading process is initiated, and the imageLoadComplete() method, which is called when the external image is
completely loaded.
Loading an external image is similar to loading an external SWF; both use an instance of the flash.display.Loader class
to perform the loading operation. The actual code in the MoonSphere() method that starts loading the image is as
follows:
var imageLoader:Loader = new Loader();
imageLoader.contentLoaderInfo.addEventListener(Event.COMPLETE, imageLoadComplete);
imageLoader.load(new URLRequest("moonMap.png"));
The first line declares the Loader instance named imageLoader. The third line actually starts the loading process by
calling the Loader object’s load() method, passing a URLRequest instance representing the URL of the image to load.
The second line sets up the event listener that will be triggered when the image has completely loaded. Notice that the
addEventListener() method is not called on the Loader instance itself; instead, it’s called on the Loader object’s
contentLoaderInfo property. The Loader instance itself doesn’t dispatch events relating to the content being loaded.
File Description
SpinningMoon.mxml
or
SpinningMoon.fla
The main application file in Flex (MXML) or Flash (FLA).
com/example/programmingas3/moon/MoonSphere.as Class that performs the functionality of loading, displaying, and
animating the moon.
moonMap.png Image file containing a photograph of the moon’s surface, which is
loaded and used to create the animated, spinning moon.

244
ACTIONSCRIPT 3.0 DEVELOPER’S GUIDE
Working with bitmaps
Last updated 3/21/2011
Its contentLoaderInfo property, however, contains a reference to the LoaderInfo object that’s associated with the
content being loaded into the Loader object (the external image in this case). That LoaderInfo object does provide
several events relating to the progress and completion of loading the external content, including the complete event
(Event.COMPLETE) that will trigger a call to the imageLoadComplete() method when the image has completely
loaded.
While starting the external image loading is an important part of the process, it’s equally important to know what to
do when it finishes loading. As shown in the code above, the imageLoadComplete() function is called when the image
is loaded. That function does several things with the loaded image data, described subsequently. However, to use the
image data, it needs to access that data. When a Loader object is used to load an external image, the loaded image
becomes a Bitmap instance, which is attached as a child display object of the Loader object. In this case, the Loader
instance is available to the event listener method as part of the event object that’s passed to the method as a parameter.
The first lines of the imageLoadComplete() method are as follows:
private function imageLoadComplete(event:Event):void
{
textureMap = event.target.content.bitmapData;
...
}
Notice that the event object parameter is named event, and it’s an instance of the Event class. Every instance of the
Event class has a target property, which refers to the object triggering the event (in this case, the LoaderInfo instance
on which the addEventListener() method was called, as described previously). The LoaderInfo object, in turn, has
a content property that (once the loading process is complete) contains the Bitmap instance with the loaded bitmap
image. If you want to display the image directly on the screen, you can attach this Bitmap instance
(event.target.content) to a display object container. (You could also attach the Loader object to a display object
container). However, in this sample, the loaded content is used as a source of raw image data rather than being
displayed on the screen. Consequently, the first line of the imageLoadComplete() method reads the bitmapData
property of the loaded Bitmap instance (event.target.content.bitmapData) and stores it in the instance variable
named textureMap, which is used as a source of the image data to create the animation of the rotating moon. This is
described next.
Creating animation by copying pixels
Flash Player 9 and later, Adobe AIR 1.0 and later
A basic definition of animation is the illusion of motion, or change, created by changing an image over time. In this
sample, the goal is to create the illusion of a spherical moon rotating around its vertical axis. However, for the purposes
of the animation, you can ignore the spherical distortion aspect of the sample. Consider the actual image that’s loaded
and used as the source of the moon image data:

245
ACTIONSCRIPT 3.0 DEVELOPER’S GUIDE
Working with bitmaps
Last updated 3/21/2011
As you can see, the image is not one or several spheres; it’s a rectangular photograph of the surface of the moon.
Because the photo was taken exactly at the moon’s equator, the parts of the image that are closer to the top and bottom
of the image are stretched and distorted. To remove the distortion from the image and make it appear spherical, we
will use a displacement map filter, as described later. However, because this source image is a rectangle, to create the
illusion that the sphere is rotating, the code simply needs to slide the moon surface photo horizontally.
Notice that the image actually contains two copies of the moon surface photograph next to each other. This image is
the source image from which image data is copied repeatedly to create the appearance of motion. By having two copies
of the image next to each other, a continuous, uninterrupted scrolling effect can more easily be created. Let’s walk
through the process of the animation step-by-step to see how this works.
The process actually involves two separate ActionScript objects. First, there is the loaded source image, which in the
code is represented by the BitmapData instance named textureMap. As described previously, textureMap is
populated with image data as soon as the external image loads, using this code:
textureMap = event.target.content.bitmapData;
The content of textureMap is the rectangle moon image. In addition, to create the animated rotation, the code uses a
Bitmap instance named sphere, which is the actual display object that shows the moon image onscreen. Like
textureMap, the sphere object is created and populated with its initial image data in the imageLoadComplete()
method, using the following code:
sphere = new Bitmap();
sphere.bitmapData = new BitmapData(textureMap.width / 2, textureMap.height);
sphere.bitmapData.copyPixels(textureMap,
new Rectangle(0, 0, sphere.width, sphere.height),
new Point(0, 0));
As the code shows, sphere is instantiated. Its bitmapData property (the raw image data that is displayed by sphere)
is created with the same height and half the width of textureMap. In other words, the content of sphere will be the
size of one moon photo (since the textureMap image contains two moon photos side-by-side). Next the bitmapData
property is filled with image data using its copyPixels() method. The parameters in the copyPixels() method call
indicate several things:
•The first parameter indicates that the image data is copied from textureMap.
•The second parameter, a new Rectangle instance, specifies from which part of textureMap the image snapshot
should be taken; in this case the snapshot is a rectangle starting from the top left corner of textureMap (indicated
by the first two Rectangle() parameters: 0, 0) and the rectangle snapshot’s width and height match the width
and height properties of sphere.
•The third parameter, a new Point instance with x and y values of 0, defines the destination of the pixel data—in this
case, the top-left corner (0, 0) of sphere.bitmapData.
Represented visually, the code copies the pixels from textureMap outlined in the following image and pastes them
onto sphere. In other words, the BitmapData content of sphere is the portion of textureMap highlighted here:

246
ACTIONSCRIPT 3.0 DEVELOPER’S GUIDE
Working with bitmaps
Last updated 3/21/2011
Remember, however, that this is just the initial state of sphere—the first image content that’s copied onto sphere.
With the source image loaded and sphere created, the final task performed by the imageLoadComplete() method is
to set up the animation. The animation is driven by a Timer instance named rotationTimer, which is created and
started by the following code:
var rotationTimer:Timer = new Timer(15);
rotationTimer.addEventListener(TimerEvent.TIMER, rotateMoon);
rotationTimer.start();
The code first creates the Timer instance named rotationTimer; the parameter passed to the Timer() constructor
indicates that rotationTimer should trigger its timer event every 15 milliseconds. Next, the addEventListener()
method is called, specifying that when the timer event (TimerEvent.TIMER) occurs, the method rotateMoon() is
called. Finally, the timer is actually started by calling its start() method.
Because of the way rotationTimer is defined, approximately every 15 milliseconds Flash Player calls the
rotateMoon() method in the MoonSphere class, which is where the animation of the moon happens. The source code
of the rotateMoon() method is as follows:
private function rotateMoon(event:TimerEvent):void
{
sourceX += 1;
if (sourceX > textureMap.width / 2)
{
sourceX = 0;
}
sphere.Data.copyPixels(textureMap,
new Rectangle(sourceX, 0, sphere.width, sphere.height),
new Point(0, 0));
event.updateAfterEvent();
}
The code does three things:
1The value of the variable sourceX (initially set to 0) increments by 1.
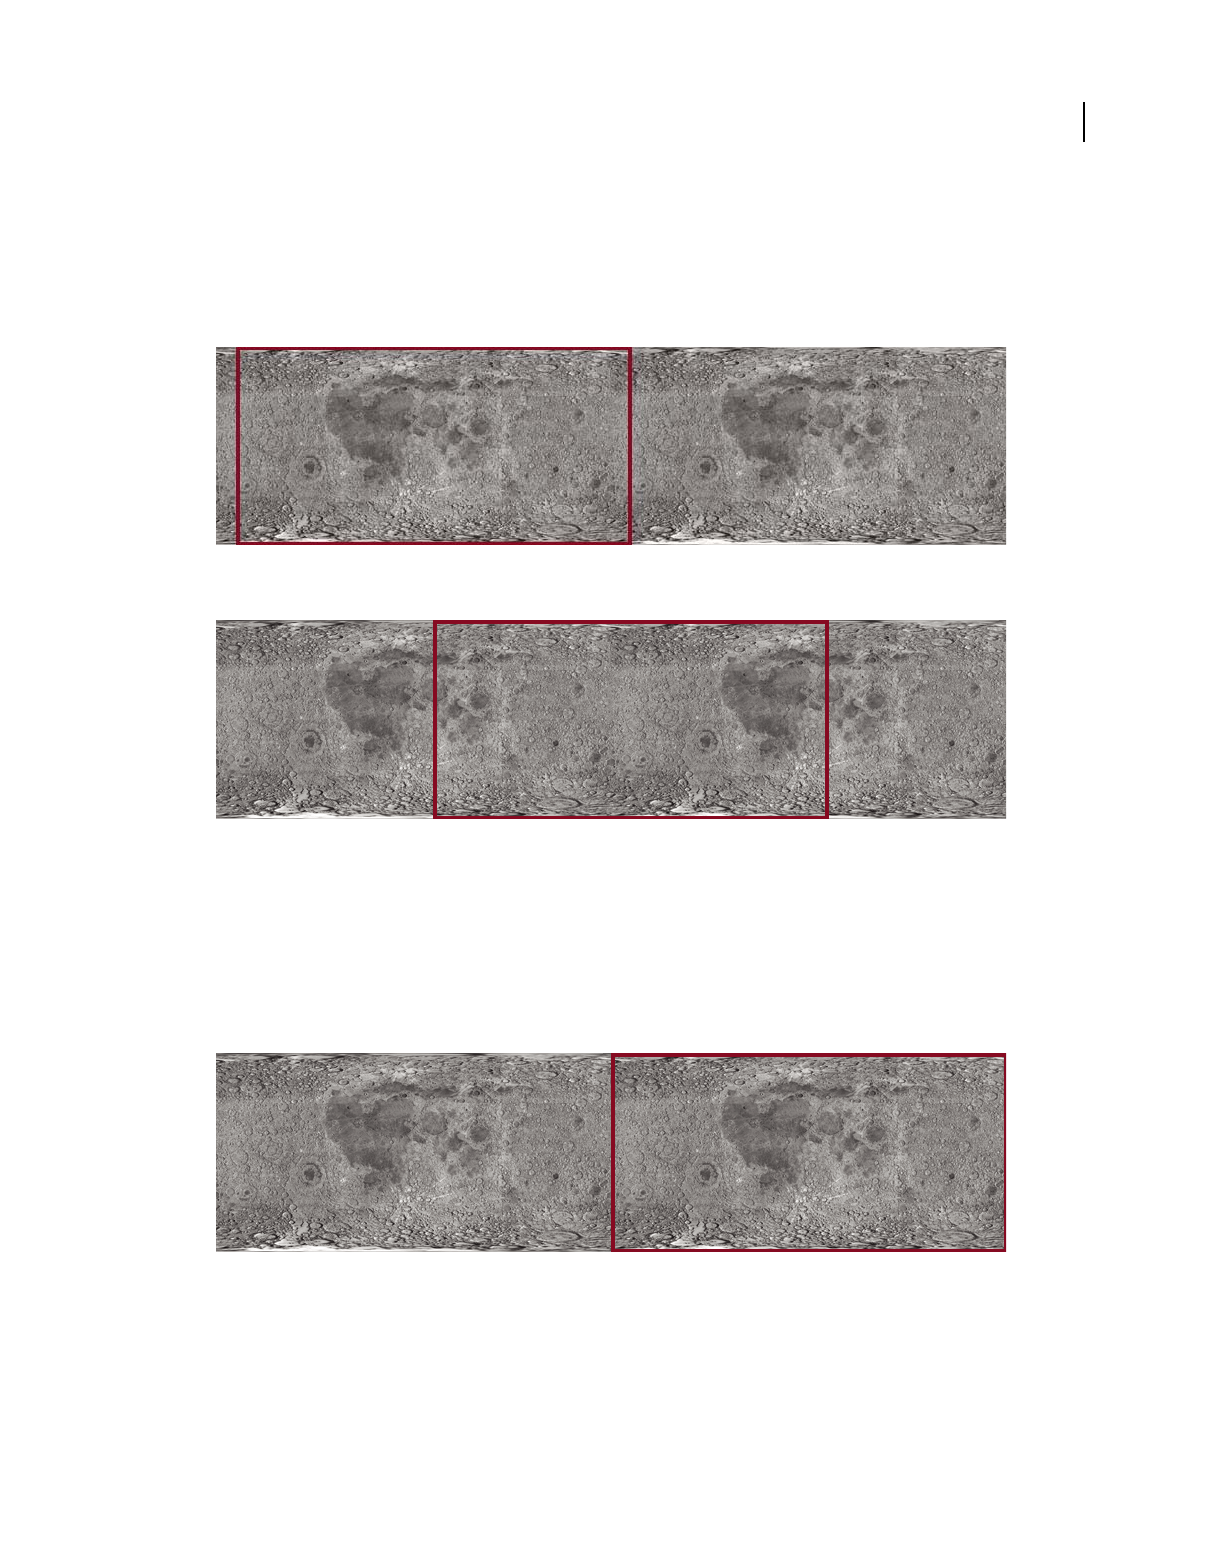
247
ACTIONSCRIPT 3.0 DEVELOPER’S GUIDE
Working with bitmaps
Last updated 3/21/2011
sourceX += 1;
As you’ll see, sourceX is used to determine the location in textureMap from which the pixels will be copied onto
sphere, so this code has the effect of moving the rectangle one pixel to the right on textureMap. Going back to the
visual representation, after several cycles of animation the source rectangle will have moved several pixels to the
right, like this:
After several more cycles, the rectangle will have moved even farther:
This gradual, steady shift in the location from which the pixels are copied is the key to the animation. By slowly and
continuously moving the source location to the right, the image that is displayed on the screen in sphere appears
to continuously slide to the left. This is the reason why the source image (textureMap) needs to have two copies of
the moon surface photo. Because the rectangle is continually moving to the right, most of the time it is not over one
single moon photo but rather overlaps the two moon photos.
2With the source rectangle slowly moving to the right, there is one problem. Eventually the rectangle will reach the
right edge of textureMap and it will run out of moon photo pixels to copy onto sphere:
The next lines of code address this issue:
if (sourceX >= textureMap.width / 2)
{
sourceX = 0;
}

248
ACTIONSCRIPT 3.0 DEVELOPER’S GUIDE
Working with bitmaps
Last updated 3/21/2011
The code checks if sourceX (the left edge of the rectangle) has reached the middle of textureMap. If so, it resets
sourceX back to 0, moving it back to the left edge of textureMap and starting the cycle over again:
3With the appropriate sourceX value calculated, the final step in creating the animation is to actually copy the new
source rectangle pixels onto sphere. The code that does this is very similar to the code that initially populated
sphere (described previously); the only difference is that in this case, in the new Rectangle() constructor call, the
left edge of the rectangle is placed at sourceX:
sphere.bitmapData.copyPixels(textureMap,
new Rectangle(sourceX, 0, sphere.width, sphere.height),
new Point(0, 0));
Remember that this code is called repeatedly, every 15 milliseconds. As the source rectangle’s location is continuously
shifted, and the pixels are copied onto sphere, the appearance on the screen is that the moon photo image represented
by sphere continuously slides. In other words, the moon appears to rotate continuously.
Creating the spherical appearance
Flash Player 9 and later, Adobe AIR 1.0 and later
The moon, of course, is a sphere and not a rectangle. Consequently, the sample needs to take the rectangular moon
surface photo, as it continuously animates, and convert it into a sphere. This involves two separate steps: a mask is used
to hide all the content except for a circular region of the moon surface photo, and a displacement map filter is used to
distort the appearance of the moon photo to make it look three-dimensional.
First, a circle-shaped mask is used to hide all the content of the MoonSphere object except for the sphere created by
the filter. The following code creates the mask as a Shape instance and applies it as the mask of the MoonSphere
instance:
moonMask = new Shape();
moonMask.graphics.beginFill(0);
moonMask.graphics.drawCircle(0, 0, radius);
this.addChild(moonMask);
this.mask = moonMask;

249
ACTIONSCRIPT 3.0 DEVELOPER’S GUIDE
Working with bitmaps
Last updated 3/21/2011
Note that since MoonSphere is a display object (it is based on the Sprite class), the mask can be applied directly to the
MoonSphere instance using its inherited mask property.
Simply hiding parts of the photo using a circle-shaped mask isn’t enough to create a realistic-looking rotating-sphere
effect. Because of the way the photo of the moon’s surface was taken, its dimensions aren’t proportional; the portions
of the image that are more toward the top or bottom of the image are more distorted and stretched compared to the
portions in the equator. To distort the appearance of the moon photo to make it look three-dimensional, we’ll use a
displacement map filter.
A displacement map filter is a type of filter that is used to distort an image. In this case, the moon photo will be
“distorted” to make it look more realistic, by squeezing the top and bottom of the image horizontally, while leaving the
middle unchanged. Assuming the filter operates on a square-shaped portion of the photo, squeezing the top and
bottom but not the middle will turn the square into a circle. A side effect of animating this distorted image is that the
middle of the image seems to move farther in actual pixel distance than the areas close to the top and bottom, which
creates the illusion that the circle is actually a three-dimensional object (a sphere).
The following code is used to create the displacement map filter, named displaceFilter:
var displaceFilter:DisplacementMapFilter;
displaceFilter = new DisplacementMapFilter(fisheyeLens,
new Point(radius, 0),
BitmapDataChannel.RED,
BitmapDataChannel.GREEN,
radius, 0);
The first parameter, fisheyeLens, is known as the map image; in this case it is a BitmapData object that is created
programmatically. The creation of that image is described in “Creating a bitmap image by setting pixel values” on
page 250. The other parameters describe the position in the filtered image at which the filter should be applied, which
color channels will be used to control the displacement effect, and to what extent they will affect the displacement.
Once the displacement map filter is created, it is applied to sphere, still within the imageLoadComplete() method:
sphere.filters = [displaceFilter];
The final image, with mask and displacement map filter applied, looks like this:

250
ACTIONSCRIPT 3.0 DEVELOPER’S GUIDE
Working with bitmaps
Last updated 3/21/2011
With every cycle of the rotating moon animation, the BitmapData content of sphere is overwritten by a new snapshot
of the source image data. However, the filter does not need to be re-applied each time. This is because the filter is
applied to the Bitmap instance (the display object) rather than to the bitmap data (the raw pixel information).
Remember, the Bitmap instance is not the actual bitmap data; it is a display object that displays the bitmap data on the
screen. To use an analogy, a Bitmap instance is like the slide projector that is used to display photographic slides on a
screen, and a BitmapData object is like the actual photographic slide that can be presented through a slide projector.
A filter can be applied directly to a BitmapData object, which would be comparable to drawing directly onto a
photographic slide to alter the image. A filter can also be applied to any display object, including a Bitmap instance;
this would be like placing a filter in front of the slide projector’s lens to distort the output shown on the screen (without
altering the original slide at all). Because the raw bitmap data is accessible through a Bitmap instance’s bitmapData
property, the filter could have been applied directly to the raw bitmap data. However, in this case, it makes sense to
apply the filter to the Bitmap display object rather than to the bitmap data.
For detailed information about using the displacement map filter in ActionScript, see “Filtering display objects” on
page 255.
Creating a bitmap image by setting pixel values
Flash Player 9 and later, Adobe AIR 1.0 and later
One important aspect of a displacement map filter is that it actually involves two images. One image, the source image,
is the image that is actually altered by the filter. In this sample, the source image is the Bitmap instance named sphere.
The other image used by the filter is known as the map image. The map image is not actually displayed on the screen.
Instead, the color of each of its pixels is used as an input to the displacement function—the color of the pixel at a certain
x, y coordinate in the map image determines how much displacement (physical shift in position) is applied to the pixel
at that x, y coordinate in the source image.
Consequently, to use the displacement map filter to create a sphere effect, the sample needs the appropriate map
image—one that has a gray background and a circle that’s filled with a gradient of a single color (red) going
horizontally from dark to light, as shown here:
Because only one map image and filter are used in this sample, the map image is only created once, in the
imageLoadComplete() method (in other words, when the external image finishes loading). The map image, named
fisheyeLens, is created by calling the MoonSphere class’s createFisheyeMap() method:
var fisheyeLens:BitmapData = createFisheyeMap(radius);
Inside the createFisheyeMap() method, the map image is actually drawn one pixel at a time using the BitmapData
class’s setPixel() method. The complete code for the createFisheyeMap() method is listed here, followed by a
step-by-step discussion of how it works:

251
ACTIONSCRIPT 3.0 DEVELOPER’S GUIDE
Working with bitmaps
Last updated 3/21/2011
private function createFisheyeMap(radius:int):BitmapData
{
var diameter:int = 2 * radius;
var result:BitmapData = new BitmapData(diameter,
diameter,
false,
0x808080);
// Loop through the pixels in the image one by one
for (var i:int = 0; i < diameter; i++)
{
for (var j:int = 0; j < diameter; j++)
{
// Calculate the x and y distances of this pixel from
// the center of the circle (as a percentage of the radius).
var pctX:Number = (i - radius) / radius;
var pctY:Number = (j - radius) / radius;
// Calculate the linear distance of this pixel from
// the center of the circle (as a percentage of the radius).
var pctDistance:Number = Math.sqrt(pctX * pctX + pctY * pctY);
// If the current pixel is inside the circle,
// set its color.
if (pctDistance < 1)
{
// Calculate the appropriate color depending on the
// distance of this pixel from the center of the circle.
var red:int;
var green:int;
var blue:int;
var rgb:uint;
red = 128 * (1 + 0.75 * pctX * pctX * pctX / (1 - pctY * pctY));
green = 0;
blue = 0;
rgb = (red << 16 | green << 8 | blue);
// Set the pixel to the calculated color.
result.setPixel(i, j, rgb);
}
}
}
return result;
}
First, when the method is called it receives a parameter, radius, indicating the radius of the circle-shaped image to
create. Next, the code creates the BitmapData object on which the circle will be drawn. That object, named result, is
eventually passed back as the return value of the method. As shown in the following code snippet, the result
BitmapData instance is created with a width and height as big as the diameter of the circle, without transparency
(false for the third parameter), and pre-filled with the color 0x808080 (middle gray):
var result:BitmapData = new BitmapData(diameter,
diameter,
false,
0x808080);

252
ACTIONSCRIPT 3.0 DEVELOPER’S GUIDE
Working with bitmaps
Last updated 3/21/2011
Next, the code uses two loops to iterate over each pixel of the image. The outer loop goes through each column of the
image from left to right (using the variable i to represent the horizontal position of the pixel currently being
manipulated), while the inner loop goes through each pixel of the current column from top to bottom (with the
variable j representing the vertical position of the current pixel). The code for the loops (with the inner loop’s contents
omitted) is shown here:
for (var i:int = 0; i < diameter; i++)
{
for (var j:int = 0; j < diameter; j++)
{
...
}
}
As the loops cycle through the pixels one by one, at each pixel a value (the color value of that pixel in the map image)
is calculated. This process involves four steps:
1The code calculates the distance of the current pixel from the center of the circle along the x axis (i - radius).
That value is divided by the radius to make it a percentage of the radius rather than an absolute distance ((i -
radius) / radius). That percentage value is stored in a variable named pctX, and the equivalent value for the y
axis is calculated and stored in the variable pctY, as shown in this code:
var pctX:Number = (i - radius) / radius;
var pctY:Number = (j - radius) / radius;
2Using a standard trigonometric formula, the Pythagorean theorem, the linear distance between the center of the
circle and the current point is calculated from pctX and pctY. That value is stored in a variable named
pctDistance, as shown here:
var pctDistance:Number = Math.sqrt(pctX * pctX + pctY * pctY);
3Next, the code checks whether the distance percentage is less than 1 (meaning 100% of the radius, or in other words,
if the pixel being considered is within the radius of the circle). If the pixel falls inside the circle, it is assigned a
calculated color value (omitted here, but described in step 4); if not, nothing further happens with that pixel so its
color is left as the default middle gray:
if (pctDistance < 1)
{
...
}
4For those pixels that fall inside the circle, a color value is calculated for the pixel. The final color will be a shade of
red ranging from black (0% red) at the left edge of the circle to bright (100%) red at the right edge of the circle. The
color value is initially calculated in three parts (red, green, and blue), as shown here:
red = 128 * (1 + 0.75 * pctX * pctX * pctX / (1 - pctY * pctY));
green = 0;
blue = 0;
Notice that only the red portion of the color (the variable red) actually has a value. The green and blue values (the
variables green and blue) are shown here for clarity, but could be omitted. Since the purpose of this method is to
create a circle that contains a red gradient, no green or blue values are needed.
Once the three individual color values are determined, they are combined into a single integer color value using a
standard bit-shifting algorithm, shown in this code:
rgb = (red << 16 | green << 8 | blue);
Finally, with the color value calculated, that value is actually assigned to the current pixel using the setPixel()
method of the result BitmapData object, shown here:

253
ACTIONSCRIPT 3.0 DEVELOPER’S GUIDE
Working with bitmaps
Last updated 3/21/2011
result.setPixel(i, j, rgb);
Asynchronous decoding of bitmap images
Flash Player 10.2 and later, Adobe AIR 2.6 and later
When you work with bitmap images, you can asynchronously decode and load the bitmap images to improve your
application’s perceived performance. Decoding a bitmap image asynchronously can take the same time as decoding
the image synchronously in many cases. However, the bitmap image gets decoded in a separate thread before the
associated Loader object sends the COMPLETE event. Hence, you can asynchronously decode larger images after
loading them.
The ImageDecodingPolicy class in the flash.system package, allows you to specify the bitmap loading scheme. The
default loading scheme is synchronous.
Note: If the file being loaded is a bitmap image and the decoding policy used is ON_LOAD, the image is decoded
asynchronously before the COMPLETE event is dispatched.
The following code shows the usage of the ImageDecodingPolicy class:
var loaderContext:LoaderContext = new LoaderContext();
loaderContext.imageDecodingPolicy = ImageDecodingPolicy.ON_LOAD
var loader:Loader = new Loader();
loader.load(new URLRequest("http://www.adobe.com/myimage.png"), loaderContext);
You can still use ON_DEMAND decoding with Loader.load() and Loader.loadBytes() methods. However, all the
other methods that take a LoaderContext object as an argument, ignore any ImageDecodingPolicy value passed.
The following example shows the difference in decoding a bitmap image synchronously and asynchronously:
Bitmap Decoding Policy Bitmap Loading Scheme Description
ImageDecodingPolicy.ON_DEMAND Synchronous Loaded images are decoded when the
image data is accessed.
Use this policy to decode smaller images.
You can also use this policy when your
application does not rely on complex
effects and transitions.
ImageDecodingPolicy.ON_LOAD Asynchronous Loaded images are decoded on load,
before the COMPLETE event is dispatched.
Ideal for larger images (greater than 10
MP). When you are developing AIR-based
mobile applications with page transitions,
use this bitmap loading policy to improve
your application’s perceived
performance.

254
ACTIONSCRIPT 3.0 DEVELOPER’S GUIDE
Working with bitmaps
Last updated 3/21/2011
package
{
import flash.display.Loader;
import flash.display.Sprite;
import flash.events.Event;
import flash.net.URLRequest;
import flash.system.ImageDecodingPolicy;
import flash.system.LoaderContext;
public class AsyncTest extends Sprite
{
private var loaderContext:LoaderContext;
private var loader:Loader;
private var urlRequest:URLRequest;
public function AsyncTest()
{
//Load the image synchronously
loaderContext = new LoaderContext();
//Default behavior.
loaderContext.imageDecodingPolicy = ImageDecodingPolicy.ON_DEMAND;
loader = new Loader();
loadImageSync();
//Load the image asynchronously
loaderContext = new LoaderContext();
loaderContext.imageDecodingPolicy = ImageDecodingPolicy.ON_LOAD;
loader = new Loader();
loadImageASync();
}
private function loadImageASync():void{
trace("Loading image asynchronously...");
urlRequest = new URLRequest("http://www.adobe.com/myimage.png");
urlRequest.useCache = false;
loader.load(urlRequest, loaderContext);
loader.contentLoaderInfo.addEventListener
(Event.COMPLETE, onAsyncLoadComplete);
}
private function onAsyncLoadComplete(event:Event):void{
trace("Async. Image Load Complete");
}
private function loadImageSync():void{
trace("Loading image synchronously...");
urlRequest = new URLRequest("http://www.adobe.com/myimage.png");
urlRequest.useCache = false;
loader.load(urlRequest, loaderContext);
loader.contentLoaderInfo.addEventListener
(Event.COMPLETE, onSyncLoadComplete);
}
private function onSyncLoadComplete(event:Event):void{
trace("Sync. Image Load Complete");
}
}
}

255
Last updated 3/21/2011
Chapter 13: Filtering display objects
Flash Player 9 and later, Adobe AIR 1.0 and later
Historically, the application of filter effects to bitmap images has been the domain of specialized image-editing
software such as Adobe Photoshop® and Adobe Fireworks®. ActionScript 3.0 includes the flash.filters package, which
contains a series of bitmap effect filter classes. These effects allow developers to programmatically apply filters to
bitmaps and display objects and achieve many of the same effects that are available in graphics manipulation
applications.
Basics of filtering display objects
Flash Player 9 and later, Adobe AIR 1.0 and later
One of the ways to add polish to an application is to add simple graphic effects. You can add a drop shadow behind a
photo to create the illusion of 3-d, or a glow around a button to show that it is active. ActionScript 3.0 includes ten
filters that you can apply to any display object or to a BitmapData instance. The built-in filters range from basic, such
as the drop shadow and glow filters, to complex, such as the displacement map filter and the convolution filter.
Note: In addition to the built-in filters, you can also program custom filters and effects using Pixel Bender. See “Working
with Pixel Bender shaders” on page 288.
Important concepts and terms
The following reference list contains important terms that you might encounter when creating filters:
Bevel An edge created by lightening pixels on two sides and darkening pixels on the opposite two sides. This effect
creates the appearance of a three-dimensional border. The effect is commonly used for raised or indented buttons and
similar graphics.
Convolution Distorting pixels in an image by combining each pixel’s value with the values of some or all of its
neighboring pixels, using various ratios.
Displacement Shifting or moving pixels in an image to a new position.
Matrix A grid of numbers used to perform certain mathematical calculations by applying the numbers in the grid to
various values, then combining the results.
More Help topics
flash.filters package
flash.display.DisplayObject.filters
flash.display.BitmapData.applyFilter()

256
ACTIONSCRIPT 3.0 DEVELOPER’S GUIDE
Filtering display objects
Last updated 3/21/2011
Creating and applying filters
Flash Player 9 and later, Adobe AIR 1.0 and later
Filters allow you to apply a range of effects to bitmap and display objects, ranging from drop shadows to bevels and
blurs. Each filter is defined as a class, so applying filters involves creating instances of filter objects, which is no different
from constructing any other object. Once you’ve created an instance of a filter object, it can easily be applied to a
display object by using the object’s filters property, or in the case of a BitmapData object, by using the
applyFilter() method.
Creating a filter
Flash Player 9 and later, Adobe AIR 1.0 and later
To create a filter object, simply call the constructor method of your selected filter class. For example, to create a
DropShadowFilter object, use the following code:
import flash.filters.DropShadowFilter;
var myFilter:DropShadowFilter = new DropShadowFilter();
Although not shown here, the DropShadowFilter() constructor (like all the filter classes’ constructors) accepts
several optional parameters that can be used to customize the appearance of the filter effect.
Applying a filter
Flash Player 9 and later, Adobe AIR 1.0 and later
Once you've constructed a filter object, you can apply it to a display object or a BitmapData object; how you apply the
filter depends on the object to which you’re applying it.
Applying a filter to a display object
When you apply filter effects to a display object, you apply them through the filters property. The filters
property of a display object is an Array instance, whose elements are the filter objects applied to the display object. To
apply a single filter to a display object, create the filter instance, add it to an Array instance, and assign that Array object
to the display object’s filters property:

257
ACTIONSCRIPT 3.0 DEVELOPER’S GUIDE
Filtering display objects
Last updated 3/21/2011
import flash.display.Bitmap;
import flash.display.BitmapData;
import flash.filters.DropShadowFilter;
// Create a bitmapData object and render it to screen
var myBitmapData:BitmapData = new BitmapData(100,100,false,0xFFFF3300);
var myDisplayObject:Bitmap = new Bitmap(myBitmapData);
addChild(myDisplayObject);
// Create a DropShadowFilter instance.
var dropShadow:DropShadowFilter = new DropShadowFilter();
// Create the filters array, adding the filter to the array by passing it as
// a parameter to the Array() constructor.
var filtersArray:Array = new Array(dropShadow);
// Assign the filters array to the display object to apply the filter.
myDisplayObject.filters = filtersArray;
If you want to assign multiple filters to the object, simply add all the filters to the Array instance before assigning it to
the filters property. You can add multiple objects to an Array by passing them as parameters to its constructor. For
example, this code applies a bevel filter and a glow filter to the previously created display object:
import flash.filters.BevelFilter;
import flash.filters.GlowFilter;
// Create the filters and add them to an array.
var bevel:BevelFilter = new BevelFilter();
var glow:GlowFilter = new GlowFilter();
var filtersArray:Array = new Array(bevel, glow);
// Assign the filters array to the display object to apply the filter.
myDisplayObject.filters = filtersArray;
When you’re creating the array containing the filters, you can create it using the new Array() constructor (as shown
in the previous examples) or you can use Array literal syntax, wrapping the filters in square brackets ([]). For instance,
this line of code:
var filters:Array = new Array(dropShadow, blur);
does the same thing as this line of code:
var filters:Array = [dropShadow, blur];
If you apply multiple filters to display objects, they are applied in a cumulative, sequential manner. For example, if a
filters array has two elements, a bevel filter added first and a drop shadow filter added second, the drop shadow filter
is applied to both the bevel filter and the display object. This is because of the drop shadow filter’s second position in
the filters array. If you want to apply filters in a noncumulative manner, apply each filter to a new copy of the display
object.
If you’re only assigning one or a few filters to a display object, you can create the filter instance and assign it to the
object in a single statement. For example, the following line of code applies a blur filter to a display object called
myDisplayObject:
myDisplayObject.filters = [new BlurFilter()];
The previous code creates an Array instance using Array literal syntax (square braces), creates a BlurFilter instance as
an element in the Array, and assigns that Array to the filters property of the display object named
myDisplayObject.

258
ACTIONSCRIPT 3.0 DEVELOPER’S GUIDE
Filtering display objects
Last updated 3/21/2011
Removing filters from a display object
Removing all filters from a display object is as simple as assigning a null value to the filters property:
myDisplayObject.filters = null;
If you’ve applied multiple filters to an object and want to remove only one of the filters, you must go through several
steps to change the filters property array. For more information, see “Potential issues for working with filters” on
page 258.
Applying a filter to a BitmapData object
Applying a filter to a BitmapData object requires the use of the BitmapData object’s applyFilter() method:
var rect:Rectangle = new Rectangle();
var origin:Point = new Point();
myBitmapData.applyFilter(sourceBitmapData, rect, origin, new BlurFilter());
The applyFilter() method applies a filter to a source BitmapData object, producing a new, filtered image. This
method does not modify the original source image; instead, the result of the filter being applied to the source image is
stored in the BitmapData instance on which the applyFilter() method is called.
How filters work
Flash Player 9 and later, Adobe AIR 1.0 and later
Display object filtering works by caching a copy of the original object as a transparent bitmap.
Once a filter has been applied to a display object, the runtime caches the object as a bitmap for as long as the object has
a valid filter list. This source bitmap is then used as the original image for all subsequently applied filter effects.
Each display object usually contains two bitmaps: one with the original unfiltered source display object and another
for the final image after filtering. The final image is used when rendering. As long as the display object does not change,
the final image does not need updating.
Potential issues for working with filters
Flash Player 9 and later, Adobe AIR 1.0 and later
There are several potential sources of confusion or trouble to keep in mind when you’re working with filters.
Filters and bitmap caching
To apply a filter to a display object, bitmap caching must be enabled for that object. When you apply a filter to a display
object whose cacheAsBitmap property is set to false, the object’s cacheAsBitmap property is automatically set to
true. If you later remove all the filters from the display object, the cacheAsBitmap property is reset to the last value
it was set to.

259
ACTIONSCRIPT 3.0 DEVELOPER’S GUIDE
Filtering display objects
Last updated 3/21/2011
Changing filters at run time
If a display object already has one or more filters applied to it, you can’t change the set of filters by adding additional
filters to or removing filters from the filters property array. Instead, to add to or change the set of filters being
applied, you must make your changes to a separate array, then assign that array to the filters property of the display
object for the filters to be applied to the object. The simplest way to do this is to read the filters property array into
an Array variable and make your modifications to this temporary array. You then reassign this array back to the
filters property of the display object. In more complex cases, you might need to keep a separate master array of
filters. You make any changes to that master filter array, and reassign the master array to the display object’s filters
property after each change.
Adding an additional filter
The following code demonstrates the process of adding an additional filter to a display object that already has one or
more filters applied to it. Initially, a glow filter is applied to the display object named myDisplayObject; later, when
the display object is clicked, the addFilters() function is called. In this function, two additional filters are applied to
myDisplayObject:
import flash.events.MouseEvent;
import flash.filters.*;
myDisplayObject.filters = [new GlowFilter()];
function addFilters(event:MouseEvent):void
{
// Make a copy of the filters array.
var filtersCopy:Array = myDisplayObject.filters;
// Make desired changes to the filters (in this case, adding filters).
filtersCopy.push(new BlurFilter());
filtersCopy.push(new DropShadowFilter());
// Apply the changes by reassigning the array to the filters property.
myDisplayObject.filters = filtersCopy;
}
myDisplayObject.addEventListener(MouseEvent.CLICK, addFilters);
Removing one filter from a set of filters
If a display object has multiple filters applied to it, and you want to remove one of the filters while the other filters
continue to be applied to the object, you copy the filters into a temporary array, remove the unwanted filter from that
array, and reassign the temporary array to the display object’s filters property. Several ways to remove one or more
elements from any array are described in “Retrieving values and removing array elements” on page 31.
The most straightforward situation is to remove the top-most filter on the object (the last filter applied to the object).
You use the Array class’s pop() method to remove the filter from the array:

260
ACTIONSCRIPT 3.0 DEVELOPER’S GUIDE
Filtering display objects
Last updated 3/21/2011
// Example of removing the top-most filter from a display object
// named "filteredObject".
var tempFilters:Array = filteredObject.filters;
// Remove the last element from the Array (the top-most filter).
tempFilters.pop();
// Apply the new set of filters to the display object.
filteredObject.filters = tempFilters;
Similarly, to remove the bottom-most filter (the first one applied to the object) you use the same code, substituting the
Array class’s shift() method in place of the pop() method.
To remove a filter from the middle of an array of filters (assuming that the array has more than two filters) you can use
the splice() method. You must know the index (the position in the array) of the filter you want to remove. For
example, the following code removes the second filter (the filter at index 1) from a display object:
// Example of removing a filter from the middle of a stack of filters
// applied to a display object named "filteredObject".
var tempFilters:Array = filteredObject.filters;
// Remove the second filter from the array. It's the item at index 1
// because Array indexes start from 0.
// The first "1" indicates the index of the filter to remove; the
// second "1" indicates how many elements to remove.
tempFilters.splice(1, 1);
// Apply the new set of filters to the display object.
filteredObject.filters = tempFilters;
Determining a filter’s index
You need to know which filter to remove from the array, so that you know the index of the filter. You must either know
(by virtue of the way the application is designed), or calculate the index of the filter to remove.
The best approach is to design your application so that the filter you want to remove is always in the same position in
the set of filters. For example, if you have a single display object with a convolution filter and a drop-shadow filter
applied to it (in that order), and you want to remove the drop-shadow filter but keep the convolution filter, the filter
is in a known position (the top-most filter) so that you can know ahead of time which Array method to use (in this
case Array.pop() to remove the drop-shadow filter).
If the filter you want to remove is always a certain type, but not necessarily always in the same position in the set of
filters, you can check the data type of each filter in the array to determine which one to remove. For example, the
following code determines which of a set of filters is a glow filter, and removes that filter from the set.

261
ACTIONSCRIPT 3.0 DEVELOPER’S GUIDE
Filtering display objects
Last updated 3/21/2011
// Example of removing a glow filter from a set of filters, where the
//filter you want to remove is the only GlowFilter instance applied
// to the filtered object.
var tempFilters:Array = filteredObject.filters;
// Loop through the filters to find the index of the GlowFilter instance.
var glowIndex:int;
var numFilters:int = tempFilters.length;
for (var i:int = 0; i < numFilters; i++)
{
if (tempFilters[i] is GlowFilter)
{
glowIndex = i;
break;
}
}
// Remove the glow filter from the array.
tempFilters.splice(glowIndex, 1);
// Apply the new set of filters to the display object.
filteredObject.filters = tempFilters;
In a more complex case, such as if the filter to remove is selected at runtime, the best approach is to keep a separate,
persistent copy of the filter array that serves as the master list of filters. Any time you make a change to the set of filters,
change the master list then apply that filter array as the filters property of the display object.
For example, in the following code listing, multiple convolution filters are applied to a display object to create different
visual effects, and at a later point in the application one of those filters is removed while the others are retained. In this
case, the code keeps a master copy of the filters array, as well as a reference to the filter to remove. Finding and
removing the specific filter is similar to the preceding approach, except that instead of making a temporary copy of the
filters array, the master copy is manipulated and then applied to the display object.

262
ACTIONSCRIPT 3.0 DEVELOPER’S GUIDE
Filtering display objects
Last updated 3/21/2011
// Example of removing a filter from a set of
// filters, where there may be more than one
// of that type of filter applied to the filtered
// object, and you only want to remove one.
// A master list of filters is stored in a separate,
// persistent Array variable.
var masterFilterList:Array;
// At some point, you store a reference to the filter you
// want to remove.
var filterToRemove:ConvolutionFilter;
// ... assume the filters have been added to masterFilterList,
// which is then assigned as the filteredObject.filters:
filteredObject.filters = masterFilterList;
// ... later, when it's time to remove the filter, this code gets called:
// Loop through the filters to find the index of masterFilterList.
var removeIndex:int = -1;
var numFilters:int = masterFilterList.length;
for (var i:int = 0; i < numFilters; i++)
{
if (masterFilterList[i] == filterToRemove)
{
removeIndex = i;
break;
}
}
if (removeIndex >= 0)
{
// Remove the filter from the array.
masterFilterList.splice(removeIndex, 1);
// Apply the new set of filters to the display object.
filteredObject.filters = masterFilterList;
}
In this approach (when you’re comparing a stored filter reference to the items in the filters array to determine which
filter to remove), you must keep a separate copy of the filters array—the code does not work if you compare the stored
filter reference to the elements in a temporary array copied from the display object’s filters property. This is because
internally, when you assign an array to the filters property, the runtime makes a copy of each filter object in the
array. Those copies (rather than the original objects) are applied to the display object, and when you read the filters
property into a temporary array, the temporary array contains references to the copied filter objects rather than
references to the original filter objects. Consequently, if in the preceding example you try to determine the index of
filterToRemove by comparing it to the filters in a temporary filters array, no match is found.
Filters and object transformations
No filtered region—a drop shadow, for example—outside of a display object’s bounding box rectangle is considered
to be part of the surface for the purposes of hit detection (determining if an instance overlaps or intersects with another
instance). Because the DisplayObject class’s hit detection methods are vector-based, you cannot perform a hit
detection on the bitmap result. For example, if you apply a bevel filter to a button instance, hit detection is not available
on the beveled portion of the instance.

263
ACTIONSCRIPT 3.0 DEVELOPER’S GUIDE
Filtering display objects
Last updated 3/21/2011
Scaling, rotating, and skewing are not supported by filters; if the filtered display object itself is scaled (if scaleX and
scaleY are not 100%), the filter effect does not scale with the instance. This means that the original shape of the
instance rotates, scales, or skews; however, the filter does not rotate, scale, or skew with the instance.
You can animate an instance with a filter to create realistic effects, or nest instances and use the BitmapData class to
animate filters to achieve this effect.
Filters and Bitmap objects
When you apply any filter to a BitmapData object, the cacheAsBitmap property is automatically set to true. In this
way, the filter is actually applied to the copy of the object rather than to the original.
This copy is then placed on the main display (over the original object) as close as possible to the nearest pixel. If the
bounds of the original bitmap change, the filtered copy bitmap is recreated from the original, rather than being
stretched or distorted.
If you clear all filters for a display object, the cacheAsBitmap property is reset to what it was before the filter was
applied.
Available display filters
Flash Player 9 and later, Adobe AIR 1.0 and later
ActionScript 3.0 includes ten filter classes that you can apply to display objects and BitmapData objects:
•Bevel filter (BevelFilter class)
•Blur filter (BlurFilter class)
•Drop shadow filter (DropShadowFilter class)
•Glow filter (GlowFilter class)
•Gradient bevel filter (GradientBevelFilter class)
•Gradient glow filter (GradientGlowFilter class)
•Color matrix filter (ColorMatrixFilter class)
•Convolution filter (ConvolutionFilter class)
•Displacement map filter (DisplacementMapFilter class)
•Shader filter (ShaderFilter class)
The first six filters are simple filters that can be used to create one specific effect, with some customization of the effect
available. Those six filters can be applied using ActionScript, and can also be applied to objects in Flash Professional
using the Filters panel. Consequently, even if you’re applying filters using ActionScript, if you have Flash Professional
you can use the visual interface to quickly try out different filters and settings to figure out how to create a desired
effect.
The final four filters are available in ActionScript only. Those filters, the color matrix filter, convolution filter,
displacement map filter, and shader filter, are much more flexible in the types of effects that they can be used to create.
Rather than being optimized for a single effect, they provide power and flexibility. For example, by selecting different
values for its matrix, the convolution filter can be used to create effects such as blurring, embossing, sharpening,
finding color edges, transformations, and more.

264
ACTIONSCRIPT 3.0 DEVELOPER’S GUIDE
Filtering display objects
Last updated 3/21/2011
Each of the filters, whether simple or complex, can be customized using their properties. Generally, you have two
choices for setting filter properties. All the filters let you set the properties by passing parameter values to the filter
object’s constructor. Alternatively, whether or not you set the filter properties by passing parameters, you can adjust
the filters later by setting values for the filter object’s properties. Most of the example code listings set the properties
directlyto make the example easier to follow. Nevertheless, you could usually achieve the same result in fewer lines of
code by passing the values as parameters in the filter object’s constructor. For more details on the specifics of each
filter, its properties and its constructor parameters, see the listings for the flash.filters package in the ActionScript 3.0
Reference for the Adobe Flash Platform.
Bevel filter
Flash Player 9 and later, Adobe AIR 1.0 and later
The BevelFilter class allows you to add a 3D beveled edge to the filtered object. This filter makes the hard corners or
edges of your object look like they have been chiseled, or beveled, away.
The BevelFilter class properties allow you to customize the appearance of the bevel. You can set highlight and shadow
colors, bevel edge blurs, bevel angles, and bevel edge placement; you can even create a knockout effect.
The following example loads an external image and applies a bevel filter to it.
import flash.display.*;
import flash.filters.BevelFilter;
import flash.filters.BitmapFilterQuality;
import flash.filters.BitmapFilterType;
import flash.net.URLRequest;
// Load an image onto the Stage.
var imageLoader:Loader = new Loader();
var url:String = "http://www.helpexamples.com/flash/images/image3.jpg";
var urlReq:URLRequest = new URLRequest(url);
imageLoader.load(urlReq);
addChild(imageLoader);
// Create the bevel filter and set filter properties.
var bevel:BevelFilter = new BevelFilter();
bevel.distance = 5;
bevel.angle = 45;
bevel.highlightColor = 0xFFFF00;
bevel.highlightAlpha = 0.8;
bevel.shadowColor = 0x666666;
bevel.shadowAlpha = 0.8;
bevel.blurX = 5;
bevel.blurY = 5;
bevel.strength = 5;
bevel.quality = BitmapFilterQuality.HIGH;
bevel.type = BitmapFilterType.INNER;
bevel.knockout = false;
// Apply filter to the image.
imageLoader.filters = [bevel];

265
ACTIONSCRIPT 3.0 DEVELOPER’S GUIDE
Filtering display objects
Last updated 3/21/2011
Blur filter
Flash Player 9 and later, Adobe AIR 1.0 and later
The BlurFilter class smears, or blurs, a display object and its contents. Blur effects are useful for giving the impression
that an object is out of focus or for simulating fast movement, as in a motion blur. By setting the quality property of
the blur filter too low, you can simulate a softly out-of-focus lens effect. Setting the quality property to high results
in a smooth blur effect similar to a Gaussian blur.
The following example creates a circle object using the drawCircle() method of the Graphics class and applies a blur
filter to it:
import flash.display.Sprite;
import flash.filters.BitmapFilterQuality;
import flash.filters.BlurFilter;
// Draw a circle.
var redDotCutout:Sprite = new Sprite();
redDotCutout.graphics.lineStyle();
redDotCutout.graphics.beginFill(0xFF0000);
redDotCutout.graphics.drawCircle(145, 90, 25);
redDotCutout.graphics.endFill();
// Add the circle to the display list.
addChild(redDotCutout);
// Apply the blur filter to the rectangle.
var blur:BlurFilter = new BlurFilter();
blur.blurX = 10;
blur.blurY = 10;
blur.quality = BitmapFilterQuality.MEDIUM;
redDotCutout.filters = [blur];
Drop shadow filter
Flash Player 9 and later, Adobe AIR 1.0 and later
Drop shadows give the impression that there is a separate light source situated above a target object. The position and
intensity of this light source can be modified to produce a variety of different drop shadow effects.
The DropShadowFilter class uses an algorithm that is similar to the blur filter’s algorithm. The main difference is that
the drop shadow filter has a few more properties that you can modify to simulate different light-source attributes (such
as alpha, color, offset and brightness).
The drop shadow filter also allows you to apply custom transformation options on the style of the drop shadow,
including inner or outer shadow and knockout (also known as cutout) mode.
The following code creates a square box sprite and applies a drop shadow filter to it:

266
ACTIONSCRIPT 3.0 DEVELOPER’S GUIDE
Filtering display objects
Last updated 3/21/2011
import flash.display.Sprite;
import flash.filters.DropShadowFilter;
// Draw a box.
var boxShadow:Sprite = new Sprite();
boxShadow.graphics.lineStyle(1);
boxShadow.graphics.beginFill(0xFF3300);
boxShadow.graphics.drawRect(0, 0, 100, 100);
boxShadow.graphics.endFill();
addChild(boxShadow);
// Apply the drop shadow filter to the box.
var shadow:DropShadowFilter = new DropShadowFilter();
shadow.distance = 10;
shadow.angle = 25;
// You can also set other properties, such as the shadow color,
// alpha, amount of blur, strength, quality, and options for
// inner shadows and knockout effects.
boxShadow.filters = [shadow];
Glow filter
Flash Player 9 and later, Adobe AIR 1.0 and later
The GlowFilter class applies a lighting effect to display objects, making it appear that a light is being shined up from
underneath the object to create a soft glow.
Similar to the drop shadow filter, the glow filter includes properties to modify the distance, angle, and color of the light
source to produce varying effects. The GlowFilter also has several options for modifying the style of the glow, including
inner or outer glow and knockout mode.
The following code creates a cross using the Sprite class and applies a glow filter to it:

267
ACTIONSCRIPT 3.0 DEVELOPER’S GUIDE
Filtering display objects
Last updated 3/21/2011
import flash.display.Sprite;
import flash.filters.BitmapFilterQuality;
import flash.filters.GlowFilter;
// Create a cross graphic.
var crossGraphic:Sprite = new Sprite();
crossGraphic.graphics.lineStyle();
crossGraphic.graphics.beginFill(0xCCCC00);
crossGraphic.graphics.drawRect(60, 90, 100, 20);
crossGraphic.graphics.drawRect(100, 50, 20, 100);
crossGraphic.graphics.endFill();
addChild(crossGraphic);
// Apply the glow filter to the cross shape.
var glow:GlowFilter = new GlowFilter();
glow.color = 0x009922;
glow.alpha = 1;
glow.blurX = 25;
glow.blurY = 25;
glow.quality = BitmapFilterQuality.MEDIUM;
crossGraphic.filters = [glow];
Gradient bevel filter
Flash Player 9 and later, Adobe AIR 1.0 and later
The GradientBevelFilter class lets you apply an enhanced bevel effect to display objects or BitmapData objects. Using
a gradient color on the bevel greatly improves the spatial depth of the bevel, giving edges a more realistic, 3D
appearance.
The following code creates a rectangle object using the drawRect() method of the Shape class and applies a gradient
bevel filter to it.

268
ACTIONSCRIPT 3.0 DEVELOPER’S GUIDE
Filtering display objects
Last updated 3/21/2011
import flash.display.Shape;
import flash.filters.BitmapFilterQuality;
import flash.filters.GradientBevelFilter;
// Draw a rectangle.
var box:Shape = new Shape();
box.graphics.lineStyle();
box.graphics.beginFill(0xFEFE78);
box.graphics.drawRect(100, 50, 90, 200);
box.graphics.endFill();
// Apply a gradient bevel to the rectangle.
var gradientBevel:GradientBevelFilter = new GradientBevelFilter();
gradientBevel.distance = 8;
gradientBevel.angle = 225; // opposite of 45 degrees
gradientBevel.colors = [0xFFFFCC, 0xFEFE78, 0x8F8E01];
gradientBevel.alphas = [1, 0, 1];
gradientBevel.ratios = [0, 128, 255];
gradientBevel.blurX = 8;
gradientBevel.blurY = 8;
gradientBevel.quality = BitmapFilterQuality.HIGH;
// Other properties let you set the filter strength and set options
// for inner bevel and knockout effects.
box.filters = [gradientBevel];
// Add the graphic to the display list.
addChild(box);
Gradient glow filter
Flash Player 9 and later, Adobe AIR 1.0 and later
The GradientGlowFilter class lets you apply an enhanced glow effect to display objects or BitmapData objects. The
effect gives you greater color control of the glow, and in turn produces a more realistic glow effect. Additionally, the
gradient glow filter allows you to apply a gradient glow to the inner, outer, or upper edges of an object.
The following example draws a circle on the Stage, and applies a gradient glow filter to it. As you move the mouse
further to the right and down, the amount of blur increases in the horizontal and vertical directions respectively. In
addition, any time you click on the Stage, the strength of the blur increases.

269
ACTIONSCRIPT 3.0 DEVELOPER’S GUIDE
Filtering display objects
Last updated 3/21/2011
import flash.events.MouseEvent;
import flash.filters.BitmapFilterQuality;
import flash.filters.BitmapFilterType;
import flash.filters.GradientGlowFilter;
// Create a new Shape instance.
var shape:Shape = new Shape();
// Draw the shape.
shape.graphics.beginFill(0xFF0000, 100);
shape.graphics.moveTo(0, 0);
shape.graphics.lineTo(100, 0);
shape.graphics.lineTo(100, 100);
shape.graphics.lineTo(0, 100);
shape.graphics.lineTo(0, 0);
shape.graphics.endFill();
// Position the shape on the Stage.
addChild(shape);
shape.x = 100;
shape.y = 100;
// Define a gradient glow.
var gradientGlow:GradientGlowFilter = new GradientGlowFilter();
gradientGlow.distance = 0;
gradientGlow.angle = 45;
gradientGlow.colors = [0x000000, 0xFF0000];
gradientGlow.alphas = [0, 1];
gradientGlow.ratios = [0, 255];
gradientGlow.blurX = 10;
gradientGlow.blurY = 10;
gradientGlow.strength = 2;
gradientGlow.quality = BitmapFilterQuality.HIGH;
gradientGlow.type = BitmapFilterType.OUTER;
// Define functions to listen for two events.
function onClick(event:MouseEvent):void
{
gradientGlow.strength++;
shape.filters = [gradientGlow];
}
function onMouseMove(event:MouseEvent):void
{
gradientGlow.blurX = (stage.mouseX / stage.stageWidth) * 255;
gradientGlow.blurY = (stage.mouseY / stage.stageHeight) * 255;
shape.filters = [gradientGlow];
}
stage.addEventListener(MouseEvent.CLICK, onClick);
stage.addEventListener(MouseEvent.MOUSE_MOVE, onMouseMove);

270
ACTIONSCRIPT 3.0 DEVELOPER’S GUIDE
Filtering display objects
Last updated 3/21/2011
Example: Combining basic filters
Flash Player 9 and later, Adobe AIR 1.0 and later
The following code example uses several basic filters, combined with a Timer for creating repeating actions, to create
an animated traffic light simulation.
import flash.display.Shape;
import flash.events.TimerEvent;
import flash.filters.BitmapFilterQuality;
import flash.filters.BitmapFilterType;
import flash.filters.DropShadowFilter;
import flash.filters.GlowFilter;
import flash.filters.GradientBevelFilter;
import flash.utils.Timer;
var count:Number = 1;
var distance:Number = 8;
var angleInDegrees:Number = 225; // opposite of 45 degrees
var colors:Array = [0xFFFFCC, 0xFEFE78, 0x8F8E01];
var alphas:Array = [1, 0, 1];
var ratios:Array = [0, 128, 255];
var blurX:Number = 8;
var blurY:Number = 8;
var strength:Number = 1;
var quality:Number = BitmapFilterQuality.HIGH;
var type:String = BitmapFilterType.INNER;
var knockout:Boolean = false;
// Draw the rectangle background for the traffic light.
var box:Shape = new Shape();
box.graphics.lineStyle();
box.graphics.beginFill(0xFEFE78);
box.graphics.drawRect(100, 50, 90, 200);
box.graphics.endFill();
// Draw the 3 circles for the three lights.
var stopLight:Shape = new Shape();
stopLight.graphics.lineStyle();
stopLight.graphics.beginFill(0xFF0000);
stopLight.graphics.drawCircle(145,90,25);
stopLight.graphics.endFill();
var cautionLight:Shape = new Shape();
cautionLight.graphics.lineStyle();
cautionLight.graphics.beginFill(0xFF9900);
cautionLight.graphics.drawCircle(145,150,25);
cautionLight.graphics.endFill();
var goLight:Shape = new Shape();
goLight.graphics.lineStyle();
goLight.graphics.beginFill(0x00CC00);
goLight.graphics.drawCircle(145,210,25);
goLight.graphics.endFill();
// Add the graphics to the display list.
addChild(box);

271
ACTIONSCRIPT 3.0 DEVELOPER’S GUIDE
Filtering display objects
Last updated 3/21/2011
addChild(stopLight);
addChild(cautionLight);
addChild(goLight);
// Apply a gradient bevel to the traffic light rectangle.
var gradientBevel:GradientBevelFilter = new GradientBevelFilter(distance, angleInDegrees,
colors, alphas, ratios, blurX, blurY, strength, quality, type, knockout);
box.filters = [gradientBevel];
// Create the inner shadow (for lights when off) and glow
// (for lights when on).
var innerShadow:DropShadowFilter = new DropShadowFilter(5, 45, 0, 0.5, 3, 3, 1, 1, true,
false);
var redGlow:GlowFilter = new GlowFilter(0xFF0000, 1, 30, 30, 1, 1, false, false);
var yellowGlow:GlowFilter = new GlowFilter(0xFF9900, 1, 30, 30, 1, 1, false, false);
var greenGlow:GlowFilter = new GlowFilter(0x00CC00, 1, 30, 30, 1, 1, false, false);
// Set the starting state of the lights (green on, red/yellow off).
stopLight.filters = [innerShadow];
cautionLight.filters = [innerShadow];
goLight.filters = [greenGlow];
// Swap the filters based on the count value.
function trafficControl(event:TimerEvent):void
{
if (count == 4)
{
count = 1;
}
switch (count)
{
case 1:
stopLight.filters = [innerShadow];
cautionLight.filters = [yellowGlow];
goLight.filters = [innerShadow];
break;
case 2:
stopLight.filters = [redGlow];
cautionLight.filters = [innerShadow];
goLight.filters = [innerShadow];
break;
case 3:
stopLight.filters = [innerShadow];
cautionLight.filters = [innerShadow];
goLight.filters = [greenGlow];
break;
}
count++;
}
// Create a timer to swap the filters at a 3 second interval.
var timer:Timer = new Timer(3000, 9);
timer.addEventListener(TimerEvent.TIMER, trafficControl);
timer.start();

272
ACTIONSCRIPT 3.0 DEVELOPER’S GUIDE
Filtering display objects
Last updated 3/21/2011
Color matrix filter
Flash Player 9 and later, Adobe AIR 1.0 and later
The ColorMatrixFilter class is used to manipulate the color and alpha values of the filtered object. This allows you to
create saturation changes, hue rotation (shifting a palette from one range of colors to another), luminance-to-alpha
changes, and other color manipulation effects using values from one color channel and potentially applying them to
other channels.
Conceptually, the filter goes through the pixels in the source image one by one and separates each pixel into its red,
green, blue, and alpha components. It then multiplies values provided in the color matrix by each of these values,
adding the results together to determine the resulting color value that will be displayed on the screen for that pixel. The
matrix property of the filter is an array of 20 numbers that are used in calculating the final color. For details of the
specific algorithm used to calculate the color values, see the entry describing the ColorMatrixFilter class’s matrix
property in the ActionScript 3.0 Reference for the Adobe Flash Platform.
Further information and examples of the color matrix filter can be found in the article “Using Matrices for
Transformations, Color Adjustments, and Convolution Effects in Flash” on the Adobe Developer Center website.
Convolution filter
Flash Player 9 and later, Adobe AIR 1.0 and later
The ConvolutionFilter class can be used to apply a wide range of imaging transformations to BitmapData objects or
display objects, such as blurring, edge detection, sharpening, embossing, and beveling.
The convolution filter conceptually goes through each pixel in the source image one by one and determines the final
color of that pixel using the value of the pixel and its surrounding pixels. A matrix, specified as an array of numeric
values, indicates to what degree the value of each particular neighboring pixel affects the final resulting value.
Consider the most commonly used type of matrix, which is a three by three matrix. The matrix includes nine values:
NNN
NPN
NNN
When the convolution filter is applied to a certain pixel, it will look at the color value of the pixel itself (“P” in the
example), as well as the values of the surrounding pixels (labeled “N” in the example). However, by setting values in
the matrix, you specify how much priority certain pixels have in affecting the resulting image.
For example, the following matrix, applied using a convolution filter, will leave an image exactly as it was:
000
010
000
The reason the image is unchanged is because the original pixel’s value has a relative strength of 1 in determining the
final pixel color, while the surrounding pixels’ values have relative strength of 0—meaning their colors don’t affect the
final image.
Similarly, this matrix will cause the pixels of an image to shift one pixel to the left:
000
001
000
Notice that in this case, the pixel itself has no effect on the final value of the pixel displayed in that location on the final
image—only the value of the pixel to the right is used to determine the pixel’s resulting value.

273
ACTIONSCRIPT 3.0 DEVELOPER’S GUIDE
Filtering display objects
Last updated 3/21/2011
In ActionScript, you create the matrix as a combination of an Array instance containing the values and two properties
specifying the number of rows and columns in the matrix. The following example loads an image and, when the image
finishes loading, applies a convolution filter to the image using the matrix in the previous listing:
// Load an image onto the Stage.
var loader:Loader = new Loader();
var url:URLRequest = new URLRequest("http://www.helpexamples.com/flash/images/image1.jpg");
loader.load(url);
this.addChild(loader);
function applyFilter(event:MouseEvent):void
{
// Create the convolution matrix.
var matrix:Array = [0, 0, 0,
0, 0, 1,
0, 0, 0];
var convolution:ConvolutionFilter = new ConvolutionFilter();
convolution.matrixX = 3;
convolution.matrixY = 3;
convolution.matrix = matrix;
convolution.divisor = 1;
loader.filters = [convolution];
}
loader.addEventListener(MouseEvent.CLICK, applyFilter);
Something that isn’t obvious in this code is the effect of using values other than 1 or 0 in the matrix. For example, the
same matrix, with the number 8 instead of 1 in the right-hand position, performs the same action (shifting the pixels
to the left). In addition, it affects the colors of the image, making them 8 times brighter. This is because the final pixel
color values are calculated by multiplying the matrix values by the original pixel colors, adding the values together, and
dividing by the value of the filter’s divisor property. Notice that in the example code, the divisor property is set to
1. As a general rule, if you want the brightness of the colors to stay about the same as in the original image, you should
make the divisor equal to the sum of the matrix values. So with a matrix where the values add up to 8, and a divisor of
1, the resulting image is going to be roughly 8 times brighter than the original image.
Although the effect of this matrix isn’t very noticeable, other matrix values can be used to create various effects. Here
are several standard sets of matrix values for different effects using a three by three matrix:
•Basic blur (divisor 5):
0 1 0
1 1 1
0 1 0
•Sharpening (divisor 1):
0, -1, 0
-1, 5, -1
0, -1, 0
•Edge detection (divisor 1):
0, -1, 0
-1, 4, -1
0, -1, 0
•Embossing effect (divisor 1):

274
ACTIONSCRIPT 3.0 DEVELOPER’S GUIDE
Filtering display objects
Last updated 3/21/2011
-2, -1, 0
-1, 1, 1
0, 1, 2
Notice that with most of these effects, the divisor is 1. This is because the negative matrix values added to the
positive matrix values result in 1 (or 0 in the case of edge detection, but the divisor property’s value cannot be 0).
Displacement map filter
Flash Player 9 and later, Adobe AIR 1.0 and later
The DisplacementMapFilter class uses pixel values from a BitmapData object (known as the displacement map image)
to perform a displacement effect on a new object. The displacement map image is typically different than the actual
display object or BitmapData instance to which the filter is being applied. A displacement effect involves displacing
pixels in the filtered image—in other words, shifting them away from their original location to some extent. This filter
can be used to create a shifted, warped, or mottled effect.
The location and amount of displacement applied to a given pixel is determined by the color value of the displacement
map image. When working with the filter, in addition to specifying the map image, you specify the following values to
control how the displacement is calculated from the map image:
•Map point: The location on the filtered image at which the upper-left corner of the displacement filter will be
applied. You can use this if you only want to apply the filter to part of an image.
•X component: Which color channel of the map image affects the x position of pixels.
•Y component: Which color channel of the map image affects the y position of pixels.
•X scale: A multiplier value that specifies how strong the x axis displacement is.
•Y scale: A multiplier value that specifies how strong the y axis displacement is.
•Filter mode: Determines what to do in any empty spaces created by pixels being shifted away. The options, defined
as constants in the DisplacementMapFilterMode class, are to display the original pixels (filter mode IGNORE), to
wrap the pixels around from the other side of the image (filter mode WRAP, which is the default), to use the nearest
shifted pixel (filter mode CLAMP), or to fill in the spaces with a color (filter mode COLOR).
To understand how the displacement map filter works, consider a basic example. In the following code, an image is
loaded, and when it finishes loading it is centered on the Stage and a displacement map filter is applied to it, causing
the pixels in the entire image to shift horizontally to the left.

275
ACTIONSCRIPT 3.0 DEVELOPER’S GUIDE
Filtering display objects
Last updated 3/21/2011
import flash.display.BitmapData;
import flash.display.Loader;
import flash.events.MouseEvent;
import flash.filters.DisplacementMapFilter;
import flash.geom.Point;
import flash.net.URLRequest;
// Load an image onto the Stage.
var loader:Loader = new Loader();
var url:URLRequest = new URLRequest("http://www.helpexamples.com/flash/images/image3.jpg");
loader.load(url);
this.addChild(loader);
var mapImage:BitmapData;
var displacementMap:DisplacementMapFilter;
// This function is called when the image finishes loading.
function setupStage(event:Event):void
{
// Center the loaded image on the Stage.
loader.x = (stage.stageWidth - loader.width) / 2;
loader.y = (stage.stageHeight - loader.height) / 2;
// Create the displacement map image.
mapImage = new BitmapData(loader.width, loader.height, false, 0xFF0000);
// Create the displacement filter.
displacementMap = new DisplacementMapFilter();
displacementMap.mapBitmap = mapImage;
displacementMap.mapPoint = new Point(0, 0);
displacementMap.componentX = BitmapDataChannel.RED;
displacementMap.scaleX = 250;
loader.filters = [displacementMap];
}
loader.contentLoaderInfo.addEventListener(Event.COMPLETE, setupStage);
The properties used to define the displacement are as follows:
•Map bitmap: The displacement bitmap is a new BitmapData instance created by the code. Its dimensions match the
dimensions of the loaded image (so the displacement is applied to the entire image). It is filled with solid red pixels.
•Map point: This value is set to the point 0, 0—again, causing the displacement to be applied to the entire image.
•X component: This value is set to the constant BitmapDataChannel.RED, meaning the red value of the map bitmap
will determine how much the pixels are displaced (how much they move) along the x axis.
•X scale: This value is set to 250. The full amount of displacement (from the map image being completely red) only
displaces the image by a small amount (roughly one-half of a pixel), so if this value was set to 1 the image would
only shift .5 pixels horizontally. By setting it to 250, the image shifts by approximately 125 pixels.

276
ACTIONSCRIPT 3.0 DEVELOPER’S GUIDE
Filtering display objects
Last updated 3/21/2011
These settings cause the filtered image’s pixels to shift 250 pixels to the left. The direction (left or right) and amount of
shift is based on the color value of the pixels in the map image. Conceptually, the filter goes through the pixels of the
filtered image one by one (at least, the pixels in the region where the filter is applied, which in this case means all the
pixels), and does the following with each pixel:
1It finds the corresponding pixel in the map image. For example, when the filter calculates the displacement amount
for the pixel in the upper-left corner of the filtered image, it looks at the pixel in the upper-left corner of the map
image.
2It determines the value of the specified color channel in the map pixel. In this case, the x component color channel
is the red channel, so the filter looks to see what the value of the red channel of the map image is at the pixel in
question. Since the map image is solid red, the pixel’s red channel is 0xFF, or 255. This is used as the displacement
value.
3It compares the displacement value to the “middle” value (127, which is halfway between 0 and 255). If the
displacement value is lower than the middle value, the pixel shifts in a positive direction (to the right for x
displacement; down for y displacement). On the other hand, if the displacement value is higher than the middle
value (as in this example), the pixel shifts in a negative direction (to the left for x displacement; up for y
displacement). To be more precise, the filter subtracts the displacement value from 127, and the result (positive or
negative) is the relative amount of displacement that is applied.
4Finally, it determines the actual amount of displacement by determining what percentage of full displacement the
relative displacement value represents. In this case, full red means 100% displacement. That percentage is then
multiplied by the x scale or y scale value to determine the number of pixels of displacement that will be applied. In
this example, 100% times a multiplier of 250 determines the amount of displacement—roughly 125 pixels to the left.
Because no values are specified for y component and y scale, the defaults (which cause no displacement) are used—
that’s why the image doesn’t shift at all in the vertical direction.
The default filter mode setting, WRAP, is used in the example, so as the pixels shift to the left the empty space on the
right is filled in by the pixels that shifted off the left edge of the image. You can experiment with this value to see the
different effects. For example, if you add the following line to the portion of code where the displacement properties
are being set (before the line loader.filters = [displacementMap]), it will make the image look as though it has
been smeared across the Stage:
displacementMap.mode = DisplacementMapFilterMode.CLAMP;
For a more complex example, the following listing uses a displacement map filter to create a magnifying glass effect on
an image:

277
ACTIONSCRIPT 3.0 DEVELOPER’S GUIDE
Filtering display objects
Last updated 3/21/2011
import flash.display.Bitmap;
import flash.display.BitmapData;
import flash.display.BitmapDataChannel;
import flash.display.GradientType;
import flash.display.Loader;
import flash.display.Shape;
import flash.events.MouseEvent;
import flash.filters.DisplacementMapFilter;
import flash.filters.DisplacementMapFilterMode;
import flash.geom.Matrix;
import flash.geom.Point;
import flash.net.URLRequest;
// Create the gradient circles that will together form the
// displacement map image
var radius:uint = 50;
var type:String = GradientType.LINEAR;
var redColors:Array = [0xFF0000, 0x000000];
var blueColors:Array = [0x0000FF, 0x000000];
var alphas:Array = [1, 1];
var ratios:Array = [0, 255];
var xMatrix:Matrix = new Matrix();
xMatrix.createGradientBox(radius * 2, radius * 2);
var yMatrix:Matrix = new Matrix();
yMatrix.createGradientBox(radius * 2, radius * 2, Math.PI / 2);
var xCircle:Shape = new Shape();
xCircle.graphics.lineStyle(0, 0, 0);
xCircle.graphics.beginGradientFill(type, redColors, alphas, ratios, xMatrix);
xCircle.graphics.drawCircle(radius, radius, radius);
var yCircle:Shape = new Shape();
yCircle.graphics.lineStyle(0, 0, 0);
yCircle.graphics.beginGradientFill(type, blueColors, alphas, ratios, yMatrix);
yCircle.graphics.drawCircle(radius, radius, radius);
// Position the circles at the bottom of the screen, for reference.
this.addChild(xCircle);
xCircle.y = stage.stageHeight - xCircle.height;
this.addChild(yCircle);
yCircle.y = stage.stageHeight - yCircle.height;
yCircle.x = 200;
// Load an image onto the Stage.
var loader:Loader = new Loader();
var url:URLRequest = new URLRequest("http://www.helpexamples.com/flash/images/image1.jpg");
loader.load(url);
this.addChild(loader);
// Create the map image by combining the two gradient circles.
var map:BitmapData = new BitmapData(xCircle.width, xCircle.height, false, 0x7F7F7F);
map.draw(xCircle);
var yMap:BitmapData = new BitmapData(yCircle.width, yCircle.height, false, 0x7F7F7F);
yMap.draw(yCircle);
map.copyChannel(yMap, yMap.rect, new Point(0, 0), BitmapDataChannel.BLUE,
BitmapDataChannel.BLUE);

278
ACTIONSCRIPT 3.0 DEVELOPER’S GUIDE
Filtering display objects
Last updated 3/21/2011
yMap.dispose();
// Display the map image on the Stage, for reference.
var mapBitmap:Bitmap = new Bitmap(map);
this.addChild(mapBitmap);
mapBitmap.x = 400;
mapBitmap.y = stage.stageHeight - mapBitmap.height;
// This function creates the displacement map filter at the mouse location.
function magnify():void
{
// Position the filter.
var filterX:Number = (loader.mouseX) - (map.width / 2);
var filterY:Number = (loader.mouseY) - (map.height / 2);
var pt:Point = new Point(filterX, filterY);
var xyFilter:DisplacementMapFilter = new DisplacementMapFilter();
xyFilter.mapBitmap = map;
xyFilter.mapPoint = pt;
// The red in the map image will control x displacement.
xyFilter.componentX = BitmapDataChannel.RED;
// The blue in the map image will control y displacement.
xyFilter.componentY = BitmapDataChannel.BLUE;
xyFilter.scaleX = 35;
xyFilter.scaleY = 35;
xyFilter.mode = DisplacementMapFilterMode.IGNORE;
loader.filters = [xyFilter];
}
// This function is called when the mouse moves. If the mouse is
// over the loaded image, it applies the filter.
function moveMagnifier(event:MouseEvent):void
{
if (loader.hitTestPoint(loader.mouseX, loader.mouseY))
{
magnify();
}
}
loader.addEventListener(MouseEvent.MOUSE_MOVE, moveMagnifier);

279
ACTIONSCRIPT 3.0 DEVELOPER’S GUIDE
Filtering display objects
Last updated 3/21/2011
The code first generates two gradient circles, which are combined together to form the displacement map image. The
red circle creates the x axis displacement (xyFilter.componentX = BitmapDataChannel.RED), and the blue circle
creates the y axis displacement (xyFilter.componentY = BitmapDataChannel.BLUE). To help you understand
what the displacement map image looks like, the code adds the original circles as well as the combined circle that serves
as the map image to the bottom of the screen.
The code then loads an image and, as the mouse moves, applies the displacement filter to the portion of the image that’s
under the mouse. The gradient circles used as the displacement map image causes the displaced region to spread out
away from the pointer. Notice that the gray regions of the displacement map image don’t cause any displacement. The
gray color is 0x7F7F7F. The blue and red channels of that shade of gray exactly match the middle shade of those color
channels, so there is no displacement in a gray area of the map image. Likewise, in the center of the circle there is no
displacement. Although the color there isn’t gray, that color’s blue channel and red channel are identical to the blue
channel and red channel of medium gray, and since blue and red are the colors that cause displacement, no
displacement happens there.
Shader filter
Flash Player 10 and later, Adobe AIR 1.5 and later
The ShaderFilter class lets you use a custom filter effect defined as a Pixel Bender shader. Because the filter effect is
written as a Pixel Bender shader, the effect can be completely customized. The filtered content is passed in to the shader
as an image input, and the result of the shader operation becomes the filter result.
Note: The Shader filter is available in ActionScript starting with Flash Player 10 and Adobe AIR 1.5.
To apply a shader filter to an object, you first create a Shader instance representing the Pixel Bender shader that you
are using. For details on the procedure for creating a Shader instance and on how to specify input image and parameter
values, see “Working with Pixel Bender shaders” on page 288.
When using a shader as a filter, there are three important things to keep in mind:
•The shader must be defined to accept at least one input image.
•The filtered object (the display object or BitmapData object to which the filter is applied) is passed to the shader as
the first input image value. Because of this, do not manually specify a value for the first image input.

280
ACTIONSCRIPT 3.0 DEVELOPER’S GUIDE
Filtering display objects
Last updated 3/21/2011
•If the shader defines more that one input image, the additional inputs must be specified manually (that is, by setting
the input property of any ShaderInput instance that belongs to the Shader instance).
Once you have a Shader object for your shader, you create a ShaderFilter instance. This is the actual filter object that
you use like any other filter. To create a ShaderFilter that uses a Shader object, call the ShaderFilter() constructor
and pass the Shader object as an argument, as shown in this listing:
var myFilter:ShaderFilter = new ShaderFilter(myShader);
For a complete example of using a shader filter, see “Using a shader as a filter” on page 306.
Filtering display objects example: Filter Workbench
Flash Player 9 and later, Adobe AIR 1.0 and later
The Filter Workbench provides a user interface to apply different filters to images and other visual content and see the
resulting code that can be used to generate the same effect in ActionScript. In addition to providing a tool for
experimenting with filters, this application demonstrates the following techniques:
•Creating instances of various filters
•Applying multiple filters to a display object
To get the application files for this sample, see www.adobe.com/go/learn_programmingAS3samples_flash. The Filter
Workbench application files can be found in the Samples/FilterWorkbench folder. The application consists of the
following files:
File Description
com/example/programmingas3/filterWorkbench/FilterWorkbenchController.as Class that provides the main functionality of the
application, including switching content to which
filters are applied, and applying filters to content.
com/example/programmingas3/filterWorkbench/IFilterFactory.as Interface defining common methods that are
implemented by each of the filter factory classes.
This interface defines the common functionality that
the FilterWorkbenchController class uses to interact
with the individual filter factory classes.
in folder com/example/programmingas3/filterWorkbench/:
BevelFactory.as
BlurFactory.as
ColorMatrixFactory.as
ConvolutionFactory.as
DropShadowFactory.as
GlowFactory.as
GradientBevelFactory.as
GradientGlowFactory.as
Set of classes, each of which implements the
IFilterFactory interface. Each of these classes
provides the functionality of creating and setting
values for a single type of filter. The filter property
panels in the application use these factory classes to
create instances of their particular filters, which the
FilterWorkbenchController class retrieves and
applies to the image content.
com/example/programmingas3/filterWorkbench/IFilterPanel.as Interface defining common methods that are
implemented by classes that define the user
interface panels that are used to manipulate filter
values in the application.

281
ACTIONSCRIPT 3.0 DEVELOPER’S GUIDE
Filtering display objects
Last updated 3/21/2011
com/example/programmingas3/filterWorkbench/ColorStringFormatter.as Utility class that includes a method to convert a
numeric color value to hexadecimal String format
com/example/programmingas3/filterWorkbench/GradientColor.as Class that serves as a value object, combining into a
single object the three values (color, alpha, and
ratio) that are associated with each color in the
GradientBevelFilter and GradientGlowFilter
User interface (Flex)
FilterWorkbench.mxml The main file defining the application’s user
interface.
flexapp/FilterWorkbench.as Class that provides the functionality for the main
application’s user interface; this class is used as the
code-behind class for the application MXML file.
In folder flexapp/filterPanels:
BevelPanel.mxml
BlurPanel.mxml
ColorMatrixPanel.mxml
ConvolutionPanel.mxml
DropShadowPanel.mxml
GlowPanel.mxml
GradientBevelPanel.mxml
GradientGlowPanel.mxml
Set of MXML components that provide the
functionality for each panel that is used to set
options for a single filter.
flexapp/ImageContainer.as A display object that serves as a container for the
loaded image on the screen
flexapp/controls/BGColorCellRenderer.as Custom cell renderer used to change the
background color of a cell in the DataGrid
component
flexapp/controls/QualityComboBox.as Custom control defining a combo box that can be
used for the Quality setting in several filter panels.
flexapp/controls/TypeComboBox.as Custom control defining a combo box that can be
used for the Type setting in several filter panels.
User interface (Flash)
FilterWorkbench.fla The main file defining the application’s user
interface.
flashapp/FilterWorkbench.as Class that provides the functionality for the main
application’s user interface; this class is used as the
document class for the application FLA file.
File Description

282
ACTIONSCRIPT 3.0 DEVELOPER’S GUIDE
Filtering display objects
Last updated 3/21/2011
Experimenting with ActionScript filters
Flash Player 9 and later, Adobe AIR 1.0 and later
The Filter Workbench application is designed to help you experiment with various filter effects and generate the
relevant ActionScript code for that effect. The application lets you select from three different files containing visual
content, including bitmap images and an animation created by Flash, and apply eight different ActionScript filters to
the selected image, either individually or in combination with other filters. The application includes the following
filters:
•Bevel (flash.filters.BevelFilter)
•Blur (flash.filters.BlurFilter)
•Color matrix (flash.filters.ColorMatrixFilter)
•Convolution (flash.filters.ConvolutionFilter)
•Drop shadow (flash.filters.DropShadowFilter)
•Glow (flash.filters.GlowFilter)
•Gradient bevel (flash.filters.GradientBevelFilter)
In folder flashapp/filterPanels:
BevelPanel.as
BlurPanel.as
ColorMatrixPanel.as
ConvolutionPanel.as
DropShadowPanel.as
GlowPanel.as
GradientBevelPanel.as
GradientGlowPanel.as
Set of classes that provide the functionality for each
panel that is used to set options for a single filter.
For each class, there is also an associated MovieClip
symbol in the library of the main application FLA file,
whose name matches the name of the class (for
example, the symbol “BlurPanel” is linked to the
class defined in BlurPanel.as). The components that
make up the user interface are positioned and
named within those symbols.
flashapp/ImageContainer.as A display object that serves as a container for the
loaded image on the screen
flashapp/BGColorCellRenderer.as Custom cell renderer used to change the
background color of a cell in the DataGrid
component
flashapp/ButtonCellRenderer.as Custom cell renderer used to include a button
component in a cell in the DataGrid component
Filtered image content
com/example/programmingas3/filterWorkbench/ImageType.as This class serves as a value object containing the
type and URL of a single image file to which the
application can load and apply filters. The class also
includes a set of constants representing the actual
image files available.
images/sampleAnimation.swf,
images/sampleImage1.jpg,
images/sampleImage2.jpg
Images and other visual content to which filters are
applied in the application.
File Description

283
ACTIONSCRIPT 3.0 DEVELOPER’S GUIDE
Filtering display objects
Last updated 3/21/2011
•Gradient glow (flash.filters.GradientGlowFilter)
Once a user has selected an image and a filter to apply to that image, the application displays a panel with controls for
setting the specific properties of the selected filter. For example, the following image shows the application with the
Bevel filter selected:
As the user adjusts the filter properties, the preview updates in real time. The user can also apply multiple filters by
customizing one filter, clicking the Apply button, customizing another filter, clicking the Apply button, and so forth.
There are a few features and limitations in the application’s filter panels:
•The color matrix filter includes a set of controls for directly manipulating common image properties including
brightness, contrasts, saturation, and hue. In addition, custom color matrix values can be specified.
•The convolution filter, which is only available using ActionScript, includes a set of commonly used convolution
matrix values, or custom values can be specified. However, while the ConvolutionFilter class accepts a matrix of
any size, the Filter Workbench application uses a fixed 3 x 3 matrix, the most commonly used filter size.
•The displacement map filter and shader filter, which are only available in ActionScript, are not available in the Filter
Workbench application.
Creating filter instances
Flash Player 9 and later, Adobe AIR 1.0 and later
The Filter Workbench application includes a set of classes, one for each of the available filters, which are used by the
individual panels to create the filters. When a user selects a filter, the ActionScript code associated with the filter panel
creates an instance of the appropriate filter factory class. (These classes are known as factory classes because their
purpose is to create instances of other objects, much like a real-world factory creates individual products.)

284
ACTIONSCRIPT 3.0 DEVELOPER’S GUIDE
Filtering display objects
Last updated 3/21/2011
Whenever the user changes a property value on the panel, the panel’s code calls the appropriate method in the factory
class. Each factory class includes specific methods that the panel uses to create the appropriate filter instance. For
example, if the user selects the Blur filter, the application creates a BlurFactory instance. The BlurFactory class includes
a modifyFilter() method that accepts three parameters: blurX, blurY, and quality, which together are used to
create the desired BlurFilter instance:
private var _filter:BlurFilter;
public function modifyFilter(blurX:Number = 4, blurY:Number = 4, quality:int = 1):void
{
_filter = new BlurFilter(blurX, blurY, quality);
dispatchEvent(new Event(Event.CHANGE));
}
On the other hand, if the user selects the Convolution filter, that filter allows for much greater flexibility and
consequently has a larger set of properties to control. In the ConvolutionFactory class, the following code is called
when the user selects a different value on the filter panel:
private var _filter:ConvolutionFilter;
public function modifyFilter(matrixX:Number = 0,
matrixY:Number = 0,
matrix:Array = null,
divisor:Number = 1.0,
bias:Number = 0.0,
preserveAlpha:Boolean = true,
clamp:Boolean = true,
color:uint = 0,
alpha:Number = 0.0):void
{
_filter = new ConvolutionFilter(matrixX, matrixY, matrix, divisor, bias, preserveAlpha,
clamp, color, alpha);
dispatchEvent(new Event(Event.CHANGE));
}
Notice that in each case, when the filter values are changed, the factory object dispatches an Event.CHANGE event to
notify listeners that the filter’s values have changed. The FilterWorkbenchController class, which does the work of
actually applying filters to the filtered content, listens for that event to ascertain when it needs to retrieve a new copy
of the filter and re-apply it to the filtered content.
The FilterWorkbenchController class doesn’t need to know specific details of each filter factory class—it just needs to
know that the filter has changed and to be able to access a copy of the filter. To support this, the application includes
an interface, IFilterFactory, that defines the behavior a filter factory class needs to provide so the application’s
FilterWorkbenchController instance can do its job. The IFilterFactory defines the getFilter() method that’s used in
the FilterWorkbenchController class:
function getFilter():BitmapFilter;
Notice that the getFilter() interface method definition specifies that it returns a BitmapFilter instance rather than
a specific type of filter. The BitmapFilter class does not define a specific type of filter. Rather, BitmapFilter is the base
class on which all the filter classes are built. Each filter factory class defines a specific implementation of the
getFilter() method in which it returns a reference to the filter object it has built. For example, here is an abbreviated
version of the ConvolutionFactory class’s source code:

285
ACTIONSCRIPT 3.0 DEVELOPER’S GUIDE
Filtering display objects
Last updated 3/21/2011
public class ConvolutionFactory extends EventDispatcher implements IFilterFactory
{
// ------- Private vars -------
private var _filter:ConvolutionFilter;
...
// ------- IFilterFactory implementation -------
public function getFilter():BitmapFilter
{
return _filter;
}
...
}
In the ConvolutionFactory class’s implementation of the getFilter() method, it returns a ConvolutionFilter
instance, although any object that calls getFilter() doesn’t necessarily know that—according to the definition of the
getFilter() method that ConvolutionFactory follows, it must return any BitmapFilter instance, which could be an
instance of any of the ActionScript filter classes.
Applying filters to display objects
Flash Player 9 and later, Adobe AIR 1.0 and later
As explained previously, the Filter Workbench application uses an instance of the FilterWorkbenchController class
(hereafter referred to as the “controller instance”), which performs the actual task of applying filters to the selected
visual object. Before the controller instance can apply a filter, it first needs to know what image or visual content the
filter should be applied to. When the user selects an image, the application calls the setFilterTarget() method in
the FilterWorkbenchController class, passing in one of the constants defined in the ImageType class:
public function setFilterTarget(targetType:ImageType):void
{
...
_loader = new Loader();
...
_loader.contentLoaderInfo.addEventListener(Event.COMPLETE, targetLoadComplete);
...
}
Using that information the controller instance loads the designated file, storing it in an instance variable named
_currentTarget once it loads:
private var _currentTarget:DisplayObject;
private function targetLoadComplete(event:Event):void
{
...
_currentTarget = _loader.content;
...
}
When the user selects a filter, the application calls the controller instance’s setFilter() method, giving the controller
a reference to the relevant filter factory object, which it stores in an instance variable named _filterFactory.

286
ACTIONSCRIPT 3.0 DEVELOPER’S GUIDE
Filtering display objects
Last updated 3/21/2011
private var _filterFactory:IFilterFactory;
public function setFilter(factory:IFilterFactory):void
{
...
_filterFactory = factory;
_filterFactory.addEventListener(Event.CHANGE, filterChange);
}
Notice that, as described previously, the controller instance doesn’t know the specific data type of the filter factory
instance that it is given; it only knows that the object implements the IFilterFactory instance, meaning it has a
getFilter() method and it dispatches a change (Event.CHANGE) event when the filter changes.
When the user changes a filter’s properties in the filter’s panel, the controller instance finds out that the filter has
changed through the filter factory’s change event, which calls the controller instance’s filterChange() method. That
method, in turn, calls the applyTemporaryFilter() method:
private function filterChange(event:Event):void
{
applyTemporaryFilter();
}
private function applyTemporaryFilter():void
{
var currentFilter:BitmapFilter = _filterFactory.getFilter();
// Add the current filter to the set temporarily
_currentFilters.push(currentFilter);
// Refresh the filter set of the filter target
_currentTarget.filters = _currentFilters;
// Remove the current filter from the set
// (This doesn't remove it from the filter target, since
// the target uses a copy of the filters array internally.)
_currentFilters.pop();
}
The work of applying the filter to the display object occurs within the applyTemporaryFilter() method. First, the
controller retrieves a reference to the filter object by calling the filter factory’s getFilter() method.
var currentFilter:BitmapFilter = _filterFactory.getFilter();
The controller instance has an Array instance variable named _currentFilters, in which it stores all the filters that
have been applied to the display object. The next step is to add the newly updated filter to that array:
_currentFilters.push(currentFilter);
Next, the code assigns the array of filters to the display object’s filters property, which actually applies the filters to
the image:
_currentTarget.filters = _currentFilters;
Finally, since this most recently added filter is still the “working” filter, it shouldn’t be permanently applied to the
display object, so it is removed from the _currentFilters array:

287
ACTIONSCRIPT 3.0 DEVELOPER’S GUIDE
Filtering display objects
Last updated 3/21/2011
_currentFilters.pop();
Removing this filter from the array doesn’t affect the filtered display object, because a display object makes a copy of
the filters array when it is assigned to the filters property, and it uses that internal array rather than the original one.
For this reason, any changes that are made to the array of filters don’t affect the display object until the array is assigned
to the display object’s filters property again.

288
Last updated 3/21/2011
Chapter 14: Working with Pixel Bender
shaders
Flash Player 10 and later, Adobe AIR 1.5 and later
Adobe Pixel Bender Toolkit allows developers to write shaders that create graphical effects and perform other image
and data processing. The Pixel Bender bytecode can be executed in ActionScript to apply the effect to image data or
visual content. Using Pixel Bender shaders in ActionScript gives you the capability to create custom visual effects and
perform data processing beyond the built-in capabilities in ActionScript.
Note: Pixel Bender support is available starting in Flash Player 10 and Adobe AIR 1.5. Pixel Bender blends, filters, and
fills are not supported under GPU rendering.
More Help topics
Adobe Pixel Bender Technology Center
Pixel Bender Developer's Guide
Pixel Bender Reference
flash.display.Shader
flash.filters.ShaderFilter
Pixel Bender basics for Flash
Pixel Bender basics for Flex
Basics of Pixel Bender shaders
Flash Player 10 and later, Adobe AIR 1.5 and later
Adobe Pixel Bender is a programming language that is used to create or manipulate image content. Using Pixel Bender
you create a kernel, also known as a shader. The shader defines a single function that executes on each of the pixels of
an image individually. The result of each call to the function is the output color at that pixel coordinate in the image.
Input images and parameter values can be specified to customize the operation. In a single execution of a shader, input
and parameter values are constant. The only thing that varies is the coordinate of the pixel whose color is the result of
the function call.
Where possible, the shader function is called for multiple output pixel coordinates in parallel. This improves shader
performance and can provide high-performance processing.
In ActionScript, three types of effects can be easily created using a shader:
•drawing fill
•blend mode
•filter

289
ACTIONSCRIPT 3.0 DEVELOPER’S GUIDE
Working with Pixel Bender shaders
Last updated 3/21/2011
A shader can also be executed in stand-alone mode. Using stand-alone mode a shader’s result is accessed directly
rather than pre-specifying its intended use. The result can be accessed as image data or as binary or number data. The
data need not be image data at all. In this way you can give a shader a set of data as an input. The shader processes the
data, and you can access the result data returned by the shader.
Pixel Bender support is available starting in Flash Player 10 and Adobe AIR 1.5. Pixel Bender blends, filters, and fills
are not supported under GPU rendering. On mobile devices, Pixel Bender shaders do run under CPU rendering.
However, performance is not at the same level as on a desktop computer. Many shader programs may only execute at
a few frames per second.
Important concepts and terms
The following reference list contains important terms that you will encounter when creating and using Pixel Bender
shaders:
Kernel For Pixel Bender, a kernel is the same thing as a shader. Using Pixel Bender your code defines a kernel, which
defines a single function that executes on each of the pixels of an image individually.
Pixel Bender bytecode When a Pixel Bender kernel is compiled it is transformed into Pixel Bender bytecode. The
bytecode is accessed and executed at run time.
Pixel Bender language The programming language used to create a Pixel Bender kernel.
Pixel Bender Toolkit The application that is used to create a Pixel Bender bytecode file from Pixel Bender source code.
The toolkit allows you to write, test, and compile Pixel Bender source code.
Shader For the purposes of this document, a shader is a set of functionality written in the Pixel Bender language. A
shader’s code creates a visual effect or performs a calculation. In either case, the shader returns a set of data (usually
the pixels of an image). The shader performs the same operation on each data point, with the only difference being the
coordinates of the output pixel.The shader is not written in ActionScript. It is written in the Pixel Bender language and
compiled into Pixel Bender bytecode. It can be embedded into a SWF file at compile time or loaded as an external file
at run time. In either case it is accessed in ActionScript by creating a Shader object and linking that object to the shader
bytecode.
Shader input A complex input, usually bitmap image data, that is provided to a shader to use in its calculations. For
each input variable defined in a shader, a single value (that is, a single image or set of binary data) is used for the entire
execution of the shader.
Shader parameter A single value (or limited set of values) that is provided to a shader to use in its calculations. Each
parameter value is defined for a single shader execution, and the same value is used throughout the shader execution.
Working through the code examples
You may want to test the example code listings that are provided. Testing the code involves running the code and
viewing the results in the SWF that’s created. All the examples create content using the drawing API which uses or is
modified by the shader effect.
Most of the example code listings include two parts. One part is the Pixel Bender source code for the shader used in
the example. You must first use the Pixel Bender Toolkit to compile the source code to a Pixel Bender bytecode file.
Follow these steps to create the Pixel Bender bytecode file:
1Open Adobe Pixel Bender Toolkit. If necessary, from the Build menu choose “Turn on Flash Player warnings and
errors.”
2Copy the Pixel Bender code listing and paste it into the code editor pane of the Pixel Bender Toolkit.
3From the File menu, choose “Export kernel filter for Flash Player.”

290
ACTIONSCRIPT 3.0 DEVELOPER’S GUIDE
Working with Pixel Bender shaders
Last updated 3/21/2011
4Save the Pixel Bender bytecode file in the same directory as the Flash document. The file’s name should match the
name specified in the example description.
The ActionScript part of each example is written as a class file. To test the example in Flash Professional:
1Create an empty Flash document and save it to your computer.
2Create a new ActionScript file and save it in the same directory as the Flash document. The file’s name should match
the name of the class in the code listing. For instance, if the code listing defines a class named MyApplication, use
the name MyApplication.as to save the ActionScript file.
3Copy the code listing into the ActionScript file and save the file.
4In the Flash document, click a blank part of the Stage or work space to activate the document Property inspector.
5In the Property inspector, in the Document Class field, enter the name of the ActionScript class you copied from
the text.
6Run the program using Control > Test Movie
You will see the results of the example in the preview window.
These techniques for testing example code listings are explained in more detail in “How to Use ActionScript Examples”
on page 1061.
Loading or embedding a shader
Flash Player 10 and later, Adobe AIR 1.5 and later
The first step in using a Pixel Bender shader in ActionScript is to get access to the shader in your ActionScript code.
Because a shader is created using the Adobe Pixel Bender Toolkit, and written in the Pixel Bender language, it cannot
be directly accessed in ActionScript. Instead, you create an instance of the Shader class that represents the Pixel Bender
shader to ActionScript. The Shader object allows you to find out information about the shader, such as whether it
expects parameters or input image values. You pass the Shader object to other objects to actually use the shader. For
example, to use the shader as a filter you assign the Shader object to a ShaderFilter object’s shader property.
Alternatively, to use the shader as a drawing fill, you pass the Shader object as an argument to the
Graphics.beginShaderFill() method.
Your ActionScript code can access a shader created by Adobe Pixel Bender Toolkit (a .pbj file) in two ways:
•Loaded at run time: the shader file can be loaded as an external asset using a URLLoader object. This technique is
like loading an external asset such as a text file. The following example demonstrates loading a shader bytecode file
at run time and linking it to a Shader instance:

291
ACTIONSCRIPT 3.0 DEVELOPER’S GUIDE
Working with Pixel Bender shaders
Last updated 3/21/2011
var loader:URLLoader = new URLLoader();
loader.dataFormat = URLLoaderDataFormat.BINARY;
loader.addEventListener(Event.COMPLETE, onLoadComplete);
loader.load(new URLRequest("myShader.pbj"));
var shader:Shader;
function onLoadComplete(event:Event):void {
// Create a new shader and set the loaded data as its bytecode
shader = new Shader();
shader.byteCode = loader.data;
// You can also pass the bytecode to the Shader() constructor like this:
// shader = new Shader(loader.data);
// do something with the shader
}
•Embedded in the SWF file: the shader file can be embedded in the SWF file at compile time using the [Embed]
metadata tag. The [Embed] metadata tag is only available if you use the Flex SDK to compile the SWF file. The
[Embed] tag’s source parameter points to the shader file, and its mimeType parameter is "application/octet-
stream", as in this example:
[Embed(source="myShader.pbj", mimeType="application/octet-stream")]
var MyShaderClass:Class;
// ...
// create a shader and set the embedded shader as its bytecode
var shader:Shader = new Shader();
shader.byteCode = new MyShaderClass();
// You can also pass the bytecode to the Shader() constructor like this:
// var shader:Shader = new Shader(new MyShaderClass());
// do something with the shader
In either case, you link the raw shader bytecode (the URLLoader.data property or an instance of the [Embed] data
class) to the Shader instance. As the previous examples demonstrate, you can assign the bytecode to the Shader
instance in two ways. You can pass the shader bytecode as an argument to the Shader() constructor. Alternatively,
you can set it as the Shader instance's byteCode property.
Once a Pixel Bender shader has been created and linked to a Shader object, you can use the shader to create effects in
several ways. You can use it as a filter, a blend mode, a bitmap fill, or for stand-alone processing of bitmap or other
data. You can also use the Shader object’s data property to access the shader’s metadata, specify input images, and set
parameter values.
Accessing shader metadata
Flash Player 10 and later, Adobe AIR 1.5 and later
While creating a Pixel Bender shader kernel, the author can specify metadata about the shader in the Pixel Bender
source code. While using a shader in ActionScript, you can examine the shader and extract its metadata.

292
ACTIONSCRIPT 3.0 DEVELOPER’S GUIDE
Working with Pixel Bender shaders
Last updated 3/21/2011
When you create a Shader instance and link it to a Pixel Bender shader, a ShaderData object containing data about the
shader is created and stored in the Shader object’s data property. The ShaderData class doesn’t define any properties
of its own. However, at run time a property is dynamically added to the ShaderData object for each metadata value
defined in the shader source code. The name given to each property is the same as the name specified in the metadata.
For example, suppose the source code of a Pixel Bender shader includes the following metadata definition:
namespace : "Adobe::Example";
vendor : "Bob Jones";
version : 1;
description : "Creates a version of the specified image with the specified brightness.";
The ShaderData object created for that shader is created with the following properties and values:
•namespace (String): "Adobe::Example"
•vendor (String): "Bob Jones"
•version (String): "1"
•description (String): "Creates a version of the specified image with the specified brightness"
Because metadata properties are dynamically added to the ShaderData object, you can use a for..in loop to examine
the ShaderData object. Using this technique you can find out whether the shader has any metadata and what the
metadata values are. In addition to metadata properties, a ShaderData object can have properties representing inputs
and parameters that are defined in the shader. When you use a for..in loop to examine a ShaderData object, check
the data type of each property to determine whether the property is an input (a ShaderInput instance), a parameter (a
ShaderParameter instance), or a metadata value (a String instance). The following example shows how to use a
for..in loop to examine the dynamic properties of a shader’s data property. Each metadata value is added to a Vector
instance named metadata. Note that this example assumes a Shader instance named myShader is already created:
var shaderData:ShaderData = myShader.data;
var metadata:Vector.<String> = new Vector.<String>();
for (var prop:String in shaderData)
{
if (!(shaderData[prop] is ShaderInput) && !(shaderData[prop] is ShaderParameter))
{
metadata[metadata.length] = shaderData[prop];
}
}
// do something with the metadata
For a version of this example that also extracts shader inputs and parameters, see “Identifying shader inputs and
parameters” on page 293. For more information about input and parameter properties, see “Specifying shader input
and parameter values” on page 293.

293
ACTIONSCRIPT 3.0 DEVELOPER’S GUIDE
Working with Pixel Bender shaders
Last updated 3/21/2011
Specifying shader input and parameter values
Flash Player 10 and later, Adobe AIR 1.5 and later
Many Pixel Bender shaders are defined to use one or more input images that are used in the shader processing. For
example, it’s common for a shader to accept a source image and output that image with a particular effect applied to
it. Depending on how the shader is used the input value may be specified automatically or you may need to explicitly
provide a value. Similarly, many shaders specify parameters that are used to customize the output of the shader. You
must also explicitly set a value for each parameter before using the shader.
You use the Shader object’s data property to set shader inputs and parameters and to determine whether a particular
shader expects inputs or parameters. The data property is a ShaderData instance.
Identifying shader inputs and parameters
Flash Player 10 and later, Adobe AIR 1.5 and later
The first step in specifying shader input and parameter values is to find out whether the particular shader you’re using
expects any input images or parameters. Each Shader instance has a data property containing a ShaderData object. If
the shader defines any inputs or parameters, they are accessed as properties of that ShaderData object. The properties’
names match the names specified for the inputs and parameters in the shader source code. For example, if a shader
defines an input named src, the ShaderData object has a property named src representing that input. Each property
that represents an input is a ShaderInput instance, and each property that represents a parameter is a ShaderParameter
instance.
Ideally, the author of the shader provides documentation for the shader, indicating what input image values and
parameters the shader expects, what they represent, the appropriate values, and so forth.
However, if the shader isn’t documented (and you don’t have its source code) you can inspect the shader data to
identify the inputs and parameters. The properties representing inputs and parameters are dynamically added to the
ShaderData object. Consequently, you can use a for..in loop to examine the ShaderData object to find out whether
its associated shader defines any inputs or parameters. As described in “Accessing shader metadata” on page 291, any
metadata value defined for a shader is also accessed as a dynamic property added to the Shader.data property. When
you use this technique to identify shader inputs and parameters, check the data type of the dynamic properties. If a
property is a ShaderInput instance it represents an input. If it is a ShaderParameter instance it represents a parameter.
Otherwise, it is a metadata value. The following example shows how to use a for..in loop to examine the dynamic
properties of a shader’s data property. Each input (ShaderInput object) is added to a Vector instance named inputs.
Each parameter (ShaderParameter object) is added to a Vector instance named parameters. Finally, any metadata
properties are added to a Vector instance named metadata. Note that this example assumes a Shader instance named
myShader is already created:

294
ACTIONSCRIPT 3.0 DEVELOPER’S GUIDE
Working with Pixel Bender shaders
Last updated 3/21/2011
var shaderData:ShaderData = myShader.data;
var inputs:Vector.<ShaderInput> = new Vector.<ShaderInput>();
var parameters:Vector.<ShaderParameter> = new Vector.<ShaderParameter>();
var metadata:Vector.<String> = new Vector.<String>();
for (var prop:String in shaderData)
{
if (shaderData[prop] is ShaderInput)
{
inputs[inputs.length] = shaderData[prop];
}
else if (shaderData[prop] is ShaderParameter)
{
parameters[parameters.length] = shaderData[prop];
}
else
{
metadata[metadata.length] = shaderData[prop];
}
}
// do something with the inputs or properties
Specifying shader input values
Flash Player 10 and later, Adobe AIR 1.5 and later
Many shaders expect one or more input images that are used in the shader processing. However, in many cases an
input is specified automatically when the Shader object is used. For example, suppose a shader requires one input, and
that shader is used as a filter. When the filter is applied to a display object or BitmapData object, that object is
automatically set as the input. In that case you do not explicitly set an input value.
However, in some cases, especially if a shader defines multiple inputs, you do explicitly set a value for an input. Each
input that is defined in a shader is represented in ActionScript by a ShaderInput object. The ShaderInput object is a
property of the ShaderData instance in the Shader object’s data property, as described in “Identifying shader inputs
and parameters” on page 293. For example, suppose a shader defines an input named src, and that shader is linked to
a Shader object named myShader. In that case you access the ShaderInput object corresponding to the src input using
the following identifier:
myShader.data.src
Each ShaderInput object has an input property that is used to set the value for the input. You set the input property
to a BitmapData instance to specify image data. You can also set the input property to a BitmapData or
Vector.<Number> instance to specify binary or number data. For details and restrictions on using a BitmapData or
Vector.<Number> instance as an input, see the ShaderInput.input listing in the ActionScript 3.0 Reference for the
Adobe Flash Platform.
In addition to the input property, a ShaderInput object has properties that can be used to determine what type of
image the input expects. These properties include the width, height, and channels properties. Each ShaderInput
object also has an index property that is useful for determining whether an explicit value must be provided for the
input. If a shader expects more inputs than the number that are automatically set, then you set values for those inputs.
For details on the different ways to use a shader, and whether input values are automatically set, see “Using a shader”
on page 298.

295
ACTIONSCRIPT 3.0 DEVELOPER’S GUIDE
Working with Pixel Bender shaders
Last updated 3/21/2011
Specifying shader parameter values
Flash Player 10 and later, Adobe AIR 1.5 and later
Some shaders define parameter values that the shader uses in creating its result. For example, a shader that alters the
brightness of an image might specify a brightness parameter that determines how much the operation affects the
brightness. A single parameter defined in a shader can expect a single value or multiple values, according to the
parameter definition in the shader. Each parameter that is defined in a shader is represented in ActionScript by a
ShaderParameter object. The ShaderParameter object is a property of the ShaderData instance in the Shader object’s
data property, as described in “Identifying shader inputs and parameters” on page 293. For example, suppose a shader
defines a parameter named brightness, and that shader is represented by a Shader object named myShader. In that
case you access the ShaderParameter corresponding to the brightness parameter using the following identifier:
myShader.data.brightness
To set a value (or values) for the parameter, create an ActionScript array containing the value or values and assign that
array to the ShaderParameter object’s value property. The value property is defined as an Array instance because it’s
possible that a single shader parameter requires multiple values. Even if the shader parameter only expects a single
value, you must wrap the value in an Array object to assign it to the ShaderParameter.value property. The following
listing demonstrates setting a single value as the value property:
myShader.data.brightness.value = [75];
If the Pixel Bender source code for the shader defines a default value for the parameter, an array containing the default
value or values is created and assigned to the ShaderParameter object’s value property when the Shader object is
created. Once an array has been assigned to the value property (including if it’s the default array) the parameter value
can be changed by changing the value of the array element. You do not need to create a new array and assign it to the
value property.
The following example demonstrates setting a shader’s parameter value in ActionScript. In this example the shader
defines a parameter named color. The color parameter is declared as a float4 variable in the Pixel Bender source
code, which means it is an array of four floating point numbers. In the example, the color parameter value is changed
continuously, and each time it changes the shader is used to draw a colored rectangle on the screen. The result is an
animated color change.
Note: The code for this example was written by Ryan Taylor. Thank you Ryan for sharing this example. You can see
Ryan’s portfolio and read his writing at www.boostworthy.com/.
The ActionScript code centers around three methods:
•init(): In the init() method the code loads the Pixel Bender bytecode file containing the shader. When the file
loads, the onLoadComplete() method is called.
•onLoadComplete(): In the onLoadComplete() method the code creates the Shader object named shader. It also
creates a Sprite instance named texture. In the renderShader() method, the code draws the shader result into
texture once per frame.
•onEnterFrame(): The onEnterFrame() method is called once per frame, creating the animation effect. In this
method, the code sets the shader parameter value to the new color, then calls the renderShader() method to draw
the shader result as a rectangle.
•renderShader(): In the renderShader() method, the code calls the Graphics.beginShaderFill() method to
specify a shader fill. It then draws a rectangle whose fill is defined by the shader output (the generated color) For
more information on using a shader in this way, see “Using a shader as a drawing fill” on page 298.
The following is the ActionScript code for this example. Use this class as the main application class for an ActionScript-
only project in Flash Builder, or as the document class for the FLA file in Flash Professional:

296
ACTIONSCRIPT 3.0 DEVELOPER’S GUIDE
Working with Pixel Bender shaders
Last updated 3/21/2011
package
{
import flash.display.Shader;
import flash.display.Sprite;
import flash.events.Event;
import flash.net.URLLoader;
import flash.net.URLLoaderDataFormat;
import flash.net.URLRequest;
public class ColorFilterExample extends Sprite
{
private const DELTA_OFFSET:Number = Math.PI * 0.5;
private var loader:URLLoader;
private var shader:Shader;
private var texture:Sprite;
private var delta:Number = 0;
public function ColorFilterExample()
{
init();
}
private function init():void
{
loader = new URLLoader();
loader.dataFormat = URLLoaderDataFormat.BINARY;
loader.addEventListener(Event.COMPLETE, onLoadComplete);
loader.load(new URLRequest("ColorFilter.pbj"));
}
private function onLoadComplete(event:Event):void
{
shader = new Shader(loader.data);
texture = new Sprite();
addChild(texture);
addEventListener(Event.ENTER_FRAME, onEnterFrame);
}
private function onEnterFrame(event:Event):void
{

297
ACTIONSCRIPT 3.0 DEVELOPER’S GUIDE
Working with Pixel Bender shaders
Last updated 3/21/2011
shader.data.color.value[0] = 0.5 + Math.cos(delta - DELTA_OFFSET) * 0.5;
shader.data.color.value[1] = 0.5 + Math.cos(delta) * 0.5;
shader.data.color.value[2] = 0.5 + Math.cos(delta + DELTA_OFFSET) * 0.5;
// The alpha channel value (index 3) is set to 1 by the kernel's default
// value. This value doesn't need to change.
delta += 0.1;
renderShader();
}
private function renderShader():void
{
texture:graphics.clear();
texture.graphics.beginShaderFill(shader);
texture.graphics.drawRect(0, 0, stage.stageWidth, stage.stageHeight);
texture.graphics.endFill();
}
}
}
The following is the source code for the ColorFilter shader kernel, used to create the “ColorFilter.pbj” Pixel Bender
bytecode file:
<languageVersion : 1.0;>
kernel ColorFilter
<
namespace : "boostworthy::Example";
vendor : "Ryan Taylor";
version : 1;
description : "Creates an image where every pixel has the specified color value.";
>
{
output pixel4 result;
parameter float4 color
<
minValue:float4(0, 0, 0, 0);
maxValue:float4(1, 1, 1, 1);
defaultValue:float4(0, 0, 0, 1);
>;
void evaluatePixel()
{
result = color;
}
}
If you’re using a shader whose parameters aren’t documented, you can figure out how many elements of what type
must be included in the array by checking the ShaderParameter object’s type property. The type property indicates
the data type of the parameter as defined in the shader itself. For a list of the number and type of elements expected by
each parameter type, see the ShaderParameter.value property listing in the ActionScript 3.0 Reference.

298
ACTIONSCRIPT 3.0 DEVELOPER’S GUIDE
Working with Pixel Bender shaders
Last updated 3/21/2011
Each ShaderParameter object also has an index property that indicates where the parameter fits in the order of the
shader’s parameters. In addition to these properties, a ShaderParameter object can have additional properties
containing metadata values provided by the shader’s author. For example, the author can specify metadata values such
as minimum, maximum, and default values for a parameter. Any metadata values that the author specifies are added
to the ShaderParameter object as dynamic properties. To examine those properties, use a for..in loop to loop over
the ShaderParameter object’s dynamic properties to identify its metadata. The following example shows how to use a
for..in loop to identify a ShaderParameter object’s metadata. Each metadata value is added to a Vector instance
named metadata. Note that this example assumes a Shader instance named myShader is already created, and that it is
known to have a parameter named brightness:
var brightness:ShaderParameter = myShader.data.brightness;
var metadata:Vector.<String> = new Vector.<String>();
for (var prop:String in brightness)
{
if (brightness[prop] is String)
{
metadata[metadata.length] = brightness[prop];
}
}
// do something with the metadata
Using a shader
Flash Player 10 and later, Adobe AIR 1.5 and later
Once a Pixel Bender shader is available in ActionScript as a Shader object, it can be used in several ways:
•Shader drawing fill: The shader defines the fill portion of a shape drawn using the drawing api
•Blend mode: The shader defines the blend between two overlapping display objects
•Filter: The shader defines a filter that modifies the appearance of visual content
•Stand-alone shader processing: The shader processing runs without specifying the intended use of the output. The
shader can optionally run in the background, with the result is available when the processing completes. This
technique can be used to generate bitmap data and also to process non-visual data.
Using a shader as a drawing fill
Flash Player 10 and later, Adobe AIR 1.5 and later
When you use a shader to create a drawing fill, you use the drawing api methods to create a vector shape. The shader’s
output is used to fill in the shape, in the same way that any bitmap image can be used as a bitmap fill with the drawing
api. To create a shader fill, at the point in your code at which you want to start drawing the shape, call the Graphics
object’s beginShaderFill() method. Pass the Shader object as the first argument to the beginShaderFill()
method, as shown in this listing:
var canvas:Sprite = new Sprite();
canvas.graphics.beginShaderFill(myShader);
canvas.graphics.drawRect(10, 10, 150, 150);
canvas.graphics.endFill();
// add canvas to the display list to see the result

299
ACTIONSCRIPT 3.0 DEVELOPER’S GUIDE
Working with Pixel Bender shaders
Last updated 3/21/2011
When you use a shader as a drawing fill, you set any input image values and parameter values that the shader requires.
The following example demonstrates using a shader as a drawing fill. In this example, the shader creates a three-point
gradient. This gradient has three colors, each at the point of a triangle, with a gradient blend between them. In addition,
the colors rotate to create an animated spinning color effect.
Note: The code for this example was written by Petri Leskinen. Thank you Petri for sharing this example. You can see
more of Petri’s examples and tutorials at http://pixelero.wordpress.com/.
The ActionScript code is in three methods:
•init(): The init() method is called when the application loads. In this method the code sets the initial values for
the Point objects representing the points of the triangle. The also code creates a Sprite instance named canvas.
Later, in the updateShaderFill(), the code draws the shader result into canvas once per frame. Finally, the code
loads the shader bytecode file.
•onLoadComplete(): In the onLoadComplete() method the code creates the Shader object named shader. It also
sets the initial parameter values. Finally, the code adds the updateShaderFill() method as a listener for the
enterFrame event, meaning that it is called once per frame to create an animation effect.
•updateShaderFill(): The updateShaderFill() method is called once per frame, creating the animation effect.
In this method, the code calculates and sets the shader parameters’ values. The code then calls the
beginShaderFill() method to create a shader fill and calls other drawing api methods to draw the shader result
in a triangle.
The following is the ActionScript code for this example. Use this class as the main application class for an ActionScript-
only project in Flash Builder, or as the document class for a FLA file in Flash Professional:

300
ACTIONSCRIPT 3.0 DEVELOPER’S GUIDE
Working with Pixel Bender shaders
Last updated 3/21/2011
package
{
import flash.display.Shader;
import flash.display.Sprite;
import flash.events.Event;
import flash.geom.Point;
import flash.net.URLLoader;
import flash.net.URLLoaderDataFormat;
import flash.net.URLRequest;
public class ThreePointGradient extends Sprite
{
private var canvas:Sprite;
private var shader:Shader;
private var loader:URLLoader;
private var topMiddle:Point;
private var bottomLeft:Point;
private var bottomRight:Point;
private var colorAngle:Number = 0.0;
private const d120:Number = 120 / 180 * Math.PI; // 120 degrees in radians
public function ThreePointGradient()
{
init();
}
private function init():void
{
canvas = new Sprite();
addChild(canvas);
var size:int = 400;
topMiddle = new Point(size / 2, 10);
bottomLeft = new Point(0, size - 10);
bottomRight = new Point(size, size - 10);
loader = new URLLoader();
loader.dataFormat = URLLoaderDataFormat.BINARY;
loader.addEventListener(Event.COMPLETE, onLoadComplete);
loader.load(new URLRequest("ThreePointGradient.pbj"));
}
private function onLoadComplete(event:Event):void
{
shader = new Shader(loader.data);
shader.data.point1.value = [topMiddle.x, topMiddle.y];
shader.data.point2.value = [bottomLeft.x, bottomLeft.y];
shader.data.point3.value = [bottomRight.x, bottomRight.y];
addEventListener(Event.ENTER_FRAME, updateShaderFill);
}
private function updateShaderFill(event:Event):void

301
ACTIONSCRIPT 3.0 DEVELOPER’S GUIDE
Working with Pixel Bender shaders
Last updated 3/21/2011
{
colorAngle += .06;
var c1:Number = 1 / 3 + 2 / 3 * Math.cos(colorAngle);
var c2:Number = 1 / 3 + 2 / 3 * Math.cos(colorAngle + d120);
var c3:Number = 1 / 3 + 2 / 3 * Math.cos(colorAngle - d120);
shader.data.color1.value = [c1, c2, c3, 1.0];
shader.data.color2.value = [c3, c1, c2, 1.0];
shader.data.color3.value = [c2, c3, c1, 1.0];
canvas.graphics.clear();
canvas.graphics.beginShaderFill(shader);
canvas.graphics.moveTo(topMiddle.x, topMiddle.y);
canvas.graphics.lineTo(bottomLeft.x, bottomLeft.y);
canvas.graphics.lineTo(bottomRight.x, bottomLeft.y);
canvas.graphics.endFill();
}
}
}
The following is the source code for the ThreePointGradient shader kernel, used to create the
“ThreePointGradient.pbj” Pixel Bender bytecode file:
<languageVersion : 1.0;>
kernel ThreePointGradient
<
namespace : "Petri Leskinen::Example";
vendor : "Petri Leskinen";
version : 1;
description : "Creates a gradient fill using three specified points and colors.";
>
{
parameter float2 point1 // coordinates of the first point
<
minValue:float2(0, 0);
maxValue:float2(4000, 4000);
defaultValue:float2(0, 0);
>;
parameter float4 color1 // color at the first point, opaque red by default
<
defaultValue:float4(1.0, 0.0, 0.0, 1.0);
>;
parameter float2 point2 // coordinates of the second point
<
minValue:float2(0, 0);
maxValue:float2(4000, 4000);
defaultValue:float2(0, 500);
>;
parameter float4 color2 // color at the second point, opaque green by default
<
defaultValue:float4(0.0, 1.0, 0.0, 1.0);

302
ACTIONSCRIPT 3.0 DEVELOPER’S GUIDE
Working with Pixel Bender shaders
Last updated 3/21/2011
>;
parameter float2 point3 // coordinates of the third point
<
minValue:float2(0, 0);
maxValue:float2(4000, 4000);
defaultValue:float2(0, 500);
>;
parameter float4 color3 // color at the third point, opaque blue by default
<
defaultValue:float4(0.0, 0.0, 1.0, 1.0);
>;
output pixel4 dst;
void evaluatePixel()
{
float2 d2 = point2 - point1;
float2 d3 = point3 - point1;
// transformation to a new coordinate system
// transforms point 1 to origin, point2 to (1, 0), and point3 to (0, 1)
float2x2 mtrx = float2x2(d3.y, -d2.y, -d3.x, d2.x) / (d2.x * d3.y - d3.x * d2.y);
float2 pNew = mtrx * (outCoord() - point1);
// repeat the edge colors on the outside
pNew.xy = clamp(pNew.xy, 0.0, 1.0); // set the range to 0.0 ... 1.0
// interpolating the output color or alpha value
dst = mix(mix(color1, color2, pNew.x), color3, pNew.y);
}
}
Note: If you use a shader fill when rendering under the graphics processing unit (GPU), the filled area will be colored cyan.
For more information about drawing shapes using the drawing api, see “Using the drawing API” on page 211.
Using a shader as a blend mode
Flash Player 10 and later, Adobe AIR 1.5 and later
Using a shader as a blend mode is like using other blend modes. The shader defines the appearance resulting from two
display objects being blended together visually. To use a shader as a blend mode, assign your Shader object to the
blendShader property of the foreground display object. Assigning a value other than null to the blendShader
property automatically sets the display object’s blendMode property to BlendMode.SHADER. The following listing
demonstrates using a shader as a blend mode. Note that this example assumes that there is a display object named
foreground contained in the same parent on the display list as other display content, with foreground overlapping
the other content:
foreground.blendShader = myShader;

303
ACTIONSCRIPT 3.0 DEVELOPER’S GUIDE
Working with Pixel Bender shaders
Last updated 3/21/2011
When you use a shader as a blend mode, the shader must be defined with at least two inputs. As the example shows,
you do not set the input values in your code. Instead, the two blended images are automatically used as shader inputs.
The foreground image is set as the second image. (This is the display object to which the blend mode is applied.) A
background image is created by taking the composite of all the pixels behind the foreground image’s bounding box.
This background image is set as the first input image. If you use a shader that expects more than two inputs, you
provide a value for any input beyond the first two.
The following example demonstrates using a shader as a blend mode. This example uses a lighten blend mode based
on luminosity. The result of the blend is that the lightest pixel value from either of the blended objects becomes the
pixel that’s displayed.
Note: The code for this example was written by Mario Klingemann. Thank you Mario for sharing this example. You can
see more of Mario’s work and read his writing at www.quasimondo.com/.
The important ActionScript code is in these two methods:
•init(): The init() method is called when the application loads. In this method the code loads the shader
bytecode file.
•onLoadComplete(): In the onLoadComplete() method the code creates the Shader object named shader. It then
draws three objects. The first, backdrop, is a dark gray background behind the blended objects. The second,
backgroundShape, is a green gradient ellipse. The third object, foregroundShape, is an orange gradient ellipse.
The foregroundShape ellipse is the foreground object of the blend. The background image of the blend is formed
by the part of backdrop and the part of backgroundShape that are overlapped by the foregroundShape object’s
bounding box. The foregroundShape object is the front-most object in the display list. It partially overlaps
backgroundShape and completely overlaps backdrop. Because of this overlap, without a blend mode applied, the
orange ellipse (foregroundShape) shows completely and part of the green ellipse (backgroundShape) is hidden
by it:
However, with the blend mode applied, the brighter part of the green ellipse “shows through” because it is lighter
than the portion of foregroundShape that overlaps it:
The following is the ActionScript code for this example. Use this class as the main application class for an ActionScript-
only project in Flash Builder, or as the document class for the FLA file in Flash Professional:

304
ACTIONSCRIPT 3.0 DEVELOPER’S GUIDE
Working with Pixel Bender shaders
Last updated 3/21/2011
package
{
import flash.display.BlendMode;
import flash.display.GradientType;
import flash.display.Graphics;
import flash.display.Shader;
import flash.display.Shape;
import flash.display.Sprite;
import flash.events.Event;
import flash.geom.Matrix;
import flash.net.URLLoader;
import flash.net.URLLoaderDataFormat;
import flash.net.URLRequest;
public class LumaLighten extends Sprite
{
private var shader:Shader;
private var loader:URLLoader;
public function LumaLighten()
{
init();
}
private function init():void
{
loader = new URLLoader();
loader.dataFormat = URLLoaderDataFormat.BINARY;
loader.addEventListener(Event.COMPLETE, onLoadComplete);
loader.load(new URLRequest("LumaLighten.pbj"));
}
private function onLoadComplete(event:Event):void
{
shader = new Shader(loader.data);
var backdrop:Shape = new Shape();
var g0:Graphics = backdrop.graphics;
g0.beginFill(0x303030);
g0.drawRect(0, 0, 400, 200);
g0.endFill();
addChild(backdrop);
var backgroundShape:Shape = new Shape();
var g1:Graphics = backgroundShape.graphics;
var c1:Array = [0x336600, 0x80ff00];
var a1:Array = [255, 255];
var r1:Array = [100, 255];
var m1:Matrix = new Matrix();
m1.createGradientBox(300, 200);
g1.beginGradientFill(GradientType.LINEAR, c1, a1, r1, m1);
g1.drawEllipse(0, 0, 300, 200);

305
ACTIONSCRIPT 3.0 DEVELOPER’S GUIDE
Working with Pixel Bender shaders
Last updated 3/21/2011
g1.endFill();
addChild(backgroundShape);
var foregroundShape:Shape = new Shape();
var g2:Graphics = foregroundShape.graphics;
var c2:Array = [0xff8000, 0x663300];
var a2:Array = [255, 255];
var r2:Array = [100, 255];
var m2:Matrix = new Matrix();
m2.createGradientBox(300, 200);
g2.beginGradientFill(GradientType.LINEAR, c2, a2, r2, m2);
g2.drawEllipse(100, 0, 300, 200);
g2.endFill();
addChild(foregroundShape);
foregroundShape.blendShader = shader;
foregroundShape.blendMode = BlendMode.SHADER;
}
}
}
The following is the source code for the LumaLighten shader kernel, used to create the “LumaLighten.pbj” Pixel
Bender bytecode file:
<languageVersion : 1.0;>
kernel LumaLighten
<
namespace : "com.quasimondo.blendModes";
vendor : "Quasimondo.com";
version : 1;
description : "Luminance based lighten blend mode";
>
{
input image4 background;
input image4 foreground;
output pixel4 dst;
const float3 LUMA = float3(0.212671, 0.715160, 0.072169);
void evaluatePixel()
{
float4 a = sampleNearest(foreground, outCoord());
float4 b = sampleNearest(background, outCoord());
float luma_a = a.r * LUMA.r + a.g * LUMA.g + a.b * LUMA.b;
float luma_b = b.r * LUMA.r + b.g * LUMA.g + b.b * LUMA.b;
dst = luma_a > luma_b ? a : b;
}
}
For more information on using blend modes, see “Applying blending modes” on page 177.

306
ACTIONSCRIPT 3.0 DEVELOPER’S GUIDE
Working with Pixel Bender shaders
Last updated 3/21/2011
Note: When a Pixel Bender shader program is run as a blend in Flash Player or AIR, the sampling and outCoord()
functions behave differently than in other contexts.In a blend, a sampling function will always return the current pixel
being evaluated by the shader. You cannot, for example, use add an offset to outCoord() in order to sample a
neighboring pixel. Likewise, if you use the outCoord() function outside a sampling function, its coordinates always
evaluate to 0. You cannot, for example, use the position of a pixel to influence how the blended images are combined.
Using a shader as a filter
Flash Player 10 and later, Adobe AIR 1.5 and later
Using a shader as a filter is like using any of the other filters in ActionScript. When you use a shader as a filter, the
filtered image (a display object or BitmapData object) is passed to the shader. The shader uses the input image to create
the filter output, which is usually a modified version of the original image. If the filtered object is a display object the
shader’s output is displayed on the screen in place of the filtered display object. If the filtered object is a BitmapData
object, the shader’s output becomes the content of the BitmapData object whose applyFilter() method is called.
To use a shader as a filter, you first create the Shader object as described in “Loading or embedding a shader” on
page 290. Next you create a ShaderFilter object linked to the Shader object. The ShaderFilter object is the filter that is
applied to the filtered object. You apply it to an object in the same way that you apply any filter. You pass it to the
filters property of a display object or you call the applyFilter() method on a BitmapData object. For example,
the following code creates a ShaderFilter object and applies the filter to a display object named homeButton.
var myFilter:ShaderFilter = new ShaderFilter(myShader);
homeButton.filters = [myFilter];
When you use a shader as a filter, the shader must be defined with at least one input. As the example shows, you do
not set the input value in your code. Instead, the filtered display object or BitmapData object is set as the input image.
If you use a shader that expects more than one input, you provide a value for any input beyond the first one.
In some cases, a filter changes the dimensions of the original image. For example, a typical drop shadow effect adds
extra pixels containing the shadow that’s added to the image. When you use a shader that changes the image
dimensions, set the leftExtension, rightExtension, topExtension, and bottomExtension properties to indicate
by how much you want the image size to change.
The following example demonstrates using a shader as a filter. The filter in this example inverts the red, green, and
blue channel values of an image. The result is the “negative” version of the image.
Note: The shader that this example uses is the invertRGB.pbk Pixel Bender kernel that is included with the Pixel Bender
Toolkit. You can load the source code for the kernel from the Pixel Bender Toolkit installation directory. Compile the
source code and save the bytecode file in the same directory as the source code.
The important ActionScript code is in these two methods:
•init(): The init() method is called when the application loads. In this method the code loads the shader
bytecode file.

307
ACTIONSCRIPT 3.0 DEVELOPER’S GUIDE
Working with Pixel Bender shaders
Last updated 3/21/2011
•onLoadComplete(): In the onLoadComplete() method the code creates the Shader object named shader. It then
creates and draws the contents of an object named target. The target object is a rectangle filled with a linear
gradient color that is red on the left, yellow-green in the middle, and light blue on the right. The unfiltered object
looks like this:
With the filter applied the colors are inverted, making the rectangle look like this:
The shader that this example uses is the “invertRGB.pbk” sample Pixel Bender kernel that is included with the Pixel
Bender Toolkit. The source code is available in the file “invertRGB.pbk” in the Pixel Bender Toolkit installation
directory. Compile the source code and save the bytecode file with the name “invertRGB.pbj” in the same directory as
your ActionScript source code.
The following is the ActionScript code for this example. Use this class as the main application class for an ActionScript-
only project in Flash Builder, or as the document class for the FLA file in Flash Professional:
package
{
import flash.display.GradientType;
import flash.display.Graphics;
import flash.display.Shader;
import flash.display.Shape;
import flash.display.Sprite;
import flash.filters.ShaderFilter;
import flash.events.Event;
import flash.geom.Matrix;
import flash.net.URLLoader;
import flash.net.URLLoaderDataFormat;
import flash.net.URLRequest;
public class InvertRGB extends Sprite
{
private var shader:Shader;
private var loader:URLLoader;
public function InvertRGB()

308
ACTIONSCRIPT 3.0 DEVELOPER’S GUIDE
Working with Pixel Bender shaders
Last updated 3/21/2011
{
init();
}
private function init():void
{
loader = new URLLoader();
loader.dataFormat = URLLoaderDataFormat.BINARY;
loader.addEventListener(Event.COMPLETE, onLoadComplete);
loader.load(new URLRequest("invertRGB.pbj"));
}
private function onLoadComplete(event:Event):void
{
shader = new Shader(loader.data);
var target:Shape = new Shape();
addChild(target);
var g:Graphics = target.graphics;
var c:Array = [0x990000, 0x445500, 0x007799];
var a:Array = [255, 255, 255];
var r:Array = [0, 127, 255];
var m:Matrix = new Matrix();
m.createGradientBox(w, h);
g.beginGradientFill(GradientType.LINEAR, c, a, r, m);
g.drawRect(10, 10, w, h);
g.endFill();
var invertFilter:ShaderFilter = new ShaderFilter(shader);
target.filters = [invertFilter];
}
}
}
For more information on applying filters, see “Creating and applying filters” on page 256.
Using a shader in stand-alone mode
Flash Player 10 and later, Adobe AIR 1.5 and later
When you use a shader in stand-alone mode, the shader processing runs independent of how you intend to use the
output. You specify a shader to execute, set input and parameter values, and designate an object into which the result
data is placed. You can use a shader in stand-alone mode for two reasons:
•Processing non-image data: In stand-alone mode, you can choose to pass arbitrary binary or number data to the
shader rather than bitmap image data. You can choose to have the shader result be returned as binary data or
number data in addition to bitmap image data.
•Background processing: When you run a shader in stand-alone mode, by default the shader executes
asynchronously. This means that the shader runs in the background while your application continues to run, and
your code is notified when the shader processing finishes. You can use a shader that takes a long time to run and it
doesn’t freeze up the application user interface or other processing while the shader is running.

309
ACTIONSCRIPT 3.0 DEVELOPER’S GUIDE
Working with Pixel Bender shaders
Last updated 3/21/2011
You use a ShaderJob object to execute a shader in stand-alone mode. First you create the ShaderJob object and link it
to the Shader object representing the shader to execute:
var job:ShaderJob = new ShaderJob(myShader);
Next, you set any input or parameter values that the shader expects. If you are executing the shader in the background,
you also register a listener for the ShaderJob object’s complete event. Your listener is called when the shader finishes
its work:
function completeHandler(event:ShaderEvent):void
{
// do something with the shader result
}
job.addEventListener(ShaderEvent.COMPLETE, completeHandler);
Next, you create an object into which the shader operation result is written when the operation finishes. You assign
that object to the ShaderJob object’s target property:
var jobResult:BitmapData = new BitmapData(100, 75);
job.target = jobResult;
Assign a BitmapData instance to the target property if you are using the ShaderJob to perform image processing. If
you are processing binary or number data, assign a ByteArray object or Vector.<Number> instance to the target
property. In that case, you must set the ShaderJob object’s width and height properties to specify the amount of data
to output to the target object.
Note: You can set the ShaderJob object’s shader, target,width, and height properties in one step by passing arguments
to the ShaderJob() constructor, like this:var job:ShaderJob = new ShaderJob(myShader, myTarget, myWidth,
myHeight);
When you are ready to execute the shader, you call the ShaderJob object’s start() method:
job.start();
By default calling start() causes the ShaderJob to execute asynchronously. In that case program execution continues
immediately with the next line of code rather than waiting for the shader to finish. When the shader operation finishes,
the ShaderJob object calls its complete event listeners, notifying them that it is done. At that point (that is, in the body
of your complete event listener) the target object contains the shader operation result.
Note: Instead of using the target property object, you can retrieve the shader result directly from the event object that’s
passed to your listener method. The event object is a ShaderEvent instance. The ShaderEvent object has three properties
that can be used to access the result, depending on the data type of the object you set as the target property:
ShaderEvent.bitmapData, ShaderEvent.byteArray, and ShaderEvent.vector.
Alternatively, you can pass a true argument to the start() method. In that case the shader operation executes
synchronously. All code (including interaction with the user interface and any other events) pauses while the shader
executes. When the shader finishes, the target object contains the shader result and the program continues with the
next line of code.
job.start(true);

310
Last updated 3/21/2011
Chapter 15: Working with movie clips
Flash Player 9 and later, Adobe AIR 1.0 and later
The MovieClip class is the core class for animation and movie clip symbols that you create in your Adobe® Flash®
development environment. It has all the behaviors and functionality of display objects, but with additional properties
and methods for controlling its timeline.
Basics of movie clips
Flash Player 9 and later, Adobe AIR 1.0 and later
Movie clips are a key element for people who create animated content with the Flash authoring tool and want to
control that content with ActionScript. Whenever you create a movie clip symbol in Flash, Flash adds the symbol to
the library of that Flash document. By default, this symbol becomes an instance of the MovieClip class, and as such has
the properties and methods of the MovieClip class.
When an instance of a movie clip symbol is placed on the Stage, the movie clip automatically progresses through its
timeline (if it has more than one frame) unless its playback is altered using ActionScript. It is this timeline that
distinguishes the MovieClip class, allowing you to create animation through motion or shape tweens through the Flash
authoring tool. By contrast, with a display object that is an instance of the Sprite class, you can create animation only
by programmatically changing the object’s values.
In previous versions of ActionScript, the MovieClip class was the base class of all instances on the Stage. In
ActionScript 3.0, a movie clip is only one of many display objects that can appear on the screen. If a timeline is not
necessary for the function of a display object, using the Shape class or Sprite class in lieu of the MovieClip class may
improve rendering performance. For more information on choosing the appropriate display object for a task, see
“Choosing a DisplayObject subclass” on page 163.
Important concepts and terms
The following reference list contains important terms related to movie clips:
AVM1 SWF A SWF file created using ActionScript 1.0 or ActionScript 2.0, usually targeting Flash Player 8 or earlier.
AVM2 SWF A SWF file created using ActionScript 3.0 for Adobe Flash Player 9 or later or Adobe AIR.
External SWF A SWF file that is created separately from the project SWF file and is intended to be loaded into the
project SWF file and played back within that SWF file.
Frame The smallest division of time on the timeline. As with a motion picture filmstrip, each frame is like a snapshot
of the animation in time, and when frames are played quickly in sequence, the effect of animation is created.
Timeline The metaphorical representation of the series of frames that make up a movie clip’s animation sequence. The
timeline of a MovieClip object is equivalent to the timeline in the Flash authoring tool.
Playhead A marker identifying the location (frame) in the timeline that is being displayed at a given moment.

311
ACTIONSCRIPT 3.0 DEVELOPER’S GUIDE
Working with movie clips
Last updated 3/21/2011
Working with MovieClip objects
Flash Player 9 and later, Adobe AIR 1.0 and later
When you publish a SWF file, Flash converts all movie clip symbol instances on the Stage to MovieClip objects. You
can make a movie clip symbol available to ActionScript by giving it an instance name in the Instance Name field of the
Property inspector. When the SWF file is created, Flash generates the code that creates the MovieClip instance on the
Stage and declares a variable using the instance name. If you have named movie clips that are nested inside other named
movie clips, those child movie clips are treated like properties of the parent movie clip—you can access the child movie
clip using dot syntax. For example, if a movie clip with the instance name
childClip
is nested within another clip with
the instance name
parentClip
, you can make the child clip’s timeline animation play by calling this code:
parentClip.childClip.play();
Note: : Children instances placed on the Stage in the Flash authoring tool cannot be accessed by code from within the
constructor of a parent instance since they have not been created at that point in code execution. Before accessing the
child, the parent must instead either create the child instance by code or delay access to a callback function that listens
for the child to dispatch its Event.ADDED_TO_STAGE event.
While some legacy methods and properties of the ActionScript 2.0 MovieClip class remain the same, others have
changed. All properties prefixed with an underscore have been renamed. For example, _width and _height
properties are now accessed as width and height, while _xscale and _yscale are now accessed as scaleX and
scaleY. For a complete list of the properties and methods of the MovieClip class, consult the ActionScript 3.0
Reference for the Adobe Flash Platform .
Controlling movie clip playback
Flash Player 9 and later, Adobe AIR 1.0 and later
Flash uses the metaphor of a timeline to convey animation or a change in state. Any visual element that employs a
timeline must be either a MovieClip object or extend from the MovieClip class. While ActionScript can direct any
movie clip to stop, play, or go to another point on the timeline, it cannot be used to dynamically create a timeline or
add content at specific frames; this is only possible using the Flash authoring tool.
When a MovieClip is playing, it progresses along its timeline at a speed dictated by the frame rate of the SWF file.
Alternatively, you can override this setting by setting the Stage.frameRate property in ActionScript.
Playing movie clips and stopping playback
Flash Player 9 and later, Adobe AIR 1.0 and later
The play() and stop() methods allow basic control of a movie clip across its timeline. For example, suppose you have
a movie clip symbol on the Stage which contains an animation of a bicycle moving across the screen, with its instance
name set to bicycle. If the following code is attached to a keyframe on the main timeline,
bicycle.stop();
the bicycle will not move (its animation will not play). The bicycle’s movement could start through some other user
interaction. For example, if you had a button named startButton, the following code on a keyframe on the main
timeline would make it so that clicking the button causes the animation to play:

312
ACTIONSCRIPT 3.0 DEVELOPER’S GUIDE
Working with movie clips
Last updated 3/21/2011
// This function will be called when the button is clicked. It causes the
// bicycle animation to play.
function playAnimation(event:MouseEvent):void
{
bicycle.play();
}
// Register the function as a listener with the button.
startButton.addEventListener(MouseEvent.CLICK, playAnimation);
Fast-forwarding and rewinding
Flash Player 9 and later, Adobe AIR 1.0 and later
The play() and stop() methods are not the only way of controlling playback in a movie clip. You can also move the
playhead forward or backward along the timeline manually by using the nextFrame() and prevFrame() methods.
Calling either of these methods stops playback and moves the playhead one frame forward or backward, respectively.
Using the play() method is analogous to calling nextFrame() every time the movie clip object’s enterFrame event
is triggered. Along these lines, you could make the bicycle movie clip play backwards by creating an event listener
for the enterFrame event and telling bicycle to go to its previous frame in the listener function, as follows:
// This function is called when the enterFrame event is triggered, meaning
// it's called once per frame.
function everyFrame(event:Event):void
{
if (bicycle.currentFrame == 1)
{
bicycle.gotoAndStop(bicycle.totalFrames);
}
else
{
bicycle.prevFrame();
}
}
bicycle.addEventListener(Event.ENTER_FRAME, everyFrame);
In normal playback, if a movie clip contains more than a single frame, it will loop indefinitely when playing; that is, it
will return to Frame 1 if it progresses past its final frame. When you use prevFrame() or nextFrame(), this behavior
does not happen automatically (calling prevFrame() when the playhead is on Frame 1 doesn’t move the playhead to
the last frame). The if condition in the example above checks to see if the playhead has progressed backwards to the
first frame, and sets the playhead ahead to its final frame, effectively creating a continuous loop of the movie clip
playing backwards.
Jumping to a different frame and using frame labels
Flash Player 9 and later, Adobe AIR 1.0 and later
Sending a movie clip to a new frame is a simple affair. Calling either gotoAndPlay() or gotoAndStop() will jump the
movie clip to the frame number specified as a parameter. Alternatively, you can pass a string that matches the name of
a frame label. Any frame on the timeline can be assigned a label. To do this, select a frame on the timeline and then
enter a name in the Frame Label field on the Property inspector.

313
ACTIONSCRIPT 3.0 DEVELOPER’S GUIDE
Working with movie clips
Last updated 3/21/2011
The advantages of using frame labels instead of numbers are particularly evident when creating a complex movie clip.
When the number of frames, layers, and tweens in an animation becomes large, consider labeling important frames
with explanatory descriptions that represent shifts in the behavior of the movie clip (for example, “off,” “walking,” or
“running”). This improves code readability and also provides flexibility, since ActionScript calls that go to a labeled
frame are pointers to a single reference—the label—rather than a specific frame number. If later on you decide to move
a particular segment of the animation to a different frame, you will not need to change your ActionScript code as long
as you keep the same label for the frames in the new location.
To represent frame labels in code, ActionScript 3.0 includes the FrameLabel class. Each instance of this class represents
a single frame label, and has a name property representing the name of the frame label as specified in the Property
inspector, and a frame property representing the frame number of the frame where the label is placed on the timeline.
In order to get access to the FrameLabel instances associated with a movie clip instance, the MovieClip class includes
two properties that directly return FrameLabel objects. The currentLabels property returns an array that consists of
all FrameLabel objects across the entire timeline of a movie clip. The currentLabel property returns a string
containing the name of the frame label encountered most recently along the timeline.
Suppose you were creating a movie clip named robot and had labeled the various states of its animation. You could
set up a condition that checks the currentLabel property to access the current state of robot, as in the following code:
if (robot.currentLabel == "walking")
{
// do something
}
Working with scenes
Flash Player 9 and later, Adobe AIR 1.0 and later
In the Flash authoring environment, you can use scenes to demarcate a series of timelines that a SWF file will progress
through. Using the second parameter of the gotoAndPlay() or gotoAndStop() methods, you can specify a scene to
send the playhead to. All FLA files start with only the initial scene, but you can create new scenes.
Using scenes is not always the best approach because scenes have a number of drawbacks. A Flash document that
contains multiple scenes can be difficult to maintain, particularly in multiauthor environments. Multiple scenes can
also be inefficient in bandwidth, because the publishing process merges all scenes into a single timeline. This causes a
progressive download of all scenes, even if they are never played. For these reasons, use of multiple scenes is often
discouraged except for organizing lengthy multiple timeline-based animations.
The scenes property of the MovieClip class returns an array of Scene objects representing all the scenes in the SWF
file. The currentScene property returns a Scene object that represents the scene that is currently playing.
The Scene class has several properties that give information about a scene. The labels property returns an array of
FrameLabel objects representing the frame labels in that scene. The name property returns the scene’s name as a string.
The numFrames property returns an int representing the total number of frames in the scene.

314
ACTIONSCRIPT 3.0 DEVELOPER’S GUIDE
Working with movie clips
Last updated 3/21/2011
Creating MovieClip objects with ActionScript
Flash Player 9 and later, Adobe AIR 1.0 and later
One way of adding content to the screen in Flash is by dragging assets from the library onto the Stage, but that is not
the only workflow. For complex projects, experienced developers commonly prefer to create movie clips
programatically. This approach brings several advantages: easier re-use of code, faster compile-time speed, and more
sophisticated modifications that are available only to ActionScript.
The display list API of ActionScript 3.0 streamlines the process of dynamically creating MovieClip objects. The ability
to instantiate a MovieClip instance directly, separate from the process of adding it to the display list, provides flexibility
and simplicity without sacrificing control.
In ActionScript 3.0, when you create a movie clip (or any other display object) instance programatically, it is not visible
on the screen until it is added to the display list by calling the addChild() or the addChildAt() method on a display
object container. This allows you to create a movie clip, set its properties, and even call methods before it is rendered
to the screen. For more information on working with the display list, see “Working with display object containers” on
page 151.
Exporting library symbols for ActionScript
Flash Player 9 and later, Adobe AIR 1.0 and later
By default, instances of movie clip symbols in a Flash document’s library cannot be dynamically created (that is,
created using only ActionScript). This is because each symbol that is exported for use in ActionScript adds to the size
of your SWF file, and it’s recognized that some symbols might not be intended for use on the stage. For this reason, in
order to make a symbol available in ActionScript, you must specify that the symbol should be exported for
ActionScript.
To export a symbol for ActionScript:
1Select the symbol in the Library panel and open its Symbol Properties dialog box.
2If necessary, activate the Advanced settings.
3In the Linkage section, activate the Export for ActionScript checkbox.
This will activate the Class and Base Class fields.
By default, the Class field is populated with the symbol name, with spaces removed (for example, a symbol named
“Tree House” would become “TreeHouse”). To specify that the symbol should use a custom class for its behavior,
enter the full name of the class including its package in this field. If you want to be able to create instances of the
symbol in ActionScript, but don’t need to add any additional behavior, you can leave the class name as-is.
The Base Class field’s value defaults to flash.display.MovieClip. If you want your symbol to extend the
functionality of another customer class, you can specify that class’s name instead, as long as that class extends the
Sprite (or MovieClip) class.
4Press the OK button to save the changes.
At this point, if Flash can’t find an external ActionScript file with a definition for the specified class (for instance, if
you didn’t need to add additional behavior for the symbol), a warning is displayed:
A definition for this class could not be found in the classpath, so one will be automatically generated in the SWF file
upon export.

315
ACTIONSCRIPT 3.0 DEVELOPER’S GUIDE
Working with movie clips
Last updated 3/21/2011
You can disregard this warning if your library symbol does not require unique functionality beyond the
functionality of the MovieClip class.
If you do not provide a class for your symbol, Flash will create a class for your symbol equivalent to this one:
package
{
import flash.display.MovieClip;
public class ExampleMovieClip extends MovieClip
{
public function ExampleMovieClip()
{
}
}
}
If you do want to add extra ActionScript functionality to your symbol, add the appropriate properties and methods to
the code structure below. For example, suppose you have a movie clip symbol containing a circle of 50 pixels width
and 50 pixels height, and the symbol is specified to be exported for ActionScript with a class named Circle. The
following code, when placed in a Circle.as file, extends the MovieClip class and provides the symbol with the additional
methods getArea() and getCircumference():
package
{
import flash.display.MovieClip;
public class Circle extends MovieClip
{
public function Circle()
{
}
public function getArea():Number
{
// The formula is Pi times the radius squared.
return Math.PI * Math.pow((width / 2), 2);
}
public function getCircumference():Number
{
// The formula is Pi times the diameter.
return Math.PI * width;
}
}
}
The following code, placed on a keyframe on Frame 1 of the Flash document, will create an instance of the symbol and
display it on the screen:
var c:Circle = new Circle();
addChild(c);
trace(c.width);
trace(c.height);
trace(c.getArea());
trace(c.getCircumference());

316
ACTIONSCRIPT 3.0 DEVELOPER’S GUIDE
Working with movie clips
Last updated 3/21/2011
This code demonstrates ActionScript-based instantiation as an alternative to dragging individual assets onto the Stage.
It creates a circle that has all of the properties of a movie clip and also has the custom methods defined in the Circle
class. This is a very basic example—your library symbol can specify any number of properties and methods in its class.
ActionScript-based instantiation is powerful, because it allows you to dynamically create large quantities of instances
that would be tedious to arrange manually. It is also flexible, because you can customize each instance’s properties as
it is created. You can get a sense of both of these benefits by using a loop to dynamically create several Circle instances.
With the Circle symbol and class described previously in your Flash document’s library, place the following code on a
keyframe on Frame 1:
import flash.geom.ColorTransform;
var totalCircles:uint = 10;
var i:uint;
for (i = 0; i < totalCircles; i++)
{
// Create a new Circle instance.
var c:Circle = new Circle();
// Place the new Circle at an x coordinate that will space the circles
// evenly across the Stage.
c.x = (stage.stageWidth / totalCircles) * i;
// Place the Circle instance at the vertical center of the Stage.
c.y = stage.stageHeight / 2;
// Change the Circle instance to a random color
c.transform.colorTransform = getRandomColor();
// Add the Circle instance to the current timeline.
addChild(c);
}
function getRandomColor():ColorTransform
{
// Generate random values for the red, green, and blue color channels.
var red:Number = (Math.random() * 512) - 255;
var green:Number = (Math.random() * 512) - 255;
var blue:Number = (Math.random() * 512) - 255;
// Create and return a ColorTransform object with the random colors.
return new ColorTransform(1, 1, 1, 1, red, green, blue, 0);
}
This demonstrates how you can create and customize multiple instances of a symbol quickly using code. Each instance
is positioned based on the current count within the loop, and each instance is given a random color by setting its
transform property (which Circle inherits by extending the MovieClip class).
Loading an external SWF file
Flash Player 9 and later, Adobe AIR 1.0 and later
In ActionScript 3.0, SWF files are loaded using the Loader class. To load an external SWF file, your ActionScript needs
to do four things:
1Create a new URLRequest object with the url of the file.
2Create a new Loader object.

317
ACTIONSCRIPT 3.0 DEVELOPER’S GUIDE
Working with movie clips
Last updated 3/21/2011
3Call the Loader object’s load() method, passing the URLRequest instance as a parameter.
4Call the addChild() method on a display object container (such as the main timeline of a Flash document) to add
the Loader instance to the display list.
Ultimately, the code looks like this:
var request:URLRequest = new URLRequest("http://www.[yourdomain].com/externalSwf.swf");
var loader:Loader = new Loader()
loader.load(request);
addChild(loader);
This same code can be used to load an external image file such as a JPEG, GIF, or PNG image, by specifying the image
file’s url rather than a SWF file’s url. A SWF file, unlike an image file, may contain ActionScript. Thus, although the
process of loading a SWF file may be identical to loading an image, when loading an external SWF file both the SWF
file doing the loading and the SWF file being loaded must reside in the same security sandbox if Flash Player or AIR is
playing the SWF and you plan to use ActionScript to communicate in any way to the external SWF file. Additionally,
if the external SWF file contains classes that share the same namespace as classes in the loading SWF file, you may need
to create a new application domain for the loaded SWF file in order to avoid namespace conflicts. For more
information on security and application domain considerations, see “Working with application domains” on page 139
and “Loading content” on page 1024.
When the external SWF file is successfully loaded, it can be accessed through the Loader.content property. If the
external SWF file is published for ActionScript 3.0, this will be either a movie clip or a sprite, depending on which class
it extends.
Considerations for loading an older SWF file
Flash Player 9 and later, Adobe AIR 1.0 and later
If the external SWF file has been published with an older version of ActionScript, there are important limitations to
consider. Unlike an ActionScript 3.0 SWF file that runs in AVM2 (ActionScript Virtual Machine 2), a SWF file
published for ActionScript 1.0 or 2.0 runs in AVM1 (ActionScript Virtual Machine 1).
There are important differences when loading an ActionScript 1.0 or 2.0 SWF file into an ActionScript 3.0 SWF file
(compared to loading an ActionScript 3.0 SWF file). Flash Player provides full backward compatibility with previously
published content. Any content that runs in previous versions of Flash Player runs in Flash Player versions that
support ActionScript 3.0. However, the following limitations apply:
•ActionScript 3.0 code can load a SWF file written in ActionScript 1.0 or 2.0. When an ActionScript 1.0 or 2.0 SWF
file is successfully loaded, the loaded object (the Loader.content property) is an AVM1Movie object. An
AVM1Movie instance is not the same as a MovieClip instance. It is a display object, but unlike a movie clip, it does
not include timeline-related methods or properties. The parent AVM2 SWF file cannot access the properties,
methods, or objects of the loaded AVM1Movie object.
•SWF files written in ActionScript 1.0 or 2.0 cannot load SWF files written in ActionScript 3.0. This means that SWF
files authored in Flash 8 or Flex Builder 1.5 or earlier versions cannot load ActionScript 3.0 SWF files.
The only exception to this rule is that an ActionScript 2.0 SWF file can replace itself with an ActionScript 3.0 SWF
file, as long as the ActionScript 2.0 SWF file hasn't previously loaded anything into any of its levels. An ActionScript
2.0 SWF file can do this through a call to loadMovieNum(), passing a value of 0 to the level parameter.
•In general, SWF files written in ActionScript 1.0 or 2.0 must be migrated if they are to work together with SWF files
written in ActionScript 3.0. For example, suppose you created a media player using ActionScript 2.0. The media
player loads various content that was also created using ActionScript 2.0. You cannot create new content in
ActionScript 3.0 and load it in the media player. You must migrate the video player to ActionScript 3.0.

318
ACTIONSCRIPT 3.0 DEVELOPER’S GUIDE
Working with movie clips
Last updated 3/21/2011
If, however, you create a media player in ActionScript 3.0, that media player can perform simple loads of your
ActionScript 2.0 content.
The following tables summarize the limitations of previous versions of Flash Player in relation to loading newer
content and executing code, as well as the limitations for cross-scripting between SWF files written in different
versions of ActionScript.
In the following table, “Supported functionality” refers to content running in Flash Player 9 or later. Content running
in Flash Player 8 or earlier can load, display, execute, and cross-script only ActionScript 1.0 and 2.0.
Movie clip example: RuntimeAssetsExplorer
Flash Player 9 and later, Adobe AIR 1.0 and later
The Export for ActionScript functionality can be especially advantageous for libraries that may be useful across more
than one project. If Flash Player or AIR executes a SWF file, symbols that have been exported to ActionScript are
available to any SWF file within the same security sandbox as the SWF that loads it. In this way, a single Flash
document can generate a SWF file that is designated for the sole purpose of holding graphical assets. This technique is
particularly useful for larger projects where designers working on visual assets can work in parallel with developers
who create a “wrapper” SWF file that then loads the graphical assets SWF file at run time. You can use this method to
maintain a series of versioned files where graphical assets are not dependent upon the progress of programming
development.
The RuntimeAssetsExplorer application loads any SWF file that is a subclass of RuntimeAsset and allows you to
browse the available assets of that SWF file. The example illustrates the following:
•Loading an external SWF file using Loader.load()
•Dynamic creation of a library symbol exported for ActionScript
•ActionScript control of MovieClip playback
Before beginning, note that each of the SWF files to run in Flash Player must be located in the same security sandbox.
For more information, see “Security sandboxes” on page 1010.
To get the application files for this sample, download the Flash Professional Samples. The RuntimeAssetsExplorer
application files can be found in the folder Samples/RuntimeAssetsExplorer. The application consists of the following
files:
Supported functionality Flash Player 7 Flash Player 8 Flash Player 9 and 10
Can load SWFs published for 7 and earlier 8 and earlier 9 (or 10) and earlier
Contains this AVM AVM1 AVM1 AVM1 and AVM2
Runs SWFs written in ActionScript 1.0 and 2.0 1.0 and 2.0 1.0 and 2.0, and 3.0
Supported functionality Content created in ActionScript 1.0 and 2.0 Content created in ActionScript 3.0
Can load content and execute code in
content created in
ActionScript 1.0 and 2.0 only ActionScript 1.0 and 2.0, and ActionScript 3.0
Can cross script content created in ActionScript 1.0 and 2.0 only (ActionScript 3.0
through Local Connection)
ActionScript 1.0 and 2.0 through
LocalConnection.
ActionScript 3.0

319
ACTIONSCRIPT 3.0 DEVELOPER’S GUIDE
Working with movie clips
Last updated 3/21/2011
Establishing a run-time library interface
Flash Player 9 and later, Adobe AIR 1.0 and later
In order for the explorer to properly interact with a SWF library, the structure of the run-time asset libraries must be
formalized. We will accomplish this by creating an interface, which is similar to a class in that it’s a blueprint of
methods that demarcate an expected structure, but unlike a class it includes no method bodies. The interface provides
a way for both the run-time library and the explorer to communicate to one another. Each SWF of run-time assets that
is loaded in our browser will implement this interface. For more information about interfaces and how they can be
useful, see Interfaces in Learning ActionScript 3.0.
The RuntimeLibrary interface will be very simple—we merely require a function that can provide the explorer with an
array of classpaths for the symbols to be exported and available in the run-time library. To this end, the interface has
a single method: getAssets().
package com.example.programmingas3.runtimeassetexplorer
{
public interface RuntimeLibrary
{
function getAssets():Array;
}
}
Creating the asset library SWF file
Flash Player 9 and later, Adobe AIR 1.0 and later
By defining the RuntimeLibrary interface, it’s possible to create multiple asset library SWF files that can be loaded into
another SWF file. Making an individual SWF library of assets involves four tasks:
•Creating a class for the asset library SWF file
•Creating classes for individual assets contained in the library
File Description
RuntimeAssetsExample.mxml
or
RuntimeAssetsExample.fla
The user interface for the application for Flex (MXML)
or Flash (FLA).
RuntimeAssetsExample.as Document class for the Flash (FLA) application.
GeometricAssets.as An example class that implements the RuntimeAsset
interface.
GeometricAssets.fla A FLA file linked to the GeometricAssets class (the
document class of the FLA) containing symbols that
are exported for ActionScript.
com/example/programmingas3/runtimeassetexplorer/RuntimeLibrary.as An interface that defines the required methods
expected of all run-time asset SWF files that will be
loaded into the explorer container.
com/example/programmingas3/runtimeassetexplorer/AnimatingBox.as The class of the library symbol in the shape of a
rotating box.
com/example/programmingas3/runtimeassetexplorer/AnimatingStar.as The class of the library symbol in the shape of a
rotating star.

320
ACTIONSCRIPT 3.0 DEVELOPER’S GUIDE
Working with movie clips
Last updated 3/21/2011
•Creating the actual graphic assets
•Associating graphic elements with classes and publishing the library SWF
Creating a class to implement the RuntimeLibrary interface
Next, we’ll create the GeometricAssets class that will implement the RuntimeLibrary interface. This will be the
document class of the FLA. The code for this class is very similar to the RuntimeLibrary interface—the difference
between them is that in the class definition the getAssets() method has a method body.
package
{
import flash.display.Sprite;
import com.example.programmingas3.runtimeassetexplorer.RuntimeLibrary;
public class GeometricAssets extends Sprite implements RuntimeLibrary
{
public function GeometricAssets() {
}
public function getAssets():Array {
return [ "com.example.programmingas3.runtimeassetexplorer.AnimatingBox",
"com.example.programmingas3.runtimeassetexplorer.AnimatingStar" ];
}
}
}
If we were to create a second run-time library, we could create another FLA based upon another class (for example,
AnimationAssets) that provides its own getAssets() implementation.
Creating classes for each MovieClip asset
For this example, we’ll merely extend the MovieClip class without adding any functionality to the custom assets. The
following code for AnimatingStar is analogous to that of AnimatingBox:
package com.example.programmingas3.runtimeassetexplorer
{
import flash.display.MovieClip;
public class AnimatingStar extends MovieClip
{
public function AnimatingStar() {
}
}
}
Publishing the library
We’ll now connect the MovieClip-based assets to the new class by creating a new FLA and entering GeometricAssets
into the Document Class field of the Property inspector. For the purposes of this example, we’ll create two very basic
shapes that use a timeline tween to make one clockwise rotation over 360 frames. Both the animatingBox and
animatingStar symbols are set to Export for ActionScript and have the Class field set to the respective classpaths
specified in the getAssets() implementation. The default base class of flash.display.MovieClip remains, as we
want to subclass the standard MovieClip methods.
After setting up your symbol’s export settings, publish the FLA. You now have your first run-time library. This SWF
file could be loaded into another AVM2 SWF file and the AnimatingBox and AnimatingStar symbols would be
available to the new SWF file.

321
ACTIONSCRIPT 3.0 DEVELOPER’S GUIDE
Working with movie clips
Last updated 3/21/2011
Loading the library into another SWF file
Flash Player 9 and later, Adobe AIR 1.0 and later
The last functional piece to deal with is the user interface for the asset explorer. In this example, the path to the run-
time library is hard-coded as a variable named ASSETS_PATH. Alternatively, you could use the FileReference class—for
example, to create an interface that browses for a particular SWF file on your hard drive.
When the run-time library is successfully loaded, Flash Player calls the runtimeAssetsLoadComplete() method:
private function runtimeAssetsLoadComplete(event:Event):void
{
var rl:* = event.target.content;
var assetList:Array = rl.getAssets();
populateDropdown(assetList);
stage.frameRate = 60;
}
In this method, the variable rl represents the loaded SWF file. The code calls the getAssets() method of the loaded
SWF file, obtaining the list of assets that are available, and uses them to populate a ComboBox component with a list
of available assets by calling the populateDropDown() method. That method in turn stores the full classpath of each
asset. Clicking the Add button on the user interface triggers the addAsset() method:
private function addAsset():void
{
var className:String = assetNameCbo.selectedItem.data;
var AssetClass:Class = getDefinitionByName(className) as Class;
var mc:MovieClip = new AssetClass();
...
}
which gets the classpath of whichever asset is currently selected in the ComboBox
(assetNameCbo.selectedItem.data), and uses the getDefinitionByName() function (from the flash.utils
package) to obtain an actual reference to the asset’s class in order to create a new instance of that asset.

322
Last updated 3/21/2011
Chapter 16: Working with inverse
kinematics
Flash Player 10 and later, Adobe AIR 1.5 and later, requires Flash CS4 or later
Inverse kinematics (IK) is a great technique for creating realistic motion.
IK lets you create coordinated movements within a chain of connected parts called an IK armature, so that the parts
move together in a lifelike way. The parts of the armature are its bones and joints. Given the end point of the armature,
IK calculates the angles for the joints that are required to reach that end point.
Calculating those angles manually yourself would be challenging. The beauty of this feature is that you can create
armatures interactively using Adobe® Flash® Professional. Then animate them using ActionScript. The IK engine
included with Flash Professional performs the calculations to describe the movement of the armature. You can limit
the movement to certain parameters in your ActionScript code.
New to the Flash Professional CS5 version of IK is the concept of bone spring, typically associated with high-end
animation applications. Used with the new dynamic Physics Engine, this feature lets you configure life-like movement.
And, this effect is visible both at runtime and during authoring.
To create inverse kinematics armatures, you must have a license for Flash Professional.
More Help topics
fl.ik package
Basics of Inverse Kinematics
Flash Player 10 and later, Adobe AIR 1.5 and later, requires Flash CS4 or later
Inverse kinematics (IK) lets you create life-like animation by linking parts so they move in relation to one another in
a realistic manner.
For example, using IK you can move a leg to a certain position by articulating the movements of the joints in the leg
required to achieve the desired pose. IK uses a framework of bones chained together in a structure called an IK
armature. The fl.ik package helps you create animations resembling natural motion. It lets you animate multiple IK
armatures seamlessly without having to know a lot about the physics behind the IK algorithms.
Create the IK armature with its ancillary bones and joints with Flash Professional. Then you can access the IK classes
to animate them at runtime.
See the Using inverse kinematics section in Using Flash Professional for detailed instructions on how to create an IK
armature.
Important concepts and terms
The following reference list contains important terms that are relevant to this feature:
Armature A kinematic chain, consisting of bones and joints, used in computer animation to simulate realistic motion.
Bone A rigid segment in an armature, analogous to a bone in an animal skeleton.
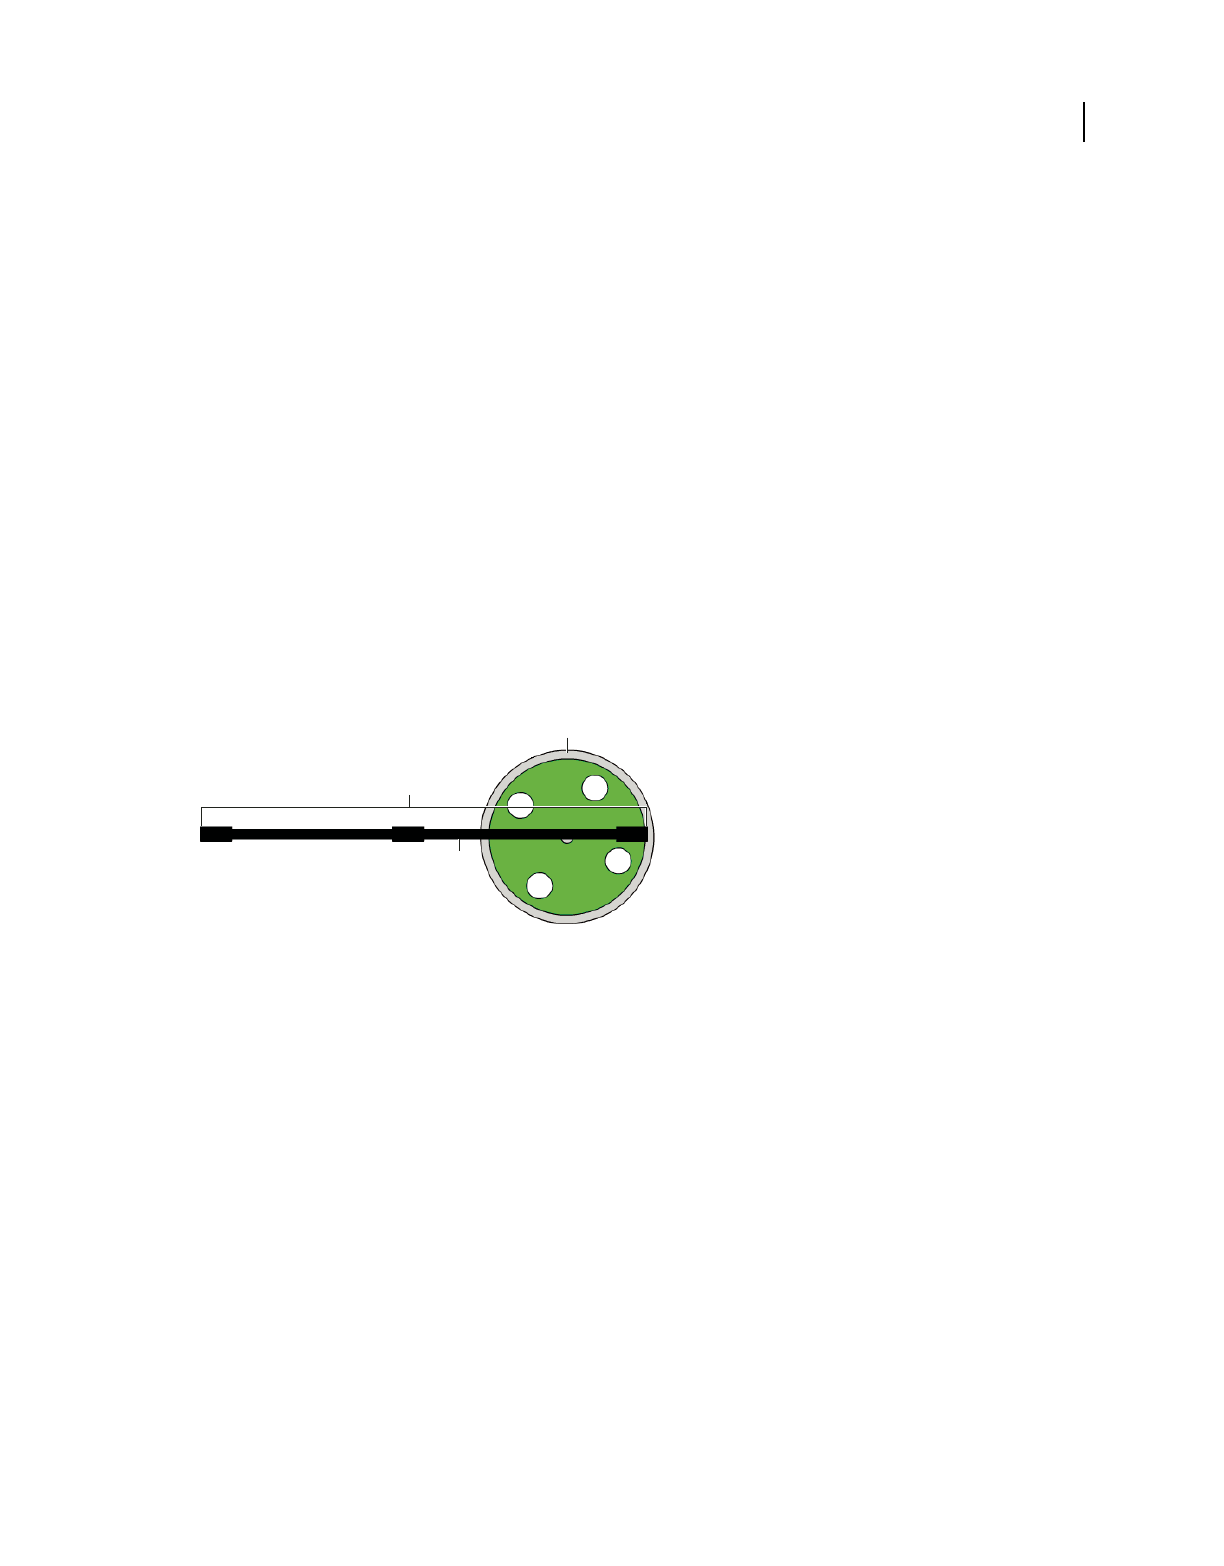
323
ACTIONSCRIPT 3.0 DEVELOPER’S GUIDE
Working with inverse kinematics
Last updated 3/21/2011
Inverse Kinematics (IK) Process of determining the parameters of a jointed flexible object called a kinematic chain or
armature.
Joint The location at which two bones make contact, constructed to enable movement of the bones; analogous to a
joint in an animal.
Physics Engine A package of physics-related algorithms used to provide life-like actions to animation.
Spring The quality of a bone that moves and reacts when the parent bone is moved and then incrementally diminishes
over time.
Animating IK Armatures Overview
Flash Player 10 and later, Adobe AIR 1.5 and later, requires Flash CS4 or later
After creating an IK armature in Flash Professional, use the fl.ik classes to limit its movement, track its events, and
animate it at runtime.
The following figure shows a movie clip named Wheel. The axle is an instance of an IKArmature named Axle. The
IKMover class moves the armature in synchronization with the rotation of wheel. The IKBone, ikBone2, in the
armature is attached to the wheel at its tail joint.
A. Wheel B. Axle C. ikBone2
B
A
C

324
ACTIONSCRIPT 3.0 DEVELOPER’S GUIDE
Working with inverse kinematics
Last updated 3/21/2011
At runtime, the wheel spins in association with the __motion_Wheel motion tween discussed in Describing the
animation. An IKMover object initiates and controls the movement of the axle. The following figure shows two
snapshots of the axle armature attached to the spinning wheel at different frames in the rotation.
At runtime, the following ActionScript:
•Gets information about the armature and its components
•Instantiates an IKMover object
•Moves the axle in conjunction with the rotation of the wheel
import fl.ik.*
var tree:IKArmature = IKManager.getArmatureByName("Axle");
var bone:IKBone = tree.getBoneByName("ikBone2");
var endEffector:IKJoint = bone.tailJoint;
var pos:Point = endEffector.position;
var ik:IKMover = new IKMover(endEffector, pos);
ik.limitByDistance = true;
ik.distanceLimit = 0.1;
ik.limitByIteration = true;
ik.iterationLimit = 10;
Wheel.addEventListener(Event.ENTER_FRAME, frameFunc);
function frameFunc(event:Event)
{
if (Wheel != null)
{
var mat:Matrix = Wheel.transform.matrix;
var pt = new Point(90, 0);
pt = mat.transformPoint(pt);
ik.moveTo(pt);
}
}

325
ACTIONSCRIPT 3.0 DEVELOPER’S GUIDE
Working with inverse kinematics
Last updated 3/21/2011
The IK classes used to move the axle are:
•IKArmature: describes the armature, a tree structure consisting of bones and joints; must be created with Flash
Professional
•IKManager: container class for all the IK armatures in the document; must be created with Flash Professional
•IKBone: a segment of an IK armature
•IKJoint: a connection between two IK bones
•IKMover: initiates and controls IK movement of armatures
For complete and detailed descriptions of these classes, see the ik package.
Getting information about an IK armature
Flash Player 10 and later, Adobe AIR 1.5 and later, requires Flash CS4 or later
First, declare variables for the armature, the bone, and the joint that make up the parts that you want to move.
The following code uses the getArmatureByName() method of the IKManager class to assign the value of the Axle
armature to the IKArmature variable tree. The Axle armature was previously created with Flash Professional.
var tree:IKArmature = IKManager.getArmatureByName("Axle");
Similarly, the following code uses the getBoneByName() method of the IKArmature class to assign to the IKBone
variable the value of the ikBone2 bone.
var bone:IKBone = tree.getBoneByName("ikBone2");
The tail joint of the ikBone2 bone is the part of the armature that attaches to the spinning wheel.
The following line declares the variable endEffector and assigns to it the tailjoint property of the ikBone2 bone:
var endEffector:IKJoint = home.tailjoint;
The variable pos is a point that stores the current position of the endEffector joint.
var pos:Point = endEffector.position;
In this example, pos is the position of the joint at the end of the axle where it connects to the wheel. The original value
of this variable is obtained from the position property of the IKJoint.
Instantiating an IK Mover and Limiting Its Movement
Flash Player 10 and later, Adobe AIR 1.5 and later, requires Flash CS4 or later
An instance of the IKMover class moves the axle.
The following line instantiates the IKMover object ik, passing to its constructor the element to move and the starting
point for the movement:
var ik:IKMover = new IKMover(endEffector, pos);
The properties of the IKMover class let you limit the movement of an armature. You can limit movement based on the
distance, iterations, and time of the movement.

326
ACTIONSCRIPT 3.0 DEVELOPER’S GUIDE
Working with inverse kinematics
Last updated 3/21/2011
The following pairs of properties enforce these limits. The pairs consist of a Boolean value that indicates whether the
movement is limited and an integer that specifies the limit:
By default, all the Boolean values are set to false, so movement is not limited unless you explicitly set a Boolean value
to true. To enforce a limit, set the appropriate property to true and then specify a value for the corresponding integer
property. If you set the limit to a value without setting its corresponding Boolean property, the limit is ignored. In this
case, the IK engine continues to move the object until another limit or the target position of the IKMover is reached.
In the following example, the maximum distance of the armature movement is set to 0.1 pixels per iteration. The
maximum number of iterations for every movement is set to ten.
ik.limitByDistance = true;
ik.distanceLimit = 0.1;
ik.limitByIteration = true;
ik.iterationLimit = 10;
Moving an IK Armature
Flash Player 10 and later, Adobe AIR 1.5 and later, requires Flash CS4 or later
The IKMover moves the axle inside the event listener for the wheel. On each enterFrame event of the wheel, a new
target position for the armature is calculated. Using its moveTo() method, the IKMover moves the tail joint to its
target position or as far as it can within the constraints set by its limitByDistance, limitByIteration, and
limitByTime properties.
Wheel.addEventListener(Event.ENTER_FRAME, frameFunc);
function frameFunc(event:Event)
{
if (Wheel != null)
{
var mat:Matrix = Wheel.transform.matrix;
var pt = new Point(90,0);
pt = mat.transformPoint(pt);
ik.moveTo(pt);
}
}
Boolean property Integer property Limit set
limitByDistance:Boolean distanceLimit:int Sets the maximum distance in pixels that the IK engine moves for each
iteration.
limitByIteration:Boolean iterationLimit:int Sets the maximum number of iterations the IK engine performs for each
movement.
limitByTime:Boolean timeLimit:int Sets the maximum time in milliseconds allotted to the IK engine to
perform the movement.

327
ACTIONSCRIPT 3.0 DEVELOPER’S GUIDE
Working with inverse kinematics
Last updated 3/21/2011
Using Springs
Flash Player 10 and later, Adobe AIR 1.5 and later, requires Flash CS5 or later
Inverse kinematics in Flash Professional CS5 supports bone spring. Bone spring can be set during authoring, and bone
spring attributes can be added or modified at runtime. Spring is a property of a bone and its joints. It has two attributes:
IKJoint.springStrength, which sets the amount of spring, and IKJoint.springDamping, which adds resistance
to the strength value and changes the rate of decay of the spring.
Spring strength is a percent value from the default 0 (completely rigid) to 100 (very loose and controlled by physics).
Bones with spring react to the movement of their joint. If no other translation (rotation, x, or y) is enabled, the spring
settings have no effect.
Spring damping is a percent value from the default 0 (no resistance) to 100 (heavily damped). Damping changes the
amount of time between a bone’s initial movement and its return to a rest position.
You can check to see if springs are enabled for an IKArmature object by checking its IKArmature.springsEnabled
property. The other spring properties and methods belong to individual IKJoint objects. A joint can be enabled for
angular rotation and translation along the x- and y-axes. You can position a rotational joint’s spring angle with
IKJoint.setSpringAngle and a translational joint’s spring position with IKJoint.setSpringPt.
This example selects a bone by name and identifies its tailJoint. The code tests the parent armature to see if springs are
enabled and then sets spring properties for the joint.
var arm:IKArmature = IKManager.getArmatureAt(0);
var bone:IKBone = arm.getBoneByName("c");
var joint:IKJoint = bone.tailJoint;
if (arm.springsEnabled) {
joint.springStrength = 50; //medium spring strength
joint.springDamping = 10; //light damping resistance
if (joint.hasSpringAngle) {
joint.setSpringAngle(30); //set angle for rotational spring
}
}
Using IK Events
Flash Player 10 and later, Adobe AIR 1.5 and later, requires Flash CS4 or later
The IKEvent class lets you create an event object that contains information about IK Events. IKEvent information
describes motion that has terminated because the specified time, distance, or iteration limit was exceeded.
The following code shows an event listener and handler for tracking time limit events. This event handler reports on
the time, distance, iteration count, and joint properties of an event that fires when the time limit of the IKMover is
exceeded.

328
ACTIONSCRIPT 3.0 DEVELOPER’S GUIDE
Working with inverse kinematics
Last updated 3/21/2011
var ikmover:IKMover = new IKMover(endjoint, pos);
ikMover.limitByTime = true;
ikMover.timeLimit = 1000;
ikmover.addEventListener(IKEvent.TIME_LIMIT, timeLimitFunction);
function timeLimitFunction(evt:IKEvent):void
{
trace("timeLimit hit");
trace("time is " + evt.time);
trace("distance is " + evt.distance);
trace("iterationCount is " + evt.iterationCount);
trace("IKJoint is " + evt.joint.name);
}

329
Last updated 3/21/2011
Chapter 17: Working in three dimensions
(3D)
Flash Player 10 and later, Adobe AIR 1.5 and later
Basics of 3D
Flash Player 10 and later, Adobe AIR 1.5 and later
The main difference between a two-dimensional (2D) object and a three-dimensional (3D) object projected on a two-
dimensional screen is the addition of a third dimension to the object. The third dimension allows the object to move
toward and away from viewpoint of the user.
When you explicitly set the z property of a display object to a numeric value, the object automatically creates a 3D
transformation matrix. You can alter this matrix to modify the 3D transformation settings of that object.
In addition, 3D rotation differs from 2D rotation. In 2D the axis of rotation is always perpendicular to the x/y plane -
in other words, on the z-axis. In 3D the axis of rotation can be around any of the x, y, or z axes. Setting the rotation
and scaling properties of a display object enable it to move in 3D space.
Important concepts and terms
The following reference list contains important terms that you will encounter when programming 3-dimensional
graphics:
Perspective In a 2D plane, representation of parallel lines as converging on a vanishing point to give the illusion of
depth and distance.
Projection The production of a 2D image of a higher-dimensional object; 3D projection maps 3D points to a 2D plane.
Rotation Changing the orientation (and often the position) of an object by moving every point included in the object
in a circular motion.
Transformation Altering 3D points or sets of points by translation, rotation, scale, skew, or a combination of these
actions.
Translation Changing the position of an object by moving every point included in the object by the same amount in
the same direction.
Vanishing point Point at which receding parallel lines seem to meet when represented in linear perspective.
Vector A 3D vector represents a point or a location in the three-dimensional space using the Cartesian coordinates x,
y, and z.
Vertex A corner point.
Textured mesh Any point defining an object in 3D space.
UV mapping A way to apply a texture or bitmap to a 3D surface. UV mapping assigns values to coordinates on an
image as percentages of the horizontal (U) axis and vertical (V) axis.
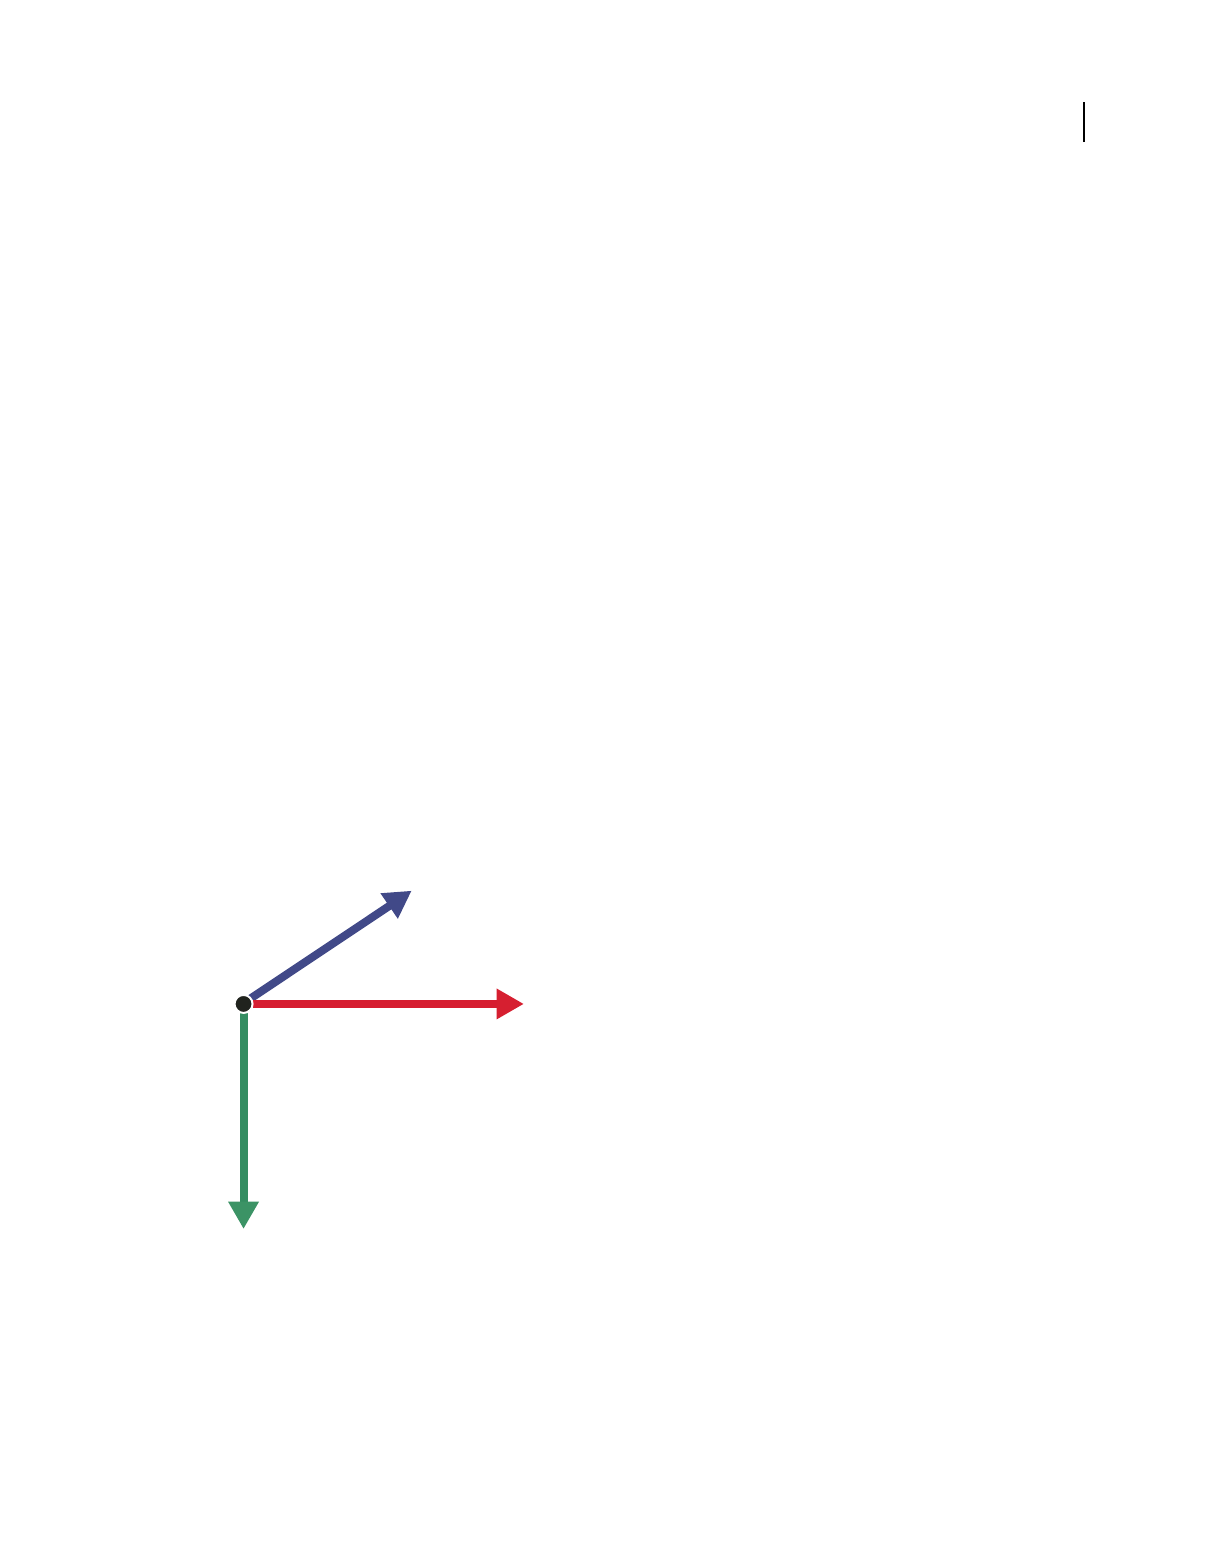
330
ACTIONSCRIPT 3.0 DEVELOPER’S GUIDE
Working in three dimensions (3D)
Last updated 3/21/2011
T value The scaling factor for determining the size of a 3D object as the object moves toward, or away from, the current
point of view.
Culling Rendering, or not, surfaces with specific winding. Using culling you can hide surfaces that are not visible to
the current point of view.
Understanding the 3D features of Flash Player and the
AIR runtime
Flash Player 10 and later, Adobe AIR 1.5 and later
In Flash Player versions prior to Flash Player 10 and Adobe AIR versions prior to Adobe AIR 1.5, display objects have
two properties, x and y, for positioning them on a 2D plane. Starting with Flash Player 10 and Adobe AIR 1.5, every
ActionScript display object has a z property that lets you position it along the z-axis, which is generally used to indicate
depth or distance.
Flash Player 10 and Adobe AIR 1.5 introduced support for 3D effects. However, display objects are inherently flat.
Each display object, such as a MovieClip object or a Sprite object, ultimately renders itself in two dimensions, on a
single plane. The 3D features let you place, move, rotate, and otherwise transform these planar objects in all three
dimensions. They also let you manage 3D points and convert them to 2D x, y coordinates, so you can project 3D
objects onto a 2D view. You can simulate many kinds of 3D experiences using these features.
The 3D coordinate system used by ActionScript differs from other systems. When you use 2D coordinates in
ActionScript, the value of x increases as you move to the right along the x-axis, and the value of y increases as you move
down along the y-axis. The 3D coordinate system retains those conventions and adds a z-axis whose value increases
as you move away from the viewpoint.
The positive directions of the x, y, and z axes in the ActionScript 3D coordinate system.
A. + Z axis B. Origin C. +X axis D. +Y axis
Note: Be aware that Flash Player and AIR always represent 3D in layers. This means that if object A is in front of object
B on the display list, Flash Player or AIR always renders A in front of B regardless of the z-axis values of the two objects.
To resolve this conflict between the display list order and the z-axis order, use the transform.getRelativeMatrix3D()
method to save and then re-order the layers of 3D display objects. For more information, see “Using Matrix3D objects for
reordering display” on page 340.
A
C
B
(0,0,0)
D

331
ACTIONSCRIPT 3.0 DEVELOPER’S GUIDE
Working in three dimensions (3D)
Last updated 3/21/2011
The following ActionScript classes support the new 3D-related features:
1The flash.display.DisplayObject class contains the z property and new rotation and scaling properties for
manipulating display objects in 3D space. The DisplayObject.local3DToGlobal() method offers a simple way
to project 3D geometry onto a 2D plane.
2The flash.geom.Vector3D class can be used as a data structure for managing 3D points. It also supports vector
mathematics.
3The flash.geom.Matrix3D class supports complex transformations of 3D geometry, such as rotation, scaling, and
translation.
4The flash.geom.PerspectiveProjection class controls the parameters for mapping 3D geometry onto a 2D view.
There are two different approaches to simulating 3D images in ActionScript:
1Arranging and animating planar objects in 3D space. This approach involves animating display objects using the x,
y and z properties of display objects, or setting rotation and scaling properties using the DisplayObject class. More
complex motion can be achieved using the DisplayObject.transform.matrix3D object. The
DisplayObject.transform.perspectiveProjection object customizes how the display objects are drawn in 3D
perspective. Use this approach when you want to animate 3D objects that consist primarily of planes. Examples of
this approach include 3D image galleries or 2D animation objects arranged in 3D space.
2Generating 2D triangles from 3D geometry, and rendering those triangles with textures. To use this approach you
must first define and manage data about 3D objects and then convert that data into 2D triangles for rendering.
Bitmap textures can be mapped to these triangles, and then the triangles are drawn to a graphics object using the
Graphics.drawTriangles() method. Examples of this approach include loading 3D model data from a file and
rendering the model on the screen, or generating and drawing 3D terrain as triangle meshes.
Creating and moving 3D objects
Flash Player 10 and later, Adobe AIR 1.5 and later
To convert a 2D display object into a 3D display object, you can explicitly set its z property to a numeric value. When
you assign a value to the z property, a new Transform object is created for the display object. Setting the
DisplayObject.rotationX or DisplayObject.rotationY properties also creates a new Transform object. The
Transform object contains a Matrix3D property that governs how the display object is represented in 3D space.
The following code sets the coordinates for a display object called “leaf”:
leaf.x = 100; leaf.y = 50; leaf.z = -30;
You can see these values, as well as properties derived from these values, in the matrix3D property of the Transform
object of the leaf:
var leafMatrix:Matrix3D = leaf.transform.matrix3D;
trace(leafMatrix.position.x);
trace(leafMatrix.position.y);
trace(leafMatrix.position.z);
trace(leafMatrix.position.length);
trace(leafMatrix.position.lengthSquared);
For information about the properties of the Transform object, see the Transformclass. For information about the
properties of the Matrix3D object, see the Matrix3D class.

332
ACTIONSCRIPT 3.0 DEVELOPER’S GUIDE
Working in three dimensions (3D)
Last updated 3/21/2011
Moving an object in 3D space
Flash Player 10 and later, Adobe AIR 1.5 and later
You can move an object in 3D space by changing the values of its x, y, or z properties. When you change the value
of the z property the object appears to move closer or farther away from the viewer.
The following code moves two ellipses back and forth along their z-axes by changing the value of their z properties in
response to an event. ellipse2 moves faster than ellipse1: its z property is increased by a multiple of 20 on each
Frame event while the z property of ellipse1 is increased by a multiple of 10:
var depth:int = 1000;
function ellipse1FrameHandler(e:Event):void
{
ellipse1Back = setDepth(e, ellipse1Back);
e.currentTarget.z += ellipse1Back * 10;
}
function ellipse2FrameHandler(e:Event):void
{
ellipse2Back = setDepth(e, ellipse1Back);
e.currentTarget.z += ellipse1Back * 20;
}
function setDepth(e:Event, d:int):int
{
if(e.currentTarget.z > depth)
{
e.currentTarget.z = depth;
d = -1;
}
else if (e.currentTarget.z < 0)
{
e.currentTarget.z = 0;
d = 1;
}
}
Rotating an object in 3D space
Flash Player 10 and later, Adobe AIR 1.5 and later
You can rotate an object in three different ways, depending on how you set the object’s rotation properties: rotationX,
rotationY, and rotationZ.
The figure below shows two squares that are not rotated:
The next figure shows the two squares when you increment the rotationY property of the container of the squares to
rotate them on the y- axis. Rotating the container, or parent display object, of the two squares rotates both squares:

333
ACTIONSCRIPT 3.0 DEVELOPER’S GUIDE
Working in three dimensions (3D)
Last updated 3/21/2011
container.rotationY += 10;
The next figure shows what happens when you set the rotationX property of the container for the squares. This
rotates the squares on the x- axis.
The next figure shows what happens when you increment the rotationZ property of the container of the squares.This
rotates the squares on the z-axis.
A display object can simultaneously move and rotate in 3D space.
Projecting 3D objects onto a 2D view
Flash Player 10 and later, Adobe AIR 1.5 and later
The PerspectiveProjection class in the flash.geom package provides a simple way of applying rudimentary
perspective when moving display objects through 3D space.
If you do not explicitly create a perspective projection for your 3D space, the 3D engine uses a default
PerspectiveProjection object that exists on the root and is propagated to all its children.
The three properties that define how a PerspectiveProjection object displays 3D space are:
•fieldOfView
•projectionCenter
•focalLength
Modifying the value of the fieldOfView automatically modifies the value of the focalLength and vice-versa, since
they are interdependent.
The formula used to calculate the focalLength given the fieldOfView value is:

334
ACTIONSCRIPT 3.0 DEVELOPER’S GUIDE
Working in three dimensions (3D)
Last updated 3/21/2011
focalLength = stageWidth/2 * (cos(fieldOfView/2) / sin(fieldOfView/2)
Typically you would modify the fieldOfView property explicitly.
Field of view
Flash Player 10 and later, Adobe AIR 1.5 and later
By manipulating the fieldOfView property of the PerspectiveProjection class, you can make a 3D display object
approaching the viewer appear larger and an object receding from the viewer appear smaller.
The fieldOfView property specifies an angle between 0 and 180 degrees that determines the strength of the
perspective projection. The greater the value, the stronger the distortion applied to a display object moving along its
z-axis. A low fieldOfView value results in very little scaling and causes objects to appear to move only slightly back
in space. A high fieldOfView value causes more distortion and the appearance of greater movement. The maximum
value of 179.9999... degrees results in an extreme fish-eye camera lens effect. The maximum value of fieldOfView is
179.9999... and the minimum is 0.00001... Exactly 0 and 180 are illegal values.
Projection center
Flash Player 10 and later, Adobe AIR 1.5 and later
The projectionCenter property represents the vanishing point in the perspective projection. It is applied as an offset
to the default registration point (0,0) in the upper-left corner of the stage.
As an object appears to move further from the viewer, it skews towards the vanishing point and eventually vanishes.
Imagine an infinitely long hall. As you look down the hall, the edges of the walls converge to a vanishing point far down
the hall.
If the vanishing point is at the center of the stage, the hall disappears towards a point in the center. The default value
for the projectionCenter property is the center of the stage. If, for example, you want elements to appear on the left
of the stage and a 3D area to appear on the right, set the projectionCenter to a point on the right of the stage to make
that the vanishing point of your 3D viewing area.
Focal length
Flash Player 10 and later, Adobe AIR 1.5 and later
The focalLength property represents the distance between the origin of the viewpoint (0,0,0) and the location of the
display object on its z-axis.
A long focal length is like a telephoto lens with a narrow view and compressed distances between objects. A short focal
length is like a wide angle lens, with which you get a wide view with a lot of distortion. A medium focal length
approximates what the human eye sees.
Typically the focalLength is re-calculated dynamically during perspective transformation as the display object
moves, but you can set it explicitly.

335
ACTIONSCRIPT 3.0 DEVELOPER’S GUIDE
Working in three dimensions (3D)
Last updated 3/21/2011
Default perspective projection values
Flash Player 10 and later, Adobe AIR 1.5 and later
The default PerspectiveProjection object created on the root has the following values:
•fieldOfView: 55
•perspectiveCenter: stagewidth/2, stageHeight/2
•focalLength: stageWidth/ 2 * ( cos(fieldOfView/2) / sin(fieldOfView/2) )
These are the values that are used if you do not create your own PerspectiveProjection object.
You can instantiate your own PerspectiveProjection object with the intention of modifying the projectionCenter
and fieldOfView yourself. In this case, the default values of the newly created object are the following, based on a
default stage size of 500 by 500:
•fieldOfView: 55
•perspectiveCenter: 250,250
•focalLength: 480.24554443359375
Example: Perspective projection
Flash Player 10 and later, Adobe AIR 1.5 and later
The following example demonstrates the use of perspective projection to create 3D space. It shows how you can modify
the vanishing point and change the perspective projection of the space through the projectionCenter property. This
modification forces the recalculation of the focalLength and fieldOfView with its concomitant distortion of the 3D
space.
This example:
1Creates a sprite named center, as a circle with cross hairs
2Assigns the coordinates of the center sprite to the projectionCenter property of the perspectiveProjection
property of the transform property of the root
3Adds event listeners for mouse events that call handlers that modify the projectionCenter so that it follows the
location of the center object
4Creates four accordion-style boxes that form the walls of the perspective space
When you test this example, ProjectionDragger.swf, drag the circle around to different locations. The vanishing point
follows the circle, landing wherever you drop it. Watch the boxes that enclose the space stretch and become distorted
when you move the projection center far from the center of the stage.
To get the application files for this sample, see www.adobe.com/go/learn_programmingAS3samples_flash. The
ProjectionDragger application files are in the Samples/ProjectionDragger folder.

336
ACTIONSCRIPT 3.0 DEVELOPER’S GUIDE
Working in three dimensions (3D)
Last updated 3/21/2011
package
{
import flash.display.Sprite;
import flash.display.Shape;
import flash.geom.Point;
import flash.events.*;
public class ProjectionDragger extends Sprite
{
private var center : Sprite;
private var boxPanel:Shape;
private var inDrag:Boolean = false;
public function ProjectionDragger():void
{
createBoxes();
createCenter();
}
public function createCenter():void
{
var centerRadius:int = 20;
center = new Sprite();
// circle
center.graphics.lineStyle(1, 0x000099);
center.graphics.beginFill(0xCCCCCC, 0.5);
center.graphics.drawCircle(0, 0, centerRadius);
center.graphics.endFill();
// cross hairs
center.graphics.moveTo(0, centerRadius);
center.graphics.lineTo(0, -centerRadius);
center.graphics.moveTo(centerRadius, 0);
center.graphics.lineTo(-centerRadius, 0);
center.x = 175;
center.y = 175;
center.z = 0;
this.addChild(center);
center.addEventListener(MouseEvent.MOUSE_DOWN, startDragProjectionCenter);
center.addEventListener(MouseEvent.MOUSE_UP, stopDragProjectionCenter);
center.addEventListener( MouseEvent.MOUSE_MOVE, doDragProjectionCenter);
root.transform.perspectiveProjection.projectionCenter = new Point(center.x,
center.y);
}
public function createBoxes():void
{
// createBoxPanel();
var boxWidth:int = 50;
var boxHeight:int = 50;
var numLayers:int = 12;
var depthPerLayer:int = 50;
// var boxVec:Vector.<Shape> = new Vector.<Shape>(numLayers);
for (var i:int = 0; i < numLayers; i++)
{
this.addChild(createBox(150, 50, (numLayers - i) * depthPerLayer, boxWidth,
boxHeight, 0xCCCCFF));

337
ACTIONSCRIPT 3.0 DEVELOPER’S GUIDE
Working in three dimensions (3D)
Last updated 3/21/2011
this.addChild(createBox(50, 150, (numLayers - i) * depthPerLayer, boxWidth,
boxHeight, 0xFFCCCC));
this.addChild(createBox(250, 150, (numLayers - i) * depthPerLayer, boxWidth,
boxHeight, 0xCCFFCC));
this.addChild(createBox(150, 250, (numLayers - i) * depthPerLayer, boxWidth,
boxHeight, 0xDDDDDD));
}
}
public function createBox(xPos:int = 0, yPos:int = 0, zPos:int = 100, w:int = 50, h:int
= 50, color:int = 0xDDDDDD):Shape
{
var box:Shape = new Shape();
box.graphics.lineStyle(2, 0x666666);
box.graphics.beginFill(color, 1.0);
box.graphics.drawRect(0, 0, w, h);
box.graphics.endFill();
box.x = xPos;
box.y = yPos;
box.z = zPos;
return box;
}
public function startDragProjectionCenter(e:Event)
{
center.startDrag();
inDrag = true;
}
public function doDragProjectionCenter(e:Event)
{
if (inDrag)
{
root.transform.perspectiveProjection.projectionCenter = new Point(center.x,
center.y);
}
}
public function stopDragProjectionCenter(e:Event)
{
center.stopDrag();
root.transform.perspectiveProjection.projectionCenter = new Point(center.x,
center.y);
inDrag = false;
}
}
}
For more complex perspective projection, use the Matrix3D class.

338
ACTIONSCRIPT 3.0 DEVELOPER’S GUIDE
Working in three dimensions (3D)
Last updated 3/21/2011
Performing complex 3D transformations
Flash Player 10 and later, Adobe AIR 1.5 and later
The Matrix3D class lets you transform 3D points within a coordinate space or map 3D points from one coordinate
space to another.
You don't need to understand matrix mathematics to use the Matrix3D class. Most of the common transformation
operations can be handled using the methods of the class. You don't have to worry about explicitly setting or
calculating the values of each element in the matrix.
After you set the z property of a display object to a numeric value, you can retrieve the object’s transformation matrix
using the Matrix3D property of the display object’s Transform object:
var leafMatrix:Matrix3D = this.transform.matrix3D;
You can use the methods of the Matrix3D object to perform translation, rotation, scaling, and perspective projection
on the display object.
Use the Vector3D class with its x, y, and z properties for managing 3D points. It can also represent a spatial vector in
physics, which has a direction and a magnitude. The methods of the Vector3D class let you perform common
calculations with spatial vectors, such as addition, dot product, and cross product calculations.
Note: The Vector3D class is not related to the ActionScript Vector class. The Vector3D class contains properties and
methods for defining and manipulating 3D points, while the Vector class supports arrays of typed objects.
Creating Matrix3D objects
Flash Player 10 and later, Adobe AIR 1.5 and later
There are three main ways of creating or retrieving Matrix3D objects:
1Use the Matrix3D() constructor method to instantiate a new matrix. The Matrix3D() constructor takes a Vector
object containing 16 numeric values and places each value into a cell of the matrix. For example:
var rotateMatrix:Matrix3D = new Matrix3D(1,0,0,1, 0,1,0,1, 0,0,1,1, 0,0,0,1);
2Set the value the z property of a display object. Then retrieve the transformation matrix from the
transform.matrix3D property of that object.
3Retrieve the Matrix3D object that controls the display of 3D objects on the stage by getting the value of the
perspectiveProjection.matrix3D property of the root display object.
Applying multiple 3D transformations
Flash Player 10 and later, Adobe AIR 1.5 and later
You can apply many 3D transformations at once using a Matrix3D object. For example if you wanted to rotate, scale,
and then move a cube, you could apply three separate transformations to each point of the cube. However it is much
more efficient to precalculate multiple transformations in one Matrix3D object and then perform one matrix
transformation on each of the points.
Note: The order in which matrix transformations are applied is important. Matrix calculations are not commutative. For
example, applying a rotation followed by a translation gives a different result than applying the same translation followed
by the same rotation.

339
ACTIONSCRIPT 3.0 DEVELOPER’S GUIDE
Working in three dimensions (3D)
Last updated 3/21/2011
The following example shows two ways of performing multiple 3D transformations.
package {
import flash.display.Sprite;
import flash.display.Shape;
import flash.display.Graphics;
import flash.geom.*;
public class Matrix3DTransformsExample extends Sprite
{
private var rect1:Shape;
private var rect2:Shape;
public function Matrix3DTransformsExample():void
{
var pp:PerspectiveProjection = this.transform.perspectiveProjection;
pp.projectionCenter = new Point(275,200);
this.transform.perspectiveProjection = pp;
rect1 = new Shape();
rect1.x = -70;
rect1.y = -40;
rect1.z = 0;
rect1.graphics.beginFill(0xFF8800);
rect1.graphics.drawRect(0,0,50,80);
rect1.graphics.endFill();
addChild(rect1);
rect2 = new Shape();
rect2.x = 20;
rect2.y = -40;
rect2.z = 0;
rect2.graphics.beginFill(0xFF0088);
rect2.graphics.drawRect(0,0,50,80);
rect2.graphics.endFill();
addChild(rect2);
doTransforms();
}
private function doTransforms():void
{
rect1.rotationX = 15;
rect1.scaleX = 1.2;
rect1.x += 100;
rect1.y += 50;
rect1.rotationZ = 10;
var matrix:Matrix3D = rect2.transform.matrix3D;
matrix.appendRotation(15, Vector3D.X_AXIS);
matrix.appendScale(1.2, 1, 1);
matrix.appendTranslation(100, 50, 0);
matrix.appendRotation(10, Vector3D.Z_AXIS);
rect2.transform.matrix3D = matrix;
}
}
}

340
ACTIONSCRIPT 3.0 DEVELOPER’S GUIDE
Working in three dimensions (3D)
Last updated 3/21/2011
In the doTransforms() method the first block of code uses the DisplayObject properties to change the rotation,
scaling, and position of a rectangle shape. The second block of code uses the methods of the Matrix3D class to do the
same transformations.
The main advantage of using the Matrix3D methods is that all of the calculations are performed in the matrix first,.
Then they are applied to the display object only once, when its transform.matrix3D property is set. Setting
DisplayObject properties make the source code a bit simpler to read. However each time a rotation or scaling property
is set, it causes multiple calculations and changes multiple display object properties.
If your code will apply the same complex transformations to display objects more than once, save the Matrix3D object
as a variable and then reapply it over and over.
Using Matrix3D objects for reordering display
Flash Player 10 and later, Adobe AIR 1.5 and later
As mentioned previously, the layering order of display objects in the display list determines the display layering order,
regardless of their relative z-axes. If your animation transforms the properties of display objects into an order that
differs from the display list order, the viewer might see display object layering that does not correspond to the z-axis
layering. So, an object that should appear further away from the viewer might appear in front of an object that is closer
to the viewer.
To ensure that the layering of 3D display objects corresponds to the relative depths of the objects, use an approach like
the following:
1Use the getRelativeMatrix3D() method of the Transform object to get the relative z-axes of the child 3D
display objects.
2Use the removeChild() method to remove the objects from the display list.
3Sort the display objects based on their relative z-axis values.
4Use the addChild() method to add the children back to the display list in reverse order.
This reordering ensures that your objects display in accordance with their relative z-axes.
The following code enforces the correct display of the six faces of a 3D box. It reorders the faces of the box after
rotations have been applied to the it:
public var faces:Array; . . .
public function ReorderChildren()
{
for(var ind:uint = 0; ind < 6; ind++)
{
faces[ind].z = faces[ind].child.transform.getRelativeMatrix3D(root).position.z;
this.removeChild(faces[ind].child);
}
faces.sortOn("z", Array.NUMERIC | Array.DESCENDING);
for (ind = 0; ind < 6; ind++)
{
this.addChild(faces[ind].child);
}
}
To get the application files for this sample, see www.adobe.com/go/learn_programmingAS3samples_flash. The
application files are in the Samples/ReorderByZ folder.

341
ACTIONSCRIPT 3.0 DEVELOPER’S GUIDE
Working in three dimensions (3D)
Last updated 3/21/2011
Using triangles for 3D effects
Flash Player 10 and later, Adobe AIR 1.5 and later
In ActionScript, you perform bitmap transformations using the Graphics.drawTriangles() method, because 3D
models are represented by a collection of triangles in space. (However, Flash Player and AIR do not support a depth
buffer, so display objects are still inherently flat, or 2D. This is described in “Understanding the 3D features of Flash
Player and the AIR runtime” on page 330.) The Graphics.drawTriangles() method is like the
Graphics.drawPath() method, as it takes a set of coordinates to draw a triangle path.
To familiarize yourself with using Graphics.drawPath(), see “Drawing Paths” on page 225.
The
Graphics.drawTriangles()
method uses a Vector.<Number> to specify the point locations for the triangle path:
drawTriangles(vertices:Vector.<Number>, indices:Vector.<int> = null, uvtData:Vector.<Number>
= null, culling:String = "none"):void
The first parameter of drawTriangles() is the only required parameter: the vertices parameter. This parameter is
a vector of numbers defining the coordinates through which your triangles are drawn. Every three sets of coordinates
(six numbers) represents a triangle path. Without the indices parameter, the length of the vector should always be a
factor of six, since each triangle requires three coordinate pairs (three sets of two x/y values). For example:
graphics.beginFill(0xFF8000);
graphics.drawTriangles(
Vector.<Number>([
10,10, 100,10, 10,100,
110,10, 110,100, 20,100]));
Neither of these triangles share any points, but if they did, the second drawTriangles() parameter, indices, could
be used to reuse values in the vertices vector for more than one triangle.
When using the indices parameter, be aware that the indices values are point indices, not indices that relate directly
to the vertices array elements. In other words, an index in the vertices vector as defined by indices is actually the
real index divided by 2. For the third point of a vertices vector, for example, use an indices value of 2, even though
the first numeric value of that point starts at the vector index of 4.
For example, merge two triangles to share the diagonal edge using the indices parameter:
graphics.beginFill(0xFF8000);
graphics.drawTriangles(
Vector.<Number>([10,10, 100,10, 10,100, 100,100]),
Vector.<int>([0,1,2, 1,3,2]));
Notice that though a square has now been drawn using two triangles, only four points were specified in the vertices
vector. Using indices, the two points shared by the two triangles are reused for each triangle. This reduces the overall
vertices count from 6 (12 numbers) to 4 (8 numbers):

342
ACTIONSCRIPT 3.0 DEVELOPER’S GUIDE
Working in three dimensions (3D)
Last updated 3/21/2011
A square drawn with two triangles using the vertices parameter
This technique becomes useful with larger triangle meshes where most points are shared by multiple triangles.
All fills can be applied to triangles. The fills are applied to the resulting triangle mesh as they would to any other shape.
Transforming bitmaps
Flash Player 10 and later, Adobe AIR 1.5 and later
Bitmap transformations provide the illusion of perspective or "texture" on a three-dimensional object. Specifically, you
can distort a bitmap toward a vanishing point so the image appears to shrink as it moves toward the vanishing point.
Or, you can use a two-dimensional bitmap to create a surface for a three-dimensional object, providing the illusion of
texture or “wrapping” on that three-dimensional object.
A two-dimensional surface using a vanishing point and a three-dimensional object wrapped with a bitmap.
UV mapping
Flash Player 10 and later, Adobe AIR 1.5 and later
Once you start working with textures, you'll want to make use of the uvtData parameter of drawTriangles(). This
parameter allows you to set up UV mapping for bitmap fills.
UV mapping is a method for texturing objects. It relies on two values, a U horizontal (x) value and a V vertical (y)
value. Rather than being based on pixel values, they are based on percentages. 0 U and 0 V is the upper-left of an image
and 1 U and 1 V is the lower-right:
01
23
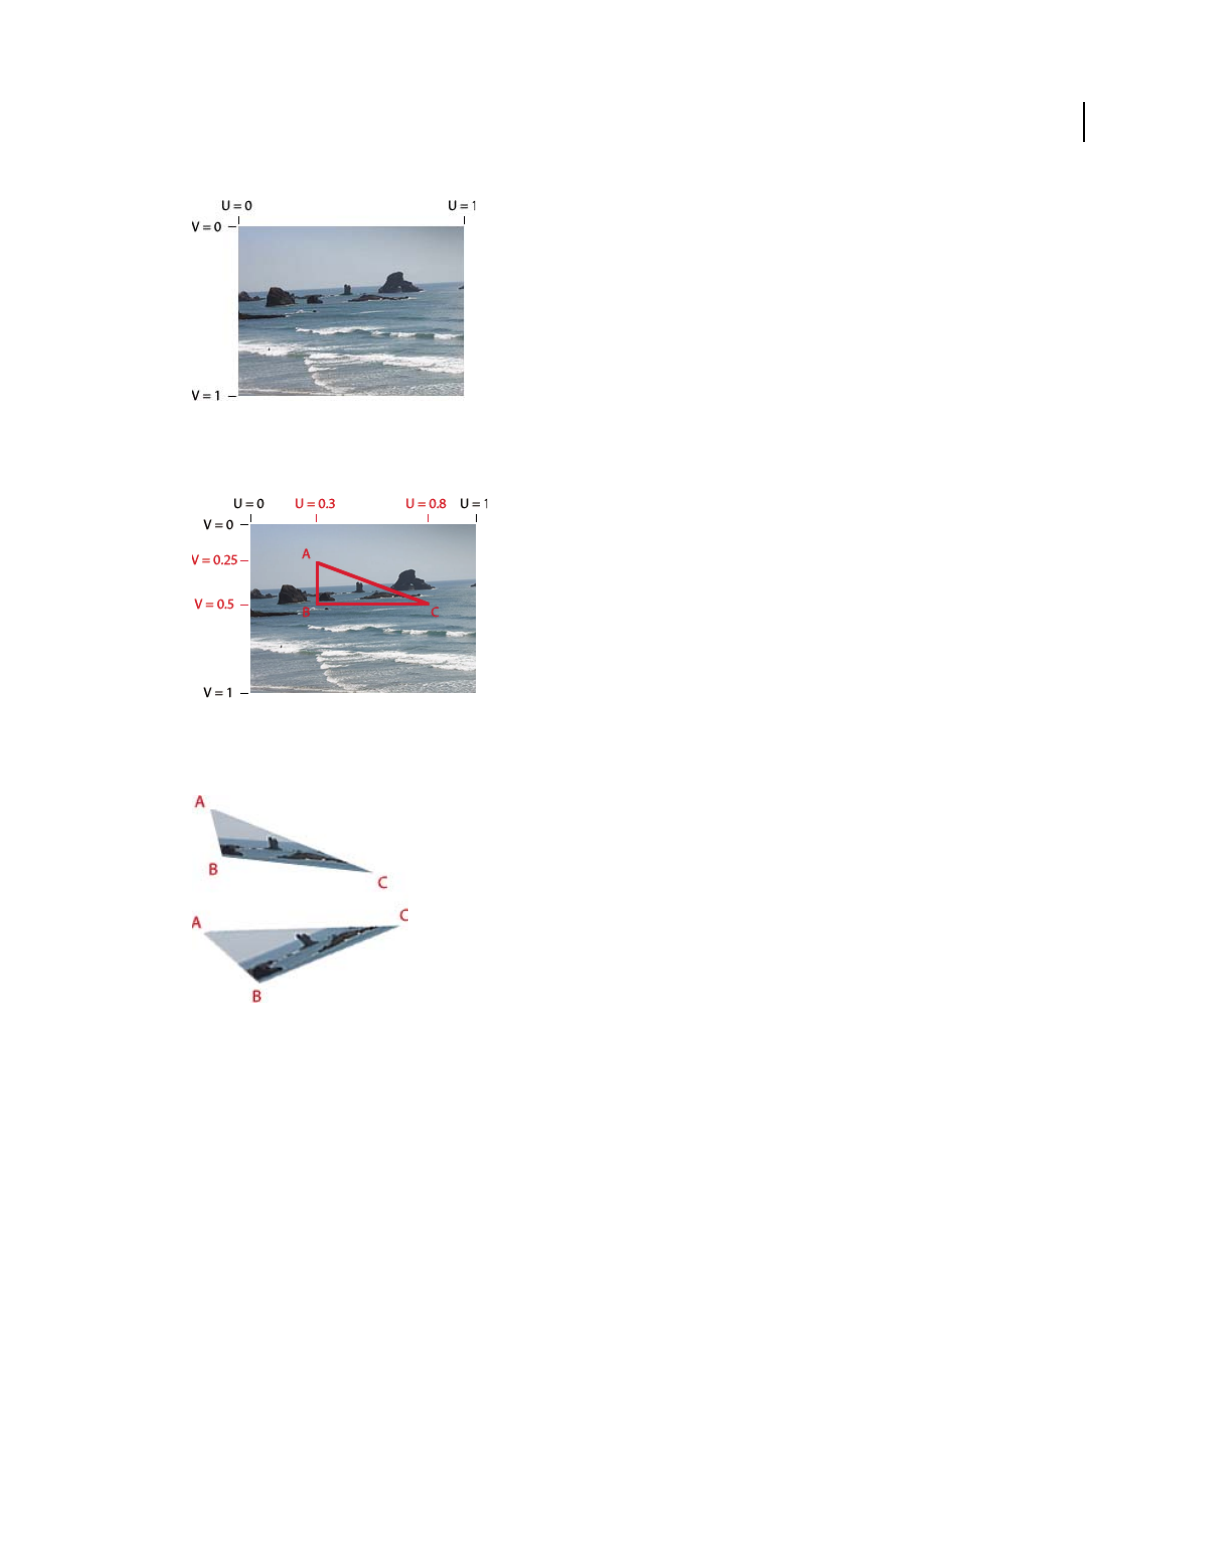
343
ACTIONSCRIPT 3.0 DEVELOPER’S GUIDE
Working in three dimensions (3D)
Last updated 3/21/2011
The UV 0 and 1 locations on a bitmap image
Vectors of a triangle can be given UV coordinates to associate themselves with the respective locations on an image:
The UV coordinates of a triangular area of a bitmap image
The UV values stay consistent with the points of the triangle:
The vertices of the triangle move and the bitmap distorts to keep the UV values for an individual point the same
As ActionScript 3D transformations are applied to the triangle associated with the bitmap, the bitmap image is applied
to the triangle based on the UV values. So, instead of using matrix calculations, set or adjust the UV values to create a
three-dimensional effect.
The Graphics.drawTriangles() method also accepts an optional piece of information for three-dimensional
transformations: the T value. The T value in uvtData represents the 3D perspective, or more specifically, the scale
factor of the associated vertex. UVT mapping adds perspective correction to UV mapping. For example, if an object is
positioned in 3D space away from the viewpoint so that it appears to be 50% its “original” size, the T value of that object
would be 0.5. Since triangles are drawn to represent objects in 3D space, their locations along the z-axis determine their
T values. The equation that determines the T value is:
T = focalLength/(focalLength + z);
In this equation, focalLength represents a focal length or calculated "screen" location which dictates the amount of
perspective provided in the view.
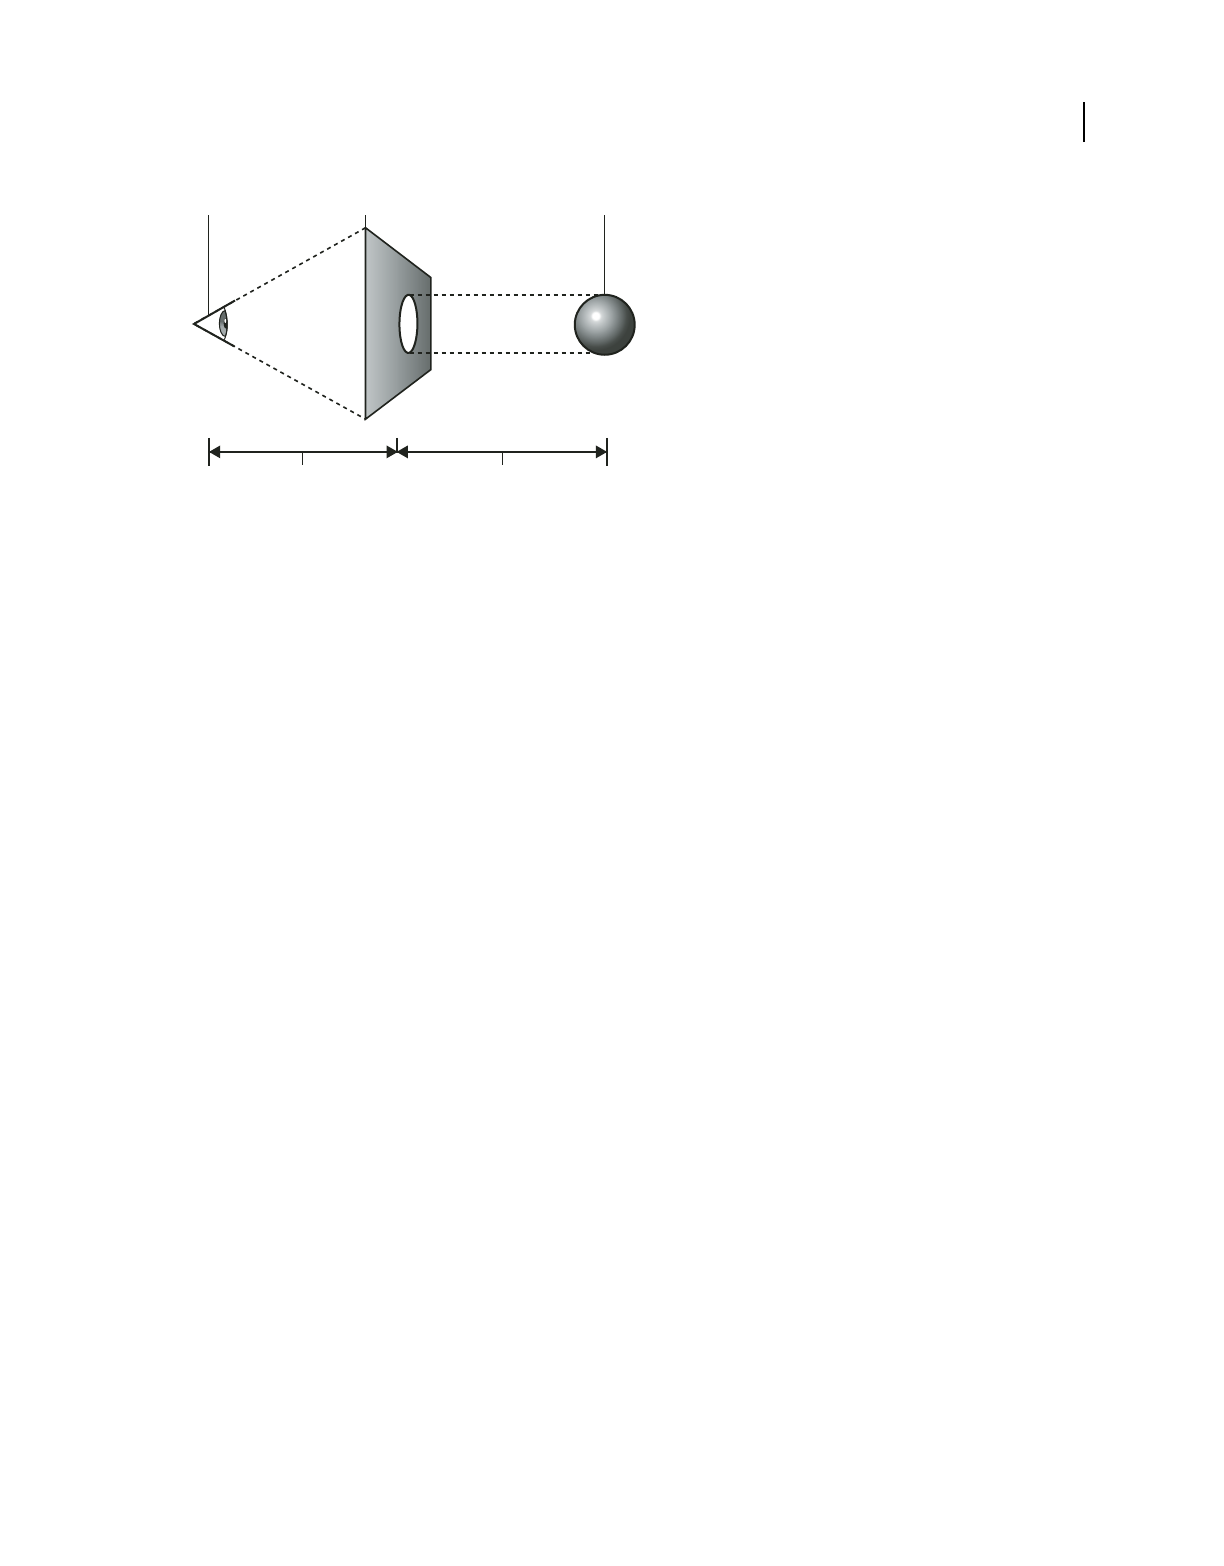
344
ACTIONSCRIPT 3.0 DEVELOPER’S GUIDE
Working in three dimensions (3D)
Last updated 3/21/2011
The focal length and z value
A. viewpoint B. screen C. 3D object D. focalLength value E. z value
The value of T is used to scale basic shapes to make them seem further in the distance. It is usually the value used to
convert 3D points to 2D points. In the case of UVT data, it is also used to scale a bitmap between the points within a
triangle with perspective.
When you define UVT values, the T value directly follows the UV values defined for a vertex. With the inclusion of T,
every three values in the uvtData parameter (U, V, and T) match up with every two values in the vertices parameter
(x, and y). With UV values alone, uvtData.length == vertices.length. With the inclusion of a T value, uvtData.length =
1.5*vertices.length.
The following example shows a plane being rotated in 3D space using UVT data. This example uses an image called
ocean.jpg and a “helper” class, ImageLoader, to load the ocean.jpg image so it can be assigned to the BitmapData
object.
Here is the ImageLoader class source (save this code into a file named ImageLoader.as):
D E
BA C

345
ACTIONSCRIPT 3.0 DEVELOPER’S GUIDE
Working in three dimensions (3D)
Last updated 3/21/2011
package {
import flash.display.*
import flash.events.*;
import flash.net.URLRequest;
public class ImageLoader extends Sprite {
public var url:String;
public var bitmap:Bitmap;
public function ImageLoader(loc:String = null) {
if (loc != null){
url = loc;
loadImage();
}
}
public function loadImage():void{
if (url != null){
var loader:Loader = new Loader();
loader.contentLoaderInfo.addEventListener(Event.COMPLETE, onComplete);
loader.contentLoaderInfo.addEventListener(IOErrorEvent.IO_ERROR, onIoError);
var req:URLRequest = new URLRequest(url);
loader.load(req);
}
}
private function onComplete(event:Event):void {
var loader:Loader = Loader(event.target.loader);
var info:LoaderInfo = LoaderInfo(loader.contentLoaderInfo);
this.bitmap = info.content as Bitmap;
this.dispatchEvent(new Event(Event.COMPLETE));
}
private function onIoError(event:IOErrorEvent):void {
trace("onIoError: " + event);
}
}
}
And here is the ActionScript that uses triangles, UV mapping, and T values to make the image appear as if it is
shrinking toward a vanishing point and rotating. Save this code in a file named Spinning3dOcean.as:

346
ACTIONSCRIPT 3.0 DEVELOPER’S GUIDE
Working in three dimensions (3D)
Last updated 3/21/2011
package {
import flash.display.*
import flash.events.*;
import flash.utils.getTimer;
public class Spinning3dOcean extends Sprite {
// plane vertex coordinates (and t values)
var x1:Number = -100,y1:Number = -100,z1:Number = 0,t1:Number = 0;
var x2:Number = 100,y2:Number = -100,z2:Number = 0,t2:Number = 0;
var x3:Number = 100,y3:Number = 100,z3:Number = 0,t3:Number = 0;
var x4:Number = -100,y4:Number = 100,z4:Number = 0,t4:Number = 0;
var focalLength:Number = 200;
// 2 triangles for 1 plane, indices will always be the same
var indices:Vector.<int>;
var container:Sprite;
var bitmapData:BitmapData; // texture
var imageLoader:ImageLoader;
public function Spinning3dOcean():void {
indices = new Vector.<int>();
indices.push(0,1,3, 1,2,3);
container = new Sprite(); // container to draw triangles in
container.x = 200;
container.y = 200;
addChild(container);
imageLoader = new ImageLoader("ocean.jpg");
imageLoader.addEventListener(Event.COMPLETE, onImageLoaded);
}
function onImageLoaded(event:Event):void {
bitmapData = imageLoader.bitmap.bitmapData;
// animate every frame
addEventListener(Event.ENTER_FRAME, rotatePlane);
}
function rotatePlane(event:Event):void {
// rotate vertices over time
var ticker = getTimer()/400;
z2 = z3 = -(z1 = z4 = 100*Math.sin(ticker));
x2 = x3 = -(x1 = x4 = 100*Math.cos(ticker));
// calculate t values
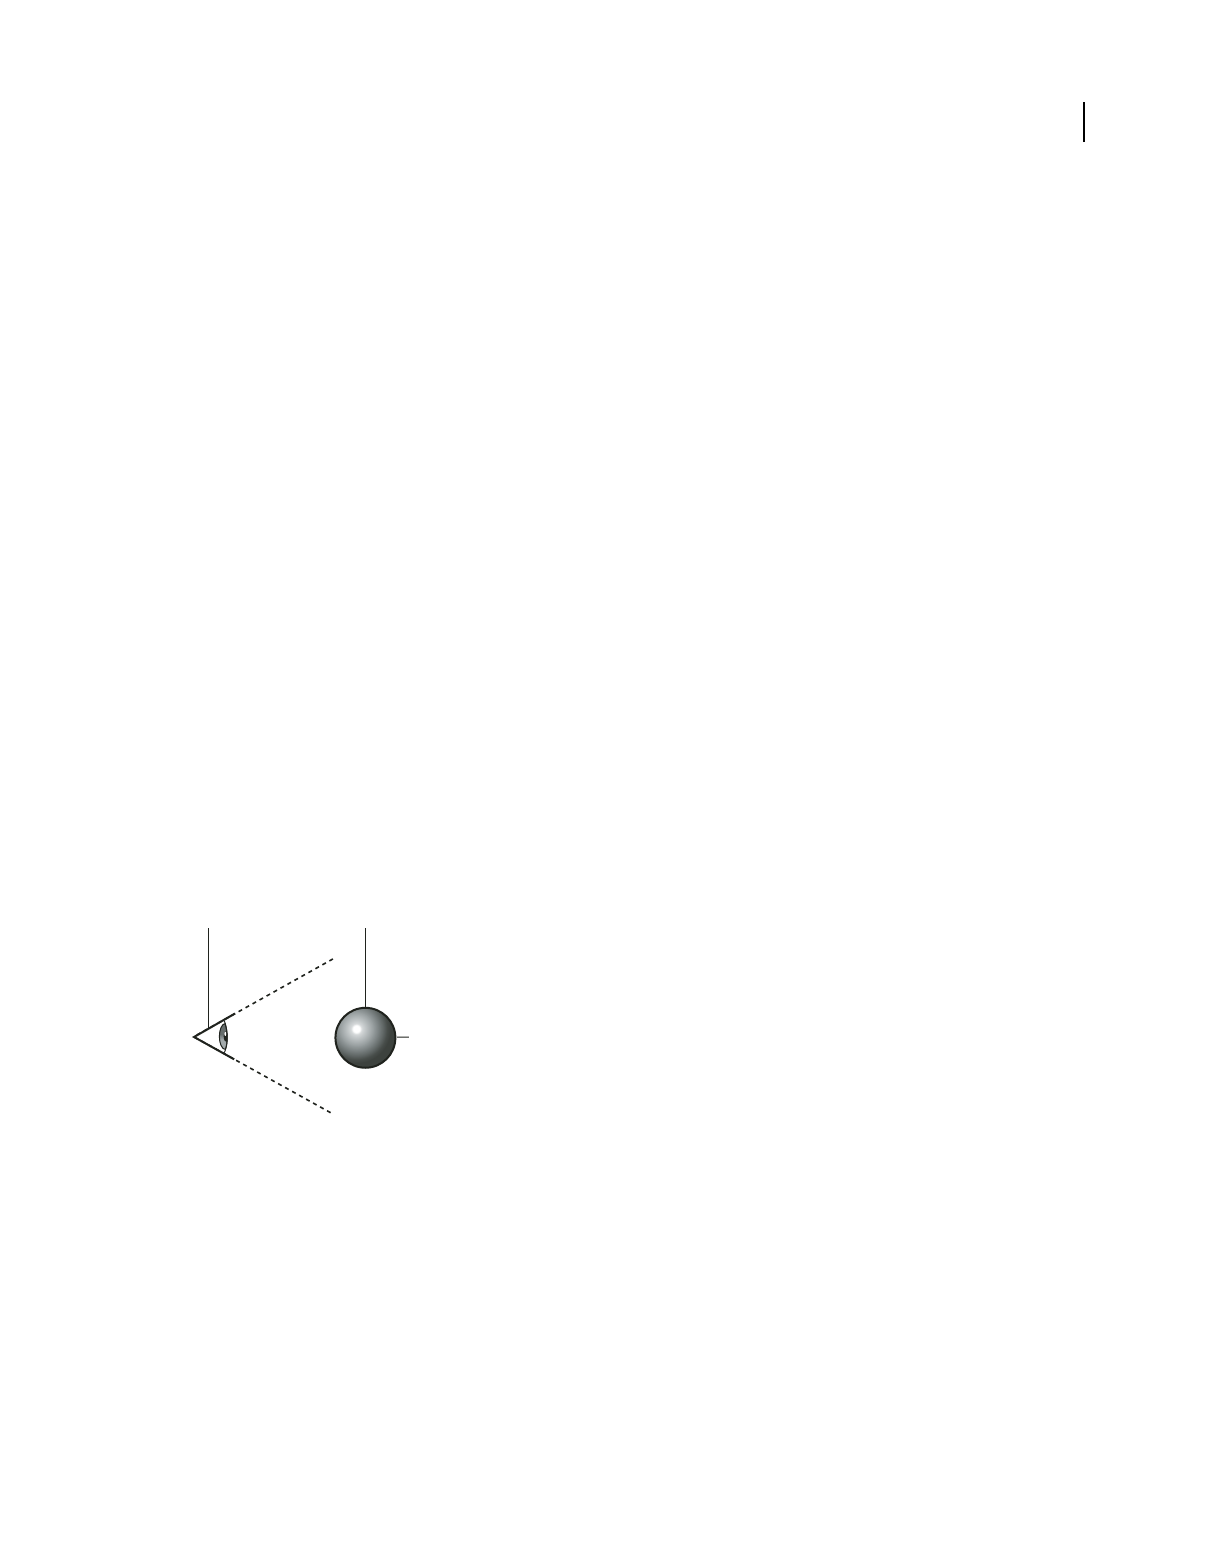
347
ACTIONSCRIPT 3.0 DEVELOPER’S GUIDE
Working in three dimensions (3D)
Last updated 3/21/2011
t1 = focalLength/(focalLength + z1);
t2 = focalLength/(focalLength + z2);
t3 = focalLength/(focalLength + z3);
t4 = focalLength/(focalLength + z4);
// determine triangle vertices based on t values
var vertices:Vector.<Number> = new Vector.<Number>();
vertices.push(x1*t1,y1*t1, x2*t2,y2*t2, x3*t3,y3*t3, x4*t4,y4*t4);
// set T values allowing perspective to change
// as each vertex moves around in z space
var uvtData:Vector.<Number> = new Vector.<Number>();
uvtData.push(0,0,t1, 1,0,t2, 1,1,t3, 0,1,t4);
// draw
container.graphics.clear();
container.graphics.beginBitmapFill(bitmapData);
container.graphics.drawTriangles(vertices, indices, uvtData);
}
}
}
To test this example, save these two class files in the same directory as an image named “ocean.jpg”. You can see how
the original bitmap is transformed to appear as if it is vanishing in the distance and rotating in 3D space.
Culling
Flash Player 10 and later, Adobe AIR 1.5 and later
Culling is the process that determines which surfaces of a three-dimensional object the renderer should not render
because they are hidden from the current viewpoint. In 3D space, the surface on the “back” of a three-dimensional
object is hidden from the viewpoint:
The back of a 3D object is hidden from the viewpoint.
A. viewpoint B. 3D object C. the back of a three dimensional object
Inherently all triangles are always rendered no matter their size, shape, or position. Culling insures that Flash Player
or AIR renders your 3D object correctly. In addition, to save on rendering cycles, sometimes you want some triangles
to be skipped by the render. Consider a cube rotating in space. At any given time, you'll never see more than three sides
of that cube since the sides not in view would be facing the other direction on the other side of the cube. Since those
sides are not going to be seen, the renderer shouldn't draw them. Without culling, Flash Player or AIR renders both
the front and back sides.
BA
C
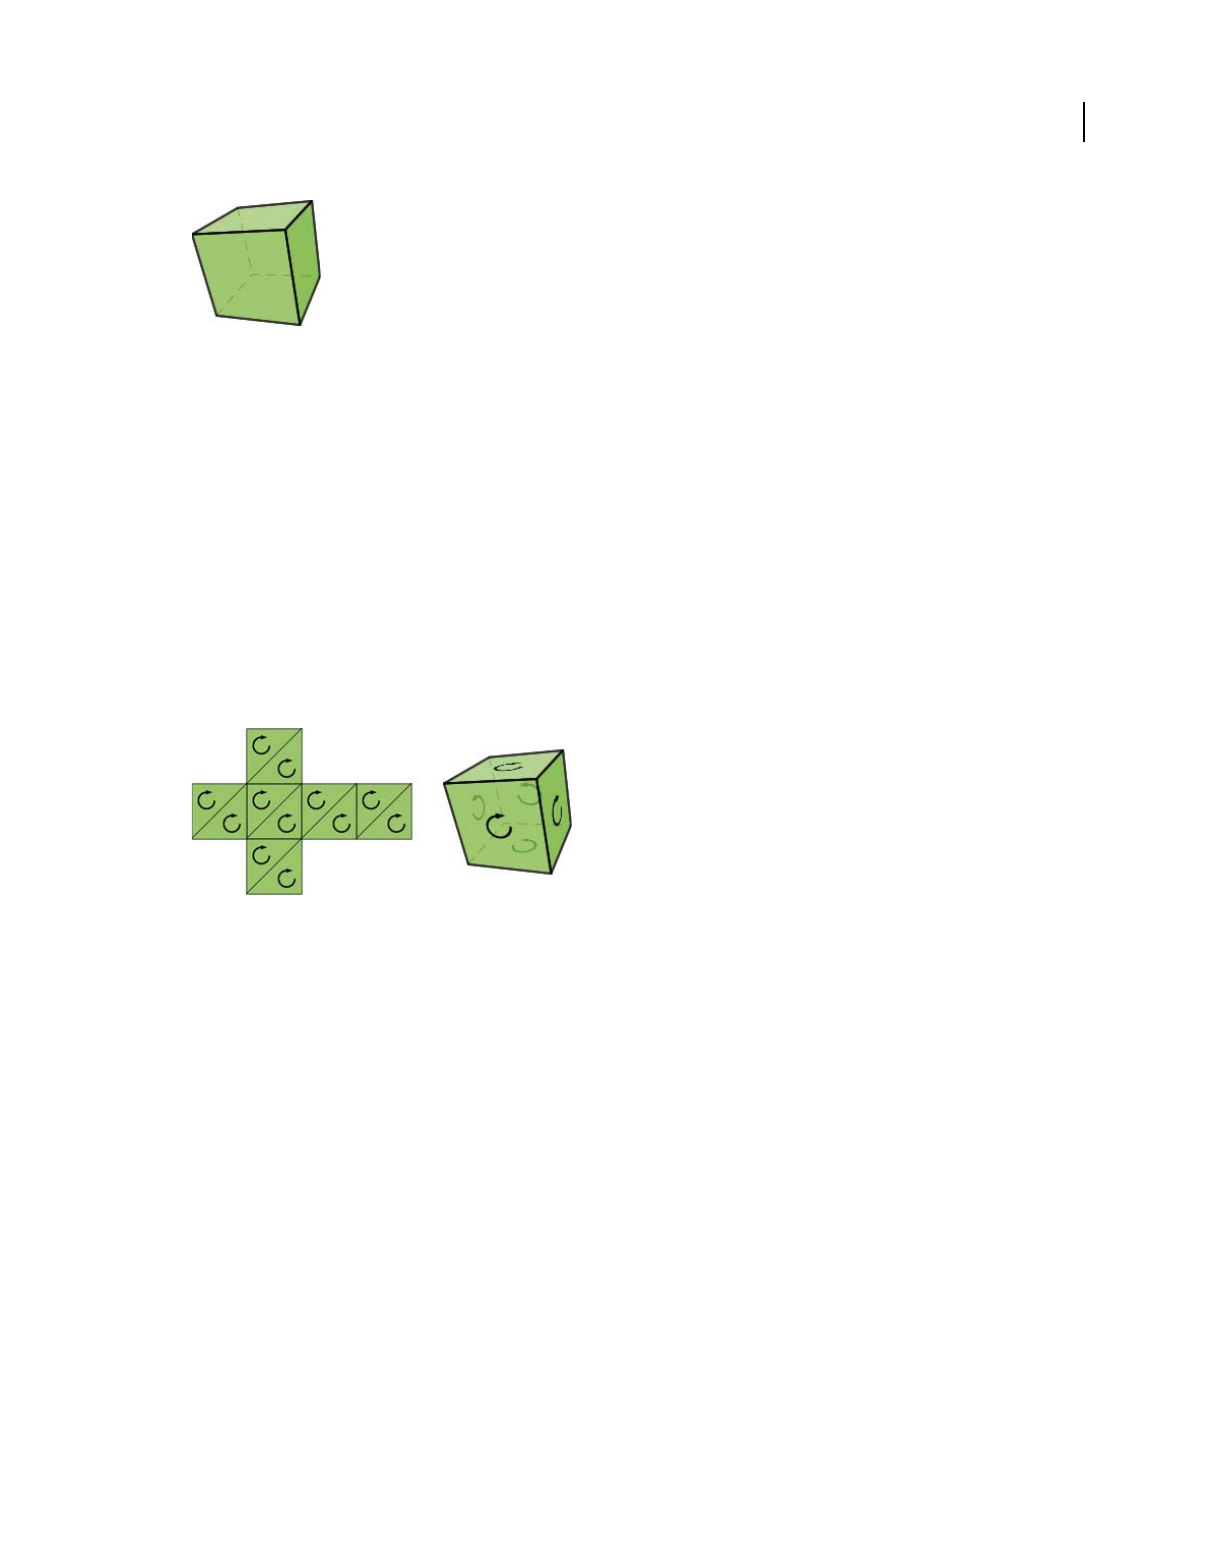
348
ACTIONSCRIPT 3.0 DEVELOPER’S GUIDE
Working in three dimensions (3D)
Last updated 3/21/2011
A cube has sides not visible from the current viewpoint
So, the Graphics.drawTriangles() method has a fourth parameter to establish a culling value:
public function drawTriangles(vertices:Vector.<Number>, indices:Vector.<int> = null,
uvtData:Vector.<Number> = null, culling:String = "none"):void
The culling parameter is a value from the TriangleCulling enumeration class: TriangleCulling.NONE,
TriangleCulling.POSITIVE, and TriangleCulling.NEGATIVE. These values are dependent upon the direction of
the triangle path defining the surface of the object. The ActionScript API for determining the culling assumes that all
out-facing triangles of a 3D shape are drawn with the same path direction. Once a triangle face is turned around, the
path direction also changes. At that point, the triangle can be culled (removed from rendering).
So, a TriangleCulling value of POSITIVE removes triangles with positive path direction (clockwise). A
TriangleCulling value of NEGATIVE removes triangles with a negative (counterclockwise) path direction. In the case
of a cube, while the front facing surfaces have a positive path direction, the back facing surfaces have a negative path
direction:
A cube “unwrapped” to show the path direction. When “wrapped”, the back side path direction is reversed.
To see how culling works, start with the earlier example from “UV mapping” on page 342, set the culling parameter of
the drawTriangles() method to TriangleCulling.NEGATIVE:
container.graphics.drawTriangles(vertices, indices, uvtData, TriangleCulling.NEGATIVE);
Notice the “back” side of the image is not rendered as the object rotates.

349
Last updated 3/21/2011
Chapter 18: Basics of Working with text
Flash Player 9 and later, Adobe AIR 1.0 and later
To display text on the screen in Adobe® Flash® Player or Adobe® AIR™, use an instance of the TextField class or use the
Flash Text Engine classes. These classes allow you to create, display, and format text. Alternatively, you can use the
Text Layout Framework (TLF) — a component library based on the Flash Text Engine classes, but designed for ease
of use.
You can establish specific content for text fields, or designate the source for the text, and then set the appearance of
that text. You can also respond to user events as the user inputs text or clicks a hypertext link.
Both the TextField class and the Flash Text Engine classes allow you to display and manage text in Flash Player and
AIR.You can use the TextField class to create text objects for display and input. The TextField class provides the basis
for other text-based components, such as TextArea and TextInput. You can use the TextFormat class to set character
and paragraph formatting for TextField objects and you can apply Cascading Style Sheets (CSS) using the
Textfield.styleSheet property and the StyleSheet class. You can assign HTML-formatted text, which can contain
embedded media (movie clips, SWF files, GIF files, PNG files, and JPEG files), directly to a text field.
The Flash Text Engine, available starting with Flash Player 10 and Adobe AIR 1.5, provides low-level support for
sophisticated control of text metrics, formatting, and bi-directional text. It also offers improved text flow and enhanced
language support. While you can use the Flash Text Engine to create and manage text elements, it is primarily designed
as the foundation for creating text-handling components and requires greater programming expertise.The Text
Layout Framework, which includes a text-handling component based on the Flash Text Engine, provides an easier way
to use the advanced features of the new text engine. The Text Layout Framework is an extensible library built entirely
in ActionScript 3.0. You can use the existing TLF component, or use the framework to build your own text component.
For more information on these topics, see:
•“Using the TextField class” on page 351
•“Using the Flash Text Engine” on page 375
•“Using the Text Layout Framework” on page 404
Important concepts and terms
The following reference list contains important terms involved with text handling:
Cascading style sheets A standard syntax for specifying styles and formatting for content that’s structured in XML (or
HTML) format.
Device font A font that is installed on the user’s machine.
Dynamic text field A text field whose contents can be changed by ActionScript but not by user input.
Embedded font A font that has its character outline data stored in the application SWF file.
HTML text Text content entered into a text field using ActionScript that includes HTML formatting tags along with
actual text content.
Input text field A text field whose contents can be changed either by user input or by ActionScript.
Kerning An adjustment of the spacing between pairs of characters to make the spacing in words more proportional
and the text easier to read.
Static text field A text field created in the authoring tool, whose content cannot change when the SWF file is running.

350
ACTIONSCRIPT 3.0 DEVELOPER’S GUIDE
Basics of Working with text
Last updated 3/21/2011
Text line metrics Measurements of the size of various parts of the text content in a text field, such as the baseline of the
text, the height of the top of the characters, size of descenders (the part of some lowercase letters that extends below
the baseline), and so on.
Tracking An adjustment of spacing between groups of letters or blocks of text to increase or decrease the density and
make the text more readable.

351
Last updated 3/21/2011
Chapter 19: Using the TextField class
Flash Player 9 and later, Adobe AIR 1.0 and later
You can use an instance of the TextField class to display text or create a text input field on the screen in Adobe® Flash®
Player or Adobe® AIR™. The TextField class is the basis for other text-based components, such as the TextArea
components or the TextInput components.
Text field content can be pre-specified in the SWF file, loaded from a text file or database, or entered by a user
interacting with your application. Within a text field, the text can appear as rendered HTML content, with images
embedded in the rendered HTML. After you create an instance of a text field, you can use flash.text classes, such as
TextFormat and StyleSheet, to control the appearance of the text. The flash.text package contains nearly all the classes
related to creating, managing, and formatting text in ActionScript.
You can format text by defining the formatting with a TextFormat object and assigning that object to the text field. If
your text field contains HTML text, you can apply a StyleSheet object to the text field to assign styles to specific pieces
of the text field content. The TextFormat object or StyleSheet object contains properties defining the appearance of the
text, such as color, size, and weight. The TextFormat object assigns the properties to all the content within a text field
or to a range of text. For example, within the same text field, one sentence can be bold red text and the next sentence
can be blue italic text.
In addition to the classes in the flash.text package, you can use the flash.events.TextEvent class to respond to user
actions related to text.
More Help topics
“Assigning text formats” on page 358
“Displaying HTML text” on page 353
“Applying cascading style sheets” on page 358
Displaying text
Flash Player 9 and later, Adobe AIR 1.0 and later
Although authoring tools like Adobe Flash Builder and Flash Professional provide several options for displaying text,
including text-related components or text tools, the simplest way to display text programmatically is through a text
field.
Types of text
Flash Player 9 and later, Adobe AIR 1.0 and later
The type of text within a text field is characterized by its source:
•Dynamic text
Dynamic text includes content that is loaded from an external source, such as a text file, an XML file, or even a
remote web service.

352
ACTIONSCRIPT 3.0 DEVELOPER’S GUIDE
Using the TextField class
Last updated 3/21/2011
•Input text
Input text is any text entered by a user or dynamic text that a user can edit. You can set up a style sheet to format
input text, or use the flash.text.TextFormat class to assign properties to the text field for the input content. For more
information, see “Capturing text input” on page 356.
•Static text
Static text is created through Flash Professional only. You cannot create a static text instance using ActionScript
3.0. However, you can use ActionScript classes like StaticText and TextSnapshot to manipulate an existing static
text instance. For more information, see “Working with static text” on page 364.
Modifying the text field contents
Flash Player 9 and later, Adobe AIR 1.0 and later
You can define dynamic text by assigning a string to the flash.text.TextField.text property. You assign a string
directly to the property, as follows:
myTextField.text = "Hello World";
You can also assign the text property a value from a variable defined in your script, as in the following example:
package
{
import flash.display.Sprite;
import flash.text.*;
public class TextWithImage extends Sprite
{
private var myTextBox:TextField = new TextField();
private var myText:String = "Hello World";
public function TextWithImage()
{
addChild(myTextBox);
myTextBox.text = myText;
}
}
}
Alternatively, you can assign the text property a value from a remote variable. You have three options for loading text
values from remote sources:
•The flash.net.URLLoader and flash.net.URLRequest classes load variables for the text from a local or remote
location.
•The FlashVars attribute is embedded in the HTML page hosting the SWF file and can contain values for text
variables.
•The flash.net.SharedObject class manages persistent storage of values. For more information, see “Storing local
data” on page 668.

353
ACTIONSCRIPT 3.0 DEVELOPER’S GUIDE
Using the TextField class
Last updated 3/21/2011
Displaying HTML text
Flash Player 9 and later, Adobe AIR 1.0 and later
The flash.text.TextField class has an htmlText property that you can use to identify your text string as one containing
HTML tags for formatting the content. As in the following example, you must assign your string value to the htmlText
property (not the text property) for Flash Player or AIR to render the text as HTML:
var myText:String = "<p>This is <b>some</b> content to <i>render</i> as <u>HTML</u> text.</p>";
myTextBox.htmlText = myText;
Flash Player and AIR support a subset of HTML tags and entities for the htmlText property. The
flash.text.TextField.htmlText property description in the ActionScript 3.0 Reference provides detailed
information about the supported HTML tags and entities.
Once you designate your content using the htmlText property, you can use style sheets or the textformat tag to
manage the formatting of your content. For more information, see “Formatting text” on page 358.
Using images in text fields
Flash Player 9 and later, Adobe AIR 1.0 and later
Another advantage to displaying your content as HTML text is that you can include images in the text field. You can
reference an image, local or remote, using the img tag and have it appear within the associated text field.
The following example creates a text field named myTextBox and includes a JPG image of an eye, stored in the same
directory as the SWF file, within the displayed text:
package
{
import flash.display.Sprite;
import flash.text.*;
public class TextWithImage extends Sprite
{
private var myTextBox:TextField;
private var myText:String = "<p>This is <b>some</b> content to <i>test</i> and
<i>see</i></p><p><img src='eye.jpg' width='20' height='20'></p><p>what can be
rendered.</p><p>You should see an eye image and some <u>HTML</u> text.</p>";
public function TextWithImage()
{
myTextBox.width = 200;
myTextBox.height = 200;
myTextBox.multiline = true;
myTextBox.wordWrap = true;
myTextBox.border = true;
addChild(myTextBox);
myTextBox.htmlText = myText;
}
}
}
The img tag supports JPEG, GIF, PNG, and SWF files.

354
ACTIONSCRIPT 3.0 DEVELOPER’S GUIDE
Using the TextField class
Last updated 3/21/2011
Scrolling text in a text field
Flash Player 9 and later, Adobe AIR 1.0 and later
In many cases, your text can be longer than the text field displaying the text. Or you may have an input field that allows
a user to input more text than can be displayed at one time. You can use the scroll-related properties of the
flash.text.TextField class to manage lengthy content, either vertically or horizontally.
The scroll-related properties include TextField.scrollV, TextField.scrollH and maxScrollV and maxScrollH.
Use these properties to respond to events, like a mouse click or a keypress.
The following example creates a text field that is a set size and contains more text than the field can display at one time.
As the user clicks the text field, the text scrolls vertically.
package
{
import flash.display.Sprite;
import flash.text.*;
import flash.events.MouseEvent;
public class TextScrollExample extends Sprite
{
private var myTextBox:TextField = new TextField();
private var myText:String = "Hello world and welcome to the show. It's really nice to
meet you. Take your coat off and stay a while. OK, show is over. Hope you had fun. You can go
home now. Don't forget to tip your waiter. There are mints in the bowl by the door. Thank you.
Please come again.";
public function TextScrollExample()
{
myTextBox.text = myText;
myTextBox.width = 200;
myTextBox.height = 50;
myTextBox.multiline = true;
myTextBox.wordWrap = true;
myTextBox.background = true;
myTextBox.border = true;
var format:TextFormat = new TextFormat();
format.font = "Verdana";
format.color = 0xFF0000;
format.size = 10;
myTextBox.defaultTextFormat = format;
addChild(myTextBox);
myTextBox.addEventListener(MouseEvent.MOUSE_DOWN, mouseDownScroll);
}
public function mouseDownScroll(event:MouseEvent):void
{
myTextBox.scrollV++;
}
}
}

355
ACTIONSCRIPT 3.0 DEVELOPER’S GUIDE
Using the TextField class
Last updated 3/21/2011
Selecting and manipulating text
Flash Player 9 and later, Adobe AIR 1.0 and later
You can select dynamic or input text. Since the text selection properties and methods of the TextField class use index
positions to set the range of text to manipulate, you can programmatically select dynamic or input text even if you
don’t know the content.
Note: In Flash Professional, if you choose the selectable option on a static text field, the text field that is exported and
placed on the display list is a regular, dynamic text field.
Selecting text
Flash Player 9 and later, Adobe AIR 1.0 and later
The flash.text.TextField.selectable property is true by default, and you can programmatically select text
using the setSelection() method.
For example, you can set specific text within a text field to be selected when the user clicks the text field:
var myTextField:TextField = new TextField();
myTextField.text = "No matter where you click on this text field the TEXT IN ALL CAPS is selected.";
myTextField.autoSize = TextFieldAutoSize.LEFT;
addChild(myTextField);
addEventListener(MouseEvent.CLICK, selectText);
function selectText(event:MouseEvent):void
{
myTextField.setSelection(49, 65);
}
Similarly, if you want text within a text field to be selected as the text is initially displayed, create an event handler
function that is called as the text field is added to the display list.
Capturing user-selected text
Flash Player 9 and later, Adobe AIR 1.0 and later
The TextField selectionBeginIndex and selectionEndIndex properties, which are “read-only” so they can’t be set
to programmatically select text, can be used to capture whatever the user has currently selected. Additionally, input
text fields can use the caretIndex property.
For example, the following code traces the index values of user-selected text:

356
ACTIONSCRIPT 3.0 DEVELOPER’S GUIDE
Using the TextField class
Last updated 3/21/2011
var myTextField:TextField = new TextField();
myTextField.text = "Please select the TEXT IN ALL CAPS to see the index values for the first
and last letters.";
myTextField.autoSize = TextFieldAutoSize.LEFT;
addChild(myTextField);
addEventListener(MouseEvent.MOUSE_UP, selectText);
function selectText(event:MouseEvent):void
{
trace("First letter index position: " + myTextField.selectionBeginIndex);
trace("Last letter index position: " + myTextField.selectionEndIndex);
}
You can apply a collection of TextFormat object properties to the selection to change the text appearance. For more
information about applying a collection of TextFormat properties to selected text, see “Formatting ranges of text
within a text field” on page 361.
Capturing text input
Flash Player 9 and later, Adobe AIR 1.0 and later
By default, the type property of a text field is set to dynamic. If you set the type property to input using the
TextFieldType class, you can collect user input and save the value for use in other parts of your application. Input text
fields are useful for forms and any application that wants the user to define a text value for use elsewhere in the
program.
For example, the following code creates an input text field called myTextBox. As the user enters text in the field, the
textInput event is triggered. An event handler called textInputCapture captures the string of text entered and
assigns it a variable. Flash Player or AIR displays the new text in another text field, called myOutputBox.
package
{
import flash.display.Sprite;
import flash.display.Stage;
import flash.text.*;
import flash.events.*;
public class CaptureUserInput extends Sprite
{
private var myTextBox:TextField = new TextField();
private var myOutputBox:TextField = new TextField();
private var myText:String = "Type your text here.";
public function CaptureUserInput()
{
captureText();
}
public function captureText():void
{
myTextBox.type = TextFieldType.INPUT;
myTextBox.background = true;
addChild(myTextBox);

357
ACTIONSCRIPT 3.0 DEVELOPER’S GUIDE
Using the TextField class
Last updated 3/21/2011
myTextBox.text = myText;
myTextBox.addEventListener(TextEvent.TEXT_INPUT, textInputCapture);
}
public function textInputCapture(event:TextEvent):void
{
var str:String = myTextBox.text;
createOutputBox(str);
}
public function createOutputBox(str:String):void
{
myOutputBox.background = true;
myOutputBox.x = 200;
addChild(myOutputBox);
myOutputBox.text = str;
}
}
}
Restricting text input
Flash Player 9 and later, Adobe AIR 1.0 and later
Since input text fields are often used for forms or dialog boxes in applications, you may want to limit the types of
characters a user can enter in a text field, or even keep the text hidden —for example, for a password. The
flash.text.TextField class has a displayAsPassword property and a restrict property that you can set to control user
input.
The displayAsPassword property simply hides the text (displaying it as a series of asterisks) as the user types it. When
displayAsPassword is set to true, the Cut and Copy commands and their corresponding keyboard shortcuts do not
function. As the following example shows, you assign the displayAsPassword property just as you would other
properties, such as background and color:
myTextBox.type = TextFieldType.INPUT;
myTextBox.background = true;
myTextBox.displayAsPassword = true;
addChild(myTextBox);
The restrict property is a little more complicated since you must specify which characters the user is allowed to type
in an input text field. You can allow specific letters, numbers, or ranges of letters, numbers, and characters. The
following code allows the user to enter only uppercase letters (and not numbers or special characters) in the text field:
myTextBox.restrict = "A-Z";
ActionScript 3.0 uses hyphens to define ranges, and carets to define excluded characters. For more information about
defining what is restricted in an input text field, see the flash.text.TextField.restrict property entry in the
ActionScript 3.0 Reference.

358
ACTIONSCRIPT 3.0 DEVELOPER’S GUIDE
Using the TextField class
Last updated 3/21/2011
Formatting text
Flash Player 9 and later, Adobe AIR 1.0 and later
You have several options for programmatically formatting the display of text. You can set properties directly on the
TextField instance—for example, the TextFIeld.thickness, TextField.textColor, and TextField.textHeight
properties.Or you can designate the content of the text field using the htmlText property and use the supported
HTML tags, such as b, i, and u. But you can also apply TextFormat objects to text fields containing plain text, or
StyleSheet objects to text fields containing the htmlText property. Using TextFormat and StyleSheet objects provides
the most control and consistency over the appearance of text throughout your application. You can define a
TextFormat or StyleSheet object and apply it to many or all text fields in your application.
Assigning text formats
Flash Player 9 and later, Adobe AIR 1.0 and later
You can use the TextFormat class to set a number of different text display properties and to apply them to the entire
contents of a TextField object, or to a range of text.
The following example applies one TextFormat object to an entire TextField object and applies a second TextFormat
object to a range of text within that TextField object:
var tf:TextField = new TextField();
tf.text = "Hello Hello";
var format1:TextFormat = new TextFormat();
format1.color = 0xFF0000;
var format2:TextFormat = new TextFormat();
format2.font = "Courier";
tf.setTextFormat(format1);
var startRange:uint = 6;
tf.setTextFormat(format2, startRange);
addChild(tf);
The TextField.setTextFormat() method only affects text that is already displayed in the text field. If the content
in the TextField changes, your application might need to call the TextField.setTextFormat() method again to
reapply the formatting. You can also set the TextField defaultTextFormat property to specify the format to be used
for user-entered text.
Applying cascading style sheets
Flash Player 9 and later, Adobe AIR 1.0 and later
Text fields can contain either plain text or HTML-formatted text. Plain text is stored in the text property of the
instance, and HTML text is stored in the htmlText property.
You can use CSS style declarations to define text styles that you can apply to many different text fields. CSS style
declarations can be created in your application code or loaded in at run time from an external CSS file.

359
ACTIONSCRIPT 3.0 DEVELOPER’S GUIDE
Using the TextField class
Last updated 3/21/2011
The flash.text.StyleSheet class handles CSS styles. The StyleSheet class recognizes a limited set of CSS properties. For a
detailed list of the style properties that the StyleSheet class supports, see the flash.textStylesheet entry in the
ActionScript 3.0 Reference.
As the following example shows, you can create CSS in your code and apply those styles to HTML text by using a
StyleSheet object:
var style:StyleSheet = new StyleSheet();
var styleObj:Object = new Object();
styleObj.fontSize = "bold";
styleObj.color = "#FF0000";
style.setStyle(".darkRed", styleObj);
var tf:TextField = new TextField();
tf.styleSheet = style;
tf.htmlText = "<span class = 'darkRed'>Red</span> apple";
addChild(tf);
After creating a StyleSheet object, the example code creates a simple object to hold a set of style declaration properties.
Then it calls the StyleSheet.setStyle() method, which adds the new style to the style sheet with the name
“.darkred”. Next, it applies the style sheet formatting by assigning the StyleSheet object to the TextField styleSheet
property.
For CSS styles to take effect, the style sheet should be applied to the TextField object before the
htmlText
property is set.
By design, a text field with a style sheet is not editable. If you have an input text field and assign a style sheet to it, the
text field shows the properties of the style sheet, but the text field does not allow users to enter new text into it. Also,
you cannot use the following ActionScript APIs on a text field with an assigned style sheet:
•The TextField.replaceText() method
•The TextField.replaceSelectedText() method
•The TextField.defaultTextFormat property
•The TextField.setTextFormat() method
If a text field has a style sheet assigned to it, but later the TextField.styleSheet property is set to null, the contents
of both TextField.text and TextField.htmlText properties add tags and attributes to their content to incorporate
the formatting from the previously assigned style sheet. To preserve the original htmlText property, save it in a
variable before setting the style sheet to null.
Loading an external CSS file
Flash Player 9 and later, Adobe AIR 1.0 and later
The CSS approach to formatting is more powerful when you can load CSS information from an external file at run
time. When the CSS data is external to the application itself, you can change the visual style of text in your application
without having to change your ActionScript 3.0 source code. After your application has been deployed, you can change
an external CSS file to change the look of the application, without having to redeploy the application SWF file.
The StyleSheet.parseCSS() method converts a string that contains CSS data into style declarations in the
StyleSheet object. The following example shows how to read an external CSS file and apply its style declarations to a
TextField object.
First, here is the content of the CSS file to be loaded, which is named example.css:

360
ACTIONSCRIPT 3.0 DEVELOPER’S GUIDE
Using the TextField class
Last updated 3/21/2011
p {
font-family: Times New Roman, Times, _serif;
font-size: 14;
}
h1 {
font-family: Arial, Helvetica, _sans;
font-size: 20;
font-weight: bold;
}
.bluetext {
color: #0000CC;
}
Next is the ActionScript code for a class that loads the example.css file and applies the styles to TextField content:
package
{
import flash.display.Sprite;
import flash.events.Event;
import flash.net.URLLoader;
import flash.net.URLRequest;
import flash.text.StyleSheet;
import flash.text.TextField;
import flash.text.TextFieldAutoSize;
public class CSSFormattingExample extends Sprite
{
var loader:URLLoader;
var field:TextField;
var exampleText:String = "<h1>This is a headline</h1>" +
"<p>This is a line of text. <span class='bluetext'>" +
"This line of text is colored blue.</span></p>";
public function CSSFormattingExample():void
{
field = new TextField();
field.width = 300;

361
ACTIONSCRIPT 3.0 DEVELOPER’S GUIDE
Using the TextField class
Last updated 3/21/2011
field.autoSize = TextFieldAutoSize.LEFT;
field.wordWrap = true;
addChild(field);
var req:URLRequest = new URLRequest("example.css");
loader = new URLLoader();
loader.addEventListener(Event.COMPLETE, onCSSFileLoaded);
loader.load(req);
}
public function onCSSFileLoaded(event:Event):void
{
var sheet:StyleSheet = new StyleSheet();
sheet.parseCSS(loader.data);
field.styleSheet = sheet;
field.htmlText = exampleText;
}
}
}
When the CSS data is loaded, the onCSSFileLoaded() method executes and calls the StyleSheet.parseCSS()
method to transfer the style declarations to the StyleSheet object.
Formatting ranges of text within a text field
Flash Player 9 and later, Adobe AIR 1.0 and later
A useful method of the flash.text.TextField class is the setTextFormat() method. Using setTextFormat(), you can
assign specific properties to the contents of a part of a text field to respond to user input, such as forms that need to
remind users that certain entries are required or to change the emphasis of a subsection of a passage of text within a
text field as a user selects parts of the text.
The following example uses TextField.setTextFormat() on a range of characters to change the appearance of part
of the content of myTextField when the user clicks the text field:
var myTextField:TextField = new TextField();
myTextField.text = "No matter where you click on this text field the TEXT IN ALL CAPS changes
format.";
myTextField.autoSize = TextFieldAutoSize.LEFT;
addChild(myTextField);
addEventListener(MouseEvent.CLICK, changeText);
var myformat:TextFormat = new TextFormat();
myformat.color = 0xFF0000;
myformat.size = 18;
myformat.underline = true;
function changeText(event:MouseEvent):void
{
myTextField.setTextFormat(myformat, 49, 65);
}

362
ACTIONSCRIPT 3.0 DEVELOPER’S GUIDE
Using the TextField class
Last updated 3/21/2011
Advanced text rendering
Flash Player 9 and later, Adobe AIR 1.0 and later
ActionScript 3.0 provides a variety of classes in the flash.text package to control the properties of displayed text,
including embedded fonts, anti-aliasing settings, alpha channel control, and other specific settings. The ActionScript
3.0 Reference provides detailed descriptions of these classes and properties, including the CSMSettings, Font, and
TextRenderer classes.
Using embedded fonts
Flash Player 9 and later, Adobe AIR 1.0 and later
When you specify a specific font for a TextField in your application, Flash Player or AIR look for a device font (a font
that resides on the user’s computer) with the same name. If it doesn’t find that font on the system, or if the user has a
slightly different version of a font with that name, the text display could look very different from what you intend.
To make sure the user sees exactly the right font, you can embed that font in your application SWF file. Embedded
fonts have a number of benefits:
•Embedded font characters are anti-aliased, making their edges appear smoother, especially for larger text.
•You can rotate text that uses embedded fonts.
•Embedded font text can be made transparent or semitransparent.
•You can use the kerning CSS style with embedded fonts.
The biggest limitation to using embedded fonts is that they increase the file size or download size of your application.
The exact method of embedding a font file into your application SWF file varies according to your development
environment.
Once you have embedded a font you can make sure a TextField uses the correct embedded font:
•Set the embedFonts property of the TextField to true.
•Create a TextFormat object, set its fontFamily property to the name of the embedded font, and apply the
TextFormat object to the TextField. When specifying an embedded font, the fontFamily property should only
contain a single name; it cannot use a comma-delimited list of multiple font names.
•If using CSS styles to set fonts for TextFields or components, set the font-family CSS property to the name of the
embedded font. The font-family property must contain a single name and not a list of names if you want to
specify an embedded font.
Embedding a font in Flash
Flash Professional lets you embed almost any font you have installed on your system, including TrueType fonts and
Type 1 Postscript fonts.
You can embed fonts in an application in many ways, including:
•Setting the font and style properties of a TextField on the Stage and clicking the Embed Fonts checkbox
•Creating and referencing a font symbol
•Creating and using a run-time shared library containing embedded font symbols

363
ACTIONSCRIPT 3.0 DEVELOPER’S GUIDE
Using the TextField class
Last updated 3/21/2011
For more details about how to embed fonts in applications, see “Embedded fonts for dynamic or input text fields” in
Using Flash.
Embedding a font in Flex
You can embed fonts in a Flex application in many ways, including:
•Using the [Embed] metadata tag in a script
•Using the @font-face style declaration
•Establish a class for the font and use the [Embed] tag to embed it.
You can only embed TrueType fonts directly in a Flex application. Fonts in other formats, such as Type 1 Postscript
fonts, can first be embedded in a SWF file using Flash Professional and then that SWF file can be used in your Flex
application. For more details about using embedded fonts from SWF files in Flex, see “Embedding fonts from SWF
files” in Using Flex
4.
More Help topics
Peter deHaan: Embedding fonts
Divillysausages.com: AS3 Font embedding masterclass
Controlling sharpness, thickness, and anti-aliasing
Flash Player 9 and later, Adobe AIR 1.0 and later
By default, Flash Player or AIR determines the settings for text display controls like sharpness, thickness, and anti-
aliasing as text resizes, changes color, or is displayed on various backgrounds. In some cases, like when you have very
small or very large text, or text on a variety of unique backgrounds, you might want to maintain control over these
settings. You can override Flash Player or AIR settings using the flash.text.TextRenderer class and its associated
classes, like the CSMSettings class. These classes give you precise control over the rendering quality of embedded text.
For more information about embedded fonts, see “Using embedded fonts” on page 362.
Note: The flash.text.TextField.antiAliasType property must have the value AntiAliasType.ADVANCED in order
for you to set the sharpness, thickness, or the gridFitType property, or to use the
TextRenderer.setAdvancedAntiAliasingTable() method.
The following example applies custom continuous stroke modulation (CSM) properties and formatting to displayed
text using an embedded font called myFont. When the user clicks the displayed text, Flash Player or Adobe AIR applies
the custom settings:

364
ACTIONSCRIPT 3.0 DEVELOPER’S GUIDE
Using the TextField class
Last updated 3/21/2011
var format:TextFormat = new TextFormat();
format.color = 0x336699;
format.size = 48;
format.font = "myFont";
var myText:TextField = new TextField();
myText.embedFonts = true;
myText.autoSize = TextFieldAutoSize.LEFT;
myText.antiAliasType = AntiAliasType.ADVANCED;
myText.defaultTextFormat = format;
myText.selectable = false;
myText.mouseEnabled = true;
myText.text = "Hello World";
addChild(myText);
myText.addEventListener(MouseEvent.CLICK, clickHandler);
function clickHandler(event:Event):void
{
var myAntiAliasSettings = new CSMSettings(48, 0.8, -0.8);
var myAliasTable:Array = new Array(myAntiAliasSettings);
TextRenderer.setAdvancedAntiAliasingTable("myFont", FontStyle.ITALIC,
TextColorType.DARK_COLOR, myAliasTable);
}
Working with static text
Flash Player 9 and later, Adobe AIR 1.0 and later
Static text is created only within Flash Professional. You cannot programmatically instantiate static text using
ActionScript. Static text is useful if the text is short and is not intended to change (as dynamic text can). Think of static
text as similar to a graphic element like a circle or square drawn on the Stage in Flash Professional. While static text is
more limited than dynamic text, ActionScript 3.0 does allow you to read the property values of static text using the
StaticText class. You can also use the TextSnapshot class to read values out of the static text.
Accessing static text fields with the StaticText class
Flash Player 9 and later, Adobe AIR 1.0 and later
Typically, you use the flash.text.StaticText class in the Actions panel of Flash Professional to interact with a static text
instance placed on the Stage. You may also work in ActionScript files that interact with a SWF file containing static
text. In either case, you can’t instantiate a static text instance programmatically. Static text is created in Flash
Professional.
To create a reference to an existing static text field, iterate over the items in the display list and assign a variable. For
example:

365
ACTIONSCRIPT 3.0 DEVELOPER’S GUIDE
Using the TextField class
Last updated 3/21/2011
for (var i = 0; i < this.numChildren; i++) {
var displayitem:DisplayObject = this.getChildAt(i);
if (displayitem instanceof StaticText) {
trace("a static text field is item " + i + " on the display list");
var myFieldLabel:StaticText = StaticText(displayitem);
trace("and contains the text: " + myFieldLabel.text);
}
}
Once you have a reference to a static text field, you can use the properties of that field in ActionScript 3.0. The following
code is attached to a frame in the Timeline, and assumes that a variable named myFieldLabel is assigned to a static
text reference. A dynamic text field named myField is positioned relative to the x and y values of myFieldLabel and
displays the value of myFieldLabel again.
var myField:TextField = new TextField();
addChild(myField);
myField.x = myFieldLabel.x;
myField.y = myFieldLabel.y + 20;
myField.autoSize = TextFieldAutoSize.LEFT;
myField.text = "and " + myFieldLabel.text
Using the TextSnapshot class
Flash Player 9 and later, Adobe AIR 1.0 and later
If you want to programmatically work with an existing static text instance, you can use the flash.text.TextSnapshot
class to work with the textSnapshot property of a flash.display.DisplayObjectContainer. In other words, you create
a TextSnapshot instance from the DisplayObjectContainer.textSnapshot property. You can then apply methods
to that instance to retrieve values or select parts of the static text.
For example, place a static text field that contains the text "TextSnapshot Example" on the Stage. Add the following
ActionScript to Frame 1 of the Timeline:
var mySnap:TextSnapshot = this.textSnapshot;
var count:Number = mySnap.charCount;
mySnap.setSelected(0, 4, true);
mySnap.setSelected(1, 2, false);
var myText:String = mySnap.getSelectedText(false);
trace(myText);
The TextSnapshot class is useful for getting the text out of static text fields in a loaded SWF file, if you want to use the
text as a value in another part of an application.
TextField Example: Newspaper-style text formatting
Flash Player 9 and later, Adobe AIR 1.0 and later
The News Layout example formats text to look something like a story in a printed newspaper. The input text can
contain a headline, a subtitle, and the body of the story. Given a display width and height, this News Layout example
formats the headline and the subtitle to take the full width of the display area. The story text is distributed across two
or more columns.

366
ACTIONSCRIPT 3.0 DEVELOPER’S GUIDE
Using the TextField class
Last updated 3/21/2011
This example illustrates the following ActionScript programming techniques:
•Extending the TextField class
•Loading and applying an external CSS file
•Converting CSS styles into TextFormat objects
•Using the TextLineMetrics class to get information about text display size
To get the application files for this sample, see www.adobe.com/go/learn_programmingAS3samples_flash. The News
Layout application files can be found in the folder Samples/NewsLayout. The application consists of the following files:
Reading the external CSS file
Flash Player 9 and later, Adobe AIR 1.0 and later
The News Layout application starts by reading story text from a local XML file. Then it reads an external CSS file that
provides the formatting information for the headline, subtitle, and main text.
The CSS file defines three styles, a standard paragraph style for the story, and the h1 and h2 styles for the headline and
subtitle respectively.
File Description
NewsLayout.mxml
or
NewsLayout.fla
The user interface for the application for Flex (MXML) or Flash (FLA).
com/example/programmingas3/ne
wslayout/StoryLayoutComponent.a
s
A Flex UIComponent class that places the StoryLayout instance.
com/example/programmingas3/ne
wslayout/StoryLayout.as
The main ActionScript class that arranges all the components of a news story for display.
com/example/programmingas3/ne
wslayout/FormattedTextField.as
A subclass of the TextField class that manages its own TextFormat object.
com/example/programmingas3/ne
wslayout/HeadlineTextField.as
A subclass of the FormattedTextField class that adjusts font sizes to fit a desired width.
com/example/programmingas3/ne
wslayout/MultiColumnTextField.as
An ActionScript class that splits text across two or more columns.
story.css A CSS file that defines text styles for the layout.

367
ACTIONSCRIPT 3.0 DEVELOPER’S GUIDE
Using the TextField class
Last updated 3/21/2011
p {
font-family: Georgia, "Times New Roman", Times, _serif;
font-size: 12;
leading: 2;
text-align: justify;
indent: 24;
}
h1 {
font-family: Verdana, Arial, Helvetica, _sans;
font-size: 20;
font-weight: bold;
color: #000099;
text-align: left;
}
h2 {
font-family: Verdana, Arial, Helvetica, _sans;
font-size: 16;
font-weight: normal;
text-align: left;
}
The technique used to read the external CSS file is the same as the technique described in “Loading an external CSS
file” on page 359. When the CSS file has been loaded the application executes the onCSSFileLoaded() method, shown
below.
public function onCSSFileLoaded(event:Event):void
{
this.sheet = new StyleSheet();
this.sheet.parseCSS(loader.data);
h1Format = getTextStyle("h1", this.sheet);
if (h1Format == null)
{
h1Format = getDefaultHeadFormat();
}
h2Format = getTextStyle("h2", this.sheet);
if (h2Format == null)
{
h2Format = getDefaultHeadFormat();
h2Format.size = 16;
}
pFormat = getTextStyle("p", this.sheet);
if (pFormat == null)
{
pFormat = getDefaultTextFormat();
pFormat.size = 12;
}
displayText();
}
The onCSSFileLoaded() method creates a StyleSheet object and has it parse the input CSS data. The main text for the
story is displayed in a MultiColumnTextField object, which can use a StyleSheet object directly. However, the headline
fields use the HeadlineTextField class, which uses a TextFormat object for its formatting.

368
ACTIONSCRIPT 3.0 DEVELOPER’S GUIDE
Using the TextField class
Last updated 3/21/2011
The onCSSFileLoaded() method calls the getTextStyle() method twice to convert a CSS style declaration into a
TextFormat object for use with each of the two HeadlineTextField objects.
public function getTextStyle(styleName:String, ss:StyleSheet):TextFormat
{
var format:TextFormat = null;
var style:Object = ss.getStyle(styleName);
if (style != null)
{
var colorStr:String = style.color;
if (colorStr != null && colorStr.indexOf("#") == 0)
{
style.color = colorStr.substr(1);
}
format = new TextFormat(style.fontFamily,
style.fontSize,
style.color,
(style.fontWeight == "bold"),
(style.fontStyle == "italic"),
(style.textDecoration == "underline"),
style.url,
style.target,
style.textAlign,
style.marginLeft,
style.marginRight,
style.indent,
style.leading);
if (style.hasOwnProperty("letterSpacing"))
{
format.letterSpacing = style.letterSpacing;
}
}
return format;
}
The property names and the meaning of the property values differ between CSS style declarations and TextFormat
objects. The getTextStyle() method translates CSS property values into the values expected by the TextFormat
object.
Arranging story elements on the page
Flash Player 9 and later, Adobe AIR 1.0 and later
The StoryLayout class formats and lays out the headline, subtitle, and main text fields into a newspaper-style
arrangement. The displayText() method initially creates and places the various fields.

369
ACTIONSCRIPT 3.0 DEVELOPER’S GUIDE
Using the TextField class
Last updated 3/21/2011
public function displayText():void
{
headlineTxt = new HeadlineTextField(h1Format);
headlineTxt.wordWrap = true;
headlineTxt.x = this.paddingLeft;
headlineTxt.y = this.paddingTop;
headlineTxt.width = this.preferredWidth;
this.addChild(headlineTxt);
headlineTxt.fitText(this.headline, 1, true);
subtitleTxt = new HeadlineTextField(h2Format);
subtitleTxt.wordWrap = true;
subtitleTxt.x = this.paddingLeft;
subtitleTxt.y = headlineTxt.y + headlineTxt.height;
subtitleTxt.width = this.preferredWidth;
this.addChild(subtitleTxt);
subtitleTxt.fitText(this.subtitle, 2, false);
storyTxt = new MultiColumnText(this.numColumns, 20,
this.preferredWidth, 400, true, this.pFormat);
storyTxt.x = this.paddingLeft;
storyTxt.y = subtitleTxt.y + subtitleTxt.height + 10;
this.addChild(storyTxt);
storyTxt.text = this.content;
...
Each field is placed below the previous field by setting its y property to equal the y property of the previous field plus
its height. This dynamic placement calculation is needed because HeadlineTextField objects and
MultiColumnTextField objects can change their height to fit their contents.
Altering font size to fit the field size
Flash Player 9 and later, Adobe AIR 1.0 and later
Given a width in pixels and a maximum number of lines to display, the HeadlineTextField alters the font size to make
the text fit the field. If the text is short, the font size is large, creating a tabloid-style headline. If the text is long, the font
size is smaller.
The HeadlineTextField.fitText() method shown below does the font sizing work:

370
ACTIONSCRIPT 3.0 DEVELOPER’S GUIDE
Using the TextField class
Last updated 3/21/2011
public function fitText(msg:String, maxLines:uint = 1, toUpper:Boolean = false,
targetWidth:Number = -1):uint
{
this.text = toUpper ? msg.toUpperCase() : msg;
if (targetWidth == -1)
{
targetWidth = this.width;
}
var pixelsPerChar:Number = targetWidth / msg.length;
var pointSize:Number = Math.min(MAX_POINT_SIZE, Math.round(pixelsPerChar * 1.8 * maxLines));
if (pointSize < 6)
{
// the point size is too small
return pointSize;
}
this.changeSize(pointSize);
if (this.numLines > maxLines)
{
return shrinkText(--pointSize, maxLines);
}
else
{
return growText(pointSize, maxLines);
}
}
public function growText(pointSize:Number, maxLines:uint = 1):Number
{
if (pointSize >= MAX_POINT_SIZE)
{
return pointSize;
}
this.changeSize(pointSize + 1);
if (this.numLines > maxLines)
{
// set it back to the last size
this.changeSize(pointSize);
return pointSize;
}
else
{
return growText(pointSize + 1, maxLines);
}

371
ACTIONSCRIPT 3.0 DEVELOPER’S GUIDE
Using the TextField class
Last updated 3/21/2011
}
public function shrinkText(pointSize:Number, maxLines:uint=1):Number
{
if (pointSize <= MIN_POINT_SIZE)
{
return pointSize;
}
this.changeSize(pointSize);
if (this.numLines > maxLines)
{
return shrinkText(pointSize - 1, maxLines);
}
else
{
return pointSize;
}
}
The HeadlineTextField.fitText() method uses a simple recursive technique to size the font. First it guesses an
average number of pixels per character in the text and from there calculates a starting point size. Then it changes the
font size and checks whether the text has word wrapped to create more than the maximum number of text lines. If
there are too many lines it calls the shrinkText() method to decrease the font size and try again. If there are not too
many lines it calls the growText() method to increase the font size and try again. The process stops at the point where
incrementing the font size by one more point would create too many lines.
Splitting text across multiple columns
Flash Player 9 and later, Adobe AIR 1.0 and later
The MultiColumnTextField class spreads text among multiple TextField objects which are then arranged like
newspaper columns.
The MultiColumnTextField() constructor first creates an array of TextField objects, one for each column, as shown here:
for (var i:int = 0; i < cols; i++)
{
var field:TextField = new TextField();
field.multiline = true;
field.autoSize = TextFieldAutoSize.NONE;
field.wordWrap = true;
field.width = this.colWidth;
field.setTextFormat(this.format);
this.fieldArray.push(field);
this.addChild(field);
}
Each TextField object is added to the array and added to the display list with the addChild() method.
Whenever the StoryLayout text property or styleSheet property changes, it calls the layoutColumns() method to
redisplay the text. The layoutColumns() method calls the getOptimalHeight() method, to figure out the correct
pixel height that is needed to fit all of the text within the given layout width.

372
ACTIONSCRIPT 3.0 DEVELOPER’S GUIDE
Using the TextField class
Last updated 3/21/2011
public function getOptimalHeight(str:String):int
{
if (field.text == "" || field.text == null)
{
return this.preferredHeight;
}
else
{
this.linesPerCol = Math.ceil(field.numLines / this.numColumns);
var metrics:TextLineMetrics = field.getLineMetrics(0);
this.lineHeight = metrics.height;
var prefHeight:int = linesPerCol * this.lineHeight;
return prefHeight + 4;
}
}
First the getOptimalHeight() method calculates the width of each column. Then it sets the width and htmlText
property of the first TextField object in the array. The getOptimalHeight() method uses that first TextField object
to discover the total number of word-wrapped lines in the text, and from that it identifies how many lines should be
in each column. Next it calls the TextField.getLineMetrics() method to retrieve a TextLineMetrics object that
contains details about size of the text in the first line. The TextLineMetrics.height property represents the full
height of a line of text, in pixels, including the ascent, descent, and leading. The optimal height for the
MultiColumnTextField object is then the line height multiplied by the number of lines per column, plus 4 to account
for the two-pixel border at the top and the bottom of a TextField object.
Here is the code for the full layoutColumns() method:
public function layoutColumns():void
{
if (this._text == "" || this._text == null)
{
return;
}
var field:TextField = fieldArray[0] as TextField;
field.text = this._text;
field.setTextFormat(this.format);
this.preferredHeight = this.getOptimalHeight(field);
var remainder:String = this._text;
var fieldText:String = "";
var lastLineEndedPara:Boolean = true;
var indent:Number = this.format.indent as Number;
for (var i:int = 0; i < fieldArray.length; i++)
{
field = this.fieldArray[i] as TextField;
field.height = this.preferredHeight;
field.text = remainder;
field.setTextFormat(this.format);

373
ACTIONSCRIPT 3.0 DEVELOPER’S GUIDE
Using the TextField class
Last updated 3/21/2011
var lineLen:int;
if (indent > 0 && !lastLineEndedPara && field.numLines > 0)
{
lineLen = field.getLineLength(0);
if (lineLen > 0)
{
field.setTextFormat(this.firstLineFormat, 0, lineLen);
}
}
field.x = i * (colWidth + gutter);
field.y = 0;
remainder = "";
fieldText = "";
var linesRemaining:int = field.numLines;
var linesVisible:int = Math.min(this.linesPerCol, linesRemaining);
for (var j:int = 0; j < linesRemaining; j++)
{
if (j < linesVisible)
{
fieldText += field.getLineText(j);
}
else
{
remainder +=field.getLineText(j);
}
}
field.text = fieldText;
field.setTextFormat(this.format);
if (indent > 0 && !lastLineEndedPara)
{
lineLen = field.getLineLength(0);
if (lineLen > 0)
{
field.setTextFormat(this.firstLineFormat, 0, lineLen);
}
}
var lastLine:String = field.getLineText(field.numLines - 1);
var lastCharCode:Number = lastLine.charCodeAt(lastLine.length - 1);

374
ACTIONSCRIPT 3.0 DEVELOPER’S GUIDE
Using the TextField class
Last updated 3/21/2011
if (lastCharCode == 10 || lastCharCode == 13)
{
lastLineEndedPara = true;
}
else
{
lastLineEndedPara = false;
}
if ((this.format.align == TextFormatAlign.JUSTIFY) &&
(i < fieldArray.length - 1))
{
if (!lastLineEndedPara)
{
justifyLastLine(field, lastLine);
}
}
}
}
After the preferredHeight property has been set by calling the getOptimalHeight() method, the
layoutColumns() method iterates through the TextField objects, setting the height of each to the preferredHeight
value. The layoutColumns() method then distributes just enough lines of text to each field so that no scrolling occurs
in any individual field, and the text in each successive field begins where the text in the previous field ended. If the text
alignment style has been set to “justify” then the justifyLastLine() method is called to justify the final line of text
in a field. Otherwise that last line would be treated as an end-of-paragraph line and not justified.

375
Last updated 3/21/2011
Chapter 20: Using the Flash Text Engine
Flash Player 10 and later, Adobe AIR 1.5 and later
The Adobe® Flash® Text Engine (FTE), available starting with Flash Player 10 and Adobe® AIR™1.5, provides low-level
support for sophisticated control of text metrics, formatting, and bi-directional text. It offers improved text flow and
enhanced language support. While it can be used to create and manage simple text elements, the FTE is primarily
designed as a foundation for developers to create text-handling components. As such, Flash Text Engine assumes a
more advanced level of programming expertise. To display simple text elements, see “Using the TextField class” on
page 351.
The Text Layout Framework, which includes a text-handling component based on the FTE, provides an easier way to
use its advanced features. The Text Layout Framework is an extensible library built entirely in ActionScript 3.0. You
can use the existing TLF component, or use the framework to build your own text component. For more information,
see “Using the Text Layout Framework” on page 404.
More Help topics
flash.text.engine package
Creating and displaying text
Flash Player 10 and later, Adobe AIR 1.5 and later
The classes that make up the Flash Text Engine enable you to create, format, and control text. The following classes
are the basic building blocks for creating and displaying text with the Flash Text Engine:
•TextElement/GraphicElement/GroupElement - contain the content of a TextBlock instance
•ElementFormat - specifies formatting attributes for the content of a TextBlock instance
•TextBlock - the factory for building a paragraph of text
•TextLine - a line of text created from the TextBlock
To display text, create a TextElement object from a String, using an ElementFormat object to specify the formatting
characteristics. Assign the TextElement to the content property of a TextBlock object. Create the lines of text for
display by calling the TextBlock.createTextLine() method. The createTextLine() method returns a TextLine
object containing as much of the string as will fit in the specified width. Call the method repeatedly until the entire
string has been formatted into lines. When there are no more lines to be created, the textLineCreationResult property
of the TextBlock object is assigned the value: TextLineCreationResult.COMPLETE. To show the lines, add them to
the display list (with appropriate x and y position values).
The following code, for example, uses these FTE classes to display, "Hello World! This is Flash Text Engine!", using
default format and font values. In this simple example, only a single line of text is created.

376
ACTIONSCRIPT 3.0 DEVELOPER’S GUIDE
Using the Flash Text Engine
Last updated 3/21/2011
package
{
import flash.text.engine.*;
import flash.display.Sprite;
public class HelloWorldExample extends Sprite
{
public function HelloWorldExample()
{
var str = "Hello World! This is Flash Text Engine!";
var format:ElementFormat = new ElementFormat();
var textElement:TextElement = new TextElement(str, format);
var textBlock:TextBlock = new TextBlock();
textBlock.content = textElement;
var textLine1:TextLine = textBlock.createTextLine(null, 300);
addChild(textLine1);
textLine1.x = 30;
textLine1.y = 30;
}
}
}
The parameters for createTextLine() specify the line from which to begin the new line and the width of the line in
pixels. The line from which to begin the new line is usually the previous line but, in the case of the first line, it is null.
Adding GraphicElement and GroupElement objects
Flash Player 10 and later, Adobe AIR 1.5 and later
You can assign a GraphicElement object to a TextBlock object to display an image or a graphic element. Simply create
an instance of the GraphicElement class from a graphic or an image and assign the instance to the
TextBlock.content property. Create the text line by calling TextBlock.createTextline() as you normally would.
The following example creates two text lines, one with a GraphicElement object and one with a TextElement object.
package
{
import flash.text.engine.*;
import flash.display.Sprite;
import flash.display.Shape;
import flash.display.Graphics;
public class GraphicElementExample extends Sprite
{
public function GraphicElementExample()
{
var str:String = "Beware of Dog!";
var triangle:Shape = new Shape();
triangle.graphics.beginFill(0xFF0000, 1);
triangle.graphics.lineStyle(3);
triangle.graphics.moveTo(30, 0);
triangle.graphics.lineTo(60, 50);
triangle.graphics.lineTo(0, 50);
triangle.graphics.lineTo(30, 0);
triangle.graphics.endFill();

377
ACTIONSCRIPT 3.0 DEVELOPER’S GUIDE
Using the Flash Text Engine
Last updated 3/21/2011
var format:ElementFormat = new ElementFormat();
format.fontSize = 20;
var graphicElement:GraphicElement = new GraphicElement(triangle, triangle.width,
triangle.height, format);
var textBlock:TextBlock = new TextBlock();
textBlock.content = graphicElement;
var textLine1:TextLine = textBlock.createTextLine(null, triangle.width);
textLine1.x = 50;
textLine1.y = 110;
addChild(textLine1);
var textElement:TextElement = new TextElement(str, format);
textBlock.content = textElement;
var textLine2 = textBlock.createTextLine(null, 300);
addChild(textLine2);
textLine2.x = textLine1.x - 30;
textLine2.y = textLine1.y + 15;
}
}
}
You can create a GroupElement object to create a group of TextElement, GraphicElement, and other GroupElement
objects. A GroupElement can be assigned to the content property of a TextBlock object. The parameter to the
GroupElement() constructor is a Vector, which points to the text, graphic, and group elements that make up the
group. The following example groups two graphic elements and a text element and assigns them as a unit to a text
block.
package
{
import flash.text.engine.*;
import flash.display.Sprite;
import flash.display.Shape;
import flash.display.Graphics;
public class GroupElementExample extends Sprite
{
public function GroupElementExample()
{
var str:String = "Beware of Alligators!";
var triangle1:Shape = new Shape();
triangle1.graphics.beginFill(0xFF0000, 1);
triangle1.graphics.lineStyle(3);
triangle1.graphics.moveTo(30, 0);
triangle1.graphics.lineTo(60, 50);
triangle1.graphics.lineTo(0, 50);
triangle1.graphics.lineTo(30, 0);
triangle1.graphics.endFill();
var triangle2:Shape = new Shape();
triangle2.graphics.beginFill(0xFF0000, 1);
triangle2.graphics.lineStyle(3);
triangle2.graphics.moveTo(30, 0);
triangle2.graphics.lineTo(60, 50);
triangle2.graphics.lineTo(0, 50);

378
ACTIONSCRIPT 3.0 DEVELOPER’S GUIDE
Using the Flash Text Engine
Last updated 3/21/2011
triangle2.graphics.lineTo(30, 0);
triangle2.graphics.endFill();
var format:ElementFormat = new ElementFormat();
format.fontSize = 20;
var graphicElement1:GraphicElement = new GraphicElement(triangle1,
triangle1.width, triangle1.height, format);
var textElement:TextElement = new TextElement(str, format);
var graphicElement2:GraphicElement = new GraphicElement(triangle2,
triangle2.width, triangle2.height, format);
var groupVector:Vector.<ContentElement> = new Vector.<ContentElement>();
groupVector.push(graphicElement1, textElement, graphicElement2);
var groupElement = new GroupElement(groupVector);
var textBlock:TextBlock = new TextBlock();
textBlock.content = groupElement;
var textLine:TextLine = textBlock.createTextLine(null, 800);
addChild(textLine);
textLine.x = 100;
textLine.y = 200;
}
}
}
Replacing text
Flash Player 10 and later, Adobe AIR 1.5 and later
You can replace text in a TextBlock instance by calling TextElement.replaceText() to replace text in the
TextElement that you assigned to the TextBlock.content property.
The following example uses replaceText() to first, insert text at the beginning of the line, then, to append text to the
end of the line, and, finally, to replace text in the middle of the line.

379
ACTIONSCRIPT 3.0 DEVELOPER’S GUIDE
Using the Flash Text Engine
Last updated 3/21/2011
package
{
import flash.text.engine.*;
import flash.display.Sprite;
public class ReplaceTextExample extends Sprite
{
public function ReplaceTextExample()
{
var str:String = "Lorem ipsum dolor sit amet";
var fontDescription:FontDescription = new FontDescription("Arial");
var format:ElementFormat = new ElementFormat(fontDescription);
format.fontSize = 14;
var textElement:TextElement = new TextElement(str, format);
var textBlock:TextBlock = new TextBlock();
textBlock.content = textElement;
createLine(textBlock, 10);
textElement.replaceText(0, 0, "A text fragment: ");
createLine(textBlock, 30);
textElement.replaceText(43, 43, "...");
createLine(textBlock, 50);
textElement.replaceText(23, 28, "(ipsum)");
createLine(textBlock, 70);
}
function createLine(textBlock:TextBlock, y:Number):void {
var textLine:TextLine = textBlock.createTextLine(null, 300);
textLine.x = 10;
textLine.y = y;
addChild(textLine);
}
}
}
The replaceText() method replaces the text specified by the beginIndex and endIndex parameters with the text
specified by the newText parameter. If the values of the beginIndex and endIndex parameters are the same,
replaceText() inserts the specified text at that location. Otherwise it replaces the characters specified by beginIndex
and endIndex with the new text.
Handling Events in FTE
Flash Player 10 and later, Adobe AIR 1.5 and later
You can add event listeners to a TextLine instance just as you can to other display objects. For example, you can detect
when a user rolls the mouse over a text line or a user clicks the line. The following example detects both of these events.
When you roll the mouse over the line, the cursor changes to a button cursor and when you click the line, it changes
color.

380
ACTIONSCRIPT 3.0 DEVELOPER’S GUIDE
Using the Flash Text Engine
Last updated 3/21/2011
package
{
import flash.text.engine.*;
import flash.ui.Mouse;
import flash.display.Sprite
import flash.events.MouseEvent;
import flash.events.EventDispatcher;
public class EventHandlerExample extends Sprite
{
var textBlock:TextBlock = new TextBlock();
public function EventHandlerExample():void
{
var str:String = "I'll change color if you click me.";
var fontDescription:FontDescription = new FontDescription("Arial");
var format:ElementFormat = new ElementFormat(fontDescription, 18);
var textElement = new TextElement(str, format);
textBlock.content = textElement;
createLine(textBlock);
}
private function createLine(textBlock:TextBlock):void
{
var textLine:TextLine = textBlock.createTextLine(null, 500);
textLine.x = 30;
textLine.y = 30;
addChild(textLine);
textLine.addEventListener("mouseOut", mouseOutHandler);
textLine.addEventListener("mouseOver", mouseOverHandler);
textLine.addEventListener("click", clickHandler);
}
private function mouseOverHandler(event:MouseEvent):void
{
Mouse.cursor = "button";
}
private function mouseOutHandler(event:MouseEvent):void
{
Mouse.cursor = "arrow";
}
function clickHandler(event:MouseEvent):void {
if(textBlock.firstLine)
removeChild(textBlock.firstLine);
var newFormat:ElementFormat = textBlock.content.elementFormat.clone();

381
ACTIONSCRIPT 3.0 DEVELOPER’S GUIDE
Using the Flash Text Engine
Last updated 3/21/2011
switch(newFormat.color)
{
case 0x000000:
newFormat.color = 0xFF0000;
break;
case 0xFF0000:
newFormat.color = 0x00FF00;
break;
case 0x00FF00:
newFormat.color = 0x0000FF;
break;
case 0x0000FF:
newFormat.color = 0x000000;
break;
}
textBlock.content.elementFormat = newFormat;
createLine(textBlock);
}
}
}
Mirroring events
Flash Player 10 and later, Adobe AIR 1.5 and later
You can also mirror events on a text block, or on a portion of a text block, to an event dispatcher. First, create an
EventDispatcher instance and then assign it to the eventMirror property of a TextElement instance. If the text block
consists of a single text element, the text engine mirrors events for the entire text block. If the text block consists of
multiple text elements, the text engine mirrors events only for the TextElement instances that have the eventMirror
property set. The text in the following example consists of three elements: the word "Click", the word "here", and the
string "to see me in italic". The example assigns an event dispatcher to the second text element, the word "here", and
adds an event listener, the clickHandler() method. The clickHandler() method changes the text to italic. It also
replaces the content of the third text element to read, "Click here to see me in normal font!".
package
{
import flash.text.engine.*;
import flash.ui.Mouse;
import flash.display.Sprite;
import flash.events.MouseEvent;
import flash.events.EventDispatcher;
public class EventMirrorExample extends Sprite
{
var fontDescription:FontDescription = new FontDescription("Helvetica", "bold");
var format:ElementFormat = new ElementFormat(fontDescription, 18);
var textElement1 = new TextElement("Click ", format);
var textElement2 = new TextElement("here ", format);
var textElement3 = new TextElement("to see me in italic! ", format);
var textBlock:TextBlock = new TextBlock();
public function EventMirrorExample()
{
var myEvent:EventDispatcher = new EventDispatcher();

382
ACTIONSCRIPT 3.0 DEVELOPER’S GUIDE
Using the Flash Text Engine
Last updated 3/21/2011
myEvent.addEventListener("click", clickHandler);
myEvent.addEventListener("mouseOut", mouseOutHandler);
myEvent.addEventListener("mouseOver", mouseOverHandler);
textElement2.eventMirror=myEvent;
var groupVector:Vector.<ContentElement> = new Vector.<ContentElement>;
groupVector.push(textElement1, textElement2, textElement3);
var groupElement:GroupElement = new GroupElement(groupVector);
textBlock.content = groupElement;
createLines(textBlock);
}
private function clickHandler(event:MouseEvent):void
{
var newFont:FontDescription = new FontDescription();
newFont.fontWeight = "bold";
var newFormat:ElementFormat = new ElementFormat();
newFormat.fontSize = 18;
if(textElement3.text == "to see me in italic! ") {
newFont.fontPosture = FontPosture.ITALIC;
textElement3.replaceText(0,21, "to see me in normal font! ");
}
else {
newFont.fontPosture = FontPosture.NORMAL;
textElement3.replaceText(0, 26, "to see me in italic! ");
}
newFormat.fontDescription = newFont;
textElement1.elementFormat = newFormat;
textElement2.elementFormat = newFormat;
textElement3.elementFormat = newFormat;
createLines(textBlock);
}
private function mouseOverHandler(event:MouseEvent):void
{
Mouse.cursor = "button";
}
private function mouseOutHandler(event:MouseEvent):void
{
Mouse.cursor = "arrow";
}
private function createLines(textBlock:TextBlock):void
{
if(textBlock.firstLine)
removeChild (textBlock.firstLine);
var textLine:TextLine = textBlock.createTextLine (null, 300);
textLine.x = 15;
textLine.y = 20;
addChild (textLine);
}
}
}

383
ACTIONSCRIPT 3.0 DEVELOPER’S GUIDE
Using the Flash Text Engine
Last updated 3/21/2011
The mouseOverHandler() and mouseOutHandler() functions set the cursor to a button cursor when it's over the
word "here" and back to an arrow when it's not.
Formatting text
Flash Player 10 and later, Adobe AIR 1.5 and later
A TextBlock object is a factory for creating lines of text. The content of a TextBlock is assigned via the TextElement
object. An ElementFormat object handles the formatting for the text. The ElementFormat class defines such
properties as baseline alignment, kerning, tracking, text rotation, and font size, color, and case. It also includes a
FontDescription, which is covered in detail in “Working with fonts” on page 387.
Using the ElementFormat object
Flash Player 10 and later, Adobe AIR 1.5 and later
The constructor for the ElementFormat object takes any of a long list of optional parameters, including a
FontDescription. You can also set these properties outside the constructor. The following example shows the
relationship of the various objects in defining and displaying a simple text line:
package
{
import flash.display.Sprite;
import flash.text.*;
public class ElementFormatExample extends Sprite
{
private var tb:TextBlock = new TextBlock();
private var te:TextElement;
private var ef:ElementFormat;
private var fd:FontDescription = new FontDescription();
private var str:String;
private var tl:TextLine;
public function ElementFormatExample()
{
fd.fontName = "Garamond";
ef = new ElementFormat(fd);
ef.fontSize = 30;
ef.color = 0xFF0000;
str = "This is flash text";
te = new TextElement(str, ef);
tb.content = te;
tl = tb.createTextLine(null,600);
addChild(tl);
}
}
}

384
ACTIONSCRIPT 3.0 DEVELOPER’S GUIDE
Using the Flash Text Engine
Last updated 3/21/2011
Font color and transparency (alpha)
Flash Player 10 and later, Adobe AIR 1.5 and later
The color property of the ElementFormat object sets the font color. The value is an integer representing the RGB
components of the color; for example, 0xFF0000 for red and 0x00FF00 for green. The default is black (0x000000).
The alpha property sets the alpha transparency value for an element (both TextElement and GraphicElement).
Values can range from 0 (fully transparent) to 1 (fully opaque, which is the default). Elements with an alpha of 0 are
invisible, but still active. This value is multiplied by any inherited alpha values, thus making the element more
transparent.
var ef:ElementFormat = new ElementFormat();
ef.alpha = 0.8;
ef.color = 0x999999;
Baseline alignment and shift
Flash Player 10 and later, Adobe AIR 1.5 and later
The font and size of the largest text in a line determine its dominant baseline. You can override these values by setting
TextBlock.baselineFontDescription and TextBlock.baselineFontSize. You can align the dominant baseline
with one of several baselines within the text. These baselines include the ascent line and the descent line or the
ideographic top, center, or bottom.
A. Ascent B. Baseline C. Descent D. x-height
In the ElementFormat object, three properties determine baseline and alignment characteristics. The
alignmentBaseline property sets the main baseline of a TextElement or GraphicElement. This baseline is the
“snap-to” line for the element, and it’s to this position that the dominant baseline of all text aligns.
The dominantBaseline property specifies which of the various baselines of the element to use, which determines the
vertical position of the element on the line. The default value is TextBaseline.ROMAN, but it can also be set to have
the IDEOGRAPHIC_TOP or IDEOGRAPHIC_BOTTOM baselines be dominant.
The baselineShift property moves the baseline by a set number of pixels on the y-axis. In normal (non-rotated) text,
a positive value moves the baseline down and a negative value moves it up.
Typographic Case
Flash Player 10 and later, Adobe AIR 1.5 and later
The TypographicCase property of ElementFormat specifies text case, such as uppercase, lowercase, or small caps.
D
A
CB

385
ACTIONSCRIPT 3.0 DEVELOPER’S GUIDE
Using the Flash Text Engine
Last updated 3/21/2011
var ef_Upper:ElementFormat = new ElementFormat();
ef_Upper.typographicCase = TypographicCase.UPPERCASE;
var ef_SmallCaps:ElementFormat = new ElementFormat();
ef_SmallCaps.typographicCase = TypographicCase.SMALL_CAPS;
Rotating text
Flash Player 10 and later, Adobe AIR 1.5 and later
You can rotate a block of text or the glyphs within a segment of text in increments of 90°. The TextRotation class
defines the following constants for setting both text block and glyph rotation:
To rotate the lines of text in a text block, set the TextBlock.lineRotation property before calling the
TextBlock.createTextLine() method to create the text line.
To rotate the glyphs within a block of text or a segment, set the ElementFormat.textRotation property to the
number of degrees that you want the glyphs to rotate. A glyph is the shape that makes up a character, or a part of a
character that consists of multiple glyphs. The letter “a” and the dot on an “i”, for example, are glyphs.
Rotating glyphs is relevant in some Asian languages in which you want to rotate the lines to vertical but not rotate the
characters within the lines. For more information on rotating Asian text, see “Justifying East Asian text” on page 391.
Here is an example of rotating both a block of text and the glyphs within, as you would with Asian text. The example
also uses a Japanese font:
Constant Value Description
AUTO “auto” Specifies 90 degree counter-clockwise rotation. Typically used with vertical Asian text to
rotate only glyphs that require rotation.
ROTATE_0 “rotate_0” Specifies no rotation.
ROTATE_180 “rotate_180” Specifies 180 degree rotation.
ROTATE_270 “rotate_270” Specifies 270 degree rotation.
ROTATE_90 “rotate_90” Specifies 90 degree clockwise rotation.

386
ACTIONSCRIPT 3.0 DEVELOPER’S GUIDE
Using the Flash Text Engine
Last updated 3/21/2011
package
{
import flash.display.Sprite;
import flash.text.*;
public class RotationExample extends Sprite
{
private var tb:TextBlock = new TextBlock();
private var te:TextElement;
private var ef:ElementFormat;
private var fd:FontDescription = new FontDescription();
private var str:String;
private var tl:TextLine;
public function RotationExample()
{
fd.fontName = "MS Mincho";
ef = new ElementFormat(fd);
ef.textRotation = TextRotation.AUTO;
str = "This is rotated Japanese text";
te = new TextElement(str, ef);
tb.lineRotation = TextRotation.ROTATE_90;
tb.content = te;
tl = tb.createTextLine(null,600);
addChild(tl);
}
}
}
Locking and cloning ElementFormat
Flash Player 10 and later, Adobe AIR 1.5 and later
When an ElementFormat object is assigned to any type of ContentElement, its locked property is automatically set
to true. Attempting to modify a locked ElementFormat object throws an IllegalOperationError. The best
practice is to fully define such an object before assigning it to a TextElement instance.
If you want to modify an existing ElementFormat instance, first check its locked property. If it’s true, use the
clone()method to create an unlocked copy of the object. The properties of this unlocked object can be changed, and
it can then be assigned to the TextElement instance. Any new lines created from it have the new formatting. Previous
lines created from this same object and using the old format are unchanged.

387
ACTIONSCRIPT 3.0 DEVELOPER’S GUIDE
Using the Flash Text Engine
Last updated 3/21/2011
package
{
import flash.display.Sprite;
import flash.text.*;
public class ElementFormatCloneExample extends Sprite
{
private var tb:TextBlock = new TextBlock();
private var te:TextElement;
private var ef1:ElementFormat;
private var ef2:ElementFormat;
private var fd:FontDescription = new FontDescription();
public function ElementFormatCloneExample()
{
fd.fontName = "Garamond";
ef1 = new ElementFormat(fd);
ef1.fontSize = 24;
var str:String = "This is flash text";
te = new TextElement(str, ef);
tb.content = te;
var tx1:TextLine = tb.createTextLine(null,600);
addChild(tx1);
ef2 = (ef1.locked) ? ef1.clone() : ef1;
ef2.fontSize = 32;
tb.content.elementFormat = ef2;
var tx2:TextLine = tb.createTextLine(null,600);
addChild(tx2);
}
}
}
Working with fonts
Flash Player 10 and later, Adobe AIR 1.5 and later
The FontDescription object is used in conjunction with ElementFormat to identify a font face and define some of
its characteristics. These characteristics include the font name, weight, posture, rendering, and how to find the font
(device versus embedded).
Note: FTE does not support Type 1 fonts or bitmap fonts such as Type 3, ATC, sfnt-wrapped CID, or Naked CID.

388
ACTIONSCRIPT 3.0 DEVELOPER’S GUIDE
Using the Flash Text Engine
Last updated 3/21/2011
Defining font characteristics (FontDescription object)
Flash Player 10 and later, Adobe AIR 1.5 and later
The fontName property of the FontDescription object can be a single name or a comma-separated list of names. For
example, in a list such as “Arial, Helvetica, _sans”, the text engine looks for “Arial” first, then “Helvetica”, and finally
“_sans”, if it can’t find either of the first two fonts. The set of font names include three generic device font names:
“_sans”, “_serif”, and “_typewriter”. They map to specific device fonts, depending on the playback system. It is good
practice to specify default names such as these in all font descriptions that use device fonts. If no fontName is specified,
“_serif” is used as the default.
The fontPosture property can either be set to the default (FontPosture.NORMAL) or to italics
(FontPosture.ITALIC). The fontWeight property can be set to the default (FontWeight.NORMAL) or to bold
(FontWeight.BOLD).
var fd1:FontDescription = new FontDescription();
fd1.fontName = "Arial, Helvetica, _sans";
fd1.fontPosture = FontPosture.NORMAL;
fd1.fontWeight = FontWeight.BOLD;
Embedded versus device fonts
Flash Player 10 and later, Adobe AIR 1.5 and later
The fontLookup property of the FontDescription object specifies whether the text engine looks for a device font or
embedded font to render text. If a device font (FontLookup.DEVICE) is specified, the runtime looks for the font on the
playback system. Specifying an embedded font (FontLookup.EMBEDDED_CFF) causes the runtime to look for an
embedded font with the specified name in the SWF file. Only embedded CFF (Compact Font Format) fonts work with
this setting. If the specified font is not found, a fallback device font is used.
Device fonts result in a smaller SWF file size. Embedded fonts give you greater fidelity across platforms.
var fd1:FontDescription = new FontDescription();
fd1.fontLookup = FontLookup.EMBEDDED_CFF;
fd1.fontName = "Garamond, _serif";
Rendering mode and hinting
Flash Player 10 and later, Adobe AIR 1.5 and later
CFF (Compact Font Format) rendering is available starting with Flash Player 10 and Adobe AIR 1.5. This type of font
rendering makes text more legible, and permits higher-quality display of fonts at small sizes. This setting only applies
to embedded fonts. FontDescription defaults to this setting (RenderingMode.CFF) for the renderingMode
property. You can set this property to RenderingMode.NORMAL to match the type of rendering used by Flash Player
7 or earlier versions.
When CFF rendering is selected, a second property, cffHinting, controls how a font’s horizontal stems are fit to the
subpixel grid. The default value, CFFHinting.HORIZONTAL_STEM, uses CFF hinting. Setting this property to
CFFHinting.NONE removes hinting, which is appropriate for animation or for large font sizes.
var fd1:FontDescription = new FontDescription();
fd1.renderingMode = RenderingMode.CFF;
fd1.cffHinting = CFFHinting.HORIZONTAL_STEM;

389
ACTIONSCRIPT 3.0 DEVELOPER’S GUIDE
Using the Flash Text Engine
Last updated 3/21/2011
Locking and cloning FontDescription
Flash Player 10 and later, Adobe AIR 1.5 and later
When a FontDescription object is assigned to an ElementFormat, its locked property is automatically set to true.
Attempting to modify a locked FontDescription object throws an IllegalOperationError. The best practice is to
fully define such an object before assigning it to a ElementFormat.
If you want to modify an existing FontDescription, first check its locked property. If it’s true, use the
clone()method to create an unlocked copy of the object. The properties of this unlocked object can be changed, and
it can then be assigned to the ElementFormat. Any new lines created from this TextElement have the new formatting.
Previous lines created from this same object are unchanged.
package
{
import flash.display.Sprite;
import flash.text.*;
public class FontDescriptionCloneExample extends Sprite
{
private var tb:TextBlock = new TextBlock();
private var te:TextElement;
private var ef1:ElementFormat;
private var ef2:ElementFormat;
private var fd1:FontDescription = new FontDescription();
private var fd2:FontDescription;
public function FontDescriptionCloneExample()
{
fd1.fontName = "Garamond";
ef1 = new ElementFormat(fd);
var str:String = "This is flash text";
te = new TextElement(str, ef);
tb.content = te;
var tx1:TextLine = tb.createTextLine(null,600);
addChild(tx1);
fd2 = (fd1.locked) ? fd1.clone() : fd1;
fd2.fontName = "Arial";
ef2 = (ef1.locked) ? ef1.clone() : ef1;
ef2.fontDescription = fd2;
tb.content.elementFormat = ef2;
var tx2:TextLine = tb.createTextLine(null,600);
addChild(tx2);
}
}
}
Controlling text
Flash Player 10 and later, Adobe AIR 1.5 and later
FTE gives you a new set of text formatting controls to handle justification and character spacing (kerning and
tracking). There are also properties for controlling that way lines are broken and for setting tab stops within lines.

390
ACTIONSCRIPT 3.0 DEVELOPER’S GUIDE
Using the Flash Text Engine
Last updated 3/21/2011
Justifying text
Flash Player 10 and later, Adobe AIR 1.5 and later
Justifying text makes all lines in a paragraph the same length by adjusting the spacing between words and sometimes
between letters. The effect is to align the text on both sides, while the spacing between words and letters varies.
Columns of text in newspapers and magazines are frequently justified.
The lineJustfication property in the SpaceJustifier class allows you to control the justification of lines in a block
of text. The LineJustification class defines constants that you can use to specify a justification option: ALL_BUT_LAST
justifies all but the last line of text; ALL_INCLUDING_LAST justifies all text, including the last line; UNJUSTIFIED, which
is the default, leaves the text unjustified.
To justify text, set the lineJustification property to an instance of the SpaceJustifier class and assign that instance
to the textJustifier property of a TextBlock instance. The following example creates a paragraph in which all but
the last line of text is justified.
package
{
import flash.text.engine.*;
import flash.display.Sprite;
public class JustifyExample extends Sprite
{
public function JustifyExample()
{
var str:String = "Lorem ipsum dolor sit amet, consectetur adipisicing elit, " +
"sed do eiusmod tempor incididunt ut labore et dolore magna aliqua. Ut " +
"enim ad minim veniam, quis nostrud exercitation ullamco laboris nisi ut " +
"aliquip ex ea commodo consequat.";
var format:ElementFormat = new ElementFormat();
var textElement:TextElement=new TextElement(str,format);
var spaceJustifier:SpaceJustifier=new
SpaceJustifier("en",LineJustification.ALL_BUT_LAST);
var textBlock:TextBlock = new TextBlock();
textBlock.content=textElement;
textBlock.textJustifier=spaceJustifier;
createLines(textBlock);
}
private function createLines(textBlock:TextBlock):void {
var yPos=20;
var textLine:TextLine=textBlock.createTextLine(null,150);
while (textLine) {
addChild(textLine);
textLine.x=15;
yPos+=textLine.textHeight+2;
textLine.y=yPos;
textLine=textBlock.createTextLine(textLine,150);
}
}
}
}

391
ACTIONSCRIPT 3.0 DEVELOPER’S GUIDE
Using the Flash Text Engine
Last updated 3/21/2011
To vary spacing between letters as well as between words, set the SpaceJustifier.letterspacing property to true.
Turning on letterspacing can reduce the occurrences of unsightly gaps between words, which can sometimes occur
with simple justification.
Justifying East Asian text
Flash Player 10 and later, Adobe AIR 1.5 and later
Justifying East Asian text entails additional considerations. It can be written from top to bottom and some characters,
known as kinsoku, cannot appear at the beginning or end of a line. The JustificationStyle class defines the following
constants, which specify the options for handling these characters. PRIORITIZE_LEAST_ADJUSTMENT bases
justification on either expanding or compressing the line, depending on which one produces the most desirable result.
PUSH_IN_KINSOKU bases justification on compressing kinsoku at the end of the line, or expanding it if no kinsoku
occurs, or if that space is insufficient.
PUSH_OUT_ONLY bases justification on expanding the line. To create a block of vertical Asian text, set the
TextBlock.lineRotation property to TextRotation.ROTATE_90 and set the ElementFormat.textRotation
property to TextRotation.AUTO, which is the default. Setting the textRotation property to AUTO causes the glyphs
in the text to remain vertical instead of turning on their side when the line is rotated. The AUTO setting rotates 90°
counter-clockwise for full width and wide glyphs only, as determined by the Unicode properties of the glyph. The
following example displays a vertical block of Japanese text and justifies it using the PUSH_IN_KINSOKU option.
package
{
import flash.text.engine.*;
import flash.display.Stage;
import flash.display.Sprite;
import flash.system.Capabilities;
public class EastAsianJustifyExample extends Sprite
{
public function EastAsianJustifyExample()
{
var Japanese_txt:String = String.fromCharCode(
0x5185, 0x95A3, 0x5E9C, 0x304C, 0x300C, 0x653F, 0x5E9C, 0x30A4,
0x30F3, 0x30BF, 0x30FC, 0x30CD, 0x30C3, 0x30C8, 0x30C6, 0x30EC,
0x30D3, 0x300D, 0x306E, 0x52D5, 0x753B, 0x914D, 0x4FE1, 0x5411,
0x3051, 0x306B, 0x30A2, 0x30C9, 0x30D3, 0x30B7, 0x30B9, 0x30C6,
0x30E0, 0x30BA, 0x793E, 0x306E)
var textBlock:TextBlock = new TextBlock();
var font:FontDescription = new FontDescription();
var format:ElementFormat = new ElementFormat();
format.fontSize = 12;
format.color = 0xCC0000;
format.textRotation = TextRotation.AUTO;
textBlock.baselineZero = TextBaseline.IDEOGRAPHIC_CENTER;
var eastAsianJustifier:EastAsianJustifier = new EastAsianJustifier("ja",
LineJustification.ALL_BUT_LAST);
eastAsianJustifier.justificationStyle = JustificationStyle.PUSH_IN_KINSOKU;
textBlock.textJustifier = eastAsianJustifier;
textBlock.lineRotation = TextRotation.ROTATE_90;
var linePosition:Number = this.stage.stageWidth - 75;
if (Capabilities.os.search("Mac OS") > -1)
// set fontName: Kozuka Mincho Pro R

392
ACTIONSCRIPT 3.0 DEVELOPER’S GUIDE
Using the Flash Text Engine
Last updated 3/21/2011
font.fontName = String.fromCharCode(0x5C0F, 0x585A, 0x660E, 0x671D) + " Pro R";
else
font.fontName = "Kozuka Mincho Pro R";
textBlock.content = new TextElement(Japanese_txt, format);
var previousLine:TextLine = null;
while (true)
{
var textLine:TextLine = textBlock.createTextLine(previousLine, 200);
if (textLine == null)
break;
textLine.y = 20;
textLine.x = linePosition;
linePosition -= 25;
addChild(textLine);
previousLine = textLine;
}
}
}
}
Kerning and tracking
Flash Player 10 and later, Adobe AIR 1.5 and later
Kerning and tracking affect the distance between adjacent pairs of characters in a text block. Kerning controls how
character pairs “fit” together, such as the pairs “WA” or “Va”. Kerning is set in the ElementFormat object. It is enabled
by default (Kerning.ON), and can be set to OFF or AUTO, in which case kerning is only applied between characters if
neither is Kanji, Hiragana, or Katakana.
Tracking adds or subtracts a set number of pixels between all characters in a text block, and is also set in the
ElementFormat object. It works with both embedded and device fonts. FTE supports two tracking properties,
trackingLeft, which adds/subtracts pixels from the left side of a character, and trackingRight, which
adds/subtracts from the right side. If kerning is being used, the tracking value is added to or subtracted from kerning
values for each character pair.
A. Kerning.OFF B. TrackingRight=5, Kerning.OFF C. TrackingRight=-5, Kerning.OFF D. Kerning.ON E. TrackingRight=-5, Kerning.ON
F. TrackingRight=-5, Kerning.ON
VAY
VAY
VAY
VAY
VA
Y
VAY
A
B
C
D
E
F

393
ACTIONSCRIPT 3.0 DEVELOPER’S GUIDE
Using the Flash Text Engine
Last updated 3/21/2011
var ef1:ElementFormat = new ElementFormat();
ef1.kerning = Kerning.OFF;
var ef2:ElementFormat = new ElementFormat();
ef2.kerning = Kerning.ON;
ef2.trackingLeft = 0.8;
ef2.trackingRight = 0.8;
var ef3:ElementFormat = new ElementFormat();
ef3.trackingRight = -0.2;
Line breaks for wrapped text
Flash Player 10 and later, Adobe AIR 1.5 and later
The breakOpportunity property of the ElementFormat object determines which characters can be used for breaking
when wrapping text is broken into multiple lines. The default, BreakOpportunity.AUTO, uses standard Unicode
properties, such as breaking between words and on hyphens. Using BreakOpportunity.ALL allows any character to
be treated as a line break opportunity, which is useful for creating effects like text along a path.
var ef:ElementFormat = new ElementFormat();
ef.breakOpportunity = BreakOpportunity.ALL;
Tab stops
Flash Player 10 and later, Adobe AIR 1.5 and later
To set tab stops in a text block, define the tab stops by creating instances of the TabStop class. The parameters to the
TabStop() constructor specify how the text aligns with the tab stop. These parameters specify the position of the tab
stop, and for decimal alignment, the value on which to align, expressed as a string. Typically, this value is a decimal
point but it could also be a comma, a dollar sign, or the symbol for the Yen or the Euro, for example. The following
line of code creates a tab stop called tab1.
var tab1:TabStop = new TabStop(TabAlignment.DECIMAL, 50, ".");
Once you've created the tab stops for a text block, assign them to the tabStops property of a TextBlock instance.
Because the tabStops property requires a Vector, though, first create a Vector and add the tab stops to it. The Vector
allows you to assign a set of tab stops to the text block. The following example creates a Vector<TabStop> instance
and adds a set of TabStop objects to it. Then it assigns the tab stops to the tabStops property of a TextBlock instance.
var tabStops:Vector.<TabStop> = new Vector.<TabStop>();
tabStops.push(tab1, tab2, tab3, tab4);
textBlock.tabStops = tabStops
For more information on Vectors, see “Working with arrays” on page 25.
The following example shows the effect of each of the TabStop alignment options.

394
ACTIONSCRIPT 3.0 DEVELOPER’S GUIDE
Using the Flash Text Engine
Last updated 3/21/2011
package {
import flash.text.engine.*;
import flash.display.Sprite;
public class TabStopExample extends Sprite
{
public function TabStopExample()
{
var format:ElementFormat = new ElementFormat();
format.fontDescription = new FontDescription("Arial");
format.fontSize = 16;
var tabStops:Vector.<TabStop> = new Vector.<TabStop>();
tabStops.push(
new TabStop(TabAlignment.START, 20),
new TabStop(TabAlignment.CENTER, 140),
new TabStop(TabAlignment.DECIMAL, 260, "."),
new TabStop(TabAlignment.END, 380));
var textBlock:TextBlock = new TextBlock();
textBlock.content = new TextElement(
"\tt1\tt2\tt3\tt4\n" +
"\tThis line aligns on 1st tab\n" +
"\t\t\t\tThis is the end\n" +
"\tThe following fragment centers on the 2nd tab:\t\t\n" +
"\t\tit's on me\t\t\n" +
"\tThe following amounts align on the decimal point:\n" +
"\t\t\t45.00\t\n" +
"\t\t\t75,320.00\t\n" +
"\t\t\t6,950.00\t\n" +
"\t\t\t7.01\t\n", format);
textBlock.tabStops = tabStops;
var yPosition:Number = 60;
var previousTextLine:TextLine = null;
var textLine:TextLine;
var i:int;
for (i = 0; i < 10; i++) {
textLine = textBlock.createTextLine(previousTextLine, 1000, 0);
textLine.x = 20;
textLine.y = yPosition;
addChild(textLine);
yPosition += 25;
previousTextLine = textLine;
}
}
}
}

395
ACTIONSCRIPT 3.0 DEVELOPER’S GUIDE
Using the Flash Text Engine
Last updated 3/21/2011
Flash Text Engine example: News layout
Flash Player 10 and later, Adobe AIR 1.5 and later
This programming example shows the Flash Text Engine in use laying out a simple newspaper page. The page includes
a large headline, a subhead, and a multicolumn body section.
First, create an FLA file, and attach the following code to frame #2 of the default layer:
import com.example.programmingas3.newslayout.StoryLayout ;
// frame sc ript - create a 3-columned arti cle layout
var story:StoryLayout = new StoryLayout(720, 500, 3, 10);
story.x = 20;
story.y = 80;
addChild(story);
stop();
StoryLayout.as is the controller script for this example. It sets the content, reads in style information from an external
style sheet, and assigns those styles to ElementFormat objects. It then creates the headline, subhead and multicolumn
text elements.
package com.example.programmingas3.newslayout
{
import flash.display.Sprite;
import flash.text.StyleSheet;
import flash.text.engine.*;
import flash.events.Event;
import flash.net.URLRequest;
import flash.net.URLLoader;
import flash.display.Sprite;
import flash.display.Graphics;
public class StoryLayout extends Sprite
{
public var headlineTxt:HeadlineTextField;
public var subtitleTxt:HeadlineTextField;
public var storyTxt:MultiColumnText;
public var sheet:StyleSheet;
public var h1_ElFormat:ElementFormat;
public var h2_ElFormat:ElementFormat;
public var p_ElFormat:ElementFormat;
private var loader:URLLoader;
public var paddingLeft:Number;
public var paddingRight:Number;
public var paddingTop:Number;
public var paddingBottom:Number;
public var preferredWidth:Number;
public var preferredHeight:Number;
public var numColumns:int;
public var bgColor:Number = 0xFFFFFF;

396
ACTIONSCRIPT 3.0 DEVELOPER’S GUIDE
Using the Flash Text Engine
Last updated 3/21/2011
public var headline:String = "News Layout Example";
public var subtitle:String = "This example formats text like a newspaper page using the
Flash Text Engine API. ";
public var rawTestData:String =
"From the part Mr. Burke took in the American Revolution, it was natural that I should
consider him a friend to mankind; and as our acquaintance commenced on that ground, it would
have been more agreeable to me to have had cause to continue in that opinion than to change it. " +
"At the time Mr. Burke made his violent speech last winter in the English Parliament
against the French Revolution and the National Assembly, I was in Paris, and had written to him
but a short time before to inform him how prosperously matters were going on. Soon after this I
saw his advertisement of the Pamphlet he intended to publish: As the attack was to be made in a
language but little studied, and less understood in France, and as everything suffers by
translation, I promised some of the friends of the Revolution in that country that whenever Mr.
Burke's Pamphlet came forth, I would answer it. This appeared to me the more necessary to be
done, when I saw the flagrant misrepresentations which Mr. Burke's Pamphlet contains; and that
while it is an outrageous abuse on the French Revolution, and the principles of Liberty, it is
an imposition on the rest of the world. " +
"I am the more astonished and disappointed at this conduct in Mr. Burke, as (from the
circumstances I am going to mention) I had formed other expectations. " +
"I had seen enough of the miseries of war, to wish it might never more have existence
in the world, and that some other mode might be found out to settle the differences that should
occasionally arise in the neighbourhood of nations. This certainly might be done if Courts were
disposed to set honesty about it, or if countries were enlightened enough not to be made the
dupes of Courts. The people of America had been bred up in the same prejudices against France,
which at that time characterised the people of England; but experience and an acquaintance with
the French Nation have most effectually shown to the Americans the falsehood of those prejudices;
and I do not believe that a more cordial and confidential intercourse exists between any two
countries than between America and France. ";
public function StoryLayout(w:int = 400, h:int = 200, cols:int = 3, padding:int =
10):void
{
this.preferredWidth = w;
this.preferredHeight = h;
this.numColumns = cols;
this.paddingLeft = padding;
this.paddingRight = padding;
this.paddingTop = padding;
this.paddingBottom = padding;
var req:URLRequest = new URLRequest("story.css");
loader = new URLLoader();
loader.addEventListener(Event.COMPLETE, onCSSFileLoaded);
loader.load(req);
}
public function onCSSFileLoaded(event:Event):void
{
this.sheet = new StyleSheet();
this.sheet.parseCSS(loader.data);
// convert headline styles to ElementFormat objects
h1_ElFormat = getElFormat("h1", this.sheet);

397
ACTIONSCRIPT 3.0 DEVELOPER’S GUIDE
Using the Flash Text Engine
Last updated 3/21/2011
h1_ElFormat.typographicCase = TypographicCase.UPPERCASE;
h2_ElFormat = getElFormat("h2", this.sheet);
p_ElFormat = getElFormat("p", this.sheet);
displayText();
}
public function drawBackground():void
{
var h:Number = this.storyTxt.y + this.storyTxt.height +
this.paddingTop + this.paddingBottom;
var g:Graphics = this.graphics;
g.beginFill(this.bgColor);
g.drawRect(0, 0, this.width + this.paddingRight + this.paddingLeft, h);
g.endFill();
}
/**
* Reads a set of style properties for a named style and then creates
* a TextFormat object that uses the same properties.
*/
public function getElFormat(styleName:String, ss:StyleSheet):ElementFormat
{
var style:Object = ss.getStyle(styleName);
if (style != null)
{
var colorStr:String = style.color;
if (colorStr != null && colorStr.indexOf("#") == 0)
{
style.color = colorStr.substr(1);
}
var fd:FontDescription = new FontDescription(
style.fontFamily,
style.fontWeight,
FontPosture.NORMAL,
FontLookup.DEVICE,
RenderingMode.NORMAL,
CFFHinting.NONE);
var format:ElementFormat = new ElementFormat(fd,
style.fontSize,
style.color,
1,
TextRotation.AUTO,
TextBaseline.ROMAN,
TextBaseline.USE_DOMINANT_BASELINE,
0.0,
Kerning.ON,
0.0,
0.0,
"en",
BreakOpportunity.AUTO,
DigitCase.DEFAULT,
DigitWidth.DEFAULT,
LigatureLevel.NONE,
TypographicCase.DEFAULT);
if (style.hasOwnProperty("letterSpacing"))
{

398
ACTIONSCRIPT 3.0 DEVELOPER’S GUIDE
Using the Flash Text Engine
Last updated 3/21/2011
format.trackingRight = style.letterSpacing;
}
}
return format;
}
public function displayText():void
{
headlineTxt = new HeadlineTextField(h1_ElFormat,headline,this.preferredWidth);
headlineTxt.x = this.paddingLeft;
headlineTxt.y = 40 + this.paddingTop;
headlineTxt.fitText(1);
this.addChild(headlineTxt);
subtitleTxt = new HeadlineTextField(h2_ElFormat,subtitle,this.preferredWidth);
subtitleTxt.x = this.paddingLeft;
subtitleTxt.y = headlineTxt.y + headlineTxt.height;
subtitleTxt.fitText(2);
this.addChild(subtitleTxt);
storyTxt = new MultiColumnText(rawTestData, this.numColumns,
20, this.preferredWidth, this.preferredHeight, p_ElFormat);
storyTxt.x = this.paddingLeft;
storyTxt.y = subtitleTxt.y + subtitleTxt.height + 10;
this.addChild(storyTxt);
drawBackground();
}
}
}
FormattedTextBlock.as is used as a base class for creating blocks of text. It also includes utility functions for changing
font size and case.
package com.example.programmingas3.newslayout
{
import flash.text.engine.*;
import flash.display.Sprite;
public class FormattedTextBlock extends Sprite
{
public var tb:TextBlock;
private var te:TextElement;
private var ef1:ElementFormat;
private var textWidth:int;
public var totalTextLines:int;
public var blockText:String;
public var leading:Number = 1.25;
public var preferredWidth:Number = 720;
public var preferredHeight:Number = 100;
public function FormattedTextBlock(ef:ElementFormat,txt:String, colW:int = 0)
{
this.textWidth = (colW==0) ? preferredWidth : colW;
blockText = txt;
ef1 = ef;
tb = new TextBlock();

399
ACTIONSCRIPT 3.0 DEVELOPER’S GUIDE
Using the Flash Text Engine
Last updated 3/21/2011
tb.textJustifier = new SpaceJustifier("en",LineJustification.UNJUSTIFIED,false);
te = new TextElement(blockText,this.ef1);
tb.content = te;
this.breakLines();
}
private function breakLines()
{
var textLine:TextLine = null;
var y:Number = 0;
var lineNum:int = 0;
while (textLine = tb.createTextLine(textLine,this.textWidth,0,true))
{
textLine.x = 0;
textLine.y = y;
y += this.leading*textLine.height;
this.addChild(textLine);
}
for (var i:int = 0; i < this.numChildren; i++)
{
TextLine(this.getChildAt(i)).validity = TextLineValidity.STATIC;
}
this.totalTextLines = this.numChildren;
}
private function rebreakLines()
{
this.clearLines();
this.breakLines();
}
private function clearLines()
{
while(this.numChildren)
{
this.removeChildAt(0);
}
}

400
ACTIONSCRIPT 3.0 DEVELOPER’S GUIDE
Using the Flash Text Engine
Last updated 3/21/2011
public function changeSize(size:uint=12):void
{
if (size > 5)
{
var ef2:ElementFormat = ef1.clone();
ef2.fontSize = size;
te.elementFormat = ef2;
this.rebreakLines();
}
}
public function changeCase(newCase:String = "default"):void
{
var ef2:ElementFormat = ef1.clone();
ef2.typographicCase = newCase;
te.elementFormat = ef2;
}
}
}
HeadlineTextBlock.as extends the FormattedTextBlock class and is used for creating headlines. It includes a function
for fitting text within a defined space on the page.
package com.example.programmingas3.newslayout
{
import flash.text.engine.*;
public class HeadlineTextField extends FormattedTextBlock
{
public static var MIN_POINT_SIZE:uint = 6;
public static var MAX_POINT_SIZE:uint = 128;
public function HeadlineTextField(te:ElementFormat,txt:String,colW:int = 0)
{
super(te,txt);
}
public function fitText(maxLines:uint = 1, targetWidth:Number = -1):uint
{
if (targetWidth == -1)
{
targetWidth = this.width;
}
var pixelsPerChar:Number = targetWidth / this.blockText.length;
var pointSize:Number = Math.min(MAX_POINT_SIZE,
Math.round(pixelsPerChar * 1.8 * maxLines));
if (pointSize < 6)
{
// the point size is too small
return pointSize;
}
this.changeSize(pointSize);
if (this.totalTextLines > maxLines)

401
ACTIONSCRIPT 3.0 DEVELOPER’S GUIDE
Using the Flash Text Engine
Last updated 3/21/2011
{
return shrinkText(--pointSize, maxLines);
}
else
{
return growText(pointSize, maxLines);
}
}
public function growText(pointSize:Number, maxLines:uint = 1):Number
{
if (pointSize >= MAX_POINT_SIZE)
{
return pointSize;
}
this.changeSize(pointSize + 1);
if (this.totalTextLines > maxLines)
{
// set it back to the last size
this.changeSize(pointSize);
return pointSize;
}
else
{
return growText(pointSize + 1, maxLines);
}
}
public function shrinkText(pointSize:Number, maxLines:uint=1):Number
{
if (pointSize <= MIN_POINT_SIZE)
{
return pointSize;
}
this.changeSize(pointSize);
if (this.totalTextLines > maxLines)
{
return shrinkText(pointSize - 1, maxLines);
}
else
{
return pointSize;
}
}
}
}
MultiColumnText.as handles formatting text within a multicolumn design. It demonstrates the flexible use a
TextBlock object as a factory for creating, formatting, and placing text lines.

402
ACTIONSCRIPT 3.0 DEVELOPER’S GUIDE
Using the Flash Text Engine
Last updated 3/21/2011
package com.example.programmingas3.newslayout
{
import flash.display.Sprite;
import flash.text.engine.*;
public class MultiColumnText extends Sprite
{
private var tb:TextBlock;
private var te:TextElement;
private var numColumns:uint = 2;
private var gutter:uint = 10;
private var leading:Number = 1.25;
private var preferredWidth:Number = 400;
private var preferredHeight:Number = 100;
private var colWidth:int = 200;
public function MultiColumnText(txt:String = "",cols:uint = 2,
gutter:uint = 10, w:Number = 400, h:Number = 100,
ef:ElementFormat = null):void
{
this.numColumns = Math.max(1, cols);
this.gutter = Math.max(1, gutter);
this.preferredWidth = w;
this.preferredHeight = h;
this.setColumnWidth();
var field:FormattedTextBlock = new FormattedTextBlock(ef,txt,this.colWidth);
var totLines:int = field.totalTextLines;
field = null;
var linesPerCol:int = Math.ceil(totLines/cols);
tb = new TextBlock();
te = new TextElement(txt,ef);
tb.content = te;
var textLine:TextLine = null;
var x:Number = 0;
var y:Number = 0;
var i:int = 0;
var j:int = 0;
while (textLine = tb.createTextLine(textLine,this.colWidth,0,true))
{
textLine.x = Math.floor(i/(linesPerCol+1))*(this.colWidth+this.gutter);
textLine.y = y;
y += this.leading*textLine.height;

403
ACTIONSCRIPT 3.0 DEVELOPER’S GUIDE
Using the Flash Text Engine
Last updated 3/21/2011
j++;
if(j>linesPerCol)
{
y = 0;
j = 0;
}
i++;
this.addChild(textLine);
}
}
private function setColumnWidth():void
{
this.colWidth = Math.floor( (this.preferredWidth -
((this.numColumns - 1) * this.gutter)) / this.numColumns);
}
}
}

404
Last updated 3/21/2011
Chapter 21: Using the Text Layout
Framework
Flash Player 10 and later, Adobe AIR 1.5 and later
Overview of the Text Layout Framework
Flash Player 10 and later, Adobe AIR 1.5 and later
The Text Layout Framework (TLF) is an extensible ActionScript library. The TLF is built on the text engine in Adobe®
Flash® Player 10 and Adobe® AIR® 1.5. The TLF provides advanced typographic and text layout features for innovative
typography on the web. The framework can be used with Adobe® Flex® or Adobe® Flash® Professional. Developers can
use or extend existing components, or they can use the framework to create their own text components.
The TLF includes the following capabilities:
•Bidirectional text, vertical text, and over 30 writing scripts including Arabic, Hebrew, Chinese, Japanese, Korean,
Thai, Lao, Vietnamese, and others
•Selection, editing, and flowing text across multiple columns and linked containers
•Vertical text, Tate-Chu-Yoko (horizontal within vertical text) and justifier for East Asian typography
•Rich typographical controls, including kerning, ligatures, typographic case, digit case, digit width, and
discretionary hyphens
•Cut, copy, paste, undo, and standard keyboard and mouse gestures for editing
•Rich developer APIs to manipulate text content, layout, and markup and create custom text components
•Robust list support including custom markers and numbering formats
•Inline images and positioning rules
The TLF is an ActionScript 3.0 library built on the Flash Text Engine (FTE) introduced in Flash Player 10. FTE can be
accessed through the flash.text.engine package, which is part of the Flash Player 10 Application Programming
Interface (API).
The Flash Player API, however, provides low-level access to the text engine, which means that some tasks can require
a relatively large amount of code. The TLF encapsulates the low-level code into simpler APIs. The TLF also provides
a conceptual architecture that organizes the basic building blocks defined by FTE into a system that is easier to use.
Unlike FTE, the TLF is not built in to Flash Player. Rather, it is an independent component library written entirely in
ActionScript 3.0. Because the framework is extensible, it can be customized for specific environments. Both Flash
Professional and the Flex SDK include components that are based on the TLF framework.
More Help topics
"Flow" TLF markup application

405
ACTIONSCRIPT 3.0 DEVELOPER’S GUIDE
Using the Text Layout Framework
Last updated 3/21/2011
Complex script support
Flash Player 10 and later, Adobe AIR 1.5 and later
The TLF provides complex script support. Complex script support includes the ability to display and edit right-to-left
scripts. The TLF also provides the ability to display and edit a mixture of left-to-right and right-to-left scripts such as
Arabic and Hebrew. The framework not only supports vertical text layout for Chinese, Japanese, and Korean, but also
supports tate-chu-yoko (TCY elements). TCY elements are blocks of horizontal text embedded into vertical runs of
text. The following scripts are supported:
•Latin (English, Spanish, French, Vietnamese, and so on)
•Greek, Cyrillic, Armenian, Georgian, and Ethiopic
•Arabic and Hebrew
•Han ideographs and Kana (Chinese, Japanese, and Korean) and Hangul Johab (Korean)
•Thai, Lao, and Khmer
•Devanagari, Bengali, Gurmukhi, Malayalam, Telugu, Tamil, Gujarati, Oriya, Kannada, and Tibetan
•Tifinagh, Yi, Cherokee, Canadian Syllabics, Deseret, Shavian, Vai, Tagalog, Hanunoo, Buhid, and Tagbanwa
Using the Text Layout Framework in Flash Professional and Flex
You can use the TLF classes directly to create custom components in Flash. In addition, Flash Professional CS5
provides a new class, fl.text.TLFTextField, that encapsulates the TLF functionality. Use the TLFTextField class to create
text fields in ActionScript that use the advanced text display features of the TLF. Create a TLFTextField object the same
way you create a text field with the TextField class. Then, use the textFlow property to assign advanced formatting
from the TLF classes.
You can also use Flash Professional to create the TLFTextField instance on the stage using the text tool. Then you can
use ActionScript to control the formatting and layout of the text field content using the TLF classes. For more
information, see TLFTextField in the ActionScript 3.0 Reference for the Adobe Flash Platform.
If you are working in Flex, use the TLF classes. For more information, see “Using the Text Layout Framework” on
page 405.
Using the Text Layout Framework
Flash Player 10 and later, Adobe AIR 1.5 and later
If you are working in Flex or are building custom text components, use the TLF classes. The TLF is an ActionScript
3.0 library contained entirely within the textLayout.swc library. The TLF library contains about 100 ActionScript 3.0
classes and interfaces organized into ten packages. These packages are subpackages of the flashx.textLayout package.
The Text Layout Framework classes
Flash Player 10 and later, Adobe AIR 1.5 and later
The TLF classes can be grouped into three categories:
•Data structures and formatting classes

406
ACTIONSCRIPT 3.0 DEVELOPER’S GUIDE
Using the Text Layout Framework
Last updated 3/21/2011
•Rendering classes
•User interaction classes
Data structures and formatting classes
The following packages contain the data structures and formatting classes for the TLF:
•flashx.textLayout.elements
•flashx.textLayout.formats
•flashx.textLayout.conversion
The main data structure of the TLF is the text flow hierarchy, which is defined in the elements package. Within this
structure, you can assign styles and attributes to runs of text with the formats package. You can also control how text
is imported to, and exported from, the data structure with the conversion package.
Rendering classes
The following packages contain the rendering classes for the TLF:
•flashx.textLayout.factory
•flashx.textLayout.container
•flashx.textLayout.compose
The classes in these packages facilitate the rendering of text for display by Flash Player. The factory package provides
a simple way to display static text. The container package includes classes and interfaces that define display containers
for dynamic text. The compose package defines techniques for positioning and displaying dynamic text in containers.
User interaction classes
The following packages contain the user interaction classes for the TLF:
•flashx.textLayout.edit
•flashx.textLayout.operations
•flashx.textLayout.events
The edit and operations packages define classes that you can use to allow editing of text stored in the data structures.
The events package contains event handling classes.
General steps for creating text with the Text Layout Framework
The following steps describe the general process for creating text with the Text Layout Format:
1Import formatted text into the TLF data structures. For more information, see “Structuring text with TLF” on
page 410 and “Formatting text with TLF” on page 414.
2Create one or more linked display object containers for the text. For more information, see “Managing text
containers with TLF” on page 415.
3Associate the text in the data structures with the containers and set editing and scrolling options. For more
information, see “Enabling text selection, editing, and undo with TLF” on page 416.
4Create an event handler to reflow the text in response to resize (or other) events. For more information, see “Event
handling with TLF” on page 417.

407
ACTIONSCRIPT 3.0 DEVELOPER’S GUIDE
Using the Text Layout Framework
Last updated 3/21/2011
Text Layout Framework example: News layout
Flash Player 10 and later, Adobe AIR 1.5 and later
The following example demonstrates using the TLF to lay out a simple newspaper page. The page includes a large
headline, a subhead, and a multicolumn body section:
package
{
import flash.display.Sprite;
import flash.display.StageAlign;
import flash.display.StageScaleMode;
import flash.events.Event;
import flash.geom.Rectangle;
import flashx.textLayout.compose.StandardFlowComposer;
import flashx.textLayout.container.ContainerController;
import flashx.textLayout.container.ScrollPolicy;
import flashx.textLayout.conversion.TextConverter;
import flashx.textLayout.elements.TextFlow;
import flashx.textLayout.formats.TextLayoutFormat;
public class TLFNewsLayout extends Sprite
{
private var hTextFlow:TextFlow;
private var headContainer:Sprite;
private var headlineController:ContainerController;
private var hContainerFormat:TextLayoutFormat;
private var bTextFlow:TextFlow;
private var bodyTextContainer:Sprite;
private var bodyController:ContainerController;
private var bodyTextContainerFormat:TextLayoutFormat;
private const headlineMarkup:String = "<flow:TextFlow
xmlns:flow='http://ns.adobe.com/textLayout/2008'><flow:p textAlign='center'><flow:span
fontFamily='Helvetica' fontSize='18'>TLF News Layout Example</flow:span><flow:br/><flow:span
fontFamily='Helvetica' fontSize='14'>This example formats text like a newspaper page with a
headline, a subtitle, and multiple columns</flow:span></flow:p></flow:TextFlow>";
private const bodyMarkup:String = "<flow:TextFlow
xmlns:flow='http://ns.adobe.com/textLayout/2008' fontSize='12' textIndent='10' marginBottom='15'
paddingTop='4' paddingLeft='4'><flow:p marginBottom='inherit'><flow:span>There are many
</flow:span><flow:span fontStyle='italic'>such</flow:span><flow:span> lime-kilns in that tract
of country, for the purpose of burning the white marble which composes a large part of the
substance of the hills. Some of them, built years ago, and long deserted, with weeds growing in
the vacant round of the interior, which is open to the sky, and grass and wild-flowers rooting
themselves into the chinks of the stones, look already like relics of antiquity, and may yet be
overspread with the lichens of centuries to come. Others, where the lime-burner still feeds his
daily and nightlong fire, afford points of interest to the wanderer among the hills, who seats
himself on a log of wood or a fragment of marble, to hold a chat with the solitary man. It is a
lonesome, and, when the character is inclined to thought, may be an intensely thoughtful
occupation; as it proved in the case of Ethan Brand, who had mused to such strange purpose, in
days gone by, while the fire in this very kiln was burning.</flow:span></flow:p><flow:p
marginBottom='inherit'><flow:span>The man who now watched the fire was of a different order, and
troubled himself with no thoughts save the very few that were requisite to his business. At
frequent intervals, he flung back the clashing weight of the iron door, and, turning his face

408
ACTIONSCRIPT 3.0 DEVELOPER’S GUIDE
Using the Text Layout Framework
Last updated 3/21/2011
from the insufferable glare, thrust in huge logs of oak, or stirred the immense brands with a
long pole. Within the furnace were seen the curling and riotous flames, and the burning marble,
almost molten with the intensity of heat; while without, the reflection of the fire quivered on
the dark intricacy of the surrounding forest, and showed in the foreground a bright and ruddy
little picture of the hut, the spring beside its door, the athletic and coal-begrimed figure of
the lime-burner, and the half-frightened child, shrinking into the protection of his father's
shadow. And when again the iron door was closed, then reappeared the tender light of the half-
full moon, which vainly strove to trace out the indistinct shapes of the neighboring mountains;
and, in the upper sky, there was a flitting congregation of clouds, still faintly tinged with the
rosy sunset, though thus far down into the valley the sunshine had vanished long and long
ago.</flow:span></flow:p></flow:TextFlow>";
public function TLFNewsLayout()
{
//wait for stage to exist
addEventListener(Event.ADDED_TO_STAGE, onAddedToStage);
}
private function onAddedToStage(evtObj:Event):void
{
removeEventListener(Event.ADDED_TO_STAGE, onAddedToStage);
stage.scaleMode = StageScaleMode.NO_SCALE;
stage.align = StageAlign.TOP_LEFT;
// Headline text flow and flow composer
hTextFlow = TextConverter.importToFlow(headlineMarkup,
TextConverter.TEXT_LAYOUT_FORMAT);
// initialize the headline container and controller objects
headContainer = new Sprite();
headlineController = new ContainerController(headContainer);
headlineController.verticalScrollPolicy = ScrollPolicy.OFF;
hContainerFormat = new TextLayoutFormat();
hContainerFormat.paddingTop = 4;
hContainerFormat.paddingRight = 4;
hContainerFormat.paddingBottom = 4;
hContainerFormat.paddingLeft = 4;
headlineController.format = hContainerFormat;
hTextFlow.flowComposer.addController(headlineController);
addChild(headContainer);
stage.addEventListener(flash.events.Event.RESIZE, resizeHandler);
// Body text TextFlow and flow composer
bTextFlow = TextConverter.importToFlow(bodyMarkup,
TextConverter.TEXT_LAYOUT_FORMAT);
// The body text container is below, and has three columns
bodyTextContainer = new Sprite();
bodyController = new ContainerController(bodyTextContainer);
bodyTextContainerFormat = new TextLayoutFormat();
bodyTextContainerFormat.columnCount = 3;
bodyTextContainerFormat.columnGap = 30;
bodyController.format = bodyTextContainerFormat;
bTextFlow.flowComposer.addController(bodyController);
addChild(bodyTextContainer);

409
ACTIONSCRIPT 3.0 DEVELOPER’S GUIDE
Using the Text Layout Framework
Last updated 3/21/2011
resizeHandler(null);
}
private function resizeHandler(event:Event):void
{
const verticalGap:Number = 25;
const stagePadding:Number = 16;
var stageWidth:Number = stage.stageWidth - stagePadding;
var stageHeight:Number = stage.stageHeight - stagePadding;
var headlineWidth:Number = stageWidth;
var headlineContainerHeight:Number = stageHeight;
// Initial compose to get height of headline after resize
headlineController.setCompositionSize(headlineWidth,
headlineContainerHeight);
hTextFlow.flowComposer.compose();
var rect:Rectangle = headlineController.getContentBounds();
headlineContainerHeight = rect.height;
// Resize and place headline text container
// Call setCompositionSize() again with updated headline height
headlineController.setCompositionSize(headlineWidth, headlineContainerHeight );
headlineController.container.x = stagePadding / 2;
headlineController.container.y = stagePadding / 2;
hTextFlow.flowComposer.updateAllControllers();
// Resize and place body text container
var bodyContainerHeight:Number = (stageHeight - verticalGap -
headlineContainerHeight);
bodyController.format = bodyTextContainerFormat;
bodyController.setCompositionSize(stageWidth, bodyContainerHeight );
bodyController.container.x = (stagePadding/2);
bodyController.container.y = (stagePadding/2) + headlineContainerHeight +
verticalGap;
bTextFlow.flowComposer.updateAllControllers();
}
}
}
The TLFNewsLayout class uses two text containers. One container displays a headline and subhead, and the other
displays three-column body text. For simplicity, the text is hard-coded into the example as TLF Markup text. The
headlineMarkup variable contains both the headline and the subhead, and the bodyMarkup variable contains the
body text. For more information on TLF Markup, see “Structuring text with TLF” on page 410.
After some initialization, the onAddedToStage() function imports the headline text into a TextFlow object, which is
the main data structure of the TLF:
hTextFlow = TextConverter.importToFlow(headlineMarkup, TextConverter.TEXT_LAYOUT_FORMAT);
Next, a Sprite object is created for the container, and a controller is created and associated with the container:
headContainer = new Sprite();
headlineController = new ContainerController(headContainer);
The controller is initialized to set formatting, scrolling, and other options. The controller contains geometry that
defines the bounds of the container that the text flows into. A TextLayoutFormat object contains the formatting
options:
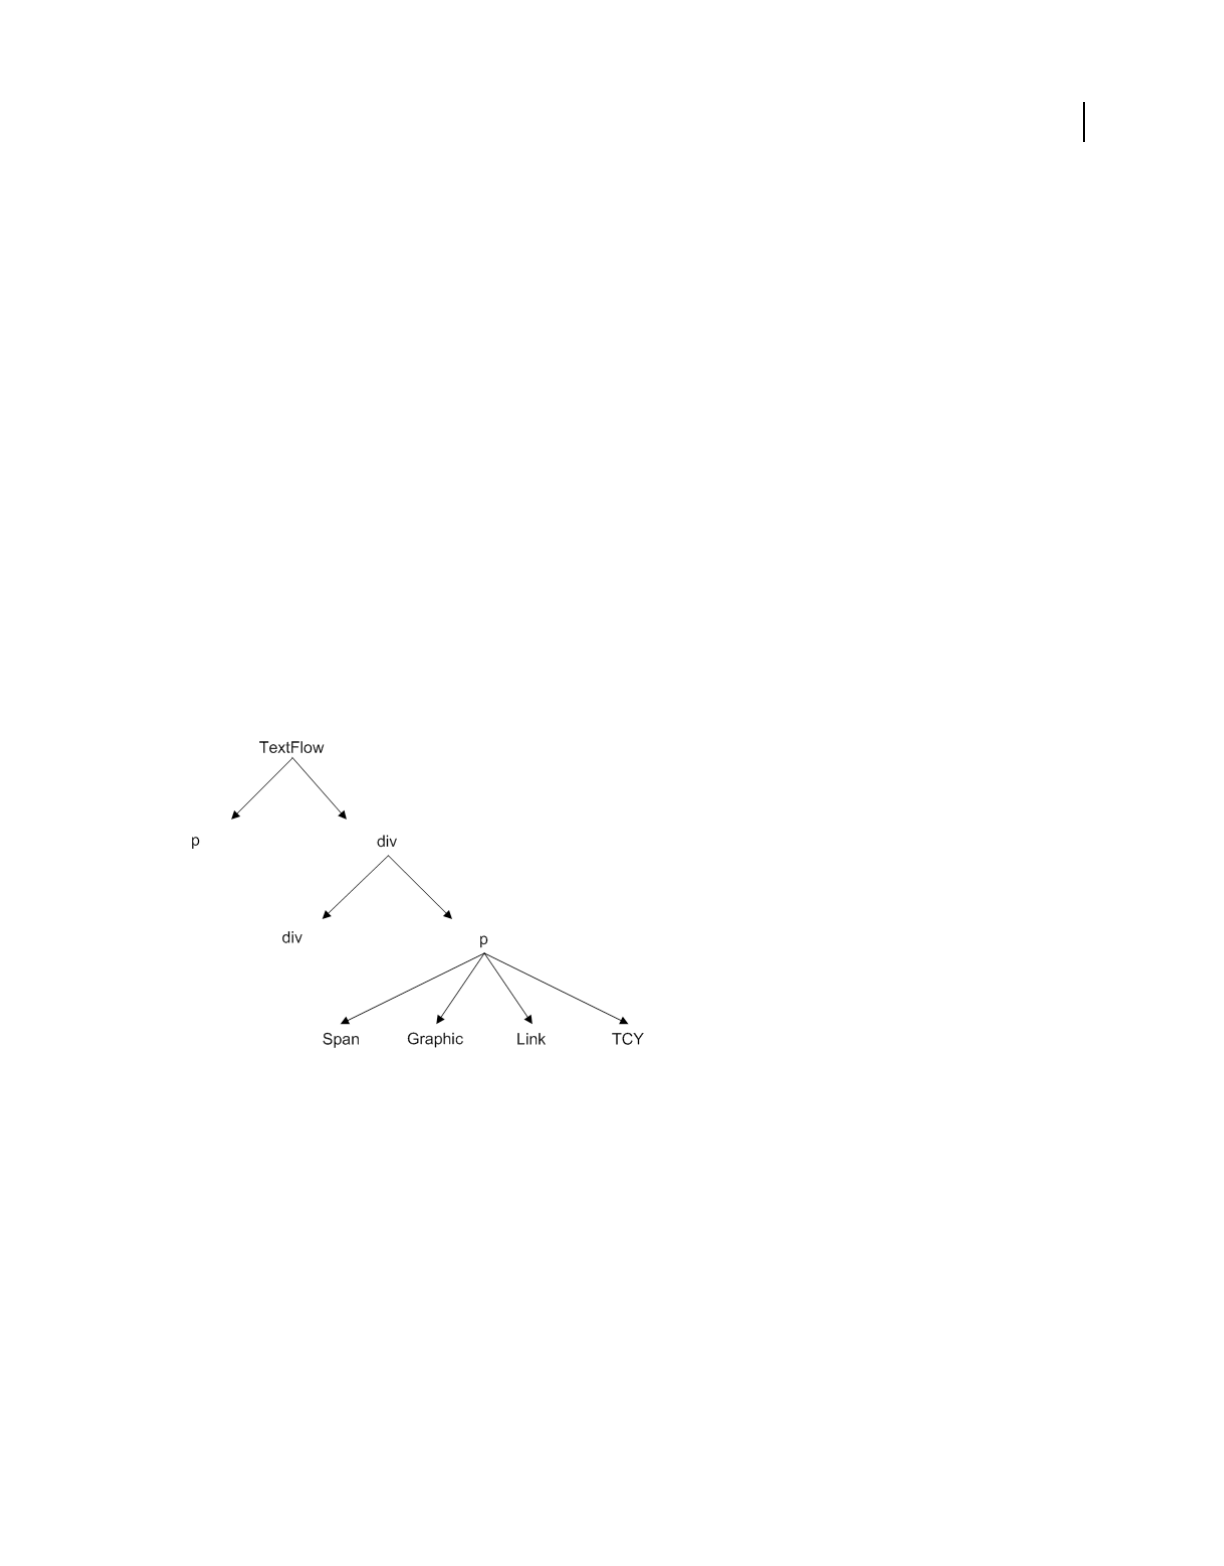
410
ACTIONSCRIPT 3.0 DEVELOPER’S GUIDE
Using the Text Layout Framework
Last updated 3/21/2011
hContainerFormat = new TextLayoutFormat();
The controller is assigned to the flow composer and the function adds the container to the display list. The actual
composition and display of the containers is deferred to the resizeHandler() method. The same sequence of steps
is performed to initialize the body TextFlow object.
The resizeHandler() method measures the space available for rendering the containers and sizes the containers
accordingly. An initial call to the compose() method allows for the calculation of the proper height of the headline
container. The resizeHandler() method can then place and display the headline container with the
updateAllControllers() method. Finally, the resizeHandler() method uses the size of the headline container to
determine the placement of the body text container.
Structuring text with TLF
The TLF uses a hierarchical tree to represent text. Each node in the tree is an instance of a class defined in the elements
package. For example, the root node of the tree is always an instance of the TextFlow class. The TextFlow class
represents an entire story of text. A story is a collection of text and other elements that is treated as one unit, or flow.
A single story can require more than one column or text container to display.
Apart from the root node, the remaining elements are loosely based on XHTML elements. The following diagram
shows the hierarchy of the framework:
TextFlow Hierarchy
Text Layout Framework markup
Understanding the structure of the TLF is also helpful when dealing with TLF Markup. TLF Markup is an XML
representation of text that is part of the TLF. Although the framework also supports other XML formats, TLF Markup
is unique in that it is based specifically on the structure of the TextFlow hierarchy. If you export XML from a TextFlow
using this markup format, the XML is exported with this hierarchy intact.
TLF Markup provides the highest fidelity representation of text in a TextFlow hierarchy. The markup language
provides tags for each of the TextFlow hierarchy’s basic elements, and also provides attributes for all formatting
properties available in the TextLayoutFormat class.
The following table contains the tags that can be used in TLF Markup.

411
ACTIONSCRIPT 3.0 DEVELOPER’S GUIDE
Using the Text Layout Framework
Last updated 3/21/2011
More Help topics
TLF 2.0 Lists Markup
TLF 2.0 SubParagraphGroupElements and typeName
Using numbered and bulleted lists
You can use the ListElement and ListItemElement classes to add bulleted lists to your text controls. The bulleted lists
can be nested and can be customized to use different bullets (or markers) and auto-numbering, as well as outline-style
numbering.
To create lists in your text flows, use the <list> tag. You then use <li> tags within the <list> tag for each list item
in the list. You can customize the appearance of the bullets by using the ListMarkerFormat class.
The following example creates simple lists:
Element Description Children Class
textflow The root element of the markup. div, p TextFlow
div A division within a TextFlow. May contain a
group of paragraphs.
div, list, p DivElement
pA paragraph. a, tcy, span, img, tab, br,
g
ParagraphElement
aA link. tcy, span, img, tab, br, g LinkElement
tcy A run of horizontal text (used in a vertical
TextFlow).
a, span, img, tab, br, g TCYElement
span A run of text within a paragraph. SpanElement
img An image in a paragraph. InlineGraphicElement
tab A tab character. TabElement
br A break character. Used for ending a line
within a paragraph; text continues on the
next line, but remains in the same paragraph.
BreakElement
linkNormalFormat Defines the formatting attributes used for
links in normal state.
TextLayoutFormat TextLayoutFormat
linkActiveFormat Defines the formatting attributes used for
links in active state, when the mouse is down
on a link.
TextLayoutFormat TextLayoutFormat
linkHoverFormat Defines the formatting attributes used for
links in hover state, when the mouse is within
the bounds (rolling over) a link.
TextLayoutFormat TextLayoutFormat
li A list item element. Must be inside a list
element.
div, li, list, p ListItemElement
list A list. Lists can be nested, or placed adjacent
to each other. Different labeling or
numbering schemes can be applied to the list
items.
div, li, list, p ListElement
g A group element. Used for grouping
elements in a paragraph. The lets you nest
elements below the paragraph level.
a, tcy, span, img, tab, br,
g
SubParagraphGroupE
lement

412
ACTIONSCRIPT 3.0 DEVELOPER’S GUIDE
Using the Text Layout Framework
Last updated 3/21/2011
<flow:list paddingRight="24" paddingLeft="24">
<flow:li>Item 1</flow:li>
<flow:li>Item 2</flow:li>
<flow:li>Item 3</flow:li>
</flow:list>
You can nest lists within other lists, as the following example shows:
<flow:list paddingRight="24" paddingLeft="24">
<flow:li>Item 1</flow:li>
<flow:list paddingRight="24" paddingLeft="24">
<flow:li>Item 1a</flow:li>
<flow:li>Item 1b</flow:li>
<flow:li>Item 1c</flow:li>
</flow:list>
<flow:li>Item 2</flow:li>
<flow:li>Item 3</flow:li>
</flow:list>
To customize the type of marker in the list, use the listStyleType property of the ListElement. This property can be
any value defined by the ListStyleType class (such as check, circle, decimal, and box). The following example
creates lists with various marker types and a custom counter increment:
<flow:list paddingRight="24" paddingLeft="24" listStyleType="upperAlpha">
<flow:li>upperAlpha item</flow:li> <flow:li>another</flow:li> </flow:list> <flow:list
paddingRight="24" paddingLeft="24" listStyleType="lowerAlpha"> <flow:li>lowerAlpha
item</flow:li> <flow:li>another</flow:li> </flow:list> <flow:list paddingRight="24"
paddingLeft="24" listStyleType="upperRoman"> <flow:li>upperRoman item</flow:li>
<flow:li>another</flow:li> </flow:list> <flow:list paddingRight="24" paddingLeft="24"
listStyleType="lowerRoman"> <flow:listMarkerFormat> <!-- Increments the list by 2s rather than
1s. --> <flow:ListMarkerFormat counterIncrement="ordered 2"/> </flow:listMarkerFormat>
<flow:li>lowerRoman item</flow:li> <flow:li>another</flow:li> </flow:list>
You use the ListMarkerFormat class to define the counter. In addition to defining the increment of a counter, you can
also customize the counter by resetting it with the counterReset property.
You can further customize the appearance of the markers in your lists by using the beforeContent and
afterContent properties of the ListMarkerFormat. These properties apply to content that appears before and after
the content of the marker.
The following example adds the string “XX” before the marker, and the string “YY” after the marker:
<flow:list listStyleType="upperRoman" paddingLeft="36" paddingRight="24">
<flow:listMarkerFormat>
<flow:ListMarkerFormat fontSize="16"
beforeContent="XX"
afterContent="YY"
counterIncrement="ordered -1"/>
</flow:listMarkerFormat>
<flow:li>Item 1</flow:li>
<flow:li>Item 2</flow:li>
<flow:li>Item 3</flow:li>
</flow:list>
The content property itself can define further customizations of the marker format. The following example displays
an ordered, uppercase Roman numeral marker:

413
ACTIONSCRIPT 3.0 DEVELOPER’S GUIDE
Using the Text Layout Framework
Last updated 3/21/2011
<flow:list listStyleType="disc" paddingLeft="96" paddingRight="24">
<flow:listMarkerFormat>
<flow:ListMarkerFormat fontSize="16"
beforeContent="Section "
content="counters(ordered,"*",upperRoman)"
afterContent=": "/>
</flow:listMarkerFormat>
<flow:li>Item 1</li>
<flow:li>Item 2</li>
<flow:li>Item 3</li>
</flow:list>
As the previous example shows, the content property can also insert a suffix: a string that appears after the marker,
but before the afterContent. To insert this string when providing XML content to the flow, wrap the string in
"e; HTML entities rather than quotation marks ("<string>").
More Help topics
TLF 2.0 Lists Markup
Using padding in TLF
Each FlowElement supports padding properties that you use to control the position of each element’s content area,
and the space between the content areas.
The total width of an element is the sum of its content’s width, plus the paddingLeft and paddingRight properties.
The total height of an element is the sum of its content’s height, plus the paddingTop and paddingBottom properties.
The padding is the space between the border and the content. The padding properties are paddingBottom,
paddingTop, paddingLeft, and paddingRight. Padding can be applied to the TextFlow object, as well as the
following child elements:
•div
•img
•li
•list
•p
Padding properties cannot be applied to span elements.
The following example sets padding properties on the TextFlow:
<flow:TextFlow version="2.0.0" xmlns:flow="http://ns.adobe.com/textLayout/2008" fontSize="14"
textIndent="15" paddingTop="4" paddingLeft="4" fontFamily="Times New Roman">
Valid values for the padding properties are a number (in pixels), “auto”, or “inherit”. The default value is “auto”, which
means it is calculated automatically and set to 0, for all elements except the ListElement. For ListElements, “auto” is 0
except on the start side of the list where the value of the listAutoPadding property is used. The default value of
listAutoPadding is 40, which gives lists a default indent.
The padding properties do not, by default, inherit. The “auto” and “inherit” values are constants defined by the
FormatValue class.
Padding properties can be negative values.

414
ACTIONSCRIPT 3.0 DEVELOPER’S GUIDE
Using the Text Layout Framework
Last updated 3/21/2011
More Help topics
Padding changes in TLF 2.0
Formatting text with TLF
Flash Player 10 and later, Adobe AIR 1.5 and later
The flashx.textLayout.formats package contains interfaces and classes that allow you to assign formats to any
FlowElement in the text flow hierarchy tree. There are two ways to apply formatting. You can assign a specific format
individually or assign a group of formats simultaneously with a special formatting object.
The ITextLayoutFormat interface contains all of the formats that can be applied to a FlowElement. Some formats apply
to an entire container or paragraph of text, but do not logically apply to individual characters. For example, formats
such as justification and tab stops apply to whole paragraphs, but are not applicable to individual characters.
Assigning formats to a FlowElement with properties
Flash Player 10 and later, Adobe AIR 1.5 and later
You can set formats on any FlowElement through property assignment. The FlowElement class implements the
ITextLayoutFormat interface, so any subclass of the FlowElement class must also implement that interface.
For example, the following code shows how to assign individual formats to an instance of ParagraphElement:
var p:ParagraphElement = new ParagraphElement();
p.fontSize = 18;
p.fontFamily = "Arial";
Assigning formats to a FlowElement with the TextLayoutFormat class
Flash Player 10 and later, Adobe AIR 1.5 and later
You can apply formats to a FlowElement with the TextLayoutFormat class. You use this class to create a special
formatting object that contains all of the formatting values you want. You can then assign that object to the format
property of any FlowElement object. Both TextLayoutFormat and FlowElement implement the ITextLayoutFormat
interface. This arrangement ensures that both classes contain the same format properties.
For more information, see TextLayoutFormat in the ActionScript 3.0 Reference for the Adobe Flash Platform.
Format inheritance
Flash Player 10 and later, Adobe AIR 1.5 and later
Formats are inherited through the text flow hierarchy. If you assign an instance of TextLayoutFormat to a
FlowElement instance with children, the framework initiates a process called a cascade. During a cascade, the
framework recursively examines each node in the hierarchy that inherits from your FlowElement. It then determines
whether to assign the inherited values to each formatting property. The following rules are applied during the cascade:
1Property values are inherited only from an immediate ancestor (sometimes called the parent).
2Property values are inherited only if a property does not already have a value (that is, the value is undefined).

415
ACTIONSCRIPT 3.0 DEVELOPER’S GUIDE
Using the Text Layout Framework
Last updated 3/21/2011
3Some attributes do not inherit values when undefined, unless the attribute’s value is set to “inherit” or the constant
flashx.textLayout.formats.FormatValue.INHERIT.
For example, if you set the fontSize value at the TextFlow level, the setting applies to all elements in the TextFlow. In
other words, the values cascade down the text flow hierarchy. You can, however, override the value in a given element
by assigning a new value directly to the element. As a counter-example, if you set the backgroundColor value for at
the TextFlow level, the children of the TextFlow do not inherit that value. The backgroundColor property is one that
does not inherit from its parent during a cascade. You can override this behavior by setting the backgroundColor
property on each child to flashx.textLayout.formats.FormatValue.INHERIT.
For more information, see TextLayoutFormat in the ActionScript 3.0 Reference for the Adobe Flash Platform.
Importing and exporting text with TLF
Flash Player 10 and later, Adobe AIR 1.5 and later
The TextConverter class in the flashx.textLayout.conversion.* package lets you import text to, and export text from,
the TLF. Use this class if you plan to load text at runtime instead of compiling the text into the SWF file. You can also
use this class to export text that is stored in a TextFlow instance into a String or XML object.
Both import and export are straightforward procedures. You call either the export() method or the importToFlow()
method, both of which are part of the TextConverter class. Both methods are static, which means that you call the
methods on the TextConverter class rather than on an instance of the TextConverter class.
The classes in the flashx.textLayout.conversion package provide considerable flexibility in where you choose to store
your text. For example, if you store your text in a database, you can import the text into the framework for display. You
can then use the classes in the flashx.textLayout.edit package to change the text, and export the changed text back to
your database.
For more information, see flashx.textLayout.conversion in the ActionScript 3.0 Reference for the Adobe Flash
Platform.
Managing text containers with TLF
Flash Player 10 and later, Adobe AIR 1.5 and later
Once text is stored in the TLF data structures, Flash Player can display it. The text that is stored in the flow hierarchy
must be converted into a format that Flash Player can display. The TLF offers two ways to create display objects from
a flow. The first, more simple approach is suitable for displaying static text. The second, more complicated approach
lets you create dynamic text that can be selected and edited. In both cases, the text is ultimately converted into instances
of the TextLine class, which is part of the flash.text.engine.* package in Flash Player 10.
Creating static text
The simple approach uses the TextFlowTextLineFactory class, which can be found in the flashx.textLayout.factory
package. The advantage of this approach, beyond its simplicity, is that it has a smaller memory footprint than does the
FlowComposer approach. This approach is advisable for static text that the user does not need to edit, select, or scroll.
For more information, see TextFlowTextLineFactory in the ActionScript 3.0 Reference for the Adobe Flash Platform.

416
ACTIONSCRIPT 3.0 DEVELOPER’S GUIDE
Using the Text Layout Framework
Last updated 3/21/2011
Creating dynamic text and containers
Use a flow composer if you want to have more control over the display of text than that provided by
TextFlowTextLineFactory. For example, with a flow composer, your users can select and edit the text. For more
information, see “Enabling text selection, editing, and undo with TLF” on page 416.
A flow composer is an instance of the StandardFlowComposer class in the flashx.textLayout.compose package. A flow
composer manages the conversion of TextFlow into TextLine instances, and also the placement of those TextLine
instances into one or more containers.
An IFlowComposer has zero or more ContainerControllers
Every TextFlow instance has a corresponding object that implements the IFlowComposer interface. This
IFlowComposer object is accessible through the TextFlow.flowComposer property. You can call methods defined by
the IFlowComposer interface through this property. These methods allow you to associate the text with one or more
containers and prepare the text for display within a container.
A container is an instance of the Sprite class, which is a subclass of the DisplayObjectContainer class. Both of these
classes are part of the Flash Player display list API. A container is a more advanced form of the bounding rectangle
used in with TextLineFactory class. Like the bounding rectangle, a container defines the area where TextLine instances
appear. Unlike a bounding rectangle, a container has a corresponding “controller” object. The controller manages
scrolling, composition, linking, formatting, and event handling for a container or set of containers. Each container has
a corresponding controller object that is an instance of the ContainerController class in the
flashx.textLayout.container package.
To display text, create a controller object to manage the container and associate it with the flow composer. Once you
have the container associated, compose the text so that it can be displayed. Accordingly, containers have two states:
composition and display. Composition is the process of converting the text from the text flow hierarchy into TextLine
instances and calculating whether those instances fit into the container. Display is the process of updating the Flash
Player display list.
For more information, see IFlowComposer, StandardFlowComposer, and ContainerController in the ActionScript 3.0
Reference for the Adobe Flash Platform.
Enabling text selection, editing, and undo with TLF
Flash Player 9.0 and later, Adobe AIR 1.0 and later
The ability to select or edit text is controlled at the text flow level. Every instance of the TextFlow class has an associated
interaction manager. You can access a TextFlow object’s interaction manager through the object’s
TextFlow.interactionManager property. To enable text selection, assign an instance of the SelectionManager class
to the interactionManager property. To enable both text selection and editing, assign an instance of the
EditManager class instead of an instance of the SelectionManager class. To enable undo operations, create an instance
of the UndoManager class and include it as an argument when calling the constructor for EditManager. The
UndoManager class maintains a history of the user's most recent editing activities and lets the user undo or redo
specific edits. All three of these classes are part of the edit package.
IFlowComposer
ContainerController
TextFlow
TextLine TextLine
Stage
Sprite

417
ACTIONSCRIPT 3.0 DEVELOPER’S GUIDE
Using the Text Layout Framework
Last updated 3/21/2011
For more information, see SelectionManager, EditManager, and UndoManager in the ActionScript 3.0 Reference for
the Adobe Flash Platform.
Event handling with TLF
Flash Player 10 and later, Adobe AIR 1.5 and later
TextFlow objects dispatch events in many circumstances, including:
•When the text or layout changes
•Before an operation begins and after an operation completes
•When the status of a FlowElement object changes
•When a compose operation completes
For more information, see flashx.textLayout.events in the ActionScript 3.0 Reference for the Adobe Flash Platform.
More Help topics
TLF FlowElement and LinkElement Events and EventMirrors
Positioning images within text
To position the InlineGraphicElement within the text, you use the following properties:
•float property of the InlineGraphicElement class
•clearFloats property of the FlowElement
The float property controls the placement of the graphic and the text around it. The clearFloats property controls
the placement of the paragraph elements relative to the float.
To control the location of an image within a text element, you use the float property. The following example adds an
image to a paragraph and aligns it to the left so the text wraps around the right:
<flow:p paragraphSpaceAfter="15" >Images in a flow are a good thing. For example, here is a
float. It should show on the left: <flow:img float="left" height="50" width="19"
source="../assets/bulldog.jpg"></flow:img> Don't you agree? Another sentence here. Another
sentence here. Another sentence here. Another sentence here. Another sentence here. Another
sentence here. Another sentence here. Another sentence here.</flow:p>
Valid values for the float property are “left”, “right”, “start”, “end”, and “none”. The Float class defines these
constants. The default value is “none”.
The clearFloats property is useful in cases where you want to adjust the starting position of subsequent paragraphs
that would normally wrap around the image. For example, assume that you have an image that is larger than the first
paragraph. To be sure the second paragraph starts after the image, set the clearFloats property.
The following example uses an image that is taller than the text in the first paragraph. To get the second paragraph to
start after the image in the text block, this example sets the clearFloats property on the second paragraph to “end”.

418
ACTIONSCRIPT 3.0 DEVELOPER’S GUIDE
Using the Text Layout Framework
Last updated 3/21/2011
<flow:p paragraphSpaceAfter="15" >Here is another float, it should show up on the right:
<flow:img float="right" height="50" elementHeight="200" width="19"
source="../assets/bulldog.jpg"></flow:img>We'll add another paragraph that should clear past
it.</flow:p><flow:p clearFloats="end" >This should appear after the previous float on the
right.</flow:p>
Valid values for the clearFloats property are “left”, “right”, “end”, “start”, “none”, and “both”. The ClearFloats class
defines these constants. You can also set the clearFloats property to “inherit”, which is a constant defined by the
FormatValue class. The default value is “none”.
More Help topics
TLF Floats

419
Last updated 3/21/2011
Chapter 22: Working with sound
Flash Player 9 and later, Adobe AIR 1.0 and later
ActionScript is made for immersive, interactive applications—and one often overlooked element of powerfully
immersive applications is sound. You can add sound effects to a video game, audio feedback to an application user
interface, or even make a program that analyzes mp3 files loaded over the Internet, with sound at the core of the
application.
You can load external audio files and work with audio that’s embedded in a SWF. You can control the audio, create
visual representations of the sound information, and capture sound from a user’s microphone.
More Help topics
flash.media package
flash.events.SampleDataEvent
Basics of working with sound
Flash Player 9 and later, Adobe AIR 1.0 and later
Computers can capture and encode digital audio—computer representation of sound information—and can store it
and retrieve it to play back over speakers. You can play back sound using either Adobe® Flash® Player or Adobe® AIR™
and ActionScript.
When sound data is converted to digital form, it has various characteristics, such as the sound’s volume and whether
it is stereo or mono sound. When you play back a sound in ActionScript, you can adjust these characteristics as well—
make the sound louder, or make it seem to be coming from a certain direction, for instance.
Before you can control a sound in ActionScript, you need to have the sound information loaded into Flash Player or
AIR. There are five ways you can get audio data into Flash Player or AIR so that you can work with it using
ActionScript.
•Load an external sound file such as an mp3 file into the SWF.
•Embed the sound information into the SWF file directly when it’s being created.
•Capture audio from a microphone attached to a user’s computer.
•Stream audio from a server.
•Dynamically generate and play audio.
When you load sound data from an external sound file, you can begin playing back the start of the sound file while the
rest of the sound data is still loading.
Although there are various sound file formats used to encode digital audio, ActionScript 3.0, Flash Player and AIR
support sound files that are stored in the mp3 format. They cannot directly load or play sound files in other formats
like WAV or AIFF.

420
ACTIONSCRIPT 3.0 DEVELOPER’S GUIDE
Working with sound
Last updated 3/21/2011
While you’re working with sound in ActionScript, you’ll likely work with several classes from the flash.media package.
The Sound class is the class you use to get access to audio information by loading a sound file or assigning a function
to an event that samples sound data and then starting playback. Once you start playing a sound, Flash Player and AIR
give you access to a SoundChannel object. Since an audio file that you’ve loaded may only be one of several sounds that
you play on a user’s computer, each individual sound that’s playing uses its own SoundChannel object; the combined
output of all the SoundChannel objects mixed together is what actually plays over the computer’s speakers. You use
this SoundChannel instance to control properties of the sound and to stop its playback. Finally, if you want to control
the combined audio, the SoundMixer class gives you control over the mixed output.
You can also use several other classes to perform more specific tasks when you’re working with sound in ActionScript;
for more information on all the sound-related classes, see “Understanding the sound architecture” on page 420.
Important concepts and terms
The following reference list contains important terms that you may encounter:
Amplitude The distance of a point on the sound waveform from the zero or equilibrium line.
Bit rate
The amount of data that is encoded or streamed for each second of a sound file. For mp3 files, the bit rate is usually
stated in terms of thousands of bits per second (kbps). A higher bit rate generally means a higher quality sound wave.
Buffering The receiving and storing of sound data before it is played back.
mp3 MPEG-1 Audio Layer 3, or mp3, is a popular sound compression format.
Panning The positioning of an audio signal between the left and right channels in a stereo soundfield.
Peak The highest point in a waveform.
Sampling rate Defines the number of samples per second taken from an analog audio signal to make a digital signal.
The sampling rate of standard compact disc audio is 44.1 kHz or 44,100 samples per second.
Streaming The process of playing the early portions of a sound file or video file while later portions of that file are still
being loaded from a server.
Volume The loudness of a sound.
Waveform The shape of a graph of the varying amplitudes of a sound signal over time.
Understanding the sound architecture
Flash Player 9 and later, Adobe AIR 1.0 and later
Your applications can load sound data from five main sources:
•External sound files loaded at run time
•Sound resources embedded within the application’s SWF file
•Sound data from a microphone attached to the user’s system
•Sound data streamed from a remote media server, such as Flash Media Server
•Sound data being generated dynamically through the use of the sampleData event handler
Sound data can be fully loaded before it is played back, or it can be streamed, meaning that it is played back while it is
still loading.

421
ACTIONSCRIPT 3.0 DEVELOPER’S GUIDE
Working with sound
Last updated 3/21/2011
The ActionScript 3.0 sound classes support sound files that are stored in the mp3 format. They cannot directly load or
play sound files in other formats, such as WAV or AIFF. However, starting with Flash Player 9.0.115.0, AAC audio
files can be loaded and played using the NetStream class. This is the same technique as is used for loading and playing
video content. For more information on this technique, see “Working with video” on page 452.
Using Adobe Flash Professional, you can import WAV or AIFF sound files and then embed them into your
application’s SWF files in the mp3 format. The Flash Authoring tool also lets you compress embedded sound files to
reduce their file size, though this size reduction comes at the expense of sound quality. For more information see
“Importing Sounds” in Using Flash.
The ActionScript 3.0 sound architecture makes use of the following classes in the flash.media package.
Each sound that is loaded and played needs its own instance of the Sound class and the SoundChannel class. The
output from multiple SoundChannel instances is then mixed together by the global SoundMixer class during playback,
The Sound, SoundChannel, and SoundMixer classes are not used for sound data obtained from a microphone or from
a streaming media server like Flash Media Server.
Loading external sound files
Flash Player 9 and later, Adobe AIR 1.0 and later
Each instance of the Sound class exists to load and trigger the playback of a specific sound resource. An application
can’t reuse a Sound object to load more than one sound. If it wants to load a new sound resource, it should create a
new Sound object.
If you are loading a small sound file, such as a click sound to be attached to a button, your application can create a new
Sound and have it automatically load the sound file, as shown below:
Class Description
flash.media.Sound The Sound class handles the loading of sound, manages basic sound properties, and starts a sound
playing.
flash.media.SoundChannel When an application plays a Sound object, a new SoundChannel object is created to control the
playback. The SoundChannel object controls the volume of both the left and right playback channels
of the sound. Each sound that plays has its own SoundChannel object.
flash.media.SoundLoaderContext The SoundLoaderContext class specifies how many seconds of buffering to use when loading a sound,
and whether Flash Player or AIR looks for a policy file from the server when loading a file. A
SoundLoaderContext object is used as a parameter to the Sound.load() method.
flash.media.SoundMixer The SoundMixer class controls playback and security properties that pertain to all sounds in an
application. In effect, multiple sound channels are mixed through a common SoundMixer object, so
property values in the SoundMixer object will affect all SoundChannel objects that are currently
playing.
flash.media.SoundTransform The SoundTransform class contains values that control sound volume and panning. A SoundTransform
object can be applied to an individual SoundChannel object, to the global SoundMixer object, or to a
Microphone object, among others.
flash.media.ID3Info An ID3Info object contains properties that represent ID3 metadata information that is often stored in
mp3 sound files.
flash.media.Microphone The Microphone class represents a microphone or other sound input device attached to the user’s
computer. Audio input from a microphone can be routed to local speakers or sent to a remote server.
The Microphone object controls the gain, sampling rate, and other characteristics of its own sound
stream.

422
ACTIONSCRIPT 3.0 DEVELOPER’S GUIDE
Working with sound
Last updated 3/21/2011
var req:URLRequest = new URLRequest("click.mp3");
var s:Sound = new Sound(req);
The Sound() constructor accepts a URLRequest object as its first parameter. When a value for the URLRequest
parameter is supplied, the new Sound object starts loading the specified sound resource automatically.
In all but the simplest cases, your application should pay attention to the sound’s loading progress and watch for errors
during loading. For example, if the click sound is fairly large, it might not be completely loaded by the time the user
clicks the button that triggers the sound. Trying to play an unloaded sound could cause a run-time error. It’s safer to
wait for the sound to load completely before letting users take actions that might start sounds playing.
A Sound object dispatches a number of different events during the sound loading process. Your application can listen
for these events to track loading progress and make sure that the sound loads completely before playing. The following
table lists the events that can be dispatched by a Sound object.
The following code illustrates how to play a sound after it has finished loading:
import flash.events.Event;
import flash.media.Sound;
import flash.net.URLRequest;
var s:Sound = new Sound();
s.addEventListener(Event.COMPLETE, onSoundLoaded);
var req:URLRequest = new URLRequest("bigSound.mp3");
s.load(req);
function onSoundLoaded(event:Event):void
{
var localSound:Sound = event.target as Sound;
localSound.play();
}
First, the code sample creates a new Sound object without giving it an initial value for the URLRequest parameter.
Then, it listens for the Event.COMPLETE event from the Sound object, which causes the onSoundLoaded() method to
execute when all the sound data is loaded. Next, it calls the Sound.load() method with a new URLRequest value for
the sound file.
The onSoundLoaded() method executes when the sound loading is complete. The target property of the Event
object is a reference to the Sound object. Calling the play() method of the Sound object then starts the sound
playback.
Event Description
open (Event.OPEN) Dispatched right before the sound loading operation begins.
progress (ProgressEvent.PROGRESS) Dispatched periodically during the sound loading process when data is received from the file or
stream.
id3 (Event.ID3) Dispatched when ID3 data is available for an mp3 sound.
complete (Event.COMPLETE) Dispatched when all of the sound resource’s data has been loaded.
ioError (IOErrorEvent.IO_ERROR)Dispatched when a sound file cannot be located or when the loading process is interrupted before
all sound data can be received.

423
ACTIONSCRIPT 3.0 DEVELOPER’S GUIDE
Working with sound
Last updated 3/21/2011
Monitoring the sound loading process
Flash Player 9 and later, Adobe AIR 1.0 and later
Sound files can be very large and take a long time to load. While Flash Player and AIR let your application play sounds
even before they are fully loaded, you might want to give the user an indication of how much of the sound data has
been loaded and how much of the sound has already been played.
The Sound class dispatches two events that make it relatively easy to display the loading progress of a sound:
ProgressEvent.PROGRESS and Event.COMPLETE. The following example shows how to use these events to display
progress information about the sound being loaded:
import flash.events.Event;
import flash.events.ProgressEvent;
import flash.media.Sound;
import flash.net.URLRequest;
var s:Sound = new Sound();
s.addEventListener(ProgressEvent.PROGRESS, onLoadProgress);
s.addEventListener(Event.COMPLETE, onLoadComplete);
s.addEventListener(IOErrorEvent.IO_ERROR, onIOError);
var req:URLRequest = new URLRequest("bigSound.mp3");
s.load(req);
function onLoadProgress(event:ProgressEvent):void
{
var loadedPct:uint = Math.round(100 * (event.bytesLoaded / event.bytesTotal));
trace("The sound is " + loadedPct + "% loaded.");
}
function onLoadComplete(event:Event):void
{
var localSound:Sound = event.target as Sound;
localSound.play();
}
function onIOError(event:IOErrorEvent)
{
trace("The sound could not be loaded: " + event.text);
}
This code first creates a Sound object and then adds listeners to that object for the ProgressEvent.PROGRESS and
Event.COMPLETE events. After the Sound.load() method has been called and the first data is received from the sound
file, a ProgressEvent.PROGRESS event occurs and triggers the onSoundLoadProgress() method.
The percentage of the sound data that has been loaded is equal to the value of the bytesLoaded property of the
ProgressEvent object divided by the value of the bytesTotal property. The same bytesLoaded and bytesTotal
properties are available on the Sound object as well. The example above simply shows messages about the sound
loading progress, but you can easily use the bytesLoaded and bytesTotal values to update progress bar components,
such as the ones that come with the Adobe Flex framework or the Adobe Flash authoring tool.
This example also shows how an application can recognize and respond to an error when loading sound files. For
example, if a sound file with the given filename cannot be located, an Event.IO_ERROR event is dispatched by the
Sound object. In the previous code, the onIOError() method executes and displays a brief error message when an
error occurs.

424
ACTIONSCRIPT 3.0 DEVELOPER’S GUIDE
Working with sound
Last updated 3/21/2011
Working with embedded sounds
Flash Player 9 and later, Adobe AIR 1.0 and later
Using embedded sounds, instead of loading sound from an external file, is most useful for small sounds that are used
as indicators within your application’s user interface, such as sounds that play when buttons are clicked.
When you embed a sound file in your application, the size of the resulting SWF file increases by the size of the sound
file. In other words, embedding large sound files in your application can increase the size of your SWF file to an
undesirable size.
The exact method of embedding a sound file into your application’s SWF file varies according to your development
environment.
Using an embedded sound file in Flash
Flash Player 9 and later, Adobe AIR 1.0 and later
The Flash authoring tool lets you import sounds in a number of sound formats and store them as symbols in the
Library. You can then assign them to frames in the timeline or to the frames of a button state, use them with Behaviors,
or use them directly in ActionScript code. This section describes how to use embedded sounds in ActionScript code
with the Flash authoring tool. For information about the other ways to use embedded sounds in Flash, see “Importing
Sounds” in Using Flash.
To embed a sound file using the Flash authoring tool:
1Select File > Import > Import to Library, and then select a sound file and import it.
2Right-click the name of the imported file in the Library panel, and select Properties. Click the Export for
ActionScript checkbox.
3In the Class field, enter a name to use when referring to this embedded sound in ActionScript. By default, it will use
the name of the sound file in this field. If the filename includes a period, as in the name “DrumSound.mp3”, you
must change it to something like “DrumSound”; ActionScript does not allow a period character in a class name.
The Base Class field should still show flash.media.Sound.
4Click OK. You might see a dialog box saying that a definition for this class could not be found in the classpath. Click
OK and continue. If you entered a class name that doesn’t match the name of any of the classes in your application’s
classpath, a new class that inherits from the flash.media.Sound class is automatically generated for you.
5To use the embedded sound, you reference the class name for that sound in ActionScript. For example, the
following code starts by creating a new instance of the automatically generated DrumSound class:
var drum:DrumSound = new DrumSound();
var channel:SoundChannel = drum.play();
DrumSound is a subclass of the flash.media.Sound class so it inherits the Sound class’s methods and properties,
including the play() method as shown above.
Using an embedded sound file in Flex
Flash Player 9 and later, Adobe AIR 1.0 and later
There are many ways to embed sound assets in a Flex application, including:
•Using the [Embed] metadata tag in a script

425
ACTIONSCRIPT 3.0 DEVELOPER’S GUIDE
Working with sound
Last updated 3/21/2011
•Using the @Embed directive in MXML to assign an embedded asset as a property of a component like a Button or a
SoundEffect.
•Using the @Embed directive within a CSS file
This section describes the first option: how to embed sounds in ActionScript code within a Flex application using the
[Embed] metadata tag.
To embed an asset in ActionScript code, use the [Embed] metadata tag.
Place the sound file in the main source folder or another folder that is in your project’s build path. When the compiler
encounters an Embed metadata tag, it creates the embedded asset class for you. You can access the class through a
variable of data type Class that you declare immediately after the [Embed] metadata tag.
The following code embeds a sound named smallSound.mp3 and uses a variable named soundClass to store a
reference to the embedded asset class associated with that sound. The code then creates an instance of the embedded
asset class, casts it as an instance of the Sound class, and calls the play() method on that instance:
package
{
import flash.display.Sprite;
import flash.media.Sound;
import flash.media.SoundChannel;
public class EmbeddedSoundExample extends Sprite
{
[Embed(source="smallSound.mp3")]
public var soundClass:Class;
public function EmbeddedSoundExample()
{
var smallSound:Sound = new soundClass() as Sound;
smallSound.play();
}
}
}
To use the embedded sound to set a property of a Flex component, it should be cast as an instance of the
mx.core.SoundAsset class instead of as an instance of the Sound class. For a similar example that uses the SoundAsset
class see “Embedded asset classes” in Learning ActionScript 3.0.
Working with streaming sound files
Flash Player 9 and later, Adobe AIR 1.0 and later
When a sound file or video file is playing back while its data is still being loaded, it is said to be streaming. External
sound files that are loaded from a remote server are often streamed so that the user doesn’t have to wait for all the
sound data to load before listening to the sound.
The SoundMixer.bufferTime property represents the number of milliseconds of sound data that Flash Player or AIR
should gather before letting the sound play. In other words, if the bufferTime property is set to 5000, Flash Player or
AIR loads at least 5000 milliseconds worth of data from the sound file before the sound begins to play. The default
SoundMixer.bufferTime value is 1000.

426
ACTIONSCRIPT 3.0 DEVELOPER’S GUIDE
Working with sound
Last updated 3/21/2011
Your application can override the global SoundMixer.bufferTime value for an individual sound by explicitly
specifying a new bufferTime value when loading the sound. To override the default buffer time, first create a new
instance of the SoundLoaderContext class, set its bufferTime property, and then pass it as a parameter to the
Sound.load() method, as shown below:
import flash.media.Sound;
import flash.media.SoundLoaderContext;
import flash.net.URLRequest;
var s:Sound = new Sound();
var req:URLRequest = new URLRequest("bigSound.mp3");
var context:SoundLoaderContext = new SoundLoaderContext(8000, true);
s.load(req, context);
s.play();
As playback continues, Flash Player and AIR try to keep the sound buffer at the same size or greater. If the sound data
loads faster than the playback speed, playback will continue without interruption. However, if the data loading rate
slows down because of network limitations, the playhead could reach the end of the sound buffer. If this happens,
playback is suspended, though it automatically resumes once more sound data has been loaded.
To find out if playback is suspended because Flash Player or AIR is waiting for data to load, use the
Sound.isBuffering property.
Working with dynamically generated audio
Flash Player 10 and later, Adobe AIR 1.5 and later
Note: The ability to dynamically generate audio is available starting with Flash Player 10 and Adobe AIR 1.5.
Instead of loading or streaming an existing sound, you can generate audio data dynamically. You can generate audio
data when you assign an event listener for the sampleData event of a Sound object. (The sampleData event is defined
in the SampleDataEvent class in the flash.events package.) In this environment, the Sound object doesn’t load sound
data from a file. Instead, it acts as a socket for sound data that is being streamed to it through the use of the function
you assign to this event.
When you add a sampleData event listener to a Sound object, the object periodically requests data to add to the sound
buffer. This buffer contains data for the Sound object to play. When you call the play() method of the Sound object,
it dispatches the sampleData event when requesting new sound data. (This is true only when the Sound object has not
loaded mp3 data from a file.)
The SampleDataEvent object includes a data property. In your event listener, you write ByteArray objects to this data
object. The byte arrays you write to this object add to buffered sound data that the Sound object plays. The byte array
in the buffer is a stream of floating-point values from -1 to 1. Each floating-point value represents the amplitude of one
channel (left or right) of a sound sample. Sound is sampled at 44,100 samples per second. Each sample contains a left
and right channel, interleaved as floating-point data in the byte array.
In your handler function, you use the ByteArray.writeFloat() method to write to the data property of the
sampleData event. For example, the following code generates a sine wave:

427
ACTIONSCRIPT 3.0 DEVELOPER’S GUIDE
Working with sound
Last updated 3/21/2011
var mySound:Sound = new Sound();
mySound.addEventListener(SampleDataEvent.SAMPLE_DATA, sineWaveGenerator);
mySound.play();
function sineWaveGenerator(event:SampleDataEvent):void
{
for (var i:int = 0; i < 8192; i++)
{
var n:Number = Math.sin((i + event.position) / Math.PI / 4);
event.data.writeFloat(n);
event.data.writeFloat(n);
}
}
When you call Sound.play(), the application starts calling your event handler, requesting sound sample data. The
application continues to send events as the sound plays back until you stop providing data, or until you call
SoundChannel.stop().
The latency of the event varies from platform to platform, and could change in future versions of Flash Player and AIR.
Do not depend on a specific latency; calculate it instead. To calculate the latency, use the following formula:
(SampleDataEvent.position / 44.1) - SoundChannelObject.position
Provide from 2048 through 8192 samples to the data property of the SampleDataEvent object (for each call to the
event listener). For best performance, provide as many samples as possible (up to 8192). The fewer samples you
provide, the more likely it is that clicks and pops will occur during playback. This behavior can differ on various
platforms and can occur in various situations—for example, when resizing the browser. Code that works on one
platform when you provide only 2048 sample might not work as well when run on a different platform. If you require
the lowest latency possible, consider making the amount of data user-selectable.
If you provide fewer than 2048 samples (per call to the sampleData event listener), the application stops after playing
the remaining samples. The SoundChannel object then dispatches a SoundComplete event.
Modifying sound from mp3 data
Flash Player 10 and later, Adobe AIR 1.5 and later
You use the Sound.extract() method to extract data from a Sound object. You can use (and modify) that data to
write to the dynamic stream of another Sound object for playback. For example, the following code uses the bytes of a
loaded MP3 file and passes them through a filter function, upOctave():

428
ACTIONSCRIPT 3.0 DEVELOPER’S GUIDE
Working with sound
Last updated 3/21/2011
var mySound:Sound = new Sound();
var sourceSnd:Sound = new Sound();
var urlReq:URLRequest = new URLRequest("test.mp3");
sourceSnd.load(urlReq);
sourceSnd.addEventListener(Event.COMPLETE, loaded);
function loaded(event:Event):void
{
mySound.addEventListener(SampleDataEvent.SAMPLE_DATA, processSound);
mySound.play();
}
function processSound(event:SampleDataEvent):void
{
var bytes:ByteArray = new ByteArray();
sourceSnd.extract(bytes, 8192);
event.data.writeBytes(upOctave(bytes));
}
function upOctave(bytes:ByteArray):ByteArray
{
var returnBytes:ByteArray = new ByteArray();
bytes.position = 0;
while(bytes.bytesAvailable > 0)
{
returnBytes.writeFloat(bytes.readFloat());
returnBytes.writeFloat(bytes.readFloat());
if (bytes.bytesAvailable > 0)
{
bytes.position += 8;
}
}
return returnBytes;
}
Limitations on generated sounds
Flash Player 10 and later, Adobe AIR 1.5 and later
When you use a sampleData event listener with a Sound object, the only other Sound methods that are enabled are
Sound.extract() and Sound.play(). Calling any other methods or properties results in an exception. All methods
and properties of the SoundChannel object are still enabled.
Playing sounds
Flash Player 9 and later, Adobe AIR 1.0 and later
Playing a loaded sound can be as simple as calling the Sound.play() method for a Sound object, as follows:
var snd:Sound = new Sound(new URLRequest("smallSound.mp3"));
snd.play();
When playing back sounds using ActionScript 3.0, you can perform the following operations:
•Play a sound from a specific starting position
•Pause a sound and resume playback from the same position later

429
ACTIONSCRIPT 3.0 DEVELOPER’S GUIDE
Working with sound
Last updated 3/21/2011
•Know exactly when a sound finishes playing
•Track the playback progress of a sound
•Change volume or panning while a sound plays
To perform these operations during playback, use the SoundChannel, SoundMixer, and SoundTransform classes.
The SoundChannel class controls the playback of a single sound. The SoundChannel.position property can be
thought of as a playhead, indicating the current point in the sound data that’s being played.
When an application calls the Sound.play() method, a new instance of the SoundChannel class is created to control
the playback.
Your application can play a sound from a specific starting position by passing that position, in terms of milliseconds,
as the startTime parameter of the Sound.play() method. It can also specify a fixed number of times to repeat the
sound in rapid succession by passing a numeric value in the loops parameter of the Sound.play() method.
When the Sound.play() method is called with both a startTime parameter and a loops parameter, the sound is
played back repeatedly from the same starting point each time, as shown in the following code:
var snd:Sound = new Sound(new URLRequest("repeatingSound.mp3"));
snd.play(1000, 3);
In this example, the sound is played from a point one second after the start of the sound, three times in succession.
Pausing and resuming a sound
Flash Player 9 and later, Adobe AIR 1.0 and later
If your application plays long sounds, like songs or podcasts, you probably want to let users pause and resume the
playback of those sounds. A sound cannot literally be paused during playback in ActionScript; it can only be stopped.
However, a sound can be played starting from any point. You can record the position of the sound at the time it was
stopped, and then replay the sound starting at that position later.
For example, let’s say your code loads and plays a sound file like this:
var snd:Sound = new Sound(new URLRequest("bigSound.mp3"));
var channel:SoundChannel = snd.play();
While the sound plays, the SoundChannel.position property indicates the point in the sound file that is currently
being played. Your application can store the position value before stopping the sound from playing, as follows:
var pausePosition:int = channel.position;
channel.stop();
To resume playing the sound, pass the previously stored position value to restart the sound from the same point it
stopped at before.
channel = snd.play(pausePosition);
Monitoring playback
Flash Player 9 and later, Adobe AIR 1.0 and later
Your application might want to know when a sound stops playing so it can start playing another sound, or clean up
some resources used during the previous playback. The SoundChannel class dispatches an Event.SOUND_COMPLETE
event when its sound finishes playing. Your application can listen for this event and take appropriate action, as shown
below:

430
ACTIONSCRIPT 3.0 DEVELOPER’S GUIDE
Working with sound
Last updated 3/21/2011
import flash.events.Event;
import flash.media.Sound;
import flash.net.URLRequest;
var snd:Sound = new Sound();
var req:URLRequest = new URLRequest("smallSound.mp3");
snd.load(req);
var channel:SoundChannel = snd.play();
channel.addEventListener(Event.SOUND_COMPLETE, onPlaybackComplete);
public function onPlaybackComplete(event:Event)
{
trace("The sound has finished playing.");
}
The SoundChannel class does not dispatch progress events during playback. To report on playback progress, your
application can set up its own timing mechanism and track the position of the sound playhead.
To calculate what percentage of a sound has been played, you can divide the value of the SoundChannel.position
property by the length of the sound data that’s being played:
var playbackPercent:uint = 100 * (channel.position / snd.length);
However, this code only reports accurate playback percentages if the sound data was fully loaded before playback
began. The Sound.length property shows the size of the sound data that is currently loaded, not the eventual size of
the entire sound file. To track the playback progress of a streaming sound that is still loading, your application should
estimate the eventual size of the full sound file and use that value in its calculations. You can estimate the eventual
length of the sound data using the bytesLoaded and bytesTotal properties of the Sound object, as follows:
var estimatedLength:int =
Math.ceil(snd.length / (snd.bytesLoaded / snd.bytesTotal));
var playbackPercent:uint = 100 * (channel.position / estimatedLength);
The following code loads a larger sound file and uses the Event.ENTER_FRAME event as its timing mechanism for
showing playback progress. It periodically reports on the playback percentage, which is calculated as the current
position value divided by the total length of the sound data:

431
ACTIONSCRIPT 3.0 DEVELOPER’S GUIDE
Working with sound
Last updated 3/21/2011
import flash.events.Event;
import flash.media.Sound;
import flash.net.URLRequest;
var snd:Sound = new Sound();
var req:URLRequest = new
URLRequest("http://av.adobe.com/podcast/csbu_dev_podcast_epi_2.mp3");
snd.load(req);
var channel:SoundChannel;
channel = snd.play();
addEventListener(Event.ENTER_FRAME, onEnterFrame);
channel.addEventListener(Event.SOUND_COMPLETE, onPlaybackComplete);
function onEnterFrame(event:Event):void
{
var estimatedLength:int =
Math.ceil(snd.length / (snd.bytesLoaded / snd.bytesTotal));
var playbackPercent:uint =
Math.round(100 * (channel.position / estimatedLength));
trace("Sound playback is " + playbackPercent + "% complete.");
}
function onPlaybackComplete(event:Event)
{
trace("The sound has finished playing.");
removeEventListener(Event.ENTER_FRAME, onEnterFrame);
}
After the sound data starts loading, this code calls the snd.play() method and stores the resulting SoundChannel
object in the channel variable. Then it adds an event listener to the main application for the Event.ENTER_FRAME
event and another event listener to the SoundChannel object for the Event.SOUND_COMPLETE event that occurs when
playback is complete.
Each time the application reaches a new frame in its animation, the onEnterFrame() method is called. The
onEnterFrame() method estimates the total length of the sound file based on the amount of data that has already been
loaded, and then it calculates and displays the current playback percentage.
When the entire sound has been played, the onPlaybackComplete() method executes, removing the event listener
for the Event.ENTER_FRAME event so that it doesn’t try to display progress updates after playback is done.
The Event.ENTER_FRAME event can be dispatched many times per second. In some cases, you won’t want to display
playback progress that frequently. In those cases, your application can set up its own timing mechanism using the
flash.util.Timer class; see “Working with dates and times” on page 1.
Stopping streaming sounds
Flash Player 9 and later, Adobe AIR 1.0 and later
There is a quirk in the playback process for sounds that are streaming—that is, for sounds that are still loading while
they are being played. When your application calls the SoundChannel.stop() method on a SoundChannel instance
that is playing back a streaming sound, the sound playback stops for one frame, and then on the next frame, it restarts
from the beginning of the sound. This occurs because the sound loading process is still underway. To stop both the
loading and the playback of a streaming sound, call the Sound.close() method.

432
ACTIONSCRIPT 3.0 DEVELOPER’S GUIDE
Working with sound
Last updated 3/21/2011
Security considerations when loading and playing
sounds
Flash Player 9 and later, Adobe AIR 1.0 and later
Your application’s ability to access sound data can be limited according to the Flash Player or AIR security model. Each
sound is subject to the restrictions of two different security sandboxes, the sandbox for the content itself (the “content
sandbox”), and the sandbox for the application or object that loads and plays the sound (the “owner sandbox”). For
AIR application content in the application security sandbox, all sounds, including those loaded from other domains,
are accessible to content in the application security sandbox. However, content in other security security sandboxes
observe the same rules as content running in Flash Player. For more information about the Flash Player security model
in general, and the definition of sandboxes, see “Security” on page 1008.
The content sandbox controls whether detailed sound data can be extracted from the sound using the id3 property or
the SoundMixer.computeSpectrum() method. It doesn’t restrict the loading or playing of the sound file itself.
The domain of origin of the sound file defines the security limitations of the content sandbox. Generally, if a sound file
is located in the same domain or folder as the SWF file of the application or object that loads it, the application or object
will have full access to that sound file. If the sound comes from a different domain than the application does, it can still
be brought within the content sandbox by using a policy file.
Your application can pass a SoundLoaderContext object with a checkPolicyFile property as a parameter to the
Sound.load() method. Setting the checkPolicyFile property to true tells Flash Player or AIR to look for a policy
file on the server from which the sound is loaded. If a policy file exists, and it grants access to the domain of the loading
SWF file, the SWF file can load the sound file, access the id3 property of the Sound object, and call the
SoundMixer.computeSpectrum() method for loaded sounds.
The owner sandbox controls local playback of the sounds. The application or object that starts playing a sound defines
the owner sandbox.
The SoundMixer.stopAll() method silences the sounds in all SoundChannel objects that are currently playing, as
long as they meet the following criteria:
•The sounds were started by objects within the same owner sandbox.
•The sounds are from a source with a policy file that grants access to the domain of the application or object that
calls the SoundMixer.stopAll() method.
However, in an AIR application, content in the application security sandbox (content installed with the AIR
application) are not restricted by these security limitations.
To find out if the SoundMixer.stopAll() method will indeed stop all playing sounds, your application can call the
SoundMixer.areSoundsInaccessible() method. If that method returns a value of true, some of the sounds being
played are outside the control of the current owner sandbox and will not be stopped by the SoundMixer.stopAll()
method.
The SoundMixer.stopAll() method also stops the playhead from continuing for all sounds that were loaded from
external files. However, sounds that are embedded in FLA files and attached to frames in the timeline using the Flash
Authoring tool might start playing again if the animation moves to a new frame.

433
ACTIONSCRIPT 3.0 DEVELOPER’S GUIDE
Working with sound
Last updated 3/21/2011
Controlling sound volume and panning
Flash Player 9 and later, Adobe AIR 1.0 and later
An individual SoundChannel object controls both the left and the right stereo channels for a sound. If an mp3 sound
is a monaural sound, the left and right stereo channels of the SoundChannel object will contain identical waveforms.
You can find out the amplitude of each stereo channel of the sound being played using the leftPeak and rightPeak
properties of the SoundChannel object. These properties show the peak amplitude of the sound waveform itself. They
do not represent the actual playback volume. The actual playback volume is a function of the amplitude of the sound
wave and the volume values set in the SoundChannel object and the SoundMixer class.
The pan property of a SoundChannel object can be used to specify a different volume level for each of the left and right
channels during playback. The pan property can have a value ranging from -1 to 1, where -1 means the left channel
plays at top volume while the right channel is silent, and 1 means the right channel plays at top volume while the left
channel is silent. Numeric values in between -1 and 1 set proportional values for the left and right channel values, and
a value of 0 means that both channels play at a balanced, mid-volume level.
The following code example creates a SoundTransform object with a volume value of 0.6 and a pan value of -1 (top left
channel volume and no right channel volume). It passes the SoundTransform object as a parameter to the play()
method, which applies that SoundTransform object to the new SoundChannel object that is created to control the
playback.
var snd:Sound = new Sound(new URLRequest("bigSound.mp3"));
var trans:SoundTransform = new SoundTransform(0.6, -1);
var channel:SoundChannel = snd.play(0, 1, trans);
You can alter the volume and panning while a sound is playing by setting the pan or volume properties of a
SoundTransform object and then applying that object as the soundTransform property of a SoundChannel object.
You can also set global volume and pan values for all sounds at once using the soundTransform property of the
SoundMixer class, as the following example shows:
SoundMixer.soundTransform = new SoundTransform(1, -1);
You can also use a SoundTransform object to set volume and pan values for a Microphone object (see “Capturing
sound input” on page 439) and for Sprite objects and SimpleButton objects.
The following example alternates the panning of the sound from the left channel to the right channel and back while
the sound plays.

434
ACTIONSCRIPT 3.0 DEVELOPER’S GUIDE
Working with sound
Last updated 3/21/2011
import flash.events.Event;
import flash.media.Sound;
import flash.media.SoundChannel;
import flash.media.SoundMixer;
import flash.net.URLRequest;
var snd:Sound = new Sound();
var req:URLRequest = new URLRequest("bigSound.mp3");
snd.load(req);
var panCounter:Number = 0;
var trans:SoundTransform;
trans = new SoundTransform(1, 0);
var channel:SoundChannel = snd.play(0, 1, trans);
channel.addEventListener(Event.SOUND_COMPLETE, onPlaybackComplete);
addEventListener(Event.ENTER_FRAME, onEnterFrame);
function onEnterFrame(event:Event):void
{
trans.pan = Math.sin(panCounter);
channel.soundTransform = trans; // or SoundMixer.soundTransform = trans;
panCounter += 0.05;
}
function onPlaybackComplete(event:Event):void
{
removeEventListener(Event.ENTER_FRAME, onEnterFrame);
}
This code starts by loading a sound file and then creating a new SoundTransform object with volume set to 1 (full
volume) and pan set to 0 (evenly balanced between left and right). Then it calls the snd.play() method, passing the
SoundTransform object as a parameter.
While the sound plays, the onEnterFrame() method executes repeatedly. The onEnterFrame() method uses the
Math.sin() function to generate a value between -1 and 1, a range that corresponds to the acceptable values of the
SoundTransform.pan property. The SoundTransform object’s pan property is set to the new value, and then the
channel’s soundTransform property is set to use the altered SoundTransform object.
To run this example, replace the filename bigSound.mp3 with the name of a local mp3 file. Then run the example. You
should hear the left channel volume getting louder while the right channel volume gets softer, and vice versa.
In this example, the same effect could be achieved by setting the soundTransform property of the SoundMixer class.
However, that would affect the panning of all sounds currently playing, not just the single sound being played by this
SoundChannel object.
Working with sound metadata
Flash Player 9 and later, Adobe AIR 1.0 and later
Sound files that use the mp3 format can contain additional data about the sound in the form of ID3 tags.

435
ACTIONSCRIPT 3.0 DEVELOPER’S GUIDE
Working with sound
Last updated 3/21/2011
Not every mp3 file contains ID3 metadata. When a Sound object loads an mp3 sound file, it dispatches an Event.ID3
event if the sound file contains ID3 metadata. To prevent run-time errors, your application should wait to receive the
Event.ID3 event before accessing the Sound.id3 property for a loaded sound.
The following code shows how to recognize when the ID3 metadata for a sound file has been loaded:
import flash.events.Event;
import flash.media.ID3Info;
import flash.media.Sound;
var s:Sound = new Sound();
s.addEventListener(Event.ID3, onID3InfoReceived);
s.load("mySound.mp3");
function onID3InfoReceived(event:Event)
{
var id3:ID3Info = event.target.id3;
trace("Received ID3 Info:");
for (var propName:String in id3)
{
trace(propName + " = " + id3[propName]);
}
}
This code starts by creating a Sound object and telling it to listen for the Event.ID3 event. When the sound file’s ID3
metadata is loaded, the onID3InfoReceived() method is called. The target of the Event object that is passed to the
onID3InfoReceived() method is the original Sound object, so the method then gets the Sound object’s id3 property
and then iterates through all of its named properties to trace their values.
Accessing raw sound data
Flash Player 9 and later, Adobe AIR 1.0 and later
The SoundMixer.computeSpectrum() method lets an application read the raw sound data for the waveform that is
currently being played. If more than one SoundChannel object is currently playing the
SoundMixer.computeSpectrum() method shows the combined sound data of every SoundChannel object mixed
together.
The sound data is returned as a ByteArray object containing 512 bytes of data, each of which contains a floating point
value between -1 and 1. These values represent the amplitude of the points in the sound waveform being played. The
values are delivered in two groups of 256, the first group for the left stereo channel and the second group for the right
stereo channel.
The SoundMixer.computeSpectrum() method returns frequency spectrum data rather than waveform data if the
FFTMode parameter is set to true. The frequency spectrum shows amplitude arranged by sound frequency, from
lowest frequency to highest. A Fast Fourier Transform (FFT) is used to convert the waveform data into frequency
spectrum data. The resulting frequency spectrum values range from 0 to roughly 1.414 (the square root of 2).
The following diagram compares the data returned from the computeSpectrum() method when the FFTMode
parameter is set to true and when it is set to false. The sound whose data was used for this diagram contains a loud
bass sound in the left channel and a drum hit sound in the right channel.

436
ACTIONSCRIPT 3.0 DEVELOPER’S GUIDE
Working with sound
Last updated 3/21/2011
Values returned by the SoundMixer.computeSpectrum() method
A. fftMode=true B. fftMode=false
The computeSpectrum() method can also return data that has been resampled at a lower bit rate. Generally, this
results in smoother waveform data or frequency data at the expense of detail. The stretchFactor parameter controls
the rate at which the computeSpectrum() method data is sampled. When the stretchFactor parameter is set to 0,
the default, the sound data is sampled at a rate of 44.1 kHz. The rate is halved at each successive value of the
stretchFactor parameter, so a value of 1 specifies a rate of 22.05 kHz, a value of 2 specifies a rate of 11.025 kHz, and so
on. The computeSpectrum() method still returns 256 bytes per stereo channel when a higher stretchFactor value
is used.
The SoundMixer.computeSpectrum() method has some limitations:
•Because sound data from a microphone or from RTMP streams do not pass through the global SoundMixer object,
the SoundMixer.computeSpectrum() method will not return data from those sources.
•If one or more of the sounds being played come from sources outside the current content sandbox, security
restrictions will cause the SoundMixer.computeSpectrum() method to throw an error. For more detail about the
security limitations of the SoundMixer.computeSpectrum() method please see “Security considerations when
loading and playing sounds” on page 432and “Accessing loaded media as data” on page 1030.
However, in an AIR application, content in the application security sandbox (content installed with the AIR
application) are not restricted by these security limitations.
Building a simple sound visualizer
Flash Player 9 and later, Adobe AIR 1.0 and later
The following example uses the SoundMixer.computeSpectrum() method to show a chart of the sound waveform
that animates with each frame:
Left Channel Right Channel
Left Channel Right Channel
A
B

437
ACTIONSCRIPT 3.0 DEVELOPER’S GUIDE
Working with sound
Last updated 3/21/2011
import flash.display.Graphics;
import flash.events.Event;
import flash.media.Sound;
import flash.media.SoundChannel;
import flash.media.SoundMixer;
import flash.net.URLRequest;
const PLOT_HEIGHT:int = 200;
const CHANNEL_LENGTH:int = 256;
var snd:Sound = new Sound();
var req:URLRequest = new URLRequest("bigSound.mp3");
snd.load(req);
var channel:SoundChannel;
channel = snd.play();
addEventListener(Event.ENTER_FRAME, onEnterFrame);
snd.addEventListener(Event.SOUND_COMPLETE, onPlaybackComplete);
var bytes:ByteArray = new ByteArray();
function onEnterFrame(event:Event):void
{
SoundMixer.computeSpectrum(bytes, false, 0);
var g:Graphics = this.graphics;
g.clear();
g.lineStyle(0, 0x6600CC);
g.beginFill(0x6600CC);
g.moveTo(0, PLOT_HEIGHT);
var n:Number = 0;
// left channel
for (var i:int = 0; i < CHANNEL_LENGTH; i++)
{
n = (bytes.readFloat() * PLOT_HEIGHT);
g.lineTo(i * 2, PLOT_HEIGHT - n);
}
g.lineTo(CHANNEL_LENGTH * 2, PLOT_HEIGHT);

438
ACTIONSCRIPT 3.0 DEVELOPER’S GUIDE
Working with sound
Last updated 3/21/2011
g.endFill();
// right channel
g.lineStyle(0, 0xCC0066);
g.beginFill(0xCC0066, 0.5);
g.moveTo(CHANNEL_LENGTH * 2, PLOT_HEIGHT);
for (i = CHANNEL_LENGTH; i > 0; i--)
{
n = (bytes.readFloat() * PLOT_HEIGHT);
g.lineTo(i * 2, PLOT_HEIGHT - n);
}
g.lineTo(0, PLOT_HEIGHT);
g.endFill();
}
function onPlaybackComplete(event:Event)
{
removeEventListener(Event.ENTER_FRAME, onEnterFrame);
}
This example first loads and plays a sound file and then listens for the Event.ENTER_FRAME event which will trigger
the onEnterFrame() method while the sound plays. The onEnterFrame() method starts by calling the
SoundMixer.computeSpectrum() method, which stores the sound wave data in the bytes ByteArray object.
The sound waveform is plotted using the vector drawing API. A for loop cycles through the first 256 data values,
representing the left stereo channel, and draws a line from each point to the next using the Graphics.lineTo()
method. A second for loop cycles through the next set of 256 values, plotting them in reverse order this time, from
right to left. The resulting waveform plots can produce an interesting mirror-image effect, as shown in the following
image.

439
ACTIONSCRIPT 3.0 DEVELOPER’S GUIDE
Working with sound
Last updated 3/21/2011
Capturing sound input
Flash Player 9 and later, Adobe AIR 1.0 and later
The Microphone class lets your application connect to a microphone or other sound input device on the user’s system
and broadcast the input audio to that system’s speakers or send the audio data to a remote server, such as Flash Media
Server. You can access the raw audio data from the microphone and record or process it; you can also send the audio
directly to the system’s speakers or send compressed audio data to a remote server. You can use either Speex or
Nellymoser codec for data sent to a remote server. (The Speex codec is supported starting with Flash Player 10 and
Adobe AIR 1.5.)
More Help topics
Michael Chaize: AIR, Android, and the Microphone
Christophe Coenraets: Voice Notes for Android
Accessing a microphone
Flash Player 9 and later, Adobe AIR 1.0 and later
The Microphone class does not have a constructor method. Instead, you use the static
Microphone.getMicrophone() method to obtain a new Microphone instance, as shown below:
var mic:Microphone = Microphone.getMicrophone();
Calling the Microphone.getMicrophone() method without a parameter returns the first sound input device
discovered on the user’s system.
A system can have more than one sound input device attached to it. Your application can use the Microphone.names
property to get an array of the names of all available sound input devices. Then it can call the
Microphone.getMicrophone() method with an index parameter that matches the index value of a device’s name in
the array.
A system might not have a microphone or other sound input device attached to it. You can use the Microphone.names
property or the Microphone.getMicrophone() method to check whether the user has a sound input device installed.
If the user doesn’t have a sound input device installed, the names array has a length of zero, and the getMicrophone()
method returns a value of null.
When your application calls the Microphone.getMicrophone() method, Flash Player displays the Flash Player
Settings dialog box, which prompts the user to either allow or deny Flash Player access to the camera and microphone
on the system. After the user clicks on either the Allow button or the Deny button in this dialog, a StatusEvent is
dispatched. The code property of that StatusEvent instance indicates whether microphone access was allowed or
denied, as shown in this example:

440
ACTIONSCRIPT 3.0 DEVELOPER’S GUIDE
Working with sound
Last updated 3/21/2011
import flash.media.Microphone;
var mic:Microphone = Microphone.getMicrophone();
mic.addEventListener(StatusEvent.STATUS, this.onMicStatus);
function onMicStatus(event:StatusEvent):void
{
if (event.code == "Microphone.Unmuted")
{
trace("Microphone access was allowed.");
}
else if (event.code == "Microphone.Muted")
{
trace("Microphone access was denied.");
}
}
The StatusEvent.code property will contain “Microphone.Unmuted” if access was allowed, or
“Microphone.Muted” if access was denied.
The Microphone.muted property is set to true or false when the user allows or denies microphone access,
respectively. However, the muted property is not set on the Microphone instance until the StatusEvent has been
dispatched, so your application should also wait for the StatusEvent.STATUS event to be dispatched before checking
the Microphone.muted property.
In order for Flash Player to display the settings dialog, the application window must be large enough to display it (at
least 215 by 138 pixels). Otherwise, access is denied automatically.
Content running in the AIR application sandbox does not need the permission of the user to access the microphone.
Thus, status events for muting and unmuting the microphone are never dispatched. Content running in AIR outside
the application sandbox does require permission from the user, so these status events can be dispatched.
Routing microphone audio to local speakers
Flash Player 9 and later, Adobe AIR 1.0 and later
Audio input from a microphone can be routed to the local system speakers by calling the
Microphone.setLoopback() method with a parameter value of true.
When sound from a local microphone is routed to local speakers, there is a risk of creating an audio feedback loop,
which can cause loud squealing sounds and can potentially damage sound hardware. Calling the
Microphone.setUseEchoSuppression() method with a parameter value of true reduces, but does not completely
eliminate, the risk that audio feedback will occur. Adobe recommends you always call
Microphone.setUseEchoSuppression(true) before calling Microphone.setLoopback(true), unless you are
certain that the user is playing back the sound using headphones or something other than speakers.
The following code shows how to route the audio from a local microphone to the local system speakers:
var mic:Microphone = Microphone.getMicrophone();
mic.setUseEchoSuppression(true);
mic.setLoopBack(true);

441
ACTIONSCRIPT 3.0 DEVELOPER’S GUIDE
Working with sound
Last updated 3/21/2011
Altering microphone audio
Flash Player 9 and later, Adobe AIR 1.0 and later
Your application can alter the audio data that comes from a microphone in two ways. First, it can change the gain of
the input sound, which effectively multiplies the input values by a specified amount to create a louder or quieter sound.
The Microphone.gain property accepts numeric values between 0 and 100 inclusive. A value of 50 acts like a
multiplier of one and specifies normal volume. A value of zero acts like a multiplier of zero and effectively silences the
input audio. Values above 50 specify higher than normal volume.
Your application can also change the sample rate of the input audio. Higher sample rates increase sound quality, but
they also create denser data streams that use more resources for transmission and storage. The Microphone.rate
property represents the audio sample rate measured in kilohertz (kHz). The default sample rate is 8 kHz. You can set
the Microphone.rate property to a value higher than 8 kHz if your microphone supports the higher rate. For
example, setting the Microphone.rate property to a value of 11 sets the sample rate to 11 kHz; setting it to 22 sets the
sample rate to 22 kHz, and so on. The sample rates available depend on the selected codec. When you use the
Nellymoser codec, you can specify 5, 8, 11, 16, 22 and 44 kHz as the sample rate. When you use Speex codec (available
starting in Flash Player 10 and Adobe AIR 1.5), you can only use 16 kHz.
Detecting microphone activity
Flash Player 9 and later, Adobe AIR 1.0 and later
To conserve bandwidth and processing resources, Flash Player tries to detect when no sound is being transmitted by
a microphone. When the microphone’s activity level stays below the silence level threshold for a period of time, Flash
Player stops transmitting the audio input and dispatches a simple ActivityEvent instead. If you use the Speex codec
(available in Flash Player 10 or later and Adobe AIR 1.5 or later), set the silence level to 0, to ensure that the application
continuously transmits audio data. Speex voice activity detection automatically reduces bandwidth.
Note: A Microphone object only dispatches Activity events when your application is monitoring the microphone. Thus, if
you do not call setLoopBack( true ), add a listener for sample data events, or attach the microphone to a NetStream
object, then no activity events are dispatched.
Three properties of the Microphone class monitor and control the detection of activity:
•The read-only activityLevel property indicates the amount of sound the microphone is detecting, on a scale
from 0 to 100.
•The silenceLevel property specifies the amount of sound needed to activate the microphone and dispatch an
ActivityEvent.ACTIVITY event. The silenceLevel property also uses a scale from 0 to 100, and the default
value is 10.
•The silenceTimeout property describes the number of milliseconds that the activity level must stay below the
silence level, until an ActivityEvent.ACTIVITY event is dispatched to indicate that the microphone is now silent.
The default silenceTimeout value is 2000.
Both the Microphone.silenceLevel property and the Microphone.silenceTimeout property are read only, but
their values can be changed by using the Microphone.setSilenceLevel() method.
In some cases, the process of activating the microphone when new activity is detected can cause a short delay. Keeping
the microphone active at all times can remove such activation delays. Your application can call the
Microphone.setSilenceLevel() method with the silenceLevel parameter set to zero to tell Flash Player to keep
the microphone active and keep gathering audio data, even when no sound is being detected. Conversely, setting the
silenceLevel parameter to 100 prevents the microphone from being activated at all.

442
ACTIONSCRIPT 3.0 DEVELOPER’S GUIDE
Working with sound
Last updated 3/21/2011
The following example displays information about the microphone and reports on activity events and status events
dispatched by a Microphone object:
import flash.events.ActivityEvent;
import flash.events.StatusEvent;
import flash.media.Microphone;
var deviceArray:Array = Microphone.names;
trace("Available sound input devices:");
for (var i:int = 0; i < deviceArray.length; i++)
{
trace(" " + deviceArray[i]);
}
var mic:Microphone = Microphone.getMicrophone();
mic.gain = 60;
mic.rate = 11;
mic.setUseEchoSuppression(true);
mic.setLoopBack(true);
mic.setSilenceLevel(5, 1000);
mic.addEventListener(ActivityEvent.ACTIVITY, this.onMicActivity);
mic.addEventListener(StatusEvent.STATUS, this.onMicStatus);
var micDetails:String = "Sound input device name: " + mic.name + '\n';
micDetails += "Gain: " + mic.gain + '\n';
micDetails += "Rate: " + mic.rate + " kHz" + '\n';
micDetails += "Muted: " + mic.muted + '\n';
micDetails += "Silence level: " + mic.silenceLevel + '\n';
micDetails += "Silence timeout: " + mic.silenceTimeout + '\n';
micDetails += "Echo suppression: " + mic.useEchoSuppression + '\n';
trace(micDetails);
function onMicActivity(event:ActivityEvent):void
{
trace("activating=" + event.activating + ", activityLevel=" +
mic.activityLevel);
}
function onMicStatus(event:StatusEvent):void
{
trace("status: level=" + event.level + ", code=" + event.code);
}
When you run the above example, speak or makes noises into your system microphone and watch the resulting trace
statements appear in a console or debug window.
Sending audio to and from a media server
Flash Player 9 and later, Adobe AIR 1.0 and later
Additional audio capabilities are available when using ActionScript with a streaming media server such as Flash Media
Server.

443
ACTIONSCRIPT 3.0 DEVELOPER’S GUIDE
Working with sound
Last updated 3/21/2011
In particular, your application can attach a Microphone object to a NetStream object and transmit data directly from
the user’s microphone to the server. Audio data can also be streamed from the server to an application and played back
as part of a MovieClip or by using a Video object.
The Speex codec is available starting with Flash Player 10 and Adobe AIR 1.5. To set the codec used for compressed
audio sent to the media server, set the codec property of the Microphone object. This property can have two values,
which are enumerated in the SoundCodec class. Setting the codec property to SoundCodec.SPEEX selects the Speex
codec for compressing audio. Setting the property to SoundCodec.NELLYMOSER (the default) selects the Nellymoser
codec for compressing audio.
For more information, see the Flash Media Server documentation online at www.adobe.com/go/learn_fms_docs_en.
Capturing microphone sound data
Flash Player 10.1 and later, Adobe AIR 2 and later
In Flash Player 10.1 and AIR 2, or later, you can capture data from a microphone data as a byte array of floating point
values. Each value represents a sample of monophonic audio data.
To get microphone data, set an event listener for the sampleData event of the Microphone object. The Microphone
object dispatches sampleData events periodically as the microphone buffer is filled with sound samples. The
SampleDataEvent object has a data property that is a byte array of sound samples. The samples are each represented
as floating point values, each representing a monophonic sound sample.
The following code captures microphone sound data into a ByteArray object named soundBytes:
var mic:Microphone = Microphone.getMicrophone();
mic.setSilenceLevel(0, DELAY_LENGTH);
mic.addEventListener(SampleDataEvent.SAMPLE_DATA, micSampleDataHandler);
function micSampleDataHandler(event:SampleDataEvent):void {
while(event.data.bytesAvailable) {
var sample:Number = event.data.readFloat();
soundBytes.writeFloat(sample);
}
}
You can reuse the sample bytes as playback audio for a Sound object. If you do, you should set the rate property of
the Microphone object to 44, which is the sample rate used by Sound objects. (You can also convert microphone
samples captured at a lower rate to 44 kHz rate required by the Sound object.) Also, keep in mind that the Microphone
object captures monophonic samples, whereas the Sound object uses stereo sound; so you should write each of the
bytes captured by the Microphone object to the Sound object twice. The following example captures 4 seconds of
microphone data and plays it back using a Sound object:

444
ACTIONSCRIPT 3.0 DEVELOPER’S GUIDE
Working with sound
Last updated 3/21/2011
const DELAY_LENGTH:int = 4000;
var mic:Microphone = Microphone.getMicrophone();
mic.setSilenceLevel(0, DELAY_LENGTH);
mic.gain = 100;
mic.rate = 44;
mic.addEventListener(SampleDataEvent.SAMPLE_DATA, micSampleDataHandler);
var timer:Timer = new Timer(DELAY_LENGTH);
timer.addEventListener(TimerEvent.TIMER, timerHandler);
timer.start();
function micSampleDataHandler(event:SampleDataEvent):void
{
while(event.data.bytesAvailable)
{
var sample:Number = event.data.readFloat();
soundBytes.writeFloat(sample);
}
}
var sound:Sound = new Sound();
var channel:SoundChannel;
function timerHandler(event:TimerEvent):void
{
mic.removeEventListener(SampleDataEvent.SAMPLE_DATA, micSampleDataHandler);
timer.stop();
soundBytes.position = 0;
sound.addEventListener(SampleDataEvent.SAMPLE_DATA, playbackSampleHandler);
channel.addEventListener( Event.SOUND_COMPLETE, playbackComplete );
channel = sound.play();
}
function playbackSampleHandler(event:SampleDataEvent):void
{
for (var i:int = 0; i < 8192 && soundBytes.bytesAvailable > 0; i++)
{
trace(sample);
var sample:Number = soundBytes.readFloat();
event.data.writeFloat(sample);
event.data.writeFloat(sample);
}
}
function playbackComplete( event:Event ):void
{
trace( "Playback finished.");
}
For more information on playing back sounds from sound sample data, see “Working with dynamically generated
audio” on page 426.

445
ACTIONSCRIPT 3.0 DEVELOPER’S GUIDE
Working with sound
Last updated 3/21/2011
Sound example: Podcast Player
Flash Player 9 and later, Adobe AIR 1.0 and later
A podcast is a sound file that is distributed over the Internet, on demand or by subscription. Podcasts are usually
published as part of a series, which is also called a podcast channel. Because podcast episodes can last anywhere from
one minute to many hours, they are usually streamed while playing. Podcast episodes, which are also called items, are
usually delivered in the mp3 file format. Video podcasts are also popular, but this sample application plays only audio
podcasts that use mp3 files.
This example is not a full-featured podcast aggregator application. For example, it does not manage subscriptions to
specific podcasts or remember which podcasts the user has listened to the next time the application is run. It could
serve as a starting point for a more full-featured podcast aggregator.
The Podcast Player example illustrates the following ActionScript programming techniques:
•Reading an external RSS feed and parsing its XML content
•Creating a SoundFacade class to simplify loading and playback of sound files
•Displaying sound playback progress
•Pausing and resuming sound playback
To get the application files for this sample, see www.adobe.com/go/learn_programmingAS3samples_flash. The
Podcast Player application files can be found in the folder Samples/PodcastPlayer. The application consists of the
following files:
File Description
PodcastPlayer.mxml
or
PodcastPlayer.fla
The user interface for the application for Flex (MXML) or Flash (FLA).
comp/example/progra
mmingas3/podcastplay
er/PodcastPlayer.as
Document class containing the user interface logic for the podcast player (Flash only).
SoundPlayer.mxml An MXML component that displays playback buttons and progress bars and controls sound playback, for Flex only.
main.css Styles for the application user interface (Flex only).
images/ Icons for styling the buttons (Flex only).
comp/example/progra
mmingas3/podcastplay
er/SoundPlayer.as
Class for the SoundPlayer movie clip symbol containing the user interface logic for the sound player (Flash only).
comp/example/progra
mmingas3/podcastplay
er/PlayButtonRenderer.
as
Custom cell renderer for displaying a play button in a data grid cell (Flash only).
com/example/program
mingas3/podcastplayer
/RSSBase.as
A base class that provides common properties and methods for the RSSChannel class and the RSSItem class.
com/example/program
mingas3/podcastplayer
/RSSChannel.as
An ActionScript class that holds data about an RSS channel.

446
ACTIONSCRIPT 3.0 DEVELOPER’S GUIDE
Working with sound
Last updated 3/21/2011
Reading RSS data for a podcast channel
Flash Player 9 and later, Adobe AIR 1.0 and later
The Podcast Player application starts by reading information about a number of podcast channels and their episodes:
1. First, the application reads an XML configuration file that contains a list of podcast channels and displays the list of
channels to the user.
2. When the user selects one of the podcast channels, it reads the RSS feed for the channel and displays a list of the
channel episodes.
This example uses the URLLoader utility class to retrieve text-based data from a remote location or a local file. The
Podcast Player first creates a URLLoader object to get a list of RSS feeds in XML format from the playerconfig.xml file.
Next, when the user selects a specific feed from the list, a new URLLoader object is created to read the RSS data from
that feed’s URL.
Simplifying sound loading and playback using the SoundFacade class
Flash Player 9 and later, Adobe AIR 1.0 and later
The ActionScript 3.0 sound architecture is powerful but complex. Applications that only need basic sound loading and
playback features can use a class that hides some of the complexity by providing a simpler set of method calls and
events. In the world of software design patterns, such a class is called a facade.
The SoundFacade class presents a single interface for performing the following tasks:
•Loading sound files using a Sound object, a SoundLoaderContext object, and the SoundMixer class
•Playing sound files using the Sound object and the SoundChannel object
•Dispatching playback progress events
•Pausing and resuming playback of the sound using the Sound object and the SoundChannel object
The SoundFacade class tries to offer most of the functionality of the ActionScript sound classes with less complexity.
The following code shows the class declaration, the class properties, and the SoundFacade() constructor method:
com/example/program
mingas3/podcastplayer
/RSSItem.as
An ActionScript class that holds data about an RSS item.
com/example/program
mingas3/podcastplayer
/SoundFacade.as
The main ActionScript class for the application. It encapsulates the methods and events of the Sound class and the
SoundChannel class and adds support for pausing and resuming playback.
com/example/program
mingas3/podcastplayer
/URLService.as
An ActionScript class that retrieves data from a remote URL.
playerconfig.xml An XML file containing a list of RSS feeds that represent podcast channels.
comp/example/progra
mmingas3/utils/DateUt
il.as
Class that is used for easy date formatting (Flash only).
File Description

447
ACTIONSCRIPT 3.0 DEVELOPER’S GUIDE
Working with sound
Last updated 3/21/2011
public class SoundFacade extends EventDispatcher
{
public var s:Sound;
public var sc:SoundChannel;
public var url:String;
public var bufferTime:int = 1000;
public var isLoaded:Boolean = false;
public var isReadyToPlay:Boolean = false;
public var isPlaying:Boolean = false;
public var isStreaming:Boolean = true;
public var autoLoad:Boolean = true;
public var autoPlay:Boolean = true;
public var pausePosition:int = 0;
public static const PLAY_PROGRESS:String = "playProgress";
public var progressInterval:int = 1000;
public var playTimer:Timer;
public function SoundFacade(soundUrl:String, autoLoad:Boolean = true,
autoPlay:Boolean = true, streaming:Boolean = true,
bufferTime:int = -1):void
{
this.url = soundUrl;
// Sets Boolean values that determine the behavior of this object
this.autoLoad = autoLoad;
this.autoPlay = autoPlay;
this.isStreaming = streaming;
// Defaults to the global bufferTime value
if (bufferTime < 0)
{
bufferTime = SoundMixer.bufferTime;
}
// Keeps buffer time reasonable, between 0 and 30 seconds
this.bufferTime = Math.min(Math.max(0, bufferTime), 30000);
if (autoLoad)
{
load();
}
}
The SoundFacade class extends the EventDispatcher class so that it can dispatch its own events. The class code first
declares properties for a Sound object and a SoundChannel object. The class also stores the value of the URL of the
sound file and a bufferTime property to use when streaming the sound. In addition, it accepts some Boolean
parameter values that affect the loading and playback behavior:
•The autoLoad parameter tells the object that sound loading should start as soon as this object is created.
•The autoPlay parameter indicates that sound playing should start as soon as enough sound data has been loaded.
If this is a streaming sound, playback will begin as soon as enough data, as specified by the bufferTime property,
has loaded.

448
ACTIONSCRIPT 3.0 DEVELOPER’S GUIDE
Working with sound
Last updated 3/21/2011
•The streaming parameter indicates that this sound file can start playing before loading has completed.
The bufferTime parameter defaults to a value of -1. If the constructor method detects a negative value in the
bufferTime parameter, it sets the bufferTime property to the value of SoundMixer.bufferTime. This lets the
application default to the global SoundMixer.bufferTime value as desired.
If the autoLoad parameter is set to true, the constructor method immediately calls the following load() method to
start loading the sound file:
public function load():void
{
if (this.isPlaying)
{
this.stop();
this.s.close();
}
this.isLoaded = false;
this.s = new Sound();
this.s.addEventListener(ProgressEvent.PROGRESS, onLoadProgress);
this.s.addEventListener(Event.OPEN, onLoadOpen);
this.s.addEventListener(Event.COMPLETE, onLoadComplete);
this.s.addEventListener(Event.ID3, onID3);
this.s.addEventListener(IOErrorEvent.IO_ERROR, onIOError);
this.s.addEventListener(SecurityErrorEvent.SECURITY_ERROR, onIOError);
var req:URLRequest = new URLRequest(this.url);
var context:SoundLoaderContext = new SoundLoaderContext(this.bufferTime, true);
this.s.load(req, context);
}
The load() method creates a new Sound object and then adds listeners for all of the important sound events. Then it
tells the Sound object to load the sound file, using a SoundLoaderContext object to pass in the bufferTime value.
Because the url property can be changed, a SoundFacade instance can be used to play different sound files in
succession: simply change the url property and call the load() method, and the new sound file will be loaded.
The following three event listener methods show how the SoundFacade object tracks loading progress and decides
when to start playing the sound:

449
ACTIONSCRIPT 3.0 DEVELOPER’S GUIDE
Working with sound
Last updated 3/21/2011
public function onLoadOpen(event:Event):void
{
if (this.isStreaming)
{
this.isReadyToPlay = true;
if (autoPlay)
{
this.play();
}
}
this.dispatchEvent(event.clone());
}
public function onLoadProgress(event:ProgressEvent):void
{
this.dispatchEvent(event.clone());
}
public function onLoadComplete(event:Event):void
{
this.isReadyToPlay = true;
this.isLoaded = true;
this.dispatchEvent(evt.clone());
if (autoPlay && !isPlaying)
{
play();
}
}
The onLoadOpen() method executes when sound loading starts. If the sound can be played in streaming mode, the
onLoadComplete() method sets the isReadyToPlay flag to true right away. The isReadyToPlay flag determines
whether the application can start the sound playing, perhaps in response to a user action like clicking a Play button.
The SoundChannel class manages the buffering of sound data, so there is no need to explicitly check whether enough
data has been loaded before calling the play() method.
The onLoadProgress() method executes periodically during the loading process. It simply dispatches a clone of its
ProgressEvent object for use by code that uses this SoundFacade object.
When the sound data has been fully loaded the onLoadComplete() method executes, calling the play() method for
non-streaming sounds if needed. The play() method itself is shown below.

450
ACTIONSCRIPT 3.0 DEVELOPER’S GUIDE
Working with sound
Last updated 3/21/2011
public function play(pos:int = 0):void
{
if (!this.isPlaying)
{
if (this.isReadyToPlay)
{
this.sc = this.s.play(pos);
this.sc.addEventListener(Event.SOUND_COMPLETE, onPlayComplete);
this.isPlaying = true;
this.playTimer = new Timer(this.progressInterval);
this.playTimer.addEventListener(TimerEvent.TIMER, onPlayTimer);
this.playTimer.start();
}
}
}
The play() method calls the Sound.play() method if the sound is ready to play. The resulting SoundChannel object
is stored in the sc property. The play() method then creates a Timer object that will be used to dispatch playback
progress events at regular intervals.
Displaying playback progress
Flash Player 9 and later, Adobe AIR 1.0 and later
Creating a Timer object to drive playback monitoring is complex operation that you should only have to code once.
Encapsulating this Timer logic in a reusable class like the SoundFacade class lets applications listen to the same kinds
of progress events when a sound is loading and when it is playing.
The Timer object that is created by the SoundFacade.play() method dispatches a TimerEvent instance every second.
The following onPlayTimer() method executes whenever a new TimerEvent arrives:
public function onPlayTimer(event:TimerEvent):void
{
var estimatedLength:int =
Math.ceil(this.s.length / (this.s.bytesLoaded / this.s.bytesTotal));
var progEvent:ProgressEvent =
new ProgressEvent(PLAY_PROGRESS, false, false, this.sc.position, estimatedLength);
this.dispatchEvent(progEvent);
}
The onPlayTimer() method implements the size estimation technique described in the section “Monitoring
playback” on page 429. Then it creates a new ProgressEvent instance with an event type of
SoundFacade.PLAY_PROGRESS, with the bytesLoaded property set to the current position of the SoundChannel
object and the bytesTotal property set to the estimated length of the sound data.
Pausing and resuming playback
Flash Player 9 and later, Adobe AIR 1.0 and later
The SoundFacade.play() method shown previously accepts a pos parameter corresponding to a starting position in
the sound data. If the pos value is zero, the sound starts playing from the beginning.
The SoundFacade.stop() method also accepts a pos parameter as shown here:

451
ACTIONSCRIPT 3.0 DEVELOPER’S GUIDE
Working with sound
Last updated 3/21/2011
public function stop(pos:int = 0):void
{
if (this.isPlaying)
{
this.pausePosition = pos;
this.sc.stop();
this.playTimer.stop();
this.isPlaying = false;
}
}
Whenever the SoundFacade.stop() method is called, it sets the pausePosition property so that the application
knows where to position the playhead if the user wants to resume playback of the same sound.
The SoundFacade.pause() and SoundFacade.resume() methods shown below invoke the SoundFacade.stop()
and SoundFacade.play() methods respectively, passing a pos parameter value each time.
public function pause():void
{
stop(this.sc.position);
}
public function resume():void
{
play(this.pausePosition);
}
The pause() method passes the current SoundChannel.position value to the play() method, which stores that
value in the pausePosition property. The resume() method starts playing the same sound again using the
pausePosition value as the starting point.
Extending the Podcast Player example
Flash Player 9 and later, Adobe AIR 1.0 and later
This example presents a bare-bones Podcast Player that showcases the use of the reusable SoundFacade class. You
could add other features to enhance the usefulness of this application, including the following:
•Store the list of feeds and usage information about each episode in a SharedObject instance that can be used the
next time the user runs the application.
•Let the user add his or her own RSS feeds to the list of podcast channels.
•Remember the position of the playhead when the user stops or leaves an episode, so it can be restarted from that
point next time the user runs the application.
•Download mp3 files of episodes for listening offline, when the user is not connected to the Internet.
•Add subscription features that periodically check for new episodes in a podcast channel and update the episode list
automatically.
•Add podcast searching and browsing functionality using an API from a podcast hosting service like Odeo.com.

452
Last updated 3/21/2011
Chapter 23: Working with video
Flash Player 9 and later, Adobe AIR 1.0 and later
Flash video is one of the standout technologies on the Internet. However, the traditional presentation of video—in a
rectangular screen with a progress bar and control buttons underneath—is only one possible use of video. Through
ActionScript, you have fine-tuned access to and control over video loading, presentation, and playback.
Basics of video
Flash Player 9 and later, Adobe AIR 1.0 and later
One important capability of Adobe® Flash® Player and Adobe® AIR™ is the ability to display and manipulate video
information with ActionScript in the same way that you can manipulate other visual content such as images,
animation, text, and so on. When you create a Flash Video (FLV) file in Adobe Flash CS4 Professional, you have the
option to select a skin that includes common playback controls. However, there is no reason you need to limit yourself
to the options available. Using ActionScript, you have fine-tuned control over loading, displaying, and playback of
video—meaning you could create your own video player skin, or use your video in any less traditional way that you
want. Working with video in ActionScript involves working with a combination of several classes:
•Video class: The classic video content box on the Stage is an instance of the Video class. The Video class is a display
object, so it can be manipulated using the same techniques that can be applied to other display objects, such as
positioning, applying transformations, applying filters and blending modes, and so forth.
•StageVideo class: The Video class typically uses software decoding and rendering. When GPU hardware
acceleration is available on a device, your application can take best advantage of hardware rendering by switching
to the StageVideo class. The StageVideo API includes a set of events that tell your code when to switch between
StageVideo and Video objects. Stage video imposes some minor restrictions on video playback. If your application
accepts those limitations, implement the StageVideo API. See “Guidelines and limitations” on page 488.
•NetStream class: When you’re loading a video file to be controlled by ActionScript, a NetStream instance represents
the source of the video content—in this case, a stream of video data. Using a NetStream instance also involves using
a NetConnection object, which is the connection to the video file—like the tunnel that the video data is fed through.
•Camera class: When you’re working with video data from a camera connected to the user’s computer, a Camera
instance represents the source of the video content—the user’s camera and the video data it makes available.
When you’re loading external video, you can load the file from a standard web server for progressive download, or you
can work with streaming video delivered by a specialized server such as Adobe’s Flash® Media Server.
Important concepts and terms
Cue point A marker that can be placed at a specific moment in time in a video file, for example to act like a bookmark
for locating that point in time, or to provide additional data that is associated with that moment in time.
Encoding The process of taking video data in one format and converting it to another video data format; for example,
taking a high-resolution source video and converting it to a format that’s suitable for Internet delivery.
Frame A single segment of video information; each frame is like a still image representing a snapshot of a moment in
time. By playing frames in sequence at high speed, the illusion of motion is created.

453
ACTIONSCRIPT 3.0 DEVELOPER’S GUIDE
Working with video
Last updated 3/21/2011
Keyframe A video frame which contains the full information for the frame. Other frames that follow a keyframe only
contain information about how they differ from the keyframe, rather than containing the full frame’s worth of
information.
Metadata Information about a video file that is embedded within the video file and retrieved when the video has
loaded.
Progressive download When a video file is delivered from a standard web server, the video data is loaded using
progressive download, meaning the video information loads in sequence. This has the benefit that the video can begin
playing before the entire file is downloaded; however, it prevents you from jumping ahead to a part of the video that
hasn’t loaded.
Streaming As an alternative to progressive download, a special video server can be used to deliver video over the
Internet using a technique known as streaming (sometimes called “true streaming”). With streaming, the viewer’s
computer never downloads the entire video at one time. To speed up download times, at any moment the computer
only needs a portion of the total video information. Because a special server controls the delivery of the video content,
any part of the video can be accessed at any time, rather than needing to wait for it to download before accessing it.
Understanding video formats
Flash Player 9 and later, Adobe AIR 1.0 and later
In addition to the Adobe FLV video format, Flash Player and Adobe AIR support video and audio encoded in H.264
and HE-AAC from within MPEG-4 standard file formats. These formats stream high quality video at lower bit rates.
Developers can leverage industry standard tools, including Adobe Premiere Pro and Adobe After Effects, to create and
deliver compelling video content.
More Help topics
Flash Media Server: Supported codecs
Adobe HTTP Dynamic Streaming
Encoding video for mobile devices
AIR on Android can decode a wide range of H.264 videos. However, only a small subset of H.264 videos is suited to
have a smooth playback on mobile phones. It is because many mobile phones are constrained for processing power.
Adobe Flash Player for mobile can decode H.264 videos using in-built hardware acceleration. This decoding assures
better quality at lower power consumption.
Type Format Container
Video H.264 MPEG-4: MP4, M4V, F4V, 3GPP
Video Sorenson Spark FLV file
Video ON2 VP6 FLV file
Audio AAC+ / HE-AAC / AAC v1 / AAC v2 MPEG-4:MP4, M4V, F4V, 3GPP
Audio Mp3 Mp3
Audio Nellymoser FLV file
Audio Speex FLV file
454
ACTIONSCRIPT 3.0 DEVELOPER’S GUIDE
Working with video
Last updated 3/21/2011
H.264 standard supports several encoding techniques. Only high-end devices smoothly play videos with complex
profiles and levels. However, a majority of devices can play video encoded in baseline profile. On mobile devices,
hardware acceleration is available for a subset of these techniques. The profile and the level parameters define this
subset of encoding techniques and settings used by the encoder. For developers, it translates into encoding the video
in selected resolution which plays well on most devices.
Though resolutions that benefit from hardware acceleration vary from device to device, but most devices support the
following standard resolutions.
Note: Flash Player supports every level and profile of the H.264 standard. Adhering to these recommendations ensures
hardware acceleration and better user experience on most devices. These recommendations are not mandatory.
For a detailed discussion and encoding settings in Adobe Media Encoder CS5, see Recommendations for encoding
H.264 video for Flash Player 10.1 on mobile devices.
Note: On iOS, only video encoded with the Sorenson Spark and On2 VP6 codecs can be played back using the Video class.
You can play back H.264 encoded video in the device video player by launching the URL to the video using the
flash.net.navigateToURL() function. You can also play back H.264 video using the <video> tag in an html page
displayed in a StageWebView object.
Flash Player and AIR compatibility with encoded video files
Flash Player 9 and later, Adobe AIR 1.0 and later
Flash Player 7 supports FLV files that are encoded with the Sorenson™ Spark™ video codec. Flash Player 8 supports FLV
files encoded with Sorenson Spark or On2 VP6 encoder in Flash Professional 8. The On2 VP6 video codec supports
an alpha channel.
Flash Player 9.0.115.0 and later versions support files derived from the standard MPEG-4 container format. These files
include F4V, MP4, M4A, MOV, MP4V, 3GP, and 3G2, if they contain H.264 video or HE-AAC v2 encoded audio, or
both. H.264 delivers higher quality video at lower bit rates when compared to the same encoding profile in Sorenson
or On2. HE-AAC v2 is an extension of AAC, a standard audio format defined in the MPEG-4 video standard. HE-
AAC v2 uses spectral band replication (SBR) and parametric stereo (PS) techniques to increase coding efficiency at
low bit rates.
The following table lists the supported codecs. It also shows the corresponding SWF file format and the versions of
Flash Player and AIR that are required to play them:
Aspect ratio Recommended resolutions
4:3 640 × 480 512 × 384 480 × 360
16:9 640 × 360 512 x 288 480 × 272
Codec SWF file format version (earliest
supported publish version)
Flash Player and AIR (earliest version required for playback)
Sorenson Spark 6 Flash Player 6, Flash Lite 3
On2 VP6 6 Flash Player 8, Flash Lite 3.
Only Flash Player 8 and later versions support publish and
playback of On2 VP6 video.
H.264 (MPEG-4 Part 10) 9 Flash Player 9 Update 3, AIR 1.0
ADPCM 6 Flash Player 6, Flash Lite 3

455
ACTIONSCRIPT 3.0 DEVELOPER’S GUIDE
Working with video
Last updated 3/21/2011
Understanding the Adobe F4V and FLV video file formats
Flash Player 9 and later, Adobe AIR 1.0 and later
Adobe provides the F4V and FLV video file formats for streaming content to Flash Player and AIR. For a complete
description of these video file formats, see www.adobe.com/go/video_file_format.
The F4V video file format
Flash Player 9 and later, Adobe AIR 1.0 and later
Beginning with Flash Player Update 3 (9.0.115.0) and AIR 1.0, Flash Player and AIR support the Adobe F4V video
format, which is based on the ISO MP4 format, Subsets of the format support different features. Flash Player expects
a valid F4V file to begin with one of the following top-level boxes:
•ftyp
The ftyp box identifies the features that a program must support to play a particular file format.
•moov
The moov box is effectively the header of an F4V file. It contains one or more other boxes that in turn contain other
boxes that define the structure of the F4V data. An F4V file must contain one and only one moov box.
•mdat
An mdat box contains the data payload for the F4V file. An FV file contains only one mdat box. A moov box also
must be present in the file because the mdat box cannot be understood on its own.
F4V files support multibyte integers in big-endian byte order, in which the most significant byte occurs first, at the
lowest address.
The FLV video file format
Flash Player 9 and later, Adobe AIR 1.0 and later
The Adobe FLV file format contains encoded audio and video data for delivery by Flash Player. You can use an
encoder, such as Adobe Media Encoder or Sorenson™ Squeeze, to convert a QuickTime or Windows Media video file
to an FLV file.
Note: You can create FLV files by importing video into Flash and exporting it as an FLV file. You can use the FLV Export
plug-in to export FLV files from supported video-editing applications. To load FLV files from a web server, register the
filename extension and MIME type with your web server. Check your web server documentation. The MIME type for FLV
files is video/x-flv. For more information, see “About configuring FLV files for hosting on a server” on page 480.
For more information on FLV files, see “Advanced topics for video files” on page 479.
Mp3 6 Flash Player 6, Flash Lite 3
AAC (MPEG-4 Part 3) 9 Flash Player 9 Update 3, AIR 1.0
Speex (audio) 10 Flash Player 10, AIR 1.5
Nellymoser 6 Flash Player 6
Codec SWF file format version (earliest
supported publish version)
Flash Player and AIR (earliest version required for playback)

456
ACTIONSCRIPT 3.0 DEVELOPER’S GUIDE
Working with video
Last updated 3/21/2011
External vs embedded video
Flash Player 9 and later, Adobe AIR 1.0 and later
Using external video files provides certain capabilities that are not available when you use imported video:
•Longer video clips can be used in your application without slowing down playback. External video files use cached
memory, which means that large files are stored in small pieces and accessed dynamically. For this reason, external
F4V and FLV files require less memory than embedded video files.
•An external video file can have a different frame rate than the SWF file in which it plays. For example, you can set
the SWF file frame rate to 30 frames per second (fps) and the video frame rate to 21 fps. This setting gives you better
control of the video than embedded video, to ensure smooth video playback. It also allows you to play video files at
different frame rates without the need to alter existing SWF file content.
•With external video files, playback of the SWF content is not interrupted while the video file is loading. Imported
video files can sometimes interrupt document playback to perform certain functions, such as accessing a CD-ROM
drive. Video files can perform functions independently of the SWF content, without interrupting playback.
•Captioning video content is easier with external FLV files because you can access the video metadata using event
handlers.
Understanding the Video class
Flash Player 9 and later, Adobe AIR 1.0 and later
The Video class enables you to display live streaming video in an application without embedding it in your SWF file.
You can capture and play live video using the Camera.getCamera() method. You can also use the Video class to play
back video files over HTTP or from the local file system. There are several different ways to use Video in your projects:
•Load a video file dynamically using the NetConnection and NetStream classes and display the video in a Video
object.
•Capture input from the user’s camera. For more information, see “Working with cameras” on page 495.
•Use the FLVPlayback component.
•Use the VideoDisplay control.
Note: Instances of a Video object on the Stage are instances of the Video class.
Even though the Video class is in the flash.media package, it inherits from the flash.display.DisplayObject class.
Therefore, all display object functionality, such as matrix transformations and filters, also applies to Video instances.
For more information see “Manipulating display objects” on page 164, “Working with geometry” on page 199, and
“Filtering display objects” on page 255.

457
ACTIONSCRIPT 3.0 DEVELOPER’S GUIDE
Working with video
Last updated 3/21/2011
Loading video files
Flash Player 9 and later, Adobe AIR 1.0 and later
Loading videos using the NetStream and NetConnection classes is a multistep process:
1Create a NetConnection object. If you are connecting to a local video file or one that is not using a server such as
Adobe's Flash Media Server 2, pass null to the connect() method to play the video files from either an HTTP
address or a local drive. If you are connecting to a server, set the parameter to the URI of the application that
contains the video file on the server.
var nc:NetConnection = new NetConnection();
nc.connect(null);
2Create a NetStream object which takes a NetConnection object as a parameter and specify the video file that you
want to load. The following snippet connects a NetStream object to the specified NetConnection instance and loads
a video file named video.mp4 in the same directory as the SWF file:
var ns:NetStream = new NetStream(nc);
ns.addEventListener(AsyncErrorEvent.ASYNC_ERROR, asyncErrorHandler);
ns.play("video.mp4");
function asyncErrorHandler(event:AsyncErrorEvent):void
{
// ignore error
}
3Create a new Video object and attach the previously created NetStream object using the Video class’s
attachNetStream() method. Then you can add the video object to the display list using the addChild() method,
as seen in the following snippet:
var vid:Video = new Video();
vid.attachNetStream(ns);
addChild(vid);
As Flash Player executes this code it attempts to load the video.mp4 video file from the same directory as your SWF file.
More Help topics
Flex: Spark VideoPlayer control
spark.components.VideoDisplay
Controlling video playback
Flash Player 9 and later, Adobe AIR 1.0 and later
The NetStream class offers four main methods for controlling video playback:
pause(): Pauses playback of a video stream. If the video is already paused, calling this method does nothing.
resume(): Resumes playback of a video stream that is paused. If the video is already playing, calling this method does
nothing.
seek(): Seeks the keyframe closest to the specified location (an offset, in seconds, from the beginning of the stream).
togglePause(): Pauses or resumes playback of a stream.

458
ACTIONSCRIPT 3.0 DEVELOPER’S GUIDE
Working with video
Last updated 3/21/2011
Note: There is no stop() method. In order to stop a stream you must pause playback and seek to the beginning of the
video stream.
Note: The play() method does not resume playback, it is used for loading video files.
The following example demonstrates how to control a video using several different buttons. To run the following
example, create a new document and add four button instances to your workspace (pauseBtn, playBtn, stopBtn, and
togglePauseBtn):
var nc:NetConnection = new NetConnection();
nc.connect(null);
var ns:NetStream = new NetStream(nc);
ns.addEventListener(AsyncErrorEvent.ASYNC_ERROR, asyncErrorHandler);
ns.play("video.flv");
function asyncErrorHandler(event:AsyncErrorEvent):void
{
// ignore error
}
var vid:Video = new Video();
vid.attachNetStream(ns);
addChild(vid);
pauseBtn.addEventListener(MouseEvent.CLICK, pauseHandler);
playBtn.addEventListener(MouseEvent.CLICK, playHandler);
stopBtn.addEventListener(MouseEvent.CLICK, stopHandler);
togglePauseBtn.addEventListener(MouseEvent.CLICK, togglePauseHandler);
function pauseHandler(event:MouseEvent):void
{
ns.pause();
}
function playHandler(event:MouseEvent):void
{
ns.resume();
}
function stopHandler(event:MouseEvent):void
{
// Pause the stream and move the playhead back to
// the beginning of the stream.
ns.pause();
ns.seek(0);
}
function togglePauseHandler(event:MouseEvent):void
{
ns.togglePause();
}
Clicking on the pauseBtn button instance while the video is playing causes the video file to pause. If the video is
already paused, clicking this button has no effect. Clicking on the playBtn button instance resumes video playback if
playback was previously paused, otherwise the button has no effect if the video was already playing.

459
ACTIONSCRIPT 3.0 DEVELOPER’S GUIDE
Working with video
Last updated 3/21/2011
Detecting the end of a video stream
Flash Player 9 and later, Adobe AIR 1.0 and later
In order to listen for the beginning and end of a video stream, you need to add an event listener to the NetStream
instance to listen for the netStatus event. The following code demonstrates how to listen for the various codes
throughout the video’s playback:
ns.addEventListener(NetStatusEvent.NET_STATUS, statusHandler);
function statusHandler(event:NetStatusEvent):void
{
trace(event.info.code)
}
The previous code generates the following output:
NetStream.Play.Start
NetStream.Buffer.Empty
NetStream.Buffer.Full
NetStream.Buffer.Empty
NetStream.Buffer.Full
NetStream.Buffer.Empty
NetStream.Buffer.Full
NetStream.Buffer.Flush
NetStream.Play.Stop
NetStream.Buffer.Empty
NetStream.Buffer.Flush
The two codes that you want to specifically listen for are “NetStream.Play.Start” and “NetStream.Play.Stop” which
signal the beginning and end of the video’s playback. The following snippet uses a switch statement to filter these two
codes and trace a message:
function statusHandler(event:NetStatusEvent):void
{
switch (event.info.code)
{
case "NetStream.Play.Start":
trace("Start [" + ns.time.toFixed(3) + " seconds]");
break;
case "NetStream.Play.Stop":
trace("Stop [" + ns.time.toFixed(3) + " seconds]");
break;
}
}
By listening for the netStatus event (NetStatusEvent.NET_STATUS), you can build a video player which loads the
next video in a playlist once the current video has finished playing.
Playing video in full-screen mode
Flash Player 9 and later, Adobe AIR 1.0 and later
Flash Player and AIR allow you to create a full-screen application for your video playback, and support scaling video
to full screen.

460
ACTIONSCRIPT 3.0 DEVELOPER’S GUIDE
Working with video
Last updated 3/21/2011
For AIR content running in full-screen mode on the desktop, the system screen saver and power-saving options are
disabled during play until either the video input stops or the user exits full-screen mode.
For full details on using full-screen mode, see “Working with full-screen mode” on page 159.
Enabling full-screen mode for Flash Player in a browser
Before you can implement full-screen mode for Flash Player in a browser, enable it through the Publish template for
your application. Templates that allow full screen include <object> and <embed> tags that contain an
allowFullScreen parameter. The following example shows the allowFullScreen parameter in an <embed> tag.
<object classid="clsid:D27CDB6E-AE6D-11cf-96B8-444553540000"
id="fullScreen" width="100%" height="100%"
codebase="http://fpdownload.macromedia.com/get/flashplayer/current/swflash.cab">
...
<param name="allowFullScreen" value="true" />
<embed src="fullScreen.swf" allowFullScreen="true" quality="high" bgcolor="#869ca7"
width="100%" height="100%" name="fullScreen" align="middle"
play="true"
loop="false"
quality="high"
allowScriptAccess="sameDomain"
type="application/x-shockwave-flash"
pluginspage="http://www.adobe.com/go/getflashplayer">
</embed>
...
</object>
In Flash, select File -> Publish Settings and in the Publish Settings dialog box, on the HTML tab, select the Flash Only
- Allow Full Screen template.
In Flex, ensure that the HTML template includes <object> and <embed> tags that support full screen.
Initiating full-screen mode
For Flash Player content running in a browser, you initiate full-screen mode for video in response to either a mouse
click or a keypress. For example, you can initiate full-screen mode when the user clicks a button labeled Full Screen or
selects a Full Screen command from a context menu. To respond to the user, add an event listener to the object on which
the action occurs. The following code adds an event listener to a button that the user clicks to enter full-screen mode:
var fullScreenButton:Button = new Button();
fullScreenButton.label = "Full Screen";
addChild(fullScreenButton);
fullScreenButton.addEventListener(MouseEvent.CLICK, fullScreenButtonHandler);
function fullScreenButtonHandler(event:MouseEvent)
{
stage.displayState = StageDisplayState.FULL_SCREEN;
}
The code initiates full-screen mode by setting the Stage.displayState property to
StageDisplayState.FULL_SCREEN. This code scales the entire stage to full screen with the video scaling in
proportion to the space it occupies on the stage.

461
ACTIONSCRIPT 3.0 DEVELOPER’S GUIDE
Working with video
Last updated 3/21/2011
The fullScreenSourceRect property allows you to specify a particular area of the stage to scale to full screen. First,
define the rectangle that you want to scale to full screen. Then assign it to the Stage.fullScreenSourceRect
property. This version of the fullScreenButtonHandler() function adds two additional lines of code that scale just
the video to full screen.
private function fullScreenButtonHandler(event:MouseEvent)
{
var screenRectangle:Rectangle = new Rectangle(video.x, video.y, video.width, video.height);
stage.fullScreenSourceRect = screenRectangle;
stage.displayState = StageDisplayState.FULL_SCREEN;
}
Though this example invokes an event handler in response to a mouse click, the technique of going to full-screen mode
is the same for both Flash Player and AIR. Define the rectangle that you want to scale and then set the
Stage.displayState property. For more information, see the ActionScript 3.0 Reference for the Adobe Flash
Platform.
The complete example, which follows, adds code that creates the connection and the NetStream object for the video
and begins to play it.
package
{
import flash.net.NetConnection;
import flash.net.NetStream;
import flash.media.Video;
import flash.display.StageDisplayState;
import fl.controls.Button;
import flash.display.Sprite;
import flash.events.MouseEvent;
import flash.events.FullScreenEvent;
import flash.geom.Rectangle;
public class FullScreenVideoExample extends Sprite
{
var fullScreenButton:Button = new Button();
var video:Video = new Video();
public function FullScreenVideoExample()
{
var videoConnection:NetConnection = new NetConnection();
videoConnection.connect(null);
var videoStream:NetStream = new NetStream(videoConnection);
videoStream.client = this;
addChild(video);
video.attachNetStream(videoStream);
videoStream.play("http://www.helpexamples.com/flash/video/water.flv");
fullScreenButton.x = 100;

462
ACTIONSCRIPT 3.0 DEVELOPER’S GUIDE
Working with video
Last updated 3/21/2011
fullScreenButton.y = 270;
fullScreenButton.label = "Full Screen";
addChild(fullScreenButton);
fullScreenButton.addEventListener(MouseEvent.CLICK, fullScreenButtonHandler);
}
private function fullScreenButtonHandler(event:MouseEvent)
{
var screenRectangle:Rectangle = new Rectangle(video.x, video.y, video.width,
video.height);
stage.fullScreenSourceRect = screenRectangle;
stage.displayState = StageDisplayState.FULL_SCREEN;
}
public function onMetaData(infoObject:Object):void
{
// stub for callback function
}
}
}
The onMetaData() function is a callback function for handling video metadata, if any exists. A callback function is a
function that the runtime calls in response to some type of occurrence or event. In this example, the
onMetaData()function is a stub that satisfies the requirement to provide the function. For more information, see
“Writing callback methods for metadata and cue points” on page 464
Leaving full-screen mode
A user can leave full-screen mode by entering one of the keyboard shortcuts, such as the Escape key. You can end full-
screen mode in ActionScript by setting the Stage.displayState property to StageDisplayState.NORMAL. The
code in the following example ends full-screen mode when the NetStream.Play.Stop netStatus event occurs.
videoStream.addEventListener(NetStatusEvent.NET_STATUS, netStatusHandler);
private function netStatusHandler(event:NetStatusEvent)
{
if(event.info.code == "NetStream.Play.Stop")
stage.displayState = StageDisplayState.NORMAL;
}
Full-screen hardware acceleration
When you rescale a rectangular area of the stage to full-screen mode, Flash Player or AIR uses hardware acceleration,
if it's available and enabled. The runtime uses the video adapter on the computer to speed up scaling of the video, or a
portion of the stage, to full-screen size. Under these circumstances, Flash Player applications can often profit by
switching to the StageVideo class from the Video class.
For more information on hardware acceleration in full-screen mode, see “Working with full-screen mode” on
page 159. For more information on StageVideo, see “Using the StageVideo class for hardware-accelerated rendering”
on page 486.

463
ACTIONSCRIPT 3.0 DEVELOPER’S GUIDE
Working with video
Last updated 3/21/2011
Streaming video files
Flash Player 9 and later, Adobe AIR 1.0 and later
To stream files from Flash Media Server, you can use the NetConnection and NetStream classes to connect to a remote
server instance and play a specified stream. To specify a Real-Time Messaging Protocol (RTMP) server, you pass the
desired RTMP URL, such as “rtmp://localhost/appName/appInstance”, to the NetConnection.connect() method
instead of passing null. To play a specific live or recorded stream from the specified Flash Media Server, you pass an
identifying name for live data published by NetStream.publish(), or a recorded filename for playback to the
NetStream.play() method.
Sending video to a server
Flash Player 9 and later, Adobe AIR 1.0 and later
If you want to build more complex applications involving video or camera objects, Flash Media Server offers a
combination of streaming media capabilities and a development environment for creating and delivering media
applications to a wide audience. This combination enables developers to create applications such as Video on Demand,
live web-event broadcasts, and Mp3 streaming as well as video blogging, video messaging, and multimedia chat
environments. For more information, see the Flash Media Server documentation online at
www.adobe.com/go/learn_fms_docs_en.
Understanding cue points
Flash Player 9 and later, Adobe AIR 1.0 and later
You can embed cue points in an Adobe F4V or FLV video file during encoding. Historically, cue points were
embedded in movies to give the projectionist a visual signal that indicated the reel of film was nearing the end. In
Adobe F4V and FLV video formats, a cue point allows you to trigger one or more other actions in your application at
the time that it occurs in the video stream.
You can use several different kinds of cue points with Flash video. You can use ActionScript to interact with cue points
that you embed in a video file when you create it.
•Navigation cue points: You embed navigation cue points in the video stream and metadata packet when you encode
the video file. You use navigation cue points to let users seek to a specified part of a file.
•Event cue points: You embed event cue points in the video stream and metadata packet when you encode the video
file. You can write code to handle the events that are triggered at specified points during video playback.
•ActionScript cue points: ActionScript cue points are available only to the Flash FLVPlayback component.
ActionScript cue points are external cue points that you create and access with ActionScript code. You can write
code to trigger these cue points in relation to the video's playback. These cue points are less accurate than embedded
cue points (up to a tenth of a second), because the video player tracks them separately. If you plan to create an
application in which you want users to navigate to a cue point, you should create and embed cue points when you
encode the file instead of using ActionScript cue points. You should embed the cue points in the FLV file, because
they are more accurate.

464
ACTIONSCRIPT 3.0 DEVELOPER’S GUIDE
Working with video
Last updated 3/21/2011
Navigation cue points create a keyframe at the specified cue point location, so you can use code to move a video player's
playhead to that location. You can set particular points in a video file where you might want users to seek. For example,
your video might have multiple chapters or segments, and you can control the video by embedding navigation cue
points in the video file.
For more information on encoding Adobe video files with cue points, see “Embed cue points” in Using Flash.
You can access cue point parameters by writing ActionScript. Cue point parameters are a part of the event object
received by the callback handler.
To trigger certain actions in your code when an FLV file reaches a specific cue point, use the NetStream.onCuePoint
event handler.
To synchronize an action for a cue point in an F4V video file, you must retrieve the cue point data from either the
onMetaData() or the onXMPData() callback functions and trigger the cue point using the Timer class in ActionScript
3.0. For more information on F4V cue points, see “Using onXMPData()” on page 475.
For more information on handling cue points and metadata, see “Writing callback methods for metadata and cue
points” on page 464.
Writing callback methods for metadata and cue points
Flash Player 9 and later, Adobe AIR 1.0 and later
You can trigger actions in your application when specific metadata is received by the player or when specific cue points
are reached. When these events occur, you must use specific callback methods as event handlers. The NetStream class
specifies the following metadata events that can occur during playback: onCuePoint (FLV files only), onImageData,
onMetaData, onPlayStatus, onTextData, and onXMPData.
You must write callback methods for these handlers, or the Flash runtime may throw errors. For example, the
following code plays an FLV file named video.flv in the same folder where the SWF file resides:
var nc:NetConnection = new NetConnection();
nc.connect(null);
var ns:NetStream = new NetStream(nc);
ns.addEventListener(AsyncErrorEvent.ASYNC_ERROR, asyncErrorHandler);
ns.play("video.flv");
function asyncErrorHandler(event:AsyncErrorEvent):void
{
trace(event.text);
}
var vid:Video = new Video();
vid.attachNetStream(ns);
addChild(vid);
The previous code loads a local video file named video.flv and listens for the asyncError
(AsyncErrorEvent.ASYNC_ERROR) to be dispatched. This event is dispatched when an exception is thrown from
native asynchronous code. In this case, it is dispatched when the video file contains metadata or cue point information,
and the appropriate listeners have not been defined. The previous code handles the asyncError event and ignores the
error if you are not interested in the video file’s metadata or cue point information. If you had an FLV with metadata
and several cue points, the trace() function would display the following error messages:

465
ACTIONSCRIPT 3.0 DEVELOPER’S GUIDE
Working with video
Last updated 3/21/2011
Error #2095: flash.net.NetStream was unable to invoke callback onMetaData.
Error #2095: flash.net.NetStream was unable to invoke callback onCuePoint.
Error #2095: flash.net.NetStream was unable to invoke callback onCuePoint.
Error #2095: flash.net.NetStream was unable to invoke callback onCuePoint.
The errors occur because the NetStream object was unable to find an onMetaData or onCuePoint callback method.
There are several ways to define these callback methods within your applications.
More Help topics
Flash Media Server: Handling metadata in streams
Set the NetStream object’s client property to an Object
Flash Player 9 and later, Adobe AIR 1.0 and later
By setting the client property to either an Object or a subclass of NetStream, you can reroute the onMetaData and
onCuePoint callback methods or ignore them completely. The following example demonstrates how you can use an
empty Object to ignore the callback methods without listening for the asyncError event:
var nc:NetConnection = new NetConnection();
nc.connect(null);
var customClient:Object = new Object();
var ns:NetStream = new NetStream(nc);
ns.client = customClient;
ns.play("video.flv");
var vid:Video = new Video();
vid.attachNetStream(ns);
addChild(vid);
If you wanted to listen for either the onMetaData or onCuePoint callback methods, you would need to define methods
to handle those callback methods, as shown in the following snippet:
var customClient:Object = new Object();
customClient.onMetaData = metaDataHandler;
function metaDataHandler(infoObject:Object):void
{
trace("metadata");
}
The previous code listens for the onMetaData callback method and calls the metaDataHandler() method, which
traces a string. If the Flash runtime encountered a cue point, no errors would be generated even though no
onCuePoint callback method is defined.
Create a custom class and define methods to handle the callback methods
Flash Player 9 and later, Adobe AIR 1.0 and later
The following code sets the NetStream object’s client property to a custom class, CustomClient, which defines
handlers for the callback methods:

466
ACTIONSCRIPT 3.0 DEVELOPER’S GUIDE
Working with video
Last updated 3/21/2011
var nc:NetConnection = new NetConnection();
nc.connect(null);
var ns:NetStream = new NetStream(nc);
ns.client = new CustomClient();
ns.play("video.flv");
var vid:Video = new Video();
vid.attachNetStream(ns);
addChild(vid);
The CustomClient class is as follows:
package
{
public class CustomClient
{
public function onMetaData(infoObject:Object):void
{
trace("metadata");
}
}
}
The CustomClient class defines a handler for the onMetaData callback handler. If a cue point was encountered and
the onCuePoint callback handler was called, an asyncError event (AsyncErrorEvent.ASYNC_ERROR) would be
dispatched saying “flash.net.NetStream was unable to invoke callback onCuePoint.” To prevent this error, you would
either need to define an onCuePoint callback method in your CustomClient class, or define an event handler for the
asyncError event.
Extend the NetStream class and add methods to handle the callback methods
Flash Player 9 and later, Adobe AIR 1.0 and later
The following code creates an instance of the CustomNetStream class, which is defined in a later code listing:
var ns:CustomNetStream = new CustomNetStream();
ns.play("video.flv");
var vid:Video = new Video();
vid.attachNetStream(ns);
addChild(vid);
The following code listing defines the CustomNetStream class that extends the NetStream class, handles the creation
of the necessary NetConnection object, and handles the onMetaData and onCuePoint callback handler methods:

467
ACTIONSCRIPT 3.0 DEVELOPER’S GUIDE
Working with video
Last updated 3/21/2011
package
{
import flash.net.NetConnection;
import flash.net.NetStream;
public class CustomNetStream extends NetStream
{
private var nc:NetConnection;
public function CustomNetStream()
{
nc = new NetConnection();
nc.connect(null);
super(nc);
}
public function onMetaData(infoObject:Object):void
{
trace("metadata");
}
public function onCuePoint(infoObject:Object):void
{
trace("cue point");
}
}
}
If you want to rename the onMetaData() and onCuePoint() methods in the CustomNetStream class, you could use
the following code:
package
{
import flash.net.NetConnection;
import flash.net.NetStream;
public class CustomNetStream extends NetStream
{
private var nc:NetConnection;
public var onMetaData:Function;
public var onCuePoint:Function;
public function CustomNetStream()
{
onMetaData = metaDataHandler;
onCuePoint = cuePointHandler;
nc = new NetConnection();
nc.connect(null);
super(nc);
}
private function metaDataHandler(infoObject:Object):void
{
trace("metadata");
}
private function cuePointHandler(infoObject:Object):void
{
trace("cue point");
}
}
}

468
ACTIONSCRIPT 3.0 DEVELOPER’S GUIDE
Working with video
Last updated 3/21/2011
Extend the NetStream class and make it dynamic
Flash Player 9 and later, Adobe AIR 1.0 and later
You can extend the NetStream class and make the subclass dynamic so that onCuePoint and onMetaData callback
handlers can be added dynamically. This is demonstrated in the following listing:
var ns:DynamicCustomNetStream = new DynamicCustomNetStream();
ns.play("video.flv");
var vid:Video = new Video();
vid.attachNetStream(ns);
addChild(vid);
The DynamicCustomNetStream class is as follows:
package
{
import flash.net.NetConnection;
import flash.net.NetStream;
public dynamic class DynamicCustomNetStream extends NetStream
{
private var nc:NetConnection;
public function DynamicCustomNetStream()
{
nc = new NetConnection();
nc.connect(null);
super(nc);
}
}
}
Even with no handlers for the onMetaData and onCuePoint callback handlers, no errors are thrown since the
DynamicCustomNetStream class is dynamic. If you want to define methods for the onMetaData and onCuePoint
callback handlers, you could use the following code:
var ns:DynamicCustomNetStream = new DynamicCustomNetStream();
ns.onMetaData = metaDataHandler;
ns.onCuePoint = cuePointHandler;
ns.play("http://www.helpexamples.com/flash/video/cuepoints.flv");
var vid:Video = new Video();
vid.attachNetStream(ns);
addChild(vid);
function metaDataHandler(infoObject:Object):void
{
trace("metadata");
}
function cuePointHandler(infoObject:Object):void
{
trace("cue point");
}

469
ACTIONSCRIPT 3.0 DEVELOPER’S GUIDE
Working with video
Last updated 3/21/2011
Set the NetStream object’s client property to this
Flash Player 9 and later, Adobe AIR 1.0 and later
By setting the client property to this, the application looks in the current scope for onMetaData() and
onCuePoint() methods. You can see this in the following example:
var nc:NetConnection = new NetConnection();
nc.connect(null);
var ns:NetStream = new NetStream(nc);
ns.client = this;
ns.play("video.flv");
var vid:Video = new Video();
vid.attachNetStream(ns);
addChild(vid);
If the onMetaData or onCuePoint callback handlers are called and no methods exist to handle the callback, no errors
are generated. To handle these callback handlers, create an onMetaData() and onCuePoint() method in your code,
as seen in the following snippet:
function onMetaData(infoObject:Object):void
{
trace("metadata");
}
function onCuePoint(infoObject:Object):void
{
trace("cue point");
}
Using cue points and metadata
Flash Player 9 and later, Adobe AIR 1.0 and later
Use the NetStream callback methods to capture and process cue point and metadata events as the video plays.
Using cue points
Flash Player 9 and later, Adobe AIR 1.0 and later
The following table describes the callback methods that you can use to capture F4V and FLV cue points in Flash Player
and AIR.
Runtime F4V FLV
Flash Player 9/ AIR1.0 OnCuePoint
OnMetaData
Flash Player 10 OnCuePoint
OnMetaData OnMetaData
OnXMPData OnXMPData

470
ACTIONSCRIPT 3.0 DEVELOPER’S GUIDE
Working with video
Last updated 3/21/2011
The following example uses a simple for..in loop to iterate over each of the properties in the infoObject parameter
that the onCuePoint()function receives. It calls the trace() function to display a message when it receives cue point data:
var nc:NetConnection = new NetConnection();
nc.connect(null);
var ns:NetStream = new NetStream(nc);
ns.client = this;
ns.play("video.flv");
var vid:Video = new Video();
vid.attachNetStream(ns);
addChild(vid);
function onCuePoint(infoObject:Object):void
{
var key:String;
for (key in infoObject)
{
trace(key + ": " + infoObject[key]);
}
}
The following output appears:
parameters:
name: point1
time: 0.418
type: navigation
This code uses one of several techniques to set the object on which the callback method runs. You can use other
techniques; for more information, see “Writing callback methods for metadata and cue points” on page 464.
Using video metadata
Flash Player 9 and later, Adobe AIR 1.0 and later
You can use the OnMetaData() and OnXMPData() functions to access the metadata information in your video file,
including cue points.
Using OnMetaData()
Flash Player 9 and later, Adobe AIR 1.0 and later
Metadata includes information about your video file, such as duration, width, height, and frame rate. The metadata
information that is added to your video file depends on the software you use to encode the video file.

471
ACTIONSCRIPT 3.0 DEVELOPER’S GUIDE
Working with video
Last updated 3/21/2011
var nc:NetConnection = new NetConnection();
nc.connect(null);
var ns:NetStream = new NetStream(nc);
ns.client = this;
ns.play("video.flv");
var vid:Video = new Video();
vid.attachNetStream(ns);
addChild(vid);
function onMetaData(infoObject:Object):void
{
var key:String;
for (key in infoObject)
{
trace(key + ": " + infoObject[key]);
}
}
The previous code generates output like the following:
width: 320
audiodelay: 0.038
canSeekToEnd: true
height: 213
cuePoints: ,,
audiodatarate: 96
duration: 16.334
videodatarate: 400
framerate: 15
videocodecid: 4
audiocodecid: 2
If your video does not have audio, the audio-related metadata information (such as audiodatarate) returns
undefined because no audio information is added to the metadata during encoding.
In the previous code, the cue point information was not displaying. To display the cue point metadata, you can use the
following function which recursively displays the items in an Object:

472
ACTIONSCRIPT 3.0 DEVELOPER’S GUIDE
Working with video
Last updated 3/21/2011
function traceObject(obj:Object, indent:uint = 0):void
{
var indentString:String = "";
var i:uint;
var prop:String;
var val:*;
for (i = 0; i < indent; i++)
{
indentString += "\t";
}
for (prop in obj)
{
val = obj[prop];
if (typeof(val) == "object")
{
trace(indentString + " " + prop + ": [Object]");
traceObject(val, indent + 1);
}
else
{
trace(indentString + " " + prop + ": " + val);
}
}
}
Using the previous code snippet to trace the infoObject parameter in the onMetaData() method creates the
following output:
width: 320
audiodatarate: 96
audiocodecid: 2
videocodecid: 4
videodatarate: 400
canSeekToEnd: true
duration: 16.334
audiodelay: 0.038
height: 213
framerate: 15
cuePoints: [Object]
0: [Object]
parameters: [Object]
lights: beginning
name: point1
time: 0.418
type: navigation
1: [Object]
parameters: [Object]
lights: middle
name: point2
time: 7.748
type: navigation
2: [Object]
parameters: [Object]
lights: end
name: point3
time: 16.02
type: navigation

473
ACTIONSCRIPT 3.0 DEVELOPER’S GUIDE
Working with video
Last updated 3/21/2011
The following example displays the metadata for an MP4 video. It assumes that there is a TextArea object called
metaDataOut, to which it writes the metadata.
package
{
import flash.net.NetConnection;
import flash.net.NetStream;
import flash.events.NetStatusEvent;
import flash.media.Video;
import flash.display.StageDisplayState;
import flash.display.Loader;
import flash.display.Sprite;
import flash.events.MouseEvent;
public class onMetaDataExample extends Sprite
{
var video:Video = new Video();
public function onMetaDataExample():void
{
var videoConnection:NetConnection = new NetConnection();
videoConnection.connect(null);
var videoStream:NetStream = new NetStream(videoConnection);
videoStream.client = this;
addChild(video);
video.x = 185;
video.y = 5;
video.attachNetStream(videoStream);
videoStream.play("video.mp4");
videoStream.addEventListener(NetStatusEvent.NET_STATUS, netStatusHandler);
}
public function onMetaData(infoObject:Object):void
{
for(var propName:String in infoObject)
{
metaDataOut.appendText(propName + "=" + infoObject[propName] + "\n");
}
}
private function netStatusHandler(event:NetStatusEvent):void
{
if(event.info.code == "NetStream.Play.Stop")
stage.displayState = StageDisplayState.NORMAL;
}
}
}
The onMetaData() function produced the following output for this video:

474
ACTIONSCRIPT 3.0 DEVELOPER’S GUIDE
Working with video
Last updated 3/21/2011
moovposition=731965
height=352
avclevel=21
videocodecid=avc1
duration=2.36
width=704
videoframerate=25
avcprofile=88
trackinfo=[object Object]
Using the information object
The following table shows the possible values for video metadata that are passed to the onMetaData() callback
function in the Object that they receive:
Parameter Description
aacaot AAC audio object type; 0, 1, or 2 are supported.
avclevel AVC IDC level number such as 10, 11, 20, 21, and so on.
avcprofile AVC profile number such as 55, 77, 100, and so on.
audiocodecid A string that indicates the audio codec (code/decode technique) that was used - for example “.Mp3” or “mp4a”
audiodatarate A number that indicates the rate at which audio was encoded, in kilobytes per second.
audiodelay A number that indicates what time in the FLV file "time 0" of the original FLV file exists. The video content
needs to be delayed by a small amount to properly synchronize the audio.
canSeekToEnd A Boolean value that is true if the FLV file is encoded with a keyframe on the last frame, which allows seeking
to the end of a progressive -download video file. It is false if the FLV file is not encoded with a keyframe on
the last frame.
cuePoints An array of objects, one for each cue point embedded in the FLV file. Value is undefined if the FLV file does not
contain any cue points. Each object has the following properties:
•type: a string that specifies the type of cue point as either "navigation" or "event".
•name: a string that is the name of the cue point.
•time: a number that is the time of the cue point in seconds with a precision of three decimal places
(milliseconds).
•parameters: an optional object that has name-value pairs that are designated by the user when creating
the cue points.
duration A number that specifies the duration of the video file, in seconds.
framerate A number that is the frame rate of the FLV file.
height A number that is the height of the FLV file, in pixels.
seekpoints An array that lists the available keyframes as timestamps in milliseconds. Optional.
tags An array of key-value pairs that represent the information in the “ilst” atom, which is the equivalent of ID3 tags
for MP4 files. iTunes uses these tags. Can be used to display artwork, if available.
trackinfo Object that provides information on all the tracks in the MP4 file, including their sample description ID.
videocodecid A string that is the codec version that was used to encode the video. - for example, “avc1” or “VP6F”

475
ACTIONSCRIPT 3.0 DEVELOPER’S GUIDE
Working with video
Last updated 3/21/2011
The following table shows the possible values for the videocodecid parameter:
The following table shows the possible values for the audiocodecid parameter:
Using onXMPData()
Flash Player 10 and later, Adobe AIR 1.5 and later
The onXMPData() callback function receives information specific to Adobe Extensible Metadata Platform (XMP) that
is embedded in the Adobe F4V or FLV video file. The XMP metadata includes cue points as well as other video
metadata. XMP metadata support is introduced with Flash Player 10 and Adobe AIR 1.5 and supported by subsequent
versions.
The following example processes cue point data in the XMP metadata:
videodatarate A number that is the video data rate of the FLV file.
videoframerate Framerate of the MP4 video.
width A number that is the width of the FLV file, in pixels.
videocodecid Codec name
2Sorenson H.263
3 Screen video (SWF version 7 and later only)
4VP6 (SWF version 8 and later only)
5 VP6 video with alpha channel (SWF version 8 and later only)
audiocodecid Codec Name
0 uncompressed
1 ADPCM
2 Mp3
4 Nellymoser @ 16 kHz mono
5 Nellymoser, 8kHz mono
6 Nellymoser
10 AAC
11 Speex
Parameter Description

476
ACTIONSCRIPT 3.0 DEVELOPER’S GUIDE
Working with video
Last updated 3/21/2011
package
{
import flash.display.*;
import flash.net.*;
import flash.events.NetStatusEvent;
import flash.media.Video;
public class onXMPDataExample extends Sprite
{
public function onXMPDataExample():void
{
var videoConnection:NetConnection = new NetConnection();
videoConnection.connect(null);
var videoStream:NetStream = new NetStream(videoConnection);
videoStream.client = this;
var video:Video = new Video();
addChild(video);
video.attachNetStream(videoStream);
videoStream.play("video.f4v");
}
public function onMetaData(info:Object):void {
trace("onMetaData fired");
}
public function onXMPData(infoObject:Object):void
{
trace("onXMPData Fired\n");
//trace("raw XMP =\n");
//trace(infoObject.data);
var cuePoints:Array = new Array();
var cuePoint:Object;
var strFrameRate:String;
var nTracksFrameRate:Number;
var strTracks:String = "";
var onXMPXML = new XML(infoObject.data);
// Set up namespaces to make referencing easier
var xmpDM:Namespace = new Namespace("http://ns.adobe.com/xmp/1.0/DynamicMedia/");
var rdf:Namespace = new Namespace("http://www.w3.org/1999/02/22-rdf-syntax-ns#");
for each (var it:XML in onXMPXML..xmpDM::Tracks)
{

477
ACTIONSCRIPT 3.0 DEVELOPER’S GUIDE
Working with video
Last updated 3/21/2011
var strTrackName:String =
it.rdf::Bag.rdf::li.rdf::Description.@xmpDM::trackName;
var strFrameRateXML:String =
it.rdf::Bag.rdf::li.rdf::Description.@xmpDM::frameRate;
strFrameRate = strFrameRateXML.substr(1,strFrameRateXML.length);
nTracksFrameRate = Number(strFrameRate);
strTracks += it;
}
var onXMPTracksXML:XML = new XML(strTracks);
var strCuepoints:String = "";
for each (var item:XML in onXMPTracksXML..xmpDM::markers)
{
strCuepoints += item;
}
trace(strCuepoints);
}
}
}
For a short video file called startrekintro.f4v, this example produces the following trace lines. The lines show the cue
point data for navigation and event cue points in the XMP meta data:

478
ACTIONSCRIPT 3.0 DEVELOPER’S GUIDE
Working with video
Last updated 3/21/2011
onMetaData fired
onXMPData Fired
<xmpDM:markers xmlns:xmp="http://ns.adobe.com/xap/1.0/"
xmlns:xmpDM="http://ns.adobe.com/xmp/1.0/DynamicMedia/"
xmlns:stDim="http://ns.adobe.com/xap/1.0/sType/Dimensions#"
xmlns:xmpMM="http://ns.adobe.com/xap/1.0/mm/"
xmlns:stEvt="http://ns.adobe.com/xap/1.0/sType/ResourceEvent#"
xmlns:dc="http://purl.org/dc/elements/1.1/" xmlns:rdf="http://www.w3.org/1999/02/22-rdf-
syntax-ns#" xmlns:x="adobe:ns:meta/">
<rdf:Seq>
<rdf:li>
<rdf:Description xmpDM:startTime="7695905817600" xmpDM:name="Title1"
xmpDM:type="FLVCuePoint" xmpDM:cuePointType="Navigation">
<xmpDM:cuePointParams>
<rdf:Seq>
<rdf:li xmpDM:key="Title" xmpDM:value="Star Trek"/>
<rdf:li xmpDM:key="Color" xmpDM:value="Blue"/>
</rdf:Seq>
</xmpDM:cuePointParams>
</rdf:Description>
</rdf:li>
<rdf:li>
<rdf:Description xmpDM:startTime="10289459980800" xmpDM:name="Title2"
xmpDM:type="FLVCuePoint" xmpDM:cuePointType="Event">
<xmpDM:cuePointParams>
<rdf:Seq>
<rdf:li xmpDM:key="William Shatner" xmpDM:value="First Star"/>
<rdf:li xmpDM:key="Color" xmpDM:value="Light Blue"/>
</rdf:Seq>
</xmpDM:cuePointParams>
</rdf:Description>
</rdf:li>
</rdf:Seq>
</xmpDM:markers>
onMetaData fired
Note: In XMP data, time is stored as DVA Ticks rather than seconds. To compute the cue point time, divide the start
time by the framerate. For example, the start time of 7695905817600 divided by a framerate of 254016000000 equals
30:30.
To see the complete raw XMP metadata, which includes the framerate, remove the comment identifiers (//’s)
preceding the second and third trace() statements at the beginning of the onXMPData() function.
For more information on XMP, see:
•partners.adobe.com/public/developer/xmp/topic.html
•www.adobe.com/devnet/xmp/

479
ACTIONSCRIPT 3.0 DEVELOPER’S GUIDE
Working with video
Last updated 3/21/2011
Using image metadata
Flash Player 9 and later, Adobe AIR 1.0 and later
The onImageData event sends image data as a byte array through an AMF0 data channel. The data can be in JPEG,
PNG, or GIF formats. Define an onImageData() callback method to process this information, in the same way that
you would define callback methods for onCuePoint and onMetaData. The following example accesses and displays
image data using an onImageData() callback method:
public function onImageData(imageData:Object):void
{
// display track number
trace(imageData.trackid);
var loader:Loader = new Loader();
//imageData.data is a ByteArray object
loader.loadBytes(imageData.data);
addChild(loader);
}
Using text metadata
Flash Player 9 and later, Adobe AIR 1.0 and later
The onTextData event sends text data through an AMF0 data channel. The text data is in UTF-8 format and contains
additional information about formatting, based on the 3GP timed-text specification. This specification defines a
standardized subtitle format. Define an onTextData() callback method to process this information, in the same way
that you would define callback methods for onCuePoint or onMetaData. In the following example, the onTextData()
method displays the track ID number and corresponding track text.
public function onTextData(textData:Object):void
{
// display the track number
trace(textData.trackid);
// displays the text, which can be a null string, indicating old text
// that should be erased
trace(textData.text);
}
Advanced topics for video files
Flash Player 9 and later, Adobe AIR 1.0 and later
The following topics address some special issues for working with FLV files.

480
ACTIONSCRIPT 3.0 DEVELOPER’S GUIDE
Working with video
Last updated 3/21/2011
About configuring FLV files for hosting on a server
Flash Player 9 and later, Adobe AIR 1.0 and later
When you work with FLV files, you might have to configure your server to work with the FLV file format.
Multipurpose Internet Mail Extensions (MIME) is a standardized data specification that lets you send non-ASCII files
over Internet connections. Web browsers and e-mail clients are configured to interpret numerous MIME types so that
they can send and receive video, audio, graphics, and formatted text. To load FLV files from a web server, you might
need to register the file extension and MIME type with your web server, so you should check your web server
documentation. The MIME type for FLV files is video/x-flv. The full information for the FLV file type is as follows:
•Mime Type: video/x-flv
•File extension: .flv
•Required parameters: none
•Optional parameters: none
•Encoding considerations: FLV files are binary files; some applications might require the application/octet-stream
subtype to be set
•Security issues: none
•Published specification: www.adobe.com/go/video_file_format
Microsoft changed the way streaming media is handled in Microsoft Internet Information Services (IIS) 6.0 web server
from earlier versions. Earlier versions of IIS do not require any modification to stream Flash Video. In IIS 6.0, the
default web server that comes with Windows 2003, the server requires a MIME type to recognize that FLV files are
streaming media.
When SWF files that stream external FLV files are placed on Microsoft Windows Server® 2003 and are viewed in a
browser, the SWF file plays correctly, but the FLV video does not stream. This issue affects all FLV files placed on
Windows Server 2003, including files you make with earlier versions of the Flash authoring tool, and the Macromedia
Flash Video Kit for Dreamweaver MX 2004 from Adobe. These files work correctly if you test them on other operating
systems.
For information about configuring Microsoft Windows 2003 and Microsoft IIS Server 6.0 to stream FLV video, see
www.adobe.com/go/tn_19439.
About targeting local FLV files on the Macintosh
Flash Player 9 and later, Adobe AIR 1.0 and later
If you attempt to play a local FLV from a non-system drive on an Apple® Macintosh® computer by using a path that
uses a relative slash (/), the video will not play. Non-system drives include, but are not limited to, CD-ROMs,
partitioned hard disks, removable storage media, and connected storage devices.
Note: The reason for this failure is a limitation of the operating system, not a limitation in Flash Player or AIR.
For an FLV file to play from a non-system drive on a Macintosh, refer to it with an absolute path using a colon-based
notation (:) rather than slash-based notation (/). The following list shows the difference in the two kinds of notation:
•Slash-based notation: myDrive/myFolder/myFLV.flv
•Colon-based notation: (Mac OS®) myDrive:myFolder:myFLV.flv

481
ACTIONSCRIPT 3.0 DEVELOPER’S GUIDE
Working with video
Last updated 3/21/2011
Video example: Video Jukebox
Flash Player 9 and later, Adobe AIR 1.0 and later
The following example builds a simple video jukebox which dynamically loads a list of videos to play back in a
sequential order. This allows you to build an application that lets a user browse through a series of video tutorials, or
perhaps specifies which advertisements should be played back before delivering the user’s requested video. This
example demonstrates the following features of ActionScript 3.0:
•Updating a playhead based on a video file’s playback progress
•Listening for and parsing a video file’s metadata
•Handling specific codes in a net stream
•Loading, playing, pausing, and stopping a dynamically loaded FLV
•Resizing a video object on the display list based on the net stream’s metadata
To get the application files for this sample, see www.adobe.com/go/learn_programmingAS3samples_flash. The Video
Jukebox application files can be found in the folder Samples/VideoJukebox. The application consists of the following
files:
Loading an external video playlist file
Flash Player 9 and later, Adobe AIR 1.0 and later
The external playlist.xml file specifies which videos to load, and the order to play them back in. In order to load the
XML file, you need to use a URLLoader object and a URLRequest object, as seen in the following code:
uldr = new URLLoader();
uldr.addEventListener(Event.COMPLETE, xmlCompleteHandler);
uldr.load(new URLRequest(PLAYLIST_XML_URL));
This code is placed in the VideoJukebox class’s constructor so the file is loaded before any other code is run. As soon
as the XML file has finished loading, the xmlCompleteHandler() method is called which parses the external file into
an XML object, as seen in the following code:
private function xmlCompleteHandler(event:Event):void
{
playlist = XML(event.target.data);
videosXML = playlist.video;
main();
}
The playlist XML object contains the raw XML from the external file, whereas the videos XML is an XMLList object
which contains just the video nodes. A sample playlist.xml file can be seen in the following snippet:
File Description
VideoJukebox.fla
or
VideoJukebox.mxml
The main application file for Flex (MXML) or Flash (FLA).
VideoJukebox.as The class that provides the main functionality of the application.
playlist.xml A file that lists which video files will be loaded into the video jukebox.

482
ACTIONSCRIPT 3.0 DEVELOPER’S GUIDE
Working with video
Last updated 3/21/2011
<videos>
<video url="video/caption_video.flv" />
<video url="video/cuepoints.flv" />
<video url="video/water.flv" />
</videos>
Finally, the xmlCompleteHandler() method calls the main() method which sets up the various component instances
on the display list, as well as the NetConnection and NetStream objects which are used to load the external FLV files.
Creating the user interface
Flash Player 9 and later, Adobe AIR 1.0 and later
To build the user interface you need to drag five Button instances onto the display list and give them the following
instance names: playButton, pauseButton, stopButton, backButton, and forwardButton.
For each of these Button instances, you’ll need to assign a handler for the click event, as seen in the following snippet:
playButton.addEventListener(MouseEvent.CLICK, buttonClickHandler);
pauseButton.addEventListener(MouseEvent.CLICK, buttonClickHandler);
stopButton.addEventListener(MouseEvent.CLICK, buttonClickHandler);
backButton.addEventListener(MouseEvent.CLICK, buttonClickHandler);
forwardButton.addEventListener(MouseEvent.CLICK, buttonClickHandler);
The buttonClickHandler() method uses a switch statement to determine which button instance was clicked, as seen
in the following code:
private function buttonClickHandler(event:MouseEvent):void
{
switch (event.currentTarget)
{
case playButton:
ns.resume();
break;
case pauseButton:
ns.togglePause();
break;
case stopButton:
ns.pause();
ns.seek(0);
break;
case backButton:
playPreviousVideo();
break;
case forwardButton:
playNextVideo();
break;
}
}
Next, add a Slider instance to the display list and give it an instance name of volumeSlider. The following code sets
the slider instance’s liveDragging property to true and defines an event listener for the slider instance’s change
event:

483
ACTIONSCRIPT 3.0 DEVELOPER’S GUIDE
Working with video
Last updated 3/21/2011
volumeSlider.value = volumeTransform.volume;
volumeSlider.minimum = 0;
volumeSlider.maximum = 1;
volumeSlider.snapInterval = 0.1;
volumeSlider.tickInterval = volumeSlider.snapInterval;
volumeSlider.liveDragging = true;
volumeSlider.addEventListener(SliderEvent.CHANGE, volumeChangeHandler);
Add a ProgressBar instance to the display list and give it an instance name of positionBar. Set its mode property to
manual, as seen in the following snippet:
positionBar.mode = ProgressBarMode.MANUAL;
Finally add a Label instance to the display list and give it an instance name of positionLabel. This Label instance’s
value will be set by the timer instance
Listening for a video object’s metadata
Flash Player 9 and later, Adobe AIR 1.0 and later
When Flash Player encounters metadata for each of the loaded videos, the onMetaData() callback handler is called on
the NetStream object’s client property. The following code initializes an Object and sets up the specified callback
handler:
client = new Object();
client.onMetaData = metadataHandler;
The metadataHandler() method copies its data to the meta property defined earlier in the code. This allows you to
access the metadata for the current video anytime throughout the entire application. Next, the video object on the
Stage is resized to match the dimensions returned from the metadata. Finally, the positionBar progress bar instance is
moved and resized based on the size of the currently playing video. The following code contains the entire
metadataHandler() method:
private function metadataHandler(metadataObj:Object):void
{
meta = metadataObj;
vid.width = meta.width;
vid.height = meta.height;
positionBar.move(vid.x, vid.y + vid.height);
positionBar.width = vid.width;
}
Dynamically loading a video
Flash Player 9 and later, Adobe AIR 1.0 and later
To dynamically load each of the videos, the application uses a NetConnection and a NetStream object. The following
code creates a NetConnection object and passes null to the connect() method. By specifying null, Flash Player
connects to a video on the local server instead of connecting to a server, such as a Flash Media Server.
The following code creates both the NetConnection and NetStream instances, defines an event listener for the
netStatus event, and assigns the client Object to the client property:

484
ACTIONSCRIPT 3.0 DEVELOPER’S GUIDE
Working with video
Last updated 3/21/2011
nc = new NetConnection();
nc.connect(null);
ns = new NetStream(nc);
ns.addEventListener(NetStatusEvent.NET_STATUS, netStatusHandler);
ns.client = client;
The netStatusHandler() method is called whenever the status of the video is changed. This includes when a video
starts or stops playback, is buffering or if a video stream cannot be found. The following code lists the
netStatusHandler() event:
private function netStatusHandler(event:NetStatusEvent):void
{
try
{
switch (event.info.code)
{
case "NetStream.Play.Start":
t.start();
break;
case "NetStream.Play.StreamNotFound":
case "NetStream.Play.Stop":
t.stop();
playNextVideo();
break;
}
}
catch (error:TypeError)
{
// Ignore any errors.
}
}
The previous code evaluates the code property of the info object and filters whether the code is “NetStream.Play.Start”,
“NetStream.Play.StreamNotFound”, or “NetStream.Play.Stop”. All other codes will be ignored. If the net stream is
starting the code starts the Timer instance which updates the playhead. If the net stream cannot be found or is stopped,
the Timer instance is stopped and the application attempts to play the next video in the playlist.
Every time the Timer executes, the positionBar progress bar instance updates its current position by calling the
setProgress() method of the ProgressBar class and the positionLabel Label instance is updated with the time
elapsed and total time of the current video.
private function timerHandler(event:TimerEvent):void
{
try
{
positionBar.setProgress(ns.time, meta.duration);
positionLabel.text = ns.time.toFixed(1) + " of " meta.duration.toFixed(1) + " seconds";
}
catch (error:Error)
{
// Ignore this error.
}
}

485
ACTIONSCRIPT 3.0 DEVELOPER’S GUIDE
Working with video
Last updated 3/21/2011
Controlling the volume of the video
Flash Player 9 and later, Adobe AIR 1.0 and later
You can control the volume for the dynamically loaded video by setting the soundTransform property on the
NetStream object. The video jukebox application allows you to modify the volume level by changing the value of the
volumeSlider Slider instance. The following code shows how you can change the volume level by assigning the value
of the Slider component to a SoundTransform object which is set to the soundTransform property on the NetStream
object:
private function volumeChangeHandler(event:SliderEvent):void
{
volumeTransform.volume = event.value;
ns.soundTransform = volumeTransform;
}
Controlling video playback
Flash Player 9 and later, Adobe AIR 1.0 and later
The rest of the application controls video playback when the video reaches the end of the video stream or the user skips
to the previous or next video.
The following method retrieves the video URL from the XMLList for the currently selected index:
private function getVideo():String
{
return videosXML[idx].@url;
}
The playVideo() method calls the play() method on the NetStream object to load the currently selected video:
private function playVideo():void
{
var url:String = getVideo();
ns.play(url);
}
The playPreviousVideo() method decrements the current video index, calls the playVideo() method to load the
new video file and sets the progress bar to visible:
private function playPreviousVideo():void
{
if (idx > 0)
{
idx--;
playVideo();
positionBar.visible = true;
}
}
The final method, playNextVideo(), increments the video index and calls the playVideo() method. If the current
video is the last video in the playlist, the clear() method is called on the Video object and the progress bar instance’s
visible property is set to false:

486
ACTIONSCRIPT 3.0 DEVELOPER’S GUIDE
Working with video
Last updated 3/21/2011
private function playNextVideo():void
{
if (idx < (videosXML.length() - 1))
{
idx++;
playVideo();
positionBar.visible = true;
}
else
{
idx++;
vid.clear();
positionBar.visible = false;
}
}
Using the StageVideo class for hardware-accelerated
rendering
Flash Player 10.2 and later, Adobe AIR 2.5 for TV and later
Flash Player optimizes video performance by using hardware acceleration for H.264 decoding. You can enhance
performance further by using the StageVideo API. Stage video lets your application take advantage of hardware-
accelerated rendering.
Runtimes that support the StageVideo API include:
•Flash Player 10.2 and later
•Adobe AIR 2.5 for TV and later
Adobe AIR 2.5 for TV and Adobe Flash Player Beta for Google TV support stage video through a subset of the full API.
On these platforms, configuration differences and additional restrictions apply. For instructions for using stage video
on these platforms, see Delivering video and content for the Flash Platform on TV .
Downloadable source code and additional details for the stage video feature are available at Getting Started with Stage
Video. For a StageVideo quick start tutorial, see Working with Stage Video.
About hardware acceleration using StageVideo
The Video class typically uses software rendering. Software rendering occurs in the device CPU and can consume a
significant portion of system resources. On devices that offer GPU (hardware) acceleration, you can use a
flash.media.StageVideo object to render video directly on the device hardware. Direct rendering frees the CPU to
perform other tasks while the GPU renders video. Hardware-accelerated rendering enhances the performance benefits
of hardware-accelerated decoding.
Currently, few devices provide full GPU acceleration. However, stage video lets applications take maximum advantage
of whatever hardware acceleration is available.
The StageVideo class does not make the Video class obsolete. Working together, these two classes provide the optimal
video display experience allowed by device resources at any given time. Your application takes advantage of hardware
acceleration by listening to the appropriate events and switching between StageVideo and Video as necessary.
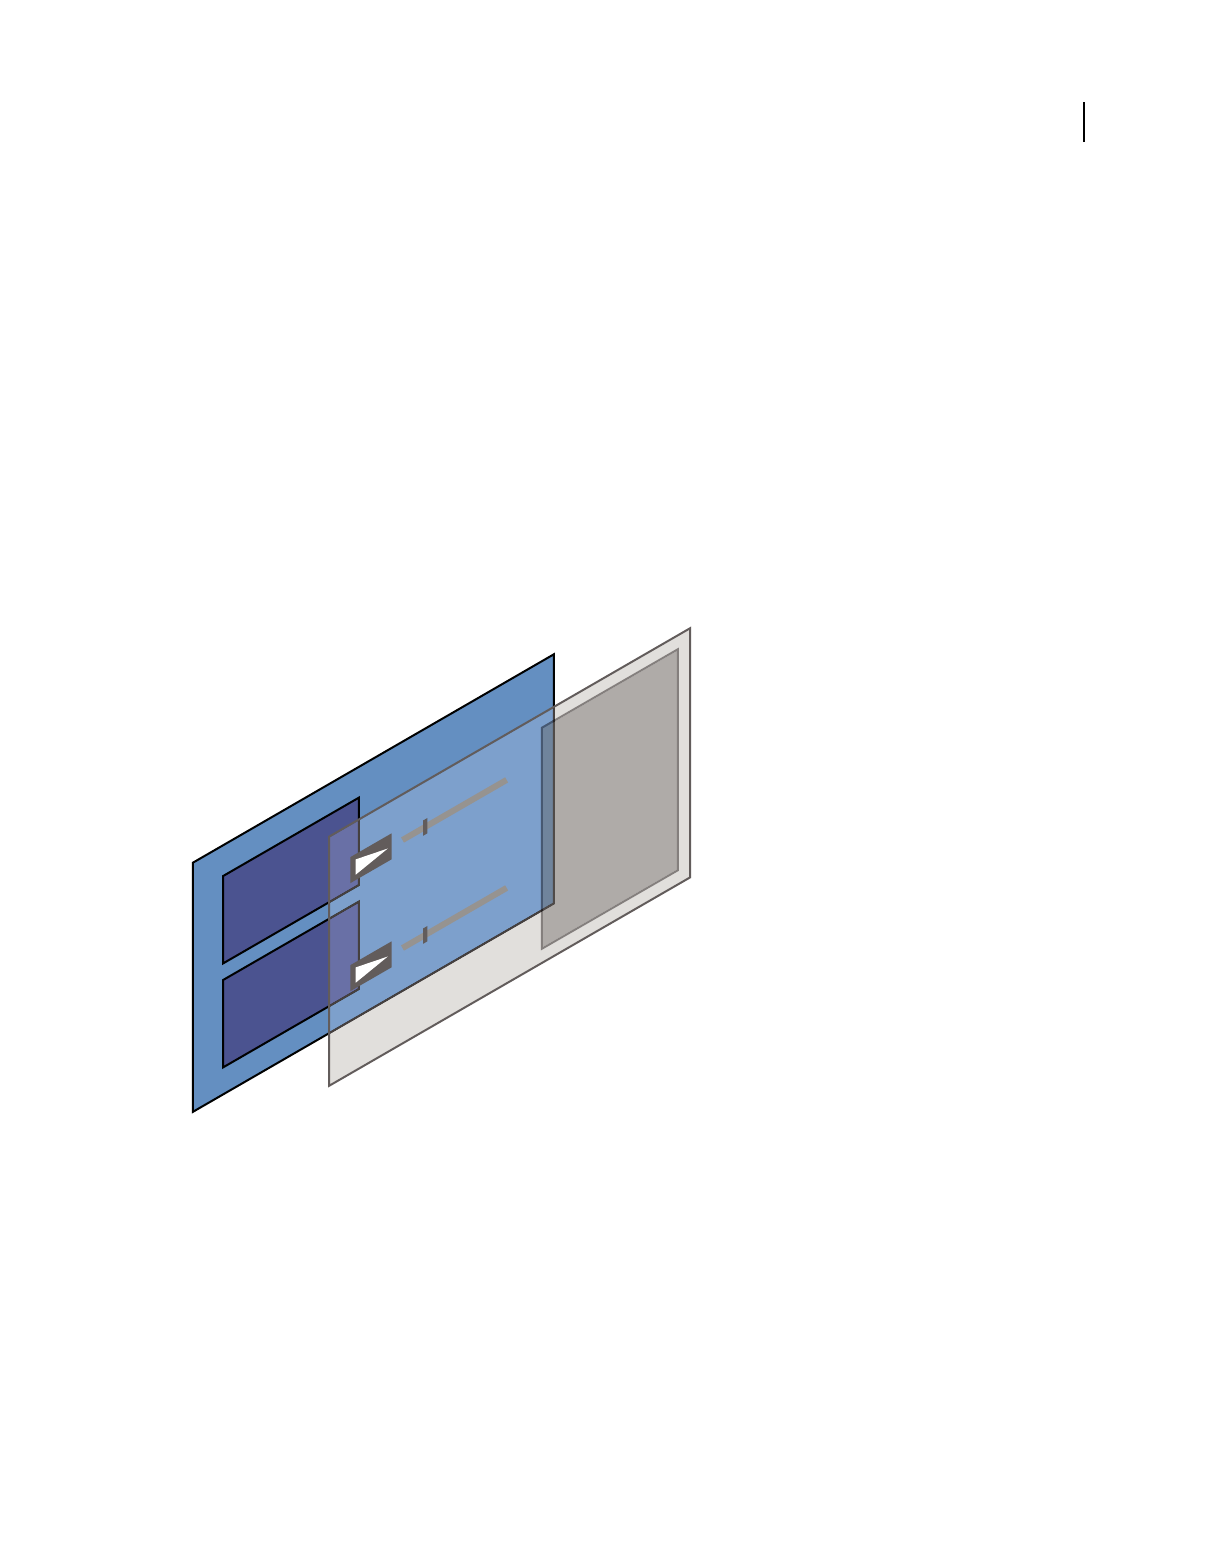
487
ACTIONSCRIPT 3.0 DEVELOPER’S GUIDE
Working with video
Last updated 3/21/2011
The StageVideo class imposes certain restrictions on video usage. Before implementing StageVideo, review the
guidelines and make sure your application can accept them. If you accept the restrictions, use the StageVideo class
whenever Flash Player detects that hardware-accelerated rendering is available. See “Guidelines and limitations” on
page 488.
Parallel planes: Stage video and the Flash display list
With the stage video model, Flash Player can separate video from the display list. Flash Player divides the composite
display between two Z-ordered planes:
Stage video plane The stage video plane sits in the background. It displays only hardware-accelerated video. Because
of this design, this plane is not available if hardware acceleration is not supported or not available on the device. In
ActionScript, StageVideo objects handle videos played on the stage video plane.
Flash display list plane Flash display list entities are composited on a plane in front of the stage video plane. Display
list entities include anything that the runtime renders, including playback controls. When hardware acceleration is not
available, videos can be played only on this plane, using the Video class object. Stage video always displays behind Flash
display list graphics.
Video display planes
The StageVideo object appears in a non-rotated, window-aligned rectangular region of the screen. You cannot layer
objects behind the stage video plane. However, you can use the Flash display list plane to layer other graphics on top
of the stage video plane. Stage video runs concurrently with the display list. Thus, you can use the two mechanisms
together to create a unified visual effect that uses two discreet planes. For example, you can use the front plane for
playback controls that operate on the stage video running in the background.
Stage video and H.264 codec
In Flash Player applications, implementing video hardware acceleration involves two steps:
1Encoding the video as H.264
Video 1
Video 2
Stage Video Plane (GPU accelerated)
Controls 1
Controls 2
Flash Display List (CPU only)
Other
Flash
graphics

488
ACTIONSCRIPT 3.0 DEVELOPER’S GUIDE
Working with video
Last updated 3/21/2011
2Implementing the StageVideo API
For best results, perform both steps. The H.264 codec lets you take maximum advantage of hardware acceleration on
the target device, from video decoding to rendering.
Stage video eliminates GPU-to-CPU read-back. In other words, the GPU no longer sends decoded frames back to the
CPU for compositing with display list objects. Instead, the GPU blits decoded and rendered frames directly to the
screen, behind the display list objects. This technique reduces CPU and memory usage and also provides better pixel
fidelity.
More Help topics
“Understanding video formats” on page 453
Guidelines and limitations
When video is running in full screen mode, stage video is always available if the device supports hardware acceleration.
Flash Player, however, also runs within a browser. In the browser context, the wmode setting affects stage video
availability. Try to use wmode="direct" at all times if you want to use stage video. Stage video is not compatible with
other wmode settings when not in full screen mode. This restriction means that, at run time, stage video can vacillate
unpredictably between being available and unavailable. For example, if the user exits full screen mode while stage video
is running, the video context reverts to the browser. If the browser wmode parameter is not set to "direct", stage video
can suddenly become unavailable. Flash Player communicates playback context changes to applications through a set
of events. If you implement the StageVideo API, maintain a Video object as a backup when stage video becomes
unavailable.
Because of its direct relationship to hardware, stage video restricts some video features. Stage video enforces the
following constraints:
•For each SWF file, Flash Player limits the number of StageVideo objects that can concurrently display videos to
four. However, the actual limit can be lower, depending on device hardware resources. On AIR for TV devices and
most mobile devices, only one StageVideo object at a time can display a video.
•The video timing is not synchronized with the timing of content that the runtime displays.
•The video display area can only be a rectangle. You cannot use more advanced display areas, such as elliptical or
irregular shapes.
•You cannot rotate the video.
•You cannot bitmap cache the video or use BitmapData object to access it.
•You cannot apply filters to the video.
•You cannot apply color transforms to the video.
•You cannot apply an alpha value to the video.
•Blend modes that you apply to objects in the display list plane do not apply to stage video.
•You can place the video only on full pixel boundaries.
•Though GPU rendering is the best available for the given device hardware, it is not 100% “pixel identical” across
devices. Slight variations occur due to driver and platform differences.
•A few devices do not support all required color spaces. For example, some devices do not support BT.709, the H.264
standard. In such cases, you can use BT.601 for fast display.
•You cannot use stage video with WMODE settings such as normal, opaque, or transparent. Stage video supports
only WMODE=direct when not in full screen mode. WMODE has no effect in Safari 4 or higher, IE 9 or higher, or
in AIR for TV.

489
ACTIONSCRIPT 3.0 DEVELOPER’S GUIDE
Working with video
Last updated 3/21/2011
In most cases, these limitations do not affect video player applications. If you can accept these limitations, use stage
video whenever possible.
More Help topics
“Working with full-screen mode” on page 159
Using the StageVideo APIs
Stage video is a mechanism within the runtime that enhances video playback and device performance. The runtime
creates and maintains this mechanism; as a developer, your role is to configure your application to take advantage of it.
To use stage video, you implement a framework of event handlers that detect when stage video is and isn’t available.
When you receive notification that stage video is available, you retrieve a StageVideo object from the
Stage.stageVideos property. The runtime populates this Vector object with one or more StageVideo objects. You
can then use one of the provided StageVideo objects, rather than a Video object, to display streaming video.
On Flash Player, when you receive notification that stage video is no longer available, switch your video stream back
to a Video object. This step does not apply to AIR 2.5 for TV applications.
Note: You cannot create StageVideo objects.
Stage.stageVideos property
The Stage.stageVideos property is a Vector object that gives you access to StageVideo instances. This vector can
contain up to four StageVideo objects, depending on hardware and system resources. AIR for TV devices are limited
to a single StageVideo instance. Mobile devices can be limited to one, or none.
When stage video is not available, this vector contains no objects. To avoid run time errors, be sure that you access
members of this vector only when the most recent StageVideoAvailability event indicates that stage video is
available.
StageVideo events
The StageVideo API framework provides the following events:
StageVideoAvailabilityEvent.STAGE_VIDEO_AVAILABILITY (Not supported in AIR 2.5 for TV) Sent when the
Stage.stageVideos property changes. The StageVideoAvailabilityEvent.availability property indicates
either AVAILABLE or UNAVAILABLE. Use this event to determine whether the stageVideos property contains any
StageVideo objects, rather than directly checking the length of the Stage.stageVideos vector.
StageVideoEvent.RENDER_STATE Sent when a NetStream object has been attached to a StageVideo object and is
playing. Indicates the type of decoding currently in use: hardware, software, or unavailable (nothing is displayed). The
event target contains videoWidth and videoHeight properties that are safe to use for resizing the video viewport.
Important: Coordinates obtained from the StageVideo target object use Stage coordinates, since they are not part of the
standard display list.
VideoEvent.RENDER_STATE (Not supported in AIR 2.5 for TV) Sent when a Video object is being used. Indicates
whether software or hardware-accelerated decoding is in use. If this event indicates hardware-accelerated decoding,
switch to a StageVideo object if possible. The Video event target contains videoWidth and videoHeight properties
that are safe to use for resizing the video viewport.

490
ACTIONSCRIPT 3.0 DEVELOPER’S GUIDE
Working with video
Last updated 3/21/2011
Workflow for implementing the StageVideo feature
Follow these top-level steps to implement the StageVideo feature:
1Listen for the StageVideoAvailabilityEvent.STAGE_VIDEO_AVAILABILITY event to find out when the
Stage.stageVideos vector has changed. See “Using the
StageVideoAvailabilityEvent.STAGE_VIDEO_AVAILABILITY event” on page 491. (Not supported for AIR 2.5
for TV.)
2If the StageVideoAvailabilityEvent.STAGE_VIDEO_AVAILABILITY event reports that stage video is available,
use the Stage.stageVideos Vector object within the event handler to access a StageVideo object. In AIR 2.5 for
TV, access Stage.stageVideos after the first SWF frame has rendered.
3Attach a NetStream object using StageVideo.attachNetStream().
4Play the video using NetStream.play().
5Listen for the StageVideoEvent.RENDER_STATE event on the StageVideo object to determine the status of playing
the video. Receipt of this event also indicates that the width and height properties of the video have been initialized
or changed. See “Using the StageVideoEvent.RENDER_STATE and VideoEvent.RENDER_STATE events” on
page 493.
6Listen for the VideoEvent.RENDER_STATE event on the Video object. This event provides the same statuses as
StageVideoEvent.RENDER_STATE, so you can also use it to determine whether GPU acceleration is available.
Receipt of this event also indicates that the width and height properties of the video have been initialized or
changed. (Not supported for AIR 2.5 for TV.) See “Using the StageVideoEvent.RENDER_STATE and
VideoEvent.RENDER_STATE events” on page 493.
Initializing StageVideo event listeners
Set up your StageVideoAvailabilityEvent and VideoEvent listeners during application initialization. For example, you
can initialize these listeners in the flash.events.Event.ADDED_TO_STAGE event handler. This event guarantees that
your application is visible on the stage:

491
ACTIONSCRIPT 3.0 DEVELOPER’S GUIDE
Working with video
Last updated 3/21/2011
public class SimpleStageVideo extends Sprite
private var nc:NetConnection;
private var ns:NetStream;
public function SimpleStageVideo()
{
// Constructor for SimpleStageVideo class
// Make sure the app is visible and stage available
addEventListener(Event.ADDED_TO_STAGE, onAddedToStage);
}
private function onAddedToStage(event:Event):void
{
//...
// Connections
nc = new NetConnection();
nc.connect(null);
ns = new NetStream(nc);
ns.addEventListener(NetStatusEvent.NET_STATUS, onNetStatus);
ns.client = this;
// Screen
video = new Video();
video.smoothing = true;
// Video Events
// the StageVideoEvent.STAGE_VIDEO_STATE informs you whether
// StageVideo is available
stage.addEventListener(StageVideoAvailabilityEvent.STAGE_VIDEO_AVAILABILITY,
onStageVideoState);
// in case of fallback to Video, listen to the VideoEvent.RENDER_STATE
// event to handle resize properly and know about the acceleration mode running
video.addEventListener(VideoEvent.RENDER_STATE, videoStateChange);
//...
}
Using the StageVideoAvailabilityEvent.STAGE_VIDEO_AVAILABILITY event
In the StageVideoAvailabilityEvent.STAGE_VIDEO_AVAILABILITY handler, decide whether to use a Video or
StageVideo object based on the availability of StageVideo. If the StageVideoAvailabilityEvent.availability
property is set to StageVideoAvailability.AVAILABLE, use StageVideo. In this case, you can rely on the
Stage.stageVideos vector to contain one or more StageVideo objects. Obtain a StageVideo object from the
Stage.stageVideos property and attach the NetStream object to it. Because StageVideo objects always appear in the
background, remove any existing Video object (always in the foreground). You also use this event handler to add a
listener for the StageVideoEvent.RENDER_STATE event.
If the StageVideoAvailabilityEvent.availability property is set to
StageVideoAvailability.UNAVAILABLE, do not use StageVideo or access the Stage.stageVideos vector. In this
case, attach the NetStream object to a Video object. Finally, add the StageVideo or Video object to the stage and call
NetStream.play().
The following code shows how to handle the StageVideoAvailabilityEvent.STAGE_VIDEO_AVAILABILITY event:

492
ACTIONSCRIPT 3.0 DEVELOPER’S GUIDE
Working with video
Last updated 3/21/2011
private var sv:StageVideo;
private var video:Video;
private function onStageVideoState(event:StageVideoAvailabilityEvent):void
{
// Detect if StageVideo is available and decide what to do in toggleStageVideo
toggleStageVideo(event.availability == StageVideoAvailability.AVAILABLE);
}
private function toggleStageVideo(on:Boolean):void
{
// To choose StageVideo attach the NetStream to StageVideo
if (on)
{
stageVideoInUse = true;
if ( sv == null )
{
sv = stage.stageVideos[0];
sv.addEventListener(StageVideoEvent.RENDER_STATE, stageVideoStateChange);
sv.attachNetStream(ns);
}
if (classicVideoInUse)
{
// If you use StageVideo, remove from the display list the
// Video object to avoid covering the StageVideo object
// (which is always in the background)
stage.removeChild ( video );
classicVideoInUse = false;
}
} else
{
// Otherwise attach it to a Video object
if (stageVideoInUse)
stageVideoInUse = false;
classicVideoInUse = true;
video.attachNetStream(ns);
stage.addChildAt(video, 0);
}
if ( !played )
{
played = true;
ns.play(FILE_NAME);
}
}
Important: The first time an application accesses the vector element at Stage.stageVideos[0], the default rect is set to
0,0,0,0, and pan and zoom properties use default values. Always reset these values to your preferred settings. You can use
the videoWidth and videoHeight properties of the StageVideoEvent.RENDER_STATE or
VideoEvent.RENDER_STATE event target for calculating the video viewport dimensions.
Download the full source code for this sample application at Getting Started with Stage Video.

493
ACTIONSCRIPT 3.0 DEVELOPER’S GUIDE
Working with video
Last updated 3/21/2011
Using the StageVideoEvent.RENDER_STATE and VideoEvent.RENDER_STATE events
StageVideo and Video objects send events that inform applications when the rendering environment changes. These
events are StageVideoEvent.RENDER_STATE and VideoEvent.RENDER_STATE.
A StageVideo or Video object dispatches a render state event when a NetStream object is attached and begins playing.
It also sends this event when the rendering environment changes; for example, when the video viewport is resized. Use
these notifications to reset your viewport to the current videoHeight and videoWidth values of the event target object.
Reported render states include:
•RENDER_STATUS_UNAVAILABLE
•RENDER_STATUS_SOFTWARE
•RENDER_STATUS_ACCELERATED
Render states indicate when hardware-accelerated decoding is in use, regardless of which class is currently playing
video. Check the StageVideoEvent.status property to learn whether the necessary decoding is available. If this
property is set to “unavailable”, the StageVideo object cannot play the video. This status requires that you immediately
reattach the NetStream object to a Video object. Other statuses inform your application of the current rendering
conditions.
The following table describes the implications of all render status values for StageVideoEvent and VideoEvent objects
in Flash Player:
Note: AIR 2.5 for TV does not define the VideoStatus class and does not decode H.264 in software. See the
StageVideoEvent class in the ActionScript 3 Reference for details on AIR 2.5 for TV event implementation.
Color spaces
Stage video uses underlying hardware capabilities to support color spaces. SWF content can provide metadata
indicating its preferred color space. However, the device graphics hardware determines whether that color space can
be used. One device can support several color spaces, while another supports none. If the hardware does not support
the requested color space, Flash Player attempts to find the closest match among the supported color spaces.
To query which color spaces the hardware supports, use the StageVideo.colorSpaces property. This property
returns the list of supported color spaces in a String vector:
var colorSpace:Vector.<String> = stageVideo.colorSpaces();
To learn which color space the currently playing video is using, check the StageVideoEvent.colorSpace property.
Check this property in your event handler for the StageVideoEvent.RENDER_STATE event:
VideoStatus.ACCELERATED VideoStatus.SOFTWARE VideoStatus.UNAVAILABLE
StageVideoEvent Rendering and decoding both
occur in hardware. (Best
performance.)
Rendering in hardware,
decoding in software.
(Acceptable performance.)
No GPU resources are available
to render the video, and
nothing is displayed. Fall back
to a Video object.
VideoEvent Rendering in software,
decoding in hardware.
(Acceptable performance on a
modern desktop system only.
Degraded full-screen
performance.)
Rendering in software,
decoding in software.
(Worst case performance-
wise. Degraded full-screen
performance)
(N/A)

494
ACTIONSCRIPT 3.0 DEVELOPER’S GUIDE
Working with video
Last updated 3/21/2011
var currColorSpace:String;
//StageVideoEvent.RENDER_STATE event handler
private function stageVideoRenderState(event:Object):void
{
//...
currColorSpace = (event as StageVideoEvent).colorSpace;
//...
}
If Flash Player cannot find a substitute for an unsupported color space, stage video uses the default color space BT.601.
For example, video streams with H.264 encoding typically use the BT.709 color space. If the device hardware does not
support BT.709, the colorSpace property returns "BT601". A StageVideoEvent.colorSpace value of "unknown"
indicates that the hardware does not provide a means of querying the color space.
Note: In AIR 2.5 for TV, StageVideo does not support color spaces. The StageVideoEvent.colorSpace property on this
platform returns “BT709” to indicate hardware rendering or “BT601” to indicate software rendering.
If your application deems the current color space unacceptable, you can choose to switch from a StageVideo object to
a Video object. The Video class supports all color spaces through software compositing.

495
Last updated 3/21/2011
Chapter 24: Working with cameras
Flash Player 9 and later, Adobe AIR 1.0 and later
A camera attached to a user’s computer can serve as a source of video data that you can display and manipulate using
ActionScript. The Camera class is the mechanism built into ActionScript for working with a computer or device
camera.
On mobile devices, you can also use the CameraUI class. The CameraUI class launches a separate camera application
to allow the user to capture a still image or video. When the user is finished, your application can access the image or
video through a MediaPromise object.
More Help topics
Christian Cantrell: How to use CameraUI in a Cross-platform Way
Michaël CHAIZE: Android, AIR and the Camera
Understanding the Camera class
Flash Player 9 and later, Adobe AIR 1.0 and later
The Camera object allows you to connect to the user’s local camera and broadcast the video either locally (back to the
user) or remotely to a server (such as Flash Media Server).
Using the Camera class, you can access the following kinds of information about the user’s camera:
•Which cameras installed on the user’s computer or device are available
•Whether a camera is installed
•Whether Flash Player is allowed or denied access to the user’s camera
•Which camera is currently active
•The width and height of the video being captured
The Camera class includes several useful methods and properties for working with camera objects. For example, the
static Camera.names property contains an array of camera names currently installed on the user’s computer. You can
also use the name property to display the name of the currently active camera.
Note: When streaming camera video across the network, you should always handle network interruptions. Network
interruptions can occur for many reasons, particularly on mobile devices.

496
ACTIONSCRIPT 3.0 DEVELOPER’S GUIDE
Working with cameras
Last updated 3/21/2011
Displaying camera content on screen
Flash Player 9 and later, Adobe AIR 1.0 and later
Connecting to a camera can require less code than using the NetConnection and NetStream classes to load a video.
The camera class can also quickly become tricky because with Flash Player, you need a user’s permission to connect to
their camera before you can access it.
The following code demonstrates how you can use the Camera class to connect to a user’s local camera:
var cam:Camera = Camera.getCamera();
var vid:Video = new Video();
vid.attachCamera(cam);
addChild(vid);
Note: The Camera class does not have a constructor method. In order to create a new Camera instance you use the static
Camera.getCamera() method.
Designing your camera application
Flash Player 9 and later, Adobe AIR 1.0 and later
When writing an application that connects to a user’s camera, you need to account for the following in your code:
•Check if the user has a camera currently installed. Handle the case where no camera is available.
•For Flash Player only, check if the user has explicitly allowed access to the camera. For security reasons the player
displays the Flash Player Settings dialog which lets the user allow or deny access to their camera. This prevents Flash
Player from connecting to a user’s camera and broadcasting a video stream without their permission. If a user clicks
allow, your application can connect to the user’s camera. If the user clicks deny, your application will be unable to
access the user’s camera. Your applications should always handle both cases gracefully.
•For AIR only, check whether the Camera class is supported for the device profiles supported by your application.
•The Camera class is not supported in mobile browsers.
•The Camera class is not supported in mobile AIR apps that use the GPU rendering mode.
•On iOS, only one camera can be active at a time.
•On Android, only the rear-facing camera can be accessed
More Help topics
Christophe Coenraets: Multi-User Video Tic-Tac-Toe
Mark Doherty: Android Radar app (source)

497
ACTIONSCRIPT 3.0 DEVELOPER’S GUIDE
Working with cameras
Last updated 3/21/2011
Connecting to a user’s camera
Flash Player 9 and later, Adobe AIR 1.0 and later
The first step when connecting to a user’s camera is to create a new camera instance by creating a variable of type
Camera and initializing it to the return value of the static Camera.getCamera() method.
The next step is to create a new video object and attach the Camera object to it.
The third step is to add the video object to the display list. You need to perform steps 2 and 3 because the Camera class
does not extend the DisplayObject class so it cannot be added directly to the display list. To display the camera’s
captured video, you create a new video object and call the attachCamera() method.
The following code shows these three steps:
var cam:Camera = Camera.getCamera();
var vid:Video = new Video();
vid.attachCamera(cam);
addChild(vid);
Note that if a user does not have a camera installed, the application does not display anything.
In real life, you need to perform additional steps for your application. See “Verifying that cameras are installed” on
page 497 and “Detecting permissions for camera access” on page 498 for further information.
More Help topics
Lee Brimelow: How to access the camera on Android devices
Verifying that cameras are installed
Flash Player 9 and later, Adobe AIR 1.0 and later
Before you attempt to use any methods or properties on a camera instance, you’ll want to verify that the user has a
camera installed. There are two ways to check whether the user has a camera installed:
•Check the static Camera.names property which contains an array of camera names which are available. Typically
this array will have one or fewer strings, as most users will not likely have more than one camera installed at a time.
The following code demonstrates how you could check the Camera.names property to see if the user has any
available cameras:
if (Camera.names.length > 0)
{
trace("User has at least one camera installed.");
var cam:Camera = Camera.getCamera(); // Get default camera.
}
else
{
trace("User has no cameras installed.");
}
•Check the return value of the static Camera.getCamera() method. If no cameras are available or installed, this
method returns null, otherwise it returns a reference to a Camera object. The following code demonstrates how
you could check the Camera.getCamera() method to see if the user has any available cameras:

498
ACTIONSCRIPT 3.0 DEVELOPER’S GUIDE
Working with cameras
Last updated 3/21/2011
var cam:Camera = Camera.getCamera();
if (cam == null)
{
trace("User has no cameras installed.");
}
else
{
trace("User has at least 1 camera installed.");
}
Since the Camera class doesn’t extend the DisplayObject class, it cannot be directly added to the display list using the
addChild() method. In order to display the camera’s captured video, you need to create a new Video object and call
the attachCamera() method on the Video instance.
This snippet shows how you can attach the camera if one exists; if not, the application simply displays nothing:
var cam:Camera = Camera.getCamera();
if (cam != null)
{
var vid:Video = new Video();
vid.attachCamera(cam);
addChild(vid);
}
Mobile device cameras
The Camera class is not supported in the Flash Player runtime in mobile browsers.
In AIR applications on mobile devices you can access the camera or cameras on the device. On iOS, you can use both
the front- and the back-facing camera, but only one camera output can be displayed at any given time. (Attaching a
second camera will detach the first.) The front-facing camera is horizontally mirrored. On Android, only the back-
facing camera can be accessed.
Detecting permissions for camera access
Flash Player 9 and later, Adobe AIR 1.0 and later
In the AIR application sandbox, the application can access any camera without the user's permission. On Android,
however, the application must specify the Android CAMERA permission in the application descriptor.
Before Flash Player can display a camera’s output, the user must explicitly allow Flash Player to access the camera.
When the attachCamera() method gets called Flash Player displays the Flash Player Settings dialog box which
prompts the user to either allow or deny Flash Player access to the camera and microphone. If the user clicks the Allow
button, Flash Player displays the camera’s output in the Video instance on the Stage. If the user clicks the Deny button,
Flash Player is unable to connect to the camera and the Video object does not display anything.
If you want to detect whether the user allowed Flash Player access to the camera, you can listen for the camera’s status
event (StatusEvent.STATUS), as seen in the following code:

499
ACTIONSCRIPT 3.0 DEVELOPER’S GUIDE
Working with cameras
Last updated 3/21/2011
var cam:Camera = Camera.getCamera();
if (cam != null)
{
cam.addEventListener(StatusEvent.STATUS, statusHandler);
var vid:Video = new Video();
vid.attachCamera(cam);
addChild(vid);
}
function statusHandler(event:StatusEvent):void
{
// This event gets dispatched when the user clicks the "Allow" or "Deny"
// button in the Flash Player Settings dialog box.
trace(event.code); // "Camera.Muted" or "Camera.Unmuted"
}
The statusHandler() function gets called as soon as the user clicks either Allow or Deny. You can detect which
button the user clicked, using one of two methods:
•The event parameter of the statusHandler() function contains a code property which contains the string
“Camera.Muted” or “Camera.Unmuted”. If the value is “Camera.Muted” the user clicked the Deny button and
Flash Player is unable to access the camera. You can see an example of this in the following snippet:
function statusHandler(event:StatusEvent):void
{
switch (event.code)
{
case "Camera.Muted":
trace("User clicked Deny.");
break;
case "Camera.Unmuted":
trace("User clicked Accept.");
break;
}
}
•The Camera class contains a read-only property named muted which specifies whether the user has denied access
to the camera (true) or allowed access (false) in the Flash Player Privacy panel. You can see an example of this in
the following snippet:
function statusHandler(event:StatusEvent):void
{
if (cam.muted)
{
trace("User clicked Deny.");
}
else
{
trace("User clicked Accept.");
}
}
By checking for the status event to be dispatched, you can write code that handles the user accepting or denying access
to the camera and clean up appropriately. For example, if the user clicks the Deny button, you could display a message
to the user stating that they need to click Allow if they want to participate in a video chat, or you could instead make
sure the Video object on the display list is deleted to free up system resources.
In AIR, a Camera object does not dispatch status events since permission to use the camera is not dynamic.

500
ACTIONSCRIPT 3.0 DEVELOPER’S GUIDE
Working with cameras
Last updated 3/21/2011
Maximizing camera video quality
Flash Player 9 and later, Adobe AIR 1.0 and later
By default, new instances of the Video class are 320 pixels wide by 240 pixels high. In order to maximize video quality
you should always ensure that your video object matches the same dimensions as the video being returned by the
camera object. You can get the camera object’s width and height by using the Camera class’s width and height
properties, you can then set the video object’s width and height properties to match the camera objects dimensions,
or you can pass the camera’s width and height to the Video class’s constructor method, as seen in the following snippet:
var cam:Camera = Camera.getCamera();
if (cam != null)
{
var vid:Video = new Video(cam.width, cam.height);
vid.attachCamera(cam);
addChild(vid);
}
Since the getCamera() method returns a reference to a camera object (or null if no cameras are available) you can
access the camera’s methods and properties even if the user denies access to their camera. This allows you to set the
size of the video instance using the camera’s native height and width.
var vid:Video;
var cam:Camera = Camera.getCamera();
if (cam == null)
{
trace("Unable to locate available cameras.");
}
else
{
trace("Found camera: " + cam.name);
cam.addEventListener(StatusEvent.STATUS, statusHandler);
vid = new Video();
vid.attachCamera(cam);
}
function statusHandler(event:StatusEvent):void
{
if (cam.muted)
{
trace("Unable to connect to active camera.");
}
else
{
// Resize Video object to match camera settings and
// add the video to the display list.
vid.width = cam.width;
vid.height = cam.height;
addChild(vid);
}
// Remove the status event listener.
cam.removeEventListener(StatusEvent.STATUS, statusHandler);
}
For information about full-screen mode, see the full-screen mode section under “Setting Stage properties” on
page 156.

501
ACTIONSCRIPT 3.0 DEVELOPER’S GUIDE
Working with cameras
Last updated 3/21/2011
Monitoring camera status
Flash Player 9 and later, Adobe AIR 1.0 and later
The camera class contains several properties which allow you to monitor the Camera object’s current status. For
example, the following code displays several of the camera’s properties using a Timer object and a text field instance
on the display list:
var vid:Video;
var cam:Camera = Camera.getCamera();
var tf:TextField = new TextField();
tf.x = 300;
tf.autoSize = TextFieldAutoSize.LEFT;
addChild(tf);
if (cam != null)
{
cam.addEventListener(StatusEvent.STATUS, statusHandler);
vid = new Video();
vid.attachCamera(cam);
}
function statusHandler(event:StatusEvent):void
{
if (!cam.muted)
{
vid.width = cam.width;
vid.height = cam.height;
addChild(vid);
t.start();
}
cam.removeEventListener(StatusEvent.STATUS, statusHandler);
}
var t:Timer = new Timer(100);
t.addEventListener(TimerEvent.TIMER, timerHandler);
function timerHandler(event:TimerEvent):void
{
tf.text = "";
tf.appendText("activityLevel: " + cam.activityLevel + "\n");
tf.appendText("bandwidth: " + cam.bandwidth + "\n");
tf.appendText("currentFPS: " + cam.currentFPS + "\n");
tf.appendText("fps: " + cam.fps + "\n");
tf.appendText("keyFrameInterval: " + cam.keyFrameInterval + "\n");
tf.appendText("loopback: " + cam.loopback + "\n");
tf.appendText("motionLevel: " + cam.motionLevel + "\n");
tf.appendText("motionTimeout: " + cam.motionTimeout + "\n");
tf.appendText("quality: " + cam.quality + "\n");
}
Every 1/10 of a second (100 milliseconds) the Timer object’s timer event is dispatched and the timerHandler()
function updates the text field on the display list.

502
Last updated 3/21/2011
Chapter 25: Using digital rights
management
Flash Player 10.1 and later, Adobe AIR 1.5 and later
Adobe® Flash® Access™ is a content protection solution. It lets content owners, distributors, and advertisers realize new
sources of revenue by providing seamless access to premium content. Publishers use Flash Access to encrypt content,
create policies, and maintain licenses. Adobe Flash Player and Adobe AIR incorporate a DRM library, the Flash Access
module. This module enables the runtime to communicate with the Flash Access license server and play back protected
content. The runtime thus completes the life cycle of content protected by Flash Access and distributed by Flash Media
Server.
With Flash Access, content providers can provide both free content and premium content. For example, a consumer
wants to view a television program without advertisements. The consumer registers and pays the content publisher.
The consumer can then enter their user credentials to gain access and play the program without the ads.
In another example, a consumer wants to view content offline while traveling with no Internet access. This offline
workflow is supported in AIR applications. After registering and paying the publisher for the content, the user can
access and download the content and associated AIR application from the publisher’s web site. Using the AIR
application, the user can view the content offline during the permitted period. The content cannot be shared with other
users.
Flash Access also supports anonymous access, which does not require user authentication. For example, a publisher
can use anonymous access to distribute ad-supported content. Anonymous access also lets a publish allow free access
to the current content for a specified number of days. The content provider can also specify and restrict the type and
version of the player needed for their content.
When a user tries to play protected content in Flash Player or Adobe AIR, your application must call the DRM APIs.
The DRM APIs initiate the workflow for playback of protected content. The runtime, through the Flash Access
module, contacts the license server. The license server authenticates the user, if necessary, and issues a voucher
(license) to allow playback of protected content. The runtime receives the license and decrypts the content for
playback.
How to enable your application to play content protected by Flash Access is described here. It is not necessary to
understand how to encrypt content or maintain policies using Flash Access. However, it is assumed that you are
communicating with the Flash Access license server to authenticate the user and retrieve the license. It is also assumed
that you are designing an application to specifically play content protected by Flash Access.
For an overview of Flash Access, including creating policies, see the documentation included with Flash Access.
More Help topics
flash.net.drm package
flash.net.NetConnection
flash.net.NetStream

503
ACTIONSCRIPT 3.0 DEVELOPER’S GUIDE
Using digital rights management
Last updated 3/21/2011
Understanding the protected content workflow
Flash Player 10.1 and later, Adobe AIR 2.0 and later
The following high-level workflow shows how an application can retrieve and play protected content. The workflow
assumes that the application is designed specifically to play content protected by Flash Access:
1Get the content metadata.
2Handle updates to Flash Player, if needed.
3Check if a license is available locally. If so, load it and go to step 7. If not, go to step 4.
4Check if authentication is required. If not, you can go to step 7.
5If authentication is required, get the authentication credentials from the user and pass them to the license server.
6Once authentication succeeds, download the license from the server.
7Play the content.
If an error has not occurred and the user was successfully authorized to view the content, the NetStream object
dispatches a DRMStatusEvent object. The application then begins playback. The DRMStatusEvent object holds the
related voucher information, which identifies the user’s policy and permissions. For example, it holds information
regarding whether the content can be made available offline or when the license expires. The application can use this
data to inform the user of the status of their policy. For example, the application can display the number of remaining
days the user has for viewing the content in a status bar.
(AIR only) If the user is allowed offline access, the voucher is cached, and the encrypted content is downloaded to the
user’s machine. The content is made accessible for the duration defined in the offline lease period. The detail
property in the event contains "DRM.voucherObtained". The application decides where to store the content locally
in order for it to be available offline. You can also preload vouchers using the DRMManager class.
All DRM-related errors result in the application dispatching a DRMErrorEvent event object or, in AIR,
DRMAuthenticationErrorEvent object. It is the application’s responsibility to explicitly handle all other error events.
These events include cases where the user inputs valid credentials, but the voucher protecting the encrypted content
restricts the access to the content. For example, an authenticated user cannot access content if the rights have not been
paid for. This case can also occur when two registered members of the same publisher attempt to share content that
only one of them has paid for. The application should inform the user of the error and provide an alternative
suggestion. A typical alternative suggestion is instructions in how to register and pay for viewing rights.
Detailed API workflow
Flash Player 10.1 and later, AIR 2.0 and later
This workflow provides a more detailed view of the protected-content workflow. This workflow describes the specific
APIs used to play content protected by Flash Access.
1Using a URLLoader object, load the bytes of the protected content’s metadata file. Set this object to a variable, such
as metadata_bytes.
All content controlled by Flash Access has Flash Access metadata. When the content is packaged, this metadata can
be saved as a separate metadata file (.metadata) alongside the content. For more information, see the Flash Access
documentation.
2Create a DRMContentData instance. Put this code into a try-catch block:
new DRMContentData(metadata_bytes)

504
ACTIONSCRIPT 3.0 DEVELOPER’S GUIDE
Using digital rights management
Last updated 3/21/2011
where metadata_bytes is the URLLoader object obtained in step 1.
3(Flash Player only) The runtime checks for the Flash Access module. If not found, an IllegalOperationError with
error code 3344 is thrown.
To handle this error, download the Flash Access module using the SystemUpdater API. After this module is
downloaded, the SystemUpdater object dispatches a COMPLETE event. Include an event listener for this event that
returns to step 2 when this event is dispatched. The following code demonstrates these steps:
flash.system.SystemUpdater.addEventListener(Event.COMPLETE, updateCompleteHandler);
flash.system.SystemUpdater.update(flash.system.SystemUpdaterType.DRM)
private function updateCompleteHandler (event:Event):void {
/*redo step 2*/
drmContentData = new DRMContentData(metadata_bytes);
}
If the player itself must be updated, a status event is dispatched. For more information on handling this event, see
“Listening for an update event” on page 517.
Note: In AIR applications, the AIR installer handles updating the Flash Access module and required runtime updates.
4Create listeners to listen for the DRMStatusEvent and DRMErrorEvent dispatched from the DRMManager object:
DRMManager.addEventListener(DRMStatusEvent.DRM_STATUS, onDRMStatus);
DRMManager.addEventListener(DRMErrorEvent.DRM_ERROR, onDRMError);
In the DRMStatusEvent listener, check that the voucher is valid (not null). In the DRMErrorEvent listener, handle
DRMErrorEvents. See “Using the DRMStatusEvent class” on page 510 and “Using the DRMErrorEvent class” on
page 514.
5Load the voucher (license) that is required to play the content.
First, try to load a locally stored license to play the content:
DRMManager.loadvoucher(drmContentData, LoadVoucherSetting.LOCAL_ONLY)
After loading completes, the DRMManager object dispatches DRMStatusEvent.DRM_Status.
6If the DRMVoucher object is not null, the voucher is valid. Skip to step 13.
7If the DRMVoucher object is null, check the authentication method required by the policy for this content. Use the
DRMContentData.authenticationMethod property.
8If the authentication method is ANONYMOUS, go to step 13.
9If the authentication method is USERNAME_AND_PASSWORD, your application must provide a mechanism to let the
user enter credentials. Pass these credentials to the license server to authenticate the user:
DRMManager.authenticate(metadata.serverURL, metadata.domain, username, password)
The DRMManager dispatches a DRMAuthenticationErrorEvent if authentication fails or a
DRMAuthenticationCompleteEvent if authentication succeeds. Create listeners for these events.
10 If authentication fails, your application must return to step 9. Ensure that your application has a mechanism to
handle and limit repeated authentication failures. For example, after three attempts, you display a message to the
user indicating the authentication has failed and content cannot be played.
11 If authentication succeeds, download the license from the license server:
DRMManager.loadvoucher(drmContentData, LoadVoucherSetting.FORCE_REFRESH)
After loading completes, the DRMManager object dispatches DRMStatusEvent.DRM_STATUS. Listen for this
event, and when it is dispatched, you can play the content.

505
ACTIONSCRIPT 3.0 DEVELOPER’S GUIDE
Using digital rights management
Last updated 3/21/2011
12 (optional) If authentication succeeds, you can capture the authentication token, which is a byte array cached in
memory. Get this token with the DRMAuthenticationCompleteEvent.token property. You can store and use the
authentication token so that the user does not have to repeatedly enter credentials for this content. The license
server determines the valid period of the authentication token.
To use the stored token instead of prompting the user to enter credentials, set the token with
DRMManager.setAuthenticationToken() method. You then download the license from the license server and
play content as in step 8.
13 Play the video by creating a NetStream object and then calling its play() method:
stream = new NetStream(connection);
stream.addEventListener(DRMStatusEvent.DRM _STATUS, drmStatusHandler);
stream.addEventListener(DRMErrorEvent.DRM_ERROR, drmErrorHandler);
stream.addEventListener(NetStatusEvent.NET_STATUS, netStatusHandler);
stream.client = new CustomClient();
video.attachNetStream(stream);
stream.play(videoURL);
DRM-related events
The runtime dispatches numerous events when an application attempts to play protected content:
•DRMAuthenticateEvent (AIR only), dispatched by NetStream
•DRMAuthenticationCompleteEvent, dispatched by DRMManager
•DRMAuthenticationErrorEvent, dispatched by DRMManager
•DRMErrorEvent, dispatched by NetStream and DRMManager
•DRMStatusEvent, dispatched by NetStream and DRMManager
•StatusEvent
•NetStatusEvent. See “Listening for an update event” on page 517
To support content protected by Flash Access, add event listeners for handling the DRM events.
Preloading vouchers for offline playback
Adobe AIR 1.5 and later
You can preload the vouchers (licenses) required to play content protected by Flash Access. Preloaded vouchers allow
users to view the content whether they have an active Internet connection. (The preload process itself requires an
Internet connection.) You can use the NetStream class preloadEmbeddedMetadata() method and the DRMManager
class to preload vouchers. In AIR 2.0 and later, you can use a DRMContentData object to preload vouchers directly.
This technique is preferable because it lets you update the DRMContentData object independent of the content. (The
preloadEmbeddedData() method fetches DRMContentData from the content.)

506
ACTIONSCRIPT 3.0 DEVELOPER’S GUIDE
Using digital rights management
Last updated 3/21/2011
Using DRMContentData
Adobe AIR 2.0 and later
The following steps describe the workflow for preloading the voucher for a protected media file using a
DRMContentData object.
1Get the binary metadata for the packaged content. If using the Flash Access Java Reference Packager, this metadata
file is automatically generated with a .metadata extension. You could, for example, download this metadata using
the URLLoader class.
2Create a DRMContentData object, passing the metadata to the constructor function:
var drmData:DRMContentData = new DRMContentData( metadata );
3The rest of the steps are identical to the workflow described in “Understanding the protected content workflow” on
page 503.
Using preloadEmbeddedMetadata()
Adobe AIR 1.5 and later
The following steps describe the workflow for preloading the voucher for a DRM-protected media file using
preloadEmbeddedMetadata():
1Download and store the media file. (DRM metadata can only be preloaded from locally stored files.)
2Create the NetConnection and NetStream objects, supplying implementations for the onDRMContentData() and
onPlayStatus() callback functions of the NetStream client object.
3Create a NetStreamPlayOptions object and set the stream property to the URL of the local media file.
4Call the NetStream preloadEmbeddedMetadata(), passing in the NetStreamPlayOptions object identifying the
media file to parse.
5If the media file contains DRM metadata, then the onDRMContentData() callback function is invoked. The
metadata is passed to this function as a DRMContentData object.
6Use the DRMContentData object to obtain the voucher using the DRMManager loadVoucher() method.
If the value of the authenticationMethod property of the DRMContentData object is userNameAndPassword,
authenticate the user on the media rights server before loading the voucher. The serverURL and domain properties
of the DRMContentData object can be passed to the DRMManager authenticate() method, along with the user’s
credentials.
7The onPlayStatus() callback function is invoked when file parsing is complete. If the onDRMContentData()
function has not been called, the file does not contain the metadata required to obtain a voucher. This missing call
also possibly means that Flash Access does not protect this file.
The following code example for AIR illustrates how to preload a voucher for a local media file:

507
ACTIONSCRIPT 3.0 DEVELOPER’S GUIDE
Using digital rights management
Last updated 3/21/2011
package
{
import flash.display.Sprite;
import flash.events.DRMAuthenticationCompleteEvent;
import flash.events.DRMAuthenticationErrorEvent;
import flash.events.DRMErrorEvent;
import flash.ev ents.DRMStatusEvent;
import flash.events.NetStatusEvent;
import flash.net.NetConnection;
import flash.net.NetStream;
import flash.net.NetStreamPlayOptions;
import flash.net.drm.AuthenticationMethod;
import flash.net.drm.DRMContentData;
import flash.net.drm.DRMManager;
import flash.net.drm.LoadVoucherSetting;
public class DRMPreloader extends Sprite
{
private var videoURL:String = "app-storage:/video.flv";
private var userName:String = "user";
private var password:String = "password";
private var preloadConnection:NetConnection;
private var preloadStream:NetStream;
private var drmManager:DRMManager = DRMManager.getDRMManager();
private var drmContentData:DRMContentData;
public function DRMPreloader():void {
drmManager.addEventListener(
DRMAuthenticationCompleteEvent.AUTHENTICATION_COMPLETE,
onAuthenticationComplete);
drmManager.addEventListener(DRMAuthenticationErrorEvent.AUTHENTICATION_ERROR,
onAuthenticationError);
drmManager.addEventListener(DRMStatusEvent.DRM_STATUS, onDRMStatus);
drmManager.addEventListener(DRMErrorEvent.DRM_ERROR, onDRMError);
preloadConnection = new NetConnection();
preloadConnection.addEventListener(NetStatusEvent.NET_STATUS, onConnect);
preloadConnection.connect(null);
}
private function onConnect( event:NetStatusEvent ):void
{
preloadMetadata();
}
private function preloadMetadata():void
{
preloadStream = new NetStream( preloadConnection );
preloadStream.client = this;
var options:NetStreamPlayOptions = new NetStreamPlayOptions();
options.streamName = videoURL;
preloadStream.preloadEmbeddedData( options );
}
public function onDRMContentData( drmMetadata:DRMContentData ):void
{
drmContentData = drmMetadata;
if ( drmMetadata.authenticationMethod == AuthenticationMethod.USERNAME_AND_PASSWORD )
{
authenticateUser();
}
else

508
ACTIONSCRIPT 3.0 DEVELOPER’S GUIDE
Using digital rights management
Last updated 3/21/2011
{
getVoucher();
}
}
private function getVoucher():void
{
drmManager.loadVoucher( drmContentData, LoadVoucherSetting.ALLOW_SERVER );
}
private function authenticateUser():void
{
drmManager.authenticate( drmContentData.serverURL, drmContentData.domain, userName,
password );
}
private function onAuthenticationError( event:DRMAuthenticationErrorEvent ):void
{
trace( "Authentication error: " + event.errorID + ", " + event.subErrorID );
}
private function onAuthenticationComplete( event:DRMAuthenticationCompleteEvent ):void
{
trace( "Authenticated to: " + event.serverURL + ", domain: " + event.domain );
getVoucher();
}
private function onDRMStatus( event:DRMStatusEvent ):void
{
trace( "DRM Status: " + event.detail);
trace("--Voucher allows offline playback = " + event.isAvailableOffline );
trace("--Voucher already cached = " + event.isLocal );
trace("--Voucher required authentication = " + !event.isAnonymous );
}
private function onDRMError( event:DRMErrorEvent ):void
{
trace( "DRM error event: " + event.errorID + ", " + event.subErrorID + ", " + event.text );
}
public function onPlayStatus( info:Object ):void
{
preloadStream.close();
}
}
}
DRM-related members and events of the NetStream
class
Flash Player 10.1 and later, Adobe AIR 1.0 and later
The NetStream class provides a one-way streaming connection between Flash Player or an AIR application, and either
Flash Media Server or the local file system. (The NetStream class also supports progressive download.) A NetStream
object is a channel within a NetConnection object. The NetStream class dispatches four DRM-related events:

509
ACTIONSCRIPT 3.0 DEVELOPER’S GUIDE
Using digital rights management
Last updated 3/21/2011
The NetStream class includes the following DRM-specific methods, for use in AIR only:
In addition, in AIR, a NetStream object calls the onDRMContentData() and onPlayStatus() callback functions as a
result of a call to the preloadEmbeddedMetaData() method. The onDRMContentData() function is called when
DRM metadata is encountered in a media file. The onPlayStatus() function is called when the file has been parsed.
The onDRMContentData() and onPlayStatus() functions must be defined on the client object assigned to the
NetStream instance. If you use the same NetStream object to preload vouchers and play content, wait for the
onPlayStatus() call generated by preloadEmbeddedMetaData() before starting playback.
In the following code for AIR, username (“administrator”), password (“password”) and the “drm” authentication type
are set for authenticating the user. The setDRMAuthenticationCredentials() method must provide credentials that
match credentials known and accepted by the content provider. These credentials are the same user credentials that
permit the user to view the content. The code for playing the video and making sure that a successful connection to
the video stream has been made is not included here.
Event Description
drmAuthenticate
(AIR only)
Defined in the DRMAuthenticateEvent class. This event is dispatched when a NetStream object tries to play
protected content that requires a user credential for authentication before playback.
The properties of this event include header, usernamePrompt, passwordPrompt, and urlPrompt properties
that can be used in obtaining and setting the user’s credentials. This event occurs repeatedly until the
NetStream object receives valid user credentials.
drmError Defined in the DRMErrorEvent class and dispatched when a NetStream object tries to play protected content
and encounters a DRM-related error. For example, DRM error event object is dispatched when the user
authorization fails. This error could occur because the user has not purchased the rights to view the content.
It could also occur because the content provider does not support the viewing application.
drmStatus Defined in the DRMStatusEvent class. This event is dispatched when the protected content begins playing
(when the user is authenticated and authorized to play the content). The DRMStatusEvent object contains
information related to the voucher. Voucher information includes whether the content can be made available
offline or when the voucher expires and the content can no longer be viewed.
status Defined in events.StatusEvent and only dispatched when the application attempts to play protected content,
by invoking the NetStream.play() method. The value of the status code property is "DRM.encryptedFLV".
Method Description
resetDRMVouchers() Deletes all the locally cached digital rights management (DRM) voucher data. The application
must download the vouchers again for the user to be able to access the encrypted content.
For example, the following code removes all vouchers from the cache:
NetStream.resetDRMVouchers();
setDRMAuthenticationCredentials() Passes a set of authentication credentials, namely user name, password, and authentication type,
to the NetStream object for authentication. Valid authentication types are "drm" and "proxy"
. With "drm" authentication type, the credentials provided is authenticated against Flash Access.
With "proxy" authentication type, the credentials authenticate against the proxy server and
must match the credentials required by the proxy server. For example, an enterprise can require
the application to authenticate against a proxy server before the user can access the Internet. The
proxy option allows this type of authentication. Unless anonymous authentication is used, after
the proxy authentication, the user must still authenticate against Flash Access to obtain the
voucher and play the content. You can use setDRMAuthenticationcredentials()a second
time, with “drm" option, to authenticate against Flash Access.
preloadEmbeddedMetadata() Parses a local media file for embedded metadata. When DRM-related metadata is found, AIR calls
the onDRMContentData() callback function.

510
ACTIONSCRIPT 3.0 DEVELOPER’S GUIDE
Using digital rights management
Last updated 3/21/2011
var connection:NetConnection = new NetConnection();
connection.connect(null);
var videoStream:NetStream = new NetStream(connection);
videoStream.addEventListener(DRMAuthenticateEvent.DRM_AUTHENTICATE,
drmAuthenticateEventHandler)
private function drmAuthenticateEventHandler(event:DRMAuthenticateEvent):void
{
videoStream.setDRMAuthenticationCredentials("administrator", "password", "drm");
}
Using the DRMStatusEvent class
Flash Player 10.1, Adobe AIR 1.0 and later
A NetStream object dispatches a DRMStatusEvent object when the content protected by Flash Access begins playing
successfully. (Success implies that the license is verified and that the user is authenticated and authorized to view the
content). The DRMStatusEvent is also dispatched for anonymous users if they are permitted access. The license is
checked to verify whether anonymous users, who do not require authentication, are allowed access to play the content.
Anonymous users maybe denied access for various reasons. For example, an anonymous user does not have access to
the content when the license has expired.
The DRMStatusEvent object contains information related to the license. Such information includes whether the
content can be made available offline or when the voucher expires and the content can no longer be viewed. The
application can use this data to convey the user’s policy status and its permissions.
DRMStatusEvent properties
Flash Player 10.1, Adobe AIR 1.0 and later
The DRMStatusEvent class includes the following properties. Some properties became available in versions of AIR
later than 1.0. For complete version information, see the ActionScript 3.0 Reference.
For properties that aren’t supported in Flash Player 10.1, the DRMVoucher class provides similar properties for Flash
Player.
Property Description
contentData A DRMContentData object containing the DRM metadata embedded in the content.
detail (AIR only) A string explaining the context of the status event. In DRM 1.0, the only valid value is DRM.voucherObtained.
isAnonymous (AIR only) Indicates whether the content, protected with Flash Access, is available without requiring a user to provide
authentication credentials (true) or not (false). A false value means that the user must provide a username and
password that matches the one known and expected by the content provider.
isAvailableOffline (AIR
only)
Indicates whether the content, protected with Flash Access, can be made available offline (true) or not (false).
In order for digitally protected content to be available offline, its voucher must be cached to the user's local
machine.
isLocal Indicates whether the voucher that is required to play the content is cached locally.

511
ACTIONSCRIPT 3.0 DEVELOPER’S GUIDE
Using digital rights management
Last updated 3/21/2011
Creating a DRMStatusEvent handler
Flash Player 10.1, Adobe AIR 1.0 and later
The following example creates an event handler that outputs the DRM content status information for the NetStream
object that originated the event. Add this event handler to a NetStream object that points to protected content.
function drmStatusEventHandler(event:DRMStatusEvent):void
{
trace(event);
}
function drmStatusEventHandler(event:DRMStatusEvent):void
{
trace(event);
}
Using the DRMAuthenticateEvent class
Adobe AIR 1.0 and later
The DRMAuthenticateEvent object is dispatched when a NetStream object tries to play protected content that requires
a user credential for authentication before playback.
The DRMAuthenticateEvent handler is responsible for gathering the required credentials (user name, password, and
type) and passing the values to the NetStream.setDRMAuthenticationCredentials() method for validation. Each
AIR application must provide some mechanism for obtaining user credentials. For example, the application could
provide a user with a simple user interface to enter the username and password values. Also, provide a mechanism for
handling and limiting repeated authentication attempts.
DRMAuthenticateEvent properties
Adobe AIR 1.0 and later
The DRMAuthenticateEvent class includes the following properties:
offlineLeasePeriod (AIR
only)
The remaining number of days that content can be viewed offline.
policies (AIR only) A custom object that can contain custom DRM properties.
voucher The DRMVoucher.
voucherEndDate (AIR only) The absolute date on which the voucher expires and the content is no longer viewable.
Property Description

512
ACTIONSCRIPT 3.0 DEVELOPER’S GUIDE
Using digital rights management
Last updated 3/21/2011
Creating a DRMAuthenticateEvent handler
Adobe AIR 1.0 and later
The following example creates an event handler that passes a set of hard-coded authentication credentials to the
NetStream object that originated the event. (The code for playing the video and making sure that a successful
connection to the video stream has been made is not included here.)
var connection:NetConnection = new NetConnection();
connection.connect(null);
var videoStream:NetStream = new NetStream(connection);
videoStream.addEventListener(DRMAuthenticateEvent.DRM_AUTHENTICATE,
drmAuthenticateEventHandler)
private function drmAuthenticateEventHandler(event:DRMAuthenticateEvent):void
{
videoStream.setDRMAuthenticationCredentials("administrator", "password", "drm");
}
Creating an interface for retrieving user credentials
Adobe AIR 1.0 and later
In the case where protected content requires user authentication, the AIR application must usually retrieve the user’s
authentication credentials via a user interface.
The following is a Flex example of a simple user interface for retrieving user credentials. It consists of a panel object
containing two TextInput objects, one for each of the user name and password credentials. The panel also contains a
button that launches the credentials() method.
Property Description
authenticationType Indicates whether the supplied credentials are for authenticating against Flash Access (“drm”) or a proxy
server (“proxy”). For example, the "proxy" option allows the application to authenticate against a proxy server
if necessary before the user can access the Internet. Unless anonymous authentication is used, after the proxy
authentication, the user must still authenticate against Flash Access to obtain the voucher and play the
content. You can use setDRMAuthenticationcredentials() a second time, with "drm" option, to authenticate
against Flash Access.
header The encrypted content file header provided by the server. It contains information about the context of the
encrypted content.
netstream The NetStream object that initiated this event.
passwordPrompt A prompt for a password credential, provided by the server. The string can include instruction for the type of
password required.
urlPrompt A prompt for a URL string, provided by the server. The string can provide the location where the username and
password are sent.
usernamePrompt A prompt for a user name credential, provided by the server. The string can include instruction for the type of
user name required. For example, a content provider can require an e-mail address as the user name.

513
ACTIONSCRIPT 3.0 DEVELOPER’S GUIDE
Using digital rights management
Last updated 3/21/2011
<mx:Panel x="236.5" y="113" width="325" height="204" layout="absolute" title="Login">
<mx:TextInput x="110" y="46" id="uName"/>
<mx:TextInput x="110" y="76" id="pWord" displayAsPassword="true"/>
<mx:Text x="35" y="48" text="Username:"/>
<mx:Text x="35" y="78" text="Password:"/>
<mx:Button x="120" y="115" label="Login" click="credentials()"/>
</mx:Panel>
The credentials() method is a user-defined method that passes the user name and password values to the
setDRMAuthenticationCredentials() method. Once the values are passed, the credentials() method resets the
values of the TextInput objects.
<mx:Script>
<![CDATA[
public function credentials():void
{
videoStream.setDRMAuthenticationCredentials(uName, pWord, "drm");
uName.text = "";
pWord.text = "";
}
]]>
</mx:Script>
One way to implement this type of simple interface is to include the panel as part of a new state. The new state
originates from the base state when the DRMAuthenticateEvent object is thrown. The following example contains a
VideoDisplay object with a source attribute that points to a protected FLV file. In this case, the credentials()
method is modified so that it also returns the application to the base state. This method does so after passing the user
credentials and resetting the TextInput object values.
<?xml version="1.0" encoding="utf-8"?>
<mx:WindowedApplication xmlns:mx="http://www.adobe.com/2006/mxml"
layout="absolute"
width="800"
height="500"
title="DRM FLV Player"
creationComplete="initApp()" >
<mx:states>
<mx:State name="LOGIN">
<mx:AddChild position="lastChild">
<mx:Panel x="236.5" y="113" width="325" height="204" layout="absolute"
title="Login">
<mx:TextInput x="110" y="46" id="uName"/>
<mx:TextInput x="110" y="76" id="pWord" displayAsPassword="true"/>
<mx:Text x="35" y="48" text="Username:"/>
<mx:Text x="35" y="78" text="Password:"/>
<mx:Button x="120" y="115" label="Login" click="credentials()"/>
<mx:Button x="193" y="115" label="Reset" click="uName.text='';
pWord.text='';"/>
</mx:Panel>
</mx:AddChild>
</mx:State>
</mx:states>
<mx:Script>
<
514
ACTIONSCRIPT 3.0 DEVELOPER’S GUIDE
Using digital rights management
Last updated 3/21/2011
private function initApp():void
{
videoStream.addEventListener(DRMAuthenticateEvent.DRM_AUTHENTICATE,
drmAuthenticateEventHandler);
}
public function credentials():void
{
videoStream.setDRMAuthenticationCredentials(uName, pWord, "drm");
uName.text = "";
pWord.text = "";
currentState='';
}
private function drmAuthenticateEventHandler(event:DRMAuthenticateEvent):void
{
currentState='LOGIN';
}
]]>
</mx:Script>
<mx:VideoDisplay id="video" x="50" y="25" width="700" height="350"
autoPlay="true"
bufferTime="10.0"
source="http://www.example.com/flv/Video.flv" />
</mx:WindowedApplication>
Using the DRMErrorEvent class
Flash Player 10.1 and later, Adobe AIR 1.0 and later
Adobe Flash Player and Adobe AIR dispatch a DRMErrorEvent object when a NetStream object, trying to play
protected content, encounters a DRM-related error. If user credentials are invalid in an AIR application, the
DRMAuthenticateEvent object repeatedly dispatches until the user enters valid credentials or the application denies
further attempts. The application is responsible for listening to any other DRM error events to detect, identify, and
handle the DRM-related errors. In Flash Player, the application listens to all DRM error events to detect, identify, and
handle DRM-related errors.
Even with valid user credentials, the terms of the content’s voucher can still prevent a user from viewing the encrypted
content. For example, a user can be denied access for attempting to view content in an unauthorized application. An
unauthorized application is one that the publisher of the encrypted content has not validated. In this case, a
DRMErrorEvent object is dispatched.
The error events can also be fired if the content is corrupted or if the application’s version does not match what the
voucher specifies. The application must provide appropriate mechanism for handling errors.
DRMErrorEvent properties
Flash Player 10.1 and later, Adobe AIR 1.0 and later
For a complete list of errors, see the Runtime Error Codes in the ActionScript 3.0 Reference. The DRM-related errors
start at error 3300.

515
ACTIONSCRIPT 3.0 DEVELOPER’S GUIDE
Using digital rights management
Last updated 3/21/2011
Creating a DRMErrorEvent handler
Flash Player 10.1 and later, Adobe AIR 1.0 and later
The following example creates an event handler for the NetStream object that originated the event. It is called when
the NetStream encounters an error while attempting to play protected content. Normally, when an application
encounters an error, it performs any number of clean-up tasks. It then informs the user of the error and provides
options for solving the problem.
private function drmErrorEventHandler(event:DRMErrorEvent):void
{
trace(event.toString());
}
Using the DRMManager class
Flash Player 10.1 and later, Adobe AIR 1.5 and later
Use the DRMManager class to manage vouchers and media rights server sessions in applications.
Voucher management (AIR only)
Whenever a user plays protected content, the runtime obtains and caches the license required to view the content. If
the application saves the file locally, and the license allows offline playback, the user can view the content in the AIR
application. Such local offline playback succeeds even if a connection to the media rights server is not available. Using
the DRMManager and the NetStream preloadEmbeddedMetadata() method, you can pre-cache the voucher. The
application does not have to obtain the license necessary to view the content. For example, your application could
download the media file and then obtain the voucher while the user is still online.
To preload a voucher, use the NetStream preloadEmbeddedMetadata() method to obtain a DRMContentData
object. The DRMContentData object contains the URL and domain of the media rights server that can provide the
license and describes whether user authentication is required. With this information, you can call the DRMManager
loadVoucher() method to obtain and cache the voucher. The workflow for preloading vouchers is described in more
detail in “Preloading vouchers for offline playback” on page 505.
Session management
You can also use the DRMManager to authenticate the user to a media rights server and to manage persistent sessions.
Call the DRMManager authenticate() method to establish a session with the media rights server. When
authentication is completed successfully, the DRMManager dispatches a DRMAuthenticationCompleteEvent object.
This object contains a session token. You can save this token to establish future sessions so that the user does not have
to provide their account credentials. Pass the token to the setAuthenticationToken() method to establish a new
authenticated session. (The settings of the server that generated the token determine the token expiration and other
attributes. AIR application code should not interpret the token data structure, because the structure may change in
future AIR updates.)
Authentication tokens can be transferred to other computers. To protect tokens, you can store them in the AIR
Encrypted Local Store. See “Encrypted local storage” on page 677 for more information.

516
ACTIONSCRIPT 3.0 DEVELOPER’S GUIDE
Using digital rights management
Last updated 3/21/2011
DRMStatus Events
Flash Player 10.1 and later, Adobe AIR 1.5 and later
The DRMManager dispatches a DRMStatusEvent object after a call to the loadVoucher() method completes
successfully.
If a voucher is obtained, then the detail property (AIR only) of the event object has the value:
"DRM.voucherObtained", and the voucher property contains the DRMVoucher object.
If a voucher is not obtained, then the detail property (AIR only) still has the value: "DRM.voucherObtained";
however, the voucher property is null. A voucher cannot be obtained if, for example, you use the
LoadVoucherSetting of localOnly and there is no locally cached voucher.
If the loadVoucher() call does not complete successfully, perhaps because of an authentication or communication
error, then the DRMManager dispatches a DRMErrorEvent or DRMAuthenticationErrorEvent object instead.
DRMAuthenticationComplete events
Flash Player 10.1 and later, Adobe AIR 1.5 and later
The DRMManager dispatches a DRMAuthenticationCompleteEvent object when a user is successfully authenticated
through a call to the authenticate() method.
The DRMAuthenticationCompleteEvent object contains a reusable token that can be used to persist user
authentication across application sessions. Pass this token to DRMManager setAuthenticationToken() method to
re-establish the session. (The token creator sets token attributes such as expiration. Adobe does not provide an API for
examining token attributes.)
DRMAuthenticationError events
Flash Player 10.1 and later, Adobe AIR 1.5 and later
The DRMManager dispatches a DRMAuthenticationErrorEvent object when a user cannot be successfully
authenticated through a call to the authenticate() or setAuthenticationToken() methods.
Using the DRMContentData class
Flash Player 10.1 and later, Adobe AIR 1.5 and later
The DRMContentData object contains the metadata properties of content protected by Flash Access. The
DRMContentData properties contain the information necessary to obtain a license voucher for viewing the content,
such as the following. You can use the DRMContentData class to get the metadata file associated with content, as
described in the “Detailed API workflow” on page 503.
For more information, see the DRMContentData class in the ActionScript 3.0 Reference for the Adobe Flash Platform.

517
ACTIONSCRIPT 3.0 DEVELOPER’S GUIDE
Using digital rights management
Last updated 3/21/2011
Updating Flash Player to support Flash Access
Flash Player 10.1 and later
To support Flash Access, Flash Player requires the Flash Access module. When Flash Player tries to play protected
content, the runtime indicates if the module or a new version of Flash Player must be downloaded. In this way, Flash
Player allows SWF developers the option of not updating if desired.
In most cases, to play protected content, SWF developers update to the required Flash Access module or player. To
update, you can use the SystemUpdater API to get the latest version of the Flash Access module or of Flash Player.
The SystemUpdater API permits only one update at a time. The error code 2201 indicates that an update is already
occurring in the current runtime instance or another instance. For example, if an update is occurring in a Flash Player
instance in Internet Explorer, an update cannot proceed in a Flash Player instance running in Firefox.
The SystemUpdater API is supported for desktop platforms only.
Note: For versions of Flash Player earlier than 10.1, use the update mechanism supported in earlier player versions
(manual download and install from www.adobe.com or ExpressInstall). Also, the AIR installer handles necessary updates
for Flash Access and does not support the SystemUpdater API.
Listening for an update event
Flash Player 10.1 and later
When an update of the Flash Access module is required, the NetStream object dispatches a NetStatusEvent with a code
value of DRM.UpdateNeeded. This value indicates that the NetStream object cannot play back the protected stream
with any of the currently installed Flash Access modules. Listen for this event and call the following code:
SystemUpdater.update(flash.system.SystemUpdaterType.DRM)
This code updates the Flash Access module installed in the player. User consent for this module update is not required.
If the Flash Access module is not found, an error is thrown. See step 3 of the “Detailed API workflow” on page 503.
Note: If play() is called on an encrypted stream in players earlier than 10.1, a NetStatusEvent with code value of
NetStream.Play.StreamNotFound is dispatched. For earlier players, use the update mechanism supported for those
players (manual download and install from www.adobe.com or ExpressInstall).
When an update of the player itself is required, the SystemUpdater object dispatches a StatusEvent with a code value
of DRM.UpdateNeededButIncompatible is dispatched. For an update of the player, user consent is required. In your
application, provide an interface for the user to agree to and initiate the update of the player. Listen for the StatusEvent
event and call the following code:
SystemUpdater.update(flash.system.SystemUpdaterType.SYSTEM);
This code initiates the update of the player.
Additional events for the SystemUpdater class are documented in the ActionScript 3.0 Reference for the Adobe Flash
Platform.
After the player update completes, the user is redirected to the page where the update began. The Flash Access module
is downloaded, and the stream can begin playing.

518
Last updated 3/21/2011
Chapter 26: Adding PDF content in AIR
Adobe AIR 1.0 and later
Applications running in Adobe® AIR® can render not only SWF and HTML content, but also PDF content. AIR
applications render PDF content using the HTMLLoader class, the WebKit engine, and the Adobe® Reader® browser
plug-in. In an AIR application, PDF content can either stretch across the full height and width of your application or
alternatively as a portion of the interface. The Adobe Reader browser plug-in controls display of PDF files in an AIR
application. modifications to the Reader toolbar interface (such as controls for position, anchoring, and visibility)
persist in subsequent viewing of PDF files in both AIR applications and the browser.
Important: To render PDF content in AIR, the user must have Adobe Reader or Adobe® Acrobat® version 8.1 or higher
installed.
Detecting PDF Capability
Adobe AIR 1.0 and later
If the user does not have Adobe Reader or Adobe Acrobat 8.1 or higher, PDF content is not displayed in an AIR
application. To detect if a user can render PDF content, first check the HTMLLoader.pdfCapability property. This
property is set to one of the following constants of the HTMLPDFCapability class:
On Windows, if Adobe Acrobat or Adobe Reader version 7.x or above is running on the user's system, that version is
used even if a later version that supports loading PDF is installed. In this case, if the value of the pdfCapability
property is HTMLPDFCapability.STATUS_OK, when an AIR application attempts to load PDF content, the older
version of Acrobat or Reader displays an alert (and no exception is thrown in the AIR application). If this is a possible
situation for your end users, consider providing them with instructions to close Acrobat while running your
application. You may want to display these instructions if the PDF content does not load within an acceptable time
frame.
On Linux, AIR looks for Adobe Reader in the PATH exported by the user (if it contains the acroread command) and
in the /opt/Adobe/Reader directory.
The following code detects whether a user can display PDF content in an AIR application. If the user cannot display
PDF, the code traces the error code that corresponds to the HTMLPDFCapability error object:
Constant Description
HTMLPDFCapability.STATUS_OK A sufficient version (8.1 or greater) of Adobe Reader is detected and
PDF content can be loaded into an HTMLLoader object.
HTMLPDFCapability.ERROR_INSTALLED_READER_NOT_FOUND No version of Adobe Reader is detected. An HTMLLoader object
cannot display PDF content.
HTMLPDFCapability.ERROR_INSTALLED_READER_TOO_OLD Adobe Reader has been detected, but the version is too old. An
HTMLLoader object cannot display PDF content.
HTMLPDFCapability.ERROR_PREFERRED_READER_TOO_OLD A sufficient version (8.1 or later) of Adobe Reader is detected, but the
version of Adobe Reader that is set up to handle PDF content is older
than Reader 8.1. An HTMLLoader object cannot display PDF content.

519
ACTIONSCRIPT 3.0 DEVELOPER’S GUIDE
Adding PDF content in AIR
Last updated 3/21/2011
if(HTMLLoader.pdfCapability == HTMLPDFCapability.STATUS_OK)
{
trace("PDF content can be displayed");
}
else
{
trace("PDF cannot be displayed. Error code:", HTMLLoader.pdfCapability);
}
Loading PDF content
Adobe AIR 1.0 and later
You can add a PDF to an AIR application by creating an HTMLLoader instance, setting its dimensions, and loading
the path of a PDF.
The following example loads a PDF from an external site. Replace the URLRequest with the path to an available
external PDF.
var request:URLRequest = new URLRequest("http://www.example.com/test.pdf");
pdf = new HTMLLoader();
pdf.height = 800;
pdf.width = 600;
pdf.load(request);
container.addChild(pdf);
You can also load content from file URLs and AIR-specific URL schemes, such as app and app-storage. For example,
the following code loads the test.pdf file in the PDFs subdirectory of the application directory:
app:/js_api_reference.pdf
For more information on AIR URL schemes, see “URI schemes” on page 780.
Scripting PDF content
Adobe AIR 1.0 and later
You can use JavaScript to control PDF content just as you can in a web page in the browser.
JavaScript extensions to Acrobat provide the following features, among others:
•Controlling page navigation and magnification
•Processing forms within the document
•Controlling multimedia events
Full details on JavaScript extensions for Adobe Acrobat are provided at the Adobe Acrobat Developer Connection at
http://www.adobe.com/devnet/acrobat/javascript.html.

520
ACTIONSCRIPT 3.0 DEVELOPER’S GUIDE
Adding PDF content in AIR
Last updated 3/21/2011
HTML-PDF communication basics
Adobe AIR 1.0 and later
JavaScript in an HTML page can send a message to JavaScript in PDF content by calling the postMessage() method
of the DOM object representing the PDF content. For example, consider the following embedded PDF content:
<object id="PDFObj" data="test.pdf" type="application/pdf" width="100%" height="100%"/>
The following JavaScript code in the containing HTML content sends a message to the JavaScript in the PDF file:
pdfObject = document.getElementById("PDFObj");
pdfObject.postMessage(["testMsg", "hello"]);
The PDF file can include JavaScript for receiving this message. You can add JavaScript code to PDF files in some
contexts, including the document-, folder-, page-, field-, and batch-level contexts. Only the document-level context,
which defines scripts that are evaluated when the PDF document opens, is discussed here.
A PDF file can add a messageHandler property to the hostContainer object. The messageHandler property is an
object that defines handler functions to respond to messages. For example, the following code defines the function to
handle messages received by the PDF file from the host container (which is the HTML content embedding the PDF
file):
this.hostContainer.messageHandler = {onMessage: myOnMessage};
function myOnMessage(aMessage)
{
if(aMessage[0] == "testMsg")
{
app.alert("Test message: " + aMessage[1]);
}
else
{
app.alert("Error");
}
}
JavaScript code in the HTML page can call the postMessage() method of the PDF object contained in the page.
Calling this method sends a message ("Hello from HTML") to the document-level JavaScript in the PDF file:

521
ACTIONSCRIPT 3.0 DEVELOPER’S GUIDE
Adding PDF content in AIR
Last updated 3/21/2011
<html>
<head>
<title>PDF Test</title>
<script>
function init()
{
pdfObject = document.getElementById("PDFObj");
try {
pdfObject.postMessage(["alert", "Hello from HTML"]);
}
catch (e)
{
alert( "Error: \n name = " + e.name + "\n message = " + e.message );
}
}
</script>
</head>
<body onload='init()'>
<object
id="PDFObj"
data="test.pdf"
type="application/pdf"
width="100%" height="100%"/>
</body>
</html>
For a more advanced example, and for information on using Acrobat 8 to add JavaScript to a PDF file, see Cross-
scripting PDF content in Adobe AIR.
Scripting PDF content from ActionScript
Adobe AIR 1.0 and later
ActionScript code (in SWF content) cannot directly communicate with JavaScript in PDF content. However,
ActionScript can communicate with the JavaScript in the HTML page loaded in an HTMLLoader object that loads
PDF content, and that JavaScript code can communicate with the JavaScript in the loaded PDF file. For more
information, see “Programming HTML and JavaScript in AIR” on page 952.
Known limitations for PDF content in AIR
Adobe AIR 1.0 and later
PDF content in Adobe AIR has the following limitations:
•PDF content does not display in a window (a NativeWindow object) that is transparent (where the transparent
property is set to true).
•The display order of a PDF file operates differently than other display objects in an AIR application. Although PDF
content clips correctly according to HTML display order, it will always sit on top of content in the AIR application's
display order.

522
ACTIONSCRIPT 3.0 DEVELOPER’S GUIDE
Adding PDF content in AIR
Last updated 3/21/2011
•If certain visual properties of an HTMLLoader object that contains a PDF document are changed, the PDF
document will become invisible. These properties include the filters, alpha, rotation, and scaling properties.
Changing these properties renders the PDF content invisible until the properties are reset. The PDF content is also
invisible if you change these properties of display object containers that contain the HTMLLoader object.
•PDF content is visible only when the scaleMode property of the Stage object of the NativeWindow object
containing the PDF content is set to StageScaleMode.NO_SCALE. When it is set to any other value, the PDF
content is not visible.
•Clicking links to content within the PDF file update the scroll position of the PDF content. Clicking links to content
outside the PDF file redirect the HTMLLoader object that contains the PDF (even if the target of a link is a new
window).
•PDF commenting workflows do not function in AIR.

523
Last updated 3/21/2011
Chapter 27: Basics of user interaction
Flash Player 9 and later, Adobe AIR 1.0 and later
Your application can create interactivity by using ActionScript 3.0 to respond to user activity. Note that this section
assumes that you are already familiar with the ActionScript 3.0 event model. For more information, see “Handling
events” on page 117.
Capturing user input
Flash Player 9 and later, Adobe AIR 1.0 and later
User interaction, whether by keyboard, mouse, camera, or a combination of these devices, is the foundation of
interactivity. In ActionScript 3.0, identifying and responding to user interaction primarily involves listening to events.
The InteractiveObject class, a subclass of the DisplayObject class, provides the common structure of events and
functionality necessary for handling user interaction. You do not directly create an instance of the InteractiveObject
class. Instead, display objects such as SimpleButton, Sprite, TextField, and various Flash authoring tool and Flex
components inherit their user interaction model from this class and therefore share a common structure. This means
that the techniques you learn and the code you write to handle user interaction in an object derived from
InteractiveObject are applicable to all the others.
Important concepts and terms
It’s important to familiarize yourself with the following key user interaction terms before proceeding:
Character code A numeric code representing a character in the current character set (associated with a key being
pressed on the keyboard). For example, “D” and “d” have different character codes even though they’re created by the
same key on a U.S. English keyboard.
Context menu The menu that appears when a user right-clicks or uses a particular keyboard-mouse combination.
Context menu commands typically apply directly to what has been clicked. For example, a context menu for an image
may contain a command to show the image in a separate window and a command to download it.
Focus The indication that a selected element is active and that it is the target of keyboard or mouse interaction.
Key code A numeric code corresponding to a physical key on the keyboard.
More Help topics
InteractiveObject
Keyboard
Mouse
ContextMenu

524
ACTIONSCRIPT 3.0 DEVELOPER’S GUIDE
Basics of user interaction
Last updated 3/21/2011
Managing focus
Flash Player 9 and later, Adobe AIR 1.0 and later
An interactive object can receive focus, either programmatically or through a user action. Additionally, if the
tabEnabled property is set to true, the user can pass focus from one object to another by pressing the Tab key. Note
that the tabEnabled value is false by default, except in the following cases:
•For a SimpleButton object, the value is true.
•For a input text field, the value is true.
•For a Sprite or MovieClip object with buttonMode set to true, the value is true.
In each of these situations, you can add a listener for FocusEvent.FOCUS_IN or FocusEvent.FOCUS_OUT to provide
additional behavior when focus changes. This is particularly useful for text fields and forms, but can also be used on
sprites, movie clips, or any object that inherits from the InteractiveObject class. The following example shows how to
enable focus cycling with the Tab key and how to respond to the subsequent focus event. In this case, each square
changes color as it receives focus.
Note: Flash Professional uses keyboard shortcuts to manage focus; therefore, to properly simulate focus management,
SWF files should be tested in a browser or AIR rather than within Flash.
var rows:uint = 10;
var cols:uint = 10;
var rowSpacing:uint = 25;
var colSpacing:uint = 25;
var i:uint;
var j:uint;
for (i = 0; i < rows; i++)
{
for (j = 0; j < cols; j++)
{
createSquare(j * colSpacing, i * rowSpacing, (i * cols) + j);
}
}
function createSquare(startX:Number, startY:Number, tabNumber:uint):void
{
var square:Sprite = new Sprite();
square.graphics.beginFill(0x000000);
square.graphics.drawRect(0, 0, colSpacing, rowSpacing);
square.graphics.endFill();
square.x = startX;

525
ACTIONSCRIPT 3.0 DEVELOPER’S GUIDE
Basics of user interaction
Last updated 3/21/2011
square.y = startY;
square.tabEnabled = true;
square.tabIndex = tabNumber;
square.addEventListener(FocusEvent.FOCUS_IN, changeColor);
addChild(square);
}
function changeColor(event:FocusEvent):void
{
event.target.transform.colorTransform = getRandomColor();
}
function getRandomColor():ColorTransform
{
// Generate random values for the red, green, and blue color channels.
var red:Number = (Math.random() * 512) - 255;
var green:Number = (Math.random() * 512) - 255;
var blue:Number = (Math.random() * 512) - 255;
// Create and return a ColorTransform object with the random colors.
return new ColorTransform(1, 1, 1, 1, red, green, blue, 0);
}
Discovering input types
Flash Player 10.1 and later, Adobe AIR 2 and later
The Flash Player 10.1 and Adobe AIR 2 releases introduced the ability to test the runtime environment for support of
specific input types. You can use ActionScript to test if the device on which the runtime is currently deployed:
•Supports stylus or finger input (or no touch input at all).
•Has a virtual or physical keyboard for the user (or no keyboard at all).
•Displays a cursor (if not, then features that are dependent upon having a cursor hover over an object do not work).
The input discovery ActionScript APIs include:
•flash.system.Capabilities.touchscreenType property: A value provided at runtime indicating what input type is
supported in the current environment.
•flash.system.TouchscreenType class: A class of enumeration value constants for the Capabilities.touchscreenType
property.
•flash.ui.Mouse.supportsCursor property: A value provided at runtime indicating if a persistent cursor is available
or not.
•flash.ui.Keyboard.physicalKeyboardType property: A value provided at runtime indicating if a full physical
keyboard is available or a numeric keypad, only, or no keyboard at all.
•flash.ui.KeyboardType class: A class of enumeration value constants for the
flash.ui.Keyboard.physicalKeyboardType property.
•flash.ui.Keyboard.hasVirtualKeyboard property: A value provided at runtime indicating if a virtual keyboard is
provided to the user (either in place of a physical keyboard, or in addition to a physical keyboard).

526
ACTIONSCRIPT 3.0 DEVELOPER’S GUIDE
Basics of user interaction
Last updated 3/21/2011
The input discovery APIs let you take advantage of a user’s device capabilities, or provide alternatives when those
capabilities are not present. These API are especially useful for developing mobile and touch-enabled applications. For
example, if you have an interface for a mobile device that has small buttons for a stylus, you can provide an alternative
interface with larger buttons for a user using finger touches for input. The following code is for an application that has
a function called createStylusUI() that assigns one set of user interface elements appropriate for stylus interaction.
Another function, called createTouchUI(), assigns another set of user interface elements appropriate for finger
interaction:
if(Capabilities.touchscreenType == TouchscreenType.STYLUS ){
//Construct the user interface using small buttons for a stylus
//and allow more screen space for other visual content
createStylusUI();
} else if(Capabilities.touchscreenType = TouchscreenType.FINGER){
//Construct the user interface using larger buttons
//to capture a larger point of contact with the device
createTouchUI();
}
When developing applications for different input environments, consider the following compatibility chart:
Note: Different device platforms can support many combinations of input types. Use this chart as a general guide.
Environment supportsCursor touchscreenType == FINGER touchscreenType == STYLUS touchscreenType == NONE
Traditional Desktop true false false true
Capacitive Touchscreen
Devices (tablets, PDAs, and
phones that detect subtle
human touch, such as the
Apple iPhone or Palm Pre)
false true false false
Resistive Touchscreen
devices (tablets, PDAs, and
phones that detect precise,
high-pressure contact,
such as the HTC Fuze)
false false true false
Non-Touchscreen devices
(feature phones and
devices that run
applications but don’t
have screens that detect
contact)
false false false true

527
Last updated 3/21/2011
Chapter 28: Keyboard input
Flash Player 9 and later, Adobe AIR 1.0 and later
Your application can capture and respond to keyboard input and can manipulate an IME to let users type non-ASCII
text characters in multibyte languages. Note that this section assumes that you are already familiar with the
ActionScript 3.0 event model. For more information, see “Handling events” on page 117.
For information on discovering what kind of keyboard support is available (such as physical, virtual, alphanumeric, or
12-button numeric) during runtime, see “Discovering input types” on page 525.
An Input Method Editor (IME) allows users to type complex characters and symbols using a standard keyboard. You
can use the IME classes to enable users to take advantage of their system IME in your applications.
More Help topics
flash.events.KeyboardEvent
flash.system.IME
Capturing keyboard input
Flash Player 9 and later, Adobe AIR 1.0 and later
Display objects that inherit their interaction model from the InteractiveObject class can respond to keyboard events
by using event listeners. For example, you can place an event listener on the Stage to listen for and respond to keyboard
input. In the following code, an event listener captures a key press, and the key name and key code properties are
displayed:
function reportKeyDown(event:KeyboardEvent):void
{
trace("Key Pressed: " + String.fromCharCode(event.charCode) + " (character code: " +
event.charCode + ")");
}
stage.addEventListener(KeyboardEvent.KEY_DOWN, reportKeyDown);
Some keys, such as the Ctrl key, generate events even though they have no glyph representation.
In the previous code example, the keyboard event listener captured keyboard input for the entire Stage. You can also
write an event listener for a specific display object on the Stage; this event listener is triggered when the object has the
focus.
In the following example, keystrokes are reflected in the Output panel only when the user types inside the TextField
instance. Holding the Shift key down temporarily changes the border color of the TextField to red.
This code assumes there is a TextField instance named tf on the Stage.

528
ACTIONSCRIPT 3.0 DEVELOPER’S GUIDE
Keyboard input
Last updated 3/21/2011
tf.border = true;
tf.type = "input";
tf.addEventListener(KeyboardEvent.KEY_DOWN,reportKeyDown);
tf.addEventListener(KeyboardEvent.KEY_UP,reportKeyUp);
function reportKeyDown(event:KeyboardEvent):void
{
trace("Key Pressed: " + String.fromCharCode(event.charCode) + " (key code: " +
event.keyCode + " character code: " + event.charCode + ")");
if (event.keyCode == Keyboard.SHIFT) tf.borderColor = 0xFF0000;
}
function reportKeyUp(event:KeyboardEvent):void
{
trace("Key Released: " + String.fromCharCode(event.charCode) + " (key code: " +
event.keyCode + " character code: " + event.charCode + ")");
if (event.keyCode == Keyboard.SHIFT)
{
tf.borderColor = 0x000000;
}
}
The TextField class also reports a textInput event that you can listen for when a user enters text. For more
information, see “Capturing text input” on page 356.
Note: In the AIR runtime, a keyboard event can be canceled. In the Flash Player runtime, a keyboard event cannot be
canceled.
Key codes and character codes
Flash Player 9 and later, Adobe AIR 1.0 and later
You can access the keyCode and charCode properties of a keyboard event to determine what key was pressed and then
trigger other actions. The keyCode property is a numeric value that corresponds to the value of a key on the keyboard.
The charCode property is the numeric value of that key in the current character set. (The default character set is UTF-
8, which supports ASCII.)
The primary difference between the key code and character values is that a key code value represents a particular key
on the keyboard (the 1 on a keypad is different than the 1 in the top row, but the key that generates “1” and the key
that generates “!” are the same key) and the character value represents a particular character (the R and r characters
are different).
Note: For the mappings between keys and their character code values in ASCII, see the flash.ui.Keyboard class in the
ActionScript 3.0 Reference for the Adobe Flash Platform.
The mappings between keys and their key codes is dependent on the device and the operating system. For this reason,
you should not use key mappings to trigger actions. Instead, you should use the predefined constant values provided
by the Keyboard class to reference the appropriate keyCode properties. For example, instead of using the key mapping
for the Shift key, use the Keyboard.SHIFT constant (as shown in the preceding code sample).

529
ACTIONSCRIPT 3.0 DEVELOPER’S GUIDE
Keyboard input
Last updated 3/21/2011
KeyboardEvent precedence
Flash Player 9 and later, Adobe AIR 1.0 and later
As with other events, the keyboard event sequence is determined by the display object hierarchy and not the order in
which addEventListener() methods are assigned in code.
For example, suppose you place a text field called tf inside a movie clip called container and add an event listener
for a keyboard event to both instances, as the following example shows:
container.addEventListener(KeyboardEvent.KEY_DOWN,reportKeyDown);
container.tf.border = true;
container.tf.type = "input";
container.tf.addEventListener(KeyboardEvent.KEY_DOWN,reportKeyDown);
function reportKeyDown(event:KeyboardEvent):void
{
trace(event.currentTarget.name + " hears key press: " + String.fromCharCode(event.charCode)
+ " (key code: " + event.keyCode + " character code: " + event.charCode + ")");
}
Because there is a listener on both the text field and its parent container, the reportKeyDown() function is called twice
for every keystroke inside the TextField. Note that for each key pressed, the text field dispatches an event before the
container movie clip dispatches an event.
The operating system and the web browser will process keyboard events before Adobe Flash Player or AIR. For
example, in Microsoft Internet Explorer, pressing Ctrl+W closes the browser window before any contained SWF file
dispatches a keyboard event.
Using the IME class
Flash Player 9 and later, Adobe AIR 1.0 and later
The IME class lets you manipulate the operating system’s IME within Flash Player or Adobe AIR.
Using ActionScript, you can determine the following:
•If an IME is installed on the user's computer (Capabilities.hasIME)
•If the IME is enabled or disabled on the user’s computer (IME.enabled)
•The conversion mode the current IME is using (IME.conversionMode)
You can associate an input text field with a particular IME context. When you switch between input fields, you can
also switch the IME between Hiragana (Japanese), full-width numbers, half-width numbers, direct input, and so on.
An IME lets users type non-ASCII text characters in multibyte languages, such as Chinese, Japanese, and Korean.
For more information on working with IMEs, see the documentation for the operating system for which you are
developing the application. For additional resources, see the following web sites:
•http://www.msdn.microsoft.com/goglobal/
•http://developer.apple.com/documentation/
•http://www.java.sun.com/

530
ACTIONSCRIPT 3.0 DEVELOPER’S GUIDE
Keyboard input
Last updated 3/21/2011
Note: If an IME is not active on the user's computer, calls to IME methods or properties, other than
Capabilities.hasIME, will fail. Once you manually activate an IME, subsequent ActionScript calls to IME methods
and properties will work as expected. For example, if you are using a Japanese IME, you must activate it before you can
call any IME method or property.
Checking if an IME is installed and enabled
Flash Player 9 and later, Adobe AIR 1.0 and later
Before you call any of the IME methods or properties, you should always check to see if the user’s computer currently
has an IME installed and enabled. The following code illustrates how to check that the user has an IME both installed
and active before you call any methods:
if (Capabilities.hasIME)
{
if (IME.enabled)
{
trace("IME is installed and enabled.");
}
else
{
trace("IME is installed but not enabled. Please enable your IME and try again.");
}
}
else
{
trace("IME is not installed. Please install an IME and try again.");
}
The previous code first checks to see if the user has an IME installed using the Capabilities.hasIME property. If this
property is set to true, the code then checks whether the user’s IME is currently enabled, using the IME.enabled
property.
Determining which IME conversion mode is currently enabled
Flash Player 9 and later, Adobe AIR 1.0 and later
When building multilingual applications, you may need to determine which conversion mode the user currently has
active. The following code demonstrates how to check whether the user has an IME installed, and if so, which IME
conversion mode is currently active:

531
ACTIONSCRIPT 3.0 DEVELOPER’S GUIDE
Keyboard input
Last updated 3/21/2011
if (Capabilities.hasIME)
{
switch (IME.conversionMode)
{
case IMEConversionMode.ALPHANUMERIC_FULL:
tf.text = "Current conversion mode is alphanumeric (full-width).";
break;
case IMEConversionMode.ALPHANUMERIC_HALF:
tf.text = "Current conversion mode is alphanumeric (half-width).";
break;
case IMEConversionMode.CHINESE:
tf.text = "Current conversion mode is Chinese.";
break;
case IMEConversionMode.JAPANESE_HIRAGANA:
tf.text = "Current conversion mode is Japananese Hiragana.";
break;
case IMEConversionMode.JAPANESE_KATAKANA_FULL:
tf.text = "Current conversion mode is Japanese Katakana (full-width).";
break;
case IMEConversionMode.JAPANESE_KATAKANA_HALF:
tf.text = "Current conversion mode is Japanese Katakana (half-width).";
break;
case IMEConversionMode.KOREAN:
tf.text = "Current conversion mode is Korean.";
break;
default:
tf.text = "Current conversion mode is " + IME.conversionMode + ".";
break;
}
}
else
{
tf.text = "Please install an IME and try again.";
}
The previous code first checks to see whether the user has an IME installed. Next it checks which conversion mode the
current IME is using by comparing the IME.conversionMode property against each of the constants in the
IMEConversionMode class.
Setting the IME conversion mode
Flash Player 9 and later, Adobe AIR 1.0 and later
When you change the conversion mode of the user’s IME, you need to make sure that the code is wrapped in a
try..catch block, because setting a conversion mode using the conversionMode property can throw an error if the
IME is unable to set the conversion mode. The following code demonstrates how to use a try..catch block when
setting the IME.conversionMode property:

532
ACTIONSCRIPT 3.0 DEVELOPER’S GUIDE
Keyboard input
Last updated 3/21/2011
var statusText:TextField = new TextField;
statusText.autoSize = TextFieldAutoSize.LEFT;
addChild(statusText);
if (Capabilities.hasIME)
{
try
{
IME.enabled = true;
IME.conversionMode = IMEConversionMode.KOREAN;
statusText.text = "Conversion mode is " + IME.conversionMode + ".";
}
catch (error:Error)
{
statusText.text = "Unable to set conversion mode.\n" + error.message;
}
}
The previous code first creates a text field, which is used to display a status message to the user. Next, if the IME is
installed, the code enables the IME and sets the conversion mode to Korean. If the user’s computer does not have a
Korean IME installed, an error is thrown by Flash Player or AIR and is caught by the try..catch block. The
try..catch block displays the error message in the previously created text field.
Disabling the IME for certain text fields
Flash Player 9 and later, Adobe AIR 1.0 and later
In some cases, you may want to disable the user’s IME while they type characters. For example, if you had a text field
that only accepts numeric input, you may not want the IME to come up and slow down data entry.
The following example demonstrates how you can listen for the FocusEvent.FOCUS_IN and FocusEvent.FOCUS_OUT
events and disable the user’s IME accordingly:

533
ACTIONSCRIPT 3.0 DEVELOPER’S GUIDE
Keyboard input
Last updated 3/21/2011
var phoneTxt:TextField = new TextField();
var nameTxt:TextField = new TextField();
phoneTxt.type = TextFieldType.INPUT;
phoneTxt.addEventListener(FocusEvent.FOCUS_IN, focusInHandler);
phoneTxt.addEventListener(FocusEvent.FOCUS_OUT, focusOutHandler);
phoneTxt.restrict = "0-9";
phoneTxt.width = 100;
phoneTxt.height = 18;
phoneTxt.background = true;
phoneTxt.border = true;
addChild(phoneTxt);
nameField.type = TextFieldType.INPUT;
nameField.x = 120;
nameField.width = 100;
nameField.height = 18;
nameField.background = true;
nameField.border = true;
addChild(nameField);
function focusInHandler(event:FocusEvent):void
{
if (Capabilities.hasIME)
{
IME.enabled = false;
}
}
function focusOutHandler(event:FocusEvent):void
{
if (Capabilities.hasIME)
{
IME.enabled = true;
}
}
This example creates two input text fields, phoneTxt and nameTxt, and then adds two event listeners to the phoneTxt
text field. When the user sets focus to the phoneTxt text field, a FocusEvent.FOCUS_IN event is dispatched and the
IME is disabled. When the phoneTxt text field loses focus, the FocusEvent.FOCUS_OUT event is dispatched to re-
enable the IME.
Listening for IME composition events
Flash Player 9 and later, Adobe AIR 1.0 and later
IME composition events are dispatched when a composition string is being set. For example, if the user has their IME
enabled and active and types a string in Japanese, the IMEEvent.IME_COMPOSITION event would dispatch as soon as
the user selects the composition string. In order to listen for the IMEEvent.IME_COMPOSITION event, you need to add
an event listener to the static ime property in the System class
(flash.system.System.ime.addEventListener(...)), as shown in the following example:

534
ACTIONSCRIPT 3.0 DEVELOPER’S GUIDE
Keyboard input
Last updated 3/21/2011
var inputTxt:TextField;
var outputTxt:TextField;
inputTxt = new TextField();
inputTxt.type = TextFieldType.INPUT;
inputTxt.width = 200;
inputTxt.height = 18;
inputTxt.border = true;
inputTxt.background = true;
addChild(inputTxt);
outputTxt = new TextField();
outputTxt.autoSize = TextFieldAutoSize.LEFT;
outputTxt.y = 20;
addChild(outputTxt);
if (Capabilities.hasIME)
{
IME.enabled = true;
try
{
IME.conversionMode = IMEConversionMode.JAPANESE_HIRAGANA;
}
catch (error:Error)
{
outputTxt.text = "Unable to change IME.";
}
System.ime.addEventListener(IMEEvent.IME_COMPOSITION, imeCompositionHandler);
}
else
{
outputTxt.text = "Please install IME and try again.";
}
function imeCompositionHandler(event:IMEEvent):void
{
outputTxt.text = "you typed: " + event.text;
}
The previous code creates two text fields and adds them to the display list. The first text field, inputTxt, is an input
text field that allows the user to enter Japanese text. The second text field, outputTxt, is a dynamic text field that
displays error messages to the user, or echoes the Japanese string that the user types into the inputTxt text field.
Virtual keyboards
Flash Player 10.2 and later, AIR 2.6 and later
Mobile devices, such as phones and tablets, often provide a virtual, software keyboard instead of a physical one. The
classes in the Flash API let you:
•Detect when the virtual keyboard is raised and when it closes.
•Prevent the keyboard from raising.
•Determine the area of the stage obscured by the virtual keyboard.

535
ACTIONSCRIPT 3.0 DEVELOPER’S GUIDE
Keyboard input
Last updated 3/21/2011
•
Create interactive objects that raise the keyboard when they gain focus. (Not supported by AIR applications on iOS.)
•(AIR only) Disable the automatic panning behavior so that your application can modify its own display to
accommodate the keyboard.
Controlling virtual keyboard behavior
The runtime automatically opens the virtual keyboard when the user taps inside a text field or a specially configured
interactive object. When the keyboard opens, the runtime follows the native platform conventions in panning and
resizing the application content so that the user can see the text as they type.
When the keyboard opens, the focused object dispatches the following events in sequence:
softKeyboardActivating event — dispatched immediately before the keyboard begins to rise over the stage. If you
call the preventDefault() method of the dispatched event object, the virtual keyboard does not open.
softKeyboardActivate event — dispatched after softKeyboardActivating event handling has completed. When
the focused object dispatches this event, the softKeyboardRect property of the Stage object has been updated to
reflect the area of the stage obscured by the virtual keyboard. This event cannot be canceled.
Note: If the keyboard changes size, for example, when the user changes the keyboard type, the focused object dispatches a
second softKeyboardActivate event.
softKeyboardDeactivate event — dispatched when the virtual keyboard closes for any reason. This event cannot be
canceled.
The following example adds two TextField objects on the stage. The upper TextField prevents the keyboard from
raising when you tap the field and closes it if it is already raised. The lower TextField demonstrates the default behavior.
The example reports the soft keyboard events dispatched by both text fields.
package
{
import flash.display.Sprite;
import flash.text.TextField;
import flash.text.TextFieldType;
import flash.events.SoftKeyboardEvent;
public class SoftKeyboardEventExample extends Sprite
{
private var tf1:TextField = new TextField();
private var tf2:TextField = new TextField();
public function SoftKeyboardEventExample()
{
tf1.width = this.stage.stageWidth;
tf1.type = TextFieldType.INPUT;
tf1.border = true;
this.addChild( tf1 );
tf1.addEventListener( SoftKeyboardEvent.SOFT_KEYBOARD_ACTIVATING, preventSoftKe
yboard );
tf1.addEventListener( SoftKeyboardEvent.SOFT_KEYBOARD_ACTIVATE, preventSoftKe
yboard );
tf1.addEventListener( SoftKeyboardEvent.SOFT_KEYBOARD_DEACTIVATE, preventSoftKeyboard
);
tf2.border = true;
tf2.type = TextFieldType.INPUT;

536
ACTIONSCRIPT 3.0 DEVELOPER’S GUIDE
Keyboard input
Last updated 3/21/2011
tf2.width = this.stage.stageWidth;
tf2.y = tf1.y + tf1.height + 30;
this.addChild( tf2 );
tf2.addEventListener( SoftKeyboardEvent.SOFT_KEYBOARD_ACTIVATING, allowSoftKeyboard );
tf2.addEventListener( SoftKeyboardEvent.SOFT_KEYBOARD_ACTIVATE, allowSoftKeyboard );
tf2.addEventListener( SoftKeyboardEvent.SOFT_KEYBOARD_DEACTIVATE, allowSoftKeyboard);
}
private function preventSoftKeyboard( event:SoftKeyboardEvent ):void
{
event.preventDefault();
this.stage.focus = null; //close the keyboard, if raised
trace( "tf1 dispatched: " + event.type + " -- " + event.triggerType );
}
private function allowSoftKeyboard( event:SoftKeyboardEvent ) :void
{
trace( "tf2 dispatched: " + event.type + " -- " + event.triggerType );
}
}
}
Adding virtual keyboard support for interactive objects
Flash Player 10.2 and later, AIR 2.6 and later (but not supported on iOS)
Normally, the virtual keyboard only opens when a TextField object is tapped. You can configure an instance of the
InteractiveObject class to open the virtual keyboard when it receives focus.
To configure an InteractiveObject instance to open the soft keyboard, set its needsSoftKeyboard property to true.
Whenever the object is assigned to the stage focus property, the soft keyboard automatically opens. In addition, you
can raise the keyboard by calling the requestSoftKeyboard() method of the InteractiveObject.
The following example illustrates how you can program an InteractiveObject to act as a text entry field. The TextInput
class shown in the example sets the needsSoftKeyboard property so that the keyboard is raised when needed. The
object then listens for keyDown events and inserts the typed character into the field.
The example uses the Flash text engine to append and display any typed text and handles some important events. For
simplicity, the example does not implement a full-featured text field.

537
ACTIONSCRIPT 3.0 DEVELOPER’S GUIDE
Keyboard input
Last updated 3/21/2011
package {
import flash.geom.Rectangle;
import flash.display.Sprite;
import flash.text.engine.TextElement;
import flash.text.engine.TextBlock;
import flash.events.MouseEvent;
import flash.events.FocusEvent;
import flash.events.KeyboardEvent;
import flash.text.engine.TextLine;
import flash.text.engine.ElementFormat;
import flash.events.Event;
public class TextInput extends Sprite
{
public var text:String = " ";
public var textSize:Number = 24;
public var textColor:uint = 0x000000;
private var _bounds:Rectangle = new Rectangle( 0, 0, 100, textSize );
private var textElement: TextElement;
private var textBlock:TextBlock = new TextBlock();
public function TextInput( text:String = "" )
{
this.text = text;
this.scrollRect = _bounds;
this.focusRect= false;
//Enable keyboard support
this.needsSoftKeyboard = true;
this.addEventListener(MouseEvent.MOUSE_DOWN, onSelect);
this.addEventListener(FocusEvent.FOCUS_IN, onFocusIn);
this.addEventListener(FocusEvent.FOCUS_OUT, onFocusOut);
//Setup text engine
textElement = new TextElement( text, new ElementFormat( null, textSize, textColor ) );
textBlock.content = textElement;
var firstLine:TextLine = textBlock.createTextLine( null, _bounds.width - 8 );
firstLine.x = 4;
firstLine.y = 4 + firstLine.totalHeight;
this.addChild( firstLine );
}
private function onSelect( event:MouseEvent ):void
{
stage.focus = this;
}
private function onFocusIn( event:FocusEvent ):void
{
this.addEventListener( KeyboardEvent.KEY_DOWN, onKey );
}
private function onFocusOut( event:FocusEvent ):void
{
this.removeEventListener( KeyboardEvent.KEY_UP, onKey );
}

538
ACTIONSCRIPT 3.0 DEVELOPER’S GUIDE
Keyboard input
Last updated 3/21/2011
private function onKey( event:KeyboardEvent ):void
{
textElement.replaceText( textElement.text.length, textElement.text.length,
String.fromCharCode( event.charCode ) );
updateText();
}
public function set bounds( newBounds:Rectangle ):void
{
_bounds = newBounds.clone();
drawBackground();
updateText();
this.scrollRect = _bounds;
//force update to focus rect, if needed
if( this.stage!= null && this.focusRect && this.stage.focus == this )
this.stage.focus = this;
}
private function updateText():void
{
//clear text lines
while( this.numChildren > 0 ) this.removeChildAt( 0 );
//and recreate them
var textLine:TextLine = textBlock.createTextLine( null, _bounds.width - 8);
while ( textLine)
{
textLine.x = 4;
if( textLine.previousLine != null )
{
textLine.y = textLine.previousLine.y +
textLine.previousLine.totalHeight + 2;
}
else
{
textLine.y = 4 + textLine.totalHeight;
}
this.addChild(textLine);
textLine = textBlock.createTextLine(textLine, _bounds.width - 8 );
}
}
private function drawBackground():void
{
//draw background and border for the field
this.graphics.clear();
this.graphics.beginFill( 0xededed );
this.graphics.lineStyle( 1, 0x000000 );
this.graphics.drawRect( _bounds.x + 2, _bounds.y + 2, _bounds.width - 4,
_bounds.height - 4);
this.graphics.endFill();
}
}
}

539
ACTIONSCRIPT 3.0 DEVELOPER’S GUIDE
Keyboard input
Last updated 3/21/2011
The following main application class illustrates how to use the TextInput class and manage the application layout when
the keyboard is raised or the device orientation changes. The main class creates a TextInput object and sets its bounds
to fill the stage. The class adjusts the size of the TextInput object when either the soft keyboard is raised or the stage
changes size. The class listens for soft keyboard events from the TextInput object and resize events from the stage.
Irrespective of the cause of the event, the application determines the visible area of the stage and resizes the input
control to fill it. Naturally, in a real application, you would need a more sophisticated layout algorithm.
package {
import flash.display.MovieClip;
import flash.events.SoftKeyboardEvent;
import flash.geom.Rectangle;
import flash.events.Event;
import flash.display.StageScaleMode;
import flash.display.StageAlign;
public class CustomTextField extends MovieClip {
private var customField:TextInput = new TextInput("Input text: ");
public function CustomTextField() {
this.stage.scaleMode = StageScaleMode.NO_SCALE;
this.stage.align = StageAlign.TOP_LEFT;
this.addChild( customField );
customField.bounds = new Rectangle( 0, 0, this.stage.stageWidth,
this.stage.stageHeight );
//track soft keyboard and stage resize events
customField.addEventListener(SoftKeyboardEvent.SOFT_KEYBOARD_ACTIVATE,
onDisplayAreaChange );
customField.addEventListener(SoftKeyboardEvent.SOFT_KEYBOARD_DEACTIVATE,
onDisplayAreaChange );
this.stage.addEventListener( Event.RESIZE, onDisplayAreaChange );
}
private function onDisplayAreaChange( event:Event ):void
{
//Fill the stage if possible, but avoid the area covered by a keyboard
var desiredBounds = new Rectangle( 0, 0, this.stage.stageWidth,
this.stage.stageHeight );
if( this.stage.stageHeight - this.stage.softKeyboardRect.height <
desiredBounds.height )
desiredBounds.height = this.stage.stageHeight -
this.stage.softKeyboardRect.height;
customField.bounds = desiredBounds;
}
}
}
Note: The stage only dispatches resize events in response to an orientation change when the scaleMode property is set to
noScale. In other modes, the dimensions of the stage do not change; instead, the content is scaled to compensate.

540
ACTIONSCRIPT 3.0 DEVELOPER’S GUIDE
Keyboard input
Last updated 3/21/2011
Handling application display changes
AIR 2.6 and later
In AIR, you can turn off the default panning and resizing behavior associated with raising a soft keyboard by setting
the softKeyboardBehavior element in the application descriptor to none:
<softKeyboardBehavior>none</softKeyboardBehavior>
When you turn off the automatic behavior, it is your application’s responsibility to make any necessary adjustments
to the application display. A softKeyboardActivate event is dispatched when the keyboard opens. When the
softKeyboardActivate event is dispatched, the softKeyboardRect property of the stage contains the dimensions
of the area obscured by the open keyboard. Use these dimensions to move or resize your content so that it is displayed
properly while the keyboard is open and the user is typing. (When the keyboard is closed, the dimensions of the
softKeyboardRect rectangle are all zero.)
When the keyboard closes, a softKeyboardDeactivate event is dispatched, and you can return the application
display to normal.
package {
import flash.display.MovieClip;
import flash.events.SoftKeyboardEvent;
import flash.events.Event;
import flash.display.StageScaleMode;
import flash.display.StageAlign;
import flash.display.InteractiveObject;
import flash.text.TextFieldType;
import flash.text.TextField;
public class PanningExample extends MovieClip {
private var textField:TextField = new TextField();
public function PanningExample() {
this.stage.scaleMode = StageScaleMode.NO_SCALE;
this.stage.align = StageAlign.TOP_LEFT;
textField.y = this.stage.stageHeight - 201;
textField.width = this.stage.stageWidth;
textField.height = 200;
textField.type = TextFieldType.INPUT;
textField.border = true;
textField.wordWrap = true;
textField.multiline = true;
this.addChild( textField );
//track soft keyboard and stage resize events
textField.addEventListener(SoftKeyboardEvent.SOFT_KEYBOARD_ACTIVATE,
onKeyboardChange );
textField.addEventListener(SoftKeyboardEvent.SOFT_KEYBOARD_DEACTIVATE,
onKeyboardChange );
this.stage.addEventListener( Event.RESIZE, onDisplayAreaChange );
}
private function onDisplayAreaChange( event:Event ):void
{

541
ACTIONSCRIPT 3.0 DEVELOPER’S GUIDE
Keyboard input
Last updated 3/21/2011
textField.y = this.stage.stageHeight - 201;
textField.width = this.stage.stageWidth;
}
private function onKeyboardChange( event:SoftKeyboardEvent ):void
{
var field:InteractiveObject = textField;
var offset:int = 0;
//if the softkeyboard is open and the field is at least partially covered
if( (this.stage.softKeyboardRect.y != 0) && (field.y + field.height >
this.stage.softKeyboardRect.y) )
offset = field.y + field.height - this.stage.softKeyboardRect.y;
//but don't push the top of the field above the top of the screen
if( field.y - offset < 0 ) offset += field.y - offset;
this.y = -offset;
}
}
}
Note: On Android, there are circumstances, including fullscreen mode, in which the exact dimensions of the keyboard are
not available from the operating system. In these cases, the size is estimated. Also, in landscape orientations, the native
fullscreen IME keyboard is used for all text entry. This IME keyboard has a built-in text entry field and obscures the entire
stage. There is no way to display a landscape keyboard that does not fill the screen.

542
Last updated 3/21/2011
Chapter 29: Mouse input
Flash Player 9 and later, Adobe AIR 1.0 and later
Your application can create interactivity by capturing and responding to mouse input. Note that this section assumes
that you are already familiar with the ActionScript 3.0 event model. For more information, see “Handling events” on
page 117.
For information on discovering what kind of mouse support is available (such as persistent cursor, stylus or touch
input) during runtime, see “Discovering input types” on page 525.
More Help topics
flash.ui.Mouse
flash.events.MouseEvent
“Touch, multitouch and gesture input” on page 548
Capturing mouse input
Flash Player 9 and later, Adobe AIR 1.0 and later
Mouse clicks create mouse events that can be used to trigger interactive functionality. You can add an event listener to
the Stage to listen for mouse events that occur anywhere within the SWF file. You can also add event listeners to objects
on the Stage that inherit from InteractiveObject (for example, Sprite or MovieClip); these listeners are triggered when
the object is clicked.
As with keyboard events, mouse events bubble. In the following example, because square is a child of the Stage, the
event dispatches both from the sprite square as well as from the Stage object when the square is clicked:
var square:Sprite = new Sprite();
square.graphics.beginFill(0xFF0000);
square.graphics.drawRect(0,0,100,100);
square.graphics.endFill();
square.addEventListener(MouseEvent.CLICK, reportClick);
square.x =
square.y = 50;
addChild(square);
stage.addEventListener(MouseEvent.CLICK, reportClick);
function reportClick(event:MouseEvent):void
{
trace(event.currentTarget.toString() + " dispatches MouseEvent. Local coords [" +
event.localX + "," + event.localY + "] Stage coords [" + event.stageX + "," + event.stageY + "]");
}

543
ACTIONSCRIPT 3.0 DEVELOPER’S GUIDE
Mouse input
Last updated 3/21/2011
In the previous example, notice that the mouse event contains positional information about the click. The localX and
localY properties contain the location of the click on the lowest child in the display chain. For example, clicking at
the top-left corner of square reports local coordinates of [0,0] because that is the registration point of square.
Alternatively, the stageX and stageY properties refer to the global coordinates of the click on the Stage. The same
click reports [50,50] for these coordinates, because square was moved to these coordinates. Both of these coordinate
pairs can be useful depending on how you want to respond to user interaction.
The MouseEvent object also contains altKey, ctrlKey, and shiftKey Boolean properties. You can use these
properties to check if the Alt, Ctrl, or Shift key is also being pressed at the time of the mouse click.
Dragging Sprites around the stage
Flash Player 9 and later, Adobe AIR 1.0 and later
You can allow users to drag a Sprite object around the stage using the startDrag() method of the Sprite class. The
following code shows an example of this:
import flash.display.Sprite;
import flash.events.MouseEvent;
var circle:Sprite = new Sprite();
circle.graphics.beginFill(0xFFCC00);
circle.graphics.drawCircle(0, 0, 40);
var target1:Sprite = new Sprite();
target1.graphics.beginFill(0xCCFF00);
target1.graphics.drawRect(0, 0, 100, 100);
target1.name = "target1";
var target2:Sprite = new Sprite();
target2.graphics.beginFill(0xCCFF00);
target2.graphics.drawRect(0, 200, 100, 100);
target2.name = "target2";
addChild(target1);
addChild(target2);
addChild(circle);
circle.addEventListener(MouseEvent.MOUSE_DOWN, mouseDown)
function mouseDown(event:MouseEvent):void
{
circle.startDrag();
}
circle.addEventListener(MouseEvent.MOUSE_UP, mouseReleased);
function mouseReleased(event:MouseEvent):void
{
circle.stopDrag();
trace(circle.dropTarget.name);
}
For more details, see the section on creating mouse drag interaction in “Changing position” on page 164.

544
ACTIONSCRIPT 3.0 DEVELOPER’S GUIDE
Mouse input
Last updated 3/21/2011
Drag-and-drop in AIR
In Adobe AIR, you can enable drag-and-drop support to allow users to drag data into and out of your application. For
more details, see “Drag and drop in AIR” on page 575.
Customizing the mouse cursor
Flash Player 9 and later, Adobe AIR 1.0 and later
The mouse cursor (mouse pointer) can be hidden or swapped for any display object on the Stage. To hide the mouse
cursor, call the Mouse.hide() method. Customize the cursor by calling Mouse.hide(), listening to the Stage for the
MouseEvent.MOUSE_MOVE event, and setting the coordinates of a display object (your custom cursor) to the stageX
and stageY properties of the event. The following example illustrates a basic execution of this task:
var cursor:Sprite = new Sprite();
cursor.graphics.beginFill(0x000000);
cursor.graphics.drawCircle(0,0,20);
cursor.graphics.endFill();
addChild(cursor);
stage.addEventListener(MouseEvent.MOUSE_MOVE,redrawCursor);
Mouse.hide();
function redrawCursor(event:MouseEvent):void
{
cursor.x = event.stageX;
cursor.y = event.stageY;
}
Mouse input example: WordSearch
Flash Player 9 and later, Adobe AIR 1.0 and later
This example demonstrates user interaction by handling mouse events. Users build as many words as possible from a
random grid of letters, spelling by moving horizontally or vertically in the grid, but never using the same letter
twice.This example demonstrates the following features of ActionScript 3.0:
•Building a grid of components dynamically
•Responding to mouse events
•Maintaining a score based on user interaction
To get the application files for this sample, see www.adobe.com/go/learn_programmingAS3samples_flash. The
WordSearch application files can be found in the folder Samples/WordSearch. The application consists of the
following files:

545
ACTIONSCRIPT 3.0 DEVELOPER’S GUIDE
Mouse input
Last updated 3/21/2011
Loading a dictionary
Flash Player 9 and later, Adobe AIR 1.0 and later
To create a game that involves finding words, a dictionary is needed. The example includes a text file called
dictionary.txt that contains a list of words separated by carriage returns. After creating an array named words, the
loadDictionary() function requests this file, and when it loads successfully, the file becomes a long string. You can
parse this string into an array of words by using the split() method, breaking at each instance of a carriage return
(character code 10) or new line (character code 13). This parsing occurs in the dictionaryLoaded() function:
words = dictionaryText.split(String.fromCharCode(13, 10));
Creating the user interface
Flash Player 9 and later, Adobe AIR 1.0 and later
After the words have been stored, you can set up the user interface. Create two Button instances: one for submitting a
word, and another for clearing a word that is currently being spelled. In each case, you must respond to user input by
listening to the MouseEvent.CLICK event that the button broadcasts and then calling a function. In the setupUI()
function, this code creates the listeners on the two buttons:
submitWordButton.addEventListener(MouseEvent.CLICK,submitWord);
clearWordButton.addEventListener(MouseEvent.CLICK,clearWord);
Generating a game board
Flash Player 9 and later, Adobe AIR 1.0 and later
The game board is a grid of random letters. In the generateBoard() function, a two-dimensional grid is created by
nesting one loop inside another. The first loop increments rows and the second increments the total number of
columns per row. Each of the cells created by these rows and columns contains a button that represents a letter on the
board.
File Description
WordSearch.as The class that provides the main functionality of the application.
WordSearch.fla
or
WordSearch.mxml
The main application file for Flex (MXML) or Flash (FLA).
dictionary.txt A file used to determine if spelled words are scorable and spelled correctly.

546
ACTIONSCRIPT 3.0 DEVELOPER’S GUIDE
Mouse input
Last updated 3/21/2011
private function generateBoard(startX:Number, startY:Number, totalRows:Number,
totalCols:Number, buttonSize:Number):void
{
buttons = new Array();
var colCounter:uint;
var rowCounter:uint;
for (rowCounter = 0; rowCounter < totalRows; rowCounter++)
{
for (colCounter = 0; colCounter < totalCols; colCounter++)
{
var b:Button = new Button();
b.x = startX + (colCounter*buttonSize);
b.y = startY + (rowCounter*buttonSize);
b.addEventListener(MouseEvent.CLICK, letterClicked);
b.label = getRandomLetter().toUpperCase();
b.setSize(buttonSize,buttonSize);
b.name = "buttonRow"+rowCounter+"Col"+colCounter;
addChild(b);
buttons.push(b);
}
}
}
Although a listener is added for a MouseEvent.CLICK event on only one line, because it is in a for loop, it is assigned
to each Button instance. Also, each button is assigned a name derived from its row and column position, which
provides an easy way to reference the row and column of each button later in the code.
Building words from user input
Flash Player 9 and later, Adobe AIR 1.0 and later
Words can be spelled by selecting letters that are vertically or horizontally adjacent, but never using the same letter
twice. Each click generates a mouse event, at which point the word the user is spelling must be checked to ensure it
properly continues from letters that have previously been clicked. If it is not, the previous word is removed and a new
one is started. This check occurs in the isLegalContinuation() method.
private function isLegalContinuation(prevButton:Button, currButton:Button):Boolean
{
var currButtonRow:Number = Number(currButton.name.charAt(currButton.name. indexOf("Row") +
3));
var currButtonCol:Number = Number(currButton.name.charAt(currButton.name.indexOf("Col") +
3));
var prevButtonRow:Number = Number(prevButton.name.charAt(prevButton.name.indexOf("Row") +
3));
var prevButtonCol:Number = Number(prevButton.name.charAt(prevButton.name.indexOf("Col") +
3));
return ((prevButtonCol == currButtonCol && Math.abs(prevButtonRow - currButtonRow) <= 1) ||
(prevButtonRow == currButtonRow && Math.abs(prevButtonCol - currButtonCol) <= 1));
}

547
ACTIONSCRIPT 3.0 DEVELOPER’S GUIDE
Mouse input
Last updated 3/21/2011
The charAt() and indexOf() methods of the String class retrieve the appropriate rows and columns from both the
currently clicked button and the previously clicked button. The isLegalContinuation() method returns true if the
row or column is unchanged and if the row or column that has been changed is within a single increment from the
previous one. If you want to change the rules of the game and allow diagonal spelling, you can remove the checks for
an unchanged row or column and the final line would look like this:
return (Math.abs(prevButtonRow - currButtonRow) <= 1) && Math.abs(prevButtonCol -
currButtonCol) <= 1));
Checking word submissions
Flash Player 9 and later, Adobe AIR 1.0 and later
To complete the code for the game, mechanisms for checking word submissions and tallying the score are needed. The
searchForWord() method contains both:
private function searchForWord(str:String):Number
{
if (words && str)
{
var i:uint = 0
for (i = 0; i < words.length; i++)
{
var thisWord:String = words[i];
if (str == words[i])
{
return i;
}
}
return -1;
}
else
{
trace("WARNING: cannot find words, or string supplied is null");
}
return -1;
}
This function loops through all of the words in the dictionary. If the user’s word matches a word in the dictionary, its
position in the dictionary is returned. The submitWord() method then checks the response and updates the score if
the position is valid.
Customization
Flash Player 9 and later, Adobe AIR 1.0 and later
At the beginning of the class are several constants. You can modify this game by modifying these variables. For
example, you can change the amount of time available to play by increasing the TOTAL_TIME variable. You can also
increase the PERCENT_VOWELS variable slightly to increase the likelihood of finding words.

548
Last updated 3/21/2011
Chapter 30: Touch, multitouch and gesture
input
Flash Player 10.1 and later, Adobe AIR 2 and later
The touch event handling features of the Flash Platform include input from a single point of contact or multiple points
of contact on touch-enabled devices. And, the Flash runtimes handle events that combine multiple touch points with
movement to create a gesture. In other words, Flash runtimes interpret two types of input:
Touch input with a single point device such as a finger, stylus, or other tool on a touch-enabled device. Some devices
support multiple simultaneous points of contact with a finger or stylus.
Multitouch input with more than one simultaneous point of contact.
Gesture Input interpreted by a device or operating system in response to one or more touch events. For example, a
user rotates two fingers simultaneously, and the device or operating system interprets that touch input as a rotation
gesture. Some gestures are performed with one finger or touch point, and some gestures require multiple touch points.
The device or operating system establishes the type of gesture to assign to the input.
Both touch and gesture input can be multitouch input depending on the user’s device. ActionScript provides API for
handling touch events, gesture events, and individually tracked touch events for multitouch input.
Note: Listening for touch and gesture events can consume a significant amount of processing resources (equivalent to
rendering several frames per second), depending on the computing device and operating system. It is often better to use
mouse events when you do not actually need the extra functionality provided by touch or gestures. When you do use touch
or gesture events, consider reducing the amount of graphical changes that can occur, especially when such events can be
dispatched rapidly, as during a pan, rotate, or zoom operation. For example, you could stop animation within a
component while the user resizes it using a zoom gesture.
More Help topics
flash.ui.Multitouch
flash.events.TouchEvent
flash.events.GestureEvent
flash.events.TransformGestureEvent
flash.events.GesturePhase
flash.events.PressAndTapGestureEvent
Paul Trani: Touch Events and Gestures on Mobile

549
ACTIONSCRIPT 3.0 DEVELOPER’S GUIDE
Touch, multitouch and gesture input
Last updated 3/21/2011
Basics of touch input
Flash Player 10.1 and later, Adobe AIR 2 and later
When the Flash Platform is running in an environment that supports touch input, InteractiveObject instances can
listen for touch events and call handlers. Generally, you handle touch, multitouch, and gesture events as you would
other events in ActionScript (see “Handling events” on page 117 for basic information about event handling with
ActionScript).
However, for the Flash runtime to interpret a touch or gesture, the runtime must be running in a hardware and
software environment that supports touch or multitouch input. See “Discovering input types” on page 525 for a chart
comparing different touch screen types. Additionally, if the runtime is running within a container application (such
as a browser), then that container passes the input to the runtime. In some cases, the current hardware and operating
system environment support multitouch, but the browser containing the Flash runtime interprets the input and does
not pass it on to the runtime. Or, it can simply ignore the input altogether.
The following diagram shows the flow of input from user to runtime:
Flow of input from user to the Flash Platform runtime
Fortunately, the ActionScript API for developing touch applications includes classes, methods, and properties to
determine the support for touch or multitouch input in the runtime environment. The API you use to determine
support for touch input are the “discovery API” for touch event handling.
Important concepts and terms
The following reference list contains important terms for writing touch event-handling applications:
Discovery API The methods and properties used to test the runtime environment for support of touch events and
different modes of input.
Touch event An input action performed on a touch-enabled device using a single point of contact.
Touch point The point of contact for a single touch event. Even if a device does not support gesture input, it might
support multiple simultaneous touch points.
Touch sequence The series of events representing the lifespan of a single touch. These events include one beginning,
zero or more moves, and one end.
Multitouch event An input action performed on a touch-enabled device using several points of contact (such as more
than one finger).
Gesture event An input action performed on a touch-enabled device tracing some complex movement. For example,
one gesture is touching a screen with two fingers and moving them simultaneously around the perimeter of an abstract
circle to indicate rotation.
Phases Distinct points of time in the event flow (such as begin and end).
Stylus An instrument for interacting with a touch-enabled screen. A stylus can provide more precision than the
human finger. Some devices recognize only input from a specific type of stylus. Devices that do recognize stylus input
might not recognize multiple, simultaneous points of contact or finger contact.
User Device Operating
system
Application
container
(i.e. browser)
Flash
runtime

550
ACTIONSCRIPT 3.0 DEVELOPER’S GUIDE
Touch, multitouch and gesture input
Last updated 3/21/2011
Press-and-tap A specific type of multitouch input gesture where the user pushes a finger against a touch-enabled
device and then taps with another finger or pointing device. This gesture is often used to simulate a mouse right-click
in multitouch applications.
The touch input API structure
The ActionScript touch input API is designed to address the fact that touch input handling depends on the hardware
and software environment of the Flash runtime. The touch input API primarily addresses three needs of touch
application development: discovery, events, and phases. Coordinate these API to produce a predictable and responsive
experience for the user; even if the target device is unknown as you develop an application.
Discovery
The discovery API provides the ability to test the hardware and software environment at runtime. The values
populated by the runtime determine the touch input available to the Flash runtime in its current context. Also, use the
collection of discovery properties and methods to set your application to react to mouse events (instead of touch events
in case some touch input is not supported by the environment). For more information, see “Touch support discovery”
on page 551.
Events
ActionScript manages touch input events with event listeners and event handlers as it does other events. However,
touch input event handling also must take into account:
•A touch can be interpreted in several ways by the device or operating system, either as a sequence of touches or,
collectively, as a gesture.
•A single touch to a touch-enabled device (by a finger, stylus or pointing device) always dispatches a mouse event,
too. You can handle the mouse event with the event types in the MouseEvent class. Or, you can design your
application only to respond to touch events. Or, you can design an application that responds to both.
•An application can respond to multiple, simultaneous touch events, and handle each one separately.
Typically, use the discovery API to conditionally handle the events your application handles, and how they are
handled. Once the application knows the runtime environment, it can call the appropriate handler or establish the
correct event object when the user interacts with the application. Or, the application can indicate that specific input
cannot be handled in the current environment and provide the user with an alternative or information. For more
information, see “Touch event handling” on page 552 and “Gesture event handling” on page 556.
Phases
For touch and multitouch applications, touch event objects contain properties to track the phases of user interaction.
Write ActionScript to handle phases like the begin, update, or end phase of user input to provide the user with
feedback. Respond to event phases so visual objects change as the user touch and moves the point of touch on a screen.
Or, use the phases to track specific properties of a gesture, as the gesture evolves.
For touch point events, track how long the user rests on a specific interactive object. An application can track multiple,
simultaneous touch points’ phases individually, and handle each accordingly.
For a gesture, interpret specific information about the transformation of the gesture as it occurs. Track the coordinates
of the point of contact (or several) as they move across the screen.

551
ACTIONSCRIPT 3.0 DEVELOPER’S GUIDE
Touch, multitouch and gesture input
Last updated 3/21/2011
Touch support discovery
Flash Player 10.1 and later, Adobe AIR 2 and later
Use the Multitouch class properties to set the scope of touch input your application handles. Then, test the
environment to ensure that support exists for the events your ActionScript handles. Specifically, first establish the type
of touch input for your application. The options are: touch point, gesture, or none (interpret all touch input as mouse
clicks and use mouse event handlers, only). Then, use the properties and methods of the Multitouch class to make sure
that the runtime is in an environment that supports the touch input your application requires. Test the runtime
environment for support of the types of touch input (such as whether it can interpret gestures), and respond
accordingly.
Note: The Multitouch class properties are static properties, and do not belong to instances of any class. Use them with the
syntax Multitouch.property, for example:
var touchSupport:Boolean = Multitouch.supportsTouchEvents;
Set the input type
The Flash runtime must know the type of touch input to interpret, because a touch event can have many elements or
phases. If a finger simply touches a touch-enabled screen, does the runtime dispatch a touch event? Or does it wait for
a gesture? Or does the runtime track the touch as a mouse-down event? An application that supports touch input must
establish the type of touch events it handles for the Flash runtime. Use the Multitouch.inputMode property to
establish the type of touch input for the runtime. The input mode can be one of three options:
None No special handling is provided for touch events. Set: Multitouch.inputMode=MultitouchInputMode.NONE
and use the MouseEvent class to handle input.
Single touch points All touch input is interpreted, individually, and all touch points can be tracked and handled. Set:
Multitouch.inputMode=MultitouchInputMode.TOUCH_POINT and use the TouchEvent class to handle input.
Gesture input The device or operating system interprets input as a complex form of finger movement across the
screen. The device or operating system collectively assigns the movement to a single gesture input event. Set:
Multitouch.inputMode=MultitouchInputMode.GESTURE and use the TransformGestureEvent,
PressAndTapGestureEvent, or GestureEvent classes to handle input.
See “Touch event handling” on page 552 for an example that uses the Multitouch.inputMode property to set the
input type before handling a touch event.
Test for touch input support
Other properties of the Multitouch class provide values for fine-tuning your application to the current environment’s
touch support. The Flash runtime populates values for the number of simultaneous touch points allowed or gestures
available. If the runtime is in an environment that does not support the touch event handling your application needs,
provide the user with an alternative. For example, provide mouse event handling or information about what features
are available, or not, in the current environment.
You can also use the API for keyboard, touch, and mouse support, see “Discovering input types” on page 525.
For more information about compatibility testing, see “Troubleshooting” on page 560.

552
ACTIONSCRIPT 3.0 DEVELOPER’S GUIDE
Touch, multitouch and gesture input
Last updated 3/21/2011
Touch event handling
Flash Player 10.1 and later, Adobe AIR 2 and later
Basic touch events are handled the same way you handle other events, like mouse events, in ActionScript. You can
listen for a series of touch events defined by the event type constants in the TouchEvent class.
Note: For multiple touch point input (such as touching a device with more than one finger), the first point of contact
dispatches a mouse event and a touch event.
To handle a basic touch event:
1Set your application to handle touch events by setting the flash.ui.Multitouch.inputMode property to
MultitouchInputMode.TOUCH_POINT.
2Attach an event listener to an instance of a class that inherits properties from the InteractiveObject class, such as
Sprite or TextField.
3Specify the type of touch event to handle.
4Call an event handler function to do something in response to the event.
For example, the following code displays a message when the square drawn on mySprite is tapped on a touch-enabled
screen:
Multitouch.inputMode=MultitouchInputMode.TOUCH_POINT;
var mySprite:Sprite = new Sprite();
var myTextField:TextField = new TextField();
mySprite.graphics.beginFill(0x336699);
mySprite.graphics.drawRect(0,0,40,40);
addChild(mySprite);
mySprite.addEventListener(TouchEvent.TOUCH_TAP, taphandler);
function taphandler(evt:TouchEvent): void {
myTextField.text = "I've been tapped";
myTextField.y = 50;
addChild(myTextField);
}
Touch Event properties
When an event occurs, an event object is created. The TouchEvent object contains information about the location and
conditions of the touch event. You can use the properties of the event object to retrieve that information.
For example, the following code creates a TouchEvent object evt, and then displays the stageX property of the event
object (the x-coordinate of the point in the Stage space that the touch occurred) in the text field:

553
ACTIONSCRIPT 3.0 DEVELOPER’S GUIDE
Touch, multitouch and gesture input
Last updated 3/21/2011
Multitouch.inputMode=MultitouchInputMode.TOUCH_POINT;
var mySprite:Sprite = new Sprite();
var myTextField:TextField = new TextField();
mySprite.graphics.beginFill(0x336699);
mySprite.graphics.drawRect(0,0,40,40);
addChild(mySprite);
mySprite.addEventListener(TouchEvent.TOUCH_TAP, taphandler);
function taphandler(evt:TouchEvent): void {
myTextField.text = evt.stageX.toString;
myTextField.y = 50;
addChild(myTextField);
}
See the TouchEvent class for the properties available through the event object.
Note: Not all TouchEvent properties are supported in all runtime environments. For example, not all touch-enabled
devices are capable or detecting the amount of pressure the user is applying to the touch screen. So, the
TouchEvent.pressure property is not supported on those devices. Try testing for specific property support to ensure
your application works, and see “Troubleshooting” on page 560 for more information.
Touch event phases
Track touch events through various stages over and outside an InteractiveObject just as you do for mouse events. And,
track touch events through the beginning, middle, and end of a touch interaction. The TouchEvent class provides
values for handling touchBegin, touchMove, and touchEnd events.
For example, you could use touchBegin, touchMove, and touchEnd events to give the user visual feedback as they
touch and move a display object:
Multitouch.inputMode = MultitouchInputMode.TOUCH_POINT;
var mySprite:Sprite = new Sprite();
mySprite.graphics.beginFill(0x336699);
mySprite.graphics.drawRect(0,0,40,40);
addChild(mySprite);
var myTextField:TextField = new TextField();
myTextField.width = 200;
myTextField.height = 20;
addChild(myTextField);
mySprite.addEventListener(TouchEvent.TOUCH_BEGIN, onTouchBegin);
stage.addEventListener(TouchEvent.TOUCH_MOVE, onTouchMove);
stage.addEventListener(TouchEvent.TOUCH_END, onTouchEnd);
function onTouchBegin(event:TouchEvent) {
myTextField.text = "touch begin" + event.touchPointID;
}
function onTouchMove(event:TouchEvent) {
myTextField.text = "touch move" + event.touchPointID;
}
function onTouchEnd(event:TouchEvent) {
myTextField.text = "touch end" + event.touchPointID;
}

554
ACTIONSCRIPT 3.0 DEVELOPER’S GUIDE
Touch, multitouch and gesture input
Last updated 3/21/2011
Note: The initial touch listener is attached to mySprite, but the listeners for moving and ending the touch event are not.
If the users’s finger or pointing devices moves ahead of the display object, the Stage continues to listen for the touch event.
Touch Point ID
The TouchEvent.touchPointID property is an essential part of writing applications that respond to touch input. The
Flash runtime assigns each point of touch a unique touchPointID value. Whenever an application responds to the
phases or movement of touch input, check the touchPointID before handling the event. The touch input dragging
methods of the Sprite class use the touchPointID property as a parameter so the correct input instance is handled.
The touchPointID property ensures that an event handler is responding to the correct touch point. Otherwise, the
event handler responds to any instances of the touch event type (such as all touchMove events) on the device,
producing unpredictable behavior. The property is especially important when the user is dragging objects.
Use the touchPointID property to manage an entire touch sequence. A touch sequence has one touchBegin event,
zero or more touchMove events, and one touchEnd event that all have the same touchPointID value.
The following example establishes a variable touchMoveID to test for the correct touchPointID value before
responding to a touch move event. Otherwise, other touch input triggers the event handler, too. Notice the listeners
for the move and end phases are on the stage, not the display object. The stage listens for the move or end phases in
case the user’s touch moves beyond the display object boundaries.
Multitouch.inputMode = MultitouchInputMode.TOUCH_POINT;
var mySprite:Sprite = new Sprite();
mySprite.graphics.beginFill(0x336699);
mySprite.graphics.drawRect(0,0,40,40);
addChild(mySprite);
var myTextField:TextField = new TextField();
addChild(myTextField);
myTextField.width = 200;
myTextField.height = 20;
var touchMoveID:int = 0;
mySprite.addEventListener(TouchEvent.TOUCH_BEGIN, onTouchBegin);
function onTouchBegin(event:TouchEvent) {
if(touchMoveID != 0) {
myTextField.text = "already moving. ignoring new touch";
return;
}
touchMoveID = event.touchPointID;
myTextField.text = "touch begin" + event.touchPointID;
stage.addEventListener(TouchEvent.TOUCH_MOVE, onTouchMove);
stage.addEventListener(TouchEvent.TOUCH_END, onTouchEnd);

555
ACTIONSCRIPT 3.0 DEVELOPER’S GUIDE
Touch, multitouch and gesture input
Last updated 3/21/2011
}
function onTouchMove(event:TouchEvent) {
if(event.touchPointID != touchMoveID) {
myTextField.text = "ignoring unrelated touch";
return;
}
mySprite.x = event.stageX;
mySprite.y = event.stageY;
myTextField.text = "touch move" + event.touchPointID;
}
function onTouchEnd(event:TouchEvent) {
if(event.touchPointID != touchMoveID) {
myTextField.text = "ignoring unrelated touch end";
return;
}
touchMoveID = 0;
stage.removeEventListener(TouchEvent.TOUCH_MOVE, onTouchMove);
stage.removeEventListener(TouchEvent.TOUCH_END, onTouchEnd);
myTextField.text = "touch end" + event.touchPointID;
}
Touch and drag
Flash Player 10.1 and later, Adobe AIR 2 and later
Two methods were added to the Sprite class to provide additional support for touch-enabled applications supporting
touch-point input: Sprite.startTouchDrag() and Sprite.stopTouchDrag(). These methods behave the same as
Sprite.startDrag() and Sprite.stopDrag() do for mouse events. However, notice the
Sprite.startTouchDrag() and Sprite.stopTouchDrag() methods both take touchPointID values as
parameters.
The runtime assigns the touchPointID value to the event object for a touch event. Use this value to respond to a
specific touch point in the case the environment supports multiple, simultaneous, touch points (even if it does not
handle gestures). For more information about the touchPointID property, see “Touch Point ID” on page 554.
The following code shows a simple start drag event handler and a stop drag event handler for a touch event. The
variable bg is a display object that contains mySprite:
mySprite.addEventListener(TouchEvent.TOUCH_BEGIN, onTouchBegin);
mySprite.addEventListener(TouchEvent.TOUCH_END, onTouchEnd);
function onTouchBegin(e:TouchEvent) {
e.target.startTouchDrag(e.touchPointID, false, bg.getRect(this));
trace("touch begin");
}
function onTouchEnd(e:TouchEvent) {
e.target.stopTouchDrag(e.touchPointID);
trace("touch end");
}
And the following shows a more advanced example combining dragging with touch event phases:

556
ACTIONSCRIPT 3.0 DEVELOPER’S GUIDE
Touch, multitouch and gesture input
Last updated 3/21/2011
Multitouch.inputMode = MultitouchInputMode.TOUCH_POINT;
var mySprite:Sprite = new Sprite();
mySprite.graphics.beginFill(0x336699);
mySprite.graphics.drawRect(0,0,40,40);
addChild(mySprite);
mySprite.addEventListener(TouchEvent.TOUCH_BEGIN, onTouchBegin);
mySprite.addEventListener(TouchEvent.TOUCH_MOVE, onTouchMove);
mySprite.addEventListener(TouchEvent.TOUCH_END, onTouchEnd);
function onTouchBegin(evt:TouchEvent) {
evt.target.startTouchDrag(evt.touchPointID);
evt.target.scaleX *= 1.5;
evt.target.scaleY *= 1.5;
}
function onTouchMove(evt:TouchEvent) {
evt.target.alpha = 0.5;
}
function onTouchEnd(evt:TouchEvent) {
evt.target.stopTouchDrag(evt.touchPointID);
evt.target.width = 40;
evt.target.height = 40;
evt.target.alpha = 1;
}
Gesture event handling
Flash Player 10.1 and later, Adobe AIR 2 and later
Handle gesture events in the same way as basic touch events. You can listen for a series of gesture events defined by
the event type constants in the TransformGestureEvent class, the GestureEvent class and the
PressAndTapGestureEvent class.
To handle a gesture touch event:
1Set your application to handle gesture input by setting the flash.ui.Multitouch.inputMode property to
MultitouchInputMode.GESTURE.
2Attach an event listener to an instance of a class that inherits properties from the InteractiveObject class, such as
Sprite or TextField.
3Specify the type of gesture event to handle.
4Call an event handler function to do something in response to the event.
For example, the following code displays a message when the square drawn on mySprite is swiped on a touch-enabled
screen:

557
ACTIONSCRIPT 3.0 DEVELOPER’S GUIDE
Touch, multitouch and gesture input
Last updated 3/21/2011
Multitouch.inputMode=MultitouchInputMode.GESTURE;
var mySprite:Sprite = new Sprite();
var myTextField:TextField = new TextField();
mySprite.graphics.beginFill(0x336699);
mySprite.graphics.drawRect(0,0,40,40);
addChild(mySprite);
mySprite.addEventListener(TransformGestureEvent.GESTURE_SWIPE, swipehandler);
function swipehandler(evt:TransformGestureEvent): void {
myTextField.text = "I've been swiped";
myTextField.y = 50;
addChild(myTextField);
}
Two-finger tap events are handled the same way, but use the GestureEvent class:
Multitouch.inputMode=MultitouchInputMode.GESTURE;
var mySprite:Sprite = new Sprite();
var myTextField:TextField = new TextField();
mySprite.graphics.beginFill(0x336699);
mySprite.graphics.drawRect(0,0,40,40);
addChild(mySprite);
mySprite.addEventListener(GestureEvent.GESTURE_TWO_FINGER_TAP, taphandler);
function taphandler(evt:GestureEvent): void {
myTextField.text = "I've been two-finger tapped";
myTextField.y = 50;
addChild(myTextField);
}
Press-and-tap events are also handled the same way, but use the PressAndTapGestureEvent class:
Multitouch.inputMode=MultitouchInputMode.GESTURE;
var mySprite:Sprite = new Sprite();
var myTextField:TextField = new TextField();
mySprite.graphics.beginFill(0x336699);
mySprite.graphics.drawRect(0,0,40,40);
addChild(mySprite);
mySprite.addEventListener(PressAndTapGestureEvent.GESTURE_PRESS_AND_TAP, taphandler);
function taphandler(evt:PressAndTapGestureEvent): void {
myTextField.text = "I've been press-and-tapped";
myTextField.y = 50;
addChild(myTextField);
}

558
ACTIONSCRIPT 3.0 DEVELOPER’S GUIDE
Touch, multitouch and gesture input
Last updated 3/21/2011
Note: Not all GestureEvent, TransformGestureEvent, and PressAndTapGestureEvent event types are supported in all
runtime environments. For example, not all touch-enabled devices are capable or detecting a multi-finger swipe. So, the
InteractiveObject gestureSwipe events are not supported on those devices. Try testing for specific event support to
ensure your application works, and see “Troubleshooting” on page 560 for more information.
Gesture Event properties
Gesture events have a smaller scope of event properties than basic touch events. You access them the same way,
through the event object in the event handler function.
For example, the following code rotates mySprite as the user performs a rotation gesture on it. The text field shows the
amount of rotation since the last gesture (when testing this code, rotate it several times to see the values change):
Multitouch.inputMode=MultitouchInputMode.GESTURE;
var mySprite:Sprite = new Sprite();
var mySpriteCon:Sprite = new Sprite();
var myTextField:TextField = new TextField();
myTextField.y = 50;
addChild(myTextField);
mySprite.graphics.beginFill(0x336699);
mySprite.graphics.drawRect(-20,-20,40,40);
mySpriteCon.addChild(mySprite);
mySprite.x = 20;
mySprite.y = 20;
addChild(mySpriteCon);
mySprite.addEventListener(TransformGestureEvent.GESTURE_ROTATE, rothandler);
function rothandler(evt:TransformGestureEvent): void {
evt.target.parent.rotationZ += evt.target.rotation;
myTextField.text = evt.target.parent.rotation.toString();
}
Note: Not all TransformGestureEvent properties are supported in all runtime environments. For example, not all touch-
enabled devices are capable or detecting the rotation of a gesture on the screen. So, the
TransformGestureEvent.rotation property is not supported on those devices. Try testing for specific property support
to ensure your application works, and see “Troubleshooting” on page 560 for more information.
Gesture phases
Additionally, the gesture events can be tracked through phases, so you can track properties as the gesture is taking
place. For example, you can track x-coordinates as an object is moved with a swipe gesture. Use those values to draw
a line through all the points in its path after the swipe is complete. Or, visually change a display object as it is dragged
across a screen using a pan gesture. Change the object again once the pan gesture is complete.

559
ACTIONSCRIPT 3.0 DEVELOPER’S GUIDE
Touch, multitouch and gesture input
Last updated 3/21/2011
Multitouch.inputMode = MultitouchInputMode.GESTURE;
var mySprite = new Sprite();
mySprite.addEventListener(TransformGestureEvent.GESTURE_PAN , onPan);
mySprite.graphics.beginFill(0x336699);
mySprite.graphics.drawRect(0, 0, 40, 40);
var myTextField = new TextField();
myTextField.y = 200;
addChild(mySprite);
addChild(myTextField);
function onPan(evt:TransformGestureEvent):void {
evt.target.localX++;
if (evt.phase==GesturePhase.BEGIN) {
myTextField.text = "Begin";
evt.target.scaleX *= 1.5;
evt.target.scaleY *= 1.5;
}
if (evt.phase==GesturePhase.UPDATE) {
myTextField.text = "Update";
evt.target.alpha = 0.5;
}
if (evt.phase==GesturePhase.END) {
myTextField.text = "End";
evt.target.width = 40;
evt.target.height = 40;
evt.target.alpha = 1;
}
}
Note: The frequency of the update phase depends on the runtime’s environment. Some operating system and hardware
combinations do not relay updates at all.
Gesture phase is “all” for simple gesture events
Some gesture event objects do not track individual phases of the gesture event, and instead populate the event object’s
phase property with the value all. The simple gestures swipe and two-finger tap do not track the event by multiple
phases. The phase property of the event object for an InteractiveObject listening for the gestureSwipe or
gestureTwoFingerTap events is always all once the event is dispatched:

560
ACTIONSCRIPT 3.0 DEVELOPER’S GUIDE
Touch, multitouch and gesture input
Last updated 3/21/2011
Multitouch.inputMode = MultitouchInputMode.GESTURE;
var mySprite = new Sprite();
mySprite.addEventListener(TransformGestureEvent.GESTURE_SWIPE, onSwipe);
mySprite.addEventListener(GestureEvent.GESTURE_TWO_FINGER_TAP, onTwoTap);
mySprite.graphics.beginFill(0x336699);
mySprite.graphics.drawRect(0, 0, 40, 40);
var myTextField = new TextField();
myTextField.y = 200;
addChild(mySprite);
addChild(myTextField);
function onSwipe(swipeEvt:TransformGestureEvent):void {
myTextField.text = swipeEvt.phase // Output is "all"
}
function onTwoTap(tapEvt:GestureEvent):void {
myTextField.text = tapEvt.phase // Output is "all"
}
Troubleshooting
Flash Player 10.1 and later, Adobe AIR 2 and later
Hardware and software support for touch input is changing, rapidly. This reference does not maintain a list of every
device an operating system and software combination that supports multitouch. However, it provides guidance on
using the discovery API to determine if your application is deployed on a device that supports multitouch, and
provides tips for troubleshooting your ActionScript code.
Flash runtimes respond to touch events based on information the device, operating system, or containing software
(such as a browser) passes to the runtime. This dependency on the software environment complicates documenting
multitouch compatibility. Some devices interpret a gesture or touch motion differently than another device. Is rotation
defined by two fingers rotating at the same time? Is rotation one finger drawing a circle on a screen? Depending on the
hardware and software environment, the rotation gesture could be either, or something entirely different. So, the
device tells the operating system the user input, then the operating system passes that information to the runtime. If
the runtime is inside a browser, the browser software sometimes interprets the gesture or touch event and does not
pass the input to the runtime. This behavior is similar to the behavior of “hotkeys”: you try to use a specific key
combination to get Flash Player to do something inside the browser and the browser keeps opening a menu instead.
Individual API and classes mention if they’re not compatible with specific operating systems. You can explore
individual API entries here, starting with the Multitouch class:
http://help.adobe.com/en_US/FlashPlatform/reference/actionscript/3/flash/ui/Multitouch.html.
Here are some common gesture and touch descriptions:
Pan Move a finger left-to-right or right-to-left. Some devices require two fingers to pan.
Rotate Touch two fingers down, then move them around in a circle (as if they’re both simultaneously tracing an
imaginary circle on a surface). The pivot point is set at the midpoint between the two finger touch points.
Swipe Move three fingers left-to-right or right-to-left, top-to-bottom, or bottom-to-top, quickly.
Zoom Touch two fingers down, then move them away from each other to zoom in and toward each other to zoom out.
Press-and-tap Move or press one finger, then tap the surface with another.

561
ACTIONSCRIPT 3.0 DEVELOPER’S GUIDE
Touch, multitouch and gesture input
Last updated 3/21/2011
Each device has its own documentation about the gestures the device supports and how to perform each gesture on
that device. In general, the user must remove all fingers from contact with the device between gestures, depending
upon the operating system.
If you find your application is not responding to touch events or gestures, test the following:
1Do you have event listeners for touch or gesture events attached to an object class that inherits from the
InteractiveObject class? Only InteractiveObject instances can listen for touch and gesture events
2Are you testing your application within Flash Professional CS5? If so, try publishing and testing the application,
because Flash Professional can intercept the interaction.
3Start simple and see what does work, first (the following code example is from the API entry for
Multitouch.inputMode:
Multitouch.inputMode=MultitouchInputMode.TOUCH_POINT;
var mySprite:Sprite = new Sprite();
var myTextField:TextField = new TextField()
mySprite.graphics.beginFill(0x336699);
mySprite.graphics.drawRect(0,0,40,40);
addChild(mySprite);
mySprite.addEventListener(TouchEvent.TOUCH_TAP, taplistener);
function taplistener(e:TouchEvent): void {
myTextField.text = "I've been tapped";
myTextField.y = 50;
addChild(myTextField);
}
Tap the rectangle. If this example works, then you know your environment supports a simple tap. Then you can try
more complicated handling.
Testing for gesture support is more complicated. An individual device or operating system supports any
combination of gesture input, or none.
Here is a simple test for the zoom gesture:
Multitouch.inputMode = MultitouchInputMode.GESTURE;
stage.addEventListener(TransformGestureEvent.GESTURE_ZOOM , onZoom);
var myTextField = new TextField();
myTextField.y = 200;
myTextField.text = "Perform a zoom gesture";
addChild(myTextField);
function onZoom(evt:TransformGestureEvent):void {
myTextField.text = "Zoom is supported";
}
Perform a zoom gesture on the device and see if the text field populates with the message Zoom is supported. The
event listener is added to the stage so you can perform the gesture on any part of the test application.
Here is a simple test for the pan gesture:

562
ACTIONSCRIPT 3.0 DEVELOPER’S GUIDE
Touch, multitouch and gesture input
Last updated 3/21/2011
Multitouch.inputMode = MultitouchInputMode.GESTURE;
stage.addEventListener(TransformGestureEvent.GESTURE_PAN , onPan);
var myTextField = new TextField();
myTextField.y = 200;
myTextField.text = "Perform a pan gesture";
addChild(myTextField);
function onPan(evt:TransformGestureEvent):void {
myTextField.text = "Pan is supported";
}
Perform a pan gesture on the device and see if the text field populates with the message Pan is supported. The
event listener is added to the stage so you can perform the gesture on any part of the test application.
Some operating system and device combinations support both gestures, some support only one, some none. Test
your application’s deployment environment to be sure.
Known Issues
The following are known issues related to touch input:
1Mobile Internet Explorer on Windows Mobile operating system automatically zooms SWF file content:
This Internet Explorer zoom behavior is overridden by adding the following to the HTML page hosting the SWF file:
<head>
<meta name="viewport" content="width=device-width, height=device-height, initial-
scale=1.0">
</head>
2Windows 7 (and possibly other operating systems), the user must lift the pointing device (or fingers) off the screen
between gestures. For example:, to rotate and zoom an image:
•Perform the rotate gesture.
•Lift your fingers off the screen.
•Put your fingers back onto the screen and perform the zoom gesture.
3Windows 7 (and possibly other operating systems), the rotate and zoom gestures don’t always generate an “update”
phase if the user performs the gesture very quickly.
4Windows 7 Starter Edition does not support multitouch. See the AIR Labs Forum for details:
http://forums.adobe.com/thread/579180?tstart=0
5For Mac OS 10.5.3 and later, the Multitouch.supportsGestureEvents value is always true, even if the hardware
does not support gesture events.

563
Last updated 3/21/2011
Chapter 31: Copy and paste
Flash Player 10 and later, Adobe AIR 1.0 and later
Use the classes in the clipboard API to copy information to and from the system clipboard. The data formats that can
be transferred into or out of an application running in Adobe® Flash® Player or Adobe® AIR® include:
•Text
•HTML-formatted text
•Rich Text Format data
•Serialized objects
•Object references (valid only within the originating application)
•Bitmaps (AIR only)
•Files (AIR only)
•URL strings (AIR only)
Basics of copy-and-paste
Flash Player 10 and later, Adobe AIR 1.0 and later
The copy-and-paste API contains the following classes.
The static Clipboard.generalClipboard property represents the operating system clipboard. The Clipboard class
provides methods for reading and writing data to clipboard objects.
The HTMLLoader class (in AIR) and the TextField class implement default behavior for the normal copy and paste
keyboard shortcuts. To implement copy and paste shortcut behavior for custom components, you can listen for these
keystrokes directly. You can also use native menu commands along with key equivalents to respond to the keystrokes
indirectly.
Different representations of the same information can be made available in a single Clipboard object to increase the
ability of other applications to understand and use the data. For example, an image might be included as image data,
a serialized Bitmap object, and as a file. Rendering of the data in a format can be deferred so that the format is not
actually created until the data in that format is read.
Package Classes
flash.desktop •Clipboard
•ClipboardFormats
•ClipboardTransferMode

564
ACTIONSCRIPT 3.0 DEVELOPER’S GUIDE
Copy and paste
Last updated 3/21/2011
Reading from and writing to the system clipboard
Flash Player 10 and later, Adobe AIR 1.0 and later
To read the operating system clipboard, call the getData() method of the Clipboard.generalClipboard object,
passing in the name of the format to read:
import flash.desktop.Clipboard;
import flash.desktop.ClipboardFormats;
if(Clipboard.generalClipboard.hasFormat(ClipboardFormats.TEXT_FORMAT)){
var text:String = Clipboard.generalClipboard.getData(ClipboardFormats.TEXT_FORMAT);
}
Note: Content running in Flash Player or in a non-application sandbox in AIR can call the getData() method only in
an event handler for a paste event. In other words, only code running in the AIR application sandbox can call the
getData() method outside of a paste event handler.
To write to the clipboard, add the data to the Clipboard.generalClipboard object in one or more formats. Any
existing data in the same format is overwritten automatically. Nevertheless, it is a good practice to also clear the system
clipboard before writing new data to it to make sure that unrelated data in any other formats is also deleted.
import flash.desktop.Clipboard;
import flash.desktop.ClipboardFormats;
var textToCopy:String = "Copy to clipboard.";
Clipboard.generalClipboard.clear();
Clipboard.generalClipboard.setData(ClipboardFormats.TEXT_FORMAT, textToCopy, false);
Note: Content running in Flash Player or in a non-application sandbox in AIR can call the setData() method only in
an event handler for a user event, such as a keyboard or mouse event, or a copy or cut event. In other words, only code
running in the AIR application sandbox can call the setData() method outside of a user event handler.
HTML copy and paste in AIR
Adobe AIR 1.0 and later
The HTML environment in Adobe AIR provides its own set of events and default behavior for copy and paste. Only
code running in the application sandbox can access the system clipboard directly through the AIR
Clipboard.generalClipboard object. JavaScript code in a non-application sandbox can access the clipboard
through the event object dispatched in response to one of the copy or paste events dispatched by an element in an
HTML document.
Copy and paste events include: copy, cut, and paste. The object dispatched for these events provides access to the
clipboard through the clipboardData property.

565
ACTIONSCRIPT 3.0 DEVELOPER’S GUIDE
Copy and paste
Last updated 3/21/2011
Default behavior
Adobe AIR 1.0 and later
By default, AIR copies selected items in response to the copy command, which can be generated either by a keyboard
shortcut or a context menu. Within editable regions, AIR cuts text in response to the cut command or pastes text to
the cursor or selection in response to the paste command.
To prevent the default behavior, your event handler can call the preventDefault() method of the dispatched event
object.
Using the clipboardData property of the event object
Adobe AIR 1.0 and later
The clipboardData property of the event object dispatched as a result of one of the copy or paste events allows you
to read and write clipboard data.
To write to the clipboard when handling a copy or cut event, use the setData() method of the clipboardData object,
passing in the data to copy and the MIME type:
function customCopy(event){
event.clipboardData.setData("text/plain", "A copied string.");
}
To access the data that is being pasted, you can use the getData() method of the clipboardData object, passing in
the MIME type of the data format. The available formats are reported by the types property.
function customPaste(event){
var pastedData = event.clipboardData("text/plain");
}
The getData() method and the types property can only be accessed in the event object dispatched by the paste
event.
The following example illustrates how to override the default copy and paste behavior in an HTML page. The copy
event handler italicizes the copied text and copies it to the clipboard as HTML text. The cut event handler copies the
selected data to the clipboard and removes it from the document. The paste handler inserts the clipboard contents as
HTML and styles the insertion as bold text.

566
ACTIONSCRIPT 3.0 DEVELOPER’S GUIDE
Copy and paste
Last updated 3/21/2011
<html>
<head>
<title>Copy and Paste</title>
<script language="javascript" type="text/javascript">
function onCopy(event){
var selection = window.getSelection();
event.clipboardData.setData("text/html","<i>" + selection + "</i>");
event.preventDefault();
}
function onCut(event){
var selection = window.getSelection();
event.clipboardData.setData("text/html","<i>" + selection + "</i>");
var range = selection.getRangeAt(0);
range.extractContents();
event.preventDefault();
}
function onPaste(event){
var insertion = document.createElement("b");
insertion.innerHTML = event.clipboardData.getData("text/html");
var selection = window.getSelection();
var range = selection.getRangeAt(0);
range.insertNode(insertion);
event.preventDefault();
}
</script>
</head>
<body onCopy="onCopy(event)"
onPaste="onPaste(event)"
onCut="onCut(event)">
<p>Sed ut perspiciatis unde omnis iste natus error sit voluptatem accusantium
doloremque laudantium, totam rem aperiam, eaque ipsa quae ab illo inventore
veritatis et quasi architecto beatae vitae dicta sunt explicabo. Nemo enim ipsam
voluptatem quia voluptas sit aspernatur aut odit aut fugit, sed quia consequuntur
magni dolores eos qui ratione voluptatem sequi nesciunt.</p>
</body>
</html>
Clipboard data formats
Flash Player 10 and later, Adobe AIR 1.0 and later
Clipboard formats describe the data placed in a Clipboard object. Flash Player or AIR automatically translates the
standard data formats between ActionScript data types and system clipboard formats. In addition, application objects
can be transferred within and between ActionScript-based applications using application-defined formats.
A Clipboard object can contain representations of the same information in different formats. For example, a Clipboard
object representing a Sprite could include a reference format for use within the same application, a serialized format
for use by another application running in Flash Player or AIR, a bitmap format for use by an image editor, and a file
list format, perhaps with deferred rendering to encode a PNG file, for copying or dragging a representation of the
Sprite to the file system.

567
ACTIONSCRIPT 3.0 DEVELOPER’S GUIDE
Copy and paste
Last updated 3/21/2011
Standard data formats
Flash Player 10 and later, Adobe AIR 1.0 and later
The constants defining the standard format names are provided in the ClipboardFormats class:
When copying and pasting data in response to a copy, cut, or paste event in HTML content hosted in an AIR
application, MIME types must be used instead of the ClipboardFormat strings. The valid data MIME types are:
Note: Rich text format data is not available from the clipboardData property of the event object dispatched as a result
of a paste event within HTML content.
Custom data formats
Flash Player 10 and later, Adobe AIR 1.0 and later
You can use application-defined custom formats to transfer objects as references or as serialized copies. References are
valid only within the same application. Serialized objects can be transferred between applications, but can be used only
with objects that remain valid when serialized and deserialized. Objects can usually be serialized if their properties are
either simple types or serializable objects.
To add a serialized object to a Clipboard object, set the serializable parameter to true when calling the
Clipboard.setData() method. The format name can be one of the standard formats or an arbitrary string defined
by your application.
Transfer modes
Flash Player 10 and later, Adobe AIR 1.0 and later
When an object is written to the clipboard using a custom data format, the object data can be read from the clipboard
either as a reference or as a serialized copy of the original object. There are four transfer modes that determine whether
objects are transferred as references or as serialized copies:
Constant Description
TEXT_FORMAT Text-format data is translated to and from the ActionScript String class.
HTML_FORMAT Text with HTML markup.
RICH_TEXT_FORMAT Rich-text-format data is translated to and from the ActionScript ByteArray class. The RTF markup is not
interpreted or translated in any way.
BITMAP_FORMAT (AIR only) Bitmap-format data is translated to and from the ActionScript BitmapData class.
FILE_LIST_FORMAT (AIR only) File-list-format data is translated to and from an array of ActionScript File objects.
URL_FORMAT (AIR only) URL-format data is translated to and from the ActionScript String class.
MIME type Description
Text "text/plain"
URL "text/uri-list"
Bitmap "image/x-vnd.adobe.air.bitmap"
File list "application/x-vnd.adobe.air.file-list"

568
ACTIONSCRIPT 3.0 DEVELOPER’S GUIDE
Copy and paste
Last updated 3/21/2011
Reading and writing custom data formats
Flash Player 10 and later, Adobe AIR 1.0 and later
When writing an object to the clipboard, you can use any string that does not begin with the reserved prefixes air: or
flash: for the format parameter. Use the same string as the format to read the object. The following examples
illustrate how to read and write objects to the clipboard:
public function createClipboardObject(object:Object):Clipboard{
var transfer:Clipboard = Clipboard.generalClipboard;
transfer.setData("object", object, true);
}
To extract a serialized object from the clipboard object (after a drop or paste operation), use the same format name
and the CLONE_ONLY or CLONE_PREFFERED transfer modes.
var transfer:Object = clipboard.getData("object", ClipboardTransferMode.CLONE_ONLY);
A reference is always added to the Clipboard object. To extract the reference from the clipboard object (after a drop or
paste operation), instead of the serialized copy, use the ORIGINAL_ONLY or ORIGINAL_PREFFERED transfer modes:
var transferredObject:Object =
clipboard.getData("object", ClipboardTransferMode.ORIGINAL_ONLY);
References are valid only if the Clipboard object originates from the current application. Use the
ORIGINAL_PREFFERED transfer mode to access the reference when it is available, and the serialized clone when the
reference is not available.
Deferred rendering
Flash Player 10 and later, Adobe AIR 1.0 and later
If creating a data format is computationally expensive, you can use deferred rendering by supplying a function that
supplies the data on demand. The function is called only if a receiver of the drop or paste operation requests data in
the deferred format.
The rendering function is added to a Clipboard object using the setDataHandler() method. The function must
return the data in the appropriate format. For example, if you called
setDataHandler(ClipboardFormat.TEXT_FORMAT, writeText), then the writeText() function must return a
string.
If a data format of the same type is added to a Clipboard object with the setData() method, that data takes precedence
over the deferred version (the rendering function is never called). The rendering function may or may not be called
again if the same clipboard data is accessed a second time.
Note: On Mac OS X, deferred rendering works only with custom data formats. With standard data formats, the rendering
function is called immediately.
Transfer mode Description
ClipboardTransferModes.ORIGINAL_ONLY Only a reference is returned. If no reference is available, a null value is returned.
ClipboardTransferModes.ORIGINAL_PREFFERED A reference is returned, if available. Otherwise a serialized copy is returned.
ClipboardTransferModes.CLONE_ONLY Only a serialized copy is returned. If no serialized copy is available, a null value is
returned.
ClipboardTransferModes.CLONE_PREFFERED A serialized copy is returned, if available. Otherwise a reference is returned.

569
ACTIONSCRIPT 3.0 DEVELOPER’S GUIDE
Copy and paste
Last updated 3/21/2011
Pasting text using a deferred rendering function
Flash Player 10 and later, Adobe AIR 1.0 and later
The following example illustrates how to implement a deferred rendering function.
When the user presses the Copy button, the application clears the system clipboard to ensure that no data is left over
from previous clipboard operations. The setDataHandler() method then sets the renderData() function as the
clipboard renderer.
When the user selects the Paste command from the context menu of the destination text field, the application accesses
the clipboard and sets the destination text. Since the text data format on the clipboard has been set with a function
rather than a string, the clipboard calls the renderData() function. The renderData() function returns the text in
the source text, which is then assigned to the destination text.
Notice that if you edit the source text before pressing the Paste button, the edit will be reflected in the pasted text, even
when the edit occurs after the copy button was pressed. This is because the rendering function doesn’t copy the source
text until the paste button is pressed. (When using deferred rendering in a real application, you might want to store or
protect the source data in some way to prevent this problem.)
Flash example
package {
import flash.desktop.Clipboard;
import flash.desktop.ClipboardFormats;
import flash.desktop.ClipboardTransferMode;
import flash.display.Sprite;
import flash.text.TextField;
import flash.text.TextFormat;
import flash.text.TextFieldType;
import flash.events.MouseEvent;
import flash.events.Event;
public class DeferredRenderingExample extends Sprite
{
private var sourceTextField:TextField;
private var destination:TextField;
private var copyText:TextField;
public function DeferredRenderingExample():void
{
sourceTextField = createTextField(10, 10, 380, 90);
sourceTextField.text = "Neque porro quisquam est qui dolorem "
+ "ipsum quia dolor sit amet, consectetur, adipisci velit.";
copyText = createTextField(10, 110, 35, 20);
copyText.htmlText = "<a href='#'>Copy</a>";
copyText.addEventListener(MouseEvent.CLICK, onCopy);
destination = createTextField(10, 145, 380, 90);
destination.addEventListener(Event.PASTE, onPaste);
}
private function createTextField(x:Number, y:Number, width:Number,
height:Number):TextField
{
var newTxt:TextField = new TextField();
newTxt.x = x;
newTxt.y = y;
newTxt.height = height;

570
ACTIONSCRIPT 3.0 DEVELOPER’S GUIDE
Copy and paste
Last updated 3/21/2011
newTxt.width = width;
newTxt.border = true;
newTxt.multiline = true;
newTxt.wordWrap = true;
newTxt.type = TextFieldType.INPUT;
addChild(newTxt);
return newTxt;
}
public function onCopy(event:MouseEvent):void
{
Clipboard.generalClipboard.clear();
Clipboard.generalClipboard.setDataHandler(ClipboardFormats.TEXT_FORMAT,
renderData);
}
public function onPaste(event:Event):void
{
sourceTextField.text =
Clipboard.generalClipboard.getData(ClipboardFormats.TEXT_FORMAT).toString;
}
public function renderData():String
{
trace("Rendering data");
var sourceStr:String = sourceTextField.text;
if (sourceTextField.selectionEndIndex >
sourceTextField.selectionBeginIndex)
{
return sourceStr.substring(sourceTextField.selectionBeginIndex,
sourceTextField.selectionEndIndex);
}
else
{
return sourceStr;
}
}
}
}

571
ACTIONSCRIPT 3.0 DEVELOPER’S GUIDE
Copy and paste
Last updated 3/21/2011
Flex example
<mx:Application xmlns:mx="http://www.adobe.com/2006/mxml" layout="absolute" width="326"
height="330" applicationComplete="init()">
<mx:Script>
<![CDATA[
import flash.desktop.Clipboard;
import flash.desktop.ClipboardFormats;
public function init():void
{
destination.addEventListener("paste", doPaste);
}
public function doCopy():void
{
Clipboard.generalClipboard.clear();
Clipboard.generalClipboard.setDataHandler(ClipboardFormats.TEXT_FORMAT, renderData);
}
public function doPaste(event:Event):void
{
destination.text =
Clipboard.generalClipboard.getData(ClipboardFormats.TEXT_FORMAT).toString;
}
public function renderData():String{
trace("Rendering data");
return source.text;
}
]]>
</mx:Script>
<mx:Label x="10" y="10" text="Source"/>
<mx:TextArea id="source" x="10" y="36" width="300" height="100">
<mx:text>Neque porro quisquam est qui dolorem ipsum quia dolor sit amet, consectetur,
adipisci velit.</mx:text>
</mx:TextArea>
<mx:Label x="10" y="181" text="Destination"/>
<mx:TextArea id="destination" x="12" y="207" width="300" height="100"/>
<mx:Button click="doCopy();" x="91" y="156" label="Copy"/>
</mx:Application>

572
Last updated 3/21/2011
Chapter 32: Accelerometer input
Flash Player 10.1 and later, Adobe AIR 2 and later
The Accelerometer class dispatches events based on activity detected by the device's motion sensor. This data
represents the device's location or movement along a three-dimensional axis. When the device moves, the sensor
detects this movement and returns the acceleration coordinates of the device. The Accelerometer class provides
methods to query whether accelerometer is supported, and also to set the rate at which acceleration events are
dispatched.
The accelerometer axes are normalized to the display orientation, not the physical orientation of the device. When the
device re-orients the display, the accelerometer axes are re-oriented as well. Thus the y-axis is always roughly vertical
when the user is holding the phone in a normal, upright viewing position — no matter which way the phone is rotated.
If auto-orientation is off, for example, when SWF content in a browser is in full-screen mode, then the accelerometer
axes are not re-oriented as the device is rotated.
More Help topics
flash.sensors.Accelerometer
flash.events.AccelerometerEvent
Michaël Chiaze: AIR and the Accelerometer
Jonathan Campos: AIR for Android: Accelerometer
Checking accelerometer support
Use the Accelerometer.isSupported property to test the runtime environment for the ability to use this feature:
if (Accelerometer.isSupported)
{
// Set up Accelerometer event listeners and code.
}
The Accelerometer class and its members are accessible to the runtime versions listed for each API entry. However the
current environment at run time determines the availability of this feature. For example, you can compile code using
the Accelerometer class properties for Flash Player 10.1, but you need to use the Accelerometer.isSupported
property to test for the availability of the Accelerometer feature on the user’s device. If Accelerometer.isSupported
is true at runtime, then Accelerometer support currently exists.
Detecting accelerometer changes
To use the accelerometer sensor, instantiate an Accelerometer object and register for update events it dispatches. The
update event is an Accelerometer event object. The event has four properties, and each are numbers:
•accelerationX—Acceleration along the x-axis, measured in g’s. The x-axis runs from the left to the right of the
device when it is in the upright position. (The device is upright when the top of the device is facing up.) The
acceleration is positive if the device moves toward the right.

573
ACTIONSCRIPT 3.0 DEVELOPER’S GUIDE
Accelerometer input
Last updated 3/21/2011
•accelerationY—Acceleration along the y-axis, measured in g’s. The y-axis runs from the bottom to the top of the
device when it is in the upright position. (The device is upright when the top of the device is facing up.) The
acceleration is positive if the device moves up relative to this axis.
•accelerationZ—Acceleration along the z-axis, measured in g’s. The Z axis runs perpendicular to the face of the
device. The acceleration is positive if you move the device so that the face of the device points up. The acceleration
is negative if the face of the device points towards the ground.
•timestamp—The number of milliseconds at the time of the event since the runtime was initialized.
1 g is the standard acceleration due to gravity, roughly 9.8 m/sec2..
Here is a basic example that displays accelerometer data in a text field:
var accl:Accelerometer;
if (Accelerometer.isSupported)
{
accl = new Accelerometer();
accl.addEventListener(AccelerometerEvent.UPDATE, updateHandler);
}
else
{
accTextField.text = "Accelerometer feature not supported";
}
function updateHandler(evt:AccelerometerEvent):void
{
accTextField.text = "acceleration X: " + evt.accelerationX.toString() + "\n"
+ "acceleration Y: " + evt.accelerationY.toString() + "\n"
+ "acceleration Z: " + evt.accelerationZ.toString()
}
To use this example, be sure to create the accTextField text field and add it to the display list before using this code.
You can adjust the desired time interval for accelerometer events by calling the setRequestedUpdateInterval()
method of the Accelerometer object. This method takes one parameter, interval, which is the requested update
interval in milliseconds:
var accl:Accelerometer;
accl = new Accelerometer();
accl.setRequestedUpdateInterval(1000);
The actual time between accelerometer updates may be greater or lesser than this value. Any change in the update
interval affects all registered listeners. If you don’t call the setRequestedUpdateInterval() method, the application
receives updates based on the device's default interval.
Accelerometer data has some degree of inaccuracy. You can use a moving average of recent data to smooth out the
data. For example, the following example factors recent accelerometer readings with the current reading to get a
rounded result:

574
ACTIONSCRIPT 3.0 DEVELOPER’S GUIDE
Accelerometer input
Last updated 3/21/2011
var accl:Accelerometer;
var rollingX:Number = 0;
var rollingY:Number = 0;
var rollingZ:Number = 0;
const FACTOR:Number = 0.25;
if (Accelerometer.isSupported)
{
accl = new Accelerometer();
accl.setRequestedUpdateInterval(200);
accl.addEventListener(AccelerometerEvent.UPDATE, updateHandler);
}
else
{
accTextField.text = "Accelerometer feature not supported";
}
function updateHandler(event:AccelerometerEvent):void
{
accelRollingAvg(event);
accTextField.text = rollingX + "\n" + rollingY + "\n" + rollingZ + "\n";
}
function accelRollingAvg(event:AccelerometerEvent):void
{
rollingX = (event.accelerationX * FACTOR) + (rollingX * (1 - FACTOR));
rollingY = (event.accelerationY * FACTOR) + (rollingY * (1 - FACTOR));
rollingZ = (event.accelerationZ * FACTOR) + (rollingZ * (1 - FACTOR));
}
However, this moving average is only desirable if the accelerometer update interval is small.

575
Last updated 3/21/2011
Chapter 33: Drag and drop in AIR
Adobe AIR 1.0 and later
Use the classes in the Adobe® AIR™ drag-and-drop API to support user-interface drag-and-drop gestures. A gesture in
this sense is an action by the user, mediated by both the operating system and your application, expressing an intent
to copy, move, or link information. A drag-out gesture occurs when the user drags an object out of a component or
application. A drag-in gesture occurs when the user drags in an object from outside a component or application.
With the drag-and-drop API, you can allow a user to drag data between applications and between components within
an application. Supported transfer formats include:
•Bitmaps
•Files
•HTML-formatted text
•Text
•Rich Text Format data
•URLs
•File promises
•Serialized objects
•Object references (only valid within the originating application)
Basics of drag and drop in AIR
Adobe AIR 1.0 and later
For a quick explanation and code examples of using drag and drop in an AIR application, see the following quick start
articles on the Adobe Developer Connection:
•Supporting drag-and-drop and copy-and-paste (Flex)
•Supporting drag-and-drop and copy-and-paste (Flash)
The drag-and-drop API contains the following classes.

576
ACTIONSCRIPT 3.0 DEVELOPER’S GUIDE
Drag and drop in AIR
Last updated 3/21/2011
Drag-and-drop gesture stages
The drag-and-drop gesture has three stages:
Initiation A user initiates a drag-and-drop operation by dragging from a component, or an item in a component, while
holding down the mouse button. The component that is the source of the dragged item is typically designated as the
drag initiator and dispatches nativeDragStart and nativeDragComplete events. An Adobe AIR application starts
a drag operation by calling the NativeDragManager.doDrag() method in response to a mouseDown or mouseMove
event.
If the drag operation is initiated from outside an AIR application, there is no initiator object to dispatch
nativeDragStart or nativeDragComplete events.
Dragging While holding down the mouse button, the user moves the mouse cursor to another component, application,
or to the desktop. As long as the drag is underway, the initiator object dispatches nativeDragUpdate events. (However,
this event is not dispatched in AIR for Linux.) When the user moves the mouse over a possible drop target in an AIR
application, the drop target dispatches a nativeDragEnter event. The event handler can inspect the event object to
determine whether the dragged data is available in a format that the target accepts and, if so, let the user drop the data
onto it by calling the NativeDragManager.acceptDragDrop() method.
As long as the drag gesture remains over an interactive object, that object dispatches nativeDragOver events. When
the drag gesture leaves the interactive object, it dispatches a nativeDragExit event.
Drop The user releases the mouse over an eligible drop target. If the target is an AIR application or component, then the
target object dispatches a nativeDragDrop event. The event handler can access the transferred data from the event
object. If the target is outside AIR, the operating system or another application handles the drop. In both cases, the
initiating object dispatches a nativeDragComplete event (if the drag started from within AIR).
The NativeDragManager class controls both drag-in and drag-out gestures. All the members of the
NativeDragManager class are static, do not create an instance of this class.
The Clipboard object
Data that is dragged into or out of an application or component is contained in a Clipboard object. A single Clipboard
object can make available different representations of the same information to increase the likelihood that another
application can understand and use the data. For example, an image could be included as image data, a serialized
Bitmap object, and as a file. Rendering of the data in a format can be deferred to a rendering function that is not called
until the data is read.
Package Classes
flash.desktop •NativeDragManager
•NativeDragOptions
•Clipboard
•URLFilePromise
•IFilePromise
Constants used with the drag-and-drop API are defined in the following classes:
•NativeDragActions
•ClipboardFormat
•ClipboardTransferModes
flash.events NativeDragEvent

577
ACTIONSCRIPT 3.0 DEVELOPER’S GUIDE
Drag and drop in AIR
Last updated 3/21/2011
Once a drag gesture has started, the Clipboard object can only be accessed from within an event handler for the
nativeDragEnter, nativeDragOver, and nativeDragDrop events. After the drag gesture has ended, the Clipboard
object cannot be read or reused.
An application object can be transferred as a reference and as a serialized object. References are only valid within the
originating application. Serialized object transfers are valid between AIR applications, but can only be used with
objects that remain valid when serialized and deserialized. Objects that are serialized are converted into the Action
Message Format for ActionScript 3 (AMF3), a string-based data-transfer format.
Working with the Flex framework
In most cases, it is better to use the Adobe® Flex™ drag-and-drop API when building Flex applications. The Flex
framework provides an equivalent feature set when a Flex application is run in AIR (it uses the AIR
NativeDragManager internally). Flex also maintains a more limited feature set when an application or component is
running within the more restrictive browser environment. AIR classes cannot be used in components or applications
that run outside the AIR run-time environment.
Supporting the drag-out gesture
Adobe AIR 1.0 and later
To support the drag-out gesture, you must create a Clipboard object in response to a mouseDown event and send it to
the NativeDragManager.doDrag() method. Your application can then listen for the nativeDragComplete event on
the initiating object to determine what action to take when the user completes or abandons the gesture.
Preparing data for transfer
Flash Player 9 and later, Adobe AIR 1.0 and later
To prepare data or an object for dragging, create a Clipboard object and add the information to be transferred in one
or more formats. You can use the standard data formats to pass data that can be translated automatically to native
clipboard formats, and application-defined formats to pass objects.
If it is computationally expensive to convert the information to be transferred into a particular format, you can supply
the name of a handler function to perform the conversion. The function is called if and only if the receiving component
or application reads the associated format.
For more information on clipboard formats, see “Clipboard data formats” on page 566.
The following example illustrates how to create a Clipboard object containing a bitmap in several formats: a Bitmap
object, a native bitmap format, and a file list format containing the file from which the bitmap was originally loaded:
import flash.desktop.Clipboard;
import flash.display.Bitmap;
import flash.filesystem.File;
public function createClipboard(image:Bitmap, sourceFile:File):Clipboard{
var transfer:Clipboard = new Clipboard();
transfer.setData("CUSTOM_BITMAP", image, true); //Flash object by value and by reference
transfer.setData(ClipboardFormats.BITMAP_FORMAT, image.bitmapData, false);
transfer.setData(ClipboardFormats.FILE_LIST_FORMAT, new Array(sourceFile), false);
return transfer;
}

578
ACTIONSCRIPT 3.0 DEVELOPER’S GUIDE
Drag and drop in AIR
Last updated 3/21/2011
Starting a drag-out operation
Adobe AIR 1.0 and later
To start a drag operation, call the NativeDragManager.doDrag() method in response to a mouse down event. The
doDrag() method is a static method that takes the following parameters:
The following example illustrates how to start a drag operation for a bitmap object loaded from a file. The example
loads an image and, on a mouseDown event, starts the drag operation.
package
{
import flash.desktop.NativeDragManager;
import mx.core.UIComponent;
import flash.display.Sprite;
import flash.display.Loader;
import flash.system.LoaderContext;
import flash.net.URLRequest;
import flash.geom.Point;
import flash.desktop.Clipboard;
import flash.display.Bitmap;
import flash.filesystem.File;
import flash.events.Event;
import flash.events.MouseEvent;
public class DragOutExample extends UIComponent Sprite {
protected var fileURL:String = "app:/image.jpg";
protected var display:Bitmap;
private function init():void {
loadImage();
}
private function onMouseDown(event:MouseEvent):void {
var bitmapFile:File = new File(fileURL);
var transferObject:Clipboard = createClipboard(display, bitmapFile);
NativeDragManager.doDrag(this,
transferObject,
display.bitmapData,
Parameter Description
initiator The object from which the drag originates, and which dispatches the dragStart and dragComplete
events. The initiator must be an interactive object.
clipboard The Clipboard object containing the data to be transferred. The Clipboard object is referenced in the
NativeDragEvent objects dispatched during the drag-and-drop sequence.
dragImage (Optional) A BitmapData object to display during the drag. The image can specify an alpha value. (Note:
Microsoft Windows always applies a fixed alpha fade to drag images).
offset (Optional) A Point object specifying the offset of the drag image from the mouse hotspot. Use negative
coordinates to move the drag image up and left relative to the mouse cursor. If no offset is provided, the top,
left corner of the drag image is positioned at the mouse hotspot.
actionsAllowed (Optional) A NativeDragOptions object specifying which actions (copy, move, or link) are valid for the drag
operation. If no argument is provided, all actions are permitted. The DragOptions object is referenced in
NativeDragEvent objects to enable a potential drag target to check that the allowed actions are compatible
with the purpose of the target component. For example, a “trash” component might only accept drag
gestures that allow the move action.

579
ACTIONSCRIPT 3.0 DEVELOPER’S GUIDE
Drag and drop in AIR
Last updated 3/21/2011
new Point(-mouseX,-mouseY));
}
public function createClipboard(image:Bitmap, sourceFile:File):Clipboard {
var transfer:Clipboard = new Clipboard();
transfer.setData("bitmap",
image,
true);
// ActionScript 3 Bitmap object by value and by reference
transfer.setData(ClipboardFormats.BITMAP_FORMAT,
image.bitmapData,
false);
// Standard BitmapData format
transfer.setData(ClipboardFormats.FILE_LIST_FORMAT,
new Array(sourceFile),
false);
// Standard file list format
return transfer;
}
private function loadImage():void {
var url:URLRequest = new URLRequest(fileURL);
var loader:Loader = new Loader();
loader.load(url,new LoaderContext());
loader.contentLoaderInfo.addEventListener(Event.COMPLETE, onLoadComplete);
}
private function onLoadComplete(event:Event):void {
display = event.target.loader.content;
var flexWrapper:UIComponent = new UIComponent();
flexWrapper.addChild(event.target.loader.content);
addChild(flexWrapper);
flexWrapper.addEventListener(MouseEvent.MOUSE_DOWN, onMouseDown);
}
}
}
Completing a drag-out transfer
Adobe AIR 1.0 and later
When a user drops the dragged item by releasing the mouse, the initiator object dispatches a nativeDragComplete
event. You can check the dropAction property of the event object and then take the appropriate action. For example,
if the action is NativeDragAction.MOVE, you could remove the source item from its original location. The user can
abandon a drag gesture by releasing the mouse button while the cursor is outside an eligible drop target. The drag
manager sets the dropAction property for an abandoned gesture to NativeDragAction.NONE.
Supporting the drag-in gesture
Adobe AIR 1.0 and later
To support the drag-in gesture, your application (or, more typically, a visual component of your application) must
respond to nativeDragEnter or nativeDragOver events.

580
ACTIONSCRIPT 3.0 DEVELOPER’S GUIDE
Drag and drop in AIR
Last updated 3/21/2011
Steps in a typical drop operation
Adobe AIR 1.0 and later
The following sequence of events is typical for a drop operation:
1The user drags a clipboard object over a component.
2The component dispatches a nativeDragEnter event.
3The nativeDragEnter event handler examines the event object to check the available data formats and allowed
actions. If the component can handle the drop, it calls NativeDragManager.acceptDragDrop().
4The NativeDragManager changes the mouse cursor to indicate that the object can be dropped.
5The user drops the object over the component.
6The receiving component dispatches a nativeDragDrop event.
7The receiving component reads the data in the desired format from the Clipboard object within the event object.
8If the drag gesture originated within an AIR application, then the initiating interactive object dispatches a
nativeDragComplete event. If the gesture originated outside AIR, no feedback is sent.
Acknowledging a drag-in gesture
Adobe AIR 1.0 and later
When a user drags a clipboard item into the bounds of a visual component, the component dispatches
nativeDragEnter and nativeDragOver events. To determine whether the component can accept the clipboard item,
the handlers for these events can check the clipboard and allowedActions properties of the event object. To signal
that the component can accept the drop, the event handler must call the NativeDragManager.acceptDragDrop()
method, passing a reference to the receiving component. If more than one registered event listener calls the
acceptDragDrop() method, the last handler in the list takes precedence. The acceptDragDrop() call remains valid
until the mouse leaves the bounds of the accepting object, triggering the nativeDragExit event.
If more than one action is permitted in the allowedActions parameter passed to doDrag(), the user can indicate
which of the allowed actions they intend to perform by holding down a modifier key. The drag manager changes the
cursor image to tell the user which action would occur if they completed the drop. The intended action is reported by
the dropAction property of the NativeDragEvent object. The action set for a drag gesture is advisory only. The
components involved in the transfer must implement the appropriate behavior. To complete a move action, for
example, the drag initiator might remove the dragged item and the drop target might add it.
Your drag target can limit the drop action to one of the three possible actions by setting the dropAction property of
NativeDragManager class. If a user tries to choose a different action using the keyboard, then the NativeDragManager
displays the unavailable cursor. Set the dropAction property in the handlers for both the nativeDragEnter and the
nativeDragOver events.
The following example illustrates an event handler for a nativeDragEnter or nativeDragOver event. This handler
only accepts a drag-in gesture if the clipboard being dragged contains text-format data.

581
ACTIONSCRIPT 3.0 DEVELOPER’S GUIDE
Drag and drop in AIR
Last updated 3/21/2011
import flash.desktop.NativeDragManager;
import flash.events.NativeDragEvent;
public function onDragIn(event:NativeDragEvent):void{
NativeDragManager.dropAction = NativeDragActions.MOVE;
if(event.clipboard.hasFormat(ClipboardFormats.TEXT_FORMAT)){
NativeDragManager.acceptDragDrop(this); //'this' is the receiving component
}
}
Completing the drop
Adobe AIR 1.0 and later
When the user drops a dragged item on an interactive object that has accepted the gesture, the interactive object
dispatches a nativeDragDrop event. The handler for this event can extract the data from the clipboard property of
the event object.
When the clipboard contains an application-defined format, the transferMode parameter passed to the getData()
method of the Clipboard object determines whether the drag manager returns a reference or a serialized version of the
object.
The following example illustrates an event handler for the nativeDragDrop event:
import flash.desktop.Clipboard;
import flash.events.NativeDragEvent;
public function onDrop(event:NativeDragEvent):void {
if (event.clipboard.hasFormat(ClipboardFormats.TEXT_FORMAT)) {
var text:String =
String(event.clipboard.getData(ClipboardFormats.TEXT_FORMAT,
ClipboardTransferMode.ORIGINAL_PREFERRED));
}
Once the event handler exits, the Clipboard object is no longer valid. Any attempt to access the object or its data
generates an error.
Updating the visual appearance of a component
Adobe AIR 1.0 and later
A component can update its visual appearance based on the NativeDragEvent events. The following table describes the
types of changes that a typical component would make in response to the different events:
Event Description
nativeDragStart The initiating interactive object can use the nativeDragStart event to provide visual feedback that the
drag gesture originated from that interactive object.
nativeDragUpdate The initiating interactive object can use the nativeDragUpdate event to update its state during the gesture.
(This event does not exist in AIR for Linux.)
nativeDragEnter A potential receiving interactive object can use this event to take the focus, or indicate visually that it can or
cannot accept the drop.

582
ACTIONSCRIPT 3.0 DEVELOPER’S GUIDE
Drag and drop in AIR
Last updated 3/21/2011
Tracking mouse position during a drag-in gesture
Adobe AIR 1.0 and later
While a drag gesture remains over a component, that component dispatches nativeDragOver events. These events
are dispatched every few milliseconds and also whenever the mouse moves. The nativeDragOver event object can be
used to determine the position of the mouse over the component. Having access to the mouse position can be helpful
in situations where the receiving component is complex, but is not made up of sub-components. For example, if your
application displayed a bitmap containing a street map and you wanted to highlight zones on the map when the user
dragged information into them, you could use the mouse coordinates reported in the nativeDragOver event to track
the mouse position within the map.
Drag and drop in HTML
Adobe AIR 1.0 and later
To drag data into and out of an HTML-based application (or into and out of the HTML displayed in an HTMLLoader),
you can use HTML drag and drop events. The HTML drag-and-drop API allows you to drag to and from DOM
elements in the HTML content.
Note: You can also use the AIR NativeDragEvent and NativeDragManager APIs by listening for events on the
HTMLLoader object containing the HTML content. However, the HTML API is better integrated with the HTML DOM
and gives you control of the default behavior.
Default drag-and-drop behavior
Adobe AIR 1.0 and later
The HTML environment provides default behavior for drag-and-drop gestures involving text, images, and URLs.
Using the default behavior, you can always drag these types of data out of an element. However, you can only drag text
into an element and only to elements in an editable region of a page. When you drag text between or within editable
regions of a page, the default behavior performs a move action. When you drag text to an editable region from a non-
editable region or from outside the application, then the default behavior performs a copy action.
You can override the default behavior by handling the drag-and-drop events yourself. To cancel the default behavior,
you must call the preventDefault() methods of the objects dispatched for the drag-and-drop events. You can then
insert data into the drop target and remove data from the drag source as necessary to perform the chosen action.
nativeDragOver A potential receiving interactive object can use this event to respond to the movement of the mouse within
the interactive object, such as when the mouse enters a “hot” region of a complex component such as a street
map display.
nativeDragExit A potential receiving interactive object can use this event to restore its state when a drag gesture moves
outside its bounds.
nativeDragComplete The initiating interactive object can use this event to update its associated data model, such as by removing
an item from a list, and to restore its visual state.
Event Description

583
ACTIONSCRIPT 3.0 DEVELOPER’S GUIDE
Drag and drop in AIR
Last updated 3/21/2011
By default, the user can select and drag any text, and drag images and links. You can use the WebKit CSS property, -
webkit-user-select to control how any HTML element can be selected. For example, if you set -webkit-user-
select to none, then the element contents are not selectable and so cannot be dragged. You can also use the -webkit-
user-drag CSS property to control whether an element as a whole can be dragged. However, the contents of the
element are treated separately. The user could still drag a selected portion of the text. For more information, see “CSS
in AIR” on page 948.
Drag-and-drop events in HTML
Adobe AIR 1.0 and later
The events dispatched by the initiator element from which a drag originates, are:
The events dispatched by a drag target are:
The event object dispatched in response to these events is similar to a mouse event. You can use mouse event properties
such as (clientX, clientY) and (screenX, screenY), to determine the mouse position.
The most important property of a drag event object is dataTransfer, which contains the data being dragged. The
dataTransfer object itself has the following properties and methods:
Event Description
dragstart Dispatched when the user starts the drag gesture. The handler for this event can prevent the drag, if
necessary, by calling the preventDefault() method of the event object. To control whether the dragged data
can be copied, linked, or moved, set the effectAllowed property. Selected text, images, and links are put onto
the clipboard by the default behavior, but you can set different data for the drag gesture using the
dataTransfer property of the event object.
drag Dispatched continuously during the drag gesture.
dragend Dispatched when the user releases the mouse button to end the drag gesture.
Event Description
dragover Dispatched continuously while the drag gesture remains within the element boundaries. The handler for this
event should set the dataTransfer.dropEffect property to indicate whether the drop will result in a copy, move,
or link action if the user releases the mouse.
dragenter Dispatched when the drag gesture enters the boundaries of the element.
If you change any properties of a dataTransfer object in a dragenter event handler, those changes are quickly
overridden by the next dragover event. On the other hand, there is a short delay between a dragenter and the
first dragover event that can cause the cursor to flash if different properties are set. In many cases, you can use
the same event handler for both events.
dragleave Dispatched when the drag gesture leaves the element boundaries.
drop Dispatched when the user drops the data onto the element. The data being dragged can only be accessed
within the handler for this event.

584
ACTIONSCRIPT 3.0 DEVELOPER’S GUIDE
Drag and drop in AIR
Last updated 3/21/2011
MIME types for the HTML drag-and-drop
Adobe AIR 1.0 and later
The MIME types to use with the dataTransfer object of an HTML drag-and-drop event include:
You can also use other MIME strings, including application-defined strings. However, other applications may not be
able to recognize or use the transferred data. It is your responsibility to add data to the dataTransfer object in the
expected format.
Important: Only code running in the application sandbox can access dropped files. Attempting to read or set any property
of a File object within a non-application sandbox generates a security error. See “Handling file drops in non-application
HTML sandboxes” on page 589 for more information.
Property or Method Description
effectAllowed The effect allowed by the source of the drag. Typically, the handler for the dragstart event sets this value. See
“Drag effects in HTML” on page 585.
dropEffect The effect chosen by the target or the user. If you set the dropEffect in a dragover or dragenter event
handler, then AIR updates the mouse cursor to indicate the effect that occurs if the user releases the mouse. If
the dropEffect set does not match one of the allowed effects, no drop is allowed and the unavailable cursor
is displayed. If you have not set a dropEffect in response to the latest dragover or dragenter event, then
the user can choose from the allowed effects with the standard operating system modifier keys.
The final effect is reported by the dropEffect property of the object dispatched for dragend. If the user
abandons the drop by releasing the mouse outside an eligible target, then dropEffect is set to none.
types An array containing the MIME type strings for each data format present in the dataTransfer object.
getData(mimeType) Gets the data in the format specified by the mimeType parameter.
The getData() method can only be called in response to the drop event.
setData(mimeType) Adds data to the dataTransfer in the format specified by the mimeType parameter. You can add data in
multiple formats by calling setData() for each MIME type. Any data placed in the dataTransfer object by
the default drag behavior is cleared.
The setData() method can only be called in response to the dragstart event.
clearData(mimeType) Clears any data in the format specified by the mimeType parameter.
setDragImage(image,
offsetX, offsetY)
Sets a custom drag image. The setDragImage() method can only be called in response to the dragstart
event and only when an entire HTML element is dragged by setting its -webkit-user-drag CSS style to
element. The image parameter can be a JavaScript Element or Image object.
Data format MIME type
Text "text/plain"
HTML "text/html"
URL "text/uri-list"
Bitmap "image/x-vnd.adobe.air.bitmap"
File list "application/x-vnd.adobe.air.file-list"

585
ACTIONSCRIPT 3.0 DEVELOPER’S GUIDE
Drag and drop in AIR
Last updated 3/21/2011
Drag effects in HTML
Adobe AIR 1.0 and later
The initiator of the drag gesture can limit the allowed drag effects by setting the dataTransfer.effectAllowed
property in the handler for the dragstart event. The following string values can be used:
The target of the drag gesture can set the dataTransfer.dropEffect property to indicate the action that is taken if
the user completes the drop. If the drop effect is one of the allowed actions, then the system displays the appropriate
copy, move, or link cursor. If not, then the system displays the unavailable cursor. If no drop effect is set by the target,
the user can choose from the allowed actions with the modifier keys.
Set the dropEffect value in the handlers for both the dragover and dragenter events:
function doDragStart(event) {
event.dataTransfer.setData("text/plain","Text to drag");
event.dataTransfer.effectAllowed = "copyMove";
}
function doDragOver(event) {
event.dataTransfer.dropEffect = "copy";
}
function doDragEnter(event) {
event.dataTransfer.dropEffect = "copy";
}
Note: Although you should always set the dropEffect property in the handler for dragenter, be aware that the next
dragover event resets the property to its default value. Set dropEffect in response to both events.
Dragging data out of an HTML element
Adobe AIR 1.0 and later
The default behavior allows most content in an HTML page to be copied by dragging. You can control the content
allowed to be dragged using CSS properties -webkit-user-select and -webkit-user-drag.
Override the default drag-out behavior in the handler for the dragstart event. Call the setData() method of the
dataTransfer property of the event object to put your own data into the drag gesture.
String value Description
"none" No drag operations are allowed.
"copy" The data will be copied to the destination, leaving the original in place.
"link" The data will be shared with the drop destination using a link back to the original.
"move” The data will be copied to the destination and removed from the original location.
"copyLink" The data can be copied or linked.
"copyMove" The data can be copied or moved.
"linkMove" The data can be linked or moved.
"all" The data can be copied, moved, or linked. All is the default effect when you prevent the default behavior.

586
ACTIONSCRIPT 3.0 DEVELOPER’S GUIDE
Drag and drop in AIR
Last updated 3/21/2011
To indicate which drag effects a source object supports when you are not relying on the default behavior, set the
dataTransfer.effectAllowed property of the event object dispatched for the dragstart event. You can choose any
combination of effects. For example, if a source element supports both copy and link effects, set the property to
"copyLink".
Setting the dragged data
Flash Player 9 and later, Adobe AIR 1.0 and later
Add the data for the drag gesture in the handler for the dragstart event with the dataTransfer property. Use the
dataTransfer.setData() method to put data onto the clipboard, passing in the MIME type and the data to transfer.
For example, if you had an image element in your application, with the id imageOfGeorge, you could use the following
dragstart event handler. This example adds representations of a picture of George in several data formats, which
increases the likelihood that other applications can use the dragged data.
function dragStartHandler(event){
event.dataTransfer.effectAllowed = "copy";
var dragImage = document.getElementById("imageOfGeorge");
var dragFile = new air.File(dragImage.src);
event.dataTransfer.setData("text/plain","A picture of George");
event.dataTransfer.setData("image/x-vnd.adobe.air.bitmap", dragImage);
event.dataTransfer.setData("application/x-vnd.adobe.air.file-list",
new Array(dragFile));
}
Note: When you call the setData() method of dataTransfer object, no data is added by the default drag-and-drop
behavior.
Dragging data into an HTML element
Adobe AIR 1.0 and later
The default behavior only allows text to be dragged into editable regions of the page. You can specify that an element
and its children can be made editable by including the contenteditable attribute in the opening tag of the element.
You can also make an entire document editable by setting the document object designMode property to "on".
You can support alternate drag-in behavior on a page by handling the dragenter, dragover, and drop events for any
elements that can accept dragged data.
Enabling drag-in
Adobe AIR 1.0 and later
To handle the drag-in gesture, you must first cancel the default behavior. Listen for the dragenter and dragover
events on any HTML elements you want to use as drop targets. In the handlers for these events, call the
preventDefault() method of the dispatched event object. Canceling the default behavior allows non-editable
regions to receive a drop.

587
ACTIONSCRIPT 3.0 DEVELOPER’S GUIDE
Drag and drop in AIR
Last updated 3/21/2011
Getting the dropped data
Adobe AIR 1.0 and later
You can access the dropped data in the handler for the ondrop event:
function doDrop(event){
droppedText = event.dataTransfer.getData("text/plain");
}
Use the dataTransfer.getData() method to read the data onto the clipboard, passing in the MIME type of the data
format to read. You can find out which data formats are available using the types property of the dataTransfer
object. The types array contains the MIME type string of each available format.
When you cancel the default behavior in the dragenter or dragover events, you are responsible for inserting any
dropped data into its proper place in the document. No API exists to convert a mouse position into an insertion point
within an element. This limitation can make it difficult to implement insertion-type drag gestures.
Example: Overriding the default HTML drag-in behavior
Adobe AIR 1.0 and later
This example implements a drop target that displays a table showing each data format available in the dropped item.
The default behavior is used to allow text, links, and images to be dragged within the application. The example
overrides the default drag-in behavior for the div element that serves as the drop target. The key step to enabling non-
editable content to accept a drag-in gesture is to call the preventDefault() method of the event object dispatched for
both the dragenter and dragover events. In response to a drop event, the handler converts the transferred data into
an HTML row element and inserts the row into a table for display.
<html>
<head>
<title>Drag-and-drop</title>
<script language="javascript" type="text/javascript" src="AIRAliases.js"></script>
<script language="javascript">
function init(){
var target = document.getElementById('target');
target.addEventListener("dragenter", dragEnterOverHandler);
target.addEventListener("dragover", dragEnterOverHandler);
target.addEventListener("drop", dropHandler);
var source = document.getElementById('source');
source.addEventListener("dragstart", dragStartHandler);
source.addEventListener("dragend", dragEndHandler);
emptyRow = document.getElementById("emptyTargetRow");
}
function dragStartHandler(event){
event.dataTransfer.effectAllowed = "copy";
}
function dragEndHandler(event){
air.trace(event.type + ": " + event.dataTransfer.dropEffect);

588
ACTIONSCRIPT 3.0 DEVELOPER’S GUIDE
Drag and drop in AIR
Last updated 3/21/2011
}
function dragEnterOverHandler(event){
event.preventDefault();
}
var emptyRow;
function dropHandler(event){
for(var prop in event){
air.trace(prop + " = " + event[prop]);
}
var row = document.createElement('tr');
row.innerHTML = "<td>" + event.dataTransfer.getData("text/plain") + "</td>" +
"<td>" + event.dataTransfer.getData("text/html") + "</td>" +
"<td>" + event.dataTransfer.getData("text/uri-list") + "</td>" +
"<td>" + event.dataTransfer.getData("application/x-vnd.adobe.air.file-list") +
"</td>";
var imageCell = document.createElement('td');
if((event.dataTransfer.types.toString()).search("image/x-vnd.adobe.air.bitmap") > -
1){
imageCell.appendChild(event.dataTransfer.getData("image/x-
vnd.adobe.air.bitmap"));
}
row.appendChild(imageCell);
var parent = emptyRow.parentNode;
parent.insertBefore(row, emptyRow);
}
</script>
</head>
<body onLoad="init()" style="padding:5px">
<div>
<h1>Source</h1>
<p>Items to drag:</p>
<ul id="source">
<li>Plain text.</li>
<li>HTML <b>formatted</b> text.</li>
<li>A <a href="http://www.adobe.com">URL.</a></li>
<li><img src="icons/AIRApp_16.png" alt="An image"/></li>
<li style="-webkit-user-drag:none;">
Uses "-webkit-user-drag:none" style.
</li>

589
ACTIONSCRIPT 3.0 DEVELOPER’S GUIDE
Drag and drop in AIR
Last updated 3/21/2011
<li style="-webkit-user-select:none;">
Uses "-webkit-user-select:none" style.
</li>
</ul>
</div>
<div id="target" style="border-style:dashed;">
<h1 >Target</h1>
<p>Drag items from the source list (or elsewhere).</p>
<table id="displayTable" border="1">
<tr><th>Plain text</th><th>Html text</th><th>URL</th><th>File list</th><th>Bitmap
Data</th></tr>
<tr
id="emptyTargetRow"><td> </td><td> </td><td> </td><td> </td><td> </
td></tr>
</table>
</div>
</div>
</body>
</html>
Handling file drops in non-application HTML sandboxes
Adobe AIR 1.0 and later
Non-application content cannot access the File objects that result when files are dragged into an AIR application. Nor
is it possible to pass one of these File objects to application content through a sandbox bridge. (The object properties
must be accessed during serialization.) However, you can still drop files in your application by listening for the AIR
nativeDragDrop events on the HTMLLoader object.
Normally, if a user drops a file into a frame that hosts non-application content, the drop event does not propagate from
the child to the parent. However, since the events dispatched by the HTMLLoader (which is the container for all
HTML content in an AIR application) are not part of the HTML event flow, you can still receive the drop event in
application content.
To receive the event for a file drop, the parent document adds an event listener to the HTMLLoader object using the
reference provided by window.htmlLoader:
window.htmlLoader.addEventListener("nativeDragDrop",function(event){
var filelist = event.clipboard.getData(air.ClipboardFormats.FILE_LIST_FORMAT);
air.trace(filelist[0].url);
});
The following example uses a parent document that loads a child page into a remote sandbox (http://localhost/). The
parent listens for the nativeDragDrop event on the HTMLLoader object and traces out the file url.

590
ACTIONSCRIPT 3.0 DEVELOPER’S GUIDE
Drag and drop in AIR
Last updated 3/21/2011
<html>
<head>
<title>Drag-and-drop in a remote sandbox</title>
<script language="javascript" type="text/javascript" src="AIRAliases.js"></script>
<script language="javascript">
window.htmlLoader.addEventListener("nativeDragDrop",function(event){
var filelist = event.clipboard.getData(air.ClipboardFormats.FILE_LIST_FORMAT);
air.trace(filelist[0].url);
});
</script>
</head>
<body>
<iframe src="child.html"
sandboxRoot="http://localhost/"
documentRoot="app:/"
frameBorder="0" width="100%" height="100%">
</iframe>
</body>
</html>
The child document must present a valid drop target by calling the Event object preventDefault() method in the
HTML dragenter and dragover event handlers. Otherwise, the drop event can never occur.
<html>
<head>
<title>Drag and drop target</title>
<script language="javascript" type="text/javascript">
function preventDefault(event){
event.preventDefault();
}
</script>
</head>
<body ondragenter="preventDefault(event)" ondragover="preventDefault(event)">
<div>
<h1>Drop Files Here</h1>
</div>
</body>
</html>
Dropping file promises
Adobe AIR 2 and later
A file promise is a drag-and-drop clipboard format that allows a user to drag a file that does not yet exist out of an AIR
application. For example, using file promises, your application could allow a user to drag a proxy icon to a desktop
folder. The proxy icon represents a file or some data known to be available at a URL. After the user drops the icon, the
runtime downloads the data and writes the file to the drop location.
You can use the URLFilePromise class in an AIR application to drag-and-drop files accessible at a URL. The
URLFilePromise implementation is provided in the aircore library as part of the AIR 2 SDK. Use either the aircore.swc
or aircore.swf file found in the SDK frameworks/libs/air directory.
Alternately, you can implement your own file promise logic using the IFilePromise interface (which is defined in the
runtime flash.desktop package).

591
ACTIONSCRIPT 3.0 DEVELOPER’S GUIDE
Drag and drop in AIR
Last updated 3/21/2011
File promises are similar in concept to deferred rendering using a data handler function on the clipboard. Use file
promises instead of deferred rendering when dragging and dropping files. The deferred rendering technique can lead
to undesirable pauses in the drag gesture as the data is generated or downloaded. Use deferred rendering for copy and
paste operations (for which file promises are not supported).
Limitations when using file promises
File promises have the following limitations compared to other data formats that you can put in a drag-and-drop
clipboard:
•File promises can only be dragged out of an AIR application; they cannot be dropped into an AIR application.
•File promises are not supported on all operating systems. Use the Clipboard.supportsFilePromise property to
test whether file promises are supported on the host system. On systems that do not support file promises, you
should provide an alternative mechanism for downloading or generating the file data.
•File promises cannot be used with the copy-and-paste clipboard (Clipboard.generalClipboard).
More Help topics
flash.desktop.IFilePromise
air.desktop.URLFilePromise
Dropping remote files
Adobe AIR 2 and later
Use the URLFilePromise class to create file promise objects representing files or data available at a URL. Add one or
more file promise objects to the clipboard using the FILE_PROMISE_LIST clipboard format. In the following example,
a single file, available at http://www.example.com/foo.txt, is downloaded and saved to the drop location as bar.txt. (The
remote and the local file names do not have to match.)
if( Clipboard.supportsFilePromise )
{
var filePromise:URLFilePromise = new URLFilePromise();
filePromise.request = new URLRequest("http://example.com/foo.txt");
filePromise.relativePath = "bar.txt";
var fileList:Array = new Array( filePromise );
var clipboard:Clipboard = new Clipboard();
clipboard.setData( ClipboardFormats.FILE_PROMISE_LIST_FORMAT, fileList );
NativeDragManager.doDrag( dragSource, clipboard );
}
You can allow the user to drag more than one file at a time by adding more file promise objects to the array assigned
to the clipboard. You can also specify subdirectories in the relativePath property so that some or all of the files
included in the operation are placed in a subfolder relative to the drop location.
The following example illustrates how to initiate a drag operation that includes multiple file promises. In this example,
an html page, article.html, is put on the clipboard as a file promise, along with its two linked image files. The images
are copied into an images subfolder so that the relative links are maintained.

592
ACTIONSCRIPT 3.0 DEVELOPER’S GUIDE
Drag and drop in AIR
Last updated 3/21/2011
if( Clipboard.supportsFilePromise )
{ //Create the promise objects
var filePromise:URLFilePromise = new URLFilePromise();
filePromise.request = new URLRequest("http://example.com/article.html");
filePromise.relativePath = "article.html";
var image1Promise:URLFilePromise = new URLFilePromise();
image1Promise.request = new URLRequest("http://example.com/images/img_1.jpg");
image1Promise.relativePath = "images/img_1.html";
var image2Promise:URLFilePromise = new URLFilePromise();
image2Promise.request = new URLRequest("http://example.com/images/img_2.jpg");
image2Promise.relativePath = "images/img_2.jpg";
//Put the promise objects onto the clipboard inside an array
var fileList:Array = new Array( filePromise, image1Promise, image2Promise );
var clipboard:Clipboard = new Clipboard();
clipboard.setData( ClipboardFormats.FILE_PROMISE_LIST_FORMAT, fileList );
//Start the drag operation
NativeDragManager.doDrag( dragSource, clipboard );
}
Implementing the IFilePromise interface
Adobe AIR 2 and later
To provide file promises for resources that cannot be accessed using a URLFilePromise object, you can implement the
IFilePromise interface in a custom class. The IFilePromise interface defines the methods and properties used by the
AIR runtime to access the data to be written to a file once the file promise is dropped.
An IFilePromise implementation passes another object to the AIR runtime that provides the data for the file promise.
This object must implement the IDataInput interface, which the AIR runtime uses to read the data. For example, the
URLFilePromise class, which implements IFilePromise, uses a URLStream object as the data provider.
AIR can read the data synchronously or asynchronously. The IFilePromise implementation reports which mode of
access is supported by returning the appropriate value in the isAsync property. If asynchronous data access is
provided, the data provider object must implement the IEventDispatcher interface and dispatch the necessary events,
such as open, progress and complete.
You can use a custom class, or one of the following built-in classes, as a data provider for a file promise:
•ByteArray (synchronous)
•FileStream (synchronous or asynchronous)
•Socket (asynchronous)
•URLStream (asynchronous)
To implement the IFilePromise interface, you must provide code for the following functions and properties:
•open():IDataInput — Returns the data provider object from which the data for the promised file is read. The
object must implement the IDataInput interface. If the data is provided asynchronously, the object must also
implement the IEventDispatcher interface and dispatch the necessary events (see “Using an asynchronous data
provider in a file promise” on page 594).

593
ACTIONSCRIPT 3.0 DEVELOPER’S GUIDE
Drag and drop in AIR
Last updated 3/21/2011
•get relativePath():String — Provides the path, including file name, for the created file. The path is resolved
relative to the drop location chosen by the user in the drag-and-drop operation. To make sure that the path uses
the proper separator character for the host operating system, use the File.separator constant when specifying
paths containing directories. You can add a setter function or use a constructor parameter to allow the path to be
set at runtime.
•get isAsync():Boolean — Informs the AIR runtime whether the data provider object provides it’s data
asynchronously or synchronously.
•close():void — Called by the runtime when the data is fully read (or an error prevents further reading). You can
use this function to cleanup resources.
•reportError( e:ErrorEvent ):void — Called by the runtime when an error reading the data occurs.
All of the IFilePromise methods are called by the runtime during a drag-and-drop operation involving the file promise.
Typically, your application logic should not call any of these methods directly.
Using a synchronous data provider in a file promise
Adobe AIR 2 and later
The simplest way to implement the IFilePromise interface is to use a synchronous data provider object, such as a
ByteArray or a synchronous FileStream. In the following example, a ByteArray object is created, filled with data, and
returned when the open() method is called.
package
{
import flash.desktop.IFilePromise;
import flash.events.ErrorEvent;
import flash.utils.ByteArray;
import flash.utils.IDataInput;
public class SynchronousFilePromise implements IFilePromise
{
private const fileSize:int = 5000; //size of file data
private var filePath:String = "SynchronousFile.txt";
public function get relativePath():String
{
return filePath;
}
public function get isAsync():Boolean
{
return false;
}
public function open():IDataInput
{
var fileContents:ByteArray = new ByteArray();
//Create some arbitrary data for the file
for( var i:int = 0; i < fileSize; i++ )

594
ACTIONSCRIPT 3.0 DEVELOPER’S GUIDE
Drag and drop in AIR
Last updated 3/21/2011
{
fileContents.writeUTFBytes( 'S' );
}
//Important: the ByteArray is read from the current position
fileContents.position = 0;
return fileContents;
}
public function close():void
{
//Nothing needs to be closed in this case.
}
public function reportError(e:ErrorEvent):void
{
trace("Something went wrong: " + e.errorID + " - " + e.type + ", " + e.text );
}
}
}
In practice, synchronous file promises have limited utility. If the amount of data is small, you could just as easily create
a file in a temporary directory and add a normal file list array to the drag-and-drop clipboard. On the other hand, if
the amount of data is large or generating the data is computationally expensive, a long synchronous process is
necessary. Long synchronous processes can block UI updates for a noticeable amount of time and make your
application seem unresponsive. To avoid this problem, you can create an asynchronous data provider driven by a
timer.
Using an asynchronous data provider in a file promise
Adobe AIR 2 and later
When you use an asynchronous data provider object, the IFilePromise isAsync property must be true and the object
returned by the open() method must implement the IEventDispatcher interface. The runtime listens for several
alternative events so that different built-in objects can be used as a data provider. For example, progress events are
dispatched by FileStream and URLStream objects, whereas socketData events are dispatched by Socket objects. The
runtime listens for the appropriate events from all of these objects.
The following events drive the process of reading the data from the data provider object:
•Event.OPEN — Informs the runtime that the data source is ready.
•ProgressEvent.PROGRESS — Informs the runtime that data is available. The runtime will read the amount of
available data from the data provider object.
•ProgressEvent.SOCKET_DATA — Informs the runtime that data is available. The socketData event is dispatched
by socket-based objects. For other object types, you should dispatch a progress event. (The runtime listens for
both events to detect when data can be read.)
•Event.COMPLETE — Informs the runtime that the data has all been read.
•Event.CLOSE — Informs the runtime that the data has all been read. (The runtime listens for both close and
complete for this purpose.)
•IOErrorEvent.IOERROR — Informs the runtime that an error reading the data has occurred. The runtime aborts
file creation and calls the IFilePromise close() method.

595
ACTIONSCRIPT 3.0 DEVELOPER’S GUIDE
Drag and drop in AIR
Last updated 3/21/2011
•SecurityErrorEvent.SECURITY_ERROR — Informs the runtime that a security error has occurred. The runtime
aborts file creation and calls the IFilePromise close() method.
•HTTPStatusEvent.HTTP_STATUS — Used, along with httpResponseStatus, by the runtime to make sure that
the data available represents the desired content, rather than an error message (such as a 404 page). Objects based
on the HTTP protocol should dispatch this event.
•HTTPStatusEvent.HTTP_RESPONSE_STATUS — Used, along with httpStatus, by the runtime to make sure
that the data available represents the desired content. Objects based on the HTTP protocol should dispatch this
event.
The data provider should dispatch these events in the following sequence:
1open event
2progress or socketData events
3complete or close event
Note: The built-in objects, FileStream, Socket, and URLStream, dispatch the appropriate events automatically.
The following example creates a file promise using a custom, asynchronous data provider. The data provider class
extends ByteArray (for the IDataInput support) and implements the IEventDispatcher interface. At each timer event,
the object generates a chunk of data and dispatches a progress event to inform the runtime that the data is available.
When enough data has been produced, the object dispatches a complete event.
package
{
import flash.events.Event;
import flash.events.EventDispatcher;
import flash.events.IEventDispatcher;
import flash.events.ProgressEvent;
import flash.events.TimerEvent;
import flash.utils.ByteArray;
import flash.utils.Timer;
[Event(name="open", type="flash.events.Event.OPEN")]
[Event(name="complete", type="flash.events.Event.COMPLETE")]
[Event(name="progress", type="flash.events.ProgressEvent")]
[Event(name="ioError", type="flash.events.IOErrorEvent")]
[Event(name="securityError", type="flash.events.SecurityErrorEvent")]
public class AsyncDataProvider extends ByteArray implements IEventDispatcher
{
private var dispatcher:EventDispatcher = new EventDispatcher();
public var fileSize:int = 0; //The number of characters in the file
private const chunkSize:int = 1000; //Amount of data written per event
private var dispatchDataTimer:Timer = new Timer( 100 );
private var opened:Boolean = false;
public function AsyncDataProvider()
{
super();
dispatchDataTimer.addEventListener( TimerEvent.TIMER, generateData );
}
public function begin():void{
dispatchDataTimer.start();
}

596
ACTIONSCRIPT 3.0 DEVELOPER’S GUIDE
Drag and drop in AIR
Last updated 3/21/2011
public function end():void
{
dispatchDataTimer.stop();
}
private function generateData( event:Event ):void
{
if( !opened )
{
var open:Event = new Event( Event.OPEN );
dispatchEvent( open );
opened = true;
}
else if( position + chunkSize < fileSize )
{
for( var i:int = 0; i <= chunkSize; i++ )
{
writeUTFBytes( 'A' );
}
//Set position back to the start of the new data
this.position -= chunkSize;
var progress:ProgressEvent =
new ProgressEvent( ProgressEvent.PROGRESS, false, false, bytesAvailable,
bytesAvailable + chunkSize);
dispatchEvent( progress )
}
else
{
var complete:Event = new Event( Event.COMPLETE );
dispatchEvent( complete );
}
}
//IEventDispatcher implementation
public function addEventListener(type:String, listener:Function,
useCapture:Boolean=false, priority:int=0, useWeakReference:Boolean=false):void
{
dispatcher.addEventListener( type, listener, useCapture, priority, useWeakReference );
}
public function removeEventListener(type:String, listener:Function,
useCapture:Boolean=false):void

597
ACTIONSCRIPT 3.0 DEVELOPER’S GUIDE
Drag and drop in AIR
Last updated 3/21/2011
{
dispatcher.removeEventListener( type, listener, useCapture );
}
public function dispatchEvent(event:Event):Boolean
{
return dispatcher.dispatchEvent( event );
}
public function hasEventListener(type:String):Boolean
{
return dispatcher.hasEventListener( type );
}
public function willTrigger(type:String):Boolean
{
return dispatcher.willTrigger( type );
}
}
}
Note: Because the AsyncDataProvider class in the example extends ByteArray, it cannot also extend EventDispatcher. To
implement the IEventDispatcher interface, the class uses an internal EventDispatcher object and forwards the
IEventDispatcher method calls to that internal object. You could also extend EventDispatcher and implement IDataInput
(or implement both interfaces).
The asynchronous IFilePromise implementation is almost identical to the synchronous implementation. The main
differences are that isAsync returns true and that the open() method returns an asynchronous data object:
package
{
import flash.desktop.IFilePromise;
import flash.events.ErrorEvent;
import flash.events.EventDispatcher;
import flash.utils.IDataInput;
public class AsynchronousFilePromise extends EventDispatcher implements IFilePromise
{
private var fileGenerator:AsyncDataProvider;
private const fileSize:int = 5000; //size of file data
private var filePath:String = "AsynchronousFile.txt";
public function get relativePath():String
{
return filePath;
}
public function get isAsync():Boolean
{
return true;
}

598
ACTIONSCRIPT 3.0 DEVELOPER’S GUIDE
Drag and drop in AIR
Last updated 3/21/2011
public function open():IDataInput
{
fileGenerator = new AsyncDataProvider();
fileGenerator.fileSize = fileSize;
fileGenerator.begin();
return fileGenerator;
}
public function close():void
{
fileGenerator.end();
}
public function reportError(e:ErrorEvent):void
{
trace("Something went wrong: " + e.errorID + " - " + e.type + ", " + e.text );
}
}
}

599
Last updated 3/21/2011
Chapter 34: Working with menus
Flash Player 9 and later, Adobe AIR 1.0 and later
Use the classes in the context menu API to modify the context menu in web-based Flex and Flash Player applications.
Use the classes in the native menu API to define application, window, context, and pop-up menus in Adobe® AIR®.
Menu basics
Flash Player 9 and later, Adobe AIR 1.0 and later
For a quick explanation and code examples of creating native menus in AIR applications, see the following quick start
articles on the Adobe Developer Connection:
•Adding native menus to an AIR application (Flex)
•Adding native menus to an AIR application (Flash)
The native menu classes allow you to access the native menu features of the operating system on which your
application is running. NativeMenu objects can be used for application menus (available on Mac OS X), window
menus (available on Windows and Linux), context menus, and pop-up menus.
Outside of AIR, you can use the context menu classes to modify the context menu that Flash Player automatically
displays when a user right-clicks or cmd-clicks on an object in your application. (An automatic context menu is not
displayed for AIR applications.)
Menu classes
Flash Player 9 and later, Adobe AIR 1.0 and later
The menu classes include:
Package Classes
flash.display •NativeMenu
•NativeMenuItem
flash.ui •ContextMenu
•ContextMenuItem
flash.events •Event
•ContextMenuEvent

600
ACTIONSCRIPT 3.0 DEVELOPER’S GUIDE
Working with menus
Last updated 3/21/2011
Menu varieties
Flash Player 9 and later, Adobe AIR 1.0 and later
AIR supports the following types of menus:
Context menus Context menus open in response to a right-click or command-click on an interactive object in SWF
content or a document element in HTML content.
In the Flash Player runtime, a context menu is automatically displayed. You can use the ContextMenu and
ContextMenuItem classes to add your own commands to the menu. You can also remove some, but not all, of the
built-in commands.
In the AIR runtime, you can create a context menu using either the NativeMenu or the ContextMenu class. In HTML
content in AIR, you can use the Webkit HTML and JavaScript APIs to add context menus to HTML elements.
Application menus (AIR only) An application menu is a global menu that applies to the entire application. Application
menus are supported on Mac OS X, but not on Windows or Linux. On Mac OS X, the operating system automatically
creates an application menu. You can use the AIR menu API to add items and submenus to the standard menus. You
can add listeners for handling the existing menu commands. Or you can remove existing items.
Window menus (AIR only) A window menu is associated with a single window and is displayed below the title bar.
Menus can be added to a window by creating a NativeMenu object and assigning it to the menu property of the
NativeWindow object. Window menus are supported on the Windows and Linux operating systems, but not on Mac
OS X. Native window menus can only be used with windows that have system chrome.
Dock and system tray icon menus (AIR only) These icon menus are similar to context menus and are assigned to an
application icon in the Mac OS X dock or the Windows and Linux notification areas on the taskbar. Dock and system
tray icon menus use the NativeMenu class. On Mac OS X, the items in the menu are added above the standard
operating system items. On Windows or Linux, there is no standard menu.
Pop-up menus (AIR only) An AIR pop-up menu is like a context menu, but is not necessarily associated with a
particular application object or component. Pop-up menus can be displayed anywhere in a window by calling the
display() method of any NativeMenu object.
Custom menus Native menus are drawn entirely by the operating system and, as such, exist outside the Flash and
HTML rendering models. Instead of using native menus, you can always create your own custom, non-native menus
using MXML, ActionScript, or JavaScript (in AIR). Such menus must be fully rendered inside application content.
Flex menus The Adobe® Flex™ framework provides a set of Flex menu components. The Flex menus are drawn by the
runtime rather than the operating system and are not native menus. A Flex menu component can be used for Flex
windows that do not have system chrome. Another benefit of using the Flex menu component is that you can specify
menus declaratively in MXML format. If you are using the Flex Framework, use the Flex menu classes for window
menus instead of the native classes.
Default menus (AIR only)
The following default menus are provided by the operating system or a built-in AIR class:
•Application menu on Mac OS X
•Dock icon menu on Mac OS X
•Context menu for selected text and images in HTML content
•Context menu for selected text in a TextField object (or an object that extends TextField)

601
ACTIONSCRIPT 3.0 DEVELOPER’S GUIDE
Working with menus
Last updated 3/21/2011
About context menus
Flash Player 9 and later, Adobe AIR 1.0 and later
In SWF content, any object that inherits from InteractiveObject can be given a context menu by assigning a menu
object to its contextMenu property. Several commands are included by default, including Forward, Back, Print,
Quality, and Zoom. In the AIR runtime, the menu object assigned to contextMenu can either be of type NativeMenu
or of type ContextMenu. In the Flash Player runtime, only the ContextMenu class is available.
You can listen for either native menu events or context menus events when using the ContextMenu and
ContextMenuItem classes; both are dispatched. One benefit provided by the ContextMenuEvent object properties is
that contextMenuOwner identifies the object to which the menu is attached and mouseTarget identifies the object
that was clicked to open the menu. This information is not available from the NativeMenuEvent object.
The following example creates a Sprite and adds a simple edit context menu:
var sprite:Sprite = new Sprite();
sprite.contextMenu = createContextMenu()
private function createContextMenu():ContextMenu{
var editContextMenu:ContextMenu = new ContextMenu();
var cutItem:ContextMenuItem = new ContextMenuItem("Cut")
cutItem.addEventListener(ContextMenuEvent.MENU_ITEM_SELECT, doCutCommand);
editContextMenu.customItems.push(cutItem);
var copyItem:ContextMenuItem = new ContextMenuItem("Copy")
copyItem.addEventListener(ContextMenuEvent.MENU_ITEM_SELECT, doCopyCommand);
editContextMenu.customItems.push(copyItem);
var pasteItem:ContextMenuItem = new ContextMenuItem("Paste")
pasteItem.addEventListener(ContextMenuEvent.MENU_ITEM_SELECT, doPasteCommand);
editContextMenu.customItems.push(pasteItem);
return editContextMenu
}
private function doCutCommand(event:ContextMenuEvent):void{trace("cut");}
private function doCopyCommand(event:ContextMenuEvent):void{trace("copy");}
private function doPasteCommand(event:ContextMenuEvent):void{trace("paste");}
Note: In contrast to SWF content displayed in a browser environment, context menus in AIR do not have any built-in
commands.
Customizing a Flash Player context menu
In a browser or a projector, context menus in SWF content always have built-in items. You can remove all of these
default commands from the menu, except for the Settings and About commands. Setting the Stage property
showDefaultContextMenu to false removes these commands from the context menu.
To create a customized context menu for a specific display object, create a new instance of the ContextMenu class, call
the hideBuiltInItems() method, and assign that instance to the contextMenu property of that DisplayObject
instance. The following example provides a dynamically drawn square with a context menu command to change it to
a random color:

602
ACTIONSCRIPT 3.0 DEVELOPER’S GUIDE
Working with menus
Last updated 3/21/2011
var square:Sprite = new Sprite();
square.graphics.beginFill(0x000000);
square.graphics.drawRect(0,0,100,100);
square.graphics.endFill();
square.x =
square.y = 10;
addChild(square);
var menuItem:ContextMenuItem = new ContextMenuItem("Change Color");
menuItem.addEventListener(ContextMenuEvent.MENU_ITEM_SELECT,changeColor);
var customContextMenu:ContextMenu = new ContextMenu();
customContextMenu.hideBuiltInItems();
customContextMenu.customItems.push(menuItem);
square.contextMenu = customContextMenu;
function changeColor(event:ContextMenuEvent):void
{
square.transform.colorTransform = getRandomColor();
}
function getRandomColor():ColorTransform
{
return new ColorTransform(Math.random(), Math.random(), Math.random(),1,(Math.random() *
512) - 255, (Math.random() * 512) -255, (Math.random() * 512) - 255, 0);
}
Native menu structure (AIR)
Adobe AIR 1.0 and later
Native menus are hierarchical in nature. NativeMenu objects contain child NativeMenuItem objects.
NativeMenuItem objects that represent submenus, in turn, can contain NativeMenu objects. The top- or root-level
menu object in the structure represents the menu bar for application and window menus. (Context, icon, and pop-up
menus don’t have a menu bar).
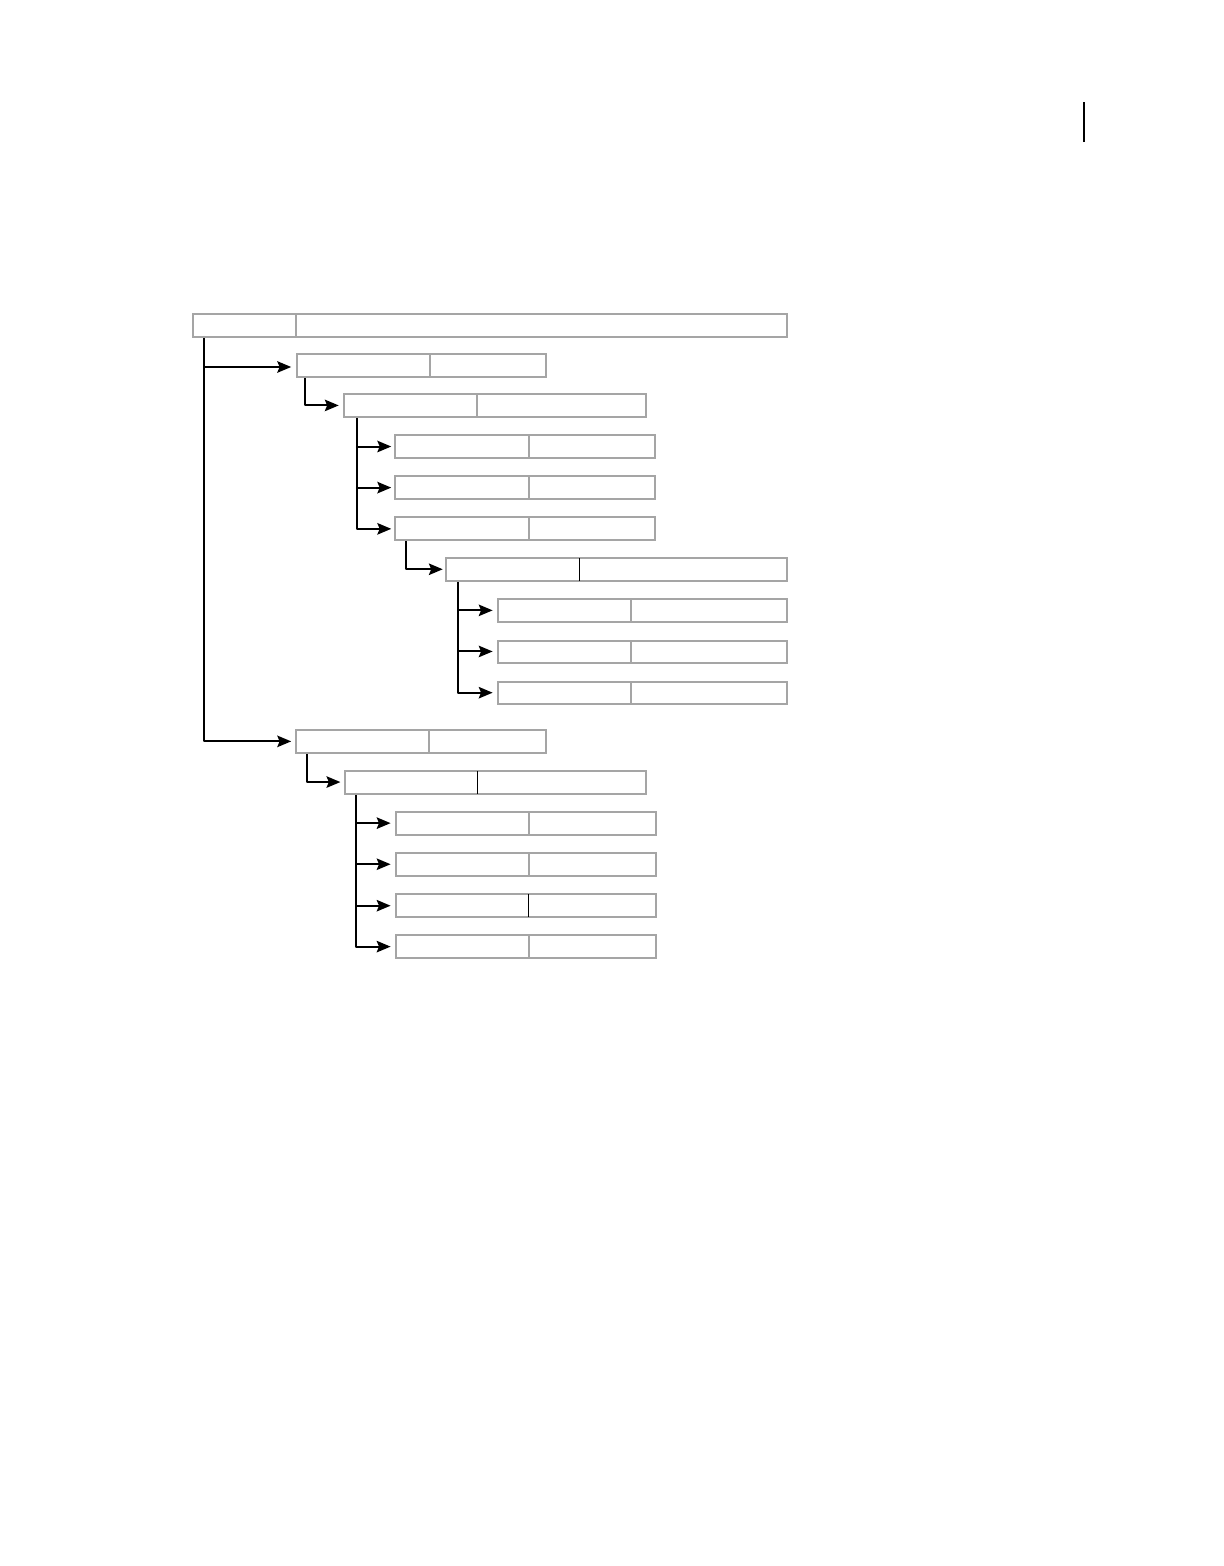
603
ACTIONSCRIPT 3.0 DEVELOPER’S GUIDE
Working with menus
Last updated 3/21/2011
The following diagram illustrates the structure of a typical menu. The root menu represents the menu bar and contains
two menu items referencing a File submenu and an Edit submenu. The File submenu in this structure contains two
command items and an item that references an Open Recent Menu submenu, which, itself, contains three items. The
Edit submenu contains three commands and a separator.
Defining a submenu requires both a NativeMenu and a NativeMenuItem object. The NativeMenuItem object defines
the label displayed in the parent menu and allows the user to open the submenu. The NativeMenu object serves as a
container for items in the submenu. The NativeMenuItem object references the NativeMenu object through the
NativeMenuItem submenu property.
To view a code example that creates this menu see “Native menu example: Window and application menu (AIR)” on
page 611.
Menu events
Adobe AIR 1.0 and later
NativeMenu and NativeMenuItem objects both dispatch preparing, displaying, and select events:
Preparing: Whenever the object is about to begin a user interaction, the menu and its menu items dispatch a
preparing event to any registered listeners. Interaction includes opening the menu or selecting an item with a
keyboard shortcut.
NativeMenu Root Menu
NativeMenuItem “File”
NativeMenu File Menu
NativeMenuItem “New”
NativeMenuItem “Save”
NativeMenuItem “Open Recent”
NativeMenu Open Recent Menu
NativeMenuItem “GreatGatsby.pdf”
NativeMenuItem “WarAndPeace.pdf”
NativeMenuItem “Iliad.pdf”
NativeMenuItem “Edit”
NativeMenu Edit Menu
NativeMenuItem “Copy”
NativeMenuItem “Paste”
NativeMenuItem Separator
NativeMenuItem “Preferences”

604
ACTIONSCRIPT 3.0 DEVELOPER’S GUIDE
Working with menus
Last updated 3/21/2011
Note: The preparing event is available only for Adobe AIR 2.6 and later.
Displaying: Immediately before a menu is displayed, the menu and its menu items dispatch a displaying event to
any registered listeners.
The preparing and displaying events give you an opportunity to update the menu contents or item appearance
before it is shown to the user. For example, in the listener for the displaying event of an “Open Recent” menu, you
could change the menu items to reflect the current list of recently viewed documents.
If you remove the menu item whose keyboard shortcut triggered a preparing event, the menu interaction is effectively
canceled and a select event is not dispatched.
The target and currentTarget properties of the event are both the object on which the listener is registered: either
the menu itself, or one of its items.
The
preparing
event is dispatched before the
displaying
event. You typically listen for one event or the other, not both.
Select: When a command item is chosen by the user, the item dispatches a select event to any registered listeners.
Submenu and separator items cannot be selected and so never dispatch a select event.
A select event bubbles up from a menu item to its containing menu, on up to the root menu. You can listen for
select events directly on an item and you can listen higher up in the menu structure. When you listen for the select
event on a menu, you can identify the selected item using the event target property. As the event bubbles up through
the menu hierarchy, the currentTarget property of the event object identifies the current menu object.
Note: ContextMenu and ContextMenuItem objects dispatch menuItemSelect and menuSelect events as well as
select, preparing, and displaying events.
Key equivalents for native menu commands (AIR)
Adobe AIR 1.0 and later
You can assign a key equivalent (sometimes called an accelerator) to a menu command. The menu item dispatches a
select event to any registered listeners when the key, or key combination is pressed. The menu containing the item
must be part of the menu of the application or the active window for the command to be invoked.
Key equivalents have two parts, a string representing the primary key and an array of modifier keys that must also be
pressed. To assign the primary key, set the menu item keyEquivalent property to the single character string for that
key. If you use an uppercase letter, the shift key is added to the modifier array automatically.
On Mac OS X, the default modifier is the command key (Keyboard.COMMAND). On Windows and Linux, it is the
control key (Keyboard.CONTROL). These default keys are automatically added to the modifier array. To assign
different modifier keys, assign a new array containing the desired key codes to the keyEquivalentModifiers
property. The default array is overwritten. Whether you use the default modifiers or assign your own modifier array,
the shift key is added if the string you assign to the keyEquivalent property is an uppercase letter. Constants for the
key codes to use for the modifier keys are defined in the Keyboard class.
The assigned key equivalent string is automatically displayed beside the menu item name. The format depends on the
user’s operating system and system preferences.
Note: If you assign the Keyboard.COMMAND value to a key modifier array on the Windows operating system, no key
equivalent is displayed in the menu. However, the control key must be used to activate the menu command.
The following example assigns Ctrl+Shift+G as the key equivalent for a menu item:
var item:NativeMenuItem = new NativeMenuItem("Ungroup");
item.keyEquivalent = "G";

605
ACTIONSCRIPT 3.0 DEVELOPER’S GUIDE
Working with menus
Last updated 3/21/2011
This example assigns Ctrl+Shift+G as the key equivalent by setting the modifier array directly:
var item:NativeMenuItem = new NativeMenuItem("Ungroup");
item.keyEquivalent = "G";
item.keyEquivalentModifiers = [Keyboard.CONTROL];
Note: Key equivalents are only triggered for application and window menus. If you add a key equivalent to a context or
pop-up menu, the key equivalent is displayed in the menu label, but the associated menu command is never invoked.
Mnemonics (AIR)
Adobe AIR 1.0 and later
Mnemonics are part of the operating system keyboard interface to menus. Linux, Mac OS X, and Windows allow users
to open menus and select commands with the keyboard, but there are subtle differences.
On Mac OS X, the user types the first letter or two of the menu or command and then presses the return key. The
mnemonicIndex property is ignored.
On Windows, only a single letter is significant. By default, the significant letter is the first character in the label, but if
you assign a mnemonic to the menu item, then the significant character becomes the designated letter. If two items in
a menu have the same significant character (whether or not a mnemonic has been assigned), then the user’s keyboard
interaction with the menu changes slightly. Instead of pressing a single letter to select the menu or command, the user
must press the letter as many times as necessary to highlight the desired item and then press the enter key to complete
the selection. To maintain a consistent behavior, you should assign a unique mnemonic to each item in a menu for
window menus.
On Linux, no default mnemonic is provided. You must specify a value for the mnemonicIndex property of a menu item
to provide a mnemonic.
Specify the mnemonic character as an index into the label string. The index of the first character in a label is 0. Thus,
to use “r” as the mnemonic for a menu item labeled, “Format,” you would set the mnemonicIndex property equal to 2.
var item:NativeMenuItem = new NativeMenuItem("Format");
item.mnemonicIndex = 2;
Menu item state
Adobe AIR 1.0 and later
Menu items have the two state properties, checked and enabled:
checked Set to true to display a check mark next to the item label.
var item:NativeMenuItem = new NativeMenuItem("Format");
item.checked = true;
enabled Toggle the value between true and false to control whether the command is enabled. Disabled items are
visually “grayed-out” and do not dispatch select events.
var item:NativeMenuItem = new NativeMenuItem("Format");
item.enabled = false;

606
ACTIONSCRIPT 3.0 DEVELOPER’S GUIDE
Working with menus
Last updated 3/21/2011
Attaching an object to a menu item
Adobe AIR 1.0 and later
The data property of the NativeMenuItem class allows you to reference an arbitrary object in each item. For example,
in an “Open Recent” menu, you could assign the File object for each document to each menu item.
var file:File = File.applicationStorageDirectory.resolvePath("GreatGatsby.pdf")
var menuItem:NativeMenuItem = docMenu.addItem(new NativeMenuItem(file.name));
menuItem.data = file;
Creating native menus (AIR)
Adobe AIR 1.0 and later
This topic describes how to create the various types of native menu supported by AIR.
Creating a root menu object
Adobe AIR 1.0 and later
To create a NativeMenu object to serve as the root of the menu, use the NativeMenu constructor:
var root:NativeMenu = new NativeMenu();
For application and window menus, the root menu represents the menu bar and should only contain items that open
submenus. Context menu and pop-up menus do not have a menu bar, so the root menu can contain commands and
separator lines as well as submenus.
After the menu is created, you can add menu items. Items appear in the menu in the order in which they are added,
unless you add the items at a specific index using the addItemAt() method of a menu object.
Assign the menu as an application, window, icon, or context menu, or display it as a pop-up menu as shown in the
following sections:
Setting the application menu or window menu
It’s important that your code accommodate both application menus (supported on Mac OS) and window menus
(supported on other operating systems)
var root:NativeMenu = new NativeMenu();
if (NativeApplication.supportsMenu)
{
NativeApplication.nativeApplication.menu = root;
}
else if (NativeWindow.supportsMenu)
{
nativeWindow.menu = root;
}
Note: Mac OS defines a menu containing standard items for every application. Assigning a new NativeMenu object to
the menu property of the NativeApplication object replaces the standard menu. You can also use the standard menu
instead of replacing it.

607
ACTIONSCRIPT 3.0 DEVELOPER’S GUIDE
Working with menus
Last updated 3/21/2011
The Adobe Flex provides a FlexNativeMenu class for easily creating menus that work across platforms. If you are using
the Flex Framework, use the FlexNativeMenu classes instead of the NativeMenu class.
Setting a context menu on an interactive object
interactiveObject.contextMenu = root;
Setting a dock icon menu or system tray icon menu
It’s important that your code accommodate both application menus (supported on Mac OS) and window menus
(supported on other operating systems)
if (NativeApplication.supportsSystemTrayIcon)
{
SystemTrayIcon(NativeApplication.nativeApplication.icon).menu = root;
}
else if (NativeApplication.supportsDockIcon)
{
DockIcon(NativeApplication.nativeApplication.icon).menu = root;
}
Note: Mac OS X defines a standard menu for the application dock icon. When you assign a new NativeMenu to the menu
property of the DockIcon object, the items in that menu are displayed above the standard items. You cannot remove,
access, or modify the standard menu items.
Displaying a menu as a pop-up
root.display(stage, x, y);
More Help topics
Developing cross-platform AIR applications
Creating a submenu
Adobe AIR 1.0 and later
To create a submenu, you add a NativeMenuItem object to the parent menu and then assign the NativeMenu object
defining the submenu to the item’s submenu property. AIR provides two ways to create submenu items and their
associated menu object:
You can create a menu item and its related menu object in one step with the addSubmenu() method:
var editMenuItem:NativeMenuItem = root.addSubmenu(new NativeMenu(), "Edit");
You can also create the menu item and assign the menu object to its submenu property separately:
var editMenuItem:NativeMenuItem = root.addItem("Edit", false);
editMenuItem.submenu = new NativeMenu();
Creating a menu command
Adobe AIR 1.0 and later
To create a menu command, add a NativeMenuItem object to a menu and add an event listener referencing the
function implementing the menu command:

608
ACTIONSCRIPT 3.0 DEVELOPER’S GUIDE
Working with menus
Last updated 3/21/2011
var copy:NativeMenuItem = new NativeMenuItem("Copy", false);
copy.addEventListener(Event.SELECT, onCopyCommand);
editMenu.addItem(copy);
You can listen for the select event on the command item itself (as shown in the example), or you can listen for the
select event on a parent menu object.
Note: Menu items that represent submenus and separator lines do not dispatch select events and so cannot be used as
commands.
Creating a menu separator line
Adobe AIR 1.0 and later
To create a separator line, create a NativeMenuItem, setting the isSeparator parameter to true in the constructor.
Then add the separator item to the menu in the correct location:
var separatorA:NativeMenuItem = new NativeMenuItem("A", true);
editMenu.addItem(separatorA);
The label specified for the separator, if any, is not displayed.
About context menus in HTML (AIR)
Adobe AIR 1.0 and later
In HTML content displayed using the HTMLLoader object, the contextmenu event can be used to display a context
menu. By default, a context menu is displayed automatically when the user invokes the context menu event on selected
text (by right-clicking or command-clicking the text). To prevent the default menu from opening, listen for the
contextmenu event and call the event object’s preventDefault() method:
function showContextMenu(event){
event.preventDefault();
}
You can then display a custom context menu using DHTML techniques or by displaying an AIR native context menu.
The following example displays a native context menu by calling the menu display() method in response to the
HTML contextmenu event:

609
ACTIONSCRIPT 3.0 DEVELOPER’S GUIDE
Working with menus
Last updated 3/21/2011
<html>
<head>
<script src="AIRAliases.js" language="JavaScript" type="text/javascript"></script>
<script language="javascript" type="text/javascript">
function showContextMenu(event){
event.preventDefault();
contextMenu.display(window.nativeWindow.stage, event.clientX, event.clientY);
}
function createContextMenu(){
var menu = new air.NativeMenu();
var command = menu.addItem(new air.NativeMenuItem("Custom command"));
command.addEventListener(air.Event.SELECT, onCommand);
return menu;
}
function onCommand(){
air.trace("Context command invoked.");
}
var contextMenu = createContextMenu();
</script>
</head>
<body>
<p oncontextmenu="showContextMenu(event)" style="-khtml-user-select:auto;">Custom context
menu.</p>
</body>
</html>
Displaying pop-up native menus (AIR)
Adobe AIR 1.0 and later
You can display any NativeMenu object at an arbitrary time and location above a window, by calling the menu
display() method. The method requires a reference to the stage; thus, only content in the application sandbox can
display a menu as a pop-up.
The following method displays the menu defined by a NativeMenu object named popupMenu in response to a mouse
click:
private function onMouseClick(event:MouseEvent):void {
popupMenu.display(event.target.stage, event.stageX, event.stageY);
}
Note: The menu does not need to be displayed in direct response to an event. Any method can call the display()
function.

610
ACTIONSCRIPT 3.0 DEVELOPER’S GUIDE
Working with menus
Last updated 3/21/2011
Handling menu events
Flash Player 9 and later, Adobe AIR 1.0 and later
A menu dispatches events when the user selects the menu or when the user selects a menu item.
Events summary for menu classes
Flash Player 9 and later, Adobe AIR 1.0 and later
Add event listeners to menus or individual items to handle menu events.
Select menu events
Adobe AIR 1.0 and later
To handle a click on a menu item, add an event listener for the select event to the NativeMenuItem object:
var menuCommandX:NativeMenuItem = new NativeMenuItem("Command X");
menuCommandX.addEventListener(Event.SELECT, doCommandX)
Because select events bubble up to the containing menus, you can also listen for select events on a parent menu.
When listening at the menu level, you can use the event object target property to determine which menu command
was selected. The following example traces the label of the selected command:
Object Events dispatched
NativeMenu (AIR) Event.PREPARING (Adobe AIR 2.6 and later)
Event.DISPLAYING
Event.SELECT (propagated from child items and submenus)
NativeMenuItem (AIR) Event.PREPARING (Adobe AIR 2.6 and later)
Event.SELECT
Event.DISPLAYING (propagated from parent menu)
ContextMenu ContextMenuEvent.MENU_SELECT
ContextMenuItem ContextMenuEvent.MENU_ITEM_SELECT
Event.SELECT (AIR)

611
ACTIONSCRIPT 3.0 DEVELOPER’S GUIDE
Working with menus
Last updated 3/21/2011
var colorMenuItem:NativeMenuItem = new NativeMenuItem("Choose a color");
var colorMenu:NativeMenu = new NativeMenu();
colorMenuItem.submenu = colorMenu;
var red:NativeMenuItem = new NativeMenuItem("Red");
var green:NativeMenuItem = new NativeMenuItem("Green");
var blue:NativeMenuItem = new NativeMenuItem("Blue");
colorMenu.addItem(red);
colorMenu.addItem(green);
colorMenu.addItem(blue);
if(NativeApplication.supportsMenu){
NativeApplication.nativeApplication.menu.addItem(colorMenuItem);
NativeApplication.nativeApplication.menu.addEventListener(Event.SELECT, colorChoice);
} else if (NativeWindow.supportsMenu){
var windowMenu:NativeMenu = new NativeMenu();
this.stage.nativeWindow.menu = windowMenu;
windowMenu.addItem(colorMenuItem);
windowMenu.addEventListener(Event.SELECT, colorChoice);
}
function colorChoice(event:Event):void {
var menuItem:NativeMenuItem = event.target as NativeMenuItem;
trace(menuItem.label + " has been selected");
}
If you are using the ContextMenuItem class, you can listen for either the select event or the menuItemSelect event.
The menuItemSelect event gives you additional information about the object owning the context menu, but does not
bubble up to the containing menus.
Displaying menu events
Adobe AIR 1.0 and later
To handle the opening of a menu, you can add a listener for the displaying event, which is dispatched before a menu
is displayed. You can use the displaying event to update the menu, for example by adding or removing items, or by
updating the enabled or checked states of individual items. You can also listen for the menuSelect event from a
ContextMenu object.
In AIR 2.6 and later, you can use the preparing event to update a menu in response to either displaying a menu or
selecting an item with a keyboard shortcut.
Native menu example: Window and application menu
(AIR)
Adobe AIR 1.0 and later
The following example creates the menu shown in “Native menu structure (AIR)” on page 602.

612
ACTIONSCRIPT 3.0 DEVELOPER’S GUIDE
Working with menus
Last updated 3/21/2011
The menu is designed to work both on Windows, for which only window menus are supported, and on Mac OS X, for
which only application menus are supported. To make the distinction, the MenuExample class constructor checks the
static supportsMenu properties of the NativeWindow and NativeApplication classes. If
NativeWindow.supportsMenu is true, then the constructor creates a NativeMenu object for the window and then
creates and adds the File and Edit submenus. If NativeApplication.supportsMenu is true, then the constructor
creates and adds the File and Edit menus to the existing menu provided by the Mac OS X operating system.
The example also illustrates menu event handling. The select event is handled at the item level and also at the menu
level. Each menu in the chain from the menu containing the selected item to the root menu responds to the select
event. The displaying event is used with the “Open Recent” menu. Just before the menu is opened, the items in the
menu are refreshed from the recent Documents array (which doesn’t actually change in this example). Although not
shown in this example, you can also listen for displaying events on individual items.
package {
import flash.display.NativeMenu;
import flash.display.NativeMenuItem;
import flash.display.NativeWindow;
import flash.display.Sprite;
import flash.events.Event;
import flash.filesystem.File;
import flash.desktop.NativeApplication;
public class MenuExample extends Sprite
{
private var recentDocuments:Array =
new Array(new File("app-storage:/GreatGatsby.pdf"),
new File("app-storage:/WarAndPeace.pdf"),
new File("app-storage:/Iliad.pdf"));
public function MenuExample()
{
var fileMenu:NativeMenuItem;
var editMenu:NativeMenuItem;
if (NativeWindow.supportsMenu){
stage.nativeWindow.menu = new NativeMenu();
stage.nativeWindow.menu.addEventListener(Event.SELECT, selectCommandMenu);
fileMenu = stage.nativeWindow.menu.addItem(new NativeMenuItem("File"));
fileMenu.submenu = createFileMenu();
editMenu = stage.nativeWindow.menu.addItem(new NativeMenuItem("Edit"));
editMenu.submenu = createEditMenu();
}
if (NativeApplication.supportsMenu){
NativeApplication.nativeApplication.menu.addEventListener(Event.SELECT,
selectCommandMenu);
fileMenu = NativeApplication.nativeApplication.menu.addItem(new
NativeMenuItem("File"));
fileMenu.submenu = createFileMenu();
editMenu = NativeApplication.nativeApplication.menu.addItem(new
NativeMenuItem("Edit"));
editMenu.submenu = createEditMenu();
}
}
public function createFileMenu():NativeMenu {

613
ACTIONSCRIPT 3.0 DEVELOPER’S GUIDE
Working with menus
Last updated 3/21/2011
var fileMenu:NativeMenu = new NativeMenu();
fileMenu.addEventListener(Event.SELECT, selectCommandMenu);
var newCommand:NativeMenuItem = fileMenu.addItem(new NativeMenuItem("New"));
newCommand.addEventListener(Event.SELECT, selectCommand);
var saveCommand:NativeMenuItem = fileMenu.addItem(new NativeMenuItem("Save"));
saveCommand.addEventListener(Event.SELECT, selectCommand);
var openRecentMenu:NativeMenuItem =
fileMenu.addItem(new NativeMenuItem("Open Recent"));
openRecentMenu.submenu = new NativeMenu();
openRecentMenu.submenu.addEventListener(Event.DISPLAYING,
updateRecentDocumentMenu);
openRecentMenu.submenu.addEventListener(Event.SELECT, selectCommandMenu);
return fileMenu;
}
public function createEditMenu():NativeMenu {
var editMenu:NativeMenu = new NativeMenu();
editMenu.addEventListener(Event.SELECT, selectCommandMenu);
var copyCommand:NativeMenuItem = editMenu.addItem(new NativeMenuItem("Copy"));
copyCommand.addEventListener(Event.SELECT, selectCommand);
copyCommand.keyEquivalent = "c";
var pasteCommand:NativeMenuItem =
editMenu.addItem(new NativeMenuItem("Paste"));
pasteCommand.addEventListener(Event.SELECT, selectCommand);
pasteCommand.keyEquivalent = "v";
editMenu.addItem(new NativeMenuItem("", true));
var preferencesCommand:NativeMenuItem =
editMenu.addItem(new NativeMenuItem("Preferences"));
preferencesCommand.addEventListener(Event.SELECT, selectCommand);
return editMenu;
}
private function updateRecentDocumentMenu(event:Event):void {
trace("Updating recent document menu.");
var docMenu:NativeMenu = NativeMenu(event.target);
for each (var item:NativeMenuItem in docMenu.items) {
docMenu.removeItem(item);
}
for each (var file:File in recentDocuments) {
var menuItem:NativeMenuItem =
docMenu.addItem(new NativeMenuItem(file.name));
menuItem.data = file;
menuItem.addEventListener(Event.SELECT, selectRecentDocument);
}
}
private function selectRecentDocument(event:Event):void {
trace("Selected recent document: " + event.target.data.name);
}
private function selectCommand(event:Event):void {

614
ACTIONSCRIPT 3.0 DEVELOPER’S GUIDE
Working with menus
Last updated 3/21/2011
trace("Selected command: " + event.target.label);
}
private function selectCommandMenu(event:Event):void {
if (event.currentTarget.parent != null) {
var menuItem:NativeMenuItem =
findItemForMenu(NativeMenu(event.currentTarget));
if (menuItem != null) {
trace("Select event for \"" +
event.target.label +
"\" command handled by menu: " +
menuItem.label);
}
} else {
trace("Select event for \"" +
event.target.label +
"\" command handled by root menu.");
}
}
private function findItemForMenu(menu:NativeMenu):NativeMenuItem {
for each (var item:NativeMenuItem in menu.parent.items) {
if (item != null) {
if (item.submenu == menu) {
return item;
}
}
}
return null;
}
}
}

615
Last updated 3/21/2011
Chapter 35: Taskbar icons in AIR
Adobe AIR 1.0 and later
Many operating systems provide a taskbar, such as the Mac OS X dock, that can contain an icon to represent an
application. Adobe® AIR® provides an interface for interacting with the application task bar icon through the
NativeApplication.nativeApplication.icon property.
•Using the system tray and dock icons (Flex)
•Using the system tray and dock icons (Flash)
More Help topics
flash.desktop.NativeApplication
flash.desktop.DockIcon
flash.desktop.SystemTrayIcon
About taskbar icons
Adobe AIR 1.0 and later
AIR creates the NativeApplication.nativeApplication.icon object automatically. The object type is either
DockIcon or SystemTrayIcon, depending on the operating system. You can determine which of these InteractiveIcon
subclasses that AIR supports on the current operating system using the NativeApplication.supportsDockIcon
and NativeApplication.supportsSystemTrayIcon properties. The InteractiveIcon base class provides the
properties width, height, and bitmaps, which you can use to change the image used for the icon. However, accessing
properties specific to DockIcon or SystemTrayIcon on the wrong operating system generates a runtime error.
To set or change the image used for an icon, create an array containing one or more images and assign it to the
NativeApplication.nativeApplication.icon.bitmaps property. The size of taskbar icons can be different on
different operating systems. To avoid image degradation due to scaling, you can add multiple sizes of images to the
bitmaps array. If you provide more than one image, AIR selects the size closest to the current display size of the taskbar
icon, scaling it only if necessary. The following example sets the image for a taskbar icon using two images:
NativeApplication.nativeApplication.icon.bitmaps =
[bmp16x16.bitmapData, bmp128x128.bitmapData];
To change the icon image, assign an array containing the new image or images to the bitmaps property. You can
animate the icon by changing the image in response to an enterFrame or timer event.
To remove the icon from the notification area on Windows and Linux, or to restore the default icon appearance on
Mac OS X, set bitmaps to an empty array:
NativeApplication.nativeApplication.icon.bitmaps = [];

616
ACTIONSCRIPT 3.0 DEVELOPER’S GUIDE
Taskbar icons in AIR
Last updated 3/21/2011
Dock icons
Adobe AIR 1.0 and later
AIR supports dock icons when NativeApplication.supportsDockIcon is true. The
NativeApplication.nativeApplication.icon property represents the application icon on the dock (not a
window dock icon).
Note: AIR does not support changing window icons on the dock under Mac OS X. Also, changes to the application dock
icon only apply while an application is running — the icon reverts to its normal appearance when the application
terminates.
Dock icon menus
Adobe AIR 1.0 and later
You can add commands to the standard dock menu by creating a NativeMenu object containing the commands and
assigning it to the NativeApplication.nativeApplication.icon.menu property. The items in the menu are
displayed above the standard dock icon menu items.
Bouncing the dock
Adobe AIR 1.0 and later
You can bounce the dock icon by calling the NativeApplication.nativeApplication.icon.bounce() method. If
you set the bounce() priority parameter to informational, then the icon bounces once. If you set it to critical, then
the icon bounces until the user activates the application. Constants for the priority parameter are defined in the
NotificationType class.
Note: The icon does not bounce if the application is already active.
Dock icon events
Adobe AIR 1.0 and later
When the dock icon is clicked, the NativeApplication object dispatches an invoke event. If the application is not
running, the system launches it. Otherwise, the invoke event is delivered to the running application instance.
System Tray icons
Adobe AIR 1.0 and later
AIR supports system tray icons when NativeApplication.supportsSystemTrayIcon is true, which is currently
the case only on Windows and most Linux distributions. On Windows and Linux, system tray icons are displayed in
the notification area of the taskbar. No icon is displayed by default. To show an icon, assign an array containing
BitmapData objects to the icon bitmaps property. To change the icon image, assign an array containing the new
images to bitmaps. To remove the icon, set bitmaps to null.

617
ACTIONSCRIPT 3.0 DEVELOPER’S GUIDE
Taskbar icons in AIR
Last updated 3/21/2011
System tray icon menus
Adobe AIR 1.0 and later
You can add a menu to the system tray icon by creating a NativeMenu object and assigning it to the
NativeApplication.nativeApplication.icon.menu property (no default menu is provided by the operating
system). Access the system tray icon menu by right-clicking the icon.
System tray icon tooltips
Adobe AIR 1.0 and later
Add a tooltip to an icon by setting the tooltip property:
NativeApplication.nativeApplication.icon.tooltip = "Application name";
System tray icon events
Adobe AIR 1.0 and later
The SystemTrayIcon object referenced by the NativeApplication.nativeApplication.icon property dispatches a
ScreenMouseEvent for click, mouseDown, mouseUp, rightClick, rightMouseDown, and rightMouseUp events. You
can use these events, along with an icon menu, to allow users to interact with your application when it has no visible
windows.
Example: Creating an application with no windows
Adobe AIR 1.0 and later
The following example creates an AIR application which has a system tray icon, but no visible windows. (The visible
property of the application must not be set to true in the application descriptor, or the window will be visible when
the application starts up.)
package
{
import flash.display.Loader;
import flash.display.NativeMenu;
import flash.display.NativeMenuItem;
import flash.display.NativeWindow;
import flash.display.Sprite;
import flash.desktop.DockIcon;
import flash.desktop.SystemTrayIcon;
import flash.events.Event;
import flash.net.URLRequest;
import flash.desktop.NativeApplication;
public class SysTrayApp extends Sprite
{
public function SysTrayApp():void{
NativeApplication.nativeApplication.autoExit = false;
var icon:Loader = new Loader();
var iconMenu:NativeMenu = new NativeMenu();
var exitCommand:NativeMenuItem = iconMenu.addItem(new NativeMenuItem("Exit"));
exitCommand.addEventListener(Event.SELECT, function(event:Event):void {

618
ACTIONSCRIPT 3.0 DEVELOPER’S GUIDE
Taskbar icons in AIR
Last updated 3/21/2011
NativeApplication.nativeApplication.icon.bitmaps = [];
NativeApplication.nativeApplication.exit();
});
if (NativeApplication.supportsSystemTrayIcon) {
NativeApplication.nativeApplication.autoExit = false;
icon.contentLoaderInfo.addEventListener(Event.COMPLETE, iconLoadComplete);
icon.load(new URLRequest("icons/AIRApp_16.png"));
var systray:SystemTrayIcon =
NativeApplication.nativeApplication.icon as SystemTrayIcon;
systray.tooltip = "AIR application";
systray.menu = iconMenu;
}
if (NativeApplication.supportsDockIcon){
icon.contentLoaderInfo.addEventListener(Event.COMPLETE,iconLoadComplete);
icon.load(new URLRequest("icons/AIRApp_128.png"));
var dock:DockIcon = NativeApplication.nativeApplication.icon as DockIcon;
dock.menu = iconMenu;
}
}
private function iconLoadComplete(event:Event):void
{
NativeApplication.nativeApplication.icon.bitmaps =
[event.target.content.bitmapData];
}
}
}
Note: When using the Flex WindowedApplication component, you must set the visible attribute of the
WindowedApplication tag to false. This attribute supercedes the setting in the application descriptor.
Note: The example assumes that there are image files named
AIRApp_16.png
and
AIRApp_128.png
in an
icons
subdirectory of the application. (Sample icon files, which you can copy to your project folder, are included in the AIR SDK.)
Window taskbar icons and buttons
Adobe AIR 1.0 and later
Iconified representations of windows are typically displayed in the window area of a taskbar or dock to allow users to
easily access background or minimized windows. The Mac OS X dock displays an icon for your application as well as
an icon for each minimized window. The Microsoft Windows and Linux taskbars display a button containing the
progam icon and title for each normal-type window in your application.

619
ACTIONSCRIPT 3.0 DEVELOPER’S GUIDE
Taskbar icons in AIR
Last updated 3/21/2011
Highlighting the taskbar window button
Adobe AIR 1.0 and later
When a window is in the background, you can notify the user that an event of interest related to the window has
occurred. On Mac OS X, you can notify the user by bouncing the application dock icon (as described in “Bouncing the
dock” on page 616). On Windows and Linux, you can highlight the window taskbar button by calling the
notifyUser() method of the NativeWindow instance. The type parameter passed to the method determines the
urgency of the notification:
•NotificationType.CRITICAL: the window icon flashes until the user brings the window to the foreground.
•NotificationType.INFORMATIONAL: the window icon highlights by changing color.
Note: On Linux, only the informational type of notification is supported. Passing either type value to the
notifyUser() function will create the same effect.
The following statement highlights the taskbar button of a window:
stage.nativeWindow.notifyUser(NotificationType.CRITICAL);
Calling the NativeWindow.notifyUser() method on an operating system that does not support window-level
notification has no effect. Use the NativeWindow.supportsNotification property to determine if window
notification is supported.
Creating windows without taskbar buttons or icons
Adobe AIR 1.0 and later
On the Windows operating system, windows created with the types utility or lightweight do not appear on the taskbar.
Invisible windows do not appear on the taskbar, either.
Because the initial window is necessarily of type, normal, in order to create an application without any windows
appearing in the taskbar, you must either close the initial window or leave it invisible. To close all windows in your
application without terminating the application, set the autoExit property of the NativeApplication object to false
before closing the last window. To simply prevent the initial window from ever becoming visible, add
<visible>false</visible> to the <initalWindow> element of the application descriptor file (and do not set the
visible property to true or call the activate() method of the window).
In new windows opened by the application, set the type property of the NativeWindowInitOption object passed to
the window constructor to NativeWindowType.UTILITY or NativeWindowType.LIGHTWEIGHT.
On Mac OS X, windows that are minimized are displayed on the dock taskbar. You can prevent the minimized icon
from being displayed by hiding the window instead of minimizing it. The following example listens for a
nativeWindowDisplayState change event and cancels it if the window is being minimized. Instead the handler sets
the window visible property to false:
private function preventMinimize(event:NativeWindowDisplayStateEvent):void{
if(event.afterDisplayState == NativeWindowDisplayState.MINIMIZED){
event.preventDefault();
event.target.visible = false;
}
}
If a window is minimized on the Mac OS X dock when you set the visible property to false, the dock icon is not
removed. A user can still click the icon to make the window reappear.

620
Last updated 3/21/2011
Chapter 36: Working with the file system
Flash Player 9 and later, Adobe AIR 1.0 and later
Flash® Player provides basic file reading and writing capabilities, via the FileReference class. For security reasons, when
running in Flash Player, the user must always grant permission before you can read or write a file.
Adobe® AIR® provides more complete access to the file system of the host computer than is available in Flash Player.
Using the AIR file system API, you can access and manage directories and files, create directories and files, write data
to files, and so on.
More Help topics
flash.net.FileReference
flash.net.FileReferenceList
flash.filesystem.File
flash.filesystem.FileStream
Using the FileReference class
Flash Player 9 and later, Adobe AIR 1.0 and later
A FileReference object represents a data file on a client or server machine. The methods of the FileReference class let
your application load and save data files locally, and transfer file data to and from remote servers.
The FileReference class offers two different approaches to loading, transferring, and saving data files. Since its
introduction, the FileReference class has includedthe browse() method, the upload() method, and the download()
method. Use the browse() method to let the user select a file. Use the upload() method to transfer the file data to a
remote server. Use the download() method to retrieve that data from the server and save it in a local file. Starting with
Flash Player 10 and Adobe AIR 1.5, the FileReference class includes the load() and save() methods. The load() and
save() methods allow you to access and save local files directly as well. The use of those methods is similar to the
equivalent-named methods in the URLLoader and Loader classes.
Note: The File class, which extends the FileReference class, and the FileStream class provide additional functions for
working with files and the local file system. The File and FileStream classes are only supported in AIR and not in the Flash
Player.
FileReference class
Flash Player 9 and later, Adobe AIR 1.0 and later
Each FileReference object represents a single data file on the local machine. The properties of the FileReference class
contain information about the file’s size, type, name, filename extension, creator, creation date, and modification date.
Note: The creator property is supported on Mac OS only. All other platforms return null.
Note: The extension property is only supported in Adobe AIR.

621
ACTIONSCRIPT 3.0 DEVELOPER’S GUIDE
Working with the file system
Last updated 3/21/2011
You can create an instance of the FileReference class one of two ways:
•Use the new operator, as shown in the following code:
import flash.net.FileReference;
var fileRef:FileReference = new FileReference();
•Call the FileReferenceList.browse() method, which opens a dialog box and prompts the user to select one or
more files to upload. It then creates an array of FileReference objects if the user successfully selects one or more files.
Once you have created a FileReference object, you can do the following:
•Call the FileReference.browse() method, which opens a dialog box and prompts the user to select a single file
from the local file system. This is usually done before a subsequent call to the FileReference.upload() method
or FileReference.load() method. Call the FileReference.upload() method to upload the file to a remote
server. Call to the FileReference.load() method to open a local file.
•Call the FileReference.download() method. The download() method opens a dialog box to let the user select
a location for saving a new file. Then it downloads data from the server and stores it in the new file.
•Call the FileReference.load() method. This method begins loading data from a file selected previously using
the browse() method. The load() method can’t be called until the browse() operation completes (the user selects
a file).
•Call the FileReference.save() method. This method opens a dialog box and prompts the user to choose a single
file location on the local file system. It then saves data to the specified location.
Note: You can only perform one browse(), download(), or save() action at a time, because only one dialog box can
be open at any point.
The FileReference object properties such as name, size, or modificationDate are not defined until one of the
following happens:
•The FileReference.browse() method or FileReferenceList.browse() method has been called, and the user
has selected a file using the dialog box.
•The FileReference.download() method has been called, and the user has specified a new file location using the
dialog box.
Note: When performing a download, only the FileReference.name property is populated before the download is
complete. After the file has been downloaded, all properties are available.
While calls to the FileReference.browse(), FileReferenceList.browse(), FileReference.download(),
FileReference.load(), or FileReference.save() methods are executing, most players continue SWF file
playback including dispatching events and executing code.
For uploading and downloading operations, a SWF file can access files only within its own domain, including any
domains specified by a policy file. You need to put a policy file on the server containing the file if that server is not in
the same domain as the SWF file initiating the upload or download.
See FileReference.
Loading data from files
Flash Player 9 and later, Adobe AIR 1.0 and later
The FileReference.load() method lets you load data from a local file into memory.
Note: Your code must first call the FileReference.browse() method to let the user select a file to load. This restriction
does not apply to content running in Adobe AIR in the application security sandbox

622
ACTIONSCRIPT 3.0 DEVELOPER’S GUIDE
Working with the file system
Last updated 3/21/2011
The FileReference.load() method returns immediately after being called, but the data being loaded isn’t available
immediately. The FileReference object dispatches events to invoke listener methods at each step of the loading process.
The FileReference object dispatches the following events during the loading process.
•open event (Event.OPEN): Dispatched when the load operation starts.
•progress event (ProgressEvent.PROGRESS): Dispatched periodically as bytes of data are read from the file.
•complete event (Event.COMPLETE): Dispatched when the load operation completes successfully.
•ioError event (IOErrorEvent.IO_ERROR): Dispatched if the load process fails because an input/output error
occurs while opening or reading data from the file.
Once the FileReference object dispatches the complete event, the loaded data can be accessed as a ByteArray in the
FileReference object’s data property.
The following example shows how to prompt the user to select a file and then load the data from that file into memory:
package
{
import flash.display.Sprite;
import flash.events.*;
import flash.net.FileFilter;
import flash.net.FileReference;
import flash.net.URLRequest;
import flash.utils.ByteArray;
public class FileReferenceExample1 extends Sprite
{
private var fileRef:FileReference;
public function FileReferenceExample1()
{
fileRef = new FileReference();
fileRef.addEventListener(Event.SELECT, onFileSelected);
fileRef.addEventListener(Event.CANCEL, onCancel);
fileRef.addEventListener(IOErrorEvent.IO_ERROR, onIOError);
fileRef.addEventListener(SecurityErrorEvent.SECURITY_ERROR,
onSecurityError);
var textTypeFilter:FileFilter = new FileFilter("Text Files (*.txt, *.rtf)",
"*.txt;*.rtf");
fileRef.browse([textTypeFilter]);
}
public function onFileSelected(evt:Event):void
{
fileRef.addEventListener(ProgressEvent.PROGRESS, onProgress);
fileRef.addEventListener(Event.COMPLETE, onComplete);
fileRef.load();
}
public function onProgress(evt:ProgressEvent):void
{
trace("Loaded " + evt.bytesLoaded + " of " + evt.bytesTotal + " bytes.");
}
public function onComplete(evt:Event):void

623
ACTIONSCRIPT 3.0 DEVELOPER’S GUIDE
Working with the file system
Last updated 3/21/2011
{
trace("File was successfully loaded.");
trace(fileRef.data);
}
public function onCancel(evt:Event):void
{
trace("The browse request was canceled by the user.");
}
public function onIOError(evt:IOErrorEvent):void
{
trace("There was an IO Error.");
}
public function onSecurityError(evt:Event):void
{
trace("There was a security error.");
}
}
}
The example code first creates the FileReference object named fileRef and then calls its browse() method. The
browse() method opens a dialog box that prompts the user to select a file. When a file is selected, the code invokes the
onFileSelected() method. This method adds listeners for the progress and complete events and then calls the
FileReference object’s load() method. The other handler methods in the example simply output messages to report
on the progress of the load operation. When the loading completes, the application displays the contents of the loaded
file using the trace() method.
In Adobe AIR, the FileStream class provides additional functionality for reading data from a local file. See “Reading
and writing files” on page 655.
Saving data to local files
Flash Player 9 and later, Adobe AIR 1.0 and later
The FileReference.save() method lets you save data to a local file. It starts by opening a dialog box to let the user
enter a new filename and location to which to save a file. After the user selects the filename and location, the data is
written to the new file. When the file is saved successfully, the properties of the FileReference object are populated with
the properties of the local file.
Note: Your code can only call the FileReference.save() method in response to a user-initiated event such as a mouse
click or a keypress event. Otherwise an error is thrown. This restriction does not apply to content running in Adobe AIR
in the application security sandbox.
The FileReference.save() method returns immediately after being called. The FileReference object then
dispatches events to call listener methods at each step of the file saving process.
The FileReference object dispatches the following events during the file saving process:
•select event (Event.SELECT): Dispatched when the user specifies the location and file name for the new file to be
saved.
•cancel event (Event.CANCEL): Dispatched when the user click the Cancel button in the dialog box.
•open event (Event.OPEN): Dispatched when the save operation starts.
•progress event (ProgressEvent.PROGRESS): Dispatched periodically as bytes of data are saved to the file.

624
ACTIONSCRIPT 3.0 DEVELOPER’S GUIDE
Working with the file system
Last updated 3/21/2011
•complete event (Event.COMPLETE): Dispatched when the save operation completes successfully.
•ioError event (IOErrorEvent.IO_ERROR): Dispatched if the saving process fails because an input/output error
occurs while attempting to save data to the file.
The type of object passed in the data parameter of the FileReference.save() method determines how the data is
written to the file:
•If it is a String value, then it is saved as a text file using UTF-8 encoding.
•If it is an XML object, then it is written to a file in XML format with all formatting preserved.
•If it is a ByteArray object, then its contents are written directly to the file with no conversion.
•If it is some other object, then the FileReference.save() method calls the object’s toString() method and then
saves the resulting String value to a UTF-8 text file. If the object’s toString() method can’t be called, then an error
is thrown.
If the value of the data parameter is null, then an error is thrown.
The following code extends the previous example for the FileReference.load() method. After reading the data
from the file, this example prompts the user for a filename and then saves the data in a new file:
package
{
import flash.display.Sprite;
import flash.events.*;
import flash.net.FileFilter;
import flash.net.FileReference;
import flash.net.URLRequest;
import flash.utils.ByteArray;
public class FileReferenceExample2 extends Sprite
{
private var fileRef:FileReference;
public function FileReferenceExample2()
{
fileRef = new FileReference();
fileRef.addEventListener(Event.SELECT, onFileSelected);
fileRef.addEventListener(Event.CANCEL, onCancel);
fileRef.addEventListener(IOErrorEvent.IO_ERROR, onIOError);
fileRef.addEventListener(SecurityErrorEvent.SECURITY_ERROR,
onSecurityError);
var textTypeFilter:FileFilter = new FileFilter("Text Files (*.txt, *.rtf)",
"*.txt;*.rtf");
fileRef.browse([textTypeFilter]);
}
public function onFileSelected(evt:Event):void
{
fileRef.addEventListener(ProgressEvent.PROGRESS, onProgress);
fileRef.addEventListener(Event.COMPLETE, onComplete);
fileRef.load();
}
public function onProgress(evt:ProgressEvent):void
{
trace("Loaded " + evt.bytesLoaded + " of " + evt.bytesTotal + " bytes.");
}
public function onCancel(evt:Event):void
{

625
ACTIONSCRIPT 3.0 DEVELOPER’S GUIDE
Working with the file system
Last updated 3/21/2011
trace("The browse request was canceled by the user.");
}
public function onComplete(evt:Event):void
{
trace("File was successfully loaded.");
fileRef.removeEventListener(Event.SELECT, onFileSelected);
fileRef.removeEventListener(ProgressEvent.PROGRESS, onProgress);
fileRef.removeEventListener(Event.COMPLETE, onComplete);
fileRef.removeEventListener(Event.CANCEL, onCancel);
saveFile();
}
public function saveFile():void
{
fileRef.addEventListener(Event.SELECT, onSaveFileSelected);
fileRef.save(fileRef.data,"NewFileName.txt");
}
public function onSaveFileSelected(evt:Event):void
{
fileRef.addEventListener(ProgressEvent.PROGRESS, onSaveProgress);
fileRef.addEventListener(Event.COMPLETE, onSaveComplete);
fileRef.addEventListener(Event.CANCEL, onSaveCancel);
}
public function onSaveProgress(evt:ProgressEvent):void
{
trace("Saved " + evt.bytesLoaded + " of " + evt.bytesTotal + " bytes.");
}
public function onSaveComplete(evt:Event):void
{
trace("File saved.");
fileRef.removeEventListener(Event.SELECT, onSaveFileSelected);
fileRef.removeEventListener(ProgressEvent.PROGRESS, onSaveProgress);
fileRef.removeEventListener(Event.COMPLETE, onSaveComplete);
fileRef.removeEventListener(Event.CANCEL, onSaveCancel);
}
public function onSaveCancel(evt:Event):void
{
trace("The save request was canceled by the user.");
}
public function onIOError(evt:IOErrorEvent):void
{
trace("There was an IO Error.");
}
public function onSecurityError(evt:Event):void
{
trace("There was a security error.");
}
}
}

626
ACTIONSCRIPT 3.0 DEVELOPER’S GUIDE
Working with the file system
Last updated 3/21/2011
When all of the data loads from the file, the code calls the onComplete() method. The onComplete() method
removes the listeners for the loading events and then calls the saveFile() method. The saveFile() method calls the
FileReference.save() method. The FileReference.save() method opens a new dialog box to let the user enter
a new filename and location to save the file. The remaining event listener methods trace the progress of the file saving
process until it is complete.
In Adobe AIR, the FileStream class provides additional functionality for writing data to a local file. See “Reading and
writing files” on page 655.
Uploading files to a server
Flash Player 9 and later, Adobe AIR 1.0 and later
To upload files to a server, first call the browse() method to allow a user to select one or more files. Next, when the
FileReference.upload() method is called, the selected file is transferred to the server. If the user selects multiple
files using the FileReferenceList.browse() method, Flash Player creates an array of selected files called
FileReferenceList.fileList. You can then use the FileReference.upload() method to upload each file
individually.
Note: Using the FileReference.browse() method allows you to upload single files only. To allow a user to upload
multiple files, use the FileReferenceList.browse() method.
By default, the system file picker dialog box allows users to pick any file type from the local computer. Developers can
specify one or more custom file type filters by using the FileFilter class and passing an array of file filter instances to
the browse() method:
var imageTypes:FileFilter = new FileFilter("Images (*.jpg, *.jpeg, *.gif, *.png)", "*.jpg;
*.jpeg; *.gif; *.png");
var textTypes:FileFilter = new FileFilter("Text Files (*.txt, *.rtf)", "*.txt; *.rtf");
var allTypes:Array = new Array(imageTypes, textTypes);
var fileRef:FileReference = new FileReference();
fileRef.browse(allTypes);
When the user has selected the files and clicked the Open button in the system file picker, the Event.SELECT event is
dispatched. If the FileReference.browse() method is used to select a file to upload, the following code sends the
file to a web server:

627
ACTIONSCRIPT 3.0 DEVELOPER’S GUIDE
Working with the file system
Last updated 3/21/2011
var fileRef:FileReference = new FileReference();
fileRef.addEventListener(Event.SELECT, selectHandler);
fileRef.addEventListener(Event.COMPLETE, completeHandler);
try
{
var success:Boolean = fileRef.browse();
}
catch (error:Error)
{
trace("Unable to browse for files.");
}
function selectHandler(event:Event):void
{
var request:URLRequest = new URLRequest("http://www.[yourdomain].com/fileUploadScript.cfm")
try
{
fileRef.upload(request);
}
catch (error:Error)
{
trace("Unable to upload file.");
}
}
function completeHandler(event:Event):void
{
trace("uploaded");
}
You can send data to the server with the FileReference.upload() method by using the URLRequest.method and
URLRequest.data properties to send variables using the POST or GET methods.
When you attempt to upload a file using the FileReference.upload() method, the following events are dispatched:
•open event (Event.OPEN): Dispatched when the upload operation starts.
•progress event (ProgressEvent.PROGRESS): Dispatched periodically as bytes of data from the file are uploaded.
•complete event (Event.COMPLETE): Dispatched when the upload operation completes successfully.
•httpStatus event (HTTPStatusEvent.HTTP_STATUS): Dispatched when the upload process fails because of an
HTTP error.
•httpResponseStatus event (HTTPStatusEvent.HTTP_RESPONSE_STATUS): Dispatched if a call to the upload()
or uploadUnencoded() method attempts to access data over HTTP and Adobe AIR is able to detect and return the
status code for the request.
•securityError event (SecurityErrorEvent.SECURITY_ERROR): Dispatched when an upload operation fails
because of a security violation.
•uploadCompleteData event (DataEvent.UPLOAD_COMPLETE_DATA): Dispatched after data is received from the
server after a successful upload.
•ioError event (IOErrorEvent.IO_ERROR): Dispatched if the upload process fails for any of the following reasons:
•An input/output error occurred while Flash Player is reading, writing, or transmitting the file.
•The SWF tried to upload a file to a server that requires authentication (such as a user name and password).
During upload, Flash Player does not provide a means for users to enter passwords.
•The url parameter contains an invalid protocol. The FileReference.upload() method must use either
HTTP or HTTPS.

628
ACTIONSCRIPT 3.0 DEVELOPER’S GUIDE
Working with the file system
Last updated 3/21/2011
Flash Player does not offer complete support for servers that require authentication. Only SWF files that are running
in a browser using the browser plug-in or Microsoft ActiveX® control can provide a dialog box to prompt the user to
enter a user name and password for authentication, and then only for downloads. For uploads using the plug-in or
ActiveX control or upload/download using either the stand-alone or external player, the file transfer fails.
To create a server script in ColdFusion to accept a file upload from Flash Player, you can use code similar to the
following:
<cffile action="upload" filefield="Filedata" destination="#ExpandPath('./')#"
nameconflict="OVERWRITE" />
This ColdFusion code uploads the file sent by Flash Player and saves it to the same directory as the ColdFusion
template, overwriting any file with the same name. The previous code shows the bare minimum amount of code
necessary to accept a file upload; this script should not be used in a production environment. Ideally, add data
validation to ensure that users upload only accepted file types, such as an image instead of a potentially dangerous
server-side script.
The following code demonstrates file uploads using PHP, and it includes data validation. The script limits the number
of uploaded files in the upload directory to 10, ensures that the file is less than 200 KB, and permits only JPEG, GIF, or
PNG files to be uploaded and saved to the file system.
<?php
$MAXIMUM_FILESIZE = 1024 * 200; // 200KB
$MAXIMUM_FILE_COUNT = 10; // keep maximum 10 files on server
echo exif_imagetype($_FILES['Filedata']);
if ($_FILES['Filedata']['size'] <= $MAXIMUM_FILESIZE)
{
move_uploaded_file($_FILES['Filedata']['tmp_name'],
"./temporary/".$_FILES['Filedata']['name']);
$type = exif_imagetype("./temporary/".$_FILES['Filedata']['name']);
if ($type == 1 || $type == 2 || $type == 3)
{
rename("./temporary/".$_FILES['Filedata']['name'],
"./images/".$_FILES['Filedata']['name']);
}
else
{
unlink("./temporary/".$_FILES['Filedata']['name']);
}
}
$directory = opendir('./images/');
$files = array();
while ($file = readdir($directory))
{
array_push($files, array('./images/'.$file, filectime('./images/'.$file)));
}
usort($files, sorter);
if (count($files) > $MAXIMUM_FILE_COUNT)
{
$files_to_delete = array_splice($files, 0, count($files) - $MAXIMUM_FILE_COUNT);

629
ACTIONSCRIPT 3.0 DEVELOPER’S GUIDE
Working with the file system
Last updated 3/21/2011
for ($i = 0; $i < count($files_to_delete); $i++)
{
unlink($files_to_delete[$i][0]);
}
}
print_r($files);
closedir($directory);
function sorter($a, $b)
{
if ($a[1] == $b[1])
{
return 0;
}
else
{
return ($a[1] < $b[1]) ? -1 : 1;
}
}
?>
You can pass additional variables to the upload script using either the POST or GET request method. To send additional
POST variables to your upload script, you can use the following code:
var fileRef:FileReference = new FileReference();
fileRef.addEventListener(Event.SELECT, selectHandler);
fileRef.addEventListener(Event.COMPLETE, completeHandler);
fileRef.browse();
function selectHandler(event:Event):void
{
var params:URLVariables = new URLVariables();
params.date = new Date();
params.ssid = "94103-1394-2345";
var request:URLRequest = new
URLRequest("http://www.yourdomain.com/FileReferenceUpload/fileupload.cfm");
request.method = URLRequestMethod.POST;
request.data = params;
fileRef.upload(request, "Custom1");
}
function completeHandler(event:Event):void
{
trace("uploaded");
}
The previous example creates a URLVariables object that you pass to the remote server- side script. In previous
versions of ActionScript, you could pass variables to the server upload script by passing values in the query string.
ActionScript 3.0 allows you to pass variables to the remote script using a URLRequest object, which allows you to pass
data using either the POST or GET method; this, in turn, makes passing larger sets of data easier and cleaner. In order
to specify whether the variables are passed using the GET or POST request method, you can set the URLRequest.method
property to either URLRequestMethod.GET or URLRequestMethod.POST, respectively.
ActionScript 3.0 also lets you override the default Filedata upload file field name by providing a second parameter
to the upload() method, as demonstrated in the previous example (which replaced the default value Filedata with
Custom1).

630
ACTIONSCRIPT 3.0 DEVELOPER’S GUIDE
Working with the file system
Last updated 3/21/2011
By default, Flash Player does not attempt to send a test upload, although you can override this default by passing a value
of true as the third parameter to the upload() method. The purpose of the test upload is to check whether the actual
file upload will be successful and that server authentication, if required, will succeed.
Note: A test upload occurs only on Windows-based Flash Players at this time.
The server script that handles the file upload should expect an HTTP POST request with the following elements:
•Content-Type with a value of multipart/form-data.
•Content-Disposition with a name attribute set to “Filedata” and a filename attribute set to the name of the
original file. You can specify a custom name attribute by passing a value for the uploadDataFieldName parameter
in the FileReference.upload() method.
•The binary contents of the file.
Here is a sample HTTP POST request:
POST /handler.asp HTTP/1.1
Accept: text/*
Content-Type: multipart/form-data;
boundary=----------Ij5ae0ae0KM7GI3KM7ei4cH2ei4gL6
User-Agent: Shockwave Flash
Host: www.mydomain.com
Content-Length: 421
Connection: Keep-Alive
Cache-Control: no-cache
------------Ij5ae0ae0KM7GI3KM7ei4cH2ei4gL6
Content-Disposition: form-data; name="Filename"
sushi.jpg
------------Ij5ae0ae0KM7GI3KM7ei4cH2ei4gL6
Content-Disposition: form-data; name="Filedata"; filename="sushi.jpg"
Content-Type: application/octet-stream
Test File
------------Ij5ae0ae0KM7GI3KM7ei4cH2ei4gL6
Content-Disposition: form-data; name="Upload"
Submit Query
------------Ij5ae0ae0KM7GI3KM7ei4cH2ei4gL6
(actual file data,,,)
The following sample HTTP POST request sends three POST variables: api_sig, api_key, and auth_token, and uses
a custom upload data field name value of "photo":

631
ACTIONSCRIPT 3.0 DEVELOPER’S GUIDE
Working with the file system
Last updated 3/21/2011
POST /handler.asp HTTP/1.1
Accept: text/*
Content-Type: multipart/form-data;
boundary=----------Ij5ae0ae0KM7GI3KM7ei4cH2ei4gL6
User-Agent: Shockwave Flash
Host: www.mydomain.com
Content-Length: 421
Connection: Keep-Alive
Cache-Control: no-cache
------------Ij5GI3GI3ei4GI3ei4KM7GI3KM7KM7
Content-Disposition: form-data; name="Filename"
sushi.jpg
------------Ij5GI3GI3ei4GI3ei4KM7GI3KM7KM7
Content-Disposition: form-data; name="api_sig"
XXXXXXXXXXXXXXXXXXXXXXXXXXXXXXXX
------------Ij5GI3GI3ei4GI3ei4KM7GI3KM7KM7
Content-Disposition: form-data; name="api_key"
XXXXXXXXXXXXXXXXXXXXXXXXXXXXXXXX
------------Ij5GI3GI3ei4GI3ei4KM7GI3KM7KM7
Content-Disposition: form-data; name="auth_token"
XXXXXXXXXXXXXXXXXXXXXXX
------------Ij5GI3GI3ei4GI3ei4KM7GI3KM7KM7
Content-Disposition: form-data; name="photo"; filename="sushi.jpg"
Content-Type: application/octet-stream
(actual file data,,,)
------------Ij5GI3GI3ei4GI3ei4KM7GI3KM7KM7
Content-Disposition: form-data; name="Upload"
Submit Query
------------Ij5GI3GI3ei4GI3ei4KM7GI3KM7KM7--
Downloading files from a server
Flash Player 9 and later, Adobe AIR 1.0 and later
You can let users download files from a server using the FileReference.download() method, which takes two
parameters: request and defaultFileName. The first parameter is the URLRequest object that contains the URL of
the file to download. The second parameter is optional—it lets you specify a default filename that appears in the
download file dialog box. If you omit the second parameter, defaultFileName, the filename from the specified URL
is used.
The following code downloads a file named index.xml from the same directory as the SWF file:
var request:URLRequest = new URLRequest("index.xml");
var fileRef:FileReference = new FileReference();
fileRef.download(request);
To set the default name to currentnews.xml instead of index.xml, specify the defaultFileName parameter, as the
following snippet shows:

632
ACTIONSCRIPT 3.0 DEVELOPER’S GUIDE
Working with the file system
Last updated 3/21/2011
var request:URLRequest = new URLRequest("index.xml");
var fileToDownload:FileReference = new FileReference();
fileToDownload.download(request, "currentnews.xml");
Renaming a file can be useful if the server filename was not intuitive or was server-generated. It’s also good to explicitly
specify the defaultFileName parameter when you download a file using a server-side script, instead of downloading
the file directly. For example, you need to specify the defaultFileName parameter if you have a server-side script that
downloads specific files based on URL variables passed to it. Otherwise, the default name of the downloaded file is the
name of your server-side script.
Data can be sent to the server using the download() method by appending parameters to the URL for the server script
to parse. The following ActionScript 3.0 snippet downloads a document based on which parameters are passed to a
ColdFusion script:
package
{
import flash.display.Sprite;
import flash.net.FileReference;
import flash.net.URLRequest;
import flash.net.URLRequestMethod;
import flash.net.URLVariables;
public class DownloadFileExample extends Sprite
{
private var fileToDownload:FileReference;
public function DownloadFileExample()
{
var request:URLRequest = new URLRequest();
request.url = "http://www.[yourdomain].com/downloadfile.cfm";
request.method = URLRequestMethod.GET;
request.data = new URLVariables("id=2");
fileToDownload = new FileReference();
try
{
fileToDownload.download(request, "file2.txt");
}
catch (error:Error)
{
trace("Unable to download file.");
}
}
}
}
The following code demonstrates the ColdFusion script, download.cfm, that downloads one of two files from the
server, depending on the value of a URL variable:
<cfparam name="URL.id" default="1" />
<cfswitch expression="#URL.id#">
<cfcase value="2">
<cfcontent type="text/plain" file="#ExpandPath('two.txt')#" deletefile="No" />
</cfcase>
<cfdefaultcase>
<cfcontent type="text/plain" file="#ExpandPath('one.txt')#" deletefile="No" />
</cfdefaultcase>
</cfswitch>

633
ACTIONSCRIPT 3.0 DEVELOPER’S GUIDE
Working with the file system
Last updated 3/21/2011
FileReferenceList class
Flash Player 9 and later, Adobe AIR 1.0 and later
The FileReferenceList class lets the user select one or more files to upload to a server-side script. The file upload is
handled by the FileReference.upload() method, which must be called on each file that the user selects.
The following code creates two FileFilter objects (imageFilter and textFilter) and passes them in an array to the
FileReferenceList.browse() method. This causes the operating system file dialog box to display two possible
filters for file types.
var imageFilter:FileFilter = new FileFilter("Image Files (*.jpg, *.jpeg, *.gif, *.png)",
"*.jpg; *.jpeg; *.gif; *.png");
var textFilter:FileFilter = new FileFilter("Text Files (*.txt, *.rtf)", "*.txt; *.rtf");
var fileRefList:FileReferenceList = new FileReferenceList();
try
{
var success:Boolean = fileRefList.browse(new Array(imageFilter, textFilter));
}
catch (error:Error)
{
trace("Unable to browse for files.");
}
Allowing the user to select and upload one or more files by using the FileReferenceList class is the same as using
FileReference.browse() to select files, although the FileReferenceList allows you to select more than one file.
Uploading multiple files requires you to upload each of the selected files by using FileReference.upload(), as the
following code shows:
var fileRefList:FileReferenceList = new FileReferenceList();
fileRefList.addEventListener(Event.SELECT, selectHandler);
fileRefList.browse();
function selectHandler(event:Event):void
{
var request:URLRequest = new URLRequest("http://www.[yourdomain].com/fileUploadScript.cfm");
var file:FileReference;
var files:FileReferenceList = FileReferenceList(event.target);
var selectedFileArray:Array = files.fileList;
for (var i:uint = 0; i < selectedFileArray.length; i++)
{
file = FileReference(selectedFileArray[i]);
file.addEventListener(Event.COMPLETE, completeHandler);
try
{
file.upload(request);
}
catch (error:Error)
{
trace("Unable to upload files.");
}
}
}
function completeHandler(event:Event):void
{
trace("uploaded");
}

634
ACTIONSCRIPT 3.0 DEVELOPER’S GUIDE
Working with the file system
Last updated 3/21/2011
Because the Event.COMPLETE event is added to each individual FileReference object in the array, Flash Player calls the
completeHandler() method when each individual file finishes uploading.
Using the AIR file system API
Adobe AIR 1.0 and later
The Adobe AIR file system API includes the following classes:
•File
•FileMode
•FileStream
The file system API lets you do the following (and more):
•Copy, create, delete, and move files and directories
•Get in from at ion about files and directories
•Read and write files
AIR file basics
Adobe AIR 1.0 and later
For a quick explanation and code examples of working with the file system in AIR, see the following quick start articles
on the Adobe Developer Connection:
•Building a text-file editor (Flash)
•Building a text-file editor (Flex)
•Building a directory search application (Flex)
•Reading and writing from an XML preferences file (Flex)
•Compressing files and data (Flex)
Adobe AIR provides classes that you can use to access, create, and manage both files and folders. These classes,
contained in the flash.filesystem package, are used as follows:
Some methods in the File class have both synchronous and asynchronous versions:
•File.copyTo() and File.copyToAsync()
File classes Description
File File object represents a path to a file or directory. You use a file object to create a pointer to a file or
folder, initiating interaction with the file or folder.
FileMode The FileMode class defines string constants used in the fileMode parameter of the open() and
openAsync() methods of the FileStream class. The fileMode parameter of these methods determines
the capabilities available to the FileStream object once the file is opened, which include writing, reading,
appending, and updating.
FileStream FileStream object is used to open files for reading and writing. Once you’ve created a File object that
points to a new or existing file, you pass that pointer to the FileStream object so that you can open it and
read or write data.

635
ACTIONSCRIPT 3.0 DEVELOPER’S GUIDE
Working with the file system
Last updated 3/21/2011
•File.deleteDirectory() and File.deleteDirectoryAsync()
•File.deleteFile() and File.deleteFileAsync()
•File.getDirectoryListing() and File.getDirectoryListingAsync()
•File.moveTo() and File.moveToAsync()
•File.moveToTrash() and File.moveToTrashAsync()
Also, FileStream operations work synchronously or asynchronously depending on how the FileStream object opens
the file: by calling the open() method or by calling the openAsync() method.
The asynchronous versions let you initiate processes that run in the background and dispatch events when complete
(or when error events occur). Other code can execute while these asynchronous background processes are taking place.
With asynchronous versions of the operations, you must set up event listener functions, using the
addEventListener() method of the File or FileStream object that calls the function.
The synchronous versions let you write simpler code that does not rely on setting up event listeners. However, since
other code cannot execute while a synchronous method is executing, important processes such as display object
rendering and animation can be delayed.
Working with File objects in AIR
Adobe AIR 1.0 and later
A File object is a pointer to a file or directory in the file system.
The File class extends the FileReference class. The FileReference class, which is available in Adobe® Flash® Player as well
as AIR, represents a pointer to a file. The File class adds properties and methods that are not exposed in Flash Player
(in a SWF file running in a browser), due to security considerations.
About the File class
Adobe AIR 1.0 and later
You can use the File class for the following:
•Getting the path to special directories, including the user directory, the user's documents directory, the directory
from which the application was launched, and the application directory
•Coping files and directories
•Moving files and directories
•Deleting files and directories (or moving them to the trash)
•Listing files and directories contained in a directory
•Creating temporary files and folders
Once a File object points to a file path, you can use it to read and write file data, using the FileStream class.
A File object can point to the path of a file or directory that does not yet exist. You can use such a File object in creating
a file or directory.
Paths of File objects
Adobe AIR 1.0 and later
Each File object has two properties that each define its path:

636
ACTIONSCRIPT 3.0 DEVELOPER’S GUIDE
Working with the file system
Last updated 3/21/2011
The File class includes static properties for pointing to standard directories on Mac OS, Windows, and Linux. These
properties include:
•File.applicationStorageDirectory—a storage directory unique to each installed AIR application. This
directory is an appropriate place to store dynamic application assets and user preferences. Consider storing large
amounts of data elsewhere.
On Android and iOS, the application storage directory is removed when the application is uninstalled or the user
chooses to clear application data, but this is not the case on other platforms.
•File.applicationDirectory—the directory where the application is installed (along with any installed assets).
On some operating systems, the application is stored in a single package file rather than a physical directory. In this
case, the contents may not be accessible using the native path. The application directory is read-only.
•File.desktopDirectory—the user’s desktop directory. If a platform does not define a desktop directory, another
location on the file system is used.
•File.documentsDirectory—the user’s documents directory. If a platform does not define a documents
directory, another location on the file system is used.
•File.userDirectory—the user directory. If a platform does not define a user directory, another location on the
file system is used.
Note: When a platform does not define standard locations for desktop, documents, or user directories,
File.documentsDirectory, File.desktopDirectory, and File.userDirectory can reference the same directory.
These properties have different values on different operating systems. For example, Mac and Windows each have a
different native path to the user’s desktop directory. However, the File.desktopDirectory property points to an
appropriate directory path on every platform. To write applications that work well across platforms, use these
properties as the basis for referencing other directories and files used by the application. Then use the resolvePath()
method to refine the path. For example, this code points to the preferences.xml file in the application storage directory:
var prefsFile:File = File.applicationStorageDirectory;
prefsFile = prefsFile.resolvePath("preferences.xml");
Although the File class lets you point to a specific file path, doing so can lead to applications that do not work across
platforms. For example, the path C:\Documents and Settings\joe\ only works on Windows. For these reasons, it is best
to use the static properties of the File class, such as File.documentsDirectory.
Property Description
nativePath Specifies the platform-specific path to a file. For example, on Windows a path might be "c:\Sample
directory\test.txt" whereas on Mac OS it could be "/Sample directory/test.txt". A nativePath
property uses the backslash (\) character as the directory separator character on Windows, and it uses
the forward slash (/) character on Mac OS and Linux.
url This may use the file URL scheme to point to a file. For example, on Windows a path might be
"file:///c:/Sample%20directory/test.txt" whereas on Mac OS it could be
"file:///Sample%20directory/test.txt". The runtime includes other special URL schemes besides file
and are described in “Supported AIR URL schemes” on page 644

637
ACTIONSCRIPT 3.0 DEVELOPER’S GUIDE
Working with the file system
Last updated 3/21/2011
Common directory locations
The actual native paths for these directories vary based on the operating system and computer configuration. The
paths shown in this table are typical examples. You should always use the appropriate static File class properties to refer
Platform Directory type Typical file system location
Android Application /data/data/
Application-storage /data/data/air.applicationID/filename/Local Store
Desktop /mnt/sdcard
Documents /mnt/sdcard
Temporary /data/data/applicationID/cache/FlashTmp.randomString
User /mnt/sdcard
iOS Application /var/mobile/Applications/uid/filename.app
Application-storage /var/mobile/Applications/uid/Library/Application
Support/applicationID/Local Store
Desktop not accessible
Documents not accessible
Temporary /private/var/mobile/Applications/uid/tmp/FlashTmpNNN
User not accessible
Linux Application /opt/filename/share
Application-storage /home/userName/.appdata/applicationID/Local Store
Desktop /home/userName/Desktop
Documents /home/userName/Documents
Temporary /tmp/FlashTmp.randomString
User /home/userName
Mac Application /Applications/filename.app/Contents/Resources
Application-storage /Users/userName/Library/Preferences/applicationID/Local Store
Desktop /Users/userName/Desktop
Documents /Users/userName/Documents
Temporary /private/var/folders/JY/randomString/TemporaryItems/FlashTmp
User /Users/userName
Windows Application C:\Program Files\filename
Application-storage C:\Documents and
settings\userName\ApplicationData\applicationID\Local Store
Desktop C:\Documents and settings\userName\Desktop
Documents C:\Documents and settings\userName\My Documents
Temporary C:\Documents and settings\userName\Local
Settings\Temp\randomString.tmp
User C:\Documents and settings\userName

638
ACTIONSCRIPT 3.0 DEVELOPER’S GUIDE
Working with the file system
Last updated 3/21/2011
to these directories so that your application works correctly on any platform. In an actual AIR application, the values
for applicationID and filename shown in the table are taken from the application descriptor. If you specify a
publisher ID in the application descriptor, then the publisher ID is appended to the application ID in these paths. The
value for userName is the account name of the installing user.
Directory view for AIR for TV applications
To provide security to the system files on AIR for TV devices, an AIR application can access only a limited set of
directories. AIR for TV prohibits the application from accessing any other directories. Furthermore, AIR for TV
isolates each user’s user-specific data for each AIR application.
The AIR application uses directory names that are only for ActionScript 3.0 use. These names do not represent actual
directories on the device. AIR for TV maps these ActionScript 3.0 directory names to actual device directories. This mapping
protects AIR for TV applications from maliciously or inadvertently accessing local files that do not belong to them.
The ActionScript 3.0 directory names are:
/app/ The read-only application directory for the running AIR application.
/app-storage/ The read-write application storage directory for the running AIR application.
/home/ The read-write user directory.
/tmp/ The read-write temporary directory for the running AIR application.
/volumes/ The read-only directory containing zero or more read-write subdirectories that represent mounted
volumes.
If an application tries to access a prohibited directory, the runtime throws an exception that ActionScript code can
catch.
The following table shows the File.nativePath value for various File properties and methods. The values reflect the
application’s limited view of the device’s file system.
Also consider the behavior of the following methods on AIR for TV devices:
•File.createTempFile() creates a file in the /tmp/ directory.
File property or method File.nativePat
h value
Mapping information
applicationDirectory /app/ Maps to an application-specific directory.
applicationStorageDirectory /app-storage/ Maps to an application-specific directory within a user-
specific directory.
desktopDirectory /home/ Maps to an application-specific directory within a user-
specific directory. The same directory as userDirectory
and documentsDirectory.
userDirectory /home/ Maps to an application-specific directory within a user-
specific directory. The same directory as
desktopDirectory and documentsDirectory.
documentsDirectory /home/ Maps to an application-specific directory within a user-
specific directory. The same directory as userDirectory
and desktopDirectory.
createTempDirectory() /tmp/ Maps to a temporary directory. AIR for TV deletes this
directory and its contents when the AIR application exits.

639
ACTIONSCRIPT 3.0 DEVELOPER’S GUIDE
Working with the file system
Last updated 3/21/2011
•File.getRootDirectories()returns an array with one File object. The File object’s nativePath property has the
value /. This root directory contains the directories app, app-storage, home and tmp.
•StorageVolumeInfo.storageVolumeInfo.getStorageVolumes() returns a Vector of StorageVolume objects.
Each StorageVolume object’s rootDirectory property is a File object. The File object’s nativePath value begins
with /volumes/. All applications and users have access to the /volumes/ directory.
Pointing a File object to a directory
Adobe AIR 1.0 and later
There are different ways to set a File object to point to a directory.
Pointing to the user’s home directory
Adobe AIR 1.0 and later
You can point a File object to the user’s home directory. The following code sets a File object to point to an AIR Test
subdirectory of the home directory:
var file:File = File.userDirectory.resolvePath("AIR Test");
Pointing to the user’s documents directory
Adobe AIR 1.0 and later
You can point a File object to the user's documents directory. The following code sets a File object to point to an AIR
Test subdirectory of the documents directory:
var file:File = File.documentsDirectory.resolvePath("AIR Test");
Pointing to the desktop directory
Adobe AIR 1.0 and later
You can point a File object to the desktop. The following code sets a File object to point to an AIR Test subdirectory
of the desktop:
var file:File = File.desktopDirectory.resolvePath("AIR Test");
Pointing to the application storage directory
Adobe AIR 1.0 and later
You can point a File object to the application storage directory. For every AIR application, there is a unique associated
path that defines the application storage directory. This directory is unique to each application and user. You can use
this directory to store user-specific, application-specific data (such as user data or preferences files). For example, the
following code points a File object to a preferences file, prefs.xml, contained in the application storage directory:
var file:File = File.applicationStorageDirectory;
file = file.resolvePath("prefs.xml");

640
ACTIONSCRIPT 3.0 DEVELOPER’S GUIDE
Working with the file system
Last updated 3/21/2011
The application storage directory location is typically based on the user name and the application ID. The following
file system locations are given here to help you debug your application. You should always use the
File.applicationStorage property or app-storage: URI scheme to resolve files in this directory:
•On Mac OS—In:
/Users/user name/Library/Preferences/applicationID/Local Store/
For example:
/Users/babbage/Library/Preferences/com.example.TestApp/Local Store
•On Windows—In the documents and Settings directory, in:
C:\Documents and Settings\user name\Application Data\applicationID\Local Store\
For example:
C:\Documents and Settings\babbage\Application Data\com.example.TestApp\Local Store
•On Linux—In:
/home/user name/.appdata/applicationID/Local Store/
For example:
/home/babbage/.appdata/com.example.TestApp/Local Store
•On Android—In:
/data/data/androidPackageID/applicationID/Local Store
For example:
/data/data/air.com.example.TestApp/com.example.TestApp/Local Store
•On AIR for TV devices, the location is described in “Directory view for AIR for TV applications” on page 638.
Note: If an application has a publisher ID, then the publisher ID is also used as part of the path to the application storage
directory.
The URL (and url property) for a File object created with File.applicationStorageDirectory uses the app-
storage URL scheme (see “Supported AIR URL schemes” on page 644), as in the following:
var dir:File = File.applicationStorageDirectory;
dir = dir.resolvePath("preferences");
trace(dir.url); // app-storage:/preferences
Pointing to the application directory
Adobe AIR 1.0 and later
You can point a File object to the directory in which the application was installed, known as the application directory.
You can reference this directory using the File.applicationDirectory property. You can use this directory to
examine the application descriptor file or other resources installed with the application. For example, the following
code points a File object to a directory named images in the application directory:
var dir:File = File.applicationDirectory;
dir = dir.resolvePath("images");
The URL (and url property) for a File object created with File.applicationDirectory uses the app URL scheme
(see “Supported AIR URL schemes” on page 644), as in the following:

641
ACTIONSCRIPT 3.0 DEVELOPER’S GUIDE
Working with the file system
Last updated 3/21/2011
var dir:File = File.applicationDirectory;
dir = dir.resolvePath("images");
trace(dir.url); // app:/images
Note: On Android, the files in the application package are not accessible via the nativePath. The nativePath property
is an empty string. Always use the URL to access files in the application directory rather than a native path.
Pointing to the file system root
Adobe AIR 1.0 and later
The File.getRootDirectories() method lists all root volumes, such as C: and mounted volumes, on a Windows
computer. On Mac OS and Linux, this method always returns the unique root directory for the machine (the "/"
directory). The StorageVolumeInfo.getStorageVolumes() method provides more detailed information on
mounted storage volumes (see “Working with storage volumes” on page 654).
Note: The root of the file system is not readable on Android. A File object referencing the directory with the native path,
“/”, is returned, but the properties of that object do not have accurate values. For example, spaceAvailable is always 0.
Pointing to an explicit directory
Adobe AIR 1.0 and later
You can point the File object to an explicit directory by setting the nativePath property of the File object, as in the
following example (on Windows):
var file:File = new File();
file.nativePath = "C:\\AIR Test";
Important: Pointing to an explicit path this way can lead to code that does not work across platforms. For example,
the previous example only works on Windows. You can use the static properties of the File object, such as
File.applicationStorageDirectory, to locate a directory that works cross-platform. Then use the
resolvePath() method (see the next section) to navigate to a relative path.
Navigating to relative paths
Adobe AIR 1.0 and later
You can use the resolvePath() method to obtain a path relative to another given path. For example, the following
code sets a File object to point to an "AIR Test" subdirectory of the user's home directory:
var file:File = File.userDirectory;
file = file.resolvePath("AIR Test");
You can also use the url property of a File object to point it to a directory based on a URL string, as in the following:
var urlStr:String = "file:///C:/AIR Test/";
var file:File = new File()
file.url = urlStr;
For more information, see “Modifying File paths” on page 644.

642
ACTIONSCRIPT 3.0 DEVELOPER’S GUIDE
Working with the file system
Last updated 3/21/2011
Letting the user browse to select a directory
Adobe AIR 1.0 and later
The File class includes the browseForDirectory() method, which presents a system dialog box in which the user can
select a directory to assign to the object. The browseForDirectory() method is asynchronous. The File object
dispatches a select event if the user selects a directory and clicks the Open button, or it dispatches a cancel event if
the user clicks the Cancel button.
For example, the following code lets the user select a directory and outputs the directory path upon selection:
var file:File = new File();
file.addEventListener(Event.SELECT, dirSelected);
file.browseForDirectory("Select a directory");
function dirSelected(e:Event):void {
trace(file.nativePath);
}
Note: On Android, the browseForDirectory() method is not supported. Calling this method has no effect; a cancel
event is dispatched immediately. To allow users to select a directory, use a custom, application-defined dialog, instead.
Pointing to the directory from which the application was invoked
Adobe AIR 1.0 and later
You can get the directory location from which an application is invoked, by checking the currentDirectory property
of the InvokeEvent object dispatched when the application is invoked. For details, see “Capturing command line
arguments” on page 852.
Pointing a File object to a file
Adobe AIR 1.0 and later
There are different ways to set the file to which a File object points.
Pointing to an explicit file path
Adobe AIR 1.0 and later
Important: Pointing to an explicit path can lead to code that does not work across platforms. For example, the path
C:/foo.txt only works on Windows. You can use the static properties of the File object, such as
File.applicationStorageDirectory, to locate a directory that works cross-platform. Then use the
resolvePath() method (see “Modifying File paths” on page 644) to navigate to a relative path.
You can use the url property of a File object to point it to a file or directory based on a URL string, as in the following:
var urlStr:String = "file:///C:/AIR Test/test.txt";
var file:File = new File()
file.url = urlStr;
You can also pass the URL to the File() constructor function, as in the following:
var urlStr:String = "file:///C:/AIR Test/test.txt";
var file:File = new File(urlStr);
The url property always returns the URI-encoded version of the URL (for example, blank spaces are replaced with
"%20):

643
ACTIONSCRIPT 3.0 DEVELOPER’S GUIDE
Working with the file system
Last updated 3/21/2011
file.url = "file:///c:/AIR Test";
trace(file.url); // file:///c:/AIR%20Test
You can also use the nativePath property of a File object to set an explicit path. For example, the following code, when
run on a Windows computer, sets a File object to the test.txt file in the AIR Test subdirectory of the C: drive:
var file:File = new File();
file.nativePath = "C:/AIR Test/test.txt";
You can also pass this path to the File() constructor function, as in the following:
var file:File = new File("C:/AIR Test/test.txt");
Use the forward slash (/) character as the path delimiter for the nativePath property. On Windows, you can also use
the backslash (\) character, but doing so leads to applications that do not work across platforms.
For more information, see “Modifying File paths” on page 644.
Enumerating files in a directory
Adobe AIR 1.0 and later
You can use the getDirectoryListing() method of a File object to get an array of File objects pointing to files and
subdirectories at the root level of a directory. For more information, see “Enumerating directories” on page 650.
Letting the user browse to select a file
Adobe AIR 1.0 and later
The File class includes the following methods that present a system dialog box in which the user can select a file to
assign to the object:
•browseForOpen()
•browseForSave()
•browseForOpenMultiple()
These methods are each asynchronous. The browseForOpen() and browseForSave() methods dispatch the select
event when the user selects a file (or a target path, in the case of browseForSave()). With the browseForOpen() and
browseForSave() methods, upon selection the target File object points to the selected files. The
browseForOpenMultiple() method dispatches a selectMultiple event when the user selects files. The
selectMultiple event is of type FileListEvent, which has a files property that is an array of File objects (pointing
to the selected files).
For example, the following code presents the user with an “Open” dialog box in which the user can select a file:

644
ACTIONSCRIPT 3.0 DEVELOPER’S GUIDE
Working with the file system
Last updated 3/21/2011
var fileToOpen:File = File.documentsDirectory;
selectTextFile(fileToOpen);
function selectTextFile(root:File):void
{
var txtFilter:FileFilter = new FileFilter("Text", "*.as;*.css;*.html;*.txt;*.xml");
root.browseForOpen("Open", [txtFilter]);
root.addEventListener(Event.SELECT, fileSelected);
}
function fileSelected(event:Event):void
{
trace(fileToOpen.nativePath);
}
If the application has another browser dialog box open when you call a browse method, the runtime throws an Error
exception.
Note: On Android, only image, video, and audio files can be selected with the browseForOpen() and
browseForOpenMultiple() methods. The browseForSave() dialog also displays only media files even though the user
can enter an arbitrary filename. For opening and saving non-media files, you should consider using custom dialogs
instead of these methods.
Modifying File paths
Adobe AIR 1.0 and later
You can also modify the path of an existing File object by calling the resolvePath() method or by modifying the
nativePath or url property of the object, as in the following examples (on Windows):
var file1:File = File.documentsDirectory;
file1 = file1.resolvePath("AIR Test");
trace(file1.nativePath); // C:\Documents and Settings\userName\My Documents\AIR Test
var file2:File = File.documentsDirectory;
file2 = file2.resolvePath("..");
trace(file2.nativePath); // C:\Documents and Settings\userName
var file3:File = File.documentsDirectory;
file3.nativePath += "/subdirectory";
trace(file3.nativePath); // C:\Documents and Settings\userName\My Documents\subdirectory
var file4:File = new File();
file4.url = "file:///c:/AIR Test/test.txt";
trace(file4.nativePath); // C:\AIR Test\test.txt
When using the nativePath property, use the forward slash (/) character as the directory separator character. On
Windows, you can use the backslash (\) character as well, but you should not do so, as it leads to code that does not
work cross-platform.
Supported AIR URL schemes
Adobe AIR 1.0 and later
In AIR, you can use any of the following URL schemes in defining the url property of a File object:

645
ACTIONSCRIPT 3.0 DEVELOPER’S GUIDE
Working with the file system
Last updated 3/21/2011
Finding the relative path between two files
Adobe AIR 1.0 and later
You can use the getRelativePath() method to find the relative path between two files:
var file1:File = File.documentsDirectory.resolvePath("AIR Test");
var file2:File = File.documentsDirectory
file2 = file2.resolvePath("AIR Test/bob/test.txt");
trace(file1.getRelativePath(file2)); // bob/test.txt
The second parameter of the getRelativePath() method, the useDotDot parameter, allows for .. syntax to be
returned in results, to indicate parent directories:
var file1:File = File.documentsDirectory;
file1 = file1.resolvePath("AIR Test");
var file2:File = File.documentsDirectory;
file2 = file2.resolvePath("AIR Test/bob/test.txt");
var file3:File = File.documentsDirectory;
file3 = file3.resolvePath("AIR Test/susan/test.txt");
trace(file2.getRelativePath(file1, true)); // ../..
trace(file3.getRelativePath(file2, true)); // ../../bob/test.txt
Obtaining canonical versions of file names
Adobe AIR 1.0 and later
File and path names are not case sensitive on Windows and Mac OS. In the following, two File objects point to the
same file:
File.documentsDirectory.resolvePath("test.txt");
File.documentsDirectory.resolvePath("TeSt.TxT");
However, documents and directory names do include capitalization. For example, the following assumes that there is
a folder named AIR Test in the documents directory, as in the following examples:
URL scheme Description
file Use to specify a path relative to the root of the file system. For example:
file:///c:/AIR Test/test.txt
The URL standard specifies that a file URL takes the form file://<host>/<path>. As a special
case,<host> can be the empty string, which is interpreted as "the machine from which the URL is being
interpreted." For this reason, file URLs often have three slashes (///).
app Use to specify a path relative to the root directory of the installed application (the directory that contains
the application.xml file for the installed application). For example, the following path points to an images
subdirectory of the directory of the installed application:
app:/images
app-storage Use to specify a path relative to the application store directory. For each installed application, AIR defines
a unique application store directory, which is a useful place to store data specific to that application. For
example, the following path points to a prefs.xml file in a settings subdirectory of the application store
directory:
app-storage:/settings/prefs.xml

646
ACTIONSCRIPT 3.0 DEVELOPER’S GUIDE
Working with the file system
Last updated 3/21/2011
var file:File = File.documentsDirectory.resolvePath("AIR test");
trace(file.nativePath); // ... AIR test
file.canonicalize();
trace(file.nativePath); // ... AIR Test
The canonicalize() method converts the nativePath object to use the correct capitalization for the file or directory
name. On case sensitive file systems (such as Linux), when multiple files exists with names differing only in case, the
canonicalize() method adjusts the path to match the first file found (in an order determined by the file system).
You can also use the canonicalize() method to convert short file names ("8.3" names) to long file names on
Windows, as in the following examples:
var path:File = new File();
path.nativePath = "C:\\AIR~1";
path.canonicalize();
trace(path.nativePath); // C:\AIR Test
Working with packages and symbolic links
Adobe AIR 1.0 and later
Various operating systems support package files and symbolic link files:
Packages—On Mac OS, directories can be designated as packages and show up in the Mac OS Finder as a single file
rather than as a directory.
Symbolic links—Mac OS, Linux, and Windows Vista support symbolic links. Symbolic links allow a file to point to
another file or directory on disk. Although similar, symbolic links are not the same as aliases. An alias is always
reported as a file (rather than a directory), and reading or writing to an alias or shortcut never affects the original file
or directory that it points to. On the other hand, a symbolic link behaves exactly like the file or directory it points to.
It can be reported as a file or a directory, and reading or writing to a symbolic link affects the file or directory that it
points to, not the symbolic link itself. Additionally, on Windows the isSymbolicLink property for a File object
referencing a junction point (used in the NTFS file system) is set to true.
The File class includes the isPackage and isSymbolicLink properties for checking if a File object references a
package or symbolic link.
The following code iterates through the user’s desktop directory, listing subdirectories that are not packages:
var desktopNodes:Array = File.desktopDirectory.getDirectoryListing();
for (var i:uint = 0; i < desktopNodes.length; i++)
{
if (desktopNodes[i].isDirectory && !!desktopNodes[i].isPackage)
{
trace(desktopNodes[i].name);
}
}
The following code iterates through the user’s desktop directory, listing files and directories that are not symbolic links:

647
ACTIONSCRIPT 3.0 DEVELOPER’S GUIDE
Working with the file system
Last updated 3/21/2011
var desktopNodes:Array = File.desktopDirectory.getDirectoryListing();
for (var i:uint = 0; i < desktopNodes.length; i++)
{
if (!desktopNodes[i].isSymbolicLink)
{
trace(desktopNodes[i].name);
}
}
The canonicalize() method changes the path of a symbolic link to point to the file or directory to which the link
refers. The following code iterates through the user’s desktop directory, and reports the paths referenced by files that
are symbolic links:
var desktopNodes:Array = File.desktopDirectory.getDirectoryListing();
for (var i:uint = 0; i < desktopNodes.length; i++)
{
if (desktopNodes[i].isSymbolicLink)
{
var linkNode:File = desktopNodes[i] as File;
linkNode.canonicalize();
trace(linkNode.nativePath);
}
}
Determining space available on a volume
Adobe AIR 1.0 and later
The spaceAvailable property of a File object is the space available for use at the File location, in bytes. For example,
the following code checks the space available in the application storage directory:
trace(File.applicationStorageDirectory.spaceAvailable);
If the File object references a directory, the spaceAvailable property indicates the space in the directory that files can
use. If the File object references a file, the spaceAvailable property indicates the space into which the file could grow.
If the file location does not exist, the spaceAvailable property is set to 0. If the File object references a symbolic link,
the spaceAvailable property is set to space available at the location the symbolic link points to.
Typically the space available for a directory or file is the same as the space available on the volume containing the
directory or file. However, space available can take into account quotas and per-directory limits.
Adding a file or directory to a volume generally requires more space than the actual size of the file or the size of the
contents of the directory. For example, the operating system may require more space to store index information. Or
the disk sectors required may use additional space. Also, available space changes dynamically. So, you cannot expect
to allocate all of the reported space for file storage. For information on writing to the file system, see “Reading and
writing files” on page 655.
The StorageVolumeInfo.getStorageVolumes() method provides more detailed information on mounted storage
volumes (see “Working with storage volumes” on page 654).

648
ACTIONSCRIPT 3.0 DEVELOPER’S GUIDE
Working with the file system
Last updated 3/21/2011
Opening files with the default system application
Adobe AIR 2 and later
In AIR 2, you can open a file using the application registered by the operating system to open it. For example, an AIR
application can open a DOC file with the application registered to open it. Use the openWithDefaultApplication()
method of a File object to open the file. For example, the following code opens a file named test.doc on the user’s
desktop and opens it with the default application for DOC files:
var file:File = File.deskopDirectory;
file = file.resolvePath("test.doc");
file.openWithDefaultApplication();
Note: On Linux, the file’s MIME type, not the filename extension, determines the default application for a file.
The following code lets the user navigate to an mp3 file and open it in the default application for playing mp3 files:
var file:File = File.documentsDirectory;
var mp3Filter:FileFilter = new FileFilter("MP3 Files", "*.mp3");
file.browseForOpen("Open", [mp3Filter]);
file.addEventListener(Event.SELECT, fileSelected);
function fileSelected(e:Event):void
{
file.openWithDefaultApplication();
}
You cannot use the openWithDefaultApplication() method with files located in the application directory.
AIR prevents you from using the openWithDefaultApplication() method to open certain files. On Windows, AIR
prevents you from opening files that have certain filetypes, such as EXE or BAT. On Mac OS and Linux, AIR prevents
you from opening files that will launch in certain application. (These include Terminal and AppletLauncher on Mac
OS; and csh, bash, or ruby on Linux.) Attempting to open one of these files using the
openWithDefaultApplication() method results in an exception. For a complete list of prevented filetypes, see the
language reference entry for the File.openWithDefaultApplication() method.
Note: This limitation does not exist for an AIR application installed using a native installer (an extended desktop
application).
Getting file system information
Adobe AIR 1.0 and later
The File class includes the following static properties that provide some useful information about the file system:
The Capabilities class also includes useful system information that can be useful when working with files:
Property Description
File.lineEnding The line-ending character sequence used by the host operating system. On Mac OS and Linux, this is
the line-feed character. On Windows, this is the carriage return character followed by the line-feed
character.
File.separator The host operating system's path component separator character. On Mac OS and Linux, this is the
forward slash (/) character. On Windows, it is the backslash (\) character.
File.systemCharset The default encoding used for files by the host operating system. This pertains to the character set
used by the operating system, corresponding to its language.

649
ACTIONSCRIPT 3.0 DEVELOPER’S GUIDE
Working with the file system
Last updated 3/21/2011
Note: Be careful when using Capabilities.os to determine system characteristics. If a more specific property exists to
determine a system characteristic, use it. Otherwise, you run the risk of writing code that does not work correctly on all
platforms. For example, consider the following code:
var separator:String;
if (Capablities.os.indexOf("Mac") > -1)
{
separator = "/";
}
else
{
separator = "\\";
}
This code leads to problems on Linux. It is better to simply use the File.separator property.
Working with directories
Adobe AIR 1.0 and later
The runtime provides you with capabilities to work with directories on the local file system.
For details on creating File objects that point to directories, see “Pointing a File object to a directory” on page 639.
Creating directories
Adobe AIR 1.0 and later
The File.createDirectory() method lets you create a directory. For example, the following code creates a directory
named AIR Test as a subdirectory of the user's home directory:
var dir:File = File.userDirectory.resolvePath("AIR Test");
dir.createDirectory();
If the directory exists, the createDirectory() method does nothing.
Also, in some modes, a FileStream object creates directories when opening files. Missing directories are created when
you instantiate a FileStream instance with the fileMode parameter of the FileStream() constructor set to
FileMode.APPEND or FileMode.WRITE. For more information, see “Workflow for reading and writing files” on
page 656.
Creating a temporary directory
Adobe AIR 1.0 and later
The File class includes a createTempDirectory() method, which creates a directory in the temporary directory
folder for the System, as in the following example:
Property Description
Capabilities.hasIME Specifies whether the player is running on a system that does (true) or does not (false) have an
input method editor (IME) installed.
Capabilities.language Specifies the language code of the system on which the player is running.
Capabilities.os Specifies the current operating system.

650
ACTIONSCRIPT 3.0 DEVELOPER’S GUIDE
Working with the file system
Last updated 3/21/2011
var temp:File = File.createTempDirectory();
The createTempDirectory() method automatically creates a unique temporary directory (saving you the work of
determining a new unique location).
You can use a temporary directory to temporarily store temporary files used for a session of the application. Note that
there is a createTempFile() method for creating new, unique temporary files in the System temporary directory.
You may want to delete the temporary directory before closing the application, as it is not automatically deleted on all
devices.
Enumerating directories
Adobe AIR 1.0 and later
You can use the getDirectoryListing() method or the getDirectoryListingAsync() method of a File object to
get an array of File objects pointing to files and subfolders in a directory.
For example, the following code lists the contents of the user's documents directory (without examining
subdirectories):
var directory:File = File.documentsDirectory;
var contents:Array = directory.getDirectoryListing();
for (var i:uint = 0; i < contents.length; i++)
{
trace(contents[i].name, contents[i].size);
}
When using the asynchronous version of the method, the directoryListing event object has a files property that
is the array of File objects pertaining to the directories:
var directory:File = File.documentsDirectory;
directory.getDirectoryListingAsync();
directory.addEventListener(FileListEvent.DIRECTORY_LISTING, dirListHandler);
function dirListHandler(event:FileListEvent):void
{
var contents:Array = event.files;
for (var i:uint = 0; i < contents.length; i++)
{
trace(contents[i].name, contents[i].size);
}
}
Copying and moving directories
Adobe AIR 1.0 and later
You can copy or move a directory, using the same methods as you would to copy or move a file. For example, the
following code copies a directory synchronously:
var sourceDir:File = File.documentsDirectory.resolvePath("AIR Test");
var resultDir:File = File.documentsDirectory.resolvePath("AIR Test Copy");
sourceDir.copyTo(resultDir);

651
ACTIONSCRIPT 3.0 DEVELOPER’S GUIDE
Working with the file system
Last updated 3/21/2011
When you specify true for the overwrite parameter of the copyTo() method, all files and folders in an existing target
directory are deleted and replaced with the files and folders in the source directory (even if the target file does not exist
in the source directory).
The directory that you specify as the newLocation parameter of the copyTo() method specifies the path to the
resulting directory; it does not specify the parent directory that will contain the resulting directory.
For details, see “Copying and moving files” on page 652.
Deleting directory contents
Adobe AIR 1.0 and later
The File class includes a deleteDirectory() method and a deleteDirectoryAsync() method. These methods
delete directories, the first working synchronously, the second working asynchronously (see “AIR file basics” on
page 634). Both methods include a deleteDirectoryContents parameter (which takes a Boolean value); when this
parameter is set to true (the default value is false) the call to the method deletes non-empty directories; otherwise,
only empty directories are deleted.
For example, the following code synchronously deletes the AIR Test subdirectory of the user's documents directory:
var directory:File = File.documentsDirectory.resolvePath("AIR Test");
directory.deleteDirectory(true);
The following code asynchronously deletes the AIR Test subdirectory of the user's documents directory:
var directory:File = File.documentsDirectory.resolvePath("AIR Test");
directory.addEventListener(Event.COMPLETE, completeHandler)
directory.deleteDirectoryAsync(true);
function completeHandler(event:Event):void {
trace("Deleted.")
}
Also included are the moveToTrash() and moveToTrashAsync() methods, which you can use to move a directory to
the System trash. For details, see “Moving a file to the trash” on page 653.
Working with files
Adobe AIR 1.0 and later
Using the AIR file API, you can add basic file interaction capabilities to your applications. For example, you can read
and write files, copy and delete files, and so on. Since your applications can access the local file system, refer to “AIR
security” on page 1041, if you haven't already done so.
Note: You can associate a file type with an AIR application (so that double-clicking it opens the application). For details,
see “Managing file associations” on page 860.
Getting file information
Adobe AIR 1.0 and later
The File class includes the following properties that provide information about a file or directory to which a File object
points:

652
ACTIONSCRIPT 3.0 DEVELOPER’S GUIDE
Working with the file system
Last updated 3/21/2011
For details on these properties, see the File class entry in the ActionScript 3.0 Reference for the Adobe Flash Platform.
Copying and moving files
Adobe AIR 1.0 and later
The File class includes two methods for copying files or directories: copyTo() and copyToAsync(). The File class
includes two methods for moving files or directories: moveTo() and moveToAsync(). The copyTo() and moveTo()
methods work synchronously, and the copyToAsync() and moveToAsync() methods work asynchronously (see “AIR
file basics” on page 634).
To copy or move a file, you set up two File objects. One points to the file to copy or move, and it is the object that calls
the copy or move method; the other points to the destination (result) path.
The following copies a test.txt file from the AIR Test subdirectory of the user's documents directory to a file named
copy.txt in the same directory:
var original:File = File.documentsDirectory.resolvePath("AIR Test/test.txt");
var newFile:File = File.resolvePath("AIR Test/copy.txt");
original.copyTo(newFile, true);
In this example, the value of overwrite parameter of the copyTo() method (the second parameter) is set to true. By
setting overwrite to true, an existing target file is overwritten. This parameter is optional. If you set it to false (the
default value), the operation dispatches an IOErrorEvent event if the target file exists (and the file is not copied).
File property Description
creationDate The creation date of the file on the local disk.
creator Obsolete—use the extension property. (This property reports the Macintosh creator type of the file,
which is only used in Mac OS versions prior to Mac OS X.)
downloaded (AIR 2 and later) Indicates whether the referenced file or directory was downloaded (from the internet)
or not. property is only meaningful on operating systems in which files can be flagged as downloaded:
•Windows XP service pack 2 and later, and on Windows Vista
•Mac OS 10.5 and later
exists Whether the referenced file or directory exists.
extension The file extension, which is the part of the name following (and not including) the final dot ("."). If there
is no dot in the filename, the extension is null.
icon An Icon object containing the icons defined for the file.
isDirectory Whether the File object reference is to a directory.
modificationDate The date that the file or directory on the local disk was last modified.
name The name of the file or directory (including the file extension, if there is one) on the local disk.
nativePath The full path in the host operating system representation. See “Paths of File objects” on page 635.
parent The folder that contains the folder or file represented by the File object. This property is null if the File
object references a file or directory in the root of the file system.
size The size of the file on the local disk in bytes.
type Obsolete—use the extension property. (On the Macintosh, this property is the four-character file type,
which is only used in Mac OS versions prior to Mac OS X.)
url The URL for the file or directory. See “Paths of File objects” on page 635.

653
ACTIONSCRIPT 3.0 DEVELOPER’S GUIDE
Working with the file system
Last updated 3/21/2011
The “Async” versions of the copy and move methods work asynchronously. Use the addEventListener() method to
monitor completion of the task or error conditions, as in the following code:
var original = File.documentsDirectory;
original = original.resolvePath("AIR Test/test.txt");
var destination:File = File.documentsDirectory;
destination = destination.resolvePath("AIR Test 2/copy.txt");
original.addEventListener(Event.COMPLETE, fileMoveCompleteHandler);
original.addEventListener(IOErrorEvent.IO_ERROR, fileMoveIOErrorEventHandler);
original.moveToAsync(destination);
function fileMoveCompleteHandler(event:Event):void {
trace(event.target); // [object File]
}
function fileMoveIOErrorEventHandler(event:IOErrorEvent):void {
trace("I/O Error.");
}
The File class also includes the File.moveToTrash() and File.moveToTrashAsync() methods, which move a file
or directory to the system trash.
Deleting a file
Adobe AIR 1.0 and later
The File class includes a deleteFile() method and a deleteFileAsync() method. These methods delete files, the
first working synchronously, the second working asynchronously (see “AIR file basics” on page 634).
For example, the following code synchronously deletes the test.txt file in the user's documents directory:
var file:File = File.documentsDirectory.resolvePath("test.txt");
file.deleteFile();
The following code asynchronously deletes the test.txt file of the user's documents directory:
var file:File = File.documentsDirectory.resolvePath("test.txt");
file.addEventListener(Event.COMPLETE, completeHandler)
file.deleteFileAsync();
function completeHandler(event:Event):void {
trace("Deleted.")
}
Also included are the moveToTrash() and moveToTrashAsync methods, which you can use to move a file or directory
to the System trash. For details, see “Moving a file to the trash” on page 653.
Moving a file to the trash
Adobe AIR 1.0 and later
The File class includes a moveToTrash() method and a moveToTrashAsync() method. These methods send a file or
directory to the System trash, the first working synchronously, the second working asynchronously (see “AIR file
basics” on page 634).

654
ACTIONSCRIPT 3.0 DEVELOPER’S GUIDE
Working with the file system
Last updated 3/21/2011
For example, the following code synchronously moves the test.txt file in the user's documents directory to the System
trash:
var file:File = File.documentsDirectory.resolvePath("test.txt");
file.moveToTrash();
Note: On operating systems that do not support the concept of a recoverable trash folder, the files are removed
immediately.
Creating a temporary file
Adobe AIR 1.0 and later
The File class includes a createTempFile() method, which creates a file in the temporary directory folder for the
System, as in the following example:
var temp:File = File.createTempFile();
The createTempFile() method automatically creates a unique temporary file (saving you the work of determining a
new unique location).
You can use a temporary file to temporarily store information used in a session of the application. Note that there is
also a createTempDirectory() method, for creating a unique temporary directory in the System temporary
directory.
You may want to delete the temporary file before closing the application, as it is not automatically deleted on all
devices.
Working with storage volumes
Adobe AIR 2 and later
In AIR 2, you can detect when mass storage volumes are mounted or unmounted. The StorageVolumeInfo class
defines a singleton storageVolumeInfo object. The StorageVolumeInfo.storageVolumeInfo object dispatches a
storageVolumeMount event when a storage volume is mounted. And it dispatches a storageVolumeUnmount event
when a volume is unmounted. The StorageVolumeChangeEvent class defines these events.
Note: On modern Linux distributions, the StorageVolumeInfo object only dispatches storageVolumeMount and
storageVolumeUnmount events for physical devices and network drives mounted at particular locations.
The storageVolume property of the StorageVolumeChangeEvent class is a StorageVolume object. The
StorageVolume class defines basic properties of the storage volume:
•drive—The volume drive letter on Windows (null on other operating systems)
•fileSystemType—The type of file system on the storage volume (such as "FAT", "NTFS", "HFS", or "UFS")
•isRemoveable—Whether a volume is removable (true) or not (false)
•isWritable—Whether a volume is writable (true) or not (false)
•name—The name of the volume
•rootDirectory—A File object corresponding to the root directory of the volume
The StorageVolumeChangeEvent class also includes a rootDirectory property. The rootDirectory property is a
File object referencing the root directory of the storage volume that has been mounted or unmounted.

655
ACTIONSCRIPT 3.0 DEVELOPER’S GUIDE
Working with the file system
Last updated 3/21/2011
The storageVolume property of the StorageVolumeChangeEvent object is undefined (null) for an unmounted
volume. However you can access the rootDirectory property of the event.
The following code outputs the name and file path of a storage volume when it is mounted:
StorageVolumeInfo.storageVolumeInfo.addEventListener(StorageVolumeChangeEvent.STORAGE_VOLUME
_MOUNT, onVolumeMount);
function onVolumeMount(event:StorageVolumeChangeEvent):void
{
trace(event.storageVolume.name, event.rootDirectory.nativePath);
}
The following code outputs the file path of a storage volume when it is unmounted:
StorageVolumeInfo.storageVolumeInfo.addEventListener(StorageVolumeChangeEvent.STORAGE_VOLUME
_UNMOUNT, onVolumeUnmount);
function onVolumeUnmount(event:StorageVolumeChangeEvent):void
{
trace(event.rootDirectory.nativePath);
}
The StorageVolumeInfo.storageVolumeInfo object includes a getStorageVolumes() method. This method
returns a vector of StorageVolume objects corresponding to the currently mounted storage volumes. The following
code shows how to list the names and root directories of all mounted storage volumes:
var volumes:Vector.<StorageVolume> = new Vector.<StorageVolume>;
volumes = StorageVolumeInfo.storageVolumeInfo.getStorageVolumes();
for (var i:int = 0; i < volumes.length; i++)
{
trace(volumes[i].name, volumes[i].rootDirectory.nativePath);
}
Note: On modern Linux distributions, the getStorageVolumes() method returns objects corresponding to physical
devices and network drives mounted at particular locations.
The File.getRootDirectories() method lists the root directories (see “Pointing to the file system root” on
page 641. However, the StorageVolume objects (enumerated by the StorageVolumeInfo.getStorageVolumes()
method) provides more information about the storage volumes.
You can use the spaceAvailable property of the rootDirectory property of a StorageVolume object to get the space
available on a storage volume. (See “Determining space available on a volume” on page 647.)
For information about storage volumes on AIR for TV devices, see “Directory view for AIR for TV applications” on
page 638.
More Help topics
StorageVolume
StorageVolumeInfo
Reading and writing files
Adobe AIR 1.0 and later
The FileStream class lets AIR applications read and write to the file system.

656
ACTIONSCRIPT 3.0 DEVELOPER’S GUIDE
Working with the file system
Last updated 3/21/2011
Workflow for reading and writing files
Adobe AIR 1.0 and later
The workflow for reading and writing files is as follows.
Initialize a File object that points to the path.
The File object represents the path of the file that you want to work with (or a file that you will later create).
var file:File = File.documentsDirectory;
file = file.resolvePath("AIR Test/testFile.txt");
This example uses the File.documentsDirectory property and the resolvePath() method of a File object to
initialize the File object. However, there are many other ways to point a File object to a file. For more information, see
“Pointing a File object to a file” on page 642.
Initialize a FileStream object.
Call the open() method or the openAsync() method of the FileStream object.
The method you call depends on whether you want to open the file for synchronous or asynchronous operations. Use
the File object as the file parameter of the open method. For the fileMode parameter, specify a constant from the
FileMode class that specifies the way in which you will use the file.
For example, the following code initializes a FileStream object that is used to create a file and overwrite any existing data:
var fileStream:FileStream = new FileStream();
fileStream.open(file, FileMode.WRITE);
For more information, see “Initializing a FileStream object, and opening and closing files” on page 657 and
“FileStream open modes” on page 657.
If you opened the file asynchronously (using the openAsync() method), add and set up event listeners for the
FileStream object.
These event listener methods respond to events dispatched by the FileStream object in various situations. These
situations include when data is read in from the file, when I/O errors are encountered, or when the complete amount
of data to be written has been written.
For details, see “Asynchronous programming and the events generated by a FileStream object opened asynchronously”
on page 661.
Include code for reading and writing data, as needed.
There are many methods of the FileStream class related to reading and writing. (They each begin with "read" or
"write".) The method you choose to use to read or write data depends on the format of the data in the target file.
For example, if the data in the target file is UTF-encoded text, you may use the readUTFBytes() and
writeUTFBytes() methods. If you want to deal with the data as byte arrays, you may use the readByte(),
readBytes(), writeByte(), and writeBytes() methods. For details, see “Data formats, and choosing the read and
write methods to use” on page 662.
If you opened the file asynchronously, then be sure that enough data is available before calling a read method. For
details, see “The read buffer and the bytesAvailable property of a FileStream object” on page 660.
Before writing to a file, if you want to check the amount of disk space available, you can check the spaceAvailable
property of the File object. For more information, see “Determining space available on a volume” on page 647.

657
ACTIONSCRIPT 3.0 DEVELOPER’S GUIDE
Working with the file system
Last updated 3/21/2011
Call the close() method of the FileStream object when you are done working with the file.
Calling the close() method makes the file available to other applications.
For details, see “Initializing a FileStream object, and opening and closing files” on page 657.
To see a sample application that uses the FileStream class to read and write files, see the following articles at the Adobe
AIR Developer Center:
•Building a text-file editor
•Building a text-file editor
•Reading and writing from an XML preferences file
Working with FileStream objects
Adobe AIR 1.0 and later
The FileStream class defines methods for opening, reading, and writing files.
FileStream open modes
Adobe AIR 1.0 and later
The open() and openAsync() methods of a FileStream object each include a fileMode parameter, which defines
some properties for a file stream, including the following:
•The ability to read from the file
•The ability to write to the file
•Whether data will always be appended past the end of the file (when writing)
•What to do when the file does not exist (and when its parent directories do not exist)
The following are the various file modes (which you can specify as the fileMode parameter of the open() and
openAsync() methods):
Initializing a FileStream object, and opening and closing files
Adobe AIR 1.0 and later
When you open a FileStream object, you make it available to read and write data to a file. You open a FileStream object
by passing a File object to the open() or openAsync() method of the FileStream object:
File mode Description
FileMode.READ Specifies that the file is open for reading only.
FileMode.WRITE Specifies that the file is open for writing. If the file does not exist, it is created when the FileStream object
is opened. If the file does exist, any existing data is deleted.
FileMode.APPEND Specifies that the file is open for appending. The file is created if it does not exist. If the file exists, existing
data is not overwritten, and all writing begins at the end of the file.
FileMode.UPDATE Specifies that the file is open for reading and writing. If the file does not exist, it is created. Specify this
mode for random read/write access to the file. You can read from any position in the file. When writing
to the file, only the bytes written overwrite existing bytes (all other bytes remain unchanged).

658
ACTIONSCRIPT 3.0 DEVELOPER’S GUIDE
Working with the file system
Last updated 3/21/2011
var myFile:File = File.documentsDirectory.resolvePath("AIR Test/test.txt");
var myFileStream:FileStream = new FileStream();
myFileStream.open(myFile, FileMode.READ);
The fileMode parameter (the second parameter of the open() and openAsync() methods), specifies the mode in
which to open the file: for read, write, append, or update. For details, see the previous section, “FileStream open
modes” on page 657.
If you use the openAsync() method to open the file for asynchronous file operations, set up event listeners to handle
the asynchronous events:
var myFile:File = File.documentsDirectory.resolvePath("AIR Test/test.txt");
var myFileStream:FileStream = new FileStream();
myFileStream.addEventListener(Event.COMPLETE, completeHandler);
myFileStream.addEventListener(ProgressEvent.PROGRESS, progressHandler);
myFileStream.addEventListener(IOErrorEvent.IOError, errorHandler);
myFileStream.open(myFile, FileMode.READ);
function completeHandler(event:Event):void {
// ...
}
function progressHandler(event:ProgressEvent):void {
// ...
}
function errorHandler(event:IOErrorEvent):void {
// ...
}
The file is opened for synchronous or asynchronous operations, depending upon whether you use the open() or
openAsync() method. For details, see “AIR file basics” on page 634.
If you set the fileMode parameter to FileMode.READ or FileMode.UPDATE in the open method of the FileStream
object, data is read into the read buffer as soon as you open the FileStream object. For details, see “The read buffer and
the bytesAvailable property of a FileStream object” on page 660.
You can call the close() method of a FileStream object to close the associated file, making it available for use by other
applications.
The position property of a FileStream object
Adobe AIR 1.0 and later
The position property of a FileStream object determines where data is read or written on the next read or write
method.
Before a read or write operation, set the position property to any valid position in the file.
For example, the following code writes the string "hello" (in UTF encoding) at position 8 in the file:
var myFile:File = File.documentsDirectory.resolvePath("AIR Test/test.txt");
var myFileStream:FileStream = new FileStream();
myFileStream.open(myFile, FileMode.UPDATE);
myFileStream.position = 8;
myFileStream.writeUTFBytes("hello");

659
ACTIONSCRIPT 3.0 DEVELOPER’S GUIDE
Working with the file system
Last updated 3/21/2011
When you first open a FileStream object, the position property is set to 0.
Before a read operation, the value of position must be at least 0 and less than the number of bytes in the file (which
are existing positions in the file).
The value of the position property is modified only in the following conditions:
•When you explicitly set the position property.
•When you call a read method.
•When you call a write method.
When you call a read or write method of a FileStream object, the position property is immediately incremented by
the number of bytes that you read or write. Depending on the read method you use, the position property is either
incremented by the number of bytes you specify to read or by the number of bytes available. When you call a read or
write method subsequently, it reads or writes starting at the new position.
var myFile:File = File.documentsDirectory.resolvePath("AIR Test/test.txt");
var myFileStream:FileStream = new FileStream();
myFileStream.open(myFile, FileMode.UPDATE);
myFileStream.position = 4000;
trace(myFileStream.position); // 4000
myFileStream.writeBytes(myByteArray, 0, 200);
trace(myFileStream.position); // 4200
There is, however, one exception: for a FileStream opened in append mode, the position property is not changed after
a call to a write method. (In append mode, data is always written to the end of the file, independent of the value of the
position property.)
For a file opened for asynchronous operations, the write operation does not complete before the next line of code is
executed. However, you can call multiple asynchronous methods sequentially, and the runtime executes them in order:
var myFile:File = File.documentsDirectory.resolvePath("AIR Test/test.txt");
var myFileStream:FileStream = new FileStream();
myFileStream.openAsync(myFile, FileMode.WRITE);
myFileStream.writeUTFBytes("hello");
myFileStream.writeUTFBytes("world");
myFileStream.addEventListener(Event.CLOSE, closeHandler);
myFileStream.close();
trace("started.");
closeHandler(event:Event):void
{
trace("finished.");
}
The trace output for this code is the following:
started.
finished.
You can specify the position value immediately after you call a read or write method (or at any time), and the next
read or write operation will take place starting at that position. For example, note that the following code sets the
position property right after a call to the writeBytes() operation, and the position is set to that value (300) even
after the write operation completes:

660
ACTIONSCRIPT 3.0 DEVELOPER’S GUIDE
Working with the file system
Last updated 3/21/2011
var myFile:File = File.documentsDirectory.resolvePath("AIR Test/test.txt");
var myFileStream:FileStream = new FileStream();
myFileStream.openAsync(myFile, FileMode.UPDATE);
myFileStream.position = 4000;
trace(myFileStream.position); // 4000
myFileStream.writeBytes(myByteArray, 0, 200);
myFileStream.position = 300;
trace(myFileStream.position); // 300
The read buffer and the bytesAvailable property of a FileStream object
Adobe AIR 1.0 and later
When a FileStream object with read capabilities (one in which the fileMode parameter of the open() or openAsync()
method was set to READ or UPDATE) is opened, the runtime stores the data in an internal buffer. The FileStream object
begins reading data into the buffer as soon as you open the file (by calling the open() or openAsync() method of the
FileStream object).
For a file opened for synchronous operations (using the open() method), you can always set the position pointer to
any valid position (within the bounds of the file) and begin reading any amount of data (within the bounds of the file),
as shown in the following code (which assumes that the file contains at least 100 bytes):
var myFile:File = File.documentsDirectory.resolvePath("AIR Test/test.txt");
var myFileStream:FileStream = new FileStream();
myFileStream.open(myFile, FileMode.READ);
myFileStream.position = 10;
myFileStream.readBytes(myByteArray, 0, 20);
myFileStream.position = 89;
myFileStream.readBytes(myByteArray, 0, 10);
Whether a file is opened for synchronous or asynchronous operations, the read methods always read from the
"available" bytes, represented by the bytesAvalable property. When reading synchronously, all of the bytes of the file
are available all of the time. When reading asynchronously, the bytes become available starting at the position specified
by the position property, in a series of asynchronous buffer fills signaled by progress events.
For files opened for synchronous operations, the bytesAvailable property is always set to represent the number of
bytes from the position property to the end of the file (all bytes in the file are always available for reading).
For files opened for asynchronous operations, you need to ensure that the read buffer has consumed enough data
before calling a read method. For a file opened asynchronously, as the read operation progresses, the data from the file,
starting at the position specified when the read operation started, is added to the buffer, and the bytesAvailable
property increments with each byte read. The bytesAvailable property indicates the number of bytes available
starting with the byte at the position specified by the position property to the end of the buffer. Periodically, the
FileStream object sends a progress event.
For a file opened asynchronously, as data becomes available in the read buffer, the FileStream object periodically
dispatches the progress event. For example, the following code reads data into a ByteArray object, bytes, as it is read
into the buffer:

661
ACTIONSCRIPT 3.0 DEVELOPER’S GUIDE
Working with the file system
Last updated 3/21/2011
var bytes:ByteArray = new ByteArray();
var myFile:File = File.documentsDirectory.resolvePath("AIR Test/test.txt");
var myFileStream:FileStream = new FileStream();
myFileStream.addEventListener(ProgressEvent.PROGRESS, progressHandler);
myFileStream.openAsync(myFile, FileMode.READ);
function progressHandler(event:ProgressEvent):void
{
myFileStream.readBytes(bytes, myFileStream.position, myFileStream.bytesAvailable);
}
For a file opened asynchronously, only the data in the read buffer can be read. Furthermore, as you read the data, it is
removed from the read buffer. For read operations, you need to ensure that the data exists in the read buffer before
calling the read operation. For example, the following code reads 8000 bytes of data starting from position 4000 in the
file:
var myFile:File = File.documentsDirectory.resolvePath("AIR Test/test.txt");
var myFileStream:FileStream = new FileStream();
myFileStream.addEventListener(ProgressEvent.PROGRESS, progressHandler);
myFileStream.addEventListener(Event.COMPLETE, completed);
myFileStream.openAsync(myFile, FileMode.READ);
myFileStream.position = 4000;
var str:String = "";
function progressHandler(event:Event):void
{
if (myFileStream.bytesAvailable > 8000 )
{
str += myFileStream.readMultiByte(8000, "iso-8859-1");
}
}
During a write operation, the FileStream object does not read data into the read buffer. When a write operation
completes (all data in the write buffer is written to the file), the FileStream object starts a new read buffer (assuming
that the associated FileStream object was opened with read capabilities), and starts reading data into the read buffer,
starting from the position specified by the position property. The position property may be the position of the last
byte written, or it may be a different position, if the user specifies a different value for the position object after the
write operation.
Asynchronous programming and the events generated by a FileStream object opened asynchronously
Adobe AIR 1.0 and later
When a file is opened asynchronously (using the openAsync() method), reading and writing files are done
asynchronously. As data is read into the read buffer and as output data is being written, other ActionScript code can
execute.
This means that you need to register for events generated by the FileStream object opened asynchronously.
By registering for the progress event, you can be notified as new data becomes available for reading, as in the
following code:

662
ACTIONSCRIPT 3.0 DEVELOPER’S GUIDE
Working with the file system
Last updated 3/21/2011
var myFile:File = File.documentsDirectory.resolvePath("AIR Test/test.txt");
var myFileStream:FileStream = new FileStream();
myFileStream.addEventListener(ProgressEvent.PROGRESS, progressHandler);
myFileStream.openAsync(myFile, FileMode.READ);
var str:String = "";
function progressHandler(event:ProgressEvent):void
{
str += myFileStream.readMultiByte(myFileStream.bytesAvailable, "iso-8859-1");
}
You can read the entire data by registering for the complete event, as in the following code:
var myFile:File = File.documentsDirectory.resolvePath("AIR Test/test.txt");
var myFileStream:FileStream = new FileStream();
myFileStream.addEventListener(Event.COMPLETE, completed);
myFileStream.openAsync(myFile, FileMode.READ);
var str:String = "";
function completeHandler(event:Event):void
{
str = myFileStream.readMultiByte(myFileStream.bytesAvailable, "iso-8859-1");
}
In much the same way that input data is buffered to enable asynchronous reading, data that you write on an
asynchronous stream is buffered and written to the file asynchronously. As data is written to a file, the FileStream
object periodically dispatches an OutputProgressEvent object. An OutputProgressEvent object includes a
bytesPending property that is set to the number of bytes remaining to be written. You can register for the
outputProgress event to be notified as this buffer is actually written to the file, perhaps in order to display a progress
dialog. However, in general, it is not necessary to do so. In particular, you may call the close() method without
concern for the unwritten bytes. The FileStream object will continue writing data and the close event will be delivered
after the final byte is written to the file and the underlying file is closed.
Data formats, and choosing the read and write methods to use
Adobe AIR 1.0 and later
Every file is a set of bytes on a disk. In ActionScript, the data from a file can always be represented as a ByteArray. For
example, the following code reads the data from a file into a ByteArray object named bytes:
var myFile:File = File.documentsDirectory.resolvePath("AIR Test/test.txt");
var myFileStream:FileStream = new FileStream();
myFileStream.addEventListener(Event.COMPLETE, completeHandler);
myFileStream.openAsync(myFile, FileMode.READ);
var bytes:ByteArray = new ByteArray();
function completeHandler(event:Event):void
{
myFileStream.readBytes(bytes, 0, myFileStream.bytesAvailable);
}
Similarly, the following code writes data from a ByteArray named bytes to a file:
var myFile:File = File.documentsDirectory.resolvePath("AIR Test/test.txt");
var myFileStream:FileStream = new FileStream();
myFileStream.open(myFile, FileMode.WRITE);
myFileStream.writeBytes(bytes, 0, bytes.length);

663
ACTIONSCRIPT 3.0 DEVELOPER’S GUIDE
Working with the file system
Last updated 3/21/2011
However, often you do not want to store the data in an ActionScript ByteArray object. And often the data file is in a
specified file format.
For example, the data in the file may be in a text file format, and you may want to represent such data in a String object.
For this reason, the FileStream class includes read and write methods for reading and writing data to and from types
other than ByteArray objects. For example, the readMultiByte() method lets you read data from a file and store it to
a string, as in the following code:
var myFile:File = File.documentsDirectory.resolvePath("AIR Test/test.txt");
var myFileStream:FileStream = new FileStream();
myFileStream.addEventListener(Event.COMPLETE, completed);
myFileStream.openAsync(myFile, FileMode.READ);
var str:String = "";
function completeHandler(event:Event):void
{
str = myFileStream.readMultiByte(myFileStream.bytesAvailable, "iso-8859-1");
}
The second parameter of the readMultiByte() method specifies the text format that ActionScript uses to interpret
the data ("iso-8859-1" in the example). Adobe AIR supports common character set encodings (see Supported character
sets).
The FileStream class also includes the readUTFBytes() method, which reads data from the read buffer into a string
using the UTF-8 character set. Since characters in the UTF-8 character set are of variable length, do not use
readUTFBytes() in a method that responds to the progress event, since the data at the end of the read buffer may
represent an incomplete character. (This is also true when using the readMultiByte() method with a variable-length
character encoding.) For this reason, read the entire set of data when the FileStream object dispatches the complete
event.
There are also similar write methods, writeMultiByte() and writeUTFBytes(), for working with String objects and
text files.
The readUTF() and the writeUTF() methods (not to be confused with readUTFBytes() and writeUTFBytes())
also read and write the text data to a file, but they assume that the text data is preceded by data specifying the length of
the text data, which is not a common practice in standard text files.
Some UTF-encoded text files begin with a "UTF-BOM" (byte order mark) character that defines the endianness as well
as the encoding format (such as UTF-16 or UTF-32).
For an example of reading and writing to a text file, see “Example: Reading an XML file into an XML object” on
page 665.
The readObject() and writeObject() are convenient ways to store and retrieve data for complex ActionScript
objects. The data is encoded in AMF (ActionScript Message Format). Adobe AIR, Flash Player, Flash Media Server,
and Flex Data Services include APIs for working with data in this format.
There are some other read and write methods (such as readDouble() and writeDouble()). However, if you use
these, make sure that the file format matches the formats of the data defined by these methods.
File formats are often more complex than simple text formats. For example, an MP3 file includes compressed data that
can only be interpreted with the decompression and decoding algorithms specific to MP3 files. MP3 files also may
include ID3 tags that contain meta tag information about the file (such as the title and artist for a song). There are
multiple versions of the ID3 format, but the simplest (ID3 version 1) is discussed in the “Example: Reading and writing
data with random access” on page 666 section.

664
ACTIONSCRIPT 3.0 DEVELOPER’S GUIDE
Working with the file system
Last updated 3/21/2011
Other files formats (for images, databases, application documents, and so on) have different structures, and to work
with their data in ActionScript, you must understand how the data is structured.
Using the load() and save() methods
Flash Player 10 and later, Adobe AIR 1.5 and later
Flash Player 10 added the load() and save() methods to the FileReference class. These methods are also in AIR 1.5,
and the File class inherits the methods from the FileReference class. These methods were designed to provide a secure
means for users to load and save file data in Flash Player. However, AIR applications can also use these methods as an
easy way to load and save files asynchronously.
For example, the following code saves a string to a text file:
var file:File = File.applicationStorageDirectory.resolvePath("test.txt");
var str:String = "Hello.";
file.addEventListener(Event.COMPLETE, fileSaved);
file.save(str);
function fileSaved(event:Event):void
{
trace("Done.");
}
The data parameter of the save() method can take a String, XML, or ByteArray value. When the argument is a String
or XML value, the method saves the file as a UTF-8–encoded text file.
When this code sample executes, the application displays a dialog box in which the user selects the saved file
destination.
The following code loads a string from a UTF-8–encoded text file:
var file:File = File.applicationStorageDirectory.resolvePath("test.txt");
file.addEventListener(Event.COMPLETE, loaded);
file.load();
var str:String;
function loaded(event:Event):void
{
var bytes:ByteArray = file.data;
str = bytes.readUTFBytes(bytes.length);
trace(str);
}
The FileStream class provides more functionality than that provided by the load() and save() methods:
•Using the FileStream class, you can read and write data both synchronously and asynchronously.
•Using the FileStream class lets you write incrementally to a file.
•Using the FileStream class lets you open a file for random access (both reading from and writing to any section of
the file).
•The FileStream class lets you specify the type of file access you have to the file, by setting the fileMode parameter
of the open() or openAsync() method.
•The FileStream class lets you save data to files without presenting the user with an Open or Save dialog box.
•You can directly use types other than byte arrays when reading data with the FileStream class.

665
ACTIONSCRIPT 3.0 DEVELOPER’S GUIDE
Working with the file system
Last updated 3/21/2011
Example: Reading an XML file into an XML object
Adobe AIR 1.0 and later
The following examples demonstrate how to read and write to a text file that contains XML data.
To read from the file, initialize the File and FileStream objects, call the readUTFBytes() method of the FileStream and
convert the string to an XML object:
var file:File = File.documentsDirectory.resolvePath("AIR Test/preferences.xml");
var fileStream:FileStream = new FileStream();
fileStream.open(file, FileMode.READ);
var prefsXML:XML = XML(fileStream.readUTFBytes(fileStream.bytesAvailable));
fileStream.close();
Similarly, writing the data to the file is as easy as setting up appropriate File and FileStream objects, and then calling a
write method of the FileStream object. Pass the string version of the XML data to the write method as in the following
code:
var prefsXML:XML = <prefs><autoSave>true</autoSave></prefs>;
var file:File = File.documentsDirectory.resolvePath("AIR Test/preferences.xml");
fileStream = new FileStream();
fileStream.open(file, FileMode.WRITE);
var outputString:String = '<?xml version="1.0" encoding="utf-8"?>\n';
outputString += prefsXML.toXMLString();
fileStream.writeUTFBytes(outputString);
fileStream.close();
These examples use the readUTFBytes() and writeUTFBytes() methods, because they assume that the files are in
UTF-8 format. If not, you may need to use a different method (see “Data formats, and choosing the read and write
methods to use” on page 662).
The previous examples use FileStream objects opened for synchronous operation. You can also open files for
asynchronous operations (which rely on event listener functions to respond to events). For example, the following
code shows how to read an XML file asynchronously:
var file:File = File.documentsDirectory.resolvePath("AIR Test/preferences.xml");
var fileStream:FileStream = new FileStream();
fileStream.addEventListener(Event.COMPLETE, processXMLData);
fileStream.openAsync(file, FileMode.READ);
var prefsXML:XML;
function processXMLData(event:Event):void
{
prefsXML = XML(fileStream.readUTFBytes(fileStream.bytesAvailable));
fileStream.close();
}
The processXMLData() method is invoked when the entire file is read into the read buffer (when the FileStream
object dispatches the complete event). It calls the readUTFBytes() method to get a string version of the read data,
and it creates an XML object, prefsXML, based on that string.
To see a sample application that shows these capabilities, see Reading and writing from an XML preferences file.

666
ACTIONSCRIPT 3.0 DEVELOPER’S GUIDE
Working with the file system
Last updated 3/21/2011
Example: Reading and writing data with random access
Adobe AIR 1.0 and later
MP3 files can include ID3 tags, which are sections at the beginning or end of the file that contain meta data identifying
the recording. The ID3 tag format itself has different revisions. This example describes how to read and write from an
MP3 file that contains the simplest ID3 format (ID3 version 1.0) using "random access to file data", which means that
it reads from and writes to arbitrary locations in the file.
An MP3 file that contains an ID3 version 1 tag includes the ID3 data at the end of the file, in the final 128 bytes.
When accessing a file for random read/write access, it is important to specify FileMode.UPDATE as the fileMode
parameter for the open() or openAsync() method:
var file:File = File.documentsDirectory.resolvePath("My Music/Sample ID3 v1.mp3");
var fileStr:FileStream = new FileStream();
fileStr.open(file, FileMode.UPDATE);
This lets you both read and write to the file.
Upon opening the file, you can set the position pointer to the position 128 bytes before the end of the file:
fileStr.position = file.size - 128;
This code sets the position property to this location in the file because the ID3 v1.0 format specifies that the ID3 tag
data is stored in the last 128 bytes of the file. The specification also says the following:
•The first 3 bytes of the tag contain the string "TAG".
•The next 30 characters contain the title for the MP3 track, as a string.
•The next 30 characters contain the name of the artist, as a string.
•The next 30 characters contain the name of the album, as a string.
•The next 4 characters contain the year, as a string.
•The next 30 characters contain the comment, as a string.
•The next byte contains a code indicating the track's genre.
•All text data is in ISO 8859-1 format.
The id3TagRead() method checks the data after it is read in (upon the complete event):
function id3TagRead():void
{
if (fileStr.readMultiByte(3, "iso-8859-1").match(/tag/i))
{
var id3Title:String = fileStr.readMultiByte(30, "iso-8859-1");
var id3Artist:String = fileStr.readMultiByte(30, "iso-8859-1");
var id3Album:String = fileStr.readMultiByte(30, "iso-8859-1");
var id3Year:String = fileStr.readMultiByte(4, "iso-8859-1");
var id3Comment:String = fileStr.readMultiByte(30, "iso-8859-1");
var id3GenreCode:String = fileStr.readByte().toString(10);
}
}

667
ACTIONSCRIPT 3.0 DEVELOPER’S GUIDE
Working with the file system
Last updated 3/21/2011
You can also perform a random-access write to the file. For example, you could parse the id3Title variable to ensure
that it is correctly capitalized (using methods of the String class), and then write a modified string, called newTitle,
to the file, as in the following:
fileStr.position = file.length - 125; // 128 - 3
fileStr.writeMultiByte(newTitle, "iso-8859-1");
To conform with the ID3 version 1 standard, the length of the newTitle string should be 30 characters, padded at the
end with the character code 0 (String.fromCharCode(0)).

668
Last updated 3/21/2011
Chapter 37: Storing local data
Flash Player 9 and later, Adobe AIR 1.0 and later
You use the SharedObject class to store small amounts of data on the client computer. In Adobe AIR, you can also use
the EncryptedLocalStore class to store small amounts of privacy-sensitive user data on the local computer in an AIR
application.
You can also read and write files on the file system and (in Adobe AIR) access local database files. For more
information, see “Working with the file system” on page 620 and “Working with local SQL databases in AIR” on
page 681.
There are a number of security factors that relate to shared objects. For more information, see “Shared objects” on
page 1039 in “Security” on page 1008.
Shared objects
Flash Player 9 and later, Adobe AIR 1.0 and later
A shared object, sometimes referred to as a “Flash cookie,” is a data file that can be created on your computer by the
sites that you visit. Shared objects are most often used to enhance your web-browsing experience—for example, by
allowing you to personalize the look and feel of a website that you frequently visit.
About shared objects
Flash Player 9 and later, Adobe AIR 1.0 and later
Shared objects function like browser cookies. You use the SharedObject class to store data on the user’s local hard disk
and call that data during the same session or in a later session. Applications can access only their own SharedObject
data, and only if they are running on the same domain. The data is not sent to the server and is not accessible by other
applications running on other domains, but can be made accessible by applications from the same domain.
Shared objects compared with cookies
Flash Player 9 and later, Adobe AIR 1.0 and later
Cookies and shared objects are very similar. Because most web programmers are familiar with how cookies work, it
might be useful to compare cookies and local SharedObjects.
Cookies that adhere to the RFC 2109 standard generally have the following properties:
•They can expire, and often do at the end of a session by default.
•They can be disabled by the client on a site-specific basis.
•There is a limit of 300 cookies total, and 20 cookies maximum per site.
•They are usually limited to a size of 4 KB each.
•They are sometimes perceived to be a security threat, and as a result, they are sometimes disabled on the client.
•They are stored in a location specified by the client browser.

669
ACTIONSCRIPT 3.0 DEVELOPER’S GUIDE
Storing local data
Last updated 3/21/2011
•They are transmitted from client to server through HTTP.
In contrast, shared objects have the following properties:
•They do not expire by default.
•By default, they are limited to a size of 100 KB each.
•They can store simple data types (such as String, Array, and Date).
•They are stored in a location specified by the application (within the user’s home directory).
•They are never transmitted between the client and server.
About the SharedObject class
Flash Player 9 and later, Adobe AIR 1.0 and later
Using the SharedObject class, you can create and delete shared objects, as well as detect the current size of a
SharedObject object that you are using. The SharedObject class consists of the following methods.
In addition to these methods, SharedObject objects have the following properties:
Creating a shared object
Flash Player 9 and later, Adobe AIR 1.0 and later
To create a SharedObject object, use the SharedObject.getLocal() method, which has the following syntax:
SharedObject.getLocal("objectName" [, pathname]): SharedObject
The following example creates a shared object called mySO:
public var mySO:SharedObject;
mySO = SharedObject.getLocal("preferences");
This creates a file on the client’s machine called preferences.sol.
The term local refers to the location of the shared object. In this case, Adobe® Flash® Player stores the SharedObject file
locally in the client’s home directory.
Method Description
clear() Purges all of the data from the SharedObject object, and deletes the SharedObject file from the
disk.
flush() Immediately writes the SharedObject file to a file on the client.
getLocal() Returns a reference to the client’s domain-specific, local SharedObject object. If none exists, this
method creates a new shared object on the client.
getSize() Gets the size of the SharedObject file, in bytes. The default size limit is 100 KB, although it can
be larger if the client allows it.
Property Description
data Read-only property that represents the collection of attributes the shared object stores.
onStatus The shared object’s event handler that is invoked for every warning, error, or informational
note.

670
ACTIONSCRIPT 3.0 DEVELOPER’S GUIDE
Storing local data
Last updated 3/21/2011
When you create a shared object, Flash Player creates a new directory for the application and domain inside its
sandbox. It also creates a *.sol file that stores the SharedObject data. The default location of this file is a subdirectory
of the user’s home directory. The following table shows the default locations of this directory:
Below the #SharedObjects directory is a randomly-named directory. Below that is a directory that matches the
hostname, then the path to the application, and finally the *.sol file.
For example, if you request an application named MyApp.swf on the local host, and within a subdirectory named /sos,
Flash Player stores the *.sol file in the following location on Windows XP:
c:/Documents and Settings/fred/Application Data/Macromedia/Flash
Player/#SharedObjects/KROKWXRK/#localhost/sos/MyApp.swf/data.sol
Note: If you do not provide a name in the SharedObject.getLocal() method, Flash Player names the file
undefined.sol.
By default, Flash can save locally persistent SharedObject objects of up to 100 KB per domain. This value is user-
configurable. When the application tries to save data to a shared object that would make it bigger than 100 KB, Flash
Player displays the Local Storage dialog box, which lets the user allow or deny more local storage for the domain that
is requesting access.
Specifying a path
Flash Player 9 and later, Adobe AIR 1.0 and later
You can use the optional pathname parameter to specify a location for the SharedObject file. This file must be a
subdirectory of that domain’s SharedObject directory. For example, if you request an application on the localhost and
specify the following:
mySO = SharedObject.getLocal("myObjectFile","/");
Flash Player writes the SharedObject file in the /#localhost directory (or /localhost if the application is offline). This is
useful if you want more than one application on the client to be able to access the same shared object. In this case, the
client could run two Flex applications, both of which specify a path to the shared object that is the root of the domain;
the client could then access the same shared object from both applications. To share data between more than
application without persistence, you can use the LocalConnection object.
If you specify a directory that does not exist, Flash Player does not create a SharedObject file.
Operating System Location
Windows
95/98/ME/2000/XP
c:/Documents and Settings/username/Application
Data/Macromedia/Flash Player/#SharedObjects
Windows Vista c:/Users/username/AppData/Roaming/Macromedia/Flash
Player/#SharedObjects
Macintosh OS X /Users/username/Library/Preferences/Macromedia/Flash
Player/#SharedObjects/web_domain/path_to_application/applicatio
n_name/object_name.sol
Linux/Unix /home/username/.macromedia/Flash_Player/#SharedObjects/web_doma
in/path_to_application/application_name/object_name.sol

671
ACTIONSCRIPT 3.0 DEVELOPER’S GUIDE
Storing local data
Last updated 3/21/2011
Adding data to a shared object
Flash Player 9 and later, Adobe AIR 1.0 and later
You add data to a SharedObject’s *.sol file using the data property of the SharedObject object. To add new data to the
shared object, use the following syntax:
sharedObject_name.data.variable = value;
The following example adds the userName, itemNumbers, and adminPrivileges properties and their values to a
SharedObject:
public var currentUserName:String = "Reiner";
public var itemsArray:Array = new Array(101,346,483);
public var currentUserIsAdmin:Boolean = true;
mySO.data.userName = currentUserName;
mySO.data.itemNumbers = itemsArray;
mySO.data.adminPrivileges = currentUserIsAdmin;
After you assign values to the data property, you must instruct Flash Player to write those values to the SharedObject’s
file. To force Flash Player to write the values to the SharedObject’s file, use the SharedObject.flush() method, as
follows:
mySO.flush();
If you do not call the SharedObject.flush() method, Flash Player writes the values to the file when the application
quits. However, this does not provide the user with an opportunity to increase the available space that Flash Player has
to store the data if that data exceeds the default settings. Therefore, it is a good practice to call
SharedObject.flush().
When using the flush() method to write shared objects to a user’s hard drive, you should be careful to check whether
the user has explicitly disabled local storage using the Flash Player Settings Manager
(www.macromedia.com/support/documentation/en/flashplayer/help/settings_manager07.html), as shown in the
following example:
var so:SharedObject = SharedObject.getLocal("test");
trace("Current SharedObject size is " + so.size + " bytes.");
so.flush();
Storing objects in shared objects
You can store simple objects such as Arrays or Strings in a SharedObject’s data property.
The following example is an ActionScript class that defines methods that control the interaction with the shared object.
These methods let the user add and remove objects from the shared object. This class stores an ArrayCollection that
contains simple objects.

672
ACTIONSCRIPT 3.0 DEVELOPER’S GUIDE
Storing local data
Last updated 3/21/2011
package {
import mx.collections.ArrayCollection;
import flash.net.SharedObject;
public class LSOHandler {
private var mySO:SharedObject;
private var ac:ArrayCollection;
private var lsoType:String;
// The parameter is "feeds" or "sites".
public function LSOHandler(s:String) {
init(s);
}
private function init(s:String):void {
ac = new ArrayCollection();
lsoType = s;
mySO = SharedObject.getLocal(lsoType);
if (getObjects()) {
ac = getObjects();
}
}
public function getObjects():ArrayCollection {
return mySO.data[lsoType];
}
public function addObject(o:Object):void {
ac.addItem(o);
updateSharedObjects();
}
private function updateSharedObjects():void {
mySO.data[lsoType] = ac;
mySO.flush();
}
}
}
The following Flex application creates an instance of the ActionScript class for each of the types of shared objects it
needs. It then calls methods on that class when the user adds or removes blogs or site URLs.

673
ACTIONSCRIPT 3.0 DEVELOPER’S GUIDE
Storing local data
Last updated 3/21/2011
<?xml version="1.0"?>
<!-- lsos/BlogAggregator.mxml -->
<mx:Application
xmlns:local="*"
xmlns:mx="http://www.adobe.com/2006/mxml"
creationComplete="initApp()"
backgroundColor="#ffffff"
>
<mx:Script>
<![CDATA[
import mx.collections.ArrayCollection;
import mx.utils.ObjectUtil;
import flash.net.SharedObject;
[Bindable]
public var welcomeMessage:String;
[Bindable]
public var localFeeds:ArrayCollection = new ArrayCollection();
[Bindable]
public var localSites:ArrayCollection = new ArrayCollection();
public var lsofeeds:LSOHandler;
public var lsosites:LSOHandler;
private function initApp():void {
lsofeeds = new LSOHandler("feeds");
lsosites = new LSOHandler("sites");
if (lsofeeds.getObjects()) {
localFeeds = lsofeeds.getObjects();
}
if (lsosites.getObjects()) {
localSites = lsosites.getObjects();
}
}
// Adds a new feed to the feeds DataGrid.
private function addFeed():void {
// Construct an object you want to store in the
// LSO. This object can contain any number of fields.
var o:Object = {name:ti1.text, url:ti2.text, date:new Date()};
lsofeeds.addObject(o);
// Because the DataGrid's dataProvider property is
// bound to the ArrayCollection, Flex updates the
// DataGrid when you call this method.
localFeeds = lsofeeds.getObjects();
// Clear the text fields.
ti1.text = '';
ti2.text = '';
}
// Removes feeds from the feeds DataGrid.
private function removeFeed():void {

674
ACTIONSCRIPT 3.0 DEVELOPER’S GUIDE
Storing local data
Last updated 3/21/2011
// Use a method of ArrayCollection to remove a feed.
// Because the DataGrid's dataProvider property is
// bound to the ArrayCollection, Flex updates the
// DataGrid when you call this method. You do not need
// to update it manually.
if (myFeedsGrid.selectedIndex > -1) {
localFeeds.removeItemAt(myFeedsGrid.selectedIndex);
}
}
private function addSite():void {
var o:Object = {name:ti3.text, date:new Date()};
lsosites.addObject(o);
localSites = lsosites.getObjects();
ti3.text = '';
}
private function removeSite():void {
if (mySitesGrid.selectedIndex > -1) {
localSites.removeItemAt(mySitesGrid.selectedIndex);
}
}
]]>
</mx:Script>
<mx:Label text="Blog aggregator" fontSize="28"/>
<mx:Panel title="Blogs">
<mx:Form id="blogForm">
<mx:HBox>
<mx:FormItem label="Name:">
<mx:TextInput id="ti1" width="100"/>
</mx:FormItem>
<mx:FormItem label="Location:">
<mx:TextInput id="ti2" width="300"/>
</mx:FormItem>
<mx:Button id="b1" label="Add Feed" click="addFeed()"/>
</mx:HBox>
<mx:FormItem label="Existing Feeds:">
<mx:DataGrid
id="myFeedsGrid"
dataProvider="{localFeeds}"
width="400"
/>
</mx:FormItem>
<mx:Button id="b2" label="Remove Feed" click="removeFeed()"/>
</mx:Form>
</mx:Panel>
<mx:Panel title="Sites">

675
ACTIONSCRIPT 3.0 DEVELOPER’S GUIDE
Storing local data
Last updated 3/21/2011
<mx:Form id="siteForm">
<mx:HBox>
<mx:FormItem label="Site:">
<mx:TextInput id="ti3" width="400"/>
</mx:FormItem>
<mx:Button id="b3" label="Add Site" click="addSite()"/>
</mx:HBox>
<mx:FormItem label="Existing Sites:">
<mx:DataGrid
id="mySitesGrid"
dataProvider="{localSites}"
width="400"
/>
</mx:FormItem>
<mx:Button id="b4" label="Remove Site" click="removeSite()"/>
</mx:Form>
</mx:Panel>
</mx:Application>
Storing typed objects in shared objects
You can store typed ActionScript instances in shared objects. You do this by calling the
flash.net.registerClassAlias() method to register the class. If you create an instance of your class and store it
in the data member of your shared object and later read the object out, you will get a typed instance. By default, the
SharedObject objectEncoding property supports AMF3 encoding, and unpacks your stored instance from the
SharedObject object; the stored instance retains the same type you specified when you called the
registerClassAlias() method.
Creating multiple shared objects
Flash Player 9 and later, Adobe AIR 1.0 and later
You can create multiple shared objects for the same Flex application. To do this, you assign each of them a different
instance name, as the following example shows:
public var mySO:SharedObject = SharedObject.getLocal("preferences");
public var mySO2:SharedObject = SharedObject.getLocal("history");
This creates a preferences.sol file and a history.sol file in the Flex application’s local directory.
Creating a secure SharedObject
Flash Player 9 and later, Adobe AIR 1.0 and later
When you create either a local or remote SharedObject using getLocal() or getRemote(), there is an optional
parameter named secure that determines whether access to this shared object is restricted to SWF files that are
delivered over an HTTPS connection. If this parameter is set to true and your SWF file is delivered over HTTPS, Flash
Player creates a new secure shared object or gets a reference to an existing secure shared object. This secure shared
object can be read from or written to only by SWF files delivered over HTTPS that call SharedObject.getLocal()
with the secure parameter set to true. If this parameter is set to false and your SWF file is delivered over HTTPS,
Flash Player creates a new shared object or gets a reference to an existing shared object.

676
ACTIONSCRIPT 3.0 DEVELOPER’S GUIDE
Storing local data
Last updated 3/21/2011
This shared object can be read from or written to by SWF files delivered over non-HTTPS connections. If your SWF
file is delivered over a non-HTTPS connection and you try to set this parameter to true, the creation of a new shared
object (or the access of a previously created secure shared object) fails, an error is thrown, and the shared object is set
to null. If you attempt to run the following snippet from a non-HTTPS connection, the SharedObject.getLocal()
method will throw an error:
try
{
var so:SharedObject = SharedObject.getLocal("contactManager", null, true);
}
catch (error:Error)
{
trace("Unable to create SharedObject.");
}
Regardless of the value of this parameter, the created shared objects count toward the total amount of disk space
allowed for a domain.
Displaying contents of a shared object
Flash Player 9 and later, Adobe AIR 1.0 and later
Values are stored in shared objects within the data property. You can loop over each value within a shared object
instance by using a for..in loop, as the following example shows:
var so:SharedObject = SharedObject.getLocal("test");
so.data.hello = "world";
so.data.foo = "bar";
so.data.timezone = new Date().timezoneOffset;
for (var i:String in so.data)
{
trace(i + ":\t" + so.data[i]);
}
Destroying shared objects
Flash Player 9 and later, Adobe AIR 1.0 and later
To destroy a SharedObject on the client, use the SharedObject.clear() method. This does not destroy directories
in the default path for the application’s shared objects.
The following example deletes the SharedObject file from the client:
public function destroySharedObject():void {
mySO.clear();
}
SharedObject example
Flash Player 9 and later, Adobe AIR 1.0 and later
The following example shows that you can store simple objects, such as a Date object, in a SharedObject object without
having to manually serialize and deserialize those objects.

677
ACTIONSCRIPT 3.0 DEVELOPER’S GUIDE
Storing local data
Last updated 3/21/2011
The following example begins by welcoming you as a first-time visitor. When you click Log Out, the application stores
the current date in a shared object. The next time you launch this application or refresh the page, the application
welcomes you back with a reminder of the time you logged out.
To see the application in action, launch the application, click Log Out, and then refresh the page. The application
displays the date and time that you clicked the Log Out button on your previous visit. At any time, you can delete the
stored information by clicking the Delete LSO button.
<?xml version="1.0"?>
<!-- lsos/WelcomeMessage.mxml -->
<mx:Application xmlns:mx="http://www.adobe.com/2006/mxml" initialize="initApp()">
<mx:Script><![CDATA[
public var mySO:SharedObject;
[Bindable]
public var welcomeMessage:String;
public function initApp():void {
mySO = SharedObject.getLocal("mydata");
if (mySO.data.visitDate==null) {
welcomeMessage = "Hello first-timer!"
} else {
welcomeMessage = "Welcome back. You last visited on " +
getVisitDate();
}
}
private function getVisitDate():Date {
return mySO.data.visitDate;
}
private function storeDate():void {
mySO.data.visitDate = new Date();
mySO.flush();
}
private function deleteLSO():void {
// Deletes the SharedObject from the client machine.
// Next time they log in, they will be a 'first-timer'.
mySO.clear();
}
]]></mx:Script>
<mx:Label id="label1" text="{welcomeMessage}"/>
<mx:Button label="Log Out" click="storeDate()"/>
<mx:Button label="Delete LSO" click="deleteLSO()"/>
</mx:Application>
Encrypted local storage
The Adobe® AIR® runtime provides a persistent encrypted local store (ELS) for each AIR application installed on a
user's computer. This lets you save and retrieve data that is stored on the user’s local hard drive in an encrypted format
that cannot easily be deciphered by other users. A separate encrypted local store is used for each AIR application, and
each AIR application uses a separate encrypted local store for each user.

678
ACTIONSCRIPT 3.0 DEVELOPER’S GUIDE
Storing local data
Last updated 3/21/2011
Note: In addition to the encrypted local store, AIR also provides encryption for content stored in SQL databases. For
details, see “Using encryption with SQL databases” on page 725.
You may want to use the encrypted local store to cache information that must be secured, such as login credentials for
web services. The ELS is appropriate for storing information that must be kept private from other users. It does not,
however, protect the data from other processes run under the same user account. It is thus not appropriate for
protecting secret application data, such as DRM or encryption keys.
AIR uses DPAPI on Windows, KeyChain on Mac OS, and KeyRing or KWallet on Linux to associate the encrypted
local store to each application and user. The encrypted local store uses AES-CBC 128-bit encryption.
Information in the encrypted local store is only available to AIR application content in the application security
sandbox.
If you update an AIR application, the updated version retains access to any existing data in the encrypted local store
unless:
•The items were added with the stronglyBound parameter set to true
•The existing and update versions are both published prior to AIR 1.5.3 and the update is signed with a migration
signature.
Limitations of the encrypted local store
The data in the encrypted local store is protected by the user’s operating system account credentials. Other entities
cannot access the data in the store unless they can login as that user. However, the data is not secure against access by
other applications run by an authenticated user.
Because the user must be authenticated for these attacks to work, the user’s private data is still protected (unless the
user account itself is compromised). However, data that your application may want to keep secret from users, such as
keys used for licensing or digital rights management, is not secure. Thus the ELS is not an appropriate location for
storing such information. It is only an appropriate place for storing a user’s private data, such as passwords.
Data in the ELS can be lost for a variety of reasons. For example, the user could uninstall the application and delete the
encrypted file. Or, the publisher ID could be changed as a result of an update. Thus the ELS should be treated as a
private cache, not a permanent data storage.
The stronglyBound parameter is deprecated and should not be set to true. Setting the parameter to true does not
provide any additional protection for data. At the same time, access to the data is lost whenever the application is
updated — even if the publisher ID stays the same.
The encrypted local store may perform more slowly if the stored data exceeds 10MB.
When you uninstall an AIR application, the uninstaller does not delete data stored in the encrypted local store.
The best practices for using the ELS include:
•Use the ELS to store sensitive user data such as passwords (setting stronglyBound to false)
•Do not use the ELS to store applications secrets such as DRM keys or licensing tokens.
•Provide a way for your application to recreate the data stored in the ELS if the ELS data is lost. For example, by
prompting the user to re-enter their account credentials when necessary.
•Do not use the stronglyBound parameter.
•If you do set stronglyBound to true, do not migrate stored items during an update. Recreate the data after the
update instead.
•Only store relatively small amounts of data. For larger amounts of data, use an AIR SQL database with encryption.

679
ACTIONSCRIPT 3.0 DEVELOPER’S GUIDE
Storing local data
Last updated 3/21/2011
More Help topics
flash.data.EncryptedLocalStore
Adding data to the encrypted local store
Use the setItem() static method of the EncryptedLocalStore class to store data in the local store. The data is stored
in a hash table, using strings as keys, with the data stored as byte arrays.
For example, the following code stores a string in the encrypted local store:
var str:String = "Bob";
var bytes:ByteArray = new ByteArray();
bytes.writeUTFBytes(str);
EncryptedLocalStore.setItem("firstName", bytes);
The third parameter of the setItem() method, the stronglyBound parameter, is optional. When this parameter is
set to true, the encrypted local store binds the stored item to the storing AIR application’s digital signature and bits:
var str:String = "Bob";
var bytes:ByteArray = new ByteArray();
bytes.writeUTFBytes(str);
EncryptedLocalStore.setItem("firstName", bytes, false);
For an item that is stored with stronglyBound set to true, subsequent calls to getItem() only succeed if the calling
AIR application is identical to the storing application (if no data in files in the application directory have changed). If
the calling AIR application is different from the storing application, the application throws an Error exception when
you call getItem() for a strongly bound item. If you update your application, it will not be able to read strongly bound
data previously written to the encrypted local store.
If the stronglyBound parameter is set to false (the default), only the publisher ID needs to stay the same for the
application to read the data. The bits of the application may change (and they need to be signed by the same publisher),
but they do not need to be the exact same bits as were in application that stored the data. Updated applications with
the same publisher ID as the original can continue to access the data.
Note: In practice, setting stronglyBound to true does not add any additional data protection. A “malicious” user could
still alter an application to gain access to items stored in the ELS. Furthermore, data is protected from external, non-user
threats just as strongly whether stronglyBound is set to true or false. For these reasons, setting stronglyBound to
true is discouraged.
Accessing data in the encrypted local store
Adobe AIR 1.0 and later
You can retrieve a value from the encrypted local store by using the EncryptedLocalStore.getItem() method, as
in the following example:
var storedValue:ByteArray = EncryptedLocalStore.getItem("firstName");
trace(storedValue.readUTFBytes(storedValue.length)); // "Bob"

680
ACTIONSCRIPT 3.0 DEVELOPER’S GUIDE
Storing local data
Last updated 3/21/2011
Removing data from the encrypted local store
Adobe AIR 1.0 and later
You can delete a value from the encrypted local store by using the EncryptedLocalStore.removeItem() method,
as in the following example:
EncryptedLocalStore.removeItem("firstName");
You can clear all data from the encrypted local store by calling the EncryptedLocalStore.reset() method, as in the
following example:
EncryptedLocalStore.reset();

681
Last updated 3/21/2011
Chapter 38: Working with local SQL
databases in AIR
Adobe AIR 1.0 and later
Adobe® AIR® includes the capability of creating and working with local SQL databases. The runtime includes a SQL
database engine with support for many standard SQL features, using the open source SQLite database system. A local
SQL database can be used for storing local, persistent data. For example, it can be used for application data, application
user settings, documents, or any other type of data that you want your application to save locally.
About local SQL databases
Adobe AIR 1.0 and later
For a quick explanation and code examples of using SQL databases, see the following quick start articles on the Adobe
Developer Connection:
•Working asynchronously with a local SQL database (Flex)
•Working synchronously with a local SQL database (Flex)
•Using an encrypted database (Flex)
•Working asynchronously with a local SQL database (Flash)
•Working synchronously with a local SQL database (Flash)
•Using an encrypted database (Flash)
Adobe AIR includes a SQL-based relational database engine that runs within the runtime, with data stored locally in
database files on the computer on which the AIR application runs (for example, on the computer’s hard drive). Because
the database runs and data files are stored locally, a database can be used by an AIR application regardless of whether
a network connection is available. Thus, the runtime’s local SQL database engine provides a convenient mechanism
for storing persistent, local application data, particularly if you have experience with SQL and relational databases.
Uses for local SQL databases
Adobe AIR 1.0 and later
The AIR local SQL database functionality can be used for any purpose for which you might want to store application
data on a user’s local computer. Adobe AIR includes several mechanisms for storing data locally, each of which has
different advantages. The following are some possible uses for a local SQL database in your AIR application:
•For a data-oriented application (for example an address book), a database can be used to store the main application data.
•For a document-oriented application, where users create documents to save and possibly share, each document
could be saved as a database file, in a user-designated location. (Note, however, that unless the database is encrypted
any AIR application would be able to open the database file. Encryption is recommended for potentially sensitive
documents.)

682
ACTIONSCRIPT 3.0 DEVELOPER’S GUIDE
Working with local SQL databases in AIR
Last updated 3/21/2011
•For a network-aware application, a database can be used to store a local cache of application data, or to store data
temporarily when a network connection isn’t available. You could create a mechanism for synchronizing the local
database with the network data store.
•For any application, a database can be used to store individual users’ application settings, such as user options or
application information like window size and position.
More Help topics
Christophe Coenraets: Employee Directory on AIR for Android
Raymond Camden: jQuery and AIR - Moving from web page to application
About AIR databases and database files
Adobe AIR 1.0 and later
An individual Adobe AIR local SQL database is stored as a single file in the computer’s file system. The runtime
includes the SQL database engine that manages creation and structuring of database files and manipulation and
retrieval of data from a database file. The runtime does not specify how or where database data is stored on the file
system; rather, each database is stored completely within a single file. You specify the location in the file system where
the database file is stored. A single AIR application can access one or many separate databases (that is, separate
database files). Because the runtime stores each database as a single file on the file system, you can locate your database
as needed by the design of your application and file access constraints of the operating system. Each user can have a
separate database file for their specific data, or a database file can be accessed by all application users on a single
computer for shared data. Because the data is local to a single computer, data is not automatically shared among users
on different computers. The local SQL database engine doesn’t provide any capability to execute SQL statements
against a remote or server-based database.
About relational databases
Adobe AIR 1.0 and later
A relational database is a mechanism for storing (and retrieving) data on a computer. Data is organized into tables:
rows represent records or items, and columns (sometimes called “fields”) divide each record into individual values.
For example, an address book application could contain a “friends” table. Each row in the table would represent a
single friend stored in the database. The table’s columns would represent data such as first name, last name, birth date,
and so forth. For each friend row in the table, the database stores a separate value for each column.
Relational databases are designed to store complex data, where one item is associated with or related to items of
another type. In a relational database, any data that has a one-to-many relationship—where a single record can be
related to multiple records of a different type—should be divided among different tables. For example, suppose you
want your address book application to store multiple phone numbers for each friend; this is a one-to-many
relationship. The “friends” table would contain all the personal information for each friend. A separate “phone
numbers” table would contain all the phone numbers for all the friends.
In addition to storing the data about friends and phone numbers, each table would need a piece of data to keep track
of the relationship between the two tables—to match individual friend records with their phone numbers. This data is
known as a primary key—a unique identifier that distinguishes each row in a table from other rows in that table. The
primary key can be a “natural key,” meaning it’s one of the items of data that naturally distinguishes each record in a
table. In the “friends” table, if you knew that none of your friends share a birth date, you could use the birth date
column as the primary key (a natural key) of the “friends” table. If there isn’t a natural key, you would create a separate
primary key column such as a “friend id” —an artificial value that the application uses to distinguish between rows.

683
ACTIONSCRIPT 3.0 DEVELOPER’S GUIDE
Working with local SQL databases in AIR
Last updated 3/21/2011
Using a primary key, you can set up relationships between multiple tables. For example, suppose the “friends” table
has a column “friend id” that contains a unique number for each row (each friend). The related “phone numbers” table
can be structured with two columns: one with the “friend id” of the friend to whom the phone number belongs, and
one with the actual phone number. That way, no matter how many phone numbers a single friend has, they can all be
stored in the “phone numbers” table and can be linked to the related friend using the “friend id” primary key. When a
primary key from one table is used in a related table to specify the connection between the records, the value in the
related table is known as a foreign key. Unlike many databases, the AIR local database engine does not allow you to
create foreign key constraints, which are constraints that automatically check that an inserted or updated foreign key
value has a corresponding row in the primary key table. Nevertheless, foreign key relationships are an important part
of the structure of a relational database, and foreign keys should be used when creating relationships between tables in
your database.
About SQL
Adobe AIR 1.0 and later
Structured Query Language (SQL) is used with relational databases to manipulate and retrieve data. SQL is a descriptive
language rather than a procedural language. Instead of giving the computer instructions on how it should retrieve data,
a SQL statement describes the set of data you want. The database engine determines how to retrieve that data.
The SQL language has been standardized by the American National Standards Institute (ANSI). The Adobe AIR local
SQL database supports most of the SQL-92 standard.
For specific descriptions of the SQL language supported in Adobe AIR, see “SQL support in local databases” on
page 1068.
About SQL database classes
Adobe AIR 1.0 and later
To work with local SQL databases in ActionScript 3.0, you use instances of these classes in the flash.data package:
To obtain schema information describing the structure of a database, you use these classes in the flash.data package:
Class Description
flash.data.SQLConnection Provides the means to create and open databases (database files), as well as methods for performing
database-level operations and for controlling database transactions.
flash.data.SQLStatement Represents a single SQL statement (a single query or command) that is executed on a database, including
defining the statement text and setting parameter values.
flash.data.SQLResult Provides a way to get information about or results from executing a statement, such as the result rows from
a SELECT statement, the number of rows affected by an UPDATE or DELETE statement, and so forth.
Class Description
flash.data.SQLSchemaResult Serves as a container for database schema results generated by calling the
SQLConnection.loadSchema() method.
flash.data.SQLTableSchema Provides information describing a single table in a database.

684
ACTIONSCRIPT 3.0 DEVELOPER’S GUIDE
Working with local SQL databases in AIR
Last updated 3/21/2011
Other classes in the flash.data package provide constants that are used with the SQLConnection class and the
SQLColumnSchema class:
In addition, the following classes in the flash.events package represent the events (and supporting constants) that you use:
Finally, the following classes in the flash.errors package provide information about database operation errors:
About synchronous and asynchronous execution modes
Adobe AIR 1.0 and later
When you’re writing code to work with a local SQL database, you specify that database operations execution in one of
two execution modes: asynchronous or synchronous execution mode. In general, the code examples show how to
perform each operation in both ways, so that you can use the example that’s most appropriate for your needs.
flash.data.SQLViewSchema Provides information describing a single view in a database.
flash.data.SQLIndexSchema Provides information describing a single column of a table or view in a database.
flash.data.SQLTriggerSchem
a
Provides information describing a single trigger in a database.
Class Description
flash.data.SQLMode Defines a set of constants representing the possible values for the openMode parameter of the
SQLConnection.open() and SQLConnection.openAsync() methods.
flash.data.SQLColumnNameStyle Defines a set of constants representing the possible values for the SQLConnection.columnNameStyle
property.
flash.data.SQLTransactionLockType Defines a set of constants representing the possible values for the option parameter of the
SQLConnection.begin() method.
flash.data.SQLCollationType Defines a set of constants representing the possible values for the
SQLColumnSchema.defaultCollationType property and the defaultCollationType parameter
of the SQLColumnSchema() constructor.
Class Description
flash.events.SQLEvent Defines the events that a SQLConnection or SQLStatement instance dispatches when any of its operations
execute successfully. Each operation has an associated event type constant defined in the SQLEvent class.
flash.events.SQLErrorEvent Defines the event that a SQLConnection or SQLStatement instance dispatches when any of its operations
results in an error.
flash.events.SQLUpdateEven
t
Defines the event that a SQLConnection instances dispatches when table data in one of its connected
databases changes as a result of an INSERT, UPDATE, or DELETE SQL statement being executed.
Class Description
flash.errors.SQLError Provides information about a database operation error, including the operation that was being attempted
and the cause of the failure.
flash.errors.SQLErrorOperati
on
Defines a set of constants representing the possible values for the SQLError class’s operation property,
which indicates the database operation that resulted in an error.
Class Description

685
ACTIONSCRIPT 3.0 DEVELOPER’S GUIDE
Working with local SQL databases in AIR
Last updated 3/21/2011
In asynchronous execution mode, you give the runtime an instruction and the runtime dispatches an event when your
requested operation completes or fails. First you tell the database engine to perform an operation. The database engine
does its work in the background while the application continues running. Finally, when the operation is completed (or
when it fails) the database engine dispatches an event. Your code, triggered by the event, carries out subsequent
operations. This approach has a significant benefit: the runtime performs the database operations in the background
while the main application code continues executing. If the database operation takes a notable amount of time, the
application continues to run. Most importantly, the user can continue to interact with it without the screen freezing.
Nevertheless, asynchronous operation code can be more complex to write than other code. This complexity is usually
in cases where multiple dependent operations must be divided up among various event listener methods.
Conceptually, it is simpler to code operations as a single sequence of steps—a set of synchronous operations—rather
than a set of operations split into several event listener methods. In addition to asynchronous database operations,
Adobe AIR also allows you to execute database operations synchronously. In synchronous execution mode, operations
don’t run in the background. Instead they run in the same execution sequence as all other application code. You tell
the database engine to perform an operation. The code then pauses at that point while the database engine does its
work. When the operation completes, execution continues with the next line of your code.
Whether operations execute asynchronously or synchronously is set at the SQLConnection level. Using a single
database connection, you can’t execute some operations or statements synchronously and others asynchronously. You
specify whether a SQLConnection operates in synchronous or asynchronous execution mode by calling a
SQLConnection method to open the database. If you call SQLConnection.open() the connection operates in
synchronous execution mode, and if you call SQLConnection.openAsync() the connection operates in
asynchronous execution mode. Once a SQLConnection instance is connected to a database using open() or
openAsync(), it is fixed to synchronous or asynchronous execution mode unless you close and reopen the connection
to the database.
Each execution mode has benefits. While most aspects of each mode are similar, there are some differences you’ll want
to keep in mind when working in each mode. For more information on these topics, and suggestions for working in
each mode, see “Using synchronous and asynchronous database operations” on page 720.
Creating and modifying a database
Adobe AIR 1.0 and later
Before your application can add or retrieve data, there must be a database with tables defined in it that your application
can access. Described here are the tasks of creating a database and creating the data structure within a database. While
these tasks are less frequently used than data insertion and retrieval, they are necessary for most applications.
More Help topics
Mind the Flex: Updating an existing AIR database

686
ACTIONSCRIPT 3.0 DEVELOPER’S GUIDE
Working with local SQL databases in AIR
Last updated 3/21/2011
Creating a database
Adobe AIR 1.0 and later
To create a database file, you first create a SQLConnection instance. You call its open() method to open it in
synchronous execution mode, or its openAsync() method to open it in asynchronous execution mode. The open()
and openAsync() methods are used to open a connection to a database. If you pass a File instance that refers to a non-
existent file location for the reference parameter (the first parameter), the open() or openAsync() method creates
a database file at that file location and open a connection to the newly created database.
Whether you call the open() method or the openAsync() method to create a database, the database file’s name can
be any valid filename, with any filename extension. If you call the open() or openAsync() method with null for the
reference parameter, a new in-memory database is created rather than a database file on disk.
The following code listing shows the process of creating a database file (a new database) using asynchronous execution
mode. In this case, the database file is saved in the “Pointing to the application storage directory” on page 639, with the
filename “DBSample.db”:
import flash.data.SQLConnection;
import flash.events.SQLErrorEvent;
import flash.events.SQLEvent;
import flash.filesystem.File;
var conn:SQLConnection = new SQLConnection();
conn.addEventListener(SQLEvent.OPEN, openHandler);
conn.addEventListener(SQLErrorEvent.ERROR, errorHandler);
// The database file is in the application storage directory
var folder:File = File.applicationStorageDirectory;
var dbFile:File = folder.resolvePath("DBSample.db");
conn.openAsync(dbFile);
function openHandler(event:SQLEvent):void
{
trace("the database was created successfully");
}
function errorHandler(event:SQLErrorEvent):void
{
trace("Error message:", event.error.message);
trace("Details:", event.error.details);
}

687
ACTIONSCRIPT 3.0 DEVELOPER’S GUIDE
Working with local SQL databases in AIR
Last updated 3/21/2011
<?xml version="1.0" encoding="utf-8"?>
<mx:WindowedApplication xmlns:mx="http://www.adobe.com/2006/mxml" creationComplete="init()">
<mx:Script>
<![CDATA[
import flash.data.SQLConnection;
import flash.events.SQLErrorEvent;
import flash.events.SQLEvent;
import flash.filesystem.File;
private function init():void
{
var conn:SQLConnection = new SQLConnection();
conn.addEventListener(SQLEvent.OPEN, openHandler);
conn.addEventListener(SQLErrorEvent.ERROR, errorHandler);
// The database file is in the application storage directory
var folder:File = File.applicationStorageDirectory;
var dbFile:File = folder.resolvePath("DBSample.db");
conn.openAsync(dbFile);
}
private function openHandler(event:SQLEvent):void
{
trace("the database was created successfully");
}
private function errorHandler(event:SQLErrorEvent):void
{
trace("Error message:", event.error.message);
trace("Details:", event.error.details);
}
]]>
</mx:Script>
</mx:WindowedApplication>
Note: Although the File class lets you point to a specific native file path, doing so can lead to applications that will not
work across platforms. For example, the path C:\Documents and Settings\joe\test.db only works on Windows. For these
reasons, it is best to use the static properties of the File class such as File.applicationStorageDirectory, as well as
the resolvePath() method (as shown in the previous example). For more information, see “Paths of File objects” on
page 635.
To execute operations synchronously, when you open a database connection with the SQLConnection instance, call
the open() method. The following example shows how to create and open a SQLConnection instance that executes its
operations synchronously:

688
ACTIONSCRIPT 3.0 DEVELOPER’S GUIDE
Working with local SQL databases in AIR
Last updated 3/21/2011
import flash.data.SQLConnection;
import flash.errors.SQLError;
import flash.filesystem.File;
var conn:SQLConnection = new SQLConnection();
// The database file is in the application storage directory
var folder:File = File.applicationStorageDirectory;
var dbFile:File = folder.resolvePath("DBSample.db");
try
{
conn.open(dbFile);
trace("the database was created successfully");
}
catch (error:SQLError)
{
trace("Error message:", error.message);
trace("Details:", error.details);
}
<?xml version="1.0" encoding="utf-8"?>
<mx:WindowedApplication xmlns:mx="http://www.adobe.com/2006/mxml" creationComplete="init()">
<mx:Script>
<![CDATA[
import flash.data.SQLConnection;
import flash.errors.SQLError;
import flash.filesystem.File;
private function init():void
{
var conn:SQLConnection = new SQLConnection();
// The database file is in the application storage directory
var folder:File = File.applicationStorageDirectory;
var dbFile:File = folder.resolvePath("DBSample.db");
try
{
conn.open(dbFile);
trace("the database was created successfully");
}
catch (error:SQLError)
{
trace("Error message:", error.message);
trace("Details:", error.details);
}
}
]]>
</mx:Script>
</mx:WindowedApplication>

689
ACTIONSCRIPT 3.0 DEVELOPER’S GUIDE
Working with local SQL databases in AIR
Last updated 3/21/2011
Creating database tables
Adobe AIR 1.0 and later
Creating a table in a database involves executing a SQL statement on that database, using the same process that you
use to execute a SQL statement such as SELECT, INSERT, and so forth. To create a table, you use a CREATE TABLE
statement, which includes definitions of columns and constraints for the new table. For more information about
executing SQL statements, see “Working with SQL statements” on page 696.
The following example demonstrates creating a table named “employees” in an existing database file, using
asynchronous execution mode. Note that this code assumes there is a SQLConnection instance named conn that is
already instantiated and is already connected to a database.
import flash.data.SQLConnection;
import flash.data.SQLStatement;
import flash.events.SQLErrorEvent;
import flash.events.SQLEvent;
// ... create and open the SQLConnection instance named conn ...
var createStmt:SQLStatement = new SQLStatement();
createStmt.sqlConnection = conn;
var sql:String =
"CREATE TABLE IF NOT EXISTS employees (" +
" empId INTEGER PRIMARY KEY AUTOINCREMENT, " +
" firstName TEXT, " +
" lastName TEXT, " +
" salary NUMERIC CHECK (salary > 0)" +
")";
createStmt.text = sql;
createStmt.addEventListener(SQLEvent.RESULT, createResult);
createStmt.addEventListener(SQLErrorEvent.ERROR, createError);
createStmt.execute();
function createResult(event:SQLEvent):void
{
trace("Table created");
}
function createError(event:SQLErrorEvent):void
{
trace("Error message:", event.error.message);
trace("Details:", event.error.details);
}

690
ACTIONSCRIPT 3.0 DEVELOPER’S GUIDE
Working with local SQL databases in AIR
Last updated 3/21/2011
<?xml version="1.0" encoding="utf-8"?>
<mx:WindowedApplication xmlns:mx="http://www.adobe.com/2006/mxml" creationComplete="init()">
<mx:Script>
<![CDATA[
import flash.data.SQLConnection;
import flash.data.SQLStatement;
import flash.events.SQLErrorEvent;
import flash.events.SQLEvent;
private function init():void
{
// ... create and open the SQLConnection instance named conn ...
var createStmt:SQLStatement = new SQLStatement();
createStmt.sqlConnection = conn;
var sql:String =
"CREATE TABLE IF NOT EXISTS employees (" +
" empId INTEGER PRIMARY KEY AUTOINCREMENT, " +
" firstName TEXT, " +
" lastName TEXT, " +
" salary NUMERIC CHECK (salary > 0)" +
")";
createStmt.text = sql;
createStmt.addEventListener(SQLEvent.RESULT, createResult);
createStmt.addEventListener(SQLErrorEvent.ERROR, createError);
createStmt.execute();
}
private function createResult(event:SQLEvent):void
{
trace("Table created");
}
private function createError(event:SQLErrorEvent):void
{
trace("Error message:", event.error.message);
trace("Details:", event.error.details);
}
]]>
</mx:Script>
</mx:WindowedApplication>
The following example demonstrates how to create a table named “employees” in an existing database file, using
synchronous execution mode. Note that this code assumes there is a SQLConnection instance named conn that is
already instantiated and is already connected to a database.

691
ACTIONSCRIPT 3.0 DEVELOPER’S GUIDE
Working with local SQL databases in AIR
Last updated 3/21/2011
import flash.data.SQLConnection;
import flash.data.SQLStatement;
import flash.errors.SQLError;
// ... create and open the SQLConnection instance named conn ...
var createStmt:SQLStatement = new SQLStatement();
createStmt.sqlConnection = conn;
var sql:String =
"CREATE TABLE IF NOT EXISTS employees (" +
" empId INTEGER PRIMARY KEY AUTOINCREMENT, " +
" firstName TEXT, " +
" lastName TEXT, " +
" salary NUMERIC CHECK (salary > 0)" +
")";
createStmt.text = sql;
try
{
createStmt.execute();
trace("Table created");
}
catch (error:SQLError)
{
trace("Error message:", error.message);
trace("Details:", error.details);
}

692
ACTIONSCRIPT 3.0 DEVELOPER’S GUIDE
Working with local SQL databases in AIR
Last updated 3/21/2011
<?xml version="1.0" encoding="utf-8"?>
<mx:WindowedApplication xmlns:mx="http://www.adobe.com/2006/mxml" creationComplete="init()">
<mx:Script>
<![CDATA[
import flash.data.SQLConnection;
import flash.data.SQLStatement;
import flash.errors.SQLError;
private function init():void
{
// ... create and open the SQLConnection instance named conn ...
var createStmt:SQLStatement = new SQLStatement();
createStmt.sqlConnection = conn;
var sql:String =
"CREATE TABLE IF NOT EXISTS employees (" +
" empId INTEGER PRIMARY KEY AUTOINCREMENT, " +
" firstName TEXT, " +
" lastName TEXT, " +
" salary NUMERIC CHECK (salary > 0)" +
")";
createStmt.text = sql;
try
{
createStmt.execute();
trace("Table created");
}
catch (error:SQLError)
{
trace("Error message:", error.message);
trace("Details:", error.details);
}
}
]]>
</mx:Script>
</mx:WindowedApplication>
Manipulating SQL database data
Adobe AIR 1.0 and later
There are some common tasks that you perform when you’re working with local SQL databases. These tasks include
connecting to a database, adding data to tables, and retrieving data from tables in a database. There are also several
issues you’ll want to keep in mind while performing these tasks, such as working with data types and handling errors.
Note that there are also several database tasks that are things you’ll deal with less frequently, but will often need to do
before you can perform these more common tasks. For example, before you can connect to a database and retrieve data
from a table, you’ll need to create the database and create the table structure in the database. Those less-frequent initial
setup tasks are discussed in “Creating and modifying a database” on page 685.

693
ACTIONSCRIPT 3.0 DEVELOPER’S GUIDE
Working with local SQL databases in AIR
Last updated 3/21/2011
You can choose to perform database operations asynchronously, meaning the database engine runs in the background
and notifies you when the operation succeeds or fails by dispatching an event. You can also perform these operations
synchronously. In that case the database operations are performed one after another and the entire application
(including updates to the screen) waits for the operations to complete before executing other code. For more
information on working in asynchronous or synchronous execution mode, see “Using synchronous and asynchronous
database operations” on page 720.
Connecting to a database
Adobe AIR 1.0 and later
Before you can perform any database operations, first open a connection to the database file. A SQLConnection
instance is used to represent a connection to one or more databases. The first database that is connected using a
SQLConnection instance is known as the “main” database. This database is connected using the open() method (for
synchronous execution mode) or the openAsync() method (for asynchronous execution mode).
If you open a database using the asynchronous openAsync() operation, register for the SQLConnection instance’s
open event in order to know when the openAsync() operation completes. Register for the SQLConnection instance’s
error event to determine if the operation fails.
The following example shows how to open an existing database file for asynchronous execution. The database file is
named “DBSample.db” and is located in the user’s “Pointing to the application storage directory” on page 639.
import flash.data.SQLConnection;
import flash.data.SQLMode;
import flash.events.SQLErrorEvent;
import flash.events.SQLEvent;
import flash.filesystem.File;
var conn:SQLConnection = new SQLConnection();
conn.addEventListener(SQLEvent.OPEN, openHandler);
conn.addEventListener(SQLErrorEvent.ERROR, errorHandler);
// The database file is in the application storage directory
var folder:File = File.applicationStorageDirectory;
var dbFile:File = folder.resolvePath("DBSample.db");
conn.openAsync(dbFile, SQLMode.UPDATE);
function openHandler(event:SQLEvent):void
{
trace("the database opened successfully");
}
function errorHandler(event:SQLErrorEvent):void
{
trace("Error message:", event.error.message);
trace("Details:", event.error.details);
}

694
ACTIONSCRIPT 3.0 DEVELOPER’S GUIDE
Working with local SQL databases in AIR
Last updated 3/21/2011
<?xml version="1.0" encoding="utf-8"?>
<mx:WindowedApplication xmlns:mx="http://www.adobe.com/2006/mxml" creationComplete="init()">
<mx:Script>
<![CDATA[
import flash.data.SQLConnection;
import flash.data.SQLMode;
import flash.events.SQLErrorEvent;
import flash.events.SQLEvent;
import flash.filesystem.File;
private function init():void
{
var conn:SQLConnection = new SQLConnection();
conn.addEventListener(SQLEvent.OPEN, openHandler);
conn.addEventListener(SQLErrorEvent.ERROR, errorHandler);
// The database file is in the application storage directory
var folder:File = File.applicationStorageDirectory;
var dbFile:File = folder.resolvePath("DBSample.db");
conn.openAsync(dbFile, SQLMode.UPDATE);
}
private function openHandler(event:SQLEvent):void
{
trace("the database opened successfully");
}
private function errorHandler(event:SQLErrorEvent):void
{
trace("Error message:", event.error.message);
trace("Details:", event.error.details);
}
]]>
</mx:Script>
</mx:WindowedApplication>
The following example shows how to open an existing database file for synchronous execution. The database file is
named “DBSample.db” and is located in the user’s “Pointing to the application storage directory” on page 639.

695
ACTIONSCRIPT 3.0 DEVELOPER’S GUIDE
Working with local SQL databases in AIR
Last updated 3/21/2011
import flash.data.SQLConnection;
import flash.data.SQLMode;
import flash.errors.SQLError;
import flash.filesystem.File;
var conn:SQLConnection = new SQLConnection();
// The database file is in the application storage directory
var folder:File = File.applicationStorageDirectory;
var dbFile:File = folder.resolvePath("DBSample.db");
try
{
conn.open(dbFile, SQLMode.UPDATE);
trace("the database opened successfully");
}
catch (error:SQLError)
{
trace("Error message:", error.message);
trace("Details:", error.details);
}
<?xml version="1.0" encoding="utf-8"?>
<mx:WindowedApplication xmlns:mx="http://www.adobe.com/2006/mxml" creationComplete="init()">
<mx:Script>
<![CDATA[
import flash.data.SQLConnection;
import flash.data.SQLMode;
import flash.errors.SQLError;
import flash.filesystem.File;
private function init():void
{
var conn:SQLConnection = new SQLConnection();
// The database file is in the application storage directory
var folder:File = File.applicationStorageDirectory;
var dbFile:File = folder.resolvePath("DBSample.db");
try
{
conn.open(dbFile, SQLMode.UPDATE);
trace("the database opened successfully");
}
catch (error:SQLError)
{
trace("Error message:", error.message);
trace("Details:", error.details);
}
}
]]>
</mx:Script>
</mx:WindowedApplication>

696
ACTIONSCRIPT 3.0 DEVELOPER’S GUIDE
Working with local SQL databases in AIR
Last updated 3/21/2011
Notice that in the openAsync() method call in the asynchronous example, and the open() method call in the
synchronous example, the second argument is the constant SQLMode.UPDATE. Specifying SQLMode.UPDATE for the
second parameter (openMode) causes the runtime to dispatch an error if the specified file doesn’t exist. If you pass
SQLMode.CREATE for the openMode parameter (or if you leave the openMode parameter off), the runtime attempts to
create a database file if the specified file doesn’t exist. However, if the file exists it is opened, which is the same as if you
use SQLMode.Update. You can also specify SQLMode.READ for the openMode parameter to open an existing database
in a read-only mode. In that case data can be retrieved from the database but no data can be added, deleted, or changed.
Working with SQL statements
Adobe AIR 1.0 and later
An individual SQL statement (a query or command) is represented in the runtime as a SQLStatement object. Follow
these steps to create and execute a SQL statement:
Create a SQLStatement instance.
The SQLStatement object represents the SQL statement in your application.
var selectData:SQLStatement = new SQLStatement();
Specify which database the query runs against.
To do this, set the SQLStatement object’s sqlConnection property to the SQLConnection instance that’s connected
with the desired database.
// A SQLConnection named "conn" has been created previously
selectData.sqlConnection = conn;
Specify the actual SQL statement.
Create the statement text as a String and assign it to the SQLStatement instance’s text property.
selectData.text = "SELECT col1, col2 FROM my_table WHERE col1 = :param1";
Define functions to handle the result of the execute operation (asynchronous execution mode only).
Use the addEventListener() method to register functions as listeners for the SQLStatement instance’s result and
error events.
// using listener methods and addEventListener()
selectData.addEventListener(SQLEvent.RESULT, resultHandler);
selectData.addEventListener(SQLErrorEvent.ERROR, errorHandler);
function resultHandler(event:SQLEvent):void
{
// do something after the statement execution succeeds
}
function errorHandler(event:SQLErrorEvent):void
{
// do something after the statement execution fails
}
Alternatively, you can specify listener methods using a Responder object. In that case you create the Responder
instance and link the listener methods to it.

697
ACTIONSCRIPT 3.0 DEVELOPER’S GUIDE
Working with local SQL databases in AIR
Last updated 3/21/2011
// using a Responder (flash.net.Responder)
var selectResponder = new Responder(onResult, onError);
function onResult(result:SQLResult):void
{
// do something after the statement execution succeeds
}
function onError(error:SQLError):void
{
// do something after the statement execution fails
}
If the statement text includes parameter definitions, assign values for those parameters.
To assign parameter values, use the SQLStatement instance’s parameters associative array property.
selectData.parameters[":param1"] = 25;
Execute the SQL statement.
Call the SQLStatement instance’s execute() method.
// using synchronous execution mode
// or listener methods in asynchronous execution mode
selectData.execute();
Additionally, if you’re using a Responder instead of event listeners in asynchronous execution mode, pass the
Responder instance to the execute() method.
// using a Responder in asynchronous execution mode
selectData.execute(-1, selectResponder);
For specific examples that demonstrate these steps, see the following topics:
“Retrieving data from a database” on page 700
“Inserting data” on page 710
“Changing or deleting data” on page 716
Using parameters in statements
Adobe AIR 1.0 and later
Using SQL statement parameters allows you to create a reusable SQL statement. When you use statement parameters,
values within the statement can change (such as values being added in an INSERT statement) but the basic statement
text remains unchanged. Consequently, using parameters provides performance benefits and makes it easier to code
an application.

698
ACTIONSCRIPT 3.0 DEVELOPER’S GUIDE
Working with local SQL databases in AIR
Last updated 3/21/2011
Understanding statement parameters
Adobe AIR 1.0 and later
Frequently an application uses a single SQL statement multiple times in an application, with slight variation. For
example, consider an inventory-tracking application where a user can add new inventory items to the database. The
application code that adds an inventory item to the database executes a SQL INSERT statement that actually adds the
data to the database. However, each time the statement is executed there is a slight variation. Specifically, the actual
values that are inserted in the table are different because they are specific to the inventory item being added.
In cases where you have a SQL statement that’s used multiple times with different values in the statement, the best
approach is to use a SQL statement that includes parameters rather than literal values in the SQL text. A parameter is
a placeholder in the statement text that is replaced with an actual value each time the statement is executed. To use
parameters in a SQL statement, you create the SQLStatement instance as usual. For the actual SQL statement assigned
to the text property, use parameter placeholders rather than literal values. You then define the value for each
parameter by setting the value of an element in the SQLStatement instance’s parameters property. The parameters
property is an associative array, so you set a particular value using the following syntax:
statement.parameters[parameter_identifier] = value;
The parameter_identifier is a string if you’re using a named parameter, or an integer index if you’re using an unnamed
parameter.
Using named parameters
Adobe AIR 1.0 and later
A parameter can be a named parameter. A named parameter has a specific name that the database uses to match the
parameter value to its placeholder location in the statement text. A parameter name consists of the “:” or “@” character
followed by a name, as in the following examples:
:itemName
@firstName
The following code listing demonstrates the use of named parameters:
var sql:String =
"INSERT INTO inventoryItems (name, productCode)" +
"VALUES (:name, :productCode)";
var addItemStmt:SQLStatement = new SQLStatement();
addItemStmt.sqlConnection = conn;
addItemStmt.text = sql;
// set parameter values
addItemStmt.parameters[":name"] = "Item name";
addItemStmt.parameters[":productCode"] = "12345";
addItemStmt.execute();

699
ACTIONSCRIPT 3.0 DEVELOPER’S GUIDE
Working with local SQL databases in AIR
Last updated 3/21/2011
Using unnamed parameters
Adobe AIR 1.0 and later
As an alternative to using named parameters, you can also use unnamed parameters. To use an unnamed parameter
you denote a parameter in a SQL statement using a “?” character. Each parameter is assigned a numeric index,
according to the order of the parameters in the statement, starting with index 0 for the first parameter. The following
example demonstrates a version of the previous example, using unnamed parameters:
var sql:String =
"INSERT INTO inventoryItems (name, productCode)" +
"VALUES (?, ?)";
var addItemStmt:SQLStatement = new SQLStatement();
addItemStmt.sqlConnection = conn;
addItemStmt.text = sql;
// set parameter values
addItemStmt.parameters[0] = "Item name";
addItemStmt.parameters[1] = "12345";
addItemStmt.execute();
Benefits of using parameters
Adobe AIR 1.0 and later
Using parameters in a SQL statement provides several benefits:
Better performance A SQLStatement instance that uses parameters can execute more efficiently compared to one that
dynamically creates the SQL text each time it executes. The performance improvement is because the statement is
prepared a single time and can then be executed multiple times using different parameter values, without needing to
recompile the SQL statement.
Explicit data typing Parameters are used to allow for typed substitution of values that are unknown at the time the SQL
statement is constructed. The use of parameters is the only way to guarantee the storage class for a value passed in to
the database. When parameters are not used, the runtime attempts to convert all values from their text representation
to a storage class based on the associated column's type affinity.
For more information on storage classes and column affinity, see “Data type support” on page 1089.
Greater security The use of parameters helps prevent a malicious technique known as a SQL injection attack. In a SQL
injection attack, a user enters SQL code in a user-accessible location (for example, a data entry field). If application
code constructs a SQL statement by directly concatenating user input into the SQL text, the user-entered SQL code is
executed against the database. The following listing shows an example of concatenating user input into SQL text. Do
not use this technique:

700
ACTIONSCRIPT 3.0 DEVELOPER’S GUIDE
Working with local SQL databases in AIR
Last updated 3/21/2011
// assume the variables "username" and "password"
// contain user-entered data
var sql:String =
"SELECT userId " +
"FROM users " +
"WHERE username = '" + username + "' " +
" AND password = '" + password + "'";
var statement:SQLStatement = new SQLStatement();
statement.text = sql;
Using statement parameters instead of concatenating user-entered values into a statement's text prevents a SQL
injection attack. SQL injection can’t happen because the parameter values are treated explicitly as substituted values,
rather than becoming part of the literal statement text. The following is the recommended alternative to the previous
listing:
// assume the variables "username" and "password"
// contain user-entered data
var sql:String =
"SELECT userId " +
"FROM users " +
"WHERE username = :username " +
" AND password = :password";
var statement:SQLStatement = new SQLStatement();
statement.text = sql;
// set parameter values
statement.parameters[":username"] = username;
statement.parameters[":password"] = password;
Retrieving data from a database
Adobe AIR 1.0 and later
Retrieving data from a database involves two steps. First, you execute a SQL SELECT statement, describing the set of
data you want from the database. Next, you access the retrieved data and display or manipulate it as needed by your
application.
Executing a SELECT statement
Adobe AIR 1.0 and later
To retrieve existing data from a database, you use a SQLStatement instance. Assign the appropriate SQL SELECT
statement to the instance’s text property, then call its execute() method.
For details on the syntax of the SELECT statement, see “SQL support in local databases” on page 1068.
The following example demonstrates executing a SELECT statement to retrieve data from a table named “products,”
using asynchronous execution mode:

701
ACTIONSCRIPT 3.0 DEVELOPER’S GUIDE
Working with local SQL databases in AIR
Last updated 3/21/2011
var selectStmt:SQLStatement = new SQLStatement();
// A SQLConnection named "conn" has been created previously
selectStmt.sqlConnection = conn;
selectStmt.text = "SELECT itemId, itemName, price FROM products";
selectStmt.addEventListener(SQLEvent.RESULT, resultHandler);
selectStmt.addEventListener(SQLErrorEvent.ERROR, errorHandler);
selectStmt.execute();
function resultHandler(event:SQLEvent):void
{
var result:SQLResult = selectStmt.getResult();
var numResults:int = result.data.length;
for (var i:int = 0; i < numResults; i++)
{
var row:Object = result.data[i];
var output:String = "itemId: " + row.itemId;
output += "; itemName: " + row.itemName;
output += "; price: " + row.price;
trace(output);
}
}
function errorHandler(event:SQLErrorEvent):void
{
// Information about the error is available in the
// event.error property, which is an instance of
// the SQLError class.
}
<?xml version="1.0" encoding="utf-8"?>
<mx:WindowedApplication xmlns:mx="http://www.adobe.com/2006/mxml" creationComplete="init()">
<mx:Script>
<
702
ACTIONSCRIPT 3.0 DEVELOPER’S GUIDE
Working with local SQL databases in AIR
Last updated 3/21/2011
selectStmt.execute();
}
private function resultHandler(event:SQLEvent):void
{
var result:SQLResult = selectStmt.getResult();
var numResults:int = result.data.length;
for (var i:int = 0; i < numResults; i++)
{
var row:Object = result.data[i];
var output:String = "itemId: " + row.itemId;
output += "; itemName: " + row.itemName;
output += "; price: " + row.price;
trace(output);
}
}
private function errorHandler(event:SQLErrorEvent):void
{
// Information about the error is available in the
// event.error property, which is an instance of
// the SQLError class.
}
]]>
</mx:Script>
</mx:WindowedApplication>
The following example demonstrates executing a SELECT statement to retrieve data from a table named “products,”
using synchronous execution mode:

703
ACTIONSCRIPT 3.0 DEVELOPER’S GUIDE
Working with local SQL databases in AIR
Last updated 3/21/2011
var selectStmt:SQLStatement = new SQLStatement();
// A SQLConnection named "conn" has been created previously
selectStmt.sqlConnection = conn;
selectStmt.text = "SELECT itemId, itemName, price FROM products";
try
{
selectStmt.execute();
var result:SQLResult = selectStmt.getResult();
var numResults:int = result.data.length;
for (var i:int = 0; i < numResults; i++)
{
var row:Object = result.data[i];
var output:String = "itemId: " + row.itemId;
output += "; itemName: " + row.itemName;
output += "; price: " + row.price;
trace(output);
}
}
catch (error:SQLError)
{
// Information about the error is available in the
// error variable, which is an instance of
// the SQLError class.
}
<?xml version="1.0" encoding="utf-8"?>
<mx:WindowedApplication xmlns:mx="http://www.adobe.com/2006/mxml" creationComplete="init()">
<mx:Script>
<
704
ACTIONSCRIPT 3.0 DEVELOPER’S GUIDE
Working with local SQL databases in AIR
Last updated 3/21/2011
var numResults:int = result.data.length;
for (var i:int = 0; i < numResults; i++)
{
var row:Object = result.data[i];
var output:String = "itemId: " + row.itemId;
output += "; itemName: " + row.itemName;
output += "; price: " + row.price;
trace(output);
}
}
catch (error:SQLError)
{
// Information about the error is available in the
// error variable, which is an instance of
// the SQLError class.
}
}
]]>
</mx:Script>
</mx:WindowedApplication>
In asynchronous execution mode, when the statement finishes executing, the SQLStatement instance dispatches a
result event (SQLEvent.RESULT) indicating that the statement was run successfully. Alternatively, if a Responder
object is passed as an argument to the execute() method, the Responder object’s result handler function is called. In
synchronous execution mode, execution pauses until the execute() operation completes, then continues on the next
line of code.
Accessing SELECT statement result data
Adobe AIR 1.0 and later
Once the SELECT statement has finished executing, the next step is to access the data that was retrieved. You retrieve
the result data from executing a SELECT statement by calling the SQLStatement object’s getResult() method:
var result:SQLResult = selectStatement.getResult();
The getResult() method returns a SQLResult object. The SQLResult object’s data property is an Array containing
the results of the SELECT statement:
var numResults:int = result.data.length;
for (var i:int = 0; i < numResults; i++)
{
// row is an Object representing one row of result data
var row:Object = result.data[i];
}
Each row of data in the SELECT result set becomes an Object instance contained in the data Array. That object has
properties whose names match the result set’s column names. The properties contain the values from the result set’s
columns. For example, suppose a SELECT statement specifies a result set with three columns named “itemId,”
“itemName,” and “price.” For each row in the result set, an Object instance is created with properties named itemId,
itemName, and price. Those properties contain the values from their respective columns.

705
ACTIONSCRIPT 3.0 DEVELOPER’S GUIDE
Working with local SQL databases in AIR
Last updated 3/21/2011
The following code listing defines a SQLStatement instance whose text is a SELECT statement. The statement retrieves
rows containing the firstName and lastName column values of all the rows of a table named employees. This
example uses asynchronous execution mode. When the execution completes, the selectResult() method is called,
and the resulting rows of data are accessed using SQLStatement.getResult() and displayed using the trace()
method. Note that this listing assumes there is a SQLConnection instance named conn that has already been
instantiated and is already connected to the database. It also assumes that the “employees” table has already been
created and populated with data.
import flash.data.SQLConnection;
import flash.data.SQLResult;
import flash.data.SQLStatement;
import flash.events.SQLErrorEvent;
import flash.events.SQLEvent;
// ... create and open the SQLConnection instance named conn ...
// create the SQL statement
var selectStmt:SQLStatement = new SQLStatement();
selectStmt.sqlConnection = conn;
// define the SQL text
var sql:String =
"SELECT firstName, lastName " +
"FROM employees";
selectStmt.text = sql;
// register listeners for the result and error events
selectStmt.addEventListener(SQLEvent.RESULT, selectResult);
selectStmt.addEventListener(SQLErrorEvent.ERROR, selectError);
// execute the statement
selectStmt.execute();
function selectResult(event:SQLEvent):void
{
// access the result data
var result:SQLResult = selectStmt.getResult();
var numRows:int = result.data.length;
for (var i:int = 0; i < numRows; i++)
{
var output:String = "";
for (var columnName:String in result.data[i])
{
output += columnName + ": " + result.data[i][columnName] + "; ";
}
trace("row[" + i.toString() + "]\t", output);
}
}
function selectError(event:SQLErrorEvent):void
{
trace("Error message:", event.error.message);
trace("Details:", event.error.details);
}

706
ACTIONSCRIPT 3.0 DEVELOPER’S GUIDE
Working with local SQL databases in AIR
Last updated 3/21/2011
<?xml version="1.0" encoding="utf-8"?>
<mx:WindowedApplication xmlns:mx="http://www.adobe.com/2006/mxml" creationComplete="init()">
<mx:Script>
<![CDATA[
import flash.data.SQLConnection;
import flash.data.SQLResult;
import flash.data.SQLStatement;
import flash.events.SQLErrorEvent;
import flash.events.SQLEvent;
private function init():void
{
// ... create and open the SQLConnection instance named conn ...
// create the SQL statement
var selectStmt:SQLStatement = new SQLStatement();
selectStmt.sqlConnection = conn;
// define the SQL text
var sql:String =
"SELECT firstName, lastName " +
"FROM employees";
selectStmt.text = sql;
// register listeners for the result and error events
selectStmt.addEventListener(SQLEvent.RESULT, selectResult);
selectStmt.addEventListener(SQLErrorEvent.ERROR, selectError);
// execute the statement
selectStmt.execute();
}
private function selectResult(event:SQLEvent):void
{
// access the result data
var result:SQLResult = selectStmt.getResult();
var numRows:int = result.data.length;
for (var i:int = 0; i < numRows; i++)
{
var output:String = "";
for (var columnName:String in result.data[i])
{
output += columnName + ": " + result.data[i][columnName] + "; ";
}
trace("row[" + i.toString() + "]\t", output);
}
}
private function selectError(event:SQLErrorEvent):void
{
trace("Error message:", event.error.message);
trace("Details:", event.error.details);
}
]]>
</mx:Script>
</mx:WindowedApplication>

707
ACTIONSCRIPT 3.0 DEVELOPER’S GUIDE
Working with local SQL databases in AIR
Last updated 3/21/2011
The following code listing demonstrates the same techniques as the preceding one, but uses synchronous execution
mode. The example defines a SQLStatement instance whose text is a SELECT statement. The statement retrieves rows
containing the firstName and lastName column values of all the rows of a table named employees. The resulting
rows of data are accessed using SQLStatement.getResult() and displayed using the trace() method. Note that this
listing assumes there is a SQLConnection instance named conn that has already been instantiated and is already
connected to the database. It also assumes that the “employees” table has already been created and populated with data.
import flash.data.SQLConnection;
import flash.data.SQLResult;
import flash.data.SQLStatement;
import flash.errors.SQLError;
// ... create and open the SQLConnection instance named conn ...
// create the SQL statement
var selectStmt:SQLStatement = new SQLStatement();
selectStmt.sqlConnection = conn;
// define the SQL text
var sql:String =
"SELECT firstName, lastName " +
"FROM employees";
selectStmt.text = sql;
try
{
// execute the statement
selectStmt.execute();
// access the result data
var result:SQLResult = selectStmt.getResult();
var numRows:int = result.data.length;
for (var i:int = 0; i < numRows; i++)
{
var output:String = "";
for (var columnName:String in result.data[i])
{
output += columnName + ": " + result.data[i][columnName] + "; ";
}
trace("row[" + i.toString() + "]\t", output);
}
}
catch (error:SQLError)
{
trace("Error message:", error.message);
trace("Details:", error.details);
}

708
ACTIONSCRIPT 3.0 DEVELOPER’S GUIDE
Working with local SQL databases in AIR
Last updated 3/21/2011
<?xml version="1.0" encoding="utf-8"?>
<mx:WindowedApplication xmlns:mx="http://www.adobe.com/2006/mxml" creationComplete="init()">
<mx:Script>
<![CDATA[
import flash.data.SQLConnection;
import flash.data.SQLResult;
import flash.data.SQLStatement;
import flash.errors.SQLError;
private function init():void
{
// ... create and open the SQLConnection instance named conn ...
// create the SQL statement
var selectStmt:SQLStatement = new SQLStatement();
selectStmt.sqlConnection = conn;
// define the SQL text
var sql:String =
"SELECT firstName, lastName " +
"FROM employees";
selectStmt.text = sql;
try
{
// execute the statement
selectStmt.execute();
// access the result data
var result:SQLResult = selectStmt.getResult();
var numRows:int = result.data.length;
for (var i:int = 0; i < numRows; i++)
{
var output:String = "";
for (var columnName:String in result.data[i])
{
output += columnName + ": ";
output += result.data[i][columnName] + "; ";
}
trace("row[" + i.toString() + "]\t", output);
}
}
catch (error:SQLError)
{
trace("Error message:", error.message);
trace("Details:", error.details);
}
}
]]>
</mx:Script>
</mx:WindowedApplication>

709
ACTIONSCRIPT 3.0 DEVELOPER’S GUIDE
Working with local SQL databases in AIR
Last updated 3/21/2011
Defining the data type of SELECT result data
Adobe AIR 1.0 and later
By default, each row returned by a SELECT statement is created as an Object instance with properties named for the
result set's column names and with the value of each column as the value of its associated property. However, before
executing a SQL SELECT statement, you can set the itemClass property of the SQLStatement instance to a class. By
setting the itemClass property, each row returned by the SELECT statement is created as an instance of the designated
class. The runtime assigns result column values to property values by matching the column names in the SELECT result
set to the names of the properties in the itemClass class.
Any class assigned as an itemClass property value must have a constructor that does not require any parameters. In
addition, the class must have a single property for each column returned by the SELECT statement. It is considered an
error if a column in the SELECT list does not have a matching property name in the itemClass class.
Retrieving SELECT results in parts
Adobe AIR 1.0 and later
By default, a SELECT statement execution retrieves all the rows of the result set at one time. Once the statement
completes, you usually process the retrieved data in some way, such as creating objects or displaying the data on the
screen. If the statement returns a large number of rows, processing all the data at once can be demanding for the
computer, which in turn will cause the user interface to not redraw itself.
You can improve the perceived performance of your application by instructing the runtime to return a specific number
of result rows at a time. Doing so causes the initial result data to return more quickly. It also allows you to divide the
result rows into sets, so that the user interface is updated after each set of rows is processed. Note that it’s only practical
to use this technique in asynchronous execution mode.
To retrieve SELECT results in parts, specify a value for the SQLStatement.execute() method’s first parameter (the
prefetch parameter). The prefetch parameter indicates the number of rows to retrieve the first time the statement
executes. When you call a SQLStatement instance’s execute() method, specify a prefetch parameter value and only
that many rows are retrieved:
var stmt:SQLStatement = new SQLStatement();
stmt.sqlConnection = conn;
stmt.text = "SELECT ...";
stmt.addEventListener(SQLEvent.RESULT, selectResult);
stmt.execute(20); // only the first 20 rows (or fewer) are returned
The statement dispatches the result event, indicating that the first set of result rows is available. The resulting
SQLResult instance’s data property contains the rows of data, and its complete property indicates whether there are
additional result rows to retrieve. To retrieve additional result rows, call the SQLStatement instance’s next() method.
Like the execute() method, the next() method’s first parameter is used to indicate how many rows to retrieve the
next time the result event is dispatched.

710
ACTIONSCRIPT 3.0 DEVELOPER’S GUIDE
Working with local SQL databases in AIR
Last updated 3/21/2011
function selectResult(event:SQLEvent):void
{
var result:SQLResult = stmt.getResult();
if (result.data != null)
{
// ... loop through the rows or perform other processing ...
if (!result.complete)
{
stmt.next(20); // retrieve the next 20 rows
}
else
{
stmt.removeEventListener(SQLEvent.RESULT, selectResult);
}
}
}
The SQLStatement dispatches a result event each time the next() method returns a subsequent set of result rows.
Consequently, the same listener function can be used to continue processing results (from next() calls) until all the
rows are retrieved.
For more information, see the descriptions for the SQLStatement.execute() method (the prefetch parameter
description) and the SQLStatement.next() method.
Inserting data
Adobe AIR 1.0 and later
Adding data to a database involves executing a SQL INSERT statement. Once the statement has finished executing, you
can access the primary key for the newly inserted row if the key was generated by the database.
Executing an INSERT statement
Adobe AIR 1.0 and later
To add data to a table in a database, you create and execute a SQLStatement instance whose text is a SQL INSERT
statement.
The following example uses a SQLStatement instance to add a row of data to the already-existing employees table. This
example demonstrates inserting data using asynchronous execution mode. Note that this listing assumes that there is
a SQLConnection instance named conn that has already been instantiated and is already connected to a database. It
also assumes that the “employees” table has already been created.

711
ACTIONSCRIPT 3.0 DEVELOPER’S GUIDE
Working with local SQL databases in AIR
Last updated 3/21/2011
import flash.data.SQLConnection;
import flash.data.SQLResult;
import flash.data.SQLStatement;
import flash.events.SQLErrorEvent;
import flash.events.SQLEvent;
// ... create and open the SQLConnection instance named conn ...
// create the SQL statement
var insertStmt:SQLStatement = new SQLStatement();
insertStmt.sqlConnection = conn;
// define the SQL text
var sql:String =
"INSERT INTO employees (firstName, lastName, salary) " +
"VALUES ('Bob', 'Smith', 8000)";
insertStmt.text = sql;
// register listeners for the result and failure (status) events
insertStmt.addEventListener(SQLEvent.RESULT, insertResult);
insertStmt.addEventListener(SQLErrorEvent.ERROR, insertError);
// execute the statement
insertStmt.execute();
function insertResult(event:SQLEvent):void
{
trace("INSERT statement succeeded");
}
function insertError(event:SQLErrorEvent):void
{
trace("Error message:", event.error.message);
trace("Details:", event.error.details);
}
<?xml version="1.0" encoding="utf-8"?>
<mx:WindowedApplication xmlns:mx="http://www.adobe.com/2006/mxml" creationComplete="init()">
<mx:Script>
<
712
ACTIONSCRIPT 3.0 DEVELOPER’S GUIDE
Working with local SQL databases in AIR
Last updated 3/21/2011
"VALUES ('Bob', 'Smith', 8000)";
insertStmt.text = sql;
// register listeners for the result and failure (status) events
insertStmt.addEventListener(SQLEvent.RESULT, insertResult);
insertStmt.addEventListener(SQLErrorEvent.ERROR, insertError);
// execute the statement
insertStmt.execute();
}
private function insertResult(event:SQLEvent):void
{
trace("INSERT statement succeeded");
}
private function insertError(event:SQLErrorEvent):void
{
trace("Error message:", event.error.message);
trace("Details:", event.error.details);
}
]]>
</mx:Script>
</mx:WindowedApplication>
The following example adds a row of data to the already-existing employees table, using synchronous execution mode.
Note that this listing assumes that there is a SQLConnection instance named conn that has already been instantiated
and is already connected to a database. It also assumes that the “employees” table has already been created.

713
ACTIONSCRIPT 3.0 DEVELOPER’S GUIDE
Working with local SQL databases in AIR
Last updated 3/21/2011
import flash.data.SQLConnection;
import flash.data.SQLResult;
import flash.data.SQLStatement;
import flash.errors.SQLError;
// ... create and open the SQLConnection instance named conn ...
// create the SQL statement
var insertStmt:SQLStatement = new SQLStatement();
insertStmt.sqlConnection = conn;
// define the SQL text
var sql:String =
"INSERT INTO employees (firstName, lastName, salary) " +
"VALUES ('Bob', 'Smith', 8000)";
insertStmt.text = sql;
try
{
// execute the statement
insertStmt.execute();
trace("INSERT statement succeeded");
}
catch (error:SQLError)
{
trace("Error message:", error.message);
trace("Details:", error.details);
}

714
ACTIONSCRIPT 3.0 DEVELOPER’S GUIDE
Working with local SQL databases in AIR
Last updated 3/21/2011
<?xml version="1.0" encoding="utf-8"?>
<mx:WindowedApplication xmlns:mx="http://www.adobe.com/2006/mxml" creationComplete="init()">
<mx:Script>
<![CDATA[
import flash.data.SQLConnection;
import flash.data.SQLResult;
import flash.data.SQLStatement;
import flash.errors.SQLError;
private function init():void
{
// ... create and open the SQLConnection instance named conn ...
// create the SQL statement
var insertStmt:SQLStatement = new SQLStatement();
insertStmt.sqlConnection = conn;
// define the SQL text
var sql:String =
"INSERT INTO employees (firstName, lastName, salary) " +
"VALUES ('Bob', 'Smith', 8000)";
insertStmt.text = sql;
try
{
// execute the statement
insertStmt.execute();
trace("INSERT statement succeeded");
}
catch (error:SQLError)
{
trace("Error message:", error.message);
trace("Details:", error.details);
}
}
]]>
</mx:Script>
</mx:WindowedApplication>
Retrieving a database-generated primary key of an inserted row
Adobe AIR 1.0 and later
Often after inserting a row of data into a table, your code needs to know a database-generated primary key or row
identifier value for the newly inserted row. For example, once you insert a row in one table, you might want to add
rows in a related table. In that case you would want to insert the primary key value as a foreign key in the related table.
The primary key of a newly inserted row can be retrieved using the SQLResult object associated with the statement
execution. This is the same object that’s used to access result data after a SELECT statement is executed. As with any
SQL statement, when the execution of an INSERT statement completes the runtime creates a SQLResult instance. You
access the SQLResult instance by calling the SQLStatement object’s getResult() method if you’re using an event
listener or if you’re using synchronous execution mode. Alternatively, if you’re using asynchronous execution mode
and you pass a Responder instance to the execute() call, the SQLResult instance is passed as an argument to the result
handler function. In any case, the SQLResult instance has a property, lastInsertRowID, that contains the row
identifier of the most-recently inserted row if the executed SQL statement is an INSERT statement.

715
ACTIONSCRIPT 3.0 DEVELOPER’S GUIDE
Working with local SQL databases in AIR
Last updated 3/21/2011
The following example demonstrates accessing the primary key of an inserted row in asynchronous execution mode:
insertStmt.text = "INSERT INTO ...";
insertStmt.addEventListener(SQLEvent.RESULT, resultHandler);
insertStmt.execute();
function resultHandler(event:SQLEvent):void
{
// get the primary key
var result:SQLResult = insertStmt.getResult();
var primaryKey:Number = result.lastInsertRowID;
// do something with the primary key
}
The following example demonstrates accessing the primary key of an inserted row in synchronous execution mode:
insertStmt.text = "INSERT INTO ...";
try
{
insertStmt.execute();
// get the primary key
var result:SQLResult = insertStmt.getResult();
var primaryKey:Number = result.lastInsertRowID;
// do something with the primary key
}
catch (error:SQLError)
{
// respond to the error
}
Note that the row identifier may or may not be the value of the column that is designated as the primary key column
in the table definition, according to the following rules:
•If the table is defined with a primary key column whose affinity (column data type) is INTEGER, the
lastInsertRowID property contains the value that was inserted into that row (or the value generated by the
runtime if it’s an AUTOINCREMENT column).
•If the table is defined with multiple primary key columns (a composite key) or with a single primary key column
whose affinity is not INTEGER, behind the scenes the database generates an integer row identifier value for the row.
That generated value is the value of the lastInsertRowID property.
•The value is always the row identifier of the most-recently inserted row. If an INSERT statement causes a trigger to
fire which in turn inserts a row, the lastInsertRowID property contains the row identifier of the last row inserted
by the trigger rather than the row created by the INSERT statement.
As a consequence of these rules, if you want to have an explicitly defined primary key column whose value is available
after an INSERT command through the SQLResult.lastInsertRowID property, the column must be defined as an
INTEGER PRIMARY KEY column. Even if your table does not include an explicit INTEGER PRIMARY KEY column, it is
equally acceptable to use the database-generated row identifier as a primary key for your table in the sense of defining
relationships with related tables. The row identifier column value is available in any SQL statement by using one of the
special column names ROWID, _ROWID_, or OID. You can create a foreign key column in a related table and use the row

716
ACTIONSCRIPT 3.0 DEVELOPER’S GUIDE
Working with local SQL databases in AIR
Last updated 3/21/2011
identifier value as the foreign key column value just as you would with an explicitly declared INTEGER PRIMARY KEY
column. In that sense, if you are using an arbitrary primary key rather than a natural key, and as long as you don’t mind
the runtime generating the primary key value for you, it makes little difference whether you use an INTEGER PRIMARY
KEY column or the system-generated row identifier as a table’s primary key for defining a foreign key relationship with
between two tables.
For more information about primary keys and generated row identifiers, see “SQL support in local databases” on
page 1068.
Changing or deleting data
Adobe AIR 1.0 and later
The process for executing other data manipulation operations is identical to the process used to execute a SQL SELECT
or INSERT statement, as described in “Working with SQL statements” on page 696. Simply substitute a different SQL
statement in the SQLStatement instance’s text property:
•To change existing data in a table, use an UPDATE statement.
•To delete one or more rows of data from a table, use a DELETE statement.
For descriptions of these statements, see “SQL support in local databases” on page 1068.
Working with multiple databases
Adobe AIR 1.0 and later
Use the SQLConnection.attach() method to open a connection to an additional database on a SQLConnection
instance that already has an open database. You give the attached database a name using the name parameter in the
attach() method call. When writing statements to manipulate that database, you can then use that name in a prefix
(using the form database-name.table-name) to qualify any table names in your SQL statements, indicating to the
runtime that the table can be found in the named database.
You can execute a single SQL statement that includes tables from multiple databases that are connected to the same
SQLConnection instance. If a transaction is created on the SQLConnection instance, that transaction applies to all SQL
statements that are executed using the SQLConnection instance. This is true regardless of which attached database the
statement runs on.
Alternatively, you can also create multiple SQLConnection instances in an application, each of which is connected to
one or multiple databases. However, if you do use multiple connections to the same database keep in mind that a
database transaction isn’t shared across SQLConnection instances. Consequently, if you connect to the same database
file using multiple SQLConnection instances, you can’t rely on both connections’ data changes being applied in the
expected manner. For example, if two UPDATE or DELETE statements are run against the same database through
different SQLConnection instances, and an application error occurs after one operation takes place, the database data
could be left in an intermediate state that would not be reversible and might affect the integrity of the database (and
consequently the application).

717
ACTIONSCRIPT 3.0 DEVELOPER’S GUIDE
Working with local SQL databases in AIR
Last updated 3/21/2011
Handling database errors
Adobe AIR 1.0 and later
In general, database error handling is like other runtime error handling. You should write code that is prepared for
errors that may occur, and respond to the errors rather than leave it up to the runtime to do so. In a general sense, the
possible database errors can be divided into three categories: connection errors, SQL syntax errors, and constraint
errors.
Connection errors
Adobe AIR 1.0 and later
Most database errors are connection errors, and they can occur during any operation. Although there are strategies for
preventing connection errors, there is rarely a simple way to gracefully recover from a connection error if the database
is a critical part of your application.
Most connection errors have to do with how the runtime interacts with the operating system, the file system, and the
database file. For example, a connection error occurs if the user doesn’t have permission to create a database file in a
particular location on the file system. The following strategies help to prevent connection errors:
Use user-specific database files Rather than using a single database file for all users who use the application on a single
computer, give each user their own database file. The file should be located in a directory that’s associated with the
user’s account. For example, it could be in the application’s storage directory, the user’s documents folder, the user’s
desktop, and so forth.
Consider different user types Test your application with different types of user accounts, on different operating
systems. Don’t assume that the user has administrator permission on the computer. Also, don’t assume that the
individual who installed the application is the user who’s running the application.
Consider various file locations If you allow a user to specify where to save a database file or select a file to open,
consider the possible file locations that the users might use. In addition, consider defining limits on where users can
store (or from where they can open) database files. For example, you might only allow users to open files that are within
their user account’s storage location.
If a connection error occurs, it most likely happens on the first attempt to create or open the database. This means that
the user is unable to do any database-related operations in the application. For certain types of errors, such as read-
only or permission errors, one possible recovery technique is to copy the database file to a different location. The
application can copy the database file to a different location where the user does have permission to create and write
to files, and use that location instead.
Syntax errors
Adobe AIR 1.0 and later
A syntax error occurs when a SQL statement is incorrectly formed, and the application attempts to execute the
statement. Because local database SQL statements are created as strings, compile-time SQL syntax checking is not
possible. All SQL statements must be executed to check their syntax. Use the following strategies to prevent SQL syntax
errors:
Test all SQL statements thoroughly If possible, while developing your application test your SQL statements separately
before encoding them as statement text in the application code. In addition, use a code-testing approach such as unit
testing to create a set of tests that exercise every possible option and variation in the code.

718
ACTIONSCRIPT 3.0 DEVELOPER’S GUIDE
Working with local SQL databases in AIR
Last updated 3/21/2011
Use statement parameters and avoid concatenating (dynamically generating) SQL Using parameters, and avoiding
dynamically built SQL statements, means that the same SQL statement text is used each time a statement is executed.
Consequently, it’s much easier to test your statements and limit the possible variation. If you must dynamically
generate a SQL statement, keep the dynamic parts of the statement to a minimum. Also, carefully validate any user
input to make sure it won’t cause syntax errors.
To recover from a syntax error, an application would need complex logic to be able to examine a SQL statement and
correct its syntax. By following the previous guidelines for preventing syntax errors, your code can identify any
potential run-time sources of SQL syntax errors (such as user input used in a statement). To recover from a syntax
error, provide guidance to the user. Indicate what to correct to make the statement execute properly.
Constraint errors
Adobe AIR 1.0 and later
Constraint errors occur when an INSERT or UPDATE statement attempts to add data to a column. The error happens if
the new data violates one of the defined constraints for the table or column. The set of possible constraints includes:
Unique constraint Indicates that across all the rows in a table, there cannot be duplicate values in one column.
Alternatively, when multiple columns are combined in a unique constraint, the combination of values in those
columns must not be duplicated. In other words, in terms of the specified unique column or columns, each row must
be distinct.
Primary key constraint In terms of the data that a constraint allows and doesn’t allow, a primary key constraint is
identical to a unique constraint.
Not null constraint Specifies that a single column cannot store a NULL value and consequently that in every row, that
column must have a value.
Check constraint Allows you to specify an arbitrary constraint on one or more tables. A common check constraint is
a rule that define that a column’s value must be within certain bounds (for example, that a numeric column’s value
must be larger than 0). Another common type of check constraint specifies relationships between column values (for
example, that a column’s value must be different from the value of another column in the same row).
Data type (column affinity) constraint The runtime enforces the data type of columns’ values, and an error occurs if
an attempt is made to store a value of the incorrect type in a column. However, in many conditions values are
converted to match the column’s declared data type. See “Working with database data types” on page 719 for more
information.
The runtime does not enforce constraints on foreign key values. In other words, foreign key values aren’t required to
match an existing primary key value.
In addition to the predefined constraint types, the runtime SQL engine supports the use of triggers. A trigger is like an
event handler. It is a predefined set of instructions that are carried out when a certain action happens. For example, a
trigger could be defined that runs when data is inserted into or deleted from a particular table. One possible use of a
trigger is to examine data changes and cause an error to occur if specified conditions aren’t met. Consequently, a
trigger can serve the same purpose as a constraint, and the strategies for preventing and recovering from constraint
errors also apply to trigger-generated errors. However, the error id for trigger-generated errors is different from the
error id for constraint errors.
The set of constraints that apply to a particular table is determined while you’re designing an application. Consciously
designing constraints makes it easier to design your application to prevent and recover from constraint errors.
However, constraint errors are difficult to systematically predict and prevent. Prediction is difficult because constraint
errors don’t appear until application data is added. Constraint errors occur with data that is added to a database after

719
ACTIONSCRIPT 3.0 DEVELOPER’S GUIDE
Working with local SQL databases in AIR
Last updated 3/21/2011
it’s created. These errors are often a result of the relationship between new data and data that already exists in the
database. The following strategies can help you avoid many constraint errors:
Carefully plan database structure and constraints The purpose of constraints is to enforce application rules and help
protect the integrity of the database’s data. When you’re planning your application, consider how to structure your
database to support your application. As part of that process, identify rules for your data, such as whether certain
values are required, whether a value has a default, whether duplicate values are allowed, and so forth. Those rules guide
you in defining database constraints.
Explicitly specify column names An INSERT statement can be written without explicitly specifying the columns into
which values are to be inserted, but doing so is an unnecessary risk. By explicitly naming the columns into which values
are to be inserted, you can allow for automatically generated values, columns with default values, and columns that
allow NULL values. In addition, by doing so you can ensure that all NOT NULL columns have an explicit value inserted.
Use default values Whenever you specify a NOT NULL constraint for a column, if at all possible specify a default value
in the column definition. Application code can also provide default values. For example, your code can check if a String
variable is null and assign it a value before using it to set a statement parameter value.
Validate user-entered data Check user-entered data ahead of time to make sure that it obeys limits specified by
constraints, especially in the case of NOT NULL and CHECK constraints. Naturally, a UNIQUE constraint is more difficult
to check for because doing so would require executing a SELECT query to determine whether the data is unique.
Use triggers You can write a trigger that validates (and possibly replaces) inserted data or takes other actions to correct
invalid data. This validation and correction can prevent a constraint error from occurring.
In many ways constraint errors are more difficult to prevent than other types of errors. Fortunately, there are several
strategies to recover from constraint errors in ways that don’t make the application unstable or unusable:
Use conflict algorithms When you define a constraint on a column, and when you create an INSERT or UPDATE
statement, you have the option of specifying a conflict algorithm. A conflict algorithm defines the action the database
takes when a constraint violation occurs. There are several possible actions the database engine can take. The database
engine can end a single statement or a whole transaction. It can ignore the error. It can even remove old data and
replace it with the data that the code is attempting to store.
For more information see the section “ON CONFLICT (conflict algorithms)” in the “SQL support in local databases”
on page 1068.
Provide corrective feedback The set of constraints that can affect a particular SQL command can be identified ahead
of time. Consequently, you can anticipate constraint errors that a statement could cause. With that knowledge, you
can build application logic to respond to a constraint error. For example, suppose an application includes a data entry
form for entering new products. If the product name column in the database is defined with a UNIQUE constraint, the
action of inserting a new product row in the database could cause a constraint error. Consequently, the application is
designed to anticipate a constraint error. When the error happens, the application alerts the user, indicating that the
specified product name is already in use and asking the user to choose a different name. Another possible response is
to allow the user to view information about the other product with the same name.
Working with database data types
Adobe AIR 1.0 and later
When a table is created in a database, the SQL statement for creating the table defines the affinity, or data type, for each
column in the table. Although affinity declarations can be omitted, it’s a good idea to explicitly declare column affinity
in your CREATE TABLE SQL statements.

720
ACTIONSCRIPT 3.0 DEVELOPER’S GUIDE
Working with local SQL databases in AIR
Last updated 3/21/2011
As a general rule, any object that you store in a database using an INSERT statement is returned as an instance of the
same data type when you execute a SELECT statement. However, the data type of the retrieved value can be different
depending on the affinity of the database column in which the value is stored. When a value is stored in a column, if
its data type doesn’t match the column’s affinity, the database attempts to convert the value to match the column’s
affinity. For example, if a database column is declared with NUMERIC affinity, the database attempts to convert inserted
data into a numeric storage class (INTEGER or REAL) before storing the data. The database throws an error if the data
can’t be converted. According to this rule, if the String “12345” is inserted into a NUMERIC column, the database
automatically converts it to the integer value 12345 before storing it in the database. When it’s retrieved with a SELECT
statement, the value is returned as an instance of a numeric data type (such as Number) rather than as a String instance.
The best way to avoid undesirable data type conversion is to follow two rules. First, define each column with the affinity
that matches the type of data that it is intended to store. Next, only insert values whose data type matches the defined
affinity. Following these rules provides two benefits. When you insert the data it isn’t converted unexpectedly (possibly
losing its intended meaning as a result). In addition, when you retrieve the data it is returned with its original data type.
For more information about the available column affinity types and using data types in SQL statements, see the “Data
type support” on page 1089.
Using synchronous and asynchronous database
operations
Adobe AIR 1.0 and later
Previous sections have described common database operations such as retrieving, inserting, updating, and deleting
data, as well as creating a database file and tables and other objects within a database. The examples have demonstrated
how to perform these operations both asynchronously and synchronously.
As a reminder, in asynchronous execution mode, you instruct the database engine to perform an operation. The
database engine then works in the background while the application keeps running. When the operation finishes the
database engine dispatches an event to alert you to that fact. The key benefit of asynchronous execution is that the
runtime performs the database operations in the background while the main application code continues executing.
This is especially valuable when the operation takes a notable amount of time to run.
On the other hand, in synchronous execution mode operations don’t run in the background. You tell the database
engine to perform an operation. The code pauses at that point while the database engine does its work. When the
operation completes, execution continues with the next line of your code.
A single database connection can’t execute some operations or statements synchronously and others asynchronously.
You specify whether a SQLConnection operates in synchronous or asynchronous when you open the connection to
the database. If you call SQLConnection.open() the connection operates in synchronous execution mode, and if you
call SQLConnection.openAsync() the connection operates in asynchronous execution mode. Once a
SQLConnection instance is connected to a database using open() or openAsync(), it is fixed to synchronous or
asynchronous execution.

721
ACTIONSCRIPT 3.0 DEVELOPER’S GUIDE
Working with local SQL databases in AIR
Last updated 3/21/2011
Using synchronous database operations
Adobe AIR 1.0 and later
There is little difference in the actual code that you use to execute and respond to operations when using synchronous
execution, compared to the code for asynchronous execution mode. The key differences between the two approaches
fall into two areas. The first is executing an operation that depends on another operation (such as SELECT result rows
or the primary key of the row added by an INSERT statement). The second area of difference is in handling errors.
Writing code for synchronous operations
Adobe AIR 1.0 and later
The key difference between synchronous and asynchronous execution is that in synchronous mode you write the code
as a single series of steps. In contrast, in asynchronous code you register event listeners and often divide operations
among listener methods. When a database is connected in synchronous execution mode, you can execute a series of
database operations in succession within a single code block. The following example demonstrates this technique:
var conn:SQLConnection = new SQLConnection();
// The database file is in the application storage directory
var folder:File = File.applicationStorageDirectory;
var dbFile:File = folder.resolvePath("DBSample.db");
// open the database
conn.open(dbFile, OpenMode.UPDATE);
// start a transaction
conn.begin();
// add the customer record to the database
var insertCustomer:SQLStatement = new SQLStatement();
insertCustomer.sqlConnection = conn;
insertCustomer.text =
"INSERT INTO customers (firstName, lastName) " +
"VALUES ('Bob', 'Jones')";
insertCustomer.execute();
var customerId:Number = insertCustomer.getResult().lastInsertRowID;
// add a related phone number record for the customer
var insertPhoneNumber:SQLStatement = new SQLStatement();
insertPhoneNumber.sqlConnection = conn;
insertPhoneNumber.text =
"INSERT INTO customerPhoneNumbers (customerId, number) " +
"VALUES (:customerId, '800-555-1234')";
insertPhoneNumber.parameters[":customerId"] = customerId;
insertPhoneNumber.execute();
// commit the transaction
conn.commit();
As you can see, you call the same methods to perform database operations whether you’re using synchronous or
asynchronous execution. The key differences between the two approaches are executing an operation that depends on
another operation and handling errors.

722
ACTIONSCRIPT 3.0 DEVELOPER’S GUIDE
Working with local SQL databases in AIR
Last updated 3/21/2011
Executing an operation that depends on another operation
Adobe AIR 1.0 and later
When you’re using synchronous execution mode, you don’t need to write code that listens for an event to determine
when an operation completes. Instead, you can assume that if an operation in one line of code completes successfully,
execution continues with the next line of code. Consequently, to perform an operation that depends on the success of
another operation, simply write the dependent code immediately following the operation on which it depends. For
instance, to code an application to begin a transaction, execute an INSERT statement, retrieve the primary key of the
inserted row, insert that primary key into another row of a different table, and finally commit the transaction, the code
can all be written as a series of statements. The following example demonstrates these operations:
var conn:SQLConnection = new SQLConnection();
// The database file is in the application storage directory
var folder:File = File.applicationStorageDirectory;
var dbFile:File = folder.resolvePath("DBSample.db");
// open the database
conn.open(dbFile, SQLMode.UPDATE);
// start a transaction
conn.begin();
// add the customer record to the database
var insertCustomer:SQLStatement = new SQLStatement();
insertCustomer.sqlConnection = conn;
insertCustomer.text =
"INSERT INTO customers (firstName, lastName) " +
"VALUES ('Bob', 'Jones')";
insertCustomer.execute();
var customerId:Number = insertCustomer.getResult().lastInsertRowID;
// add a related phone number record for the customer
var insertPhoneNumber:SQLStatement = new SQLStatement();
insertPhoneNumber.sqlConnection = conn;
insertPhoneNumber.text =
"INSERT INTO customerPhoneNumbers (customerId, number) " +
"VALUES (:customerId, '800-555-1234')";
insertPhoneNumber.parameters[":customerId"] = customerId;
insertPhoneNumber.execute();
// commit the transaction
conn.commit();

723
ACTIONSCRIPT 3.0 DEVELOPER’S GUIDE
Working with local SQL databases in AIR
Last updated 3/21/2011
Handling errors with synchronous execution
Adobe AIR 1.0 and later
In synchronous execution mode, you don’t listen for an error event to determine that an operation has failed. Instead,
you surround any code that could trigger errors in a set of try..catch..finally code blocks. You wrap the error-
throwing code in the try block. Write the actions to perform in response to each type of error in separate catch blocks.
Place any code that you want to always execute regardless of success or failure (for example, closing a database
connection that’s no longer needed) in a finally block. The following example demonstrates using
try..catch..finally blocks for error handling. It builds on the previous example by adding error handling code:
var conn:SQLConnection = new SQLConnection();
// The database file is in the application storage directory
var folder:File = File.applicationStorageDirectory;
var dbFile:File = folder.resolvePath("DBSample.db");
// open the database
conn.open(dbFile, SQLMode.UPDATE);
// start a transaction
conn.begin();
try
{
// add the customer record to the database
var insertCustomer:SQLStatement = new SQLStatement();
insertCustomer.sqlConnection = conn;
insertCustomer.text =
"INSERT INTO customers (firstName, lastName)" +
"VALUES ('Bob', 'Jones')";
insertCustomer.execute();
var customerId:Number = insertCustomer.getResult().lastInsertRowID;
// add a related phone number record for the customer
var insertPhoneNumber:SQLStatement = new SQLStatement();
insertPhoneNumber.sqlConnection = conn;
insertPhoneNumber.text =
"INSERT INTO customerPhoneNumbers (customerId, number)" +
"VALUES (:customerId, '800-555-1234')";
insertPhoneNumber.parameters[":customerId"] = customerId;
insertPhoneNumber.execute();
// if we've gotten to this point without errors, commit the transaction
conn.commit();
}
catch (error:SQLError)
{
// rollback the transaction
conn.rollback();
}

724
ACTIONSCRIPT 3.0 DEVELOPER’S GUIDE
Working with local SQL databases in AIR
Last updated 3/21/2011
Understanding the asynchronous execution model
Adobe AIR 1.0 and later
One common concern about using asynchronous execution mode is the assumption that you can’t start executing a
SQLStatement instance if another SQLStatement is currently executing against the same database connection. In fact,
this assumption isn’t correct. While a SQLStatement instance is executing you can’t change the text property of the
statement. However, if you use a separate SQLStatement instance for each different SQL statement that you want to
execute, you can call the execute() method of a SQLStatement while another SQLStatement instance is still
executing, without causing an error.
Internally, when you’re executing database operations using asynchronous execution mode, each database connection
(each SQLConnection instance) has its own queue or list of operations that it is instructed to perform. The runtime
executes each operation in sequence, in the order they are added to the queue. When you create a SQLStatement
instance and call its execute() method, that statement execution operation is added to the queue for the connection.
If no operation is currently executing on that SQLConnection instance, the statement begins executing in the
background. Suppose that within the same block of code you create another SQLStatement instance and also call that
method’s execute() method. That second statement execution operation is added to the queue behind the first
statement. As soon as the first statement finishes executing, the runtime moves to the next operation in the queue. The
processing of subsequent operations in the queue happens in the background, even while the result event for the first
operation is being dispatched in the main application code. The following code demonstrates this technique:
// Using asynchronous execution mode
var stmt1:SQLStatement = new SQLStatement();
stmt1.sqlConnection = conn;
// ... Set statement text and parameters, and register event listeners ...
stmt1.execute();
// At this point stmt1's execute() operation is added to conn's execution queue.
var stmt2:SQLStatement = new SQLStatement();
stmt2.sqlConnection = conn;
// ... Set statement text and parameters, and register event listeners ...
stmt2.execute();
// At this point stmt2's execute() operation is added to conn's execution queue.
// When stmt1 finishes executing, stmt2 will immediately begin executing
// in the background.
There is an important side effect of the database automatically executing subsequent queued statements. If a statement
depends on the outcome of another operation, you can’t add the statement to the queue (in other words, you can’t call
its execute() method) until the first operation completes. This is because once you’ve called the second statement’s
execute() method, you can’t change the statement’s text or parameters properties. In that case you must wait for
the event indicating that the first operation completes before starting the next operation. For example, if you want to
execute a statement in the context of a transaction, the statement execution depends on the operation of opening the
transaction. After calling the SQLConnection.begin() method to open the transaction, you need to wait for the
SQLConnection instance to dispatch its begin event. Only then can you call the SQLStatement instance’s execute()
method. In this example the simplest way to organize the application to ensure that the operations are executed
properly is to create a method that’s registered as a listener for the begin event. The code to call the
SQLStatement.execute() method is placed within that listener method.

725
ACTIONSCRIPT 3.0 DEVELOPER’S GUIDE
Working with local SQL databases in AIR
Last updated 3/21/2011
Using encryption with SQL databases
Adobe AIR 1.5 and later
All Adobe AIR applications share the same local database engine. Consequently, any AIR application can connect to,
read from, and write to an unencrypted database file. Starting with Adobe AIR 1.5, AIR includes the capability of
creating and connecting to encrypted database files. When you use an encrypted database, in order to connect to the
database an application must provide the correct encryption key. If the incorrect encryption key (or no key) is
provided, the application is not able to connect to the database. Consequently, the application can’t read data from the
database or write to or change data in the database.
To use an encrypted database, you must create the database as an encrypted database. With an existing encrypted
database, you can open a connection to the database. You can also change the encryption key of an encrypted database.
Other than creating and connecting to encrypted databases, the techniques for working with an encrypted database
are the same as for working with an unencrypted one. In particular, executing SQL statements is the same regardless
of whether a database is encrypted or not.
Uses for an encrypted database
Adobe AIR 1.5 and later
Encryption is useful any time you want to restrict access to the information stored in a database. The database
encryption functionality of Adobe AIR can be used for several purposes. The following are some examples of cases
where you would want to use an encrypted database:
•A read-only cache of private application data downloaded from a server
•A local application store for private data that is synchronized with a server (data is sent to and loaded from the
server)
•Encrypted files used as the file format for documents created and edited by the application. The files could be
private to one user, or could be designed to be shared among all users of the application.
•Any other use of a local data store, such as the ones described in “Uses for local SQL databases” on page 681, where
the data must be kept private from people who have access to the machine or the database files.
Understanding the reason why you want to use an encrypted database helps you decide how to architect your
application. In particular, it can affect how your application creates, obtains, and stores the encryption key for the
database. For more information about these considerations, see “Considerations for using encryption with a database”
on page 729.
Other than an encrypted database, an alternative mechanism for keeping sensitive data private is the encrypted local
store. With the encrypted local store, you store a single ByteArray value using a String key. Only the AIR application
that stores the value can access it, and only on the computer on which it is stored. With the encrypted local store, it
isn’t necessary to create your own encryption key. For these reasons, the encrypted local store is most suitable for easily
storing a single value or set of values that can easily be encoded in a ByteArray. An encrypted database is most suitable
for larger data sets where structured data storage and querying are desirable. For more information about using the
encrypted local store, see “Encrypted local storage” on page 677.

726
ACTIONSCRIPT 3.0 DEVELOPER’S GUIDE
Working with local SQL databases in AIR
Last updated 3/21/2011
Creating an encrypted database
Adobe AIR 1.5 and later
To use an encrypted database, the database file must be encrypted when it is created. Once a database is created as
unencrypted, it can’t be encrypted later. Likewise, an encrypted database can’t be unencrypted later. If needed you can
change the encryption key of an encrypted database. For details, see “Changing the encryption key of a database” on
page 728. If you have an existing database that’s not encrypted and you want to use database encryption, you can create
a new encrypted database and copy the existing table structure and data to the new database.
Creating an encrypted database is nearly identical to creating an unencrypted database, as described in “Creating a
database” on page 686. You first create a SQLConnection instance that represents the connection to the database. You
create the database by calling the SQLConnection object’s open() method or openAsync() method, specifying for the
database location a file that doesn’t exist yet. The only difference when creating an encrypted database is that you
provide a value for the encryptionKey parameter (the open() method’s fifth parameter and the openAsync()
method’s sixth parameter).
A valid encryptionKey parameter value is a ByteArray object containing exactly 16 bytes.
The following examples demonstrate creating an encrypted database. For simplicity, in these examples the encryption
key is hard-coded in the application code. However, this technique is strongly discouraged because it is not secure.
var conn:SQLConnection = new SQLConnection();
var encryptionKey:ByteArray = new ByteArray();
encryptionKey.writeUTFBytes("Some16ByteString"); // This technique is not secure!
// Create an encrypted database in asynchronous mode
conn.openAsync(dbFile, SQLMode.CREATE, null, false, 1024, encryptionKey);
// Create an encrypted database in synchronous mode
conn.open(dbFile, SQLMode.CREATE, false, 1024, encryptionKey);
For an example demonstrating a recommended way to generate an encryption key, see “Example: Generating and
using an encryption key” on page 730.
Connecting to an encrypted database
Adobe AIR 1.5 and later
Like creating an encrypted database, the procedure for opening a connection to an encrypted database is like
connecting to an unencrypted database. That procedure is described in greater detail in “Connecting to a database” on
page 693. You use the open() method to open a connection in synchronous execution mode, or the openAsync()
method to open a connection in asynchronous execution mode. The only difference is that to open an encrypted
database, you specify the correct value for the encryptionKey parameter (the open() method’s fifth parameter and
the openAsync() method’s sixth parameter).
If the encryption key that’s provided is not correct, an error occurs. For the open() method, a SQLError exception is
thrown. For the openAsync() method, the SQLConnection object dispatches a SQLErrorEvent, whose error
property contains a SQLError object. In either case, the SQLError object generated by the exception has the errorID
property value 3138. That error ID corresponds to the error message “File opened is not a database file.”
The following example demonstrates opening an encrypted database in asynchronous execution mode. For simplicity,
in this example the encryption key is hard-coded in the application code. However, this technique is strongly
discouraged because it is not secure.

727
ACTIONSCRIPT 3.0 DEVELOPER’S GUIDE
Working with local SQL databases in AIR
Last updated 3/21/2011
import flash.data.SQLConnection;
import flash.data.SQLMode;
import flash.events.SQLErrorEvent;
import flash.events.SQLEvent;
import flash.filesystem.File;
var conn:SQLConnection = new SQLConnection();
conn.addEventListener(SQLEvent.OPEN, openHandler);
conn.addEventListener(SQLErrorEvent.ERROR, errorHandler);
var dbFile:File = File.applicationStorageDirectory.resolvePath("DBSample.db");
var encryptionKey:ByteArray = new ByteArray();
encryptionKey.writeUTFBytes("Some16ByteString"); // This technique is not secure!
conn.openAsync(dbFile, SQLMode.UPDATE, null, false, 1024, encryptionKey);
function openHandler(event:SQLEvent):void
{
trace("the database opened successfully");
}
function errorHandler(event:SQLErrorEvent):void
{
if (event.error.errorID == 3138)
{
trace("Incorrect encryption key");
}
else
{
trace("Error message:", event.error.message);
trace("Details:", event.error.details);
}
}
The following example demonstrates opening an encrypted database in synchronous execution mode. For simplicity,
in this example the encryption key is hard-coded in the application code. However, this technique is strongly
discouraged because it is not secure.

728
ACTIONSCRIPT 3.0 DEVELOPER’S GUIDE
Working with local SQL databases in AIR
Last updated 3/21/2011
import flash.data.SQLConnection;
import flash.data.SQLMode;
import flash.filesystem.File;
var conn:SQLConnection = new SQLConnection();
var dbFile:File = File.applicationStorageDirectory.resolvePath("DBSample.db");
var encryptionKey:ByteArray = new ByteArray();
encryptionKey.writeUTFBytes("Some16ByteString"); // This technique is not secure!
try
{
conn.open(dbFile, SQLMode.UPDATE, false, 1024, encryptionKey);
trace("the database was created successfully");
}
catch (error:SQLError)
{
if (error.errorID == 3138)
{
trace("Incorrect encryption key");
}
else
{
trace("Error message:", error.message);
trace("Details:", error.details);
}
}
For an example demonstrating a recommended way to generate an encryption key, see “Example: Generating and
using an encryption key” on page 730.
Changing the encryption key of a database
Adobe AIR 1.5 and later
When a database is encrypted, you can change the encryption key for the database at a later time. To change a
database’s encryption key, first open a connection to the database by creating a SQLConnection instance and calling
its open() or openAsync() method. Once the database is connected, call the reencrypt() method, passing the new
encryption key as an argument.
Like most database operations, the reencrypt() method’s behavior varies depending on whether the database
connection uses synchronous or asynchronous execution mode. If you use the open() method to connect to the
database, the reencrypt() operation runs synchronously. When the operation finishes, execution continues with the
next line of code:
var newKey:ByteArray = new ByteArray();
// ... generate the new key and store it in newKey
conn.reencrypt(newKey);
On the other hand, if the database connection is opened using the openAsync() method, the reencrypt() operation
is asynchronous. Calling reencrypt() begins the reencryption process. When the operation completes, the
SQLConnection object dispatches a reencrypt event. You use an event listener to determine when the reencryption
finishes:

729
ACTIONSCRIPT 3.0 DEVELOPER’S GUIDE
Working with local SQL databases in AIR
Last updated 3/21/2011
var newKey:ByteArray = new ByteArray();
// ... generate the new key and store it in newKey
conn.addEventListener(SQLEvent.REENCRYPT, reencryptHandler);
conn.reencrypt(newKey);
function reencryptHandler(event:SQLEvent):void
{
// save the fact that the key changed
}
The reencrypt() operation runs in its own transaction. If the operation is interrupted or fails (for example, if the
application is closed before the operation finishes) the transaction is rolled back. In that case, the original encryption
key is still the encryption key for the database.
The reencrypt() method can’t be used to remove encryption from a database. Passing a null value or encryption
key that’s not a 16-byte ByteArray to the reencrypt() method results in an error.
Considerations for using encryption with a database
Adobe AIR 1.5 and later
The section “Uses for an encrypted database” on page 725 presents several cases in which you would want to use an
encrypted database. It’s obvious that the usage scenarios of different applications (including these and other scenarios)
have different privacy requirements. The way you architect the use of encryption in your application plays an
important part in controlling how private a database’s data is. For example, if you are using an encrypted database to
keep personal data private, even from other users of the same machine, then each user’s database needs its own
encryption key. For the greatest security, your application can generate the key from a user-entered password. Basing
the encryption key on a password ensures that even if another person is able to impersonate the user’s account on the
machine, the data still can’t be accessed. On the other end of the privacy spectrum, suppose you want a database file to
be readable by any user of your application but not to other applications. In that case every installed copy of the
application needs access to a shared encryption key.
You can design your application, and in particular the technique used to generate the encryption key, according to the
level of privacy that you want for your application data. The following list provides design suggestions for various levels
of data privacy:
•To make a database accessible to any user who has access to the application on any machine, use a single key that’s
available to all instances of the application. For example, the first time an application runs it can download the
shared encryption key from a server using a secure protocol such as SSL. It can then save the key in the encrypted
local store for future use. As an alternative, encrypt the data per-user on the machine, and synchronize the data with
a remote data store such as a server to make the data portable.
•To make a database accessible to a single user on any machine, generate the encryption key from a user secret (such
as a password). In particular, do not use any value that’s tied to a particular computer (such as a value stored in the
encrypted local store) to generate the key. As an alternative, encrypt the data per-user on the machine, and
synchronize the data with a remote data store such as a server to make the data portable.
•To make a database accessible only to a single individual on a single machine, generate the key from a password
and a generated salt. For an example of this technique, see “Example: Generating and using an encryption key” on
page 730.

730
ACTIONSCRIPT 3.0 DEVELOPER’S GUIDE
Working with local SQL databases in AIR
Last updated 3/21/2011
The following are additional security considerations that are important to keep in mind when designing an application
to use an encrypted database:
•A system is only as secure as its weakest link. If you are using a user-entered password to generate an encryption
key, consider imposing minimum length and complexity restrictions on passwords. A short password that uses
only basic characters can be guessed quickly.
•The source code of an AIR application is stored on a user’s machine in plain text (for HTML content) or an easily
decompilable binary format (for SWF content). Because the source code is accessible, two points to remember are:
•Never hard-code an encryption key in your source code
•Always assume that the technique used to generate an encryption key (such as random character generator or a
particular hashing algorithm) can be easily worked out by an attacker
•AIR database encryption uses the Advanced Encryption Standard (AES) with Counter with CBC-MAC (CCM)
mode. This encryption cipher requires a user-entered key to be combined with a salt value to be secure. For an
example of this, see “Example: Generating and using an encryption key” on page 730.
•When you elect to encrypt a database, all disk files used by the database engine in conjunction with that database
are encrypted. However, the database engine holds some data temporarily in an in-memory cache to improve read-
and write-time performance in transactions. Any memory-resident data is unencrypted. If an attacker is able to
access the memory used by an AIR application, for example by using a debugger, the data in a database that is
currently open and unencrypted would be available.
Example: Generating and using an encryption key
Adobe AIR 1.5 and later
This example application demonstrates one technique for generating an encryption key. This application is designed
to provide the highest level of privacy and security for users’ data. One important aspect of securing private data is to
require the user to enter a password each time the application connects to the database. Consequently, as shown in this
example, an application that requires this level of privacy should never directly store the database encryption key.
The application consists of two parts: an ActionScript class that generates an encryption key (the
EncryptionKeyGenerator class), and a basic user interface that demonstrates how to use that class. For the complete
source code, see “Complete example code for generating and using an encryption key” on page 732.
Using the EncryptionKeyGenerator class to obtain a secure encryption key
Adobe AIR 1.5 and later
It isn’t necessary to understand the details of how the EncryptionKeyGenerator class works to use it in your
application. If you are interested in the details of how the class generates an encryption key for a database, see
“Understanding the EncryptionKeyGenerator class” on page 737.
Follow these steps to use the EncryptionKeyGenerator class in your application:
1Download the EncryptionKeyGenerator class as source code or a compiled SWC. The EncryptionKeyGenerator
class is included in the open-source ActionScript 3.0 core library (as3corelib) project. You can download the
as3corelib package including source code and documentation. You can also download the SWC or source code files
from the project page.
2Place the source code for the EncryptionKeyGenerator class (or the as3corelib SWC) in a location where your
application source code can find it.
3In your application source code, add an import statement for the EncryptionKeyGenerator class.

731
ACTIONSCRIPT 3.0 DEVELOPER’S GUIDE
Working with local SQL databases in AIR
Last updated 3/21/2011
import com.adobe.air.crypto.EncryptionKeyGenerator;
4Before the point where the code creates the database or opens a connection to it, add code to create an
EncryptionKeyGenerator instance by calling the EncryptionKeyGenerator() constructor.
var keyGenerator:EncryptionKeyGenerator = new EncryptionKeyGenerator();
5Obtain a password from the user:
var password:String = passwordInput.text;
if (!keyGenerator.validateStrongPassword(password))
{
// display an error message
return;
}
The EncryptionKeyGenerator instance uses this password as the basis for the encryption key (shown in the next
step). The EncryptionKeyGenerator instance tests the password against certain strong password validation
requirements. If the validation fails, an error occurs. As the example code shows, you can check the password ahead
of time by calling the EncryptionKeyGenerator object’s validateStrongPassword() method. That way you can
determine whether the password meets the minimum requirements for a strong password and avoid an error.
6Generate the encryption key from the password:
var encryptionKey:ByteArray = keyGenerator.getEncryptionKey(password);
The getEncryptionKey() method generates and returns the encryption key (a 16-byte ByteArray). You can then
use the encryption key to create your new encrypted database or open your existing one.
The getEncryptionKey() method has one required parameter, which is the password obtained in step 5.
Note: To maintain the highest level of security and privacy for data, an application must require the user to enter a
password each time the application connects to the database. Do not store the user’s password or the database
encryption key directly. Doing so exposes security risks. Instead, as demonstrated in this example, an application
should use the same technique to derive the encryption key from the password both when creating the encrypted
database and when connecting to it later.
The getEncryptionKey() method also accepts a second (optional) parameter, the overrideSaltELSKey
parameter. The EncryptionKeyGenerator creates a random value (known as a salt) that is used as part of the
encryption key. In order to be able to re-create the encryption key, the salt value is stored in the Encrypted Local
Store (ELS) of your AIR application. By default, the EncryptionKeyGenerator class uses a particular String as the
ELS key. Although unlikely, it’s possible that the key can conflict with another key your application uses. Instead of
using the default key, you might want to specify your own ELS key. In that case, specify a custom key by passing it
as the second getEncryptionKey() parameter, as shown here:
var customKey:String = "My custom ELS salt key";
var encryptionKey:ByteArray = keyGenerator.getEncryptionKey(password, customKey);
7Create or open the database
With an encryption key returned by the getEncryptionKey() method, your code can create a new encrypted
database or attempt to open the existing encrypted database. In either case you use the SQLConnection class’s
open() or openAsync() method, as described in “Creating an encrypted database” on page 726 and “Connecting
to an encrypted database” on page 726.
In this example, the application is designed to open the database in asynchronous execution mode. The code sets
up the appropriate event listeners and calls the openAsync() method, passing the encryption key as the final
argument:

732
ACTIONSCRIPT 3.0 DEVELOPER’S GUIDE
Working with local SQL databases in AIR
Last updated 3/21/2011
conn.addEventListener(SQLEvent.OPEN, openHandler);
conn.addEventListener(SQLErrorEvent.ERROR, openError);
conn.openAsync(dbFile, SQLMode.CREATE, null, false, 1024, encryptionKey);
In the listener methods, the code removes the event listener registrations. It then displays a status message
indicating whether the database was created, opened, or whether an error occurred. The most noteworthy part of
these event handlers is in the openError() method. In that method an if statement checks if the database exists
(meaning that the code is attempting to connect to an existing database) and if the error ID matches the constant
EncryptionKeyGenerator.ENCRYPTED_DB_PASSWORD_ERROR_ID. If both of these conditions are true, it probably
means that the password the user entered is incorrect. (It could also mean that the specified file isn’t a database file
at all.) The following is the code that checks the error ID:
if (!createNewDB && event.error.errorID ==
EncryptionKeyGenerator.ENCRYPTED_DB_PASSWORD_ERROR_ID)
{
statusMsg.text = "Incorrect password!";
}
else
{
statusMsg.text = "Error creating or opening database.";
}
For the complete code for the example event listeners, see “Complete example code for generating and using an
encryption key” on page 732.
Complete example code for generating and using an encryption key
Adobe AIR 1.5 and later
The following is the complete code for the example application “Generating and using an encryption key.” The code
consists of two parts.
The example uses the EncryptionKeyGenerator class to create an encryption key from a password. The
EncryptionKeyGenerator class is included in the open-source ActionScript 3.0 core library (as3corelib) project. You
can download the as3corelib package including source code and documentation. You can also download the SWC or
source code files from the project page.
Flex example
The application MXML file contains the source code for a simple application that creates or opens a connection to an
encrypted database:

733
ACTIONSCRIPT 3.0 DEVELOPER’S GUIDE
Working with local SQL databases in AIR
Last updated 3/21/2011
<?xml version="1.0" encoding="utf-8"?>
<mx:WindowedApplication xmlns:mx="http://www.adobe.com/2006/mxml" layout="vertical"
creationComplete="init();">
<mx:Script>
<
734
ACTIONSCRIPT 3.0 DEVELOPER’S GUIDE
Working with local SQL databases in AIR
Last updated 3/21/2011
conn.openAsync(dbFile, SQLMode.CREATE, null, false, 1024, encryptionKey);
}
private function openHandler(event:SQLEvent):void
{
conn.removeEventListener(SQLEvent.OPEN, openHandler);
conn.removeEventListener(SQLErrorEvent.ERROR, openError);
statusMsg.setStyle("color", 0x009900);
if (createNewDB)
{
statusMsg.text = "The encrypted database was created successfully.";
}
else
{
statusMsg.text = "The encrypted database was opened successfully.";
}
}
private function openError(event:SQLErrorEvent):void
{
conn.removeEventListener(SQLEvent.OPEN, openHandler);
conn.removeEventListener(SQLErrorEvent.ERROR, openError);
if (!createNewDB && event.error.errorID ==
EncryptionKeyGenerator.ENCRYPTED_DB_PASSWORD_ERROR_ID)
{
statusMsg.text = "Incorrect password!";
}
else
{
statusMsg.text = "Error creating or opening database.";
}
}
]]>
</mx:Script>
<mx:Text id="instructions" text="Enter a password to create an encrypted database. The next
time you open the application, you will need to re-enter the password to open the database
again." width="75%" height="65"/>
<mx:HBox>
<mx:TextInput id="passwordInput" displayAsPassword="true"/>
<mx:Button id="openButton" label="Create Database" click="openConnection();"/>
</mx:HBox>
<mx:Text id="statusMsg" color="#990000" width="75%"/>
</mx:WindowedApplication>
Flash Professional example
The application FLA file contains the source code for a simple application that creates or opens a connection to an
encrypted database. The FLA file has four components placed on the stage:

735
ACTIONSCRIPT 3.0 DEVELOPER’S GUIDE
Working with local SQL databases in AIR
Last updated 3/21/2011
The code for the application is defined on a keyframe on frame 1 of the main timeline. The following is the code for
the application:
import com.adobe.air.crypto.EncryptionKeyGenerator;
const dbFileName:String = "encryptedDatabase.db";
var dbFile:File;
var createNewDB:Boolean = true;
var conn:SQLConnection;
init();
// ------- Event handling -------
function init():void
{
passwordInput.displayAsPassword = true;
openButton.addEventListener(MouseEvent.CLICK, openConnection);
statusMsg.setStyle("textFormat", new TextFormat(null, null, 0x990000));
conn = new SQLConnection();
dbFile = File.applicationStorageDirectory.resolvePath(dbFileName);
if (dbFile.exists)
{
createNewDB = false;
instructions.text = "Enter your database password to open the encrypted database.";
openButton.label = "Open Database";
}
else
{
instructions.text = "Enter a password to create an encrypted database. The next time
you open the application, you will need to re-enter the password to open the database again.";
openButton.label = "Create Database";
}
}
function openConnection(event:MouseEvent):void
{
var keyGenerator:EncryptionKeyGenerator = new EncryptionKeyGenerator();
var password:String = passwordInput.text;
if (password == null || password.length <= 0)
{
statusMsg.text = "Please specify a password.";
return;
Instance name Component type Description
instructions Label Contains the instructions given to the user
passwordInput TextInput Input field where the user enters the password
openButton Button Button the user clicks after entering the password
statusMsg Label Displays status (success or failure) messages

736
ACTIONSCRIPT 3.0 DEVELOPER’S GUIDE
Working with local SQL databases in AIR
Last updated 3/21/2011
}
if (!keyGenerator.validateStrongPassword(password))
{
statusMsg.text = "The password must be 8-32 characters long. It must contain at least
one lowercase letter, at least one uppercase letter, and at least one number or symbol.";
return;
}
passwordInput.text = "";
passwordInput.enabled = false;
openButton.enabled = false;
var encryptionKey:ByteArray = keyGenerator.getEncryptionKey(password);
conn.addEventListener(SQLEvent.OPEN, openHandler);
conn.addEventListener(SQLErrorEvent.ERROR, openError);
conn.openAsync(dbFile, SQLMode.CREATE, null, false, 1024, encryptionKey);
}
function openHandler(event:SQLEvent):void
{
conn.removeEventListener(SQLEvent.OPEN, openHandler);
conn.removeEventListener(SQLErrorEvent.ERROR, openError);
statusMsg.setStyle("textFormat", new TextFormat(null, null, 0x009900));
if (createNewDB)
{
statusMsg.text = "The encrypted database was created successfully.";
}
else
{
statusMsg.text = "The encrypted database was opened successfully.";
}
}
function openError(event:SQLErrorEvent):void
{
conn.removeEventListener(SQLEvent.OPEN, openHandler);
conn.removeEventListener(SQLErrorEvent.ERROR, openError);
if (!createNewDB && event.error.errorID ==
EncryptionKeyGenerator.ENCRYPTED_DB_PASSWORD_ERROR_ID)
{
statusMsg.text = "Incorrect password!";
}
else
{
statusMsg.text = "Error creating or opening database.";
}
}

737
ACTIONSCRIPT 3.0 DEVELOPER’S GUIDE
Working with local SQL databases in AIR
Last updated 3/21/2011
Understanding the EncryptionKeyGenerator class
Adobe AIR 1.5 and later
It isn’t necessary to understand the inner workings of the EncryptionKeyGenerator class to use it to create a secure
encryption key for your application database. The process for using the class is explained in “Using the
EncryptionKeyGenerator class to obtain a secure encryption key” on page 730. However, you might find it valuable to
understand the techniques that the class uses. For example, you might want to adapt the class or incorporate some of
its techniques for situations where a different level of data privacy is desired.
The EncryptionKeyGenerator class is included in the open-source ActionScript 3.0 core library (as3corelib) project.
You can download the as3corelib package including source code and documentation.You can also view the source
code on the project site or download it to follow along with the explanations.
When code creates an EncryptionKeyGenerator instance and calls its getEncryptionKey() method, several steps are
taken to ensure that only the rightful user can access the data. The process is the same to generate an encryption key
from a user-entered password before the database is created as well as to re-create the encryption key to open the
database.
Obtain and validate a strong password
Adobe AIR 1.5 and later
When code calls the getEncryptionKey() method, it passes in a password as a parameter. The password is used as
the basis for the encryption key. By using a piece of information that only the user knows, this design ensures that only
the user who knows the password can access the data in the database. Even if an attacker accesses the user’s account
on the computer, the attacker can’t get into the database without knowing the password. For maximum security, the
application never stores the password.
An application’s code creates an EncryptionKeyGenerator instance and calls its getEncryptionKey() method,
passing a user-entered password as an argument (the variable password in this example):
var keyGenerator:EncryptionKeyGenerator = new EncryptionKeyGenerator();
var encryptionKey:ByteArray = keyGenerator.getEncryptionKey(password);
The first step the EncryptionKeyGenerator class takes when the getEncryptionKey() method is called is to check the
user-entered password to ensure that it meets the password strength requirements. The EncryptionKeyGenerator class
requires a password to be 8 - 32 characters long. The password must contain a mix of uppercase and lowercase letters
and at least one number or symbol character.
The regular expression that checks this pattern is defined as a constant named STRONG_PASSWORD_PATTERN:
private static const STRONG_PASSWORD_PATTERN:RegExp =
/(?=^.{8,32}$)((?=.*\d)|(?=.*\W+))(?![.\n])(?=.*[A-Z])(?=.*[a-z]).*$/;
The code that checks the password is in the EncryptionKeyGenerator class’s validateStrongPassword() method.
The code is as follows:
public function vaidateStrongPassword(password:String):Boolean
{
if (password == null || password.length <= 0)
{
return false;
}
return STRONG_PASSWORD_PATTERN.test(password))
}

738
ACTIONSCRIPT 3.0 DEVELOPER’S GUIDE
Working with local SQL databases in AIR
Last updated 3/21/2011
Internally the getEncryptionKey() method calls the EncryptionKeyGenerator class’s validateStrongPassword()
method and, if the password isn’t valid, throws an exception. The validateStrongPassword() method is a public
method so that application code can check a password without calling the getEncryptionKey() method to avoid
causing an error.
Expand the password to 256 bits
Adobe AIR 1.5 and later
Later in the process, the password is required to be 256 bits long. Rather than require each user to enter a password
that’s exactly 256 bits (32 characters) long, the code creates a longer password by repeating the password characters.
The getEncryptionKey() method calls the concatenatePassword() method to perform the task of creating the
long password.
var concatenatedPassword:String = concatenatePassword(password);
The following is the code for the concatenatePassword() method:
private function concatenatePassword(pwd:String):String
{
var len:int = pwd.length;
var targetLength:int = 32;
if (len == targetLength)
{
return pwd;
}
var repetitions:int = Math.floor(targetLength / len);
var excess:int = targetLength % len;
var result:String = "";
for (var i:uint = 0; i < repetitions; i++)
{
result += pwd;
}
result += pwd.substr(0, excess);
return result;
}
If the password is less than 256 bits, the code concatenates the password with itself to make it 256 bits. If the length
doesn’t work out exactly, the last repetition is shortened to get exactly 256 bits.
Generate or retrieve a 256-bit salt value
Adobe AIR 1.5 and later
The next step is to get a 256-bit salt value that in a later step is combined with the password. A salt is a random value
that is added to or combined with a user-entered value to form a password. Using a salt with a password ensures that
even if a user chooses a real word or common term as a password, the password-plus-salt combination that the system
uses is a random value. This randomness helps guard against a dictionary attack, where an attacker uses a list of words
to attempt to guess a password. In addition, by generating the salt value and storing it in the encrypted local store, it is
tied to the user’s account on the machine on which the database file is located.

739
ACTIONSCRIPT 3.0 DEVELOPER’S GUIDE
Working with local SQL databases in AIR
Last updated 3/21/2011
If the application is calling the getEncryptionKey() method for the first time, the code creates a random 256-bit salt
value. Otherwise, the code loads the salt value from the encrypted local store.
The salt is stored in a variable named salt. The code determines if it has already created a salt by attempting to load
the salt from the encrypted local store:
var salt:ByteArray = EncryptedLocalStore.getItem(saltKey);
if (salt == null)
{
salt = makeSalt();
EncryptedLocalStore.setItem(saltKey, salt);
}
If the code is creating a new salt value, the makeSalt() method generates a 256-bit random value. Because the value
is eventually stored in the encrypted local store, it is generated as a ByteArray object. The makeSalt() method uses
the Math.random() method to randomly generate the value. The Math.random() method can’t generate 256 bits at
one time. Instead, the code uses a loop to call Math.random() eight times. Each time, a random uint value between 0
and 4294967295 (the maximum uint value) is generated. A uint value is used for convenience, because a uint uses
exactly 32 bits. By writing eight uint values into the ByteArray, a 256-bit value is generated. The following is the code
for the makeSalt() method:
private function makeSalt():ByteArray
{
var result:ByteArray = new ByteArray;
for (var i:uint = 0; i < 8; i++)
{
result.writeUnsignedInt(Math.round(Math.random() * uint.MAX_VALUE));
}
return result;
}
When the code is saving the salt to the Encrypted Local Store (ELS) or retrieving the salt from the ELS, it needs a String
key under which the salt is saved. Without knowing the key, the salt value can’t be retrieved. In that case, the
encryption key can’t be re-created each time to reopen the database. By default, the EncryptionKeyGenerator uses a
predefined ELS key that is defined in the constant SALT_ELS_KEY. Instead of using the default key, application code
can also specify an ELS key to use in the call to the getEncryptionKey() method. Either the default or the application-
specified salt ELS key is stored in a variable named saltKey. That variable is used in the calls to
EncryptedLocalStore.setItem() and EncryptedLocalStore.getItem(), as shown previously.
Combine the 256-bit password and salt using the XOR operator
Adobe AIR 1.5 and later
The code now has a 256-bit password and a 256-bit salt value. It next uses a bitwise XOR operation to combine the salt
and the concatenated password into a single value. In effect, this technique creates a 256-bit password consisting of
characters from the entire range of possible characters. This principle is true even though most likely the actual
password input consists of primarily alphanumeric characters. This increased randomness provides the benefit of
making the set of possible passwords large without requiring the user to enter a long complex password.
The result of the XOR operation is stored in the variable unhashedKey. The actual process of performing a bitwise
XOR on the two values happens in the xorBytes() method:
var unhashedKey:ByteArray = xorBytes(concatenatedPassword, salt);

740
ACTIONSCRIPT 3.0 DEVELOPER’S GUIDE
Working with local SQL databases in AIR
Last updated 3/21/2011
The bitwise XOR operator (^) takes two uint values and returns a uint value. (A uint value contains 32 bits.) The input
values passed as arguments to the xorBytes() method are a String (the password) and a ByteArray (the salt).
Consequently, the code uses a loop to extract 32 bits at a time from each input to combine using the XOR operator.
private function xorBytes(passwordString:String, salt:ByteArray):ByteArray
{
var result:ByteArray = new ByteArray();
for (var i:uint = 0; i < 32; i += 4)
{
// ...
}
return result;
}
Within the loop, first 32 bits (4 bytes) are extracted from the passwordString parameter. Those bits are extracted and
converted into a uint (o1) in a two-part process. First, the charCodeAt() method gets each character’s numeric value.
Next, that value is shifted to the appropriate position in the uint using the bitwise left shift operator (<<) and the shifted
value is added to o1. For example, the first character (i) becomes the first 8 bits by using the bitwise left shift operator
(<<) to shift the bits left by 24 bits and assigning that value to o1. The second character (i + 1) becomes the second
8 bits by shifting its value left 16 bits and adding the result to o1. The third and fourth characters’ values are added the
same way.
// ...
// Extract 4 bytes from the password string and convert to a uint
var o1:uint = passwordString.charCodeAt(i) << 24;
o1 += passwordString.charCodeAt(i + 1) << 16;
o1 += passwordString.charCodeAt(i + 2) << 8;
o1 += passwordString.charCodeAt(i + 3);
// ...
The variable o1 now contains 32 bits from the passwordString parameter. Next, 32 bits are extracted from the salt
parameter by calling its readUnsignedInt() method. The 32 bits are stored in the uint variable o2.
// ...
salt.position = i;
var o2:uint = salt.readUnsignedInt();
// ...
Finally, the two 32-bit (uint) values are combined using the XOR operator and the result is written into a ByteArray
named result.
// ...
var xor:uint = o1 ^ o2;
result.writeUnsignedInt(xor);
// ...
Once the loop completes, the ByteArray containing the XOR result is returned.

741
ACTIONSCRIPT 3.0 DEVELOPER’S GUIDE
Working with local SQL databases in AIR
Last updated 3/21/2011
// ...
}
return result;
}
Hash the key
Adobe AIR 1.5 and later
Once the concatenated password and the salt have been combined, the next step is to further secure this value by
hashing it using the SHA-256 hashing algorithm. Hashing the value makes it more difficult for an attacker to reverse-
engineer it.
At this point the code has a ByteArray named
unhashedKey
containing the concatenated password combined with the
salt. The ActionScript 3.0 core library (as3corelib) project includes a SHA256 class in the com.adobe.crypto package.
The
SHA256.hashBytes()
method that performs a SHA-256 hash on a ByteArray and returns a String containing the
256-bit hash result as a hexadecimal number. The EncryptionKeyGenerator class uses the SHA256 class to hash the key:
var hashedKey:String = SHA256.hashBytes(unhashedKey);
Extract the encryption key from the hash
Adobe AIR 1.5 and later
The encryption key must be a ByteArray that is exactly 16 bytes (128 bits) long. The result of the SHA-256 hashing
algorithm is always 256 bits long. Consequently, the final step is to select 128 bits from the hashed result to use as the
actual encryption key.
In the EncryptionKeyGenerator class, the code reduces the key to 128 bits by calling the generateEncryptionKey()
method. It then returns that method’s result as the result of the getEncryptionKey() method:
var encryptionKey:ByteArray = generateEncryptionKey(hashedKey);
return encryptionKey;
It isn’t necessary to use the first 128 bits as the encryption key. You could select a range of bits starting at some arbitrary
point, you could select every other bit, or use some other way of selecting bits. The important thing is that the code
selects 128 distinct bits, and that the same 128 bits are used each time.
In this case, the generateEncryptionKey() method uses the range of bits starting at the 18th byte as the encryption
key. As mentioned previously, the SHA256 class returns a String containing a 256-bit hash as a hexadecimal number.
A single block of 128 bits has too many bytes to add to a ByteArray at one time. Consequently, the code uses a for loop
to extract characters from the hexadecimal String, convert them to actual numeric values, and add them to the
ByteArray. The SHA-256 result String is 64 characters long. A range of 128 bits equals 32 characters in the String, and
each character represents 4 bits. The smallest increment of data you can add to a ByteArray is one byte (8 bits), which
is equivalent to two characters in the hash String. Consequently, the loop counts from 0 to 31 (32 characters) in
increments of 2 characters.
Within the loop, the code first determines the starting position for the current pair of characters. Since the desired
range starts at the character at index position 17 (the 18th byte), the position variable is assigned the current iterator
value (i) plus 17. The code uses the String object’s substr() method to extract the two characters at the current
position. Those characters are stored in the variable hex. Next, the code uses the parseInt() method to convert the
hex String to a decimal integer value. It stores that value in the int variable byte. Finally, the code adds the value in
byte to the result ByteArray using its writeByte() method. When the loop finishes, the result ByteArray contains
16 bytes and is ready to use as a database encryption key.

742
ACTIONSCRIPT 3.0 DEVELOPER’S GUIDE
Working with local SQL databases in AIR
Last updated 3/21/2011
private function generateEncryptionKey(hash:String):ByteArray
{
var result:ByteArray = new ByteArray();
for (var i:uint = 0; i < 32; i += 2)
{
var position:uint = i + 17;
var hex:String = hash.substr(position, 2);
var byte:int = parseInt(hex, 16);
result.writeByte(byte);
}
return result;
}
Strategies for working with SQL databases
Adobe AIR 1.0 and later
There are various ways that an application can access and work with a local SQL database. The application design can
vary in terms of how the application code is organized, the sequence and timing of how operations are performed, and
so on. The techniques you choose can have an impact on how easy it is to develop your application. They can affect
how easy it is to modify the application in future updates. They can also affect how well the application performs from
the users’ perspective.
Distributing a pre-populated database
Adobe AIR 1.0 and later
When you use an AIR local SQL database in your application, the application expects a database with a certain
structure of tables, columns, and so forth. Some applications also expect certain data to be pre-populated in the
database file. One way to ensure that the database has the proper structure is to create the database within the
application code. When the application loads it checks for the existence of its database file in a particular location. If
the file doesn’t exist, the application executes a set of commands to create the database file, create the database
structure, and populate the tables with the initial data.
The code that creates the database and its tables is frequently complex. It is often only used once in the installed lifetime
of the application, but still adds to the size and complexity of the application. As an alternative to creating the database,
structure, and data programmatically, you can distribute a pre-populated database with your application. To distribute
a predefined database, include the database file in the application’s AIR package.
Like all files that are included in an AIR package, a bundled database file is installed in the application directory (the
directory represented by the File.applicationDirectory property). However, files in that directory are read only.
Use the file from the AIR package as a “template” database. The first time a user runs the application, copy the original
database file into the user’s “Pointing to the application storage directory” on page 639 (or another location), and use
that database within the application.

743
ACTIONSCRIPT 3.0 DEVELOPER’S GUIDE
Working with local SQL databases in AIR
Last updated 3/21/2011
Best practices for working with local SQL databases
Adobe AIR 1.0 and later
The following list is a set of suggested techniques you can use to improve the performance, security, and ease of
maintenance of your applications when working with local SQL databases.
Pre-create database connections
Adobe AIR 1.0 and later
Even if your application doesn’t execute any statements when it first loads, instantiate a SQLConnection object and
call its open() or openAsync() method ahead of time (such as after the initial application startup) to avoid delays
when running statements. See “Connecting to a database” on page 693.
Reuse database connections
Adobe AIR 1.0 and later
If you access a certain database throughout the execution time of your application, keep a reference to the
SQLConnection instance, and reuse it throughout the application, rather than closing and reopening the connection.
See “Connecting to a database” on page 693.
Favor asynchronous execution mode
Adobe AIR 1.0 and later
When writing data-access code, it can be tempting to execute operations synchronously rather than asynchronously,
because using synchronous operations frequently requires shorter and less complex code. However, as described in
“Using synchronous and asynchronous database operations” on page 720, synchronous operations can have a
performance impact that is obvious to users and detrimental to their experience with an application. The amount of
time a single operation takes varies according to the operation and particularly the amount of data it involves. For
instance, a SQL INSERT statement that only adds a single row to the database takes less time than a SELECT statement
that retrieves thousands of rows of data. However, when you’re using synchronous execution to perform multiple
operations, the operations are usually strung together. Even if the time each single operation takes is very short, the
application is frozen until all the synchronous operations finish. As a result, the cumulative time of multiple operations
strung together may be enough to stall your application.
Use asynchronous operations as a standard approach, especially with operations that involve large numbers of rows.
There is a technique for dividing up the processing of large sets of SELECT statement results, described in “Retrieving
SELECT results in parts” on page 709. However, this technique can only be used in asynchronous execution mode.
Only use synchronous operations when you can’t achieve certain functionality using asynchronous programming,
when you’ve considered the performance trade-off that your application’s users will face, and when you’ve tested your
application so that you know how your application’s performance is affected. Using asynchronous execution can
involve more complex coding. However, remember that you only have to write the code once, but the application’s
users have to use it repeatedly, fast or slow.
In many cases, by using a separate SQLStatement instance for each SQL statement to be executed, multiple SQL
operations can be queued up at one time, which makes asynchronous code like synchronous code in terms of how the
code is written. For more information, see “Understanding the asynchronous execution model” on page 724.

744
ACTIONSCRIPT 3.0 DEVELOPER’S GUIDE
Working with local SQL databases in AIR
Last updated 3/21/2011
Use separate SQL statements and don’t change the SQLStatement’s text property
Adobe AIR 1.0 and later
For any SQL statement that is executed more than once in an application, create a separate SQLStatement instance for
each SQL statement. Use that SQLStatement instance each time that SQL command executes. For example, suppose
you are building an application that includes four different SQL operations that are performed multiple times. In that
case, create four separate SQLStatement instances and call each statement’s execute() method to run it. Avoid the
alternative of using a single SQLStatement instance for all SQL statements, redefining its text property each time
before executing the statement.
Use statement parameters
Adobe AIR 1.0 and later
Use SQLStatement parameters—never concatenate user input into statement text. Using parameters makes your
application more secure because it prevents the possibility of SQL injection attacks. It makes it possible to use objects
in queries (rather than only SQL literal values). It also makes statements run more efficiently because they can be
reused without needing to be recompiled each time they’re executed. See “Using parameters in statements” on
page 697 for more information.

745
Last updated 3/21/2011
Chapter 39: Working with byte arrays
Flash Player 9 and later, Adobe AIR 1.0 and later
The ByteArray class allows you to read from and write to a binary stream of data, which is essentially an array of bytes.
This class provides a way to access data at the most elemental level. Because computer data consists of bytes, or groups
of 8 bits, the ability to read data in bytes means that you can access data for which classes and access methods do not
exist. The ByteArray class allows you to parse any stream of data, from a bitmap to a stream of data traveling over the
network, at the byte level.
The writeObject() method allows you to write an object in serialized Action Message Format (AMF) to a ByteArray,
while the readObject() method allows you to read a serialized object from a ByteArray to a variable of the original
data type. You can serialize any object except for display objects, which are those objects that can be placed on the
display list. You can also assign serialized objects back to custom class instances if the custom class is available to the
runtime. After converting an object to AMF, you can efficiently transfer it over a network connection or save it to a file.
The sample Adobe® AIR® application described here reads a .zip file as an example of processing a byte stream,
extracting a list of the files that the .zip file contains and writing them to the desktop.
More Help topics
flash.utils.ByteArray
flash.utils.IExternalizable
Action Message Format specification
Reading and writing a ByteArray
Flash Player 9 and later, Adobe AIR 1.0 and later
The ByteArray class is part of the flash.utils package. To create a ByteArray object in ActionScript 3.0, import the
ByteArray class and invoke the constructor, as shown in the following example:
import flash.utils.ByteArray;
var stream:ByteArray = new ByteArray();
ByteArray methods
Flash Player 9 and later, Adobe AIR 1.0 and later
Any meaningful data stream is organized into a format that you can analyze to find the information that you want. A
record in a simple employee file, for example, would probably include an ID number, a name, an address, a phone
number, and so on. An MP3 audio file contains an ID3 tag that identifies the title, author, album, publishing date, and
genre of the file that’s being downloaded. The format allows you to know the order in which to expect the data on the
data stream. It allows you to read the byte stream intelligently.

746
ACTIONSCRIPT 3.0 DEVELOPER’S GUIDE
Working with byte arrays
Last updated 3/21/2011
The ByteArray class includes several methods that make it easier to read from and write to a data stream. Some of these
methods include readBytes() and writeBytes(), readInt() and writeInt(), readFloat() and writeFloat(),
readObject() and writeObject(), and readUTFBytes() and writeUTFBytes(). These methods enable you to
read data from the data stream into variables of specific data types and write from specific data types directly to the
binary data stream.
For example, the following code reads a simple array of strings and floating-point numbers and writes each element
to a ByteArray. The organization of the array allows the code to call the appropriate ByteArray methods
(writeUTFBytes() and writeFloat()) to write the data. The repeating data pattern makes it possible to read the
array with a loop.
// The following example reads a simple Array (groceries), made up of strings
// and floating-point numbers, and writes it to a ByteArray.
import flash.utils.ByteArray;
// define the grocery list Array
var groceries:Array = ["milk", 4.50, "soup", 1.79, "eggs", 3.19, "bread" , 2.35]
// define the ByteArray
var bytes:ByteArray = new ByteArray();
// for each item in the array
for (var i:int = 0; i < groceries.length; i++) {
bytes.writeUTFBytes(groceries[i++]); //write the string and position to the next item
bytes.writeFloat(groceries[i]);// write the float
trace("bytes.position is: " + bytes.position);//display the position in ByteArray
}
trace("bytes length is: " + bytes.length);// display the length
The position property
Flash Player 9 and later, Adobe AIR 1.0 and later
The position property stores the current position of the pointer that indexes the ByteArray during reading or writing.
The initial value of the position property is 0 (zero) as shown in the following code:
var bytes:ByteArray = new ByteArray();
trace("bytes.position is initially: " + bytes.position); // 0
When you read from or write to a ByteArray, the method that you use updates the position property to point to the
location immediately following the last byte that was read or written. For example, the following code writes a string
to a ByteArray and afterward the position property points to the byte immediately following the string in the
ByteArray:
var bytes:ByteArray = new ByteArray();
trace("bytes.position is initially: " + bytes.position); // 0
bytes.writeUTFBytes("Hello World!");
trace("bytes.position is now: " + bytes.position);// 12
Likewise, a read operation increments the position property by the number of bytes read.

747
ACTIONSCRIPT 3.0 DEVELOPER’S GUIDE
Working with byte arrays
Last updated 3/21/2011
var bytes:ByteArray = new ByteArray();
trace("bytes.position is initially: " + bytes.position); // 0
bytes.writeUTFBytes("Hello World!");
trace("bytes.position is now: " + bytes.position);// 12
bytes.position = 0;
trace("The first 6 bytes are: " + (bytes.readUTFBytes(6)));//Hello
trace("And the next 6 bytes are: " + (bytes.readUTFBytes(6)));// World!
Notice that you can set the position property to a specific location in the ByteArray to read or write at that offset.
The bytesAvailable and length properties
Flash Player 9 and later, Adobe AIR 1.0 and later
The length and bytesAvailable properties tell you how long a ByteArray is and how many bytes remain in it from
the current position to the end. The following example illustrates how you can use these properties. The example writes
a String of text to the ByteArray and then reads the ByteArray one byte at a time until it encounters either the character
“a” or the end (bytesAvailable <= 0).
var bytes:ByteArray = new ByteArray();
var text:String = "Lorem ipsum dolor sit amet, consectetuer adipiscing elit. Vivamus etc.";
bytes.writeUTFBytes(text); // write the text to the ByteArray
trace("The length of the ByteArray is: " + bytes.length);// 70
bytes.position = 0; // reset position
while (bytes.bytesAvailable > 0 && (bytes.readUTFBytes(1) != 'a')) {
//read to letter a or end of bytes
}
if (bytes.position < bytes.bytesAvailable) {
trace("Found the letter a; position is: " + bytes.position); // 23
trace("and the number of bytes available is: " + bytes.bytesAvailable);// 47
}
The endian property
Flash Player 9 and later, Adobe AIR 1.0 and later
Computers can differ in how they store multibyte numbers, that is, numbers that require more than 1 byte of memory
to store them. An integer, for example, can take 4 bytes, or 32 bits, of memory. Some computers store the most
significant byte of the number first, in the lowest memory address, and others store the least significant byte first. This
attribute of a computer, or of byte ordering, is referred to as being either big endian (most significant byte first) or little
endian (least significant byte first). For example, the number 0x31323334 would be stored as follows for big endian and
little endian byte ordering, where a0 represents the lowest memory address of the 4 bytes and a3 represents the highest:
Big
Endian
Big
Endian
Big
Endian
Big
Endian
a0 a1 a2 a3
31 32 33 34

748
ACTIONSCRIPT 3.0 DEVELOPER’S GUIDE
Working with byte arrays
Last updated 3/21/2011
The endian property of the ByteArray class allows you to denote this byte order for multibyte numbers that you are
processing. The acceptable values for this property are either "bigEndian" or "littleEndian" and the Endian class
defines the constants BIG_ENDIAN and LITTLE_ENDIAN for setting the endian property with these strings.
The compress() and uncompress() methods
Flash Player 9 and later, Adobe AIR 1.0 and later
The compress() method allows you to compress a ByteArray in accordance with a compression algorithm that you
specify as a parameter. The uncompress() method allows you to uncompress a compressed ByteArray in accordance
with a compression algorithm. After calling compress() and uncompress(), the length of the byte array is set to the
new length and the position property is set to the end.
The CompressionAlgorithm class (AIR) defines constants that you can use to specify the compression algorithm. The
ByteArray class supports both the deflate (AIR-only) and zlib algorithms. The deflate compression algorithm is used
in several compression formats, such as zlib, gzip, and some zip implementations. The zlib compressed data format is
described at http://www.ietf.org/rfc/rfc1950.txt and the deflate compression algorithm is described at
http://www.ietf.org/rfc/rfc1951.txt.
The following example compresses a ByteArray called bytes using the deflate algorithm:
bytes.compress(CompressionAlgorithm.DEFLATE);
The following example uncompresses a compressed ByteArray using the deflate algorithm:
bytes.uncompress(CompressionAlgorithm.DEFLATE);
Reading and writing objects
Flash Player 9 and later, Adobe AIR 1.0 and later
The readObject() and writeObject() methods read an object from and write an object to a ByteArray, encoded in
serialized Action Message Format (AMF). AMF is a proprietary message protocol created by Adobe and used by
various ActionScript 3.0 classes, including Netstream, NetConnection, NetStream, LocalConnection, and Shared
Objects.
A one-byte type marker describes the type of the encoded data that follows. AMF uses the following 13 data types:
value-type = undefined-marker | null-marker | false-marker | true-marker | integer-type |
double-type | string-type | xml-doc-type | date-type | array-type | object-type |
xml-type | byte-array-type
The encoded data follows the type marker unless the marker represents a single possible value, such as null or true or
false, in which case nothing else is encoded.
Little
Endian
Little
Endian
Little
Endian
Little
Endian
a0 a1 a2 a3
34 33 32 31

749
ACTIONSCRIPT 3.0 DEVELOPER’S GUIDE
Working with byte arrays
Last updated 3/21/2011
There are two versions of AMF: AMF0 and AMF3. AMF 0 supports sending complex objects by reference and allows
endpoints to restore object relationships. AMF 3 improves AMF 0 by sending object traits and strings by reference, in
addition to object references, and by supporting new data types that were introduced in ActionScript 3.0. The
ByteArray.objectEcoding property specifies the version of AMF that is used to encode the object data. The
flash.net.ObjectEncoding class defines constants for specifying the AMF version: ObjectEncoding.AMF0 and
ObjectEncoding.AMF3.
The following example calls writeObject() to write an XML object to a ByteArray, which it then compresses using
the Deflate algorithm and writes to the order file on the desktop. The example uses a label to display the message
“Wrote order file to desktop!” in the AIR window when it is finished.
/* The following lines, minus comment characters
, are for Flex version:
* <?xml version="1.0" encoding="utf-8"?>
* <mx:WindowedApplication xmlns:mx="http://www.adobe.com/2006/mxml" layout="absolute"
* creationComplete="init();">
* <mx:Script>
* <
750
ACTIONSCRIPT 3.0 DEVELOPER’S GUIDE
Working with byte arrays
Last updated 3/21/2011
bytes.position = 0;//reset position to beginning
bytes.compress(CompressionAlgorithm.DEFLATE);// compress ByteArray
outFile("order", bytes);
myLabel.text = "Wrote order file to desktop!";
// for Flex: } // end of init()function outFile(fileName:String, data:ByteArray):void {
var outFile:File = File.desktopDirectory; // dest folder is desktop
outFile = outFile.resolvePath(fileName); // name of file to write
var outStream:FileStream = new FileStream();
// open output file stream in WRITE mode
outStream.open(outFile, FileMode.WRITE);
// write out the file
outStream.writeBytes(data, 0, data.length);
// close it
outStream.close();
}
/* Add the following lines for Flex, minus comment characters:
* ]]>
* </mx:Script>
* </mx:WindowedApplication>
*/
The readObject() method reads an object in serialized AMF from a ByteArray and stores it in an object of the
specified type. The following example reads the order file from the desktop into a ByteArray (inBytes),
uncompresses it, and calls readObject() to store it in the XML object orderXML. The example uses a for each()
loop construct to add each node to a text area for display. The example also displays the value of the objectEncoding
property along with a header for the contents of the order file.
/* The following lines, minus comment characters, are for Flex version:
* <?xml version="1.0" encoding="utf-8"?>
* <mx:WindowedApplication xmlns:mx="http://www.adobe.com/2006/mxml" layout="absolute"
* creationComplete="init();">
* <mx:Script>
* <
751
ACTIONSCRIPT 3.0 DEVELOPER’S GUIDE
Working with byte arrays
Last updated 3/21/2011
//for each node in orderXML
for each(var child:XML in orderXML) {
// append child node to text area
myTxt.text += child + "\n";
}
// for Flex version: } // end of init() // read specified file into byte array
function readFile(fileName:String, data:ByteArray) {
var inFile:File = File.desktopDirectory; // source folder is desktop
inFile = inFile.resolvePath(fileName); // name of file to read
var inStream:FileStream = new FileStream();
inStream.open(inFile, FileMode.READ);
inStream.readBytes(data, 0, data.length);
inStream.close();
}
/* Add the following lines, minus comment characters, for Flex:
* ]]>
* </mx:Script>
*
* </mx:WindowedApplication>
*/
ByteArray example: Reading a .zip file
Adobe AIR 1.0 and later
This example demonstrates how to read a simple .zip file containing several files of different types. It does so by
extracting relevant data from the metadata for each file, uncompressing each file into a ByteArray and writing the file
to the desktop.
The general structure of a .zip file is based on the specification by PKWARE Inc., which is maintained at
http://www.pkware.com/documents/casestudies/APPNOTE.TXT. First is a file header and file data for the first file in
the .zip archive, followed by a file header and file data pair for each additional file. (The structure of the file header is
described later.) Next, the .zip file optionally includes a data descriptor record (usually when the output zip file was
created in memory rather than saved to a disk). Next are several additional optional elements: archive decryption
header, archive extra data record, central directory structure, Zip64 end of central directory record, Zip64 end of
central directory locator, and end of central directory record.
The code in this example is written to only parse zip files that do not contain folders and it does not expect data
descriptor records. It ignores all information following the last file data.
The format of the file header for each file is as follows:
file header signature 4 bytes
required version 2 bytes
general-purpose bit flag 2 bytes
compression method 2 bytes (8=DEFLATE; 0=UNCOMPRESSED)
last modified file time 2 bytes
last modified file date 2 bytes
crc-32 4 bytes

752
ACTIONSCRIPT 3.0 DEVELOPER’S GUIDE
Working with byte arrays
Last updated 3/21/2011
Following the file header is the actual file data, which can be either compressed or uncompressed, depending on the
compression method flag. The flag is 0 (zero) if the file data is uncompressed, 8 if the data is compressed using the
DEFLATE algorithm, or another value for other compression algorithms.
The user interface for this example consists of a label and a text area (taFiles). The application writes the following
information to the text area for each file it encounters in the .zip file: the file name, the compressed size, and the
uncompressed size. The following MXML document defines the user interface for the Flex version of the application:
<?xml version="1.0" encoding="utf-8"?>
<mx:WindowedApplication xmlns:mx="http://www.adobe.com/2006/mxml" layout="vertical"
creationComplete="init();">
<mx:Script>
<![CDATA[
// The application code goes here
]]>
</mx:Script>
<mx:Form>
<mx:FormItem label="Output">
<mx:TextArea id="taFiles" width="320" height="150"/>
</mx:FormItem>
</mx:Form>
</mx:WindowedApplication>
The beginning of the program performs the following tasks:
•Imports the required classes
import flash.filesystem.*;
import flash.utils.ByteArray;
import flash.events.Event;
•Defines the user interface for Flash
import fl.controls.*;
//requires TextArea and Label components in the Library
var taFiles = new TextArea();
var output = new Label();
taFiles.setSize(320, 150);
taFiles.move(10, 30);
output.move(10, 10);
output.width = 150;
output.text = "Contents of HelloAir.zip";
addChild(taFiles);
addChild(output);
•Defines the bytes ByteArray
var bytes:ByteArray = new ByteArray();
compressed size 4 bytes
uncompressed size 4 bytes
file name length 2 bytes
extra field length 2 bytes
file name variable
extra field variable

753
ACTIONSCRIPT 3.0 DEVELOPER’S GUIDE
Working with byte arrays
Last updated 3/21/2011
•Defines variables to store metadata from the file header
// variables for reading fixed portion of file header
var fileName:String = new String();
var flNameLength:uint;
var xfldLength:uint;
var offset:uint;
var compSize:uint;
var uncompSize:uint;
var compMethod:int;
var signature:int;
•Defines File (zfile) and FileStream (zStream) objects to represent the .zip file, and specifies the location of the
.zip file from which the files are extracted—a file named “HelloAIR.zip” in the desktop directory.
// File variables for accessing .zip file
var zfile:File = File.desktopDirectory.resolvePath("HelloAIR.zip");
var zStream:FileStream = new FileStream();
In Flex, the program code starts in the init() method, which is called as the creationComplete handler for the root
mx:WindowedApplication tag.
// for Flex
private function init():void
{
The program begins by opening the .zip file in READ mode.
zStream.open(zfile, FileMode.READ);
It then sets the endian property of bytes to LITTLE_ENDIAN to indicate that the byte order of numeric fields has the
least significant byte first.
bytes.endian = Endian.LITTLE_ENDIAN;
Next, a while() statement begins a loop that continues until the current position in the file stream is greater than or
equal to the size of the file.
while (zStream.position < zfile.size)
{
The first statement inside the loop reads the first 30 bytes of the file stream into the ByteArray bytes. The first 30 bytes
make up the fixed-size part of the first file header.
// read fixed metadata portion of local file header
zStream.readBytes(bytes, 0, 30);
Next, the code reads an integer (signature) from the first bytes of the 30-byte header. The ZIP format definition
specifies that the signature for every file header is the hexadecimal value 0x04034b50; if the signature is different it
means that the code has moved beyond the file portion of the .zip file and there are no more files to extract. In that case
the code exits the while loop immediately rather than waiting for the end of the byte array.
bytes.position = 0;
signature = bytes.readInt();
// if no longer reading data files, quit
if (signature != 0x04034b50)
{
break;
}

754
ACTIONSCRIPT 3.0 DEVELOPER’S GUIDE
Working with byte arrays
Last updated 3/21/2011
The next part of the code reads the header byte at offset position 8 and stores the value in the variable compMethod.
This byte contains a value indicating the compression method that was used to compress this file. Several compression
methods are allowed, but in practice nearly all .zip files use the DEFLATE compression algorithm. If the current file is
compressed with DEFLATE compression, compMethod is 8; if the file is uncompressed, compMethod is 0.
bytes.position = 8;
compMethod = bytes.readByte(); // store compression method (8 == Deflate)
Following the first 30 bytes is a variable-length portion of the header that contains the file name and, possibly, an extra
field. The variable offset stores the size of this portion. The size is calculated by adding the file name length and extra
field length, read from the header at offsets 26 and 28.
offset = 0;// stores length of variable portion of metadata
bytes.position = 26; // offset to file name length
flNameLength = bytes.readShort();// store file name
offset += flNameLength; // add length of file name
bytes.position = 28;// offset to extra field length
xfldLength = bytes.readShort();
offset += xfldLength;// add length of extra field
Next the program reads the variable-length portion of the file header for the number of bytes stored in the offset
variable.
// read variable length bytes between fixed-length header and compressed file data
zStream.readBytes(bytes, 30, offset);
The program reads the file name from the variable length portion of the header and displays it in the text area along
with the compressed (zipped) and uncompressed (original) sizes of the file.
// Flash version
bytes.position = 30;
fileName = bytes.readUTFBytes(flNameLength); // read file name
taFiles.appendText(fileName + "\n"); // write file name to text area
bytes.position = 18;
compSize = bytes.readUnsignedInt(); // store size of compressed portion
taFiles.appendText("\tCompressed size is: " + compSize + '\n');
bytes.position = 22; // offset to uncompressed size
uncompSize = bytes.readUnsignedInt(); // store uncompressed size
taFiles.appendText("\tUncompressed size is: " + uncompSize + '\n');
// Flex version
bytes.position = 30;
fileName = bytes.readUTFBytes(flNameLength); // read file name
taFiles.text += fileName + "\n"; // write file name to text area
bytes.position = 18;
compSize = bytes.readUnsignedInt(); // store size of compressed portion
taFiles.text += "\tCompressed size is: " + compSize + '\n';
bytes.position = 22; // offset to uncompressed size
uncompSize = bytes.readUnsignedInt(); // store uncompressed size
taFiles.text += "\tUncompressed size is: " + uncompSize + '\n';
The example reads the rest of the file from the file stream into bytes for the length specified by the compressed size,
overwriting the file header in the first 30 bytes. The compressed size is accurate even if the file is not compressed
because in that case the compressed size is equal to the uncompressed size of the file.
// read compressed file to offset 0 of bytes; for uncompressed files
// the compressed and uncompressed size is the same
zStream.readBytes(bytes, 0, compSize);

755
ACTIONSCRIPT 3.0 DEVELOPER’S GUIDE
Working with byte arrays
Last updated 3/21/2011
Next, the example uncompresses the compressed file and calls the outfile() function to write it to the output file
stream. It passes outfile() the file name and the byte array containing the file data.
if (compMethod == 8) // if file is compressed, uncompress
{
bytes.uncompress(CompressionAlgorithm.DEFLATE);
}
outFile(fileName, bytes); // call outFile() to write out the file
The closing braces indicate the end of the while loop, and of the init() method and the Flex application code, except
for the outFile() method. Execution loops back to the beginning of the while loop and continues processing the next
bytes in the .zip file—either extracting another file or ending processing of the .zip file if the last file has been processed.
} // end of while loop
} // for Flex version, end of init() method and application
The outfile() function opens an output file in WRITE mode on the desktop, giving it the name supplied by the
filename parameter. It then writes the file data from the data parameter to the output file stream (outStream) and
closes the file.
// Flash version
function outFile(fileName:String, data:ByteArray):void
{
var outFile:File = File.desktopDirectory; // destination folder is desktop
outFile = outFile.resolvePath(fileName); // name of file to write
var outStream:FileStream = new FileStream();
// open output file stream in WRITE mode
outStream.open(outFile, FileMode.WRITE);
// write out the file
outStream.writeBytes(data, 0, data.length);
// close it
outStream.close();
}
private function outFile(fileName:String, data:ByteArray):void
{
var outFile:File = File.desktopDirectory; // dest folder is desktop
outFile = outFile.resolvePath(fileName); // name of file to write
var outStream:FileStream = new FileStream();
// open output file stream in WRITE mode
outStream.open(outFile, FileMode.WRITE);
// write out the file
outStream.writeBytes(data, 0, data.length);
// close it
outStream.close();
}

756
Last updated 3/21/2011
Chapter 40: Basics of networking and
communication
Flash Player 9 and later, Adobe AIR 1.0 and later
When you build applications in Flash Player or AIR, you often need to access resources outside your application. For
example, you might send a request for an image to an Internet web server and get the image data in return. Or, you
might send serialized objects back and forth over a socket connection with an application server. The Flash Player and
AIR APIs provide several classes that allow your applications to participate in this exchange. These APIs support IP-
based networking for protocols like UDP, TCP, HTTP, RTMP, and RTMFP.
The following classes can be used to send and receive data across a network:
Often, when creating a web application it is helpful to store persistent information about the user’s application state.
HTML pages and applications typically use cookies for this purpose. In Flash Player, you can use the SharedObject
class for the same purpose. See “Shared objects” on page 668. (The SharedObject class can be used in AIR applications,
but there are fewer restrictions when just saving the data to a regular file.)
Class Supported data formats Protocols Description
Loader SWF, PNG, JPEG, GIF HTTP, HTTPS Loads supported data types and converts the
data into a display object.
See “Loading display content dynamically” on
page 189.
URLLoader Any (text, XML, binary,
etc.)
HTTP, HTTPS Loads arbitrary formats of data. Your
application is responsible for interpreting the
data.
See “Using the URLLoader class” on page 782
FileReference Any HTTP Upload and download files.
See “Using the FileReference class” on
page 620
NetConnection Video, audio, ActionScript
Message Format (AMF)
HTTP, HTTPS,
RTMP, RTMFP
Connects to video, audio and remote object
streams.
See “Working with video” on page 452.
Sound Audio HTTP Loads and plays supported audio formats.
See “Loading external sound files” on
page 421.
XMLSocket XML TCP Exchanges XML messages with an XMLSocket
server.
See “XML sockets” on page 769.
Socket Any TCP Connects to a TCP socket server.
See “Binary client sockets” on page 765.
SecureSocket (AIR) Any TCP with SSLv3
or TLSv1
Connects to a TCP socket server that requires
SSL or TLS security.
See “Secure client sockets (AIR)” on page 765.
ServerSocket (AIR) Any TCP Acts as a server for incoming TCP socket
connections.
See “Server sockets” on page 773.
DatagramSocket (AIR) Any UDP Sends and receives UDP packets.
See “UDP sockets (AIR)” on page 775

757
ACTIONSCRIPT 3.0 DEVELOPER’S GUIDE
Basics of networking and communication
Last updated 3/21/2011
When your Flash Player or AIR application needs to communicate with another Flash Player or AIR application on
the same computer, you can use the LocalConnection class. For example, two (or more) SWFs on the same web page
can communicate with each other. Likewise, a SWF running on a web page can communicate with an AIR application.
See “Communicating with other Flash Player and AIR instances” on page 797.
When you need to communicate with other, non-SWF processes on the local computer, you can use the NativeProcess
class added in AIR 2. The NativeProcess class allows your AIR application to launch and communicate with other
applications. See “Communicating with native processes in AIR” on page 804.
When you need information about the network environment of the computer on which an AIR application is running,
you can use the following classes:
•NetworkInfo—Provides information about the available network interfaces, such as the computer’s IP address. See
“Network interfaces” on page 758.
•DNSResolver—Allows you to look up DNS records. See “Domain Name System (DNS) records” on page 761.
•ServiceMonitor—Allows you to monitor the availability of a server. See “Service monitoring” on page 759.
•URLMonitor—Allows you to monitor the availability of a resource at a particular URL. See “HTTP monitoring”
on page 760.
•SocketMonitor and SecureSocketMonitor—Allows you to monitor the availability of a resource at a socket. See
“Socket monitoring” on page 761.
Important concepts and terms
The following reference list contains important terms that you will encounter when programming networking and
communications code:
External data Data that is stored in some form outside of the application, and loaded into the application when
needed. This data could be stored in a file that’s loaded directly, or stored in a database or other form that is retrieved
by calling scripts or programs running on a server.
URL-encoded variables The URL-encoded format provides a way to represent several variables (pairs of variable
names and values) in a single string of text. Individual variables are written in the format name=value. Each variable
(that is, each name-value pair) is separated by ampersand characters, like this: variable1=value1&variable2=value2. In
this way, an indefinite number of variables can be sent as a single message.
MIME type A standard code used to identify the type of a given file in Internet communication. Any given file type has
a specific code that is used to identify it. When sending a file or message, a computer (such as a web server or a user’s
Flash Player or AIR instance) will specify the type of file being sent.
HTTP Hypertext Transfer Protocol—a standard format for delivering web pages and various other types of content
that are sent over the Internet.
Request method When an application (such as an AIR application or a web browser) sends a message (called an
HTTP request) to a web server, any data being sent can be embedded in the request in one of two ways; these are the
two request methods GET and POST. On the server end, the program receiving the request will need to look in the
appropriate portion of the request to find the data, so the request method used to send data from your application
should match the request method used to read that data on the server.
Socket connection A persistent connection for communication between two computers.
Upload To send a file to another computer.
Download To retrieve a file from another computer.

758
ACTIONSCRIPT 3.0 DEVELOPER’S GUIDE
Basics of networking and communication
Last updated 3/21/2011
Network interfaces
Adobe AIR 2 and later
You can use the NetworkInfo object to discover the hardware and software network interfaces available to your
application. The NetworkInfo object is a singleton object, you do not need to create one. Instead, use the static class
property, networkInfo, to access the single NetworkInfo object. The NetworkInfo object also dispatches a
networkChange event when one of the available interfaces change.
Call the findInterfaces() method to get a list of NetworkInterface objects. Each NetworkInterface object in the list
describes one of the available interfaces. The NetworkInterface object provides such information as the IP address,
hardware address, maximum transmission unit, and whether the interface is active.
The following code example traces the NetworkInterface properties of each interface on the client computer:
package {
import flash.display.Sprite;
import flash.net.InterfaceAddress;
import flash.net.NetworkInfo;
import flash.net.NetworkInterface;
public class NetworkInformationExample extends Sprite
{
public function NetworkInformationExample()
{
var networkInfo:NetworkInfo = NetworkInfo.networkInfo;
var interfaces:Vector.<NetworkInterface> = networkInfo.findInterfaces();
if( interfaces != null )
{
trace( "Interface count: " + interfaces.length );
for each ( var interfaceObj:NetworkInterface in interfaces )
{
trace( "\nname: " + interfaceObj.name );
trace( "display name: " + interfaceObj.displayName );
trace( "mtu: " + interfaceObj.mtu );
trace( "active?: " + interfaceObj.active );
trace( "parent interface: " + interfaceObj.parent );
trace( "hardware address: " + interfaceObj.hardwareAddress );
if( interfaceObj.subInterfaces != null )
{
trace( "# subinterfaces: " + interfaceObj.subInterfaces.length );
}
trace("# addresses: " + interfaceObj.addresses.length );
for each ( var address:InterfaceAddress in interfaceObj.addresses )
{
trace( " type: " + address.ipVersion );
trace( " address: " + address.address );
trace( " broadcast: " + address.broadcast );
trace( " prefix length: " + address.prefixLength );
}
}
}
}
}
}

759
ACTIONSCRIPT 3.0 DEVELOPER’S GUIDE
Basics of networking and communication
Last updated 3/21/2011
For more information, see:
•NetworkInfo
•NetworkInterface
•InterfaceAddress
Network connectivity changes
Adobe AIR 1.0 and later
Your AIR application can run in environments with uncertain and changing network connectivity. To help an
application manage connections to online resources, Adobe AIR sends a network change event whenever a network
connection becomes available or unavailable. Both the NetworkInfo object and the application’s NativeApplication
object dispatch the networkChange event. To react to this event, add a listener:
NetworkInfo.networkInfo.addEventListener(Event.NETWORK_CHANGE, onNetworkChange);
And define an event handler function:
function onNetworkChange(event:Event)
{
//Check resource availability
}
The networkChange event does not indicate a change in all network activity, only that an individual network
connection has changed. AIR does not attempt to interpret the meaning of the network change. A networked
computer can have many real and virtual connections, so losing a connection does not necessarily mean losing a
resource. On the other hand, new connections do not guarantee improved resource availability, either. Sometimes a
new connection can even block access to resources previously available (for example, when connecting to a VPN).
In general, the only way for an application to determine whether it can connect to a remote resource is to try it. The
service monitoring framework provides an event-based means of responding to changes in network connectivity to a
specified host.
Note: The service monitoring framework detects whether a server responds acceptably to a request. A successful check does
not guarantee full connectivity. Scalable web services often use caching and load-balancing appliances to redirect traffic
to a cluster of web servers. In this situation, service providers only provide a partial diagnosis of network connectivity.
Service monitoring
Adobe AIR 1.0 and later
The service monitor framework, separate from the AIR framework, resides in the file aircore.swc. To use the
framework, the aircore.swc file must be included in your build process.
Adobe® Flash® Builder includes this library automatically.

760
ACTIONSCRIPT 3.0 DEVELOPER’S GUIDE
Basics of networking and communication
Last updated 3/21/2011
The ServiceMonitor class implements the framework for monitoring network services and provides a base
functionality for service monitors. By default, an instance of the ServiceMonitor class dispatches events regarding
network connectivity. The ServiceMonitor object dispatches these events when the instance is created and whenever
the runtime detects a network change. Additionally, you can set the pollInterval property of a ServiceMonitor
instance to check connectivity at a specified interval in milliseconds, regardless of general network connectivity events.
A ServiceMonitor object does not check network connectivity until the start() method is called.
The URLMonitor class, a subclass of the ServiceMonitor class, detects changes in HTTP connectivity for a specified
URLRequest.
The SocketMonitor class, also a subclass of the ServiceMonitor class, detects changes in connectivity to a specified host
at a specified port.
Note: Prior to AIR 2, the service monitor framework was published in the servicemonitor.swc library. This library is now
deprecated. Use the aircore.swc library instead.
Flash CS4 and CS5 Professional
To use these classes in Adobe® Flash® CS4 or CS5 Professional:
1Select the File > Publish Settings command.
2Click the Settings button for ActionScript 3.0. Select Library Path.
3Click the Browse to SWC button and browse to the AIK folder in your Flash Professional installation folder.
4Within this folder, find the /frameworks/libs/air/aircore.swc (for AIR 2) or
/frameworks/libs/air/servicemonitor.swc (for AIR 1.5).
5Click the OK button.
6Add the following import statement to your ActionScript 3.0 code:
import air.net.*;
Flash CS3 Professional
To use these classes in Adobe® Flash® CS3 Professional, drag the ServiceMonitorShim component from the
Components panel to the Library. Then, add the following importstatement to your ActionScript 3.0 code:
import air.net.*;
HTTP monitoring
Adobe AIR 1.0 and later
The URLMonitor class determines if HTTP requests can be made to a specified address at port 80 (the typical port for
HTTP communication). The following code uses an instance of the URLMonitor class to detect connectivity changes
to the Adobe website:

761
ACTIONSCRIPT 3.0 DEVELOPER’S GUIDE
Basics of networking and communication
Last updated 3/21/2011
import air.net.URLMonitor;
import flash.net.URLRequest;
import flash.events.StatusEvent;
var monitor:URLMonitor;
monitor = new URLMonitor(new URLRequest('http://www.example.com'));
monitor.addEventListener(StatusEvent.STATUS, announceStatus);
monitor.start();
function announceStatus(e:StatusEvent):void {
trace("Status change. Current status: " + monitor.available);
}
Socket monitoring
Adobe AIR 1.0 and later
AIR applications can also use socket connections for push-model connectivity. Firewalls and network routers typically
restrict network communication on unauthorized ports for security reasons. For this reason, developers must consider
that users do not always have the capability to make socket connections.
The following code uses an instance of the SocketMonitor class to detect connectivity changes to a socket connection.
The port monitored is 6667, a common port for IRC:
import air.net.ServiceMonitor;
import flash.events.StatusEvent;
socketMonitor = new SocketMonitor('www.example.com',6667);
socketMonitor.addEventListener(StatusEvent.STATUS, socketStatusChange);
socketMonitor.start();
function announceStatus(e:StatusEvent):void {
trace("Status change. Current status: " + socketMonitor.available);
}
If the socket server requires a secure connection, you can use the SecureSocketMonitor class instead of SocketMonitor.
Domain Name System (DNS) records
Adobe AIR 2.0 and later
You can look up DNS resource records using the DNSResolver class. DNS resource records provide information like
the IP address of a domain name and the domain name of an IP address. You can look up the following types of DNS
resource records:
•ARecord—IPv4 address for a host.
•AAAARecord—IPv6 address for a host.
•MXRecord—mail exchange record for a host.
•PTRRecord—host name for an IP address.
•SRVRecord—service record for a service.
To look up a record, you pass a query string and the class object representing the record type to the lookup() method
of the DNSResolver object. The query string to use depends on the record type:

762
ACTIONSCRIPT 3.0 DEVELOPER’S GUIDE
Basics of networking and communication
Last updated 3/21/2011
The following code example looks up the IP address of the host “example.com”.
package
{
import flash.display.Sprite;
import flash.events.DNSResolverEvent;
import flash.events.ErrorEvent;
import flash.net.dns.ARecord;
import flash.net.dns.DNSResolver;
public class DNSResolverExample extends Sprite
{
public function DNSResolverExample()
{
var resolver:DNSResolver = new DNSResolver();
resolver.addEventListener( DNSResolverEvent.LOOKUP, lookupComplete );
resolver.addEventListener( ErrorEvent.ERROR, lookupError );
resolver.lookup( "example.com.", ARecord );
}
private function lookupComplete( event:DNSResolverEvent ):void
{
trace( "Query string: " + event.host );
trace( "Record count: " + event.resourceRecords.length );
for each( var record:* in event.resourceRecords )
{
if( record is ARecord ) trace( record.address );
}
}
private function lookupError( error:ErrorEvent ):void
{
trace("Error: " + error.text );
}
}
}
For more information, see:
•DNSResolver
•DNSResolverEvent
•ARecord
Record class Query string Example query string
ARecord host name “example.com”
AAAARecord host name “example.com”
MXRecord host name “example.com”
PTRRecord IP address “208.77.188.166”
SRVRecord Service identifier: _service._protocol.host “_sip._tcp.example.com”

763
ACTIONSCRIPT 3.0 DEVELOPER’S GUIDE
Basics of networking and communication
Last updated 3/21/2011
•AAAARecord
•MXRecord
•PTRRecord
•SRVRecord

764
Last updated 3/21/2011
Chapter 41: Sockets
Flash Player 9 and later, Adobe AIR 1.0 and later
A socket is a type of network connection established between two computer processes. Typically, the processes are
running on two different computers attached to the same Internet Protocol (IP) network. However, the connected
processes can be running on the same computer using the special “local host” IP address.
Adobe Flash Player supports client-side Transport Control Protocol (TCP) sockets. A Flash Player application can
connect to another process acting as a socket server, but cannot accept incoming connection requests from other
processes. In other words, a Flash Player application can connect to a TCP server, but cannot serve as one.
The Flash Player API also includes the XMLSocket class. The XMLSocket class uses a Flash Player-specific protocol
that allows you to exchange XML messages with a server that understands that protocol. The XMLSocket class was
introduced in ActionScript 1 and is still supported to provide backward compatibility. In general, the Socket class
should be used for new applications unless you are connecting to a server specifically created to communicate with
Flash XMLSockets.
Adobe AIR adds several additional classes for socket-based network programming. AIR applications can act as TCP
socket servers with the ServerSocket class and can connect to socket servers requiring SSL or TLS security with the
SecureSocket class. AIR applications can also send and receive Universal Datagram Protocol (UDP) messages with the
DatagramSocket class.
More Help topics
flash.net package
“Connecting to sockets” on page 1033
TCP sockets
Flash Player 9 and later, Adobe AIR 1.0 and later
The Transmission Control Protocol (TCP) provides a way to exchange messages over a persistent network connection.
TCP guarantees that any messages sent arrive in the correct order (barring major network problems). TCP
connections require a “client” and a “server.” Flash Player can create client sockets. Adobe AIR can, additionally, create
server sockets.
The following ActionScript APIs provide TCP connections:
•Socket — allows a client application to connect to a server. The Socket class cannot listen for incoming connections.
•SecureSocket (AIR) — allows a client application to connect to a trusted server and engage in encrypted
communications.
•ServerSocket (AIR) — allows an application to listen for incoming connections and act as a server.
•XMLSocket — allows a client application to connect to an XMLSocket server.

765
ACTIONSCRIPT 3.0 DEVELOPER’S GUIDE
Sockets
Last updated 3/21/2011
Binary client sockets
Flash Player 9 and later, Adobe AIR 1.0 and later
A binary socket connection is similar to an XML socket except that the client and server are not limited to exchanging
XML messages. Instead, the connection can transfer data as binary information. Thus, you can connect to a wider
range of services, including mail servers (POP3, SMTP, and IMAP), and news servers (NNTP).
Socket class
Flash Player 9 and later, Adobe AIR 1.0 and later
The Socket class enables you to make socket connections and to read and write raw binary data. The Socket class is
useful for interoperating with servers that use binary protocols. By using binary socket connections, you can write code
that interacts with several different Internet protocols, such as POP3, SMTP, IMAP, and NNTP. This interaction, in
turn, enables your applications to connect to mail and news servers.
Flash Player can interface with a server by using the binary protocol of that server directly. Some servers use the big-
endian byte order, and some use the little-endian byte order. Most servers on the Internet use the big-endian byte order
because “network byte order” is big-endian. The little-endian byte order is popular because the Intel® x86 architecture
uses it. You should use the endian byte order that matches the byte order of the server that is sending or receiving data.
All operations that are performed by the IDataInput and IDataOutput interfaces, and the classes that implement those
interfaces (ByteArray, Socket, and URLStream), are encoded by default in big-endian format; that is, with the most
significant byte first. This default byte order was chosen to match Java and the official network byte order. To change
whether big-endian or little-endian byte order is used, you can set the endian property to Endian.BIG_ENDIAN or
Endian.LITTLE_ENDIAN.
The Socket class inherits all the methods defined by the IDataInput and IDataOutput interfaces (located in the
flash.utils package). Those methods must be used to write to and read from the Socket.
For more information, see:
•Socket
•IDataInput
•IDataOutput
•socketData event
Secure client sockets (AIR)
Adobe AIR 2 and later
You can use the SecureSocket class to connect to socket servers that use Secure Sockets Layer version 4 (SSLv4) or
Transport Layer Security version 1 (TLSv1). A secure socket provides three benefits: server authentication, data
integrity, and message confidentiality. The runtime authenticates a server using the server certificate and its
relationship to the root or intermediate certificate authority certificates in the user’s trust store. The runtime relies on
the cryptography algorithms used by the SSL and TLS protocol implementations to provide data integrity and message
confidentiality.
When you connect to a server using the SecureSocket object, the runtime validates the server certificate using the
certificate trust store. On Windows and Mac, the operating system provides the trust store. On Linux, the runtime
provides its own trust store.

766
ACTIONSCRIPT 3.0 DEVELOPER’S GUIDE
Sockets
Last updated 3/21/2011
If the server certificate is not valid or not trusted, the runtime dispatches an ioError event. You can check the
serverCertificateStatus property of the SecureSocket object to determine why validation failed. No provision is
provided for communicating with a server that does not have a valid and trusted certificate.
The CertificateStatus class defines string constants that represent the possible validation results:
•Expired—the certificate expiration date has passed.
•Invalid—there are a number of reasons that a certificate can be invalid. For example, the certificate could have been
altered, corrupted, or it could be the wrong type of certificate.
•Invalid chain—one or more of the certificates in the server’s chain of certificates are invalid.
•Principal mismatch—the host name of the server and the certificate common name do not match. In other words,
the server is using the wrong certificate.
•Revoked—the issuing certificate authority has revoked the certificate.
•Trusted—the certificate is valid and trusted. A SecureSocket object can only connect to a server that uses a valid,
trusted certificate.
•Unknown—the SecureSocket object has not validated the certificate yet. The serverCertificateStatus
property has this status value before you call connect() and before either a connect or an ioError event is
dispatched.
•Untrusted signers—the certificate does not “chain” to a trusted root certificate in the trust store of the client
computer.
Communicating with a SecureSocket object requires a server that uses a secure protocol and has a valid, trusted
certificate. In other respects, using a SecureSocket object is the same as using a Socket object.
The SecureSocket object is not supported on all platforms. Use the SecureSocket class isSupported property to test
whether the runtime supports use of the SecureSocket object on the current client computer.
For more information, see:
•SecureSocket
•CertificateStatus
•IDataInput
•IDataOutput
•socketData event
TCP socket example: Building a Telnet client
Flash Player 9 and later, Adobe AIR 1.0 and later
The Telnet example demonstrates techniques for connecting with a remote server and transmitting data using the
Socket class. The example demonstrates the following techniques:
•Creating a custom telnet client using the Socket class
•Sending text to the remote server using a ByteArray object
•Handling received data from a remote server
To get the application files for this sample, see www.adobe.com/go/learn_programmingAS3samples_flash. The Telnet
application files can be found in the Samples/Telnet folder. The application consists of the following files:

767
ACTIONSCRIPT 3.0 DEVELOPER’S GUIDE
Sockets
Last updated 3/21/2011
Telnet socket application overview
Flash Player 9 and later, Adobe AIR 1.0 and later
The main TelnetSocket.mxml file is responsible for creating the user interface (UI) for the entire application.
In addition to the UI, this file also defines two methods, login() and sendCommand(), to connect the user to the
specified server.
The following code lists the ActionScript in the main application file:
import com.example.programmingas3.socket.Telnet;
private var telnetClient:Telnet;
private function connect():void
{
telnetClient = new Telnet(serverName.text, int(portNumber.text), output);
console.title = "Connecting to " + serverName.text + ":" + portNumber.text;
console.enabled = true;
}
private function sendCommand():void
{
var ba:ByteArray = new ByteArray();
ba.writeMultiByte(command.text + "\n", "UTF-8");
telnetClient.writeBytesToSocket(ba);
command.text = "";
}
The first line of code imports the Telnet class from the custom com.example.programmingas.socket package. The
second line of code declares an instance of the Telnet class, telnetClient, that is initialized later by the connect()
method. Next, the connect() method is declared and initializes the telnetClient variable declared earlier. This
method passes the user-specified telnet server name, telnet server port, and a reference to a TextArea component on
the display list, which is used to display the text responses from the socket server. The final two lines of the connect()
method set the title property for the Panel and enable the Panel component, which allows the user to send data to
the remote server. The final method in the main application file, sendCommand(), is used to send the user's commands
to the remote server as a ByteArray object.
Telnet class overview
Flash Player 9 and later, Adobe AIR 1.0 and later
The Telnet class is responsible for connecting to the remote Telnet server and sending/receiving data.
The Telnet class declares the following private variables:
File Description
TelnetSocket.fla
or
TelnetSocket.mxml
The main application file consisting of the user interface for Flex (MXML) or Flash
(FLA).
TelnetSocket.as Document class providing the user interface logic (Flash only).
com/example/programmingas3/Telnet/Telnet.as Provides the Telnet client functionality for the application, such as connecting to a
remote server, and sending, receiving, and displaying data.

768
ACTIONSCRIPT 3.0 DEVELOPER’S GUIDE
Sockets
Last updated 3/21/2011
private var serverURL:String;
private var portNumber:int;
private var socket:Socket;
private var ta:TextArea;
private var state:int = 0;
The first variable, serverURL, contains the user-specified server address to connect to.
The second variable, portNumber, is the port number that the Telnet server is currently running on. By default, the
Telnet service runs on port 23.
The third variable, socket, is a Socket instance that attempts to connect to the server defined by the serverURL and
portNumber variables.
The fourth variable, ta, is a reference to a TextArea component instance on the Stage. This component is used to
display responses from the remote Telnet server, or any possible error messages.
The final variable, state, is a numeric value that is used to determine which options your Telnet client supports.
As you saw before, the Telnet class's constructor function is called by the connect() method in the main application file.
The Telnet constructor takes three parameters: server, port, and output. The server and port parameters specify
the server name and port number where the Telnet server is running. The final parameter, output, is a reference to a
TextArea component instance on the Stage where server output is displayed to users.
public function Telnet(server:String, port:int, output:TextArea)
{
serverURL = server;
portNumber = port;
ta = output;
socket = new Socket();
socket.addEventListener(Event.CONNECT, connectHandler);
socket.addEventListener(Event.CLOSE, closeHandler);
socket.addEventListener(ErrorEvent.ERROR, errorHandler);
socket.addEventListener(IOErrorEvent.IO_ERROR, ioErrorHandler);
socket.addEventListener(ProgressEvent.SOCKET_DATA, dataHandler);
Security.loadPolicyFile("http://" + serverURL + "/crossdomain.xml");
try
{
msg("Trying to connect to " + serverURL + ":" + portNumber + "\n");
socket.connect(serverURL, portNumber);
}
catch (error:Error)
{
msg(error.message + "\n");
socket.close();
}
}
Writing data to a socket
Flash Player 9 and later, Adobe AIR 1.0 and later
To write data to a socket connection, you call any of the write methods in the Socket class. These write methods include
writeBoolean(), writeByte(), writeBytes(), writeDouble(), and others. Then, flush the data in the output
buffer using the flush() method. In the Telnet server, data is written to the socket connection using the
writeBytes() method which takes the byte array as a parameter and sends it to the output buffer. The
writeBytesToSocket() method is as follows:

769
ACTIONSCRIPT 3.0 DEVELOPER’S GUIDE
Sockets
Last updated 3/21/2011
public function writeBytesToSocket(ba:ByteArray):void
{
socket.writeBytes(ba);
socket.flush();
}
This method gets called by the sendCommand() method of the main application file.
Displaying messages from the socket server
Flash Player 9 and later, Adobe AIR 1.0 and later
Whenever a message is received from the socket server, or an event occurs, the custom msg() method is called. This
method appends a string to the TextArea on the Stage and calls a custom setScroll() method, which causes the
TextArea component to scroll to the bottom. The msg() method is as follows:
private function msg(value:String):void
{
ta.text += value;
setScroll();
}
If you didn’t automatically scroll the contents of the TextArea component, users would need to manually drag the
scroll bars on the text area to see the latest response from the server.
Scrolling a TextArea component
Flash Player 9 and later, Adobe AIR 1.0 and later
The setScroll() method contains a single line of ActionScript that scrolls the TextArea component’s contents
vertically so the user can see the last line of the returned text. The following snippet shows the setScroll() method:
public function setScroll():void
{
ta.verticalScrollPosition = ta.maxVerticalScrollPosition;
}
This method sets the verticalScrollPosition property, which is the line number of the top row of characters that
is currently displayed, and sets it to the value of the maxVerticalScrollPosition property.
XML sockets
Flash Player 9 and later, Adobe AIR 1.0 and later
An XML socket lets you create a connection to a remote server that remains open until explicitly closed. You can
exchange string data, such as XML, between the server and client. A benefit of using an XML socket server is that the
client does not need to explicitly request data. The server can send data without waiting for a request and can send data
to every connected client connected.
In Flash Player, and in Adobe AIR content outside the application sandbox, XML socket connections require the
presence of a socket policy file on the target server. For more information, see “Website controls (policy files)” on
page 1017 and “Connecting to sockets” on page 1033.
The XMLSocket class cannot tunnel through firewalls automatically because, unlike the Real-Time Messaging
Protocol (RTMP), XMLSocket has no HTTP tunneling capability. If you need to use HTTP tunneling, consider using
Flash Remoting or Flash Media Server (which supports RTMP) instead.

770
ACTIONSCRIPT 3.0 DEVELOPER’S GUIDE
Sockets
Last updated 3/21/2011
The following restrictions apply to how and where content in Flash Player or in an AIR application outside of the
application security sandbox can use an XMLSocket object to connect to the server:
•For content outside of the application security sandbox, the XMLSocket.connect() method can connect only to
TCP port numbers greater than or equal to 1024. One consequence of this restriction is that the server daemons
that communicate with the XMLSocket object must also be assigned to port numbers greater than or equal to 1024.
Port numbers below 1024 are often used by system services such as FTP (21), Telnet (23), SMTP (25), HTTP (80),
and POP3 (110), so XMLSocket objects are barred from these ports for security reasons. The port number
restriction limits the possibility that these resources will be inappropriately accessed and abused.
•For content outside of the application security sandbox, the XMLSocket.connect() method can connect only to
computers in the same domain where the content resides. (This restriction is identical to the security rules for
URLLoader.load().) To connect to a server daemon running in a domain other than the one where the content
resides, you can create a cross-domain policy file on the server that allows access from specific domains. For details
on cross-domain policy files, see “AIR security” on page 1041.
Note: Setting up a server to communicate with the XMLSocket object can be challenging. If your application does not
require real-time interactivity, use the URLLoader class instead of the XMLSocket class.
You can use the XMLSocket.connect() and XMLSocket.send() methods of the XMLSocket class to transfer XML to
and from a server over a socket connection. The XMLSocket.connect() method establishes a socket connection with
a web server port. The XMLSocket.send() method passes an XML object to the server specified in the socket
connection.
When you invoke the XMLSocket.connect() method, the application opens a TCP/IP connection to the server and
keeps that connection open until one of the following occurs:
•The XMLSocket.close() method of the XMLSocket class is called.
•No more references to the XMLSocket object exist.
•Flash Player exits.
•The connection is broken (for example, the modem disconnects).
Connecting to a server with the XMLSocket class
Flash Player 9 and later, Adobe AIR 1.0 and later
To create a socket connection, you must create a server-side application to wait for the socket connection request and
send a response to the Flash Player or AIR application. This type of server-side application can be written in AIR or in
another programming language such as Java, Python, or Perl. To use the XMLSocket class, the server computer must
run a daemon that understands the simple protocol used by the XMLSocket class:
•XML messages are sent over a full-duplex TCP/IP stream socket connection.
•Each XML message is a complete XML document, terminated by a zero (0) byte.
•An unlimited number of XML messages can be sent and received over a single XMLSocket connection.
Creating and connecting to a Java XML socket server
Flash Player 9 and later, Adobe AIR 1.0 and later
The following code demonstrates a simple XMLSocket server written in Java that accepts incoming connections and
displays the received messages in the command prompt window. By default, a new server is created on port 8080 of
your local machine, although you can specify a different port number when starting your server from the command
line.

771
ACTIONSCRIPT 3.0 DEVELOPER’S GUIDE
Sockets
Last updated 3/21/2011
Create a new text document and add the following code:
import java.io.*;
import java.net.*;
class SimpleServer
{
private static SimpleServer server;
ServerSocket socket;
Socket incoming;
BufferedReader readerIn;
PrintStream printOut;
public static void main(String[] args)
{
int port = 8080;
try
{
port = Integer.parseInt(args[0]);
}
catch (ArrayIndexOutOfBoundsException e)
{
// Catch exception and keep going.
}
server = new SimpleServer(port);
}
private SimpleServer(int port)
{
System.out.println(">> Starting SimpleServer");
try
{
socket = new ServerSocket(port);
incoming = socket.accept();
readerIn = new BufferedReader(new InputStreamReader(incoming.getInputStream()));
printOut = new PrintStream(incoming.getOutputStream());
printOut.println("Enter EXIT to exit.\r");
out("Enter EXIT to exit.\r");
boolean done = false;
while (!done)
{
String str = readerIn.readLine();
if (str == null)
{
done = true;
}
else
{
out("Echo: " + str + "\r");

772
ACTIONSCRIPT 3.0 DEVELOPER’S GUIDE
Sockets
Last updated 3/21/2011
if(str.trim().equals("EXIT"))
{
done = true;
}
}
incoming.close();
}
}
catch (Exception e)
{
System.out.println(e);
}
}
private void out(String str)
{
printOut.println(str);
System.out.println(str);
}
}
Save the document to your hard disk as SimpleServer.java and compile it using a Java compiler, which creates a Java
class file named SimpleServer.class.
You can start the XMLSocket server by opening a command prompt and typing java SimpleServer. The
SimpleServer.class file can be located anywhere on your local computer or network; it doesn’t need to be placed in the
root directory of your web server.
If you’re unable to start the server because the files are not located within the Java classpath, try starting the server
with java -classpath . SimpleServer.
To connect to the XMLSocket from your application, you need to create a new instance of the XMLSocket class, and
call the XMLSocket.connect() method while passing a host name and port number, as follows:
var xmlsock:XMLSocket = new XMLSocket();
xmlsock.connect("127.0.0.1", 8080);
Whenever you receive data from the server, the data event (flash.events.DataEvent.DATA) is dispatched:
xmlsock.addEventListener(DataEvent.DATA, onData);
private function onData(event:DataEvent):void
{
trace("[" + event.type + "] " + event.data);
}
To send data to the XMLSocket server, you use the XMLSocket.send() method and pass an XML object or string.
Flash Player converts the supplied parameter to a String object and sends the content to the XMLSocket server
followed by a zero (0) byte:
xmlsock.send(xmlFormattedData);
The XMLSocket.send() method does not return a value that indicates whether the data was successfully transmitted.
If an error occurred while trying to send data, an IOError error is thrown.
Each message you send to the XML socket server must be terminated by a newline (\n) character.
For more information, see XMLSocket.

773
ACTIONSCRIPT 3.0 DEVELOPER’S GUIDE
Sockets
Last updated 3/21/2011
Server sockets
Adobe AIR 2 and later
Use the ServerSocket class to allow other processes to connect to your application using a Transport Control Protocol
(TCP) socket. The connecting process can be running on the local computer or on another network-connected
computer. When a ServerSocket object receives a connection request, it dispatches a connect event. The
ServerSocketConnectEvent object dispatched with the event contains a Socket object. You can use this Socket object
for subsequent communication with the other process.
To listen for incoming socket connections:
1Create a ServerSocket object and bind it to a local port
2Add event listeners for the connect event
3Call the listen() method
4Respond to the connect event, which provides a Socket object for each incoming connection
The ServerSocket object continues to listen for new connections until you call the close() method.
The following code example illustrates how to create a socket server application. The example listens for incoming
connections on port 8087. When a connection is received, the example sends a message (the string “Connected.”) to
the client socket. Thereafter, the server echoes any messages received back to the client.
package
{
import flash.display.Sprite;
import flash.events.Event;
import flash.events.IOErrorEvent;
import flash.events.ProgressEvent;
import flash.events.ServerSocketConnectEvent;
import flash.net.ServerSocket;
import flash.net.Socket;
public class ServerSocketExample extends Sprite
{
private var serverSocket:ServerSocket;
private var clientSockets:Array = new Array();
public function ServerSocketExample()
{
try
{
// Create the server socket
serverSocket = new ServerSocket();
// Add the event listener
serverSocket.addEventListener( Event.CONNECT, connectHandler );
serverSocket.addEventListener( Event.CLOSE, onClose );
// Bind to local port 8087
serverSocket.bind( 8087, "127.0.0.1" );
// Listen for connections
serverSocket.listen();
trace( "Listening on " + serverSocket.localPort );

774
ACTIONSCRIPT 3.0 DEVELOPER’S GUIDE
Sockets
Last updated 3/21/2011
}
catch(e:SecurityError)
{
trace(e);
}
}
public function connectHandler(event:ServerSocketConnectEvent):void
{
//The socket is provided by the event object
var socket:Socket = event.socket as Socket;
clientSockets.push( socket );
socket.addEventListener( ProgressEvent.SOCKET_DATA, socketDataHandler);
socket.addEventListener( Event.CLOSE, onClientClose );
socket.addEventListener( IOErrorEvent.IO_ERROR, onIOError );
//Send a connect message
socket.writeUTFBytes("Connected.");
socket.flush();
trace( "Sending connect message" );
}
public function socketDataHandler(event:ProgressEvent):void
{
var socket:Socket = event.target as Socket
//Read the message from the socket
var message:String = socket.readUTFBytes( socket.bytesAvailable );
trace( "Received: " + message);
// Echo the received message back to the sender
message = "Echo -- " + message;
socket.writeUTFBytes( message );
socket.flush();
trace( "Sending: " + message );
}
private function onClientClose( event:Event ):void
{
trace( "Connection to client closed." );
//Should also remove from clientSockets array...
}
private function onIOError( errorEvent:IOErrorEvent ):void
{
trace( "IOError: " + errorEvent.text );
}
private function onClose( event:Event ):void
{
trace( "Server socket closed by OS." );
}
}}

775
ACTIONSCRIPT 3.0 DEVELOPER’S GUIDE
Sockets
Last updated 3/21/2011
For more information, see:
•ServerSocket
•ServerSocketConnectEvent
•Socket
UDP sockets (AIR)
Adobe AIR 2 and later
The Universal Datagram Protocol (UDP) provides a way to exchange messages over a stateless network connection.
UDP provides no guarantees that messages are delivered in order or even that messages are delivered at all. With UDP,
the operating system’s network code usually spends less time marshaling, tracking, and acknowledging messages.
Thus, UDP messages typically arrive at the destination application with a shorter delay than do TCP messages.
UDP socket communication is helpful when you must send real-time information such as position updates in a game,
or sound packets in an audio chat application. In such applications, some data loss is acceptable, and low transmission
latency is more important than guaranteed arrival. For almost all other purposes, TCP sockets are a better choice.
Your AIR application can send and receive UDP messages with the DatagramSocket and DatagramSocketDataEvent
classes. To send or receive a UDP message:
1Create a DatagramSocket object
2Add an event listener for the data event
3Bind the socket to a local IP address and port using the bind() method
4Send messages by calling the send() method, passing in the IP address and port of the target computer
5Receive messages by responding to the data event. The DatagramSocketDataEvent object dispatched for this event
contains a ByteArray object containing the message data.
The following code example illustrates how an application can send and receive UDP messages. The example sends a
single message containing the string, “Hello.”, to the target computer. It also traces the contents of any messages
received.

776
ACTIONSCRIPT 3.0 DEVELOPER’S GUIDE
Sockets
Last updated 3/21/2011
package
{
import flash.display.Sprite;
import flash.events.DatagramSocketDataEvent;
import flash.events.Event;
import flash.net.DatagramSocket;
import flash.utils.ByteArray;
public class DatagramSocketExample extends Sprite
{
private var datagramSocket:DatagramSocket;
//The IP and port for this computer
private var localIP:String = "192.168.0.1";
private var localPort:int = 55555;
//The IP and port for the target computer
private var targetIP:String = "192.168.0.2";
private var targetPort:int = 55555;
public function DatagramSocketExample()
{
//Create the socket
datagramSocket = new DatagramSocket();
datagramSocket.addEventListener( DatagramSocketDataEvent.DATA, dataReceived );
//Bind the socket to the local network interface and port
datagramSocket.bind( localPort, localIP );
//Listen for incoming datagrams
datagramSocket.receive();
//Create a message in a ByteArray
var data:ByteArray = new ByteArray();
data.writeUTFBytes("Hello.");
//Send the datagram message
datagramSocket.send( data, 0, 0, targetIP, targetPort);
}
private function dataReceived( event:DatagramSocketDataEvent ):void
{
//Read the data from the datagram
trace("Received from " + event.srcAddress + ":" + event.srcPort + "> " +
event.data.readUTFBytes( event.data.bytesAvailable ) );
}
}}
Keep in mind the following considerations when using UDP sockets:
•A single packet of data cannot be larger than the smallest maximum transmission unit (MTU) of the network
interface or any network nodes between the sender and the recipient. All of the data in the ByteArray object passed
to the send() method is sent as a single packet. (In TCP, large messages are broken up into separate packets.)
•There is no handshaking between the sender and the target. Messages are discarded without error if the target does
not exist or does not have an active listener at the specified port.

777
ACTIONSCRIPT 3.0 DEVELOPER’S GUIDE
Sockets
Last updated 3/21/2011
•When you use the connect() method, messages sent from other sources are ignored. A UDP connection provides
convenient packet filtering only. It does not mean that there is necessarily a valid, listening process at the target
address and port.
•UDP traffic can swamp a network. Network administrators might need to implement quality-of-service controls if
network congestion occurs. (TCP has built-in traffic control to reduce the impact of network congestion.)
For more information, see:
•DatagramSocket
•DatagramSocketDataEvent
•ByteArray
IPv6 addresses
Flash Player 9 and later, Adobe AIR 1.0 and later
Flash Player 9.0.115.0 and later support IPv6 (Internet Protocol version 6). IPv6 is a version of Internet Protocol that
supports 128-bit addresses (an improvement on the earlier IPv4 protocol that supports 32-bit addresses). You might
need to activate IPv6 on your networking interfaces. For more information, see the Help for the operating system
hosting the data.
If IPv6 is supported on the hosting system, you can specify numeric IPv6 literal addresses in URLs enclosed in brackets
([]), as in the following:
[2001:db8:ccc3:ffff:0:444d:555e:666f]
Flash Player returns literal IPv6 values, according to the following rules:
•Flash Player returns the long form of the string for IPv6 addresses.
•The IP value has no double-colon abbreviations.
•Hexadecimal digits are lowercase only.
•IPv6 addresses are enclosed in square brackets ([]).
•Each address quartet is output as 0 to 4 hexadecimal digits, with the leading zeros omitted.
•An address quartet of all zeros is output as a single zero (not a double colon) except as noted in the following list of
exceptions.
The IPv6 values that Flash Player returns have the following exceptions:
•An unspecified IPv6 address (all zeros) is output as [::].
•The loopback or localhost IPv6 address is output as [::1].
•IPv4 mapped (converted to IPv6) addresses are output as [::ffff:a.b.c.d], where a.b.c.d is a typical IPv4 dotted-
decimal value.
•IPv4 compatible addresses are output as [::a.b.c.d], where a.b.c.d is a typical IPv4 dotted-decimal value.

778
Last updated 3/21/2011
Chapter 42: HTTP communications
Flash Player 9 and later, Adobe AIR 1.0 and later
Adobe® AIR® and Adobe® Flash® Player applications can communicate with HTTP-based servers to load data, images,
video and to exchange messages.
More Help topics
flash.net.URLLoader
flash.net.URLStream
flash.net.URLRequest
flash.net.URLRequestDefaults
flash.net.URLRequestHeader
flash.net.URLRequestMethod
flash.net.URLVariables
Loading external data
Flash Player 9 and later, Adobe AIR 1.0 and later
ActionScript 3.0 includes mechanisms for loading data from external sources. Those sources can provide static content
such as text files, or dynamic content generated by a web script. The data can be formatted in various ways, and
ActionScript provides functionality for decoding and accessing the data. You can also send data to the external server
as part of the process of retrieving data.
Using the URLRequest class
Flash Player 9 and later, Adobe AIR 1.0 and later
Many APIs that load external data use the URLRequest class to define the properties of necessary network request.
URLRequest properties
Flash Player 9 and later, Adobe AIR 1.0 and later
You can set the following properties of a URLRequest object in any security sandbox:

779
ACTIONSCRIPT 3.0 DEVELOPER’S GUIDE
HTTP communications
Last updated 3/21/2011
In AIR, you can set additional properties of the URLRequest class, which are only available to AIR content running in
the application security sandbox. Content in the application sandbox can also define URLs using new URL schemes
(in addition to standard schemes like file and http).
Note: The HTMLLoader class has related properties for settings pertaining to content loaded by an HTMLLoader object.
For details, see “About the HTMLLoader class” on page 952.
Setting URLRequest defaults (AIR only)
Adobe AIR 1.0 and later
The URLRequestDefaults class lets you define application-specific default settings for URLRequest objects. For
example, the following code sets the default values for the manageCookies and useCache properties. All new
URLRequest objects will use the specified values for these properties instead of the normal defaults:
URLRequestDefaults.manageCookies = false;
URLRequestDefaults.useCache = false;
Note: The URLRequestDefaults class is defined for content running in Adobe AIR only. It is not supported in Flash Player.
Property Description
contentType The MIME content type of any data sent with the URL request. If no contentType is set, values are sent as
application/x-www-form-urlencoded.
data An object containing data to be transmitted with the URL request.
digest A string that uniquely identifies the signed Adobe platform component to be stored to (or retrieved from) the
Adobe® Flash® Player cache.
method The HTTP request method, such as a GET or POST. (Content running in the AIR application security domain can
specify strings other than "GET" or "POST" as the method property. Any HTTP verb is allowed and "GET" is
the default method. See “AIR security” on page 1041.)
requestHeaders The array of HTTP request headers to be appended to the HTTP request. Note that permission to set some
headers is restricted in Flash Player as well as in AIR content running outside the application security sandbox.
url Specifies the URL to be requested.
Property Description
followRedirects Specifies whether redirects are to be followed (true, the default value) or not (false). This is only supported
in the AIR application sandbox.
manageCookies Specifies whether the HTTP protocol stack should manage cookies (true, the default value) or not (false) for
this request. Setting this property is only supported in the AIR application sandbox.
authenticate Specifies whether authentication requests should be handled (true) for this request. Setting this property is
only supported in the AIR application sandbox. The default is to authenticate requests—which may cause an
authentication dialog box to be displayed if the server requires credentials. You can also set the user name and
password using the URLRequestDefaults class—see “Setting URLRequest defaults (AIR only)” on page 779.
cacheResponse Specifies whether response data should be cached for this request. Setting this property is only supported in
the AIR application sandbox. The default is to cache the response (true).
useCache Specifies whether the local cache should be consulted before this URLRequest fetches data. Setting this
property is only supported in the AIR application sandbox. The default (true) is to use the local cached
version, if available.
userAgent Specifies the user-agent string to be used in the HTTP request.

780
ACTIONSCRIPT 3.0 DEVELOPER’S GUIDE
HTTP communications
Last updated 3/21/2011
The URLRequestDefaults class includes a setLoginCredentialsForHost() method that lets you specify a default
user name and password to use for a specific host. The host, which is defined in the hostname parameter of the method,
can be a domain, such as "www.example.com", or a domain and a port number, such as "www.example.com:80".
Note that "example.com", "www.example.com", and "sales.example.com" are each considered unique hosts.
These credentials are only used if the server requires them. If the user has already authenticated (for example, by using
the authentication dialog box), then calling the setLoginCredentialsForHost() method does not change the
authenticated user.
The following code sets the default user name and password to use for requests sent to www.example.com:
URLRequestDefaults.setLoginCredentialsForHost("www.example.com", "Ada", "love1816$X");
The URLRequestDefaults settings only apply to the current application domain, with one exception. The credentials
passed to the setLoginCredentialsForHost() method are used for requests made in any application domain within
the AIR application.
For more information, see the URLRequestDefaults class in the ActionScript 3.0 Reference for the Adobe Flash
Platform.
URI schemes
Flash Player 9 and later, Adobe AIR 1.0 and later
The standard URI schemes, such as the following, can be used in requests made from any security sandbox:
http: and https:
Use these for standard Internet URLs (in the same way that they are used in a web browser).
file:
Use file: to specify the URL of a file located on the local file system. For example:
file:///c:/AIR Test/test.txt
In AIR, you can also use the following schemes when defining a URL for content running in the application security
sandbox:
app:
Use app: to specify a path relative to the root directory of the installed application. For example, the following path
points to a resources subdirectory of the directory of the installed application:
app:/resources
When an AIR application is launched using the AIR Debug Launcher (ADL), the application directory is the directory
that contains the application descriptor file.
app-storage:
Use app-storage: to specify a path relative to the data storage directory of the application. For each installed
application (and user), AIR creates a unique application storage directory, which is a useful place to store data specific
to that application. For example, the following path points to a prefs.xml file in a settings subdirectory of the
application store directory:
app-storage:/settings/prefs.xml

781
ACTIONSCRIPT 3.0 DEVELOPER’S GUIDE
HTTP communications
Last updated 3/21/2011
The application storage directory location is based on the user name, the application ID, and the publisher ID (if
applicable):
•On Mac OS—In:
/Users/user name/Library/Preferences/applicationID.publisherID/Local Store/
For example:
/Users/babbage/Library/Preferences/com.example.TestApp.02D88EEED35F84C264A183921344EEA353
A629FD.1/Local Store
•On Windows—In the documents and Settings directory, in:
user name/Application Data/applicationID.publisherID/Local Store/
For example:
C:\Documents and Settings\babbage\Application
Data\com.example.TestApp.02D88EEED35F84C264A183921344EEA353A629FD.1\Local Store
•On Linux—In:
/home/user name/.appdata/applicationID.publisherID/Local Store/
For example:
/home/babbage/.appdata/com.example.TestApp.02D88EEED35F84C264A183921344EEA353A629FD.1\Loc
al Store
Note: As of AIR 1.5.3, not all AIR applications have a publisher ID.
The URL (and url property) for a File object created with File.applicationStorageDirectory uses the app-
storage URI scheme, as in the following:
var dir:File = File.applicationStorageDirectory;
dir = dir.resolvePath("preferences");
trace(dir.url); // app-storage:/preferences
mailto:
You can use the mailto scheme in URLRequest objects passed to the navigateToURL() function. See “Opening a URL
in another application” on page 794.
You can use a URLRequest object that uses any of these URI schemes to define the URL request for a number of
different objects, such as a FileStream or a Sound object. You can also use these schemes in HTML content running in
AIR; for example, you can use them in the src attribute of an img tag.
However, you can only use these AIR-specific URI schemes (app: and app-storage:) in content in the application
security sandbox. For more information, see “AIR security” on page 1041.
Prohibited URI schemes (in AIR)
Some APIs allow you to launch content in a web browser. For security reasons, some URI schemes are prohibited when
using these APIs in AIR. The list of prohibited schemes depends on the security sandbox of the code using the API.
For details, see “Opening a URL in another application” on page 794.
Setting URL variables
While you can add variables to the URL string directly, it can be easier to use the URLVariables class to define any
variables needed for a request.

782
ACTIONSCRIPT 3.0 DEVELOPER’S GUIDE
HTTP communications
Last updated 3/21/2011
There are three ways in which you can add parameters to a URLVariables object:
•Within the URLVariables constructor
•With the URLVariables.decode() method
•As dynamic properties of the URLVariables object itself
The following example illustrates all three methods and also how to assign the variables to a URLRequest object:
var urlVar:URLVariables = new URLVariables( "one=1&two=2" );
urlVar.decode("amp=" + encodeURIComponent( "&" ) );
urlVar.three = 3;
urlVar.amp2 = "&&";
trace(urlVar.toString()); //amp=%26&2=%26%26&one=1&two=2&three=3
var urlRequest:URLRequest = new URLRequest( "http://www.example.com/test.cfm" );
urlRequest.data = urlVar;
When you define variables within the URLVariables constructor or within the URLVariables.decode() method,
make sure that you URL-encode the characters that have a special meaning in a URI string. For example, when you
use an ampersand in a parameter name or value, you must encode the ampersand by changing it from & to %26 because
the ampersand acts as a delimiter for parameters. The top-level encodeURIComponent() function can be used for this
purpose.
Using the URLLoader class
Flash Player 9 and later, Adobe AIR 1.0 and later
The URLLoader class let you send a request to a server and access the information returned. You can also use the
URLLoader class to access files on the local file system in contexts where local file access is permitted (such as the Flash
Player local-with-filesystem sandbox and the AIR application sandbox). The URLLoader class downloads data from a
URL as text, binary data, or URL-encoded variables. The URLLoader class dispatches events such as complete,
httpStatus, ioError, open, progress, and securityError.
The ActionScript 3.0 event-handling model is significantly different than the ActionScript 2.0 model, which used the
LoadVars.onData, LoadVars.onHTTPStatus, and LoadVars.onLoad event handlers. For more information on
handling events in ActionScript 3.0, see “Handling events” on page 117
Downloaded data is not available until the download has completed. You can monitor the progress of the download
(bytes loaded and bytes total) by listening for the progress event to be dispatched. However, if a file loads quickly
enough a progress event might not be dispatched. When a file has successfully downloaded, the complete event is
dispatched. By setting the URLLoader dataFormat property, you can receive the data as text, raw binary data, or as a
URLVariables object.
The URLLoader.load() method (and optionally the URLLoader class’s constructor) takes a single parameter,
request, which is a URLRequest object. A URLRequest object contains all of the information for a single HTTP
request, such as the target URL, request method (GET or POST), additional header information, and the MIME type.
For example, to upload an XML packet to a server-side script, you could use the following code:

783
ACTIONSCRIPT 3.0 DEVELOPER’S GUIDE
HTTP communications
Last updated 3/21/2011
var secondsUTC:Number = new Date().time;
var dataXML:XML =
<clock>
<time>{secondsUTC}</time>
</clock>;
var request:URLRequest = new URLRequest("http://www.yourdomain.com/time.cfm");
request.contentType = "text/xml";
request.data = dataXML.toXMLString();
request.method = URLRequestMethod.POST;
var loader:URLLoader = new URLLoader();
loader.load(request);
The previous snippet creates an XML document named dataXML that contains the XML packet to be sent to the server.
The example sets the URLRequest contentType property to "text/xml" and assigns the XML document to the
URLRequest data property. Finally, the example creates a URLLoader object and sends the request to the remote
script by using the load() method.
Using the URLStream class
Flash Player 9 and later, Adobe AIR 1.0 and later
The URLStream class provides access to the downloading data as the data arrives. The URLStream class also lets you
close a stream before it finishes downloading. The downloaded data is available as raw binary data.
When reading data from a URLStream object, use the bytesAvailable property to determine whether sufficient data
is available before reading it. An EOFError exception is thrown if you attempt to read more data than is available.
The httpResponseStatus event (AIR)
In Adobe AIR, the URLStream class dispatches an httpResponseStatus event in addition to the httpStatus event.
The httpResponseStatus event is delivered before any response data. The httpResponseStatus event (represented
by the HTTPStatusEvent class) includes a responseURL property, which is the URL that the response was returned
from, and a responseHeaders property, which is an array of URLRequestHeader objects representing the response
headers that the response returned.
Loading data from external documents
Flash Player 9 and later, Adobe AIR 1.0 and later
When you build dynamic applications, it can be useful to load data from external files or from server-side scripts. This
lets you build dynamic applications without having to edit or recompile your application. For example, if you build a
“tip of the day” application, you can write a server-side script that retrieves a random tip from a database and saves it
to a text file once a day. Then your application can load the contents of a static text file instead of querying the database
each time.
The following snippet creates a URLRequest and URLLoader object, which loads the contents of an external text file,
params.txt:
var request:URLRequest = new URLRequest("params.txt");
var loader:URLLoader = new URLLoader();
loader.load(request);

784
ACTIONSCRIPT 3.0 DEVELOPER’S GUIDE
HTTP communications
Last updated 3/21/2011
By default, if you do not define a request method, Flash Player and Adobe AIR load the content using the HTTP GET
method. To send the request using the POST method, set the request.method property to POST using the static
constant URLRequestMethod.POST, as the following code shows:
var request:URLRequest = new URLRequest("sendfeedback.cfm");
request.method = URLRequestMethod.POST;
The external document, params.txt, that is loaded at run time contains the following data:
monthNames=January,February,March,April,May,June,July,August,September,October,November,Dece
mber&dayNames=Sunday,Monday,Tuesday,Wednesday,Thursday,Friday,Saturday
The file contains two parameters, monthNames and dayNames. Each parameter contains a comma-separated list that
is parsed as strings. You can split this list into an array using the String.split() method.
Avoid using reserved words or language constructs as variable names in external data files, because doing so makes
reading and debugging your code more difficult.
Once the data has loaded, the complete event is dispatched, and the contents of the external document are available
to use in the URLLoader’s data property, as the following code shows:
function completeHandler(event)
{
var loader2 = event.target;
air.trace(loader2.data);
}
If the remote document contains name-value pairs, you can parse the data using the URLVariables class by passing in
the contents of the loaded file, as follows:
private function completeHandler(event:Event):void
{
var loader2:URLLoader = URLLoader(event.target);
var variables:URLVariables = new URLVariables(loader2.data);
trace(variables.dayNames);
}
Each name-value pair from the external file is created as a property in the URLVariables object. Each property within
the variables object in the previous code sample is treated as a string. If the value of the name-value pair is a list of items,
you can convert the string into an array by calling the String.split() method, as follows:
var dayNameArray:Array = variables.dayNames.split(",");
If you are loading numeric data from external text files, convert the values into numeric values by using a top-level
function, such as int(), uint(), or Number().
Instead of loading the contents of the remote file as a string and creating a new URLVariables object, you could instead
set the URLLoader.dataFormat property to one of the static properties found in the URLLoaderDataFormat class.
The three possible values for the URLLoader.dataFormat property are as follows:
•URLLoaderDataFormat.BINARY—The URLLoader.data property will contain binary data stored in a ByteArray
object.
•URLLoaderDataFormat.TEXT—The URLLoader.data property will contain text in a String object.
•URLLoaderDataFormat.VARIABLES—The URLLoader.data property will contain URL-encoded variables stored
in a URLVariables object.
The following code demonstrates how setting the URLLoader.dataFormat property to
URLLoaderDataFormat.VARIABLES allows you to automatically parse loaded data into a URLVariables object:

785
ACTIONSCRIPT 3.0 DEVELOPER’S GUIDE
HTTP communications
Last updated 3/21/2011
package
{
import flash.display.Sprite;
import flash.events.*;
import flash.net.URLLoader;
import flash.net.URLLoaderDataFormat;
import flash.net.URLRequest;
public class URLLoaderDataFormatExample extends Sprite
{
public function URLLoaderDataFormatExample()
{
var request:URLRequest = new URLRequest("http://www.[yourdomain].com/params.txt");
var variables:URLLoader = new URLLoader();
variables.dataFormat = URLLoaderDataFormat.VARIABLES;
variables.addEventListener(Event.COMPLETE, completeHandler);
try
{
variables.load(request);
}
catch (error:Error)
{
trace("Unable to load URL: " + error);
}
}
private function completeHandler(event:Event):void
{
var loader:URLLoader = URLLoader(event.target);
trace(loader.data.dayNames);
}
}
}
Note: The default value for URLLoader.dataFormat is URLLoaderDataFormat.TEXT.
As the following example shows, loading XML from an external file is the same as loading URLVariables. You can
create a URLRequest instance and a URLLoader instance and use them to download a remote XML document. When
the file has completely downloaded, the Event.COMPLETE event is dispatched and the contents of the external file are
converted to an XML instance, which you can parse using XML methods and properties.

786
ACTIONSCRIPT 3.0 DEVELOPER’S GUIDE
HTTP communications
Last updated 3/21/2011
package
{
import flash.display.Sprite;
import flash.errors.*;
import flash.events.*;
import flash.net.URLLoader;
import flash.net.URLRequest;
public class ExternalDocs extends Sprite
{
public function ExternalDocs()
{
var request:URLRequest = new URLRequest("http://www.[yourdomain].com/data.xml");
var loader:URLLoader = new URLLoader();
loader.addEventListener(Event.COMPLETE, completeHandler);
try
{
loader.load(request);
}
catch (error:ArgumentError)
{
trace("An ArgumentError has occurred.");
}
catch (error:SecurityError)
{
trace("A SecurityError has occurred.");
}
}
private function completeHandler(event:Event):void
{
var dataXML:XML = XML(event.target.data);
trace(dataXML.toXMLString());
}
}
}
Communicating with external scripts
Flash Player 9 and later, Adobe AIR 1.0 and later
In addition to loading external data files, you can also use the URLVariables class to send variables to a server-side
script and process the server’s response. This is useful, for example, if you are programming a game and want to send
the user’s score to a server to calculate whether it should be added to the high scores list, or even send a user’s login
information to a server for validation. A server-side script can process the user name and password, validate it against
a database, and return confirmation of whether the user-supplied credentials are valid.
The following snippet creates a URLVariables object named variables, which creates a new variable called name.
Next, a URLRequest object is created that specifies the URL of the server-side script to send the variables to. Then you
set the method property of the URLRequest object to send the variables as an HTTP POST request. To add the
URLVariables object to the URL request, you set the data property of the URLRequest object to the URLVariables
object created earlier. Finally, the URLLoader instance is created and the URLLoader.load() method is invoked,
which initiates the request.

787
ACTIONSCRIPT 3.0 DEVELOPER’S GUIDE
HTTP communications
Last updated 3/21/2011
var variables:URLVariables = new URLVariables("name=Franklin");
var request:URLRequest = new URLRequest();
request.url = "http://www.[yourdomain].com/greeting.cfm";
request.method = URLRequestMethod.POST;
request.data = variables;
var loader:URLLoader = new URLLoader();
loader.dataFormat = URLLoaderDataFormat.VARIABLES;
loader.addEventListener(Event.COMPLETE, completeHandler);
try
{
loader.load(request);
}
catch (error:Error)
{
trace("Unable to load URL");
}
function completeHandler(event:Event):void
{
trace(event.target.data.welcomeMessage);
}
The following code contains the contents of the Adobe ColdFusion® greeting.cfm document used in the previous
example:
<cfif NOT IsDefined("Form.name") OR Len(Trim(Form.Name)) EQ 0>
<cfset Form.Name = "Stranger" />
</cfif>
<cfoutput>welcomeMessage=#UrlEncodedFormat("Welcome, " & Form.name)#
</cfoutput>
Web service requests
Flash Player 9 and later, Adobe AIR 1.0 and later
There are a variety of HTTP-based web services. The main types include:
•REST
•XML-RPC
•SOAP
To use a web service in ActionScript 3, you create a URLRequest object, construct the web service call using either URL
variables or an XML document, and send the call to the service using a URLLoader object. The Flex framework
contains several classes that make it easier to use web services—especially useful when accessing complex SOAP
services. Starting with Flash Professional CS3, you can use the Flex classes in applications developed with Flash
Professional as well as in applications developed in Flash Builder.
In HTML-based AIR applications, you can use either the URLRequest and URLLoader classes or the JavaScript
XMLHttpRequest class. If desired, you can also create a SWF library that exposes the web service components of the
Flex framework to your JavaScript code.

788
ACTIONSCRIPT 3.0 DEVELOPER’S GUIDE
HTTP communications
Last updated 3/21/2011
When your application runs in a browser, you can only use web services in the same Internet domain as the calling
SWF unless the server hosting the web service also hosts a cross-domain policy file that permits access from other
domains. A technique that is often used when a cross-domain policy file is not available is to proxy the requests
through your own server. Adobe Blaze DS and Adobe LiveCycle support web service proxying.
In AIR applications, a cross-domain policy file is not required when the web service call originates from the application
security sandbox. AIR application content is never served from a remote domain, so it cannot participate in the types
of attacks that cross-domain policies prevent. In HTML-based AIR applications, content in the application security
sandbox can make cross-domain XMLHttpRequests. You can allow content in other security sandboxes to make cross-
domain XMLHttpRequests as long as that content is loaded into an iframe.
More Help topics
“Website controls (policy files)” on page 1017
Adobe BlazeDS
Adobe LiveCycle ES2
REST architecture
XML-RPC
SOAP protocol
REST-style web service requests
Flash Player 9 and later, Adobe AIR 1.0 and later
REST-style web services use HTTP method verbs to designate the basic action and URL variables to specify the action
details. For example, a request to get data for an item could use the GET verb and URL variables to specify a method
name and item ID. The resulting URL string might look like:
http://service.example.com/?method=getItem&id=d3452
To access a REST-style web service with ActionScript, you can use the URLRequest, URLVariables, and URLLoader
classes. In JavaScript code within an AIR application, you can also use an XMLHttpRequest.
Programming a REST-style web service call in ActionScript, typically involves the following steps:
1Create a URLRequest object.
2Set the service URL and HTTP method verb on the request object.
3Create a URLVariables object.
4Set the service call parameters as dynamic properties of the variables object.
5Assign the variables object to the data property of the request object.
6Send the call to the service with a URLLoader object.
7Handle the complete event dispatched by the URLLoader that indicates that the service call is complete. It is also
wise to listen for the various error events that can be dispatched by a URLLoader object.
For example, consider a web service that exposes a test method that echoes the call parameters back to the requestor.
The following ActionScript code could be used to call the service:

789
ACTIONSCRIPT 3.0 DEVELOPER’S GUIDE
HTTP communications
Last updated 3/21/2011
import flash.events.Event;
import flash.events.ErrorEvent;
import flash.events.IOErrorEvent;
import flash.events.SecurityErrorEvent;
import flash.net.URLLoader;
import flash.net.URLRequest;
import flash.net.URLRequestMethod;
import flash.net.URLVariables;
private var requestor:URLLoader = new URLLoader();
public function restServiceCall():void
{
//Create the HTTP request object
var request:URLRequest = new URLRequest( "http://service.example.com/" );
request.method = URLRequestMethod.GET;
//Add the URL variables
var variables:URLVariables = new URLVariables();
variables.method = "test.echo";
variables.api_key = "123456ABC";
variables.message = "Able was I, ere I saw Elba.";
request.data = variables;
//Initiate the transaction
requestor = new URLLoader();
requestor.addEventListener( Event.COMPLETE, httpRequestComplete );
requestor.addEventListener( IOErrorEvent.IOERROR, httpRequestError );
requestor.addEventListener( SecurityErrorEvent.SECURITY_ERROR, httpRequestError );
requestor.load( request );
}
private function httpRequestComplete( event:Event ):void
{
trace( event.target.data );
}
private function httpRequestError( error:ErrorEvent ):void{
trace( "An error occured: " + error.message );
}
In JavaScript within an AIR application, you can make the same request using the XMLHttpRequest object:

790
ACTIONSCRIPT 3.0 DEVELOPER’S GUIDE
HTTP communications
Last updated 3/21/2011
<html>
<head><title>RESTful web service request</title>
<script type="text/javascript">
function makeRequest()
{
var requestDisplay = document.getElementById( "request" );
var resultDisplay = document.getElementById( "result" );
//Create a conveninece object to hold the call properties
var request = {};
request.URL = "http://service.example.com/";
request.method = "test.echo";
request.HTTPmethod = "GET";
request.parameters = {};
request.parameters.api_key = "ABCDEF123";
request.parameters.message = "Able was I ere I saw Elba.";
var requestURL = makeURL( request );
xmlhttp = new XMLHttpRequest();
xmlhttp.open( request.HTTPmethod, requestURL, true);
xmlhttp.onreadystatechange = function() {
if (xmlhttp.readyState == 4) {
resultDisplay.innerHTML = xmlhttp.responseText;
}
}
xmlhttp.send(null);
requestDisplay.innerHTML = requestURL;
}
//Convert the request object into a properly formatted URL
function makeURL( request )
{
var url = request.URL + "?method=" + escape( request.method );
for( var property in request.parameters )
{
url += "&" + property + "=" + escape( request.parameters[property] );
}
return url;
}
</script>
</head>
<body onload="makeRequest()">
<h1>Request:</h1>
<div id="request"></div>
<h1>Result:</h1>
<div id="result"></div>
</body>
</html>

791
ACTIONSCRIPT 3.0 DEVELOPER’S GUIDE
HTTP communications
Last updated 3/21/2011
XML-RPC web service requests
Flash Player 9 and later, Adobe AIR 1.0 and later
An XML-RPC web service takes its call parameters as an XML document rather than as a set of URL variables. To
conduct a transaction with an XML-RPC web service, create a properly formatted XML message and send it to the web
service using the HTTP POST method. In addition, you should set the Content-Type header for the request so that the
server treats the request data as XML.
The following example illustrates how to use the same web service call shown in the REST example, but this time as an
XML-RPC service:
import flash.events.Event;
import flash.events.ErrorEvent;
import flash.events.IOErrorEvent;
import flash.events.SecurityErrorEvent;
import flash.net.URLLoader;
import flash.net.URLRequest;
import flash.net.URLRequestMethod;
import flash.net.URLVariables;
public function xmlRPCRequest():void
{
//Create the XML-RPC document
var xmlRPC:XML = <methodCall>
<methodName></methodName>
<params>
<param>
<value>
<struct/>
</value>
</param>
</params>
</methodCall>;
xmlRPC.methodName = "test.echo";
//Add the method parameters
var parameters:Object = new Object();
parameters.api_key = "123456ABC";
parameters.message = "Able was I, ere I saw Elba.";
for( var propertyName:String in parameters )
{
xmlRPC..struct.member[xmlRPC..struct.member.length + 1] =
<member>
<name>{propertyName}</name>
<value>
<string>{parameters[propertyName]}</string>
</value>
</member>;
}
//Create the HTTP request object
var request:URLRequest = new URLRequest( "http://service.example.com/xml-rpc/" );
request.method = URLRequestMethod.POST;
request.cacheResponse = false;
request.requestHeaders.push(new URLRequestHeader("Content-Type", "application/xml"));

792
ACTIONSCRIPT 3.0 DEVELOPER’S GUIDE
HTTP communications
Last updated 3/21/2011
request.data = xmlRPC;
//Initiate the request
requestor = new URLLoader();
requestor.dataFormat = URLLoaderDataFormat.TEXT;
requestor.addEventListener( Event.COMPLETE, xmlRPCRequestComplete );
requestor.addEventListener( IOErrorEvent.IO_ERROR, xmlRPCRequestError );
requestor.addEventListener( SecurityErrorEvent.SECURITY_ERROR, xmlRPCRequestError );
requestor.load( request );
}
private function xmlRPCRequestComplete( event:Event ):void
{
trace( XML(event.target.data).toXMLString() );
}
private function xmlRPCRequestError( error:ErrorEvent ):void
{
trace( "An error occurred: " + error );
}
WebKit in AIR doesn’t support E4X syntax, so the method used to create the XML document in the previous example
does not work in JavaScript code. Instead, you must use the DOM methods to create the XML document or create the
document as a string and use the JavaScript DOMParser class to convert the string to XML.
The following example uses DOM methods to create an XML-RPC message and an XMLHttpRequest to conduct the
web service transaction:
<html>
<head>
<title>XML-RPC web service request</title>
<script type="text/javascript">
function makeRequest()
{
var requestDisplay = document.getElementById( "request" );
var resultDisplay = document.getElementById( "result" );
var request = {};
request.URL = "http://services.example.com/xmlrpc/";
request.method = "test.echo";
request.HTTPmethod = "POST";
request.parameters = {};
request.parameters.api_key = "123456ABC";
request.parameters.message = "Able was I ere I saw Elba.";
var requestMessage = formatXMLRPC( request );
xmlhttp = new XMLHttpRequest();
xmlhttp.open( request.HTTPmethod, request.URL, true);
xmlhttp.onreadystatechange = function() {
if (xmlhttp.readyState == 4) {
resultDisplay.innerText = xmlhttp.responseText;
}
}
xmlhttp.send( requestMessage );
requestDisplay.innerText = xmlToString( requestMessage.documentElement );

793
ACTIONSCRIPT 3.0 DEVELOPER’S GUIDE
HTTP communications
Last updated 3/21/2011
}
//Formats a request as XML-RPC document
function formatXMLRPC( request )
{
var xmldoc = document.implementation.createDocument( "", "", null );
var root = xmldoc.createElement( "methodCall" );
xmldoc.appendChild( root );
var methodName = xmldoc.createElement( "methodName" );
var methodString = xmldoc.createTextNode( request.method );
methodName.appendChild( methodString );
root.appendChild( methodName );
var params = xmldoc.createElement( "params" );
root.appendChild( params );
var param = xmldoc.createElement( "param" );
params.appendChild( param );
var value = xmldoc.createElement( "value" );
param.appendChild( value );
var struct = xmldoc.createElement( "struct" );
value.appendChild( struct );
for( var property in request.parameters )
{
var member = xmldoc.createElement( "member" );
struct.appendChild( member );
var name = xmldoc.createElement( "name" );
var paramName = xmldoc.createTextNode( property );
name.appendChild( paramName )
member.appendChild( name );
var value = xmldoc.createElement( "value" );
var type = xmldoc.createElement( "string" );
value.appendChild( type );
var paramValue = xmldoc.createTextNode( request.parameters[property] );
type.appendChild( paramValue )
member.appendChild( value );
}
return xmldoc;
}
//Returns a string representation of an XML node
function xmlToString( rootNode, indent )
{
if( indent == null ) indent = "";
var result = indent + "<" + rootNode.tagName + ">\n";
for( var i = 0; i < rootNode.childNodes.length; i++)
{
if(rootNode.childNodes.item( i ).nodeType == Node.TEXT_NODE )
{
result += indent + " " + rootNode.childNodes.item( i ).textContent + "\n";
}
}
if( rootNode.childElementCount > 0 )

794
ACTIONSCRIPT 3.0 DEVELOPER’S GUIDE
HTTP communications
Last updated 3/21/2011
{
result += xmlToString( rootNode.firstElementChild, indent + " " );
}
if( rootNode.nextElementSibling )
{
result += indent + "</" + rootNode.tagName + ">\n";
result += xmlToString( rootNode.nextElementSibling, indent );
}
else
{
result += indent +"</" + rootNode.tagName + ">\n";
}
return result;
}
</script>
</head>
<body onload="makeRequest()">
<h1>Request:</h1>
<pre id="request"></pre>
<h1>Result:</h1>
<pre id="result"></pre>
</body>
</html>
SOAP web service requests
Flash Player 9 and later, Adobe AIR 1.0 and later
SOAP builds on the general XML-RPC web service concept and provides a richer, albeit more complex, means for
transferring typed data. SOAP web services typically provide a Web Service Description Language file (WSDL) that
specifies the web service calls, data types, and service URL. While ActionScript 3 does not provide direct support for
SOAP, you can construct a SOAP XML message “by hand,” post it to the server, and then parse the results. However,
for anything except the simplest SOAP web service, you can probably save a significant amount of development time
using an existing SOAP library.
The Flex framework includes libraries for accessing SOAP web services. In Flash Builder the library, rpc.swc, is
automatically included in Flex projects, since it is part of the Flex framework. In Flash Professional, you can add the
Flex framework.swc and rpc.swc to the library path of a project and then access the Flex classes with ActionScript.
More Help topics
Using the Flex web service component in Flash Professional
Cristophe Coenraets: Real-time Trader Desktop for Android
Opening a URL in another application
Flash Player 9 and later, Adobe AIR 1.0 and later
You can use the navigateToURL() function to open a URL in a web browser or other application. For content running
in AIR, the navigateToURL() function opens the page in the default system web browser.

795
ACTIONSCRIPT 3.0 DEVELOPER’S GUIDE
HTTP communications
Last updated 3/21/2011
For the URLRequest object you pass as the request parameter of this function, only the url property is used.
The first parameter of the navigateToURL() function, the navigate parameter, is a URLRequest object (see “Using
the URLRequest class” on page 778). The second is an optional window parameter, in which you can specify the
window name. For example, the following code opens the www.adobe.com web page:
var url:String = "http://www.adobe.com";
var urlReq:URLRequest = new URLRequest(url);
navigateToURL(urlReq);
Note: When using the navigateToURL() function, the runtime treats a URLRequest object that uses the POST method
(one that has its method property set to URLRequestMethod.POST) as using the GET method.
When using the navigateToURL() function, URI schemes are permitted based on the security sandbox of the code
calling the navigateToURL() function.
Some APIs allow you to launch content in a web browser. For security reasons, some URI schemes are prohibited when
using these APIs in AIR. The list of prohibited schemes depends on the security sandbox of the code using the API.
(For details on security sandboxes, see “AIR security” on page 1041.)
Application sandbox (AIR only)
The following schemes are allowed. Use these schemes as you would use them in a web browser.
•http:
•https:
•file:
•mailto: — AIR directs these requests to the registered system mail application
•app:
•app-storage:
•sms: — on mobile devices, AIR redirects sms: requests to the default text message app. (If no app is configured to
handle sms: URLs, then the request will do nothing.) The URL format must conform to the system conventions
under which the app is running. For example, on Android, the URI scheme must be lowercase.
navigateToURL( new URLRequest( "sms:+15555550101") );
•tel: — on mobile devices, AIR redirects tel: requests to the default telephone dialing app. (If no app is configured
to handle tel: URLs, then the request will do nothing.) The URL format must conform to the system conventions
under which the app is running. For example, on Android, the URI scheme must be lowercase.
navigateToURL( new URLRequest( "tel:5555555555") );
•market: — on Android devices, AIR redirects market: requests to the Market app.
navigateToURL( new URLRequest( "market://search?q=Adobe Flash") );
navigateToURL( new URLRequest( "market://search?q=pname:com.adobe.flashplayer") );
All other URL schemes are prohibited.
Remote sandboxes
The following schemes are allowed. Use these schemes as you would use them in a web browser.
•http:
•https:
•mailto: — AIR directs these requests to the registered system mail application

796
ACTIONSCRIPT 3.0 DEVELOPER’S GUIDE
HTTP communications
Last updated 3/21/2011
All other URI schemes are prohibited.
Local-with-file sandbox
The following schemes are allowed. Use these schemes as you would use them in a web browser.
•file:
•mailto: — AIR directs these requests to the registered system mail application
All other URI schemes are prohibited.
Local-with-networking sandbox
The following schemes are allowed. Use these schemes as you would use them in a web browser.
•http:
•https:
•mailto: — AIR directs these requests to the registered system mail application
All other URI schemes are prohibited.
Local-trusted sandbox
The following schemes are allowed. Use these schemes as you would use them in a web browser.
•file:
•http:
•https:
•mailto: — AIR directs these requests to the registered system mail application
All other URI schemes are prohibited.

797
Last updated 3/21/2011
Chapter 43: Communicating with other
Flash Player and AIR instances
Flash Player 9 and later, Adobe AIR 1.0 and later
The LocalConnection class enables communications between Adobe® AIR® applications, as well as between SWF
content running in the browser. You can also use the LocalConnection class to communicate between an AIR
application and SWF content running in the browser. The LocalConnection class allows you to build versatile
applications that can share data between Flash Player and AIR instances.
About the LocalConnection class
Flash Player 9 and later, Adobe AIR 1.0 and later
The LocalConnection class lets you develop SWF files that can send instructions to other SWF files without the use of
the fscommand() method or JavaScript. LocalConnection objects can communicate only among SWF files that are
running on the same client computer, but they can run in different applications. For example, a SWF file running in a
browser and a SWF file running in a projector can share information, with the projector maintaining local information
and the browser-based SWF file connecting remotely. (A projector is a SWF file saved in a format that can run as a
stand-alone application—that is, the projector doesn’t require Flash Player to be installed because it is embedded
inside the executable.)
LocalConnection objects can be used to communicate between SWFs using different ActionScript versions:
•ActionScript 3.0 LocalConnection objects can communicate with LocalConnection objects created in ActionScript
1.0 or 2.0.
•ActionScript 1.0 or 2.0 LocalConnection objects can communicate with LocalConnection objects created in
ActionScript 3.0.
Flash Player handles this communication between LocalConnection objects of different versions automatically.
The simplest way to use a LocalConnection object is to allow communication only between LocalConnection objects
located in the same domain or the same AIR application. That way, you do not have to worry about security issues.
However, if you need to allow communication between domains, you have several ways to implement security
measures. For more information, see the discussion of the connectionName parameter of the send() method and the
allowDomain() and domain entries in the LocalConnection class listing in the ActionScript 3.0 Reference for the
Adobe Flash Platform.
It is possible to use LocalConnection objects to send and receive data within a single SWF file, but Adobe does not
recommended doing so. Instead, use shared objects.
There are three ways to add callback methods to your LocalConnection objects:
•Subclass the LocalConnection class and add methods.
•Set the LocalConnection.client property to an object that implements the methods.
•Create a dynamic class that extends LocalConnection and dynamically attach methods.

798
ACTIONSCRIPT 3.0 DEVELOPER’S GUIDE
Communicating with other Flash Player and AIR instances
Last updated 3/21/2011
The first way to add callback methods is to extend the LocalConnection class. You define the methods within the
custom class instead of dynamically adding them to the LocalConnection instance. This approach is demonstrated in
the following code:
package
{
import flash.net.LocalConnection;
public class CustomLocalConnection extends LocalConnection
{
public function CustomLocalConnection(connectionName:String)
{
try
{
connect(connectionName);
}
catch (error:ArgumentError)
{
// server already created/connected
}
}
public function onMethod(timeString:String):void
{
trace("onMethod called at: " + timeString);
}
}
}
In order to create a new instance of the CustomLocalConnection class, you can use the following code:
var serverLC:CustomLocalConnection;
serverLC = new CustomLocalConnection("serverName");
The second way to add callback methods is to use the LocalConnection.client property. This involves creating a
custom class and assigning a new instance to the client property, as the following code shows:
var lc:LocalConnection = new LocalConnection();
lc.client = new CustomClient();
The LocalConnection.client property indicates the object callback methods that should be invoked. In the
previous code, the client property was set to a new instance of a custom class, CustomClient. The default value for
the client property is the current LocalConnection instance. You can use the client property if you have two data
handlers that have the same set of methods but act differently—for example, in an application where a button in one
window toggles the view in a second window.
To create the CustomClient class, you could use the following code:
package
{
public class CustomClient extends Object
{
public function onMethod(timeString:String):void
{
trace("onMethod called at: " + timeString);
}
}
}
The third way to add callback methods, creating a dynamic class and dynamically attaching the methods, is very
similar to using the LocalConnection class in earlier versions of ActionScript, as the following code shows:

799
ACTIONSCRIPT 3.0 DEVELOPER’S GUIDE
Communicating with other Flash Player and AIR instances
Last updated 3/21/2011
import flash.net.LocalConnection;
dynamic class DynamicLocalConnection extends LocalConnection {}
Callback methods can be dynamically added to this class by using the following code:
var connection:DynamicLocalConnection = new DynamicLocalConnection();
connection.onMethod = this.onMethod;
// Add your code here.
public function onMethod(timeString:String):void
{
trace("onMethod called at: " + timeString);
}
The previous way of adding callback methods is not recommended because the code is not very portable. In addition,
using this method of creating local connections could create performance issues, because accessing dynamic properties
is dramatically slower than accessing sealed properties.
isPerUser property
The isPerUser property was added to Flash Player (10.0.32) and AIR (1.5.2) to resolve a conflict that occurs when
more than one user is logged into a Mac computer. On other operating systems, the property is ignored since the local
connection has always been scoped to individual users. The isPerUser property should be set to true in new code.
However, the default value is currently false for backward compatibility. The default may be changed in future
versions of the runtimes.
Sending messages between two applications
Flash Player 9 and later, Adobe AIR 1.0 and later
You use the LocalConnection class to communicate between different AIR applications and between different Adobe®
Flash® Player (SWF) applications running in a browser. You can also use the LocalConnection class to communicate
between an AIR application and a SWF application running in a browser.
For example, you could have multiple Flash Player instances on a web page, or have a Flash Player instance retrieve
data from a Flash Player instance in a pop-up window.
The following code defines a LocalConnection object that acts as a server and accepts incoming LocalConnection calls
from other applications:

800
ACTIONSCRIPT 3.0 DEVELOPER’S GUIDE
Communicating with other Flash Player and AIR instances
Last updated 3/21/2011
package
{
import flash.net.LocalConnection;
import flash.display.Sprite;
public class ServerLC extends Sprite
{
public function ServerLC()
{
var lc:LocalConnection = new LocalConnection();
lc.client = new CustomClient1();
try
{
lc.connect("conn1");
}
catch (error:Error)
{
trace("error:: already connected");
}
}
}
}
This code first creates a LocalConnection object named lc and sets the client property to an object, clientObject.
When another application calls a method in this LocalConnection instance, the runtime looks for that method in the
clientObject object.
If you already have a connection with the specified name, an Argument Error exception is thrown, indicating that the
connection attempt failed because the object is already connected.
Whenever a Flash Player instance connects to this SWF file and tries to invoke any method for the specified local
connection, the request is sent to the class specified by the client property, which is set to the CustomClient1 class:
package
{
import flash.events.*;
import flash.system.fscommand;
import flash.utils.Timer;
public class CustomClient1 extends Object
{
public function doMessage(value:String = ""):void
{
trace(value);
}
public function doQuit():void
{
trace("quitting in 5 seconds");
this.close();
var quitTimer:Timer = new Timer(5000, 1);
quitTimer.addEventListener(TimerEvent.TIMER, closeHandler);
}
public function closeHandler(event:TimerEvent):void
{
fscommand("quit");
}
}
}

801
ACTIONSCRIPT 3.0 DEVELOPER’S GUIDE
Communicating with other Flash Player and AIR instances
Last updated 3/21/2011
To create a LocalConnection server, call the LocalConnection.connect() method and provide a unique connection
name. If you already have a connection with the specified name, an ArgumentError error is generated, indicating that
the connection attempt failed because the object is already connected.
The following snippet demonstrates how to create a LocalConnection with the name conn1:
try
{
connection.connect("conn1");
}
catch (error:ArgumentError)
{
trace("Error! Server already exists\n");
}
Connecting to the primary application from a secondary application requires that you first create a LocalConnection
object in the sending LocalConnection object; then call the LocalConnection.send() method with the name of the
connection and the name of the method to execute. For example, to send the doQuit method to the LocalConnection
object that you created earlier, use the following code:
sendingConnection.send("conn1", "doQuit");
This code connects to an existing LocalConnection object with the connection name conn1 and invokes the
doMessage() method in the remote application. If you want to send parameters to the remote application, you specify
additional arguments after the method name in the send() method, as the following snippet shows:
sendingConnection.send("conn1", "doMessage", "Hello world");
Connecting to content in different domains and to AIR
applications
Flash Player 9 and later, Adobe AIR 1.0 and later
To allow communications only from specific domains, you call the allowDomain() or allowInsecureDomain()
method of the LocalConnection class and pass a list of one or more domains that are allowed to access this
LocalConnection object, passing one or more names of domains to be allowed.
In earlier versions of ActionScript, LocalConnection.allowDomain() and
LocalConnection.allowInsecureDomain() were callback methods that had to be implemented by developers and
that had to return a Boolean value. In ActionScript 3.0, LocalConnection.allowDomain() and
LocalConnection.allowInsecureDomain() are both built-in methods, which developers can call just like
Security.allowDomain() and Security.allowInsecureDomain(), passing one or more names of domains to be
allowed.
Flash Player 8 introduced security restrictions on local SWF files. A SWF file that is allowed to access the Internet
cannot also have access to the local file system. If you specify localhost, any local SWF file can access the SWF file.
If the LocalConnection.send() method attempts to communicate with a SWF file from a security sandbox to which
the calling code does not have access, a securityError event(SecurityErrorEvent.SECURITY_ERROR) is
dispatched. To work around this error, you can specify the caller's domain in the receiver's
LocalConnection.allowDomain() method.

802
ACTIONSCRIPT 3.0 DEVELOPER’S GUIDE
Communicating with other Flash Player and AIR instances
Last updated 3/21/2011
There are two special values that you can pass to the LocalConnection.allowDomain() and
LocalConnection.allowInsecureDomain() methods: * and localhost. The asterisk value (*) allows access from
all domains. The string localhost allows calls to the application from content locally installed, but outside of the
application resource directory.
If the LocalConnection.send() method attempts to communicate with an application from a security sandbox to
which the calling code does not have access, a securityError event(SecurityErrorEvent.SECURITY_ERROR) is
dispatched. To work around this error, you can specify the caller's domain in the receiver's
LocalConnection.allowDomain() method.
If you implement communication only between content in the same domain, you can specify a connectionName
parameter that does not begin with an underscore (_) and does not specify a domain name (for example,
myDomain:connectionName). Use the same string in the LocalConnection.connect(connectionName)
command.
If you implement communication between content in different domains, you specify a connectionName parameter
that begins with an underscore. Specifying the underscore makes the content with the receiving LocalConnection
object more portable between domains. Here are the two possible cases:
•If the string for connectionName does not begin with an underscore, the runtime adds a prefix with the
superdomain name and a colon (for example, myDomain:connectionName). Although this ensures that your
connection does not conflict with connections of the same name from other domains, any sending
LocalConnection objects must specify this superdomain (for example, myDomain:connectionName). If you move
the HTML or SWF file with the receiving LocalConnection object to another domain, the runtime changes the
prefix to reflect the new superdomain (for example, anotherDomain:connectionName). All sending
LocalConnection objects have to be manually edited to point to the new superdomain.
•If the string for connectionName begins with an underscore (for example, _connectionName), the runtime does
not add a prefix to the string. This means the receiving and sending LocalConnection objects use identical strings
for connectionName. If the receiving object uses LocalConnection.allowDomain() to specify that connections
from any domain will be accepted, you can move the HTML or SWF file with the receiving LocalConnection object
to another domain without altering any sending LocalConnection objects.
A downside to using underscore names in connectionName is the potential for collisions, such as when two
applications both try to connect using the same connectionName. A second, related downside is security-related.
Connection names that use underscore syntax do not identify the domain of the listening application. For these
reasons, domain-qualified names are preferred.
Adobe AIR
To communicate with content running in the AIR application security sandbox (content installed with the AIR
application), you must prefix the connection name with a superdomain identifying the AIR application. The
superdomain string starts with app# followed by the application ID followed by a dot (.) character, followed by the
publisher ID (if defined). For example, the proper superdomain to use in the connectionName parameter for an
application with the application ID, com.example.air.MyApp, and no publisher ID is:
"app#com.example.air.MyApp". Thus, if the base connection name is “appConnection,” then the entire string to use
in the connectionName parameter is: "app#com.example.air.MyApp:appConnection". If the application has the
publisher ID, then the that ID must also be included in the superdomain string:
"app#com.example.air.MyApp.B146A943FBD637B68C334022D304CEA226D129B4.1".

803
ACTIONSCRIPT 3.0 DEVELOPER’S GUIDE
Communicating with other Flash Player and AIR instances
Last updated 3/21/2011
When you allow another AIR application to communicate with your application through the local connection, you
must call the allowDomain() of the LocalConnection object, passing in the local connection domain name. For an
AIR application, this domain name is formed from the application and publisher IDs in the same fashion as the
connection string. For example, if the sending AIR application has an application ID of
com.example.air.FriendlyApp and a publisher ID of 214649436BD677B62C33D02233043EA236D13934.1, then
the domain string that you would use to allow this application to connect is:
app#com.example.air.FriendlyApp.214649436BD677B62C33D02233043EA236D13934.1. (As of AIR 1.5.3, not
all AIR applications have publisher IDs.)

804
Last updated 3/21/2011
Chapter 44: Communicating with native
processes in AIR
Adobe AIR 2 and later
As of Adobe AIR 2, AIR applications can run and communicate with other native processes via the command line. For
example, an AIR application can run a process and communicate with it via the standard input and output streams.
To communicate with native processes, package an AIR application to be installed via a native installer. The file type
of native installer is specific to the operating system for which it is created:
•It is a DMG file on Mac OS.
•It is an EXE file on Windows.
•It is an RPM or DEB package on Linux.
These applications are known as extended desktop profile applications. You can create a native installer file by
specifying the -target native option when calling the -package command using ADT.
More Help topics
flash.filesystem.File.openWithDefaultApplication()
flash.desktop.NativeProcess
Overview of native process communications
Adobe AIR 2 and later
An AIR application in the extended desktop profile can execute a file, as if it were invoked by the command line. It can
communicate with the standard streams of the native process. Standard streams include the standard input stream
(stdin), the output stream (stdout), the standard error stream (stderr).
Note: Applications in the extended desktop profile can also launch files and applications using the
File.openWithDefaultApplication() method. However, using this method does not provide the AIR application
with access to the standard streams. For more information, see “Opening files with the default system application” on
page 648
The following code sample shows how to launch a test.exe application in the application directory. The application
passes the argument "hello" as a command-line argument, and it adds an event listener to the process’s standard
output stream:

805
ACTIONSCRIPT 3.0 DEVELOPER’S GUIDE
Communicating with native processes in AIR
Last updated 3/21/2011
var nativeProcessStartupInfo:NativeProcessStartupInfo = new NativeProcessStartupInfo();
var file:File = File.applicationDirectory.resolvePath("test.exe");
nativeProcessStartupInfo.executable = file;
var processArgs:Vector.<String> = new Vector.<String>();
processArgs.push("hello");
nativeProcessStartupInfo.arguments = processArgs;
process = new NativeProcess();
process.addEventListener(ProgressEvent.STANDARD_OUTPUT_DATA, onOutputData);
process.start(nativeProcessStartupInfo);
public function onOutputData(event:ProgressEvent):void
{
var stdOut:ByteArray = process.standardOutput;
var data:String = stdOut.readUTFBytes(process.standardOutput.bytesAvailable);
trace("Got: ", data);
}
Launching and closing a native process
Adobe AIR 2 and later
To launch a native process, set up a NativeProcessInfo object to do the following:
•Point to the file you want to launch
•Store command-line arguments to pass to the process when launched (optional)
•Set the working directory of the process (optional)
To start the native process, pass the NativeProcessInfo object as the parameter of the start() method of a
NativeProcess object.
For example, the following code shows how to launch a test.exe application in the application directory. The
application passes the argument "hello" and sets the user’s documents directory as the working directory:
var nativeProcessStartupInfo:NativeProcessStartupInfo = new NativeProcessStartupInfo();
var file:File = File.applicationDirectory.resolvePath("test.exe");
nativeProcessStartupInfo.executable = file;
var processArgs:Vector.<String> = new Vector.<String>();
processArgs[0] = "hello";
nativeProcessStartupInfo.arguments = processArgs;
nativeProcessStartupInfo.workingDirectory = File.documentsDirectory;
process = new NativeProcess();
process.start(nativeProcessStartupInfo);
To terminate the process, call the exit() method of the NativeProcess object.
If you want a file to be executable in your installed application, make sure that it's executable on the file system when
you package your application. (On Mac and Linux, you can use chmod to set the executable flag, if needed.)

806
ACTIONSCRIPT 3.0 DEVELOPER’S GUIDE
Communicating with native processes in AIR
Last updated 3/21/2011
Communicating with a native process
Adobe AIR 2 and later
Once an AIR application has started a native process, it can communicate with the standard input, standard output,
and standard error streams of the process.
You read and write data to the streams using the following properties of the NativeProcess object:
•standardInput—Contains access to the standard input stream data.
•standardOutput—Contains access to the standard output stream data.
•standardError—Contains access to the standard error stream data.
Writing to the standard input stream
You can write data to the standard input stream using the write methods of the standardInput property of the
NativeProcess object. As the AIR application writes data to the process, the NativeProcess object dispatches
standardInputProgress events.
If an error occurs in writing to the standard input stream, the NativeProcess object dispatches an
ioErrorStandardInput event.
You can close the input stream by calling the closeInput() method of the NativeProcess object. When the input
stream closes, the NativeProcess object dispatches a standardInputClose event.
var nativeProcessStartupInfo:NativeProcessStartupInfo = new NativeProcessStartupInfo();
var file:File = File.applicationDirectory.resolvePath("test.exe");
nativeProcessStartupInfo.executable = file;
process = new NativeProcess();
process.start(nativeProcessStartupInfo);
process.standardInput.writeUTF("foo");
if(process.running)
{
process.closeInput();
}
Reading from the standard output stream
You can read data from the standard output stream using the read methods of this property. As the AIR application
gets output stream data from the process, the NativeProcess object dispatches standardOutputData events.
If an error occurs in writing to the standard output stream, the NativeProcess object dispatches a
standardOutputError event.
When process closes the output stream, the NativeProcess object dispatches a standardOutputClose event.
When reading data from the standard input stream, be sure to read data as it is generated. In other words, add an event
listener for the standardOutputData event. In the standardOutputData event listener, read the data from the
standardOutput property of the NativeProcess object. Do not simply wait for the standardOutputClose event or
the exit event to read all data. If you do not read data as the native process generates the data, the buffer can fill up,
or data can be lost. A full buffer can cause the native process to stall when trying to write more data. However, if you
do not register an event listener for the standardOutputData event, then the buffer will not fill and the process will
not stall. In this case, you will not have access to the data.

807
ACTIONSCRIPT 3.0 DEVELOPER’S GUIDE
Communicating with native processes in AIR
Last updated 3/21/2011
var nativeProcessStartupInfo:NativeProcessStartupInfo = new NativeProcessStartupInfo();
var file:File = File.applicationDirectory.resolvePath("test.exe");
nativeProcessStartupInfo.executable = file;
process = new NativeProcess();
process.addEventListener(ProgressEvent.STANDARD_OUTPUT_DATA, dataHandler);
process.start(nativeProcessStartupInfo);
var bytes:ByteArray = new ByteArray();
function dataHandler(event:ProgressEvent):void
{
bytes.writeBytes(process.standardOutput.readBytes(process.standardOutput.bytesAvailable);
}
Reading from the standard error stream
You can read data from the standard error stream using the read methods of this property. As the AIR application
reads error stream data from the process, the NativeProcess object dispatches standardErrorData events.
If an error occurs in writing to the standard error stream, the NativeProcess object dispatches an
standardErrorIoError event.
When process closes the error stream, the NativeProcess object dispatches a standardErrorClose event.
When reading data from the standard error stream, be sure to read data as it is generated. In other words, add an event
listener for the standardErrorData event. In the standardErrorData event listener, read the data from the
standardError property of the NativeProcess object. Do not simply wait for the standardErrorClose event or the
exit event to read all data. If you do not read data as the native process generates the data, the buffer can fill up, or
data can be lost. A full buffer can cause the native process to stall when trying to write more data. However, if you do
not register an event listener for the standardErrorData event, then the buffer will not fill and the process will not
stall. In this case, you will not have access to the data.
var nativeProcessStartupInfo:NativeProcessStartupInfo = new NativeProcessStartupInfo();
var file:File = File.applicationDirectory.resolvePath("test.exe");
nativeProcessStartupInfo.executable = file;
process = new NativeProcess();
process.addEventListener(ProgressEvent.STANDARD_ERROR_DATA, errorDataHandler);
process.start(nativeProcessStartupInfo);
var errorBytes:ByteArray = new ByteArray();
function errorDataHandler(event:ProgressEvent):void
{
bytes.writeBytes(process.standardError.readBytes(process.standardError.bytesAvailable);
}
Security considerations for native process
communication
Adobe AIR 2 and later
The native process API can run any executable on the user’s system. Take extreme care when constructing and
executing commands. If any part of a command to be executed originates from an external source, carefully validate
that the command is safe to execute. Likewise, your AIR application should validate any data passed to a running
process.

808
ACTIONSCRIPT 3.0 DEVELOPER’S GUIDE
Communicating with native processes in AIR
Last updated 3/21/2011
However, validating input can be difficult. To avoid such difficulties, it is best to write a native application (such as an
EXE file on Windows) that has specific APIs. These APIs should process only those commands defined by the
application. For example, the application may accept only a limited set of instructions via the standard input stream.
AIR on Windows does not allow you to run .bat files directly. The command interpreter application (cmd.exe)
executes Windows .bat files. When you invoke a .bat file, this command application can interpret arguments passed to
the command as additional applications to launch. A malicious injection of extra characters in the argument string
could cause cmd.exe to execute a harmful or insecure application. For example, without proper data validation, your
AIR application may call myBat.bat myArguments c:/evil.exe. The command application would launch the
evil.exe application in addition to running your batch file.

809
Last updated 3/21/2011
Chapter 45: Using the external API
Flash Player 9 and later, Adobe AIR 1.0 and later
The ActionScript 3.0 external API (flash.external.ExternalInterface) enables straightforward communication between
ActionScript and the container application within which Adobe Flash Player is running. There are several situations
in which you may want to use the external API—for example, when you create interaction between a SWF document
and JavaScript in an HTML page, or when you build a desktop application that uses Flash Player to display a SWF file.
You can use the external API to interact with a container application, pass data between ActionScript and JavaScript
in an HTML page, and establish communication and exchange data between ActionScript and a desktop application.
Some common external API tasks are:
•Getting information about the container application
•Using ActionScript to call code in a container application, including a web page or desktop application
•Calling ActionScript code from code in a container application
•Creating a proxy to simplify calling ActionScript code from a container application
Note: This discussion of the external interface only covers communication between ActionScript in a SWF file and the
container application that includes a reference to the Flash Player or instance in which the SWF file is loaded. Any other
use of Flash Player within an application is outside the scope of this documentation. Flash Player is designed to be used
as a browser plug-in or as a projector (standalone application). Other usage scenarios may have limited support.
Using the external API in AIR
Since an AIR application does not have an external container, this external interface does not generally apply—nor is
it generally needed. When your AIR application loads a SWF file directly, the application code can communicate
directly with the ActionScript code in the SWF (subject to security sandbox restrictions).
However, when your AIR application loads a SWF file using an HTML page in an HTMLLoader object (or an HTML
component in Flex), the HTMLLoader object serves as the external container. Thus, you can use the external interface
to communicate between the ActionScript code in the loaded SWF and the JavaScript code in the HTML page loaded
in the HTMLLoader.
Basics of using the external API
Flash Player 9 and later, Adobe AIR 1.0 and later
Although in some cases a SWF file can run on its own (for example, if you use Adobe® Flash® Professional to create a
SWF projector), in the majority of cases a SWF application runs as an element inside of another application.
Commonly, the container that includes the SWF is an HTML file; somewhat less frequently, a SWF file is used for all
or part of the user interface of a desktop application.

810
ACTIONSCRIPT 3.0 DEVELOPER’S GUIDE
Using the external API
Last updated 3/21/2011
As you work on more advanced applications, you may find a need to set up communication between the SWF file and
the container application. For instance, it’s common for a web page to display text or other information in HTML, and
include a SWF file to display dynamic visual content such as a chart or video. In such a case, you might want to make
it so that when users click a button on the web page, it changes something in the SWF file. ActionScript contains a
mechanism, known as the external API, that facilitates this type of communication between ActionScript in a SWF file
and other code in the container application.
Important concepts and terms
The following reference list contains important terms relevant to this feature:
ActiveX container A container application (not a web browser) that includes an instance of the Flash Player ActiveX
control to display SWF content within the application.
Container application The application within which Flash Player is running a SWF file, such as a web browser and
HTML page that includes Flash Player content.
Projector An executable file that includes SWF content and an embedded version of Flash Player. You can create a
projector file using Flash Professional or the standalone Flash Player. Projectors are commonly used to distribute SWF
files by CD-ROM or in similar situations where download size is not an issue and the SWF author wants to be certain
the user will be able to run the SWF file, regardless of whether Flash Player is installed on the user’s computer.
Proxy A go-between application or code that calls code in one application (the “external application”) on behalf of
another application (the “calling application”), and returns values to the calling application. A proxy can be used for
various reasons, including:
•To simplify the process of making external function calls by converting native function calls in the calling
application into the format understood by the external application.
•To work around security or other restrictions that prevent the caller from communicating directly with the external
application.
Serialize To convert objects or data values into a format that can be used to pass the values in messages between two
programming systems, such as over the Internet or between two different applications running on a single computer.
Working through the examples
Many of the code examples provided are small listings of code for demonstration purposes rather than full working
examples or code that checks values. Because using the external API requires (by definition) writing ActionScript code
as well as code in a container application, testing the examples involves creating a container (for example, a web page
containing the SWF file) and using the code listings to interact with the container.
To test an example of ActionScript-to-JavaScript communication:
1Create a new document using Flash Professional and save it to your computer.
2From the main menu, choose File > Publish Settings.
3In the Publish Settings dialog box, on the Formats tab, confirm that the Flash and HTML check boxes are selected.
4Click the Publish button. This generates a SWF file and HTML file in the same folder and with the same name that
you used to save the document. Click OK to close the Publish Settings dialog box.
5Deselect the HTML check box. Now that the HTML page is generated, you are going to modify it to add the
appropriate JavaScript code. Deselecting the HTML check box ensures that after you modify the HTML page, Flash
will not overwrite your changes with a new HTML page when it’s publishing the SWF file.
6Click OK to close the Publish Settings dialog box.

811
ACTIONSCRIPT 3.0 DEVELOPER’S GUIDE
Using the external API
Last updated 3/21/2011
7With an HTML or text editor application, open the HTML file that was created by Flash when you published the
SWF file. In the HTML source code, add opening and closing script tags, and copy into them the JavaScript code
from the example code listing:
<script>
// add the sample JavaScript code here
</script>
8Save the HTML file and return to Flash.
9Select the keyframe on Frame 1 of the Timeline, and open the Actions panel.
10 Copy the ActionScript code listing into the Script pane.
11 From the main menu, choose File > Publish to update the SWF file with the changes that you’ve made.
12 Using a web browser, open the HTML page you edited to view the page and test communication between
ActionScript and the HTML page.
To test an example of ActionScript-to-ActiveX container communication:
1Create a new document using Flash Professional and save it to your computer. You may want to save it in the folder
where your container application will expect to find the SWF file.
2From the main menu, choose File > Publish Settings.
3In the Publish Settings dialog box, on the Formats tab, confirm that only the Flash check box is selected.
4In the File field next to the Flash check box, click the folder icon to select the folder into which your SWF file will
be published. By setting the location for your SWF file, you can (for example) keep the document in one folder, but
put the published SWF file in another folder such as the folder containing the source code for the container
application.
5Select the keyframe on Frame 1 of the Timeline, and open the Actions panel.
6Copy the ActionScript code for the example into the Script pane.
7From the main menu, choose File > Publish to re-publish the SWF file.
8Create and run your container application to test communication between ActionScript and the container
application.
For full examples of using the external API to communicate with an HTML page and a C# desktop application, see the
following topics:
•“External API example: Communicating between ActionScript and JavaScript in a web browser” on page 817
•“External API example: Communicating between ActionScript and a desktop application that uses the ActiveX
control” on page 823
Those examples include the full code, including ActionScript and container error-checking code, which you should
use when writing code using the external API. For another full example using the external API, see the class example
for the ExternalInterface class in the ActionScript 3.0 Reference.

812
ACTIONSCRIPT 3.0 DEVELOPER’S GUIDE
Using the external API
Last updated 3/21/2011
External API requirements and advantages
Flash Player 9 and later, Adobe AIR 1.0 and later
The external API is the portion of ActionScript that provides a mechanism for communication between ActionScript
and code running in an “external application” that is acting as a container for Flash Player (commonly a web browser
or stand-alone projector application). In ActionScript 3.0, the functionality of the external API is provided by the
ExternalInterface class. In Flash Player versions prior to Flash Player 8, the fscommand() action was used to carry out
communication with the container application. The ExternalInterface class is a replacement for fscommand().
Note: If you need to use the old fscommand() function—for example, to maintain compatibility with older applications
or to interact with a third-party SWF container application or the stand-alone Flash Player—it is still available as a
package-level function in the flash.system package.
The ExternalInterface class is a subsystem that lets you easily communicate from ActionScript and Flash Player to
JavaScript in an HTML page, or to any desktop application that includes an instance of Flash Player.
The ExternalInterface class is available only under the following conditions:
•In all supported versions of Internet Explorer for Windows (5.0 and later)
•In a container application such as a desktop application using an instance of the Flash Player ActiveX control
•In any browser that supports the NPRuntime interface, which currently includes Firefox 1.0 and later, Mozilla 1.7.5
and later, Netscape 8.0 and later, and Safari 1.3 and later.
In all other situations (such as running in a stand-alone player), the ExternalInterface.available property
returns false.
From ActionScript, you can call a JavaScript function on the HTML page. The external API offers the following
improved functionality compared with fscommand():
•You can use any JavaScript function, not only the functions that you can use with the fscommand() function.
•You can pass any number of arguments, with any names; you aren't limited to passing a command and a single
string argument. This gives the external API much more flexibility than fscommand().
•You can pass various data types (such as Boolean, Number, and String); you aren’t limited to String parameters.
•You can receive the value of a call, and that value returns immediately to ActionScript (as the return value of the
call you make).
Important: If the name given to the Flash Player instance in an HTML page (the object tag’s id attribute) includes a
hyphen (-) or other characters that are defined as operators in JavaScript (such as +, *, /, \, ., and so on),
ExternalInterface calls from ActionScript will not work when the container web page is viewed in Internet Explorer.In
addition, if the HTML tags that define the Flash Player instance (the object and embed tags) are nested in an HTML
form tag, ExternalInterface calls from ActionScript will not work.

813
ACTIONSCRIPT 3.0 DEVELOPER’S GUIDE
Using the external API
Last updated 3/21/2011
Using the ExternalInterface class
Flash Player 9 and later, Adobe AIR 1.0 and later
Communication between ActionScript and the container application can take one of two forms: either ActionScript
can call code (such as a JavaScript function) defined in the container, or code in the container can call an ActionScript
function that has been designated as being callable. In either case, information can be sent to the code being called, and
results can be returned to the code making the call.
To facilitate this communication, the ExternalInterface class includes two static properties and two static methods.
These properties and methods are used to obtain information about the external interface connection, to execute code
in the container from ActionScript, and to make ActionScript functions available to be called by the container.
Getting information about the external container
Flash Player 9 and later, Adobe AIR 1.0 and later
The ExternalInterface.available property indicates whether the current Flash Player is in a container that offers
an external interface. If the external interface is available, this property is true; otherwise, it is false. Before using any
of the other functionality in the ExternalInterface class, you should always check to make sure that the current
container supports external interface communication, as follows:
if (ExternalInterface.available)
{
// Perform ExternalInterface method calls here.
}
Note: The ExternalInterface.available property reports whether the current container is a type that supports
ExternalInterface connectivity. It doesn’t tell you if JavaScript is enabled in the current browser.
The ExternalInterface.objectID property allows you to determine the unique identifier of the Flash Player
instance (specifically, the id attribute of the object tag in Internet Explorer or the name attribute of the embed tag in
browsers using the NPRuntime interface). This unique ID represents the current SWF document in the browser, and
can be used to make reference to the SWF document—for example, when calling a JavaScript function in a container
HTML page. When the Flash Player container is not a web browser, this property is null.
Calling external code from ActionScript
Flash Player 9 and later, Adobe AIR 1.0 and later
The ExternalInterface.call() method executes code in the container application. It requires at least one
parameter, a string containing the name of the function to be called in the container application. Any additional
parameters passed to the ExternalInterface.call() method are passed along to the container as parameters of the
function call.
// calls the external function "addNumbers"
// passing two parameters, and assigning that function's result
// to the variable "result"
var param1:uint = 3;
var param2:uint = 7;
var result:uint = ExternalInterface.call("addNumbers", param1, param2);

814
ACTIONSCRIPT 3.0 DEVELOPER’S GUIDE
Using the external API
Last updated 3/21/2011
If the container is an HTML page, this method invokes the JavaScript function with the specified name, which must
be defined in a script element in the containing HTML page. The return value of the JavaScript function is passed
back to ActionScript.
<script language="JavaScript">
// adds two numbers, and sends the result back to ActionScript
function addNumbers(num1, num2)
{
return (num1 + num2);
}
</script>
If the container is some other ActiveX container, this method causes the Flash Player ActiveX control to dispatch its
FlashCall event. The specified function name and any parameters are serialized into an XML string by Flash Player.
The container can access that information in the request property of the event object and use it to determine how to
execute its own code. To return a value to ActionScript, the container code calls the ActiveX object’s
SetReturnValue() method, passing the result (serialized into an XML string) as a parameter of that method. For
more information about the XML format used for this communication, see “The external API’s XML format” on
page 815.
Whether the container is a web browser or another ActiveX container, if the call fails or the container method does
not specify a return value, null is returned. The ExternalInterface.call() method throws a SecurityError
exception if the containing environment belongs to a security sandbox to which the calling code does not have access.
You can work around this by setting an appropriate value for allowScriptAccess in the containing environment.
For example, to change the value of allowScriptAccess in an HTML page, you would edit the appropriate attribute
in the object and embed tags.
Calling ActionScript code from the container
Flash Player 9 and later, Adobe AIR 1.0 and later
A container can only call ActionScript code that’s in a function—no other ActionScript code can be called by a
container. To call an ActionScript function from the container application, you must do two things: register the
function with the ExternalInterface class, and then call it from the container’s code.
First, you must register your ActionScript function to indicate that it should be made available to the container. Use
the ExternalInterface.addCallback() method, as follows:
function callMe(name:String):String
{
return "busy signal";
}
ExternalInterface.addCallback("myFunction", callMe);
The addCallback() method takes two parameters. The first, a function name as a String, is the name by which the
function will be known to the container. The second parameter is the actual ActionScript function that will be executed
when the container calls the defined function name. Because these names are distinct, you can specify a function name
that will be used by the container, even if the actual ActionScript function has a different name. This is especially useful
if the function name is not known—for example, if an anonymous function is specified, or if the function to be called
is determined at run time.

815
ACTIONSCRIPT 3.0 DEVELOPER’S GUIDE
Using the external API
Last updated 3/21/2011
Once an ActionScript function has been registered with the ExternalInterface class, the container can actually call the
function. How this is done varies according to the type of container. For example, in JavaScript code in a web browser,
the ActionScript function is called using the registered function name as though it’s a method of the Flash Player
browser object (that is, a method of the JavaScript object representing the object or embed tag). In other words,
parameters are passed and a result is returned as though a local function is being called.
<script language="JavaScript">
// callResult gets the value "busy signal"
var callResult = flashObject.myFunction("my name");
</script>
...
<object id="flashObject"...>
...
<embed name="flashObject".../>
</object>
Alternatively, when calling an ActionScript function in a SWF file running in a desktop application, the registered
function name and any parameters must be serialized into an XML-formatted string. Then the call is actually
performed by calling the CallFunction() method of the ActiveX control with the XML string as a parameter. For
more information about the XML format used for this communication, see “The external API’s XML format” on
page 815.
In either case, the return value of the ActionScript function is passed back to the container code, either directly as a
value when the caller is JavaScript code in a browser, or serialized as an XML-formatted string when the caller is an
ActiveX container.
The external API’s XML format
Flash Player 9 and later, Adobe AIR 1.0 and later
Communication between ActionScript and an application hosting the Shockwave Flash ActiveX control uses a specific
XML format to encode function calls and values. There are two parts to the XML format used by the external API. One
format is used to represent function calls. Another format is used to represent individual values; this format is used for
parameters in functions as well as function return values. The XML format for function calls is used for calls to and
from ActionScript. For a function call from ActionScript, Flash Player passes the XML to the container; for a call from
the container, Flash Player expects the container application to pass it an XML string in this format. The following
XML fragment shows an example XML-formatted function call:
<invoke name="functionName" returntype="xml">
<arguments>
... (individual argument values)
</arguments>
</invoke>
The root node is the invoke node. It has two attributes: name indicates the name of the function to call, and
returntype is always xml. If the function call includes parameters, the invoke node has a child arguments node,
whose child nodes will be the parameter values formatted using the individual value format explained next.
Individual values, including function parameters and function return values, use a formatting scheme that includes
data type information in addition to the actual values. The following table lists ActionScript classes and the XML
format used to encode values of that data type:

816
ACTIONSCRIPT 3.0 DEVELOPER’S GUIDE
Using the external API
Last updated 3/21/2011
Note: By way of example, this table shows equivalent C# classes in addition to ActionScript classes; however, the external
API can be used to communicate with any programming language or run time that supports ActiveX controls, and is not
limited to C# applications.
When you are building your own applications using the external API with an ActiveX container application, you’ll
probably find it convenient to write a proxy that will perform the task of converting native function calls to the
serialized XML format. For an example of a proxy class written in C#, see “Inside the ExternalInterfaceProxy class” on
page 827.
ActionScript
class/value
C# class/value Format Comments
null null <null/>
Boolean true bool true <true/>
Boolean false bool false <false/>
String string <string>string value</string>
Number, int, uint single, double, int, uint <number>27.5</number>
<number>-12</number>
Array (elements can be
mixed types)
A collection that allows
mixed-type elements,
such as ArrayList or
object[]
<array>
<property id="0">
<number>27.5</number>
</property>
<property id="1">
<string>Hello there!</string>
</property>
...
</array>
The property node
defines individual
elements, and the id
attribute is the
numeric, zero-based
index.
Object A dictionary with string
keys and object values,
such as a HashTable with
string keys
<object>
<property id="name">
<string>John Doe</string>
</property>
<property id="age">
<string>33</string>
</property>
...
</object>
The property node
defines individual
properties, and the
id attribute is the
property name (a
string).
Other built-in or custom
classes
<null/> or
<object></object>
ActionScript encodes
other objects as null
or as an empty object.
In either case any
property values are
lost.

817
ACTIONSCRIPT 3.0 DEVELOPER’S GUIDE
Using the external API
Last updated 3/21/2011
External API example: Communicating between
ActionScript and JavaScript in a web browser
Flash Player 9 and later, Adobe AIR 1.0 and later
This sample application demonstrates appropriate techniques for communicating between ActionScript and
JavaScript in a web browser, in the context of an Instant Messaging application that allows a person to chat with him
or herself (hence the name of the application: Introvert IM). Messages are sent between an HTML form in the web
page and a SWF interface using the external API. The techniques demonstrated by this example include the following:
•Properly initiating communication by verifying that the browser is ready to communicate before setting up
communication
•Checking whether the container supports the external API
•Calling JavaScript functions from ActionScript, passing parameters, and receiving values in response
•Making ActionScript methods available to be called by JavaScript, and performing those calls
To get the application files for this sample, see www.adobe.com/go/learn_programmingAS3samples_flash. The
Introvert IM application files can be found in the Samples/IntrovertIM_HTML folder. The application consists of the
following files:
Preparing for ActionScript-browser communication
Flash Player 9 and later, Adobe AIR 1.0 and later
One of the most common uses for the external API is to allow ActionScript applications to communicate with a web
browser. Using the external API, ActionScript methods can call code written in JavaScript and vice versa. Because of
the complexity of browsers and how they render pages internally, there is no way to guarantee that a SWF document
will register its callbacks before the first JavaScript on the HTML page runs. For that reason, before calling functions
in the SWF document from JavaScript, your SWF document should always call the HTML page to notify it that the
SWF document is ready to accept connections.
File Description
IntrovertIMApp.fla
or
IntrovertIMApp.mxml
The main application file for Flash (FLA) or Flex (MXML).
com/example/programmingas3/introvertIM/IMManager.as The class that establishes and manages communication between
ActionScript and the container.
com/example/programmingas3/introvertIM/IMMessageEvent.as Custom event type, dispatched by the IMManager class when a message
is received from the container.
com/example/programmingas3/introvertIM/IMStatus.as Enumeration whose values represent the different “availability” status
values that can be selected in the application.
html-flash/IntrovertIMApp.html
or
html-template/index.template.html
The HTML page for the application for Flash (html-
flash/IntrovertIMApp.html) or the template that is used to create the
container HTML page for the application for Adobe Flex (html-
template/index.template.html). This file contains all the JavaScript
functions that make up the container part of the application.

818
ACTIONSCRIPT 3.0 DEVELOPER’S GUIDE
Using the external API
Last updated 3/21/2011
For example, through a series of steps performed by the IMManager class, the Introvert IM determines whether the
browser is ready for communication and prepares the SWF file for communication. The first step, determining when
the browser is ready for communication, happens in the IMManager constructor, as follows:
public function IMManager(initialStatus:IMStatus)
{
_status = initialStatus;
// Check if the container is able to use the external API.
if (ExternalInterface.available)
{
try
{
// This calls the isContainerReady() method, which in turn calls
// the container to see if Flash Player has loaded and the container
// is ready to receive calls from the SWF.
var containerReady:Boolean = isContainerReady();
if (containerReady)
{
// If the container is ready, register the SWF's functions.
setupCallbacks();
}
else
{
// If the container is not ready, set up a Timer to call the
// container at 100ms intervals. Once the container responds that
// it's ready, the timer will be stopped.
var readyTimer:Timer = new Timer(100);
readyTimer.addEventListener(TimerEvent.TIMER, timerHandler);
readyTimer.start();
}
}
...
}
else
{
trace("External interface is not available for this container.");
}
}
First of all, the code checks whether the external API is even available in the current container using the
ExternalInterface.available property. If so, it begins the process of setting up communication. Because security
exceptions and other errors can occur when you attempt communication with an external application, the code is
wrapped in a try block (the corresponding catch blocks were omitted from the listing for brevity).
The code next calls the isContainerReady() method, listed here:
private function isContainerReady():Boolean
{
var result:Boolean = ExternalInterface.call("isReady");
return result;
}
The isContainerReady() method in turn uses ExternalInterface.call() method to call the JavaScript function
isReady(), as follows:

819
ACTIONSCRIPT 3.0 DEVELOPER’S GUIDE
Using the external API
Last updated 3/21/2011
<script language="JavaScript">
<!--
// ------- Private vars -------
var jsReady = false;
...
// ------- functions called by ActionScript -------
// called to check if the page has initialized and JavaScript is available
function isReady()
{
return jsReady;
}
...
// called by the onload event of the <body> tag
function pageInit()
{
// Record that JavaScript is ready to go.
jsReady = true;
}
...
//-->
</script>
The isReady() function simply returns the value of the jsReady variable. That variable is initially false; once the
onload event of the web page has been triggered, the variable’s value is changed to true. In other words, if
ActionScript calls the isReady() function before the page is loaded, JavaScript returns false to
ExternalInterface.call("isReady"), and consequently the ActionScript isContainerReady() method returns
false. Once the page has loaded, the JavaScript isReady() function returns true, so the ActionScript
isContainerReady() method also returns true.
Back in the IMManager constructor, one of two things happens depending on the readiness of the container. If
isContainerReady() returns true, the code simply calls the setupCallbacks() method, which completes the
process of setting up communication with JavaScript. On the other hand, if isContainerReady() returns false, the
process is essentially put on hold. A Timer object is created and is told to call the timerHandler() method every 100
milliseconds, as follows:
private function timerHandler(event:TimerEvent):void
{
// Check if the container is now ready.
var isReady:Boolean = isContainerReady();
if (isReady)
{
// If the container has become ready, we don't need to check anymore,
// so stop the timer.
Timer(event.target).stop();
// Set up the ActionScript methods that will be available to be
// called by the container.
setupCallbacks();
}
}
Each time the timerHandler() method gets called, it once again checks the result of the isContainerReady()
method. Once the container is initialized, that method returns true. The code then stops the Timer and calls the
setupCallbacks() method to finish the process of setting up communication with the browser.

820
ACTIONSCRIPT 3.0 DEVELOPER’S GUIDE
Using the external API
Last updated 3/21/2011
Exposing ActionScript methods to JavaScript
Flash Player 9 and later, Adobe AIR 1.0 and later
As the previous example showed, once the code determines that the browser is ready, the setupCallbacks() method
is called. This method prepares ActionScript to receive calls from JavaScript, as shown here:
private function setupCallbacks():void
{
// Register the SWF client functions with the container
ExternalInterface.addCallback("newMessage", newMessage);
ExternalInterface.addCallback("getStatus", getStatus);
// Notify the container that the SWF is ready to be called.
ExternalInterface.call("setSWFIsReady");
}
The setCallBacks() method finishes the task of preparing for communication with the container by calling
ExternalInterface.addCallback() to register the two methods that will be available to be called from JavaScript.
In this code, the first parameter—the name by which the method is known to JavaScript ("newMessage" and
"getStatus")—is the same as the method’s name in ActionScript. (In this case, there was no benefit to using different
names, so the same name was reused for simplicity.) Finally, the ExternalInterface.call() method is used to call
the JavaScript function setSWFIsReady(), which notifies the container that the ActionScript functions have been
registered.
Communication from ActionScript to the browser
Flash Player 9 and later, Adobe AIR 1.0 and later
The Introvert IM application demonstrates a range of examples of calling JavaScript functions in the container page.
In the simplest case (an example from the setupCallbacks() method), the JavaScript function setSWFIsReady() is
called without passing any parameters or receiving a value in return:
ExternalInterface.call("setSWFIsReady");
In another example from the isContainerReady() method, ActionScript calls the isReady() function and receives
a Boolean value in response:
var result:Boolean = ExternalInterface.call("isReady");
You can also pass parameters to JavaScript functions using the external API. For instance, consider the IMManager
class’s sendMessage() method, which is called when the user is sending a new message to his or her “conversation
partner”:
public function sendMessage(message:String):void
{
ExternalInterface.call("newMessage", message);
}
Once again, ExternalInterface.call() is used to call the designated JavaScript function, notifying the browser of
the new message. In addition, the message itself is passed as an additional parameter to ExternalInterface.call(),
and consequently it is passed as a parameter to the JavaScript function newMessage().

821
ACTIONSCRIPT 3.0 DEVELOPER’S GUIDE
Using the external API
Last updated 3/21/2011
Calling ActionScript code from JavaScript
Flash Player 9 and later, Adobe AIR 1.0 and later
Communication is supposed to be a two-way street, and the Introvert IM application is no exception. Not only does
the Flash Player IM client call JavaScript to send messages, but the HTML form calls JavaScript code to send messages
to and ask for information from the SWF file as well. For example, when the SWF file notifies the container that it has
finished establishing contact and it’s ready to communicate, the first thing the browser does is call the IMManager
class’s getStatus() method to retrieve the initial user availability status from the SWF IM client. This is done in the
web page, in the updateStatus() function, as follows:
<script language="JavaScript">
...
function updateStatus()
{
if (swfReady)
{
var currentStatus = getSWF("IntrovertIMApp").getStatus();
document.forms["imForm"].status.value = currentStatus;
}
}
...
</script>
The code checks the value of the swfReady variable, which tracks whether the SWF file has notified the browser that
it has registered its methods with the ExternalInterface class. If the SWF file is ready to receive communication, the
next line (var currentStatus = ...) actually calls the getStatus() method in the IMManager class. Three things
happen in this line of code:
•The getSWF() JavaScript function is called, returning a reference to the JavaScript object representing the SWF file.
The parameter passed to getSWF() determines which browser object is returned in case there is more than one
SWF file in an HTML page. The value passed to that parameter must match the id attribute of the object tag and
name attribute of the embed tag used to include the SWF file.
•Using the reference to the SWF file, the getStatus() method is called as though it’s a method of the SWF object.
In this case the function name “ getStatus” is used because that’s the name under which the ActionScript function
is registered using ExternalInterface.addCallback().
•The getStatus() ActionScript method returns a value, and that value is assigned to the currentStatus variable,
which is then assigned as the content (the value property) of the status text field.
Note: If you’re following along in the code, you’ve probably noticed that in the source code for the updateStatus()
function, the line of code that calls the getSWF() function, is actually written as follows: var currentStatus =
getSWF("${application}").getStatus(); The ${application} text is a placeholder in the HTML page template; when
Adobe Flash Builder generates the actual HTML page for the application, this placeholder text is replaced by the same
text that is used as the object tag’s id attribute and the embed tag’s name attribute (IntrovertIMApp in the example).
That is the value that is expected by the getSWF() function.
The sendMessage() JavaScript function demonstrates passing a parameter to an ActionScript function.
(sendMessage() is thefunction that is called when the user presses the Send button on the HTML page.)

822
ACTIONSCRIPT 3.0 DEVELOPER’S GUIDE
Using the external API
Last updated 3/21/2011
<script language="JavaScript">
...
function sendMessage(message)
{
if (swfReady)
{
...
getSWF("IntrovertIMApp").newMessage(message);
}
}
...
</script>
The newMessage() ActionScript method expects one parameter, so the JavaScript message variable gets passed to
ActionScript by using it as a parameter in the newMessage() method call in the JavaScript code.
Detecting the browser type
Flash Player 9 and later, Adobe AIR 1.0 and later
Because of differences in how browsers access content, it’s important to always use JavaScript to detect which browser
the user is running and to access the movie according to the browser-specific syntax, using the window or document
object, as shown in the getSWF() JavaScript function in this example:
<script language="JavaScript">
...
function getSWF(movieName)
{
if (navigator.appName.indexOf("Microsoft") != -1)
{
return window[movieName];
}
else
{
return document[movieName];
}
}
...
</script>
If your script does not detect the user’s browser type, the user might see unexpected behavior when playing SWF files
in an HTML container.

823
ACTIONSCRIPT 3.0 DEVELOPER’S GUIDE
Using the external API
Last updated 3/21/2011
External API example: Communicating between
ActionScript and a desktop application that uses the
ActiveX control
Flash Player 9 and later
This example demonstrates using the external API to communicate between ActionScript and a desktop application
that uses the ActiveX control. The example reuses the Introvert IM application, including the ActionScript code and
even the same SWF file, and therefore does not describe the use of the external API in ActionScript. Familiarity with
the preceding example will be helpful in understanding this one.
The desktop application in this example is written in C# using Microsoft Visual Studio .NET. The focus of the
discussion is the specific techniques for working with the external API using the ActiveX control. This example
demonstrates the following:
•Calling ActionScript functions from a desktop application hosting the Flash Player ActiveX control
•Receiving function calls from ActionScript and processing them in an ActiveX container
•Using a proxy class to hide the details of the serialized XML format that Flash Player uses for messages sent to an
ActiveX container
To get the application files for this sample, see www.adobe.com/go/learn_programmingAS3samples_flash. The
Introvert IM C# files can be found in the Samples/IntrovertIM_CSharp folder. The application consists of the
following files:
File Description
AppForm.cs The main application file with the C# Windows Forms interface.
bin/Debug/IntrovertIMApp.swf The SWF file loaded by the application.
ExternalInterfaceProxy/ExternalInterfaceProxy.cs The class that serves as a wrapper around the ActiveX control for External Interface
communication. It provides mechanisms for calling and receiving calls from
ActionScript.
ExternalInterfaceProxy/ExternalInterfaceSerializer.cs The class that performs the task of converting Flash Player’s XML format messages
to .NET objects.
ExternalInterfaceProxy/ExternalInterfaceEventArgs.cs This file defines two C# types (classes): a custom delegate, and an event arguments
class, which are used by the ExternalInterfaceProxy class to notify a listener of a
function call from ActionScript.
ExternalInterfaceProxy/ExternalInterfaceCall.cs This class is a value object representing a function call from ActionScript to the
ActiveX container, with properties for the function name and parameters.
bin/Debug/IntrovertIMApp.swf The SWF file loaded by the application.
obj/AxInterop.ShockwaveFlashObjects.dll,
obj/Interop.ShockwaveFlashObjects.dll
Wrapper assemblies created by Visual Studio .NET that are required to access the
Flash Player (Adobe Shockwave® Flash) ActiveX control from managed code.

824
ACTIONSCRIPT 3.0 DEVELOPER’S GUIDE
Using the external API
Last updated 3/21/2011
Overview of the Introvert IM C# Application
Flash Player 9 and later
This sample application represents two instant-messaging client programs (one within a SWF file and another built
with Windows Forms) that communicate with each other. The user interface includes an instance of the Shockwave
Flash ActiveX control, within which the SWF file containing the ActionScript IM client is loaded. The interface also
includes several text fields that make up the Windows Forms IM client: a field for entering messages (MessageText),
another that displays the transcript of the messages sent between the clients (Transcript), and a third (Status) that
displays the availability status as set in the SWF IM client.
Including the Shockwave Flash ActiveX control
Flash Player 9 and later
To include the Shockwave Flash ActiveX control in your own Windows Forms application, you must first add it to the
Microsoft Visual Studio Toolbox.
To add the control to the toolbox:
1Open the Visual Studio Toolbox.
2Right-click the Windows Forms section in Visual Studio 2003 or any section in Visual Studio 2005. From the
context menu select Add/Remove Items in Visual Studio 2003 (Choose Items... in Visual Studio 2005).
This opens the Customize Toolbox (2003)/Choose Toolbox Items (2005) dialog box.
3Select the COM Components tab, which lists all of the available COM components on your computer, including
the Flash Player ActiveX control.
4Scroll to Shockwave Flash Object and select it.
If this item is not listed, make sure that the Flash Player ActiveX control is installed on your system.
Understanding ActionScript to ActiveX container communication
Flash Player 9 and later
Communication using the external API with an ActiveX container application works like communication with a web
browser, with one important difference. As described earlier, when ActionScript communicates with a web browser,
as far as the developer is concerned, the functions are called directly; the details of how the function calls and responses
are formatted to pass them between the player and browser are hidden. However, when the external API is used to
communicate with an ActiveX container application, Flash Player sends messages (function calls and return values) to
the application in a specific XML format, and it expects function calls and return values from the container application
to use the same XML format. The developer of the ActiveX container application must write code that understands
and can create function calls and responses in the appropriate format.
The Introvert IM C# example includes a set of classes that allow you to avoid formatting messages; instead, you can
work with standard data types when calling ActionScript functions and receiving function calls from ActionScript. The
ExternalInterfaceProxy class, together with other helper classes, provides this functionality, and can be reused in any
.NET project to facilitate external API communication.
The following sections of code, excerpted from the main application form (AppForm.cs), demonstrate the simplified
interaction that is achieved by using the ExternalInterfaceProxy class:

825
ACTIONSCRIPT 3.0 DEVELOPER’S GUIDE
Using the external API
Last updated 3/21/2011
public class AppForm : System.Windows.Forms.Form
{
...
private ExternalInterfaceProxy proxy;
...
public AppForm()
{
...
// Register this app to receive notification when the proxy receives
// a call from ActionScript.
proxy = new ExternalInterfaceProxy(IntrovertIMApp);
proxy.ExternalInterfaceCall += new
ExternalInterfaceCallEventHandler(proxy_ExternalInterfaceCall);
...
}
...
The application declares and creates an ExternalInterfaceProxy instance named proxy, passing in a reference to the
Shockwave Flash ActiveX control that is in the user interface (IntrovertIMApp). Next, the code registers the
proxy_ExternalInterfaceCall() method to receive the proxy’s ExternalInterfaceCall event. This event is
dispatched by the ExternalInterfaceProxy class when a function call comes from Flash Player. Subscribing to this event
is the way the C# code receives and responds to function calls from ActionScript.
When a function call comes from ActionScript, the ExternalInterfaceProxy instance (proxy) receives the call, converts
it from XML format, and notifies the objects that are listeners for the proxy’s ExternalInterfaceCall event. In the
case of the AppForm class, the proxy_ExternalInterfaceCall() method handles that event, as follows:
/// <summary>
/// Called by the proxy when an ActionScript ExternalInterface call
/// is made by the SWF
/// </summary>
private object proxy_ExternalInterfaceCall(object sender, ExternalInterfaceCallEventArgs e)
{
switch (e.FunctionCall.FunctionName)
{
case "isReady":
return isReady();
case "setSWFIsReady":
setSWFIsReady();
return null;
case "newMessage":
newMessage((string)e.FunctionCall.Arguments[0]);
return null;
case "statusChange":
statusChange();
return null;
default:
return null;
}
}
...
The method gets passed an ExternalInterfaceCallEventArgs instance, named e in this example. That object, in turn,
has a FunctionCall property that is an instance of the ExternalInterfaceCall class.

826
ACTIONSCRIPT 3.0 DEVELOPER’S GUIDE
Using the external API
Last updated 3/21/2011
An ExternalInterfaceCall instance is a simple value object with two properties. The FunctionName property contains
the function name specified in the ActionScript ExternalInterface.Call() statement. If any parameters are added
in ActionScript, those parameters are included in the ExternalInterfaceCall object’s Arguments property. In this case,
the method that handles the event is simply a switch statement that acts like a traffic manager. The value of the
FunctionName property (e.FunctionCall.FunctionName) determines which method of the AppForm class is
called.
The branches of the switch statement in the previous code listing demonstrate common method call scenarios. For
instance, any method must return a value to ActionScript (for example, the isReady() method call) or else should
return null (as seen in the other method calls). Accessing parameters passed from ActionScript is demonstrated in
the newMessage() method call (which passes along a parameter e.FunctionCall.Arguments[0], the first element
of the Arguments array).
Calling an ActionScript function from C# using the ExternalInterfaceProxy class is even more straightforward than
receiving a function call from ActionScript. To call an ActionScript function, you use the ExternalInterfaceProxy
instance’s Call() method, as follows:
/// <summary>
/// Called when the "Send" button is pressed; the value in the
/// MessageText text field is passed in as a parameter.
/// </summary>
/// <param name="message">The message to send.</param>
private void sendMessage(string message)
{
if (swfReady)
{
...
// Call the newMessage function in ActionScript.
proxy.Call("newMessage", message);
}
}
...
/// <summary>
/// Call the ActionScript function to get the current "availability"
/// status and write it into the text field.
/// </summary>
private void updateStatus()
{
Status.Text = (string)proxy.Call("getStatus");
}
...
}
As this example shows, the ExternalInterfaceProxy class’s Call() method is very similar to its ActionScript
counterpart, ExternalInterface.Call(). The first parameter is a string, the name of the function to call. Any
additional parameters (not shown here) are passed along to the ActionScript function. If the ActionScript function
returns a value, that value is returned by the Call() method (as seen in the previous example).

827
ACTIONSCRIPT 3.0 DEVELOPER’S GUIDE
Using the external API
Last updated 3/21/2011
Inside the ExternalInterfaceProxy class
Flash Player 9 and later
Using a proxy wrapper around the ActiveX control may not always be practical, or you may wish to write your own
proxy class (for instance, in a different programming language or targeting a different platform). Although not all the
details of creating a proxy will be explained here, it is instructive to understand the inner workings of the proxy class
in this example.
You use the Shockwave Flash ActiveX control’s CallFunction() method to call an ActionScript function from the
ActiveX container using the external API. This is shown in this extract from the ExternalInterfaceProxy class’s Call()
method:
// Call an ActionScript function on the SWF in "_flashControl",
// which is a Shockwave Flash ActiveX control.
string response = _flashControl.CallFunction(request);
In this code excerpt, _flashControl is the Shockwave Flash ActiveX control. ActionScript function calls are made
using the CallFunction() method. That method takes one parameter (request in the example), which is a string
containing XML-formatted instructions including the name of the ActionScript function to call and any parameters.
Any value returned from ActionScript is encoded as an XML-formatted string and sent back as the return value of the
CallFunction() call. In this example, that XML string is stored in the response variable.
Receiving a function call from ActionScript is a multistep process. Function calls from ActionScript cause the
Shockwave Flash ActiveX control to dispatch its FlashCall event, so a class (such as the ExternalInterfaceProxy class)
that intends to receive calls from a SWF file needs to define a handler for that event. In the ExternalInterfaceProxy
class, the event handler function is named _flashControl_FlashCall(), and it is registered to listen for the event in
the class constructor, as follows:
private AxShockwaveFlash _flashControl;
public ExternalInterfaceProxy(AxShockwaveFlash flashControl)
{
_flashControl = flashControl;
_flashControl.FlashCall += new
_IShockwaveFlashEvents_FlashCallEventHandler(_flashControl_FlashCall);
}
...
private void _flashControl_FlashCall(object sender, _IShockwaveFlashEvents_FlashCallEvent e)
{
// Use the event object's request property ("e.request")
// to execute some action.
...
// Return a value to ActionScript;
// the returned value must first be encoded as an XML-formatted string.
_flashControl.SetReturnValue(encodedResponse);
}
The event object (e) has a request property (e.request) that is a string containing information about the function
call, such as the function name and parameters, in XML format. This information can be used by the container to
determine what code to execute. In the ExternalInterfaceProxy class, the request is converted from XML format to an
ExternalInterfaceCall object, which provides the same information in a more accessible form. The ActiveX control’s
SetReturnValue() method is used to return a function result to the ActionScript caller; once again, the result
parameter must be encoded in the XML format used by the external API.

828
ACTIONSCRIPT 3.0 DEVELOPER’S GUIDE
Using the external API
Last updated 3/21/2011
Communication between ActionScript and an application hosting the Shockwave Flash ActiveX control uses a specific
XML format to encode function calls and values. In the Introvert IM C# example, the ExternalInterfaceProxy class
makes it possible for the code in the application form to operate directly on values sent to or received from
ActionScript, and ignore the details of the XML format used by Flash Player. In order to accomplish this, the
ExternalInterfaceProxy class uses the methods of the ExternalInterfaceSerializer class to actually translate the XML
messages into .NET objects. The ExternalInterfaceSerializer class has four public methods:
•EncodeInvoke(): Encodes a function name and a C# ArrayList of arguments into the appropriate XML format.
•EncodeResult(): Encodes a result value into the appropriate XML format.
•DecodeInvoke(): Decodes a function call from ActionScript. The FlashCall event object’s request property is
passed to the DecodeInvoke() method, and it translates the call into an ExternalInterfaceCall object.
•DecodeResult(): Decodes the XML received as the result of calling an ActionScript function.
These methods encode C# values into the external API’s XML format and decode the XML into C# objects. For details
on the XML format used by Flash Player, see “The external API’s XML format” on page 815.

829
Last updated 3/21/2011
Chapter 46: XML signature validation in
AIR
Adobe AIR 1.5 and later
Use the classes in the Adobe® AIR® XMLSignatureValidator API to validate digital signatures conforming to a subset
of the W3C recommendation for XML-Signature Syntax and Processing (http://http://www.w3.org/TR/xmldsig-
core/). XML signatures can be used to help verify the integrity and signer identity of data or information.
XML signatures can be used to validate messages or resources downloaded by your application. For example, if your
application provides services on a subscription basis, you could encapsulate the subscription terms in a signed XML
document. If someone attempted to alter the subscription document, validation would fail.
You could also use an XML signature to help validate downloaded resources used by your application by including a
signed manifest containing digests of those resources. Your application could verify that the resources have not been
altered by comparing the digest in the signed file with a digest computed from the loaded bytes. This is particularly
valuable when the downloaded resource is a SWF file or other active content that you want to run in the application
security sandbox.
Basics of XML signature validation
Adobe AIR 1.5 and later
For a quick explanation and code examples of validating XML signatures, see the following quick start articles on the
Adobe Developer Connection:
•Creating and validating XML signatures (Flex)
•Creating and validating XML signatures (Flash)
Adobe® AIR® provides the XMLSignatureValidator class and IURIDereferencer interface for validating XML
signatures. The XML syntax accepted by the XMLSignatureValidator class is a subset of the W3C recommendation for
XML Signature Syntax and Processing. (Because only a subset of the recommendation is supported, not all legal
signatures can be validated.) AIR does not provide an API for creating XML signatures.
XML signature validation classes
Adobe AIR 1.5 and later
The XML signature validation API includes the following classes:

830
ACTIONSCRIPT 3.0 DEVELOPER’S GUIDE
XML signature validation in AIR
Last updated 3/21/2011
Using the XML signature validation classes
Adobe AIR 1.5 and later
To use the XMLSignatureValidator class to validate an XML signature, you must:
•Create an XMLSignatureValidator object
•Provide an implementation of the IURIDereferencer interface. The XMLSignatureValidator object calls the
IURIDereferencer dereference() method, passing in the URI for each reference in a signature. The
dereference() method must resolve the URI and return the referenced data (which could be in the same
document as the signature, or could be in an external resource).
•Set the certificate trust, revocation checking, and reference validation settings of the XMLSignatureValidator object
as appropriate for your application.
•Add event listeners for the complete and error events.
•Call the verify() method, passing in the signature to validate.
•Handle the complete and error events and interpret the results.
The following example implements a validate() function that verifies the validity of an XML signature. The
XMLSignatureValidator properties are set such that the signing certificate must be in the system trust store, or chain
to a certificate in the trust store. The example also assumes that a suitable IURIDereferencer class named
XMLDereferencer exists.
Package Classes
flash.security •XMLSignatureValidator
•IURIDereferencer (interface)
XMLSignatureValidator string constants are defined in the following classes:
•ReferencesValidationSetting
•RevocationCheckSettings
•SignatureStatus
•SignerTrustSettings
flash.events •Event
•ErrorEvent

831
ACTIONSCRIPT 3.0 DEVELOPER’S GUIDE
XML signature validation in AIR
Last updated 3/21/2011
private function validate( xmlSignature:XML ):void
{
var verifier:XMLSignatureValidator = new XMLSignatureValidator();
verifier.addEventListener(Event.COMPLETE, verificationComplete);
verifier.addEventListener(ErrorEvent.ERROR, verificationError);
try
{
verifier.uriDereferencer = new XMLDereferencer();
verifier.referencesValidationSetting =
ReferencesValidationSetting.VALID_IDENTITY;
verifier.revocationCheckSetting = RevocationCheckSettings.BEST_EFFORT;
verifier.useSystemTrustStore = true;
//Verify the signature
verifier.verify( xmlSignature );
}
catch (e:Error)
{
trace("Verification error.\n" + e);
}
}
//Trace verification results
private function verificationComplete(event:Event):void
var signature:XMLSignatureValidator = event.target as XMLSignatureValidator;
trace("Signature status: " + signature.validityStatus + "\n");
trace(" Digest status: " + signature.digestStatus + "\n");
trace(" Identity status: " + signature.identityStatus + "\n");
trace(" Reference status: " + signature.referencesStatus + "\n");
}
private function verificationError(event:ErrorEvent):void
{
trace("Verification error.\n" + event.text);
}
The XML signature validation process
Adobe AIR 1.5 and later
When you call the XMLSignatureValidator verify() method, AIR performs the following steps:
•The runtime verifies the cryptographic integrity of the signature using the public key of the signing certificate.
•The runtime establishes the cryptographic integrity, identity, and trustworthiness of the certificate based on the
current settings of the XMLSignatureValidator object.
The trust placed in the signing certificate is key to the integrity of the validation process. Signature validation is
conducted using a well-defined cryptographic process, but the trustworthiness of the signing certificate is a
judgment that cannot be made algorithmically.
In general, you have three ways to decide whether a certificate is trustworthy:
•By relying on certification authorities and the operating system trust store.

832
ACTIONSCRIPT 3.0 DEVELOPER’S GUIDE
XML signature validation in AIR
Last updated 3/21/2011
•By obtaining, directly from the signer, a copy of the certificate, another certificate that serves as a trust anchor
for the certificate, or sufficient information to reliably identify the certificate, such as the public key.
•Asking the end user of your application if they trust the certificate. Such a query is invalid with self-signed
certificates since the identifying information in the certificate is inherently unreliable.
•The runtime verifies the cryptographic integrity of the signed data.
The signed data is verified with the help of your IURIDereferencer implementation. For each reference in the
signature document, the IURIDereferencer implementation dereference() method is called. The data returned
by the dereference() method is used to compute the reference digest. This digest value is compared to the digest
recorded in the signature document. If the digests match, then the data has not been altered since it was signed.
One important consideration when relying on the results of validating an XML signature is that only what is signed
is secure. For example, consider a signed manifest listing the files in a package. When the XMLSignatureValidator
verifies the signature, it only checks whether the manifest itself is unaltered. The data in the files is not signed, so
the signature will still validate when files referenced in the manifest are changed or deleted.
Note: To verify files in such a manifest, you can compute the digest of the file data (using the same hashing algorithm
used in the manifest) and compare the result to the digest stored in the signed manifest. In some cases, you should also
check for the presence of additional files.
Interpreting validation results
Adobe AIR 1.5 and later
The validation results are reported by the status properties of the XMLSignatureValidator object. These properties can
be read after the validator object dispatches the complete event. The four status properties include: validityStatus,
digestStatus, identityStatus, and referencesStatus.
The validityStatus property
Adobe AIR 1.5 and later
The validityStatus property reports the overall validity of the signature. The validityStatus depends on the state
of the other three status properties and can have one of the following values:
•valid — If digestStatus, identityStatus, and referencesStatus are all valid.
•invalid — If one or more of the individual status properties is invalid.
•unknown — If one or more of the individual status properties is unknown and no individual status is invalid.
The digestStatus property
Adobe AIR 1.5 and later
The digestStatus property reports the results of the cryptographic verification of the message digest. The
digestStatus property can have one of the following values:
•valid — If the signature document itself is unaltered since signing.
•invalid — If the signature document has been altered or is malformed.
•unknown — If the verify() method has not completed without error.

833
ACTIONSCRIPT 3.0 DEVELOPER’S GUIDE
XML signature validation in AIR
Last updated 3/21/2011
The identityStatus property
Adobe AIR 1.5 and later
The identityStatus property reports the status of the signing certificate. The value of this property depends on
several factors including:
•the cryptographic integrity of the certificate
•whether the certificate is expired or revoked
•whether the certificate is trusted on the current machine
•the state of the XMLSignatureValidator object (such as whether additional certificates have been added for building
the trust chain, whether those certificates are trusted, and the values of the useSystemTrustStore and
revocationCheckSettings properties)
The identityStatus property can have the following values:
•valid — To be considered valid, the signing certificate must meet the following conditions:
•The signing certificate must be unaltered.
•The signing certificate must not be expired or revoked—except when a valid timestamp is present in the
signature. If the signature is timestamped, the certificate will be considered valid as long as it was valid at the
time the document was signed. (The certificate used by the timestamp service to sign the timestamp must chain
to a trusted root certificate on the user’s computer.)
•The signing certificate is trusted. A certificate is trusted if the certificate is in the system trust store or chains to
another certificate in the system trust store and you set the useSystemTrustStore property to true. You can
also designate a certificate as trusted using the addCertificate() method of the XMLSignatureValidator
object.
•The certificate is, in fact, the signing certificate.
•invalid — The certificate is expired or revoked—and no timestamp proving validity at the time of signing is
present—or the certificate has been altered.
•unknown — If the certificate is not invalid, but is not trusted either. Self-signed certificates, for example, will be
reported as unknown (unless explicitly trusted). The identityStatus is also reported as unknown if the verify()
method has not completed without error or if the identity has not been checked because the signature digest is
invalid.
The referencesStatus property
Adobe AIR 1.5 and later
The referencesStatus property reports the cryptographic integrity of the references in the SignedData element of
the signature.
•valid — If the computed digest of every reference in the signature matches the corresponding digest recorded in
the XML signature. A valid status indicates that the signed data has not been altered.
•invalid — If any computed digest does not match the corresponding digest in the signature.
•unknown — If the reference digests have not been checked. The references are not checked if the overall signature
digest is invalid or the signing certificate is invalid. If the identityStatus is unknown, then the references are
only checked when the referencesValidationSetting is validOrUnknown.

834
ACTIONSCRIPT 3.0 DEVELOPER’S GUIDE
XML signature validation in AIR
Last updated 3/21/2011
About XML signatures
Adobe AIR 1.5 and later
An XML signature is a digital signature represented in XML syntax. The data in an XML signature can be used to
validate that the signed information has not been altered since signing. In addition, when a signing certificate has been
issued by a trusted certification authority, the identity of the signer can be verified through the public key
infrastructure.
An XML signature can be applied to any type of digital data (in binary or XML format). XML signatures are typically
used for such purposes as:
•checking whether external or downloaded resources have been modified
•verifying that messages come from a known source
•validating application license or subscription privileges
Supported XML signature syntax
Adobe AIR 1.5 and later
AIR supports the following elements from the W3C recommendation for XML Signature Syntax and Processing:
•All core signature syntax elements (section 4 of the W3C recommendation document)—except the KeyInfo
element is not fully supported
•The KeyInfo element must only contain an X509Data element
•An X509Data element must only contain an X509Certificate element
•The SHA256 digest method
•The RSA-SHA1 (PKCS1) signing algorithm
•The "Canonical XML without comments" canonicalization method and transform
•The enveloped signature transform
•timestamps
The following document illustrates a typical XML signature (most of the cryptographic data has been removed to
simplify the example):

835
ACTIONSCRIPT 3.0 DEVELOPER’S GUIDE
XML signature validation in AIR
Last updated 3/21/2011
<Signature xmlns="http://www.w3.org/2000/09/xmldsig#">
<SignedInfo>
<CanonicalizationMethod Algorithm="http://www.w3.org/TR/2001/REC-xml-c14n-
20010315"/>
<SignatureMethod Algorithm="http://www.w3.org/2000/09/xmldsig#rsa-sha1"/>
<Reference URI="URI_to_signed_data">
<Transforms>
<Transform Algorithm="http://www.w3.org/2000/09/xmldsig#enveloped-
signature"/></Transforms>
<DigestMethod Algorithm="http://www.w3.org/2001/04/xmlenc#sha256"/>
<DigestValue>uoo...vY=</DigestValue>
</Reference>
</SignedInfo>
<SignatureValue>Ked...w==</SignatureValue>
<KeyInfo>
<X509Data>
<X509Certificate>i7d...w==</X509Certificate>
</X509Data>
</KeyInfo>
</Signature>
The key elements of a signature are:
•SignedInfo — Contains references to the signed data and the computed digest values at the time of signing. The
signed data itself may be included in the same document as the XML signature or may be external.
•SignatureValue — Contains a digest of the SignedInfo element encrypted with the signer’s private key.
•KeyInfo — Contains the signing certificate, as well as any additional certificates needed to establish the chain of
trust. Note that although the KeyInfo element is technically optional, AIR cannot validate the signature if it is not
included.
There are three general types of XML signatures:
•Enveloped — the signature is inserted inside the XML data that it is signing.
•Enveloping — the signed XML data is contained within an Object element within the Signature element.
•Detached — the signed data is external to the XML signature. The signed data might be in an external file.
Alternately, it might be in the same XML document as the signature, just not a parent or child element of the
Signature element.
XML signatures use URIs to reference the signed data. The signing and the validating applications must use the same
conventions for resolving these URIs. When using the XMLSignatureValidator class, you must provide an
implementation of the IURIDereferencer interface. This implementation is responsible for resolving the URI and
returning the signed data as a ByteArray object. The returned ByteArray object is digested using the same algorithm
that produced the digest in the signature.
Certificates and trust
Adobe AIR 1.5 and later
A certificate consists of a public key, identifying information, and possibly one or more certificates belonging to the
issuing certification authority.
There are two ways to establish trust in a certificate. You can establish trust by obtaining a copy of the certificate
directly from the signer, for example on physical media, or through a secure digital transmission such as an SSL
transaction. You can also rely on a certification authority to determine whether the signing certificate is trustworthy.

836
ACTIONSCRIPT 3.0 DEVELOPER’S GUIDE
XML signature validation in AIR
Last updated 3/21/2011
To rely on a certification authority, the signing certificate must be issued by an authority that is trusted on the
computer upon which the signature is validated. Most operating system manufacturers place the root certificates of a
number of certification authorities into the operating system trust store. Users can also add and remove certificates
from the store.
Even if a certificate is issued by a trusted certification authority, you must still decide whether the certificate belongs
to someone you trust. In many use cases, this decision is passed along to the end-user. For example, when an AIR
application is installed, the AIR installer displays the identifying information from the publisher’s certificate when
asking the user to verify whether they want to install the application. In other cases, you might have to compare the
public key or other certificate information to a list of acceptable keys. (This list must be secured, perhaps by its own
signature, or by storing in the AIR encrypted local store, so that the list itself cannot be tampered with.)
Note: While you can elect to trust the signing certificate without independent verification—such as when a signature is
“self-signed”—you do not thereby gain much assurance of anything by verifying the signature. Without knowing who
created a signature, the assurance that the signature has not been tampered with, is of little, if any, value. The signature
could be a validly signed forgery.
Certificate expiration and revocation
Adobe AIR 1.5 and later
All certificates expire. Certificates can also be revoked by the issuing certification authority if, for example, the private
key related to the certificate is compromised or stolen. If a signature is signed with an expired or revoked certificate,
then the signature will be reported as invalid unless a timestamp has been included as part of the signature. If a
timestamp is present, then the XMLSignatureValidator class will validate the signature as long as the certificate was
valid at the time of signing.
A timestamp is a signed digital message from a timestamp service that certifies that the data was signed at a particular
time and date. Timestamps are issued by timestamp authorities and signed by the timestamp authority’s own
certificate. The timestamp authority certificate embedded in the timestamp must be trusted on the current machine
for the timestamp to be considered valid. The XMLSignatureValidator does not provide an API for designating a
different certificate to use in validating the timestamp.
Implementing the IURIDereferencer interface
Adobe AIR 1.5 and later
To validate an XML signature, you must provide an implementation of the IURIDereferencer interface. The
implementation is responsible for resolving the URIs within the Reference elements of an XML signature document
and returning the data so that the digest can be computed. The computed digest is compared with the digest in the
signature to determine if the referenced data has been altered since the signature was created.
Note: HTML-based AIR applications must import a SWF library containing an ActionScript implementation in order to
validate XML signatures. The IURIDereferencer interface cannot be implemented in JavaScript.
The IURIDerefencer interface has a single method, dereference(uri:String), that must be implemented. The
XMLSignatureValidator object calls this method for each reference in the signature. The method must return the data
in a ByteArray object.

837
ACTIONSCRIPT 3.0 DEVELOPER’S GUIDE
XML signature validation in AIR
Last updated 3/21/2011
In most cases, you will also need to add properties or methods that allow your dereferencer object to locate the
referenced data. For example, if the signed data is located in the same document as the signature, you could add a
member variable that provides a reference to the XML document. The dereference() method can then use this
variable, along with the URI, to locate the referenced data. Likewise, if the signed data is located in a directory of the
local file system, the dereference() method might need a property providing the path to that directory in order to
resolve the referenced files.
The XMLSignatureValidator relies entirely on the dereferencer for interpreting URI strings. The standard rules for
dereferencing URIs are given in the section 4.3.3 of the W3C Recommendation for XML Signature Syntax and
Processing.
Dereferencing URIs in enveloped signatures
Adobe AIR 1.5 and later
When an enveloped XML signature is generated, the signature elements are inserted into the signed data. For example,
if you signed the following message using an enveloped signature structure:
<message>
<data>...</data>
</message>
The resulting signed document will look like this:
<message>
<data>...</data>
<Signature xmlns="http://www.w3.org/2000/09/xmldsig#">
<SignedInfo>
<CanonicalizationMethod Algorithm="http://www.w3.org/TR/2001/REC-xml-c14n-
20010315"/>
<SignatureMethod Algorithm="http://www.w3.org/2000/09/xmldsig#rsa-sha1"/>
<Reference URI="">
<Transforms>
<Transform Algorithm="http://www.w3.org/2000/09/xmldsig#enveloped-
signature"/>
</Transforms>
<DigestMethod Algorithm="http://www.w3.org/2001/04/xmlenc#sha256"/>
<DigestValue>yv6...Z0Y=</DigestValue>
</Reference>
</SignedInfo>
<SignatureValue>cCY...LQ==</SignatureValue>
<KeyInfo>
<X509Data>
<X509Certificate>MII...4e</X509Certificate>
</X509Data>
</KeyInfo>
</Signature>
</message>
Notice that the signature contains a single Reference element with an empty string as its URI. An empty string in this
context refers to the root of the document.
Also notice that the transform algorithm specifies that an enveloped signature transform has been applied. When an
enveloped signature transform has been applied, the XMLSignatureValidator automatically removes the signature
from the document before computing the digest. This means that the dereferencer does not need to remove the
Signature element when returning the data.

838
ACTIONSCRIPT 3.0 DEVELOPER’S GUIDE
XML signature validation in AIR
Last updated 3/21/2011
The following example illustrates a dereferencer for enveloped signatures:
package
{
import flash.events.ErrorEvent;
import flash.events.EventDispatcher;
import flash.security.IURIDereferencer;
import flash.utils.ByteArray;
import flash.utils.IDataInput;
public class EnvelopedDereferencer
extends EventDispatcher implements IURIDereferencer
{
private var signedMessage:XML;
public function EnvelopedDereferencer( signedMessage:XML )
{
this.signedMessage = signedMessage;
}
public function dereference( uri:String ):IDataInput
{
try
{
if( uri.length != 0 )
{
throw( new Error("Unsupported signature type.") );
}
var data:ByteArray = new ByteArray();
data.writeUTFBytes( signedMessage.toXMLString() );
data.position = 0;
}
catch (e:Error)
{
var error:ErrorEvent =
new ErrorEvent("Ref error " + uri + " ", false, false, e.message);
this.dispatchEvent(error);
data = null;
throw new Error("Reference not resolvable: " + uri + ", " + e.message);
}
finally
{
return data;
}
}
}
}
This dereferencer class uses a constructor function with a parameter, signedMessage, to make the enveloped
signature document available to the dereference() method. Since the reference in an enveloped signature always
refers to the root of the signed data, the dereferencer() method writes the document into a byte array and returns it.

839
ACTIONSCRIPT 3.0 DEVELOPER’S GUIDE
XML signature validation in AIR
Last updated 3/21/2011
Dereferencing URIs in enveloping and detached signatures
Adobe AIR 1.5 and later
When the signed data is located in the same document as the signature itself, the URIs in the references typically use
XPath or XPointer syntax to address the elements that are signed. The W3C Recommendation for XML Signature
Syntax and Processing only recommends this syntax, so you should base your implementation on the signatures you
expect to encounter (and add sufficient error checking to gracefully handle unsupported syntax).
The signature of an AIR application is an example of an enveloping signature. The files in the application are listed in
a Manifest element. The Manifest element is addressed in the Reference URI attribute using the string,
“#PackageContents”, which refers to the Id of the Manifest element:
<Signature xmlns="http://www.w3.org/2000/09/xmldsig#" Id="PackageSignature">
<SignedInfo>
<CanonicalizationMethod Algorithm="http://www.w3.org/TR/2001/REC-xml-c14n-
20010315"/>
<SignatureMethod Algorithm="http://www.w3.org/TR/xmldsig-core#rsa-sha1"/>
<Reference URI="#PackageContents">
<Transforms>
<Transform Algorithm="http://www.w3.org/TR/2001/REC-xml-c14n-20010315"/>
</Transforms>
<DigestMethod Algorithm="http://www.w3.org/2001/04/xmlenc#sha256"/>
<DigestValue>ZMGqQdaRKQc1HirIRsDpeBDlaElS+pPotdziIAyAYDk=</DigestValue>
</Reference>
</SignedInfo>
<SignatureValue Id="PackageSignatureValue">cQK...7Zg==</SignatureValue>
<KeyInfo>
<X509Data>
<X509Certificate>MII...T4e</X509Certificate>
</X509Data>
</KeyInfo>
<Object>
<Manifest Id="PackageContents">
<Reference URI="mimetype">
<DigestMethod Algorithm="http://www.w3.org/2001/04/xmlenc#sha256">
</DigestMethod>
<DigestValue>0/oCb84THKMagtI0Dy0KogEu92TegdesqRr/clXct1c=</DigestValue>
</Reference>
<Reference URI="META-INF/AIR/application.xml">
<DigestMethod Algorithm="http://www.w3.org/2001/04/xmlenc#sha256">
</DigestMethod>
<DigestValue>P9MqtqSdqcqnFgeoHCJysLQu4PmbUW2JdAnc1WLq8h4=</DigestValue>
</Reference>
<Reference URI="XMLSignatureValidation.swf">
<DigestMethod Algorithm="http://www.w3.org/2001/04/xmlenc#sha256">
</DigestMethod>
<DigestValue>OliRHRAgc9qt3Dk0m0Bi53Ur5ur3fAweIFwju74rFgE=</DigestValue>
</Reference>
</Manifest>
</Object>
</Signature>
A dereferencer for validating this signature must take the URI string containing, "#PackageContents" from the
Reference element, and return the Manifest element in a ByteArray object. The “#” symbol refers to the value of an
element Id attribute.

840
ACTIONSCRIPT 3.0 DEVELOPER’S GUIDE
XML signature validation in AIR
Last updated 3/21/2011
The following example implements a dereferencer for validating AIR application signatures. The implementation is
kept simple by relying on the known structure of an AIR signature. A general-purpose dereferencer could be
significantly more complex.
package
{
import flash.events.ErrorEvent;
import flash.security.IURIDereferencer;
import flash.utils.ByteArray;
import flash.utils.IDataInput;
public class AIRSignatureDereferencer implements IURIDereferencer {
private const XML_SIG_NS:Namespace =
new Namespace( "http://www.w3.org/2000/09/xmldsig#" );
private var airSignature:XML;
public function AIRSignatureDereferencer( airSignature:XML ) {
this.airSignature = airSignature;
}
public function dereference( uri:String ):IDataInput {
var data:ByteArray = null;
try
{
if( uri != "#PackageContents" )
{
throw( new Error("Unsupported signature type.") );
}
var manifest:XMLList =
airSignature.XML_SIG_NS::Object.XML_SIG_NS::Manifest;
data = new ByteArray();
data.writeUTFBytes( manifest.toXMLString());
data.position = 0;
}
catch (e:Error)
{
data = null;
throw new Error("Reference not resolvable: " + uri + ", " + e.message);
}
finally
{
return data;
}
}
}
}
When you verify this type of signature, only the data in the Manifest element is validated. The actual files in the package
are not checked at all. To check the package files for tampering, you must read the files, compute the SHA256 digest
and compare the result to digest recorded in the manifest. The XMLSignatureValidator does not automatically check
such secondary references.
Note: This example is provided only to illustrate the signature validation process. There is little use in an AIR application
validating its own signature. If the application has already been tampered with, the tampering agent could simply remove
the validation check.

841
ACTIONSCRIPT 3.0 DEVELOPER’S GUIDE
XML signature validation in AIR
Last updated 3/21/2011
Computing digest values for external resources
Adobe AIR 1.5 and later
AIR does not include built-in functions for computing SHA256 digests, but the Flex SDK does include a SHA256
utility class. The SDK also includes the Base64 encoder utility class that is helpful for comparing the computed digest
to the digest stored in a signature.
The following example function reads and validates the files in an AIR package manifest:
import mx.utils.Base64Encoder;
import mx.utils.SHA256;
private function verifyManifest( sigFile:File, manifest:XML ):Boolean
{
var result:Boolean = true;
var message:String = '';
var nameSpace:Namespace = manifest.namespace();
if( manifest.nameSpace::Reference.length() <= 0 )
{
result = false;
message = "Nothing to validate.";
}
for each (var reference:XML in manifest.nameSpace::Reference)
{
var file:File = sigFile.parent.parent.resolvePath( reference.@URI );
var stream:FileStream = new FileStream();
stream.open(file, FileMode.READ);
var fileData:ByteArray = new ByteArray();
stream.readBytes( fileData, 0, stream.bytesAvailable );
var digestHex:String = SHA256.computeDigest( fileData );
//Convert hexidecimal string to byte array
var digest:ByteArray = new ByteArray();
for( var c:int = 0; c < digestHex.length; c += 2 ){
var byteChar:String = digestHex.charAt(c) + digestHex.charAt(c+1);
digest.writeByte( parseInt( byteChar, 16 ));
}
digest.position = 0;

842
ACTIONSCRIPT 3.0 DEVELOPER’S GUIDE
XML signature validation in AIR
Last updated 3/21/2011
var base64Encoder:Base64Encoder = new Base64Encoder();
base64Encoder.insertNewLines = false;
base64Encoder.encodeBytes( digest, 0, digest.bytesAvailable );
var digestBase64:String = base64Encoder.toString();
if( digestBase64 == reference.nameSpace::DigestValue )
{
result = result && true;
message += " " + reference.@URI + " verified.\n";
}
else
{
result = false;
message += " ---- " + reference.@URI + " has been modified!\n";
}
base64Encoder.reset();
}
trace( message );
return result;
}
The function loops through all the references in the Manifest element. For each reference, the SHA256 digest is
computed, encoded in base64 format, and compared to the digest in the manifest. The URIs in an AIR package refer
to paths relative to the application directory. The paths are resolved based on the location of the signature file, which
is always in the META-INF subdirectory within the application directory. Note that the Flex SHA256 class returns the
digest as a string of hexadecimal characters. This string must be converted into a ByteArray containing the bytes
represented by the hexadecimal string.
To use the mx.utils.SHA256 and Base64Encoder classes in Flash CS4, you can either locate and copy these classes into
your application development directory or compile a library SWF containing the classes using the Flex SDK.
Dereferencing URIs in detached signatures referencing external data
Adobe AIR 1.5 and later
When a URI refers to an external resource, the data must be accessed and loaded into a ByteArray object. If the URI
contains an absolute URL, then it is simply a matter of reading a file or requesting a URL. If, as is probably the more
common case, the URI contains to a relative path, then your IURIDereferencer implementation must include a way to
resolve the paths to the signed files.
The following example uses a File object initialized when the dereferencer instance is constructed as the base for
resolving signed files.

843
ACTIONSCRIPT 3.0 DEVELOPER’S GUIDE
XML signature validation in AIR
Last updated 3/21/2011
package
{
import flash.events.ErrorEvent;
import flash.events.EventDispatcher;
import flash.filesystem.File;
import flash.filesystem.FileMode;
import flash.filesystem.FileStream;
import flash.security.IURIDereferencer;
import flash.utils.ByteArray;
import flash.utils.IDataInput;
public class RelativeFileDereferencer
extends EventDispatcher implements IURIDereferencer
{
private var base:File;
public function RelativeFileDereferencer( base:File )
{
this.base = base;
}
public function dereference( uri:String ):IDataInput
{
var data:ByteArray = null;
try{
var referent:File = this.base.resolvePath( uri );
var refStream:FileStream = new FileStream();
data = new ByteArray();
refStream.open( referent, FileMode.READ );
refStream.readBytes( data, 0, data.bytesAvailable );
} catch ( e:Error ) {
data = null;
throw new Error("Reference not resolvable: " + referent.nativePath + ", " +
e.message );
} finally {
return data;
}
}
}
}
The dereference() function simply locates the file addressed by the reference URI, loads the file contents into a byte
array, and returns the ByteArray object.
Note: Before validating remote external references, consider whether your application could be vulnerable to a “phone
home” or similar type of attack by a maliciously constructed signature document.

844
Last updated 3/21/2011
Chapter 47: Client system environment
Flash Player 9 and later, Adobe AIR 1.0 and later
This discussion explains how to interact with the user’s system. It shows you how to determine what features are
supported and how to build multilingual applications using the user’s installed input method editor (IME) if available.
It also shows typical uses for application domains.
More Help topics
flash.system.System
flash.system.Capabilities
Basics of the client system environment
Flash Player 9 and later, Adobe AIR 1.0 and later
As you build more advanced applications, you may find a need to know details about—and access functions of—your
users’ operating systems. The flash.system package contains a collection of classes that allow you to access system-level
functionality such as the following:
•Determining which application and security domain code is executing in
•Determining the capabilities of the user’s Flash runtime (such as Flash® Player or Adobe® AIR™) instance, such as
the screen size (resolution) and whether certain functionality is available, such as mp3 audio
•Building multilingual sites using the IME
•Interacting with the Flash runtime’s container (which could be an HTML page or a container application).
•Saving information to the user’s clipboard
The flash.system package also includes the IMEConversionMode and SecurityPanel classes. These classes contain
static constants that you use with the IME and Security classes, respectively.
Important concepts and terms
The following reference list contains important terms:
Operating system The main program that runs on a computer, within which all other applications run—such as
Microsoft Windows, Mac OS X, or Linux®.
Clipboard The operating system’s container for holding text or items that are copied or cut, and from which items are
pasted into applications.
Application domain A mechanism for separating classes used in different SWF files, so that if the SWF files include
different classes with the same name, the classes don’t overwrite each other.
IME (input method editor) A program (or operating system tool) that is used to enter complex characters or symbols
using a standard keyboard.

845
ACTIONSCRIPT 3.0 DEVELOPER’S GUIDE
Client system environment
Last updated 3/21/2011
Client system In programming terms, a client is the part of an application (or whole application) that runs on an
individual’s computer and is used by a single user. The client system is the underlying operating system on the user’s
computer.
Using the System class
Flash Player 9 and later, Adobe AIR 1.0 and later
The System class contains methods and properties that allow you to interact with the user’s operating system and
retrieve the current memory usage of the runtime. The methods and properties of the System class also allow you to
listen for imeComposition events, instruct the runtime to load external text files using the user’s current code page or
to load them as Unicode, or set the contents of the user’s clipboard.
Getting data about the user’s system at run time
Flash Player 9 and later, Adobe AIR 1.0 and later
By checking the System.totalMemory property, you can determine the amount of memory (in bytes) that the
runtime is currently using. This property allows you to monitor memory usage and optimize your applications based
on how the memory level changes. For example, if a particular visual effect causes a large increase in memory usage,
you may want to consider modifying the effect or eliminating it altogether.
The System.ime property is a reference to the currently installed Input Method Editor (IME). This property allows
you to listen for imeComposition events (flash.events.IMEEvent.IME_COMPOSITION) by using the
addEventListener() method.
The third property in the System class is useCodePage. When useCodePage is set to true, the runtime uses the
traditional code page of the operating system to load external text files. If you set this property to false, you tell the
runtime to interpret the external file as Unicode.
If you set System.useCodePage to true, remember that the traditional code page of the operating system must
include the characters used in your external text file in order for the text to display. For example, if you load an external
text file that contains Chinese characters, those characters cannot display on a system that uses the English Windows
code page because that code page does not include Chinese characters.
To ensure that users on all platforms can view the external text files that are used in your application, you should
encode all external text files as Unicode and leave System.useCodePage set to false by default. This way, the runtime
interprets the text as Unicode.
Saving text to the clipboard
Flash Player 9 and later, Adobe AIR 1.0 and later
The System class includes a method called setClipboard() that allows the Flash runtime to set the contents of the
user’s clipboard with a specified string. For security reasons, there is no Security.getClipboard() method, since
such a method could potentially allow malicious sites to access the data last copied to the user’s clipboard.
The following code illustrates how an error message can be copied to the user’s clipboard when a security error occurs.
The error message can be useful if the user wants to report a potential bug with an application.

846
ACTIONSCRIPT 3.0 DEVELOPER’S GUIDE
Client system environment
Last updated 3/21/2011
private function securityErrorHandler(event:SecurityErrorEvent):void
{
var errorString:String = "[" + event.type + "] " + event.text;
trace(errorString);
System.setClipboard(errorString);
}
Flash Player 10 and AIR 1.0
You can use the Clipboard class to read and write clipboard data in response to a user event. In AIR, a user event is not
required for code running in the application sandbox to access the clipboard.
Using the Capabilities class
Flash Player 9 and later, Adobe AIR 1.0 and later
The Capabilities class allows developers to determine the environment in which an application is being run. Using
various properties of the Capabilities class, you can find out the resolution of the user’s system, whether the user’s
system supports accessibility software, and the language of the user’s operating system, as well as the currently installed
version of the Flash runtime.
By checking the properties in the Capabilities class, you can customize your application to work best with the specific
user’s environment. For example, by checking the Capabilities.screenResolutionX and
Capabilities.screenResolutionY properties, you can determine the display resolution the user’s system is using
and decide which video size may be most appropriate. Or you can check the Capabilities.hasMP3 property to see
if the user’s system supports mp3 playback before attempting to load an external mp3 file.
The following code uses a regular expression to parse the Flash runtime version that the client is using:
var versionString:String = Capabilities.version;
var pattern:RegExp = /^(\w*) (\d*),(\d*),(\d*),(\d*)$/;
var result:Object = pattern.exec(versionString);
if (result != null)
{
trace("input: " + result.input);
trace("platform: " + result[1]);
trace("majorVersion: " + result[2]);
trace("minorVersion: " + result[3]);
trace("buildNumber: " + result[4]);
trace("internalBuildNumber: " + result[5]);
}
else
{
trace("Unable to match RegExp.");
}
If you want to send the user’s system capabilities to a server-side script so that the information can be stored in a
database, you can use the following ActionScript code:

847
ACTIONSCRIPT 3.0 DEVELOPER’S GUIDE
Client system environment
Last updated 3/21/2011
var url:String = "log_visitor.cfm";
var request:URLRequest = new URLRequest(url);
request.method = URLRequestMethod.POST;
request.data = new URLVariables(Capabilities.serverString);
var loader:URLLoader = new URLLoader(request);
Capabilities example: Detecting system capabilities
Flash Player 9 and later
The CapabilitiesExplorer example demonstrates how you can use the flash.system.Capabilities class to determine
which features the user’s version of the Flash runtime supports. This example teaches the following techniques:
•Detecting which capabilities the user’s version of the Flash runtime supports using the Capabilities class
•Using the ExternalInterface class to detect which browser settings the user’s browser supports
To get the application files for this sample, see www.adobe.com/go/learn_programmingAS3samples_flash. The
CapabilitiesExplorer application files can be found in the folder Samples/CapabilitiesExplorer. This application
consists of the following files:
CapabilitiesExplorer overview
Flash Player 9 and later
The CapabilitiesExplorer.mxml file is responsible for setting up the user interface for the CapabilitiesExplorer
application. The capabilities of the user’s version of the Flash runtime will be displayed within a DataGrid component
instance on the Stage. Their browser capabilities will also be displayed if they are running the application from an
HTML container and if the external API is available.
When the main application file’s creationComplete event is dispatched, the initApp() method is invoked. The
initApp() method calls the getCapabilities() method from within the
com.example.programmingas3.capabilities.CapabilitiesGrabber class. The code for the initApp() method is as
follows:
private function initApp():void
{
var dp:Array = CapabilitiesGrabber.getCapabilities();
capabilitiesGrid.dataProvider = dp;
}
File Description
CapabilitiesExplorer.fla
or
CapabilitiesExplorer.mxml
The main application file in Flash (FLA) or Flex (MXML).
com/example/programmingas3/capabilities/CapabilitiesGrabber.as The class that provides the main functionality of the application,
including adding the system Capabilities to an array, sorting the
items, and using the ExternalInterface class to retrieve browser
capabilities.
capabilities.html An HTML container that contains the necessary JavaScript to
communicate with the external API.

848
ACTIONSCRIPT 3.0 DEVELOPER’S GUIDE
Client system environment
Last updated 3/21/2011
The CapabilitiesGrabber.getCapabilities() method returns a sorted array of the Flash runtime and browser
capabilities, which then gets set to the dataProvider property of the capabilitiesGrid DataGrid component
instance on the Stage.
CapabilitiesGrabber class overview
Flash Player 9 and later
The static getCapabilities() method of the CapabilitiesGrabber class adds each property from the
flash.system.Capabilities class to an array (capDP). It then calls the static getBrowserObjects() method in the
CapabilitiesGrabber class. The getBrowserObjects() method uses the external API to loop over the browser’s
navigator object, which contains the browser’s capabilities. The getCapabilities() method is as follows:
public static function getCapabilities():Array
{
var capDP:Array = new Array();
capDP.push({name:"Capabilities.avHardwareDisable", value:Capabilities.avHardwareDisable});
capDP.push({name:"Capabilities.hasAccessibility", value:Capabilities.hasAccessibility});
capDP.push({name:"Capabilities.hasAudio", value:Capabilities.hasAudio});
...
capDP.push({name:"Capabilities.version", value:Capabilities.version});
var navArr:Array = CapabilitiesGrabber.getBrowserObjects();
if (navArr.length > 0)
{
capDP = capDP.concat(navArr);
}
capDP.sortOn("name", Array.CASEINSENSITIVE);
return capDP;
}
The getBrowserObjects() method returns an array of each of the properties in the browser’s navigator object. If this
array has a length of one or more items, the array of browser capabilities (navArr) is appended to the array of Flash
Player capabilities (capDP), and the entire array is sorted alphabetically. Finally, the sorted array is returned to the main
application file, which then populates the data grid. The code for the getBrowserObjects() method is as follows:

849
ACTIONSCRIPT 3.0 DEVELOPER’S GUIDE
Client system environment
Last updated 3/21/2011
private static function getBrowserObjects():Array
{
var itemArr:Array = new Array();
var itemVars:URLVariables;
if (ExternalInterface.available)
{
try
{
var tempStr:String = ExternalInterface.call("JS_getBrowserObjects");
itemVars = new URLVariables(tempStr);
for (var i:String in itemVars)
{
itemArr.push({name:i, value:itemVars[i]});
}
}
catch (error:SecurityError)
{
// ignore
}
}
return itemArr;
}
If the external API is available in the current user environment, the Flash runtime calls the JavaScript
JS_getBrowserObjects() method, which loops over the browser’s navigator object and returns a string of URL-
encoded values to ActionScript. This string is then converted into a URLVariables object (itemVars) and added to the
itemArr array, which is returned to the calling script.
Communicating with JavaScript
Flash Player 9 and later
The final piece in building the CapabilitiesExplorer application is writing the necessary JavaScript to loop over each of
the items in the browser’s navigator object and append a name-value pair to a temporary array. The code for the
JavaScript JS_getBrowserObjects() method in the container.html file is as follows:
<script language="JavaScript">
function JS_getBrowserObjects()
{
// Create an array to hold each of the browser's items.
var tempArr = new Array();
// Loop over each item in the browser's navigator object.
for (var name in navigator)
{
var value = navigator[name];
// If the current value is a string or Boolean object, add it to the
// array, otherwise ignore the item.
switch (typeof(value))
{
case "string":
case "boolean":
// Create a temporary string which will be added to the array.
// Make sure that we URL-encode the values using JavaScript's

850
ACTIONSCRIPT 3.0 DEVELOPER’S GUIDE
Client system environment
Last updated 3/21/2011
// escape() function.
var tempStr = "navigator." + name + "=" + escape(value);
// Push the URL-encoded name/value pair onto the array.
tempArr.push(tempStr);
break;
}
}
// Loop over each item in the browser's screen object.
for (var name in screen)
{
var value = screen[name];
// If the current value is a number, add it to the array, otherwise
// ignore the item.
switch (typeof(value))
{
case "number":
var tempStr = "screen." + name + "=" + escape(value);
tempArr.push(tempStr);
break;
}
}
// Return the array as a URL-encoded string of name-value pairs.
return tempArr.join("&");
}
</script>
The code begins by creating a temporary array that will hold all the name-value pairs in the navigator object. Next, the
navigator object is looped over using a for..in loop, and the data type of the current value is evaluated to filter out
unwanted values. In this application, we are interested only in String or Boolean values, and other data types (such as
functions or arrays) are ignored. Each String or Boolean value in the navigator object is appended to the tempArr
array. Next, the browser’s screen object is looped over using a for..in loop, and each numeric value is added to the
tempArr array. Finally, the temporary array is converted into a string using the Array.join() method. The array uses
an ampersand (&) as a delimiter, which allows ActionScript to easily parse the data using the URLVariables class.

851
Last updated 3/21/2011
Chapter 48: AIR application invocation
and termination
Adobe AIR 1.0 and later
This section discusses the ways in which an installed Adobe® AIR® application can be invoked, as well as options and
considerations for closing a running application.
Note: The NativeApplication, InvokeEvent, and BrowserInvokeEvent objects are only available to SWF content running
in the AIR application sandbox. SWF content running in the Flash Player runtime, within the browser or the standalone
player (projector), or in an AIR application outside the application sandbox, cannot access these classes.
For a quick explanation and code examples of invoking and terminating AIR applications, see the following quick start
articles on the Adobe Developer Connection:
•Startup Options
More Help topics
flash.desktop.NativeApplication
flash.events.InvokeEvent
flash.events.BrowserInvokeEvent
Application invocation
Adobe AIR 1.0 and later
An AIR application is invoked when the user (or the operating system):
•Launches the application from the desktop shell.
•Uses the application as a command on a command line shell.
•Opens a type of file for which the application is the default opening application.
•(Mac OS X) clicks the application icon in the dock taskbar (whether or not the application is currently running).
•Chooses to launch the application from the installer (either at the end of a new installation process, or after double-
clicking the AIR file for an already installed application).
•Begins an update of an AIR application when the installed version has signaled that it is handling application
updates itself (by including a <customUpdateUI>true</customUpdateUI> declaration in the application
descriptor file).
•Visits a web page hosting a Flash badge or application that calls com.adobe.air.AIR launchApplication()
method specifying the identifying information for the AIR application. (The application descriptor must also
include a <allowBrowserInvocation>true</allowBrowserInvocation> declaration for browser invocation to
succeed.)

852
ACTIONSCRIPT 3.0 DEVELOPER’S GUIDE
AIR application invocation and termination
Last updated 3/21/2011
Whenever an AIR application is invoked, AIR dispatches an InvokeEvent object of type invoke through the singleton
NativeApplication object. To allow an application time to initialize itself and register an event listener, invoke events
are queued instead of discarded. As soon as a listener is registered, all the queued events are delivered.
Note: When an application is invoked using the browser invocation feature, the NativeApplication object only dispatches
an invoke event if the application is not already running.
To receive invoke events, call the addEventListener() method of the NativeApplication object
(NativeApplication.nativeApplication). When an event listener registers for an invoke event, it also receives
all invoke events that occurred before the registration. Queued invoke events are dispatched one at a time on a short
interval after the call to addEventListener() returns. If a new invoke event occurs during this process, it may be
dispatched before one or more of the queued events. This event queuing allows you to handle any invoke events that
have occurred before your initialization code executes. Keep in mind that if you add an event listener later in execution
(after application initialization), it will still receive all invoke events that have occurred since the application started.
Only one instance of an AIR application is started. When an already running application is invoked again, AIR
dispatches a new invoke event to the running instance. It is the responsibility of an AIR application to respond to an
invoke event and take the appropriate action (such as opening a new document window).
An InvokeEvent object contains any arguments passed to the application, as well as the directory from which the
application has been invoked. If the application was invoked because of a file-type association, then the full path to the
file is included in the command line arguments. Likewise, if the application was invoked because of an application
update, the full path to the update AIR file is provided.
When multiple files are opened in one operation a single InvokeEvent object is dispatched on Mac OS X. Each file is
included in the arguments array. On Windows and Linux, a separate InvokeEvent object is dispatched for each file.
Your application can handle invoke events by registering a listener with its NativeApplication object:
NativeApplication.nativeApplication.addEventListener(InvokeEvent.INVOKE, onInvokeEvent);
And defining an event listener:
var arguments:Array;
var currentDir:File;
public function onInvokeEvent(invocation:InvokeEvent):void {
arguments = invocation.arguments;
currentDir = invocation.currentDirectory;
}
Capturing command line arguments
Adobe AIR 1.0 and later
The command line arguments associated with the invocation of an AIR application are delivered in the InvokeEvent
object dispatched by the NativeApplication object. The InvokeEvent arguments property contains an array of the
arguments passed by the operating system when an AIR application is invoked. If the arguments contain relative file
paths, you can typically resolve the paths using the currentDirectory property.
The arguments passed to an AIR program are treated as white-space delimited strings, unless enclosed in double
quotes:

853
ACTIONSCRIPT 3.0 DEVELOPER’S GUIDE
AIR application invocation and termination
Last updated 3/21/2011
The currentDirectory property of an InvokeEvent object contains a File object representing the directory from
which the application was launched.
When an application is invoked because a file of a type registered by the application is opened, the native path to the
file is included in the command line arguments as a string. (Your application is responsible for opening or performing
the intended operation on the file.) Likewise, when an application is programmed to update itself (rather than relying
on the standard AIR update user interface), the native path to the AIR file is included when a user double-clicks an
AIR file containing an application with a matching application ID.
You can access the file using the resolve() method of the currentDirectory File object:
if((invokeEvent.currentDirectory != null)&&(invokeEvent.arguments.length > 0)){
dir = invokeEvent.currentDirectory;
fileToOpen = dir.resolvePath(invokeEvent.arguments[0]);
}
You should also validate that an argument is indeed a path to a file.
Example: Invocation event log
Adobe AIR 1.0 and later
The following example demonstrates how to register listeners for and handle the invoke event. The example logs all
the invocation events received and displays the current directory and command line arguments.
ActionScript example
package
{
import flash.display.Sprite;
import flash.events.InvokeEvent;
import flash.desktop.NativeApplication;
import flash.text.TextField;
public class InvokeEventLogExample extends Sprite
{
public var log:TextField;
public function InvokeEventLogExample()
{
log = new TextField();
log.x = 15;
log.y = 15;
log.width = 520;
log.height = 370;
log.background = true;
addChild(log);
Arguments Array
tick tock {tick,tock}
tick "tick tock" {tick,tick tock}
"tick" “tock” {tick,tock}
\"tick\" \"tock\" {"tick","tock"}

854
ACTIONSCRIPT 3.0 DEVELOPER’S GUIDE
AIR application invocation and termination
Last updated 3/21/2011
NativeApplication.nativeApplication.addEventListener(InvokeEvent.INVOKE, onInvoke);
}
public function onInvoke(invokeEvent:InvokeEvent):void
{
var now:String = new Date().toTimeString();
logEvent("Invoke event received: " + now);
if (invokeEvent.currentDirectory != null)
{
logEvent("Current directory=" + invokeEvent.currentDirectory.nativePath);
}
else
{
logEvent("--no directory information available--");
}
if (invokeEvent.arguments.length > 0)
{
logEvent("Arguments: " + invokeEvent.arguments.toString());
}
else
{
logEvent("--no arguments--");
}
}
public function logEvent(entry:String):void
{
log.appendText(entry + "\n");
trace(entry);
}
}
}

855
ACTIONSCRIPT 3.0 DEVELOPER’S GUIDE
AIR application invocation and termination
Last updated 3/21/2011
Flex example
<?xml version="1.0" encoding="utf-8"?>
<mx:WindowedApplication xmlns:mx="http://www.adobe.com/2006/mxml" layout="vertical"
invoke="onInvoke(event)" title="Invocation Event Log">
<mx:Script>
<![CDATA[
import flash.events.InvokeEvent;
import flash.desktop.NativeApplication;
public function onInvoke(invokeEvent:InvokeEvent):void {
var now:String = new Date().toTimeString();
logEvent("Invoke event received: " + now);
if (invokeEvent.currentDirectory != null){
logEvent("Current directory=" + invokeEvent.currentDirectory.nativePath);
} else {
logEvent("--no directory information available--");
}
if (invokeEvent.arguments.length > 0){
logEvent("Arguments: " + invokeEvent.arguments.toString());
} else {
logEvent("--no arguments--");
}
}
public function logEvent(entry:String):void {
log.text += entry + "\n";
trace(entry);
}
]]>
</mx:Script>
<mx:TextArea id="log" width="100%" height="100%" editable="false"
valueCommit="log.verticalScrollPosition=log.textHeight;"/>
</mx:WindowedApplication>
Invoking an AIR application on user login
Adobe AIR 1.0 and later
An AIR application can be set to launch automatically when the current user logs in by setting the NativeApplication
startAtLogin property to true. Once set, the application automatically starts whenever the user logs in. It continues
to launch at login until the setting is changed to false, the user manually changes the setting through the operating
system, or the application is uninstalled. Launching at login is a run-time setting. The setting only applies to the
current user. The application must be installed to successfully set the startAtLogin property to true. An error is
thrown if the property is set when an application is not installed (such as when it is launched with ADL).
Note: The application does not launch when the computer system starts. It launches when the user logs in.

856
ACTIONSCRIPT 3.0 DEVELOPER’S GUIDE
AIR application invocation and termination
Last updated 3/21/2011
To determine whether an application has launched automatically or as a result of a user action, you can examine the
reason property of the InvokeEvent object. If the property is equal to InvokeEventReason.LOGIN, then the
application started automatically. For any other invocation path, the reason property equals
InvokeEventReason.STANDARD. To access the reason property, your application must target AIR 1.5.1 (by setting
the correct namespace value in the application descriptor file).
The following, simplified application uses the InvokeEvent reason property to decide how to behave when an invoke
event occurs. If the reason property is "login", then the application remains in the background. Otherwise, it makes the
main application visible. An application using this pattern typically starts at login so that it can carry out background
processing or event monitoring and opens a window in response to a user-triggered invoke event.
package {
import flash.desktop.InvokeEventReason;
import flash.desktop.NativeApplication;
import flash.display.Sprite;
import flash.events.InvokeEvent;
public class StartAtLogin extends Sprite
{
public function StartAtLogin()
{
try
{
NativeApplication.nativeApplication.startAtLogin = true;
}
catch ( e:Error )
{
trace( "Cannot set startAtLogin:" + e.message );
}
NativeApplication.nativeApplication.addEventListener( InvokeEvent.INVOKE, onInvoke );
}
private function onInvoke( event:InvokeEvent ):void
{
if( event.reason == InvokeEventReason.LOGIN )
{
//do background processing...
trace( "Running in background..." );
}
else
{
this.stage.nativeWindow.activate();
}
}
}
}
Note: To see the difference in behavior, package and install the application. The startAtLogin property can only be set
for installed applications.

857
ACTIONSCRIPT 3.0 DEVELOPER’S GUIDE
AIR application invocation and termination
Last updated 3/21/2011
Invoking an AIR application from the browser
Adobe AIR 1.0 and later
Using the browser invocation feature, a web site can launch an installed AIR application to be launched from the
browser. Browser invocation is only permitted if the application descriptor file sets
allowBrowserInvocation
to
true
:
<allowBrowserInvocation>true</allowBrowserInvocation>
When the application is invoked via the browser, the application’s NativeApplication object dispatches a
BrowserInvokeEvent object.
To receive BrowserInvokeEvent events, call the addEventListener() method of the NativeApplication object
(NativeApplication.nativeApplication) in the AIR application. When an event listener registers for a
BrowserInvokeEvent event, it also receives all BrowserInvokeEvent events that occurred before the registration. These
events are dispatched after the call to addEventListener() returns, but not necessarily before other
BrowserInvokeEvent events that might be received after registration. This allows you to handle BrowserInvokeEvent
events that have occurred before your initialization code executes (such as when the application was initially invoked
from the browser). Keep in mind that if you add an event listener later in execution (after application initialization) it
still receives all BrowserInvokeEvent events that have occurred since the application started.
The BrowserInvokeEvent object includes the following properties:
If you use the browser invocation feature, be sure to consider security implications. When a web site launches an AIR
application, it can send data via the arguments property of the BrowserInvokeEvent object. Be careful using this data
in any sensitive operations, such as file or code loading APIs. The level of risk depends on what the application is doing
with the data. If you expect only a specific web site to invoke the application, the application should check the
securityDomain property of the BrowserInvokeEvent object. You can also require the web site invoking the
application to use HTTPs, which you can verify by checking the isHTTPS property of the BrowserInvokeEvent object.
The application should validate the data passed in. For example, if an application expects to be passed URLs to a
specific domain, it should validate that the URLs really do point to that domain. This can prevent an attacker from
tricking the application into sending it sensitive data.
Property Description
arguments An array of arguments (strings) to pass to the application.
isHTTPS Whether the content in the browser uses the https URL scheme (true) or not (false).
isUserEvent Whether the browser invocation resulted in a user event (such as a mouse click). In AIR 1.0, this is always set to
true; AIR requires a user event to the browser invocation feature.
sandboxType The sandbox type for the content in the browser. Valid values are defined the same as those that can be used
in the Security.sandboxType property, and can be one of the following:
•Security.APPLICATION — The content is in the application security sandbox.
•Security.LOCAL_TRUSTED — The content is in the local-with-filesystem security sandbox.
•Security.LOCAL_WITH_FILE — The content is in the local-with-filesystem security sandbox.
•Security.LOCAL_WITH_NETWORK — The content is in the local-with-networking security sandbox.
•Security.REMOTE — The content is in a remote (network) domain.
securityDomain The security domain for the content in the browser, such as "www.adobe.com" or "www.example.org".
This property is only set for content in the remote security sandbox (for content from a network domain). It is
not set for content in a local or application security sandbox.

858
ACTIONSCRIPT 3.0 DEVELOPER’S GUIDE
AIR application invocation and termination
Last updated 3/21/2011
No application should use BrowserInvokeEvent arguments that might point to local resources. For example, an
application should not create File objects based on a path passed from the browser. If remote paths are expected to be
passed from the browser, the application should ensure that the paths do not use the file:// protocol instead of a
remote protocol.
Application termination
Adobe AIR 1.0 and later
The quickest way to terminate an application is to call the NativeApplication exit() method. This works fine when your
application has no data to save or external resources to clean up. Calling exit() closes all windows and then
terminates the application. However, to allow windows or other components of your application to interrupt the
termination process, perhaps to save vital data, dispatch the proper warning events before calling exit().
Another consideration in gracefully shutting down an application is providing a single execution path, no matter how
the shut-down process starts. The user (or operating system) can trigger application termination in the following ways:
•By closing the last application window when NativeApplication.nativeApplication.autoExit is true.
•By selecting the application exit command from the operating system; for example, when the user chooses the exit
application command from the default menu. (This only happens on Mac OS; Windows and Linux do not provide
an application exit command through system chrome.)
•By shutting down the computer.
When an exit command is mediated through the operating system by one of these routes, the NativeApplication
dispatches an exiting event. If no listeners cancel the exiting event, any open windows are closed. Each window
dispatches a closing and then a close event. If any of the windows cancel the closing event, the shut-down process
stops.
If the order of window closure is an issue for your application, listen for the exiting event from the NativeApplication
and close the windows in the proper order yourself. You might need to do this, for example, if you have a document
window with tool palettes. It could be inconvenient, or worse, if the system closed the palettes, but the user decided to
cancel the exit command to save some data. On Windows, the only time you will get the exiting event is after closing
the last window (when the autoExit property of the NativeApplication object is set to true).
To provide consistent behavior on all platforms, whether the exit sequence is initiated via operating system chrome,
menu commands, or application logic, observe the following good practices for exiting the application:
1Always dispatch an exiting event through the NativeApplication object before calling exit() in application code
and check that another component of your application doesn’t cancel the event.
public function applicationExit():void {
var exitingEvent:Event = new Event(Event.EXITING, false, true);
NativeApplication.nativeApplication.dispatchEvent(exitingEvent);
if (!exitingEvent.isDefaultPrevented()) {
NativeApplication.nativeApplication.exit();
}
}
2Listen for the application exiting event from the NativeApplication.nativeApplication object and, in the
handler, close any windows (dispatching a closing event first). Perform any needed clean-up tasks, such as saving
application data or deleting temporary files, after all windows have been closed. Only use synchronous methods
during cleanup to ensure that they finish before the application quits.

859
ACTIONSCRIPT 3.0 DEVELOPER’S GUIDE
AIR application invocation and termination
Last updated 3/21/2011
If the order in which your windows are closed doesn’t matter, then you can loop through the
NativeApplication.nativeApplication.openedWindows array and close each window in turn. If order does
matter, provide a means of closing the windows in the correct sequence.
private function onExiting(exitingEvent:Event):void {
var winClosingEvent:Event;
for each (var win:NativeWindow in NativeApplication.nativeApplication.openedWindows) {
winClosingEvent = new Event(Event.CLOSING,false,true);
win.dispatchEvent(winClosingEvent);
if (!winClosingEvent.isDefaultPrevented()) {
win.close();
} else {
exitingEvent.preventDefault();
}
}
if (!exitingEvent.isDefaultPrevented()) {
//perform cleanup
}
}
3Windows should always handle their own clean up by listening for their own closing events.
4Only use one exiting listener in your application since handlers called earlier cannot know whether subsequent
handlers will cancel the exiting event (and it would be unwise to rely on the order of execution).

860
Last updated 3/21/2011
Chapter 49: Working with AIR runtime
and operating system information
Adobe AIR 1.0 and later
This section discusses ways that an AIR application can manage operating system file associations, detect user activity,
and get information about the Adobe® AIR® runtime.
More Help topics
flash.desktop.NativeApplication
Managing file associations
Adobe AIR 1.0 and later
Associations between your application and a file type must be declared in the application descriptor. During the
installation process, the AIR application installer associates the AIR application as the default opening application for
each of the declared file types, unless another application is already the default. The AIR application install process
does not override an existing file type association. To take over the association from another application, call the
NativeApplication.setAsDefaultApplication() method at run time.
It is a good practice to verify that the expected file associations are in place when your application starts up. This is
because the AIR application installer does not override existing file associations, and because file associations on a
user’s system can change at any time. When another application has the current file association, it is also a polite
practice to ask the user before taking over an existing association.
The following methods of the NativeApplication class let an application manage file associations. Each of the methods
takes the file type extension as a parameter:
AIR can only manage associations for the file types originally declared in the application descriptor. You cannot get
information about the associations of a non-declared file type, even if a user has manually created the association
between that file type and your application. Calling any of the file association management methods with the extension
for a file type not declared in the application descriptor causes the application to throw a runtime exception.
Method Description
isSetAsDefaultApplication() Returns true if the AIR application is currently associated with the specified file type.
setAsDefaultApplication() Creates the association between the AIR application and the open action of the file type.
removeAsDefaultApplication() Removes the association between the AIR application and the file type.
getDefaultApplication() Reports the path of the application that is currently associated with the file type.

861
ACTIONSCRIPT 3.0 DEVELOPER’S GUIDE
Working with AIR runtime and operating system information
Last updated 3/21/2011
Getting the runtime version and patch level
Adobe AIR 1.0 and later
The NativeApplication object has a runtimeVersion property, which is the version of the runtime in which the
application is running (a string, such as "1.0.5"). The NativeApplication object also has a runtimePatchLevel
property, which is the patch level of the runtime (a number, such as 2960). The following code uses these properties:
trace(NativeApplication.nativeApplication.runtimeVersion);
trace(NativeApplication.nativeApplication.runtimePatchLevel);
Detecting AIR capabilities
Adobe AIR 1.0 and later
For a file that is bundled with the Adobe AIR application, the Security.sandboxType property is set to the value
defined by the Security.APPLICATION constant. You can load content (which may or may not contain APIs specific
to AIR) based on whether a file is in the Adobe AIR security sandbox, as illustrated in the following code:
if (Security.sandboxType == Security.APPLICATION)
{
// Load SWF that contains AIR APIs
}
else
{
// Load SWF that does not contain AIR APIs
}
All resources that are not installed with the AIR application are assigned to the same security sandboxes as would be
assigned by Adobe® Flash® Player in a web browser. Remote resources are put in sandboxes according to their source
domains, and local resources are put in the local-with-networking, local-with-filesystem, or local-trusted sandbox.
You can check if the Capabilities.playerType static property is set to "Desktop" to see if content is executing in
the runtime (and not running in Flash Player running in a browser).
For more information, see “AIR security” on page 1041.
Tracking user presence
Adobe AIR 1.0 and later
The NativeApplication object dispatches two events that help you detect when a user is actively using a computer. If
no mouse or keyboard activity is detected in the interval determined by the NativeApplication.idleThreshold
property, the NativeApplication dispatches a userIdle event. When the next keyboard or mouse input occurs, the
NativeApplication object dispatches a userPresent event. The idleThreshold interval is measured in seconds and
has a default value of 300 (5 minutes). You can also get the number of seconds since the last user input from the
NativeApplication.nativeApplication.lastUserInput property.

862
ACTIONSCRIPT 3.0 DEVELOPER’S GUIDE
Working with AIR runtime and operating system information
Last updated 3/21/2011
The following lines of code set the idle threshold to 2 minutes and listen for both the userIdle and userPresent
events:
NativeApplication.nativeApplication.idleThreshold = 120;
NativeApplication.nativeApplication.addEventListener(Event.USER_IDLE, function(event:Event) {
trace("Idle");
});
NativeApplication.nativeApplication.addEventListener(Event.USER_PRESENT,
function(event:Event) {
trace("Present");
});
Note: Only a single userIdle event is dispatched between any two userPresent events.

863
Last updated 3/21/2011
Chapter 50: Working with AIR native
windows
Adobe AIR 1.0 and later
You use the classes provided by the Adobe® AIR® native window API to create and manage desktop windows.
Basics of native windows in AIR
Adobe AIR 1.0 and later
For quick explanations and code examples of working with native windows in AIR, see the following quick start articles
on the Adobe Developer Connection:
•Creating a transparent window application (Flex)
•Interacting with a window (Flex)
•Customizing the look and feel of a native window (Flex)
•Launching windows (Flex)
•Creating toast-style windows (Flex)
•Controlling the display order of windows (Flex)
•Creating resizable, non-rectangular windows (Flex)
•Interacting with a window (Flash)
•Customizing the look and feel of a native window (Flash)
•Creating toast-style windows (Flash)
•Controlling the display order of windows (Flash)
•Creating resizable, non-rectangular windows (Flash)
AIR provides an easy-to-use, cross-platform window API for creating native operating system windows using Flash®,
Flex™, and HTML programming techniques.
With AIR, you have a wide latitude in developing the appearance of your application. The windows you create can look
like a standard desktop application, matching Apple style when run on the Mac, conforming to Microsoft conventions
when run on Windows, and harmonizing with the window manager on Linux—all without including a line of
platform-specific code. Or you can use the skinnable, extensible chrome provided by the Flex framework to establish
your own style no matter where your application is run. You can even draw your own window chrome with vector and
bitmap artwork with full support for transparency and alpha blending against the desktop. Tired of rectangular
windows? Draw a round one.

864
ACTIONSCRIPT 3.0 DEVELOPER’S GUIDE
Working with AIR native windows
Last updated 3/21/2011
Windows in AIR
Adobe AIR 1.0 and later
AIR supports three distinct APIs for working with windows:
•The ActionScript-oriented NativeWindow class provides the lowest level window API. Use NativeWindows in
ActionScript and Flash Professional-authored applications. Consider extending the NativeWindow class to
specialize the windows used in your application.
•In the HTML environment, you can use the JavaScript Window class, just as you would in a browser-based web
application. Calls to JavaScript Window methods are forwarded to the underlying native window object.
•The Flex framework mx:WindowedApplication and mx:Window classes provide a Flex “wrapper” for the
NativeWindow class. The WindowedApplication component replaces the Application component when you create
an AIR application with Flex and must always be used as the initial window in your Flex application.
ActionScript windows
When you create windows with the NativeWindow class, use the Flash Player stage and display list directly. To add a
visual object to a NativeWindow, add the object to the display list of the window stage or to another display object
container on the stage.
HTML windows
When you create HTML windows, you use HTML, CSS, and JavaScript to display content. To add a visual object to an
HTML window, you add that content to the HTML DOM. HTML windows are a special category of NativeWindow.
The AIR host defines a nativeWindow property in HTML windows that provides access to the underlying
NativeWindow instance. You can use this property to access the NativeWindow properties, methods, and events
described here.
Note: The JavaScript Window object also has methods for scripting the containing window, such as moveTo() and
close(). Where overlapping methods are available, you can use whichever method that is convenient.
Flex Framework windows
When you create windows with the Flex framework, you typically use MXML components to populate the window.
To add a Flex component to a window, you add the component element to the window MXML definition. You can
also use ActionScript to add content dynamically. The mx:WindowedApplication and mx:Window components are
designed as Flex containers and so can accept Flex components directly, whereas NativeWindow objects cannot. When
necessary, the NativeWindow properties and methods can be accessed through the WindowedApplication and
Window objects using the nativeWindow property.
The initial application window
The first window of your application is automatically created for you by AIR. AIR sets the properties and content of
the window using the parameters specified in the initialWindow element of the application descriptor file.
If the root content is a SWF file, AIR creates a NativeWindow instance, loads the SWF file, and adds it to the window
stage. If the root content is an HTML file, AIR creates an HTML window and loads the HTML.
Native window classes
Adobe AIR 1.0 and later
The native window API contains the following classes:

865
ACTIONSCRIPT 3.0 DEVELOPER’S GUIDE
Working with AIR native windows
Last updated 3/21/2011
Native window event flow
Adobe AIR 1.0 and later
Native windows dispatch events to notify interested components that an important change is about to occur or has
already occurred. Many window-related events are dispatched in pairs. The first event warns that a change is about to
happen. The second event announces that the change has been made. You can cancel a warning event, but not a
notification event. The following sequence illustrates the flow of events that occurs when a user clicks the maximize
button of a window:
1The NativeWindow object dispatches a displayStateChanging event.
2If no registered listeners cancel the event, the window maximizes.
3The NativeWindow object dispatches a displayStateChange event.
In addition, the NativeWindow object also dispatches events for related changes to the window size and position.
The window does not dispatch warning events for these related changes. The related events are:
aA move event is dispatched if the top, left corner of the window moved because of the maximize operation.
bA resize event is dispatched if the window size changed because of the maximize operation.
A NativeWindow object dispatches a similar sequence of events when minimizing, restoring, closing, moving, and
resizing a window.
The warning events are only dispatched when a change is initiated through window chrome or other operating-
system controlled mechanism. When you call a window method to change the window size, position, or display
state, the window only dispatches an event to announce the change. You can dispatch a warning event, if desired,
using the window dispatchEvent() method, then check to see if your warning event has been canceled before
proceeding with the change.
For detailed information about the window API classes, methods, properties, and events, see the ActionScript 3.0
Reference for the Adobe Flash Platform.
Package Classes
flash.display •NativeWindow
•NativeWindowInitOptions
•NativeWindowDisplayState
•NativeWindowResize
•NativeWindowSystemChrome
•NativeWindowType
flash.events •NativeWindowBoundsEvent
•NativeWindowDisplayStateEvent

866
ACTIONSCRIPT 3.0 DEVELOPER’S GUIDE
Working with AIR native windows
Last updated 3/21/2011
Properties controlling native window style and behavior
Flash Player 9 and later, Adobe AIR 1.0 and later
The following properties control the basic appearance and behavior of a window:
•type
•systemChrome
•transparent
•owner
When you create a window, you set these properties on the NativeWindowInitOptions object passed to the window
constructor. AIR reads the properties for the initial application window from the application descriptor. (Except the
type property, which cannot be set in the application descriptor and is always set to normal.) The properties cannot
be changed after window creation.
Some settings of these properties are mutually incompatible: systemChrome cannot be set to standard when either
transparent is true or type is lightweight.
Window types
Adobe AIR 1.0 and later
The AIR window types combine chrome and visibility attributes of the native operating system to create three
functional types of window. Use the constants defined in the NativeWindowType class to reference the type names in
code. AIR provides the following window types:
Window chrome
Adobe AIR 1.0 and later
Window chrome is the set of controls that allow users to manipulate a window in the desktop environment. Chrome
elements include the title bar, title bar buttons, border, and resize grippers.
System chrome
You can set the systemChrome property to standard or none. Choose standard system chrome to give your window
the set of standard controls created and styled by the user’s operating system. Choose none to provide your own
chrome for the window. Use the constants defined in the NativeWindowSystemChrome class to reference the system
chrome settings in code.
Type Description
Normal A typical window. Normal windows use the full-size style of chrome and appear on the Windows taskbar and
the Mac OS X window menu.
Utility A tool palette. Utility windows use a slimmer version of the system chrome and do not appear on the Windows
taskbar and the Mac OS X window menu.
Lightweight Lightweight windows have no chrome and do not appear on the Windows taskbar or the Mac OS X window
menu. In addition, lightweight windows do not have the System (Alt+Space) menu on Windows. Lightweight
windows are suitable for notification bubbles and controls such as combo-boxes that open a short-lived display
area. When the lightweight type is used, systemChrome must be set to none.

867
ACTIONSCRIPT 3.0 DEVELOPER’S GUIDE
Working with AIR native windows
Last updated 3/21/2011
System chrome is managed by the system. Your application has no direct access to the controls themselves, but can
react to the events dispatched when the controls are used. When you use standard chrome for a window, the
transparent property must be set to false and the type property must be normal or utility.
Flex chrome
When you use the Flex WindowedApplication or Window components, the window can be use either system chrome
or chrome provided by the Flex framework. To use the Flex chrome, set the systemChrome property used to create the
window to none. When using the Flex 4 spark components rather than the mx components, you must specify the skin
class in order to use Flex chrome. You can use the built-in skins or provide your own. The following example
demonstrates how to use the built-in spark WindowedApplication skin class to provide the window chrome:
<?xml version="1.0" encoding="utf-8"?>
<s:WindowedApplication xmlns:fx="http://ns.adobe.com/mxml/2009"
xmlns:s="library://ns.adobe.com/flex/spark"
xmlns:mx="library://ns.adobe.com/flex/mx">
<fx:Style>
@namespace "library://ns.adobe.com/flex/spark";
WindowedApplication
{
skinClass:ClassReference("spark.skins.spark.SparkChromeWindowedApplicationSkin");
}
</fx:Style>
</s:WindowedApplication>
For more information, see Using Flex 4: About the AIR window containers: Controlling window chrome
Custom chrome
When you create a window with no system chrome, then you must add your own chrome controls to handle the
interactions between a user and the window. You are also free to make transparent, non-rectangular windows.
To use custom chrome with the mx:WindowedApplication or mx:Window components, you must set the
showFlexChrome style to false. Otherwise, Flex will add its own chrome to your windows.
Window transparency
Adobe AIR 1.0 and later
To allow alpha blending of a window with the desktop or other windows, set the window transparent property to
true. The transparent property must be set before the window is created and cannot be changed.
A transparent window has no default background. Any window area not containing an object drawn by the application
is invisible. If a displayed object has an alpha setting of less than one, then anything below the object shows through,
including other display objects in the same window, other windows, and the desktop.
Transparent windows are useful when you want to create applications with borders that are irregular in shape or that
“fade out” or appear to be invisible. However, rendering large alpha-blended areas can be slow, so the effect should be
used conservatively.
Important: On Linux, mouse events do not pass through fully transparent pixels. You should avoid creating windows
with large, fully transparent areas since you may invisibly block the user’s access to other windows or items on their
desktop. On Mac OS X and Windows, mouse events do pass through fully transparent pixels.
Transparency cannot be used with windows that have system chrome. In addition, SWF and PDF content in HTML
may not display in transparent windows. For more information, see “Considerations when loading SWF or PDF
content in an HTML page” on page 975.

868
ACTIONSCRIPT 3.0 DEVELOPER’S GUIDE
Working with AIR native windows
Last updated 3/21/2011
The static NativeWindow.supportsTransparency property reports whether window transparency is available.
When transparency is not supported, the application is composited against a black background. In these cases, any
transparent areas of the application display as an opaque black. It is a good practice to provide a fallback in case this
property tests false. For example, you could display a warning dialog to the user, or display a rectangular, non-
transparent user interface.
Note that transparency is always supported by the Mac and Windows operating systems. Support on Linux operating
systems requires a compositing window manager, but even when a compositing window manager is active,
transparency can be unavailable because of user display options or hardware configuration.
Transparency in an MXML application window
Adobe AIR 1.0 and later
By default, the background of an MXML window is opaque, even if you create the window as transparent. (Notice the
transparency effect at the corners of the window.) To present a transparent background for the window, set a
background color and alpha value in the style sheet or <mx:Style> element contained in your application MXML file.
For example, the following style declaration gives the background a slightly transparent green shade:
WindowedApplication
{
background-alpha:".8";
background-color:"0x448234";
}
Transparency in an HTML application window
Adobe AIR 1.0 and later
By default the background of HTML content displayed in HTML windows and HTMLLoader objects is opaque, event
if the containing window is transparent. To turn off the default background displayed for HTML content, set the
paintsDefaultBackground property to false. The following example creates an HTMLLoader and turns off the
default background:
var htmlView:HTMLLoader = new HTMLLoader();
htmlView.paintsDefaultBackground = false;
This example uses JavaScript to turn off the default background of an HTML window:
window.htmlLoader.paintsDefaultBackground = false;
If an element in the HTML document sets a background color, the background of that element is not transparent.
Setting a partial transparency (or opacity) value is not supported. However, you can use a transparent PNG-format
graphic as the background for a page or a page element to achieve a similar visual effect.
Window ownership
One window can own one or more other windows. These owned windows always appear in front of the master
window, are minimized and restored along with the master window, and are closed when the master window is closed.
Window ownership cannot be transfered to another window or removed. A window can only be owned by one master
window, but can own any number of other windows.
You can use window ownership to make it easier to manage windows used for tool palettes and dialogs. For example,
if you displayed a Save dialog in association with a document window, making the document window own the dialog
will keep the dialog in front of the document window automatically.

869
ACTIONSCRIPT 3.0 DEVELOPER’S GUIDE
Working with AIR native windows
Last updated 3/21/2011
A visual window catalog
Adobe AIR 1.0 and later
The following table illustrates the visual effects of different combinations of window property settings on the Mac OS
X, Windows, and Linux operating systems:
Window settings Mac OS X Microsoft Windows Linux*
Type: normal
SystemChrome: standard
Transparent: false
Type: utility
SystemChrome: standard
Transparent: false
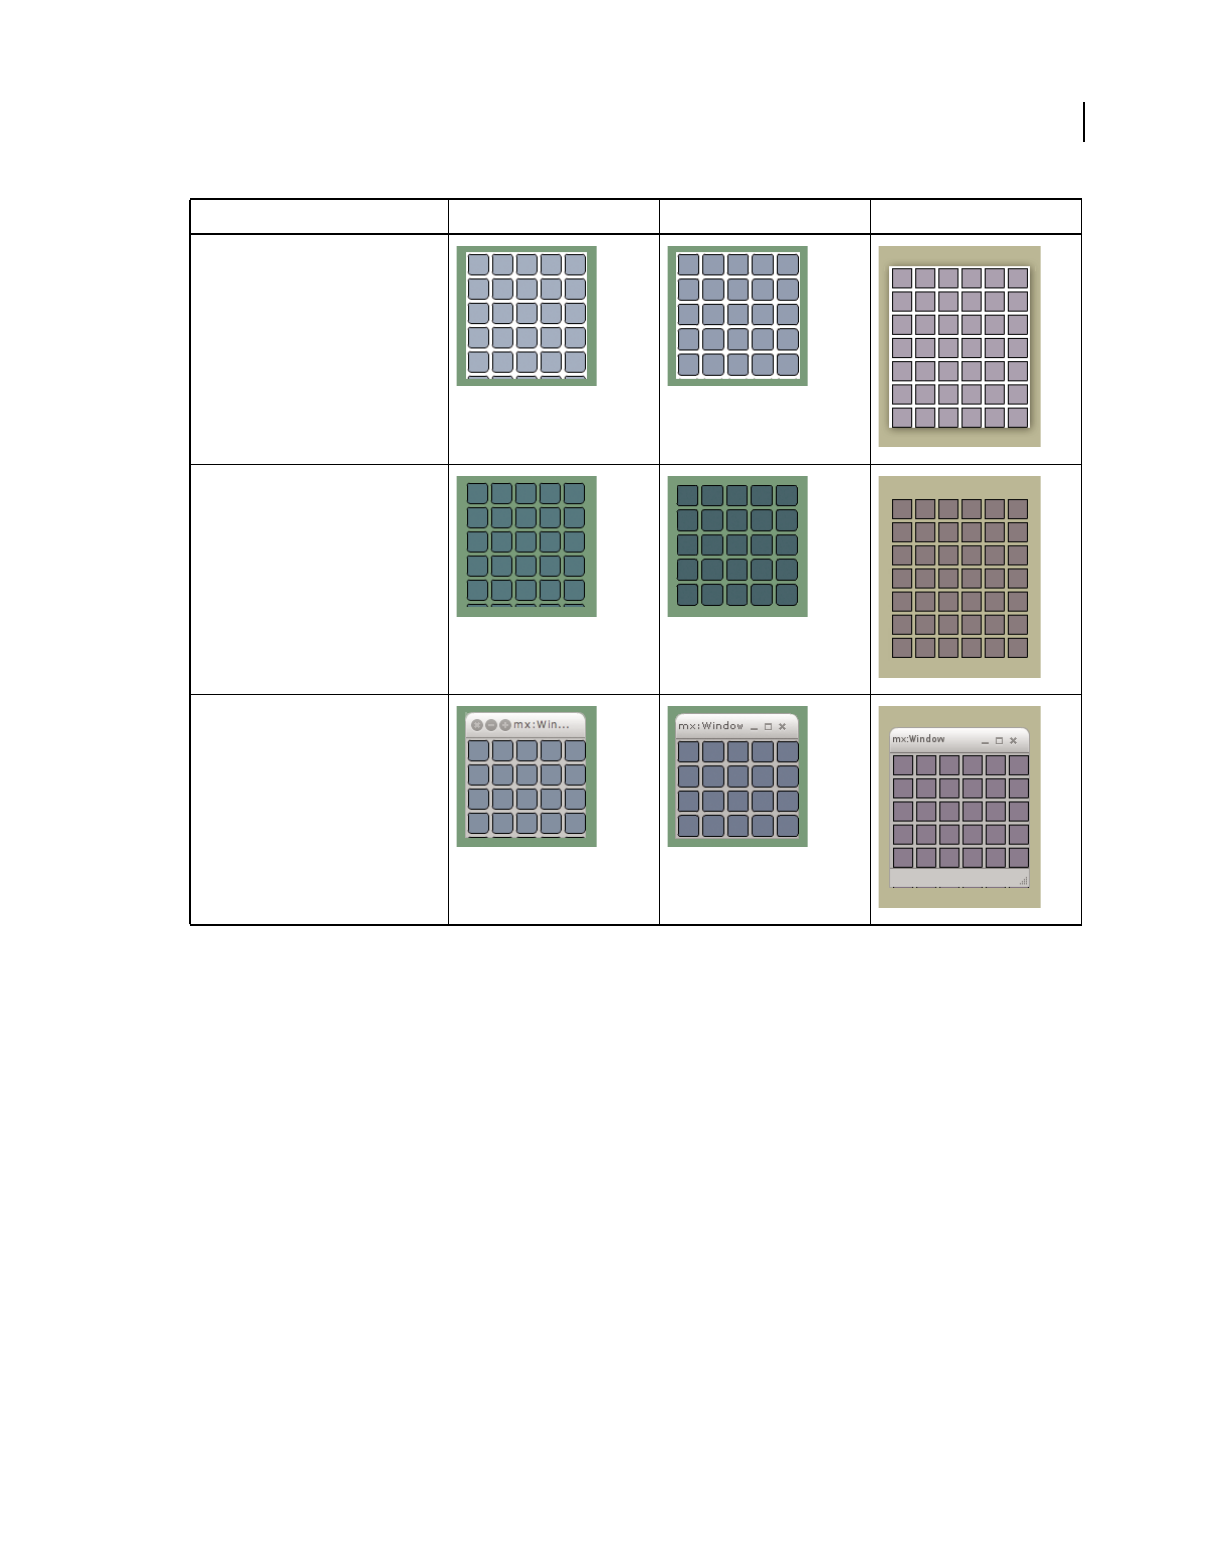
870
ACTIONSCRIPT 3.0 DEVELOPER’S GUIDE
Working with AIR native windows
Last updated 3/21/2011
*Ubuntu with Compiz window manager
Note: The following system chrome elements are not supported by AIR: the Mac OS X Toolbar, the Mac OS X Proxy Icon,
Windows title bar icons, and alternate system chrome.
Creating windows
Adobe AIR 1.0 and later
AIR automatically creates the first window for an application, but you can create any additional windows you need.
To create a native window, use the NativeWindow constructor method.
To create an HTML window, either use the HTMLLoader createRootWindow() method or, from an HTML
document, call the JavaScript window.open() method. The window created is a NativeWindow object whose display
list contains an HTMLLoader object. The HTMLLoader object interprets and displays the HTML and JavaScript
content for the window. You can access the properties of the underlying NativeWindow object from JavaScript using
the window.nativeWindow property. (This property is only accessible to code running in the AIR application
sandbox.)
Type: Any
SystemChrome: none
Transparent: false
Type: Any
SystemChrome: none
Transparent: true
mxWindowedApplication or
mx:Window
Type: Any
SystemChrome: none
Transparent: true
Window settings Mac OS X Microsoft Windows Linux*

871
ACTIONSCRIPT 3.0 DEVELOPER’S GUIDE
Working with AIR native windows
Last updated 3/21/2011
When you initialize a window—including the initial application window—you should consider creating the window
in the invisible state, loading content or executing any graphical updates, and then making the window visible. This
sequence prevents any jarring visual changes from being visible to your users. You can specify that the initial window
of your application should be created in the invisible state by specifying the <visible>false</visible> tag in the
application descriptor (or by leaving the tag out altogether since false is the default value). New NativeWindows are
invisible by default. When you create an HTML window with the HTMLLoader createRootWindow() method, you
can set the visible argument to false. Call the NativeWindow activate() method or set the visible property to
true to make a window visible.
Specifying window initialization properties
Adobe AIR 1.0 and later
The initialization properties of a native window cannot be changed after the desktop window is created. These
immutable properties and their default values include:
Set the properties for the initial window created by AIR in the application descriptor file. The main window of an AIR
application is always type, normal. (Additional window properties can be specified in the descriptor file, such as
visible, width, and height, but these properties can be changed at any time.)
Set the properties for other native and HTML windows created by your application using the
NativeWindowInitOptions class. When you create a window, you must pass a NativeWindowInitOptions object
specifying the window properties to either the NativeWindow constructor function or the HTMLLoader
createRootWindow() method.
The following code creates a NativeWindowInitOptions object for a utility window:
var options:NativeWindowInitOptions = new NativeWindowInitOptions();
options.systemChrome = NativeWindowSystemChrome.STANDARD;
options.type = NativeWindowType.UTILITY
options.transparent = false;
options.resizable = false;
options.maximizable = false;
Setting systemChrome to standard when transparent is true or type is lightweight is not supported.
Note: You cannot set the initialization properties for a window created with the JavaScript window.open() function.
You can, however, override how these windows are created by implementing your own HTMLHost class. See “Handling
JavaScript calls to window.open()” on page 987 for more information.
Property Default value
systemChrome standard
type normal
transparent false
owner null
maximizable true
minimizable true
resizable true

872
ACTIONSCRIPT 3.0 DEVELOPER’S GUIDE
Working with AIR native windows
Last updated 3/21/2011
When you create a window with the Flex mx:Window class, specify the initialization properties on the window object
itself, either in the MXML declaration for the window, or in the code that creates the window. The underlying
NativeWindow object is not created until you call the open() method. Once a window is opened, these initialization
properties cannot be changed.
Creating the initial application window
Adobe AIR 1.0 and later
AIR creates the initial application window based on the properties specified in the application descriptor and loads the
file referenced in the content element. The content element must reference a SWF file or an HTML file.
The initial window can be the main window of your application or it can merely serve to launch one or more other
windows. You do not have to make it visible at all.
Creating the initial window with ActionScript
Adobe AIR 1.0 and later
When you create an AIR application using ActionScript, the main class of your application must extend the Sprite class
(or a subclass of Sprite). This class serves as the main entry point for the application.
When your application launches, AIR creates a window, creates an instance of the main class, and adds the instance to
the window stage. To access the window, you can listen for the addedToStage event and then use the nativeWindow
property of the Stage object to get a reference to the NativeWindow object.
The following example illustrates the basic skeleton for the main class of an AIR application built with ActionScript:
package {
import flash.display.NativeWindow;
import flash.display.Sprite;
import flash.events.Event;
public class MainClass extends Sprite
{
private var mainWindow:NativeWindow;
public function MainClass(){
this.addEventListener(Event.ADDED_TO_STAGE, initialize);
}
private function initialize(event:Event):void{
mainWindow = this.stage.nativeWindow;
//perform initialization...
mainWindow.activate(); //show the window
}
}
}
Note: Technically, you CAN access the nativeWindow property in the constructor function of the main class. However,
this is a special case applying only to the initial application window.
When creating an application in Flash Professional, the main document class is created automatically if you do not
create your own in a separate ActionScript file. You can access the NativeWindow object for the initial window using
the stage nativeWindow property. For example, the following code activates the main window in the maximized state
(from the timeline):

873
ACTIONSCRIPT 3.0 DEVELOPER’S GUIDE
Working with AIR native windows
Last updated 3/21/2011
import flash.display.NativeWindow;
var mainWindow:NativeWindow = this.stage.nativeWindow;
mainWindow.maximize();
mainWindow.activate();
Creating the initial window with Flex
Adobe AIR 1.0 and later
When creating an AIR application with the Flex framework, use the mx:WindowedApplication as the root element of
your main MXML file. (You can use the mx:Application component, but it does not support all the features available
in AIR.) The WindowedApplication component serves as the initial entry point for the application.
When you launch the application, AIR creates a native window, initializes the Flex framework, and adds the
WindowedApplication object to the window stage. When the launch sequence finishes, the WindowedApplication
dispatches an applicationComplete event. Access the desktop window object with the nativeWindow property of
the WindowedApplication instance.
The following example creates a simple WindowedApplication component that sets its x and y coordinates:
<?xml version="1.0" encoding="utf-8"?>
<mx:WindowedApplication xmlns:mx="http://www.adobe.com/2006/mxml"
applicationComplete="placeWindow()">
<mx:Script>
<![CDATA[
private function placeWindow():void{
this.nativeWindow.x = 300;
this.nativeWindow.y = 300;
}
]]>
</mx:Script>
<mx:Label text="Hello World" horizontalCenter="0" verticalCenter="0"/>
</mx:WindowedApplication>
Creating a NativeWindow
Adobe AIR 1.0 and later
To create a NativeWindow, pass a NativeWindowInitOptions object to the NativeWindow constructor:
var options:NativeWindowInitOptions = new NativeWindowInitOptions();
options.systemChrome = NativeWindowSystemChrome.STANDARD;
options.transparent = false;
var newWindow:NativeWindow = new NativeWindow(options);
The window is not shown until you set the visible property to true or call the activate() method.
Once the window is created, you can initialize its properties and load content into the window using the stage property
and Flash display list techniques.
In almost all cases, you should set the stage scaleMode property of a new native window to noScale (use the
StageScaleMode.NO_SCALE constant). The Flash scale modes are designed for situations in which the application
author does not know the aspect ratio of the application display space in advance. The scale modes let the author
choose the least-bad compromise: clip the content, stretch or squash it, or pad it with empty space. Since you control
the display space in AIR (the window frame), you can size the window to the content or the content to the window
without compromise.

874
ACTIONSCRIPT 3.0 DEVELOPER’S GUIDE
Working with AIR native windows
Last updated 3/21/2011
The scale mode for Flex and HTML windows is set to noScale automatically.
Note: To determine the maximum and minimum window sizes allowed on the current operating system, use the following
static NativeWindow properties:
var maxOSSize:Point = NativeWindow.systemMaxSize;
var minOSSize:Point = NativeWindow.systemMinSize;
Creating an HTML window
Adobe AIR 1.0 and later
To create an HTML window, you can either call the JavaScript Window.open() method, or you can call the AIR
HTMLLoader class createRootWindow() method.
HTML content in any security sandbox can use the standard JavaScript Window.open() method. If the content is
running outside the application sandbox, the open() method can only be called in response to user interaction, such
as a mouse click or keypress. When open() is called, a window with system chrome is created to display the content
at the specified URL. For example:
newWindow = window.open("xmpl.html", "logWindow", "height=600, width=400, top=10, left=10");
Note: You can extend the HTMLHost class in ActionScript to customize the window created with the JavaScript
window.open() function. See “About extending the HTMLHost class” on page 980.
Content in the application security sandbox has access to the more powerful method of creating windows,
HTMLLoader.createRootWindow(). With this method, you can specify all the creation options for a new window. For
example, the following JavaScript code creates a lightweight type window without system chrome that is 300x400
pixels in size:
var options = new air.NativeWindowInitOptions();
options.systemChrome = "none";
options.type = "lightweight";
var windowBounds = new air.Rectangle(200,250,300,400);
newHTMLLoader = air.HTMLLoader.createRootWindow(true, options, true, windowBounds);
newHTMLLoader.load(new air.URLRequest("xmpl.html"));
Note: If the content loaded by a new window is outside the application security sandbox, the window object does not have
the AIR properties: runtime, nativeWindow, or htmlLoader.
If you create a transparent window, then SWF content embedded in the HTML loaded into that window is not always
displayed. You must set the wmode parameter of the object or embed tag used to reference the SWF file to either opaque
or transparent. The default value of wmode is window, so, by default, SWF content is not displayed in transparent
windows. PDF content cannot be displayed in transparent windows, no matter which wmode value is set. (Prior to AIR
1.5.2, SWF content could not be displayed in transparent windows, either.)
Windows created with the createRootWindow() method remain independent from the opening window. The
parent and opener properties of the JavaScript Window object are null. The opening window can access the
Window object of the new window using the HTMLLoader reference returned by the createRootWindow() function.
In the context of the previous example, the statement newHTMLLoader.window would reference the JavaScript
Window object of the created window.
Note: The createRootWindow() function can be called from both JavaScript and ActionScript.

875
ACTIONSCRIPT 3.0 DEVELOPER’S GUIDE
Working with AIR native windows
Last updated 3/21/2011
Creating a mx:Window
Adobe AIR 1.0 and later
To create a mx:Window, you can create an MXML file using mx:Window as the root tag, or you can call the Window
class constructor directly.
The following example creates and shows a mx:Window by calling the Window constructor:
var newWindow:Window = new Window();
newWindow.systemChrome = NativeWindowSystemChrome.NONE;
newWindow.transparent = true;
newWindow.title = "New Window";
newWindow.width = 200;
newWindow.height = 200;
newWindow.open(true);
Adding content to a window
Adobe AIR 1.0 and later
How you add content to an AIR window depends on the type of window. For example, MXML and HTML let you
declaratively define the basic content of the window. You can embed resources in the application SWF files or you can
load them from separate application files. Flex, Flash, and HTML content can all be created on the fly and added to a
window dynamically.
When you load SWF content, or HTML content containing JavaScript, you must take the AIR security model into
consideration. Any content in the application security sandbox, that is, content installed with your application and
loadable with the app: URL scheme, has full privileges to access all the AIR APIs. Any content loaded from outside this
sandbox cannot access the AIR APIs. JavaScript content outside the application sandbox is not able to use the runtime,
nativeWindow, or htmlLoader properties of the JavaScript Window object.
To allow safe cross-scripting, you can use a sandbox bridge to provide a limited interface between application content
and non-application content. In HTML content, you can also map pages of your application into a non-application
sandbox to allow the code on that page to cross-script external content. See “AIR security” on page 1041.
Loading a SWF file or image
You can load Flash SWF files or images into the display list of a native window using the flash.display.Loader
class:

876
ACTIONSCRIPT 3.0 DEVELOPER’S GUIDE
Working with AIR native windows
Last updated 3/21/2011
package {
import flash.display.Sprite;
import flash.events.Event;
import flash.net.URLRequest;
import flash.display.Loader;
public class LoadedSWF extends Sprite
{
public function LoadedSWF(){
var loader:Loader = new Loader();
loader.load(new URLRequest("visual.swf"));
loader.contentLoaderInfo.addEventListener(Event.COMPLETE,loadFlash);
}
private function loadFlash(event:Event):void{
addChild(event.target.loader);
}
}
}
Note: Older SWF files created using ActionScript 1 or 2 share global states such as class definitions, singletons, and global
variables if they are loaded into the same window. If such a SWF file relies on untouched global states to work correctly,
it cannot be loaded more than once into the same window, or loaded into the same window as another SWF file using
overlapping class definitions and variables. This content can be loaded into separate windows.
Loading HTML content into a NativeWindow
To load HTML content into a NativeWindow, you can either add an HTMLLoader object to the window stage and
load the HTML content into the HTMLLoader, or create a window that already contains an HTMLLoader object by
using the HTMLLoader.createRootWindow()method. The following example displays HTML content within a 300
by 500 pixel display area on the stage of a native window:
//newWindow is a NativeWindow instance
var htmlView:HTMLLoader = new HTMLLoader();
htmlView.width = 300;
htmlView.height = 500;
//set the stage so display objects are added to the top-left and not scaled
newWindow.stage.align = "TL";
newWindow.stage.scaleMode = "noScale";
newWindow.stage.addChild( htmlView );
//urlString is the URL of the HTML page to load
htmlView.load( new URLRequest(urlString) );
To load an HTML page into a Flex application, you can use the Flex HTML component.
SWF content in an HTML file is not displayed if the window uses transparency (that is the transparent property of
the window is true) unless the wmode parameter of the object or embed tag used to reference the SWF file is set to
either opaque or transparent. Since the default wmode value is window, by default, SWF content is not displayed in
a transparent window. PDF content is not displayed in a transparent window no matter what wmode value is used.
Also, neither SWF nor PDF content is displayed if the HTMLLoader control is scaled, rotated, or if the HTMLLoader
alpha property is set to a value other than 1.0.

877
ACTIONSCRIPT 3.0 DEVELOPER’S GUIDE
Working with AIR native windows
Last updated 3/21/2011
Adding SWF content as an overlay on an HTML window
Because HTML windows are contained within a NativeWindow instance, you can add Flash display objects both above
and below the HTML layer in the display list.
To add a display object above the HTML layer, use the addChild() method of the window.nativeWindow.stage
property. The addChild() method adds content layered above any existing content in the window.
To add a display object below the HTML layer, use the addChildAt() method of the window.nativeWindow.stage
property, passing in a value of zero for the index parameter. Placing an object at the zero index moves existing content,
including the HTML display, up one layer and insert the new content at the bottom. For content layered underneath
the HTML page to be visible, you must set the paintsDefaultBackground property of the HTMLlLoader object to
false. In addition, any elements of the page that set a background color, will not be transparent. If, for example, you
set a background color for the body element of the page, none of the page will be transparent.
The following example illustrates how to add a Flash display objects as overlays and underlays to an HTML page. The
example creates two simple shape objects, adds one below the HTML content and one above. The example also updates
the shape position based on the enterFrame event.
<html>
<head>
<title>Bouncers</title>
<script src="AIRAliases.js" type="text/javascript"></script>
<script language="JavaScript" type="text/javascript">
air.Shape = window.runtime.flash.display.Shape;
function Bouncer(radius, color){
this.radius = radius;
this.color = color;
//velocity
this.vX = -1.3;
this.vY = -1;
//Create a Shape object and draw a circle with its graphics property
this.shape = new air.Shape();
this.shape.graphics.lineStyle(1,0);
this.shape.graphics.beginFill(this.color,.9);
this.shape.graphics.drawCircle(0,0,this.radius);
this.shape.graphics.endFill();
//Set the starting position
this.shape.x = 100;
this.shape.y = 100;
//Moves the sprite by adding (vX,vY) to the current position
this.update = function(){
this.shape.x += this.vX;
this.shape.y += this.vY;
//Keep the sprite within the window
if( this.shape.x - this.radius < 0){
this.vX = -this.vX;
}
if( this.shape.y - this.radius < 0){
this.vY = -this.vY;

878
ACTIONSCRIPT 3.0 DEVELOPER’S GUIDE
Working with AIR native windows
Last updated 3/21/2011
}
if( this.shape.x + this.radius > window.nativeWindow.stage.stageWidth){
this.vX = -this.vX;
}
if( this.shape.y + this.radius > window.nativeWindow.stage.stageHeight){
this.vY = -this.vY;
}
};
}
function init(){
//turn off the default HTML background
window.htmlLoader.paintsDefaultBackground = false;
var bottom = new Bouncer(60,0xff2233);
var top = new Bouncer(30,0x2441ff);
//listen for the enterFrame event
window.htmlLoader.addEventListener("enterFrame",function(evt){
bottom.update();
top.update();
});
//add the bouncing shapes to the window stage
window.nativeWindow.stage.addChildAt(bottom.shape,0);
window.nativeWindow.stage.addChild(top.shape);
}
</script>
<body onload="init();">
<h1>de Finibus Bonorum et Malorum</h1>
<p>Sed ut perspiciatis unde omnis iste natus error sit voluptatem accusantium
doloremque laudantium, totam rem aperiam, eaque ipsa quae ab illo inventore veritatis
et quasi architecto beatae vitae dicta sunt explicabo.</p>
<p style="background-color:#FFFF00; color:#660000;">This paragraph has a background color.</p>
<p>At vero eos et accusamus et iusto odio dignissimos ducimus qui blanditiis
praesentium voluptatum deleniti atque corrupti quos dolores et quas molestias
excepturi sint occaecati cupiditate non provident, similique sunt in culpa qui
officia deserunt mollitia animi, id est laborum et dolorum fuga.</p>
</body>
</html>
This example provides a rudimentary introduction to some advanced techniques that cross over the boundaries
between JavaScript and ActionScript in AIR. If your are unfamiliar with using ActionScript display objects, refer to
“Display programming” on page 143 in the ActionScript 3.0 Developer’s Guide.
Example: Creating a native window
Adobe AIR 1.0 and later
The following example illustrates how to create a native window:

879
ACTIONSCRIPT 3.0 DEVELOPER’S GUIDE
Working with AIR native windows
Last updated 3/21/2011
public function createNativeWindow():void {
//create the init options
var options:NativeWindowInitOptions = new NativeWindowInitOptions();
options.transparent = false;
options.systemChrome = NativeWindowSystemChrome.STANDARD;
options.type = NativeWindowType.NORMAL;
//create the window
var newWindow:NativeWindow = new NativeWindow(options);
newWindow.title = "A title";
newWindow.width = 600;
newWindow.height = 400;
newWindow.stage.align = StageAlign.TOP_LEFT;
newWindow.stage.scaleMode = StageScaleMode.NO_SCALE;
//activate and show the new window
newWindow.activate();
}
Managing windows
Adobe AIR 1.0 and later
You use the properties and methods of the NativeWindow class to manage the appearance, behavior, and life cycle of
desktop windows.
Note: When using the Flex framework, it is generally better to manage window behavior using the framework classes.
Most of the NativeWindow properties and methods can be accessed through the mx:WindowedApplication and
mx:Window classes.
Getting a NativeWindow instance
Adobe AIR 1.0 and later
To manipulate a window, you must first get the window instance. You can get a window instance from one of the
following places:
•The native window constructor used to create the window:
var win:NativeWindow = new NativeWindow(initOptions);
•The nativeWindow property of the window stage:
var win:NativeWindow = stage.nativeWindow;
•The stage property of a display object in the window:
var win:NativeWindow = displayObject.stage.nativeWindow;
•The target property of a native window event dispatched by the window:
private function onNativeWindowEvent(event:NativeWindowBoundsEvent):void
{
var win:NativeWindow = event.target as NativeWindow;
}

880
ACTIONSCRIPT 3.0 DEVELOPER’S GUIDE
Working with AIR native windows
Last updated 3/21/2011
•The nativeWindow property of an HTML page displayed in the window:
var win:NativeWindow = htmlLoader.window.nativeWindow;
•The activeWindow and openedWindows properties of the NativeApplication object:
var nativeWin:NativeWindow = NativeApplication.nativeApplication.activeWindow;
var firstWindow:NativeWindow = NativeApplication.nativeApplication.openedWindows[0];
NativeApplication.nativeApplication.activeWindow references the active window of an application (but
returns null if the active window is not a window of this AIR application). The
NativeApplication.nativeApplication.openedWindows array contains all of the windows in an AIR
application that have not been closed.
Because the Flex mx:WindowedApplication, and mx:Window objects are display objects, you can easily reference the
application window in an MXML file using the stage property, as follows:
<?xml version="1.0" encoding="utf-8"?>
<mx:WindowedApplication xmlns:mx="http://www.adobe.com/2006/mxml"
applicationComplete="init();">
<mx:Script>
<![CDATA[
import flash.display.NativeWindow;
public function init():void{
var appWindow:NativeWindow = this.stage.nativeWindow;
//set window properties
appWindow.visible = true;
}
]]>
</mx:Script>
</WindowedApplication
Note: Until the WindowedApplication or Window component is added to the window stage by the Flex framework, the
component's stage property is null. This behavior is consistent with that of the Flex Application component, but does
mean that it is not possible to access the stage or the NativeWindow instance in listeners for events that occur earlier in
the initialization cycle of the WindowedApplication and Window components, such as creationComplete. It is safe to
access the stage and NativeWindow instance when the applicationComplete event is dispatched.
Activating, showing, and hiding windows
Adobe AIR 1.0 and later
To activate a window, call the NativeWindow activate() method. Activating a window brings the window to the
front, gives it keyboard and mouse focus, and, if necessary, makes it visible by restoring the window or setting the
visible property to true. Activating a window does not change the ordering of other windows in the application.
Calling the activate() method causes the window to dispatch an activate event.
To show a hidden window without activating it, set the visible property to true. This brings the window to the front,
but will not assign the focus to the window.
To hide a window from view, set its visible property to false. Hiding a window suppresses the display of both the
window, any related taskbar icons, and, on Mac OS X, the entry in the Windows menu.
When you change the visibility of a window, the visibility of any windows that window owns is also changed. For
example, if you hide a window, all of its owned windows are also hidden.

881
ACTIONSCRIPT 3.0 DEVELOPER’S GUIDE
Working with AIR native windows
Last updated 3/21/2011
Note: On Mac OS X, it is not possible to completely hide a minimized window that has an icon in the window portion of
the dock. If the visible property is set to false on a minimized window, the dock icon for the window is still displayed.
If the user clicks the icon, the window is restored to a visible state and displayed.
Changing the window display order
Adobe AIR 1.0 and later
AIR provides several methods for directly changing the display order of windows. You can move a window to the front
of the display order or to the back; you can move a window above another window or behind it. At the same time, the
user can reorder windows by activating them.
You can keep a window in front of other windows by setting its alwaysInFront property to true. If more than one
window has this setting, then the display order of these windows is sorted among each other, but they are always sorted
above windows which have alwaysInFront set to false.
Windows in the top-most group are also displayed above windows in other applications, even when the AIR
application is not active. Because this behavior can be disruptive to a user, setting alwaysInFront to true should only
be done when necessary and appropriate. Examples of justified uses include:
•Temporary pop-up windows for controls such as tool tips, pop-up lists, custom menus, or combo boxes. Because
these windows should close when they lose focus, the annoyance of blocking a user from viewing another window
can be avoided.
•Extremely urgent error messages and alerts. When an irrevocable change may occur if the user does not respond in
a timely manner, it may be justified to push an alert window to the forefront. However, most errors and alerts can
be handled in the normal window display order.
•Short-lived toast-style windows.
Note: AIR does not enforce proper use of the alwaysInFront property. However, if your application disrupts a user’s
workflow, it is likely to be consigned to that same user’s trash can.
If a window owns other windows, those windows are always ordered in front of it. If you call orderToFront() or set
alwaysInFront to true on a window that owns other windows, then the owned windows are re-ordered along with
the owner window in front of other windows, but the owned windows still display in front of the owner.
Calling the window ordering methods on owned windows works normally among windows owned by the same
window, but can also change the ordering of the entire group of owned windows compared to windows outside that
group. For example, if you call orderToFront() on an owned window, then both that window, its owner, and any
other windows owned by the same owner are moved to the front of the window display order.
The NativeWindow class provides the following properties and methods for setting the display order of a window
relative to other windows:
Member Description
alwaysInFront property Specifies whether the window is displayed in the top-most group of windows.
In almost all cases, false is the best setting. Changing the value from false to true brings the window
to the front of all windows (but does not activate it). Changing the value from true to false orders the
window behind windows remaining in the top-most group, but still in front of other windows. Setting the
property to its current value for a window does not change the window display order.
The alwaysInFront setting has no affect on windows owned by another window.
orderToFront() Brings the window to the front.
orderInFrontOf() Brings the window directly in front of a particular window.

882
ACTIONSCRIPT 3.0 DEVELOPER’S GUIDE
Working with AIR native windows
Last updated 3/21/2011
Note: If a window is hidden (visible is false) or minimized, then calling the display order methods has no effect.
On the Linux operating system, different window managers enforce different rules regarding the window display
order:
•On some window managers, utility windows are always displayed in front of normal windows.
•On some window managers, a full screen window with alwaysInFront set to true is always displayed in front of
other windows that also have alwaysInFront set to true.
Closing a window
Adobe AIR 1.0 and later
To close a window, use the NativeWindow.close() method.
Closing a window unloads the contents of the window, but if other objects have references to this content, the content
objects will not be destroyed. The NativeWindow.close() method executes asynchronously, the application that is
contained in the window continues to run during the closing process. The close method dispatches a close event when
the close operation is complete. The NativeWindow object is still technically valid, but accessing most properties and
methods on a closed window generates an IllegalOperationError. You cannot reopen a closed window. Check the
closed property of a window to test whether a window has been closed. To simply hide a window from view, set the
NativeWindow.visible property to false.
If the Nativeapplication.autoExit property is true, which is the default, then the application exits when its last
window closes.
Any windows that have an owner are closed when the owner is closed. The owned windows do not dispatch a closing
event and hence cannot prevent closure. A close event is dispatched.
Allowing cancellation of window operations
Adobe AIR 1.0 and later
When a window uses system chrome, user interaction with the window can be canceled by listening for, and canceling
the default behavior of the appropriate events. For example, when a user clicks the system chrome close button, the
closing event is dispatched. If any registered listener calls the preventDefault() method of the event, then the
window does not close.
When a window does not use system chrome, notification events for intended changes are not automatically
dispatched before the change is made. Hence, if you call the methods for closing a window, changing the window state,
or set any of the window bounds properties, the change cannot be canceled. To notify components in your application
before a window change is made, your application logic can dispatch the relevant notification event using the
dispatchEvent() method of the window.
For example, the following logic implements a cancelable event handler for a window close button:
orderToBack() Sends the window behind other windows.
orderBehind() Sends the window directly behind a particular window.
activate() Brings the window to the front (along with making the window visible and assigning focus).
Member Description

883
ACTIONSCRIPT 3.0 DEVELOPER’S GUIDE
Working with AIR native windows
Last updated 3/21/2011
public function onCloseCommand(event:MouseEvent):void{
var closingEvent:Event = new Event(Event.CLOSING,true,true);
dispatchEvent(closing);
if(!closingEvent.isDefaultPrevented()){
win.close();
}
}
The dispatchEvent() method returns false if the event preventDefault() method is called by a listener.
However, it can also return false for other reasons, so it is better to explicitly use the isDefaultPrevented()
method to test whether the change should be canceled.
Maximizing, minimizing, and restoring a window
Adobe AIR 1.0 and later
To maximize the window, use the NativeWindow maximize() method.
myWindow.maximize();
To minimize the window, use the NativeWindow minimize() method.
myWindow.minimize();
To restore the window (that is, return it to the size that it was before it was either minimized or maximized), use the
NativeWindow restore() method.
myWindow.restore();
A window that has an owner is minimized and restored when the owning window is minimized or restored. No events
are dispatched by the owned window when it is minimized because its owner is minimized.
Note: The behavior that results from maximizing an AIR window is different from the Mac OS X standard behavior.
Rather than toggling between an application-defined “standard” size and the last size set by the user, AIR windows toggle
between the size last set by the application or user and the full usable area of the screen.
On the Linux operating system, different window managers enforce different rules regarding setting the window
display state:
•On some window managers, utility windows cannot be maximized.
•If a maximum size is set for the window, then some windows do not allow a window to be maximized. Some other
window managers set the display state to maximized, but do not resize the window. In either of these cases, no
display state change event is dispatched.
•Some window managers do not honor the window maximizable or minimizable settings.
Note: On Linux, window properties are changed asynchronously. If you change the display state in one line of your
program, and read the value in the next, the value read will still reflect the old setting. On all platforms, the
NativeWindow object dispatches the displayStateChange event when the display state changes. If you need to take
some action based on the new state of the window, always do so in a displayStateChange event handler. See “Listening
for window events” on page 888.

884
ACTIONSCRIPT 3.0 DEVELOPER’S GUIDE
Working with AIR native windows
Last updated 3/21/2011
Example: Minimizing, maximizing, restoring and closing a window
Adobe AIR 1.0 and later
The following short MXML application demonstrates the Window maximize(), minimize(), restore(), and
close() methods:
<?xml version="1.0" encoding="utf-8"?>
<mx:WindowedApplication
xmlns:mx="http://www.adobe.com/2006/mxml"
layout="vertical">
<mx:Script>
<![CDATA[
public function minimizeWindow():void
{
this.stage.nativeWindow.minimize();
}
public function maximizeWindow():void
{
this.stage.nativeWindow.maximize();
}
public function restoreWindow():void
{
this.stage.nativeWindow.restore();
}
public function closeWindow():void
{
this.stage.nativeWindow.close();
}
]]>
</mx:Script>
<mx:VBox>
<mx:Button label="Minimize" click="minimizeWindow()"/>
<mx:Button label="Restore" click="restoreWindow()"/>
<mx:Button label="Maximize" click="maximizeWindow()"/>
<mx:Button label="Close" click="closeWindow()"/>
</mx:VBox>
</mx:WindowedApplication>
The following ActionScript example for Flash creates four clickable text fields that trigger the NativeWindow
minimize(), maximize(), restore(), and close() methods:

885
ACTIONSCRIPT 3.0 DEVELOPER’S GUIDE
Working with AIR native windows
Last updated 3/21/2011
package
{
import flash.display.Sprite;
import flash.events.MouseEvent;
import flash.text.TextField;
public class MinimizeExample extends Sprite
{
public function MinimizeExample():void
{
var minTextBtn:TextField = new TextField();
minTextBtn.x = 10;
minTextBtn.y = 10;
minTextBtn.text = "Minimize";
minTextBtn.background = true;
minTextBtn.border = true;
minTextBtn.selectable = false;
addChild(minTextBtn);
minTextBtn.addEventListener(MouseEvent.CLICK, onMinimize);
var maxTextBtn:TextField = new TextField();
maxTextBtn.x = 120;
maxTextBtn.y = 10;
maxTextBtn.text = "Maximize";
maxTextBtn.background = true;
maxTextBtn.border = true;
maxTextBtn.selectable = false;
addChild(maxTextBtn);
maxTextBtn.addEventListener(MouseEvent.CLICK, onMaximize);
var restoreTextBtn:TextField = new TextField();
restoreTextBtn.x = 230;
restoreTextBtn.y = 10;
restoreTextBtn.text = "Restore";
restoreTextBtn.background = true;
restoreTextBtn.border = true;
restoreTextBtn.selectable = false;
addChild(restoreTextBtn);
restoreTextBtn.addEventListener(MouseEvent.CLICK, onRestore);
var closeTextBtn:TextField = new TextField();
closeTextBtn.x = 340;
closeTextBtn.y = 10;
closeTextBtn.text = "Close Window";
closeTextBtn.background = true;
closeTextBtn.border = true;
closeTextBtn.selectable = false;
addChild(closeTextBtn);

886
ACTIONSCRIPT 3.0 DEVELOPER’S GUIDE
Working with AIR native windows
Last updated 3/21/2011
closeTextBtn.addEventListener(MouseEvent.CLICK, onCloseWindow);
}
function onMinimize(event:MouseEvent):void
{
this.stage.nativeWindow.minimize();
}
function onMaximize(event:MouseEvent):void
{
this.stage.nativeWindow.maximize();
}
function onRestore(event:MouseEvent):void
{
this.stage.nativeWindow.restore();
}
function onCloseWindow(event:MouseEvent):void
{
this.stage.nativeWindow.close();
}
}
}
Resizing and moving a window
Adobe AIR 1.0 and later
When a window uses system chrome, the chrome provides drag controls for resizing the window and moving around
the desktop. If a window does not use system chrome you must add your own controls to allow the user to resize and
move the window.
Note: To resize or move a window, you must first obtain a reference to the NativeWindow instance. For information
about how to obtain a window reference, see “Getting a NativeWindow instance” on page 879.
Resizing a window
To allow a user to resize a window interactively, use the NativeWindow startResize() method. When this method
is called from a mouseDown event, the resizing operation is driven by the mouse and completes when the operating
system receives a mouseUp event. When calling startResize(), you pass in an argument that specifies the edge or
corner from which to resize the window.
To set the window size programmatically, set the width, height, or bounds properties of the window to the desired
dimensions. When you set the bounds, the window size and position can all be changed at the same time. However,
the order that the changes occur is not guaranteed. Some Linux window managers do not allow windows to extend
outside the bounds of the desktop screen. In these cases, the final window size may be limited because of the order in
which the properties are set, even though the net affect of the changes would otherwise have resulted in a legal window.
For example, if you change both the height and y position of a window near the bottom of the screen, then the full
height change might not occur when the height change is applied before the y position change.
Note: On Linux, window properties are changed asynchronously. If you resize a window in one line of your program, and
read the dimensions in the next, they will still reflect the old settings. On all platforms, the NativeWindow object
dispatches the resize event when the window resizes. If you need to take some action, such as laying out controls in the
window, based on the new size or state of the window, always do so in a resize event handler. See “Listening for window
events” on page 888.

887
ACTIONSCRIPT 3.0 DEVELOPER’S GUIDE
Working with AIR native windows
Last updated 3/21/2011
The scale mode of the stage determines how the window stage and its contents behaves when a window is resized. Keep
in mind that the stage scale modes are designed for situations, such as a web browser, where the application is not in
control of the size or aspect ratio of its display space. In general, you get the best results by setting the stage scaleMode
property to StageScaleMode.NO_SCALE. If you want the contents of the window to scale, you can still set the scaleX
and scaleY parameters of the content in response to the window bounds changes.
Moving a window
To move a window without resizing it, use the NativeWindow startMove() method. Like the startResize()
method, when the startMove() method is called from a mouseDown event, the move process is mouse-driven and
completes when the operating system receives a mouseUp event.
For more information about the startResize() and startMove() methods, see the ActionScript 3.0 Reference for
the Adobe Flash Platform.
To move a window programmatically, set the x, y, or bounds properties of the window to the desired position. When
you set the bounds, the window size and position can both be changed at the same time.
Note: On Linux, window properties are changed asynchronously. If you move a window in one line of your program, and
read the position in the next, the value read will still reflect the old setting. On all platforms, the NativeWindow object
dispatches the move event when the position changes. If you need to take some action based on the new position of the
window, always do so in a move event handler. See “Listening for window events” on page 888.
Example: Resizing and moving windows
Adobe AIR 1.0 and later
The following example shows how to initiate resizing and moving operations on a window:
package
{
import flash.display.Sprite;
import flash.events.MouseEvent;
import flash.display.NativeWindowResize;
public class NativeWindowResizeExample extends Sprite
{
public function NativeWindowResizeExample():void
{
// Fills a background area.
this.graphics.beginFill(0xFFFFFF);
this.graphics.drawRect(0, 0, 400, 300);
this.graphics.endFill();
// Creates a square area where a mouse down will start the resize.
var resizeHandle:Sprite =
createSprite(0xCCCCCC, 20, this.width - 20, this.height - 20);
resizeHandle.addEventListener(MouseEvent.MOUSE_DOWN, onStartResize);
// Creates a square area where a mouse down will start the move.
var moveHandle:Sprite = createSprite(0xCCCCCC, 20, this.width - 20, 0);
moveHandle.addEventListener(MouseEvent.MOUSE_DOWN, onStartMove);
}
public function createSprite(color:int, size:int, x:int, y:int):Sprite
{

888
ACTIONSCRIPT 3.0 DEVELOPER’S GUIDE
Working with AIR native windows
Last updated 3/21/2011
var s:Sprite = new Sprite();
s.graphics.beginFill(color);
s.graphics.drawRect(0, 0, size, size);
s.graphics.endFill();
s.x = x;
s.y = y;
this.addChild(s);
return s;
}
public function onStartResize(event:MouseEvent):void
{
this.stage.nativeWindow.startResize(NativeWindowResize.BOTTOM_RIGHT);
}
public function onStartMove(event:MouseEvent):void
{
this.stage.nativeWindow.startMove();
}
}
}
Listening for window events
Adobe AIR 1.0 and later
To listen for the events dispatched by a window, register a listener with the window instance. For example, to listen for
the closing event, register a listener with the window as follows:
myWindow.addEventListener(Event.CLOSING, onClosingEvent);
When an event is dispatched, the target property references the window sending the event.
Most window events have two related messages. The first message signals that a window change is imminent (and can
be canceled), while the second message signals that the change has occurred. For example, when a user clicks the close
button of a window, the closing event message is dispatched. If no listeners cancel the event, the window closes and
the close event is dispatched to any listeners.
Typically, the warning events, such as closing, are only dispatched when system chrome has been used to trigger an
event. Calling the window close() method, for example, does not automatically dispatch the closing event—only
the close event is dispatched. You can, however, construct a closing event object and dispatch it using the window
dispatchEvent() method.
The window events that dispatch an Event object are:
Event Description
activate Dispatched when the window receives focus.
deactivate Dispatched when the window loses focus
closing Dispatched when the window is about to close. This only occurs automatically when the system chrome close
button is pressed or, on Mac OS X, when the Quit command is invoked.
close Dispatched when the window has closed.

889
ACTIONSCRIPT 3.0 DEVELOPER’S GUIDE
Working with AIR native windows
Last updated 3/21/2011
The window events that dispatch an NativeWindowBoundsEvent object are:
For NativeWindowBoundsEvent events, you can use the beforeBounds and afterBounds properties to determine
the window bounds before and after the impending or completed change.
The window events that dispatch an NativeWindowDisplayStateEvent object are:
For NativeWindowDisplayStateEvent events, you can use the beforeDisplayState and afterDisplayState
properties to determine the window display state before and after the impending or completed change.
On some Linux window managers, a display state change event is not dispatched when a window with a maximum
size setting is maximized. (The window is set to the maximized display state, but is not resized.)
Displaying full-screen windows
Adobe AIR 1.0 and later
Setting the displayState property of the Stage to StageDisplayState.FULL_SCREEN_INTERACTIVE places the
window in full-screen mode, and keyboard input is permitted in this mode. (In SWF content running in a browser,
keyboard input is not permitted). To exit full-screen mode, the user presses the Escape key.
Note: Some Linux window managers will not change the window dimensions to fill the screen if a maximum size is set
for the window (but do remove the window system chrome).
For example, the following Flex code defines a simple AIR application that sets up a simple full-screen terminal:
Event Description
moving Dispatched immediately before the top-left corner of the window changes position, either as a result of moving,
resizing or changing the window display state.
move Dispatched after the top-left corner has changed position.
resizing Dispatched immediately before the window width or height changes either as a result of resizing or a display
state change.
resize Dispatched after the window has changed size.
Event Description
displayStateChanging Dispatched immediately before the window display state changes.
displayStateChange Dispatched after the window display state has changed.

890
ACTIONSCRIPT 3.0 DEVELOPER’S GUIDE
Working with AIR native windows
Last updated 3/21/2011
<?xml version="1.0" encoding="utf-8"?>
<mx:WindowedApplication xmlns:mx="http://www.adobe.com/2006/mxml"
layout="vertical"
applicationComplete="init()" backgroundColor="0x003030" focusRect="false">
<mx:Script>
<![CDATA[
private function init():void
{
stage.displayState = StageDisplayState.FULL_SCREEN_INTERACTIVE;
focusManager.setFocus(terminal);
terminal.text = "Welcome to the dumb terminal app. Press the ESC key to
exit..\n";
terminal.selectionBeginIndex = terminal.text.length;
terminal.selectionEndIndex = terminal.text.length;
}
]]>
</mx:Script>
<mx:TextArea
id="terminal"
height="100%" width="100%"
scroll="false"
backgroundColor="0x003030"
color="0xCCFF00"
fontFamily="Lucida Console"
fontSize="44"/>
</mx:WindowedApplication>
The following ActionScript example for Flash simulates a simple full-screen text terminal:

891
ACTIONSCRIPT 3.0 DEVELOPER’S GUIDE
Working with AIR native windows
Last updated 3/21/2011
import flash.display.Sprite;
import flash.display.StageDisplayState;
import flash.text.TextField;
import flash.text.TextFormat;
public class FullScreenTerminalExample extends Sprite
{
public function FullScreenTerminalExample():void
{
var terminal:TextField = new TextField();
terminal.multiline = true;
terminal.wordWrap = true;
terminal.selectable = true;
terminal.background = true;
terminal.backgroundColor = 0x00333333;
this.stage.displayState = StageDisplayState.FULL_SCREEN_INTERACTIVE;
addChild(terminal);
terminal.width = 550;
terminal.height = 400;
terminal.text = "Welcome to the dumb terminal application. Press the ESC key to
exit.\n_";
var tf:TextFormat = new TextFormat();
tf.font = "Courier New";
tf.color = 0x00CCFF00;
tf.size = 12;
terminal.setTextFormat(tf);
terminal.setSelection(terminal.text.length - 1, terminal.text.length);
}
}

892
Last updated 3/21/2011
Chapter 51: Display screens in AIR
Adobe AIR 1.0 and later
Use the Adobe® AIR® Screen class to access information about the display screens attached to a computer or device.
More Help topics
flash.display.Screen
Basics of display screens in AIR
Adobe AIR 1.0 and later
•Measuring the virtual desktop (Flex)
•Measuring the virtual desktop (Flash)
The screen API contains a single class, Screen, which provides static members for getting system screen information,
and instance members for describing a particular screen.
A computer system can have several monitors or displays attached, which can correspond to several desktop screens
arranged in a virtual space. The AIR Screen class provides information about the screens, their relative arrangement,
and their usable space. If more than one monitor maps to the same screen, only one screen exists. If the size of a screen
is larger than the display area of the monitor, there is no way to determine which portion of the screen is currently
visible.
A screen represents an independent desktop display area. Screens are described as rectangles within the virtual
desktop. The upper-left corner of screen designated as the primary display is the origin of the virtual desktop
coordinate system. All values used to describe a screen are provided in pixels.
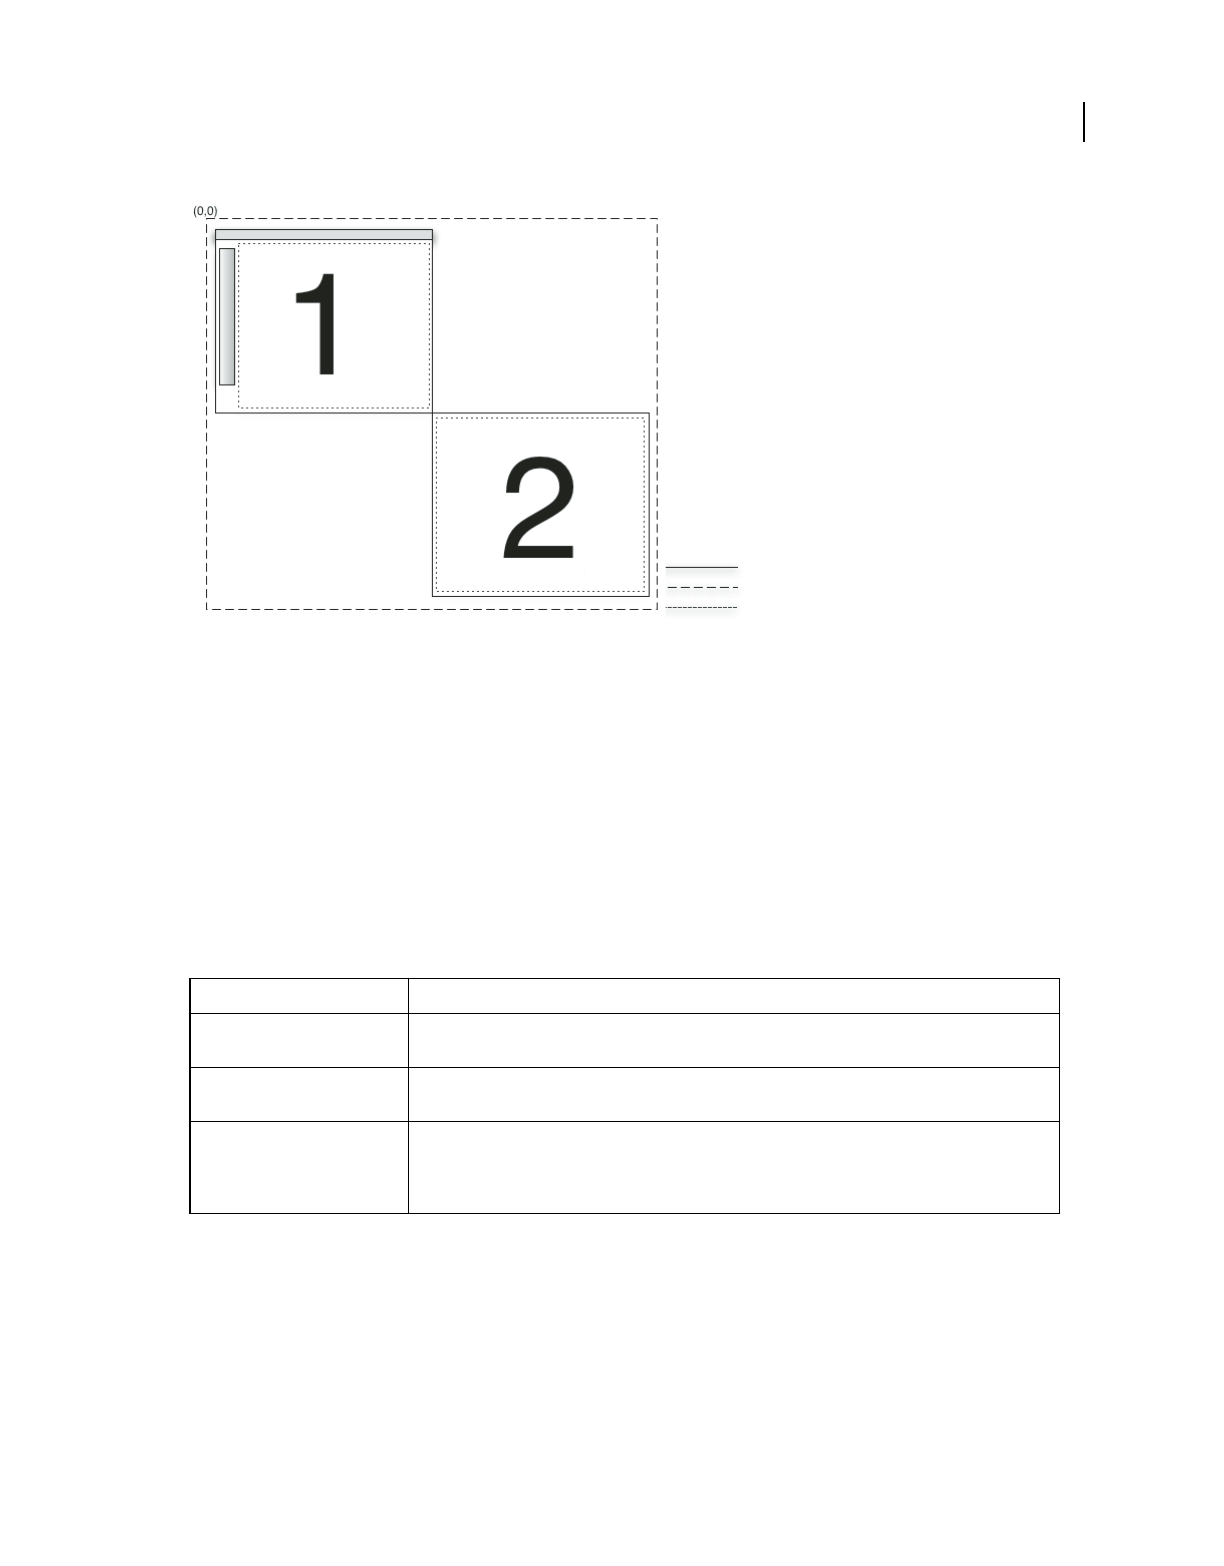
893
ACTIONSCRIPT 3.0 DEVELOPER’S GUIDE
Display screens in AIR
Last updated 3/21/2011
In this screen arrangement, two screens exist on the virtual desktop. The coordinates of the upper-left corner of the main screen (#1) are always
(0,0). If the screen arrangement is changed to designate screen #2 as the main screen, then the coordinates of screen #1 become negative.
Menubars, taskbars, and docks are excluded when reporting the usable bounds for a screen.
For detailed information about the screen API class, methods, properties, and events, see the ActionScript 3.0
Reference for the Adobe Flash Platform.
Enumerating the screens
Adobe AIR 1.0 and later
You can enumerate the screens of the virtual desktop with the following screen methods and properties:
Do not save the values returned by the Screen class methods and properties. The user or operating system can change
the available screens and their arrangement at any time.
The following example uses the screen API to move a window between multiple screens in response to pressing the
arrow keys. To move the window to the next screen, the example gets the screens array and sorts it either vertically
or horizontally (depending on the arrow key pressed). The code then walks through the sorted array, comparing each
screen to the coordinates of the current screen. To identify the current screen of the window, the example calls
Screen.getScreensForRectangle(), passing in the window bounds.
Method or Property Description
Screen.screens Provides an array of Screen objects describing the available screens. The order of the array is not
significant.
Screen.mainScreen Provides a Screen object for the main screen. On Mac OS X, the main screen is the screen displaying the
menu bar. On Windows, the main screen is the system-designated primary screen.
Screen.getScreensForRectangle() Provides an array of Screen objects describing the screens intersected by the given rectangle. The
rectangle passed to this method is in pixel coordinates on the virtual desktop. If no screens intersect the
rectangle, then the array is empty. You can use this method to find out on which screens a window is
displayed.
Screen bounds
Virtual screen
Usable bounds

894
ACTIONSCRIPT 3.0 DEVELOPER’S GUIDE
Display screens in AIR
Last updated 3/21/2011
package {
import flash.display.Sprite;
import flash.display.Screen;
import flash.events.KeyboardEvent;
import flash.ui.Keyboard;
import flash.display.StageAlign;
import flash.display.StageScaleMode;
public class ScreenExample extends Sprite
{
public function ScreenExample()
{
stage.align = StageAlign.TOP_LEFT;
stage.scaleMode = StageScaleMode.NO_SCALE;
stage.addEventListener(KeyboardEvent.KEY_DOWN,onKey);
}
private function onKey(event:KeyboardEvent):void{
if(Screen.screens.length > 1){
switch(event.keyCode){
case Keyboard.LEFT :
moveLeft();
break;
case Keyboard.RIGHT :
moveRight();
break;
case Keyboard.UP :
moveUp();
break;
case Keyboard.DOWN :
moveDown();
break;
}
}
}
private function moveLeft():void{
var currentScreen = getCurrentScreen();
var left:Array = Screen.screens;
left.sort(sortHorizontal);
for(var i:int = 0; i < left.length - 1; i++){
if(left[i].bounds.left < stage.nativeWindow.bounds.left){
stage.nativeWindow.x +=
left[i].bounds.left - currentScreen.bounds.left;
stage.nativeWindow.y += left[i].bounds.top - currentScreen.bounds.top;
}
}
}
private function moveRight():void{
var currentScreen:Screen = getCurrentScreen();
var left:Array = Screen.screens;
left.sort(sortHorizontal);
for(var i:int = left.length - 1; i > 0; i--){
if(left[i].bounds.left > stage.nativeWindow.bounds.left){
stage.nativeWindow.x +=

895
ACTIONSCRIPT 3.0 DEVELOPER’S GUIDE
Display screens in AIR
Last updated 3/21/2011
left[i].bounds.left - currentScreen.bounds.left;
stage.nativeWindow.y += left[i].bounds.top - currentScreen.bounds.top;
}
}
}
private function moveUp():void{
var currentScreen:Screen = getCurrentScreen();
var top:Array = Screen.screens;
top.sort(sortVertical);
for(var i:int = 0; i < top.length - 1; i++){
if(top[i].bounds.top < stage.nativeWindow.bounds.top){
stage.nativeWindow.x += top[i].bounds.left - currentScreen.bounds.left;
stage.nativeWindow.y += top[i].bounds.top - currentScreen.bounds.top;
break;
}
}
}
private function moveDown():void{
var currentScreen:Screen = getCurrentScreen();
var top:Array = Screen.screens;
top.sort(sortVertical);
for(var i:int = top.length - 1; i > 0; i--){
if(top[i].bounds.top > stage.nativeWindow.bounds.top){
stage.nativeWindow.x += top[i].bounds.left - currentScreen.bounds.left;
stage.nativeWindow.y += top[i].bounds.top - currentScreen.bounds.top;
break;
}
}
}
private function sortHorizontal(a:Screen,b:Screen):int{
if (a.bounds.left > b.bounds.left){
return 1;
} else if (a.bounds.left < b.bounds.left){
return -1;
} else {return 0;}
}
private function sortVertical(a:Screen,b:Screen):int{
if (a.bounds.top > b.bounds.top){
return 1;
} else if (a.bounds.top < b.bounds.top){
return -1;
} else {return 0;}
}
private function getCurrentScreen():Screen{
var current:Screen;
var screens:Array = Screen.getScreensForRectangle(stage.nativeWindow.bounds);
(screens.length > 0) ? current = screens[0] : current = Screen.mainScreen;
return current;
}
}
}

896
Last updated 3/21/2011
Chapter 52: Printing
Flash Player 9 and later, Adobe AIR 1.0 and later
Flash runtimes (such as Adobe® Flash® Player and Adobe® AIR™) can communicate with an operating system’s printing
interface so that you can pass pages to the print spooler. Each page sent to the spooler can contain content that is
visible, dynamic, or off screen to the user, including database values and dynamic text. Additionally, the properties of
the flash.printing.PrintJob class contain values based on a user’s printer settings, so that you can format pages
appropriately.
The following content provides strategies for using the flash.printing.PrintJob class methods and properties to create
a print job, read a user’s print settings, and adjust a print job based on feedback from a Flash runtime and the user’s
operating system.
Basics of printing
Flash Player 9 and later, Adobe AIR 1.0 and later
In ActionScript 3.0, you use the PrintJob class to create snapshots of display content to convert to the ink-and-paper
representation in a printout. In some ways, setting up content for printing is the same as setting it up for on-screen
display—you position and size elements to create the desired layout. However printing has some idiosyncrasies that
make it different from screen layout. For example, printers use different resolution than computer monitors; the
contents of a computer screen are dynamic and can change, while printed content is inherently static; and in planning
printing, consider the constraints of fixed page size and the possibility of multipage printing.
Even though these differences seem obvious, it’s important to keep them in mind when setting up printing with
ActionScript. Accurate printing depends on a combination of the values specified by you and the characteristics of the
user’s printer. The PrintJob class includes properties that allow you to determine the important characteristics of the
user’s printer.
Important concepts and terms
The following reference list contains important terms related to printing:
Spooler A portion of the operating system or printer driver software that tracks the pages as they are waiting to be
printed and sends them to the printer when it is available.
Page orientation The rotation of the printed content in relation to the paper—either horizontal (landscape) or vertical
(portrait).
Print job The page or set of pages that make up a single printout.

897
ACTIONSCRIPT 3.0 DEVELOPER’S GUIDE
Printing
Last updated 3/21/2011
Printing a page
Flash Player 9 and later, Adobe AIR 1.0 and later
You use an instance of the PrintJob class to handle printing. To print a basic page through Flash Player or AIR, you
use these four statements in sequence:
•new PrintJob(): Creates a new print job instance of the name you specify.
•PrintJob.start(): Initiates the printing process for the operating system, calling the print dialog box for the user,
and populates the read-only properties of the print job.
•PrintJob.addPage(): Contains the details about the print job contents, including the Sprite object (and any
children it contains), the size of the print area, and whether the printer prints the image as a vector or bitmap. You
can use successive calls to addPage() to print multiple sprites over several pages.
•PrintJob.send(): Sends the pages to the operating system’s printer.
So, for example, a simple print job script is (including package, import and class statements for compiling):
package
{
import flash.printing.PrintJob;
import flash.display.Sprite;
public class BasicPrintExample extends Sprite
{
var myPrintJob:PrintJob = new PrintJob();
var mySprite:Sprite = new Sprite();
public function BasicPrintExample()
{
myPrintJob.start();
myPrintJob.addPage(mySprite);
myPrintJob.send();
}
}
}
Note: This example is intended to show the basic elements of a print job script, and does not contain any error handling.
To build a script that responds properly to a user canceling a print job, see “Working with exceptions and returns” on
page 898.
To clear a PrintJob object’s properties for any reason, set the PrintJob variable to null (as in myPrintJob = null).

898
ACTIONSCRIPT 3.0 DEVELOPER’S GUIDE
Printing
Last updated 3/21/2011
Flash runtime tasks and system printing
Flash Player 9 and later, Adobe AIR 1.0 and later
Because Flash runtimes dispatch pages to the operating system’s printing interface, be aware of the tasks managed by
Flash runtimes and the tasks managed by an operating system’s own printing interface. Flash runtimes can initiate a
print job, read some of a printer’s page settings, pass the content for a print job to the operating system, and verify if
the user or system has canceled a print job. Other processes, such as displaying printer specific dialog boxes, canceling
a spooled print job, or reporting on the printer’s status, are all handled by the operating system. Flash runtimes are able
to respond if there is a problem initiating or formatting a print job, but can report back only on certain properties or
conditions from the operating system’s printing interface. As a developer, your code needs to respond to these
properties or conditions.
Working with exceptions and returns
Flash Player 9 and later, Adobe AIR 1.0 and later
Check to see if the PrintJob.start() method returns true before executing addPage() and send() calls, in case
the user has canceled the print job. A simple way to check whether these methods have been canceled before
continuing is to wrap them in an if statement, as follows:
if (myPrintJob.start())
{
// addPage() and send() statements here
}
If PrintJob.start() is true, the user selected Print (or a Flash runtime, such as Flash Player or AIR, has initiated a
Print command). So, the addPage() and send() methods can be called.
Also, to help manage the printing process, Flash runtimes throw exceptions for the PrintJob.addPage() method, so
that you can catch errors and provide information and options to the user. If a PrintJob.addPage() method fails,
you can also call another function or stop the current print job. You catch these exceptions by embedding addPage()
calls within a try..catch statement, as in the following example. In the example, [params] is a placeholder for the
parameters specifying the actual content you want to print:
if (myPrintJob.start())
{
try
{
myPrintJob.addPage([params]);
}
catch (error:Error)
{
// Handle error,
}
myPrintJob.send();
}
After the print job starts, you can add the content using PrintJob.addPage() and see if that generates an exception
(for example, if the user has canceled the print job). If it does, you can add logic to the catch statement to provide the
user (or the Flash runtime) with information and options, or you can stop the current print job. If you add the page
successfully, you can proceed to send the pages to the printer using PrintJob.send().

899
ACTIONSCRIPT 3.0 DEVELOPER’S GUIDE
Printing
Last updated 3/21/2011
If the Flash runtime encounters a problem sending the print job to the printer (for example, if the printer is offline),
you can catch that exception, too, and provide more information or more options (such as displaying message text or
providing an alert within an animation). For example, you can assign new text to a text field in an if..else statement,
as the following code shows:
if (myPrintJob.start())
{
try
{
myPrintJob.addPage([params]);
}
catch (error:Error)
{
// Handle error.
}
myPrintJob.send();
}
else
{
myAlert.text = "Print job canceled";
}
For a working example, see “Printing example: Scaling, cropping, and responding” on page 906.
Working with page properties
Flash Player 9 and later, Adobe AIR 1.0 and later
Once the user clicks OK in the Print dialog box and PrintJob.start() returns true, you can access the properties
defined by the printer’s settings. These settings include the paper width, paper height (pageHeight and pageWidth),
and content orientation on the paper. Because these are printer settings, not controlled by the Flash runtime, you
cannot alter these settings; however, you can use them to align the content you send to the printer to match the current
settings. For more information, see “Setting size, scale, and orientation” on page 900.
Setting vector or bitmap rendering
Flash Player 9 and later, Adobe AIR 1.0 and later
You can manually set the print job to spool each page as vector graphics or a bitmap image. In some cases, vector
printing produces a smaller spool file, and a better image than bitmap printing. However, if your content includes a
bitmap image, and you want to preserve any alpha transparency or color effects, print the page as a bitmap image. Also,
a non-PostScript printer automatically converts any vector graphics to bitmap images.
You specify bitmap printing by passing a PrintJobOptions object as the third parameter of PrintJob.addPage().
For Flash Player and AIR prior to AIR 2, set the PrintJobOptions object’s printAsBitmap parameter set to true, as
follows:
var options:PrintJobOptions = new PrintJobOptions();
options.printAsBitmap = true;
myPrintJob.addPage(mySprite, null, options);
If you don’t specify a value for the third parameter, the print job uses the default, which is vector printing.

900
ACTIONSCRIPT 3.0 DEVELOPER’S GUIDE
Printing
Last updated 3/21/2011
For AIR 2 and later, use the PrintJobOptions object’s printMethod property to specify the print method. This
property accepts three values, which are defined as constants in the PrintMethod class:
•PrintMethod.AUTO: Automatically chooses the best print method based on the content being printed. For
example, if a page consists of text, the vector print method is chosen. However, if a watermark image with alpha
transparency is overlaid on the text, bitmap printing is chosen to preserve the transparency.
•PrintMethod.BITMAP: Forces bitmap printing regardless of the content
•PrintMethod.VECTOR: Forces vector printing regardless of the content
Timing print job statements
Flash Player 9 and later, Adobe AIR 1.0 and later
ActionScript 3.0 does not restrict a PrintJob object to a single frame (as did previous versions of ActionScript).
However, because the operating system displays print status information to the user once the user has clicked the OK
button in the Print dialog box, call PrintJob.addPage() and PrintJob.send() as soon as possible to send pages to
the spooler. A delay reaching the frame containing the PrintJob.send() call delays the printing process.
In ActionScript 3.0, there is a script time-out limit of 15 seconds. Therefore, the time between each major statement
in a print job sequence cannot exceed 15 seconds. In other words, the 15-second script time-out limit applies to the
following intervals:
•Between PrintJob.start() and the first PrintJob.addPage()
•Between PrintJob.addPage() and the next PrintJob.addPage()
•Between the last PrintJob.addPage() and PrintJob.send()
If any of these intervals spans more than 15 seconds, the next call to PrintJob.start() on the PrintJob instance
returns false, and the next PrintJob.addPage() on the PrintJob instance causes Flash Player or AIR to throw a run-
time exception.
Setting size, scale, and orientation
Flash Player 9 and later, Adobe AIR 1.0 and later
The section “Printing a page” on page 897 details the steps for a basic print job, where the output directly reflects the
printed equivalent of the screen size and position of the specified sprite. However, printers use different resolutions
for printing, and can have settings that adversely affect the appearance of the printed sprite.
Flash runtimes can read an operating system’s printing settings, but note that these properties are read-only: although
you can respond to their values, you can’t set them. So, for example, you can find out the printer’s page size setting and
adjust your content to fit the size. You can also determine a printer’s margin settings and page orientation. To respond
to the printer settings, specify a print area, adjust for the difference between a screen’s resolution and a printer’s point
measurements, or transform your content to meet the size or orientation settings of the user’s printer.

901
ACTIONSCRIPT 3.0 DEVELOPER’S GUIDE
Printing
Last updated 3/21/2011
Using rectangles for the print area
Flash Player 9 and later, Adobe AIR 1.0 and later
The PrintJob.addPage() method allows you to specify the region of a sprite that you want printed. The second
parameter, printArea, is in the form of a Rectangle object. You have three options for providing a value for this
parameter:
•Create a Rectangle object with specific properties and then use that rectangle in the addPage() call, as in the
following example:
private var rect1:Rectangle = new Rectangle(0, 0, 400, 200);
myPrintJob.addPage(sheet, rect1);
•If you haven’t already specified a Rectangle object, you can do it within the call itself, as in the following example:
myPrintJob.addPage(sheet, new Rectangle(0, 0, 100, 100));
•If you plan to provide values for the third parameter in the addPage() call, but don’t want to specify a rectangle,
you can use null for the second parameter, as in the following;
myPrintJob.addPage(sheet, null, options);
Comparing points and pixels
Flash Player 9 and later, Adobe AIR 1.0 and later
A rectangle's width and height are pixel values. A printer uses points as print units of measurement. Points are a fixed
physical size (1/72 inch), but the size of a pixel on the screen depends on the resolution of the particular screen. The
conversion rate between pixels and points depends on the printer settings and whether the sprite is scaled. An unscaled
sprite that is 72 pixels wide prints out one inch wide, with one point equal to one pixel, independent of screen
resolution.
You can use the following equivalencies to convert inches or centimeters to twips or points (a twip is 1/20 of a point):
•1 point = 1/72 inch = 20 twips
•1 inch = 72 points = 1440 twips
•1 centimeter = 567 twips
If you omit the printArea parameter, or if it is passed incorrectly, the full area of the sprite is printed.
Scaling
Flash Player 9 and later, Adobe AIR 1.0 and later
If you want to scale a Sprite object before you print it, set the scale properties (see “Manipulating size and scaling
objects” on page 170) before calling the PrintJob.addPage() method, and set them back to their original values after
printing. The scale of a Sprite object has no relation to the printArea property. In other words, if you specify a print
area that is 50 pixels by 50 pixels, 2500 pixels are printed. If you scale the Sprite object, the same 2500 pixels are printed,
but the Sprite object is printed at the scaled size.
For an example, see “Printing example: Scaling, cropping, and responding” on page 906.

902
ACTIONSCRIPT 3.0 DEVELOPER’S GUIDE
Printing
Last updated 3/21/2011
Printing for landscape or portrait orientation
Flash Player 9 and later, Adobe AIR 1.0 and later
Because Flash Player and AIR can detect the settings for orientation, you can build logic into your ActionScript to
adjust the content size or rotation in response to the printer settings, as the following example illustrates:
if (myPrintJob.orientation == PrintJobOrientation.LANDSCAPE)
{
mySprite.rotation = 90;
}
Note: If you plan to read the system setting for content orientation on the paper, remember to import the
PrintJobOrientation class. The PrintJobOrientation class provides constant values that define the content orientation on
the page. You import the class using the following statement:
import flash.printing.PrintJobOrientation;
Responding to page height and width
Flash Player 9 and later, Adobe AIR 1.0 and later
Using a strategy that is similar to handling printer orientation settings, you can read the page height and width settings
and respond to them by embedding some logic into an if statement. The following code shows an example:
if (mySprite.height > myPrintJob.pageHeight)
{
mySprite.scaleY = .75;
}
In addition, a page’s margin settings can be determined by comparing the page and paper dimensions, as the following
example illustrates:
margin_height = (myPrintJob.paperHeight - myPrintJob.pageHeight) / 2;
margin_width = (myPrintJob.paperWidth - myPrintJob.pageWidth) / 2;
Advanced printing techniques
Adobe AIR 2 and later
Starting with Adobe AIR 2, the PrintJob class has additional properties and methods, and three additional classes are
supported: PrintUIOptions, PaperSize, and PrintMethod. These changes allow additional printer workflows and give
authors greater control over the printing process. Changes include:
•Page setup dialogs: Both standard and custom page setup dialogs can be displayed. The user can set page ranges,
paper size, orientation, and scaling before printing.
•Print view: A viewing mode can be created which accurately shows paper size, margins, and the position of content
on the page.
•Restricted printing: Authors can restrict printing options, such as the range of printable pages.
•Quality options: Authors can adjust the print quality for a document and allow the user to select resolution and
color options.

903
ACTIONSCRIPT 3.0 DEVELOPER’S GUIDE
Printing
Last updated 3/21/2011
•Multiple print sessions: A single PrintJob instance can now be used for multiple printing sessions. Applications can
provide consistent settings each time the page setup and print dialogs are displayed.
Print workflow changes
The new print workflow consists of the following steps:
•new PrintJob(): Creates a PrintJob instance (or reuse an existing instance). Many new PrintJob properties and
methods, such as selectPaperSize(), are available before the print job starts or during printing.
•PrintJob.showPageSetupDialog(): (optional) Display the page setup dialog without starting a print job.
•PrintJob.start() or PrintJob.start2(): In addition to the start() method, the start2() method is used to
initiate the print spooling process. The start2() method allows you to choose whether to display the Print dialog
and customize the dialog if it is shown.
•PrintJob.addPage(): Add content to the print job. Unchanged from existing process.
•PrintJob.send() or PrintJob.terminate(): Send the pages to the selected printer or terminate the print job
without sending. Print jobs are terminated in response to an error. If a PrintJob instance is terminated, it can still
be reused. Regardless of whether the print job is sent to the printer or terminated, the current print settings are
retained when you reuse the PrintJob instance.
Page setup dialog
The showPageSetupDialog()method displays the operating system’s Page Setup dialog, if the current environment
supports it. Always check the supportsPageSetupDialog property before calling this method. Here is a simple
example:
import flash.printing.PrintJob;
var myPrintJob:PrintJob = new PrintJob();
//check for static property supportsPageSetupDialog of PrintJob class
if (PrintJob.supportsPageSetupDialog) {
myPrintJob.showPageSetupDialog();
}
The method can optionally be called with a PrintUIOptions class property to control which options are displayed in
the Page Setup dialog. The min and max page numbers can be set. The following example limits printing to the first
three pages:
import flash.printing.PrintJob;
var myPrintJob:PrintJob = new PrintJob();
if (PrintJob.supportsPageSetupDialog) {
var uiOpt:PrintUIOptions = new PrintUIOptions();
uiOpt.minPage = 1;
uiOpt.maxPage = 3;
myPrintJob.showPageSetupDialog(uiOpt);
}
Changing print settings
The settings for a PrintJob instance can be changed at any time after it is constructed. This includes changing settings
between addPage()calls and after a print job has been sent or terminated. Some settings, such as the printer
property, apply to the entire print job, not individual pages. Those settings must be set before a call to start() or
start2().

904
ACTIONSCRIPT 3.0 DEVELOPER’S GUIDE
Printing
Last updated 3/21/2011
The selectPaperSize() method can be called to set the default paper size in the Page Setup and Print dialogs. It can
also be called during a print job to set the paper size for a range of pages. It is called using constants defined in the
PaperSize class, as in this example, which selects a number 10 envelope size:
import flash.printing.PrintJob;
import flash.printing.PaperSize;
var myPrintJob:PrintJob = new PrintJob();
myPrintJob.selectPaperSize(PaperSize.ENV_10);
Use the printer property to get or set the name of the printer for the current print job. By default it is set to the name
of the default printer. The printer property is null if no printers are available or the system does not support
printing. To change the printer, first get the list of available printers using the printers property. That property is a
Vector whose String elements are available printer names. Set the printer property to one of those String values to
make that printer the active one. The printer property of an active print job cannot be changed. Attempts to change
it after a successful call to start() or start2() and before the job is sent or terminated fail. Here is an example of
setting this property:
import flash.printing.PrintJob;
var myPrintJob:PrintJob = new PrintJob();
myPrintJob.printer = "HP_LaserJet_1";
myPrintJob.start();
The copies property gets the value for the number of copies set in the operating system’s Print dialog. The firstPage
and lastPage properties get the page range. The orientation property gets the paper orientation setting. These
properties can be set to override the values from the Print dialog. The following example sets these properties:
import flash.printing.PrintJob;
import flash.printing.PrintJobOrientation;
var myPrintJob:PrintJob = new PrintJob();
myPrintJob.copies = 3;
myPrintJob.firstPage = 1;
myPrintJob.lastPage = 3;
myPrintJob.orientation = PrintJobOrientation.LANDSCAPE;
The following read-only settings associated with PrintJob provide helpful information on the current printer setup:
•paperArea: The rectangular bounds of the printer medium, in points.
•printableArea: The rectangular bounds of the printable area, in points.
•maxPixelsPerInch: The physical resolution of the current printer, in pixels per inch.
•isColor: The ability of the current printer to print color (returns true if the current printer can print color).
See “Printing example: Page setup and print options” on page 908.
Printing example: Multiple-page printing
Flash Player 9 and later, Adobe AIR 1.0 and later
When printing more than one page of content, you can associate each page of content with a different sprite (in this
case, sheet1 and sheet2), and then use PrintJob.addPage() for each sprite. The following code illustrates this
technique:

905
ACTIONSCRIPT 3.0 DEVELOPER’S GUIDE
Printing
Last updated 3/21/2011
package
{
import flash.display.MovieClip;
import flash.printing.PrintJob;
import flash.printing.PrintJobOrientation;
import flash.display.Stage;
import flash.display.Sprite;
import flash.text.TextField;
import flash.geom.Rectangle;
public class PrintMultiplePages extends MovieClip
{
private var sheet1:Sprite;
private var sheet2:Sprite;
public function PrintMultiplePages():void
{
init();
printPages();
}
private function init():void
{
sheet1 = new Sprite();
createSheet(sheet1, "Once upon a time...", {x:10, y:50, width:80, height:130});
sheet2 = new Sprite();
createSheet(sheet2, "There was a great story to tell, and it ended quickly.\n\nThe
end.", null);
}
private function createSheet(sheet:Sprite, str:String, imgValue:Object):void
{
sheet.graphics.beginFill(0xEEEEEE);
sheet.graphics.lineStyle(1, 0x000000);
sheet.graphics.drawRect(0, 0, 100, 200);
sheet.graphics.endFill();
var txt:TextField = new TextField();
txt.height = 200;
txt.width = 100;
txt.wordWrap = true;
txt.text = str;
if (imgValue != null)
{
var img:Sprite = new Sprite();
img.graphics.beginFill(0xFFFFFF);
img.graphics.drawRect(imgValue.x, imgValue.y, imgValue.width, imgValue.height);
img.graphics.endFill();
sheet.addChild(img);
}
sheet.addChild(txt);
}
private function printPages():void
{
var pj:PrintJob = new PrintJob();

906
ACTIONSCRIPT 3.0 DEVELOPER’S GUIDE
Printing
Last updated 3/21/2011
var pagesToPrint:uint = 0;
if (pj.start())
{
if (pj.orientation == PrintJobOrientation.LANDSCAPE)
{
throw new Error("Page is not set to an orientation of portrait.");
}
sheet1.height = pj.pageHeight;
sheet1.width = pj.pageWidth;
sheet2.height = pj.pageHeight;
sheet2.width = pj.pageWidth;
try
{
pj.addPage(sheet1);
pagesToPrint++;
}
catch (error:Error)
{
// Respond to error.
}
try
{
pj.addPage(sheet2);
pagesToPrint++;
}
catch (error:Error)
{
// Respond to error.
}
if (pagesToPrint > 0)
{
pj.send();
}
}
}
}
}
Printing example: Scaling, cropping, and responding
Flash Player 9 and later, Adobe AIR 1.0 and later
In some cases, you want to adjust the size (or other properties) of a display object when printing it to accommodate
differences between the way it appears on screen and the way it appears printed on paper. When you adjust the
properties of a display object before printing (for example, by using the scaleX and scaleY properties), be aware that
if the object scales larger than the defined rectangle for the print area, the object is cropped. You will also probably
want to reset the properties after the pages have been printed.

907
ACTIONSCRIPT 3.0 DEVELOPER’S GUIDE
Printing
Last updated 3/21/2011
The following code scales the dimensions of the txt display object (but not the green box background), and the text
field ends up cropped by the dimensions of the specified rectangle. After printing, the text field is returned to its
original size for display on screen. If the user cancels the print job from the operating system’s Print dialog box, the
content in the Flash runtime changes to alert the user that the job has been canceled.
package
{
import flash.printing.PrintJob;
import flash.display.Sprite;
import flash.text.TextField;
import flash.display.Stage;
import flash.geom.Rectangle;
public class PrintScaleExample extends Sprite
{
private var bg:Sprite;
private var txt:TextField;
public function PrintScaleExample():void
{
init();
draw();
printPage();
}
private function printPage():void
{
var pj:PrintJob = new PrintJob();
txt.scaleX = 3;
txt.scaleY = 2;
if (pj.start())
{
trace(">> pj.orientation: " + pj.orientation);
trace(">> pj.pageWidth: " + pj.pageWidth);
trace(">> pj.pageHeight: " + pj.pageHeight);
trace(">> pj.paperWidth: " + pj.paperWidth);
trace(">> pj.paperHeight: " + pj.paperHeight);
try
{
pj.addPage(this, new Rectangle(0, 0, 100, 100));
}
catch (error:Error)
{
// Do nothing.
}
pj.send();
}
else
{
txt.text = "Print job canceled";
}
// Reset the txt scale properties.
txt.scaleX = 1;
txt.scaleY = 1;
}

908
ACTIONSCRIPT 3.0 DEVELOPER’S GUIDE
Printing
Last updated 3/21/2011
private function init():void
{
bg = new Sprite();
bg.graphics.beginFill(0x00FF00);
bg.graphics.drawRect(0, 0, 100, 200);
bg.graphics.endFill();
txt = new TextField();
txt.border = true;
txt.text = "Hello World";
}
private function draw():void
{
addChild(bg);
addChild(txt);
txt.x = 50;
txt.y = 50;
}
}
}
Printing example: Page setup and print options
Adobe AIR 2 and later
The following example initializes the PrintJob settings for number of copies, paper size (legal), and page orientation
(landscape). It forces the Page Setup dialog to be displayed first, then starts the print job by displaying the Print dialog.
package
{
import flash.printing.PrintJob;
import flash.printing.PrintJobOrientation;
import flash.printing.PaperSize;
import flash.printing.PrintUIOptions;
import flash.display.Sprite;
import flash.text.TextField;
import flash.display.Stage;
import flash.geom.Rectangle;
public class PrintAdvancedExample extends Sprite
{
private var bg:Sprite = new Sprite();
private var txt:TextField = new TextField();
private var pj:PrintJob = new PrintJob();
private var uiOpt:PrintUIOptions = new PrintUIOptions();
public function PrintAdvancedExample():void
{
initPrintJob();
initContent();
draw();
printPage();

909
ACTIONSCRIPT 3.0 DEVELOPER’S GUIDE
Printing
Last updated 3/21/2011
}
private function printPage():void
{
//test for dialog support as a static property of PrintJob class
if (PrintJob.supportsPageSetupDialog)
{
pj.showPageSetupDialog();
}
if (pj.start2(uiOpt, true))
{
try
{
pj.addPage(this, new Rectangle(0, 0, 100, 100));
}
catch (error:Error)
{
// Do nothing.
}
pj.send();
}
else
{
txt.text = "Print job terminated";
pj.terminate();
}
}
private function initContent():void
{
bg.graphics.beginFill(0x00FF00);
bg.graphics.drawRect(0, 0, 100, 200);
bg.graphics.endFill();
txt.border = true;
txt.text = "Hello World";
}
private function initPrintJob():void
{
pj.selectPaperSize(PaperSize.LEGAL);
pj.orientation = PrintJobOrientation.LANDSCAPE;
pj.copies = 2;
pj.jobName = "Flash test print";
}
private function draw():void
{
addChild(bg);
addChild(txt);
txt.x = 50;
txt.y = 50;
}
}
}

910
Last updated 3/21/2011
Chapter 53: Geolocation
If a device supports geolocation, you can use the geolocation API to obtain the current geographical location of the
device. If the device supports this feature, you can obtain geolocation information. This information includes the
altitude, accuracy, heading, speed, and timestamp of the latest change in the location.
The Geolocation class dispatches update events in response to the device’s location sensor. The update event is a
GeolocationEvent object.
More Help topics
flash.sensors.Geolocation
flash.events.GeolocationEvent
Detecting geolocation changes
To use the geolocation sensor, instantiate a Geolocation object and register for update events it dispatches. The
update event is a Geolocation event object. The event has eight properties:
•altitude—The altitude in meters.
•heading—The direction of movement (with respect to true north) in degrees.
•horizontalAccuracy—The horizontal accuracy in meters.
•latitude—The latitude in degrees.
•longitude—The longitude in degrees.
•speed—The speed in meters per second.
•timestamp—The number of milliseconds at the time of the event since the runtime was initialized.
•verticalAccuracy—The vertical accuracy in meters.
The timestamp property is an int object. The others are Number objects.
Here is a basic example that displays geolocation data in a text field:

911
ACTIONSCRIPT 3.0 DEVELOPER’S GUIDE
Geolocation
Last updated 3/21/2011
var geo:Geolocation;
if (Geolocation.isSupported)
{
geo = new Geolocation();
geo.addEventListener(GeolocationEvent.UPDATE, updateHandler);
}
else
{
geoTextField.text = "Geolocation feature not supported";
}
function updateHandler(event:GeolocationEvent):void
{
geoTextField.text = "latitude: " + event.latitude.toString() + "\n"
+ "longitude: " + event.longitude.toString() + "\n"
+ "altitude: " + event.altitude.toString()
+ "speed: " + event.speed.toString()
+ "heading: " + event.heading.toString()
+ "horizontal accuracy: " + event.horizontalAccuracy.toString()
+ "vertical accuracy: " + event.verticalAccuracy.toString()
}
To use this example, be sure to create the geoTextField text field and add it to the display list before using this code.
You can adjust the desired time interval for geolocation events by calling the setRequestedUpdateInterval()
method of the Geolocation object. This method takes one parameter, interval, which is the requested update interval
in milliseconds:
var geo:Geolocation = new Geolocation();
geo.setRequestedUpdateInterval(10000);
The actual time between geolocation updates may be greater or lesser than this value. Any change in the update interval
affects all registered listeners. If you don’t call the setRequestedUpdateInterval() method, the application receives
updates based on the device's default interval.
The user can prevent an application from accessing geolocation data. For example, the iPhone prompts the user when
an application attempts to obtain geolocation data. In response to the prompt, the user can deny the application access
to geolocation data. The Geolocation object dispatches a status event when the user makes access to geolocation data
unavailable. Also, the Geolocation object has a muted property, which is set to true when the geolocation sensor is
unavailable. The Geolocation object dispatches a status event when the muted property changes. The following code
shows how to detect when geolocation data is unavailable:

912
ACTIONSCRIPT 3.0 DEVELOPER’S GUIDE
Geolocation
Last updated 3/21/2011
var geo:Geolocation;
var latitude:Number;
var longitude:Number;
if (Geolocation.isSupported)
{
geo = new Geolocation();
if (!geo.muted)
{
geo.addEventListener(GeolocationEvent.UPDATE, updateHandler);
geo.addEventListener(StatusEvent.STATUS, geoStatusHandler);
}
}
else
{
trace("not supported");
}
function updateHandler(event:GeolocationEvent):void
{
latitude = event.latitude;
longitude = event.longitude;
}
function geoStatusHandler(event:StatusEvent):void
{
geo.removeEventListener(GeolocationEvent.UPDATE, updateHandler);
}
Note: First-generation iPhones, which do not include a GPS unit, dispatch update events only occasionally. On these
devices, a Geolocation object initially dispatches one or two update events. It then dispatches update events when
information changes noticeably.
Checking geolocation support
Use the Geolocation.isSupported property to test the runtime environment for the ability to use this feature:
if (Geolocation.isSupported)
{
// Set up geolocation event listeners and code.
}
Currently, geolocation is only supported on ActionScript-based applications for the iPhone and in Flash Lite 4. If
Geolocation.isSupported is true at run time, then geolocation support exists.
Some iPhone models do not have a GPS unit. These models use other means (such as mobile phone triangulation) to
obtain geolocation data. For these models, or on any iPhone that has the GPS disabled, a Geolocation object may only
dispatch one or two initial update events.

913
Last updated 3/21/2011
Chapter 54: Internationalizing
applications
Flash Player 10.1 and later, Adobe AIR 2.0 and later
The flash.globalization package makes it easier to create international software that adapts to the conventions of
different languages and regions.
More Help topics
flash.globalization package
“Localizing applications” on page 930
Charles Bihis: Want to Localize your Flex/AIR Apps?
Basics of internationalizing applications
The terms globalization and internationalization are sometimes used interchangeably. But most definitions of these
terms say that globalization refers to a combination of business and engineering processes while internationalization
refers to engineering alone.
Here are some definitions for important terms:
Globalization A broad range of engineering and business processes needed for preparing and launching products and
company activities globally. Globalization consists of engineering activities like internationalization, localization and
culturization and business activities like product management, financial planning, marketing, and legal work.
Globalization is sometimes abbreviated as G11n (which stands for the letter G, then 11 more letters, and then the letter
n). “Globalization is what businesses do.”
Internationalization An engineering process for generalizing a product so that it can handle multiple languages,
scripts and cultural conventions (including currencies, sorting rules, number and date formats, and more) without the
need for redesign or recompilation. This process can be divided into two sets of activities: enablement and localization.
Internationalization is sometimes known as world-readiness, and sometimes abbreviated as I18n. “Internationalization
is what engineers do.”
Localization A process of adapting a product or service to a particular language, culture, and desired local appearance.
Localization is sometimes abbreviated as L10n. “Localization is what translators do.”
Culturization An engineering process for developing or adapting specific features for the unique needs of a culture.
Examples include the Japanese publishing features available in Adobe InDesign, and the Hanko support feature in
Adobe Acrobat.
Some other important internationalization terms can be defined as follows:
Character Set The characters used by a language or by a group of languages. A character set includes national
characters, special characters (such as punctuation marks and mathematical symbols), numeric digits, and computer
control characters.
Collation The sorting of text into a proper order for a given locale.

914
ACTIONSCRIPT 3.0 DEVELOPER’S GUIDE
Internationalizing applications
Last updated 3/21/2011
Locale A value that represents the language and cultural conventions used in a geographical, political, or cultural
region (which in many cases indicates a single country). A unique locale identifier (locale ID) represents this value.
The locale ID is used to look up a set of locale data that provides locale-specific support. This support applies to
measurement units, the parsing and formatting of numbers and dates, and so on.
Resource Bundle A stored set of locale-specific elements that are created for a locale in which an application is used.
A resource bundle typically contains all text elements in the application’s user interface. Within the bundle, these
elements are translated into the appropriate language for the given locale. It can also contain other settings that alter
the layout or behavior of the user interface for a specific locale. A resource bundle can contain other media types, or
references to other media types, that are locale-specific.
Overview of the flash.globalization package
Flash Player 10.1 and later, Adobe AIR 2.0 and later
The flash.globalization package harnesses the cultural support capabilities of the underlying operating system. It
makes it easier to write applications that follow the cultural conventions of individual users.
The main classes in the package include:
•The Collator class which governs the sorting and matching of strings
•The CurrencyFormatter class which formats numbers into currency amount strings, and parses currency amounts
and symbols from input strings
•The DateTimeFormatter class which formats date values
•The LocaleID class for retrieving information about a specific locale
•The NumberFormatter class which formats and parses numeric values
•The StringTools class which handles locale-sensitive case conversion of strings
The flash.globalization package and resource localization
The flash.globalization package doesn’t handle resource localization. However you can use the flash.globalization
locale ID as the key value for retrieving localized resources using other techniques. For example, you can localize
application resources built with Flex using the ResourceManager and ResourceBundle classes. For more information,
see Localizing Flex Applications.
Adobe AIR 1.1 also contains some features to help localize AIR applications, as discussed in “Localizing AIR
applications” on page 931.
A general approach to internationalizing an application
The following steps describe a high-level common approach for internationalizing an application using the
flash.globalization package:
1Determine or set the locale.
2Create an instance of a service class (Collator, CurrencyFormatter, DateTimeFormatter, NumberFormatter, or
StringTools).
3Check for errors and fallbacks using lastOperationStatus properties.
4Format and display information using locale-specific settings.

915
ACTIONSCRIPT 3.0 DEVELOPER’S GUIDE
Internationalizing applications
Last updated 3/21/2011
The next step is to load and display strings and user interface resources that are specific to the locale. This step can
include tasks such as:
•Using the autolayout features to resize the UI to accommodate the string lengths
•Choosing the right fonts and supporting font fallbacks
•Using the FTE text engine to support other writing systems
•Ensuring that input method editors are correctly handled
Checking for errors and fallbacks
The flash.globalization service classes all follow a similar pattern for identifying errors. They also share a pattern for
falling back from an unavailable requested locale to one that the user’s operating system supports.
The following example shows how to check for errors and fallbacks when instantiating service classes. Each service
class has a lastOperationStatus property that indicates whether the most recent method call triggered their errors or
warnings.
var nf:NumberFormatter = new NumberFormatter("de-DE");
if(nf.lastOperationStatus != LastOperationStatus.NO_ERROR)
{
if(nf.lastOperationStatus == LastOperationStatus.USING_FALLBACK_WARNING)
{
// perform fallback logic here, if needed
trace("Warning - Fallback locale ID: " + nf.actualLocaleIDName);
}
else
{
// perform error handling logic here, if needed
trace("Error: " + nf.lastOperationStatus);
}
}
This example simply traces a message if a fallback locale ID is used, or if there is an error. Your application can perform
additional error handling logic, if needed. For example, you could display a message to the user or force the application
to use a specific, supported locale.
Determining the locale
Flash Player 10.1 and later, Adobe AIR 2.0 and later
A locale identifies a specific combination of language and cultural conventions for a country or region.
A locale identifier can be safely managed as a string. But you can use the LocaleID class to obtain additional
information related to a locale.
You create a LocaleID object as follows:
var locale:LocaleID = new LocaleID("es-MX");
After the LocaleID object is created, you can retrieve data about the locale ID. Use the getKeysAndValues(),
getLanguage(), getRegion(), getScript(), getVariant(), and isRightToLeft() methods, and the name
property.

916
ACTIONSCRIPT 3.0 DEVELOPER’S GUIDE
Internationalizing applications
Last updated 3/21/2011
The values retrieved from these methods and properties can reflect additional information that cannot be extracted
directly from the locale identifier about the locale.
When an application creates a locale-aware service, such as a date formatter, it must specify the intended locale. The
list of supported locales varies from one operating system to another; hence, the requested locale can be unavailable.
Flash Player first tries to match the language code of the locale that you requested. Then it tries to refine the locale by
finding a matching writing system (script) and region. For example:
var loc:LocaleID = new LocaleID("es");
trace(loc.getLanguage()); // es
trace(loc.getScript()); // Latn
trace(loc.getRegion()); // ES
In this example, the LocaleID() constructor retrieved data about the locale that best matches the language code “es”
for that user.
Setting the locale ID
There are a number of ways to set the current locale for an application, including:
•Hard-code a single locale ID into the application. This approach is common, but it does not support
internationalization of the application.
•Use the locale ID preferences from the user’s operating system, or browser, or other user preferences. This
technique usually results in the best locale settings for the user, but it is not always accurate. There is a risk that the
operating system settings do not reflect the user’s actual preferences. For example, the user could be using a shared
computer and be unable to change the operating system’s preferred locales.
•After setting the locale ID based on the user’s preferences, let the user select from a list of supported locales. This
strategy is normally the best option if your application can support more than one locale.
You can implement this third option as follows:
1Retrieve a list of the user’s preferred locales or languages from a user profile, browser settings, operating system
settings, or a cookie. (Your application would need to implement this logic itself. The flash.globalization library
does not support reading such preferences directly.)
2Determine which of those locales your application supports and select the best one by default. Use the method
LocaleID.determinePreferredLocales() to find the best locales for a user based on their preferred locales and the
locales supported by the operating system.
3Give the user a way to change the default locale setting in case the default locale is not satisfactory.
Limitations of other locale and language classes
The fl.lang.Locale class lets you replace text strings based on a locale, using resource bundles containing string
values. However this class does not support other internationalization features such as number, currency, or date
formatting, sorting and matching, and so on. In addition, this class is only available with Flash Professional.
You can also retrieve the current language code setting for the operating system using the
flash.system.Capabilities.language property. However, this property retrieves only the two-character ISO
639-1 language code—not the full locale ID—and it only supports a specific set of locales.
With AIR 1.5, you can use the flash.system.Capabilities.languages property. This property provides an array
of the user’s preferred user interface languages. Thus, it does not have the limitations of Capabilities.language.

917
ACTIONSCRIPT 3.0 DEVELOPER’S GUIDE
Internationalizing applications
Last updated 3/21/2011
Formatting numbers
Flash Player 10.1 and later, Adobe AIR 2.0 and later
The display format of numeric values varies widely from region to region. For example, here is how the number
123456.78 is formatted for certain locales:
There are many factors that influence number formats, including:
•Separators. The decimal separator is placed between the integer and fractional portions of a number. It can be a
period, comma, or another character. The grouping separator or thousands separator can be a period, a comma, a
non-breaking space, or another character.
•Grouping patterns. The number of digits between each grouping separator to the left of the decimal point can be
two or three or another value.
•Negative number indicators. Negative numbers can be shown with a minus sign to the left or the right of the
number, or within parentheses for financial applications. For example, negative 19 can be shown as -19, 19-, or (19).
•Leading and trailing zeroes. Some cultural conventions add leading or trailing zeroes to displayed numbers. For
example the value 0.17 can be displayed as .17, 0.17, or 0.170, among other options.
•Sets of digit characters. Many languages, including Hindi, Arabic, and Japanese, use different sets of digit
characters. The flash.globalization package supports any digit character sets that map to the digits 0-9.
The NumberFormatter class considers all of these factors when formatting numeric values.
Using the NumberFormatter class
The NumberFormatter class formats numeric values (of type int, uint, or Number) according to the conventions of a
specific locale.
The following example shows the simplest way to format a number using the default formatting properties provided
by the user’s operating system:
var nf:NumberFormatter = new NumberFormatter(LocaleID.DEFAULT);
trace(nf.formatNumber(-123456.789))
The result vary based on the user’s locale settings and user preferences. For example, if the user’s locale is fr-FR then
the formatted value would be:
-123.456,789
If you only want to format a number for a specific locale, regardless of the user’s settings, set the locale name
specifically. For example:
Locale Number Format
en-US (English, USA) -123,456.78
de-DE (German, Germany) -123.456,78
fr-FR (France, French) -123 456,78
de-CH (German, Switzerland) -123'456.78
en-IN (English, India) -1,23,456.78
Many Arabic locales 123,456.78-

918
ACTIONSCRIPT 3.0 DEVELOPER’S GUIDE
Internationalizing applications
Last updated 3/21/2011
var nf:NumberFormatter = new NumberFormatter("de-CH");
trace(nf.formatNumber(-123456.789));
The result in this case are:
-123'456.789
The formatNumber() method takes a Number as a parameter. The NumberFormatter class also has a formatInt()
method that takes an int as input, and a formatUint() method that takes a uint.
You can explicitly control the formatting logic by setting properties of the NumberFormatter class, as shown in this
example:
var nf:NumberFormatter = new NumberFormatter("de-CH");
nf.negativeNumberFormat = 0;
nf.fractionalDigits = 5;
nf.trailingZeros = true;
nf.decimalSeparator = ",";
nf.useGrouping = false;
trace(nf.formatNumber(-123456.789)); //(123456.78900)
This example first creates a NumberFormatter object and then:
•sets the negative number format to use parentheses (as in financial applications);
•sets the number of digits after the decimal separator to 5;
•specifies that trailing zeroes be used to ensure five decimal places;
•sets the decimal separator to a comma;
•tells the formatter not to use any grouping separators.
Note: When some of these properties change, the resulting number format no longer corresponds to the preferred format
for the specified locale. Use some of these properties only when locale-awareness is not important; when you need detailed
control over a single aspect of the format, such as the number of trailing zeroes; or when the user requests the change
directly, for example, through the Windows Control Panel.
Parsing strings that contain numeric values
The NumberFormatter class can also extract numeric values from strings that conform to locale-specific formatting
requirements. The NumberFormatter.parseNumber() method extracts a single numeric value from a string. For
example:
var nf:NumberFormatter = new NumberFormatter( "en-US" );
var inputNumberString:String = "-1,234,567.890"
var parsedNumber:Number = nf.parseNumber(inputNumberString);
trace("Value:" + parsedNumber); // -1234567.89
trace("Status:" + nf.lastOperationStatus); // noError
The parseNumber() method handles strings that contain only digits and number formatting characters such as
negative signs and separators. If the string contains other characters, an error code is set:
var nf:NumberFormatter = new NumberFormatter( "en-US" );
var inputNumberString:String = "The value is 1,234,567.890"
var parsedNumber:Number = nf.parseNumber(inputNumberString);
trace("Value:" + parsedNumber); // NaN
trace("Status:" + nf.lastOperationStatus); // parseError
To extract numbers from strings that contain additional alphabetic characters, use the NumberFormatter.parse()
method:

919
ACTIONSCRIPT 3.0 DEVELOPER’S GUIDE
Internationalizing applications
Last updated 3/21/2011
var nf:NumberFormatter = new NumberFormatter( "en-US" );
var inputNumberString:String = "The value is 123,456,7.890";
var parseResult:NumberParseResult = nf.parse(inputNumberString);
trace("Value:" + parseResult.value); // 1234567.89
trace("startIndex: " + parseResult.startIndex); // 14
trace("Status:" + nf.lastOperationStatus); // noError
The parse() method returns a NumberParseResult object that contains the parsed numeric value in its value property.
The startIndex property indicates the index of the first numeric character that was found. You can use the startIndex
and endIndex properties to extract the portions of the string that come before and after the digits.
Formatting currency values
Flash Player 10.1 and later, Adobe AIR 2.0 and later
The display formats of currency values vary as much as number formats do. For example, here is how the US dollar
value $123456.78 is formatted for certain locales:
Currency formatting involves all the same factors as number formatting, plus these additional factors:
•Currency ISO code. The three letter ISO 4217 currency code for the actual locale being used, such as USD or EUR.
•Currency symbol. The currency symbol or string for the actual locale being used, such as $ or €.
•Negative currency format. Defines the location of the currency symbol and the negative symbol or parentheses in
relation to the numeric portion of the currency amount.
•Positive currency format. Defines the location of currency symbol relative to the numeric portion of the currency
amount.
Using the CurrencyFormatter class
The CurrencyFormatter class formats numeric values into strings that contain currency strings and formatted
numbers, according to the conventions of a specific locale.
When you instantiate a new CurrencyFormatter object, it sets its currency to the default currency for the given locale.
The following example shows that a CurrencyFormatter object created using a German locale assumes that currency
amounts are in Euros:
var cf:CurrencyFormatter = new CurrencyFormatter( "de-DE" );
trace(cf.format(1234567.89)); // 1.234.567,89 EUR
In most cases, do not rely on the default currency for a locale. If the user’s default locale is not supported, then the
CurrencyFormatter class assigns a fallback locale. The fallback locale can have a different default currency. In addition,
you normally want the currency formats to look correct to your user, even if the amounts are not in the user’s local
currency. For example, a Canadian user can want to see a German company’s prices in Euros, but formatted in the
Canadian style.
Locale Number Format
en-US (English, USA) $123,456.78
de-DE (German, Germany) 123.456,78 $
en-IN (English, India) $ 1,23,456.78

920
ACTIONSCRIPT 3.0 DEVELOPER’S GUIDE
Internationalizing applications
Last updated 3/21/2011
The CurrencyFormatter.setCurrency() method specifies the exact currency string and currency symbol to use.
The following example shows currency amounts in Euros to users in the French part of Canada:
var cf:CurrencyFormatter = new CurrencyFormatter( "fr-CA" );
cf.setCurrency("EUR", "€");
trace(cf.format(1234567.89)); // 1.234.567,89 EUR
The setCurrency() method can also be used to reduce confusion by setting unambiguous currency symbols. For
example:
cf.setCurrency("USD","US$");
By default the format() method displays a three character ISO 4217 currency code instead of the currency symbol. ISO
4217 codes are unambiguous and do not require localization. However many users prefer to see currency symbols
rather than ISO codes.
The CurrencyFormatter class can help you decide which symbol a formatted currency string uses: a currency symbol,
like a dollar sign or Euro sign, or a three character ISO currency string, such as USD or EUR. For example, an amount
in Canadian dollars could be displayed as $200 for a user in Canada. For a user in the United States, however, it could
be displayed as CAD 200. Use the method formattingWithCurrencySymbolIsSafe() to determine whether the
amount’s currency symbol would be ambiguous or incorrect given the user’s locale settings.
The following example formats a value in Euros into a format for the en-US locale. Depending on the user’s locale, the
output string uses either the ISO currency code or the currency symbol.
var cf:CurrencyFormatter = new CurrencyFormatter( "en-CA");
if (cf.formattingWithCurrencySymbolIsSafe("USD"))
{
trace(cf.format(1234567.89, true)); // $1,234,567.89
}
else
{
cf.setCurrency("USD", "$");
trace(cf.format(1234567.89)); // USD1,234,567.89
}
Parsing strings that contain currency values
The CurrencyFormatter class can also extract a currency amount and a currency string from an input string that
conforms to locale-specific formatting requirements. The CurrencyFormatter.parse() method stores the parsed
amount and currency string in a CurrencyParseResult object, as shown here:
var cf:CurrencyFormatter = new CurrencyFormatter( "en-US" );
var inputCurrencyString:String = "(GBP 123,56,7.890)";
var parseResult:CurrencyParseResult = cf.parse(inputCurrencyString);
trace("parsed amount: " + parseResult.value); // -1234567.89
trace("currencyString: " + parseResult.currencyString ); // GBP
The currency string portion of the input string can contain a currency symbol, a currency ISO code, and additional
text characters. The positions of the currency string, the negative number indicator, and the numeric value, match the
formats specified by the negativeCurrencyFormat and positiveCurrencyFormat properties. For example:

921
ACTIONSCRIPT 3.0 DEVELOPER’S GUIDE
Internationalizing applications
Last updated 3/21/2011
var cf:CurrencyFormatter = new CurrencyFormatter( "en-US" );
var inputCurrencyString:String = "Total $-123,56,7.890";
var parseResult:CurrencyParseResult = cf.parse(inputCurrencyString);
trace("status: " + cf.lastOperationStatus ); // parseError
trace("parsed amount: " + parseResult.value); // NaN
trace("currencyString: " + parseResult.currencyString ); //
cf.negativeCurrencyFormat = 2;
parseResult = cf.parse(inputCurrencyString);
trace("status: " + cf.lastOperationStatus ); // noError
trace("parsed amount: " + parseResult.value); // -123567.89
trace("currencyString: " + parseResult.currencyString ); // Total $
In this example, the input string has a currency string followed by a minus sign and a number. However the default
negativeCurrencyFormat value for the en-US locale specifies that the negative indicator comes first. As a result, the
parse() method generates an error and the parsed value is NaN.
After it sets the negativeCurrencyFormat to 2, which specifies that the currency string comes first, the parse() method
succeeds.
Formatting dates and times
Flash Player 10.1 and later, Adobe AIR 2.0 and later
The display format of date and time values also varies widely from region to region. For example, here is how the
second day of January, 1962 at 1:01 PM is displayed in a short format for certain locales:
Using the DateTimeFormatter class
The DateTimeFormatter class formats Date values into date and time strings according to the conventions of a specific
locale.
Formatting follows a pattern string which contains sequences of letters that are replaced with date or time values. For
example, in the pattern "yyyy/MM" the characters "yyyy" are replaced with a four-digit year, followed by a "/" character,
and a two-digit month.
The pattern string can be set explicitly using the setDateTimePattern() method. However it is best to let the pattern be
set automatically according to the user’s locale and operating system preferences. This practice helps assure that the
result is culturally appropriate.
The DateTimeFormatter can represent dates and times in three standard styles (LONG, MEDIUM, and SHORT) and
it can also use a CUSTOM pattern. One style can be used for the date, and a second style for the time. The actual
patterns used for each style vary somewhat by operating system.
You can specify the styles when you create a DateTimeFormatter object. If the style parameters are not specified, then
they are set to DateTimeStyle.LONG by default. You can change the styles later by using the setDateTimeStyles()
method, as shown in the following example:
Locale Date and Time Format
en-US (English, USA) 1/2/62 1:01pm
fr-FR (France, French) 2/1/62 13:01
ja-JP (Japan, Japanese) 1962/2/1 13:01

922
ACTIONSCRIPT 3.0 DEVELOPER’S GUIDE
Internationalizing applications
Last updated 3/21/2011
var date:Date = new Date(2009, 2, 27, 13, 1);
var dtf:DateTimeFormatter = new DateTimeFormatter("en-US",
DateTimeStyle.LONG, DateTimeStyle.LONG);
var longDate:String = dtf.format(date);
trace(longDate); // March 27, 2009 1:01:00 PM
dtf.setDateTimeStyles(DateTimeStyle.SHORT, DateTimeStyle.SHORT);
var shortDate:String = dtf.format(date);
trace(shortDate); // 3/27/09 1:01 PM
Localizing month names and day names
Many applications use lists of month names and the names of the days of the week in calendar displays or pull-down
lists.
You can retrieve a localized list of the month names using the method DateTimeFormatter.getMonthNames().
Depending on the operating system, full and abbreviated forms might be available. Pass the value
DateTimeNameStyle.FULL to get full length month names. Pass the values
DateTimeNameStyle.LONG_ABBREVIATION or DateTimeNameStyle.SHORT_ABBREVIATION to get shorter
versions.
In some languages, a month name changes (into its genitive form) when it is placed next to the day value in a date
format. If you plan to use the month names alone, pass the value DateTimeNameContext.STANDALONE to the
getMonthNames() method. To use the month names in formatted dates, however, pass the value
DateTimeNameContext.FORMAT.
var dtf:DateTimeFormatter = new DateTimeFormatter("fr-FR");
var months:Vector.<String> = dtf.getMonthNames(DateTimeNameStyle.FULL,
DateTimeNameContext.STANDALONE);
trace(months[0]); // janvier
months = dtf.getMonthNames(DateTimeNameStyle.SHORT_ABBREVIATION,
DateTimeNameContext.STANDALONE);
trace(months[0]); // janv.
The DateTimeFormatter.getWeekdayNames() method provides a localized list of the names of the days of the week.
The getWeekdayNames() method accepts the same nameStyle and context parameters that the getMonthNames()
method does.
var dtf:DateTimeFormatter = new DateTimeFormatter("fr-FR");
var weekdays:Vector.<String> = dtf.getWeekdayNames(DateTimeNameStyle.FULL,
DateTimeNameContext.STANDALONE);
trace(weekdays[0]); // dimanche
weekdays = dtf.getWeekdayNames(DateTimeNameStyle.LONG_ABBREVIATION,
DateTimeNameContext.STANDALONE);
trace(weekdays[0]); // dim.
In addition, the getFirstWeekday() method returns the index value of the day that traditionally marks the beginning
of the week in the selected locale.

923
ACTIONSCRIPT 3.0 DEVELOPER’S GUIDE
Internationalizing applications
Last updated 3/21/2011
Sorting and comparing strings
Flash Player 10.1 and later, Adobe AIR 2.0 and later
Collation is the process of arranging things in their proper order. Collation rules vary significantly by locale. The rules
also differ if you are sorting a list or matching similar items, such as in a text search algorithm.
When sorting, small differences such as upper and lowercase letters or diacritic marks such as accents, are often
significant. For example, the letter ö (o with a diaeresis) is considered mostly equivalent to the plain letter o in French
or English. The same letter, however, follows the letter z in Swedish. Also, in French and some other languages, the last
accent difference in a word determines its order in a sorted list.
When searching, you often want to ignore differences in case or diacritics, to increase the chance of finding relevant
matches. For example, a search for the characters “cote” in a French document conceivably returns matches for “cote”,
“côte”, and “coté”.
Using the Collator class
The main methods of the Collator class are the compare() method, used primarily for sorting, and the equals() method,
used for matching values.
The following example shows the different behavior of the compare() and equals() methods.
var words:Array = new Array("coté", "côte");
var sorter:Collator = new Collator("fr-FR", CollatorMode.SORTING);
words.sort(sorter.compare);
trace(words); // côte,coté
var matcher:Collator = new Collator("fr-FR", CollatorMode.MATCHING);
if (matcher.equals(words[0], words[1]))
{
trace(words[0] + " = " + words[1]); // côte = coté
}
The example first creates a Collator object in SORTING mode for the French-France locale. Then it sorts two words
that differ only by diacritical marks. This shows that the SORTING comparison distinguishes between accented and
non-accented characters.
The sorting is performed by passing a reference to the Collator object’s sort() method as a parameter to the Array.sort()
method. This technique is one of the most efficient ways of using a Collator object to control sort order.
The example then creates a Collator object in MATCHING mode. When that Collator object compares the two words, it
treats them as equal. That shows that the MATCHING comparison values accented and non-accented characters the same.
Customizing the behavior of the Collator class
By default, the Collator class uses string comparison rules obtained from the operating system based on the locale and
the user’s system preferences. You can customize the behavior of the compare() and equals() methods by explicitly
setting various properties. The following table lists the properties and the effect they have upon comparisons:

924
ACTIONSCRIPT 3.0 DEVELOPER’S GUIDE
Internationalizing applications
Last updated 3/21/2011
The following code shows that setting the ignoreDiacritics property to true changes the sort order of a list of French
words:
var words:Array = new Array("COTE", "coté", "côte", "Coté","cote");
var sorter:Collator = new Collator("fr-CA", CollatorMode.SORTING);
words.sort(sorter.compare);
trace(words); // cote,COTE,côte,coté,Coté
sorter.ignoreDiacritics = true;
words.sort(sorter.compare);
trace(words); // côte,coté,cote,Coté,COTE
Case conversion
Flash Player 10.1 and later, Adobe AIR 2.0 and later
Languages also differ in their rules for converting letters between uppercase forms (majiscules) and lowercase forms
(miniscules).
For example, in most languages that use the Latin alphabet the lowercase form of the capital letter “I” is “i”. However
in some languages (such as Turkish and Azeri) there is an additional dotless letter “ı”. As a result in those languages a
lowercase dotless “ı” transforms into an uppercase ”I”. A lowercase “i” transforms into an uppercase “İ” with a dot.
The StringTools class provides methods that use language-specific rules to perform such transformations.
Using the StringTools class
The StringTools class provides two methods to perform case transformations: toLowerCase() and toUpperCase(). You
create a StringTools object by calling the constructor with a locale ID. The StringTools class retrieves the case
conversion rules for that locale (or a fallback locale) from the operating system. It is not possible to further customize
the case conversion algorithm.
The following example uses the toUpperCase() and toLowerCase() methods to transform a German phrase that
includes the letter “ß” (sharp S).
Collator Property Effect
numericComparison Controls whether digit characters are treated as numbers or as text.
ignoreCase Controls whether uppercase and lowercase differences are ignored.
ignoreCharacterWidth Controls whether full-width and half-width forms of some Chinese and Japanese characters are
evaluated as equal.
ignoreDiacritics Controls whether strings that use the same base characters but different accents or other diacritic
marks are evaluated as equal.
ignoreKanaType Controls whether strings that differ only by the type of kana character being used are treated as equal.
ignoreSymbols Controls whether symbol characters such as spaces, currency symbols, math symbols, and others are
ignored.

925
ACTIONSCRIPT 3.0 DEVELOPER’S GUIDE
Internationalizing applications
Last updated 3/21/2011
var phrase:String = "Schloß Neuschwanstein";
var converter:StringTools = new StringTools("de-DE");
var upperPhrase:String = converter.toUpperCase(phrase);
trace(upperPhrase); // SCHLOSS NEUSCHWANSTEIN
var lowerPhrase:String = converter.toLowerCase(upperPhrase);
trace(lowerPhrase);// schloss neuschwanstein
The toUpperCase() method transforms the lowercase letter “ß” into the uppercase letters “SS”. This transformation
works only in one direction. When the letters “SS” are transformed back to lowercase, the result is “ss” not “ß”.
Example: Internationalizing a stock ticker application
Flash Player 10.1 and later, Adobe AIR 2.0 and later
The Global Stock Ticker application retrieves and displays fictitious data about stocks in three different stock markets:
the United States, Japan, and Europe. It formats the data according to the conventions of various locales.
This example illustrates the following features of the flash.globalization package:
•Locale-aware number formatting
•Locale-aware currency formatting
•Setting currency ISO code and currency symbols
•Locale-aware date formatting
•Retrieving and displaying appropriate month name abbreviations
To get the application files for this sample, see www.adobe.com/go/learn_programmingAS3samples_flash. The Global
Stock Ticker application files can be found in the folder Samples/GlobalStockTicker. The application consists of the
following files:
File Description
GlobalStockTicker.mxm
l
or
GlobalStockTicker.fla
The user interface for the application for Flex (MXML) or Flash (FLA).
styles.css Styles for the application user interface (Flex only).
com/example/program
mingas3/stockticker/fle
x/FinGraph.mxml
An MXML component that displays a chart of simulated stock data, for Flex only.
com/example/program
mingas3/stockticker/fla
sh/GlobalStockTicker.as
Document class containing the user interface logic for the application (Flash only).
comp/example/progra
mmingas3/stockticker/f
lash/RightAlignedColu
mn.as
A custom cell renderer for the Flash DataGrid component (Flash only).

926
ACTIONSCRIPT 3.0 DEVELOPER’S GUIDE
Internationalizing applications
Last updated 3/21/2011
Understanding the user interface and sample data
The application’s main user interface elements are:
•a combo box for selecting a Locale
•a combo box for selecting a Market
•a DataGrid that displays data for six companies in each market
•a chart that shows simulated historical data for the selected company’s stock
The application stores all of its sample data about locales, markets, and company stocks in the StockDataModel class.
A real application would retrieve data from a server and then store it in a class like StockDataModel. In this example,
all the data is hard coded in the StockDataModel class.
Note: The data displayed in the financial chart doesn’t necessarily match the data shown in the DataGrid control. The
chart is randomly redrawn each time a different company is selected. It is for illustration purposes only.
Setting the locale
After some initial setup work, the application calls the method Localizer.setLocale() to create formatter objects for the
default locale. The setLocale() method is also called each time the user selects a new value from the Locale combo box.
public function setLocale(newLocale:String):void
{
locale = new LocaleID(newLocale);
nf = new NumberFormatter(locale.name);
traceError(nf.lastOperationStatus, "NumberFormatter", nf.actualLocaleIDName);
cf = new CurrencyFormatter(locale.name);
traceError(cf.lastOperationStatus, "CurrencyFormatter", cf.actualLocaleIDName);
symbolIsSafe = cf.formattingWithCurrencySymbolIsSafe(currentCurrency);
cf.setCurrency(currentCurrency, currentSymbol);
cf.fractionalDigits = currentFraction;
df = new DateTimeFormatter(locale.name, DateTimeStyle.LONG, DateTimeStyle.SHORT);
traceError(df.lastOperationStatus, "DateTimeFormatter", df.actualLocaleIDName);
monthNames = df.getMonthNames(DateTimeNameStyle.LONG_ABBREVIATION);
}
public function traceError(status:String, serviceName:String, localeID:String) :void
{
if(status != LastOperationStatus.NO_ERROR)
{
com/example/program
mingas3/stockticker/Fi
nancialGraph.as
An ActionScript class that draws a chart of simulated stock data.
com/example/program
mingas3/stockticker/Lo
calizer.as
An ActionScript class that manages the locale and currency and handles the localized formatting of numbers,
currency amounts, and dates.
com/example/program
mingas3/stockticker/St
ockDataModel.as
An ActionScript class that holds all the sample data for the Global Stock Ticker example.
File Description

927
ACTIONSCRIPT 3.0 DEVELOPER’S GUIDE
Internationalizing applications
Last updated 3/21/2011
if(status == LastOperationStatus.USING_FALLBACK_WARNING)
{
trace("Warning - Fallback locale ID used by "
+ serviceName + ": " + localeID);
}
else if (status == LastOperationStatus.UNSUPPORTED_ERROR)
{
trace("Error in " + serviceName + ": " + status);
//abort application
throw(new Error("Fatal error", 0));
}
else
{
trace("Error in " + serviceName + ": " + status);
}
}
else
{
trace(serviceName + " created for locale ID: " + localeID);
}
}
First the setLocale() method creates a LocaleID object. This object makes it easier to get details about the actual locale
later, if needed.
Next it creates new NumberFormatter, CurrencyFormatter, and DateTimeFormatter objects for the locale. After
creating each formatter object it calls the traceError() method. This method displays error and warning messages in
the console if there is a problem with the requested locale. (A real application should react based on such errors rather
than just tracing them).
After creating the CurrencyFormatter object, the setLocale() method sets the formatter’s currency ISO code, currency
symbol, and fractionalDigits properties to previously determined values. (Those values are set each time the user
selects a new market from the Markets combo box).
After creating the DateTimeFormatter object, the setLocale() method also retrieves an array of localized month name
abbreviations.
Formatting the data
The formatted stock data is presented in a DataGrid control. The DataGrid columns each call a label function that
formats the column value using the appropriate formatter object.
In the Flash version, for example, the following code sets up the DataGrid columns:

928
ACTIONSCRIPT 3.0 DEVELOPER’S GUIDE
Internationalizing applications
Last updated 3/21/2011
var col1:DataGridColumn = new DataGridColumn("ticker");
col1.headerText = "Company";
col1.sortOptions = Array.NUMERIC;
col1.width = 200;
var col2:DataGridColumn = new DataGridColumn("volume");
col2.headerText = "Volume";
col2.width = 120;
col2.cellRenderer = RightAlignedCell;
col2.labelFunction = displayVolume;
var col3:DataGridColumn = new DataGridColumn("price");
col3.headerText = "Price";
col3.width = 70;
col3.cellRenderer = RightAlignedCell;
col3.labelFunction = displayPrice;
var col4:DataGridColumn = new DataGridColumn("change");
col4.headerText = "Change";
col4.width = 120;
col4.cellRenderer = RightAlignedCell;
col4.labelFunction = displayPercent;
The Flex version of the example declares its DataGrid in MXML. It also defines similar label functions for each column.
The labelFunction properties refer to the following functions, which call formatting methods of the Localizer class:
private function displayVolume(item:Object):String
{
return localizer.formatNumber(item.volume, 0);
}
private function displayPercent(item:Object):String
{
return localizer.formatPercent(item.change ) ;
}
private function displayPrice(item:Object):String
{
return localizer.formatCurrency(item.price);
}
The Localizer methods then set up and call the appropriate formatters:

929
ACTIONSCRIPT 3.0 DEVELOPER’S GUIDE
Internationalizing applications
Last updated 3/21/2011
public function formatNumber(value:Number, fractionalDigits:int = 2):String
{
nf.fractionalDigits = fractionalDigits;
return nf.formatNumber(value);
}
public function formatPercent(value:Number, fractionalDigits:int = 2):String
{
// HACK WARNING: The position of the percent sign, and whether a space belongs
// between it and the number, are locale-sensitive decisions. For example,
// in Turkish the positive format is %12 and the negative format is -%12.
// Like most operating systems, flash.globalization classes do not currently
// provide an API for percentage formatting.
nf.fractionalDigits = fractionalDigits;
return nf.formatNumber(value) + "%";
}
public function formatCurrency(value:Number):String
{
return cf.format(value, symbolIsSafe);
}
public function formatDate(dateValue:Date):String
{
return df.format(dateValue);
}
|

930
Last updated 3/21/2011
Chapter 55: Localizing applications
Flash Player 9 and later, Adobe AIR 1.0 and later
Localization is the process of including assets to support multiple locales. A locale is the combination of a language
and a country code. For example, en_US refers to the English language as spoken in the United States, and fr_FR refers
to the French language as spoken in France. To localize an application for these locales, you would provide two sets of
assets: one for the en_US locale and one for the fr_FR locale.
Locales can share languages. For example, en_US and en_GB (Great Britain) are different locales. In this case, both
locales use the English language, but the country code indicates that they are different locales, and might therefore use
different assets. For example, an application in the en_US locale might spell the word "color", whereas the word would
be "colour" in the en_GB locale. Also, units of currency would be represented in dollars or pounds, depending on the
locale, and the format of dates and times might also be different.
You can also provide a set of assets for a language without specifying a country code. For example, you can provide en
assets for the English language and provide additional assets for the en_US locale, specific to U.S. English.
Localization goes beyond just translating strings used in your application. It can also include any type of asset such as
audio files, images, and videos.
Choosing a locale
Flash Player 9 and later, Adobe AIR 1.0 and later
To determine which locale your content or application uses, you can use one of the following methods:
•flash.globalization package — Use the locale-aware classes in the flash.globalization package to retrieve the default
locale for the user based on the operating system and user preferences. This is the preferred approach for
applications that will run on the Flash Player 10.1 or later or AIR 2.0 or later runtimes. See “Determining the locale”
on page 915 for more information.
•User prompt — You can start the application in some default locale, and then ask the user to choose their preferred
locale.
•(AIR only) Capabilities.languages — The Capabilities.languages property lists an array of languages
available on the user’s preferred languages, as set through the operating system. The strings contain language tags
(and script and region information, where applicable) defined by RFC4646 (http://www.ietf.org/rfc/rfc4646.txt).
The strings use hyphens as a delimiter (for example, "en-US" or "ja-JP"). The first entry in the returned array has
the same primary language ID as the language property. For example, if languages[0] is set to "en-US", then the
language property is set to "en". However, if the language property is set to "xu" (specifying an unknown
language), the first element in the languages array is different.
•Capabilities.language — The Capabilities.language property provides the user interface language code of
the operating system. However, this property is limited to 20 known languages. And on English systems, this
property returns only the language code, not the country code. For these reasons, it is better to use the first element
in the Capabilities.languages array.

931
ACTIONSCRIPT 3.0 DEVELOPER’S GUIDE
Localizing applications
Last updated 3/21/2011
Localizing Flex content
Flash Player 9 and later, Adobe AIR 1.0 and later
Adobe Flex includes a framework for localizing Flex content. This framework includes the Locale, ResourceBundle,
and ResourceManagerImpl classes, as well as the IResourceBundle, IResourceManagerImpl interfaces.
A Flex localization library containing utility classes for sorting application locales is available on Google Code
(http://code.google.com/p/as3localelib/).
More Help topics
http://code.google.com/p/as3localelib/
Localizing Flash content
Flash Player 9 and later, Adobe AIR 1.0 and later
Adobe Flash Professional includes a Locale class in the ActionScript 3.0 components. The Locale class allows you to
control how a SWF file displays multilanguage text. The Flash Strings panel allows you to use string IDs instead of
string literals in dynamic text fields. This facility allows you to create a SWF file that displays text loaded from a
language-specific XML file. For information on using the Locale class, see the ActionScript 3.0 Reference for the Adobe
Flash Platform.
Localizing AIR applications
Adobe AIR 1.0 and later
The AIR SDK provides an HTML Localization Framework (contained in an AIRLocalizer.js file). This framework
includes APIs that assist in working with multiple locales in an HTML-based application. An ActionScript library for
sorting locales is provided at http://code.google.com/p/as3localelib/.
More Help topics
http://code.google.com/p/as3localelib/
Localizing dates, times, and currencies
Flash Player 9 and later, Adobe AIR 1.0 and later
The way applications present dates, times, and currencies varies greatly for each locale. For example, the U.S. standard
for representing dates is month/day/year, whereas the European standard for representing dates is day/month/year.

932
ACTIONSCRIPT 3.0 DEVELOPER’S GUIDE
Localizing applications
Last updated 3/21/2011
You can write code to format dates, times, and currencies. For example, the following code converts a Date object into
month/day/year format or day/month/year format. if the locale variable (representing the locale) is set to "en_US",
the function returns month/day/year format. The example converts a Date object into day/month/year format for all
other locales:
function convertDate(date)
{
if (locale == "en_US")
{
return (date.getMonth() + 1) + "/" + date.getDate() + "/" + date.getFullYear();
}
else
{
return date.getDate() + "/" + (date.getMonth() + 1) + "/" + date.getFullYear();
}
}
ADOBE FLEX
The Flex framework includes controls for formatting dates, times, and currencies. These controls include the
DateFormatter and CurrencyFormatter controls.
•mx:DateFormatter
•mx:CurrencyFormatter

933
Last updated 3/21/2011
Chapter 56: About the HTML
environment
Adobe AIR 1.0 and later
Adobe® AIR® uses WebKit (www.webkit.org), also used by the Safari web browser, to parse, layout, and render HTML
and JavaScript content. Using the AIR APIs in HTML content is optional. You can program in the content of an
HTMLLoader object or HTML window entirely with HTML and JavaScript. Most existing HTML pages and
applications should run with few changes (assuming they use HTML, CSS, DOM, and JavaScript features compatible
with WebKit).
Important: New versions of the Adobe AIR runtime may include updated versions of WebKit. A WebKit update in a
new version of AIR may result in unexpected changes in a deployed AIR application. These changes may affect the
behavior or appearance of HTML content in an application. For example, improvements or corrections in WebKit
rendering may change the layout of elements in an application’s user interface. For this reason, it is highly
recommended that you provide an update mechanism in your application. Should you need to update your application
due to a change in the WebKit version included in AIR, the AIR update mechanism can prompt the user to install the
new version of your application.
The following table lists the version of WebKit used in each release of AIR. The closest corresponding release of the
Safari web browser is also given:
You can always determine the installed version of WebKit by examining the default user agent string returned by a
HTMLLoader object:
var htmlLoader:HTMLLoader = new HTMLLoader();
trace( htmlLoader.userAgent );
Keep in mind that the version of WebKit used in AIR is not identical to the open source version. Some features are not
supported in AIR and the AIR version can include security and bug fixes not yet available in the corresponding WebKit
version. See “WebKit features not supported in AIR” on page 948.
Because AIR applications run directly on the desktop, with full access to the file system, the security model for HTML
content is more stringent than the security model of a typical web browser. In AIR, only content loaded from the
application installation directory is placed in the application sandbox. The application sandbox has the highest level of
privilege and allows access to the AIR APIs. AIR places other content into isolated sandboxes based on where that
content came from. Files loaded from the file system go into a local sandbox. Files loaded from the network using the
http: or https: protocols go into a sandbox based on the domain of the remote server. Content in these non-application
sandboxes is prohibited from accessing any AIR API and runs much as it would in a typical web browser.
HTML content in AIR does not display SWF or PDF content if alpha, scaling, or transparency settings are applied. For
more information, see “Considerations when loading SWF or PDF content in an HTML page” on page 975 and
“Window transparency” on page 867.
AIR version WebKit version Safari version
1.0 420 2.04
1.1 523 3.04
1.5 526.9 4.0 Beta
2.0 531.9 4.03
2.5 531.9 4.03
2.6 531.9 4.03

934
ACTIONSCRIPT 3.0 DEVELOPER’S GUIDE
About the HTML environment
Last updated 3/21/2011
More Help topics
Webkit DOM Reference
Safari HTML Reference
Safari CSS Reference
www.webkit.org
Overview of the HTML environment
Adobe AIR 1.0 and later
Adobe AIR provides a complete browser-like JavaScript environment with an HTML renderer, document object
model, and JavaScript interpreter. The JavaScript environment is represented by the AIR HTMLLoader class. In
HTML windows, an HTMLLoader object contains all HTML content, and is, in turn, contained within a
NativeWindow object. In SWF content, the HTMLLoader class, which extends the Sprite class, can be added to the
display list of a stage like any other display object. The Adobe® ActionScript® 3.0 properties of the class are described
in “Scripting the AIR HTML Container” on page 974 and also in the ActionScript 3.0 Reference for the Adobe Flash
Platform. In the Flex framework, the AIR HTMLLoader class is wrapped in a mx:HTML component. The mx:HTML
component extends the UIComponent class, so it can be used directly with other Flex containers. The JavaScript
environment within the mx:HTML component is otherwise identical.
About the JavaScript environment and its relationship to the AIR host
Adobe AIR 1.0 and later
The following diagram illustrates the relationship between the JavaScript environment and the AIR run-time
environment. Although only a single native window is shown, an AIR application can contain multiple windows. (And
a single window can contain multiple HTMLLoader objects.)

935
ACTIONSCRIPT 3.0 DEVELOPER’S GUIDE
About the HTML environment
Last updated 3/21/2011
The JavaScript environment has its own Document and Window objects. JavaScript code can interact with the AIR run-time environment
through the runtime, nativeWindow, and htmlLoader properties. ActionScript code can interact with the JavaScript environment through the
window property of an HTMLLoader object, which is a reference to the JavaScript Window object. In addition, both ActionScript and JavaScript
objects can listen for events dispatched by both AIR and JavaScript objects.
The runtime property provides access to AIR API classes, allowing you to create new AIR objects as well as access class
(also called static) members. To access an AIR API, you add the name of the class, with package, to the runtime
property. For example, to create a File object, you would use the statement:
var file = new window.runtime.filesystem.File();
Note: The AIR SDK provides a JavaScript file, AIRAliases.js, that defines more convenient aliases for the most
commonly used AIR classes. When you import this file, you can use the shorter form air.Class instead of
window.runtime.package.Class. For example, you could create the File object with new air.File().
The NativeWindow object provides properties for controlling the desktop window. From within an HTML page, you
can access the containing NativeWindow object with the window.nativeWindow property.
The HTMLLoader object provides properties, methods, and events for controlling how content is loaded and
rendered. From within an HTML page, you can access the parent HTMLLoader object with the window.htmlLoader
property.
AIR Run-time Environment
NativeWindow
HTMLLoader
JavaScript
Environment
window
window
document
body
h1 div
p
table
head
htmlLoader
nativeWindow
runtime

936
ACTIONSCRIPT 3.0 DEVELOPER’S GUIDE
About the HTML environment
Last updated 3/21/2011
Important: Only pages installed as part of an application have the htmlLoader, nativeWindow, or runtime properties
and only when loaded as the top-level document. These properties are not added when a document is loaded into a frame
or iframe. (A child document can access these properties on the parent document as long as it is in the same security
sandbox. For example, a document loaded in a frame could access the runtime property of its parent with
parent.runtime.)
About security
Adobe AIR 1.0 and later
AIR executes all code within a security sandbox based on the domain of origin. Application content, which is limited
to content loaded from the application installation directory, is placed into the application sandbox. Access to the run-
time environment and the AIR APIs are only available to HTML and JavaScript running within this sandbox. At the
same time, most dynamic evaluation and execution of JavaScript is blocked in the application sandbox after all
handlers for the page load event have returned.
You can map an application page into a non-application sandbox by loading the page into a frame or iframe and setting
the AIR-specific sandboxRoot and documentRoot attributes of the frame. By setting the sandboxRoot value to an
actual remote domain, you can enable the sandboxed content to cross-script content in that domain. Mapping pages
in this way can be useful when loading and scripting remote content, such as in a mash-up application.
Another way to allow application and non-application content to cross-script each other, and the only way to give non-
application content access to AIR APIs, is to create a sandbox bridge. A parent-to-child bridge allows content in a child
frame, iframe, or window to access designated methods and properties defined in the application sandbox. Conversely,
a child-to-parent bridge allows application content to access designated methods and properties defined in the sandbox
of the child. Sandbox bridges are established by setting the parentSandboxBridge and childSandboxBridge
properties of the window object. For more information, see “HTML security in Adobe AIR” on page 1045 and “HTML
frame and iframe elements” on page 944.
About plug-ins and embedded objects
Adobe AIR 1.0 and later
AIR supports the Adobe® Acrobat® plug-in. Users must have Acrobat or Adobe® Reader® 8.1 (or better) to display PDF
content. The HTMLLoader object provides a property for checking whether a user’s system can display PDF. SWF file
content can also be displayed within the HTML environment, but this capability is built in to AIR and does not use an
external plug-in.
No other WebKit plug-ins are supported in AIR.
More Help topics
“HTML security in Adobe AIR” on page 1045
“HTML Sandboxes” on page 937
“HTML frame and iframe elements” on page 944
“JavaScript Window object” on page 942
“The XMLHttpRequest object” on page 938
“Adding PDF content in AIR” on page 518

937
ACTIONSCRIPT 3.0 DEVELOPER’S GUIDE
About the HTML environment
Last updated 3/21/2011
AIR and WebKit
Adobe AIR 1.0 and later
Adobe AIR uses the open source WebKit engine, also used in the Safari web browser. AIR adds several extensions to
allow access to the runtime classes and objects as well as for security. In addition, WebKit itself adds features not
included in the W3C standards for HTML, CSS, and JavaScript.
Only the AIR additions and the most noteworthy WebKit extensions are covered here; for additional documentation
on non-standard HTML, CSS, and JavaScript, see www.webkit.org and developer.apple.com. For standards
information, see the W3C web site. Mozilla also provides a valuable general referenceon HTML, CSS, and DOM topics
(of course, the WebKit and Mozilla engines are not identical).
JavaScript in AIR
Flash Player 9 and later, Adobe AIR 1.0 and later
AIR makes several changes to the typical behavior of common JavaScript objects. Many of these changes are made to
make it easier to write secure applications in AIR. At the same time, these differences in behavior mean that some
common JavaScript coding patterns, and existing web applications using those patterns, might not always execute as
expected in AIR. For information on correcting these types of issues, see “Avoiding security-related JavaScript errors”
on page 954.
HTML Sandboxes
Adobe AIR 1.0 and later
AIR places content into isolated sandboxes according to the origin of the content. The sandbox rules are consistent
with the same-origin policy implemented by most web browsers, as well as the rules for sandboxes implemented by
the Adobe Flash Player. In addition, AIR provides a new application sandbox type to contain and protect application
content. See “Security sandboxes” on page 1010 for more information on the types of sandboxes you may encounter
when developing AIR applications.
Access to the run-time environment and AIR APIs are only available to HTML and JavaScript running within the
application sandbox. At the same time, however, dynamic evaluation and execution of JavaScript, in its various forms,
is largely restricted within the application sandbox for security reasons. These restrictions are in place whether or not
your application actually loads information directly from a server. (Even file content, pasted strings, and direct user
input may be untrustworthy.)
The origin of the content in a page determines the sandbox to which it is consigned. Only content loaded from the
application directory (the installation directory referenced by the app: URL scheme) is placed in the application
sandbox. Content loaded from the file system is placed in the local-with-file system or the local-trusted sandbox, which
allows access and interaction with content on the local file system, but not remote content. Content loaded from the
network is placed in a remote sandbox corresponding to its domain of origin.
To allow an application page to interact freely with content in a remote sandbox, the page can be mapped to the same
domain as the remote content. For example, if you write an application that displays map data from an Internet service,
the page of your application that loads and displays content from the service could be mapped to the service domain.
The attributes for mapping pages into a remote sandbox and domain are new attributes added to the frame and iframe
HTML elements.

938
ACTIONSCRIPT 3.0 DEVELOPER’S GUIDE
About the HTML environment
Last updated 3/21/2011
To allow content in a non-application sandbox to safely use AIR features, you can set up a parent sandbox bridge. To
allow application content to safely call methods and access properties of content in other sandboxes, you can set up a
child sandbox bridge. Safety here means that remote content cannot accidentally get references to objects, properties,
or methods that are not explicitly exposed. Only simple data types, functions, and anonymous objects can be passed
across the bridge. However, you must still avoid explicitly exposing potentially dangerous functions. If, for example,
you exposed an interface that allowed remote content to read and write files anywhere on a user’s system, then you
might be giving remote content the means to do considerable harm to your users.
JavaScript eval() function
Adobe AIR 1.0 and later
Use of the eval() function is restricted within the application sandbox once a page has finished loading. Some uses
are permitted so that JSON-formatted data can be safely parsed, but any evaluation that results in executable
statements results in an error. “Code restrictions for content in different sandboxes” on page 1047 describes the
allowed uses of the eval() function.
Function constructors
Adobe AIR 1.0 and later
In the application sandbox, function constructors can be used before a page has finished loading. After all page load
event handlers have finished, new functions cannot be created.
Loading external scripts
Adobe AIR 1.0 and later
HTML pages in the application sandbox cannot use the script tag to load JavaScript files from outside of the
application directory. For a page in your application to load a script from outside the application directory, the page
must be mapped to a non-application sandbox.
The XMLHttpRequest object
Adobe AIR 1.0 and later
AIR provides an XMLHttpRequest (XHR) object that applications can use to make data requests. The following
example illustrates a simple data request:
xmlhttp = new XMLHttpRequest();
xmlhttp.open("GET", "http:/www.example.com/file.data", true);
xmlhttp.onreadystatechange = function() {
if (xmlhttp.readyState == 4) {
//do something with data...
}
}
xmlhttp.send(null);
In contrast to a browser, AIR allows content running in the application sandbox to request data from any domain. The
result of an XHR that contains a JSON string can be evaluated into data objects unless the result also contains
executable code. If executable statements are present in the XHR result, an error is thrown and the evaluation attempt
fails.
To prevent accidental injection of code from remote sources, synchronous XHRs return an empty result if made before
a page has finished loading. Asynchronous XHRs will always return after a page has loaded.

939
ACTIONSCRIPT 3.0 DEVELOPER’S GUIDE
About the HTML environment
Last updated 3/21/2011
By default, AIR blocks cross-domain XMLHttpRequests in non-application sandboxes. A parent window in the
application sandbox can choose to allow cross-domain requests in a child frame containing content in a non-
application sandbox by setting allowCrossDomainXHR, an attribute added by AIR, to true in the containing frame or
iframe element:
<iframe id="mashup"
src="http://www.example.com/map.html"
allowCrossDomainXHR="true"
</iframe>
Note: When convenient, the AIR URLStream class can also be used to download data.
If you dispatch an XMLHttpRequest to a remote server from a frame or iframe containing application content that has
been mapped to a remote sandbox, make sure that the mapping URL does not mask the server address used in the
XHR. For example, consider the following iframe definition, which maps application content into a remote sandbox
for the example.com domain:
<iframe id="mashup"
src="http://www.example.com/map.html"
documentRoot="app:/sandbox/"
sandboxRoot="http://www.example.com/"
allowCrossDomainXHR="true"
</iframe>
Because the sandboxRoot attribute remaps the root URL of the www.example.com address, all requests are loaded
from the application directory and not the remote server. Requests are remapped whether they derive from page
navigation or from an XMLHttpRequest.
To avoid accidentally blocking data requests to your remote server, map the sandboxRoot to a subdirectory of the
remote URL rather than the root. The directory does not have to exist. For example, to allow requests to the
www.example.com to load from the remote server rather than the application directory, change the previous iframe to
the following:
<iframe id="mashup"
src="http://www.example.com/map.html"
documentRoot="app:/sandbox/"
sandboxRoot="http://www.example.com/air/"
allowCrossDomainXHR="true"
</iframe>
In this case, only content in the air subdirectory is loaded locally.
For more information on sandbox mapping see “HTML frame and iframe elements” on page 944 and “HTML security
in Adobe AIR” on page 1045.
Cookies
Adobe AIR 1.0 and later
In AIR applications, only content in remote sandboxes (content loaded from http: and https: sources) can use cookies
(the document.cookie property). In the application sandbox, other means for storing persistent data are available,
including the EncryptedLocalStore, SharedObject, and FileStream classes.

940
ACTIONSCRIPT 3.0 DEVELOPER’S GUIDE
About the HTML environment
Last updated 3/21/2011
The Clipboard object
Adobe AIR 1.0 and later
The WebKit Clipboard API is driven with the following events: copy, cut, and paste. The event object passed in these
events provides access to the clipboard through the clipboardData property. Use the following methods of the
clipboardData object to read or write clipboard data:
JavaScript code outside the application sandbox can only access the clipboard through theses events. However, content
in the application sandbox can access the system clipboard directly using the AIR Clipboard class. For example, you
could use the following statement to get text format data on the clipboard:
var clipping = air.Clipboard.generalClipboard.getData("text/plain",
air.ClipboardTransferMode.ORIGINAL_ONLY);
The valid data MIME types are:
Important: Only content in the application sandbox can access file data present on the clipboard. If non-application
content attempts to access a file object from the clipboard, a security error is thrown.
For more information on using the clipboard, see “Copy and paste” on page 563 and Using the Pasteboard from
JavaScript (Apple Developer Center).
Drag and Drop
Adobe AIR 1.0 and later
Drag-and-drop gestures into and out of HTML produce the following DOM events: dragstart, drag, dragend,
dragenter, dragover, dragleave, and drop. The event object passed in these events provides access to the dragged
data through the dataTransfer property. The dataTransfer property references an object that provides the same
methods as the clipboardData object associated with a clipboard event. For example, you could use the following
function to get text format data from a drop event:
function onDrop(dragEvent){
return dragEvent.dataTransfer.getData("text/plain",
air.ClipboardTransferMode.ORIGINAL_ONLY);
}
The dataTransfer object has the following important members:
Method Description
clearData(mimeType) Clears the clipboard data. Set the mimeType parameter to the MIME type of the data to clear.
getData(mimeType) Get the clipboard data. This method can only be called in a handler for the paste event. Set the mimeType
parameter to the MIME type of the data to return.
setData(mimeType, data) Copy data to the clipboard. Set the mimeType parameter to the MIME type of the data.
MIME type Value
Text "text/plain"
HTML "text/html"
URL "text/uri-list"
Bitmap "image/x-vnd.adobe.air.bitmap"
File list "application/x-vnd.adobe.air.file-list"

941
ACTIONSCRIPT 3.0 DEVELOPER’S GUIDE
About the HTML environment
Last updated 3/21/2011
For more information on adding support for drag-and-drop to an AIR application see “Drag and drop in AIR” on
page 575 and Using the Drag-and-Drop from JavaScript (Apple Developer Center).
innerHTML and outerHTML properties
Adobe AIR 1.0 and later
AIR places security restrictions on the use of the innerHTML and outerHTML properties for content running in the
application sandbox. Before the page load event, as well as during the execution of any load event handlers, use of the
innerHTML and outerHTML properties is unrestricted. However, once the page has loaded, you can only use
innerHTML or outerHTML properties to add static content to the document. Any statement in the string assigned to
innerHTML or outerHTML that evaluates to executable code is ignored. For example, if you include an event callback
attribute in an element definition, the event listener is not added. Likewise, embedded <script> tags are not
evaluated. For more information, see the “HTML security in Adobe AIR” on page 1045.
Document.write() and Document.writeln() methods
Adobe AIR 1.0 and later
Use of the write() and writeln() methods is not restricted in the application sandbox before the load event of the
page. However, once the page has loaded, calling either of these methods does not clear the page or create a new one.
In a non-application sandbox, as in most web browsers, calling document.write() or writeln() after a page has
finished loading clears the current page and opens a new, blank one.
Document.designMode property
Adobe AIR 1.0 and later
Set the document.designMode property to a value of on to make all elements in the document editable. Built-in editor
support includes text editing, copy, paste, and drag-and-drop. Setting designMode to on is equivalent to setting the
contentEditable property of the body element to true. You can use the contentEditable property on most
HTML elements to define which sections of a document are editable. See “HTML contentEditable attribute” on
page 946 for additional information.
Member Description
clearData(mimeType) Clears the data. Set the mimeType parameter to the MIME type of the data representation to clear.
getData(mimeType) Get the dragged data. This method can only be called in a handler for the drop event. Set the mimeType
parameter to the MIME type of the data to get.
setData(mimeType, data) Set the data to be dragged. Set the mimeType parameter to the MIME type of the data.
types An array of strings containing the MIME types of all data representations currently available in the
dataTransfer object.
effectsAllowed Specifies whether the data being dragged can be copied, moved, linked, or some combination thereof. Set the
effectsAllowed property in the handler for the dragstart event.
dropEffect Specifies which of the allowed drop effects are supported by a drag target. Set the dropEffect property in
the handler for the dragEnter event. During the drag, the cursor changes to indicate which effect would
occur if the user released the mouse. If no dropEffect is specified, an effectsAllowed property effect is
chosen. The copy effect has priority over the move effect, which itself has priority over the link effect. The user
can modify the default priority using the keyboard.

942
ACTIONSCRIPT 3.0 DEVELOPER’S GUIDE
About the HTML environment
Last updated 3/21/2011
unload events (for body and frameset objects)
Adobe AIR 1.0 and later
In the top-level frameset or body tag of a window (including the main window of the application), do not use the
unload event to respond to the window (or application) being closed. Instead, use exiting event of the
NativeApplication object (to detect when an application is closing). Or use the closing event of the NativeWindow
object (to detect when a window is closing). For example, the following JavaScript code displays a message
("Goodbye.") when the user closes the application:
var app = air.NativeApplication.nativeApplication;
app.addEventListener(air.Event.EXITING, closeHandler);
function closeHandler(event)
{
alert("Goodbye.");
}
However, scripts can successfully respond to the unload event caused by navigation of a frame, iframe, or top-level
window content.
Note: These limitations may be removed in a future version of Adobe AIR.
JavaScript Window object
Adobe AIR 1.0 and later
The Window object remains the global object in the JavaScript execution context. In the application sandbox, AIR
adds new properties to the JavaScript Window object to provide access to the built-in classes of AIR, as well as
important host objects. In addition, some methods and properties behave differently depending on whether they are
within the application sandbox or not.
Window.runtime property The runtime property allows you to instantiate and use the built-in runtime classes from
within the application sandbox. These classes include the AIR and Flash Player APIs (but not, for example, the Flex
framework). For example, the following statement creates an AIR file object:
var preferencesFile = new window.runtime.flash.filesystem.File();
The AIRAliases.js file, provided in the AIR SDK, contains alias definitions that allow you to shorten such references.
For example, when AIRAliases.js is imported into a page, a File object can be created with the following statement:
var preferencesFile = new air.File();
The window.runtime property is only defined for content within the application sandbox and only for the parent
document of a page with frames or iframes.
See “Using the AIRAliases.js file” on page 959.
Window.nativeWindow property The nativeWindow property provides a reference to the underlying native window
object. With this property, you can script window functions and properties such as screen position, size, and visibility,
and handle window events such as closing, resizing, and moving. For example, the following statement closes the
window:
window.nativeWindow.close();
Note: The window control features provided by the NativeWindow object overlap the features provided by the JavaScript
Window object. In such cases, you can use whichever method you find most convenient.
The window.nativeWindow property is only defined for content within the application sandbox and only for the
parent document of a page with frames or iframes.

943
ACTIONSCRIPT 3.0 DEVELOPER’S GUIDE
About the HTML environment
Last updated 3/21/2011
Window.htmlLoader property The htmlLoader property provides a reference to the AIR HTMLLoader object that
contains the HTML content. With this property, you can script the appearance and behavior of the HTML
environment. For example, you can use the htmlLoader.paintsDefaultBackground property to determine whether
the control paints a default, white background:
window.htmlLoader.paintsDefaultBackground = false;
Note: The HTMLLoader object itself has a window property, which references the JavaScript Window object of the HTML
content it contains. You can use this property to access the JavaScript environment through a reference to the containing
HTMLLoader.
The window.htmlLoader property is only defined for content within the application sandbox and only for the parent
document of a page with frames or iframes.
Window.parentSandboxBridge and Window.childSandboxBridge properties The parentSandboxBridge and
childSandboxBridge properties allow you to define an interface between a parent and a child frame. For more
information, see “Cross-scripting content in different security sandboxes” on page 970.
Window.setTimeout() and Window.setInterval() functions AIR places security restrictions on use of the
setTimeout() and setInterval() functions within the application sandbox. You cannot define the code to be
executed as a string when calling setTimeout() or setInterval(). You must use a function reference. For more
information, see “setTimeout() and setInterval()” on page 956.
Window.open() function When called by code running in a non-application sandbox, the open() method only opens
a window when called as a result of user interaction (such as a mouse click or keypress). In addition, the window title
is prefixed with the application title (to prevent windows opened by remote content from impersonating windows
opened by the application). For more information, see the “Restrictions on calling the JavaScript window.open()
method” on page 1050.
air.NativeApplication object
Adobe AIR 1.0 and later
The NativeApplication object provides information about the application state, dispatches several important
application-level events, and provides useful functions for controlling application behavior. A single instance of the
NativeApplication object is created automatically and can be accessed through the class-defined
NativeApplication.nativeApplication property.
To access the object from JavaScript code you could use:
var app = window.runtime.flash.desktop.NativeApplication.nativeApplication;
Or, if the AIRAliases.js script has been imported, you could use the shorter form:
var app = air.NativeApplication.nativeApplication;
The NativeApplication object can only be accessed from within the application sandbox. For more information about
the NativeApplication object, see “Working with AIR runtime and operating system information” on page 860.
The JavaScript URL scheme
Adobe AIR 1.0 and later
Execution of code defined in a JavaScript URL scheme (as in href="javascript:alert('Test')") is blocked within
the application sandbox. No error is thrown.

944
ACTIONSCRIPT 3.0 DEVELOPER’S GUIDE
About the HTML environment
Last updated 3/21/2011
HTML in AIR
Adobe AIR 1.0 and later
AIR and WebKit define a couple of non-standard HTML elements and attributes, including:
“HTML frame and iframe elements” on page 944
“HTML element event handlers” on page 946
HTML frame and iframe elements
Adobe AIR 1.0 and later
AIR adds new attributes to the frame and iframe elements of content in the application sandbox:
sandboxRoot attribute The sandboxRoot attribute specifies an alternate, non-application domain of origin for the file
specified by the frame src attribute. The file is loaded into the non-application sandbox corresponding to the specified
domain. Content in the file and content loaded from the specified domain can cross-script each other.
Important: If you set the value of sandboxRoot to the base URL of the domain, all requests for content from that domain
are loaded from the application directory instead of the remote server (whether that request results from page navigation,
from an XMLHttpRequest, or from any other means of loading content).
documentRoot attribute The documentRoot attribute specifies the local directory from which to load URLs that
resolve to files within the location specified by sandboxRoot.
When resolving URLs, either in the frame src attribute, or in content loaded into the frame, the part of the URL
matching the value specified in sandboxRoot is replaced with the value specified in documentRoot. Thus, in the
following frame tag:
<iframe src="http://www.example.com/air/child.html"
documentRoot="app:/sandbox/"
sandboxRoot="http://www.example.com/air/"/>
child.html is loaded from the sandbox subdirectory of the application installation folder. Relative URLs in
child.html are resolved based on sandbox directory. Note that any files on the remote server at
www.example.com/air are not accessible in the frame, since AIR would attempt to load them from the app:/sandbox/
directory.
allowCrossDomainXHR attribute Include allowCrossDomainXHR="allowCrossDomainXHR" in the opening frame
tag to allow content in the frame to make XMLHttpRequests to any remote domain. By default, non-application
content can only make such requests to its own domain of origin. There are serious security implications involved in
allowing cross-domain XHRs. Code in the page is able to exchange data with any domain. If malicious content is
somehow injected into the page, any data accessible to code in the current sandbox can be compromised. Only enable
cross-domain XHRs for pages that you create and control and only when cross-domain data loading is truly necessary.
Also, carefully validate all external data loaded by the page to prevent code injection or other forms of attack.
Important: If the allowCrossDomainXHR attribute is included in a frame or iframe element, cross-domain XHRs are
enabled (unless the value assigned is "0" or starts with the letters "f" or "n"). For example, setting allowCrossDomainXHR
to "deny" would still enable cross-domain XHRs. Leave the attribute out of the element declaration altogether if you do
not want to enable cross-domain requests.
ondominitialize attribute Specifies an event handler for the dominitialize event of a frame. This event is an AIR-
specific event that fires when the window and document objects of the frame have been created, but before any scripts
have been parsed or document elements created.

945
ACTIONSCRIPT 3.0 DEVELOPER’S GUIDE
About the HTML environment
Last updated 3/21/2011
The frame dispatches the dominitialize event early enough in the loading sequence that any script in the child page
can reference objects, variables, and functions added to the child document by the dominitialize handler. The
parent page must be in the same sandbox as the child to directly add or access any objects in a child document.
However, a parent in the application sandbox can establish a sandbox bridge to communicate with content in a non-
application sandbox.
The following examples illustrate use of the iframe tag in AIR:
Place child.html in a remote sandbox, without mapping to an actual domain on a remote server:
<iframe src="http://localhost/air/child.html"
documentRoot="app:/sandbox/"
sandboxRoot="http://localhost/air/"/>
Place child.html in a remote sandbox, allowing XMLHttpRequests only to www.example.com:
<iframe src="http://www.example.com/air/child.html"
documentRoot="app:/sandbox/"
sandboxRoot="http://www.example.com/air/"/>
Place child.html in a remote sandbox, allowing XMLHttpRequests to any remote domain:
<iframe src="http://www.example.com/air/child.html"
documentRoot="app:/sandbox/"
sandboxRoot="http://www.example.com/air/"
allowCrossDomainXHR="allowCrossDomainXHR"/>
Place child.html in a local-with-file-system sandbox:
<iframe src="file:///templates/child.html"
documentRoot="app:/sandbox/"
sandboxRoot="app-storage:/templates/"/>
Place child.html in a remote sandbox, using the dominitialize event to establish a sandbox bridge:
<html>
<head>
<script>
var bridgeInterface = {};
bridgeInterface.testProperty = "Bridge engaged";
function engageBridge(){
document.getElementById("sandbox").parentSandboxBridge = bridgeInterface;
}
</script>
</head>
<body>
<iframe id="sandbox"
src="http://www.example.com/air/child.html"
documentRoot="app:/"
sandboxRoot="http://www.example.com/air/"
ondominitialize="engageBridge()"/>
</body>
</html>
The following child.html document illustrates how child content can access the parent sandbox bridge:

946
ACTIONSCRIPT 3.0 DEVELOPER’S GUIDE
About the HTML environment
Last updated 3/21/2011
<html>
<head>
<script>
document.write(window.parentSandboxBridge.testProperty);
</script>
</head>
<body></body>
</html>
For more information, see “Cross-scripting content in different security sandboxes” on page 970 and “HTML security
in Adobe AIR” on page 1045.
HTML element event handlers
Adobe AIR 1.0 and later
DOM objects in AIR and WebKit dispatch some events not found in the standard DOM event model. The following
table lists the related event attributes you can use to specify handlers for these events:
HTML contentEditable attribute
Adobe AIR 1.0 and later
You can add the contentEditable attribute to any HTML element to allow users to edit the content of the element.
For example, the following example HTML code sets the entire document as editable, except for first p element:
Callback attribute name Description
oncontextmenu Called when a context menu is invoked, such as through a right-click
or command-click on selected text.
oncopy Called when a selection in an element is copied.
oncut Called when a selection in an element is cut.
ondominitialize Called when the DOM of a document loaded in a frame or iframe is
created, but before any DOM elements are created or scripts parsed.
ondrag Called when an element is dragged.
ondragend Called when a drag is released.
ondragenter Called when a drag gesture enters the bounds of an element.
ondragleave Called when a drag gesture leaves the bounds of an element.
ondragover Called continuously while a drag gesture is within the bounds of an
element.
ondragstart Called when a drag gesture begins.
ondrop Called when a drag gesture is released while over an element.
onerror Called when an error occurs while loading an element.
oninput Called when text is entered into a form element.
onpaste Called when an item is pasted into an element.
onscroll Called when the content of a scrollable element is scrolled.
onselectstart Called when a selection begins.

947
ACTIONSCRIPT 3.0 DEVELOPER’S GUIDE
About the HTML environment
Last updated 3/21/2011
<html>
<head/>
<body contentEditable="true">
<h1>de Finibus Bonorum et Malorum</h1>
<p contentEditable="false">Sed ut perspiciatis unde omnis iste natus error.</p>
<p>At vero eos et accusamus et iusto odio dignissimos ducimus qui blanditiis.</p>
</body>
</html>
Note: If you set the document.designMode property to on, then all elements in the document are editable, regardless of
the setting of contentEditable for an individual element. However, setting designMode to off, does not disable
editing of elements for which contentEditable is true. See “Document.designMode property” on page 941 for
additional information.
Data: URLs
Adobe AIR 2 and later
AIR supports data: URLs for the following elements:
•img
•input type=”image”
•CSS rules allowing images (such as background-image)
Data URLs allow you to insert binary image data directly into a CSS or HTML document as a base64-encoded string.
The following example uses a data: URL as a repeating background:
<html>
<head>
<style>
body {
background-
image:url('data:image/png;base64,iVBORw0KGgoAAAANSUhEUgAAAGQAAABkCAMAAABHPGVmAAAAGXRFWHRTb2Z
0d2FyZQBBZG9iZSBJbWFnZVJlYWR5ccllPAAAAAZQTFRF%2F6cA%2F%2F%2F%2Fgxp3lwAAAAJ0Uk5T%2FwDltzBKAAA
BF0lEQVR42uzZQQ7CMAxE0e%2F7X5oNCyRocWzPiJbMBZ6qpIljE%2BnwklgKG7kwUjc2IkIaxkY0CPdEsCCasws6ShX
BgmBBmEagpXQQLAgWBAuSY2gaKaWPYEGwIEwg0FRmECwIFoQeQjJlhJWUEFazjFDJCkI5WYRWMgjtfEGYyQnCXD4jTCd
m1zmngFpBFznwVNi5RPSbwbWnpYr%2BBHi%2FtCTfgPLEPL7jBctAKBRptXJ8M%2BprIuZKu%2BUKcg4YK1PLz7kx4bS
qHyPaT4d%2B28OCJJiRBo4FCQsSA0bziT3XubMgYUG6fc5fatmGBQkL0hoJ1IaZMiQsSFiQ8vRscTjlQOI2iHZwtpHuf
%2BJAYiOiJSkj8Z%2FIQ4ABANvXGLd3%2BZMrAAAAAElFTkSuQmCC');
background-repeat:repeat;
}
</style>
</head>
<body>
</body>
</html>
When using data: URLS, be aware that extra whitespace is significant. For example, the data string must be entered as
a single, unbroken line. Otherwise, the line breaks are treated as part of the data and the image cannot be decoded.

948
ACTIONSCRIPT 3.0 DEVELOPER’S GUIDE
About the HTML environment
Last updated 3/21/2011
CSS in AIR
Adobe AIR 1.0 and later
WebKit supports several extended CSS properties. Many of these extensions use the prefix: -webkit. Note that some
of these extensions are experimental in nature and may be removed from a future version of WebKit. For more
information about the Webkit support for CSS and its extensions to CSS, see Safari CSS Reference.
WebKit features not supported in AIR
Adobe AIR 1.0 and later
AIR does not support the following features available in WebKit or Safari 4:
•Cross-domain messaging via window.postMessage (AIR provides its own cross-domain communication APIs)
•CSS variables
•Web Open Font Format (WOFF) and SVG fonts.
•HTML video and audio tags
•Media device queries
•Offline application cache
•Printing (AIR provides its own PrintJob API)
•Spelling and grammar checkers
•SVG
•WAI-ARIA
•WebSockets (AIR provides its own socket APIs)
•Web workers
•WebKit SQL API (AIR provides its own API)
•WebKit geolocation API (AIR provides its own geolocation API on supported devices)
•WebKit multi-file upload API
•WebKit touch events (AIR provides its own touch events)
•Wireless Markup Language (WML)
The following lists contain specific JavaScript APIs, HTML elements, and CSS properties and values that AIR does not
support:
Unsupported JavaScript Window object members:
•applicationCache()
•console
•openDatabase()
•postMessage()
•document.print()
Unsupported HTML tags:
•audio

949
ACTIONSCRIPT 3.0 DEVELOPER’S GUIDE
About the HTML environment
Last updated 3/21/2011
•video
Unsupported HTML attributes:
•aria-*
•draggable
•formnovalidate
•list
•novalidate
•onbeforeload
•onhashchange
•onorientationchange
•onpagehide
•onpageshow
•onpopstate
•ontouchstart
•ontouchmove
•ontouchend
•ontouchcancel
•onwebkitbeginfullscreen
•onwebkitendfullscreen
•pattern
•required
•sandbox
Unsupported JavaScript events:
•beforeload
•hashchange
•orientationchange
•pagehide
•pageshow
•popstate
•touchstart
•touchmove
•touchend
•touchcancel
•webkitbeginfullscreen
•webkitendfullscreen

950
ACTIONSCRIPT 3.0 DEVELOPER’S GUIDE
About the HTML environment
Last updated 3/21/2011
Unsupported CSS properties:
•background-clip
•background-origin (use -webkit-background-origin)
•background-repeat-x
•background-repeat-y
•background-size (use -webkit-background-size)
•border-bottom-left-radius
•border-bottom-right-radius
•border-radius
•border-top-left-radius
•border-top-right-radius
•text-rendering
•-webkit-animation-play-state
•-webkit-background-clip
•-webkit-color-correction
•-webkit-font-smoothing
Unsupported CSS values:
•appearance property values:
•media-volume-slider-container
•media-volume-slider
•media-volume-sliderthumb
•outer-spin-button
•border-box (background-clip and background-origin)
•contain (background-size)
•content-box (background-clip and background-origin)
•cover (background-size)
•list property values:
•afar
•amharic
•amharic-abegede
•cjk-earthly-branch
•cjk-heavenly-stem
•ethiopic
•ethiopic-abegede
•ethiopic-abegede-am-et
•ethiopic-abegede-gez
•ethiopic-abegede-ti-er

951
ACTIONSCRIPT 3.0 DEVELOPER’S GUIDE
About the HTML environment
Last updated 3/21/2011
•ethiopic-abegede-ti-et
•ethiopic-halehame-aa-er
•ethiopic-halehame-aa-et
•ethiopic-halehame-am-et
•ethiopic-halehame-gez
•ethiopic-halehame-om-et
•ethiopic-halehame-sid-et
•ethiopic-halehame-so-et
•ethiopic-halehame-ti-er
•ethiopic-halehame-ti-et
•ethiopic-halehame-tig
•hangul
•hangul-consonant
•lower-norwegian
•oromo
•sidama
•somali
•tigre
•tigrinya-er
•tigrinya-er-abegede
•tigrinya-et
•tigrinya-et-abegede
•upper-greek
•upper-norwegian
•-wap-marquee (display property)

952
Last updated 3/21/2011
Chapter 57: Programming HTML and
JavaScript in AIR
Adobe AIR 1.0 and later
A number of programming topics are unique to developing Adobe® AIR® applications with HTML and JavaScript. The
following information is important whether you are programming an HTML-based AIR application or programming
a SWF-based AIR application that runs HTML and JavaScript using the HTMLLoader class (or mx:HTML Flex™
component).
About the HTMLLoader class
Adobe AIR 1.0 and later
The HTMLLoader class of Adobe AIR defines the display object that can display HTML content in an AIR application.
SWF-based applications can add an HTMLLoader control to an existing window or create an HTML window that
automatically contains a HTMLLoader object with HTMLLoader.createRootWindow(). The HTMLLoader object
can be accessed through the JavaScript window.htmlLoader property from within the loaded HTML page.
Loading HTML content from a URL
Adobe AIR 1.0 and later
The following code loads a URL into an HTMLLoader object (add the HTMLLoader as a child of the stage or other
display object container to display the HTML content in your application):
import flash.html.HTMLLoader;
var html:HTMLLoader = new HTMLLoader;
html.width = 400;
html.height = 600;
var urlReq:URLRequest = new URLRequest("http://www.adobe.com/");
html.load(urlReq);
An HTMLLoader object's width and height properties are both set to 0 by default. You will want to set these
dimensions when adding an HTMLLoader object to the stage. The HTMLLoader dispatches several events as a page
loads. You can use these events to determine when it is safe to interact with the loaded page. These events are described
in “Handling HTML-related events in AIR” on page 991.
Note: In the Flex framework, only classes that extend the UIComponent class can be added as children of a Flex Container
components. For this reason, you cannot directly add an HTMLLoader as a child of a Flex Container component;
however you can use the Flex mx:HTML control, you can build a custom class that extends UIComponent and contains
an HTMLLoader as a child of the UIComponent, or you can add the HTMLLoader as a child of a UIComponent and add
the UIComponent to the Flex container.

953
ACTIONSCRIPT 3.0 DEVELOPER’S GUIDE
Programming HTML and JavaScript in AIR
Last updated 3/21/2011
You can also render HTML text by using the TextField class, but its capabilities are limited. The Adobe® Flash® Player’s
TextField class supports a subset of HTML markup, but because of size limitations, its capabilities are limited. (The
HTMLLoader class included in Adobe AIR is not available in Flash Player.)
Loading HTML content from a string
Adobe AIR 1.0 and later
The loadString() method of an HTMLLoader object loads a string of HTML content into the HTMLLoader object:
var html:HTMLLoader = new HTMLLoader();
var htmlStr:String = "<html><body>Hello <b>world</b>.</body></html>";
html.loadString(htmlStr);
By default, content loaded via the loadString() method is placed in a non-application sandbox with the following
characteristics:
•It has access to load content from the network (but not from the file system).
•It cannot load data using XMLHttpRequest.
•The window.location property is set to "about:blank".
•The content cannot access the window.runtime property (like content in any non-application sandbox can).
In AIR 1.5, the HTMLLoader class includes a placeLoadStringContentInApplicationSandbox property. When
this property is set to true for an HTMLLoader object, content loaded via the loadString() method is placed in the
application sandbox. (The default value is false.) This gives content loaded via the loadString() method access to
the window.runtime property and to all AIR APIs. If you set this property to true, ensure that the data source for a
string used in a call to the loadString() method is trusted. Code statements in the HTML string are executed with
full application privileges when this property is set to true. Only set this property to true when you are certain that
the string cannot contain harmful code.
In applications compiled with the AIR 1.0 or AIR 1.1 SDKs, content loaded via the loadString() method is placed
in the application sandbox.
Important security rules when using HTML in AIR applications
Adobe AIR 1.0 and later
The files you install with the AIR application have access to the AIR APIs. For security reasons, content from other
sources do not. For example, this restriction prevents content from a remote domain (such as http://example.com)
from reading the contents the user’s desktop directory (or worse).
Because there are security loopholes that can be exploited through calling the eval() function (and related APIs),
content installed with the application, by default, is restricted from using these methods. However, some Ajax
frameworks use the calling the eval() function and related APIs.
To properly structure content to work in an AIR application, you must take into account the rules for the security
restrictions on content from different sources. Content from different sources is placed in separate security
classifications, called sandboxes (see “Security sandboxes” on page 1010). By default, content installed with the
application is installed in a sandbox known as the application sandbox, and this grants it access to the AIR APIs. The
application sandbox is generally the most secure sandbox, with restrictions designed to prevent the execution of
untrusted code.

954
ACTIONSCRIPT 3.0 DEVELOPER’S GUIDE
Programming HTML and JavaScript in AIR
Last updated 3/21/2011
The runtime allows you to load content installed with your application into a sandbox other than the application
sandbox. Content in non-application sandboxes operates in a security environment similar to that of a typical web
browser. For example, code in non-application sandboxes can use eval() and related methods (but at the same time
is not allowed to access the AIR APIs). The runtime includes ways to have content in different sandboxes communicate
securely (without exposing AIR APIs to non-application content, for example). For details, see “Cross-scripting
content in different security sandboxes” on page 970.
If you call code that is restricted from use in a sandbox for security reasons, the runtime dispatches a JavaScript error:
“Adobe AIR runtime security violation for JavaScript code in the application security sandbox.”
To avoid this error, follow the coding practices described in the next section, “Avoiding security-related JavaScript
errors” on page 954.
For more information, see “HTML security in Adobe AIR” on page 1045.
Avoiding security-related JavaScript errors
Adobe AIR 1.0 and later
If you call code that is restricted from use in a sandbox due to these security restrictions, the runtime dispatches a
JavaScript error: “Adobe AIR runtime security violation for JavaScript code in the application security sandbox.” To
avoid this error, follow these coding practices.
Causes of security-related JavaScript errors
Adobe AIR 1.0 and later
Code executing in the application sandbox is restricted from most operations that involve evaluating and executing
strings once the document load event has fired and any load event handlers have exited. Attempting to use the
following types of JavaScript statements that evaluate and execute potentially insecure strings generates JavaScript
errors:
•eval() function
•setTimeout() and setInterval()
•Function constructor
In addition, the following types of JavaScript statements fail without generating an unsafe JavaScript error:
•javascript: URLs
•Event callbacks assigned through onevent attributes in innerHTML and outerHTML statements
•Loading JavaScript files from outside the application installation directory
•document.write() and document.writeln()
•Synchronous XMLHttpRequests before the load event or during a load event handler
•Dynamically created script elements
Note: In some restricted cases, evaluation of strings is permitted. See “Code restrictions for content in different
sandboxes” on page 1047for more information.
Adobe maintains a list of Ajax frameworks known to support the application security sandbox, at
http://www.adobe.com/go/airappsandboxframeworks.

955
ACTIONSCRIPT 3.0 DEVELOPER’S GUIDE
Programming HTML and JavaScript in AIR
Last updated 3/21/2011
The following sections describe how to rewrite scripts to avoid these unsafe JavaScript errors and silent failures for
code running in the application sandbox.
Mapping application content to a different sandbox
Adobe AIR 1.0 and later
In most cases, you can rewrite or restructure an application to avoid security-related JavaScript errors. However, when
rewriting or restructuring is not possible, you can load the application content into a different sandbox using the
technique described in “Loading application content into a non-application sandbox” on page 970. If that content also
must access AIR APIs, you can create a sandbox bridge, as described in “Setting up a sandbox bridge interface” on
page 971.
eval() function
Flash Player 9 and later, Adobe AIR 1.0 and later
In the application sandbox, the eval() function can only be used before the page load event or during a load event
handler. After the page has loaded, calls to eval() will not execute code. However, in the following cases, you can
rewrite your code to avoid the use of eval().
Assigning properties to an object
Adobe AIR 1.0 and later
Instead of parsing a string to build the property accessor:
eval("obj." + propName + " = " + val);
access properties with bracket notation:
obj[propName] = val;
Creating a function with variables available in context
Adobe AIR 1.0 and later
Replace statements such as the following:
function compile(var1, var2){
eval("var fn = function(){ this."+var1+"(var2) }");
return fn;
}
with:
function compile(var1, var2){
var self = this;
return function(){ self[var1](var2) };
}

956
ACTIONSCRIPT 3.0 DEVELOPER’S GUIDE
Programming HTML and JavaScript in AIR
Last updated 3/21/2011
Creating an object using the name of the class as a string parameter
Adobe AIR 1.0 and later
Consider a hypothetical JavaScript class defined with the following code:
var CustomClass =
{
Utils:
{
Parser: function(){ alert('constructor') }
},
Data:
{
}
};
var constructorClassName = "CustomClass.Utils.Parser";
The simplest way to create a instance would be to use eval():
var myObj;
eval('myObj=new ' + constructorClassName +'()')
However, you could avoid the call to eval() by parsing each component of the class name and building the new object
using bracket notation:
function getter(str)
{
var obj = window;
var names = str.split('.');
for(var i=0;i<names.length;i++){
if(typeof obj[names[i]]=='undefined'){
var undefstring = names[0];
for(var j=1;j<=i;j++)
undefstring+="."+names[j];
throw new Error(undefstring+" is undefined");
}
obj = obj[names[i]];
}
return obj;
}
To create the instance, use:
try{
var Parser = getter(constructorClassName);
var a = new Parser();
}catch(e){
alert(e);
}
setTimeout() and setInterval()
Adobe AIR 1.0 and later
Replace the string passed as the handler function with a function reference or object. For example, replace a statement
such as:

957
ACTIONSCRIPT 3.0 DEVELOPER’S GUIDE
Programming HTML and JavaScript in AIR
Last updated 3/21/2011
setTimeout("alert('Timeout')", 100);
with:
setTimeout(function(){alert('Timeout')}, 100);
Or, when the function requires the this object to be set by the caller, replace a statement such as:
this.appTimer = setInterval("obj.customFunction();", 100);
with the following:
var _self = this;
this.appTimer = setInterval(function(){obj.customFunction.apply(_self);}, 100);
Function constructor
Adobe AIR 1.0 and later
Calls to new Function(param, body) can be replaced with an inline function declaration or used only before the
page load event has been handled.
javascript: URLs
Adobe AIR 1.0 and later
The code defined in a link using the javascript: URL scheme is ignored in the application sandbox. No unsafe
JavaScript error is generated. You can replace links using javascript: URLs, such as:
<a href="javascript:code()">Click Me</a>
with:
<a href="#" onclick="code()">Click Me</a>
Event callbacks assigned through onevent attributes in innerHTML and
outerHTML statements
Adobe AIR 1.0 and later
When you use innerHTML or outerHTML to add elements to the DOM of a document, any event callbacks assigned
within the statement, such as onclick or onmouseover, are ignored. No security error is generated. Instead, you can
assign an id attribute to the new elements and set the event handler callback functions using the
addEventListener() method.
For example, given a target element in a document, such as:
<div id="container"></div>
Replace statements such as:
document.getElementById('container').innerHTML =
'<a href="#" onclick="code()">Click Me.</a>';
with:
document.getElementById('container').innerHTML = '<a href="#" id="smith">Click Me.</a>';
document.getElementById('smith').addEventListener("click", function() { code(); });

958
ACTIONSCRIPT 3.0 DEVELOPER’S GUIDE
Programming HTML and JavaScript in AIR
Last updated 3/21/2011
Loading JavaScript files from outside the application installation directory
Adobe AIR 1.0 and later
Loading script files from outside the application sandbox is not permitted. No security error is generated. All script
files that run in the application sandbox must be installed in the application directory. To use external scripts in a page,
you must map the page to a different sandbox. See “Loading application content into a non-application sandbox” on
page 970.
document.write() and document.writeln()
Adobe AIR 1.0 and later
Calls to document.write() or document.writeln() are ignored after the page load event has been handled. No
security error is generated. As an alternative, you can load a new file, or replace the body of the document using DOM
manipulation techniques.
Synchronous XMLHttpRequests before the load event or during a load event
handler
Adobe AIR 1.0 and later
Synchronous XMLHttpRequests initiated before the page load event or during a load event handler do not return any
content. Asynchronous XMLHttpRequests can be initiated, but do not return until after the load event. After the load
event has been handled, synchronous XMLHttpRequests behave normally.
Dynamically created script elements
Adobe AIR 1.0 and later
Dynamically created script elements, such as when created with innerHTML or document.createElement()
method are ignored.
Accessing AIR API classes from JavaScript
Adobe AIR 1.0 and later
In addition to the standard and extended elements of Webkit, HTML and JavaScript code can access the host classes
provided by the runtime. These classes let you access the advanced features that AIR provides, including:
•Access to the file system
•Use of local SQL databases
•Control of application and window menus
•Access to sockets for networking
•Use of user-defined classes and objects
•Sound capabilities

959
ACTIONSCRIPT 3.0 DEVELOPER’S GUIDE
Programming HTML and JavaScript in AIR
Last updated 3/21/2011
For example, the AIR file API includes a File class, contained in the flash.filesystem package. You can create a File
object in JavaScript as follows:
var myFile = new window.runtime.flash.filesystem.File();
The runtime object is a special JavaScript object, available to HTML content running in AIR in the application
sandbox. It lets you access runtime classes from JavaScript. The flash property of the runtime object provides
access to the flash package. In turn, the flash.filesystem property of the runtime object provides access to the
flash.filesystem package (and this package includes the File class). Packages are a way of organizing classes used in
ActionScript.
Note: The runtime property is not automatically added to the window objects of pages loaded in a frame or iframe.
However, as long as the child document is in the application sandbox, the child can access the runtime property of the
parent.
Because the package structure of the runtime classes would require developers to type long strings of JavaScript
code strings to access each class (as in window.runtime.flash.desktop.NativeApplication), the AIR SDK
includes an AIRAliases.js file that lets you access runtime classes much more easily (for instance, by simply typing
air.NativeApplication).
The AIR API classes are discussed throughout this guide. Other classes from the Flash Player API, which may be of
interest to HTML developers, are described in the Adobe AIR API Reference for HTML Developers. ActionScript is
the language used in SWF (Flash Player) content. However, JavaScript and ActionScript syntax are similar. (They
are both based on versions of the ECMAScript language.) All built-in classes are available in both JavaScript (in
HTML content) and ActionScript (in SWF content).
Note: JavaScript code cannot use the Dictionary, XML, and XMLList classes, which are available in ActionScript.
Using the AIRAliases.js file
Adobe AIR 1.0 and later
The runtime classes are organized in a package structure, as in the following:
•window.runtime.flash.desktop.NativeApplication
•window.runtime.flash.desktop.ClipboardManager
•window.runtime.flash.filesystem.FileStream
•window.runtime.flash.data.SQLDatabase
Included in the AIR SDK is an AIRAliases.js file that provide “alias” definitions that let you access the runtime
classes with less typing. For example, you can access the classes listed above by simply typing the following:
•air.NativeApplication
•air.Clipboard
•air.FileStream
•air.SQLDatabase
This list is just a short subset of the classes in the AIRAliases.js file. The complete list of classes and package-level
functions is provided in the Adobe AIR API Reference for HTML Developers.
In addition to commonly used runtime classes, the AIRAliases.js file includes aliases for commonly used package-
level functions: window.runtime.trace(), window.runtime.flash.net.navigateToURL(), and
window.runtime.flash.net.sendToURL(), which are aliased as air.trace(), air.navigateToURL(), and
air.sendToURL().

960
ACTIONSCRIPT 3.0 DEVELOPER’S GUIDE
Programming HTML and JavaScript in AIR
Last updated 3/21/2011
To use the AIRAliases.js file, include the following script reference in your HTML page:
<script src="AIRAliases.js"></script>
Adjust the path in the src reference, as needed.
Important: Except where noted, the JavaScript example code in this documentation assumes that you have included
the AIRAliases.js file in your HTML page.
About URLs in AIR
Adobe AIR 1.0 and later
In HTML content running in AIR, you can use any of the following URL schemes in defining src attributes for img,
frame, iframe, and script tags, in the href attribute of a link tag, or anywhere else you can provide a URL.
For more information about using URL schemes in AIR, see “URI schemes” on page 780.
Many of AIR APIs, including the File, Loader, URLStream, and Sound classes, use a URLRequest object rather than a
string containing the URL. The URLRequest object itself is initialized with a string, which can use any of the same url
schemes. For example, the following statement creates a URLRequest object that can be used to request the Adobe
home page:
var urlReq = new air.URLRequest("http://www.adobe.com/");
For information about URLRequest objects see “HTTP communications” on page 778.
Making ActionScript objects available to JavaScript
Adobe AIR 1.0 and later
JavaScript in the HTML page loaded by an HTMLLoader object can call the classes, objects, and functions defined in
the ActionScript execution context using the window.runtime, window.htmlLoader, and window.nativeWindow
properties of the HTML page. You can also make ActionScript objects and functions available to JavaScript code by
creating references to them within the JavaScript execution context.
URL scheme Description Example
file A path relative to the root of the file system. file:///c:/AIR Test/test.txt
app A path relative to the root directory of the installed
application.
app:/images
app-storage A path relative to the application store directory. For each
installed application, AIR defines a unique application store
directory, which is a useful place to store data specific to that
application.
app-storage:/settings/prefs.xml
http A standard HTTP request. http://www.adobe.com
https A standard HTTPS request. https://secure.example.com

961
ACTIONSCRIPT 3.0 DEVELOPER’S GUIDE
Programming HTML and JavaScript in AIR
Last updated 3/21/2011
A basic example of accessing JavaScript objects from ActionScript
Adobe AIR 1.0 and later
The following example illustrates how to add properties referencing ActionScript objects to the global window object
of an HTML page:
var html:HTMLLoader = new HTMLLoader();
var foo:String = "Hello from container SWF."
function helloFromJS(message:String):void {
trace("JavaScript says:", message);
}
var urlReq:URLRequest = new URLRequest("test.html");
html.addEventListener(Event.COMPLETE, loaded);
html.load(urlReq);
function loaded(e:Event):void{
html.window.foo = foo;
html.window.helloFromJS = helloFromJS;
}
The HTML content (in a file named test.html) loaded into the HTMLLoader object in the previous example can access
the foo property and the helloFromJS() method defined in the parent SWF file:
<html>
<script>
function alertFoo() {
alert(foo);
}
</script>
<body>
<button onClick="alertFoo()">
What is foo?
</button>
<p><button onClick="helloFromJS('Hi.')">
Call helloFromJS() function.
</button></p>
</body>
</html>
When accessing the JavaScript context of a loading document, you can use the htmlDOMInitialize event to create
objects early enough in the page construction sequence that any scripts defined in the page can access them. If you wait
for the complete event, only scripts in the page that run after the page load event can access the added objects.
Making class definitions available to JavaScript
Adobe AIR 1.0 and later
To make the ActionScript classes of your application available in JavaScript, you can assign the loaded HTML content
to the application domain containing the class definitions. The application domain of the JavaScript execution context
can be set with the runtimeApplicationDomain property of the HTMLLoader object. To set the application domain
to the primary application domain, for example, set runtimeApplicationDomain to
ApplicationDomain.currentDomain, as shown in the following code:
html.runtimeApplicationDomain = ApplicationDomain.currentDomain;

962
ACTIONSCRIPT 3.0 DEVELOPER’S GUIDE
Programming HTML and JavaScript in AIR
Last updated 3/21/2011
Once the runtimeApplicationDomain property is set, the JavaScript context shares class definitions with the
assigned domain. To create an instance of a custom class in JavaScript, reference the class definition through the
window.runtime property and use the new operator:
var customClassObject = new window.runtime.CustomClass();
The HTML content must be from a compatible security domain. If the HTML content is from a different security
domain than that of the application domain you assign, the page uses a default application domain instead. For
example, if you load a remote page from the Internet, you could not assign ApplicationDomain.currentDomain as the
application domain of the page.
Removing event listeners
Adobe AIR 1.0 and later
When you add JavaScript event listeners to objects outside the current page, including runtime objects, objects in
loaded SWF content, and even JavaScript objects running in other pages, you should always remove those event
listeners when the page unloads. Otherwise, the event listener dispatches the event to a handler function that no longer
exists. If this happens, you will see the following error message: “The application attempted to reference a JavaScript
object in an HTML page that is no longer loaded." Removing unneeded event listeners also lets AIR reclaim the
associated memory. For more information, see “Removing event listeners in HTML pages that navigate” on page 995.
Accessing HTML DOM and JavaScript objects from
ActionScript
Adobe AIR 1.0 and later
Once the HTMLLoader object dispatches the complete event, you can access all the objects in the HTML DOM
(document object model) for the page. Accessible objects include display elements (such as div and p objects in the
page) as well as JavaScript variables and functions. The complete event corresponds to the JavaScript page load event.
Before complete is dispatched, DOM elements, variables, and functions may not have been parsed or created. If
possible, wait for the complete event before accessing the HTML DOM.
For example, consider the following HTML page:
<html>
<script>
foo = 333;
function test() {
return "OK.";
}
</script>
<body>
<p id="p1">Hi.</p>
</body>
</html>
This simple HTML page defines a JavaScript variable named foo and a JavaScript function named test(). Both of these
are properties of the global window object of the page. Also, the window.document object includes a named P element
(with the ID p1), which you can access using the getElementById() method. Once the page is loaded (when the
HTMLLoader object dispatches the complete event), you can access each of these objects from ActionScript, as shown
in the following ActionScript code:

963
ACTIONSCRIPT 3.0 DEVELOPER’S GUIDE
Programming HTML and JavaScript in AIR
Last updated 3/21/2011
var html:HTMLLoader = new HTMLLoader();
html.width = 300;
html.height = 300;
html.addEventListener(Event.COMPLETE, completeHandler);
var xhtml:XML =
<html>
<script>
foo = 333;
function test() {
return "OK.";
}
</script>
<body>
<p id="p1">Hi.</p>
</body>
</html>;
html.loadString(xhtml.toString());
function completeHandler(e:Event):void {
trace(html.window.foo); // 333
trace(html.window.document.getElementById("p1").innerHTML); // Hi.
trace(html.window.test()); // OK.
}
To access the content of an HTML element, use the innerHTML property. For example, the previous code uses
html.window.document.getElementById("p1").innerHTML to get the contents of the HTML element named p1.
You can also set properties of the HTML page from ActionScript. For example, the following example sets the contents
of the p1 element and the value of the foo JavaScript variable on the page using a reference to the containing
HTMLLoader object:
html.window.document.getElementById("p1").innerHTML = "Goodbye";
html.window.foo = 66;
Embedding SWF content in HTML
Adobe AIR 1.0 and later
You can embed SWF content in HTML content within an AIR application just as you would in a browser. Embed the
SWF content using an object tag, an embed tag, or both.
Note: A common web development practice is to use both an object tag and an embed tag to display SWF content in an
HTML page. This practice has no benefit in AIR. You can use the W3C-standard object tag by itself in content to be
displayed in AIR. At the same time, you can continue to use the object and embed tags together, if necessary, for HTML
content that is also displayed in a browser.
If you have enabled transparency in the NativeWindow object displaying the HTML and SWF content, then AIR does
not display the SWF content when window mode (wmode) used to embed the content is set to the value: window. To
display SWF content in an HTML page of a transparent window, set the wmode parameter to opaque or transparent.
The window is the default value for wmode, so if you do not specify a value, your content may not be displayed.

964
ACTIONSCRIPT 3.0 DEVELOPER’S GUIDE
Programming HTML and JavaScript in AIR
Last updated 3/21/2011
The following example illustrates the use of the HTML object tag to display a SWF file within HTML content. The
wmode parameter is set to opaque so that the content is displayed, even if the underlying NativeWindow object is
transparent. The SWF file is loaded from the application directory, but you can use any of the URL schemes supported
by AIR. (The location from which the SWF file is loaded determines the security sandbox in which AIR places the
content.)
<object type="application/x-shockwave-flash" width="100%" height="100%">
<param name="movie" value="app:/SWFFile.swf"></param>
<param name="wmode" value="opaque"></param>
</object>
You can also use a script to load content dynamically. The following example creates an object node to display the
SWF file specified in the urlString parameter. The example adds the node as a child of the page element with the ID
specified by the elementID parameter:
<script>
function showSWF(urlString, elementID){
var displayContainer = document.getElementById(elementID);
var flash = createSWFObject(urlString, 'opaque', 650, 650);
displayContainer.appendChild(flash);
}
function createSWFObject(urlString, wmodeString, width, height){
var SWFObject = document.createElement("object");
SWFObject.setAttribute("type","application/x-shockwave-flash");
SWFObject.setAttribute("width","100%");
SWFObject.setAttribute("height","100%");
var movieParam = document.createElement("param");
movieParam.setAttribute("name","movie");
movieParam.setAttribute("value",urlString);
SWFObject.appendChild(movieParam);
var wmodeParam = document.createElement("param");
wmodeParam.setAttribute("name","wmode");
wmodeParam.setAttribute("value",wmodeString);
SWFObject.appendChild(wmodeParam);
return SWFObject;
}
</script>
SWF content is not displayed if the HTMLLoader object is scaled or rotated, or if the alpha property is set to a value
other than 1.0. Prior to AIR 1.5.2, SWF content was not displayed in a transparent window no matter which wmode
value was set.
Note: When an embedded SWF object attempts to load an external asset like a video file, the SWF content may not be
rendered properly if an absolute path to the video file is not provided in the HTML file. However, an embedded SWF
object can load an external image file using a relative path.
The following example depicts how external assets can be loaded through a SWF object embedded in an HTML
content:

965
ACTIONSCRIPT 3.0 DEVELOPER’S GUIDE
Programming HTML and JavaScript in AIR
Last updated 3/21/2011
var imageLoader;
function showSWF(urlString, elementID){
var displayContainer = document.getElementById(elementID);
imageLoader = createSWFObject(urlString,650,650);
displayContainer.appendChild(imageLoader);
}
function createSWFObject(urlString, width, height){
var SWFObject = document.createElement("object");
SWFObject.setAttribute("type","application/x-shockwave-flash");
SWFObject.setAttribute("width","100%");
SWFObject.setAttribute("height","100%");
var movieParam = document.createElement("param");
movieParam.setAttribute("name","movie");
movieParam.setAttribute("value",urlString);
SWFObject.appendChild(movieParam);
var flashVars = document.createElement("param");
flashVars.setAttribute("name","FlashVars");
//Load the asset inside the SWF content.
flashVars.setAttribute("value","imgPath=air.jpg");
SWFObject.appendChild(flashVars);
return SWFObject;
}
function loadImage()
{
showSWF("ImageLoader.swf", "imageSpot");
}
In the following ActionScript example, the image path passed by the HTML file is read and the image is loaded on
stage:

966
ACTIONSCRIPT 3.0 DEVELOPER’S GUIDE
Programming HTML and JavaScript in AIR
Last updated 3/21/2011
package
{
import flash.display.Sprite;
import flash.display.LoaderInfo;
import flash.display.StageScaleMode;
import flash.display.StageAlign;
import flash.display.Loader;
import flash.net.URLRequest;
public class ImageLoader extends Sprite
{
public function ImageLoader()
{
var flashvars = LoaderInfo(this.loaderInfo).parameters;
if(flashvars.imgPath){
var imageLoader = new Loader();
var image = new URLRequest(flashvars.imgPath);
imageLoader.load(image);
addChild(imageLoader);
imageLoader.x = 0;
imageLoader.y = 0;
stage.scaleMode=StageScaleMode.NO_SCALE;
stage.align=StageAlign.TOP_LEFT;
}
}
}
}
Using ActionScript libraries within an HTML page
Adobe AIR 1.0 and later
AIR extends the HTML script element so that a page can import ActionScript classes in a compiled SWF file. For
example, to import a library named, myClasses.swf, located in the lib subdirectory of the root application folder,
include the following script tag within an HTML file:
<script src="lib/myClasses.swf" type="application/x-shockwave-flash"></script>
Important: The type attribute must be type="application/x-shockwave-flash" for the library to be properly
loaded.
If the SWF content is compiled as a Flash Player 10 or AIR 1.5 SWF, you must set the XML namespace of the
application descriptor file to the AIR 1.5 namespace.
The lib directory and myClasses.swf file must also be included when the AIR file is packaged.
Access the imported classes through the runtime property of the JavaScript Window object:
var libraryObject = new window.runtime.LibraryClass();
If the classes in the SWF file are organized in packages, you must include the package name as well. For example, if the
LibraryClass definition was in a package named utilities, you would create an instance of the class with the following
statement:

967
ACTIONSCRIPT 3.0 DEVELOPER’S GUIDE
Programming HTML and JavaScript in AIR
Last updated 3/21/2011
var libraryObject = new window.runtime.utilities.LibraryClass();
Note: To compile an ActionScript SWF library for use as part of an HTML page in AIR, use the acompc compiler. The
acompc utility is part of the Flex SDK and is described in the Flex SDK documentation.
Accessing the HTML DOM and JavaScript objects from an imported
ActionScript file
Adobe AIR 1.0 and later
To access objects in an HTML page from ActionScript in a SWF file imported into the page using the <script> tag,
pass a reference to a JavaScript object, such as window or document, to a function defined in the ActionScript code.
Use the reference within the function to access the JavaScript object (or other objects accessible through the passed-in
reference).
For example, consider the following HTML page:
<html>
<script src="ASLibrary.swf" type="application/x-shockwave-flash"></script>
<script>
num = 254;
function getStatus() {
return "OK.";
}
function runASFunction(window){
var obj = new runtime.ASClass();
obj.accessDOM(window);
}
</script>
<body onload="runASFunction">
<p id="p1">Body text.</p>
</body>
</html>
This simple HTML page has a JavaScript variable named num and a JavaScript function named getStatus(). Both of
these are properties of the window object of the page. Also, the window.document object includes a named P element
(with the ID p1).
The page loads an ActionScript file, “ASLibrary.swf,” that contains a class, ASClass. ASClass defines a function named
accessDOM() that simply traces the values of these JavaScript objects. The accessDOM() method takes the JavaScript
Window object as an argument. Using this Window reference, it can access other objects in the page including
variables, functions, and DOM elements as illustrated in the following definition:
public class ASClass{
public function accessDOM(window:*):void {
trace(window.num); // 254
trace(window.document.getElementById("p1").innerHTML); // Body text..
trace(window.getStatus()); // OK.
}
}
You can both get and set properties of the HTML page from an imported ActionScript class. For example, the
following function sets the contents of the p1 element on the page and it sets the value of the foo JavaScript variable
on the page:

968
ACTIONSCRIPT 3.0 DEVELOPER’S GUIDE
Programming HTML and JavaScript in AIR
Last updated 3/21/2011
public function modifyDOM(window:*):void {
window.document.getElementById("p1").innerHTML = "Bye";
window.foo = 66;
Converting Date and RegExp objects
Adobe AIR 1.0 and later
The JavaScript and ActionScript languages both define Date and RegExp classes, but objects of these types are not
automatically converted between the two execution contexts. You must convert Date and RegExp objects to the
equivalent type before using them to set properties or function parameters in the alternate execution context.
For example, the following ActionScript code converts a JavaScript Date object named jsDate to an ActionScript
Date object:
var asDate:Date = new Date(jsDate.getMilliseconds());
The following ActionScript code converts a JavaScript RegExp object named jsRegExp to an ActionScript RegExp
object:
var flags:String = "";
if (jsRegExp.dotAll) flags += "s";
if (jsRegExp.extended) flags += "x";
if (jsRegExp.global) flags += "g";
if (jsRegExp.ignoreCase) flags += "i";
if (jsRegExp.multiline) flags += "m";
var asRegExp:RegExp = new RegExp(jsRegExp.source, flags);
Manipulating an HTML stylesheet from ActionScript
Adobe AIR 1.0 and later
Once the HTMLLoader object has dispatched the complete event, you can examine and manipulate CSS styles in a
page.
For example, consider the following simple HTML document:

969
ACTIONSCRIPT 3.0 DEVELOPER’S GUIDE
Programming HTML and JavaScript in AIR
Last updated 3/21/2011
<html>
<style>
.style1A { font-family:Arial; font-size:12px }
.style1B { font-family:Arial; font-size:24px }
</style>
<style>
.style2 { font-family:Arial; font-size:12px }
</style>
<body>
<p class="style1A">
Style 1A
</p>
<p class="style1B">
Style 1B
</p>
<p class="style2">
Style 2
</p>
</body>
</html>
After an HTMLLoader object loads this content, you can manipulate the CSS styles in the page via the cssRules array
of the window.document.styleSheets array, as shown here:
var html:HTMLLoader = new HTMLLoader( );
var urlReq:URLRequest = new URLRequest("test.html");
html.load(urlReq);
html.addEventListener(Event.COMPLETE, completeHandler);
function completeHandler(event:Event):void {
var styleSheet0:Object = html.window.document.styleSheets[0];
styleSheet0.cssRules[0].style.fontSize = "32px";
styleSheet0.cssRules[1].style.color = "#FF0000";
var styleSheet1:Object = html.window.document.styleSheets[1];
styleSheet1.cssRules[0].style.color = "blue";
styleSheet1.cssRules[0].style.font-family = "Monaco";
}
This code adjusts the CSS styles so that the resulting HTML document appears like the following:
Keep in mind that code can add styles to the page after the HTMLLoader object dispatches the complete event.

970
ACTIONSCRIPT 3.0 DEVELOPER’S GUIDE
Programming HTML and JavaScript in AIR
Last updated 3/21/2011
Cross-scripting content in different security sandboxes
Adobe AIR 1.0 and later
The runtime security model isolates code from different origins. By cross-scripting content in different security
sandboxes, you can allow content in one security sandbox to access selected properties and methods in another
sandbox.
AIR security sandboxes and JavaScript code
Adobe AIR 1.0 and later
AIR enforces a same-origin policy that prevents code in one domain from interacting with content in another. All files
are placed in a sandbox based on their origin. Ordinarily, content in the application sandbox cannot violate the same-
origin principle and cross-script content loaded from outside the application install directory. However, AIR provides
a few techniques that let you cross-script non-application content.
One technique uses frames or iframes to map application content into a different security sandbox. Any pages loaded
from the sandboxed area of the application behave as if they were loaded from the remote domain. For example, by
mapping application content to the example.com domain, that content could cross-script pages loaded from
example.com.
Since this technique places the application content into a different sandbox, code within that content is also no longer
subject to the restrictions on the execution of code in evaluated strings. You can use this sandbox mapping technique
to ease these restrictions even when you don’t need to cross-script remote content. Mapping content in this way can
be especially useful when working with one of the many JavaScript frameworks or with existing code that relies on
evaluating strings. However, you should consider and guard against the additional risk that untrusted content could
be injected and executed when content is run outside the application sandbox.
At the same time, application content mapped to another sandbox loses its access to the AIR APIs, so the sandbox
mapping technique cannot be used to expose AIR functionality to code executed outside the application sandbox.
Another cross-scripting technique lets you create an interface called a sandbox bridge between content in a non-
application sandbox and its parent document in the application sandbox. The bridge allows the child content to access
properties and methods defined by the parent, the parent to access properties and methods defined by the child, or both.
Finally, you can also perform cross-domain XMLHttpRequests from the application sandbox and, optionally, from
other sandboxes.
For more information, see “HTML frame and iframe elements” on page 944, “HTML security in Adobe AIR” on
page 1045, and “The XMLHttpRequest object” on page 938.
Loading application content into a non-application sandbox
Adobe AIR 1.0 and later
To allow application content to safely cross-script content loaded from outside the application install directory, you
can use frame or iframe elements to load application content into the same security sandbox as the external content.
If you do not need to cross-script remote content, but still wish to load a page of your application outside the
application sandbox, you can use the same technique, specifying http://localhost/ or some other innocuous value,
as the domain of origin.

971
ACTIONSCRIPT 3.0 DEVELOPER’S GUIDE
Programming HTML and JavaScript in AIR
Last updated 3/21/2011
AIR adds the new attributes, sandboxRoot and documentRoot, to the frame element that allow you to specify whether
an application file loaded into the frame should be mapped to a non-application sandbox. Files resolving to a path
underneath the sandboxRoot URL are loaded instead from the documentRoot directory. For security purposes, the
application content loaded in this way is treated as if it was actually loaded from the sandboxRoot URL.
The sandboxRoot property specifies the URL to use for determining the sandbox and domain in which to place the
frame content. The file:, http:, or https: URL schemes must be used. If you specify a relative URL, the content
remains in the application sandbox.
The documentRoot property specifies the directory from which to load the frame content. The file:, app:, or app-
storage: URL schemes must be used.
The following example maps content installed in the sandbox subdirectory of the application to run in the remote
sandbox and the www.example.com domain:
<iframe
src="http://www.example.com/local/ui.html"
sandboxRoot="http://www.example.com/local/"
documentRoot="app:/sandbox/">
</iframe>
The ui.html page could load a javascript file from the local, sandbox folder using the following script tag:
<script src="http://www.example.com/local/ui.js"></script>
It could also load content from a directory on the remote server using a script tag such as the following:
<script src="http://www.example.com/remote/remote.js"></script>
The sandboxRoot URL will mask any content at the same URL on the remote server. In the above example, you would
not be able to access any remote content at www.example.com/local/ (or any of its subdirectories) because AIR
remaps the request to the local application directory. Requests are remapped whether they derive from page
navigation, from an XMLHttpRequest, or from any other means of loading content.
Setting up a sandbox bridge interface
Adobe AIR 1.0 and later
You can use a sandbox bridge when content in the application sandbox must access properties or methods defined by
content in a non-application sandbox, or when non-application content must access properties and methods defined
by content in the application sandbox. Create a bridge with the childSandboxBridge and parentSandboxBridge
properties of the window object of any child document.
Establishing a child sandbox bridge
Adobe AIR 1.0 and later
The childSandboxBridge property allows the child document to expose an interface to content in the parent
document. To expose an interface, you set the childSandbox property to a function or object in the child document.
You can then access the object or function from content in the parent document. The following example shows how a
script running in a child document can expose an object containing a function and a property to its parent:

972
ACTIONSCRIPT 3.0 DEVELOPER’S GUIDE
Programming HTML and JavaScript in AIR
Last updated 3/21/2011
var interface = {};
interface.calculatePrice = function(){
return ".45 cents";
}
interface.storeID = "abc"
window.childSandboxBridge = interface;
If this child content was loaded into an iframe assigned an id of “child”, you could access the interface from parent
content by reading the childSandboxBridge property of the frame:
var childInterface = document.getElementById("child").contentWindow.childSandboxBridge;
air.trace(childInterface.calculatePrice()); //traces ".45 cents"
air.trace(childInterface.storeID)); //traces "abc"
Establishing a parent sandbox bridge
Adobe AIR 1.0 and later
The parentSandboxBridge property allows the parent document to expose an interface to content in a child
document. To expose an interface, the parent document sets the parentSandbox property of the child document to a
function or object defined in the parent document. You can then access the object or function from content in the
child. The following example shows how a script running in a parent frame can expose an object containing a function
to a child document:
var interface = {};
interface.save = function(text){
var saveFile = air.File("app-storage:/save.txt");
//write text to file
}
document.getElementById("child").contentWindow.parentSandboxBridge = interface;
Using this interface, content in the child frame could save text to a file named save.txt, but would not have any other
access to the file system. The child content could call the save function as follows:
var textToSave = "A string.";
window.parentSandboxBridge.save(textToSave);
Application content should expose the narrowest interface possible to other sandboxes. Non-application content
should be considered inherently untrustworthy since it may be subject to accidental or malicious code injection. You
must put appropriate safeguards in place to prevent misuse of the interface you expose through the parent sandbox
bridge.
Accessing a parent sandbox bridge during page loading
Adobe AIR 1.0 and later
In order for a script in a child document to access a parent sandbox bridge, the bridge must be set up before the script
is run. Window, frame and iframe objects dispatch a dominitialize event when a new page DOM has been created,
but before any scripts have been parsed, or DOM elements added. You can use the dominitialize event to establish
the bridge early enough in the page construction sequence that all scripts in the child document can access it.
The following example illustrates how to create a parent sandbox bridge in response to the dominitialize event
dispatched from the child frame:

973
ACTIONSCRIPT 3.0 DEVELOPER’S GUIDE
Programming HTML and JavaScript in AIR
Last updated 3/21/2011
<html>
<head>
<script>
var bridgeInterface = {};
bridgeInterface.testProperty = "Bridge engaged";
function engageBridge(){
document.getElementById("sandbox").contentWindow.parentSandboxBridge = bridgeInterface;
}
</script>
</head>
<body>
<iframe id="sandbox"
src="http://www.example.com/air/child.html"
documentRoot="app:/"
sandboxRoot="http://www.example.com/air/"
ondominitialize="engageBridge()"/>
</body>
</html>
The following child.html document illustrates how child content can access the parent sandbox bridge:
<html>
<head>
<script>
document.write(window.parentSandboxBridge.testProperty);
</script>
</head>
<body></body>
</html>
To listen for the dominitialize event on a child window, rather than a frame, you must add the listener to the new
child window object created by the window.open() function:
var childWindow = window.open();
childWindow.addEventListener("dominitialize", engageBridge());
childWindow.document.location = "http://www.example.com/air/child.html";
In this case, there is no way to map application content into a non-application sandbox. This technique is only useful
when child.html is loaded from outside the application directory. You can still map application content in the
window to a non-application sandbox, but you must first load an intermediate page that itself uses frames to load the
child document and map it to the desired sandbox.
If you use the HTMLLoader class createRootWindow() function to create a window, the new window is not a child
of the document from which createRootWindow() is called. Thus, you cannot create a sandbox bridge from the
calling window to non-application content loaded into the new window. Instead, you must use load an intermediate
page in the new window that itself uses frames to load the child document. You can then establish the bridge from the
parent document of the new window to the child document loaded into the frame.

974
Last updated 3/21/2011
Chapter 58: Scripting the AIR HTML
Container
Adobe AIR 1.0 and later
The HTMLLoader class serves as the container for HTML content in Adobe® AIR®. The class provides many properties
and methods, inherited from the Sprite class, for controlling the behavior and appearance of the object on the
ActionScript® 3.0 display list. In addition, the class defines properties and methods for such tasks as loading and
interacting with HTML content and managing history.
The HTMLHost class defines a set of default behaviors for an HTMLLoader. When you create an HTMLLoader object,
no HTMLHost implementation is provided. Thus when HTML content triggers one of the default behaviors, such as
changing the window location, or the window title, nothing happens. You can extend the HTMLHost class to define
the behaviors desired for your application.
A default implementation of the HTMLHost is provided for HTML windows created by AIR. You can assign the
default HTMLHost implementation to another HTMLLoader object by setting the htmlHost property of the object
using a new HTMLHost object created with the defaultBehavior parameter set to true.
Note: In the Adobe® Flex™ Framework, the HTMLLoader object is wrapped by the mx:HTML component. When using
Flex, use the HTML component.
Display properties of HTMLLoader objects
Adobe AIR 1.0 and later
An HTMLLoader object inherits the display properties of the Adobe® Flash® Player Sprite class. You can resize, move,
hide, and change the background color, for example. Or you can apply advanced effects like filters, masks, scaling, and
rotation. When applying effects, consider the impact on legibility. SWF and PDF content loaded into an HTML page
cannot be displayed when some effects are applied.
HTML windows contain an HTMLLoader object that renders the HTML content. This object is constrained within
the area of the window, so changing the dimensions, position, rotation, or scale factor does not always produce
desirable results.
Basic display properties
Adobe AIR 1.0 and later
The basic display properties of the HTMLLoader allow you to position the control within its parent display object, to
set the size, and to show or hide the control. You should not change these properties for the HTMLLoader object of an
HTML window.
The basic properties include:

975
ACTIONSCRIPT 3.0 DEVELOPER’S GUIDE
Scripting the AIR HTML Container
Last updated 3/21/2011
Outside an HTML window, the width and height properties of an HTMLLoader object default to 0. You must set the
width and height before the loaded HTML content can be seen. HTML content is drawn to the HTMLLoader size, laid
out according to the HTML and CSS properties in the content. Changing the HTMLLoader size reflows the content.
When loading content into a new HTMLLoader object (with width still set to 0), it can be tempting to set the display
width and height of the HTMLLoader using the contentWidth and contentHeight properties. This technique
works for pages that have a reasonable minimum width when laid out according the HTML and CSS flow rules.
However, some pages flow into a long and narrow layout in the absence of a reasonable width provided by the
HTMLLoader.
Note: When you change the width and height of an HTMLLoader object, the scaleX and scaleY values do not change, as
would happen with most other types of display objects.
Transparency of HTMLLoader content
Adobe AIR 1.0 and later
The paintsDefaultBackground property of an HTMLLoader object, which is true by default, determines whether
the HTMLLoader object draws an opaque background. When paintsDefaultBackground is false, the background
is clear. The display object container or other display objects below the HTMLLoader object are visible behind the
foreground elements of the HTML content.
If the body element or any other element of the HTML document specifies a background color (using
style="background-color:gray", for example), then the background of that portion of the HTML is opaque and
rendered with the specified background color. If you set the opaqueBackground property of the HTMLLoader object,
and paintsDefaultBackground is false, then the color set for the opaqueBackground is visible.
Note: You can use a transparent, PNG-format graphic to provide an alpha-blended background for an element in an
HTML document. Setting the opacity style of an HTML element is not supported.
Scaling HTMLLoader content
Adobe AIR 1.0 and later
Avoid scaling an HTMLLoader object beyond a scale factor of 1.0. Text in HTMLLoader content is rendered at a
specific resolution and appears pixelated if the HTMLLoader object is scaled up. To prevent the HTMLLoader, as well
as its contents, from scaling when a window is resized, set the scaleMode property of the Stage to
StageScaleMode.NO_SCALE.
Considerations when loading SWF or PDF content in an HTML page
Adobe AIR 1.0 and later
SWF and PDF content loaded into in an HTMLLoader object disappears in the following conditions:
•If you scale the HTMLLoader object to a factor other that 1.0.
Property Notes
x, yPositions the object within its parent container.
width, height Changes the dimensions of the display area.
visible Controls the visibility of the object and any content it contains.

976
ACTIONSCRIPT 3.0 DEVELOPER’S GUIDE
Scripting the AIR HTML Container
Last updated 3/21/2011
•If you set the alpha property of the HTMLLoader object to a value other than 1.0.
•If you rotate the HTMLLoader content.
The content reappears if you remove the offending property setting and remove the active filters.
In addition, the runtime cannot display PDF content in transparent windows. The runtime only displays SWF content
embedded in an HTML page when the wmode parameter of the object or embed tag is set to opaque or transparent.
Since the default value of wmode is window, SWF content is not displayed in transparent windows unless you explicitly
set the wmode parameter.
Note: Prior to AIR 1.5.2, SWF embedded in HTML could not be displayed no matter which wmode value was used.
For more information on loading these types of media in an HTMLLoader, see “Embedding SWF content in HTML”
on page 963and “Adding PDF content in AIR” on page 518.
Advanced display properties
Adobe AIR 1.0 and later
The HTMLLoader class inherits several methods that can be used for special effects. In general, these effects have
limitations when used with the HTMLLoader display, but they can be useful for transitions or other temporary effects.
For example, if you display a dialog window to gather user input, you could blur the display of the main window until
the user closes the dialog. Likewise, you could fade the display out when closing a window.
The advanced display properties include:
The following example illustrates how to set the filters array to blur the entire HTML display:
Property Limitations
alpha Can reduce the legibility of HTML content
filters In an HTML Window, exterior effects are clipped by the window edge
graphics Shapes drawn with graphics commands appear below HTML content,
including the default background. The paintsDefaultBackground property
must be false for the drawn shapes to be visible.
opaqueBackground Does not change the color of the default background. The
paintsDefaultBackground property must be false for this color layer to be
visible.
rotation The corners of the rectangular HTMLLoader area can be clipped by the
window edge. SWF and PDF content loaded in the HTML content is not
displayed.
scaleX, scaleY The rendered display can appear pixelated at scale factors greater than 1. SWF
and PDF content loaded in the HTML content is not displayed.
transform Can reduce legibility of HTML content. The HTML display can be clipped by the
window edge. SWF and PDF content loaded in the HTML content is not
displayed if the transform involves rotation, scaling, or skewing.

977
ACTIONSCRIPT 3.0 DEVELOPER’S GUIDE
Scripting the AIR HTML Container
Last updated 3/21/2011
var html:HTMLLoader = new HTMLLoader();
var urlReq:URLRequest = new URLRequest("http://www.adobe.com/");
html.load(urlReq);
html.width = 800;
html.height = 600;
var blur:BlurFilter = new BlurFilter(8);
var filters:Array = [blur];
html.filters = filters;
Scrolling HTML content
Adobe AIR 1.0 and later
The HTMLLoader class includes the following properties that let you control the scrolling of HTML content:
The following code sets the scrollV property so that HTML content is scrolled to the bottom of the page:
var html:HTMLLoader = new HTMLLoader();
html.addEventListener(Event.HTML_BOUNDS_CHANGE, scrollHTML);
const SIZE:Number = 600;
html.width = SIZE;
html.height = SIZE;
var urlReq:URLRequest = new URLRequest("http://www.adobe.com");
html.load(urlReq);
this.addChild(html);
function scrollHTML(event:Event):void
{
html.scrollV = html.contentHeight - SIZE;
}
The HTMLLoader does not include horizontal and vertical scroll bars. You can implement scroll bars in ActionScript
or by using a Flex component. The Flex HTML component automatically includes scroll bars for HTML content. You
can also use the HTMLLoader.createRootWindow() method to create a window that contains an HTMLLoader object
with scroll bars (see “Creating windows with scrolling HTML content” on page 989).
Property Description
contentHeight The height, in pixels, of the HTML content.
contentWidth The width, in pixels, of the HTML content.
scrollH The horizontal scroll position of the HTML content within the HTMLLoader object.
scrollV The vertical scroll position of the HTML content within the HTMLLoader object.

978
ACTIONSCRIPT 3.0 DEVELOPER’S GUIDE
Scripting the AIR HTML Container
Last updated 3/21/2011
Accessing the HTML history list
Adobe AIR 1.0 and later
As new pages are loaded in an HTMLLoader object, the runtime maintains a history list for the object. The history list
corresponds to the window.history object in the HTML page. The HTMLLoader class includes the following
properties and methods that let you work with the HTML history list:
Items in the history list are stored as objects of type HTMLHistoryItem. The HTMLHistoryItem class has the following
properties:
Setting the user agent used when loading HTML content
Adobe AIR 1.0 and later
The HTMLLoader class has a userAgent property, which lets you set the user agent string used by the HTMLLoader.
Set the userAgent property of the HTMLLoader object before calling the load() method. If you set this property on
the HTMLLoader instance, then the userAgent property of the URLRequest passed to the load() method is not used.
You can set the default user agent string used by all HTMLLoader objects in an application domain by setting the
URLRequestDefaults.userAgent property. The static URLRequestDefaults properties apply as defaults for all
URLRequest objects, not only URLRequests used with the load() method of HTMLLoader objects. Setting the
userAgent property of an HTMLLoader overrides the default URLRequestDefaults.userAgent setting.
Class member Description
historyLength The overall length of the history list, including back and forward entries.
historyPosition The current position in the history list. History items before this position represent “back” navigation, and
items after this position represent “forward” navigation.
getHistoryAt() Returns the URLRequest object corresponding to the history entry at the specified position in the history list.
historyBack() Navigates back in the history list, if possible.
historyForward() Navigates forward in the history list, if possible.
historyGo() Navigates the indicated number of steps in the browser history. Navigates forward if positive, backward if
negative. Navigating to zero reloads the page. Specifying a position beyond the end navigates to the end of
the list.
Property Description
isPost Set to true if the HTML page includes POST data.
originalUrl The original URL of the HTML page, before any redirects.
title The title of the HTML page.
url The URL of the HTML page.

979
ACTIONSCRIPT 3.0 DEVELOPER’S GUIDE
Scripting the AIR HTML Container
Last updated 3/21/2011
If you do not set a user agent value for either the userAgent property of the HTMLLoader object or for
URLRequestDefaults.userAgent, then the default AIR user agent value is used. This default value varies depending
on the runtime operating system (such as Mac OS or Windows), the runtime language, and the runtime version, as in
the following two examples:
•"Mozilla/5.0 (Macintosh; U; PPC Mac OS X; en) AppleWebKit/420+ (KHTML, like Gecko)
AdobeAIR/1.0"
•"Mozilla/5.0 (Windows; U; en) AppleWebKit/420+ (KHTML, like Gecko) AdobeAIR/1.0"
Setting the character encoding to use for HTML content
Adobe AIR 1.0 and later
An HTML page can specify the character encoding it uses by including meta tag, such as the following:
meta http-equiv="content-type" content="text/html" charset="ISO-8859-1";
Override the page setting to ensure that a specific character encoding is used by setting the textEncodingOverride
property of the HTMLLoader object:
var html:HTMLLoader = new HTMLLoader();
html.textEncodingOverride = "ISO-8859-1";
Specify the character encoding for the HTMLLoader content to use when an HTML page does not specify a setting
with the textEncodingFallback property of the HTMLLoader object:
var html:HTMLLoader = new HTMLLoader();
html.textEncodingFallback = "ISO-8859-1";
The textEncodingOverride property overrides the setting in the HTML page. And the textEncodingOverride
property and the setting in the HTML page override the textEncodingFallback property.
Set the textEncodingOverride property or the textEncodingFallback property before loading the HTML
content.
Defining browser-like user interfaces for HTML content
Adobe AIR 1.0 and later
JavaScript provides several APIs for controlling the window displaying the HTML content. In AIR, these APIs can be
overridden by implementing a custom HTMLHost class.

980
ACTIONSCRIPT 3.0 DEVELOPER’S GUIDE
Scripting the AIR HTML Container
Last updated 3/21/2011
About extending the HTMLHost class
Adobe AIR 1.0 and later
If, for example, your application presents multiple HTMLLoader objects in a tabbed interface, you may want title
changes made by the loaded HTML pages to change the label of the tab, not the title of the main window. Similarly,
your code could respond to a window.moveTo() call by repositioning the HTMLLoader object in its parent display
object container, by moving the window that contains the HTMLLoader object, by doing nothing at all, or by doing
something else entirely.
The AIR HTMLHost class controls the following JavaScript properties and methods:
•window.status
•window.document.title
•window.location
•window.blur()
•window.close()
•window.focus()
•window.moveBy()
•window.moveTo()
•window.open()
•window.resizeBy()
•window.resizeTo()
When you create an HTMLLoader object using new HTMLLoader(), the listed JavaScript properties or methods are
not enabled. The HTMLHost class provides a default, browser-like implementation of these JavaScript APIs. You can
also extend the HTMLHost class to customize the behavior. To create an HTMLHost object supporting the default
behavior, set the defaultBehaviors parameter to true in the HTMLHost constructor:
var defaultHost:HTMLHost = new HTMLHost(true);
When you create an HTML window in AIR with the HTMLLoader class createRootWindow() method, an
HTMLHost instance supporting the default behaviors is assigned automatically. You can change the host object
behavior by assigning a different HTMLHost implementation to the htmlHost property of the HTMLLoader, or you
can assign null to disable the features entirely.
Note: AIR assigns a default HTMLHost object to the initial window created for an HTML-based AIR application and
any windows created by the default implementation of the JavaScript window.open() method.
Example: Extending the HTMLHost class
Adobe AIR 1.0 and later
The following example shows how to customize the way that an HTMLLoader object affects the user interface, by
extending the HTMLHost class:
Flex example:
1Create a class that extends the HTMLHost class (a subclass).

981
ACTIONSCRIPT 3.0 DEVELOPER’S GUIDE
Scripting the AIR HTML Container
Last updated 3/21/2011
2Override methods of the new class to handle changes in the user interface-related settings. For example, the
following class, CustomHost, defines behaviors for calls to window.open() and changes to
window.document.title. Calls to window.open() open the HTML page in a new window, and changes to
window.document.title (including the setting of the <title> element of an HTML page) set the title of that
window.
package
{
import flash.html.*;
import flash.display.StageScaleMode;
import flash.display.NativeWindow;
import flash.display.NativeWindowInitOptions;
public class CustomHost extends HTMLHost
{
import flash.html.*;
override public function
createWindow(windowCreateOptions:HTMLWindowCreateOptions):HTMLLoader
{
var initOptions:NativeWindowInitOptions = new NativeWindowInitOptions();
var bounds:Rectangle = new Rectangle(windowCreateOptions.x,
windowCreateOptions.y,
windowCreateOptions.width,
windowCreateOptions.height);
var htmlControl:HTMLLoader = HTMLLoader.createRootWindow(true, initOptions,
windowCreateOptions.scrollBarsVisible, bounds);
htmlControl.htmlHost = new HTMLHostImplementation();
if(windowCreateOptions.fullscreen){
htmlControl.stage.displayState =
StageDisplayState.FULL_SCREEN_INTERACTIVE;
}
return htmlControl;
}
override public function updateTitle(title:String):void
{
htmlLoader.stage.nativeWindow.title = title;
}
}
}
3In the code that contains the HTMLLoader (not the code of the new subclass of HTMLHost), create an object of
the new class. Assign the new object to the htmlHost property of the HTMLLoader. The following Flex code uses
the CustomHost class defined in the previous step:

982
ACTIONSCRIPT 3.0 DEVELOPER’S GUIDE
Scripting the AIR HTML Container
Last updated 3/21/2011
<?xml version="1.0" encoding="utf-8"?>
<mx:WindowedApplication
xmlns:mx="http://www.adobe.com/2006/mxml"
layout="vertical"
applicationComplete="init()">
<mx:Script>
<![CDATA[
import flash.html.HTMLLoader;
import CustomHost;
private function init():void
{
var html:HTMLLoader = new HTMLLoader();
html.width = container.width;
html.height = container.height;
var urlReq:URLRequest = new URLRequest("Test.html");
html.htmlHost = new CustomHost();
html.load(urlReq);
container.addChild(html);
}
]]>
</mx:Script>
<mx:UIComponent id="container" width="100%" height="100%"/>
</mx:WindowedApplication>
To test the code described here, include an HTML file with the following content in the application directory:
<html>
<head>
<title>Test</title>
</head>
<script>
function openWindow()
{
window.runtime.trace("in");
document.title = "foo"
window.open('Test.html');
window.runtime.trace("out");
}
</script>
<body>
<a href="#" onclick="openWindow()">window.open('Test.html')</a>
</body>
</html>
Flash Professional example:
1Create a Flash file for AIR. Set its document class to CustomHostExample and then save the file as
CustomHostExample.fla.
2Create an ActionScript file called CustomHost.as containing a class that extends the HTMLHost class (a subclass).
This class overrides certain methods of the new class to handle changes in the user interface-related settings. For
example, the following class, CustomHost, defines behaviors for calls to window.open() and changes to
window.document.title. Calls to the window.open() method open the HTML page in a new window, and
changes to the window.document.title property (including the setting of the <title> element of an HTML
page) set the title of that window.

983
ACTIONSCRIPT 3.0 DEVELOPER’S GUIDE
Scripting the AIR HTML Container
Last updated 3/21/2011
package
{
import flash.display.StageScaleMode;
import flash.display.NativeWindow;
import flash.display.NativeWindowInitOptions;
import flash.events.Event;
import flash.events.NativeWindowBoundsEvent;
import flash.geom.Rectangle;
import flash.html.HTMLLoader;
import flash.html.HTMLHost;
import flash.html.HTMLWindowCreateOptions;
import flash.text.TextField;
public class CustomHost extends HTMLHost
{
public var statusField:TextField;
public function CustomHost(defaultBehaviors:Boolean=true)
{
super(defaultBehaviors);
}
override public function windowClose():void
{
htmlLoader.stage.nativeWindow.close();
}
override public function createWindow(
windowCreateOptions:HTMLWindowCreateOptions ):HTMLLoader
{
var initOptions:NativeWindowInitOptions = new NativeWindowInitOptions();
var bounds:Rectangle = new Rectangle(windowCreateOptions.x,
windowCreateOptions.y,
windowCreateOptions.width,
windowCreateOptions.height);
var htmlControl:HTMLLoader = HTMLLoader.createRootWindow(true, initOptions,
windowCreateOptions.scrollBarsVisible, bounds);
htmlControl.htmlHost = new HTMLHostImplementation();
if(windowCreateOptions.fullscreen){
htmlControl.stage.displayState =
StageDisplayState.FULL_SCREEN_INTERACTIVE;
}
return htmlControl;
}
override public function updateLocation(locationURL:String):void
{
trace(locationURL);
}
override public function set windowRect(value:Rectangle):void
{
htmlLoader.stage.nativeWindow.bounds = value;

984
ACTIONSCRIPT 3.0 DEVELOPER’S GUIDE
Scripting the AIR HTML Container
Last updated 3/21/2011
}
override public function updateStatus(status:String):void
{
statusField.text = status;
trace(status);
}
override public function updateTitle(title:String):void
{
htmlLoader.stage.nativeWindow.title = title + "- Example Application";
}
override public function windowBlur():void
{
htmlLoader.alpha = 0.5;
}
override public function windowFocus():void
{
htmlLoader.alpha = 1;
}
}
}
3Create another ActionScript file named CustomHostExample.as to contain the document class for the application.
This class creates an HTMLLoader object and sets its host property to an instance of the CustomHost class defined
in the previous step:

985
ACTIONSCRIPT 3.0 DEVELOPER’S GUIDE
Scripting the AIR HTML Container
Last updated 3/21/2011
package
{
import flash.display.Sprite;
import flash.html.HTMLLoader;
import flash.net.URLRequest;
import flash.text.TextField;
public class CustomHostExample extends Sprite
{
function CustomHostExample():void
{
var html:HTMLLoader = new HTMLLoader();
html.width = 550;
html.height = 380;
var host:CustomHost = new CustomHost();
html.htmlHost = host;
var urlReq:URLRequest = new URLRequest("Test.html");
html.load(urlReq);
addChild(html);
var statusTxt:TextField = new TextField();
statusTxt.y = 380;
statusTxt.height = 20;
statusTxt.width = 550;
statusTxt.background = true;
statusTxt.backgroundColor = 0xEEEEEEEE;
addChild(statusTxt);
host.statusField = statusTxt;
}
}
}
To test the code described here, include an HTML file with the following content in the application directory:

986
ACTIONSCRIPT 3.0 DEVELOPER’S GUIDE
Scripting the AIR HTML Container
Last updated 3/21/2011
<html>
<head>
<title>Test</title>
<script>
function openWindow()
{
document.title = "Test"
window.open('Test.html');
}
</script>
</head>
<body bgColor="#EEEEEE">
<a href="#" onclick="window.open('Test.html')">window.open('Test.html')</a>
<br/><a href="#" onclick="window.document.location='http://www.adobe.com'">
window.document.location = 'http://www.adobe.com'</a>
<br/><a href="#" onclick="window.moveBy(6, 12)">moveBy(6, 12)</a>
<br/><a href="#" onclick="window.close()">window.close()</a>
<br/><a href="#" onclick="window.blur()">window.blur()</a>
<br/><a href="#" onclick="window.focus()">window.focus()</a>
<br/><a href="#" onclick="window.status = new Date().toString()">window.status=new
Date().toString()</a>
</body>
</html>
Handling changes to the window.location property
Adobe AIR 1.0 and later
Override the locationChange() method to handle changes of the URL of the HTML page. The locationChange()
method is called when JavaScript in a page changes the value of window.location. The following example simply
loads the requested URL:
override public function updateLocation(locationURL:String):void
{
htmlLoader.load(new URLRequest(locationURL));
}
Note: You can use the htmlLoader property of the HTMLHost object to reference the current HTMLLoader object.
Handling JavaScript calls to window.moveBy(), window.moveTo(),
window.resizeTo(), window.resizeBy()
Adobe AIR 1.0 and later
Override the set windowRect() method to handle changes in the bounds of the HTML content. The set
windowRect() method is called when JavaScript in a page calls window.moveBy(), window.moveTo(),
window.resizeTo(), or window.resizeBy(). The following example simply updates the bounds of the desktop
window:
override public function set windowRect(value:Rectangle):void
{
htmlLoader.stage.nativeWindow.bounds = value;
}

987
ACTIONSCRIPT 3.0 DEVELOPER’S GUIDE
Scripting the AIR HTML Container
Last updated 3/21/2011
Handling JavaScript calls to window.open()
Adobe AIR 1.0 and later
Override the createWindow() method to handle JavaScript calls to window.open(). Implementations of the
createWindow() method are responsible for creating and returning a new HTMLLoader object. Typically, you would
display the HTMLLoader in a new window, but creating a window is not required.
The following example illustrates how to implement the createWindow() function using the
HTMLLoader.createRootWindow() to create both the window and the HTMLLoader object. You can also create a
NativeWindow object separately and add the HTMLLoader to the window stage.
override public function createWindow(windowCreateOptions:HTMLWindowCreateOptions):HTMLLoader{
var initOptions:NativeWindowInitOptions = new NativeWindowInitOptions();
var bounds:Rectangle = new Rectangle(windowCreateOptions.x, windowCreateOptions.y,
windowCreateOptions.width, windowCreateOptions.height);
var htmlControl:HTMLLoader = HTMLLoader.createRootWindow(true, initOptions,
windowCreateOptions.scrollBarsVisible, bounds);
htmlControl.htmlHost = new HTMLHostImplementation();
if(windowCreateOptions.fullscreen){
htmlControl.stage.displayState = StageDisplayState.FULL_SCREEN_INTERACTIVE;
}
return htmlControl;
}
Note: This example assigns the custom HTMLHost implementation to any new windows created with window.open().
You can also use a different implementation or set the htmlHost property to null for new windows, if desired.
The object passed as a parameter to the createWindow() method is an HTMLWindowCreateOptions object. The
HTMLWindowCreateOptions class includes properties that report the values set in the features parameter string in
the call to window.open():
The HTMLLoader class does not implement all the features that can be specified in the feature string. Your application
must provide scroll bars, location bars, menu bars, status bars, and toolbars when appropriate.
HTMLWindowCreateOptions
property
Corresponding setting in the
features string in the JavaScript
call to window.open()
fullscreen fullscreen
height height
locationBarVisible location
menuBarVisible menubar
resizeable resizable
scrollBarsVisible scrollbars
statusBarVisible status
toolBarVisible toolbar
width width
x left or screenX
y top or screenY

988
ACTIONSCRIPT 3.0 DEVELOPER’S GUIDE
Scripting the AIR HTML Container
Last updated 3/21/2011
The other arguments to the JavaScript window.open() method are handled by the system. A createWindow()
implementation should not load content in the HTMLLoader object, or set the window title.
Handling JavaScript calls to window.close()
Adobe AIR 1.0 and later
Override the windowClose() to handle JavaScript calls to window.close() method. The following example closes the
desktop window when the window.close() method is called:
override public function windowClose():void
{
htmlLoader.stage.nativeWindow.close();
}
JavaScript calls to window.close() do not have to close the containing window. You could, for example, remove the
HTMLLoader from the display list, leaving the window (which may have other content) open, as in the following code:
override public function windowClose():void
{
htmlLoader.parent.removeChild(htmlLoader);
}
Handling changes of the window.status property
Adobe AIR 1.0 and later
Override the updateStatus() method to handle JavaScript changes to the value of window.status. The following
example traces the status value:
override public function updateStatus(status:String):void
{
trace(status);
}
The requested status is passed as a string to the updateStatus() method.
The HTMLLoader object does not provide a status bar.
Handling changes of the window.document.title property
Adobe AIR 1.0 and later
override the updateTitle() method to handle JavaScript changes to the value of window.document.title. The
following example changes the window title and appends the string, "Sample," to the title:
override public function updateTitle(title:String):void
{
htmlLoader.stage.nativeWindow.title = title + " - Sample";
}
When document.title is set on an HTML page, the requested title is passed as a string to the updateTitle()
method.
Changes to document.title do not have to change the title of the window containing the HTMLLoader object. You
could, for example, change another interface element, such as a text field.

989
ACTIONSCRIPT 3.0 DEVELOPER’S GUIDE
Scripting the AIR HTML Container
Last updated 3/21/2011
Handling JavaScript calls to window.blur() and window.focus()
Adobe AIR 1.0 and later
Override the windowBlur() and windowFocus() methods to handle JavaScript calls to window.blur() and
window.focus(), as shown in the following example:
override public function windowBlur():void
{
htmlLoader.alpha = 0.5;
}
override public function windowFocus():void
{
htmlLoader.alpha = 1.0;
NativeApplication.nativeApplication.activate(htmlLoader.stage.nativeWindow);
}
Note: AIR does not provide an API for deactivating a window or application.
Creating windows with scrolling HTML content
Adobe AIR 1.0 and later
The HTMLLoader class includes a static method, HTMLLoader.createRootWindow(), which lets you open a new
window (represented by a NativeWindow object) that contains an HTMLLoader object and define some user interface
settings for that window. The method takes four parameters, which let you define the user interface:
For example, the following code uses the HTMLLoader.createRootWindow() method to create a window with
HTMLLoader content that uses scroll bars:
var initOptions:NativeWindowInitOptions = new NativeWindowInitOptions();
var bounds:Rectangle = new Rectangle(10, 10, 600, 400);
var html2:HTMLLoader = HTMLLoader.createRootWindow(true, initOptions, true, bounds);
var urlReq2:URLRequest = new URLRequest("http://www.example.com");
html2.load(urlReq2);
html2.stage.nativeWindow.activate();
Note: Windows created by calling createRootWindow() directly in JavaScript remain independent from the opening
HTML window. The JavaScript Window opener and parent properties, for example, are null. However, if you call
createRootWindow() indirectly by overriding the HTMLHost createWindow() method to call
createRootWindow(), then opener and parent do reference the opening HTML window.
Parameter Description
visible A Boolean value that specifies whether the window is initially visible (true) or not (false).
windowInitOptions A NativeWindowInitOptions object. The NativeWindowInitOptions class defines initialization options for a
NativeWindow object, including the following: whether the window is minimizable, maximizable, or resizable,
whether the window has system chrome or custom chrome, whether the window is transparent or not (for
windows that do not use system chrome), and the type of window.
scrollBarsVisible Whether there are scroll bars (true) or not (false).
bounds A Rectangle object defining the position and size of the new window.

990
ACTIONSCRIPT 3.0 DEVELOPER’S GUIDE
Scripting the AIR HTML Container
Last updated 3/21/2011
Creating subclasses of the HTMLLoader class
Adobe AIR 1.0 and later
You can create a subclass of the HTMLLoader class, to create new behaviors. For example, you can create a subclass
that defines default event listeners for HTMLLoader events (such as those events dispatched when HTML is rendered
or when the user clicks a link).
The following example extends the HTMLHost class to provide normal behavior when the JavaScript window.open()
method is called. The example then defines a subclass of HTMLLoader that uses the custom HTMLHost
implementation class:
package
{
import flash.html.HTMLLoader;
public class MyHTMLHost extends HTMLHost
{
public function MyHTMLHost()
{
super(false);
}
override public function createWindow(opts:HTMLWindowCreateOptions):void
{
var initOptions:NativeWindowInitOptions = new NativeWindowInitOptions();
var bounds:Rectangle = new Rectangle(opts.x, opts.y, opts.width, opts.height);
var html:HTMLLoader = HTMLLoader.createRootWindow(true,
initOptions,
opts.scrollBarsVisible,
bounds);
html.stage.nativeWindow.orderToFront();
return html
}
}
The following defines a subclass of the HTMLLoader class that assigns a MyHTMLHost object to its htmlHost
property:
package
{
import flash.html.HTMLLoader;
import MyHTMLHost;
import HTMLLoader;
public class MyHTML extends HTMLLoader
{
public function MyHTML()
{
super();
htmlHost = new MyHTMLHost();
}
}
}
For details on the HTMLHost class and the HTMLLoader.createRootWindow() method used in this example, see
“Defining browser-like user interfaces for HTML content” on page 979.

991
Last updated 3/21/2011
Chapter 59: Handling HTML-related
events in AIR
Adobe AIR 1.0 and later
An event-handling system allows programmers to respond to user input and system events in a convenient way. The
Adobe® AIR® event model is not only convenient, but also standards-compliant. Based on the Document Object Model
(DOM) Level 3 Events Specification, an industry-standard event-handling architecture, the event model provides a
powerful, yet intuitive, event-handling tool for programmers.
HTMLLoader events
Adobe AIR 1.0 and later
An HTMLLoader object dispatches the following Adobe® ActionScript® 3.0 events:
You can also register an ActionScript function for a JavaScript event (such as onClick). For details, see “Handling
DOM events with ActionScript” on page 991.
Handling DOM events with ActionScript
Adobe AIR 1.0 and later
You can register ActionScript functions to respond to JavaScript events. For example, consider the following HTML
content:
Event Description
htmlDOMInitialize Dispatched when the HTML document is created, but before any scripts are parsed or
DOM nodes are added to the page.
complete Dispatched when the HTML DOM has been created in response to a load operation,
immediately after the onload event in the HTML page.
htmlBoundsChanged Dispatched when one or both of the contentWidth and contentHeight
properties have changed.
locationChange Dispatched when the location property of the HTMLLoader has changed.
scroll Dispatched anytime the HTML engine changes the scroll position. Scroll events can be
because of navigation to anchor links (# links) in the page or because of calls to the
window.scrollTo() method. Entering text in a text input or text area can also
cause a scroll event.
uncaughtScriptException Dispatched when a JavaScript exception occurs in the HTMLLoader and the exception
is not caught in JavaScript code.

992
ACTIONSCRIPT 3.0 DEVELOPER’S GUIDE
Handling HTML-related events in AIR
Last updated 3/21/2011
<html>
<body>
<a href="#" id="testLink">Click me.</a>
</html>
You can register an ActionScript function as a handler for any event in the page. For example, the following code adds
the clickHandler() function as the listener for the onclick event of the testLink element in the HTML page:
var html:HTMLLoader = new HTMLLoader( );
var urlReq:URLRequest = new URLRequest("test.html");
html.load(urlReq);
html.addEventListener(Event.COMPLETE, completeHandler);
function completeHandler(event:Event):void {
html.window.document.getElementById("testLink").onclick = clickHandler;
}
function clickHandler( event:Object ):void {
trace("Event of type: " + event.type );
}
The event object dispatched is not of type flash.events.Event or one of the Event subclasses. Use the Object class to
declare a type for the event handler function argument.
You can also use the addEventListener() method to register for these events. For example, you could replace the
completeHandler() method in the previous example with the following code:
function completeHandler(event:Event):void {
var testLink:Object = html.window.document.getElementById("testLink");
testLink.addEventListener("click", clickHandler);
}
When a listener refers to a specific DOM element, it is good practice to wait for the parent HTMLLoader to dispatch
the complete event before adding the event listeners. HTML pages often load multiple files and the HTML DOM is
not fully built until all the files are loaded and parsed. The HTMLLoader dispatches the complete event when all
elements have been created.
Responding to uncaught JavaScript exceptions
Adobe AIR 1.0 and later
Consider the following HTML:
<html>
<head>
<script>
function throwError() {
var x = 400 * melbaToast;
}
</script>
</head>
<body>
<a href="#" onclick="throwError()">Click me.</a>
</html>
It contains a JavaScript function, throwError(), that references an unknown variable, melbaToast:

993
ACTIONSCRIPT 3.0 DEVELOPER’S GUIDE
Handling HTML-related events in AIR
Last updated 3/21/2011
var x = 400 * melbaToast;
When a JavaScript operation encounters an illegal operation that is not caught in the JavaScript code with a try/catch
structure, the HTMLLoader object containing the page dispatches an HTMLUncaughtScriptExceptionEvent event.
You can register a handler for this event, as in the following code:
var html:HTMLLoader = new HTMLLoader();
var urlReq:URLRequest = new URLRequest("test.html");
html.load(urlReq);
html.width = container.width;
html.height = container.height;
container.addChild(html);
html.addEventListener(HTMLUncaughtScriptExceptionEvent.UNCAUGHT_SCRIPT_EXCEPTION,
htmlErrorHandler);
function htmlErrorHandler(event:HTMLUncaughtJavaScriptExceptionEvent):void
{
event.preventDefault();
trace("exceptionValue:", event.exceptionValue)
for (var i:int = 0; i < event.stackTrace.length; i++)
{
trace("sourceURL:", event.stackTrace[i].sourceURL);
trace("line:", event.stackTrace[i].line);
trace("function:", event.stackTrace[i].functionName);
}
}
Within JavaScript, you can handle the same event using the window.htmlLoader property:
<html>
<head>
<script language="javascript" type="text/javascript" src="AIRAliases.js"></script>
<script>
function throwError() {
var x = 400 * melbaToast;
}
function htmlErrorHandler(event) {
event.preventDefault();
var message = "exceptionValue:" + event.exceptionValue + "\n";
for (var i = 0; i < event.stackTrace.length; i++){
message += "sourceURL:" + event.stackTrace[i].sourceURL +"\n";
message += "line:" + event.stackTrace[i].line +"\n";
message += "function:" + event.stackTrace[i].functionName + "\n";
}
alert(message);
}
window.htmlLoader.addEventListener("uncaughtScriptException", htmlErrorHandler);
</script>
</head>
<body>
<a href="#" onclick="throwError()">Click me.</a>
</html>

994
ACTIONSCRIPT 3.0 DEVELOPER’S GUIDE
Handling HTML-related events in AIR
Last updated 3/21/2011
The htmlErrorHandler() event handler cancels the default behavior of the event (which is to send the JavaScript
error message to the AIR trace output), and generates its own output message. It outputs the value of the
exceptionValue of the HTMLUncaughtScriptExceptionEvent object. It outputs the properties of each object in the
stackTrace array:
exceptionValue: ReferenceError: Can't find variable: melbaToast
sourceURL: app:/test.html
line: 5
function: throwError
sourceURL: app:/test.html
line: 10
function: onclick
Handling runtime events with JavaScript
Adobe AIR 1.0 and later
The runtime classes support adding event handlers with the addEventListener() method. To add a handler function
for an event, call the addEventListener() method of the object that dispatches the event, providing the event type
and the handling function. For example, to listen for the closing event dispatched when a user clicks the window close
button on the title bar, use the following statement:
window.nativeWindow.addEventListener(air.NativeWindow.CLOSING, handleWindowClosing);
Creating an event handler function
Adobe AIR 1.0 and later
The following code creates a simple HTML file that displays information about the position of the main window. A
handler function named moveHandler(), listens for a move event (defined by the NativeWindowBoundsEvent class)
of the main window.

995
ACTIONSCRIPT 3.0 DEVELOPER’S GUIDE
Handling HTML-related events in AIR
Last updated 3/21/2011
<html>
<script src="AIRAliases.js" />
<script>
function init() {
writeValues();
window.nativeWindow.addEventListener(air.NativeWindowBoundsEvent.MOVE,
moveHandler);
}
function writeValues() {
document.getElementById("xText").value = window.nativeWindow.x;
document.getElementById("yText").value = window.nativeWindow.y;
}
function moveHandler(event) {
air.trace(event.type); // move
writeValues();
}
</script>
<body onload="init()" />
<table>
<tr>
<td>Window X:</td>
<td><textarea id="xText"></textarea></td>
</tr>
<tr>
<td>Window Y:</td>
<td><textarea id="yText"></textarea></td>
</tr>
</table>
</body>
</html>
When a user moves the window, the textarea elements display the updated X and Y positions of the window:
Notice that the event object is passed as an argument to the moveHandler() method. The event parameter allows your
handler function to examine the event object. In this example, you use the event object's type property to report that
the event is a move event.
Removing event listeners
Adobe AIR 1.0 and later
You can use the removeEventListener() method to remove an event listener that you no longer need. It is a good
idea to remove any listeners that will no longer be used. Required parameters include the eventName and listener
parameters, which are the same as the required parameters for the addEventListener() method.
Removing event listeners in HTML pages that navigate
Adobe AIR 1.0 and later
When HTML content navigates, or when HTML content is discarded because a window that contains it is closed, the
event listeners that reference objects on the unloaded page are not automatically removed. When an object dispatches
an event to a handler that has already been unloaded, you see the following error message: “The application attempted
to reference a JavaScript object in an HTML page that is no longer loaded.”
To avoid this error, remove JavaScript event listeners in an HTML page before it goes away. In the case of page
navigation (within an HTMLLoader object), remove the event listener during the unload event of the window object.

996
ACTIONSCRIPT 3.0 DEVELOPER’S GUIDE
Handling HTML-related events in AIR
Last updated 3/21/2011
For example, the following JavaScript code removes an event listener for an uncaughtScriptException event:
window.onunload = cleanup;
window.htmlLoader.addEventListener('uncaughtScriptException', uncaughtScriptException);
function cleanup()
{
window.htmlLoader.removeEventListener('uncaughtScriptException',
uncaughtScriptExceptionHandler);
}
To prevent the error from occurring when closing windows that contain HTML content, call a cleanup function in
response to the closing event of the NativeWindow object (window.nativeWindow). For example, the following
JavaScript code removes an event listener for an uncaughtScriptException event:
window.nativeWindow.addEventListener(air.Event.CLOSING, cleanup);
function cleanup()
{
window.htmlLoader.removeEventListener('uncaughtScriptException',
uncaughtScriptExceptionHandler);
}
You can also prevent this error from occurring by removing an event listener as soon as it runs (if the event only needs
to be handled once). For example, the following JavaScript code creates an html window by calling the
createRootWindow() method of the HTMLLoader class and adds an event listener for the complete event. When
the complete event handler is called, it removes its own event listener using the removeEventListener() function:
var html = runtime.flash.html.HTMLLoader.createRootWindow(true);
html.addEventListener('complete', htmlCompleteListener);
function htmlCompleteListener()
{
html.removeEventListener(complete, arguments.callee)
// handler code..
}
html.load(new runtime.flash.net.URLRequest("second.html"));
Removing unneeded event listeners also allows the system garbage collector to reclaim any memory associated with
those listeners.
Checking for existing event listeners
Adobe AIR 1.0 and later
The hasEventListener() method lets you check for the existence of an event listener on an object.

997
Last updated 3/21/2011
Chapter 60: Displaying HTML content in
mobile apps
Adobe AIR AIR 2.5 and later
The StageWebView class displays HTML content using the system browser control on mobile devices and using the
standard Adobe® AIR® HTMLLoader control on desktop computers. Check the StageWebView.isSupported
property to determine whether the class is supported on the current device. Support is not guaranteed for all devices
in the mobile profile.
In all profiles, the StageWebView class supports only limited interaction between the HTML content and the rest of
the application. You can control navigation, but no cross-scripting or direct exchange of data is allowed. You can load
content from a local or remote URL or pass in a string of HTML.
More Help topics
Mark Doherty: StageWebView demo - OAuth Support
Jonathan Campos: HTML Web View in AIR for Android
Sönke Rohde: AIR Mobile StageWebView UIComponent
Judah Frangipane: Using StageWebView within a UIComponent in Mobile
StageWebView objects
A StageWebView object is not a display object and cannot be added to the display list. Instead, it operates as a viewport
attached directly to the stage. StageWebView content draws over the top of any display list content. There is no way to
control the drawing order of multiple StageWebView objects.
To display a StageWebView object, you assign the stage on which the object is to appear to the stage property of the
StageWebView. Set the size of the display using the viewPort property.
Set the x and y coordinates of the viewPort property between -8192 and 8191. The maximum value of stage width and
height is 8191. If the size exceeds the maximum values, an exception is thrown.
The following example creates a StageWebView object, sets the stage and viewPort properties, and displays a string
of HTML:
var webView:StageWebView = new StageWebView();
webView.viewPort = new Rectangle( 0, 0, this.stage.stageWidth, this .stage.stageHeight);
webView.stage = this.stage;
var htmlString:String = "<!DOCTYPE HTML>" +
"<html><body>" +
"<p>King Philip could order five good steaks.</p>" +
"</body></html>";
webView.loadString( htmlString );
To hide a StageWebView object, set its stage property to null. To destroy the object entirely, call the dispose()
method. Calling dispose() is optional, but does help the garbage collector reclaim the memory used by the object
sooner.

998
ACTIONSCRIPT 3.0 DEVELOPER’S GUIDE
Displaying HTML content in mobile apps
Last updated 3/21/2011
Content
You can load content into a StageWebView object using two methods: loadURL() and loadString().
The loadURL() method loads a resource at the specified URL. You can use any URI scheme supported by the system
web browser control, including: data:, file:, http:, https:, and javascript:. The app: and app-storage: schemes are not
supported. AIR does not validate the URL string.
The loadString() method loads a literal string containing HTML content. The location of a page loaded with this
method is expressed as:
•On Desktop: about:blank
•On iOS: htmlString
•On Android: the data URI format of the encoded htmlString
The URI scheme determines the rules for loading embedded content or data.
Note: If the stage’s displayState property is set to FULL_SCREEN, in Desktop, you cannot type in a text field displayed
in the StageWebView. However, in iOS and Android, you can type in a text field on StageWebView even if the stage’s
displayState is FULL_SCREEN.
The following example uses a StageWebView object to display Adobe’s website:
package {
import flash.display.MovieClip;
import flash.media.StageWebView;
import flash.geom.Rectangle;
public class StageWebViewExample extends MovieClip{
var webView:StageWebView = new StageWebView();
public function StageWebViewExample() {
webView.stage = this.stage;
webView.viewPort = new Rectangle( 0, 0, stage.stageWidth, stage.stageHeight );
webView.loadURL( "http://www.adobe.com" );
}
}
}
On Android devices, you must specify the Android INTERNET permission in order for the app to successfully load
remote resources.
URI scheme Load local resource Load remote
resource
Local XMLHttpRequest Remote XMLHttpRequest
data: No Yes No No
file: Yes Yes Yes Yes
http:, https: No Yes No Same domain
about: (loadString()
method)
No Yes No No

999
ACTIONSCRIPT 3.0 DEVELOPER’S GUIDE
Displaying HTML content in mobile apps
Last updated 3/21/2011
JavaScript URI
You can use a JavaScript URI to call a function defined in the HTML page that is loaded by a StageWebView object.
The function you call using the JavaScript URI runs in the context of the loaded web page. The following example uses
a StageWebView object to call a JavaScript function:
package {
import flash.display.*;
import flash.geom.Rectangle;
import flash.media.StageWebView;
public class WebView extends Sprite
{
public var webView:StageWebView = new StageWebView();
public function WebView()
{
var htmlString:String = "<!DOCTYPE HTML>" +
"<html><script type=text/javascript>" +
"function callURI(){" +
"alert(\"You clicked me!!\");"+
"}</script><body>" +
"<p><a href=javascript:callURI()>Click Me</a></p>" +
"</body></html>";
webView.stage = this.stage;
webView.viewPort = new Rectangle( 0, 0, stage.stageWidth, stage.stageHeight );
webView.loadString( htmlString );
}
}
}
More Help topics
Sean Voisen: Making the Most of StageWebView
Navigation events
When a user clicks a link in the HTML, the StageWebView object dispatches a locationChanging event. You can call
the preventDefault() method of the event object to stop the navigation. Otherwise, the StageWebView object
navigates to the new page and dispatches a locationChange event. When the page load has finished, the
StageWebView dispatches a complete event.
A locationChanging event is dispatched on every HTML redirect. The locationChange and complete events are
dispatched at the appropriate time.
On iOS, a locationChanging event is dispatched before a locationChange event, except for the first loadURL() or
loadString() methods. A locationChange event is also dispatched for navigational changes through iFrames and
Frames.
The following example illustrates how you can prevent a location change and open the new page in the system browser
instead.

1000
ACTIONSCRIPT 3.0 DEVELOPER’S GUIDE
Displaying HTML content in mobile apps
Last updated 3/21/2011
package {
import flash.display.MovieClip;
import flash.media.StageWebView;
import flash.events.LocationChangeEvent;
import flash.geom.Rectangle;
import flash.net.navigateToURL;
import flash.net.URLRequest;
public class StageWebViewNavEvents extends MovieClip{
var webView:StageWebView = new StageWebView();
public function StageWebViewNavEvents() {
webView.stage = this.stage;
webView.viewPort = new Rectangle( 0, 0, stage.stageWidth, stage.stageHeight );
webView.addEventListener( LocationChangeEvent.LOCATION_CHANGING, onLocationChanging );
webView.loadURL( "http://www.adobe.com" );
}
private function onLocationChanging( event:LocationChangeEvent ):void
{
event.preventDefault();
navigateToURL( new URLRequest( event.location ) );
}
}
}
History
As a user clicks links in the content displayed in a StageWebView object, the control saves the backwards and forwards
history stacks. The following example illustrates how to navigate through the two history stacks. The example uses the
Back and Search soft keys.

1001
ACTIONSCRIPT 3.0 DEVELOPER’S GUIDE
Displaying HTML content in mobile apps
Last updated 3/21/2011
package {
import flash.display.MovieClip;
import flash.media.StageWebView;
import flash.geom.Rectangle;
import flash.events.KeyboardEvent;
import flash.ui.Keyboard;
public class StageWebViewExample extends MovieClip{
var webView:StageWebView = new StageWebView();
public function StageWebViewExample()
{
webView.stage = this.stage;
webView.viewPort = new Rectangle( 0, 0, stage.stageWidth, stage.stageHeight );
webView.loadURL( "http://www.adobe.com" );
stage.addEventListener( KeyboardEvent.KEY_DOWN, onKey );
}
private function onKey( event:KeyboardEvent ):void
{
if( event.keyCode == Keyboard.BACK && webView.isHistoryBackEnabled )
{
trace("back");
webView.historyBack();
event.preventDefault();
}
if( event.keyCode == Keyboard.SEARCH && webView.isHistoryForwardEnabled )
{
trace("forward");
webView.historyForward();
}
}
}
}
Focus
Even though it is not a display object, the StageWebView class contains members that allow you to manage the focus
transitions into and out of the control.
When the StageWebView object gains focus, it dispatches a focusIn event. You use this event to manage the focus
elements in your application, if necessary.
When the StageWebView relinquishes the focus, it dispatches a focusOut event. A StageWebView instance can
relinquish focus when a user “tabs” past the first or last control on the web page using a device trackball or directional
arrows. The direction property of the event object lets you know whether the focus flow is rising up past the top of
the page or down through the bottom of the page. Use this information to assign focus to the appropriate display object
above or below the StageWebView.
On iOS, focus cannot be set programmatically. StageWebView dispatches focusIn and focusOut events with the
direction property of FocusEvent set to none. If the user touches inside the StageWebView, the focusIn event is
dispatched. If the user touches outside the StageWebView, the focusOut event is dispatched.

1002
ACTIONSCRIPT 3.0 DEVELOPER’S GUIDE
Displaying HTML content in mobile apps
Last updated 3/21/2011
The following example illustrates how focus passes from the StageWebView object to Flash display objects:
package {
import flash.display.MovieClip;
import flash.media.StageWebView;
import flash.geom.Rectangle;
import flash.events.KeyboardEvent;
import flash.ui.Keyboard;
import flash.text.TextField;
import flash.text.TextFieldType;
import flash.events.FocusEvent;
import flash.display.FocusDirection;
import flash.events.LocationChangeEvent;
public class StageWebViewFocusEvents extends MovieClip{
var webView:StageWebView = new StageWebView();
var topControl:TextField = new TextField();
var bottomControl:TextField = new TextField();
public function StageWebViewFocusEvents()
{
trace("Starting");
topControl.type = TextFieldType.INPUT;
addChild( topControl );
topControl.height = 60;
topControl.width = stage.stageWidth;
topControl.background = true;
topControl.text = "One control on top.";
topControl.addEventListener( FocusEvent.FOCUS_IN, flashFocusIn );
topControl.addEventListener( FocusEvent.FOCUS_OUT, flashFocusOut );
webView.stage = this.stage;
webView.viewPort = new Rectangle( 0, 60, stage.stageWidth, stage.stageHeight
- 120 );
webView.addEventListener( FocusEvent.FOCUS_IN, webFocusIn );
webView.addEventListener(FocusEvent.FOCUS_OUT, webFocusOut );
webView.addEventListener(LocationChangeEvent.LOCATION_CHANGING,
function( event:LocationChangeEvent ):void
{
event.preventDefault();
} );
webView.loadString("<form action='#'><input/><input/><input/></form>");
webView.assignFocus();
bottomControl.type = TextFieldType.INPUT;
addChild( bottomControl );
bottomControl.y = stage.stageHeight - 60;
bottomControl.height = 60;
bottomControl.width = stage.stageWidth;
bottomControl.background = true;
bottomControl.text = "One control on the bottom.";
bottomControl.addEventListener( FocusEvent.FOCUS_IN, flashFocusIn );
bottomControl.addEventListener( FocusEvent.FOCUS_OUT, flashFocusOut );}
private function webFocusIn( event:FocusEvent ):void
{
trace("Web focus in");

1003
ACTIONSCRIPT 3.0 DEVELOPER’S GUIDE
Displaying HTML content in mobile apps
Last updated 3/21/2011
}
private function webFocusOut( event:FocusEvent ):void
{
trace("Web focus out: " + event.direction);
if( event.direction == FocusDirection.TOP )
{
stage.focus = topControl;
}
else
{
stage.focus = bottomControl;
}
}
private function flashFocusIn( event:FocusEvent ):void
{
trace("Flash focus in");
var textfield:TextField = event.target as TextField;
textfield.backgroundColor = 0xff5566;
}
private function flashFocusOut( event:FocusEvent ):void
{
trace("Flash focus out");
var textfield:TextField = event.target as TextField;
textfield.backgroundColor = 0xffffff;
}
}
}
Bitmap capture
A StageWebView object is rendered above all display list content. You cannot add a content above a StageWebView
object. For example, you cannot expand a drop-down over the StageWebView content. To solve this issue, capture a
snapshot of the StageWebView. Then, hide the StageWebView and add the bitmap snapshot instead.
The following example illustrates how to capture the snapshot of a StageWebView object using the
drawViewPortToBitmapData method. It hides the StageWebView object by setting the stage to null. After the web
page is fully loaded, it calls a function that captures the bitmap and displays it. When you run, the code displays two
labels, Google and Facebook. Clicking the label captures the corresponding web page and displays it as a snapshot on
the stage.

1004
ACTIONSCRIPT 3.0 DEVELOPER’S GUIDE
Displaying HTML content in mobile apps
Last updated 3/21/2011
package
{
import flash.display.Bitmap;
import flash.display.BitmapData;
import flash.display.Sprite;
import flash.events.*;
import flash.geom.Rectangle;
import flash.media.StageWebView;
import flash.net.*;
import flash.text.TextField;
public class stagewebview extends Sprite
{
public var webView:StageWebView=new StageWebView();
public var textGoogle:TextField=new TextField();
public var textFacebook:TextField=new TextField();
public function stagewebview()
{
textGoogle.htmlText="<b>Google</b>";
textGoogle.x=300;
textGoogle.y=-80;
addChild(textGoogle);
textFacebook.htmlText="<b>Facebook</b>";
textFacebook.x=0;
textFacebook.y=-80;
addChild(textFacebook);
textGoogle.addEventListener(MouseEvent.CLICK,goGoogle);
textFacebook.addEventListener(MouseEvent.CLICK,goFaceBook);
webView.stage = this.stage;
webView.viewPort = new Rectangle(0, 0, stage.stageWidth, stage.stageHeight);
}
public function goGoogle(e:Event):void
{
webView.loadURL("http://www.google.com");
webView.stage = null;
webView.addEventListener(Event.COMPLETE,handleLoad);
}
public function goFaceBook(e:Event):void
{
webView.loadURL("http://www.facebook.com");
webView.stage = null;
webView.addEventListener(Event.COMPLETE,handleLoad);
}
public function handleLoad(e:Event):void
{
var bitmapData:BitmapData = new BitmapData(webView.viewPort.width,
webView.viewPort.height);
webView.drawViewPortToBitmapData(bitmapData);
var webViewBitmap:Bitmap=new Bitmap(bitmapData);
addChild(webViewBitmap);
}
}
}

1005
ACTIONSCRIPT 3.0 DEVELOPER’S GUIDE
Displaying HTML content in mobile apps
Last updated 3/21/2011
Displaying ads
You can use the StageWebView class to display ads from ad services that provide a JavaScript/HTML interface. Set the
StageWebView object viewport to cover the area in your application in which you want to display the ad. Then load
an HTML page that contains the code for requesting and displaying ads.
The following example shows an HTML page that loads the Admob JavaScript library and requests an ad to display. A
similar mechanism should work for other ad services. To request even test ads with this example, you must first sign
up for an Admob account and assign your Admob publisher id to the pubid variable.
<html>
<head>
<title>Ad jig</title>
<script type="text/javascript">
var admob_vars = {
pubid: 'admob_pubID', // change to your publisher id
bgcolor: 'ffffff', // background color (hex)
text: '000000', // font-color (hex)
test: true, // test mode, set to false if non-test mode
manual_mode: true
};
function showAd()
{
_admob.fetchAd(document.getElementById('adspace'));
}
</script>
<script type="text/javascript" src="http://mm.admob.com/static/iphone/iadmob.js"></script>
<style type="text/css">
body {
margin-left: 0px;
margin-top: 0px;
margin-right: 0px;
margin-bottom: 0px;
}
</style>
</head>
<body onload="showAd()">
<div id="adspace"></div>
</body>
</html>
The following ActionScript code displays the ad page in a mobile AIR application. The example is formatted for use
on the timeline in Flash Professional. If you are using Flash Builder or creating a class, you will have to adapt the
example code accordingly.
When the user taps an ad, you can either display the ad destination page in your application or use navigateToURL()
to display the destination page in the device web browser. This example uses navigateToURL(), which works for both
http: links and market: links.
On mobile devices, the underlying web control handles code-initiated location changes to known URI schemes
without dispatching a locationChanging event. Since the Admob JavaScript API changes the page location, the
example handles both the locationChanging and locationChange events so that the application can take the proper
action no matter how the location of the StageWebView object changes.

1006
ACTIONSCRIPT 3.0 DEVELOPER’S GUIDE
Displaying HTML content in mobile apps
Last updated 3/21/2011
A locationChanging event can be canceled, so the example calls the event preventDefault() method and launches
the device web browser based on the event location property. A locationChange event cannot be canceled. In this
case, the example launches the new location using navigateToURL() and reloads the ad display page.
//Set up web view object
var webView:StageWebView = new StageWebView();
webView.stage = this.stage;
var adViewPort = new Rectangle( 0, 0, this.stage.stageWidth, 60 );
webView.viewPort = adViewPort;
webView.addEventListener(ErrorEvent.ERROR, onWebViewError );
webView.addEventListener(LocationChangeEvent.LOCATION_CHANGING, onWebViewLocChanging );
webView.addEventListener(LocationChangeEvent.LOCATION_CHANGE, onWebViewLocChange );
//Copy the html file outside the app directory
var templateFile:File = File.applicationDirectory.resolvePath( "adview.html" );
var workingFile:File = File.createTempFile();
templateFile.copyTo( workingFile, true );
try
{
webView.loadURL( workingFile.url );
}
catch (e:Error)
{
trace( e );
}
function onWebViewLocChange( event:LocationChangeEvent ):void
{
trace( "Change to" + event.location );
if( event.location != workingFile.url )
{
//Reset location back to our ad display page
navigateToURL( new URLRequest( event.location ) );
try
{

1007
ACTIONSCRIPT 3.0 DEVELOPER’S GUIDE
Displaying HTML content in mobile apps
Last updated 3/21/2011
webView.loadURL( workingFile.url );
}
catch (e:Error)
{
trace( e );
}
}
}
function onWebViewLocChanging( event:LocationChangeEvent ):void
{
trace( "Changing " + event.location );
event.preventDefault();
navigateToURL( new URLRequest( event.location ) );
}
function onWebViewError( error:ErrorEvent ):void
{
trace( error );
}
Note: The example does not work in desktop applications, or when testing mobile applications on the desktop, due to
local-versus-remote sandbox restrictions. On the desktop, the StageWebView object has security constraints appropriate
to a desktop operating system. On mobile devices, the StageWebView object uses the standard web control and security
constraints imposed by the mobile operating system. In this case, a file loaded locally (adview.html) can access remote
resources — the ad service — on a mobile device, but not on the desktop.

1008
Last updated 3/21/2011
Chapter 61: Security
Flash Player 9 and later, Adobe AIR 1.0 and later
Security is a key concern of Adobe, users, website owners, and content developers. For this reason, Adobe® Flash®
Player and Adobe® AIR™ include a set of security rules and controls to safeguard the user, website owner, and content
developer. This discussion covers the security model for SWF files published with ActionScript 3.0 and running in
Flash Player 9.0.124.0 or later, and SWF, HTML, and JavaScript files running in AIR 1.0 or later, unless otherwise
noted.
This discussion provides an overview of security; it does not try to comprehensively explain all implementation details,
usage scenarios, or ramifications for using certain APIs. For a more detailed discussion of Flash Player security
concepts, see the Flash Player Developer Center topic “Security” at www.adobe.com/go/devnet_security_en.
Flash Platform security overview
Flash Player 9 and later, Adobe AIR 1.0 and later
Much of security model used by the Flash Player and AIR runtimes is based on the domain of origin for loaded SWF
files, HTML, media, and other assets. Executable code in a file from a specific Internet domain, such as
www.example.com, can always access all data from that domain. These assets are put in the same security grouping,
known as a security sandbox. (For more information, see “Security sandboxes” on page 1010.)
For example, ActionScript code in a SWF file can load SWF files, bitmaps, audio, text files, and any other asset from
its own domain. Also, cross-scripting between two SWF files from the same domain is always permitted, as long as
both files are written using ActionScript 3.0. Cross-scripting is the ability of code in one file to access the properties,
methods, and objects defined by the code in another file.
Cross-scripting is not supported between SWF files written using ActionScript 3.0 and those using previous versions
of ActionScript; however, these files can communicate by using the LocalConnection class. Also, the ability of a SWF
file to cross-script ActionScript 3.0 SWF files from other domains and to load data from other domains is prohibited
by default; however, such access can be granted with a call to the Security.allowDomain() method in the loaded
SWF file. For more information, see “Cross-scripting” on page 1027.
The following basic security rules always apply by default:
•Resources in the same security sandbox can always access each other.
•Executable code in files in a remote sandbox can never access local files and data.
The Flash Player and AIR runtimes consider the following to be individual domains, and set up individual security
sandboxes for each:
•http://example.com
•http://www.example.com
•http://store.example.com
•https://www.example.com
•http://192.0.34.166

1009
ACTIONSCRIPT 3.0 DEVELOPER’S GUIDE
Security
Last updated 3/21/2011
Even if a named domain, such as http://example.com, maps to a specific IP address, such as http://192.0.34.166, the
runtimes set up separate security sandboxes for each.
There are two basic methods that a developer can use to grant a SWF file access to assets from sandboxes other than
that of the SWF file:
•The Security.allowDomain() method (see “Author (developer) controls” on page 1020)
•The URL policy file (see “Website controls (policy files)” on page 1017)
In the Flash Player and AIR runtime security models, there is a distinction between loading content and extracting or
accessing data. Content is defined as media, including visual media the runtimes can display, audio, video, or a SWF
file or HTML that includes displayed media. Data is defined as something that is accessible only to code. Content and
data are loaded in different ways.
•Loading content—You can load content using classes such as the Loader, Sound, and NetStream classes; through
MXML tags when using Flex; or through HTML tags in an AIR application.
•Extracting data—You can extract data from loaded media content by using Bitmap objects, the
BitmapData.draw() method, the Sound.id3 property, or the SoundMixer.computeSpectrum() method.
•Accessing data—You can access data directly by loading it from an external file (such as an XML file) using classes
such as the URLStream, URLLoader, FileReference, Socket, and XMLSocket classes. AIR provides additional
classes for loading data, such as FileStream, and XMLHttpRequest.
The Flash Player security model defines different rules for loading content and accessing data. In general, there are
fewer restrictions on loading content than on accessing data.
In general, content (SWF files, bitmaps, mp3 files, and videos) can be loaded from anywhere, but if the content is from
a domain other than that of the loading code or content, it will be partitioned in a separate security sandbox.
There are a few barriers to loading content:
•By default, local SWF files (those loaded from a non-network address, such as a user’s hard drive) are classified in
the local-with-filesystem sandbox. These files cannot load content from the network. For more information, see
“Local sandboxes” on page 1010.
•Real-Time Messaging Protocol (RTMP) servers can limit access to content. For more information, see “Content
delivered using RTMP servers” on page 1027.
If the loaded media is an image, audio, or video, its data, such as pixel data and sound data, can be accessed by a SWF
file outside its security sandbox only if the domain of that SWF file has been included in a URL policy file at the origin
domain of the media. For details, see “Accessing loaded media as data” on page 1030.
Other forms of loaded data include text or XML files, which are loaded with a URLLoader object. Again in this case,
to access any data from another security sandbox, permission must be granted by means of a URL policy file at the
origin domain. For details, see “Using URLLoader and URLStream” on page 1033.
Note: Policy files are never required in order for code executing in the AIR application sandbox to load remote content or
data.

1010
ACTIONSCRIPT 3.0 DEVELOPER’S GUIDE
Security
Last updated 3/21/2011
Security sandboxes
Flash Player 9 and later, Adobe AIR 1.0 and later
Client computers can obtain individual files containing code, content, and data from a number of sources, such as
from external websites, from a local file system, or from an installed AIR application. The Flash Player and AIR
runtimes individually assign code files and other resources, such as shared objects, bitmaps, sounds, videos, and data
files, to security sandboxes based on their origin when they are loaded. The following sections describe the rules,
enforced by the runtimes, that govern what a code or content executing within a given sandbox can access.
For more information on Flash Player security, see the Flash Player Developer Center topic “Security” at
www.adobe.com/go/devnet_security_en.
Remote sandboxes
Flash Player 9 and later, Adobe AIR 1.0 and later
The Flash Player and AIR runtimes classify assets (including SWF files) from the Internet in separate sandboxes that
correspond to their domain of origin. For example, assets loaded from example.com will be placed into a different
security sandbox than assets loaded from foo.org. By default, these files are authorized to access any resources from
their own server. Remote SWF files can be allowed to access additional data from other domains by explicit website
and author permissions, such as URL policy files and the Security.allowDomain() method. For details, see
“Website controls (policy files)” on page 1017 and “Author (developer) controls” on page 1020.
Remote SWF files cannot load any local files or resources.
For more information on Flash Player security, see the Flash Player Developer Center topic “Security” at
www.adobe.com/go/devnet_security_en.
Local sandboxes
Flash Player 9 and later, Adobe AIR 1.0 and later
Local file describes any file that is referenced by using the file: protocol or a Universal Naming Convention (UNC)
path. Local SWF files are placed into one of four local sandboxes:
•The local-with-filesystem sandbox—For security purposes, the Flash Player and AIR runtimes place all local files
in the local-with-file-system sandbox, by default. From this sandbox, executable code can read local files (by using
the URLLoader class, for example), but cannot communicate with the network in any way. This assures the user
that local data cannot be leaked out to the network or otherwise inappropriately shared.
•The local-with-networking sandbox—When compiling a SWF file, you can specify that it has network access when
run as a local file (see “Setting the sandbox type of local SWF files” on page 1013).These files are placed in the local-
with-networking sandbox. SWF files that are assigned to the local-with-networking sandbox forfeit their local file
access. In return, the SWF files are allowed to access data from the network. However, a local-with-networking
SWF file is still not allowed to read any network-derived data unless permissions are present for that action,
through a URL policy file or a call to the Security.allowDomain() method. In order to grant such permission, a
URL policy file must grant permission to all domains by using <allow-access-from domain="*"/> or by using
Security.allowDomain("*"). For more information, see “Website controls (policy files)” on page 1017 and
“Author (developer) controls” on page 1020.

1011
ACTIONSCRIPT 3.0 DEVELOPER’S GUIDE
Security
Last updated 3/21/2011
•The local-trusted sandbox—Local SWF files that are registered as trusted (by users or by installer programs) are
placed in the local-trusted sandbox. System administrators and users also have the ability to reassign (move) a local
SWF file to or from the local-trusted sandbox based on security considerations (see “Administrator controls” on
page 1014 and “User controls” on page 1016). SWF files that are assigned to the local-trusted sandbox can interact
with any other SWF files and can load data from anywhere (remote or local).
•The AIR application sandbox—This sandbox contains content that was installed with the running AIR application.
By default, code executing in the AIR application sandbox can cross-script code from any domain. However, files
outside the AIR application sandbox are not permitted to cross-script code in the application sandbox. By default,
code and content in the AIR application sandbox can load content and data from any domain.
Communication between the local-with-networking and local-with-filesystem sandboxes, as well as communication
between the local-with-filesystem and remote sandboxes, is strictly forbidden. Permission to allow such
communication cannot be granted by an application running in Flash Player or by a user or administrator.
Scripting in either direction between local HTML files and local SWF files—for example, using the ExternalInterface
class—requires that both the HTML file and SWF file involved be in the local-trusted sandbox. This is because the local
security models for browsers differ from the Flash Player local security model.
SWF files in the local-with-networking sandbox cannot load SWF files in the local-with-filesystem sandbox. SWF files
in the local-with-filesystem sandbox cannot load SWF files in the local-with-networking sandbox.
The AIR application sandbox
Adobe AIR 1.0 and later
The Adobe AIR runtime adds an additional sandbox, called the application sandbox, to the Flash Player security
sandbox model. Files installed as part of an AIR application load into the application sandbox. Any other files loaded
by the application have security restrictions corresponding to those specified by the regular Flash Player security
model.
When an application is installed, all files included within an AIR package are installed onto the user's computer into
an application directory. Developers can reference this directory in code through the app:/ URL scheme (see “URI
schemes” on page 780). All files within the application directory tree are assigned to the application sandbox when the
application is run. Content in the application sandbox is blessed with the full privileges available to an AIR application,
including interaction with the local file system.
Many AIR applications use only these locally installed files to run the application. However, AIR applications are not
restricted to just the files within the application directory — they can load any type of file from any source. This
includes files local to the user's computer as well as files from available external sources, such as those on a local
network or on the Internet. File type has no impact on security restrictions; loaded HTML files have the same security
privileges as loaded SWF files from the same source.
Content in the application security sandbox has access to AIR APIs that content in other sandboxes are prevented from
using. For example, the air.NativeApplication.nativeApplication.applicationDescriptor property, which
returns the contents of the application descriptor file for the application, is restricted to content in the application
security sandbox. Another example of a restricted API is the FileStream class, which contains methods for reading and
writing to the local file system.
ActionScript APIs that are only available to content in the application security sandbox are indicated with the AIR logo
in the ActionScript 3.0 Reference for Adobe Flash Platform. Using these APIs in other sandboxes causes the runtime to
throw a SecurityError exception.

1012
ACTIONSCRIPT 3.0 DEVELOPER’S GUIDE
Security
Last updated 3/21/2011
For HTML content (in an HTMLLoader object), all AIR JavaScript APIs (those that are available via the
window.runtime property, or via the air object when using the AIRAliases.js file) are available to content in the
application security sandbox. HTML content in another sandbox does not have access to the window.runtime
property, so this content cannot access the AIR or Flash Player APIs.
Content executing within the AIR application sandbox has the following additional restrictions:
•For HTML content in the application security sandbox, there are limitations on using APIs that can dynamically
transform strings into executable code after the code is loaded. This is to prevent the application from inadvertently
injecting (and executing) code from non-application sources (such as potentially insecure network domains). An
example is the use of the eval() function. For details, see “Code restrictions for content in different sandboxes” on
page 1047.
•To prevent possible phishing attacks, img tags in HTML content in ActionScript TextField objects are ignored in
SWF content in the application security sandbox.
•Content in the application sandbox cannot use the asfunction protocol in HTML content in ActionScript 2.0 text
fields.
•SWF content in the application sandbox cannot use the cross-domain cache, a feature that was added to Flash
Player 9 Update 3. This feature lets Flash Player persistently cache Adobe platform component content and reuse
it in loaded SWF content on demand (eliminating the need to reload the content multiple times).
Restrictions for JavaScript inside AIR
Adobe AIR 1.0 and later
Unlike content in the application security sandbox, JavaScript content in a non-application security sandbox can call
the eval() function to execute dynamically generated code at any time. However, there are restrictions on JavaScript
running in a non-application security sandbox within AIR. These include:
•JavaScript code in a non-application sandbox does not have access to the window.runtime object, and as such this
code cannot execute AIR APIs.
•By default, content in a non-application security sandbox cannot use XMLHttpRequest calls to load data from other
domains other than the domain calling the request. However, application code can grant non-application content
permission to do so by setting an allowCrossdomainXHR attribute in the containing frame or iframe. For more
information, see “Code restrictions for content in different sandboxes” on page 1047.
•There are restrictions on calling the JavaScript window.open() method. For details, see “Restrictions on calling the
JavaScript window.open() method” on page 1050.
•HTML content in remote (network) security sandboxes can only load CSS, frame, iframe, and img content from
remote domains (from network URLs).
•HTML content in local-with-filesystem, local-with-networking, or local-trusted sandboxes can only load CSS,
frame, iframe, and img content from local sandboxes (not from application or network URLs).
For details, see “Code restrictions for content in different sandboxes” on page 1047.

1013
ACTIONSCRIPT 3.0 DEVELOPER’S GUIDE
Security
Last updated 3/21/2011
Setting the sandbox type of local SWF files
Flash Player 9 and later, Adobe AIR 1.0 and later
An end user or the administrator of a computer can specify that a local SWF file is trusted, allowing it to load data from
all domains, both local and network. This is specified in the Global Flash Player Trust and User Flash Player Trust
directories. For more information, see “Administrator controls” on page 1014 and “User controls” on page 1016.
For more information on local sandboxes, see “Local sandboxes” on page 1010.
Adobe Flash Professional
You can configure a SWF file for the local-with-filesystem sandbox or the local-with-networking sandbox by setting
the document’s publish settings in the authoring tool.
Adobe Flex
You can configure a SWF file for the local-with-filesystem sandbox or the local-with-networking sandbox by setting
the use-network flag in the Adobe Flex compiler. For more information, see “About the application compiler
options” in Building and Deploying Adobe Flex 3 Applications.
The Security.sandboxType property
Flash Player 9 and later, Adobe AIR 1.0 and later
An author of a SWF file can use the read-only static Security.sandboxType property to determine the type of
sandbox to which the Flash Player or AIR runtime has assigned the SWF file. The Security class includes constants that
represent possible values of the Security.sandboxType property, as follows:
•Security.REMOTE—The SWF file is from an Internet URL, and operates under domain-based sandbox rules.
•Security.LOCAL_WITH_FILE—The SWF file is a local file, but it has not been trusted by the user and was not
published with a networking designation. The SWF file can read from local data sources but cannot communicate
with the Internet.
•Security.LOCAL_WITH_NETWORK—The SWF file is a local file and has not been trusted by the user, but it was
published with a networking designation. The SWF file can communicate with the Internet but cannot read from
local data sources.
•Security.LOCAL_TRUSTED—The SWF file is a local file and has been trusted by the user, using either the Settings
Manager or a Flash Player trust configuration file. The SWF file can both read from local data sources and
communicate with the Internet.
•Security.APPLICATION—The SWF file is running in an AIR application, and it was installed with the package
(AIR file) for that application. By default, files in the AIR application sandbox can cross-script any file from any
domain. However, files outside the AIR application sandbox are not permitted to cross-script the AIR file. By
default, files in the AIR application sandbox can load content and data from any domain.

1014
ACTIONSCRIPT 3.0 DEVELOPER’S GUIDE
Security
Last updated 3/21/2011
Permission controls
Flash Player 9 and later, Adobe AIR 1.0 and later
The Flash Player client run-time security model has been designed around resources, which are objects such as SWF
files, local data, and Internet URLs. Stakeholders are the parties who own or use those resources. Stakeholders can
exercise controls (security settings) over their own resources, and each resource has four stakeholders. Flash Player
strictly enforces a hierarchy of authority for these controls, as the following illustration shows:
Hierarchy of security controls
This means, for instance, that if an administrator restricts access to a resource, no other stakeholders can override that
restriction.
For AIR applications, these permission controls only apply to content running outside the AIR application sandbox.
Administrator controls
Flash Player 9 and later, Adobe AIR 1.0 and later
An administrative user of a computer (a user who has logged in with administrative rights) can apply Flash Player
security settings that affect all users of the computer. In a non-enterprise environment, such as on a home computer,
there is usually one user who also has administrative access. Even in an enterprise environment, individual users may
have administrative rights to the computer.
There are two types of administrative user controls:
•The mms.cfg file
•The Global Flash Player Trust directory
The mms.cfg file
Flash Player 9 and later, Adobe AIR 1.0 and later
The mms.cfg file is a text file that lets administrators enable or restrict access to a variety of capabilities. When Flash
Player starts, it reads its security settings from this file, and uses them to limit functionality. The mms.cfg file includes
settings that the administrator uses to manage capabilities such as privacy controls, local file security, socket
connections, and so on.
Administrator
(User Institution)
settings
User settings
Website settings
Author settings

1015
ACTIONSCRIPT 3.0 DEVELOPER’S GUIDE
Security
Last updated 3/21/2011
A SWF file can access some information on capabilities that have been disabled by calling the
Capabilities.avHardwareDisable and Capabilities.localFileReadDisable properties. However, most of
the settings in the mms.cfg file cannot be queried from ActionScript.
To enforce application-independent security and privacy policies for a computer, the mms.cfg file should be modified
only by system administrators. The mms.cfg file is not for use by application installers. While an installer running with
administrative privileges could modify the contents of the mms.cfg file, Adobe considers such usage a violation of the
user’s trust and urges creators of installers never to modify the mms.cfg file.
The mms.cfg file is stored in the following location:
•Windows: system\Macromed\Flash\mms.cfg
(for example, C:\WINDOWS\system32\Macromed\Flash\mms.cfg)
•Mac: app support/Macromedia/mms.cfg
(for example, /Library/Application Support/Macromedia/mms.cfg)
For more information about the mms.cfg file, see the Flash Player Administration Guide at
www.adobe.com/go/flash_player_admin.
The Global Flash Player Trust directory
Flash Player 9 and later, Adobe AIR 1.0 and later
Administrative users and installer applications can register specified local SWF files as trusted for all users. These SWF
files are assigned to the local-trusted sandbox. They can interact with any other SWF files, and they can load data from
anywhere, remote or local. Files are designated as trusted in the Global Flash Player Trust directory, in the following
location:
•Windows: system\Macromed\Flash\FlashPlayerTrust
(for example, C:\WINDOWS\system32\Macromed\Flash\FlashPlayerTrust)
•Mac: app support/Macromedia/FlashPlayerTrust
(for example, /Library/Application Support/Macromedia/FlashPlayerTrust)
The Flash Player Trust directory can contain any number of text files, each of which lists trusted paths, with one path
per line. Each path can be an individual SWF file, HTML file, or directory. Comment lines begin with the # symbol.
For example, a Flash Player trust configuration file containing the following text grants trusted status to all files in the
specified directory and all subdirectories:
# Trust files in the following directories:
C:\Documents and Settings\All Users\Documents\SampleApp
The paths listed in a trust configuration file should always be local paths or SMB network paths. Any HTTP path in a
trust configuration file is ignored; only local files can be trusted.
To avoid conflicts, give each trust configuration file a filename corresponding to the installing application, and use a
.cfg file extension.
As a developer distributing a locally run SWF file through an installer application, you can have the installer
application add a configuration file to the Global Flash Player Trust directory, granting full privileges to the file that
you are distributing. The installer application must be run by a user with administrative rights. Unlike the mms.cfg
file, the Global Flash Player Trust directory is included for the purpose of installer applications granting trust
permissions. Both administrative users and installer applications can designate trusted local applications using the
Global Flash Player Trust directory.

1016
ACTIONSCRIPT 3.0 DEVELOPER’S GUIDE
Security
Last updated 3/21/2011
There are also Flash Player Trust directories for individual users (see “User controls” on page 1016).
User controls
Flash Player 9 and later
Flash Player provides three different user-level mechanisms for setting permissions: the Settings UI and Settings
Manager, and the User Flash Player Trust directory.
The Settings UI and Settings Manager
Flash Player 9 and later
The Settings UI is a quick, interactive mechanism for configuring the settings for a specific domain. The Settings
Manager presents a more detailed interface and provides the ability to make global changes that affect permissions for
many or all domains. Additionally, when a new permission is requested by a SWF file, requiring run-time decisions
concerning security or privacy, dialog boxes are displayed in which users can adjust some Flash Player settings.
The Settings Manager and Settings UI provide security-related options such as camera and microphone settings,
shared object storage settings, settings related to legacy content, and so on. Neither the Settings Manager nor the
Settings UI are available to AIR applications.
Note: Any settings made in the mms.cfg file (see “Administrator controls” on page 1014) are not reflected in the Settings
Manager.
For details on the Settings Manager, see www.adobe.com/go/settingsmanager.
The User Flash Player Trust directory
Flash Player 9 and later, Adobe AIR 1.0 and later
Users and installer applications can register specified local SWF files as trusted. These SWF files are assigned to the
local-trusted sandbox. They can interact with any other SWF files, and they can load data from anywhere, remote or
local. A user designates a file as trusted in the User Flash Player Trust directory, which is in same directory as the shared
object storage area, in the following locations (locations are specific to the current user):
•Windows: app data\Macromedia\Flash Player\#Security\FlashPlayerTrust
(for example, C:\Documents and Settings\JohnD\Application Data\Macromedia\Flash
Player\#Security\FlashPlayerTrust on Windows XP or C:\Users\JohnD\AppData\Roaming\Macromedia\Flash
Player\#Security\FlashPlayerTrust on Windows Vista)
In Windows, the Application Data folder is hidden by default. To show hidden folders and files, select My
Computer to open Windows Explorer, select Tools
> Folder Options and then select the View tab. Under the View
tab, select the Show hidden files and folders radio button.
•Mac: app data/Macromedia/Flash Player/#Security/FlashPlayerTrust
(for example, /Users/JohnD/Library/Preferences/Macromedia/Flash Player/#Security/FlashPlayerTrust)
These settings affect only the current user, not other users who log in to the computer. If a user without
administrative rights installs an application in their own portion of the system, the User Flash Player Trust
directory lets the installer register the application as trusted for that user.

1017
ACTIONSCRIPT 3.0 DEVELOPER’S GUIDE
Security
Last updated 3/21/2011
As a developer distributing a locally run SWF file by way of an installer application, you can have the installer
application add a configuration file to the User Flash Player Trust directory, granting full privileges to the file that
you are distributing. Even in this situation, the User Flash Player Trust directory file is considered a user control,
because a user action (installation) initiates it.
There is also a Global Flash Player Trust directory, used by the administrative user or installers to register an
application for all users of a computer (see “Administrator controls” on page 1014).
Website controls (policy files)
Flash Player 9 and later, Adobe AIR 1.0 and later
To make data from your web server available to SWF files from other domains, you can create a policy file on your
server. A policy file is an XML file placed in a specific location on your server.
Policy files affect access to a number of assets, including the following:
•Data in bitmaps, sounds, and videos
•Loading XML and text files
•Importing SWF files from other security domains into the security domain of the loading SWF file
•Access to socket and XML socket connections
ActionScript objects instantiate two different kinds of server connections: document-based server connections and
socket connections. ActionScript objects like Loader, Sound, URLLoader, and URLStream instantiate document-
based server connections, and these objects load a file from a URL. ActionScript Socket and XMLSocket objects make
socket connections, which operate with streaming data, not loaded documents.
Because Flash Player supports two kinds of server connections, there are two types of policy files—URL policy files and
socket policy files.
•Document-based connections require URL policy files. These files let the server indicate that its data and documents
are available to SWF files served from certain domains or from all domains.
•Socket connections require socket policy files, which enable networking directly at the lower TCP socket level, using
the Socket and XMLSocket classes.
Flash Player requires policy files to be transmitted using the same protocol that the attempted connection wants to use.
For example, when you place a policy file on your HTTP server, SWF files from other domains are allowed to load data
from it as an HTTP server. However, if you don’t provide a socket policy file at the same server, you are forbidding
SWF files from other domains to connect to the server at the socket level. In other words, the means by which a policy
file is retrieved must match the means of connecting.
Policy file usage and syntax are discussed briefly in the rest of this section, as they apply to SWF files published for
Flash Player 10. (Policy file implementation is slightly different in earlier versions of Flash Player, as successive releases
have strengthened Flash Player security.) For more detailed information on policy files, see the Flash Player Developer
Center topic “Policy File Changes in Flash Player 9” at www.adobe.com/go/devnet_security_en.
Code executing in the AIR application sandbox does not require a policy file to access data from a URL or socket. Code
in an AIR application executing in a non-application sandbox does require a policy file.

1018
ACTIONSCRIPT 3.0 DEVELOPER’S GUIDE
Security
Last updated 3/21/2011
Master policy files
Flash Player 9 and later, Adobe AIR 1.0 and later
By default, Flash Player (and AIR content that is not in the AIR application sandbox) first looks for a URL policy file
named crossdomain.xml in the root directory of the server, and looks for a socket policy file on port 843. A file in
either of these locations is called the master policy file. (In the case of socket connections, Flash Player also looks for a
socket policy file on the same port as the main connection. However, a policy file found on that port is not considered
a master policy file.)
In addition to specifying access permissions, the master policy file can also contain a meta-policy statement. A meta-
policy specifies which locations can contain policy files. The default meta-policy for URL policy files is “master-only,”
which means that /crossdomain.xml is the only policy file allowed on the server. The default meta-policy for socket
policy files is “all,” which means that any socket on the host can serve a socket policy file.
Note: In Flash Player 9 and earlier, the default meta-policy for URL policy files was “all,” which means that any directory
can contain a policy file. If you have deployed applications that load policy files from locations other than the default
/crossdomain.xml file, and those applications might now be running in Flash Player 10, make sure you (or the server
administrator) modify the master policy file to allow additional policy files. For information on how to specify different
a different meta-policy, see the Flash Player Developer Center topic “Policy File Changes in Flash Player 9” at
www.adobe.com/go/devnet_security_en.
A SWF file can check for a different policy filename or a different directory location by calling the
Security.loadPolicyFile() method. However, if the master policy file doesn’t specify that the target location can
serve policy files, the call to loadPolicyFile() has no effect, even if there is a policy file at that location. Call
loadPolicyFile() before attempting any network operations that require the policy file. Flash Player automatically
queues networking requests behind their corresponding policy file attempts. So, for example, it is acceptable to call
Security.loadPolicyFile() immediately before initiating a networking operation.
When checking for a master policy file, Flash Player waits three seconds for a server response. If a response isn’t
received, Flash Player assumes that no master policy file exists. However, there is no default timeout value for calls to
loadPolicyFile(); Flash Player assumes that the file being called exists, and waits as long as necessary to load it.
Therefore, if you want to make sure that a master policy file is loaded, use loadPolicyFile() to call it explicitly.
Even though the method is named Security.loadPolicyFile(), a policy file isn’t loaded until a network call that
requires a policy file is issued. Calls to loadPolicyFile() simply tell Flash Player where to look for policy files when
they are needed.
You can’t receive notification of when a policy file request is initiated or completed, and there is no reason to do so.
Flash Player performs policy checks asynchronously, and automatically waits to initiate connections until after the
policy file checks have succeeded.
The following sections contain information that applies only to URL policy files. For more information on socket
policy files, see “Connecting to sockets” on page 1033.
URL policy file scope
Flash Player 9 and later, Adobe AIR 1.0 and later
A URL policy file applies only to the directory from which it is loaded and to its child directories. A policy file in the
root directory applies to the whole server; a policy file loaded from an arbitrary subdirectory applies only to that
directory and its subdirectories.

1019
ACTIONSCRIPT 3.0 DEVELOPER’S GUIDE
Security
Last updated 3/21/2011
A policy file affects access only to the particular server on which it resides. For example, a policy file located at
https://www.adobe.com:8080/crossdomain.xml applies only to data- loading calls made to www.adobe.com over
HTTPS at port 8080.
Specifying access permissions in a URL policy file
Flash Player 9 and later, Adobe AIR 1.0 and later
A policy file contains a single <cross-domain-policy> tag, which in turn contains zero or more <allow-access-
from> tags. Each <allow-access-from> tag contains an attribute, domain, which specifies either an exact IP address,
an exact domain, or a wildcard domain (any domain). Wildcard domains are indicated in one of two ways:
•By a single asterisk (*), which matches all domains and all IP addresses
•By an asterisk followed by a suffix, which matches only those domains that end with the specified suffix
Suffixes must begin with a dot. However, wildcard domains with suffixes can match domains that consist of only the
suffix without the leading dot. For example, xyz.com is considered to be part of *.xyz.com. Wildcards are not allowed
in IP domain specifications.
The following example shows a URL policy file that permits access to SWF files that originate from *.example.com,
www.friendOfExample.com and 192.0.34.166:
<?xml version="1.0"?>
<cross-domain-policy>
<allow-access-from domain="*.example.com" />
<allow-access-from domain="www.friendOfExample.com" />
<allow-access-from domain="192.0.34.166" />
</cross-domain-policy>
If you specify an IP address, access is granted only to SWF files loaded from that IP address using IP syntax (for
example, http://65.57.83.12/flashmovie.swf). Access isn’t granted to SWF files using domain-name syntax. Flash
Player does not perform DNS resolution.
You can permit access to documents originating from any domain, as shown in the following example:
<?xml version="1.0"?>
<!-- http://www.foo.com/crossdomain.xml -->
<cross-domain-policy>
<allow-access-from domain="*" />
</cross-domain-policy>
Each <allow-access-from> tag also has the optional secure attribute, which defaults to true. If your policy file is
on an HTTPS server and you want to allow SWF files on a non-HTTPS server to load data from the HTTPS server,
you can set the attribute to false.
Setting the secure attribute to false could compromise the security offered by HTTPS. In particular, setting this
attribute to false opens secure content to snooping and spoofing attacks. Adobe strongly recommends that you not
set the secure attribute to false.
If data to be loaded is on an HTTPS server, but the SWF file loading it is on an HTTP server, Adobe recommends that
you move the loading SWF file to an HTTPS server. Doing so lets you keep all copies of your secure data under the
protection of HTTPS. However, if you decide that you must keep the loading SWF file on an HTTP server, add the
secure="false" attribute to the <allow-access-from> tag, as shown in the following code:
<allow-access-from domain="www.example.com" secure="false" />

1020
ACTIONSCRIPT 3.0 DEVELOPER’S GUIDE
Security
Last updated 3/21/2011
Another element you can use to permit access is the allow-http-request-headers-from tag. This element grants
a client hosting content from another permission domain to send user-defined headers to your domain. While the
<allow-access-from> tag grants other domains permission to pull data from your domain, the allow-http-
request-headers-from tag grants other domains permission to push data to your domain, in the form of headers.
In the following example, any domain is permitted to send the SOAPAction header to the current domain:
<cross-domain-policy>
<allow-http-request-headers-from domain="*" headers="SOAPAction"/>
</cross-domain-policy>
If the allow-http-request-headers-from statement is in the master policy file, it applies to all directories on the
host. Otherwise, it applies only to the directory and subdirectories of the policy file that contains the statement.
Preloading policy files
Flash Player 9 and later, Adobe AIR 1.0 and later
Loading data from a server or connecting to a socket is an asynchronous operation. Flash Player simply waits for the
policy file to finish downloading before it begins the main operation. However, extracting pixel data from images or
extracting sample data from sounds is a synchronous operation. The policy file must load before you can extract data.
When you load the media, specify that it check for a policy file:
•When using the Loader.load() method, set the checkPolicyFile property of the context parameter, which is
a LoaderContext object.
•When embedding an image in a text field using the <img> tag, set the checkPolicyFile attribute of the <img> tag
to "true", as in the following:
<img checkPolicyFile = "true" src = "example.jpg">
•When using the Sound.load() method, set the checkPolicyFile property of the context parameter, which is a
SoundLoaderContext object.
•When using the NetStream class, set the checkPolicyFile property of the NetStream object.
When you set one of these parameters, Flash Player first checks for any policy files that it already has downloaded for
that domain. Then it looks for the policy file in the default location on the server, checking both for <allow-access-
from> statements and for the presence of a meta-policy. Finally, it considers any pending calls to the
Security.loadPolicyFile() method to see if they are in scope.
Author (developer) controls
Flash Player 9 and later, Adobe AIR 1.0 and later
The main ActionScript API used to grant security privileges is the Security.allowDomain() method, which grant
privileges to SWF files in the domains that you specify. In the following example, a SWF file grants access to SWF files
served from the www.example.com domain:
Security.allowDomain("www.example.com")
This method grants permissions for the following:
•Cross-scripting between SWF files (see “Cross-scripting” on page 1027)
•Display list access (see “Traversing the display list” on page 1030)
•Event detection (see “Event security” on page 1030)
•Full access to properties and methods of the Stage object (see “Stage security” on page 1029)

1021
ACTIONSCRIPT 3.0 DEVELOPER’S GUIDE
Security
Last updated 3/21/2011
The primary purpose of calling the Security.allowDomain() method is to grant permission for SWF files in an
outside domain to script the SWF file calling the Security.allowDomain() method. For more information, see
“Cross-scripting” on page 1027.
Specifying an IP address as a parameter to the Security.allowDomain() method does not permit access by all parties
that originate at the specified IP address. Instead, it permits access only by a party that contains the specified IP address
as its URL, rather than a domain name that maps to that IP address. For example, if the domain name
www.example.com maps to the IP address 192.0.34.166, a call to Security.allowDomain("192.0.34.166") does
not grant access to www.example.com.
You can pass the "*" wildcard to the Security.allowDomain() method to allow access from all domains. Because it
grants permission for SWF files from all domains to script the calling SWF file, use the "*" wildcard with care.
ActionScript includes a second permission API, called Security.allowInsecureDomain(). This method does the
same thing as the Security.allowDomain() method, except that, when called from a SWF file served by a secure
HTTPS connection, it additionally permits access to the calling SWF file by other SWF files that are served from an
insecure protocol, such as HTTP. However, it is not a good security practice to allow scripting between files from a
secure protocol (HTTPS) and those from insecure protocols (such as HTTP); doing so can open secure content to
snooping and spoofing attacks. Here is how such attacks can work: since the Security.allowInsecureDomain()
method allows access to your secure HTTPS data by SWF files served over HTTP connections, an attacker interposed
between your HTTP server and your users could replace your HTTP SWF file with one of their own, which can then
access your HTTPS data.
Important: Code executing in the AIR application sandbox is not permitted to call either the allowDomain() or
allowInsecureDomain() methods of the Security class.
Another important security-related method is the Security.loadPolicyFile() method, which causes Flash Player
to check for a policy file at a nonstandard location. For more information, see “Website controls (policy files)” on
page 1017.
Restricting networking APIs
Flash Player 9 and later, Adobe AIR 1.0 and later
Networking APIs can be restricted in two ways. To prevent malicious activity, access to commonly reserved ports is
blocked; you can’t override these blocks in your code. To control a SWF file’s access to network functionality with
regard to other ports, you can use the allowNetworking setting.
Blocked ports
Flash Player 9 and later, Adobe AIR 1.0 and later
Flash Player and Adobe AIR have restrictions on HTTP access to certain ports, as do browsers. HTTP requests are not
permitted to certain standard ports that are conventionally used for non-HTTP types of servers.
Any API that accesses a network URL is subject to these port blocking restrictions. The only exception is APIs that call
sockets directly, such as Socket.connect() and XMLSocket.connect(), or calls to Security.loadPolicyFile()
in which a socket policy file is being loaded. Socket connections are permitted or denied through the use of socket
policy files on the target server.
The following list shows the ActionScript 3.0 APIs to which port blocking applies:

1022
ACTIONSCRIPT 3.0 DEVELOPER’S GUIDE
Security
Last updated 3/21/2011
FileReference.download(),FileReference.upload(), Loader.load(), Loader.loadBytes(),
navigateToURL(), NetConnection.call(), NetConnection.connect(), NetStream.play(),
Security.loadPolicyFile(), sendToURL(), Sound.load(), URLLoader.load(), URLStream.load()
Port blocking also applies to Shared Library importing, the use of the <img> tag in text fields, and the loading of SWF
files in an HTML page using the <object> and <embed> tags.
Port blocking also applies to the use of the <img> tag in text fields and the loading of SWF files in an HTML page using
the <object> and <embed> tags.
The following lists show which ports are blocked:
HTTP: 20 (ftp data), 21 (ftp control)
HTTP and FTP: 1 (tcpmux), 7 (echo), 9 (discard), 11 (systat), 13 (daytime), 15 (netstat), 17 (qotd), 19 (chargen),
22
(ssh), 23 (telnet), 25 (smtp), 37 (time), 42 (name), 43 (nicname), 53 (domain), 77 (priv-rjs), 79 (finger),
87
(ttylink), 95 (supdup), 101 (hostriame), 102 (iso-tsap), 103 (gppitnp), 104 (acr-nema), 109 (pop2), 110 (pop3),
111
(sunrpc), 113 (auth), 115 (sftp), 117 (uucp-path), 119 (nntp), 123 (ntp), 135 (loc-srv / epmap), 139 (netbios),
143
(imap2), 179 (bgp), 389 (ldap), 465 (smtp+ssl), 512 (print / exec), 513 (login), 514 (shell), 515 (printer),
526
(tempo), 530 (courier), 531 (chat), 532 (netnews), 540 (uucp), 556 (remotefs), 563 (nntp+ssl), 587 (smtp),
601
(syslog), 636 (ldap+ssl), 993 (ldap+ssl), 995 (pop3+ssl), 2049 (nfs), 4045 (lockd), 6000 (x11)
Using the allowNetworking parameter
Flash Player 9 and later, Adobe AIR 1.0 and later
You can control a SWF file’s access to network functionality by setting the allowNetworking parameter in the
<object> and <embed> tags in the HTML page that contains the SWF content.
Possible values of allowNetworking are:
•"all" (the default)—All networking APIs are permitted in the SWF file.
•"internal"—The SWF file may not call browser navigation or browser interaction APIs, listed later in this section,
but it may call any other networking APIs.
•"none"—The SWF file may not call browser navigation or browser interaction APIs, listed later in this section, and
it cannot use any SWF-to-SWF communication APIs, also listed later.
The allowNetworking parameter is designed to be used primarily when the SWF file and the enclosing HTML page
are from different domains. Using the value of "internal" or "none" is not recommended when the SWF file being
loaded is from the same domain as its enclosing HTML pages, because you can’t ensure that a SWF file is always loaded
with the HTML page you intend. Untrusted parties could load a SWF file from your domain with no enclosing HTML,
in which case the allowNetworking restriction will not work as you intended.
Calling a prevented API throws a SecurityError exception.
Add the allowNetworking parameter and set its value in the <object> and <embed> tags in the HTML page that
contains a reference to the SWF file, as shown in the following example:

1023
ACTIONSCRIPT 3.0 DEVELOPER’S GUIDE
Security
Last updated 3/21/2011
<object classic="clsid:d27cdb6e-ae6d-11cf-96b8-444553540000"
Code
base="http://fpdownload.macromedia.com/pub/shockwave/cabs/flash/swflash.cab#version=9,0,124,
0"
width="600" height="400" ID="test" align="middle">
<param name="allowNetworking" value="none" />
<param name="movie" value="test.swf" />
<param name="bgcolor" value="#333333" />
<embed src="test.swf" allowNetworking="none" bgcolor="#333333"
width="600" height="400"
name="test" align="middle" type="application/x-shockwave-flash"
pluginspage="http://www.macromedia.com/go/getflashplayer" />
</object>
An HTML page may also use a script to generate SWF-embedding tags. You need to alter the script so that it inserts
the proper allowNetworking settings. HTML pages generated by Adobe Flash Professional and Adobe Flash Builder
use the AC_FL_RunContent() function to embed references to SWF files. Add the allowNetworking parameter
settings to the script, as in the following:
AC_FL_RunContent( ... "allowNetworking", "none", ...)
The following APIs are prevented when allowNetworking is set to "internal":
navigateToURL(), fscommand(), ExternalInterface.call()
In addition to the APIs on the previous list, the following APIs are also prevented when allowNetworking is set to
"none":
sendToURL(), FileReference.download(), FileReference.upload(), Loader.load(),
LocalConnection.connect(), LocalConnection.send(), NetConnection.connect(), NetStream.play(),
Security.loadPolicyFile(), SharedObject.getLocal(), SharedObject.getRemote(), Socket.connect(),
Sound.load(), URLLoader.load(), URLStream.load(), XMLSocket.connect()
Even if the selected allowNetworking setting permits a SWF file to use a networking API, there may be other
restrictions based on security sandbox limitations (see “Security sandboxes” on page 1010).
When allowNetworking is set to "none", you cannot reference external media in an <img> tag in the htmlText
property of a TextField object (a SecurityError exception is thrown).
When allowNetworking is set to "none", a symbol from an imported shared library added in the Flash Professional
(not ActionScript) is blocked at run time.
Full-screen mode security
Flash Player 9 and later, Adobe AIR 1.0 and later
Flash Player 9.0.27.0 and later support full-screen mode, in which content running in Flash Player can fill the entire
screen. To enter full-screen mode, the displayState property of the Stage is set to the
StageDisplayState.FULL_SCREEN constant. For more information, see “Working with full-screen mode” on
page 159.
For SWF files running in a remote sandbox, there are some security considerations.

1024
ACTIONSCRIPT 3.0 DEVELOPER’S GUIDE
Security
Last updated 3/21/2011
To enable full-screen mode, in the <object> and <embed> tags in the HTML page that contains a reference to the SWF
file, add the allowFullScreen parameter, with its value set to "true" (the default value is "false"), as shown in the
following example:
<object classid="clsid:d27cdb6e-ae6d-11cf-96b8-444553540000"
codebase="http://fpdownload.macromedia.com/pub/shockwave/cabs/flash/swflash.cab#version=9,0,
18,0"
width="600" height="400" id="test" align="middle">
<param name="allowFullScreen" value="true" />
<param name="movie" value="test.swf" />
<param name="bgcolor" value="#333333" />
<embed src="test.swf" allowFullScreen="true" bgcolor="#333333"
width="600" height="400"
name="test" align="middle" type="application/x-shockwave-flash"
pluginspage="http://www.macromedia.com/go/getflashplayer" />
</object>
An HTML page may also use a script to generate SWF-embedding tags. You must alter the script so that it inserts the
proper allowFullScreen settings. HTML pages generated by Flash Professional and Flash Builder use the
AC_FL_RunContent() function to embed references to SWF files, and you need to add the allowFullScreen
parameter settings, as in the following:
AC_FL_RunContent( ... "allowFullScreen", "true", ...)
The ActionScript that initiates full-screen mode can be called only in response to a mouse event or keyboard event. If
it is called in other situations, Flash Player throws an exception.
A message appears when the content enters full-screen mode, instructing the user how to exit and return to normal
mode. The message appears for a few seconds and then fades out.
For content that is running in a browser, keyboard usage is restricted in full-screen mode. In Flash Player 9, only
keyboard shortcuts that return the application to normal mode, such as pressing the Escape key, are supported. Users
can’t enter text in text fields or navigate around the screen. In Flash Player 10 and later, certain non-printing keys
(specifically the arrow keys, space, and Tab key) are supported. However, text input is still prohibited.
Full-screen mode is always permitted in the stand-alone player or in a projector file. Also, keyboard usage (including
text input) is fully supported in those environments.
Calling the displayState property of a Stage object throws an exception for any caller that is not in the same security
sandbox as the Stage owner (the main SWF file). For more information, see “Stage security” on page 1029.
Administrators can disable full-screen mode for SWF files running in browsers by setting FullScreenDisable = 1
in the mms.cfg file. For details, see “Administrator controls” on page 1014.
In a browser, a SWF file must be contained in an HTML page to allow full-screen mode.
Loading content
Flash Player 9 and later, Adobe AIR 1.0 and later
Flash Player and AIR content can load many types of other content, including the following:
•SWF files
•Images

1025
ACTIONSCRIPT 3.0 DEVELOPER’S GUIDE
Security
Last updated 3/21/2011
•Sound
•Video
•HTML files (AIR only)
•JavaScript (AIR only)
Loading SWF files and images with the Loader class
Flash Player 9 and later, Adobe AIR 1.0 and later
You use the Loader class to load SWF files and images (JPG, GIF, or PNG files). Any SWF file, other than one in the
local-with-filesystem sandbox, can load SWF files and images from any network domain. Only SWF files in local
sandboxes can load SWF files and images from the local file system. However, files in the local-with-networking
sandbox can only load local SWF files that are in the local-trusted or local-with-networking sandbox. SWF files in the
local-with-networking sandbox load local content other than SWF files (such as images), however they cannot access
data in the loaded content.
When loading a SWF file from a non-trusted source (such as a domain other than that of the Loader object’s root SWF
file), you may want to define a mask for the Loader object, to prevent the loaded content (which is a child of the Loader
object) from drawing to portions of the Stage outside of that mask, as in the following code:
import flash.display.*;
import flash.net.URLRequest;
var rect:Shape = new Shape();
rect.graphics.beginFill(0xFFFFFF);
rect.graphics.drawRect(0, 0, 100, 100);
addChild(rect);
var ldr:Loader = new Loader();
ldr.mask = rect;
var url:String = "http://www.unknown.example.com/content.swf";
var urlReq:URLRequest = new URLRequest(url);
ldr.load(urlReq);
addChild(ldr);
When you call the load() method of the Loader object, you can specify a context parameter, which is a
LoaderContext object. The LoaderContext class includes three properties that let you define the context of how the
loaded content can be used:
•checkPolicyFile: Use this property only when loading an image file (not a SWF file). Specify this for an image
file from a domain other than that of the file containing the Loader object. If you set this property to true, the
Loader checks the origin server for a URL policy file (see “Website controls (policy files)” on page 1017). If the
server grants permission to the Loader domain, ActionScript from SWF files in the Loader domain can access data
in the loaded image. In other words, you can use the Loader.content property to obtain a reference to the Bitmap
object that represents the loaded image, or the BitmapData.draw() method to access pixels from the loaded image.
•securityDomain: Use this property only when loading a SWF file (not an image). Specify this for a SWF file from
a domain other than that of the file containing the Loader object. Only two values are currently supported for the
securityDomain property: null (the default) and SecurityDomain.currentDomain. If you specify
SecurityDomain.currentDomain, this requests that the loaded SWF file be imported to the sandbox of the
loading SWF file, meaning that it operates as though it had been loaded from the loading SWF file’s own server.
This is only permitted if a URL policy file is found on the loaded SWF file’s server, allowing access by the loading

1026
ACTIONSCRIPT 3.0 DEVELOPER’S GUIDE
Security
Last updated 3/21/2011
SWF file’s domain. If the required policy file is found, the loader and loadee can freely script each other once the
load begins, since they are in the same sandbox. Note that sandbox importing can mostly be replaced by performing
an ordinary load and then having the loaded SWF file call the Security.allowDomain() method. This latter
method may be easier to use, since the loaded SWF file will then be in its own natural sandbox, and thus able to
access resources on its own actual server.
•applicationDomain: Use this property only when loading a SWF file written in ActionScript 3.0 (not an image or
a SWF file written in ActionScript 1.0 or 2.0). When loading the file, you can specify that the file be placed into a
particular application domain, rather than the default of being placed in a new application domain that is a child of
the loading SWF file’s application domain. Note that application domains are subunits of security domains, and
thus you can specify a target application domain only if the SWF file that you are loading is from your own security
domain, either because it is from your own server, or because you have successfully imported it into your security
domain using the securityDomain property. If you specify an application domain but the loaded SWF file is part
of a different security domain, the domain you specify in applicationDomain is ignored. For more information,
see “Working with application domains” on page 139.
For details, see “Specifying loading context” on page 191.
An important property of a Loader object is the contentLoaderInfo property, which is a LoaderInfo object. Unlike
most other objects, a LoaderInfo object is shared between the loading SWF file and the loaded content, and it is always
accessible to both parties. When the loaded content is a SWF file, it can access the LoaderInfo object through the
DisplayObject.loaderInfo property. LoaderInfo objects include information such as load progress, the URLs of
loader and loadee, the trust relationship between loader and loadee, and other information. For more information, see
“Monitoring loading progress” on page 190.
Loading sound and videos
Flash Player 9 and later, Adobe AIR 1.0 and later
Any content, except content in the local-with-filesystem sandbox, is allowed to load sound and video from network
origins, using the Sound.load(), NetConnection.connect(), and NetStream.play() methods.
Only content in the local-with-filesystem and AIR application sandboxes can load media from the local file system.
Only content in the local-with-filesystem sandbox, the AIR application sandbox, or the local-trusted sandbox can
access data in these loaded files.
There are other restrictions on accessing data from loaded media. For details, see “Accessing loaded media as data” on
page 1030.
Loading SWF files and images using the <img> tag in a text field
Flash Player 9 and later, Adobe AIR 1.0 and later
You can load SWF files and bitmaps into a text field by using the <img> tag, as in the following code:
<img src = 'filename.jpg' id = 'instanceName' >
You can access content loaded this way by using the getImageReference() method of the TextField instance, as in
the following code:
var loadedObject:DisplayObject = myTextField.getImageReference('instanceName');
Note, however, that SWF files and images loaded in this way are put in the sandbox that corresponds to their origin.

1027
ACTIONSCRIPT 3.0 DEVELOPER’S GUIDE
Security
Last updated 3/21/2011
When you load an image file using an <img> tag in a text field, access to the data in the image may be permitted by a
URL policy file. You can check for a policy file by adding a checkPolicyFile attribute to the <img> tag, as in the
following code:
<img src = 'filename.jpg' checkPolicyFile = 'true' id = 'instanceName' >
When you load a SWF using an <img> tag in a text field, you can permit access to that SWF file’s data through a call
to the Security.allowDomain() method.
When you use an <img> tag in a text field to load an external file (as opposed to using a Bitmap class embedded within
your SWF), a Loader object is automatically created as a child of the TextField object, and the external file is loaded
into that Loader just as if you had used a Loader object in ActionScript to load the file. In this case, the
getImageReference() method returns the Loader that was automatically created. No security check is needed to
access this Loader object because it is in the same security sandbox as the calling code.
However, when you refer to the content property of the Loader object to access the loaded media, security rules apply.
If the content is an image, you need to implement a URL policy file, and if the content is a SWF file, you need to have
the code in the SWF file call the allowDomain() method.
Adobe AIR
In the application sandbox, <img> tags in a text field are ignored to prevent phishing attacks. In addition, code running
in the application sandbox is not permitted to call the Security allowDomain() method.
Content delivered using RTMP servers
Flash Player 9 and later, Adobe AIR 1.0 and later
Flash Media Server uses the Real-Time Media Protocol (RTMP) to serve data, audio, and video. You can load this
media by using the connect() method of the NetConnection class, passing an RTMP URL as the parameter. Flash
Media Server can restrict connections and prevent content from downloading, based on the domain of the requesting
file. For details, see the Flash Media Server documentation online at www.adobe.com/go/learn_fms_docs_en.
To use the BitmapData.draw() and SoundMixer.computeSpectrum() methods to extract run-time graphics and
sound data from RTMP streams, you must allow access on the server. Use the Server-Side ActionScript
Client.videoSampleAccess and Client.audioSampleAccess properties to allow access to specific directories on
Flash Media Server. For more information, see the Server-Side ActionScript Language Reference.
Cross-scripting
Flash Player 9 and later, Adobe AIR 1.0 and later
If two SWF files written with ActionScript 3.0, or two HTML files running in AIR are served from the same domain—
for example, the URL for one SWF file is http://www.example.com/swfA.swf and the URL for the other is
http://www.example.com/swfB.swf—then code defined in one file can examine and modify variables, objects,
properties, methods, and so on in the other, and vice versa. This is called cross-scripting.
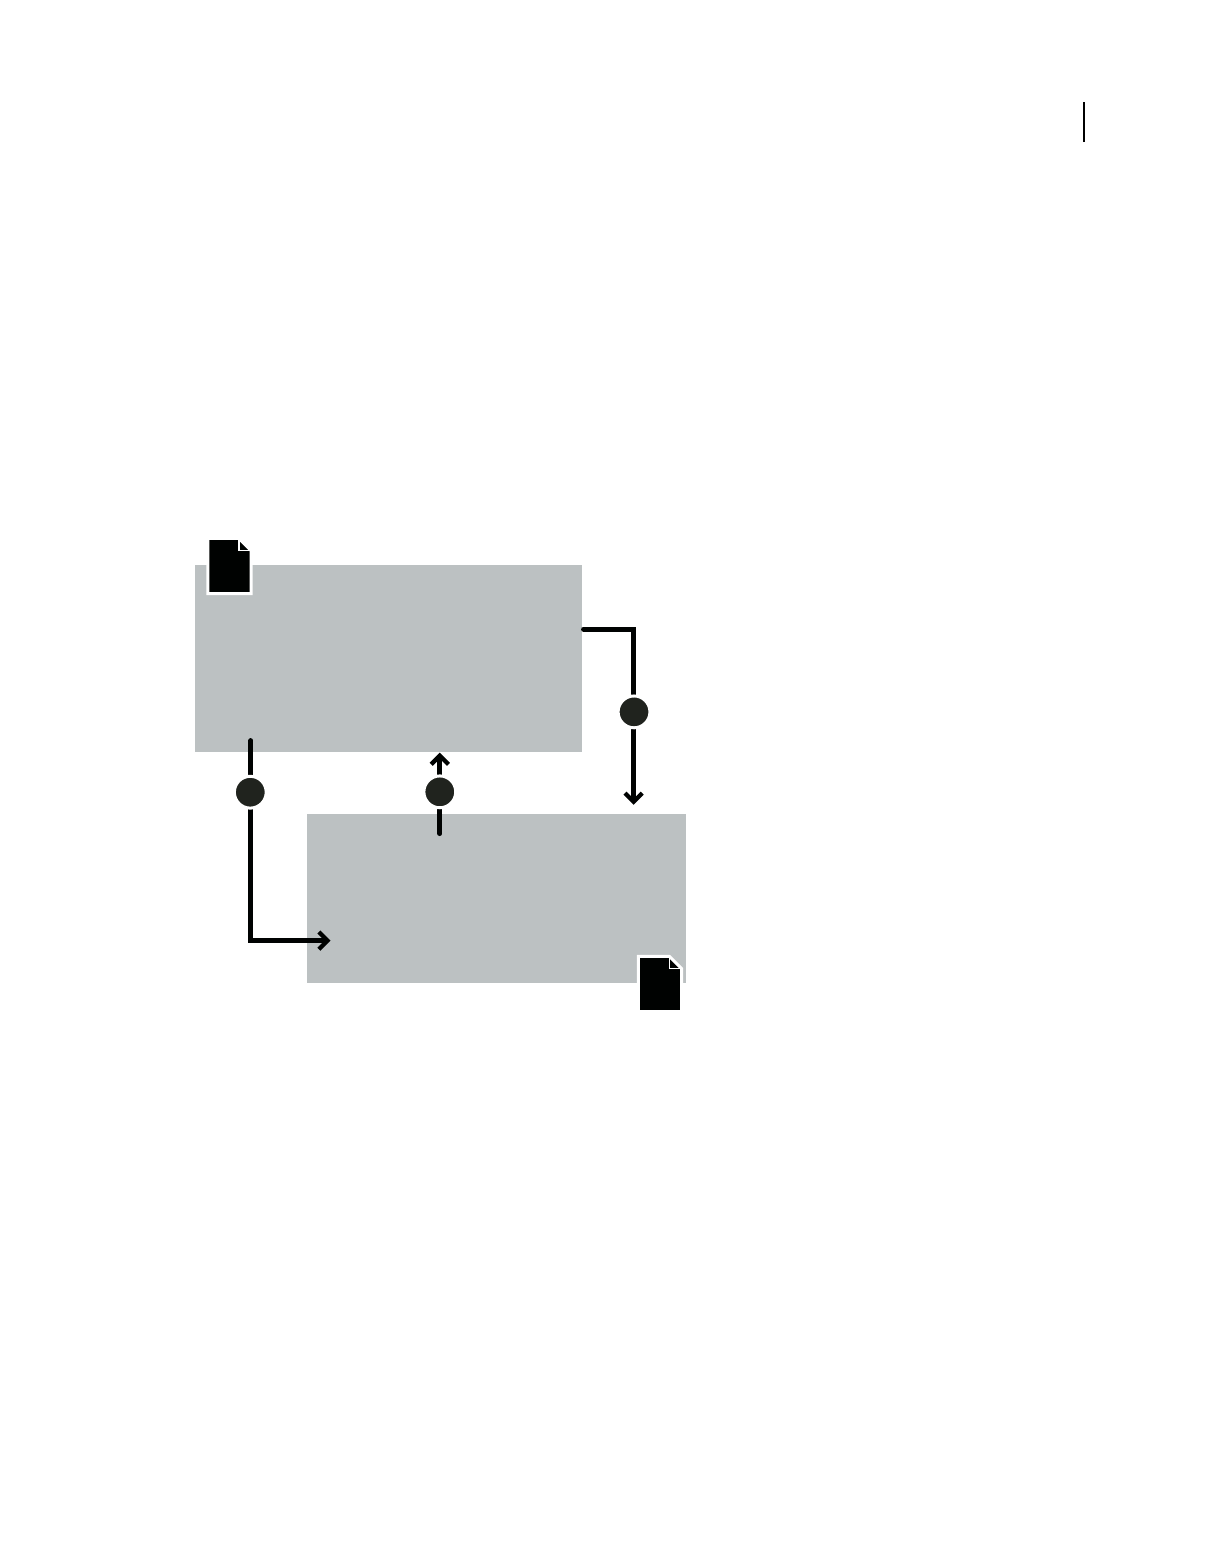
1028
ACTIONSCRIPT 3.0 DEVELOPER’S GUIDE
Security
Last updated 3/21/2011
If the two files are served from different domains—for example, http://siteA.com/swfA.swf and
http://siteB.com/swfB.swf—then, by default, Flash Player and AIR do not allow swfA.swf to script swfB.swf, nor
swfB.swf to script swfA.swf. A SWF file gives permission to SWF files from other domains by calling
Security.allowDomain(). By calling Security.allowDomain("siteA.com"), swfB.swf gives SWF files from
siteA.com permission to script it.
Cross-scripting is not supported between AVM1 SWF files and AVM2 SWF files. An AVM1 SWF file is one created
by using ActionScript 1.0 or ActionScript 2.0. (AVM1 and AVM2 refer to the ActionScript Virtual Machine.) You can,
however, use the LocalConnection class to send data between AVM1 and AVM2.
In any cross-domain situation, it is important to be clear about the two parties involved. For the purposes of this
discussion, the side that is performing the cross-scripting is called the accessing party (usually the accessing SWF), and
the other side is called the party being accessed (usually the SWF being accessed). When siteA.swf scripts siteB.swf,
siteA.swf is the accessing party, and siteB.swf is the party being accessed, as the following illustration shows:
Cross-domain permissions that are established with the Security.allowDomain() method are asymmetrical. In the
previous example, siteA.swf can script siteB.swf, but siteB.swf cannot script siteA.swf, because siteA.swf has not called
the Security.allowDomain() method to give SWF files at siteB.com permission to script it. You can set up
symmetrical permissions by having both SWF files call the Security.allowDomain() method.
In addition to protecting SWF files from cross-domain scripting originated by other SWF files, Flash Player protects
SWF files from cross-domain scripting originated by HTML files. HTML-to-SWF scripting can occur with callbacks
established through the ExternalInterface.addCallback() method. When HTML-to-SWF scripting crosses
domains, the SWF file being accessed must call the Security.allowDomain() method, just as when the accessing
party is a SWF file, or the operation will fail. For more information, see “Author (developer) controls” on page 1020.
Also, Flash Player provides security controls for SWF-to-HTML scripting. For more information, see “Controlling
outbound URL access” on page 1037.
Security.allowDomain("siteA.com");
var eggCount:Number;
function DisplayEggs() { ... };
siteA.com / swfA.swf
siteB.com / swfB.swf
load
1
SWF
SWF
cross-script
32permission
var url:String = "http://siteB.com/swfB.swf";
var req:URLRequest = new URLRequest(url);
myLoader.load(req);
myLoader.content.eggCount = 3;
myLoader.content.DisplayEggs();

1029
ACTIONSCRIPT 3.0 DEVELOPER’S GUIDE
Security
Last updated 3/21/2011
Stage security
Flash Player 9 and later, Adobe AIR 1.0 and later
Some properties and methods of the Stage object are available to any sprite or movie clip on the display list.
However, the Stage object is said to have an owner: the first SWF file loaded. By default, the following properties and
methods of the Stage object are available only to SWF files in the same security sandbox as the Stage owner:
In order for a SWF file in a sandbox other than that of the Stage owner to access these properties and methods, the
Stage owner SWF file must call the Security.allowDomain() method to permit the domain of the external sandbox.
For more information, see “Author (developer) controls” on page 1020.
The frameRate property is a special case—any SWF file can read the frameRate property. However, only those in the
Stage owner’s security sandbox (or those granted permission by a call to the Security.allowDomain() method) can
change the property.
There are also restrictions on the removeChildAt() and swapChildrenAt() methods of the Stage object, but these
are different from the other restrictions. Rather than needing to be in the same domain as the Stage owner, to call these
methods code must be in the same domain as the owner of the affected child object(s), or the child object(s) can call
the Security.allowDomain() method.
Properties Methods
align addChild()
displayState addChildAt()
frameRate addEventListener()
height dispatchEvent()
mouseChildren hasEventListener()
numChildren setChildIndex()
quality willTrigger()
scaleMode
showDefaultContextMenu
stageFocusRect
stageHeight
stageWidth
tabChildren
textSnapshot
width

1030
ACTIONSCRIPT 3.0 DEVELOPER’S GUIDE
Security
Last updated 3/21/2011
Traversing the display list
Flash Player 9 and later, Adobe AIR 1.0 and later
The ability of one SWF file to access display objects loaded from other sandboxes is restricted. In order for a SWF file
to access a display object created by another SWF file in a different sandbox, the SWF file being accessed must call the
Security.allowDomain() method to permit access by the domain of the accessing SWF file. For more information,
see “Author (developer) controls” on page 1020.
To access a Bitmap object that was loaded by a Loader object, a URL policy file must exist on the origin server of the
image file, and that policy file must grant permission to the domain of the SWF file trying to access the Bitmap object
(see “Website controls (policy files)” on page 1017).
The LoaderInfo object that corresponds to a loaded file (and to the Loader object) includes the following three
properties, which define the relationship between the loaded object and the Loader object: childAllowsParent,
parentAllowsChild, and sameDomain.
Event security
Flash Player 9 and later, Adobe AIR 1.0 and later
Events related to the display list have security access limitations, based on the sandbox of the display object that is
dispatching the event. An event in the display list has bubbling and capture phases (described in “Handling events” on
page 117). During the bubbling and capture phases, an event migrates from the source display object through parent
display objects in the display list. If a parent object is in a different security sandbox than the source display object, the
capture and bubble phase stops below that parent object, unless there is mutual trust between the owner of the parent
object and the owner of the source object. This mutual trust can be achieved by the following:
1The SWF file that owns the parent object must call the Security.allowDomain() method to trust the domain of
the SWF file that owns the source object.
2The SWF file that owns the source object must call the Security.allowDomain() method to trust the domain of
the SWF file that owns the parent object.
The LoaderInfo object that corresponds to a loaded file (and to the Loader object) includes the following two
properties, which define the relationship between the loaded object and the Loader object: childAllowsParent and
parentAllowsChild.
For events that are dispatched from objects other than display objects, there are no security checks or security-related
implications.
Accessing loaded media as data
Flash Player 9 and later, Adobe AIR 1.0 and later
To access load data use the BitmapData.draw() and SoundMixer.computeSpectrum()methods. By default, you
cannot obtain pixel data or audio data from graphic or audio objects rendered or played by media loaded in a different
sandbox. However, you can use the following methods to grant permission to access such data across sandbox
boundaries:
•In the content rendering or playing the data to be accessed, call the Security.allowDomain() method to grant
data access to content in other domains.

1031
ACTIONSCRIPT 3.0 DEVELOPER’S GUIDE
Security
Last updated 3/21/2011
•For a loaded image, sound, or video, add a URL policy file on the server of the loaded file. This policy file must grant
access to the domain of the SWF file that is attempting to call the BitmapData.draw() or
SoundMixer.computeSpectrum() methods to extract data from the file.
The following sections provide details on accessing bitmap, sound, and video data.
Accessing bitmap data
Flash Player 9 and later, Adobe AIR 1.0 and later
The draw() method of a BitmapData object lets you draw the currently displayed pixels of any display object to the
BitmapData object. This could include the pixels of a MovieClip object, a Bitmap object, or any display object. The
following conditions must be met for the draw() method to draw pixels to the BitmapData object:
•In the case of a source object other than a loaded bitmap, the source object and (in the case of a Sprite or MovieClip
object) all of its child objects must come from the same domain as the object calling the draw() method, or they
must be in a SWF file that is accessible to the caller by having called the Security.allowDomain() method.
•In the case of a Loaded bitmap source object, the source object must come from the same domain as the object
calling the draw() method, or its source server must include a URL policy file that grants permission to the calling
domain.
If these conditions are not met, a SecurityError exception is thrown.
When you load the image using the load() method of the Loader class, you can specify a context parameter, which
is a LoaderContext object. If you set the checkPolicyFile property of the LoaderContext object to true, Flash Player
checks for a URL policy file on the server from which the image is loaded. If there is a policy file, and the file permits
the domain of the loading SWF file, the file is allowed to access data in the Bitmap object; otherwise, access is denied.
You can also specify a checkPolicyFile property in an image loaded via an <img> tag in a text field. For details, see
“Loading SWF files and images using the <img> tag in a text field” on page 1026.
Accessing sound data
Flash Player 9 and later, Adobe AIR 1.0 and later
The following sound-related ActionScript 3.0 APIs have security restrictions:
•The SoundMixer.computeSpectrum() method—Always permitted for code running in the same security
sandbox as the sound file. For code running in other sandboxes, there are security checks.
•The SoundMixer.stopAll() method—Always permitted for code running in the same security sandbox as the
sound file. For files in other sandboxes, there are security checks.
•The id3 property of the Sound class—Always permitted for SWF files that are in the same security sandbox as the
sound file. For code running in other sandboxes, there are security checks.
Every sound has two kinds of sandboxes associated with it—a content sandbox and an owner sandbox:
•The origin domain for the sound determines the content sandbox, and this determines whether data can be
extracted from the sound via the id3 property of the sound and the SoundMixer.computeSpectrum() method.
•The object that started the sound playing determines the owner sandbox, and this determines whether the sound
can be stopped using the SoundMixer.stopAll() method.

1032
ACTIONSCRIPT 3.0 DEVELOPER’S GUIDE
Security
Last updated 3/21/2011
When you load the sound using the load() method of the Sound class, you can specify a context parameter, which
is a SoundLoaderContext object. If you set the checkPolicyFile property of the SoundLoaderContext object to true,
the runtime checks for a URL policy file on the server from which the sound is loaded. If there is a policy file, and the
file permits the domain of the loading code, the code is allowed to access the id property of the Sound object;
otherwise, it will not. Also, setting the checkPolicyFile property can enable the SoundMixer.computeSpectrum()
method for loaded sounds.
You can use the SoundMixer.areSoundsInaccessible() method to find out whether a call to the
SoundMixer.stopAll() method would not stop all sounds because the sandbox of one or more sound owners is
inaccessible to the caller.
Calling the SoundMixer.stopAll() method stops those sounds whose owner sandbox is the same as that of the caller
of stopAll(). It also stops those sounds whose playback was started by SWF files that have called the
Security.allowDomain() method to permit access by the domain of the SWF file calling the stopAll() method.
Any other sounds are not stopped, and the presence of such sounds can be revealed by calling the
SoundMixer.areSoundsInaccessible() method.
Calling the computeSpectrum() method requires that every sound that is playing be either from the same sandbox as
the object calling the method or from a source that has granted permission to the caller's sandbox; otherwise, a
SecurityError exception is thrown. For sounds that were loaded from embedded sounds in a library in a SWF file,
permission is granted with a call to the Security.allowDomain() method in the loaded SWF file. For sounds loaded
from sources other than SWF files (originating from loaded mp3 files or from video files), a URL policy file on the
source server grants access to data in loaded media.
For more information, see “Author (developer) controls” on page 1020 and “Website controls (policy files)” on
page 1017.
To access sound data from RTMP streams, you must allow access on the server. Use the Server-Side ActionScript
Client.audioSampleAccess property to allow access to specific directories on Flash Media Server. For more
information, see the Server-Side ActionScript Language Reference.
Accessing video data
Flash Player 9 and later, Adobe AIR 1.0 and later
You can use the BitmapData.draw() method to capture the pixel data of the current frame of a video.
There are two different kinds of video:
•Video streamed over RTMP from Flash Media Server
•Progressive video, which is loaded from an FLV or F4V file
To use the BitmapData.draw() method to extract run-time graphics from RTMP streams, you must allow access on
the server. Use the Server-Side ActionScript Client.videoSampleAccess property to allow access to specific
directories on Flash Media Server. For more information, see the Server-Side ActionScript Language Reference.
When you call the BitmapData.draw() method with progressive video as the source parameter, the caller of
BitmapData.draw() must either be from the same sandbox as the FLV file, or the server of the FLV file must have a
policy file that grants permission to the domain of the calling SWF file. You can request that the policy file be
downloaded by setting the checkPolicyFile property of the NetStream object to true.

1033
ACTIONSCRIPT 3.0 DEVELOPER’S GUIDE
Security
Last updated 3/21/2011
Loading data
Flash Player 9 and later, Adobe AIR 1.0 and later
Flash Player and AIR content can exchange data with servers. Loading data is a different kind of operation from
loading media, because the loaded information appears as program objects, rather than being displayed as media.
Generally, content may load data from the same domain that the content originated from. However, content usually
requires policy files in order to load data from other domains (see “Website controls (policy files)” on page 1017).
Note: Content running in the AIR application sandbox is never served from a remote domain (unless the developer
intentionally imports remote content into the application sandbox), so it cannot participate in the types of attacks that
policy files protect against. AIR content in the application sandbox is not restricted from loading data by policy files.
However, AIR content in other sandboxes is subject to the restrictions described here.
Using URLLoader and URLStream
Flash Player 9 and later, Adobe AIR 1.0 and later
You can load data, such as an XML file or a text file. The load() methods of the URLLoader and URLStream classes
are governed by URL policy file permissions.
If you use the load() method to load content from a domain other than that of the code that is calling the method,
the runtime checks for a URL policy file on the server of the loaded assets. If there is a policy file, and it grants access
to the domain of the loading content, you can load the data.
Connecting to sockets
Flash Player 9 and later, Adobe AIR 1.0 and later
By default, the runtime looks for a socket policy file served from port 843. As with URL policy files, this file is called
the master policy file.
When policy files were first introduced in Flash Player 6, there was no support for socket policy files. Connections to
socket servers were authorized by a policy file in the default location on an HTTP server on port 80 of the same host
as the socket server. Flash Player 9 still supports this capability, but Flash Player 10 does not. In Flash Player 10, only
socket policy files can authorize socket connections.
Like URL policy files, socket policy files support a meta-policy statement that specifies which ports can serve policy
files. However, instead of “master-only,” the default meta-policy for socket policy files is “all.” That is, unless the
master policy file specifies a more restrictive setting, Flash Player assumes that any socket on the host can serve a socket
policy file.
Access to socket and XML socket connections is disabled by default, even if the socket you are connecting to is in the
same domain as the SWF file. You can permit socket-level access by serving a socket policy file from any of the
following locations:
•Port 843 (the location of the master policy file)
•The same port as the main socket connection
•A different port than the main socket connection
By default, Flash Player looks for a socket policy file on port 843 and on the same port as the main socket connection.
If you want to serve a socket policy file from a different port, the SWF file must call Security.loadPolicyFile().

1034
ACTIONSCRIPT 3.0 DEVELOPER’S GUIDE
Security
Last updated 3/21/2011
A socket policy file has the same syntax as a URL policy file, except that it must also specify the ports to which it grants
access. When a socket policy file is served from a port number below 1024, it may grant access to any ports; when a
policy file comes from port 1024 or higher, it may grant access only to ports 1024 and higher. The allowed ports are
specified in a to-ports attribute in the <allow-access-from> tag. Single port numbers, port ranges, and wildcards
are accepted values.
Here is an example socket policy file:
<?xml version="1.0"?>
<!DOCTYPE cross-domain-policy SYSTEM "http://www.adobe.com/xml/dtds/cross-domain-policy.dtd">
<!-- Policy file for xmlsocket://socks.mysite.com -->
<cross-domain-policy>
<allow-access-from domain="*" to-ports="507" />
<allow-access-from domain="*.example.com" to-ports="507,516" />
<allow-access-from domain="*.example.org" to-ports="516-523" />
<allow-access-from domain="adobe.com" to-ports="507,516-523" />
<allow-access-from domain="192.0.34.166" to-ports="*" />
</cross-domain-policy>
To retrieve a socket policy file from port 843 or from the same port as a main socket connection, call the
Socket.connect() or XMLSocket.connect() method. Flash Player first checks for a master policy file on port 843.
If it finds one, it checks to see if the file contains a meta-policy statement that prohibits socket policy files on the target
port. If access isn’t prohibited, Flash Player first looks for the appropriate allow-access-from statement in the
master policy file. If it doesn’t find one, it then looks for a socket policy file on the same port as the main socket
connection.
To retrieve a socket policy file a different location, first call the Security.loadPolicyFile() method with the special
"xmlsocket" syntax, as in the following:
Security.loadPolicyFile("xmlsocket://server.com:2525");
Call the Security.loadPolicyFile() method before calling the Socket.connect() or XMLSocket.connect()
method. Flash Player then waits until it has fulfilled your policy file request before deciding whether to allow your main
connection. However, if the master policy file specifies that the target location can’t serve policy files, the call to
loadPolicyFile() has no effect, even if there is a policy file at that location.
If you are implementing a socket server and you need to provide a socket policy file, decide whether to provide the
policy file using the same port that accepts main connections, or using a different port. In either case, your server must
wait for the first transmission from your client before sending a response.
When Flash Player requests a policy file, it always transmits the following string as soon as a connection is established:
<policy-file-request/>
Once the server receives this string, it can transmit the policy file. The request from Flash Player is always terminated
by a null byte, and the response from the server must also be terminated by a null byte.
Do not expect to reuse the same connection for both a policy file request and a main connection; close the connection
after transmitting the policy file. If you do not, Flash Player closes the policy file connection before reconnecting to set
up the main connection.

1035
ACTIONSCRIPT 3.0 DEVELOPER’S GUIDE
Security
Last updated 3/21/2011
Protecting data
Flash Player 9 and later, Adobe AIR 1.0 and later
To protect data from eavesdropping and alteration as it travels over the Internet, you can use the Transport Layer
Security (TLS) or Socket Layer Security (SSL) on the server where the data originates. You can then connect to the
server using the HTTPS protocol.
In applications created for AIR 2 or above, you can also protect TCP socket communications. The SecureSocket class
allows you to initiate a socket connection to a socket server that uses TLS version 1or SSL version 4.
Sending data
Flash Player 9 and later, Adobe AIR 1.0 and later
Data sending occurs when code sends data to a server or resource. Sending data is always permitted for content from
a network domain. A local SWF file can send data to network addresses only if it is in the local-trusted, local-with-
networking, or AIR application sandbox. For more information, see “Local sandboxes” on page 1010.
You can use the flash.net.sendToURL() function to send data to a URL. Other methods also send requests to URLs.
These include loading methods, such as Loader.load() and Sound.load(), and data-loading methods, such as
URLLoader.load() and URLStream.load().
Uploading and downloading files
Flash Player 9 and later, Adobe AIR 1.0 and later
The FileReference.upload() method starts the upload of a file selected by a user to a remote server. You must call
the FileReference.browse() or FileReferenceList.browse() method before calling the
FileReference.upload() method.
The code that initiates the FileReference.browse() or FileReferenceList.browse() method can be called only
in response to a mouse event or keyboard event. If it is called in other situations, Flash Player 10 and later throws an
exception. However, a user-initiated event is not required to call these methods from the AIR application sandbox.
Calling the FileReference.download() method opens a dialog box in which the user can download a file from a
remote server.
Note: If your server requires user authentication, only SWF files running in a browser—that is, using the browser plug-
in or ActiveX control—can provide a dialog box to prompt the user for a user name and password for authentication, and
only for downloads. Flash Player does not allow uploads to a server that requires user authentication.
Uploads and downloads are not allowed if the calling SWF file is in the local-with-filesystem sandbox.
By default, a SWF file may not initiate an upload to, or a download from, a server other than its own. A SWF file may
upload to, or download from, a different server if that server provides a policy file that grants permission to the domain
of the invoking SWF file.

1036
ACTIONSCRIPT 3.0 DEVELOPER’S GUIDE
Security
Last updated 3/21/2011
Loading embedded content from SWF files imported
into a security domain
Flash Player 9 and later, Adobe AIR 1.0 and later
When you load a SWF file, you can set the context parameter of the load() method of the Loader object that is used
to load the file. This parameter takes a LoaderContext object. When you set the securityDomain property of this
LoaderContext object to Security.currentDomain, Flash Player checks for a URL policy file on the server of the
loaded SWF file. If there is a policy file, and it grants access to the domain of the loading SWF file, you can load the
SWF file as imported media. In this way, the loading file can get access to objects in the library of the SWF file.
An alternative way for a SWF file to access classes in loaded SWF files from a different security sandbox is to have the
loaded SWF file call the Security.allowDomain() method to grant access to the domain of the calling SWF file. You
can add the call to the Security.allowDomain() method to the constructor method of the main class of the loaded
SWF file, and then have the loading SWF file add an event listener to respond to the init event dispatched by the
contentLoaderInfo property of the Loader object. When this event is dispatched, the loaded SWF file has called the
Security.allowDomain() method in the constructor method, and classes in the loaded SWF file are available to the
loading SWF file. The loading SWF file can retrieve classes from the loaded SWF file by calling
Loader.contentLoaderInfo.applicationDomain.getDefinition().
Working with legacy content
Flash Player 9 and later, Adobe AIR 1.0 and later
In Flash Player 6, the domain that is used for certain Flash Player settings is based on the trailing portion of the domain
of the SWF file. These settings include settings for camera and microphone permissions, storage quotas, and storage
of persistent shared objects.
If the domain of a SWF file includes more than two segments, such as www.example.com, the first segment of the
domain (www) is removed, and the remaining portion of the domain is used. So, in Flash Player 6, www.example.com
and store.example.com both use example.com as the domain for these settings. Similarly, www.example.co.uk and
store.example.co.uk both use example.co.uk as the domain for these settings. This can lead to problems in which SWF
files from unrelated domains, such as example1.co.uk and example2.co.uk, have access to the same shared objects.
In Flash Player 7 and later, player settings are chosen by default according to a SWF file’s exact domain. For example,
a SWF file from www.example.com would use the player settings for www.example.com. A SWF file from
store.example.com would use the separate player settings for store.example.com.
In a SWF file written using ActionScript 3.0, when Security.exactSettings is set to true (the default), Flash Player
uses exact domains for player settings. When it is set to false, Flash Player uses the domain settings used in Flash
Player 6. If you change exactSettings from its default value, you must do so before any events occur that require
Flash Player to choose player settings—for example, using a camera or microphone, or retrieving a persistent shared
object.
If you published a version 6 SWF file and created persistent shared objects from it, to retrieve those persistent shared
objects from a SWF that uses ActionScript 3.0, you must set Security.exactSettings to false before calling
SharedObject.getLocal().

1037
ACTIONSCRIPT 3.0 DEVELOPER’S GUIDE
Security
Last updated 3/21/2011
Setting LocalConnection permissions
Flash Player 9 and later, Adobe AIR 1.0 and later
The LocalConnection class lets you send messages between one Flash Player or AIR application and another.
LocalConnection objects can communicate only among Flash Player or AIR content running on the same client
computer, but they can be running in different applications—for example, a SWF file running in a browser, a SWF file
running in a projector, and an AIR application can all communicate use the LocalConnection class.
For every LocalConnection communication, there is a sender and a listener. By default, Flash Player allows
LocalConnection communication between code running in the same domain. For code running in different
sandboxes, the listener must allow the sender permission by using the LocalConnection.allowDomain() method.
The string you pass as an argument to the LocalConnection.allowDomain() method can contain any of the
following: exact domain names, IP addresses, and the * wildcard.
The allowDomain() method has changed from the form it had in ActionScript 1.0 and 2.0. In those earlier versions,
allowDomain() was a callback method that you implemented. In ActionScript 3.0, allowDomain() is a built-in
method of the LocalConnection class that you call. With this change, allowDomain() works in much the same way as
Security.allowDomain().
A SWF file can use the domain property of the LocalConnection class to determine its domain.
Controlling outbound URL access
Flash Player 9 and later, Adobe AIR 1.0 and later
Outbound scripting and URL access (through the use of HTTP URLs, mailto: and so on) are achieved through use of
the following APIs:
•The flash.system.fscommand() function
•The ExternalInterface.call() method
•The flash.net.navigateToURL() function
For content loaded from the local file system, calls to these methods are successful only if the code and the containing
web page (if there is one) are in the local-trusted or AIR application security sandboxes. Calls to these methods fail if
the content is in the local-with-networking or local-with-filesystem sandbox.
For content that is not loaded locally, all of these APIs can communicate with the web page in which they are
embedded, depending on the value of the AllowScriptAccess parameter described below. The
flash.net.navigateToURL() function has the additional ability to communicate with any open browser window or
frame, not just the page in which the SWF file is embedded. For more information on this functionality, see “Using the
navigateToURL() function” on page 1038.
The AllowScriptAccess parameter in the HTML code that loads a SWF file controls the ability to perform outbound
URL access from within the SWF file. Set this parameter inside the PARAM or EMBED tag. If no value is set for
AllowScriptAccess, the SWF file and the HTML page can communicate only if both are from the same domain.
The AllowScriptAccess parameter can have one of three possible values: "always", "sameDomain", or "never".
•When AllowScriptAccess is "always", the SWF file can communicate with the HTML page in which it is
embedded even when the SWF file is from a different domain than the HTML page.

1038
ACTIONSCRIPT 3.0 DEVELOPER’S GUIDE
Security
Last updated 3/21/2011
•When AllowScriptAccess is "sameDomain", the SWF file can communicate with the HTML page in which it is
embedded only when the SWF file is from the same domain as the HTML page. This value is the default value for
AllowScriptAccess. Use this setting, or do not set a value for AllowScriptAccess, to prevent a SWF file hosted
from one domain from accessing a script in an HTML page that comes from another domain.
•When AllowScriptAccess is "never", the SWF file cannot communicate with any HTML page. Using this value
has been deprecated since the release of Adobe Flash CS4 Professional. It is not recommended and shouldn’t be
necessary if you don’t serve untrusted SWF files from your own domain. If you do need to serve untrusted SWF
files, Adobe recommends that you create a distinct subdomain and place all untrusted content there.
Here is an example of setting the AllowScriptAccess tag in an HTML page to allow outbound URL access to a
different domain:
<object id='MyMovie.swf' classid='clsid:D27CDB6E-AE6D-11cf-96B8-444553540000'
codebase='http://download.adobe.com/pub/shockwave/cabs/flash/swflash.cab#version=9,0,0,0'
height='100%' width='100%'>
<param name='AllowScriptAccess' value='always'/>
<param name='src' value=''MyMovie.swf'/>
<embed name='MyMovie.swf' pluginspage='http://www.adobe.com/go/getflashplayer'
src='MyMovie.swf' height='100%' width='100%' AllowScriptAccess='never'/>
</object>
Using the navigateToURL() function
Flash Player 9 and later, Adobe AIR 1.0 and later
In addition to the security setting specified by the allowScriptAccess parameter discussed above, the
navigateToURL() function has an optional second parameter - target. The target parameter can be used to specify
the name of an HTML window or frame to send the URL request to. Additional security restrictions apply to such
requests, and the restrictions vary depending on whether navigateToURL() is being used as a scripting or non-
scripting statement.
For scripting statements, such as navigateToURL("javascript: alert('Hello from Flash Player.')"), the
following rules apply.
•If the SWF file is a locally trusted file, the request succeeds.
•If the target is the HTML page in which the SWF file is embedded, the allowScriptAccess rules described above
apply.
•If the target holds content loaded from the same domain as the SWF file, the request succeeds.
•If the target holds content loaded from a different domain than the SWF file, and neither of the previous two
conditions is met, the request fails.
For non-scripting statements (such as HTTP, HTTPS, and mailto:, the request fails if all of the following conditions
apply:
•The target is one of the special keywords "_top" or "_parent", and
•the SWF file is in a web page hosted from a different domain, and
•the SWF file is embedded with a value for allowScriptAccess that is not "always".

1039
ACTIONSCRIPT 3.0 DEVELOPER’S GUIDE
Security
Last updated 3/21/2011
For more information
Flash Player 9 and later, Adobe AIR 1.0 and later
For more information on outbound URL access, see the following entries in the ActionScript 3.0 Reference for the
Adobe Flash Platform:
•The flash.system.fscommand() function
•The call() method of the ExternalInterface class
•The flash.net.navigateToURL() function
Shared objects
Flash Player 9 and later, Adobe AIR 1.0 and later
Flash Player provides the ability to use shared objects, which are ActionScript objects that persist outside of a SWF file,
either locally on a user’s file system or remotely on an RTMP server. Shared objects, like other media in Flash Player,
are partitioned into security sandboxes. However, the sandbox model for shared objects is somewhat different, because
shared objects are not resources that can ever be accessed across domain boundaries. Instead, shared objects are always
retrieved from a shared object store that is particular to the domain of each SWF file that calls methods of the
SharedObject class. Usually a shared object store is even more particular than a SWF file’s domain: by default, each
SWF file uses a shared object store particular to its entire origin URL. For more information on shared objects, see
“Shared objects” on page 668.
A SWF file can use the localPath parameter of the SharedObject.getLocal() and SharedObject.getRemote()
methods to use a shared object store associated with only a part of its URL. In this way, the SWF file can permit sharing
with other SWF files from other URLs. Even if you pass '/' as the localPath parameter, this still specifies a shared
object store particular to its own domain.
Users can restrict shared object access by using the Flash Player Settings dialog box or the Settings Manager. By default,
shared objects can be created up to a maximum of 100 KB of data per domain. Administrative users and users can also
place restrictions on the ability to write to the file system. For more information, see “Administrator controls” on
page 1014 and “User controls” on page 1016.
You can specify that a shared object is secure, by specifying true for the secure parameter of the
SharedObject.getLocal() method or the SharedObject.getRemote() method. Note the following about the
secure parameter:
•If this parameter is set to true, Flash Player creates a new secure shared object or gets a reference to an existing
secure shared object. This secure shared object can be read from or written to only by SWF files delivered over
HTTPS that call SharedObject.getLocal() with the secure parameter set to true.
•If this parameter is set to false, Flash Player creates a new shared object or gets a reference to an existing shared
object that can be read from or written to by SWF files delivered over non-HTTPS connections.
If the calling SWF file is not from an HTTPS URL, specifying true for the secure parameter of the
SharedObject.getLocal() method or the SharedObject.getRemote() method results in a SecurityError
exception.

1040
ACTIONSCRIPT 3.0 DEVELOPER’S GUIDE
Security
Last updated 3/21/2011
The choice of a shared object store is based on a SWF file’s origin URL. This is true even in the two situations where a
SWF file does not originate from a simple URL: import loading and dynamic loading. Import loading refers to the
situation where you load a SWF file with the LoaderContext.securityDomain property set to
SecurityDomain.currentDomain. In this situation, the loaded SWF file will have a pseudo-URL that begins with its
loading SWF file’s domain and then specifies its actual origin URL. Dynamic loading refers to the loading of a SWF
file using the Loader.loadBytes() method. In this situation, the loaded SWF file will have a pseudo-URL that begins
with its loading SWF file’s full URL followed by an integer ID. In both the import loading and dynamic loading cases,
a SWF file’s pseudo-URL can be examined using the LoaderInfo.url property. The pseudo-URL is treated exactly
like a real URL for the purposes of choosing a shared object store. You can specify a shared object localPath
parameter that uses part or all of the pseudo-URL.
Users and administrators can elect to disable the use of third-party shared objects. This is the usage of shared objects
by any SWF file that is executing in a web browser, when that SWF file’s origin URL is from a different domain than
the URL shown in the browser’s address bar. Users and administrators may choose to disable third-party shared object
usage for reasons of privacy, wishing to avoid cross-domain tracking. In order to avoid this restriction, you may wish
to ensure that any SWF file using shared objects is loaded only within HTML page structures that ensure that the SWF
file comes from the same domain as is shown in the browser's address bar. When you attempt to use shared objects
from a third-party SWF file, and third-party shared object use is disabled, theSharedObject.getLocal() and
SharedObject.getRemote() methods return null. For more information, see
www.adobe.com/products/flashplayer/articles/thirdpartylso.
Camera, microphone, clipboard, mouse, and keyboard
access
Flash Player 9 and later, Adobe AIR 1.0 and later
When a SWF file attempts to access a user's camera or microphone using the Camera.get() or Microphone.get()
methods, Flash Player displays a Privacy dialog box, in which the user can allow or deny access to their camera and
microphone. The user and the administrative user can also disable camera access on a per-site or global basis, through
controls in the mms.cfg file, the Settings UI, and the Settings Manager (see “Administrator controls” on page 1014 and
“User controls” on page 1016). With user restrictions, the Camera.get() and Microphone.get() methods each
return a null value. You can use the Capabilities.avHardwareDisable property to determine whether the camera
and microphone have been administratively prohibited (true) or allowed (false).
The System.setClipboard() method allows a SWF file to replace the contents of the clipboard with a plain-text
string of characters. This poses no security risk. To protect against the risk posed by passwords and other sensitive data
being cut or copied to clipboards, there is no corresponding getClipboard() method.
An application running in Flash Player can monitor only keyboard and mouse events that occur within its focus.
Content running in Flash Player cannot detect keyboard or mouse events in another application.

1041
ACTIONSCRIPT 3.0 DEVELOPER’S GUIDE
Security
Last updated 3/21/2011
AIR security
Adobe AIR 1.0 and later
AIR security basics
Adobe AIR 1.0 and later
AIR applications run with the same security restrictions as native applications. In general, AIR applications, like native
applications, have broad access to operating system capabilities such as reading and writing files, starting applications,
drawing to the screen, and communicating with the network. Operating system restrictions that apply to native
applications, such as user-specific privileges, equally apply to AIR applications.
Although the Adobe® AIR® security model is an evolution of the Adobe® Flash® Player security model, the security
contract is different from the security contract applied to content in a browser. This contract offers developers a secure
means of broader functionality for rich experiences with freedoms that would be inappropriate for a browser-based
application.
AIR applications are written using either compiled bytecode (SWF content) or interpreted script (JavaScript, HTML)
so that the runtime provides memory management. This minimizes the chances of AIR applications being affected by
vulnerabilities related to memory management, such as buffer overflows and memory corruption. These are some of
the most common vulnerabilities affecting desktop applications written in native code.
Installation and updates
Adobe AIR 1.0 and later
AIR applications are distributed via AIR installer files which use the air extension or via native installers, which use
the file format and extension of the native platform. For example, the native installer format of Windows is an EXE
file, and for Android the native format is an APK file.
When Adobe AIR is installed and an AIR installer file is opened, the AIR runtime administers the installation process.
When a native installer is used, the operating system administers the installation process.
Note: Developers can specify a version, and application name, and a publisher source, but the initial application
installation workflow itself cannot be modified. This restriction is advantageous for users because all AIR applications
share a secure, streamlined, and consistent installation procedure administered by the runtime. If application
customization is necessary, it can be provided when the application is first executed.
Runtime installation location
Adobe AIR 1.0 and later
AIR applications first require the runtime to be installed on a user's computer, just as SWF files first require the Flash
Player browser plug-in to be installed.
The runtime is installed to the following location on desktop computers:
•Mac OS: /Library/Frameworks/
•Windows: C:\Program Files\Common Files\Adobe AIR
•Linux: /opt/Adobe AIR/

1042
ACTIONSCRIPT 3.0 DEVELOPER’S GUIDE
Security
Last updated 3/21/2011
On Mac OS, to install an updated version of an application, the user must have adequate system privileges to install to
the application directory. On Windows and Linux, a user must have administrative privileges.
Note: On iOS, the AIR runtime is not installed separately; every AIR app is a self-contained application.
The runtime can be installed in two ways: using the seamless install feature (installing directly from a web browser) or
via a manual install.
Seamless install (runtime and application)
Adobe AIR 1.0 and later
The seamless install feature provides developers with a streamlined installation experience for users who do not have
Adobe AIR installed yet. In the seamless install method, the developer creates a SWF file that presents the application
for installation. When a user clicks in the SWF file to install the application, the SWF file attempts to detect the
runtime. If the runtime cannot be detected it is installed, and the runtime is activated immediately with the installation
process for the developer's application.
Manual install
Adobe AIR 1.0 and later
Alternatively, the user can manually download and install the runtime before opening an AIR file. The developer can
then distribute an AIR file by different means (for instance, via e-mail or an HTML link on a website). When the AIR
file is opened, the runtime begins to process the application installation.
Application installation flow
Adobe AIR 1.0 and later
The AIR security model allows users to decide whether to install an AIR application. The AIR install experience
provides several improvements over native application install technologies that make this trust decision easier for
users:
•The runtime provides a consistent installation experience on all operating systems, even when an AIR application
is installed from a link in a web browser. Most native application install experiences depend upon the browser or
other application to provide security information, if it is provided at all.
•The AIR application install experience identifies the source of the application and information about what
privileges are available to the application (if the user allows the installation to proceed).
•The runtime administers the installation process of an AIR application. An AIR application cannot manipulate the
installation process the runtime uses.
In general, users should not install any desktop application that comes from a source that they do not trust, or that
cannot be verified. The burden of proof on security for native applications is equally true for AIR applications as it is
for other installable applications.
Application destination
Adobe AIR 1.0 and later
The installation directory can be set using one of the following two options:
1The user customizes the destination during installation. The application installs to wherever the user specifies.

1043
ACTIONSCRIPT 3.0 DEVELOPER’S GUIDE
Security
Last updated 3/21/2011
2If the user does not change the install destination, the application installs to the default path as determined by the
runtime:
•Mac OS: ~/Applications/
•Windows XP and earlier: C:\Program Files\
•Windows Vista: ~/Apps/
•Linux: /opt/
If the developer specifies an installFolder setting in the application descriptor file, the application is installed to
a subpath of this directory.
The AIR file system
Adobe AIR 1.0 and later
The install process for AIR applications copies all files that the developer has included within the AIR installer file onto
the user's local computer. The installed application is composed of:
•Windows: A directory containing all files included in the AIR installer file. The runtime also creates an exe file
during the installation of the AIR application.
•Linux: A directory containing all files included in the AIR installer file. The runtime also creates a bin file during
the installation of the AIR application.
•Mac OS: An app file that contains all of the contents of the AIR installer file. It can be inspected using the "Show
Package Contents" option in Finder. The runtime creates this app file as part of the installation of the AIR
application.
An AIR application is run by:
•Windows: Running the .exe file in the install folder, or a shortcut that corresponds to this file (such as a shortcut
on the Start Menu or desktop).
•Linux: Launching the .bin file in the install folder, choosing the application from the Applications menu, or running
from an alias or desktop shortcut.
•Mac OS: Running the .app file or an alias that points to it.
The application file system also includes subdirectories related to the function of the application. For example,
information written to encrypted local storage is saved to a subdirectory in a directory named after the application
identifier of the application.
AIR application storage
Adobe AIR 1.0 and later
AIR applications have privileges to write to any location on the user's hard drive; however, developers are encouraged
to use the app-storage:/ path for local storage related to their application. Files written to app-storage:/ from an
application are located in a standard location depending on the user's operating system:
•On Mac OS: the storage directory of an application is <appData>/<appId>/Local Store/ where <appData> is
the user's “preferences folder,” typically: /Users/<user>/Library/Preferences
•On Windows: the storage directory of an application is <appData>\<appId>\Local Store\ where <appData> is the
user's CSIDL_APPDATA “Special Folder,” typically: C:\Documents and Settings\<user>\Application Data
•On Linux: <appData>/<appID>/Local Store/where <appData> is /home/<user>/.appdata

1044
ACTIONSCRIPT 3.0 DEVELOPER’S GUIDE
Security
Last updated 3/21/2011
You can access the application storage directory via the air.File.applicationStorageDirectory property. You
can access its contents using the resolvePath() method of the File class. For details, see “Working with the file
system” on page 620.
Updating Adobe AIR
Adobe AIR 1.0 and later
When the user installs an AIR application that requires an updated version of the runtime, the runtime automatically
installs the required runtime update.
To update the runtime, a user must have administrative privileges for the computer.
Updating AIR applications
Adobe AIR 1.0 and later
Development and deployment of software updates are one of the biggest security challenges facing native code
applications. The AIR API provides a mechanism to improve this: the Updater.update() method can be invoked
upon launch to check a remote location for an AIR file. If an update is appropriate, the AIR file is downloaded,
installed, and the application restarts. Developers can use this class not only to provide new functionality but also
respond to potential security vulnerabilities.
The Updater class can only be used to update applications distributed as AIR files. Applications distributed as native
applications must use the update facilities, if any, of the native operating system.
Note: Developers can specify the version of an application by setting the versionNumber property of the application
descriptor file.
Uninstalling an AIR application
Adobe AIR 1.0 and later
Removing an AIR application removes all files in the application directory. However, it does not remove all files that
the application may have written to outside of the application directory. Removing AIR applications does not revert
changes the AIR application has made to files outside of the application directory.
Windows registry settings for administrators
Adobe AIR 1.0 and later
On Windows, administrators can configure a machine to prevent (or allow) AIR application installation and runtime
updates. These settings are contained in the Windows registry under the following key:
HKLM\Software\Policies\Adobe\AIR. They include the following:
Registry setting Description
AppInstallDisabled Specifies that AIR application installation and uninstallation are allowed. Set to 0 for “allowed,” set to 1
for “disallowed.”
UntrustedAppInstallDisabled Specifies that installation of untrusted AIR applications (applications that do not includes a trusted
certificate) is allowed. Set to 0 for “allowed,” set to 1 for “disallowed.”
UpdateDisabled Specifies that updating the runtime is allowed, either as a background task or as part of an explicit
installation. Set to 0 for “allowed,” set to 1 for “disallowed.”

1045
ACTIONSCRIPT 3.0 DEVELOPER’S GUIDE
Security
Last updated 3/21/2011
HTML security in Adobe AIR
Adobe AIR 1.0 and later
This topic describes the AIR HTML security architecture and how to use iframes, frames, and the sandbox bridge to
set up HTML-based applications and safely integrate HTML content into SWF-based applications.
The runtime enforces rules and provides mechanisms for overcoming possible security vulnerabilities in HTML and
JavaScript. The same rules are enforced whether your application is primarily written in JavaScript or whether you load
the HTML and JavaScript content into a SWF-based application. Content in the application sandbox and the non-
application security sandbox have different privileges. When loading content into an iframe or frame, the runtime
provides a secure sandbox bridge mechanism that allows content in the frame or iframe to communicate securely with
content in the application security sandbox.
The AIR SDK provides three classes for rendering HTML content.
The HTMLLoader class provides close integration between JavaScript code and the AIR APIs.
The StageWebView class is an HTML rendering class and has very limited integration with the host AIR application.
Content loaded by the StageWebView class is never placed in the application security sandbox and cannot access data
or call functions in the host AIR application. On desktop platforms, the StageWebView class uses the built-in AIR
HTML engine, based on Webkit, which is also used by the HTMLLoader class. On mobile platforms, the
StageWebView class uses the HTML control provided by the operating system. Thus, on mobile platforms the
StageWebView class has the same security considerations and vulnerabilities as the system web browser.
The TextField class can display strings of HTML text. No JavaScript can be executed, but the text can include links and
externally loaded images.
For more information, see “Avoiding security-related JavaScript errors” on page 954.
Overview on configuring your HTML-based application
Adobe AIR 1.0 and later
Frames and iframes provide a convenient structure for organizing HTML content in AIR. Frames provide a means
both for maintaining data persistence and for working securely with remote content.
Because HTML in AIR retains its normal, page-based organization, the HTML environment completely refreshes if
the top frame of your HTML content “navigates” to a different page. You can use frames and iframes to maintain data
persistence in AIR, much the same as you would for a web application running in a browser. Define your main
application objects in the top frame and they persist as long as you don’t allow the frame to navigate to a new page. Use
child frames or iframes to load and display the transient parts of the application. (There are a variety of ways to
maintain data persistence that can be used in addition to, or instead of, frames. These include cookies, local shared
objects, local file storage, the encrypted file store, and local database storage.)
Because HTML in AIR retains its normal, blurred line between executable code and data, AIR puts content in the top
frame of the HTML environment into the application sandbox. After the page load event, AIR restricts any
operations, such as eval(), that can convert a string of text into an executable object. This restriction is enforced even
when an application does not load remote content. To allow HTML content to execute these restricted operations, you
must use frames or iframes to place the content into a non-application sandbox. (Running content in a sandboxed
child frame may be necessary when using some JavaScript application frameworks that rely on the eval() function.)
For a complete list of the restrictions on JavaScript in the application sandbox, see “Code restrictions for content in
different sandboxes” on page 1047.

1046
ACTIONSCRIPT 3.0 DEVELOPER’S GUIDE
Security
Last updated 3/21/2011
Because HTML in AIR retains its ability to load remote, possibly insecure content, AIR enforces a same-origin policy
that prevents content in one domain from interacting with content in another. To allow interaction between
application content and content in another domain, you can set up a bridge to serve as the interface between a parent
and a child frame.
Setting up a parent-child sandbox relationship
Adobe AIR 1.0 and later
AIR adds the sandboxRoot and documentRoot attributes to the HTML frame and iframe elements. These attributes
let you treat application content as if it came from another domain:
The following example maps content installed in the sandbox subdirectory of the application to run in the remote
sandbox and the www.example.com domain:
<iframe
src="ui.html"
sandboxRoot="http://www.example.com/local/"
documentRoot="app:/sandbox/">
</iframe>
Setting up a bridge between parent and child frames in different sandboxes or domains
Adobe AIR 1.0 and later
AIR adds the childSandboxBridge and parentSandboxBridge properties to the window object of any child frame.
These properties let you define bridges to serve as interfaces between a parent and a child frame. Each bridge goes in
one direction:
childSandboxBridge — The childSandboxBridge property allows the child frame to expose an interface to content
in the parent frame. To expose an interface, you set the childSandbox property to a function or object in the child
frame. You can then access the object or function from content in the parent frame. The following example shows how
a script running in a child frame can expose an object containing a function and a property to its parent:
var interface = {};
interface.calculatePrice = function(){
return .45 + 1.20;
}
interface.storeID = "abc"
window.childSandboxBridge = interface;
If this child content is in an iframe assigned an id of "child", you can access the interface from parent content by
reading the childSandboxBridge property of the frame:
var childInterface = document.getElementById("child").childSandboxBridge;
air.trace(childInterface.calculatePrice()); //traces "1.65"
air.trace(childInterface.storeID)); //traces "abc"
Attribute Description
sandboxRoot The URL to use for determining the sandbox and domain in which to place the
frame content. The file:, http:, or https: URL schemes must be used.
documentRoot The URL from which to load the frame content. The file:, app:, or app-
storage: URL schemes must be used.

1047
ACTIONSCRIPT 3.0 DEVELOPER’S GUIDE
Security
Last updated 3/21/2011
parentSandboxBridge — The parentSandboxBridge property allows the parent frame to expose an interface to
content in the child frame. To expose an interface, you set the parentSandbox property of the child frame to a function
or object in the parent frame. You can then access the object or function from content in the child frame. The following
example shows how a script running in the parent frame can expose an object containing a save function to a child:
var interface = {};
interface.save = function(text){
var saveFile = air.File("app-storage:/save.txt");
//write text to file
}
document.getElementById("child").parentSandboxBridge = interface;
Using this interface, content in the child frame could save text to a file named save.txt. However, it would not have any
other access to the file system. In general, application content should expose the narrowest possible interface to other
sandboxes. The child content could call the save function as follows:
var textToSave = "A string.";
window.parentSandboxBridge.save(textToSave);
If child content attempts to set a property of the parentSandboxBridge object, the runtime throws a SecurityError
exception. If parent content attempts to set a property of the childSandboxBridge object, the runtime throws a
SecurityError exception.
Code restrictions for content in different sandboxes
Adobe AIR 1.0 and later
As discussed in the introduction to this topic, “HTML security in Adobe AIR” on page 1045, the runtime enforces rules
and provides mechanisms for overcoming possible security vulnerabilities in HTML and JavaScript. This topic lists
those restrictions. If code attempts to call these restricted APIs, the runtime throws an error with the message “Adobe
AIR runtime security violation for JavaScript code in the application security sandbox.”
For more information, see “Avoiding security-related JavaScript errors” on page 954.
Restrictions on using the JavaScript eval() function and similar techniques
Adobe AIR 1.0 and later
For HTML content in the application security sandbox, there are limitations on using APIs that can dynamically
transform strings into executable code after the code is loaded (after the onload event of the body element has been
dispatched and the onload handler function has finished executing). This is to prevent the application from
inadvertently injecting (and executing) code from non-application sources (such as potentially insecure network
domains).
For example, if your application uses string data from a remote source to write to the innerHTML property of a DOM
element, the string could include executable (JavaScript) code that could perform insecure operations. However, while
the content is loading, there is no risk of inserting remote strings into the DOM.
One restriction is in the use of the JavaScript eval() function. Once code in the application sandbox is loaded and
after processing of the onload event handler, you can only use the eval() function in limited ways. The following rules
apply to the use of the eval() function after code is loaded from the application security sandbox:
•Expressions involving literals are allowed. For example:
eval("null");
eval("3 + .14");
eval("'foo'");

1048
ACTIONSCRIPT 3.0 DEVELOPER’S GUIDE
Security
Last updated 3/21/2011
•Object literals are allowed, as in the following:
{ prop1: val1, prop2: val2 }
•Object literal setter/getters are prohibited, as in the following:
{ get prop1() { ... }, set prop1(v) { ... } }
•Array literals are allowed, as in the following:
[ val1, val2, val3 ]
•Expressions involving property reads are prohibited, as in the following:
a.b.c
•Function invocation is prohibited.
•Function definitions are prohibited.
•Setting any property is prohibited.
•Function literals are prohibited.
However, while the code is loading, before the onload event, and during execution the onload event handler function,
these restrictions do not apply to content in the application security sandbox.
For example, after code is loaded, the following code results in the runtime throwing an exception:
eval("alert(44)");
eval("myFunction(44)");
eval("NativeApplication.applicationID");
Dynamically generated code, such as that which is made when calling the eval() function, would pose a security risk
if allowed within the application sandbox. For example, an application may inadvertently execute a string loaded from
a network domain, and that string may contain malicious code. For example, this could be code to delete or alter files
on the user’s computer. Or it could be code that reports back the contents of a local file to an untrusted network
domain.
Ways to generate dynamic code are the following:
•Calling the eval() function.
•Using innerHTML properties or DOM functions to insert script tags that load a script outside of the application
directory.
•Using innerHTML properties or DOM functions to insert script tags that have inline code (rather than loading a
script via the src attribute).
•Setting the src attribute for a script tags to load a JavaScript file that is outside of the application directory.
•Using the javascript URL scheme (as in href="javascript:alert('Test')").
•Using the setInterval() or setTimout()function where the first parameter (defining the function to run
asynchronously) is a string (to be evaluated) rather than a function name (as in setTimeout('x = 4', 1000)).
•Calling document.write() or document.writeln().
Code in the application security sandbox can only use these methods while content is loading.
These restrictions do not prevent using eval() with JSON object literals. This lets your application content work with
the JSON JavaScript library. However, you are restricted from using overloaded JSON code (with event handlers).

1049
ACTIONSCRIPT 3.0 DEVELOPER’S GUIDE
Security
Last updated 3/21/2011
For other Ajax frameworks and JavaScript code libraries, check to see if the code in the framework or library works
within these restrictions on dynamically generated code. If they do not, include any content that uses the framework
or library in a non-application security sandbox. For details, see “Restrictions for JavaScript inside AIR” on page 1012
and “Scripting between application and non-application content” on page 1055. Adobe maintains a list of Ajax
frameworks known to support the application security sandbox, at
http://www.adobe.com/products/air/develop/ajax/features/.
Unlike content in the application security sandbox, JavaScript content in a non-application security sandbox can call
the eval() function to execute dynamically generated code at any time.
Restrictions on access to AIR APIs (for non-application sandboxes)
Adobe AIR 1.0 and later
JavaScript code in a non-application sandbox does not have access to the window.runtime object, and as such this
code cannot execute AIR APIs. If content in a non-application security sandbox calls the following code, the
application throws a TypeError exception:
try {
window.runtime.flash.system.NativeApplication.nativeApplication.exit();
}
catch (e)
{
alert(e);
}
The exception type is TypeError (undefined value), because content in the non-application sandbox does not
recognize the window.runtime object, so it is seen as an undefined value.
You can expose runtime functionality to content in a non-application sandbox by using a script bridge. For details, see
and “Scripting between application and non-application content” on page 1055.
Restrictions on using XMLHttpRequest calls
Adobe AIR 1.0 and later
HTML content in the application security sandbox cannot use synchronous XMLHttpRequest methods to load data
from outside of the application sandbox while the HTML content is loading and during onLoad event.
By default, HTML content in non-application security sandboxes are not allowed to use the JavaScript
XMLHttpRequest object to load data from domains other than the domain calling the request. A frame or iframe tag
can include an allowcrosscomainxhr attribute. Setting this attribute to any non-null value allows the content in the
frame or iframe to use the JavaScript XMLHttpRequest object to load data from domains other than the domain of the
code calling the request:
<iframe id="UI"
src="http://example.com/ui.html"
sandboxRoot="http://example.com/"
allowcrossDomainxhr="true"
documentRoot="app:/">
</iframe>
For more information, see “Scripting between content in different domains” on page 1051.

1050
ACTIONSCRIPT 3.0 DEVELOPER’S GUIDE
Security
Last updated 3/21/2011
Restrictions on loading CSS, frame, iframe, and img elements (for content in non-application sandboxes)
Adobe AIR 1.0 and later
HTML content in remote (network) security sandboxes can only load CSS, frame, iframe, and img content from
remote sandboxes (from network URLs).
HTML content in local-with-filesystem, local-with-networking, or local-trusted sandboxes can only load CSS, frame,
iframe, and img content from local sandboxes (not from application or remote sandboxes).
Restrictions on calling the JavaScript window.open() method
Adobe AIR 1.0 and later
If a window that is created via a call to the JavaScript window.open() method displays content from a non-application
security sandbox, the window’s title begins with the title of the main (launching) window, followed by a colon
character. You cannot use code to move that portion of the title of the window off screen.
Content in non-application security sandboxes can only successfully call the JavaScript window.open() method in
response to an event triggered by a user mouse or keyboard interaction. This prevents non-application content from
creating windows that might be used deceptively (for example, for phishing attacks). Also, the event handler for the
mouse or keyboard event cannot set the window.open() method to execute after a delay (for example by calling the
setTimeout() function).
Content in remote (network) sandboxes can only use the window.open() method to open content in remote network
sandboxes. It cannot use the window.open() method to open content from the application or local sandboxes.
Content in the local-with-filesystem, local-with-networking, or local-trusted sandboxes (see “Security sandboxes” on
page 1010) can only use the window.open() method to open content in local sandboxes. It cannot use
window.open()to open content from the application or remote sandboxes.
Errors when calling restricted code
Adobe AIR 1.0 and later
If you call code that is restricted from use in a sandbox due to these security restrictions, the runtime dispatches a
JavaScript error: "Adobe AIR runtime security violation for JavaScript code in the application security sandbox."
For more information, see “Avoiding security-related JavaScript errors” on page 954.
Sandbox protection when loading HTML content from a string
Adobe AIR 1.0 and later
The loadString() method of the HTMLLoader class lets you create HTML content at run time. However, data that
you use as the HTML content can be corrupted if the data is loaded from an insecure Internet source. For this reason,
by default, HTML created using the loadString() method is not placed in the application sandbox and it has no
access to AIR APIs. However, you can set the placeLoadStringContentInApplicationSandbox property of an
HTMLLoader object to true to place HTML created using the loadString() method into the application sandbox.
For more information, see “Loading HTML content from a string” on page 953.

1051
ACTIONSCRIPT 3.0 DEVELOPER’S GUIDE
Security
Last updated 3/21/2011
Scripting between content in different domains
Adobe AIR 1.0 and later
AIR applications are granted special privileges when they are installed. It is crucial that the same privileges not be
leaked to other content, including remote files and local files that are not part of the application.
About the AIR sandbox bridge
Adobe AIR 1.0 and later
Normally, content from other domains cannot call scripts in other domains. To protect AIR applications from
accidental leakage of privileged information or control, the following restrictions are placed on content in the
application security sandbox (content installed with the application):
•Code in the application security sandbox cannot allow to other sandboxes by calling the
Security.allowDomain() method. Calling this method from the application security sandbox will throw an
error.
•Importing non-application content into the application sandbox by setting the LoaderContext.securityDomain
or the LoaderContext.applicationDomain property is prevented.
There are still cases where the main AIR application requires content from a remote domain to have controlled access
to scripts in the main AIR application, or vice versa. To accomplish this, the runtime provides a sandbox bridge
mechanism, which serves as a gateway between the two sandboxes. A sandbox bridge can provide explicit interaction
between remote and application security sandboxes.
The sandbox bridge exposes two objects that both loaded and loading scripts can access:
•The parentSandboxBridge object lets loading content expose properties and functions to scripts in the loaded
content.
•The childSandboxBridge object lets loaded content expose properties and function to scripts in the loading
content.
Objects exposed via the sandbox bridge are passed by value, not by reference. All data is serialized. This means that the
objects exposed by one side of the bridge cannot be set by the other side, and that objects exposed are all untyped. Also,
you can only expose simple objects and functions; you cannot expose complex objects.
If child content attempts to set a property of the parentSandboxBridge object, the runtime throws a SecurityError
exception. Similarly, if parent content attempts to set a property of the childSandboxBridge object, the runtime throws
a SecurityError exception.
Sandbox bridge example (SWF)
Adobe AIR 1.0 and later
Suppose an AIR music store application wants to allow remote SWF files to broadcast the price of albums, but does
not want the remote SWF file to disclose whether the price is a sale price. To do this, a StoreAPI class provides a
method to acquire the price, but obscures the sale price. An instance of this StoreAPI class is then assigned to the
parentSandboxBridge property of the LoaderInfo object of the Loader object that loads the remote SWF.
The following is the code for the AIR music store:

1052
ACTIONSCRIPT 3.0 DEVELOPER’S GUIDE
Security
Last updated 3/21/2011
<?xml version="1.0" encoding="utf-8"?>
<mx:WindowedApplication xmlns:mx="http://www.adobe.com/2006/mxml" layout="absolute"
title="Music Store" creationComplete="initApp()">
<mx:Script>
import flash.display.Loader;
import flash.net.URLRequest;
private var child:Loader;
private var isSale:Boolean = false;
private function initApp():void {
var request:URLRequest =
new URLRequest("http://[www.yourdomain.com]/PriceQuoter.swf")
child = new Loader();
child.contentLoaderInfo.parentSandboxBridge = new StoreAPI(this);
child.load(request);
container.addChild(child);
}
public function getRegularAlbumPrice():String {
return "$11.99";
}
public function getSaleAlbumPrice():String {
return "$9.99";
}
public function getAlbumPrice():String {
if(isSale) {
return getSaleAlbumPrice();
}
else {
return getRegularAlbumPrice();
}
}
</mx:Script>
<mx:UIComponent id="container" />
</mx:WindowedApplication>
The StoreAPI object calls the main application to retrieve the regular album price, but returns “Not available” when
the getSaleAlbumPrice() method is called. The following code defines the StoreAPI class:

1053
ACTIONSCRIPT 3.0 DEVELOPER’S GUIDE
Security
Last updated 3/21/2011
public class StoreAPI
{
private static var musicStore:Object;
public function StoreAPI(musicStore:Object)
{
this.musicStore = musicStore;
}
public function getRegularAlbumPrice():String {
return musicStore.getRegularAlbumPrice();
}
public function getSaleAlbumPrice():String {
return "Not available";
}
public function getAlbumPrice():String {
return musicStore.getRegularAlbumPrice();
}
}
The following code represents an example of a PriceQuoter SWF file that reports the store’s price, but cannot report
the sale price:
package
{
import flash.display.Sprite;
import flash.system.Security;
import flash.text.*;
public class PriceQuoter extends Sprite
{
private var storeRequester:Object;
public function PriceQuoter() {
trace("Initializing child SWF");
trace("Child sandbox: " + Security.sandboxType);
storeRequester = loaderInfo.parentSandboxBridge;
var tf:TextField = new TextField();
tf.autoSize = TextFieldAutoSize.LEFT;
addChild(tf);
tf.appendText("Store price of album is: " + storeRequester.getAlbumPrice());
tf.appendText("\n");
tf.appendText("Sale price of album is: " + storeRequester.getSaleAlbumPrice());
}
}
}

1054
ACTIONSCRIPT 3.0 DEVELOPER’S GUIDE
Security
Last updated 3/21/2011
Sandbox bridge example (HTML)
Adobe AIR 1.0 and later
In HTML content, the parentSandboxBridge and childSandboxBridge properties are added to the JavaScript
window object of a child document. For an example of how to set up bridge functions in HTML content, see “Setting
up a sandbox bridge interface” on page 971.
Limiting API exposure
Adobe AIR 1.0 and later
When exposing sandbox bridges, it's important to expose high-level APIs that limit the degree to which they can be
abused. Keep in mind that the content calling your bridge implementation may be compromised (for example, via a
code injection). So, for example, exposing a readFile(path:String) method (that reads the contents of an arbitrary
file) via a bridge is vulnerable to abuse. It would be better to expose a readApplicationSetting() API that doesn't
take a path and reads a specific file. The more semantic approach limits the damage that an application can do once
part of it is compromised.
More Help topics
“Cross-scripting content in different security sandboxes” on page 970
“The AIR application sandbox” on page 1011
Writing to disk
Adobe AIR 1.0 and later
Applications running in a web browser have only limited interaction with the user's local file system. Web browsers
implement security policies that ensure that a user's computer cannot be compromised as a result of loading web
content. For example, SWF files running through Flash Player in a browser cannot directly interact with files already
on a user's computer. Shared objects and cookies can be written to a user's computer for the purpose of maintaining
user preferences and other data, but this is the limit of file system interaction. Because AIR applications are natively
installed, they have a different security contract, one which includes the capability to read and write across the local
file system.
This freedom comes with high responsibility for developers. Accidental application insecurities jeopardize not only
the functionality of the application, but also the integrity of the user's computer. For this reason, developers should
read “Best security practices for developers” on page 1056.
AIR developers can access and write files to the local file system using several URL scheme conventions:
Note: AIR applications cannot modify content using the app: URL scheme. Also, the application directory may be read
only because of administrator settings.
URL scheme Description
app:/ An alias to the application directory. Files accessed from this path are assigned the application sandbox and have
the full privileges granted by the runtime.
app-storage:/ An alias to the local storage directory, standardized by the runtime. Files accessed from this path are assigned a
non-application sandbox.
file:/// An alias that represents the root of the user's hard disk. A file accessed from this path is assigned an application
sandbox if the file exists in the application directory, and a non-application sandbox otherwise.

1055
ACTIONSCRIPT 3.0 DEVELOPER’S GUIDE
Security
Last updated 3/21/2011
Unless there are administrator restrictions to the user's computer, AIR applications are privileged to write to any
location on the user's hard drive. Developers are advised to use the app-storage:/ path for local storage related to
their application. Files written to app-storage:/ from an application are put in a standard location:
•On Mac OS: the storage directory of an application is <appData>/<appId>/Local Store/ where <appData> is
the user's preferences folder. This is typically /Users/<user>/Library/Preferences
•On Windows: the storage directory of an application is <appData>\<appId>\Local Store\ where <appData> is
the user's CSIDL_APPDATA Special Folder. This is typically C:\Documents and
Settings\<userName>\Application Data
•On Linux: <appData>/<appID>/Local Store/where <appData> is /home/<user>/.appdata
If an application is designed to interact with existing files in the user's file system, be sure to read “Best security
practices for developers” on page 1056.
Working securely with untrusted content
Adobe AIR 1.0 and later
Content not assigned to the application sandbox can provide additional scripting functionality to your application, but
only if it meets the security criteria of the runtime. This topic explains the AIR security contract with non-application
content.
Security.allowDomain()
Adobe AIR 1.0 and later
AIR applications restrict scripting access for non-application content more stringently than the Flash Player browser
plug-in restricts scripting access for untrusted content. For example, in Flash Player in the browser, when a SWF file
that is assigned to the local-trusted sandbox calls the System.allowDomain() method, scripting access is granted
to any SWF loaded from the specified domain. The analogous approach is not permitted from application content
in AIR applications, since it would grant unreasonable access unto the non-application file into the user's file system.
Remote files cannot directly access the application sandbox, regardless of calls to the Security.allowDomain()
method.
Scripting between application and non-application content
Adobe AIR 1.0 and later
AIR applications that script between application and non-application content have more complex security
arrangements. Files that are not in the application sandbox are only allowed to access the properties and methods of
files in the application sandbox through the use of a sandbox bridge. A sandbox bridge acts as a gateway between
application content and non-application content, providing explicit interaction between the two files. When used
correctly, sandbox bridges provide an extra layer of security, restricting non-application content from accessing object
references that are part of application content.
The benefit of sandbox bridges is best illustrated through example. Suppose an AIR music store application wants to
provide an API to advertisers who want to create their own SWF files, with which the store application can then
communicate. The store wants to provide advertisers with methods to look up artists and CDs from the store, but also
wants to isolate some methods and properties from the third-party SWF file for security reasons.

1056
ACTIONSCRIPT 3.0 DEVELOPER’S GUIDE
Security
Last updated 3/21/2011
A sandbox bridge can provide this functionality. By default, content loaded externally into an AIR application at
runtime does not have access to any methods or properties in the main application. With a custom sandbox bridge
implementation, a developer can provide services to the remote content without exposing these methods or properties.
Consider the sandbox bridge as a pathway between trusted and untrusted content, providing communication between
loader and loadee content without exposing object references.
For more information on how to securely use sandbox bridges, see “Scripting between content in different domains”
on page 1051.
Protection against dynamically generating unsafe SWF content
Adobe AIR 1.0 and later
The Loader.loadBytes() method provides a way for an application to generate SWF content from a byte array.
However, injection attacks on data loaded from remote sources could do severe damage when loading content. This is
especially true when loading data into the application sandbox, where the generated SWF content can access the full
set of AIR APIs.
There are legitimate uses for using the loadBytes() method without generating executable SWF code. You can use
the loadBytes() method to generate an image data to control the timing of image display, for example. There are also
legitimate uses that do rely on executing code, such as dynamic creation of SWF content for audio playback. In AIR,
by default the loadBytes() method does not let you load SWF content; it only allows you to load image content. In
AIR, the loaderContext property of the loadBytes() method has an allowLoadBytesCodeExecution property,
which you can set to true to explicitly allow the application to use loadBytes() to load executable SWF content. The
following code shows how to use this feature:
var loader:Loader = new Loader();
var loaderContext:LoaderContext = new LoaderContext();
loaderContext.allowLoadBytesCodeExecution = true;
loader.loadBytes(bytes, loaderContext);
If you call loadBytes() to load SWF content and the allowLoadBytesCodeExecution property of the
LoaderContext object is set to false (the default), the Loader object throws a SecurityError exception.
Note: In a future release of Adobe AIR, this API may change. When that occurs, you may need to recompile content that
uses the allowLoadBytesCodeExecution property of the LoaderContext class.
Best security practices for developers
Adobe AIR 1.0 and later
Although AIR applications are built using web technologies, it is important for developers to note that they are not
working within the browser security sandbox. This means that it is possible to build AIR applications that can do harm
to the local system, either intentionally or unintentionally. AIR attempts to minimize this risk, but there are still ways
where vulnerabilities can be introduced. This topic covers important potential insecurities.

1057
ACTIONSCRIPT 3.0 DEVELOPER’S GUIDE
Security
Last updated 3/21/2011
Risk from importing files into the application security sandbox
Adobe AIR 1.0 and later
Files that exist in the application directory are assigned to the application sandbox and have the full privileges of the
runtime. Applications that write to the local file system are advised to write to app-storage:/. This directory exists
separately from the application files on the user's computer, hence the files are not assigned to the application sandbox
and present a reduced security risk. Developers are advised to consider the following:
•Include a file in an AIR file (in the installed application) only if it is necessary.
•Include a scripting file in an AIR file (in the installed application) only if its behavior is fully understood and trusted.
•Do not write to or modify content in the application directory. The runtime prevents applications from writing or
modifying files and directories using the app:/ URL scheme by throwing a SecurityError exception.
•Do not use data from a network source as parameters to methods of the AIR API that may lead to code execution.
This includes use of the Loader.loadBytes() method and the JavaScript eval() function.
Risk from using an external source to determine paths
Adobe AIR 1.0 and later
An AIR application can be compromised when using external data or content. For this reason, take special care when
using data from the network or file system. The onus of trust is ultimately on the developer and the network
connections they make, but loading foreign data is inherently risky, and should not be used for input into sensitive
operations. Developers are advised against the following:
•Using data from a network source to determine a file name
•Using data from a network source to construct a URL that the application uses to send private information
Risk from using, storing, or transmitting insecure credentials
Adobe AIR 1.0 and later
Storing user credentials on the user's local file system inherently introduces the risk that these credentials may be
compromised. Developers are advised to consider the following:
•If credentials must be stored locally, encrypt the credentials when writing to the local file system. The runtime
provides an encrypted storage unique to each installed application, via the EncryptedLocalStore class. For details,
see “Encrypted local storage” on page 677.
•Do not transmit unencrypted user credentials to a network source unless that source is trusted.
•Never specify a default password in credential creation — let users create their own. Users who leave the default
unchanged expose their credentials to an attacker who already knows the default password.

1058
ACTIONSCRIPT 3.0 DEVELOPER’S GUIDE
Security
Last updated 3/21/2011
Risk from a downgrade attack
Adobe AIR 1.0 and later
During application install, the runtime checks to ensure that a version of the application is not currently installed. If
an application is already installed, the runtime compares the version string against the version that is being installed.
If this string is different, the user can choose to upgrade their installation. The runtime does not guarantee that the
newly installed version is newer than the older version, only that it is different. An attacker can distribute an older
version to the user to circumvent a security weakness. For this reason, the developer is advised to make version checks
when the application is run. It is a good idea to have applications check the network for required updates. That way,
even if an attacker gets the user to run an old version, that old version will recognize that it needs to be updated. Also,
using a clear versioning scheme for your application makes it more difficult to trick users into installing a downgraded
version.
Code signing
Adobe AIR 1.0 and later
All AIR installer files are required to be code signed. Code signing is a cryptographic process of confirming that the
specified origin of software is accurate. AIR applications can be signed using either by a certificate issued by an external
certificate authority (CA) or by a self-signed certificate you create yourself. A commercial certificate from a well-
known CA is strongly recommended and provides assurance to your users that they are installing your application,
not a forgery. However, self-signed certificates can be created using adt from the SDK or using either Flash, Flash
Builder, or another application that uses adt for certificate generation. Self-signed certificates do not provide any
assurance that the application being installed is genuine and should only be used for testing an application prior to
public release.
Security on Android devices
Adobe AIR 2.5 and later
On Android, as on all computing devices, AIR conforms to the native security model. At the same time, AIR maintains
its own security rules, which are intended to make it easy for developers to write secure, Internet-connected
applications.
Since AIR applications on Android use the Android package format, installation falls under the Android security
model. The AIR application installer is not used.
The Android security model has three primary aspects:
•Permissions
•Application signatures
•Application user IDs
Android permissions
Many features of Android are protected by the operating system permission mechanism. In order to use a protected
feature, the AIR application descriptor must declare that the application requires the necessary permission. When a
user attempts to install the app, the Android operating system displays all requested permissions to the user before the
installation proceeds.

1059
ACTIONSCRIPT 3.0 DEVELOPER’S GUIDE
Security
Last updated 3/21/2011
Most AIR applications will need to specify Android permissions in the application descriptor. By default, no
permissions are included. The following permissions are required for protected Android features exposed through the
AIR runtime:
ACCESS_COARSE_LOCATION Allows the application to access WIFI and cellular network location data through the
Geolocation class.
ACCESS_FINE_LOCATION Allows the application to access GPS data through the Geolocation class.
ACCESS_NETWORK_STATE and ACCESS_WIFI_STATE Allows the application to access network information the
NetworkInfo class.
CAMERA Allows the application to access the camera.
INTERNET Allows the application to make network requests. Also allows remote debugging.
READ_PHONE_STATE Allows the AIR runtime to mute audio when an incoming call occurs.
RECORD_AUDIO Allows the application to access the microphone.
WAKE_LOCK and DISABLE_KEYGUARD Allows the application to prevent the device from going to sleep using the
SystemIdleMode class settings.
WRITE_EXTERNAL_STORAGE Allows the application to write to the external memory card on the device.
Application signatures
All application packages created for the Android platform must be signed. Since AIR applications on Android are
packaged in the native Android APK format, they are signed in accordance to Android conventions rather than AIR
conventions. While Android and AIR use code signing in a similar fashion, there are significant differences:
•On Android, the signature verifies that the private key is in possession of the developer, but is not used to verify the
identity of the developer.
•For apps submitted to the Android market, the certificate must be valid for at least 25 years.
•Android does not support migrating the package signature to another certificate. If an update is signed by a
different certificate, then users must uninstall the original app before they can install the updated app.
•Two apps signed with the same certificate can specify a shared ID that permits them to access each others cache and
data files. (Such sharing is not facilitated by AIR. )
Application user IDs
Android uses a Linux kernel. Every installed app is assigned a Linux-type user ID that determines its permissions for
such operations as file access. Files in the application, application storage, and temporary directories are protected
from access by file system permissions. Files written to external storage (in other words, the SD card) can be read,
modified, and deleted by other applications, or by the user, when the SD card is mounted as a mass storage device on
a computer.
Cookies received with internet requests are not shared between AIR applications.
More Help topics
Android: Security and Permissions
Encrypted data on Android
AIR applications on Android can use the encryption options available in the built-in SQL database to save encrypted
data. The EncryptedLocalStore class is not supported on mobile devices.

1060
ACTIONSCRIPT 3.0 DEVELOPER’S GUIDE
Security
Last updated 3/21/2011
Security on iOS devices
On iOS AIR conforms to the native security model. At the same time, AIR maintains its own security rules, which are
intended to make it easy for developers to write secure, Internet-connected applications.
Since AIR applications on iOS use the iOS package format, installation falls under the iOS security model. The AIR
application installer is not used. Furthermore, a separate AIR runtime is not used on iOS devices. Every AIR
application contains all the code needed to function.
Application signatures
All application packages created for the iOS platform must be signed. Since AIR applications on iOS are packaged in
the native iOS IPA format, they are signed in accordance with iOS requirements rather than AIR requirements. While
iOS and AIR use code signing in a similar fashion, there are significant differences:
•On iOS, the certificate used to sign an application must be issued by Apple; Certificates from other certificate
authorities cannot be used.
•On iOS, Apple-issued distribution certificates are typically valid for one year.

1061
Last updated 3/21/2011
Chapter 62: How to Use ActionScript
Examples
Run a code example to learn how particular classes and methods work. The types of ActionScript 3.0 code examples are:
•“Code snippet examples” on page 1061
•“Class-based examples” on page 1061
•“Practical examples containing multiple source files” on page 1062
To run the ActionScript 3.0 code examples on the desktop, see the following:
•“Running ActionScript 3.0 examples in Flash Professional” on page 1062
•“Running ActionScript 3.0 examples in Flash Builder” on page 1063
Using trace statements and other debugging tools in Adobe Flash Professional or Adobe Flash Builder can increase
your understanding of a code example.
You can also run the ActionScript 3.0 code examples on mobile devices that support Flash Player 10.1 and later
releases. For more information, see “Running ActionScript 3.0 examples on mobile devices” on page 1064.
If you are developing applications for TV devices, you can also benefit from the ActionScript 3.0 examples. Use your
desktop to study the examples. For information about developing for TV devices, see Flash Platform for TV on the
Adobe Developer Connection website.
Types of Examples
There are three types of code examples used in the ActionScript 3.0 Developer’s Guide and in other related books,
articles, and language references:
•Code snippets
•Class-based examples
•Practical examples containing multiple source files
Code snippet examples
A code snippet example looks like this:
var x:int = 5;
trace(x); // 5
Code snippets only contain enough code to demonstrate a single idea. They do not normally contain package or class
statements.
Class-based examples
Many examples show the source code for a complete ActionScript class. A class-based example looks like this:

1062
ACTIONSCRIPT 3.0 DEVELOPER’S GUIDE
How to Use ActionScript Examples
Last updated 3/21/2011
package {
public class Example1 {
public function Example1():void {
var x:int = 5;
trace(x); //5
}
}
}
The code for a class-based example includes a package statement, a class declaration, and a constructor function.
Practical examples containing multiple source files
Many of the topics in the ActionScript 3.0 Developer’s Guide conclude with practical examples that show how to use
certain ActionScript features in a practical, real-world context. These examples usually contain multiple files
including:
•One or more ActionScript source files
•A .FLA file for use with Flash Professional
•One or more MXML files for use with Flash Builder
•Data files, image files, sound files, or other assets used by the example application (optional).
Practical examples are also found with many of the Quick Start articles in the Flash Developer Center and Flex
Developer Center.
Practical examples are normally delivered as ZIP archive files.
Running ActionScript 3.0 examples in Flash Professional
First determine the type of ActionScript 3.0 example that you want to run (as described in “Types of Examples” on
page 1061). Then use one of the following procedures to run it using Flash Professional.
Running a code snippet example in Flash Professional
To run a code snippet example in Flash Professional:
1Select File > New.
2In the New Document dialog box, select Flash Document, and click OK.
A new Flash window is displayed.
3Click on the first frame of the first layer in the Timeline panel.
4In the Actions panel, type or paste the code snippet example.
5Select File > Save. Give the file a name and click OK.
6To test the example, select Control > Test Movie.
Running a class-based example in Flash Professional
To run a class-based example in Flash Professional:
1Select File > New.

1063
ACTIONSCRIPT 3.0 DEVELOPER’S GUIDE
How to Use ActionScript Examples
Last updated 3/21/2011
2In the New Document dialog box, select ActionScript File, and click OK. A new editor window is displayed.
3Copy the class-based example code and paste it into the editor window.
If the class is the main document class for the program, it must extend the MovieClip class:
import flash.display.MovieClip;
public class Example1 extends MovieClip{
//...
}
Also make sure that all the classes referenced in the example are declared using import statements.
4Select File > Save. Give the file the same name as the class in the example (e.g. ContextMenuExample.as).
Note: Some of the class-based examples, such as the flashx.textLayout.container.ContainerController class example,
include multiple levels in the package declaration (package flashx.textLayout.container.examples {). For
these examples, save the file in a sub folder that matches the package declaration
(flashx/textLayout/container/examples), or remove the package name (so the ActionScript starts with package {
only) and you can test the file from any location.
5Select File > New.
6In the New Document dialog box, select Flash Document (ActionScript 3.0), and click OK. A new Flash window is
displayed.
7In the Properties panel, in the Document Class field, enter the name of the example class, which should match the
name of the ActionScript source file you just saved (e.g. ContextMenuExample).
8Select File > Save. Give the FLA file the same name as the class in the example (e.g. ContextMenuExample.fla).
9To test the example, select Control > Test Movie.
Running a practical example in Flash Professional
Practical examples are normally delivered as ZIP archive files. To run a practical example using Flash Professional:
1Unzip the archive file into a folder of your choice.
2In Flash Professional select File > Open.
3Browse to the folder where you unzipped the archive file. Select the FLA file in that folder and click Open.
4To test the example, select Control > Test Movie.
Running ActionScript 3.0 examples in Flash Builder
First determine the type of ActionScript 3.0 example that you want to run (as described in “Types of Examples” on
page 1061). Then use one of the following procedures to run it using Flash Builder (or Flex Builder).
Running a code snippet example in Flash Builder
To run a code snippet example in Flash Builder:
1Either create a new Flex Project (select File > New > Flex Project), or within an existing Flex project create a new
MXML Application (select File > New > MXML Application). Give the project or application a descriptive name
(such as ContextMenuExample).
2Inside the generated MXML file, add a <mx:Script> tag.

1064
ACTIONSCRIPT 3.0 DEVELOPER’S GUIDE
How to Use ActionScript Examples
Last updated 3/21/2011
3
Paste the contents of the code snippet example between the <mx:Script> and </mx:Script> tags. Save the MXML file.
4To run the example, select the Run > Run menu option for the main MXML file (such as Run > Run
ContextMenuExample).
Running a class-based example in Flash Builder
To run a class-based example in Flash Builder:
1Select File > New > ActionScript Project.
2Enter the name of the primary class (such as ContextMenuExample) into the Project Name field. Use the default
values for other fields (or change them according to your specific environment). Click Finish to create the project
and the main ActionScript file.
3Erase any generated content from the ActionScript file. Paste the example code, including package and import
statements, into the ActionScript file and save the file.
Note: Some of the class-based examples, such as the flashx.textLayout.container.ContainerController class example,
include multiple levels in the package declaration (package flashx.textLayout.container.examples {). For
these examples, save the file in a sub folder that matches the package declaration
(flashx/textLayout/container/examples), or remove the package name (so the ActionScript starts with package {
only) and you can test the file from any location.
4To run the example, select the Run > Run menu option for the main ActionScript class name (such as Run > Run
ContextMenuExample).
Running a practical example in Flash Builder
Practical examples are normally delivered as ZIP archive files. To run a practical example using Flash Builder:
1Unzip the archive file into a folder of your choice. Give the folder a descriptive name (such as
ContextMenuExample).
2In Flash Builder select File > New Flex Project. In the Project Location section, click Browse and select the folder
containing the example files. In the Project Name field enter the folder name (such as ContextMenuExample). Use
the default values for other fields (or change them according to your specific environment). Click Next to continue.
3In the Output panel click Next to accept the default value.
4In the Source Paths panel click the Browse button next to the Main Application File field. Select the main MXML
example file from the example folder. Click Finish to create the project files.
5To run the example, select the Run > Run menu option for the main MXML file (such as Run > Run
ContextMenuExample).
Running ActionScript 3.0 examples on mobile devices
You can run the ActionScript 3.0 code examples on mobile devices that support Flash Player 10.1. However, typically
you run a code example to learn how particular classes and methods work. In that case, run the example on a non-
mobile device such as a desktop computer. On the desktop computer, you can use trace statements and other
debugging tools in Flash Professional or Flash Builder to increase your understanding of a code example.

1065
ACTIONSCRIPT 3.0 DEVELOPER’S GUIDE
How to Use ActionScript Examples
Last updated 3/21/2011
If you want to run the example on a mobile device, you can either copy the files to the device or to a web server. To
copy files to the device and run the example in the browser, do the following:
1Create the SWF file by following the instructions in “Running ActionScript 3.0 examples in Flash Professional” on
page 1062 or in “Running ActionScript 3.0 examples in Flash Builder” on page 1063. In Flash Professional, you
create the SWF file when you select Control > Test Movie. In Flash Builder, you create the SWF file when you run,
debug, or build your Flash Builder project.
2Copy the SWF file to a directory on the mobile device. Use software provided with the device to copy the file.
3In the address bar of browser on the mobile device, enter the file:// URL for the SWF file. For example, enter
file:://applications/myExample.swf.
To copy files to a web server and run the example in the device’s browser, do the following:
1Create a SWF file and an HTML file. First, follow the instructions in “Running ActionScript 3.0 examples in Flash
Professional” on page 1062 or in “Running ActionScript 3.0 examples in Flash Builder” on page 1063. In Flash
Professional, selecting Control > Test Movie creates only the SWF file. To create both files, first select both Flash
and HTML on the Formats tab in the Publish Settings dialog. Then select File > Publish to create both the HTML
and SWF files. In Flash Builder, you create both the SWF file and HTML file when you run, debug, or build your
Flash Builder project.
2Copy the SWF file and HTML file to a directory on the web server.
3In the address bar of browser on the mobile device, enter the HTTP address for the HTML file. For example, enter
http://www.myWebServer/examples/myExample.html.
Before running an example on a mobile device, consider each of the following issues.
Stage size
The stage size you use when running an example on a mobile device is much smaller than when you use a non-mobile
device. Many examples do not require a particular Stage size. When creating the SWF file, specify a Stage size
appropriate to your device. For example, specify 176 x 208 pixels.
The purpose of the practical examples in the ActionScript 3.0 Development Guide is to illustrate different ActionScript
3.0 concepts and classes. Their user interfaces are designed to look good and work well on a desktop or laptop
computer. Although the examples work on mobile devices, the Stage size and user interface design is not suitable to
the small screen. Adobe recommends that you run the practical examples on a computer to learn the ActionScript, and
then use pertinent code snippets in your mobile applications.
Text fields instead of trace statements
When running an example on a mobile device, you cannot see the output from the example’s trace statements. To see
the output, create an instance of the TextField class. Then, append the text from the trace statements to the text
property of the text field.
You can use the following function to set up a text field to use for tracing:

1066
ACTIONSCRIPT 3.0 DEVELOPER’S GUIDE
How to Use ActionScript Examples
Last updated 3/21/2011
function createTracingTextField(x:Number, y:Number,
width:Number, height:Number):TextField {
var tracingTF:TextField = new TextField();
tracingTF.x = x;
tracingTF.y = y;
tracingTF.width = width;
tracingTF.height = height;
// A border lets you more easily see the area the text field covers.
tracingTF.border = true;
// Left justifying means that the right side of the text field is automatically
// resized if a line of text is wider than the width of the text field.
// The bottom is also automatically resized if the number of lines of text
// exceed the length of the text field.
tracingTF.autoSize = TextFieldAutoSize.LEFT;
// Use a text size that works well on the device.
var myFormat:TextFormat = new TextFormat();
myFormat.size = 18;
tracingTF.defaultTextFormat = myFormat;
addChild(tracingTF);
return tracingTF;
}
For example, add this function to the document class as a private function. Then, in other methods of the document
class, trace data with code like the following:
var traceField:TextField = createTracingTextField(10, 10, 150, 150);
// Use the newline character "\n" to force the text to the next line.
traceField.appendText("data to trace\n");
traceField.appendText("more data to trace\n");
// Use the following line to clear the text field.
traceField.appendText("");
The appendText() method accepts only one value as a parameter. That value is a string (either a String instance or a
string literal). To print the value of a non-string variable, first convert the value to a String. The easiest way to do that
is to call the object’s toString() method:
var albumYear:int = 1999;
traceField.appendText("albumYear = ");
traceField.appendText(albumYear.toString());
Text size
Many examples use text fields to help illustrate a concept. Sometimes adjusting the size of the text in the text field
provides better readability on a mobile device. For example, if an example uses a text field instance named
myTextField, change the size of its text with the following code:
// Use a text size that works well on the device.
var myFormat:TextFormat = new TextFormat();
myFormat.size = 18;
myTextField.defaultTextFormat = myFormat

1067
ACTIONSCRIPT 3.0 DEVELOPER’S GUIDE
How to Use ActionScript Examples
Last updated 3/21/2011
Capturing user input
The mobile operating system and browser capture some user input events that the SWF content does not receive.
Specific behavior depends on the operating system and browser, but could result in unexpected behavior when you
run the examples on a mobile device. For more information, see “KeyboardEvent precedence” on page 529.
Also, the user interfaces of many examples are designed for a desktop or laptop computer. For example, most of the
practical examples in the ActionScript 3.0 Developer’s Guide are well-suited for desktop viewing. Therefore, the entire
Stage is sometimes not visible on the mobile device’s screen. The ability to pan through the browser’s contents depends
on the browser. Furthermore, the examples are not designed to catch and handle scrolling or panning events.
Therefore, some examples’ user interfaces are not suitable for running on the small screen. Adobe recommends that
you run the examples on a computer to learn the ActionScript, and then use pertinent code snippets in your mobile
applications.
For more information, see “Panning and scrolling display objects” on page 169.
Handling focus
Some examples require you to give a field the focus. By giving a field the focus, you can, for example, enter text or select
a button. To give a field focus, use the mobile device’s pointer device, such as a stylus or your finger. Or, use the mobile
device’s navigation keys to give a field focus. To select a button that has the focus, use the mobile device’s Select key as
you would use Enter on a computer. On some devices, tapping twice on a button selects it.
For more information about focus, see “Managing focus” on page 524.
Handling mouse events
Many examples listen for mouse events. On a computer, these mouse events can occur, for example, when a user rolls
over a display object with the mouse, or clicks the mouse button on a display object. On mobile devices, events from
using pointer devices such as a stylus or finger, are called touch events. Flash Player 10.1 maps touch events to mouse
events. This mapping ensures that SWF content that was developed before Flash Player 10.1 continues to work.
Therefore, examples work when using a pointer device to select or drag a display object.
Performance
Mobile devices have less processing power than desktop devices. Some CPU-intensive examples possibly perform
slowly on mobile devices. For example, the example in “Drawing API example: Algorithmic Visual Generator” on
page 222 does extensive computations and drawing upon entering every frame. Running this example on a computer
illustrates various drawing APIs. However, the example is not suitable on some mobile devices due to their
performance limitations.
For more information about performance on mobile devices, see Optimizing Performance for the Flash Platform.
Best Practices
The examples do not consider best practices in developing applications for mobile devices. Limitations in memory and
processing power in mobile devices require special consideration. Similarly, the user interface for the small screen has
different needs than a desktop display. For more information about developing applications for mobile devices, see
Optimizing Performance for the Flash Platform.

1068
Last updated 3/21/2011
Chapter 63: SQL support in local databases
Adobe AIR includes a SQL database engine with support for local SQL databases with many standard SQL features,
using the open source SQLite database system. The runtime does not specify how or where database data is stored on
the file system. Each database is stored completely within a single file. A developer can specify the location in the file
system where the database file is stored, and a single AIR application can access one or many separate databases (i.e.
separate database files).This document outlines the SQL syntax and data type support for Adobe AIR local SQL
databases. This document is not intended to serve as a comprehensive SQL reference. Rather, it describes specific
details of the SQL dialect that Adobe AIR supports. The runtime supports most of the SQL-92 standard SQL dialect.
Because there are numerous references, web sites, books, and training materials for learning SQL, this document is not
intended to be a comprehensive SQL reference or tutorial. Instead, this document particularly focuses on the AIR-
supported SQL syntax, and the differences between SQL-92 and the supported SQL dialect.
SQL statement definition conventions
Within statement definitions in this document, the following conventions are used:
•Text case
•UPPER CASE - literal SQL keywords are written in all upper case.
•lower case - placeholder terms or clause names are written in all lower case.
•Definition characters
•::= Indicates a clause or statement definition.
•Grouping and alternating characters
•| The pipe character is used between alternative options, and can be read as "or".
•[] Items in square brackets are optional items; the brackets can contain a single item or a set of alternative items.
•() Parentheses surrounding a set of alternatives (a set of items separated by pipe characters), designates a
required group of items, that is, a set of items that are the possible values for a single required item.
•Quantifiers
• + A plus character following an item in parentheses indicates that the preceding item can occur 1 or more times.
•* An asterisk character following an item in square brackets indicates that the preceding (bracketed) item can
occur 0 or more times
•Literal characters
•* An asterisk character used in a column name or between the parentheses following a function name signifies
a literal asterisk character rather than the "0 or more" quantifier.
•. A period character represents a literal period.
•, A comma character represents a literal comma.
•() A pair of parentheses surrounding a single clause or item indicates that the parentheses are required, literal
parentheses characters.
•Other characters, unless otherwise indicated, represent those literal characters.

1069
ACTIONSCRIPT 3.0 DEVELOPER’S GUIDE
SQL support in local databases
Last updated 3/21/2011
Supported SQL syntax
The following SQL syntax listings are supported by the Adobe AIR SQL database engine. The listings are divided into
explanations of different statement and clause types, expressions, built-in functions, and operators. The following
topics are covered:
•General SQL syntax
•Data manipulation statements (SELECT, INSERT, UPDATE, and DELETE)
•Data definition statements (CREATE, ALTER, and DROP statements for tables, indices, views, and triggers)
•Special statements and clauses
•Built-in functions (Aggregate, scalar, and date/time formatting functions)
•Operators
•Parameters
•Unsupported SQL features
•Additional SQL features
General SQL syntax
In addition to the specific syntax for various statements and expressions, the following are general rules of SQL syntax:
Case sensitivity SQL statements, including object names, are not case sensitive. Nevertheless, SQL statements are
frequently written with SQL keywords written in uppercase, and this document uses that convention. While SQL
syntax is not case sensitive, literal text values in SQL are case sensitive, and comparison and sorting operations can be
case sensitive, as specified by the collation sequence defined for a column or operation. For more information see
COLLATE.
White space A white-space character (such as space, tab, new line, and so forth) must be used to separate individual
words in an SQL statement. However, white space is optional between words and symbols. The type and quantity of
white-space characters in a SQL statement is not significant. You can use white space, such as indenting and line
breaks, to format your SQL statements for easy readability, without affecting the meaning of the statement.
Data manipulation statements
Data manipulation statements are the most commonly used SQL statements. These statements are used to retrieve,
add, modify, and remove data from database tables. The following data manipulation statements are supported:
SELECT, INSERT, UPDATE, and DELETE.
SELECT
The SELECT statement is used to query the database. The result of a SELECT is zero or more rows of data where each
row has a fixed number of columns. The number of columns in the result is specified by the result column name or
expression list between the SELECT and optional FROM keywords.

1070
ACTIONSCRIPT 3.0 DEVELOPER’S GUIDE
SQL support in local databases
Last updated 3/21/2011
sql-statement ::= SELECT [ALL | DISTINCT] result
[FROM table-list]
[WHERE expr]
[GROUP BY expr-list]
[HAVING expr]
[compound-op select-statement]*
[ORDER BY sort-expr-list]
[LIMIT integer [( OFFSET | , ) integer]]
result ::= result-column [, result-column]*
result-column ::= * | table-name . * | expr [[AS] string]
table-list ::= table [ join-op table join-args ]*
table ::= table-name [AS alias] |
( select ) [AS alias]
join-op ::= , | [NATURAL] [LEFT | RIGHT | FULL] [OUTER | INNER | CROSS] JOIN
join-args ::= [ON expr] [USING ( id-list )]
compound-op ::= UNION | UNION ALL | INTERSECT | EXCEPT
sort-expr-list ::= expr [sort-order] [, expr [sort-order]]*
sort-order ::= [COLLATE collation-name] [ASC | DESC]
collation-name ::= BINARY | NOCASE
Any arbitrary expression can be used as a result. If a result expression is * then all columns of all tables are substituted
for that one expression. If the expression is the name of a table followed by .* then the result is all columns in that one
table.
The DISTINCT keyword causes a subset of result rows to be returned, in which each result row is different. NULL
values are not treated as distinct from each other. The default behavior is that all result rows are returned, which can
be made explicit with the keyword ALL.
The query is executed against one or more tables specified after the FROM keyword. If multiple table names are
separated by commas, then the query uses the cross join of the various tables. The JOIN syntax can also be used to
specify how tables are joined. The only type of outer join that is supported is LEFT OUTER JOIN. The ON clause
expression in join-args must resolve to a boolean value. A subquery in parentheses may be used as a table in the FROM
clause. The entire FROM clause may be omitted, in which case the result is a single row consisting of the values of the
result expression list.
The WHERE clause is used to limit the number of rows the query retrieves. WHERE clause expressions must resolve
to a boolean value. WHERE clause filtering is performed before any grouping, so WHERE clause expressions may not
include aggregate functions.
The GROUP BY clause causes one or more rows of the result to be combined into a single row of output. A GROUP
BY clause is especially useful when the result contains aggregate functions. The expressions in the GROUP BY clause
do not have to be expressions that appear in the SELECT expression list.
The HAVING clause is like WHERE in that it limits the rows returned by the statement. However, the HAVING clause
applies after any grouping specified by a GROUP BY clause has occurred. Consequently, the HAVING expression may
refer to values that include aggregate functions. A HAVING clause expression is not required to appear in the SELECT
list. Like a WHERE expression, a HAVING expression must resolve to a boolean value.
The ORDER BY clause causes the output rows to be sorted. The sort-expr-list argument to the ORDER BY clause is a
list of expressions that are used as the key for the sort. The expressions do not have to be part of the result for a simple
SELECT, but in a compound SELECT (a SELECT using one of the compound-op operators) each sort expression must
exactly match one of the result columns. Each sort expression may be optionally followed by a sort-order clause
consisting of the COLLATE keyword and the name of a collation function used for ordering text and/or the keyword
ASC or DESC to specify the sort order (ascending or descending). The sort-order can be omitted and the default
(ascending order) is used. For a definition of the COLLATE clause and collation functions, see COLLATE.

1071
ACTIONSCRIPT 3.0 DEVELOPER’S GUIDE
SQL support in local databases
Last updated 3/21/2011
The LIMIT clause places an upper bound on the number of rows returned in the result. A negative LIMIT indicates
no upper bound. The optional OFFSET following LIMIT specifies how many rows to skip at the beginning of the result
set. In a compound SELECT query, the LIMIT clause may only appear after the final SELECT statement, and the limit
is applied to the entire query. Note that if the OFFSET keyword is used in the LIMIT clause, then the limit is the first
integer and the offset is the second integer. If a comma is used instead of the OFFSET keyword, then the offset is the
first number and the limit is the second number. This seeming contradiction is intentional — it maximizes
compatibility with legacy SQL database systems.
A compound SELECT is formed from two or more simple SELECT statements connected by one of the operators
UNION, UNION ALL, INTERSECT, or EXCEPT. In a compound SELECT, all the constituent SELECT statements
must specify the same number of result columns. There can only be a single ORDER BY clause after the final SELECT
statement (and before the single LIMIT clause, if one is specified). The UNION and UNION ALL operators combine
the results of the preceding and following SELECT statements into a single table. The difference is that in UNION, all
result rows are distinct, but in UNION ALL, there may be duplicates. The INTERSECT operator takes the intersection
of the results of the preceding and following SELECT statements. EXCEPT takes the result of preceding SELECT after
removing the results of the following SELECT. When three or more SELECT statements are connected into a
compound, they group from first to last.
For a definition of permitted expressions, see Expressions.
Starting with AIR 2.5, the SQL CAST operator is supported when reading to convert BLOB data to ActionScript
ByteArray objects. For example, the following code reads raw data that is not stored in the AMF format and stores it
in a ByteArray object:
stmt.text = "SELECT CAST(data AS ByteArray) AS data FROM pictures;";
stmt.execute();
var result:SQLResult = stmt.getResult();
var bytes:ByteArray = result.data[0].data;
INSERT
The INSERT statement comes in two basic forms and is used to populate tables with data.
sql-statement ::= INSERT [OR conflict-algorithm] INTO [database-name.] table-name [(column-
list)] VALUES (value-list) |
INSERT [OR conflict-algorithm] INTO [database-name.] table-name [(column-
list)] select-statement
REPLACE INTO [database-name.] table-name [(column-list)] VALUES (value-list) |
REPLACE INTO [database-name.] table-name [(column-list)] select-statement
The first form (with the VALUES keyword) creates a single new row in an existing table. If no column-list is specified
then the number of values must be the same as the number of columns in the table. If a column-list is specified, then
the number of values must match the number of specified columns. Columns of the table that do not appear in the
column list are filled with the default value defined when the table is created, or with NULL if no default value is
defined.
The second form of the INSERT statement takes its data from a SELECT statement. The number of columns in the
result of the SELECT must exactly match the number of columns in the table if column-list is not specified, or it must
match the number of columns named in the column-list. A new entry is made in the table for every row of the SELECT
result. The SELECT may be simple or compound. For a definition of allowable SELECT statements, see SELECT.
The optional conflict-algorithm allows the specification of an alternative constraint conflict resolution algorithm to
use during this one command. For an explanation and definition of conflict algorithms, see “Special statements and
clauses” on page 1078.

1072
ACTIONSCRIPT 3.0 DEVELOPER’S GUIDE
SQL support in local databases
Last updated 3/21/2011
The two REPLACE INTO forms of the statement are equivalent to using the standard INSERT [OR conflict-
algorithm] form with the REPLACE conflict algorithm (i.e. the INSERT OR REPLACE... form).
The two REPLACE INTO forms of the statement are equivalent to using the standard INSERT [OR conflict-
algorithm] form with the REPLACE conflict algorithm (i.e. the INSERT OR REPLACE... form).
UPDATE
The update command changes the existing records in a table.
sql-statement ::= UPDATE [database-name.] table-name SET column1=value1, column2=value2,...
[WHERE expr]
The command consists of the UPDATE keyword followed by the name of the table in which you want to update the
records. After the SET keyword, provide the name of the column and the value to which the column to be changed as
a comma-separated list. The WHERE clause expression provides the row or rows in which the records are updated.
DELETE
The delete command is used to remove records from a table.
sql-statement ::= DELETE FROM [database-name.] table-name [WHERE expr]
The command consists of the DELETE FROM keywords followed by the name of the table from which records are to
be removed.
Without a WHERE clause, all rows of the table are removed. If a WHERE clause is supplied, then only those rows that
match the expression are removed. The WHERE clause expression must resolve to a boolean value. For a definition of
permitted expressions, see Expressions.
Data definition statements
Data definition statements are used to create, modify, and remove database objects such as tables, views, indices, and
triggers. The following data definition statements are supported:
•Tables:
•CREATE TABLE
•ALTER TABLE
•DROP TABLE
•Indices:
•CREATE INDEX
•DROP INDEX
•Views:
•CREATE VIEWS
•DROP VIEWS
•Triggers:
•CREATE TRIGGERS
•DROP TRIGGERS

1073
ACTIONSCRIPT 3.0 DEVELOPER’S GUIDE
SQL support in local databases
Last updated 3/21/2011
CREATE TABLE
A CREATE TABLE statement consists of the keywords CREATE TABLE followed by the name of the new table, then
(in parentheses) a list of column definitions and constraints. The table name can be either an identifier or a string.
sql-statement ::= CREATE [TEMP | TEMPORARY] TABLE [IF NOT EXISTS] [database-name.] table-
name
( column-def [, column-def]* [, constraint]* )
sql-statement ::= CREATE [TEMP | TEMPORARY] TABLE [database-name.] table-name AS select-
statement
column-def ::= name [type] [[CONSTRAINT name] column-constraint]*
type ::= typename | typename ( number ) | typename ( number , number )
column-constraint ::= NOT NULL [ conflict-clause ] |
PRIMARY KEY [sort-order] [ conflict-clause ] [AUTOINCREMENT] |
UNIQUE [conflict-clause] |
CHECK ( expr ) |
DEFAULT default-value |
COLLATE collation-name
constraint ::= PRIMARY KEY ( column-list ) [conflict-clause] |
UNIQUE ( column-list ) [conflict-clause] |
CHECK ( expr )
conflict-clause ::= ON CONFLICT conflict-algorithm
conflict-algorithm ::= ROLLBACK | ABORT | FAIL | IGNORE | REPLACE
default-value ::= NULL | string | number | CURRENT_TIME | CURRENT_DATE | CURRENT_TIMESTAMP
sort-order ::= ASC | DESC
collation-name ::= BINARY | NOCASE
column-list ::= column-name [, column-name]*
Each column definition is the name of the column followed by the data type for that column, then one or more optional
column constraints. The data type for the column restricts what data may be stored in that column. If an attempt is
made to store a value in a column with a different data type, the runtime converts the value to the appropriate type if
possible, or raises an error. See the Data type support section for additional information.
The NOT NULL column constraint indicates that the column cannot contain NULL values.
A UNIQUE constraint causes an index to be created on the specified column or columns. This index must contain
unique keys—no two rows may contain duplicate values or combinations of values for the specified column or
columns. A CREATE TABLE statement can have multiple UNIQUE constraints, including multiple columns with a
UNIQUE constraint in the column's definition and/or multiple table-level UNIQUE constraints.
A CHECK constraint defines an expression that is evaluated and must be true in order for a row's data to be inserted
or updated. The CHECK expression must resolve to a boolean value.
A COLLATE clause in a column definition specifies what text collation function to use when comparing text entries
for the column. The BINARY collating function is used by default. For details on the COLLATE clause and collation
functions, see COLLATE.
The DEFAULT constraint specifies a default value to use when doing an INSERT. The value may be NULL, a string
constant, or a number. The default value may also be one of the special case-independent keywords CURRENT_TIME,
CURRENT_DATE or CURRENT_TIMESTAMP. If the value is NULL, a string constant, or a number, it is literally
inserted into the column whenever an INSERT statement does not specify a value for the column. If the value is
CURRENT_TIME, CURRENT_DATE or CURRENT_TIMESTAMP, then the current UTC date and/or time is
inserted into the column. For CURRENT_TIME, the format is HH:MM:SS. For CURRENT_DATE, the format is
YYYY-MM-DD. The format for CURRENT_TIMESTAMP is YYYY-MM-DD HH:MM:SS.

1074
ACTIONSCRIPT 3.0 DEVELOPER’S GUIDE
SQL support in local databases
Last updated 3/21/2011
Specifying a PRIMARY KEY normally just creates a UNIQUE index on the corresponding column or columns.
However, if the PRIMARY KEY constraint is on a single column that has the data type INTEGER (or one of its
synonyms such as int) then that column is used by the database as the actual primary key for the table. This means that
the column may only hold unique integer values. (Note that in many SQLite implementations, only the column type
INTEGER causes the column to serve as the internal primary key, but in Adobe AIR synonyms for INTEGER such as
int also specify that behavior.)
If a table does not have an INTEGER PRIMARY KEY column, an integer key is automatically generated when a row
is inserted. The primary key for a row can always be accessed using one of the special names ROWID, OID, or
_ROWID_. These names can be used regardless of whether it is an explicitly declared INTEGER PRIMARY KEY or
an internal generated value. However, if the table has an explicit INTEGER PRIMARY KEY, the name of the column
in the result data is the actual column name rather than the special name.
An INTEGER PRIMARY KEY column can also include the keyword AUTOINCREMENT. When the
AUTOINCREMENT keyword is used, the database automatically generates and inserts a sequentially incremented
integer key in the INTEGER PRIMARY KEY column when it executes an INSERT statement that doesn't specify an
explicit value for the column.
There can only be one PRIMARY KEY constraint in a CREATE TABLE statement. It can either be part of one column's
definition or one single table-level PRIMARY KEY constraint. A primary key column is implicitly NOT NULL.
The optional conflict-clause following many constraints allows the specification of an alternative default constraint
conflict resolution algorithm for that constraint. The default is ABORT. Different constraints within the same table
may have different default conflict resolution algorithms. If an INSERT or UPDATE statement specifies a different
conflict resolution algorithm, that algorithm is used in place of the algorithm specified in the CREATE TABLE
statement. See the ON CONFLICT section of “Special statements and clauses” on page 1078 for additional
information.
Additional constraints, such as FOREIGN KEY constraints, do not result in an error but the runtime ignores them.
If the TEMP or TEMPORARY keyword occurs between CREATE and TABLE then the table that is created is only
visible within the same database connection (SQLConnection instance). It is automatically deleted when the database
connection is closed. Any indices created on a temporary table are also temporary. Temporary tables and indices are
stored in a separate file distinct from the main database file.
If the optional database-name prefix is specified, then the table is created in a named database (a database that was
connected to the SQLConnection instance by calling the attach() method with the specified database name). It is an
error to specify both a database-name prefix and the TEMP keyword, unless the database-name prefix is temp. If no
database name is specified, and the TEMP keyword is not present, the table is created in the main database (the
database that was connected to the SQLConnection instance using the open() or openAsync()method).
There are no arbitrary limits on the number of columns or on the number of constraints in a table. There is also no
arbitrary limit on the amount of data in a row.
The CREATE TABLE AS form defines the table as the result set of a query. The names of the table columns are the
names of the columns in the result.
If the optional IF NOT EXISTS clause is present and another table with the same name already exists, then the database
ignores the CREATE TABLE command.
A table can be removed using the DROP TABLE statement, and limited changes can be made using the ALTER TABLE
statement.

1075
ACTIONSCRIPT 3.0 DEVELOPER’S GUIDE
SQL support in local databases
Last updated 3/21/2011
ALTER TABLE
The ALTER TABLE command allows the user to rename or add a new column to an existing table. It is not possible
to remove a column from a table.
sql-statement ::= ALTER TABLE [database-name.] table-name alteration
alteration ::= RENAME TO new-table-name
alteration ::= ADD [COLUMN] column-def
The RENAME TO syntax is used to rename the table identified by [database-name.] table-name to new-table-name.
This command cannot be used to move a table between attached databases, only to rename a table within the same
database.
If the table being renamed has triggers or indices, then they remain attached to the table after it has been renamed.
However, if there are any view definitions or statements executed by triggers that refer to the table being renamed, they
are not automatically modified to use the new table name. If a renamed table has associated views or triggers, you must
manually drop and recreate the triggers or view definitions using the new table name.
The ADD [COLUMN] syntax is used to add a new column to an existing table. The new column is always appended
to the end of the list of existing columns. The column-def clause may take any of the forms permissible in a CREATE
TABLE statement, with the following restrictions:
•The column may not have a PRIMARY KEY or UNIQUE constraint.
•The column may not have a default value of CURRENT_TIME, CURRENT_DATE or CURRENT_TIMESTAMP.
•If a NOT NULL constraint is specified, the column must have a default value other than NULL.
The execution time of the ALTER TABLE statement is not affected by the amount of data in the table.
DROP TABLE
The DROP TABLE statement removes a table added with a CREATE TABLE statement. The table with the specified
table-name is the table that's dropped. It is completely removed from the database and the disk file. The table cannot
be recovered. All indices associated with the table are also deleted.
sql-statement ::= DROP TABLE [IF EXISTS] [database-name.] table-name
By default the DROP TABLE statement does not reduce the size of the database file. Empty space in the database is
retained and used in subsequent INSERT operations. To remove free space in the database use the
SQLConnection.clean() method. If the autoClean parameter is set to true when the database is initially created, the
space is freed automatically.
The optional IF EXISTS clause suppresses the error that would normally result if the table does not exist.
CREATE INDEX
The CREATE INDEX command consists of the keywords CREATE INDEX followed by the name of the new index,
the keyword ON, the name of a previously created table that is to be indexed, and a parenthesized list of names of
columns in the table whose values are used for the index key.
sql-statement ::= CREATE [UNIQUE] INDEX [IF NOT EXISTS] [database-name.] index-name
ON table-name ( column-name [, column-name]* )
column-name ::= name [COLLATE collation-name] [ASC | DESC]
Each column name can be followed by ASC or DESC keywords to indicate sort order, but the sort order designation
is ignored by the runtime. Sorting is always done in ascending order.

1076
ACTIONSCRIPT 3.0 DEVELOPER’S GUIDE
SQL support in local databases
Last updated 3/21/2011
The COLLATE clause following each column name defines a collating sequence used for text values in that column.
The default collation sequence is the collation sequence defined for that column in the CREATE TABLE statement. If
no collation sequence is specified, the BINARY collation sequence is used. For a definition of the COLLATE clause
and collation functions see COLLATE.
There are no arbitrary limits on the number of indices that can be attached to a single table. There are also no limits
on the number of columns in an index.
DROP INDEX
The drop index statement removes an index added with the CREATE INDEX statement. The specified index is
completely removed from the database file. The only way to recover the index is to reenter the appropriate CREATE
INDEX command.
sql-statement ::= DROP INDEX [IF EXISTS] [database-name.] index-name
By default the DROP INDEX statement does not reduce the size of the database file. Empty space in the database is
retained and used in subsequent INSERT operations. To remove free space in the database use the
SQLConnection.clean() method. If the autoClean parameter is set to true when the database is initially created, the
space is freed automatically.
CREATE VIEW
The CREATE VIEW command assigns a name to a pre-defined SELECT statement. This new name can then be used
in a FROM clause of another SELECT statement in place of a table name. Views are commonly used to simplify queries
by combining a complex (and frequently used) set of data into a structure that can be used in other operations.
sql-statement ::= CREATE [TEMP | TEMPORARY] VIEW [IF NOT EXISTS] [database-name.] view-name AS
select-statement
If the TEMP or TEMPORARY keyword occurs in between CREATE and VIEW then the view that is created is only
visible to the SQLConnection instance that opened the database and is automatically deleted when the database is
closed.
If a [database-name] is specified the view is created in the named database (a database that was connected to the
SQLConnection instance using the attach() method, with the specified name argument. It is an error to specify both a
[database-name] and the TEMP keyword unless the [database-name] is temp. If no database name is specified, and the
TEMP keyword is not present, the view is created in the main database (the database that was connected to the
SQLConnection instance using the open() or openAsync() method).
Views are read only. A DELETE, INSERT, or UPDATE statement cannot be used on a view, unless at least one trigger
of the associated type (INSTEAD OF DELETE, INSTEAD OF INSERT, INSTEAD OF UPDATE) is defined. For
information on creating a trigger for a view, see CREATE TRIGGER.
A view is removed from a database using the DROP VIEW statement.
DROP VIEW
The DROP VIEW statement removes a view created by a CREATE VIEW statement.
sql-statement ::= DROP VIEW [IF EXISTS] view-name
The specified view-name is the name of the view to drop. It is removed from the database, but no data in the underlying
tables is modified.
CREATE TRIGGER
The create trigger statement is used to add triggers to the database schema. A trigger is a database operation (the
trigger-action) that is automatically performed when a specified database event (the database-event) occurs.

1077
ACTIONSCRIPT 3.0 DEVELOPER’S GUIDE
SQL support in local databases
Last updated 3/21/2011
sql-statement ::= CREATE [TEMP | TEMPORARY] TRIGGER [IF NOT EXISTS] [database-name.] trigger-
name
[BEFORE | AFTER] database-event
ON table-name
trigger-action
sql-statement ::= CREATE [TEMP | TEMPORARY] TRIGGER [IF NOT EXISTS] [database-name.] trigger-
name
INSTEAD OF database-event
ON view-name
trigger-action
database-event ::= DELETE |
INSERT |
UPDATE |
UPDATE OF column-list
trigger-action ::= [FOR EACH ROW] [WHEN expr]
BEGIN
trigger-step ;
[ trigger-step ; ]*
END
trigger-step ::= update-statement |
insert-statement |
delete-statement |
select-statement
column-list ::= column-name [, column-name]*
A trigger is specified to fire whenever a DELETE, INSERT, or UPDATE of a particular database table occurs, or
whenever an UPDATE of one or more specified columns of a table are updated. Triggers are permanent unless the
TEMP or TEMPORARY keyword is used. In that case the trigger is removed when the SQLConnection instance's main
database connection is closed. If no timing is specified (BEFORE or AFTER) the trigger defaults to BEFORE.
Only FOR EACH ROW triggers are supported, so the FOR EACH ROW text is optional. With a FOR EACH ROW
trigger, the trigger-step statements are executed for each database row being inserted, updated or deleted by the
statement causing the trigger to fire, if the WHEN clause expression evaluates to true.
If a WHEN clause is supplied, the SQL statements specified as trigger-steps are only executed for rows for which the
WHEN clause is true. If no WHEN clause is supplied, the SQL statements are executed for all rows.
Within the body of a trigger, (the trigger-action clause) the pre-change and post-change values of the affected table are
available using the special table names OLD and NEW. The structure of the OLD and NEW tables matches the
structure of the table on which the trigger is created. The OLD table contains any rows that are modified or deleted by
the triggering statement, in their state before the triggering statement's operations. The NEW table contains any rows
that are modified or created by the triggering statement, in their state after the triggering statement's operations. Both
the WHEN clause and the trigger-step statements can access values from the row being inserted, deleted or updated
using references of the form NEW.column-name and OLD.column-name, where column-name is the name of a
column from the table with which the trigger is associated. The availability of the OLD and NEW table references
depends on the type of database-event the trigger handles:
•INSERT – NEW references are valid
•UPDATE – NEW and OLD references are valid
•DELETE – OLD references are valid
The specified timing (BEFORE, AFTER, or INSTEAD OF) determines when the trigger-step statements are executed
relative to the insertion, modification or removal of the associated row. An ON CONFLICT clause may be specified as
part of an UPDATE or INSERT statement in a trigger-step. However, if an ON CONFLICT clause is specified as part
of the statement causing the trigger to fire, then that conflict handling policy is used instead.

1078
ACTIONSCRIPT 3.0 DEVELOPER’S GUIDE
SQL support in local databases
Last updated 3/21/2011
In addition to table triggers, an INSTEAD OF trigger can be created on a view. If one or more INSTEAD OF INSERT,
INSTEAD OF DELETE, or INSTEAD OF UPDATE triggers are defined on a view, it is not considered an error to
execute the associated type of statement (INSERT, DELETE, or UPDATE) on the view. In that case, executing an
INSERT, DELETE or UPDATE on the view causes the associated triggers to fire. Because the trigger is an INSTEAD
OF trigger, the tables underlying the view are not modified by the statement that causes the trigger to fire. However,
the triggers can be used to perform modifying operations on the underlying tables.
There is an important issue to keep in mind when creating a trigger on a table with an INTEGER PRIMARY KEY
column. If a BEFORE trigger modifies the INTEGER PRIMARY KEY column of a row that is to be updated by the
statement that causes the trigger to fire, the update doesn't occur. A workaround is to create the table with a PRIMARY
KEY column instead of an INTEGER PRIMARY KEY column.
A trigger can be removed using the DROP TRIGGER statement. When a table or view is dropped, all triggers
associated with that table or view are automatically dropped as well.
RAISE () function
A special SQL function RAISE() can be used in a trigger-step statement of a trigger. This function has the following
syntax:
raise-function ::= RAISE ( ABORT, error-message ) |
RAISE ( FAIL, error-message ) |
RAISE ( ROLLBACK, error-message ) |
RAISE ( IGNORE )
When one of the first three forms is called during trigger execution, the specified ON CONFLICT processing action
(ABORT, FAIL, or ROLLBACK) is performed and the current statement's execution ends. The ROLLBACK is
considered a statement execution failure, so the SQLStatement instance whose execute() method was being carried out
dispatches an error (SQLErrorEvent.ERROR) event. The SQLError object in the dispatched event object's error
property has its details property set to the error-message specified in the RAISE() function.
When RAISE(IGNORE) is called, the remainder of the current trigger, the statement that caused the trigger to execute,
and any subsequent triggers that would have been executed are abandoned. No database changes are rolled back. If the
statement that caused the trigger to execute is itself part of a trigger, that trigger program resumes execution at the
beginning of the next step. For more information about the conflict resolution algorithms, see the section ON
CONFLICT (conflict algorithms).
DROP TRIGGER
The DROP TRIGGER statement removes a trigger created by the CREATE TRIGGER statement.
sql-statement ::= DROP TRIGGER [IF EXISTS] [database-name.] trigger-name
The trigger is deleted from the database. Note that triggers are automatically dropped when their associated table is
dropped.
Special statements and clauses
This section describes several clauses that are extensions to SQL provided by the runtime, as well as two language
elements that can be used in many statements, comments and expressions.
COLLATE
The COLLATE clause is used in SELECT, CREATE TABLE, and CREATE INDEX statements to specify the
comparison algorithm that is used when comparing or sorting values.

1079
ACTIONSCRIPT 3.0 DEVELOPER’S GUIDE
SQL support in local databases
Last updated 3/21/2011
sql-statement ::= COLLATE collation-name
collation-name ::= BINARY | NOCASE
The default collation type for columns is BINARY. When BINARY collation is used with values of the TEXT storage
class, binary collation is performed by comparing the bytes in memory that represent the value regardless of the text
encoding.
The NOCASE collation sequence is only applied for values of the TEXT storage class. When used, the NOCASE
collation performs a case-insensitive comparison.
No collation sequence is used for storage classes of type NULL, BLOB, INTEGER, or REAL.
To use a collation type other than BINARY with a column, a COLLATE clause must be specified as part of the column
definition in the CREATE TABLE statement. Whenever two TEXT values are compared, a collation sequence is used
to determine the results of the comparison according to the following rules:
•For binary comparison operators, if either operand is a column, then the default collation type of the column
determines the collation sequence that is used for the comparison. If both operands are columns, then the collation
type for the left operand determines the collation sequence used. If neither operand is a column, then the BINARY
collation sequence is used.
•The BETWEEN...AND operator is equivalent to using two expressions with the >= and <= operators. For example,
the expression x BETWEEN y AND z is equivalent to x >= y AND x <= z. Consequently, the BETWEEN...AND
operator follows the preceding rule to determine the collation sequence.
•The IN operator behaves like the =operator for the purposes of determining the collation sequence to use. For
example, the collation sequence used for the expressionx IN (y, z) is the default collation type of x if x is a column.
Otherwise, BINARY collation is used.
•An ORDER BY clause that is part of a SELECT statement may be explicitly assigned a collation sequence to be used
for the sort operation. In that case the explicit collation sequence is always used. Otherwise, if the expression sorted
by an ORDER BYclause is a column, the default collation type of the column is used to determine sort order. If the
expression is not a column, the BINARY collation sequence is used.
EXPLAIN
The EXPLAIN command modifier is a non-standard extension to SQL.
sql-statement ::= EXPLAIN sql-statement
If the EXPLAIN keyword appears before any other SQL statement, then instead of actually executing the command,
the result reports the sequence of virtual machine instructions it would have used to execute the command, had the
EXPLAIN keyword not been present. The EXPLAIN feature is an advanced feature and allows developers to change
SQL statement text in an attempt to optimize performance or debug a statement that doesn't appear to be working
properly.
ON CONFLICT (conflict algorithms)
The ON CONFLICT clause is not a separate SQL command. It is a non-standard clause that can appear in many other
SQL commands.
conflict-clause ::= ON CONFLICT conflict-algorithm
conflict-clause ::= OR conflict-algorithm
conflict-algorithm ::= ROLLBACK |
ABORT |
FAIL |
IGNORE |
REPLACE

1080
ACTIONSCRIPT 3.0 DEVELOPER’S GUIDE
SQL support in local databases
Last updated 3/21/2011
The first form of the ON CONFLICT clause, using the keywords ON CONFLICT, is used in a CREATE TABLE
statement. For an INSERT or UPDATE statement, the second form is used, with ON CONFLICT replaced by OR to
make the syntax seem more natural. For example, instead of INSERT ON CONFLICT IGNORE, the statement becomes
INSERT OR IGNORE. Although the keywords are different, the meaning of the clause is the same in either form.
The ON CONFLICT clause specifies the algorithm that is used to resolve constraint conflicts. The five algorithms are
ROLLBACK, ABORT, FAIL, IGNORE, and REPLACE. The default algorithm is ABORT. The following is an
explanation of the five conflict algorithms:
ROLLBACK When a constraint violation occurs, an immediate ROLLBACK occurs, ending the current transaction.
The command aborts and the SQLStatement instance dispatches an error event. If no transaction is active (other than
the implied transaction that is created on every command) then this algorithm works the same as ABORT.
ABORT When a constraint violation occurs, the command backs out any prior changes it might have made and the
SQLStatement instance dispatches an error event. No ROLLBACK is executed, so changes from prior commands
within a transaction are preserved. ABORT is the default behavior.
FAIL When a constraint violation occurs, the command aborts and the SQLStatement dispatches an error event.
However, any changes to the database that the statement made before encountering the constraint violation are
preserved and are not backed out. For example, if an UPDATE statement encounters a constraint violation on the
100th row that it attempts to update, then the first 99 row changes are preserved but changes to rows 100 and beyond
don’t occur.
IGNORE When a constraint violation occurs, the one row that contains the constraint violation is not inserted or
changed. Aside from this row being ignored, the command continues executing normally. Other rows before and after
the row that contained the constraint violation continue to be inserted or updated normally. No error is returned.
REPLACE When a UNIQUE constraint violation occurs, the pre-existing rows that are causing the constraint violation
are removed before inserting or updating the current row. Consequently, the insert or update always occurs, and the
command continues executing normally. No error is returned. If a NOT NULL constraint violation occurs, the NULL
value is replaced by the default value for that column. If the column has no default value, then the ABORT algorithm
is used. If a CHECK constraint violation occurs then the IGNORE algorithm is used. When this conflict resolution
strategy deletes rows in order to satisfy a constraint, it does not invoke delete triggers on those rows.
The algorithm specified in the OR clause of an INSERT or UPDATE statement overrides any algorithm specified in a
CREATE TABLE statement. If no algorithm is specified in the CREATE TABLE statement or the executing INSERT
or UPDATE statement, the ABORT algorithm is used.
REINDEX
The REINDEX command is used to delete and re-create one or more indices. This command is useful when the
definition of a collation sequence has changed.
sql-statement ::= REINDEX collation-name
sql-statement ::= REINDEX [database-name .] ( table-name | index-name )
In the first form, all indices in all attached databases that use the named collation sequence are recreated. In the second
form, when a table-name is specified, all indices associated with the table are rebuilt. If an index-name is given, only
the specified index is deleted and recreated.
COMMENTS
Comments aren't SQL commands, but they can occur in SQL queries. They are treated as white space by the runtime.
They can begin anywhere white space can be found, including inside expressions that span multiple lines.

1081
ACTIONSCRIPT 3.0 DEVELOPER’S GUIDE
SQL support in local databases
Last updated 3/21/2011
comment ::= single-line-comment |
block-comment
single-line-comment ::= -- single-line
block-comment ::= /* multiple-lines or block [*/]
A single-line comment is indicated by two dashes. A single line comment only extends to the end of the current line.
Block comments can span any number of lines, or be embedded within a single line. If there is no terminating
delimiter, a block comment extends to the end of the input. This situation is not treated as an error. A new SQL
statement can begin on a line after a block comment ends. Block comments can be embedded anywhere white space
can occur, including inside expressions, and in the middle of other SQL statements. Block comments do not nest.
Single-line comments inside a block comment are ignored.
EXPRESSIONS
Expressions are subcommands within other SQL blocks. The following describes the valid syntax for an expression
within a SQL statement:
expr ::= expr binary-op expr |
expr [NOT] like-op expr [ESCAPE expr] |
unary-op expr |
( expr ) |
column-name |
table-name.column-name |
database-name.table-name.column-name |
literal-value |
parameter |
function-name( expr-list | * ) |
expr ISNULL |
expr NOTNULL |
expr [NOT] BETWEEN expr AND expr |
expr [NOT] IN ( value-list ) |
expr [NOT] IN ( select-statement ) |
expr [NOT] IN [database-name.] table-name |
[EXISTS] ( select-statement ) |
CASE [expr] ( WHEN expr THEN expr )+ [ELSE expr] END |
CAST ( expr AS type ) |
expr COLLATE collation-name
like-op ::= LIKE | GLOB
binary-op ::= see Operators
unary-op ::= see Operators
parameter ::= :param-name | @param-name | ?
value-list ::= literal-value [, literal-value]*
literal-value ::= literal-string | literal-number | literal-boolean | literal-blob |
literal-null
literal-string ::= 'string value'
literal-number ::= integer | number
literal-boolean ::= true | false
literal-blob ::= X'string of hexadecimal data'
literal-null ::= NULL
An expression is any combination of values and operators that can be resolved to a single value. Expressions can be
divided into two general types, according to whether they resolve to a boolean (true or false) value or whether they
resolve to a non-boolean value.

1082
ACTIONSCRIPT 3.0 DEVELOPER’S GUIDE
SQL support in local databases
Last updated 3/21/2011
In several common situations, including in a WHERE clause, a HAVING clause, the ON expression in a JOIN clause,
and a CHECK expression, the expression must resolve to a boolean value. The following types of expressions meet this
condition:
•ISNULL
•NOTNULL
•IN ()
•EXISTS ()
•LIKE
•GLOB
•Certain functions
•Certain operators (specifically comparison operators)
Literal values
A literal numeric value is written as an integer number or a floating point number. Scientific notation is supported.
The . (period) character is always used as the decimal point.
A string literal is indicated by enclosing the string in single quotes '. To include a single quote within a string, put two
single quotes in a row like this example: ''.
A boolean literal is indicated by the value true or false. Literal boolean values are used with the Boolean column data type.
A BLOB literal is a string literal containing hexadecimal data and proceeded by a single x or X character, such as
X'53514697465'.
A literal value can also be the token NULL.
Column name
A column name can be any of the names defined in the CREATE TABLE statement or one of the following special
identifiers: ROWID, OID, or _ROWID_. These special identifiers all describe the unique random integer key (the "row
key") associated with every row of every table. The special identifiers only refer to the row key if the CREATE TABLE
statement does not define a real column with the same name. Row keys behave as read-only columns. A row key can
be used anywhere a regular column can be used, except that you cannot change the value of a row key in an UPDATE
or INSERT statement. The SELECT * FROM table statement does not include the row key in its result set.
SELECT statement
A SELECT statement can appear in an expression as either the right-hand operand of the IN operator, as a scalar
quantity (a single result value), or as the operand of an EXISTS operator. When used as a scalar quantity or the operand
of an IN operator, the SELECT can only have a single column in its result. A compound SELECT statement (connected
with keywords like UNION or EXCEPT) is allowed. With the EXISTS operator, the columns in the result set of the
SELECT are ignored and the expression returns TRUE if one or more rows exist and FALSE if the result set is empty.
If no terms in the SELECT expression refer to the value in the containing query, then the expression is evaluated once
before any other processing and the result is reused as necessary. If the SELECT expression does contain variables from
the outer query, known as a correlated subquery, then the SELECT is re-evaluated every time it is needed.
When a SELECT is the right operand of the IN operator, the IN operator returns TRUE if the result of the left operand
is equal to any of the values in the SELECT statement's result set. The IN operator may be preceded by the NOT
keyword to invert the sense of the test.

1083
ACTIONSCRIPT 3.0 DEVELOPER’S GUIDE
SQL support in local databases
Last updated 3/21/2011
When a SELECT appears within an expression but is not the right operand of an IN operator, then the first row of the
result of the SELECT becomes the value used in the expression. If the SELECT yields more than one result row, all rows
after the first are ignored. If the SELECT yields no rows, then the value of the SELECT is NULL.
CAST expression
A CAST expression changes the data type of the value specified to the one given. The type specified can be any non-
empty type name that is valid for the type in a column definition of a CREATE TABLE statement. See Data type
support for details.
Additional expression elements
The following SQL elements can also be used in expressions:
•Built-in functions: Aggregate functions, Scalar functions, and Date and time formatting functions
•Operators
•Parameters
Built-in functions
The built-in functions fall into three main categories:
•Aggregate functions
•Scalar functions
•Date and time functions
In addition to these functions, there is a special function RAISE() that is used to provide notification of an error in the
execution of a trigger. This function can only be used within the body of a CREATE TRIGGER statement. For
information on the RAISE() function, see CREATE TRIGGER > RAISE().
Like all keywords in SQL, function names are not case sensitive.
Aggregate functions
Aggregate functions perform operations on values from multiple rows. These functions are primarily used in SELECT
statements in conjunction with the GROUP BY clause.
In any of the preceding aggregate functions that take a single argument, that argument can be preceded by the keyword
DISTINCT. In that case, duplicate elements are filtered before being passed into the aggregate function. For example,
the function call COUNT(DISTINCT x) returns the number of distinct values of column X instead of the total number
of non-NULL values in column x.
AVG(X) Returns the average value of all non-NULL X within a group. String and BLOB values that do not
look like numbers are interpreted as 0. The result of AVG() is always a floating point value even
if all inputs are integers.
COUNT(X)
COUNT(*)
The first form returns a count of the number of times that X is not NULL in a group. The second
form (with the * argument) returns the total number of rows in the group.
MAX(X) Returns the maximum value of all values in the group. The usual sort order is used to determine
the maximum.
MIN(X) Returns the minimum non-NULL value of all values in the group. The usual sort order is used
to determine the minimum. If all values in the group are NULL, NULL is returned.
SUM(X)
TOTAL(X)
Returns the numeric sum of all non-NULL values in the group. If all of the values are NULL then
SUM() returns NULL, and TOTAL() returns 0.0. The result of TOTAL() is always a floating point
value. The result of SUM() is an integer value if all non-NULL inputs are integers. If any input to
SUM() is not an integer and not NULL then SUM() returns a floating point value. This value
might be an approximation to the true sum.

1084
ACTIONSCRIPT 3.0 DEVELOPER’S GUIDE
SQL support in local databases
Last updated 3/21/2011
Scalar functions
Scalar functions operate on values one row at a time.
Date and time formatting functions
The date and time formatting functions are a group of scalar functions that are used to create formatted date and time
data. Note that these functions operate on and return string and number values. These functions are not intended to
be used with the DATE data type. If you use these functions on data in a column whose declared data type is DATE,
they do not behave as expected.
ABS(X) Returns the absolute value of argument X.
COALESCE(X, Y, ...) Returns a copy of the first non-NULL argument. If all arguments are NULL then NULL is
returned. There must be at least two arguments.
GLOB(X, Y) This function is used to implement the X GLOB Y syntax.
IFNULL(X, Y) Returns a copy of the first non-NULL argument. If both arguments are NULL then NULL is
returned. This function behaves the same as COALESCE().
HEX(X) The argument is interpreted as a value of the BLOB storage type. The result is a hexadecimal
rendering of the content of that value.
LAST_INSERT_ROWID(
)
Returns the row identifier (generated primary key) of the last row inserted to the database
through the current SQLConnection. This value is the same as the value returned by the
SQLConnection.lastInsertRowID property.
LENGTH(X) Returns the string length of X in characters.
LIKE(X, Y [, Z]) This function is used to implement the X LIKE Y [ESCAPE Z] syntax of SQL. If the optional
ESCAPE clause is present, then the function is invoked with three arguments. Otherwise, it is
invoked with two arguments only.
LOWER(X) Returns a copy of string X with all characters converted to lower case.
LTRIM(X) LTRIM(X, Y) Returns a string formed by removing spaces from the left side of X. If a Y argument is specified,
the function removes any of the characters in Y from the left side of X.
MAX(X, Y, ...) Returns the argument with the maximum value. Arguments may be strings in addition to
numbers. The maximum value is determined by the defined sort order. Note that MAX() is a
simple function when it has 2 or more arguments but is an aggregate function when it has a
single argument.
MIN(X, Y, ...) Returns the argument with the minimum value. Arguments may be strings in addition to
numbers. The minimum value is determined by the defined sort order. Note that MIN() is a
simple function when it has 2 or more arguments but is an aggregate function when it has a
single argument.
NULLIF(X, Y) Returns the first argument if the arguments are different, otherwise returns NULL.
QUOTE(X) This routine returns a string which is the value of its argument suitable for inclusion into
another SQL statement. Strings are surrounded by single-quotes with escapes on interior
quotes as needed. BLOB storage classes are encoded as hexadecimal literals. The function is
useful when writing triggers to implement undo/redo functionality.
RANDOM(*) Returns a pseudo-random integer between -9223372036854775808 and
9223372036854775807. This random value is not crypto-strong.
RANDOMBLOB(N) Returns an N-byte BLOB containing pseudo-random bytes. N should be a positive integer. This
random value is not crypto-strong. If the value of N is negative a single byte is returned.
ROUND(X) ROUND(X,
Y)
Rounds off the number X to Y digits to the right of the decimal point. If the Y argument is
omitted, 0 is used.
RTRIM(X) RTRIM(X, Y) Returns a string formed by removing spaces from the right side of X. If a Y argument is
specified, the function removes any of the characters in Y from the right side of X.
SUBSTR(X, Y, Z) Returns a substring of input string X that begins with the Y-th character and which is Z
characters long. The left-most character of X is index position 1. If Y is negative the first
character of the substring is found by counting from the right rather than the left.
TRIM(X) TRIM(X, Y) Returns a string formed by removing spaces from the right side of X. If a Y argument is
specified, the function removes any of the characters in Y from the right side of X.
TYPEOF(X) Returns the type of the expression X. The possible return values are 'null', 'integer', 'real', 'text',
and 'blob'. For more information on data types see Data type support.
UPPER(X) Returns a copy of input string X converted to all upper-case letters.
ZEROBLOB(N) Returns a BLOB containing N bytes of 0x00.

1085
ACTIONSCRIPT 3.0 DEVELOPER’S GUIDE
SQL support in local databases
Last updated 3/21/2011
Time formats
A time string can be in any of the following formats:
The character T in these formats is a literal character "T" separating the date and the time. Formats that only include
a time assume the date 2001-01-01.
DATE(T, ...) The DATE() function returns a string containing the date in this format: YYYY-MM-DD. The first
parameter (T) specifies a time string of the format found under Time formats. Any number of
modifiers can be specified after the time string. The modifiers can be found under Modifiers.
TIME(T, ...) The TIME() function returns a string containing the time as HH:MM:SS. The first parameter (T)
specifies a time string of the format found under Time formats. Any number of modifiers can
be specified after the time string. The modifiers can be found under Modifiers.
DATETIME(T, ...) The DATETIME() function returns a string containing the date and time in YYYY-MM-DD
HH:MM:SS format. The first parameter (T) specifies a time string of the format found under
Time formats. Any number of modifiers can be specified after the time string. The modifiers
can be found under Modifiers.
JULIANDAY(T, ...) The JULIANDAY() function returns a number indicating the number of days since noon in
Greenwich on November 24, 4714 B.C. and the provided date. The first parameter (T) specifies
a time string of the format found under Time formats. Any number of modifiers can be
specified after the time string. The modifiers can be found under Modifiers.
STRFTIME(F, T, ...) The STRFTIME() routine returns the date formatted according to the format string specified as
the first argument F. The format string supports the following substitutions:
%d - day of month
%f - fractional seconds SS.SSS
%H - hour 00-24
%j - day of year 001-366
%J - Julian day number
%m -month 01-12
%M - minute 00-59
%s - seconds since 1970-01-01
%S - seconds 00-59
%w - day of week 0-6 (sunday = 0)
%W - week of year 00-53
%Y - year 0000-9999
%% - %
The second parameter (T) specifies a time string of the format found under Time formats. Any
number of modifiers can be specified after the time string. The modifiers can be found under
Modifiers.
YYYY-MM-DD 2007-06-15
YYYY-MM-DD HH:MM 2007-06-15 07:30
YYYY-MM-DD HH:MM:SS 2007-06-15 07:30:59
YYYY-MM-DD HH:MM:SS.SSS 2007-06-15 07:30:59.152
YYYY-MM-DDTHH:MM 2007-06-15T07:30
YYYY-MM-DDTHH:MM:SS 2007-06-15T07:30:59
YYYY-MM-DDTHH:MM:SS.SSS 2007-06-15T07:30:59.152
HH:MM 07:30 (date is 2000-01-01)
HH:MM:SS 07:30:59 (date is 2000-01-01)
HH:MM:SS.SSS 07:30:59:152 (date is 2000-01-01)
now Current date and time in Universal Coordinated Time.
DDDD.DDDD Julian day number as a floating-point number.

1086
ACTIONSCRIPT 3.0 DEVELOPER’S GUIDE
SQL support in local databases
Last updated 3/21/2011
Modifiers
The time string can be followed by zero or more modifiers that alter the date or alter the interpretation of the date. The
available modifiers are as follows:
Operators
SQL supports a large selection of operators, including common operators that exist in most programming languages,
as well as several operators that are unique to SQL.
Common operators
The following binary operators are allowed in a SQL block and are listed in order from highest to lowest precedence:
* / %
+ -
<< >> & |
< >= > >=
= == != <> IN
AND
OR
Supported unary prefix operators are:
! ~ NOT
The COLLATE operator can be thought of as a unary postfix operator. The COLLATE operator has the highest
precedence. It always binds more tightly than any prefix unary operator or any binary operator.
Note that there are two variations of the equals and not equals operators. Equals can be either = or ==. The not-equals
operator can be either != or <>.
The || operator is the string concatenation operator—it joins together the two strings of its operands.
The operator % outputs the remainder of its left operand modulo its right operand.
The result of any binary operator is a numeric value, except for the || concatenation operator which gives a string result.
SQL operators
LIKE
The LIKE operator does a pattern matching comparison.
expr ::= (column-name | expr) LIKE pattern
pattern ::= '[ string | % | _ ]'
NNN days Number of days to add to the time.
NNN hours Number of hours to add to the time.
NNN minutes Number of minutes to add to the time.
NNN.NNNN seconds Number of seconds and milliseconds to add to the time.
NNN months Number of months to add to the time.
NNN years Number of years to add to the time.
start of month Shift time backwards to the start of the month.
start of year Shift time backwards to the start of the year.
start of day Shift time backwards to the start of the day.
weekday N Forwards the time to the specified weekday. (0 = Sunday, 1 =
Monday, and so forth).
localtime Converts the date to local time.
utc Converts the date to Universal Coordinated Time.

1087
ACTIONSCRIPT 3.0 DEVELOPER’S GUIDE
SQL support in local databases
Last updated 3/21/2011
The operand to the right of the LIKE operator contains the pattern, and the left-hand operand contains the string to
match against the pattern. A percent symbol (%) in the pattern is a wildcard character—it matches any sequence of
zero or more characters in the string. An underscore (_) in the pattern matches any single character in the string. Any
other character matches itself or its lower/upper case equivalent, that is, matches are performed in a case-insensitive
manner. (Note: the database engine only understands upper/lower case for 7-bit Latin characters. Consequently, the
LIKE operator is case sensitive for 8-bit iso8859 characters or UTF-8 characters. For example, the expression 'a' LIKE
'A' is TRUE but 'æ' LIKE 'Æ' is FALSE). Case sensitivity for Latin characters can be changed using the
SQLConnection.caseSensitiveLike property.
If the optional ESCAPE clause is present, then the expression following the ESCAPE keyword must evaluate to a string
consisting of a single character. This character may be used in the LIKE pattern to match literal percent or underscore
characters. The escape character followed by a percent symbol, underscore or itself matches a literal percent symbol,
underscore or escape character in the string, respectively.
GLOB
The GLOB operator is similar to LIKE but uses the Unix file globbing syntax for its wildcards. Unlike LIKE, GLOB is
case sensitive.
IN
The IN operator calculates whether its left operand is equal to one of the values in its right operand (a set of values in
parentheses).
in-expr ::= expr [NOT] IN ( value-list ) |
expr [NOT] IN ( select-statement ) |
expr [NOT] IN [database-name.] table-name
value-list ::= literal-value [, literal-value]*
The right operand can be a set of comma-separated literal values, or it can be the result of a SELECT statement. See
SELECT statements in expressions for an explanation and limitations on using a SELECT statement as the right-hand
operand of the IN operator.
BETWEEN...AND
The BETWEEN...AND operator is equivalent to using two expressions with the >= and <= operators. For example, the
expression x BETWEEN y AND z is equivalent to x >= y AND x <= z.
NOT
The NOT operator is a negation operator. The GLOB, LIKE, and IN operators may be preceded by the NOT keyword
to invert the sense of the test (in other words, to check that a value does not match the indicated pattern).
Parameters
A parameter specifies a placeholder in the expression for a literal value that is filled in at runtime by assigning a value
to the SQLStatement.parameters associative array. Parameters can take three forms:
A question mark indicates an indexed parameter. Parameters are assigned numerical (zero-
based) index values according to their order in the statement.
:AAAA A colon followed by an identifier name holds a spot for a named parameter with the name
AAAA. Named parameters are also numbered according to their order in the SQL statement.
To avoid confusion, it is best to avoid mixing named and numbered parameters.
@AAAA An "at sign" is equivalent to a colon.

1088
ACTIONSCRIPT 3.0 DEVELOPER’S GUIDE
SQL support in local databases
Last updated 3/21/2011
Unsupported SQL features
The following is a list of the standard SQL elements that are not supported in Adobe AIR:
FOREIGN KEY constraints FOREIGN KEY constraints are parsed but are not enforced.
Triggers FOR EACH STATEMENT triggers are not supported (all triggers must be FOR EACH ROW). INSTEAD
OF triggers are not supported on tables (INSTEAD OF triggers are only allowed on views). Recursive triggers—
triggers that trigger themselves—are not supported.
ALTER TABLE Only the RENAME TABLE and ADD COLUMN variants of the ALTER TABLE command are
supported. Other kinds of ALTER TABLE operations such as DROP COLUMN, ALTER COLUMN, ADD
CONSTRAINT, and so forth are ignored.
Nested transactions Only a single active transaction is allowed.
RIGHT and FULL OUTER JOIN RIGHT OUTER JOIN or FULL OUTER JOIN are not supported.
Updateable VIEW A view is read only. You may not execute a DELETE, INSERT, or UPDATE statement on a view.
An INSTEAD OF trigger that fires on an attempt to DELETE, INSERT, or UPDATE a view is supported and can be
used to update supporting tables in the body of the trigger.
GRANT and REVOKE A database is an ordinary disk file; the only access permissions that can be applied are the normal
file access permissions of the underlying operating system. The GRANT and REVOKE commands commonly found
on client/server RDBMSes are not implemented.
The following SQL elements and SQLite features are supported in some SQLite implementations, but are not
supported in Adobe AIR. Most of this functionality is available through methods of the SQLConnection class:
Transaction-related SQL elements (BEGIN, END, COMMIT, ROLLBACK) This functionality is available through the
transaction-related methods of the SQLConnection class: SQLConnection.begin(), SQLConnection.commit(), and
SQLConnection.rollback().
ANALYZE This functionality is available through the SQLConnection.analyze() method.
ATTACH This functionality is available through the SQLConnection.attach() method.
COPY This statement is not supported.
CREATE VIRTUAL TABLE This statement is not supported.
DETACH This functionality is available through the SQLConnection.detach() method.
PRAGMA This statement is not supported.
VACUUM This functionality is available through the SQLConnection.compact() method.
System table access is not available The system tables including sqlite_master and other tables with the "sqlite_"
prefix are not available in SQL statements. The runtime includes a schema API that provides an object-oriented way
to access schema data. For more information see the SQLConnection.loadSchema() method.
Regular-expression functions (MATCH() and REGEX()) These functions are not available in SQL statements.
The following functionality differs between many SQLite implementations and Adobe AIR:
Indexed statement parameters In many implementations indexed statement parameters are one-based. However, in
Adobe AIR indexed statement parameters are zero-based (that is, the first parameter is given the index 0, the second
parameter is given the index 1, and so forth.
INTEGER PRIMARY KEY column definitions In many implementations, only columns that are defined exactly as
INTEGER PRIMARY KEY are used as the actual primary key column for a table. In those implementations, using
another data type that is usually a synonym for INTEGER (such as int) does not cause the column to be used as the

1089
ACTIONSCRIPT 3.0 DEVELOPER’S GUIDE
SQL support in local databases
Last updated 3/21/2011
internal primary key. However, in Adobe AIR, the int data type (and other INTEGER synonyms) are considered
exactly equivalent to INTEGER. Consequently, a column defined as int PRIMARY KEY is used as the internal primary
key for a table. For more information, see the sections CREATE TABLE and Column affinity.
Additional SQL features
The following column affinity types are not supported by default in SQLite, but are supported in Adobe AIR (Note
that, like all keywords in SQL, these data type names are not case-sensitive):
Boolean corresponding to the Boolean class.
Date corresponding to the Date class.
int corresponding to the int class (equivalent to the INTEGER column affinity).
Number corresponding to the Number class (equivalent to the REAL column affinity).
Object corresponding to the Object class or any subclass that can be serialized and deserialized using AMF3. (This
includes most classes including custom classes, but excludes some classes including display objects and objects that
include display objects as properties.)
String corresponding to the String class (equivalent to the TEXT column affinity).
XML corresponding to the ActionScript (E4X) XML class.
XMLList corresponding to the ActionScript (E4X) XMLList class.
The following literal values are not supported by default in SQLite, but are supported in Adobe AIR:
true used to represent the literal boolean value true, for working with BOOLEAN columns.
false used to represent the literal boolean value false, for working with BOOLEAN columns.
Data type support
Unlike most SQL databases, the Adobe AIR SQL database engine does not require or enforce that table columns
contain values of a certain type. Instead, the runtime uses two concepts, storage classes and column affinity, to control
data types. This section describes storage classes and column affinity, as well as how data type differences are resolved
under various conditions:
•“Storage classes” on page 1090
•“Column affinity” on page 1090
•“Data types and comparison operators” on page 1093
•“Data types and mathematical operators” on page 1093
•“Data types and sorting” on page 1093
•“Data types and grouping” on page 1093
•“Data types and compound SELECT statements” on page 1094

1090
ACTIONSCRIPT 3.0 DEVELOPER’S GUIDE
SQL support in local databases
Last updated 3/21/2011
Storage classes
Storage classes represent the actual data types that are used to store values in a database. The following storage classes
are used by the database:
NULL The value is a NULL value.
INTEGER The value is a signed integer.
REAL The value is a floating-point number value.
TEXT The value is a text string (limited to 256 MB).
BLOB The value is a Binary Large Object (BLOB); in other words, raw binary data (limited to 256 MB).
All values supplied to the database as literals embedded in a SQL statement or values bound using parameters to a
prepared SQL statement are assigned a storage class before the SQL statement is executed.
Literals that are part of a SQL statement are assigned storage class TEXT if they are enclosed by single or double quotes,
INTEGER if the literal is specified as an unquoted number with no decimal point or exponent, REAL if the literal is an
unquoted number with a decimal point or exponent and NULL if the value is a NULL. Literals with storage class BLOB
are specified using the X'ABCD' notation. For more information, see Literal values in expressions.
Values supplied as parameters using the SQLStatement.parameters associative array are assigned the storage class that
most closely matches the native data type bound. For example, int values are bound as INTEGER storage class,
Number values are given the REAL storage class, String values are given the TEXT storage class, and ByteArray objects
are given the BLOB storage class.
Column affinity
The affinity of a column is the recommended type for data stored in that column. When a value is stored in a column
(through an INSERT or UPDATE statement), the runtime attempts to convert that value from its data type to the
specified affinity. For example, if a Date value (an ActionScript or JavaScript Date instance) is inserted into a column
whose affinity is TEXT, the Date value is converted to the String representation (equivalent to calling the object's
toString() method) before being stored in the database. If the value cannot be converted to the specified affinity an
error occurs and the operation is not performed. When a value is retrieved from the database using a SELECT
statement, it is returned as an instance of the class corresponding to the affinity, regardless of whether it was converted
from a different data type when it was stored.
If a column accepts NULL values, the ActionScript or JavaScript value null can be used as a parameter value to store
NULL in the column. When a NULL storage class value is retrieved in a SELECT statement, it is always returned as
the ActionScript or JavaScript value null, regardless of the column's affinity. If a column accepts NULL values, always
check values retrieved from that column to determine if they're null before attempting to cast the values to a non-
nullable type (such as Number or Boolean).
Each column in the database is assigned one of the following type affinities:
•TEXT (or String)
•NUMERIC
•INTEGER (or int)
•REAL (or Number)
•Boolean
•Date
•XML

1091
ACTIONSCRIPT 3.0 DEVELOPER’S GUIDE
SQL support in local databases
Last updated 3/21/2011
•XMLLIST
•Object
•NONE
TEXT (or String)
A column with TEXT or String affinity stores all data using storage classes NULL, TEXT, or BLOB. If numerical data
is inserted into a column with TEXT affinity it is converted to text form before being stored.
NUMERIC
A column with NUMERIC affinity contains values using storage classes NULL, REAL, or INTEGER. When text data
is inserted into a NUMERIC column, an attempt is made to convert it to an integer or real number before it is stored.
If the conversion is successful, then the value is stored using the INTEGER or REAL storage class (for example, a value
of '10.05' is converted to REAL storage class before being stored). If the conversion cannot be performed an error
occurs. No attempt is made to convert a NULL value. A value that's retrieved from a NUMERIC column is returned
as an instance of the most specific numeric type into which the value fits. In other words, if the value is a positive
integer or 0, it's returned as a uint instance. If it’s a negative integer, it’s returned as an int instance. Finally, if it has a
floating-point component (it's not an integer) it's returned as a Number instance.
INTEGER (or int)
A column that uses INTEGER affinity behaves in the same way as a column with NUMERIC affinity, with one
exception. If the value to be stored is a real value (such as a Number instance) with no floating point component or if
the value is a text value that can be converted to a real value with no floating point component, it is converted to an
integer and stored using the INTEGER storage class. If an attempt is made to store a real value with a floating point
component an error occurs.
REAL (or Number)
A column with REAL or NUMBER affinity behaves like a column with NUMERIC affinity except that it forces integer
values into floating point representation. A value in a REAL column is always returned from the database as a Number
instance.
Boolean
A column with Boolean affinity stores true or false values. A Boolean column accepts a value that is an ActionScript
or JavaScript Boolean instance. If code attempts to store a String value, a String with a length greater than zero is
considered true, and an empty String is false. If code attempts to store numeric data, any non-zero value is stored as
true and 0 is stored as false. When a Boolean value is retrieved using a SELECT statement, it is returned as a Boolean
instance. Non-NULL values are stored using the INTEGER storage class (0 for false and 1 for true) and are converted
to Boolean objects when data is retrieved.
Date
A column with Date affinity stores date and time values. A Date column is designed to accept values that are
ActionScript or JavaScript Date instances. If an attempt is made to store a String value in a Date column, the runtime
attempts to convert it to a Julian date. If the conversion fails an error occurs. If code attempts to store a Number, int, or
uint value, no attempt is made to validate the data and it is assumed to be a valid Julian date value. A Date value that's
retrieved using a SELECT statement is automatically converted to a Date instance. Date values are stored as Julian date
values using the REAL storage class, so sorting and comparing operations work as you would expect them to.
XML or XMLList

1092
ACTIONSCRIPT 3.0 DEVELOPER’S GUIDE
SQL support in local databases
Last updated 3/21/2011
A column that uses XML or XMLList affinity stores XML structures. When code attempts to store data in an XML
column using a SQLStatement parameter the runtime attempts to convert and validate the value using the
ActionScript XML() or XMLList() function. If the value cannot be converted to valid XML an error occurs. If the
attempt to store the data uses a literal SQL text value (for example INSERT INTO (col1) VALUES ('Invalid XML (no
closing tag)'), the value is not parsed or validated — it is assumed to be well-formed. If an invalid value is stored, when
it is retrieved it is returned as an empty XML object. XML and XMLList Data is stored using the TEXT storage class or
the NULL storage class.
Object
A column with Object affinity stores ActionScript or JavaScript complex objects, including Object class instances as
well as instances of Object subclasses such as Array instances and even custom class instances. Object column data is
serialized in AMF3 format and stored using the BLOB storage class. When a value is retrieved, it is deserialized from
AMF3 and returned as an instance of the class as it was stored. Note that some ActionScript classes, notably display
objects, cannot be deserialized as instances of their original data type. Before storing a custom class instance, you must
register an alias for the class using the flash.net.registerClassAlias() method (or in Flex by adding [RemoteObject]
metadata to the class declaration). Also, before retrieving that data you must register the same alias for the class. Any
data that can't be deserialized properly, either because the class inherently can't be deserialized or because of a missing
or mismatched class alias, is returned as an anonymous object (an Object class instance) with properties and values
corresponding to the original instance as stored.
NONE
A column with affinity NONE does not prefer one storage class over another. It makes no attempt to convert data
before it is inserted.
Determining affinity
The type affinity of a column is determined by the declared type of the column in the CREATE TABLE statement.
When determining the type the following rules (not case-sensitive) are applied:
•If the data type of the column contains any of the strings "CHAR", "CLOB", "STRI", or "TEXT" then that column
has TEXT/String affinity. Notice that the type VARCHAR contains the string "CHAR" and is thus assigned TEXT
affinity.
•If the data type for the column contains the string "BLOB" or if no data type is specified then the column has affinity
NONE.
•If the data type for column contains the string "XMLL" then the column has XMLList affinity.
•If the data type is the string "XML" then the column has XML affinity.
•If the data type contains the string "OBJE" then the column has Object affinity.
•If the data type contains the string "BOOL" then the column has Boolean affinity.
•If the data type contains the string "DATE" then the column has Date affinity.
•If the data type contains the string "INT" (including "UINT") then it is assigned INTEGER/int affinity.
•If the data type for a column contains any of the strings "REAL", "NUMB", "FLOA", or "DOUB" then the column
has REAL/Number affinity.
•Otherwise, the affinity is NUMERIC.
•If a table is created using a CREATE TABLE t AS SELECT... statement then all columns have no data type specified
and they are given the affinity NONE.

1093
ACTIONSCRIPT 3.0 DEVELOPER’S GUIDE
SQL support in local databases
Last updated 3/21/2011
Data types and comparison operators
The following binary comparison operators =, <, <=, >= and != are supported, along with an operation to test for set
membership, IN, and the ternary comparison operator BETWEEN. For details about these operators see Operators.
The results of a comparison depend on the storage classes of the two values being compared. When comparing two
values the following rules are applied:
•A value with storage class NULL is considered less than any other value (including another value with storage class
NULL).
•An INTEGER or REAL value is less than any TEXT or BLOB value. When an INTEGER or REAL is compared to
another INTEGER or REAL, a numerical comparison is performed.
•A TEXT value is less than a BLOB value. When two TEXT values are compared, a binary comparison is performed.
•When two BLOB values are compared, the result is always determined using a binary comparison.
The ternary operator BETWEEN is always recast as the equivalent binary expression. For example, a BETWEEN b
AND c is recast to a >= b AND a <= c, even if this means that different affinities are applied to a in each of the
comparisons required to evaluate the expression.
Expressions of the type a IN (SELECT b ....) are handled by the three rules enumerated previously for binary
comparisons, that is, in a similar manner to a = b. For example, if b is a column value and a is an expression, then the
affinity of b is applied to a before any comparisons take place. The expression a IN (x, y, z) is recast as a = +x OR a =
+y OR a = +z. The values to the right of the IN operator (the x, y, and z values in this example) are considered to be
expressions, even if they happen to be column values. If the value of the left of the IN operator is a column, then the
affinity of that column is used. If the value is an expression then no conversions occur.
How comparisons are performed can also be affected by the use of a COLLATE clause. For more information, see
COLLATE.
Data types and mathematical operators
For each of the supported mathematical operators, *, /, %, +, and -, numeric affinity is applied to each operand before
evaluating the expression. If any operand cannot be converted to the NUMERIC storage class successfully the
expression evaluates to NULL.
When the concatenation operator || is used each operand is converted to the TEXT storage class before the expression
is evaluated. If any operand cannot be converted to the TEXT storage class then the result of the expression is NULL.
This inability to convert the value can happen in two situations, if the value of the operand is NULL, or if it's a BLOB
containing a non-TEXT storage class.
Data types and sorting
When values are sorted by an ORDER BY clause, values with storage class NULL come first. These are followed by
INTEGER and REAL values interspersed in numeric order, followed by TEXT values in binary order or based on the
specified collation (BINARY or NOCASE). Finally come BLOB values in binary order. No storage class conversions
occur before the sort.
Data types and grouping
When grouping values with the GROUP BY clause, values with different storage classes are considered distinct. An
exception is INTEGER and REAL values which are considered equal if they are numerically equivalent. No affinities
are applied to any values as the result of a GROUP BY clause.

1094
ACTIONSCRIPT 3.0 DEVELOPER’S GUIDE
SQL support in local databases
Last updated 3/21/2011
Data types and compound SELECT statements
The compound SELECT operators UNION, INTERSECT, and EXCEPT perform implicit comparisons between
values. Before these comparisons are performed an affinity may be applied to each value. The same affinity, if any, is
applied to all values that may be returned in a single column of the compound SELECT result set. The affinity that is
applied is the affinity of the column returned by the first component SELECT statement that has a column value (and
not some other kind of expression) in that position. If for a given compound SELECT column none of the component
SELECT statements return a column value, no affinity is applied to the values from that column before they are
compared.

1095
Last updated 3/21/2011
Chapter 64: SQL error detail messages, ids,
and arguments
The SQLError class represents various errors that can occur while working with an Adobe AIR local SQL database. For
any given exception, the SQLError instance has a details property containing an English error message. In addition,
each error message has an associated unique identifier that is available in the SQLError object’s detailID property.
Using the detailID property, an application can identify the specific details error message. The application can
provide alternate text for the end user in the language of his or her locale. The argument values in the
detailArguments array can be substituted in the appropriate position in the error message string. This is useful for
applications that display the details property error message for an error directly to end users in a specific locale.
The following table contains a list of the detailID values and the associated English error message text. Placeholder
text in the messages indicates where detailArguments values are substituted in by the runtime. This list can be used
as a source for localizing the error messages that can occur in SQL database operations.
SQLError detailID English error detail message and parameters
1001 Connection closed.
1102 Database must be open to perform this operation.
1003 %s [,|and %s] parameter name(s) found in parameters property but not in the SQL
specified.
1004 Mismatch in parameter count. Found %d in SQL specified and %d value(s) set in
parameters property. Expecting values for %s [,|and %s].
1005 Auto compact could not be turned on.
1006 The pageSize value could not be set.
1007 The schema object with name '%s' of type '%s' in database '%s' was not found.
1008 The schema object with name '%s' in database '%s' was not found.
1009 No schema objects with type '%s' in database '%s' were found.
1010 No schema objects in database '%s' were found.
2001 Parser stack overflow.
2002 Too many arguments on function '%s'
2003 near '%s': syntax error
2004 there is already another table or index with this name: '%s'
2005 PRAGMA is not allowed in SQL.
2006 Not a writable directory.
2007 Unknown or unsupported join type: '%s %s %s'
2008 RIGHT and FULL OUTER JOINs are not currently supported.
2009 A NATURAL join may not have an ON or USING clause.
2010 Cannot have both ON and USING clauses in the same join.
2011 Cannot join using column '%s' - column not present in both tables.
2012 Only a single result allowed for a SELECT that is part of an expression.
2013 No such table: '[%s.]%s'
2014 No tables specified.
2015 Too many columns in result set|too many columns on '%s'.
2016 %s ORDER|GROUP BY term out of range - should be between 1 and %d
2017 Too many terms in ORDER BY clause.
2018 %s ORDER BY term out of range - should be between 1 and %d.
2019 %r ORDER BY term does not match any column in the result set.
2020 ORDER BY clause should come after '%s' not before.
2021 LIMIT clause should come after '%s' not before.
2022 SELECTs to the left and right of '%s' do not have the same number of result columns.
2023 A GROUP BY clause is required before HAVING.
2024 Aggregate functions are not allowed in the GROUP BY clause.
2025 DISTINCT in aggregate must be followed by an expression.

1096
ACTIONSCRIPT 3.0 DEVELOPER’S GUIDE
SQL error detail messages, ids, and arguments
Last updated 3/21/2011
2026 Too many terms in compound SELECT.
2027 Too many terms in ORDER|GROUP BY clause
2028 Temporary trigger may not have qualified name
2030 Trigger '%s' already exists
2032 Cannot create BEFORE|AFTER trigger on view: '%s'.
2033 Cannot create INSTEAD OF trigger on table: '%s'.
2034 No such trigger: '%s'
2035 Recursive triggers not supported ('%s').
2036 No such column: %s[.%s[.%s]]
2037 VACUUM is not allowed from SQL.
2043 Table '%s': indexing function returned an invalid plan.
2044 At most %d tables in a join.
2046 Cannot add a PRIMARY KEY column.
2047 Cannot add a UNIQUE column.
2048 Cannot add a NOT NULL column with default value NULL.
2049 Cannot add a column with non-constant default.
2050 Cannot add a column to a view.
2051 ANALYZE is not allowed in SQL.
2052 Invalid name: '%s'
2053 ATTACH is not allowed from SQL.
2054 %s '%s' cannot reference objects in database '%s'
2055 Access to '[%s.]%s.%s' is prohibited.
2056 Not authorized.
2058 No such view: '[%s.]%s'
2060 Temporary table name must be unqualified.
2061 Table '%s' already exists.
2062 There is already an index named: '%s'
2064 Duplicate column name: '%s'
2065 Table '%s' has more than one primary key.
2066 AUTOINCREMENT is only allowed on an INTEGER PRIMARY KEY
2067 No such collation sequence: '%s'
2068 Parameters are not allowed in views.
2069 View '%s' is circularly defined.
2070 Table '%s' may not be dropped.
2071 Use DROP VIEW to delete view '%s'
2072 Use DROP TABLE to delete table '%s'
2073 Foreign key on '%s' should reference only one column of table '%s'
2074 Number of columns in foreign key does not match the number of columns in the
referenced table.
2075 Unknown column '%s' in foreign key definition.
2076 Table '%s' may not be indexed.
2077 Views may not be indexed.
2080 Conflicting ON CONFLICT clauses specified.
2081 No such index: '%s'
2082 Index associated with UNIQUE or PRIMARY KEY constraint cannot be dropped.
2083 BEGIN is not allowed in SQL.
2084 COMMIT is not allowed in SQL.
2085 ROLLBACK is not allowed in SQL.
2086 Unable to open a temporary database file for storing temporary tables.
2087 Unable to identify the object to be reindexed.
2088 Table '%s' may not be modified.
2089 Cannot modify '%s' because it is a view.
2090 Variable number must be between ?0 and ?%d<
2092 Misuse of aliased aggregate '%s'
2093 Ambiguous column name: '[%s.[%s.]]%s'
2094 No such function: '%s'
2095 Wrong number of arguments to function '%s'
2096 Subqueries prohibited in CHECK constraints.
2097 Parameters prohibited in CHECK constraints.

1097
ACTIONSCRIPT 3.0 DEVELOPER’S GUIDE
SQL error detail messages, ids, and arguments
Last updated 3/21/2011
2098 Expression tree is too large (maximum depth %d)
2099 RAISE() may only be used within a trigger-program
2100 Table '%s' has %d columns but %d values were supplied
2101 Database schema is locked: '%s'
2102 Statement too long.
2103 Unable to delete/modify collation sequence due to active statements
2104 Too many attached databases - max %d
2105 Cannot ATTACH database within transaction.
2106 Database '%s' is already in use.
2108 Attached databases must use the same text encoding as main database.
2200 Out of memory.
2201 Unable to open database.
2202 Cannot DETACH database within transaction.
2203 Cannot detach database: '%s'
2204 Database '%s' is locked.
2205 Unable to acquire a read lock on the database.
2206 [column|columns] '%s'[,'%s'] are not [unique|is] not unique.
2207 Malformed database schema.
2208 Unsupported file format.
2209 Unrecognized token: '%s'
2300 Could not convert text value to numeric value.
2301 Could not convert string value to date.
2302 Could not convert floating point value to integer without loss of data.
2303 Cannot rollback transaction - SQL statements in progress.
2304 Cannot commit transaction - SQL statements in progress.
2305 Database table is locked: '%s'
2306 Read-only table.
2307 String or blob too big.
2309 Cannot open indexed column for writing.
2400 Cannot open value of type %s.
2401 No such rowid: %s<
2402 Object name reserved for internal use: '%s'
2403 View '%s' may not be altered.
2404 Default value of column '%s' is not constant.
2405 Not authorized to use function '%s'
2406 Misuse of aggregate function '%s'
2407 Misuse of aggregate: '%s'
2408 No such database: '%s'
2409 Table '%s' has no column named '%s'
2501 No such module: '%s'
2508 No such savepoint: '%s'
2510 Cannot rollback - no transaction is active.
2511 Cannot commit - no transaction is active.
