Adobe Audition CC (2016) Help Cc2016 En
User Manual: adobe Audition - CC (2016) - Help Free User Guide for Adobe Audition Software, Manual
Open the PDF directly: View PDF ![]() .
.
Page Count: 179 [warning: Documents this large are best viewed by clicking the View PDF Link!]
- Legal notices
- Contents
- Chapter 1: What's New
- Chapter 2: Digital audio fundamentals
- Chapter 3: Workspace and setup
- Chapter 4: Importing, recording, and playing
- Chapter 5: Editing audio files
- Editing, repairing, and improving audio using Essential Sound panel
- Generating text-to-speech
- Matching loudness across multiple audio files
- Displaying audio in the Waveform Editor
- Selecting audio
- How to copy, cut, paste, and delete audio in Audition
- Visually fading and changing amplitude
- Working with markers
- Inverting, reversing, and silencing audio
- How to automate common tasks in Audition
- Analyze phase, frequency, and amplitude with Audition
- Frequency Band Splitter
- Undo, redo, and history
- Converting sample types
- Chapter 6: Applying effects
- Enabling CEP extensions
- Effects controls
- Applying effects in the Waveform Editor
- Applying effects in the Multitrack Editor
- Adding third-party plug-ins
- Notch Filter effect
- Fade and Gain Envelope effects (Waveform Editor only)
- Manual Pitch Correction effect (Waveform Editor only)
- Graphic Phase Shifter effect
- Doppler Shifter effect (Waveform Editor only)
- Chapter 7: Effects reference
- Amplitude and compression effects in Audition
- Amplify effect
- Channel Mixer effect
- DeEsser effect
- Dynamics Processing effect
- Fade Envelope effect
- Gain Envelope effect
- Hard Limiter effect
- Multiband Compressor effect
- Normalize effect (Waveform Editor only)
- Single-band Compressor effect
- Speech Volume Leveler effect
- Tube-modeled Compressor effect
- Volume Envelope effect
- Delay and echo effects
- Diagnostics effects (Waveform Editor only) for Audition
- Filter and equalizer effects
- Modulation effects
- Noise reduction techniques and restoration effects for Audition
- Reverb effects
- How to use special effects with Audition
- Stereo imagery effects
- Time and pitch manipulation effects
- Generate tones and noise
- Amplitude and compression effects in Audition
- Chapter 8: Mixing multitrack sessions
- Creating remix
- Multitrack Editor overview
- Basic multitrack controls
- Multitrack routing and EQ controls
- Arrange and edit multitrack clips with Audition
- Looping clips
- How to match, fade, and mix clip volume with Audition
- Automating mixes with envelopes
- Multitrack clip stretching
- Chapter 9: Video and surround sound
- Chapter 10: Saving and exporting
- Save and export files in Adobe Audition
- Viewing and editing XMP metadata

Adobe® Audition®
CC
Help

iii
Last updated 6/16/2016
Contents
Chapter 1: What's New
New features summary . . . . . . . . . . . . . . . . . . . . . . . . . . . . . . . . . . . . . . . . . . . . . . . . . . . . . . . . . . . . . . . . . . . . . . . . . . . . . . . . . . . . . . . . . . . . . . . . .1
Chapter 2: Digital audio fundamentals
Understanding sound . . . . . . . . . . . . . . . . . . . . . . . . . . . . . . . . . . . . . . . . . . . . . . . . . . . . . . . . . . . . . . . . . . . . . . . . . . . . . . . . . . . . . . . . . . . . . . . . . .4
Digitizing audio . . . . . . . . . . . . . . . . . . . . . . . . . . . . . . . . . . . . . . . . . . . . . . . . . . . . . . . . . . . . . . . . . . . . . . . . . . . . . . . . . . . . . . . . . . . . . . . . . . . . . . . .6
Chapter 3: Workspace and setup
Viewing, zooming, and navigating audio . . . . . . . . . . . . . . . . . . . . . . . . . . . . . . . . . . . . . . . . . . . . . . . . . . . . . . . . . . . . . . . . . . . . . . . . . . . . . . . .9
Customizing workspaces . . . . . . . . . . . . . . . . . . . . . . . . . . . . . . . . . . . . . . . . . . . . . . . . . . . . . . . . . . . . . . . . . . . . . . . . . . . . . . . . . . . . . . . . . . . . . 12
Connecting to audio hardware in Audition . . . . . . . . . . . . . . . . . . . . . . . . . . . . . . . . . . . . . . . . . . . . . . . . . . . . . . . . . . . . . . . . . . . . . . . . . . . . 19
Customizing and saving application settings . . . . . . . . . . . . . . . . . . . . . . . . . . . . . . . . . . . . . . . . . . . . . . . . . . . . . . . . . . . . . . . . . . . . . . . . . . 20
Default keyboard shortcuts . . . . . . . . . . . . . . . . . . . . . . . . . . . . . . . . . . . . . . . . . . . . . . . . . . . . . . . . . . . . . . . . . . . . . . . . . . . . . . . . . . . . . . . . . . . 21
Finding and customizing shortcuts . . . . . . . . . . . . . . . . . . . . . . . . . . . . . . . . . . . . . . . . . . . . . . . . . . . . . . . . . . . . . . . . . . . . . . . . . . . . . . . . . . . . 23
Chapter 4: Importing, recording, and playing
Create, open, or import files for Adobe Audition . . . . . . . . . . . . . . . . . . . . . . . . . . . . . . . . . . . . . . . . . . . . . . . . . . . . . . . . . . . . . . . . . . . . . . . 24
Importing with the Files panel . . . . . . . . . . . . . . . . . . . . . . . . . . . . . . . . . . . . . . . . . . . . . . . . . . . . . . . . . . . . . . . . . . . . . . . . . . . . . . . . . . . . . . . . 27
Supported import formats . . . . . . . . . . . . . . . . . . . . . . . . . . . . . . . . . . . . . . . . . . . . . . . . . . . . . . . . . . . . . . . . . . . . . . . . . . . . . . . . . . . . . . . . . . . . 28
Extracting audio from CDs . . . . . . . . . . . . . . . . . . . . . . . . . . . . . . . . . . . . . . . . . . . . . . . . . . . . . . . . . . . . . . . . . . . . . . . . . . . . . . . . . . . . . . . . . . . . 29
Navigate time and playing audio in Adobe Audition . . . . . . . . . . . . . . . . . . . . . . . . . . . . . . . . . . . . . . . . . . . . . . . . . . . . . . . . . . . . . . . . . . . 30
Recording audio . . . . . . . . . . . . . . . . . . . . . . . . . . . . . . . . . . . . . . . . . . . . . . . . . . . . . . . . . . . . . . . . . . . . . . . . . . . . . . . . . . . . . . . . . . . . . . . . . . . . . . 33
Monitoring recording and playback levels . . . . . . . . . . . . . . . . . . . . . . . . . . . . . . . . . . . . . . . . . . . . . . . . . . . . . . . . . . . . . . . . . . . . . . . . . . . . . 36
Chapter 5: Editing audio files
Editing, repairing, and improving audio using Essential Sound panel . . . . . . . . . . . . . . . . . . . . . . . . . . . . . . . . . . . . . . . . . . . . . . . . . . . 38
Generating text-to-speech . . . . . . . . . . . . . . . . . . . . . . . . . . . . . . . . . . . . . . . . . . . . . . . . . . . . . . . . . . . . . . . . . . . . . . . . . . . . . . . . . . . . . . . . . . . . 47
Matching loudness across multiple audio files . . . . . . . . . . . . . . . . . . . . . . . . . . . . . . . . . . . . . . . . . . . . . . . . . . . . . . . . . . . . . . . . . . . . . . . . . 50
Displaying audio in the Waveform Editor . . . . . . . . . . . . . . . . . . . . . . . . . . . . . . . . . . . . . . . . . . . . . . . . . . . . . . . . . . . . . . . . . . . . . . . . . . . . . . 52
Selecting audio . . . . . . . . . . . . . . . . . . . . . . . . . . . . . . . . . . . . . . . . . . . . . . . . . . . . . . . . . . . . . . . . . . . . . . . . . . . . . . . . . . . . . . . . . . . . . . . . . . . . . . . 55
How to copy, cut, paste, and delete audio in Audition . . . . . . . . . . . . . . . . . . . . . . . . . . . . . . . . . . . . . . . . . . . . . . . . . . . . . . . . . . . . . . . . . . 59
Visually fading and changing amplitude . . . . . . . . . . . . . . . . . . . . . . . . . . . . . . . . . . . . . . . . . . . . . . . . . . . . . . . . . . . . . . . . . . . . . . . . . . . . . . . 61
Working with markers . . . . . . . . . . . . . . . . . . . . . . . . . . . . . . . . . . . . . . . . . . . . . . . . . . . . . . . . . . . . . . . . . . . . . . . . . . . . . . . . . . . . . . . . . . . . . . . . 63
Inverting, reversing, and silencing audio . . . . . . . . . . . . . . . . . . . . . . . . . . . . . . . . . . . . . . . . . . . . . . . . . . . . . . . . . . . . . . . . . . . . . . . . . . . . . . 65
How to automate common tasks in Audition . . . . . . . . . . . . . . . . . . . . . . . . . . . . . . . . . . . . . . . . . . . . . . . . . . . . . . . . . . . . . . . . . . . . . . . . . . 66
Analyze phase, frequency, and amplitude with Audition . . . . . . . . . . . . . . . . . . . . . . . . . . . . . . . . . . . . . . . . . . . . . . . . . . . . . . . . . . . . . . . 68
Frequency Band Splitter . . . . . . . . . . . . . . . . . . . . . . . . . . . . . . . . . . . . . . . . . . . . . . . . . . . . . . . . . . . . . . . . . . . . . . . . . . . . . . . . . . . . . . . . . . . . . . 72
Undo, redo, and history . . . . . . . . . . . . . . . . . . . . . . . . . . . . . . . . . . . . . . . . . . . . . . . . . . . . . . . . . . . . . . . . . . . . . . . . . . . . . . . . . . . . . . . . . . . . . . . 73
Converting sample types . . . . . . . . . . . . . . . . . . . . . . . . . . . . . . . . . . . . . . . . . . . . . . . . . . . . . . . . . . . . . . . . . . . . . . . . . . . . . . . . . . . . . . . . . . . . . 73
Chapter 6: Applying effects
Enabling CEP extensions . . . . . . . . . . . . . . . . . . . . . . . . . . . . . . . . . . . . . . . . . . . . . . . . . . . . . . . . . . . . . . . . . . . . . . . . . . . . . . . . . . . . . . . . . . . . . . 77
Effects controls . . . . . . . . . . . . . . . . . . . . . . . . . . . . . . . . . . . . . . . . . . . . . . . . . . . . . . . . . . . . . . . . . . . . . . . . . . . . . . . . . . . . . . . . . . . . . . . . . . . . . . . 77
Applying effects in the Waveform Editor . . . . . . . . . . . . . . . . . . . . . . . . . . . . . . . . . . . . . . . . . . . . . . . . . . . . . . . . . . . . . . . . . . . . . . . . . . . . . . 81

iv
ADOBE AUDITION
Contents
Last updated 6/16/2016
Applying effects in the Multitrack Editor . . . . . . . . . . . . . . . . . . . . . . . . . . . . . . . . . . . . . . . . . . . . . . . . . . . . . . . . . . . . . . . . . . . . . . . . . . . . . . . 82
Adding third-party plug-ins . . . . . . . . . . . . . . . . . . . . . . . . . . . . . . . . . . . . . . . . . . . . . . . . . . . . . . . . . . . . . . . . . . . . . . . . . . . . . . . . . . . . . . . . . . . 83
Notch Filter effect . . . . . . . . . . . . . . . . . . . . . . . . . . . . . . . . . . . . . . . . . . . . . . . . . . . . . . . . . . . . . . . . . . . . . . . . . . . . . . . . . . . . . . . . . . . . . . . . . . . . 84
Fade and Gain Envelope effects (Waveform Editor only) . . . . . . . . . . . . . . . . . . . . . . . . . . . . . . . . . . . . . . . . . . . . . . . . . . . . . . . . . . . . . . . . 85
Manual Pitch Correction effect (Waveform Editor only) . . . . . . . . . . . . . . . . . . . . . . . . . . . . . . . . . . . . . . . . . . . . . . . . . . . . . . . . . . . . . . . . 85
Graphic Phase Shifter effect . . . . . . . . . . . . . . . . . . . . . . . . . . . . . . . . . . . . . . . . . . . . . . . . . . . . . . . . . . . . . . . . . . . . . . . . . . . . . . . . . . . . . . . . . . 86
Doppler Shifter effect (Waveform Editor only) . . . . . . . . . . . . . . . . . . . . . . . . . . . . . . . . . . . . . . . . . . . . . . . . . . . . . . . . . . . . . . . . . . . . . . . . . 86
Chapter 7: Effects reference
Amplitude and compression effects in Audition . . . . . . . . . . . . . . . . . . . . . . . . . . . . . . . . . . . . . . . . . . . . . . . . . . . . . . . . . . . . . . . . . . . . . . . 88
Delay and echo effects . . . . . . . . . . . . . . . . . . . . . . . . . . . . . . . . . . . . . . . . . . . . . . . . . . . . . . . . . . . . . . . . . . . . . . . . . . . . . . . . . . . . . . . . . . . . . . . . 96
Diagnostics effects (Waveform Editor only) for Audition . . . . . . . . . . . . . . . . . . . . . . . . . . . . . . . . . . . . . . . . . . . . . . . . . . . . . . . . . . . . . . . 98
Filter and equalizer effects . . . . . . . . . . . . . . . . . . . . . . . . . . . . . . . . . . . . . . . . . . . . . . . . . . . . . . . . . . . . . . . . . . . . . . . . . . . . . . . . . . . . . . . . . . . 100
Modulation effects . . . . . . . . . . . . . . . . . . . . . . . . . . . . . . . . . . . . . . . . . . . . . . . . . . . . . . . . . . . . . . . . . . . . . . . . . . . . . . . . . . . . . . . . . . . . . . . . . . 105
Noise reduction techniques and restoration effects for Audition . . . . . . . . . . . . . . . . . . . . . . . . . . . . . . . . . . . . . . . . . . . . . . . . . . . . . . 108
Reverb effects . . . . . . . . . . . . . . . . . . . . . . . . . . . . . . . . . . . . . . . . . . . . . . . . . . . . . . . . . . . . . . . . . . . . . . . . . . . . . . . . . . . . . . . . . . . . . . . . . . . . . . . 118
How to use special effects with Audition . . . . . . . . . . . . . . . . . . . . . . . . . . . . . . . . . . . . . . . . . . . . . . . . . . . . . . . . . . . . . . . . . . . . . . . . . . . . . 123
Stereo imagery effects . . . . . . . . . . . . . . . . . . . . . . . . . . . . . . . . . . . . . . . . . . . . . . . . . . . . . . . . . . . . . . . . . . . . . . . . . . . . . . . . . . . . . . . . . . . . . . . 126
Time and pitch manipulation effects . . . . . . . . . . . . . . . . . . . . . . . . . . . . . . . . . . . . . . . . . . . . . . . . . . . . . . . . . . . . . . . . . . . . . . . . . . . . . . . . . 128
Generate tones and noise . . . . . . . . . . . . . . . . . . . . . . . . . . . . . . . . . . . . . . . . . . . . . . . . . . . . . . . . . . . . . . . . . . . . . . . . . . . . . . . . . . . . . . . . . . . . 133
Chapter 8: Mixing multitrack sessions
Creating remix . . . . . . . . . . . . . . . . . . . . . . . . . . . . . . . . . . . . . . . . . . . . . . . . . . . . . . . . . . . . . . . . . . . . . . . . . . . . . . . . . . . . . . . . . . . . . . . . . . . . . . 136
Multitrack Editor overview . . . . . . . . . . . . . . . . . . . . . . . . . . . . . . . . . . . . . . . . . . . . . . . . . . . . . . . . . . . . . . . . . . . . . . . . . . . . . . . . . . . . . . . . . . . 137
Basic multitrack controls . . . . . . . . . . . . . . . . . . . . . . . . . . . . . . . . . . . . . . . . . . . . . . . . . . . . . . . . . . . . . . . . . . . . . . . . . . . . . . . . . . . . . . . . . . . . . 139
Multitrack routing and EQ controls . . . . . . . . . . . . . . . . . . . . . . . . . . . . . . . . . . . . . . . . . . . . . . . . . . . . . . . . . . . . . . . . . . . . . . . . . . . . . . . . . . . 143
Arrange and edit multitrack clips with Audition . . . . . . . . . . . . . . . . . . . . . . . . . . . . . . . . . . . . . . . . . . . . . . . . . . . . . . . . . . . . . . . . . . . . . . . 148
Looping clips . . . . . . . . . . . . . . . . . . . . . . . . . . . . . . . . . . . . . . . . . . . . . . . . . . . . . . . . . . . . . . . . . . . . . . . . . . . . . . . . . . . . . . . . . . . . . . . . . . . . . . . . 151
How to match, fade, and mix clip volume with Audition . . . . . . . . . . . . . . . . . . . . . . . . . . . . . . . . . . . . . . . . . . . . . . . . . . . . . . . . . . . . . . 152
Automating mixes with envelopes . . . . . . . . . . . . . . . . . . . . . . . . . . . . . . . . . . . . . . . . . . . . . . . . . . . . . . . . . . . . . . . . . . . . . . . . . . . . . . . . . . . 155
Multitrack clip stretching . . . . . . . . . . . . . . . . . . . . . . . . . . . . . . . . . . . . . . . . . . . . . . . . . . . . . . . . . . . . . . . . . . . . . . . . . . . . . . . . . . . . . . . . . . . . 160
Chapter 9: Video and surround sound
Working with video applications . . . . . . . . . . . . . . . . . . . . . . . . . . . . . . . . . . . . . . . . . . . . . . . . . . . . . . . . . . . . . . . . . . . . . . . . . . . . . . . . . . . . . 161
Importing video and working with video clips . . . . . . . . . . . . . . . . . . . . . . . . . . . . . . . . . . . . . . . . . . . . . . . . . . . . . . . . . . . . . . . . . . . . . . . . 163
5.1 surround sound . . . . . . . . . . . . . . . . . . . . . . . . . . . . . . . . . . . . . . . . . . . . . . . . . . . . . . . . . . . . . . . . . . . . . . . . . . . . . . . . . . . . . . . . . . . . . . . . . . 164
Chapter 10: Saving and exporting
Save and export files in Adobe Audition . . . . . . . . . . . . . . . . . . . . . . . . . . . . . . . . . . . . . . . . . . . . . . . . . . . . . . . . . . . . . . . . . . . . . . . . . . . . . . 167
Viewing and editing XMP metadata . . . . . . . . . . . . . . . . . . . . . . . . . . . . . . . . . . . . . . . . . . . . . . . . . . . . . . . . . . . . . . . . . . . . . . . . . . . . . . . . . . 173

1
Last updated 6/16/2016
Chapter 1: What's New
New features summary
The 2015.2 release of Adobe Audition CC includes advanced features that enhance your audio quality and overall
efficiency of editing audio. Use the Essential Sound panel to make common adjustments to obtain professional-quality
results even if you are not a professional audio editor and send projects directly to Adobe Media Encoder without going
back to Premiere Pro.
Essential Sound panel
New in Audition CC 2015.2 | June 2016
With shorter turnaround times and shrinking budgets, many video editors mix their audio without engaging a
professional audio engineer. This release of Adobe Audition empowers video editors with limited audio experience to
easily handle mixing techniques for their projects.
The Essential Sound panel gives you a complete toolset to mix your audio for achieving professional-quality output.
The panel provides simple controls to unify volume levels, repair sound, improve clarity, and add special effects that
help your video projects sound like a professional audio engineer has mixed them. You can save the applied adjustments
as presets for re-use and they reflect in the full Audition toolset, making them handy for more audio refinements.
For more information, see Editing, repairing, and improving audio using Essential Sound panel.
2
What's New
Last updated 6/16/2016
Export Multitrack to Adobe Media Encoder
New in Audition CC 2015.2 | June 2016
Audition can now export your edited audio directly to Adobe Media Encoder for a fully linear post-production
workflow, using format presets and audio channel customization without rendering or wrangling various mixdown
files.
To export, just select your destination format and preset, which might include re-wrapping your video for many
formats to prevent re-encoding the video stream, and add to the render queue. You can even customize how your final
audio channels are assigned to your video file.
Your project will start rendering automatically in the background when the project files are prepared. Projects that you
had edited using Audition wear the Audition logo, making it easy to identify which projects are complete and ready for
use. You can get back to work in Audition or Premiere on your next project while Adobe Media Encoder renders the
files in the background.
For more information, see Save and export files in Adobe Audition.
Remix
New in Audition CC 2015.1 | November 2015
Create remixes of music files from a collection. For example, you can take a song that has a longer duration and create
a shorter version that still sounds like the original. You can recompose any piece of music in your collection to fit the
video or project duration.
For more information, see Creating remix.
Text to speech

3
What's New
Last updated 6/16/2016
New in Audition CC 2015.1 | November 2015
Type or paste text, and generate a realistic voice-over or narration track. Use this tool to create synthesized voices for
videos, games, and audio productions.
For more information, see Generating text-to-speech.
Match loudness
New in Audition CC 2015.1 | November 2015
Match loudness in audio clips, and apply correction to support various loudness standards and true peak limiting. The
Match Loudness panel replaces the old Match Volume panel.
For more information, see Matching loudness across multiple audio files.
Enable CEP extensions
New in Audition CC 2015.1 | November 2015
You can use Common Extensibility Platform (CEP) extensions and build integrated panels in Adobe desktop
applications.
For more information, see Enabling CEP extensions.
4
Last updated 6/16/2016
Chapter 2: Digital audio fundamentals
Understanding sound
Sound waves
Sound starts with vibrations in the air, like those produced by guitar strings, vocal cords, or speaker cones. These
vibrations push nearby air molecules together, raising the air pressure slightly. The air molecules under pressure then
push on the air molecules surrounding them, which push on the next set of molecules, and so on. As high-pressure
areas move through the air, they leave low-pressure areas behind them. When these waves of pressure changes reach
us, they vibrate the receptors in our ears, and we hear the vibrations as sound.
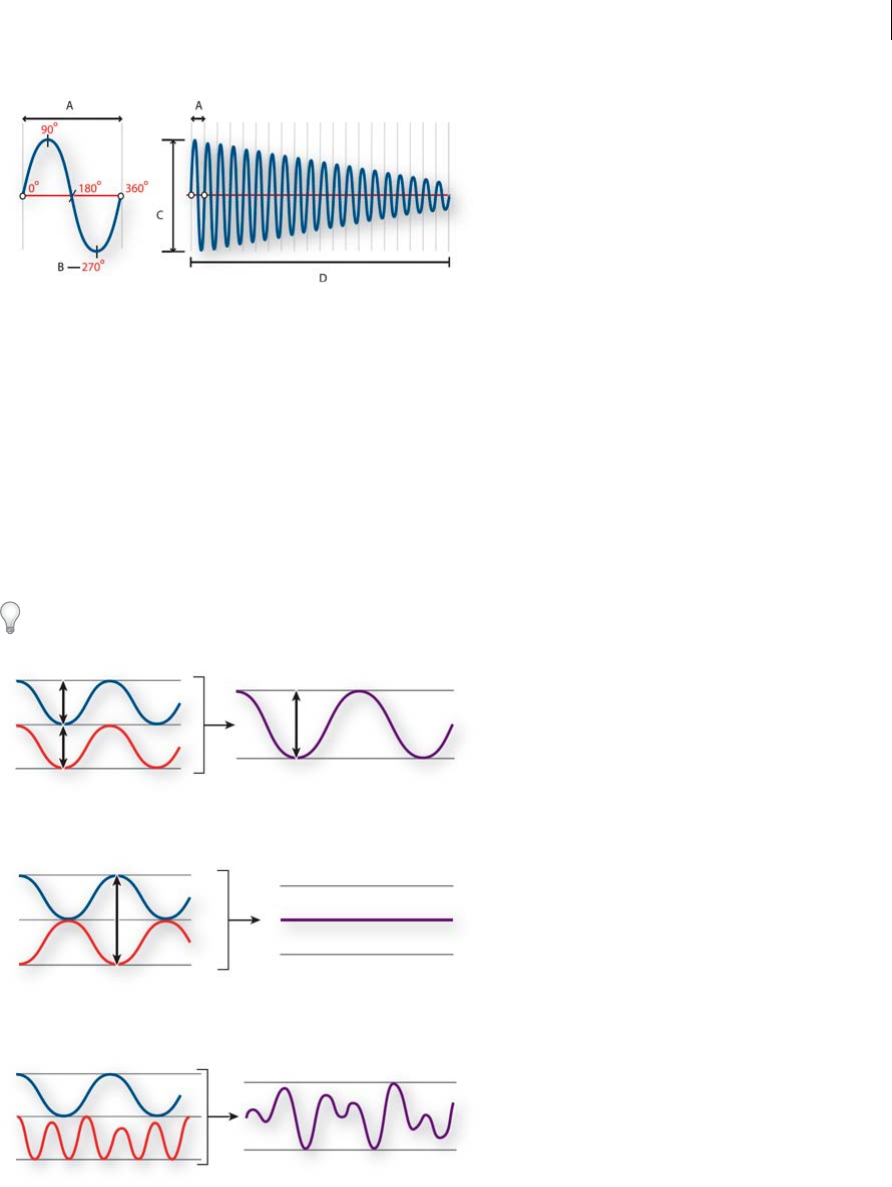
When you see a visual waveform that represents audio, it reflects these waves of air pressure. The zero line in the
waveform is the pressure of air at rest. When the line swings up to a peak, it represents higher pressure; when the line
swings down to a trough, it represents lower pressure.
A Zero line B Low-pressure area C High-pressure area
Waveform measurements
Several measurements describe waveforms:
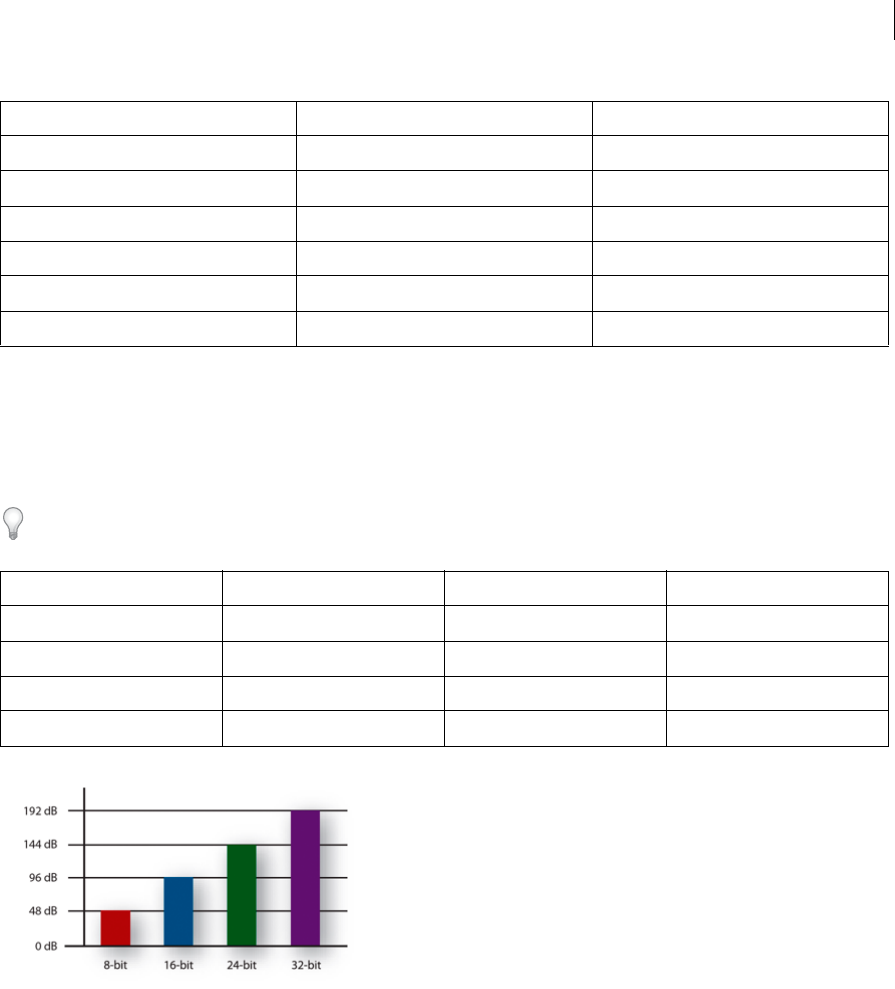
Amplitude Reflects the change in pressure from the peak of the waveform to the trough. High-amplitude waveforms
are loud; low-amplitude waveforms are quiet.
Cycle Describes a single, repeated sequence of pressure changes, from zero pressure, to high pressure, to low pressure,
and back to zero.
Frequency Measured in hertz (Hz), describes the number of cycles per second. (For example, a 1000-Hz waveform has
1000 cycles per second.) The higher the frequency, the higher the musical pitch.
Phase Measured in 360 degrees, indicates the position of a waveform in a cycle. Zero degrees is the start point, followed
by 90º at high pressure, 180º at the halfway point, 270º at low pressure, and 360º at the end point.
Wavelength Measured in units such as inches or centimeters, is the distance between two points with the same degree
of phase. As frequency increases, wavelength decreases.
5
Digital audio fundamentals
Last updated 6/16/2016
A Wavelength B Degree of phase C Amplitude D One second
How sound waves interact
When two or more sound waves meet, they add to and subtract from each other. If their peaks and troughs are perfectly
in phase, they reinforce each other, resulting in a waveform that has higher amplitude than either individual waveform.
If the peaks and troughs of two waveforms are perfectly out of phase, they cancel each other out, resulting in no
waveform at all.
In most cases, however, waves are out of phase in varying amounts, resulting in a combined waveform that is more
complex than individual waveforms. A complex waveform that represents music, voice, noise, and other sounds, for
example, combines the waveforms from each sound.
Because of its unique physical structure, a single instrument can create extremely complex waves. That’s why a violin
and a trumpet sound different even when playing the same note.

6
Digital audio fundamentals
Last updated 6/16/2016
Digitizing audio
Comparing analog and digital audio
In analog and digital audio, sound is transmitted and stored very differently.
Analog audio: positive and negative voltage
A microphone converts the pressure waves of sound into voltage changes in a wire: high pressure becomes positive
voltage, and low pressure becomes negative voltage. When these voltage changes travel down a microphone wire, they
can be recorded onto tape as changes in magnetic strength or onto vinyl records as changes in groove size. A speaker
works like a microphone in reverse, taking the voltage signals from an audio recording and vibrating to re-create the
pressure wave.
Digital audio: zeroes and ones
Unlike analog storage media such as magnetic tape or vinyl records, computers store audio information digitally as a
series of zeroes and ones. In digital storage, the original waveform is broken up into individual snapshots called samples.
This process is typically known as digitizing or sampling the audio, but it is sometimes called analog-to-digital
conversion.
When you record from a microphone into a computer, for example, analog-to-digital converters transform the analog
signal into digital samples that computers can store and process.
Understanding sample rate
Sample rate indicates the number of digital snapshots taken of an audio signal each second. This rate determines the
frequency range of an audio file. The higher the sample rate, the closer the shape of the digital waveform is to that of
the original analog waveform. Low sample rates limit the range of frequencies that can be recorded, which can result in
a recording that poorly represents the original sound.
A Low sample rate that distorts the original sound wave. B High sample rate that perfectly reproduces the original sound wave.
To reproduce a given frequency, the sample rate must be at least twice that frequency. For example, CDs have a sample
rate of 44,100 samples per second, so they can reproduce frequencies up to 22,050 Hz, which is just beyond the limit of
human hearing, 20,000 Hz.
Here are the most common sample rates for digital audio:
7
Digital audio fundamentals
Last updated 6/16/2016
Understanding bit depth
Bit depth determines dynamic range. When a sound wave is sampled, each sample is assigned the amplitude value
closest to the original wave’s amplitude. Higher bit depth provides more possible amplitude values, producing greater
dynamic range, a lower noise floor, and higher fidelity.
For the best audio quality, Audition transforms all audio in 32-bit mode and then converts to a specified bit depth when
saving files.
Measuring amplitude in dBFS
In digital audio, amplitude is measured in decibels below full scale, or dBFS. The maximum possible amplitude is 0
dBFS; all amplitudes below that are expressed as negative numbers.
Note: A given dBFS value does not directly correspond to the original sound pressure level measured in acoustic dB.
Audio file contents and size
An audio file on your hard drive, such as a WAV file, consists of a small header indicating sample rate and bit depth,
and then a long series of numbers, one for each sample. These files can be very large. For example, at 44,100 samples
per second and 16 bits per sample, a mono file requires 86 KB per second—about 5 MB per minute. That figure doubles
to 10 MB per minute for a stereo file, which has two channels.
Sample rate Quality level Frequency range
11,025 Hz Poor AM radio (low-end multimedia) 0–5,512 Hz
22,050 Hz Near FM radio (high-end multimedia) 0–11,025 Hz
32,000 Hz Better than FM radio (standard broadcast rate) 0–16,000 Hz
44,100 Hz CD 0–22,050 Hz
48,000 Hz Standard DVD 0–24,000 Hz
96,000 Hz Blu-ray DVD 0–48,000 Hz
Bit depth Quality level Amplitude values Dynamic range
8-bit Telephony 256 48 dB
16-bit Audio CD 65,536 96 dB
24-bit Audio DVD 16,777,216 144 dB
32-bit Best 4,294,967,296 192 dB

8
Digital audio fundamentals
Last updated 6/16/2016
How Adobe Audition digitizes audio
When you record audio in Adobe Audition, the sound card starts the recording process and specifies what sample rate
and bit depth to use. Through Line In or Microphone In ports, the sound card receives analog audio and digitally
samples it at the specified rate. Adobe Audition stores each sample in sequence until you stop recording.
When you play a file in Adobe Audition, the process happens in reverse. Adobe Audition sends a series of digital
samples to the sound card. The card reconstructs the original waveform and sends it as an analog signal through Line
Out ports to your speakers.
To sum up, the process of digitizing audio starts with a pressure wave in the air. A microphone converts this pressure
wave into voltage changes. A sound card converts these voltage changes into digital samples. After analog sound
becomes digital audio, Adobe Audition can record, edit, process, and mix it—the possibilities are limited only by your
imagination.

9
Last updated 6/16/2016
Chapter 3: Workspace and setup
Viewing, zooming, and navigating audio
Comparing the Waveform and Multitrack editors
Adobe Audition provides different views for editing audio files and creating multitrack mixes. To edit individual files,
use the Waveform Editor. To mix multiple files and integrate them with video, use the Multitrack Editor.
The Waveform and Multitrack editors use different editing methods, and each has unique advantages. The Waveform
Editor uses a destructive method, which changes audio data, permanently altering saved files. Such permanent changes
are preferable when converting sample rate and bit depth, mastering, or batch processing. The Multitrack Editor uses
a nondestructive method, which is impermanent and instantaneous, requiring more processing power, but increasing
flexibility. This flexibility is preferable when gradually building and reevaluating a multilayered musical composition
or video soundtrack.
You can combine destructive and nondestructive editing to suit the needs of a project. If a multitrack clip requires
destructive editing, for example, simply double-click it to enter the Waveform Editor. Likewise, if an edited waveform
contains recent changes that you dislike, use the Undo command to revert to previous states—destructive edits aren’t
applied until you save a file.
For more information about the Waveform Editor, see Editing audio files ; for more information about the Multitrack
Editor, see Mixing multitrack sessions .
Basic components of the editors
Though available options differ in the Waveform and Multitrack editors, both views share basic components, such as
the tool and status bars, and the Editor panel.
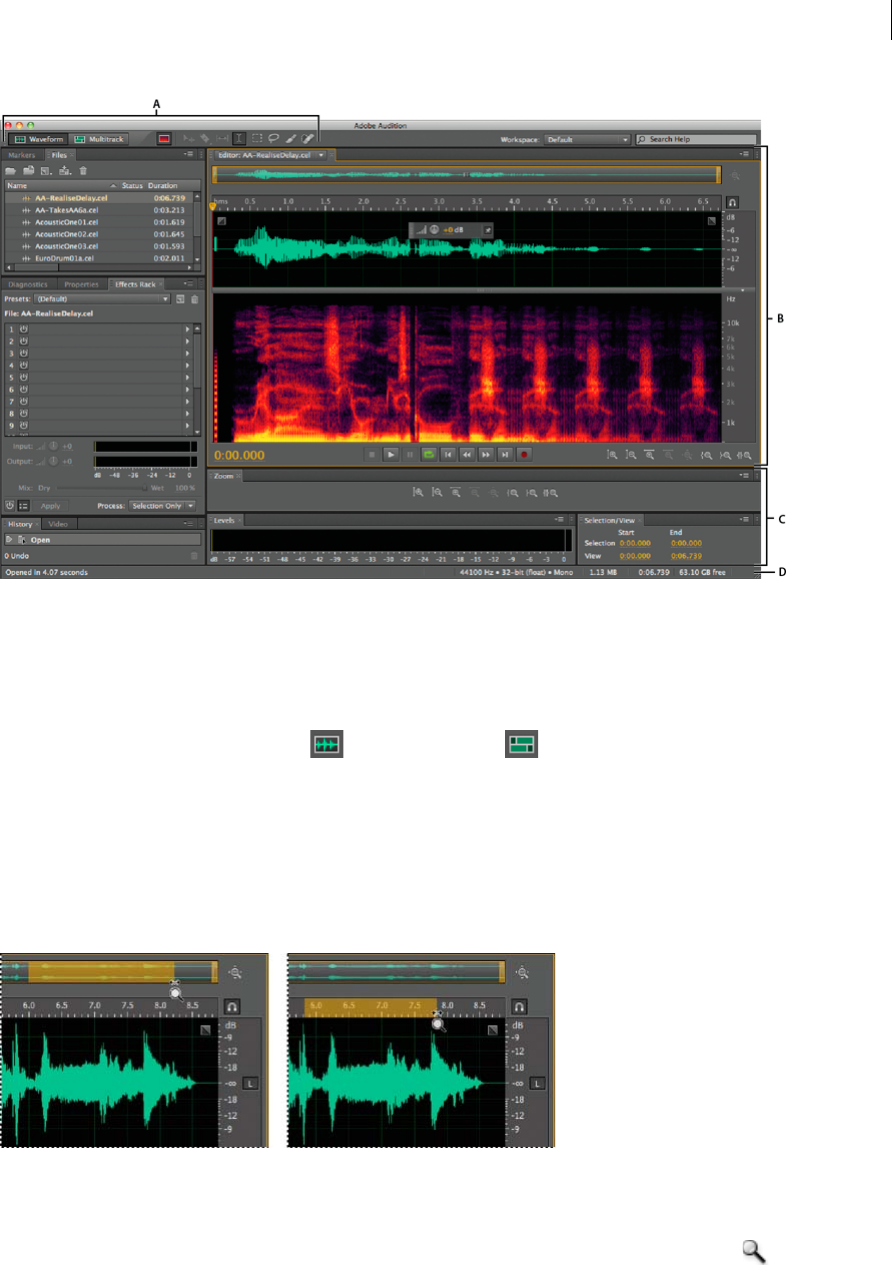
10
Workspace and setup
Last updated 6/16/2016
A View buttons and toolbar B Editor panel with zoom navigator at top C Various other panels D Status bar
Switch editors
Do one of the following:
•From the View menu, choose Waveform or Multitrack Editor.
•In the toolbar, click the Waveform or Multitrack Editor button.
•In the Multitrack Editor, double-click an audio clip to open it in the Waveform Editor. Alternatively, double-click
a file in the Files panel.
•In the Waveform Editor, choose Edit > Edit Original to open the multitrack session that created a mixdown file.
(This command requires embedded metadata in the file. See Link sessions to exported mixdown files.)
Zoom audio in the Editor panel
A Zoom navigator B Timeline ruler
Zoom into a specific time range
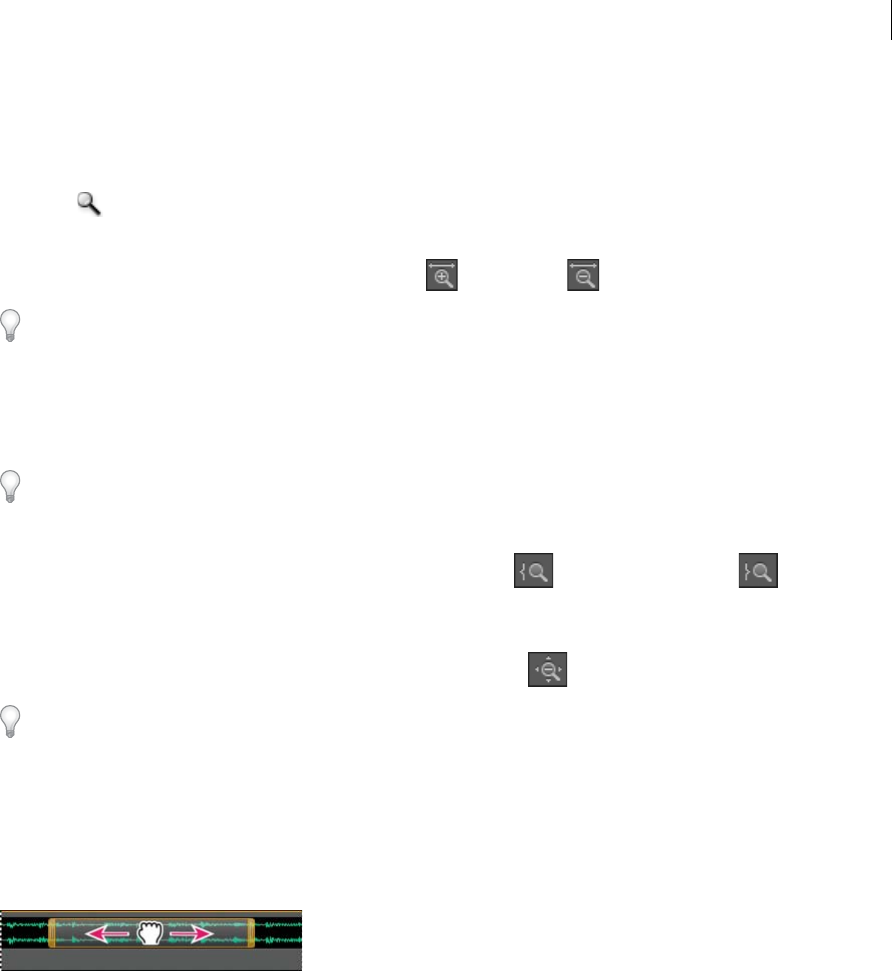
In either the zoom navigator or the timeline ruler, right-click and drag. The magnifying glass icon creates a
selection showing the range that will fill the Editor panel.
Zoom into a specific frequency range
11
Workspace and setup
Last updated 6/16/2016
In the vertical ruler for the spectral display, right-click and drag. (See View audio waveforms and spectrums.)
Extend or shorten the displayed range
Place the pointer over the left or right edge of the highlighted area in the zoom navigator, and then drag the magnifying
glass icon .
Gradually zoom in or out
In the lower right of the Editor panel, click the Zoom In or Zoom Out button.
You can set the Zoom Factor in the General section of the Preferences dialog box. (See Customize preferences.)
Zoom with the mouse wheel or Mac trackpad
Place the pointer over the zoom navigator or ruler, and either roll the wheel or drag up or down with two fingers. (In
the Waveform Editor, this zoom method also works when the pointer is over the waveform.)
Roll or drag over the spectral display, and press Shift to switch between logarithmic and linear frequency scales.
(Logarithmic better reflects human hearing; linear makes individual frequencies more visually distinct.)
Magnify selected audio
In the lower right of the Editor panel, click the Zoom In At In Point , Zoom In At Out Point , or Zoom To
Selection buttons.
Display the entire audio file or multitrack session
In the lower right of the Editor panel, click the Zoom Out Full button .
To display zoom buttons in a separate panel, choose Window > Zoom.
Navigate through time
At higher zoom levels, you can navigate to different audio content in the Editor panel.
Navigate by scrolling
•In the zoom navigator, drag left or right.
•To scroll through audio frequencies in the spectral display, drag up or down in the vertical ruler. (See View audio
waveforms and spectrums.)
Navigate with the Selection/View panel
The Selection/View panel shows the start and end of the current selection and view in the Editor panel. The panel
displays this information in the current time format, such as Decimal or Bars And Beats. (See Change the time display
format.)
1To display the Selection/View panel, choose Window > Selection/View Controls.
2(Optional) Enter new values into the Begin, End, or Duration boxes to change the selection or view.
12
Workspace and setup
Last updated 6/16/2016
More Help topics
Keys for playing and zooming audio
Monitoring time
Position the current-time indicator
Dock, group, or float panels
Customizing workspaces
About workspaces
Adobe video and audio applications provide a consistent, customizable workspace. Although each application has its
own set of panels (such as Project, Metadata, and Timeline), you move and group panels in the same way across
products.
The main window of a program is the application window. Panels are organized in this window in an arrangement
called a workspace. The default workspace contains groups of panels as well as panels that stand alone.
You customize a workspace by arranging panels in the layout that best suits your working style. As you rearrange panels,
the other panels resize automatically to fit the window. You can create and save several custom workspaces for different
tasks—for example, one for editing and one for previewing.
You can use floating windows to create a workspace more like workspaces in previous versions of Adobe applications,
or to place panels on multiple monitors.
In these two tutorials Andrew Devis from Creative Cow shows how to use different workspaces, and how to customize
your workspace.
A Application window B Grouped panels C Individual panel
13
Last updated 6/16/2016
Workspace and setup
Choose a workspace
Each Adobe video and audio application includes several predefined workspaces that optimize the layout of panels for
specific tasks. When you choose one of these workspaces, or any custom workspaces you’ve saved, the current
workspace is redrawn accordingly.
Open the project you want to work on, choose Window > Workspace, and select the desired workspace.
Dock, group, or float panels
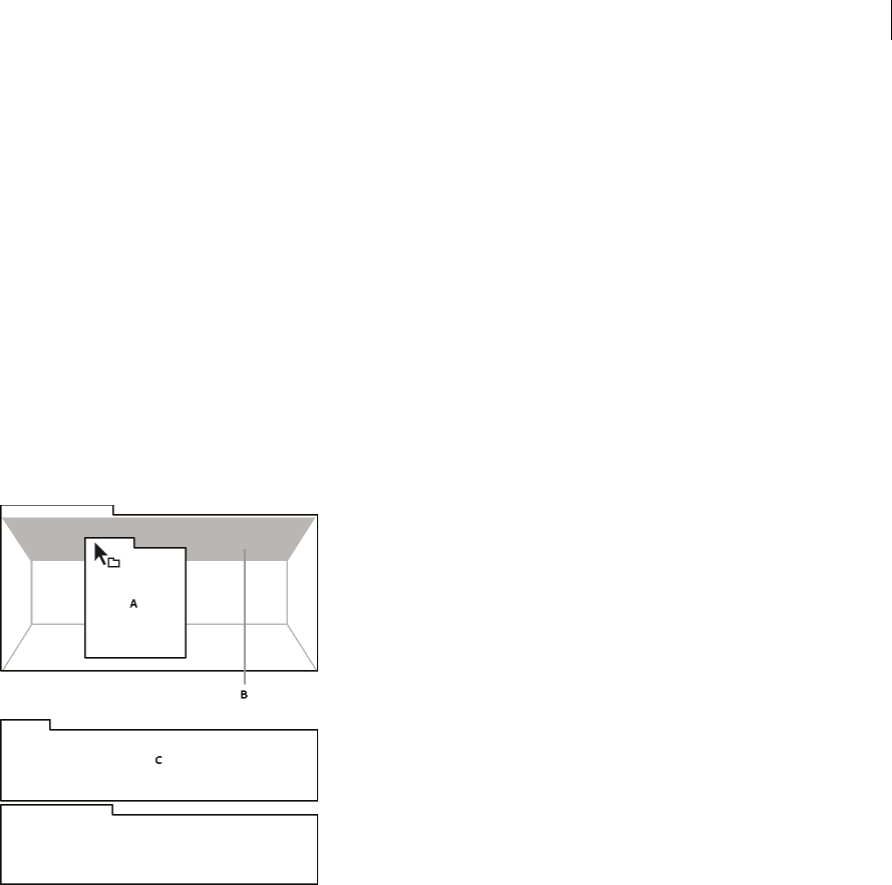
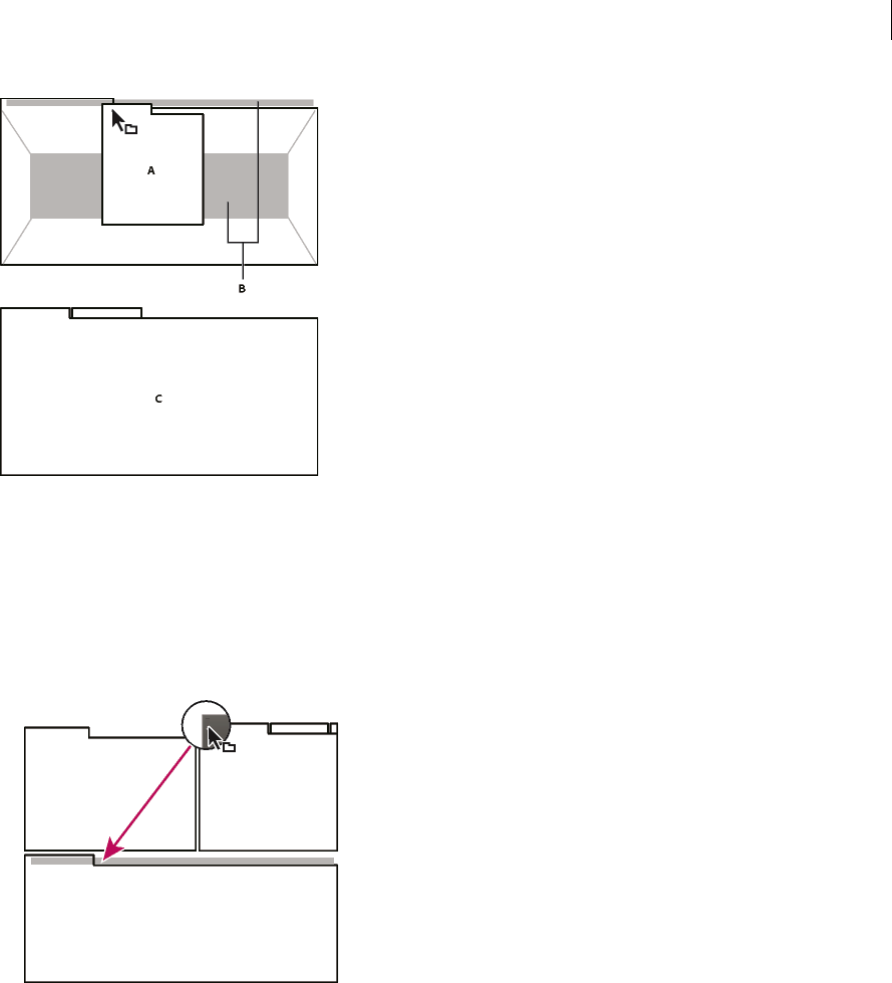
You can dock panels together, move them into or out of groups, and undock them so they float above the application
window. As you drag a panel, drop zones—areas onto which you can move the panel—become highlighted. The drop
zone you choose determines where the panel is inserted, and whether it docks or groups with other panels.
Docking zones
Docking zones exist along the edges of a panel, group, or window. Docking a panel places it adjacent to the existing
group, resizing all groups to accommodate the new panel.
Grouping zones
Grouping zones exist in the middle of a panel or group, and along the tab area of panels. Dropping a panel on a grouping
zone stacks it with other panels.
14
Workspace and setup
Last updated 6/16/2016
Dock or group panels
1If the panel you want to dock or group is not visible, choose it from the Window menu.
2Do one of the following:
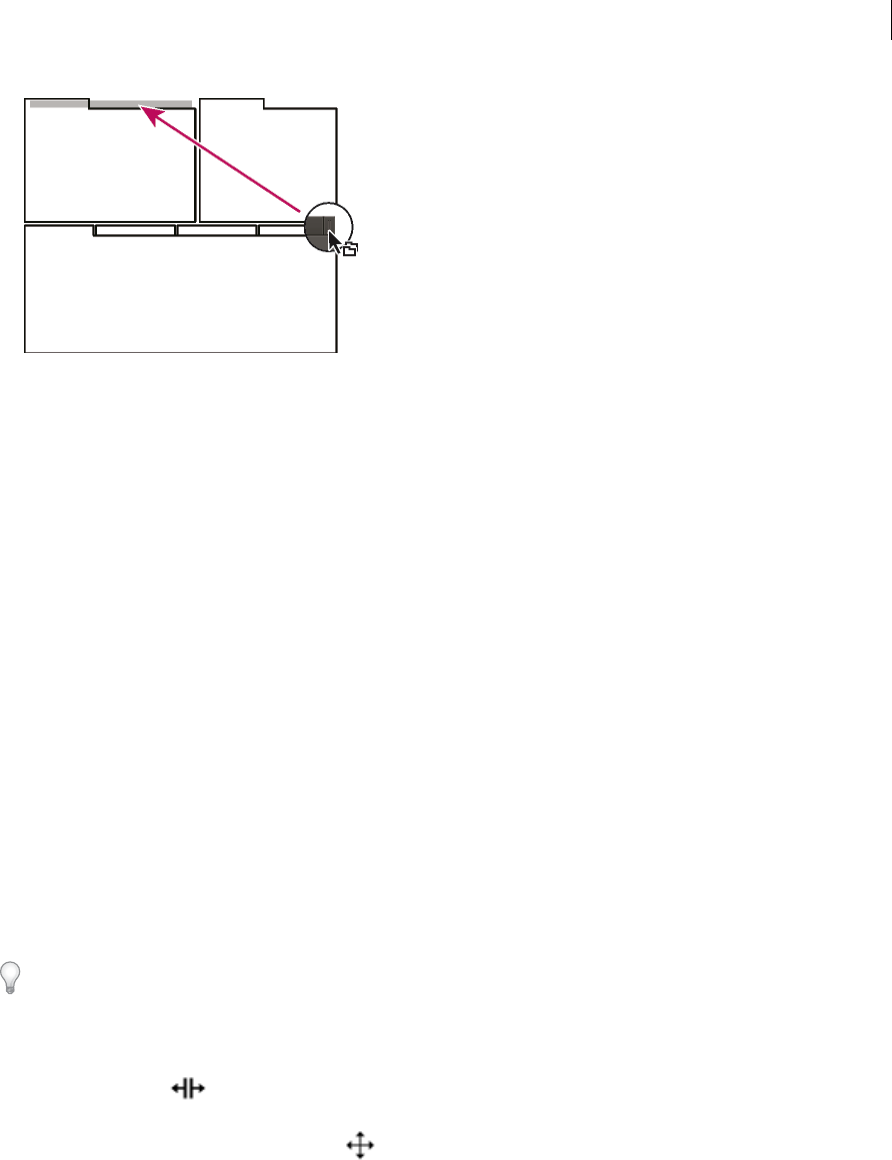
•To move an individual panel, drag the gripper area in the upper-left corner of a panel’s tab onto the desired drop
zone.
•To move an entire group, drag the group gripper in the upper-right corner onto the desired drop zone.
15
Workspace and setup
Last updated 6/16/2016
The application docks or groups the panel, according to the type of drop zone.
Undock a panel in a floating window
When you undock a panel in a floating window, you can add panels to the window and modify it similarly to the
application window. You can use floating windows to use a secondary monitor, or to create workspaces like the
workspaces in earlier versions of Adobe applications.
Select the panel you want to undock (if it’s not visible, choose it from the Window menu), and then do one of the
following:
•Choose Undock Panel or Undock Frame from the panel menu. Undock Frame undocks the panel group.
•Hold down Ctrl (Windows®) or Command (Mac OS®), and drag the panel or group from its current location.
When you release the mouse button, the panel or group appears in a new floating window.
•Drag the panel or group outside the application window. (If the application window is maximized, drag the panel
to the Windows taskbar.)
Resize panel groups
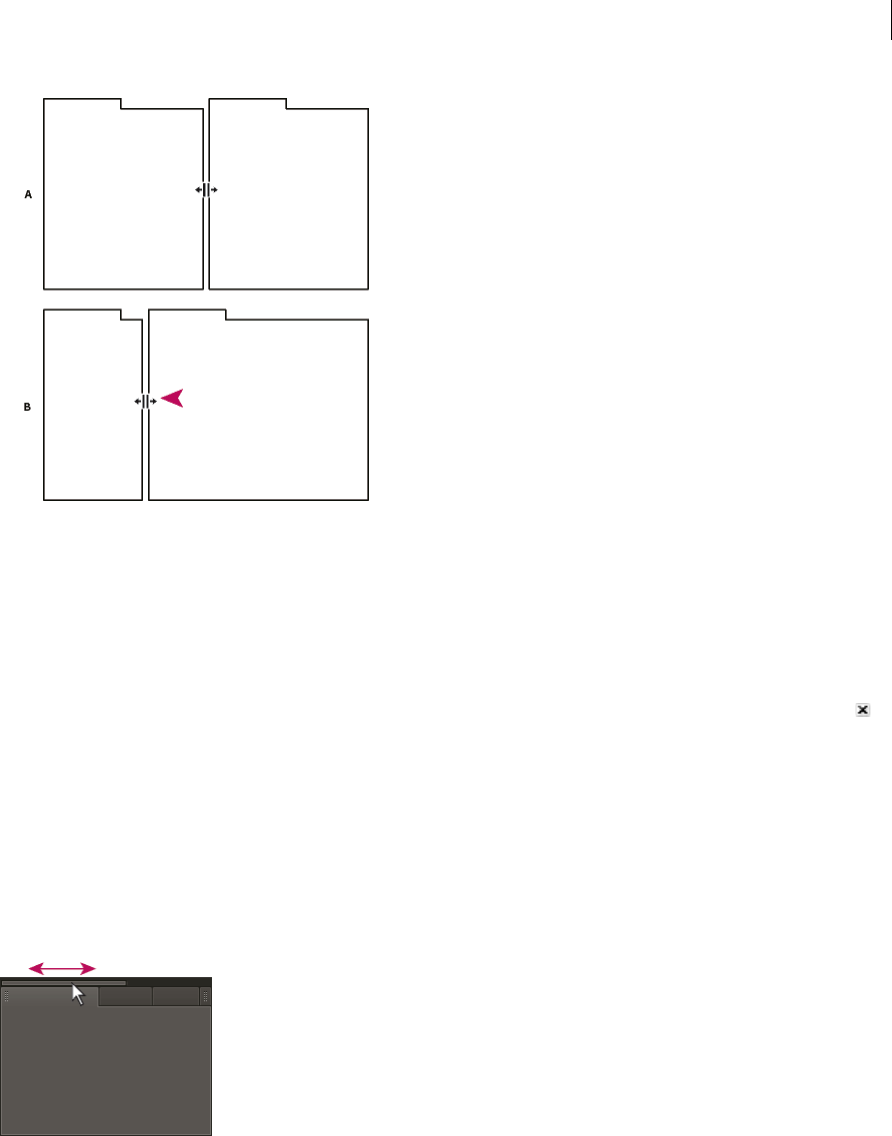
When you position the pointer over dividers between panel groups, resize icons appear. When you drag these icons, all
groups that share the divider are resized. For example, suppose your workspace contains three panel groups stacked
vertically. If you drag the divider between the bottom two groups, they are resized, but the topmost group doesn’t
change.
To quickly maximize a panel beneath the pointer, press the accent key. (Do not press Shift.) Press the accent key again
to return the panel to its original size.
1Do either of the following:
•To resize either horizontally or vertically, position the pointer between two panel groups. The pointer becomes
a double-arrow .
•To resize in both directions at once, position the pointer at the intersection between three or more panel groups.
The pointer becomes a four-way arrow .
2Hold down the mouse button, and drag to resize the panel groups.
16
Workspace and setup
Last updated 6/16/2016
A Original group with resize icon B Resized groups
Open, close, and scroll to panels
When you close a panel group in the application window, the other groups resize to use the newly available space. When
you close a floating window, the panels within it close, too.
•To open a panel, choose it from the Window menu.
•To close a panel or window, press Control-W (Windows) or Command-W (Mac OS), or click its Close button .
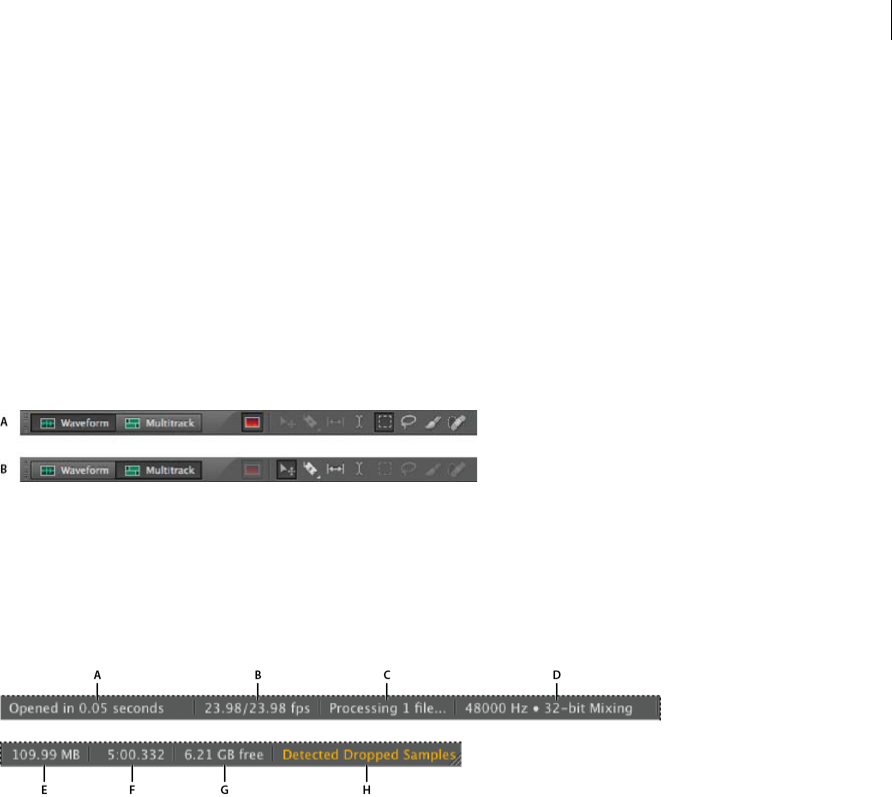
•To see all the panel tabs in a narrow panel group, drag the horizontal scroll bar.
•To bring a panel to the front of a group of panels, do one of the following:
•Click the tab of the panel you want in front.
•Hover the cursor above the tab area, and turn the mouse scroll wheel. Scrolling brings each panel to the front,
one after another.
•Drag tabs horizontally to change their order.
•To reveal panels hidden in a narrow panel group, drag the scroll bar above the panel group.
Working with multiple monitors
To increase the available screen space, use multiple monitors. When you work with multiple monitors, the application
window appears on one monitor, and you place floating windows on the second monitor. Monitor configurations are
stored in the workspace.
17
Workspace and setup
Last updated 6/16/2016
Display the toolbar
The toolbar provides quick access to tools, the Workspace menu, and buttons that toggle between the Waveform and
Multitrack editors. Some tools are unique to each view. Likewise, some Waveform Editor tools are available only in the
spectral display.
By default, the toolbar is docked immediately below the menu bar. However, you can undock the toolbar, converting it
to the Tools panel, which you can manipulate like any other panel.
•To show or hide the toolbar, choose Window > Tools. A check mark by the Tools command indicates that it is shown.
•To undock the toolbar from its default location, drag the handle at the left edge to another location in the work area.
•To redock the Tools panel in its default location, drag the Tools panel tab to the drop zone that spans the entire width
of the Adobe Audition window, just under the menu bar.
A Waveform Editor tools for spectral display B Multitrack Editor tools
Display the status bar
The status bar runs across the bottom of the Adobe Audition work area. The far left of the status bar indicates the time
required to open, save, or process a file, as well as the current transport status (Playing, Recording, or Stopped). The far
right of the bar displays various information that you can customize.
A Time to open, save, or process file B Video Frame Rate C File Status D Sample Type E Uncompressed Audio Size F Duration G Free Space
H Detect Dropped Samples
•To show or hide the status bar, choose View > Status Bar > Show. A check mark indicates that the status bar is visible.
•To change the information displayed at the far right of the bar, choose View > Status Bar, or right-click the bar. Then
select from the following options:
Show Data Under Cusror: Displays the frequency, time, channel, and amplitude information at the location under
the cursor.
Video Frame Rate: Displays the current and target frame rate of open video files in the Multitrack Editor.
File Status: Indicates when processing is occurring for effects and amplitude adjustments.
Sample Type: Displays sample information about the currently opened waveform (Waveform Editor) or session file
(Multitrack Editor). For example, a 44,100 Hz, 16-bit stereo file is displayed as 44100 Hz • 16-bit • Stereo.
Uncompressed Audio Size: Indicates either how large the active audio file would be if saved to an uncompressed
format such as WAV and AIFF, or the total size of a multitrack session.
Duration: Shows you the length of the current waveform or session. For example, 0:01:247 means the waveform or
session is 1.247 seconds long.
Free Space: Shows how much space is available on your hard drive.

18
Workspace and setup
Free Space (Time): Displays the time remaining for recording, based upon the currently selected sample rate. This
value is shown as minutes, seconds, and thousandths of seconds. For example, if Adobe Audition is set to record
8-bit mono audio at 11,025 Hz, the time remaining might read 4399:15.527 free. Change the recording options to
16-bit stereo at 44,100 Hz, and the time remaining becomes 680:44.736 free.
Tip: By default, Free Space (Time) information is hidden. To show it, right-click the status bar, and select Free Space
(Time) from the pop-up menu.
Detect Dropped Samples: Indicates that samples were missing during recording or playback. If this indicator
appears, consider rerecording the file to avoid audible dropouts.
Change interface colors, brightness, and performance
1Choose Edit > Preferences > Appearance (Windows) or Audition > Preferences > Appearance (Mac OS).
2Adjust any of the following options, and then click OK:PresetsApplies, saves, or deletes a combination of Colors and
Brightness settings.ColorsClick a swatch to change the color of waveforms, selections, or the current-time
indicator.BrightnessBrightens or darkens panels, windows, and dialog boxes.Use GradientsWhen deselected,
removes shadows and highlights from panels, buttons, and meters.
Save, reset, or delete workspaces
Save a custom workspace
As you customize a workspace, the application tracks your changes, storing the most recent layout. To store a specific
layout more permanently, save a custom workspace. Saved custom workspaces appear in the Workspace menu, where
you can return to and reset them.
Arrange the frames and panels as desired, and then choose Window > Workspace > New Workspace. Type a name
for the workspace, and click OK.
Note: (After Effects, Premiere Pro, Encore) If a project saved with a custom workspace is opened on another system, the
application looks for a workspace with a matching name. If it can’t find a match (or the monitor configuration doesn’t
match), it uses the current local workspace.
Reset a workspace
Reset the current workspace to return to its original, saved layout of panels.
Choose Window > Workspace > Reset workspace name.
Delete a workspace
1 Choose Window > Workspace >Delete Workspace.
2 Choose the workspace you want to delete, and then click OK.
Note: You cannot delete the currently active workspace.
More Help topics
Comparing the Waveform and Multitrack editors
Basic components of the editors
Last updated 6/16/2016
19
Workspace and setup
Last updated 6/16/2016
Connecting to audio hardware in Audition
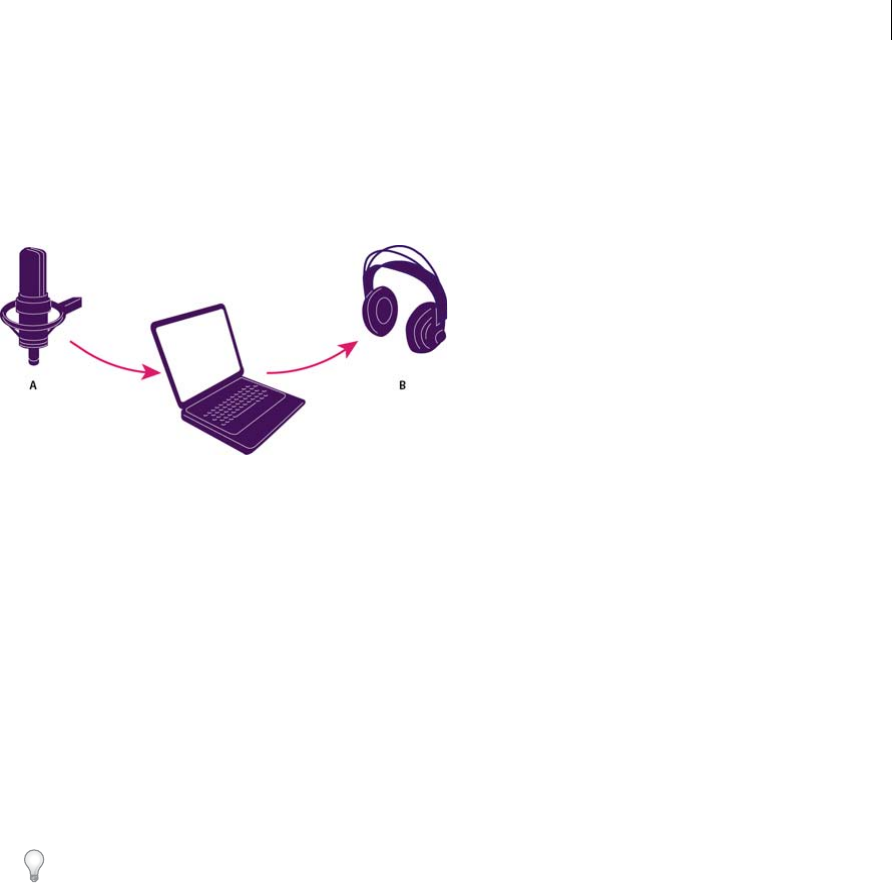
You can use a wide range of hardware inputs and outputs with Adobe Audition. Sound card inputs let you bring in audio
from sources such as microphones, tape decks, and digital effects units. Sound card outputs let you monitor audio
through sources such as speakers and headphones.
A Sound card inputs connect to sources such as microphones and tape decks. B Sound card outputs connect to speakers and headphones.
Configure audio inputs and outputs
When you configure inputs and outputs for recording and playback, Adobe Audition can use these kinds of sound card
drivers:
•In Windows, ASIO drivers support professional cards and MME drivers typically support standard cards.
•In Mac OS, CoreAudio drivers support both professional and standard cards.
ASIO and CoreAudio drivers are preferable because they provide better performance and lower latency. You can also
monitor audio as you record it and instantly hear volume, pan, and effects changes during playback.
1Choose Edit > Preferences > Audio Hardware (Windows) or Audition > Preferences > Audio Hardware (Mac OS).
2From the Device Class menu, choose the driver for the sound card you want to use.
3Choose a Default Input and Output from the card.
In the Multitrack Editor, you can override the defaults for specific tracks. See Assign audio inputs and outputs to
tracks.
4(MME and CoreAudio) For Master Clock, choose the input or output to which you want other digital audio
hardware to synchronize (ensuring accurate alignment of samples).
5For I/O Buffer Size (ASIO and CoreAudio) or Latency (MME), specify the lowest setting possible without audio
dropouts. The ideal setting depends on the speed of your system, so some experimentation may be necessary.
6Choose a Sample Rate for the audio hardware. (For common rates for different output mediums, see Understanding
sample rate.)
7(Optional) To optimize the performance of ASIO and CoreAudio cards, click Settings. For more information,
consult the documentation for the sound card.
Note: By default, Adobe Audition controls ASIO sound cards while playing or monitoring audio. If you want to access the
card in another application, select Release ASIO Driver In Background. (Audition still controls the card while recording to
avoid having recordings suddenly stop.)

20
Workspace and setup
Apply machine-specific hardware settings for network users
In network environments, Audition preferences are stored with each user account. For editing, interface, and other
preferences, this creates a customized experience for each user. Audio hardware preferences, however, should typically
remain consistent on a given machine, ensuring that inputs and outputs on the installed audio interface are available in
Audition.
1Choose Edit > Preferences > Audio Hardware (Windows) or Audition > Preferences > Audio Hardware (Mac OS).
2At the bottom of the Audio Hardware settings, select Use Machine-Specific Device Defaults. (Deselect this option
only if users move an assigned audio interface from machine to machine.)
To instead duplicate hardware settings from one machine to others, search for and copy the
MachineSpecificSettings.xml file.
Assign file channels to inputs and outputs
1Choose Edit > Preferences > Audio Channel Mapping (Windows) or Audition > Preferences > Audio Channel
Mapping (Mac OS).
2To the far right of items in the Input and Output lists, click the triangles to choose a hardware port for each file
channel.
This procedure also sets default outputs for the Master track in the Multitrack Editor. To override the defaults, see
Assign audio inputs and outputs to tracks.
More Help topics
Monitoring 5.1 surround sound
Customizing and saving application settings
Customize preferences
The Preferences dialog box lets you customize Adobe Audition’s display, editing behavior, use of hard disk space, and
other settings.
Choose Edit > Preferences (Windows) or Audition > Preferences (Mac OS). Then choose the area you want to
customize.
For information about a particular option, hover the mouse over it until a tooltip appears.
In the Media & Disk Cache preferences, choose your fastest drive for the Primary Temp folder, and a separate drive for
the Secondary Temp folder. Select Save Peak Files to store information about how to display WAV files. (Without peak
files, larger WAV files reopen more slowly.)
Restore preferences to default settings
Unexpected behavior may indicate damaged preferences files. To re-create preferences files, do the following.
Hold down the Shift key, and start Adobe Audition.
Last updated 6/16/2016

21
Workspace and setup
Last updated 6/16/2016
Export and import customized application settings
Application settings files store all current preferences, effect settings, and workspaces. Export and import these files to
store groups of customized settings for specific workflows, or transfer favorite settings to another machine.
1Choose File > Export > Application Settings. Then specify a filename and location.
2To reapply the settings at a later time, choose File > Import > Application Settings.
To import preferences from Audition 2.0 or 3.0, search your system for the audition_settings.xml file. You can import
that file into both the Mac and Windows versions of Audition CS.
More Help topics
Change interface colors, brightness, and performance
Configure audio inputs and outputs
Working with markers
Customize the spectral display
Change the time display format
Navigating time and playing audio
Default keyboard shortcuts
These partial lists include the shortcuts that Adobe Audition experts find most useful. For a complete list of shortcuts,
choose Edit > Keyboard Shortcuts.
Keys for playing and zooming audio
Result Windows shortcut Mac OS shortcut
Toggle between Waveform and Multitrack
Editor
8 8
Start and stop playback Spacebar Spacebar
Move current-time indicator to beginning of
timeline
Home Home
Move current-time indicator to end of
timeline
End End
Move current-time indicator to previous
marker, clip, or selection edge
Ctrl+left arrow Command+left arrow
Move current-time indicator to next marker,
clip, or selection edge
Ctrl+right arrow Command+right arrow
Toggle preference for Return CTI To Start
Position On Stop
Shift+X Shift+X
Zoom in horizontally = =
Zoom in vertically Alt+= Option+=
Zoom out horizontally - -

22
Workspace and setup
Last updated 6/16/2016
Keys for editing audio files
The following keyboard shortcuts apply only in the Waveform Editor.
Keys for mixing multitrack sessions
The following keyboard shortcuts apply only in the Multitrack Editor.
Zoom out vertically Alt+minus sign Option+minus sign
Add marker M or * (asterisk) M or * (asterisk)
Move to previous marker Crtl+Alt+left arrow Cmd+Option+left arrow
Move to next marker Crtl+Alt+right arrow Cmd+Option+right arrow
Result Windows shortcut Mac OS shortcut
Repeat previous command (opening its
dialog box and clicking OK)
Shift+R Shift+R
Repeat previous command (opening its
dialog box but not clicking OK)
Ctrl+R Command+R
Open Convert Sample Type dialog box Shift+T Shift+T
Capture a noise reduction profile for the Noise
Reduction effect
Shift+P Shift+P
Activate left channel of a stereo file for editing Up arrow Up arrow
Activate right channel of a stereo file for
editing
Down arrow Down arrow
Make spectral display more logarithmic or
linear
Ctrl+Alt+up or down arrow Option+Command+up or down arrow
Make spectral display fully logarithmic or
linear
Ctrl+Alt+Page Up or Down Option+Command+Page Up or Down
Increase or decrease spectral resolution Shift+Ctrl+up or down arrow Shift+Command-up or down arrow
Result Windows shortcut Mac OS shortcut
Select the same input or output for all audio
tracks
Ctrl+Shift-select Command+Shift-select
Activate or deactivate Mute, Solo, Arm For
Record, or Monitor Input in all tracks
Ctrl+Shift-click Command+Shift-click
Adjust knobs in large increments Shift-drag Shift-drag
Adjust knobs in small increments Ctrl-drag Command-drag
Nudge selected clip to the left Alt+comma Option+comma
Nudge selected clip to the right Alt+period Alt+period
Maintain keyframe time position or parameter
value
Shift-drag Shift-drag
Reposition envelope segment without
creating keyframe
Ctrl-drag Command-drag

23
Workspace and setup
Last updated 6/16/2016
More Help topics
Customize shortcuts
Finding and customizing shortcuts
Adobe Audition provides a default set of keyboard shortcuts to help you speed up the editing process. In menus and
tool tips, available keyboard shortcuts appear to the right of command and button names. You can customize nearly all
default shortcuts and add shortcuts for other functions.
Find shortcuts
Do any of the following:
•For menu commands, look for shortcuts to the right of command names.
•For tools or buttons, look for shortcuts to the right of tool tips. (To display tool tips, hold the pointer over a tool
or button.)
•For a complete list of all shortcuts, choose Edit > Keyboard Shortcuts.
Customize shortcuts
You can customize nearly all default keyboard shortcuts and add shortcuts for other commands.
1Choose Edit > Keyboard Shortcuts.
2In the Command column, select the command you want to customize.
3If you want to replace or remove an existing shortcut, choose it from the Shortcuts For Command menu.
4Do any of the following:
•To create a shortcut, click inside the Press Shortcut box, and press the desired key combination. Then click
Assign.
•To remove a shortcut, click Remove.
If you enter a key combination that’s already in use, Audition displays an alert. Click Yes to transfer the shortcut to
a different command, or No to retain the existing assignment.
Assign shortcuts to the Workspace commands to quickly switch between custom panel layouts.
Save or delete custom sets of shortcuts
1Choose Edit > Keyboard Shortcuts.
2Do either of the following:
•To save a custom set, click Save As, enter a name, and click OK.
•To delete a custom set, choose it from the Set menu, and then click Delete.
Restore the default shortcuts
1Choose Edit > Keyboard Shortcuts.
2From the Set menu, choose Default Set.

24
Last updated 6/16/2016
Chapter 4: Importing, recording, and
playing
Create, open, or import files for Adobe Audition
Create a new, blank audio file
New, blank audio files are perfect for recording new audio or combining pasted audio.
1Choose File > New > Audio File.
To quickly create a file from selected audio in an open file, choose Edit > Copy To New. (See Copy or cut audio data.)
2Enter a filename, and set the following options:
Sample Rate Determines the frequency range of the file. To reproduce a given frequency, the sample rate must be
at least twice that frequency. (See Understanding sample rate.)
Channels Determines if the waveform is mono, stereo, 5.1 surround. Audition saves the last five custom audio
channel layouts that you had used for quick access.
Note: Certain custom channel layout settings are not supported by all file formats.
For voice-only recordings, the mono option is a good choice that results in quicker processing and smaller files.
Bit Depth Determines the amplitude range of the file. The 32-bit level provides maximum processing flexibility in
Adobe Audition. For compatibility with common applications, however, convert to a lower bit depth when editing
is complete. (See Understanding bit depthand Change the bit depth of a file.)
Create a new multitrack session
Session (*.sesx) files contain no audio data themselves. Instead, they are small XML-based files that point to other audio
and video files on the hard drive. A session file keeps track of which files are a part of the session, where they are
inserted, which envelopes and effects are applied, and so on.
To examine settings in detail, SESX files can be opened in text editors or stored in version control systems (such as
Perforce or Git, which are popular in the gaming industry).
1Choose File > New > Multitrack Session.
2Enter a filename and location, and set the following options:
Template Specifies either a default template or one you've created. Session templates specify source files and settings
such as Sample Rate and Bit Depth.
25
Importing, recording, and playing
Last updated 6/16/2016
Sample Rate Determines the frequency range of the session. To reproduce a given frequency, the sample rate must
be at least twice that frequency. (See Understanding sample rate.)
Note: All files added to a session must share the sample rate. If you attempt to import files with different sample rates,
Adobe Audition prompts you to resample them, which may lower audio quality. To change resampling quality, adjust
the Sample Rate Conversion settings in the Data preferences.
Bit Depth Determines the amplitude range of the session, including recordings and files created with the Multitrack
> Mixdown To New File command. (See Understanding bit depth.)
Note: Choose a bit depth carefully, because it cannot be changed after you create a session. Ideally, you should work at
the 32-bit level with fast systems. If your system performs slowly, try a lower bit depth.
Master Determines whether tracks are mixed down to a mono, stereo, or 5.1 Master track. (See Routing audio to
buses, sends, and the Master track.)
Open existing audio files and multitrack mixes
The following file types open in the Multitrack Editor: Audition Session, Audition 3.0 XML, Adobe Premiere Pro
Sequence XML, Final Cut Pro XML Interchange, and OMF.
All other supported file types open in the Waveform Editor, including the audio portion of video files.
Note: SES session files from Audition 3.0 and earlier are unsupported. If you have Audition 3.0, save sessions to XML
format to open them in later versions.
1Choose File > Open.
2Select an audio or video file. (See Supported import formats.)
If you don’t see the file you want, choose All Supported Media from the menu at the bottom of the dialog box.
Append audio files to another
Append files with CD Track markers to quickly assemble audio and apply consistent processing.
1In the Waveform Editor, do either of the following:
•To add to the active file, choose File > Open Append > To Current.
•To add to a new file, choose File > Open Append > To New.
2
In the Open Append dialog box, select one or more files.
Note: If the selected files have a different sample rate, bit depth, or channel type than the open file, Audition converts
the selected files to match the open file. For the best results, append files with the same sample type as the original file.

26
Importing, recording, and playing
Last updated 6/16/2016
3Click Open.
Import a file as raw data
If you can’t open a particular file, it may lack necessary header information that describes the sample type. To manually
specify this information, import the file as raw data.
1Choose File > Import > Raw Data.
2Select the file, and click Open.
3Set the following options:
Sample Rate Should match the known rate of the file, if possible. For examples of common settings, see
Understanding sample rate. Adobe Audition can import raw data with rates ranging from 1 to 10,000,000 Hz, but
playback and recording are supported only between 6000 Hz and 192,000 Hz.
Channels Enter a number from 1 to 32.
Encoding Specifies the data storage scheme for the file. If you are unsure what encoding the file uses, consult the
supplier of the file, or the documentation for the application that created it. In many cases, trial and error might be
necessary.
Byte Order Specifies the numerical sequence for bytes of data. The Little-Endian method is common to WAV files,
while the Big-Endian method is common to AIFF files. The Default Byte Order automatically applies the default for
your system processor and is typically the best option.
Start Byte Offset Specifies the data point in the file at which the import process should begin.
Insert an audio file into a multitrack session
When you insert an audio file in the Multitrack Editor, the file becomes an audio clip on the selected track. If you insert
several files at once, or a single file that’s longer than the space available on the selected track, Adobe Audition inserts
new clips on the nearest empty tracks.
1In the Multitrack Editor, select a track, and then place the playhead at the desired time position.
2Choose Multitrack > Insert Files.
3Select an audio or video file. (See Supported import formats.)
Drag ranges from the Markers panel to the Multitrack Editor to automatically convert them to clips.
Spot-insert a Broadcast Wave file into a session
When you insert a Broadcast Wave (BWF) file into a multitrack session, Adobe Audition can use the embedded
timestamp to insert the file at a specific time. This is commonly called spot-inserting.
1Choose Edit > Preferences > Multitrack (Windows) or Audition > Preferences > Multitrack (Mac OS).
2Select Use Embedded Timecode When Inserting Clips Into Multitrack.
3In the Multitrack Editor, select a track.
4Choose Multitrack > Insert Files, and select one or more BWF files.
Adobe Audition inserts an audio clip at the designated start time.
To view or edit the timestamp for a BWF clip, open the clip in the Waveform Editor, and then choose Window >
Metadata. On the BWF tab, the timestamp value appears as the Time Reference.

27
Importing, recording, and playing
Last updated 6/16/2016
More Help topics
About multitrack sessions
Insert a video file into a multitrack session
Importing with the Files panel
Arranging and editing clips
Viewing and editing XMP metadata
Importing with the Files panel
The Files panel displays a list of open audio and video files for easy access.
Double-click an empty area of the file list to quickly access the Open File dialog box.
Import files into the Files panel
Import files into the Files panel if you want to retain the currently open file in the Editor panel. This technique is
particularly helpful when assembling files for a multitrack session.
1Do either of the following:
•In the Files panel, click the Import File button .
•Choose File > Import > File.
2Select an audio or video file. (See Supported import formats.)
Insert from the Files panel into a multitrack session
1In the Files panel, select the files you want to insert.
To select multiple adjacent files, click the first file in the desired range, and then Shift-click the last. To select
nonadjacent files, Ctrl-click (Windows) or Command-click (Mac OS).
2At the top of the Files panel, click the Insert Into Multitrack button . Then choose either New Multitrack
Session (see Create a new multitrack session) or an open session.
The files are inserted on separate tracks at the current time position.
Change displayed metadata in the Files panel
1In the upper right of the Files panel, click the menu icon , and choose Metadata Display.
2Select the metadata you want to display, and click OK
3To move metadata columns left or right, drag column headers such as Name or Duration.
To change the sort order of files, click column headers.
More Help topics
Viewing and editing XMP metadata

28
Importing, recording, and playing
Last updated 6/16/2016
Supported import formats
Audio import formats
Adobe Audition can open audio files in the following formats:
•AAC (including HE-AAC)
•AIF, AIFF, AIFC (including files with up to 32 channels)
There are many different variations of AIFF format. Audition can open all uncompressed AIFF files and most common
compressed versions.
Note: To see Author metadata in AIFF files, view the Dublin Core: Creator field on the XMP tab of the Metadata panel.
(See Viewing and editing XMP metadata .)
•AC-3
•APE
•AU
•AVR
•BWF
•CAF (all uncompressed and most compressed versions)
•EC-3
•FLAC
•HTK
•IFF
•M4A
•MAT
•MPC
•MP2
•MP3 (including MP3-surround files)
•OGA, OGG
•PAF
•PCM
•PVF
•RAW
•RF64
•SD2
•SDS
•SF
•SND

29
Importing, recording, and playing
Last updated 6/16/2016
•VOC
•VOX
•W64
•WAV (including files with up to 32 channels)
There are many different variations of WAV format. Adobe Audiition can open all uncompressed WAV files and most
common compressed versions.
•WMA (Windows only, and enabled with DLMS Format Support in Media & Disk Cache preferences)
•WVE
•XI
Video import formats
The Waveform Editor lets you open the audio portion of video files in the formats below. The Multitrack Editor lets
you insert the same file types and provides a preview in the Video panel.
To access these video formats, install QuickTime. To import additional formats, extend QuickTime support. For more
information, see this article on the Apple website.
•AVI
•DV
•MOV
•MPEG-1
•MPEG-4
•3GPP and 3GPP2
Note: The following formats are enabled with DLMS Format Support in Media & Disk Cache preferences. This preference
is turned on by default.
•AVI (Windows only)
•FLV
•R3D
•SWF
•WMV
More Help topics
Saving and exporting files
Insert a video file into a multitrack session
Export sessions to OMF or Final Cut Pro Interchange format
Extracting audio from CDs

30
Importing, recording, and playing
Last updated 6/16/2016
Extract CD tracks with the Extract Audio From CD command
The Extract Audio From CD command is faster and provides more control, including the ability to optimize drive
speed and rename tracks.
1Place an audio CD in the computer’s CD-ROM drive.
2Choose File > Extract Audio From CD.
3For Drive, choose the drive that contains the audio CD.
4For Speed, choose from all the extraction speeds that the selected drive supports. The Maximum Speed option
usually produces satisfactory results, but if it produces errors, specify a slower speed.
5Do any of the following:
•To preview a track, click its Play button.
•To include or exclude tracks, click the checkboxes to the left of track numbers, or click Toggle All.
•To rename a track, double-click it.
6Audition CC only: Enable Extract to Single File to create a single file that contains all selected tracks.
Configure track information and CD databases
In the center of the Extract Audio From CD dialog box, Artist, Album, Genre, and Year information is drawn from the
specified CD database by default. To adjust these entries, do any of the following:
•To customize information, overwrite current entries.
•To insert original information from the database, click the Retrieve Titles icon .
•If a message indicates multiple matching records, click the arrows to insert different database records.
•To specify a different database and file naming convention, click the Title Settings icon . For details about each Title
Settings option, position the mouse over it until a tool tip appears.
Note: If multiple Artist entries are detected, Audition automatically selects the Compilation option. In the Title Settings
dialog box, enter a Separator For Compilations character to separate Artist and Track Title for each track.
Extract CD tracks with the Open command (Mac OS)
Note: This extraction method can greatly degrade Audition performance. The Extract Audio From CD command is usually
a better choice.
The Open command lets you extract tracks in AIFF format but requires Audition to continue reading audio data from
CD, slowing importing and editing.
1Place an audio CD in the computer’s CD-ROM drive.
2Choose File > Open.
3Choose QuickTime as the file type, and navigate to the CD-ROM drive.
4Select the tracks you want to extract, and click Open.
Navigate time and playing audio in Adobe Audition
31
Last updated 6/16/2016
Importing, recording, and playing
Monitoring time
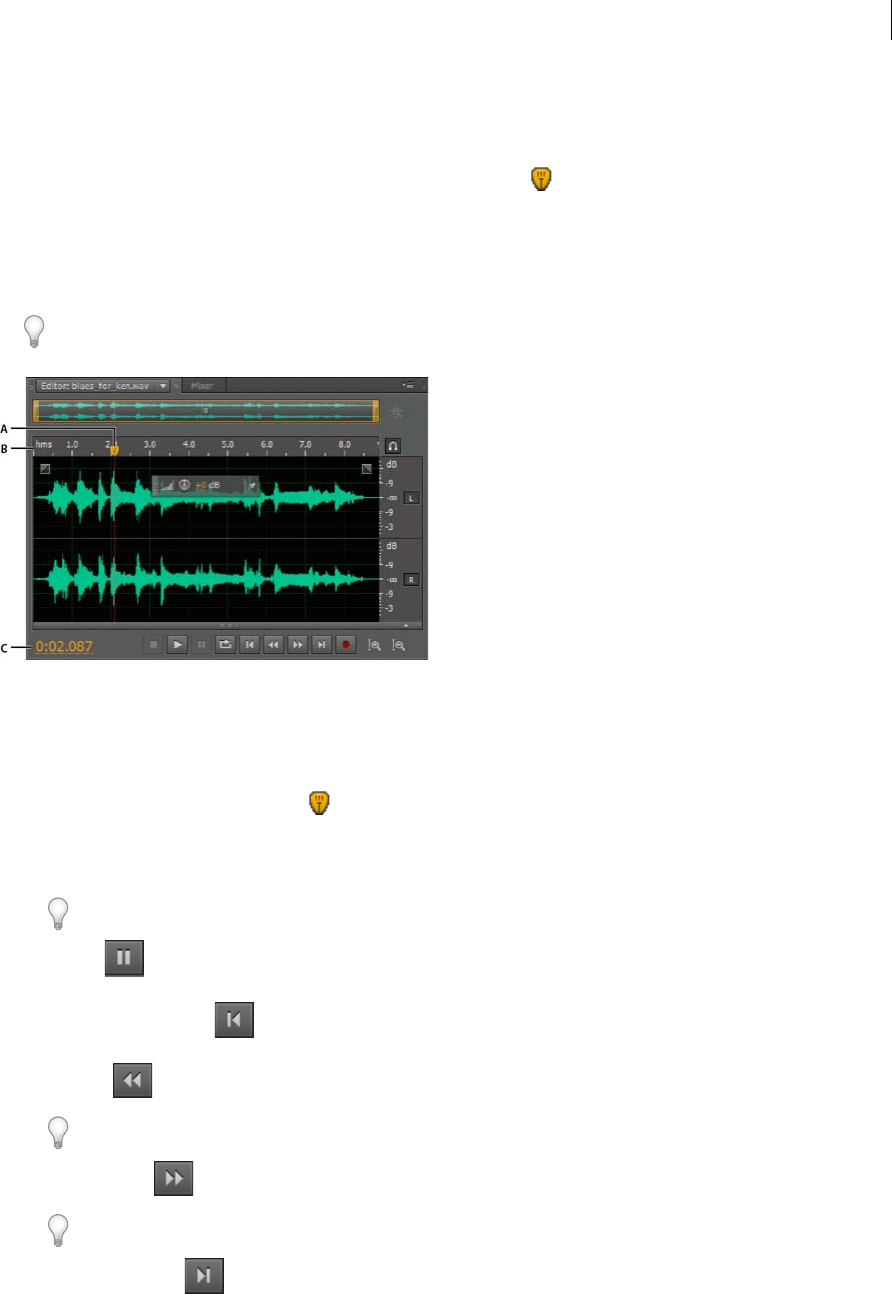
In the Editor panel, the following features help you monitor time:
In the timeline near the top of the panel, the current-time indicator lets you start playback or recording at a
specific point.
In the lower left of the panel, the time display shows the current time in numerical format. The default time format
is Decimal, but you can easily change it. (See Change the time display format.) The same format is used by the
timeline.
To show the time display in separate panel, choose Window > Time.
A Current-time indicator B Timeline C Time display
Position the current-time indicator
In the Editor panel, do any of the following:
aIn the timeline, drag the indicator or click a specific time point.
bIn the time display at lower left, drag across the numbers, or click to enter a specific time.
cAt the bottom of the panel, click one of the following buttons:
To display these buttons in a separate panel, choose Window > Transport.
Pause Temporarily stops the current-time indicator. Click the Pause button again to resume playback or
recording.
Move CTI to Previous Places the current-time indicator at the beginning of the next marker. If there are no
markers, the current-time indicator moves to the beginning of the waveform or session.
Rewind Shuttles the current-time indicator backward in time.
Right-click the Rewind button to set the rate at which the cursor moves.
Fast Forward Shuttles the current-time indicator forward in time.
Right-click the Fast Forward button to set the rate at which the cursor moves.
Move CTI to Next Moves the current-time indicator to the next marker. If there are no markers, the
current-time indicator moves to the end of the waveform or session.

32
Last updated 6/16/2016
Importing, recording, and playing
Preview audio by scrubbing
To scrub audio (producing an audible preview as you shuttle across a file), do any of the following:
Drag the current-time indicator .
Press the Rewind or Fast Forward buttons.
Press the J, K, and L keys to shuttle backward, stop, or shuttle forward. Repeatedly pressing the J or L key gradually
increases shuttle speed. (To change the default, set JKL Shuttle Speed in the Playback preferences.)
Play audio linearly or in a loop
To quickly start and stop playback, press the spacebar.
1In the Editor panel, position the current-time indicator, or select a range.
2(Optional) At the bottom of the panel, right-click the Play button , and select one of the following:
Return CTI to Start Position on Stop Reflects the behavior of Audition 3.0 and earlier. (Press Shift+X to toggle this
option on and off.)
Play Spectral Selection Only Plays only frequencies you’ve selected with the Marquee , Lasso , or
Paintbrush Selection tool.
3(Optional) Click the Loop Playback button if you want to fine-tune a selected range or experiment with
different effects processing.
4To start playback, click the Play button.
Note: By default, the Editor panel scrolls when playback extends beyond the visible section of a waveform. In the Playback
area of the Preferences dialog box, you can disable auto-scrolling.
Synchronize the current-time indicator across files or views
In the Waveform Editor, you can maintain the position of the current-time indicator when you switch between files—
a useful technique when editing different versions of the same waveform. In the Multitrack Editor, you can maintain
the position of the current-time indicator when you switch to the Waveform Editor—a useful technique when applying
edits and effects in both views.
Synchronize the current-time indicator between files in the Waveform Editor
1Choose Edit > Preferences > General (Windows) or Adobe Audition Preferences > General (Mac OS).
2Select Synchronize Selection, Zoom Level, and CTI Across Files In The Waveform Editor.
Synchronize the current-time indicator between the Multitrack and Waveform Editors
1Choose Edit > Preferences > Multitrack (Windows) or Adobe Audition Preferences > Multitrack (Mac OS).
2Select Synchronize Clips With Waveform Editor.

33
Importing, recording, and playing
Last updated 6/16/2016
Change the time display format
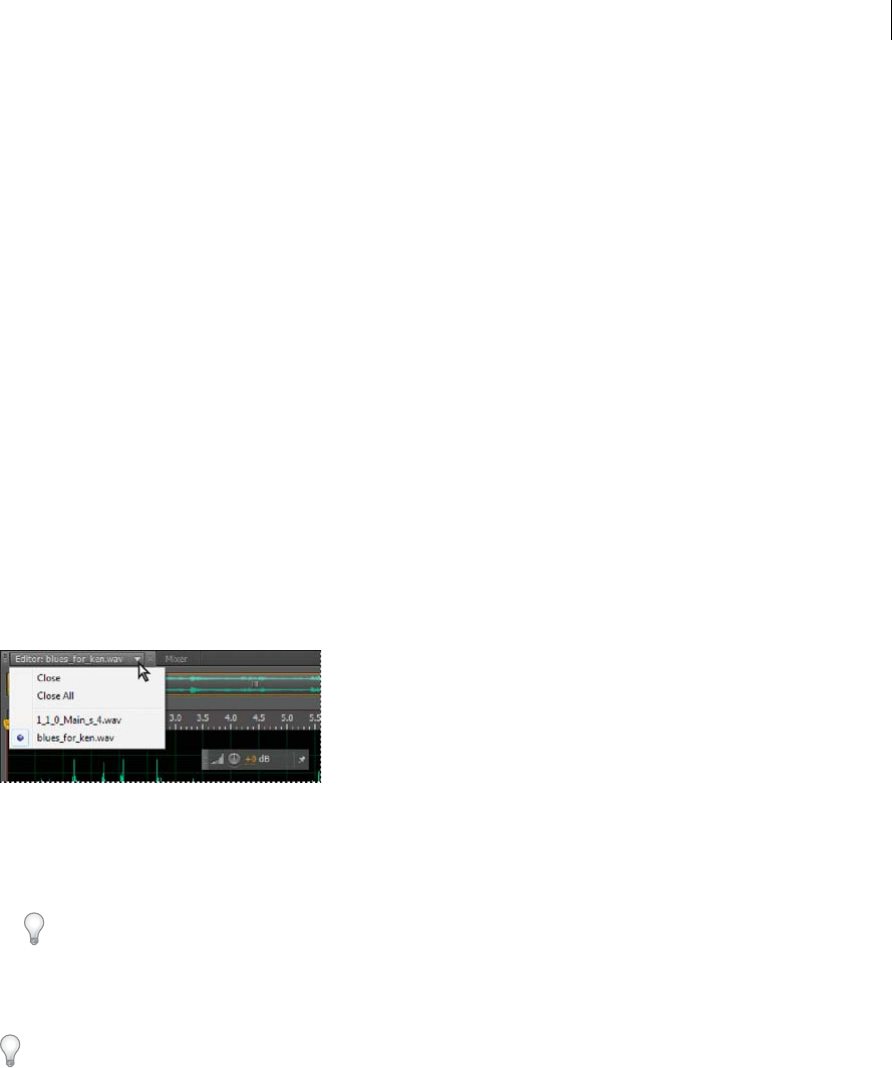
By default, all audio files and multitrack sessions use the same time display format. To customize the format for an open
file or session, choose Window > Properties, expand the Advanced settings, and deselect Synchronize With Time Display
Preferences.
Choose View > Display Time Format, and choose the desired option:
Decimal (mm:ss.ddd) Displays time in minutes, seconds, and thousandths of a second.
Compact Disc 75 fps Displays time in the same format used by audio compact discs, where each second equals 75
frames.
SMPTE 30 fps Displays time in the SMPTE format, where each second equals 30 frames.
SMPTE Drop (29.97 fps) Displays time in the SMPTE drop-frame format, where each second equals 29.97 frames.
SMPTE 29.97 fps Displays time in the SMPTE non-drop-frame format, where each second equals 29.97 frames.
SMPTE 25 fps (EBU) Displays time using the European PAL television frame rate, where each second equals 25
frames.
SMPTE 24 fps (Film) Displays time in a format where each second equals 24 frames, suitable for film.
Samples Displays time numerically, using as a reference the actual number of samples that have passed since the
beginning of the edited file.
Bars and Beats Displays time in a musical measures format of bars:beats:subdivisions. To customize settings,
choose Edit Tempo, and set the following options in the Properties panel:
Tem poSpecifies beats per minute.
Time SignatureSpecifies the number of beats per measure, and the note that represents full beats. For example, with
a signature of 3/8, there are three notes per measure, and eighth-notes represent full beats.
SubdivisionsSpecifies the number of sections each beat is divided into, or the value after the decimal point. For
example, if you enter 32 subdivisions per beat, a time setting of 4:2:16 represents an eighth note halfway between
beats 2 and 3 in 4/4 time.
Custom (X frames per second) Displays time in a custom format. To modify a custom format, choose Edit Custom
Frame Rate, and enter a number of frames per second. Valid values are whole numbers from 2 to 1000.
More Help topics
Customize start offset and time display for multitracksessions
Recording audio
Record audio in the Waveform Editor
You can record audio from a microphone or any device you can plug into the Line In port of a sound card. Before
recording, you may need to adjust the input signal to optimize signal-to-noise levels. (See either Adjust recording levels
for standard sound cardsor the documentation for a professional card.)
1Set audio inputs. (See Configure audio inputs and outputs.)

34
Importing, recording, and playing
Last updated 6/16/2016
2Do one of the following:
•Create a new file.
•Open an existing file to overwrite or add new audio, and place the current-time indicator where you want to
start recording.
3At the bottom of the Editor panel, click the Record button to start and stop recording.
Correct DC offset
Some sound cards record with a slight DC offset, in which direct current is introduced into the signal, causing the center
of the waveform to be offset from the zero point (the center line in the waveform display). DC offset can cause a click
or pop at the beginning and end of a file.
In the Waveform Editor, choose Favorites > Repair DC Offset.
To measure DC offset, see Analyze amplitude.
Direct-to-file recording in the Multitrack Editor
In the Multitrack Editor, Adobe Audition automatically saves each recorded clip directly to a WAV file. Direct-to-file
recording lets you quickly record and save multiple clips, providing tremendous flexibility.
Inside the session folder, you’ll find each recorded clip in the [session name]_Recorded folder. Clip file names begin
with the track name, followed by the take number (for example, Track 1_003.wav).
After recording, you can edit takes to produce a polished final mix. For example, if you create multiple takes of a guitar
solo, you can combine the best sections of each solo. (See Trimming and extending clips.) Or, you can use one version
of the solo for a video soundtrack, and another version for an audio CD.
Record audio clips in the Multitrack Editor
In the Multitrack Editor, you can record audio on multiple tracks by overdubbing. When you overdub tracks, you listen
to previously recorded tracks and play along with them to create sophisticated, layered compositions. Each recording
becomes a new audio clip on a track.
1In the Inputs/Outputs area of the Editor panel, choose a source from a track’s Input menu.
Note: To change the available inputs, choose Audio Hardware, and then click Settings.
2Click the Arm For Record button for the track.
The track meters display the input, helping you optimize levels. (To disable this default and display levels only while
recording, deselect Enable Input Metering When Arming Tracks in the Multitrack preferences.)
3To hear hardware inputs routed through any track effects and sends, click the Monitor Input button .
Note: Routing inputs through effects and sends requires significant processing. To reduce latency (an audible delay) that
disrupts timing for performers, see Configure audio inputs and outputs.
4To simultaneously record on multiple tracks, repeat steps 1-3.
5In the Editor panel, position the current-time indicator at the desired starting point, or select a range for the new
clip.
6At the bottom of the panel, click the Record button to start and stop recording.
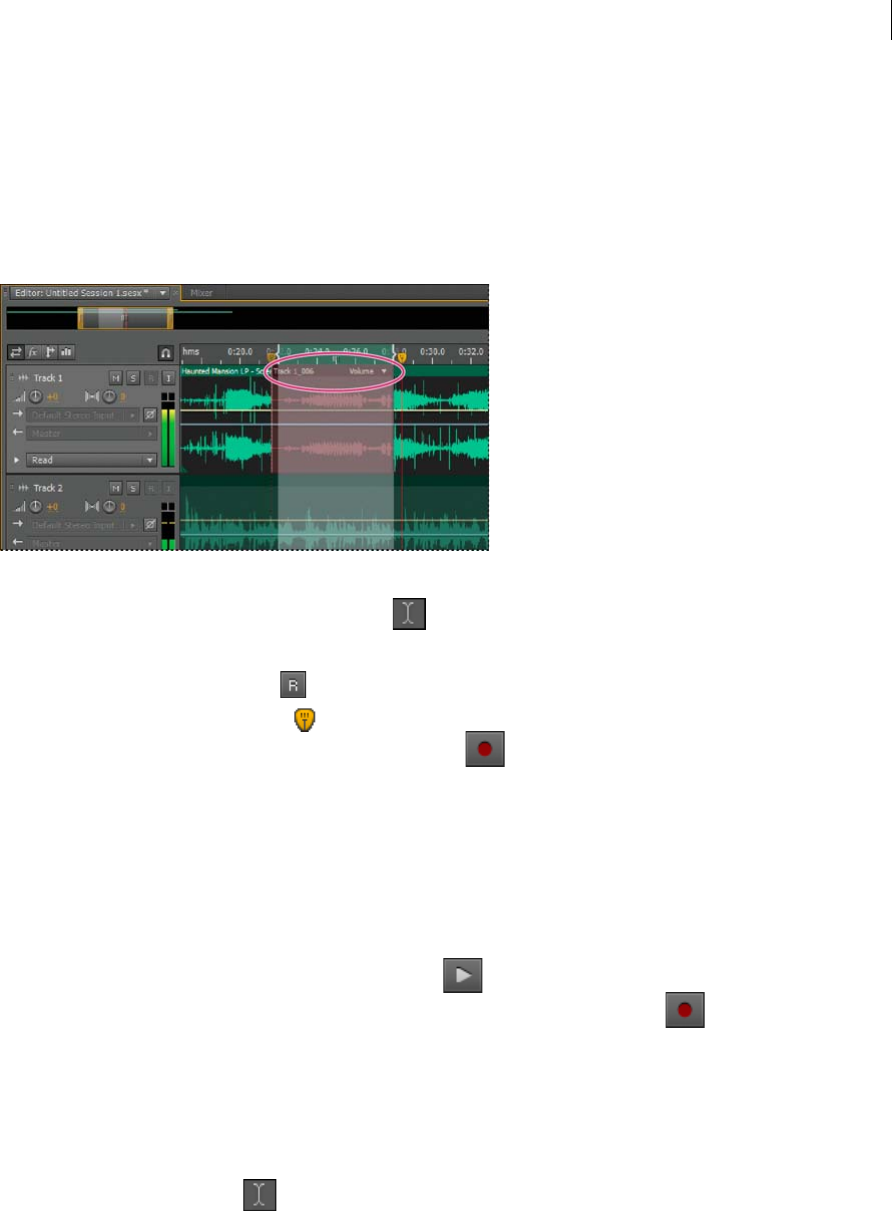
35
Importing, recording, and playing
Last updated 6/16/2016
Punch into a selected range in the Multitrack Editor
If you’re dissatisfied with a time range of a recorded clip, you can select that range and punch in a new recording, leaving
the original clip intact. Though you can record into a specific range without punching in, punching in lets you hear
audio immediately before and after a range; that audio provides vital context that helps you create natural transitions.
For particularly important or difficult sections, you can punch in multiple takes, and then select or edit takes to create
the best performance.
1In the Editor panel, drag the Time Selection tool in the appropriate track to select a time range for the clip.
2Select the correct track input. (See Assign audio inputs and outputs to tracks.)
3Click the Arm For Record button for the track.
4Position the current-time indicator a few seconds before the selected range.
5At the bottom of the Editor panel, click the Record button .
Audition plays the audio preceding the selection, records for the duration of the selected range, and then resumes
playback.
Punch in during playback in the Multitrack Editor
If you don’t need to punch into a specific range, you can quickly punch into a general area during playback.
1Enable one or more tracks for recording. (See Record audio clips in the Multitrack Editor.)
2At the bottom of the Editor panel, click the Play button .
3When you reach an area where you want to begin recording, click the Record button . When you finish
recording, click the button again.
Choose punch-in takes
If you punch in multiple takes, Audition layers the takes over each other in the Editor panel. To choose between takes,
do the following:
1With the Time Selection tool , select a range that snaps to the start and end of the punch-in takes. (See Snap to
clip endpoints.)
2In the track, position the mouse over the clip header. (The header displays the track name, followed by take number.)
3Drag the topmost take to a different location (typically the end of the session to avoid unwanted playback).
4Play the session. If you prefer a take you previously moved, drag it back to the selected range.
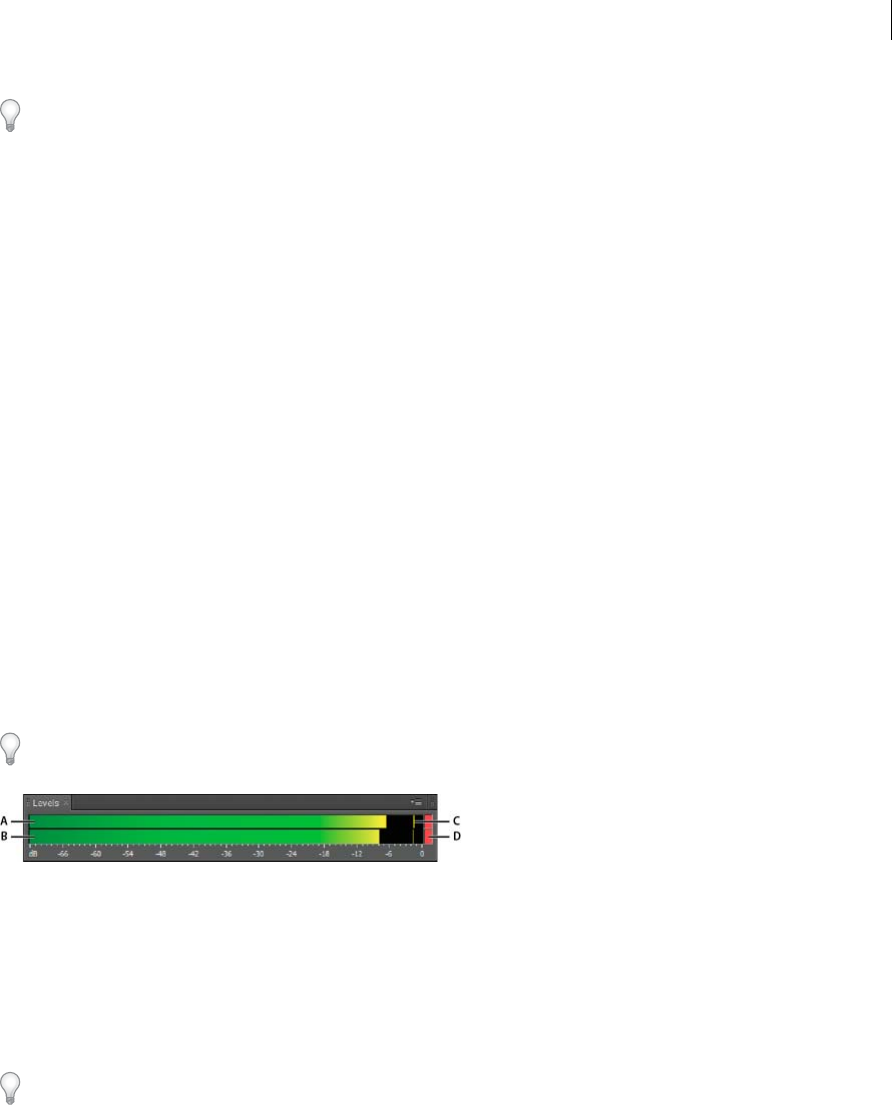
36
Importing, recording, and playing
Last updated 6/16/2016
To mute the original clip for the duration of the punch-in range, adjust the volume envelope. (See Automating clip
settings.)
More Help topics
Create a new, blank audio file
Position the current-time indicator
Monitoring recording and playback levels
Monitoring recording and playback levels
Monitoring recording and playback levels
Level meters overview
To monitor the amplitude of incoming and outgoing signals during recording and playback, you use level meters. The
Waveform Editor provides these meters only in the Levels panel. The Multitrack Editor provides them in both the
Levels panel, which shows the amplitude of the Master output, and track meters, which show the amplitude of
individual tracks.
You can dock the Levels panel horizontally or vertically. When the panel is docked horizontally, the upper meter
represents the left channel, and the lower meter represents the right channel.
To show or hide the panel, choose Window > Level Meters.
A Left channel B Right channel C Peak indicators D Clip indicators
The meters show signal levels in dBFS (decibels below full scale), where a level of 0 dB is the maximum amplitude
possible before clipping occurs. Yellow peak indicators remain for 1.5 seconds so you can easily determine peak
amplitude.
If amplitude is too low, sound quality is reduced; if amplitude is too high, clipping occurs and produces distortion. The
red clip-indicator to the right of the meters lights up when levels exceed the maximum of 0 dB.
To clear clip indicators, either click them individually, or right-click the meters and choose Reset Indicators.
Customize level meters
Right-click the meters and select any of the following options:
Meter Input Signal In the Waveform Editor, displays the level of the default hardware input. (See Configure audio
inputs and outputs.) To quickly enable or disable this option, double-click the meters.
Range options Change the displayed decibel range.
Show Valleys Shows valley indicators at low-amplitude points.

37
Importing, recording, and playing
Last updated 6/16/2016
Tip: If valley indicators are close to peak indicators, dynamic range (the difference between the quietest and loudest
sounds) is low. If the indicators are spread far apart, dynamic range is high.
Show Color Gradient Gradually transitions the meters from green, to yellow, to red. Deselect this option to display
abrupt color shifts to yellow at -18 dBFS, and red at -6.
Show LED Meters Displays a separate bar for each whole decibel level.
Dynamic or Static Peaks Change the mode of peak indicators. Dynamic Peaks resets the yellow peak level indicators to
a new peak level after 1.5 seconds, letting you easily see recent peak amplitude. As the audio gets quieter, the peak
indicators recede. Static Peaks retains peak indicators, letting you determine the maximum amplitude of the signal
since monitoring, playback, or recording began. However, you can manually reset peak indicators by clicking clip
indicators.
Tip: To find out how loud audio will get before you record it, choose Static Peaks. Then monitor input levels; the peak
indicators show the level of the loudest part.
Adjust recording levels for standard sound cards
Adjust levels if recordings are too quiet (causing unwanted noise) or too loud (causing distortion). To get the best
sounding results, record audio as loud as possible without clipping. When setting recording levels, watch the meters,
and try to keep the loudest peaks in the yellow range below -3 dB
Adobe Audition doesn’t directly control a sound card’s recording levels. For a professional sound card, you adjust these
levels with the mixer application provided with the card (see the card’s documentation for instructions). For a standard
sound card, you use the mixer provided by Windows or Mac OS.
Adjust sound card levels in Windows 7 and Vista
1Right-click the speaker icon in the taskbar, and choose Recording Devices.
2Double-click the input source you want to use.
3Click the Levels tab, and adjust the slider as needed.
Adjust sound card levels in Windows XP
1Double-click the speaker icon in the taskbar.
2Choose Options > Properties.
3Select Recording, and then click OK.
4Select the input source you want to use, and adjust the Volume slider as needed.
Adjust sound card levels in Mac OS
1Choose System Preferences from the Apple menu.
2Click Sound, and then click the Input tab.
3Select the device you want to use, and adjust the Input Volume slider as needed.

38
Last updated 6/16/2016
Chapter 5: Editing audio files
Editing, repairing, and improving audio using Essential
Sound panel
Overview
Essential Sound is an all-in-one panel that gives you an extensive toolset of mixing techniques and repair options that
are useful for your common audio mixing tasks. The panel provides simple controls to unify volume levels, repair
sound, improve clarity, and add special effects that help your video projects sound like a professional audio engineer
has mixed them. You can save the applied adjustments as presets for reuse and they reflect in the full Audition toolset,
making them handy for more audio refinements.
Audition allows you to classify your audio clips as Dialogue, Music, SFX, or Ambience and configure and apply presets
to set of clips that belong to the same type or to multiple clips that you add as a sequence.
Once you assign a mix type, for example Dialogue for a voiceover clip, the Dialogue tab of the Essential Sound panel
presents you several parameter groups that allow you to carry out the common tasks that are associated with dialogue,
such as unifying the different recordings to common loudness, reducing background noise, and adding compression
and EQ. Note that the mix types in the Essential Sound panel are mutually exclusive, that is, selecting one mix type for
a track will revert the previous changes done on that track using another mix type.
All the changes that you do using the Essential Sound panel controls are reflected in the more advanced clip settings.
For an effect like restoration or clarity, audio effects are inserted into the clip rack. If you are an advanced user, you can
start with your primary edits in the Essential Sound panel and then go on with your sophisticated internal effect settings
and apply finishing touches.
To launch the Essential Sound panel, select a track from a multitrack sequence and choose Window > Essential Sound.
Unify loudness in your audio
1In the Essential Sound panel, select the clip type as Dialogue, Music, SFX, or Ambience.
2To make the loudness level uniform throughout the clip, expand Unify Loudness and click Auto Match. The
loudness level (in LUFS) to which Audition auto-matched your clip appears below the Auto Match button.
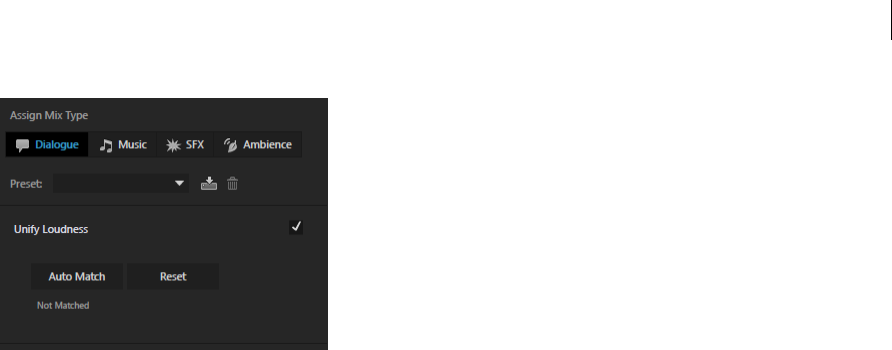
39
Editing audio files
Last updated 6/16/2016
Repair a dialogue track
If your clip contains dialogue audio data, you can use the options under the Dialogue tab in the Essential Sound panel
to repair the sound by reducing noise, rumble, hum, and ‘ess’ sounds.
1Add the audio clip to an empty track in a multitrack session.
2Select the audio clip and in the Essential Sound panel, select the clip type as Dialogue.
3Select the Repair Sound checkbox and expand the section.
4Select the checkbox for the property that you want to change, and use the slider to adjust the level of the following
properties between 0 and 10:
•Reduce Noise: Reduce the level of unwanted noises in the background, such as studio floor sounds and microphone
background noise, and clicks. The proper amount of noise reduction depends upon the type of background noise
and the acceptable loss in quality for the remaining signal.
•Reduce Rumble: Reduce the rumble noise--very low-frequency noise that ranges below the 80 Hz range, for
example, noise produced by a turntable motor or an action camera.
•DeHum: Reduce or eliminate Hum—noise consists of a single frequency, in 50 Hz range (common in Europe, Asia,
and Africa) or 60 Hz range (common in North and South America). For example, electrical interference due to
power cables laid too close to the audio cables can use such noise. You can select the hum level depending on the clip.
•DeEss: Reduce harsh, high-frequency ess-like sounds. For example, sibilance in vocal recordings that cause s-
sounds created by breathing or air movement between the microphone and the singer’s mouth.
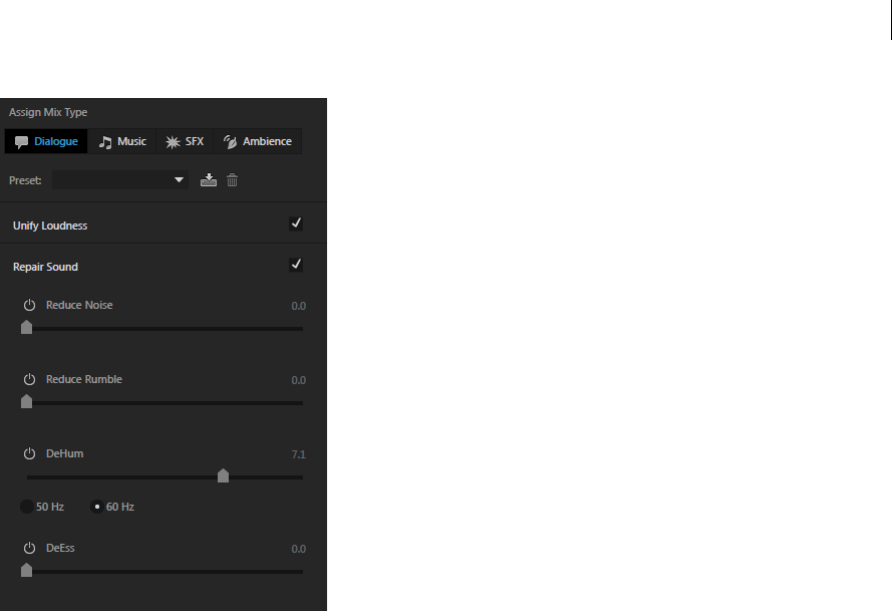
40
Editing audio files
Last updated 6/16/2016
Improve the clarity of your dialogue track
Improving the clarity of the dialogue track in your sequence has dependency on a variety of factors because of the
variations in volume and frequency of the human voice that range between 50Hz and 2kH and the contents of the other
tracks that go with it. Some of the common methods used for improving dialogue audio clarity are compressing or
expanding the dynamic range of the recording, adjusting the frequency response of the recording, and processing the
enhancing male and female voices.
1Add the audio clip to an empty track in a multitrack session.
2Select the clip and in the Essential Sound panel, select the clip type as Dialogue.
3Select the Improve Clarity checkbox and expand the section.
4Select the checkbox for the property that you want to change, and use the slider to adjust the level of the following
properties between 0 and 10:
1Dynamics: Change the impact of the recording by compressing or expanding the dynamic range of your
recording. You can change the level from natural to focused.
2EQ: Reduce or boost selected frequencies in your recording. You can choose from a list of EQ presets that you
can readily test on your audio and use and adjust the amount using the slider.
Note: To edit an EQ preset, select a preset, click the Edit icon. The Effect-Graphic Equalizer dialog box displays
the graphic equalizer that you can adjust during playback, and save the changes.
3Enhance speech: Select the dialogue as Male or Female to process and enhance it at the appropriate frequency.
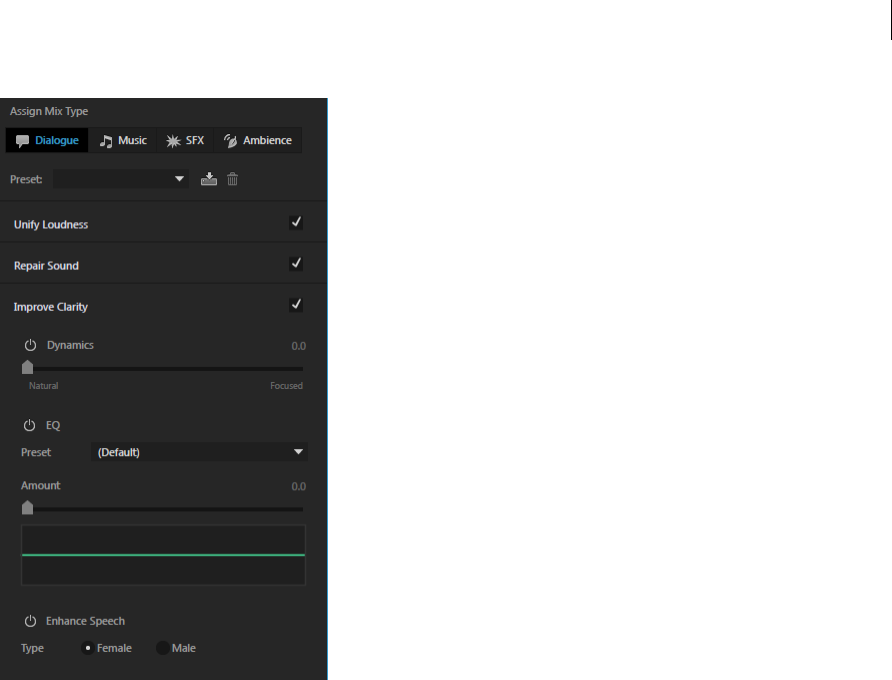
41
Editing audio files
Last updated 6/16/2016
Remix or stretch background music to fit a duration
Often, editors and remix engineers use abrupt fading, looping, or remixing the music to fit in to a set duration. The
remix and stretch features help you edit your music to fit to any duration real quick.
Audition Remix analyzes your song files, identifying hundreds of loops, transitions, and important segments, and then
allows you to remix to any duration.
The stretch option allows you to stretch a short clip to fit a longer duration without applying the remix features.
To remix a clip in your project
1Add the audio clip to an empty track in a multitrack session.
2Select the audio clip and choose Window > Essential Sound > Music.
3Under Duration, select Remix. Audition analyzes and prepares the clip for remix.
4In the Target box, type the desired length of the remixed audio clip.
5Select Favor shorter segments checkbox to make audition favor shorter segments with more transitions to make the
remix flow more naturally.
6Optional: After playback, if you want to improve the remix, try the following controls in the Remix tab of the
Properties panel:
•Edit length: Use this to favor shorter segments with more transitions, or longer segments with fewer transitions. If
your original song changes fairly dramatically from start to finish, shorter segments and more transitions allow your
remix to flow more naturally. Songs with a consistent structure and style may benefit from fewer transitions, keeping
any changes to a minimum.
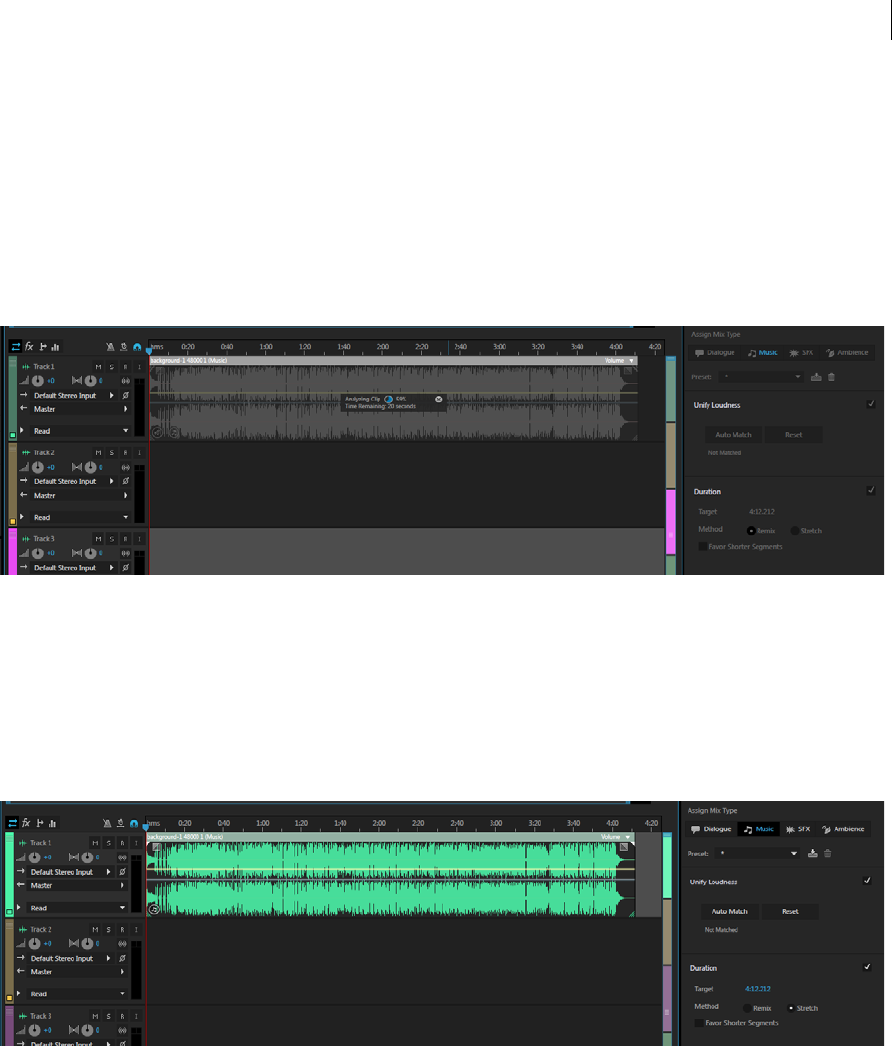
42
Editing audio files
Last updated 6/16/2016
•Features: Select this to favor Timbre (rhythmic elements) or Harmonic structure when making transitions and
crossfades. For electronic or pop music, Timbre makes sure that the beat stays locked in place. For choral or softer
tracks, Harmonic emphasis helps create smooth blends.
•Minimum loop: Select this to define the shortest segment that you can have, in number of beats. Setting this value
helps if the algorithm makes short transitions, which might be mathematically ideal, but might sound unnatural to
our subjective ears.
•Maximum slack: Use this to constrain the remix duration to as close to your target duration as possible. If an exact
duration is not necessary, adjusting this parameter can make for better-sounding remixes.
To stretch a music clip to fit a duration
1Add the audio clip to an empty track in a multitrack session.
2Select the audio clip and choose Window > Essential Sound > Music.
3Under Duration, select Stretch.
4In the Target box, type the desired length of the stretched audio clip.
Working with Sound effects clips
Audition allows you to create artificial sound effects for your audio. SFX helps you create illusions such as the music
originating from a particular position in the stereo field or an ambience of a room or field with appropriate reflections
and reverberation.
To add SFX and ambience to your audio
1Add the audio clip to an empty track in a multitrack session.
2Select the audio clip and choose Window > Essential Sound > SFX.
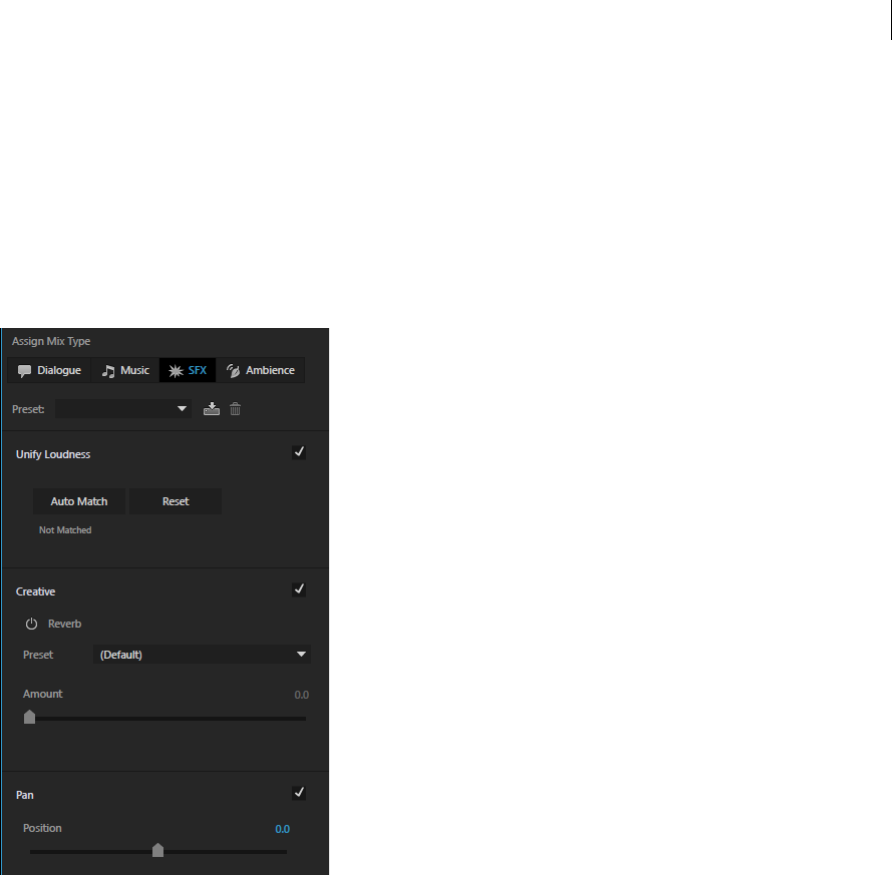
43
Editing audio files
Last updated 6/16/2016
3To set reverb effect, switch on the Reverb knob under Creative.
4In the Preset box, select a Reverb preset that suits your needs.
5To manually adjust the SFX elements during playback:
1To add the desired level of reflection and reverberation, adjust the Amount slider.
2To set the origin of the sound at a particular position in the stereo field, adjust the Position slider under Pan.
3To set stereo width at an ideal position depending on your composition, switch on the Width knob under Stereo
Width and adjust the slider.
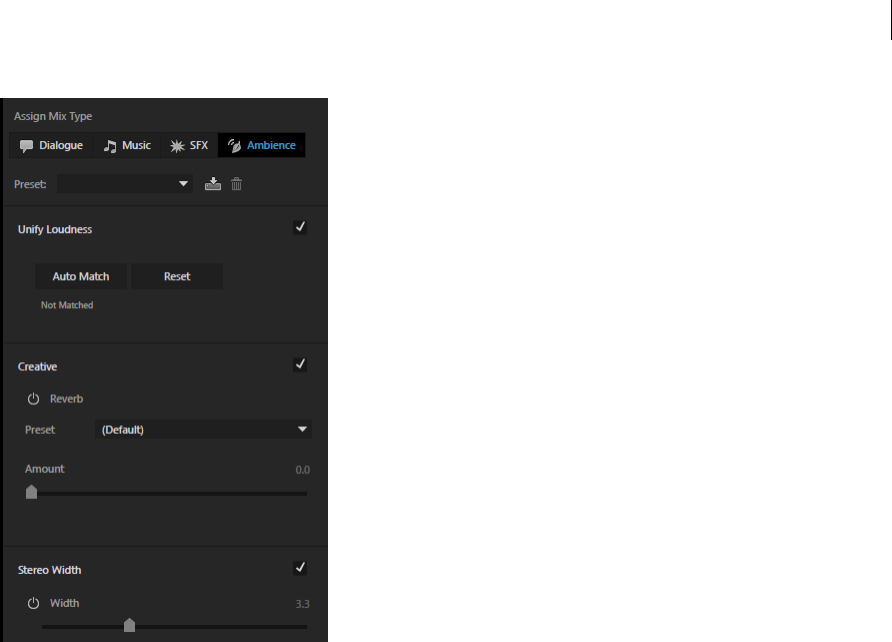
44
Editing audio files
Last updated 6/16/2016
Creating presets
Professional Audition users can create presets for the benefit of the users and projects that work on a similar set of audio
assets to ensure consistency and to save time. You can create audio presets for particular type of sound, such as dialogue,
music, SFX, or Ambience, or create effects presets for EQ, Reverb for SFX, and Reverb for Ambience.
To create a preset
1In the Essential Sound panel, click the panel menu and choose Master Template View.
2Click the + icon next to the preset dropdown, for example, Dialogue, EQ, or Reverb.
3Change the desired settings and click Save settings as a preset button next to the Presets dropdown.
4Type a name for the new preset and click OK. The new preset is listed under the audio or effect type it was created
for.
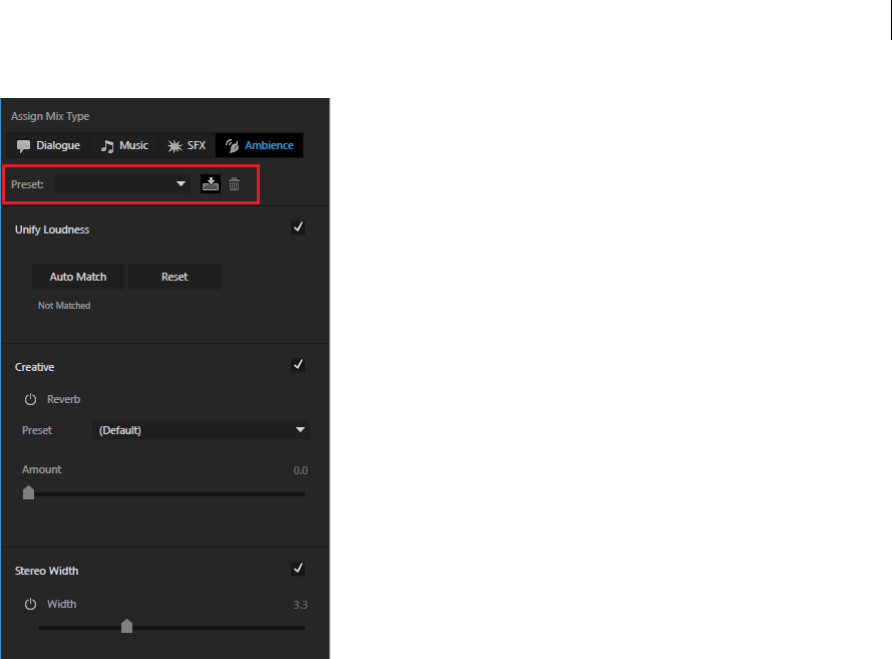
45
Editing audio files
Last updated 6/16/2016
Note: Presets are coupled to their selected master templates. Selecting a new master template for a preset or creating a new
master template give you another preset selection and different sound settings.
Select all the clips of the same mix type
Audition allows you to select all the clips of a specific mix type, such as dialogue, music, SFX, or ambience, and
uniformly apply your audio edits to all of them.
To select all the clips of a mix type, for example dialogue, choose Edit > Select > Clips of Mix Type > Dialogue.
Customize and share master settings for consistency
If you are a professional audio engineer working on a large project or in a multi-editor, multi-session environment that
requires a uniform set of standards or signature sound settings, you can create a master template with custom ranges.
Using the Master Template View, you can customize and share the ranges and default settings for the effects that you
use with your project team for uniformly applying them across sessions and projects. The Master Template is
particularly useful when you want to share common min/max ranges or EQ/reverb settings within your team.
1In the Essential Sound panel, click the panel menu and choose Master Template View.
2Select the mix type for which you want to change the settings.
3Expand the effect for which you want to change the minimum and maximum limits, for example Reduce Noise.
4Under the effect, click Set Minimum or Set Maximum.
5In the Effect dialog box, set your values and use the Play button or the Toggle Loop button to preview your changes
before saving.
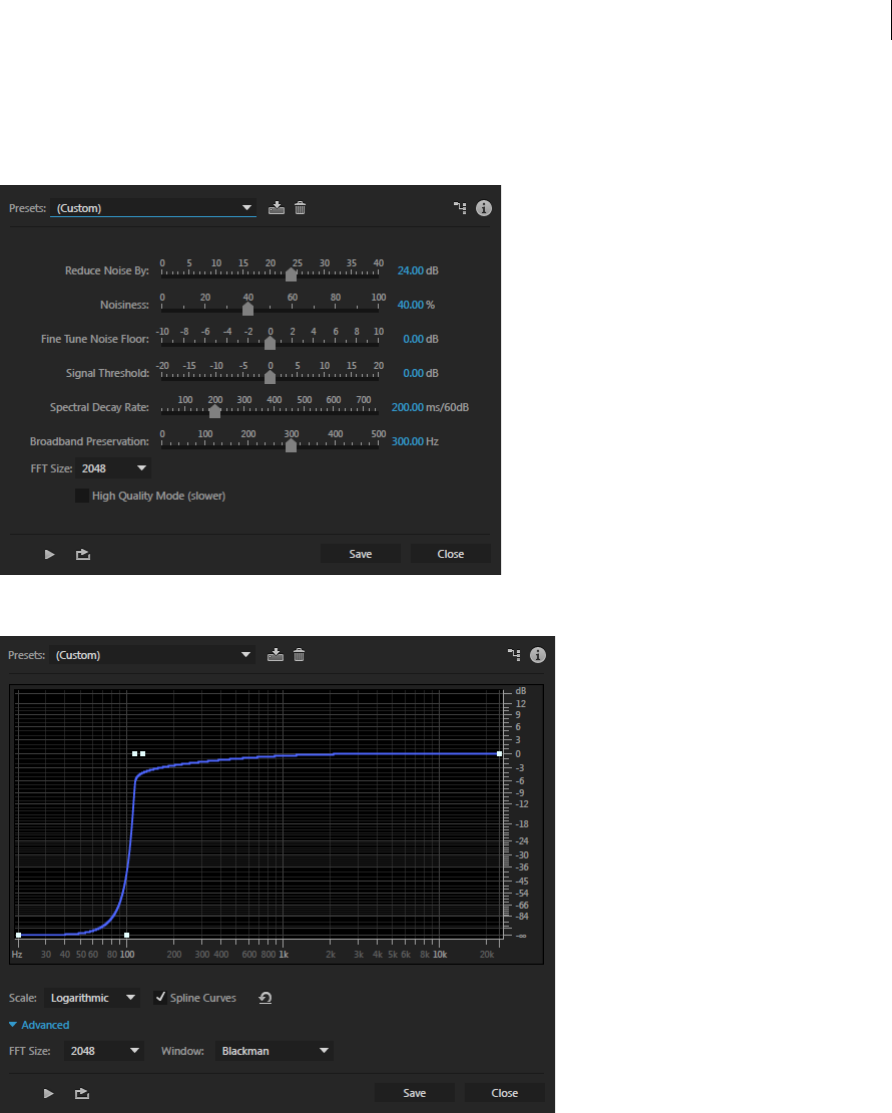
46
Editing audio files
Last updated 6/16/2016
Note: Presets are coupled to a master template. As presets in the user mode refer to settings configured in the master
template mode, changing a template or creating a new template might alter the sound of existing presets. When you delete
an EQ preset in the master template, all ESP presets that refer to that EQ preset stop working.
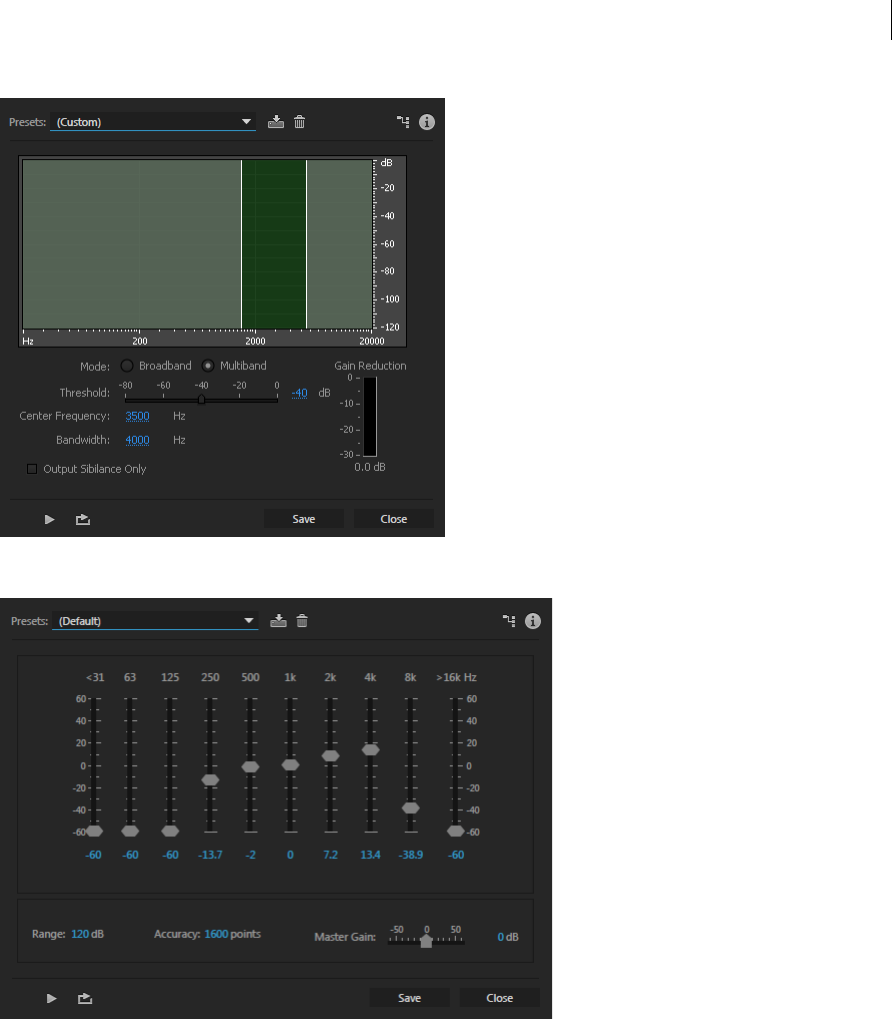
47
Editing audio files
Last updated 6/16/2016
Generating text-to-speech
Overview
The Generate Speech tool enables you to paste or type text, and generate a realistic voice-over or narration track. The
tool uses the libraries available in your Operating System. Use this tool to create synthesized voices for videos, games,
and audio productions.
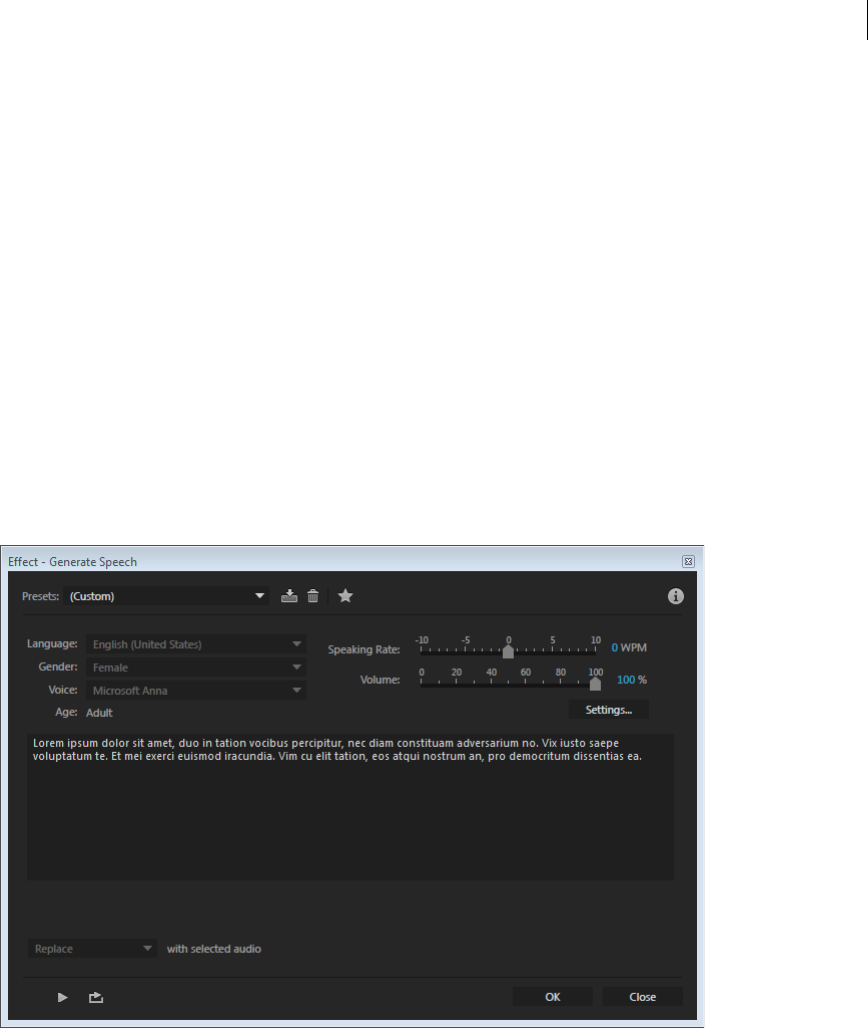
48
Editing audio files
Last updated 6/16/2016
Speech Generation on Mac uses a different underlying speech synthesis engine than Windows. Both engines are
provided by the respective operating system and are not cross-platform compatible. As such, the XML tags that
Windows supports in its engine are not compatible on Mac, and vice versa for the tag format that Mac supports.
Note: Voices have license restrictions for commercial or public usage. Check if you have rights to distribute any work
containing voices.
Generate speech
1Generate speech in either Waveform view or Multitrack view:
aWaveform vie w:
bChoose File > New > Audio File and create a mono audio file.
cChoose Effects > Generate > Speech.
dMultitrack view:
ePosition the playhead and select the track to insert the speech.
fChoose Effects > Generate > Speech.
2In the Generate Speech dialog box, you can select the language, gender, and voice of the speech to synthesize. In
Mac OS and Windows, you can find additional voices in the following ways:
•Mac OS: In the dialog box. click Settings. Choose System Voice > Customize. You can install voices and
languages, directly from Apple.
You can also use embedded speech commands to create speech. See the Apple developer documentation on using
embedded speech commands.
You can control pronunciation and other parameters by using the tags. For example, type [[emph +]] to speak a
word or phrase with emphasis.
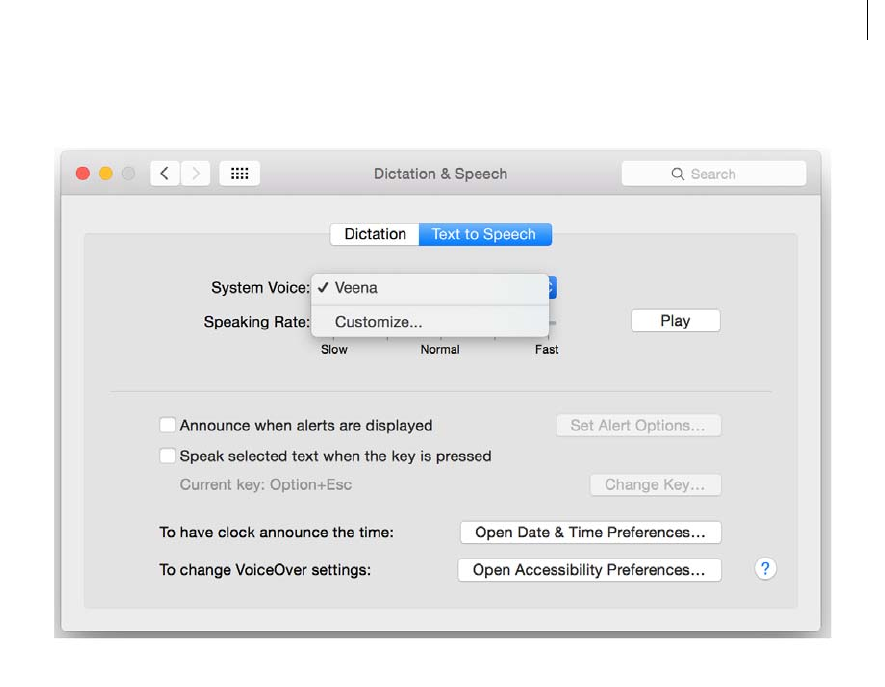
49
Editing audio files
Last updated 6/16/2016
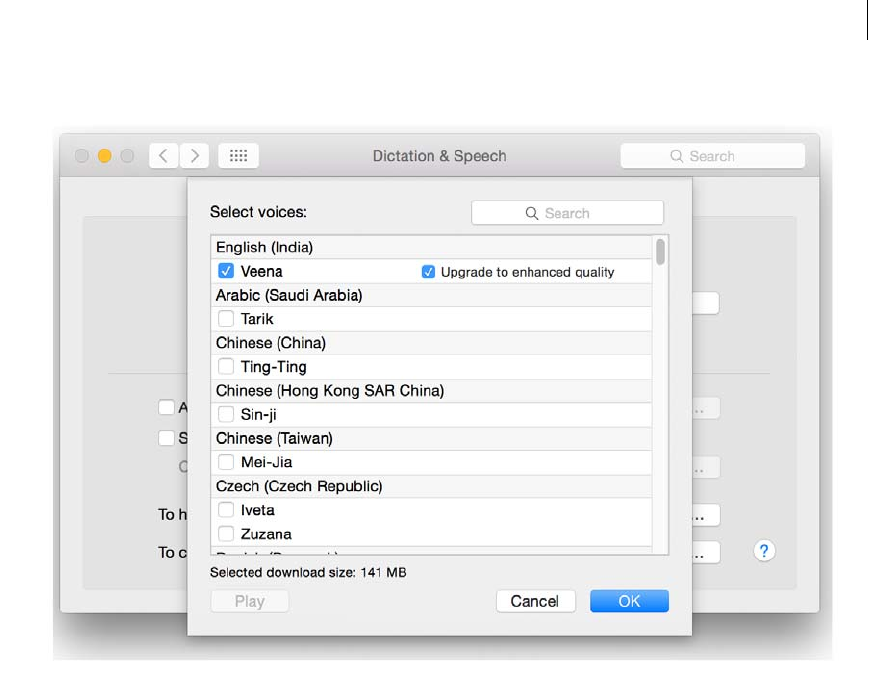
50
Editing audio files
Last updated 6/16/2016
•Windows: You can download new voices and languages from Cepstral or NeoSpeech.
3Enter the text in the text entry field. Click Preview to hear the speech in the current voice.
4Click OK.
Matching loudness across multiple audio files
Overview
In Audition CC, you can measure loudness in audio clips and apply correction to support various loudness standards
and true peak limiting.
Match loudness across multiple audio files
1Choose Window > Match L oudness to open the Match Loudness panel.
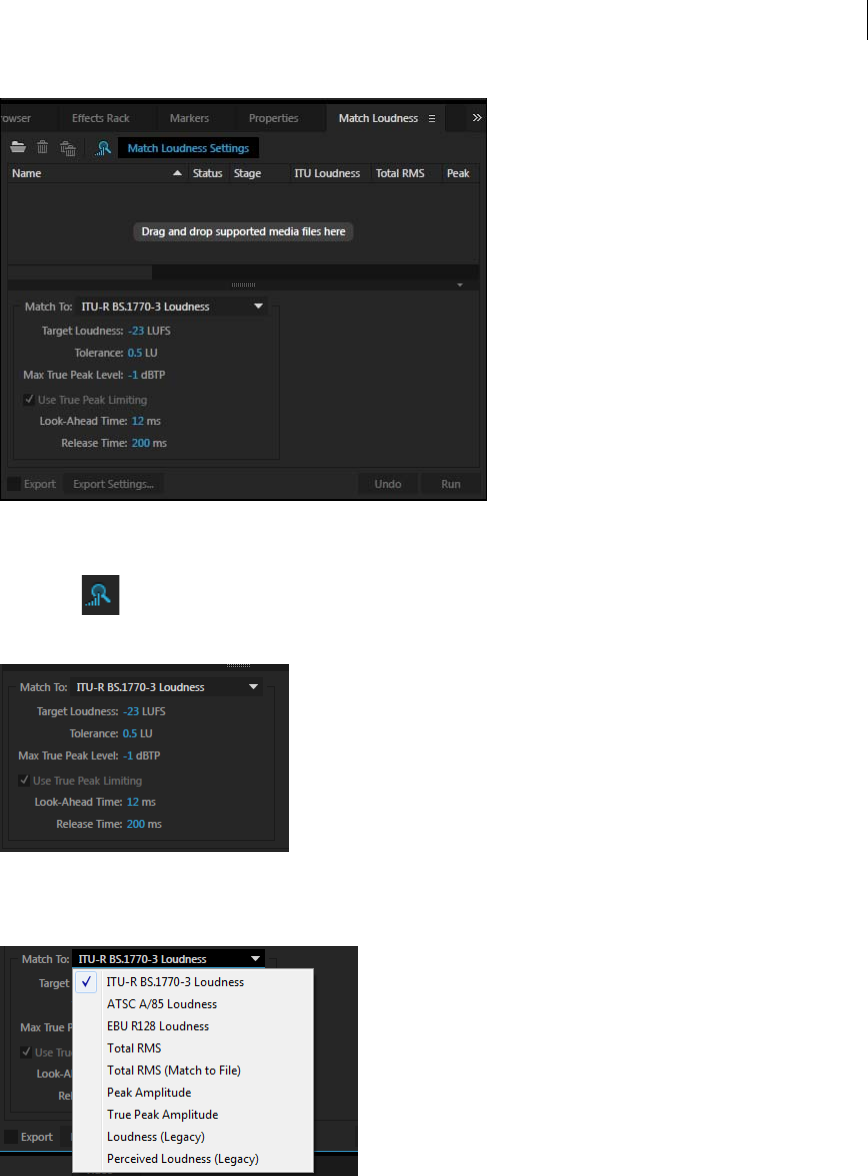
51
Editing audio files
Last updated 6/16/2016
2Drag one or more audio files and drop them in the panel.
3Click Scan to analyze the current loudness values for each clip.
4Click Match Loudness Settings to expand the loudness parameter group.
5From the Match To drop-down list, select a loudness standard for your region.
6Adjust the Maximum True Peak Level, loudness and tolerance levels and click Run.
Note: Maximum True Peak Limiting prevents a signal from crossing a pre-defined limit, which otherwise can potentially
damage speakers and other output devices. True Peak Limiting ensures that the signal never exceeds the limit.

52
Editing audio files
Last updated 6/16/2016
List of loudness standards in Audition CC
•ITU BS1770
•ITU BS1770-2
•ITU BS1770-3 only differs from ITU BS1770-2 by removing filters from the true peak level measurement that
have been optional beforehand.
•EBU R128 (Target Loudness: -23 LUFS +/-0.5 LUFS (+/-1 LUFS for live content), True Peak: -1dB). EBU also
provides corresponding test signals.
•EBU TECH3341 defines how to measure momentary, short-term and integrated loudness based on ITU BS1770-
2
•EBU TECH3342 defines how to measure loudness range (LRA) based on short-term loudness (using a relative
gate of -20LU instead of -10LU) and taking the 10th and 95th percentile
•EBU TECH3343 describes the correction part of the loudness workflow (see chapter 4.4 and 6)
•EBU TECH3344 describes loudness metering usage in distribution systems
•EBU R128 s1 defines loudness measurement for short form content such as commercials
•ATSC A/85 (Target Loudness: -24 LUFS +/-2 LUFS, True Peak: -2dB)
•FreeTV OP59
•ARIB TR-B32
•PRSS (National Public Radio)
•Podcasting
Displaying audio in the Waveform Editor
View audio waveforms and spectrums
In the Waveform Editor, the Editor panel provides a visual representation of sound waves. Below the panel’s default
waveform display, which is ideal for evaluating audio amplitude, you can view audio in the spectral display, which
reveals audio frequency (low bass to high treble).
To view the spectral display, do either of the following:.
•In the toolbar, click the Spectral Display button.
•In the Editor panel, drag the divider between the waveform and spectral displays to change the proportion of
each. To instantly show or hide the spectral display, double-click the handle or click the triangle to its right.
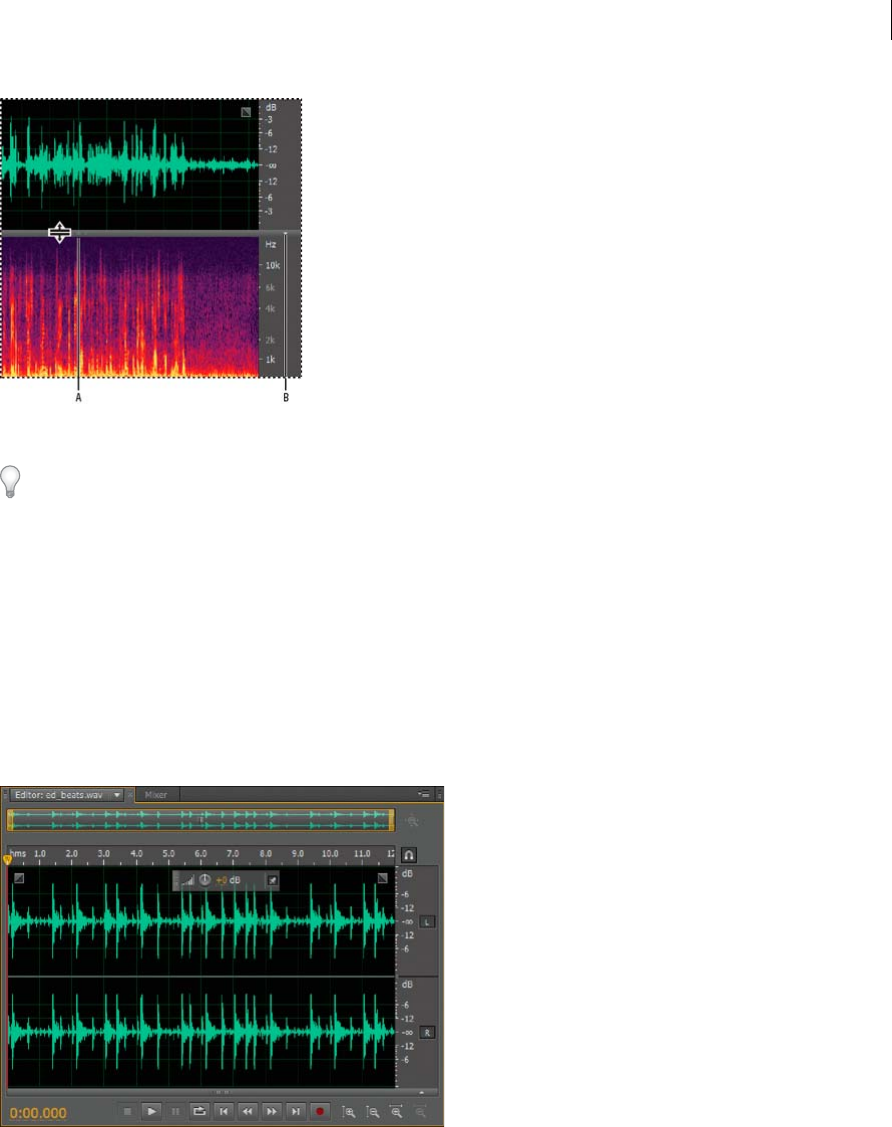
53
Editing audio files
Last updated 6/16/2016
A Drag the divider to change the proportion of each. B Click the triangle to show or hide the spectral display.
To identify specific channels in stereo and 5.1 surround files, note the indicators in the vertical ruler.
About the waveform display
The waveform display shows a waveform as a series of positive and negative peaks. The x-axis (horizontal ruler)
measures time, and the y-axis (vertical ruler) measures amplitude—the loudness of the audio signal. Quiet audio has
both lower peaks and lower valleys (near the center line) than loud audio. You can customize the waveform display by
changing the vertical scale and colors.
With its clear indication of amplitude changes, the waveform display is perfect for identifying percussive changes in
vocals, drums, and more. To find a particular spoken word, for example, simply look for the peak at the first syllable
and the valley after the last.
About the spectral display
The spectral display shows a waveform by its frequency components, where the x-axis (horizontal ruler) measures time
and the y-axis (vertical ruler) measures frequency. This view lets you analyze audio data to see which frequencies are
most prevalent. Brighter colors represent greater amplitude components. Colors range from dark blue (low-amplitude
frequencies) to bright yellow (high-amplitude frequencies).
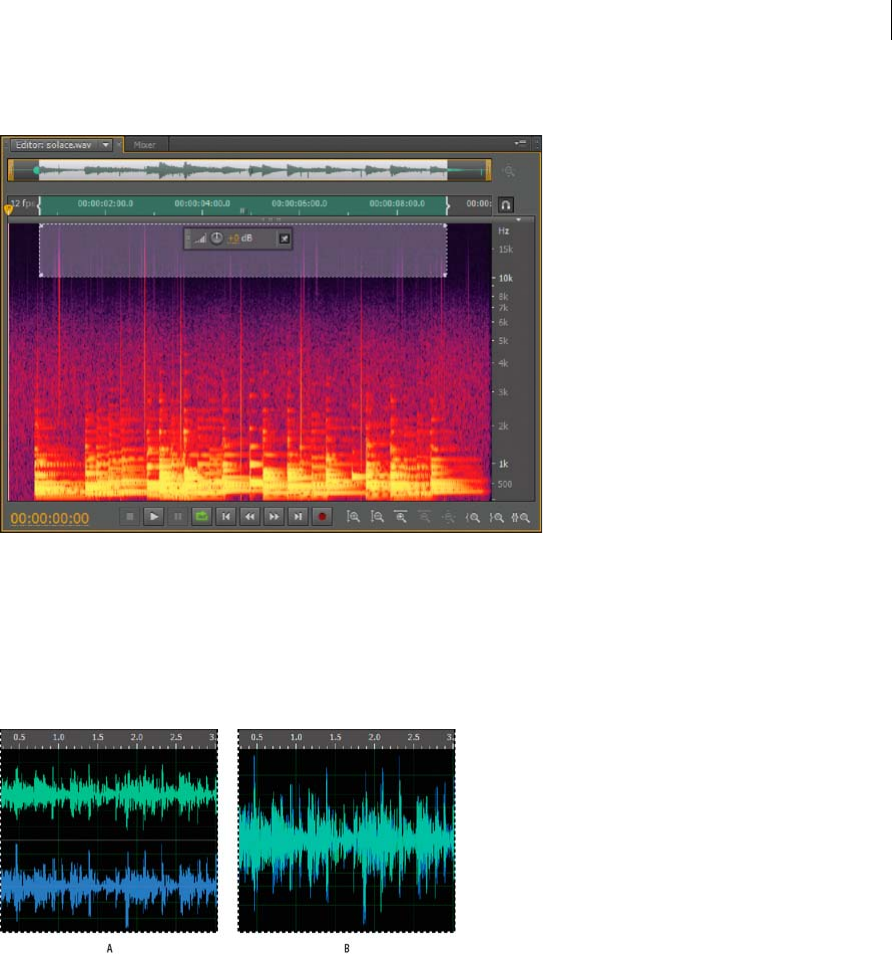
54
Editing audio files
Last updated 6/16/2016
The spectral display is perfect for removing unwanted sounds, such as coughs and other artifacts.
View layered or uniquely colored waveform channels
For stereo and 5.1 surround files, you can view layered or uniquely colored channels. Layered channels better reveal
overall volume changes. Uniquely colored channels help you visually distinguish them.
Choose View > Waveform Channels, and then select Layered or Uniquely Colored.
A Uniquely Colored B Layered (with Uniquely Colored still selected)
Customize the spectral display
The Spectral Display preferences help you enhance different details and better isolate artifacts.
1Choose Edit > Preferences > Spectral Display (Windows) or Audition > Preferences > Spectral Display (Mac OS).
2Set the following options
Windowing Function Determines the Fast Fourier transform shape. These functions are listed in order from
narrowest to widest. Narrower functions include fewer surrounding frequencies but less precisely reflect center
frequencies. Wider functions include more surrounding frequencies but more precisely reflect center frequencies.
The Hamming and Blackman options provide excellent overall results.
Spectral Resolution Specifies the number of vertical bands used to draw frequencies. As you increase resolution,
frequency accuracy increases, but time accuracy decreases. Experiment to find the right balance for your audio
content. Highly percussive audio, for example, may be better reflected by low resolution.

55
Editing audio files
Last updated 6/16/2016
To adjust resolution directly in the Editor panel, right-click the vertical ruler next to the spectral display, and choose
Increase or Decrease Spectral Resolution.
Decibel Range Changes the amplitude range over which frequencies are displayed. Increasing the range intensifies
colors, helping you see more detail in quieter audio. This value simply adjusts the spectral display; it does not change
audio amplitude.
Play Only Selected Frequencies When A Spectral Selection Exists Deselect this option to hear all frequencies in the
same time range as a selection.
Change the vertical scale
In the Waveform Editor, you can change the amplitude or frequency scale of the vertical ruler.
Change the amplitude scale of the waveform display
In the waveform display, right-click the vertical ruler and select one of the following:
Decibels Indicates amplitude on a decibel scale that ranges from –Infinity to zero dBFS.
Percentage Indicates amplitude on a percentage scale that ranges from –100% to 100%.
Sample Values Indicates amplitude on a scale that shows the range of data values supported by the current bit depth.
(See Understanding bit depth.) 32-bit float values reflect the normalized scale below.
Normalized Values Indicates amplitude on a normalized scale that ranges from –1 to 1.
Change the frequency scale of the spectral display
In the spectral display, right-click the vertical ruler and select one of the following:
More Logarithmic or Linear Gradually displays frequencies in a more logarithmic scale (reflecting human hearing)
or a more linear scale (making high frequencies more visually distinct).
Hold down Shift and roll the mouse wheel over the spectral display to show frequencies more logarithmically (up)
or linearly (down).
Full Logarithmic or Linear Displays frequencies completely logarithmically or linearly.
More Help topics
Sound waves
Comparing the Waveform and Multitrack editors
Change interface colors, brightness, and performance
Select spectral ranges
Techniques for restoring audio
Selecting audio
Select time ranges
1In the toolbar, select the Time Selection tool .
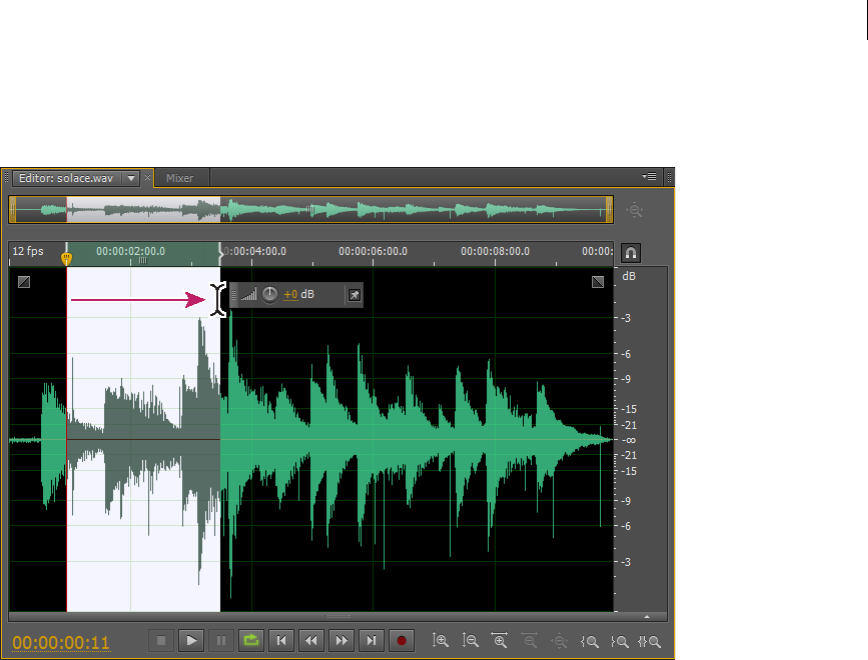
56
Editing audio files
Last updated 6/16/2016
2Do any of the following:
•To select a range, drag in the Editor panel.
•To extend or shorten a selection, drag the selection edges. (Shift-click beyond the edges to quickly extend a
selection to a specific location.)
note: If you prefer, you can right-click to extend or shorten a selection. To enable this feature, select Extend
Selection in the General section of the Preferences dialog box.
Select spectral ranges
When working in a spectral display, you can use the Marquee, Lasso, or Paintbrush Selection tool to select audio data
within specific spectral ranges. The Marquee Selection tool lets you select a rectangular area. The Lasso Selection and
Paintbrush Selection tools let you make free-form selections. All three tools allow for detailed editing and processing,
including incredible flexibility in audio restoration work. For example, if you find audio artifacts, you can select and
edit just the affected frequencies, producing superior results with faster processing.
The Paintbrush Selection tool creates unique selections that determine the intensity of applied effects. To adjust
intensity, either layer brush strokes or change the Opacity setting in the toolbar. The more opaque the white, selected
area is, the more intense applied effects will be.
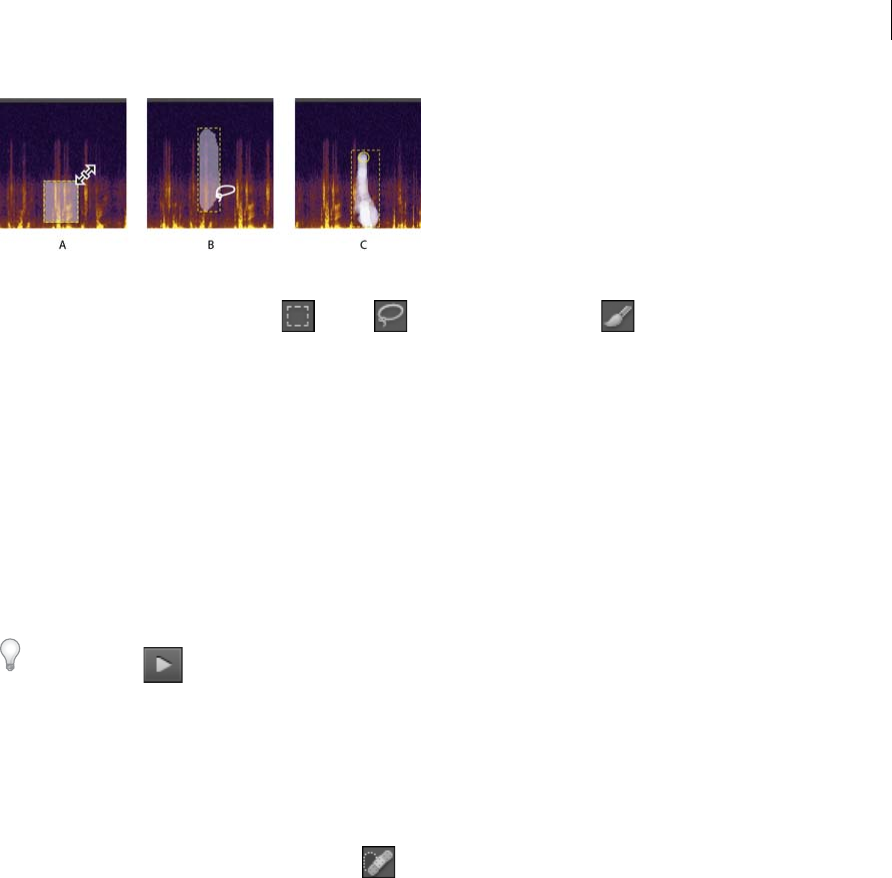
57
Editing audio files
Last updated 6/16/2016
A Marquee B Lasso C Paintbrush
1In the toolbar, select the Marquee , Lasso , or Paintbrush Selection .
2In the Editor panel, drag in the spectral display to select the desired audio data.
Note: When you make a selection in a stereo waveform, the selection is applied to all channels by default. To select audio
data in specific channels, choose them from the Edit > Enable Channels menu.
3To adjust the selection, do any of the following:
•To move the selection, position the pointer in the selection, and drag it to the desired location.
•To resize the selection, position the pointer on the corner or edge of the selection, and drag it to the desired size.
(For paintbrush selections, you can also adjust the brush Size setting in the toolbar.)
•To add to a lasso or paintbrush selection, Shift-drag. To subtract from the selection, Alt-drag.
•To determine the intensity of effects applied to paintbrush selections, adjust the Opacity setting in the toolbar.
By default, Adobe Audition plays only audio the spectral selection. To hear all audio in the same time range, right-click
the Play button , and deselect Play Spectral Selection Only.
Select artifacts and repair them automatically
For the quickest repair of small, individual audio artifacts like isolated clicks or pops, use the Spot Healing Brush. When
you select audio with this tool, it automatically applies the Favorites > Auto Heal command.
Note: Auto-healing is optimized for small audio artifacts and thus limited to selections of four seconds or less.
1In the toolbar, select the Spot Healing Brush .
2To change the pixel diameter, adjust the Size setting. Or press the square bracket keys.
3In the Editor panel, either click and hold or drag across an audio artifact in the spectral display.
Note: If you click without holding down the mouse button, Audition moves the current-time indicator so you can
preview audio, but doesn’t repair it. To repair audio by clicking, select Create A Circular Selection On Mouse Down in
the General preferences.
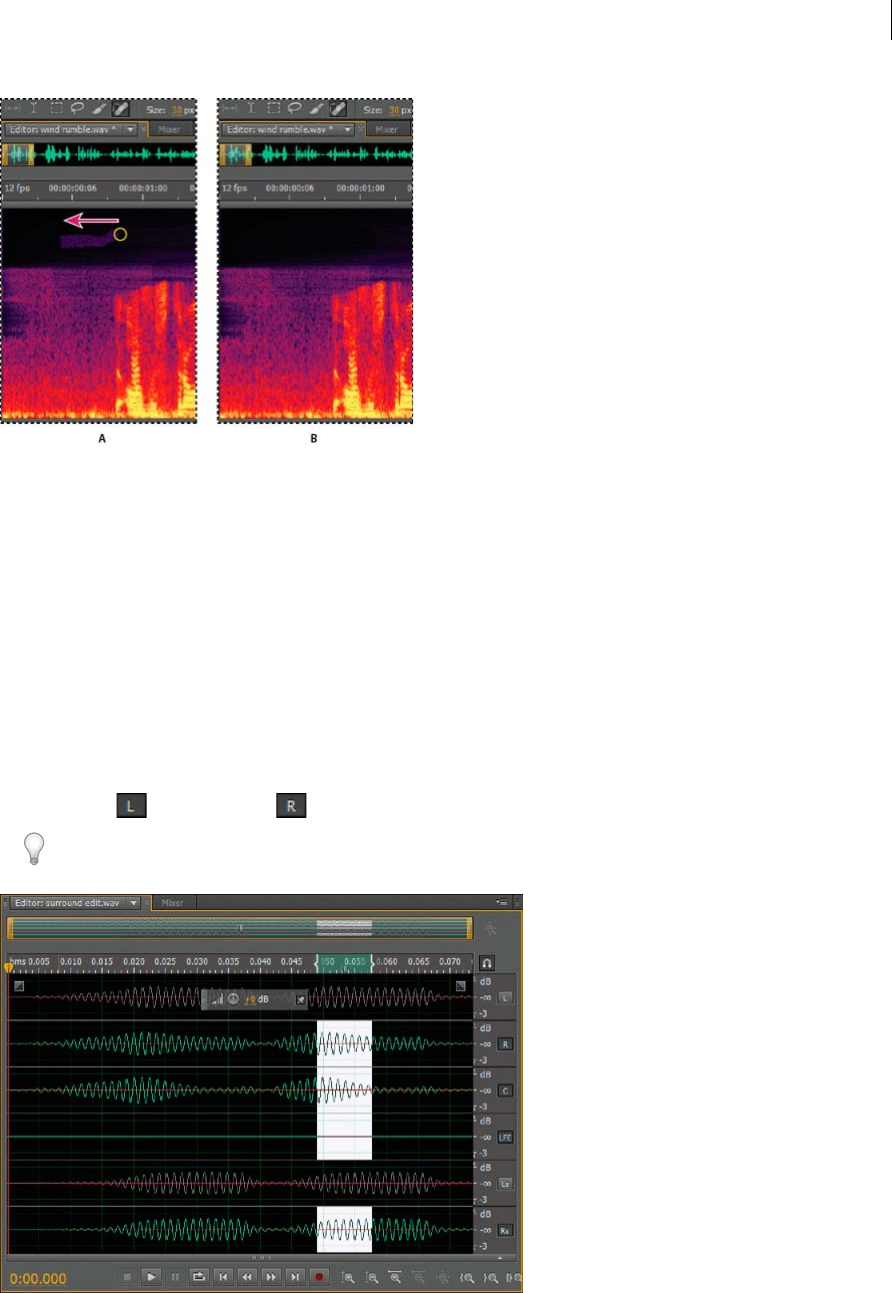
58
Editing audio files
Last updated 6/16/2016
A Before B After
Select all of a waveform
Do either of the following:
•To select the visible range of a waveform, double-click in the Editor panel.
•To select all of a waveform, triple-click in the Editor panel.
Specify which channels you want to edit
By default, Adobe Audition applies selections and edits to all channels of a stereo or surround waveform. However, you
can easily select and edit specific channels.
•At the right of the Editor panel, click channel buttons in the amplitude ruler. For a stereo file, for example, click the
left channel or right channel button.
Tip: To select one stereo channel simply by dragging across the very top or bottom of the Editor panel, select Allow
Context-Sensitive Channel Editing in the General section of the Preferences dialog box.

59
Last updated 6/16/2016
Editing audio files
Adjust a selection to zero-crossing points
For many editing tasks such as deleting or inserting audio, zero-crossings (points where amplitude is zero) are the best
places to make selections. Selections that begin and end at zero-crossings reduce the chance that edits will create audible
pops or clicks.
To adjust a selection to the closest zero-crossing points, choose Edit > Zero Crossings. Then select an option such
as Adjust Selection Inward (which moves both edges inward to the next zero crossing).
To further reduce the chance of pops or clicks, all edits are crossfaded. You can change crossfade durations in the Data
section of the Preferences dialog box.
Snap to markers, rulers, frames, and zero crossings
Snapping causes selection boundaries, as well as the current-time indicator, to move to items such as markers, ruler
ticks, zero-crossing points, and frames. Enabling snapping helps you make accurate selections; however, if you prefer,
you can disable snapping for specific items.
1To enable snapping for selected items, click the Toggle Snapping icon at the top of the Editor panel.
2To specify items to snap to, choose Edit > Snapping, and select any of the following:
Snap To Markers Snaps to a marker point. For information on defining markers, see Working with markers.
Snap To Ruler (Coarse) Snaps only to the major numeric divisions (such as minutes and seconds) in the timeline.
note: You can enable only one Snap To Ruler command at a time.
Snap To Ruler (Fine) Snaps to subdivisions (such as milliseconds) in the timeline. Zoom in (right-click and drag
across the timeline) to display more accurate subdivisions and place the cursor more precisely.
Snap To Zero Crossings Snaps to the nearest place where audio crosses the center line (the zero amplitude point).
Snap To Frames Snaps to a frame boundary if the time format is measured in frames (such as Compact Disc and
SMPTE).
You can access snapping commands by right-clicking the timeline.
More Help topics
Techniques for restoring audio
About the spectral display
Customize the spectral display
Techniques for restoring audio
Snap to clip endpoints
Snap to loop beats
How to copy, cut, paste, and delete audio in Audition

60
Editing audio files
Last updated 6/16/2016
Copy or cut audio data
1In the Waveform Editor, select the audio data you want to copy or cut. Or, to copy or cut the entire waveform,
deselect all audio data.
2Choose one of the following:
•Edit > Copy to copy audio data to the clipboard.
•Edit > Copy To New to copy and paste the audio data into a newly created file.
•Edit > Cut to remove audio data from the current waveform and copy it to the clipboard.
Paste audio data
Do either of the following:
•To paste audio into the current file, place the current-time indicator where you want to insert the audio or
select existing audio you want to replace. Then choose Edit > Paste.
•To paste audio data into a new file, choose Edit > Paste To New. The new file automatically inherits the sample
type (rate and bit depth) from the original clipboard material.
Mix audio data when pasting
The Mix Paste command mixes audio data from the clipboard with the current waveform.
1In the Editor panel, place the current-time indicator where you want to start mixing the audio data. Alternately,
select the audio data you want to replace.
2Choose Edit > Mix Paste.
3Set the following options and click OK.
Copied and Existing Audio Adjust the percentage volume of copied and existing audio.
Invert Copied Audio Reverses the phase of copied audio, either exaggerating or reducing phase cancellation if the
existing audio contains similar content. (To understand phase cancellation, see How sound waves interact.)
Crossfade Applies a crossfade to the beginning and end of the pasted audio, producing smoother transitions.
Specify the fade length in milliseconds.
Paste Type | Audition CC Specify the paste type. The options are as follows:
Insert Inserts audio at the current location or selection. Adobe Audition inserts audio at the cursor location,
moving any existing data to the end of the inserted material.
Overlap (Mix) Mixes audio at the selected volume level with the current waveform. If the audio is longer than the
current waveform, the current waveform is lengthened to accommodate the pasted audio.
Overwrite Overdubs the audio beginning at the cursor location, and replaces the existing material thereafter for the
duration of audio. For example, pasting 5 seconds of material replaces the first 5 seconds after the cursor.
Modulate Modulates the audio with the current waveform for an interesting effect. The result is similar to
overlapping, except that the values of the two waveforms are multiplied by each other, sample by sample, instead of
added.
From Clipboard Pastes audio data from the active internal clipboard.
From File Pastes audio data from a file. Click Browse to navigate to the file.
Loop Paste Pastes audio data the specified number of times. If the audio is longer than the current selection, the
current selection is automatically lengthened accordingly.
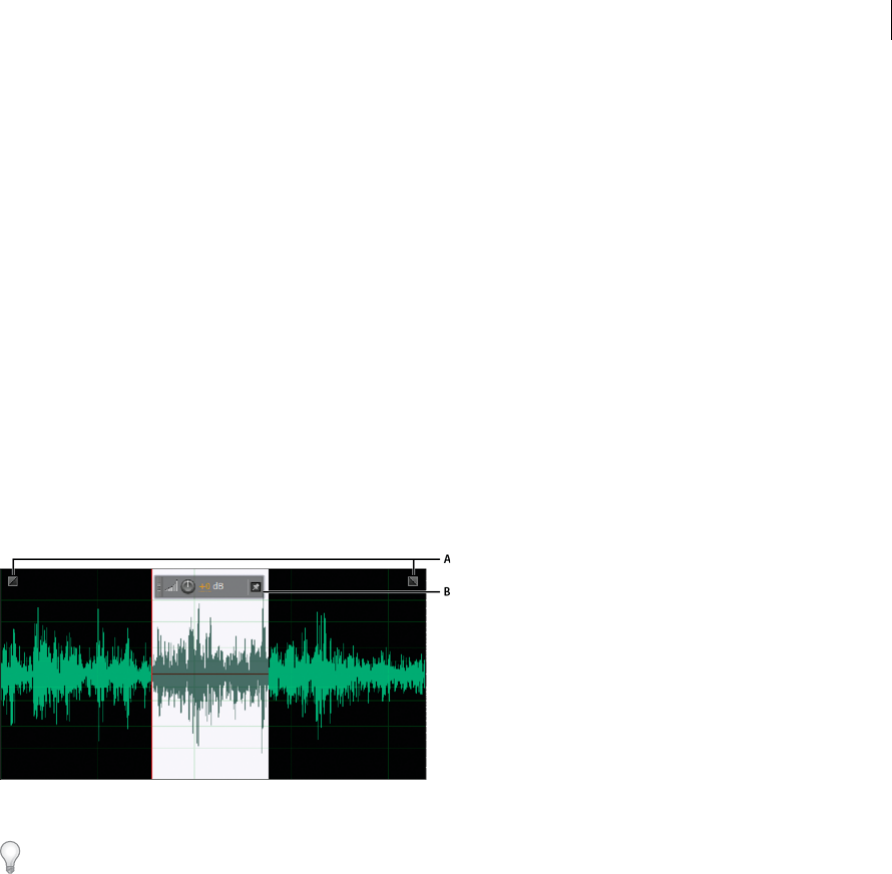
61
Last updated 6/16/2016
Editing audio files
Delete or crop audio
Do one of the following:
•Select audio you want to delete, and choose Edit > Delete.
•Select audio you want to keep, and choose Edit > Crop. (Unwanted audio at the beginning and end of the file is
removed.)
More Help topics
Convert a waveform between surround, stereo, and mono
Channel Mixer effect
Visually fading and changing amplitude
Though various effects can change amplitude or produce fades, visual fade and gain controls make the task quick and
intuitive. As you drag these controls in the Editor panel, a preview helps you precisely adjust audio.
A Fade controls B Gain control (heads-up display)
To quickly fade selected audio, choose Favorites > Fade In or Fade Out.
Visually fade in or out
Adobe Audition offers three types of visual fades:
•Linear fades produce an even volume change that works well for much material. If this fade sounds too abrupt,
however, try one of the other options.
•Logarithmic fades smoothly change volume slowly and then rapidly, or vice versa.
•Cosine fades are shaped like an S-curve, changing volume slowly at first, rapidly through the bulk of the fade, and
slowly at the finish.
Note: In the Waveform Editor, fades permanently change audio data. To apply fades you can readjust in the Multitrack
Editor, see Fade or crossfade multitrack clips.
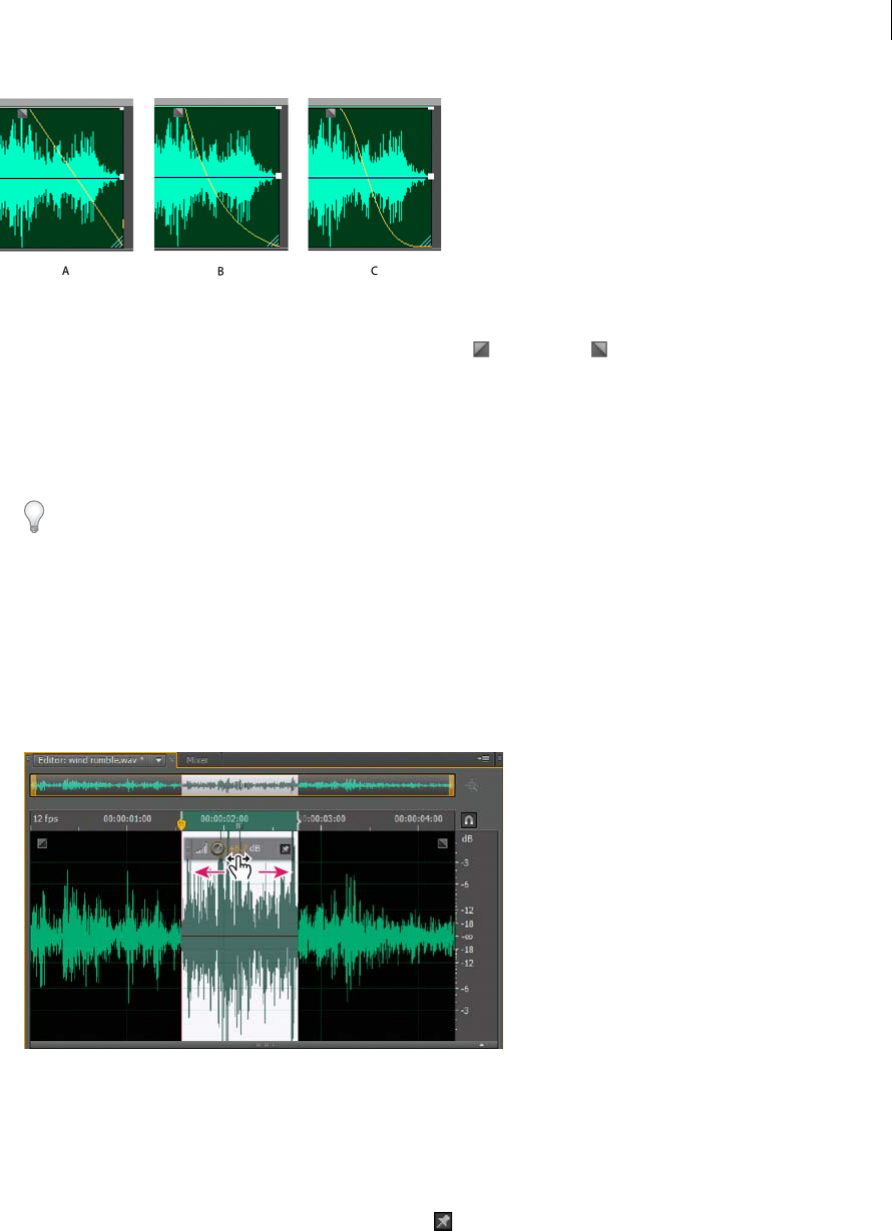
62
Editing audio files
Last updated 6/16/2016
A Linear B Logarithmic C Cosine
In the upper left or right of the waveform, drag the Fade In or Fade Out handle inward, and do any of the
following:
•For a linear fade, drag perfectly horizontally.
•For a logarithmic fade, drag up or down.
•For a cosine (S-curve) fade, hold down Ctrl (Windows) or Command (Mac OS).
To create cosine fades by default and hold the keys above to create linear or logarithmic fades, change the Default
Fade setting in the General preferences.
Visually raise or lower amplitude
1In the Editor panel, select specific audio, or select nothing to adjust the entire file.
2In the gain control that floats above the panel, drag the knob or numbers.
The numbers indicate how new amplitude compares with existing amplitude. When you release the mouse button,
the numbers return to 0 dB, so you can make further adjustments.
Pin or hide the visual amplitude control
By default, the visual amplitude control appears in a heads-up display (HUD) that floats over all waveforms. If you find
the HUD distracting, do any of the following:
•To lock the HUD in one location, click the Pin button .
•To show the HUD only over highlighted selections, select Show HUD for Selection Ranges Only in the General
preferences.
•To totally hide the HUD, deselect View > Show HUD.
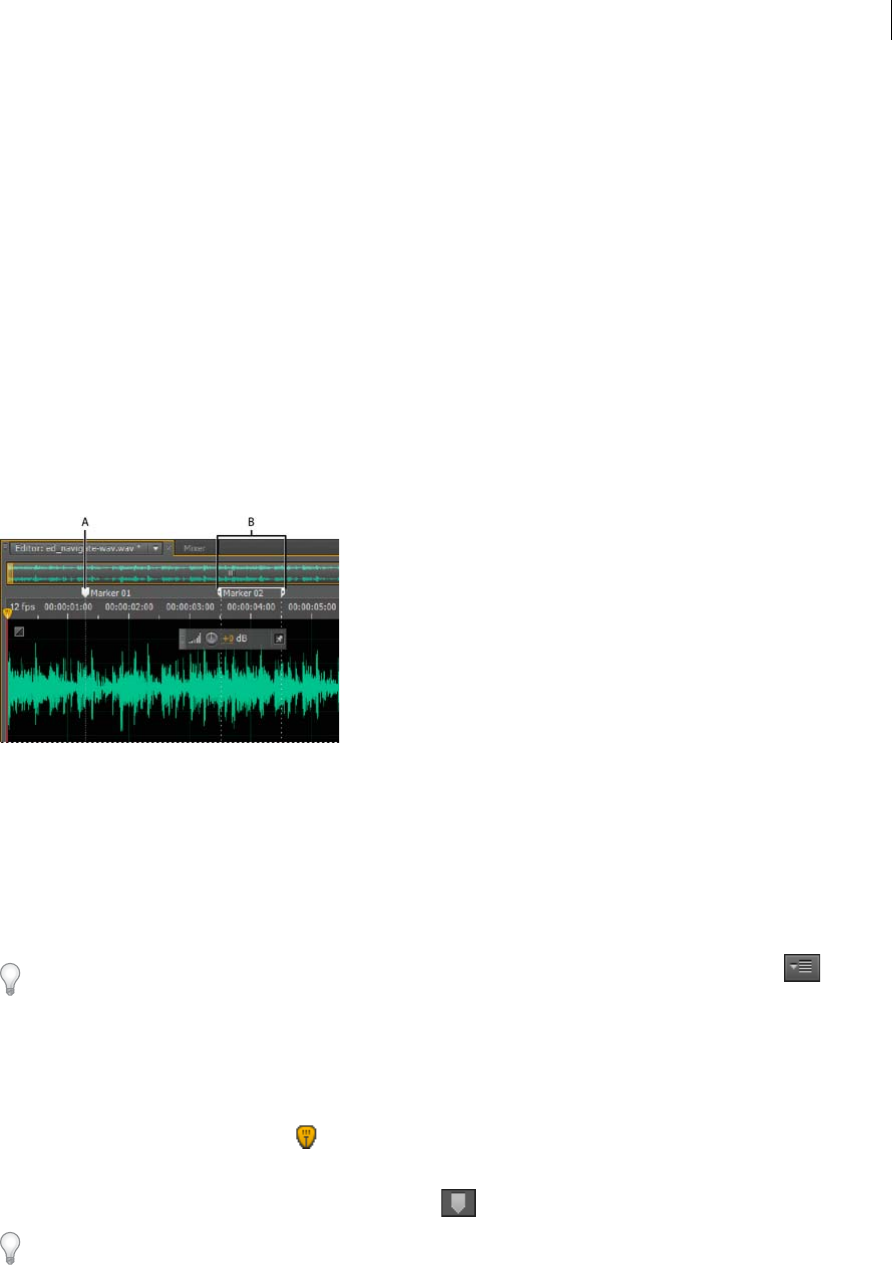
63
Editing audio files
Last updated 6/16/2016
More Help topics
Volume Envelope effect (Waveform Editor only)
Amplify effect
Working with markers
Markers (sometimes called cues) are locations that you define in a waveform. Markers make it easy to navigate within
a waveform to make a selection, perform edits, or play back audio.
In Adobe Audition, a marker can be either a point or a range. A point refers to a specific time position within a
waveform (for instance, 1:08.566 from the start of the file). A range has both a start time and an end time (for example,
all of the waveform from 1:08.566 to 3:07.379). You can drag start and end markers for a range to different times.
In the timeline at the top of the Editor panel, markers have white handles you can select, drag, or right-click to access
additional commands.
A Marker point B Marker range
Note: To preserve markers when you save a file, select Include Markers and Other Metadata.
Add, select, and rename markers
Though you can add markers directly in the Editor panel, you use the Markers panel (Windows > Markers) to define
and select markers.
To hide or show information such as Duration and Type, choose Markers Display from the panel menu .
Add a marker
1Do one of the following:
•Play audio.
•Place the current-time indicator where you want a marker point to be.
•Select the audio data you want to define as a marker range.
2Either press the M key, or click the Add Marker button in the Markers panel.
To automatically create markers where silence occurs, see Delete Silence and Mark Audio options.

64
Editing audio files
Last updated 6/16/2016
Select markers
•Click a marker in the Editor or Markers panel. Or double-click to move the current-time indicator to that
location and select the area for range markers.
•To select adjacent markers, click the first marker you want to select in the Markers panel, and then Shift-click the
last.
•To select nonadjacent markers, Ctrl-click (Windows) or Command-click (Mac OS) them in the Markers panel.
•To move the current-time indicator to the nearest marker, choose Edit > Marker > Move CTI to Next or Previous.
Rename a marker
1In the Markers panel, select the marker.
2Click the marker name, and enter a new name.
Adjust, merge, convert, or delete markers
After creating markers, you can fine-tune them to best address the needs of an audio project.
Reposition markers
•In the Editor panel, drag marker handles to a new location.
•In the Markers panel, select the marker, and enter new Start values for point markers, or Start, End, and Duration
values for range markers.
Merge individual markers
In the Markers panel, select the markers you want to merge, and click the Merge button .
The new merged marker inherits its name from the first marker. Merged point markers become range markers.
Convert a point marker to a range marker
Right-click the marker handle, and choose Convert to Range.
The marker handle splits into two handles.
Convert a range marker to a point marker
Right-click a marker handle, and choose Convert to Point.
The two parts of the range marker handle merge into a single handle, with the start time of the range becoming the
time for the point marker.
Delete markers
•Select one or more markers, and click the Delete button in the Markers panel.
•Right-click the marker handle in the Editor panel, and choose Delete Marker.
Save audio between markers to new files
1In the Waveform Editor, choose Window > Markers.
2Select one or more marker ranges. (See Working with markers .)
3Click the Export Audio button in the Markers panel.
4Set the following options:
Use Marker Names In Filename Uses the marker name as the prefix for the filename.

65
Editing audio files
Last updated 6/16/2016
Prefix Specifies a filename prefix for the new files.
Postfix Starting # Specifies the number to begin with when adding numbers to the filename prefix. Adobe Audition
automatically adds numbers after the prefix (for example, prefix02, prefix03) to distinguish saved files.
Location Specifies the destination folder for saved files. Click Browse to specify a different folder.
Format Specifies the file format. The Format Settings area below indicates and data compression and storage
modes; to adjust these, click Change. (See Audio format settings .)
Sample Type Indicates the sample rate and bit depth. To adjust these options, click Change. (See Convert the sample
rate of a file.)
Include Markers and Other Metadata Includes audio markers and information from the Metadata panel in
processed files. (See Viewing and editing XMP metadata .)
Creating playlists
A playlist is an arrangement of marker ranges that you can play back in any order and loop a specified number of times.
A playlist lets you try different versions of an arrangement before you commit to edits. You create playlists in the Playlist
panel (Window > Playlist).
Note: To store a playlist with a file, you must save in WAV format. (See Save audio files .)
Create a playlist
1 In the Playlist panel, click the Open Markers Panel button .
2 In the Markers panel, select marker ranges you want to add to the playlist. Then click the Insert Selected Range
Markers Into Playlist button , or drag the range markers to the Playlist panel.
Change the order of items in a playlist
Drag the item up or down.
Play items in a playlist
•To play all or part of the list, select the first item you want to play. Then click the Play button at the top of the
panel.
•To play a specific item, click the Play button to the left of the item name.
Loop an item in a playlist
Select an item, and enter a number in the Loops column. Each item can loop a different number of times.
Delete items from a playlist
Select the items, and click the Remove button .
More Help topics
Delete Silence and Mark Audio options
Batch process files
Inverting, reversing, and silencing audio

66
Editing audio files
Last updated 6/16/2016
Invert a waveform
The Invert effect inverts audio phase by 180 degrees. (To understand phase degrees, see Waveform measurements.)
Inverting doesn’t produce an audible change on an individual waveform, but you can hear a difference when combining
waveforms. For example, you might invert pasted audio to better align it with existing audio. Or, you could invert one
channel of a stereo file to correct an out-of-phase recording.
1If you want to invert part of a waveform, select the desired range. Or, deselect all audio data to invert the entire
waveform.
2Choose Effects > Invert.
Reverse a waveform
The Reverse effect reverses a waveform from right to left so it plays backwards. Reversing is useful for creating special
effects.
1If you want to reverse part of the waveform, select the desired range. Or, deselect all audio data to reverse the entire
waveform.
2Choose Effects > Reverse.
Create silence
Creating silence is useful for inserting pauses and removing nonessential noise from an audio file. Adobe Audition
provides two ways to create silence:
•To mute existing audio in the Waveform Editor, select the desired content, and choose Effects > Silence. Unlike
deleting or cutting a selection, which splices the surrounding material together, muting leaves the duration of the
selection intact.
•To add silence in the Waveform or Multitrack Editor, either position the current-time indicator or select existing
audio. Then choose Edit > Insert >Silence, and enter the number of seconds. Any audio to the right is pushed out
in time, lengthening duration. Multitrack clips are split if necessary.
More Help topics
Waveform measurements
Delete Silence and Mark Audio options
How to automate common tasks in Audition
Favorites
Favorites are combinations of effects, fades, and amplitude adjustments that you can save and quickly reapply to any file
or selection in the Waveform Editor. The Favorites menu lists some defaults to get you started, plus any additional
favorites you create.
To assign favorites to keyboard shortcuts, see Customize shortcuts.

67
Editing audio files
Last updated 6/16/2016
Create a favorite from a combination of adjustments
1In the Waveform Editor, choose Favorites > Start Recording Favorite.
2Apply the effects, fades, and amplitude adjustments you want to save.
3Choose Favorite > Stop Recording Favorite, and name the favorite.
Create a favorite from a specific effect
1Adjust effect settings as desired.
2In the upper right of the effect dialog box, click the Favorite icon . Then name the favorite.
Delete a favorite
1Choose Favorites > Delete Favorite.
2Select the favorite name, and click OK.
Batch process files
Batch process groups of files to quickly apply favorite processing, resample, or save to a new format. Quickly automate
common tasks like exporting to mp3 format or applying identical effects to related files.
1In the Waveform Editor, choose Window > Batch Process.
2In the Batch Process panel, click the Add Files button to browse to files on your system. (To quickly add all open
files, choose File > Save All Audio as Batch Process.)
Note: By default, batch processing is limited to three files at a time for optimal performance. To process more files, change
the value for Maximum Number Of Concurrent File Processes in the Data preferences.
3Select a processing option from the Favorite menu. Then do one of the following:
•To process the existing files, deselect Export at the bottom of the panel, and click Run.
•To process new files, select Export, and click Run. (To customize Export Settings, see the following step.)
4Click Export Settings, and set the following options:
Filename Prefix and Postfix Help you identify batched files.
Template Specifies a naming convention for processed files, such as Artist, Date, Song (%a/%d/%s/).
To learn more about the different batch processing filename templates, read this blog post by Durin Gleaves.
Location Specifies the destination folder for processed files.
Same As Source File Location Saves modified files in the same folder as the file’s source file.
Overwrite Existing Files Automatically replaces existing files with the same name.
Format Specifies the file format. The Format Settings area below indicates data compression and storage modes; to
adjust these, click Change. (See Audio format settings .)
Sample Type Indicates the sample rate and bit depth. To customize these options, click Change. (See Convert the
sample rate of a file.)
New Sample Type Indicates the sample rate and bit depth after export. If source files have varying sample types,
click the pop-up menu to see how each file will be converted. (The menu does not apply conversion options; to
adjust those, click Change for Sample Type.)

68
Editing audio files
Last updated 6/16/2016
Remove Files from Panel After Completion Removes filenames from the Batch Process panel after export.
Include Markers and Other Metadata Includes audio markers and information from the Metadata panel in
processed files. (See Working with markers and Viewing and editing XMP metadata .)
More Help topics
Selecting audio
Use effect presets
Normalize effect (Waveform Editor only)
Analyze amplitude
Analyze phase, frequency, and amplitude with Audition
Adobe Audition provides several ways to analyze audio. To compare phase relationships between any two channels, use
the Phase Meter panel. To analyze tonal and dynamic range, use the Frequency Analysis and Amplitude Statistics
panels.
The Waveform Editor also provides Spectral Frequency Display, which you can use together with the analysis methods
above. (See Displaying audio in the Waveform Editor.)
Analyze phase
The Phase Meter panel reveals out-of-phase channels for stereo and surround waveforms, which you can address with
the Effects > Invert command. (See Invert a waveform.) This panel also helps you identify highly in-phase channels that
will sound similar if summed to mono. (See Convert a waveform between surround, stereo, and mono.)
To understand audio phase, see How sound waves interact.
1Choose Window > Phase Meter.
2Right-click the Phase Meter panel, and choose channels from the Channel and Compare To menus.
3In Editor panel, select a range if desired, and start playback.
In the Phase Meter, audio to the left is more out of phase, while audio to the right is more in phase. -1.0 reflects total
phase cancellation, while 1.0 reflects identical audio content in each channel.
To customize meter appearance, right-click them, and select Show Color Gradient or Show LED Meters.
Analyze frequency range
You can use the Frequency Analysis panel to identify problematic frequency bands, which you can then correct with a
filter effect.
1Choose Window > Frequency Analysis.
2In the Editor panel, click a time point, select a range, or start playback.
3In the Frequency Analysis panel, view frequency along the horizontal axis, and amplitude along the vertical axis.

69
Editing audio files
Last updated 6/16/2016
If you selected a range, Adobe Audition analyzes only the center point. To analyze the overall frequency of the range,
click Scan Selection.
Frequency Analysis options
Scale Displays the frequency scale either logarithmically (reflecting human hearing) or linearly (providing more detail
for upper frequencies).
Copy All Graph Data
Copies a text report of the frequency data to the system clipboard.
Hold buttons Let you take up to eight frequency snapshots as a waveform is playing. The frequency outline (which is
rendered in the same color as the button clicked) is frozen on the graph and overlaid on other frequency outlines. To
clear a frozen frequency outline, click its corresponding Hold button again.
Display Changes the graph display. Choose one of the following styles:
Lines Displays amplitude at each frequency with simple lines. By default, the left channel is green; the right is blue.
Area Also displays lines for amplitude, but fills the area beneath the lines in a solid color, and smooths out amplitude
differences in the same area.
Bars Shows the effect of analysis resolution by splitting the display into rectangular segments. The higher the FFT size,
the greater the analysis resolution, and the narrower the bars.
Top Channel Determines which channel of a stereo or surround file appears over others in the graph. To combine
displayed channels, choose Average.
Scan or Scan Selection Scans the entire file or selection, and displays average frequency data in the graph. (By default,
the graph displays data from the center point of files and selections.)
Advanced options
FFT Size Specifies the Fast Fourier Transform size. Higher FFT sizes report frequency data more accurately but they
require longer processing times.
Window Determines the Fast Fourier transform shape. These functions are listed in order from narrowest to widest.
Narrower functions include fewer surrounding frequencies but less precisely reflect center frequencies. Wider
functions include more surrounding frequencies but more precisely reflect center frequencies. The Hamming and
Blackman options provide excellent overall results.
0 dB Reference Determines the amplitude at which full scale, 0 dBFS audio data is displayed. For example, a value of
zero displays 0 dBFS audio at 0 dB. A value of 30 displays 0 dBFS audio at –30 dB. This value simply moves the graph
up or down; it does not change the amplitude of audio data.
Tip: Adjust the 0 dB Reference to calibrate this display to another decibel reference, like sound pressure level (SPL).
Value at [x] Hz Reveals precise amplitude for specific frequencies when you position the mouse over the graph.
Overall Frequency For the start point of a selected range, indicates average frequency.
Overall Musical Note For the start point of a selected range, indicates keyboard position and variance from standard
tuning (A440). For example, A2 +7 equals the second-lowest A on a keyboard tuned 7% higher than normal.
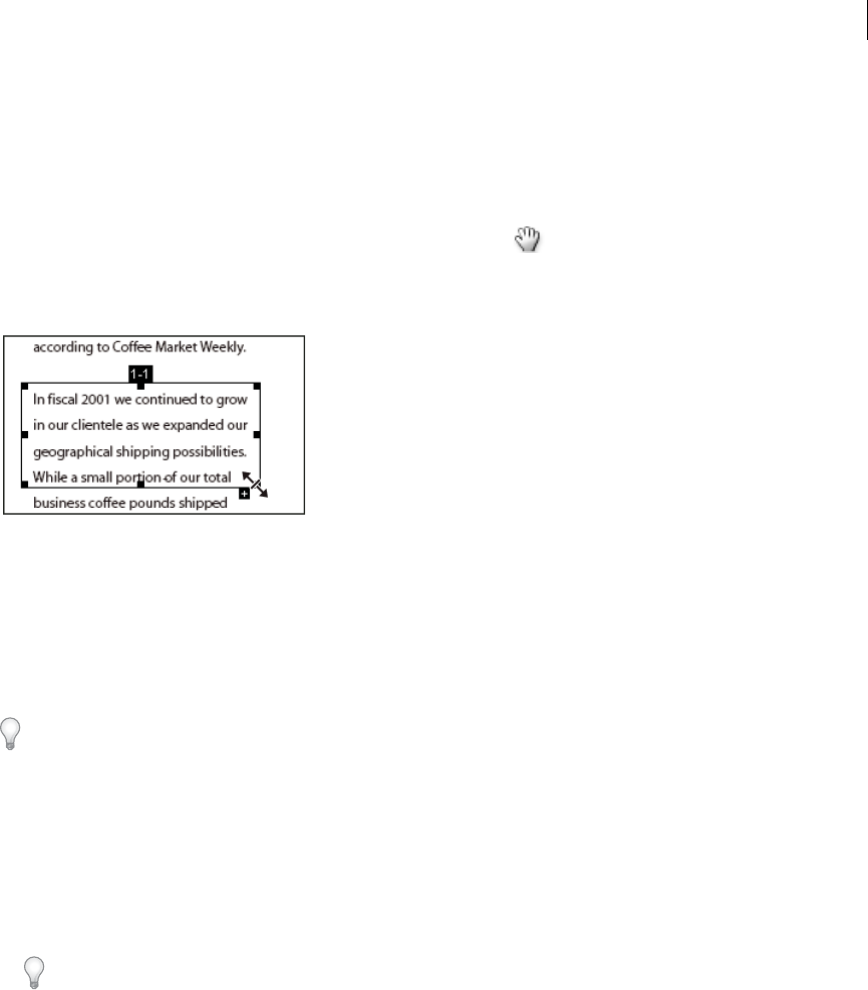
70
Last updated 6/16/2016
Editing audio files
Zoom frequency graphs
In the Frequency Analysis panel, you can zoom graphs to analyze frequency in more detail.
Do any of the following:
•To zoom in on a graph, right-click and drag the magnifying glass icon in the vertical or horizontal ruler.
•To navigate a magnified graph, left-click and drag the hand icon in the vertical or horizontal ruler.
•To zoom out on a magnified graph, right-click in the vertical or horizontal ruler, and choose Zoom Out to return
to the previous magnification, or Zoom Out Full to zoom out completely.
Analyze amplitude
1In the Waveform Editor, choose Window > Amplitude Statistics.
2To calculate statistics from an entire file or selection, click Scan or Scan Selection. (By default, statistics are calculated
from the center point of files and selections.)
You can adjust a selection in the Editor panel. Click Scan Selection again to recalculate statistics.
3Evaluate amplitude on the following tabs:
•The General tab displays numerical statistics that indicate dynamic range, identify clipped samples, and note any
DC offset.
•The RMS Histogram tab displays a graph that shows the relative prevalence of each amplitude. The horizontal
ruler measures amplitude in decibels, and the vertical ruler measures prevalence using the RMS formula. Choose
a channel to display from the Show Channel menu.
Tip: Use the Histogram tab to identify prevalent amplitudes, and then compress, limit, or normalize them with
an amplitude effect.
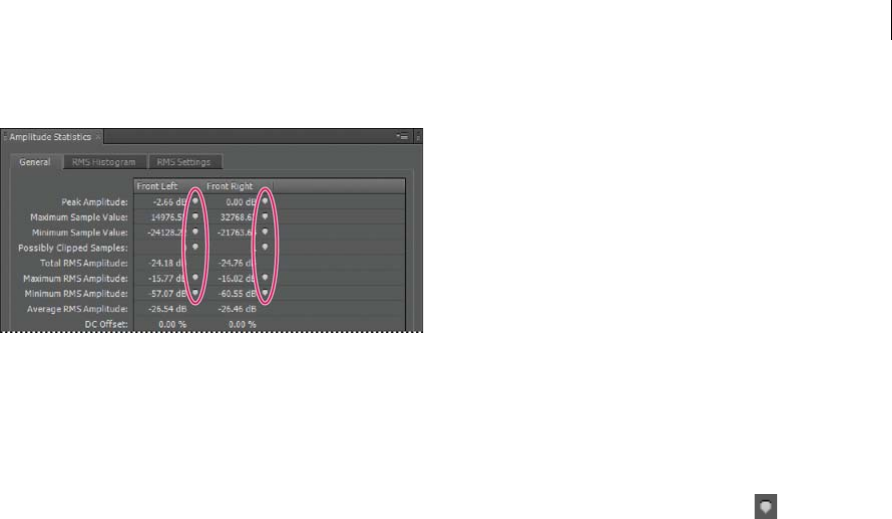
71
Editing audio files
Last updated 6/16/2016
General options
Peak Amplitude Shows the sample with the highest amplitude in decibel form.
Maximum Sample Value Shows the sample with the highest amplitude.
Minimum Sample Value Shows the sample with the lowest amplitude.
Possibly Clipped Samples Shows the number of samples have likely exceeded 0 dBFS. Click the icon to the right of
this value to navigate to the first clipped sample in the audio file. (If necessary, click the icon again to view subsequent
clipped samples.)
Total, Maximum, Minimum, and Average RMS Amplitude Show the root-mean-square values of the selection. RMS
values are based on the prevalence of specific amplitudes, often reflecting perceived loudness better than absolute or
average amplitudes.
DC Offset Shows any direct current offset applied to the waveform during recording. Positive values are above the
center line, and negative values are below it. (See Correct DC offset.)
Measured Bit Depth Reports the waveform’s bit depth. (32 indicates that the waveform uses the full 32-bit float range).
Dynamic Range Reflects the difference between the Maximum and Minimum RMS Amplitude.
Dynamic Range Used Shows the dynamic range minus unusually long periods of low RMS amplitude, such as silent
passages.
Loudness Shows the average amplitude.
Perceived Loudness Compensates for the human ear’s emphasis on middle frequencies.
Copy Copies all statistics on the General tab to the system clipboard.
RMS Settings options
To adjust how RMS statistics are calculated, set the following options:
0dB = FS Sine Wave Correspond the dB level to a full-scale sine wave, where peak amplitude is about 3.01 dB quieter
than a full-scale square wave.
0dB = FS Square Wave Corresponds the dB level to a full-scale square wave, where peak amplitude is about 3.01 dB
louder than a full-scale sine wave.
Account For DC Ignores any DC offset in the measurements.
Window Width Specifies the number of milliseconds in each RMS window. A selected range contains a series of such
windows, which Adobe Audition averages to calculate the Minimum RMS and Maximum RMS values. To achieve the
most accurate RMS values, use wide windows for audio with a wide dynamic range, and narrow windows for audio with
a narrow dynamic range.
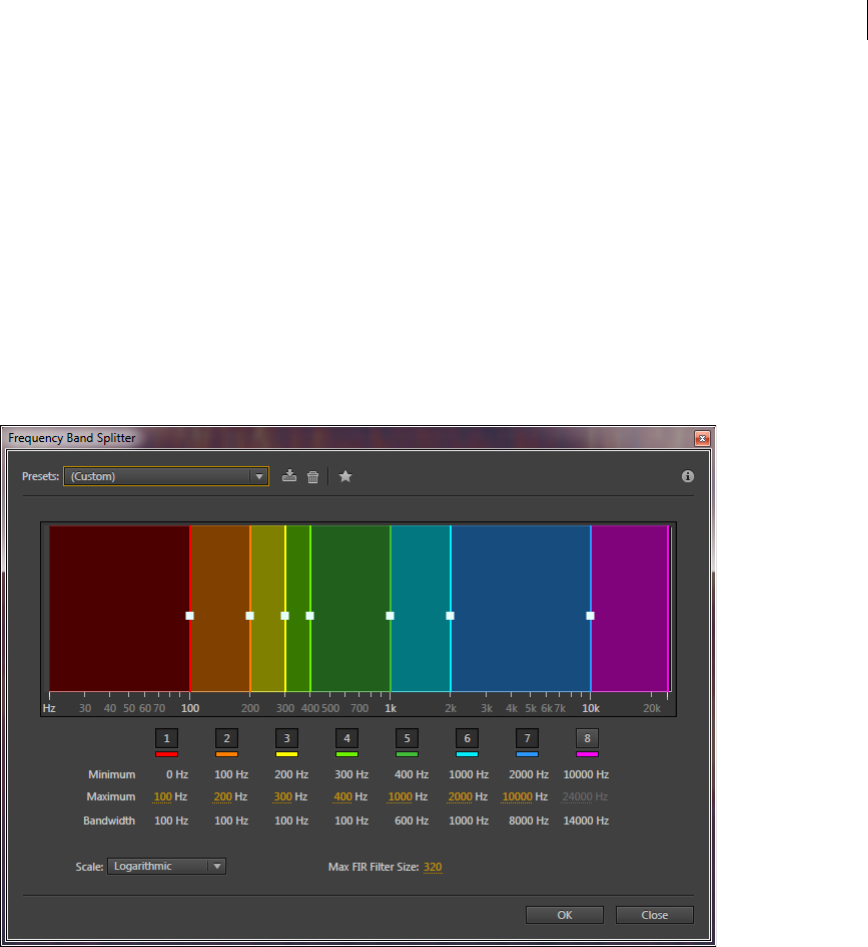
72
Editing audio files
Last updated 6/16/2016
Frequency Band Splitter
The Frequency Band Splitter lets you take a selected audio clip (or a highlighted section thereof) and make up to eight
copies of it, with each copy assuming a different frequency range of the original. The specified crossover frequencies
determine the split points. Each copy of the waveform is placed in its own track in the session window. You can then
edit or apply effects to each band separately.
For example, using the default setting of three bands with crossover values of 800 and 3200 creates three copies of the
selected waveform: one with the frequencies of the selected wave from 0 Hz to 800 Hz, one from 800 Hz to 3200 Hz,
and one from 3200 Hz to 22050 Hz (or whatever the maximum frequency present is, based on the sample rate).
1Open an audio clip. To process a selection, using a selection tool, select a range you want to process.
2Choose Edit > Frequency Band Splitter.
3Set the desired options and click OK.
Frequency Splitter options
Bands Sets the number of split points. The original waveform is copied the number of times you specify, with each copy
having a different frequency range, as determined by the number of crossovers.
Maximum Specifies the maximum frequency for each band. The Minimum and Bandwidth display calculated values
based on the maximum frequency values for the current and adjacent bands.
Scale Specifies the scale displayed to indicate the bands graphically. You can choose either Linear or Logarithmic.
Max FIR Filter Size Sets the maximum size of the FIR (Finite Impulse Response) filter, which maintains phase errors
over the response curve. FIR filters are unlike IIR filters, which can have phase error (often audible as a ringing quality).
Higher values create higher accuracy in the frequency filtering. The default value, 320, works most of the time, but you
should increase it if distortion or ringing occurs in the filtered waves.

73
Editing audio files
Last updated 6/16/2016
Undo, redo, and history
Undo or redo changes
Each time you start Adobe Audition, it keeps track of the edits you perform. Edits aren’t permanently applied until you
save and close a file, giving you unlimited undo and redo capability.
To undo or redo changes, do any of the following:
•To undo a change, choose Edit > Undo [name of change].
•To redo a change, choose Edit > Redo [name of change].
•To repeat the last command in the Waveform Editor, choose Edit > Repeat Last Command. You can repeat most
commands; however, there are a few exceptions (such as Delete).
To repeat the last command without opening its dialog box, press Ctrl+R (Windows) or Command+R (Mac OS).
Compare history states
While the Undo and Redo commands restrict you to an incremental sequence of changes, the History panel lets you
instantly revert back to any previous change. Use the panel to quickly compare processed and original audio or discard
a series of changes that produced undesired results.
Note: History states disappear when you close a file.
Revert to states
•To revert to any history state, click it.
•To incrementally move through states, press the up and down arrows on the keyboard.
Delete states
When you work with very large audio files, delete unnecessary history states to clear disk space and improve
performance.
•To delete all states, choose Clear History from the panel menu .
•To delete a specific state, select it, and then click the trash icon .
Note: Deleting history states also removes related Undo commands.
Converting sample types
Hear a file in a different sample rate
The Interpret Sample Rate command lets you hear how an audio file sounds at a different sample rate. (See
Understanding sample rate.) This command helps you identify files that specify an incorrect rate in the file header. To
then permanently convert the sample rate, choose Edit > Convert Sample Type.
1In the Waveform Editor, choose Edit > Interpret Sample Rate.

74
Editing audio files
Last updated 6/16/2016
2Enter a sample rate in the text box, or choose a common sample rate from the list.
Note: Although you can work with sample rates ranging from 6000 to 192,000 Hz in Adobe Audition, your sound card may
not be capable of playing all rates properly. To determine supported sample rates, consult the documentation for the card.
Convert the sample rate of a file
The sample rate of a file determines the frequency range of the waveform. When converting the sample rate, keep in
mind that most sound cards support only certain sample rates.
1In the Waveform Editor, choose Edit > Convert Sample Type.
To quickly access the Convert Sample Type dialog box, double-click the Sample Type section of the status bar. (See
Display the status bar.)
2Select a rate from the Sample Rate list, or enter a custom rate in the text box.
3In the Advanced section, drag the Quality slider to adjust the quality of the sampling conversion.
Higher values retain more high frequencies, but the conversion takes longer. Lower values require less processing
time but reduce high frequencies.
Use higher Quality values whenever you downsample a high rate to a low rate. When upsampling, higher values
have little effect.
4For the best results, select Pre/Post Filter to prevent aliasing noise.
Convert a waveform between surround, stereo, and mono
The Convert Sample Type command is the quickest way to convert a waveform to a different number of channels.
1In the Waveform Editor, choose Edit > Convert Sample Type.
2From the Channels menu, select Mono, Stereo, or 5.1.
3In the Advanced section, Enter percentages for Left Mix and Right Mix:
•When you convert from mono to stereo, the Left Mix and Right Mix options specify the relative amplitude with
which the original mono signal is placed into each side of the new stereo signal. For example, you can place the
mono source on the left channel only, the right channel only, or any point in between.
•When you convert from stereo to mono, the Left Mix and Right Mix options control the amount of signal from
the respective channel that will be mixed into the final mono waveform. The most common mixing method uses
50% of both channels.
For other channel-conversion techniques, see the following topics:
•Extract audio channels to mono files
•Mix audio data when pasting
•Channel Mixer effect
Change the bit depth of a file
The bit depth of a file determines the dynamic range of the audio. (See Understanding bit depth.) Adobe Audition
supports up to 32-bit resolution. You can raise the bit depth of a file to gain a greater dynamic range, or you can lower
the bit depth to reduce the file size.
75
Editing audio files
Last updated 6/16/2016
Note: Some common applications and media players require 16-bit or lower audio.
1In the Waveform Editor, choose Edit > Convert Sample Type.
2Select a Bit Depth from the menu, or enter a custom bit depth in the text box.
3In the Advanced section, set the following options:
Dithering Enables or disables dithering when converting to lower bit depths. If dithering is disabled, bit depth is
abruptly truncated, producing a crackly effect on low-volume passages caused by quantization distortion.
Although dithering introduces a small amount of noise, the result is far preferable to the increased distortion that
you would otherwise hear at low signal levels. Dithering also lets you hear sounds that would be masked by the noise
and distortion limits of audio at lower bit depths.
Dither Type Controls how dithering noise is distributed relative to the original amplitude value. Usually, Triangular
provides the best tradeoff among signal-to-noise ratio, distortion, and noise modulation.
note: Triangular (Shaped) and Gaussian (Shaped) move slightly more noise to higher frequencies. For additional
control, set Noise Shaping options.
Noise Shaping Determines which frequencies contain dithering noise. By introducing noise shaping, you may be
able to use lower dither depths without introducing audible artifacts. The best shaping depends on the source audio,
final sample rate, and bit depth.
note: Noise Shaping is disabled for sample rates below 32Khz because all noise would remain in audible frequencies.
High PassWith a crossover set to 7.3 kHz, drops dithering noise to -180dB at 0 Hz and -162dB at100 Hz.
Light SlopeWith a crossover set to 11 kHz, drops noise to -3dB at 0 Hz and -10dB at 5 kHz.
Neutral Light is flat up to 14 kHz, ramps noise up to a maximum at 17kHz, and is again flat at higher frequencies.
Background noise sounds the same as it does without noise shaping but is about 11dB quieter. Heavy is flat up to
15.5kHz, placing all dithering noise above 16kHz (or wherever you specify the crossover). Sensitive ears may hear
a high pitched ringing if the crossover is too low. If converting 48 or 96 kHz audio, however, the crossover can be
placed well above 20 kHz.
Tip: Choose a Neutral shape to avoid sonically coloring background hiss. Note, however, that hiss will sound louder
than with other shapes.
U-ShapedShallow is mostly flat from 2 kHz up to 14 kHz but gets louder as audio approaches 0 Hz because low
frequencies are much less audible. Medium places a little more noise in the highs above 9 kHz, allowing for lower
noise below that frequency. Deep increases noise above 9 kHz even more, but also lowers it much more in the 2-6
kHz range.
Weighte dLight attempts to match how the ear perceives low-level sounds by reducing noise more in the 2-6 kHz
range and raising it in the 10-14 kHz range. At high volumes, hiss may be more noticeable. Heavy more evenly
reduces the most sensitive 2-6KHz range at the expense of more noise above 8kHz.
Crossover Specifies the frequency above which noise shaping will occur.
Strength Specify the maximum amplitude of noise added to any one frequency.
Adaptive Mode Varies the distribution of noise across frequencies.
Dither type Reduces signal-to-noise ratio Noise modulation
Triangular 4.8 dB No
Gaussian 6.0 dB Negligible

76
Editing audio files
Last updated 6/16/2016
Use sample rate conversion presets
If you need to make the same conversion on multiple files, you can save time by using a sample rate conversion preset.
1Choose Edit > Convert Sample Type.
2Adjust the settings as desired.
3Click the New Preset button .
After you create a preset, it appears in the Presets list at the top of the dialog box. If you want to delete a preset,
choose it from the list, and click the Delete button .
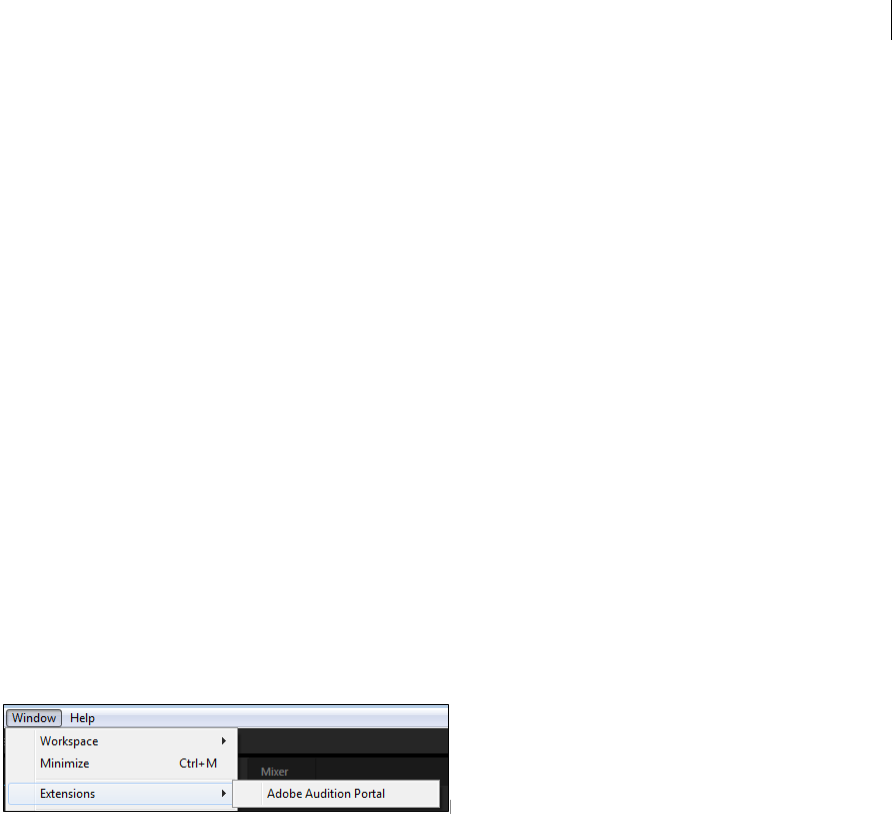
77
Last updated 6/16/2016
Chapter 6: Applying effects
Enabling CEP extensions
Overview
Audition CC supports Common Extensibility Platform (CEP) extensions, which enable developers to build integrated
panels in Adobe desktop applications.
Developers design the panels using HTML5 and JavaScript. They use ExtendScript to communicate with the
application.
The Adobe-CEP repository at Github contains source code, documentation, and community-built extensions.
Accessing the CEP extensions
Choose Window > Extensions > Adobe Audition Portal to access extensions.
You can install extensions using the Creative Cloud desktop application. Download from the Adobe Add-ons
Marketplace and then enable File Sync in the application to automatically install extensions.
You can use the SDK to create custom CEP extensions. Refer to the documentation and sample code in the SDK.
Download the Audition SDK from the Audition Developer Center.
Effects controls
Effects Rack overview
The Effects Rack lets you insert, edit, and reorder up to 16 effects, optimize mix levels, and store favorite presets. Most
rack controls appear in both the Waveform and Multitrack editors.
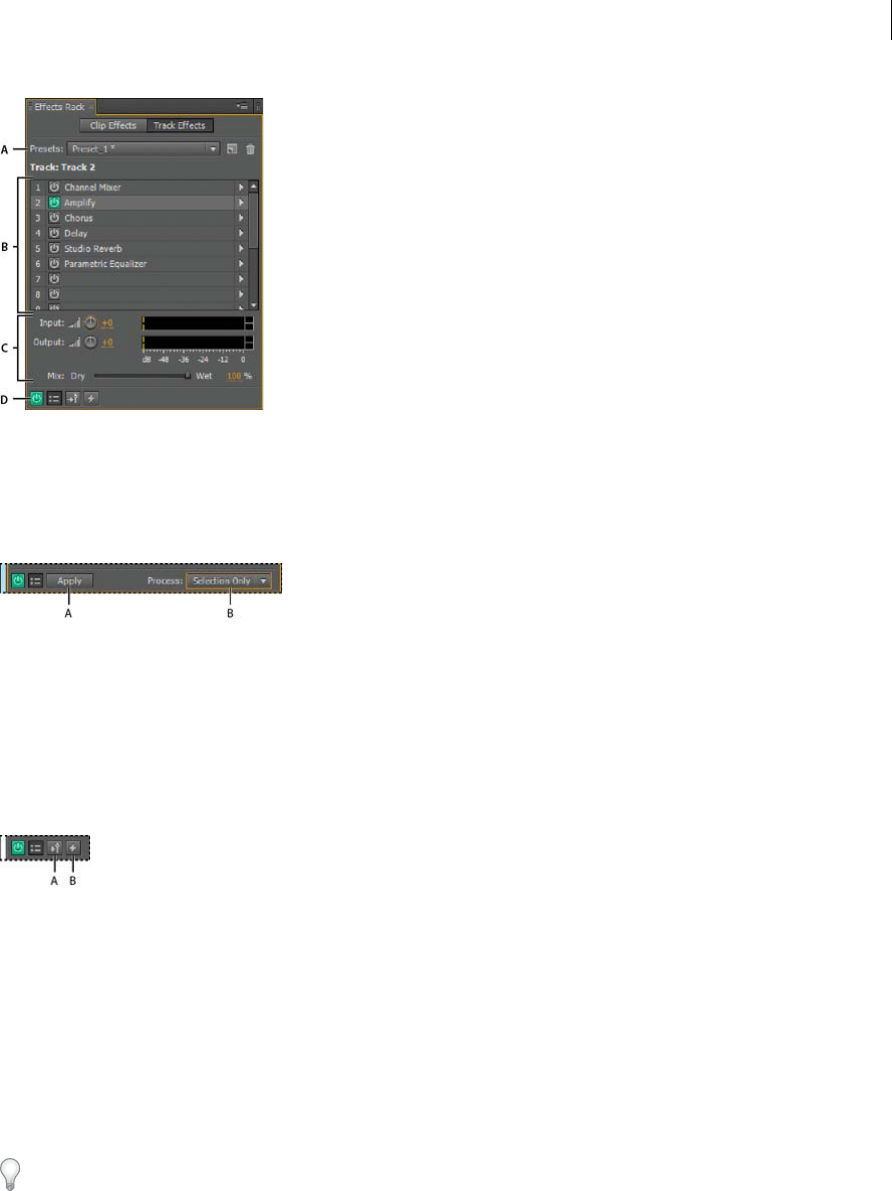
78
Applying effects
Last updated 6/16/2016
A Rack Preset controls B Effect slots C Level controls D Main Power button
Controls unique to the Waveform Editor
In the Waveform Editor, the Effects Rack provides a Process menu that that lets you modify a selection or the entire file,
and an Apply button that permanently applies effects.
A Apply button permanently applies effects B Process menu lets you modify selection or entire file
Controls unique to the Multitrack Editor
The Effects Rack provides Pre-render Track and FX Pre/Post-Fader buttons that you use to optimize and route effects.
Each clip and track has its own Effects Rack, which is saved with the session.
Note: Buses and the Master track lack a Pre-render option because processing effects from all source tracks would reduce
performance.
A FX Pre/Post-Fader B Pre-render
Set input, output, and mix levels in racks
•To optimize volume, adjust Input and Output levels so their meters peak without clipping.
•To change the percentage of processed audio, drag the Mix slider. 100% (Wet) equals fully processed audio; 0% (Dry)
equals original, unprocessed audio.
Insert, bypass, reorder, or remove effects in racks
In the Effects Rack, you manage groups of effects by using individual effect slots.
In the Multitrack Editor, the fx section of the Editor panel or Mixer provides quick access to slots in the Effects Rack.
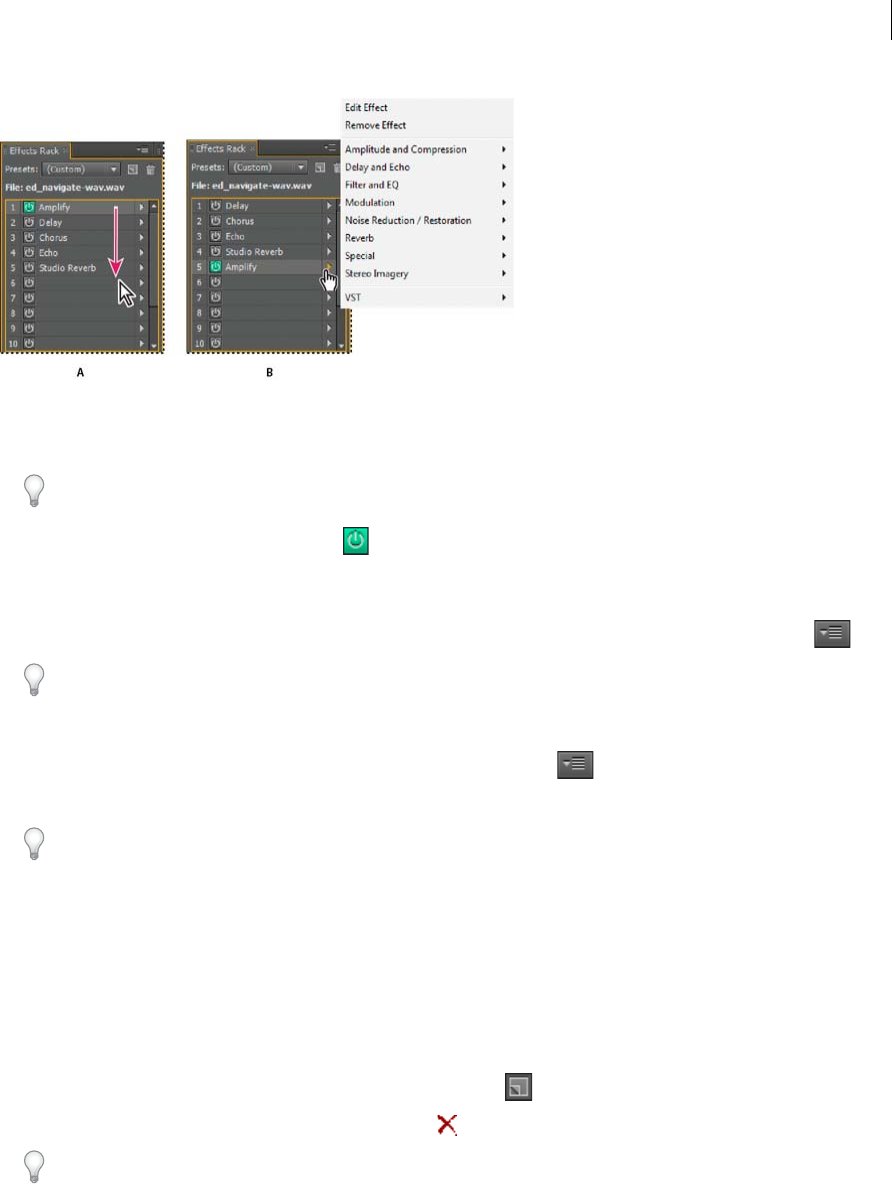
79
Applying effects
Last updated 6/16/2016
A Reorder by dragging B Insert with the slot menu
To insert an effect, choose it from a slot’s pop-up menu. Then adjust effect settings as desired.
To later reaccess effect settings, double-click the effect name in the rack.
To bypass an effect, click its Power button .
To bypass all effects, click the main Power button in the lower left corner of a rack, or the fx power button in the
Editor panel or Mixer.
To bypass a selected group of effects, choose Toggle Power State of Selected Effects from the panel menu .
Bypass effects to quickly compare processed and unprocessed audio.
To remove a single effect, choose Remove Effect from a slot’s pop-up menu. Or select the slot, and press Delete.
To remove all effects, choose Remove All Effects from the panel menu .
To reorder effects, drag them to different slots.
Reordering effects produces different sonic results. (For an example, place Reverb prior to Phaser, and vice versa.)
Use effect presets
Many effects provide presets that let you store and recall favorite settings. In addition to effect-specific presets, the
Effects Rack provides rack presets that store groups of effects and settings.
To apply a preset, choose it from the Presets menu.
1 To save current settings as a preset, click the New Preset button .
To delete a preset, select it, and click the Delete button .
To modify an existing preset, apply it, adjust settings as desired, and then save a new preset with the same name.
Control effect settings with graphs
Many Adobe Audition effects provide graphs where you can adjust parameters. By adding and moving control points
on the graph, you can precisely tailor effect settings.
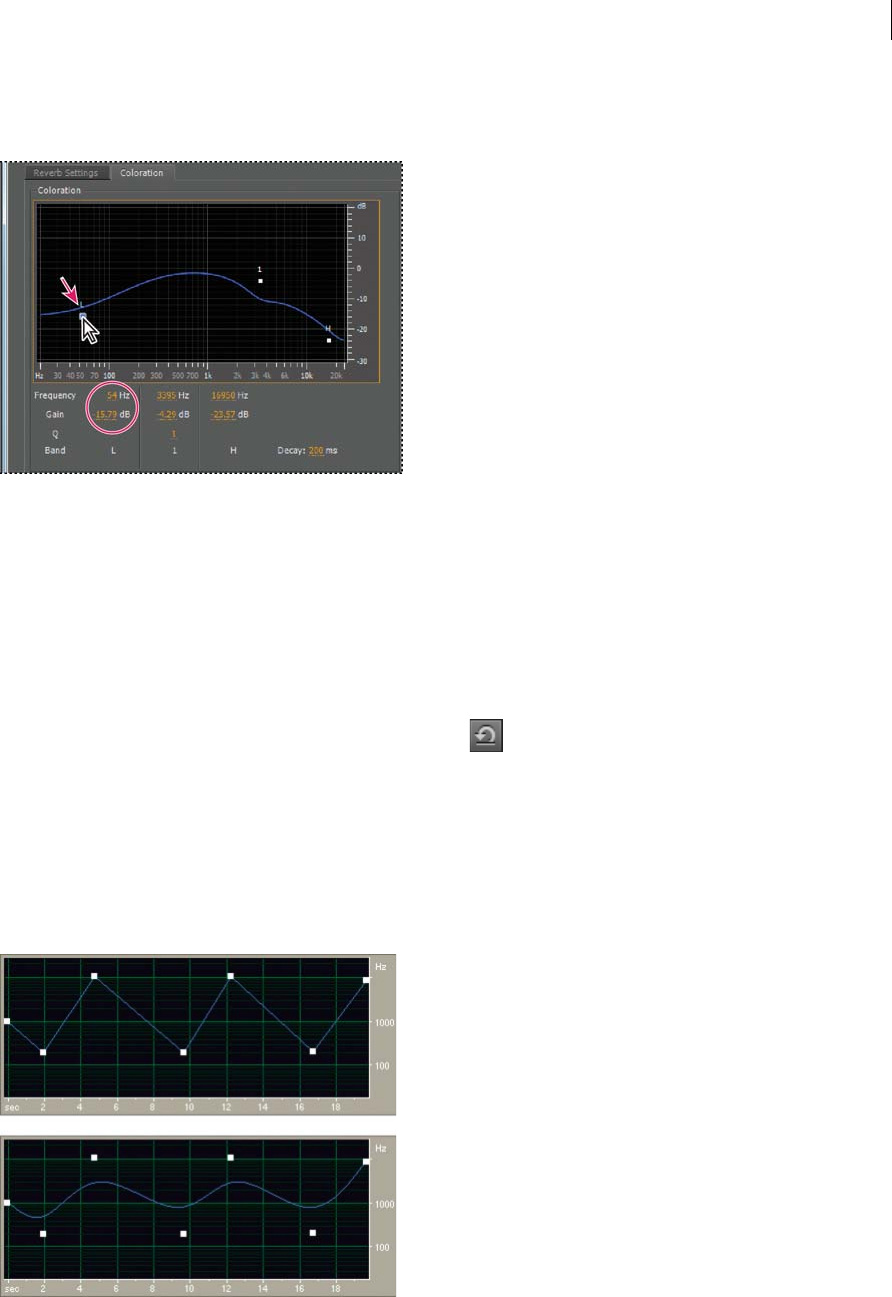
80
Applying effects
Last updated 6/16/2016
Graph control points function together with related numerical settings. If you change or disable a numerical setting,
the related graph control follows suit.
To move a point on a graph, drag it to a new location.
Note: The following techniques don’t apply to the DeHummer, Mastering, Full Reverb, Parametric Equalizer, and Track
EQ graphs.
To add a control point to a graph, click in the grid at the location where you want to place the point.
To enter numeric values for a control point, right-click it, and choose Edit Point
To remove a point from a graph, drag it off the graph.
To return a graph to its default state, click the Reset button .
About spline curves for graphs
By default, graphs display straight lines between control points. However, some graphs provide a Spline Curves option
that creates a curve between control points for smoother transitions.
When you use spline curves, lines don’t travel directly through control points. Instead, the points control the shape of
the curve. To move the curve closer to a control point, click near it to create a cluster of control points.

81
Applying effects
Last updated 6/16/2016
More Help topics
Apply groups of effects in the Waveform Editor
Apply effects to clips or tracks
Comparing the Waveform and Multitrack editors
Favorites
Applying effects in the Waveform Editor
While previewing effects, you can adjust selections and the current-time indicator in the Editor panel. (The Normalize
and Stretch effects are exceptions.)
Apply groups of effects in the Waveform Editor
In the Waveform Editor, the Effects Rack lets you apply groups of effects. (It doesn’t provide process effects such as
Noise Reduction, which must be applied individually.)
1Choose Window > Effects Rack.
2In the numbered list, choose effects for up to 16 slots. (See Insert, bypass, reorder, or remove effects in racks.)
3Start playback to preview the changes, and then edit, mix, and reorder effects as needed.
To compare processed audio to original audio, select and deselect the main Power button in the lower left corner of
the rack, or the Power buttons for individual effects.
4To apply the changes to the audio data, click Apply.
To store settings, save a rack preset. (See Use effect presets.)
Apply individual effects in the Waveform Editor
1From any submenu in the Effects menu, choose an effect.
2Click the Preview button , and then edit settings as needed.
As you edit settings, watch the Levels panel to optimize amplitude.
3To compare original audio to processed audio, select and deselect the Power button .
4To apply the changes to the audio data, click Apply.
About process effects
You can identify process effects by the word process in menu commands. These processing-intensive effects are
available only offline in the Waveform Editor. Unlike real-time effects, process effects can be applied only individually,
so they aren’t accessible in the Effects Rack.
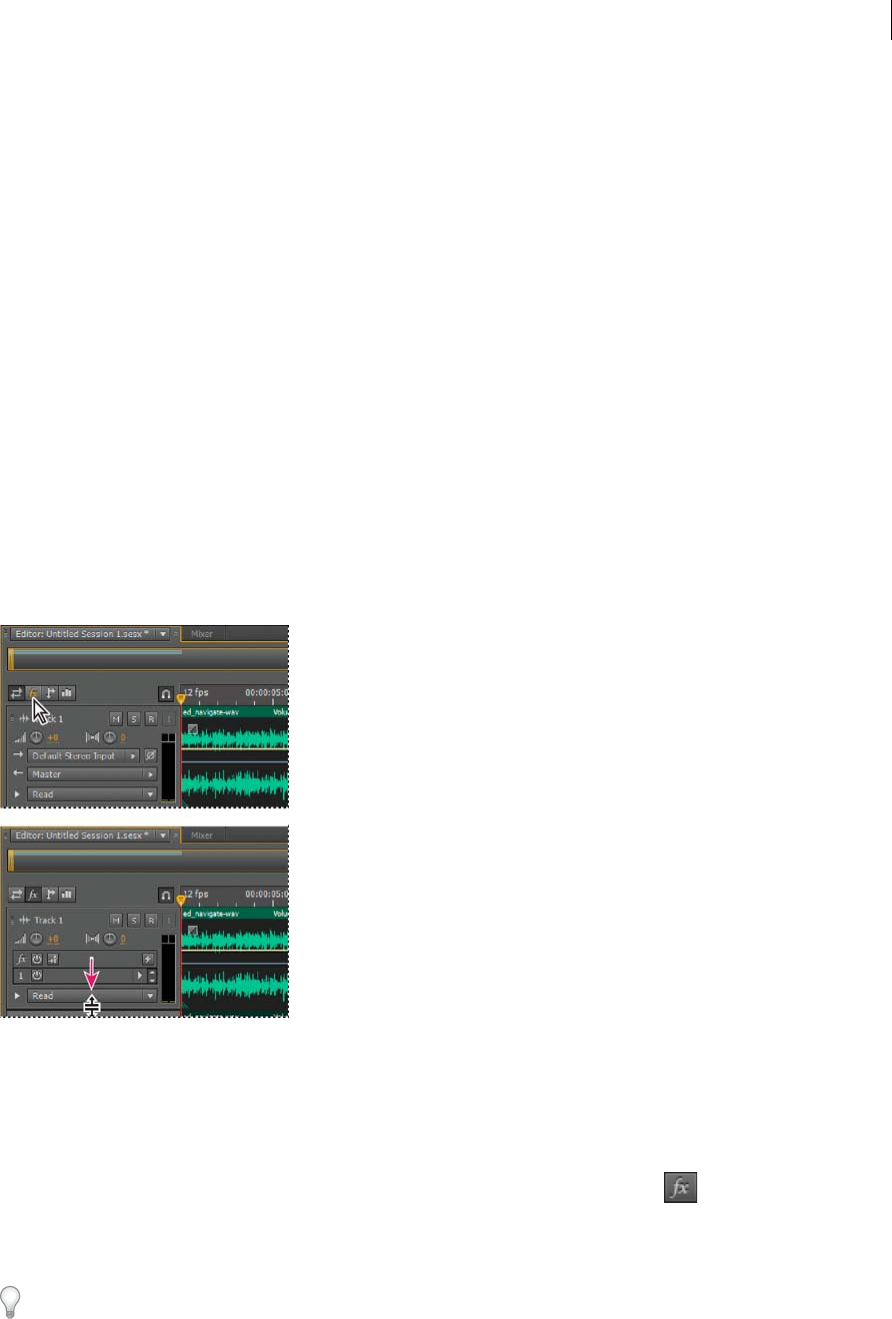
82
Applying effects
Last updated 6/16/2016
More Help topics
Effects Rack overview
Use effect presets
Control effect settings with graphs
Applying effects in the Multitrack Editor
Apply effects to clips or tracks
In the Multitrack Editor, you can apply up to 16 effects to each clip, track, and bus and adjust them while a mix plays.
(Apply clip effects if a track contains multiple clips that you want to process independently.)
You can insert, reorder, and remove effects in the Editor, Mixer, or Effects Rack panel. Only in the Effects Rack,
however, can you save favorite settings as presets, which you can apply to multiple tracks.
In the Multitrack Editor, effects are nondestructive, so you can change them at any time. To readapt a session for
different projects, for example, simply reopen it and change effects to create new sonic textures.
1Do any of the following:
•Select a clip, and click Clip Effects at the top of the Effects Rack.
•Select a track, and click Track Effects at the top of the Effects Rack.
•Display the fx section of the Editor or Mixer. (In the Editor panel, click the button in the upper-left corner.)
2Choose effects for up to 16 slots in the list. (See Insert, bypass, reorder, or remove effects in racks.)
3Press the spacebar to play the session, and then edit, reorder, or remove effects as needed.
To change effect settings over time, use envelopes. (See Automating mixes with envelopes.)
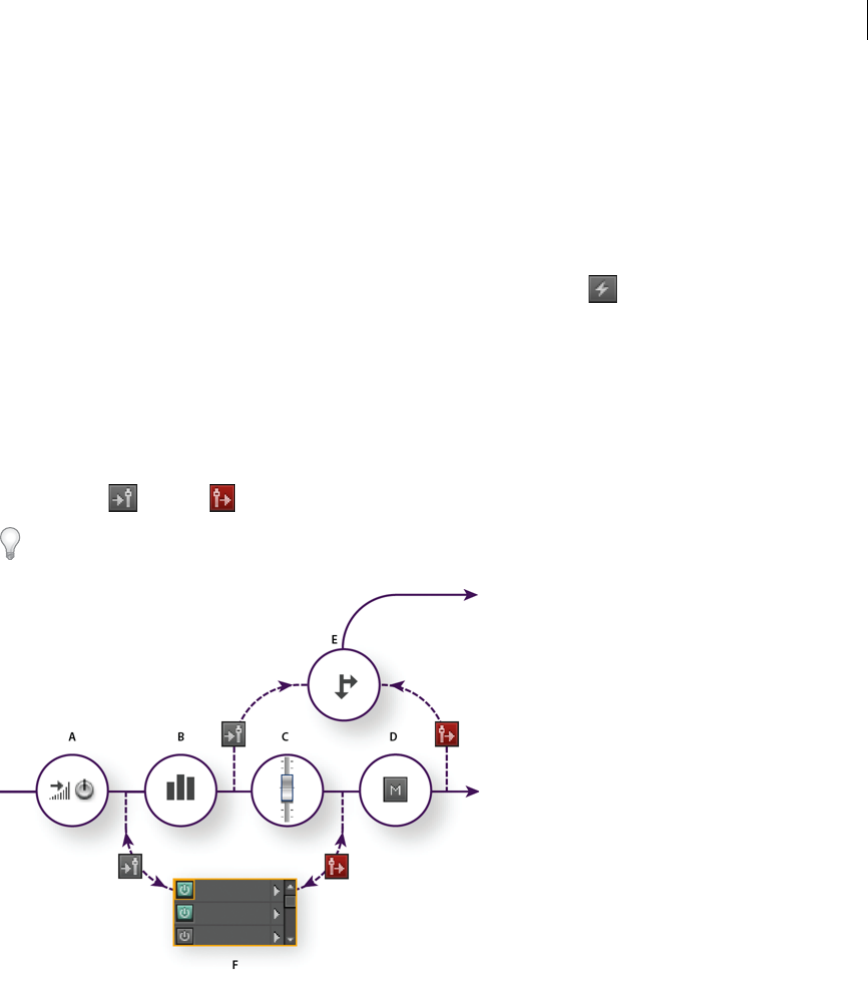
83
Applying effects
Last updated 6/16/2016
Pre-render track effects to improve performance
In the Multitrack Editor, pre-render track effects to address heavy CPU usage, improving performance for complex
mixes or low-latency recording. (Latency measures the delay between user input and sound output from a computer. If
latency is high, it produces an audible echo during recording, disrupting timing for musicians.)
You can continue to edit track settings normally; pre-rendering processes audio when pauses occur in playback or
editing.
In the Editor panel, Effects Rack, or Mixer, click the Pre-Render Track button .
Insert effects before or after sends and EQ
On each track, you can insert effects either pre- or post-fader. Pre-fader effects process audio before sends and EQ.
Post-fader effects process audio after sends and EQ. For most mixes, the default, pre-fader setting works well. The
post-fader setting offers signal-routing flexibility for particularly complex mixes.
In the fx section of the Editor panel or Mixer, click the Pre-Fader/Post-Fader button to insert effects either before
sends and EQ , or after .
If you’re editing effect settings in the Effects Rack, click the Pre-Fader/Post-Fader button in the lower-left corner.
A Input B EQ C Volume D Mute E Send F Effects Rack
More Help topics
Effects Rack overview
Routing audio to buses, sends, and the Master track
Set up a send
Adding third-party plug-ins
Third-party plug-ins let you extend the already powerful effects provided with Adobe Audition. The application
supports VST plug-ins on both platforms and Audio Units plug-ins on Mac OS.

84
Applying effects
Last updated 6/16/2016
Applying plug-in effects is identical to applying built-in effects. For information about plug-in features, consult the
documentation provided by the plug-in manufacturer.
Enable VST and Audio Units plug-ins
To access third-party plug-ins in Adobe Audition, you must first enable them. By default, all third-party plug-ins are
disabled. To optimize performance, enable only the plug-ins you plan to use in Adobe Audition.
Note: If effects are being used in a multitrack session, close the session.
1Choose Effects > Audio Plug-in Manager.
2In the VST Plug-in Folders section, click Add to specify custom folders you want to scan for plug-ins. Click Default
to specify the standard VST folder for your operating system.
3In the Available Plug-ins section, click Scan For Plug-ins.
If you’ve recently updated a plug-in, select Rescan Existing Plug-ins.
4Select the plug-ins you want to access in Adobe Audition, and then click OK.
Note: If a third-party effect is incompatible, Adobe Audition adds it to an Unsupported submenu in effects menus.
More Help topics
Applying effects in the Waveform Editor
Applying effects in the Multitrack Editor
Automating track settings
Notch Filter effect
The Filter and EQ > Notch Filter effect removes up to six user-defined frequency bands. Use this effect to remove very
narrow frequency bands, such as a 60 Hz hum, while leaving all surrounding frequencies untouched.
To remove shrill “ess” sounds, use the Sibilance Softener preset. Or use DTMF presets to remove standard tones for
analog telephone systems.
Frequency Specifies the center frequency for each notch.
Gain Specifies the amplitude for each notch.
Notch width Determines frequency range for all notches. The three options range from Narrow for a second order
filter, which removes some adjacent frequencies, to Super Narrow for a sixth order filter, which is very specific.
Generally, use no more than 30 dB of attenuation for a Narrow setting, 60 dB for Very Narrow, and 90 dB for Super
Narrow. Greater attenuation can remove a wide range of neighboring frequencies.
Ultra-Quiet Virtually eliminates noise and artifacts, but requires more processing. This option is audible only on high-
end headphones and monitoring systems.
Fix Attenuations To Determines if notches have equal or individual attenuation levels.

85
Applying effects
Last updated 6/16/2016
Fade and Gain Envelope effects (Waveform Editor only)
The Amplitude and Compression > Fade and Gain Envelope effects function similarly but modify audio differently:
•Choose Fade Envelope to reduce amplitude by varying amounts over time.
•Choose Gain Envelope to boost or reduce amplitude over time.
In the Editor panel, click the yellow envelope line to add keyframes, and drag them up or down to change amplitude.
To quickly select, reposition, or delete multiple keyframes, see Adjust automation with keyframes.
Select the Spline Curves option to create smoother, curved transitions between keyframes, rather than linear transitions.
See About spline curves for graphs.
Manual Pitch Correction effect (Waveform Editor only)
The Manual Pitch Correction effect lets you visually adjust pitch with the Spectral Pitch Display. The Spectral Pitch
Display shows the fundamental pitch as a bright blue line, and overtones in yellow to red hues. Corrected pitch appears
as a bright green line.
You can visually monitor pitch at any time, without using the Manual Pitch Correction effect. Simply click the Spectral
Pitch Display icon in the options bar. To customize resolution, decibel range, and gridlines, adjust Pitch Display settings
in the Spectral Displays preferences.
1Choose Effects > Time and Pitch > Manual Pitch Correction.
2In the Manual Pitch Correction window, set the following options:
Reference Channel Choose a source channel in which pitch changes are most clear. The effect analyzes only the
channel you choose, but applies the pitch correction equally to all channels.
Spline Curves Create smoother transitions when using envelope keyframes to apply different pitch correction over
time.
Pitch Curve Resolution Sets the Fast Fourier Transform size of each piece of data that the effect processes. In general,
use smaller values for correcting higher frequencies. For voices, a setting of 2048 or 4096 sounds most natural, and
a setting of 1024 creates robotic effects.
3In the Editor panel, do either of the following:
•To change pitch uniformly, drag the Adjust Pitch knob in the heads-up display.
•To change pitch over time, add keyframes to the yellow envelope line in the center of the waveform display.
To zoom in on specific pitch ranges, right-click and drag in the vertical ruler to the right of the Spectral Pitch Display.
To reset the zoom level or customize the displayed scale, right-click the ruler and select options from the pop-up
menu.

86
Applying effects
Last updated 6/16/2016
Graphic Phase Shifter effect
The Stereo Imagery > Graphic Phase Shifter effect lets you adjust the phase of a waveform by adding control points to
a graph.
Right-click points to access the Edit Point dialog box for precise, numerical control.
Phase shift graph The horizontal ruler (x-axis) measures frequency, while the vertical ruler (y-axis) displays the degree
of phase to shift, where zero is no phase shift. You can create simulated stereo by creating a zigzag pattern that gets more
extreme at the high end on one channel.
Frequency Scale Sets the values of the horizontal ruler (x-axis) on a linear or logarithmic scale. Select Logarithmic to
work at finer detail in the lower frequencies. (The logarithmic scale better reflects the frequency-emphasis of human
hearing.) Select Linear to work at finer detail in the higher frequencies.
Range Sets the values of the vertical ruler (y-axis) on a 360° or 180° scale.
Channel Specifies the channel(s) to apply the phase shift to.
Note: Process a single channel for the best results. If you apply identical phase shift to two stereo channels, the resulting file
sounds exactly the same.
FFT Size Specifies the Fast Fourier Transform size. Higher sizes create more precise results, but they take longer to
process.
Doppler Shifter effect (Waveform Editor only)
The Special > Doppler Shifter effect creates the increase and decrease in pitch we notice when an object approaches and
then passes us, such as when a police car passes with its siren on. When the car comes toward you, the sound reaches
your ears as a higher frequency because each sound wave is compressed by the car moving forward. The opposite
happens as the car passes by; the waves are stretched out, resulting in a lower-pitched sound.
Note: Unlike many graphs in Adobe Audition effects, the Doppler Shifter graph is noninteractive: You can’t directly
manipulate the graph. Instead, the graph changes as you adjust the effect’s parameters.
Path Type Defines which path the sound source appears to take. Depending on the path type, a different set of options
is available.
Straight Line options:
•Starting Distance Away sets the virtual starting point (in meters) of the effect.
•Velocity defines the virtual speed (in meters per second) at which the effect moves.
•Coming From sets the virtual direction (in degrees) from where the effect appears to come.
•Passes In Front By specifies how far (in meters) the effect seems to pass in front of the listener.
•Passes On Right By specifies how far (in meters) the effect seems to pass to the right of the listener.
Circular options:
•Radius sets the circular dimensions (in meters) of the effect.
•Velocity defines the virtual speed (in meters per second) at which the effect moves.
•Starting Angle sets the beginning virtual angle (in degrees) of the effect.

87
Applying effects
Last updated 6/16/2016
•Center In Front By specifies how far (in meters) the sound source is from the front of the listener.
•Center On Right By specifies how far (in meters) the sound source is from the right of the listener.
Adjust Volume Based on Distance or Direction Automatically adjusts the effect’s volume based on the values specified.
Quality Level Provides six different levels of processing quality. Lower quality levels require less processing time, but
higher quality levels generally produce better sounding results.

88
Last updated 6/16/2016
Chapter 7: Effects reference
Amplitude and compression effects in Audition
Amplify effect
The Amplitude And Compression > Amplify effect boosts or attenuates an audio signal. Because the effect operates in
real time, you can combine it with other effects in the Effects Rack.
Gain sliders Boost or attenuate individual audio channels.
Link Sliders Moves the channel sliders together.
Channel Mixer effect
The Amplitude and Compression > Channel Mixer effect alters the balance of stereo or surround channels, letting you
change the apparent position of sounds, correct mismatched levels, or address phasing issues.
Channel tabs Select the output channel.
Input channel sliders Determine the percentage of the current channels to mix into the output channel. For a stereo
file, for example, an L value of 50 and an R value of 50 results in an output channel that contains equal audio from the
current left and right channels.
Invert Inverts a channel’s phase. (To understand this key audio concept, see How sound waves interact.) Inverting all
channels causes no perceived difference in sound. Inverting only one channel, however, can greatly change the sound.
DeEsser effect
The Amplitude and Compression > DeEsser effect removes sibilance, “ess” sounds heard in speech and singing that can
distort high frequencies.
The graph reveals the processed frequencies. Click the Preview button to see how much audio content exists in
the processed range.
Mode Choose Broadband to uniformly compress all frequencies or Multiband to only compress the sibilance range.
Multiband is best for most audio content but slightly increases processing time.
Threshold Sets the amplitude above which compression occurs.
89
Effects reference
Last updated 6/16/2016
Center Frequency Specifies the frequency at which sibilance is most intense. To verify, adjust this setting while playing
audio.
Bandwidth Determines the frequency range that triggers the compressor.
Tip: To visually adjust Center Frequency and Bandwidth, drag the edges of the selection in the graph.
Output Sibilance Only Lets you hear detected sibilance. Start playback, and fine-tune settings above.
Gain Reduction Shows the compression level of the processed frequencies.
Dynamics Processing effect
The Amplitude And Compression > Dynamics Processing effect can be used as a compressor, limiter, or expander. As
a compressor and limiter, this effect reduces dynamic range, producing consistent volume levels. As an expander, it
increases dynamic range by reducing the level of low-level signals. (With extreme expander settings, you can create a
noise gate that totally eliminates noise below a specific amplitude threshold.)
The Dynamics Processing effect can produce subtle changes that you notice only after repeated listening. When
applying this effect in the Waveform Editor, use a copy of the original file so you can return to the original audio if
necessary.
Use the Broadcast Limiter preset to simulate the processed sound of a contemporary radio station.
Dynamics tab
Graph Depicts input level along the horizontal ruler (x-axis) and the new output level along the vertical ruler (y-axis).
The default graph, with a straight line from the lower left to the upper right, depicts a signal that has been left
untouched; every input level has the same output level. Adjusting the graph changes the relationship between input and
output levels, altering dynamic range.
For example, if a desirable sonic element occurs around -20 dB, you can boost the input signal at that level, but leave
everything else unchanged. You can also draw an inverse line (from the upper left to the lower right) that will
dramatically boost quiet sounds and suppress loud ones.
Add point
Adds control point in graph using numerical input and output levels you specify. This method is more precise than
clicking the graph to add points.
Tip: To numerically adjust an existing control point, right-click it, and choose Edit Point.
Delete point
Removes selected point from the graph.
Invert
Flips the graph, converting compression into expansion, or vice versa.

90
Effects reference
Last updated 6/16/2016
note: You can invert a graph only if it has points in the two default corners (-100, -100 and 0, 0) and if its output level
increases from left to right (that is, each control point must be higher than the one to its left).
Reset
Resets the graph to its default state.
Spline Curves creates smoother, curved transitions between control points, rather than more abrupt, linear transitions.
(See About spline curves for graphs.)
Make-Up Gain Boosts the processed signal.
Settings tab
General Provides overall settings.
Look-Ahead Time Addresses transient spikes that can occur at the onset of extremely loud signals that extend beyond
the compressor’s Attack Time settings. Extending Look-Ahead Time causes compression to attack before the audio gets
loud, ensuring that amplitude never exceeds a certain level. Conversely, reducing Look-Ahead Time may be desirable
to enhance the impact of percussive music like drum hits.
Noise Gating Completely silences signals that are expanded below a 50-to-1 ratio.
Level Detector Determines the original input amplitude.
Input Gain Applies gain to the signal before it enters the Level Detector.
Attack Time Determines how many milliseconds it takes for the input signal to register a changed amplitude level. For
example, if audio suddenly drops 30 dB, the specified attack time passes before the input registers an amplitude change.
This avoids erroneous amplitude readings due to temporary changes.
Release Time Determines how many milliseconds the current amplitude level is maintained before another amplitude
change can register.
Tip: Use fast attack and release settings for audio with fast transients, and slower settings for less percussive audio.
Peak mode Determines levels based on amplitude peaks. This mode is a bit more difficult to use than RMS, because
peaks aren’t precisely reflected in the Dynamics graph. However, it can be helpful when audio has loud transient peaks
you want to subdue.
RMS mode Determines levels based on the root-mean-square formula, an averaging method that more closely matches
the way people perceive volume. This mode precisely reflects amplitudes in the Dynamics graph. For example, a limiter
(flat horizontal line) at -10 dB reflects an average RMS amplitude of -10 dB.
Gain Processor Amplifies or attenuates the signal depending on the amplitude detected.
Output Gain Applies gain to the output signal after all dynamics processing.
Attack Time Determines how many milliseconds it takes for the output signal to reach the specified level. For example,
if audio suddenly drops 30 dB, the specified attack time passes before the output level changes.
Release Time Determines how many milliseconds the current output level is maintained.
note: If the sum of Attack and Release times is too short (less than about 30 milliseconds), audible artifacts can be heard.
To see good attack and release times for different types of audio content, choose various options from the Presets menu.
Link Channels Processes all channels equally, preserving the stereo or surround balance. For example, a compressed
drum beat on the left channel will reduce the right channel level by an equal amount.
Band Limiting Restricts dynamics processing to a specific frequency range.

91
Effects reference
Last updated 6/16/2016
Low Cutoff Is the lowest frequency that dynamics processing affects.
High Cutoff Is the highest frequency that dynamics processing affects.
Fade Envelope effect
Choose Fade Envelope (Effects > Amplitude and Compression) to reduce amplitude by varying amounts over time.
In the Waveform Editor panel, click the yellow envelope line to add keyframes, and drag them up or down to change
amplitude. To quickly select, reposition, or delete multiple keyframes, see Adjust automation with keyframes.
Select the Spline Curves option to create smoother, curved transitions between keyframes, rather than linear transitions.
See About spline curves for graphs.
Gain Envelope effect
Choose Gain Envelope (Effects > Amplitude and Compression) to boost or reduce amplitude over time.
In the Waveform Editor panel, click the yellow envelope line to add keyframes, and drag them up or down to change
amplitude. To quickly select, reposition, or delete multiple keyframes, see Adjust automation with keyframes.
Select the Spline Curves option to create smoother, curved transitions between keyframes, rather than linear transitions.
See About spline curves for graphs.
Hard Limiter effect
The Amplitude And Compression > Hard Limiter effect greatly attenuates audio that rises above a specified threshold.
Typically, limiting is applied with an input boost, a technique that increases overall volume while avoiding distortion.
Maximum Amplitude Sets the maximum sample amplitude allowed.
Tip: To avoid clipping when working with 16-bit audio, set this value to no more than -0.3 dB. If you set it even lower,
to -3 dB, you’ll have a little more clearance for any future edits.
Input Boost Preamplifies audio before you limit it, making a selection louder without clipping it. As you increase this
level, compression increases. Try extreme settings to achieve the loud, high-impact audio heard in contemporary pop
music.
Look-Ahead Time Sets the amount of time (in milliseconds) generally needed to attenuate the audio before the loudest
peak is hit.
note: Make sure that the value is at least 5 milliseconds. If this value is too small, audible distortion effects may occur.
Release Time Sets the time (in milliseconds) needed for the attenuation to rebound back 12 dB (or roughly the time
needed for audio to resume normal volume if an extremely loud peak is encountered). In general, a setting of around
100 (the default) works well and preserves very low bass frequencies.
note: If this value is too large, audio may remain very quiet and not resume normal levels for a while.
Link Channels Links the loudness of all channels together, preserving the stereo or surround balance.
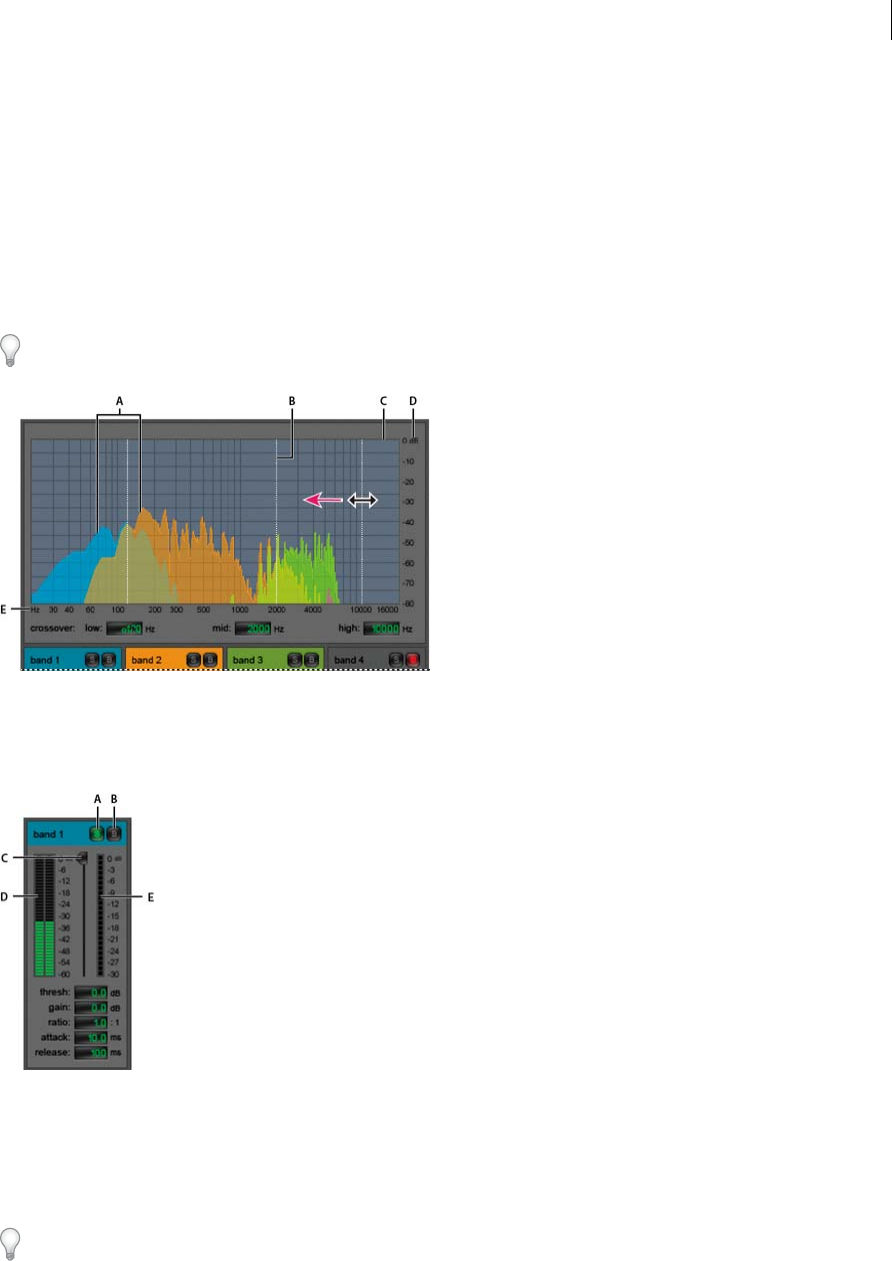
92
Effects reference
Last updated 6/16/2016
Multiband Compressor effect
The Amplitude And Compression > Multiband Compressor effect lets you independently compress four different
frequency bands. Because each band typically contains unique dynamic content, multiband compression is a
particularly powerful tool for audio mastering.
Controls in the Multiband Compressor let you precisely define crossover frequencies and apply band-specific
compression settings. Click Solo buttons to preview bands in isolation, or Bypass buttons to pass bands through without
processing. After you fine-tune individual bands, select Link Band Controls to adjust them globally, and then optimize
overall volume with the Output Gain slider and Limiter settings.
To change compression settings over time, use automation lanes in the Multitrack Editor. (See Automating track
settings.)
A Frequency bands B Crossover markers C Bypassed band (no processing applied) D Amplitude scale E Frequency scale
Crossover Sets the crossover frequencies, which determine the width of each band. Either enter specific Low,
Midrange, and High frequencies, or drag the crossover markers above the graph.
A Solo B Bypass C Threshold slider D Input Level meters E Gain Reduction meters
Solo buttons Let you hear specific frequency bands. Enable one Solo button at a time to hear bands in isolation, or
enable multiple buttons to hear two or more bands together.
Bypass buttons Bypass individual bands so they pass through without processing.
Tip: Alt-click (Windows) or Option-click (Mac OS) Solo or Bypass buttons to quickly apply a unique setting to one band.
Threshold sliders Set the input level at which compression begins. Possible values range from -60 to 0 dB. The best
setting depends on audio content and musical style. To compress only extreme peaks and retain more dynamic range,

93
Effects reference
Last updated 6/16/2016
try thresholds around 5 dB below the peak input level; to highly compress audio and greatly reduce dynamic range, try
settings around 15 dB below the peak input level.
Input Level meters Measure input amplitude. Double-click the meters to reset peak and clip indicators.
Gain Reduction meters Measure amplitude reduction with red meters that extend from top (minimal reduction) to
bottom (maximum reduction).
Gain Boosts or cuts amplitude after compression. Possible values range from -18 to +18 dB, where 0 is unity gain.
Ratio Sets a compression ratio between 1-to-1 and 30-to-1. For example, a setting of 3.0 outputs 1 dB for every 3 dB
increase above the compression threshold. Typical settings range from 2.0 to 5.0; higher settings produce the extremely
compressed sound often heard in pop music.
Attack Determines how quickly compression is applied when audio exceeds the threshold. Possible values range from
0 to 500 milliseconds. The default, 10 milliseconds, works well for a wide range of audio. Faster settings may work better
for audio with fast transients, but such settings sound unnatural for less percussive audio.
Release Determines how quickly compression stops after audio drops below the threshold. Possible values range from
0 to 5000 milliseconds. The default, 100 milliseconds, works well for a wide range of audio. Try faster settings for audio
with fast transients, and slower settings for less percussive audio.
Output Gain Boosts or cuts overall output level after compression. Possible values range from -18 to +18 dB, where 0
is unity gain. Double-click the meters to reset peak and clip indicators.
Limiter Applies limiting after Output Gain, at the end of the signal path, optimizing overall levels. Specify Threshold,
Attack, and Release settings that are less agressive than similar band-specific settings. Then specify a Margin setting to
determine the absolute ceiling relative to 0 dBFS.
Tip: To create extremely compressed audio, enable the Limiter, and then experiment with very high Output Gain
settings.
Spectrum On Input Displays the frequency spectrum of the input signal, rather than the output signal, in the multiband
graph. To quickly see the amount of compression applied to each band, toggle this option on and off.
Brickwall Limiter Applies immediate, hard limiting at the current Margin setting. (Deselect this option to apply slower
soft limiting, which sounds less compressed but may exceed the Margin setting.)
note: The maximum Attack time for brickwall limiting is 5 ms.
Link Band Controls Lets you globally adjust the compression settings for all bands, while retaining relative differences
between bands.
Tip: To temporarily link band controls, hold down Alt+Shift (Windows) or Option+Shift (Mac OS). To reset a control
in all bands, hold down Ctrl+Alt+Shift (Windows) or Command+Option+Shift (Mac OS), and click the control.
Normalize effect (Waveform Editor only)
Note: This effect requires offline processing. While it is open, you cannot edit the waveform, adjust selections, or move the
current-time indicator.
The Amplitude And Compression > Normalize effect lets you set a peak level for a file or selection. When you
normalize audio to 100%, you achieve the maximum amplitude that digital audio allows—0 dBFS. If you’re sending
audio to a mastering engineer, however, normalize audio to between –3 and –6 dBFS, providing a cushion for further
processing.
The Normalize effect amplifies the entire file or selection equally. For example, if the original audio reaches a loud peak
of 80% and a quiet low of 20%, normalizing to 100% amplifies the loud peak to 100% and the quiet low to 40%.
94
Effects reference
Last updated 6/16/2016
To apply RMS normalization, choose Effects > Match Volume. If desired, you can apply that command to only one file.
(See Match volume across multiple files.)
Normalize To Sets the percentage of the highest peak relative to the maximum possible amplitude.
Tip: Select dB to enter the Normalize value in decibels instead of a percentage.
Normalize All Channels Equally Uses all channels of a stereo or surround waveform to calculate the amplification
amount. If this option is deselected, the amount is calculated separately for each channel, potentially amplifying one
considerably more than others.
DC Bias Adjust Lets you adjust the position of the waveform in the wave display. Some recording hardware may
introduce a DC bias, causing the recorded waveform to appear to be above or below the normal center line in the wave
display. To center the waveform, set the percentage to zero. To skew the entire selected waveform above or below the
center line, specify a positive or negative percentage.
Single-band Compressor effect
The Amplitude And Compression > Single-band Compressor effect reduces dynamic range, producing consistent
volume levels and increasing perceived loudness. Single-band compression is particularly effective for voice-overs,
because it helps the speaker stand out over musical soundtracks and background audio.
For examples of highly-compressed audio, listen to recordings of modern pop music. By contrast, most jazz recordings
are lightly compressed, while typical classical recordings feature no compression at all.
Threshold Sets the input level at which compression begins. The best setting depends on audio content and style. To
compress only extreme peaks and retain more dynamic range, try thresholds around 5 dB below the peak input level.
To highly compress audio and greatly reduce dynamic range, try settings around 15 dB below the peak input level.
Ratio Sets a compression ratio between 1-to-1 and 30-to-1. For example, a setting of 3 outputs 1 dB for every 3-dB
increase above the threshold. Typical settings range from 2 to 5; higher settings produce the extremely compressed
sound often heard in pop music.
Attack Determines how quickly compression starts after audio exceeds the Threshold setting. The default, 10
milliseconds, works well for a wide range of source material. Use faster settings only for audio with quick transients,
such as percussion recordings.
Release Determines how quickly compression stops when audio drops below the Threshold setting. The default, 100
milliseconds, works well for a wide range of audio. Try faster settings for audio with fast transients, and slower settings
for less percussive audio.
Output Gain Boosts or cuts amplitude after compression. Possible values range from -30 dB to +30 dB, where 0 is unity
gain.
Speech Volume Leveler effect
The Amplitude and Compression > Speech Volume Leveler is a compression effect that optimizes dialogue, evening
out levels and removing background noise.

95
Effects reference
Last updated 6/16/2016
For the best results, do the following:
1Select audio with the lowest level. Set Target Volume Level and Leveling Amount to the left. Start playback, and
gradually increase the Leveling Amount until speech becomes nicely audible without increasing background noise.
2Select audio with the highest level, and start playback. Adjust the Target Volume Level until the volume matches the
loudness of the quiet passage you adjusted previously.
3 If necessary, readjust the Leveling Amount to avoid an over-compressed sound.
Here are additional details about each option:
Target Volume Level Sets the desired output level relative to zero dBFS. (See Measuring amplitude in dBFS.)
Leveling Amount At low settings, amplifies speech slightly without boosting the noise floor. At high settings, amplifies
the entire signal more as the signal drops closer to the noise floor.
Boost Low Signals Interprets shorter, low-volume passages as speech that should be amplified. For most audio content,
deselect this option to produce smoother sound.
Target Dynamic Range Minimizes background noises while amplifying and leveling only speech.
For best results with most content, specify a Target Dynamic Range value between –45dB and –60dB.
Note: Specifying a higher parameter value (up to –80dB) can significantly reduce background noise, but applies less leveling
and amplification of speech content.Specifying a lower parameter value (down to –30dB) provides better speech leveling,
but may amplify the background noise more than desired.
Advanced settings Click the triangle to access the following options:
Compressor Maintains a strong level if the processed signal falls below a threshold relative to zero dBFS.
Noise Gate Eliminates background noise by dramatically reducing output level when the signal drops by an offset you
specify.
Tube-modeled Compressor effect
The Amplitude And Compression > Tube-modeled Compressor effect simulates the warmth of vintage hardware
compressors. Use this effect to add subtle distortion that pleasantly colors audio.
Threshold slider Sets the input level at which compression begins. Possible values range from -60 to 0 dB. The best
setting depends on audio content and musical style. To compress only extreme peaks and retain more dynamic range,
try thresholds around 5 dB below the peak input level; to highly compress audio and greatly reduce dynamic range, try
settings around 15 dB below the peak input level.
Input Level meters To the left of the slider, these meters measure input amplitude. Double-click the meters to reset
peak and clip indicators.
Gain Reduction meters To the right of the slider, these meters measure amplitude reduction with red bars that extend
from top (minimal reduction) to bottom (maximum reduction).
Gain Boosts or cuts amplitude after compression. Possible values range from -18 to +18 dB, where 0 is unity gain.
Ratio Sets a compression ratio between 1-to-1 and 30-to-1. For example, a setting of 3.0 outputs 1 dB for every 3 dB
increase above the compression threshold. Typical settings range from 2.0 to 5.0; higher settings produce the extremely
compressed sound often heard in pop music.
Attack Determines how quickly compression is applied when audio exceeds the threshold. Possible values range from
0 to 500 milliseconds. The default, 10 milliseconds, works well for a wide range of audio. Faster settings may work better
for audio with fast transients, but such settings sound unnatural for less percussive audio.
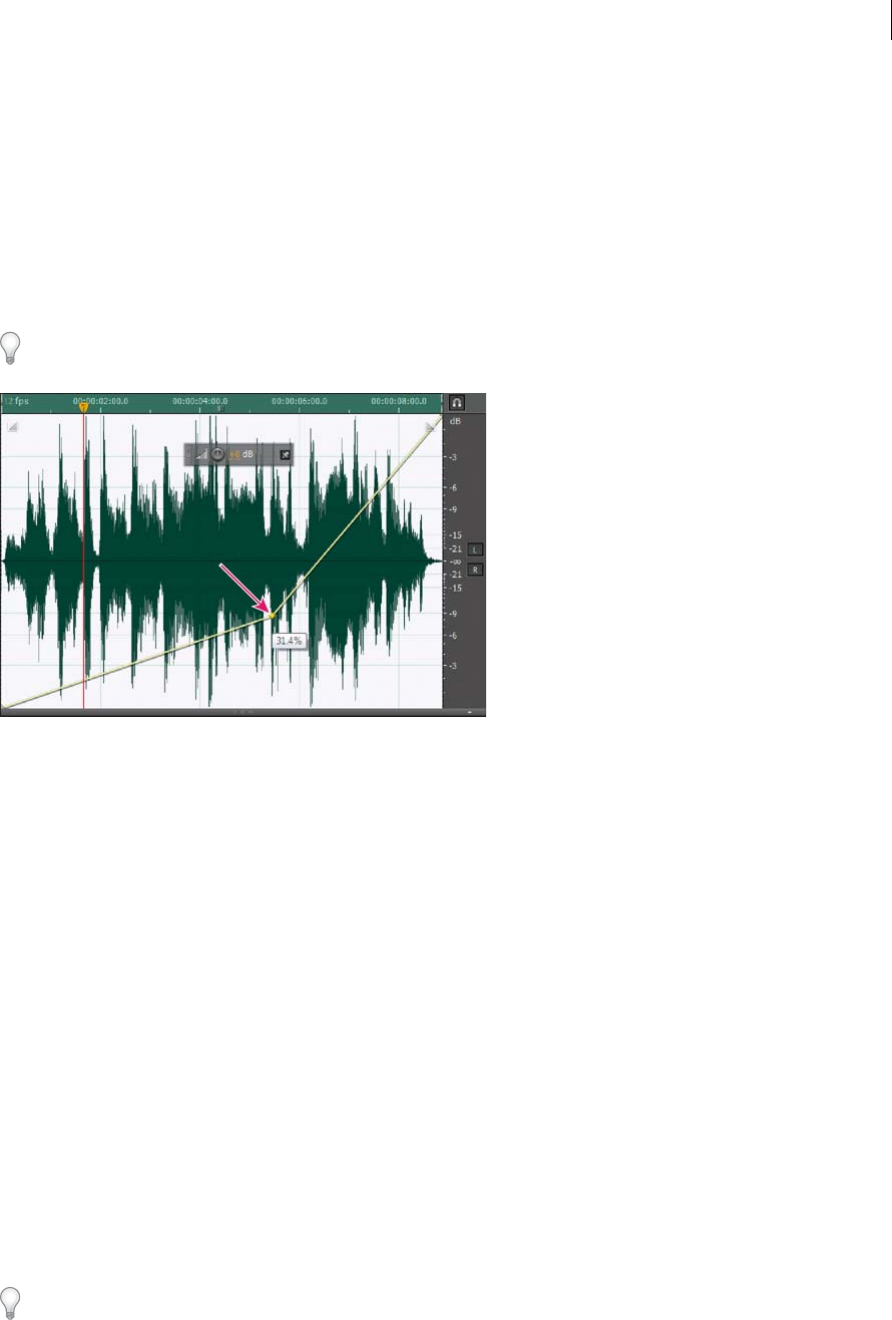
96
Effects reference
Last updated 6/16/2016
Release Determines how quickly compression stops after audio drops below the threshold. Possible values range from
0 to 5000 milliseconds. The default, 100 milliseconds, works well for a wide range of audio. Try faster settings for audio
with fast transients, and slower settings for less percussive audio.
Volume Envelope effect
The Amplitude And Compression > Volume Envelope effect lets you change volume over time with boosts and fades.
In the Waveform Editor panel, simply drag the yellow line. The top of the panel represents 100% (normal)
amplification; the bottom represents 100% attenuation (silence).
Though the Volume Envelope effect isn’t available in the Multitrack Editor, you can use automation lanes to accomplish
the same task. (See Automating track settings.)
Yellow envelope line in Editor panel Drag to adjust amplitude percentage, and click to add keyframes for additional
boosts and fades. To quickly select, reposition, or delete multiple keyframes, see Adjust automation with keyframes.
Spline curves Applies smoother, curved transitions between keyframes, rather than linear transitions. See About spline
curves for graphs.
More Help topics
Applying effects in the Waveform Editor
Applying effects in the MultitrackEditor
Use effect presets
Mix audio data when pasting
Delay and echo effects
Delays are separate copies of an original signal that reoccur within milliseconds of each other. Echoes are sounds that
are delayed far enough in time so that you hear each as a distinct copy of the original sound. When reverb or chorus
might muddy the mix, both delays and echoes are a great way to add ambience to a track.
To access familiar options from hardware delays, use the Echo effect in Adobe Audition.

97
Effects reference
Last updated 6/16/2016
Analog Delay effect
The Delay And Echo > Analog Delay effect simulates the sonic warmth of vintage hardware delay units. Unique options
apply characteristic distortion and adjust the stereo spread. To create discrete echoes, specify delay times of 35
milliseconds or more; to create more subtle effects, specify shorter times.
Mode Specifies the type of hardware emulation, determining equalization and distortion characteristics. Tape and
Tube reflect the sonic character of vintage delay units, while Analog reflects later electronic delay lines.
Dry Out Determines the level of original, unprocessed audio.
Wet Out Determines the level of delayed, processed audio.
Delay Specifies the delay length in milliseconds.
Feedback Creates repeating echoes by resending delayed audio through the delay line. For example, a setting of 20%
sends delayed audio at one-fifth of its original volume, creating echoes that gently fade away. A setting of 200% sends
delayed audio at double its original volume, creating echoes that quickly grow in intensity.
note: When experimenting with extremely high Feedback settings, turn down your system volume.
Trash Increases distortion and boosts low frequencies, adding warmth.
Spread Determines the stereo width of the delayed signal.
Delay effect
The Delay And Echo > Delay effect can be used to create single echoes, as well as a number of other effects. Delays of
35 milliseconds or more create discrete echoes, while those between 15-34 milliseconds can create a simple chorus or
flanging effect. (These results won’t be as effective as the Chorus or Flanger effects in Adobe Audition, because the delay
settings don’t change over time.)
By further reducing a delay to between 1 and 14 milliseconds, you can spatially locate a mono sound so that the sound
seems to be coming from the left or the right side, even though the actual volume levels for left and right are identical.
Delay Time Adjusts the delay for both the left and right channels from -500 milliseconds to +500 milliseconds.
Entering a negative number means that you can move a channel ahead in time instead of delaying it. For instance, if
you enter 200 milliseconds for the left channel, the delayed portion of the affected waveform is heard before the original
part.
Mix Sets the ratio of processed, Wet signal to original, Dry signal to be mixed into the final output. A value of 50 mixes
the two evenly.
Invert Inverts the phase of the delayed signal, creating phase-cancellation effects similar to comb filters. (To
understand phase cancellation, see How sound waves interact.)
Echo effect
The Delay And Echo > Echo effect adds a series of repeated, decaying echoes to a sound. (For a single echo, use the
Delay effect instead.) You can create effects ranging from a Grand Canyon-type “Hello-ello-llo-lo-o” to metallic,
clanging drainpipe sounds by varying the delay amount. By equalizing the delays, you can change a room’s
characteristic sound from one with reflective surfaces (creating echoes that sound brighter) to one that is almost totally
absorptive (creating echoes that sound darker).

98
Effects reference
Last updated 6/16/2016
Note: Make sure the audio file is long enough for the echo to end. If the echo is cut off abruptly before it fully decays, undo
the Echo effect, add several seconds of silence by choosing Generate > Silence, and then reapply the effect.
Delay Time Specifies the number of milliseconds, beats, or samples between each echo. For example, a setting of 100
milliseconds results in a 1/10th-second delay between successive echoes.
Feedback Determines the falloff ratio of an echo. Each successive echo tails off at a certain percentage less than the
previous one. A decay setting of 0% results in no echo at all, while a decay of 100% produces an echo that never gets
quieter.
Echo Level Sets the percentage of echoed (wet) signal to mix with the original (dry) signal in the final output.
Tip: You can create striking stereo echo effects by setting different left and right values for the Delay Time, Feedback,
and Echo Level controls.
Lock Left & Right Links the sliders for Decay, Delay, and Initial Echo Volume, maintaining the same settings for each
channel.
Echo Bounce Makes the echoes bounce back and forth between the left and right channels. If you want to create one
echo that bounces back and forth, select an initial echo volume of 100% for one channel and 0% for the other.
Otherwise, the settings for each channel will bounce to the other, creating two sets of echoes on each channel.
Successive Echo Equalization Passes each successive echo through an eight-band equalizer, letting you simulate the
natural sound absorption of a room. A setting of 0 leaves the frequency band unchanged, while a maximum setting of
-15 decreases that frequency by 15 dB. And, because -15 dB is the difference of each successive echo, some frequencies
will die out much faster than others.
Delay Time Units Specifies milliseconds, beats, or samples for the Delay Time setting.
More Help topics
Reverb effects
Applying effects in the Waveform Editor
Applying effects in the Multitrack Editor
Use effect presets
Applying effects in the Waveform Editor
Applying effects in the Multitrack Editor
Use effect presets
Applying effects in the Waveform Editor
Applying effects in the Multitrack Editor
Use effect presets
Diagnostics effects (Waveform Editor only) for Audition
Diagnostics are available either via the Effects menu or directly from the Diagnostics panel (Window > Diagnostics).
These tools let you quickly remove clicks, distortion, or silence from audio, as well as add markers where silence occurs.
For maximum audio restoration control, use diagnostics together with Spectral Display tools and Noise Reduction
effects. See Techniques for restoring audio.

99
Effects reference
Last updated 6/16/2016
Diagnose and repair, delete, or mark audio
Unlike conventional noise reduction effects, which process all selected audio, diagnostics scan for problematic or silent
areas, and then let you choose which to address.
1In the Diagnostics panel, choose an option from the Effect menu.
2Click Scan.
3At the bottom of the panel, do any of the following:
•Select one or more detected items in the list, and click Repair, Delete, or Mark. (The available options depend
upon the chosen diagnostic effect.)
Tip: To mark detected clicks or clipping, right-click selected items in the list, and choose Create Markers from the
pop-up menu. (See Working with markers.)
•Click Repair All, Delete All, or Mark All to address all detected items.
•Click the magnifying glass to zoom in on a selected problem in the Editor panel. Click the icon again to zoom
out.
•Click Clear Repaired, Deleted, or Marked to remove previously addressed items from the list.
DeClicker options
The Diagnostics > DeClicker effect detects and removes clicks and pops from wireless microphones, vinyl records, and
other sources.
DeClicker options match those for the Automatic Click Remover, which you can combine with other effects in the
Effects Rack and apply in the Multitrack Editor. (See Automatic Click Remover effect.) That effect also applies multiple
scan and repair passes automatically; to achieve the same level of click reduction with the DeClicker, you must manually
apply it multiple times. However, the DeClicker lets you evaluate detected clicks and choose which to address.
In the Diagnostics panel, click Settings to access these options:
Threshold Determines sensitivity to noise. Lower settings detect more clicks and pops but may include audio you wish
to retain. Settings range from 1 to 100; the default is 30.
Complexity Indicates the complexity of noise. Higher settings apply more processing but can degrade audio quality.
Settings range from 1 to 100; the default is 16.
To visually identify clicks, zoom in and use Spectral Frequency Display with a resolution of 256 bands. (You can access
this setting in the Spectral Display tab of the Preferences dialog box.) Most clicks appear as bright vertical bars that
extend from the top to the bottom of the display.
DeClipper options
The Diagnostics > DeClipper effect repairs clipped waveforms by filling in clipped sections with new audio data.
Clipping occurs when audio amplitude exceeds the maximum level for the current bit depth. Commonly, clipping
results from recording levels that are too high. You can monitor clipping during recording or playback by watching the
Level Meters; when clipping occurs, the boxes on the far right of the meters turn red.
Visually, clipped audio appears as broad flat areas at the top of a waveform. Sonically, clipped audio is a static-like
distortion.
Note: If you need to adjust the DC offset of clipped audio, first use the DeClipper effect. If you instead adjust DC offset first,
the DeClipper won’t identify clipped areas that fall below 0 dBFS.

100
Effects reference
Last updated 6/16/2016
In the Diagnostics panel, click Settings to access these options:
Gain Specifies the amount of attenuation that occurs before processing. Click Auto to base the gain setting on average
input amplitude.
Tolerance Specifies the amplitude variation in clipped regions. A value of 0% detects clipping only in perfectly
horizontal lines at maximum amplitude; 1% detects clipping beginning at 1% below maximum amplitude, and so on.
(A value of 1% detects most clipping.)
Min. Clip Size Specifies the length of the shortest run of clipped samples to repair. Lower values repair a higher
percentage of clipped samples; higher values repair clipped samples only if they’re preceded or followed other clipped
samples.
Interpolation The Cubic option uses spline curves to re-create the frequency content of clipped audio. This approach
is faster for most situations but can introduce spurious new frequencies. The FFT option uses Fast Fourier transforms
to re-create clipped audio. This approach is typically slower but best for severe clipping. From the FFT Size menu,
choose the number of frequency bands to evaluate and replace. (More bands result in greater accuracy but longer
processing.)
To retain amplitude when restoring clipped audio, apply the DeClipper effect with a Gain setting of zero, followed by
the Hard Limiting effect with a Boost value of zero and a Limit value of -0.2 dB.
Delete Silence and Mark Audio options
The Diagnostics > Delete Silence and Mark Audio effects identify silent passages of audio and either remove or mark
them. (See Working with markers.) Automatically deleting silence helps you tighten up tracks without affecting
foreground audio. Automatically marking silence helps you quickly navigate to audio cues for editing.
In the Diagnostics panel, click Settings to access these options:
Define Silence As Specifies the amplitude and duration identified as silence.
Define Audio As Specifies the amplitude and duration identified as audio content.
Find Levels Automatically calculates the signal levels of silence and audio based on content in the file.
Fix By (Delete Silence only) Choose Shortening Silence to reduce silent passages to the specified number of
milliseconds. Choose Deleting Silence to mute silent passages but retain file length. (Deleting silence helps maintain
video synchronization with audio clips in video editing applications.)
To divide sections of sound or speech separated by silence into different files, apply the Mark Audio effect, and click Mark
All. Then see Save audio between markers to new files.
More Help topics
About process effects
Apply individual effects in the Waveform Editor
Use effect presets
Create silence
Filter and equalizer effects

101
Effects reference
Last updated 6/16/2016
FFT Filter effect
The graphic nature of the Filter And EQ > FFT Filter effect makes it easy to draw curves or notches that reject or boost
specific frequencies. FFT stands for Fast Fourier Transform, an algorithm that quickly analyzes frequency and
amplitude.
This effect can produce broad high- or low-pass filters (to maintain high or low frequencies), narrow band-pass filters
(to simulate the sound of a telephone call), or notch filters (to eliminate small, precise frequency bands).
Scale Determines how frequencies are arranged along the horizontal x-axis:
•For finer control over low frequencies, select Logarithmic. A logarithmic scale more closely resembles how people
hear sound.
•For detailed, high-frequency work with evenly spaced intervals in frequency, select Linear.
Spline Curves Creates smoother, curved transitions between control points, rather than more abrupt, linear
transitions. (See About spline curves for graphs.)
Reset
Reverts the graph to the default state, removing filtering.
Advanced options Click the triangle to access these settings:
FFT Size Specifies the Fast Fourier Transform size, determining the tradeoff between frequency and time accuracy. For
steep, precise frequency filters, choose higher values. For reduced transient artifacts in percussive audio, choose lower
values. Values between 1024 and 8192 work well for most material.
Window Determines the Fast Fourier Transform shape, with each option resulting in a different frequency response
curve.
These functions are listed in order from narrowest to widest. Narrower functions include fewer surrounding, or
sidelobe, frequencies but less precisely reflect center frequencies. Wider functions include more surrounding
frequencies but more precisely reflect center frequencies. The Hamming and Blackman options provide excellent
overall results.
Graphic Equalizer effect
The Filter And EQ > Graphic Equalizer effect boosts or cuts specific frequency bands and provides a visual
representation of the resulting EQ curve. Unlike the Parametric Equalizer, the Graphic Equalizer uses preset frequency
bands for quick and easy equalization.
You can space frequency bands at the following intervals:
•One octave (10 bands)
•One-half octave (20 bands)
•One-third octave (30 bands)
Graphic equalizers with fewer bands provide quicker adjustment; more bands provide greater precision.
Gain sliders Sets the exact boost or attenuation (measured in decibels) for the chosen band.
Range Defines the range of the slider controls. Enter any value between 1.5 and 120 dB. (By comparison, standard
hardware equalizers have a range of about 12 to 30 dB.)
Accuracy Sets the accuracy level for equalization. Higher accuracy levels give better frequency response in the lower
ranges, but they require more processing time. If you equalize only higher frequencies, you can use lower accuracy
levels.

102
Effects reference
Last updated 6/16/2016
If you equalize extremely low frequencies, set Accuracy to between 500 and 5000 points.
Master Gain Compensates for an overall volume level that is too soft or too loud after the EQ settings are adjusted. The
default value of 0 dB represents no master gain adjustment.
Note: The Graphic Equalizer is an FIR (Finite Impulse Response) filter. FIR filters better maintain phase accuracy but have
slightly less frequency accuracy than IIR (Infinite Impulse Response) filters like the Parametric Equalizer.
Notch Filter effect
The Filter and EQ > Notch Filter effect removes up to six user-defined frequency bands. Use this effect to remove very
narrow frequency bands, such as a 60 Hz hum, while leaving all surrounding frequencies untouched.
To remove shrill “ess” sounds, use the Sibilance Softener preset. Or use DTMF presets to remove standard tones for
analog telephone systems.
Frequency Specifies the center frequency for each notch.
Gain Specifies the amplitude for each notch.
Notch width Determines frequency range for all notches. The three options range from Narrow for a second order
filter, which removes some adjacent frequencies, to Super Narrow for a sixth order filter, which is very specific.
Generally, use no more than 30 dB of attenuation for a Narrow setting, 60 dB for Very Narrow, and 90 dB for Super
Narrow. Greater attenuation can remove a wide range of neighboring frequencies.
Ultra-Quiet Virtually eliminates noise and artifacts, but requires more processing. This option is audible only on high-
end headphones and monitoring systems.
Fix Attenuations To Determines if notches have equal or individual attenuation levels.
Parametric Equalizer effect
The Filter And EQ > Parametric Equalizer effect provides maximum control over tonal equalization. Unlike the
Graphic Equalizer, which provides a fixed number of frequencies and Q bandwidths, the Parametric Equalizer gives
you total control over frequency, Q, and gain settings. For example, you can simultaneously reduce a small range of
frequencies centered around 1000 Hz, boost a broad low-frequency shelf centered around 80 Hz, and insert a 60 Hz
notch filter.
The Parametric Equalizer uses second-order IIR (Infinite Impulse Response) filters, which are very fast and provide
very accurate frequency resolution. For example, you can precisely boost a range of 40 to 45 Hz. FIR (Finite Impulse
Response) filters like the Graphic Equalizer provide slightly improved phase accuracy, however.
Master Gain Compensates for an overall volume level that’s too loud or too soft after you adjust the EQ settings.
Graph Shows frequency along the horizontal ruler (x-axis) and amplitude along the vertical ruler (y-axis). Frequencies
in the graph range from lowest to highest in a logarithmic fashion (evenly spaced by octaves).
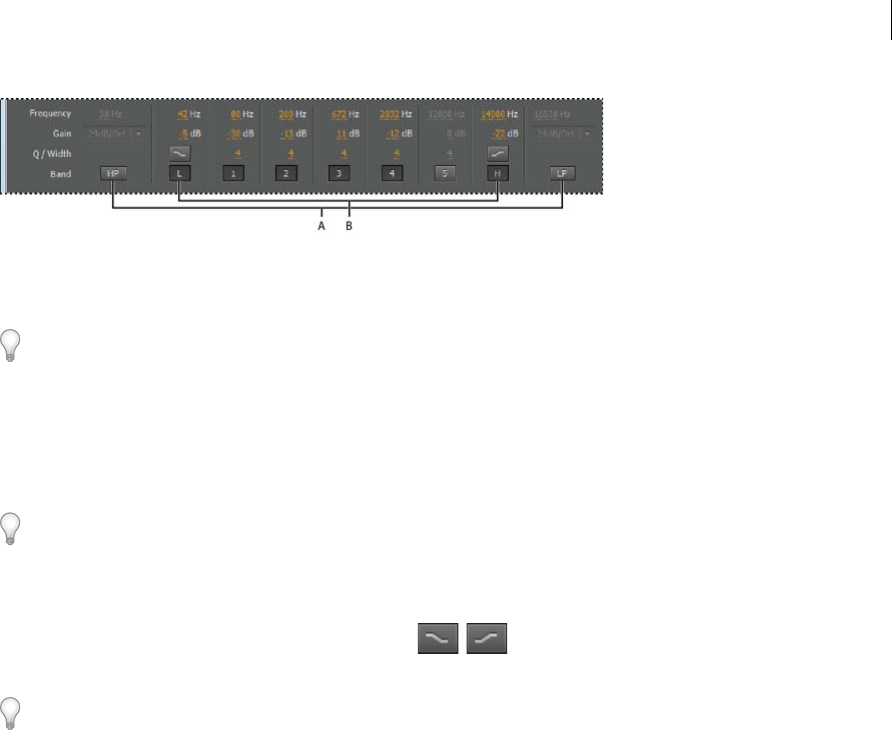
103
Effects reference
Last updated 6/16/2016
A High- and low-pass filters B High and low shelving filters
Frequency Sets the center frequency for bands 1-5, and the corner frequencies for the band-pass and shelving filters.
Use the low shelving filter to reduce low-end rumble, hum, or other unwanted low-frequency sounds. Use the high
shelving filter to reduce hiss, amplifier noise, and the like.
Gain Sets the boost or attenuation for frequency bands, and the per-octave slope of the band-pass filters.
Q / Width Controls the width of the affected frequency band. Low Q values affect a larger range of frequencies. Very
high Q values (close to 100) affect a very narrow band and are ideal for notch filters removing particular frequencies,
like 60 Hz hum.
When a very narrow band is boosted, audio tends to ring or resonate at that frequency. Q values of 1-10 are best for
general equalization.
Band Enables up to five intermediate bands, as well as high-pass, low-pass, and shelving filters, giving you very fine
control over the equalization curve. Click the band button to activate the corresponding settings above.
The low and high shelving filters provide slope buttons ( , ) that adjust the low and high shelves by 12 dB per
octave, rather than the default 6 dB per octave.
To visually adjust enabled bands in the graph, drag the related control points.
Constant Q, Constant Width Describes a frequency band’s width as either a Q value (which is a ratio of width to center
frequency) or an absolute width value in Hz. Constant Q is the most common setting.
Ultra-Quiet Virtually eliminates noise and artifacts, but requires more processing. This option is audible only on high-
end headphones and monitoring systems.
Range Sets the graph to a 30 dB range for more precise adjustments, or a 96 dB range for more extreme adjustments.
Scientific Filter effect
Use the Scientific Filter effect (Effects > Filter and EQ) for advanced manipulation of audio. You can also access the
effect from the Effects Rack for single assets in the waveform editor, or for tracks and clips in the Multitrack editor.
Types Specifies the type of scientific filter. The available options are as follows.
Bessel Provides accurate phase response with no ringing or overshoot. However, the pass band slopes at its edges,
where rejection of the stop band is the poorest of all filter types. These qualities make Bessel a good choice for
percussive, pulse-like signals. For other filtering tasks, use Butterworth.
Butterworth Provides a flat pass band with minimal phase shift, ringing, and overshoot. This filter type also rejects the
stop band much better than Bessel and only slightly worse than Chebychev 1 or 2. These overall qualities make
Butterworth the best choice for most filtering tasks.
Chebychev Provides the best stop band rejection but the worst phase response, ringing, and overshoot in the pass band.
Use this filter type only if rejecting the stop band is more important than maintaining an accurate pass band.

104
Effects reference
Last updated 6/16/2016
Elliptical Provides a sharp cut-off and narrow transition width. It can also notch out frequencies, unlike the
Butterworth and Chebychev filters. It can, however,introduce ripples in both the stop band and the pass band
Modes Specify a mode for the filter. The available options are as follows.
Low Pass Passes the low frequencies and removes high frequencies. You must specify the cutoff point at which the
frequencies are removed.
High Pass Passes high frequencies and removes low frequencies. You must specify the cutoff point at which the
frequencies are removed.
Band Pass Preserves a band, a range of frequencies, while removing all other frequencies. You must specify two cutoff
points to define the edges of the band.
Band Stop Rejects any frequencies within the specified range. Also known as a notch filter, Band Stop is the opposite
of Band Pass. You must specify two cutoff points to define the edges of the band.
Master Gain Compensates for an overall volume level that might be too loud or too soft after you adjust the filter
settings.
Cutoff Defines the frequency that serves as a border between passed and removed frequencies. At this point the filter
switches from passing to attenuating, or vice versa. In filters requiring a range (Band Pass and Band Stop), Cutoff
defines the low frequency border, while High Cutoff defines the high frequency border.
High Cutoff Defines the high frequency border in filters that require a range (Band Pass and Band Stop).
Order Determines the filter’s precision. The higher the order, the more precise the filter (with steeper slopes at the
cutoff points, and so on). However, very high orders can also have high levels of phase distortion.
Transition Bandwidth (Butterworth and Chebychev only) Sets the width of the transition band. (Lower values have
steeper slopes.) If you specify a transition bandwidth, the Order setting is filled in automatically, and vice versa. In
filters that require a range (Band Pass and Band Stop), this serves as the lower frequency transition, while High Width
defines the higher frequency transition.
High Width (Butterworth and Chebychev only) In filters that require a range (Band Pass and Band Stop), this option
serves as the higher frequency transition, while Transition Bandwidth defines the lower frequency transition.
Stop Attn (Butterworth and Chebychev only) Determines how much gain reduction to use when frequencies are
removed.
Pass Ripple/ Actual Ripple (Chebychev only) Determines the maximum allowable amount of ripple. Ripple is the effect
of unwanted boosting and cutting of frequencies near the cutoff point.
More Help topics
About process effects
Apply individual effects in the Waveform Editor
Control effect settings with graphs
Use effect presets
Applying effects in the Waveform Editor
Applying effects in the Multitrack Editor

105
Effects reference
Last updated 6/16/2016
Modulation effects
Chorus effect
The Modulation > Chorus effect simulates several voices or instruments played at once by adding multiple short delays
with a small amount of feedback. The result is lush, rich sound. You can use Chorus to enhance a vocal track or add
stereo spaciousness to mono audio.
Adobe Audition uses a direct-simulation method to achieve a chorus effect, making each voice sound distinct from the
original by slightly varying timing, intonation, and vibrato. The Feedback setting lets you add extra detail to the result.
To achieve the best results with mono files, convert them to stereo before applying the Chorus effect.
Characteristics Represent the characteristics of each voice in the chorus.
Voices Determines the number of simulated voices.
Note: As you add more voices, the sound becomes richer and richer —but processing time also increases.
Delay Time Specifies the maximum amount of delay allowed. Chorusing introduces short delays (often in the 15-35
millisecond range) that vary in duration over time. If the setting is very small, all the voices start merging into the
original, and an unnatural flanging effect might occur. If the setting is too high, a warbled effect might occur, like a tape
being eaten by a cassette deck.
Delay Rate Determines how quickly the delay cycles from zero to the maximum delay setting. Because the delay varies
over time, the pitch of the sample increases or decreases over time, giving the effect of separate, slightly out of tune
voices. For example, a rate of 2 Hz would vary the delay from zero to the maximum and back twice per second
(simulating a pitch vibrato at twice per second). If this setting is too low, the individual voices don’t vary much in pitch.
If it is set too high, the voices may vary so quickly that a warbled effect might occur.
Feedback Adds a percentage of processed voices back into the effect input. Feedback can give a waveform an extra echo
or reverb effect. A little feedback (less than 10%) can provide extra richness, depending on the delay and vibrato
settings. Higher settings produce more traditional feedback, a loud ringing which can get loud enough to clip the signal.
Spread Gives an added delay to each voice, separating them in time by as much as 200 milliseconds (1/5th of a second).
High values cause the separate voices to start at different times—the higher the value, the farther apart the onset of each
voice may be. In contrast, low values cause all voices to be in unison. Depending on other settings, low values can also
produce flanging effects, which may be undesirable if your goal is a realistic chorus effect.
Modulation Depth Determines the maximum variation in amplitude that occurs. For example, you can alter the
amplitude of a chorused voice so that it is 5 dB louder or quieter than the original. At extremely high settings, the sound
may cut in and out, creating an objectionable warble. At extremely low settings (less than 1 dB), the depth may be
unnoticeable unless the Modulation Rate is set extremely high. Natural vibratos occur around 2 dB to 5 dB.
Note that this setting is a maximum only; the vibrato volume might not always go as low as the setting indicates. This
limitation is intentional, as it creates a more natural sound.
Modulation Rate Determines the maximum rate at which amplitude changes occur. With very low values, the resulting
voice slowly gets louder and quieter, like a singer that cannot keep his or her breath steady. With very high settings, the
result can be jittery and unnatural.
Highest Quality Ensures the best quality results. Increasing the quality, however, increases the processing time for
previewing and applying the effect.

106
Effects reference
Last updated 6/16/2016
Stereo Width Determines where the individual voices are placed in the stereo field and how the original stereo signal
is interpreted. These options are active only when you work with stereo files:
Average Left & Right Channel Input Combines the original left and right channels. If deselected, the channels are kept
separate to preserve the stereo image. Leave this option deselected if the stereo source audio was originally
monophonic—it won’t have any effect other than increasing processing time.
Add Binaural Cues Adds separate delays to the left and right outputs of each voice. This delay can make each voice seem
to come from a different direction when you listen through headphones. For greater stereo separation, deselect this
option for audio that will be played through standard speakers .
Stereo Field Specifies where chorused voices are placed across the left and right stereo image. At lower settings, voices
are closer to the center of the stereo image. At a setting of 50%, voices are spaced evenly from left to right. At higher
settings, voices move to the outer edges. If you use an odd number of voices, one is always directly in the center.
Output Level Sets the ratio of original (Dry) signal to chorused (Wet) signal. Extremely high settings may cause
clipping.
In the Multitrack Editor, you can vary the Wet level over time with automation lanes. (See Automating track settings
.)This technique is handy for emphasizing vocal or instrumental solos.
Chorus/Flanger effect
The Modulation > Chorus/Flanger effect combines two popular delay-based effects. The Chorus option simulates
several voices or instruments played at once by adding multiple short delays with a small amount of feedback. The result
is lush, rich sound. Use this effect to enhance vocal tracks or add stereo spaciousness to mono audio.
The Flanger option creates a psychedelic, phase-shifted sound by mixing a varying, short delay with the original signal.
This effect was originally created by sending an identical audio signal to two reel-to-reel tape recorders, and
periodically pressing the flange of one reel to slow it down.
Chorus Simulates several voices or instruments playing at once.
Flanger Simulates the delayed, phase-shifted sound originally heard in psychedelic music.
Speed Controls the rate at which the delay time cycles from zero to the maximum setting.
Width Specifies the maximum amount of delay.
Intensity Controls the ratio of original to processed audio.
Transience Emphasizes transients, giving them a sharper, more distinct sound.
Flanger effect
Flanging is an audio effect caused by mixing a varying, short delay in roughly equal proportion to the original signal. It
was originally achieved by sending an identical audio signal to two reel-to-reel tape recorders, and then pressing the
flange of one reel to slow it down. Combining the two resulting recordings produced a phase-shifted, time-delay effect,
characteristic of psychedelic music of the 1960s and 1970s. The Modulation > Flanger effect lets you create a similar
result by slightly delaying and phasing a signal at specific or random intervals.
Initial Delay Time Sets the point in milliseconds at which flanging starts behind the original signal. The flanging effect
occurs by cycling over time from an initial delay setting to a second (or final) delay setting.
Final Delay Time Sets the point in milliseconds at which flanging ends behind the original signal.

107
Effects reference
Last updated 6/16/2016
Stereo Phasing Sets the left and right delays at separate values, measured in degrees. For example, 180° sets the initial
delay of the right channel to occur at the same time as the final delay of the left channel. You can set this option to
reverse the initial/final delay settings for the left and right channels, creating a circular, psychedelic effect.
Feedback Determines the percentage of the flanged signal that is fed back into the flanger. With no feedback, the effect
uses only the original signal. With feedback added, the effect uses a percentage of the affected signal from before the
current point of playback.
Modulation Rate Determines how quickly the delay cycles from the initial to final delay times, measured either in
cycles per second (Hz) or beats per minute (beats). Small setting adjustments produce widely varying effects.
Mode Provides three ways of flanging:
Inverted Inverts the delayed signal, cancelling out audio periodically instead of reinforcing the signal. If the Original -
Expanded mix settings are set at 50/50, the waves cancel out to silence whenever the delay is at zero.
Special Effects Mixes the normal and inverted flanging effects. The delayed signal is added to the effect while the
leading signal is subtracted.
Sinusoidal Makes the transition from initial delay to final delay and back follow a sine curve. Otherwise, the transition
is linear, and the delays from the initial setting to the final setting are at a constant rate. If Sinusoidal is selected, the
signal is at the initial and final delays more often than it is between delays.
Mix Adjusts the mix of original (Dry) and flanged (Wet) signal. You need some of both signals to achieve the
characteristic cancellation and reinforcement that occurs during flanging. With Original at 100%, no flanging occurs
at all. With Delayed at 100%, the result is a wavering sound, like a bad tape player.
Phaser effect
Similar to flanging, phasing shifts the phase of an audio signal and recombines it with the original, creating psychedelic
effects first popularized by musicians of the 1960s. But unlike the Flanger effect, which uses variable delays, the
Modulation > Phaser effect sweeps a series of phase-shifting filters to and from an upper frequency. Phasing can
dramatically alter the stereo image, creating unearthly sounds.
Stages Specifies the number of phase-shifting filters. A higher setting produces denser phasing effects.
Intensity Determines the amount of phase-shifting applied to the signal.
Depth Determines how far the filters travel below the upper frequency. Larger settings produce a wider tremolo effect;
100% sweeps from the upper frequency to zero Hz.
Mod Rate Modulation rate controls how fast the filters travel to and from the upper frequency. Specify a value in Hz
(cycles per second).
Phase Diff Determines the phase difference between stereo channels. Positive values start phase shifts in the left
channel, negative values in the right. The maximum values of +180 and -180 degrees produce a complete difference and
are sonically identical.
Upper Freq Sets the upper-most frequency from which the filters sweep. To produce the most dramatic results, select
a frequency near the middle of the selected audio’s range.
Feedback Feeds a percentage of the phaser output back to the input, intensifying the effect. Negative values invert
phase before feeding audio back.
Mix Controls the ratio of original to processed audio.
Output Gain Adjusts the output level after processing.
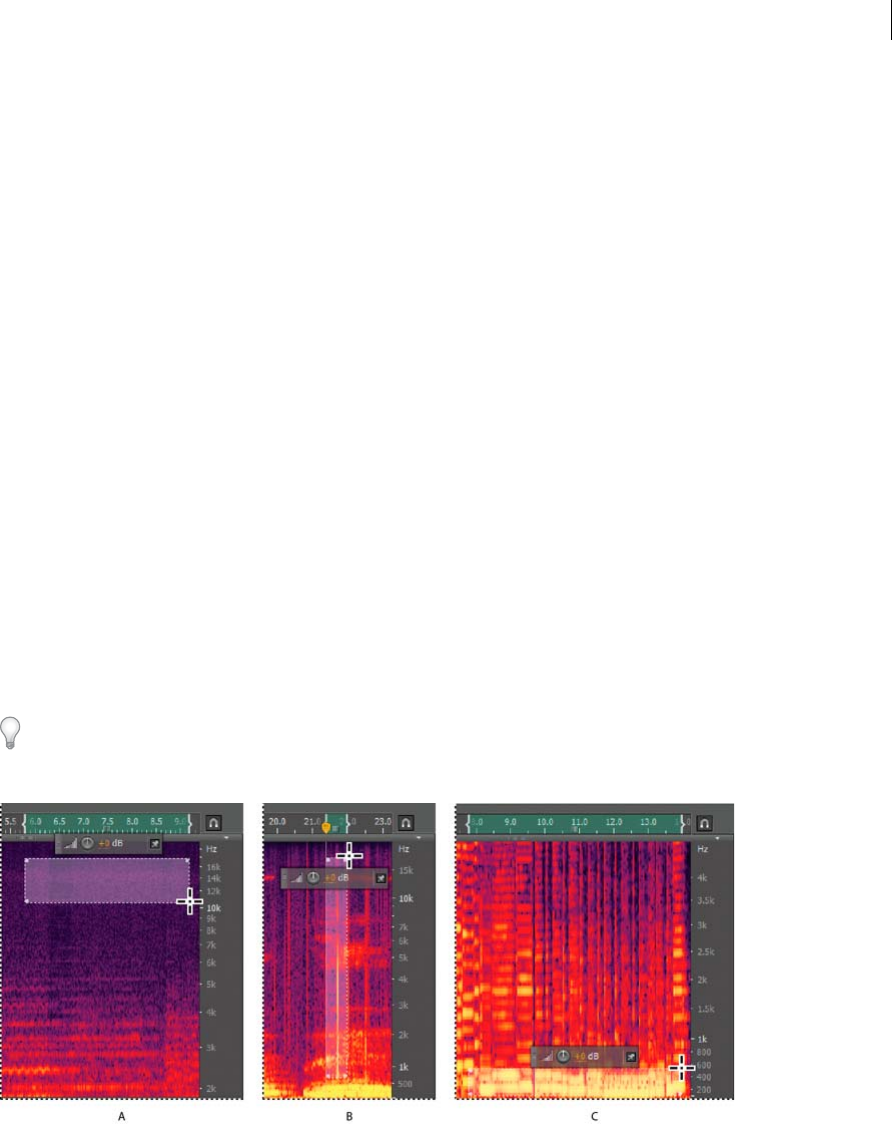
108
Effects reference
Last updated 6/16/2016
More Help topics
Applying effects in the Waveform Editor
Applying effects in the Multitrack Editor
Use effect presets
Noise reduction techniques and restoration effects for
Audition
Techniques for restoring audio
You can fix a wide array of audio problems by combining two powerful features. First, use Spectral Display to visually
identify and select ranges of noise or individual artifacts. (See Select spectral rangesand Select artifacts and repair them
automatically.) Then, use either Diagnostic or Noise Reduction effects to fix problems like the following:
•Crackle from wireless microphones or old vinyl records. (See Automatic Click Remover effect.)
•Background noise like wind rumble, tape hiss, or power-line hum. (See Adaptive Noise Reduction effectand
DeHummer effect.)
•Phase cancelation from poorly placed stereo microphones or misaligned tape machines. (See Automatic Phase
Correction effect.)
The real-time restoration effects above, which are available in both the Waveform and Multitrack editors, quickly
address common audio problems. For unusually noisy audio, however, consider using offline, process effects unique to
the Waveform Editor, such as Hiss Reduction and Noise Reduction.
A Hiss B Crackle C Rumble
Noise Reduction effect (Waveform Editor only)
The Noise Reduction/Restoration > Noise Reduction effect dramatically reduces background and broadband noise
with a minimal reduction in signal quality. This effect can remove a combination of noise, including tape hiss,
microphone background noise, power-line hum, or any noise that is constant throughout a waveform.
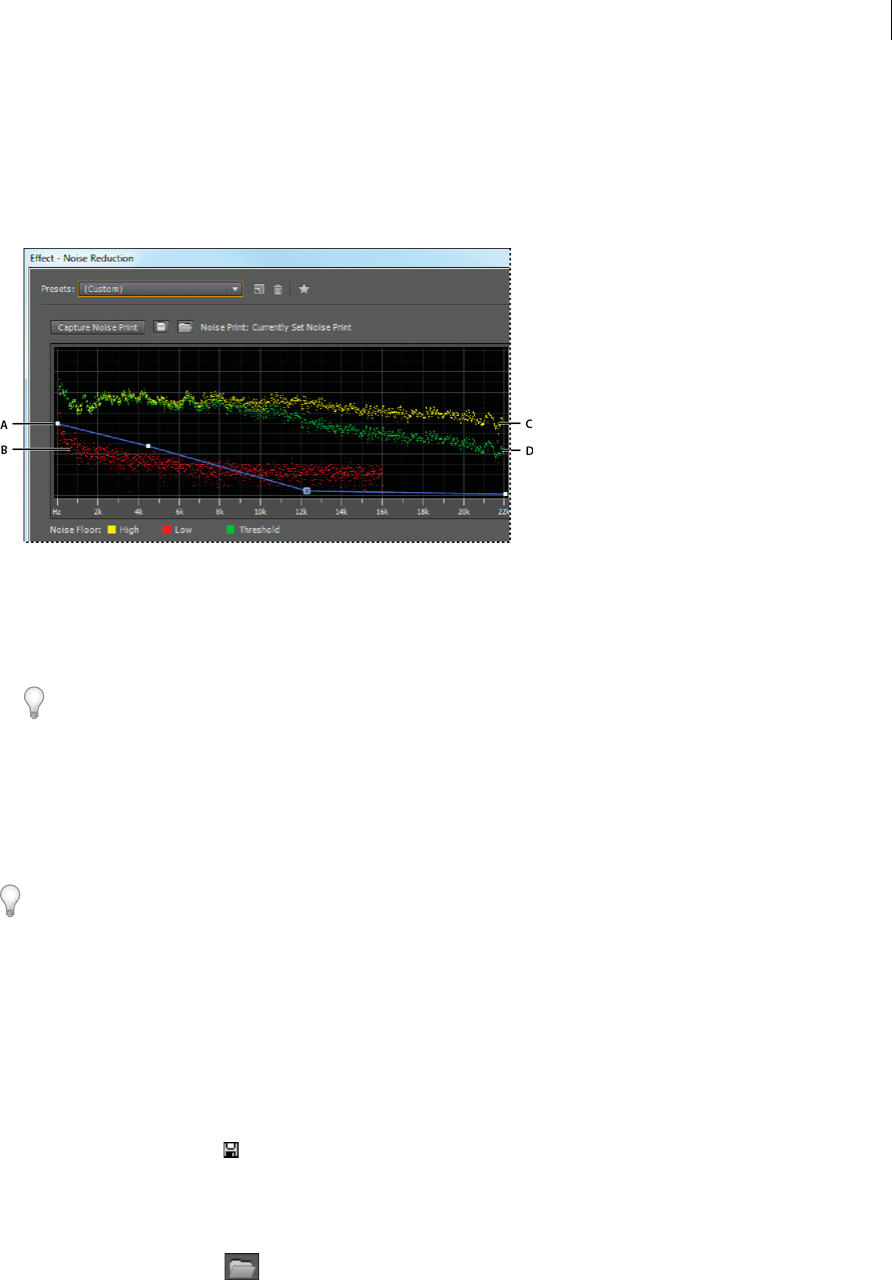
109
Effects reference
Last updated 6/16/2016
The proper amount of noise reduction depends upon the type of background noise and the acceptable loss in quality
for the remaining signal. In general, you can increase the signal-to-noise ratio by 5 to 20 dB and retain high audio
quality.
To achieve the best results with the Noise Reduction effect, apply it to audio with no DC offset. With a DC offset, this
effect may introduce clicks in quiet passages. (To remove a DC offset, choose Favorites > Repair DC Offset.)
A Drag control points to vary reduction in different frequency ranges B Low amplitude noise. C High amplitude noise D Threshold below which
noise reduction occurs.
Apply the Noise Reduction effect
1In the Waveform Editor, select a range that contains only noise and is at least half a second long.
To select noise in a specific frequency range, use the Marquee Selection tool. (See Select spectral ranges.)
2Choose Effects > Noise Reduction/Restoration > Capture Noise Print.
3In the Editor panel, select the range from which you want to remove noise.
4Choose Effects > Noise Reduction/Restoration > Noise Reduction.
5Set the desired options.
When recording in noisy environments, record a few seconds of representative background noise that can be used as a
noise print later on.
Noise Reduction options
Capture Noise Print Extracts a noise profile from a selected range, indicating only background noise. Adobe Audition
gathers statistical information about the background noise so it can remove it from the remainder of the waveform.
Tip: If the selected range is too short, Capture Noise Print is disabled. Reduce the FFT Size or select a longer range of
noise. If you can’t find a longer range, copy and paste the currently selected range to create one. (You can later remove
the pasted noise by using the Edit > Delete command.)
Save the Current Noise Print
Saves the noise print as an .fft file, which contains information about sample type, FFT (Fast Fourier Transform) size,
and three sets of FFT coefficients: one for the lowest amount of noise found, one for the highest amount, and one for
the power average.
Load a Noise Print from Disk
Opens any noise print previously saved from Adobe Audition in FFT format. However, you can apply noise prints only
to identical sample types. (For example, you can’t apply a 22 kHz mono profile to 44kHz stereo samples.)

110
Effects reference
Last updated 6/16/2016
note: Because noise prints are so specific, a print for one type of noise won’t produce good results with other types. If
you regularly remove similar noise, however, a saved profile can greatly increase efficiency.
Graph Depicts frequency along the x-axis (horizontal) and the amount of noise reduction along the y-axis (vertical).
The blue control curve sets the amount of noise reduction in different frequency ranges. For example, if you need noise
reduction only in the higher frequencies, adjust the control curve downward to the right of the graph.
If you click the Reset button to flatten the control curve, the amount of noise reduction is based entirely on the
noise print.
Tip: To better focus on the noise floor, click the menu button to the upper right of the graph, and deselect Show
Control Curve and Show Tooltip Over Graph.
Noise Floor High shows the highest amplitude of detected noise at each frequency; Low shows the lowest amplitude.
Threshold shows the amplitude below which noise reduction occurs.
Tip: The three elements of the noise floor can overlap in the graph. To better distinguish them, click the menu button
, and select options from the Show Noise Floor menu.
Scale Determines how frequencies are arranged along the horizontal x-axis:
•For finer control over low frequencies, select Logarithmic. A logarithmic scale more closely resembles how people
hear sound.
•For detailed, high-frequency work with evenly spaced intervals in frequency, select Linear.
Channel Displays the selected channel in the graph. The amount of noise reduction is always the same for all channels.
Select Entire File Lets you apply a captured noise print to the entire file.
Noise Reduction Controls the percentage of noise reduction in the output signal. Fine-tune this setting while
previewing audio to achieve maximum noise reduction with minimum artifacts. (Excessively high noise reduction
levels can sometimes cause audio to sound flanged or out-of-phase.)
Reduce By Determines the amplitude reduction of detected noise. Values between 6 and 30 dB work well. To reduce
bubbly artifacts, enter lower values.
Output Noise Only Previews only noise so you determine if the effect is removing any desirable audio.
Advanced settings Click the triangle to display the following options:
Spectral Decay Rate Specifies the percentage of frequencies processed when audio falls below the noise floor.
Fine-tuning this percentage allows greater noise reduction with fewer artifacts. Values of 40% to 75% work best. Below
those values, bubbly-sounding artifacts are often heard; above those values, excessive noise typically remains.
Smoothing Takes into account the variance of the noise signal in each frequency band. Bands that vary greatly when
analyzed (such as white noise) will be smoothed differently than constant bands (like 60-Hz hum). In general,
increasing the smoothing amount (up to 2 or so) reduces burbly background artifacts at the expense of raising the
overall background broadband noise level.
Precision Factor Controls changes in amplitude. Values of 5-10 work best, and odd numbers are ideal for symmetrical
processing. With values of 3 or less, the Fast Fourier transform is performed in giant blocks, and between them drops
or spikes in volume can occur. Values beyond 10 cause no noticeable change in quality, but they increase processing
time.
Transition Width Determines the amplitude range between noise and desirable audio. For example, a width of zero
applies a sharp, noise gate to each frequency band. Audio just above the threshold remains; audio just below is truncated
to silence. Alternatively, you can specify a range over which the audio fades to silence based upon the input level. For

111
Effects reference
Last updated 6/16/2016
example, if the transition width is 10 dB, and the noise level for the band is -60 dB, audio at -60 dB stays the same, audio
at -62 dB is reduced slightly, and audio at -70 dB is removed entirely.
FFT Size Determines how many individual frequency bands are analyzed. This option causes the most drastic changes
in quality. The noise in each frequency band is treated separately, so with more bands, noise is removed with finer
frequency detail. Good settings range from 4096 to 8192.
Fast Fourier Transform size determines the tradeoff between frequency- and time-accuracy. Higher FFT sizes might
cause swooshing or reverberant artifacts, but they very accurately remove noise frequencies. Lower FFT sizes result in
better time response (less swooshing before cymbal hits, for example), but they can produce poorer frequency
resolution, creating hollow or flanged sounds.
Noise Print Snapshots Determines how many snapshots of noise to include in the captured profile. A value of 4000 is
optimal for producing accurate data.
Very small values greatly affect the quality of the various noise reduction levels. With more snapshots, a noise reduction
level of 100 will likely cut out more noise, but also cut out more original signal. However, a low noise reduction level
with more snapshots will also cut out more noise, but likely retain the intended signal.
Sound Remover effect
The Sound Remover effect (Effects > Noise Reduction/Restoration) removes unwanted audio sources from a
recording. This effect analyzes a selected portion of the recording, and builds a sound model, which is used to find and
remove the sound.
The generated model can also be modified using parameters that indicate its complexity. A high complexity sound
model requires more refinement passes to process the recording, but provides more accurate results. You can also save
the sound model for later use. Several common presets are also included to remove some common noise sounds, such
as sirens and ringing mobile phones.
Learn Sound Model Uses the selected waveform to learn the sound model. Select an area on the waveform that only
contains the sound to remove, and then press Learn Sound Model. You can also save and load sound models on disc.
Sound Model Complexity Indicates the complexity of the Sound Model. The more complex or mixed the sound is, the
better results you'll get with a higher complexity setting, though the longer it will take to calculate. Settings range from
1 to 100.
Sound Refinement Passes Defines the number of refinement passes to make to remove the sound patterns indicated
in the sound model. Higher number of passes require longer processing time, but offer more accurate results.
Content Complexity Indicates the complexity of the signal. The more complex or mixed the sound is, the better results
you'll get with a higher complexity setting, though the longer it will take to calculate. Settings range from 5 to 100.
Content Refinement Passes Specifies the number of passes to make on the content to remove the sounds that match
the sound model. A higher number of passes require more processing time, but generally provide more accurate results.
Enhanced Supression This increases the aggressiveness of the sound removal algorithm, and can be modified on the
Strength value. A higher value will remove more of the sound model from mixed signals, which can result in greater
loss of desired signal, while a lower value will leave more of the overlapping signal and therefore, more of the noise may
be audible (though less than the original recording.)
Enhance for Speech Specifies that the audio includes speech and is careful in removing audio patterns that closely
resemble speech. The end result makes sure that speech is not removed, while removing noise.
FFT Size Determines how many individual frequency bands are analyzed. This option causes the most drastic changes
in quality. The noise in each frequency band is treated separately, so with more bands, noise is removed with finer
frequency detail. Good settings range from 4096 to 8192. Fast Fourier Transform size determines the tradeoff between

112
Effects reference
Last updated 6/16/2016
frequency- and time-accuracy. Higher FFT sizes might cause swooshing or reverberant artifacts, but they very
accurately remove noise frequencies. Lower FFT sizes result in better time response (less swooshing before cymbal hits,
for example), but they can produce poorer frequency resolution, creating hollow or flanged sounds.
Adaptive Noise Reduction effect
The Noise Reduction/Restoration > Adaptive Noise Reduction effect quickly removes variable broadband noise such
as background sounds, rumble, and wind. Because this effect operates in real time, you can combine it with other effects
in the Effects Rack and apply it in the Multitrack Editor. By contrast, the standard Noise Reduction effect is available
only as an offline process in the Waveform Editor. That effect, however, is sometimes more effective at removing
constant noise, such as hiss or hum.
For best results, apply Adaptive Noise Reduction to selections that begin with noise followed by desirable audio. The
effect identifies noise based on the first few seconds of audio.
Note: This effect requires significant processing. If your system performs slowly, lower FFT Size and turn off High Quality
Mode.
Reduce Noise By Determines the level of noise reduction. Values between 6 and 30 dB work well. To reduce bubbly
background effects, enter lower values.
Noisiness Indicates the percentage of original audio that contains noise.
Fine Tune Noise Floor Manually adjusts the noise floor above or below the automatically calculated floor.
Signal Threshold Manually adjusts the threshold of desirable audio above or below the automatically calculated
threshold.
Spectral Decay Rate Determines how quickly noise processing drops by 60 decibels. Fine-tuning this setting allows
greater noise reduction with fewer artifacts. Values that are too short create bubbly sounds; values that are too long
create a reverb effect.
Broadband Preservation Retains desirable audio in specified frequency bands between found artifacts. A setting of 100
Hz, for example, ensures that no audio is removed 100 Hz above or below found artifacts. Lower settings remove more
noise but may introduce audible processing.
FFT Size Determines how many individual frequency bands are analyzed. Choose a high setting to increase frequency
resolution; choose a low setting to increase time resolution. High settings work well for artifacts of long duration (like
squeaks or power-line hum), while low settings better address transient artifacts (like clicks and pops).
Automatic Click Remover effect
To quickly remove crackle and static from vinyl recordings, use the Noise Reduction/Restoration > Automatic Click
Remover effect. You can correct a large area of audio or a single click or pop.
This effect provides the same options as the DeClicker effect, which lets you choose which detected clicks to address
(see DeClicker options). However, because the Automatic Click Remover operates in real time, you can combine it with
other effects in the Effects Rack and apply it in the Multitrack Editor. The Automatic Click Remover effect also applies
multiple scan and repair passes automatically; to achieve the same level of click reduction with the DeClicker, you must
manually apply it multiple times.
Threshold Determines sensitivity to noise. Lower settings detect more clicks and pops but may include audio you wish
to retain. Settings range from 1 to 100; the default is 30.
Complexity Indicates the complexity of noise. Higher settings apply more processing but can degrade audio quality.
Settings range from 1 to 100; the default is 16.

113
Effects reference
Last updated 6/16/2016
Automatic Phase Correction effect
The Noise Reduction/Restoration > Automatic Phase Correction effect addresses azimuth errors from misaligned tape
heads, stereo smearing from incorrect microphone placement, and many other phase-related problems.
Global Time Shift Activates the Left and Right Channel Shift sliders, which let you apply a uniform phase shift to all
selected audio.
Auto Align Channels and Auto Center Panning Align phase and panning for a series of discrete time intervals, which
you specify using the following options:
Time Resolution Specifies the number of milliseconds in each processed interval. Smaller values increase accuracy;
larger ones increase performance.
Responsiveness Determines overall processing speed. Slow settings increase accuracy; fast settings increase
performance.
Channel Specifies the channels phase correction will be applied to.
Analysis Size Specifies the number of samples in each analyzed unit of audio.
For the most precise, effective phase correction, use the Auto Align Channels option. Enable the Global Time Shift sliders
only if you are confident that a uniform adjustment is necessary, or if you want to manually animate phase correction
in the Multitrack Editor.
Click/Pop Eliminator effect
Use the Click/Pop Eliminator effect (Effects > Noise Reduction/Restoration) to remove microphone pops, clicks,
light hiss, and crackles. Such noise is common on recordings such as old vinyl records and on-location recordings. The
effect dialog box stays open, and you can adjust the selection, and fix multiple clicks without reopening the effect
several times.
Detection and correction settings are used to find clicks and pops. The detection and rejection ranges are displayed
graphically.
Detection graph Shows the exact threshold levels to be used at each amplitude, with amplitude along the horizontal
ruler (x-axis) and threshold level along the vertical ruler (y-axis). Adobe Audition uses values on the curve to the right
(above -20 dB or so) when processing louder audio and values on the left when processing softer audio. Curves are
color-coded to indicate detection and rejection.
Scan for All Levels Scans the highlighted area for clicks based on the values for Sensitivity and Discrimination, and
determines values for Threshold, Detect, and Reject. Five areas of audio are selected, starting at the quietest and moving
to the loudest.
Sensitivity Determines the level of clicks to detect. Use a lower value, such as 10, to detect lots of subtle clicks, or a value
of 20 to detect a few louder clicks. (Detected levels with Scan for All Levels are always higher than with this option.)
Discrimination Determines how many clicks to fix. Enter high values to fix very few clicks and leave most of the
original audio intact. Enter lower values, such as 20 or 40, if the audio contains a moderate number of clicks. Enter
extremely low values, such as 2 or 4, to fix constant clicks.
Scan for Threshold Levels Automatically sets the Maximum, Average, and Minimum Threshold levels.
Maximum, Average, Minimum Determine the unique detection and rejection thresholds for the maximum, average,
and minimum amplitudes of the audio. For example, if audio has a maximum RMS amplitude of -10 dB, you should set
Maximum Threshold to -10 dB. If the minimum RMS amplitude is -55 dB, then set Minimum Threshold to -55.
Set the threshold levels before you adjust the corresponding Detect and Reject values. (Set the Maximum and
Minimum Threshold levels first, because once they’re in place, you shouldn’t need to adjust them much.) Set the

114
Effects reference
Last updated 6/16/2016
Average Threshold level to about three quarters of the way between the Maximum and Minimum Threshold levels. For
example, if Maximum Threshold is set to 30 and Minimum Threshold is set to 10, set Average Threshold to 25.
After you audition a small piece of repaired audio, you can adjust the settings as needed. For example, if a quiet part
still has a lot of clicks, lower the Minimum Threshold level a bit. If a loud piece still has clicks, lower the Average or
Maximum Threshold level. In general, less correction is required for louder audio, as the audio itself masks many clicks,
so repairing them isn’t necessary. Clicks are very noticeable in very quiet audio, so quiet audio tends to require lower
detection and rejection thresholds.
Second Level Verification (Reject Clicks) Rejects some of the potential clicks found by the click detection algorithm. In
some types of audio, such as trumpets, saxophones, female vocals, and snare drum hits, normal peaks are sometimes
detected as clicks. If these peaks are corrected, the resulting audio will sound muffled. Second Level Verification rejects
these audio peaks and corrects only true clicks.
Detect Determines sensitivity to clicks and pops. Possible values range from 1 to 150, but recommended values range
from 6 to 60. Lower values detect more clicks.
Start with a threshold of 35 for high-amplitude audio (above -15 dB), 25 for average amplitudes, and 10 for low-
amplitude audio (below-50 dB). These settings allow for the most clicks to be found, and usually all of the louder ones.
If a constant crackle is in the background of the source audio, try lowering the Min Threshold level or increasing the
dB level to which the threshold is assigned. The level can be as low as 6, but a lower setting can cause the filter to remove
sound other than clicks.
If more clicks are detected, more repair occurs, increasing the possibility of distortion. With too much distortion of this
type, audio begins to sound flat and lifeless. If this occurs, set the detection threshold rather low, and select Second Level
Verification to reanalyze the detected clicks and disregard percussive transients that aren’t clicks.
Reject Determines how many potential clicks (found using the Detection Threshold) are rejected if Second Level
Verification box is selected. Values range from 1 to 100; a setting of 30 is a good starting point. Lower settings allow for
more clicks to be repaired. Higher settings can prevent clicks from being repaired, as they might not be actual clicks.
You want to reject as many detected clicks as possible but still remove all audible clicks. If a trumpet-like sound has
clicks in it, and the clicks aren’t removed, try lowering the value to reject fewer potential clicks. If a particular sound
becomes distorted, then increase the setting to keep repairs at a minimum. (The fewer repairs that are needed to get
good results, the better.)
FFT Size Determines the FFT size used to repair clicks, pops, and crackle. In general, select Auto to let Adobe Audition
determine the FFT size. For some types of audio, however, you might want to enter a specific FFT size (from 8 to 512).
A good starting value is 32, but if clicks are still quite audible, increase the value to 48, and then 64, and so on. The
higher the value, the slower the correction will be, but the better the potential results. If the value is too high, rumbly,
low frequency distortion can occur.
Fill Single Click Corrects a single click in a selected audio range. If Auto is selected next to FFT Size, then an appropriate
FFT size is used for the restoration based on the size of the area being restored. Otherwise, settings of 128 to 256 work
very well for filling in single clicks. Once a single click is filled, press the F3 key to repeat the action. You can also create
a quick key in the Favorites menu for filling in single clicks.
Pop Oversamples Width Includes surrounding samples in detected clicks. When a potential click is found, its
beginning and end points are marked as closely as possible. The Pop Oversamples value (which can range from 0 to
300) expands that range, so more samples to the left and right of the click are considered part of the click. If corrected
clicks become quieter but are still evident, increase the Pop oversamples value. Start with a value of 8, and increase it
slowly to as much as 30 or 40. Audio that doesn’t contain a click shouldn’t change very much if it’s corrected, so this
buffer area should remain mostly untouched by the replacement algorithm. Increasing the Pop Oversamples value also
forces larger FFT sizes to be used if Auto is selected. A larger setting may remove clicks more cleanly, but if it’s too high,
audio will start to distort where the clicks are removed.

115
Effects reference
Last updated 6/16/2016
Run Size Specifies the number of samples between separate clicks. Possible values range from 0 to 1000. To
independently correct extremely close clicks, enter a low value; clicks that occur within the Run Size range are corrected
together.
A good starting point is around 25 (or half the FFT size if Auto next to FFT Size isn’t selected). If the Run Size value is
too large (over 100 or so), then the corrections may become more noticeable, as very large blocks of data are repaired
at once. If you set the Run Size too small, then clicks that are very close together may not be repaired completely on the
first pass.
Pulse Train Verification Prevents normal waveform peaks from being detected as clicks. It may also reduce detection of
valid clicks, requiring more aggressive threshold settings. Select this option only if you’ve already tried to clean up the
audio but stubborn clicks remain.
Link Channels Processes all channels equally, preserving the stereo or surround balance. For example, if a click is found
in one channel, a click will most likely be detected in the other.
Detect Big Pops Removes large unwanted events (such as those more than a few hundred samples wide) that might not
be detected as clicks. Values can range from 30 to 200.
Note that a sharp sound like a loud snare drum hit can have the same characteristic as a very large pop, so select this
option only if you know the audio has very large pops (like a vinyl record with a very big scratch in it). If this option
causes drum hits to sound softer, slightly increase the threshold to fix only loud, obvious pops.
If loud, obvious pops aren’t fixed, select Detect Big Pops, and use settings from about 30 (to find quiet pops) to 70 (to
find loud pops).
Ignore Light Crackle Smooths out one-sample errors when detected, often removing more background crackle. If the
resulting audio sounds thinner, flatter, or more tinny, deselect this option.
Passes Performs up to 32 passes automatically to catch clicks that might be too close together to be repaired effectively.
Fewer passes occur if no more clicks are found and all detected clicks are repaired. In general, about half as many clicks
are repaired on each successive pass. A higher detection threshold might lead to fewer repairs and increase the quality
while still removing all clicks.
DeHummer effect
The Noise Reduction/Restoration > DeHummer effect removes narrow frequency bands and their harmonics. The
most common application addresses power line hum from lighting and electronics. But the DeHummer can also apply
a notch filter that removes an overly resonant frequency from source audio.
To quickly address typical audio problems, choose an option from the Presets menu.
Frequency Sets the root frequency of the hum. If you’re unsure of the precise frequency, drag this setting back and forth
while previewing audio.
Tip: To visually adjust root frequency and gain, drag directly in the graph.
Q Sets the width of the root frequency and harmonics above. Higher values affect a narrower range of frequencies, and
lower values affect a wider range.
Gain Determines the amount of hum attenuation.
Number of Harmonics Specifies how many harmonic frequencies to affect.
Harmonic Slope Changes the attenuation ratio for harmonic frequencies.
Output Hum Only Lets you preview removed hum to determine if it contains any desirable audio.
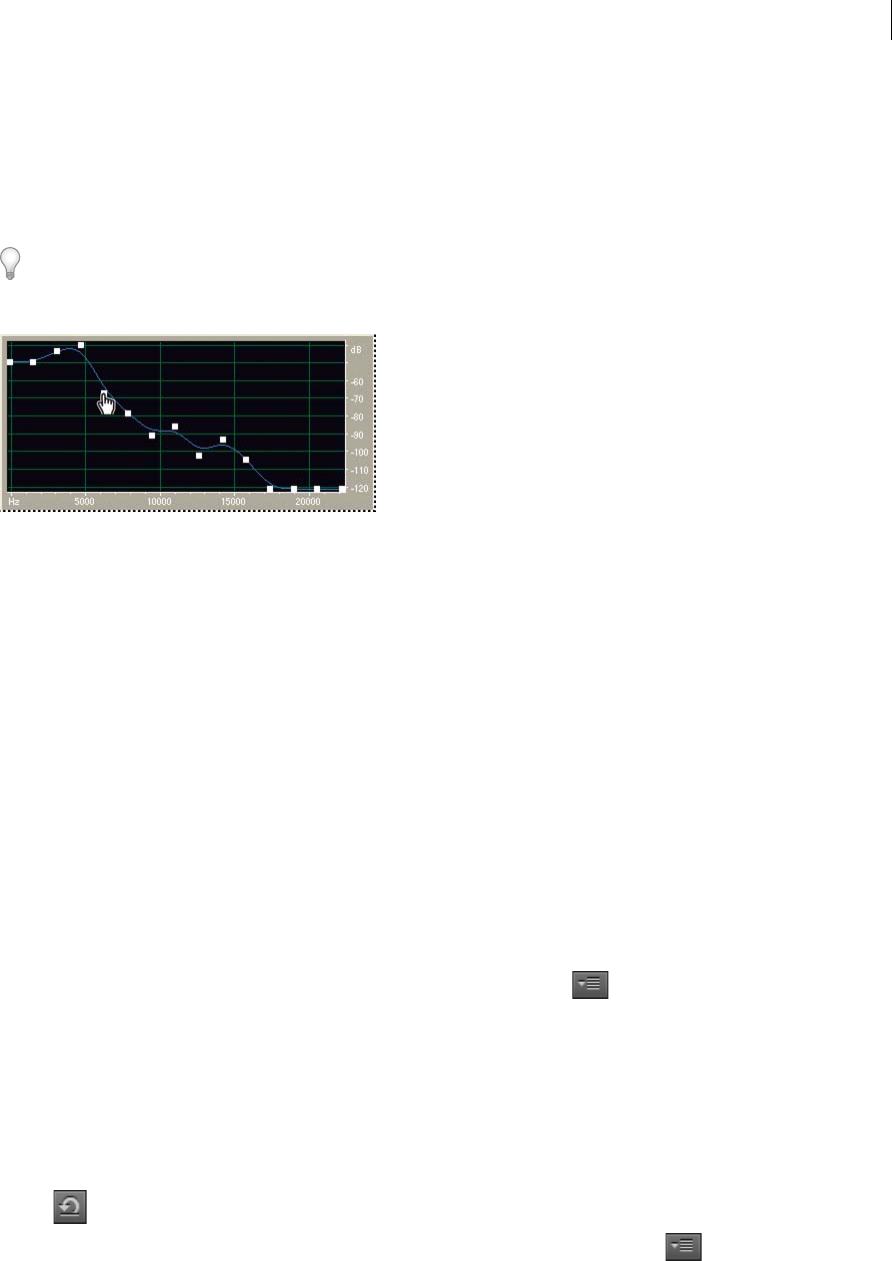
116
Effects reference
Last updated 6/16/2016
Hiss Reduction effect (Waveform Editor only)
The Noise Reduction/Restoration > Hiss Reduction effect reduces hiss from sources such as audio cassettes, vinyl
records, or microphone preamps. This effect greatly lowers the amplitude of a frequency range if it falls below an
amplitude threshold called the noise floor. Audio in frequency ranges that are louder than the threshold remain
untouched. If audio has a consistent level of background hiss, that hiss can be removed completely.
To reduce other types of noise that have a wide frequency range, try the Noise Reduction effect. (See Noise Reduction
effect (Waveform Editor only).)
Capture Noise Floor Graphs an estimate of the noise floor. The estimate is used by the Hiss Reduction effect to more
effectively remove only hiss while leaving regular audio untouched. This option is the most powerful feature of Hiss
Reduction.
To create a graph that most accurately reflects the noise floor, click Get Noise Floor with a selection of audio that
contains only hiss. Or, select an area that has the least amount of desirable audio, in addition to the least amount of high
frequency information. (In the spectral display, look for an area without any activity in the top 75% of the display.)
After you capture the noise floor, you might need to lower the control points on the left (representing the lower
frequencies) to make the graph as flat as possible. If music is present at any frequency, the control points around that
frequency will be higher than they should be.
Graph Represents the estimated noise floor for each frequency in the source audio, with frequency along the horizontal
ruler (x-axis) and the amplitude of the noise floor along the vertical ruler (y-axis). This information helps you
distinguish hiss from desirable audio data.
The actual value used to perform hiss reduction is a combination of the graph and the Noise Floor slider, which shifts
the estimated noise floor reading up or down for fine-tuning.
Tip: To disable tooltips for frequency and amplitude, click the menu button to the upper right of the graph, and
deselect Show Tooltip Over Graph.
Scale Determines how frequencies are arranged along the horizontal x-axis:
•For finer control over low frequencies, select Logarithmic. A logarithmic scale more closely resembles how people
hear sound.
•For detailed, high-frequency work with evenly spaced intervals in frequency, select Linear.
Channel Displays the selected audio channel in the graph.
Reset
Resets the estimated noise floor. To reset the floor higher or lower, click the menu button to the upper right of the
graph, and choose an option from the Reset Control Curve menu.

117
Effects reference
Last updated 6/16/2016
Tip: For quick, general-purpose hiss reduction, a complete noise floor graph isn’t always necessary. In many cases, you
can simply reset the graph to an even level and manipulate the Noise Floor slider.
Noise Floor Fine-tunes the noise floor until the appropriate level of hiss reduction and quality is achieved.
Reduce By Sets the level of hiss reduction for audio below the noise floor. With higher values (especially above 20 dB)
dramatic hiss reduction can be achieved, but the remaining audio might become distorted. With lower values, not as
much noise is removed, and the original audio signal stays relatively undisturbed.
Output Hiss Only Lets you preview only hiss to determine if the effect is removing any desirable audio.
Advanced settings Click the triangle to display these options:
Spectral Decay Rate When audio is encountered above the estimated noise floor, determines how much audio in
surrounding frequencies is assumed to follow. With low values, less audio is assumed to follow, and hiss reduction will
cut more closely to the frequencies being kept.
Values of 40% to 75% work best. If the value is too high (above 90%), unnaturally long tails and reverbs might be heard.
If the value is too low, background bubbly effects might be heard, and music might sound artificial.
Precision Factor Determines the time-accuracy of hiss reduction. Typical values range from 7 to 14. Lower values
might result in a few milliseconds of hiss before and after louder parts of audio. Larger values generally produce better
results and slower processing speeds. Values over 20 don’t ordinarily improve quality any further.
Transition Width Produces a slow transition in hiss reduction instead of an abrupt change. Values from 5 to 10 usually
achieve good results. If the value is too high, some hiss may remain after processing. If the value is too low, background
artifacts might be heard.
FFT Size Specifies a Fast Fourier Transform size, which determines the tradeoff between frequency- and time-accuracy.
In general, sizes from 2048 to 8192 work best.
Lower FFT sizes (2048 and below) result in better time response (less swooshing before cymbal hits, for example), but
they can produce poorer frequency resolution, creating hollow or flanged sounds.
Higher FFT sizes (8192 and above) might cause swooshing, reverb, and drawn out background tones, but they produce
very accurate frequency resolution.
Control Points Specifies the number of points added to the graph when you click Capture Noise Floor.
More Help topics
About the spectral display
Edit audio clips from Adobe Premiere Pro CS5.5 or AfterEffects
About process effects
Control effect settings with graphs
Applying effects in the Waveform Editor
Applying effects in the MultitrackEditor
Use effect presets

118
Effects reference
Last updated 6/16/2016
Reverb effects
In a room, sound bounces off the walls, ceiling, and floor on the way to your ears. All these reflected sounds reach your
ears so closely together that you don’t perceive them as separate echoes, but as a sonic ambience that creates an
impression of space. This reflected sound is called reverberation, or reverb for short. With Adobe Audition, you can use
reverb effects to simulate a variety of room environments.
For the most flexible, efficient use of reverb in the Multitrack Editor, add reverb effects to buses, and set reverb output
levels to 100% Wet. Then, route tracks to these buses, and use sends to control the ratio of dry to reverberant sound.
Convolution Reverb effect
The Reverb > Convolution Reverb effect reproduces rooms ranging from coat closets to concert halls. Convolution-
based reverbs use impulse files to simulate acoustic spaces. The results are incredibly realistic and life-like.
Sources of impulse files include audio you’ve recorded of an ambient space, or impulse collections available online. For
best results, impulse files should be uncompressed, 16- or 32-bit files matching the sample rate of the current audio file.
Impulse length should be no more than 30 seconds. For sound design, try a variety of source audio to produce unique,
convolution-based effects.
Note: Because Convolution Reverb requires significant processing, you may hear clicks or pops when previewing it on slower
systems. These artifacts disappear after you apply the effect.
Impulse Specifies a file that simulates an acoustic space. Click Load to add a custom impulse file in WAV or AIFF
format.
Mix Controls the ratio of original to reverberant sound.
Room Size Specifies a percentage of the full room defined by the impulse file. The larger the percentage, the longer the
reverb.
Damping LF Reduces low-frequency, bass-heavy components in reverb, avoiding muddiness and producing a clearer,
more articulate sound.
Damping HF Reduces high-frequency, transient components in reverb, avoiding harshness and producing a warmer,
lusher sound.
Pre-Delay Determines how many milliseconds the reverb takes to build to maximum amplitude. To produce the most
natural sound, specify a short pre-delay of 0–10 milliseconds. To produce interesting special effects, specify a long pre-
delay of 50 milliseconds or more.
Width Controls the stereo spread. A setting of 0 produces a mono reverb signal.
Gain Boosts or attenuates amplitude after processing.
Full Reverb effect
The Reverb > Full Reverb effect is convolution-based, avoiding ringing, metallic, and other artificial sounding artifacts.
This effect offers some unique options, such as Perception, which simulates room irregularities, Left/Right Location,
which places the source off-center, and Room Size and Dimension, which help you realistically simulate rooms that you
can customize. To simulate wall surfaces and resonance, you can change the reverb’s frequency absorption by using a
three-band, parametric EQ in the Coloration section.
When you change reverb settings, this effect creates a temporary impulse file, which simulates the acoustic environment
you specify. This file can be several megabytes in size, requiring a few seconds to process, so you might have to wait
before hearing a preview. The results, however, are incredibly realistic and easy to tailor.

119
Effects reference
Last updated 6/16/2016
Note: The Full Reverb effect demands significant processing; for real-time multitrack use, either pre-render this effect or
replace it with Studio Reverb. (See Pre-render track effects to improve performance.)
Reverb Settings
Decay Time Specifies how many milliseconds the reverb takes to decay 60 dB. However, depending on the Coloration
parameters, certain frequencies may take longer to decay to 60 dB, while other frequencies may decay much faster.
Longer values give longer reverb tails, but they also require more processing. The effective limit is about 6000
milliseconds (a 6-second tail), but the actual tail generated is much longer to allow for decaying into the background
noise level.
Pre-Delay Time Specifies how many milliseconds reverb takes to build to its maximum amplitude. Generally, reverbs
build up quickly, and then decay at a much slower rate. Interesting effects can be heard with extremely long pre-delay
times of 400 milliseconds or more.
Diffusion Controls the rate of echo buildup. High diffusion values (above 900 milliseconds) give very smooth reverbs,
without distinct echoes. Lower values produce more distinct echoes because the initial echo density is lighter, but the
density builds over the life of the reverb tail.
Tip: Bouncy echo effects can be obtained by using low Diffusion values and high Perception values. With long reverb
tails, using low Diffusion values and somewhat low Perception values gives the effect of a football stadium or similar
arena.
Perception Simulates irregularities in the environment (objects, walls, connecting rooms, and so on). Low values create
a smoothly decaying reverb without any frills. Larger values give more distinct echoes (coming from different
locations).
Tip: If a reverb is too smooth, it may not sound natural. Perception values up to about 40 give simulate typical room
variations.
Room Size Sets the volume of the virtual room, as measured in cubic meters. The larger the room, the longer the reverb.
Use this control to create virtual rooms of only a few square meters to giant coliseums.
Dimension Specifies the ratio between the room’s width (left to right) and depth (front to back). A sonically appropriate
height is calculated and reported as Actual Room Dimensions at the bottom of the dialog box. Generally, rooms with
width-to-depth ratios between 0.25 and 4 provide the best sounding reverbs.
Left/Right Location (stereo audio only) Lets you place early reflections off-center. Select Include Direct in the Output
Level section to place the original signal in the same location. Very nice effects are possible with singers slightly off
center, 5-10% to the left or right.
High Pass Cutoff Prevents the loss of low-frequency (100 Hz or less) sounds, such as bass or drums. These sounds can
get phased out when using small rooms if the early reflections mix with the original signal. Specify a frequency above
that of the sound you wish to keep. Good settings are generally between 80 Hz and 150 Hz. If the cutoff setting is too
high, you may not get a realistic image of the room size.
Set Reverb Based On Room Size Sets Decay and Pre-delay times to match the specified room size, producing a more
convincing reverb. If desired, you can then fine-tune the Decay and Pre-Delay times.
Coloration options
To visually adjust Coloration options, drag directly in the graph.
Frequency Specifies the corner frequency for the low and high shelves or the center frequency for the middle band. For
example, to increase reverb warmth, lower the high shelf frequency while also reducing its gain.
Gain Boosts or attenuates reverb in different frequency ranges.

120
Effects reference
Last updated 6/16/2016
Tip: To subtly enhance audio, boost reverb frequencies around the natural frequency of a key sonic element. For a
singer’s voice, for example, boost frequencies from 200 Hz to 800 Hz to enhance resonance in that range.
Q Sets the width of the middle band. Higher values affect a narrower range of frequencies, and lower values affect a
wider range.
Tip: For distinct resonance, use values of 10 or higher. To boost or cut a wide range of frequencies, use lower values like
2 or 3.
Decay Specifies how many milliseconds the reverb decays before the Coloration curve is applied. Values up to 700 work
fine. For more colored reverbs, use lower settings (such as 100 to 250).
Output Level options
Dry Controls the level of original signal included with reverb. Use a low level to create a distant sound. Use a high level
(near 100%) along with low levels of reverberation and reflections to create a sense of close proximity to the source.
Reverberation Controls the level of the dense layer of reverberant sound. The balance between the dry and reverberant
sounds changes perception of distance.
Early Reflections Controls the level of the first echoes to reach the ear, giving a sense of the overall room size. Too high
a value can result in an artificial sound, while too low a value can remove audible cues for the room’s size. Half the
volume of the Dry signal is a good starting point.
Include Direct Slightly phase-shifts the original signal’s left and right channels to match the location of early reflections
(set by Left/Right Location on the Early Reflections tab).
Sum Inputs Combines the channels of a stereo or surround waveform before processing occurs. Select this option for
faster processing, but deselect it for a fuller, richer reverb.
Reverb effect
The Reverb > Reverb effect simulates acoustic spaces with convolution-based processing. It can reproduce acoustic or
ambient environments such as a coat closet, a tiled bathroom shower, a concert hall, or a grand amphitheater. The
echoes can be spaced so closely together that a signal’s reverberated tail decays smoothly over time, creating a warm
and natural sound. Alternatively, Pre-Delay Time can be adjusted to give a sense of room size.
Relative to the Reverb effect, the Full Reverb effect provides more options and better audio rendering. For quick
adjustments, however, you may prefer the reduced options set of the Reverb effect.
Note: The Reverb effect demands significant processing; for real-time, multitrack use, either pre-render this effect or replace
it with Studio Reverb. (See Pre-render track effects to improve performance.)
Decay Time Sets how many milliseconds it takes for reverb to tail off to infinity (about -96 dB). Use values below 400
for small rooms, values between 400 and 800 for medium-sized rooms, and values above 800 for very large rooms, such
as concert halls. For example, enter 3000 milliseconds to create reverb tails for a giant amphitheater.
Tip: To simulate rooms that have both echoes and reverb, first use the Echo effect to establish the size of the room, and
then use the Reverb effect to make the sound more natural. A Decay Time as little as 300 milliseconds can add perceived
spaciousness to dry sound.
Pre-Delay Time Specifies how many milliseconds reverb takes to build to its maximum amplitude. For a short Decay
Time, the Pre-Delay Time time should also be smaller. In general, a value about 10% as long as the Decay Time sounds
most realistic. However, you can create interesting effects by using a longer Pre-Delay Time with a shorter Decay Time.
Diffusion Simulates natural absorption, reducing high frequencies as the reverb decays. Faster absorption times
simulate rooms full of people, furniture, and carpeting, such as nightclubs and theaters. Slower times (over 1000
milliseconds) simulate empty rooms such as auditoriums, where high frequency reflections are more prevalent.

121
Effects reference
Last updated 6/16/2016
Perception Changes the characteristics of reflections within a room. Lower values create smoother reverb without as
many distinct echoes. Higher values simulate larger rooms, cause more variation in reverb amplitude, and add
spaciousness by creating distinct reflections over time.
Tip: A Perception setting of 100 and a Decay Time of 2000 milliseconds or more creates interesting canyon effects.
Dry Sets the percentage of source audio to output. In most cases, 90% works well. To add subtle spaciousness, set the
Dry percentage higher; to achieve a special effect, set the Dry percentage lower.
Wet Sets the percentage of reverb to output. To add subtle spaciousness to a track, keep the Wet percentage lower than
the Dry percentage. Increase the Wet percentage to simulate greater distance from the audio source.
Sum Inputs Combines the channels of a stereo or surround waveform before processing occurs. Select this option for
faster processing, but deselect it for fuller, richer reverb.
Studio Reverb effect
Like the other reverb effects, the Reverb > Studio Reverb effect simulates acoustic spaces. It is faster and less
processor-intensive than the other reverb effects, however, because it isn’t convolution-based. As a result, you can make
real-time changes quickly and effectively in the Multitrack Editor, without pre-rendering effects on a track.
Room Size Sets the room size.
Decay Adjusts the amount of reverberation decay in milliseconds.
Early Reflections Controls the percentage of echoes that first reach the ear, giving a sense of the overall room size. Too
high a value can result in an artificial sound, while too low a value can lose the audio cues for the room’s size. Half the
volume of the original signal is a good starting point.
Stereo Width Controls the spread across the stereo channels. 0% produces a mono reverb signal; 100% produces
maximum stereo separation.
High Frequency Cut Specifies the highest frequency at which reverb can occur.
Low Frequency Cut Specifies the lowest frequency at which reverb can occur.
Damping Adjusts the amount of attenuation applied to the high frequencies of the reverb signal over time. Higher
percentages create more damping for a warmer reverb tone.
Diffusion Simulates the absorption of the reverberated signal as it is reflected off of surfaces, such as carpeting and
drapes. Lower settings create more echoes, while higher settings produce a smoother reverberation with fewer echoes.
Dry Sets the percentage of source audio to output with the effect.
Wet Sets the percentage of reverb to output.
Surround Reverb effect
The Reverb > Surround Reverb effect is primarily intended for 5.1 sources, but it can also provide surround ambience
to mono or stereo sources. In the Waveform Editor, you can choose Edit > Convert Sample Type to convert a mono or
stereo file to 5.1, and then apply Surround Reverb. In the Multitrack Editor, you can send mono or stereo tracks to a 5.1
bus or master with Surround Reverb.
Input, Center Determines the percentage of the center channel included in the processed signal.
Input, LFE Determines the percentage of the Low Frequency Enhancement channel used to excite reverb for other
channels. (The LFE signal itself is not reverberated.)
note: The effect always inputs 100% of the Left, Right, and rear surround channels.

122
Effects reference
Last updated 6/16/2016
Impulse Specifies a file that simulates an acoustic space. Click Load to add a custom, 6- channel impulse file in WAV
or AIFF format.
Room Size Specifies a percentage of the full room defined by the impulse file. The larger the percentage, the longer the
reverb.
Damping LF Reduces low-frequency, bass-heavy components in reverb, avoiding muddiness and producing a clearer,
more articulate sound.
Damping HF Reduces high-frequency, transient components in reverb, avoiding harshness and producing a warmer,
lusher sound.
Pre-Delay Determines how many milliseconds the reverb takes to build to maximum amplitude. To produce the most
natural sound, specify a short pre-delay of 0–10 milliseconds. To produce interesting special effects, specify a long pre-
delay of 50 milliseconds or more.
Front Width Controls the stereo spread across the front three channels.
A width setting of 0 produces a mono reverb signal.
Surround Width Controls the stereo spread across the rear surround channels (Ls and Rs).
C Wet Level Controls the amount of reverb added to the Center channel. (Because this channel usually contains dialog,
reverb should typically be lower.)
L/R Bal. Controls left-right balance for front and rear speakers. 100 outputs reverb to only the left, -100 to only the right.
F/B Bal. Controls front-back balance for left and right speakers. 100 outputs reverb to only the front, -100 to only the
back.
Wet/Dry Mix Controls the ratio of original to reverberant sound. A setting of 100 outputs only reverb.
Gain Boosts or attenuates amplitude after processing.
More Help topics
Delay and echo effects
Routing audio to buses, sends, and the Master track
Applying effects in the Waveform Editor
Applying effects in the Multitrack Editor
Use effect presets
Applying effects in the Waveform Editor
Applying effects in the Multitrack Editor
Use effect presets
Control effect settings with graphs
Applying effects in the Waveform Editor
Applying effects in the Multitrack Editor
Use effect presets
Applying effects in the Waveform Editor
Applying effects in the Multitrack Editor

123
Effects reference
Last updated 6/16/2016
Use effect presets
5.1 surround sound
Channel Mixer effect
Applying effects in the Waveform Editor
Applying effects in the Multitrack Editor
How to use special effects with Audition
Note: Special effects require mono or stereo audio; they do not support 5.1 surround.
Distortion effect
Use the Special > Distortion effect to simulate blown car speakers, muffled microphones, or overdriven amplifiers.
Link
Creates identical curves in the Positive and Negative graphs.
Positive and Negative graphs Specify separate distortion curves for positive and negative sample values. The
horizontal ruler (x-axis) indicates input level in decibels; the vertical ruler (y-axis) indicates output level. The default
diagonal line depicts an undistorted signal, with a one-to-one relationship between input and output values.
Click and drag to create and adjust points on the graphs. Drag points off a graph to remove them.
To copy one graph to another, click the arrow buttons between them.
Reset
Returns a graph to its default, undistorted state.
Curve Smoothing Creates curved transitions between control points, sometimes producing a more natural distortion
than the default linear transitions.
Time Smoothing Determines how quickly distortion reacts to changes in input levels. Level measurements are based
on low-frequency content, creating softer, more musical distortion.
dB Range Changes the amplitude range of the graphs, limiting distortion to that range.
Linear Scale Changes the amplitude scales of the graphs from logarithmic decibels to normalized values.
Post-filter DC Offset Compensates for any sample offset introduced by distortion processing. To understand this
concept, see Correct DC offset. Such offsets can cause audible pops and clicks when edited.
Doppler Shifter (process) effect
The Special > Doppler Shifter (process) effect creates the increase and decrease in pitch we notice when an object
approaches and then passes us, such as when a police car passes with its siren on. When the car comes toward you, the
sound reaches your ears as a higher frequency because each sound wave is compressed by the car moving forward. The
opposite happens as the car passes by; the waves are stretched out, resulting in a lower-pitched sound.

124
Effects reference
Last updated 6/16/2016
Note: Unlike many graphs in Adobe Audition effects, the Doppler Shifter graph is noninteractive: You can’t directly
manipulate the graph. Instead, the graph changes as you adjust the effect’s parameters.
Path Type Defines which path the sound source appears to take. Depending on the path type, a different set of options
is available.
Straight Line options:
•Starting Distance Away sets the virtual starting point (in meters) of the effect.
•Velocity defines the virtual speed (in meters per second) at which the effect moves.
•Coming From sets the virtual direction (in degrees) from where the effect appears to come.
•Passes In Front By specifies how far (in meters) the effect seems to pass in front of the listener.
•Passes On Right By specifies how far (in meters) the effect seems to pass to the right of the listener.
Circular options:
•Radius sets the circular dimensions (in meters) of the effect.
•Velocity defines the virtual speed (in meters per second) at which the effect moves.
•Starting Angle sets the beginning virtual angle (in degrees) of the effect.
•Center In Front By specifies how far (in meters) the sound source is from the front of the listener.
•Center On Right By specifies how far (in meters) the sound source is from the right of the listener.
Adjust Volume Based on Distance or Direction Automatically adjusts the effect’s volume based on the values specified.
Quality Level Provides six different levels of processing quality. Lower quality levels require less processing time, but
higher quality levels generally produce better sounding results.
Guitar Suite effect
The Special > Guitar Suite effect applies a series of processors that optimize and alter the sound of guitar tracks. The
Compressor stage reduces dynamic range, producing a tighter sound with greater impact. Filter, Distortion, and Box
Modeler stages simulate common effects that guitarists use to create expressive, artistic performances.
Apply the Guitar Suite to vocals, drums, or other audio to create textured effects.
Compressor Reduces dynamic range to maintain consistent amplitude and help guitar tracks stand out in a mix.
Filter Simulates guitar filters ranging from resonators to talk boxes. Choose an option from this menu, and then set
options below:
Type Determines which frequencies are filtered. Specify Lowpass to filter high frequencies, Highpass to filter low
frequencies, or Bandpass to filter frequencies above and below a center frequency.
Freq Determines the cutoff frequency for Lowpass and Highpass filtering, or the center frequency for Bandpass
filtering.
Resonance Feeds back frequencies near the cutoff frequency, adding crispness with low settings and whistling
harmonics with high settings.
Distortion Adds a sonic edge often heard in guitar solos. To change the distortion character, choose an option from the
Type menu.
Amplifier Simulates various amplifier and speaker combinations that guitarists use to create unique tones.
Mix Controls the ratio of original to processed audio.

125
Effects reference
Last updated 6/16/2016
Mastering effect
Masteringdescribes the complete process of optimizing audio files for a particular medium, such as radio, video, CD,
or the web. In Adobe Audition, you can quickly master audio with the Special > Mastering effect.
Before mastering audio, consider the requirements of the destination medium. If the destination is the web, for
example, the file will likely be played over computer speakers that poorly reproduce bass sounds. To compensate, you
can boost bass frequencies during the equalization stage of the mastering process.
Equalizer Adjusts the overall tonal balance.
Graph Shows frequency along the horizontal ruler (x-axis) and amplitude along the vertical ruler (y-axis), with the
curve representing the amplitude change at specific frequencies. Frequencies in the graph range from lowest to highest
in a logarithmic fashion (evenly spaced by octaves).
Drag control points in the graph to visually adjust the settings below.
Low Shelf and High Shelf Enable Activate shelving filters at either end of the frequency spectrum.
Peaking Enable Activates a peaking filter in the center of the frequency spectrum.
Hz Indicates the center frequency of each frequency band.
dB Indicates the level of each frequency band.
Q Controls the width of the affected frequency band. Low Q values (up to 3) affect a larger range of frequencies and
are best for overall audio enhancement. High Q values (6–12) affect a very narrow band and are ideal for removing a
particular, problematic frequency, like 60-Hz hum.
Reverb Adds ambience. Drag the Amount slider to change the ratio of original to reverberant sound.
Exciter Exaggerates high-frequency harmonics, adding crispness and clarity. Mode options include Retro for light
distortion, Tape for bright tone, and Tube for quick, dynamic response. Drag the Amount slider to adjust the level of
processing.
Widener Adjusts the stereo image (disabled for mono audio). Drag the Width slider to the left to narrow the image and
increase central focus. Drag the slider to the right to expand the image and enhance spatial placement of individual
sounds.
Loudness Maximizer Applies a limiter that reduces dynamic range, boosting perceived levels. A setting of 0% reflects
original levels; 100% applies maximum limiting.
Output Gain Determines output levels after processing. For example, to compensate for EQ adjustments that reduce
overall level, boost the output gain.
Loudness Radar Meter effect
TC Electronic Loudness Radar meter plug-in provides you with information about peak, average, and range levels.
Loudness History, Momentary Loudness, True-peak Level and flexible descriptors are combined to give you the
loudness overview in a single view. The Radar sweep view, which provides an excellent view of loudness changes over
time, is also available. Choose Effects > Special > Loudness Radar Meter.
Settings
Target Loudness Defines the target loudness value
Radar Speed Controls the time of each radar sweep
Radar Resolution Sets the difference in loudness between each concentric circle in the radar view.

126
Effects reference
Last updated 6/16/2016
Momentary Range Sets the range for the momentary range. EBU +9, indicates the narrow loudness range, used for
normal broadcast. EBU +18 is the wide loudness range used for drama and music.
Low Level Below Sets the shift between the green and blue colors on the momentary loudness ring. This indicates that
the level may be below the noise floor level.
Loudness Unit Sets the Loudness unit to display on the radar.
•LKFS: Loudness unit specified by the International Telecommunication Union (ITU)
•LUFS: Loudness unit specified by the European Broadcasting Union (EBU)
•LU: A unit for loudness relative to target according to EBU and ITU.
Loudness Standard Species the Loudness standard.
•BS.1770-3: This ITU standard concerns Broadcast loudness and True-peak Level measurement. This standard uses
Leq(K) to measure loudness.
•Leq(K): The loudness is based on a Leq measurement employing K-weighting, which is a specific frequency
weighting developed by the Communications Research Center (a federal research institute in Ottawa, Canada).
Peak Indicator Sets the maximum True-Peak level. If this value is exceeded, the peak indicator is activated.
Vocal Enhancer effect
The Special > Vocal Enhancer effect quickly improves the quality of voice-over recordings. The Male and Female modes
automatically reduce sibilance and plosives, as well as microphone handling noise such as low rumbles. Those modes
also apply microphone modeling and compression to give vocals a characteristic radio sound. The Music mode
optimizes soundtracks so they better complement a voice-over.
Male Optimizes audio for a man’s voice.
Female Optimizes audio for a woman’s voice.
Music Applies compression and equalization to music or background audio.
More Help topics
Applying effects in the Waveform Editor
Applying effects in the Multitrack Editor
Control effect settings with graphs
Use effect presets
Techniques for restoring audio
Match volume across multiple files
Stereo imagery effects
Some effects let you change the apparent location, or stereo imagery, of sounds coming from the speakers.

127
Effects reference
Last updated 6/16/2016
Center Channel Extractor effect
The Stereo Imagery > Center Channel Extractor effect keeps or removes frequencies that are common to both the left
and right channels—in other words, sounds that are panned center. Often voice, bass, and lead instruments are
recorded this way. As a result, you can use this effect to bring up the volume of vocals, bass, or kick drum, or you can
remove any of them to create a karaoke mix.
Extraction tab Limits extraction to audio that meets certain properties.
Extract Either select audio in the Center, Left, Right, or Surround channel, or select Custom and specify the precise
phase degree, pan percentage, and delay time for audio you want to extract or remove. (The Surround option extracts
audio that is perfectly out of phase between the left and right channels.)
Frequency Range Sets the range you want to extract or remove. Predefined ranges include Male Voice, Female Voice,
Bass, and Full Spectrum. Select Custom to define a frequency range.
Discrimination tab Includes settings that help identify the center channel.
Crossover Bleed Move the slider to the left to increase audio bleed through and make the sound less artificial. Move
the slider to the right to further separate center channel material from the mix.
Phase Discrimination In general, higher numbers work better for extracting the center channel, while lower values
work better for removing the center channel. Lower values allow more bleed through and may not effectively separate
vocals from a mix, but they may be more effective at capturing all the center material. In general, a range from 2 to 7
works well.
Amplitude Discrimination and Amplitude Bandwidth Sum the left and right channels, and create a perfectly
out-of-phase third channel that Audition uses to remove similar frequencies. If the amplitude at each frequency is
similar, in-phase audio common to both channels is also considered. Lower values for Amplitude Discrimination and
Amplitude Bandwidth cut more material from the mix, but may also cut out vocals. Higher values make the extraction
depend more on the phase of the material and the less on the channel amplitude. Amplitude Discrimination settings
between 0.5 and 10 and Amplitude Bandwidth settings between 1 and 20 work well.
Spectral Decay Rate Keep at 0% for faster processing. Set between 80% and 98% to smooth out background distortions.
Center and Side Channel Levels Specifies how much of the selected signal you want to extract or remove. Move the
sliders up to include additional material.
Advanced options Click the triangle to access these settings:
FFT Size Specifies the Fast Fourier Transform size, with low settings improving processing speed, and high settings
improving quality. In general, settings between 4096 and 8192 work best.
Overlays Defines the number of FFT windows that overlap. Higher values can produce smoother results or a
chorus-like effect, but they take longer to process. Lower values can produce bubbly-sounding background noises.
Values of 3 to 9 work well.
Window Width Specifies the percentage of each FFT window. Values of 30% to 100% work well.
Graphic Phase Shifter effect
The Stereo Imagery > Graphic Phase Shifter effect lets you adjust the phase of a waveform by adding control points to
a graph.

128
Effects reference
Last updated 6/16/2016
Right-click points to access the Edit Point dialog box for precise, numerical control.
Phase shift graph The horizontal ruler (x-axis) measures frequency, while the vertical ruler (y-axis) displays the degree
of phase to shift, where zero is no phase shift. You can create simulated stereo by creating a zigzag pattern that gets more
extreme at the high end on one channel.
Frequency Scale Sets the values of the horizontal ruler (x-axis) on a linear or logarithmic scale. Select Logarithmic to
work at finer detail in the lower frequencies. (The logarithmic scale better reflects the frequency-emphasis of human
hearing.) Select Linear to work at finer detail in the higher frequencies.
Range Sets the values of the vertical ruler (y-axis) on a 360° or 180° scale.
Channel Specifies the channel(s) to apply the phase shift to.
Note: Process a single channel for the best results. If you apply identical phase shift to two stereo channels, the resulting file
sounds exactly the same.
FFT Size Specifies the Fast Fourier Transform size. Higher sizes create more precise results, but they take longer to
process.
Stereo Expander effect
The Stereo Imagery effect positions and expands the stereo image. Because the Stereo Expander is VST-based, however,
you can combine it with other effects in the Mastering Rack and Effects Rack. In Multitrack View, you can also vary the
effect over time by using automation lanes.
Choose Effects > Stereo Imagery > Stereo Expander, and set the following options:
Center Channel Pan Positions the center of the stereo image anywhere from hard left (-100%) to hard right (100%).
Stereo Expand Expands the stereo image from Narrow/Normal (0) to Wide (300). Narrow/Normal reflects the
original, unprocessed audio.
More Help topics
Applying effects in the Waveform Editor
Applying effects in the Multitrack Editor
Use effect presets
Time and pitch manipulation effects
Automatic Pitch Correction effect
The Automatic Pitch Correction effect is available in both the Waveform and Multitrack editors. In the latter, its
parameters can be automated over time using keyframes and external control surfaces.
Choose Effects > Time and Pitch > Automatic Pitch Correction, and set the following options:
Scale Specifies the scale type that best suits the material: Major, Minor, or Chromatic. Major or Minor correct notes to
the specific key of the music. Chromatic corrects to the nearest note regardless of key.

129
Effects reference
Last updated 6/16/2016
Key Sets the intended key for corrected material. This option is available only if Scale is set to Major or Minor (because
the Chromatic scale includes all 12 tones and isn’t key-specific).
The combination of scale and key determines the key signature.
Attack Controls how quickly Adobe Audition corrects the pitch toward the scale tone. Faster settings are usually best
for notes of short duration, such as a fast, staccato passage. An extremely fast attack can achieve a robotic quality,
however. Slower settings result in more natural-sounding correction on longer sustaining notes, such as a vocal line
where the singer holds notes and adds vibrato. Because source material can change throughout a musical performance,
you can get the best results by separately correcting short musical phrases.
Sensitivity Defines the threshold beyond which notes aren’t corrected. Sensitivity is measured in cents, and there are
100 cents per semitone. For example, a Sensitivity value of 50 cents means a note must be within 50 cents (half a
semitone) of the target scale tone before it is corrected automatically.
Reference Channel Choose a source channel in which pitch changes are most clear. The effect analyzes only the
channel you choose, but applies the pitch correction equally to all channels.
FFT Size Sets the Fast Fourier Transform size of each pieces of data that the effect processes. In general, use smaller
values for correcting higher frequencies. For voices, a setting of 2048 or 4096 sounds most natural. For short, staccato
notes or percussive audio try a setting of 1024.
Calibration Specifies the tuning standard for the source audio. In Western music, the standard is A4 at 440 Hz. Source
audio, however, may have been recorded using a different standard, so you can specify A4 values from 410 to 470 Hz.
Correction meter When you preview audio, displays the amount of correction for flat and sharp tones.
Manual Pitch Correction effect
The Manual Pitch Correction effect lets you visually adjust pitch with the Spectral Pitch Display. The Spectral Pitch
Display shows the fundamental pitch as a bright blue line, and overtones in yellow to red hues. Corrected pitch appears
as a bright green line.
You can visually monitor pitch at any time, without using the Manual Pitch Correction effect. Simply click the Spectral
Pitch Display icon <<ICON>> in the options bar. To customize resolution, decibel range, and gridlines, adjust Pitch
Display settings in the Spectral Displays preferences.
1Choose Effects > Time and Pitch > Manual Pitch Correction.
2In the Manual Pitch Correction window, set the following options:
Reference Channel Choose a source channel in which pitch changes are most clear. The effect analyzes only the
channel you choose, but applies the pitch correction equally to all channels.
Spline Curves Create smoother transitions when using envelope keyframes to apply different pitch correction over
time.
Pitch Curve Resolution Sets the Fast Fourier Transform size of each piece of data that the effect processes. In general,
use smaller values for correcting higher frequencies. For voices, a setting of 2048 or 4096 sounds most natural, and
a setting of 1024 creates robotic effects.
3In the Editor panel, do either of the following:
•To change pitch uniformly, drag the Adjust Pitch knob <<ICON>> in the heads-up display.
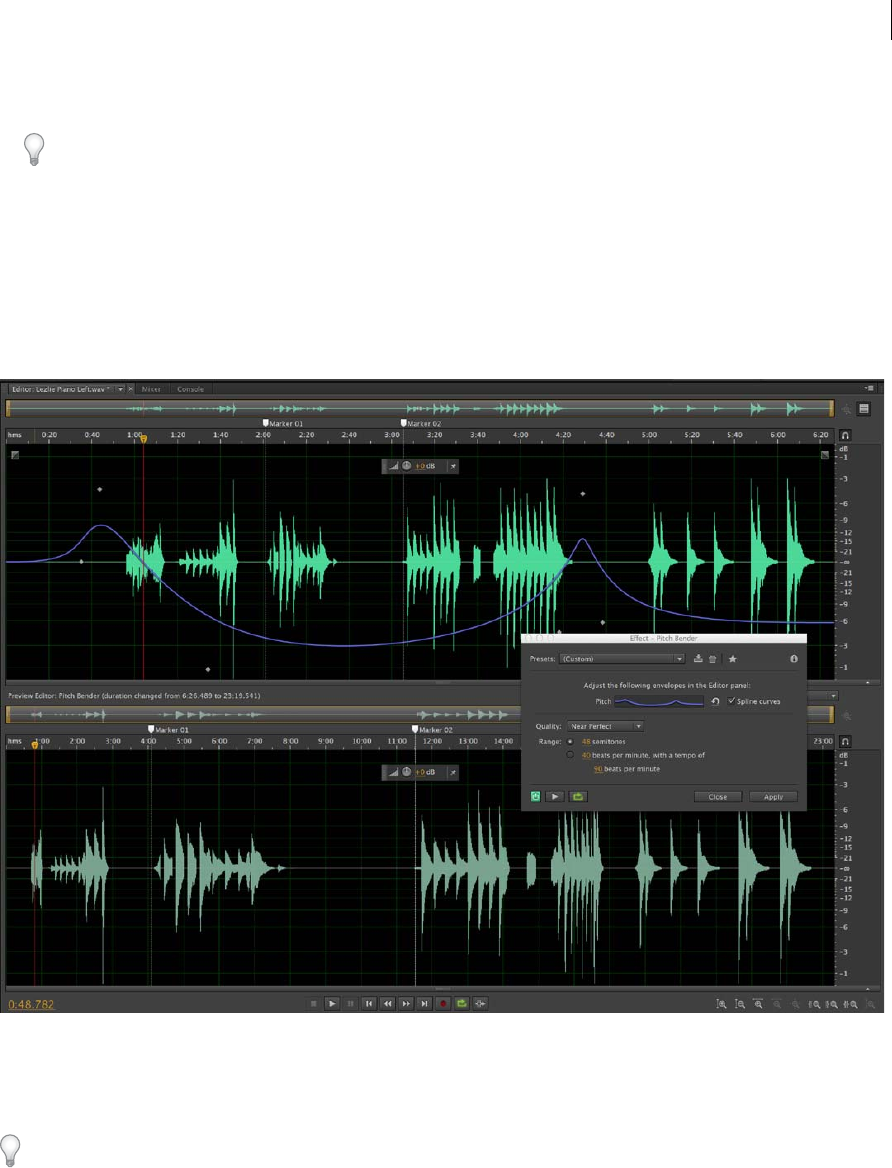
130
Effects reference
Last updated 6/16/2016
•To change pitch over time, add keyframes to the yellow envelope line in the center of the waveform display.
To zoom in on specific pitch ranges, right-click and drag in the vertical ruler to the right of the Spectral Pitch Display.
To reset the zoom level or customize the displayed scale, right-click the ruler and select options from the pop-up
menu.
Pitch bender effect
Use the Pitch Bender effect to change the tempo over time to vary the pitch. The effect now uses a keyframe edit
envelope laid across the entire waveform, similar to the Fade and Gain Envelope effects.
Choose Effects > Time and Pitch > Pitch Bender, and set the following options:
Pitch In the Editor panel, click the blue envelope line to add keyframes, and drag them up or down to change
amplitude. To quickly select, reposition, or delete multiple keyframes, see Adjust automation with keyframes.
Select the Spline Curves option to create smoother, curved transitions between keyframes, rather than linear
transitions. See About spline curves for graphs.
Quality Controls the quality level. Higher quality levels produce the best sound, but they take longer to process. Lower
quality levels produce more unwanted harmonic distortion, but they take less time to process. Usually, you won’t notice
harmonic distortion for levels from Very Good and higher. Aliasing still occurs, however, when you shift the pitch up,
but the higher quality levels greatly reduce the distortion when you shift the pitch down.

131
Effects reference
Last updated 6/16/2016
Range Sets the scale of the vertical ruler (y-axis) as semitones (there are 12 semitones to an octave) or as beats per
minute. For a range in semitones, the pitch changes logarithmically, and you can specify the number of semitones to
shift up or down. For a range in beats per minute, the pitch changes linearly, and you must specify both a range and a
base tempo. You can specify the exact tempo of a selection to change to different rates, but this isn’t required.
Pitch shifter
The Pitch Shifter effect changes the musical pitch. It's a real-time effect which can be combined with other effects in
the mastering rack or the effects rack. In the Multitrack View, you can also vary pitch over time by using automation
lanes.
Choose Effects > Time and Pitch > Pitch Shifter effect, and set the following options:
Pitch Transpose Contains options that adjust pitch:
•Semi-Tones Transposes pitch in semi-tone increments, which equalmusical half-notes (for example, the note C# is
one semi-tone higher than C). A setting of 0 reflects the original pitch; +12 semi-tones is an octave higher; -12 semi-
tones is an octave lower.
•Cents Adjusts pitch in fractions of semi-tones. Possible values range from -100 (one semi-tone lower) to +100 (one
semi-tone higher).
•Ratio Determines the relationship between shifted and original frequency. Possible values range from 0.5 (an octave
lower) to 2.0 (an octave higher).
Precision Determines sound quality, with theHigh setting taking longest to process. Use the Low setting for 8-bit or
low-quality audio, and use the High setting for professionally recorded audio.
To quickly determine which Precision setting to use, process a small selected range at each setting until you find the best
balance of quality and processing time.
Pitch Settings Control how audio is processed:
•Splicing Frequency Determines the size of each chunk of audio data. (The Pitch Shifter effect divides audio into
very small chunks for processing.) The higher the value, the more precise the placement of stretched audio over
time. However, artifacts become more noticeable as values go up. At higher Precision settings, a lower Splicing
Frequency may add stutter or echo. If the frequency is too high, sound becomes tinny and voices have a tunnel-like
quality.
•Overlapping Determines how much each chunk of audio data overlaps with the previous and next ones. If
stretching produces a chorus effect, lower the Overlapping percentage. If doing so produces a choppy sound, adjust
the percentage to strike a balance between choppiness and chorusing. Values range from 0 to 50%.
•Use Appropriate Default Settings Applies good default values for Splicing Frequency and Overlapping.
Stretch and Pitch effect (Waveform Editor only)
The Time And Pitch > Stretch And Pitch effect lets you change the pitch of an audio signal, the tempo, or both. For
example, you can use the effect to transpose a song to a higher key without changing the tempo, or you can use it to
slow down a spoken passage without changing the pitch.
Note: This effect requires offline processing. While it is open, you cannot edit the waveform, adjust selections, or move the
current-time indicator.
132
Effects reference
Last updated 6/16/2016
Algorithm Choose IZotope Radius to simultaneously stretch audio and shift pitch, or Audition to change stretch or
pitch settings over time. The iZotope Radius algorithm requires longer processing but introduces fewer artifacts.
Precision Higher settings produce better quality but require more processing time.
New Duration Indicates how long the audio will be after time-stretching. You can either adjust the New Duration value
directly, or indirectly by changing the Stretch percentage.
If you commonly stretch files to a certain duration, click the Favorite icon to save that setting for future use. To apply
a favorite to multiple files, see Batch process files.
Lock Stretch Settings to New Duration Overrides custom or preset Stretch settings, instead calculating them from
duration adjustments.
Select the option above to quickly make radio spots 30 or 60 seconds long.
Stretch Shortens or extends processed audio relative to existing audio. For example, to shrink audio to half its current
duration, specify a Stretch value of 50%.
Pitch Shift Tonally shifts audio up or down. Each semitone equals one half-step on a keyboard.
Final Stretch or Pitch Shift (Audition algorithm) Changes the initial Stretch or Pitch Shift setting over time, reaching
the final setting at the last selected audio sample.
Lock Stretch and Pitch Shift (IZotope algorithm) Stretches audio to reflect pitch changes, or vice versa.
Lock Initial Strech and Pitch Shift (Audition algorithm) Stretches audio to reflect pitch changes, or vice versa. Final
Stretch or Pitch Shift settings are unaffected.
Advanced settings (IZotope Radius algorithm) Click the triangle to access these options:
Solo Instrument Or Voice More quickly processes a solo performance.
Preserve Speech Characteristics Maintains realism in speech.
Formant Shift Determines how formants adjust to pitch shifts. The default value of zero adjusts formants together with
pitch shifts, maintaining timbre and realism. Values above zero produce higher timbres (making a male voice sound
female, for example). Values below zero do the reverse.
Pitch Coherence Maintains timbre of solo instruments or vocals. Higher values reduce phasing artifacts but introduce
more pitch modulation.
Advanced settings (Audition algorithm) Click the triangle to access these options:
Splicing Frequency Determines how big each chunk of audio data is when you preserve pitch or tempo while stretching
a waveform. The higher the value, the more precise the placement of stretched audio over time. However, artifacts are
more noticeable as rates go up; sound can become tinny or have a tunnel-like quality. With higher Precision settings,
lower splicing frequencies may add stutter or echo.

133
Effects reference
Last updated 6/16/2016
Overlapping Determines how much each chunk of audio data overlaps with the previous and next ones. If stretching
produces a chorus effect, lower the Overlapping percentage, without going so low that you produce a choppy sound.
Overlapping can be as high as 400%, but you should use this value only for very high speed increases (200% or more).
Choose Appropriate Defaults Applies good default values for Splicing Frequency and Overlapping. This option is good
for preserving pitch or tempo.
Constant Vowels Preserves the sound of vowels in stretched vocals. This option requires substantial processing; try it
on a small selection before applying it to a larger one.
More Help topics
About process effects
Apply individual effects in the Waveform Editor
Use effect presets
Generate tones and noise
Generate Noise
The Noise command lets you generate random noise in a variety of colors. (Traditionally, color is used to describethe
spectral composition of noise. Each color has its own characteristics.) Generating noise is useful for creating soothing
sounds like waterfalls (perfect for use with the Binaural Auto-Panner function of Adobe Audition) and for generating
signals that can be used to check out the frequency response of a speaker, microphone, or other audiosystem
component.
1Place the cursor where you want to insert the noise. Or, if you want to replace part of the existing waveform, select
the desired range of audio data.
2Choose Effects > Generate > Noise.
3Set options as desired, and click OK.
Color Specifies a color for the noise:
•Brown noise - Has a spectral frequency of 1/f2, which means, in layman’s terms, that the noise has much more low-
frequency content. Its sounds are thunder- and waterfall-like. Brown noise is so called because, when viewed, the
wave follows a Brownian motion curve. That is, the next sample in the waveform is equal to the previous sample,
plus a small random amount. When graphed, this waveform looks like a mountain range.
•Pink noise - Has a spectral frequency of 1/f and is found mostly in nature. It is the most natural sounding of the
noises. By equalizing the sounds, you can generate rainfall, waterfalls, wind, rushing river, and other natural sounds.
Pink noise is exactly between brown and white noise (hence, some people used to call it tan noise). It is neither
random nor predictable; it is fractal-like when viewed. When zoomed in, the pattern looks identical to when
zoomed out, except at a lower amplitude.
•White noise - Has a spectral frequency of 1, meaning that equal proportions of all frequencies are present. Because
the human ear is more susceptible to high frequencies, white noise sounds very hissy. Adobe Audition generates
white noise by choosing random values for each sample.

134
Effects reference
Last updated 6/16/2016
Style Specifies a style for the noise:
•Spatial Stereo - Generates noise by using three unique noise sources and spatially encoding them to seem as if one
comes from the left, one from the center, and one from the right. When you listen to the result with stereo
headphones, your mind perceives sound coming from all around. To specify the distance from center of the left and
right noise sources, enter a delay value in microseconds. About 900 to 1000 microseconds correspond to the
maximum delay perceivable. A delay of zero is identical to monaural noise, where left and right channels are the
same.
•Independent Channels - Generates noise by using two unique noise sources, one for each channel. The left
channel’s noise is completely independent of the right channel’s noise.
•Mono - Generates noise by using a single noise source, with the left and right channels set equally to that source.
•Inverse - Generates noise by using a single noise source (similar to the Mono option). However, the left channel’s
noise is exactly inverse of the right channel’s noise. When you listen to the result with stereo headphones, your mind
perceives sound coming from within your head instead of from somewhere externally.
Intensity Specifies the intensity of the noise on a scale of 2 to 40. At higher intensities, the noise becomes more erratic
and sounds harsher and louder.
DC Offset Adds a constant DC (Direct Current) amplitude to the tone, centering the waveform by shifting it up or
down by the specified percentage.
Duration Determines the number of seconds of noise that Adobe Audition generates.
Generate Tones
Choose Effects > Generate > Tones to create a simple waveform using several amplitude- and frequency-related
settings. Generated tones are great starting points for sound effects.
Sweep Frequencies Transitions tones from settings on Start tab to those on End tab. (Waveform remains constant.)
Base frequency Specifies the main frequency to be used for generating tones.
Modulation Depth Modulates pitch of the base frequency over a user-defined range. For example, a 100 Hz setting
modulates the original frequency from 50 Hz below to 50 Hz above.
Modulation Rate Specifies how many times per second the frequency modulates, producing a warbling, vibrato effect.
Waveform Choose one of the following:
•Sine and Inverse Sine produce the fundamental frequency. A Type setting of 1.00 produces pure tones; lower settings
produce more square waves; higher settings more triangular.
•Triangle/Sawtooth produces a true triangle waveform with only odd harmonics at a Type setting of 50%. Settings
above and below that percentage produce Sawtooth waveforms with both odd and even harmonics.
•Square produces only odd harmonics. A true square wave occurs with a Type setting of 50%. Settings above and
below adjust the duty cycle of the waveform between a flat peak at 100% and a flat trough at 0%. (The outer extremes
produce only an audible click.)
Frequency Components Adds up to five overtones to the fundamental frequency (Base Frequency). Below the sliders,
enter either a specific frequency for each overtone, or specify a multiplier of the fundamental. Then, use the Amplitude
sliders to mix overtones in proportion to one another.
Volume Specifies the overall output of the effect.
Duration Specifies the length of the generated tone in the format currently specified for the time ruler. Right-click the
numbers to choose a separate time format for Generate Tones.

135
Effects reference
Last updated 6/16/2016
To access the following options, click Advanced:
Start Phase At Specifies the starting location in the waveform cycle. If set to 0°, waves will start at the zero-crossing
point. If set to 90°, the wave will start at full amplitude (generating a noticeable click).
2nd Channel Phase Difference Adjusts the relative phase of stereo channels. A value of zero places the channels
completely in phase and 180 places them completely out of phase.
Change Speed Dynamically changes the relative phase between the two channels of a stereo audio file over time. For
example, if you enter 1 Hz, the phase difference will cycle through 360° each second.
DC Offset Adds a Direct Current offset, shifting the center of the waveform up or down by the specified percentage.
Use this adjustment to calibrate audio hardware or simulate hardware-induced offset.
With Selected Audio Choose from the following:
•Replace: Swaps existing audio with generated tones.
•Modulate: Ring modulates, or multiplies, existing audio with current tone settings. This option is great for adding
special effects.
•Demodulate: Ring demodulates existing audio with current tone settings. Use this option to create unique effects or
revert audio previously processed with the Modulate option to its original state.
•Overlap: Mixes the generated tones with existing audio.
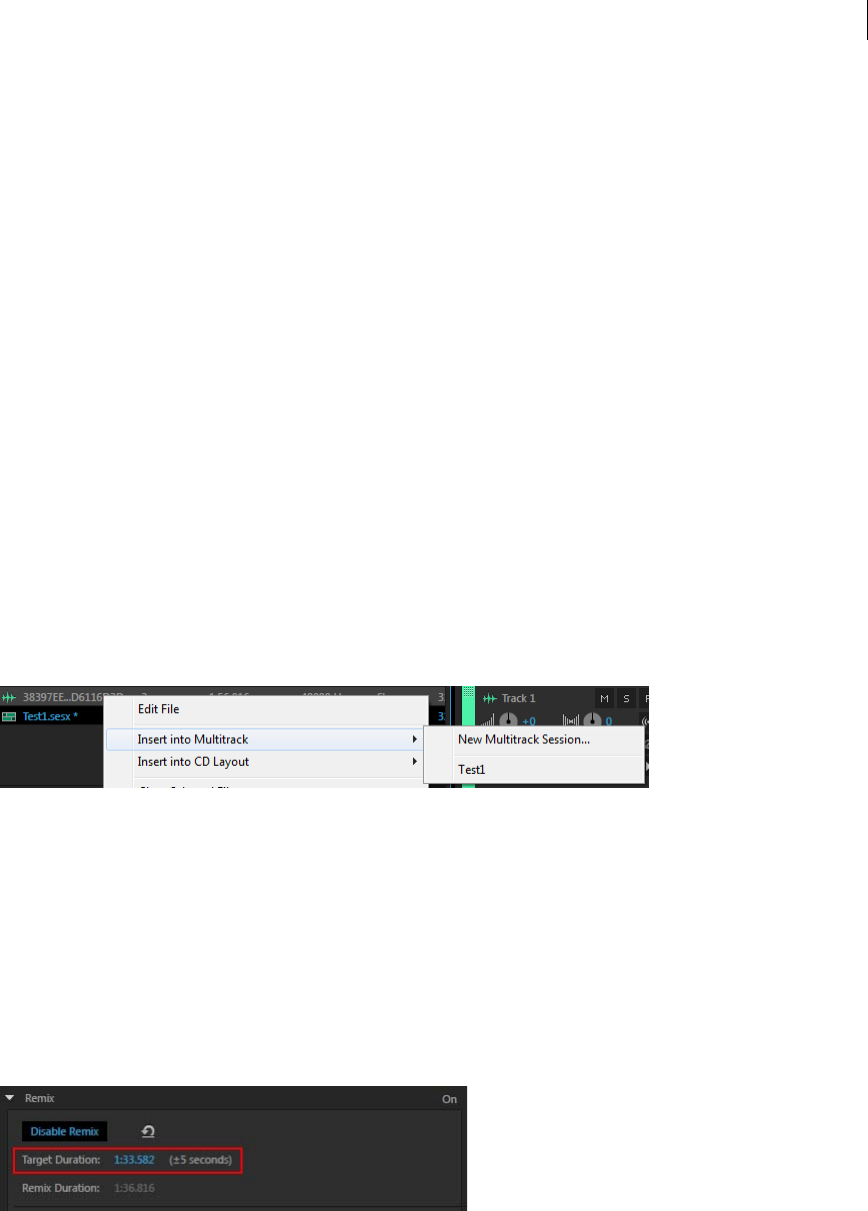
136
Last updated 6/16/2016
Chapter 8: Mixing multitrack sessions
Creating remix
Overview
In Audition CC, you can create remixes of music files from a collection. For example, you can use this option for songs
that change from beginning to end, and minimize abrupt changes in a song's dynamics or tempo. You can recompose
any piece of music in your collection to fit the video or project duration.
Remix uses a combination of beat detection, content analysis, and spectral source separation technology, to identify
hundreds of transition points in your song. It then rearranges the passages to create a composition.
Creating a remix
1Insert a clip into a multitrack session or create a multitrack session.
2Enable the clip for remix in one of the following ways:
•Choose Clip > Remix > Enable Remix in the menu bar.
•Right-click the clip and choose Remix > Enable Remix.
•Select the clip and in the Remix group of the Properties panel, click Enable Remix.
3Resize the clip to the target duration in one of the following ways:
•Grab the zigzag handles at the top edge of the clip and drag them to the length you require.
•Adjust the duration in Target Durati on in the Remix group.
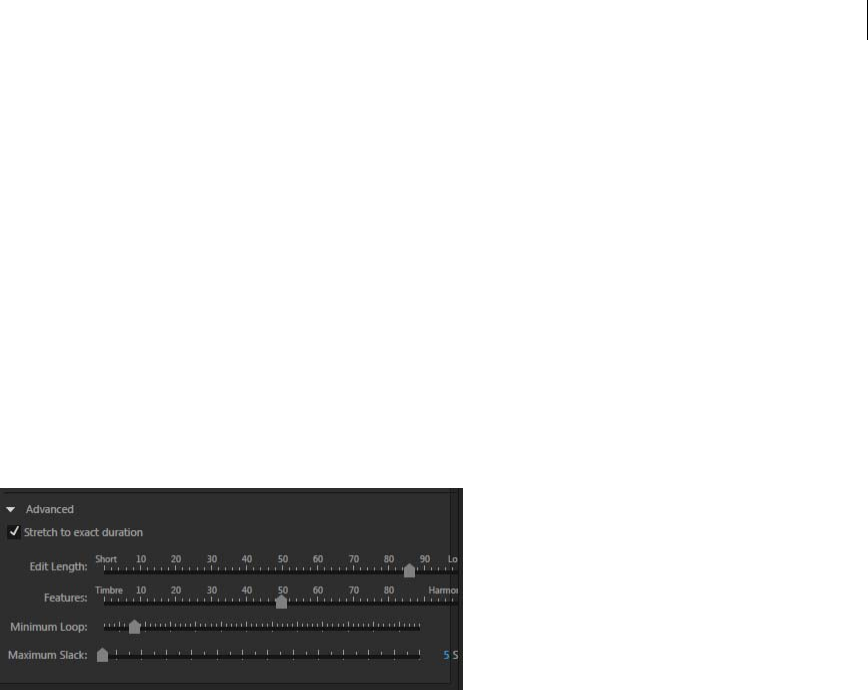
137
Mixing multitrack sessions
Last updated 6/16/2016
4Expand the Advanced section in the Properties panel to adjust the remix. The available options are:
aStretch to exact duration: This option enables time-stretch on the remixed clip and adjusts it so that it precisely
matches the target duration.
bEdit Length:
cShort: Short results in shorter segments, but in more transitions. This option is suited for songs that changes
from beginning to end to minimize abrupt changes in dynamics or tempo.
dLong: Long looks for the longest passages and smallest number of segments to minimize transitions.
eFeatures:
fTimbre: Timbre emphasizes tonal qualities in identifying transition points.
gHarmonic: Harmonic emphasizes melodic and harmonic components in transition points.
hMinimum Loop: Set the minimum acceptable length, in beats, to use in a segment.
iMaximum Slack: Set the maximum difference in duration from your target duration.
5To disable remix and restore the clip to its original version, choose Clip > Remix > Revert Remix.
Multitrack Editor overview
About multitrack sessions
In the Multitrack Editor, you can mix together multiple audio tracks to create layered soundtracks and elaborate
musical compositions. You can record and mix unlimited tracks, and each track can contain as many clips as you
need—the only limits are hard disk space and processing power. When you’re happy with a mix, you can export a
mixdown file for use on CD, the web, and more.
The Multitrack Editor is an extremely flexible, real-time editing environment, so you can change settings during
playback and immediately hear the results. While listening to a session, for example, you can adjust track volume to
properly blend tracks together. Any changes you make are impermanent, or nondestructive. If a mix doesn’t sound good
next week, or even next year, you can simply remix the original source files, freely applying and removing effects to
create different sonic textures.
Adobe Audition saves information about source files and mix settings in session (.sesx) files. Session files are relatively
small because they contain only pathnames to source files and references to mix parameters (such as volume, pan, and
effect settings). To more easily manage session files, save them in a unique folder with the source files they reference. If
you later need to move the session to another computer, you can simply move the unique session folder.
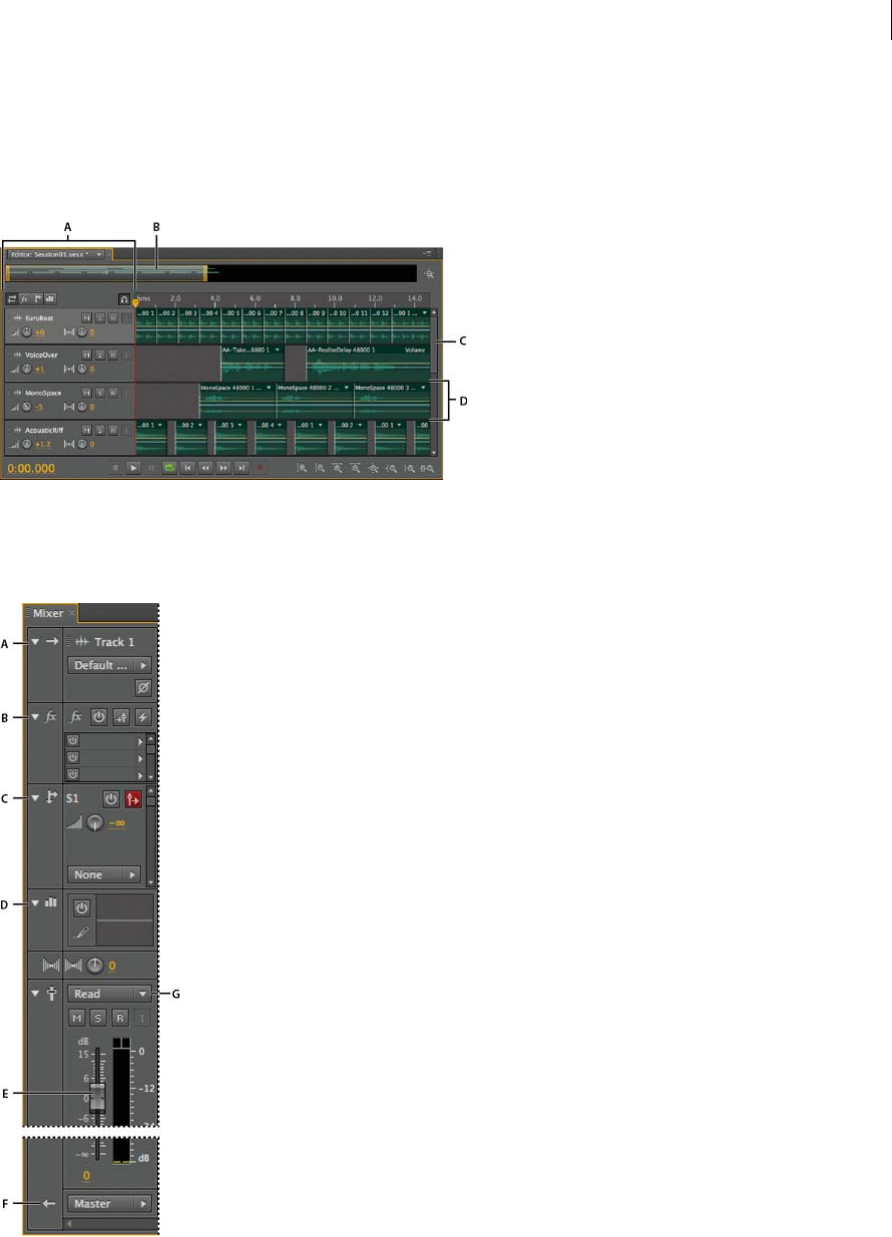
138
Mixing multitrack sessions
Last updated 6/16/2016
Editing multitrack sessions in the Editor panel and Mixer
In the Multitrack Editor, the Editor panel provides several elements that help you mix and edit sessions. In the track
controls on the left, you adjust track-specific settings, such as volume and pan. In the timeline on the right, you edit the
clips and automation envelopes in each track.
A Track controls B Zoom navigator C Vertical sc roll bar D Track
The Mixer (Window > Mixer) provides an alternative view of a session, revealing many more tracks and controls
simultaneously, without showing clips. The Mixer is ideal for mixing large sessions with many tracks.
A Inputs B Effects C Sends D Equalization E Volume F Outputs
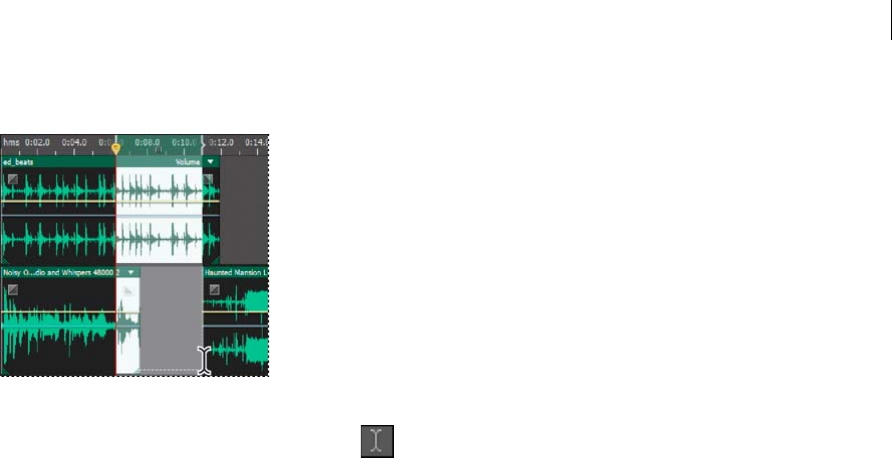
139
Mixing multitrack sessions
Last updated 6/16/2016
Select ranges in the Multitrack Editor
1In the toolbar, select the Time Selection tool .
2In the Editor panel, do one of the following:
•To select only a range, click an empty area of the track display, and drag left or right.
•To select a range and clips, click the center of a clip, and drag a marquee.
Customize start offset and time display for multitrack sessions
1In the Editor panel, click an empty area of the track display to ensure that no clips are selected.
2Choose Window > Properties.
3In the Properties panel, adjust the following options:
Start Time Sets a start-time offset, helping you match audio in Adobe Audition to the time displayed in video
applications.
Advanced settings To customize Time Display settings for the active session, set the Time Format and Custom
Frame Rate settings. For details, see Change the time display format.
More Help topics
Comparing the Waveform and Multitrack editors
Create a new multitrack session
Save multitrack sessions
Add or delete tracks
Arranging and editing multitrack clips
Automating mixes with envelopes
Basic multitrack controls
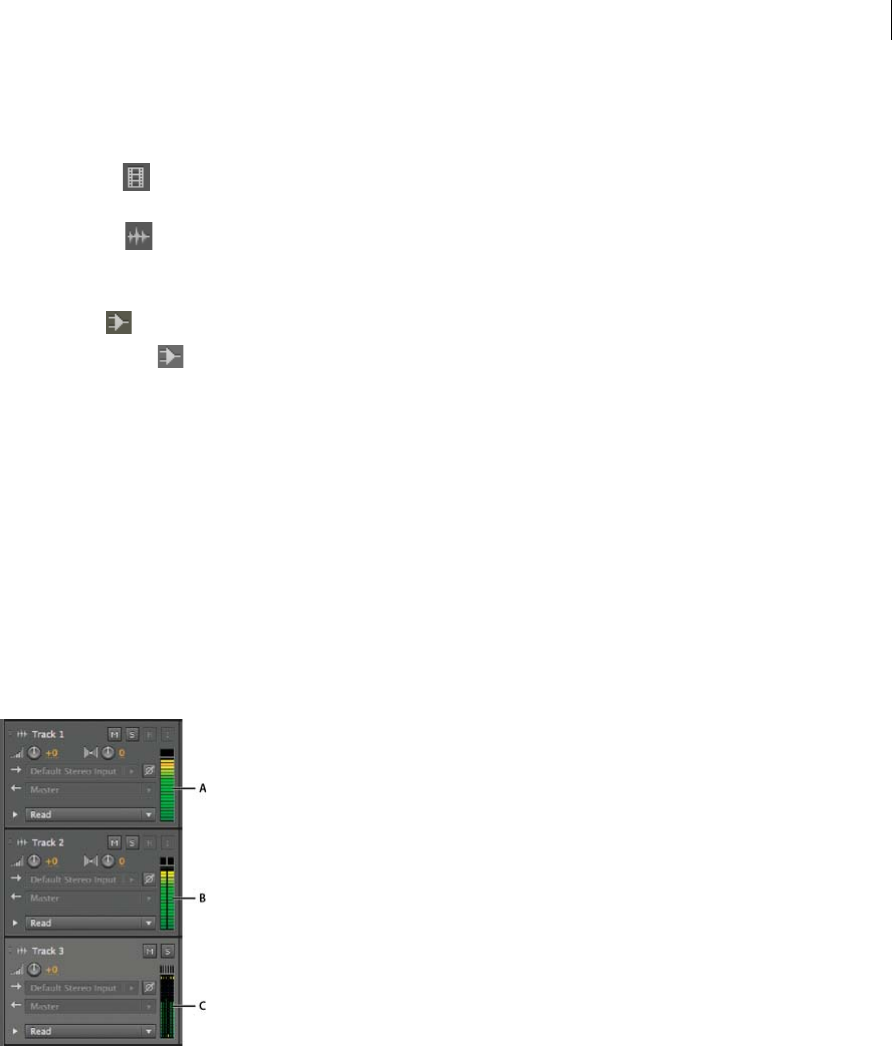
140
Mixing multitrack sessions
Last updated 6/16/2016
Understanding video, audio, bus, and master tracks
Multitrack sessions can include four different types of tracks:
•Video tracks contain an imported video clip. A session can include one video track and clip at a time. You can
watch a preview in the Video panel (Window > Video).
•Audio tracks contain either imported audio or clips recorded in the current session. These tracks offer the
widest range of controls, letting you specify inputs and outputs, apply effects and equalization, route audio to sends
and buses, and automate mixes.
•Bus tracks let you combine the outputs of several audio tracks or sends and control them collectively.
•The Master track , which is the last in each session, lets you easily combine the outputs of multiple tracks and
buses and control them with a single fader.
For more information, see Routing audio to buses, sends, and the Master track.
Choosing between mono, stereo, and 5.1 tracks
Multitrack sessions support an unlimited number of mono, stereo, and 5.1 audio and bus tracks. When adding tracks,
choose a channel configuration based on the configuration of the Master track:
•For mono masters, add mono audio and bus tracks.
•For stereo masters, add stereo audio and bus tracks. except for audio tracks with mono sources (like a single
microphone).
•For 5.1 masters, add stereo audio tracks and 5.1 bus tracks (to maintain proper gain staging). If you have any 5.1
audio clips, however, add 5.1 audio tracks to contain them.
A Mono B Stereo C 5.1
Add or delete tracks
Note: A multitrack session supports only one video track, which Adobe Audition always inserts at the top of the Editor
panel.
In the Editor panel or Mixer, do the following:
•To add a track, select the track you want to precede it, and then choose Multitrack > Track > Add [type of] Track.
•To delete a track, select it, and choose Multitrack > Track > Delete Selected Track.
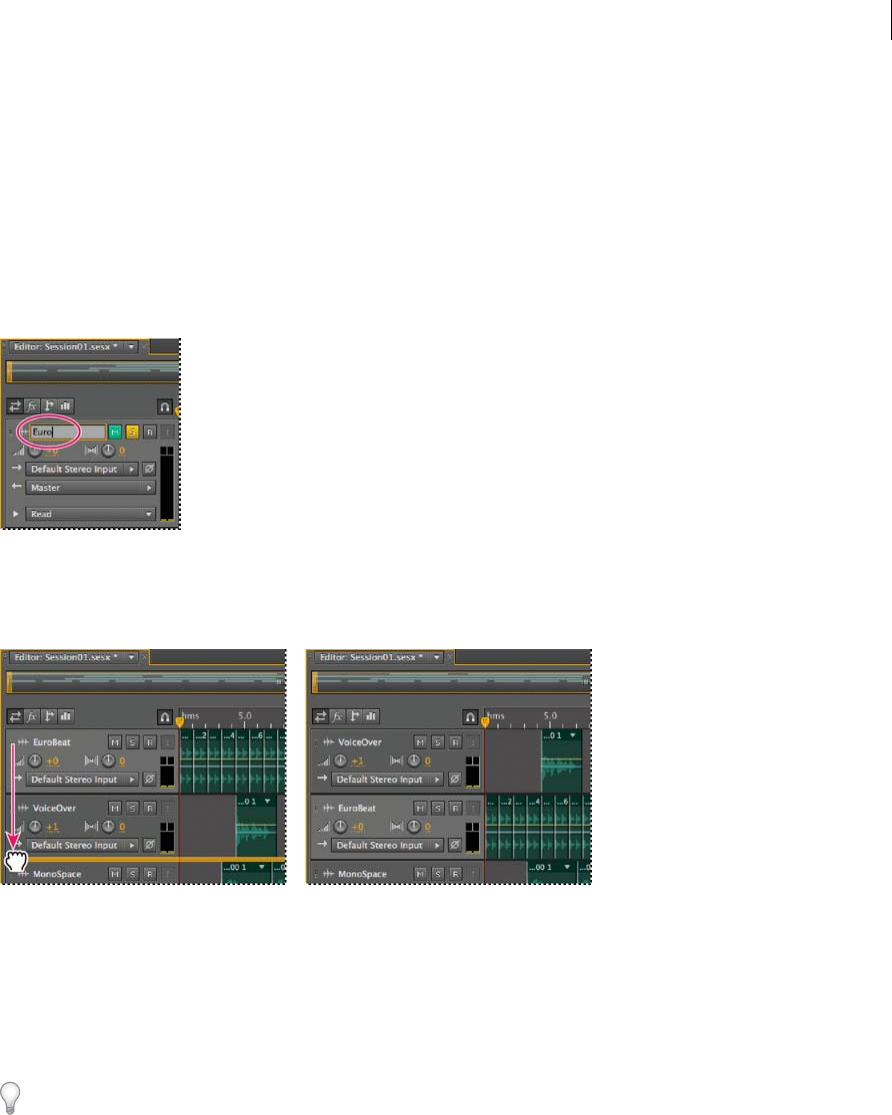
141
Mixing multitrack sessions
Last updated 6/16/2016
For more information, see the following:
•Insert an audio file into a multitrack session
•Insert a video file into a multitrack session
Name or move tracks
You can name tracks to better identify them, or move them to display related tracks together.
•In the Editor panel or Mixer, type in the name text box.
•Position the pointer to the left of the track name, and then drag either up or down in the Editor panel, or right or
left in the Mixer.
Vertically zoom tracks
When you use the vertical Zoom options in the lower right of the Editor panel, all tracks zoom simultaneously. If a
session contains many tracks, however, you may prefer to zoom them individually.
•In the track controls, drag the top or bottom border of the track up or down.
To quickly zoom all tracks, roll the mouse wheel over the track controls. To horizontally resize all track controls, drag
the right border.
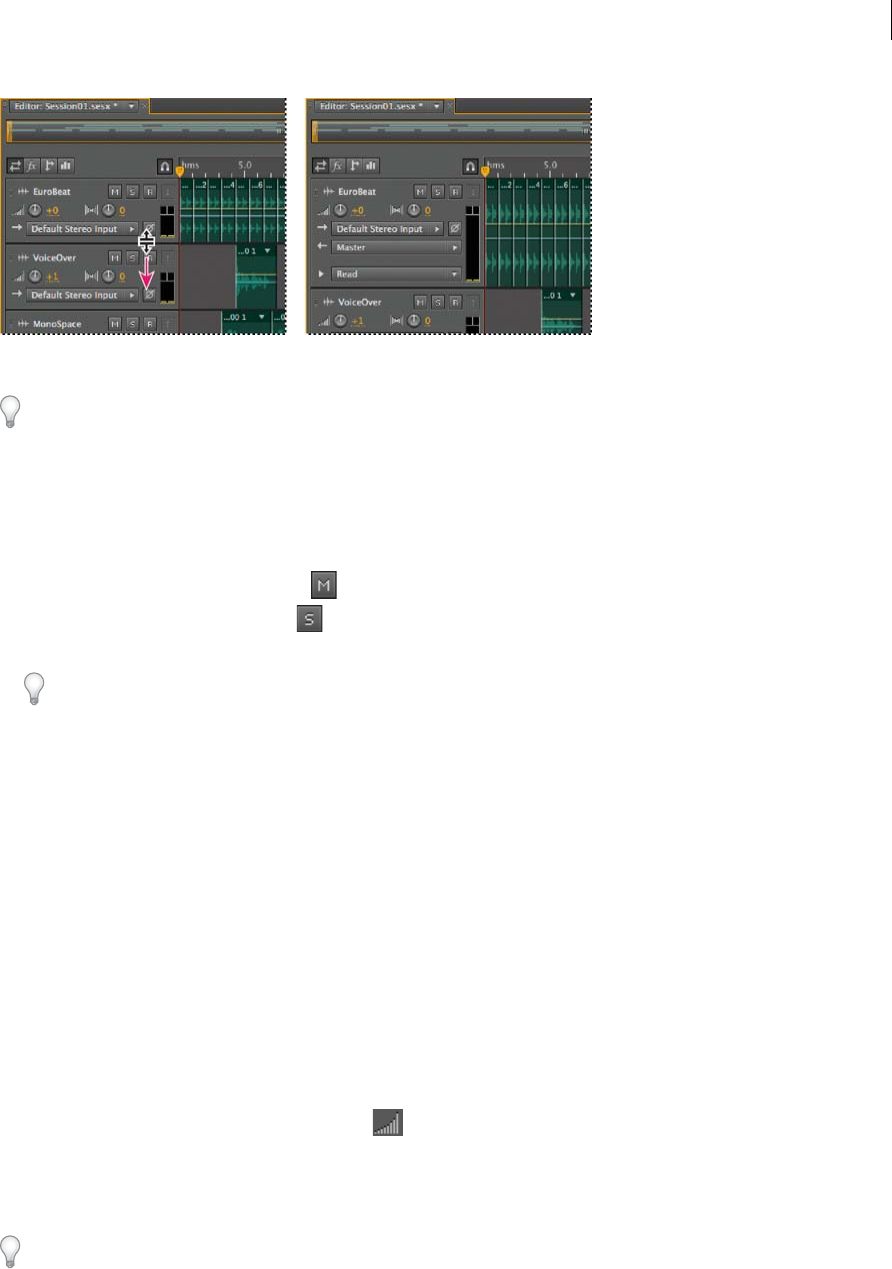
142
Mixing multitrack sessions
Last updated 6/16/2016
For additional techniques, see Zoom audio in the Editor panel.
Mute and solo tracks
You can solo tracks to hear them separately from the rest of a mix. Conversely, you can mute tracks to silence them in
a mix.
•To mute a track, click its Mute button in the Editor panel or Mixer.
•To solo a track, click its Solo button in the Editor panel or Mixer. To automatically remove other tracks from
Solo mode, Ctrl-click (Windows) or Command-click (Mac OS).
Tip: To remove other tracks from Solo mode by default, select Track Solo: Exclusive in the Multitrack section of the
Preferences dialog box. (Regardless of this setting, when you solo a bus, assigned tracks are always placed in Solo
mode.)
Apply an identical setting to all tracks
To increase your efficiency, you can quickly apply several settings to an entire session.
Hold down Ctrl+Shift (Windows) or Command+Shift (Mac OS). Then select an Input, Output, Mute, Solo, Arm
For Record, or Monitor Input setting for any track.
For more information, see the following:
•Assign audio inputs and outputs to tracks
•Record audio clips in the Multitrack Editor
Set track output volume
Do any of the following:
•In the Editor panel, drag the Volume knob . Hold down Shift to change settings in large increments. Hold
down Ctrl (Windows) or Command (Mac OS) to change settings in extremely small increments.
•In the Mixer, drag the track fader, or click above or below to move incrementally to the next tick mark. To move
to a specific point, Alt-click (Windows) or Option-click (Mac OS) above or below the fader.
To return knobs and faders to zero (unity gain), Alt-click (Windows) or Option-click (Mac OS) directly on them.

143
Mixing multitrack sessions
Last updated 6/16/2016
Pan tracks in stereo
•Drag the Pan knob in the Editor panel or Mixer.
Hold down Shift to change settings in large increments. Hold down Ctrl (Windows) or Command (Mac OS) to
change settings in extremely small increments.
Tip: By default, the Multitrack Editor pans using an equal power method, which maintains consistent perceived
loudness by slightly boosting one channel over the other. To change the boost amount, or switch to logarithmic
panning (which simply attenuates one channel), change Panning Mode in the Multitrack preferences.
Duplicate tracks
To perfectly copy all clips, effects, equalization, and envelopes in a track, duplicate it. Duplicate tracks provide a great
starting point for new adjustments, helping you compare different processing and automation settings.
1In the Editor panel or Mixer, select a track.
2Choose Multitrack > Track > Duplicate Selected Track.
More Help topics
Track routing and EQ controls
Automating track settings
Automating track settings
Pan tracks in a 5.1 surround mix
Applying effects in the Multitrack Editor
Multitrack routing and EQ controls
Show or hide track routing and EQ controls
Although the wide variety of routing and EQ controls may seem intimidating at first, the controls for each track are
identical, so once you’ve learned one, you’ve learned them all.
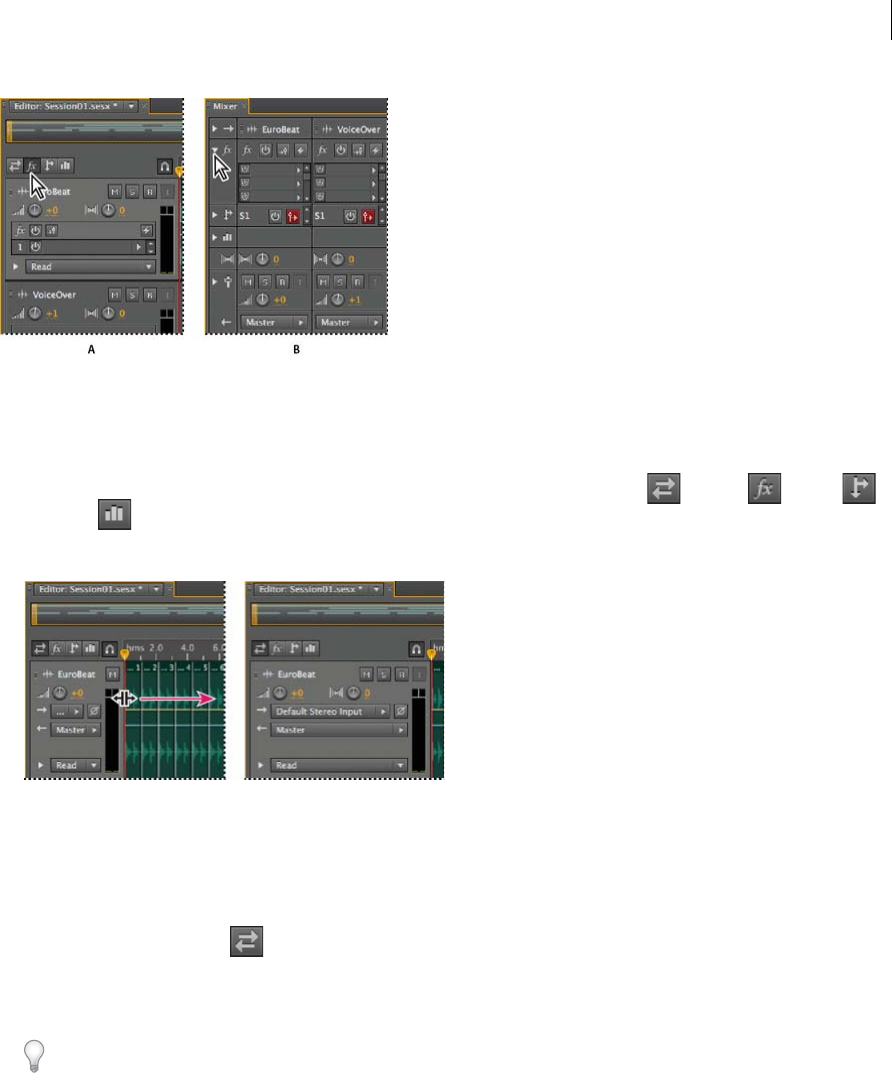
144
Mixing multitrack sessions
Last updated 6/16/2016
A Editor panel B Mixer
Do either of the following:
•On the left side of the Mixer, click the Show/Hide triangle for one or more sets of controls.
•In the upper left corner of the Editor panel, click the button for Inputs/Outputs , Effects , Sends ,
or EQ .
Tip: In the Editor panel, drag the right or bottom border of the track controls to show more or less detail.
For more information, see Vertically zoom tracks.
Assign audio inputs and outputs to tracks
In the Inputs/Outputs area of the Editor panel or Mixer, do the following:
•From the Input menu, choose a hardware input.
•From the Output menu, choose a bus, the Master track, or a hardware output.
The list of available hardware ports is determined by settings in the Audio Hardware preferences. (See Configure
audio inputs and outputs.)
For more information, see the following:
•Record audio clips in the Multitrack Editor
•Set track output volume
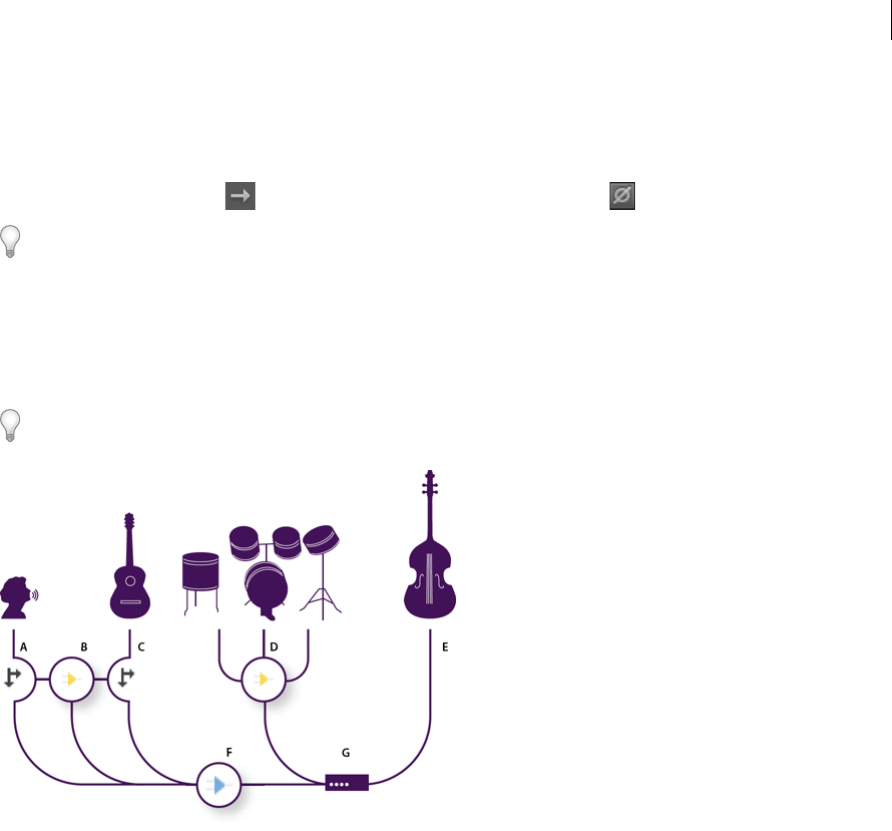
145
Mixing multitrack sessions
Last updated 6/16/2016
Invert the polarity of an input
If a pair of stereo inputs such as overhead drum microphones are out-of-phase, you’ll hear duller sound and a narrower
stereo image. To correct the problem, invert the polarity of one the inputs.
In the Input Controls area of the Mixer, click the Polarity Reverse button .
To understand audio phase, see How sound waves interact.
Routing audio to buses, sends, and the Master track
Buses, sends, and the Master track let you route multiple track outputs to one set of controls. With these combined
controls, you can efficiently organize and mix a session.
To save the output of an audio, bus, or Master track to a file, see Export multitrack mixdown files.
A Vocal B Reverb bus receiving vocal and guitar sends C Guitar D Drums bus combining drum outputs E Bass outputting direct to hardware
F Master track G Hardware outputs
Understanding bus tracks
With bus tracks, you can combine the outputs of several audio tracks or sends and control them collectively. For
example, to control the volume of multiple drum tracks with a single fader, output all the tracks to one bus. Or, to
optimize system performance, apply a single reverb effect to a bus track, and then output sends from multiple tracks to
that bus. (Individually applying the same reverb to multiple tracks would inefficiently use CPU resources.)
Although bus tracks lack a hardware input, they have all the other features of audio tracks. You can apply effects and
equalization and automate your changes over time. For most mixes, you’ll output buses to hardware ports or the Master
track. If you need to combine buses, however, you can even output them to other buses.
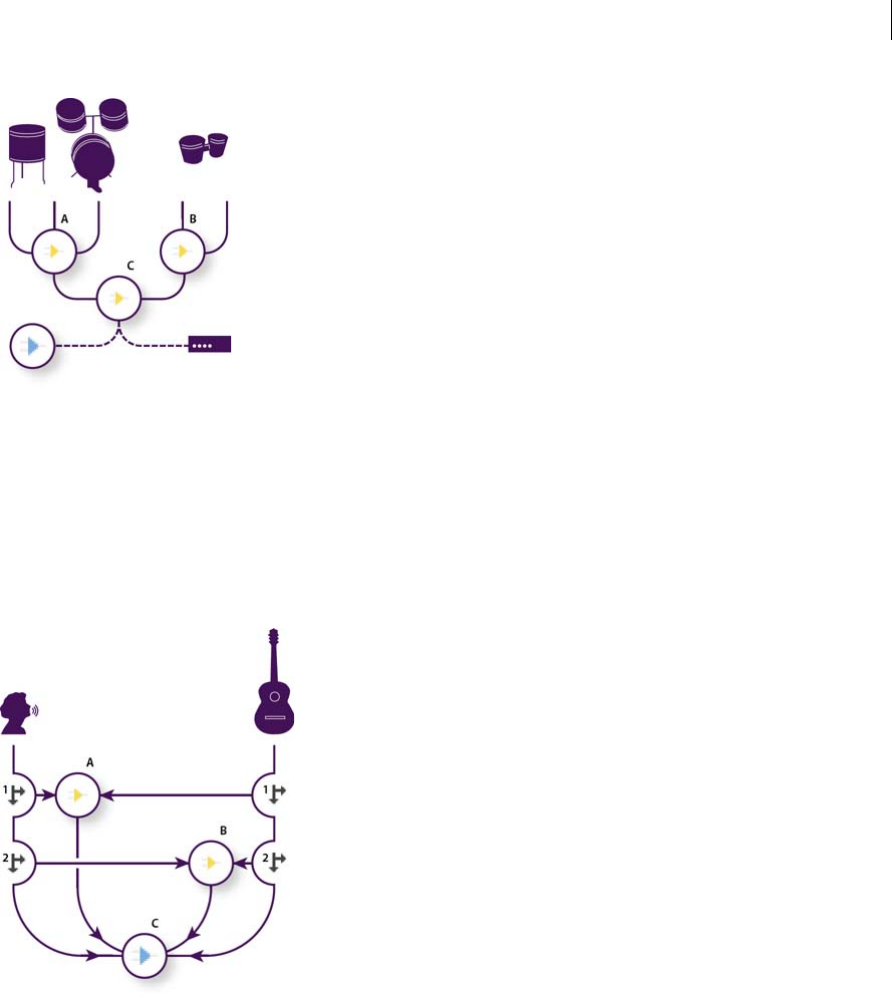
146
Mixing multitrack sessions
Last updated 6/16/2016
A Drum kit bus B Hand drum bus C Combined drums bus outputting to either the Master track or hardware
Understanding sends
Sends let you route audio from a track to multiple buses, creating tremendous signal-routing flexibility. Each track
provides up to 16 sends, which you configure independently from the track output. For example, you can output an
unprocessed track directly to a hardware port, but output Send 1 to a reverb bus and Send 2 to a headphone bus. (A
headphone bus lets performers hear a unique mix during recording. Drummers, for example, may prefer a louder bass
track.)
A Send 1 outputs to delay bus B Send 2 outputs to reverb bus C Master track combines vocal, guitar, delay, and reverb outputs
Understanding the Master track
A session always contains one Master track, so you can easily combine the outputs of multiple tracks and buses and
control them with a single fader. Because the Master track exists at the very end of the signal path, it offers fewer routing
options than audio and bus tracks. The Master track can’t directly connect to audio inputs, or output to sends or buses;
it can only output directly to hardware ports.
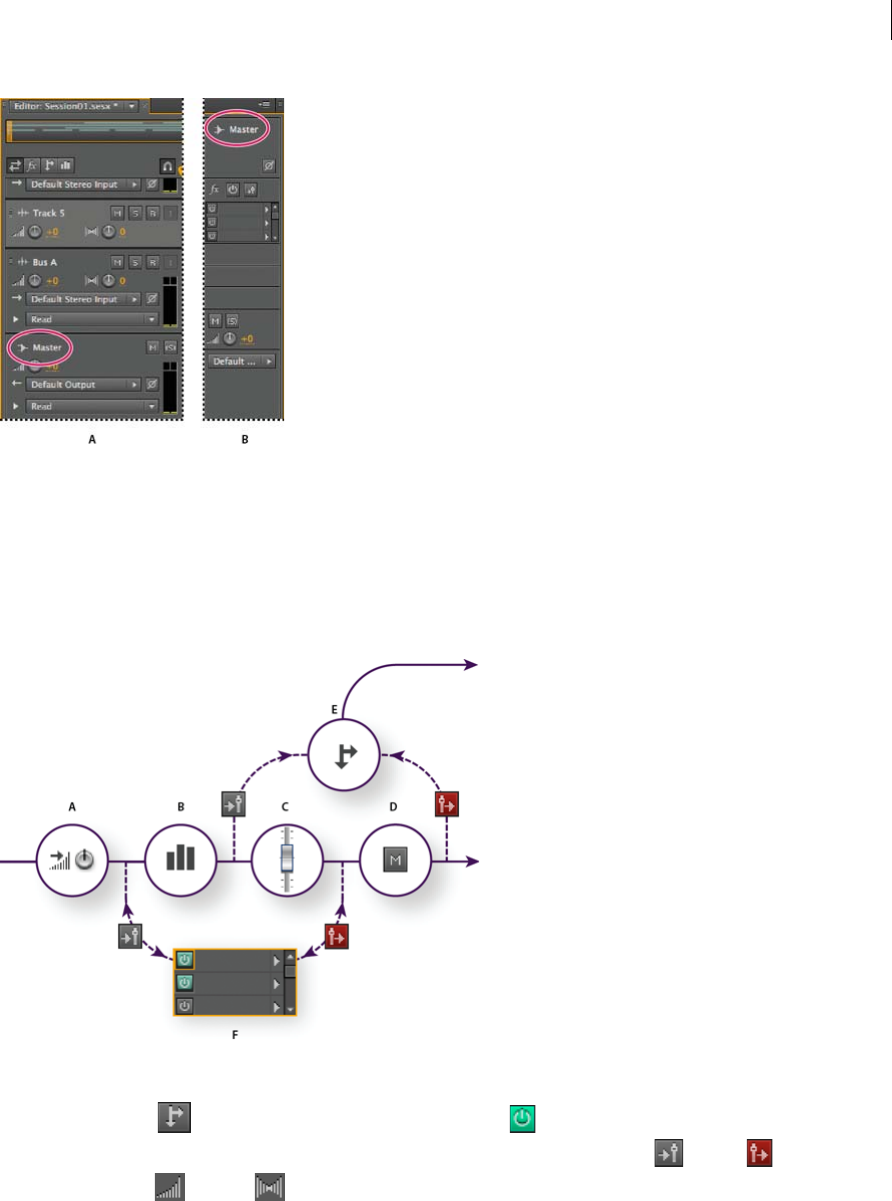
147
Mixing multitrack sessions
Last updated 6/16/2016
A Editor panel B Mixer
Set up a send
When you set up a send, you determine the volume and stereo pan it outputs to an assigned bus. You also place the send
either pre- or post-fader. Pre-fader sends aren’t affected by track volume; post-fader sends are. (For example, if you
output a pre-fader send to a reverb bus, the reverb continues after you fade out dry audio. If you instead output a
post-fader send, the reverb fades out in unison with dry audio.)
A Input B EQ C Track volume D Track mute E Send F Effects Rack
1In the Sends area of the Mixer, click the send Power button .
2Click the Pre-Fader/Post-Fader button to place the send either before track volume or after .
3Set send Volume and Pan .
4From the Send pop-up menu, select a bus.
For more information, see Insert effects before or after sends and EQ.

148
Mixing multitrack sessions
Last updated 6/16/2016
Equalize tracks
For each track, the Multitrack Editor provides a parametric equalizer.
In the EQ area of the Editor or Mixer panel, do any of the following:
•Double-click the graph to access detailed controls in the Track EQ window. (See Parametric Equalizer effect.)
•Click the EQ Power button to compare audio with and without equalization.
More Help topics
Set track output volume
Pan tracks in stereo
Use effect presets
Arrange and edit multitrack clips with Audition
When you insert an audio file in the Multitrack Editor, the file becomes a clip on the selected track. You can easily move
clips to different tracks or timeline positions. You can also edit clips nondestructively, trimming their start and end
points, crossfading them with other clips, and more.
or Time Selection tools.To arrange clips in the Editor panel, you use the Move
Select and move clips
Do any of the following:
•To select an individual clip, click it in the Editor panel.
•To select all clips in selected tracks, choose Edit > Select > All Clips In Selected Track.
•To select all clips in a session, choose Edit >Select > Select All.
•To move selected clips, select the Move tool in the toolbar, and then drag the clips. Or choose Clip > Nudge
Right or Nudge Left to move clips one pixel at a time. (If you zoom in to see individual samples, nudging moves
clips one sample at a time.)
To move clips with the Time Selection tool , right-click and drag (similar to the Hybrid tool technique in
previous versions). You can also drag the clip header with any tool.
Snap to clip endpoints
Snapping lets you quickly align clips with other clips. If snapping is enabled, both dragged clips and the current-time
indicator snap to selected items. While you drag a clip, a white line appears in the Editor panel when snapping points
meet.
1To enable snapping for selected items, click the Toggle Snapping icon at the top of the Editor panel.
2Choose Edit > Snapping > Snap To Clips.
For more information, see Snap to loop beatsand Snap to markers, rulers, frames, and zero crossings.

149
Mixing multitrack sessions
Last updated 6/16/2016
Copy a clip
You can create two types of copied audio clips: reference copies that share source files and unique copies that have
independent source files. The type of copy you choose depends upon the amount of available disk space and the nature
of destructive editing you plan to perform in the Waveform Editor.
Reference copies consume no additional disk space, letting you simultaneously edit all instances by editing the original
source file. (For example, you can add the Flanger effect to a source file in the Waveform Editor and automatically apply
the effect to all 30 referenced copies in a session.)
Unique copies have a separate audio file on disk, allowing for separate editing of each version in the Waveform Editor.
(For example, you can add destructive effects to the version in an introduction while leaving the version in a verse dry.)
To quickly copy a reference, press Ctrl + C (Windows) or Cmd + C (Mac OS). Alternatively, Alt-drag (Windows) or
Option-drag (Mac OS) the clip header.
1Click the Move tool in the toolbar. Then right-click and drag the clip.
To copy with the Time Selection tool , right-click and drag the clip header (similar to the Hybrid tool technique
in previous versions).
2Release the mouse button, and choose one of the following from the pop-up menu:
•Copy Here (to copy a reference)
•Copy Unique Here
Trimming and extending clips
You can trim or extend audio clips to suit the needs of a mix. Because the Multitrack Editor is nondestructive, clip edits
are impermanent; you can return to the original, unedited clip at any time. If you want to permanently edit an audio
clip, however, you can quickly open the source file in the Waveform Editor. (See Comparing the Waveform and
Multitrack editors.)
Remove a selected range from clips
1In the toolbar, click the Time Selection tool .
2Drag across one or more clips to select them and a range.
3Do one of the following:
•To remove the range from clips and leave a gap in the timeline, choose Edit > Delete.
•To remove the range and collapse the gap in the timeline, choose Edit > Ripple Delete, and select one of the
following options:
Selected ClipsRemoves selected clips, shifting remaining clips on the same tracks.
Time Selection in Selected ClipsRemoves the range from selected clips, splitting them if necessary.
Time Selection in All TracksRemoves the range from all clips in the session.
Time Selection in Selected TrackRemoves the range only from the currently highlighted track in the Editor
panel.
Collapse a gap between clips on a track
Right-click the empty area between the clips, and choose Ripple Delete > Gap.
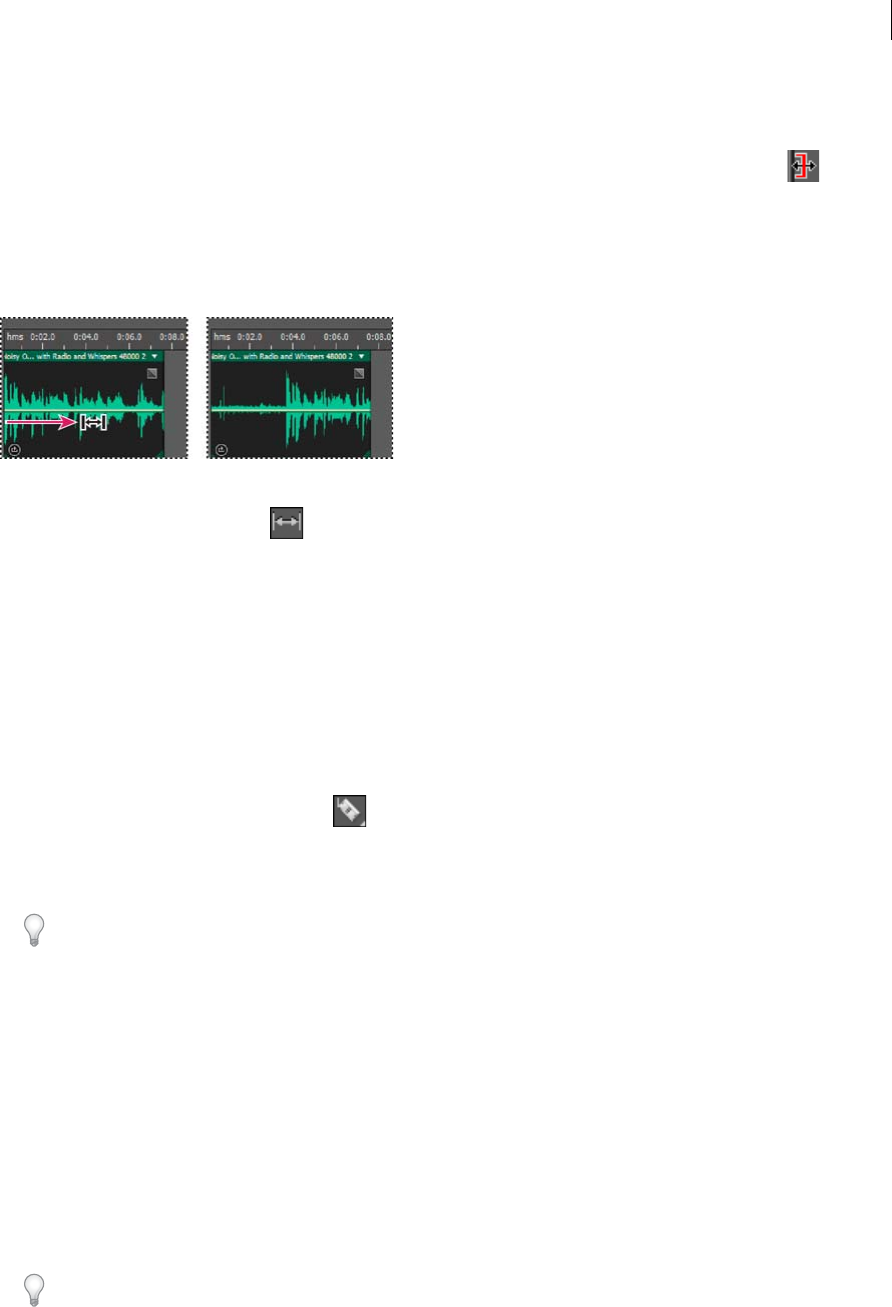
150
Mixing multitrack sessions
Last updated 6/16/2016
Trim or extend clips
1If you want to repeat a clip, right-click it and select Loop. (See Looping clips.)
2In the Editor panel, position the cursor over the left or right edge of the clip. The edge-dragging icon appears.
3Drag clip edges.
Shift the contents of a trimmed or looped clip
You can slip edit a trimmed or looped clip to shift its contents within clip edges.
1In the toolbar, click the Slip tool .
2Drag across the clip.
Permanently edit a clip’s source file in the Waveform Editor
Double-click the clip header.
Split clips
Split audio clips to break them into separate clips that you can independently move or edit.
Split clips with the Razor tool
1In the toolbar, hold down the Razor tool , and choose one of the following from the pop-up menu:
Razor Selected Clips Splits only clips you click.
Razor All Clips Splits all clips at the time point you click.
Tip: To switch between these modes in the Editor panel, press Shift.
2In the Editor panel, click where you want the split to occur.
Split all clips at the current-time indicator
1Position the current-time indicator where one or more audio clips exist.
2Choose Clip > Split.
Set audio clip properties
In the Properties panel, you can quickly change multiple settings for selected audio clips. Clip settings for gain and mute
are independent from similar track controls.
1Select an audio clip, and choose Window > Properties.
You can access individual properties from the Clip menu.
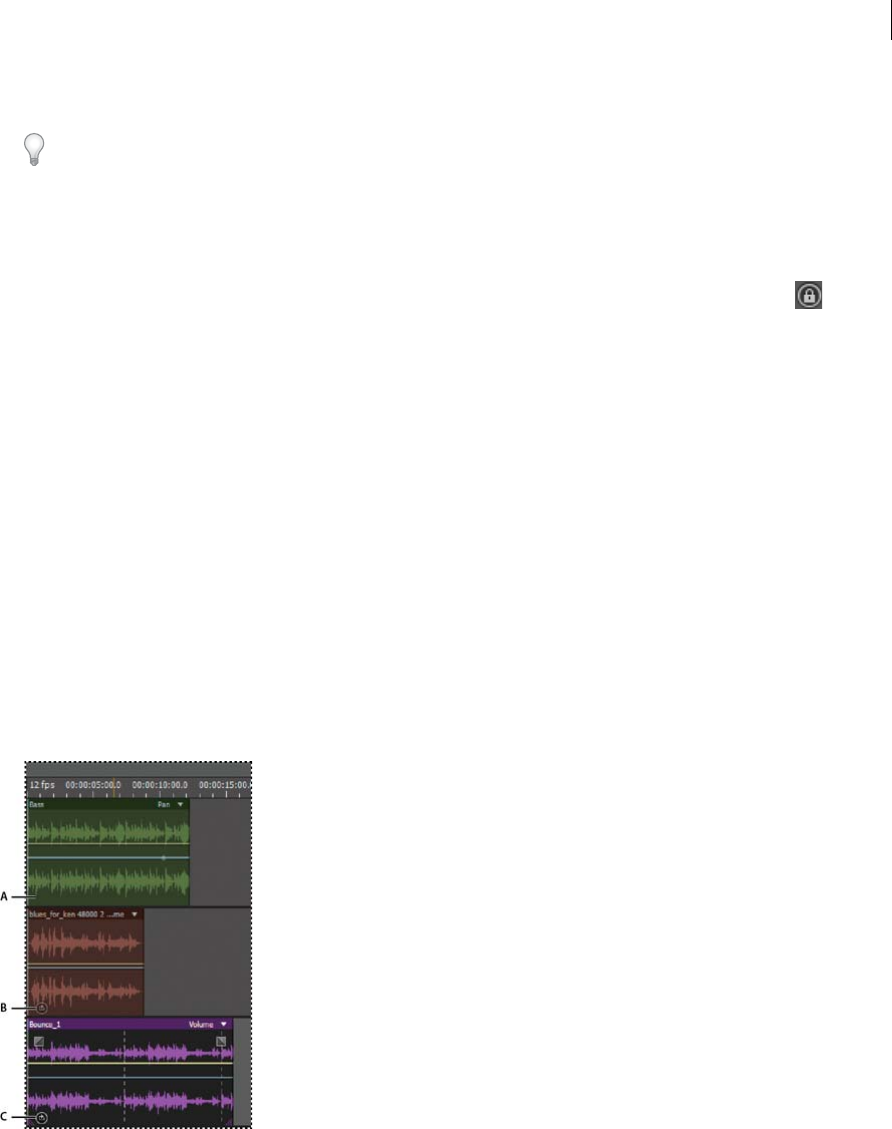
151
Mixing multitrack sessions
Last updated 6/16/2016
2Set the following options:
To change the clip name, type in the text box at the top of the panel.
Clip Color Click the swatch to customize. A swatch with a red slash indicates that the clip is using the default color
for the current Appearance preset. (See Change interface colors, brightness, and performance.)
Clip Gain Compensates for a low or high volume clip that is difficult to mix.
Lock in Time Allows only up or down moves to other tracks, with a fixed timeline position. A lock icon appears
on the clip.
Loop Enables clip looping. For more information, see Looping clips.
Mute Silences the clip.
More Help topics
Select ranges in the Multitrack Editor
Looping clips
In many musical styles, you’ll find loops used for everything from basic rhythm tracks to entire compositions. With
Adobe Audition, you can either create your own loops or choose from thousands supplied for free via the Resource
Central panel.
Loops let you create extremely flexible multitrack sessions. Though loops typically contain only one or two bars of
music (four to eight beats), you can extend and repeat them by simply dragging with the mouse.
A No loop B Single loop C Extended (repeated) loop
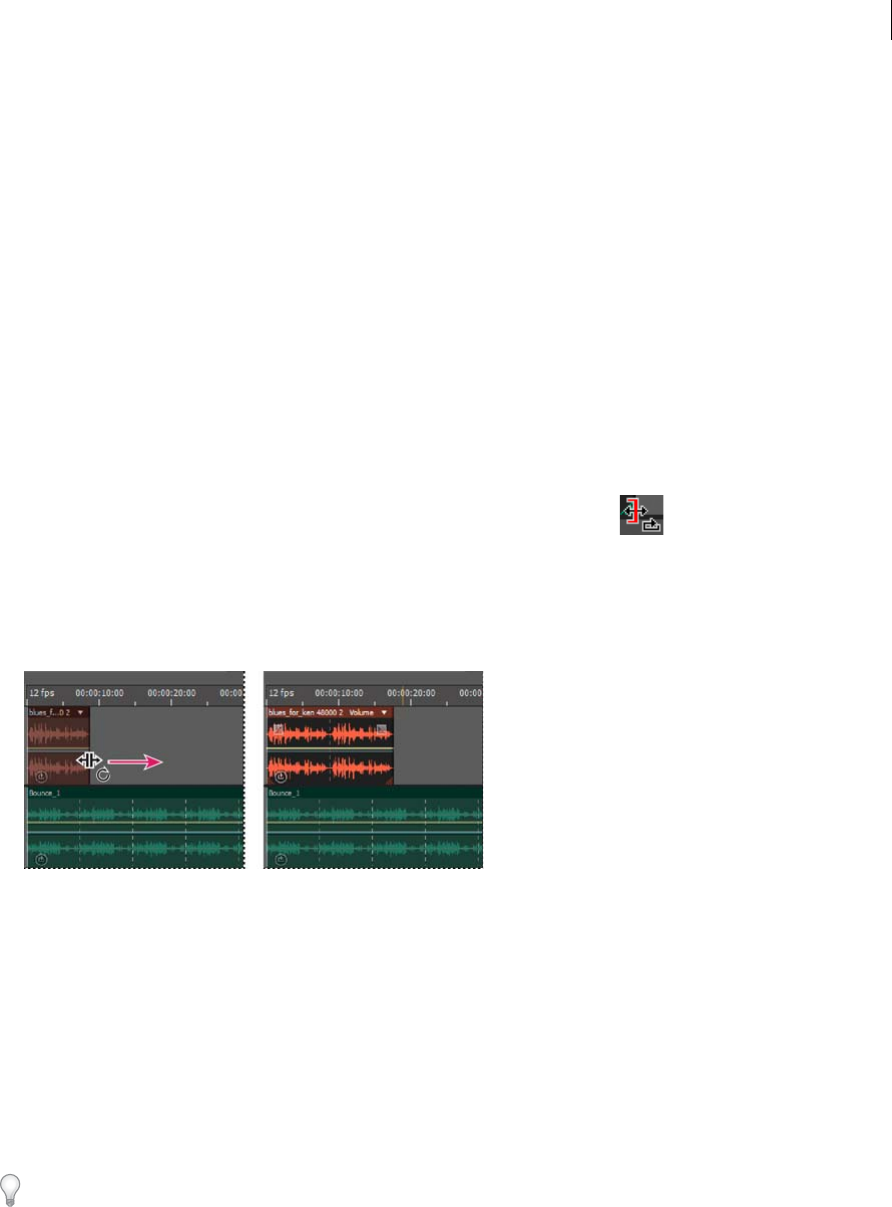
152
Mixing multitrack sessions
Last updated 6/16/2016
Snap to loop beats
To better synchronize a loop-based session, use the Bars And Beats time format and enable snapping. Then add loops
to create a rhythmic foundation, which you can build upon by recording new audio clips. (You can also add existing
audio clips, but only their start or end points will align with loop beats.)
1Choose View > Time Display > Bars And Beats. (This ruler format makes it easier to visually align loops with
musical beats.)
2From the Edit > Snapping submenu, choose any of the following:
Snap To Ruler (Coarse) Snaps to beats within bars. Use this option if you work with 1/4 or 1/2 bar loop files.
Snap To Clips Snaps to the start and end of audio clips.
Snap To Loops Snaps to the start and end of loops within clips.
Enable a looped clip and change its length
1In the Multitrack Editor, right-click an audio clip, and select Loop from the context menu.
2Position the pointer over the left or right edge of the clip; the loop editing icon appears.
3Drag to extend or shorten the loop.
Depending on how far you drag, you can make the loop repeat fully or partially. For example, you might drag a loop
that is one bar long so that it extends 3-1/2 bars, ending on a beat within the loop. As you cross each bar, a white
vertical line appears in the clip. This is the snap-to line, indicating perfect alignment to beats in other tracks.
More Help topics
Snap to markers, rulers, frames, and zero crossings
Snap to clip endpoints
Change the time display format
How to match, fade, and mix clip volume with Audition
To fade individual audio files, see Visually fading and changing amplitude . (The topics below address multitrack clips.)
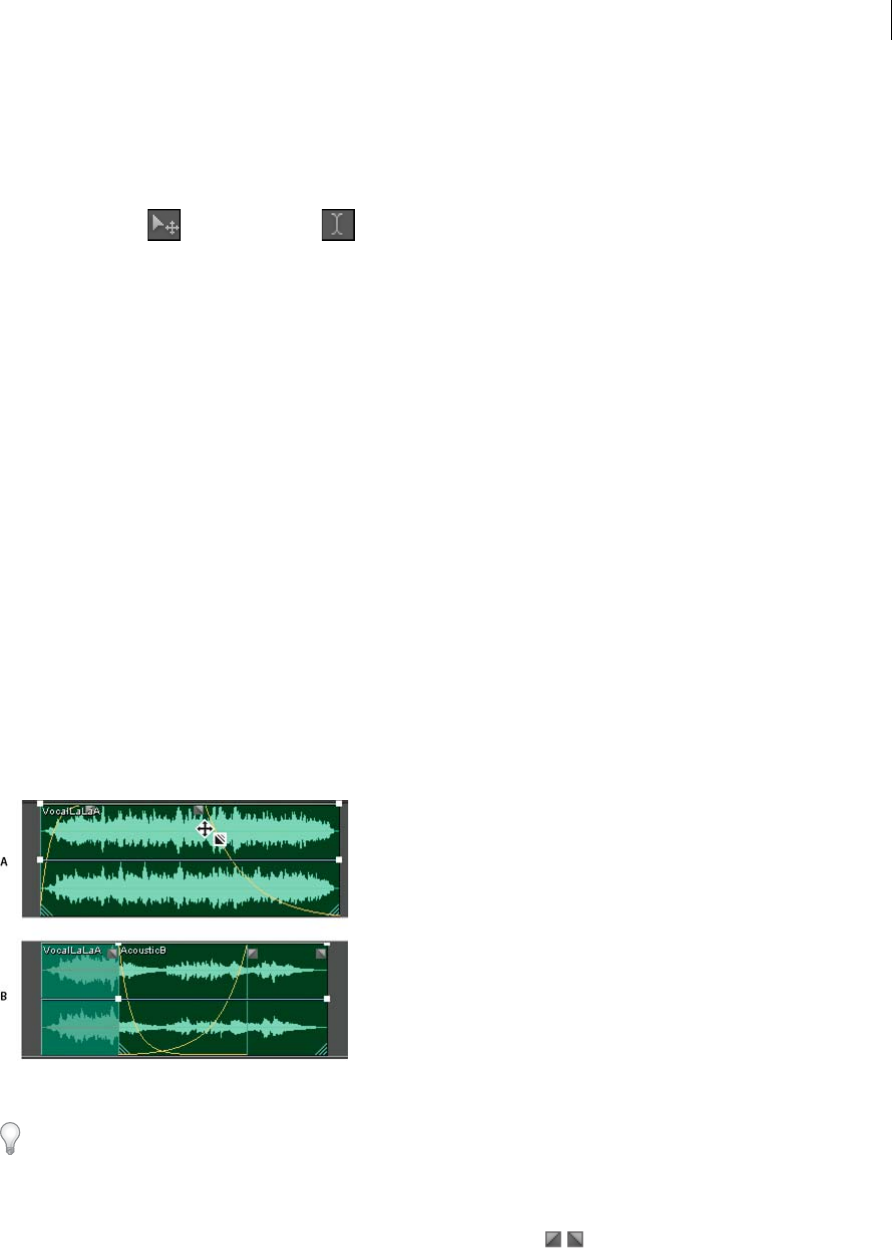
153
Mixing multitrack sessions
Last updated 6/16/2016
Match multitrack clip volume
If multitrack clips have very different volume, making mixing difficult, you can match their volumes. Because the
Multitrack Editor is nondestructive, this adjustment is completely reversible. To instead permanently change the
volume of source files, see Match volume across multiple files.
1Using the Move or Time Selection tool, Ctrl-click (Windows) or Command-click (Mac OS) to select
multiple clips.
2Choose Clip > Match Clip Volume.
3From the pop-up menu, choose one of the following options:
Loudness Matches an average amplitude you specify.
Perceived Loudness Matches a perceived amplitude you specify, accounting for middle frequencies that the ear is
most sensitive to. This option works well unless frequency emphasis varies greatly (for example, midrange
frequencies are pronounced in a short passage, but bass frequencies are elsewhere).
Peak Volume Matches a maximum amplitude you specify, normalizing the clips. Because this option retains
dynamic range, it’s a good choice for clips you plan to process further, or for highly dynamic audio like classical
music.
Total RMS Amplitude Matches an overall root-mean-square amplitude you specify. For example, if the majority of
two files is -50 dBFS, the total RMS values would reflect that, even if one file contains more loud passages.
4Enter a Target Volume.
Fade or crossfade multitrack clips
On-clip fade and crossfade controls let you visually adjust fade curves and duration. Controls for fade ins and fade outs
always appear in the upper-left and upper-right corners of clips. Controls for crossfades appear only when you overlap
clips.
A Drag controls in clip corners to fade in and out B Overlap clips to crossfade
To
Fade a clip in or out
In the upper-left or upper-right corner of the clip, drag the fade icon inward to determine fade length, and
drag up or down to adjust the fade curve.

154
Mixing multitrack sessions
Last updated 6/16/2016
Crossfade overlapping clips
When you crossfade clips on the same track, you overlap them to determine the size of the transition region (the larger
the overlapping area, the longer the transition).
1Place two clips on the same track, and move them so they overlap. (See Select and move clips.)
2At the top of the overlapping area, drag the left or right fade icon up or down to adjust the fade curves.
Fade options
To access the following fade options, select a clip, and then either right-click a fade icon in the Editor panel, or choose
Clip > Fade In or Fade Out.
No Fade Deletes the fade or crossfade.
Fade In, Fade Out, or Crossfade If clips overlap, lets you choose the fade type.
Symmetrical or Asymetrical (crossfades only) Determines how the left and right fade curves interact when you drag
them up and down. Symmetrical adjusts both fades identically, while asymetrical lets you adjust fades independently.
Linear or Cosine Applies either an even, linear fade or an S-shaped fade that starts slowly, then rapidly changes
amplitude, and ends slowly.
Tip: To switch between Linear and Cosine modes while dragging fade icons, hold down Ctrl (Windows) or Command
(Mac OS).
Automatic Crossfades Enabled Crossfades overlapping clips. Deselect this option if automatic crossfades are
undesirable or interfere with other tasks, such as trimming clips.
Create a single audio clip from multiple clips
You can combine the contents of multiple clips in the same time range, creating a single clip that you can quickly edit
in either the Multitrack or Waveform Editor.
1In the Editor panel, do any of the following:
•Select a specific time range. (See Select ranges in the Multitrack Editor.)
•Select specific clips if bouncing to a new track.
•Select nothing to mix down an entire session.
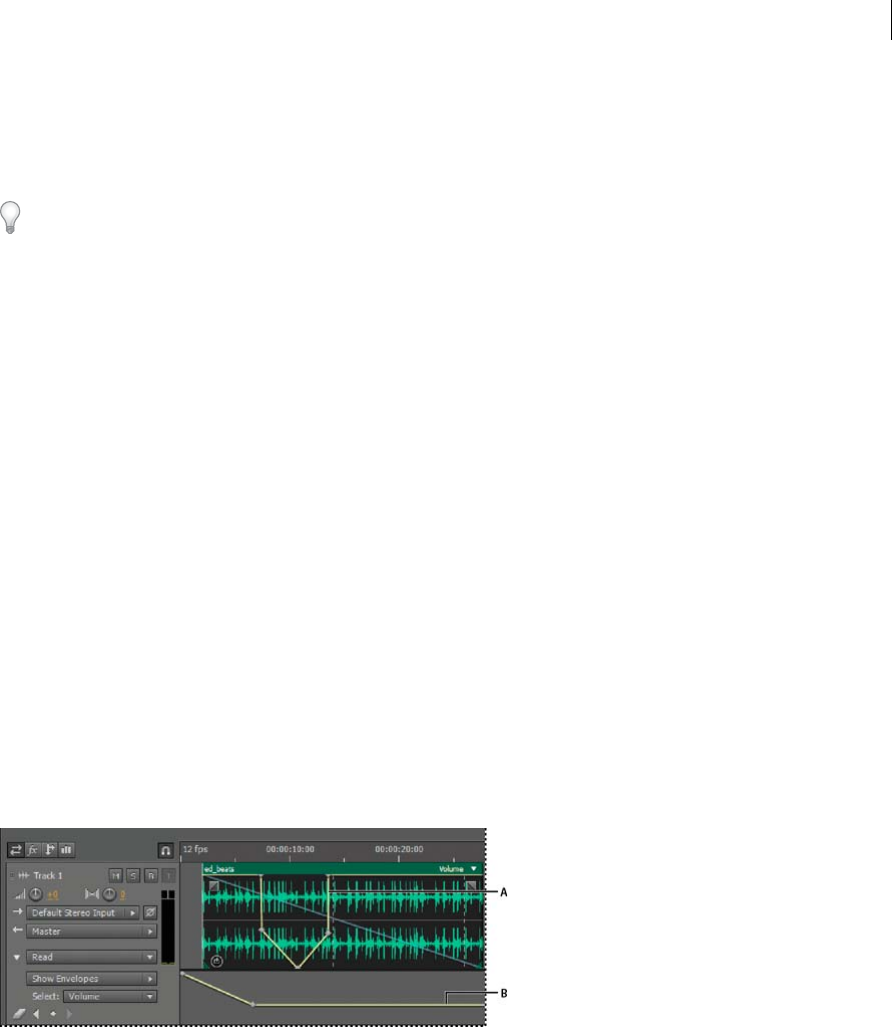
155
Mixing multitrack sessions
Last updated 6/16/2016
2To combine the contents of the original clips, do either of the following:
•To create a track and clip in the Multitrack Editor, choose Multitrack > Bounce To New Track.
•To create a file in the Waveform Editor, choose Multitrack > Mixdown To New File.
To mixdown an entire session, see Export multitrack mixdown files.
Create an audio clip from a bus or master track
If you want to edit audio from a bus or master track, create a clip from the track.
1In the Editor panel, select a time range for the new clip. (See Select ranges in the Multitrack Editor.)
2In the timeline, right-click a bus or master track, choose Bounce [track type] To New Track.
Adobe Audition creates a new track with a clip that reflects the bus or master mix.
More Help topics
Export multitrack mixdown files
Automating mixes with envelopes
By automating mixes, you can change mix settings over time. For example, you can automatically increase volume
during a critical musical passage and later reduce the volume in a gradual fade out. See this video tutorial to watch mix
automation in action.
Automation envelopes visually indicate settings at specific points in time, and you can edit them by dragging keyframes
on envelope lines. Envelopes are nondestructive, so they don’t change audio files in any way. If you open a file in the
Waveform Editor, for example, you don’t hear the effect of any envelopes applied in the Multitrack Editor.
A Clip envelope B Track envelope
Automating clip settings
With clip envelopes, you can automate clip volume, pan, and effect settings.
On stereo tracks, clip volume and pan envelopes appear by default; you can identify them by color and initial position.
Volume envelopes are yellow lines initially placed across the upper half of clips. Pan envelopes are blue lines initially
placed in the center. (With pan envelopes, the top of a clip represents full left, while the bottom represents full right.)
Note: On mono and 5.1 surround tracks, clips lack pan envelopes.
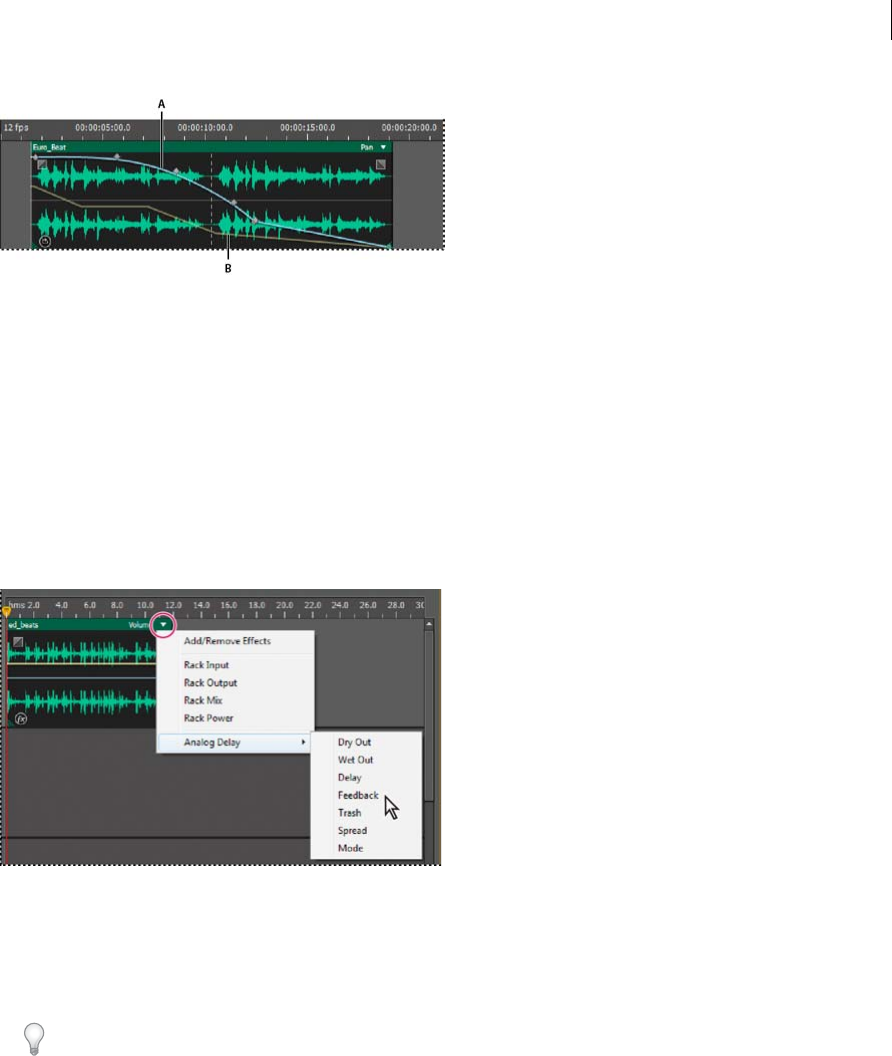
156
Mixing multitrack sessions
A Pan envelope B Volume envelope
Show or hide clip envelopes
Clip envelopes are visible by default, but if they interfere with editing or are visually distracting, you can hide them.
From the View menu, choose any of the following:
•Show Clip Volume Envelopes
•Show Clip Pan Envelopes
•Show Clip Effect Envelopes
Show or hide individual automation parameters
In the upper-right corner of a clip, click the parameter menu, and select a Rack mixing option or an effect parameter.
(In the menu, visible parameters appear with checkmarks. Select a parameter again to hide it.)
After you edit keyframes for a parameter, it appears with an asterisk (*) in the menu.
The Rack Power option lets you turn a clip's Effects Rack on and off over time.
Disable clip keyframe editing
To avoid inadvertently creating or moving keyframes, disable keyframe editing.
From the Multitrack menu, deselect Enable Clip Keyframe Editing.
Automating track settings
With track envelopes, you can change volume, pan, and effect settings over time. Adobe Audition displays track
envelopes in an automation lane below each track. Each automated parameter has its own envelope, which you edit just
like clip envelopes.
Last updated 6/16/2016
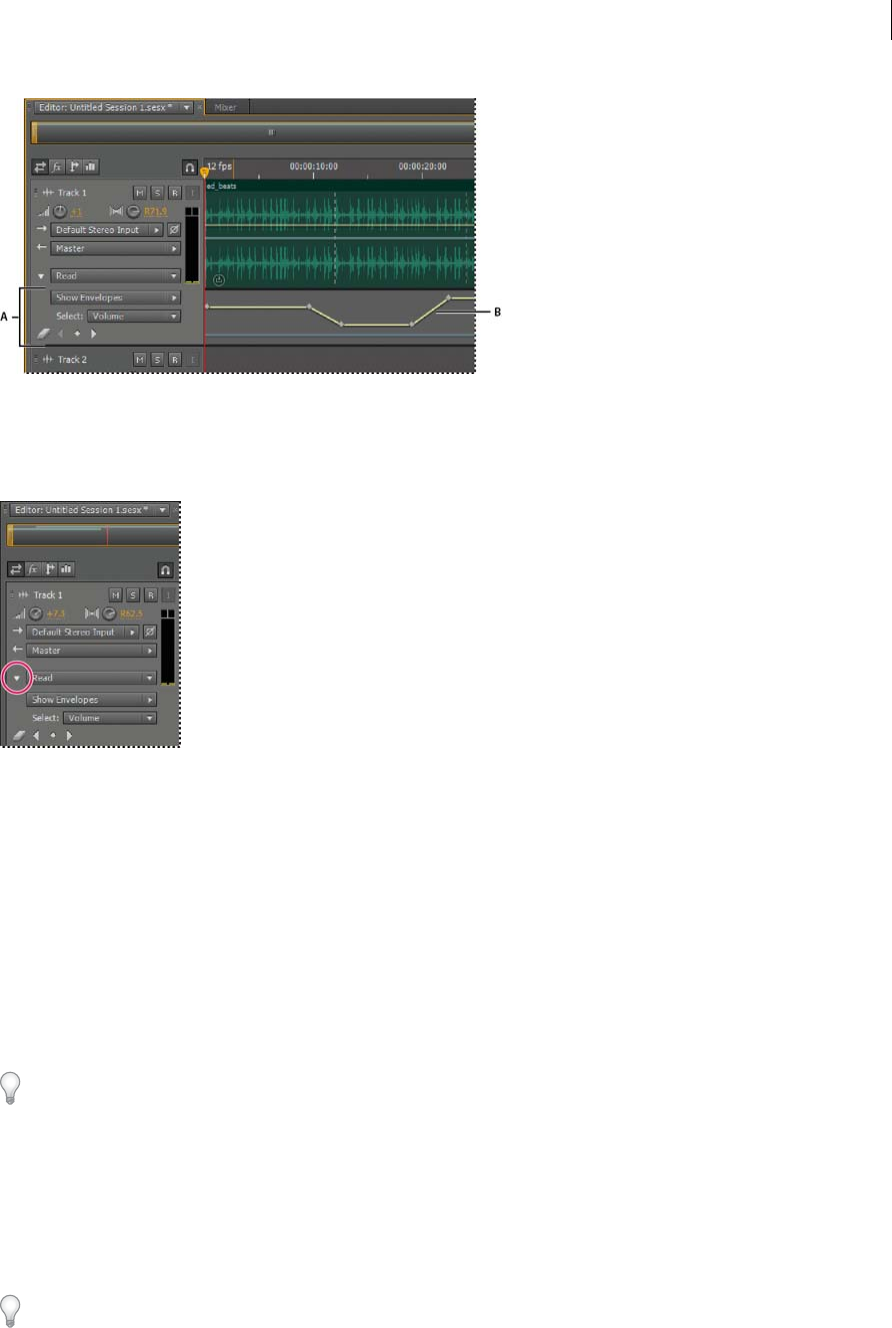
157
Mixing multitrack sessions
Last updated 6/16/2016
A Automation lane B Envelope for parameter
Create track envelopes
Track envelopes let you precisely change track settings at specific points in time.
1In Editor panel, click the triangle to the left of the Track Automation Mode menu for the track you want to automate.
(The menu is set to Read by default.)
2From the Show Envelopes menu, select a parameter to automate.
3On the envelope line, click and drag to add and adjust keyframes.
Record track automation
While playing a session, you can record adjustments you make to track volume, pan, and effect settings, creating a mix
that dynamically evolves over time. Adobe Audition automatically converts your adjustments into track envelopes,
which you can edit with precision.
With an external controller such as the Mackie Control, you can adjust multiple settings simultaneously. See Control
surface support .
1In the Main panel, position the current-time indicator where you want to start recording automation.
2Choose an option from the Track Automation Mode menu.
3To start recording automation, start playback. As audio plays, adjust track or effect settings in the Editor, Mixer, or
Effects Rack panels.
4To stop recording automation, stop playback.
If recorded keyframes are too numerous or irregular, see Optimize recorded automation .

158
Mixing multitrack sessions
Last updated 6/16/2016
Track Automation Mode options
In the Editor panel or Mixer, you can choose one of the following modes for each track:
Off Ignores track envelopes during playback and mixdown, but continues to display envelopes so you can manually
add or adjust keyframes.
Read Applies track envelopes during playback and mixdown, but doesn’t record any changes you make to them. (You
can preview such changes, but keyframes return to recorded settings.)
Write When playback starts, overwrites existing keyframes with current settings. Continues to record new settings
until playback stops.
Latch Begins recording keyframes when you first adjust a setting, and continues to record new settings until playback
stops.
Touch Similar to Latch, but gradually returns settings to previously recorded values when you stop adjusting them. Use
Touch to overwrite specific sections of automation while leaving others intact.
Protect settings when recording automation
When recording automation, you may want to protect certain parameters from inadvertent changes, while adjusting
other parameters.
1At the left of the Editor panel, navigate to the specific track's controls.
2Click the Show/Hide Automation Lanes icon [ICON].
3From the Show Envelopes menu, choose the parameter.
4Click the Protect The Parameter icon [ICON].
Optimize recorded automation keyframes
To prevent recorded automation from creating excessive or irregular keyframes, optimize the following settings in
Multitrack section of the Preferences dialog box.
Automatch Time Determines how fast parameters return to original values in the Touch mode. You can set values from
0.00 to 5.00 seconds; the default value is 1.00 second.
Linear Edit Point Thinning Removes any keyframes that represent static, unchanging parameter settings.
Minimum Time Interval Thinning Creates keyframes at time intervals larger than the specified value. Enter an interval
between 1 and 2000 milliseconds in the Minimum Time field.
Adjust automation with keyframes
Keyframes on envelope lines change clip and track parameters over time. Adobe Audition automatically calculates, or
interpolates, all the intermediate values between keyframes using one of two transition methods:
•Hold transitions create an abrupt change in value at each new keyframe.
•Linear transitions create a gradual, even change between keyframes.
You can also apply spline curves to an entire envelope, overriding the keyframe-specific setting above to create natural-
sounding transitions that change in speed near keyframes. (See About spline curves for graphs.)
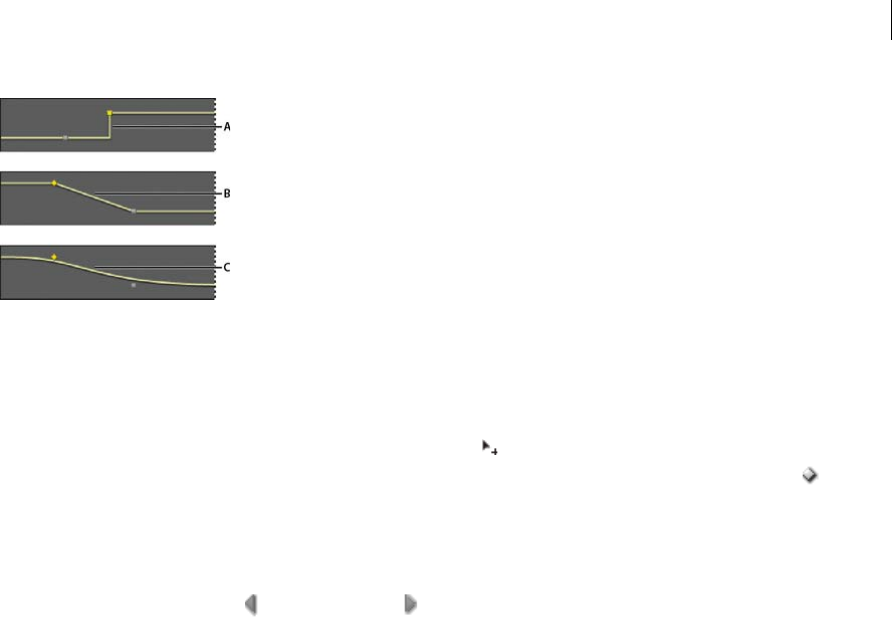
159
Mixing multitrack sessions
A Hold B Linear (the default) C Spline curves
Add a keyframe
Do either of the following:
•Position the pointer over an envelope line. When a plus sign appears, click.
•Position the playhead where you’d like a track parameter to change. Then click the Add Keyframe icon in the
track controls.
Navigate between track keyframes
1In the Editor panel, choose a parameter from the Select menu near the bottom of the track controls.
2Click the Previous Keyframe or Next Keyframe icon.
Select multiple keyframes for a parameter
•Right-click any keyframe, and choose Select All Keyframes.
•Hold down Ctrl (Windows) or Command (Mac OS), and click specific keyframes.
•Hold down Shift, and click to select a series of keyframes.
Reposition keyframes or the envelope line
•To reposition selected keyframes, drag them. (To maintain time position or parameter value, hold down Shift and
drag.)
•To reposition a segment of an envelope without creating a keyframe, hold down Ctrl (Windows) or Command (Mac
OS), and drag.
Change the transition between two keyframes
Right-click the first keyframe, and select Hold Keyframe to abruptly change values, or deselect it to gradually
transition from one value to the next.
Apply spline curves to an entire envelope
Right-click an envelope line, and choose Spline Curves.
Delete keyframes
Right-click an envelope line, and choose Delete Selected Keyframes. Or, drag an individual keyframe off a clip or
track.
Disable clip keyframe editing
To avoid inadvertently creating or moving keyframes, disable keyframe editing.
From the Multitrack menu, deselect Enable Clip Keyframe Editing.
Last updated 6/16/2016

160
Mixing multitrack sessions
Last updated 6/16/2016
More Help topics
About spline curves for graphs
Apply effects to clips or tracks
Editing multitrack sessions in the Editor panel and Mixer
Multitrack clip stretching
1Choose Clip > Stretch > Enable Global Clip Stretching.
2In the Editor panel, drag the white triangles in the upper right or left corner of clips.
Select multiple clips to stretch them proportionately.
To customize stretch settings for selected clips, adjust the following Stretch options in the Properties panel:
Mode Choose from the following:
•Off disables stretching, reverting the clip to its original length.
•Realtime lets you hear the results of stretching as you drag clips. This mode is a good choice during the editing
process.
•Rendered (High Quality) requires longer processing but can avoid audible artifacts. Choose this mode if you
encounter slow playback or performance with Realtime mode.
Type Choose from the following:
•Monophonic is best for solo musical instruments or dialogue.
•Polyphonic is best for music with multiple instruments or complex ambient sounds.
•Varispeed changes pitch in addition to duration, similar to slowing down or speeding up analog tape machines.
To quickly apply the same mode to all clips, choose Clip > Stretch > Realtime All Stretched Clips or Render All Stretched
Clips.
Duration, Stretch, and Pitch Provide numeric entries for more precise adjustments than dragging clips in the Editor
panel allows.
Advanced settings Set the following:
•Transient Sensitivity (available in Polyphonic mode) Sets sensitivity to transients such as drum hits and note
beginnings, which are used as anchor points for stretching. Increase if transients sound unnatural.
•Window Size Sets the size, in milliseconds, of each chunk of processed audio. Adjust only if echo or flanging artifacts
occur.
•Precision settings (available in Rendered mode) determine the tradeoff between quality and processing speed.
•Preserve Formants (available when Rendered and Monophonic are selected) adjusts the timbre of instruments and
voices, maintaining realism during pitch shifts.
To make male voices sound female, or vice versa, select Preserve Formants and dramatically shift pitch.
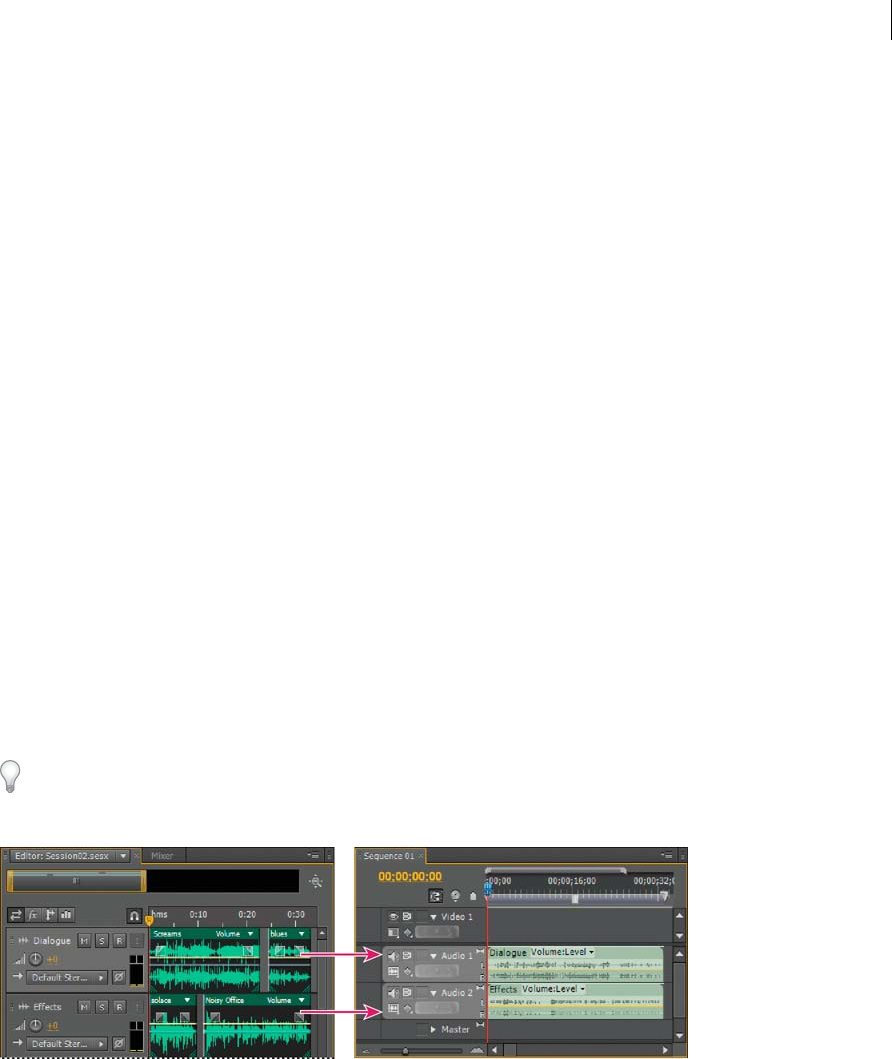
161
Last updated 6/16/2016
Chapter 9: Video and surround sound
Working with video applications
Edit audio clips from Adobe Premiere Pro or After Effects
From Adobe Premiere Pro® or After Effects®, you can quickly open selected clips in the Waveform Editor to restore or
enhance them. When you save your changes, the updated audio automatically appears in your video projects.
•In Adobe Premiere Pro, choose Edit > Edit in Adobe Audition > Clip.
•In After Effects, choose Edit > Edit in Adobe Audition.
Export a multitrack mix to Premiere Pro
Adobe Premiere Pro and Audition directly exchange audio between sequences and multitrack sessions. Any sequence
markers appear in Audition, and separate tracks can be retained for maximum editing flexibility.
The applications exchange sequences and sessions using a shared XML format, exported to a folder that contains any
referenced audio files.
If you want to send a single mixdown file to Premiere and don’t need the option of exporting individual tracks, see Link
sessions to exported mixdown files.
1Choose Multitrack > Export to Adobe Premiere Pro.
2Specify a name and location for the exported session folder, and set the following options:
Sample Rate By default, reflects the sample rate of the original sequence. Select another rate to resample the file for
different output mediums. (See Understanding sample rate.)
Export each track or bus as a stem Converts the full timeline duration of each track into a single clip, combining
multiple clips if necessary. Select this option to extend and align clips with sequence start and end points.
Mixdown Session To Exports the session to a single mono, stereo, or 5.1 file.

162
Video and surround sound
Last updated 6/16/2016
Open in Adobe Premiere Pro Automatically opens the sequence in Premiere Pro. Deselect this option if you plan to
edit the sequence later or transfer it to a different machine.
3Click Export.
4When Premiere Pro opens the exported XML file (either automatically or via the File > Import command), the Copy
Adobe Audition Tracks dialog box appears.
From the Copy to Active Sequence menu, choose where the exported Audition tracks begin. Any new tracks are
added below existing ones.
To send sequence audio from Premiere Pro to Audition, see Editing audio Adobe Audition .
Link sessions to exported mixdown files
To create layered video soundtracks that you can easily update, link multitrack sessions to exported mixdown files.
When you select the exported files in an application such as Adobe Premiere Pro, you can either remix or edit them in
Adobe Audition. As a video project evolves, simply repeat this process to create a polished final soundtrack.
Embed edit-original data in exported mixdown files
1Open a multitrack session.
2Choose Edit > Preferences > Markers & Metadata (Windows) or Audition > Preferences > Markers & Metadata (Mac
OS).
3Select Embed Edit Original Link Data in Multitrack Sessions.
4When you export mixdowns, select Include Markers and Other Metadata.
Edit a mixdown file via a video application
1In the video application, select a mixdown file you exported from Adobe Audition.
2Choose Edit > Edit Original.
3Select one of the following options, and then click OK:
•Open The Audition Multitrack Session That Created The File
•Open The File In The Audition Waveform Editor
4Remix the linked session in the Multitrack Editor, or edit the mixdown file in the Waveform Editor.
5To overwrite the original file in the video application, do one of the following:
•In the Multitrack Editor, choose File > Export > Multitrack Mixdown, and specify the same name and location
as the original file.
•In the Waveform Editor, choose File > Save.
More Help topics
Techniques for restoring audio
Mastering effect
Comparing the Waveform and Multitrack editors
Export sessions to OMF or Final Cut Pro Interchange format
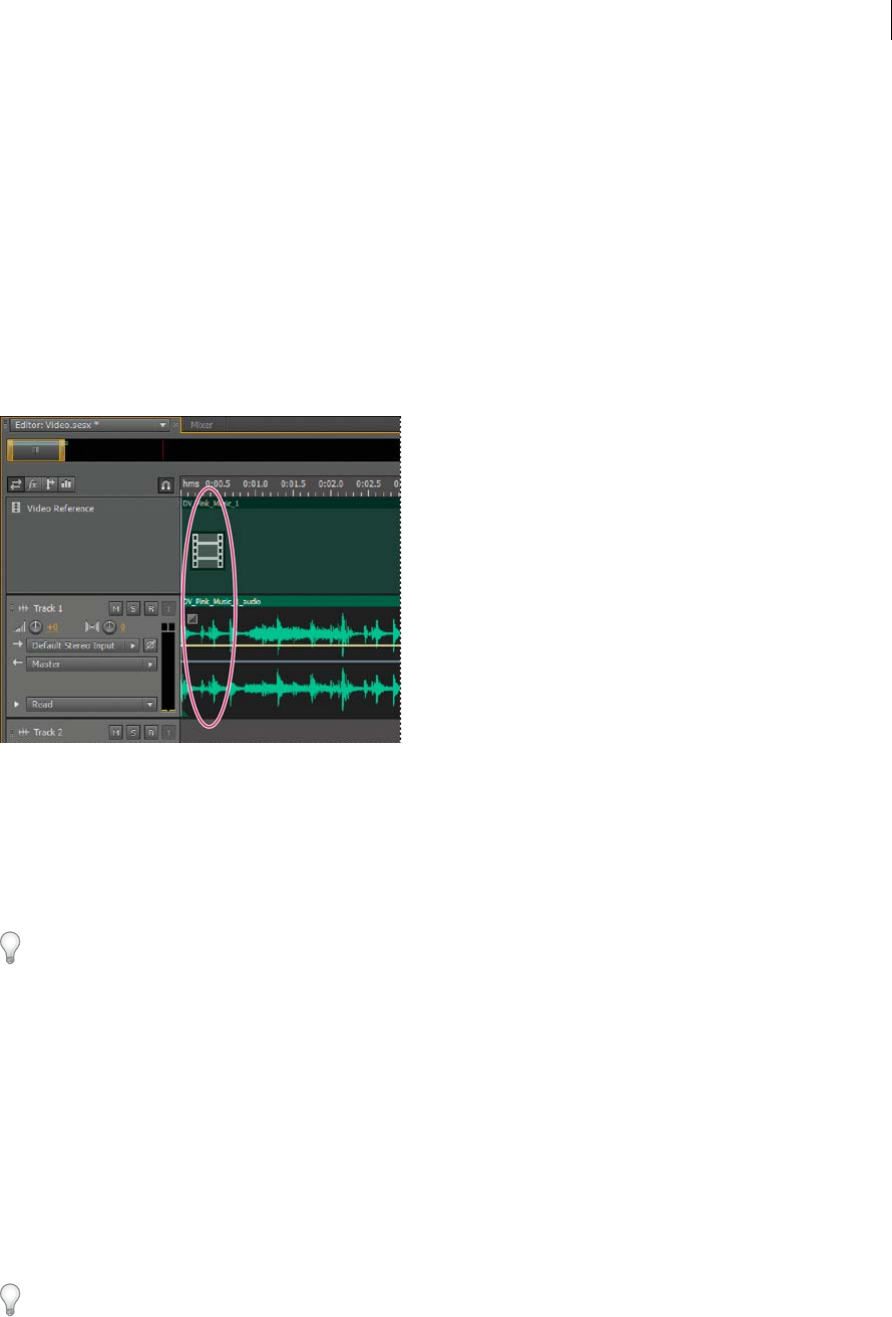
163
Video and surround sound
Last updated 6/16/2016
Importing video and working with video clips
Insert a video file into a multitrack session
In the Multitrack Editor, you can insert video files to precisely synchronize a session with a video preview. When you
insert a video file, its video clip appears at the top of the track display, and its audio clip appears on the track below.
You can move a video clip independently from the audio clip containing the original soundtrack. To instead keep such
clips synchronized, before moving them, select both: Ctrl-click (Windows) or Command+click (Mac OS).
Note: A session can contain only one video clip at a time.
1In the Multitrack Editor, position the current-time indicator at the desired insertion point.
2Choose Multitrack > Insert File, and select a video file in a supported format. (See Video file formats.)
3When you finish mixing audio for the video, export a mixdown, and import it into your video application. (See
Export multitrack mixdown files.)
To quickly edit audio from a video file, choose File > Open. This technique is great for soundtrack editing that doesn’t
require a video preview, or for readapting soundtracks for audio-only mediums, such as radio or CD.
Snap to frames in a video clip
To synchronize a multitrack session with video, snap audio clips and the current-time indicator to frames.
1Choose View > Time Display, and select the SMPTE time format that corresponds to the frame rate of the clip.
2Choose Edit > Snapping > Snap To Frames.
Customize the Video panel
In the Video panel, you can preview video clips as a multitrack session plays to precisely synchronize a soundtrack with
specific video events such as scene changes, title sequences, or special effects.
To hide or show the Video panel, choose Window > Video.

164
Video and surround sound
Last updated 6/16/2016
To customize the Video panel, right-click it, and select either of the following options:A zoom percentageZooms in or
out.Best FitFits previews to the panel.
More Help topics
Video file formats
Select and move clips
5.1 surround sound
Snap to markers, rulers, frames, and zero crossings
Snap to clip endpoints
Zoom audio in the Editor panel
5.1 surround sound
Monitoring 5.1 surround sound
Adobe Audition supports 5.1 surround sound, which requires five speakers, plus one low frequency subwoofer (LFE).
To properly monitor 5.1 surround sound , your computer must have a sound card with at least six outputs, and those
outputs must be mapped to the correct channels in Audition.
1Choose Edit > Preferences > Audio Channel Mapping (Windows) or Audition > Preferences > Audio Channel
Mapping (Mac OS).
2Map each 5.1 channel to a sound card output:
•L: Front left speaker.
•R: Front right speaker.
•C: Front center speaker.
•LFE: Subwoofer
•Ls: Left surround speaker.
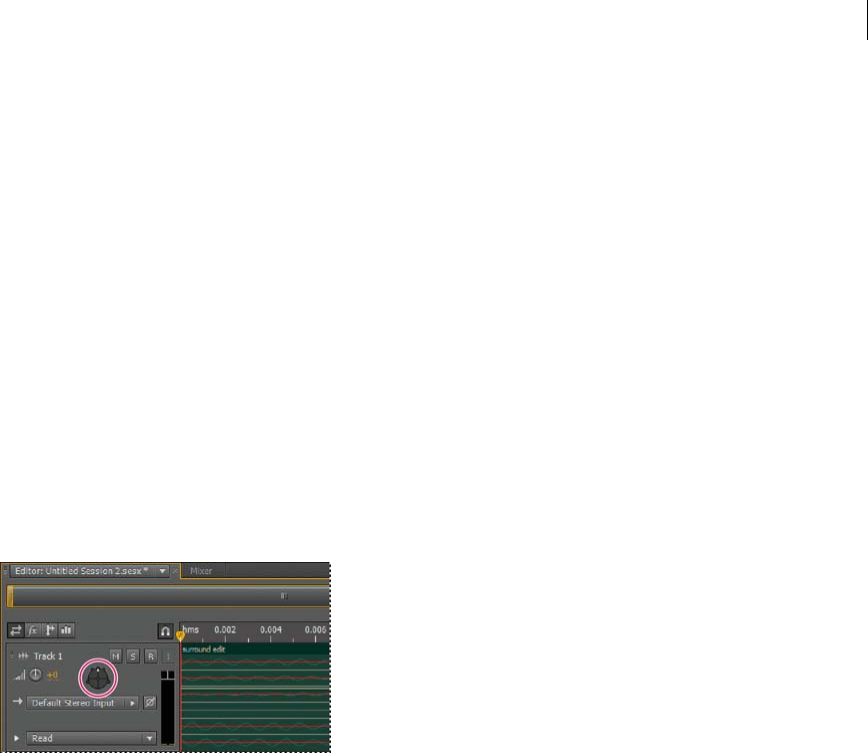
165
Video and surround sound
Last updated 6/16/2016
•Rs: Right surround speaker.
For more information, see Configure audio inputs and outputs.
Edit 5.1 surround files
In the Waveform Editor, you can edit 5.1 surround files with the same tools used for mono and stereo files.
To restrict editing to a subset of 5.1 channels, see Specify which channels you want to edit.
Pan tracks in a 5.1 surround mix
1Open or create a 5.1 multitrack session. (See Create a new multitrack session.)
2To open the Track Panner, do either of the following:
•Choose Window > Track Panner. Then select a mono or stereo track in the Editor panel.
•In the Editor or Mixer panel, double-click a surround plot for a mono or stereo track.
Note: You can pan only mono and stereo tracks, not 5.1 tracks. To adjust the relative volume of channels in a 5.1 file,
open it in the Waveform Editor.
3In the Track Panner, do any of the following:
•To enable or disable channels, click the L, C, R, Ls, and Rs buttons. Or click LFE Only to send audio only to the
subwoofer.
•In the large surround plot, drag to change the position of the signal.
As you drag, white lines change in length from the speakers, reflecting the power of the signal in each. In the
background, green and purple areas reflect the placement of left and right stereo image; blue areas indicate where
the image overlaps.
•Below the surround plot, set the following options:
AngleShows where in the surround field the sound appears to originate from. For example, -90° is directly to the
left, while 90° is directly to the right.
Stereo SpreadDetermines the separation between stereo audio tracks, with zero and -180° producing minimum
separation, and -90° producing maximum separation.
RadiusDetermines how far around the surround field the sound extends. For example, 100% produces a focused
sound originating from very few speakers, while 0% produces an unfocused sound originating from all speakers.
CenterFor tracks panned to the front of the surround field, determines the percentage of Center channel level
relative to Left and Right level.
LFEControls the level of signal sent to the subwoofer.

166
Video and surround sound
Last updated 6/16/2016
4To pan additional tracks, simply select them in the Editor panel. The Track Panner automatically displays each
track’s unique settings.
To dynamically pan surround tracks over time, see Automating track settings.
Pan sends to a 5.1 bus track
1In the Multitrack Editor, create a 5.1 bus track. (See Add or delete tracks.)
2From the send output menu for an audio track, select the 5.1 bus track. (See Set up a send.)
In the Sends area of the Editor and Mixer panels, a surround plot appears. Double-click it to access the Track
Panner for the send.
More Help topics
Routing audio to buses, sends, and the Master track

167
Last updated 6/16/2016
Chapter 10: Saving and exporting
Save and export files in Adobe Audition
Save audio files
In the Waveform Editor, you can save audio files in a variety of common formats. The format you choose depends on
how you plan to use the file. (See Audio format settings.) Keep in mind that each format stores unique information that
might be discarded if you save a file in a different format.
1In the Waveform Editor, do one of the following:
•To save changes in the current file, choose File > Save.
•To save changes under a different filename, choose File > Save As. Or choose File > Export > File to keep the
current file open.
•To save currently selected audio as a new file, choose File > Save Selection As.
•To save all open files in their current formats, choose File > Save All.
Choose File > Save All Audio as Batch Process to process all open files. For details, see Batch process files.
2Specify a filename and location, and choose a file format.
3Set the following options:
Sample Type Indicates the sample rate and bit depth. To adjust these options, click Change. (See Convert the sample
rate of a file.)
Format Settings Indicates data compression and storage modes; to adjust these, click Change. (See Audio format
settings.)
Include Markers and Other Metadata Includes audio markers and information from the Metadata panel in saved
files. (See Working with markers and Viewing and editing XMP metadata .)
Note: Some CD-burning applications misinterpret non-audio information such as markers and metadata, producing
an unpleasant burst of noise at the beginning of each track.
Export with Adobe Media Encoder CC
You can export your multitrack sessions to multiple formats by sending audio and video from Audition to Adobe Media
Encoder. Adobe Media Encoder includes a series of formats and presets that allow you to render and publish high-
quality audio and video output from Audition.
To export a multitrack session using Adobe Media Encoder:
1Choose File > Export > Export with Adobe Media Encoder.
2Specify a filename and location, and choose Adobe Media Encoder’s file format as well as the preset.

168
Saving and exporting
Last updated 6/16/2016
3 By default, only the master track is exported with Adobe Media Encoder. To configure the routing of the tracks in
your multitrack session to the channels in the output file, click Change.
To learn more about using Adobe Media Encoder to render and export your output, see Encode video or audio items
in Adobe Media Encoder
Note: To use the export workflow from Audition to Media Encoder, make sure that you are using the most recent
updates of both the applications.
Extract audio channels to mono files
If you want to edit or output individual channels of a stereo or surround-sound file, extract them to mono files. Adobe
Audition appends the channel name to each extracted filename. For example, a stereo source file named Jazz.aif
produces mono files named Jazz_L and Jazz_R.
In the Waveform Editor, choose Edit > Extract Channels To Mono Files.
Audition automatically opens each extracted file in the Editor panel.
Save multitrack sessions
A multitrack session file is a small, non-audio file. It merely stores information about locations of related audio files on
your hard drive, the duration of each audio file within the session, the envelopes and effects applied to various tracks,
and so forth. You can reopen a saved session file later to make further changes to the mix.
If you create multitrack mixes entirely in Adobe Audition, save session files in the native SESX format. If you plan to
share multitrack compositions with other applications, however, see Export with Adobe Media Encoder CC.
You can save sessions with a record of all open files, and automatically reopen them with sessions. In the Multitrack
preferences, select Reference All Open Audio And Video Files.
1In the Multitrack Editor, do one of the following:
•To save changes to the current session file, choose File > Save
•To save changes under a different filename, choose File > Save As. Or choose File > Export > Session to keep the
current session open.
•To save the session file and all the audio files it contains, choose File > Save All .
2Specify a filename and location.
3To include audio markers and information from the Metadata panel, select Include Markers And Other Metadata.
Note: For a tutorial on exporting a multitrack session, see Exporting a multitrack session from Audition .
Export sessions to OMF or Final Cut Pro Interchange format
To transfer complete mixes to other applications in your workflow, export to OMF or Final Cut Pro Interchange format.
OMF was originally created for Avid Pro Tools, but now is a common multitrack exchange format for many audio
mixing applications. Final Cut Pro Interchange format is based on human-readable XML files, which you can edit
offline to revise text references, mix settings, and so on.
Export to OMF
1In the Multitrack Editor, choose File > Export > OMF.
2Specify a filename and location.

169
Saving and exporting
Last updated 6/16/2016
3Set the following options:
Sample Type Click Change to access the Convert Sample Type dialog box. (See Converting sample types.)
OMF Settings Click Change to access the following:
Media Encapsulated stores audio clips in the OMF file itself for easier organization. Referenced stores audio clips
in the same folder as the OMF file, letting you edit them offline if necessary.
Note: Encapsulated OMF files are limited to 2 GB in size.
Media Options Determines whether clip source files are trimmed to clip length in the Editor panel or reflect the
entire original file.
Handle Duration For trimmed clips, specifies the time duration to include beyond clip edges. Including additional
audio provides more flexibility for fades and editing.
The Warnings section indicates elements of the session that will be excluded or changed. To copy this information to
the clipboard, click the Copy Warnings button .
Export to Final Cut Pro Interchange format
1In the Multitrack Editor, choose File > Export > FCP XML Interchange Format.
2Specify a filename and location.
3To include audio markers and information from the Metadata panel, select Include Markers And Other Metadata.
4To combine session and source files for easy transfer to other systems, select Save Copies Of Associated Files. To
change format and sample type for exported source files, click Options.
The following session elements are excluded from the exported file:
•The second channel of stereo clips. (All clips and tracks become mono.)
•Overlapping clips
•Effects and track EQ.
•Automation envelopes other than clip volume and mono-to-stereo track panning.
•Output routing, sends, buses, and the Master track.
Export session templates
Session templates include all multitrack properties and clips, helping you quickly start projects requiring similar
settings and tasks. Examples include an intro theme or background ambience common to several related shows.
1Choose File > Export > Session As Template. Then specify a name and location.
2To apply a template to a new session, choose File > New > Multitrack Session. Then choose an option from the
Template menu.
Export session archives
To combine session and source files for easy transfer to other computers or storage devices, export session archives.
Use this process to change the sample rate and bit depth of a session.
1Choose File > Export > Session.
2Select Save Copies Of Associated Files, and then click Options.

170
Saving and exporting
Last updated 6/16/2016
3To save source files in a different format, select Convert Files, and set options as desired.
4To export full or trimmed source files, choose from the Media Options menu.
Handle Duration specifies how much additional audio to include at the start and end of trimmed clips. For greater
flexibility with future trimming and fading adjustments, add handles of up to 10 seconds.
Export multitrack mixdown files
After you finish mixing a session, you can export all or part of it in a variety of common formats. (See Audio file
formats.) When you export, the resulting file reflects current volume, pan, and effects settings routed to the Master
track.
To quickly mix specific audio clips down to a single track, use the Multitrack > Bounce To New Track command. (See
Create a single audio clip from multiple clips.)
1If you want to export part of a session, use the Time Selection tool to select the desired range.
2Choose File > Export > Multitrack Mixdown and click one of the following depending on whether you want to
export a selected portion of your audio, an entire session, or multiple clips:
•Time Selection
•Entire Session
•Selected Clips
(Alternatively, choose Multitrack > Mixdown Session To New File to open the mixdown in the Waveform Editor and
skip the steps below.)
3Specify a filename and choose a location and file format.
4Set the following options:
Sample Type Indicates the sample rate and bit depth. To adjust these options, click Change. (See Convert the sample
rate of a file.)
New Sample Type Indicates the resulting sample types of all the files in the panel after the conversion is applied.
Format Settings Indicates data compression and storage modes; to adjust these, click Change. (See Audio format
settings.)
Mixdown Options Let you mixdown tracks as separate files, or simultaneously output mono, stereo, and 5.1
mixdowns. To adjust these and other settings, click Change.
In the Waveform Editor, choose Edit > Edit Original to open the multitrack session that created a mixdown file. This
command requires embedded metadata in the file. (See Link sessions to exported mixdown files.)
Include markers and other metadata Includes audio markers and information from the Metadata panel in saved
files. (See Working with markers and Viewing and editing XMP metadata .)
Open files after export Select the option if you want to open the files in Audition after conversion.
Audio format settings
In most cases, you should save uncompressed audio to the AIFF or WAV formats. Save to the compressed mp3 format
only when creating files for the web or portable media players.
•In a Save As or Export dialog box, click Change to the right of Format Settings to access the options below.

171
Saving and exporting
Last updated 6/16/2016
To see the effect of settings changes, note the Estimated File Size at the bottom of the dialog box.
AIFF format settings (*aif, *.aiff, *.aifc)
AIFF is the standard uncompressed audio file format on Mac OS.
Sample Type (available only for 32-bit files) Sets the audio bit depth. Higher bit depths provide more dynamic range
and reduce distortion, though they increase file size and processing time. To determine the proper setting for common
output types, see Understanding bit depth.
Integer settings clip audio that extends beyond the amplitude range for a given bit depth. Floating Point settings require
slightly more storage space, but retain much greater dynamic range.
Choose 32-bit Floating Point if you want to repeatedly process the file and discard minimal amplitude data.
Note: To add Author metadata to an AIFF file, use the Dublin Core: Creator field on the XMP tab of the Metadata panel.
(See Viewing and editing XMP metadata .)
Byte Order (available only for 16-bit files) Specifies the numerical sequence for bytes of data. Choose the Little-Endian
method for systems with Intel processors and the Big-Endian method for systems with PowerPC processors.
Monkey's Audio format settings (.ape)
Monkey's Audio compresses files to roughly half their original size, using a lossless algorithm that retains sonic fidelity.
Compression Determines the tradeoff between processing speed and file size. (Fast processing produces larger file
sizes, and vice versa.)
MP2 Audio format settings
MP2 (MPEG-1 Audio Layer II) is a lossy compression format particularly popular in radio broadcasting.
Channel Mode Choose one of the following:
•Automatic selects an option below based on the current channel configuation of the file.
•Mono produces a one-channel file.
•Dual Mono produces a two-channel file with identical audio in both channels.
•Stereo produces a two-channel file, processing channels independently, and retaining stereo imagery.
•Joint Stereo processes both channels together, reducing file size, but often affecting stereo imagery.
Bitrate Adjusts the tradeoff between file size and audio quality. Higher settings increase size and quality; lower settings
reduce size and quality.
For information about Advanced options, position the mouse over them until a tool tip appears.
MP3 format settings
MP3 is the standard compressed audio format for online distribution.
Type Choose Constant to apply a consistent bitrate or Variable to change the bitrate based on audio content.
Bitrate (for constant bitrates) or Quality (for variable) Adjusts the tradeoff between file size and audio quality. Higher
settings increase size and quality; lower settings reduce size and quality.
Avoid compressing the same audio to mp3 more than once. Opening and resaving an mp3 file causes it to be
recompressed, so any artifacts from the compressing process become more pronounced.

172
Saving and exporting
Last updated 6/16/2016
QuickTime format settings (audio-only *.mov)
You cannot adjust format settings for audio-only QuickTime files, which are always saved as uncompressed PCM (Pulse
Code Modulation) data.
Wave PCM format settings (.wav, .bwf)
Wave PCM is the standard uncompressed audio format on Windows.
You can include Broadcast Wave metadata in Windows PCM files. (See Viewing and editing XMP metadata .)
Sample Type (available only for 32-bit files) Sets the audio bit depth. Higher bit depths provide more dynamic range
and reduce distortion, though they increase file size and processing time. To determine the proper setting for common
output types, see Understanding bit depth.
Integer settings clip audio that extends beyond the amplitude range for a given bit depth. Floating Point settings require
slightly more storage space, but retain much greater dynamic range.
Note: The nonstandard 16.8 and 24.0 Floating Point options are provided for compatibility with previous versions of Adobe
Audition. (16.8 was the internal format used by Audition 1.0. 24.0 was an optional setting from the same version.)
4GB Plus Support Stores files larger than 4GB using either RF64 format, which reflects the current European
Broadcasting Union standard, or the Multiple Data Chunks format supported by older versions of Audition.
Note: To ensure compatibility with a wide range of applications, choose the RF64 format for files greater than 4GB.
libsndfile, FLAC, and OGG format settings
The following options are shared by a wide range of formats.
FLAC format uniquely is both compressed (reducing file size) and lossless (retaining full audio fidelity).
Format Specifies the file format and extension.
Encoding Specifies the data storage scheme for the file.
Byte Order Specifies the numerical sequence for bytes of data. The Default Byte Order automatically applies the default
for your system processor and is typically the best option.
VBR Quality (OGG files only) Determines the tradeoff between file size and audio quality. (Higher settings produce
larger files, but better quality.)
Close files
Do any of the following:
•To close the current file in the Editor panel, choose File > Close.
•To close all open audio, video, and session files, choose File > Close All.
•To close files that aren’t referenced by an open multitrack session, choose File > Close Unused Media.
•To close the current session and related audio clips in the Multitrack Editor, choose File > Close Session and Its
Media.

173
Saving and exporting
Last updated 6/16/2016
More Help topics
Save audio between markers to new files
Export a multitrack mix to Premiere Pro
Create an audio clip from a bus or master track
Viewing and editing XMP metadata
In Adobe Audition, the Metadata panel provides BWF, ID3, and RIFF tabs that let you quickly access this common
audio metadata. The XMP tab provides the same information, combined with a longer list of metadata common to
Adobe video applications. (For example, the Display Title field on the RIFF tab corresponds to the Title field in the
Dublin Core section of the XMP tab.)
Note: To preserve metadata when you save files, select Include Markers and Other Metadata in the Save or Export dialog
box.
The BWF tab applies to Broadcast Wave files, which let you specify a time offset for playback, as well as standard
descriptive metadata. To include Broadcast Wave metadata in a file, you must save in WAV format; see Save audio files.
To insert a Broadcast Wave file in the Multitrack Editor, see Spot-insert a Broadcast Wave file into a session.
The ID3 and RIFF tabs apply to mp3 and radio industry metadata, respectively.
About the Metadata panel and XMP
To streamline your workflow and organize your files, use XMP metadata. Metadata is a set of descriptive information
about a file. Video and audio files automatically include basic metadata properties, such as date, duration, and file type.
You can add details with properties such as location, director, copyright, and much more.
With the Metadata panel, you can share this information about assets throughout Adobe video and audio applications.
Unlike conventional clip properties, which are limited to only one application’s Project or Files panel, metadata
properties are embedded in source files, so the data automatically appears in other applications. This sharing of
metadata lets you quickly track and manage video assets as they move through your production workflow.
Note: Properties in the Metadata panel also appear in Adobe Bridge, providing additional details that help you quickly
browse assets.
About schemas and properties
A metadata schema is a collection of properties specific to a given workflow. The Dynamic Media schema, for example,
includes properties like Scene and Shot Location that are ideal for digital video projects. Exif schemas, by contrast,
include properties tailored to digital photography, like Exposure Time and Aperture Value. More general properties,
like Date and Title, appear in the Dublin Core schema. To display different properties, see Show or hide XMP metadata.
For information about a specific schema and property, hover the pointer over it in the Metadata panel. For most items,
a tool tip appears with details.
About the XMP standard
Adobe applications store metadata using the Extensible Metadata Platform (XMP). XMP is built on XML, which
facilitates the exchange of metadata across a variety of applications and publishing workflows. Metadata in most other
formats (such as Exif, GPS, and TIFF) automatically transfers to XMP so you can more easily view and manage it.

174
Saving and exporting
Last updated 6/16/2016
In most cases, XMP metadata is stored directly in source files. If a particular file format doesn’t support XMP, however,
metadata is stored in a separate sidecar file.
Project assets without corresponding files don’t support XMP. Examples from Adobe Premiere Pro include Bars and
Tone, Universal Counting Leader, Color Matte, Titles, Black Video, and Transparent Video.
To customize the creation and exchange of metadata, use the XMP Software Development Kit. For more information
about XMP, see Extensible Metadata Platform.
Show or hide XMP metadata
To optimize the Metadata panel for your workflow, show or hide entire schemas or individual properties, displaying
only those that you need.
1From the options menu for the Metadata panel, select Metadata Display.
2To show or hide schemas or properties, select or deselect them from the list.
Save, switch, or delete metadata sets
If you use multiple workflows, each requiring different sets of displayed metadata, you can save sets and switch between
them.
1From the options menu for the Metadata panel, select Metadata Display.
2Do any of the following:
•To save a customized set of displayed metadata, click Save Settings. Then enter a name, and click OK.
•To display a previously saved set of metadata, select it from the menu.
•To delete a previously saved set of metadata, select it from the menu, and click Delete Settings.
Create schemas and properties
If you have a unique, customized workflow that the default metadata options don’t address, create your own schemas
and properties.
1From the options menu for the Metadata panel, select Metadata Display.
2Click New Schema, and enter a name.
3In the list, click Add Property to the right of the schema name.
4Enter a property name, and select one of the following for Type:
Integer Displays whole numbers that you drag or click to change.
Real Displays fractional numbers that you drag or click to change.
Text Displays a text box (for properties similar to Location).
Boolean Displays a check box (for On or Off properties).
Edit XMP metadata
Similarly named properties are linked in the Metadata and Files panels. However, the Metadata panel provides more
extensive properties.
1In the Editor panel, open the desired file or session.
2In the Metadata panel, edit text or adjust values as needed.

175
Saving and exporting
Last updated 6/16/2016
Search XMP metadata
1In the Editor panel, open the file or session you want to search.
2In the Metadata panel, click the XMP tab.
3In the search box, enter the text you want to find.
The list of metadata collapses to reveal only properties that contain your search string.
4To navigate through the search results, click the Previous and Next buttons to the right of the search box, or
press Tab.
5To exit the search mode and return to the full list of metadata, click the close button to the right of the search box.
