Adobe Configuring And Administering ColdFUsion MX Cold Fusion 7.0 Cfmx7 Configadmin
User Manual: adobe ColdFusion - MX 7.0 - Configuring and Administering Free User Guide for Adobe ColdFusion Software, Manual
Open the PDF directly: View PDF ![]() .
.
Page Count: 170 [warning: Documents this large are best viewed by clicking the View PDF Link!]
- Contents
- Introduction
- Administering ColdFusion MX 7
- Administering ColdFusion MX
- Using the ColdFusion MX Administrator
- Contents
- Initial administration tasks
- Accessing user assistance
- Server Settings section
- Data & Services section
- Debugging & Logging section
- Extensions section
- Event Gateways section
- Security section
- Packaging and Deployment section
- Enterprise Manager section
- Custom Extensions section
- Administrator API
- Data Source Management
- Contents
- About JDBC
- Adding data sources
- Connecting to DB2 Universal Database
- Connecting to Informix
- Connecting to Microsoft Access
- Connecting to Microsoft Access with Unicode
- Connecting to Microsoft SQL Server
- Connecting to MySQL
- Connecting to ODBC Socket
- Connecting to Oracle
- Connecting to other data sources
- Connecting to Sybase
- Connecting to JNDI data sources
- Web Server Management
- Deploying ColdFusion Applications
- Administering Security
- Using Multiple Server Instances
- Administering Verity
- Introducing Verity and Verity Tools
- Indexing Collections with Verity Spider
- Using Verity Utilities
- Contents
- Overview of Verity utilities
- Using the mkvdk utility
- Using the rck2 utility
- Using the rcvdk utility
- Using the didump utility
- Using the browse utility
- Using the merge utility
- Index

COLDFUSION®MX 7
Configuring and Administering ColdFusion MX
Trademarks
1 Step RoboPDF, ActiveEdit, ActiveTest, Authorware, Blue Sky Software, Blue Sky, Breeze, Breezo, Captivate, Central,
ColdFusion, Contribute, Database Explorer, Director, Dreamweaver, Fireworks, Flash, FlashCast, FlashHelp, Flash Lite,
FlashPaper, Flex, Flex Builder, Fontographer, FreeHand, Generator, HomeSite, JRun, MacRecorder, Macromedia, MXML,
RoboEngine, RoboHelp, RoboInfo, RoboPDF, Roundtrip, Roundtrip HTML, Shockwave, SoundEdit, Studio MX, UltraDev,
and WebHelp are either registered trademarks or trademarks of Macromedia, Inc. and may be registered in the United States or
in other jurisdictions including internationally. Other product names, logos, designs, titles, words, or phrases mentioned within
this publication may be trademarks, service marks, or trade names of Macromedia, Inc. or other entities and may be registered in
certain jurisdictions including internationally.
This product includes code licensed from RSA Data Security.
Third-Party Information
This guide contains links to third-party websites that are not under the control of Macromedia, and Macromedia is not
responsible for the content on any linked site. If you access a third-party website mentioned in this guide, then you do so at your
own risk. Macromedia provides these links only as a convenience, and the inclusion of the link does not imply that Macromedia
endorses or accepts any responsibility for the content on those third-party sites.
Copyright © 1999–2005 Macromedia, Inc. All rights reserved. U.S. Patents Pending. This manual may not be copied,
photocopied, reproduced, translated, or converted to any electronic or machine-readable form in whole or in part without
written approval from Macromedia, Inc. Notwithstanding the foregoing, the owner or authorized user of a valid copy of
the software with which this manual was provided may print out one copy of this manual from an electronic version of this
manual for the sole purpose of such owner or authorized user learning to use such software, provided that no part of this
manual may be printed out, reproduced, distributed, resold, or transmitted for any other purposes, including, without
limitation, commercial purposes, such as selling copies of this documentation or providing paid-for support services.
Part Number ZCF70M400
Acknowledgments
Project Management: Randy Nielsen
Writing: Randy Nielsen, Chris Bedford
Editing: Linda Adler, Noreen Maher
Production Management: Patrice O’Neill,
Media Design and Production: John Francis, Adam Barnett
Special thanks to Sawako Gensure, Seungmin Lee, Takashi Koto, Nozomi Kugita, Masayo Noda, Hiroshi Okugawa, Bowne
Global Solutions
First Edition: January 2005
Macromedia, Inc.
600 Townsend St.
San Francisco, CA 94103

3
CONTENTS
INTRODUCTION . . . . . . . . . . . . . . . . . . . . . . . . . . . . . . . . . . . . . . . . . . . . . . . . . . . 7
PART I: Administering ColdFusion MX 7
CHAPTER 1: Administering ColdFusion MX . . . . . . . . . . . . . . . . . . . . . . . . . . . . . 11
About the ColdFusion MX Administrator. . . . . . . . . . . . . . . . . . . . . . . . . . . . . . . 11
CHAPTER 2: Using the ColdFusion MX Administrator . . . . . . . . . . . . . . . . . . . . . 13
Initial administration tasks . . . . . . . . . . . . . . . . . . . . . . . . . . . . . . . . . . . . . . . . . . 14
Accessing user assistance . . . . . . . . . . . . . . . . . . . . . . . . . . . . . . . . . . . . . . . . . . . . 14
Server Settings section . . . . . . . . . . . . . . . . . . . . . . . . . . . . . . . . . . . . . . . . . . . . . . 15
Data & Services section. . . . . . . . . . . . . . . . . . . . . . . . . . . . . . . . . . . . . . . . . . . . . 24
Debugging & Logging section. . . . . . . . . . . . . . . . . . . . . . . . . . . . . . . . . . . . . . . . 26
Extensions section . . . . . . . . . . . . . . . . . . . . . . . . . . . . . . . . . . . . . . . . . . . . . . . . . 32
Event Gateways section . . . . . . . . . . . . . . . . . . . . . . . . . . . . . . . . . . . . . . . . . . . . . 34
Security section . . . . . . . . . . . . . . . . . . . . . . . . . . . . . . . . . . . . . . . . . . . . . . . . . . . 35
Packaging and Deployment section . . . . . . . . . . . . . . . . . . . . . . . . . . . . . . . . . . . . 36
Enterprise Manager section . . . . . . . . . . . . . . . . . . . . . . . . . . . . . . . . . . . . . . . . . . 37
Custom Extensions section . . . . . . . . . . . . . . . . . . . . . . . . . . . . . . . . . . . . . . . . . . 38
Administrator API. . . . . . . . . . . . . . . . . . . . . . . . . . . . . . . . . . . . . . . . . . . . . . . . . 39
CHAPTER 3: Data Source Management . . . . . . . . . . . . . . . . . . . . . . . . . . . . . . . 43
About JDBC . . . . . . . . . . . . . . . . . . . . . . . . . . . . . . . . . . . . . . . . . . . . . . . . . . . . . 44
Adding data sources. . . . . . . . . . . . . . . . . . . . . . . . . . . . . . . . . . . . . . . . . . . . . . . . 45
Connecting to DB2 Universal Database . . . . . . . . . . . . . . . . . . . . . . . . . . . . . . . . 47
Connecting to Informix . . . . . . . . . . . . . . . . . . . . . . . . . . . . . . . . . . . . . . . . . . . . 49
Connecting to Microsoft Access . . . . . . . . . . . . . . . . . . . . . . . . . . . . . . . . . . . . . . 50
Connecting to Microsoft Access with Unicode . . . . . . . . . . . . . . . . . . . . . . . . . . . 52
Connecting to Microsoft SQL Server . . . . . . . . . . . . . . . . . . . . . . . . . . . . . . . . . . 53
Connecting to MySQL . . . . . . . . . . . . . . . . . . . . . . . . . . . . . . . . . . . . . . . . . . . . . 56
Connecting to ODBC Socket . . . . . . . . . . . . . . . . . . . . . . . . . . . . . . . . . . . . . . . . 57
Connecting to Oracle . . . . . . . . . . . . . . . . . . . . . . . . . . . . . . . . . . . . . . . . . . . . . . 59
Connecting to other data sources . . . . . . . . . . . . . . . . . . . . . . . . . . . . . . . . . . . . . 60
Connecting to Sybase . . . . . . . . . . . . . . . . . . . . . . . . . . . . . . . . . . . . . . . . . . . . . . 62
Connecting to JNDI data sources . . . . . . . . . . . . . . . . . . . . . . . . . . . . . . . . . . . . . 63

4 Contents
CHAPTER 4: Web Server Management . . . . . . . . . . . . . . . . . . . . . . . . . . . . . . . . 65
About web servers in ColdFusion MX. . . . . . . . . . . . . . . . . . . . . . . . . . . . . . . . . . 65
Using the built-in web server. . . . . . . . . . . . . . . . . . . . . . . . . . . . . . . . . . . . . . . . . 66
Using an external web server . . . . . . . . . . . . . . . . . . . . . . . . . . . . . . . . . . . . . . . . . 67
Web server configuration. . . . . . . . . . . . . . . . . . . . . . . . . . . . . . . . . . . . . . . . . . . . 68
Multihoming. . . . . . . . . . . . . . . . . . . . . . . . . . . . . . . . . . . . . . . . . . . . . . . . . . . . . 74
CHAPTER 5: Deploying ColdFusion Applications . . . . . . . . . . . . . . . . . . . . . . . . 79
Archive and deployment options . . . . . . . . . . . . . . . . . . . . . . . . . . . . . . . . . . . . . . 79
Packaging applications in CAR files. . . . . . . . . . . . . . . . . . . . . . . . . . . . . . . . . . . . 79
Packaging applications in J2EE archive files. . . . . . . . . . . . . . . . . . . . . . . . . . . . . . 80
Using the cfcompile utility . . . . . . . . . . . . . . . . . . . . . . . . . . . . . . . . . . . . . . . . . . 82
CHAPTER 6: Administering Security . . . . . . . . . . . . . . . . . . . . . . . . . . . . . . . . . . 85
About ColdFusion MX security. . . . . . . . . . . . . . . . . . . . . . . . . . . . . . . . . . . . . . . 85
Using password protection . . . . . . . . . . . . . . . . . . . . . . . . . . . . . . . . . . . . . . . . . . 86
Using sandbox security . . . . . . . . . . . . . . . . . . . . . . . . . . . . . . . . . . . . . . . . . . . . . 86
CHAPTER 7: Using Multiple Server Instances . . . . . . . . . . . . . . . . . . . . . . . . . . . 91
About multiple server instances . . . . . . . . . . . . . . . . . . . . . . . . . . . . . . . . . . . . . . . 92
Defining additional server instances . . . . . . . . . . . . . . . . . . . . . . . . . . . . . . . . . . . 93
Enabling application isolation . . . . . . . . . . . . . . . . . . . . . . . . . . . . . . . . . . . . . . . . 94
Enabling clustering for load balancing and failover . . . . . . . . . . . . . . . . . . . . . . . . 99
Defining remote server instances to the ColdFusion MX Administrator . . . . . . . 101
PART II: Administering Verity
CHAPTER 8: Introducing Verity and Verity Tools . . . . . . . . . . . . . . . . . . . . . . . . 105
Collections and the ColdFusion MX Verity architecture . . . . . . . . . . . . . . . . . . . 105
About Verity Spider (vspider) . . . . . . . . . . . . . . . . . . . . . . . . . . . . . . . . . . . . . . . 107
About the Verity utilities . . . . . . . . . . . . . . . . . . . . . . . . . . . . . . . . . . . . . . . . . . . 107
CHAPTER 9: Indexing Collections with Verity Spider . . . . . . . . . . . . . . . . . . . . . 109
About Verity Spider. . . . . . . . . . . . . . . . . . . . . . . . . . . . . . . . . . . . . . . . . . . . . . . 109
About Verity Spider syntax . . . . . . . . . . . . . . . . . . . . . . . . . . . . . . . . . . . . . . . . . 111
Core options . . . . . . . . . . . . . . . . . . . . . . . . . . . . . . . . . . . . . . . . . . . . . . . . . . . . 114
Processing options . . . . . . . . . . . . . . . . . . . . . . . . . . . . . . . . . . . . . . . . . . . . . . . . 115
Networking options. . . . . . . . . . . . . . . . . . . . . . . . . . . . . . . . . . . . . . . . . . . . . . . 120
Path and URL options. . . . . . . . . . . . . . . . . . . . . . . . . . . . . . . . . . . . . . . . . . . . . 123
Content options . . . . . . . . . . . . . . . . . . . . . . . . . . . . . . . . . . . . . . . . . . . . . . . . . 128
Locale options . . . . . . . . . . . . . . . . . . . . . . . . . . . . . . . . . . . . . . . . . . . . . . . . . . . 135
Logging options . . . . . . . . . . . . . . . . . . . . . . . . . . . . . . . . . . . . . . . . . . . . . . . . . 136
Maintenance options. . . . . . . . . . . . . . . . . . . . . . . . . . . . . . . . . . . . . . . . . . . . . . 137
Setting MIME types . . . . . . . . . . . . . . . . . . . . . . . . . . . . . . . . . . . . . . . . . . . . . . 138

Contents 5
CHAPTER 10: Using Verity Utilities . . . . . . . . . . . . . . . . . . . . . . . . . . . . . . . . . . . 141
Overview of Verity utilities . . . . . . . . . . . . . . . . . . . . . . . . . . . . . . . . . . . . . . . . . 141
Using the mkvdk utility. . . . . . . . . . . . . . . . . . . . . . . . . . . . . . . . . . . . . . . . . . . . 142
Using the rck2 utility. . . . . . . . . . . . . . . . . . . . . . . . . . . . . . . . . . . . . . . . . . . . . . 153
Using the rcvdk utility. . . . . . . . . . . . . . . . . . . . . . . . . . . . . . . . . . . . . . . . . . . . . 154
Using the didump utility . . . . . . . . . . . . . . . . . . . . . . . . . . . . . . . . . . . . . . . . . . . 158
Using the browse utility. . . . . . . . . . . . . . . . . . . . . . . . . . . . . . . . . . . . . . . . . . . . 160
Using the merge utility . . . . . . . . . . . . . . . . . . . . . . . . . . . . . . . . . . . . . . . . . . . . 162
INDEX . . . . . . . . . . . . . . . . . . . . . . . . . . . . . . . . . . . . . . . . . . . . . . . . . . . . . . . . . . 165

6 Contents

INTRODUCTION
Configuring and Administering ColdFusion MX is intended for anyone who needs to configure and
manage their ColdFusion development environment.
About Macromedia ColdFusion MX 7 documentation
The ColdFusion MX 7 documentation is designed to provide support for the complete spectrum of
participants.
Documentation set
The ColdFusion MX 7 documentation set includes the following titles:
Book Description
Installing and Using
ColdFusion MX
Describes system installation and basic configuration for Microsoft Windows,
Solaris, and Linux. www.macromedia.com/go/livedocs_cfmx7docs_installing
Configuring and
Administering
ColdFusion MX
Part I describes how to manage the ColdFusion environment, including
connecting to your data sources and configuring security for your applications.
Part II describes Verity search tools and utilities that you can use for configuring
the Verity Search Server, as well as creating, managing, and troubleshooting
Verity collections. To see this manual, go to www.macromedia.com/go/
livedocs_cfmx7docs_configadmin.
ColdFusion MX
Developer’s Guide
Describes how to develop your dynamic web applications, including retrieving
and updating your data, and using structures and forms. This manual includes
two volumes. To see this manual, go to www.macromedia.com/go/
livedocs_cfmx7docs_dev.
Getting Started
Building
ColdFusion MX
Applications
Contains an overview of ColdFusion features and application development
procedures. This manual includes a tutorial that guides you through the process
of developing a sample ColdFusion application. To see this manual online, go to
www.macromedia.com/go/livedocs_cfmx7docs_gs.
CFML Reference Provides descriptions, syntax, usage, and code examples for all ColdFusion
tags, functions, and variables. This manual includes two volumes. To see this
manual, go to www.macromedia.com/go/livedocs_cfmx7docs_cfml_reference.
CFML Quick Reference Shows the syntax of ColdFusion tags, functions, and variables in a brief guide.

8 Introduction:
Viewing online documentation
All ColdFusion MX documentation is available online in HTML and Adobe Acrobat Portable
Document Format (PDF) files. Go to the documentation home page for ColdFusion MX on the
Macromedia website: www.macromedia.com. In addition, you can view the documentation in
LiveDocs, which lets you add comments to pages and view the latest comments added by
Macromedia, by going to www.macromedia.com/go/livedocs_cfmx7docs.

PART I
Administering ColdFusion MX 7
This part describes how to manage the ColdFusion environment, including using the
ColdFusion MX Administrator, connecting to your data sources, managing your web server,
deploying your applications, and configuring security for your applications.
The following chapters are included:
Chapter 1: Administering ColdFusion MX . . . . . . . . . . . . . . . . . . . . . . . . . . . . . . . . . . . . . . . 11
Chapter 2: Using the ColdFusion MX Administrator . . . . . . . . . . . . . . . . . . . . . . . . . . . . . . . 13
Chapter 3: Data Source Management . . . . . . . . . . . . . . . . . . . . . . . . . . . . . . . . . . . . . . . . . . . 43
Chapter 4: Web Server Management . . . . . . . . . . . . . . . . . . . . . . . . . . . . . . . . . . . . . . . . . . . . 65
Chapter 5: Deploying ColdFusion Applications. . . . . . . . . . . . . . . . . . . . . . . . . . . . . . . . . . . . 79
Chapter 6: Administering Security. . . . . . . . . . . . . . . . . . . . . . . . . . . . . . . . . . . . . . . . . . . . . . 85
Chapter 7: Using Multiple Server Instances . . . . . . . . . . . . . . . . . . . . . . . . . . . . . . . . . . . . . . . 91
PART I

11
CHAPTER 1
Administering ColdFusion MX
This chapter presents an overview of Macromedia ColdFusion MX 7 configuration and
administration tasks. Although you perform most ColdFusion MX administration tasks using the
ColdFusion MX Administrator, you also manage databases, web server configurations, and the
Verity Search Server.
Contents
About the ColdFusion MX Administrator . . . . . . . . . . . . . . . . . . . . . . . . . . . . . . . . . . . . . . . . 11
About web server administration . . . . . . . . . . . . . . . . . . . . . . . . . . . . . . . . . . . . . . . . . . . . . . . 12
About Verity administration. . . . . . . . . . . . . . . . . . . . . . . . . . . . . . . . . . . . . . . . . . . . . . . . . . . 12
About the ColdFusion MX Administrator
The ColdFusion MX Administrator provides a browser-based interface for managing your
ColdFusion environment. You can configure many settings to provide optimal levels of security
and functionality. The available options are based on your edition of ColdFusion MX 7—
Standard or Enterprise—as well as your configuration: server, multiserver, or J2EE. For more
information on ColdFusion MX configurations, see “About the ColdFusion MX 7 installation” in
Chapter 1, “Preparing to Install ColdFusion MX 7,” in Installing and Using ColdFusion MX.
The default location for the ColdFusion MX Administrator login page is:
http://servername[:portnumber]/CFIDE/administrator/index.cfm
Where servername is the fully qualified domain name of your web server. Common values for
servername are localhost or 127.0.0.1 (each refers to the web server on the local computer).
If you are using the ColdFusion built-in web server, include the port number as part of the
servername. The default port number for the server configuration is 8500; for example,
http://servername:8500/CFIDE/administrator/index.cfm. The default port number for the
multiserver configuration is 8300. If you are using the J2EE configuration, include the port
number used by the J2EE application server’s web server.
Tip: If you were using the built-in web server in a previous version and upgraded to ColdFusion MX 7,
the installer automatically finds an unused port for the built-in web server (typically 8501).

12 Chapter 1: Administering ColdFusion MX
If your ColdFusion MX Administrator is on a remote computer, use the Domain Name Services
(DNS) name or Internet Protocol (IP) address of the remote host.
To access the ColdFusion MX Administrator, enter the password specified when you installed
ColdFusion MX.
Tip: If you are running in a multihomed environment and have problems displaying the
ColdFusion MX Administrator, see Chapter 4, “Web Server Management,” on page 65 for
configuration information.
For more information, see Chapter 2, “Using the ColdFusion MX Administrator,” on page 13.
About web server administration
ColdFusion MX applications require a web server to process ColdFusion Markup Language
(CFML) pages. The server and multiserver configurations provide a built-in web server along
with support for external web servers, such as Apache, IIS, and Sun ONE Web Server (formerly
known as iPlanet).
For more information, see Chapter 4, “Web Server Management,” on page 65.
About Verity administration
ColdFusion MX includes Verity K2 Server search technology. Verity K2 Server is a high-
performance search engine designed to process searches quickly in a high-performance,
distributed system.
For more information, see Chapter 8, “Introducing Verity and Verity Tools,” on page 105.

13
CHAPTER 2
Using the ColdFusion MX Administrator
This chapter explains the basic administration tasks, following the structure of the Macromedia
ColdFusion MX Administrator sections. It also includes a brief description of each Administrator
screen and a discussion of performing Administrator functionality programmatically through the
Administrator application programming interface (API).
Contents
Initial administration tasks. . . . . . . . . . . . . . . . . . . . . . . . . . . . . . . . . . . . . . . . . . . . . . . . . . . . 14
Accessing user assistance. . . . . . . . . . . . . . . . . . . . . . . . . . . . . . . . . . . . . . . . . . . . . . . . . . . . . . 14
Server Settings section . . . . . . . . . . . . . . . . . . . . . . . . . . . . . . . . . . . . . . . . . . . . . . . . . . . . . . . 15
Data & Services section . . . . . . . . . . . . . . . . . . . . . . . . . . . . . . . . . . . . . . . . . . . . . . . . . . . . . . 24
Debugging & Logging section . . . . . . . . . . . . . . . . . . . . . . . . . . . . . . . . . . . . . . . . . . . . . . . . . 26
Extensions section . . . . . . . . . . . . . . . . . . . . . . . . . . . . . . . . . . . . . . . . . . . . . . . . . . . . . . . . . . 32
Event Gateways section . . . . . . . . . . . . . . . . . . . . . . . . . . . . . . . . . . . . . . . . . . . . . . . . . . . . . . 34
Security section . . . . . . . . . . . . . . . . . . . . . . . . . . . . . . . . . . . . . . . . . . . . . . . . . . . . . . . . . . . . 35
Packaging and Deployment section . . . . . . . . . . . . . . . . . . . . . . . . . . . . . . . . . . . . . . . . . . . . . 36
Enterprise Manager section . . . . . . . . . . . . . . . . . . . . . . . . . . . . . . . . . . . . . . . . . . . . . . . . . . . 37
Custom Extensions section . . . . . . . . . . . . . . . . . . . . . . . . . . . . . . . . . . . . . . . . . . . . . . . . . . . 38
Administrator API . . . . . . . . . . . . . . . . . . . . . . . . . . . . . . . . . . . . . . . . . . . . . . . . . . . . . . . . . . 39

14 Chapter 2: Using the ColdFusion MX Administrator
Initial administration tasks
Immediately after you install ColdFusion MX, you might have to perform some or all of the
administrative tasks described in the following table:
Accessing user assistance
You can obtain assistance from the ColdFusion MX Administrator in the following ways:
Online Help You access the context-sensitive online Help by clicking the question-mark icon on
any ColdFusion MX Administrator page. The online Help has procedural and brief overview
content for the ColdFusion MX Administrator page that you are viewing. This information
appears in a new browser window and contains standard Contents, Index, and Search tabs.
Task Description
Establish database
connections
ColdFusion applications require data source connections to query and
write to databases. To create, verify, edit, and delete database
connections, use the Data Sources page.
For more information, see Chapter 3, “Data Source Management,” on
page 43.
Specify directory
mappings
Directory mappings redirect relative file paths to physical directories on
your server. To specify server-wide directory aliases, use the Mappings
page.
For more information, see “Mappings page” on page 20.
Configure debugging
settings
Debugging information provides important data about CFML page
processing. To choose the debugging information to display, and to
designate an IP address to receive debugging information, use the
Debugging & Logging section.
For more information, see “Debugging Settings and Debugging IPs
pages” on page 26.
Set up e-mail E-mail lets ColdFusion applications send automated e-mail messages. To
configure an e-mail server and mail options, use the Mail Server page.
For more information, see “Mail Server page” on page 20.
Change passwords You might have to change the passwords that you set for the
ColdFusion MX Administrator and RDS during ColdFusion MX
installation. To change passwords, use the Security section.
For more information, see “CF Admin Password page” on page 35 and
“RDS Password page” on page 36.
Configure Java settings (Server configuration only) You might have to customize Java settings,
such as classpath information, to meet the needs of your applications. To
change Java settings, use the Java and JVM page.
For more information, see “Extensions section” on page 32.
Restrict tag access Some CFML tags might present a potential security risk for your server. To
disable certain tags, use the Sandbox Security page.
For more information, see Chapter 6, “Administering Security,” on
page 85.

Server Settings section 15
Getting Started Experience Click the Getting Started link to open the Getting Started
Experience, which provides descriptions of new features, code examples, and sample applications
to help you learn about ColdFusion MX.
Documentation Click the Documentation link to access the entire ColdFusion MX
documentation set online.
Tech notes Click the Tech Notes link to access the collection of articles about ColdFusion MX
from the Macromedia website (www.macromedia.com).
Server Settings section
The Server Settings section lets you manage client and memory variables, mappings, charting,
and archiving. You also configure e-mail and Java settings in this section.
The Server Settings section contains the following pages:
•Settings page
•Caching page
•Client Variables page
•Memory Variables page
•Mappings page
•Mail Server page
•Charting Settings page
•Java and JVM Settings page
•ColdFusion Archives page
•Settings Summary page
Settings page
The Settings page of the ColdFusion MX Administrator contains configuration options that you
can set or enable to manage ColdFusion MX. These options can significantly affect server
performance. The following table describes the options:
Option Description
Maximum number of
simultaneous requests
(not available in J2EE
configuration)
Enter a number to limit simultaneous requests to ColdFusion MX.
When the server reaches the limit, requests are queued and handled in
the order received. Limiting the number of simultaneous requests can
improve performance.
Timeout requests after n
seconds
Select this option to prevent unusually lengthy requests from using up
server resources. Enter a limit to the time that ColdFusion MX waits
before terminating a request. Requests that take longer than the
timeout period are terminated.
Use UUID for cftoken Specify whether to use a universally unique identifier (UUID), rather
than a random number, for a cftoken.

16 Chapter 2: Using the ColdFusion MX Administrator
Caching page
The Caching page of the Administrator contains configuration options that you can set or enable
to cache templates, queries, and data sources. These options can significantly affect server
performance. The following table describes the settings:
Enable HTTP status codes Select this option to configure ColdFusion MX to set a status code of
500 Internal Server Error for an unhandled error. Disable this option to
configure ColdFusion MX to set a status code of 200 OK for
everything, including unhandled errors.
Enable Whitespace
Management (not available
in J2EE configuration)
Select this option to compress repeating sequences of spaces, tabs,
and carriage return/linefeeds. Compressing whitespace can
significantly compact the output of a ColdFusion page.
Enable Global Script
Protection
Select this option to protect Form, URL, CGI, and Cookie scope
variables from cross-site scripting attacks. Select this option if your
application does not contain this type of protection logic.
Default CFFORM
ScriptSrc Directory
Specify the default path (relative to the web root) to the directory that
contains the cfform.js file. Developers reference this file in the
ScriptSrc attribute of the cfform tag.
In a hosted environment, you might need to move the cfform.js file to a
directory other than CFIDE.
Missing Template Handler Specify a page to execute when ColdFusion MX cannot find a
requested page. This specification is relative to the web root.
Note: If the user is running Microsoft Internet Explorer with "Show
Friendly HTTP error messages" enabled in advanced settings (the
default), Internet Explorer will only display this page if it contains more
than 512 bytes.
Site-wide Error Handler Specify a page to execute when ColdFusion MX encounters an error
while processing a request. This specification is relative to the web
root. When you define a site-wide error handler or missing template
handler, ColdFusion MX does not log page not found errors and
exceptions.
Note: If the user is running Internet Explorer with "Show Friendly HTTP
error messages" enabled in advanced settings (the default), Internet
Explorer will only display this page if it contains more than 512 bytes.
Option Description
Maximum number of
cached templates
Select this option by entering a value that specifies the number of
templates that ColdFusion MX caches. For best performance, set this
to a value that is large enough to contain your application’s commonly
accessed ColdFusion pages, yet small enough to avoid excessive
reloading. You can experiment with a range of values on your
development server; a suitable starting point is one page per MB of
Java Virtual Machine (JVM) size.
Trusted cache Select this option if you want ColdFusion MX to use cached templates
without checking whether they changed. For sites that are not updated
frequently, using this option minimizes file system overhead.
Option Description

Server Settings section 17
Client Variables page
Client variables let you store user information and preferences between sessions. Using
information from client variables, you can customize page content for individual users.
You enable client variable default settings in ColdFusion MX on the Client Variables page of the
Administrator. ColdFusion MX lets you store client variables in the following ways:
•In database tables
Note: If your data source uses one of the JDBC drivers bundled with ColdFusion MX 7,
ColdFusion MX can automatically create the necessary tables. If your data source uses the ODBC
Socket or a third-party JDBC driver, you must manually create the necessary CDATA and
CGLOBAL database tables.
•As cookies in users’ web browsers
•In the operating system registry
Caution: Macromedia recommends that you do not store client variables in the registry because it
can critically degrade performance of the server. If you do use the registry to store client variables,
you must allocate sufficient memory and disk space.
You can override settings specified in the Client Variables page using the Application.cfc file or
the cfapplication tag. For more information, see ColdFusion MX Developer’s Guide.
Save Class Files Select this option to save to disk the class files generated by the
ColdFusion bytecode compiler. During the development phase, it is
typically faster if you disable this option.
Cache web server paths
(not available in J2EE
configuration)
Select this option to cache ColdFusion page paths for a single server.
Clear this option if ColdFusion MX connects to a web server with
multiple websites or multiple virtual websites.
Limit the maximum number
of cached queries on the
server to [n] queries
Select this option by entering a value to limit the maximum number of
cached queries that the server maintains. Cached queries allow
retrieval of result sets from memory rather than through a database
transaction. Because queries reside in memory, and query result set
sizes differ, you must provide a limit for the number of cached queries.
You enable cached queries with the cachedwithin or cachedafter
attributes of the cfquery tag.
Clear Template Cache Now Empties the template cache. ColdFusion reloads templates into
memory the next time they are requested and recompiles them if they
have been modified.
Option Description

18 Chapter 2: Using the ColdFusion MX Administrator
The following table compares the client variable storage options:
Migrating client variable data
To migrate your client variable data to another data source, you should know the structure of the
database tables that store this information. Client variables stored externally use two simple
database tables, like those shown in the following tables:
Creating client variable tables
Use the following sample ColdFusion page as a model for creating client variable database tables
in your own database. However, keep in mind that not all databases support the same column
data type names. For the proper data type, see your database documentation.
Tip: The ColdFusion MX Administrator can create client variable tables for data sources that use one
of the bundled JDBC drivers. For more information, see the online help.
Storage type Advantages Disadvantages
Data source •Can use existing data source
•Portable: not tied to the host
system or operating system
•Requires database transaction to
read/write variables
•More complex to implement
Browser cookies •Simple implementation
•Good performance
•Can be set to expire automatically
•Client-side control
•Users can configure browsers to
disallow cookies
•Cookie data is limited to 4 KB
•Netscape Navigator allows only 20
cookies from one host; ColdFusion MX
uses three cookies to store read-only
data, leaving only 17 cookies available
System registry •Simple implementation
•Good performance
•Registry can be exported easily to
other systems
•Server-side control
•Possible restriction of the registry’s
maximum size limit in Windows in the
Control Panel
•Integrated with the host system: not
practical for clustered servers
•Not available for UNIX
CDATA Table
Column Data type
cfid CHAR(64), TEXT, VARCHAR, or equivalent
app CHAR(64), TEXT, VARCHAR, or equivalent
data MEMO, LONGTEXT, LONG VARCHAR, or equivalent
CGLOBAL Table
Column Data type
cfid CHAR(64), TEXT, VARCHAR, or equivalent
data MEMO, LONGTEXT, LONG VARCHAR, or equivalent
lvisit TIMESTAMP, DATETIME, DATE, or equivalent

Server Settings section 19
Sample table creation page
<!---- Create the Client variable storage tables in a datasource.
This example applies to Microsoft Access databases. --->
<cfquery name="data1" datasource="#DSN#">
CREATE TABLE CDATA
(
cfid char(20),
app char(64),
data memo
)
</cfquery>
<cfquery name="data2" datasource="#DSN#">
CREATE UNIQUE INDEX id1
ON CDATA (cfid,app)
</cfquery>
<cfquery name="global1" datasource="#DSN#">
CREATE TABLE CGLOBAL
(
cfid char(20),
data memo,
lvisit date
)
</cfquery>
<cfquery name="global2" datasource="#DSN#">
CREATE INDEX id2
ON CGLOBAL (cfid)
</cfquery>
<cfquery name="global2" datasource="#DSN#">
CREATE INDEX id3
ON CGLOBAL (lvisit)
</cfquery>
Memory Variables page
You use the Memory Variables page of the ColdFusion MX Administrator to enable application
and session variables server-wide. By default, application and session variables are enabled when
you install ColdFusion MX. If you disable either type of variable in the Memory Variables page,
you cannot use them in a ColdFusion application.
You can specify maximum and default timeout values for session and application variables. Unless
you define a timeout value in an Application.cfc or Application.cfm file, application variables
expire in two days. Session variables expire when user sessions end. To change these behaviors,
enter new default and maximum timeout values on the Memory Variables page of the
Administrator.
Note: Timeout values that you specify for application variables override the timeout values set in the
Application.cfc or Application.cfm file.

20 Chapter 2: Using the ColdFusion MX Administrator
You can also specify whether to use J2EE session variables. When you enable the J2EE session
variables, ColdFusion creates an identifier for each session and does not use the CFToken or
CFID cookie value. For more information, see ColdFusion MX Developer’s Guide.
Note: When using J2EE sessions, ensure that the session timeout, specified in the
WEB-INF/web.xml session-timeout element is longer than the session timeout that you specify in
the ColdFusion MX Administrator and longer than any sessiontimeout attribute specified in a
cfapplication tag.
Mappings page
You use the Mappings page of the ColdFusion MX Administrator to add, update, and delete
logical aliases for paths to directories on your server. ColdFusion mappings apply only to pages
processed by ColdFusion MX with the cfinclude and cfmodule tags. If you save CFML pages
outside of the web_root directory (or whatever directory is mapped to "/"), you must add a
mapping to the location of those files on your server.
Assume that the "/" mapping on your server points to C:\CFusionMX7\wwwroot, but all your
ColdFusion header pages reside in C:\2002\newpages\headers. In order for ColdFusion MX to
find your header pages, you must add a mapping in the ColdFusion MX Administrator that
points to C:\2002\newpages\headers (for example, add a mapping for /headers that points to
C:\2002\newpages\headers). In the ColdFusion pages located in C:\CFusionMX7\wwwroot, you
reference these header pages using /headers in your cfinclude and cfmodule tags.
Note: ColdFusion mappings are different from web server virtual directories. For information on
creating a virtual directory to access a given directory using a URL in your web browser, consult your
web server’s documentation.
Mail Server page
You use the Mail Server page of the ColdFusion MX Administrator to specify a mail server to
send automated e-mail messages. ColdFusion MX supports the Simple Mail Transfer Protocol
(SMTP) for sending e-mail messages and the Post Office Protocol (POP) for retrieving e-mail
messages from your mail server. To use e-mail messaging in your ColdFusion applications, you
must have access to an SMTP server and a POP account.
The ColdFusion MX Enterprise Edition supports mail server failover as well as additional mail
delivery options.
The ColdFusion implementation of SMTP mail uses a spooled architecture. This means that
when a cfmail tag is processed in an application page, the messages generated might not be sent
immediately. If ColdFusion is extremely busy or has a large queue, delivery could occur after some
delay.
Note: For more information about the cfmail tag, see “Sending SMTP e-mail with the cfmail tag” in
Chapter 39, “Sending and Receiving E-Mail,” in ColdFusion MX Developer’s Guide.

Server Settings section 21
Mail Server Settings area
The following table describes basic mail server settings:
Mail Spool Settings area
The following table describes mail server spool settings:
Option Description
Mail Server Enter a valid mail server for sending dynamic SMTP mail messages in the
text box. You can enter an Internet address, such as mail.company.com,
or the IP address of the mail server, such as 127.0.0.1.
Verify Mail Server
Connection
Select this option to verify that ColdFusion MX can connect to your
specified mail server after you submit this form.
Whether or not you use this option, you should verify that your mail server
connection works by sending a test message.
Server Port Enter the number of the port on which the mail server is running. Contact
your server administrator if you are unsure of the appropriate port number.
Backup Mail Servers
(Enterprise Edition only)
Enter zero or more backup servers for sending SMTP mail messages.
You can enter an Internet address, such as mail.company.com, or the IP
address of the mail server, such as 127.0.0.1. Separate multiple servers
with a comma.
If the mail server requires authentication, prepend the mail server with the
username and password, as follows:
username:password@mailserveraddress
To use a port number other than the default (25), specify
mailserveraddress:portnumber
Maintain Connection to
Mail Server
(Enterprise Edition only)
Select this option to keep mail server connections open after sending a
mail message. Enabling this option can enhance performance when
delivering multiple messages.
Connection Timeout
(seconds)
Enter the number of seconds that ColdFusion MX should wait for a
response from the mail server before timing out.
Option Description
Spool Interval (seconds) Enter the interval, in seconds, at which you want the mail server to
process spooled mail.
Mail Delivery Threads
(Enterprise Edition only)
Enter the maximum number of simultaneous threads used to deliver
spooled mail.

22 Chapter 2: Using the ColdFusion MX Administrator
Mail Logging Settings area
Select preferences for handling mail logs, as described in the following table:
ColdFusion MX writes sent mail and mail error logs to the following directories:
•\CFusionMX7\logs (Windows server configuration)
•/opt/coldfusionmx7/log (Solaris and Linux server configuration)
•cf_webapp_root/WEB-INF/cfusion/logs (multiserver and J2EE configurations, all platforms)
The following table describes the e-mail log files:
Mail Character Set Settings area
Select preferences for the default mail character set, as described in the following table:
Spool mail messages for
delivery
(Memory spooling
available for Enterprise
Edition only)
Select this option to route outgoing mail messages to the mail spooler. If
you disable this option, ColdFusion MX delivers outgoing mail messages
immediately. In ColdFusion MX Enterprise Edition, you can spool
messages to disk (slower, but messages persist across shutdowns) or to
memory (faster, but messages do not persist).
You can override this setting in the cfmail tag.
Maximum number of
messages spooled to
memory
(Enterprise Edition only)
Enter the maximum number of messages ColdFusion MX will spool to
memory before switching to disk spooling.
Option Description
Error Log Severity From the drop-down list box, select the type of SMTP-related error
message to write to a log file. The options are the following:
•Debug (contains Information, Warning, and Error)
•Information (contains Warning and Error)
•Warning (contains Error)
•Error
Log all e-mail messages
sent by ColdFusion MX
Select this option to save to a log file the To, From, and Subject fields of
all e-mail messages.
Log Description
mailsent.log Records sent e-mail messages.
mail.log Records general e-mail errors.
Option Description
Default CFMAIL
CharSet
From the drop-down list box, select the default character set used by the
cfmail tag. The default value is UTF-8. If the majority of your e-mail
clients use a specific character set, you can use this setting to switch to
that locale-specific character set. For example, Japanese mail is typically
sent using the ISO-2022-JP character set.
Option Description

Server Settings section 23
Charting Settings page
The ColdFusion charting and graphing engine lets you produce highly customizable business
graphics, in a variety of formats, using the cfquery tag. You use the Charting page in the
Administrator to control characteristics of the engine.
The following table describes the caching and thread settings for the ColdFusion charting and
graphing engine:
Font Management page
The Font Management page lets you review and define fonts for use with Macromedia FlashPaper
and Acrobat PDF output formats. ColdFusion generates FlashPaper and PDF output through the
cfdocument tag and through the cfreport tag, when used to call a report created with the
ColdFusion Report Builder.
ColdFusion MX automatically registers Acrobat built-in fonts and fonts located in typical font
locations (such as the Windows\fonts directory). However, if your server has additional fonts
installed in nonstandard locations, you must register them with the ColdFusion MX
Administrator so that the cfdocument and cfreport tags can locate and render PDF and
FlashPaper reports.
This page contains the following sections:
Register New Font with ColdFusion Lets you browse to a directory that contains fonts, or
select a specific font.
User Defined Fonts Displays the fonts that have been registered explicitly.
Current System Fonts Displays fonts stored in platform-specific system font directories.
For more information on font management, see the ColdFusion MX Administrator online Help.
For more information on reporting in ColdFusion MX, see Chapter 32, “Creating Reports for
Printing,” in ColdFusion MX Developer’s Guide.
Option Description
Cache Type Set the cache type. Charts can be cached either in memory or to disk.
Memory caching is faster, but more memory intensive.
Maximum number of
images in cache
Specify the maximum number of charts to store in the cache. After the
cache is full, if you generate a new chart, ColdFusion discards the oldest
chart in the cache.
Max number of charting
threads
Specify the maximum number of chart requests that can be processed
concurrently. The minimum number is 1 and the maximum is 5. (Higher
numbers are more memory-intensive.)
Disk cache location When caching to disk, specify the directory in which to store the
generated charts.

24 Chapter 2: Using the ColdFusion MX Administrator
Java and JVM Settings page
The Java and JVM Settings page lets you specify the following settings, which enable
ColdFusion MX to work with Java:
Note: This page is available in the server configuration only.
Before ColdFusion saves your changes, it saves a copy of the current
cf_root/runtime/bin/jvm.config file as jvm.bak. If your changes prevent ColdFusion from
restarting, use the jvm.bak file to restore your system. For more information, see the online help.
Settings Summary page
The Settings Summary page shows all ColdFusion configuration settings. Click a group name to
open that group’s Administrator section, where you can edit settings. This page is not enabled in
the Standard Edition.
Data & Services section
The Data & Services section of the Administrator is the interface for ColdFusion MX, data
sources, and Verity search and indexing features. The following table describes some common
tasks that you can perform in the Data & Services section of the Administrator:
Option Description
Java Virtual Machine
Path
The absolute file path to the location of the Java virtual machine (JVM)
root directory. The default is cf_root/runtime/jre.
Minimum JVM Heap
Size
The JVM initial heap size.
Maximum Memory Size The JVM maximum heap size. The default value is 512 MB.
Class Path The file paths to the directories that contain the JAR files used by
ColdFusion MX. Specify either the fully qualified name of a directory that
contains your JAR files or a fully qualified JAR filename. Use a comma to
separate multiple entries.
JVM Arguments The arguments to the JVM. Use a space to separate multiple entries (for
example, -Xint -Xincgc).
Task Description
Create and manage
JDBC data sources
The Data Sources page lets you establish, edit, and delete JDBC data
source connections for ColdFusion MX. For more information, see
Chapter 3, “Data Source Management,” on page 43.
Create and maintain
Verity collections
The Verity Collections page lets you create and delete Verity collections
and perform maintenance operations on collections that you create. For
more information, see “Verity Collections page” on page 25.
Define mappings for web
services
The Web Services page lets you produce and consume remote
application functionality over the Internet. For more information, see
“Web Services page” on page 26.

Data & Services section 25
The Data & Services section contains the following pages:
•Data Sources page
•Verity Collect ions page
•Verity K2 Server page
•Web Services page
Data Sources page
The Data Sources page lets you create, edit, and delete JDBC data sources. Before you can use a
database in a ColdFusion application, you must register the data source in the ColdFusion MX
Administrator. For more information, see Chapter 3, “Data Source Management,” on page 43.
Verity Collections page
ColdFusion MX includes Verity, which provides indexing and searching technology to create,
populate, and manage collections of indexed data that are optimized for fast and efficient site
searches.
A collection is a logical group of documents and metadata about the documents. The metadata
includes word indexes, an internal documents table of document field information, and logical
pointers to the document files.
For more information about building search interfaces, see Chapter 24, “Building a Search
Interface,” in ColdFusion MX Developer’s Guide.
ColdFusion lets you manage your collections from the Administrator. You can index, optimize,
purge, or delete Verity collections that are connected to ColdFusion. You use the icons in the
Actions column to perform the following actions:
The Verity Search Server must be running. If this page is unable to retrieve collections, ensure
that the Verity Search Server is running. For more information, see “Collections and the
ColdFusion MX Verity architecture” on page 105.
Action Description
Index Analyzes the files in a collection and assembles metadata and pointers to
the files.
Optimize Reclaims space left by deleted and changed files by consolidating
collection indexes for faster searching. You should optimize collections
regularly.
Purge Deletes all documents in a collection, but not the collection itself. Leaves
the collection directory structure intact.
Delete Deletes a collection.

26 Chapter 2: Using the ColdFusion MX Administrator
Verity K2 Server page
You can install Verity on a different host computer from the one ColdFusion MX is running on.
If this is the case, you can configure the host that ColdFusion will use when it performs search
operations. If you have purchased the Verity product, you may need to use advanced settings to
configure the aliases and ports of the services that ColdFusion uses. You should not need to
change these values if you are running with the ColdFusion installed version of Verity.
Web Services page
You can use web services to produce and consume remote application functionality over the
Internet. The ColdFusion MX Administrator lets you register web services so that you do not
have to specify the entire Web Services Description Language (WSDL) URL when you reference
the web service. The first time you reference a web service, ColdFusion MX automatically
registers it in the Administrator.
When you register a web service, you can shorten your code and change a web service’s URL
without editing your code. For more information, see Chapter 36, “Using Web Services,” in
ColdFusion MX Developer’s Guide.
Debugging & Logging section
The Debugging & Logging section contains the following pages:
•Debugging Settings and Debugging IPs pages
•Debugging IP Addresses page
•Logging Settings page
•Log Files page
•Scheduled Tasks page
•System Probes page
•Code Compatibility Analyzer page
•License Scanner page
Debugging Settings and Debugging IPs pages
You use the Debugging Settings and Debugging IPs pages to configure ColdFusion MX to
provide debugging information for every application page requested by a browser. You specify
debugging preferences using the pages as follows:
•On the Debugging Settings page, select debugging output options. If debugging is enabled, the
output appears in block format after normal page output.
•On the Debugging IPs page, restrict access to debugging output. If a debugging option is
enabled, debugging output is visible to all users by default.
Note: Enabling debugging affects performance. You should not enable debugging on a production
server.

Debugging & Logging section 27
The Debugging Settings page provides the following debugging options:
* Restart ColdFusion MX after changing this setting.
Option Description
Enable Robust Exception
Information
Displays detailed information in the exceptions page, including
the template’s physical path and URI, the line number and
snippet, the SQL statement used (if any), the data source name
(if any), and the Java stack trace.
Enable Debugging Enables the ColdFusion debugging service.
Select Debugging Output
Format
Controls debugging format. Select either of the following
formats:
•classic.cfm The format available in ColdFusion 5 and earlier. It
provides a basic view and few browser restrictions.
•dockable.cfm A dockable tree-based debugging panel. For
details about the panel and browser restrictions, see the online
Help.
Report Execution Times Reports execution times that exceed a specified time limit.
General Debug Information Show general information about the ColdFusion MX version,
template, time stamp, user locale, user agent, user IP, and host
name.
Database Activity Shows the database activity for the SQL Query events and
Stored Procedure events in the debugging output.
Exception Information Shows all ColdFusion exceptions raised for the request in the
debugging output.
Tracing Information Shows trace event information in the debugging output. Tracing
lets you track program flow and efficiency using the cftrace tag.
Timer Information Shows output from the cftimer tag.
Variables Displays information about parameters, URL parameters,
cookies, sessions, and CGI variables in the debugging output.
Enable Performance Monitoring*
(Server configuration only)
Enables the standard NT Performance Monitor application to
display information about a running server.
Enable CFSTAT*
(Server configuration only)
Shows performance information on platforms that do not support
the NT Performance Monitor. For more information, see “Using
the cfstat utility” on page 28.

28 Chapter 2: Using the ColdFusion MX Administrator
Using the cfstat utility
The cfstat command-line utility provides real-time performance metrics for ColdFusion MX.
Using a socket connection to obtain metric data, the cfstat utility displays the information that
ColdFusion MX writes to the System Monitor without actually using the System Monitor
application. The following table lists the metrics that the cfstat utility returns:
Metric
abbreviation
Metric name Description
Pg/Sec Page hits per second The number of ColdFusion pages processed per
second. You can reduce this by moving static content
to HTML pages.
DB/Sec Database accesses per
second
The number of database accesses per second made
by ColdFusion MX. Any difference in complexity and
resource load between calls is ignored.
CP/Sec Cache pops per second The number of ColdFusion template cache pops per
second. A cache pop occurs when ColdFusion MX
ejects a cached template from the template cache to
make room for a new template.
Req Q'ed Number of queued requests The number of requests that are currently waiting for
ColdFusion MX to process them. Lower values,
which you can achieve with efficient CFML, are
better.
Req Run'g Number of running requests The number of requests that ColdFusion MX is
currently actively processing.
Req TO'ed Number of timed out
requests
The total number of ColdFusion requests that have
timed out. Lower values, which you can achieve by
aggressive caching, removing unnecessary dynamic
operations and third-party events, are better.
AvgQ Time Average queue time A running average of the time, in milliseconds, that
requests spend waiting for ColdFusion MX to
process them. Lower values, which you can achieve
with efficient CFML and enhanced caching, are
better.
AvgReq Time Average request time A running average of the time, in milliseconds, that
ColdFusion MX spends to process a request
(including queued time). Lower values, which you can
achieve with efficient CFML, are better.
AvgDB Time Average database
transaction time
A running average of the time that ColdFusion MX
spends on database-related processing of
ColdFusion requests.
Bytes In/Sec Bytes incoming per second The number of bytes that ColdFusion MX read in the
last second (not an average).
Bytes
Out/Sec
Bytes outgoing per second The number of bytes that ColdFusion MX wrote in the
last second (not an average).

Debugging & Logging section 29
Before you use the cfstat utility, ensure that you selected the Enable Performance Monitoring
check box in the ColdFusion MX Administrator (on the Debugging & Logging > Debugging
Settings page). If you select this check box, you must restart ColdFusion MX for this change to
take effect.
cfstat options
The cf_root/bin directory contains the cfstat utility. From that directory, type cfstat and use the
following switches:
This example runs the cfstat utility and displays a new line every 20 seconds:
cfstat 20
Debugging IP Addresses page
You use the Debugging IP Addresses page to restrict debugging output to one or more IP
addresses. You can add and remove IP addresses.
Note: If you do not specify IP addresses, and debugging options are active, ColdFusion MX displays
debugging output for all users.
Switch Description Comment
-n Suppress column headers. Useful for saving output to a file.
-s Display output in a single line. Display a single line and delay display of the first
line so the cfstat utility can display meaningful
values in the per-second counters.
#Where # is an integer, display
output every # seconds.
If you do not specify an integer, the cfstat utility
returns one line. Specify this switch with or without
the -s switch.

30 Chapter 2: Using the ColdFusion MX Administrator
Logging Settings page
You use the Logging Settings page of the Administrator to change ColdFusion MX logging
options. The following table describes the settings:
* Restart ColdFusion MX after changing this setting.
Log Files page
The Log Files page lets you perform operations on log files, such as searching, viewing,
downloading, archiving, and deleting.
Click on a Log File icon, located in the Actions column of the Available Log Files table, to search,
view, download, archive, or delete a log file.
For more information, see the ColdFusion MX Administrator online Help.
The following table describes the ColdFusion MX log files:
Option Description
Log directory* Specifies the directory to which error log files are written.
Maximum file size
(kb)
Sets the maximum file size for log files. When a file hits this size, it
automatically is archived.
Maximum number of
archives
Sets the maximum number of log archives to create. When they reach this
limit, files are deleted in the order of oldest to newest.
Log slow pages
taking longer than [n]
seconds
Logs the names of pages that take longer than the specified interval to
process. Logging slow pages can help you diagnose potential problems or
bottlenecks in your ColdFusion applications. Entries are written to the
server.log file.
Log all CORBA calls Logs all CORBA calls.
Enable logging for
scheduled tasks
Logs ColdFusion Executive task scheduling.
Log file Description
rdservice.log Records errors that occur in the ColdFusion Remote Development Service
(RDS). RDS provides remote HTTP-based access to files and databases.
application.log Records every ColdFusion MX error reported to a user. Application page
errors, including ColdFusion MX syntax, ODBC, and SQL errors, are written
to this log file.
exception.log Records stack traces for exceptions that occur in ColdFusion.
scheduler.log Records scheduled events that have been submitted for execution. Indicates
whether task submission was initiated and whether it succeeded. Provides
the scheduled page URL, the date and time executed, and a task ID.
server.log Records errors for ColdFusion MX.
customtag.log Records errors generated in custom tag processing.
car.log Records errors associated with site archive and restore operations.

Debugging & Logging section 31
Scheduled Tasks page
You use the Scheduled Tasks page to schedule the execution of local and remote web pages, to
generate static HTML pages, send mail with the cfmail tag, update database tables, index Verity
collections, delete temporary files, and any other batch-style processing. The scheduling facility is
useful for applications that do not require user interactions or customized output. ColdFusion
developers use this facility to schedule daily sales reports, corporate directories, statistical reports,
and so on.
Information that is read more often than written is a good candidate for scheduled tasks. Instead
of executing a query to a database every time the page is requested, ColdFusion MX renders the
static page with information generated by the scheduled event. Response time is faster because no
database transaction takes place.
You can run scheduled tasks once; on a specified date; or at a specified time, daily, weekly, or
monthly; daily; at a specified interval; or between specified dates.
The Scheduled Task page lets you create, edit, and delete scheduled tasks. For more information,
see the online help.
System Probes page
System probes help you evaluate the status of your ColdFusion applications. Like scheduled tasks,
they access a URL at a specified interval, but they can also check for the presence or absence of a
string in the URL. If the URL contents are unexpected, or if an error occurred while accessing the
URL, the probe can send an e-mail alert to the address specified on the System Probes page. The
probe can also execute a script to perform a recovery action, such as restarting the server. All probe
actions are logged in the logs/probes.log file. The System Probes page also displays the status of
each probe.
You use the buttons in the Actions column in the System Probes table to perform the following
actions:
Because probes run as scheduled ColdFusion tasks, they will not run if the server on which they
are hosted crashes, or if the host web server crashes or otherwise does not respond.
mail.log Records errors generated by an SMTP mail server.
mailsent.log Records messages sent by ColdFusion MX.
flash.log Records entries for Macromedia Flash Remoting.
Action Description
Edit Lets you edit the probe.
Run Runs the probe immediately, even if it was previously disabled.
Enable/Disable Starts and stops the probe from automatically executing at its specified
interval.
Delete Deletes the probe.
Log file Description

32 Chapter 2: Using the ColdFusion MX Administrator
System probes are available in ColdFusion MX Enterprise Edition only.
Code Compatibility Analyzer page
The Code Compatibility Analyzer page evaluates your ColdFusion pages for potential
incompatibilities between ColdFusion MX 7 and ColdFusion Server 5. It reviews the CFML
pages that you specify and informs you of any potential compatibility issues. Additionally, the
Code Compatibility Analyzer detects unsupported and deprecated CFML features, and outlines
the required implementation changes that ensure a smooth migration
License Scanner page
The License Scanner page searches the local subnet to find other running instances of
ColdFusion MX 7. You can use this information to determine whether the ColdFusion instances
within the subnet are licensed appropriately.
The ColdFusion MX Administrator uses universal datagram protocol (UDP) multicast to collect
license and version information from all ColdFusion instances running within the subnet.
Extensions section
You use the Extensions section of the Administrator to configure ColdFusion MX to work with
other technologies, such as Java and CORBA.
The Extensions section contains the following pages:
•Java Applets page
•CFX Tags page
•Custom Tag Paths page
•CORBA Connectors page
Java Applets page
The Java Applets page of the Administrator lets you register applets and edit and delete applet
registrations. Before you can use Java applets in your ColdFusion applications, you must register
them in the Java Applets page.
When your applet is registered with ColdFusion MX, using the cfapplet tag in your CFML
code is very simple, because all parameters are predefined. Simply enter the applet source and the
form variable name that you want to use.
Note: Parameters set with the cfapplet tag override parameters defined on the Java Applets page.
For more information, see the online help.

Extensions section 33
CFX Tags page
Before you can use a CFX tag in ColdFusion applications, you must register it. You use the CFX
Tags page to register and manage ColdFusion custom tags built with C++ and Java.
You can build CFX tags in the following two ways:
•Using C++ as a dynamic link library (DLL) on Windows or as shared objects (.so or .sl
extension) on Solaris and Linux
•Using Java interfaces defined in the cfx.jar file
For more information, see the online help.
Custom Tag Paths page
You use the Custom Tag Paths page of the Administrator to add, edit, and delete custom tag
directory paths. The default custom tag path is under the installation directory. To use custom
tags in another path, register the path on this Administrator page.
For more information, see the online Help.
CORBA Connectors page
You use the CORBA Connectors page to register, edit, and delete CORBA connectors. You must
register CORBA connectors before you use them in ColdFusion applications. You must also
restart the server when you finish configuring the CORBA connector.
ColdFusion MX loads object request broker (ORB) libraries dynamically using a connector,
which does not restrict ColdFusion developers to a specific ORB vendor. The connectors depend
on the ORB runtime libraries provided by the vendor. A connector for Borland Visibroker is
embedded within ColdFusion MX. Make sure that the ORB runtime libraries are in
cf_root/runtime/lib (server configuration) or cf_webapp_root/WEB-INF/cfusion/lib (multiserver
and J2EE configurations).
The following table contains information about the libraries and connectors:
The following lines are an example of a CORBA connector configuration for VisiBroker:
ORB Name visibroker
ORB Class Name coldfusion.runtime.corba.VisibrokerConnector
ORB Property Filec:\CFusionMX7\runtime\cfusion\lib\vbjorb.properties
Classpath [blank]
Operating
System
Vendor ORB ColdFusion
connector
ORB library
Windows
NT and later
Borland VisiBroker
4.5
coldfusion.runtime.corba.VisibrokerConnector
(embedded)
vbjorb.jar
Solaris Borland VisiBroker
4.5
coldfusion.runtime.corba.VisibrokerConnector
(embedded)
vbjorb.jar

34 Chapter 2: Using the ColdFusion MX Administrator
ColdFusion includes the vbjorb.properties file, which contains the following properties that
configure the ORB:
org.omg.CORBA.ORBClass=com.inprise.vbroker.orb.ORB
org.omg.CORBA.ORBSingletonClass=com.inprise.vbroker.orb.ORB
SVCnameroot=namingroot
Event Gateways section
The Event Gateways section of the Administrator lets you configure event gateway settings,
gateway types, and gateway instances.
This Event Gateways section contains the following pages:
•Event Gateway Settings page
•Gateway Types page
•Gateway Instances page
Event Gateway Settings page
The Event Gateway Settings page lets you configure settings for all event gateways, and start or
stop the Short Message Service (SMS) test server. The following table describes the settings:
Gateway Types page
The Gateways Types pages lets you configure the types of gateways available on your system. After
you configure a type, you can create any number of gateway instances of that type. The following
table describes the event gateway types that ship with ColdFusion MX:
Option Description
Enable ColdFusion
Event Gateway Service
Specifies whether the service is enabled. Changing this setting restarts the
service.
Event Gateway
Processing Threads
Specifies the maximum number of threads used to execute ColdFusion
functions when an event arrives. A higher number uses more resources, but
increases event throughput.
Maximum Number of
Events to Queue
Specifies the maximum number of events allowed on the event queue. If
the queue length exceeds this value, gateway events will not be added to
the processing queue.
Start/Stop SMS Test
Server
Starts and stops the short message service (SMS) test server.
Gateway type Description
CFML Used to trigger asynchronous events from ColdFusion.
SMS Used to send and receive SMS messages.
SAMETIME Used to send and receive instant messages through Lotus SameTime.

Security section 35
Gateway Instances page
The Gateway Instances page lets you configure ColdFusion event gateway instances to direct
events from various sources to ColdFusion components (CFCs) that you have written. The
following table describes the settings:
Security section
The Security section of the Administrator lets you configure the security frameworks of
ColdFusion MX.
For more information on security, see Chapter 6, “Administering Security,” on page 85.
The Security section contains the following pages:
•CF Admin Password page
•RDS Password page
•Sandbox Security page
CF Admin Password page
You use the CF Admin Password page of the Administrator to enable and disable password-
restricted access to the Administrator, and to change the Administrator password. You should
restrict ColdFusion MX Administrator access to trusted users.
XMPP Used to send and receive instant messages through the Extensible
Messaging and Presence Protocol (XMPP).
Samples Sample gateway types, including the following:
•DirectoryWatcher Watches a directory for file changes.
•JMS Acts as a Java Messaging Service consumer or producer.
•Socket Listens on a TCP/IP port.
Option Description
Gateway ID A name for the event gateway instance. You use this value in the
ColdFusion GetGatewayHelper and SendGatewayMessage functions.
Gateway Type The event gateway type.
CFC Path The absolute path to the listener CFC that handles incoming messages.
Configuration File (Optional) Configuration file, if required for the event gateway instance.
Startup Mode The event gateway startup status, as follows:
•Automatic Start the event gateway when ColdFusion starts.
•Manual Do not start the event gateway with ColdFusion, but allow
starting it from the Gateway Instances page.
•Disabled Do not allow the event gateway to start.
Gateway type Description

36 Chapter 2: Using the ColdFusion MX Administrator
RDS Password page
You use the RDS Password page to enable and disable password-restricted RDS access to server
resources from Macromedia Dreamweaver MX, Macromedia HomeSite+, or the ColdFusion
Report Builder, and to change the RDS password.
Sandbox Security page
You use the Sandbox Security page (called Resource Security in the Standard Edition) to specify
security permissions for data sources, tags, functions, files, and directories.
Sandbox security uses the location of your ColdFusion pages to determine functionality. A
sandbox is a designated area (CFM files or directories that contain CFM files) of your site to
which you apply security restrictions. By default, a subdirectory (or child directory) inherits the
sandbox settings of the directory one level above it (the parent directory). If you define sandbox
settings for a subdirectory, you override the sandbox settings inherited from the parent directory.
Use sandbox security to control access to the following:
•Data sources
•Tags
•Functions
•Files and directories
•IP addresses and ports
Note: If you have enabled sandbox security and want to use the Administrator API, you must enable
access to the CFIDE/adminapi directory.
Packaging and Deployment section
The Packaging and Deployment section of the Administrator lets you create and deploy CAR files
and create J2EE EAR or WAR files that include an existing ColdFusion application and the
ColdFusion runtime system
This Packaging and Deployment section contains the following pages:
•ColdFusion Archives page
•J2EE Archives page
ColdFusion Archives page
The ColdFusion Archives page includes tools that let you archive and deploy ColdFusion
applications, configuration settings, data source information, and other types of information to
back up your files quickly and easily. The complete list of archivable information includes the
following:
•Name and file location
•Server settings
•ColdFusion mappings
•Data sources

Enterprise Manager section 37
•Verity collections
•Scheduled tasks
•Event gateway instances
•Java applets
•CFX tags
•Archive to do lists
After you archive the information, you can use the Administrator to deploy your web applications
to the same ColdFusion MX server or to a ColdFusion MX server running on a different
computer. Additionally, you can use these features to deploy and receive any ColdFusion archive
file electronically.
The Archive Settings page lets you configure various archive system settings that apply to all
archive and deployment operations. For more information, see the online help.
J2EE Archives page
The J2EE Archives page lets you create an enterprise application archive (EAR) file or web
application archive (WAR) file that contains the following items:
•The ColdFusion MX web application.
•Server settings, such as data sources and custom tag paths.
•Your application’s CFML pages, stored in the ColdFusion web application’s root directory.
With this EAR or WAR file, a J2EE administrator can deploy your ColdFusion MX application
to a J2EE application server.
Tip: If you are creating a cluster of server instances when running the multiserver configuration, use
this page to create the WAR or EAR file to be used when creating each of the servers in the cluster.
You can create a J2EE archive regardless of whether you are running ColdFusion MX in the server
configuration or the J2EE configuration. However, you must be running the J2EE configuration
to deploy an EAR or WAR file.
Enterprise Manager section
The Enterprise Manager section of the Administrator lets you create Macromedia JRun server
instances with ColdFusion already deployed, register remote JRun server instances, and create
clusters of JRun server instances.
Note: The Enterprise Manager section appears only if you install the multiserver configuration. It does
not display in the server configuration. Nor does it display when running in a J2EE configuration
(other than that deployed in the cfusion server of the multiserver configuration).
The Enterprise Manager section contains the following pages:
•Instance Manager page
•Cluster Manager page

38 Chapter 2: Using the ColdFusion MX Administrator
Instance Manager page
The Instance Manager page lets you view the local and remote JRun servers that can be accessed
by a cfusion server running in the multiserver configuration.
From this page you can access pages that define new, local, JRun servers and register existing JRun
servers running on remote computers, as follows:
Add New Instance Create a new JRun server and automatically deploy a copy of the current
ColdFusion MX application into that server. Alternatively, you can deploy ColdFusion MX
applications packaged using the J2EE Archives page.
Register Remote Instance Define an existing remote JRun server to the Instance Manager for
the purpose of adding these servers to a cluster. The remote JRun server instance need not be
running when you define it to the Instance Manager, however, it must be running before you can
add it to a cluster.
Cluster Manager page
The Cluster Manager page in ColdFusion MX Administrator lets you create and manage clusters
of JRun servers, each containing the same ColdFusion MX application.
Custom Extensions section
You can extend the functionality of the ColdFusion MX Administrator by adding links to other
web applications and sites. These links appear under the Custom Extensions section in the left
navigation pane of the Administrator.
To extend the Administrator:
1.
Create a file that contains the HTML link code, followed by a <BR>, with a separate line for
each link. Do not include other HTML code, such as <head> or <body> tags.
The target attribute is required for each link; if you specify target="content", the page
appears in the main pane of the Administrator. If you specify any other value for the target
attribute, the page appears in a new window.
2.
Save this file as extensionscustom.cfm in the Administrator root directory
(/CFIDE/administrator/).
For example, the following file adds links for Bowdoin College, Universidad Complutense de
Madrid, and La Sapienza:
<a href="http://www.bowdoin.edu/" target="content">Bowdoin College</a><br>
<a href="http://www.http://www.ucm.es/" target="_blank">Universidad
Complutense de Madrid</a><br>
<a href="http://www.uniroma1.it/" target="_blank">La Sapienza</a><br>
When you click a link, the page appears.

Administrator API 39
Administrator API
You can perform most ColdFusion MX Administrator tasks programmatically using the
Administrator API. The Administrator API consists of a set of ColdFusion components (CFCs)
that contain methods you call to perform Administrator tasks. For example, you use the setMSQL
method of datasource.cfc to add a SQL Server data source.
The CFCs for the Administrator API are located in the cf_web_root/CFIDE/adminapi directory,
and each CFC corresponds to an area of the ColdFusion MX Administrator, as the following
table shows:
The adminapi directory also contains an Application.cfm file and two subdirectories.
Note: If you are using sandbox security, you must enable access to the cf_web_root/CFIDE/adminapi
directory to use the Administrator API.
There are two styles of methods in the Administrator API:
•Method arguments When setting complex or varied values, the Administrator API uses
method arguments.
•Getting and setting simple values When setting simple values, such as true or false debug
settings, the Administrator API uses get and set property methods.
To view the methods, method arguments, and documentation for the Administrator API CFCs,
use the CFC Explorer. For example, to view datasource.cfc when running in the server
configuration, open a browser to http://localhost:8500/CFIDE/adminapi/datasource.cfc.
CFC Description
administrator.cfc Contains basic Administrator functionality, including login, logout, the Migration
Wizard, and the Setup Wizard. You must call the login method before calling
any other methods in the Administrator API.
base.cfc Base object for all other Administrator API CFCs.
datasource.cfc Add, modify, and delete ColdFusion data sources.
debugging.cfc Manage debug settings.
eventgateway.cfc Manage event gateways.
extensions.cfc Manage custom tags, mappings, CFXs, applets, CORBA, and web services.
mail.cfc Manage ColdFusion mail settings.
runtime.cfc Manage runtime settings for fonts, cache, charts, configuration, and other
settings.
security.cfc Manage passwords, RDS, and sandbox security.
serverinstance.cfc Start, stop, and restart JRun servers. This CFC only works when running the
multiserver configuration.

40 Chapter 2: Using the ColdFusion MX Administrator
To use the Administrator API:
1.
Instantiate administrator.cfc:
<cfscript>
// Login is always required.
adminObj = createObject("component","cfide.adminapi.administrator");
Tip: You can instantiate administrator.cfc and call the login method in a single line of code, as the
following example shows:
createObject("component","cfide.adminapi.administrator").login("admin");
2.
Call the administrator.cfc login method, passing the ColdFusion MX Administrator password
or the RDS password:
adminObj.login("admin");
3.
Instantiate the desired CFC:
myObj = createObject("component","cfide.adminapi.debugging");
4.
Call the desired CFC method (this example enables debugging):
myObj.setDebugProperty(propertyName="enableDebug", propertyValue="true");
Examples
The following example adds a SQL Server data source:
<cfscript>
// Login is always required. This example uses two lines of code.
adminObj = createObject("component","cfide.adminapi.administrator");
adminObj.login("admin");
// Instantiate the data source object.
myObj = createObject("component","cfide.adminapi.datasource");
// Create a DSN.
myObj.setMSSQL(driver="MSSQLServer",
name="northwind_MSSQL",
host = "10.1.147.73",
port = "1433",
database = "northwind",
username = "sa",
login_timeout = "29",
timeout = "23",
interval = 6,
buffer = "64000",
blob_buffer = "64000",
setStringParameterAsUnicode = "false",
description = "Northwind SQL Server",
pooling = true,
maxpooledstatements = 999,
enableMaxConnections = "true",
maxConnections = "299",
enable_clob = true,
enable_blob = true,
disable = false,

Administrator API 41
storedProc = true,
alter = false,
grant = true,
select = true,
update = true,
create = true,
delete = true,
drop = false,
revoke = false );
</cfscript>
The following example adds the same SQL Server data source, but uses the argumentCollection
attribute to pass all method arguments in a structure:
<cfscript>
// Login is always required. This example uses a single line of code.
createObject("component","cfide.adminapi.administrator").login("admin");
// Instantiate the data source object.
myObj = createObject("component","cfide.adminapi.datasource");
// Required arguments for a data source.
stDSN = structNew();
stDSN.driver = "MSSQLServer";
stDSN.name="northwind_MSSQL";
stDSN.host = "10.1.147.73";
stDSN.port = "1433";
stDSN.database = "northwind";
stDSN.username = "sa";
// Optional and advanced arguments.
stDSN.login_timeout = "29";
stDSN.timeout = "23";
stDSN.interval = 6;
stDSN.buffer = "64000";
stDSN.blob_buffer = "64000";
stDSN.setStringParameterAsUnicode = "false";
stDSN.description = "Northwind SQL Server";
stDSN.pooling = true;
stDSN.maxpooledstatements = 999;
stDSN.enableMaxConnections = "true";
stDSN.maxConnections = "299";
stDSN.enable_clob = true;
stDSN.enable_blob = true;
stDSN.disable = false;
stDSN.storedProc = true;
stDSN.alter = false;
stDSN.grant = true;
stDSN.select = true;
stDSN.update = true;
stDSN.create = true;
stDSN.delete = true;
stDSN.drop = false;
stDSN.revoke = false;

42 Chapter 2: Using the ColdFusion MX Administrator
//Create a DSN.
myObj.setMSSQL(argumentCollection=stDSN);
</cfscript>
<!--- Optionally dump the stDSN structure. --->
<!---
<cfoutput>
<cfdump var="#stDSN#">
</cfoutput>
--->

43
CHAPTER 3
Data Source Management
A data source is a complete database configuration that uses a JDBC driver to communicate with
a specific database. In Macromedia ColdFusion MX 7, you must configure a data source for each
database that you want to use. After you configure a data source, ColdFusion can then
communicate with that data source through JDBC.
This chapter describes the configuration options for ColdFusion MX 7 data sources. For basic
information on data sources and connecting to databases, see Getting Started Building
ColdFusion MX Applications.
Contents
About JDBC . . . . . . . . . . . . . . . . . . . . . . . . . . . . . . . . . . . . . . . . . . . . . . . . . . . . . . . . . . . . . . 44
Adding data sources . . . . . . . . . . . . . . . . . . . . . . . . . . . . . . . . . . . . . . . . . . . . . . . . . . . . . . . . . 45
Connecting to DB2 Universal Database. . . . . . . . . . . . . . . . . . . . . . . . . . . . . . . . . . . . . . . . . . 47
Connecting to Informix. . . . . . . . . . . . . . . . . . . . . . . . . . . . . . . . . . . . . . . . . . . . . . . . . . . . . . 49
Connecting to Microsoft Access. . . . . . . . . . . . . . . . . . . . . . . . . . . . . . . . . . . . . . . . . . . . . . . . 50
Connecting to Microsoft Access with Unicode. . . . . . . . . . . . . . . . . . . . . . . . . . . . . . . . . . . . . 52
Connecting to Microsoft SQL Server. . . . . . . . . . . . . . . . . . . . . . . . . . . . . . . . . . . . . . . . . . . . 53
Connecting to MySQL . . . . . . . . . . . . . . . . . . . . . . . . . . . . . . . . . . . . . . . . . . . . . . . . . . . . . . 56
Connecting to ODBC Socket . . . . . . . . . . . . . . . . . . . . . . . . . . . . . . . . . . . . . . . . . . . . . . . . . 57
Connecting to Oracle. . . . . . . . . . . . . . . . . . . . . . . . . . . . . . . . . . . . . . . . . . . . . . . . . . . . . . . . 59
Connecting to other data sources . . . . . . . . . . . . . . . . . . . . . . . . . . . . . . . . . . . . . . . . . . . . . . . 60
Connecting to Sybase. . . . . . . . . . . . . . . . . . . . . . . . . . . . . . . . . . . . . . . . . . . . . . . . . . . . . . . . 62
Connecting to JNDI data sources . . . . . . . . . . . . . . . . . . . . . . . . . . . . . . . . . . . . . . . . . . . . . . 63

44 Chapter 3: Data Source Management
About JDBC
JDBC is a Java Application Programming Interface (API) that you use to execute SQL statements.
JDBC enables an application, such as ColdFusion MX 7, to interact with a variety of database
management systems (DBMSs), without using interfaces that are database- and platform-specific.
The following table describes the four types of JDBC drivers:
JDBC drivers are stored in JAR files. For example, the JDBC drivers that are supplied with
ColdFusion MX are in the macromedia_drivers.jar file. If you are using another JDBC driver, you
must store it in the ColdFusion classpath. For example, cf_root/cfusion/lib (server configuration)
or cf_webapp_root/WEB-INF/cfusion/lib (multiserver or J2EE configuration).
Type Name Description
1JDBC-ODBC
bridge
Translates JDBC calls to ODBC calls, and sends them to the ODBC
driver.
Advantages Allows access to many different databases.
Disadvantages The ODBC driver, and possibly the client database
libraries, must reside on the ColdFusion server computer. Performance
is slower than other JDBC driver types.
Macromedia does not recommend this driver type unless your
application requires DBMS-specific features.
2 Native-API/partly
Java driver
Converts JDBC calls to database-specific calls.
Advantages Better performance than Type 1 driver.
Disadvantages The vendor’s client database libraries must reside on
the same computer as ColdFusion.
ColdFusion MX includes a type 2 driver for use with Microsoft Access
Unicode databases.
3JDBC-Net pure
Java driver
Translates JDBC calls to the middle-tier server, which then translates
the request to the database-specific native-connectivity interface.
Advantages No need for vendor’s database libraries to be present on
client computer. Can be tailored for small size (faster loading).
Disadvantages Database-specific code must be executed in the
middle tier.
ColdFusion MX includes an ODBC socket type 3 driver for use with
Microsoft Access databases and ODBC data sources.
4Native-
protocol/all-Java
driver
Converts JDBC calls to the network protocol used directly by the
database.
Advantages Fast performance. No special software needed on the
computer on which you run ColdFusion MX.
Disadvantages Many of these protocols are proprietary, requiring a
different driver for each database.
ColdFusion MX includes type 4 drivers for many popular DBMSs;
however, not all DBMSs are supported in ColdFusion MX Standard
Edition.

Adding data sources 45
Supplied drivers
The following table lists the database drivers supplied with ColdFusion MX and where you can
find more information about them:
To see a list of database versions that ColdFusion MX supports, go to
www.macromedia.com/go/sysreqscf.
When running in the J2EE configuration, the ColdFusion MX Administrator also lets you
configure a data source that connects to a JNDI data source. A Java Naming and Directory
Interface (JNDI) data source is equivalent to a ColdFusion data source, except you define it using
your J2EE application server. After it’s defined, ColdFusion MX applications use it as they would
any data source. For information on defining a JNDI data source, see “Connecting to JNDI data
sources” on page 63.
Adding data sources
In the ColdFusion MX Administrator, you configure your data sources to communicate with
ColdFusion. After you add a data source to the Administrator, you access it by name in any
CFML tag that establishes database connections; for example, in the cfquery tag. During a
query, the data source tells ColdFusion which database to connect to and what parameters to use
for the connection.
The ColdFusion MX Administrator organizes all the information about a ColdFusion MX
server’s database connections in a single, easy-to-manage location. In addition to adding new data
sources, you can use the Administrator to specify changes to your database configuration, such as
relocation, renaming, or changes in security permissions.
Driver Type For more information
DB2 Universal Database 4 “Connecting to DB2 Universal Database” on page 47
DB2 OS/390 4 “Connecting to other data sources” on page 60
Informix 4 “Connecting to Informix” on page 49
Microsoft Access 3 “Connecting to Microsoft Access” on page 50
Microsoft Access with Unicode
support
2“Connecting to Microsoft Access with Unicode”
on page 52
Microsoft SQL Server 4 “Connecting to Microsoft SQL Server” on page 53
MySQL 4 “Connecting to MySQL” on page 56
ODBC Socket 3 “Connecting to ODBC Socket” on page 57
Oracle 4 “Connecting to Oracle” on page 59
Other “Connecting to other data sources” on page 60
Sybase 4 “Connecting to Sybase” on page 62

46 Chapter 3: Data Source Management
Adding data sources in the Administrator
You use the ColdFusion MX Administrator to quickly add a data source for use in your
ColdFusion applications. When you add a data source, you assign it a data source name (DSN)
and set all information required to establish a connection.
Note: ColdFusion MX includes data sources that are configured by default. You do not need the
following procedure to work with these data sources.
To add a data source:
1.
In the ColdFusion MX Administrator, select Data & Services > Data Sources.
2.
Under Add New Data Source, enter a Data Source Name; for example, MyTestDSN. The
following names are reserved; you cannot use them for data source names:
■service
■jms_provider
■comp
■jms
3.
Select a Driver from the drop-down list box; for example, Microsoft SQL Server.
4.
Click Add.
A form for additional DSN information appears. The available fields in this form depend on
the driver that you selected.
5.
In the Database field, enter the name of the database; for example, Northwind.
6.
In the Server field, enter the network name or IP address of the server that hosts the database,
and enter any required Port value; for example, the bullwinkle server on the default port.
7.
If your database requires login information, enter your Username and Password.
Tip: The omission of required username and password information is a common reason why a
data source fails to verify.
8.
(Optional) Enter a Description.
9.
(Optional) Click Show Advanced Settings to specify any ColdFusion specific settings; for
example, to configure which SQL commands can interact with this data source.
10.
Click Submit to create the data source.
ColdFusion MX automatically verifies that it can connect to the data source.
11.
(Optional) To verify this data source later, click the verify icon in the Actions column.
Note: To check the status of all data sources available to ColdFusion MX, click Verify All
Connections.
Specifying connection string arguments
The ColdFusion MX Administrator lets you specify connection string arguments for data sources.
In the Advanced Settings page, use the Connection String field to enter name-value pairs
separated by a semicolon. For more information, see the documentation for your database driver.
Note: As of ColdFusion MX, the cfquery connectstring attribute is not supported.

Connecting to DB2 Universal Database 47
Guidelines for data sources
When you add data sources to ColdFusion MX, keep the following guidelines in mind:
•Data source names should be all one word.
•Data source names can contain only letters, numbers, hyphens, and the underscore character
(_).
•Data source names should not contain special characters or spaces.
•Although data source names are not case-sensitive, you should use a consistent capitalization
scheme.
•Depending on the JDBC driver, connection strings and JDBC URLs might be case-sensitive.
•Ensure that you use the Administrator to verify that ColdFusion MX can connect to the data
source.
•A data source must exist in the ColdFusion MX Administrator before you use it on an
application page to retrieve data.
Connecting to DB2 Universal Database
This section discusses using the ColdFusion MX Administrator to define data sources for DB2
Universal Database (UDB). For information on defining data sources that work with DB2 for
OS/390 or iSeries, see “Connecting to other data sources” on page 60. To see a list of DB2
versions that ColdFusion MX supports, go to www.macromedia.com/go/sysreqscf.
Note: DB2 UDB refers to all versions of DB2 running on Windows, UNIX, and Linux/s390
platforms.
Use the settings in the following table to connect ColdFusion MX to DB2:
Setting Description
CF Data Source
Name
The data source name (DSN) used by ColdFusion MX to connect to the data
source.
Database The name of the database.
Server The name of the server that hosts the database that you want to use. If the
database is local, enclose the word local in parentheses.
Port The number of the TCP/IP port that the server monitors for connections.
Username The user name that ColdFusion MX passes to the JDBC driver to connect to the
data source if a ColdFusion application does not supply a user name (for
example, in a cfquery tag).
The user name must have CREATE PACKAGE privileges for the database, or
the database administrator must create a package. Consult the database
administrator when configuring this type of data source.
Password The password that ColdFusion MX passes to the JDBC driver to connect to the
data source if a ColdFusion application does not supply a password (for
example, in a cfquery tag).
Description (Optional) A description for this connection.

48 Chapter 3: Data Source Management
Connection
String
A field that passes database-specific parameters, such as login credentials, to
the data source.
For UDB on the initial connection, specify DatabaseName,
CreateDefaultPackage, ReplacePackage, and
sendStringParametersAsUnicode (with no spaces), as the following example
shows:
DatabaseName=SAMPLE;CreateDefaultPackage=TRUE;ReplacePackage=TRUE;
sendStringParametersAsUnicode=false
If the database uses Unicode, specify true for the
sendStringParametersAsUnicode parameter.
For UDB on subsequent connections, specify DatabaseName and
sendStringParametersAsUnicode (with no spaces), as the following example
shows:
DatabaseName=SAMPLE;sendStringParametersAsUnicode=false
Your user ID must have CREATE PACKAGE privileges on the database, or your
database administrator must create a package for you.
Limit
Connections
Specifies whether ColdFusion MX limits the number of database connections for
the data source. If you enable this option, use the Restrict Connections To field to
specify the maximum.
Restrict
Connections To
Specifies the maximum number of database connections for the data source. To
use this restriction, you must enable the Limit Connections option.
Maintain
Connections
ColdFusion establishes a connection to a data source for every operation that
requires one. Enable this option to improve performance by caching the data
source connection.
Max Pooled
Statements
Enables reuse of prepared statements (that is, stored procedures and queries
that use the cfqueryparam tag). Although you tune this setting based on your
application, start by setting it to the sum of the following:
•Unique cfquery tags that use the cfqueryparam tag
•Unique cfstoredproc tags
Timeout (min) The number of minutes that ColdFusion MX maintains an unused connection
before destroying it.
Interval (min) The time (in minutes) that the server waits between cycles to check for expired
data source connections to close.
Disable
Connections
If selected, suspends all client connections.
Login Timeout
(sec)
The number of seconds before ColdFusion times out the data source connection
login attempt.
CLOB Select to return the entire contents of any CLOB/Text columns in the database
for this data source. If unchecked, ColdFusion retrieves the number of characters
specified in the Long Text Buffer setting. For UDB 7.1 and 7.2, there is a 32K
limit on CLOBs.
BLOB Select to return the entire contents of any BLOB/Image columns in the database
for this data source. If unchecked, ColdFusion retrieves the number of characters
specified in the BLOB Buffer setting. BLOBs are not supported on UDB 7.1
and 7.2.
Setting Description

Connecting to Informix 49
Connecting to Informix
To see a list of Informix versions that ColdFusion MX supports, go to
www.macromedia.com/go/sysreqscf. Use the settings in the following table to connect
ColdFusion MX to Informix data sources:
LongText Buffer
(chr)
The default buffer size, used if the CLOB option is not selected. The default
value is 64000 bytes.
BLOB Buffer
(bytes)
The default buffer size, used if the BLOB option is not selected. The default
value is 64000 bytes.
Allowed SQL The SQL operations that can interact with the current data source.
Setting Description
CF Data Source
Name
The data source name (DSN) used by ColdFusion MX to connect to the data
source.
Database The database to which this data source connects.
Informix Server The name of the Informix database server to which you want to connect.
Server The name of the server that hosts the database. If the database is local, enclose
the word local in parentheses.
Port The number of the TCP/IP port that the server monitors for connections.
Username The user name that ColdFusion MX passes to the JDBC driver to connect to the
data source if a ColdFusion application does not supply a user name (for
example, in a cfquery tag).
Password The password that ColdFusion MX passes to the JDBC driver to connect to the
data source if a ColdFusion application does not supply a password (for
example, in a cfquery tag).
Description (Optional) A description for this connection.
Connection
String
A field that passes database-specific parameters, such as login credentials, to
the data source.
Limit
Connections
Specifies whether ColdFusion MX limits the number of database connections for
the data source. If you enable this option, use the Restrict Connections To field to
specify the maximum.
Restrict
Connections To
Specifies the maximum number of database connections for the data source. To
use this restriction, you must enable the Limit Connections option.
Maintain
Connections
ColdFusion MX establishes a connection to a data source for every operation
that requires one. Enable this option to improve performance by caching the data
source connection.
Max Pooled
Statements
Enables reuse of prepared statements (that is, stored procedures and queries
that use the cfqueryparam tag). Although you tune this setting based on your
application, start by setting it to the sum of the following:
•Unique cfquery tags that use the cfqueryparam tag
•Unique cfstoredproc tags
Setting Description

50 Chapter 3: Data Source Management
Connecting to Microsoft Access
Use the settings in the following table to connect ColdFusion MX to Microsoft Access data
sources:
Timeout (min) The number of minutes that ColdFusion MX maintains an unused connection
before destroying it.
Interval (min) The time (in minutes) that the server waits between cycles to check for expired
data source connections to close.
Disable
Connections
If selected, suspends all client connections.
Login Timeout
(sec)
The number of seconds before ColdFusion MX times out the data source
connection login attempt.
CLOB Select to return the entire contents of any CLOB/Text columns in the database
for this data source. If not selected, ColdFusion MX retrieves the number of
characters specified in the Long Text Buffer setting.
BLOB Select to return the entire contents of any BLOB/Image columns in the database
for this data source. If not selected, ColdFusion MX retrieves the number of
characters specified in the BLOB Buffer setting.
LongText Buffer The default buffer size, used if the CLOB option is not selected. The default
value is 64000 bytes.
BLOB Buffer The default buffer size; used if the BLOB option is not selected. The default
value is 64000 bytes.
Allowed SQL The SQL operations that can interact with the current data source.
Setting Description
CF Data Source
Name
The data source name (DSN) used by ColdFusion MX to connect to the data
source.
Database File The file that contains the database.
System Database
File
To secure access to the specified database file, click Browse Server to locate
and enter a database that contains database security information. The system
database is usually located in the same directory as the MDB file or in the
windows\system32\system.mdw directory.
Use Default
Username
If selected, ColdFusion MX does not pass a user name or password when
requesting a connection. The Microsoft Access driver uses the default user name
and password.
ColdFusion
Username
The user name that ColdFusion MX passes to the JDBC driver to connect to the
data source if a ColdFusion application does not supply a user name (for
example, in a cfquery tag).
ColdFusion
Password
The password that ColdFusion MX passes to the JDBC driver to connect to the
data source if a ColdFusion application does not supply a password (for
example, in a cfquery tag).
Setting Description

Connecting to Microsoft Access 51
Description (Optional) A description for this connection.
Page Timeout The number of milliseconds before a request for a ColdFusion page times out.
The default is 600. If you observe excessive network activity when using this
driver, increase the page timeout value.
Max Buffer Size The size of the internal buffer, in kilobytes, that Access uses to transfer data to
and from the disk. The default buffer size is 2048 KB. Specify an integer value
divisible by 256.
Connection
String
A field that passes database-specific parameters, such as login credentials, to
the data source.
Default
Username
The user name that ColdFusion MX passes to the JDBC driver to connect to the
data source if a ColdFusion application does not supply a user name (for
example, in a cfquery tag).
Default Password The password that ColdFusion MX passes to the JDBC driver to connect to the
data source if a ColdFusion application does not supply a password (for
example, in a cfquery tag).
Return
Timestamp as
String
Enable this setting if your application retrieves Date/Time data and then reuses it
in SQL statements without applying formatting (using functions such as
DateFormat, TimeFormat, and CreateODBCDateTime).
Limit
Connections
Specifies whether ColdFusion MX limits the number of database connections for
the data source. If you enable this option, use the Restrict Connections To field to
specify the maximum.
Restrict
Connections To
Specifies the maximum number of database connections for the data source. To
use this restriction, you must enable the Limit Connections option.
Maintain
Connections
ColdFusion MX establishes a connection to a data source for every operation
that requires one. Enable this option to improve performance by caching the data
source connection.
Timeout (min) The number of minutes that ColdFusion MX maintains an unused connection
before destroying it.
Interval (min) The time (in minutes) that the server waits between cycles to check for expired
data source connections to close.
Disable
Connections
If selected, suspends all client connections.
Login Timeout
(sec)
The number of seconds before ColdFusion MX times out the data source
connection login attempt.
CLOB Select to return the entire contents of any CLOB/Text columns in the database
for this data source. If not selected, ColdFusion MX retrieves the number of
characters specified in the Long Text Buffer setting.
BLOB Select to return the entire contents of any BLOB/Image columns in the database
for this data source. If unchecked, ColdFusion retrieves the number of characters
specified in the BLOB Buffer setting.
LongText Buffer The default buffer size, used if the CLOB option is not selected. The default
value is 64000 bytes.
Setting Description

52 Chapter 3: Data Source Management
Connecting to Microsoft Access with Unicode
Use the settings in the following table to connect ColdFusion MX to Microsoft Access with
Unicode data sources (this is a Type 2 driver):
BLOB Buffer The default buffer size, used if the BLOB option is not selected. The default
value is 64000 bytes.
Allowed SQL The SQL operations that can interact with the current data source.
Setting Description
CF Data Source
Name
The data source name (DSN) used by ColdFusion MX to connect to the data
source.
Database File The file that contains the database.
Description (Optional) A description for this connection.
ColdFusion
Username
The user name that ColdFusion MX passes to the JDBC driver to connect to the
data source if a ColdFusion application does not supply a user name (for
example, in a cfquery tag).
ColdFusion
Password
The password that ColdFusion MX passes to the JDBC driver to connect to the
data source if a ColdFusion application does not supply a password (for
example, in a cfquery tag).
Page Timeout The time (in tenths of a second) before a request for a ColdFusion page times
out.
Max Buffer Size The size of the internal buffer, in kilobytes, used by Microsoft Access to transfer
data to and from the disk. Can be any integer value divisible by 256.
Connection
String
A field that passes database-specific parameters, such as login credentials, to
the data source.
Limit
Connections
Specifies whether ColdFusion MX limits the number of database connections for
the data source. If you enable this option, use the Restrict Connections To field to
specify the maximum.
Restrict
Connections To
Specifies the maximum number of database connections for the data source. To
use this restriction, you must enable the Limit Connections option.
Maintain
Connections
ColdFusion MX establishes a connection to a data source for every operation
that requires one. Enable this option to improve performance by caching the data
source connection.
Timeout (min) The number of minutes that ColdFusion MX maintains an unused connection
before destroying it.
Interval (min) The time (in minutes) that the server waits between cycles to check for expired
data source connections to close.
Disable
Connections
If selected, suspends all client connections.
Login Timeout
(sec)
The number of seconds before ColdFusion MX times out the data source
connection login attempt.
Setting Description

Connecting to Microsoft SQL Server 53
Note: This driver uses the Microsoft Jet list of reserved words, including the word Last. For a
complete list, see http://support.microsoft.com/?kbid=248738.
Connecting to Microsoft SQL Server
To see a list of SQL Server versions that ColdFusion MX supports, go to
www.macromedia.com/go/sysreqscf. Use the settings in the following table to connect
ColdFusion MX to Microsoft SQL Server:
CLOB Select to return the entire contents of any CLOB/Text columns in the database
for this data source. If not selected, ColdFusion MX retrieves the number of
characters specified in the Long Text Buffer setting.
BLOB Select to return the entire contents of any BLOB/Image columns in the database
for this data source. If not selected, ColdFusion MX retrieves the number of
characters specified in the BLOB Buffer setting.
LongText Buffer The default buffer size, used if the CLOB option is not selected. The default
value is 64000 bytes.
BLOB Buffer The default buffer size, used if the BLOB option is not selected. The default
value is 64000 bytes.
Allowed SQL The SQL operations that can interact with the current data source.
Setting Description
CF Data Source
Name
The data source name (DSN) used by ColdFusion MX to connect to the data
source.
Database The database to which this data source connects.
Server The name of the server that hosts the database that you want to use. If the
database is local, enclose the word local in parentheses. If you are running SQL
Server locally (or using MSDE), specify 127.0.0.1 for the
server name instead of the actual instance name.
Port The number of the TCP/IP port that the server monitors for connections.
Username The user name that ColdFusion MX passes to the JDBC driver to connect to the
data source if a ColdFusion application does not supply a user name (for
example, in a cfquery tag).
Password The password that ColdFusion MX passes to the JDBC driver to connect to the
data source if a ColdFusion application does not supply a password (for
example, in a cfquery tag).
Description (Optional) A description for this connection.
Connection
String
A field that passes database-specific parameters, such as login credentials, to
the data source.
Setting Description

54 Chapter 3: Data Source Management
Select Method Determines whether server cursors are used for SQL queries.
•The Direct method provides more efficient retrieval of data when you retrieve
record sets in a forward-only direction and you limit your SQL Server
connection to a single open SQL statement at a time. This is typical for
ColdFusion applications.
•The Cursor method lets you have multiple open SQL statements on a
connection. This is not typical for ColdFusion applications, unless you use
pooled statements.
Limit
Connections
Specifies whether ColdFusion MX limits the number of database connections for
the data source. If you enable this option, use the Restrict Connections To field to
specify the maximum.
Restrict
Connections To
Specifies the maximum number of database connections for the data source. To
use this restriction, you must enable the Limit Connections option.
Maintain
Connections
ColdFusion MX establishes a connection to a data source for every operation
that requires one. Enable this option to improve performance by caching the data
source connection.
String Format Enable this option if your application uses Unicode data in DBMS-specific
Unicode datatypes, such as National Character or nchar.
Max Pooled
Statements
Enables reuse of prepared statements (that is, stored procedures and queries
that use the cfqueryparam tag). Although you tune this setting based on your
application, start by setting it to the sum of the following:
•Unique cfquery tags that use the cfqueryparam tag
•Unique cfstoredproc tags
Timeout (min) The number of minutes that ColdFusion MX maintains an unused connection
before destroying it.
Interval (min) The time (in minutes) that the server waits between cycles to check for expired
data source connections to close.
Disable
Connections
If selected, suspends all client connections.
Login Timeout
(sec)
The number of seconds before ColdFusion MX times out the data source
connection login attempt.
CLOB Select to return the entire contents of any CLOB/Text columns in the database
for this data source. If not selected, ColdFusion MX retrieves the number of
characters specified in the Long Text Buffer setting.
BLOB Select to return the entire contents of any BLOB/Image columns in the database
for this data source. If not selected, ColdFusion MX retrieves the number of
characters specified in the BLOB Buffer setting.
LongText Buffer The default buffer size, used if Enable Long Text Retrieval(CLOB) is not
selected. The default value is 64000 bytes.
BLOB Buffer The default buffer size, used if the BLOB option is not selected. The default
value is 64000 bytes.
Allowed SQL The SQL operations that can interact with the current data source.
Setting Description

Connecting to Microsoft SQL Server 55
Settings for the Northwind sample database
SQL Server ships with a sample database named Northwind. Establishing a connection to the
Northwind database can help you learn ColdFusion MX while using a familiar database.
To establish a connection to the SQL Server Northwind database, you must set up the database
int he SQL Server Enterprise manager and in the ColdFusion MX Administrator.
To set up the database in the SQL Server Enterprise manager:
1.
Expand the server group.
2.
Expand the server.
3.
Under the Security folder, right-click on Logins.
4.
Select New Login.
5.
Select Windows Authentication or SQL Server Authentication settings.
6.
Select the Northwind database, and specify the language.
7.
Ensure that the database server is using mixed authentication. While in Enterprise Manager,
right click on the server, select Properties > Security and then select the Security tab. Ensure that
the SQL Server and Windows radio button is clicked.
8.
Click OK.
To set up the database in the ColdFusion MX Administrator:
1.
Open the ColdFusion MX Administrator.
2.
Click Data & Services > Data Sources.
3.
Type northwind in the Data Source Name field, and select Microsoft SQL Server in the Driver
drop-down list box.
4.
Click Add.
5.
Type Northwind in the Database Name field, 127.0.0.1 (or the database server IP address) in
the Server field, and 1433 in the Port field.
Note: Do not specify a user name or password when defining the data source.
6.
Save the data source.
Troubleshooting SQL Server connections
If you are having trouble establishing a connection to SQL Server, review the following
considerations:
•If you installed SQL Server using a server name other than the default, you must use your
chosen domain\servername wherever there’s a reference to (local).
The following situations can cause a Connection Refused error:
•If you specified authentication information in SQL Server, ensure that you have not defined a
username and password in the ColdFusion data source.

56 Chapter 3: Data Source Management
•You are running a connection-limited version of SQL Server and the request exceeds the limit
for TCP/IP connections.
You can prevent this exception by setting the Limit Connections and Restrict Connections To
options in ColdFusion MX Administrator on the Advanced Settings page for the data sources,
and specifying a number less than the SQL Server maximum.
•SQL Server does not enable the TCP/IP protocol. This problem can happen when SQL Server
is on the same computer as ColdFusion MX. To fix this problem, perform the following steps:
a
In SQL Server Enterprise Manager, right-click on the name of your SQL Server and click
Properties.
b
Click Network Configuration and the General Tab.
c
Move TCP/IP from the Disabled Protocols section to the Enabled Protocols section.
d
Click OK.
e
Restart the SQL Server services.
f
Verify your data source.
•If you have are having trouble connecting, consider using mixed-mode authentication for SQL
Server (Windows and SQL) and removing the user name and password from the ColdFusion
data source.
Connecting to MySQL
To see a list of MySQL versions that ColdFusion MX supports, go to
www.macromedia.com/go/sysreqscf. Use the settings in the following table to connect
ColdFusion MX to MySQL data sources:
Setting Description
CF Data Source Name The data source name (DSN) used by ColdFusion MX to connect to the
data source.
Database The database to which this data source connects.
Server The name of the server that hosts the database that you want to use. If the
database is local, enclose the word local in parentheses.
Port The number of the TCP/IP port that the server monitors for connections.
Username The user name that ColdFusion MX passes to the JDBC driver to connect
to the data source, if a ColdFusion application does not supply a user
name (for example, in a cfquery tag).
Password The password that ColdFusion MX passes to the JDBC driver to connect
to the data source, if a ColdFusion application does not supply a
password (for example, in a cfquery tag).
Description (Optional) A description for this connection.
Connection String A field that passes database-specific parameters, such as login
credentials, to the data source.

Connecting to ODBC Socket 57
Connecting to ODBC Socket
Use the settings in the following table to connect ColdFusion MX to ODBC Socket data sources
(this is a Type 3 driver):
Limit Connections Specifies whether ColdFusion MX limits the number of database
connections for the data source. If you enable this option, use the Restrict
Connections To field to specify the maximum.
Restrict Connections To Specifies the maximum number of database connections for the data
source. To use this restriction, you must enable the Limit Connections
option.
Maintain Connections ColdFusion MX establishes a connection to a data source for every
operation that requires one. Enable this option to improve performance by
caching the data source connection.
Timeout (min) The number of minutes that ColdFusion MX maintains an unused
connection before destroying it.
Interval (min) The time (in minutes) that the server waits between cycles to check for
expired data source connections to close.
Disable Connections If selected, suspends all client connections.
Login Timeout (sec) The number of seconds before ColdFusion MX times out the data source
connection login attempt.
CLOB Select to return the entire contents of any CLOB/Text columns in the
database for this data source. If not selected, ColdFusion MX retrieves the
number of characters specified in the Long Text Buffer setting.
BLOB Select to return the entire contents of any BLOB/Image columns in the
database for this data source. If not selected, ColdFusion MX retrieves the
number of characters specified in the BLOB Buffer setting.
LongText Buffer The default buffer size; used if Enable Long Text Retrieval(CLOB) is not
selected. The default value is 64000 bytes.
BLOB Buffer The default buffer size; used if the BLOB option is not selected. The
default value is 64000 bytes.
Allowed SQL The SQL operations that can interact with the current data source.
Setting Description
CF Data Source Name The data source name (DSN) used by ColdFusion MX to connect to the
data source.
ODBC DSN Select the ODBC DSN to which you want ColdFusion MX to connect.
Trusted Connection Specifies whether to use domain user account access to the database.
Only valid for SQL Server.
Username The user name that ColdFusion MX passes to the JDBC driver to connect
to the data source if a ColdFusion application does not supply a user
name (for example, in a cfquery tag).
Setting Description

58 Chapter 3: Data Source Management
Password The password that ColdFusion MX passes to the JDBC driver to connect
to the data source if a ColdFusion application does not supply a password
(for example, in a cfquery tag).
Description (Optional) A description for this connection.
Connection String A field that passes database-specific parameters, such as login
credentials, to the data source.
Return Timestamp as
String
Enable this option if your application retrieves Date/Time data and then
re-uses it in SQL statements without applying formatting (using functions
such as DateFormat, TimeFormat, and CreateODBCDateTime).
Limit Connections Specifies whether ColdFusion MX limits the number of database
connections for the data source. If you enable this option, use the Restrict
Connections To field to specify the maximum.
Restrict Connections To Specifies the maximum number of database connections for the data
source. To use this restriction, you must enable the Limit Connections
option.
Maintain Connections ColdFusion MX establishes a connection to a data source for every
operation that requires one. Enable this option to improve performance by
caching the data source connection.
Timeout (min) The number of minutes that ColdFusion MX maintains an unused
connection before destroying it.
Interval (min) The time (in minutes) that the server waits between cycles to check for
expired data source connections to close.
Disable Connections If selected, suspends all client connections.
Login Timeout (sec) The number of seconds before ColdFusion MX times out the data source
connection login attempt.
CLOB Select to return the entire contents of any CLOB/Text columns in the
database for this data source. If not selected, ColdFusion MX retrieves the
number of characters specified in the Long Text Buffer setting.
BLOB Select to return the entire contents of any BLOB/Image columns in the
database for this data source. If not selected, ColdFusion MX retrieves the
number of characters specified in the BLOB Buffer setting.
LongText Buffer The default buffer size; used if Enable Long Text Retrieval(CLOB) is not
selected. The default value is 64000 bytes.
BLOB Buffer The default buffer size; used if the BLOB option is not selected. The
default value is 64000 bytes.
Allowed SQL The SQL operations that can interact with the current data source.
Setting Description

Connecting to Oracle 59
Connecting to Oracle
To see a list of Oracle versions that ColdFusion MX supports, go to
www.macromedia.com/go/sysreqscf. Use the settings in the following table to connect
ColdFusion MX to Oracle data sources:
Setting Description
CF Data Source Name The data source name (DSN) used by ColdFusion MX to connect to the
data source.
SID Name The Oracle System Identifier (SID) that refers to the instance of the Oracle
database software running on the server. The default value is ORCL.
Server The name of the server that hosts the database that you want to use. If the
database is local, enclose the word local in parentheses.
Port The number of the TCP/IP port that the server monitors for connections.
Username The user name that ColdFusion MX passes to the JDBC driver to connect
to the data source if a ColdFusion application does not supply a user name
(for example, in a cfquery tag).
Password The password that ColdFusion MX passes to the JDBC driver to connect
to the data source if a ColdFusion application does not supply a password
(for example, in a cfquery tag).
Description (Optional) A description for this connection.
Connection String A field that passes database-specific parameters, such as login
credentials, to the data source.
Limit Connections Specifies whether ColdFusion MX limits the number of database
connections for the data source. If you enable this option, use the Restrict
Connections To field to specify the maximum.
Restrict Connections To Specifies the maximum number of database connections for the data
source. To use this restriction, you must enable the Limit Connections
option.
Maintain Connections ColdFusion MX establishes a connection to a data source for every
operation that requires one. Enable this option to improve performance by
caching the data source connection.
Max Pooled Statements Enables reuse of prepared statements (that is, stored procedures and
queries that use the cfqueryparam tag). Although you tune this setting
based on your application, start by setting it to the sum of the following:
•Unique cfquery tags that use the cfqueryparam tag
•Unique cfstoredproc tags
The default value is 300.
Timeout (min) The number of minutes that ColdFusion MX maintains an unused
connection before destroying it.
Interval (min) The time (in minutes) that the server waits between cycles to check for
expired data source connections to close.
Disable Connections If selected, suspends all client connections.

60 Chapter 3: Data Source Management
Connecting to other data sources
Use the settings in the following table to connect ColdFusion MX to data sources through JDBC
drivers that do not appear in the drop-down list of drivers:
Login Timeout (sec) The number of seconds before ColdFusion MX times out the data source
connection login attempt.
CLOB Select to return the entire contents of any CLOB/Text columns in the
database for this data source. If not selected, ColdFusion MX retrieves the
number of characters specified in the Long Text Buffer setting.
BLOB Select to return the entire contents of any BLOB/Image columns in the
database for this data source. If not selected, ColdFusion MX retrieves the
number of characters specified in the BLOB Buffer setting.
LongText Buffer The default buffer size; used if Enable Long Text Retrieval (CLOB) is not
selected. The default value is 64000 bytes.
BLOB Buffer The default buffer size; used if the BLOB option is not selected. The
default value is 64000 bytes.
Allowed SQL The SQL operations that can interact with the current data source.
Setting Description
CF Data Source Name The data source name (DSN) used by ColdFusion MX to connect to the
data source.
JDBC URL The JDBC connection URL for this data source.
Driver Class The fully qualified class name of the driver. For example,
com.inet.tds.TdsDriver. The JAR file that contains this class must be in a
directory defined in the ColdFusion classpath.
Driver Name (Optional) The name of the driver.
Username The user name that ColdFusion MX passes to the JDBC driver to connect
to the data source if a ColdFusion application does not supply a user name
(for example, in a cfquery tag).
Password The password that ColdFusion MX passes to the JDBC driver to connect
to the data source if a ColdFusion application does not supply a password
(for example, in a cfquery tag).
Description (Optional) A description for this connection.
Connection String A field that passes database-specific parameters, such as login
credentials, to the data source.
Limit Connections Specifies whether ColdFusion MX limits the number of database
connections for the data source. If you enable this option, use the Restrict
Connections To field to specify the maximum.
Restrict Connections To Specifies the maximum number of database connections for the data
source. To use this restriction, you must enable the Limit Connections
option.
Setting Description

Connecting to other data sources 61
For example, you can use the Other Data Sources option to define a data source for DB2 OS/390
or iSeries, using the following settings:
JDBC URL jdbc:datadirect:db2://dbserver:portnumber
Driver class macromedia.jdbc.MacromediaDriver
Driver name DB2
Username A user defined to the database
Password The password for the username
Connection string Specify one connection string for the first connection, and then modify it
for use in subsequent connections, as follows:
•On the initial connection, specify LocationName, CollectionId, CreateDefaultPackage, and
sendStringParametersAsUnicode (with no spaces) as the following example shows:
LocationName=SAMPLE;CollectionId=DEFAULT;CreateDefaultPackage=TRUE;
sendStringParametersAsUnicode=false
Note: If the database uses Unicode, specify true for the sendStringParametersAsUnicode
parameter.
Maintain Connections ColdFusion MX establishes a connection to a data source for every
operation that requires one. Enable this option to improve performance by
caching the data source connection.
Timeout (min) The number of minutes that ColdFusion MX maintains an unused
connection before destroying it.
Interval (min) The time (in minutes) that the server waits between cycles to check for
expired data source connections to close.
Disable Connections If selected, suspends all client connections.
Login Timeout (sec) The number of seconds before ColdFusion MX times out the data source
connection login attempt.
CLOB Select to return the entire contents of any CLOB/Text columns in the
database for this data source. If not selected, ColdFusion MX retrieves the
number of characters specified in the Long Text Buffer setting.
BLOB Select to return the entire contents of any BLOB/Image columns in the
database for this data source. If not selected, ColdFusion MX retrieves the
number of characters specified in the BLOB Buffer setting.
LongText Buffer The default buffer size; used if Enable Long Text Retrieval (CLOB) is not
selected. The default value is 64000 bytes.
BLOB Buffer The default buffer size; used if the BLOB option is not selected. The
default value is 64000 bytes.
Allowed SQL The SQL operations that can interact with the current data source.
Setting Description

62 Chapter 3: Data Source Management
•On subsequent connections, specify LocationName, CollectionId, and
sendStringParametersAsUnicode, as the following example shows:
LocationName=SAMPLE;CollectionId=DEFAULT;
sendStringParametersAsUnicode=false
Note: DB2 OS/390 refers to all supported versions of DB2 on OS/390 and z/OS platforms; DB2
iSeries refers to all supported versions of DB2 on iSeries and AS/400.
For more information on DB2, see “Connecting to DB2 Universal Database” on page 47.
Connecting to Sybase
To see a list of Sybase versions that ColdFusion MX supports, go to
www.macromedia.com/go/sysreqscf. Use the settings in the following table to connect
ColdFusion MX to Sybase data sources:
Setting Description
CF Data Source Name The data source name (DSN) used by ColdFusion MX to connect to the
data source.
Database The database to which this data source connects.
Server The name of the server that hosts the database that you want to use. If the
database is local, enclose the word local in parentheses. This name must
be either a fully qualified domain name (resolvable through DNS) or an IP
address. It cannot be a netbios name (even if you are running NBT), or an
alias you set up using the client connectivity wizard (both of these
approaches worked in earlier ColdFusion versions).
Port The number of the TCP/IP port that the server monitors for connections.
Username The user name that ColdFusion MX passes to the JDBC driver to connect
to the data source if a ColdFusion application does not supply a user name
(for example, in a cfquery tag).
Password The password that ColdFusion MX passes to the JDBC driver to connect
to the data source if a ColdFusion application does not supply a password
(for example, in a cfquery tag).
Description (Optional) A description for this connection.
Connection String A field that passes database-specific parameters, such as login
credentials, to the data source.
Select Method Determines whether server cursors are used for SQL queries.
•The Direct method provides more efficient retrieval of data when you
retrieve record sets in a forward-only direction and you limit your Sybase
connection to a single open SQL statement at a time. This is typical for
ColdFusion applications.
•The Cursor method lets you have multiple open SQL statements on a
connection. This is not typical for ColdFusion applications, unless you
use pooled statements.
Limit Connections Specifies whether ColdFusion MX limits the number of database
connections for the data source. If you enable this option, use the Restrict
Connections To field to specify the maximum.

Connecting to JNDI data sources 63
Connecting to JNDI data sources
Use the settings in the following table to connect ColdFusion MX to JNDI data sources that have
been defined for a J2EE application server (multiserver and J2EE configurations only):
Restrict Connections To Specifies the maximum number of database connections for the data
source. To use this restriction, you must enable the Limit Connections
option.
Maintain Connections ColdFusion MX establishes a connection to a data source for every
operation that requires one. Enable this option to improve performance by
caching the data source connection.
Max Pooled Statements Enables reuse of prepared statements (that is, stored procedures and
queries that use the cfqueryparam tag). Although you tune this setting
based on your application, start by setting it to the sum of the following:
•Unique cfquery tags that use the cfqueryparam tag
•Unique cfstoredproc tags
Timeout (min) The number of minutes that ColdFusion MX maintains an unused
connection before destroying it.
Interval (min) The time (in minutes) that the server waits between cycles to check for
expired data source connections to close.
Disable Connections If selected, suspends all client connections.
Login Timeout (sec) The number of seconds before ColdFusion MX times out the data source
connection login attempt.
CLOB Select to return the entire contents of any CLOB/Text columns in the
database for this data source. If not selected, ColdFusion MX retrieves the
number of characters specified in the Long Text Buffer setting.
BLOB Select to return the entire contents of any BLOB/Image columns in the
database for this data source. If not selected, ColdFusion MX retrieves the
number of characters specified in the BLOB Buffer setting.
LongText Buffer The default buffer size; used if Enable Long Text Retrieval(CLOB) is not
selected. The default value is 64000 bytes.
BLOB Buffer The default buffer size; used if the BLOB option is not selected. The
default value is 64000 bytes.
Allowed SQL The SQL operations that can interact with the current data source.
Setting Description
CF Data Source Name The data source name (DSN) used by ColdFusion MX to connect to the
data source.
JNDI Name The JNDI location in which the J2EE application server stores the data
source.
Username The user name that ColdFusion MX passes to JNDI to connect to JNDI if
a ColdFusion application does not supply a user name (for example, in a
cfquery tag).
Setting Description

64 Chapter 3: Data Source Management
Note: The ColdFusion MX Administrator does not display the JNDI data source option when running
in the server configuration.
Password The password that ColdFusion MX passes to JNDI to connect to the data
source if a ColdFusion application does not supply a password (for
example, in a cfquery tag).
Description (Optional) A description for this connection.
JNDI Environment
Settings
Specifies additional JNDI environment settings, if required by the JNDI
data source. Use comma separated list of name/value pair. For example if
you must specify a username and password to connect to JNDI, specify
the following:
SECURITY_PRINCIPAL="myusername",SECURITY_CREDENTIALS="mypassword"
CLOB Select to return the entire contents of any CLOB/Text columns in the
database for this data source. If not selected, ColdFusion MX retrieves the
number of characters specified in the Long Text Buffer setting.
BLOB Select to return the entire contents of any BLOB/Image columns in the
database for this data source. If not selected, ColdFusion MX retrieves the
number of characters specified in the BLOB Buffer setting.
LongText Buffer The default buffer size; used if Enable Long Text Retrieval (CLOB) is not
selected. The default value is 64000 bytes.
BLOB Buffer The default buffer size; used if the BLOB option is not selected. The
default value is 64000 bytes.
Allowed SQL The SQL operations that can interact with the current data source.
Setting Description

65
CHAPTER 4
Web Server Management
You can connect Macromedia ColdFusion MX to the built-in web server and to external web
servers, such as Apache, IIS, and Sun ONE Web Server (formerly known as iPlanet). This chapter
explores common scenarios, security, and multihosting.
The information in this chapter applies when running in the server configuration, in the
multiserver configuration, and when deploying on Macromedia JRun in the J2EE configuration.
(Some J2EE application servers include web server plug-ins that provide similar functionality.)
Contents
About web servers in ColdFusion MX . . . . . . . . . . . . . . . . . . . . . . . . . . . . . . . . . . . . . . . . . . . 65
Using the built-in web server . . . . . . . . . . . . . . . . . . . . . . . . . . . . . . . . . . . . . . . . . . . . . . . . . . 66
Using an external web server . . . . . . . . . . . . . . . . . . . . . . . . . . . . . . . . . . . . . . . . . . . . . . . . . . 67
Web server configuration . . . . . . . . . . . . . . . . . . . . . . . . . . . . . . . . . . . . . . . . . . . . . . . . . . . . . 68
Multihoming . . . . . . . . . . . . . . . . . . . . . . . . . . . . . . . . . . . . . . . . . . . . . . . . . . . . . . . . . . . . . . 74
About web servers in ColdFusion MX
The web server is a critical component in your ColdFusion MX environment, and understanding
how ColdFusion interacts with web servers can help you administer your site. ColdFusion MX
provides the following web server options:
Built-in web server A lightweight, all-Java, HTTP 1.0 web server. Suitable for development
but not intended for use in production applications. For more information, see “Using the built-
in web server” on page 66.
External web server A customized web server connector module that forwards requests for
ColdFusion pages from an external web server to ColdFusion MX. For more information, see
“Using an external web server” on page 67.

66 Chapter 4: Web Server Management
Using the built-in web server
The ColdFusion MX server configuration is built on top of JRun, which includes the JRun web
server (JWS), also called the built-in web server. Although not intended for use in a production
environment, the built-in web server is particularly useful in the following cases:
Coexistence/transition The built-in web server lets you run a previous version of ColdFusion
(using an external web server) and ColdFusion MX (using the built-in web server) on the same
computer while you migrate your existing applications to ColdFusion MX.
Development If your workstation runs ColdFusion MX but does not run an external web
server, you can still develop and test ColdFusion applications locally through the built-in web
server.
All web servers listen on a TCP/IP port, which you can specify in the URL. By default, web
servers listen for HTTP requests on port 80 (for example, http://www.macromedia.com and
http://www.macromedia.com:80 are the same). Similarly, port 443 is the default port for HTTPS
requests.
By default in the server configuration, the built-in web server listens on port 8500. For example,
to access the ColdFusion MX Administrator through the built-in web server, specify
http://servername:8500/CFIDE/administrator/index.cfm. In the multiserver configuration, the
default port for the built-in web server is 8300.
Note: URLs are case-sensitive on UNIX operating systems.
If you enable the built-in web server during the installation process and the port is already in use,
the installer automatically finds the next-highest available port and configures the built-in web
server to use that port. To determine the port number used by the built-in web server, open the
cf_root/runtime/servers/coldfusion/SERVER-INF/jrun.xml file in a text editor and examine the
port attribute of the WebService service. In the multiserver configuration, the path is
jrun_root/servers/cfusion/SERVER-INF/jrun.xml.
Note: When you install ColdFusion MX Enterprise Edition using the multiserver configuration, the
installation wizard always configures the built-in web server, even if you select an external web server.
Keep in mind the following when using the built-in web server:
•Whenever possible, you should choose to configure your external web server as part of the
ColdFusion MX installation, except for the two cases mentioned at the beginning of this
section (coexistence with a previous ColdFusion version and when there is no web server on
the computer). If you select the built-in web server by mistake, you must run the Web Server
Configuration Tool manually to configure your external web server after the installation. For
information about the Web Server Configuration Tool, see “Web server configuration”
on page 68.
•The default web root when using the built-in web server is cf_root/wwwroot (server
configuration) or jrun_root/servers/cfusion/cfusion-ear/cfusion-war (multiserver
configuration). By default, the ColdFusion MX Administrator (CFIDE directory) is under this
web root.

Using an external web server 67
•If you want the built-in web server to serve pages from a different web root directory, define a
virtual mapping in the cf_root/wwwroot/WEB-INF/jrun-web.xml file
(jrun_root/servers/cfusion/cfusion-ear/cfusion-war/WEB-INF/jrun-web.xml in the multiserver
configuration), as the following example shows:
<virtual-mapping>
<resource-path>/*</resource-path>
<system-path>C:/myApps/wwwroot</system-path>
</virtual-mapping>
Warning: If you have CFML pages under your external web server’s root, ensure that
ColdFusion MX has been configured to serve these pages through the external web server. If you
have not configured ColdFusion MX to use an external web server, your external web server will
serve ColdFusion Markup Language (CFML) source code for ColdFusion pages saved under its
web root.
Using an external web server
ColdFusion MX uses the JRun web server connector to forward requests from an external web
server to the ColdFusion MX runtime system.
When a request is made for a CFM page, the connector on the web server opens a network
connection to the JRun proxy service. The ColdFusion MX runtime system handles the request
and sends its response back through the proxy service and connector. The web server connector
uses web-server-specific plug-in modules, as the following table describes:
Web server Connector details
Apache The Web Server Configuration Tool adds the following elements to the
Apache httpd.conf file:
•A LoadModule directive defines the connector.
•An AddHandler directive tells Apache to route requests for ColdFusion
pages through the connector.
For Apache 1.3.x, the connection module is mod_jrun.so; for Apache 2.x,
the connection module is mod_jrun20.so.
IIS The Web Server Configuration Tool adds the following elements at either
the global level (default) or website level:
•An ISAPI filter (available on IIS 5 only).
•Extension mappings that tell IIS to route requests for ColdFusion pages
through the connector.
With IIS 5, the IIS connection module is jrun.dll. IIS 6 uses a connection
module named jrun_iis6.dll and a helper DLL named jrun_iis6_wildcard.dll.
Sun ONE Web Server,
including iPlanet and
Netscape Enterprise
Server (NES)
The Web Server Configuration Tool adds the following elements to Sun
ONE Web Server configuration files:
•obj.conf A PathCheck directive for the JRun filter and ObjectType
directives to route requests for ColdFusion pages through the connector.
•magnus.conf Init directives to load and initialize the connector.
In Windows, the Sun ONE Web Server connection module is jrun_nsapi.dll;
on UNIX, the Sun ONE Web Server connection module is jrun_nsapi.so.
With iPlanet 4.x, the Web Server Configuration Tool places all settings in
the obj.conf file.

68 Chapter 4: Web Server Management
Web server configuration
ColdFusion MX uses the Web Server Configuration Tool to configure an external web server with
the modules and settings that the connector needs to connect to ColdFusion MX. You can run
the Web Server Configuration Tool through either the command-line interface or the graphical
user interface (GUI). In either case, the Web Server Configuration Tool configures your external
web server to interact with a ColdFusion MX server.
Using GUI mode
The Web Server Configuration Tool includes a GUI mode, which you can use to specify external
web server configuration settings through a graphical interface.
Note: When you use the Web Server Configuration Tool in GUI mode, you must select the Configure
Web Server for ColdFusion MX Applications check box.
To run the Web Server Configuration Tool in GUI mode:
1.
Open a console window.
Tip: In Windows, you can start the Web Server Configuration Tool by selecting Start > Programs >
Macromedia > ColdFusion MX 7 > Web Server Configuration Tool.
2.
Change to the cf_root/runtime/bin (server configuration) or jrun_root/bin (multiserver
configuration) directory.
3.
Start the Web Server Configuration Tool using the wsconfig.exe (Windows) or wsconfig
(UNIX) command.
The Web Server Configuration Tool window appears.
4.
Click the Add button.
5.
Select the Configure Web Server for ColdFusion MX Applications check box.
6.
In the Server drop-down list box, select the server or cluster name that you want to configure.
(Individual server names in a cluster do not appear. Clustering support is only available on the
multiserver configuration.)
Note: The server or cluster does not have to reside on the web server computer. In this case, enter
the IP address or server name of the remote computer in the JRun Host field.
7.
In the Web Server Properties area, enter web-server-specific information, and click OK.
8.
(Optional) Move the CFIDE directory and other directories (such as cfdocs) from the built-in
web server’s web root to your web server root directory. In addition, you can copy your
application’s CFM pages from the built-in web server’s web root to your web server root
directory.
Note: When a page is requested, the web server connector first looks for the ColdFusion page in
the cf_root/wwwroot (server configuration) or jrun_root/servers/cfusion/cfusion-ear/cfusion-war
(multiserver configuration) directory, and then looks under the web server root. Alternatively, you
can use the command-line interface and specify the -cfwebroot option.

Web server configuration 69
9.
(Optional) The web server connector does not serve static content (such as HTML files and
images) from the built-in web server’s root directory. If your ColdFusion web application has
an empty context root (/) and you want to serve pages from the built-in web server’s root
directory, you can create a web server mapping to the corresponding directory under the built-
in web server.
Using the command-line interface
You can also run the Web Server Configuration Tool through a command-line interface.
To run the command-line interface:
1.
Open a console window.
2.
Change to the cf_root/runtime/bin (server configuration) or jrun_root/bin (multiserver
configuration) directory.
3.
Execute the wsconfig.exe (Windows) or wsconfig (UNIX) command:
wsconfig.exe [-options]
./wsconfig [-options]
The following table describes the options:
Option Description
-ws Specifies the web server, as follows:
•IIS
•Apache
•SunOne
•iPlanet
•NES
The web server name you supply is not case-sensitive.
-dir Specifies the path to the configuration directory (Apache conf or
NES/iPlanet config).
-site Specifies the IIS website name (case-sensitive). Specify All or 0 to
configure the connector at a global level, which applies to all IIS
websites.
-host Specifies the ColdFusion server address. The default value is
localhost.
-server Specifies the ColdFusion server name.
-username Specifies a username defined to the JRun server. The default value is
guest account.
-password Specifies a password that corresponds to -username. The default
value is guest account.
-norestart Specifies not to restart the web server.
-cluster Specifies the JRun cluster name. Use this option to define a
connection to a JRun cluster instead of a single server.
-l Enables verbose logging for the connector.

70 Chapter 4: Web Server Management
Using the batch files and shell scripts
The ColdFusion MX server configuration includes batch files and shell scripts that implement
typical command-line connector configurations. These files are in the cf_root/bin/connectors
directory. For example, the IIS_connector.bat file configures all sites in IIS to site 0, which
establishes a globally defined connector so that all sites inherit the filter and mappings.
If you use Apache or Sun ONE Web Server, use these files as prototypes, editing and saving them
as appropriate for your site.
-a Enables native OS memory allocation.
-map .cfm,.cfc,.cfml,.cfr,
.cfswf,.jsp,.jws
Specifies the extension mappings list. (To use the web server
connector with ColdFusion MX, you should specify
.cfm,.cfc,.cfml,.cfr,.cfswf,.jsp,.jws.)
-filter-prefix-only (IIS 5 only) Sets ignoresuffixmap=true in the jrun.ini file. This means
that the connector module runs as an IIS extension.
-coldfusion Ensures that the proper ColdFusion MX mappings are set (.cfm,
.cfml, .cfc, .cfswf, .cfr, .jsp, .jws), and, if IIS, filter-prefix-only is
implicitly specified.
Always use this option when configuring a web server for use
with ColdFusion MX.
-upgrade Upgrades existing configured connectors with newer modules from a
newer wsconfig.jar file.
-service Specifies the Apache Windows service name. The default value is
Apache.
-bin Specifies the path to the Apache server binary file (apache.exe in
Windows, httpd on UNIX).
-script Specifies the path to the Apache UNIX control script file (apachectl,
but slightly different with certain Apache variants, such as
Stronghold).
-v Enables verbose output from the Web Server Configuration Tool.
-cfwebroot Specifies the directory corresponding to cf_root/wwwroot. If you use
this option, the Web Server Configuration Tool creates web server
mappings for /CFIDE and /cfdocs, each of which points to the
corresponding directories under cf_root/wwwroot. This option is
useful in a multihoming or hosting environment where you want
multiple applications to share the ColdFusion MX Administrator.
-list Lists all configured web servers.
-list -host server-host Lists all JRun servers on the specified host.
-remove Removes a configuration. Requires the -ws and either the -dir or
-site options.
-uninstall Uninstalls all configured connectors.
-h Lists all parameters.
Option Description

Web server configuration 71
Command-line interface examples
This section provides examples of multiple use-cases for different web servers:
•Configure a specific IIS site:
cf_root/runtime/bin/wsconfig.exe -server coldfusion -ws iis -site "web31"
-coldfusion -v
On systems where all sites run ColdFusion, there is generally no need to configure an
individual site.
•Configure all existing IIS sites (ISPs):
cf_root/runtime/bin/wsconfig.exe -server coldfusion -ws iis -site 0
-coldfusion -cfwebroot C:\Inetpub\wwwroot -v
The -cfwebroot option allows all sites to share the ColdFusion MX Administrator that runs
under C:\Inetpub\wwwroot. This example does not automatically configure newly added sites
after the first -site 0 run, but you can rerun with -site 0 at a later time, and the Web Server
Configuration Tool configures new sites only.
•Configure Apache on UNIX #1:
cf_root/runtime/bin/wsconfig -server coldfusion -ws Apache
-bin /opt/apache2/bin/httpd -script /opt/apache2/bin/apachectl
-dir /opt/apache2/conf -coldfusion -v
•Configure Apache on UNIX #2:
cf_root/runtime/bin/wsconfig -server coldfusion -ws Apache
-bin /usr/bin/httpd -script /usr/bin/httpd -dir /etc/httpd/conf
-coldfusion -v
•Configure Apache in Windows:
cf_root/runtime/bin/wsconfig.exe -server coldfusion -ws apache -dir
"c:\program files\apache group\apache2\conf" -coldfusion -v
•Configure Netscape on UNIX:
cf_root/runtime/bin/wsconfig -server coldfusion -ws nes
-dir [path to config] -coldfusion -v
•Configure Sun ONE Web Server on UNIX:
cf_root/runtime/bin/wsconfig -server coldfusion -ws sunone
-dir [path to config] -coldfusion -v
Configuration files
The Web Server Configuration Tool stores properties in configuration files, as follows:
IIS In the jrun.ini file, typically found in a subdirectory of the cf_root/runtime/lib/wsconfig
(server configuration) or jrun_root/lib/wsconfig (multiserver configuration) directory. For IIS 5
only, it also defines filter and extension mappings in the IIS metabase.
Apache In the httpd.conf file, typically found in the apache_root/conf directory.
Sun ONE Web Server/iPlanet In the obj.conf and magnus.conf files, typically found in the
ws_root/server-http-xxx/config directory.

72 Chapter 4: Web Server Management
The following table describes the web server connector properties in the web server configuration
files. The web server connector uses these settings to help it find the ColdFusion server and know
which servers to connect to.
Each time you run the Web Server Configuration Tool, it creates a new configuration file and
directory. For example, the first time you run the tool in the server configuration, it creates files
under cf_root/runtime/lib/wsconfig/1; the second time, it creates cf_root/runtime/lib/wsconfig/2;
and so on. Each of these subdirectories contains the appropriate platform-specific connector
module and web-server-specific supporting files.
Sample configuration files
To help describe the web server configuration file parameters, this section provides examples of
connector-specific web server properties. These examples assume that JRun and the web server are
on the same computer.
Property Description
bootstrap Specifies the IP address and port on which the JRun server’s proxy service is
listening for connector requests. JRun must also be configured to listen on this
port and address combination, the ProxyService must be activated, and the
JRun server must be running. Specify ipaddress:portnumber (for example,
127.0.0.1:51011).
serverstore Specifies the full path and filename of the file that contains information for the
associated JRun server. The connector creates this file automatically. The
default filename is jrunserver.store.
verbose Creates more detailed web server log file entries for the connector. Enabling
this option can cause the web server’s log files to fill quickly. Specify true or
false; the default value is false. In Apache and Sun ONE Web Server, the
connector writes to the error log configured for the web server; on IIS, the
connector writes to its own log in the related wsconfig subdirectory.
scriptpath (IIS only) Points to the virtual /JRunScripts directory on the web server.
errorurl (Optional) Specifies the URL to a file that contains a customized error
message. This property is commented out by default. You must restart the web
server after enabling this setting.
ssl (Optional) Enables secure sockets layer (SSL) between the web server and the
JRun server. You must set this setting to false.
apialloc Enables native OS memory allocation rather than the web server’s allocator
(for use on Solaris with Sun ONE, at the direction of Macromedia Support
staff).
ignoresuffixmap (IIS only) Forces the connector to use application mappings.
proxyretryinterval Specifies the number of seconds to wait before trying to reconnect to an
unreachable clustered server.
connecttimeout Specifies the number of seconds to wait on a socket connect to a JRun server.
recvtimeout Specifies the number of seconds to wait on a socket receive to a JRun server.
sendtimeout Specifies the number of seconds to wait on a socket send to a JRun server.

Web server configuration 73
Apache configuration file
The following is a typical httpd.conf file for an installation of ColdFusion MX on the same
computer as an Apache 2.0 web server:
# JRun Settings
LoadModule jrun_module "C:/CFusionMX7/runtime/lib/wsconfig/1/mod_jrun20.so"
<IfModule mod_jrun20.c>
JRunConfig Verbose false
JRunConfig Apialloc false
JRunConfig Ssl false
JRunConfig Ignoresuffixmap false
JRunConfig Serverstore
"C:/CFusionMX7/runtime/lib/wsconfig/1/jrunserver.store"
JRunConfig Bootstrap 127.0.0.1:51011
#JRunConfig Errorurl <optionally redirect to this URL on errors>
#JRunConfig ProxyRetryInterval <number of seconds to wait before trying to
reconnect to unreachable clustered server>
#JRunConfig ConnectTimeout 15
#JRunConfig RecvTimeout 300
#JRunConfig SendTimeout 15
AddHandler jrun-handler .jsp .jws .cfm .cfml .cfc .cfr .cfswf
</IfModule>
IIS configuration file
For IIS, the connector uses the jrun.ini file to initialize the jrun.dll file (jrun_iis6.dll on IIS 6).
The following is a typical jrun.ini file:
verbose=false
scriptpath=/JRunScripts/jrun.dll
serverstore=C:/CFusionMX7/runtime/lib/wsconfig/1/jrunserver.store
bootstrap=127.0.0.1:51011
apialloc=false
ssl=false
ignoresuffixmap=true
#errorurl=<optionally redirect to this URL on errors>
#proxyretryinterval=<number of seconds to wait before trying to reconnect to
unreachable clustered server>
#connecttimeout=<number of seconds to wait on a socket connect to a JRun
server>
#recvtimeout=<number of seconds to wait on a socket receive to a JRun server>
#sendtimeout=<number of seconds to wait on a socket send to a JRun server>
Netscape, iPlanet, or Sun ONE configuration file
The following is a typical obj.conf file for Netscape, iPlanet, or Sun ONE Web Server:
Note: Java must be disabled for the virtual server class that contains the server configured for JRun.
...
<Object name="default">
AuthTrans fn="match-browser" browser="*MSIE*" ssl-unclean-shutdown="true"
NameTrans fn="pfx2dir" from="/mc-icons" dir="C:/Sun/WebServer6.1/ns-icons"
name="es-internal"
NameTrans fn="pfx2dir" from="/manual" dir="C:/Sun/WebServer6.1/manual/https"

74 Chapter 4: Web Server Management
NameTrans fn="document-root" root="$docroot"
PathCheck fn="nt-uri-clean"
PathCheck fn="check-acl" acl="default"
PathCheck fn="find-pathinfo"
PathCheck fn=find-index index-names="index.jsp,index.html,home.html,index.cfm"
PathCheck fn="jrunfilter"
ObjectType fn=type-by-exp exp=*.jsp type="jrun-internal/ext"
ObjectType fn=type-by-exp exp=*.jws type="jrun-internal/ext"
ObjectType fn=type-by-exp exp=*.cfm type="jrun-internal/ext"
ObjectType fn=type-by-exp exp=*.cfml type="jrun-internal/ext"
ObjectType fn=type-by-exp exp=*.cfc type="jrun-internal/ext"
ObjectType fn=type-by-exp exp=*.swf type="jrun-internal/ext"
ObjectType fn=type-by-exp exp=*.mxml type="jrun-internal/ext"
ObjectType fn=type-by-exp exp=*.cfr type="jrun-internal/ext"
ObjectType fn="type-by-extension"
ObjectType fn="force-type" type="text/plain"
Service method=(GET|HEAD|POST) type="jrun-internal/*" fn="jrunservice"
Service method="(GET|HEAD)" type="magnus-internal/imagemap" fn="imagemap"
Service method="(GET|HEAD)" type="magnus-internal/directory" fn="index-common"
Service method="(GET|HEAD|POST)" type="*~magnus-internal/*" fn="send-file"
Service method="TRACE" fn="service-trace"
AddLog fn="flex-log" name="access"
</Object>
...
The following is a typical magnus.conf file for Netscape, iPlanet, or Sun ONE Web Server:
...
Init fn="load-modules"
shlib="C:/CFusionMX7/runtime/lib/wsconfig/1/jrun_nsapi.dll"
funcs="jruninit,jrunfilter,jrunservice"
Init fn="jruninit"
serverstore="C:/CFusionMX7/runtime/lib/wsconfig/1/jrunserver.store"
bootstrap="127.0.0.1:51011" verbose="true" apialloc="false" ssl="false"
ignoresuffixmap="false" #errorurl="<optionally redirect to this URL on
errors>" connecttimeout="15" recvtimeout="300" sendtimeout="15"
Multihoming
You typically use the Web Server Configuration Tool to configure a connection between the web
server and ColdFusion server running on the same computer. However, you can use the web
server connector to route requests to multiple virtual sites to a single ColdFusion server. This is
known as multihoming.
In a multihomed environment, you have multiple virtual hosts (also known as virtual sites)
connected to a single ColdFusion server. You might use these virtual hosts for separate
applications, such as Human Resources (HR), payroll, and marketing, or for separate users in a
hosting environment.
Note: You use web-server-specific methods to create separate virtual websites for each use.

Multihoming 75
Multihoming configuration tasks include the following:
Enabling access to the ColdFusion MX Administrator If any of the applications under a
virtual host need to access the ColdFusion MX Administrator, you must create a web server
mapping (Alias directive in Apache) for /CFIDE that points to the original CFIDE directory.
Alternatively, you can copy the entire CFIDE directory to the virtual website.
Tip: You can also configure the web server using the command-line Web Server Configuration Tool
-cfwebroot option, which allows access to the CFIDE directory under the specified web root.
Enabling access to the cfform.js file If you do not create a web server mapping for /CFIDE,
and any of the applications under a virtual host use the cfform tag, you must enable the virtual
host to find the JavaScript files under the CFIDE/scripts directory. To enable access to the these
scripts, use one of the following options:
•Copy the original_web_root/CFIDE/scripts directory to a CFIDE/scripts directory on your
virtual host.
•Modify all cfform tags to use the scriptsrc attribute to specify the location of the cfform.js
file.
Disabling the cacheRealPath attribute To ensure that ColdFusion MX always returns pages
from the correct server, ensure that Cache Web Server Paths is disabled in t‘he Caching page of
the ColdFusion MX Administrator. (When you use the multiserver configuration, set the
cacheRealPath attribute to false for the ProxyService in the
jrun_root/servers/servername/SERVER-INF/jrun.xml file.)
The procedures you perform to enable multihoming differ for each web server.
IIS
When you use IIS, you run the IIS Administrator to create additional websites and run the Web
Server Configuration Tool. You store ColdFusion pages under the web root of each virtual
website.
To connect multiple virtual sites on IIS to a single ColdFusion server:
1.
Use the IIS Administrator to create virtual websites, as necessary. The web root directory should
enable read, write, and execute access. For more information, see your IIS documentation.
2.
Configure DNS for each virtual website, as described in your IIS documentation.
3.
Test each virtual website to ensure that HTML pages are served correctly.
4.
Run the Web Server Configuration Tool, as follows:
■GUI Specify IIS for the Web Server and All from the IIS Web Site drop-down list box, and
select the Configure Web Server for ColdFusion MX Applications check box.
■Command line Specify the -site 0 and -cfwebroot options, as the following server
configuration example shows:
cf_root/runtime/bin/wsconfig.exe -ws iis -site 0
-cfwebroot cf_root/wwwroot -coldfusion -v
5.
Test each virtual website to ensure that ColdFusion pages are served correctly.

76 Chapter 4: Web Server Management
Apache
When you use Apache, you modify the apache_root/conf/httpd.conf file to create virtual hosts and
run the Web Server Configuration Tool. You store ColdFusion pages under the web root of each
virtual website.
To connect multiple Apache virtual hosts on a web server to a single ColdFusion server:
1.
Configure DNS for each virtual website, as described in your web server documentation.
2.
Open the apache_root/conf/httpd.conf file in a text editor and create virtual hosts, as necessary.
For more information, see your Apache documentation. For example:
...
NameVirtualHost 127.0.0.1
<VirtualHost 127.0.0.1>
ServerAdmin admin@yoursite.com
DocumentRoot "C:/Program Files/Apache Group/Apache2/htdocs"
ServerName SERVER02
ErrorLog logs/error.log
</VirtualHost>
<VirtualHost 127.0.0.1>
ServerAdmin admin@yoursite.com
DocumentRoot "C:/Program Files/Apache Group/Apache2/htdocs2"
ServerName mystore
ErrorLog logs/error-store.log
</VirtualHost>
<VirtualHost 127.0.0.1>
ServerAdmin admin@yoursite.com
DocumentRoot "C:/Program Files/Apache Group/Apache2/htdocs3"
ServerName myemployee
ErrorLog logs/error-employee.log
</VirtualHost>
...
3.
Test each virtual host to ensure that HTML pages are served correctly.
4.
Run the Web Server Configuration Tool, as follows:
■GUI Specify Apache for the Web Server, specify the directory that contains the httpd.conf
file, and select the Configure Web Server for ColdFusion MX Applications check box.
■Command line Specify -ws apache and the directory that contains the httpd.conf file, as
the following example shows:
cf_root/runtime/bin/wsconfig.exe -ws apache
-dir "c:\program files\apache group\apache2\conf"
-cfwebroot cf_root/wwwroot -coldfusion -v
For additional UNIX command-line examples, see “Using the command-line interface”
on page 69.
The Web Server Configuration Tool updates the httpd.conf file. For a sample, see “Apache”
on page 76.
5.
Restart Apache. You store ColdFusion files for each virtual host in the directory specified by the
DocumentRoot directive.
6.
Test each virtual host to ensure that ColdFusion pages are served correctly.

Multihoming 77
Sun ONE Web Server, iPlanet, and Netscape
When you use Sun ONE Web Server version 6, you use the Server Administrator to create virtual
servers and run the Web Server Configuration Tool. You store ColdFusion pages under the web
root of each virtual server.
Note: For earlier versions of Sun ONE/iPlanet and Netscape Enterprise Server (NES), you must
create separate server instances for each site and run the Web Server Configuration Tool once for
each site.
To connect multiple Sun ONE Web Server virtual hosts to a single ColdFusion server:
1.
Using the Sun ONE Web Server Administrator, create virtual web servers for use by
ColdFusion MX. For more information, see your Sun ONE Web Server documentation.
2.
Configure DNS for each virtual website, as described in your web server documentation.
3.
Test each virtual server to ensure that HTML pages are served correctly.
4.
Run the Web Server Configuration Tool, as follows:
■GUI Specify Netscape Enterprise Server/Sun ONE for the web server, specify the directory
that contains the obj.conf and magnus.conf files, and select the Configure Web Server for
ColdFusion MX Applications check box.
■Command line Specify -ws sunone and the directory that contains the obj.conf file, as
the following example shows:
cf_root/runtime/bin/wsconfig -ws sunone -dir [path to config]
-cfwebroot cf_root/wwwroot -coldfusion -v
5.
Test each virtual server to ensure that ColdFusion pages are served correctly.

78 Chapter 4: Web Server Management

79
CHAPTER 5
Deploying ColdFusion Applications
This chapter describes the archive and deployment options available in Macromedia
ColdFusion MX 7.
Contents
Archive and deployment options . . . . . . . . . . . . . . . . . . . . . . . . . . . . . . . . . . . . . . . . . . . . . . . 79
Packaging applications in CAR files . . . . . . . . . . . . . . . . . . . . . . . . . . . . . . . . . . . . . . . . . . . . . 79
Packaging applications in J2EE archive files . . . . . . . . . . . . . . . . . . . . . . . . . . . . . . . . . . . . . . . 80
Using the cfcompile utility. . . . . . . . . . . . . . . . . . . . . . . . . . . . . . . . . . . . . . . . . . . . . . . . . . . . 82
Archive and deployment options
ColdFusion MX 7 includes the following archive and deployment options.
ColdFusion archive files You can package your ColdFusion application’s pages, data sources
and settings in a ColdFusion Archive (CAR) file. For more information, see “Packaging
applications in CAR files” on page 79.
J2EE archives You can package your ColdFusion application as an Enterprise Application
Archive (EAR) or Web Application Archive (WAR) file for easy deployment to a J2EE application
server. For more information, see “Packaging applications in J2EE archive files” on page 80.
Cfcompile utility The cfcompile utility lets you precompile your application’s ColdFusion
pages into Java class files. In addition you can compile ColdFusion pages to bytecode and save this
bytecode in files with the CFM, CFC, or CFR extension. For more information, see “Using the
cfcompile utility” on page 82.
Packaging applications in CAR files
CAR files let you archive and deploy website configuration information, files, and applications.
Use this feature to deploy your website applications to another location or to back up your files
quickly and easily. You manage CAR files using the Packaging & Deployment > ColdFusion
Archives area of the ColdFusion MX Administrator.
Note: CAR file archiving and deployment is different from J2EE archiving and packaging through
EAR and WAR files.

80 Chapter 5: Deploying ColdFusion Applications
Perform the following steps when you archive and deploy site information:
1.
Create the archive definition.
Identify the type of information to archive about a site. You can archive almost anything about
the site, including directories, files, CFX tags, ColdFusion MX mappings, Verity collections,
automated tasks, and server settings. Each archive definition that you create is assigned a name.
You use this name each time you build or deploy its content.
2.
Build the archive.
Select the name of the archive definition and specify a location to which you store the
CAR file.
3.
Deploy the archive.
Specify the location of the CAR file and the location to which you restore the contents.
Note: ColdFusion MX does not deploy Administrator and RDS passwords, nor does it unpack
archives created in previous versions of ColdFusion.
For more information on creating, building, and deploying CAR files, see ColdFusion MX
Administrator online Help.
Packaging applications in J2EE archive files
When running ColdFusion MX in the multiserver and J2EE configurations, you deploy the
ColdFusion application, in enterprise application archive (EAR) or web application archive
(WAR) format, on a J2EE application server. You then create your ColdFusion MX application,
configuring resources (such as data sources), and storing CFM, CFC, and CFR files in the web
application root or in the web server root. In earlier ColdFusion MX releases, your J2EE
administrator had to redo each of these steps when deploying your ColdFusion application onto a
production J2EE server.
The ColdFusion MX Administrator lets you create an EAR or WAR file that contains the entire
application. This archive file contains the ColdFusion MX web application, settings for
ColdFusion MX (such as data source definitions), and the CFM, CFC, and CFR files used by
your application.
Tip: If you are using the multiserver configuration, you can combine J2EE archiving with the instance
creation functionality of the ColdFusion MX Administrator Enterprise Manager. First, create an EAR
file that contains your application and all of its settings, and then use that EAR file in the Create From
EAR/WAR option of the Instance Manager. For more information on the Enterprise Manager, see
“Defining additional server instances” on page 93.

Packaging applications in J2EE archive files 81
Application packaging
The J2EE Archive feature lets you quickly create an archive file that a J2EE administrator can use
to deploy your ColdFusion MX application.
To add a new archive definition and create an archive file:
1.
Open the ColdFusion MX Administrator.
2.
Specify a unique name for the archive file (no extension) in the Archive Name field.
3.
Click Add. The Add New Archive screen appears.
4.
Specify archive settings on the Add New Archive screen.
5.
Click Create. ColdFusion creates an EAR or WAR file in the specified application distribution
directory.
The following table describes the settings you make when creating or modifying archive:
Setting Description
Archive Type Select EAR or WAR.
Context Root (EAR
only)
Each J2EE web application running in a server is rooted at a unique base
URL, called a context root (or context path). The J2EE application server
uses the initial portion of the URL (that is, the portion immediately following
http://hostname) to determine which web application services an incoming
request.
For example, if you are running ColdFusion MX with a context root of cfmx,
you display the Administrator using the URL
http://hostname/cfmx/CFIDE/administrator/index.cfm. Most J2EE
application servers allow one application in each server instance to use a
forward slash (/) for the context root. The Remote Development Services
(RDS) web application is not required if you use a context root of /.
Serial Number Specifies a ColdFusion MX Enterprise Edition serial number. If you do not
specify a valid ColdFusion MX Enterprise Edition serial number when
creating the archive file, it is deployed as an Enterprise Edition evaluation
version, which reverts to the Developer Edition after 30 days.
COM Support If your application doesn’t use COM support, you can reduce the size of the
archive file by omitting the supporting files.
Debugging If the current ColdFusion MX server is running with debugging enabled,
you can disable debugging in the application contained in the archive file.
Include CFML Source You can optionally deploy Java bytecode instead of CFML source code.
For more information, see “Sourceless distribution” on page 83.
ColdFusion MX
Administrator
If your application does not require modification using the ColdFusion MX
Administrator, you can reduce archive size and reduce security issues by
omitting the Administrator files.
Data Sources Specifies the data source definitions to include in the archive file.

82 Chapter 5: Deploying ColdFusion Applications
Deployment considerations
Once the archive file is created, you deploy using standard ColdFusion MX J2EE configuration
deployment techniques. For more information, see “Installing an EAR file or WAR files” in
Chapter 4, “Installing the J2EE Configuration” of Installing and Using ColdFusion MX.
Post-deployment considerations
Depending on your application, the resources that it uses, and the environment in which it is
deployed, you may need to perform post-deployment configuration, as follows:
Mappings The ColdFusion mappings in the archived application refer to directories on the
original computer. If those directories do not exist on the deployment computer, modify the
ColdFusion mappings using the ColdFusion MX Administrator or the Administrator API.
Verity You must ensure that the Verity server settings on the original computer are appropriate
for the deployment computer. If not, you must modify the Verity server settings using the
ColdFusion MX Administrator or the Administrator API.
Serial number J2EE deployment is a ColdFusion MX Enterprise feature. To upgrade to the
Enterprise Edition, enter a serial number using the ColdFusion MX Administrator or the
Administrator API.
For more information on the Administrator API, see “Administrator API” on page 39.
Using the cfcompile utility
You can use the cfcompile utility for the following purposes:
Precompiling ColdFusion pages Precompile your application’s CFM pages into Java class files.
At runtime, ColdFusion MX does not have to compile CFM pages.
Sourceless distribution Create CFM pages as Java bytecode. You can deploy these CFM pages
instead of CFML source code.
The cfcompile utility is located in the cf_root/bin (server configuration) or
cf_webapp_root/WEB-INF/cfusion/bin (multiserver and J2EE configuration) directory.
Precompiling ColdFusion pages
You can use the cfcompile utility to precompile ColdFusion pages (CFM, CFC, and CFR files).
This can enhance initial page loading time at runtime.
Use the following command to compile ColdFusion pages into Java classes:
cfcompile webroot [directory-to-compile]

Using the cfcompile utility 83
The following table describes these parameters:
Sourceless distribution
You can use the cfcompile utility with the -deploy option to create ColdFusion pages (CFM,
CFC, and CFR files) that contain Java bytecode. You can then deploy the bytecode versions of the
ColdFusion pages instead of the original CFML source code.
Use the following command to compile CFML files into bytecode format that you can deploy
instead of CFML source code:
cfcompile -deploy webroot directory-to-compile output-directory
The following table describes these parameters:
After you run the cfcompile utility, perform the following steps:
1.
Back up your original CFML files
2.
Copy the generated bytecode CFML files to the original directory
3.
Deploy the application.
Tip: The J2EE Archive screen of the ColdFusion MX Administrator lets you create an EAR or WAR
file that contains bytecode versions of your application’s CFML files.
Parameter Description
webroot Fully qualified path to the web server root; for example,
C:\Inetpub\wwwroot or C:\CFusionMX7\wwwroot.
directory-to-compile Fully qualified path to the directory where the files to be compiled are
located. This directory must be under the webroot directory. If not
specified, all ColdFusion templates in the webroot directory are compiled.
Parameter Description
webroot Fully qualified path to the web server root; for example,
C:\Inetpub\wwwroot or C:\CFusionMX7\wwwroot.
directory-to-compile Fully qualified path to the directory where the files to be compiled are
located. This directory must be under the webroot directory. This is
required for the -deploy option.
output-directory Fully qualified path to the directory to contain the compiled deployable
files. This cannot be the same directory as the source directory.

84 Chapter 5: Deploying ColdFusion Applications

85
CHAPTER 6
Administering Security
This chapter describes configuration options for Macromedia ColdFusion MX security. You can
secure a number of Macromedia ColdFusion MX 7 resources with password access and you can
configure sandbox security.
Contents
About ColdFusion MX security . . . . . . . . . . . . . . . . . . . . . . . . . . . . . . . . . . . . . . . . . . . . . . . . 85
Using password protection . . . . . . . . . . . . . . . . . . . . . . . . . . . . . . . . . . . . . . . . . . . . . . . . . . . . 86
Using sandbox security. . . . . . . . . . . . . . . . . . . . . . . . . . . . . . . . . . . . . . . . . . . . . . . . . . . . . . . 86
About ColdFusion MX security
Security is especially important in web-based applications, such as those you develop in
ColdFusion MX. ColdFusion developers and administrators must fully understand the security
risks that could affect their development and runtime environments so they can enable and
restrict access appropriately.
You implement development security by requiring a password to use the ColdFusion MX
Administrator and a password for Remote Development Services (RDS), which allows developers
to develop CFML pages remotely. You implement runtime security in your CFML pages and in
the ColdFusion MX Administrator. ColdFusion MX has the following runtime security
categories:
User security Programmatically determine the logged-in user and allow or disallow restricted
functionality based on the roles assigned to that user. For more information about user security,
see “ColdFusion security features” in Chapter 16, “Securing Applications,” in ColdFusion MX
Developer’s Guide.
Sandbox security Using the ColdFusion MX Administrator, define the actions and resources
that the ColdFusion pages in and below a specified directory can use.
Note: If you have the Enterprise Edition of ColdFusion MX, you can configure multiple security
sandboxes. If you have the Standard Edition of ColdFusion MX, you can only configure a single
security sandbox.

86 Chapter 6: Administering Security
The Security area in the Administrator lets you do the following tasks:
•Configure password protection for the ColdFusion MX Administrator. For more information,
see “ColdFusion MX Administrator password protection” on page 86.
•Configure password protection for RDS access. For more information, see “RDS password
protection” on page 86.
•Enable, disable, and customize ColdFusion security, on the Security > Sandbox Security page
(called Resource Security page in the Standard edition). For more information, see “Using
sandbox security” on page 86.
Using password protection
Password protection restricts access to the ColdFusion MX Administrator and to a ColdFusion
server when you attempt access through RDS security.
ColdFusion MX Administrator password protection
Secure access to the ColdFusion MX Administrator is enabled by default. The password that you
enter during installation is saved as the default. You are prompted to enter this password whenever
you open the Administrator.
Password protection for accessing the Administrator helps guard against unauthorized
modifications of ColdFusion MX, and Macromedia highly recommends using passwords. You
can disable or change the Administrator password on the Security > CF Admin Password page.
RDS password protection
If you configured password protection for RDS access when you installed ColdFusion, you are
prompted for the password when you attempt to access ColdFusion MX from Macromedia
Dreamweaver MX 2004, Macromedia HomeSite+, or the ColdFusion Report Builder.
You can disable RDS or change the RDS password on the Security > RDS Password page.
Note: Disabling RDS also disables the applet that the ColdFusion MX Administrator uses in file-
related dialog boxes.
If you use RDS security, you rely on web server and operating system security settings to set
permissions for ColdFusion application and document directories.
Using sandbox security
Sandbox security (called Resource security in the Standard Edition) uses the location of your
ColdFusion pages to control access to ColdFusion resources. A sandbox is a designated directory
of your site to which you apply security restrictions. Sandbox security lets you specify which tags,
functions, and resources (for example, files, directories, and data sources) can be used by
ColdFusion pages located in and under the designated directory.

Using sandbox security 87
To use sandbox security in the multiserver and J2EE editions, the application server must be
running a security manager (java.lang.SecurityManager) and you must define the following
JVM arguments (for Macromedia JRun, this is the java.args line in the jrun_root/jvm.config file):
-Djava.security.manager
-Djava.security.policy="cf_root/WEB-INF/cfusion/lib/coldfusion.policy"
-Djava.security.auth.policy="cf_root/WEB-INF/cfusion/lib/neo_jaas.policy"
Note: Sandbox security is not enabled by default. You must enable it on the Security > Sandbox
Security page before ColdFusion enforces the settings.
Using multiple sandboxes (Enterprise Edition only)
By default, a subdirectory of a sandbox inherits the settings of the directory one level above it.
However, if you define a sandbox for a subdirectory, the subdirectory no longer inherits settings
from the parent, completely overriding the parent directory’s sandbox settings. For example,
consider the following directories:
C:\Inetpub\wwwroot
C:\Inetpub\wwwroot\sales
C:\Inetpub\wwwroot\rnd
C:\Inetpub\wwwroot\rnd\dev
C:\Inetpub\wwwroot\rnd\qa
If you define a sandbox for the wwwroot directory, the settings also apply to the sales and rnd
directories. If you also define a sandbox for the rnd directory, the rnd sandbox settings also apply
to the dev and qa directories; the wwwroot and sales directories maintain their original settings;
and the rnd settings override the wwwroot directory settings for the rnd directory and its
subdirectories.
This hierarchical arrangement of security permits the configuration of personalized sandboxes for
users with different security levels. For example, if you are a web hosting administrator who hosts
several clients on a ColdFusion shared server, you can configure a sandbox for each customer.
This prevents one customer from accessing the data sources or files of another customer.
Resources that you can restrict
You can restrict the following resources:
Data Sources Restrict the use of ColdFusion data sources.
CF Tags Restrict the use of ColdFusion tags that manipulate resources on the server (or on an
external server), such as files, the registry, Lightweight Directory Access Protocol (LDAP), mail,
and the log.
CF Functions Restrict the use of ColdFusion functions that access the file system.
Files/Dirs Enable tags and functions in the sandbox to access files and directories outside of the
sandbox.
Note: To use the Administrator API when sandbox security is enabled, you must allow access to the
cf_web_root/CFIDE/adminapi directory.
Server/Ports Specify the servers, ports, and port ranges that the ColdFusion tags that call
third-party resources can use.

88 Chapter 6: Administering Security
For more information, see the Administrator online Help.
Note: When you run ColdFusion MX in the J2EE configuration on IBM WebSphere, the Files/Dirs
and Server/Ports tabs are not enabled.
About directories and permissions
When you enable access to files outside of the sandbox, you specify the filename. When you
enable access to directories outside of the sandbox, you specify directoryname\indicator, where
indicator is a dash or asterisk, as follows:
•A backslash followed by a dash (\-) lets tags and functions access all files in the specified
directory, and recursively allows access to all files in subdirectories.
•A backslash followed by an asterisk (\*) lets tags and functions access all files in the specified
directory and also lets tags and functions access a list of subdirectories. However, this option
denies access to files in any subdirectories.
You can also specify the actions that ColdFusion tags and functions can perform on files and
directories outside the sandbox. The following table shows the relationship between the
permissions of a file and a directory:
Adding a sandbox (Enterprise Edition only)
ColdFusion MX Enterprise Edition lets you define multiple security sandboxes.
To add a sandbox:
1.
Open the Security > Sandbox Security page in the ColdFusion MX Administrator.
The Sandbox Security Permissions page appears.
2.
In the Add Security Sandbox box, enter the name of the new sandbox. This name must be either
a ColdFusion mapping (defined in the Administrator) or an absolute path.
3.
Select New Sandbox from the drop-down list to create a sandbox based on the default sandbox,
or select an existing sandbox to copy its settings to your new sandbox.
4.
Click Add.
The new sandbox appears in the list of Defined Directory Permissions.
Permission Effect on files Effect on directories
Read View the file List all files in the directory
Write Write to the file Not applicable
Execute Execute the file Not applicable
Delete Delete the file Delete the directory

Using sandbox security 89
Configuring a sandbox
Before you begin security sandbox configuration, analyze your application and its usage to
determine the tags, functions, and resources that it requires. You can then configure the sandbox
to enable access to the required resources and disable use of the appropriate tags and functions.
For example, if the applications in the sandbox do not use the cfregistry tag, you can safely
disable it.
Note: In the Standard Edition, the Root Security Context is the only sandbox. There is no initial list of
defined directory permissions.
To configure a sandbox:
1.
Open the Security > Sandbox Security page (Security > Resource Security page in the Standard
Edition) in the ColdFusion MX Administrator.
2.
(Enterprise Edition only) In the list of Defined Directory Permissions, click the name or Edit
icon for the directory.
A page with several tabs appears. This is the initial page in the Standard Edition. The
remaining steps describe the use of each tab.
3.
To disable a data source, in the left column of the Datasources tab, highlight the data source,
and click the right arrow.
By default, ColdFusion pages in this sandbox can access all data sources.
Note: If <<ALL DATASOURCES>> is in the Enabled Datasources column, any data source that you
add is enabled. If you move <<ALL DATASOURCES>> to the Disabled Datasources column, any
new data source is disabled.
4.
Click the CFTags tab.
5.
To disable tags, in the left column of the CFTags tab, highlight the tags, and click the right
arrow.
By default, ColdFusion pages in this sandbox can access all listed tags.
6.
Click the CFFunctions tab.
7.
To disable functions, in the left column of the CFFunctions tab, highlight the functions, and
click the right arrow.
By default, ColdFusion pages in this sandbox can access all listed functions.
8.
Click the Files/Dirs tab.
9.
To enable files or directories, in the File Path box, enter or browse to the files or directories; for
example, C:\pix. A file path that consists of the special token <<ALL FILES>> matches any file.
For information on using the backslash-hyphen (\-) and backslash-asterisk (\*) wildcard
characters, see “About directories and permissions” on page 88.
10.
Select the permissions.
For example, select the Read check box to let ColdFusion pages in the mytestapps sandbox
read files in the C:\pix directory.
11.
Click Add Files/Paths. When you edit an existing sandbox, this button reads Edit Files/Paths.
The file path and its permissions appear in the Secured Files and Directories list.

90 Chapter 6: Administering Security
12.
In the Secured Files and Directories list, verify that the file path is correct.
The character after the backslash is important. For information, see “About directories and
permissions” on page 88.
Note: The Files/Dirs tab works together with the file-based permissions of the operating system.
To restrict a user from browsing another user’s directory, you must use file-based permissions.
13.
Click the Server/Ports tab.
14.
To turn off default behavior (global access to all servers and ports), enter the IP addresses and
port numbers that pages in this sandbox can connect to by using tags that access external
resources (for example, cfmail, cfpop, cfldap, cfhttp, and so on). You can specify an IP
address, a server name (such as www.someservername.com), or a domain name (such as
someservername.com). You can optionally specify a port restriction.
Note: This behavior differs from other tabs, such as CFTags, where you select items to disable. If
you set any values in this tab, external-resource tags executed in this sandbox can access only the
specified servers and ports.
For example, to allow this sandbox access to 207.88.220.3 on ports 80 and lower, perform the
following steps:
a
In the IP Address field, enter 207.88.220.3.
b
In the Port field, enter 80, and click This Port and Lower.
Tip: To deny access by these ColdFusion tags to an entire site, enable access for a local resource,
such as your local mail server, FTP server, and so on.
15.
Click Finish to save changes to the sandbox.

91
CHAPTER 7
Using Multiple Server Instances
When you install Macromedia ColdFusion MX 7 Enterprise Edition using the multiserver
configuration, you can use the ColdFusion MX Administrator to create multiple server instances.
Deploying ColdFusion MX on multiple server instances lets you isolate individual applications
and leverage clustering functionality.
Management of multiple server instances has changed significantly in ColdFusion MX 7:
ColdFusion MX Use a J2EE deployment, along with J2EE application server features to deploy
the ColdFusion MX application on multiple instances of the J2EE application server.
ColdFusion MX 7 Use the ColdFusion MX Administrator in the multiserver configuration to
create Macromedia JRun server instances and to automatically deploy the ColdFusion MX
application on those instances. Additionally, you can combine the Administrator-driven server
instance creation with the ColdFusion MX Administrator J2EE Archive feature to deploy a
ColdFusion MX application that contains all of your application’s CFM files (including CFCs
and CFRs), settings (including data source definitions), and the ColdFusion web application. For
more information on J2EE Archive, see “Packaging applications in J2EE archive files”
on page 80.
Note: Although the concepts and procedures explained in the ColdFusion MX documentation still
apply, ColdFusion MX 7 incorporates multiple instance and cluster creation into the ColdFusion MX
Administrator.
Contents
About multiple server instances . . . . . . . . . . . . . . . . . . . . . . . . . . . . . . . . . . . . . . . . . . . . . . . . 92
Defining additional server instances . . . . . . . . . . . . . . . . . . . . . . . . . . . . . . . . . . . . . . . . . . . . . 93
Enabling application isolation . . . . . . . . . . . . . . . . . . . . . . . . . . . . . . . . . . . . . . . . . . . . . . . . . 94
Enabling clustering for load balancing and failover . . . . . . . . . . . . . . . . . . . . . . . . . . . . . . . . . 99
Defining remote server instances to the ColdFusion MX Administrator. . . . . . . . . . . . . . . . . 101

92 Chapter 7: Using Multiple Server Instances
About multiple server instances
The ColdFusion MX Administrator lets you create server instances and clusters. Additionally, you
can connect to remote JRun servers and add them to clusters.
Running multiple instances of ColdFusion MX has the following advantages:
Application isolation You deploy an independent application to each server instance. Each
server instance has separate settings and, because each server instance runs in its own Java Virtual
Machine (JVM), problems encountered by one application have no effect on other applications.
Clustering (load balancing and failover) You deploy the same application to each server
instance and add the instances to a cluster. The web server connector optimizes performance and
stability by automatically balancing load and by switching requests to another server instance
when a server instance stops running.
This chapter describes features that are available only if you have installed the multiserver
configuration. The multiserver configuration is a specialized J2EE configuration that installs
JRun and deploys ColdFusion MX as an expanded Enterprise Application Archive (EAR) in the
cfusion JRun server. The cfusion server is the only server that can create servers and clusters. The
JRun instance creation and clustering options in the ColdFusion MX Administrator are not
available in the server configuration, nor are they available in the J2EE configuration, even if you
deploy on JRun.
Note: You can also manually deploy ColdFusion MX on multiple server instances, using your J2EE
application server’s server creation and deployment facilities, as documented in the ColdFusion
MX 6.1 documentation.
Expanded archive considerations
ColdFusion MX must run from an expanded directory structure. The Instance Manager expands
the EAR or WAR file automatically and then deploys the expanded directory structure into the
new server instance.
For more information on deploying ColdFusion MX in the J2EE configuration, see Installing and
Using ColdFusion MX.
File location considerations
ColdFusion MX lets you store CFM pages either under the external web server root or under the
ColdFusion web application root. The discussions in this chapter assume that you store your
CFM pages under the ColdFusion web application root and that you specify a context root for
your application. This is different from ColdFusion MX 6.1 documentation, which assumed that
you stored CFM pages under the web server root.
If you use the web server connector to access pages under the ColdFusion web application root
and your ColdFusion web application has an empty context root (this is the default), the
connector does not automatically serve static content, such as HTML pages and image files. If
this is the case, you must define web server mappings so that it can serve files from the
ColdFusion web application root.
For more information on serving CFM pages from the web server root, see Chapter 4, “Web
Server Management.”

Defining additional server instances 93
Defining additional server instances
The multiserver configuration is a customized installation of JRun. JRun supports multiple server
instances (also called JRun servers) running on the same computer. Each server instance runs in a
separate JVM, which executes all ColdFusion pages for that instance.
You use the Instance Manager area of the ColdFusion MX Administrator to define and manage
server instances. The Instance Manager only runs in the cfusion JRun server that is created as part
of a multiserver configuration installation.
When you create a server instance with the Instance Manager, by default it deploys a copy of the
cfusion server’s ColdFusion enterprise application, including data sources, mappings, and
settings. Alternatively, you can create a new server instance and specify the location of an EAR or
WAR file (created by the J2EE Archive page), which the Instance Manager uses as the basis for
your new ColdFusion server instance.
Note: If you are running JRun 4, you can also create a server in the JRun Management Console
(JMC) and deploy the ColdFusion application using JRun deployment functionality.
To define a server instance:
1.
Ensure that you have installed ColdFusion MX 7 using the multiserver configuration.
2.
Open the ColdFusion MX Administrator for the cfusion server in a browser
(http://hostname:8300/CFIDE/administrator).
3.
Select Enterprise Manager > Instance Manager.
4.
Click Add New Instance.
5.
Specify the following in the Add New ColdFusion Server area:
■Server name
■(Optional) Directory that contains the server instance. The ColdFusion MX Administrator
fills in the default automatically (jrun_root/servers/servername).
■(Optional) Create from EAR/WAR. If you use the J2EE Packaging feature to create a J2EE
archive file with your application’s files (including CFM, CFC, and CFR files) and data
sources, use this field to specify the EAR or WAR filename and create a server instance with
your application deployed automatically.
■(Optional, Windows only) Specify whether to create a Windows service for the server
instance and whether to define the Windows service with an auto restart recovery option.
6.
Click Submit.
The ColdFusion MX Administrator creates a server instance with ColdFusion MX deployed in
it and starts the server instance. The ColdFusion MX application that it deploys is based on the
application archive file specified in the Create from EAR/WAR field or on the cfusion server
instance (if you don’t specify an EAR or WAR file).
Creating a JRun server instance and deploying the ColdFusion MX application can take a few
minutes.
7.
Click Return to Instance Manager.
You can also start and stop the server instance using the JMC, the JRun Launcher, or the
command line (jrun_root/bin jrun -start|-stop servername).

94 Chapter 7: Using Multiple Server Instances
Enabling application isolation
You can create separate server instances, each with its own ColdFusion applications; each
application then has its own ColdFusion and J2EE server resources. In this configuration, you
typically have a single external web server with multiple server instances on one computer, and
separate virtual hosts (or sites) for each server instance.
Note: Although this section describes using ColdFusion MX, other J2EE application servers provide
equivalent capabilities, and most of the concepts apply when deploying the ColdFusion MX J2EE
configuration on those J2EE servers.
Running independent applications this way has several advantages, including the following:
•Errors at the levels of the ColdFusion application or the JRun server do not affect any other
ColdFusion applications.
•You can support multihomed servers, where a single web server supports multiple IP addresses
or domain names, such as www.mycompany.com and services.anothercompany.com, each
running from a separate web root. For more information, see “Multihoming” on page 74.
•Individual applications can use different JVM configurations, or even different JVM
implementations. This feature is particularly useful if one application requires a particularly
large Java heap. To specify customized JVM options, start the JRun server instance from the
command line using the -config option of the jrun command, which specifies a customized
jvm.config file. This is explained in the “Starting and stopping JRun servers” section in
Installing and Using ColdFusion MX.
Note: These instructions describe creating multiple server instances on a single computer. To create
multiple server instances on separate computers, each computer requires a separate license of
ColdFusion MX Enterprise Edition.
To achieve complete application isolation, you use web-server-specific functionality to create a
separate website for each application. Web servers have different terminology for this concept. For
example, in IIS, you define separate websites (available in Windows server editions only) and in
Apache, you create multiple virtual hosts.
These instructions apply when running ColdFusion MX in the multiserver configuration. The
principles apply when running ColdFusion MX on other J2EE application servers. However, not
all J2EE application servers integrate with external web servers. For more information, see
“Multihoming” on page 74.
These instructions assume that you deploy each application at a named context root, which
enables users to access CFM pages by specifying http://hostname/context-root/pagename.cfm. If
other web applications are running in the server instance, each web application must use a
different context root.
For example, with a context root of cfmx, users access CFM pages by specifying
http://hostname/cfmx/pagename.cfm. For more information on using a context root, see Installing
and Using ColdFusion MX.
Note: Although cfmx is the context root, it does not relate to your web application directory structure.

Enabling application isolation 95
To use multiple server instances for application isolation:
1.
Create a separate server instance using the instructions in “Defining additional server instances”
on page 93. If you are using the built-in web server, proceed to step 6 in this procedure.
2.
Using your web-server-specific method, create a virtual website (or separate website) for the
application.
This is different for each web server; for more information, see “Multihoming” on page 74 or
consult your web server documentation.
3.
Test each virtual website to ensure that HTML pages are served correctly.
4.
Store your application’s ColdFusion files in the ColdFusion web application root
(recommended for application portability) or the web root of the virtual website.
5.
Follow the instructions for your web server to configure the connection between your virtual
website and the server instance. For more information, see “Web server configuration for
application isolation” on page 95.
6.
Test your application.
7.
Repeat these steps for each server instance.
Web server configuration for application isolation
When you use multiple server instances for application isolation, the steps you perform to
configure communication between the website and the server instance differ for each web server.
This section contains the following sections:
•Configuring application isolation in IIS
•Configuring application isolation in Apache
•Configuring application isolation in Sun ONE Web Server
Tip: To enhance performance when using an external web server with multiple server instances,
place all static content (HTML files and images, for example) under the web server root directory or
one of its subdirectories. Minimize the amount of static content served from ColdFusion web
application root directory.
Configuring application isolation in IIS
When you use multiple virtual websites with multiple server instances under IIS, you define
separate filters and mappings for each virtual website and server instance combination.
This section assumes that you already created server instances and virtual websites, as described in
“Enabling application isolation” on page 94.
To configure multiple server instances for application isolation when using IIS:
•Run the Web Server Configuration Tool multiple times, once for each virtual website, and
specify a different site and server instance each time. Ensure that you select the Configure Web
Server for ColdFusion MX Applications check box (GUI) or use the -coldfusion option
(command-line). For more information on running the Web Server Configuration Tool, see
“Using an external web server” on page 67.

96 Chapter 7: Using Multiple Server Instances
Configuring application isolation in Apache
When you use multiple virtual hosts with multiple server instances under Apache, you edit the
httpd.conf file manually.
This section assumes that you already created server instances and virtual websites, as described in
“Enabling application isolation” on page 94.
To configure multiple server instances for application isolation when using Apache:
1.
Run the Web Server Configuration Tool once, specifying the location of the Apache httpd.conf
file and any other required information. Ensure that you select the Configure Web Server for
ColdFusion MX Applications check box (GUI) or use the -coldfusion option (command-
line).
2.
The Web Server Configuration Tool creates a sequentially numbered subdirectory under
jrun_root/lib/wsconfig. You can use the subdirectory created by the Web Server Configuration
Tool for one of your virtual hosts, but you must create additional subdirectories for all other
virtual hosts. For example, the first time you run the Web Server Configuration Tool, it creates
jrun_root/lib/wsconfig/1; if you have two other virtual hosts, you must manually create two
other directories (jrun_root/lib/wsconfig/mystore and jrun_root/lib/wsconfig/myemp in this
example). These directories can be empty.
3.
Open the jrun_root/servers/servername/SERVER-INF/jrun.xml file for each of your server
instances, locate the ProxyService service, ensure that the deactivated element is set to false,
and note the value of the port element; for example:
...
<service class="jrun.servlet.jrpp.JRunProxyService" name="ProxyService">
<attribute name="activeHandlerThreads">25</attribute>
<attribute name="backlog">500</attribute>
<attribute name="deactivated">false</attribute>
<attribute name="interface">*</attribute>
<attribute name="maxHandlerThreads">1000</attribute>
<attribute name="minHandlerThreads">1</attribute>
<attribute name="port">51002</attribute>
...
4.
Restart each of the modified JRun servers.
5.
Open the apache_root/conf/httpd.conf file in a text editor and find the VirtualHost directives.
The settings added by the Web Server Configuration Tool are after the last </IfModule>
directive, as the following example shows:
...
# JRun Settings
LoadModule jrun_module "C:/JRun4/lib/wsconfig/1/mod_jrun20.so"
<IfModule mod_jrun20.c>
JRunConfig Verbose false
JRunConfig Apialloc false
JRunConfig Ssl false
JRunConfig Ignoresuffixmap false
JRunConfig Serverstore "C:/JRun4/lib/wsconfig/1/jrunserver.store"
JRunConfig Bootstrap 127.0.0.1:51000
#JRunConfig Errorurl <optionally redirect to this URL on errors>

Enabling application isolation 97
#JRunConfig ProxyRetryInterval <number of seconds to wait before trying
to reconnect to unreachable clustered server>
#JRunConfig ConnectTimeout 15
#JRunConfig RecvTimeout 300
#JRunConfig SendTimeout 15
AddHandler jrun-handler .jsp .jws .cfm .cfml .cfc .cfr .cfswf
</IfModule>
NameVirtualHost 127.0.0.1
<VirtualHost 127.0.0.1>
ServerAdmin admin@mysite.com
DocumentRoot "C:/Program Files/Apache Group/Apache2/htdocs"
ServerName SERVER02
ErrorLog logs/error.log
</VirtualHost>
<VirtualHost 127.0.0.1>
ServerAdmin admin@mysite.com
DocumentRoot "C:/Program Files/Apache Group/Apache2/htdocs2"
ServerName mystore
ErrorLog logs/error-store.log
</VirtualHost>
<VirtualHost 127.0.0.1>
ServerAdmin admin@mysite.com
DocumentRoot "C:/Program Files/Apache Group/Apache2/htdocs3"
ServerName myemployee
ErrorLog logs/error-employee.log
</VirtualHost>
...
6.
For each VirtualHost directive that relates to a ColdFusion server instance, copy the entire
IfModule mod_jrun20.c directive from its original location outside the VirtualHost directive
to the last element in the VirtualHost directive.
7.
Delete the Apialloc, Ssl, Ignoresuffixmap, and AddHandler elements in the IfModule
directive for each virtual host. Modify the Serverstore and Bootstrap elements to point to
the appropriate proxy port (from the jrun.xml file) and
jrun_root/lib/wsconfig/subdirectory/jrunserver.store file, which the web server connector creates
automatically.
8.
In the original IfModule directive, remove or comment out the Serverstore and Bootstrap
lines (comments start with #). The following example shows three virtual hosts, two of which
are configured for ColdFusion MX:
...
# JRun Settings
LoadModule jrun_module "C:/JRun4/lib/wsconfig/1/mod_jrun20.so"
<IfModule mod_jrun20.c>
JRunConfig Verbose false
JRunConfig Apialloc false
JRunConfig Ssl false
JRunConfig Ignoresuffixmap false
#JRunConfig Serverstore "C:/JRun4/lib/wsconfig/1/jrunserver.store"
#JRunConfig Bootstrap 127.0.0.1:51020
AddHandler jrun-handler .jsp .jws .cfm .cfml .cfc .cfr .cfswf
</IfModule>

98 Chapter 7: Using Multiple Server Instances
NameVirtualHost 127.0.0.1
<VirtualHost 127.0.0.1>
ServerAdmin admin@mysite.com
DocumentRoot "C:/Program Files/Apache Group/Apache2/htdocs"
ServerName RNIELSEN02
ErrorLog logs/error.log
</VirtualHost>
<VirtualHost 127.0.0.1>
ServerAdmin admin@mysite.com
DocumentRoot "C:/Program Files/Apache Group/Apache2/htdocs2"
ServerName rnielsenstore
ErrorLog logs/error-store.log
<IfModule mod_jrun20.c>
JRunConfig Verbose true
JRunConfig Serverstore "C:/JRun4/lib/wsconfig/mystore/jrunserver.store"
JRunConfig Bootstrap 127.0.0.1:51002
</IfModule>
</VirtualHost>
<VirtualHost 127.0.0.1>
ServerAdmin admin@mysite.com
DocumentRoot "C:/Program Files/Apache Group/Apache2/htdocs3"
ServerName rnielsenemployee
ErrorLog logs/error-employee.log
<IfModule mod_jrun20.c>
JRunConfig Verbose true
JRunConfig Serverstore "C:/JRun4/lib/wsconfig/myemp/jrunserver.store"
JRunConfig Bootstrap 127.0.0.1:51003
</IfModule>
</VirtualHost>
...
9.
Restart Apache.
10.
(Optional) Store the application’s ColdFusion files in your external web server root directory.
11.
Test the applications under each virtual host.
Note: Remember that the web server connector doesn’t serve static content, such as HTML and
images. Place these files under the web root or create a web server mapping to the ColdFusion
web application root.
Configuring application isolation in Sun ONE Web Server
When using multiple virtual hosts with multiple server instances under Sun ONE Web Server,
you create multiple Sun ONE Web Server instances, one for each ColdFusion server instance.
This section assumes that you have already created server instances, as described in “Enabling
application isolation” on page 94.
To configure multiple server instances for application isolation when using Sun ONE
Web Server:
•Run the Web Server Configuration Tool multiple times, once for each Sun ONE Web Server
server instance, and specify a different configuration directory and ColdFusion server instance
each time. Ensure that you select the Configure Web Server for ColdFusion MX Applications
check box (GUI) or use the -coldfusion option (command-line).

Enabling clustering for load balancing and failover 99
Enabling clustering for load balancing and failover
Load balancing is an enterprise-level feature in which the application server automatically
alternates requests among the server instances in a cluster. Clustering also enables application
servers to route requests to a running server instance when the original server instance goes down.
Note: These instructions apply only when you are running ColdFusion MX in the multiserver
configuration. If you are running JRun4, you can also create clusters in the JMC.
You can get load balancing and failover by deploying identical ColdFusion applications and
configurations to multiple server instances and adding the instances to a cluster. Each instance
must have the same applications deployed and the same resources configured (such as data
sources, Verity collections, and mappings). The web server connector optimizes performance and
stability by automatically balancing load and by switching requests to another server instance
when a server instance stops running.
Note: Because clustering uses Jini Network Technology, you must be connected to a network for
clustering to work.
For maximum failover protection, use multiple computers in a cluster. However, you must
purchase a separate ColdFusion MX Enterprise Edition license for each computer.
Note: If you set up and test multiple server instances while running the 30-day Trial version, the
cluster might not continue to function appropriately when the Trial version reverts to the Developer
version after 30 days.
To implement session failover for the server instances in a cluster, you must enable session
replication for each server instance. Session replication coordinates session information in real-
time among the server instances in a cluster. Enabling session replication lets JRun automatically
route a request to a running server if the current server is unavailable.
Note: When a cluster uses session replication, session data is copied to other servers in the cluster
each time it is modified. This can degrade performance if you store a significant amount of
information in session scope. If you plan to store a significant amount of information in session scope,
consider storing this information in client variables saved in a database.
To configure a cluster of server instances for load balancing and failover:
1.
Create your application and the data sources required for the application.
2.
Ensure that you have installed ColdFusion MX 7 using the multiserver configuration.
3.
Open the ColdFusion MX Administrator for the cfusion server in a browser
(http://hostname:8300/CFIDE/administrator).
4.
Select Packaging & Deployment > J2EE Packaging.
5.
Use the J2EE Archives page to create an EAR file that contains the application, your
application’s CFM pages, the required data sources, and other settings.
6.
Select Enterprise Manager > Instance Manager.
7.
Create server instances for the cluster as described in “Defining additional server instances”
on page 93. Ensure that you use the Create from EAR/WAR field to specify the archive file that
you just created.

100 Chapter 7: Using Multiple Server Instances
8.
(Optional) Click the Register Remote Instance button to define existing remote server instances
so that you can include them in the cluster. If you use a remote server, ensure that it contains
the same application and settings as the local server instances.
Note: A server can participate in only one cluster. When adding remote instances to a cluster,
ensure that the instance is not already part of a cluster.
9.
Ensure that each server instance is started.
Note: To administer a cluster, at least one member server instance must be running.
10.
Select Enterprise Manager > Cluster Manager.
11.
Name the cluster and click Add.
The ColdFusion MX Administrator adds the cluster to the Configured Clusters area.
12.
Click the cluster name or the edit icon.
The Edit Cluster screen appears.
13.
Use the arrow icons to add server instances to the cluster.
14.
(Optional) Enable session replication, and specify a cluster algorithm.
Note: When you enable sticky sessions, the connector does not always route requests strictly
based on the cluster algorithm. For more information, see Administrator online Help.
15.
Click Submit.
16.
Select Enterprise Manager > Instance Manager.
17.
Open the ColdFusion MX Administrator on each server instance using the CF Admin icon on
the Instance Manager. Ensure that required resources (such as data sources and Verity
collections) are defined appropriately. If you are using session replication, go to the Memory
Variables page and enable J2EE sessions. You must do this for all server instances in the cluster.
If J2EE sessions are not enabled in the ColdFusion MX Administrator, session replication does
not function properly.
Note: Session variables are the only memory variables that support session replication. In
particular, ColdFusion components do not support session replication.
18.
For servers that are not on the same subnet, open the jrun_root/lib/security.properties file and
add the IP addresses of the other JRun servers in the cluster to the jrun.trusted.hosts
property.
Note: This step is required only for servers that are not on the same subnet; it is not necessary if all
servers are on the same subnet.
19.
Restart all JRun servers in the cluster.
20.
Run the Web Server Configuration Tool. Choose your website, but instead of choosing a single
server instance, select the cluster. Ensure that you select the Configure Web Server for
ColdFusion MX Applications check box (GUI) or use the -coldfusion option (command-
line). For more information, see “Web server configuration” on page 68.
21.
Open each server instance’s SERVER-INF/jrun.xml file and ensure that the ProxyService
deactivated attribute is set to false.

Defining remote server instances to the ColdFusion MX Administrator 101
22.
(Optional) Store the application’s ColdFusion files in your external web server root directory.
23.
Test the application to ensure that load balancing and failover work as expected.
Defining remote server instances to the ColdFusion MX
Administrator
You can use the Cluster Manager to add ColdFusion MX server instances running on other
computers; however, you must first define them to the ColdFusion MX Administrator through
the Add Remote Server Instance area of the Instance Manager page.
Note: To define a remote server instance, it must be running. You cannot start or stop servers
remotely.
To define a remote server instance to ColdFusion:
1.
Open the ColdFusion MX Administrator for the cfusion server in a browser
(http://hostname:8300/CFIDE/administrator).
2.
Select Enterprise Manager > Instance Manager.
3.
Specify the following in the Add Remote ColdFusion Instance area:
■Server name
■The IP address or DNS name of the remote host.
■The remote port of the remote server. To determine the remote port, open the
jrun_root/servers/servername/SERVER-INF/jndi.properties file and note the port number in
the java.naming.provider.url property.
4.
Click Add Remote ColdFusion Server.

102 Chapter 7: Using Multiple Server Instances

PART II
Administering Verity
This part describes the Verity search tools and utilities that you can use for configuring the Verity
K2 Server search engine, as well as creating, managing, and troubleshooting Verity collection.
The following chapters are included:
Chapter 8: Introducing Verity and Verity Tools . . . . . . . . . . . . . . . . . . . . . . . . . . . . . . . . . . . 105
Chapter 9: Indexing Collections with Verity Spider . . . . . . . . . . . . . . . . . . . . . . . . . . . . . . . . 109
Chapter 10: Using Verity Utilities . . . . . . . . . . . . . . . . . . . . . . . . . . . . . . . . . . . . . . . . . . . . . 141
PART II

105
CHAPTER 8
Introducing Verity and Verity Tools
This chapter provides an overview of the advanced Verity features included in Macromedia
ColdFusion MX 7.
Contents
Collections and the ColdFusion MX Verity architecture . . . . . . . . . . . . . . . . . . . . . . . . . . . . 105
About Verity Spider (vspider). . . . . . . . . . . . . . . . . . . . . . . . . . . . . . . . . . . . . . . . . . . . . . . . . 107
About the Verity utilities . . . . . . . . . . . . . . . . . . . . . . . . . . . . . . . . . . . . . . . . . . . . . . . . . . . . 107
Collections and the ColdFusion MX Verity architecture
ColdFusion MX includes Verity K2 Server search technology. Verity K2 Server is a high-
performance search engine designed to process searches quickly in a high-performance,
distributed system. The K2 search system has a client/server model. K2 client applications, such
as ColdFusion server, provide users access to document indexes stored in Verity collections. K2
Server supports simultaneous indexing of distributed enterprise repositories, and handles
hundreds of concurrent queries and users.
The Verity search system takes advantage of the latest advances in hardware and software
technology, and provides the following features:
•Multithreaded architecture
•Support for Verity knowledge retrieval features, including topics
•Continuous operation support
•High scalability
•Category support (also called parametric indexes)
Note: ColdFusion MX no longer uses VDK mode and K2 mode. All Verity processing now uses the
K2 architecture. Additionally, ColdFusion MX no longer uses the neo-verity.xml file.
Because ColdFusion MX reads custom queries into memory, indexing a large query result set can
cause a “Java out of memory” error or lead to excessive disk use on your computer if your
ColdFusion MX Java Virtual Machine (JVM) memory allocation is too small. Manage
ColdFusion JVM memory settings as follows:
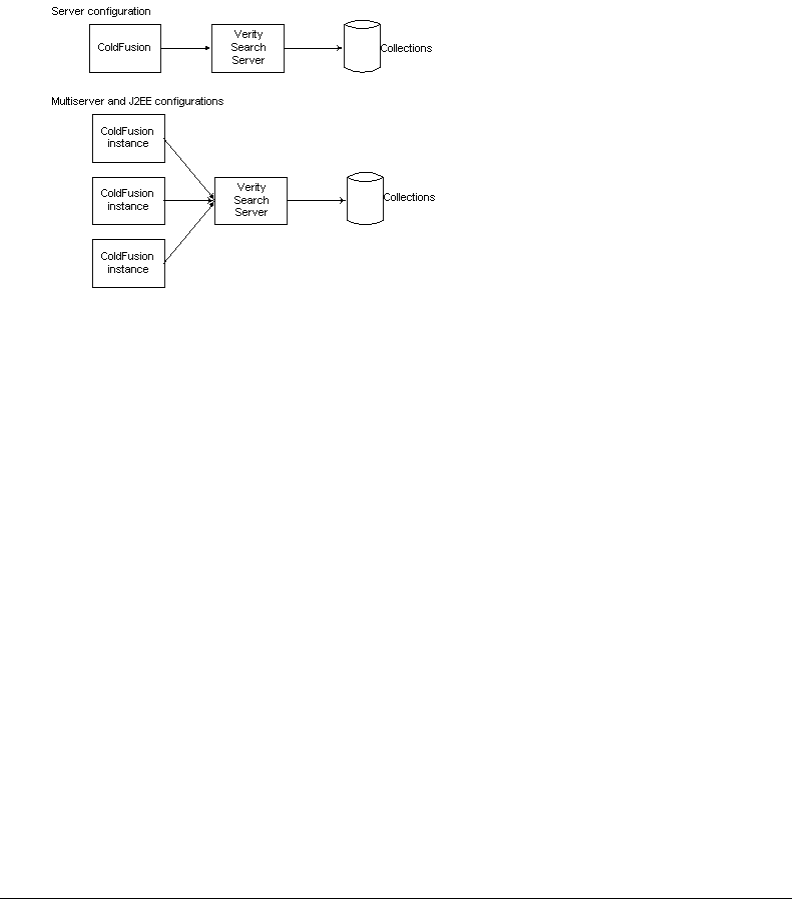
106 Chapter 8: Introducing Verity and Verity Tools
Server configuration Through the -Xmx argument to the java.args parameter in the
cf_root/runtime/bin/jvm.config file (for example, [-Xmx512m]).
Multiserver configuration Through the jrun_root/bin/jvm.config file.
J2EE configuration Through application server-specific methods.
Verity information storage
The Verity Search Server runs as a separate process from ColdFusion MX. This server controls all
access to Verity collections, as the following figure shows:
In the multiserver and J2EE configurations, multiple ColdFusion server instances all use the same
Verity Search Server to access the same set of Collections.
ColdFusion MX uses different processes for Windows and UNIX, as follows:
Windows The ColdFusion MX 7 Verity Search Server service manages and controls
configuration and services of a Verity K2 domain. This service starts three processes: k2server.exe,
k2index.exe, and k2admin.exe.
UNIX The cf_root/bin/cfmxsearch control script
(cf_webapp_root/WEB-INF/cfusion/bin/cfmxsearch in the multiserver configurations) starts and
stops Verity. When you call this script with the start argument, it calls
verity_root/k2/platform_dir/bin/k2adminstart with the appropriate user context and
environment, which in turn starts up three processes: k2server, k2index, and k2admin. Calling
the script with the stop argument calls the Verity k2adminstop script, which kills those three
processes.
Note: When you use the J2EE configuration, you must install Verity separately. For more
information, see “Installing the Verity search server separately” in Installing and Using ColdFusion MX.
You can install the Verity Search Server on a separate computer from ColdFusion MX. For more
information, see Administrator online Help.
Tip: If no Verity collections appear in the ColdFusion MX Administrator, it probably means that the
Verity Search Server process isn’t running.

About the Verity utilities 107
About Verity Spider (vspider)
Verity Spider (vspider) lets you index web-based and file system documents throughout your
enterprise, including dynamic content, and many application document formats, including
Microsoft Office, WordPerfect, ASCII text, HTML, and PDF (Adobe Acrobat) documents. For
more information, see Chapter 9, “Indexing Collections with Verity Spider,” on page 109.
About the Verity utilities
ColdFusion MX includes several Verity utilities to diagnose and manage your collections. These
tools include the mkvdk, rcvdk, rck2, and vspider utilities.
The following table describes the relationship between the major Verity utilities and the
corresponding cfcollection, cfsearch, and cfindex ColdFusion tags. The cfcollection tag
operates on the entire collection; the cfindex tag operates on records within a collection. For
more information, see Chapter 10, “Using Verity Utilities,” on page 141.
ColdFusion MX OEM restrictions
ColdFusion MX includes a restricted version of the Verity Server, with restrictions in the
following areas:
•ColdFusion MX can only interact with one Verity Server at a time.
•Verity Server has the following document search limits (limits are for all collections registered
to Verity Server):
■10,000 documents for ColdFusion MX Developer Edition
■125,000 documents for ColdFusion MX Standard Edition
■250,000 documents for ColdFusion MX Enterprise Edition
Note: Each row in a database table is considered a document.
If you install a fully licensed version of Verity Server and you configure ColdFusion MX to use
it, ColdFusion MX does not restrict document searches.
•The Verity Spider that is included with ColdFusion MX is licensed for local host indexing
only. Contact Verity Sales for licensing options regarding the use of the Verity Spider for
remote host indexing.
Additionally, ColdFusion MX OEMs and ISVs have the following document search limits:
•5,000 documents for ColdFusion MX Developer Edition
•62,500 documents for ColdFusion MX Standard Edition
•125,000 documents for ColdFusion MX Enterprise Edition
cfcollection cfindex cfsearch
utility create repair delete optimize update delete purge refresh search
mkvdk X X X X X X X
rcvdk X (file-system based)
rck2 X (server-based)

108 Chapter 8: Introducing Verity and Verity Tools

109
CHAPTER 9
Indexing Collections with Verity Spider
This chapter contains basic Verity Spider information and explains how to index documents on
your website.
Contents
About Verity Spider . . . . . . . . . . . . . . . . . . . . . . . . . . . . . . . . . . . . . . . . . . . . . . . . . . . . . . . . 109
About Verity Spider syntax. . . . . . . . . . . . . . . . . . . . . . . . . . . . . . . . . . . . . . . . . . . . . . . . . . . 111
Core options . . . . . . . . . . . . . . . . . . . . . . . . . . . . . . . . . . . . . . . . . . . . . . . . . . . . . . . . . . . . . 114
Processing options . . . . . . . . . . . . . . . . . . . . . . . . . . . . . . . . . . . . . . . . . . . . . . . . . . . . . . . . . 115
Networking options . . . . . . . . . . . . . . . . . . . . . . . . . . . . . . . . . . . . . . . . . . . . . . . . . . . . . . . . 120
Path and URL options . . . . . . . . . . . . . . . . . . . . . . . . . . . . . . . . . . . . . . . . . . . . . . . . . . . . . . 123
Content options. . . . . . . . . . . . . . . . . . . . . . . . . . . . . . . . . . . . . . . . . . . . . . . . . . . . . . . . . . . 128
Locale options . . . . . . . . . . . . . . . . . . . . . . . . . . . . . . . . . . . . . . . . . . . . . . . . . . . . . . . . . . . . 135
Logging options . . . . . . . . . . . . . . . . . . . . . . . . . . . . . . . . . . . . . . . . . . . . . . . . . . . . . . . . . . . 136
Maintenance options . . . . . . . . . . . . . . . . . . . . . . . . . . . . . . . . . . . . . . . . . . . . . . . . . . . . . . . 137
Setting MIME types. . . . . . . . . . . . . . . . . . . . . . . . . . . . . . . . . . . . . . . . . . . . . . . . . . . . . . . . 138
About Verity Spider
Verity Spider (vspider) enables you to index web-based and file system documents throughout
your enterprise. Verity Spider lets you index more than two hundred of the most popular
application document formats, including Microsoft Office, WordPerfect, ASCII text, HTML,
SGML, XML and PDF (Adobe Acrobat) documents.
Another advantage of this method, is that the index created by vspider includes dynamic content.
The cfindex tag and indexing a collection through the Macromedia ColdFusion MX
Administrator do not include dynamic content.
The Verity Spider that is included with ColdFusion MX is licensed for websites that are defined
and reside on the same machine on which ColdFusion MX is installed. Contact Verity Sales for
licensing options regarding the use of Verity Spider for external websites.

110 Chapter 9: Indexing Collections with Verity Spider
Web standard support
Verity Spider supports key web standards used by Internet and intranet sites. Standard HREF
links and frames pointers are recognized, so that navigation through them is supported.
Redirected pages are followed so that the real underlying document is indexed. Verity Spider
adheres to the robots exclusion standard specified in robots.txt files, so that administrators can
maintain friendly visits to remote websites. HTTP Basic Authentication mechanism is supported
so that password-protected sites can be indexed.
Restart capability
When an indexing job fails, or for some reason Verity Spider cannot index a significant number or
type of URLs, you can now restart the indexing job to update the collection. Only those URLs
that were not successfully indexed previously are processed.
State maintenance through a persistent store
Verity Spider stores the state of gathered and indexed URLs in a persistent store, which lets it
track progress for the purposes of gracefully and efficiently restarting halted indexing jobs.
Performance
Spidering performance is greatly improved over previous versions, because of low memory
requirements, flow control, and the help of multithreading and efficient Domain Name System
(DNS) lookups.
Flow control
When indexing websites, Verity Spider distributes requests to web servers in a round-robin
manner. This means that one URL is fetched from each web server in turn. With flow control, a
faster website can finish before a slower one. The Verity Spider optimizes indexing on every web
server.
Verity Spider adjusts the number of connections per server depending on the download
bandwidth. When the download bandwidth from a web server falls below a certain value, Verity
Spider automatically scales back the number of connections to that web server. There will always
be at least one connection to a web server. When the download bandwidth increases to an
acceptable level, Verity Spider reallocates connections (per the value of the -connections option,
which is 4 by default). You can turn off flow control with the -noflowctrl option.
Multithreading
Verity Spider separates the gathering and indexing jobs into multiple threads for concurrence.
Additionally, Verity Spider can create concurrent connections to web servers for fetching
documents, and have concurrent indexing threads for maximum utilization. This translates to an
overall improvement in throughput.

About Verity Spider syntax 111
Efficient DNS lookups
Verity Spider minimizes DNS lookups, which means great improvements to spidering
throughput. If spidering is limited by domain or host, then no DNS lookups are made on hosts
that fall outside of that range. In earlier versions, DNS lookups were made on all candidate URLs.
Proxy handling efficiency
To allow for greater flexibility when dealing with indexing jobs that involve proxy servers and
firewalls, use the following options:
-noproxy To reduce proxy checking for certain hosts
-proxyauth To authenticate on proxy servers
About Verity Spider syntax
Before you create an indexing task for a new collection, make copies of the relevant default style
files to ensure that you have a set of template style files in a known, stable state.
Running multiple simultaneous Verity Spider jobs can cause performance problems for searches.
This does not mean that you should never run indexing jobs when users might be searching,
because your collections are available for searching even while indexing jobs are running. To
optimize performance, try staggering your indexing jobs to avoid overloading your server.
The Verity Spider command
The vspider executable file, which starts the Verity Spider utility, is located in the platform/bin
directory, as follows:
Server and multiserver configuration The vspider.exe (Window) or vspider (UNIX) file is
located in cf_root/verity/k2/platform/bin (server configuration) or
jrun_root/verity/k2/platform/bin (multiserver configuration) where platform is _nti40 for
Windows, _solaris for Solaris, or _ilnx21 for Linux.
J2EE configuration The vspider.exe (Window) or vspider (UNIX) file is located in
verity_root/k2/platform/bin where platform is _nti40 for Windows, _solaris for Solaris, or _ilnx21
for Linux.
At its most basic level, a Verity Spider command consists of the following:
vspider -initialize -collection coll [options]
Where -initialize is -start or -refresh (when starting points have changed), and
-collection is required to provide a target for the Verity Spider, and [options] can be a near-
limitless combination of the options described later in this chapter.
For example:
c:\cfusionmx7\verity\k2\_nti40\bin\vspider -common
c:\cfusionmx7\verity\k2\common
-collection c:\new -start http://localhost -indinclude *

112 Chapter 9: Indexing Collections with Verity Spider
There are dependencies for other options, depending on the nature of the indexing task. The
following are some examples:
•To build a new collection, you must use -style.
•To control how Verity Spider operates, including which documents it indexes, use some Verity
Spider options.
If you do not run the Verity Spider executable from its default installation directory, you must
include that directory in your path. This is because the Verity Spider executable depends on other
files to run properly.
To use the vspider command on UNIX and Linux, the directory that contains the libvdk30.so file
must be in your LD_LIBRARY_PATH variable. In the server configuration, this directory is
cf_root/verity/k2/platform/bin; in the multiserver configuration, this directory is
jrun_root/servers/cfusion/WEB-INF/cfusion/verity/k2/platform/bin. For example, in the server
configuration on Linux, this directory is cf_root/verity/k2/_ilnx21/bin.
Using a command file
For simpler reuse and archiving of your indexing commands, use the -cmdfile option for
abstraction. By using an ASCII text file to store a task’s options, you avoid the potential problem
of using special characters in an option’s parameter value. For example, the -processbif option
requires the use of "!*" and therefore any task using that option must also use the -cmdfile
option.
Command-line option reference
The following sections describe the Verity Spider V 5.0 command-line options. Option names are
case-sensitive.
-start
Specifies a starting point for an indexing job. You can specify multiple instances, or use multiple
values in a single instance.
When you execute an indexing job from a command line, and you do not use a command file
(with the -cmdfile option), you must URL-escape any special characters in the starting point. To
URL-escape a special character, use "%hex-ASCII-character-number" in place of the character.
For example, use /time%26/ instead of /time&/. This allows the operating system to properly
process the command string.

About Verity Spider syntax 113
If an indexing task halts, you can rerun the task as-is. The persistent store for the specified
collection is read, and only those candidate URLs that are in the queue but not yet processed are
parsed. Candidate URLs correspond to URLs of the following status, as reported by vsdb:
cand, used, inse, upda, dele, fail
Note: By using the -start option with the -refresh option, you provide a starting point for Verity
Spider and therefore do not need to use at least one of the following options: -host, -domain,
-nofollow, or -unlimited.
-refresh
Used for updating a collection, specifies that Verity Spider process only those documents that
qualify, as follows:
•They are new documents in the repository, and they qualify for indexing under the criteria.
•They exist in the collection and are recorded in the Verity Spider persistent store with a status
of done. If Verity Spider determines that these indexed documents have been updated in the
repository, then they are retrieved again to be reparsed and reindexed. The document
VdkVgwKey values do not change.
•They are deleted in the collection. If Verity Spider determines that documents have been
deleted from the repository, then they are also deleted from the persistent store and the
collection. The exception to this rule is when you use the -nooptimize option with the
-refresh option. In this case, any document deleted from the repository is marked for
deletion in the collection. It will be removed from the collection and the persistent store when
the next indexing task is run for the collection.
When you rerun an existing indexing job, Verity Spider automatically refreshes the collection. If
you add or remove any of the starting points, however, you must manually specify the -refresh
option to refresh existing documents.
Note: You can also use the -start option to provide a starting point for Verity Spider. If you do not
use the -start option, use at least one of the following options: -host, -domain, or -nofollow. For
further control, also see the -refreshtime option. If you do not use any constraint criteria, Verity
Spider operates without limits and will likely index far more than you intended.
Repository type Starting point
Web The URL or URLs from which Verity Spider is to begin indexing. Use other
options, such as the -jumps option, to control how far from the starting point
Verity Spider goes.
File The starting directory or directories in which Verity Spider will start indexing. All
subdirectories beneath the starting point will be indexed, unless you use the
-pathlen option or any of the inclusion or exclusion criteria.

114 Chapter 9: Indexing Collections with Verity Spider
Core options
The following sections describe the Verity Spider core options.
-cmdfile
Syntax: -cmdfile path_and_filename
Specifies that Verity Spider reads command-line syntax from a file, in addition to the options
passed in the command-line. This option includes the pathname to the file that contains the
command-line syntax. The -cmdfile option circumvents command-line length limits.
The syntax for the command-file is:
option optional_parameters
For better readability, put each option and any parameters on a single line. Verity Spider can
properly parse the lines.
Note: Macromedia strongly recommends that you take advantage of the abstraction offered by this
option. This can greatly reduce user error in erroneously including or omitting options in subsequent
indexing jobs.
-collection
Specifies the full path to the collection to create or update.
Note: You receive an error if you specify a filename with an extension of CLM. Meta collections are
not supported.
-help
Displays Verity Spider syntax options.
-jobpath
Syntax: -jobpath path
Specifies the location of the Verity Spider databases and the indexing job-related files and
directories.
The following are the job-related directories and their contents:
log All Verity Spider log files. For descriptions of the log files, see -loglevel.
bif Bulk insert files.
temp Web pages cached for indexing. You can also specify the temp directory using the
-temp option.
These directories are created for you under the last directory specified in path.
Path values must be unique for all indexing jobs. If you do not use the -jobpath option, Verity
Spider creates a /spider/job directory within the collection. For multiple-collection tasks, the first
collection specified is used.
Note: You cannot use multiple job paths for multiple simultaneous indexing tasks for the same
collection. Only one indexing task at a time can run for a given collection.

Processing options 115
-style
Syntax: -style path
Specifies the path to the style files to use when creating a new collection.
If the -style option is not specified, Verity Spider uses the default style files in
cf_root/lib/common/style.
Note: You can safely omit the -style option when resubmitting an indexing job, as the style
information will already be part of the collection. If you are using the -cmdfile option, you can leave it
there.
Processing options
The following sections describe the Verity Spider processing options.
-abspath
Typ e : File system only
Generates absolute paths for files. Use this option when the document locations are not going to
change, but the collection might be moved around.
When you index a web server's contents through the file system, use the -prefixmap option with
the -abspath option to map the absolute file paths to URLs.
See also -prefixmap.
-detectdupfile
Typ e : File system only
Enables checksum-based detection of duplicates when indexing file systems.
By default, a document checksum is not computed on indexed files. By using the
-detectdupfile option, a checksum is computed based on the CRC-32 algorithm. The
checksum combined with the document size is used to determine if the document is a duplicate.
-indexers
Syntax: -indexers num_indexers
Specifies the maximum number of indexing threads to run on a collection.
The default value is 2. Increasing the value for the -indexers option requires additional CPU
and memory resources.
See also -maxindmem.
-license
Syntax: -license path_and_filename
Specifies the license file to use.
By default, the ind.lic file is used, from the verity_root/platform/bin directory.; where platform
represents the platform directory.

116 Chapter 9: Indexing Collections with Verity Spider
-maxindmem
Syntax: -maxindmem kilobytes
Specifies the maximum amount of memory, in kilobytes, used by each indexing thread. Specify
the number of threads with the -indexers option.
By default, each indexing thread uses as much memory as is available from the system.
-maxnumdoc
Syntax: -maxnumdoc num_docs
Specifies the maximum number of documents to download or submit for indexing. The value for
num_docs does not necessarily correspond to the number of documents indexed. The following
factors affect the actual number:
•Whether the value of num_docs falls within a block of documents dictated by the
-submitsize option. If it does, the entire block of documents must be processed.
•Whether documents retrieved are actually indexed, because they are invalid or corrupt.
-mimemap
Syntax: -mimemap path_and_filename
Specifies a control file (simple ASCII text) that maps file extensions to MIME-types. This lets you
make custom associations and override defaults.
The following is the format for the control file:
#file_ext_no_dot mime-type
abc application/word
-nocache
Typ e : Web crawling only
Used with the -noindex or -nosubmit options, this option disables the caching of files during
website indexing. This has the effect of decreasing the demands on your disk space.
Normally, Verity Spider downloads URLs, then writes them to a bulk insert file and downloads
the documents themselves. When indexing occurs, once the -submitsize option has been
reached, the cached files are indexed and then deleted. If you use the -noindex option, the bulk
insert file is submitted but not processed by Verity Spider, and so the documents are not deleted
until indexing occurs. This will usually be mkvdk or collsvc, or you can use Verity Spider again
with the -processbif option.
By using the -nocache option in conjunction with the -noindex or -nosubmit option, you
avoid storing files locally. Files are downloaded only when indexing actually occurs.
See also -noindex.

Processing options 117
-nodupdetect
Typ e : Web crawling only
Disables checksum-based detection of duplicates when indexing websites. URL-based duplicate
detection is still performed.
By default, a document checksum is computed based on the CRC-32 algorithm. The checksum
combined with the document size is used to determine if the document is a duplicate.
See also -followdup.
-noindex
Specifies that Verity Spider gathers document locations without indexing them. The document
locations are stored in a bulk insert file (BIF), which is then submitted to the collection. This
option is typically used in conjunction with a separate indexing process, such as mkvdk or
collection servicers (collsvc). The BIF will be processed by the next indexing process run for the
collection, whether it is Verity Spider, mkvdk, or collection servicers (collsvc).
Do not try to start Verity Spider and another process at the same time. You must allow Verity
Spider time to generate enough work for the secondary indexing process. If you are using mkvdk,
you can run it in persistent mode to ensure it will act upon work generated by Verity Spider.
Note: When you execute an indexing job for a collection and you use the -noindex option, the
persistent store for the collection is not updated.
See also -nocache and -nosubmit.
For more information on the mkvdk utility, see “Using the mkvdk utility” on page 142.
-nosubmit
Specifies that Verity Spider gathers document locations without submitting them. The document
locations are stored in a bulk insert file (BIF), which is not submitted to the collection. This
option is typically used in conjunction with a separate indexing process, such as mkvdk or
collection servicers (collsvc). You can also use Verity Spider again with the -processbif
option. With an indexing process other than Verity Spider, you must specify the name and path
for the BIF, because the collection has no record of it.
-persist
Syntax: -persist num_seconds
Enables the Verity Spider to run in persistent mode, checking for updates every num_seconds
seconds until it is stopped.
While Verity Spider is running in persistent mode, there is no optimization. After Verity Spider is
taken out of persistent mode, you need to perform optimization on the collection. For more
information about using the mkvdk utility, see “Using the mkvdk utility” on page 142.
Note: Do not run more than one Verity Spider process in persistent mode. As the Verity Spider is a
resource-intensive process, only run it in persistent mode with an interval of less than one day. For
time intervals greater than twelve hours, use some form of scheduling. Some examples are cron jobs
for UNIX, and the AT command for Windows server.

118 Chapter 9: Indexing Collections with Verity Spider
-preferred
Typ e : Web crawling only
Syntax: -preferred exp_1 [exp_n] ...
Specifies a list of hosts or domains that are preferred when retrieving documents for viewing. You
can use wildcard expressions, where the asterisk (*) is for text strings and the question mark (?) is
for single characters. To use regular expressions, also specify the -regexp option. Use this option
when you leave duplicate detection enabled and do not specify the -nodupdetect option.
When indexing, you might encounter a nonpreferred host first. In that case, documents are
parsed and followed and stored as candidates. When duplicates are encountered on another
server, which is preferred, the duplicate documents from the nonpreferred server are skipped.
When documents are requested for viewing, they will be retrieved from the preferred server.
In Windows, include double-quotation marks around the argument to protect the special
characters, such as the asterisk (*). On UNIX, use single-quotation marks. This is only required
when you run the indexing job from a command line. Quotation marks are not necessary within
a command file (the -cmdfile option).
See also -regexp.
-prefixmap
Typ e : File system only
Syntax: -prefixmap path_and_filename
Specifies a control file (simple ASCII text) that maps file system paths to web aliases.
In conjunction with the -abspath option, this option is typically used to create a URL field that
is the web equivalent of a file system path. File system indexing is faster than web crawling over
the network. If you use the -prefixmap option to replace the file system path with the web URL,
relative hyperlinks in the HTML pages are kept intact when returned in Verity search results.
The following is the format for the control file:
src_field src_prefix dest_field dest_prefix
If you use backslashes, you must double them so that they are properly escaped; for example:
C:\\test\\docs\\path
For example, to map the filepath /usr/pub/docs to http://web/~verity, use the following:
vdkvgwkey /usr/pub URL http://web/~verity
See also -abspath.
-processbif
Syntax: -processbif 'command_string !*'
Specifies a command string in which you can call a program or script that operates on BIFs
generated by Verity Spider.
Processing options 119
Due to the use of special characters, which represent the bulk insert file (BIF), you must run
Verity Spider with a command file using the -cmdfile option.
For example, if you want to use a script called fix_bif to add customized information to BIF files,
use the following command:
vspider -cmdfile filename
Where filename is the text-only command file that contains the following (along with any other
necessary options):
-processbif 'fix_bif !*'
Your command file will include other options as well.
-regexp
Specifies the use of regular expressions rather than the default wildcard expressions for the
following options: -exclude, -indexclude, -include, -indinclude, -skip, -indskip,
-preferred, and -nofollow.
Wildcard expressions allow the use of the asterisk (*) for text strings, and the question mark (?) for
single characters, as the following table shows:
Regular expressions allow for more powerful and flexible matching of alphanumeric strings; for
example, to match "ab11" or "ab34" but not "abcd" or "ab11cd," you could use the following
regular expression:
^ab[0-9][0-9]$
The full extent to which regular expressions can be employed is beyond the scope of this
description. For more information on regular expressions, refer to a book devoted to the subject.
-submitsize
Syntax: -submitsize num_documents
Specifies the number of documents submitted for indexing at one time. The default value is 128.
The upper limit is 64,000.
Note: Although larger values mean more efficient processing by the indexer, smaller values allow
more parallelism on multi-CPU systems. In the event of a halt during indexing, a smaller value means
fewer documents will be lost.
Wildcard expression Text string
a*t although, attitude, audit
a?t ant, art
file?.htm files.htm, file1.htm, filer.htm
name?.* names.txt, named.blank, names.ext

120 Chapter 9: Indexing Collections with Verity Spider
If a halt occurs during indexing, the chunk of documents specified by the -submitsize option is
lost because there is no transactional rollback for indexing and the documents are no longer in the
queue for indexing. When you rerun the indexing task, Verity Spider can only continue with
URLs and documents that are enqueued.
-temp
Syntax: -temp path
Specifies the directory for temporary files (disk cache). By default, the temp directory is under the
job directory (optionally specified with the -jobpath option).
If you do not specify a value for this option, Verity Spider creates a /spider/temp directory within
the collection. For multiple-collection tasks, the first collection specified is used.
Note: Make sure the location you specify contains enough disk space to handle the documents that
are downloaded and held before indexing. The documents are deleted from the hard disk after they
are indexed.
See also -jobpath, for specifying the location of all indexing job directories and files, one of
which is the temp directory.
Networking options
The following sections describe the Verity Spider networking options.
-agentname
Typ e : Web crawling only
Syntax: -agentname string
Specifies the value for the agent name field that is part of the HTTP request. Since web servers
can be configured to return different versions of the same page depending on the requesting
agent, you can use the -agentname option to impersonate a browser client.
Use double-quotation marks if the name contains a space. Use the -cmdfile option if the agent
name you want to use contains forbidden characters, such as slashes or backslashes.
-connections
Syntax: -connections num_connections
Specifies the maximum number of simultaneous socket connections to make to websites for
indexing. Each connection implies a separate thread.
The default value is 6.
Note: The Verity Spider dynamic flow control makes the most use of all available connections when
indexing websites. If you are indexing multiple sites, you might want to increase this number.
Increasing the number of connections does not always help, because of such dependencies as your
network connection and the capabilities of the remote hosts.

Networking options 121
-delay
Typ e : Web crawling only
Syntax: -delay num_milliseconds
Specifies the minimum time between HTTP requests, in milliseconds. The default value is 0
milliseconds for no delay.
-header
Typ e : Web crawling only
Syntax: -header string
Specifies an HTTP header to add to the spidering request; for example:
-header "Referer: http://www.verity.com/"
Verity Spider sends some predefined headers, such as Accept and User-Agent, by default. Special
headers are sometimes necessary to correctly index a site.
For example, earlier versions of Verity Spider did not support the Host header, which is needed
for Virtual Host indexing. Also, a Proxy-authentication header was needed to pass a username
and password to a proxy server. In the current version of Verity Spider, the Host header is
supported by default, and the -proxyauth option is available for proxy server authentication.
Therefore, the -header option is maintained only for backwards compatibility and possible
future enhancements.
Note: Misuse of this option causes spider failure. If this happens, rerun the indexing task with
modified -header values.
-hostcache
Syntax: -hostcache num_hostnames
Specifies the number of host names to cache to avoid DNS lookups. Without this option, the
host cache continues to grow.
The default value is 256.
-noflowctrl
Typ e : Web crawling only
Disables round-robin indexing of websites with network flow control.
By default, Verity Spider uses round-robin indexing of websites to avoid overwhelming a web
server and to improve indexing performance. Verity Spider connects to each web server in a
round-robin manner, using up to the value for the -connections option. This means that one
URL is fetched from each web server, in turn.
Note: Using the -noflowctrl option can result in a significant drop in performance.

122 Chapter 9: Indexing Collections with Verity Spider
-noproxy
Typ e : Web crawling only
Syntax: -noproxy name_1 [name_n] ...
Used in conjunction with the -proxy option, the -noproxy option specifies that Verity Spider
directly access the hosts whose names match those specified. By default, when you specify the
-proxy option, Verity Spider first tries to access every host with the proxy information. To
improve performance, use the -noproxy option for the hosts you know can be accessed without a
proxy host. For the name variable, you can use the asterisk (*) wildcard for text strings; for
example:
'*.verity.com'
You cannot use the question mark (?) wildcard, and the -regexp option does not let you use
regular expressions.
In Windows, include double-quotation marks around the argument to protect the asterisk special
character (*). On UNIX, use single-quotation marks. This is only required when you run the
indexing job from a command line. Quotation marks are not necessary within a command file
(the -cmdfile option).
Note: You must have valid Verity Spider licensing capability to use this option.
-proxy
Typ e : Web crawling only
Syntax: -proxy proxyhost:port
Specifies host and port for proxy server.
Note: You must have valid Verity Spider licensing capability to use this option.
See also -proxyauth for proxy servers that require authentication, and -noproxy for hosts that
you know are accessible without having to go through a proxy server.
-proxyauth
Typ e : Web crawling only
Syntax: -proxyauth login:password
Specifies login information for proxy server connections that require authorization to get outside
the firewall. Use this option in conjunction with the -proxy option.
Note: You must have valid Verity Spider licensing capability to use this option. Information Server
V3.7 does not support retrieving documents for viewing through secure proxy servers. Do not use the
-proxyauth option for indexing documents that are viewed through Information Server V3.7

Path and URL options 123
-retry
Typ e : Web crawling only
Syntax: -retry num_retries
Specifies the number of times that Verity Spider should attempt to access a URL. Use the -retry
option when it is likely that an unstable network connection will give false rejections.
The default value is 4.
-timeout
Typ e : Web crawling only
Syntax: -timeout num_seconds
Specifies the time period, in seconds, that Verity Spider should wait before timing out on a
network connection and on accessing data. The data access value is automatically twice the value
you specify for the network connection timeout.
The default value for the network connection time-out is 30 seconds, and therefore the default
value for the data access time-out is 60 seconds.
Path and URL options
The following sections describe the Verity Spider path and URL options.
-auth
Syntax: -auth path_and_filename
Specifies an authorization file to support authentication for secure paths.
Use the -auth option to specify the authorization file. The file contains one record per line. Each
line consists of server, realm, username, and password, separated by whitespace.
The following is a sample authorization file:
# This is the Authorization file for HTTP's Basic Authentication
#server realm username password
doleary MACR my_username my_password
-cgiok
Typ e : Web crawling only
Lets you index URLs containing query strings. That is, a question mark (?) followed by additional
information. This typically means that the URL leads to a CGI or other processing program.
The return document produced by the web server is indexed and parsed for document links,
which are followed and in turn indexed and parsed. However, if the web server does not return a
page, perhaps because the URL is missing parameters that are required for processing in order to
produce a page, nothing happens. There is no page to index and parse.

124 Chapter 9: Indexing Collections with Verity Spider
Example
The following is a URL without parameters:
http://server.com/cgi-bin/program?
If you include parameters in the URL to be indexed, as specified with the -start option, those
parameters are processed and any resulting pages are indexed and parsed.
By default, a URL with a question mark (?) is skipped.
-domain
Typ e : Web crawling only
Syntax: -domain name_1 [name_n] ...
Limits indexing to the specified domain(s). You must use only complete text strings for domains.
You cannot use wildcard expressions. URLs not in the specified domain(s) are not downloaded or
parsed.
You can list multiple domains by separating each one with a single space.
Note: You must have the appropriate Verity Spider licensing capability to use this option. The Verity
Spider that is included with ColdFusion MX is licensed for websites that are defined and reside on the
same machine on which ColdFusion MX is installed. Contact Verity Sales for licensing options
regarding the use of Verity Spider for external websites.
-followdup
Specifies that Verity Spider follows links within duplicate documents, although only the first
instance of any duplicate documents is indexed.
You might find this option useful if you use the same home page on multiple sites. By default,
only the first instance of the document is indexed, while subsequent instances are skipped. If you
have different secondary documents on the different sites, using the -followdup option lets you
get to them for indexing, while still indexing the common home page only once.
-followsymlink
Typ e : File system only
Specifies that Verity Spider follows symbolic links when indexing UNIX file systems.
-host
Typ e : Web crawling only
Syntax: -host name_1 [name_n] ...
Limits indexing to the specified host or hosts. You must use only complete text strings for hosts.
You cannot use wildcard expressions.
You can list multiple hosts by separating each one with a single space. URLs not on the specified
host(s) are not downloaded or parsed.

Path and URL options 125
-https
Typ e : Web crawling only
Lets you index SSL-enabled websites.
Note: You must have the Verity SSL Option Pack installed to use the -https option. The Verity SSL
Option Pack is a Verity Spider add-on available separately from a Verity salesperson.
-jumps
Typ e : Web crawling only
Syntax: -jumps num_jumps
Specifies the maximum number of levels an indexing job can go from the starting URL. Specify a
number between 0 and 254.
The default value is unlimited. If you see extremely large numbers of documents in a collection
where you do not expect them, consider experimenting with this option, in conjunction with the
Content options, to pare down your collection.
-nodocrobo
Specifies to ignore ROBOT META tag directives.
In HTML 3.0 and earlier, robot directives could only be given as the file robots.txt under the root
directory of a website. In HTML 4.0, every document can have robot directives embedded in the
META field. Use this option to ignore them. Use this option with discretion.
-nofollow
Typ e : Web crawling only
Syntax: -nofollow "exp"
Specifies that Verity Spider cannot follow any URLs that match the exp expression. If you do not
specify an exp value for the -nofollow option, Verity Spider assumes a value of "*", where no
documents are followed.
You can use wildcard expressions, where the asterisk (*) is for text strings and the question mark
(?) is for single characters. Always encapsulate the exp values in double-quotation marks to ensure
that they are properly interpreted.
If you use backslashes, you must double them so that they are properly escaped; for example:
C:\\test\\docs\\path
To use regular expressions, also specify the -regexp option.
Earlier versions of Verity Spider did not allow the use of an expression. This meant that for each
starting point URL, only the first document would be indexed. With the addition of the
expression functionality, you can now selectively skip URLs, even within documents.
See also -regexp

126 Chapter 9: Indexing Collections with Verity Spider
-norobo
Type: Web crawling only
Specifies to ignore any robots.txt files encountered. The robots.txt file is used on many websites to
specify what parts of the site indexers should avoid. The default is to honor any robots.txt files.
If you are re-indexing a site and the robots.txt file has changed, Verity Spider deletes documents
that have been newly disallowed by the robots.txt file.
Use this option with discretion and extreme care, especially in conjunction with the -cgiok
option.
See also -nodocrobo.
-pathlen
Syntax: -pathlen num_pathsegments
Limits indexing to the specified number of path segments in the URL or file system path. The
path length is determined as follows:
•The host name and drive letter are not included; for example, neither www.spider.com:80/ nor
C:\ would be included in determining the path length.
•All elements following the host name are included.
•The actual filename, if present, is included; for example, /world.html would be included in
determining the path length.
•Any directory paths between the host and the actual filename are included.
Example
For the following URL, the path length would be four:
http://www.spider:80/comics/fun/funny/world.html
<-1-> <2> <-3-> <---4--->
For the following file system path, the path length would be three:
C:\files\docs\datasheets
<-1-><-2-><---3--->
The default value is 100 path segments.
-refreshtime
Syntax: -refreshtime timeunits
Specifies not to refresh any documents that have been indexed since the timeunits value began.
The following is the syntax for timeunits:
n day n hour n min n sec
Where n is a positive integer. You must include spaces, and since the first three letters of each time
unit are parsed, you can use the singular or plural form of the word.

Path and URL options 127
If you specify the following:
-refreshtime 1 day 6 hours
Only those documents that were last indexed at least 30 hours and 1 second ago, are refreshed.
Note: This option is valid only with the -refresh option. When you use vsdb -recreate, the last
indexed date is cleared.
-reparse
Typ e : Web crawling only
Forces parsing of all HTML documents already in the collection. You must specify a starting
point with the -start option when you use the -reparse option.
You can use the -reparse option when you want to include paths and documents that were
previously skipped due to exclusion or inclusion criteria. Remember to change the criteria, or
there will be little for Verity Spider to do. This can be easy to overlook when you are using the
-cmdfile option.
-unlimited
Specifies that no limits are placed on Verity Spider if neither the -host nor the -domain option is
specified. The default is to limit based on the host of the first starting point listed.
-virtualhost
Syntax: -virtualhost name_1 [name_n] ...
Specifies that DNS lookups are avoided for the hosts listed. You must use only complete text
strings for hosts. You cannot use wildcard expressions. This lets you index by alias, such as when
multiple web servers are running on the same host. You can use regular expressions.
Normally, when Verity Spider resolves host names, it uses DNS lookups to convert the names to
canonical names, of which there can be only one per machine. This allows for the detection of
duplicate documents, to prevent results from being diluted. In the case of multiple aliased hosts,
however, duplication is not a barrier as documents can be referred to by more than one alias and
yet remain distinct because of the different alias names.
Example
You can have both marketing.verity.com and sales.verity.com running on the same host. Each
alias has a different document root, although document names such as index.htm can occur for
both. With the -virtualhost option, both server aliases can be indexed as distinct sites. Without
the -virtualhost option, they would both be resolved to the same host name, and only the first
document encountered from any duplicate pair would be indexed.
Note: If you are using Netscape Enterprise Server, and you have specified only the host name as a
virtual host, Verity Spider will not be able to index the virtual host site. This is because Verity Spider
always adds the domain name to the document key.

128 Chapter 9: Indexing Collections with Verity Spider
Content options
The following sections describe the Verity Spider content options.
-casesen
Makes processing case-sensitive by specifying that the spider separately process keys that differ
only in case. Use only for indexing UNIX servers.
-exclude
Syntax: -exclude exp_1 [exp_n] ...
Specifies that files, paths, and URLs matching the specified expression(s) will not be followed. If
you use backslashes, you must double them so that they are properly escaped; for example:
C:\\test\\docs\\path
You can use wildcard expressions, where the asterisk (*) is for text strings and the question mark
(?) is for single characters; for example:
'/my_doc*/year199?'
In Windows, include double-quotation marks around the argument to protect special characters,
such as the asterisk (*). On UNIX, use single-quotation marks. This is only required when you
run the indexing job from a command line. Quotation marks are not necessary within a
command file (the -cmdfile option).
To use regular expressions, also specify the -regexp option.
To specify a file, path, or URL that you want followed but not indexed, use the -indexclude
option. For document types, use the -mimeexclude option instead; for example, specify
-mimeexclude application/pdf rather than -exclude *.pdf.
Note: When specifying a URL, you must use full, absolute paths using the same format that appears
in the HTML hyperlink. If the link is relative, you must change it to absolute to use it with the -exclude
option.
See also -regexp.
-include
Specifies that only those files, paths, and URLs that match the specified expression or expressions
will be followed. If you use backslashes, you must double them so that they are properly escaped;
for example:
C:\\test\\docs\\path
You can use wildcard expressions, where the asterisk (*) is for text strings and the question mark
(?) is for single characters; for example:
'/my_doc*/year199?'

Content options 129
In Windows, include double-quotation marks around the argument to protect the special
characters, such as the asterisk (*). On UNIX, use single-quotation marks. This is only required
when you run the indexing job from a command line. Quotation marks are not necessary within
a command file (the -cmdfile option).
To use regular expressions, also specify the -regexp option.
If your starting points do not contain the specified -include expressions, nothing will be
indexed. The -include option prevents Verity Spider from even following anything that does not
match the specified expressions. You might want to use the -indinclude option instead. Where
the -include option prevents Verity Spider from even following anything that does not match
the specified expressions, the -indinclude option allows Verity Spider to follow what matches
the specified expressions, while not indexing.
For document types, use the -mimeinclude option instead; for example, specify -mimeinclude
text/html rather than -include *.htm.
Note: When specifying a URL, you must use full, absolute paths using the same format that appears
in the HTML hyperlink. If the link is relative, you must change it to absolute to use it with the -include
option.
See also -regexp.
-indexclude
Syntax: -indexclude exp_1 [exp_n] ...
Specifies that the files and paths in URLs that match the expressions are not indexed. They are,
however, still followed. If you use backslashes, you must double them so that they are properly
escaped; for example:
C:\\test\\docs\\path
You can use wildcard expressions, where the asterisk (*) is for text strings and the question mark
(?) is for single characters; for example:
'/my_doc*/year199?'
In Windows, include double-quotation marks around the argument to protect the special
characters, such as the asterisk (*). On UNIX, use single-quotation marks. This is only required
when you run the indexing job from a command line. Quotation marks are not necessary within
a command file (the -cmdfile option).
To use regular expressions, also specify the -regexp option.
You would use this option to gather some documents, such as HTML tables of contents, to gain
access to other documents for indexing.
Where the -exclude option prevents Verity Spider from even following anything that matches
the specified expressions, the -indexclude option allows Verity Spider to follow anything while
only skipping that which matches the specified expressions.
For document types, use the -indmimeexclude option instead.
Note: When specifying a URL, you must use full, absolute paths using the same format as appears in
the HTML hyperlink. If the link is relative, you must change it to absolute to use it with -indexclude.

130 Chapter 9: Indexing Collections with Verity Spider
See also -regexp.
-indinclude
Syntax: -indinclude exp_1 [exp_n] ...
Specifies that only those files and paths in URLs that match the expressions be followed and
indexed. If you use backslashes, you must double them so that they are properly escaped; for
example:
C:\\test\\docs\\path
You can use wildcard expressions, where the asterisk (*) is for text strings and the question mark
(?) is for single characters; for example:
'/my_doc*/year199?'
In Windows, include double-quotation marks around the argument to protect the special
characters, such as the asterisk (*). On UNIX, use single-quotation marks. This is only required
when you run the indexing job from a command line. Quotation marks are not necessary within
a command file (the -cmdfile option).
To use regular expressions, also specify the -regexp option.
Where the -include option prevents Verity Spider from even following anything that does not
match the specified expressions, the -indinclude option allows Verity Spider to follow anything
while only indexing that which matches the specified expressions.
Example
If you want to index all documents that include "search" in the URL at http://web.verity.com,
you cannot use the following:
vspider -collection collname -start http://web.verity.com
-include '*search*'
This is because the starting point does not match the -include option criteria. Instead, use the
-indinclude option to follow all documents (unless you have specified any of the exclude
options) and index only those documents that match your criteria. Replace the -include option
with the -indinclude option in the preceding example.
Note: When specifying a URL, you must use full, absolute paths using the same format that appears
in the HTML hyperlink. If the link is relative, you must change it to absolute to use it with the
-indinclude option.
See also -regexp.
-indmimeexclude
Syntax: -indmimeexclude mime_1 [mime_n] ...
Specifies that only those MIME types that match the expressions be followed but not indexed.

Content options 131
In Windows, include double-quotation marks around the argument to protect the special
characters, such as the asterisk (*). On UNIX, use single-quotation marks. This is only required
when you run the indexing job from a command line. Quotation marks are not necessary within
a command file (the -cmdfile option).
Use this option to gather some documents, such as HTML tables of contents, to gain access to
other documents for indexing. The -mimeexclude option, on the other hand, prevents specified
documents from being followed at all. For the mime variable, you can include the asterisk (*)
wildcard for text strings; for example:
'text/*'
You cannot use the question mark (?) wildcard, and the -regexp option does not let you use
regular expressions.
-indmimeinclude
Syntax: -indmimeinclude mime_1 [mime_n] ...
Specifies that only those MIME types that match the expressions be followed and indexed.
The -mimeinclude option does not let you index desired documents if the starting URL is not
followed. For the mime variable, you can include the asterisk (*) wildcard for text strings; for
example:
'text/*'
In Windows, include double-quotation marks around the argument to protect the special
character (*). On UNIX, use single-quotation marks. This is only required when you run the
indexing job from a command line. Quotation marks are not necessary within a command file
(the -cmdfile option).
You cannot use the question mark (?) wildcard, and the -regexp option does not allow you to use
regular expressions.
Example
If you want to index all Word documents at http://web.verity.com, you cannot use:
vspider -collection collname -style style_dir -start
http://web.verity.com -mimeinclude 'application/msword'
This is because the starting point does not match the -mimeinclude criteria. You can use the
-indmimeinclude option to follow all documents (unless you have specified any of the exclude
options) and index only those documents that match your criteria. Replace the -mimeinclude
option with the -indmimeinclude option in the preceding example.
-indskip
Syntax: -indskip HTML_tag "exp"
Typ e : Web crawling only

132 Chapter 9: Indexing Collections with Verity Spider
Specifies that Verity Spider follow and parse links, but not index, any HTML document that
contains the text of exp within the given HTML_tag. For multiple HTML_tag and exp
combinations, use multiple instances of the -skip option.
You can use wildcard expressions, where the asterisk (*) is for text strings and the question mark
(?) is for single characters; for example:
'/my_doc*/year199?'
In Windows, include double-quotation marks around the argument to protect the special
characters, such as the asterisk (*). On UNIX, use single-quotation marks. This is only required
when you run the indexing job from a command line. Quotation marks are not necessary within
a command file (the -cmdfile option).
If you use backslashes, you must double them so that they are properly escaped; for example:
C:\\test\\docs\\path
To use regular expressions, also specify the -regexp option.
Example 1
To skip all HTML documents that contain the word "personnel" in the Title element, while still
parsing those documents for links to other documents, use the following:
-indskip title "personnel"
Example 2
To avoid indexing directory listing pages, while still parsing the document and path links except
for the link to the parent directory, use one of the following, depending on the web server being
indexed:
•For Netscape web servers, use the following:
-indskip title "*Index of*"
-nofollow "*parent directory*"
•For Microsoft Internet Information Server, use the following:
-indskip a "*to parent directory*"
-nofollow "*parent directory*"
-maxdocsize
Syntax: -maxdocsize integer
Specifies the maximum size, in kilobytes, for documents to be indexed. Any documents larger
than the value specified by the -maxdocsize option are ignored.
The default is to index documents of any size.
-metafile
Typ e : Web crawling only
Syntax: -metafile path_and_filename

Content options 133
Lets you use a text file to map custom meta tags to valid HTTP header fields. If you use
backslashes, you must double them so that they are properly escaped; for example:
C:\\test\\docs\\path
This means that you can use your own meta tag, in the document, to replace what is returned by
the web server, or to insert it if nothing is returned. Currently, the only header fields of real value
are "Last-Modified" and "Content-Length." Future enhancements could allow for greater variety.
The following is the syntax for entries in the text file:
name Last-Modified y|n
or
name Content-Length y|n
Where y|n is an override flag, which can be yes or no.
Example
A mapping file for the -metafile option might include the following:
Doc_Last_Touched Last-Modified n
Doc_Size Content-Length y
If you use the y override flag, the value for the custom meta tag overrides the value for the valid
field, even if both values are present and differ. This can be useful when the valid field value is
always sent, but you want to specify your own value with a custom meta tag.
If you use the n override flag, the value for the custom meta tag is used only if there is no value for
the valid field returned by the server. If a value for the valid field exists, it is given precedence.
Note: If you have several entries mapping to the same valid field, only the last entry takes effect.
-mimeexclude
Syntax: -mimeexclude mime_1 [mime_n] ...
Specifies MIME types that are neither followed nor indexed.
In Windows, include double-quotation marks around the argument to protect the special
characters, such as the asterisk (*). On UNIX, use single-quotation marks. This is only required
when you run the indexing job from a command line. Quotation marks are not necessary within
a command file (the -cmdfile option).
The default is to include all MIME types. For the mime variable, you can include the asterisk (*)
wildcard for text strings; for example:
'text/*'
You cannot use the question mark (?) wildcard, and the -regexp option does not let you use
regular expressions.
Use the -indmimeexclude option to allow Verity Spider to follow documents, without indexing
them, to gain access to other desirable document types.

134 Chapter 9: Indexing Collections with Verity Spider
-mimeinclude
Syntax: -mimeinclude mime_1 [mime_n] ...
Specifies MIME types to be included.
In Windows, include double-quotation marks around the argument to protect the special
characters, such as the asterisk (*). On UNIX, use single-quotation marks. This is only required
when you run the indexing job from a command line. Quotation marks are not necessary within
a command file (the -cmdfile option).
The default is to include all MIME types. For the mime variable, you can include the asterisk (*)
wildcard for text strings; for example:
'text/*'
You cannot use the question mark (?) wildcard, and the -regexp option does not let you use
regular expressions.
-mindocsize
Syntax: -mindocsize integer
Specifies the minimum size, in kilobytes, for documents to be indexed. Any documents smaller
than the value specified by the -mindocsize option are ignored.
The default is to index documents of any sizes.
-skip
Typ e : Web crawling only
Syntax: -skip HTML_tag "exp"
Specifies that Verity Spider not index any HTML document that contains the text of exp within
the given HTML_tag. For multiple HTML_tag and exp combinations, use multiple instances of
the -skip option.
You can use wildcard expressions, where the asterisk (*) is for text strings and the question mark
(?) is for single characters; for example:
'/my_doc*/year199?'
In Windows, include double-quotation marks around the argument to protect the special
characters, such as the asterisk (*). On UNIX, use single-quotation marks. This is only required
when you run the indexing job from a command line. Quotation marks are not necessary within
a command file (the -cmdfile option).
If you use backslashes, you must double them so that they are properly escaped; for example:
C:\\test\\docs\\path
To use regular expressions, also specify the -regexp option.

Locale options 135
Example 1
To skip all HTML documents that contain the word "personnel" in the Title element, use the
following:
-skip title "personnel"
Example 2
To skip all HTML documents that contain both the word "private" and the phrase "internal user"
in any paragraph element, use the following:
-skip title "personnel"
-skip p "*internal use*"
See also -regexp.
Locale options
The following sections describe the Verity Spider locale options.
-charmap
Syntax: -charmap name
Specifies the character map to use. Valid values are 8859 or 850. The default value is 8859.
-common
Specifies the path to the Verity home directory, cf_root/verity/k2/common.
Note: This option is typically not needed, as long as the PATH environment variable is set correctly.
-datefmt
Syntax: -datefmt format
Specifies the Verity import date format to use. Valid values are MDY (the default), DMY, YMD,
USA, and EUR. (For descriptions of these values, see “Date format options” on page 147.)
-language
Syntax: -language name
Specifies the Verity locale to use in indexing. This option is being replaced by the semantically
consistent the -locale option, and is still supported for backwards compatibility.
-locale
Syntax: -locale name
Specifies the Verity locale to use in indexing, such as German (deutsch) or French (français). The
default is English (english). This option is identical to the -language option.

136 Chapter 9: Indexing Collections with Verity Spider
-msgdb
Syntax: -msgdb path
Specifies the path to the ind.msg message database file.
If Verity Spider was installed properly, this option should be unnecessary. By default, the ind.msg
message database file is read from the following directory:
cf_root/lib/platform/bin
Where platform represents the platform directory.
Logging options
The following sections describe the Verity Spider logging options.
-loglevel
Syntax: -loglevel [nostdout] argument
Specifies the types of messages to log. By default, messages are written to standard output and to
various log files in the subdirectory named /log beneath the Verity Spider job directory. If you add
nostdout to the -loglevel option, messages are not written to standard output. Log files,
however, are still created.
The following table describes valid message types:
Message type Description
information Licensing information written to info.log. Included with all arguments.
warning Warning messages written to warning.log. Included with all arguments.
error Error messages written to error.log. Included with all arguments.
badkey Messages regarding keys that could not be indexed due to invalid documents,
written to badkey.log. Included with all arguments.
progress Current state of a document key written to progress.log. Note that a key with a
progress of "inserting" might be a badkey and therefore skipped, rather than an
indexed key. Included with all arguments.
summary Inserted, indexed, and ignored messages written to summary.log. Included with all
arguments except skip.
skip Skipped documents, with explanation, written to skip.log. Included with all
arguments, except summary.
debug Internal Verity Spider processing messages, such as enqueued, written to
debug.log. Included with both debug and trace arguments.
trace Internal Verity Spider processing messages written to debug.log. Included only with
the trace argument.

Maintenance options 137
Choose one of the following arguments to determine which message types are logged:
Maintenance options
The following sections describe the Verity Spider maintenance options.
-nooptimize
Prevents Verity Spider from optimizing the collection, thus reducing processing overhead during
indexing. Use this option sparingly, as it leaves the collection in less than optimum shape. The
following are some examples of when you might want to use this option:
•You want to manually perform custom optimization of the collection, using the mkvdk utility.
By default, the Verity Spider optimization mimics the mkvdk actions of maxmerge and
vdbopt. For more information on the mkvdk utility, see Verity Command-Line Indexing
Reference and “Using the mkvdk utility” on page 142.
•You are running multiple indexing jobs against a collection, and want to wait until they are all
finished to optimize.
Generally, you should not leave a collection unoptimized for too long, as search times can slow
significantly.
In brief, optimizing a collection means creating a small number of large partitions, which can
greatly reduce search times.
Loglevel
arguments
Description
summary Includes the following message types:
information, warning, error, badkey, progress, summary
Use this option only if you do not want skip type messages.
skip Includes the following message types:
information, warning, error, badkey, progress, skip
Use this option only if you do not want summary type messages.
verbose Includes the following message types:
information, warning, error, badkey, progress, summary, skip
debug Includes the following message types:
information, warning, error, badkey, progress, summary, skip, debug
Note: Only use this argument at the direction of Verity technical support or for
troubleshooting indexing problems.
trace Includes the following message types:
information, warning, error, badkey, progress, summary, skip, debug, trace
Note: Only use this argument at the direction of Verity technical support or for
troubleshooting indexing problems.

138 Chapter 9: Indexing Collections with Verity Spider
-purge
Deletes document tables and index files in the collection, and cleans up the collection's persistent
store. The collection is then fresh with its original style files, and is not deleted from the file
system.
-repair
Specifies a failure-recovery mode for the collection, where the goal is to determine the causes of
any errors, repair the errors (if possible), and restart a collection.
Although the Verity indexing engine always leaves the collection in a consistent, usable state, and
no data can be lost or corrupted due to machine failures, it is possible for a process or event
external to the Verity engine to corrupt one or more collections.
You can use the -repair option for constant failure-recovery operation, or you can run it
selectively on collections that failed.
Setting MIME types
You can use the MIME type criteria options, -mimeinclude, -indmimeinclude, -mimeexclude,
and -indmimeexclude, to include or exclude MIME types.
Syntax restrictions
When you specify MIME type criteria, keep in mind the restrictions described in the following
sections.
Using the wildcard character (*)
The asterisk (*) wildcard character does not operate as a regular expression for the value of the
MIME type criteria. Instead, you can only use it to replace the entire MIME type or MIME sub-
type.
For example, the following value is a valid substitute for text/html:
text/*
The following value is NOT a valid substitute for text/html:
text/h*
Multiple parameter values
When you specify a series of parameter values for a single instance of one of the MIME type
criteria, and you use-quotation marks, you must enclose each separate parameter value in single-
quotation marks. For example:
-mimeinclude ’text/plain’ ’application/*’
If you enclose the entire sequence of parameter values, as follows:
-mimeinclude ’text/plain application/*’
Verity Spider considers the entire expression a single value.

Setting MIME types 139
You can also use multiple instances of the MIME type criteria, each with a single parameter value,
where quotation marks are necessary only if you use the wildcard character (*). For example:
-mimeinclude text/plain
-mimeinclude ’application/*’.Setting MIME Types
MIME types and web crawling
When you index a website, Verity Spider evaluates your MIME type criteria against the "Content-
Type" HTTP headers sent by the web server hosting that website. That web server passes along
MIME type information based on its own internal tables.
When you encounter MIME types being dropped, make sure that the web server you are indexing
has the necessary MIME type information. For information about specifying MIME types, see
the documentation for your web server.
You can examine the indexing job’s log files for indications that files are being skipped due to
MIME types. For example, a typical ASCII file you might want indexed is a log file
(filename.log). Unless the web server understands that files with .LOG extensions are ASCII text,
of MIME type text/plain, you will see in the indexing job log file that .LOG files are skipped
because of MIME type, even if you use the following:
-mimeinclude ’text/*’
MIME types and file system indexing
When you index a file system, Verity Spider reads filenames and evaluates your MIME type
criteria against an internal, compiled list of known MIME types and associated file extensions.
You cannot edit this list. However, you can use the -mimemap option to create a custom MIME
type mapping.
When you encounter MIME types being dropped, check whether Verity Spider recognizes that
particular MIME type. For more information, see the table, “Known MIME types for file system
indexing” on page 140.
You can examine the indexing job’s log files for indications that files are being skipped due to
MIME types. For example, a typical ASCII file you might want indexed is a log file
(filename.log). Since Verity Spider does not understand that files with .LOG extensions are ASCII
text, of MIME type text/plain, you will see in the indexing job log file that .LOG files are skipped
because of MIME type, even if you use the following:
-mimeinclude ’text/*’.Setting MIME Types
Indexing unknown MIME types
Whenever you find MIME types being dropped, or you know you will be indexing files whose
extensions are not known to Verity Spider by default, use the -mimemap option to point to a file
that contains your own custom mappings for file extensions and MIME types.
You can also use the regular expression ’*/*’ for your MIME type criteria; for example:
-mimeinclude ’*/*’

140 Chapter 9: Indexing Collections with Verity Spider
On either platform, you must include single-quotation marks for values that include wildcard
characters.
Also use inclusion and exclusion criteria to finely control what is indexed, as follows:
•If your list of file types to index is rather long, use exclusion criteria (-exclude, -indexclude,
-mimeexclude, or -indmimeexclude) to exclude extensions you know you do not want to
index; for example:
-exclude ’*.exe’ ’*.com’
•If the list of file types you want to index is relatively small, use inclusion criteria (-include,
-indinclude, -mimeinclude, or -indmimeinclude) to specify them; for example:
-include ’*.txt’ ’*.1st’ ’*.log’.Setting MIME Types
Known MIME types for file system indexing
The following table lists the MIME types that Verity Spider recognizes when indexing file
systems:
Format MIME type Extension
HTML text/html htm, html
ASCII text/plain txt, text, pl, eml
ASCII, source files text/plain c, h, cpp, cxx
PDF application/pdf pdf
MS Word application/msword doc
MS Excel application/vnd.ms-excel xls
MS PowerPoint application/vnd.ms-powerpoint ppt
WordPerfect 5.1 application/wordperfect5.1 wpd
RTF application/rtf rtf
FrameMaker MIF application/vnd.mif mif
Applixware application/applixware aw
Zip files application/zip zip
Eudora mail text/x-mbox mbx

141
CHAPTER 10
Using Verity Utilities
This chapter provides information about using Verity utilities to configure, maintain, and
troubleshoot Verity collections.
Contents
Overview of Verity utilities. . . . . . . . . . . . . . . . . . . . . . . . . . . . . . . . . . . . . . . . . . . . . . . . . . . 141
Using the mkvdk utility . . . . . . . . . . . . . . . . . . . . . . . . . . . . . . . . . . . . . . . . . . . . . . . . . . . . . 142
Using the rck2 utility . . . . . . . . . . . . . . . . . . . . . . . . . . . . . . . . . . . . . . . . . . . . . . . . . . . . . . . 153
Using the rcvdk utility . . . . . . . . . . . . . . . . . . . . . . . . . . . . . . . . . . . . . . . . . . . . . . . . . . . . . . 154
Using the didump utility . . . . . . . . . . . . . . . . . . . . . . . . . . . . . . . . . . . . . . . . . . . . . . . . . . . . 158
Using the browse utility . . . . . . . . . . . . . . . . . . . . . . . . . . . . . . . . . . . . . . . . . . . . . . . . . . . . . 160
Using the merge utility. . . . . . . . . . . . . . . . . . . . . . . . . . . . . . . . . . . . . . . . . . . . . . . . . . . . . . 162
Overview of Verity utilities
The following command-line utilities are included with Macromedia ColdFusion MX for
performing a variety of operations on Verity collections:
Verity utility Description For more information
mkvdk Create and maintain collections. See “Using the mkvdk utility”
on page 142.
rck2 Search K2 Server collections. See “Using the rck2 utility” on page 153.
rcvdk Search collections and display
documents.
See “Using the rcvdk utility” on page 154.
didump View collection word lists. See “Using the didump utility”
on page 158.
browse Browse documents table and
search results.
See “Using the browse utility”
on page 160.
merge Combine collections. See “Using the merge utility” on page 162.

142 Chapter 10: Using Verity Utilities
Location of Verity utilities
The Verity command-line utilities are located in the following directories:
Server and multiserver configuration The utility files are located in cf_root/verity/k2/
platform/bin (server configuration) or jrun_root/verity/k2/platform/bin (multiserver
configuration), where platform is _nti40 for Windows, _solaris for Solaris, or _ilnx21 for Linux.
J2EE configuration The utility files are located in verity_root/k2/platform/bin, where platform
is _nti40 for Windows, _solaris for Solaris, or _ilnx21 for Linux.
Using the mkvdk utility
The mkvdk utility is an indexing application, provided with other Verity utilities, that you can
use to create and maintain collections. It is a command-line utility that you can use within other
applications or shell scripts to provide more sophisticated scheduling and other capabilities.
The mkvdk executable file, which starts the mkvdk utility, is located in the platform/bin directory.
For more information on the specific location of this directory, see “Location of Verity utilities”
on page 142.
Note: To display a list of mkvdk command-line options, enter the following command:
mkvdk -help
The mkvdk utility syntax
The following is the basic syntax of the mkvdk command:
mkvdk -collection path [option] [dockey]
Multiple options and dockeys can be included, as needed. If dockey is a list of files, it should
consist of an at sign (@) followed by the filename that contains a simple list of files (for example,
@filelist). For more information about the options for the mkvdk utility, see “Getting started with
the Verity mkvdk utility” on page 143.
The following operations occur when you use the mkvdk utility to create a new collection:
1.
New collection directories are created and the specified style files are copied to the style
subdirectory.
2.
The style file settings are read and the required information is passed to the Verity search engine.
3.
The gateway is used to open the document files, which are parsed according to the settings in
various style files.
4.
A new partition is created, which includes an index and an attribute table.
5.
Assist data is generated, which might include a spanning word list.
When problems occur during an operation, the mkvdk utility writes error messages to the system
log file (sysinfo.log). You can direct error and other messages to the console by using the mkvdk
command with the -outlevel option. You can direct messages to a file of your choice by using
the -loglevel and -logfile options.

Using the mkvdk utility 143
The log file contains the following fields:
•Date
•Time
•Level
•Code
•Component
•Description
You can use the log file to view details about what happens during the collection creation process.
Use the mkvdk -loglevel command and specify the numeric identifier for the message level you
want, as summarized in the following table:
To calculate the numeric parameter, add the numbers for the message types you want to include.
The default for both -outlevel and -loglevel is 15, which selects fatal, error, warning, and
status messages (1+2+4+8).
Getting started with the Verity mkvdk utility
The following is the basic mkvdk syntax:
mkvdk -collection path [option] [...] [filespec] [...]
Where:
•Square brackets ( [ ] ) indicate optional items.
•An ellipsis (...) indicates repetition of the previous item. Thus, [filespec] [...] indicates an
optional series of filespec items.
•filespec represents a document filename or a list of document filenames. If filespec is a list of
files, it should consist of an at sign (@) followed by the filename containing the list (for
example, @filelist).
•The -collection path argument creates or opens a collection. This argument is required.
Numerous optional syntax options are listed below. All syntax options must precede the first
filespec parameter.
Type Number
Fatal 1
Error 2
Warning 4
Status 8
Info 16
Verbose 32
Debug 64

144 Chapter 10: Using Verity Utilities
Creating a collection
Creating a collection with the mkvdk utility involves setting up a collection directory structure
and inserting documents into this structure. You can create a collection using the following steps.
To create a collection:
1.
Set up a collection using the following syntax:
mkvdk -create -collection collectionname
Where collectionname is the path to the collection directory. Running this command creates
a collection directory that includes style files with configuration information.
2.
Insert documents using the following syntax:
mkvdk -collection collectionname -bulk -insert filespec
Where filespec is the name of a bulk insert file that specifies which documents to index and
insert into the collection.
Collection setup options
The mkvdk utility has a variety of collection setup options, which the following table describes:
Examples: setting up collections
The following examples show the commands for creating a collection and building the word list:
Creating a collection The following command creates a collection in path_2 using the style
files in path_1, and submits and indexes the document(s) in filespec:
mkvdk -create -style path_1 -collection path_2 filespec
Building the word list The following command builds the word list in the collection residing in
the path directory:
mkvdk -words -collection path
Option Description
-create Creates a collection in the specified collection directory. It creates the directory
structure, determines the index contents and sets up the document’s table
schema according to the style files used. If the specified collection already
exists, the mkvdk utility exits rather than overwriting the existing collection.
-style dir Specifies the style directory that contains the style files to use to create a
collection. This option can only be used with the -create option. If you do not
specify this option when you use the mkvdk utility to create a collection, the
mkvdk utility uses the style files in the common/style directory.
-description desc Sets the collection’s description. Enter alphanumeric text, such as “This
collection contains electronic mail from ABC Company.” Include the quotation
marks.
-words Builds the word list for all partitions in the collection.

Using the mkvdk utility 145
General processing options
The mkvdk utility provides a variety of general processing options, which the following table
describes:
Option Description
-collection path Specifies the path of the collection to create or open. This option is required to
execute the mkvdk utility.
-nolock Turns off file locking. Locking is on by default.
-synch Performs work immediately. If this option is not used, indexing work is done in
the background, as time permits.
-about Shows information about the collection, such as its description and the date
when it was last modified.
-datapath path Specifies the datapath to use to find documents that are added to the specified
collection. All relative document paths are relative to this setting. If you do not set
this option, the mkvdk utility looks for documents next to the collection directory.
-topicset path Creates a topic index for the collection, based on the specified topic set, and
stores it in the collection directory. This facilitates quick and efficient searches
over the collection data when using topics.
-mode mode Sets the indexing mode. Values are case-insensitive. The following are the valid
settings:
•Generic
•FastSearch
•NewsfeedIdx
•NewsfeedOpt
•BulkLoad
•ReadOnly
•Any custom mode defined in the style.plc file.
The default is Generic mode.
-common Specifies the path of the Verity common directory. If you do not use this option,
the Verity engine looks for the common directory in the directory containing the
mkvdk executable, and then along the executable search path. The executable
search path is determined by your operating system environment settings. It is
the path used by the OS to find the programs you run.
-help Displays the mkvdk utility syntax options.
-debug Runs the mkvdk command in debugging mode.
-nooptimize Prevents optimization by this instance of the mkvdk utility. Using this option
turns off the service-level VdkServiceType_Optimize. The service types
determine the type of work the Verity engine and its self-administration features
will execute on a collection.
-nohousekeep Prevents housekeeping by this instance of the mkvdk utility. Housekeeping
includes deleting files that are no longer needed. Using this option turns off the
service-level VdkServiceType_DBA. (Service types are described under
-nooptimize.)

146 Chapter 10: Using Verity Utilities
Examples: processing documents
The following examples show the commands for processing documents.
Using the default options
By default, the mkvdk command submits and indexes documents specified in the command, and
services the specified collection. The following command executes the default options:
mkvdk -collection path filespec
Servicing only
The following command performs servicing only. Use this command to only index submitted
documents and service the collection:
mkvdk -collection path
Deleting documents from a collection
The following command deletes documents from a collection:
mkvdk -delete -collection path filespec
-noindex Prevents indexing by this instance of mkvdk. Documents are not inserted or
deleted. Using this option turns off the service-level VdkServiceType_Index.
(Service types are described under -nooptimize.)
-charmap name Specifies the name of the character set to which to map all strings for your
application. Set this to a character set that your system can display properly.
Using the search engine with the English locale, the character set that any
version of Windows displays is 8859. This is NOT the name of the character set
of documents being indexed, it is only the name of the character set that your
display can handle properly. (The character set of the document is set in the
style.dft file using the /charmap option.)
Valid options are 850 and 8859. The default is no mapping.
-locale name Specifies the name of the Verity locale to be used by the mkvdk utility. The locale
name must correspond to the name of an existing locale directory, which must
exist in the install_dir/common/locale directory. Valid options are english,
deutsch, and francais. The default is english.
-datefmt format Converts a date field value into Verity’s internal data representation. You can use
this option in conjunction with the mkvdk options -extract (for the field
extraction feature) and -bulk (for the bulk submit feature). The named format
string identifies to the date parsing routines in what order dates are written when
the date string only consists of a sequence of numbers (for example, 03/03/96).
Valid options are described in “Date format options” on page 147. The default is
MDY.
-servlev level Specifies service level. The specifier, level, is a string consisting of keywords
separated by hyphens, such as search-index-optimize. Valid keywords are
described in “Service-level keyword options” on page 147.
Option Description

Using the mkvdk utility 147
Bulk inserting or deleting
The following command specifies bulk insertion of a list of documents:
mkvdk -collection coll -bulk -insert filespec
Where filespec is the list of files to insert. Since insert is the default, the following command is
equivalent to the preceding command:
mkvdk -collection coll -bulk filespec
The following command specifies bulk deletion of a list of documents:
mkvdk -collection coll -bulk -delete filespec
Where filespec is the list of files to delete. It can be the same file used to insert documents; the
only difference is that -delete is specified instead of -insert (or no specification).
Date format options
The Verity engine supports many import date formats, including many textual date formats, and
the numeric date formats listed in the following table:
Service-level keyword options
The following table describes the valid keywords for the -servlev keyword:
Format variable Description
MDY Dates written as month-day-year (US format, the default)
DMY Dates written as day-month-year (European format)
YMD Dates written as year-month-day (ISO international format)
YDM Dates written as year-day-month (Swedish format)
USA Dates written in US format (the same as MDY)
EUR Dates written in European format (the same as DMY)
Keyword Description
search Enables search and retrieval
insert Enables adding and updating documents
optimize Enables opportunistic collection optimization
assist Enables building of word list
housekeep Enables housekeeping of unneeded files
delete Enables document deletion
backup Enables backup
purge Enables background purging
repair Enables collection repair

148 Chapter 10: Using Verity Utilities
Message options
The mkvdk utility provides a variety of messaging options, as described in the following table:
Document processing options
The mkvdk utility provides a variety of document processing options, as the following table
describes:
dataprep Same as search-index-optimize-assist-housekeep
index Same as insert-delete
Option Description
-quiet Displays only fatal and error messages to the console. It overrides the
-outlevel setting. For a list of message types, see the table in “The mkvdk
utility syntax” on page 142.
-outlevel (num) Indicates which message types to display to the console. Valid values are
determined by adding together the numbers that correspond to the desired
message types. The default value is 15. For more information, see the table in
“The mkvdk utility syntax” on page 142.
-logfile filename Saves messages in the specified file.
-loglevel (num) Indicates which message types to route to the optional log file. Valid values are
determined by adding numbers together that correspond to the desired
message types. The default value is 15. For more information, see the table in
“The mkvdk utility syntax” on page 142.
Option Description
-extract Extracts field values from documents, using the field extraction rules specified
in the style.tde file.
-insert Adds documents to the collection. This is the default option for the mkvdk
command.
-update Adds documents to the collection by replacing all previous information about
the specified documents.
-delete Marks the specified documents as deleted, and makes them unavailable for
searches. To actually remove deleted documents from the collection’s internal
documents table and word indexes, use the squeeze keyword (see “About
squeezing deleted documents” on page 152).
Keyword Description

Using the mkvdk utility 149
Bulk submit options
The mkvdk utility provides a variety of bulk submit options, as described in the following table:
Using bulk insert and delete options
The bulk submit feature supports the insertion of documents and related field values into
collections.
To use the bulk submit feature to populate fields:
1.
Define the fields in the style.sfl and style.ufl file, as appropriate.
2.
Create a bulk submit file that specifies the documents to insert and the field values for each
document.
3.
Run the mkvdk utility using the -bulk option and specifying the bulk submit file or files.
-nosave Specifies that a work list, which is generated by the mkvdk utility automatically
when you use the -extract option, will not be saved in the collection directory in
a file called worklist (in the Verity bulk submit file format). By default, the mkvdk
utility saves the worklist in the worklist file.
-nosubmit Specifies that a work list, which is generated by the mkvdk utility automatically
when you use the -extract option, will not be submitted to the indexing engine
and will be saved in the collection directory in a file called worklist (in the Verity
bulk submit file format). This option allows the mkvdk utility to process field
extraction separately from other indexing tasks.
Option Description
-bulk Interprets filespec as a bulk submit file. You can use this option with the -insert,
-update, and -delete options.
-offset num Specifies the offset into a bulk submit file or files. If you specify multiple bulk
submit files and use the -offset option, the offset is applied to all of the bulk
submit files.
-numdocs num Specifies the number of documents to insert or delete from the bulk insert file or
files. If you specify multiple bulk insert or delete files and use the -numdocs
option, the -numdocs setting is applied to all of the bulk insert or delete files.
-autodel Deletes the bulk submit file or files when the bulk submission work is finished.
Option Description

150 Chapter 10: Using Verity Utilities
Collection maintenance options
The mkvdk utility provides a variety of collection maintenance options, as described in the
following table:
Examples: maintaining collections
The following examples show the commands for maintaining a collection.
Repairing a collection
The following command automatically repairs a collection, or enables it after manual repairs:
mkvdk -repair -collection path
Backing up a collection
The following command backs up a collection to the specified directory:
mkvdk -backup path_1 -collection path_2
Option Description
-backup dir Backs up the collection into the specified directory. The backup does not
include the tde subdirectory. The tde subdirectory is created by and for Topic
Document Entry if Topic Document Entry is used to create or maintain the
collection.
-repair Repairs the collection, performed by an API call.
-purge Waits the amount of time specified by the -purgewait option and then deletes
all documents in the collection, but not the collection itself. It leaves the
collection directory structure intact.
To specify a different wait period, use the -purgewait option instead of the
-purge option. If you do not use the -purgewait option, the default is 600
seconds.
-purgeback Used with the -purge option, performs a purge in the background.
-purgewait sec Specifies to the -purge option how many seconds to wait. If you do not specify
sec, the default is 600.
-noservice Prevents collection servicing, which includes indexing, by this instance of the
mkvdk command, performed by an API call.
-persist Services the collection repeatedly, at default intervals of 30 seconds. Use the
-sleeptime option to set a different interval.
-sleeptime sec Specifies the interval between service calls when the mkvdk utility is run with
the -persist option.
-optimize spec Performs various optimizations on the collection, depending on the value of
spec. The specifier, spec, is a string consisting of keywords separated by
hyphens, such as maxmerge-squeeze-readonly. For valid keywords, see
“Optimization keywords” on page 151.
-noexit Windows only. Causes the I/O window to remain after the program is finished.
By default, the window closes and the program exits, so that scripts calling the
mkvdk utility do not hang.
Using the mkvdk utility 151
Deleting a collection
To delete a collection, use the appropriate command for your operating system. For example, to
remove the collection directory structure and control files on a UNIX system, use the following
command:
rm -r -collection_path
Purging a collection
The following command deletes all documents from a collection, but does not delete the
collection itself:
mkvdk -purge -collection path
Purging a collection in the background
The following command purges the specified collection in the background:
mkvdk -purge -purgeback -collection path
Specifying persistent service
The following command runs the mkvdk command as a persistent process, so that servicing is
performed repeatedly after num idle seconds:
mkvdk -persist -sleeptime num -collection path
Deleting a collection
The -purge option deletes all documents in a collection, but does not delete the collection itself.
To delete a collection, use operating system commands, such as the rm command on UNIX, to
remove the collection directory structure and control files.
Optimization keywords
The following table describes the optimization keywords for the -optimize option:
Keyword Description
maxclean Performs the most comprehensive housekeeping possible, and removes out-of-date
collection files. Macromedia recommends this optimization only when you are
preparing an isolated collection for publication. When using this type, if the collection
is being searched, files sometimes get deleted too early, which can affect search
results.
maxmerge Performs maximal merging on the partitions to create partitions that are as large as
possible. This creates partitions that can have up to 64000 documents in them.
readonly Marks the collection as read-only and unchanged after the function call is done. This
is appropriate for CD-ROM collections.
spanword Creates a spanning word list across all the collection’s partitions. A collection consists
of numerous smaller units, called partitions, each of which includes a word list.
Optionally, a spanning word list can be built with an ngram index.

152 Chapter 10: Using Verity Utilities
About squeezing deleted documents
When a document is deleted from a collection, its space is not recovered. It is merely marked as
deleted and not available for subsequent searches. Squeezing actually removes deleted documents
from the collection’s internal documents table and word indexes, thus creating a smaller collection
and reducing the collection’s disk space. A smaller collection has a more efficient structure that
makes searching slightly faster and uses slightly less memory.
You can safely squeeze deleted documents for a collection at anytime, because the mkvdk utility
ensures that the collection is available for searching and servicing through its self-administration
features. The application does not need to temporarily disable a collection to squeeze deleted
documents, because when a squeeze request is made, the mkvdk utility assigns a new revision
code to the collection. After a squeeze has occurred, the next time the application accesses the
collection, the Verity engine notifies the application that dramatic changes have been made, and
points the application to the new collection data.
Squeezing deleted documents out of a collection is a significant update to the collection. If users
are reviewing search results at the time when squeezing occurs, the search results might be
invalidated after the squeeze operation.
About optimized Verity databases
The Verity database (VDB) is the fundamental storage mechanism responsible for supporting
dynamic access to documents in collections. A VDB consists of simple tables with rows and
columns that relate to each other by row position. VDB tables are not relational, and their
architecture supports quick and efficient searching over textual data. A VDB consists of segments
that are packed into a single file. One of the advantages of having one packed VDB file is
optimized search performance. The fewer files that need to be opened during search processing,
the faster the search performance.
ngramindex Builds an ngram index for the collection. An ngram index is designed to improve the
search performance for queries with the <TYPO> and <WILDCARD> operators. An
ngram index cannot be built without a spanning word list. You can build a spanning
word list and ngram index in the same command, for example:
mkvdk -collection collname -optimize spanword -ngramindex
squeeze Squeezes deleted documents from the collection. Squeezing deleted documents
recovers space in a collection, and improves search performance. (For more
information about squeeze, see “About squeezing deleted documents” on page 152.)
Using this option invalidates the search results.
vdbopt Configures the collection’s Verity databases (VDBs). Each collection consists of
smaller units called VDBs. This keyword has the effect of linearizing the data in a
VDB, and making the collection metadata contained in the VDB more streamlined. It
also lets the VDB grow to a much larger size.
tuneup Performs the same as combining the maxmerge, vdbopt, and spanword keywords.
publish Performs the same as all of the optimization types combined. Use this keyword to
optimize the collection for the best possible retrieval performance, such as for
publication to a network on a server or on a CD-ROM.
Keyword Description

Using the rck2 utility 153
The VDB optimization option optimizes the packing of a collection’s VDBs. When VDBs are
built during normal indexing operations, the segments are not stored sequentially in the one-file
VDB file system. As a result of VDB optimization, performance can be improved by reserializing
the packed segments in the VDBs so that all segments are contiguous, and VDBs can grow in size.
Optimized VDBs can grow up to 2 gigabytes in size, as opposed to the maximum 64 megabytes
for an unoptimized one.
Using this option might degrade your indexing performance when certain indexing modes are set
for the collection.
Performance tuning options
The mkvdk utility provides performance tuning options, as the following table describes:
Using the rck2 utility
The rck2 command-line utility lets you search collections associated with a Verity server. The
rck2 executable file, which starts the rck2 utility, is located in the platform/bin directory. For more
information on the specific location of this directory, see “Location of Verity utilities”
on page 142.
The rck2 syntax
Use the following syntax to start rck2 from the command line:
rck2 -server <servername> -port <portno>
For example:
c:\cfusionmx7\verity\k2\_nti40\bin\rck2 -server localhost -port 9901.
The following table describes rck2 syntax elements:
Option Description
-maxfiles num Sets the maximum number of files that the mkvdk utility can have open at once.
The default is 50.
-diskcache num Sets the size of the mkvdk disk cache in kilobytes. The default is 128.
Syntax element Description
-server <servername> The server name for K2 Server to which to attach. The server name is
defined in the k2server.ini file. The rck2 utility searches the collections
attached to this server.
-port <portno> The port number where K2 Server (specified by -server) is running.

154 Chapter 10: Using Verity Utilities
The rck2 command options
The following table describes rck2 command options:
Using the rcvdk utility
Using the Verity rcvdk utility, you can check the contents of a collection from the command line.
The rcvdk utility lets you write a variety of queries, using words and phrases separated by commas
and Verity query language. A viewing option lets you see document contents and highlights in a
simple text display.
Starting rcvdk
To start the rcvdk utility on most systems, type the path and executable name at a command
prompt. The following examples assume you have set your PATH variable, so you just have to
enter rcvdk at a command prompt to run it.
For example:
c:\cfusionmx7\verity\k2\_nti40\bin\rcvdk /common =
c:\cfusionmx7\verity\k2\common
rck2 command Description
p <sortspec> The sort specification for the search results. By default, results are sorted by
Score. Multiple fields must be specified in a space-separated list using asc or
desc to indicate ascending or descending order. For example: p score desc
title asc
m <maxdocs> The maximum number of documents to return in the results list.
c <collections> The list of collections to search. Multiple collections must be specified in a
space-separated list. For example: c coll1 coll2 coll3
f <fields> The list of fields to retrieve. For example: f k2dockey title date
s <query text> The query (or question) to be used to process the search. The query can be
expressed as words and phrases separated by commas. Additionally, the
query can include Verity query language, operators and modifiers.
g <collection> Display collection information.
d <k2dockey> Display fields for the K2 document key specified.
v <k2dockey> Stream the document and display it with highlights.
r <docstart> Display results starting with the first result in the results list. Fields specified
using the f command are displayed. Docstart indicates the first result to be
displayed. For example, r 10 displays results starting with the 10th document
in the results list.
b <docstart> Display results based on the last field selection.
iDisplay information about K2 Server, including nodes and collections.
x <score
precision>
Set score precision to 8- or 16-bit. By default, 16-bit precision is used.
h or ? Display online Help for the rck2 command options.

Using the rcvdk utility 155
When you start the rcvdk utility with no arguments, you get the following message, followed by
the rcvdk prompt:
Type 'help' for a list of commands.
RC>
The help command produces the following list of available commands:
RC> help
Available commands:
search s Search documents.
results r Display search results.
clusters c Display clustered search results.
view v View document.
summarize z Summarize documents.
attach a Attach to one or more collections.
detach d Detach from one or more collections.
quit q Leave application.
about Display VDK 'About' info
help ? Display help text; 'help help' for details.
expert x Toggle expert mode on/off.
RC>
You can enter the letter q at the RC prompt at any time to quit the application.
Attaching to a collection using the rcvdk utility
To search a collection, you first must attach to it using the attach (a) command. This command
must include the pathname to a collection directory as an argument. After you press Return, the
rcvdk utility reports whether the attach command was successful; for example:
RC>a /z/doc1/c/public/Collection/file_walking/collbldg/html
Attaching to collection:
/z/doc1/c/public/Collection/file_walking/collbldg/html
Successfully attached to 1 collection.
RC>
The rcvdk utility lets you attach to one or more collections. The specified collections remain
attached until you detach from one or more collections using the detach (d) command.
Basic searching
To retrieve all documents, use the search (s) command without arguments. After you press
Return, a search update message is produced, as follows:
RC>s
Search update: finished (100%). Retrieved: 85(85)/85.
RC>
The search results indicate that 85 of the total 85 documents in the collection were retrieved. If
you specify a query argument, such as “universal filter,” a subset of the total documents in the
collection that contain the specified string is retrieved; for example:
RC>s universal filter
Search update: finished (100%). Retrieved: 18(18)/85.
RC>

156 Chapter 10: Using Verity Utilities
In the message returned for the preceding search, the rcvdk utility indicates that 18 documents
matched the query. You can perform more elaborate queries using the Verity query language, as
shown in the following example:
RC>s universal filter <OR> filter.Troubleshooting and Maintenance Tools
Viewing results of the rcvdk utility
After you have attached to a collection and issued a search command successfully, you can view
the results list and look at the retrieved documents. You can use the options in the following table:
The following is the results list for the “universal filter” search. For each document, these fields are
displayed by default: Number, Score, and VdkVgwKey.
RC> r
Retrieved: 18(18)/85
Number SCORE VdkVgwKey
1: 1.00 d:\search97\s97is\locale\english\doc\collbldg\08_cbg3.htm
2: 0.97 d:\search97\s97is\locale\english\doc\collbldg\11_cbg2.htm
3: 0.97 d:\search97\s97is\locale\english\doc\collbldg\08_cbg7.htm
4: 0.97 d:\search97\s97is\locale\english\doc\collbldg\08_cbg1.htm
5: 0.95 d:\search97\s97is\locale\english\doc\collbldg\cbgtoc.htm
6: 0.95 d:\search97\s97is\locale\english\doc\collbldg\08_cbg4.htm
7: 0.93 d:\search97\s97is\locale\english\doc\collbldg\cbgix.htm
8: 0.92 d:\search97\s97is\locale\english\doc\collbldg\08_cbg6.htm
9: 0.90 d:\search97\s97is\locale\english\doc\collbldg\08_cbg.htm
10: 0.90 d:\search97\s97is\locale\english\doc\collbldg\04_cbg1.htm
11: 0.90 d:\search97\s97is\locale\english\doc\collbldg\01_cbg1.htm
12: 0.87 d:\search97\s97is\locale\english\doc\collbldg\f_cbg.htm
13: 0.87 d:\search97\s97is\locale\english\doc\collbldg\08_cbg2.htm
14: 0.84 d:\search97\s97is\locale\english\doc\collbldg\06_cbg1.htm
15: 0.80 d:\search97\s97is\locale\english\doc\collbldg\part4.htm
16: 0.80 d:\search97\s97is\locale\english\doc\collbldg\f_cbg1.htm
17: 0.80 d:\search97\s97is\locale\english\doc\collbldg\11_cbg5.htm
18: 0.80 d:\search97\s97is\locale\english\doc\collbldg\08_cbg5.htm
RC>
Option Description
r Displays the results list, starting with the first document. A maximum of 24 documents
are displayed.
r n Displays the results list, starting with the nth document. A maximum of 24 documents
are displayed.
v Displays the first or next document in the results list. Highlights are indicated using
reverse video, if possible. If not, double angle brackets are used, as in:
>>universal<< >>filter<<
To exit the document display, enter the letter q.
v n Displays the nth document in the results list. To exit the document display, enter the
letter q.

Using the rcvdk utility 157
The following table describes each of the default fields:
Displaying more fields
You can tell the rcvdk utility to display certain fields in the results list using the fields
command, which is available in the expert mode. To go to the expert mode, enter x or expert at
the RC prompt, then press Return.
All fields in a column are blank if the field is not defined for the collection’s schema in the
documents table (in style.ddd, style.sfl, or style.ufl). A field in a document’s row is blank if the
field was not populated by a gateway, bulk submit action, or filter.
Displaying a field
The fields command includes the field name and length to be displayed. When used, the
fields command overrides the default Score and VdkVgwKey fields for the results list.
The search engine returns fields for the results list, so if you do a search, then go to expert mode
to use the fields command, you must run the search again in order to see the results list with the
fields you requested. For example:
RC> expert
Expert mode enabled
RC> fields title 20
RC> s universal filter
Search update: finished (100%). Retrieved: 18(18)/85.
RC> r
Retrieved: 18(18)/85
Number title
1: Using the Universal Filter
2: Using the Zone Filter
3: The Zone Filter
4: Overview
5: Table of Contents
6: Universal Filter Configuration Using the
7: Index
8: The PDF Filter
9: Document Filters and Formatting
10: Collection Style Summary
11: Collection Basics
12: Universal Filter Document Types
13: Using the style.dft File
Field name Description
Number The rank of the document in the results list. The document with the highest score is
ranked number 1.
Score The score assigned to each retrieved document, based on its relevance to the query.
For a NULL query, no scores are assigned, so the Score column in the results list is
blank.
VdkVgwKey The document key used by the Verity engine to manage the document. If the
document is accessed through the file system, the primary key is a pathname. If the
document is accessed through a web server, using HTTP, the primary key is a URL.

158 Chapter 10: Using Verity Utilities
14: Supported Field Types
15:
16: Recognized Document Types
17: Custom Zone Definitions
18: The KeyView Filter Kit
RC>
Displaying multiple fields
You can specify multiple fields with the fields command, as shown in the following example.
The field order corresponds to the order of the columns, with the first field specified appearing in
the second column. The first column is reserved for the rank order.
Rerun the search before you display the results list with the fields specified.
For example:
RC> fields score 5 title 40
RC> s universal filter
Search update: finished (100%). Retrieved: 18(18)/85.
RC>
Using the didump utility
Using the didump utility, you can view key components of the word index per partition. The
word list is a list of all words indexed by the Verity engine; the zone list is a list of all zones; and
the zone attribute list is a list of the zone attributes found by the Verity engine.
The didump executable, which starts the didump application, is located in the platform/bin
directory. For more information on the specific location of this directory, see “Location of Verity
utilities” on page 142.
For example:
c:\cfusionmx7\verity\k2\_nti40\bin\didump /common =
c:\cfusionmx7\verity\k2\common
-pattern llama
c:\new\parts\00000001.did
Viewing the word list with the didump utility
You can view the contents of the word list for a partition by using the didump utility with the
-words flag. The command-line syntax must include the -words flag and a pathname to a
partition file, like the following:
didump -words /z/collbldg/html/parts/00000003.did
An alphabetical listing of the words in the word index displays, as follows:
didump - Verity, Inc. Version 2.5.0 (_nti31, Jul 7 1999)
Text Size Doc Word
A 10 3 4
a 34 5 24
abbreviations 4 1 1
about 4 1 1

Using the didump utility 159
acronym 5 1 2
acronyms 4 1 1
actual 4 1 1
administrator 3 1 1
advance 3 1 1
all 8 2 3
also 9 2 4
Always 4 1 1
always 9 2 3
ampersand 4 1 1
The columns in the display indicate the following:
Size The number of bytes used by the Verity engine to store information about the word
Doc The number of unique documents in which the word appears
Word The total number of occurrences of a word for the partition
To view the occurrences of a specific word or pattern, enter a command using the -pattern
option, as in the following example:
didump -pattern acronym 00000003.did
In this example, the didump utility displays information about the number of occurrences of the
word acronym. You can display the individual occurrences of a word using the -verbose option.
Viewing the zone list with the didump utility
The zone list contains a list of the zones identified by the zone filter. You can search the zones
listed using the Verity IN operator in a query. To view the contents of the zone list, use the
didump utility with the -zones flag plus the pathname to a partition, like the following:
didump -zones /z/collbldg/html/parts/00000003.did
This partition is for a collection containing the Verity Collection Building Guide in HTML
format. The Verity universal filter invoked the HTML filter by default, and indexed the
documents using these zones.
didump - Verity, Inc. Version 2.5.0 (_solaris, Jul 07 1999)
ZoneName Fmt Size Doc Regions
A Wct 10239 85 5016
ADDRESS Array 34 1 1
BODY Array 197 85 85
CAPTION Wct 298 31 85
CODE Wct 3868 66 1829
H1 Array 80 83 83
H2 Wct 646 53 212
H3 Wct 517 49 171
H4 Wct 128 8 47
HEAD Array 70 85 85
HTML Array 165 85 85
TITLE Array 70 85 85
The columns in the display indicate the following:
Fmt The internal data format used to store the zone information.

160 Chapter 10: Using Verity Utilities
Size The number of bytes used by the Verity engine to store information about the zone.
Doc The number of unique documents in which the zone appears
Region The total number of instances of a zone for the partition
Viewing the zone attribute list with the didump utility
The zone attribute list contains a list of the HTML attributes for the zones identified by the
HTML zone filter. You can search the zone attributes listed using the Verity IN operator together
with the WHEN operator in a query. To view the contents of the zone attributes list, use the
didump utility with the -attributes flag plus the pathname to a partition, like the following:
didump -attributes /z/collbldg/html/parts/00000003.did
This partition is for a collection containing the Verity Collection Building Guide in HTML format.
didump - Verity, Inc. Version 2.5.0 (_solaris, Jul 9 1999)
Text Size Doc Word
href 01_cbg.htm 10 2 4
href 01_cbg.htm#282870 3 1 1
href 01_cbg.htm#282872 6 2 2
href 01_cbg1.htm 8 2 3
href 01_cbg1.htm#286513 7 2 2
href 01_cbg1.htm#286520 3 1 1
...
The columns in the display indicate the following:
Size The number of bytes used by the Verity engine to store information about the zone
attribute
Doc The number of unique documents in which the zone attribute appears
Word The total number of occurrences of a zone attribute for the partition
Using the browse utility
A documents table is built for each partition in a collection. The documents table is used for field
searching and for sorting search results. The fields within the documents table are defined by the
following collection style files:
style.ddd Defines fields used internally by the Verity engine, identified by an initial underscore
character (_).
style.sfl Defines standard fields (many of which are commented out to limit the size of the
documents table).
style.ufl Defines custom fields that are not included in the style.sfl file.
The value of each field can be filled in from source documents or can be provided explicitly. If a
field is blank, it has not been populated.

Using the browse utility 161
The browse utility executable, which starts the browse utility application, is located in the
platform/bin directory. For more information on the specific location of this directory, see
“Location of Verity utilities” on page 142.
For example:
c:\cfusionmx7\verity\k2\_nti40\bin\browse /common =
c:\cfusionmx7\verity\k2\common
c:\my_collection\parts\0000001.ddd
Using menu options with the browse utility
Use the following browse command to start the utility and display a set of menu options:
browse 00000003.ddd
The system displays the following menu of options available for the browse utility:
D:\VERITY\colltest\parts>browse 00000003.ddd
BROWSE OPTIONS
?) help
q) quit
c) Number of entries in field
_) Toggle viewing fields beginning with '_'
v) Toggle viewing selected fields
##) Display all fields in specified record number
Dispatch/Compound field options:
n) No dispatch
d) Dispatch
s) Dispatch as stream
Action (? for help):
Displaying fields
You can use several options to control the display of field information.
To display all the document fields:
1.
At the Action prompt, enter ##
2.
Press Return twice to display the fields for the first document record.
3.
Press Return to view the document fields for the next sequential record.
The following partial display of the results of the browse command includes internal fields, used
by the Verity search engine. An internal field name starts with an underscore character (_).
50 Created FIX-date ( 4) = 12-Jan-1998 01:52:27 pm
51 Modified FIX-date ( 4) = 24-Sep-1997 02:40:26 pm
52 Size FIX-unsg ( 4) = 5381
53 DOC_OF FIX-unsg ( 4) = 0
54 DOC_SZ FIX-unsg ( 4) = 4294967295
55 DOC_FN_OF FIX-unsg ( 4) = 436
56 DOC_FN_SZ FIX-unsg ( 2) = 58
57 _CACHE_FN_OF FIX-unsg ( 4) = 2922
58 _CACHE_FN_SZ FIX-unsg ( 2) = 0
59 _ParentID_OF FIX-unsg ( 4) = 354
60 _ParentID_SZ FIX-unsg ( 2) = 46

162 Chapter 10: Using Verity Utilities
61 Title_OF FIX-unsg ( 4) = 2481
62 Title_SZ FIX-unsg ( 2) = 15
You can eliminate the internal fields. To do this, type the underscore character, then press Return.
If you enter an underscore character again, then press return, the internal fields are displayed.
Using the merge utility
The merge utility lets you combine multiple collections with identical schemas. This is useful for
merging smaller collections built from different sources into one, large collection. Also, you can
use the merge utility to break up the collection into smaller collections of a roughly uniform size.
Note: The Verity merge utility is available only in Windows.
Collections can be merged only if they have identical schemas. Collections can be merged if they
have exactly the same set of style files (and style file entries).
Breaking up a large collection helps to optimize search performance, because it allows many
applications to perform multiple concurrent search requests over the different collections. After
breaking up a large collection, you can also discard older collections to reclaim limited disk
storage space.
The merge executable, which starts the merge application, is located in the _nti40/bin directory.
For more information on the specific location of this directory, see “Location of Verity utilities”
on page 142.
For example:
c:\cfusionmx7\verity\k2\_nti40\bin\merge /common = c:\cfusionmx7\lib\common
To obtain help for the merge utility, enter the following command:
merge -help
Note: After running the merge utility, you must optimize the collection, using the mkvdk -optimize
option.
Merging collections using the merge utility
The following is the syntax for using the merge utility to merge multiple collections into a single
collection:
merge <newCollection> <srcCollection1> <srcCollection2> [srcCollectionN]
The utility reads srcCollection1, srcCollection2 and so on and merges them into a single
collection with the directory name given for newCollection If the directory name given for
newCollection does not exist, it is created.
Splitting collections using the merge utility
The following is the syntax for using the merge utility to split a single large collection into smaller
collections:
merge -split <srcCollection> <newCollection1> <newCollection2> [-number]

Using the merge utility 163
The merge utility reads srcCollection and splits it into roughly equal pieces, using the filenames
given for newCollection1 and so on.
If you want to split a very large collection into a large number of new collections, you can use the
following command, instead of explicitly naming each new collection:
merge -split -number newCollection srcCollection
The merge utility reads the collection identified by srcCollection and splits it into the number of
segments specified by the -number option. The name of the first new collection is generated by
appending the first two letters in the alphabet (aa) to the directory name given for newCollection.
Each subsequent filename is generated by incrementing one of the appended letters (up to zz) for
a maximum of 676 partitions. For example, if the value of -number is 3, and the value of
newCollection is Collection1, the collections are named, Collection1aa, Collection1ab, and
Collection1ac.
Note: The maximum length of the directory name given for newCollection is two characters less than
the length allowed by the file system.

164 Chapter 10: Using Verity Utilities

165
INDEX
A
AddHandler directive 67
administration, initial tasks 14
Administrator API
about 39
enabling access through sandbox security 36
Apache
application isolation configuration 96
configuration overview 67
multihoming 76, 96
sample configuration files 73
API, Administrator 39
apialloc property 72
application isolation
about 94
enabling 95
web server configuration 95
application packaging
J2EE archive 81
application variables 19
B
batch files 70
bootstrap property 72
browse utility 160
built-in web server
about 66
virtual mappings 67
web root 66
bytecode distribution 83
C
Cache Real Paths, disabling for multihoming 75
Caching Settings page, ColdFusion MX Administrator
16
CAR files
creating and deploying 80
overview 79
CF Admin Password page, ColdFusion MX
Administrator 35
cfcompile utility
overview 82
sourceless distribution 83
cfform tag
multihoming 75
scriptsrc attribute 75
cfform.js file 75
CFIDE/scripts directory 75
cfstat utility 28
CFX Tags page, ColdFusion MX Administrator 33
Charting page, ColdFusion MX Administrator 23
client variables
about 17
alternative to session variables 99
creating tables for 18
migrating data 18
Client Variables page, ColdFusion MX Administrator
17
cluster algorithm 100
Cluster Manager page, ColdFusion MX Administrator
38
clustering
about 99
creating a cluster of JRun servers 99
licensing for multiple computers 99
network connection required 99
performance with session replication 99
Code Compatibility Analyzer page, ColdFusion MX
Administrator 32
ColdFusion Archive (CAR) files, see CAR files
ColdFusion Archives page, ColdFusion MX
Administrator 36

166 Index
ColdFusion mappings
J2EE archive 82
ColdFusion MX Administrator
about 11
Caching Settings page 16
CF Admin Password page 35
CFX Tags page 33
Charting page 23
Client Variables page 17
Cluster Manager page 38
Code Compatibility Analyzer page 32
ColdFusion Archives page 36
CORBA Connectors page 33
Custom Extensions section 38
Custom Tag Paths page 33
Data & Services section 24
Data Sources page 25
Debugging & Logging section 26
Debugging IP Addresses page 29
Debugging Settings page 26
default location 11
Enterprise Manager section 37
Event Gateways section 34
Extensions section 32
Instance Manager page 38
J2EE Archives page 37
Java and JVM Settings page 24
Java Applets page 32
Mail Server page 20
Mappings page 20
Memory Variables page 19
Packaging and Deployment section 36
password 86
RDS Password page 36
Sandbox Security page 36
Security section 35, 86
Server Settings section 15
Settings Summary page 24
user assistance, types of 14
Verity Collections page 25
Verity K2 Server page 26
Web Ser vices page 26
ColdFusion security 89
collections
attaching to with the rcvdk utility 155
backing up with the mkvdk utility 150
creating with the mkvdk utility 144
deleting with the mkvdk utility 151
indexing with Verity Spider 111
maintaining with the mkvdk utility 150
merging with the merge utility 162
repairing with the mkvdk utility 150
searching with the rcvdk utility 155
setup options for the mkvdk utility 144
splitting with the merge utility 162
structure of 105
collections, Verity
defined 25
managing 25
Configure web server for ColdFusion MX applications
check box 68
connection string, specifying arguments 46
connecttimeout property 72
context root
J2EE archive 81
multiple server instances 92, 94
CORBA Connectors page, ColdFusion MX
Administrator 33
Custom Extensions section, ColdFusion MX
Administrator 38
Custom Tag Paths page, ColdFusion MX
Administrator 33
D
Data & Services section, ColdFusion MX
Administrator 24
data sources
adding to ColdFusion MX Administrator 45
adding to ColdFusion MX Administrator,
considerations 47
iSeries 61
OS/390 61
security 89
Data Sources page, ColdFusion MX Administrator 25
data sources, connecting to
DB2 Universal Database 47
Informix 49
JNDI 63
Microsoft Access 50
Microsoft Access with Unicode 52
Microsoft SQL Server 53
MySQL 56
ODBC Socket 57
other data sources 60
Sybase 62
DB2 Universal Database, connecting to 47
Debugging & Logging section, ColdFusion MX
Administrator 26

Index 167
Debugging IP Addresses page, ColdFusion MX
Administrator 29
Debugging Settings page, ColdFusion MX
Administrator 26
didump utility
executable 158
using 158
word list, viewing 158
zone attribute list, viewing 160
zone list, viewing 159
directory structure, expanded 92
distribution, sourceless 83
E
EAR file
creating with J2EE archive 81
J2EE archive 80
enterprise application, J2EE archive 80
Enterprise Manager 37
errorurl property 72
Event Gateways section, ColdFusion MX
Administrator 34
expanded directory structure, J2EE 92
extension mappings 67
Extensions section, ColdFusion MX Administrator 32
external web servers
about 67
configuration 68
configuring for application isolation 95
F
failover 99
files and directories, security 89
H
hosting
-cfwebroot wsconfig option 70
application isolation 94
multihoming 74
httpd.conf file
application isolation 96
elements added to 67
multihoming 76
properties stored in 71
I
ignoresuffixmap property 72
IIS
about configuration 67
application isolation configuration 95
multihoming 75
sample configuration file 73
Informix, connecting to 49
Instance Manager page, ColdFusion MX Administrator
38
IP/Port, security 90
iPlanet
application isolation configuration 98
configuration overview 67
multihoming 77
ISAPI filter 67
iSeries, data source 61
J
J2EE application servers, connecting to JNDI data
sources 63
J2EE archive
defining 81
post-deployment considerations 82
J2EE Archives page, ColdFusion MX Administrator 37
J2EE configuration
application isolation 94
J2EE Archives in Administrator 80
multiple instances 91
Web Server Configuration Tool 68
J2EE sessions, failover 100
JAR files, storing 44
Java and JVM Settings page, ColdFusion MX
Administrator 24
Java Applets page, ColdFusion MX Administrator 32
Java bytecode
deploying 81
sourceless distribution 82
java.args parameter 106
JavaScript, cfform considerations 75
JDBC
about 44
driver types 44
JAR file location 44
Jini Network Technology 99
JNDI data sources 63
JRun Launcher, starting and stopping 93

168 Index
JRun Management Console (JMC)
cluster creation 99
creating server instances 93
starting and stopping JRun 93
JRun servers
creating 93
custom jvm.config 94
JRun web server. See built-in web server
jrun.dll 67
jrun.ini file 71
jrun.trusted.hosts 100
jrun_iis6.dll 67
jrun_iis6_wildcard.dll 67
jrun_nsapi.dll 67
JRunScripts directory 72
JVM
custom JVM for a JRun server 94
Java and JVM Settings page 24
memory allocation 105
K
K2 Server, document search limits 107
L
Launcher, JRun 93
libjrun_nsapi.so 67
load balancing 99
LoadModule directive 67
Log files, created by ColdFusion MX 30
M
magnus.conf 67, 71
Mail Server page, ColdFusion MX Administrator 20
Mappings page, ColdFusion MX Administrator 20
memory allocation 105
Memory Variables page, ColdFusion MX
Administrator 19
merge utility
collections, merging 162
collections, splitting 162
executable 162
using 162
Microsoft Access with Unicode, connecting to 52
Microsoft Access, connecting to 50
Microsoft SQL Server, connecting to 53
migrating client variable data 18
mkvdk utility
bulk insert and delete, using 149
getting started 143
inserting documents into collections 144
log file 142
mkvdk executable 142
optimization keywords 151
optimized databases (VDBs) 152
processing documents with 146
service-level keywords 147
squeezing deleted documents 152
syntax 142
mkvdk utility collections
backing up 150
creating 144
deleting 151
maintaining 150
maintenance options 150
repairing 150
setup options 144
mkvdk utility options
bulk submit 149
collection maintenance 150
collection setup 144
date format 147
document processing 148
general processing 145
messaging 148
performance tuning 153
mod_jrun.so 67
mod_jrun20.so 67
multihoming
about 74
Apache 76
cacheRealPath attribute, disabling 75
CFIDE mapping 70, 75
CFIDE/scripts, copying 75
IIS 75
iPlanet 77
multiple server instances 94
Sun ONE Web Server 77
multiple server instances
about 92
application isolation 94
clustering 99
context root 92
creating 93
custom JVM for a JRun server 94
defining a JRun server 93
failover 99
load balancing 99
web server configuration (application isolation) 95

Index 169
multiserver configuration
application isolation 94
clustering 99
defining server instances 93
multiple server instances 91
MySQL, connecting to 56
N
Netscape Enterprise Server (NES)
about configuration 67
See also Sun ONE Web Server
network connection, required for clustering 99
O
obj.conf 67, 71
ObjectType directives 67
ODBC Socket, connecting to 57
Oracle, connecting to 59
OS/390 data source 61
P
packaging
CAR files 79
J2EE archive files 80
Packaging and Deployment section 36
password
ColdFusion MX Administrator 86
RDS 86
PathCheck directive 67
Post Office Protocol (POP) mail server 20
precompiling ColdFusion pages 82
proxyretryinterval property 72
Q
query strings, vspider 123
R
rck2 utility
command options 154
rck2.exe, location 153
syntax 153
rcvdk utility
collections, attaching to 155
collections, searching 155
fields, displaying multiple 158
results, viewing 156
RDS Password page, ColdFusion MX Administrator
36
RDS password, security 86
recvtimeout property 72
replication, session 100
root security context 89
S
sandbox
adding 88
configuring 89
security, Administrator API access 36
security, using 86
sandbox security
about 86
adding a sandbox 88
restricted resources 87
Sandbox Security page, ColdFusion MX Administrator
36
scriptpath property 72
security
about 85
ColdFusion 89
data sources 89
directories and permissions, about 88
files and directories 89
IP/Port 90
RDS password 86
resources, restricting 87
root security context 89
sandbox, adding 88
sandbox, configuring 89
sandbox, using 86
Security section, ColdFusion MX Administrator 35,
86
sendtimeout property 72
serial number, J2EE archive 81
server instances, multiple 93
Server Settings section, ColdFusion MX Administrator
15
serverstore property 72
session replication
about 99
enabling 100
performance note 99
session variables
failover 100
Memory Variables page 19
replication 100
sessions, sticky 100
Settings Summary page, ColdFusion MX
Administrator 24
shell scripts 70

170 Index
Simple Mail Transfer Protocol (SMTP) mail server 20
sourceless distribution 82, 83
ssl property 72
sticky sessions 100
Sun ONE Web Server
about configuration 67
application isolation configuration 98
multihoming 77
sample configuration file 73
Sybase, connecting to 62
U
Unicode, Microsoft Access 52
utilities
cfcompile 82
cfstat 28
Verity 141
V
verbose property 72
Verity Collections page, ColdFusion MX Administrator
25
Verity K2 Server page, ColdFusion MX Administrator
26
Verity ser ver
J2EE archive considerations 82
Verity Sp i de r
about 109
DNS lookups 111
flow control 110
multithreading 110
performance 110
proxy handling 111
restart capability 110
state maintenance 110
syntax 112
web standards support 110
Verity Spider MIME types
file system indexing and 139
known types for file system indexing 140
multiple parameter values 138
syntax restrictions 138
unknown types, indexing 139
web crawling and 139
wildcards, using 138
Verity Spider options
content 128
core 114
locale 135
logging 136
maintenance 137
networking 120
path and URL 123
processing 115
Verity utilities
about 107
relationships with CFML 107
virtual hosts
application isolation 96
multihoming 74
virtual mappings, built-in web server 67
virtual servers, Sun ONE Web Server 77
vspider utility
query strings 123
vspider executable 111
W
WAR file
creating with J2EE archive 81
J2EE archive 80
web application, J2EE archive 80
web root, built-in web server 66
Web Server Configuration Tool
advanced configurations 74
cluster 100
command-line interface 69
configuration files 71
GUI mode 68
using 68
web servers
built-in web server 66
configuring 68
configuring for load balancing and failover 99
external 67
IIS 73
iPlanet 73
Netscape 73
overview 65
Sun ONE Web Server 73
Web Services page, ColdFusion MX Administrator 26
wildcard, IIS 6 67
