Adobe ColdFusion Cold Fusion 2016 Configuring And Administering Config En
User Manual: adobe ColdFusion - 2016 - Configuring and Administering Free User Guide for Adobe ColdFusion Software, Manual
Open the PDF directly: View PDF ![]() .
.
Page Count: 120 [warning: Documents this large are best viewed by clicking the View PDF Link!]
- Legal notices
- Contents
- Administering ColdFusion
- About the ColdFusion Administrator
- Installing the server configuration
- ColdFusion services in Windows
- Changes in ColdFusion 11
- Changes in ColdFusion 10
- Accessing the ColdFusion Administrator
- Restricting access to ColdFusion Administrator
- Logging Administrator actions
- Changes to default settings
- Session cookie settings
- Using the ColdFusion Administrator
- Web Server Management
- Deploying ColdFusion Applications
- Administering ColdFusion Security
- Basic Troubleshooting and FAQs
- WebSocket Enhancements (ColdFusion 11)
- Security Enhancements (ColdFusion 11)
- Using the ColdFusion Server Monitor
- Gathering information about ColdFusion servers
- Starting the ColdFusion Server Monitor
- Viewing Server Monitor Reports
- Specifying Server Monitor Settings
- ColdFusion Server Monitor API
- Using the Server Monitor to improve server performance
- Setting up Server Manager client
- Configuring the Server monitoring settings
- Using Admin APIs
- Troubleshooting scenarios

$POGJHVSJOHBOE"ENJOJTUFSJOH
ADOBE®
COLDFUSIONSFMFBTF


iii
Last updated 2/17/2016
Contents
Administering ColdFusion . . . . . . . . . . . . . . . . . . . . . . . . . . . . . . . . . . . . . . . . . . . . . . . . . . . . . . . . . . . . . . . . . . . . . . . . . . . . . . . . . . . . . . . . . . . . . .1
Using the ColdFusion Administrator . . . . . . . . . . . . . . . . . . . . . . . . . . . . . . . . . . . . . . . . . . . . . . . . . . . . . . . . . . . . . . . . . . . . . . . . . . . . . . . . . . . . .7
Web Server Management . . . . . . . . . . . . . . . . . . . . . . . . . . . . . . . . . . . . . . . . . . . . . . . . . . . . . . . . . . . . . . . . . . . . . . . . . . . . . . . . . . . . . . . . . . . . . 63
Deploying ColdFusion Applications . . . . . . . . . . . . . . . . . . . . . . . . . . . . . . . . . . . . . . . . . . . . . . . . . . . . . . . . . . . . . . . . . . . . . . . . . . . . . . . . . . . 74
Administering ColdFusion Security . . . . . . . . . . . . . . . . . . . . . . . . . . . . . . . . . . . . . . . . . . . . . . . . . . . . . . . . . . . . . . . . . . . . . . . . . . . . . . . . . . . . 78
Basic Troubleshooting and FAQs . . . . . . . . . . . . . . . . . . . . . . . . . . . . . . . . . . . . . . . . . . . . . . . . . . . . . . . . . . . . . . . . . . . . . . . . . . . . . . . . . . . . . . 87
WebSocket Enhancements (ColdFusion 11) . . . . . . . . . . . . . . . . . . . . . . . . . . . . . . . . . . . . . . . . . . . . . . . . . . . . . . . . . . . . . . . . . . . . . . . . . . . . 93
Security Enhancements (ColdFusion 11) . . . . . . . . . . . . . . . . . . . . . . . . . . . . . . . . . . . . . . . . . . . . . . . . . . . . . . . . . . . . . . . . . . . . . . . . . . . . . . 101
Using the ColdFusion Server Monitor . . . . . . . . . . . . . . . . . . . . . . . . . . . . . . . . . . . . . . . . . . . . . . . . . . . . . . . . . . . . . . . . . . . . . . . . . . . . . . . . 105

1
Last updated 2/17/2016
Administering ColdFusion
Although you use the ColdFusion Administrator to perform most ColdFusion administration tasks, you can also
manage databases, web server configurations, and ColdFusion Search Server.
About the ColdFusion Administrator
The ColdFusion Administrator provides a browser-based interface for managing your ColdFusion environment. You
can configure many settings to provide optimal levels of security and functionality. The available options are based on
your edition of ColdFusion Standard or Enterprise as well as your configuration: server, or J2EE. For more information
on ColdFusion configurations, see Preparing to Install ColdFusion in Installing ColdFusion.
The default location for the ColdFusion Administrator login page is:
http://_servername_portnumber_/CFIDE/administrator/index.cfm Where servername is the fully qualified domain
name of your web server. Common values for servername are localhost or 127.0.0.1 (each refers to the web server on
the local computer).
If you are using the ColdFusion built-in web server, include the port number as part of the servername. The default
port number for the server configuration is 8500; for example,
http://_servername_:8500/CFIDE/administrator/index.cfm.
To access the ColdFusion Administrator, enter the password specified when you installed ColdFusion.If your
ColdFusion Administrator is on a remote computer, use the Domain Name Services (DNS) name or Internet Protocol
(IP) address of the remote host.
For more information, see Using the ColdFusion Administrator.
Note: If you are running ColdFusion in a multihomed environment and have problems displaying the ColdFusion
Administrator, see Web Server Managementfor configuration information.
Key features of the ColdFusion Administrator
•Server configuration: The Server area of the Administrator lets you set up and manage the functionality of
ColdFusion. You can define caching preferences, connect to data sources for use in ColdFusion applications, select
debugging options, manage variables, set up task automation, and register Java applets, settings, and custom tags.
•Security: The Security area of the Administrator lets you secure your development environment. You can enable
password protection for the Administrator, enable password protection for remote access, and control access by
using ColdFusion tags and functions to server resources.
•ColdFusion resources:The ColdFusion Administrator home page provides access to the following information and
support:
•Local resources - release notes, new features documentation, product documentation, and example applications
•Te ch n i ca l s upp or t - installation, support, resources, and TechNotes

2
Last updated 2/17/2016
•Online resources - product registration, developer information, white papers, training, enhancement requests,
and security
What you can do in ColdFusion Administrator
Some of the tasks that you can perform in ColdFusion Administrator:
•Set up and maintain your server
•Create and manage ColdFusion cluster
•Monitor system performance
•Secure your resources
•Manage and analyze log files
•Connect to ColdFusion data sources
•Schedule tasks
•Integrate Java applets and custom tags
•Download and install Server Manager
•Configure OpenOffice
•Manage undelivered mails
•Access online product documentation, release notes, product upgrades, and TechNotes
•Download and install product updates and hotfixes.
Optional configuration overview
After you perform basic configuration tasks in the Administrator pages, consider taking these actions:
•Determine the identity of a website visitor: ColdFusion lets you use client variables to determine the identity of a
client visiting your site. By managing client variables, you can use this information to customize page content for
your clients. Select Server Settings > Client Variables in the ColdFusion Administrator navigation pane to specify a
default storage mechanism for client variables and to optionally specify the data source used to store client
information.
•Create logical aliases for physical directories: You can create logical aliases for paths to directories on your server.
Select Server Settings > Mappings in the ColdFusion Administrator navigation pane. By creating aliases for
directories on your server, you can use them in your ColdFusion applications. These are referred to as mappings.
You typically use two types of mappings:
•ColdFusion mappings: Equates a logical path (for example, /payroll) with a physical directory path (for example,
C:\finance\payroll). ColdFusion uses these mappings for the cfinclude tag, the cfmodule tag, and when locating
ColdFusion components.
•Web server mappings: Web server mappings also equate a logical path to a physical path, but at the web server level.
Web server mappings are in effect for all requests made to a web server. In many cases, web server mappings render
ColdFusion mappings unnecessary.
•Register Java applets and CFX tags: You can use Java applets and CFX tags in your ColdFusion applications.
Register the applets on the appropriate Extensions pages by selecting Extensions > Java Applets or Extensions > CFX
Tags in the ColdFusion Administrator navigation pane. After they are registered, you can incorporate the applets
and tags in your applications.

3
Last updated 2/17/2016
•Configure standard debugging options: You can get useful debugging information about your application page
requests from browsers by setting debugging preferences. Select Debugging & Logging > Debug Output Settings in
the ColdFusion Administrator navigation pane to set up debugging.
•Perform advanced administration tasks: If you require granular security control over your ColdFusion resources,
or need to decentralize ColdFusion administrative responsibilities, implement ColdFusion Security. In the
ColdFusion Administrator navigation pane, select Security > Sandbox Security (Enterprise Edition) or Security >
Resource Security (Standard Edition). To take advantage of additional capabilities that ColdFusion provides for
controlling access by applications to resources on the server (such as data sources, files, directories, and IP
addresses), consider configuring Sandbox Security. For details, see Administering ColdFusion Security.
Services and processes
ColdFusion uses services in Windows operating systems and processes on UNIX systems.
If you enable or disable security or change any option in the Java and JVM Settings page in the ColdFusion
Administrator, you must stop and restart ColdFusion for your changes to take effect.
Note: This does not apply when deploying ColdFusion on a J2EE server.
Installing the server configuration
ColdFusion services in Windows
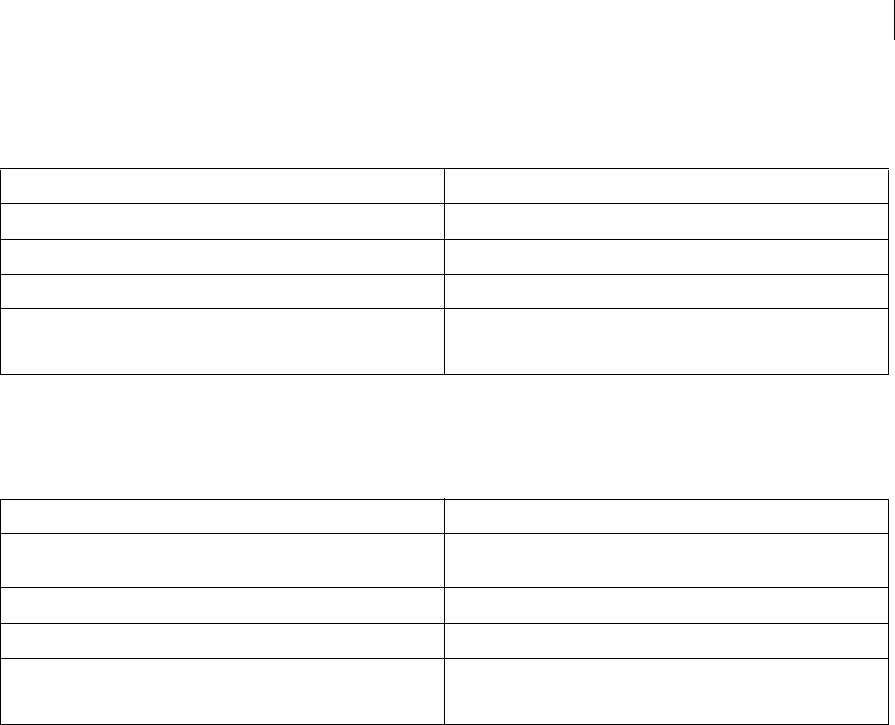
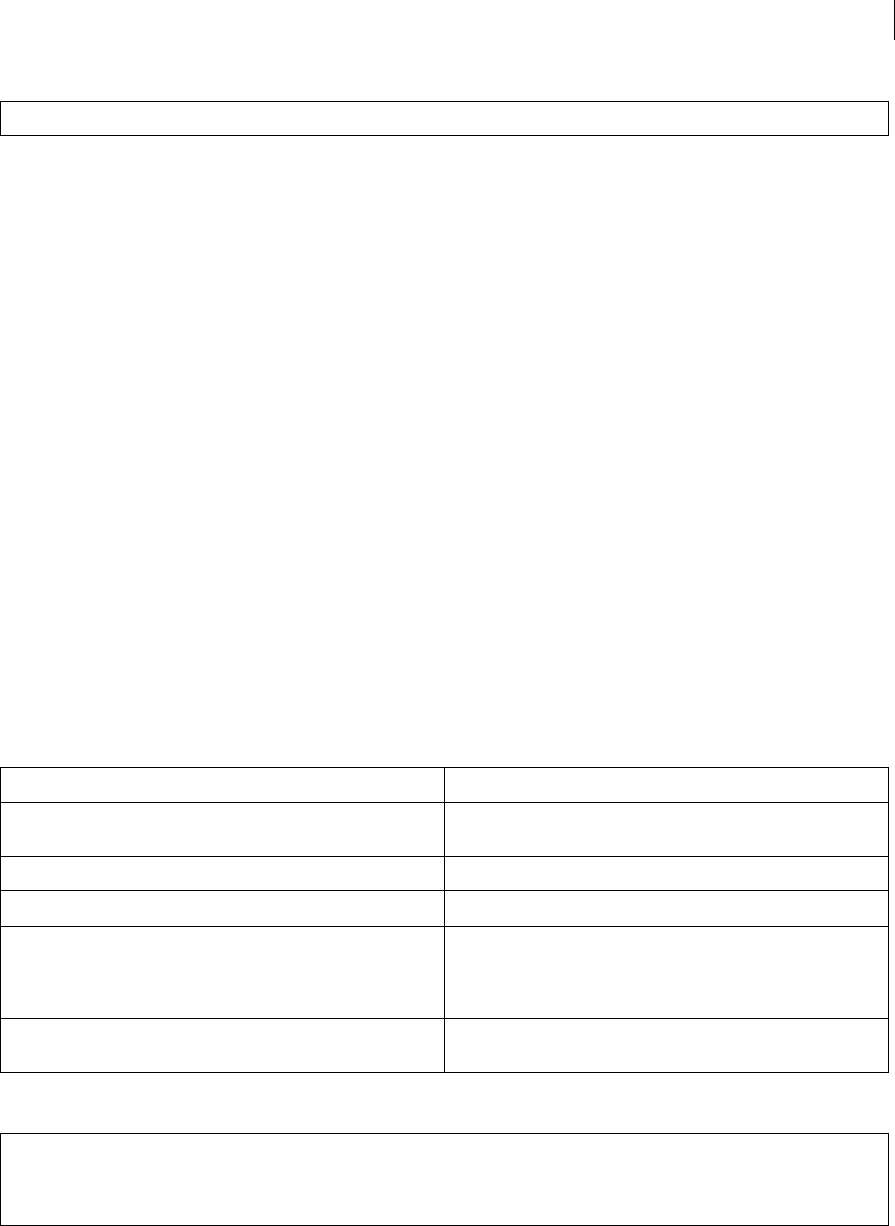
The ColdFusion installation creates the following services in Windows 2000, Windows XP, and Windows 2003:
ColdFusion processes in UNIX
The ColdFusion process discussion does not apply when deploying ColdFusion on a J2EE server
Manage the ColdFusion process in UNIXThe ColdFusion installation creates a single process in UNIX called cfusion.
To check whether it is running, use the following command: ps - eaf | grep coldfusion If it is running, your computer
returns a line like the following: nobody 4528 1 10 12:44 pts/0 00:00:07 /opt/coldfusion/bin/coldfusion -start
1Log in as root.
Service Description
ColdFusion Application Server The main ColdFusion service. ColdFusion pages cannot be processed
if this service is not running.Note: This does not apply when deploying
ColdFusion on a J2EE server.
ColdFusion .NET extension The extension that lets you access .NET assembly classes as ColdFusion
objects. Uses Java proxies to represent the .NET classes on the
ColdFusion system, and requires that the ColdFusion .NET-side agent
run on the system where the assemblies are located.
ColdFusion ODBC Agent The service that configures data sources for the ColdFusion ODBC
Server.
ColdFusion ODBC Server The middle-tier service for ODBC connections that use the ColdFusion
DataDirect drivers for Microsoft Access and ODBC Socket.
ColdFusion Jetty Server Manages and controls configuration and services of Solr.
4
Last updated 2/17/2016
2Enter the following command: cd cf_root/bin
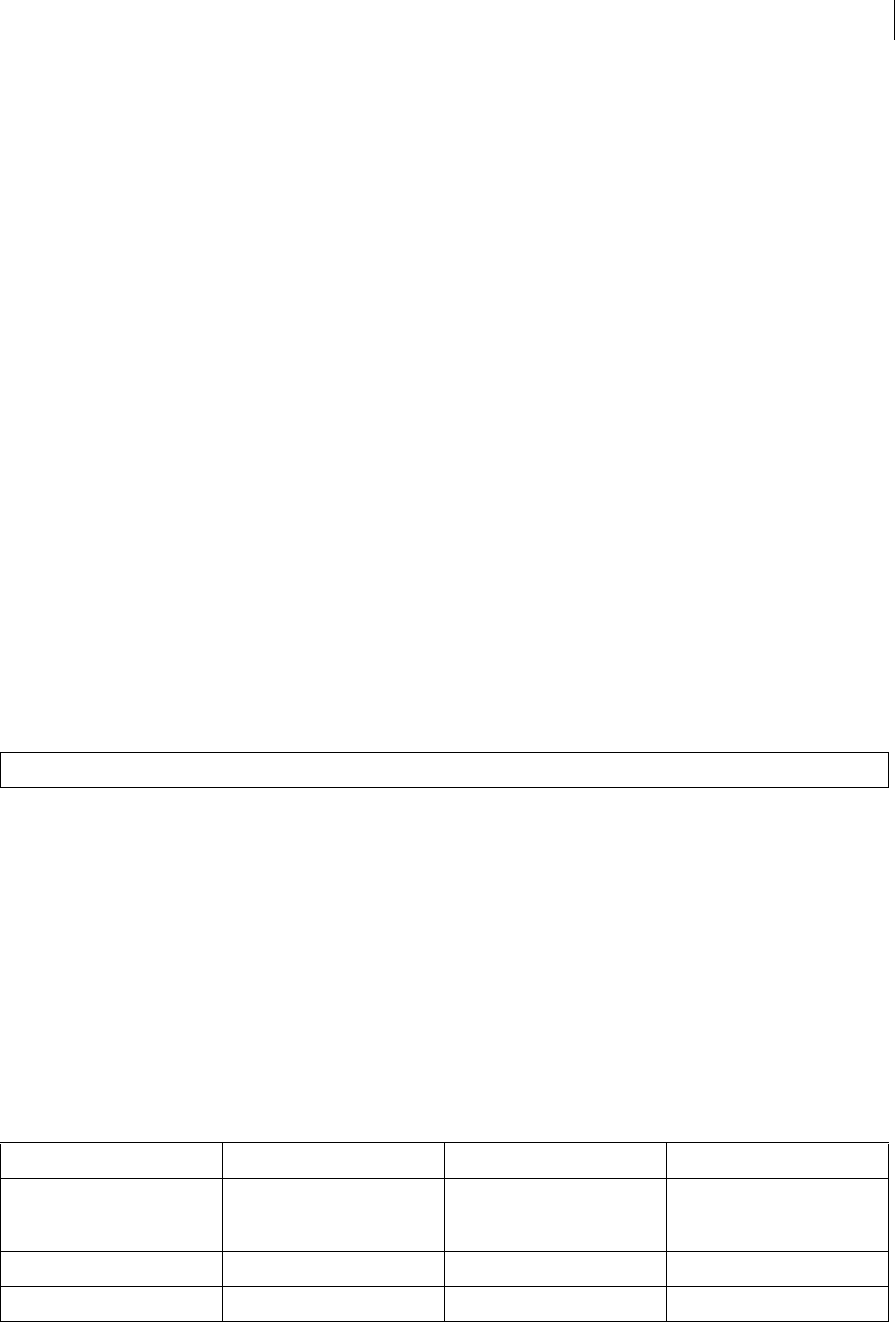
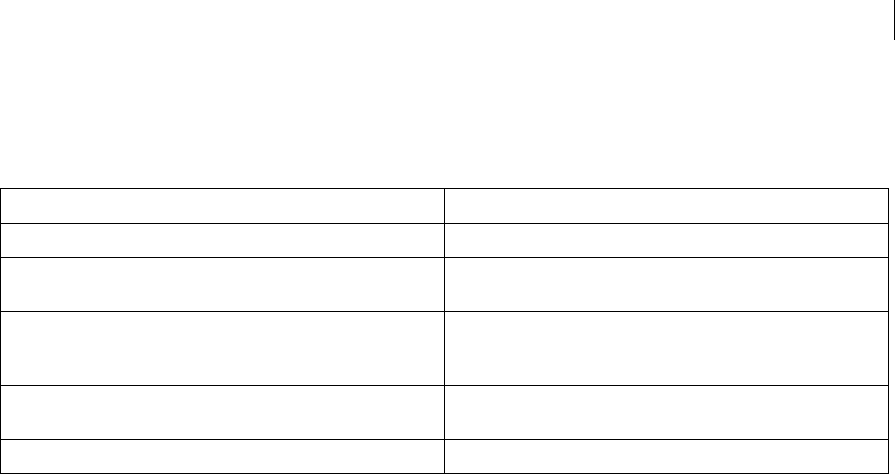
3Enter the appropriate command, as the following table describes:
Layout of the ColdFusion Administrator
To become familiar with the layout of the ColdFusion Administrator pages, open the Administrator and refer to the
following descriptions:
Verify that the web server is running
Before you install ColdFusion, ensure that your web server is installed and running.
1Open a web browser.
2In the address line, enter the URL for a web page or site. For example, if the file myindex.htm is in your web
document root directory, load the page in your browser, using the localhost URL, as follows:
http://127.0.0.1/myindex.htm}}or{{http://127.0.0.1:8500/myindex.htm (built-in web server)
3Press Enter. If the web server is running, the page appears, otherwise, an error message appears.
System information
Use the ColdFusion System Information page to do the following:
•Update or upgrade a Trial or Developer Edition of ColdFusion as follows:
1On the System Information page, enter your product serial number in the New License field.
2Click Submit Changes.
•See the expiration date of your Trial copy of ColdFusion Administrator.
•Identify values that correspond to several ColdFusion server variables. To access the ColdFusion System
Information page, click the System Information button in the top right of the ColdFusion Administrator.
Changes in ColdFusion 11
The ColdFusion 11 Administrator has significant new functionality that includes:
Task Command
Start ColdFusion coldfusion start
Stop ColdFusion coldfusion stop
Restart ColdFusion coldfusion restart
View status information for ColdFusion coldfusion status
Area or Button Description
Help button Displays online help for the page in the ColdFusion Administrator you
are viewing.
System information button Displays system information.
Resource button Displays links to additional sources of information.
Left pane Lets you navigate to pages in the ColdFusion Administrator.

5
Last updated 2/17/2016
WebSocket enhancements
ColdFusion 11 has introduced the proxy support for WebSocket. There is a new proxy module (that runs inside IIS and
Apache Web Server) that can intercept the ColdFusion WebSocket requests and redirect the requests to the ColdFusion
Server.
See WebSocket enhancements
PDF generation enhancements
To generate high quality PDFs from HTML documents, 2 new tags, <cfhtmltopdf> and <cfhtmltopdfitem> have been
introduced in ColdFusion 11.
See PDF generation enhancements
Security enhancements
ColdFusion 11 has a lot of security enhancements and bug fixes. This update fixes a few security issues and has
strengthened the Server to a large extent. Some notable security enhancements are described in the following
document:
See Security Enhancements (ColdFusion 11)
Social enhancements
ColdFusion 11 has introduced the support for dynamically generating Like button, Tweet button, and Comment box
for social media sites.
See Social Enhancements
REST enhancements
ColdFusion 11 now supports site-level REST applications and enables pluggable serializer and deserializer.
See REST Enhancements in ColdFusion 11
Changes in ColdFusion 10
Server updates
Verify if there are any product updates using the ColdFusion Administrator (Server Update > Update). The updates can
include hot fixes and security hot fixes for ColdFusion 10. For details, see Server update using ColdFusion
Administrator .
Configure built-in web server
Instead of JRun, Tomcat is embedded with a stand-alone ColdFusion 10 installation. ColdFusion Administrator
provides options to configure Tomcat. For details, see Administering ColdFusion.
Scheduling
Scheduling tasks feature (Server Settings > Scheduled Tasks) has been enhanced in this release. The enhancements
include options for Application and Server Level scheduled tasks and enabling cluster setup. For details, see
Administering ColdFusion.
Caching
Options to use internal cache to store queries, clear query cache, and to clear folder-specific template cache. For details,
see Administering ColdFusion.
Web ser v ices
6
Last updated 2/17/2016
ColdFusion supports Axis 2 web service and an option is provided to specify the Axis version. For details, see We b
services .
REST services
Option to register an application with REST service. For details, see REST Services page .
Enabling RDS
RDS can be enabled from ColdFusion Administrator. For details, see RDS page .
Accessing the ColdFusion Administrator
If you are using the Developer Edition of ColdFusion, in the previous releases, only two IP addresses are allowed to
access ColdFusion Administrator concurrently. Even if either or both of the IP addresses do not access ColdFusion
Administrator, a third IP address is denied the right. In this release, access is permitted to any two IP addresses
concurrently. For example, Client1 and Client2 already have access to ColdFusion Administrator. When either Client1
or Client2 does not access ColdFusion Administrator, Client3 is allowed access.
Restricting access to ColdFusion Administrator
For details, see Restricting access to ColdFusion Administrator
Logging Administrator actions
By default all major ColdFusion Administrator actions are logged. The log contains details that include current user,
date, time, and action taken. Note that the logs cover only high-level actions for most pages of the ColdFusion
Administrator, such as the following:
However, for the following pages on the ColdFusion Administrator, all actions performed on the page are written to
the audit logs:
•Server Settings
•Request tuning
•CACHING
•Memory VARIABLES
•Java and JVM The default log location is cfusion\logs\audit.log.
Changes to default settings
The following default settings in the previous releases of ColdFusion have been revised in this release:
<timestamp>: <Username>: <deleted data source name>
Area/UI Path Previous value New value
Client variable storage name Server Settings > Client Variables
> Select Default Storage
Mechanism for Client Sessions
Registry Cookie
Use UUID for cftoken Server Settings > Settings Unchecked Checked
Enable Global Script Protection Server Settings > Settings Unchecked Checked
7
Last updated 2/17/2016
Session cookie settings
The following settings can be made at the server level using ColdFusion Administrator (Server Settings > Memory
Variables > Session Cookie Settings). Adobe recommends that you use the new settings.
Using the ColdFusion Administrator
ColdFusion System Probes HAS BEEN DEPRECATED
For a full list of deprecated features, refer to Deprecated features .
Use the Adobe ColdFusion Administrator to perform basic administration tasks. You can also use the Administrator
Application Programming Interface (API) to perform Administrator functionality programmatically.
Initial administration tasks
Immediately after you install ColdFusion, you might have to perform some or all the administrative tasks described in
the following table:
Maximum number of
simultaneous Template requests
Server Settings > Request Tuning
> Request Limits
10 25
Maximum number of
simultaneous CFC function
requests
Server Settings > Request Tuning
> Request Limits
10 15
Minimum JVM Heap Size (MB) Server Settings > Java and JVM 256
Maximum size of post data (in MB) Server Settings > Settings >
Request Size Limits
100 20
Enable ColdFusion Event Gateway
Services
Event Gateways > Settings Checked Unchecked
Setting Default
HTTPONLY session cookie Checked
Secure Session cookie Unchecked
Session cookie timeout Maximum of 30 years and minimum of two minutes.
Task Description
Establish database connections ColdFusion applications require data source connections to query and
write to databases. To create, verify, edit, and delete database
connections, use the Data Sources page. For more information, see
Data Source Management for ColdFusion .
Specify directory mappings Directory mappings redirect relative file paths to physical directories
on your server. To specify server-wide directory aliases, use the
Mappings page. For more information, see Mappings page .
Configure debugging settings Debugging information provides important data about CFML page
processing. To choose the debugging information to display, and to
designate an IP address to receive debugging information, use the
Debugging & Logging section.For more information, see Debugging
Output Settings page .

8
Last updated 2/17/2016
Accessing user assistance
You can use the buttons on the upper left of the ColdFusion Administrator to access online Help, information about
additional resources, and system information.
•Online Help Click the question-mark icon on any ColdFusion Administrator page to access the context-sensitive
online Help. The online Help has procedural and brief overview content for the ColdFusion Administrator page that
you are viewing. This information appears in a new browser window and contains standard Contents, Index, and
Search tabs.
•System Information Click System Information to see information about the ColdFusion server, including version
number, serial number, and JVM details.
•Resources Click Resources to display the Resources page, which provides links to the following:
•Getting Started experience
•Example applications,
•Product Information
•Technical Support and Training,
•Additional Installers
•Product Updates
•Community Resources
•Security-related Information
Server Settings section
The Server Settings section lets you manage client and memory variables, mappings, charting, and archiving. It also
allows you to configure e-mail and Java settings.
Settings page
The Settings page of the ColdFusion Administrator contains configuration options that you can set or enable to manage
ColdFusion. These options can significantly affect server performance. The following table describes the options:
Set up e-mail E-mail lets ColdFusion applications send automated e-mail messages.
To configure an e-mail server and mail options, use the Mail Server
page.For more information, see Mail page.
Change passwords You might have to change the passwords that you set for the
ColdFusion Administrator and Remote Development Service (RDS)
during ColdFusion installation. To change passwords, use the Security
section.For more information, see Administrator page and RDS page .
Define user-specific access to the ColdFusion Administrator To grant user-specific access to the ColdFusion Administrator, you
create users and specify a user name, password, applicable sandboxes,
and the sections of the ColdFusion Administrator that each user can
access. For more information, see Security section .
Configure Java settings (Server configuration only) You might have to customize Java settings,
such as classpath information, to meet the needs of your applications.
To change Java settings, use the Java and JVM page.For more
information, see Extensions section .
Restrict tag access Some CFML tags might present a potential security risk for your server.
To disable certain tags, use the Sandbox Security page.For more
information, see Administering ColdFusion Security.

9
Last updated 2/17/2016
Option Description
Timeout Requests After (Seconds) Prevents unusually lengthy requests from using up server resources.
Enter a limit to the time that ColdFusion waits before terminating a
request. Requests that take longer than the time-out period are
terminated.
Enable Per App Settings Lets developers programmatically define ColdFusion settings such as
mappings and debugging per application.
Use UUID For cftoken Specify whether to use a universally unique identifier (UUID), rather
than a random number, for a cftoken.
Enable HTTP Status Codes Configures ColdFusion to set a status code of 500 Internal Server Error
for an unhandled error. Disable this option to configure ColdFusion to
set a status code of 200 OK for everything, including unhandled errors.
Enable Whitespace Management Compresses repeating sequences of spaces, tabs, and carriage returns
and linefeeds. Compressing whitespace can significantly compact the
output of a ColdFusion page. This option is enabled, by default.
Disable Access To Internal ColdFusion Java Components Prevents CFML code from accessing and creating Java objects that are
part of the internal ColdFusion implementation. This prevents a non-
authenticated CFML template from reading or modifying
administration and configuration information for this server.
Disable CFC Type Check Turns off verifying the CFC type when calling methods with CFCs as
arguments. This option also disables verifying an object that
implements the right interface. Enabling this option can improve the
performance of your application. However enable it only on a
production server.
Disable Access To Internal ColdFusion Java Components Prevents CFML code from accessing and creating Java objects that are
part of the internal ColdFusion implementation. This prevents a non-
authenticated CFML template from reading or modifying
administration and configuration information for this server.
Preserve Case for Struct Key for Serialization Maintains and preserves the case in which keys of a struct have been
defined. If not checked, keys will be converted to uppercase.
Cases for struct keys were not preserved in the past versions of
ColdFusion. The struct keys get converted to upper case automatically.
For instance, consider the following code:
In ColdFusion 10 and earlier versions, the output generated by the
above code will be:
For ColdFusion 11 and following, the output generated will be:
To enable case preservation of struct keys, change the setting in the
ColdFusion Administrator, as discussed above.
To enable case preservation of struct keys at the application level,
modify the application.cfc file by setting:
Prefix serialized JSON with Protects web services, which return JSON data from cross-site
scripting attacks by prefixing serialized JSON strings with a custom
prefix.
Enable In-Memory File System Enables the in-memory virtual file system support. By default, this is
enabled.
Memory Limit for In-Memory Virtual File System Lets you specify the memory limit in Megabytes (MB) for in-memory
virtual file system.

10
Last updated 2/17/2016
Watch Configuration Files For Changes (Check Every nSeconds) Sets ColdFusion to monitor its configuration files and automatically
reload them if they change. This action is required if you deploy
ColdFusion in a WebSphere ND vertical cluster, because multiple
instances of ColdFusion share the same configuration files. It is
recommended that you do not enable this feature for most
installations.
Enable Global Script Protection Protects Form, URL, CGI, and Cookie scope variables from cross-site
scripting attacks. Select this option if your application does not
contain this type of protection logic.
Allow Extra Attributes in AttributeCollection Specify whether ColdFusion tags can pass non-standard attributes in
the attributecollection structure.
Clear temporary files created during CFaaS after Specify the time in minutes after which the temporary files created
during CF as a Service(CFaaS) operation must be deleted. The default
value is 30 minutes.
ORM Search Index Directory Specify the index directory (the one in which all persistent entities, of
an application's indexable data, are saved) either at the server-level or
application-level.
Default ScriptSrc Directory Specify the default path (relative to the web root) to the directory that
contains the cfform.js file. Developers reference this file in the
ScriptSrc attribute of the cfform tag. In a hosted environment, you
might need to move the cfform.js file to a directory other than CFIDE.
Google Map API Key Specify the Google Map API license key that you require to access
Google Maps.
Component with onServerStart() method Specify the absolute path to a CFC having onServerStart() method or
specify a dot delimited CFC path under web root, like "a.b.server". By
default, ColdFusion looks for server.cfc under web root.
Allowed file extensions for <cfinclude> tag (New in ColdFusion 11) Specify the list of allowed file extensions (as a comma separated list)
while using the <cfinclude> tag. Specifying a wildcard ('*') in the list
makes any file included using the <cfinclude> tag to be compiled. If
any other file included using the <cfinclude> tag is not found in this
list, their content will be statically included. By default files with the
extensions cfm and cfml always gets compiled irrespective of this
setting. This value can be overridden at the application-level using the
key compileExtForInclude in theApplication.cfc/Application.cfm file.
Application.cfc/Application.cfm lookup order Select the order in which ColdFusion searches for Application.cfm or
Application.cfc if it is not found in the current project folder. You can
set ColdFusion to search as follows:
•default search order: ColdFusion looks for an
Application.cfc/Application.cfm file from the current
folder until the system root directory. On Windows,
this could be C:\ and on UNIX, /opt.
•till web root: ColdFusion looks for an
Application.cfc/Application.cfm file from the current
folder till web root.
•in web root: ColdFusion looks for an
Application.cfc/Application.cfm file in the current
folder or web root.

11
Last updated 2/17/2016
Request Tuning page
Simultaneous request tuning overview
You can specify the number of simultaneous requests that can be processed for each of the following types of requests:
•CFM page requests
•CFC method invocations (via an HTTP GET)
•Flash Remoting requests
•Web Service requests The settings are contained completely within ColdFusion code and work across all J2EE
application servers. You do not have to restart the ColdFusion server for changes to the configuration to take effect.
JSP processing is not affected by these changes.
Capabilities by edition
•Standard Edition: Only the Async CFML, DirectoryWatcher, Socket, and user written event gateways are enabled.
The maximum number of threads in the pool for the cfthread tag is limited to 10. Only the CFM page request limit
is adjustable.
•Enterprise Edition: All event gateways are supported. The number of threads in the pool for the cfthread tag is
unlimited. You can adjust the limits for each request type (CFM page, CFC, Flash Remoting, and Web Service)
independently.
Missing Template Handler Specify a page to execute when ColdFusion cannot find a requested
page. This specification is relative to the web root.Note: If the user is
running Microsoft Internet Explorer with "Show Friendly HTTP error
messages" enabled, Internet Explorer displays this page only if it
contains more than 512 bytes.
Site-Wide Error Handler Specify a page to execute when ColdFusion encounters an error while
processing a request. This specification is relative to the web root.
When you define a site-wide error handler or missing template
handler, ColdFusion does not log page-not-found errors and
exceptions.Note: If the user is running Internet Explorer with Show
Friendly HTTP Error Messages enabled, Internet Explorer only displays
this page if it contains more than 512 bytes.
Maximum Size Of Post Data Limits the amount of data that can be posted to the server in a single
request. ColdFusion rejects single requests larger than the specified
limit.
Request Throttle Threshold Requests smaller than the specified limit are not queued or counted as
part of the total memory. Requests larger than the specified limit are
counted as part of total memory and are queued if the request
throttle-memory size is exceeded.
Request Throttle Memory Limits total memory size for the throttle. If sufficient total memory is
not available, ColdFusion queues requests until enough memory is
free.
Disable Creation of unnamed application Disallows creation of unnamed applications.
Allow REST Discovery Specify whether to allow Adobe API Manager to discover REST services
published in ColdFusion.
Note: The Flash Remoting request control setting applies to remoting that uses ActionScript 2.0 and ActionScript 3.0, with each type
treated independently. For example, a setting of 5 means that up to 5 ActionScript 2.0 Flash Remoting and 5 ActionScript 3.0. Flash
Remoting requests are allowed simultaneously.

12
Last updated 2/17/2016
Request Tuning page
The Request Tuning page of the Administrator contains configuration options that you use to specify the number of
different types of requests and threads that ColdFusion can handle simultaneously.
Caching page
The Caching page of the Administrator contains configuration options that you can set or enable to cache templates,
queries, and data sources. These options can significantly affect server performance. The following table describes the
settings:
Option Description
Maximum Number Of Simultaneous Template Requests The number of CFML page requests that can be processed
concurrently. Use this setting to increase overall system performance
for heavy-load applications. Requests beyond the specified limit are
queued.
Maximum Number Of Simultaneous Flash Remoting Requests The number of Adobe Flash Remoting requests that can be processed
concurrently.
Maximum Number Of Simultaneous Web Service Requests The number of Web Service requests that can be processed
concurrently.
Maximum Number Of Simultaneous CFC Function Requests The number of ColdFusion Component methods that can be
processed concurrently through HTTP. This does not affect starting
CFC methods from CFML, only methods requested through an HTTP
request.
Maximum Number Of Simultaneous Report Threads The maximum number of ColdFusion reports that can be processed
concurrently.
Maximum Number Of Threads Available For CFTHREAD CFTHREAD that runs concurrently. Threads that CFTHREAD creates in
excess of the specified limit are queued.
Timeout Requests Waiting In Queue After n Seconds If a request has waited in queue beyond the specified limit, time out
the request. This value must be at least as long as the Request Timeout
setting (currently 60 seconds).
Request Queue Timeout Page Specify a relative path to an HTML page to send to clients when a
template requests time out before getting a chance to run. For
example "/CFIDE/timeout.html." This page cannot contain CFML. If a
page is not specified, clients receive a 500 Request Timeout error when
their request does not get a chance to run.
Option Description
Maximum Number Of Cached Templates Enter a value that specifies the number of templates that ColdFusion
caches. For best application performance, set this option to a value
that is large enough to contain the commonly accessed ColdFusion
pages, yet small enough to avoid excessive reloading. You can
experiment with a range of values on your development server; a
suitable starting point is one page per MB of Java Virtual Machine
(JVM) size.
Trusted Cache Use cached templates without checking whether they changed. For
sites that are not updated frequently, using this option minimizes file
system overhead.

13
Last updated 2/17/2016
Client Variables page
You enable client variable default settings in ColdFusion on the Client Variables page of the Administrator. ColdFusion
lets you store client variables in the following ways:
•In database tables
•As cookies in the web browsers
•In the operating system registry
Cache Template in Request When checked, any requested files are inspected only once for
potential updates within a request. If unchecked, requested file are
inspected for changes each and every time when it is accessed within
the same request. For application where templates/components are
not expected to reflect updates within the same request, this
minimizes file system overhead. This setting does not require
restarting the server.
Component cache When checked, component path resolution is cached and not resolved
again. This setting does not require restarting the server.
Save Class Files Saves to disk the class files that the ColdFusion bytecode compiler
generates. During the development phase, it is typically faster if you
disable this option.
Cache Web Server Paths Caches ColdFusion page paths for a single server. Clear this option if
ColdFusion connects to a web server with multiple websites or
multiple virtual websites.
Maximum Number Of Cached Queries Enter a value to limit the maximum number of cached queries that the
server maintains. Cached queries allow retrieval of result sets from
memory rather than through a database transaction. Because queries
reside in memory, and query result set sizes differ, provide a limit for
the number of cached queries. You enable cached queries with the
cachedwithin or cachedafter attributes of the cfquery tag. When the
maximum number of cached queries is reached, the oldest query is
dropped from the cache and replaced with the specified query. If you
set the maximum number of cached queries to 0, query caching is
unlimited.
Use Internal Cache to Store Queries When you select this option, at server level, internal cache is used to
store cached queries. By default, cached queries are stored in QUERY
region supported by Ehcache.
Clear Template Cache Now Empties the template cache. ColdFusion reloads templates into
memory the next time they are requested and recompiles them if they
have been modified.
Clear Template Cache of Specific Folder In the previous releases, you have the option only to clear the trusted
cache, which clears the entire system cache. Now you can limit the
clearing to folder level using this option.
Clear Component Cache Now Empties the component cache. ColdFusion ignores the resolved path
for components and try resolution again.
Clear Query Cache Now Removes the query cache in the server.
Note: If your data source uses one of the JDBC drivers bundled with ColdFusion 10, ColdFusion can automatically create the necessary
tables. If your data source uses the ODBC Socket or a third-party JDBC driver, you manually create the necessary CDATA and CGLOBAL
database tables.

14
Last updated 2/17/2016
To override settings specified in the Client Variables page, use the Application.cfc file or the cfapplication tag. For
more information, see the Developing ColdFusion Applications.
Store client variables in a data source
1On the Client Variables page, in the Select Data Source to Add as Client Store table, select a data source from the
drop-down.
2Click Add. The Add/Edit Client Store page for the data source appears.
3Select options for the data source, as described in the following table. (To exit from the page without saving changes,
click the left-arrow icon.)
1Click Submit Changes. The Client Variables page appears, with your data source in the list.
2In the Select Default Storage Mechanism for Client Sessions table, select the data source.
3Click Apply.
Store client variables in a cookie or in the system registry
1In the Client Variables page, select Cookie or Registry.
2Click Apply.
Client variable storage options
Note: Adobe recommends that you do not store client variables in the registry because it can critically degrade performance of the server.
If you use the registry to store client variables, you allocate sufficient memory and disk space.
Option Description
Description A description of the client data store and its settings. Not displayed for
Registry.
Create Client database tables If ColdFusion can determine that the database you use supports SQL
creation of database tables, this option appears, and you do not need
to create the client variable tables before they are used. In this case,
the Create Client Database Tables option appears on the Add/Edit
Client Store page; if you select this option, ColdFusion creates the
necessary tables in the database. If the database does not support SQL
table creation, if the database already has the required tables, or if you
are using the Registry, this option does not appear.
Purge data for clients that remain unvisited for n days Typically, client data is saved for a limited time. To delete (purge) client
data that has not been accessed in a specified number of days, select
this option and enter a value for the number of days. If a cluster of
ColdFusion servers uses this data source, ensure that only one server is
configured to purge client data.
Disable global client variable updates By default, ColdFusion updates client variables for every page request.
To prevent ColdFusion from updating variables, select this option. If
updates are disabled, ColdFusion updates global client variables only
when they are first created and when they are updated. This helps
improve application performance.
15
Last updated 2/17/2016
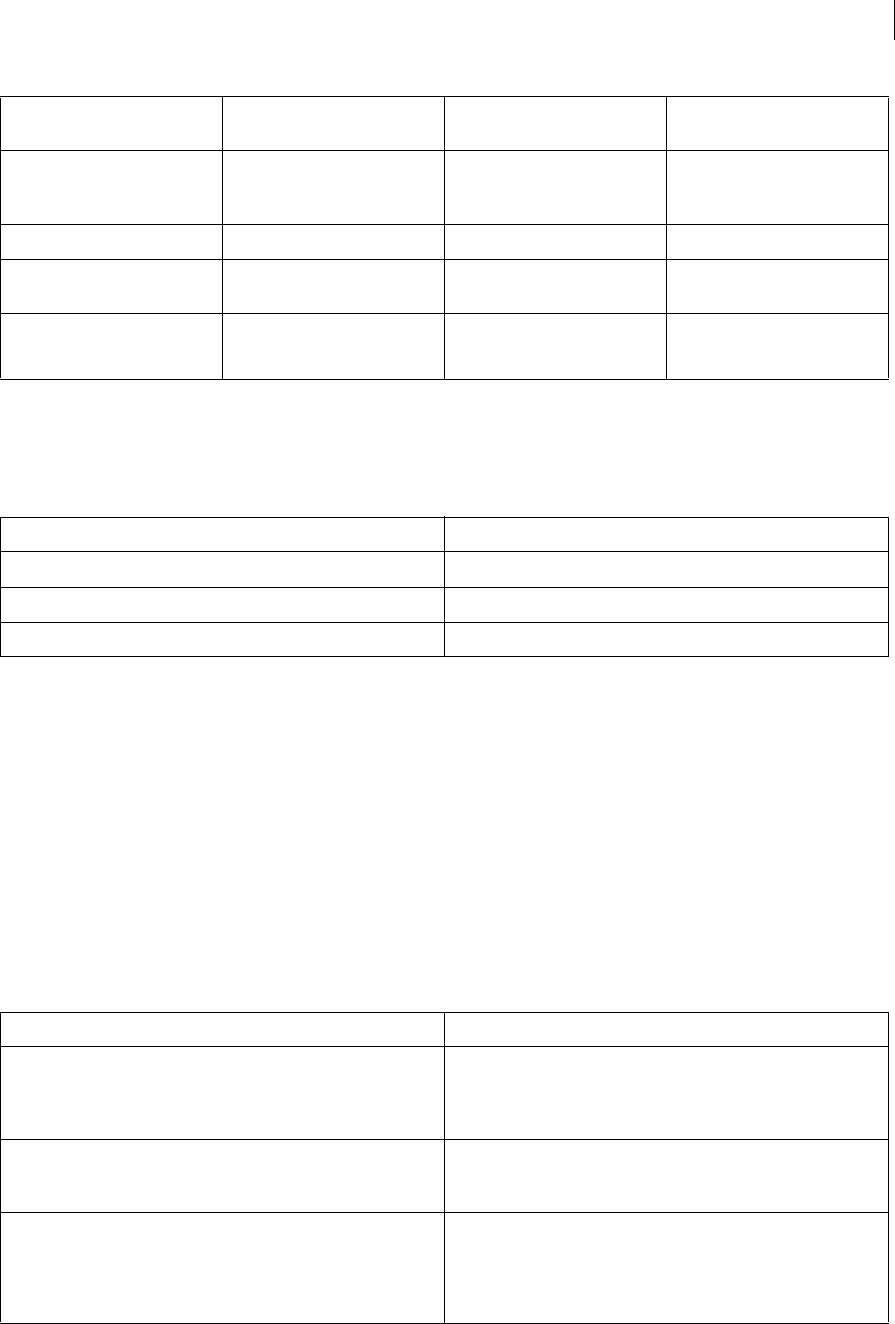
Migrating client variable data
To migrate your client variable data to another data source, determine the structure of the database tables that store this
information. Client variables stored externally use two simple database tables, as shown in the following tables:
Creating client variable tables
Use the following sample ColdFusion page as a model for creating client variable database tables in your own database.
However, keep in mind that not all databases support the same column data type names. For the proper data type, see
your database documentation.
Storage type Advantages Disadvantages
Data source •Can use existing data source
•Portable: not tied to the host system or
operating system
•Requires database transaction to
read/write variables
•More complex to implement
Browser cookies •Simple implementation
•Good performance
•Can be set to expire automatically
•Client-side control
•Users can configure browsers to disallow
cookies
•Cookie data is limited to 4-KB
•Netscape Navigator allows only 20 cookies
from one host; ColdFusion uses three
cookies to store read-only data, leaving
only 17 cookies available
System registry •Simple implementation
•Good performance
•Registry can be exported easily to other
systems
•Server-side control
•Possible restriction of the registry's
maximum size limit in Windows in the
Control Panel
•Integrated with the host system: not
practical for clustered servers
•Not available for UNIX
•Applicable only for Windows
CDATA Table
Column Data type
cfid CHAR(64), TEXT, VARCHAR, or equivalent
app CHAR(64), TEXT, VARCHAR, or equivalent
data MEMO, LONGTEXT, LONG VARCHAR, or equivalent
CGLOBAL Table
Column Data type
cfid CHAR(64), TEXT, VARCHAR, or equivalent
data MEMO, LONGTEXT, LONG VARCHAR, or equivalent
lvisit TIMESTAMP, DATETIME, DATE, or equivalent

16
Last updated 2/17/2016
Sample table creation page
This example applies to Microsoft Access databases.
(
cfid char(20),
app char(64),
data memo
)
</cfquery>
<cfquery name="data2" datasource="#DSN#">
CREATE UNIQUE INDEX id1
ON CDATA (cfid,app)
</cfquery>
<cfquery name="global1" datasource="#DSN#">
CREATE TABLE CGLOBAL
(
cfid char(20),
data memo,
lvisit date
)
</cfquery>
<cfquery name="global2" datasource="#DSN#">
CREATE INDEX id2
ON CGLOBAL (cfid)
</cfquery>
<cfquery name="global2" datasource="#DSN#">
CREATE INDEX id3
ON CGLOBAL (lvisit)
</cfquery>
Memory Variables page
You can specify maximum and default time-out values for session and application variables. Unless you define a time-
out value in an Application.cfc or Application.cfm file, application variables expire in two days. Session variables expire
when user sessions end. To change these behaviors, enter new default and maximum time-out values on the Memory
Variables page of the Administrator.
You can also specify whether to use J2EE session variables. When you enable the J2EE session variables, ColdFusion
creates an identifier for each session and does not use the CFToken or CFID cookie value. For more information, see
the Developing ColdFusion Applications.You can also determine how ColdFusion stores the session variables - in
memory or Redis. Select an option from the Session Storage drop-down list. For more information, see External
session storage .
Note: When using J2EE sessions, ensure that the session time out, specified in the WEB INF/web.xml session-timeout
element, is longer than the session time out specified in the ColdFusion Administrator, and longer than any sessiontimeout
attribute specified in a cfapplication tag.
Mappings page
Note: The ColdFusion Administrator can create client variable tables for data sources that use one of the bundled JDBC drivers. For more
information, see the Online Help.

17
Last updated 2/17/2016
Use the Mappings page of the ColdFusion Administrator to add, update, and delete logical aliases for paths to
directories on your server. ColdFusion mappings apply only to pages that ColdFusion processes with the cfinclude and
cfmodule tags. If you save CFML pages outside the web_root directory (or whatever directory is mapped to "/"), you
add a mapping to the location of those files on your server. Assume that the "/" mapping on your server points to
C:\coldfusion2016\wwwroot, but that all of your ColdFusion header pages reside in C:\2002\newpages\headers. Add a
mapping in the ColdFusion Administrator that points to C:\2002\newpages\headers, for ColdFusion to find the header
pages. For example, add a mapping for /headers that points to C:\2002\newpages\headers. In the ColdFusion pages
located in C:\coldfusion2016\wwwroot, you reference these header pages using /headers in your cfinclude and
cfmodule tags.
Note: ColdFusion mappings are different from web server virtual directories. For information on creating a virtual
directory to access a given directory using a URL in your web browser, consult your web server documentation.
Mail page
The ColdFusion Enterprise Edition supports mail-server failover, as well as additional mail delivery options. The
ColdFusion implementation of SMTP mail uses a spooled architecture. This means that when a cfmail tag is processed
in an application page, the messages generated might not be sent immediately. If ColdFusion has a large queue, delivery
could occur after some delay.
Mail Server Settings area
The following table describes basic mail server settings:
Note: For more information about the cfmail tag, see Sending SMTP e-mail with the cfmail tag in Sending and Receiving E-Mail in the
Developing ColdFusion Applications.
Option Description
Mail Server Enter a valid mail server for sending dynamic SMTP mail messages in
the text box. You can enter an Internet address, such as
mail.company.com, or the IP address of the mail server, such as
127.0.0.1.
Username Enter the user name for the mail server, if necessary.
Password Enter the password for the mail server, if necessary.
Sign Select this check box to configure ColdFusion to digitally sign your
mails.
Keystore Location of the Keystore containing the private key and certificate. The
supported type is JKS (java key store) and pkcs12.
Keystore Password Keystore password.
KeyAlias Alias of the key with which the certificate and private key is stored in
Keystore. If it is not specified then the first entry in the Keystore is be
picked up.
KeyPassword Password with which the private key is stored. If it is not specified,
KeystorePassword is used as KeyPassword.
Verify Mail Server Connection Verifies that ColdFusion can connect to your specified mail server after
you submit this form.Even if you do not use this option, send a test
message to verify that your mail server connection works.
Server Port Enter the number of the port on which the mail server is running.
Contact your server administrator if you are unsure of the appropriate
port number.

18
Last updated 2/17/2016
Mail Spool Settings area
The following table describes mail server spool settings:
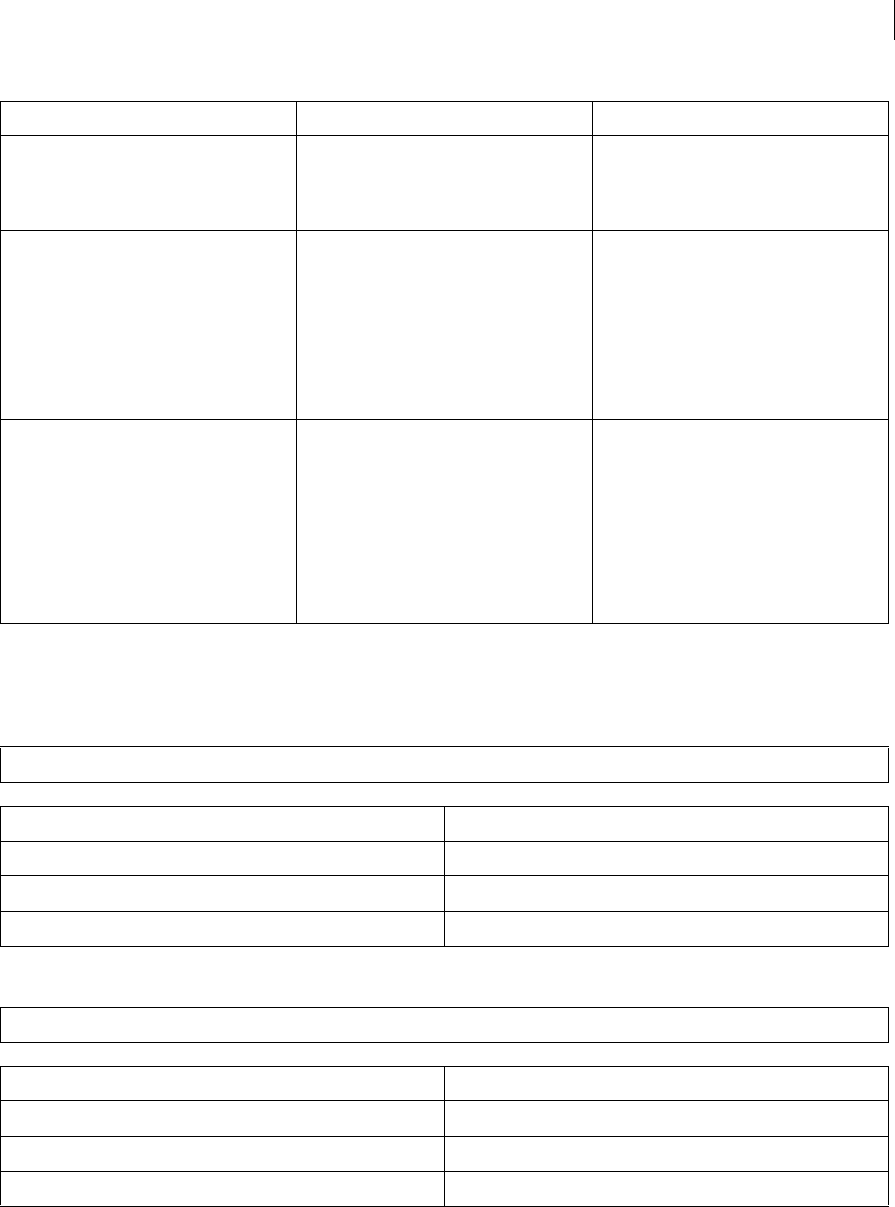
Mail Logging Settings area
Select preferences for handling mail logs, as described in the following table:
Backup Mail Servers (Enterprise Edition only) Enter zero or more backup servers for sending SMTP mail messages.
You can enter an Internet address, such as mail.company.com, or the
IP address of the mail server, such as 127.0.0.1. Separate multiple
servers with a comma. If the mail server requires authentication,
prepend the mail server with the user name and password, as
follows:username:password@mailserveraddress_To use a port
number other than the default (25), specify
_mailserveraddress:portnumber
Maintain Connection To Mail Server(Enterprise Edition only) Keeps mail server connections open after sending a mail message.
Enabling this option can enhance performance when delivering
multiple messages.
Connection Timeout (seconds) Enter the number of seconds that ColdFusion should wait for a
response from the mail server before timing out.
Enable SSL Socket Connections To Mail Server Enables SSL encryption on the connections to the mail server.
Enable TLS Connection To Mail Server Enables Transport Level Security (TLS) on the connection to the mail
server.
Option Description
Spool Interval (Seconds) Enter the interval, in seconds, at which you want the mail server to
process spooled mail.
Mail Delivery Threads(Enterprise Edition only) Enter the maximum number of simultaneous threads used to deliver
spooled mail.
Spool Mail Messages For Delivery To(Memory spooling available for
Enterprise Edition only)
Routes outgoing mail messages to the mail spooler. If you disable this
option, ColdFusion delivers outgoing mail messages immediately. In
ColdFusion Enterprise Edition, you can spool messages to disk (slower,
but messages persist across shutdowns) or to memory (faster, but
messages do not persist). You can override this setting in the cfmail
tag.
Maximum Number Of Messages Spooled To Memory(Enterprise
Edition only)
Enter the maximum number of messages that spool to memory before
switching to disk spooling.
View Undelivered Mail Click to view undelivered mails.
Option Description
Error Log Severity From the drop-down list object, select the type of SMTP-related error
message to write to a log file. The options are the following:
•Debug (contains Information, Warning, and Error)
•Information (contains Warning and Error)
•Warning (contains Error)
•Error
Log All Mail Messages Sent By ColdFusion Saves to a log file the To, From, and Subject fields of all e-mail
messages.

19
Last updated 2/17/2016
ColdFusion writes sent-mail and mail-error logs to the following directories:
•\coldfusion10\logs (Windows server configuration)
•/opt/coldfusion10/log (Solaris and Linux server configuration)
•cf_webapp_root/WEB-INF/cfusion/logs ( J2EE configurations, all platforms) The following table describes the e-
mail log files:
Mail Character Set Settings area
Select preferences for the default mail character set, as described in the following table:
Scheduled Tasks page
Information that is read more often than written is a good candidate for scheduled tasks. Instead of executing a query
to a database every time the page is requested, ColdFusion renders the static page with information that the scheduled
event generates. Response time is faster because no database transaction takes place.
You can run scheduled tasks once; on a specified date; or at a specified time, daily, weekly, or monthly; daily; at a
specified interval; or between specified dates. When a scheduled page executes, ColdFusion writes a message to a log
file called schedule.log automatically. This file identifies the name of the scheduled action, the page to be executed, and
whether the task scheduled executed successfully.You can pause and resume scheduled tasks.
The Scheduled Task page lets you create, edit, pause, resume, and delete scheduled tasks. This page has the following
areas:
•Application Level Scheduled Tasks:Provides a list of application-specific tasks that you have scheduled, with task
details in tabular format. The table provides details such as actions, application name, group, task name, duration,
interval, last run, next run, repeat count, and if cluster is enabled.
Log Description
mailsent.log Records sent e-mail messages.
mail.log Records general e-mail errors.
Option Description
Default CFMail CharSet From the drop-down list object, select the default character set that
the cfmail tag uses. The default value is UTF-8. If most of your e-mail
clients use a specific character set, you can use this setting to switch to
that locale-specific character set. For example, Japanese mail is
typically sent using the ISO-2022-JP character set.
Area Description
Schedule New Tasks Click to add new scheduled task.
Actions Click the icons to run, pause, edit or remove the schedule task.
Task Name Identifies the names of the existing tasks scheduled to run.
Duration Identifies the duration of the task to run.
Interval Identifies how often this task runs. The values for this column can be
Once, Daily, or DailyEvery.
Note: Application-specific tasks cannot be created using ColdFusion Administrator. But you can pause, resume, or delete the tasks.

20
Last updated 2/17/2016
•Server Level Scheduled Tasks: Provides a list of server-specific tasks that you have scheduled, with task details in
tabular format. The table provides new details such as group, next run, repeat count, if cluster is enabled, and the
remaining task count.
•Enable Cluster Setup:Applies if you have at least one data source configured. Specify the following details:
•Select Data source: All the data sources you have connected to are listed.
•Create Tables for Cluster Setup:Check to create scheduler-specific tables for cluster.
•After you specify the details, click Submit. To disable cluster, select the option Disable Cluster.
Add/Edit Scheduled Task page
Add/Edit Scheduled Task page lets you add or edit task. Click Submit after you specify the following tasks. When the
page loads for the first time, you are provided with only minimum options to create the task. Click Show Additional
Settings to list all settings.
Note: Enable this option only for one node in the cluster. Otherwise, the tables are overridden. If you have created tables from one
node, in other nodes you need to only select and choose the data source. All nodes will point to the same data source and therefore
will be part of the cluster.
Option Description
Task Name Enter a name for the task in the Task Name text box.
Duration Enter the start and end dates for the task. The end date is optional. If
you want this task to execute continuously, leave the End Date text
box blank.
Frequency Select the schedule for running this task:
•One-time Schedules the task to run once on the start
date and scheduled time specified. Specify the date
and time. The task must be set at least 15 minutes in
the future in order for the task to execute successfully
•Recurring Schedules the task to run daily, weekly, or
monthly at the specified time.
•Daily every Schedules the task to repeat during a day.
Specify Start Time and End Time to designate when
the task begins and ends. Specify Hours, Minutes,
Seconds to set an interval after which the task repeats.
URL Enter the URL for the ColdFusion page that you want to execute. You
can execute a local page or a page on a remote ColdFusion Server,
assuming that you have the proper access rights.
Username (Optional) Specify a user name only if the page you want to execute is
in a secure location.
Password (Optional) Specify a password only if the page you want to execute is
in a secure location.
Timeout (Optional) Specify a timeout setting. This helps prevent requests from
stalling due to an overloaded web server, a network problem, or a
page that takes too long to execute.
Proxy Server: Port (Optional) If this request must be routed through a proxy server, enter
the URL and Port number of that proxy server.

21
Last updated 2/17/2016
WebSo cket p a ge
Use the ColdFusion Administrator (Server Settings > WebSocket) to specify the following WebSocket-related details:
Charting page
The following table describes the caching and thread settings for the ColdFusion charting and graphing server:
Publish; File (Optional) To publish an output file of this task, select the Save Output
to a File option and then, in the File text box, enter the full path and
filename of the output file. Note that the Publish file in scheduled tasks
can now only have .txt and .log extensions by default. You can add
more extensions in cfusion\lib\neo-cron xml.
Resolve URL (Optional) Select the Resolve URL option to replace any relative URLs
used in links returned in the result page to absolute URLs.
Group The group to which the scheduled tasks belong. Ensure that the
combination of task name and group are unique.
Crontime Specify task scheduling time in cron job syntax.
Overwrite If not selected, creates new output files every time the task
executes.Select to overwrite the existing output file, instead of
creating a new one.
Eventhandler A CFC file whose pre-defined methods are invoked for various events
while running the task. The path you specify can be relative to webroot
for example, schedulerdemo.eventhandler, or use a ColdFusion
mapping.
Exclude Comma-separated list of dates or date range for exclusion in the
schedule period.
On Misfire Specify what the server has to do if a scheduled task misfires.
On Exception Specify what to do if a task results in error.
On Complete The action to be performed after the completion of current task.
Specify the details in the following format:Task1:Group1,Task3:Group3
Priority An integer that indicates the priority of the task.
Retry Count The number of reattempts if the task results in an error.
Cluster Enable to execute tasks in cluster setup.
Option Description
Port Port that the WebSocket server listens to.
Max Data Size Data size of packets sent/received.
Start Flash Policy Server Start Flash cross-domain Policy Server on port 1243. This is required
for Flash fallback if there is no native WebSocket support at the client
side.
Flash Port If Flash Policy server is to be run on a different port other than the
default one, it can be configured in neo-websocket.xml file located in
<cf_home>/cfusion/lib directory.

22
Last updated 2/17/2016
Font Management page
ColdFusion automatically registers Acrobat built-in fonts and fonts located in typical font locations (such as the
Windows\fonts directory). However, if your server has additional fonts installed in nonstandard locations, you register
them with the ColdFusion Administrator so that the cfdocument and cfreport tags can locate and render PDF and
FlashPaper reports. This page contains the following topics:
•Register New Font with ColdFusion Lets you browse to a directory that contains fonts, or select a specific font.
•User Defined Fonts Displays the fonts that have been registered explicitly.
•Current System Fonts Displays fonts stored in platform-specific system font directories. The following table
describes the fields on the Font Management page:
The Font Management page also displays the built-in Acrobat fonts, which are available for PDF only.For more
information on reporting in ColdFusion, see Creating Reports and Documents for Printing in the Developing
ColdFusion Applications.
About Font Management
Option Description
Cache Type Set the cache type. Charts can be cached either in memory or to disk.
Memory caching is faster, but more memory intensive.
Maximum Number Of Cached Images Specify the maximum number of charts to store in the cache. After the
cache is full, if you generate a new chart, ColdFusion discards the
oldest chart in the cache.
Max Number Of Charting Threads Specify the maximum number of chart requests that can be processed
concurrently. The minimum number is 1 and the maximum is 5.
(Higher numbers are more memory-intensive.)
Disk Cache Location When caching to disk, specify the directory in which to store the
generated charts.
Area Description
New Font/Font Directory Specifies a fully qualified path to a directory that contains font files or
to a specific font file. The ColdFusion Administrator lets you register
the following types of font formats:
•TTF: TrueType font.
•TTC: Collection of TrueType or OpenType fonts.
•OTF: OpenType font.
•PFB: (Adobe printer fonts).
•AFM: Adobe Font Metrics.
Font Family High-level font name (for example, Arial or Times New Roman).
Font Face A specific font face (for example, Arial Italic or Times New Roman Bold).
PostScript Name Specifies the PostScript name of the font.
Font Type Specifies the font type (for example, TrueType or Adobe Built-In)
Usable In Specifies whether the font is usable in PDF, FlashPaper, or both
formats. Note that Adobe built-in fonts are not usable in FlashPaper
output format.
Path Fully qualified path to the font file.

23
Last updated 2/17/2016
ColdFusion can create documents and reports in both PDF and FlashPaper format. Both of these formats require that
the server computer have access to the fonts used in the HTML styles (cfdocument tag) or the report definition
(ColdFusion Report Builder). ColdFusion requires access to these fonts to properly render text in PDF and FlashPaper
documents and, when specified, to embed fonts into a PDF file.
Types of fonts and font extensions
The ColdFusion Administrator lets you register the following types of fonts:
The Font Management page also displays the built-in Acrobat fonts, which are available for PDF only. ColdFusion does
not use PFM or FFT fonts.
Font locations
The ColdFusion Administrator automatically displays the fonts discovered in platform-specific default locations, as
follows:
•Windows - The Windows/Fonts directory (for example, WINDOWS/Fonts or WINNT/Fonts)
•Unix - The following directories:
•/usr/X/lib/X11/fonts/TrueType
•/usr/openwin/lib/X11/fonts/TrueType
•/usr/share/fonts/default/TrueType
•/usr/X11R6/lib/X11/fonts/ttf
•/usr/X11R6/lib/X11/fonts/truetype
•/usr/X11R6/lib/X11/fonts/TTF Additionally, you can define fonts stored in other locations on the server. These are
called user-defined fonts. For example, you may want to register the Lucida family of TrueType fonts, which the Sun
JDK ships in the jdk_root/jre/lib/fonts directory.
Embedding fonts in PDF output
Report developers can optionally specify that ColdFusion embed fonts in the PDF file (FlashPaper always embeds
fonts). When using the cfdocument tag, fonts are embedded if fontEmbed is set to yes or selective. When using reports
defined in the Report Builder, fonts are embedded if specified in the report definition file.Embedding fonts increases
file size, but ensures that reports display appropriately regardless of whether or not client computers have the fonts
installed.
Type File extension Description Usable in
True Type TTF Scaleable font format developed
by Apple Computer and
supported in all Macintosh and
Windows operating systems.
PDF and FlashPaper
True Type Collection TTC A file that contains multiple
TrueType or OpenType fonts
PDF and FlashPaper
Open Type OTF An extension of the TrueType font
format.
PDF and FlashPaper
Adobe printer font PFB Adobe printer font PDF only
Adobe Font Metrics AFM A font format that contains
general font information and font
metrics information. Typically
used on Unix only.
PDF only
24
Last updated 2/17/2016
Client requirements
If fonts are not embedded in the PDF file, fonts must be installed on the client computer to ensure that reports display
appropriately.Most Windows computers ship with Internet Explorer, which includes the Microsoft Core Fonts, a set of
TrueType fonts.
UNIX considerations
If you install ColdFusion on a UNIX computer you must ensure that the appropriate fonts are installed, even if the
computer provides console access only.For more information on TrueType fonts for UNIX, see
http://corefonts.sourceforge.net/.
ColdFusion Report Builder considerations
The ColdFusion Report Builder has no automatic knowledge of fonts available on the server so the developer building
the report definition must consult the ColdFusion MX Administrator to determine which fonts are available on the
server and, if necessary, register fonts in the Administrator or install fonts on the computer that runs Report Builder.
Document page
Depending on whether your ColdFusion server is installed on a local or remote server, you can configure OpenOffice
with your ColdFusion server instance.
For more information about configuring OpenOffice with ColdFusion, see Using the ColdFusion Administratorin
Installing ColdFusion.
Java and JVM page
The Java and JVM page lets you specify the following settings, which enable ColdFusion to work with Java:
Restart ColdFusion server after making the changes.
Note: Some font licenses prohibit embedding. ColdFusion does not embed fonts marked as not-for-embedding.
Option Description
Java Virtual Machine Path The absolute file path to the location of the Java Virtual Machine (JVM)
root directory. The default is cf_root/runtime/jre.
Minimum JVM Heap Size The JVM initial heap size.
Maximum JVM Heap Size The JVM maximum heap size. The default value is 512 MB.
ColdFusion Class Path The file paths to the directories that contain the JAR files that
ColdFusion uses. Specify either the fully qualified name of a directory
that contains your JAR files or a fully qualified JAR filename. Use a
comma to separate multiple entries.
JVM Arguments The arguments to the JVM. Use a space to separate multiple entries
(for example, -Xint -Xincgc).
aArgs[i] contains '-Xms' aArgs[i] contains "-Djava.security.manager" aArgs[i] contains "-Djava.security.policy" aArgs[i] contains "-
Djava.security.auth.policy" aArgs[i] contains '-Djava.awt.graphicsenv' aArgs[i] contains '-Djava.awt.headless' aArgs[i] contains '-
Dcoldfusion.classPath' aArgs[i] contains '-Dcoldfusion.rootDir' aArgs[i] contains '-Dcoldfusion.libPath' aArgs[i] contains
'{application.home}/lib/webchartsJava2D.jar'

25
Last updated 2/17/2016
When you update the Java and JVM Settings page, ColdFusion writes the changes to jvm.config, which is located in
cf_root\runtime\bin. Before ColdFusion saves your changes, it saves a copy of the current jvm.config file as jvm.bak. If
your changes prevent ColdFusion from restarting, use jvm.bak to restore your system. For example, rename jvm.config
to jvm.config_BAD, and then rename jvm.bak to jvm.config. ColdFusion filters out default settings for the jvm.args
attribute from the jvm.config file, including the following:
To use Server Monitor or Multiserver Monitor on a J2EE deployment of ColdFusion on Oracle 10g, in JVM Arguments
set -Doc4j.jmx.security.proxy.off=true
Settings Summary page
The Settings Summary page shows all ColdFusion configuration settings. Click a group name to open the
Administrator section of that group, where you can edit settings. This page is not enabled in the Standard Edition.
In ColdFusion, you can export the server settings to PDF by clicking the Save As PDF button on this page.
Data and Services section
The Data and Services section of the Administrator is the interface for ColdFusion, data sources, and search and
indexing features. The following table describes some common tasks that you can perform in the Data & Services
section of the Administrator:
Data Sources page
The Data Sources page lets you create, edit, and delete JDBC data sources. Before you can use a database in a
ColdFusion application, you register the data source in the ColdFusion Administrator. For more information, see Data
Source Management for ColdFusion . Before you can access a database with a ColdFusion application, perform the
following:
1Understand and determine the database driver required to interact with the data source. ColdFusion uses JDBC
database drivers to communicate with data sources.
2Configure the database as a ColdFusion data source by specifying a driver, adding data source information, and
connecting to a database.
3Verify the data source. For more information on adding data sources, see Adding data sources .
ColdFusion Collections page
Use this page to create and manage your Solr collections.
Task Description
Create and manage JDBC data sources The Data Sources page lets you establish, edit, and delete JDBC data
source connections for ColdFusion. For more information, see Data
Source Management for ColdFusion .
Create and maintain ColdFusion collections The ColdFusion Collections page lets you create and delete Solr
collections and perform maintenance operations on collections that
you create. For more information, see ColdFusion Collections page .
Define mappings for web services The Web Services page lets you produce and consume remote
application functionality over the Internet. For more information, see
Web Services page .
Specify settings to integrate with Adobe Flex applications The Flex Integration page lets you specify which Flex integration
features to enable and which IP addresses can perform data service
operations. For more information, see Flex Integration page .
26
Last updated 2/17/2016
ColdFusion lets you manage your collections from the Administrator. You can index, optimize, purge, reload, or delete
Solr collections that are connected to ColdFusion. You use the icons in the Actions column to perform the following
actions:
ColdFusion includes Solr, which provides indexing and searching technology. This enables creating, populating, and
managing collections of indexed data that are optimized for fast and efficient site searches. A collection is a logical
group of documents and metadata about the documents. The metadata includes word indexes, an internal documents
table of document field information, and logical pointers to the document files. For more information about building
search interfaces, see Building a Search Interface and Solr search support in the Developing ColdFusion Applications.
If the ColdFusion Collections page is unable to retrieve collections, ensure that Solr Search Server is running.
Populate a Solr collection
After you create a collection, use the Solr Collections section to populate (or index) it, with data from text and binary
files, in a directory that you specify. A collection comprises metadata that describes indexed documents. Data from a
ColdFusion query can be indexed only by using the ColdFusion cfindex tag. To populate (index) a collection,
1In the list of Solr Collections, click the name of the collection or its Index Collection button. The Index Solr
Collections page appears.
2Review the extensions in the File Extensions field. You can add, edit, or remove extensions for files in the collection.
3In the Directory Path field, enter the path to a directory to index. To locate and enter a path, click Browse Server.
4To include subdirectories of the specified directory, select the Recursively Index Sub Directories option.
5(Optional) In the Return URL field, enter the URL prefix used to display documents found in the search in a
browser. For example, if you index the ColdFusion documentation directory, the directory you index could be
C:\ColdFusion10\cfusion\wwwroot\cfdocs. You would enter the return URL as {{http://localhost:8500/cfdocs/.
}}This assumes that you are using the built-in web server on port 8500.
6Click Submit. ColdFusion populates the collection with data from the specified directory. Then the ColdFusion
Collections page appears. To close the page without saving changes, click Cancel.
Rename or create an alias for a Solr collection
1Click the ColdFusion collection that you need to rename from the ColdFusion Collections page. The Manage
Collection page is displayed.
2In the Rename Collection section, enter a new name in the New Name for Collection field and click Submit.
3To specify an alias for the collection, enter the alias in the Collection Alias field and click Submit.
Solr Server page
Action Description
Reload Reloads the collection.
Index Analyzes the files in a collection and assembles metadata and pointers
to the files.
Optimize Reclaims space left by deleted and changed files by consolidating
collection indexes for faster searching. You should optimize
collections regularly.
Purge Deletes all documents in a collection, but not the collection itself.
Leaves the collection directory structure intact.
Delete Deletes a collection.

27
Last updated 2/17/2016
The Solr server instance runs as a separate server, which you can start or stop as a service. You can configure your Solr
collection for indexing and search capabilities using ColdFusion Administrator.
Solr collections
The ColdFusion Administrator implements Solr support using the following panels in the Data & Services area:
•ColdFusion Collections Once a Solr collection is created, use the Index, Optimize, Purge, or Delete Actions under
the Solr Collection area at the bottom of the panel. You can also rename and alias a Solr collection in ColdFusion
Administrator. To do this,
1Click the ColdFusion collection that you need to rename from the ColdFusion Collections page. The Manage
Collection page is displayed.
2In the Rename Collection section, enter a new name in the New Name for Collection field and click Submit.
3To specify an alias for the collection, enter the alias in the Collection Alias field and click Submit.
•Solr Server Configure the Solr server host name, home directory, and other advance settings using the Solr Server
page.
Solr server
Use the Solr Server page to specify the Solr server host name and home directory. You can also configure advance
settings including the admin port, web application name, and buffer limit. Click Show Advance Settings to add the
following details:
•Solr admin port
•Solr WebApp
•Solr Buffer Limit
•Authentication details
•If to use an HTTPS connection, and if so the Solr HTTPS port. You can also configure indexing laguages by
providing a language name and suffix.
Migrate collections
To migrate the collection, browse and select the old Solr home and then click Migrate Solr Collections.For details, see
"Solr enhancements in ColdFusion 10" in Developing Adobe ColdFusion Applications.
Web Ser vi ces page
Web services let you publish and consume remote application functionality over the Internet. With a web service, you
can make a request to the remote application to perform an action. You can use the ColdFusion Administrator to
register web services so that clients do not have to specify the entire WSDL URL when they reference the web service.
For more information on publishing and consuming web services through ColdFusion, see ColdFusion Developer's
Guide.
Add a web service
1In the Web Service Name box, enter the name of the web service.
2In the WSDL URL box, enter the URL for the Web Services Description Language (WSDL).
3Enter a user name and password.
4(If applicable) Specify the proxy server details and credentials.
5(Optional) Specify the timeout value for the web-service request in seconds.
6Click Add Web Service. Your Web Service Name appears in the list of Active ColdFusion Web Services.

28
Last updated 2/17/2016
Edit a web service
1In the Active ColdFusion Web Services area, click the web service name. The ColdFusion Administrator displays
the web service in the top portion of the window.
2Modify settings.
3Click Update Web Service.
View WSDL for a web service
?In the Active ColdFusion Web Services area, click the WSDL URL. The ColdFusion Administrator opens the WSDL
in a new browser window.
When you register a web service, you can shorten your code and change a web service URL without editing your code.
For more information, see Using Web Services in the Developing ColdFusion Applications.
REST Services page
After you create the CFC you want to REST-enable, specify the folder for registering as web service in the ColdFusion
Administrator.
Browse and select the application path or root folder where ColdFusion would search for CFCs.When you specify a
folder, all CFCs in that folder or subfolders for which you have specified rest or restPath are registered.
1(Optional) In the Service Mapping section, specify virtual mapping in place of application name. If the folder has
an Application.cfc and an application name, then the service is identified with the application name. You can
override this by specifying the service mapping. In this case, the service is identified with the service mapping that
is provided. If there is no Applicaiton.cfc in the folder, then it is mandatory to specify the Service mapping.
2(Optional) Specify an application as default REST service. Only one application can be set as default for a server
instance. You can change the default application at any time. Check Set the default application and then click Add
Service. To remove the service as default, uncheck it.
3After you specify the details, click Add Service to register. The Active ColdFusion REST Services section specifies
the details of all registered web services. After you register, all CFCs are published as RESTful services. On
subsequent startups, the registered services automatically get published.
Flex Integration page
Use this page to specify which Flex integration features to enable and which IP addresses can perform data-service
operations. If you enable Adobe LiveCycle Data Services ES support, but do not specify any IP addresses, only processes
on the local computer can connect to the LiveCycle Data Services ES server in ColdFusion.
Option Description
Enable Flash Remoting Support Specifies whether to enable Flash clients to connect to this ColdFusion
server and invoke methods in ColdFusion components (CFCs).
Enable Remote LiveCycle Data Management Access Specifies whether to enable a LiveCycle Data Services ES server to
connect to this ColdFusion server and invoke methods in CFCs to fill,
sync, get, or count records in a result set used in a Flex application.
Enable this option only if you are running LiveCycle Data Services ES
remotely.

29
Last updated 2/17/2016
To use SSL, create a keystore file. The keystore is a self-signed certificate. (You do not need a certificate signed by a
Certificate Authority, although if you do use one, you do not need to configure Flex as indicated in the following steps.)
The information in the keystore is encrypted and can be accessed only with the password that you specify. To create the
keystore, use the Java keytool utility, which is included in the Java Runtime Environment (JRE).
Enable SSL
1Create the keystore.
2Configure Flex.
3Enable SSL in the ColdFusion Administrator.
Create the keystore
?To generate the SSL server (ColdFusion) keystore file, use the keytool utility, with a command similar to the
following:
The following table describes the parameters of the keytool utility:
Place the certificate you created in the file that the JVM uses to determine what certificates to trust. The file in which
you place the certificate (usually named cacerts), is located in the JRE, in the lib/security folder.
Configure Flex
1To export the keystore to a certificate, use the keytool utility, with a command similar to the following:
Server Identity Specifies the ColdFusion server on which you want to enable Flex Data
Management Support.
Enable RMI Over SSL For Data Management To encrypt communication between ColdFusion and Flex, enable
Secure Sockets Layer (SSL).
Select IP Addresses Where LiveCycle Data Services Are Running Specifies which LiveCycle Data Services ES servers can connect to the
LiveCycle Data Services ES support in ColdFusion. If you do not specify
a list of allowed IP addresses, only processes on the local computer can
connect to the LiveCycle Data Services ES support in ColdFusion
keytool -genkey -v -alias FlexAssembler -dname "cn=FlexAssembler" -keystore cf.keystore -keypass mypassword -storepass mypassword
Parameter Description
-alias The name of the keystore entry. You can use any name for this, as long
as you are consistent when referring to it.
-dname The Distinguished Name, which contains the Common Name (cn) of
the server.
-keystore The location of the keystore file.
-keypass The password for your private key.
-storepass The password for the keystore. The encrypted storepass is stored in
ColdFusion configuration files.
-rfc Generates the certificate in the printable encoding format.
-file The name of the keystore file.
-v Generates detailed certificate information
keytool -export -v -alias FlexAssembler -keystore cf.keystore -rfc -file cf.cer

30
Last updated 2/17/2016
2To import the certificate into the JRE cacerts file for your server, use the keytool utility, with a command similar to
the following:
Debugging and Logging section
Use the Debugging Settings and Debugging IPs pages to configure ColdFusion to provide debugging information for
every application page that a browser request. Specify debugging preferences by using the pages as follows:
•On the Debugging Output Settings page, select debugging output options. If debugging is enabled, the output
appears in block format after normal page output.
•On the Debugging IP Addresses page, restrict access to debugging output. If a debugging option is enabled,
debugging output is visible to all users by default.
•On the Logging Settings page, specify a directory for error log files that can contain useful debugging information.
Debugging Output Settings page
The Debug Output Settings page provides the following debugging options:
keytool -import -v -alias FlexAssembler -file cf.cer -keystore C:\fds2\UninstallerData\jre\lib\security\cacerts
Note: Enabling debugging affects performance. It is advised that you do not enable debugging on a production server.
Option Description
Enable Robust Exception Information Displays detailed information in the exceptions page, including the
physical path and URI of the template, the line number and snippet,
the SQL statement used (if any), the data source name (if any), and the
Java stack trace.
Enable Request Debugging Output Enables the ColdFusion debugging service.
Select Debugging Output Format Controls debugging format. Select either of the following formats:
•classic.cfm - The format available in ColdFusion 5 and
earlier. It provides a basic view and few browser
restrictions.
•dockable.cfm - A dockable tree-based debugging
panel. For details about the panel and browser
restrictions, see the online Help.
Report Execution Times Reports execution times that exceed a specified time limit.
General Debug Information Show general information about the ColdFusion MX version, template,
timestamp, user locale, user agent, user IP, and host name.
Database Activity Shows the database activity for the SQL Query events and Stored
Procedure events in the debugging output.
Exception Information Shows all ColdFusion exceptions raised for the request in the
debugging output.
Tracing Information Shows trace event information in the debugging output. Tracing lets
you track program flow and efficiency using the cftrace tag.
Timer Information Shows output from the cftimer tag.
Flash Form Compile Errors And Messages (Development use only) Displays ActionScript errors in the browser
when Flash forms are compiling, and affects the display time of the
page.

31
Last updated 2/17/2016
Using the cfstat utility
The cfstat command-line utility provides real-time performance metrics for ColdFusion. The cfstat utility uses a socket
connection to obtain metric data. You can use the cfstat utility to display information that ColdFusion writes to the
System Monitor without using the System Monitor application. The following table lists the metrics that the cfstat
utility returns:
Variables Displays information about parameters, URL parameters, cookies,
sessions, and CGI variables in the debugging output.
Enable Performance Monitoring(Server configuration only) Enables the standard NT Performance Monitor application to display
information about a running server. TIP: Restart ColdFusion after you
change this setting.
Enable CFSTAT(Server configuration only) Shows performance information on platforms that do not support the
NT Performance Monitor. For more information, see Using the cfstat
utility . TIP: Restart ColdFusion after you change this setting.
Metric abbreviation Metric name Description
Pg/Sec Page hits per second The number of ColdFusion pages processed
per second. You can reduce this limit by
moving static content to HTML pages.
DB/Sec Database accesses per second The number of database accesses per second
that ColdFusion makes. Any difference in
complexity and resource load between calls is
ignored.
Req Q'ed Number of queued requests The number of requests that are currently
waiting for ColdFusion to process them. Lower
values, which you can achieve with efficient
CFML, are better.
Req Run'g Number of running requests The number of requests that ColdFusion is
currently actively processing.
Req TO'ed Number of timed out requests The total number of ColdFusion requests that
have timed out. Lower values, which you can
achieve by aggressive caching, removing
unnecessary dynamic operations and third-
party events, are better.
AvgQ Time Average queue time A running average of the time, in milliseconds,
that requests wait for ColdFusion to process
them. Lower values, which you can achieve
with efficient CFML and enhanced caching,
are better. Averages are displayed for the last
two completed requests.
AvgReq Time Average request time A running average of the time, in milliseconds,
that it takes ColdFusion to process a request
(including queued time). Lower values, which
you can achieve with efficient CFML, are
better. Averages are displayed for the last two
completed requests.

32
Last updated 2/17/2016
Before you use the cfstat utility, ensure that you selected the Enable Performance Monitoring option in the ColdFusion
Administrator (on the Debugging & Logging > Debugging Settings page). If you select this option, restart ColdFusion
for this change to take effect.
cfstat options
The cf_root/bin directory contains the cfstat utility. From that directory, type cfstat and use the following switches:
This example runs the cfstat utility and displays a new line every 20 seconds:
Debugging IP Addresses page
Use the Debugging IP Addresses page to restrict debugging output to one or more IP addresses. You can add and
remove IP addresses.
To add a debugging IP address,
1In the Debugging IP Addresses page, enter an IP address that you want to receive debugging output. The default IP
address is 127.0.0.1.
2Click Add.
3(Optional) To add the IP address of the computer you are using, click Add Current. The list below the IP Address
field shows the IP addresses that you added. To remove a debugging IP address:
4Select an IP address from the list.
5Click Remove Selected. The address no longer appears in the list.
AvgDB Time Average database transaction time A running average of the time that ColdFusion
spends on database-related processing of
ColdFusion requests. Averages are displayed
for the last two completed requests.
Bytes In/Sec Bytes incoming per second The number of bytes that ColdFusion read in
the last second (not an average).
Bytes Out/Sec Bytes outgoing per second The number of bytes that ColdFusion wrote in
the last second (not an average).
Switch Description Comment
-n Suppress column headers. Useful for saving output to a file.
-s Display output in a single line. Display a single line and delay display of the
first line so the cfstat utility can display
meaningful values in the per-second
counters.
#Where # is an integer, display output every #
seconds.
If you do not specify an integer, the cfstat
utility returns one line. Specify this switch with
or without the s switch.
-x Display extended output breaking of different
request threads.
Available in ColdFusion Enterprise. It is
ignored in ColdFusion Standard.
-port Allows you to specify the port to which
ColdFusion listens for cfstat communications.
When using cfstat from two different
ColdFusion server instances, their port
numbers of the said server instances should
be explicitly specified.
cfstat 20

33
Last updated 2/17/2016
Debugger Settings page
Note: If you do not specify IP addresses, and debugging options are active, ColdFusion displays debugging output for all
users.
Debugger Settings page
To use the ColdFusion Debugger that runs in Eclipse, select the Allow Line Debugging option. Specify the port and the
maximum number of simultaneous debugging sessions. Specify the debugger port in the JVM settings of your
application server, for example:
To stop a currently running debugging session, click Stop Debugging. For the changes that you specify on this page to
take effect, restart the ColdFusion server.
Logging Settings page
Use the Logging Settings page of the Administrator to change ColdFusion logging options. The following table
describes the settings:
Log Files page
The Log Files page lets you perform operations on log files, such as searching, viewing, downloading, archiving, and
deleting. Click a Log File icon located in the Actions column of the Available Log Files table, to search, view, download,
archive, or delete a log file. Use the Logging Settings page to enable or disable administrative logging options, as the
following table describes:
-Xrunjdwp:transport=dt_socket,server=y,suspend=n,address=#portNum#
Option Description
Log Directory Specifies the directory to which error log files are written. TIP: Restart
ColdFusion after you change this setting.
Maximum File Size (kb) Sets the maximum file size for log files. When a file reaches this limit, it
automatically is archived.
Maximum Number Of Archives Sets the maximum number of log archives to create. When they reach
this limit, files are deleted in the order of oldest to newest.
Log Slow Pages Taking Longer Than n Seconds Logs the names of pages that take longer than the specified interval to
process. Logging slow pages can help you diagnose potential
problems or bottlenecks in your ColdFusion applications. Entries are
written to the server.log file.
Log All CORBA Calls Logs all CORBA calls.
Enable Logging For Scheduled Tasks Logs ColdFusion Executive task scheduling.
Option Description
Log directory Select this option to change the location where ColdFusion log files
are written. The location that you specify in this field must have
sufficient disk space and security privileges for the ColdFusion system
service.
Maximum file size (KB) Set the maximum file size for log files. When a file reaches this size,
ColdFusion automatically archives it.
Maximum number of archives Set the maximum number of log archives to create. After reaching this
limit, ColdFusion deletes files in order of oldest to newest.

34
Last updated 2/17/2016
The following table describes the ColdFusion log files:
Enable/Disable logging
Use the icon for start/stop in the Actions column of the Log Files page to stop/start logging for a particular log type.
Filter log content
1To open the Log Filter, click Launch Filter on the Log Viewer page.
2In the Log Filter dialog box, specify one or more of the following options:
(UNIX only) Use operating system logging facilities Select this option to log messages using the UNIX syslog logging
facility. ColdFusion also writes log messages to the standard
ColdFusion log files.
Log slow pages taking longer than n seconds Specify the number of seconds that ColdFusion waits before logging
the names of pages that take longer than the specified interval to
process. Logging slow pages can help you diagnose potential
problems in your ColdFusion applications. ColdFusion writes entries to
server.log.
Log all CORBA calls Select this option to log all CORBA calls.
Enable logging for scheduled tasks Select this option to log ColdFusion Executive task scheduling.
Log file Description
rdservice.log Records errors that occur in the ColdFusion Remote Development
Service (RDS). RDS provides remote HTTP-based access to files and
databases.
application.log Records every ColdFusion error reported to a user. Application page
errors, including ColdFusion syntax, ODBC, and SQL errors, are written
to this log file.
exception.log Records stack traces for exceptions that occur in ColdFusion.
scheduler.log Records scheduled events that have been submitted for execution.
Indicates whether task submission was initiated and whether it
succeeded. Provides the scheduled page URL, the date and time
executed, and a task ID.
eventgateway.log Records events and errors related to event gateways.
migration.log Records errors related to upgrading from a previous version of
ColdFusion.
migrationException.log Records errors related to running ColdFusion applications after
upgrading from a previous version of ColdFusion.
server.log Records errors for ColdFusion.
customtag.log Records errors generated in custom tag processing.
car.log Records errors associated with site archive and restore operations.
mail.log Records errors generated by an SMTP mail server.
mailsent.log Records messages that ColdFusion sends.
flash.log Records entries for Flash Remoting.

35
Last updated 2/17/2016
?To begin the filter process, click one of the following options:
•Show Matches Displays results that match the filter criteria specified on the tab.
•Hide Matches Displays results that exclude any information that matches the filter criteria specified on the tab.
Log files introduced in ColdFusion 9.0.1
You can generate log files for the following services in ColdFusion 9.0.1:
•http
•ftp
•web service
•Portlet
•Derby
•Feed
System Probes page
System probes help you evaluate the status of your ColdFusion applications. Like scheduled tasks, they access a URL at
a specified interval, but they can also check for the presence or absence of a string in the URL. If the URL contents are
unexpected, or if an error occurred while accessing the URL, the probe can send an e-mail alert to the address specified
on the System Probes page. The probe can also execute a script to perform a recovery action, such as restarting the
server. All probe actions are logged in the logs/probes.log file. The System Probes page also displays the status of each
probe. Use the buttons in the Actions column in the System Probes table to perform the following actions:
Option Description
Show Serverity Select one or more severity levels to filter.
Keywords Enter one or more words in the Keywords text box. Click the Find drop-
down list box, and select one of these options: exact phrase, any
words, or all words.
Applications If applicable, enter the application name to filter. If applicable, the
application name appears as the fifth (entry) column in the log file.
Thread IDs The thread identification numbers are used by Adobe Technical
Support personnel to track and troubleshoot problems. The thread
identification string appears as the fourth entry (column) in a log file.
Most Recent Specifies the relative age of included messages.
Date Range To display the log content for a specific date range, enter the start and
end dates. Enter the dates in year-month-day format ( YYYY-MM-DD).
For example, to specify April 21, 2002, enter: 2002-04-21.
Time Span To show the log content for a specific time range, enter the start and
end times. Enter the time span in hour-minute-second format (
HH:MM: SS). For example, to specify 2:00 P.M., enter 14:00:00.
Action Description
Edit Lets you edit the probe.

36
Last updated 2/17/2016
Because probes run as scheduled ColdFusion tasks, they do not run if the server on which they are hosted crashes, or
if the host web server crashes or otherwise does not respond.
System Probes page
Use the System Probes page to manage the ColdFusion system probes that were created to monitor the availability of a
resource in your website.
Suspend probe operation
In the System Probes table, select the name of the probe to suspend, and click the Disable Probe icon.
Add/Edit System Probe page
1In the ColdFusion Administrator navigation pane, click System Probes. The System Probes page appears.
Run Runs the probe immediately, even if it was previously disabled.
Enable/Disable Starts and stops the probe from automatically executing at its
specified interval.
Delete Deletes the probe.
Item Description
Define New Probe Click this button to create a probe configuration.
Actions Click these buttons to run, edit, delete, or disable an existing probe
configuration.
Probe Name Shows the names of the ColdFusion probes created.
Status Shows the current operating state of one or more configured probes
per URL, as follows:
•OK, if the probe is active
•Failed, if a probe is unable to access the URL specified.
•Disabled, if the probe is disabled.
•Unknown , if the probe is inactive and has not run
since the last server restart.
Interval Shows the period between probes.
URL Identifies the URL path that each probe is monitoring.
Notification Notification Email Recipients Specify the e-mail address of the
recipient if a probe fails to connect to the specified URL.
Email Specify the e-mail address of sender. By default, this address is the
address specified on the Mail Server page.
Probe.cfm URL Specifies the probe.cfm page that is located in the CFIDE directory.
ColdFusion requires this page to successfully execute probe
configurations.
Probe.cfm Username If the CFIDE directory is secured, the user name for that directory is
required.
Probe.cfm Password If the CFIDE directory is secured, the password for that directory is
required.

37
Last updated 2/17/2016
2In the System Probes page, do one of the following:
•Define a new probe. Click Define New Probe. The Add/Edit System Probe page appears.
•Edit an existing probe configuration. Locate and click the probe name. The Add/Edit System Probe page appears.
3In the Add/Edit System Probe page, specify or edit the following settings:
Code Analyzer page
The Code Analyzer page evaluates your ColdFusion pages for potential incompatibilities between ColdFusion 10 and
previous versions of ColdFusion. It reviews the CFML pages that you specify and informs you of any potential
compatibility issues. Additionally, the Code Compatibility Analyzer detects unsupported and deprecated CFML
features, and outlines the required implementation changes that ensure a smooth migration. Use the analyzer as
follows:
1In the left navigation pane, select Debugging & Logging > Code Analyzer.
Option Description
Probe Name Provide a name for the probe configuration.
Frequency Select the schedule for running this probe:
•How often (hours, minutes, seconds) the probe
verifies the availability of the URL resource.
•The duration (start and end times) the probe runs to
verify the URL resource.
URL Identifies the URL path that each probe is monitoring.
User Name Name If the URL is a secured path, specify the user name.
Password If the URL is a secured path, specify the password.
Timeout (sec) Specify the time, in seconds, to indicate how long the probe should
wait before registering a failure.
Proxy Server If this request must be routed through a proxy server, enter the URL
and port number of that proxy server.
Port Port number of the proxy server.
Probe Failure Select this option to identify the arguments used to test the URL
resource.
Failure Actions Specify one or both of the following actions to occur when detecting
a failure:
•Send an e-mail notification Select to instruct
ColdFusion to send an e-mail message when detecting
a failure. ColdFusion uses the e-mail address specified
onthe System Probe page.
•Execute the program To run a program when the
probe fails, specify the path and name of the program.
Publish Select to write output results to a file.
File If the publish option is selected, specify the output filename.
Reolve URL Select to maintain links to internal URLs remain intact.

38
Last updated 2/17/2016
2Enter or browse to a directory that contains the ColdFusion pages to analyze.
3(Optional) Click Advanced Options to specify the following items:
•Whether to analyze subdirectories.
•The file types to analyze (separate multiple files with semicolons).
•Whether to filter by severity. All reports error and info data, Error reports code that will not execute properly, and
Info reports that you should consider editing, but will execute properly; for example, deprecated tags.
•Whether to validate CFML. Reports invalid syntax in your CFML; for example, a comment that has an opening
ColdFusion comment tag, and a closing HTML tag.
•The product features to analyze.
License Scanner page
The License Scanner page searches the local subnet to find other running instances of ColdFusion. You can use this
information to determine whether the ColdFusion instances within the subnet are licensed appropriately.
The ColdFusion Administrator uses universal datagram protocol (UDP) multicast to collect license and version
information from all ColdFusion instances running within the subnet.
Server Monitoring section
The Server Monitoring section lets you run the following:
•Server Monitor
•Multiserver Monitor
The Server Monitor is an Adobe SWF application that lets you track activities on a ColdFusion Server. You can identify
information about the server, including requests, queries, memory usage, and errors. You can start and stop collecting
server information and take snapshots of the server.
The Multiserver Monitor is another SWF application. It lets you track the status of several servers.
Extensions section
Use the Extensions section of the Administrator to configure ColdFusion to work with other technologies, such as Java
and CORBA.
Java Applets page
The Java Applets page of the Administrator lets you register applets and edit and delete applet registrations. Before you
can use Java applets in your ColdFusion applications, register them in the Java Applets page.
When your applet is registered with ColdFusion, using the cfapplet tag in your CFML code is simple, because all
parameters are predefined: Enter the applet source and the form variable name to use.
This page has the following areas:
•Register New Applet: Registers a Java applet to include in your ColdFusion applications.
•Actions: Click the Edit icon to edit registration fields of a Java applet. Click the Delete icon to remove the
registration of a Java applet.
•Applet: Click the name of a Java applet to view or edit the registration fields for that applet.
•*Code:*Identifies the name of the file that contains the applet subclass.
•Method: If applicable, this column identifies the method name used in the name attribute of the cfapplet tag.
•Code Base: This area identifies the directory that contains the applet components.

39
Last updated 2/17/2016
To register or modify a Java applet in ColdFusion, use the Add/Edit Registered Java Applet page. Registering an applet
lets you use the cfapplet tag.
Register a Java applet or modify the registration
1If you are registering a new Java applet, install the Java class files and any other files required for the class. Make a
note of the installation path, because you must specify the code base arguments when you register the applet.
2To access the Add/Edit Registered Java Applet page:
•For new registration, select Extensions > Java Applets, and click Register New Applet. The Add/Edit Registered Java
Appletpage appears.
•For existing registration, in the Registered Java Applets table, click the name of the Java applet registration that you
want to view or modify.
?On the Add/Edit Registered Java Applet page, specify or modify the following information:
Option Description
Applet Name Provide a name for the Java applet.
Code Identify the name of the file that contains the applet subclass. This
filename is relative to the code base URL. The *.class file extension is
not required.
Code Base Provide the URL of the code base; the directory that contains the
applet components. The applet class files must be located within the
web browser root directory; for example,
http://<servername>/classes.Note that this field is not required if the
Java applet components are contained in a JAR file. For more
information, see the Archive option.
Archive (Optional) If the Java applet components are stored in a jar file, enter
the jar filename in the Archive text box.
Method (Optional) Specify the method name in the applet that returns a string
value. This method name is used in the name attribute of the cfapplet
tag to populate a form variable with the method's value. If the applet
has no method, leave this field blank.
Height Enter a measurement in pixels for the vertical space for the applet.
Width Enter a measurement in pixels for the horizontal space for the applet.
Vspace Enter a measurement in pixels for the space above and below the
applet.
Hspace Enter a measurement in pixels on each side of the applet.
Align Select an alignment option.
Not supported message Specify a message that will be displayed by browsers that do not
support Java applets. You can override this message with a different
message notsupported attribute in the cfapplet tag.
Parameter name Enter a name for each required applet parameter. Your Java applet
typically provides the parameter name needed to use the applet. Enter
each parameter in a separate parameter field.
Value Enter a default value for every parameter name specified. Click Add to
add the values for the parameters. Your applet documentation
provides guidelines on valid entries.

40
Last updated 2/17/2016
CFX Tags page
Before you can use a CFX tag in ColdFusion applications, register it. Use the CFX Tags page to register and manage
ColdFusion custom tags built with C++ and Java. You can build CFX tags in the following two ways:
•Using C++ as a dynamic link library (DLL) on Windows or as shared objects (.so or .sl extension) on Solaris and
Linux
•Using Java interfaces defined in the cfx.jar file The page has the following areas:
Add/Edit CFX Java Tag page
Add/Edit CFX C++ Tag page
Area Description
Register Java CFX Click this button to register a CFX Java tag that you want to include in
your ColdFusion applications.
Register C++ CFX Click this button to register a CFX C++ tag that you want to include in
your ColdFusion applications.
Actions Click the Edit icon to edit the registration fields of a CFX tag. Click the
Delete icon to remove the registration of a CFX tag.
Tag Name Click the name of a CFX tag to view or edit the tag's registration fields.
Type Identifies the type of language used to build the CFX tag (C++ or Java).
Description Identifies the use of the CFX tag.
Option Description
Tag Name Enter the tag name (after the cfx_prefix). Provide a name for the CFX
tag that you are registering.
Class Name Enter the class name (without the .class extension) that implements
the interface. The class file should be accessible from the Class Path
setting on the Java and JVM page. You typically package the .class file
in a .jar file and save it in the cf_root/lib (server configuration) or
cf_webapp_root/WEB-INF/cfusion/lib (J2EE configuration) directory.
Description Provide a message that identifies the use of this CFX tag.
Option Description
Tag Name Provide a name for the CFX tag that you are registering. Tag names
must be prefixed with cfx_.
Server Library (.dll) Enter the path to the library, or click Browse Server to locate the library
that you want to use.
Procedure Enter the procedure that implements the CFX tag. The procedure
name must correspond with the procedure associated with the DLL or
shared object you have specified. Notice that procedure names are
case sensitive.
Keep Library Loaded Select this option to retain the library in RAM.
Description In this text box, provide a message that identifies the use of this CFX
tag.
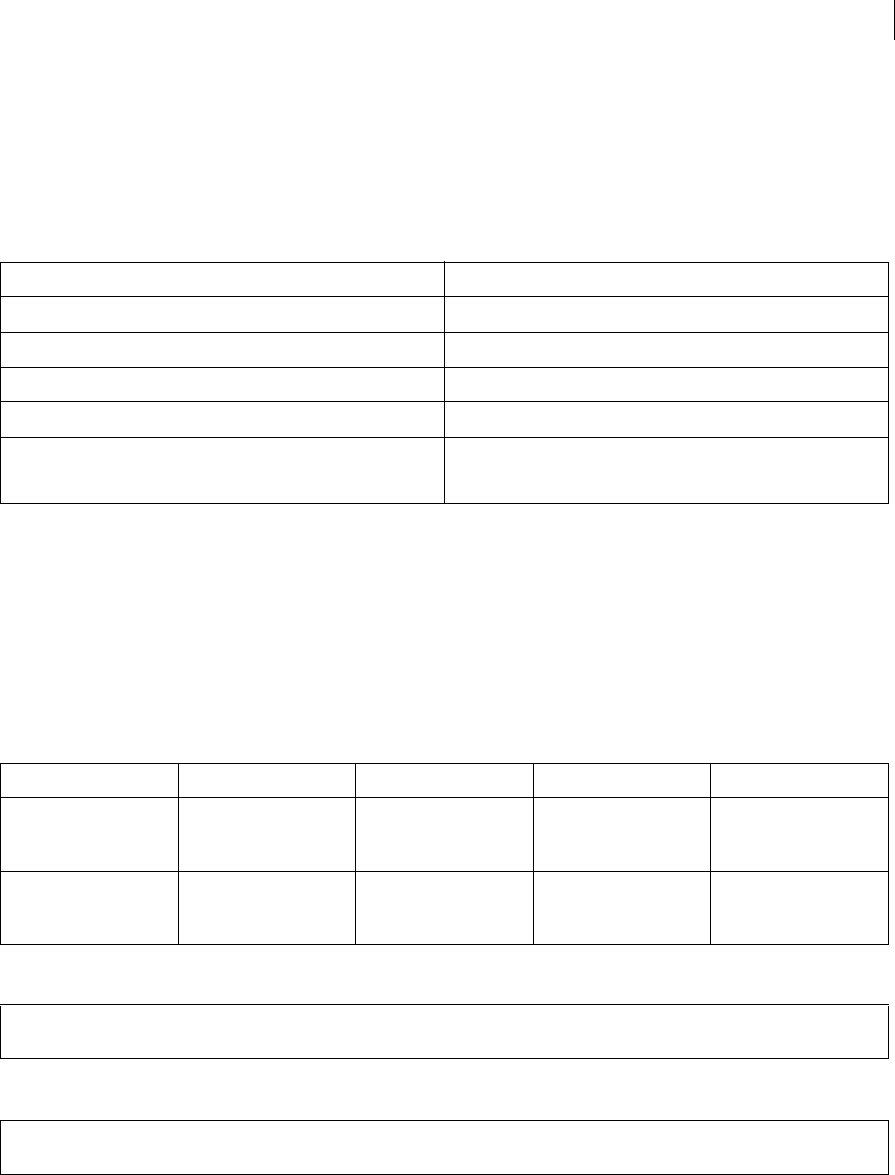
41
Last updated 2/17/2016
Custom Tag Paths page
Use the Custom Tag Paths page of the Administrator to add, edit, and delete custom tag directory paths.
By default, all custom tags are stored under the cf_root/ CustomTags (server configuration) or
cf_webapp_root/WEBINF/cfusion/CustomTags (J2EE configuration) directory. However, you can specify additional
paths to your custom tag locations by using this page. The following table describes the areas on the page:
CORBA Connectors page
Use the CORBA Connectors page to register, edit, and delete CORBA connectors. Register CORBA connectors before
you use them in ColdFusion applications and restart the server when you finish configuring the CORBA connector.
ColdFusion loads object request broker (ORB) libraries dynamically by using a connector, which does not restrict
ColdFusion developers to a specific ORB vendor. The connectors depend on the ORB runtime libraries provided by
the vendor. A connector for Borland Visibroker is embedded within ColdFusion. Make sure that the ORB runtime
libraries are in cf_root/runtime/lib (server configuration) or cf_webapp_root/WEB-INF/cfusion/lib (multiserver and
J2EE configurations). The following table contains information about the libraries and connectors:
Example of a CORBA connector configuration for VisiBroker:
ColdFusion includes the vbjorb.properties file, which contains the following properties that configure the ORB:
Event Gateways section
The Event Gateways section of the Administrator lets you configure event gateway settings, gateway types, and gateway
instances.
Area Description
New Path Specify the path of your custom tags.
Browse Server Click to browse your system fro the location of your custom tags.
Add Path Click to add the path specified in the path text box.
Actions Click Exit to edit or Delete to remove a selected path.
Path Identifies the custom tag paths registered in ColdFusion.
Operating System Vendor ORB ColdFusion connector ORB library
Windows NT and later Borland VisiBroker 4.5 coldfusion.runtime.corba.
VisibrokerConnector
(embedded)
vbjorb.jar
Solaris Borland VisiBroker 4.5 coldfusion.runtime.corba.
VisibrokerConnector
(embedded)
vbjorb.jar
ORB Name visibroker ORB Class Name coldfusion.runtime.corba.VisibrokerConnector ORB Property File
c:\ColdFusion10\runtime\cfusion\lib\vbjorb.properties Classpath [blank]
org.omg.CORBA.ORBClass=com.inprise.vbroker.orb.ORB org.omg.CORBA.ORBSingletonClass=com.inprise.vbroker.orb.ORB
SVCnameroot=namingroot

42
Last updated 2/17/2016
ColdFusion event gateways are ColdFusion elements that let ColdFusion react to or generate external events or
messages in an asynchronous manner. Event gateways let a ColdFusion application handle information that does not
come through an HTTP request. For example, you can use event gateways to handle instant messages, short messages
from mobile devices, or messages sent to a TCP/IP port. ColdFusion includes several event gateways, including an SMS
(Short Message Service) gateway for sending short, often text, messages to and from wireless devices, such as mobile
phones or pagers and a gateway for the XMPP (Extensible Messaging and Presence Protocol) instant messaging
protocol.
Event Gateways Settings page
The Event Gateways Settings page lets you configure settings for all event gateways, and start or stop the Short Message
Service (SMS) test server. The following table describes the settings:
Gateway Types page
The Gateways Types pages let you configure the types of gateways available on your system. After you configure a type,
you can create any number of gateway instances of that type.
The following table describes the event gateway types that ColdFusion includes:
Option Description
Enable ColdFusion Event Gateway Services Specifies whether the service is enabled. Changing this setting restarts
the service.
Event Gateway Processing Threads Specifies the maximum number of threads used to execute
ColdFusion functions when an event arrives. A higher number uses
more resources, but increases event throughput.
Maximum Number Of Events To Queue Specifies the maximum number of events allowed on the event
queue. If the queue length exceeds this value, gateway events are not
be added to the processing queue.
Start/Stop SMS Test Server Starts and stops the short message service (SMS) test server.
Option Description
Type Name Specifies a name for the event gateway type (for example, SMS for the
SMS event gateway).
Description Specifies a description for the gateway type.
Java Class Specifies the fully qualified name of the gateway class full Java class
name (for example, coldfusion.eventgateway.sms.SMSGateway for
the SMS event gateway).
Startup Timeout nSeconds Specifies a startup timeout, in seconds.
Stop on Startup Timeout If enabled, ColdFusion stops the gateway class if it times out on
startup. If disabled, ColdFusion logs a warning message when the
timeout value is exceeded.
Gateway type Description
CFML Triggers asynchronous events from ColdFusion.
DataManagement Lets a ColdFusion application notify a Flex destination about changes
in the data that the destination manages.
DataServicesMessaging Sends messages to and receive messages from Flex applications.

43
Last updated 2/17/2016
Gateway Instances page
The Gateway Instances page lets you configure ColdFusion event gateway instances to direct events from various
sources to ColdFusion components (CFCs) that you have written. The following table describes the settings:
Security section
The Security section of the Administrator lets you configure the security frameworks of ColdFusion.
For more information on security, see Administering ColdFusion Security.
RDS page
FMS Gateway Modifies data through the ColdFusion application or the Flash client,
and reflects the change in the Flash Media Server shared object.
SMS Used to send and receive SMS messages.
SAMETIME Used to send and receive instant messages through Lotus SameTime.
XMPP Used to send and receive instant messages through the Extensible
Messaging and Presence Protocol (XMPP).
Samples Sample gateway types, including the following:
•DirectoryWatcher - Watches a directory for file
changes.
•JMS - Acts as a Java Messaging Service consumer or
producer.
•Socket - Listens on a TCP/IP port.
Option Description
Gateway ID A name for the event gateway instance. You use this value in the
ColdFusion GetGatewayHelper and SendGatewayMessage functions.
Gateway Type The event gateway type.
CFC Path The absolute path to the listener CFC that handles incoming
messages.
Configuration File (Optional) Configuration file, if necessary for the event gateway
instance.
Startup Mode The event gateway startup status, as follows:
•Automatic - Start the event gateway when ColdFusion
starts.
•Manual - Do not start the event gateway with
ColdFusion, but allow starting it from the Gateway
Instances page.
•Disabled - Do not allow the event gateway to start.
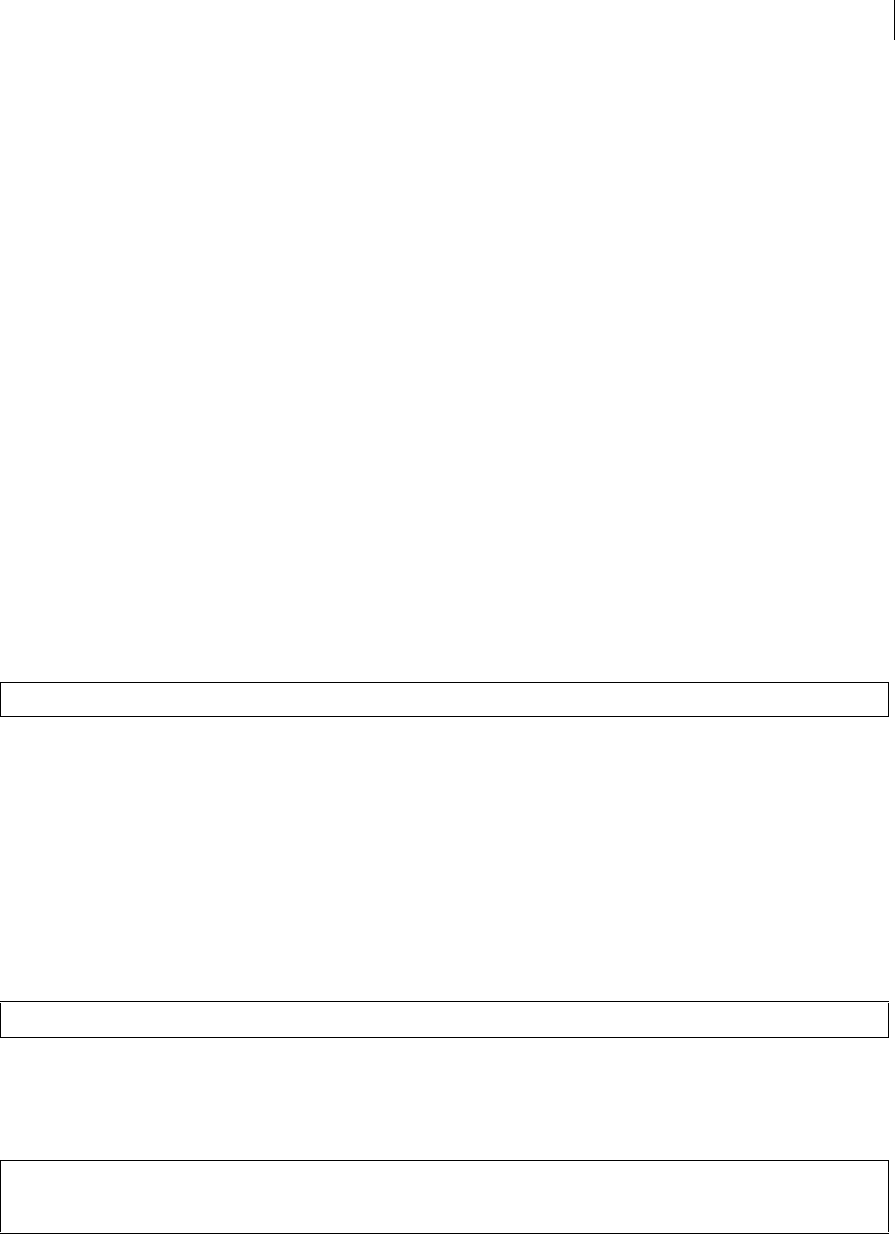
44
Last updated 2/17/2016
Use the RDS page to enable and disable password-restricted RDS access to server resources from Adobe Macromedia
Dreamweaver MX , Adobe Macromedia HomeSite+ , ColdFusion Extensions for Eclipse, or the ColdFusion Report
Builder, and to change the RDS password. You can also configure all users to use a single RDS password, or allow only
users defined in the User Manager to have access through RDS. The minimum character limit is 5 and the maximum
character limit is 50. In ColdFusion 10, you can enable/disable RDS using ColdFusion Administrator. That is, you can
modify the settings that you made at the time of installation using ColdFusion Administrator. The RDS page on the
ColdFusion Administrator (Security > RDS) lets you enable/disable RDS service.
Sandbox security page
You use the Sandbox Security page (called Resource Security in the Standard Edition) to specify security permissions
for data sources, tags, functions, files, directories, IP addresses, ports, and runtime permissions. Sandbox security uses
the location of your ColdFusion pages to determine functionality. A sandbox is a designated area (CFM files or
directories that contain CFM files) of your site to which you apply security restrictions. By default, a subdirectory (or
child directory) inherits the sandbox settings of the directory one level above it (the parent directory). If you define
sandbox settings for a subdirectory, you override the sandbox settings inherited from the parent directory. Use sandbox
security to control access to the following:
•Data sources
•Tags
•Functions
•Files and directories
•IP addresses and ports You can also edit runtime permissions for ColdFusion pages.
For details, see Using sandbox security
User Manager page
Use the User Manager page to specify the user name, password, description, access rights, exposed services, sandboxes,
and allowed roles for individual users. This page is especially useful for web hosting when multiple ColdFusion
applications are on one server, each maintained by a different user or organization. You can grant access to the
ColdFusion Administrator, which also grants access to the Administrator API. If the administrator revokes the role of
a user while the user is logged in, the revocation takes effect only when the user logs in again. The default user ID of an
administrator is admin. To change the administrator user ID, add the following in the neo-security.xml file, replacing
admin with the user ID to use:
Add a user
The User Manager lets you create users that have individually tailored access to portions of the ColdFusion
Administrator, the Administrator API, or RDS access.
1In Security > User Manager, click Add User.
2Specify the username, password, and then confirm the password.
3Optionally, enter a description.
Note: If you have enabled sandbox security and want to use the Administrator API, enable access to the CFIDE/adminapi directory.
<var name='admin.userid.root'> <string>admin</string> </var>
Note: To grant ColdFusion Administrator permissions to multiple users, in addition to creating users on the User Manager page, you must select
the Separate Username And Password Authentication option on the Security > Administrator page. Similarly, you must select the Separate
Username And Password Authentication option on the RDS page to grant RDS access to multiple users.
45
Last updated 2/17/2016
4Select the following options:
•Allow RDS access
•Allow Administrative access: Select one of the following: Administrator Console & API Access and API Access Only.
1Select the ColdFusion Administrator pages that you want the user to be able to access.
2Select any sandboxes that you want the user to be able to access.
3Select the services that you want the user to be able to access.
4Click Add User.
After you create a user, you must log into the ColdFusion Administrator using both a username and password. The
default username for the root administrator is admin. To change it, you must edit the neo-security.xml file by
changing the string "admin" in admin.userid.root, as follows:
When you grant access to specific Administrator pages, the user sees only those pages after logging in to the
Administrator. When you grant Administrator API access and select roles, the user can access the API only for the
pages you specified. For information editing existing user configuration, see Edit User Configuration.
User Sandboxes
If you change the pages or sandboxes to which a user is allowed access while that user is logged in to the Administrator,
the changes take effect only after the user logs out, and then logs in again. For details about creating sandboxes, see
Administering ColdFusion Security.
Exposed Services
ColdFusion exposes existing enterprise services as web services. You can access these services using SOAP and
AMF/Flash remoting. You can select the services available to a user from the Exposed Services section. By default, all
the services are listed in the Allowed Services list box. Press CTRL and select the services that you do not want the user
to avail and click the >> button.Now, click Edit User to implement the changes to the user settings. The following are
the exposed services:
•Allowed services: Mail Service, Document Service, PDF Service, Image Service, Chard Service, POP Service,
•Prohibited services: Exchange Service You can secure the exposed services to prevent access by unknown
applications or users. This can be done by configuring the client IP address range to which services are accessible.
Also, you can set up user access control for the services.On the Security > User Manager page, you can select the
services available to a user from the Exposed Services section. By default, all the services are listed in the Prohibited
Services list box.Press CTRL and select the services that you want the user to avail and click the << button. Now,
click Edit User to implement the changes to the user settings.
Edit user configuration
In the User Manager page, click either the user name like in the User column or the Edit icon in the Action column.
The User Manager page opens in Edit mode, where you can reconfigure the user account settings such as password,
RDS Administrator access, adding sandboxes, and resetting the exposed services for the user.
Allowed IP Addresses
Note: To select multiple contiguous sandboxes or roles, press the Shift key while making selections. To select multiple noncontiguous
sandboxes or roles, press the Control key while making selections.
<var name="admin.userid.root"> <string>admin</string> </var>
Note: You would not be able to reset the user authentication type in the edit mode.

46
Last updated 2/17/2016
Specify client IP addresses that have the permission to access exposed services.
Also see IP Restriction for CFIDE URLs.
Packaging and Deployment section
The Packaging and Deployment section of the Administrator lets you create and deploy CAR files. You can also create
J2EE EAR or WAR files that include an existing ColdFusion application and the ColdFusion runtime system.
ColdFusion Archives page
The ColdFusion Archives page includes tools that let you archive and deploy ColdFusion applications, configuration
settings, data source information, and other types of information to back up your files faster. The complete list of
archivable information includes the following:
•Name and file location
•Server settings
•ColdFusion mappings
•Data sources
•Solr collections
•Scheduled tasks
•Event gateway instances
•Java applets
•CFX tags
•Archive to do lists
After you archive the information, you can use the Administrator to deploy your web applications to the same
ColdFusion server or to a ColdFusion server running on a different computer. Additionally, you can use these features
to deploy and receive any ColdFusion archive file electronically. The Archive Settings page lets you configure various
archive system settings that apply to all archive and deployment operations. For more information, see the Online Help.
Build an archive
To archive a def inition,
1To access the ColdFusion Archives page, select Packaging and Deployment > ColdFusion Archives in the left
navigation pane of the ColdFusion Administrator.
2On the ColdFusion Archives page, locate the name of the archive definition that you want to archive, and then click
the Build Archive icon. The Archive Wizard appears.
3In the Archive Wizard, review the archive summary information, and then click Next to continue. The Choose
Archive File Location page appears.
4In the Choose Archive File Location page, do the following:
•In the File Name text box, specify the full path where you want to store the archive, followed by the name of the
archive. The archive name must have a .car extension.

47
Last updated 2/17/2016
•For U NIX users only: If you must run this archive as a privileged user, select the Run This Archive As A Specific
User option, and then enter any system account name in the User name text box and the corresponding account
password in the Password text box. The user name and password must match the existing user name and password
for this system; the archive process will run as that user. If the user name and password do not match the existing
user name and password for this system account, the build procedure fails.
?Click Next to create the archive. When the archive operation completes, one of the following archive messages
appears:
•Build Successful: The archive was successfully created and stored in the location that you specified in step 4. Click
OK and then click Close on the wizard page.
•Build Failed: The archive was not created. To determine the cause of the problem, review the information appearing
on the page, and click Details to further analyze the cause of the problem.
J2EE Archives page
ColdFusion lets you create an EAR or WAR file that contains an entire application. This archive file contains the
ColdFusion web application, settings for ColdFusion (such as data source definitions), the CFM pages used by your
application (text or compiled Java), and optionally, the ColdFusion Administrator. This feature lets you quickly create
an archive file that a J2EE administrator can use to deploy your ColdFusion application.
J2EE archives are different from ColdFusion archives (CAR) files. For information on CAR files, see ColdFusion
Archives page.
Context root Because the J2EE environment supports multiple, isolated web applications running in a server instance,
each J2EE web application running in a server is rooted at a unique base URL, called a context root (or context path).
The J2EE application server uses the initial portion of the URL (that is, the portion immediately following
http://_hostname_) to determine which web application processes an incoming request.For example, if you are running
ColdFusion with a context root of cfmx, you display the ColdFusion Administrator using the URL
http://_hostname_/_cfmx_/CFIDE/administrator/index.cfm.Most J2EE application servers allow one application in
each server instance to use / (forward slash) for the context root. The Remote Development Services (RDS) web
application is not required if you use a context root of /.
The J2EE Archives page lets you create an enterprise application archive (EAR) file or web application archive (WAR)
file that contains the following items:
•The ColdFusion web application.
•Server settings, such as data sources and custom tag paths.
•The CFML pages of your application, stored in the root directory of the ColdFusion web application. With this EAR
or WAR file, a J2EE administrator can deploy your ColdFusion MX application to a J2EE application server.
You can create a J2EE archive regardless of whether you are running ColdFusion MX in the server configuration or
the J2EE configuration. However, you must be running the J2EE configuration to deploy an EAR or WAR file.
Note: If you are creating a cluster of server instances when running the multiserver configuration, use this page to create the WAR or EAR
files required to create each of the servers in the cluster.
Option Description
Achive Name Specifies a name for the J2EE archive definition. This is also the name
given to the EAR or WAR file.
Application Directory Specifies the location of the CFM files to be included beneath the web
root of the ColdFusion web application.

48
Last updated 2/17/2016
Enterprise Manager section
The Enterprise Manager section of the Administrator lets you create Tomcat server instances with ColdFusion already
deployed, register remote Tomcat server instances, and create clusters of Tomcat server instances.
Instance Manager page
The Instance Manager page lets you view the local and remote Tomcat servers that can be accessed by a cfusion server
running. From this page you can access pages that define new, local, Tomcat servers and register existing Tomcat
servers running on remote computers, as follows:
•Add New InstanceCreate a Tomcat server and automatically deploy a copy of the current ColdFusion MX
application into that server.
•Register Remote Instance Define an existing remote Tomcat server to the Instance Manager for adding these
servers to a cluster. It is not mandatory to run the remote Tomcat server instance when you define it to the Instance
Manager. However, it must be running before you can add it to a cluster.Edit ColdFusion Server: Modify built-in
web server settings for a server instance.
Available servers
Distribution Directory Specifies the directory where ColdFusion places the EAR or WAR file.
ColdFusion uses the name archivename.ear or archivename.war,
depending on the archive type.
Archive Type Specifies whether ColdFusion creates a Web Application Archive
(WAR) file or an Enterprise Application Archive (EAR) file.
Context Root (valid for EAR) If you create an EAR file, you can optionally specify a context root for
the ColdFusion web application. The default is an empty context root.
For more information, see J2EE Archives. If you create a WAR file, the
context root is handled in an application-server-specific manner. In
some application servers, the default context root is the name of the
WAR file; in others, you specify the context root using the deploy tool
or through a server-specific configuration file.
Serial Number Specifies a valid serial number for ColdFusion Enterprise Edition.
Previous Serial Number (if Upgrade) Specify the serial number of the previous ColdFusion installation.
Include COM Support Include COM Support Specifies whether to include the modules that
provide COM support. Omitting COM support reduces the size of the
archive by about 12 MB.
Disable Debugging Specifies whether to disable debugging in the ColdFusion web
application.
Include CFML Source Specifies whether to use the original CFM files or to convert the pages
to Java bytecode.
Include CF Administrator Specifies whether to include the modules and directories for the
ColdFusion Administrator (the CFIDE directory structure). Omitting
the ColdFusion Administrator reduces the size of the archive by about
2 MB.
Configure Data Sources to be Included in Archive Specifies the data sources to include in the J2EE archive. Use the Right
and Left Arrow buttons to select and remove data sources. Use the
Double Arrow buttons to select and remove all data sources with one
click.
49
Last updated 2/17/2016
•By default, the Instance Manager deploys a copy of the current cfusion application (data sources, settings,
administrator password, and so on).
•You can optionally use the Create from EAR/WAR option to create a server with a previously archived application.
Cluster Manager page
The Cluster Manager page in ColdFusion Administrator lets you create and manage clusters of Tomcat servers, each
containing the same ColdFusion application.
1Add a cluster by typing a name in the Cluster Name box, and clicking Add. This creates a cluster and adds it to the
Configured Clusters table.
2Add servers to the cluster by clicking the Edit icon next to the cluster name in the Configured Clusters table. This
displays the Edit Cluster Page.
Edit Cluster Page
The Edit Cluster page in ColdFusion Administrator lets you define the server instances for a cluster and to customize
cluster settings.
Managing clusters
Manage clusters using the ColdFusion Administrator. If your ColdFusion application uses session replication, sticky
sessions are not typically required.
When session replication is enabled, Tomcat propagates session-variable information to all servers in the cluster every
time a session variable changes. Consider whether the application's business requirements require session replication
and whether your network incurs the increased traffic before enabling session replication. Consider using client
variables instead of session variables.
In the ColdFusion Administrator, click Enterprise Manager > Cluster Manager.The sticky sessions and session
replication options require the use of J2EE Sessions by all instances participating in the cluster. To enable J2EE sessions,
go to the Memory Variables page and enable the Use J2EE session variables option. Do this for each server in the cluster.
1Enter a cluster name and then click Add.
2Click the cluster name and move the servers to the cluster based on the requirement.
3(If required) Edit the multicast port.Multicast port is used to group the cluster members together. Default value of
multicast port is 45564. After you create a cluster, the port is added in the cf_install_dir\cfusion\config\cluster.xml
file. For more information on multicast port, see http://tomcat.apache.org/tomcat-6.0-doc/config/cluster-
membership.html.
Area Description
Actions Lets you start, stop, restart, and delete a Tomcat server.
Name Specifies the Tomcat server name. If the server is started, you can click
this name to open a browser window to the Tomcat server's web root.
Server Directory Specifies the server directory.
HTTP Port Specifies the port for the built-in web server.
Remote Port The remote port for the server instance.
Host Specifies the host name or IP address for the server instance.
Cluster Cluster Specifies the name of the cluster that contains the server.

50
Last updated 2/17/2016
4Specify if you need sticky session.Sticky session ensures that after a session is established on an instance, all future
requests from the client are mapped to that instance.
5Click Submit.
Adding a remote instance to a cluster
To add a remote instance to a cluster, add the cluster block to the remote instances server.xml. Then, register the remote
instance and add the instance to the cluster. For more information on configuring clusters on Tomcat, see
http://tomcat.apache.org/tomcat-5.5-doc/cluster-howto.html.
1Register the remote instance to the local machine.
2Create a cluster in the local machine.
3Open the cf_install_dir_instance-name_runtime\conf\server.xml file of the remote instance.
4Add the following block between the entries </host> }}and {{</engine>:
<Cluster className="org.apache.catalina.ha.tcp.SimpleTcpCluster"
channelSendOptions="8">
<Manager notifyListenersOnReplication="true" expireSessionsOnShutdown="false"
className="org.apache.catalina.ha.session.DeltaManager">
</Manager>
<Channel className="org.apache.catalina.tribes.group.GroupChannel">
<Membership port="45565" dropTime="3000" address="228.0.0.4"
className="org.apache.catalina.tribes.membership.McastService" frequency="500">
</Membership>
<Receiver port="4003" autoBind="100" address="auto" selectorTimeout="5000"
maxThreads="6" className="org.apache.catalina.tribes.transport.nio.NioReceiver">
</Receiver>
<Sender className="org.apache.catalina.tribes.transport.ReplicationTransmitter">
<Transport className="org.apache.catalina.tribes.transport.nio.
PooledParallelSender">
</Transport>
</Sender>
<Interceptor className="org.apache.catalina.tribes.group.interceptors.
TcpFailureDetector">
</Interceptor>
<Interceptor className="org.apache.catalina.tribes.group.interceptors.
MessageDispatch15Interceptor">
</Interceptor>
</Channel>
<Valve className="org.apache.catalina.ha.tcp.ReplicationValve" filter="">
</Valve>
<Valve className="org.apache.catalina.ha.session.JvmRouteBinderValve">
</Valve>
<ClusterListener className="org.apache.catalina.ha.session.JvmRouteSessionIDBinderListener">
</ClusterListener>
<ClusterListener className="org.apache.catalina.ha.session.
ClusterSessionListener">
</ClusterListener>
</Cluster>
5. In the entry, update the membership port with the multicast port of the cluster.
6. Using the ColdFusion Administrator of the local host, add the local instance and the remote instance to the cluster.
7. Restart all the instances.
Server Update section
51
Last updated 2/17/2016
In ColdFusion 10 or higher, the ColdFusion Administrator lets you verify and make product updates from the browser-
interface itself.
Updates page
Verify if there are any product updates using the ColdFusion Administrator (Server Update > Update). The updates can
include hot fixes and security hot fixes for ColdFusion 10. The Updates page has the following options:
•Available updates: Click Check for Updates to see if any updates are available for installation.With ColdFusion 10,
you can receive a notification when a new hot fix is available for download by subscribing to RSS feeds using the
following URL:http://www.adobe.com/support/coldfusion/downloads_updates.html. For a multi-server setup,
when you apply the updates from the main instance, you have option to select all local instances to which you may
opt to apply hot fix. By default, update applies only to the main instance. If you apply the updates from a newly
created local instance, the hot fix is applied only to that specific instance. You have to apply the hot fix to other
instances from the main instance or individually from each instance. Before the update, the main ColdFusion
instance automatically stops. But you have to manually stop all other instances (for which you want to apply the
updates).
•Download: Downloads and places the file in <cf_home>/hf-updates/ for later installation.
•Download and install:Downloads the hot fix and performs a silent installation.
•Installed updates: Lists all updates to ColdFusion 10 that you have installed. For multi-server setup, it shows the
list of updates to the instance to which you have logged in from the ColdFusion Administrator.Use the option
Uninstall to remove the installed hot fix (if needed).
•Settings: Provides options to specify update preferences such as update notifications or if to automatically check for
updates. If you have set up a local update site, you can also specify URL of that site to get updates. To do this,
populate the updates.xml (see the following sample) and then update the URL in the Administrator (Server Update
> Updates > Settings > Update Site > Site URL). For example, http://IPAddress:Port/updates/updates.xml. The
following is a sample updates.xml:
Note: If your server is behind a firewall or has no outbound internet access, note that you can download the hotfix file from another
machine via this URL: http://download.adobe.com/pub/adobe/coldfusion/xml/updates.xml. You can then place the hotfix file on the
ColdFusion server and apply the hotfix either with the Admin interface or via the command-line. If you place it in a locally web-accessible
location, you can even configure the updater settings to point to that local URL as the location for ColdFusion to find the updates. See the
discussion on the "settings" section, below. Similarly, if you're behind a proxy and would need to specify proxy information for ColdFusion
to access the public hotfix URL, you can provide that information (proxy host, port, user, and password) by modifying the jvm.config on the
ColdFusion server where the Administrator is being used. Again, for more on information about both of these options, as well as many
answers to 50 common or helpful questions about the updater, see this blog entry from Adobe engineer
Krishnap:http://www.krishnap.com/2012/09/coldfusion-10-hotfix-update-installer.html
Note: This option does not apply to J2EE installations. Also, in the case of multi-server installations, you have to select the server on which
you want to install the hot fix.

52
Last updated 2/17/2016
<?xml version="1.0" encoding="UTF-8"?>
<rss version="2.0">
<channel>
<title>ColdFusion_10_Update</title>
<description>Upload_description</description> <item>
<title>Hot_Fix_Name</title>
<description>Hotfix_Description</description>
<pubDate>Tue, 19 Oct 2011 11:09:11 -0400</pubDate>
<cfhf_id>HotFix_ID</cfhf_id>
<cfhf_type>Cumulative</cfhf_category>
<cfhf_updatelevel>Integer indicating Hotfix Chronology</cfhf_updatelevel>
<cfhf_filename>Hotfix_installer_file_name</cfhf_filename>
<cfhf_technotelink>Link_to_Technote</cfhf_technotelink>
<cfhf_servers>
<cfhf_server version="10,0,0">
<cfhf_downloadlink>http://localhost:8500/updates/install060811.jar
</cfhf_downloadlink> <cfhf_checksum>20f33dd56597b68c3634be08116bc84a</cfhf_checksum>
<cfhf_filename>hotfix_1.jar</cfhf_filename>
<cfhf_installinput>
<OPTIONAL_![CDATA[ HTML for input fields ]]>
</cfhf_installinput>
</cfhf_server>
</cfhf_servers>
</item>
</channel>
</rsst>
Download hot fix for later installation
1Ensure that JRE is in your system path, or directly access Java from the installation directory of ColdFusion.
2Access the downloaded files from the following location:<cf_home>/hf-updates/
3At command prompt, do the following:
For standalone installations

53
Last updated 2/17/2016
By default, after applying the hotfix, servers are restarted. If you do not want the servers to restart, additionally, provide
the following command:
•For console and GUI mode: Run the following argument: DDONOT_START_SERVERS_POST_INSTALL=true
•For silent installation: Add the property DONOT_START_SERVERS_POST_INSTALL=true to the properties file.
For J2EE installations
Platform Description
On Windows(Installation possible in either GUI or Silent mode) In GUI mode:
•At command prompt, run the following command:
java -jar<jar-file-name>. This launches the hot fix
installer.
•Follow the on-screen instructions.In Silent mode:
•At command prompt, run the following
command:java -jar<jar-file-name> -i silent -f
<install_properties_file_path>. Installation occurs
silently. The following is a sample properties file:
On Linux/Solaris/UNIX(Installation possible in either console or silent
mode)
In Console mode:
•At command prompt, run the following
command:java -jar<jar-file-name>. The console
appears with instructions.
•Follow the instructions provided in the console.In
Silent mode:
•At command prompt, run the following
command:java -jar<jar-file-name> -i silent -f
<install_properties_file_path>. Installation occurs
silently. The following is a sample properties file:
On Mac OSX(Installation possible in either GUI, Silent, or Console
mode)
In GUI mode:
•At command prompt, run the following
command:java -jar<jar-file-name> -i GUI. This
launches the hot fix installer.
•Follow the on-screen instructions.In Console mode:
•At command prompt, run the following command:
java -jar<jar-file-name>. The console appears with
instructions.
•Follow the instructions provided in the console.In
Silent mode: At command prompt, run the following
command:java -jar<jar-file-name> -i silent -f
<install_properties_file_path>. Installation occurs
silently. The following is a sample properties file:

54
Last updated 2/17/2016

55
Last updated 2/17/2016
Platform Description
56
Last updated 2/17/2016
On Windows(Installation possible in either GUI or Silent mode) In GUI mode (for exploded EAR/WAR deployment):
•At command prompt, run the following
command:java -jar <jar-file-name>. This launches the
hot fix installer.
•Follow the on-screen instructions.In GUI mode (for
unexploded EAR/WAR deployment):
•At command prompt, run the following
command:java -jar <jar-file-name> -
DINSTALL_FILES_OUTSIDE_CF=true. This
launches the hot fix installer.
•Follow the on-screen instructions.In Silent mode (for
exploded EAR/WAR deployment):
•At command prompt, run the following
command:java -jar <jar-file-name> -i silent -f
<install_properties_file_path>. Installation occurs
silently. The following is a sample properties file:
*In Silent mode (for unexploded EAR/WAR
deployment):*First, install the hotfix files outside your
EAR/WAR on your system and then manually update
the EAR/WAR.
•At command prompt, run the following
command:{{java -jar<jar-file-name> -i silent -
f<install_properties_file_path>}}Installation occurs
silently. The following is a sample properties file:

57
Last updated 2/17/2016
On Linux/Solaris/UNIX(Installation possible in either console or silent
mode)
In Console mode (for exploded EAR/WAR deployment):
•At command prompt, run the following
command:java -jar <jar-file-name>. The console
appears with instructions.
•Follow the instructions provided in the console.In
Console mode (for unexploded EAR/WAR
deployment):
•At command prompt, run the following command:
java -jar <jar-file-name> -
DINSTALL_FILES_OUTSIDE_CF=true. The console
appears with instructions.
•Follow the instructions provided in the console.In
Silent mode (for exploded EAR/WAR deployment):
•At command prompt, run the following command:{{
java -jar<jar-file-name> -i silent -f
<install_properties_file_path>}}. Installation occurs
silently. The following is a sample properties file:
*In Silent mode (for unexploded EAR/WAR
deployment):*First, you install the hotfix files outside
your EAR/WAR on your system and then manually
update the EAR/WAR.
•At command prompt, run the following
command:{{java -jar<jar-file-name> -i silent -
f<install_properties_file_path>}}Installation occurs
silently. The following is a sample properties file:
58
Last updated 2/17/2016
Uninstalling from command prompt
1. If you have installed from command prompt in Console or UI mode, from the ColdFusion root directory, run the
following command:
On Mac OSX(Installation possible in either GUI, Silent, or Console
mode)
In GUI mode (for exploded EAR/WAR deployment):
•At command prompt, run the following
command:{{java -jar<jar-file-name> -i GUI}}This
launches the hot fix installer.
•Follow the on-screen instructions.In GUI mode (for
unexploded EAR/WAR deployment):
•At command prompt, run the following
command:java -jar <jar-file-name> -
DINSTALL_FILES_OUTSIDE_CF=true -i GUI. This
launches the hot fix installer.
•Follow the on-screen instructions.In Console mode
(for exploded EAR/WAR deployment):
•At command prompt, run the following
command:{{java -jar<jar-file-name>}}The console
appears with instructions.
•Follow the instructions provided in the console.In
Console mode (for unexploded EAR/WAR
deployment):
•At command prompt, run the following
command:java -jar <jar-file-name> -
DINSTALL_FILES_OUTSIDE_CF=true. The console
appears with instructions.
•Follow the instructions provided in the console.In
Silent mode (for exploded EAR/WAR deployment):
•At command prompt, run the following
command:java -jar <jar-file-name> -i silent -f
<install_properties_file_path>. Installation occurs
silently. The following is a sample properties file:
*In Silent mode (for unexploded EAR/WAR
deployment):*First, you install the hotfix files outside
your EAR/WAR on your system and then manually
update the EAR/WAR.
•At command prompt, run the following
command:{{java -jar<jar-file-name> -i silent -
f<install_properties_file_path>}}Installation occurs
silently. The following is a sample properties file:
Note: When you create a new instance from ColdFusion Administrator, hot fixes applied to the default instance is automatically applied to the
new instance that you create.
59
Last updated 2/17/2016
(Modify the command according to your path/OS/Hotfix)
2. If you have installed from the ColdFusion Administrator, from the ColdFusion root directory, run the following
command:
3. If you have installed the hotfix using silent installation on your own, uninstallation can also be done silently. Run the
following command:
Even though you have installed hotfix to 5 instances using a single script, there is only one hotfix uninstaller for all these
5 instances for a given update (Usually this is under cfusion instance. It can be under other instances if cfusion was not
opted for HF). When you invoke the previously mentioned commands, it will uninstall the hotfix from all the 5
instances.
Custom Extensions section
You can extend the functionality of the ColdFusion Administrator by adding links to other web applications and sites.
These links appear under the Custom Extensions section in the left navigation pane of the Administrator.
Extend the Administrator
1Create a file that contains the HTML link code, followed by a <BR>, with a separate line for each link. Do not include
other HTML code, such as <head> or <body> tags. The target attribute is required for each link; if you specify
target="content", the page appears in the main pane of the Administrator. If you specify any other value for the target
attribute, the page appears in a new window.
2Save this file as extensionscustom.cfm in the Administrator root directory (/CFIDE/administrator/). For example,
the following file adds links for Bowdoin College, Universidad Complutense de Madrid, and La Sapienza:
When you click a link, the page appears. Alternatively, you can extend the ColdFusion Administrator by editing the
wwwroot/CFIDE/administrator/custommenu.xml file.
Administrator API
You can use the Administrator API to perform most ColdFusion Administrator tasks programmatically. The
Administrator API consists of a set of ColdFusion components (CFCs) that contain methods you call to perform
Administrator tasks. For example, you use the setMSQL method of datasource.cfc to add a SQL Server data source. The
CFCs for the Administrator API are located in the cf_web_root/CFIDE/adminapi directory. Each CFC corresponds to
an area of the ColdFusion Administrator, as the following table shows:
<CF_ROOT>\jre\bin\java -jar <CF_ROOT>\cfusion\hf-updates\hf-11-xxxxx\uninstall\uninstaller.jar
<CF_ROOT>\jre\bin\java -jar <CF_ROOT>\cfusion\hf-updates\hf-11-xxxxx\uninstall\uninstaller.jar
<CF_ROOT>\jre\bin\java -jar <CF_ROOT>\cfusion\hf-updates\hf-11-xxxxx\uninstall\uninstaller.jar -i SILENT
<a href="http://www.bowdoin.edu/" target="content">Bowdoin College</a><br> <a href="http://www.http://www.ucm.es/"
target="_blank">Universidad Complutense de Madrid</a><br> <a href="http://www.uniroma1.it/" target="_blank">La
Sapienza</a><br>

60
Last updated 2/17/2016
The adminapi directory also contains an Application.cfm file and two subdirectories.
Following are the styles of methods in the Administrator API:
•Method arguments When setting complex or varied values, the Administrator API uses method arguments.
•Getting and setting simple values When setting simple values, such as true or false debug settings, the
Administrator API uses get and set property methods. To view the methods, method arguments, and
documentation for the Administrator API CFCs, use the CFC Explorer. For example, to view datasource.cfc when
running in the server configuration, open a browser to http://localhost:8500/CFIDE/adminapi/datasource.cfc.
Use the Administrator API
1Instantiate administrator.cfc:
CFC Description
accessmanager.cfc Specify the user name, password, description, access rights,
sandboxes, and allowed roles for individual users.
administrator.cfc Contains basic Administrator functionality, including login, logout, the
Migration wizard, and the Setup wizard. You must call the login
method before calling any other methods in the Administrator API.
base.cfc Base object for all other Administrator API CFCs.
collection.cfc Managa ColdFusion collections. Actions include reloading collections
and enabling highlighting for collections.
datasource.cfc Add, modify, and delete ColdFusion data sources.
debugging.cfc Manage debug settings
eventgateway.cfc Manage event gateways
extensions.cfc Manage custom tags, mappings, CFXs, applets, CORBA, and web
services.
flex.cfc Manages Data Services integration settings
office.cfc Manage OpenOffice settings.
mail.cfc Manage ColdFusion mail settings.
runtime.cfc Manage runtime settings for fonts, cache, charts, configuration, and
other settings.
scheduler.cfc Manages Scheduler tasks Services integration settings like finding
task, updating task, and enabling cluster management.
security.cfc Manage passwords, RDS, and sandbox security.
serverinstance.cfc Start, stop, and restart Tomcat servers. This CFC only works for
Developer and Enterprise editions only.
servermonitoring.cfc Perform many of the Server Monitor tasks programmatically.
Note: If you are using sandbox security, enable access to the cf_web_root/CFIDE/adminapi directory to use the Administrator API.
<cfscript> // Login is always required. adminObj = createObject("component","cfide.adminapi.administrator");
Note: You can instantiate administrator.cfc and call the login_ method in a single line of code, as the following example shows:_
61
Last updated 2/17/2016
2Call the administrator.cfc loginmethod, passing the ColdFusion Administrator password or the RDS password:
3Instantiate the desired CFC:
4Call the desired CFC method (this example enables debugging):
Examples
The following example adds a SQL Server data source:
createObject("component","cfide.adminapi.administrator").login("admin");
Note: You can log in as a user other than administrator, but with proper permissions, as follows. Provide the user name after the password.
createObject("component","cfide.adminapi.administrator").login ("#password#","#username#")
adminObj.login("admin");
myObj = createObject("component","cfide.adminapi.debugging");
myObj.setDebugProperty(propertyName="enableDebug", propertyValue="true");

62
Last updated 2/17/2016
<cfscript>
// Login is always required. This example uses two lines of code.
adminObj = createObject("component","cfide.adminapi.administrator");
adminObj.login("admin");
// Instantiate the data source object.
myObj = createObject("component","cfide.adminapi.datasource");
// Create a DSN.
myObj.setMSSQL(driver="MSSQLServer",
name="northwind_MSSQL",
host = "xx.x.xxx.xx",
port = "1433",
database = "northwind",
username = "sa",
login_timeout = "29",
timeout = "23",
interval = 6,
buffer = "64000",
blob_buffer = "64000",
setStringParameterAsUnicode = "false",
description = "Northwind SQL Server",
pooling = true,
maxpooledstatements = 999,
enableMaxConnections = "true",
maxConnections = "299",
disable_clob = true,
disable_blob = true,
disable = false,
storedProc = true,
alter = false,
grant = true,
select = true,
update = true,
create = true,
delete = true,
drop = false,
revoke = false );
</cfscript>
The following example adds the same SQL Server data source, but uses the argumentCollection attribute to pass all
method arguments in a structure:

63
Last updated 2/17/2016
<cfscript>
// Login is always required. This example uses a single line of code.
createObject("component","cfide.adminapi.administrator").login("admin");
// Instantiate the data source object.
myObj = createObject("component","cfide.adminapi.datasource");
// Required arguments for a data source.
stDSN = structNew();
stDSN.driver = "MSSQLServer";
stDSN.name="northwind_MSSQL";
stDSN.host = "xx.x.xxx.xx";
stDSN.port = "1433";
stDSN.database = "northwind";
stDSN.username = "sa";
// Optional and advanced arguments.
stDSN.login_timeout = "29";
stDSN.timeout = "23";
stDSN.interval = 6;
stDSN.buffer = "64000";
stDSN.blob_buffer = "64000";
stDSN.setStringParameterAsUnicode = "false";
stDSN.description = "Northwind SQL Server";
stDSN.pooling = true;
stDSN.maxpooledstatements = 999;
stDSN.enableMaxConnections = "true";
stDSN.maxConnections = "299";
stDSN.enable_clob = true;
stDSN.enable_blob = true;
stDSN.disable = false;
stDSN.storedProc = true;
stDSN.alter = false;
stDSN.grant = true;
stDSN.select = true;
stDSN.update = true;
stDSN.create = true;
stDSN.delete = true;
stDSN.drop = false;
stDSN.revoke = false;
//Create a DSN.
myObj.setMSSQL(argumentCollection=stDSN);
</cfscript>
<!--- Optionally dump the stDSN structure. --->
<!---
<cfoutput>
<cfdump var="#stDSN#">
</cfoutput>
--->
Web Server Management
You can connect Adobe ColdFusion to the built-in web server and to external web servers, such as Apache, IIS, and Sun
ONE Web Server (formerly known as iPlanet).

64
Last updated 2/17/2016
About web servers in ColdFusion
The web server is a critical component in your ColdFusion environment, and understanding how ColdFusion interacts
with web servers can help you administer your site. ColdFusion provides the following web server options:
•Built-in web server A Coyote is Tomcat's HTTP Connector component that supports the HTTP 1.1 protocol for
the web server or application container. Coyote listens for incoming connections on a specific TCP port on the
server and forwards the request to the Tomcat Engine. Tomcat Engine processes the request and send back a
response to the requesting client. For more information, see Using the built-in web server.
•External web server A customized web server connector module that forwards requests for ColdFusion pages from
an external web server to ColdFusion. For more information, see Using an external web server.
Using the built-in web server
The ColdFusion server configuration is built on top of Tomcat, also called the built-in web server. The built-in web
server is useful in the following cases:
•Coexistence/transition The built-in web server lets you run a previous version of ColdFusion (using an external
web server) and ColdFusion (using the built-in web server) on the same computer while you migrate your existing
applications to ColdFusion.
•Development If your workstation runs ColdFusion but does not run an external web server, you can still develop
and test ColdFusion applications locally through the built-in web server. All web servers listen on a TCP/IP port,
which you can specify in the URL. By default, web servers listen for HTTP requests on port 80 (for example,
http://www.adobe.com and http://www.adobe.com:80 are the same). Similarly, port 443 is the default port for https
requests.By default in the server configuration, the built-in web server listens on port 8500. For example, to access
the ColdFusion Administrator through the built-in web server, specify
http://_servername_:8500/CFIDE/administrator/index.cfm.
Whenever possible, configure your external web server as part of the ColdFusion installation, except for the two
cases mentioned previously (coexistence with a previous ColdFusion version, and when the computer has no web
server). If you select the built-in web server by mistake, run the Web Server Configuration Tool manually to
configure your external web server after the installation. For information about the Web Server Configuration Tool,
see Web ser ver configuration.If you enable the built-in web server during the installation process and the port is
already in use, the installer automatically finds the next-highest available port and configures the built-in web server
to use that port. To determine the port number used by the built-in web server, open the
cf_root/runtime/conf/server.xml file in a text editor and examine the port attribute of the connector. For example,
<Connector port="8504" protocol="org.apache.coyote.http11.Http11Protocol>.Keep in mind the following when
using the built-in web server:
•The default web root when using the built-in web server is cf_root/cfusion/wwwroot (server configuration). By
default, the ColdFusion Administrator (CFIDE directory) is under this web root.
•If you want the built-in web server to serve pages from a different web root directory, define a virtual mapping
in the cf_root/cfusion/runtime/conf/server.xml file. Search for the string, "To add virtual directory."
Uncomment the entry context path below. To add a virtual directory, add the aliases attribute as shown below:
<Context path="/" docBase="<absolute_path_to_CF_install_directory>\wwwroot"
WorkDir="<cf_home>\runtime\conf\Catalina\localhost\tmp"
aliases="/path1=<absolute_path_to_directory1>,/path2=<absolute_path_to_directory2>"></Contex
t>
Note: If you have CFML pages under your external web server's root, ensure that ColdFusion is configured to serve these
pages through the external web server. If you did not configure ColdFusion_ to use an external web server, your external
web server serves ColdFusion Markup Language (CFML) source code for ColdFusion pages saved under its web root._
65
Last updated 2/17/2016
Using an external web server
ColdFusion uses the Tomcat web server connector to forward requests from an external web server to the ColdFusion
runtime system.
When a request is made for a CFM page, the connector on the web server opens a network connection to the Tomcat
proxy service. The ColdFusion runtime system handles the request and sends its response back through the proxy
service and connector. The web server connector uses web-server-specific plug-in modules, as the following table
describes:
Web server Connector details

66
Last updated 2/17/2016
Apache The Web Server Configuration Tool adds the following elements to the
Apache httpd.conf file:
•A LoadModule directive defines the connector.
•An AddHandler directive tells Apache to route
requests for ColdFusion pages through the connector.
For Apache 2.x, the connection module is mod_jk.so.
IIS The Web Server Configuration Tool adds the following elements at
either the global level (default) or website level:
•Creates a folder 1 in cf_root\config\wsconfig, that
contains all connector-related files.
•Creates a virtual directory Jakarta in
cf_root\config\wsconfig (in IIS).
•Adds an entry, tomcat, under the{{ ISAPI FILTERS}}.
This points to cf_root\config\wsconfig\1\
isapi_redirect.dll.
•Adds an entry, tomcat, to
cf_root\config\wsconfig\1\isapi_redirect.dll with
permission allowed under ISAPI and CGI
Restrictions. This is applicable for global sites in IIS
manager.
•Adds the following isapi handlers: cfcHandler,
cfmHandler, cfmlHandler, cfrHandler, and
cfswfHandler.
•For debugging issues, set the log level to debug, in the
isapi_redirect.properties file present in the
{{cf_roots\config\wsconfig\1\ }}directory.
•To disable webserver buffer, change the
is_buffer_enable to false in the
cf_root\config\wsconfig\1\isapi_redirect.properties
file. Do this if you want cfflush to work over an IIS
connector. If your application does not use cfflush, set
this to true. This may increase the performance.
Sun ONE Web Server The Web Server Configuration Tool adds the following elements to
Sun ONE Web Server configuration files:
•Creates a folder 1 in the
ColdFusion10\config\wsconfig folder that contains all
connector-related files.
•Adds the following entry in the magnus.conffile of Sun
ONE. Change the log level to{{ debug}} for debugging
issues.
Adds the entries for all extensions in the obj.conffile of
Sun ONE. For example,

67
Last updated 2/17/2016
Note: Note that the connector needs to be re-configured, if new sites are added after the connector has been configured with
the 'All Sites' option in IIS.
Web server configuration
ColdFusion uses the Web Server Configuration Tool to configure an external web server with the modules and settings
that the connector requires connect to ColdFusion. You can run the Web Server Configuration Tool through either the
command-line interface or the graphical user interface (GUI). In either case, the Web Server Configuration Tool
configures your external web server to interact with a ColdFusion server.
Using GUI mode
The Web Server Configuration Tool includes a GUI mode, which you can use to specify external web server
configuration settings through a graphical interface.
Note: When you use the Web Server Configuration Tool in GUI mode, select the Configure Web Server for ColdFusion
Applications check box.
Run the Web Server Configuration Tool in GUI mode
1Open a console window.
Note: In Windows, to start the Web Server Configuration Tool, select Start > All Programs > Adobe > ColdFusion 2016
> Web Server Configuration Tool.
2Change to the cf_root/cfusion/runtime/bin.
3Start the Web Server Configuration Tool using the wsconfig.exe (Windows) or wsconfig (UNIX) command. The
Web Server Configuration Tool window appears.
4Click Add.
5Select Configure Web Server For ColdFusion Applications.
6Provide the application server host and the application server cluster.
Note: The server or cluster does not have to reside on the web server computer. In this case, enter the IP address or server
name of the remote computer.
7In the Web Server Properties area, enter web-server-specific information, and click OK.
8(Optional) The web server connector does not serve static content (such as HTML files and images) from the built-
in web server's root directory. If your ColdFusion web application has an empty context root and you want to
serve pages from the built-in web server's root directory, you can create a web server mapping to the corresponding
directory under the built-in web server.
Using the command-line interface
1Open a console window.
2Change to the cf_root/runtime/bin (server configuration) directory.
3Execute the wsconfig.exe (Windows) or wsconfig (UNIX) command:
wsconfig.exe [-options]
./wsconfig [-options]
The following table describes the options:

68
Last updated 2/17/2016
Using the batch files and shell scripts
The ColdFusion server configuration includes batch files and shell scripts that implement typical command-line
connector configurations. These files are in the cf_root/bin/connectors directory. For example, the IIS_connector.bat
file configures all sites in IIS to site 0, which establishes a globally defined connector so that all sites inherit the filter
and mappings.
If you use Apache or Sun ONE Web Server, use these files as prototypes, editing, and saving them as appropriate for
your site.
Option Description
-ws Specifies the web server, as follows:
•IIS
•Apache
•SunOne The web server name you supply is not
case sensitive.
{{-dir }} Specifies the path to the configuration directory (SunONE config).
-site Specifies the IIS website name (case-sensitive). Specify All or 0 to
configure the connector at a global level, which applies to all IIS
websites.
{{-host }} Specifies the ColdFusion server address. The default value is
localhost.
-norestart Specifies not to restart the web server.
-cluster Specifies the Tomcat cluster name. Use this option to define a
connection to a Tomcat cluster instead of a single server.
-l Enables verbose logging for the connector.
-upgrade Upgrades existing configured connectors with newer modules
from a newer wsconfig.jar file.
-service Specifies the Apache Windows service name. The default value is
Apache.
-bin Specifies the path to the Apache server binary file (apache.exe in
Windows, httpd on UNIX).
-script Specifies the path to the Apache UNIX control script file
(apachectl, but slightly different with certain Apache variants,
such as Stronghold).
-v Enables verbose output from the Web Server Configuration Tool.
-list Lists all configured web servers.
-list -host server-host Lists all Tomcat servers on the specified host.
-remove Removes a configuration. Requires the ws and either the dir or site
options.
-uninstall Removes all configured connectors.
{{-h }} Lists all parameters.
69
Last updated 2/17/2016
Command-line interface examples
1Configure a specific IIS site:
On systems where all sites run ColdFusion, there is generally no need to configure an individual site.
2Configure all existing IIS sites (ISPs):
3Configure Apache on UNIX #1:
4Configure Apache on UNIX #2:
5Configure Apache in Windows:
6Configure Sun ONE Web Server on UNIX:
Configuration files
Each time you run the Web Server Configuration Tool, it creates a configuration file and directory. For example, the
first time you run the tool in the server configuration, it creates files under cf_root/config/wsconfig/1; the second time,
it creates cf_root/config/wsconfig/2; and so on. Each of these subdirectories contains the appropriate platform-specific
connector module and web-server-specific supporting files.
Backing up connector files
WS Config backs up the connector files when you un-configure or reconfigure the connector. It helps you to compare
the new connector files with the backed up files and redo the required customization.
All files available under connector directory (../ColdFusion/config/wsconfig/magicnumber) are backed up in a
directory named magicnumber.1 or magicnumber.2 and so on, depending on the number of previous backup
directories that are available for same connector. These directories are available in backup directory
(../ColdFusion/config/wsconfig/backup) . For instance, if you are about to un-configure a connector which is
configured under ../wsconfig/2/ , its files are backed up in ../wsconfig/backup/2.1. If this is the second time you are un-
configuring the connector, then ../wsconfig/backup/2.1 is already present. In that case files are saved under
../wsconfig/backup/2.2.
Note: In case of Apache connector, mod_jk.conf , which is present in Apache conf directory is also backed up under
../wsconfig/backup/2.2 directory. Also, if you are un-configuring from command line then connector is backed up by default
but if you are un-configuring using WS Config UI tool, you get an option to either accept or deny the backup before un-
configuring the connector. This is valid for all connectors and in all the supported platforms.
cf_root/runtime/bin/wsconfig.exe -ws iis -site "web31" -v
cf_root/runtime/bin/wsconfig.exe -ws iis -site 0 -v
cf_root/runtime/bin/wsconfig -ws Apache -bin /opt/apache2/bin/httpd -script /opt/apache2/bin/apachectl -dir /opt/apache2/conf -v
cf_root/runtime/bin/wsconfig -ws Apache-bin /usr/bin/httpd -script /usr/bin/httpd -dir /etc/httpd/conf -coldfusion -v
cf_root/runtime/bin/wsconfig.exe -ws apache -dir "c:\program files\apache group\apache2\conf" -coldfusion -v
cf_root/runtime/bin/wsconfig -ws sunone -dir [path to config] -coldfusion -v

70
Last updated 2/17/2016
Sample configuration files
The following are some examples of connector-specific web server properties that help describe the web server
configuration file parameters. These examples assume that Tomcat and the web server are on the same computer.
Apache configuration file
The following is a typical httpd.conf file for an installation of ColdFusion on the same computer as an Apache 2.0 web
server. The httpd.cof file includes the following entry:
Include "Apache_install\Apache Software Foundation\Apache2.2\conf\mod_jk.conf"
The mod_jk.conf file has the following:
# # Load mod_jk module
LoadModule jk_module "CF_install\config\wsconfig\1\mod_jk.so"
# Where to find workers.properties
JkWorkersFile "CF_install\config\wsconfig\1\workers.properties"
JkMountFile "CF_install\config\wsconfig\1\uriworkermap.properties"
# Where to put jk logs
JkLogFile "CF_install\config\wsconfig\1\mod_jk.log"
# Where to put jk shared memory
JkShmFile "CF_install\config\wsconfig\1\jk_shm"
# Set the jk log level [debug/error/info]
JkLogLevel info
# Select the timestamp log format
JkLogStampFormat "[%a %b %d %H:%M:%S %Y] "
AddHandler jakarta-servlet .cfm .cfml .cfc .cfr .cfswf
Alias /CFIDE "CF_install\cfusion\wwwroot\CFIDE"
<Directory "CF_install\cfusion\wwwroot\CFIDE">
Options Indexes FollowSymLinks
AllowOverride None
Order allow,deny
Allow from all
</Directory>
<Files ~ ".hbmxml$">
Order allow,deny
Deny from all
</Files>
Sun ONE configuration file
The following is a typical obj.conf file for iPlanet, or Sun ONE Web Server:
Init fn="load-modules" shlib="CF_install/config/wsconfig/2/nsapi_redirect.dll" funcs="jk_init,jk_service" Init
fn="jk_init" worker_file="CF_install/config/wsconfig/2/workers.properties" log_level="info"
log_file="CF_install/config/wsconfig/2/nsapi.log" shm_file="CF_install/config/wsconfig/2/jk_shm"
The following is a typical magnus.conf file for iPlanet, or Sun ONE Web Server:

71
Last updated 2/17/2016
<Object name="default">
NameTrans fn="assign-name" from="/*.hbmxml" name="jknsapi"
NameTrans fn="assign-name" from="/*.jsp" name="jknsapi"
NameTrans fn="assign-name" from="/*.sws" name="jknsapi"
NameTrans fn="assign-name" from="/*.cfswf" name="jknsapi"
NameTrans fn="assign-name" from="/*.cfr" name="jknsapi"
NameTrans fn="assign-name" from="/*.cfc/*" name="jknsapi"
NameTrans fn="assign-name" from="/*.cfc" name="jknsapi"
NameTrans fn="assign-name" from="/*.cfml" name="jknsapi"
NameTrans fn="assign-name" from="/*.swc" name="jknsapi"NameTrans fn="assign-name"
from="/*.cfm/*" name="jknsapi"
NameTrans fn="assign-name" from="/*.cfm" name="jknsapi"
NameTrans fn="assign-name" from="/*.as" name="jknsapi"
NameTrans fn="assign-name" from="/*.mxml" name="jknsapi"
NameTrans fn="assign-name" from="/*.cfml/*" name="jknsapi"
NameTrans fn="assign-name" from="/rest/*" name="jknsapi"
NameTrans fn="assign-name" from="/flex-internal/*" name="jknsapi"
NameTrans fn="assign-name" from="/flashservices/gateway/*" name="jknsapi"
NameTrans fn="assign-name" from="/cfform-internal/*" name="jknsapi"
NameTrans fn="assign-name" from="/CFFileServlet/*" name="jknsapi"
NameTrans fn="assign-name" from="/cffileservlet/*" name="jknsapi"
NameTrans fn="assign-name" from="/flex2gateway" name="jknsapi"
NameTrans fn="assign-name" from="/flex2gateway/*" name="jknsapi"
NameTrans fn="assign-name" from="/CFFormGateway/*" name="jknsapi"
NameTrans fn="assign-name" from="/cfformgateway/*" name="jknsapi"
NameTrans fn="pfx2dir" from="/CFIDE" dir="C:/ColdFusion2016/cfusion/wwwroot/CFIDE"
AuthTrans fn="match-browser" browser="*MSIE*" ssl-unclean-shutdown="true"
NameTrans fn="ntrans-j2ee" name="j2ee"
NameTrans fn="pfx2dir" from="/mc-icons" dir="C:/Program Files/Oracle/WebServer7/lib/icons"
name="es-internal"
PathCheck fn="uri-clean"
PathCheck fn="check-acl" acl="default"
PathCheck fn="find-pathinfo"
PathCheck fn="find-index-j2ee"
PathCheck fn="find-index" index-names="index.html,home.html,index.jsp"
ObjectType fn="type-j2ee"
ObjectType fn="type-by-extension"
ObjectType fn="force-type" type="text/plain"
Service method="(GET|HEAD)" type="magnus-internal/directory" fn="index-common"
Service method="(GET|HEAD|POST)" type="*~magnus-internal/*" fn="send-file"
Service method="TRACE" fn="service-trace"
Error fn="error-j2ee"
AddLog fn="flex-log"
</Object>
Multihoming
You typically use the Web Server Configuration Tool to configure a connection between the web server and ColdFusion
server running on the same computer. However, you can use the web server connector to route requests to multiple
virtual sites to a single ColdFusion server. This is known as multihoming.
In a multihomed environment, you have multiple virtual hosts (also known as virtual sites) connected to a single
ColdFusion server. You might use these virtual hosts for separate applications, such as Human Resources (HR), payroll,
and marketing, or for separate users in a hosting environment.

72
Last updated 2/17/2016
Multihoming configuration tasks include:
•Enabling access to the ColdFusion Administrator If any of the applications under a virtual host need to access the
ColdFusion Administrator, create a web server mapping (Alias directive in Apache) for /CFIDE that points to the
original CFIDE directory. Alternatively, you can copy the entire CFIDE directory to the virtual website.
•Enabling access to the cfform.js file If you do not create a web server mapping for /CFIDE, and any of the
applications under a virtual host use the cfformtag, enable the virtual host to find the JavaScript files under the
CFIDE/scripts directory. To enable access to the scripts, use one of the following options:
•Copy the original_web_root/CFIDE/scripts directory to a CFIDE/scripts directory on your virtual host.
•Modify all cfform tags to use the scriptsrc attribute to specify the location of the cfform.js file.
•Disabling the cacheRealPath attribute To ensure that ColdFusion always returns pages from the correct server,
disable Cache Web Server Paths in the Caching page of the ColdFusion Administrator. The procedures you perform
to enable multihoming differ for each web server.
IIS
When you use IIS, you run the IIS Administrator to create additional websites and run the Web Server Configuration
Tool. You store ColdFusion pages under the web root of each virtual website.
Connect multiple virtual sites on IIS to a single ColdFusion server
1Use the IIS Administrator to create virtual websites, as necessary. The web root directory should enable read, write,
and execute access. For more information, see your IIS documentation.
2Configure DNS for each virtual website, as described in your IIS documentation.
3Test each virtual website to ensure that HTML pages are served correctly.
4Run the Web Server Configuration Tool, as follows:
•GUI - Select IIS for the Web Server, select All from the IIS Web Site drop-down list, and select the Configure Web
Server for ColdFusion Applications check box.
•Command line - Specify the -site 0option, as the following server configuration example shows:
cf_root/runtime/bin/wsconfig.exe -ws iis -site 0 -v
5Test each virtual website to ensure that ColdFusion pages are served correctly.
Apache
When you use Apache, you modify the apache_root/conf/httpd.conf file to create virtual hosts and run the Web Server
Configuration Tool. You store ColdFusion pages under the web root of each virtual website.
Connect multiple Apache virtual hosts on a web server to a single ColdFusion server
1Configure DNS for each virtual website, as described in your web server documentation.
2Open the apache_root/conf/httpd.conf file in a text editor and create virtual hosts, as necessary. For more
information, see your Apache documentation. For example:

73
Last updated 2/17/2016
...
NameVirtualHost 127.0.0.1
<VirtualHost 127.0.0.1>
ServerAdmin admin@yoursite.com
DocumentRoot "C:/Program Files/Apache Group/Apache2/htdocs"
ServerName SERVER02
ErrorLog logs/error.log
</VirtualHost>
<VirtualHost 127.0.0.1>
ServerAdmin admin@yoursite.com
DocumentRoot "C:/Program Files/Apache Group/Apache2/htdocs2"
ServerName mystore
ErrorLog logs/error-store.log
</VirtualHost>
<VirtualHost 127.0.0.1>
ServerAdmin admin@yoursite.com
DocumentRoot "C:/Program Files/Apache Group/Apache2/htdocs3"
ServerName myemployee
ErrorLog logs/error-employee.log
</VirtualHost>
...
3Test each virtual host to ensure that HTML pages are served correctly.
4Run the Web Server Configuration Tool, as follows:
•GUI - Specify Apache for the Web Server, specify the directory that contains the httpd.conf file, and select the
Configure Web Server for ColdFusion Applications check box.
•Command line - Specify -wsapacheand the directory that contains the httpd.conf file, as the following example
shows:
cf_root/runtime/bin/wsconfig.exe -ws apache -dir "c:\program files\apache group\apache2\conf" -v
For additional UNIX command-line examples, see Using the command-line interface. The Web Server
Configuration Tool updates the httpd.conf file. For a sample, see Apache.
5Restart Apache. You store ColdFusion files for each virtual host in the directory specified by the DocumentRoot
directive.
6Test each virtual host to ensure that ColdFusion pages are served correctly.
Note: On Ubuntu, the bundled Apache Server will be configured with ColdFusion. The request for CFFileServlet and other
servlet mapping requests will fail. This is because the default Apache Server running on 80, uses default virtual host. So the
connector configuration with bundled Apache Server needs additional steps for user to manually add JkMountFile entry of
uriworkermap.properties found in mod_jk.conf to default virtual host setting found in /etc/apache2/sites-available/default.
Configuring ColdFusion Connector with Apache Virtual Hosts (Community Video)
Click this link to access the video.
Sun ONE Web Server and iPlanet
When you use Sun ONE Web Server version 6, you use the Server Administrator to create virtual servers and run the
Web Server Configuration Tool. You store ColdFusion pages under the web root of each virtual server.
Note: Earlier versions of Sun ONE/iPlanet creates separate server instances for each site. Run the Web Server Configuration
Tool once for each site.

74
Last updated 2/17/2016
Connect multiple Sun ONE Web Server virtual hosts to a single ColdFusion server
1Using the Sun ONE Web Server Administrator, create virtual web servers for ColdFusion to use. For more
information, see your Sun ONE Web Server documentation.
2Configure DNS for each virtual website, as described in your web server documentation.
3Test each virtual server to ensure that HTML pages are served correctly.
4Run the Web Server Configuration Tool, as follows:
•GUI - Specify Sun ONE for the web server, specify the directory that contains the obj.conf and magnus.conf files,
and select the Configure Web Server for ColdFusion Applications check box.
•Command line - Specify -ws sunoneand the directory that contains the obj.conf file, as the following example
shows:
cf_root/runtime/bin/wsconfig -ws sunone -dir [path to config] -coldfusion -v
5Test each virtual server to ensure that ColdFusion pages are served correctly.
Deploying ColdFusion Applications
Adobe ColdFusion includes archive and deployment options that let you package applications and create archive files.
Archive and deployment options
ColdFusion includes the following archive and deployment options.
•ColdFusion archive files You can package your ColdFusion application's pages, data sources, and settings in a
ColdFusion Archive (CAR) file. For more information, see Packaging applications in CAR files .
•J2EE archives You can package your ColdFusion application as an Enterprise Application Archive (EAR) or Web
Application Archive (WAR) file for easy deployment to a J2EE application server. For more information, see
Packaging applications in J2EE archive files .
•Cfcompile utility The cfcompile utility lets you precompile the ColdFusion pages of your application, into Java class
files. In addition, you can compile ColdFusion pages to bytecode and save this bytecode in files with the CFM, CFC,
or CFR extension. For more information, see Using the cfcompile utility .
Packaging applications in CAR files
CAR files let you archive and deploy website configuration information, files, and applications. Use this feature to
deploy your website applications to another location or to back up your files quickly and easily. You can manage CAR
files using the Packaging & Deployment > ColdFusion Archives area of the ColdFusion Administrator. You can migrate
code from ColdFusion 8 and ColdFusion 9 to ColdFusion 10
Perform the following steps when you archive and deploy site information:
1Create the archive definition. Identify the type of information to archive about a site. You can archive almost
anything about the site, including directories, files, CFX tags, ColdFusion mappings, Solr collections, automated
tasks, and server settings. Each archive definition that you create is assigned a name. You use this name each time
you build or deploy its content.
2Build the archive.Select the name of the archive definition and specify a location to which you store the CAR file.
Deploy the archive.Specify the location of the CAR file and the location to which you restore the contents.
Note: CAR file archiving and deployment is different from J2EE archiving and packaging through EAR and WAR files.

75
Last updated 2/17/2016
For more information on creating, building, and deploying CAR files, see ColdFusion Administrator online Help.
Note:
While packaging your datasource setting in a CAR file keep the following in your mind, if there are data sources with
the following drivers:
•MS Access,
•MS Access with Unicode, and
•Derby
or any other data sources referring to a directory path, CAR deployment does not show directory translation for these.
To fix this, do the following:
Go to Administrator and edit the data sources or use AdminAPI to edit those data sources.
OR
Back up the CAR file, un-archive it and then open file server_setting.xml.
In server_setting.xml, change the directory path for the required data sources.
Packaging applications in J2EE archive files
When running ColdFusion in the J2EE configuration, you deploy the ColdFusion application, in enterprise application
archive (EAR) or web application archive (WAR) format, on a J2EE application server. You then create your ColdFusion
application, configuring resources (such as data sources), and storing CFM, CFC, and CFR files in the web application
root or in the web server root. In earlier ColdFusion versions, your J2EE administrator had to redo each of these steps
when deploying your ColdFusion application onto a production J2EE server.
The ColdFusion Administrator lets you create an EAR or WAR file that contains the entire application. This archive file
contains the ColdFusion web application, settings for ColdFusion (such as data source definitions), and the CFM, CFC,
and CFR files that your application uses.
Application packaging
The J2EE Archive feature lets you quickly create an archive file that a J2EE administrator can use to deploy your
ColdFusion application.
Add a new archive definition and create an archive file
1Open the ColdFusion Administrator.
2Specify a unique name for the archive file (no extension) in the Archive Name field.
3Click Add. The Add New Archive screen appears.
4Specify archive settings on the Add New Archive screen.
5Click Create. ColdFusion creates an EAR or WAR file in the specified application distribution directory. The
following table describes the settings you make when creating or modifying an archive:
Note: ColdFusion_ does not deploy Administrator and RDS passwords, nor does it unpack archives created in earlier versions of ColdFusion._

76
Last updated 2/17/2016
Deployment considerations
After the archive file is created, you deploy by using standard ColdFusion J2EE configuration deployment techniques.
For more information, see Installing an EAR file or WAR files in Installing the JEE Configuration of Installing
ColdFusion.
Post-deployment considerations
Depending on your application, the resources that it uses, and the environment in which it is deployed, you may need
to perform post-deployment configuration, as follows:
•Mappings The ColdFusion mappings in the archived application refer to directories on the original computer. If
those directories do not exist on the deployment computer, modify the ColdFusion mappings by using the
ColdFusion Administrator or the Administrator API.
•Serial number J2EE deployment is a ColdFusion Enterprise feature. To upgrade to the Enterprise Edition, use the
ColdFusion Administrator or the Administrator API to enter a serial number.For more information on the
Administrator API, see Administrator API .
Using the cfcompile utility
Setting Description
Archive Type Select EAR or WAR.
Context Root (EAR only) Each J2EE web application running in a server is rooted at a unique
base URL, called a context root (or context path). The J2EE application
server uses the initial portion of the URL (that is, the portion
immediately following
http://hostname
) to determine which web application services an incoming
request.For example, if you are running ColdFusion with a context root
of cfmx, you display the Administrator using the URL
http://_hostname_/cfmx/CFIDE/administrator/index.cfm
Most J2EE application servers allow one application in each server
instance to use a forward slash for the context root. The Remote
Development Services (RDS) web application is not required if you use
a context root of /.
Serial Number Specifies a ColdFusion Enterprise Edition serial number. If you do not
specify a valid ColdFusion Enterprise Edition serial number when
creating the archive file, it is deployed as an Enterprise Edition
evaluation version, which reverts to the Developer Edition after 30
days.
COM Support If your application doesn't use COM support, you can reduce the size
of the archive file by omitting the supporting files.
Debugging If the current ColdFusion server is running with debugging enabled,
you can disable debugging in the application contained in the archive
file.
Include CFML Source You can optionally deploy Java bytecode instead of CFML source code.
For more information, see Sourceless distribution .
ColdFusion Administrator If your application does not require modification by using the
ColdFusion Administrator, you can reduce archive size and reduce
security issues by omitting the Administrator files.
Data sources Specifies the data source definitions to include in the archive file.
77
Last updated 2/17/2016
You can use the cfcompile utility for the following purposes:
•Precompiling ColdFusion pages Precompile your application's CFM pages into Java class files. At runtime,
ColdFusion does not have to compile CFM pages.
•Sourceless distribution Create CFM pages as Java bytecode. You can deploy these CFM pages instead of CFML
source code. The cfcompile utility is located in the cf_root/bin (server configuration) or cf_webapp_root/WEB-
INF/cfusion/bin (J2EE configuration) directory.Before you can use the cfcompile utility in the J2EE configuration,
set the CFUSION_HOME, J2EEJAR, and WEBINF variables in the cfcompile.sh/cfcompile.bat file.
Precompiling ColdFusion pages
You can use the cfcompile utility to precompile ColdFusion pages (CFM, CFC, and CFR files). This can enhance initial
page loading time at runtime. Use the following command to compile ColdFusion pages into Java classes:
The following table describes these parameters:
Sourceless distribution
You can use the cfcompile utility with the deploy option to create ColdFusion pages (CFM, CFC, and CFR files) that
contain Java bytecode. You can then deploy the bytecode versions of the ColdFusion pages instead of the original CFML
source code. Use the following command to compile CFML files into bytecode format that you can deploy instead of
CFML source code:
The following table describes these parameters:
After you run the cfcompile utility, perform the following steps:
1Back up your original CFML files
2Copy the generated bytecode CFML files to the original directory
3Deploy the application.
cfcompile webroot [directory-to-compile]
Parameter Description
webroot Fully qualified path to the web server root; for example,
C:\Inetpub\wwwroot or C:\coldfusion10\cfusion\wwwroot.
directory-to-compile Fully qualified path to the directory where the files to be compiled are
located. This directory must be under the web root directory. If not
specified, all ColdFusion templates in the web root directory are
compiled.
cfcompile -deploy webroot directory-to-compile output-directory
Parameter Description
webroot Fully qualified path to the web server root; for example,
C:\Inetpub\wwwroot or C:\coldfusion10\cfusion\wwwroot.
directory-to-compile Fully qualified path to the directory where the files to be compiled are
located. This directory must be under the web root directory. This is
required for the deploy option.
output-directory Fully qualified path to the directory to contain the compiled
deployable files. This cannot be the same directory as the source
directory.

78
Last updated 2/17/2016
Administering ColdFusion Security
You can secure many Adobe ColdFusion resources using password authentication and configure sandbox security.
About ColdFusion security
Security is especially important in web-based applications, such as those you develop in ColdFusion. ColdFusion
developers and administrators must fully understand the security risks that could affect their development and runtime
environments so they can enable and restrict access appropriately. Whether you have an e-commerce site where
customers enter credit card information or a global collaboration site where users share confidential data, you should
understand the security risks that could threaten your web applications.
•Snooping and eavesdropping: Someone can monitor data sent over the public connections of the web.
•User impersonation: Someone can impersonate a trusted user to gain access to information that only the trusted
user should see or download.
•Unauthorized access: Unauthorized users can gain access to sensitive information. This security risk is the most
complex because the Internet links every computer to one large network. Completely allowing or disallowing access
to a given system or data source is relatively straight-forward, but allowing the partial access required for an
application to be useful remains risky. For example, a bank can easily publish a public, freely accessible site with
general banking information. Creating an account maintenance site where users have exclusive access to their own
personal account information is more difficult. ColdFusion provides a highly secure environment for web
application development and deployment. It helps you reduce security risks in the following ways:
•Encryption: Use of the Secure Sockets Layer (SSL) protocol prevents snooping, eavesdropping, and message
tampering as information passes between clients and servers. SSL, which is supported by most web servers, encrypts
Internet protocols (such as HTTP) with public key cryptography. A private key resides on the server to decrypt
inbound data and encrypt outbound data.After the key is installed, the web server automatically handles encryption
and decryption.
•Authentication: Authentication checks whether someone is a valid system user. It prompts a user for a unique login
or user name, and a password or personal identification number (PIN).
•Access Control: Authenticated users have access to particular features or components based on security clearance,
group affiliation, or other criteria specified by the developer. You can implement development security by requiring
a password to use the ColdFusion Administrator and a password for Remote Development Services (RDS), which
allows developers to develop CFML pages remotely. You implement runtime security in your CFML pages and in
the ColdFusion Administrator. ColdFusion has the following runtime security categories:
•User security Programmatically determine the logged-in user and allow or disallow restricted functionality based
on the roles assigned to that user. For more information about user security, see ColdFusion security features in
Securing Applications in the Developing ColdFusion Applications.
•Sandbox security Using the ColdFusion Administrator, define the actions and resources that the ColdFusion pages
in and below a specified directory can use.
Note: The J2EE Archive screen of the ColdFusion_ Administrator lets you create an EAR or WAR file that contains bytecode versions of your
application's CFML files._
Note: In ColdFusion 11, you can configure multiple security sandboxes irrespective of the edition that you are using. However, for the
previous versions (ColdFusion 10 or older), you can configure multiple security sandboxes only when you are using the Enterprise Edition.
79
Last updated 2/17/2016
The Security area in the Administrator lets you do the following tasks:
•Configure password protection for the ColdFusion Administrator. For more information, see Administering
ColdFusion Security.
•Configure password protection for RDS access. For more information, see Administering ColdFusion Security.
•Enable, disable, and customize ColdFusion security, on the Security > Sandbox Security page (called Resource
Security page in the Standard edition). For more information, see Administering ColdFusion Security.
Using password protection
Password protection restricts access to the ColdFusion Administrator and to a ColdFusion server when you attempt
access through RDS security.
ColdFusion Administrator password protection
Secure access to the ColdFusion Administrator is enabled by default. The password that you enter during installation
is saved as the default. You are prompted to enter this password whenever you open the Administrator. Password
protection for accessing the Administrator helps guard against unauthorized modifications of ColdFusion, and Adobe
recommends using passwords. You can disable or change the Administrator password on the Security > CF Admin
Password page.
Configurable seed for password encryption
You can specify a new seed value to encrypt data source passwords. To modify the default seed value assigned by
ColdFusion or to change the value you specified,
1In the ColdFusion Administrator, got to Security > Administrator and then in the Password Seed section, specify
the new seed value between 8-500 characters.
2Click Submit Changes.
RDS password protection
If you configured password protection for RDS access when you installed ColdFusion, you are prompted for the
password when you attempt to access ColdFusion from Dreamweaver MX 2004, HomeSite+, or the ColdFusion Report
Builder. You can disable RDS or change the RDS password on the Security > RDS Password page.
If you use RDS security, you rely on web server and operating system security settings to set permissions for ColdFusion
application and document directories.
Enhancing ColdFusion Security on Windows
To enhance security for the ColdFusion server on Windows, restrict access to the following files to selected ColdFusion
users:
•/cfusion/lib/seed.properties
•/cfusion/lib/password.properties
•/cfusion/lib/license.properties
•/cfusion/bin/passwordreset.bat
•/cfusion/bin/cf-passwordreset.jar
Note: When you modify the seed value, all data source connections are reset. Therefore, Adobe recommends that you perform this task
when the server is idle or at the initial phase (after installation).
Note: Disabling RDS also disables the applet that the ColdFusion Administrator uses in file-related dialog boxes.

80
Last updated 2/17/2016
Exposing services to users
ColdFusion exposes many existing enterprise services as web services. You can access these services using SOAP and
AMF/Flash remoting. The following are the exposed services:
•cfpdf
•cfImage
•cfdocument
•cfmail
•cfpop
•cfchart
•upload service You can secure the exposed services to prevent access by unknown applications or users. This can be
done by configuring the client IP address range to which services are accessible. Also, you can set up user access
control for the services. On the Security > User Manager page, you can select the services available to a user from
the Exposed Services section. By default, all the services are listed in the Prohibited Services drop-down list. Press
CTRL and select the services that you want the user to avail and click the << button. Now, click Edit User to
implement the changes to the user settings.
Configure IP address to access exposed services
To configure IP addresses to access exposed services:
1Go to Security > Allowed IP Addresses
2To add an IP address, specify the IP address in the IP addresses field and click Add.
3To remove an IP address, select the IP address from the View/Remove Selected IP Addresses for Exposed Services
list.
4Click Remove Selected to remove the IP addresses.
Restricting access to ColdFusion Administrator
You can restrict access to ColdFusion Administrator.
To add IP addresses that must be allowed access:
1Go to Security > Allowed IP Addresses > Add/Remove IP Addresses which will have Administrator access.
2In the IP Address text box, specify the IP addresses.
3Click Add.
4Repeat the procedures to add more IP addresses. Regular expressions are supported. That is, if you specify 10...*, all
IP addresses starting with 10. are allowed access.
Enabling Secure Profile for ColdFusion Administrator
ColdFusion allows you to secure ColdFusion server furthermore by enabling or disabling selected settings on the
ColdFusion Administrator. When installing ColdFusion, you can enable Secure Profile by selecting the option when
prompted on the Secure Profile screen. Further, you could provide a comma separate list of IP addresses that may be
allowed to access the ColdFusion Administrator.
Administrator settings affected by enabling Secure Profile
Note: By default, localhost and all IP addresses can access ColdFusion server.

81
Last updated 2/17/2016
Administrator
Settings
Path Default Admin Profile Secure Profile Changes to the
setting post
migration to
ColdFusion 10
1Use UUID for cftoken Server Settings >
Settings
Enabled Enabled Overwritten
2Disable access to
internal ColdFusion
Java components
Server Settings >
Settings
Disabled Enabled Overwritten
3Enable Global Script
Protection
Server Settings >
Settings
Enabled Enabled Overwritten
4Maximum size of post
data
Server Settings >
Settings
20MB 20MB Overwritten
5Missing Template
Handler
Server Settings >
Settings
No Value Custom missing error
template
Retained if specified
6Site-wide Error
Handler
Server Settings >
Settings
No Value Custom site-wide
error template
Retained if specified
7Request Queue
Timeout Page
Server Settings >
Request Tuning
No value Custom error
template
Retained if specified
8Cookie Timeout Server Settings >
Memory Variables
15767000 minutes 1440 minutes N/A
9Disabling updating of
ColdFusion internal
cookies using
ColdFusion
tags/functions
Server Settings >
Memory Variables
Disabled Enabled N/A
10 Enable WebSocket
Server
Server Settings >
WebSocket
Enabled Disabled N/A
11 Start Flash Policy
Server
Server Settings >
WebSocket
Enabled Disabled N/A
12 Allowed SQL (all
settings)
Data & Services >
Data Sources >
database >
Advanced Settings
Enabled Create, Drop, Alter,
Grant, Revoke, Stored
Procedures are
disabled
Retained if specified
13 Enable Robust
Exception
Information
Debugging &
Logging > Debug
Output Settings
Disabled Disabled Overwritten
14 Enable CFSTAT Debugging &
Logging > Debug
Output Settings
Enabled Disabled Overwritten
15 Select the type of
Administrator
authentication
Security >
Administrator
Use a single password
only
Separate user name
and password
authentication
(allows multiple
users)
N/A
16 Enable RDS Service Security > RDS Configurable at install
time
Disabled N/A
82
Last updated 2/17/2016
COMMUNITY CONTRIBUTED HELP
The page above explains that if the "secure profile" option is taken during installation, ColdFusion will set the 3 error
handlers to a value that is shown above merely as "Custom missing error template".
More specifically, and particularly if anyone may remove them from the CF Admin and need to add them back, the
three templates can be found in this directory in your installation:
C:\ColdFusion10\cfusion\wwwroot\CFIDE\administrator\templates, and are named (in the order listed above):
•secure_profile_error.cfm
•missing_template_error.cfm
•request_timeout_error.cfm
So for instance, to put the "default" "secure" sitewide error handler back in place, provide this value for the CF
Admin>Settings>Site-wide Error Handler:
•/CFIDE/administrator/templates/secure_profile_error.cfm
Changes in Secure Profile (ColdFusion 11)
When installing ColdFusion Server, you can enable Secure Profile by selecting the option when prompted on the Secure
Profile screen. Further, you could provide a comma separate list of IP addresses that may be allowed to access the
ColdFusion Administrator. This feature has been available from ColdFusion 10. In ColdFusion 11, Secure Profile has
been enhanced to handle access to other internal components too. For instance, you can set restrictions for following
URLs:
•CFIDE/main/*
•CFIDE/adminapi/*
•CFIDE/administrator/*
•CFIDE/componentutils/*
•CFIDE/wizards/*
•CFIDE/servermanager/*
To allow IP addresses to access the internal ColdFusion components, perform the following tasks:
1Login to ColdFusion Administrator
2Click Security > Allow IP Addresses
3Go to Allow IP Addresses for accessing ColdFusion Administrator and ColdFusion Internal Directories section
and add grant access to individual IP address to access the internal components as shown in the following figure:
17 Select the type of RDS
authentication
Security > RDS Use a single password
only
Separate user name
and password
authentication
(allows multiple
users)
N/A
18 Enable ColdFusion
Sandbox Security
Security > Sandbox
Security
Disabled Disabled Overwritten
19 Allowed IP addresses
for ColdFusion
Administrator access
Security > Allowed
IP Addresses
Not available at install
time
Available at install
time
N/A
Note: Secure Profile disables Directory Browsing for a stand alone ColdFusion installation with built-in web server.
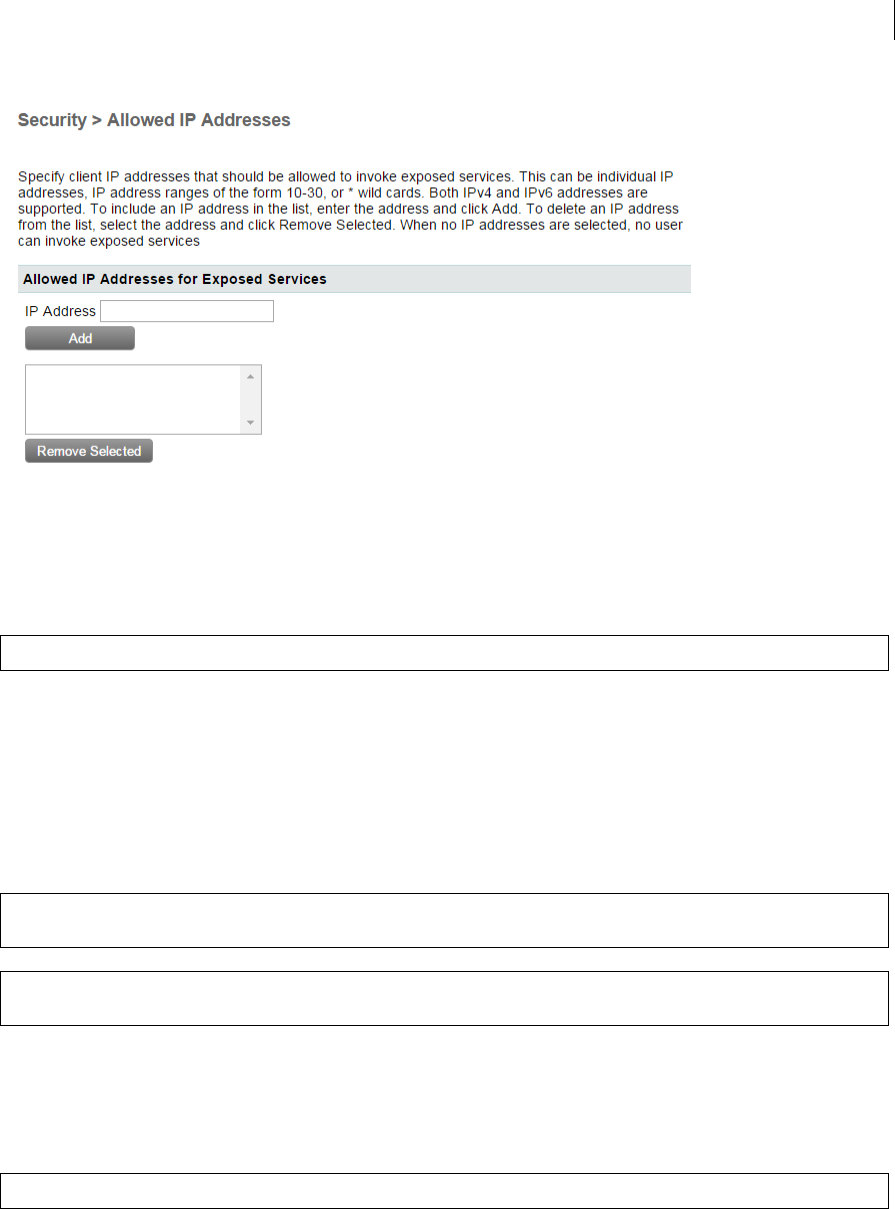
83
Last updated 2/17/2016
If you have configured an external web server, you can also restrict access to the ColdFusion Administrator and
ColdFusion Internal Directories at the connector-level by modifying the iprestriction.properties file available under the
connector folder. For instance, <cf_root>/config/wsconfig//iprestriction.properties.
Using sandbox security
Sandbox security (called Resource security in the Standard Edition) uses the location of your ColdFusion pages to
control access to ColdFusion resources. A sandbox is a designated directory of your site to which you apply security
restrictions. Sandbox security lets you specify which tags, functions, and resources (for example, files, directories, and
data sources) can be used by ColdFusion pages located in and under the designated directory. To use sandbox security
in the J2EE editions, the application server must be running a security manager (java.lang.SecurityManager) and you
define the following JVM arguments (for Tomcat, this is the java.args line in the cf_root/cfusion/bin/jvm.config file):
Using multiple sandboxes (Enterprise Edition only)
By default, a subdirectory of a sandbox inherits the settings of the directory one level above it. However, if you define
a sandbox for a subdirectory, the subdirectory no longer inherits settings from the parent, completely overriding the
parent directory's sandbox settings. For example, consider the following directories:
Note : You will need to restart the external web server after modifying the iprestriction.properties file.
-Djava.security.manager "-Djava.security.policy=cf_root/WEB-INF/cfusion/lib/coldfusion.policy" "-Djava.security.auth.policy=cf_root/WEB-
INF/cfusion/lib/neo_jaas.policy"
Note: Sandbox security is not enabled by default. You enable it on the Security > Sandbox Security page before ColdFusion enforces the
settings.
C:\Inetpub\wwwroot C:\Inetpub\wwwroot\sales C:\Inetpub\wwwroot\rnd C:\Inetpub\wwwroot\rnd\dev C:\Inetpub\wwwroot\rnd\'a
84
Last updated 2/17/2016
If you define a sandbox for the wwwroot directory, the settings also apply to the sales and rnd directories. If you also
define a sandbox for the rnd directory, the rnd sandbox settings also apply to the dev and qa directories. The wwwroot
and sales directories maintain their original settings, and the rnd settings override the wwwroot directory settings for
the rnd directory and subdirectories. This hierarchical arrangement of security permits the configuration of
personalized sandboxes for users with different security levels. For example, if you are a web hosting administrator who
hosts several clients on a ColdFusion shared server, you can configure a sandbox for each customer. This prevents one
customer from accessing the data sources or files of another customer.
Resources that you can restrict
You can restrict the following resources:
•Data Sources Restrict the use of ColdFusion data sources.
•CF Tags Restrict the use of ColdFusion tags that manipulate resources on the server (or on an external server), such
as files, the registry, Lightweight Directory Access Protocol (LDAP), mail, and the log.
•CF Functions Restrict the use of ColdFusion functions that access the file system.
•Files/DirsEnable tags and functions in the sandbox to access files and directories outside the sandbox.
•Server/PortsSpecify the servers, ports, and port ranges that the ColdFusion tags that call third-party resources can
use.For more information, see the Administrator online Help.
About directories and permissions
When you enable access to files outside the sandbox, you specify the filename. When you enable access to directories
outside the sandbox, you specify directoryname_indicator_, where indicator is a dash or asterisk, as follows:
•A backslash followed by a dash (-) lets tags and functions access all files in the specified directory, and recursively
allows access to all files in subdirectories.
•A backslash followed by an asterisk (*) lets tags and functions access all files in the specified directory and also lets
tags and functions access a list of subdirectories. However, this option denies access to files in any subdirectories.
You can also specify the actions that ColdFusion tags and functions can perform on files and directories outside the
sandbox. The following table shows the relationship between the permissions of a file and a directory:
Add a sandbox (Enterprise Edition only)
ColdFusion Enterprise Edition lets you define multiple security sandboxes.
1Open the Security > Sandbox Security page in the ColdFusion Administrator. The Sandbox Security Permissions
page appears.
2In the Add Security Sandbox box, enter the name of the new sandbox. This name must be either a ColdFusion
mapping (defined in the Administrator) or an absolute path.
Note: To use the Administrator API when sandbox security is enabled, allow access to the cf_web_root/CFIDE/adminapi directory.
Note: When you run ColdFusion in the J2EE configuration on IBM WebSphere, the Files/Dirs and Server/Ports tabs are not enabled.
Permission Effect on files Effect on directories
Read View the file List all files in the directory
Write Write to the file Not applicable
Execute Execute the file Not applicable
Delete Delete the file Delete the directory
85
Last updated 2/17/2016
3Select New Sandbox from the drop-down list to create a sandbox based on the default sandbox, or select an existing
sandbox to copy its settings to your new sandbox.
4Click Add. The new sandbox appears in the list of Defined Directory Permissions.
Configure a sandbox
Before you begin security sandbox configuration, analyze your application and its usage to determine the tags,
functions, and resources that it requires. You can then configure the sandbox to enable access to the required resources
and disable use of the appropriate tags and functions. For example, if the applications in the sandbox do not use the
cfregistry tag, you can safely disable it.
1Open the Security > Sandbox Security page (Security > Resource Security page in the Standard Edition) in the
ColdFusion Administrator.
2(Enterprise Edition only) In the list of Defined Directory Permissions, click the name or Edit icon for the directory.A
page with several tabs appears. This is the initial page in the Standard Edition. The remaining steps describe the use
of each tab.
3To disable a data source, in the left column of the Datasources tab, highlight the data source, and click the right
arrow.By default, ColdFusion pages in this sandbox can access all data sources.
4Click the CFTags tab.
5To disable tags, in the left column of the CFTags tab, highlight the tags, and click the right arrow.By default,
ColdFusion pages in this sandbox can access all listed tags.
6Click the CFFunctions tab.
7To disable functions, in the left column of the CFFunctions tab, highlight the functions, and click the right arrow.By
default, ColdFusion pages in this sandbox can access all listed functions.
8Click the Files/Dirs tab.
9To enable files or directories, in the File Path box, enter or browse to the files or directories; for example, C:\pix. A
file path that consists of the special token <<ALL FILES>> matches any file. For information on using the backslash-
hyphen (-) and backslash-asterisk (*) wildcard characters, see About directories and permissions.
10 Select the permissions.For example, select the Read check box to let ColdFusion pages in the mytestapps sandbox
read files in the C:\pix directory.
11 Click Add Files/Paths. When you edit an existing sandbox, this button reads Edit Files/Paths. The file path and its
permissions appear in the Secured Files and Directories list.
12 In the Secured Files and Directories list, verify that the file path is correct. The character after the backslash is
important. For information, see About directories and permissions.
13 Click the Server/Ports tab.
Note: In the Standard Edition, the Root Security Context is the only sandbox without any initial list of defined directory permissions.
Note: If <<ALL DATASOURCES>> is in the Enabled Datasources column, any data source that you add is enabled. If you move <<ALL
DATASOURCES>> to the Disabled Datasources column, any new data source is disabled.
Note: The Files/Dirs tab works together with the file-based permissions of the operating system. To restrict a user from browsing another
user's directory, use file-based permissions.
86
Last updated 2/17/2016
14 To turn off default behavior (global access to all servers and ports), enter the IP addresses and port numbers that
pages in this sandbox can connect to by using tags that access external resources (for example, cfmail, cfpop, cfldap,
cfhttp, and so on). You can specify an IP address, a server name (such as www.someservername.com), or a domain
name (such as someservername.com). You can optionally specify a port restriction.
For example, to allow this sandbox access to 207.88.220.3 on ports 80 and lower, perform the following steps:
aIn the IP Address field, enter 207.88.220.3.
bIn the Port field, enter 80, and click This Port and Lower.
15 Click Finish to save changes to the sandbox.
Sandbox Considerations
Using OpenOffice within Sandbox
Grant permissions in sandbox for the following filepaths:
•D:\ColdFusion10\cfusion\runtime\servers\lib Read
•D:\ColdFusion10\cfusion\runtime\servers\lib- Read
•D:\ColdFusion10\cfusion\runtime\lib- Read
•D:\ColdFusion10\cfusion\runtime\lib Read
•C:\Program Files\OpenOffice.org 3\ Read, Execute
•C:\Program Files\OpenOffice.org 3- Read , Execute
Using Caching within Sandbox
For disk-based caching to work inside a sandbox, the sandbox must provide read/write permission to the disk cache
directory. This can be the default directory (java.io.tmpdir) or a user-configured directory as identified by the diskStore
property. The diskStore property in cf_root\lib\ehcache.xml is used to specify the directory for disk cache (<diskStore
path="java.io.tmpdir"/>).Use the following code to identify the temp directory:
Also, read permission must be granted to cf_root\lib\ehcache.xml for certain functions that read from/write to
ehCache.xml to work. For example, cacheGetProperties and cacheSetProperties.
Using Service CFCs within Sandbox
Grant the following permissions:
•execute permission to cf_root\CustomTags\com\adobe\coldfusion
•read permission to cf_root\WEB-INF\cftags\META_INF\taglib.tld
Note: This behavior differs from other tabs, such as CFTags, where you select items to disable. If you set any values in this tab, external-
resource tags executed in this sandbox can access only the specified servers and ports.
Note: To deny access by these ColdFusion tags to an entire site, enable access for a local resource, such as your local mail server, FTP
server, and so on.
<cfscript> writeoutput("Temp Dir : " & createobject("java","java.lang.System").getProperty("java.io.tmpdir") ); </cfscript>
87
Last updated 2/17/2016
Basic Troubleshooting and FAQs
You can perform some tests to avoid experiencing trouble as you begin your work with ColdFusion. Verify the
following:
•Web ser ver is running: Before you install ColdFusion, ensure that your web server is installed and running. You
can do this by loading a page in your web browser using the HTTP protocol.
•ColdFusion is running: After you install ColdFusion, use the ColdFusion Administrator to ensure that ColdFusion
is running.
•Change ColdFusion user account: In Windows, ColdFusion runs under the host System account by default. If
ColdFusion application pages do not have access rights to interact with resources (remote data sources, other
application pages, COM objects), you must run ColdFusion under a specific account that provides the necessary
access rights. For details, see Change ColdFusion user account.
•Analyze activity in log files: ColdFusion log files contain valuable information that can help you identify problems
with ColdFusion or with application pages in your site. For details, see Analyze server activity in log files.
Verify that the web server is running
Before you install ColdFusion, ensure that your web server is installed and running.
1Open a web browser.
2In the address line, enter the URL for a web page or site. For example, if the file myindex.htm is in your web
document root directory, load the page in your browser, using the localhost URL, as follows:
http://127.0.0.1/myindex.htm or http://127.0.0.1:8500/myindex.htm (built-in web server)
3Press Enter. If the web server is running, the page appears, otherwise, an error message appears.
Verify that ColdFusion is running
1Open a web browser.
2In the address line, enter the appropriate URL, as follows:
•If ColdFusion is installed on a local server:http://localhost/CFIDE/administrator/index.cfm
•If ColdFusion is installed on a remote server:http://hostname/CFIDE/administrator/index.cfm}}where, hostname
is the name of the server on which ColdFusion resides. If you are using the internal web server, specify {{hostname
:8500.
?Press Enter. If ColdFusion is running, the ColdFusion Administrator opens. If you use ColdFusion Administrator
security, a password prompt appears.
Change ColdFusion user account
On a Windows platforms, ColdFusion runs under the host System account by default. However, ColdFusion application
pages may not have the access rights required to interact with other resources, such as remote data sources, other
application pages, and COM objects. Therefore, you must run ColdFusion under a specific account that provides the
necessary access rights.
1Click Start > Control Panel > Administrative Tools > Services.
2Select the ColdFusion 11 Application Server, right-click and select Properties.
Note: To run ColdFusion Administrator, you must enable cookies in your browser.
Note: On UNIX, the ColdFusion Administrator URL is case-sensitive. Ensure that you enter the address as shown.
88
Last updated 2/17/2016
3In the Logon As frame, select the This Account option, and enter the appropriate account user name and password
information.
4Click OK to save the information.
5Click Close to close the Services window.
6Restart the service for the changes to take effect.
Analyze server activity in log files
Log files generated by ColdFusion can help you monitor the activity of your server and ColdFusion applications. For
details about setting your logging preferences.You can use the Log Viewer to analyze information in your log files so
that you can troubleshoot your ColdFusion performance or repair problem pages in your site. For example, depending
on your logging preferences, you can identify pages in your applications that take longer than a specified length of time
to process.
Frequently asked questions
How will I uninstall ColdFusion?
Uninstalling ColdFusion deletes all ColdFusion program files and related components from your system.
Remove ColdFusion from Windows
1Select Start > Settings > Control Panel > Add/Remove Programs > ColdFusion.
2Click Remove. A dialog box confirms that you want to uninstall.
3To begin uninstalling, click Yes.
4When the program completes, restart your computer. ColdFusion is removed from your server.
Remove ColdFusion patches from ColdFusion Administrator
1Log in to ColdFusion Administrator.
2Go to Server Updates > Updates > Installed Updates.
3To begin uninstalling the latest patch, click the Uninstall button.
Remove ColdFusion from UNIX
1Log in as root.
2Enter the following command to go to the cf_root/uninstall directory: cd cf_root/uninstall
3Enter the following command: {{./ uninstall.sh}}ColdFusion is removed from your server.
How will I change ColdFusion Administrator password?
You can set or change the password that restricts access to ColdFusion Administrator pages as follows:
1Select Security > Administrator in the navigation pane.
2Select the type of Administrator authentication. The options are:
•Use a single password only (default)
•Separate user name and password authentication (allows multiple users)
Note: This discussion does not apply when deploying ColdFusion on a JEE server. To uninstall ColdFusion on a JEE server, uninstall the
ColdFusion ODBC service on your Windows system (if installed, during installation of ColdFusion) and undeploy the ColdFusion application.
Note: Uninstalling ColdFusion patches from the ColdFusion Administrator is not supported for JEE deployments.
89
Last updated 2/17/2016
•No authentication need (not recommended)
1In the Root Administrator Password section, specify the new password in the New Password box. The password can
have a maximum of 50 characters.
2In the Confirm Password box, confirm your new password.
3Click Submit Changes.
What will I do if I forget Administrator password or Administrator component password
1Go to the folder cfusion\bin.
2Do the following:
•On Windows: Run passwordreset.bat
•On Mac/Linux: Run passwordrest.sh
3At prompt, specify the details.
How will I start and stop ColdFusion?
During installation, you typically start ColdFusion services and processes, and configure them to start and run
whenever you start your system. After you perform any of the following actions in the ColdFusion Administrator, stop
and restart ColdFusion services:
•Enable or disable security.
•Change any option in the Java and JVM Settings page.
•Enable performance monitoring options, which enable you to use the native Windows performance monitor.
During setup, ColdFusion is installed as a set of system services, which typically start automatically at system
startup.
Stop or start ColdFusion server services manually
1Open the Services control panel window. If a service is running, its status is Started. If it is not running, no status
appears.
2To stop a service, select it and click Stop. A prompt asks you to verify that you want to stop the service; click Yes. The
status of the service is no longer Started.
3To start a service, select it and click Start. Its status is Started.
4To restart a service: select it and click Restart. This is identical to stopping and starting a service.
5Click Close. The Services window closes.
Configure ColdFusion server to start automatically or manually
1In the Services control panel window, double-click a service. The window for the service opens.
2For Startup Type, select Automatic or Manual.
3Click OK. The configuration is saved.
4Click Close. The Services window closes.
How do I configure Windows performance monitor?
Performance Monitor overview
Note: This discussion does not apply when deploying ColdFusion on a JEE server.
Note: This discussion does not apply when deploying ColdFusion on a JEE server.

90
Last updated 2/17/2016
If you install ColdFusion in Windows, you can use the Windows Performance Monitor utility to track the performance
of your server. This utility installs automatically as part of the ColdFusion installation, and works with a set of counters
to monitor server performance. The following are the available ColdFusion counters: that you can enable in the
Windows Performance Monitor:
•Average database transaction time
•Average queue time
•Average request time
•Bytes incoming per second
•Bytes outgoing per second
•Database hits per second
•Page hits per second
•Cache pops per second
•Number of queued requests
•Number of running requests
•Number of timed out requests To use performance monitoring,
1Select the Enable Performance Monitoring option on the Debug Output Settings page. For quick details, see Enable
performance monitoring.
2Configure the Performance Monitor.
Enable performance monitoring
If you install ColdFusion in Windows, you can use the Debugging Output Settings page to enable performance
monitoring through the Windows Performance Monitor utility. To enable performance monitoring,
1In the Debug Output Settings page, select the Enable Performance Monitoring option.
2Click Submit Changes.
3Restart ColdFusion for your changes to take effect. After you enable performance monitoring, you can configure
the Performance Monitor.
Configuration
After you enable performance monitoring, you can configure the Performance Monitor.
1Open the Performance Monitor window by selecting Start > Control Panel > Administrative Tools > Performance.
2Click the Add button. The Add Counters window appears.
3In the Performance Object drop-down list box, select ColdFusion Server. In the Counter list, select the counters that
you want to use. To select multiple counters, hold down the Control key as you click.
4Click Add. The Performance Monitor begins to run. The display attributes apply to all counters.
5Click Close.
How will I use Multiserver Monitor?
The ColdFusion Multiserver Monitor lets you keep track of activities on multiple ColdFusion servers. You can quickly
see the status of several servers, and view detailed information about each server. To add a server to those you are
monitoring,
1Click the Launch Multiserver Monitor button.
91
Last updated 2/17/2016
2Click Add Server.
3Enter the following:
•The server name or IP address
•The port through which you communicate with the server
•The context root, if any
•The user name and password to access the server
4Click OK. To quickly see the status of all the servers you are monitoring, click Quick View. For each server you are
monitoring, the Multiserver Monitor displays the server name, port, how long the server has been running, and
whether there are any alerts. To see a detailed status of all the servers you are monitoring, click Detailed View. The
detailed view lists each server. To see details about a server in the list, highlight it. The details appear at the bottom
of the page. To see information about any server errors, click Errors.
If you register some servers in the Multiserver Monitor served by 127.0.0.1, and then open a Multiserver Monitor
served by localhost, the servers are not considered to be the same servers. This is because Flash creates different
shared objects for these IP addresses. The information that is stored in these shared objects is saved using XOR
encryption. The master password for the Multiserver Monitor is stored using SHA1 encryption.
How to set per application settings
You can set the following on a per-application basis:
•Mappings
•Custom tag paths These settings override the server-side settings in the ColdFusion Administrator for the specified
application only. Specifying per application settings does not change the server-wide settings. To set per application
settings, you must first enable per application settings on the Settings page of the ColdFusion Administrator. You
then set the mappings or custom tag paths in the Application.cfc file. Custom Tags in per application settings
override those defined in the ColdFusion Administrator. For example, if you have two custom tags of the same name
and they are in different locations in the Administrator and per-application settings, the one in the per application
settings is taken first.
To set the mappings per application,
1Select the Enable Per App Settings option on the Settings page of the ColdFusion Administrator.
2Include code similar to the following in your Application.cfc file:
or
To set the custom tag paths per application,
3Select the Enable Per App Settings option on the Settings page of the ColdFusion Administrator.
Note: The errors listed on this page include only server errors. Application errors appear in the individual Server Monitor on the Summary
page.
Note: Per application settings are supported in applications that use an Application.cfc file only, not in applications that use an
Application.cfm file. The per application settings do not work if you have disabled application variables on the Memory Variables page of
the Administrator.
<cfset THIS.mappings["MyMap"]="c:\inetpub\myStuff">
<cfset StructInsert(THIS.mappings, "MyMap", "c:\inetpub\myStuff")>

92
Last updated 2/17/2016
4Include code similar to the following in your Application.cfc file:
How will I manage undevlivered mails?
You can view a list of undelivered mails in the Server Settings > Mail > Undelivered Mail page. To access this page and
manage your undelivered mails:
1Click the View Undelivered Mail button from the Server Settings > Mails page.
2In the Server Settings > Mail > Undelivered Mail page, you can perform the following tasks:
•Sort mails
•Select to view specific columns
•Delete mails
3Respool mails
1To sort the mails by Subject, Sender, To, File Size, and Date columns in ascending or descending order:
2Point to the column by which you want to sort the mails
3Click the down arrow and select the sorting order.
4To view selected columns on the Undelivered Mails page:
5Point to any column and click the down arrow.
6Click columns and deselect the columns that you do not want to view on the page. To delete or respool a mail, select
the mail from the list and click Delete or Respool.
How will I view and search log content?
You can view and search log content using the Log Viewer page. This page identifies the content for each log file that
you specified to view on the Log Files page. Use the Log Viewer
1On the Log Files page, click the name of the log file. The Log Viewer page appears.
2To filter the content on the Log Viewer page, click the Launch Filter button. The following table describes the areas
on the Log Viewer page:
<cfset customtagpaths = "c:\mapped1,c:\mapped2"> <cfset customtagpaths = ListAppend(customtagpaths,"c:\mapped3")> <cfset
This.customtagpaths = customtagpaths>
Area Description
Launch Filter button Click to open the Filter dialog box so you can customize the content in
the log file viewer.
Searching file Identifies the name of the log files that you are viewing.
View Raw Data Shows the actual content of the log file message, including the HTML
tags, if they exist. Many error messages are formatted with HTML tags
that are rendered by the browser. If an HTML tag exists, the raw data
shows the tag attributes <p>hello</p>, whereas not viewing the file
using the raw data feature shows "hello."
Compact View Trims the content of the error messages and increases the count of
viewed log entries from 10 to 20 per page.
Number of messages or events Shows the total number of messages with links to view the previous
and next pages.
Date and Time Identifies the date and time the event occurred.
93
Last updated 2/17/2016
How do I deploy an archive?
1Select Packaging and Deployment > ColdFusion Archives in the left navigation pane of the ColdFusion
Administrator. The ColdFusion Archives page appears.
2In the Deploy an Existing Archive panel, specify the path to the CAR file to deploy:
3Provide the full path of the archived filename (CAR file) to restore. Click the Browse Server button to select the full
path of the archived filename (CAR).
4Click Deploy. The Archive Summary Panel appears.
5In the Archive Summary panel, review the archived content.
6Click Next to proceed with restoring the archive. The Deploy Location panel appears (see step 5).
7Specify a location, and click Deploy to restore the selected CAR file. One of the following archive messages appears:
•Deploy Successful The selected CAR file was successfully restored in the specified Web Application directory. Click
Close to exit from the Archive wizard.
•Failed The deploy procedure was not successful. To determine the cause of the problem, review the information
appearing on the page. To further analyze why a problem occurred, click the links located on the panel. Click Close
to exit from the Archive wizard. If the deploy operation failed, verify that the restore Web Application directory was
not corrupted during the restore operation. To restore archives to another system, the target system must have
ColdFusion installed.
WebSocket Enhancements (ColdFusion 11)
ColdFusion 10 implemented WebSocket by providing a messaging layer for the WebSocket protocol, which you can
control using CFML and JavaScript. The messaging layer has features that make WebSocket reliable and scalable. Using
WebSocket, you can develop real-time applications for stock, charting, online gaming, social networking, dashboard
for various purposes, and monitoring.
As you are already aware of, WebSocket connections use the standard HTTP ports (80 and 443) for sending and
receiving data packets. Due to this reason, WebSockets are mostly firewall-friendly since almost all firewall
configurations allow net traffic on the HTTP ports. Hence the HTML5 WebSockets do not require new hardware to be
installed, or new ports to be opened on internal networks.
Severity Level of severity: Fatal (errors that terminate the application), Error
(recoverable errors), Warning (cautionary information), and
Information (details the status and settings of the ColdFusion server.
ThreadID Identifies the thread identification number for the event. This string is
used by Adobe Technical Support personnel to track and troubleshoot
problems.
Application Name If applicable, shows the name of the application.
Log Message Describes the error that occurred.
Note: (For UNIX users only) If you must run the deploy process as a privileged user, select the Run This Deployment As A Specific User
option. Then enter any system account name in the User name text box, and the corresponding account password in the Password text
box. The user name and password must match the existing user name and password for this system; the deployment process runs as that
user. If the user name and password do not match the existing user name and password for this system account, the deployment procedure
fails.
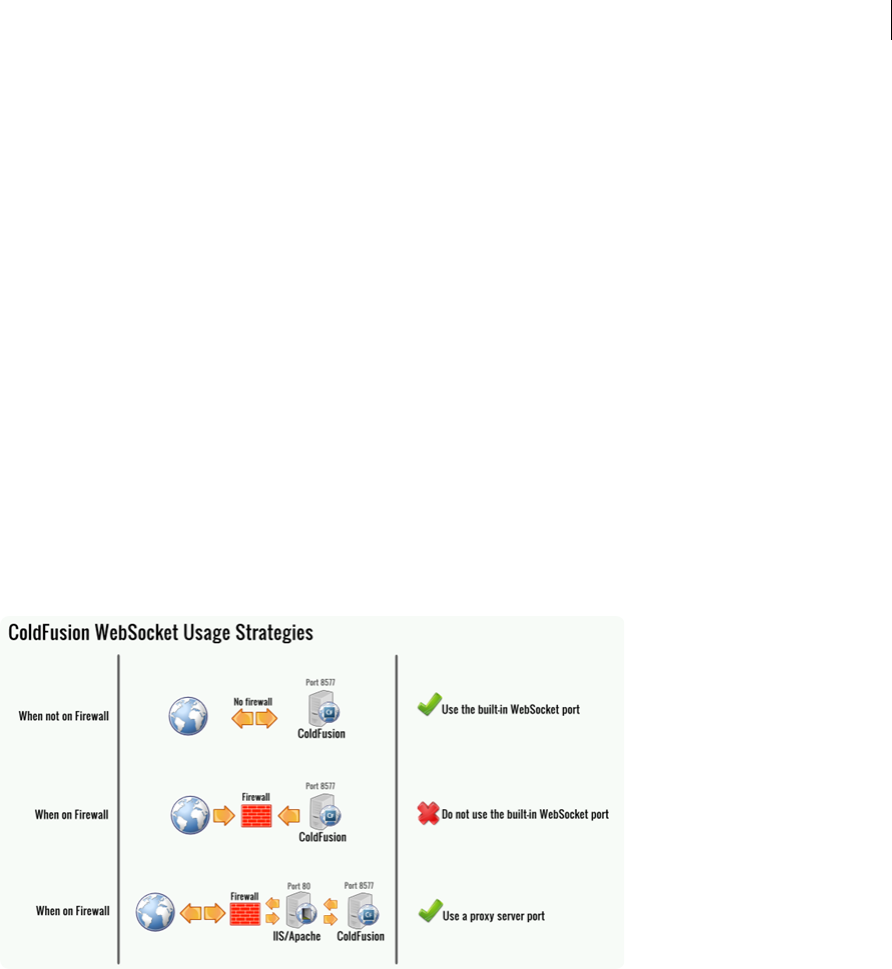
94
Last updated 2/17/2016
When there is no proxy server, reverse proxy server, or a firewall between the browser and the ColdFusion Server, the
WebSocket connection works perfectly, as long as both the server and the client understand the WebSocket protocol.
However, most of the times, there will not be any direct connection between the server and the client. ColdFusion 11
has introduced the proxy support for WebSocket. There is a new proxy module (that runs inside IIS and Apache Web
Server) that can intercept the ColdFusion WebSocket requests and redirect the requests to the ColdFusion Server.
What is new
ColdFusion 11 supports the following new features:
•Proxy support - Support is now provided for setting up a proxy server for using ColdFusion WebSockets.
•SSL support – Support is now provided for enabling SSL for ColdFusion WebSockets.
•Cluster support – Support is now provided for enabling the cluster support for ColdFusion WebSockets.
Using ColdFusion WebSockets
The support for WebSocket was available in the previous version of ColdFusion. What is new in ColdFusion 11 is the
support for WebSocket proxy.
Consider the following usage strategies for WebSocket proxy:
•Strategy 1: When you don’t have a firewall configured – You CAN use the WebSocket proxy
•Strategy 2: When you have a firewall configured – You MUST use the WebSocket proxy
Strategy 1 - Using the built-in WebSocket server (ColdFusion 10)
For more information, see, https://learn.adobe.com/wiki/display/coldfusionen/Using+ColdFusion+WebSocket
Also, see:
•Browsers and fallback
•ColdFusion and WebSocket
•How is WebSocket different from conventional communication models
•WebSocket communication models
•What is WebSocket
•Using WebSocket to broadcast messages

95
Last updated 2/17/2016
•Using WebSocket in point-to-point communication
•Error handling in ColdFusion WebSocket
•Using ColdFusion Administrator for WebSocket Configurations
•Browser support for WebSocket
Strategy 2 - Using a proxy server for WebSockets (ColdFusion 11)
ColdFusion 11 has introduced the proxy support for WebSocket. There is a new proxy module (that runs inside IIS and
Apache Web Server) that can intercept the ColdFusion WebSocket requests and redirect the requests to the ColdFusion
Server.
You can use one of the following external servers along with the ColdFusion Server:
•IIS 8 or higher running on Windows 8 or Windows Server 2012
•Apache 2.2 or higher
The following steps enable you to quickly configure a WebSocket Proxy server for ColdFusion.
Step 1 – Configuring the external server
Before you begin setting up a WebSocket proxy, you need to configure the external server to support the WebSocket
protocol.
Configuring IIS
For enabling WebSocket protocol for IIS, see this document.
Configuring Apache Server
No configuration required.
Step 2 – Enabling WebSocket Proxy
You need to enable the WebSocket Proxy port at the server-level through the ColdFusion Administrator. Perform the
following steps:
1Go to the ColdFusion Administrator page.
2Click Server Settings > Web Socket
3Click Enable WebSocket Service and select Use Proxy:
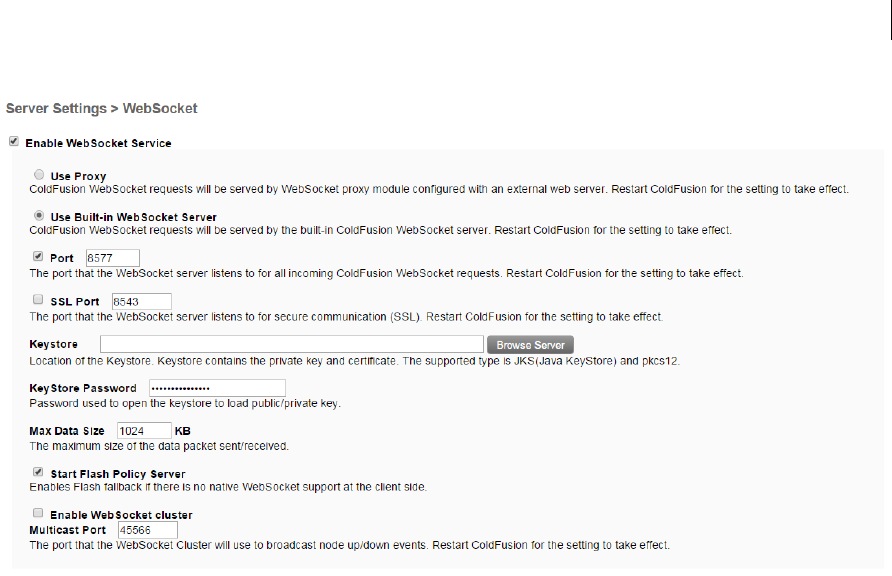
96
Last updated 2/17/2016
Step 3 – Adding the external server
You need to configure the external Web Server connector with the ColdFusion Server using the wsconfig tool.
Perform the following tasks:
1Go to <CF_INSTALL_HOME>/cfusion/runtime/bin
2Run the wsconfig tool
3In the GUI, click Add
4In the Web Ser ver drop down field, select the external server
5In the Configuration Directory field, browse and select the path to the external server’s configuration directory:
6Click OK
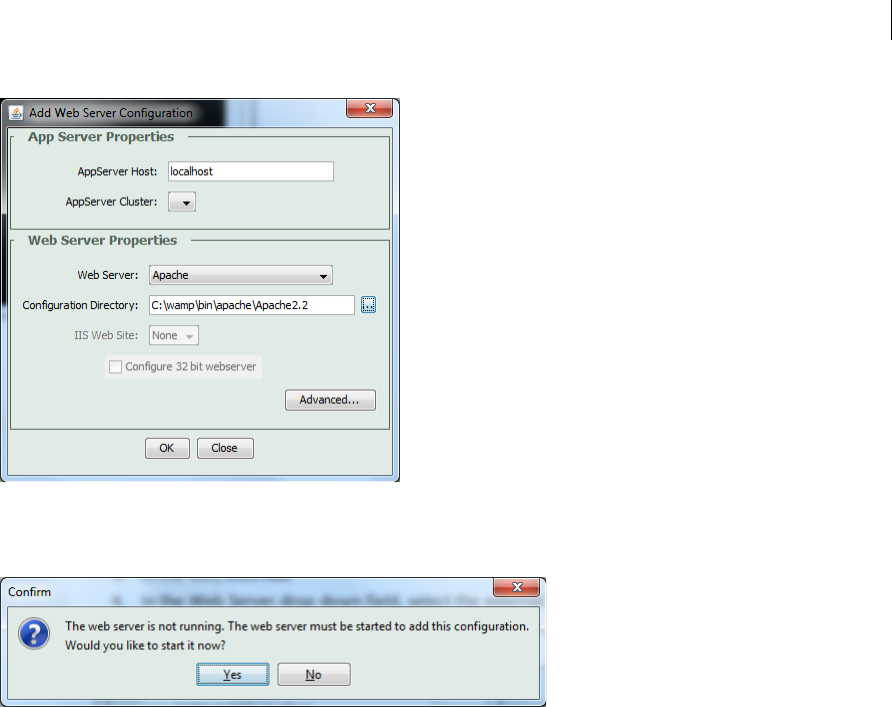
97
Last updated 2/17/2016
?If the external server is not running, you will be prompted to start the server:
1Click Yes to start the external server
2Click Exit
Step 4 - Setting up the WebSocket Proxy Server
ColdFusion 11 has introduced a new configuration tool, wsproxyconfig, which will allow you to quickly setup a
WebSocket Proxy. Perform the following tasks:
1Go to <CF_INSTALL_HOME>/cfusion/bin
2Run the wsproxyconfig tool
3In the GUI, click Add
4In the Web Ser ver drop down field, select the external server
5In the Configuration Directory field, browse and select the path to the external server’s configuration directory:
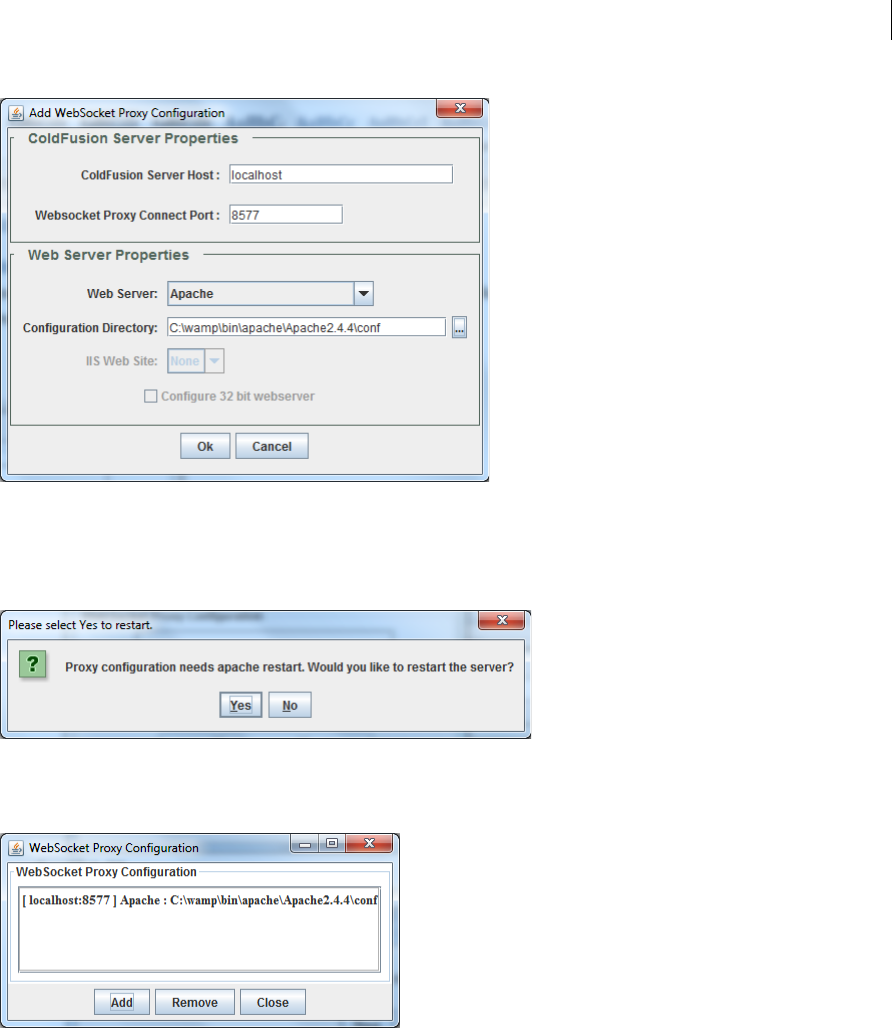
98
Last updated 2/17/2016
1Click OK
2If the external server is not running, you will be prompted to start the server:
?Confirm the proxy configuration:
?Click Close
Step 5 – Verify the proxy configuration
After you have successfully configured the WebSocket Proxy, verify if the required proxy files are created at
<CF_INSTALL_HOME>/config/wsproxy/1
You can also manually modify the config.ini file located at <CF_INSTALL_HOME>/config/wsproxy/1.
Also, a new application, cfws will be made available under the application root of the external servers:
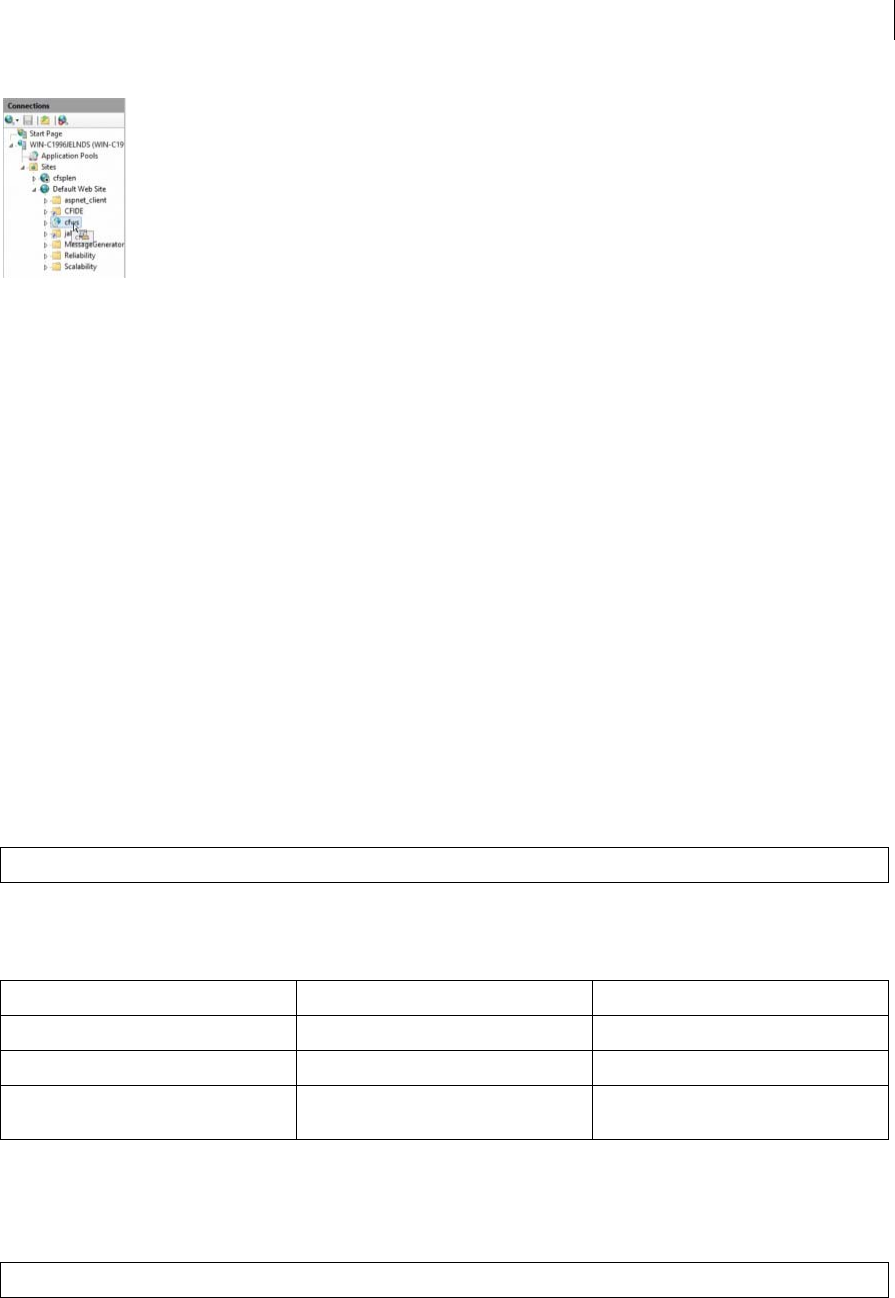
99
Last updated 2/17/2016
The <cfwebsocket> tag supports a new attribute:
•secure – (Optional) If only secure port (SSL) is configured for the WebSocket server (for web service
communication), all the WebSocket communication happens over the secure channel automatically. But in the case
if both ports (non-SSL and SSL) are defined , if you require the communication to be set through a secured TCP
socket, you must set secure to true. Default is false.
ColdFusion 11 has been enhanced to provide enterprise-level capabilities like real-time message broadcasting across
cluster of nodes and SSL support for secure websocket communication (WSS protocol).
Cluster Support
If your application is running across various nodes and on publishing a message to a single node, you want the same to
be broadcasted across all the nodes, you can use this feature.
For example, Node1 has two clients (C1 and C2) subscribed to the 'stock' channel. Similarly Node2 has two clients (C4,
C6) and Node3 has two clients (C8, C10) also subscribed to the 'stock' channel. When client C1 tries to publish a
massage on this 'stock' channel, rather than just sending this message to just C1 and C2 only, the clients from other
nodes C4, C6, C8, and C10 must also receive this message.
On using this feature, you can publish a message to all the subscribers of the channel across various nodes of the cluster
by enabling cluster. To enable the feature, choose the cluster option and define the multicast port to broadcast node up
and node down (events).
JavaScript Functions
The following JavaScript functions were enhanced to auto-support the cluster functionality:
publish
In ColdFusion 10, this function was enabled to send messages to a specific channel based on the filter criteria. In
ColdFusion 11, this function is enhanced to send message to all nodes in a cluster by default.
getSubscriberCount
Note: The cluster support is not available in the standard edition.
Functions Argument Return Type
publish ("channelname", messageBody, {filterOptions} boolean
getSubscriberCount (“channelname”) boolean
invokeAndPublish ("channelName", cfcName, cfcMethod,
[function_parameter] ,{custom_options})
boolean
Publish("channelname ", messageBody, {filterOptions});
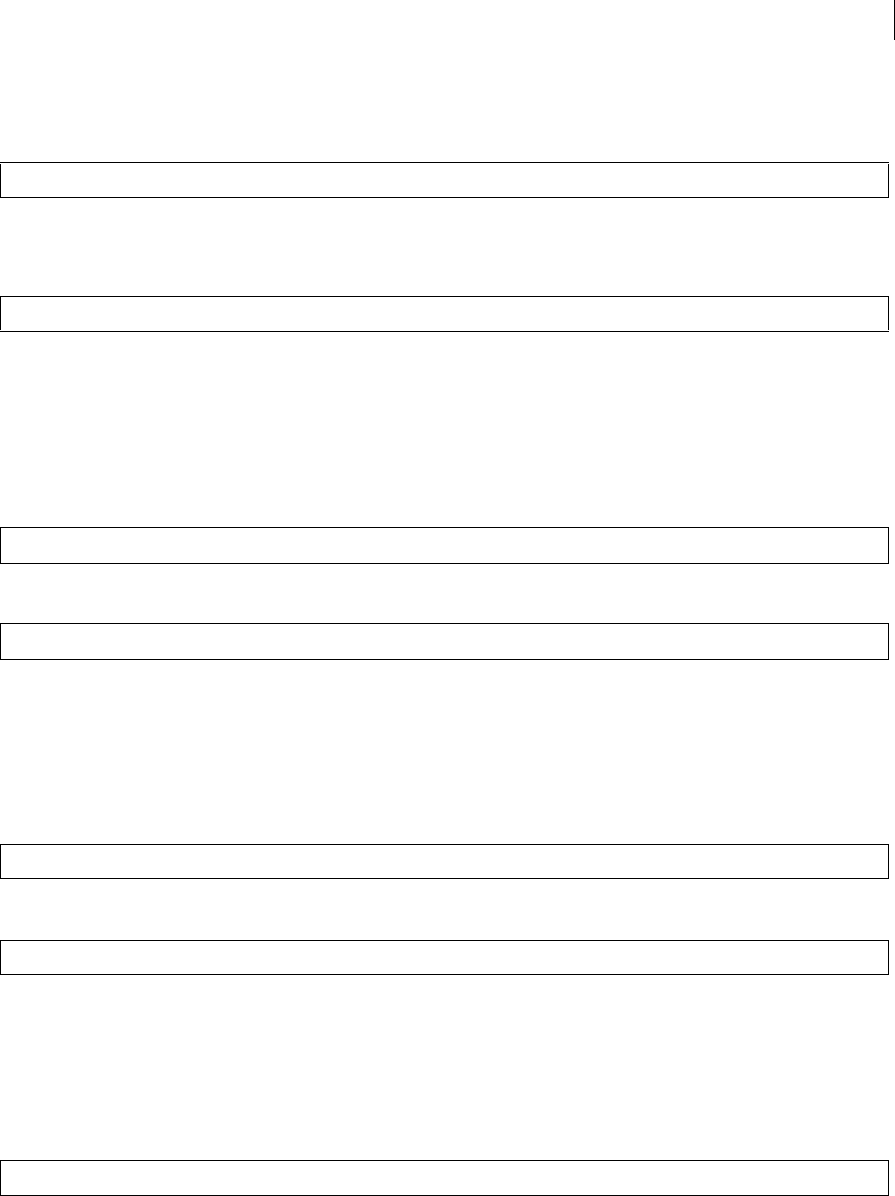
100
Last updated 2/17/2016
In ColdFusion 10, this function was enabled to get subscriber count from a specific channel based on the filter criteria.
In ColdFusion 11, this function is enhanced to fetch the subscriber count from all nodes by default.
invokeAndPublish
Use this function for message publishing and CFC invocation to be executed as separate thread.
In-built ColdFusion functions
To further facilitate cluster support, the following in-built functions are enhanced for ColdFusion 11:
WSPublish
Trigger a message publish from the server without any input from client. A new parameter "Clustered" has been added
to facilitate message broadcasting to all subscribers connected to multiple nodes.
Or
If the "clustered" parameter is not defined, then the default value will be taken based on the cluster <Enable/Disable>
setup.
WSGetSubscribers
Fetches the subscriber information from all the configured nodes. A new parameter "Clustered" has been added to fetch
subscriber information from all configured nodes.
Or
If the "clustered" parameter is not defined, then the default value will be taken based on the cluster <Enable/Disable>
setup.
WSGetAllChannels
Fetches the sub-channel information from all the configured nodes. A new parameter "Clustered" has been added to
fetch sub-channel information from all configured nodes.
If the "clustered" parameter is not defined, then the default value will be taken based on the cluster <Enable/Disable>
setup.
Secure WebSocket communication (WebSocket over SSL)
getSubscriberCount(“channelname”)
invokeandPublish("channelname ", cfcName, cfcMethod, [function_parameter] ,{custom_options})
wsPublish(“channel name”, messageBody [clustered])
wsPublish(“channel name”, messageBody , {filterOptions},[cluster]) <cfset wsPublish("publishdemochannel","Welcome to publishdemo")/>
WSGetSubscribers("channel")
WSGetSubscribers ("channlName" ,[clustered]); <cfset wsgetSubscribers(“stocks”, true)>
WSGetAllChannels ("channel", clustered) <cfset wsgetAllChannels(“stocks” true,)>
101
Last updated 2/17/2016
The Websocket screen (Administrator Console > ColdFusion Administrator > Server Settings > WebSocket) has been
enhanced in ColdFusion 11 with the following options:
•Enable SSL
•SSL port
•KeyStore File location
•KeyStore password
To enable Web socket cluster from the Administrator node, select Server Setting > Web Socket. In the Web Socket
screen, select the Enable Web Socket Cluster check box and enter the Multicast Port details. In the Multicast Port field,
the default Multicast Port 45566 is displayed. Change the port details if required. Make sure the multicast port value is
same across all the nodes in the cluster.
Security Enhancements (ColdFusion 11)
This document describes all the security enhancements made in ColdFusion 11. This update fixes a few security issues
and has strengthened the Server. Some notable security enhancements are described in the following sections.
Preventing attachment download for undelivered mails
Changes have been made to the ColdFusion Server to prevent downloading attachments of undelivered Emails. You
can allow/disallow downloading of attachments for undelivered mails through the ColdFusion Administrator as
follow:
•Login to ColdFusion Administrator
•Click Server Settings > Mail
•Go to Mail Spool Settings and check/uncheck Allow downloading the attachments for undelivered emails
Option Description
Enable SSL Enables Secure Sockets Layer (SSL) for running WebSocket over SSL.
KeyStore File location The location of keyStore in server’s file system. For example,
C:\OpenSSL\bin\keystore.jks.
KeyStore password Password for the keyStore.
SSL port Default port is 8543.
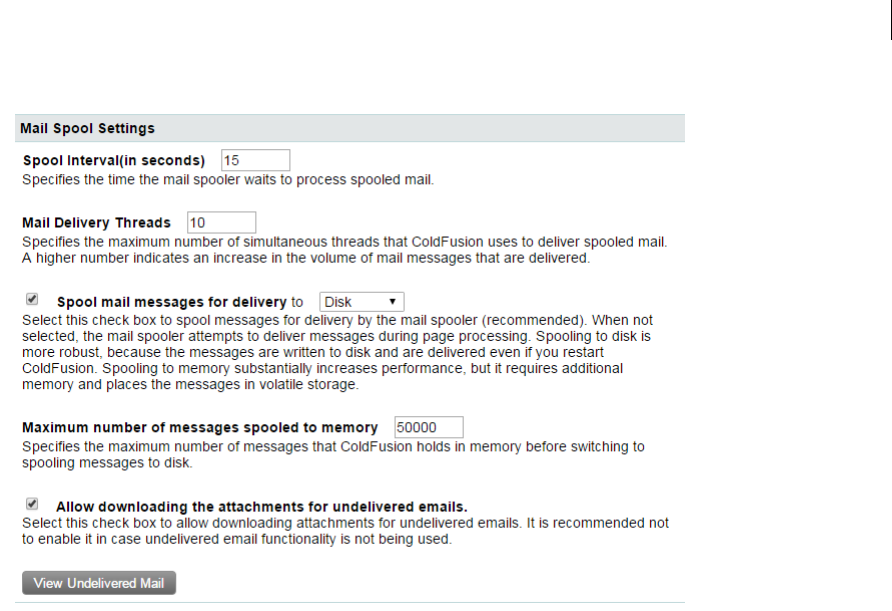
102
Last updated 2/17/2016
Changes in Administrator API
The Administrator API CFC, mail.cfc has also been updated with a new key allowDownload being added to
GetMailProperty and SetMailProperty. You can use this API to enable/disable downloading attachments for
undelivered mails programmatically. The CFC for this Administrator API are located in the
cf_web_root/CFIDE/adminapi/mail.cfc.
Sending encrypted mails using the <CFMail> tag
You can now start sending encrypted mails using the <cfmail> tag. The following list describes the new attributes added
to this tag to support sending encrypted mails:
•encrypt=”true/false” – Enable/disable sending encrypted mails.
•recipientCert = <path> – Provide the path to the recipient’s public key certificate.
•encryptionAlgorithm = <encryption_algorithm>– The algorithm to use to encrypt the mails. You can use one of
the following algorithms:
•DES_EDE3_CBC,
•RC2_CBC (default)
•AES128_CBC
•AES192_CBC
•AES256_CBC
For more information on the this tag, see the <cfmail> tag .
Changes in Secure Profile
See Administering ColdFusion Security.
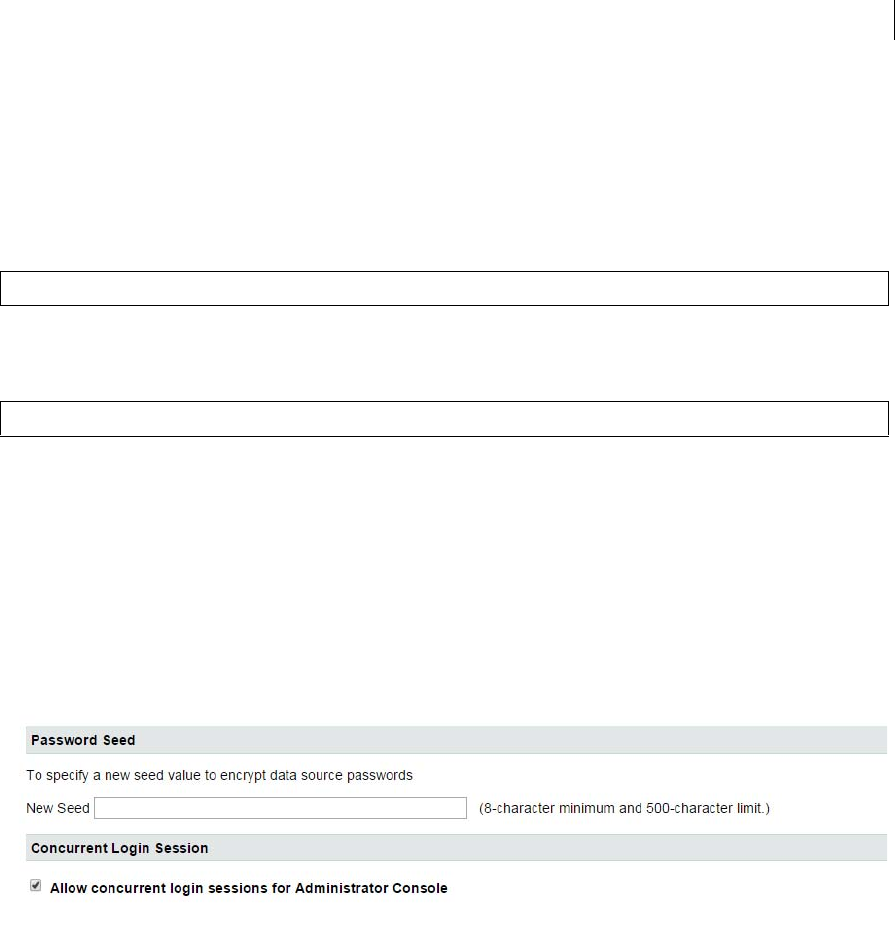
103
Last updated 2/17/2016
Support for concurrent login sessions for the same user
You can login and access an application through multiple concurrent login sessions for the given user. This option is
enabled by default. If you have any security concern, please disable this option in ColdFusion Administrator.
The following changes have been made to support multiple concurrent logins:
•A new attribute, allowconcurrent has been added to the <cflogin> tag to allow concurrent logins:
The default value is true. If allowconcurrent is set to true, the Server allows concurrent logins for a user.
•A new attribute, session has been added to the <cflogout> tag to select the right user to logout:
The default value is current. If session is set to all, all the authenticated sessions for the current user will terminate,
if it set to current, only the current session will terminate, and if it set to others, except the current session all the
other sessions will be terminated.
For administrator, to enable/disable concurrent login sessions, perform the following tasks:
1Login to ColdFusion Administrator
2Go to Security > Administrator Page
3Select Allow Concurrent Login Sessions for Administrator Console
Note that by default concurrent login sessions will be enabled. Also, when the secure profile is enabled, concurrent
login will be disabled.
Changes in Administrator API
The Administrator API CFC, security.cfc has also been updated with the following new APIs:
•isAllowCuncurrentAdminLogin – Find out of concurrent login sessions are allowed
•setAllowConcurrentAdminLogin – Enable/Disable concurrent login sessions
You can use this APIs to enable/disable concurrent login sessions programmatically. The CFC for this Administrator
API are located in the cf_web_root/CFIDE/adminapi/security.cfc.
Note: When secure profile is enabled on the Server, the ColdFusion Administrator will run in a single login session per
username mode (concurrent mode disabled).
<cflogin allowconcurrent="true|false">
<cflogout session="all|current|others">
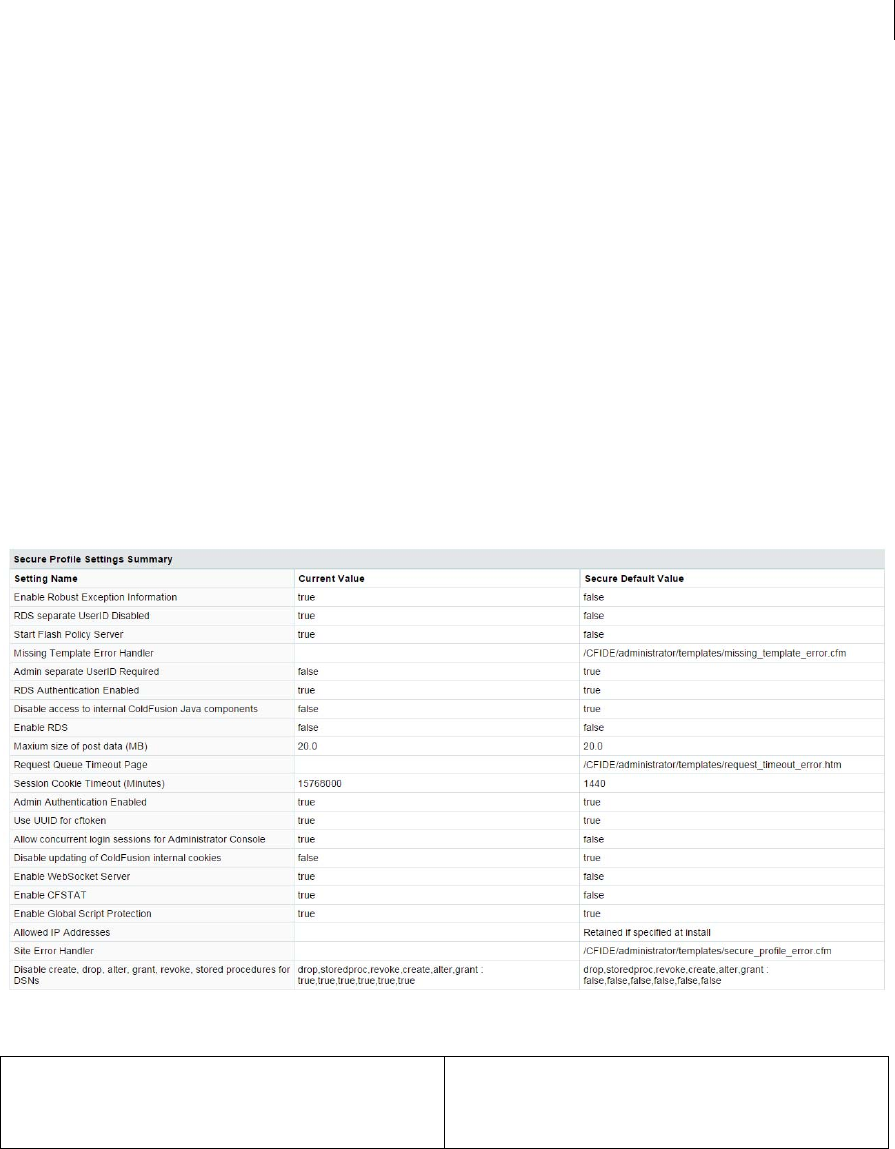
104
Last updated 2/17/2016
Support for PBKDF2 key derivation
See GeneratePBKDFKey
Enabling Secure Profile
With ColdFusion 10 and above you can use Secure Profile to configure selected settings. Secure Profile can be enabled
during installation. You can also provide a list of IP addresses which will be allowed to access Administrator Console.
In ColdFusion 11, secure profile configuration facility is extended to the Administrator console to support post
installation configuration.
To do this, from the ColdFusion Administration console, select from the ColdFusion Administrator console, Security
> Secure Profile (displayed below) and click the Enable Secure Profile check box to use ColdFusion’s recommended
default secure profile settings.
Administrator settings affected by enabling Secure Profile
A table indicating the current settings, Secure default Settings, and values at the time you enable secure profile are
displayed.
Enable or disable using this check box to change between Secure and Normal modes respectively.
Also, when the secure profile is enabled, addtoken attribute’s default value is false for the <cflocation> tag.
Note: Secure Profile disables Directory Browsing for a stand alone
ColdFusion installation with built-in web server. Directory browsing is
not configured when Secure Profile is enabled/disabled from
Administrator Console.

105
Last updated 2/17/2016
Using the ColdFusion Server Monitor
The ColdFusion Server Monitor lets you track activities on a ColdFusion Server. You can identify information about
the server, including requests, queries, memory usage, and errors. You can start and stop collecting server information
and take snapshots of the server.
To track the status of more than one ColdFusion server, use the Multiserver Monitor.
Gathering information about ColdFusion servers
The Server Monitor and Multiserver Monitor provide information about your ColdFusion servers. Generally, the
information that the Server Monitor provides is more detailed than the information that the Multiserver Monitor
provides. However, the Multiserver Monitor provides a good way to track the status of multiple ColdFusion servers.
The Server Monitor provides information about the following:
•Requests, queries, sessions, and threads
•Response time
•Memory usage
•Alerts and errors
•Snapshots of server information The Multiserver Monitor provides the following information:
•Requests
•Response time
•JVM memory usage
•Alerts, errors, and time outs
Starting the ColdFusion Server Monitor
The ColdFusion Server Monitor is a SWF application that you access from the ColdFusion Administrator. The Server
Monitor begins gathering and displaying data when you start it.
The ColdFusion Multiserver Monitor is a SWF application that can provide information about more than one
ColdFusion server. To gather detailed information about one ColdFusion server, use the Server Monitor. To gather
information about several servers, use the Multiserver Monitor.
Start the ColdFusion Server Monitor
1Start the ColdFusion Administrator.
2Select Server Monitoring > Server Monitor, and then click Launch Server Monitor.
Start the ColdFusion Multiserver Monitor
1Start the ColdFusion Administrator.
2Select Server Monitoring > Server Monitor, and then click Launch Multiserver Monitor.
Note: The cross domain details need to be mentioned in the crossdomain.xml file and this file must be placed directly under
webroot. Previously, this file was placed under <webroot>/CFIDE/multiservermonitor-access-policy.xml. For more
information, see www.adobe.com/devnet/flashplayer/articles/fplayer9_security.html
106
Last updated 2/17/2016
By default, server monitoring is turned off. To start and stop monitoring, profiling, and memory tracking, click the
corresponding buttons in the top bar of the Server Monitor. The following table indicates what data the Server Monitor
collects when you click the Start button:
Note: Do not enable these options on the production server. Enabling them will slow the server considerably.
Viewing Server Monitor Reports
When you start the Server Monitor, the Overview page appears. To return to the Overview page from any other page,
click Overview. By default, the Server Monitor retrieves data for graphs every 5 seconds; it retrieves data for reports
every 30 seconds. All the graphs let you display either all the data collected, or the data collected for a specified recent
period. The Server Monitor lets you control the detail, which you turn on and off with the following buttons:
•Start Monitoring Turns on all monitoring.
•Start Profiling Turns on monitoring of individual tags, functions, and query execution times.
•Start Memory Tracking Turns on tracking of memory that different scopes use. If Profiling is also on, the Server
Monitor tracks the memory that individual tags, functions, and queries use. Turning on or off monitoring, profiling,
and memory tracking determines which data the Server Monitor gathers. For example, all the query reports require
that you turn on profiling. The performance effect of turning on monitoring and profiling is minimal; however the
performance effect of memory tracking can be significant.
Button Action
Start Monitoring Starts gathering information about all requests, including active
requests, slowest requests, active sessions, cumulative server usage,
highest hit counts, template cache status, request throttle data,
requests that timed out, requests with errors, and server alerts. The
Server Monitor does not gather information for requests that are
excluded on the Filter Settings page.
Start Profiling Starts gathering tag and function timing information for the Slowest
Requests report; the CFML stack trace for the Active Requests report;
information about active queries, slowest queries, cached queries, and
query cache status; database pool status; and the most frequently run
queries. This information gathering lets you find bottlenecks in your
application. You can view details about each request that is slow or
consumes a lot of memory. You can determine which tags and
functions cause the request to run slowly and which variables
consume the most memory. You can use this information on
development servers. To gather the profiling information, turn on
monitoring, profiling, and, if needed, memory tracking.
Start Memory Tracking Starts gathering information about memory consumption, including
overall memory usage, the queries and sessions that use the most
memory, the memory usage of all application and server scopes, and
profiling information on the largest variables on the Requests by
Memory Usage report, if profiling is enabled.You must enable profiling
to view query-related reports; you must enable profiling and memory
tracking to view the Queries by Memory Usage report.
Reset All Statistics Resets all statistics collected on the server.
Refresh Updates the data for all the graphs, reports, and message boxes on the
page.

107
Last updated 2/17/2016
Overview
The Overview page appears when you start the ColdFusion Server Monitor. It provides an indication of the overall
performance of the server, and displays the following reports:
•Average response time Total response time divided by the number of requests. Click the drop-down list to view
data collected since the server started, for the past 5 min, or for the past minute.
•Requests per second Number of requests per second. Click the drop-down list to view data collected since the
server started, for the past 5 min, or for the past minute.
•Slowest active requests Lowest active requests that are slower than the threshold set on Slowest Requests page. The
number of requests in the list depends on the report size set on the Slowest Requests page.
•Alerts Lists any alerts. To specify when an alert is generated, select Alerts > Alert Configuration. Alerts indicate
whether your server is approaching an unresponsive state or if it is running slowly.
•Last errorMost recent error that any application generates on the server that is in the included paths specified on
the Filter Settings page. In addition, the Summary page lists the other reports available. To view a different report,
click its name. The available reports are:
•Requests with errors
•Requests that timed out
•Requests slower than 20 seconds
•Requests that use more than 40MB
•Sessions that exceed 4KB
•Queries slower than 20 seconds
•Queries slower than 10 seconds on average
•Queries that exceed 20KB
Statistics
Request Statistics
The Request Statistics section contains the following reports:
Active Requests
The Active Requests report lists all currently active requests that take longer to load than the request interval for reports
specified in the Refresh Interval setting. Requests include browser requests, CFC HTTP requests, web services,
gateways, and Flash remoting. You can view a list, a detailed view, or a graph of active requests. The detailed view
includes the CFML stack trace, which you can use to find deadlocked requests and where a long running request is
blocked. To see all request graphs in one view, click Chart. The graph indicates the number of requests that the server
is currently processing and the number of requests that are awaiting allocation of an application server thread to begin
execution. If the graph indicates that many requests are queued, you might want to increase the size of the thread pool.
Alternatively, if ColdFusion is deployed in a cluster, you may want to add a server instance for more efficient load
balancing.
Note: The Server Monitor includes LiveCycle Data Management Assemblers as Flash Remoting requests.
Active ColdFusion Threads
The Active ColdFusion Threads report lists all currently active threads. You can view a list, a detailed view, or a graph
of active threads.
Slowest Requests

108
Last updated 2/17/2016
The Slowest Requests report lists the slowest requests. You can specify the threshold that determines whether a request
appears on this page. The lower the threshold, the more requests appear on the list. Use the Report Size option to limit
the number of items in the list. You can view a list or a detailed view of the slowest requests. The detailed view includes
the CFML stack trace. For more information, see Request handling.
Slowest ColdFusion Threads
The Slowest ColdFusion Threads report lists the slowest ColdFusion threads. You can specify the threshold that
determines whether a ColdFusion thread appears in this report. As the threshold decreases, the number of requests in
the report increases.
Active Sessions
The Active Sessions report lists all active sessions. You can view a list, a detailed view, or a graph of active sessions. The
graph displays the active sessions and the number of users logged in to the server.
Cumulative Server Usage
The Cumulative Server Usage report lists the requests that have cumulatively used the most CPU time on the server.
Even if a request runs rapidly, if it runs frequently, it can consume a large proportion of CPU time. Tuning requests with
high cumulative server time can provide server-wide performance benefits. You can view a list, a detailed view, or a
graph of cumulative server usage. Use the Report Size option to limit the number of items in the list.
Highest Hit Counts
The Highest Hit Counts report lists the requests that have the highest hit count. You can view a list or a graph of requests
with the highest hit count. Use the Report Size option to limit the number of items in the list.
Template Cache Status
The Template Cache status report shows information about the template cache to indicate how it is performing. The
template cache is where ColdFusion stores compiled CFM and CFC templates in memory. When a template is executed
for the first time, it is compiled to Java bytecode, and then stored in the template cache. As long as the template is
unchanged, ColdFusion uses the compiled form of the template stored in the template cache. The Template Cache
status page lets you monitor the cache-hit ratio, which indicates the number of cache hits in relation to the number of
cache misses. Cache hits are the templates retrieved from the cache. Cache misses are the templates that must be
compiled before being placed in the cache. A server that is performing well should have more cache hits than misses,
which is a high cache-hit ratio. If the cache-hit ratio is too low, you might want to increase the cache size by selecting
Server Settings > Caching in the ColdFusion Administrator. For more information, see Caching. The Template Cache
page also lets you monitor the number of templates in the cache, and the estimated memory that the cache occupies.
Note: The template cache count includes both the Least Recently Used (LRU) cache and the soft cache. As a result, the count
can exceed the number configured in the ColdFusion Administrator.
Request Throttle Data
The Request Throttle Data report lists all requests that the ColdFusion server throttles. Requests are throttled when
ColdFusion queues them, because not enough total memory is available to handle them. Requests smaller than the
specified limit are not queued or counted as part of the total memory. Requests larger than the specified limit are
counted as part of total memory and are queued if the request throttle-memory size of the request is exceeded. The
default value is 4 MB. To change the throttle threshold and memory, select Server Settings > Settings in the ColdFusion
Administrator.
Memory Usage
The Memory Usage section contains the following reports:
Memory Usage Summary

109
Last updated 2/17/2016
The Memory Usage Summary report displays a graph that shows the estimated memory consumption by persistent
scopes on the server, including the server scope, the application scopes, and the session scopes. If your server is
consuming too much memory, the graph provides information about which scope is using too much memory, and
when the increased memory consumption began. Detailed reports let you examine estimated memory consumption
for the server scope and all active application and session scopes. For more information, see Variable memory usage.
Note: Memory usage information displayed in the Server Monitor is estimated and might vary from the actual memory
usage. The information in the memory usage report is based on empirical estimates of how different Java types, and their
corresponding ColdFusion types, consume memory. Use the information provided in the memory usage report as an
indicator rather than an absolute measure. Also, the Server Monitor does not track COM objects for memory usage
information.
Requests by Memory Usage
The Requests by Memory Usage report lists the requests that use the most memory. You can view a list or a detailed
view. The detailed view lists the variables that use the most memory during the execution of the request.
CF Threads by Memory Usage
The CF Threads by Memory Usage report lists the ColdFusion threads that use the most memory.
Queries by Memory Usage
The Queries by Memory Usage report lists the queries that use the most memory. When a query appears in this report,
you might want to tune the query to reduce the size of the result set, or cache the query to reduce memory consumption
and network traffic. This report does not include information about cached queries.
Sessions by Memory Usage
The Sessions by Memory Usage report lists the sessions that use the most memory.
Application Scope Memory Usage
The Application Scope Memory Usage report lists the application scopes that use the most memory. The detail lists the
application scope variables that use the most memory.
Server Scope Memory Usage
The Server Scope Memory Usage page lists the server scope variables that use the most memory.
Database
The Database section contains the following reports:
Active Queries
The Active Queries report lists all currently active queries that take longer to load than the threshold specified on the
Slowest Queries report. You can view a list or a detailed view.
Slowest Queries
The Slowest Queries report provides the Slowest Queries report and the Slowest Queries by Average report. Both
reports let you identify queries by template name and line number. The slowest queries report shows specific instances
of a query that is slow, along with the SQL statement for the query. The detail view includes the SQL statement. This
information lets you determine why an instance of that query was slow. The Slowest Queries by Average report
indicates queries that are slow on average. This report does not provide the SQL code for the queries because the SQL
statement might vary from one instance of the query to another. Cached queries are not included in either report. To
improve performance, tune the queries listed in these reports. If the result of a query is static, you can improve
performance by caching the query using ColdFusion's query cache. For more information, see Database response time.

110
Last updated 2/17/2016
Cached Queries
The Cached Queries report lists the queries that were cached. You can view a list of cached queries or details about an
individual query. If the execution time of a query is low, determine if you really need to cache it. If the execution count
is high, tune the cachedafter and cachedwithin settings of the query.
Query Cache Status
The Query Cache Status report graphs the number of cached queries, the estimated memory that the query cache
consumes, and the query cache-hit ratio. Performance increases as the query cache-hit ratio increases. If the cache-hit
ratio is too low, you might want to increase the size of the query cache. Alternatively, to analyze how your application
uses the query cache, determine whether you can tune the cachedAfter and cachedWithin attributes of the cfquery tag.
If the query cache is too large, determine if you can move some queries out of the cache.
Pool Status
The Pool Status report lists the data sources, whether an application on the ColdFusion server is using the data source,
and the number of connections. You can view a list of data sources or details about an individual data source.
Most Frequently Run Queries
The Most Frequently Run Queries report lists the queries that were made the most. Even if individual instances of a
query run rapidly, tuning queries with a high frequency can result in improved performance. This report does not
provide information about cached queries. You can view a list of queries or details about an individual query.
Errors
The Errors section includes the following reports:
Requests with Errors
The Requests with Errors report lists the templates that generate an error. The report includes the path of the template,
and the number of times errors occurred in that template. For the most recent error, the report indicates the time of the
error, the error message, CFML stack traces, and Java stack traces. You can view a list of templates or details about an
individual template. The detailed information includes the CFML stack trace.
Requests Timed Out
The Requests Timed Out page lists the templates that timed out. The report includes the path of the template, the
number of times the template timed out, the most recent response time for the template, the time when the template
was most recently used, the most recent estimated request size, and the CFML stack trace. A Java stack trace is not
provided because time outs can only occur within CFML. You can view a list of templates or details about an individual
template. The detailed information includes the CFML stack trace.
Alerts
The Alerts report lists all the snapshots that alerts generate.
Alert Configuration
The Alert Configuration page lets you specify the thresholds for when to generate an alert. Alerts provide warnings of
potential problems, including a slow server or an unresponsive server. The slow-server alert is triggered when the
server's average response time exceeds a specified limit. The unresponsive-server alert is triggered when more than a
specified number of threads are busy for more than a specified number of seconds. The unresponsive-server alert
creates a snapshot file, which lets you determine where request threads are unresponsive. Both types of alert let you run
a custom CFC when the alert is triggered, which lets you provide your own automated response to an alert condition.
You can specify whether to send an e-mail notification when an alert is triggered, and to whom. You can also specify
the user name and password to log in to the server that is specified on the Mail page of the ColdFusion Administrator.

111
Last updated 2/17/2016
Snapshots
The Snapshots report lists all snapshots that are triggered. Snapshots include details about the ColdFusion server at the
moment the snapshot is triggered. These details include:
•The time and reason the snapshot was triggered
•Whether profiling and memory tracking are enabled
•How many running and queued requests exist at the moment of the snapshot
•Information about memory usage, including:
•JVM memory usage
•Server, application, and session scope memory usage
•Throttle-queue size and memory usage
•Information about cached queries
•Status of the database pool
•The Java stack trace Snapshots are triggered when one of the following occurs:
•You click Trigger Snapshot on the User Snapshots page of the Server Monitor
•The threshold for either an unresponsive server or a slow server is exceeded When you click Trigger Snapshot, the
Server Monitor collects the information for the snapshot and saves it in a file named
snapshot_usrgen_timestamp.txt in the cf_root/logs/snapshots folder. When the Server Monitor creates a snapshot,
it saves the information in a file named snapshot_sysgen_timestamp.txt in the cf_root/logs/snapshots folder.
Specifying Server Monitor Settings
To specify the settings to use to generate reports, click Settings. You can specify the following:
•How often to refresh Server Monitor reports
•How often to refresh Server Monitor graphs
•How often to calculate average response times
•Whether to show the entire template path To specify what file paths to exclude and include in monitoring and
whether to monitor the ColdFusion Administrator, click Settings, and then click the Filter Settings tab. To specify
what file paths to exclude from profiling, click Settings, and then click the Profiling Filter tab. By default, the Server
Monitor collects information about all ColdFusion templates in the webroot directory and its subdirectories and in
any directories specified on the Mappings page of the ColdFusion Administrator. However, you might not want to
monitor all requests on the server. You specify a path to exclude so that the Server Monitor does not collect
information about files in that directory or in any of its subdirectories. This capability is especially useful in
restricting monitoring on production servers. Use the Include Paths option to monitor any subdirectories of an
excluded directory. To specify an alias for a template path, click Settings, and then click the Aliasing tab.
ColdFusion Server Monitor API
Use the Server Monitor API to programmatically retrieve all the data that the Server Monitor collects. The
servermonitoring.cfc ColdFusion component contains methods that you call to perform Server Monitor tasks. For
example, use the getAverageResponseTime method to get the average response time for the server.
To view the methods, method arguments, and documentation for the Server Monitor API, use the CFC Explorer. To
do so, go to http://localhost:8500/CFIDE/adminapi/servermonitoring.cfc.

112
Last updated 2/17/2016
Using the Server Monitor API
1Instantiate administrator.cfc:
<cfscript>
adminObj = createObject("component","cfide.adminapi.administrator");
Note: You can instantiate administrator.cfc and call the login_ method in a single line of code, as the following example
shows:
createObject("component","cfide.adminapi.administrator").login("admin");
2Call the administrator.cfc loginmethod, passing the ColdFusion Administrator password or the RDS password:
adminObj.login("admin");
3Instantiate the Server Monitor CFC:
myObj = createObject("component","cfide.adminapi.servermonitoring");
4Call the CFC method you want (this example uses getAverageResponseTime):
myObj.getAverageResponseTime();
Example
The following example uses the Server Monitor API to list the data sources to which the ColdFusion Server is
connected and the number of connections:
<cfscript>
// Login to the ColdFusion Administrator.
adminObj = createObject("component","cfide.adminapi.administrator");
adminObj.login("admin");
// Instantiate the Server Monitor object.
myObj = createObject("component","cfide.adminapi.servermonitoring");
// Get the dsn pool data array
dbpool = myObj.getDbPoolStats();
</cfscript>
<!--- List the data sources --->
The ColdFusion server is connected to the following data sources:<br />
<cfloop index="i" from="1" to="#ArrayLen(dbpool)#">
<cfoutput>#dbpool[i].DSN# #dbpool[i].TOTALCONNECTIONCOUNT#<br /></cfoutput>
</cfloop>
Using the Server Monitor to improve server performance
The Server Monitor provides information that you can use to help improve the performance of your ColdFusion server.
Find bottlenecks in your application during development
1Turn on monitoring, profiling, and memory tracking.
2Set the Slowest Request and Requests By Memory Usage report thresholds to zero (0).
3Run your templates.
4For each request, find the following:
•The slowest tags and functions in the Slowest Requests report.
•The largest variables in the Requests By Memory Usage report.

113
Last updated 2/17/2016
JVM memory usage
Because ColdFusion is an enterprise Java application, the Java Virtual Machine (JVM) is the software component that
most influences performance. Different JVMs from different vendors and different versions of the same JVM from the
same vendor have different performance characteristics. You might benefit from changing the JVM that you are using
with ColdFusion.
ColdFusion contains an embedded version of Tomcat as the application server and the Sun 1.6 version of the JVM. By
contrast, ColdFusion for J2EE running on IBM WebSphere Application Server uses the JVM that WebSphere is
configured to use.
To configure ColdFusion to use a different JVM, edit the cf_root/runtime/lib/jvm.config file with a text editor by
modifying the value of java.home to point to the root directory of the JVM to use. Alternatively, you can switch to a
different JVM in the ColdFusion Administrator on the Java and JVM Settings page.
Because switching the JVM changes the software environment significantly, do so first in a development or testing
environment. Also, fully test your ColdFusion applications before you make the change on a production server.
The JVM performs memory management and can have a significant effect on your performance depending on how
you configure the JVM. The most important settings for the JVM are the initial heap size and maximum heap size. The
initial heap size represents the amount of memory that the JVM uses on startup; the maximum heap size represents the
amount of memory that the JVM can use. You can modify these settings in the ColdFusion Administrator on the Java
and JVM Settings page. The Initial Memory Size setting specifies the initial heap size; the Maximum Memory Size
setting specifies the maximum heap size. The JVM arguments for initial heap size and maximum heap size are -XmsNm
and -XmxNm respectively, where N is the size of the heap in megabytes (MB). These JVM arguments are stored in the
jvm.config file, in the value of the java.args setting.
The default maximum heap size is set to 512 MB in ColdFusion. For best performance, set the initial heap size and the
maximum heap size to the same value. Determining the optimal size for the heap to run the applications on your
ColdFusion server results in improved performance. Setting the value too high can result in poorer performance
because of the higher degree of garbage collection and internal memory management required for the larger heap.
Conversely, setting the heap size too small can result in a java.lang.OutOfMemoryError error if your application tries
to use more memory than is available to it.
The best way to find the optimal heap size is to run your application under simulated peak load with a large heap and
monitor how much memory your application actually uses. If you find that your application uses only 180 MB of
memory, for example, you might see performance benefit from reducing your heap size to 256 MB.
The java.lang.OutOfMemoryError error can occur in other, more complicated, conditions. One common cause of the
error is when objects fill up the heap's permanent generation, which defaults to 64 MB. You can increase the value, for
example, to 128 MB, by adding the following JVM argument to the Java and JVM Settings page of the ColdFusion
Administrator:
-XX:MaxPermSize=128m.
Physical hardware memory is an important consideration when determining the optimal heap size. Setting the
maximum heap size to a value that exceeds the amount of free physical memory causes severe performance
degradation. For example, if you have only 512 MB of physical memory, do not set the maximum heap size to 512 MB.
Because the operating system and other running applications use memory, much less than 512 MB of memory is
available for the JVM process. it is important to have hardware that meets the requirements of your software
application. For best results, run on server hardware with 1 GB or more of physical memory.
The Server Monitor Summary page monitors the JVM's memory usage. Use this information when determining the
optimal heap size.

114
Last updated 2/17/2016
Variable memory usage
Configure client variable storage to use cookies or an RDBMS for best performance when using client variables; you do
this on the Client Variables page of the ColdFusion Administrator. Wherever possible, it is best to fully scope your
variable names, especially when using the isdefined() }}function. For example, {{<cfif
isdefined("variables.myvariable")> performs much better than <cfif isdefined("myvariable")>.
To monitor how variables use memory, view the reports in the Memory Usage of the Server Monitor.
Request handling
The Simultaneous Requests setting on the Settings page of the ColdFusion Administrator has the largest effect on how
well an application performs under load. This setting dictates how many threads are used to simultaneously process
incoming requests. For most applications, a good starting point for the optimal value for this setting is three per
processor; you can set a dual processor computer to six simultaneous requests. To find the optimal value for this setting,
test your application under load with different values until you find the value that provides the best performance under
load. While you test your application, you can view the average response time on the Server Monitor Summary page
and the reports in Statistics.
Caching
You can turn on the trusted-cache setting on the Caching page of the ColdFusion Administrator for production
applications so that the server does not check the file system to see if the CFML source code changed since it was last
compiled. This setting provides the benefit of minimizing system I/O, which has a major effect on performance. Set the
template-cache size on the Caching page of the ColdFusion Administrator to be roughly equal to the number of
ColdFusion templates that are normally used. To monitor how your settings affect performance, use the Templa te
Cache Status in the Request Statistics section of the Server Monitor. In addition, use one of the following methods to
cache wherever possible in your application:
•The cfcache tag
•Database query caching. Database caching can provide significant performance and scalability improvements, and
is accomplished with the cachedwithin and cachedafter attributes of database tags that support them, such as the
cfquery tag.
•Storing data in persistent scopes such as session, making it available for longer than a single request.
Database response time
Wherever possible, it's best to allow database servers to handle data manipulation. Adding SQL code to handle this
work is much more efficient than doing string manipulations or doing in-memory queries (query of queries).
Additionally, stored procedures generally provide a higher level of performance than regular SQL queries. Converting
queries in cfquery calls to stored procedures and using the cfstoredproc tag typically improves performance. To view
database response time information, use the Database section of the Server Monitor (see Database).
Setting up Server Manager client
Server Manager is an AIR-based desktop application that allows you to centrally manage multiple ColdFusion servers
from one location. From the Server Monitoring page, you can download and install the Server Manager client AIR
application.
For details about configuring the Server Manager client for ColdFusion server instances, see Working with Ser ver
Manager.

115
Last updated 2/17/2016
Configuring the Server monitoring settings
The monitoring server can be configured in one of the following ways:
•Use ColdFusion Administrator
•Manually edit neo-monitoring.xml and jetty.xml
•Use Admin API (servermonitoring.cfc)
Using the ColdFusion Administrator
Note: The Server Monitoring Settings Page in the ColdFusion Administrator (Server Monitoring > Monitoring Settings)
lets the following configurations:
•Enable monitoring server.
Note: When you enable monitoring server and configure it to use SSL, include the following setting to java.args in
the JVM.config file: Dcoldfusion.jsafe=true
•Specify the port on which monitoring server listens. The default port is 5500
Note: If a server monitoring application is already running, the configuration mentioned here takes effect only after
you relaunch the application.
Manually editing neo-monitoring.xml and jetty.xml
neo-monitoring.xml
Go to the following location:cf_root\lib (in the server configuration)orcf_root/WEB-INF/cfusion/lib (in the J2EE
configuration).Modify the value to true in the following code:<var name='ismonitoringserverenabled'><boolean
value='false'/></var>
Jetty.xml
Modify Jetty.xml only if you have to change the port or if your connection uses HTTPS protocol.Go to the following
location:cf_root\lib (in the server configuration)orcf_root/WEB-INF/cfusion/lib (in the J2EE configuration).You can
specify the following configurations in the XML file:
•Port
•MaxThreads
•Logging
For connections using HTTPS protocol
1Open jetty.xml.
2Remove or comment out the Set Connectors section.

116
Last updated 2/17/2016
<Call name="addConnector">
<Arg>
<New class="org.eclipse.jetty.server.nio.SelectChannelConnector">
<Set name="host">0.0.0.0</Set>
<Set name="port">5500</Set>
<Set name="maxIdleTime">300000</Set>
<Set name="Acceptors">2</Set>
<Set name="statsOn">false</Set>
<Set name="lowResourcesConnections">10</Set>
<Set name="lowResourcesMaxIdleTime">5000</Set>
</New>
</Arg>
3Uncomment the Set SSL Connector section.
<Call name="addConnector">
<Arg>
<New class="org.eclipse.jetty.server.ssl.SslSelectChannelConnector">
<Set name="host">0.0.0.0</Set>
<Set name="port">5500</Set>
<Set name="maxIdleTime">300000</Set>
<Set name="Acceptors">1</Set>
<Set name="AcceptQueueSize">100</Set>
<Set name="Keystore">"path to keystore"</Set>
<Set name="Password">OBF:1vny1zlo1x8e1vnw1vn61x8g1zlu1vn4</Set>
<Set name="KeyPassword">OBF:1u2u1wml1z7s1z7a1wnl1u2g</Set>
<Set name="truststore">"path to keystore"</Set>
<Set name="trustPassword">OBF:1vny1zlo1x8e1vnw1vn61x8g1zlu1vn4</Set>
</New>
</Arg>
</Call>
4Specify the port and the keystore-related settings.
Using Admin APIs
To programmatically configure the Server Monitoring server, use the ServerMonitoring.cfc. The following
Administrator APIs are added in this release:
API Description
setMonitoringServerPort(port); Sets the port information for the monitoring server.
getMonitoringServerPort(); Gets details of the port to which the monitoring server listens.
getMonitoringServerProtocol(); Gets the protocol details for the monitoring server.
enableMonitoringServer(); Enables the monitoring server and starts it if not running.
stopMonitoringServer(); Stops the monitoring server.
startMonitoringServer(); Starts the monitoring server.
disableMonitoringServer(); Disables the monitoring server and stops it if it is running.
isMonitoringServerEnabled(); Indicates if the monitoring server is enabled.
isMonitoringServerRunning(); Indicates if the monitoring server is running.
configureMonitoringServer(flag, port); Enables monitoring server and sets port information.

117
Last updated 2/17/2016
Troubleshooting scenarios
Multi-server monitoring
For multi-server monitoring, ensure that you specify the cross domain details in the crossdomain.xml in
(CFRoot/MonitoringServer).
Someone changes port in XML
The exception does not appear in the ColdFusion Administrator. You verify the log.
Monitoring with SSL
You might encounter an error while starting Monitoring Server in SSL mode. To resolve this known issue, add the
following in the jvm.config: "-Dcoldfusion.disablejsafe=true"
Updating the threadpool
You can update the threadpool in the jetty.xml. Modify the threadpool in the Server Threadpool section of the XML file:
<Set name="ThreadPool">
<!-- Default queued blocking threadpool
-->
<New class="org.eclipse.jetty.util.thread.QueuedThreadPool">
<Set name="minThreads">2</Set>
<Set name="maxThreads">50</Set>
</New>
<!-- Optional Java 5 bounded threadpool with job queue
<New class="org.eclipse.thread.concurrent.ThreadPool">
<Set name="corePoolSize">50</Set>
<Set name="maximumPoolSize">50</Set>
</New>
-->
</Set>
