Adobe Edge Animate CC (2015) Help Guide 2015 En
User Manual: adobe Adobe Edge Animate - CC (2015) - Help Guide Free User Guide for Adobe Edge Animate Software, Manual
Open the PDF directly: View PDF ![]() .
.
Page Count: 42
- Legal notices
- Contents
- Chapter 1: What's new
- Chapter 2: Creating content & importing assets
- Creating content for animation
- Creating a project and importing content (Video)
- Create assets and import them into your Edge Animate project
- Use web fonts
- Add audio to animations
- Add video to animations
- Import sprite sheets
- Hyperlink elements to Adobe DPS articles
- Using Flash sprite sheets with Animate (Tutorial)
- Chapter 3: Create animations using the Timeline
- The Edge Animate timeline
- Creating Animations in Edge Animate (Video)
- Using the Pin tool, Keyframes, and Transitions for animation
- Animating text (Video)
- Create nested animations with symbols
- Animate existing HTML
- Add interactivity with JavaScript
- Leveraging independent symbol timelines (Tutorial)
- Create an animated logo (Tutorial)
- Chapter 4: Use motion paths
- Chapter 5: Layout and design
- Chapter 6: Integration and publishing
- Publish your content
- Edge Animate API guide
- Publishing and integration (Video)
- Edge Animate and the Twitter API (Video)
- Enhance your DPS folios with HTML animations (Tutorial)
- Using Animate files in InDesign or Muse (Video)
- Spice up your WordPress Site with Edge Animate
- Create a PhoneGap Build app with Edge Animate
- Use Edge Animate file in InDesign or Muse
- Extending Edge Animate with 3rd party web components (Video)

Adobe®
Edge Animate CC
Help

iii
Last updated 6/16/2015
Contents
Chapter 1: What's new
New features summary . . . . . . . . . . . . . . . . . . . . . . . . . . . . . . . . . . . . . . . . . . . . . . . . . . . . . . . . . . . . . . . . . . . . . . . . . . . . . . . . . . . . . . . . . . . . . . . . .1
Chapter 2: Creating content & importing assets
Creating content for animation . . . . . . . . . . . . . . . . . . . . . . . . . . . . . . . . . . . . . . . . . . . . . . . . . . . . . . . . . . . . . . . . . . . . . . . . . . . . . . . . . . . . . . . . .7
Creating a project and importing content (Video) . . . . . . . . . . . . . . . . . . . . . . . . . . . . . . . . . . . . . . . . . . . . . . . . . . . . . . . . . . . . . . . . . . . . . . .7
Create assets and import them into your Edge Animate project . . . . . . . . . . . . . . . . . . . . . . . . . . . . . . . . . . . . . . . . . . . . . . . . . . . . . . . . . .7
Use web fonts . . . . . . . . . . . . . . . . . . . . . . . . . . . . . . . . . . . . . . . . . . . . . . . . . . . . . . . . . . . . . . . . . . . . . . . . . . . . . . . . . . . . . . . . . . . . . . . . . . . . . . . . . .7
Add audio to animations . . . . . . . . . . . . . . . . . . . . . . . . . . . . . . . . . . . . . . . . . . . . . . . . . . . . . . . . . . . . . . . . . . . . . . . . . . . . . . . . . . . . . . . . . . . . . . .9
Add video to animations . . . . . . . . . . . . . . . . . . . . . . . . . . . . . . . . . . . . . . . . . . . . . . . . . . . . . . . . . . . . . . . . . . . . . . . . . . . . . . . . . . . . . . . . . . . . . . 13
Import sprite sheets . . . . . . . . . . . . . . . . . . . . . . . . . . . . . . . . . . . . . . . . . . . . . . . . . . . . . . . . . . . . . . . . . . . . . . . . . . . . . . . . . . . . . . . . . . . . . . . . . . 16
Hyperlink elements to Adobe DPS articles . . . . . . . . . . . . . . . . . . . . . . . . . . . . . . . . . . . . . . . . . . . . . . . . . . . . . . . . . . . . . . . . . . . . . . . . . . . . . 20
Using Flash sprite sheets with Animate (Tutorial) . . . . . . . . . . . . . . . . . . . . . . . . . . . . . . . . . . . . . . . . . . . . . . . . . . . . . . . . . . . . . . . . . . . . . . 21
Chapter 3: Create animations using the Timeline
The Edge Animate timeline . . . . . . . . . . . . . . . . . . . . . . . . . . . . . . . . . . . . . . . . . . . . . . . . . . . . . . . . . . . . . . . . . . . . . . . . . . . . . . . . . . . . . . . . . . . 22
Creating Animations in Edge Animate (Video) . . . . . . . . . . . . . . . . . . . . . . . . . . . . . . . . . . . . . . . . . . . . . . . . . . . . . . . . . . . . . . . . . . . . . . . . . 22
Using the Pin tool, Keyframes, and Transitions for animation . . . . . . . . . . . . . . . . . . . . . . . . . . . . . . . . . . . . . . . . . . . . . . . . . . . . . . . . . . . 22
Animating text (Video) . . . . . . . . . . . . . . . . . . . . . . . . . . . . . . . . . . . . . . . . . . . . . . . . . . . . . . . . . . . . . . . . . . . . . . . . . . . . . . . . . . . . . . . . . . . . . . . 24
Create nested animations with symbols . . . . . . . . . . . . . . . . . . . . . . . . . . . . . . . . . . . . . . . . . . . . . . . . . . . . . . . . . . . . . . . . . . . . . . . . . . . . . . . 24
Animate existing HTML . . . . . . . . . . . . . . . . . . . . . . . . . . . . . . . . . . . . . . . . . . . . . . . . . . . . . . . . . . . . . . . . . . . . . . . . . . . . . . . . . . . . . . . . . . . . . . . 25
Add interactivity with JavaScript . . . . . . . . . . . . . . . . . . . . . . . . . . . . . . . . . . . . . . . . . . . . . . . . . . . . . . . . . . . . . . . . . . . . . . . . . . . . . . . . . . . . . . 26
Leveraging independent symbol timelines (Tutorial) . . . . . . . . . . . . . . . . . . . . . . . . . . . . . . . . . . . . . . . . . . . . . . . . . . . . . . . . . . . . . . . . . . 28
Create an animated logo (Tutorial) . . . . . . . . . . . . . . . . . . . . . . . . . . . . . . . . . . . . . . . . . . . . . . . . . . . . . . . . . . . . . . . . . . . . . . . . . . . . . . . . . . . . 28
Chapter 4: Use motion paths
Animating over a curved path . . . . . . . . . . . . . . . . . . . . . . . . . . . . . . . . . . . . . . . . . . . . . . . . . . . . . . . . . . . . . . . . . . . . . . . . . . . . . . . . . . . . . . . . 29
New features summary . . . . . . . . . . . . . . . . . . . . . . . . . . . . . . . . . . . . . . . . . . . . . . . . . . . . . . . . . . . . . . . . . . . . . . . . . . . . . . . . . . . . . . . . . . . . . . . 29
Chapter 5: Layout and design
Creating a flexible layout . . . . . . . . . . . . . . . . . . . . . . . . . . . . . . . . . . . . . . . . . . . . . . . . . . . . . . . . . . . . . . . . . . . . . . . . . . . . . . . . . . . . . . . . . . . . . 35
Create fluid responsive web page layouts . . . . . . . . . . . . . . . . . . . . . . . . . . . . . . . . . . . . . . . . . . . . . . . . . . . . . . . . . . . . . . . . . . . . . . . . . . . . . 35
Target older browsers . . . . . . . . . . . . . . . . . . . . . . . . . . . . . . . . . . . . . . . . . . . . . . . . . . . . . . . . . . . . . . . . . . . . . . . . . . . . . . . . . . . . . . . . . . . . . . . . 35
Chapter 6: Integration and publishing
Publish your content . . . . . . . . . . . . . . . . . . . . . . . . . . . . . . . . . . . . . . . . . . . . . . . . . . . . . . . . . . . . . . . . . . . . . . . . . . . . . . . . . . . . . . . . . . . . . . . . . 36
Edge Animate API guide . . . . . . . . . . . . . . . . . . . . . . . . . . . . . . . . . . . . . . . . . . . . . . . . . . . . . . . . . . . . . . . . . . . . . . . . . . . . . . . . . . . . . . . . . . . . . . 37
Publishing and integration (Video) . . . . . . . . . . . . . . . . . . . . . . . . . . . . . . . . . . . . . . . . . . . . . . . . . . . . . . . . . . . . . . . . . . . . . . . . . . . . . . . . . . . . 37
Edge Animate and the Twitter API (Video) . . . . . . . . . . . . . . . . . . . . . . . . . . . . . . . . . . . . . . . . . . . . . . . . . . . . . . . . . . . . . . . . . . . . . . . . . . . . . 37
Enhance your DPS folios with HTML animations (Tutorial) . . . . . . . . . . . . . . . . . . . . . . . . . . . . . . . . . . . . . . . . . . . . . . . . . . . . . . . . . . . . . . 37
Using Animate files in InDesign or Muse (Video) . . . . . . . . . . . . . . . . . . . . . . . . . . . . . . . . . . . . . . . . . . . . . . . . . . . . . . . . . . . . . . . . . . . . . . . 37
Spice up your WordPress Site with Edge Animate . . . . . . . . . . . . . . . . . . . . . . . . . . . . . . . . . . . . . . . . . . . . . . . . . . . . . . . . . . . . . . . . . . . . . . 37
Create a PhoneGap Build app with Edge Animate . . . . . . . . . . . . . . . . . . . . . . . . . . . . . . . . . . . . . . . . . . . . . . . . . . . . . . . . . . . . . . . . . . . . . 37

iv
EDGE ANIMATE
Contents
Last updated 6/16/2015
Use Edge Animate file in InDesign or Muse . . . . . . . . . . . . . . . . . . . . . . . . . . . . . . . . . . . . . . . . . . . . . . . . . . . . . . . . . . . . . . . . . . . . . . . . . . . . 38
Extending Edge Animate with 3rd party web components (Video) . . . . . . . . . . . . . . . . . . . . . . . . . . . . . . . . . . . . . . . . . . . . . . . . . . . . . 38
1
Last updated 6/16/2015
Chapter 1: What's new
New features summary
The 2015 release of Adobe Edge Animate CC includes support for in-line text that lets you type and edit text directly
on Stage. This release also includes a bunch of bug fixes for crashes and overall stability of Edge Animate.
Adobe Edge Animate CC (2015 release) | June 2015
In-line text
In the previous releases of Edge Animate, you used to type text in a popup that later appeared on Stage. In this release,
you can type text directly on Stage. You can also format portions of text (referred to as text spans), which was not
supported earlier.
To add a text element to your composition, do the following:
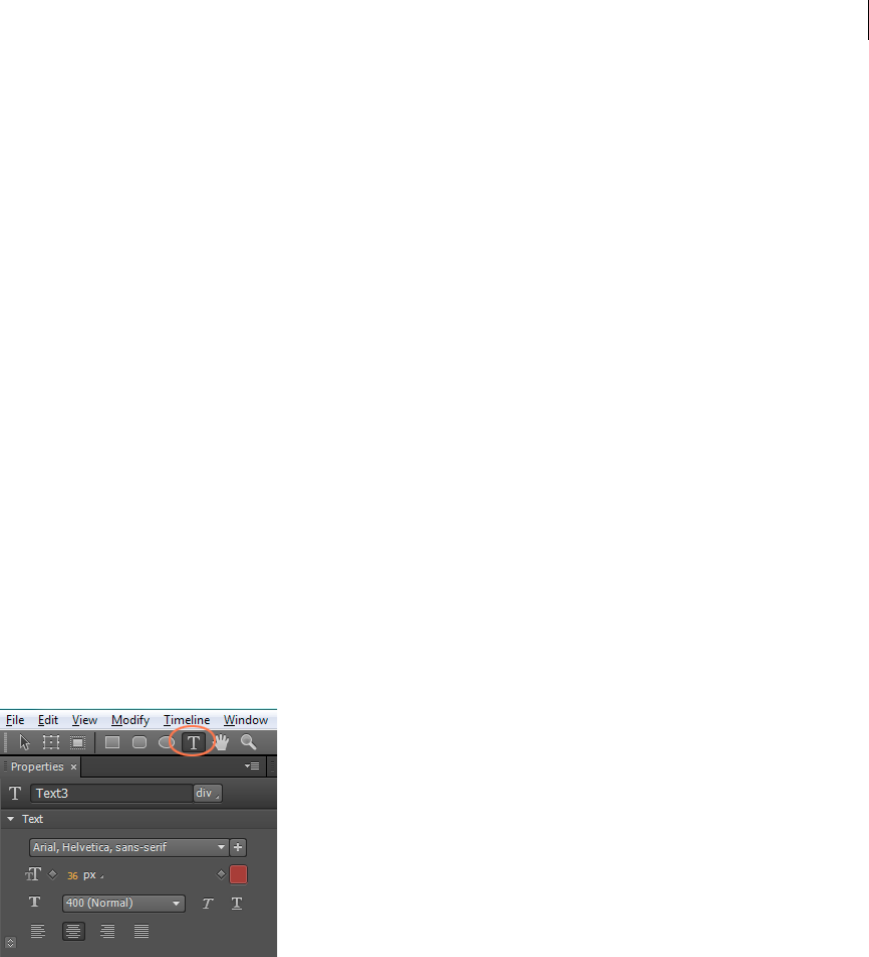
1Click the ‘T’ icon in the menu.
2Click on the Stage where you need the text to be inserted.
3Type the required text.
The text box in this case is auto adjusted to the text you type in. If you want to define your own text box and then type
the text, do the following:
1Click the ‘T’ icon in the menu. The cursor changes to ‘+’ on Stage.
2Drag on Stage to define the text box.
3Type the required text.
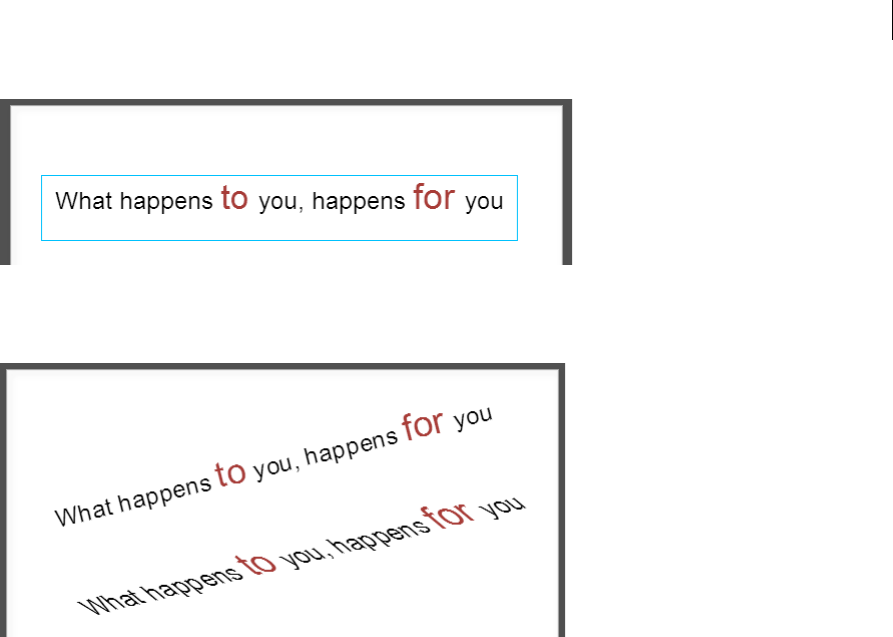
To format a portion of text differently from the rest, select the required text and use the Properties panel to modify as
required.
2
What's new
Last updated 6/16/2015
The text spans are retained when the text is transformed (rotated or scaled).
Adobe Edge Animate CC 2014.1.1 | November 2014
The 2014.1.1 release of Adobe Edge Animate CC provides many important bug fixes including crash issues while using
Timeline and reordering of elements. This release also includes fixes to issues with audio/video and scroll effects
workflow in Adobe Muse, along with new runtime APIs (getSymbolTypeName and symbol.seek).
Adobe Edge Animate CC 2014.1 | October 2014
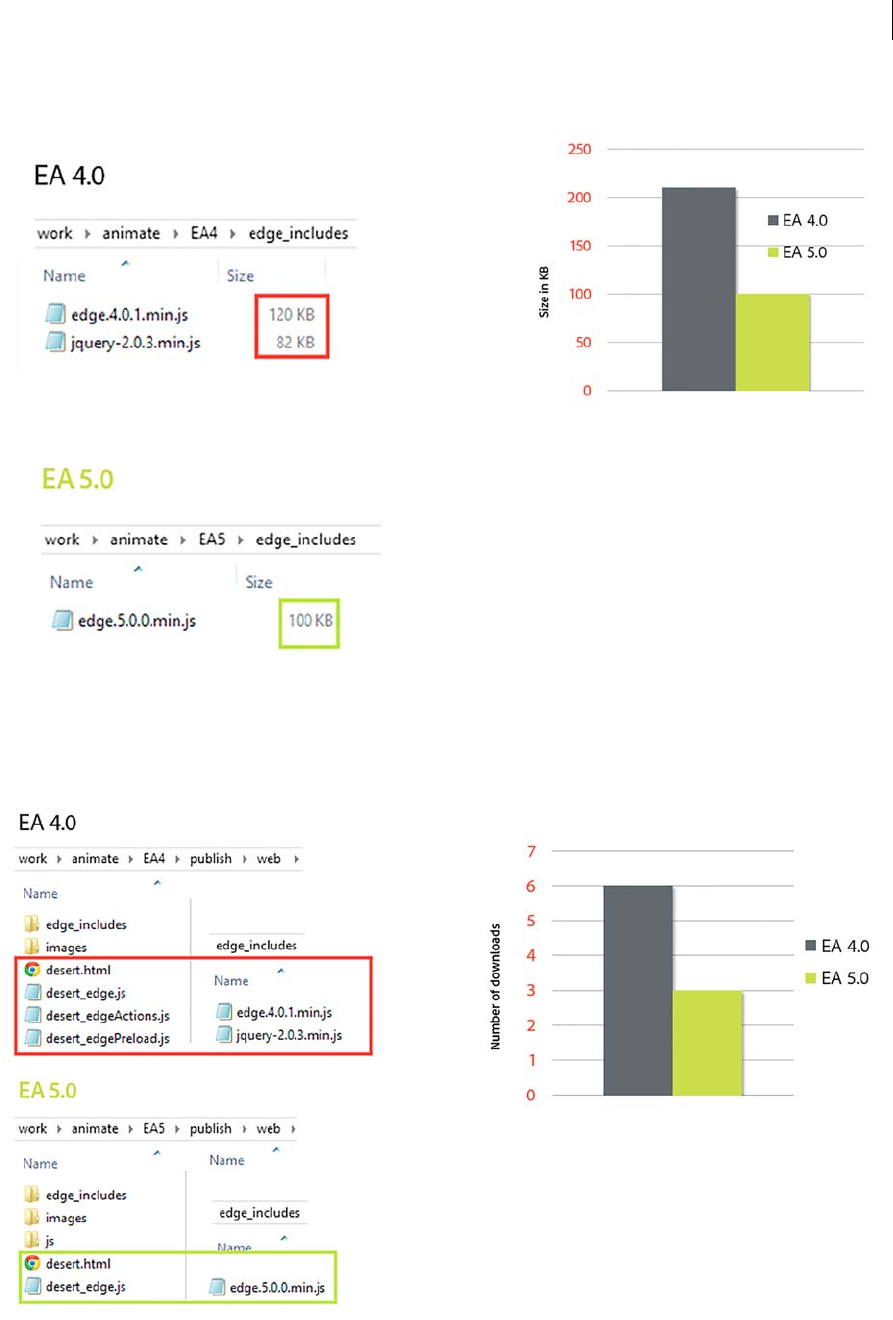
Runtime size reduced by 55%
The earlier versions of Edge Animate runtime used to depend on jQuery internally. jQuery was always added as a
dependency in your composition irrespective of whether you are actually using any of the jQuery APIs or not. This
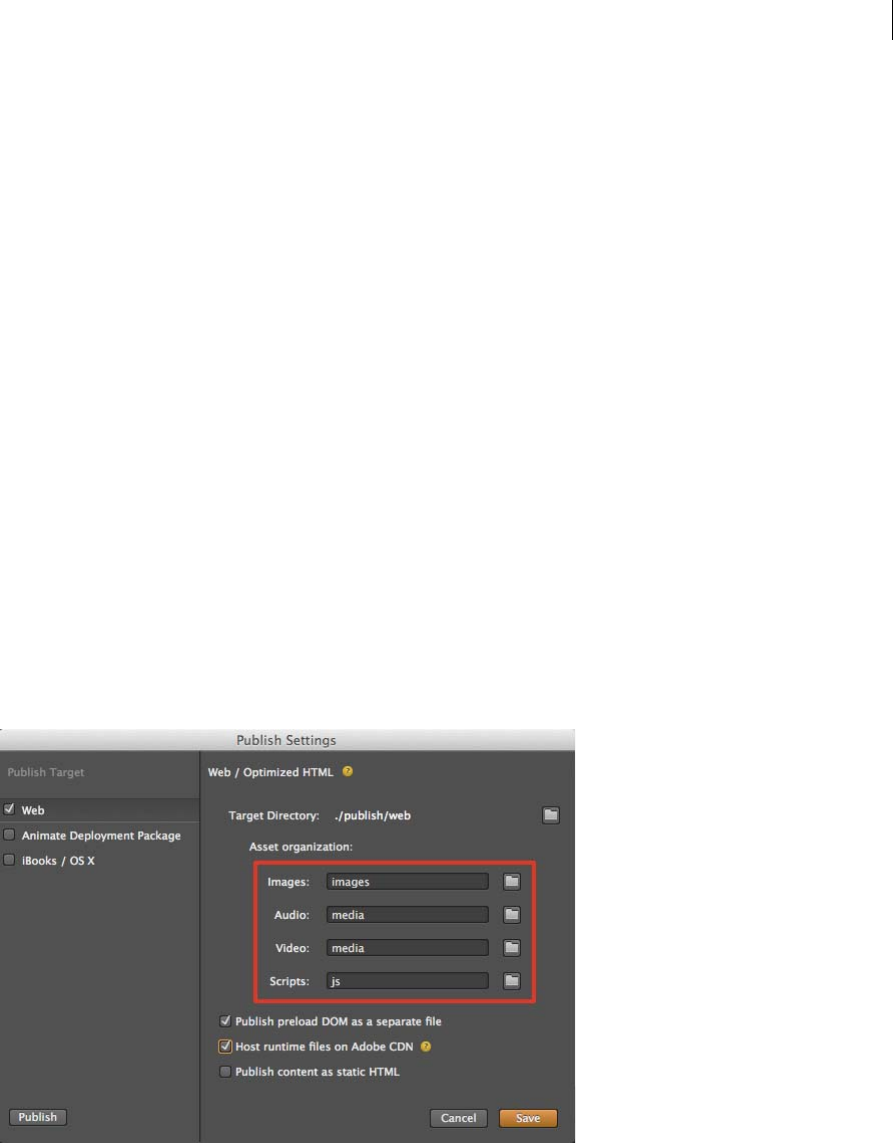
dependency is removed in the latest Edge Animate Runtime, which means a smaller payload size and reduced number
of downloads required for running your compositions.
The requirement for a separate preloader js too is removed in this release. Edge Animate now generates a single js file
for your composition, which contains the entire DOM and your complete code in the Edge Animate composition.
3
What's new
Last updated 6/16/2015
Reduced payload size
Lesser number of downloads
4
What's new
Last updated 6/16/2015
Upgrade of compositions
Compositions created using previous versions of Edge Animate are automatically upgraded when you open them with
this build. The upgraded composition along with the associated files is saved in a separate folder under the root of the
project folder.
For example, if the previous composition is in the /user/MyProject folder, the upgraded composition will be in the
folder /user/MyProject_upgraded. Assets that are directly referenced in the composition are automatically copied to
the upgrade folder. You may need to manually copy the rest of the assets that are not directly used in the composition
(for example, additional CSS files, assets used only through scripts).
Also, due to new runtime changes described below, any jQuery dependencies in the previous compositions are added
as user scripts to the Library in the upgraded composition.
Note: Since the new runtime does not depend on jQuery anymore, you can try deleting jQuery from your compositions
and test them, if you are not using any of the jQuery APIs.
Removed dependencies on third-party libraries
The Edge Animate runtime no longer requires jQuery to run your compositions. However, you can still use a few
jQuery APIs that are made available in Edge Animate. For more details, refer to the Edge Animate API reference.
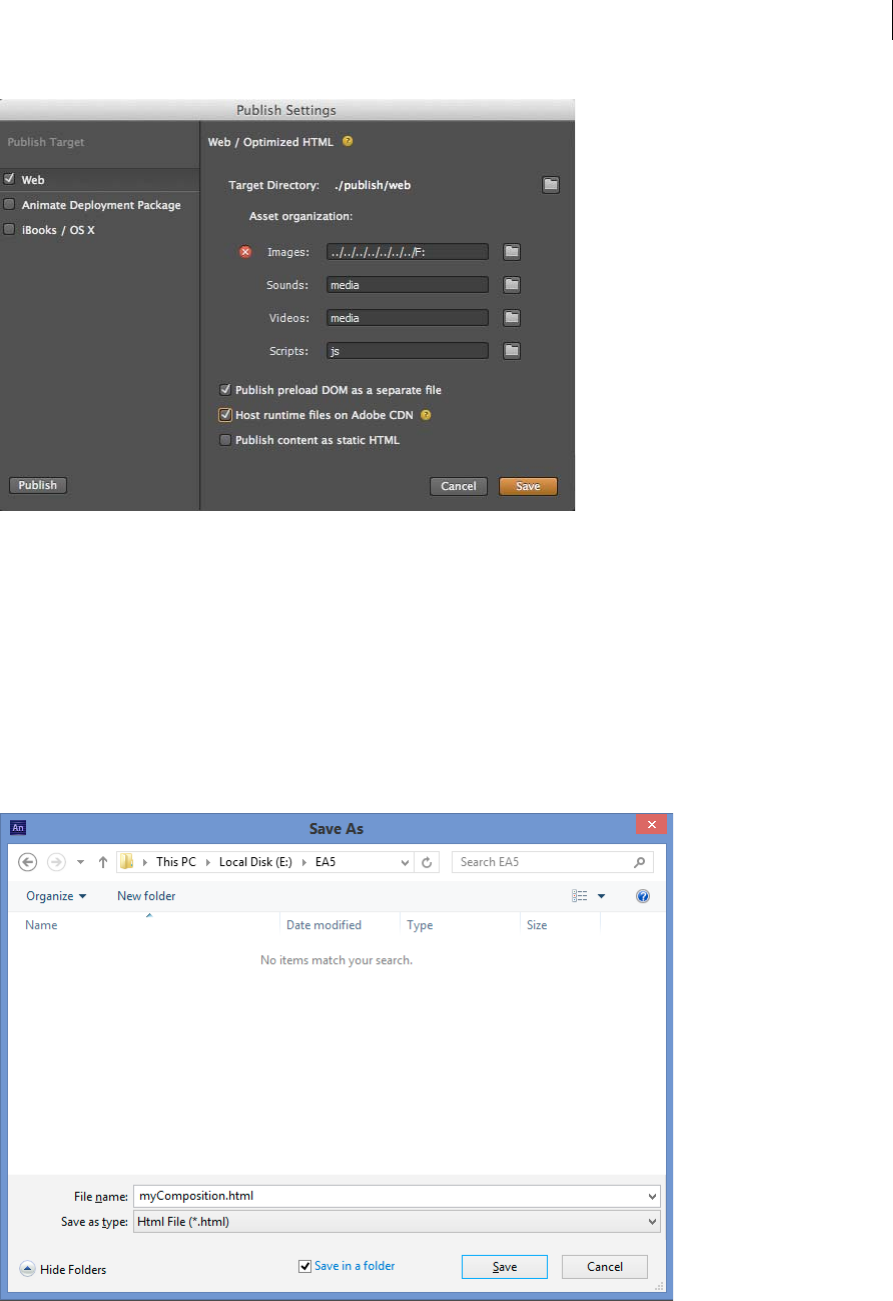
Save your images, media, and scripts to custom folders
Edge Animate now lets you specify additional file paths to enable you to target required folders for each type of asset
while publishing your compositions to Web. Since you can specify a relative path for your assets now, you can share
your assets across multiple compositions easily.
The file paths are relative to the target directory. If you type in an absolute file path or use the browse button to target
a folder in a different drive (other than that of the target directory), an error is displayed.
5
What's new
Last updated 6/16/2015
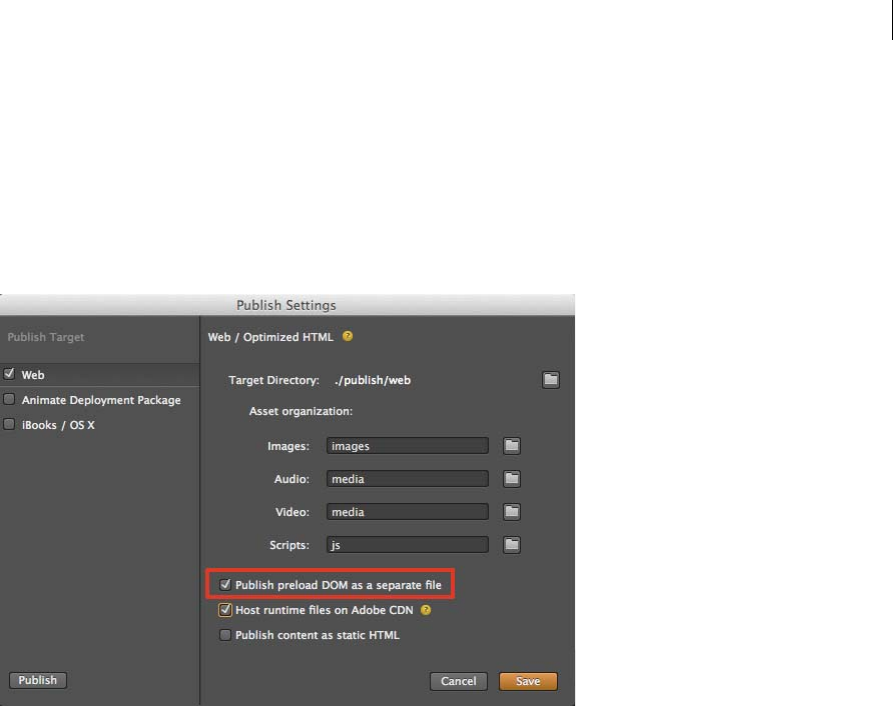
Changes to Save As dialog box
In the earlier versions of Edge Animate, when you save a composition, all html, js files and the assets are saved in the
same directory. If you save multiple compositions in the one folder, mapping the assets to the respective compositions
becomes difficult.
In this release of Edge Animate, the Save As dialog box includes a new option, Save In A Folder, which is selected by
default for unsaved compositions. So, by default your compositions are now saved in a separate folder with the name
of the composition, along with the related files and assets.
6
What's new
Last updated 6/16/2015
In the Save As dialog box, if you select a folder using your mouse or keyboard, and if the Save In A Folder option is
selected, a subfolder is created under the previously selected folder.
New preloader option
To reduce the number of downloads, the preloader DOM is directly included in your composition's HTML. However,
if you want the preloader DOM to be a separate js file, enable the option - Publish Preload DOM As A Separate File in
Publish Settings as shown below:

7
Last updated 6/16/2015
Chapter 2: Creating content & importing
assets
Creating content for animation
Creating content for animation
Creating a project and importing content (Video)
Creating a project and importing content (Video)
Create assets and import them into your Edge Animate
project
Create assets and import them into your Edge Animate project
Use web fonts
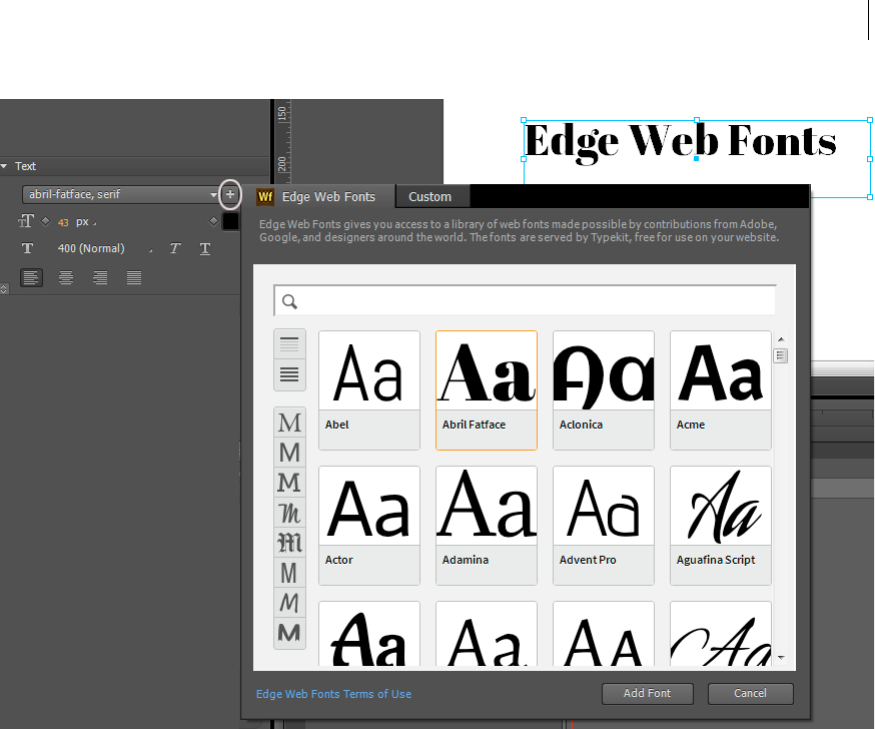
You can apply Edge Web Fonts to text directly from within Edge Animate. When you select a font from the Edge Web
Fonts dialog, the corresponding code to fetch the font from the server is automatically incorporated into the code.
Edge Animate also allows you to specify fallback fonts when there is a problem with downloading, or using Edge Web
Fonts on the user's computer.
1Insert text within the Edge Animate canvas.
2In the Text option of the Properties panel, click the "+" button next to the font menu.
8
Creating content & importing assets
Last updated 6/16/2015
3Select the font that you want to use. A preview of the text with the applied font is displayed.
You can filter the fonts in the panel by their type using the buttons to the left of the panel. For example, to view only
fonts of the sans serif type, click the Sans Serif button.
4Click Add Font.
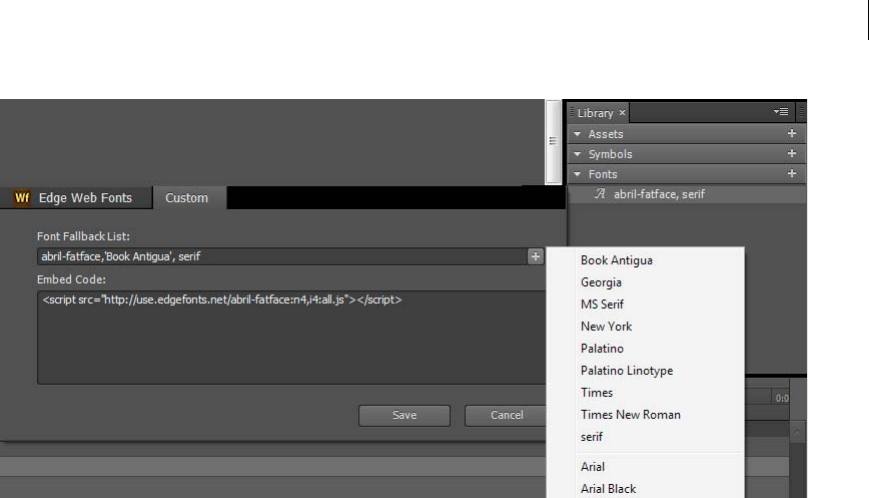
The selected and applied fonts are added to the Font library in Edge Animate. Double-click the font in the Font
library to specify fallback fonts.
In cases where there is a problem with downloading web fonts from the server, the fallback fonts are used for display.
The fonts are chosen in the order in which they appear in the list.
9
Creating content & importing assets
Last updated 6/16/2015
Add audio to animations
Adobe Edge Animate now supports native HTML5 audio with the <audio> element — making it possible to add sounds
to your animation projects. Using basic HTML and JavaScript, you can control audio playback in compositions. You
can also bind audio elements to touch and mouse events, as well as trigger audio playback on the timeline. The audio
capabilities in Adobe Edge Animate are embedded in the HTML DOM. So sounds play on any computer or device
without requiring a plug-in.
You can import the following audio types into Edge Animate:
•.mp3
•.ogg/.oga
•.wav
•.m4a
•.aac
For the best cross-browser consistency, include .mp3 and .ogg resources of audio elements in your project. For a
detailed description of supported audio types, visit Media formats supported by the HTML audio and video elements.
To create fallback versions of your audio file, you can use an audio conversion application such as Adobe Audition,
which is included in your Creative Cloud membership.
Add audio to compositions
Do one of the following:
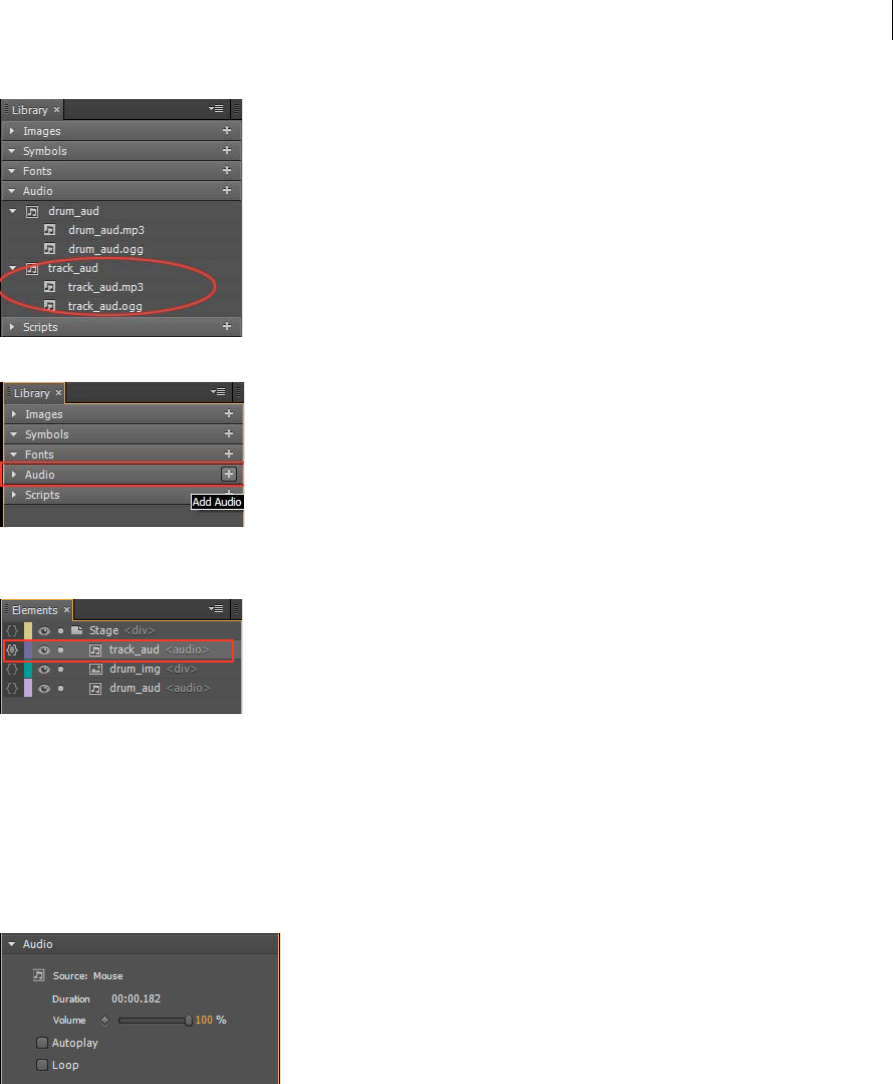
•Drag-and-drop the audio files into your project from your file system. An 'audio group' with the name of the audio
file is created in the Library. This audio group contains the audio file and the fallback files for cross-browser
compatibility.
Note: Fallback files get automatically grouped under the audio group when you drop them into the project.
10
Creating content & importing assets
Last updated 6/16/2015
•Click Add Audio in your project Library and browse for the audio file. Then, drag the audio group to the stage.
After you add audio to your project, an 'audio element' appears in the Elements panel. When you select the audio
element in the Elements panel, options to control the playback of your audio appear.
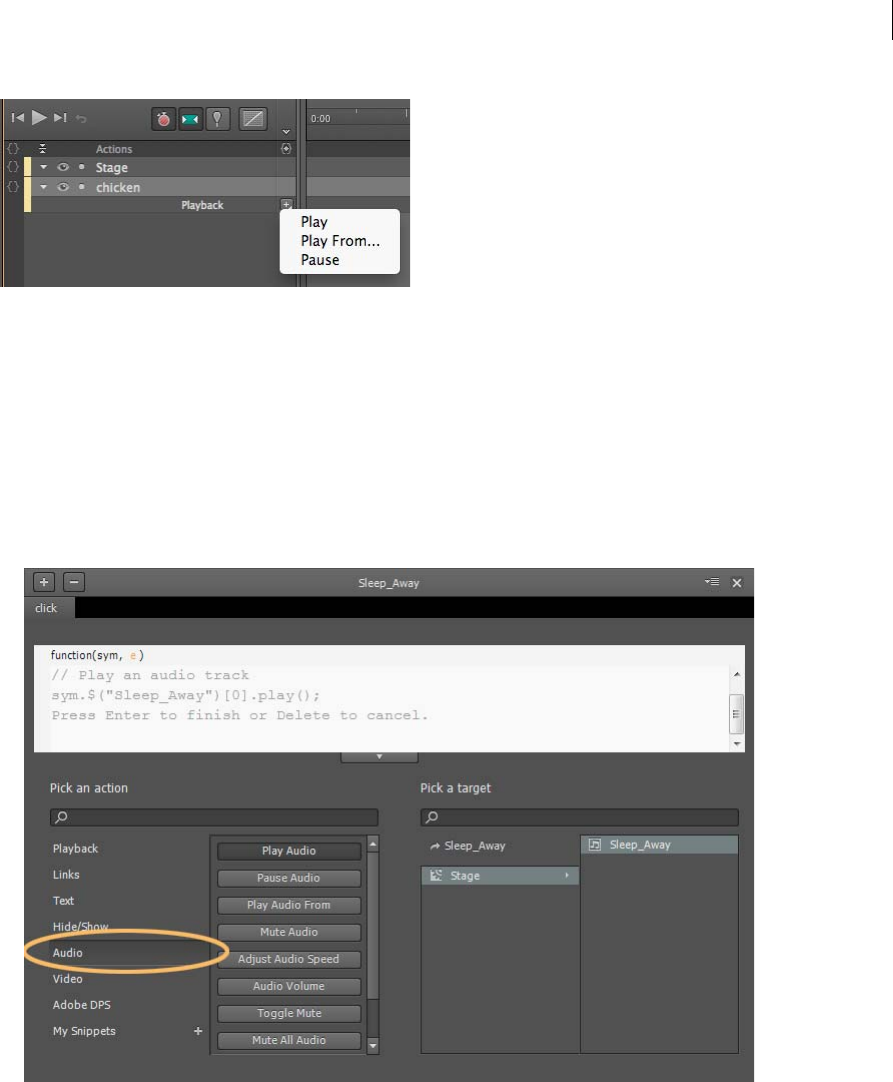
Play back and control audio
You can play back and control audio using any of the following options:
•Properties panel
•AutoPlay: Allows the audio file to automatically play on the timeline.
•Loop: Makes the audio file loop from the beginning after it finishes playing.
•Timeline
•Play: Plays the audio file from the current playhead position.
•Play From: Allows you to specify the time marker you want to play from.
•Pause: Allows you to pause the audio track. Use a play function to resume play back.
11
Creating content & importing assets
Last updated 6/16/2015
•Audio actions: Using code snippets in Actions to control audio playback through events.
More Help topics
Using audio on devices
Audio actions
1Click {} adjacent to the audio element on the timeline to open the Actions editor.
2From the list of events that appear, click the required trigger.
3In the Pick An Action list, click Audio, and then click the required action.
4In the Pick A Target section, click Stage, and then double-click the element to which the action that you selected
must apply.
5If required, modify the code in the code window.
Important: Sometimes your audio plays perfectly fine locally, but fails to play after you load it to your Web server. In
such cases, configure the .htaccess file of your Website to include the MIME types required for audio support. Contact
your Website administrator for assistance.

12
Creating content & importing assets
Last updated 6/16/2015
Fine-tune audio
You can set keyframe transitions to control volume transitions in the timeline. Use volume transitions to create unique
audio effects, such as, fade in, fade out, and cross-fading multiple tracks.
Note: Volume transitions for audio are not available on most mobile devices. See Using audio on devices for restrictions.
Preload audio
To preload audio files before the composition loads, select “Preload Audio” in the Preloading section of the Properties
panel on stage.
Note: Preloading audio is not available on most mobile devices. See Using audio on devices for restrictions.
Enable the default audio player
You can use the browser default Windows Media Player to show controls for your audio. The default audio player is
hidden by default. To turn the display of the player on, select the audio element and select “On” in the Properties panel.
The player skin is rendered by the browsers, and appears different based on the browser it is viewed in. For example,
the player you see in Chrome is different than the player you see in Firefox. See Audio actions to learn how to create
custom controls that you can use to create your own player.
When the player is viewed on stage, you can add motion and transform properties to the player like you add for other
objects. Since <audio> elements are a special type of HTML element, only a subset of properties is available for you to
apply:
•Opacity
•Clipping
•Position and Size
•Transform
Using audio on devices
iOS
In Safari on iOS (for all devices, including iPad), where users may be on a cellular network and be charged per data unit,
preload, AutoPlay, and play back actions are disabled. No data is loaded until the user plays the audio.
You can use the Audio Actions to call an audio element triggered by a user event. For more information on audio
actions, see Audio Actions .
Volume keyframes and control configured through the volume property are not supported on iOS devices. Users can
adjust the volume using the volume control of the device itself.
Prior to iOS 4.0, iPhone and iPod touch did not play audio inline. Audio was presented in full-screen mode. Audio plays
inline on iOS 4.0 and later on all devices.

13
Creating content & importing assets
Last updated 6/16/2015
Android
Android generally has the same audio element limitations as iOS.
Tips and cross-browser considerations
Audio sync
Audio can be used to choreograph sound to your stage compositions. However, due to the nature of the Web, audio
tracks can fall out-of-sync with elements moving on the stage. You may experience playback latency when coordinating
movement with sound, especially in longer tracks.
Audio Sprites
Using audio sprites allows you to create a single audio file with separate playable parts. This technique is used to
download all your audio in a single file to save download time.
To use an audio sprite, convert your audio element to a symbol and use play back markers to call the sections of your
sprite.
Add video to animations
Edge Animate supports native HTML5 videos making it easier for you to use your favorite video clips within your
compositions. You can control the playback of videos using basic playback actions and JavaScript. Also, you can bind
video elements to touch and mouse events to create a rich interactive experience.
Video playback capabilities are supported in the HTML DOM. This means, the videos can play on any modern desktop
or device browser without requiring a plug-in.
You can import .mp4 and .ogv files into Edge Animate.
For the best cross-browser compatibility, include .mp4 and .ogv resources of video elements in your project. For a
detailed description of supported video types, visit Media formats supported by the HTML audio and video elements.
Add video to compositions
Do one of the following:
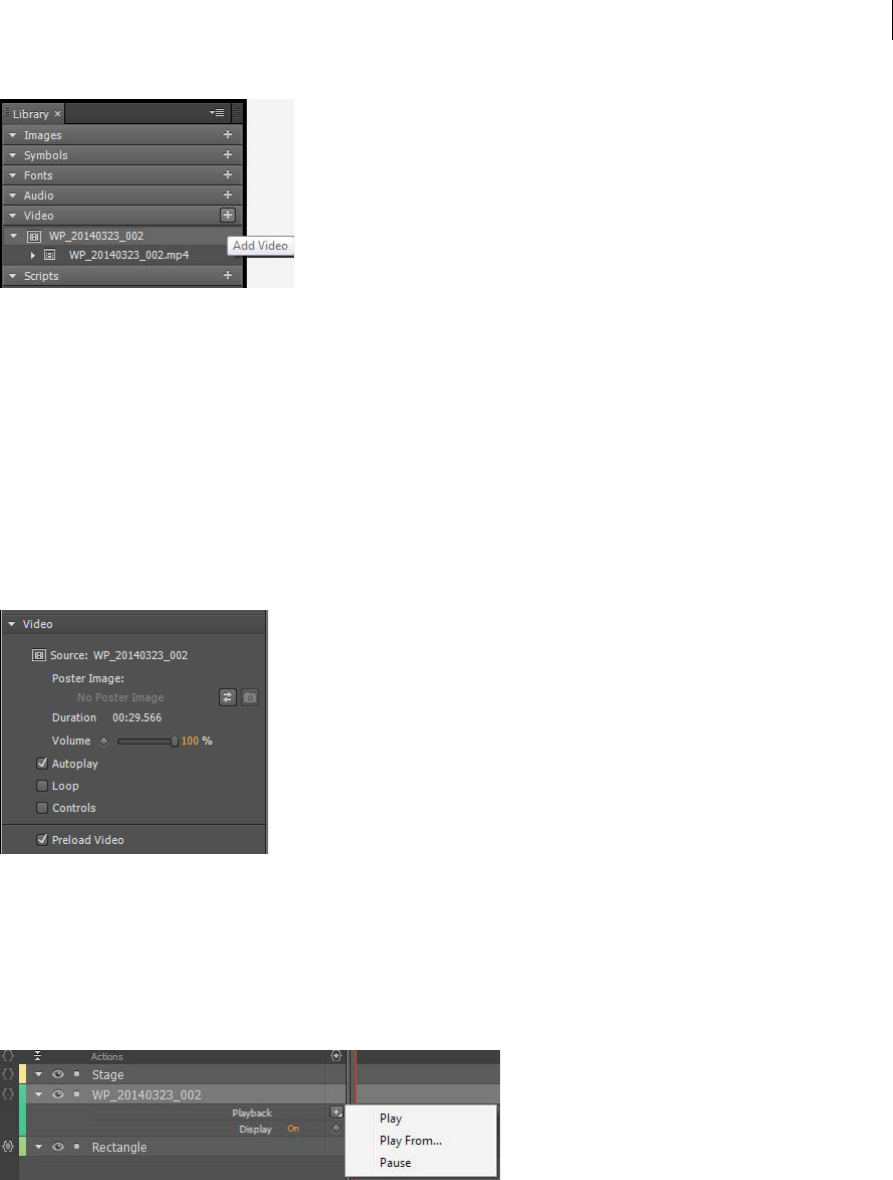
•Click File > Import or drag-and-drop the video files directly onto the Stage from your file system. A 'video group'
with the name of the video file is created in the Library. This video group contains the video file and any fallback
files you add for cross-browser compatibility.
Note: Fallback files get automatically grouped under the video group by name when you import them into the
composition.
•Click Add Video in your project Library and browse for the video file. Then, drag the video group from the library
to the Stage.
14
Creating content & importing assets
Last updated 6/16/2015
After you add a video to your composition, a 'video element' appears in the Elements panel. Options to control the
playback of your video appear in the Properties panel when you select the video element in the Elements panel.
Playback and control video
You can play back and control video using any of the following options:
•Properties panel
•Autoplay: Allows the video file to automatically play on the timeline and desktop browsers.
•Loop: Makes the video file loop from the beginning after it finishes playing.
•Timeline
•Play: Plays the video file from the current playhead position.
•Play From: Allows you to specify the time marker you want to play the video from.
•Pause: Allows you to pause the video. Use a play function to resume playback.
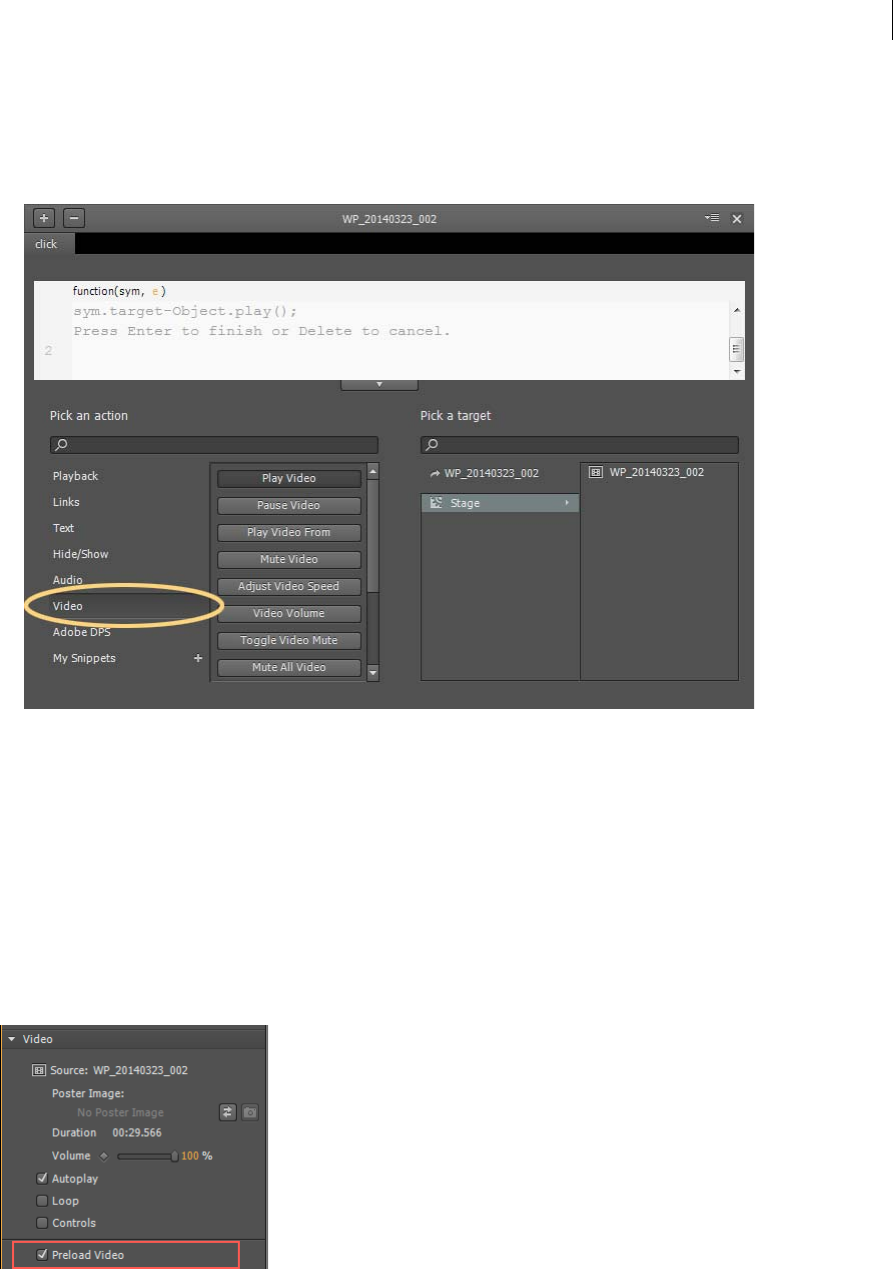
•Video actions: Using code snippets in the Actions editor to control video playback through events.
Video actions
1Open the Actions editor by clicking {} adjacent to Stage on the Timeline.
15
Creating content & importing assets
Last updated 6/16/2015
2Click a trigger (event).
3From the Pick An Action list, click Video, and then click the required action.
You can also search for an action using the search box in the Pick An Action section.
4From the Pick A Target section, click Stage, and then double-click the element or symbol to which you want to assign
the selected action.
You can also search for the element or symbol using the search box in the Pick A Target section.
Preload video
To preload video files before the composition loads, select “Preload Video” in the Preloading section of the Properties
panel on stage.
Note: Preloading video is not available on most mobile devices. See Using video on devices for restrictions.

16
Creating content & importing assets
Last updated 6/16/2015
Enable the default video player
You can use the browser's default media player to show controls for your video. The default video player is hidden by
default. To enable the default player, select the video element and select "Controls" in the Video section of the Properties
panel.
The player skin is rendered by the browsers, and appears different based on the browser it is viewed in. For example,
the player you see in Chrome is different than the player you see in Firefox.
When the player is viewed on stage, you can add motion, transform, and other properties to the player like you add for
other objects.
Using video on devices
iOS
In Safari on iOS (for all devices, including iPad), where users may be on a cellular network and be charged per data unit,
preload, Autoplay, and playback actions are disabled. No data is loaded until the user plays the video.
You can use the video actions to call a video element triggered by a user event. For more information on video actions,
see Video actions .
Android
Android generally has the same limitations for videos as iOS.
Import sprite sheets
As designers, you most likely use many other tools or programs such as Adobe Photoshop or Adobe Flash Professional
to create complex images and character animations. Edge Animate lets you reuse such creations by supporting the
import of sprite sheets generated from such tools.
A sprite sheet is an image file that contains several smaller graphics in a tiled grid arrangement. By compiling several
graphics into a single file, you enable Edge Animate and other applications to use the graphics while only needing to
load a single file. This loading efficiency can be very helpful in situations such as building animations where
performance is especially important.
17
Creating content & importing assets
Last updated 6/16/2015
Most tools let you export sprite sheets only as image files (PNG/JPEG). Adobe Flash Professional CC 2014 and later can
generate Edge Animate-specific sprite sheets. You can import both types of sprite sheets - PNG/JPEG as well as the ones
that are generated from Flash Professional - into Edge Animate.
Note: You may see performance issues with Edge Animate compositions on devices if you import and use sprite sheets of
size greater than 2048 X 2048 pixels.
Import sprite sheets saved as only image files
1Before importing sprite sheets into Edge Animate, ensure that:
•The images in the sprite sheet are of equal dimensions
•The padding between the images are uniform
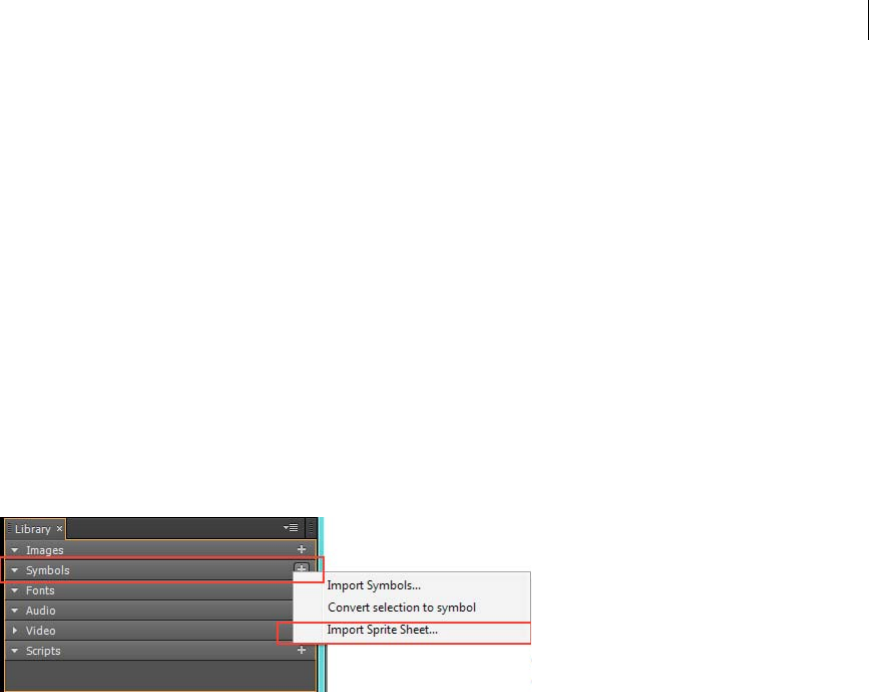
2Open Edge Animate. In the Symbols panel, right-click +, and click Import Sprite Sheets.
You can also click File > Import Sprite Sheets.
3Browse for the required sprite sheet and select the PNG or the JPEG file. Click OK.
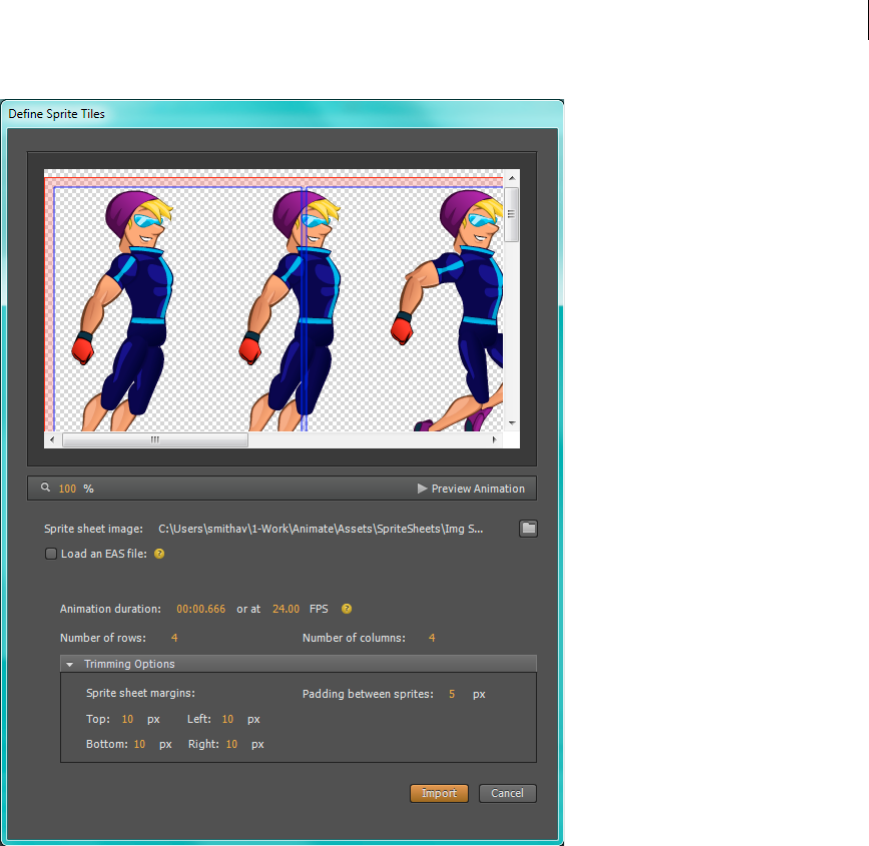
The Define Sprite Tiles dialog box appears.
18
Creating content & importing assets
Last updated 6/16/2015
•To preview the animation, click Preview Animation
•Specify the duration and fps. For PNG and JPEG files, the fps is set to 24 by default. You can modify the fps as
required.
•Specify the number of rows and columns and the trimming options.
4Click Import.
The PNG or the JPEG file corresponding to the sprite sheet is saved in the Images panel. The constituent images are
saved as separate symbols (named spritesheet_name_n) in the Symbols panel.
5Drag the required symbols from the Symbols panel onto the Stage.
Import sprite sheets generated from Adobe Flash Professional
1Ensure that you have generated the sprite sheet by choosing the Edge Animate format in Adobe Flash Professional
CC 2014 (or later).
For information on generating sprite sheets in Adobe Flash Professional CC, see Adobe Flash Professional CC Help.
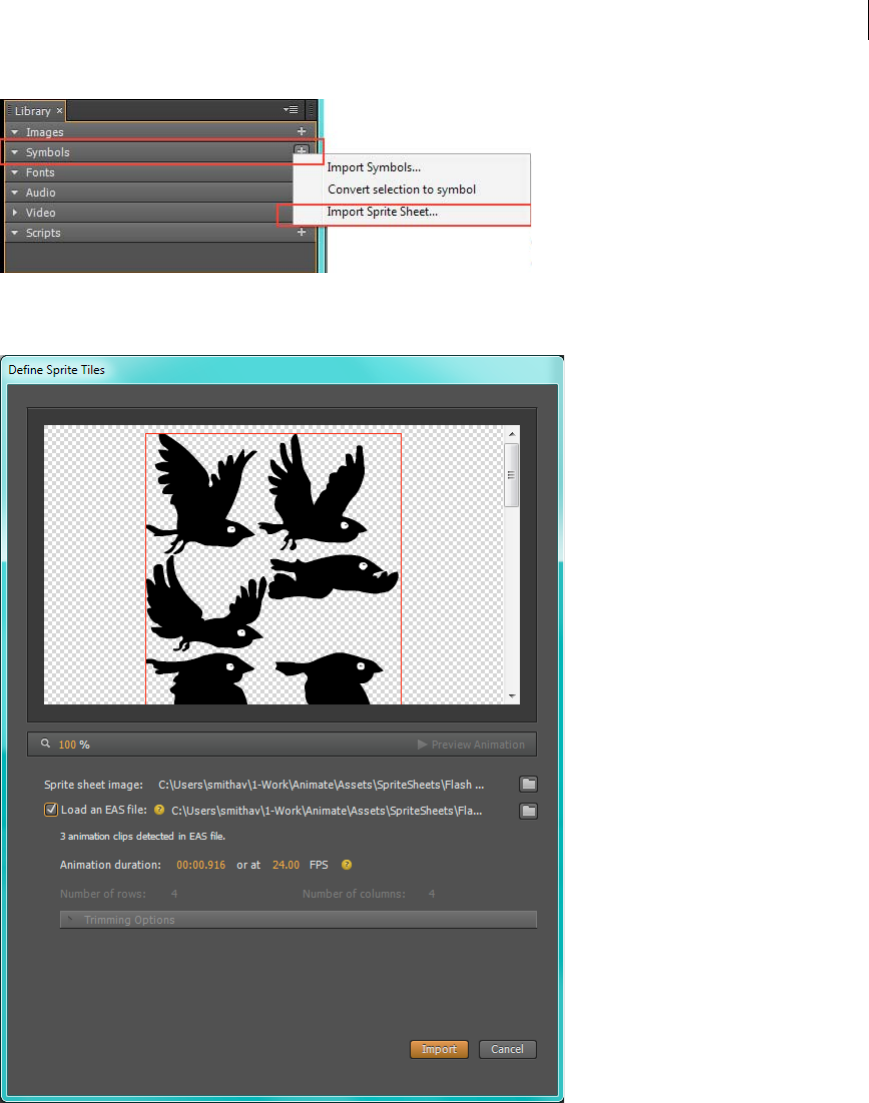
2In the Symbols panel, right-click +, and click Import Sprite Sheets.
You can also click File > Import Sprite Sheets.
19
Creating content & importing assets
Last updated 6/16/2015
3Browse for the required sprite sheet and select the PNG or the JPEG file. Click OK.
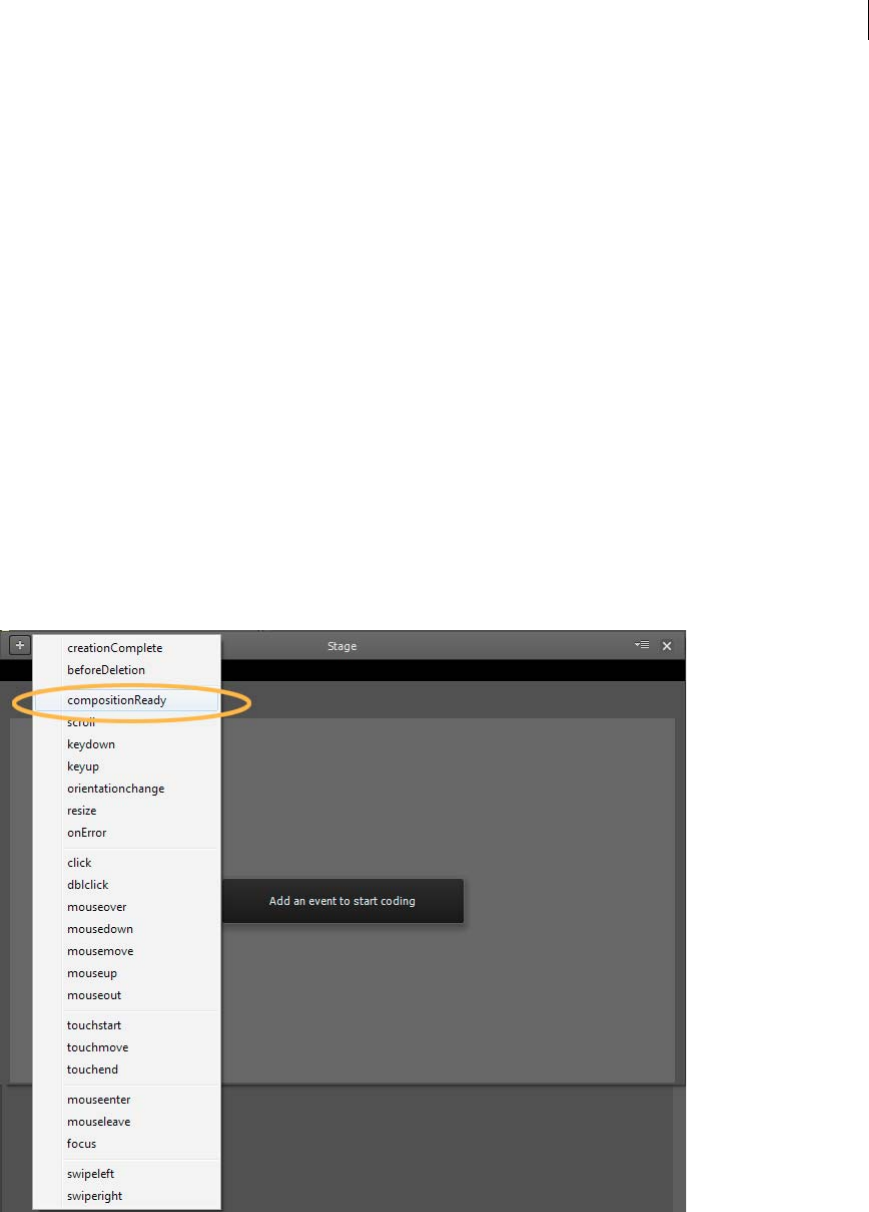
The Define Sprite Tiles dialog box appears.
•To load the EAS file that corresponds to the selected PNG or JPEG, select Load An EAS File.
•To preview the animation, click Preview Animation.
•Specify the duration and fps. For EAS files, the fps is inherited from the source. You can modify the fps as
required.
4Click Import.
The PNG or the JPEG file corresponding to the sprite sheet is saved in the Images panel. The constituent images are
saved as separate symbols (named spritesheet_name_n) in the Symbols panel.
20
Creating content & importing assets
Last updated 6/16/2015
5Drag the required symbols from the Symbols panel onto the Stage.
Hyperlink elements to Adobe DPS articles
e-magazines published through Adobe Digital Publishing Suite (DPS) can be made more engaging and interesting by
including Edge Animate compositions in them. Edge Animate lets you publish the compositions as OAM files that can
be easily included in Adobe InDesign (part of DPS).
In addition, Edge Animate compositions can be used as navigation aids within an e-magazine. Elements in a
composition can be hyperlinked to specific articles in the magazine where the animation will be embedded. Readers
can click these hyperlinked elements to quickly jump to the relevant article.
You can set up hyperlinking between the elements of a composition and the required Adobe DPS articles right from
within Edge Animate. You can then test the linking by publishing the animation as OAM files and embedding them
within the articles.
To hyperlink elements to articles or pages in an Adobe DPS article:
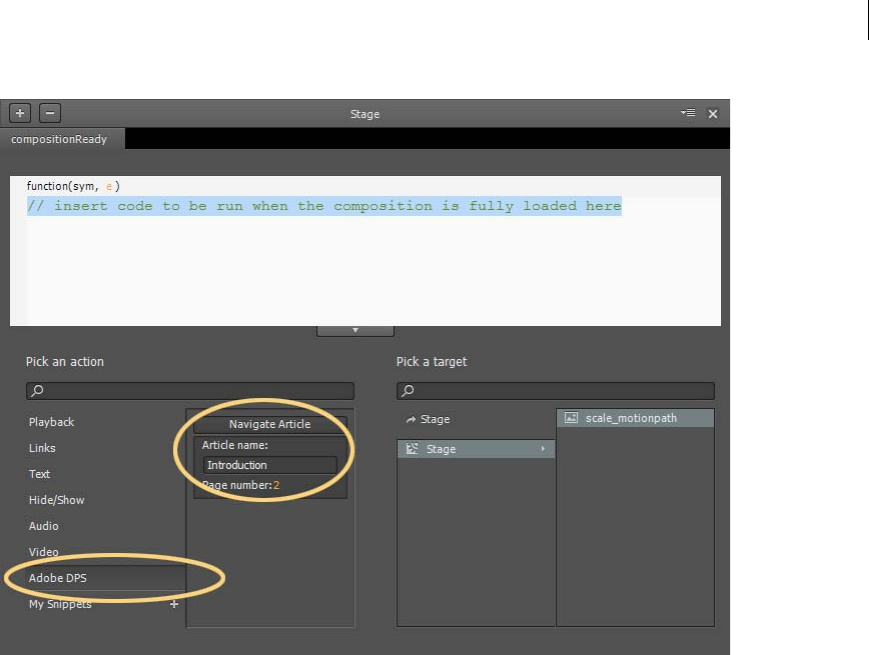
1Click {} adjacent to Stage on Timeline.
2Select a trigger from the list that appears in the Actions editor. It is recommended that you choose the
compositionReady event for setting up navigation.
3In the Pick An Action section, click Adobe DPS, and then click Navigate Article. Specify the Article Name and Page
No you want to link to. You can also edit the code to specify these details as explained in Step 5.
21
Creating content & importing assets
Last updated 6/16/2015
4In the Pick A Target section, click stage, and then double-click the name of the element that is the target for the
action above.
5(Optional) Edit the code to specify one of the following:
•The name of the article in the required Folio in Adobe InDesign and the page number
Example:
sym.$("Rectangle").append('<a style="display:block;width:100%;height:100%;"
href="navto://my_article_Name#my_page_number"/>');
•Relative link to articles, such as first, last, next, previous, or current
Example:
To navigate to the last page of the last article in the folio, use navto://relative/last#last
sym.$("Rectangle").append('<a style="display:block;width:100%;height:100%;"
href="navto://relative/last#last');
For more information on using relative navto hyperlinks, see the Adobe DPS documentation.
Using Flash sprite sheets with Animate (Tutorial)
Using Flash sprite sheets with Animate (Tutorial)

22
Last updated 6/16/2015
Chapter 3: Create animations using the
Timeline
The Edge Animate timeline
The Edge Animate timeline
Creating Animations in Edge Animate (Video)
Creating Animations in Edge Animate (Video)
Using the Pin tool, Keyframes, and Transitions for
animation
You can create animations in Edge Animate using traditional animation methods based on keyframes. Edge Animate
also provides an alternate method based on the Pin tool to create keyframes.
Create animations with the Pin tool
The Pin tool pins the property values of elements at a point in time on the Timeline. When you make an edit, the Pin
tool pins the current value while you change the properties values at the Playhead. Edge Animate generates the
keyframes and the transitions to or from the Playhead.
To animate with the Pin tool:
1Define element properties that you want to pin at a point in time on the Timeline.
2Click the Toggle Pin button in the Timeline panel.
You can also activate the Pin by double-clicking the Playhead or pressing P on your keyboard.
3Drag the Pin on the Timeline to the location on the Timeline where you want to pin the element properties.
4With the initial properties pinned, change the values of the element properties.
Because the chevron pattern points to the Playhead, the changes are set at the Playhead location.

23
Create animations using the Timeline
Last updated 6/16/2015
Adobe Edge Animate automatically adds keyframes and transitions between the Playhead and Pin positions. You
don't have to manually add keyframes or reposition the Playhead on the Timeline.
5Preview the animation by clicking the Play button in the Timeline panel or by pressing the Spacebar on the
keyboard.
For a lesson on animating with the Pin tool:
1Select Window > Lessons in Edge Animate.
2Click Animate II: The Pin.
Keyframes specify the value of a property at a point in time. When animating with keyframes, you add a keyframe at
two or more locations on the Timeline and define different element properties at each location. Edge Animate uses the
property values to animate the content between the keyframes.
To animate with ke yf rame s:
1Select the element you want to animate on the Stage.
2Move the Playhead to the location on the Timeline where you want the animation to start.
3In the Properties panel for the element, click the Add Keyframe button (diamond button) next to the property that
you want to change over time.
4Move the Playhead to another location on the Timeline and change the value of the property.
Edge automatically adds an ending keyframe and creates the transition.
5Preview the animation by clicking the Play button in the Timeline panel or by pressing the Spacebar on the
keyboard.
For a lesson on animating with keyframes:
1Select Window > Lessons in Edge Animate.
2Click Animate I: Keyframes.
Edit individual keyframes
1Move the Playhead to a keyframe (diamond icon) on the Timeline.
2Change the editable property value on the left side of the Timeline panel.
Copy transitions
You can copy a transition and paste it on the Timeline of the same element or of another element.
1Click a transition on the Timeline to select it. When selected, an orange border appears around the transition bar on
the Timeline.
2Press Ctrl+C (Windows) or Cmd+C (Macintosh) to copy the transition to the Clipboard.
You can also cut the transition from the element with Ctrl+X (Windows) or Cmd+X (Macintosh).
3If you want to copy the transition to another element, select the element on the Stage.

24
Create animations using the Timeline
Last updated 6/16/2015
4Move the Playhead to the location where you want the copied transition to start.
5Press Ctrl+V (Windows) or Cmd+V (Macintosh) to paste the transition on the Timeline.
Learn more
•Creating and importing assets
•Creating animation
•Creating a flexible layout
•Create an animated logo
Animating text (Video)
Animating text (Video)
Create nested animations with symbols
Create nested animations with independent timelines and interactive capabilities. Symbols are elements that contain
their own timeline. You can animate a symbol as a regular element on the Stage -- for example, move it from left to right.
You can also animate the individual elements that make up the symbol. In other words, you can create an animation
within another animation.
Symbols are reusable and can be controlled with APIs and pre-built code snippets.
For a lesson on animating with symbols:
1Select Window > Lessons in Edge Animate.
2Click Reuse.
Create a symbol
1In the Elements panel, select one or more elements. Selecting multiple elements creates a single symbol from them.
Note: You can also select symbols to create nested symbols.
2Right-click and select Convert To Symbol from the context menu.
3In the Create Symbol dialog box, set the Symbol Name, and click OK.
Animate the elements of a symbol
1In the Elements panel, right-click the symbol and select Edit Symbol.
You can also right-click the symbol on the Stage.
2Animate one or more of the elements making up the symbol.
3To exit symbol editing mode, click the word Stage at the top of the preview window.
4Preview the animation by clicking the Play button in the Timeline panel or by pressing the Spacebar on the
keyboard.

25
Create animations using the Timeline
Last updated 6/16/2015
Export a symbol
You can copy and paste a symbol from one project to another.
1Right-click the symbol in the Elements panel and select Copy.
2Switch to another project.
3Right-click the Stage element in the elements Panel and select Paste.
You can also export symbols and their properties as a single file (.easym) that can be shared and imported into another
composition.
1Select the symbols to export on the Stage or in the Library panel.
2Right-click and select Export Symbol.
Import a symbol
1Click the Plus (+) button next to the Symbols tab in the Library.
2Browse and select the symbol file (.easym) to import.
Control symbols with JavaScript
You can use JavaScript to control symbols. For more information, see:
•Add interactivity with JavaScript
•"Working with symbols" in the Edge Animate API guide
Learn more
•Leveraging independent symbol timelines
Animate existing HTML
You can animate and add interactivity to elements in existing HTML pages. Because the animation code generated by
Edge Animate is stored in a separate file, the integrity of the HTML page is preserved.
1Open an existing HTML page in Edge (File > Open).
Edge Animate only opens standards-compliant code. For example, if you have duplicate IDs, the tool notifies you
that the document has duplicate IDs and does not open the file. If you receive errors or see odd behaviour, try
running the HTML page through an HTML validator.
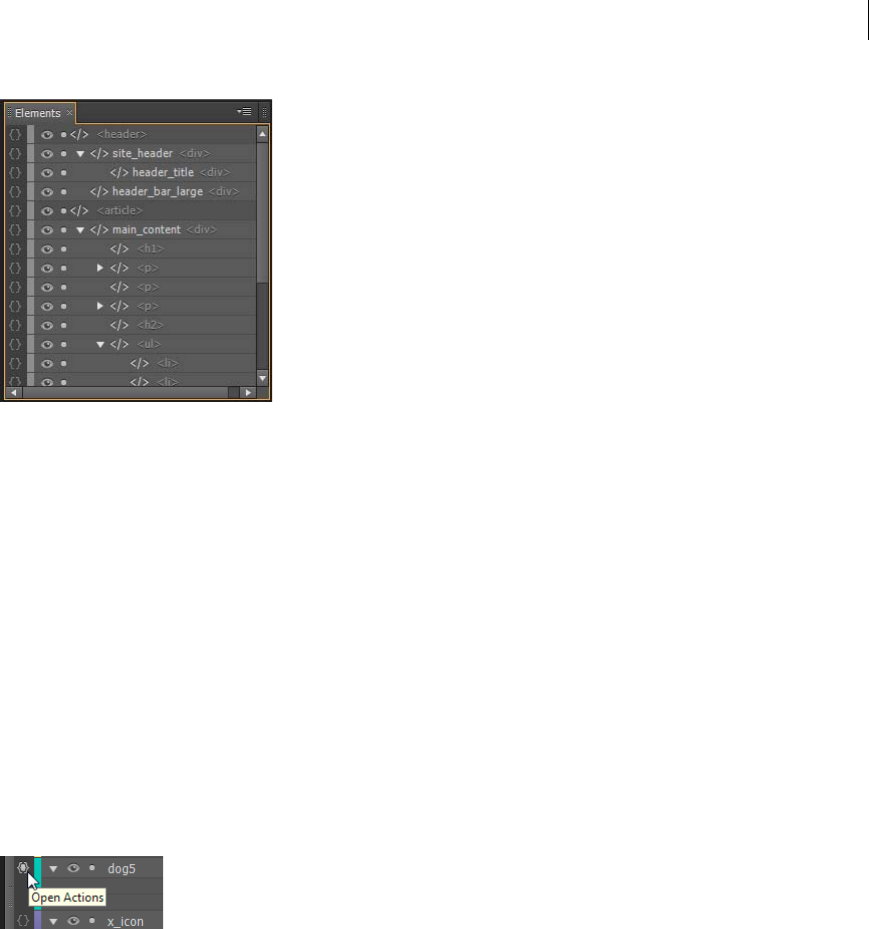
2Select a page element on the Stage.
You can also select a page element in the Elements panel, which displays the page's DOM (Document Object
Model).
26
Create animations using the Timeline
Last updated 6/16/2015
3Animate the element. See Using the Pin tool, Keyframes, and Transitions for animation.
Note: There are limitations to what you can do with HTML elements. HTML elements can't be converted to symbols
and do not have all the properties of other elements. If you receive errors or see odd behaviour, try running the HTML
page through an HTML validator.
You can also add elements like divs, text, and import images in Edge, and then animate and add interactivity to those
elements.
Add interactivity with JavaScript
You can use JavaScript to add interactivity to your compositions. You can define actions for each element using a built-
in code editor and snippet library. Actions are functions that can be added to handle a single event.
Define actions
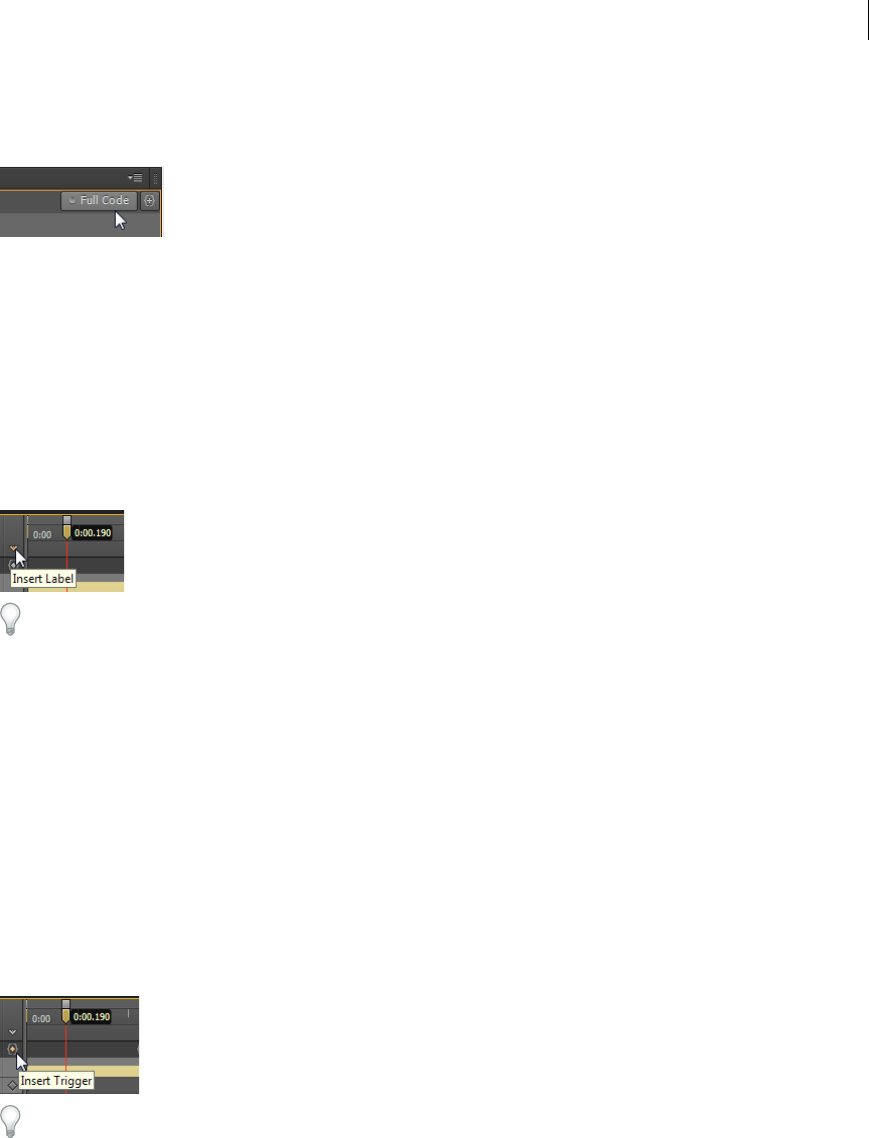
1On the Timeline, click the Open Actions button on the left side of an element or symbol name.
You can also click the Open Actions button on the left side of an element or symbol name in the Elements panel.
2Select an event to trigger the action.
The Actions Editor appears with a code editor and a list of code snippets on the right.
3Write the code for the event.
You can write your own code or use the code snippets to add common functions. For reference information, see the
Edge Animate API guide.
Use the Code editor
The Code editor gives you a complete view of the JavaScript code in your project. It also allows you to view the raw code
for the actions file.
1Select Window > Code.
You can also press Ctrl+E (Windows) or Cmd+E (Macintosh).
27
Create animations using the Timeline
Last updated 6/16/2015
2Select an event or an element by clicking the Plus (+) icon on the left of Stage in the left sidebar.
3To edit the entire JavaScript file, click the Full Code button on the upper right of the panel.
Add labels to the Timeline
You can insert labels on the Timeline and then use them as time references in function parameters. You can use a label
name as a parameter for any playback function expecting a timecode value. Labels let you create actions like playing or
seeking to a point on the Timeline.
To add a label:
1Move the Playhead to the location you want.
2Click the Insert Label button on the upper-right corner of the Timeline.
You can also press Ctrl+L (Windows) or Cmd+L (Macintosh).
3Specify a name for the label.
4When defining an action for an element in the code editor, use the label name as a parameter for playback functions
expecting a timecode value.
For example, instead of sym.play(1000), you can use sym.play('mylabel').
Add triggers to the Timeline
You can place triggers on the Timeline to execute JavaScript code at a point in time.
To ad d a tri gger :
1Move the Playhead to the location you want.
2Click the Insert Trigger button on the upper-right corner of the Timeline.
You can also press Ctrl+T (Windows) or Cmd+T (Macintosh).
The Code panel appears.
3Define the action to take at the trigger. For reference information, see the Edge Animate API guide.
You can modify the code for the trigger at any time by double-clicking the trigger icon on the Timeline.

29
Last updated 6/16/2015
Chapter 4: Use motion paths
Animating over a curved path
Animating over a curved path
New features summary
New features overview
Sarah Hunt, the Product Manager for Edge Animate provides a brief overview of Edge Animate CC features.
Motion paths
Motion paths allow you to add highly expressive motion to elements which follow along a custom curved path. Using
this feature, you can emulate real-world experiences through fluid, physics-based movements that cannot be achieved
through linear motion.
To control the movement of an element using motion paths, perform the following steps:
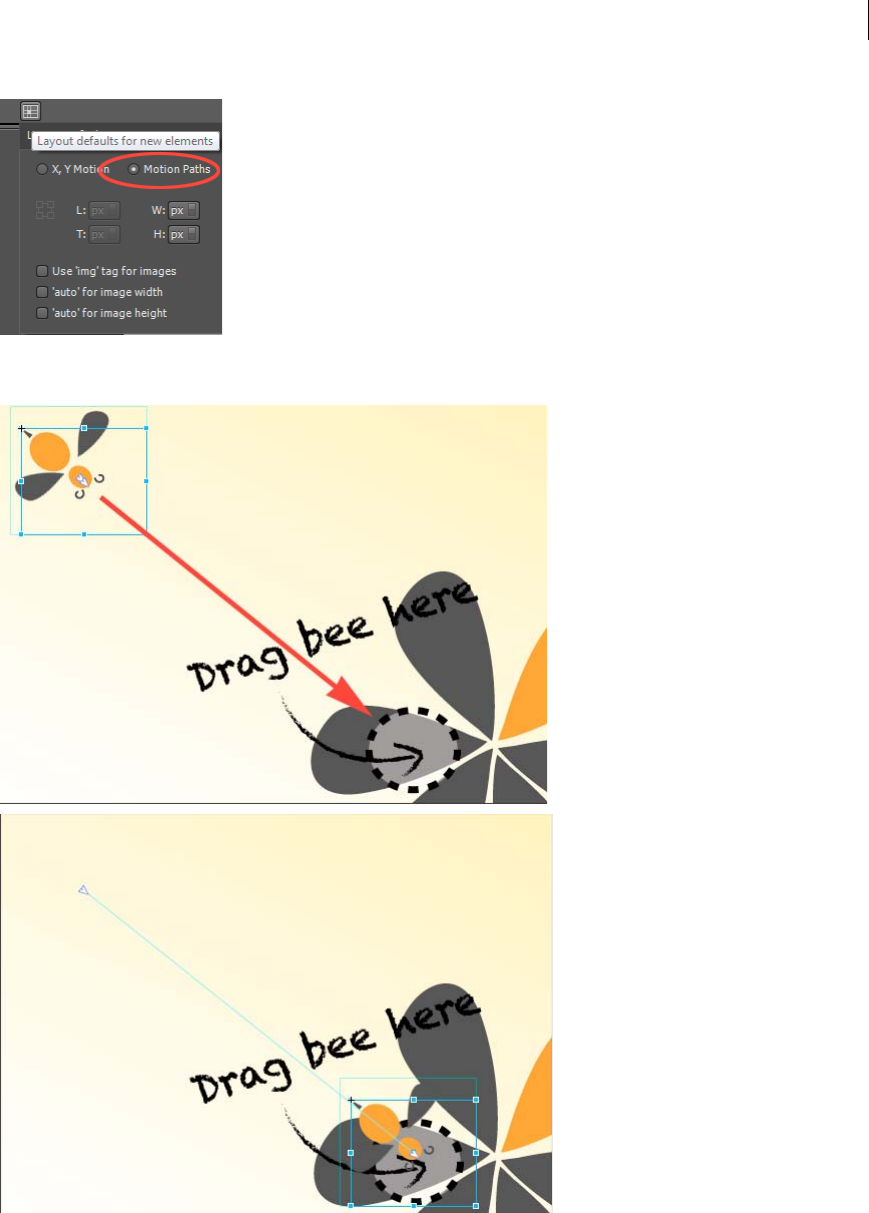
1Select the element on Stage, and click Motion Paths in the Contextual Property Panel (CPP) under the Position and
Size accordion.
To set motion paths as the default method of movement for new elements in the composition, select “Animate with
Motion Paths” from the Layout Defaults.
Update to Edge Animate CC available
For more information, see the New features summary .
30
Use motion paths
Last updated 6/16/2015
2Create a transition as you normally do using keyframes or the Pin. When you do so, you notice a line drawn between
two anchor points (represented by triangles) as shown below:
Click the line anywhere to see the handles that you can drag to define the path using a Bezier curve. Use the Auto-
Orient option to control the direction of your object as it moves along the path.
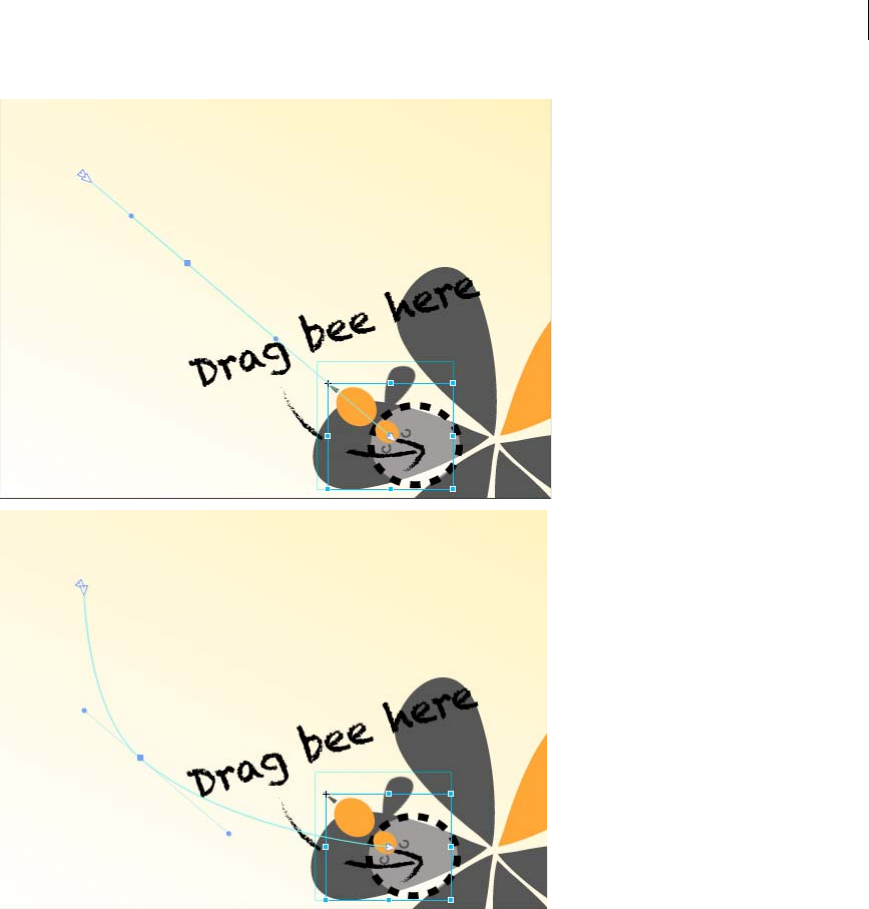
31
Use motion paths
Last updated 6/16/2015
•To add an anchor point, hover your mouse on the path and click.
•To delete an anchor point, hover your mouse on the anchor, and then Cmd/Ctrl + Click
•To convert a Bezier to a sharp point, click the anchor point, and then Option/Alt + Click.
•To unlink the two handles on either side of an anchor point so that you can move one independently of the other,
Option/Alt + click and drag.
Keyframes for location on the timeline represent two separate motion paths. Add a keyframe to split your path into two,
or delete a keyframe to create one contiguous path. Easing can be applied to motion paths, and the easing effect is
played back on a per-path basis.
•To split a motion path, add a keyframe in the timeline.
•To create a contiguous motion path, delete a location keyframe on the timeline.
•To split two adjoining motion paths in space, Cmd/Ctrl-click and drag at a joining keyframe anchor.
•To connect two end anchors of separate motion paths, drag the anchors together; they will snap to connect location.
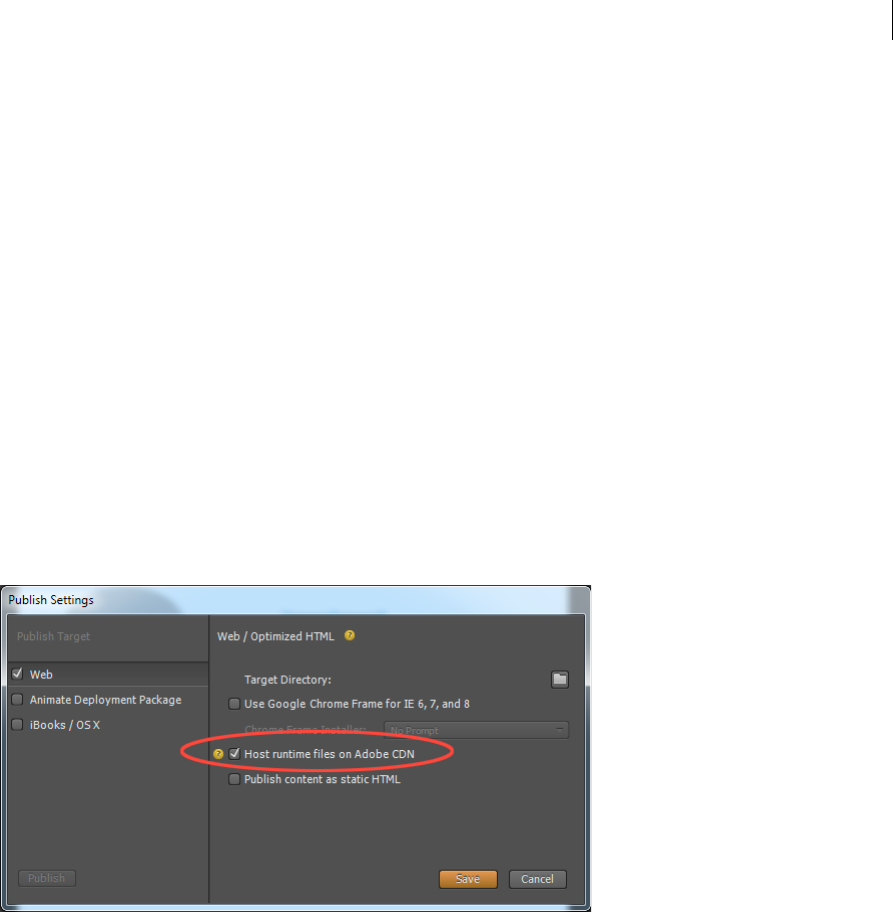
32
Use motion paths
Last updated 6/16/2015
The object is tied to the path by the transform origin. Transform origin can be adjusted so the object can follow the path
off-center.
Motion Paths and Responsive Layouts
In the current implementation, motion paths cannot be set to use percentage-based layouts. To work around this, set
your pathed object inside a group, parent, or symbol and set the parent to use %-based positioning. You can also use
this method to set the motion path relative to top/right/bottom/left.
Tutorial
Click Windows > Lessons panel, and click Motion Paths for a guided, hands-on exercise on using motion paths in an
Animate composition.
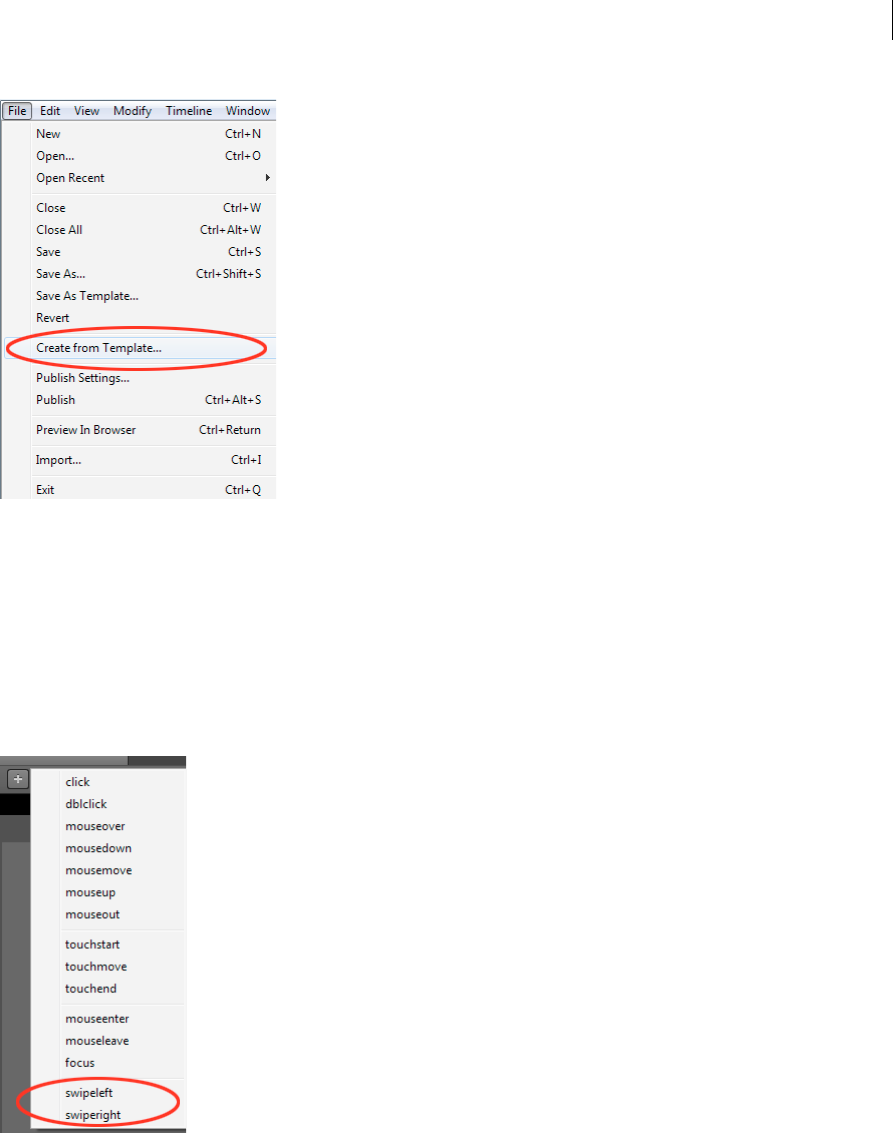
Optimized publishing with CDN Hosting
Allow your content to be delivered faster with your runtime files on Adobe Content Deliver Network (CDN). To do so,
select the Host Runtime Files On Adobe CDN option in the Publish Settings. Your projects download faster with the
benefit of cache hosting with absolutely no cost to you.
If the content needs to run offline, deselect this option in Publish Settings. This option is enabled by default.
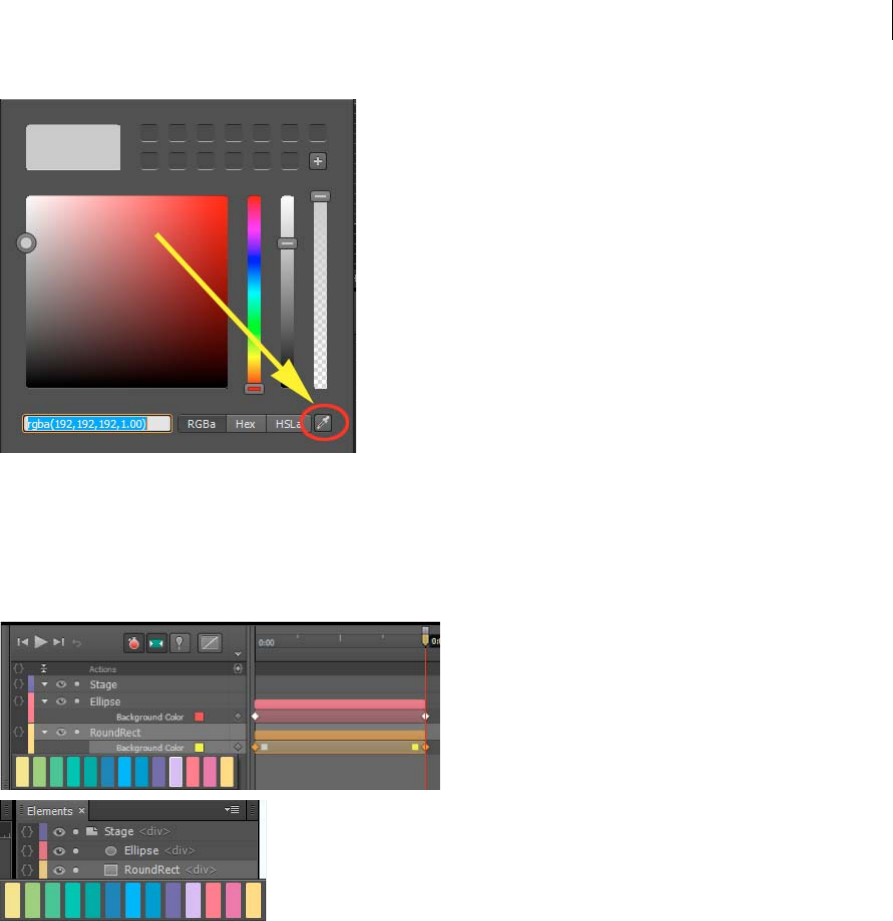
Templates
You can now load, save, and reuse templates from a template gallery. This feature allows you to load an Animate
composition for common file patterns. Templates can capture images, text, symbols, fonts, and any custom changes in
your current composition. You can load templates from the visual template loader.
Access the templates menu from the Welcome screen (“Create from Template”) or from the File menu. From the
templates gallery you can import, delete, and create a new composition from a template.
33
Use motion paths
Last updated 6/16/2015
Template files have .antmpl extension and can be freely distributed and can be stored anywhere on the file system.
Swipe gestures
You can now bind elements with left and right swiping actions for mobile-focused experiences. You can assign the
swiping action to any element in your composition. You can assign swipe gestures to the stage itself, or apply to multiple
elements to create unique mobile experiences.
Right-click the element in the Timeline, click Open Actions For <element> from the menu, and then click swipeleft or
swiperight.
Eyedropper tool
The new Eyedropper tool is introduced in the colour selection panels. Select the eyedropper icon to sample colours
from the stage.
34
Use motion paths
Last updated 6/16/2015
Color coding of elements
You can now assign colors to various elements in your composition to easily identify and work with them. You can click
the color palette in the Elements panel or Timeline to assign colors. These colors are reflected in the Timeline
transitions too.
Elements panel and Timeline jumping
The elements panel and timeline will now scroll to show selected elements (if the panel is scrolling).

35
Last updated 6/16/2015
Chapter 5: Layout and design
Creating a flexible layout
Creating a flexible layout
Create fluid responsive web page layouts
Create fluid responsive web page layouts
Target older browsers
Adobe Edge Animate uses web-standards such as HTML5, CSS3, and JavaScript to define animation and interactivity.
Some functionality may not work or appear in older browsers that don't support these standards. You can still target
older browsers by creating poster images.
Define a fallback state of your project in the form of a poster image or of your own artwork. When visitors view your
content in a legacy web browser, the poster image is displayed.
1In the Timeline panel, position the Playhead at the end state of all animations.
2In the Elements panel, select the Stage element.
3In the Properties panel, click the Capture Stage As Poster Image button (camera icon).
4In the Capture a Poster Image dialog box that appears, click Capture.
5In the Properties panel, click the Edit button for the Down-level Stage property.
6Click the Insert button. The image that you captured appears on the down-level stage.
To use your own artwork, drag the image from the Library panel to the down-level stage.
7Return to the main stage by clicking the Stage breadcrumb at the top of the preview window.

36
Last updated 6/16/2015
Chapter 6: Integration and publishing
Publish your content
To publish your content:
1Specify your publish settings. See below for more information.
2Select File > Publish.
Optimize content for the web
1Select File > Publish Settings.
2In the Publish Settings dialog box, make sure that Web is selected as the publish target.
3Note or change the target directory.
4Set the Frameworks Via CDN preference.
Select this option to download the composition's associated jQuery assets from a content delivery network (CDN).
Leave the option deselected to package the assets with the composition.
5Set the Publish Content As Static HTML preference.
Select this option to generate HTML markup instead of injecting Edge Animate content into the document through
JavaScript. This option improves SEO-friendliness and accessibility on some platforms.
6Click Save to save the publish settings, or click Publish.
Publish as Animate Deployment Package (.oam)
Select this export option to create a package file of your project for use in other Adobe tools. The following tools support
Animate Deployment Packages: Adobe Digital Publishing Suite (DPS), InDesign CS6, Dreamweaver CS6, and Muse.
1Select File > Publish Settings.
2In the Publish Settings dialog box, make sure Animate Deployment Package is selected as the publish target.
3Note or change the target directory.
4(Optional) Specify a poster image.
5Click Save to save the publish settings, or click Publish.
Publish to Apple iBooks Author
1Select File > Publish Settings.
2In the Publish Settings dialog box, make sure iBooks/OS X is selected as the publish target.
3Note or change the target directory.
4(Optional) Specify a poster image.

37
Integration and publishing
Last updated 6/16/2015
5Click Save to save the publish settings, or click Publish.
Learn more
•Enhance your DPS folios with HTML animations using Adobe Edge
Edge Animate API guide
Edge Animate API guide
Publishing and integration (Video)
Publishing and integration (Video)
Edge Animate and the Twitter API (Video)
Edge Animate and the Twitter API (Video)
Enhance your DPS folios with HTML animations
(Tutorial)
Enhance your DPS folios with HTML animations (Tutorial)
Using Animate files in InDesign or Muse (Video)
Using Animate files in InDesign or Muse (Video)
Spice up your WordPress Site with Edge Animate
Spice up your WordPress Site with Edge Animate
Create a PhoneGap Build app with Edge Animate
Create a PhoneGap Build app with Edge Animate


