Adobe Fireworks CS5.5 Troubleshooting Cs5 5
User Manual: adobe Adobe Fireworks - CS5.5 - Troubleshooting Free User Guide for Adobe Fireworks Software, Manual
Open the PDF directly: View PDF ![]() .
.
Page Count: 78
- Legal notices
- Contents
- Welcome window in Fireworks is partially off the screen and cannot be closed
- Using Photoshop layer masks in Fireworks 3
- Uninstall Fireworks 8 | Mac OS X
- Supported file formats
- How to show a ''don''t show again'' dialog again
- When you scale down an ellipse, the elliptical shape changes (Fireworks)
- Restore preferences | Fireworks CS5, CS5.1, CS6
- Quick tips for Fireworks
- How to make small text characters look cleaner
- Limitations of importing and exporting PSD files in Fireworks
- Limitations of importing and exporting AI files in Adobe Fireworks
- After installing the English version, Fireworks 8 launches in a different language
- General file and code troubleshooting
- Fireworks Online Forums
- Fireworks JavaScript preloads explained
- Fireworks generated HTML code with FrontPage
- Fireworks document fails to display in the 2-up and 4-up preview windows
- Fireworks CS6 known issues and bugs
- Fireworks CS5 known issues and bugs
- Fireworks 8 Frequently Asked Questions
- Issue
- What's new in Fireworks 8?
- Optimization
- Integrated workflow
- Create Without Complexity
- Workflow Improvements
- What does Fireworks do?
- What file formats can Fireworks Import and Export?
- How do I switch languages in Fireworks 8?
- How can I convert my pop-up menus to the new CSS based pop-up menus?
- Does Fireworks 8 work with Photoshop?
- Issue
- Fireworks 3 crashes after the splash screen appears
- How to feather an object
- Feathered selections and transparent gradients in Fireworks 3
- How to export animations in sliced images
- Error "Fireworks cannot run. A parameter was incorrect" | Fireworks CS5 | Mac OS
- Error "File is not found" when creating an AIR package in Fireworks (Windows)
- Why do sliced images from Fireworks have broken icons inside Dreamweaver?
- Differences in single-state export between Fireworks CS4 and CS5
- Changing the location of a Pop-up Menu exported from Fireworks
- How to change the location of submenus in a Fireworks Pop-up Menu
- Button text does not update correctly
- Blank panels | Fireworks | CS5, CS5.5
- How to animate a text fade in and out

Adobe Fireworks
CS5-5.5 Troubleshooting

Last updated 11/6/2015
Legal notices
Legal notices
For legal notices, see http://help.adobe.com/en_US/legalnotices/index.html.
A note to our customers
Adobe provides this searchable PDF of archived technical support documents as a service to our
customers who own and continue to enjoy older, unsupported versions of our software products. The
information in these documents is not updated, and will become increasingly less accurate as
hardware, browsers, and operating systems continue to evolve. Please be aware that these archived
documents reflect historical issues and solutions for products that are no longer supported. Adobe
does not warrant that the information in this document is accurate.

iii
Last updated 11/6/2015
Contents
Welcome window in Fireworks is partially off the screen and cannot be closed . . . . . . . . . . . . . . . . . . . . . . . . . . . . . . . . . . . . . . . . . . .1
Using Photoshop layer masks in Fireworks 3 . . . . . . . . . . . . . . . . . . . . . . . . . . . . . . . . . . . . . . . . . . . . . . . . . . . . . . . . . . . . . . . . . . . . . . . . . . . . .2
Uninstall Fireworks 8 | Mac OS X . . . . . . . . . . . . . . . . . . . . . . . . . . . . . . . . . . . . . . . . . . . . . . . . . . . . . . . . . . . . . . . . . . . . . . . . . . . . . . . . . . . . . . 12
Supported file formats . . . . . . . . . . . . . . . . . . . . . . . . . . . . . . . . . . . . . . . . . . . . . . . . . . . . . . . . . . . . . . . . . . . . . . . . . . . . . . . . . . . . . . . . . . . . . . . . 12
How to show a ''don''t show again'' dialog again . . . . . . . . . . . . . . . . . . . . . . . . . . . . . . . . . . . . . . . . . . . . . . . . . . . . . . . . . . . . . . . . . . . . . . . 13
When you scale down an ellipse, the elliptical shape changes (Fireworks) . . . . . . . . . . . . . . . . . . . . . . . . . . . . . . . . . . . . . . . . . . . . . . 14
Restore preferences | Fireworks CS5, CS5.1, CS6 . . . . . . . . . . . . . . . . . . . . . . . . . . . . . . . . . . . . . . . . . . . . . . . . . . . . . . . . . . . . . . . . . . . . . . . . 14
Quick tips for Fireworks . . . . . . . . . . . . . . . . . . . . . . . . . . . . . . . . . . . . . . . . . . . . . . . . . . . . . . . . . . . . . . . . . . . . . . . . . . . . . . . . . . . . . . . . . . . . . . . 17
How to make small text characters look cleaner . . . . . . . . . . . . . . . . . . . . . . . . . . . . . . . . . . . . . . . . . . . . . . . . . . . . . . . . . . . . . . . . . . . . . . . 19
Limitations of importing and exporting PSD files in Fireworks . . . . . . . . . . . . . . . . . . . . . . . . . . . . . . . . . . . . . . . . . . . . . . . . . . . . . . . . . . 22
Limitations of importing and exporting AI files in Adobe Fireworks . . . . . . . . . . . . . . . . . . . . . . . . . . . . . . . . . . . . . . . . . . . . . . . . . . . . . 23
After installing the English version, Fireworks 8 launches in a different language . . . . . . . . . . . . . . . . . . . . . . . . . . . . . . . . . . . . . . . . 25
General file and code troubleshooting . . . . . . . . . . . . . . . . . . . . . . . . . . . . . . . . . . . . . . . . . . . . . . . . . . . . . . . . . . . . . . . . . . . . . . . . . . . . . . . . 25
Fireworks Online Forums . . . . . . . . . . . . . . . . . . . . . . . . . . . . . . . . . . . . . . . . . . . . . . . . . . . . . . . . . . . . . . . . . . . . . . . . . . . . . . . . . . . . . . . . . . . . . 28
Fireworks JavaScript preloads explained . . . . . . . . . . . . . . . . . . . . . . . . . . . . . . . . . . . . . . . . . . . . . . . . . . . . . . . . . . . . . . . . . . . . . . . . . . . . . . 29
Fireworks generated HTML code with FrontPage . . . . . . . . . . . . . . . . . . . . . . . . . . . . . . . . . . . . . . . . . . . . . . . . . . . . . . . . . . . . . . . . . . . . . . 32
Fireworks document fails to display in the 2-up and 4-up preview windows . . . . . . . . . . . . . . . . . . . . . . . . . . . . . . . . . . . . . . . . . . . . 33
Fireworks CS6 known issues and bugs . . . . . . . . . . . . . . . . . . . . . . . . . . . . . . . . . . . . . . . . . . . . . . . . . . . . . . . . . . . . . . . . . . . . . . . . . . . . . . . . . 35
Fireworks CS5 known issues and bugs . . . . . . . . . . . . . . . . . . . . . . . . . . . . . . . . . . . . . . . . . . . . . . . . . . . . . . . . . . . . . . . . . . . . . . . . . . . . . . . . . 36
Fireworks 8 Frequently Asked Questions . . . . . . . . . . . . . . . . . . . . . . . . . . . . . . . . . . . . . . . . . . . . . . . . . . . . . . . . . . . . . . . . . . . . . . . . . . . . . . 37
Fireworks 3 crashes after the splash screen appears . . . . . . . . . . . . . . . . . . . . . . . . . . . . . . . . . . . . . . . . . . . . . . . . . . . . . . . . . . . . . . . . . . . . 40
How to feather an object . . . . . . . . . . . . . . . . . . . . . . . . . . . . . . . . . . . . . . . . . . . . . . . . . . . . . . . . . . . . . . . . . . . . . . . . . . . . . . . . . . . . . . . . . . . . . 41
Feathered selections and transparent gradients in Fireworks 3 . . . . . . . . . . . . . . . . . . . . . . . . . . . . . . . . . . . . . . . . . . . . . . . . . . . . . . . . . 42
How to export animations in sliced images . . . . . . . . . . . . . . . . . . . . . . . . . . . . . . . . . . . . . . . . . . . . . . . . . . . . . . . . . . . . . . . . . . . . . . . . . . . . 44
Error "Fireworks cannot run. A parameter was incorrect" | Fireworks CS5 | Mac OS . . . . . . . . . . . . . . . . . . . . . . . . . . . . . . . . . . . . . . . 45
Error "File is not found" when creating an AIR package in Fireworks (Windows) . . . . . . . . . . . . . . . . . . . . . . . . . . . . . . . . . . . . . . . . . 46
Why do sliced images from Fireworks have broken icons inside Dreamweaver? . . . . . . . . . . . . . . . . . . . . . . . . . . . . . . . . . . . . . . . . . 46
Differences in single-state export between Fireworks CS4 and CS5 . . . . . . . . . . . . . . . . . . . . . . . . . . . . . . . . . . . . . . . . . . . . . . . . . . . . . 51
Changing the location of a Pop-up Menu exported from Fireworks . . . . . . . . . . . . . . . . . . . . . . . . . . . . . . . . . . . . . . . . . . . . . . . . . . . . . 52
How to change the location of submenus in a Fireworks Pop-up Menu . . . . . . . . . . . . . . . . . . . . . . . . . . . . . . . . . . . . . . . . . . . . . . . . . 55
Button text does not update correctly . . . . . . . . . . . . . . . . . . . . . . . . . . . . . . . . . . . . . . . . . . . . . . . . . . . . . . . . . . . . . . . . . . . . . . . . . . . . . . . . . 58
Blank panels | Fireworks | CS5, CS5.5 . . . . . . . . . . . . . . . . . . . . . . . . . . . . . . . . . . . . . . . . . . . . . . . . . . . . . . . . . . . . . . . . . . . . . . . . . . . . . . . . . . 68
How to animate a text fade in and out . . . . . . . . . . . . . . . . . . . . . . . . . . . . . . . . . . . . . . . . . . . . . . . . . . . . . . . . . . . . . . . . . . . . . . . . . . . . . . . . . 69

1
Last updated 11/6/2015
Welcome window in Fireworks is partially off the screen
and cannot be closed
Issue
After launching Fireworks 4, the Welcome window appears partially off the screen with the Close Window button not
visible. (The Welcome window can also be activated by choosing Help > Welcome.) Because the Close Window button
is not visible, the window cannot be closed and now covers the Fireworks workspace.
Reason
The Welcome window can appear too-large on the screen if the monitor is set to a low resolution, such as 640 x 480
pixels.
Solution
Three methods exist to close this window, including:
Using the Alt+F4 function keys
The Fireworks Welcome window is a standard system element which can be removed by first pressing and holding the
Alt key and then pressing the F4 function key (Alt+F4). This keyboard shortcut will close any currently active window
(unless Function keys have been disabled on the system or some other configuration setting has disabled the key
combination). For this key combination to work, first make sure that the Welcome window is currently the active
window by clicking on it.
Changing the monitor resolution
1Right-click on an empty place on the Desktop.
2Select Properties in the context menu. The Display Properties dialog box will appear.
3Click the Settings tab and locate the Screen Area slider.
4Move the slider to the right to increase screen resolution to at least 1024 x 768 pixels.
Once the screen resolution is set to 1024 x 768 pixels or higher, the Fireworks 4 Welcome window will not appear
with its title bar and close box on your monitor until you delete the Fireworks 4 Preferences.txt file. Once this is
done, the Welcome window will appear on the screen with its title bar and close box. Click the close box to close the
window.

2
Last updated 11/6/2015
Disabling the Welcome window in the Fireworks 4 Preferences.txt file
1Close Fireworks, if it is currently open.
2Choose Start > Programs > Accessories > Notepad to launch Windows Notepad.
3In Notepad, choose File > Open and navigate to the Fireworks 4 directory which normally would be located
at:C:\Program Files\Macromedia\Fireworks 4
4Open the file named Fireworks 4 Preferences.txt found in the Fireworks 4 folder.
5Locate the following line in the preferences file (use Notepad's Edit > Find command, if
necessary):DisplayWelcomeMovie) (true)
6Change "true" to "false".
7Save the file.
8Exit Notepad and launch Fireworks 4. The Welcome window will now not appear unless the user chooses Help >
Welcome in Fireworks 4.
Using Photoshop layer masks in Fireworks 3
Accessing a layer mask from Adobe Photoshop Layer masks in Photoshop do not appear as masks in Fireworks 3
layers. Instead the masked objects appear in the Fireworks 3 PNG file as an image with a transparent background.
Beginning with Fireworks 4, however, the masks are retained from Photoshop files.
This TechNote, then, is useful for Fireworks 3 users who would like to use a Photoshop file containing masks. The
instructions show users how to use a layer mask from a Photoshop document as a mask in Fireworks. Such a layer mask
can be edited when selected. This TechNote is also useful for all Fireworks users wishing to follow the Fireworks steps
to composite masked images in all versions of Fireworks.
Note: This workaround is for Fireworks 3 users. Layer masks in Photoshop files that are opened or imported into
Fireworks 4 or MX will be retained as bitmap masks.
Strategies There are two ways to approach the task:
Once the layer mask is separated out to its own layer, import the file into Fireworks and use the mask object to mask
any other object in the document.
Photoshop tasksPreparing a Photoshop file with a layer mask (without a selection path):
A user can copy and paste a mask to a new layer from within a
Photoshop file if a selection path is not needed for modification. See
the first set of Photoshop instructions for step-by-step instructions.
If you wish to change a selection, you have the option of either using
a previously saved selection or creating a selection from the mask. The
instructions below will show how to add a modification, such as a
feathered edge, to the selection. You will also learn how to recreate the
layer mask as an image on a new separate layer. Refer to the second set
of Photoshop instructions for step-by-step instructions.
3
Last updated 11/6/2015
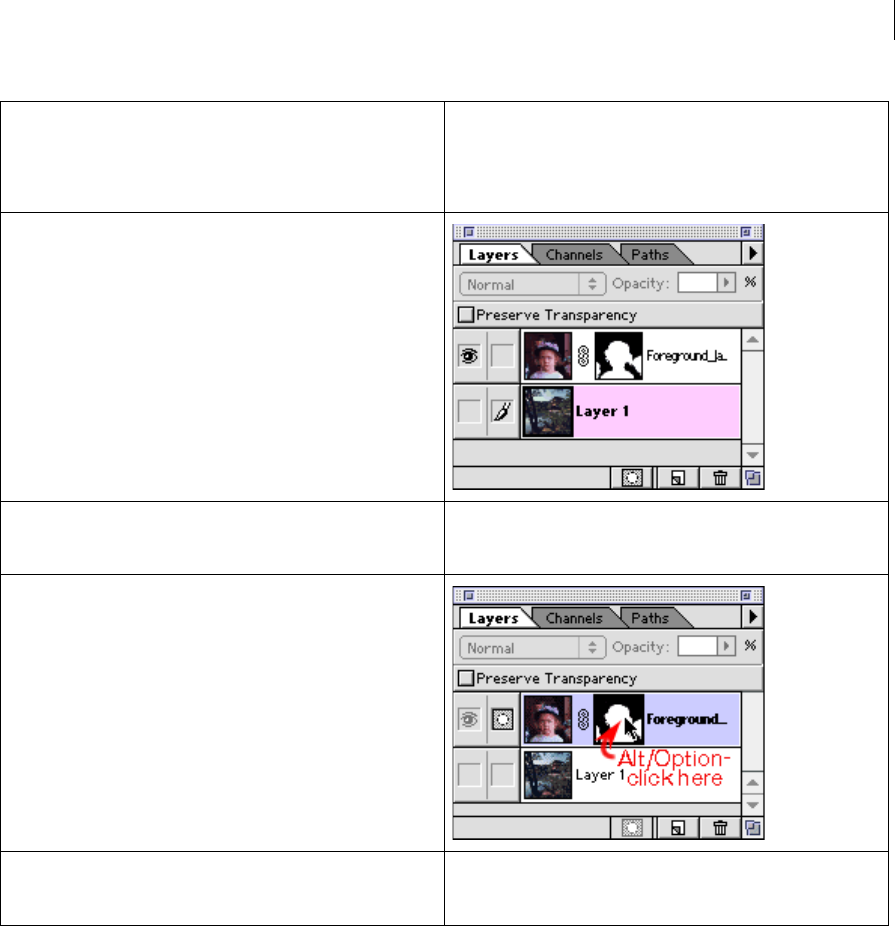
1 Open the Photoshop file containing the layer mask and turn off the
visibility of any other layers. If more than one layer has a layer mask
applied, you will need to perform this operation multiple times (once
for each individual layer mask). Make sure that only one layer is visible
at this time.
2 Press Alt (Windows) or Option (Macintosh) and click the thumbnail for
the layer mask. This will make the mask itself visible rather than the
artwork on the layer.
3 Press Ctrl + A (Windows) or Command + A (Macintosh) or choose
Select > All to select all of the mask image. Press Ctrl + C (Windows) or
Command + C (Macintosh) to copy the mask.
4
Last updated 11/6/2015
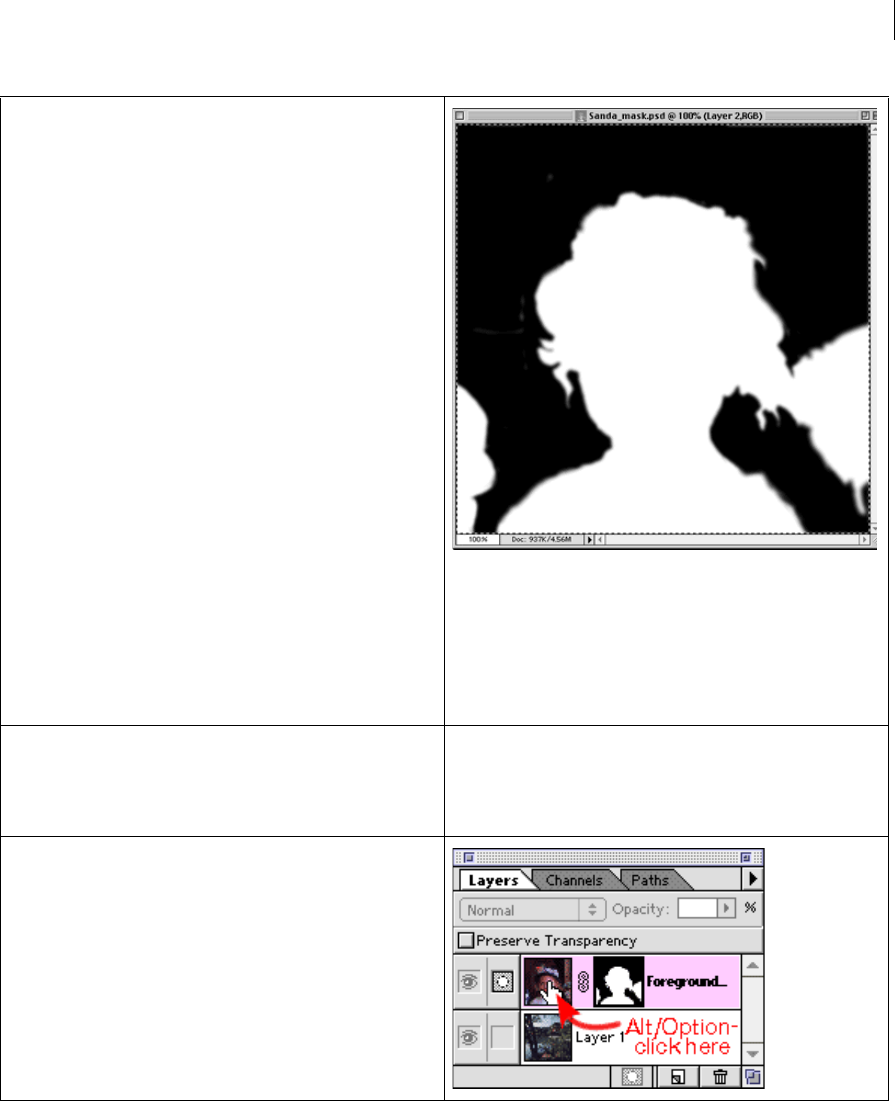
4 Press Alt (Windows) or Option (Macintosh) and click the thumbnail for
the artwork on the masked layer to restore the artwork for that layer.
This will make the artwork visible in the document window rather than
the mask. Press Ctrl + D (Windows) or Command + D (Macintosh) to
deselect all.
5
Last updated 11/6/2015
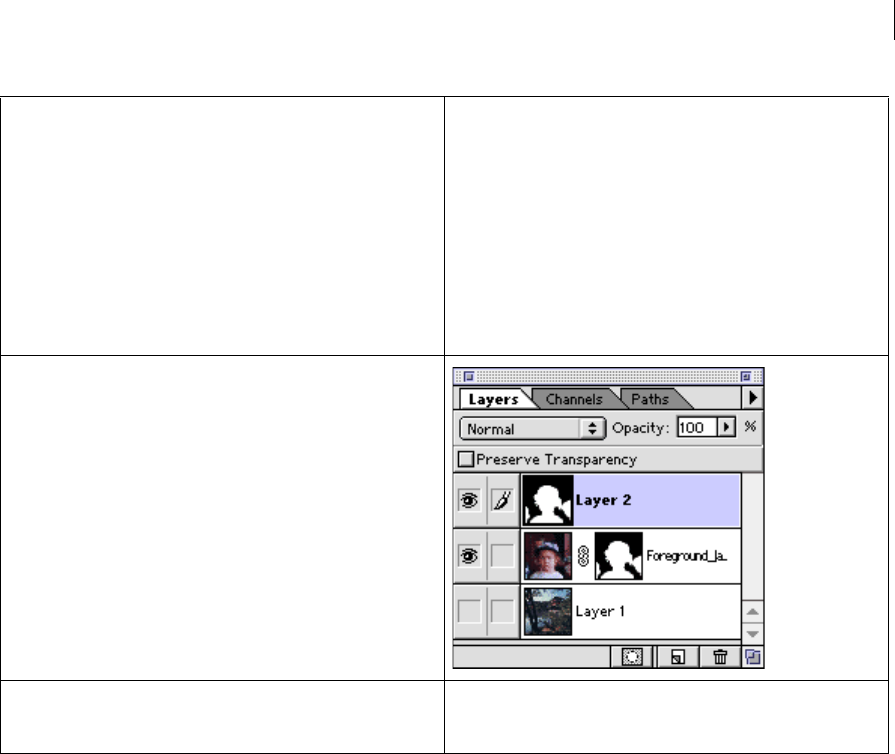
5 Press Ctrl + V (Windows) or Command + V (Macintosh) to paste the
mask image from the clipboard into the document. This will create a
new layer with the mask on it.
Note:A Fireworks mask contains two colors. The black
areas will cause the image being masked to appear
opaque. The white areas will cause the image being
masked to appear transparent. In Fireworks MX these
colors are reversed, i.e. black areas will cause pixels to
appear transparent and white objects will cause pixels to
be opaque.
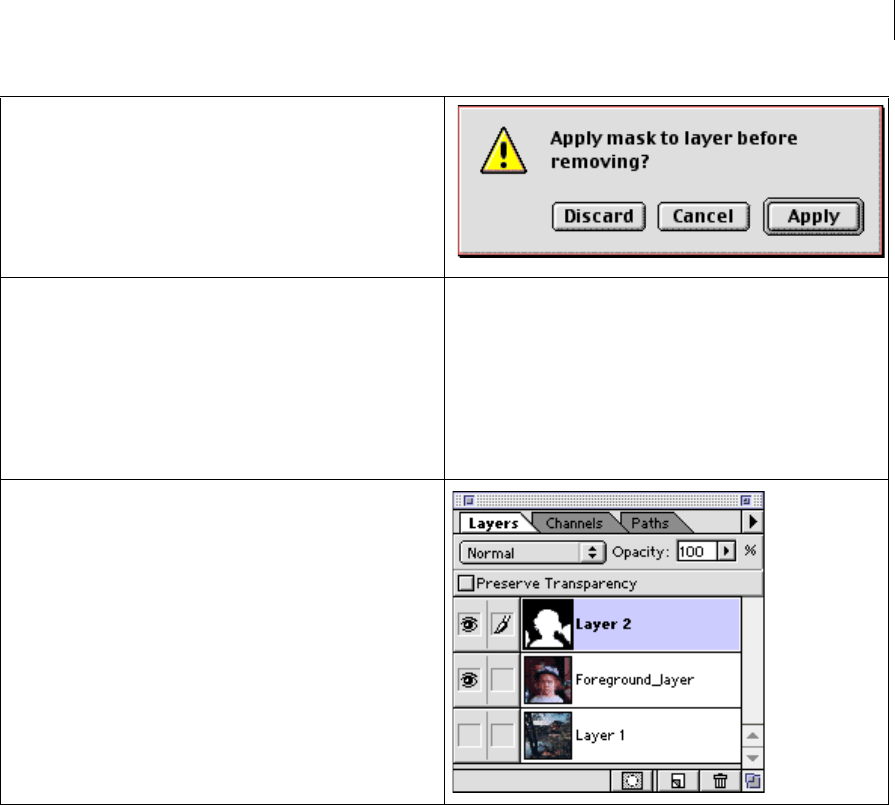
6 To remove the mask from the layer, drag the thumbnail of the layer
mask to the layer palette's trash icon. Select Discard in the alert
window that appears.
6
Last updated 11/6/2015
Proceed to the Fireworks portion of this TechNote.
Preparing a Photoshop file with a layer mask (with a selection path):
7 The layers palette will now appear with the mask on the first layer and
the unmasked layer below it. Repeat steps 1 through 6 for any other
layers with masks that you wish to use in Fireworks. Choose File > Save
As. Name and save the file as a Photoshop file format.
When the Photoshop document is opened or imported
into Fireworks, the grayscale images on their own layer
may be used with images in other layers as masks. Simply
use the Mask Group command.
7
Last updated 11/6/2015
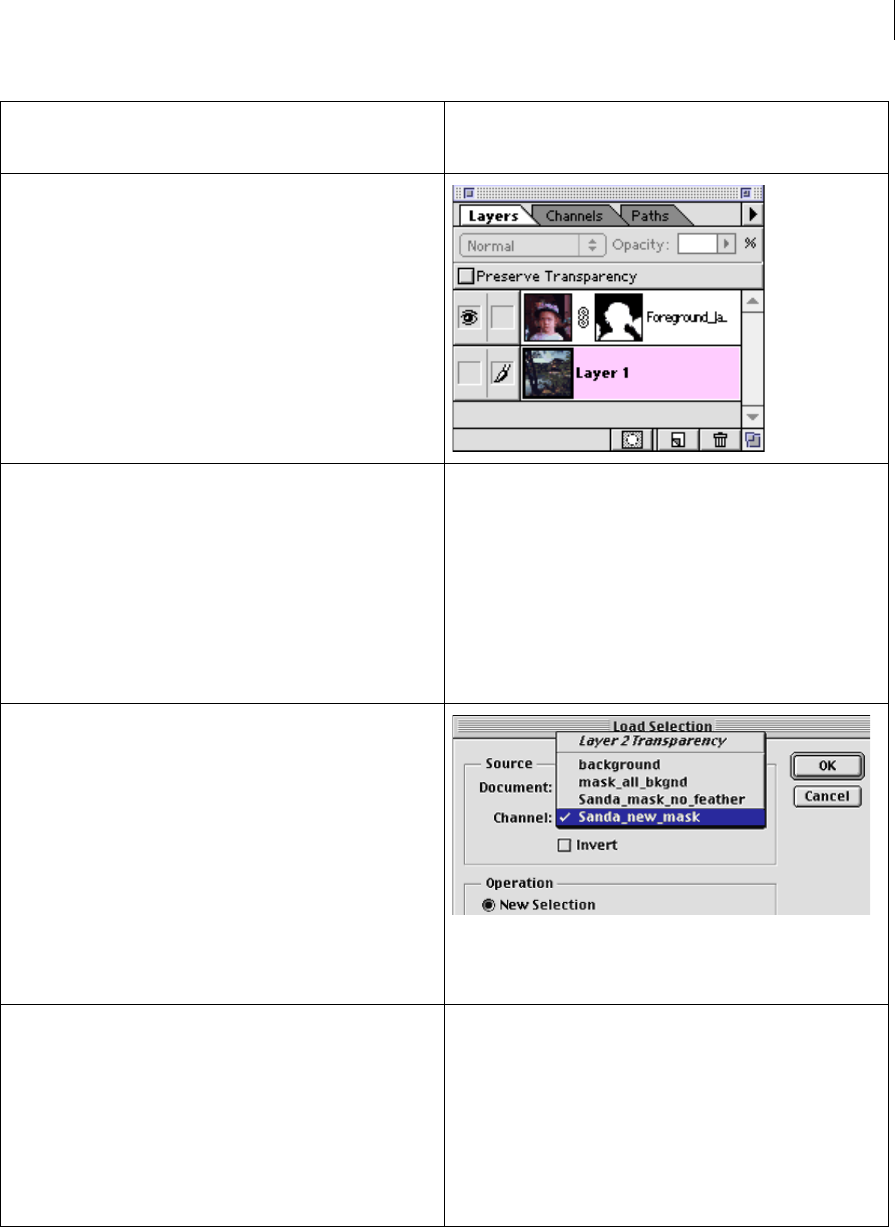
1 Open the Photoshop file containing the layer mask. Notice that the
black areas of the mask are the background. These areas mask out to
reveal the graphic in Layer 1 with the Foreground_layer image on top.
2 Choose Select > Load Selection. Choose the selection that was used
to generate the mask. If the selection was not saved, do the following:
Open the Channels panel. Hide all channels except the mask. Select
the Magic Wand. Set the tolerance for the wand to 12. Click on the
black area to select all of the mask (use shift-click if noncontiguous
areas exist).
Note:If you want to reverse the mask in Fireworks, you
can choose Select > Inverse. If you want to feather the
selection you can choose Select > Feather, then set a pixel
distance for the selection's feather.
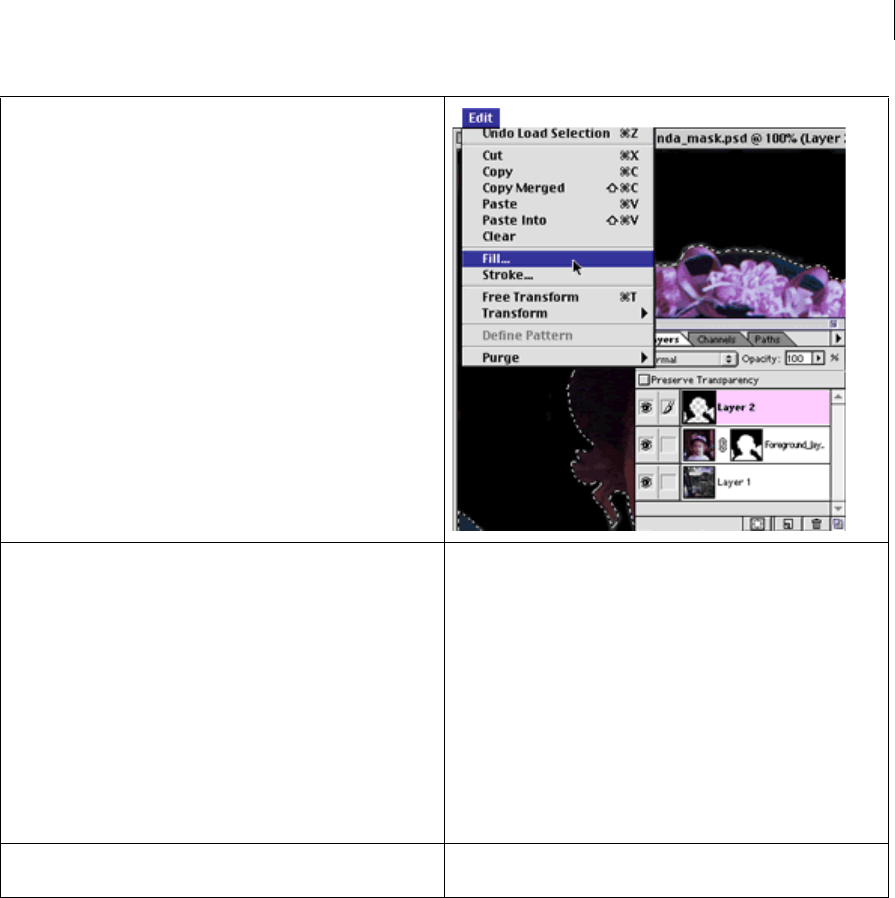
3 Click the triangle at the top right of the Layers palette to display the
palette menu. Choose New Layer and fill the selection with black. The
image on the new layer will be an exact duplicate of the layer mask but
it will be a grayscale image on the new layer. If you inverted the
selection it will be a reverse of the layer mask.
Note:In Fireworks 3 and 4 masks, black areas cause the
image being masked to appear opaque. White areas cause
the image being masked to appear transparent. This is
reversed in Fireworks MX masks.
8
Last updated 11/6/2015
Fireworks tasksTo use the layer mask in Fireworks, do the following:
Tip:You can also save your selection as a clipping path in Photoshop.
Open the Paths panel in Photoshop. While the selection is still
marqueed, click the Options arrow at the top right of the Paths panel
and select New Path from the pop-up menu. Name the path and click
OK in the New Path dialog box. With the path highlighted in the Paths
panel, click the Options arrow again and choose Make Work Path. Set
the tolerance to .5 and click OK in the Make Work Path dialog box.
Double-click the work path and give it a name in the Save Path dialog.
Click the Options arrow one more time and choose Clipping Path.
Select the path from the pop-up in the Clipping Path dialog box and
set the flatness to 3 device pixels. Click OK to save your settings.
Choose File > Export > Paths to Illustrator to create a vector shape
which may be imported into Fireworks and used as a mask or for other
purposes. The vector shape is always editable but if pixel level
accuracy is needed in your mask, a bitmap selection may work better.
4 Choose File > Save As. Name and save your file as the Photoshop file
format.
9
Last updated 11/6/2015
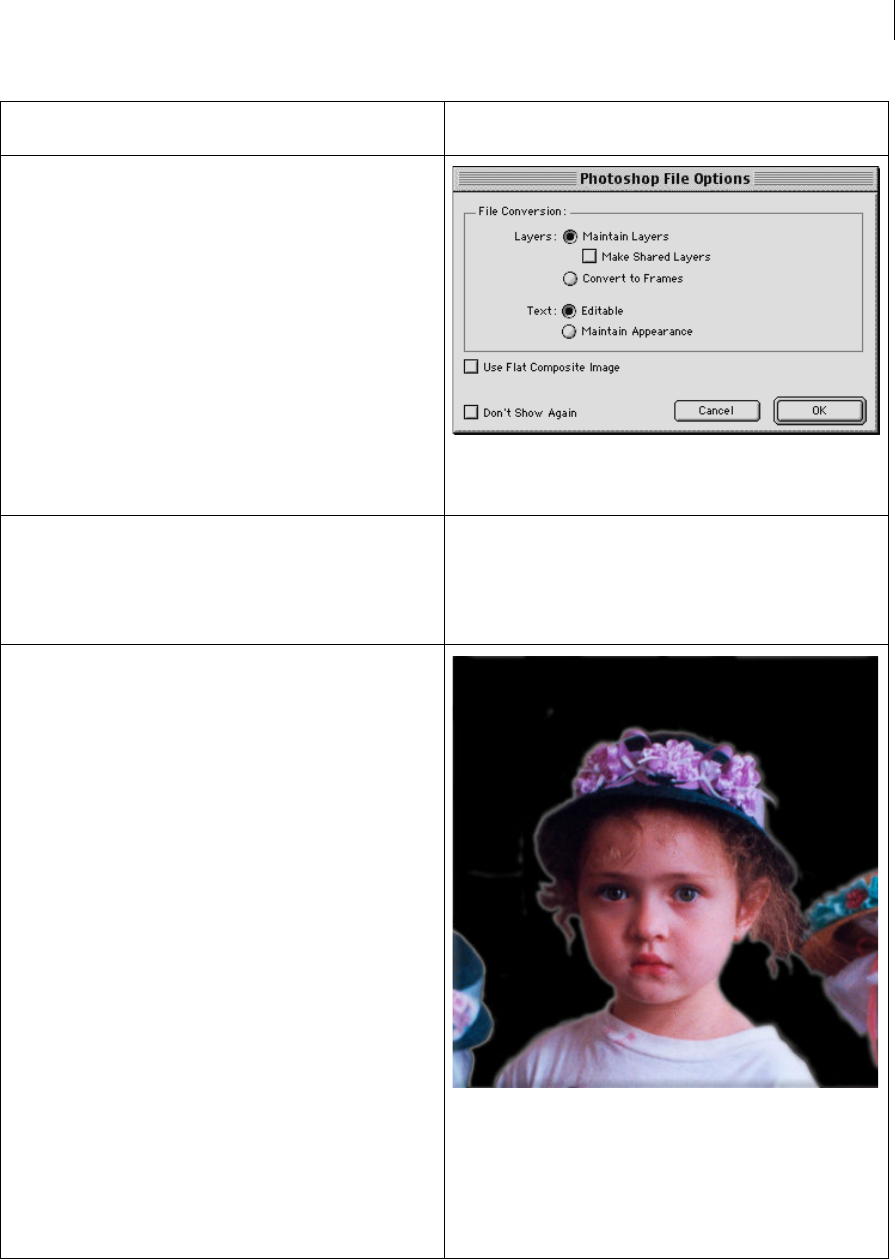
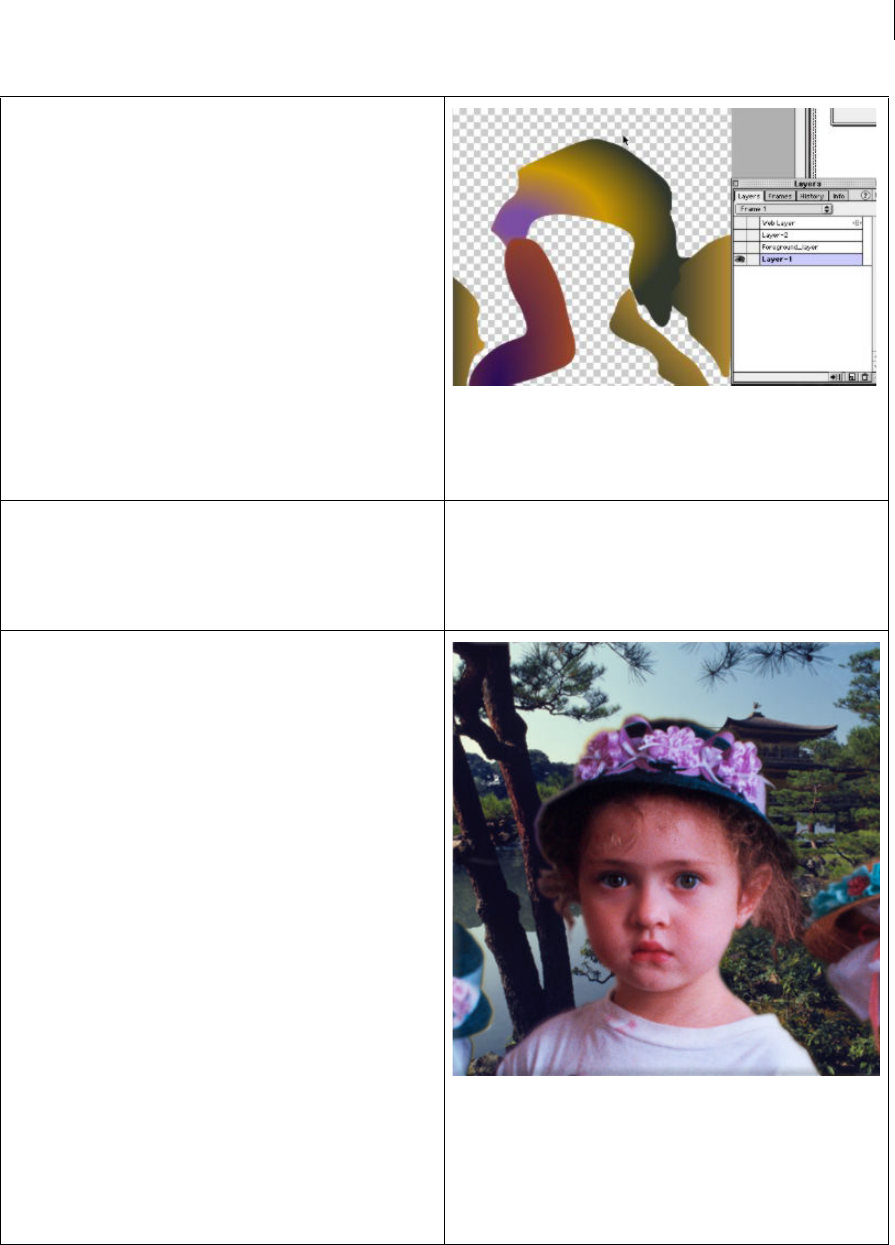
1 In Fireworks, open the Photoshop file containing the layer mask. Use
the default settings as illustrated in the image below.
2 Because the mask has been converted to a layer in Photoshop, it will
also appear in the same layer in Fireworks. Notice that all of the layers
are intact. The Layer that had the layer mask on it appears as an image
with a transparent background. In this example, the selection was
feathered so the foreground image has a glow around it. The canvas
color is showing through the feathered area.
10
Last updated 11/6/2015
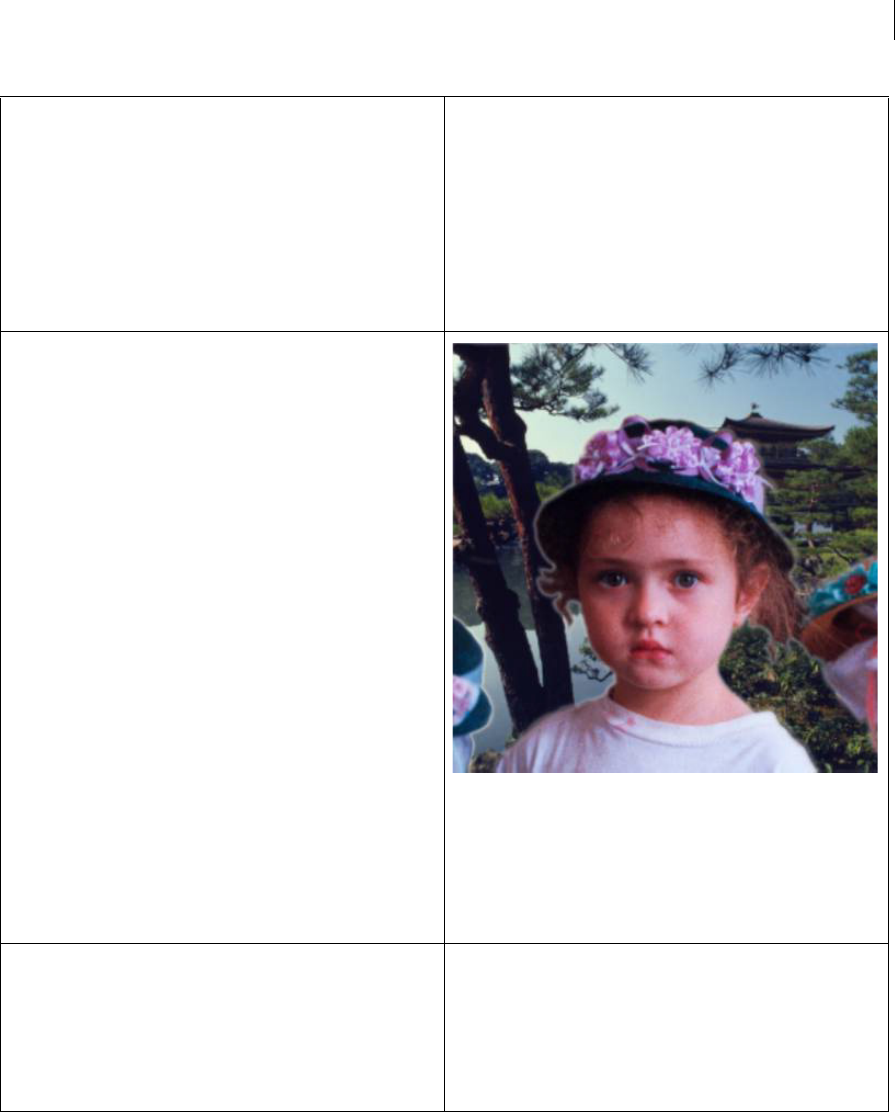
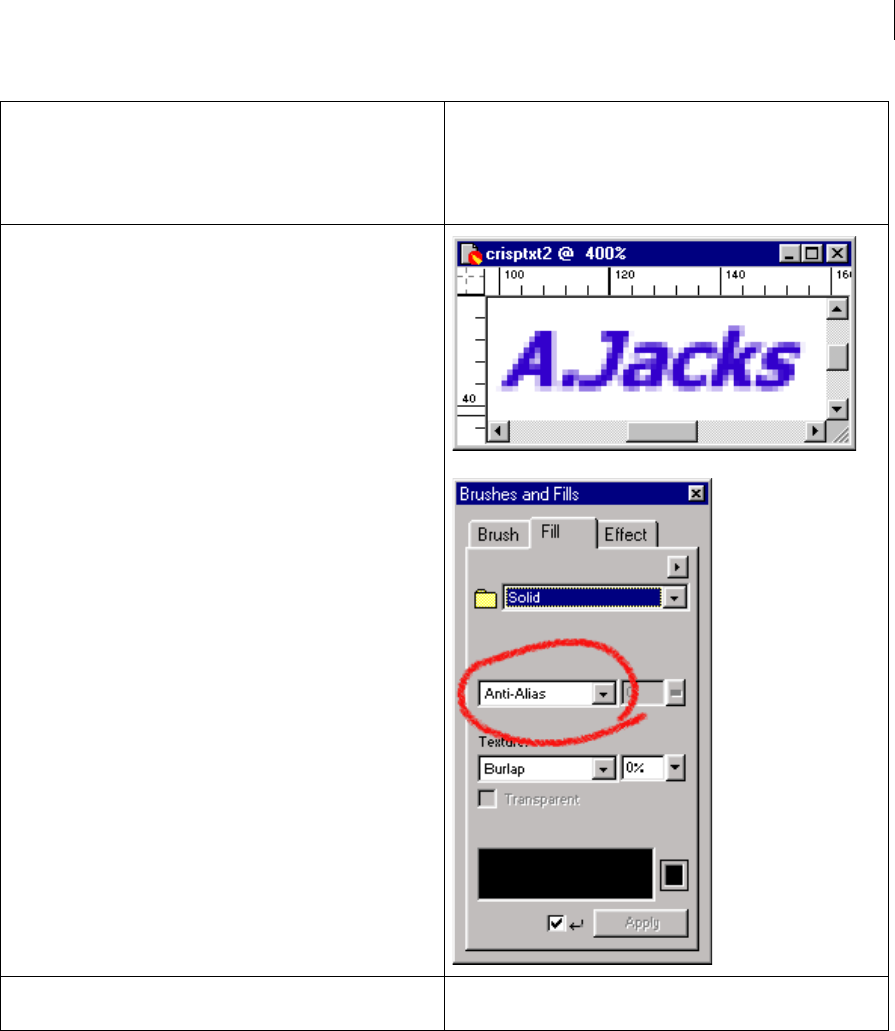
3 In this image, the layer mask was left intact and the duplicate mask
was feathered to produce a mask for the background image. Masking
the background image with a feathered image will produce
transparency at the intersection of the images, allowing the canvas to
show through. If desired, a background layer with colored fills can be
added to give a variety of colors to the glow, adding interesting
lighting effects.
Select the mask image and the background image and
choose Modify > Mask Group to create the masked
background with its feathered edge.
4 In the layers panel, click the Options arrow and select New Layer...
Name the layer. Move the new layer to the bottom of the layer stack.
Draw vector paths containing gradients using colors from the
foreground and background images.(The eyedropper in the Gradient
Fill Editor's swatch pop-up should be used to select colors from the
image). In this selection the flowers on the hat, the green in the
background and a yellow color were chosen to get a glow in some
areas and a shadow in others.
11
Last updated 11/6/2015
5 Because the vector shapes are behind the areas that are feathered and
semi-transparent, they show through the feather only slightly giving
the image a glow in some places, a shadow in others. This adds depth
to the image. Also, the Mask Group in Fireworks allows you the option
of ungrouping the mask. You can then apply it to any other image you
wish to import.

12
Last updated 11/6/2015
Uninstall Fireworks 8 | Mac OS X
You can uninstall Macromedia Fireworks 8 from Mac OS X using one of the two methods listed below.
Use the installer
When uninstalling Fireworks, be sure to select the correct location for the Fireworks application folder in the
installation program. It necessary to select the correct location to locate and remove the necessary files. Do the
following:
1If Fireworks is running, choose File > Quit
2Launch the Fireworks 8 Installer.
3When prompted to select a Destination, click the Select Folder button. Navigate to the location on your hard drive
where the Fireworks application folder is installed. Click Choose.
4On the next Install screen, select the Uninstall option from the pop-up menu at the top of the dialog box. Click the
Uninstall button to begin the uninstallation process.
Uninstall manually
To manually uninstall Fireworks 8 from your computer, delete the following folders:
Note: Confirm that Fireworks is not running before proceeding.
•Fireworks 8 application folder - The location of this folder varies if installed to a location other than the default
location of the Applications folder.
•Fireworks support files - Delete the Fireworks 8 folder from the following path: [hard_drive]: Users: [user_name]:
Library: Application Support: Macromedia:
•Fireworks preferences: Delete the Fireworks 8 folder from the following path: [hard_drive]: Users: [user_name]:
Library: Preferences: Macromedia:
Note: Delete the folder located in the Users folders for each user account that has run Fireworks 8.
Supported file formats
This document provides an overview of the supported file formats in Fireworks. For more information about how to
use different file formats in Fireworks, see the Fireworks online Help.
Supported file formats for new files
New documents in Fireworks are saved as Portable Network Graphic (PNG) documents, the native file format for
Fireworks.
Supported file formats for opening, importing, and saving
•Fireworks PNG
•Flattened PNG
•GIF
•animated GIF
•JPEG

13
Last updated 11/6/2015
•BMP
•WBMP
•SWF
•AI (Illustrator 8)
•PSD
•PICT (Mac OS only)
•TIFF
Supported file formats for exporting
•Adobe PDF
•HTML and images
•images only (based on original file type)
•FXG (CS5)
•MXML (CS5)
•EPS (Open only) (CS5)
•Dreamweaver library (lbi)
•CSS and Images (htm)
•Director (htm)
•Animations (animated GIF files, Flash SWF files or Fireworks PNG, states or layers as multiple files)
For more information on the export options of Fireworks, see the section "Optimizing and Exporting" in the online
Help.
How to show a ''don''t show again'' dialog again
When you first install Fireworks, it will often show dialogs with specific advice or tips.
The following are some examples of these dialogs:
Most of these dialogs have a small "Don't show again" checkbox withinthem, so you can stop seeing them if you wish.
Fireworks gives you necessary information once, and then gets out of your way as you learn the program.
There may be an occasion when you will want to see one of these dialogs again. This TechNote describes how you can
get these dialogs to come back after you've checked the "Don't show again" option.
To see the dialog box again do the following:
How to reduce preview time in the Export Preview dialog
Warning when converting a vector shape to filtered pixels
Warning when changing text in a single button state

14
Last updated 11/6/2015
Note:Be sure to shut down Fireworks before removing the preferences file. Many programs read their preferences at
startup, modify them during operation, and write them to disk when closing. If you delete the preferences while
Fireworks is running, then it will just write a fresh copy of the old preferences when you shut it down.
When you scale down an ellipse, the elliptical shape
changes (Fireworks)
Issue
When you scale down an ellipse so that the guides cross over, the elliptical shape changes in Adobe Fireworks.
Fireworks Version
CS4, CS5
Reason
The ellipse is a path and scaling up or down will scale the points within it. Restriction is placed on the guides such that
they don't cross each other while scaling down, this is one measure to avoid the overlap, but if the points between the
2 guides are not in a straight line they are bound to overlap.
Solution
Place the guides in such a way that path points don't overlap.
Restore preferences | Fireworks CS5, CS5.1, CS6
Damaged preferences files can cause crashes, errors, and other unexpected behavior in Fireworks. Follow the
instructions below to restore preferences to the default settings.
Disclaimer: Some of these procedures involve editing the Windows registry. Adobe doesn't provide support for editing
the registry, which contains critical system and application information. Make sure to back up the registry before
editing it. For more information about the registry, see the Windows documentation or contact Microsoft.
1 Quit Fireworks.
2 Delete the Fireworks Preferences file. On Windows this is file is found
in your Fireworks 3 folder, and on Macintosh this file is found in your
System-level Preferences folder.
3 Restart Fireworks. You will see all dialogs again, including registration
reminders.

15
Last updated 11/6/2015
Windows users: Some of the procedure below require you to access hidden folders. By default, Windows does not
display hidden folders or files. For instructions on showing these hidden folders, see Show hidden files, folders, and
filename extensions | Windows XP, Vista, Windows 7 .
Mac OS 10.7 "Lion" users: Some of the procedure below require you to access your user Library folder. In Mac OS 10.7,
Apple has made this folder hidden. For instructions to access your user Library, see Access hidden user library files |
Mac OS 10.7 Lion .
Remove existing preferences
To remove existing preferences, follow the instructions below that are appropriate for your operating system and
version of Fireworks.
•Mac OS
•Windows 7, Windows Vista
•Windows XP
Remove preferences on Mac OS
1Quit Fireworks.
2In the Finder, navigate to /Users/Your User Name/Library/Application Support/Adobe.
3Rename the Fireworks application support folder:Fireworks CS6: Rename the Fireworks CS6 folder to Old
Fireworks CS6, for example.Fireworks CS5.1: Rename the Fireworks CS5.1 folder to Old Fireworks CS5.1, for
example.Fireworks CS5: Rename the Fireworks CS5 folder to Old Fireworks CS5, for example.
4Navigate to /Users/Your User Name/Library/Preferences.
5Rename the Fireworks preferences folder:Fireworks CS6: Rename the Adobe Fireworks CS6 folder to Old Adobe
Fireworks CS6, for example.Fireworks CS5.1: Rename the Adobe Fireworks CS5.1 folder to Old Adobe Fireworks
CS5.1, for example.Fireworks CS5: Rename the Adobe Fireworks CS5 folder to Old Adobe Fireworks CS5, for
example.
Remove preferences on Windows 7 or Windows Vista
1Exit Fireworks.
2In Windows Explorer, navigate to C:/Users/Your User Name/AppData/Roaming/Adobe.
3Rename the Fireworks preferences folder:Fireworks CS6: Rename the Fireworks CS6 folder to Old Fireworks CS6,
for example.Fireworks CS5.1: Rename the Fireworks CS5.1 folder to Old Fireworks CS5.1, for example.Fireworks
CS5: Rename the Fireworks CS5 folder to Old Fireworks CS5, for example.
4Choose Start, type regedit in the Start Search, and then press Enter.
5In the left pane of the Registry Editor, navigate to the following key:
HKEY_CURRENT_USER/Software/Adobe/Fireworks
6Remove the Fireworks preferences registry entries.Fireworks CS6
aSelect the 12.0 key, then select File > Export. In the Export Registry File dialog, enter a filename and location,
and then click Save.
bEnsure the 12.0 key is still selected, and then select Edit > Delete. In the Confirm Key Delete dialog, click Yes.
Fireworks CS5.1

16
Last updated 11/6/2015
cSelect the 11.1 key, then choose File > Export. In the Export Registry File dialog, enter a filename and location,
and then click Save.
dEnsure that the 11.1 key is still selected, and then select Edit > Delete. In the Confirm Key Delete dialog, click Yes.
Fireworks CS5
eSelect the 11 key, then choose File > Export. In the Export Registry File dialog, enter a filename and location, and
then click Save.
fEnsure that the 11 key is still selected, and then select Edit > Delete. In the Confirm Key Delete dialog, click Yes.
7Exit the Registry Editor.
Remove preferences on Windows XP
1Exit Fireworks.
2In Windows Explorer, navigate to C:/Documents and Settings/Your User Name/Application Data/Adobe.
3Rename the Fireworks preferences folder:Fireworks CS6: Rename the Fireworks CS6 folder to Old Fireworks CS6,
for example.Fireworks CS5.1: Rename the Fireworks CS5.1 folder to Old Fireworks CS5.1, for example.Fireworks
CS5: Rename the Fireworks CS5 folder to Old Fireworks CS5, for example.
4Choose Start > Run. Type regedit in the Open textbox, and then press Enter or click OK.
5In the left pane of the Registry Editor, navigate to the following key:
HKEY_CURRENT_USER/Software/Adobe/Fireworks
6Remove the Fireworks preferences registry entries.Fireworks CS6
aSelect the 12.0 key, then select File > Export. In the Export Registry File dialog, enter a filename and location,
and then click Save.
bEnsure the 12.0 key is still selected, and then select Edit > Delete. In the Confirm Key Delete dialog, click Yes.
Fireworks CS5.1
cSelect the 11.1 key, then choose File > Export. In the Export Registry File dialog, enter a filename and location,
and then click Save.
dEnsure that the 11.1 key is still selected, and then select Edit > Delete. In the Confirm Key Delete dialog, click Yes.
Fireworks CS5
eSelect the 11 key, then select File > Export. In the Export Registry File dialog, enter a filename and location, and
then click Save.
fEnsure that the 11 key is still selected, and then select Edit > Delete. In the Confirm Key Delete dialog, click Yes.
7Exit the Registry Editor.
Try to re-create the problem
After you have removed your existing preferences, restart Fireworks. The application creates preferences files, folders,
and registry entries, as applicable, using the default settings.
Then try to re-create the problem that you had before.
•If the problem was resolved, then damaged preferences was the cause.

17
Last updated 11/6/2015
•If the problem persists, then the preferences are not the cause and you can replace the original preferences.
To replace the original preferences, do the following:
1Quit Fireworks.
2Delete the new preferences folder and restore the original name of the previous folder.
3Do one of the following: Mac OS: Delete the new application support folder and restore the original name of the
previous folder.Wi nd ows: Double-click the registry backup file you created.
More Help topics
Troubleshoot system errors and freezes | Adobe software on Mac OS 10.x
Troubleshoot system errors and freezes | Adobe software on Windows
Troubleshoot unexpected behavior that occurs only in a particular user account | Adobe software on Mac OS
Troubleshoot unexpected behavior that occurs only in a particular user account | Adobe software on Windows 7 and
Vista
Troubleshoot unexpected behavior that occurs only in a particular user account | Adobe software on Windows XP
Quick tips for Fireworks
Here are some fast and friendly tips for Fireworks users, courtesy of Macromedia Technical Support. To get these daily,
check out our Quick Access Bar .
To tween a live effect, apply the effect to the first instance, clone or
duplicate and then change the effect settings to the second instance.
To edit images in Fireworks 2 or 3, just select the desired bitmap
editing tool and start using the tool. Fireworks will intelligently change
to image edit mode.
In Fireworks, everything is editable all of the time. Try creating some
text, applying multiple effects, then change the text: It's easy with
Fireworks!
Use the button editor to quickly create a button in Fireworks. Clone or
duplicate the button to create multiple instances of the button for a
nav bar.
Use FreeHand clip art from the Clipart Viewer in Fireworks. Drag and
drop the art from the viewer into a Fireworks open document window.
Copy and Paste charts from Excel 97 (Windows) or Excel 98
(Macintosh) to Fireworks. In Windows, use Chart Location on new
sheet.
To use PowerPoint images in Fireworks (Windows) save the slide as a
PNG, GIF, or JPEG and import into Fireworks.
To use PowerPoint Clipart in Fireworks (Macintosh) choose File >
Import.
To ensure all text formatting changes apply to all characters
(Macintosh), use the Text Menu instead of the Text Editor.
The PICT format version of a Kodak Photo CD image can be imported
or opened directly in Fireworks (Macintosh).

18
Last updated 11/6/2015
To use FreeHand created charts in Fireworks copy and paste the charts
into Fireworks.
To use Photoshop compatible plug-ins in Fireworks go to File >
Preferences, select Folders from the pop-up menu click Photoshop
and the ellipsis button. Navigate to the plug-ins folder and click select.
Restart the Fireworks application.
Moving your FreeHand artwork into Fireworks couldn't be easier.
Fireworks can open existing FreeHand 7 and 8 files and lists options for
a simple conversion.
For help with adding Fireworks generated HTML into other HTML
applications open the Fireworks HTML file in a text editing software.
Read the comments.
To easily resize an object to an exact percentage select Modify
>Transform> numeric transformation. Type in the desired percentage.
To easily update an edited image on each frame use symbols and
instances. Select the object, choose Insert > Convert to Symbol. Clone
or duplicate the instance on the canvas. Any change to the symbol is
reflected in the all instances of the symbol across all frames.
To edit objects across multiple frames turn on Onion Skinning in the
Frames panel and choose Show all Frames and Multi-Frame Editing.
To add or change a color to selected text, use the fill color. Use
tweening with changing position, a transformation (Scale, Rotation, or
Perspective), and opacity to create a variety of simple animation
effects.
Fireworks PNG files can be imported into Flash 4. No need to export as
a different format!
To edit a gradient select the Paint Bucket and use the set of handles.
Use the Paint Bucket set of handles to rotate and change direction of a
pattern or texture.
Use the Batch command to automatically convert a folder of files to
another Fireworks supported format or to the same format with
different settings.
To make a Hotspot that is exactly the same shape as an object in
Fireworks 3, select the object and then choose Insert > Hotspot.
Fireworks can open FreeHand files containing blends destined for
animation and place each step on a separate frame, making quick
work of an animated GIF.
Check out the Fireworks online forums
athttps://www.adobe.com/support/forums/
To restrict an edit to objects on only one layer such as deleting
unwanted slices, choose Single Layer Editing from the Layer panel's
Options pop-up.
To get Photoshop layer masks into Fireworks, in Photoshop
Alt/Option-click on the mask and copy it. Click on the trash icon in the
layers panel to delete the mask and then create a new layer and paste.
Save the document. Now the mask can be used in Fireworks via the
Modify > Mask Group command.
Use the Matte color selector in the Export Preview dialog to quickly set
a background color to be designated as the transparent color for
transparent GIFs.

19
Last updated 11/6/2015
How to make small text characters look cleaner
Issue
Many users wish to export GIFs and JPEGs that contain text elements that are smaller than 14 points. Most screen
rendered text that is smaller than 14 points will either display pixelated or will be too "muddy" to read. Is there a way
to make screen rendered text that is smaller than 14 points look better?
Reason
There are two ways to render fonts in bitmap images: 1. anti-aliased and 2. with hard edges. When fonts are rendered
in Fireworks, the default setting is as anti-aliased, setting the text fill to "Hard Edge" in the Fill panel will allow text to
be displayed without anti-aliasing. Sometimes an in-between setting is desired and this can be accomplished in
Fireworks.
Solution
In Fireworks text fills can be manipulated in the fill inspector as well as opacity in the Opacity Toolbar (Fireworks 1)
or the Object panel (Fireworks 2). By overlaying text with a hard edge with the same text anti-aliased and using the
Opacity slider to make further adjustments, a satisfactory appearance can be created.
To solve the problem do the following:
Keep checking our Web site at
www.macromedia.com/support/fireworks for the latest in tutorials
and news on how people are utilizing Fireworks.
In Fireworks 3, you can save steps in the History panel as commands
that you can use later in other documents.
Go to the Extensibility section of the Fireworks Support Site to
download JavaScript commands that you can use in Fireworks.
20
Last updated 11/6/2015
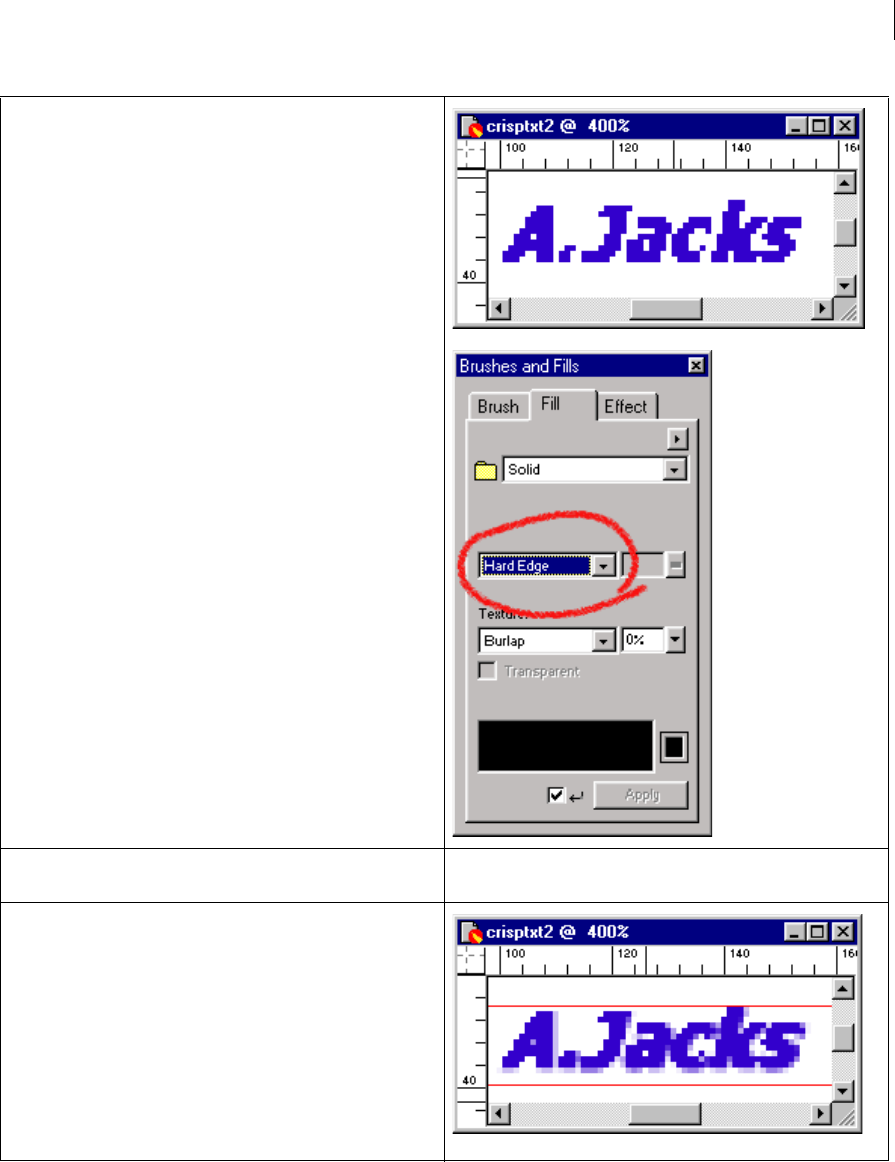
1 Type your text in the Fireworks Text editor and set the font size. This
text is 14 point. Anti-aliasing is on by default.
Note:Text under 14 points in size is usually unreadable in GIF images.
If you need to use text smaller than 12 points, consider using HTML
text and place it in a layer overlapping the image if needed.
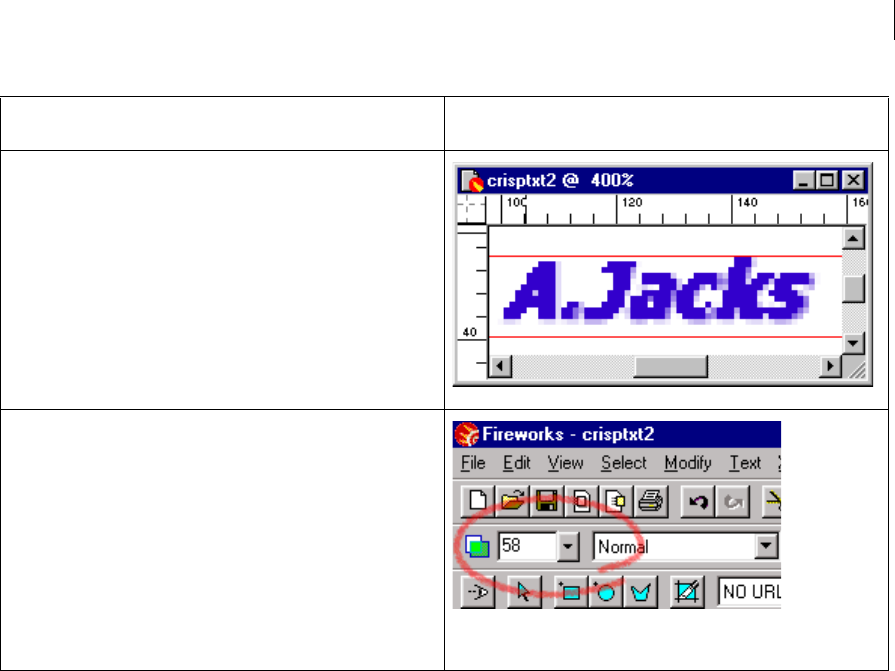
2 Clone the text object and set the fill edge to Hard Edge in the Fills
panel.
21
Last updated 11/6/2015
3 The combination of the two text objects should result in a better
overall rendering
22
Last updated 11/6/2015
Note:Some fonts are specifically meant to look good at small sizes on the web, hence they are called web fonts. They
may be found on Microsoft's web site, but beware that they are not good for high quality print material.
Limitations of importing and exporting PSD files in
Fireworks
What's covered
•PSD import and export improvements
•Known limitations of PSD import and export
Owing to enhancements in Fireworks, many elements of the original PSD file are retained when importing and
exporting as a PSD file.
PSD import and export improvements
The improved support for PSD import and export allows you to import and export the following elements in a PSD file:
•Layer affects
•Layer groups
•Transparency
•Text
•Slices
4 The Opacity of the Anti-aliased text and the hard edge text can be
manipulated to achieve a good balance of the two.
Note:The Opacity setting in Fireworks 2 may be found in the Object
panel.

23
Last updated 11/6/2015
•Smart objects
•Vector shapes
•Guides
•Gradients
Known limitations of PSD import and export
Importing
•Text objects with transformations applied revert to default fonts if the original font used to create an object is not
found on the system.
•Photoshop adjustment layers are not preserved when imported.
•PSD files are not a valid file type when creating a slideshow.
•Text on a path does not retain its original position.
•Reopening a PSD exported from Fireworks could move the layers up or down in the stack when reimported.
•Editable clipping mask
•Editable adjustment layers
Exporting
•Fireworks groups are exported as flattened layers. Blend affects applied to the group can be lost during the flattening
process.
•Images with gradient fills or pattern are exported with a random fill or pattern. There are currently no PSD Live
Effects that allow you to apply these features to images during export.
•Strokes are not preserved.
•Blend modes don't always retain exact appearance.
•Symbols are flattened as bitmaps.
Limitations of importing and exporting AI files in Adobe
Fireworks
What's covered
•Import issues
•Export issues
There are some known issues when you try to import or export Adobe Illustrator files with Adobe Fireworks.
Fireworks Version
CS4, CS5
Import issues
•Symbol libraries from Adobe Illustrator are not maintained.Workaround: Recreate the Document Library in Adobe
Fireworks.

24
Last updated 11/6/2015
•Some effects applied to objects in an Illustrator file are lost.Note: This can occur because the effect is not supported
in Adobe Fireworks. Rasterizing the effect will remove edit ability but maintain the appearance.Workaround:
1In Adobe Illustrator, use the Selection tool to select objects that are not imported correctly into Adobe Fireworks.
2Choose Object > Rasterize.
3Choose a desired setting for the objects in the Rasterize dialog box and click OK.
4Re-save the file and import into Fireworks.
•A second path is placed outside of the canvas when importing an AI file on a Japanese operating
system.Workaround: After placing the AI file, select the second path and delete it.
•AI elements are imported as a group when the file contains double-byte characters. Ungrouping the text will place
each character in a separate text element.Workaround: Copy each text element and add it to a common Text Block.
Export issues
•Indents and indent spacing are lost when exporting to the Adobe Illustrator format if the file contains double-byte
characters.Workaround:
1In Adobe Fireworks, select the double-byte text block and choose Text > Convert to Paths.
2Choose File > Save As and select Illustrator <version number> from the Save As drop down list.
3Open the saved AI file in Illustrator.
•Text Blocks are converted to plug symbols when exporting to the AI format if the file contains double-byte
characters.Workaround:
1In Adobe Fireworks, select the double-byte text block and choose Text > Convert to Paths.
2Choose File > Save As and select Illustrator <version number> from the Save As drop-down.
3Open the saved AI file in Illustrator.
•Vertical double-byte text is converted to horizontal text when exporting as an Adobe Illustrator 8
format.Work around:
1In Adobe Fireworks, select the double-byte text block and choose Text > Convert to Paths.
2Choose File > Save As and select Illustrator <version number> from the Save As drop-down.
3Open the saved AI file in Illustrator.
•Some effects applied to objects in Fireworks are lost when exporting to the Illustrator 8 format.Note: The font is
rasterized on export in the PDF format.Workaround:
1Using Adobe Fireworks, choose File > Export.
2Select Adobe PDF and click Export.
3Open the saved PDF document in Illustrator.
•Fonts are converted to Adobe Illustrator default font if the original file was exported from Adobe Fireworks in the
AI format.Note: The font is rasterized on export in the PDF format.Workaround:
1Using Adobe Fireworks, choose File > Export.
2Select Adobe PDF and click Export.
3Open the saved PDF document in Illustrator.

25
Last updated 11/6/2015
After installing the English version, Fireworks 8
launches in a different language
Issue
After installing the English version of Macromedia Studio 8 or Fireworks 8, Fireworks launches in a different language,
such as Japanese.
Reason
Fireworks 8 is a multilingual single application that senses the language of the operating system when being launched
and will run in the matching language.
Solution
Review Switching languages in Fireworks 8 (TechNote b6a0f908) for details about switching the language that
Fireworks is running, or download and install the Switching Language extension from the Fireworks Exchange.
Public_Document
General file and code troubleshooting
This TechNote provides a standard process for troubleshooting images and HTML files that originated in Fireworks.
The overall intent of this TechNote is not to provide answers to specific issues, but to help users understand where their
code has gone wrong. If you are troubleshooting pages that contain Pop-up menus look at Troubleshooting Pop-up
Menus from Fireworks (TechNote 18538).
Getting started
To troubleshoot the outcome of a Fireworks export, a user will need access to the following things:
•The original Fireworks PNG file from which the files were exported. Most troubleshooting begins by opening the
source file, the PNG file created in Fireworks. This is not the HTML file exported and published on the Internet.
Rather, it is the original file created in Fireworks. Although the code will not be read here, this is the place to check
the settings that mandate how the code is exported from Fireworks.
•The HTML and images exported from Fireworks.
Note: New to Fireworks MX, if a PNG file cannot be located, a new one can be generated in Fireworks MX by using the
Reconstitute Table feature in the File menu. This feature will create a new PNG file out of HTML code that contains a
table. This feature will not recreate the editable text and vectors that were available to you in the original PNG file, so
it is important to save and keep your original Fireworks source PNG files. See the tutorial Creating Macromedia
Fireworks MX documents from HTML for more information on this new feature.
Identify the issue

26
Last updated 11/6/2015
When troubleshooting any problem, it is important to isolate the problem. The following questions will help you
identify the parameters of the issue:
•What is the problem? Does the problem impair performance or appearance? Does it act differently than you would
expect?
•Where am I seeing the problem? Identify whether the issue is present in the browser or in Fireworks. If in the
browser, does it appear in all browsers or in only one?
•When does the problem occur? Does the issue occur when you are in Fireworks and are previewing? Does it
happen only when previewing in the browser from within Dreamweaver? Does it only occur after you've exported
the HTML and have merely opened it in the browser? Determine exactly the point at which you observed the
problem so you can eliminate the need to repeat steps in the future.
•How did I get here? This is one of the hardest questions to answer, especially if you are a creative type and have
performed many steps and undos to get to your current preview or export operation. If you can identify the steps
leading up to the observed problem, you will most likely be able to identify the cause of the problem.
Once you have answered the questions above, try using those answers to describe the problem you are going to
troubleshoot. The following paragraph is an example of the result of the above questions:
"In Internet Explorer, when viewing my exported HTML file, some of my exported images appear distorted in their
table cells, others are from other slice areas. This happened after I opened the HTML Setup and changed my file naming
settings for slices and then exported to a folder where I already had some images saved."
Common user errors
Incorrect HTML style exported Copying and pasting code incorrectly Slice options not setup correctly Non standard
filenames
After you export: other areas to consider
Attaching CSS tags inappropriately , or placing the CSS tags incorrectly in a table created in Fireworks can cause tables
to look broken.Exporting to a location in your site and maintaining document relative links Verifying that site
definitions are viable.
Start with the PNG file
Before you export your file you should always preview it in a browser by choosing File > Preview in Browser. Doing this
creates a temporary HTML file on your system, the location of which will vary by operating system and version. Since
Fireworks is not site aware, any document relative or scite root relative URL links will not work properly until you have
exported the file to the correct site directory. The image and rollover links will work however. If anything does not
display correctly, focus your attention on this section of this TechNote for suggestions.
Check the slices, hotspots and buttons in the PNG file If your file uses a button, a slice or a hotspot, then you will end
up with at least one HTML file and at least one exported image file. Each slice or button will be a separate image, and
will generate a separate table cell in the resulting HTML table.
•Make sure slices do not overlap each other or overlap buttons on the Fireworks canvas. Overlapping slices will
increase the number of exported images and may prevent your behaviors from working. See Overview of slices and
slice issues (TechNote 15903) for more information.
•Hotspots that have behaviors attached to them must be on top of any slices that share the same canvas space or their
behaviors will not work. Check the Web Layer's layer stack to see if you have any problems of this kind, and reorder
the hotspots to the top if necessary.

27
Last updated 11/6/2015
•If your file has any HTML slices, preview in a browser before exporting and adjust the contents of such slices so that
they don't break your table apart. Content in HTML slices might cause the Fireworks HTML table to be expanded
in such a way as to leave gaps between the images. Remember that Fireworks does not display the contents of an
HTML text slice, so previewing in a browser is the most dependable way of judging how the contents of that slice
will act.
Check the HTML Setup for the PNG file if you are exporting HTML The HTML Setup dialog box is available by
choosing File > HTML Setup.
•HTML tables can be exported using spacers or nesting to maintain table size and shape. If your table acts
unpredictably in the browser, you may want to choose to use either spacers or nesting. Sometimes no form of table
control is needed, and if your table is too complex, Fireworks will automatically space the table with spacers.
Note: If you export using the Nested Tables- No Spacers option and your slice arrangement causes the tables to nest
more than 8 deep, Fireworks will default to using a 1-Pixel Transparent Spacer setting for your table.
•File naming selections in the Document Specific tab of the HTML Setup can cause exported images to overwrite
each other. See How to use HTML Setup in Fireworks (TechNote 16182). Also verify here that the appropriate
HTML style is used (Dreamweaver for Dreamweaver HTML, FrontPage for FrontPage HTML, etc.).
Check the export settings for the PNG file When done with your file, you will have to export to get your finished files.
The PNG file you save is the always-editable Fireworks source file, but the exported files are what will actually be used
in the browser.
•Check the optimize settings of the document and of each slice to make sure the appropriate options were exported.
See Exporting and saving files (Fireworks Article). Bear in mind that TIFF, PICT and BMP files will not display in
browsers, and PNG files have only limited support in some browsers.
•If your file has slices, make sure you choose to export HTML and images, and verify that you are choosing to export
slices. SeeOverview of slices and slice issues (TechNote 15903).
•Until fully familiar with Fireworks HTML code and how it works, we strongly recommend exporting to the same
folder as the final HTML page that you intend to insert Fireworks objects into. There is path information in the
various JavaScript portion of the file that Dreamweaver or other HTML editors will NOT update when it is inserted
into an HTML page, and problems can occur because of an incorrect path.
Note: Because Fireworks is not "site aware" it exports HTML that will contain document relative paths to any images
it exports. If site root relative paths are desired, changes will have to be made in the HTML to reflect that style. This
TechNote does not address issues specific to using site root relative paths.
•Browsers and servers can be very picky about file and path names. Never use space characters or any high ASCII
characters in the path of file names. Some servers do not recognize uppercase characters, and though you are testing
locally, now is the right time make sure this is not an issue. Look at Server issues (TechNote 14832).
Note: Since slice names are used to create the file names for images, you are prevented in Fireworks from naming a
slice in a way that will cause problems.
Top
Continue with the HTML file:

28
Last updated 11/6/2015
After you export your Fireworks HTML, it's a good idea to check it out and see what you've got. Open your browser
and then choose File > Open to open a dialog that allows you to browse your hard drive and locate the exported
Fireworks HTML. Select the file and click Open and then click OK. Test all the JavaScript actions, view the animations
and check the status bar to see if links and status bar messages are working properly. Also check your Alt tags. If you
don't see any problems, then Fireworks has done it's job. Try opening the HTML file in your HTML editor. Test in the
browser from there.
•Most HTML editors do not change the code of HTML files opened in that application. There could be some reason
such as site definition settings that could cause problems. Rebuild the site cache, or create a new site, if problems
arise.
•If you are exporting to a Dreamweaver site, See Inserting a Fireworks table into Dreamweaver (TechNote 15687).
•If you are using FrontPage see Exporting and inserting Fireworks HTML into FrontPage (TechNote 16633).
•Look for any JavaScript functions that may be duplicated on your page. Netscape generally ignores any behaviors
whose functions that are duplicated.
•Once you have inserted the Fireworks HTML into a Dreamweaver file, in the course of working with your file, you
might inadvertantly place a CSS tag inside the Fireworks table. Look at the CSS code, where is the CSS tag in
reference to the table tag? If the CSS tag is inside of the <td>tag and viewed in some versions of Netscape spaces can
be added by the browser that may break-apart or dislocate cells.
•If you get a JavaScript error when you insert into your page, look for any misplaced tags, such as META tags which
should be in the <head> of the document.
Top
Additional information
Look at the Fireworks Support Center and the Developer and Design Center for current updates and issues.
Fireworks Online Forums
Before posting to an online forum, please consult your Macromedia Fireworks documentation, search Macromedia's
site for keywords, and scan the Fireworks TechNotes . Please also search the forum for answers before posting a
question.
Macromedia forum posts are archived daily by groups.google.com. Searching for the word fireworks, followed by a
keyword specific to your search, will usually provide multiple threads to answer many questions based on the keyword
topic.
Read the information in the List of online forums if you haven't already.
If you are new to using the online forums, please read theUsing Macromedia online forums document.
Macromedia Online Forums
The Macromedia Forums can be accessed with a web browser or a newsreader . For access to the forums with a browser
refer to Macromedia Online Forums , and for newsreader access refer to Welcome to the Macromedia Online Forums
(News interface) .
Viewing the forums with a web browser or a newsreader is mostly a personal choice of which interface you prefer,
however, many users find a text-only newsreader to be faster. Postings are the same for the web-based and newsreader-
based forums, it is only the visual display of the postings that is different.

29
Last updated 11/6/2015
Web-base d for ums
•Macromedia Online Forums Web Forum Listing
•Macromedia Fireworks web forum: General Discussion - For users of the web design tool, Fireworks. This group
hosts discussions of installation, troubleshooting, and general usage.
•Macromedia Fireworks web forum: Exchange Extensions - For advanced developers and those who wish to learn
how to extend Fireworks with JavaScript, Flash commands, customized HTML and JavaScript output and plug-ins
for live effects.
•International online forums
Newsreader-based forums (requires a newsreader)
•Macromedia Online Forums Newsreader Listing
•Macromedia Fireworks newsreader forum: General Discussion - For users of the web design tool, Fireworks. This
group hosts discussions of installation, troubleshooting, and general usage.
[news://forums.macromedia.com/macromedia.fireworks]
Fireworks JavaScript preloads explained
How image preloading works in Fireworks HTML code When HTML code that contains Rollover, Swap Image or
Toggle Group behaviors is exported from Fireworks, the JavaScript will include a preload function. This function will
download images to the browser's local cache folder so they can be quickly called by these behaviors. Depending on the
HTML style selected by the user, Fireworks will generate preload JavaScript that is compatible with the various HTML
editors it supports. Careful examination of the HTML code reveals where the preload functions are located and where
there may be a call to run the preload function later in the code. It is important that the user be aware that not only the
preload function, but also the call that initializes the function are both important for preloads to work.
What to look for in the code Every preload must be performed by a JavaScript action in the HTML called a
FUNCTION. Functions contain the actual commands that tell the browser what to do when that particular function is
called by an EVENT. Below are some examples of the JavaScript from Fireworks generated Generic, Dreamweaver 2,
GoLive and FrontPage HTML.
Generic HTML- <head> tag:
if (document.images){
preload_r1_c1_F1 = new Image(108,36); preload_r1_c1_F1.src = "preload_r1_c1.gif";
preload_r1_c1_F2 = new Image(108,36); preload_r1_c1_F2.src = "preload_r1_c1_F2.gif";
preload_r1_c1_F3 = new Image(108,36); preload_r1_c1_F3.src = "preload_r1_c1_F3.gif";
preload_r1_c1_F4 = new Image(108,36); preload_r1_c1_F4.src = "preload_r1_c1_F4.gif";
preload_r3_c1_F1 = new Image(108,36); preload_r3_c1_F1.src = "preload_r3_c1.gif";
preload_r3_c1_F2 = new Image(108,36); preload_r3_c1_F2.src = "preload_r3_c1_F2.gif";
preload_r3_c1_F3 = new Image(108,36); preload_r3_c1_F3.src = "preload_r3_c1_F3.gif";
preload_r3_c1_F4 = new Image(108,36); preload_r3_c1_F4.src = "preload_r3_c1_F4.gif";
preload_r5_c1_F1 = new Image(108,36); preload_r5_c1_F1.src = "preload_r5_c1.gif";
preload_r5_c1_F2 = new Image(108,36); preload_r5_c1_F2.src = "preload_r5_c1_F2.gif";
preload_r5_c1_F3 = new Image(108,36); preload_r5_c1_F3.src = "preload_r5_c1_F3.gif";
preload_r5_c1_F4 = new Image(108,36); preload_r5_c1_F4.src = "preload_r5_c1_F4.gif";
preload_r7_c1_F1 = new Image(108,36); preload_r7_c1_F1.src = "preload_r7_c1.gif";
preload_r7_c1_F2 = new Image(108,36); preload_r7_c1_F2.src = "preload_r7_c1_F2.gif";
preload_r7_c1_F3 = new Image(108,36); preload_r7_c1_F3.src = "preload_r7_c1_F3.gif";
preload_r7_c1_F4 = new Image(108,36); preload_r7_c1_F4.src = "preload_r7_c1_F4.gif";
}

30
Last updated 11/6/2015
The "if (document.images)" statement queries the browser to see if it understands the preload function
(document.images) and then tells the browser to download the images on the page. The list of images to preload that
follow are called an ARRAY. All images in the document as well as those used in rollovers will be listed in the array. In
the above example there are sixteen images. Notice that a variable is declared to be a new Image with an x,y pixel size,
then the source (.src) is set to be the corresponding image file.
Dreamweaver 2 HTML- <head> tag:
function MM_preloadImages() {
if (document.images) {
var imgFiles = MM_preloadImages.arguments;
if (document.preloadArray == null) {
document.preloadArray = new Array();
} var i = document.preloadArray.length;
with (document) {
for (var j = 0; j < imgFiles.length; j++) {
if (imgFiles[j].charAt(0) != "#") {
document.preloadArray[i] = new Image();
document.preloadArray[i++].src = imgFiles[j];
}
}
}
}
}
In this case, the function MM_preloadImages is declared so that it can be called upon later in the HTML file. The
variable for the image files (imgFiles) is set to MM_preloadImages.arguments which calls up the array which will be
found later in the HTML file. This function is an example of modular code that can be used in conjunction with a
separate call to run the function and the array as well.
Below is an example of the call (onLoad="MM_preloadIMages) to the function and the array that tells the function
which files to preload--<body> tag:
<body onLoad="MM_preloadImages ('images/preload_r1_c1_F2.gif','#931560371110');
MM_preloadImages('images/preload_r1_c1_F4.gif',
'images/preload_r1_c1_F4.gif','#931560371111');
MM_preloadImages('images/preload_r3_c1_F2.gif', '#931560371112');
MM_preloadImages('images/preload_r3_c1_F4.gif',
'images/preload_r3_c1_F4.gif','#931560371113');
MM_preloadImages('images/preload_r5_c1_F2.gif', '#931560371114');
MM_preloadImages('images/preload_r5_c1_F4.gif',
'images/preload_r5_c1_F4.gif','#931560371115');
MM_preloadImages('images/preload_r7_c1_F2.gif', '#931560371116');
MM_preloadImages('images/preload_r7_c1_F4.gif',
'images/preload_r7_c1_F4.gif','#931560371117');
InitGrp('FwSimpleGroup');">
Note:The above code should appear all on one line with no breaks. Line breaks have been included to aid readability.
GoLive HTML:

31
Last updated 11/6/2015
function CSILoad(im, ar) {
if (document.images) {
CSIm[im] = new Object();
for (var i = 0; i < 3; i++) {
if (ar[i] != "") {
CSIm[im][i] = new Image();
CSIm[im][i].src = ar[i];
} else {
CSIm[im][i] = 0;
}
}
CSIm[im][3] = ar[3];
}
}
The function here is named "CSILoad" and the array is found at the beginning and at then end of the JavaScript section:
function CSScriptInit() {
CSILoad('preload_r1_c1',new Array(/*URL*/'images/preload_r1_c1.gif',
/*URL*/'images/preload_r1_c1_f2.gif', /*URL*/'images/preload_r1_c1_f3.gif',''));
CSILoad('preload_r3_c1',new Array(/*URL*/'images/preload_r3_c1.gif',
/*URL*/'images/preload_r3_c1_f2.gif', /*URL*/'images/preload_r3_c1_f3.gif',''));
CSILoad('preload_r5_c1',new Array(/*URL*/'images/preload_r5_c1.gif',
/*URL*/'images/preload_r5_c1_f2.gif', /*URL*/'images/preload_r5_c1_f3.gif',''));
CSILoad('preload_r7_c1',new Array(/*URL*/'images/preload_r7_c1.gif',
/*URL*/'images/preload_r7_c1_f2.gif', /*URL*/'images/preload_r7_c1_f3.gif',''));
CSAction(new Array('65683020'));
CSAction(new Array('65683022'));
CSAction(new Array('65683024'));
CSAction(new Array('65683026'));
}
and later in the file:
CSImages=new Array(); function CSPreloadImage(action) { if (document.images) {
CSImages[CSImages.length] = new Image(); CSImages[CSImages.length - 1].src = action[1];
} } CSAct['65683020'] = new Array(CSPreloadImage,/*URL*/ 'images/preload_r1_c1_f3.gif');
CSAct['65683022'] = new Array(CSPreloadImage,/*URL*/ 'images/preload_r3_c1_f3.gif');
CSAct['65683024'] = new Array(CSPreloadImage,/*URL*/ 'images/preload_r5_c1_f3.gif');
CSAct['65683026'] = new Array(CSPreloadImage,/*URL*/ 'images/preload_r7_c1_f3.gif'); // --
></script>
</csscriptdict>
<csactions><csaction name="65683020" outputclass="Preload Image"
val0="images/preload_r1_c1_f3.gif"><csaction name="65683022" outputclass="Preload Image"
val0="images/preload_r3_c1_f3.gif"><csaction name="65683024" outputclass="Preload Image"
val0="images/preload_r5_c1_f3.gif"><csaction name="65683026" outputclass="Preload Image"
val0="images/preload_r7_c1_f3.gif"></csactions><csactionitem
name="65683020"></csactionitem><csactionitem name="65683022"></csactionitem><csactionitem
name="65683024"></csactionitem><csactionitem name="65683026"></csactionitem></head><body >
Note:Line breaks have been included to aid readability.
Note:All of the above code was copied from the <head> tag with the exception of the last line containing the onload
call to the function. The "onload" calls the function "CSScriptInit" to begin the preloading.
FrontPage HTML- <head> tag:

32
Last updated 11/6/2015
if (document.images) {
preload_r1_c1_F1 = new Image(108,36); preload_r1_c1_F1.src = "images/preload_r1_c1.gif";
preload_r1_c1_F2 = new Image(108,36); preload_r1_c1_F2.src = "images/preload_r1_c1_F2.gif";
preload_r1_c1_F3 = new Image(108,36); preload_r1_c1_F3.src = "images/preload_r1_c1_F3.gif";
preload_r1_c1_F4 = new Image(108,36); preload_r1_c1_F4.src = "images/preload_r1_c1_F4.gif";
preload_r3_c1_F1 = new Image(108,36); preload_r3_c1_F1.src = "images/preload_r3_c1.gif";
preload_r3_c1_F2 = new Image(108,36); preload_r3_c1_F2.src = "images/preload_r3_c1_F2.gif";
preload_r3_c1_F3 = new Image(108,36); preload_r3_c1_F3.src = "images/preload_r3_c1_F3.gif";
preload_r3_c1_F4 = new Image(108,36); preload_r3_c1_F4.src = "images/preload_r3_c1_F4.gif";
preload_r5_c1_F1 = new Image(108,36); preload_r5_c1_F1.src = "images/preload_r5_c1.gif";
preload_r5_c1_F2 = new Image(108,36); preload_r5_c1_F2.src = "images/preload_r5_c1_F2.gif";
preload_r5_c1_F3 = new Image(108,36); preload_r5_c1_F3.src = "images/preload_r5_c1_F3.gif";
preload_r5_c1_F4 = new Image(108,36); preload_r5_c1_F4.src = "images/preload_r5_c1_F4.gif";
preload_r7_c1_F1 = new Image(108,36); preload_r7_c1_F1.src = "images/preload_r7_c1.gif";
preload_r7_c1_F2 = new Image(108,36); preload_r7_c1_F2.src = "images/preload_r7_c1_F2.gif";
preload_r7_c1_F3 = new Image(108,36); preload_r7_c1_F3.src = "images/preload_r7_c1_F3.gif";
preload_r7_c1_F4 = new Image(108,36); preload_r7_c1_F4.src = "images/preload_r7_c1_F4.gif";
}
As in the generic HTML, the "if (document.images)" statement queries the browser to see if it understands the preload
function (document.images) and then tells the browser to download the images on the page.
Copying the code Whenever copying JavaScript code and preload arrays to a different HTML document, carefully
examine the code and make sure that no necessary preloads are missing. Notice that the Dreamweaver 2 call to the
function and the array are both found in the <body> tag proper, and the GoLive code has the onload call to the function
in the <body> tag.
For more information on copying and pasting Fireworks HTML code, see Need help when copying JavaScript from
Fireworks to other applications? (TechNote 13205).
Fireworks generated HTML code with FrontPage
Issue
When copying and pasting the HTML code from Fireworks directly into FrontPage 98, the code gets altered and links
to image files are lost.
Reason
FrontPage uses HTML code validation that inserts<Bot> tags into the body which can significantly change the
Fireworks code. This can cause broken links to image files among other problems. In order for any HTML file to link
to images that appear on the page, the HTML file must remain in the same relative location to the images. Using the
Insert > FrontPage Component to bring Fireworks HTML is recommended.
SolutionTo get Fireworks HTML into FrontPage use the following steps:
1 Export from Fireworks as FrontPage HTML being sure that you export
your images into the WWWROOT directory structure.
2 Open the HTML file in Notepad.
3 Open FrontPage and Open a new or existing HTML file.

33
Last updated 11/6/2015
Note:Many users report being able to successfully open Fireworks generated HTML in FrontPage and then continue
editing. FrontPage 98 allows only one document to be open at a time, which prohibits performing copy and paste
routines. FrontPage 2000 allows users to have more than one HTML document open at a time, facilitating the copy and
paste routine. With the advent of Fireworks 3, users may choose to copy the HTML code that fireworks exports directly
to the clipboard by choosing "Copy to Clipboard" in the Export dialog's HTML settings Location field. Check the
exciting new features in Fireworks 3 and upgrade to Fireworks 3 to gain this added feature.
Fireworks document fails to display in the 2-up and 4-up
preview windows
Issue
When the 2-up or 4-up window is opened in Fireworks 3, the document display area appears empty. Additionally,
switching export settings in the Optimize panel can also cause the display to go blank.
Reason
The 2-up and 4-up windows in Fireworks 3 are taxing the display hardware acceleration and at some point the display
driver fails to render the document.
4 In Notepad, copy the JavaScript and table from within the tag as
marked. See Need help when copying JavaScript from Fireworks to
other applications? (TechNote 13205) for more information on this
issue.
5 In FrontPage's Normal tab, choose Insert > FrontPage Component and
choose Insert HTML.
6 A window comes up with a blank field. Paste into this field. Notice the
"HTML Markup to insert (will not be checked for correctness) -this
means FrontPage won't alter this code!
7 Click OK.
8 Go to the Preview tab and preview the inserted
code/images/rollovers.Note:FrontPage has converted the comments
into HTML text and it will be necessary to delete them.
9 Go back to the HTML window and delete all of the unnecessary
comments.
10 Now in the HTML window select the JavaScript functions beginning
with the preload array and cut them.
11 Scroll up to the <head> tag and click after the<title> and before the
</head> and paste.FrontPage now accepts the JavaScript without any
complaints.
12 Go to the Preview tab and preview your work.
13 SAVE the document.
34
Last updated 11/6/2015
Solution
To see the display in the 2-up or 4-up window do the following:
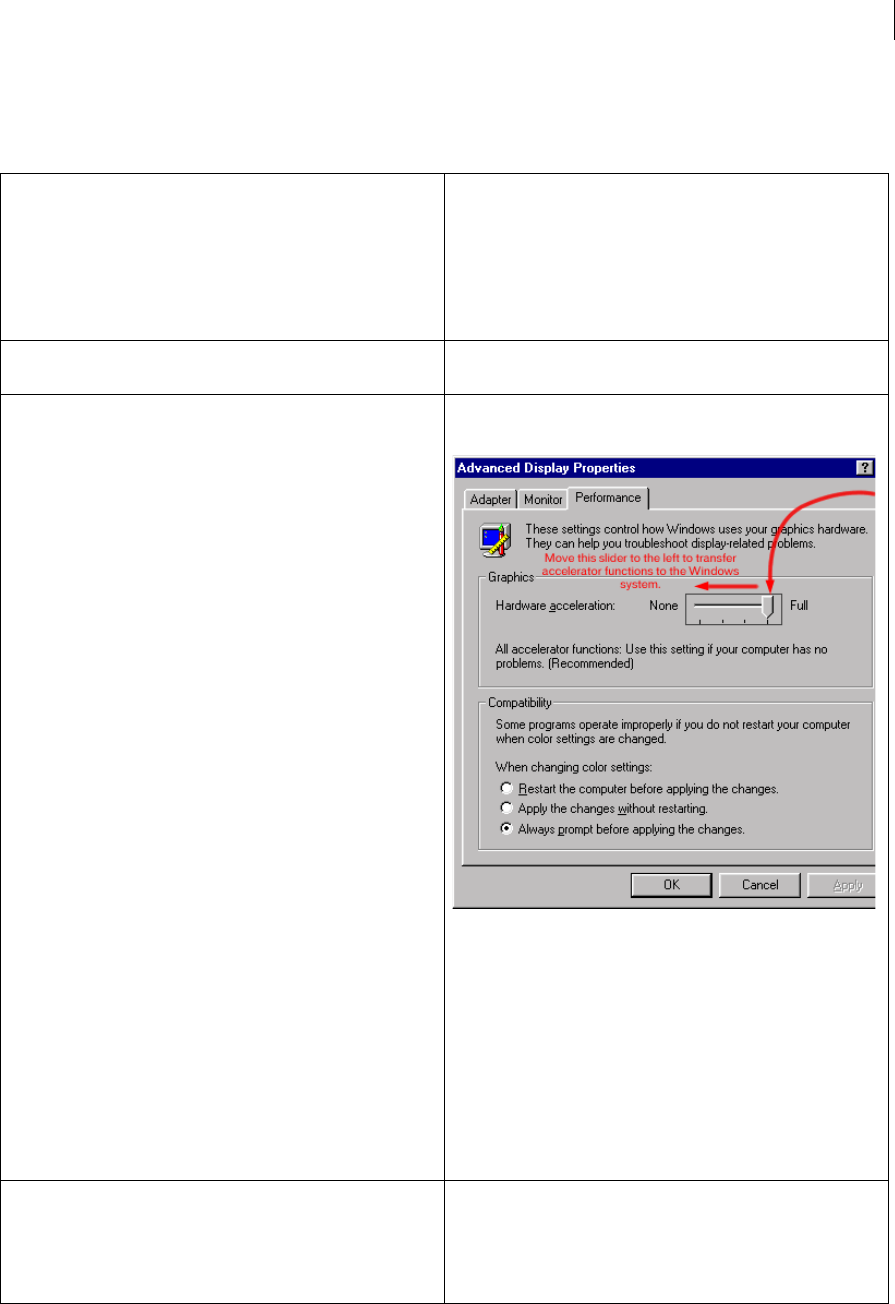
1 Reduce the Hardware Acceleration setting.
This is found in the Windows Control Panel System Properties under
the Performance tab.
Click the "Graphics..." button to access this control.
Alternatively on many systems the control can be accessed through
the Display Properties in the Settings tab.
2 Click the "Advanced... " or "Change..." button and then click the
Performance tab to get to the Hardware Acceleration slider.
3 Move the slider down one notch and then restart your computer to
activate the new setting.
Note:The Hardware Acceleration slider transfers functions that are
normally performed on the Display Adapter (video card) when
acceleration is set to Full to the Windows operating system as the
slider is moved to the right.
4 Then test Fireworks' 2-up and 4-up windows to see if the problem
persists.
If the preview is still blank, choose the next lowest setting in the
Hardware Acceleration slider, restart and test Fireworks. Continue this
process until the preview displays correctly.

35
Last updated 11/6/2015
Fireworks CS6 known issues and bugs
Adobe Fireworks CS6 known issues and bugs
Welcome to Adobe Fireworks CS6. This document contains known issues and troubleshooting tips not covered in the
Fireworks documentation. See Adobe Support for late-breaking information and known issues for all Creative Suite 6
applications.
•If you want to copy objects from Adobe Illustrator to Fireworks, change the color format from CMYK to RGB.
Fireworks supports only the RGB color format.
•If you have installed CS4, CS5, or CS6 and then uninstalled CS4 and CS5, you get the following error when you start
Fireworks CS6: "Your user privileges do not allow Fireworks to update your registry" warning message.' Discard the
message by clicking OK.
•On Mac OS, the Fill color preview does not display the opacity. The Opacity field is provided as a text box instead
of a slider.
•On Windows, if your user profile has non-default TEMP folder paths, when using the Photoshop Live Filter feature,
you receive the following errors:
•Internal error occurred
•Could not render database
•Could not complete your request. An error occurred. As a workaround, reset the TEMP folder to the default
location.
1Right-click My Computer and select Properties.
2Select Advanced > Environment Variables.
3Ensure that the TEMP and TMP variables are pointing to the following directories: TEMP =
%USERPROFILE%\Appdata\Local\Temp TMP = %USERPROFILE%\Appdata\LocalTemp
•The Image Preview window is not displayed completely by default on Netbooks with 1024 x 600 resolution.
•Fireworks CS6 provides new symbols for various categories, such as Wireframe, Icons, jQuery Bootstrap, and
Gesture. Names of the folders that contain the symbols are localized. However, the symbol names are not localized.
GB18030 support for Windows XP
To support the display of all characters of the Chinese standard GB18030 on Windows XP systems, Adobe recommends
the installation of the Microsoft GB18030 Support Package. This support package updates an XP system with, among
other things, fonts and input-method-editors (IMEs) to correctly support GB18030. The support package is available
as a download from the Microsoft website. (#BG061690)
Chinese Language-specific issues
On Windows XP (Simplified Chinese), because the application’s default Chinese font is SimSun, 4-byte GB18030
characters aren’t displayed correctly. As a workaround, use the two scripts provided with Fireworks CS6 installer
(SetNewUIFont and ClearNewUIFont) for GB18030 standard support. These two scripts are installed at the following
location: [drive:]/Program Files/Adobe/Adobe Fireworks CS6/Simplified Chinese/.

36
Last updated 11/6/2015
To set the user interface font to enable 4-byte GB18030 characters, do the following:
1Make sure that Adobe Fireworks CS6 is not currently running.
2Double-click SetNewUIFont.reg to set the user interface font for Fireworks.
3Launch Fireworks again. The user interface is enabled to view 4-byte GB18030 characters in all dialogs managed by
Fireworks.
To revert the user interface font to original settings, do the following:
1Make sure that Adobe Fireworks CS6 is not currently running.
2Double-click ClearNewUIFont.reg to clear the new user interface font for Fireworks.
3Launch Fireworks again. The user interface is reset to Fireworks standard user interface font.
Note: Restart Windows after running these scripts.
•Fireworks CS6 does not display 4-byte characters in the document tab’s title on Windows XP. As a workaround,
name the titles with ASCII or 2-byte Chinese characters.
•On Windows XP and Vista, some 2-byte and all 4-byte characters aren't correctly pasted to Illustrator when you use
the Copy Path Outlines feature in Fireworks.
•On Windows XP and Vista, some 2-byte and all 4-byte characters sometimes don't display correctly in the Create
Slideshow dialog when entered from the keyboard.
•On Windows XP, some 2-byte and all 4-byte characters sometimes don't display correctly in the HTML Slice on the
canvas.
© 2012 Adobe Systems Incorporated. All rights reserved.
Fireworks CS5 known issues and bugs
Adobe Fireworks CS5 known issues and bugs
Welcome to Adobe Fireworks CS5. This document contains known issues and troubleshooting tips not covered in the
Fireworks documentation.
You need to have AIR 2 runtime installed to be able to install the AIR package files created using the AIR extension for
Fireworks CS5.
The first launch of Extension Manager should be with administrator privileges on Microsoft Vista and Microsoft
Windows 7 (if UAC is enabled). You will get an error dialog if this is not done.
To access the template feature of Fireworks CS5 on Microsoft Vista or Microsoft Windows 7, you need to launch FW
with administrator privileges.
The Image Preview window is not displayed completely by default on netbooks with 1024x600 resolution.
Please refer to Adobe Support for late-breaking information and known issues for all Creative Suite 5 applications.
GB18030 support for Windows XP

37
Last updated 11/6/2015
In order to support the display of all characters of the Chinese standard GB18030 on Windows XP systems, Adobe
recommends the installation of the Microsoft GB18030 Support Package. This support package will update an XP
system with, among other things, fonts and input-method-editors (IMEs) to correctly support GB18030. The support
package is available as a download from the Microsoft website. (#BG061690)
Chinese Language-specific issues
On Windows XP (Simplified Chinese), because the application’s default Chinese font is SimSun, 4-byte GB18030
characters aren’t displayed correctly. As a workaround, use the two scripts provided with Fireworks CS4 installer
(SetNewUIFont and ClearNewUIFont) for GB18030 standard support. These two scripts are installed at the following
location: [drive:]\Program Files\Adobe\Adobe Fireworks CS4\Simplified Chinese\.
To set the UI font to enable 4-byte GB18030 characters:
1Make sure that Adobe Fireworks CS4 is not currently running.
2Double click the “SetNewUIFont.reg” to set the UI font for Fireworks.
3Launch Fireworks again, the UI should be enabled to view 4-byte GB18030 characters in all dialogs managed by
Fireworks.
To revert the UI font to original settings:
1Make sure that Adobe Fireworks CS4 is not currently running.
2Double-click the “ClearNewUIFont.reg” to clear the new UI font for Fireworks.
3Launch Fireworks again, the UI should be reset to Fireworks standard UI font.
Note: You must restart Windows after running these scripts.
•Fireworks CS4 does not display 4-byte characters in the document tab’s title on Windows XP. As a workaround,
name the titles with ASCII or 2-byte Chinese characters.
•On Windows XP and Windows Vista, some 2-byte and all 4-byte characters might not be correctly pasted to
Illustrator when you use the Copy Path Outlines feature in Fireworks.
•On Windows XP and Windows Vista, some 2-byte and all 4-byte characters might not be displayed correctly in the
Create Slideshow dialog when they are typed in from the keyboard.
•On Windows XP, some 2-byte and all 4-byte characters might not be displayed correctly in the HTML Slice on the
canvas.
© 2010 Adobe Systems Incorporated. All rights reserved.
Fireworks 8 Frequently Asked Questions
Issue
•What's new in Fireworks 8?
•What does Fireworks do?
•What file formats can Fireworks Import and Export?
•How do I switch languages in Fireworks 8?

38
Last updated 11/6/2015
•How can I convert my pop-up menus to the new CSS based pop-up menus?
•Does Fireworks 8 work with Photoshop?
What's new in Fireworks 8?
Optimization
•Image editing panel - Access commonly used image editing tools, filters, and menu commands in a central location.
•More import file formats - Fireworks 8 now supports import of QuickTime Image, MacPaint, SGI, and JPEG 2000
file formats. (A QuickTime plug-in is required to use this feature on Windows).
•Batch processing workflow optimized - Streamlined file renaming, the ability to check file dimensions when
scaling during a batch process, and the addition of a status bar and log file, are just a few of the workflow
optimizations.
Integrated workflow
•CSS (Cascading Style Sheet) pop-up menus - Get clean and easily customizable code that integrates well into sites
built in Dreamweaver. Fireworks 8 uses CSS (Cascading Style Sheet) format to create interactive pop-up menus.
•Vector compatibility - Preserve vector attributes (fills, strokes, filters and blend modes) when moving objects from
Fireworks to Flash.
•New slicing option - Insert polygon slices when a selected object is a polygon path.
•Recognize ActionScript color values - Ensure color consistency. Fireworks recognizes ActionScript color values
when copied from Flash and pasted into Fireworks color value fields.
•Use the âœSave asâ command to save bitmaps into different file types - Choose formats such as gif, jpg, tiff, in
the âœSave Asâ dialog box.
•Evolved open, save, and export logic - The logic used to determine the default folders in the open, save, save as,
save a copy, and export dialog boxes is enhanced, reducing the amount of navigation required.
•Less intrusive grids - Like Flash, grids now use a dotted line and a lighter default grid color.
Create Without Complexity
•26 new blend modes - 26 new choices to alter the look of your colors and objects, such as Overlay, Color Burn and
Hard Light.
•Add shadow - Add a shadow to paths and text objects.
•Solid shadow - A new live filter that stamps the object it is applied to several times.
•Mobile interface components - Mock up mobile interfaces quickly with Halo Lite bitmap interface components.
•Sample buttons, animations, themes, and bullets - Get started quickly with cool new assets like buttons,
animations, themes, and bullets.
•AutoShape properties panel - This new panel is used to modify AutoShape properties such as the star, arrow, or
smart polygon AutoShapes.
•Live marquee and convert selections (marquee to path and path to marquee) - Turn active selections into editable
vector paths and the reverse. Get instant feedback on filters and settings applied to selections.
•Autoname text - Layers are automatically named by the text you type into them.
•Special characters panel - Use this new panel to insert special characters directly into text blocks.

39
Last updated 11/6/2015
•Reshape text on a path - Path points can now be edited when text is attached.
Workflow Improvements
•Recent fonts and optimization - Recently used fonts now appear at the top of font menus. Optimization now
defaults to the last settings used.
•Save multiple selections - Save, restore, name, and delete multiple marquee selections within PNG files.
•Select objects that share an edge in the layers panel - Shift-click to select objects that share an edge or boundary
in the layers panel.
•Autosave preferences - Fireworks 8 preferences are automatically saved more frequently.
•Group consecutive nudges - Consecutive nudges are treated as one move.
•Improved tablet support - Tablet support is improved for path scrubber tools and stroke pressure sensitivity.
•Lock objects - Lock on a per-object basis in the layers panel.
What does Fireworks do?
Fireworks 8 is the best solution for creating and optimizing web images with precise control in an intuitive,
customizable environment. The industry-leading optimization tools in Fireworks enable users to strike the balance
between maximum image quality and minimum compression size. Fireworks integrates seamlessly with Dreamweaver
and Flash for ideal conditions to create and optimize images without losing information or time with roundtrip editing.
Use visual tools to create professional quality web graphics and animations, such as rollovers and pop-ups, without
programming skills.
What file formats can Fireworks Import and Export?
Fireworks imports:
•AI
•BMP
•Fireworks PNG
•FreeHand FH7-11
•GIF
•Illustrator 8
•JPEG
•JPEG 2000*
•MacPaint*
•Photoshop PSD
•PICT (Macintosh only)
•PNG
•QuickTime Image*
•SGI*
•TGA
•TIFF

40
Last updated 11/6/2015
Fireworks exports:
•BMP 8, 24 bit
•CSS layers
•GIF and animated GIF
•HTML
•Illustrator 7 (.ai)
•JPEG
•Macromedia Flash (.swf)
•Photoshop PSD (.psd)
•PICT 8, 24 bit
•PNG 8, 24, 32 bit
•TIFF 8, 24, 32 bit
•WBMP
*QuickTime plug-in required
How do I switch languages in Fireworks 8?
Fireworks 8 is a multilingual installer/application that allows the application to sense which OS your system is running
and install and runs in that language. For more information about switching languages see Switching Languages in
Fireworks 8 (TechNote b6a0f908).
How can I convert my pop-up menus to the new CSS based pop-up menus?
With the addition of CSS based pop-up menus in Fireworks 8 you may want to convert your existing menus to CSS.
For information on how to do this see Converting previous version pop-up menus to the new CSS menus (TechNote
6131eb27).
Does Fireworks 8 work with Photoshop?
Fireworks provides excellent support for importing native Photoshop (PSD) files, with options for retaining many
aspects of the imported files, including layers, masks, and editable text. Bring Photoshop images into Fireworks for
further editing and web optimization without losing the ability to export the images back into Photoshop.
Fireworks 3 crashes after the splash screen appears
Issue
When launching Fireworks 3, the splash screen appears and a message on it says "Initializing VM". It then goes away
without launching the program.
Reason
Fireworks is trying to set up its own scratch disk (virtual memory) and something in your system's configuration is not
allowing the process to work.

41
Last updated 11/6/2015
Solution
Check the system's configuration to see what is causing the problem and make the necessary changes to allow
Fireworks 3 to set up its scratch disk.
The following is a list of things to check for and change if needed:
How to feather an object
Issue
After applying a feather effect nothing happens.
The Temp directory is not found by Fireworks. On some systems the
Set Temp line in the Autoexec.bat file could be pointing to any of a
number of locations, even to a network drive. On Windows NT
configurations, the administrator may have set the temp to be a
restricted area. In a normal configuration on Windows 95 and NT, the
Temp directory should be at the root level of the hard drive. On
Windows 98 and 2000, the Temp directory should normally be in the
Windows directory.Variations on this configuration can cause vm
initialization errors
Note: A Temp directory containing a lot of files is an invitation to many
hazards. It's a good idea to keep your temp directory clear at all times.
Fireworks also looks at your first two hard drives to determine where
to set up the scratch disk. If one of those drives is not working properly
or is not properly formatted for Windows operating systems, then the
initialize vm will fail. Also make sure you have plenty of free space on
these drives. You can edit a preference in the Fireworks 3
Preferences.TXT file at these two lines:
(PrimaryScratchDisk) (c:) (SecondaryScratchDisk) (d:)
Once Fireworks is running, set the primary and secondary scratch disks
by choosing File > Preferences, clicking the Folders tab and setting the
primary and secondary scratch disks) The default should be C: and D:.
You can use Windows Notepad or any text editor to set these manually
before launching. If you do not have a D: drive, Fireworks will detect
this and set the preferences to C:
If the Preferences file is damaged, it can be deleted. Then try to launch
Fireworks. A damaged Preferences file can be caused by installing
Fireworks with virus detection software running or if the Temp
directory was full when Fireworks was installed. Other parts of the
program could be damaged as well.
Another possible cause of Fireworks freezing on the "Initializing VM"
splash screen is the presence of a virtual hard drive that is created by
McAfee VirusScan. If McAfee VirusScan is present on the system, a tool
that comes with it named Safe & Sound creates a virtual disk that
Fireworks cannot access. For more info on this and how to disable the
virtual disk see File is Locked error when launching Fireworks 3
(TechNote 14729).

42
Last updated 11/6/2015
Reason
You must press the delete key to remove the excess selection after feathering in order to see the desired effect.
Solution
To create an opaque feathered selection:
Feathered selections and transparent gradients in
Fireworks 3
Introduction
I am trying to create a feathered selection in Fireworks that fades to a transparent background. What is the best way to
do this?
I am trying to create a gradient fill that goes from a color to transparent, much like the gradient options "foreground to
transparent" or "background to transparent" that can be created in Photoshop. How is this done in Fireworks?
Discussion
1 Enter image edit mode. Objects must be converted to images to
perform the following steps. If your object is not an image, choose
Modify > Image Object (Fireworks 1) or Modify > Merge Images to
convert a vector object to an image.
2 With a selection tool such as the marquee, lasso, or magic wand, select
pixels within the image that will have a feathered edge.
3 ChooseSelect > Feather (Fireworks 1) Edit > Feather (Fireworks 2 and
3) and type a value to set the feather radius.
4 Click OK.
5 Now delete the excess portion of the pixels in the selection for a
feather effect.
Note:Choose Select> Inverse (Fireworks 1) or Edit > Select Inverse
(Fireworks 2 and 3) before deleting the excess portion, to achieve a
different feather effect.
See examples below.
1 Enter image edit mode. (Objects must be converted to images first)
2 Double-click the Marquee or Lasso tools to view the Tool Options
panel.
3 Select Feather from the Tool Options pop-up and type a value to set
the feather radius.
4 With a selection tool such as the marquee, lasso, or magic wand, select
pixels within the image.
5 Choose the paint bucket tool and add color within the selection.
See examples below.

43
Last updated 11/6/2015
Fireworks allows the user to create a vector shape that can be used as an image mask for any object or objects that are
to be grouped with the mask. This is useful for creating gradients that have transparent features that are going to be
composited with other objects in Fireworks. When using objects as masks in Fireworks it is important to remember
that black pixels in the mask will make the masked objects opaque and white pixels in the mask will make the masked
objects transparent. This is because the mask works as an Alpha when the Modify > Mask Group > Mask to Image
command is used.
In order to preserve the Alpha channel on export, use the PNG32 format and set the Matte color to Transparent in the
Optimize panel. This will allow other image editing programs to open the file with the Alpha channel intact.
Note: When opening a PNG containing an Alpha channel in Photoshop, use the Magic Wand tool to select the dark
area containing the transparency and then delete the selected area to return to the correct display of the image.
•Using a mask to feather an image selection.
•Using a mask to create a transparent gradient.
Using a mask to feather an image selection
A common practice used in image editing programs is to use a pixel selection tool to select an area of pixels, set the
feather distance and then either copy and paste to a new layer or invert the selection and delete. There's a better way to
do this in Fireworks 3 and it maintains editablity of both the selection and the image selected.
To use a mask to create a feathered selection:
1Open the image you want to make a feathered selection from and Exit Image Edit mode by clicking the Stop button
in the status bar of the main Fireworks window. You may also import an image -importing an image will bring it in
as an object in Fireworks.
2Choose the ellipse tool from the Rectangle tool flyout group. Any vector shape may be used as a mask for the object.
3Click and drag with the ellipse tool to draw an ellipse. Press the Alt (Windows)/Option (Macintosh) key to draw
from the center out. Press the Shift key to constrain the ellipse to a circle.
4Fill the ellipse with a solid black fill and set the edge to Feather. Enter a distance for the feather. You may want to
experiment with gradient fills to get a softer effect. See the image in step 2 above. It was created by placing a
rectangular gradient over the toolbox image and masking the image.
5Shift-click on the image behind the fill to add it to the selection (the object panel should read "Object (two objects)"
and choose Modify > Mask Group > Mask to Image.
6The results should look like this:
The advantage of this method lies in the editablity of the path, the feather and the image inside the path are retained.
No other image editing software can boast this kind of flexibility.
Using a mask to create a transparent Gradient

44
Last updated 11/6/2015
Since the white pixels of the mask will cause the masked image to have transparent pixels, it's easy to create a
transparent gradient using the Mask to Image command.
To create a gradient with transparency:
1Draw an object and apply a gradient fill to it using the Fill panel's fill options.
2Clone the object.
3Click and hold the Pointer tool to reveal the Pointer tool group flyout. Choose the Select Behind tool. You can also
press the "v" key to toggle from the Pointer tool to the Select Behind tool and back.
4Hold down the Shift key and notice that the outline of the object will turn red when you run the mouse over it. Click
when you see the red highlight to add the original object to the selection. The Object panel will read "Object (2
Objects)".
5Choose Modify > Mask Group > Mask to Image.
6The results should look like this:
How to export animations in sliced images
Introduction
How can Fireworks be used to export sliced tables that contain animated GIFs in some of the cells?
Here are the steps for exporting an image that contains slices with an animated GIF:
1Create the file in Fireworks creating frames for the animation or open an existing animated GIF.
2Choose File > Export and click the Animation tab. Set the desired Animation controls for your final file.Note: This
is the only place where you will be able to access these controls.
3Click Save and Close or click on the "+" button by the Saved Settings pop-up to save the settings for future use.
4Use the Slice tool to slice up the entire image.
5For each slice object in Object Properties (Fireworks 1) or the Object panel (Fireworks 2) set the Link to "No URL
(noHREF)". Slice type is Image (Fireworks 1).

45
Last updated 11/6/2015
6For each slice to be animated, in the Slice Export settings choose Custom and then click the ellipsis (...) button. Set
the Export settings to Animated GIF. (Notice you can set the Animated GIF but cannot access the Animation
controls.) Click Save and Close. If the settings were saved in step 3 (above), then the saved settings can be selected
in the Object panel.
7Choose Export Slices and export!
Note: Animated symbols may be used in Fireworks 3 to create animated areas in sliced images. See How to create an
animated symbol and insert it into a Fireworks document for more information on this.
Error "Fireworks cannot run. A parameter was incorrect"
| Fireworks CS5 | Mac OS
Issue
When you try to open Adobe Fireworks CS5 on Mac OS, the application doesn't launch and displays the following error
message:
"Fireworks cannot run. A parameter was incorrect."
Solutions
Solution 1: Verify user folder permissions.
1Using the Finder, navigate to the /Users/<username>/Library/Preferences.
2Control-click Adobe Fireworks CS5 and choose Get Info.
3In the Sharing & Permissions section, click the Details option to show owner and group options.
4Click the lock icon in the lower right corner. Type in your administrator username and password as prompted.
5Give Read & Write permissions to your username and admin.
6Click the Gear icon and choose Apply To Enclosed Item.
7Close the Get Info window.
8Repeat the process on the remaining paths.
9Launch Fireworks.
Solution 2: Re-create the Fireworks preferences files.
For instructions and some additional information, see Restore preferences | Fireworks CS5.

46
Last updated 11/6/2015
Error "File is not found" when creating an AIR package in
Fireworks (Windows)
Fireworks Version
CS4, CS5
Issue
When creating an Adobe AIR package in Adobe Fireworks, the error message "File is not found' is displayed.
Solution
Install JRE (Java Runtime Environment) 1.4 or higher.
For more information, see the Java website at www.java.com/en/download/manual.jsp.
Additional Information
This information can also be found in the Fireworks ReadMe file.
Why do sliced images from Fireworks have broken icons
inside Dreamweaver?
Introductory note:The issue addressed in this TechNote pertains mainly to Macromedia Fireworks 1 and 2. The
Export process in Fireworks, as well as Macromedia Dreamweaver's ability to to keep track of links in its site
management feature, has improved in later product versions. In Additional information below you'll find links to
resources for similar information for later product versions.
Fireworks to Dreamweaver integration When exporting sliced graphics from Fireworks, you also have the option to
generate an HTML page that contains the table information necessary to make all of the slices display as one integrated
graphic. The Slice tool separates each slice into an individual image, and each image is placed into its corresponding
table cell, similar to pieces in a puzzle. Understanding what pieces Fireworks creates with the Slice tool, and how the
pieces fit together, will assist you in integrate the resulting files into your Web page.
How does the slice tool work? The slice tool draws regions within the graphic, which will be exported as separate image
files (slices) from Fireworks. Fireworks combines the separate image files back together by creating a table that inserts
one of the images in each of the table's cells. The table tags reside in the HTML page that is created when the files are
exported. The table is generated automatically by Fireworks (when you choose an HTML style in the Export dialog
box).
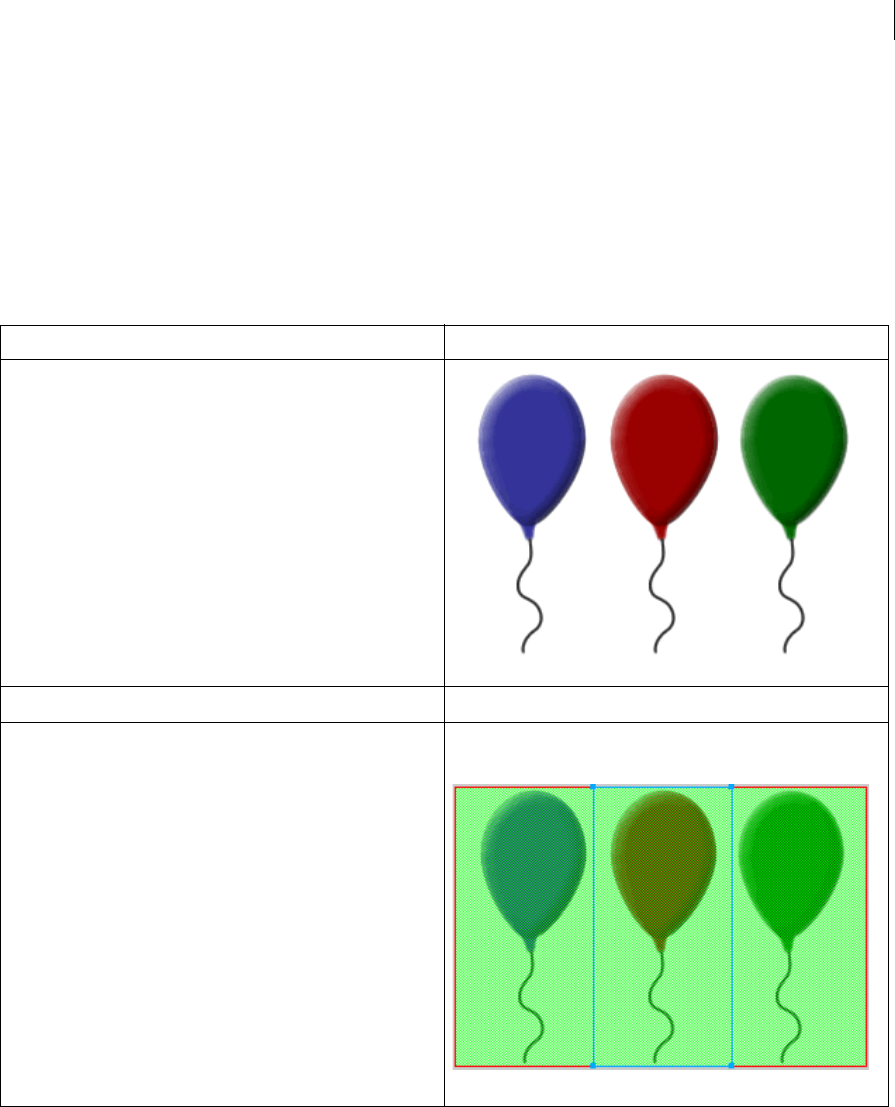
47
Last updated 11/6/2015
Why do table cells contain broken icons rather than images after a copy and paste of the table tags? In the Export
dialog box (choose File > Export, then click the "Next" button in the Export Preview dialog box) there are two different
elements that are being saved. The top of the dialog box allows you to browse to indicate where the image slices (the
separate GIF or JPEG files) should be saved. The HTML location indicates where the HTML page will be saved. Make
sure that this location contains the HTML page that the source code will ultimately be pasted into. The two pages must
reside in the same directory before copying the table information;if they are in different folders, the paths will be broken
and the images won't show up when you preview the page in a browser.
To illustrate the process, see the steps below:
1 This is how an image looks before using the slice tool:
2 This is how the image looks after the slice tool has been used to
designate the slice areas:
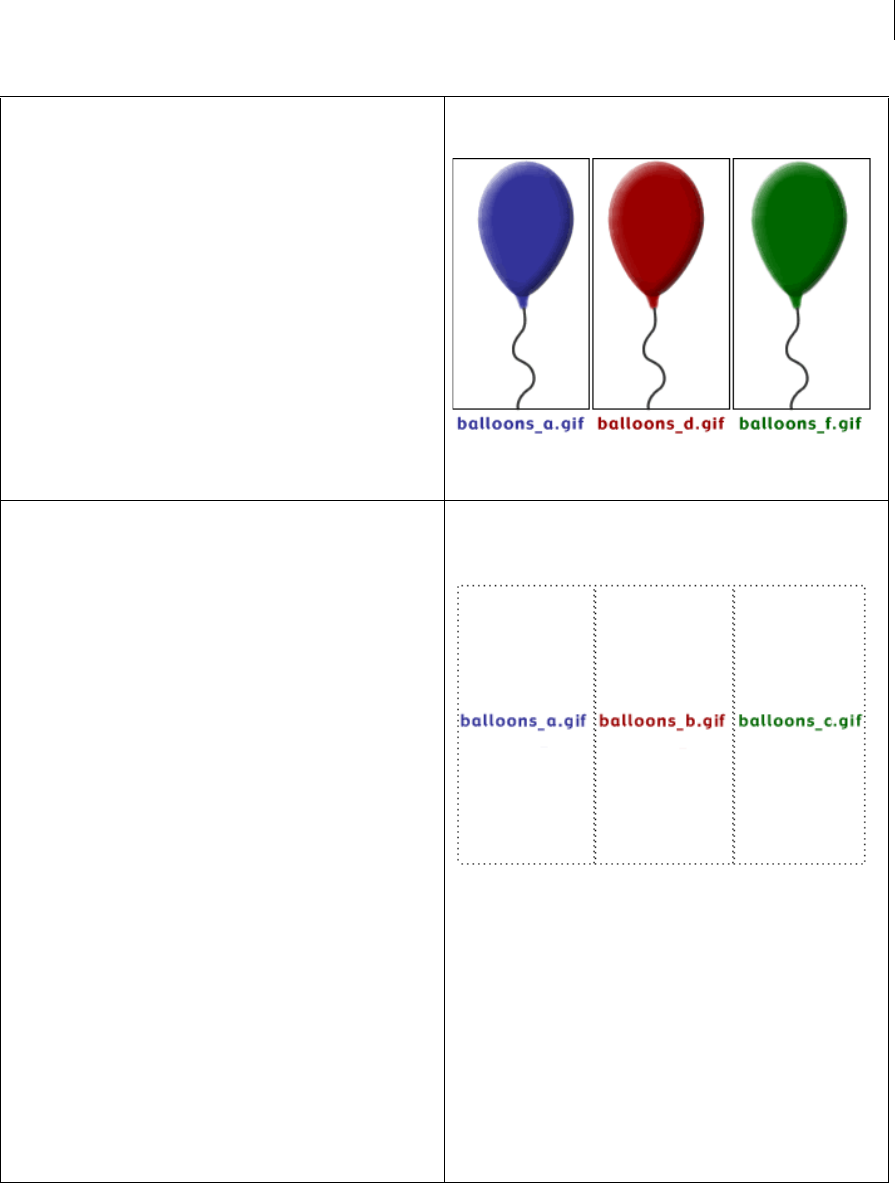
48
Last updated 11/6/2015
3 When exporting the files from Fireworks, the resulting slices will be
individual files:
4 Fireworks will also create a table, which will have the table cell
information necessary to fit all the separate slices back into their
proper location:
If you look at the source code, you'll notice that the table was created
with more than three table cells. Fireworks automatically creates
transparent GIFs (called Shims) that fill in the extra empty table cells
that are created in order to make the table perfectly square, and to
allow the table to display correctly in every browser configuration. The
default export setting inserts the Shim slices in the extra top row and
right column of table cells to ensure that the content you've designed
doesn't get distorted in the browser. The default setting is
recommended in order to get the most reliable table renderings in all
browser configurations. To change this default, open the Document
Properties by choosing File > Document Properties or by clicking
Setup in the Export dialog box to access the slice options. Click the
Table Shims pop-up menu to select either "No Shims,", "Shims from
Image", or "Transparent Image"(the default).

49
Last updated 11/6/2015
5 Along with the information in the table formatting, each table cell also
contains the path to find the corresponding slice, so that the image
will appear in the cell.
This is an example of the lines of code in the table:
<table ><tr><!--spacing row, 1 height. --><td><img
name="FwShim_Col_0"
href="/support/fireworks/ts/documents/images/shim.gif"
></td><td><img name="FwShim_Col_1"
href="/support/fireworks/ts/documents/images/shim.gif"
></td><td><img name="FwShim_Col_2"
href="/support/fireworks/ts/documents/images/shim.gif"
></td></tr><tr><!--row 1 --><td><img
href="/support/fireworks/ts/documents/images/balloons_a.gif"
name=balloons_a" ></td><td><img
href="/support/fireworks/ts/documents/images/balloons_b.gif"
name=balloons_b" ></td><td><img
href="/support/fireworks/ts/documents/images/balloons_c.gif"
name=balloons_c" ></td><td><img name="FwShim_Row_0"
href="/support/fireworks/ts/documents/images/shim.gif"
></td></tr></table>
In the example above, the three image slices are linked by a path
highlighted in the matching color of the balloons. The paths in gray
refer to the transparent Shims that Fireworks created. The path that
links a slice to each cell is document relative to the HTML page that
Fireworks creates. The paths in the code above indicate that the HTML
page balloons.html lives a folder one level up from the folder called
images. The path points the HTML page to look in a folder called
images, where all the GIF files live. As long as the relationship is
maintained between the slices and the HTML page, the links will be
correct. If the HTML page is moved to a different folder, or if the slices
are moved from the images folder, the paths will be broken and the
images will not appear in the table cells.
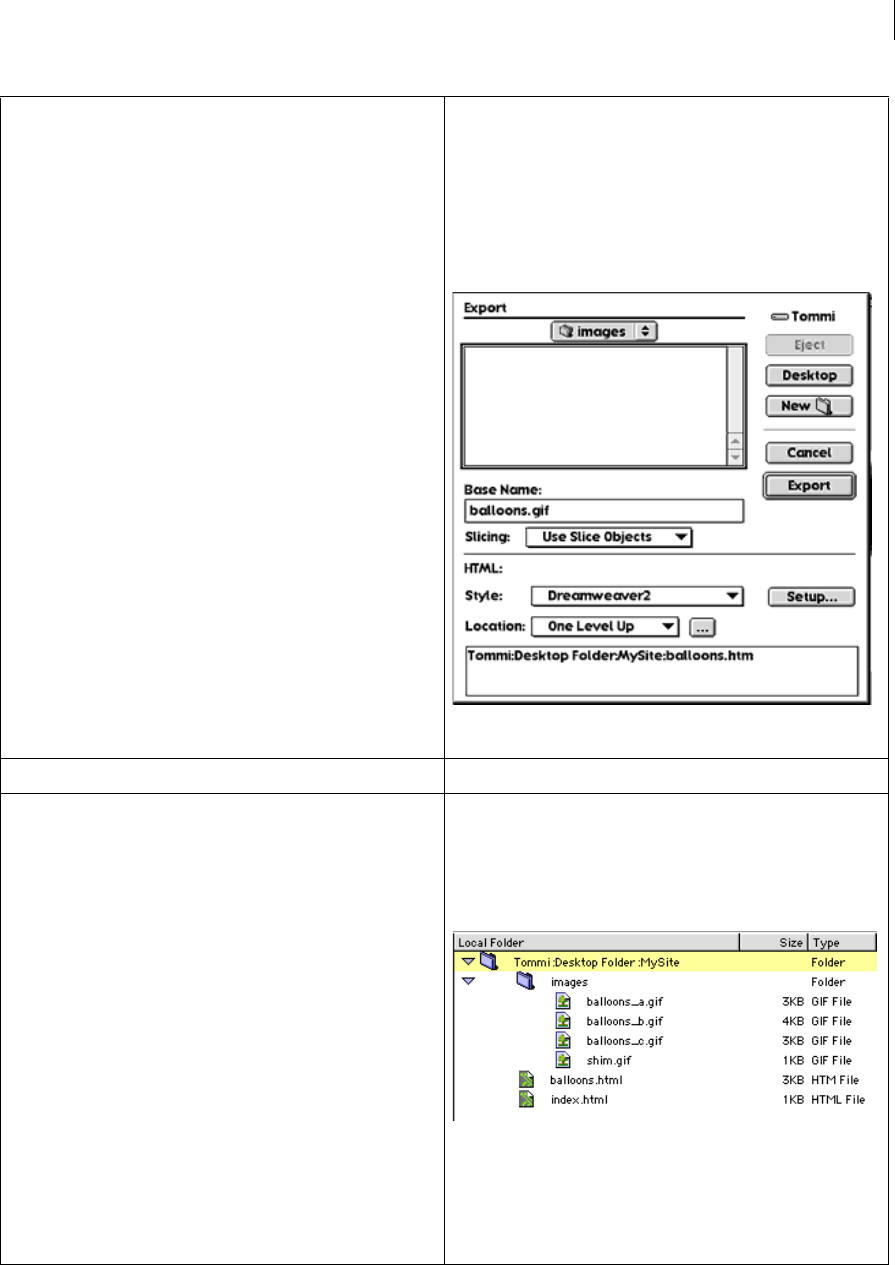
50
Last updated 11/6/2015
Additional informationBelow you'll find more updated information about exporting from Fireworks and inserting
HTML code into Dreamweaver:
6 When exporting the files from Fireworks, it is critical that the HTML
page created by Fireworks is exported into the same folder as the
HTML page you will be pasting the table information into. In the
example below, the local root folder is named MySite. Inside the
MySite folder is the index.html page and a folder called images. Since
the source code from the HTML page that Fireworks creates will be
copied into the index.html page, the Export dialog box should be
configured so that the slices will be saved in the images folder and the
HTML page will be saved one level up, in the MySite folder.
7 As long as both HTML files live in the same folder, the paths will not be
broken, and the table cells will show up with the image slices inside.
The page that the code is copied into from Fireworks will use the same
path, because it is in the same location as the page that Fireworks
created. After exporting the slices and HTML page from Fireworks, the
site structure looks like this:
The two HTML files, balloons.html and index.html are both located in
the same folder. When the HTML source is copied from the
balloons.html file into the index.html page, the paths will be correct,
and the images will appear in the table cells.
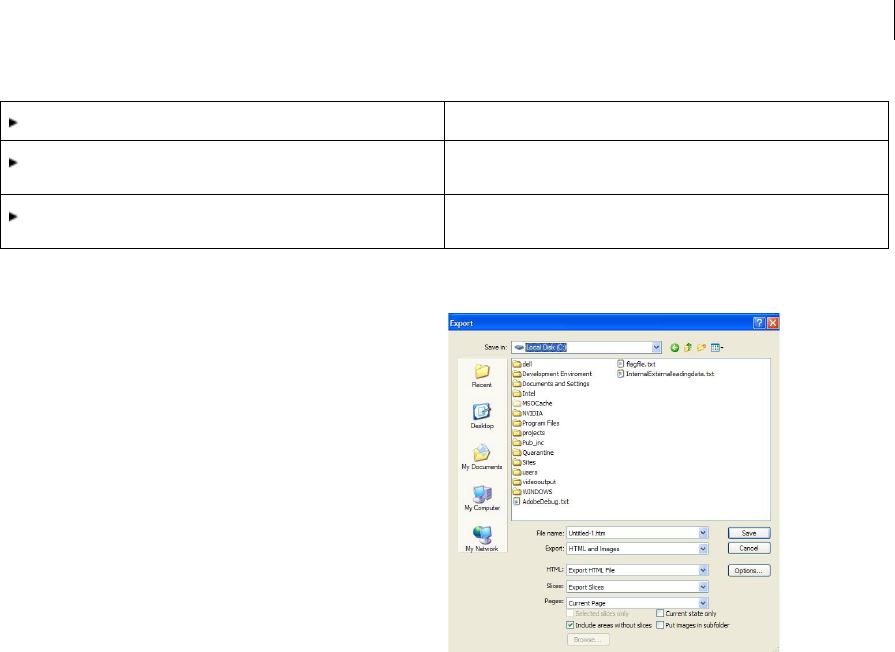
51
Last updated 11/6/2015
Differences in single-state export between Fireworks
CS4 and CS5
What's covered
Fireworks CS4 Fireworks CS5
Fireworks CS4
When you export multiple states with Current State Only deselected, the first state isn't appended with "_s1," regardless
of settings in the HTML Setup dialog box. (The Current State Only option is in the Export dialog box.) For example,
when you edit State 3 and export it without exporting all the other states, the exported slice overwrites State 1.
Example:
Export a file named XYZ with three states. Fireworks creates files XYZ, XYZ_f2, and XYZ_f3, corresponding to the
states after export. The first state isn't appended with f1. If you modify State 3, and export it with Current State Only
deselected, a file with the name XYZ is created. The XYZ file contains changes to State 3, and overwrites the previously
created XYZ file (corresponding to State 1). The XYZ_f3 file is unchanged.
To retain the naming convention for State 3, and avoid overwriting the State 1 file, do the following:
1Before you export, rename the XYZ file to XYZ_f1.
2Export State 3. A file with the name XYZ is created.
3Delete the existing XYZ_f3 file, or rename it.
4Rename the XYZ file to XYZ_f3.
Fireworks CS5
When you export multiple states with Current State Only deselected, the first state is appended with "_s1" (or the
convention defined in the HTML Setup dialog). For example, when you edit State 3 and export it without exporting all
the other states, a file named XYZ is created. The XYZ_s3 file is unchanged after export, and all changes made to State
3 are reflected in the XYZ file. Unlike CS4, the file corresponding to State 1 is not overwritten.
Example:
Export a file named XYZ with three states. Fireworks creates files XYZ_s1, XYZ_s2, and XYZ_s3 corresponding to the
states after export. If you modify State 3 and export it with Current State Only deselected, then a file with the name XYZ
is created. The XYZ file contains changes to State 3. The XYZ_s3 file is unchanged.
The Export section of the Fireworks Support Site.
The Fireworks and Dreamweaver Integration section of the
Dreamweaver Support Site.
To upgrade your current version of Dreamweaver and Fireworks, visit
the Macromedia On-line store.

52
Last updated 11/6/2015
To retain the naming convention for State 3, do the following:
1Export the state (for example, State 3), that you have modified. A file with the name XYZ is created.
2Rename the XYZ file to XYZ_s3.
Changing the location of a Pop-up Menu exported from
Fireworks
IssueWhen previewing in a browser, a Pop-up Menu exported from Fireworks 4 and inserted into an HTML document
does not appear in the expected location. The availability of a new extension on the Dreamweaver Exchange allows
more stable alignment of pop-up menus in Dreamweaver. See Note below.
Reasons There are several reasons why a Pop-up Menu might display in an unexpected location on the previewing
browser page, including:
An explanation of each reason and a corresponding solution are offered below.
Reason 1: absolute positioning relative to the top left corner of the Web page When Fireworks exports a file
containing Pop-up Menus, it creates a JavaScript file (fw_menu.js) which generates CSS layers. The JavaScript code
assigns an absolute location to each Pop-up Menu CSS layer. This is intentional so that the Pop-up Menus and sub-
menus will always appear in the same absolute location in relation to each other. However, this causes the Pop-up
Menus to be in the wrong location if the devices triggering these Pop-up Menus are placed in positions on the page
which are different than their positions on the canvas in Fireworks.
Changing location illustration The following is a simple example which illustrates how changing the location of a
triggering device between the Fireworks canvas and the Dreamweaver page "dislocates" a Pop-up Menu.
The Fireworks canvas A developer creates a single button on the canvas in Fireworks. The button is placed in the upper
right hand corner of the canvas. The developer positions the Pop-up Menu on the canvas so that it overlays the button
only slightly on the button's lower right-hand corner. View Example 1 to see how this button and the Pop-up Menu are
positioned relative to each other and the upper left hand corner of the Fireworks canvas.
Changed location of triggering device The location of the triggering
device (a hot spot, linked image or button) for a Pop-up Menu on the
Dreamweaver page is not the same location that the triggering device
occupied on the canvas in Fireworks.
Browser margins Page margins have not been set to "0" in
Dreamweaver.
Shifting location of triggering device The triggering device is not
absolutely positioned in Dreamweaver.
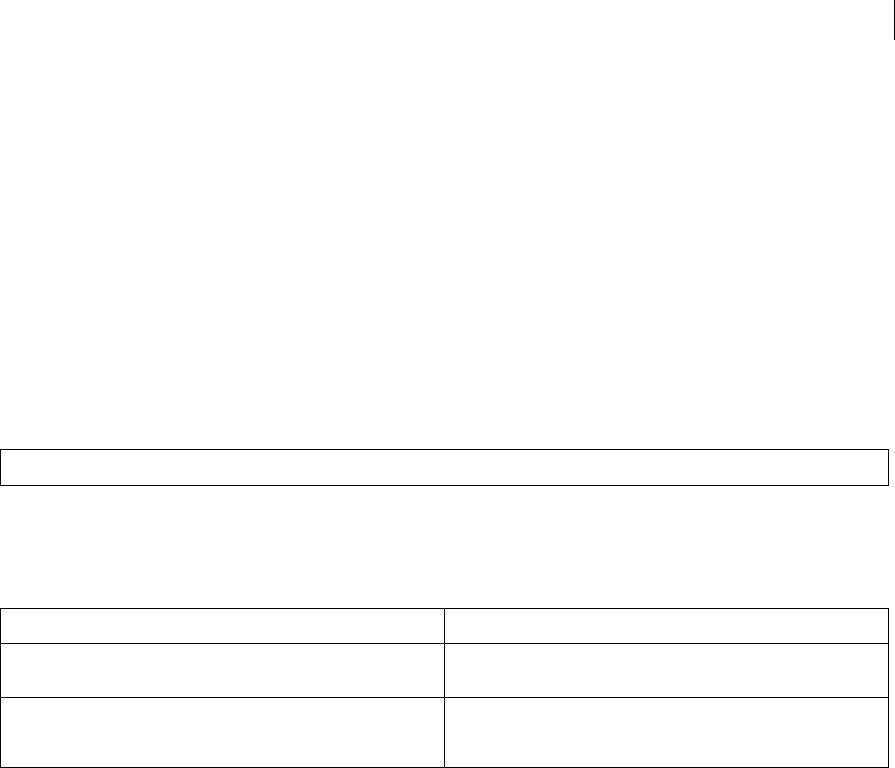
53
Last updated 11/6/2015
Different positioning on the Dreamweaver page The developer inserts the Fireworks HTML (Insert > Interactive
Images > Fireworks HTML) for the button and JavaScript into a table in Dreamweaver. However, the button is
positioned to the right and down by a 100 pixels in both directions. Although the position of the button relative to the
upper left-hand corner of the page has changed from Fireworks to Dreamweaver, the position of the Pop-up Menu
(which are housed in CSS Layers) has not. See Example 2 for an example of how this button appears in Dreamweaver,
as well as how the button and the Pop-up Menu display in a browser. For comparison purposes, consider Example 3
which demonstrates that if the button is located in Dreamweaver in the same position it occupied on the canvas in
Fireworks, the Pop-up Menu displays as expected.
Solution 1: resetting the positioning of a Pop-up Menu in the HTML Code The position of a Pop-up Menu on the
Dreamweaver page can be modified by changing its X,Y coordinates in the HTML code. The X,Y coordinates are
relative to the top left corner of the page. These coordinates are absolute;the Pop-up Menu will not move even if other
items on the page do move (as with page resizing). The image below shows the X,Y coordinates for a button created in
Fireworks, as well as the resulting HTML code for these coordinates in Dreamweaver:
Modifying the HTML will involve finding the current X,Y coordinates of your Pop-up Menu and then changing the
coordinates to appear in a location closer to the triggering device or nearer to the location anticipated in Fireworks.
Changing a Pop-up Menu's location in the Dreamweaver HTML code
1Select the image which triggers the Pop-up Menu.
2Open the Code inspector in Dreamweaver. The code relating to the
image will be highlighted.
3In the highlighted code, find the following text:
"window.FW_showMenu(window.fw_menu_#,#,#)"

54
Last updated 11/6/2015
Approximating the location where a Pop-up should display
4The last two numbers correspond to the absolute X,Y location of the
Pop-up Menu from the top left corner of the page. (The X,Y
coordinates of the Pop-up menu in the example above is 100,10.)
5Change those numbers to reflect the desired absolute location.
6Users of Internet Explorer 5.0 for Macintosh (only) must take an extra
step to change the location of their Pop-up Menus:
Once the X,Y location has been changed in the
onMouseOver call above, the following tag which appears
just above the Fireworks 4 table must be moved to the first
line under the <body> tag in the HTML file:
<Script
Language="JavaScript1.2">fwLoadMenus();</script>
Note: The above script is the call to the "fwLoadMenus()"
JavaScript function, which is located in head tag of the
document. The "fwLoadMenus()" function controls the
Pop-up Menus. A call to a JavaScript function basically
triggers the JavaScript activity in the browser. In Internet
Explorer 5.0 for the Macintosh the actual placement of the
call influences how the browser calculates the X,Y
coordinates. If the call is placed directly below the body
tag (rather than just above the Fireworks table) the X,Y
coordinates will relate to the upper left-hand corner of the
browser window. Moving this code is not necessary for
any browser other than Internet Explorer 5.0 for the
Macintosh.
1 Open the page in Dreamweaver with the Pop-up Menu(s).
2 If you are not in Design View, choose View > Design.
3 If the rulers are not already displayed on the page, choose View >
Rulers > Show. Also, pixels should be your mode of measurement
(View > Rulers > Pixels). If the origin is not 0,0, choose View > Rulers >
Reset Origin.
4 Notice that as you move your cursor around the Dreamweaver page,
small dotted lines appear in the rulers. These dotted lines indicate the
cursor's current X,Y coordinates. The dotted line in the top ruler shows
the X coordinate; the dotted line in the ruler on the left side indicates
the Y coordinate.
5 Place your cursor in the position that you would like the Pop-up Menu
to appear on the Dreamweaver page. Note the location of the dotted
line in the top ruler for the X coordinate, as well as the location of the
dotted line in the left ruler for the Y coordinate. Write down your
intended X,Y coordinates.
6 Follow the above steps to change the location of the Pop-up Menu in
the Dreamweaver HTML. You may need to again change the X,Y
coordinates by a few pixels to get the exact absolute location you
want.

55
Last updated 11/6/2015
Note: The Fireworks Insert Pop-up Menu command automatically writes the Dreamweaver Add/Remove Netscape
Resize Fix command to the external JavaScript code to prevent problems with browser resizing in Netscape 4.x. It will
not be necessary to add this command once the Fireworks HTML table has been inserted into Dreamweaver, even if
you inserted the Fireworks HTML into a layer.
Reason 2: browser margins If the Fireworks HTML table has been inserted into another HTML document, the page
margins of the document may be artificially holding the table away from the top left corner. The Pop-up Menus will
then seem to be positioned slightly above and to the left of the triggering devices.
Solution 2: resetting page margins Set the page margins to "0" in Dreamweaver.
Reason 3: triggering device location shifts on Web page Because a Pop-up Menu is absolutely positioned relative to
the top left corner of the page, the triggering device will also have to be absolutely positioned. In other words, the
triggering device cannot be located or aligned such that its position will change if the browser window resizes.
Solution 3: stabilizing the location of the triggering devices Use Left or Default alignment for a Pop-up Menu's
triggering device (and any table or layer in which the triggering device is embedded). Generally, placing a Fireworks
HTML table with Pop-up Menus inside a Center-aligned table will not allow the Pop-up Menus to consistently appear
as expected.
Note: aspects of the Pop-up Menu feature in Fireworks were improved in the Fireworks 4.0.2 Updater. See Fireworks 4
and 4.0.2 release notes for specific information about the updater.
How to change the location of submenus in a Fireworks
Pop-up Menu
Positioning submenus in Fireworks 4
Many users have asked how they can control the position of submenus that are generated using the Fireworks 4 Pop-
up Menu feature. The code that controls the horizontal and vertical position of the submenus relative to their main
menu items is found in the fw_menu.js file. This TechNote will explain how you can change the position of your
submenus using the code provided. In Fireworks MX, submenus can be positioned using the Position tab of the Pop-
up Menu Editor. See Fireworks MX Pop-Up Menus (Fireworks Article) for more information on Pop-up Menus in
Fireworks MX.
This TechNote assumes that you already know how to create Pop-up Menus in Fireworks 4 and that you know how to
export Fireworks HTML and Images to a defined Dreamweaver site directory structure. You can learn how to create
Pop-up Menus by choosing Help > Lessons and clicking on Lesson 5 in the Flash movie that appears: "Creating a Pop-
up Menu" to learn how to create Pop-up Menus. For information on how to Optimize and Export your files, see articles
in the Optimizing and Exporting area of the Fireworks support site. Also you should be somewhat familiar with
JavaScript, and should be able to edit the code in the fw_menu.js file with confidence.
This TechNote will explain:
•How to set the horizontal positioning of the submenus globally.
•How to set the vertical positioning of the submenus globally.
•How to set individual horizontal positioning for submenus.
Changing submenu horizontal position globally

56
Last updated 11/6/2015
The submenu positioning in the fw_menu.js is determined by three lines in the code. In each case, the change you make
should be identical. The following table gives details on these three lines of code and shows how they should be
changed. To do this you can open the fw_menu.js that was exported to your site directly alongside the Fireworks HTML
in Code view in Dreamweaver 4.
Note: The code in the fw_menu.js shown in this TechNote is generated from Fireworks 4.0.2 in it's original form. Make
sure you have downloaded and installed the Fireworks 4.0.2 updater before exporting your HTML and images from
Fireworks. If you have made other third party recommended changes, your line numbers may be different.
To change the horizontal position of submenus, follow these steps:
1Open the fw_menu.js file that Fireworks exported alongside the Fireworks HTML file in Dreamweaver and choose
View > Code if Code View is not enabled. You should also be able to see the line numbers. If not, choose View >
Code View Options > Line Numbers. It may also help to turn on Word Wrap, Syntax Coloring and Auto Indent as
well. Scroll down in the code to line 652 and locate the following line of code:
Notice the "-5" at the end of that line? That means the submenu should overlap its parent menu by 5 pixels. So if you
wanted increase the overlap, change the -5 to something smaller like -10. That would cause an overlap of 10 pixels. If
didn't want to overlap at all, you would add a positive number. For example, changing the -5 to +5 would cause the
submenu to be positioned 5 pixels to the right of the parent menu's right side. Change this number to the desired pixel
setting.
2Because the Pop-up Menu code is designed to work in several different browsers, there are two other locations where
you must set the distance from the right side of the main menu. Scroll down in the code to line 668 and locate the
following code:
Again, change the "-5" at the end of this line of code to the desired pixel setting to cause the submenu to appear the
desired number of pixels from the right side of the main menu.
3The third location where you must change the horizontal position of the submenu is shown below. It is only 3 lines
further down on line 671.
Here also, you will need to change the "-5" at the end of the line to the same number you entered for the two submenu
positions in lines 652 and 668. Once you have set this number in all three lines, Save the fw_menu.js file. The next time
you view the HTML in a browser, you will see that the submenus appear at exactly the location you specified in the
three lines of the fw_menu.js code.
Changing the vertical position globally
As with the horizontal position, the vertical position of the submenus is set in three lines of the fw_menu.js file. The
following table gives details on these three lines of code and shows how they should be changed. Again you must open
the fw_menu.js that was exported to your site directly alongside the Fireworks HTML in Code view in Dreamweaver 4.
To change the vertical position of submenus follow these steps:
1Again, as in step 1 in the instructions for horizontal positioning of the submenus, you must open the fw_menu.js in
Dreamweaver in Code View. Scroll down to line 647 and locate the following code:

57
Last updated 11/6/2015
Notice that the last item in the line is divided by the number "3". The default location for submenus is set to 1/3 the
height of the menu item as set in the fwLoadMenus function in the <script> area of the HTML code. By either changing
the number 3 to a different number, or by replacing the entirel.Menu.menuItemHeight/3 to a different numerical value,
positive or negative, the vertical position of the submenus can be adjusted.
2Scroll down to line 667 and locate the following code:
Again the value is expressed as the MenuItemHeight divided by "3". You can either set the value of the denominator in
this fraction or you can replace the entire l.Menu.menuItemHeight/3 with the desired value, including negative
numbers.
3Scroll to line 670 which is the last line where the vertical position must be set:
Again the value is expressed as the MenuItemHeight divided by "3". You can either set the value of the denominator in
this fraction or you can replace the entire l.Menu.menuItemHeight/3 with the desired value, including negative
numbers. All values should be set in whole numbers since they are measured in pixels.
Changing the horizontal position for individual menus
1In the fw_menu.js file, append the string "+ (childMenu.Menu.horzOffset || 0)" to the default endings to lines 649,
652, 668 and 670 as shown below:
Note: Notice the "+" must be included before(childMenu.Menu.horzOffset...) Make sure you correctly enter the entire
string!
2The Fireworks JavaScript code also sets a container for the menus and submenus to appear in as indicated by the
property "Menu.container", which in turn has a property called "clip". The Menu container is an invisible box that
the Pop-up Menus and submenus are set to appear in and the clip delimits the size and location of this container.
This container only affects Netscape 4.x code, so if you want to make submenus that are positioned to the left of the
main menu appear in Netscape 4.x you'll need to add the following two lines of code after line 652 in the fw_menu.js
file:if( l.Menu.container.clip.left > childMenu.left ) { l.Menu.container.clip.left = childMenu.left;
3In the submenu sections of the fwLoadMenus function, for each submenu you wish to control the horizontal
position, define horzOffset. See lines 14 and 20 in the example below. Positive values shift the submenu to the right,
and negative values shift the submenu to the left. If you don't define horzOffset for a submenu, it simply goes to the
default location.
4Save and close the fw_menu.js and the HTML file. Test your HTML in a browser. To see this code working, see
Example 1.
Additional Information
The following TechNotes discuss various aspects of Pop-up Menus and ways you can customize or use them in your
HTML:

58
Last updated 11/6/2015
Changing the location of a Pop-up Menu exported from Fireworks (TechNote 15001)Customizing and troubleshooting
Pop-up Menu images (TechNote 14995)Multiple Pop-up Menu HTMLs inserted into one Dreamweaver file (TechNote
15573)Fonts in Pop-up Menus (TechNote 15342)Pop-up Menus appear behind active content (TechNote 15842)How
to set the length of time a Pop-up Menu remains visible (TechNote 15007)How to open Pop-up Menus in another frame
panel (TechNote 15816)Using anchor tags with Fireworks 4 Pop-Up Menus (TechNote 15161)Assigning additional
behaviors to Pop-up Menu items (TechNote 15369)Fireworks Pop-up Menus in Dreamweaver Library files (TechNote
15101)Creating custom styles for use in Pop-up Menus (TechNote 15377)Fireworks 4 Pop-up Menus in Dreamweaver
4 templates (TechNote 15088)Preventing the Pop-up Menus from disappearing too soon after mouseover (TechNote
16052)How to create transparent Pop-up Menus (TechNote 15526)How to retain the button over state while scrolling
over a Pop-up Menu (TechNote 15926)Using site root-relative paths with Fireworks Pop-up Menus in Dreamweaver
templates (TechNote 15832)Using site root-relative paths with Fireworks Pop-up Menus in Dreamweaver Library files
(TechNote 15899)The commented fw_menu.js file (TechNote 15827)
Button text does not update correctly
IssueButton text does not update correctly.
ReasonThe addition of the Button Editor in Fireworks 3 with the copy up and update text functions, along with the
ability to update the text via the Object panel presents several problems when the user creates multiple text objects in
the Button Editor.
For example, if the button has multiple text blocks in any or all of the tabs, and the user updates the text in the Object
panel when the button is selected, which text block gets updated? This TechNote explains how Fireworks determines
this and discusses ways to work around this issue. Other text issues as related to buttons are discussed and tips for
improving button production are included.
Unlike text on the canvas, text in a button and any instances of it on the canvas are dynamically linked. This is what
allows the user to easily update button text using the Object panel. Because the Button Editor and the Symbol Editor
behave exactly like the canvas, it is possible to create multiple text objects on a button and its various states which can
present problems under the circumstances in this list.
The following problems that may occur using text in the Button Editor:
Non-updating features In Fireworks 3, only alphanumeric characters that are entered into the text string are updatable.
Font, Font size, color, style, kerning, leading, alignment, character width, baseline shift, anti-aliasing and auto-kerning
are not affected when updating text in buttons.
Note:This behavior is consistent both when text is changed in the text editor and when text is updated in the Object
panel when the button is selected.
Non-updating features.
Multiple text objects in the button editor.
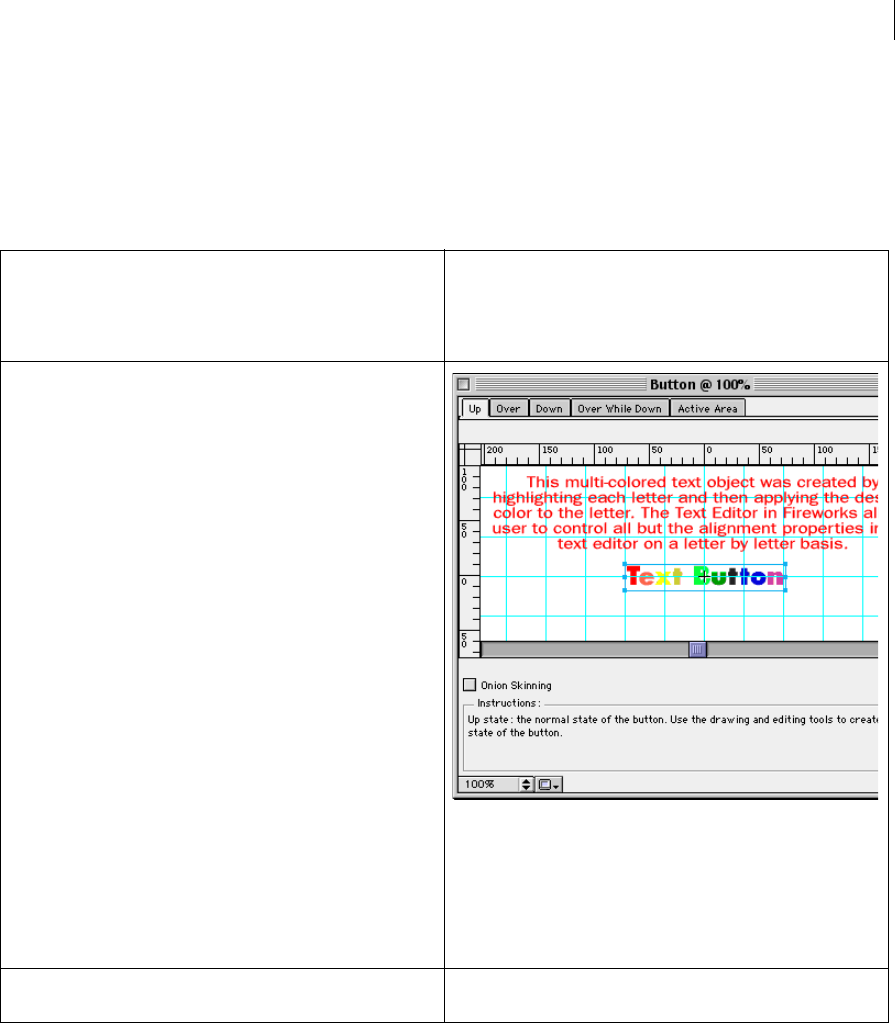
59
Last updated 11/6/2015
Multiple text objects in the Button Editor In Fireworks 3 users can place many text objects in the Button Editor.
Because of the linking of the text between the various states in the Button Editor as well as the ability to update the text
from the Object panel, problems may arise that can be easily avoided with a little foresight.
SolutionThe following steps and illustrations show what can happen (1- 12) and in step 13 how to avoid such
problems:
1 Choose Insert > Button or click a text object and select Insert >
Convert to Symbol. Check the radio "Button" in next dialog window.
Text can also be imported into the Button Editor or choose Insert >
Libraries > Other to choose a text button from another document from
your system.
2 Effects can be added to the text just as an effect can be applied to any
object on the canvas.
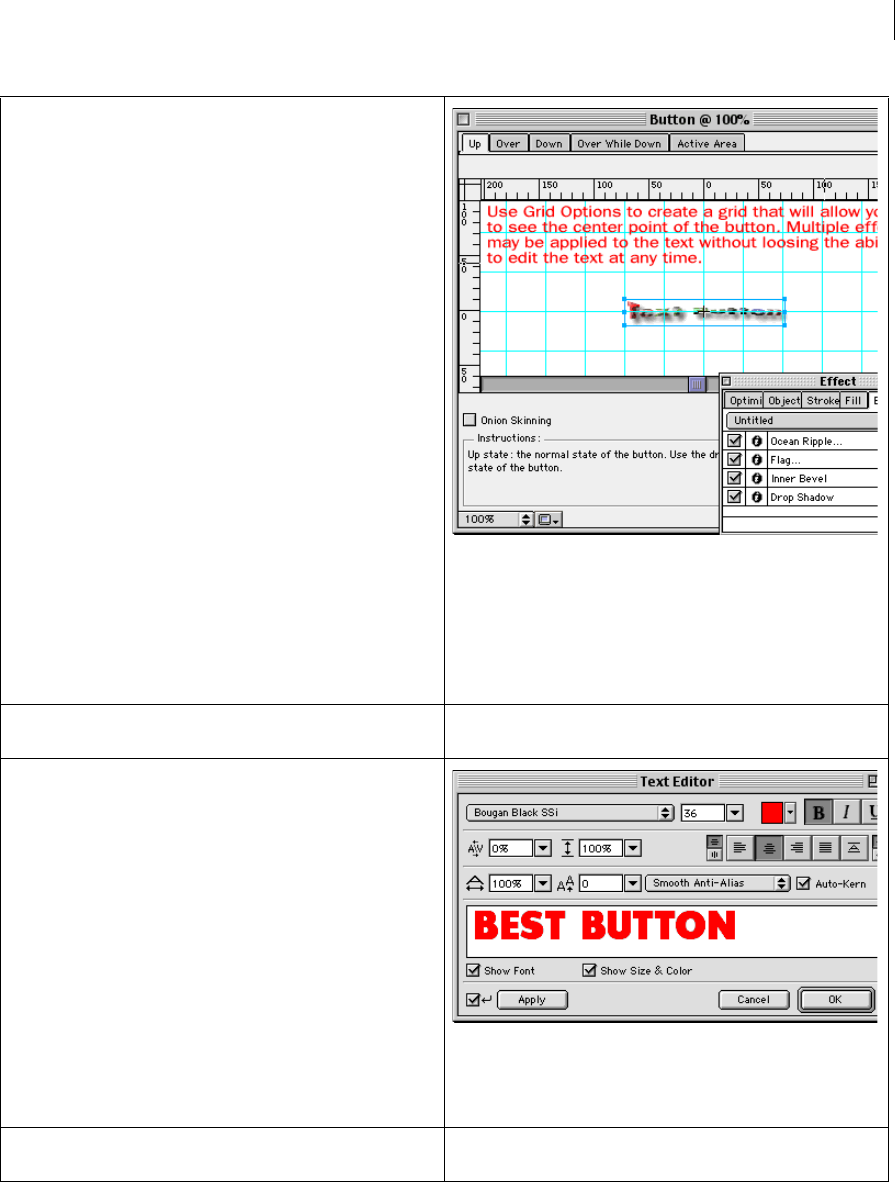
60
Last updated 11/6/2015
3 Click the Over state tab and then click the "Copy Up Graphic" button.
Double-click the text to bring up the Text Editor and change the text.
4 The Update text dialog appears asking if you wish to update the text
in the other button states.
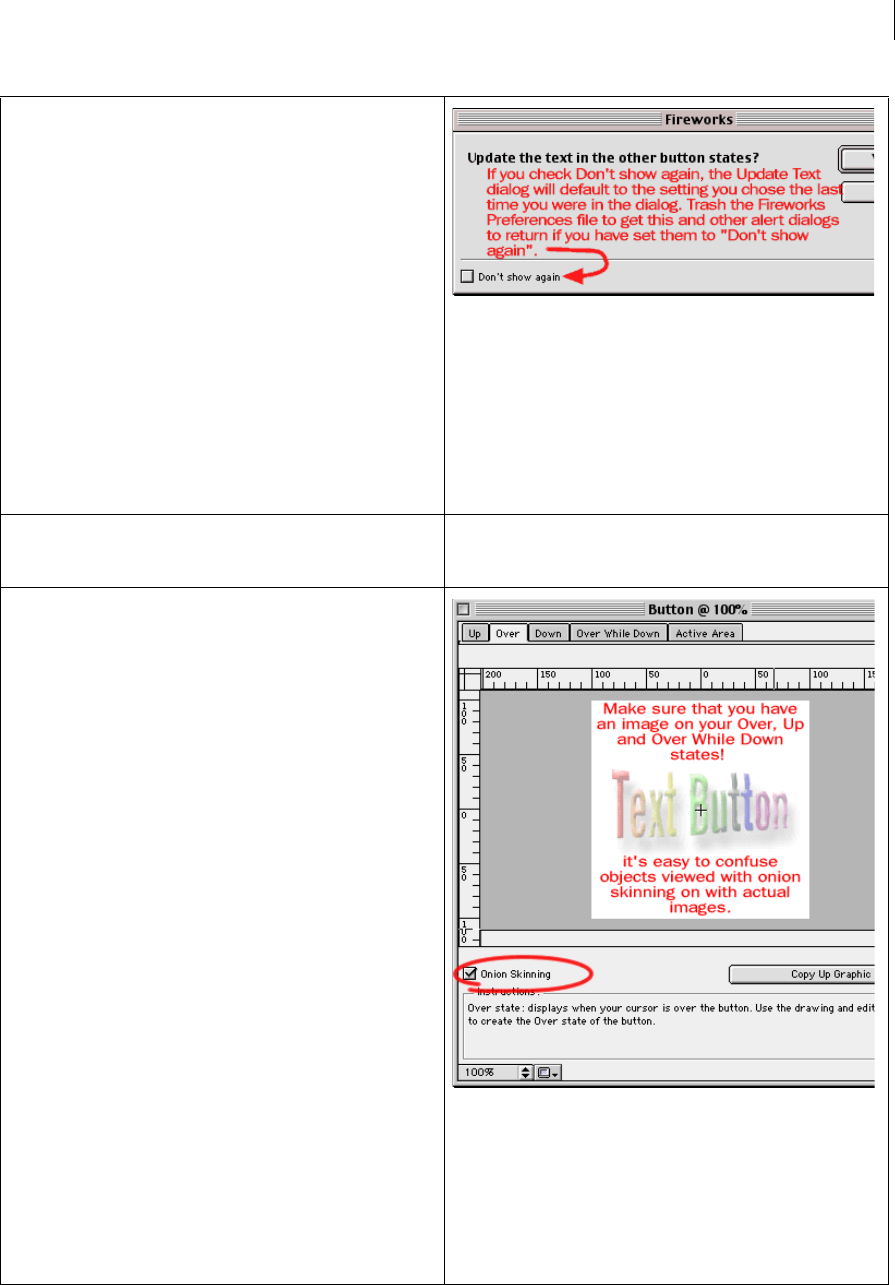
61
Last updated 11/6/2015
Note:When you click on the "Don't show again"
checkbox, the selection you choose will be kept for future
text updates. To restore the dialog to show whenever text
is updated, delete the Fireworks Preferences file and
relaunch the program.
5 Use onion skinning to see the relative position of the buttons
between the various states. Don't confuse an object on another tab as
being on the current tab because onion skinning is turned on.
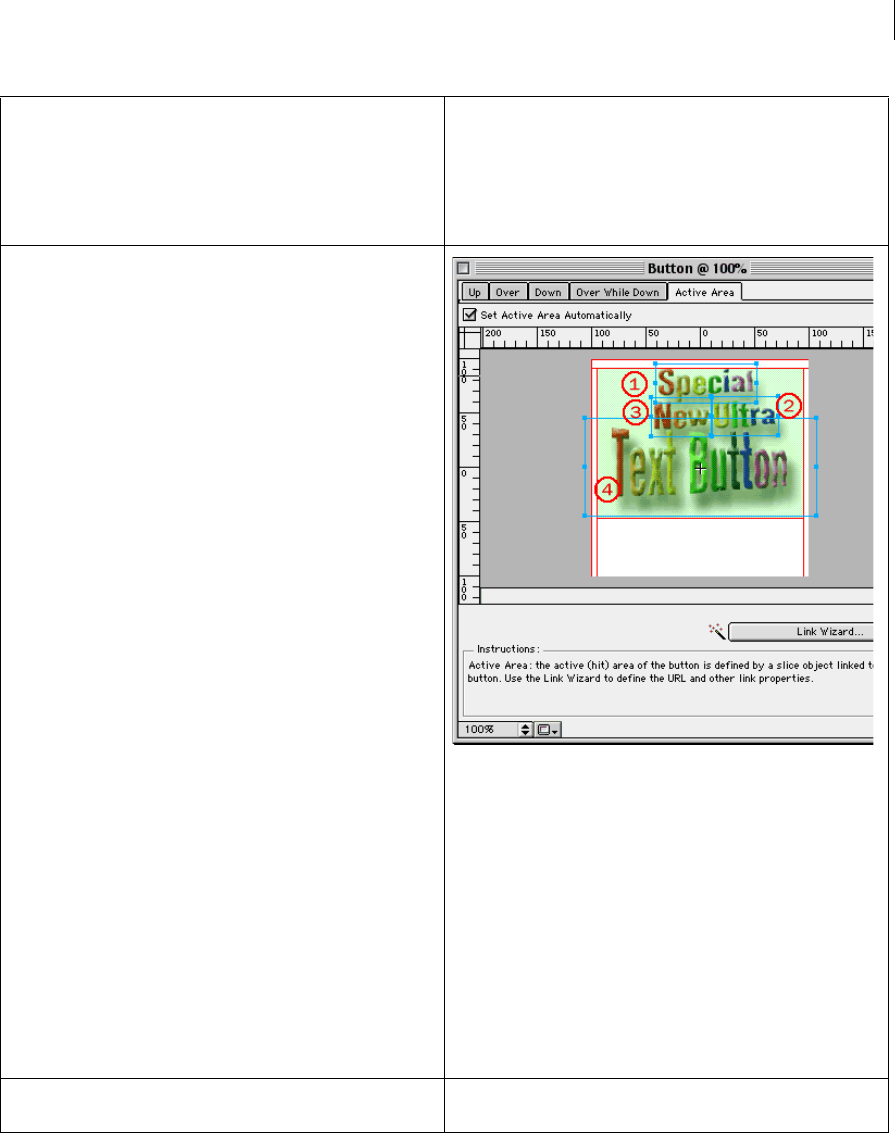
62
Last updated 11/6/2015
6 Repeat the Copy Up, Over and Down Graphic operation and add a
new text object to each subsequent state of the button. Notice that
the last added text is the top object in the button state just as layers
may contain multiple objects that appear in a front to back order. The
text to the right in this button has the word "Special" as the top object
then "Ultra" as the second object, "New" as the third and "Text Button"
as the bottom item.
Note:When working with a button that will be exported
as part of a Nav Bar, the Link Wizard may be disregarded
in the creation of the initial button. This gives you the
flexibility of setting specific button properties later in the
Object panel.
7 Once the button is created it will appear on the canvas and in the
Library panel.
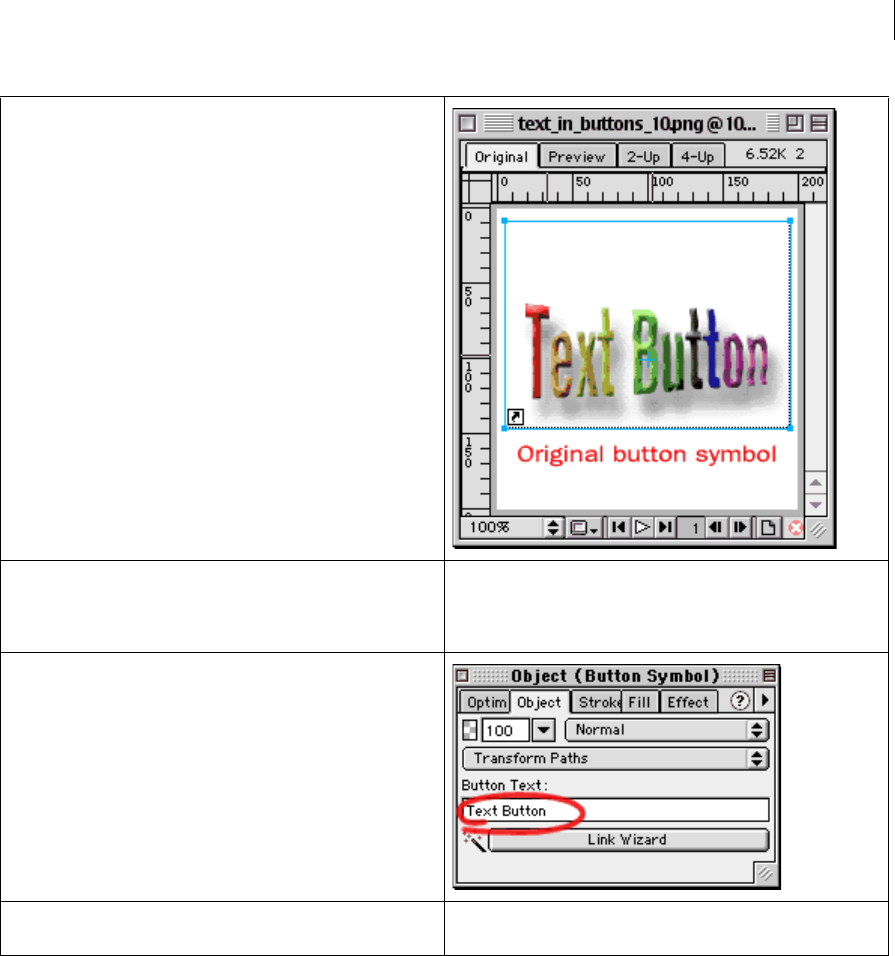
63
Last updated 11/6/2015
8 With the button selected on the canvas, bring up the Object panel
Command+ I (Macintosh) or Control+ I (Windows) and notice that the
Button text field will display the topmost text that appears in the Up
state of the Button Editor.
9 Enter some new text in the Button Text field. Notice that the new text
appears on the Over state of the button.
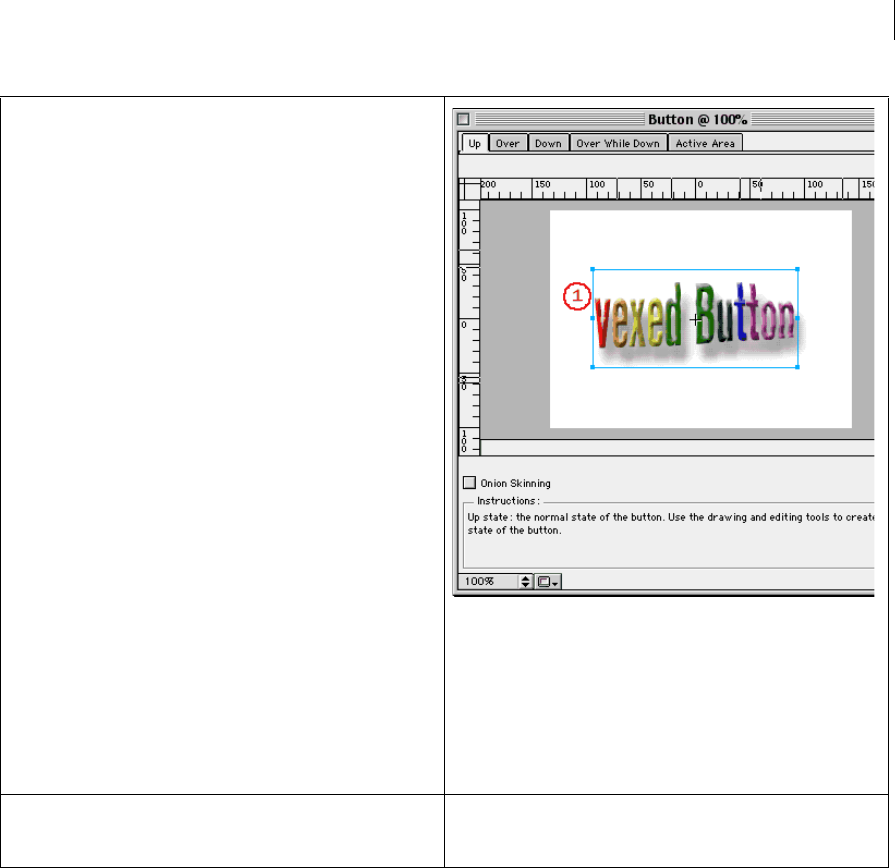
64
Last updated 11/6/2015
10 When the Over state is viewed, notice that the text in the topmost
object of the layer stack gets altered, not the original text that logically
would be linked to the text in the Up state.
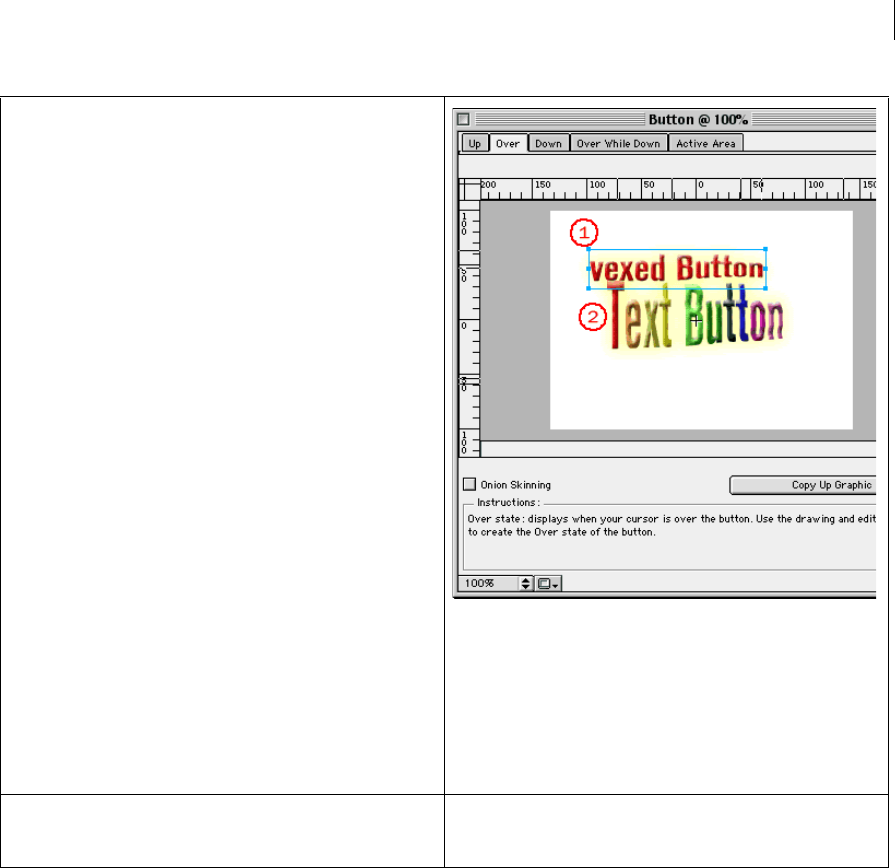
65
Last updated 11/6/2015
11 When the Down state is viewed, notice that the text in the topmost
object of the layer stack gets altered, not the original text that logically
would be linked to the text in the Over state.
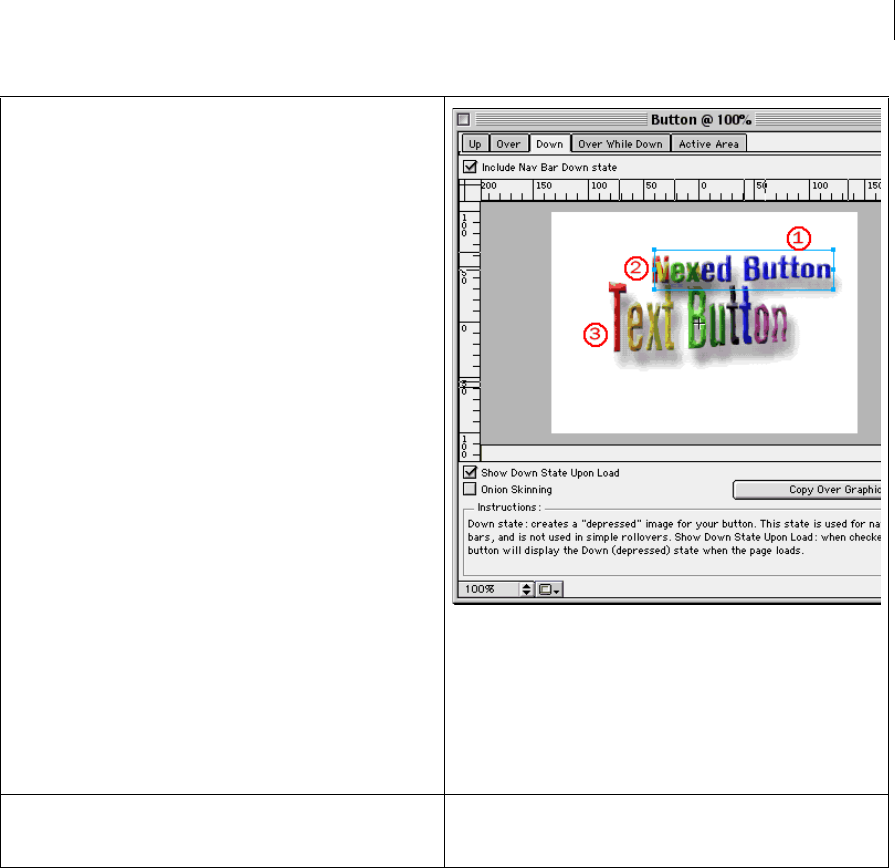
66
Last updated 11/6/2015
12 When the Over While Down state is viewed, notice that the text in the
topmost object of the layer stack gets altered, not the original text that
logically would be linked to the text in the Down state.
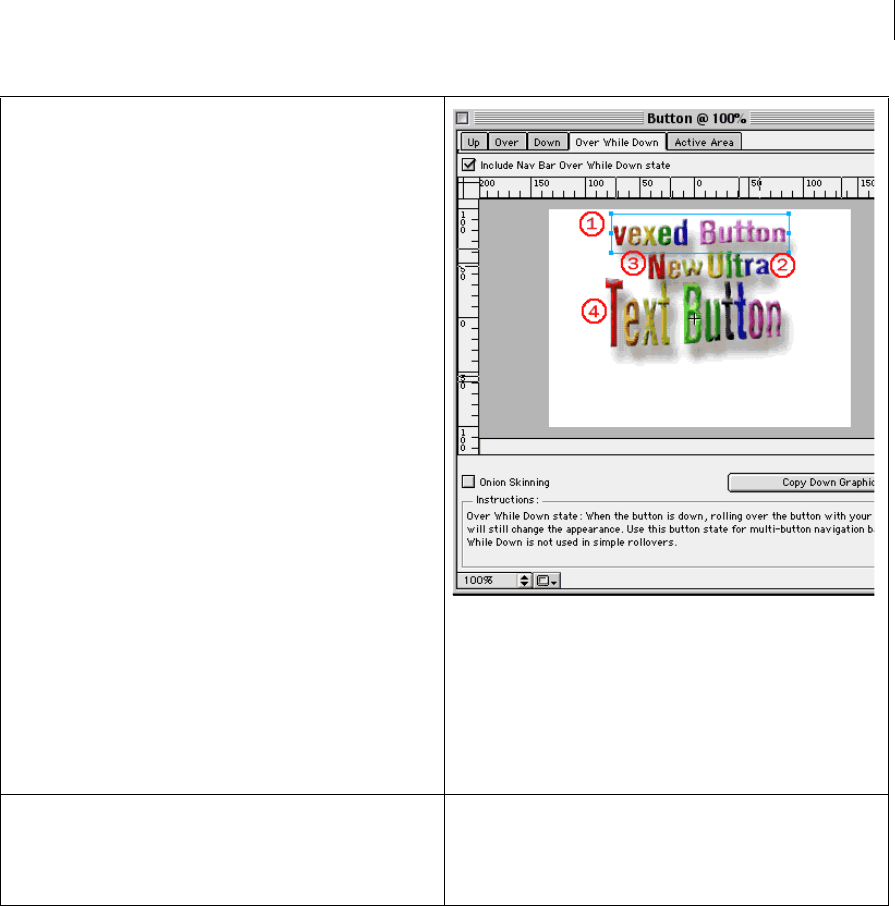
67
Last updated 11/6/2015
13 To avoid this problem, click the text object to be changed in the Over,
Down and Over While Down states and choose Modify > Arrange >
Bring to Front before exiting the Button Editor. Then when the button
is changed either by using the Object panel or by using the Button
Editor, the correct text will be altered.
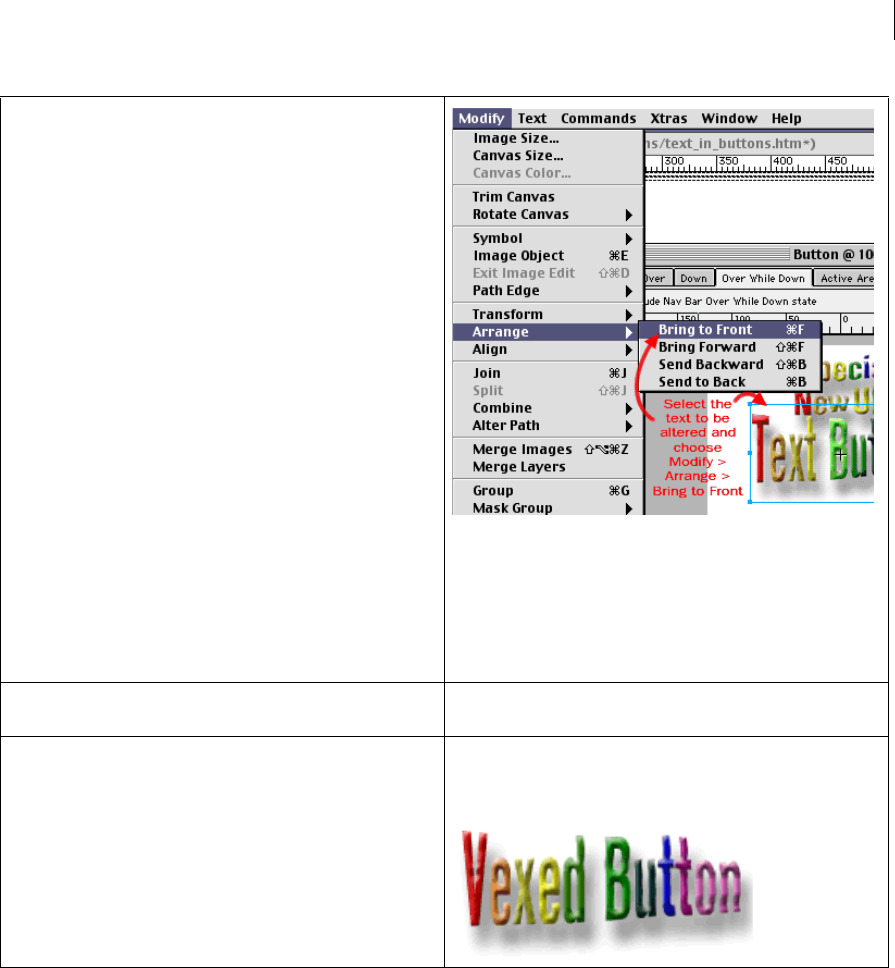
68
Last updated 11/6/2015
Blank panels | Fireworks | CS5, CS5.5
Issue
When you open Fireworks, some of the panels appear blank.
Solution
1Close Fireworks if it is open on your computer.
2Uninstall Flashbug/FlashFirebug plug-in.
14 This animation shows the various states of the button with the text
altered after moving the objects to the front.
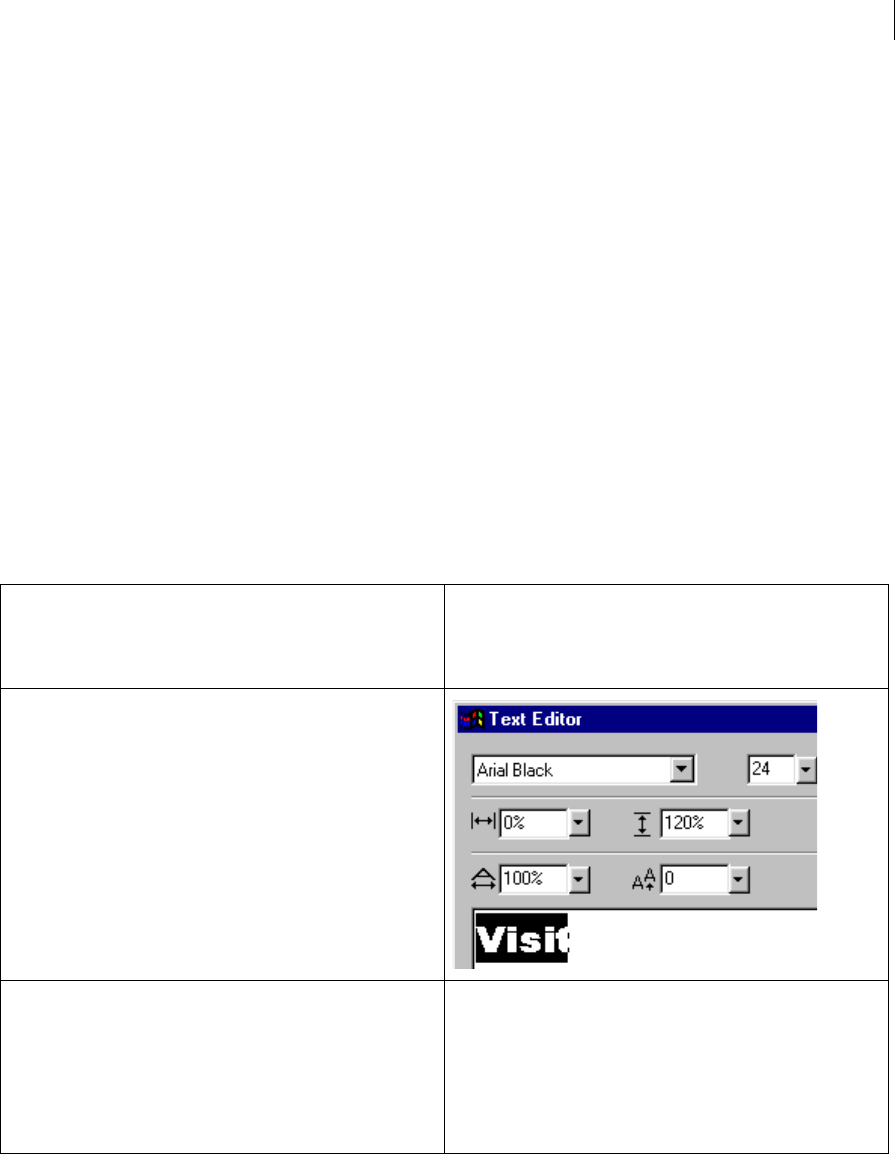
69
Last updated 11/6/2015
3Open Fireworks. The panels display as intended.
You can now reinstall the Flashbug/FlashFirebug plug-in.
Additional information
This issue most often occurs when the Flashbug/FlashFirebug plug-in for Firefox is installed on a computer running
on Windows OS.
How to animate a text fade in and out
IssueThis question came up in a Fireworks 1 seminar that Lynda Weinman held here at Macromedia. The user wanted
to use symbols and tweening in Fireworks to create a text object that changed opacity from 0% to 100% over a series of
frames and then reversed the animation with another text object, going from 100% to 0% opacity. The example below
shows the desired results:
Here's how it's done:Open a new Fireworks Document and follow the steps below:
1 In a new Fireworks document, type the first text object. Use the
Swatches panel to set the color and any other attributes.
In Fireworks 2 and 3, use either the Fill swatch at the bottom of the
toolbox or set the fill color in the Fill panel.
2 With the text object selected, Choose Edit > Symbols > Make Symbol.
In Fireworks 2 the Symbol, Tween Instances and Symbol Options can
be found under the Insert Menu. Choose Insert > Symbol.
In Fireworks 3, choose Insert > Convert to Symbol. Notice that the
Symbol is saved in the Library panel. Only instances appear on the
canvas in Fireworks 3. Tweening and other Symbol Options are under
the Modify menu.
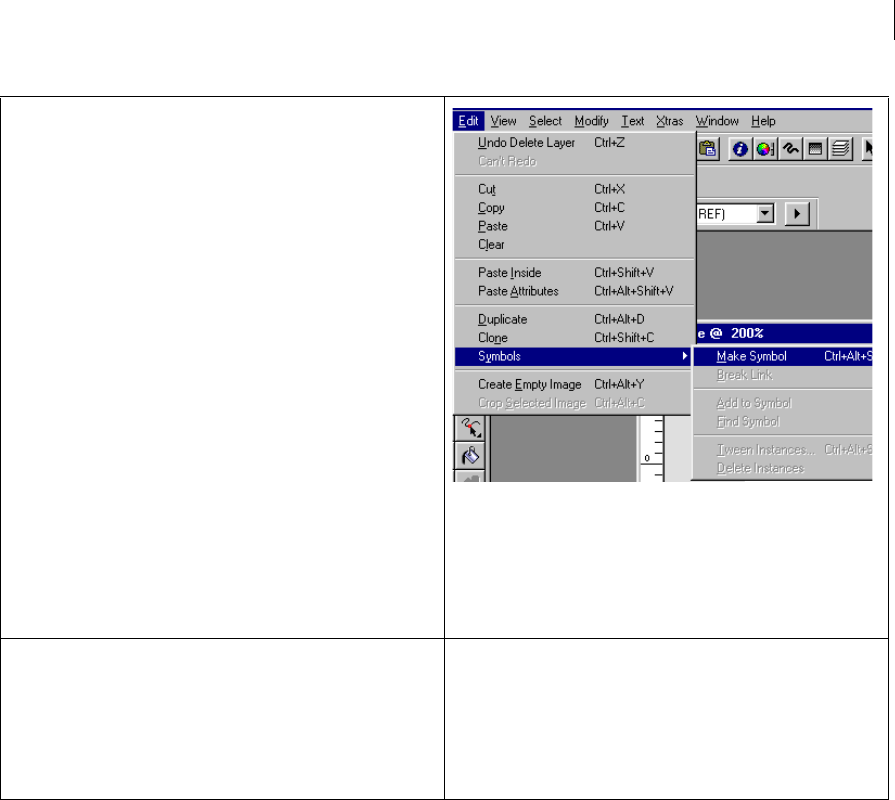
70
Last updated 11/6/2015
3 Clone the Symbol to create an Instance. Note that a symbol has a little
plus (+) sign in the lower left corner of its bounding box. An instance
has a "shortcut arrow" in the lower left of its bounding box. The clone
command is under the Edit menu. Choose Edit > Clone or press
Control+Shift+C (Windows) or Command+Shift+C (Macintosh).
As previously noted, Symbols do not appear on the canvas in
Fireworks 3. Instances only will be used for tweening in Fireworks 3.
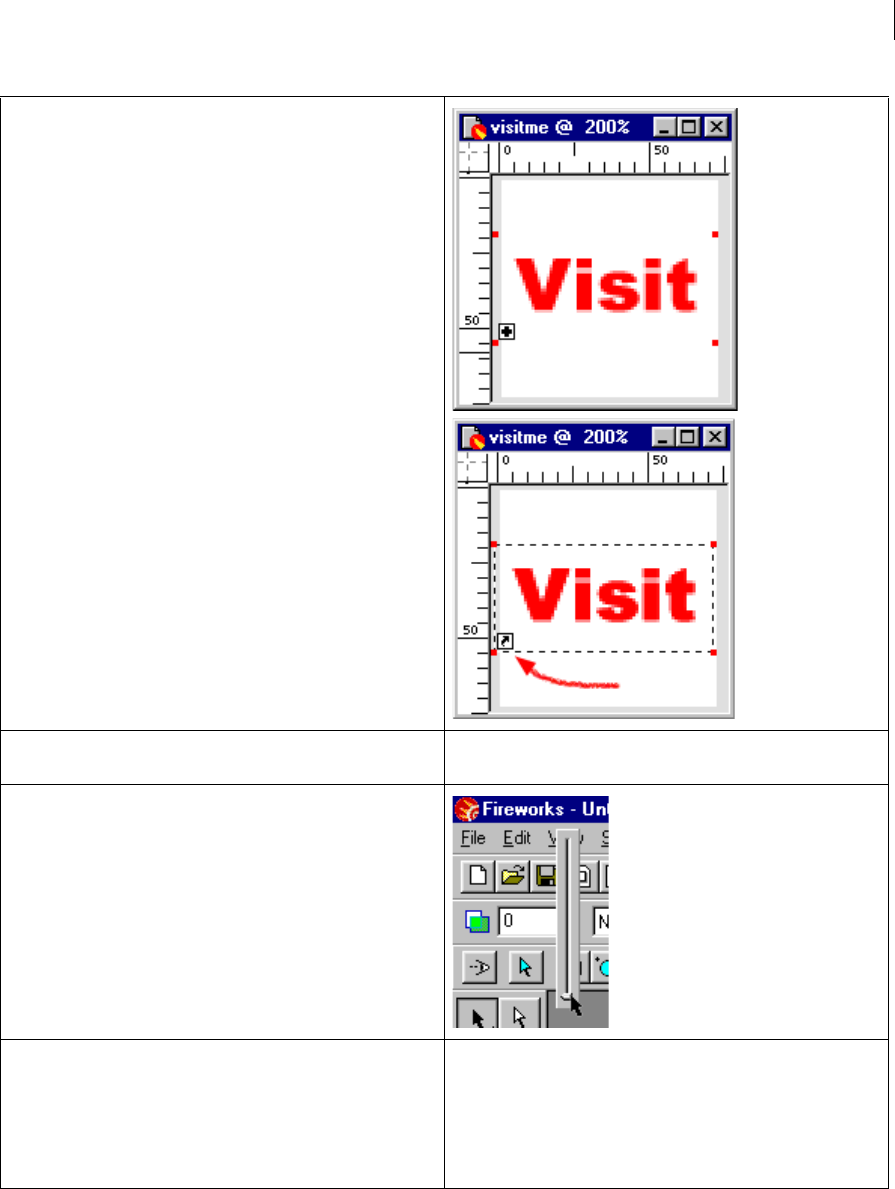
71
Last updated 11/6/2015
4 Set the opacity of the instance to 0%. In Fireworks 1 this is done in the
Opacity Toolbar. In Fireworks 2 and 3 it is found in the Object panel.
5 Choose Modify > Arrange > Send to Back or press Control+B
(Windows) or Command+B (Macintosh) to send the instance directly
behind the symbol. Animation in Fireworks is done in back to front
order. When objects are distributed to frames, the backmost object
will appear in Frame 1 and the frontmost object will appear in the last
frame. All other objects will appear in back to front order in the
corresponding sequence of frames.
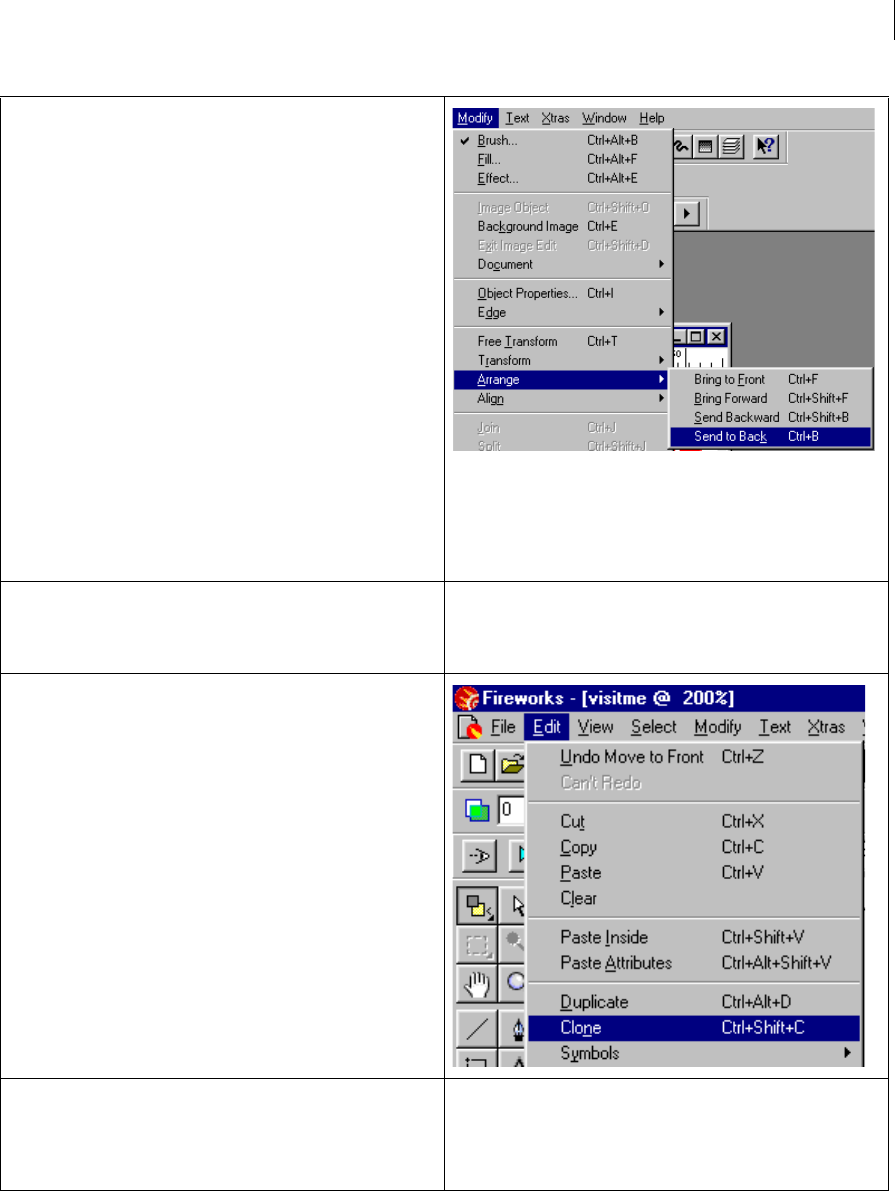
72
Last updated 11/6/2015
6 Clone the instance. The cloned instance will appear between the
instance and the symbol (the original instance in Fireworks 3). Move
the second instance to the front by choosing Modify > Arrange > Bring
to Front or press Control+F(Windows) or Command+F (Macintosh).
7• In Fireworks 1 choose Edit > Symbols > Tween Instances....
•In Fireworks 2 choose Insert > Tween Instances....
•In Fireworks 3 choose Modify > Symbol > Tween Instances....
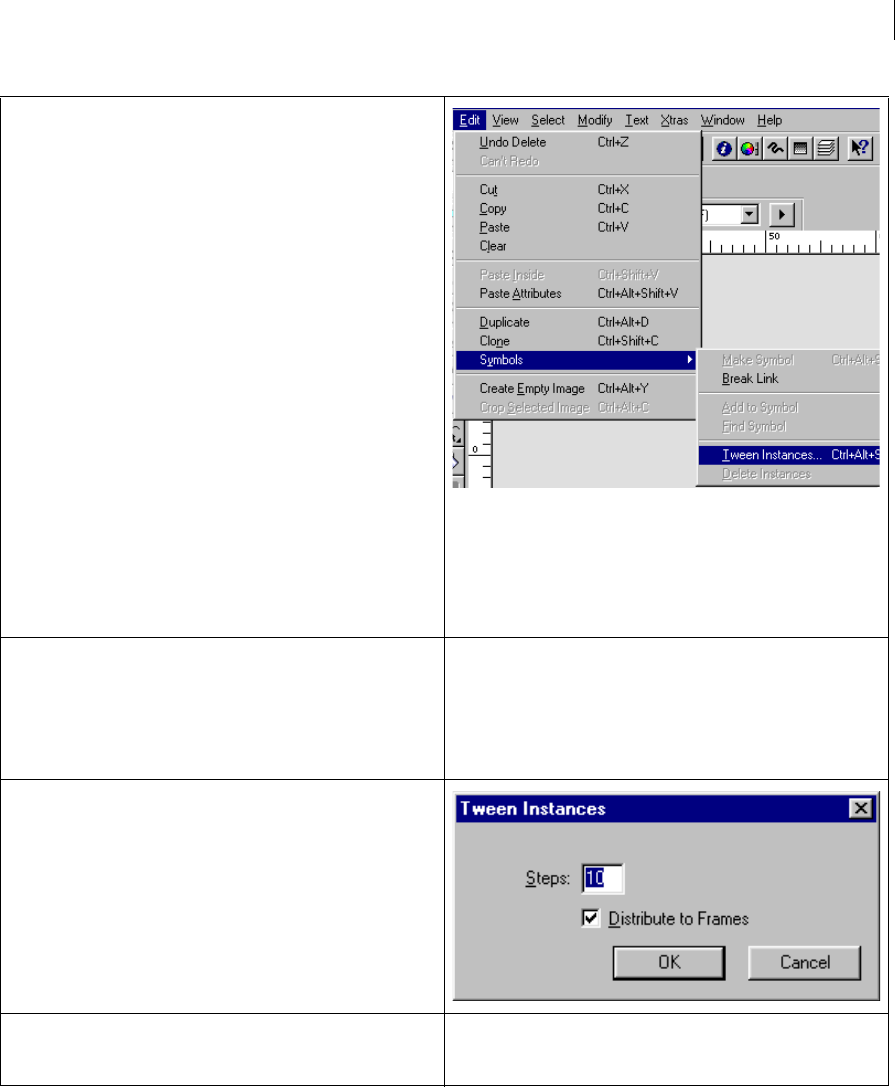
73
Last updated 11/6/2015
8 Set the number of steps desired between each of the instances and
symbol and check "Distribute to Frames".
Note: the number of instances does not include the symbols and
instances that have already been placed on the canvas. The number of
frames created will equal the number of steps entered in this dialog
plus the number of instances and symbols on the canvas.
9 Open the Frames panel and move to the Frame where the symbol
appears (in Fireworks 3 this will be the frame where the instance's
opacity reaches 100%. In this case it will be frame 12.
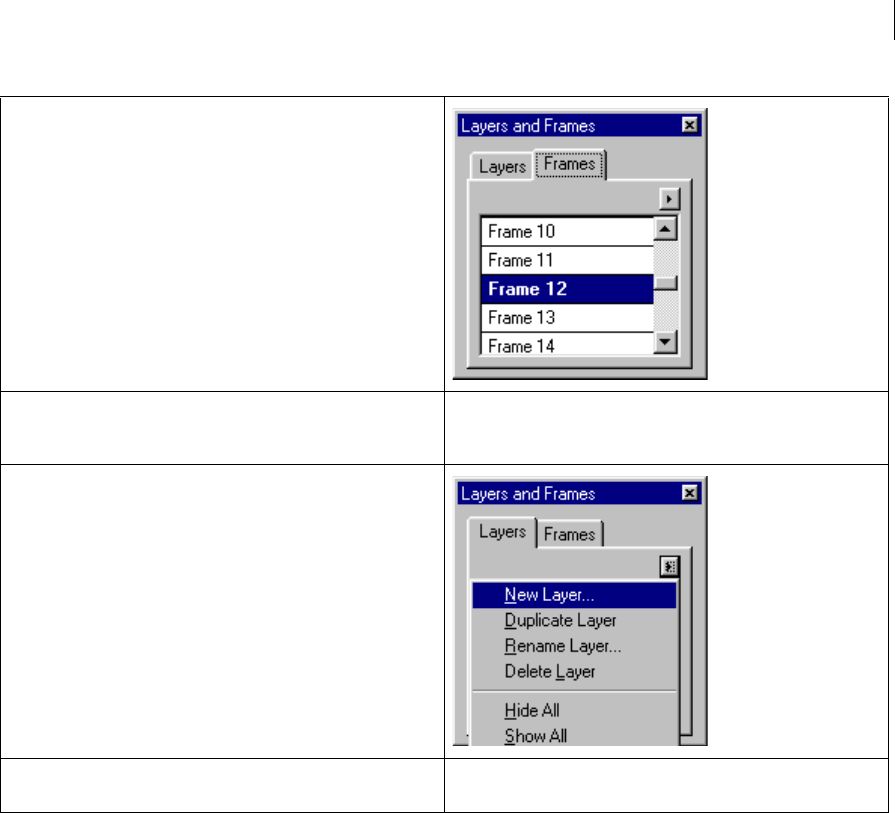
74
Last updated 11/6/2015
10 Open the Layers panel and add a new layer. Use layers to keep
animations separate and distinct. Lock the layer containing the first
part of the animation to avoid confusion.
11 Select the text tool and click on the canvas to enter the second text
object to animate.
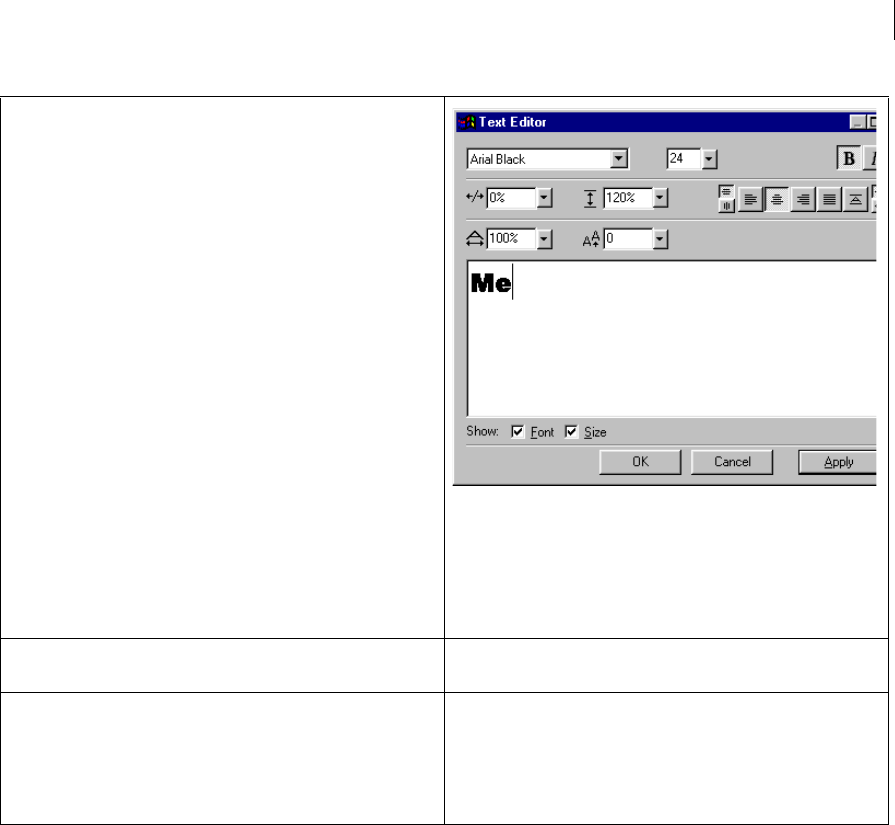
75
Last updated 11/6/2015
12 Repeat steps 2 through 8 for the second text object. Export the file as
an Animated GIF with the desired settings.
