Adobe Illustrator CS4 Freehand Migration Guide
User Manual: adobe Illustrator - CS4 - Freehand Migration Guide Free User Guide for Adobe Illustrator Software, Manual
Open the PDF directly: View PDF ![]() .
.
Page Count: 44

ADOBE® ILLUSTRATOR® CS4
FREEHAND TO ILLUSTRATOR MIGRATION GUIDE
FreeHand to Illustrator Migration Guide— 1
FreeHand to Illustrator Migration Guide— 2
Adobe, the Adobe logo, Acrobat, Creative Suite, Fireworks, Flash, FreeHand, Illustrator, InDesign, Kuler, Macromedia,
Photoshop, and PostScript are either registered trademarks or trademarks of Adobe Systems Incorporated in
the United States and/or other countries. Mac, Mac OS, and Macintosh are trademarks of Apple Computer, Inc.,
registered in the United States and other countries. OpenType, Microsoft, Windows are either registered trademarks
or trademarks of Microsoft Corporation in the United States and/or other countries. PANTONE is the property of
Pantone, Inc. SVG is a trademark of the World Wide Web Consortium; marks of the W3C are registered and held by its
host institutions MIT, INRIA and Keio. All other trademarks are the property of their respective owners.
This product may allow you to access certain features that are hosted online (“online services”), provided you have a
high-speed Internet connection. The online services, and some features thereof, may not be available in all countries,
languages, and/or currencies and may be discontinued in whole or in part without notice. Use of the online services
is governed by separate terms of use and by the Adobe Online Privacy Policy, and access to these services may require
user registration. Some online services, including services that are initially offered at no charge, may be subject to
additional fees. For more details and to review the terms of use and Online Privacy Policy, visitwww.adobe.com.
© 2009 Adobe Systems Incorporated. All rights reserved. Printed in the USA. 02/16/09
FreeHand to Illustrator Migration Guide— 3
Contents
Introduction ..................................................................4
Read about the purpose of this guide and its benets for FreeHand users.
Key Terms .....................................................................6
See how Illustrator terms compare with those in FreeHand.
Converting Macromedia FreeHand Documents..................................9
Learn about opening your FreeHand documents in Illustrator.
The Illustrator Workspace.................................................... 10
Take a tour of the Illustrator CS4 workspace which oers a host of features including tabbed
documents and a context-sensitive Control panel.
Setting up a New Document .................................................. 15
Learn how to take advantage of multiple artboards for your projects, how to use Smart Guides
and nested layers.
Working with Brushes and Gradients ......................................... 20
Apply transparency to colors in gradients, edit gradients with on-object controls, and draw with
the new Blob Brush tool.
Working with Appearances and Styles ........................................ 27
See how easy it is to create and edit multiple appearance attributes and intricate graphic styles.
Working with Text........................................................... 31
Take your text to a new level with extensive and powerful text tools.
Saving and Exporting Files................................................... 34
Save and export your artwork to many standard le formats.
Printing ..................................................................... 37
Print your artwork reliably, thanks to Separations Preview, a streamlined print interface, and
extensive support for Adobe PDF output.
Keyboard Shortcuts ......................................................... 40
Find a list of some of the most useful Illustrator CS4 keyboard shortcuts.
Additional Resources........................................................ 44
Discover useful resources for learning more about Illustrator features, tools, and techniques.

FreeHand to Illustrator Migration Guide—Introduction 4
Welcome, and thank you for having made the move or thinking about moving from
Macromedia® FreeHand® to Adobe Illustrator® CS4.
FreeHand is no longer being developed to be compatible with new operating systems and
hardware, or to integrate with other key design applications, such as Adobe Photoshop® CS4
and Adobe InDesign® CS4. Your move to Illustrator is an important step to ensure that you
can take advantage of new technologies and capabilities as they become available.
is guide explains the main dierences between the two programs and introduces you to
some of the new features in Illustrator CS4. It is written specically for FreeHand users like
you, to help you transition to Illustrator as quickly and as smoothly as possible.
Your experience using FreeHand gives you a good foundation for moving to Illustrator.
If you have been using Adobe Photoshop or Adobe InDesign, your move will be even
easier, because all Adobe graphics applications have common commands, panels, and
keyboard shortcuts. Further, Illustrator is tightly integrated with the components of
Adobe Creative Suite® 4, providing the industry-standard vector soware that completes
your toolset for print, web, interactive, motion, and mobile content design.
One of the new features in Illustrator CS4 that appeals to FreeHand users is multiple
artboards. You can now work among many artboards of varying size in one le, and export
them separately or together as a multipage PDF.
Also of interest to FreeHand users is the ability to work with tools and control eects directly
on your objects, including the application of transparency to colors in a gradient.
We hope this guide gives you the basics to explore Illustrator CS4, and makes your transition
from FreeHand a little bit easier.
Introduction
FreeHand to Illustrator Migration Guide—Introduction 5
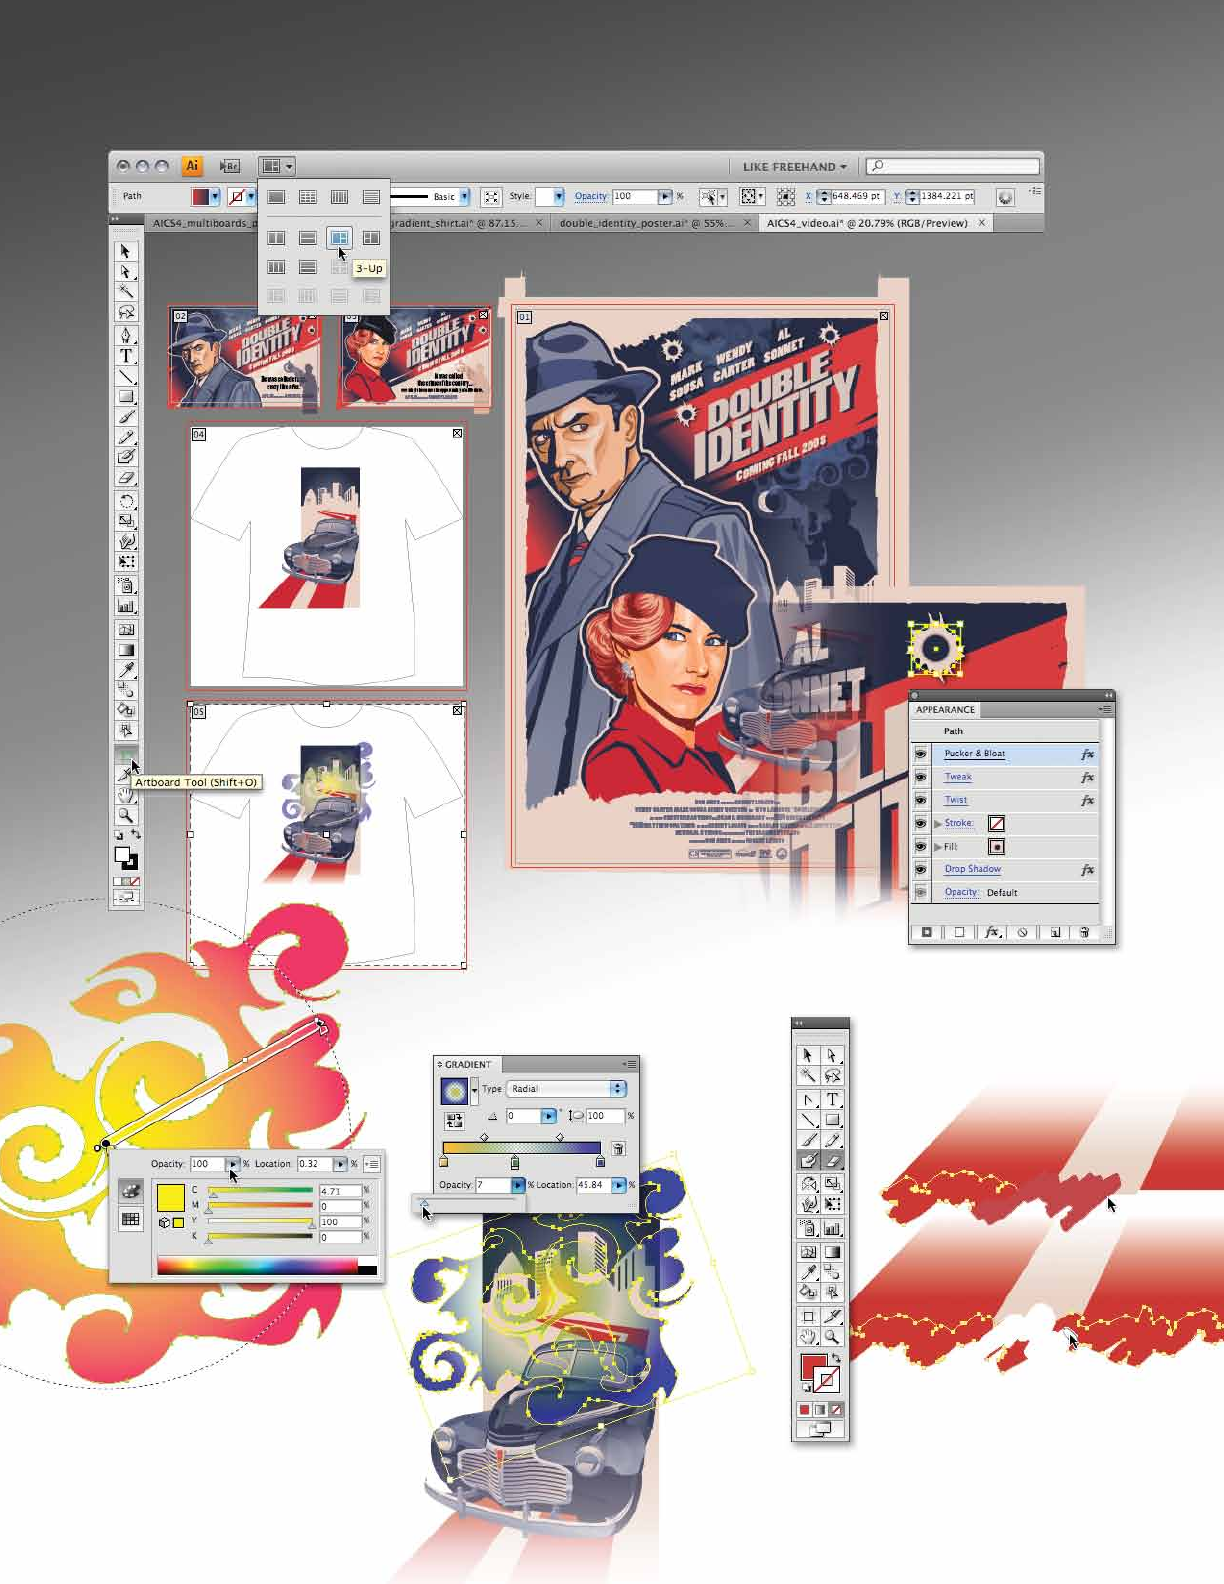
Quickly switch between workspaces, choosing
presets or your own custom arrangements.
Work among multiple les
displayed in tabs or tiled.
Work on designs of
dierent sizes in one le
using multiple artboards.
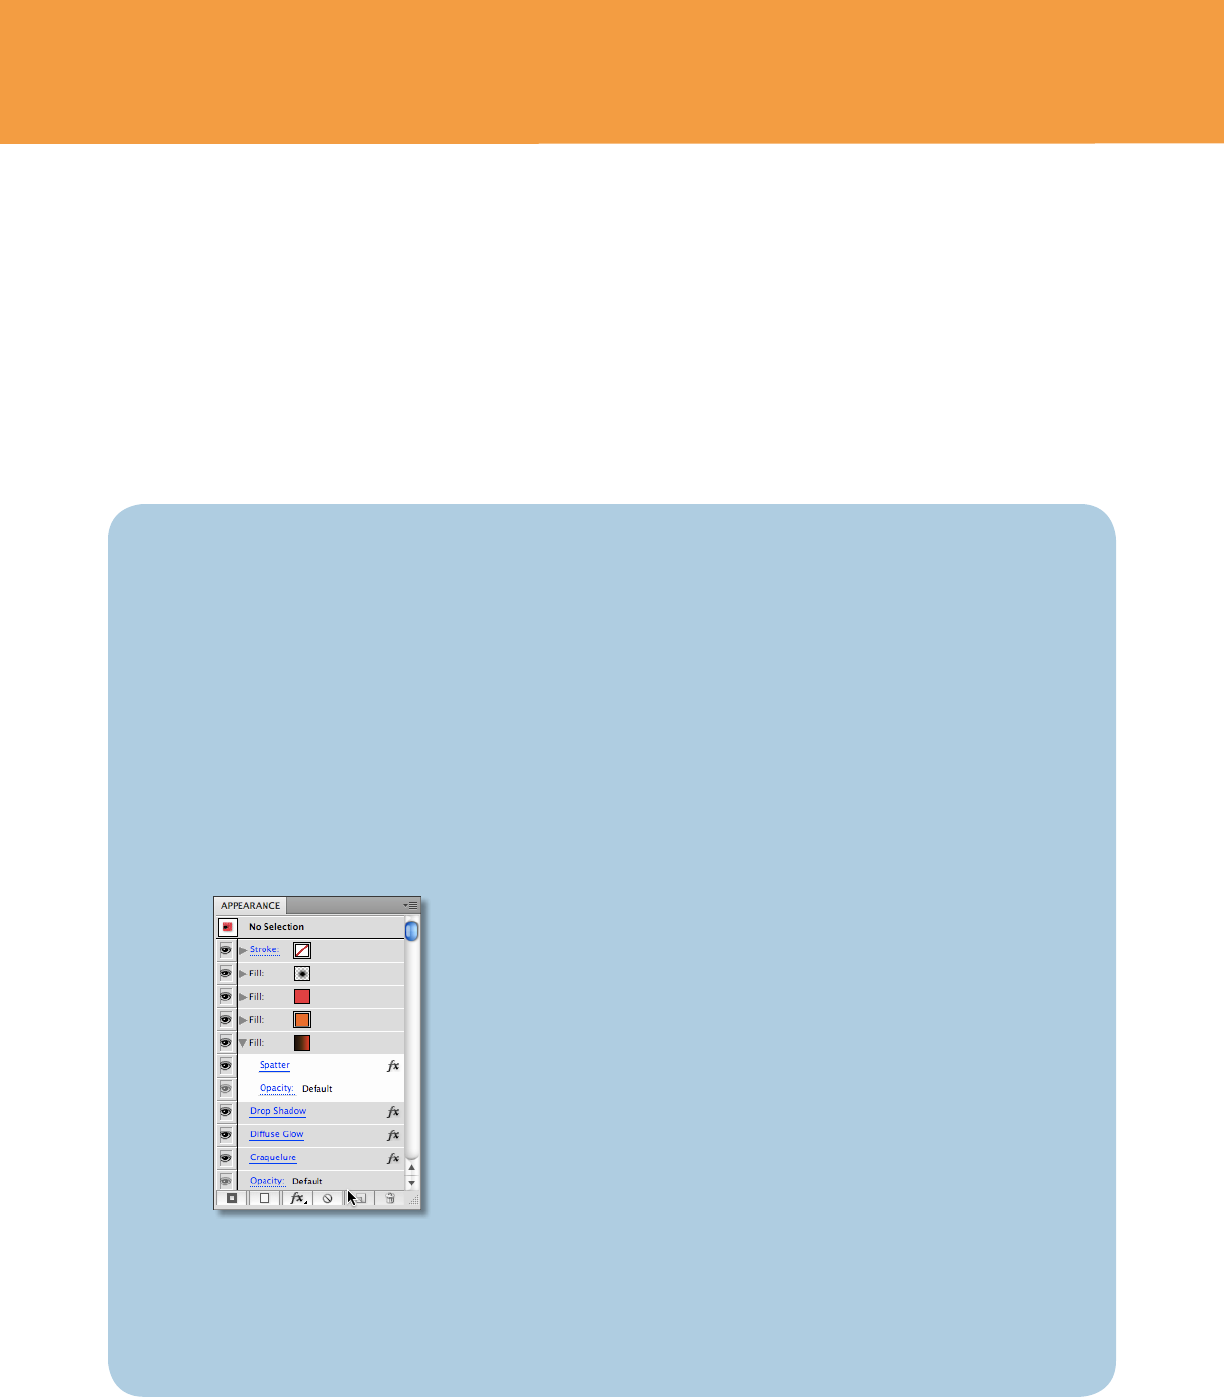
Edit, add, and delete eects, lls, and
strokes right in the Appearance panel.
Keep your eye on your designs with on-object
controls of tools such as the Gradient tool.
Sketch with the Blob Brush tool that
merges your strokes, then smoothly
erase using the Eraser tool.
Control transparency of colors in a gradient.
FreeHand to Illustrator Migration Guide—Key Terms 6
Key Terms
Pasteboard » Canvas
What you know as the pasteboard in FreeHand is called the canvas in
Illustrator. The canvas is the area outside the artboards that extends to the
edge of a 227-inch square window. The canvas represents the space where
you can arrange artboards, or create, edit, and store elements of artwork
before moving them onto an artboard. Objects placed on the canvas are
visible onscreen, but they do not print.
Pages » Artboards
In FreeHand, you can set up multiple pages within a single document;
Illustrator provides multiple artboards within a le that serve as multiple
pages or spreads. Alternately, you can divide the area of one artboard
using page tiling to dene multiple pages.
Object Properties Panel » Appearance panel
In FreeHand, the Object Properties panel is a context-sensitive area where
you access formatting options for any selected object. In Illustrator, to
achieve the same function, you use the Appearance panel. The
Appearance panel lets you view and adjust the appearance of attributes
for any object, group, or layer.
Multiple lls and strokes are listed in stacking order in the panel and
eects are listed from top to bottom in the order in which they are applied
to the artwork. Additionally, you can edit lls, strokes, and eects directly
from the Appearance panel, and you can control their display with a quick
toggle of the eye-icon.
Import » Place
In Illustrator, you can place both graphic and text les; placed graphics
can be either linked or embedded into the document and are accessible
from the Links panel. Integration across Adobe Creative Suite components
allows you, for example, to choose layer comps when you place
Photoshop les into Illustrator.
Because FreeHand and Illustrator are both vector drawing programs, they share many
common tools and commands.
Many of the terms used in the Illustrator menus, dialog boxes, and panels are identical
to those used in FreeHand. For example, tools and layers are essentially the same in
both programs. In some cases, FreeHand and Illustrator use dierent terms for the same
concept. For example, in FreeHand you work with pages, while in Illustrator you work with
artboards. Once you understand the dierences in terms, you are likely to nd the concepts
quite similar. Here are some key terms that dier between FreeHand and Illustrator:
FreeHand Term » Illustrator Term
Control object attributes
in the Appearance panel.
KEY TERMS
FreeHand to Illustrator Migration Guide—Key Terms 7
Transform Handles » Bounding box
When you select objects with the Selection tool, Illustrator displays a bounding
box around them. The bounding box lets you move, rotate, duplicate, and scale
objects easily by dragging the object or dragging a handle (one of the hollow
squares along the edge of the bounding box). To view the bounding box,
choose View > Show Bounding Box.
Keyline View » Outline
By default, Illustrator displays all artwork in color. However, you can choose to
display artwork so that only its outlines (or paths) are visible. Viewing artwork
without paint attributes speeds up the time it takes to redraw the screen when
working with complex artwork. To view artwork as outlines, choose View >
Outline. To view artwork in color, choose View > Preview.
Live Vector Eects » Eects
Eects in Illustrator are live, which means that you can modify them even
after they are applied. You can apply eects to any object and then modify
its vectors or the eect’s options, or you can remove the eect entirely using
the Appearance panel. Once you apply an eect to an object, the Appearance
panel lists the eect and enables you to edit, move, duplicate, or delete it, or
save it as part of a graphic style.
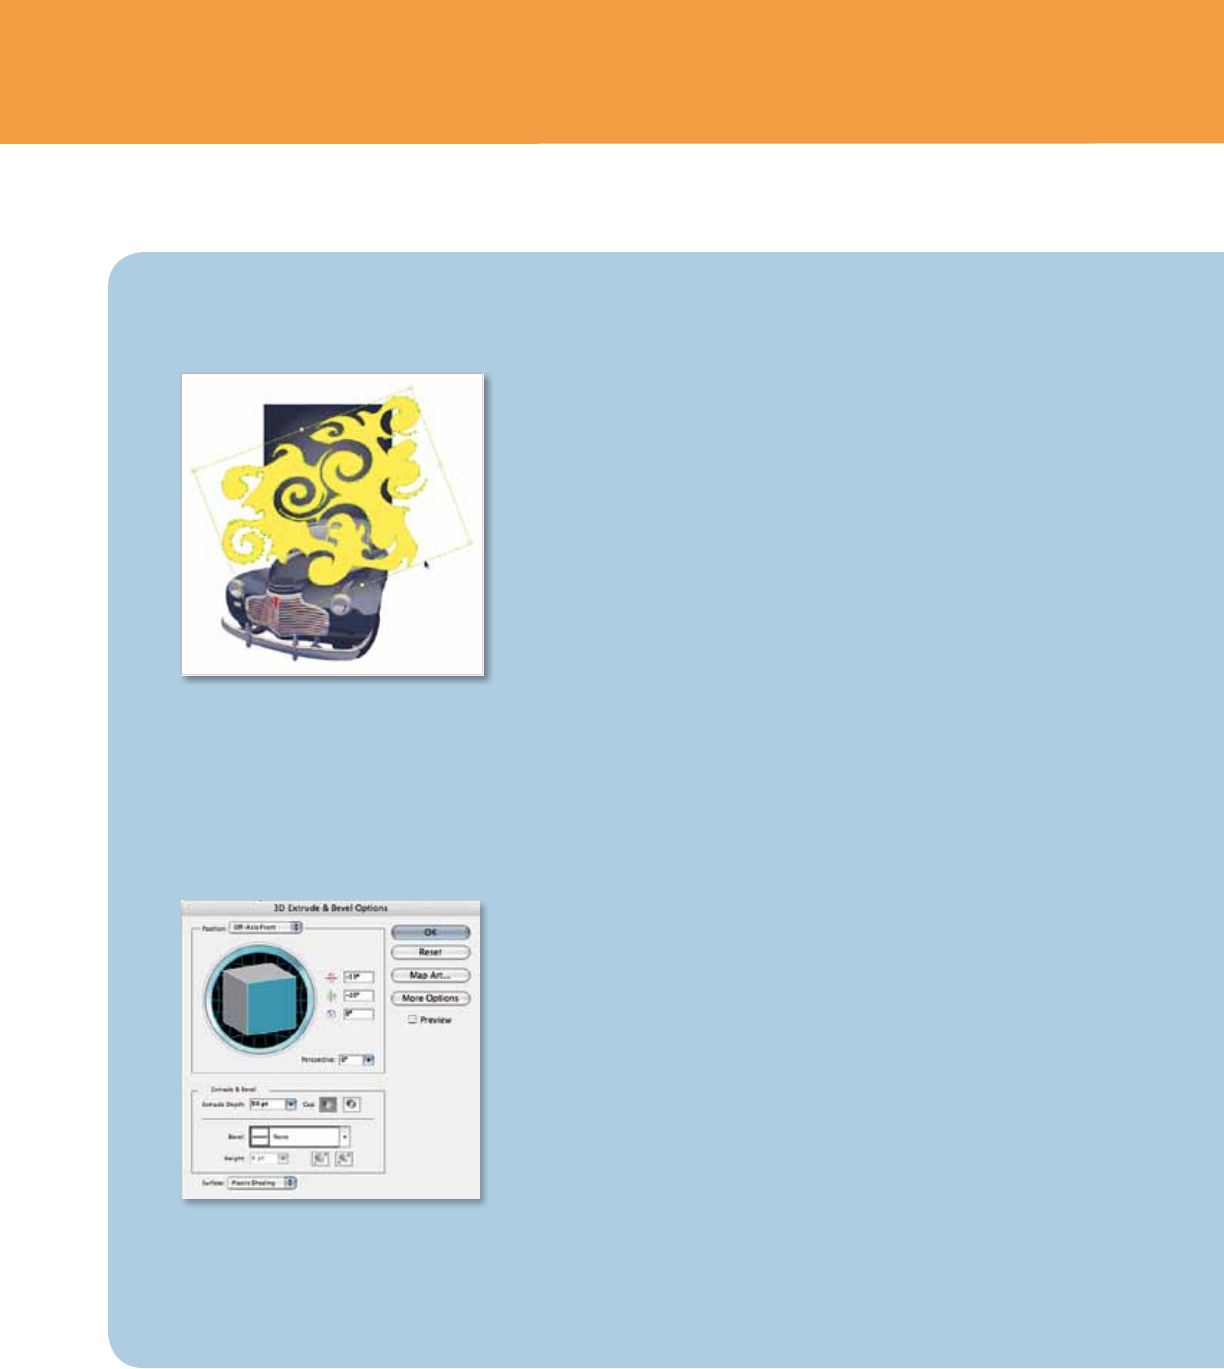
Extrude Tool » 3D eects
3D eects enable you to create three-dimensional objects by either extruding
or revolving two-dimensional objects. You can control the appearance of three-
dimensional objects with lighting, shading, rotation, and other properties.
Edit In External Editor » Edit Original
Illustrator is highly integrated with Photoshop. Edit a linked bitmap using
Photoshop by selecting the placed image and choosing Edit Original in the
Control panel or Links panel, or from the Edit menu.
Attach to Path » Type on a Path
In Illustrator, you select a path and type text on that path using the Type on a
Path tool. You can then move or ip text along the path by dragging handles
on the sides of the text. You can also choose to apply options such as Skew
and 3D Ribbon while text remains editable.
Extrude, revolve, and rotate artwork and type
to create complex three-dimensional objects
using 3D eects in Illustrator.
The bounding box in Illustrator helps you
apply transformations to selected objects.
KEY TERMS
FreeHand Term » Illustrator Term
FreeHand to Illustrator Migration Guide—Key Terms 8
KEY TERMS
Graphic Hose Tool » Symbol Sprayer
The symbolism tools let you create and modify sets of symbol instances.
You create a symbol set using the Symbol Sprayer tool. You can then use the
other symbolism tools to change the density, color, location, size, rotation,
transparency, and style of the instances in the set. You are not limited to a
particular set of symbols; you can create and use as many as you want. All the
symbols you create are available in the Symbols panel.
Output Area Tool » Multiple Artboards
Controlling the boundaries of your output is best accomplished with multiple
artboards in Illustrator CS4. You can create up to 100 artboards in one le,
each of any size and arranged as you like. You can control ruler parameters,
video and title-safe indicators, and even create artboards within artboards to
dene custom subset areas of artwork. By default all artwork is cropped to an
artboard upon output, and you can choose whether your multiple artboards are
automatically output as separate pages or separate les.
Eraser » Eraser tool
Quickly remove areas of artwork as easily as you erase pixels in Photoshop by
stroking with your mouse or stylus over any shape or set of shapes. New paths
will automatically be created along the edges of your erased stroke with points
laid down economically, but still preserving the smoothness of your erasure.
Styles » Graphic styles
A graphic style is a set of reusable appearance attributes. Graphic styles allow
you to quickly change the look of an object. For example, you can change its
ll and stroke color, alter its transparency, and apply eects in one step. All the
changes you apply with graphic styles are completely reversible and editing the
attributes that make up the graphic style is easy using the Appearances panel.
You can even add styles to an object or group of objects without destroying
existing attributes.
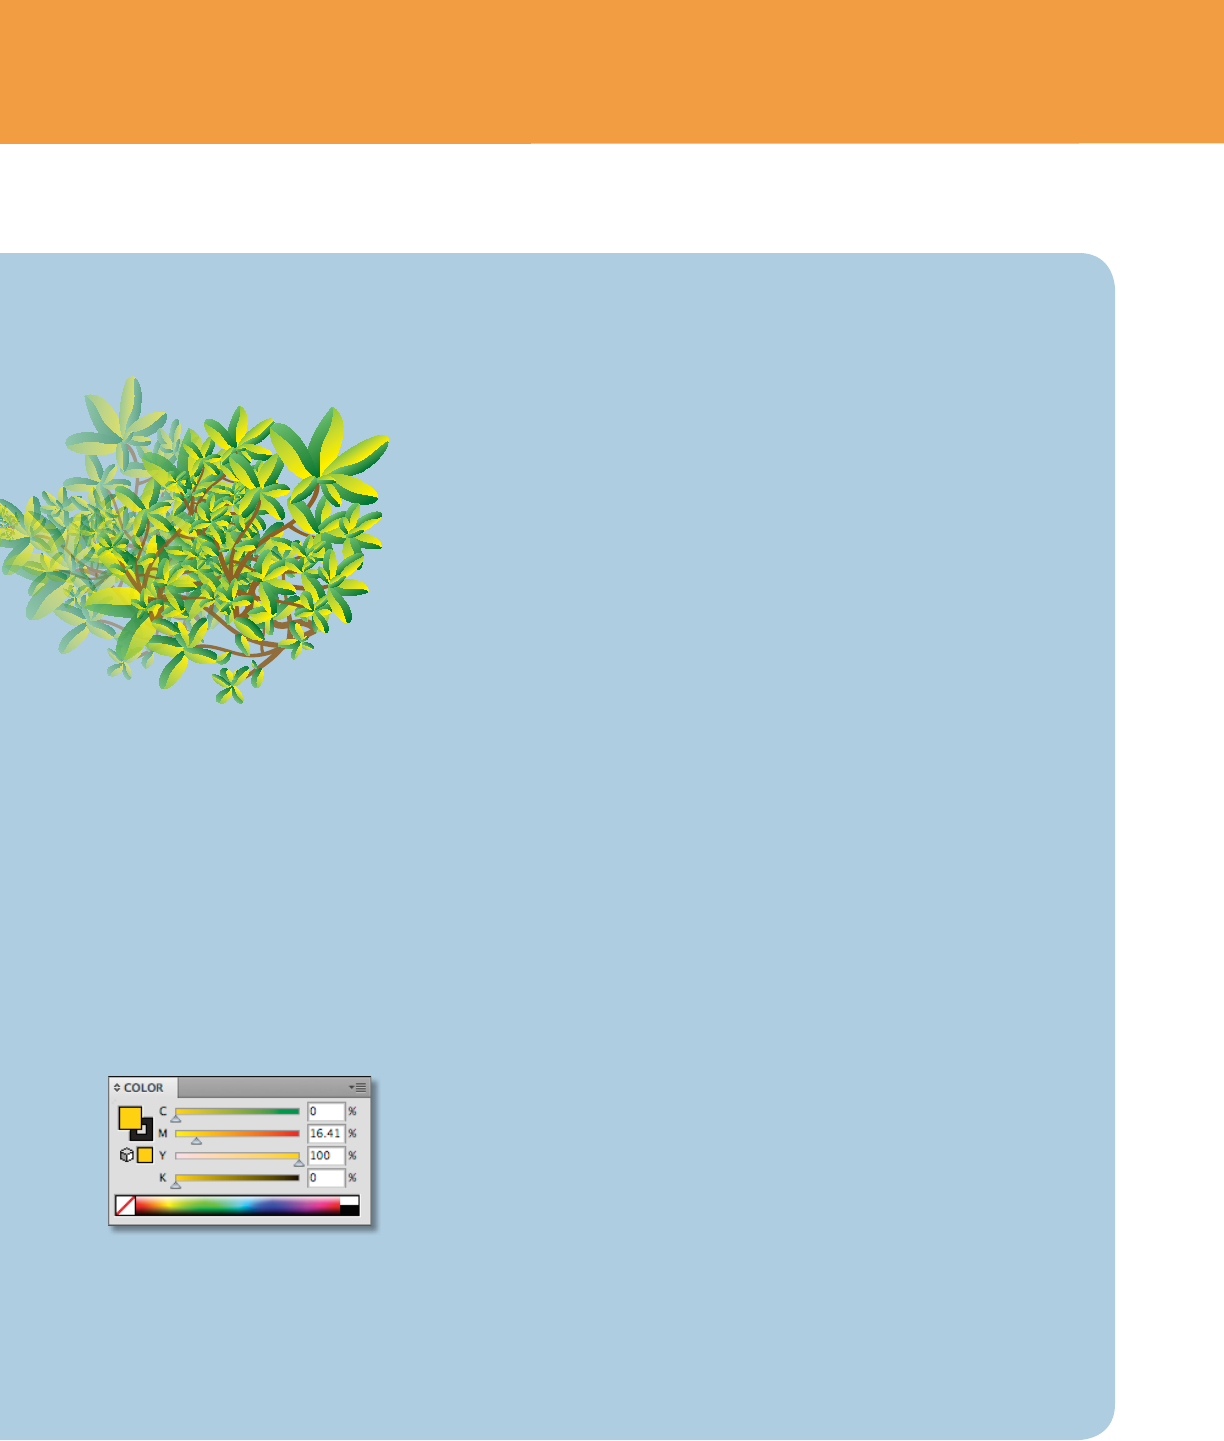
Mixer » Color panel
You use the Color panel to apply color to an object’s ll and stroke, and also
to edit and mix colors. The Color panel can display color values using dierent
color models. By default, only the most commonly used options are visible in
the Color panel. To display the panel, choose Window > Color. To change the
color model, choose Grayscale, RGB, HSB, CMYK, or Web Safe RGB from the
panel menu.
Paste Inside » Clipping Mask
Hide parts of an object or group of objects by dening a path as a clipping
mask, with similar results as pasting contents into a closed path in FreeHand.
Work easily with both masks and masked objects, quickly switching between
them for editing and controlling visibility.
FreeHand Term » Illustrator Term
The Color panel
This intricate foliage was created using
the symbolism tools in Illustrator.
FreeHand to Illustrator Migration Guide—Converting Macromedia FreeHand documents 9
CONVERTING MACROMEDIA FREEHAND DOCUMENTS
Converting Macromedia
FreeHand documents
Illustrator can open FreeHand les up to version 10 and FreeHand MX (version 11).
Artwork from FreeHand versions 7 and 8 will open with fewer options than later versions.
FreeHand allows you to import both CMYK and RGB image les. If you open a FreeHand
document that contains both CMYK and RGB images in Illustrator, you’ll be prompted to
choose a specic color space (see “Setting up a New Document” on page 15).
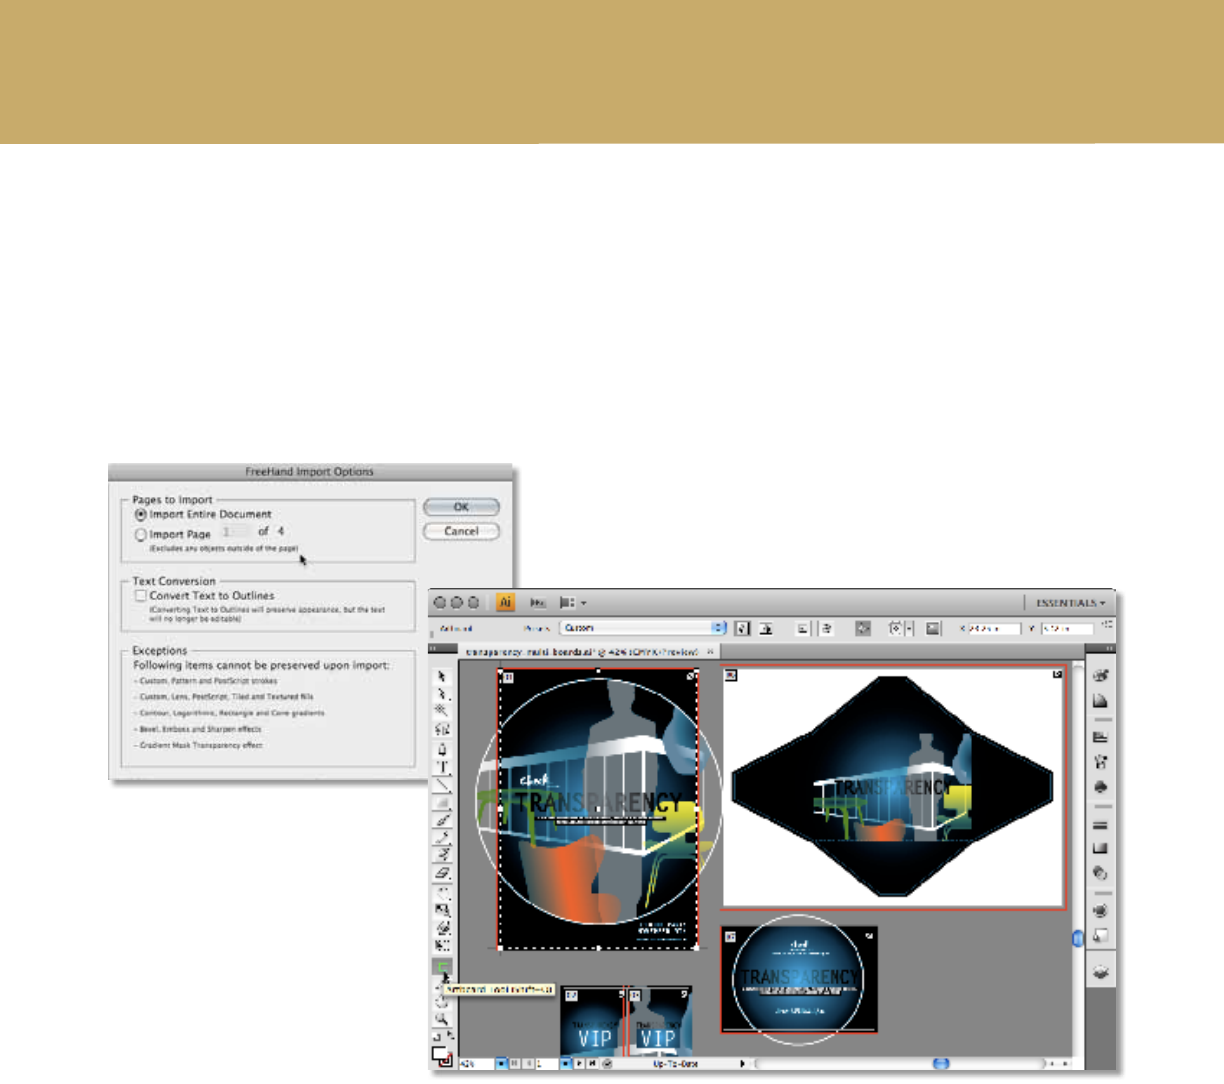
If the original FreeHand document contains more than one page, these will become separate
artboards in the Illustrator document; multiple artboards in Illustrator CS4 can be printed
and saved separately or as a multipage PDF. You also have the option import only a specic
page from a FreeHand le (see “Multiple Artboards” on page 17).
Other import features include:
• Import of FreeHand swatches, dened in the Swatches palette in FreeHand, as swatches
in Illustrator CS4.
• Import of FreeHand symbols as symbols in Illustrator CS4.
• Import of FreeHand raster eects—drop shadow, basic and feather transparency—as
live eects in Illustrator CS4.
• Import of FreeHand Envelopes as Envelope eects in Illustrator CS4.
• Import of FreeHand custom guides as Illustrator CS4 guides.
• e ability to outline text upon import so that text appearance in FreeHand is preserved
in Illustrator CS4.
• Proper positioning of FreeHand text, including text alignment, text wrap, vertical text,
and text inset, upon import into Illustrator CS4.
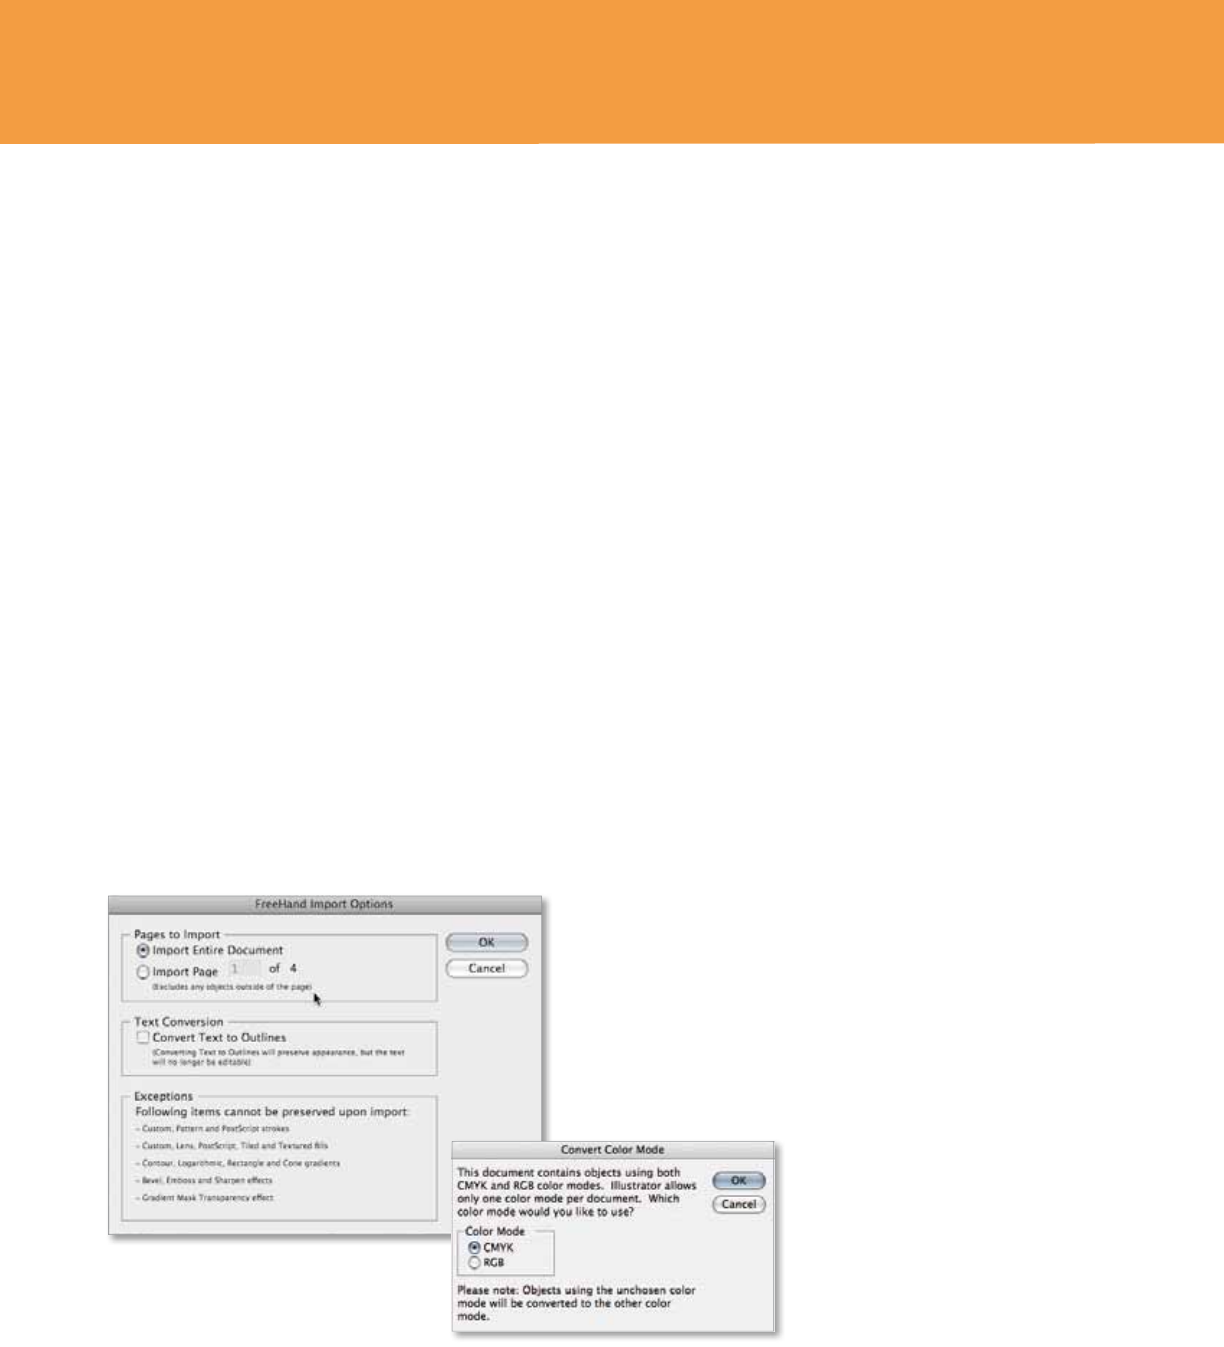
Illustrator can work in either CMYK or RGB color
mode. You will be prompted to choose one or the
other when you open a FreeHand 9, 10, or MX
document that contains objects that use both
CMYK and RGB color modes.
Multiple pages from FreeHand 9, 10, and MX
will be imported into Illustrator CS4 as multiple
artboards. You can import any and all pages at
once. You can also convert text to outlines to
preserve FreeHand appearances.
THE ILLUSTRATOR WORKSPACE
FreeHand to Illustrator Migration Guide—The Illustrator Workspace 10
The Illustrator Workspace
Tools
panel
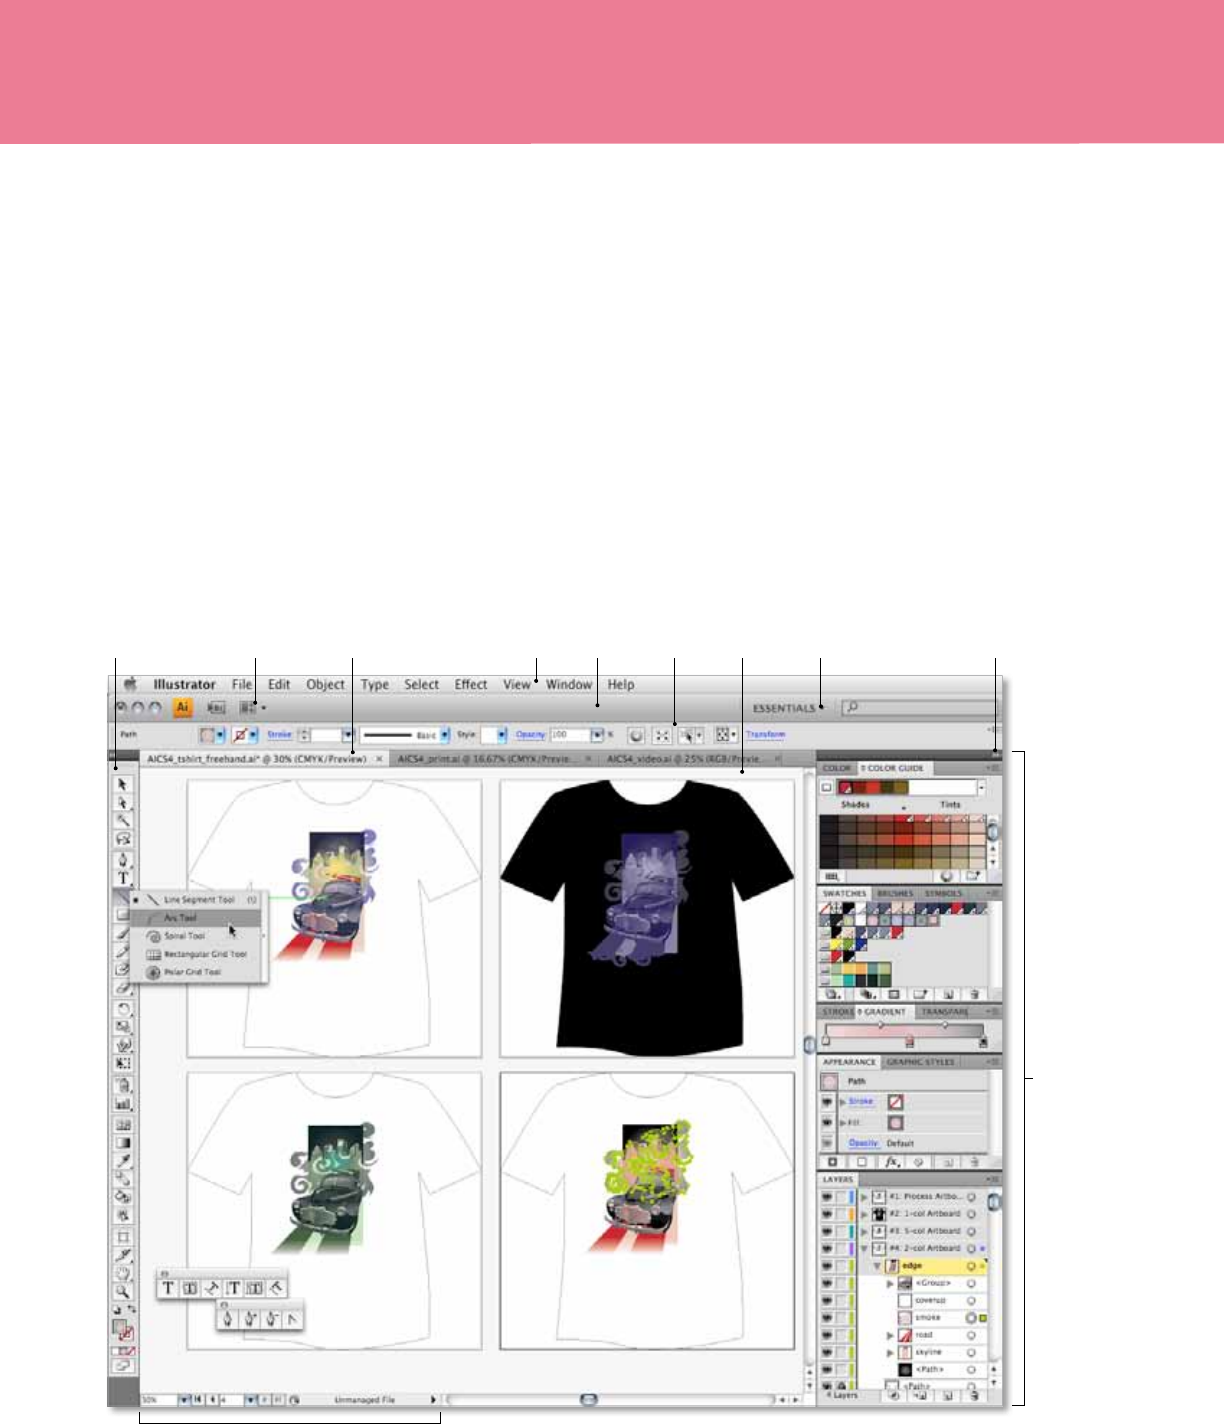
Illustrator shares the same user interface with Photoshop, InDesign, Fireworks, and Flash
Professional CS4, so you can quickly access familiar tools. You can dock panels in your
favorite conguration, pull them out to oat free anywhere on your screen, and collapse
them to an icon view. You can save custom workspace congurations and move between
les easily with tabbed and tiled views of multiple documents.
e basic workspace in Illustrator consists of an illustration window where you draw and
lay out your artwork, a Tools panel that holds the tools for drawing and editing artwork,
and panels to help you monitor and modify your artwork. Panels include a context-sensitive
Control panel across the top or the workspace that displays controls based on your selection.
e status bar (at the lower-le edge of the illustration window) displays the current zoom
level, the current artboard with an artboard navigation menu, and current tool. It shows
date and time, number of undos and redos available, document color prole, and more.
Illustration
window
Panels
Status bar
Hidden tools exposed
from the tools panel
Hidden tools
torn off of the
tools panel
Arrange
documents
The Illustrator CS4 workspace
Expand/Collapse panels
Control
panel
Menus
One of four artboards
Application
Bar
Current file visible among
three document tabs
Choose
workspace
THE ILLUSTRATOR WORKSPACE
FreeHand to Illustrator Migration Guide—The Illustrator Workspace 11
The Tools panel
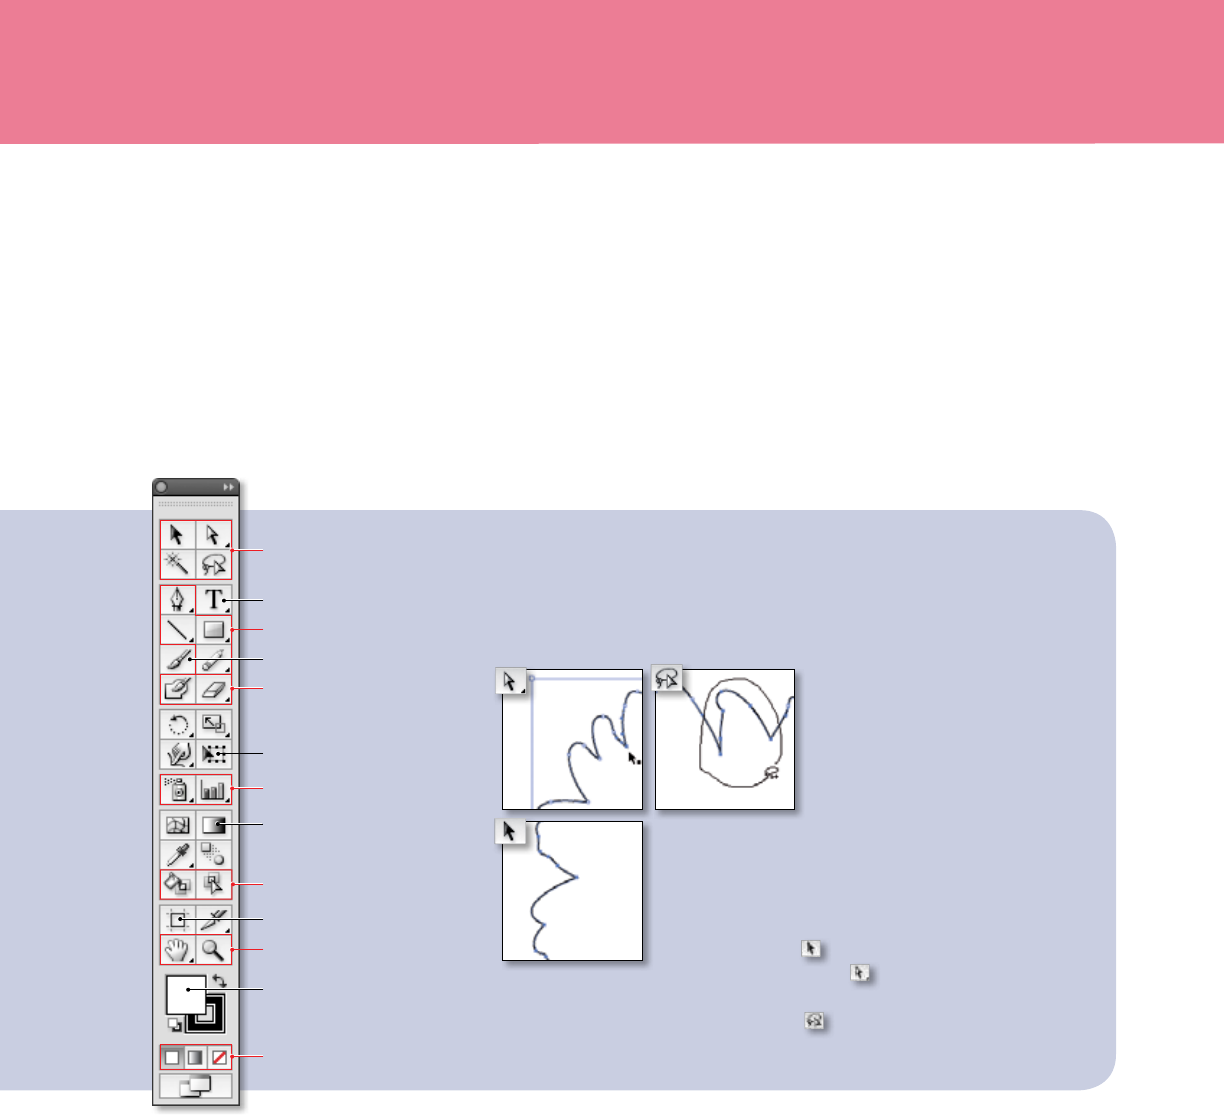
Use the tools in the Tools panel to create, select, and manipulate objects in Illustrator. Choose
to display tools in a double or single column by clicking on the double arrows at the top of
the Tools panel. Some tools have additional tools beneath them (hidden tools), indicated by a
small triangle at the lower right corner of the tool. Click and hold to reveal hidden tools.
You can tear o hidden tools into separate panels by clicking and holding the tool, and then
moving your cursor to the right and releasing at the edge of the hidden tool pop-up. Hover
your cursor over any tool to see its name and keyboard shortcuts.
The Application Bar
e Application Bar is the top frame of the application window and includes options for
arranging your workspace as well as fast access to Adobe Bridge (see page 14). e Arrange
Documents menu enables layout of multiple Illustrator documents in a variety of tiled
arrangements. e Favorites pulldown provides fast access to all preset workspaces and your
custom saved workspaces. You can ensure that the Application Bar appears by choosing
Window > Application Frame.
Illustrator tools
The rst time you start Illustrator, the Tools panel appears at the left side
of the screen. You can move the Tools panel by dragging its panel tab.
You can also show or hide the Tools panel by choosing Window > Tools.
Selection tools
Type tools
Drawing tools
Paintbrush tool
Blob Brush and Eraser tools
Symbol and graph tools
Free Transform tool
Live Paint tools
Multiple Artboard tool
Move and zoom tools
Color
Screen modes
About the Selection tools
In FreeHand, you use the Pointer tool to select both
objects and single points; with the Subselect tool, you
can modify curves and objects in groups. In Illustrator,
the Selection tool lets you select objects or groups;
the Direct Selection tool lets you modify objects or
groups and select multiple single points on a path.
Use the Lasso tool to select multiple points by
making a free-form selection.
Gradient tool
FreeHand to Illustrator Migration Guide—The Illustrator Workspace 12
THE ILLUSTRATOR WORKSPACE
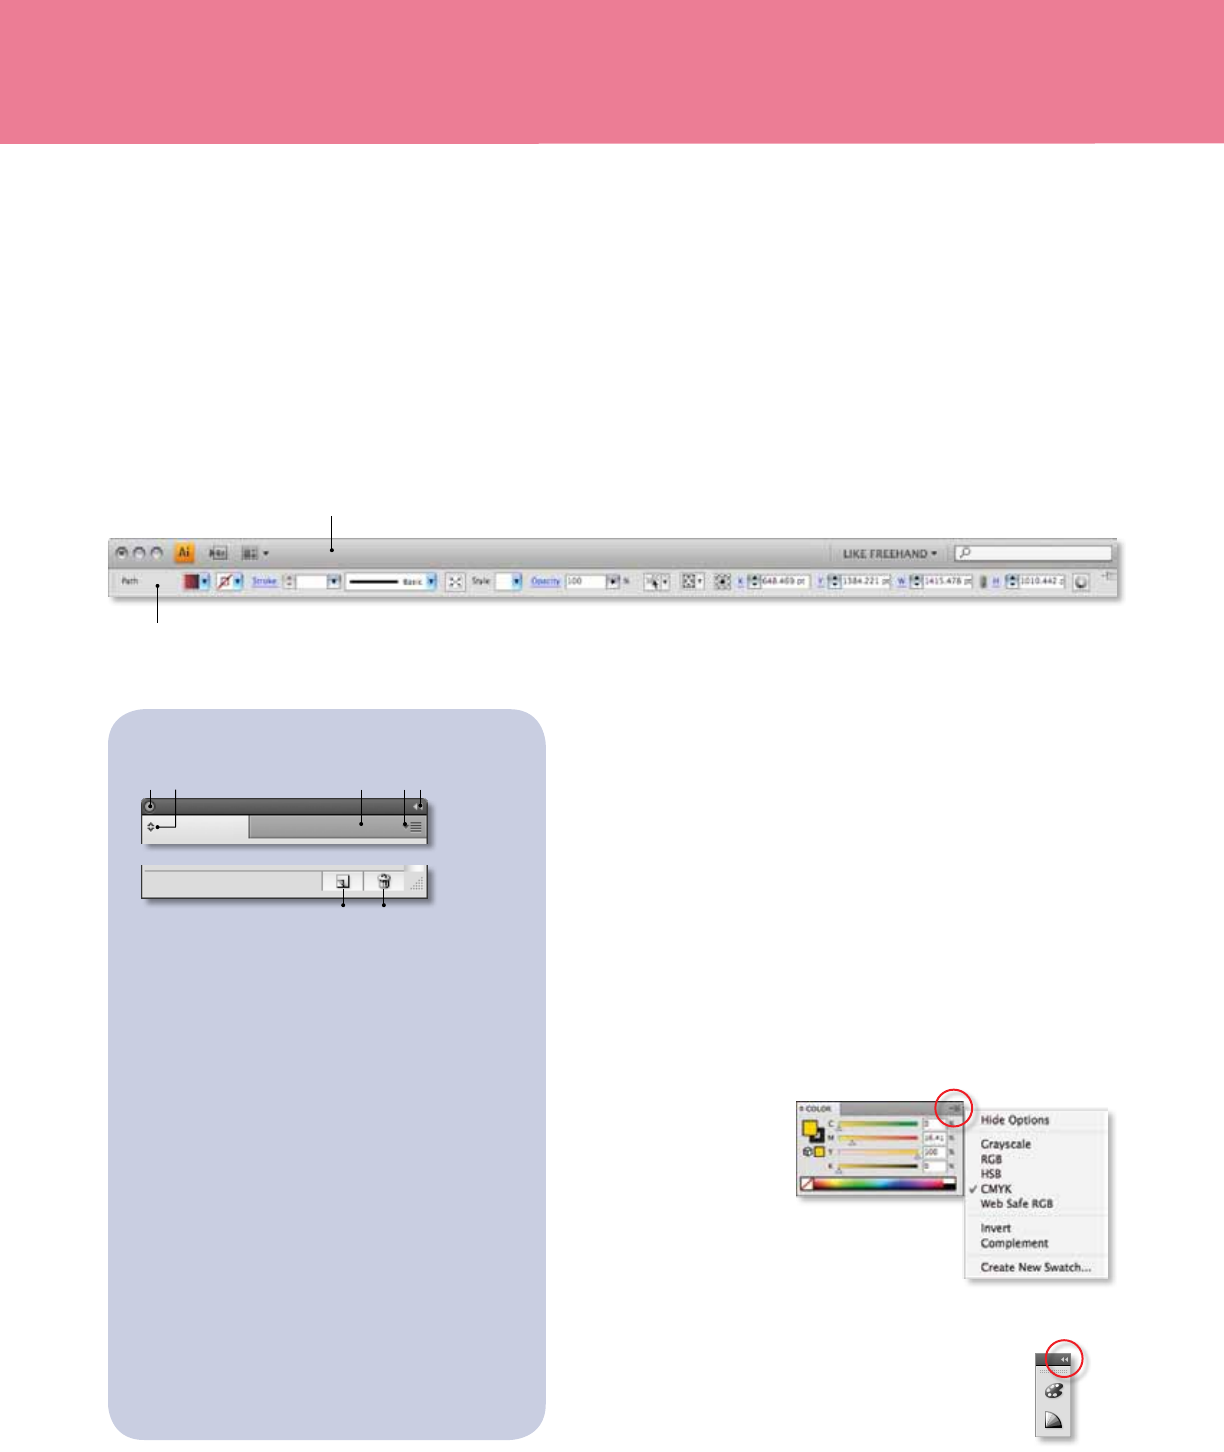
All panels, including
the Control panel,
have a pop-up menu
that oers additional
tool options and panel
viewing options.
Panels can be collapsed into an icon
view to optimize your screen space.
The Application bar provides direct access
to Bridge, document viewing options, a full
selection of workspaces, and search.
The Control panel
e Control panel is context sensitive and oers quick access to options related to the
objects you select. For example, if you select a vector object, many controls you will need
to change its attributes appear there, including commands for precise positioning. You can
access anchor point controls, selection tools, clipping masks, envelope distortions, char-
acter attributes, and more, all exposed contextually so you can use the Control panel as your
primary tool for editing your artwork.
e Control panel also provides fast access to panels, which, in some cases, oer additional
options. Click a blue hyperlink to open another panel for easy access. To congure the
Control panel, choose options from the panel’s pop-up menu, also called the panel menu.
A. Click to close panel.
B. Click to show/hide panel options.
C. Click to collapse/expand panel height.
D. Click to show pop-up menu for the panel.
E. Click to collapse/expand panel width.
F. Creates a new iteration of the panel’s “subject,” such as an
action, brush, style, layer, or swatch. Option-click (Mac OS)
or Alt-click (Windows) to set options (except action and
brush). Drag onto button to duplicate action, brush, style,
layer, swatch, or appearance.
G. Deletes action, brush, style, layer, swatch, or appearance;
Option-click (Mac OS) or Alt-click (Windows) to delete
without confirmation (except in Variables panel).
Other panel shortcuts
styles, or swatches.
brushes, layers (same level), links, styles, or swatches.
Control panel.
Common panel actions
Panels
You can access all panels in Illustrator from the Window menu; some can
also be activated by clicking the blue hyperlinks in the Control panel.
A panel can be grouped with another by dragging its tab onto the other
panel. To dock panels so that they move together, drag a panel’s tab to
the bottom of another panel until you see a blue line. When the panels
are grouped or stacked in panes, they can be collapsed into an icon view
to further optimize the working space. Once you have organized the
panels, you can save your setup as a Workspace by choosing Window >
Workspace > Save Workspace.
The context-sensitive Control panel gives
you immediate access to formatting options
that pertain to your current selection.
F G
ECB
A D
FreeHand to Illustrator Migration Guide—The Illustrator Workspace 13
THE ILLUSTRATOR WORKSPACE
Tip: To print the list of keyboard
shortcuts from within Illustrator, choose
Edit > Keyboard Shortcuts to open the
dialog box, and click Export Text.
Context-sensitive menus
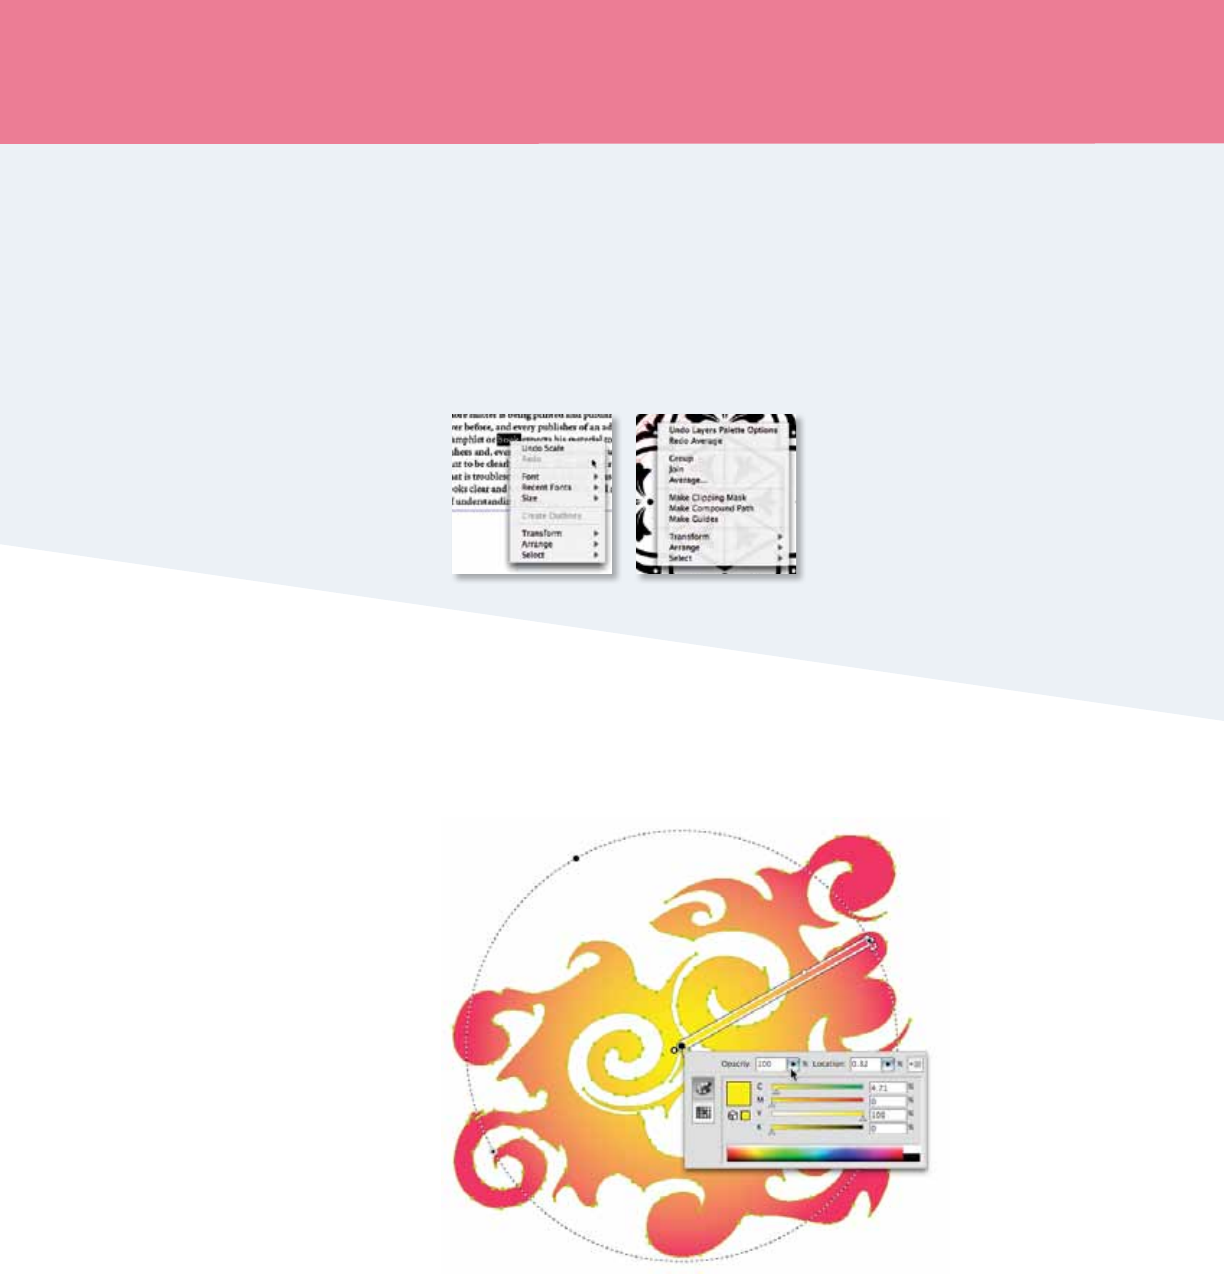
You can quickly access many commands using context-sensitive menus that display
commands relevant to the active tool, selection, or panel. To display a context-sensitive
menu, right-click in the document window or panel (or Control-click on Mac OS).
Right-click (or Control-click, Mac) on an object
to display a menu providing fast access to
contextual commands.
Keyboard shortcuts
Illustrator lets you assign keyboard shortcuts for many operations. e Keyboard Shortcuts
dialog box (choose Edit > Keyboard Shortcuts) serves as your shortcut editor, and includes
all commands that support shortcuts, some of which aren’t in the default shortcut set. For a
list of keyboard shortcuts, see page 40.
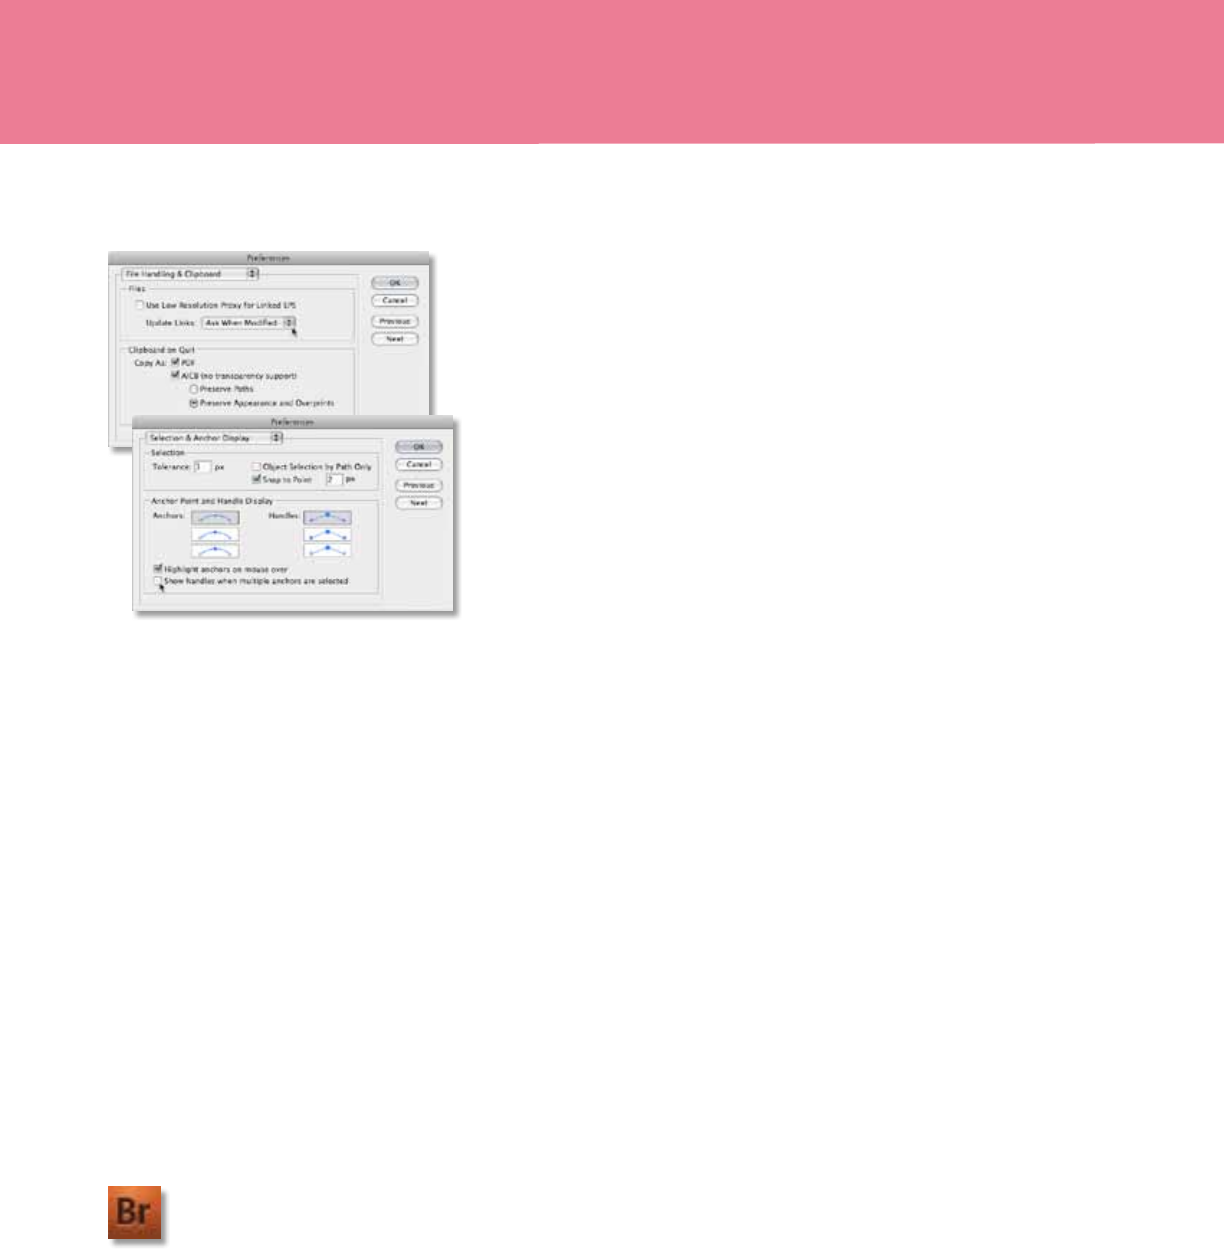
On-object controls
A number of tool control panels appear directly on your selected object. For example, when
you click the gradient tool and then select an object, gradient panel controls appear on the
selection so you can quickly edit your gradient and more easily stay focused on your work.
The gradient panel appears
right on the selected object
for instant feedback as you
adjust the characteristics of
your gradient.
FreeHand to Illustrator Migration Guide—The Illustrator Workspace 14
THE ILLUSTRATOR WORKSPACE
Preferences
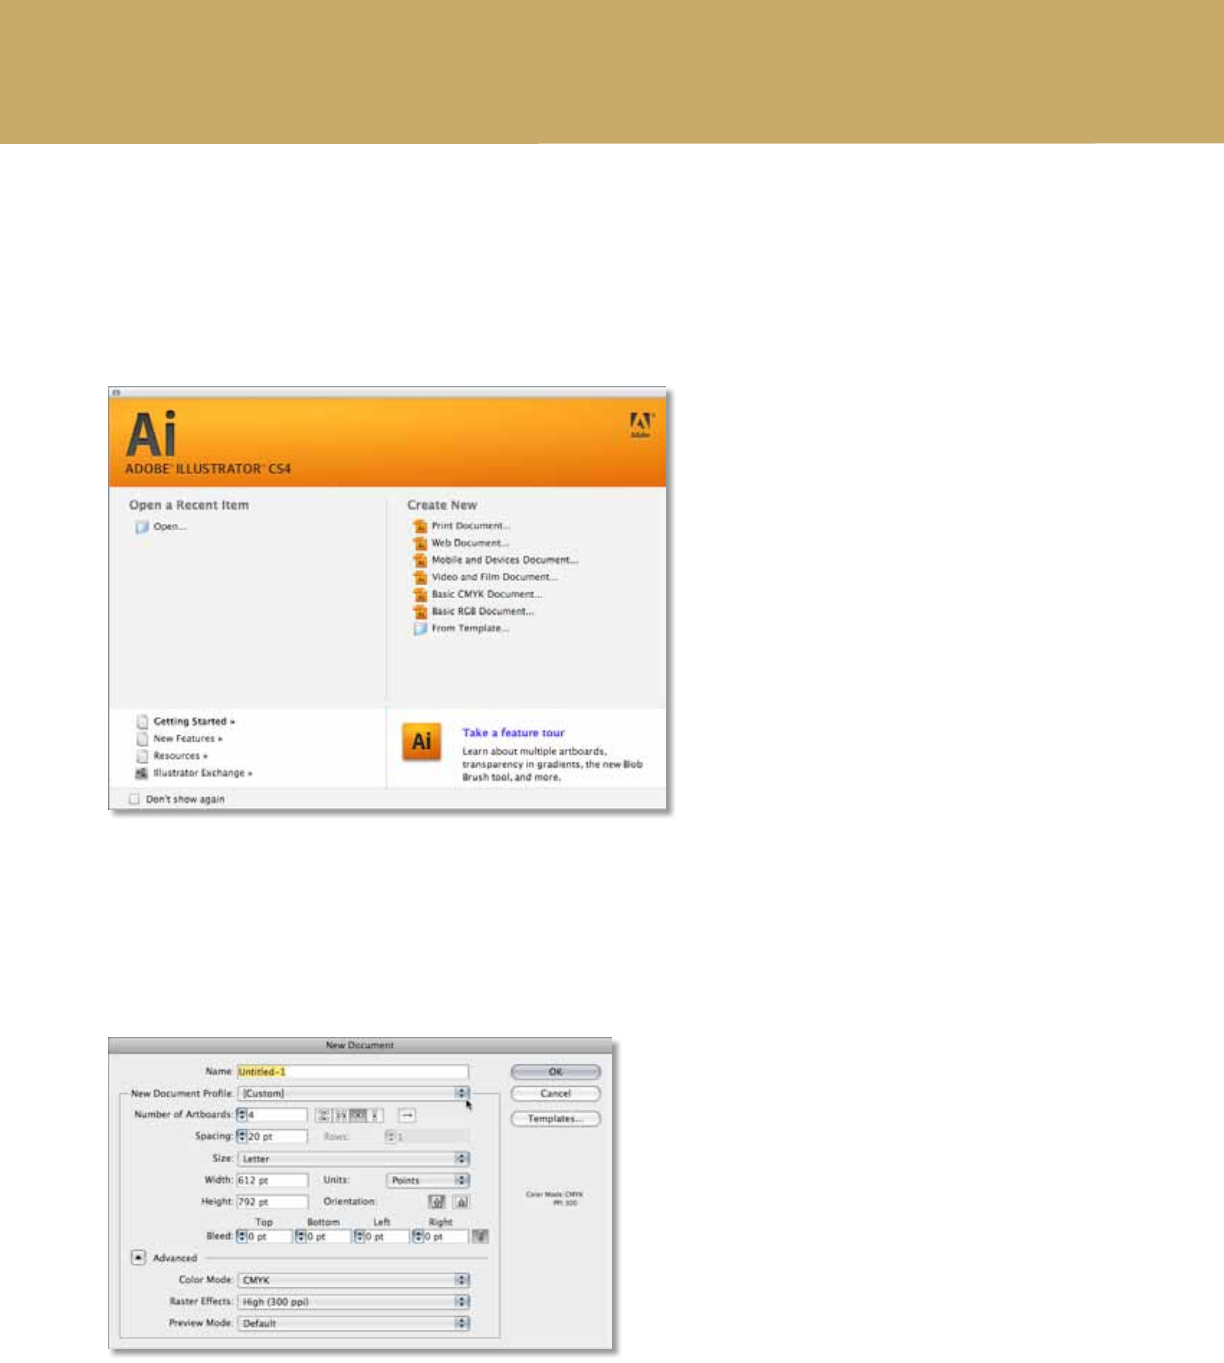
Before you begin creating artwork with Illustrator, familiarize yourself with the
program’s default settings—specically the options available in the Preferences
dialog box (in Mac OS, choose Illustrator > Preferences > General, or in Windows,
choose Edit > Preferences > General). You can customize these settings to suit your
needs, creating a work environment that’s both productive and comfortable. As you
look through the panes in the Preferences dialog box, you’ll see that many of the
options are identical to those in FreeHand. You’ll also nd several unfamiliar but
useful options, such as the option to use the clipboard to transfer selections between
an Illustrator le and other Adobe applications.
e clipboard is particularly useful for moving paths from one application to
another because paths are copied to the clipboard as PostScript language descrip-
tions. Artwork copied to the clipboard is pasted in PICT format in most applica-
tions. However, some applications, such as InDesign, accept PDF or AICB (Adobe
Illustrator Clipboard) data. PDF preserves transparency; AICB lets you specify
whether you want to preserve the overall appearance of the selection or copy the
selection as a set of paths (which can be useful in Photoshop and InDesign).
Color management
e Adobe color management system helps maintain the appearance of colors as you
import images, edit or transfer documents between Adobe applications, and as you
output your nished work.
By default, color management is turned on in Adobe Creative Suite 4 components.
You can synchronize color settings to provide consistent display of RGB and CMYK
colors no matter which application you view them in.
To change color settings within Illustrator, choose Edit > Color Settings. To ensure
that your colors are synchronized across Adobe Creative Suite components, open
Adobe Bridge, choose Edit > Creative Suite Color Settings, and select an appropriate
prole. For more information about color management, search Illustrator Help.
Help and training
Adobe provides a number of ways to get help with learning to use Illustrator. Your
rst stop is Adobe Community Help, accessible by choosing Help > Illustrator Help.
Not only will you nd complete tools help, but thanks to a powerful search engine,
you'll also nd a variety of online resources from industry experts.
You can also watch videos on Adobe TV that both instruct and inspire. Get tips,
tricks, and step-by-step tutorials that show you just how to achieve eects from the
very simple to the wonderfully sophisticated. Use Adobe TV to discover the most
current techniques developed by Illustrator users and to stay connected with the
creative world.
Find a comprehensive list of these and additional resources on page 44.
File Handling & Clipboard preferences let you choose
how to copy artwork to other applications. You can
also choose selection and snap tolerances, and how
to display anchors and handles.
What is Bridge?
Adobe Bridge CS4 is a powerful, easy-to-use
media manager for visual people, letting
you easily organize, browse, locate, and view
creative assets. Bridge provides centralized
access to project les and global settings,
as well as to XMP metadata tagging and
searching capabilities.
FreeHand to Illustrator Migration Guide—Setting up a New Document 15
Setting up a New Document
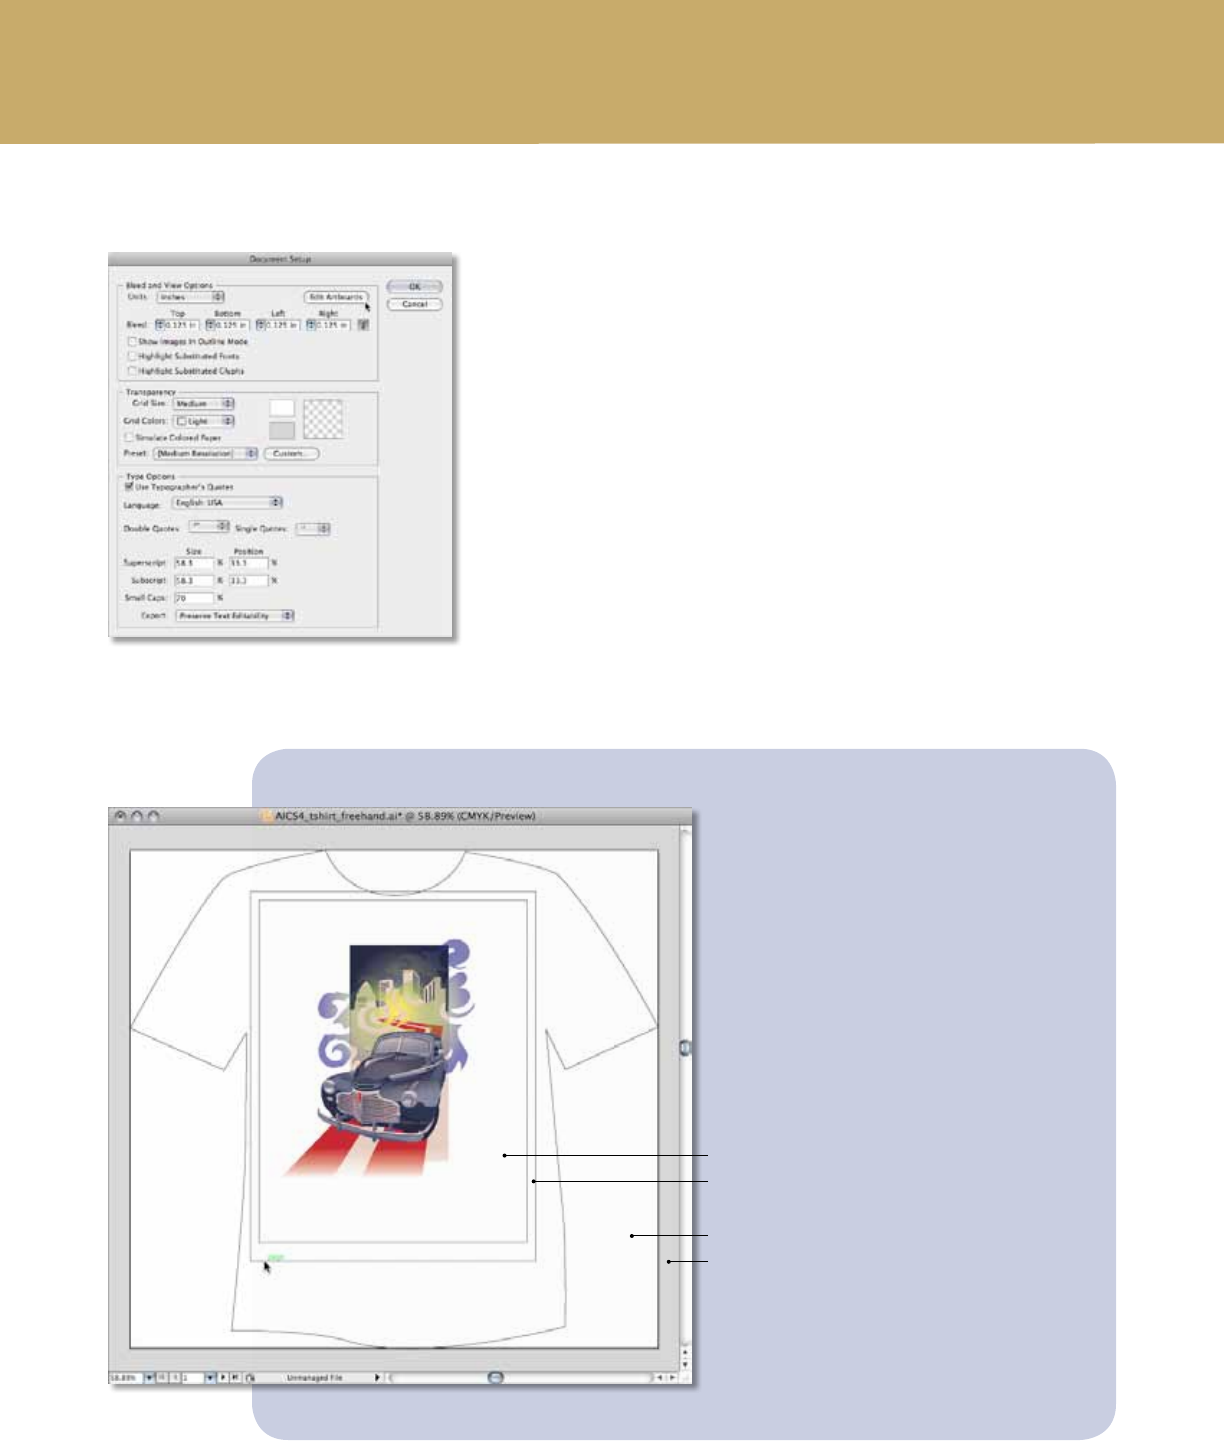
When you start Illustrator, the Welcome
screen lets you access your recent
documents or choose a new type of
document for your choice of media.
You can choose how many artboards you
wish to work with, up to 100, arranged any
way you want. For example, you can create
a 12-page document for print with 12 letter-
sized artboards arranged in three rows of
four. And you can set bleed sizes for all
artboards when you create a new document.
All of these settings are easily changed at
any time.
If you’re working on a video project, choose
a New Document prole for video, selecting
a size such as NTSC DV. Your color mode
will be set to RGB and your artboard will
automatically show the format’s dimensions
with guides for video and title-safe areas.
If you’re working on a web project, choose
a New Document Prole for the web to
automatically set raster resolution to 72ppi
and color to RGB. Print proles default to
CMYK color and oer a range of popular
artboard setups including preset raster-
eects resolutions. You can also save your
own custom proles that specify setup
parameters such as artboard dimensions,
swatches, brushes, styles, and color spaces.
To create a new document, you can also
choose File > New and choose a New
Document Prole depending on the
intended use of your illustration. As noted
above, the New Document Prole will set
dimensions, units, color mode and raster
eects parameters based on the prole
selected. Any of these settings can be
modied to suit your needs.
You can change raster eects settings at any
time by choosing Eects > Document Raster
Eects settings. To change the color mode,
choose File > Document Color Mode.
When you create a new document, you can
determine number of artboards, multiple artboard
arrangement, document size, units of measurement,
and bleeds. You can also choose a color mode.
The Illustrator Welcome screen—your
starting point for a new project.
FreeHand to Illustrator Migration Guide—Setting up a New Document 16
SETTING UP A NEW DOCUMENT
Where’s the Document panel?
In FreeHand, you use the Document panel to target and select pages and to choose
page dimensions, orientation, bleed settings, and printer resolution.
In Illustrator, choose File > Document Setup to access artboards options and choose
settings for type and transparency at the document level. You can also dene the
dictionary used for spell-checking and hyphenation, the position of superscripts, the
scale for small caps, or how to copy transparency eects over to the clipboard for use
within Illustrator or in other applications. Bleeds are also dened and edited in the
Document Setup dialog box.
Document templates
You can use templates to create new documents that share common settings and
design elements. e template can also contain symbols for common design
elements (such as logos) and specic sets of color swatches, brushes, and graphic
styles. Save your artwork in Adobe Illustrator Template (AIT) format and when you
select a template using the New From Template command, Illustrator creates a new
document with identical content to the template.
Printable area
Nonprintable
area (printer
margins)
Artboard
Canvas
The Illustrator document
Artboards represent the areas that
can contain printable artwork.
They can be of any dimension, as
can your page size. For example,
one artboard may be 15x15 inches,
while your print settings specify
8-1/2x11-inch paper.
You can view page boundaries by
showing page tiling (View > Show
Page Tiling). When page tiling is
on, the printable and nonprintable
areas are represented by a series
of solid and dotted lines. You can
move the printable area by using
the Page tool.
The canvas is the 227-square inch
area outside of all artboards.
This is the total area available
for arranging and working with
your artboards.
You can create, edit, and store
elements of artwork in the canvas,
but they will not print.
You can change the document setup at any
time by choosing File > Document Setup.
FreeHand to Illustrator Migration Guide—Setting up a New Document 17
Multiple Artboards
When you open a multipage FreeHand le with Illustrator CS4, the pages are imported as
individual artboards. Not only does this support pages of the same size, your artboards can
be of any dimension so you can work on a variety of projects in a single le. Arrange up to
100 artboards on your canvas any way you want—tiled, overlapping or freeform. You can
even create an artboard inside an artboard to easily export just a piece of a composition.
Multiple artboards provide a powerful way to organize projects with
multiple pages or diverse outputs by sharing settings and content across
designs. And you can export your artboards in any supported le format
as a series of les that are automatically numbered in sequence, or save as
a single, multipage PDF le—your choice.
Open multipage FreeHand documents
in Illustrator, choosing which pages to
import as multiple artboards.
SETTING UP A NEW DOCUMENT
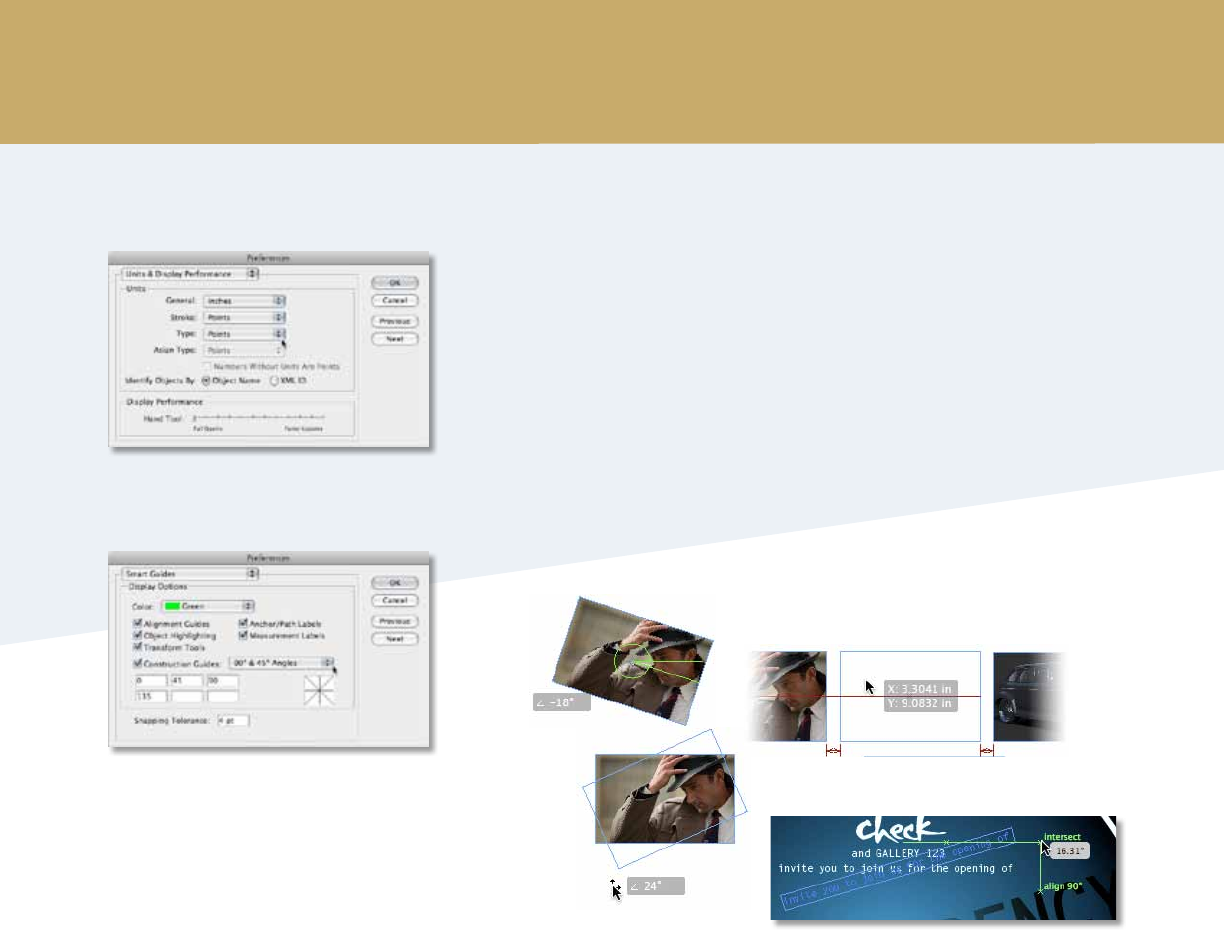
How do I set up measurement units?
In Illustrator, there are several ways to select units of measurement and change units display
as you work:
• In the Preferences dialog box, choose Units & Display Performance and select units of
measurement for your document, and for Stroke and Type.
• Choose a global measurement unit when you create a new document. You can always
change it later by using the Document Setup dialog box.
• Override defaults by typing units in the Control panel. For example, follow your numeric
value with abbreviations such as cm, mm, in, Q, pt, pc, or px.
• Turn on ruler visibility by selecting View > View Rulers. You can then quickly switch
ruler units by right-clicking (or Control-clicking in Mac OS) on the ruler itself.
FreeHand to Illustrator Migration Guide—Setting up a New Document 18
SETTING UP A NEW DOCUMENT
Using guides and grids
Guides help you align text and graphic objects. You can create ruler guides
(straight vertical or horizontal lines) and guide objects (vector objects that you
convert to guides). You can choose guide styles and color. By default, guides
are unlocked, and can be moved, modied, or deleted. Lock guides in place by
choosing View > Guides > Lock Guides.
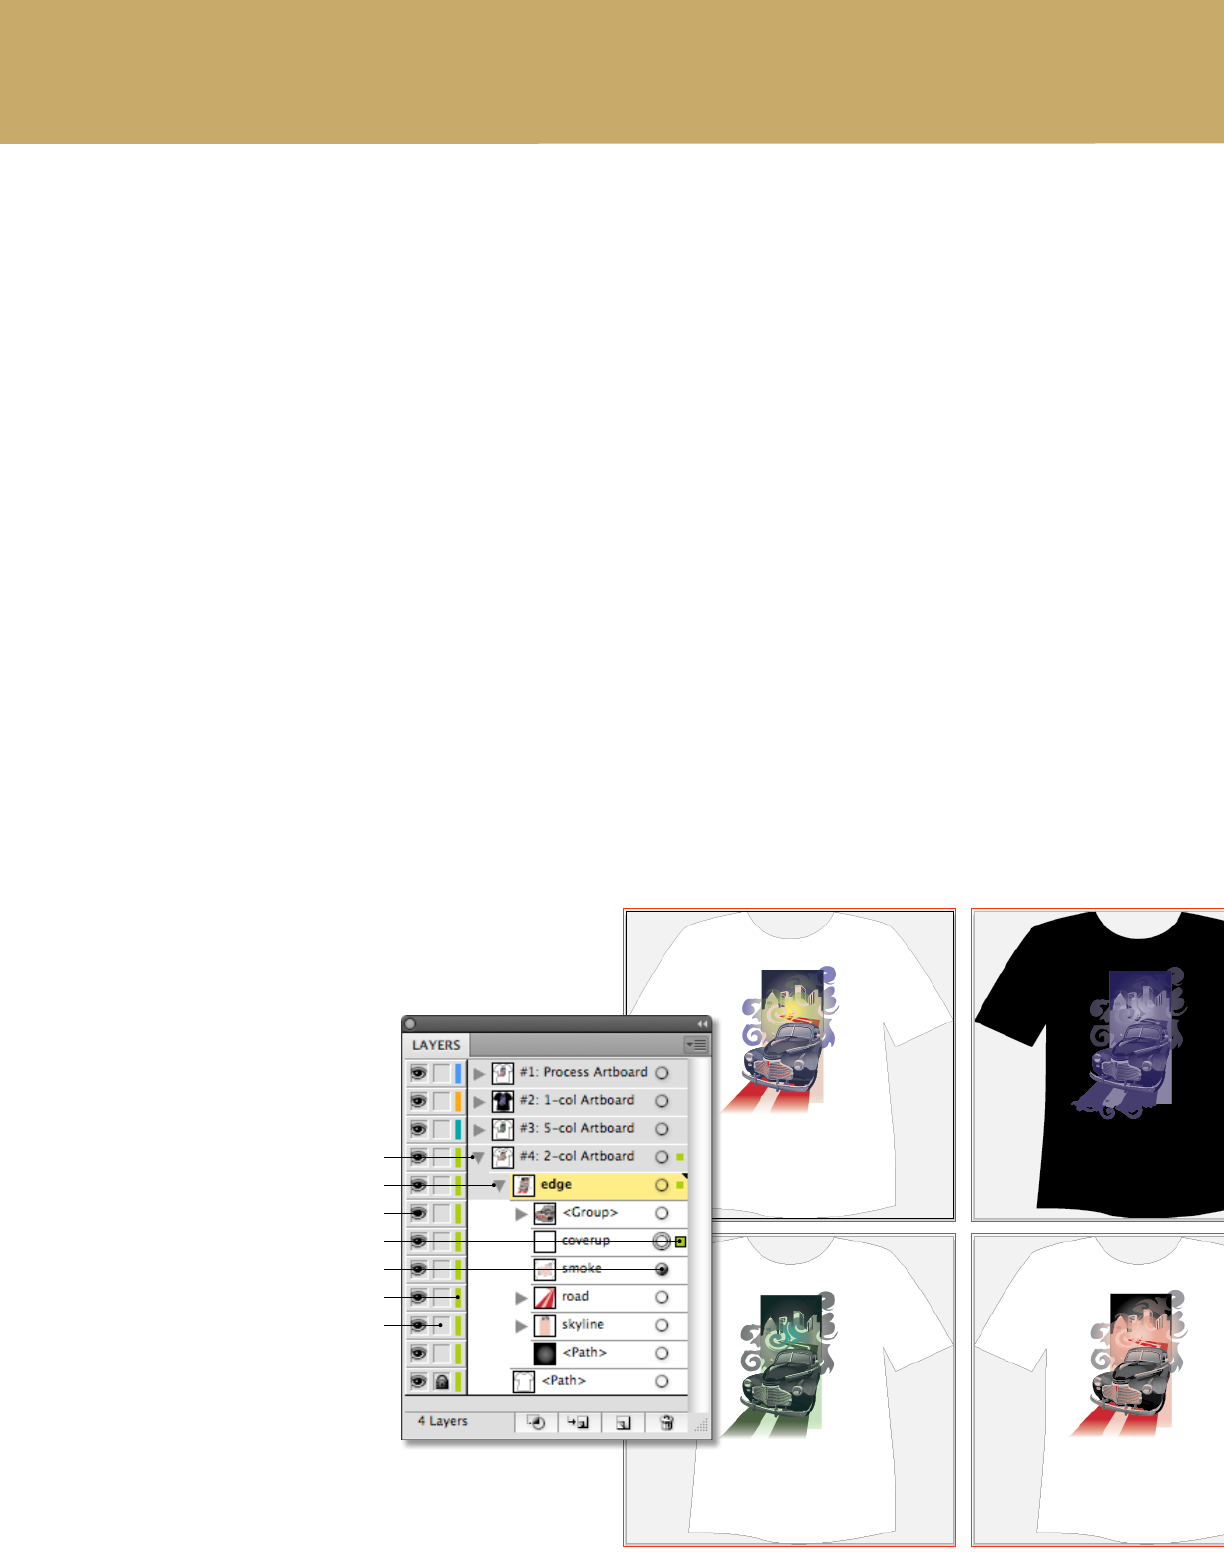
Additional indicators called Smart Guides assist you while you work. Align
objects and artboards with each other using Smart Guides and see on-cursor
readouts showing location coordinates. You can also see rotation angle, and
relation to nearby objects according to your selection’s edge rather than cursor
position—continuously, while you transform your object. Smart Guide options
are set up in the Preferences dialog box.
When you choose View > Show Grid, a grid appears behind your artwork in the
illustration window. Change the spacing between gridlines, grid color, and grid
style using the Preferences dialog box. Grids and guides do not print.
Where is the Guides Layer?
In FreeHand, there is a default layer called Guides that allows you to move guides
over or under the artwork. In Illustrator, guides belong to the layer on which they
were created; to emulate FreeHand’s behavior, create a layer and name it Guides.
You can add guides to that layer, turn the layer on or o, and move it over or
under the layers of your artwork.
Tip: To emulate the snapping feature
in FreeHand, activate Smart Guides in
Illustrator by choosing View > Smart
Guides. Smart Guides are temporary
snap-to guides that help you create,
align, edit, and transform objects relative
to other objects.
Tip: You can perform simple math in any
box that accepts numeric values using a
single mathematical operator, such as +
(addition), − (subtraction), x (multiplication),
/ (division), or % (percent).
Units & Display Performance preferences let
you choose your measurement system.
Smart Guides preferences enable customization
of Smart Guide behaviors and display.
Smart Guides with on-object readouts enable fast,
accurate positioning of objects in relation to each other.
FreeHand to Illustrator Migration Guide—Setting up a New Document 19
SETTING UP A NEW DOCUMENT
Using layers
When creating complex artwork, it’s a challenge to keep track of all the items in your
document window. Small items get hidden under larger items, and selecting artwork
becomes dicult. Layers provide a way to manage all the items that make up your artwork.
ink of layers as clear folders that contain artwork. If you reshue the folders, you change
the stacking order of the items in your artwork. You can move items between folders and
create subfolders. To display the Layers panel, choose Window > Layers.
e structure of layers in your document can be as simple or complex as you want it to
be. By default, all items are organized in a single layer. However, you can create new layers
and move items into them, or move elements from one layer to another. e Layers panel
provides an easy way to select, hide, lock, and change the appearance attributes of artwork.
You can even create template layers, which you can use to trace artwork, or exchange layers
with Photoshop.
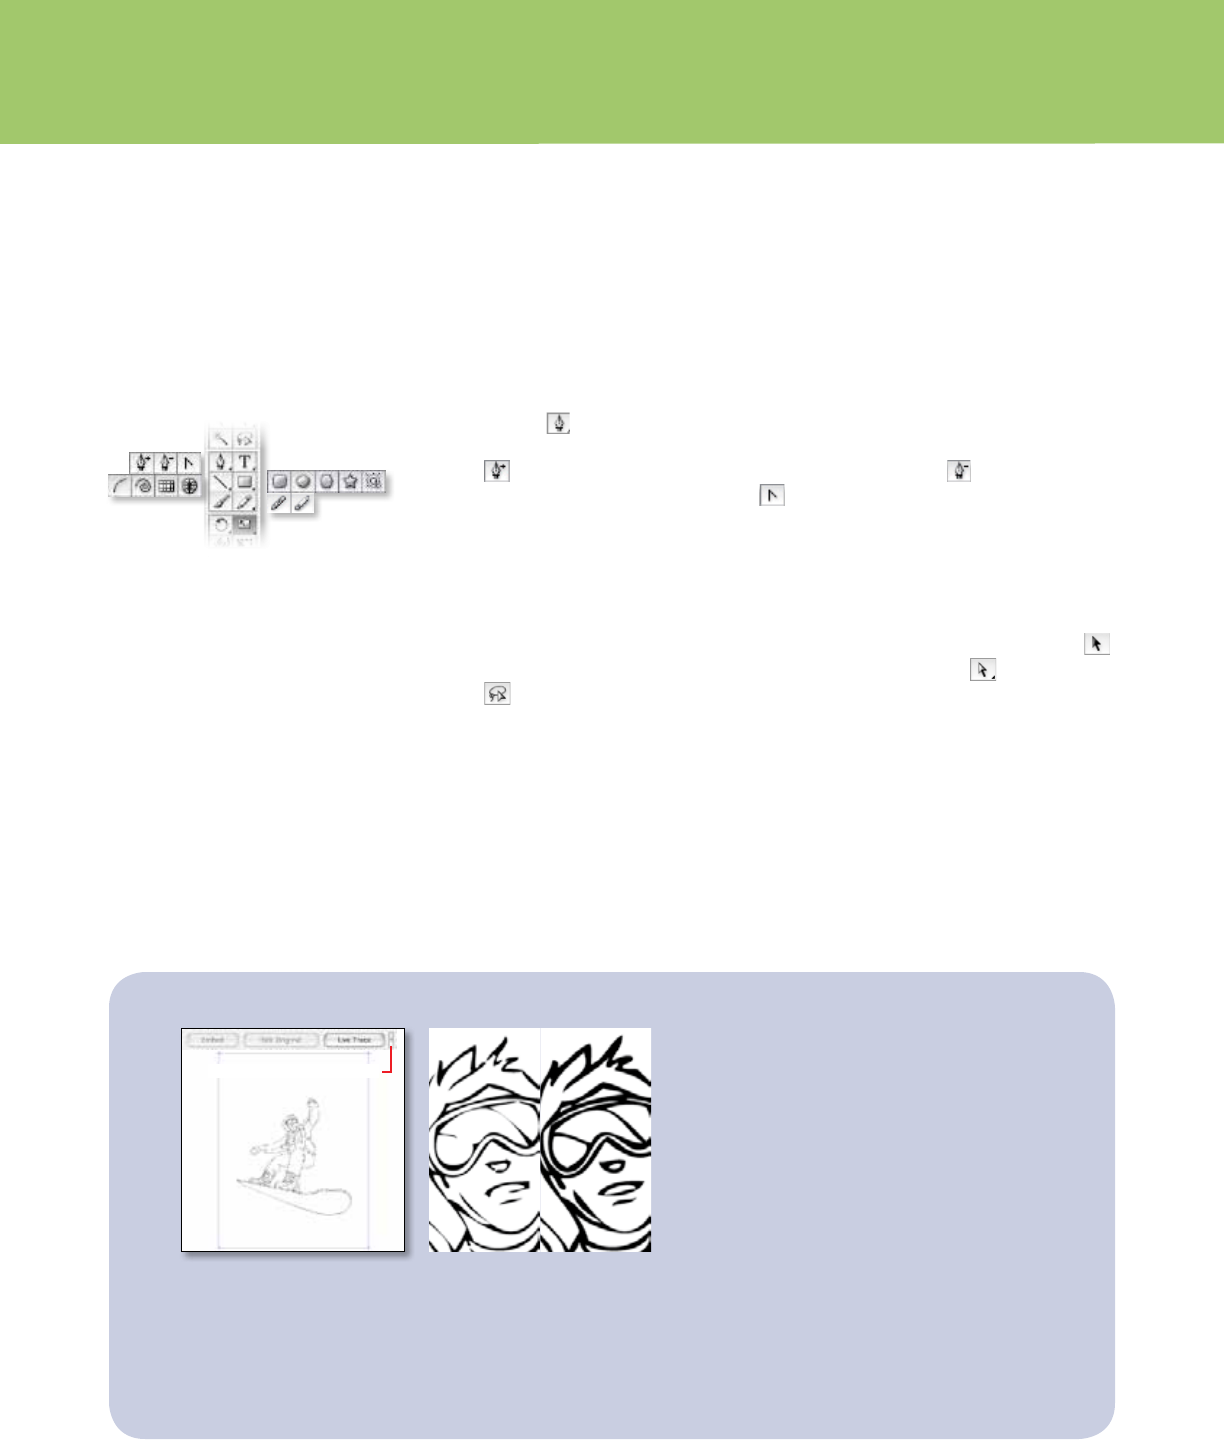
By default, Illustrator assigns a unique color to each layer in the Layers panel. e color
appears in the layer's selection column when one or more objects within the layer are
selected. e same color appears in the document window in the bounding box, path,
anchor points, and center point of the selected object. You can use this color to quickly
locate an object’s corresponding layer in the Layers panel, and you can change this layer
color to suit your needs.
When a layer or an object contains other layers or objects, a triangle appears to the le of
the item’s name in the Layers panel. Click the triangle to show or hide the contents. When a
layer or an object is selected, a colored square appears at the right edge of the items’s name
in the Layers panel; to move the selected item to another layer or change its stacking order,
drag the colored square to the desired layer.
The Layers panel
Layer
Sublayer
Layer visibility toggle
Selection indicator (drag to move to another layer)
Target indicator for effects and appearances
Layer color code
Layer locking toggle
FreeHand to Illustrator Migration Guide—Working with Graphics 20
Working with Brushes
and Gradients
Use a wide variety of drawing tools in
Illustrator to create vector graphics.
Drawing
Drawing in Illustrator is very similar to drawing in FreeHand; you use the Pen, Paintbrush,
Blob Brush, and Pencil tools to draw vector graphics in Illustrator.
Using the Pen tool
e Pen tool is the principal tool for drawing straight lines, Bézier curves, and complex
shapes. ree related tools enable manipulation of anchor points: the Add Anchor Point
tool adds anchor points to a path, the Remove Anchor Point tool removes anchor
points, and the Convert Anchor Point tool converts a corner point to a smooth point or
vice versa. You can also quickly access many Pen tool options in the Control panel such as
control for removing, connecting, and cutting paths.
Selecting and modifying paths and anchor points
In Illustrator, you select entire paths (all anchor points selected) using the Selection tool .
To select individual anchor points, you can use the Direct Selection tool or the Lasso
tool ; then move and modify anchor points. When you run your cursor over any anchor
point you can easily see and select it. In FreeHand, selected anchor points are indicated by a
hollow square; in Illustrator, selected anchor points are indicated by a lled square.
To align and distribute points, just as you would objects, make a selection with the Direct
Selection tool and use the alignment controls in the Control panel or in the Align panel.
ere are a variety of ways to divide paths and add anchor points. Use the Path Eraser tool
to remove parts of a path by stroking across a single selected object or path segment. Ready
access to controls in the Control panel enables anchor point connection, conversion to
corner or smooth, addition and removal of anchor points, and control of handle visibility.
Tip: While using the Polygon or Star tool,
press the Up Arrow and Down Arrow keys
to add and remove sides from a polygon
or points from a star.
Tip: For more on Live Trace, see Creating Vector Content Using
Live Trace on the Adobe website (www.adobe.com/products/
illustrator/pdfs/creating_vector_content.pdf).
Tracing Presets and Options
Create a Live Trace object. Easily control resulting line quality.
WORKING WITH BRUSHES AND GRADIENTS
Live Trace
Live Trace automatically turns placed
images into beautifully detailed
vector graphics that are easy to edit,
resize, and manipulate. You simply
select a placed bitmap image, and
click the Live Trace button in the
Control panel to create a Live Trace
object. All settings are fully adjustable
to achieve exactly the line quality and
tracing characteristics you need, or
select from a number of presets.
FreeHand to Illustrator Migration Guide—Working with Graphics 21
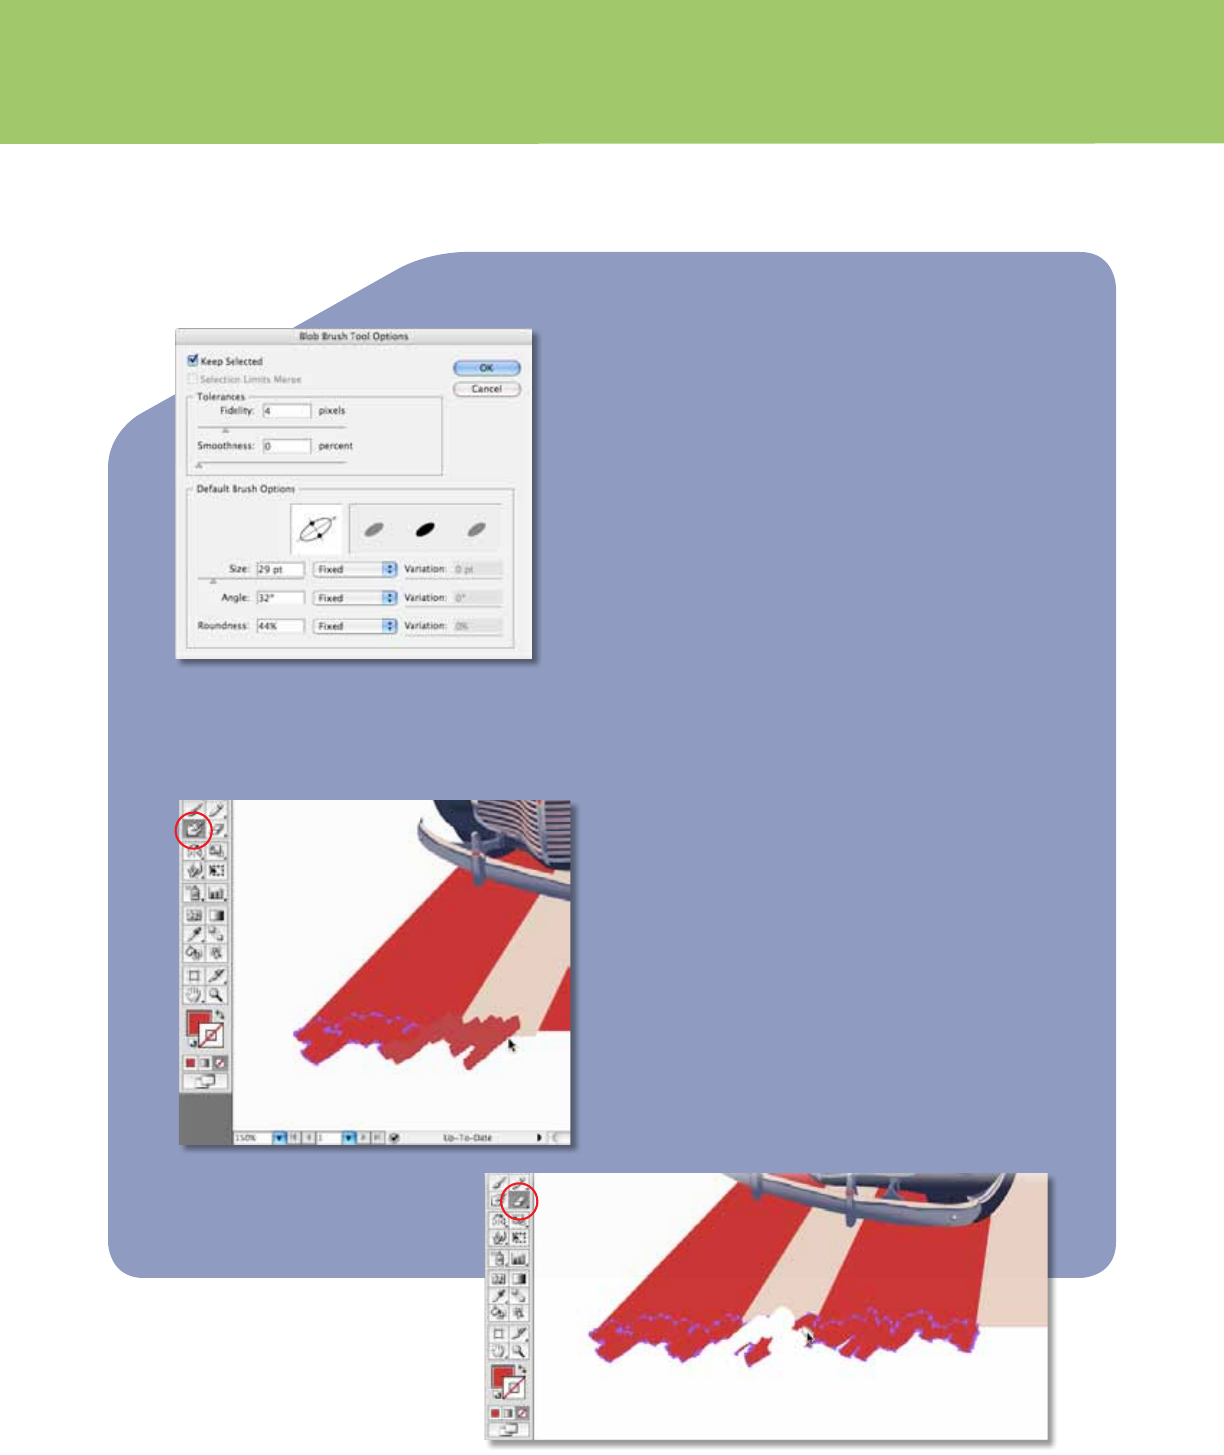
In Illustrator, you can create shapes using natural sketching, thanks
to the BlobBrush tool, the Eraser tool, and the Smooth tool. With a
combination of strokes and erasures, you can quickly experiment
with new shapes and then perfect your objects without having to
use any geometric tools or open any panels.
Using the Blob Brush
Sketch with strokes that ow together using the Blob Brush tool.
Recapture the joy of ngerpainting with a tool that provides
amazing control while you sketch naturally and uidly. The Blob
Brush tool generates a clean, lled, vector shape while you sketch,
even when strokes overlap, merging your paths naturally into
a single object that’s easily selected and edited. And you can
customize how your drawing ows together, choosing options for
stroke character and pressure sensitivity.
Using the Eraser tool
As with the Blob Brush tool, you can dene the diameter, angle, and
roundness of your Eraser tool. Stroke over your artwork to remove
areas regardless of the structure of the shape, and with an economy
of new anchor points. You can erase through all objects on all layers
with no selection, you can isloate specic objects or groups to erase,
or you can toggle o visibility of layers you wish to remain intact.
Double-click the Eraser tool to show the Options dialog box, where
you can set behaviors to achieve just the eect you want.
Using the Smooth tool
Reduce or eliminate unwanted bumps in a path using the Smooth
tool. Stoke along a selected path and see a clean smoothing of the
shape the without adding unwanted anchor points. Control the
delity of new points and amount of smoothness. Not only can you
smooth the appearance of a bumpy path, the Smooth tool is perfect
for simplifying a path by removing extra anchor points.
A New Way to Draw
The exibility of the Blob Brush tool, with its
shape options and easy switch to the Eraser
and Smooth tools, results in the most natural
and uid way of drawing yet in Illustrator.
The Blob Brush tool works with the calligraphic brushes
in Illustrator CS4 or you can create custom brush shapes.
WORKING WITH BRUSHES AND GRADIENTS
Fill color
Swap fill
and stroke
Stroke color
Default fill
and stroke
FreeHand to Illustrator Migration Guide—Working with Graphics 22
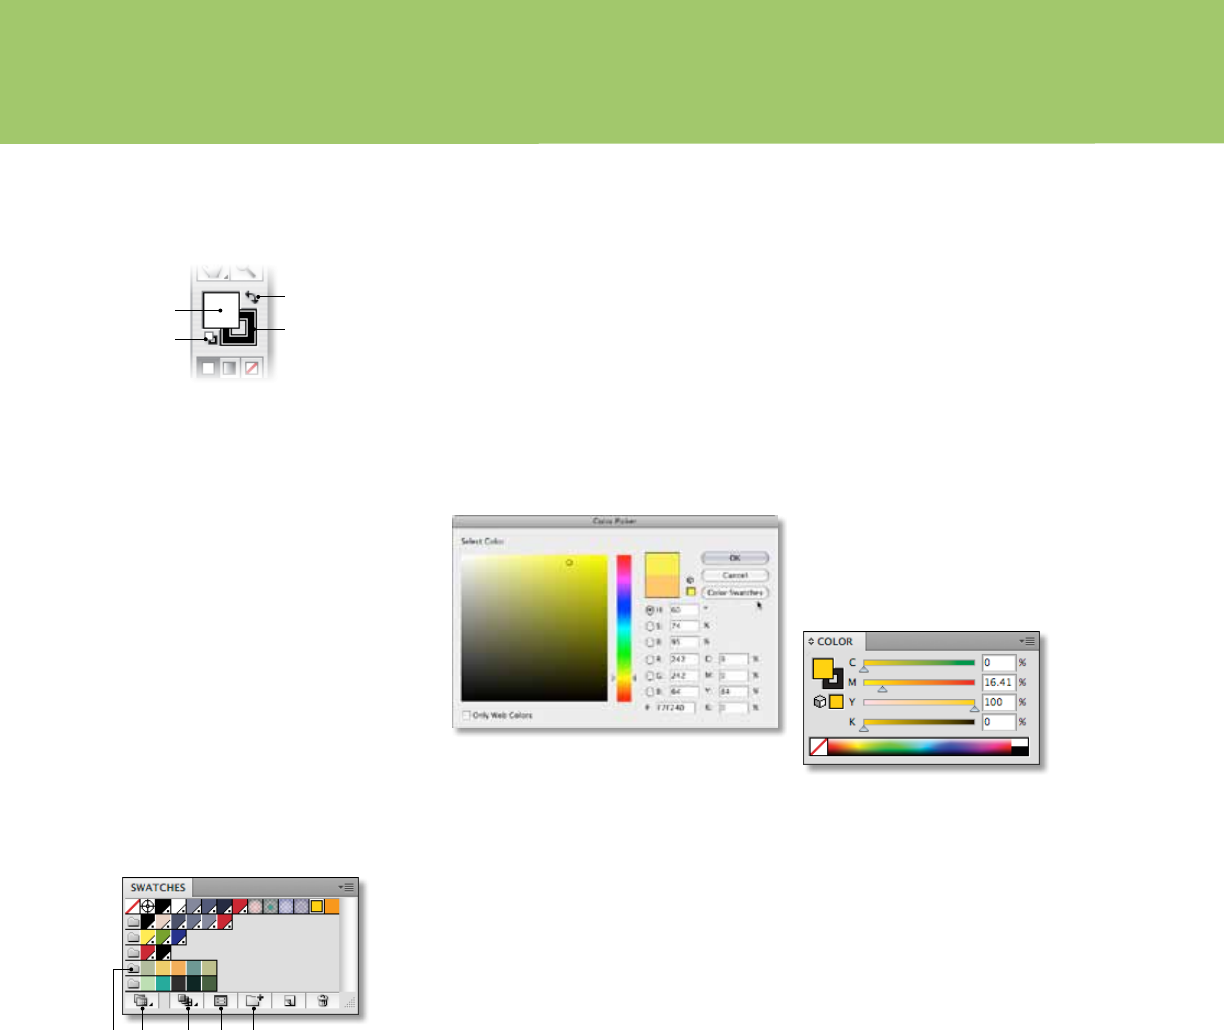
Creating and applying color
In Illustrator, there are several ways you can apply color to strokes and lls.
e Color Picker lets you select an object’s ll or stroke color by choosing from a color
spectrum, dening colors numerically, or clicking a swatch. To display the Color Picker,
double-click the ll or stroke color selection box in the Tools panel or Color panel.
In addition, you can use the Color panel to apply color to an object’s ll or stroke, and use it
to edit or mix colors. e Color panel can display color values using dierent color models.
To display the panel, choose Window > Color or click on Fill or Stroke in the Tools panel.
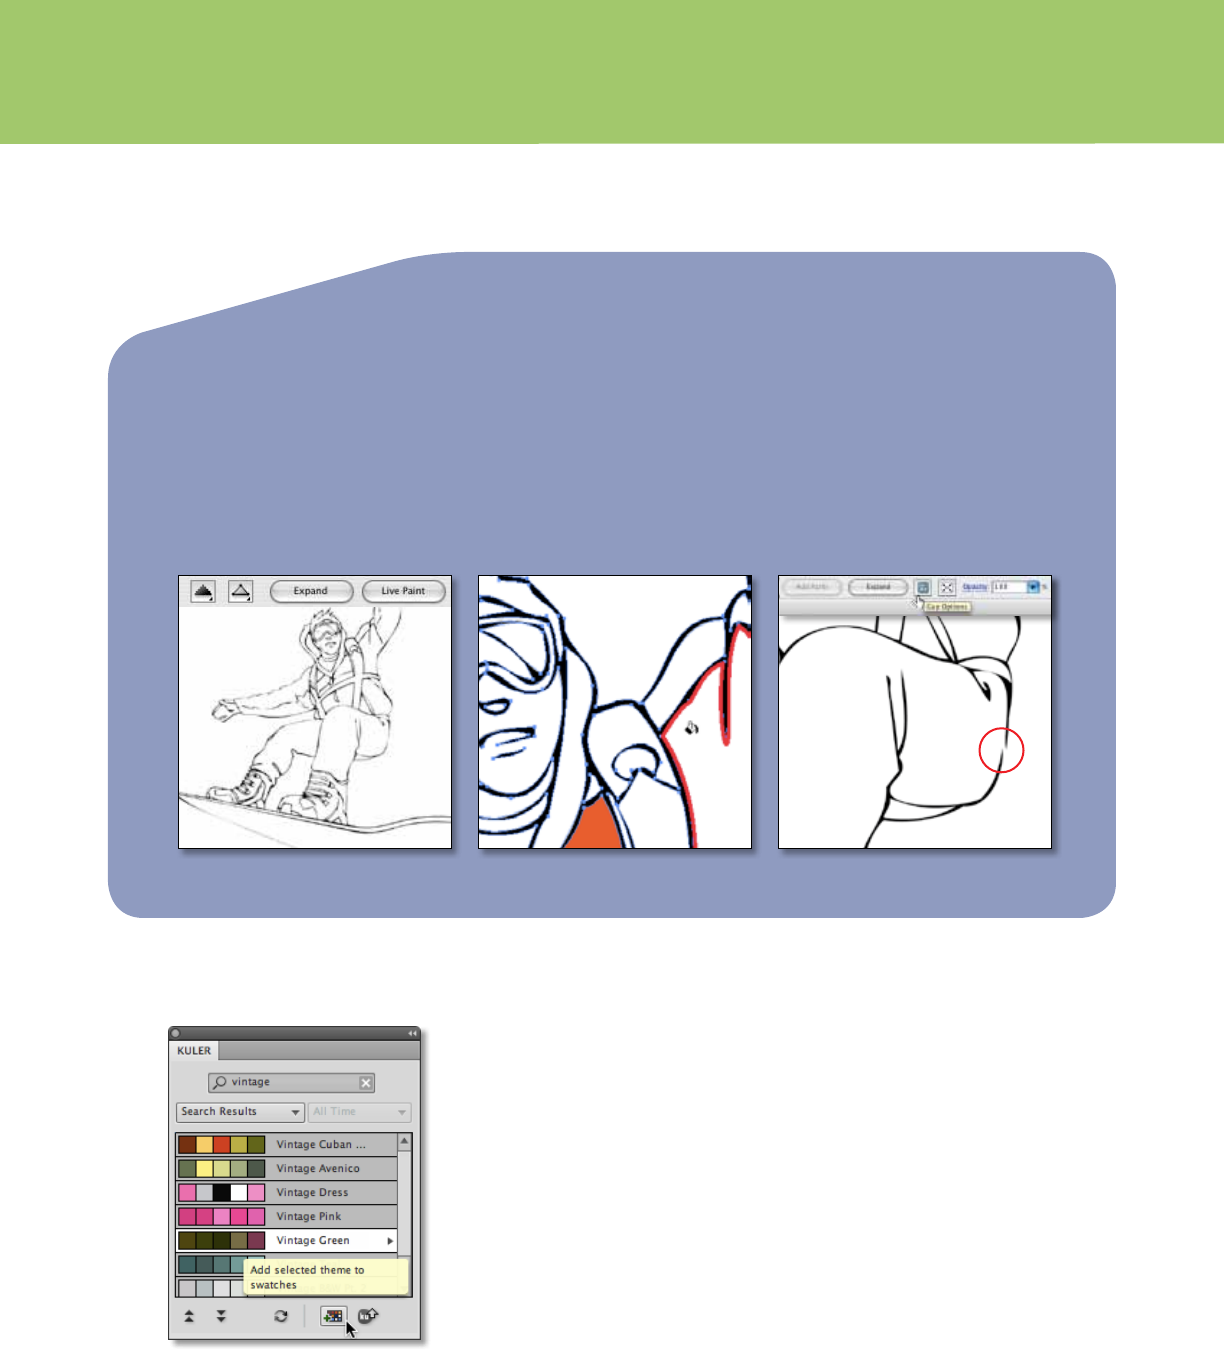
Working with swatches
Swatches are named colors, tints, gradients, and patterns. e swatches associated with a
document appear in the Swatches panel. In addition, you can open libraries of swatches
from other Illustrator documents, and access various color systems. Swatch libraries appear
in separate panels and are not saved with the document until you drag and drop specic
swatches to the Swatches panel. Swatches can be organized into groups and viewed in
organized hierarchies.
In FreeHand, swatches are global (meaning that when you modify the swatch, all items
colored with it change accordingly); in Illustrator, you can choose whether or not swatches
are global. You can save your own swatch libraries to use in other Illustrator documents
by saving in Illustrator format (AI). You can also share solid swatches between Photoshop,
Illustrator, and InDesign by saving a swatch library for exchange (ASE, Adobe Swatch
Exchange). e colors appear the same across applications as long as your color settings are
synchronized. You can also create and share color group swatches by using the Kuler panel
or the Kuler website.
How do I access Pantone Libraries?
To open a specic swatch library, including PANTONE®, HKS, Trumatch, FOCOLTONE,
DIC, TOYO, and Web, choose it from the Window > Swatch Libraries submenu or from the
Swatch Libraries menu in the Swatches panel. When you open a swatch library, it appears in
a new panel (not in the Swatches panel as in FreeHand).
The Color Picker and the Color panel
WORKING WITH BRUSHES AND GRADIENTS
The color selection area in the Tools panel
Tip: Note that with artwork selected,
double-clicking on a Color Group icon
will recolor the selected artwork using
the new colors in that color group. And
a Recolor Artwork dialog box will open
automatically for ne-tuning.
The Swatches panel lets you view and
organize named colors in groups.
A. Color Group
B. Swatch Libraries
C. Show Swatch Kinds
D. Swatch Options
E. New Color Group
A B DC E
WORKING WITH BRUSHES AND GRADIENTS
FreeHand to Illustrator Migration Guide—Working with Graphics 23
WORKING WITH GRAPHICS
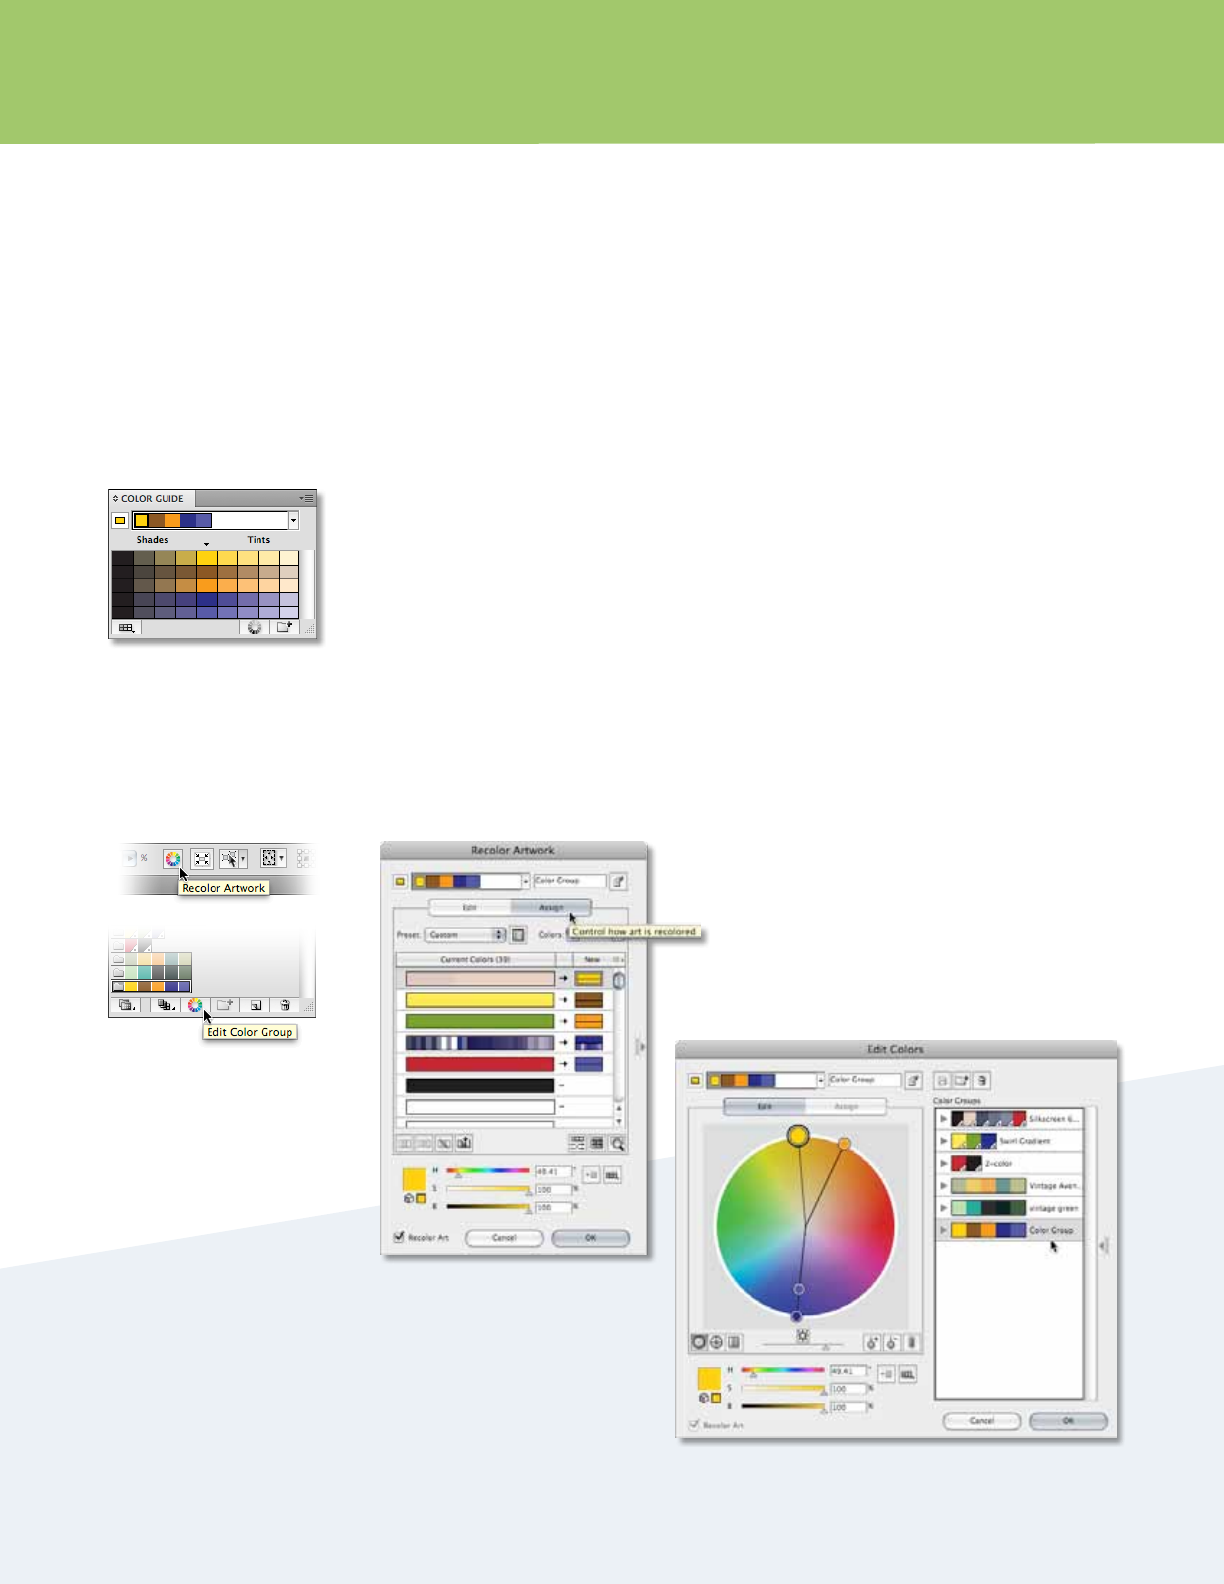
Live Paint lets you ll vector graphics intuitively by automatically detecting shapes and
correcting gaps. You can use Live Paint on any group of shapes, or try it on a traced image.
Select the traced vectors, and click the Live Paint button in the Control panel to convert
them to a Live Paint group. Select the Live Paint Bucket tool and click to ll regions with
color or gradients, using the arrow keys to choose which color swatch to apply. A red
outline indicates regions that you can ll in individually. Or, drag the bucket across multiple
regions to select them and ll them at once.
Live Paint enables location and repair of gaps where color leaks through open edges into
adjacent regions by clicking the Gap Options button in the Control panel.
Convert vectors to a Live Paint group. Paint with the Live Paint Bucket. Control gaps in your artwork.
Tip: Triple-click with the
Live Paint Selection tool to
select all regions in a Live
Paint group that are lled
with the same color.
Live Paint
Kuler
e Kuler panel is your portal to groups of colors, or themes, created by
the online community of designers. You can use it to browse thousands of
themes on Kuler, and then download some to edit or to include in your own
projects. You can also use the Kuler panel to share your themes with the
Kuler community by uploading them.
Open the Kuler panel by selecting Window > Extensions > Kuler. Search for
color themes by keywords and add selected themes to your swatches panel.
You can also save your search terms and quickly save themes that catch your
eye to your own Kuler list of saved themes.
You will need an internet connection to access the Kuler community from
within Illustrator. You can also work with Kuler in any standard browser by
visiting http://kuler.adobe.com.
Use Kuler inside Illustrator to browse and
search for Kuler themes. Add colors from
the Kuler community to your Swatches
panel with a single click.
FreeHand to Illustrator Migration Guide—Working with Graphics 24
WORKING WITH BRUSHES AND GRADIENTS
Live Color
Live Color is a complete color exploration environment within Illustrator CS4. If you
have ever been frustrated by having to color objects individually, you will appreciate this
interactive way to create and apply color schemes.
Live Color lets you work with color in a variety of ways. Discover new and unique color
combinations that you can save and reuse. Interactively apply color to multiple objects at
once, test color schemes quickly, and re-color artwork according to specic schemes such as
PANTONE or any custom library.
Live Color includes the Color Guide panel, which invites exploration of color groups
without aecting your artwork. Use the Color Guide panel to nd compelling colors
and save them to organized color groups in your Swatches panel. You can create color
schemes based on 23 classic color-harmony rules such as Complementary, Analogous,
Monochromatic, and Triad, or you can create custom harmony rules. Choose a base color,
and then see what variations you come up with according to rules you choose. You can also
limit color schemes to existing libraries such as PANTONE solids or any set of colors you
may have saved in a previous project.
Live Color is also ideal for presenting color options to clients. Quickly change the entire look
and feel of a logo, a piece of collateral, or an illustration to present likely color schemes in
the comp phase of a project. And saving color variations is easier than ever, so moving from
comps to nal production is ecient, thanks to quick application of saved schemes.
Use the Color Guide panel to quickly
redene color schemes based on a
selection or by limiting the colors to
a specic swatch library.
Open Live Color's Edit Colors
and Recolor Artwork dialog
boxes that enable creative color
scheme experimentation and fast
recoloring of selected artwork.
Access Live Color via the Control
panel or via the Swatches and
Color Guide panels.
FreeHand to Illustrator Migration Guide—Working with Graphics 25
WORKING WITH BRUSHES AND GRADIENTS
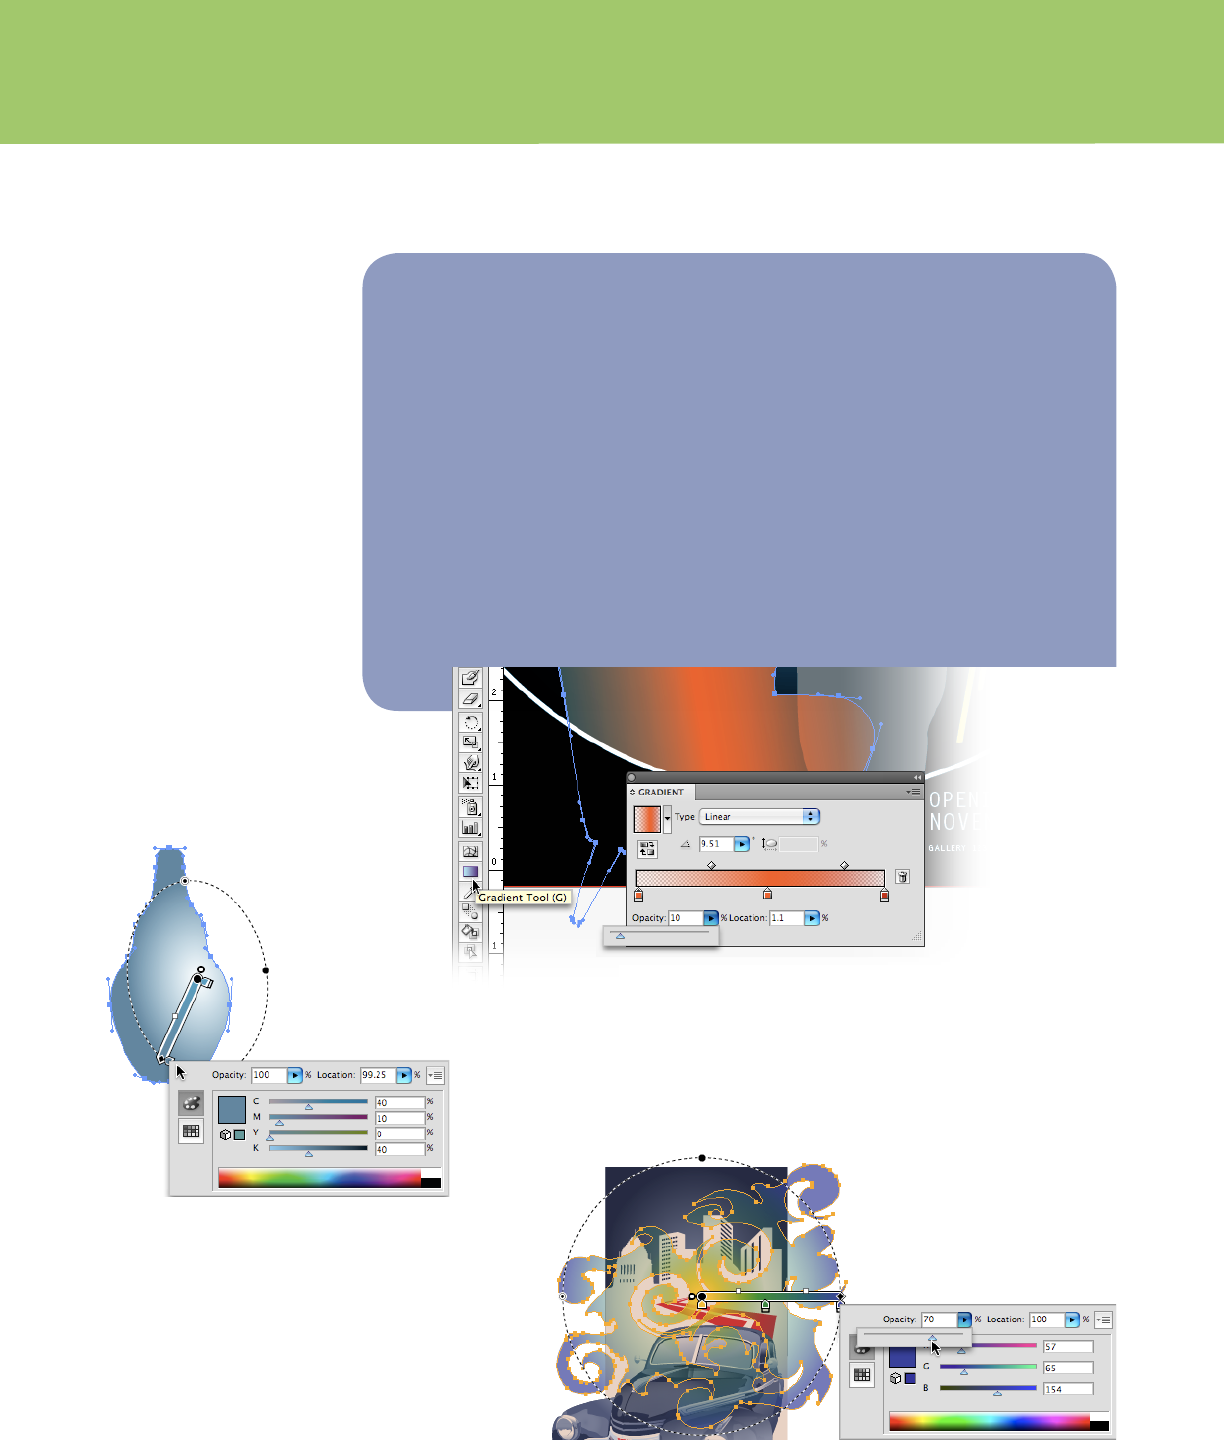
In Illustrator, you apply gradient lls to objects using the Gradient tool that features
on-object controls for easy editing. When you click the Gradient tool, the default
gradient or last-applied gradient will be immediately applied to your selected object.
You can then edit the gradient and see results as you work, right on your object.
Gradients can also be added and edited using the Gradient panel. You can save
gradients to the Swatches panel for quick application to other objects and you can
adjust the transparency of any color in your gradients.
You will nd that Illustrator gradients are smoother than those you create in FreeHand
(without visible linear or radial steps) and output exactly as you have created them.
Gradients are dened by a series of stops in the gradient slider (a minimum of two).
A stop is the point at which a gradient changes from one color to the next, and is
identied by a square below the gradient slider.
Transparency in Gradients
Gradient controls on your object provide
instant visual feedback. Add and edit color
stops, adjust the location and angle of a
gradient, and even change the shape of an
ellipitical gradient—all right on the object.
Transparency in gradients enables quick
and easy experimentation with blending
and mixing colors among layered objects.
The Gradient panel has an opacity slider you can use with any
gradient stop to create transparent colors. Opacity is indicated
by a checkerboard pattern in the gradient bar.
You can also set the angle of your gradient with a slider and
dene the dimension of a radial gradient to get an ellipse.
FreeHand to Illustrator Migration Guide—Working with Graphics 26
WORKING WITH BRUSHES AND GRADIENTS
Patterns
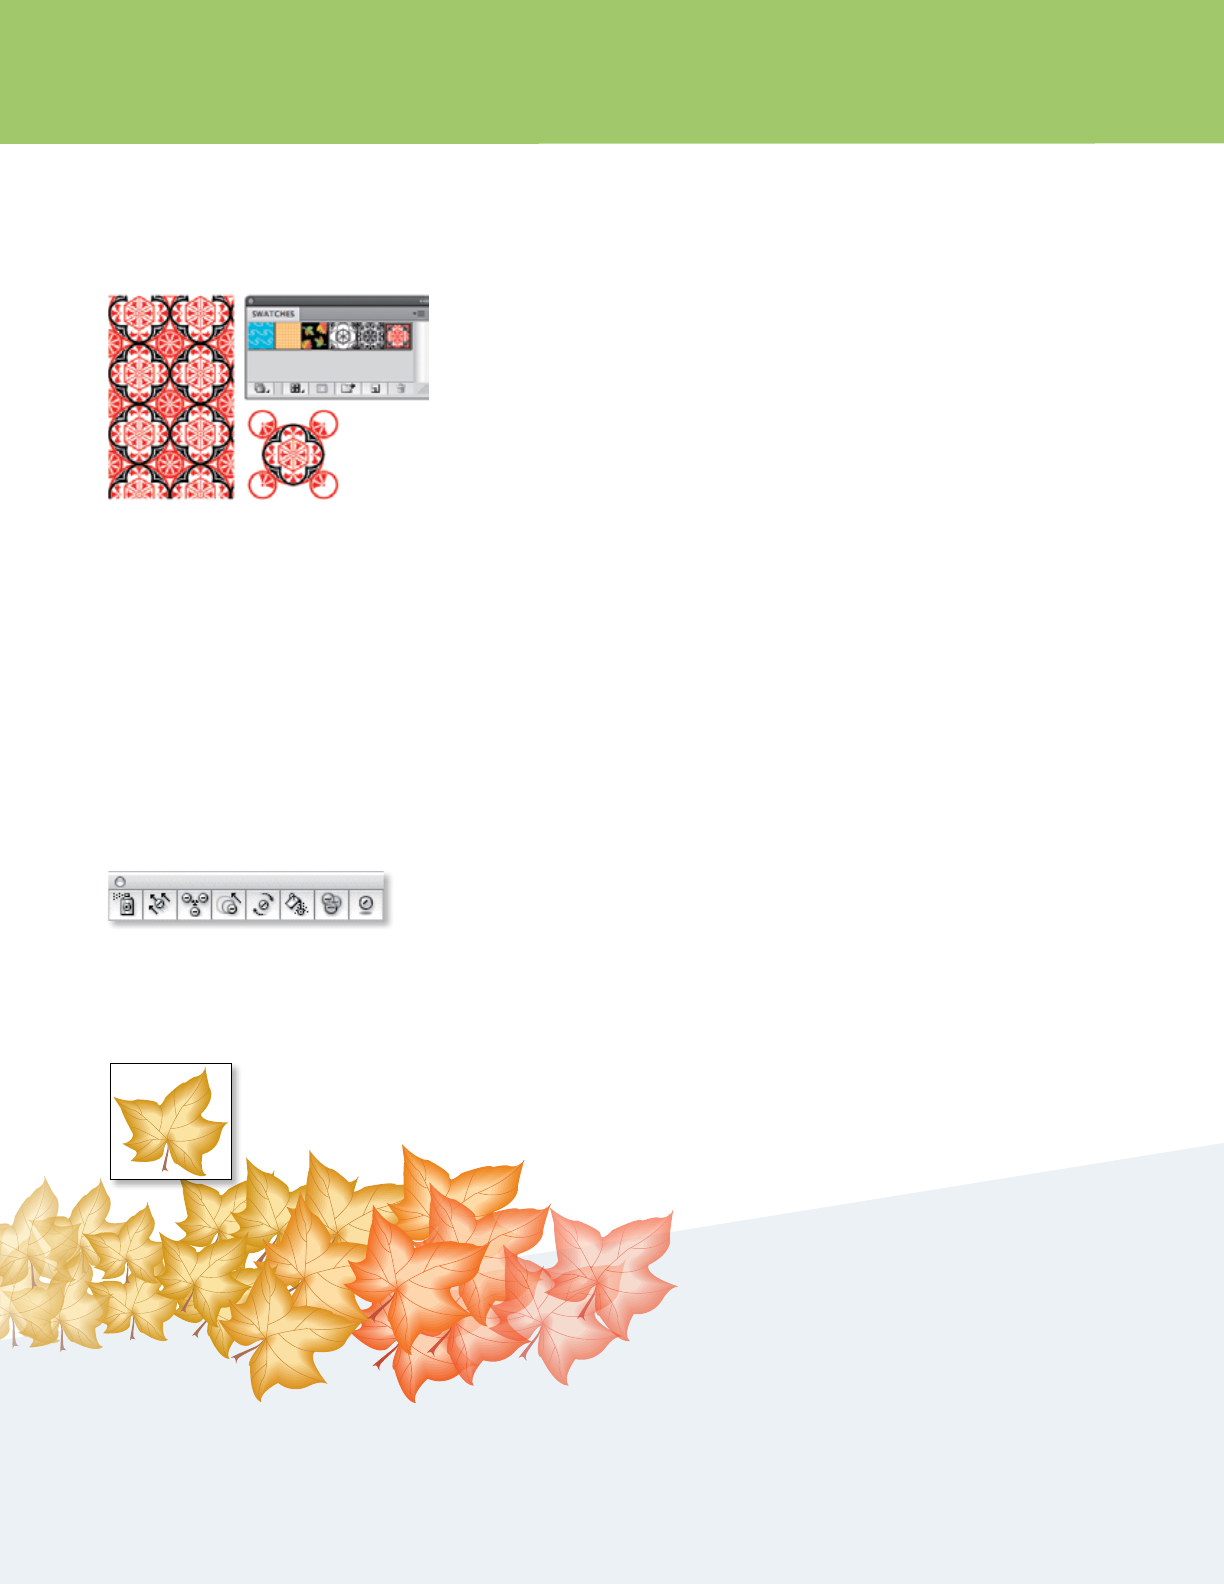
Illustrator comes with many patterns that you can access in the Swatches panel and
in the Illustrator Extras folder on the Illustrator CD. Patterns in Illustrator can be
much more intricate than the patterns oered in FreeHand, and you can also design
patterns from scratch with any of the Illustrator tools, customize existing patterns,
and see the resulting patterns onscreen as you work.
Patterns tile from le to right from the ruler origin (by default, the bottom le of the
artboard) to the opposite side of the artwork. To adjust where all patterns in your
artwork begin tiling, change the document’s ruler origin. Patterns intended for lling
objects (ll patterns) dier in design and tiling from brush patterns. For best results,
use ll patterns and brush patterns on the objects the way they were intended. Brush
patterns can consist of up to ve tiles (for the sides, outer corners, inner corners, and
the beginning and end of the path). e additional corner tiles enable brush patterns
to ow smoothly at corners.
Symbols
Working with symbols is similar to working with graphic elements in a FreeHand
Library. A symbol is an art object that you can reuse in a document. For example, if
you create a symbol from a leaf, you can then add instances of that symbol multiple
times to your artwork without adding the complex art itself. Each symbol instance is
linked to the master symbol in the Symbols panel or a symbols library. Using symbols
saves you time and greatly reduces le size.
You can make a symbol from any vector, raster, or type object in your document or
use Illustrator’s built-in Symbols library. To create a symbol, drag and drop a graphic
element into the Symbols panel. Aer you place a symbol on the artboard, you can
edit the symbol’s instances and, if you want, redene the original symbol.
Drag vector graphics into the Swatches panel
and use them as patterns that you can apply
to lls and strokes.
Use the symbolism tools to add and
manipulate multiple symbol instances at
once. You can spray, shift, scrunch, size, spin,
stain, screen, or style symbols using styles
from the Graphics Styles panel.
Sized Stained with another color
Screened to become transparent
Spun
FreeHand to Illustrator Migration Guide—Working with Graphics 27
WORKING WITH APPEARANCES AND STYLES
The Appearance panel
In FreeHand, you determine the properties of your objects in the Object Properties panel. In
Illustrator, you use the Appearance panel to view and adjust the appearance attributes for an
object, group, or layer.
Appearance attributes are properties that aect the look of an object without altering its
underlying structure. Appearance attributes include lls, strokes, transparency, and eects
that you can apply to one object or multiple objects. You can then edit, remove, or toggle
the visibility of attributes from within the Appearance panel in Illustrator CS4. You can even
copy and paste inside the panel, so adding attributes to any object is fast and simple.
In the Appearance panel, lls and strokes are listed in stacking order; top to bottom in the
panel as they correlate to front to back in the artwork. Eects are listed from top to bottom in
the order in which they are applied to the artwork. To display, choose Window > Appearance.
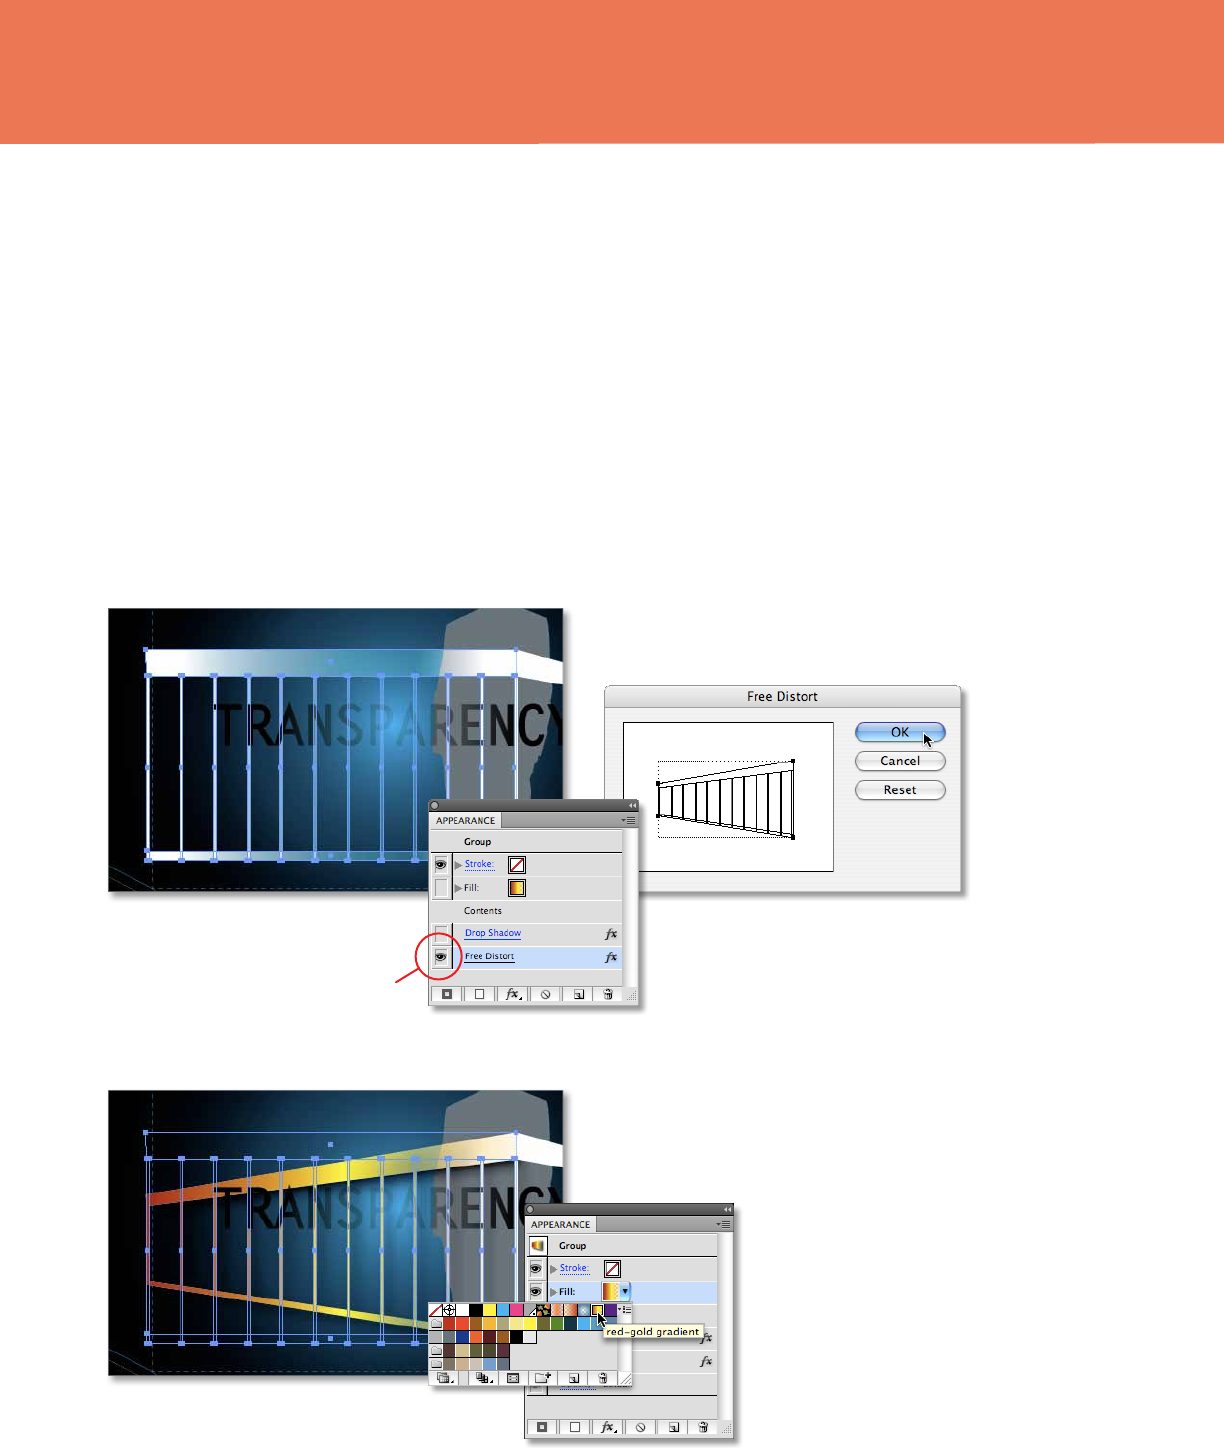
Edit an attribute by simply clicking on a ll or stroke in the
Appearance panel to access the corresponding options.
Use the eye icons to
toggle attribute visibility
Edit an eect such as Free Distort
from within the Appearance panel.
If you wish to select all objects in your
artwork that have certain attributes,
you can use the Select menu to choose
Same Appearance Attribute. Once you
have selected objects with at least one
common attribute, edit that attribute in
the Appearance panel and see immediate
results on all objects at once.
e power of editing attributes in the
Appearance panel lies in easy control
of advanced eects without interacting
with multiple panels. You can work in a
more centralized manner, manipulating
styles and complex combinations of
attributes across many objects—all from
one place.
Working with Appearances
and Styles
FreeHand to Illustrator Migration Guide—Working with Graphics 28
WORKING WITH BRUSHES AND GRADIENTS
Graphic styles
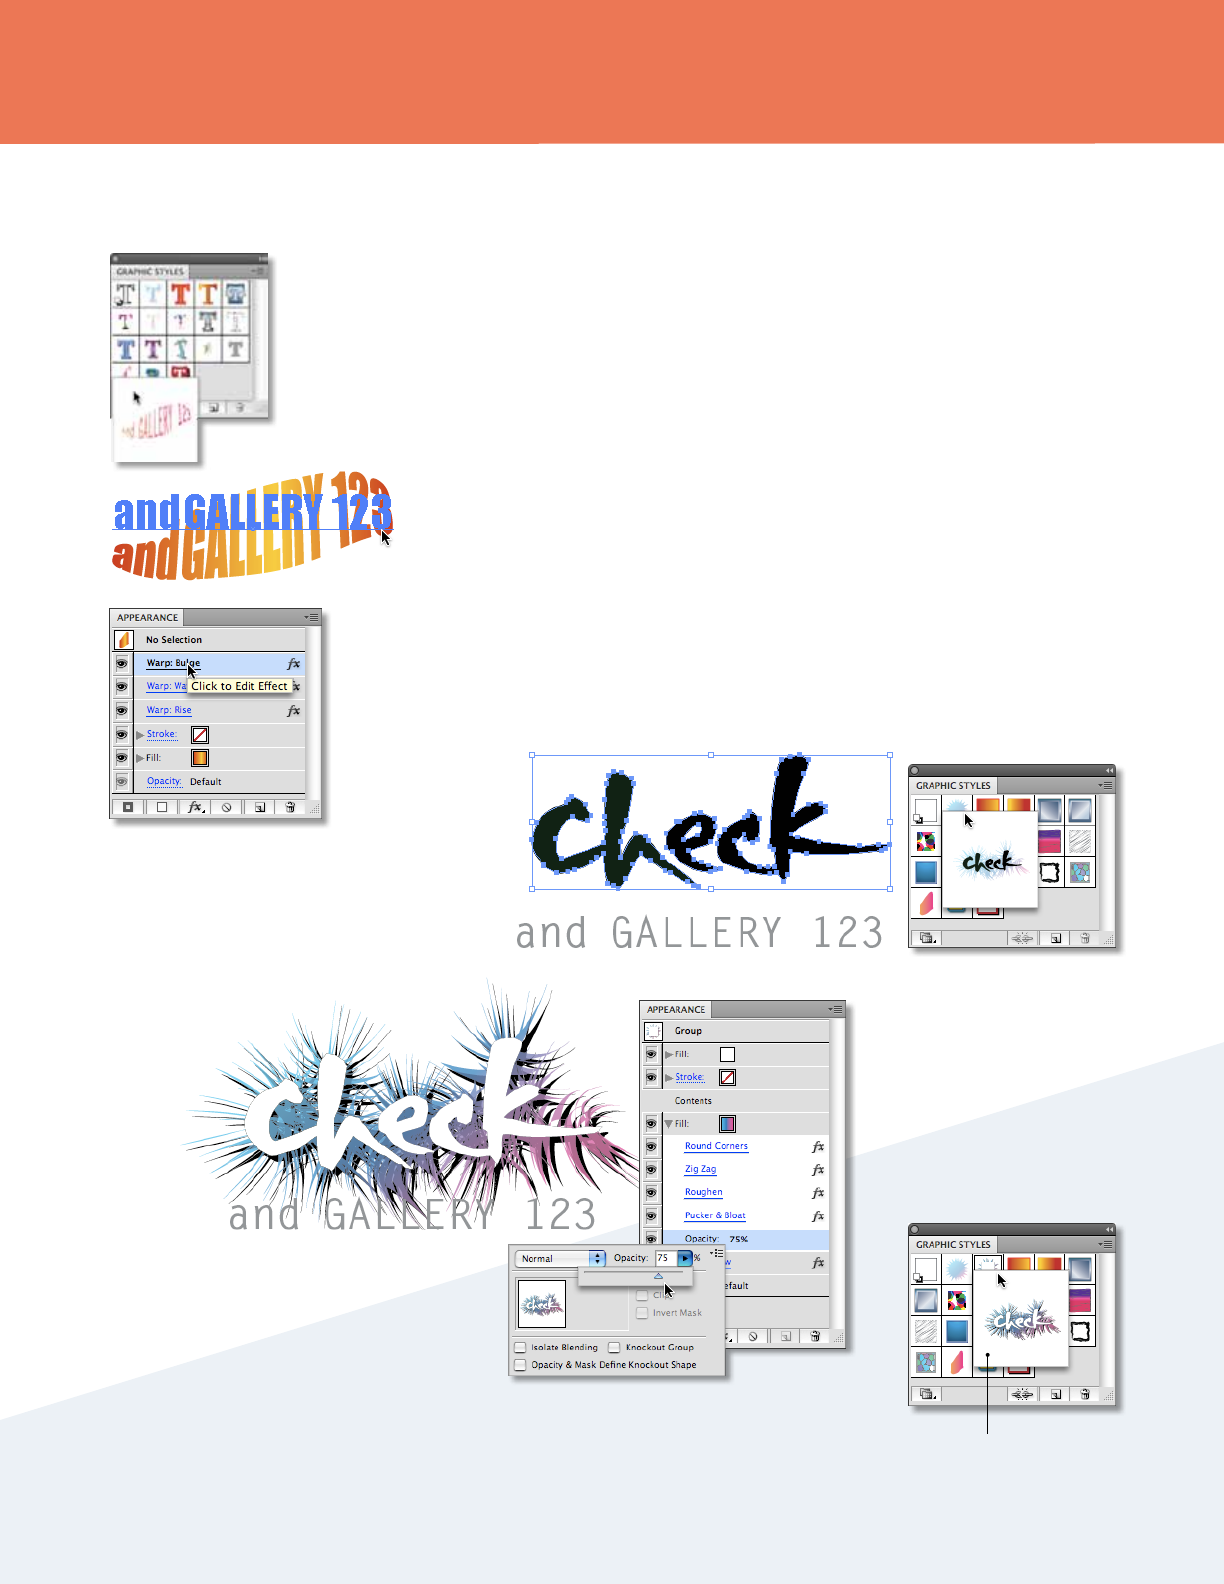
As in FreeHand, graphic styles in Illustrator are combinations of lls, strokes, and
eects that are saved together as a style. In Illustrator, combinations of attributes
can be applied to objects or text as a single graphic style, and you can layer and
combine multiple styles for unique eects. e Graphic Styles panel includes an
option to preview all your styles on the selected object or group of objects. See
how a style will look without having to actually apply it.
e Graphic Styles panel and the Appearance panel work hand in hand. To see all
the attributes that make up a graphic style, click on the style and nd its attributes
listed in the Appearance panel—each easily edited individually. And you can add
a new style to an object while pressing the Option key (Mac OS) or the Alt key
(Windows) and observe that it doesn’t replace existing appearances.
Illustrator CS4 includes a new library of prebuilt styles to jump-start your creative
exploration. It includes sets of eects such as pre-set blurs and drop shadows that
you can add without aecting lls. And, of course, you can generate your own
libraries of graphic styles that you can use again and again.
Thumbnail previews
show you the style,
even on live text.
New style
Change style
attributes in the
Appearance
panel and text
remains editable.
Edit attributes of a graphic style
in the Appearance panel, then
quickly redene your style or
create a new one.
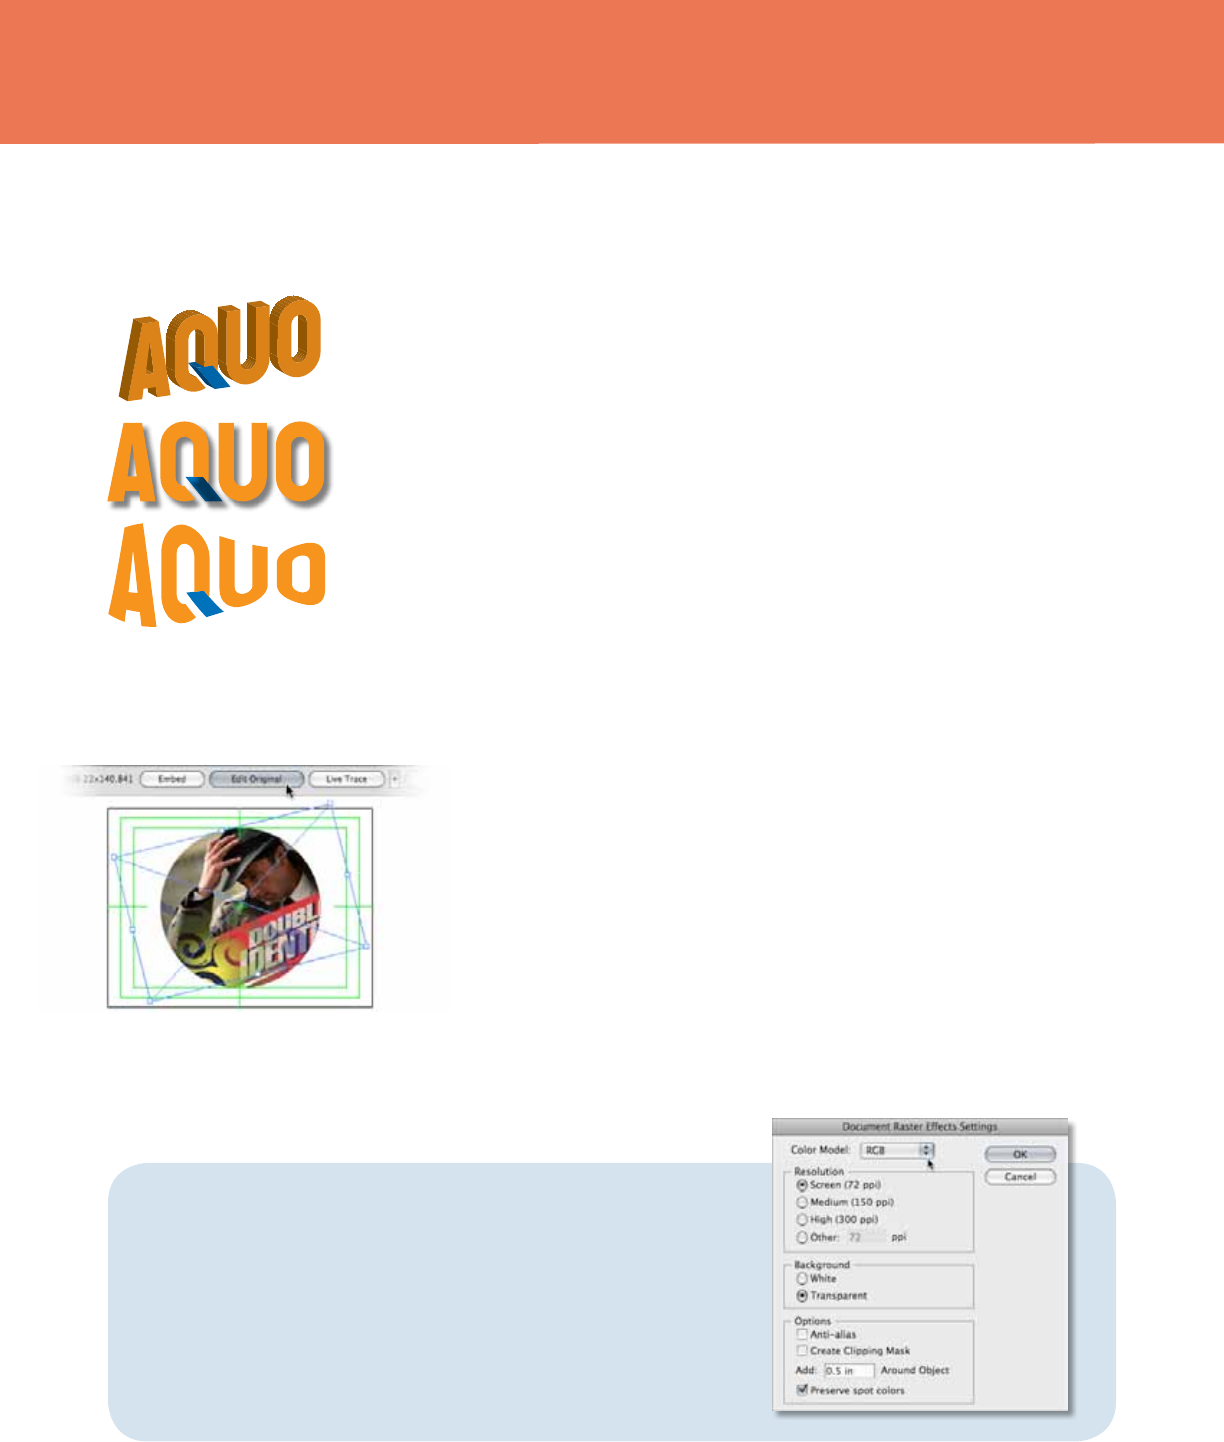
FreeHand to Illustrator Migration Guide—Working with Graphics 29
Effects
Many commands for changing the look of objects are available in the Eect menu. Eects
are live, which means you can apply an eect to an object and then modify or remove it
using the Appearance panel. To apply an eect, select an object, multiple objects, or groups
of objects and choose an eect from the Eect menu. e eect appears in the Appearance
panel where you can edit it, move it, duplicate it, delete it, or save it as part of a graphic style.
e eects in the top half of the Eect menu are vector eects. You can apply these eects
only to vector objects or to the ll or stroke of a bitmap object in the Appearance panel.
e following eects and eects categories from the top section are exceptions to this rule
and can be applied to both vector and bitmap objects: 3D eects, SVG Filters, Warp eects,
Transform eects, Drop Shadow, Feather, Inner Glow, and Outer Glow.
e eects in the bottom half of the Eect menu are raster eects. You can apply them to
either vector or bitmap objects.
When you use an eect, it doesn't change the underlying geometry of the object. To make
the eect permanent so that you can access new points and paths, you must expand the
object by choosing Object > Expand.
Placing graphics
e Place command is the primary method of importing graphics, because it provides the
highest level of support for le formats, placement options, and color. Aer you place les,
use the Links panel to identify, select, monitor, and update any of your links. Alternatively,
you can use Bridge to drag and drop assets onto any artboard. Learn more about Adobe
Bridge CS4 on page 14.
One of the benets of Creative Suite 4 is integration among its components. is means that
you can not only place EPS, TIFF, and other les, but also place native Photoshop les that
include transparency, and control the visibility of layer comps in linked, embedded, and
opened Photoshop les as easily as you control the visibility of regular Photoshop layers.
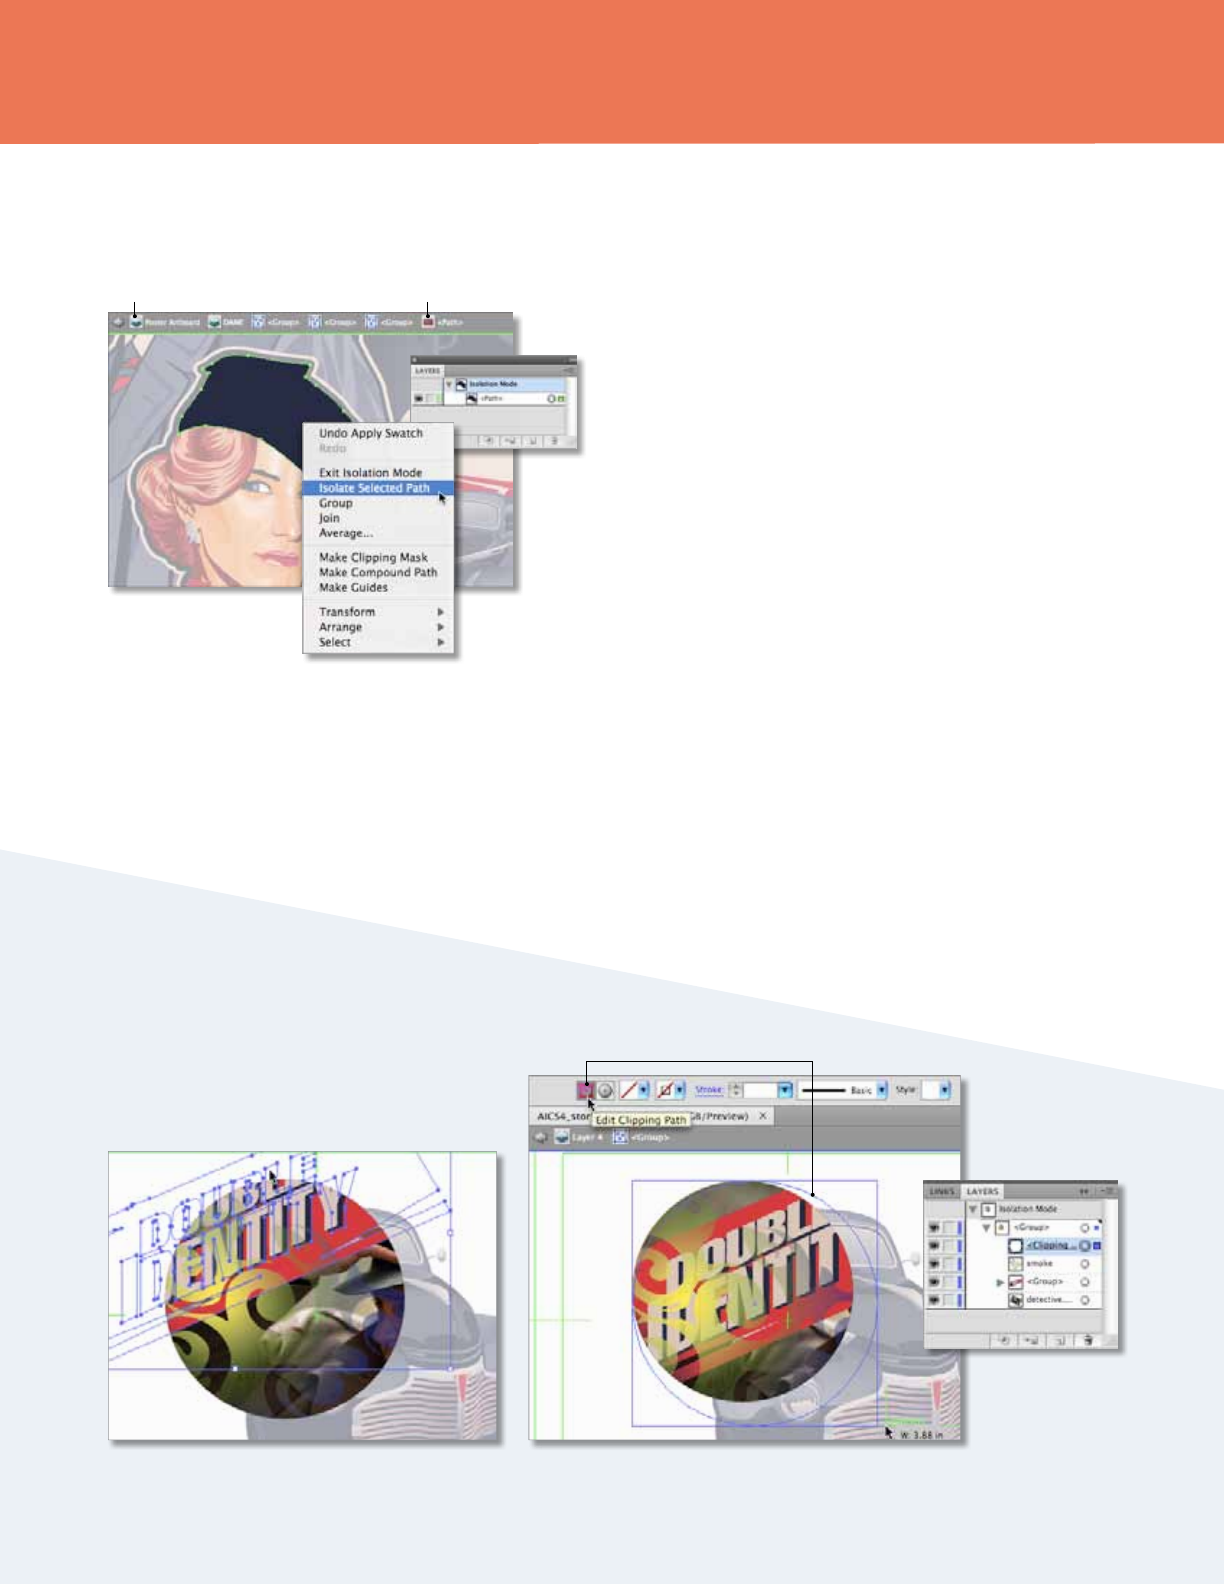
Edit a placed image by choosing Edit Original from the Control panel or the Links panel in
Illustrator. e placed le will open in Photoshop where you perform your edit, then, when
you save the le, it will automatically be updated in Illustrator.
anks to the Adobe Color Engine (ACE), placed graphics don’t suer color shis when
moved from one application to another.
3D Eects
WORKING WITH BRUSHES AND GRADIENTS
Edit Original enables convenient editing of raster
images with Photoshop, showing the high level
of integration among Creative Suite tools.
Document raster effects settings
Whenever you apply a raster eect such as Blur or Sketch, Illustrator uses the
document’s raster eects settings to determine the resolution of the resulting
image. These settings can have a large impact on your artwork; therefore,
it's important to check them before you start working with eects and, more
importantly, before you export or print your work. Set rasterization options
by choosing Eect > Document Raster Eects Settings. Document Raster
Eects Settings will be set correctly when you choose the appropriate New
Document prole for a particular medium.
Drop Shadow
Warp Eect
FreeHand to Illustrator Migration Guide—Working with Graphics 30
WORKING WITH BRUSHES AND GRADIENTS
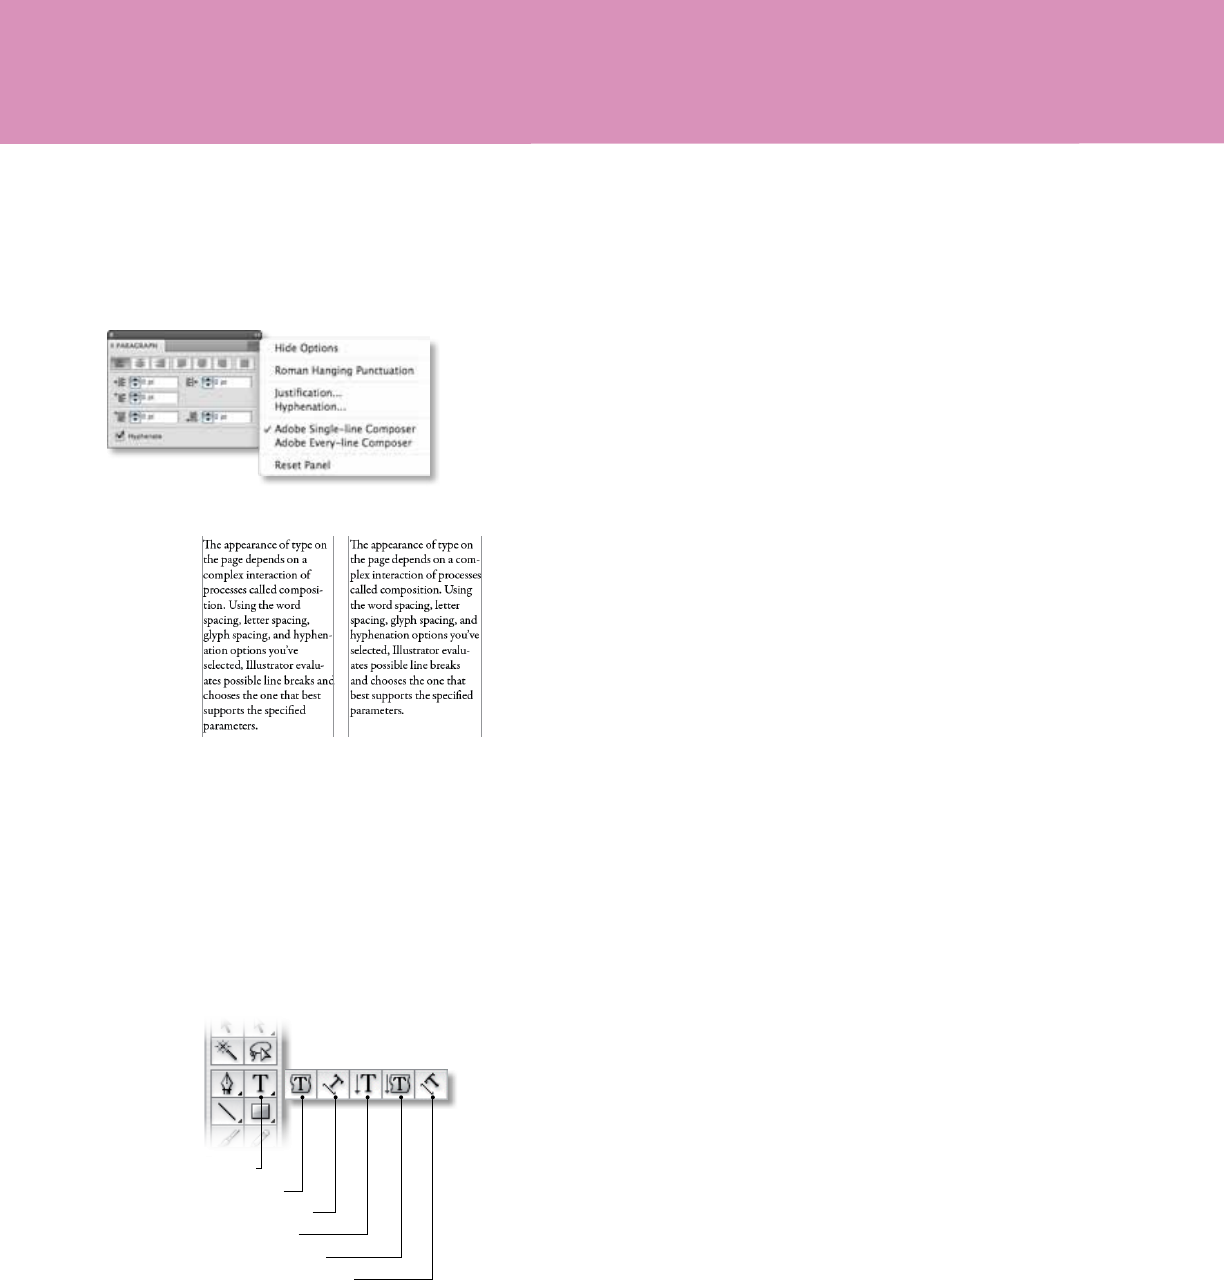
Isolation mode
In Illustrator CS4, Isolation mode is an essential method for working
with complex artwork. Isolation mode is a boon for designers who
spend a lot of time grouping, hiding, locking, and restacking layers
to access objects for editing while protecting areas of artwork that
need to remain untouched.
Objects that can be isolated include layers, sublayers, groups,
symbols, clipping masks, compound paths, gradient meshes, paths,
and brushes (for editing brush denitions). Activate Isolation mode
by double-clicking with the Selection tool on a group of objects, and
see that the rest of your artwork becomes inaccessible. Continue to
double-click on a single object and see that Isolation Mode drills
into your nested groups to isolate just that object. Clickable, iconic
breadcrumbs show you just where you are, and you can add new
objects at that very location in your stacking order—you can delete,
replace, and add new art relative to the isolated art.
Work easily back and forth between
masked objects and the clipping object,
thanks to accurate selection of paths.
Select the clipping path for editing
Current isolated objectIsolation Mode breadcrumb icon
Isolate any selected object,
group, or path.
Clipping Masks
A clipping mask is an object whose shape masks other artwork so that only areas that lie
within the shape are visible—in eect, clipping the artwork to the shape of the mask. Work
with masks easily, thanks to true WYSIWYG behavior. When the clipping object or group
is selected, you will see only the clipped area. Edit the clipping object in Isolation Mode or
choose to make it visible using the Clipping Path menu options.
e clipping path and the objects that are masked are called a clipping set. You can make
a clipping set from a selection of two or more objects (object-level) or from all objects in a
group or layer (layer-level). Easily see how your clipping and masked objects relate in the
Layers panel. Object-level clipping sets are combined as a group in the Layers panel. With
layer-level clipping sets, the object on top of the layer clips all of the objects below it.
Use Isolation mode
to edit clipping paths
without disturbing
surrounding artwork.
FreeHand to Illustrator Migration Guide—Working with Text 31
Type tool
Area Type tool
Type On A Path tool
Vertical Type tool
Vertical Area Type tool
Vertical Type On A Path tool
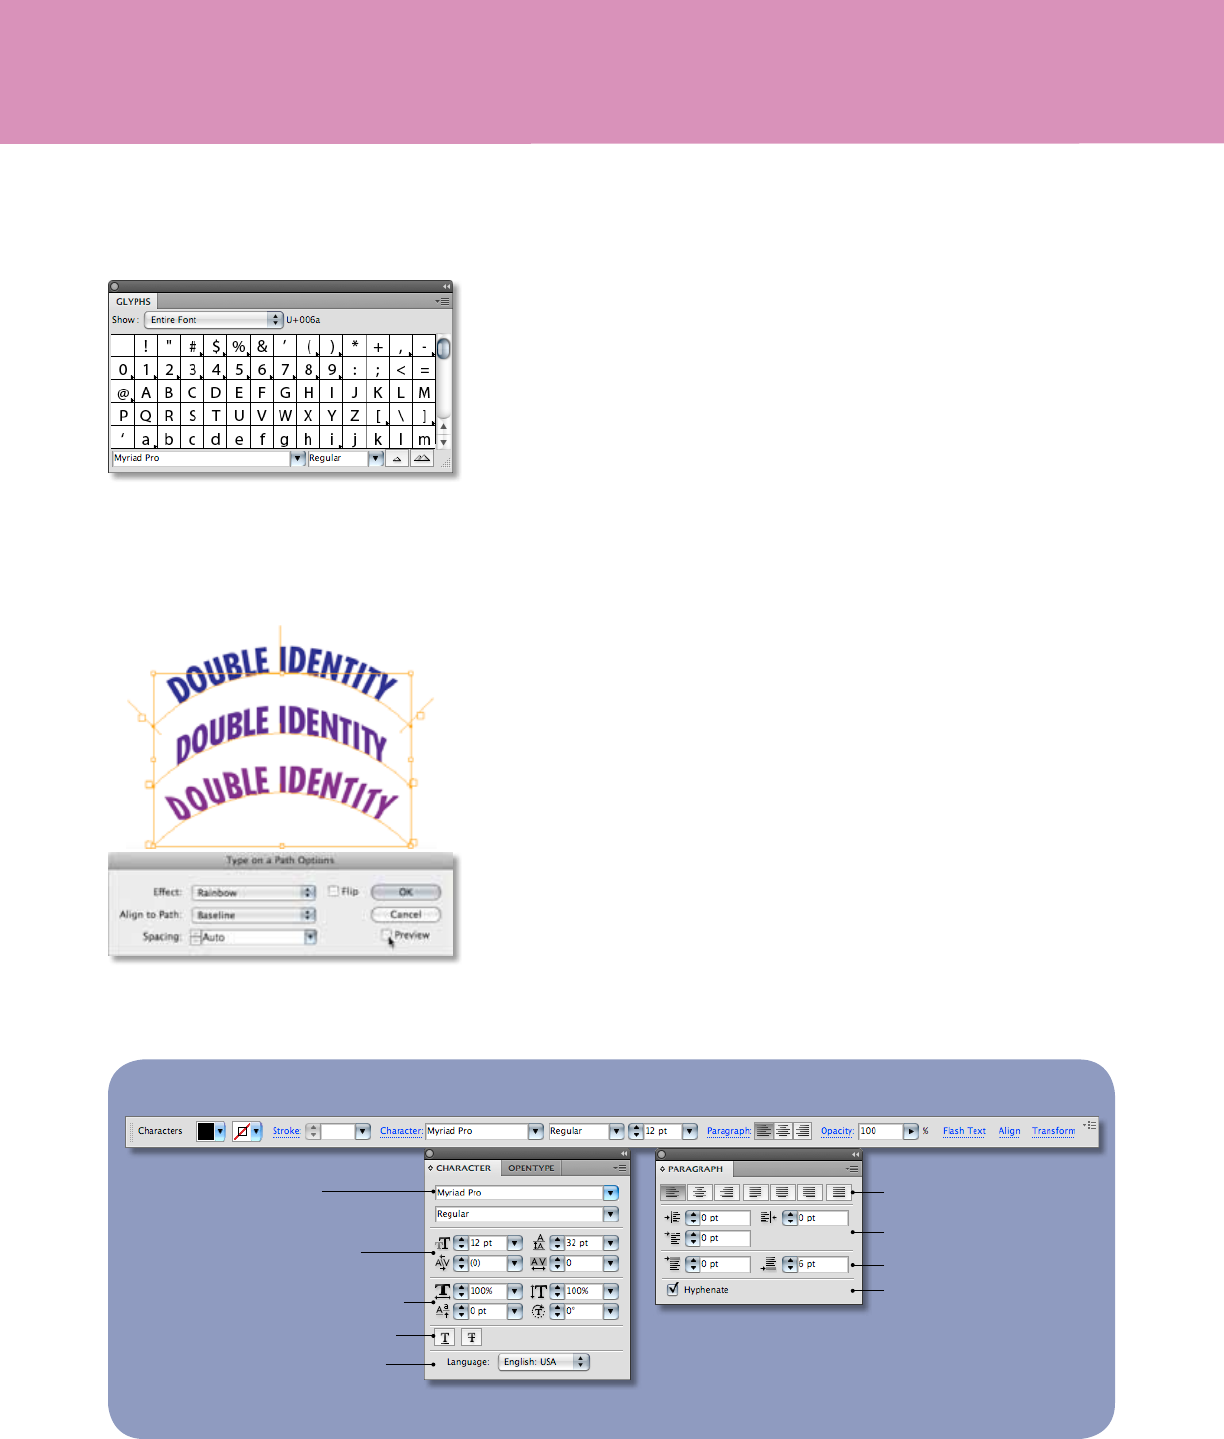
Working with Text Text composition methods
e appearance of type on the page depends on a complex interaction of
processes called composition. Using the word spacing, letter spacing, glyph
scaling, and hyphenation options you’ve selected, Illustrator evaluates possible
line breaks and chooses the one that best conforms to the specied parameters.
Illustrator oers two composition methods: the Adobe Every-line Composer and
the Adobe Single-line Composer.
e single-line composer oers a traditional approach to composing type—one
line at a time. is option is useful if you want manual control over how lines
break or if you are working with legacy text that you do not want to reow.
e every-line composer considers a network of break points for a range of lines,
and can optimize earlier lines in the paragraph in order to eliminate especially
unattractive breaks later on.
To choose one of these methods use the Paragraph panel menu. If you select
your type object with the Selection tool, Illustrator applies the method to all
paragraphs that are contained in it; if you click the text insertion point in a
paragraph the option will be applied only to that paragraph.
FreeHand uses a text composition engine that is very similar to the Adobe Single
Line Composer; if you notice unwanted text-reow in a converted document, try
changing the composition method.
Type tools
In FreeHand, you use the Text tool to enter text, either into xed size or auto
expanding text blocks, and then ow it into a shape or attach it to a path. In
Illustrator, there are three methods for creating type: at a point, inside an area,
and along a path.
• Point type is a horizontal or vertical line of text that begins where you click
on the artboard with the Type tool and expands as you enter characters. is
method is useful for adding a few words to your artwork. Point type resizes
when you drag the handles of the bounding box.
• Area type uses the boundaries of a selected vector object to control the ow
of characters. When the text reaches a boundary, it automatically wraps to t
inside the dened area. is method is useful when you want to create one or
more paragraphs, such as for a brochure. Create a container for area type by
clicking and dragging a rectangular shape with the Type tool, or use the Area
Type tool to select any closed path to contain your text. You can also create a
text area by clicking and dragging on the artboard with the Type tool. You can
modify the shape of the type area by dragging handles of the bounding box;
text will reow in the new shape.
• Type on a path ows along the edge of an open or closed path. e text ows
in the direction in which points were added to the path.
In addition to typing text in your artwork, you can import it from a variety of text
le formats (for example Microso Word, RTF format, or plain text documents)
by choosing File > Place.
Type tools in the Tools panel
Single-line Composer Every-line Composer
The Paragraph panel
and the menu options.
WORKING WITH TEXT
FreeHand to Illustrator Migration Guide—Working with Text 32
How do I insert special characters?
To insert special characters or characters for which you do not know the keyboard
shortcut, use the Glyphs panel (choose Type > Glyphs). Using any type tool, click
an insertion point where you want to enter the character, and then double-click the
character you want in the Glyphs panel.
How do I format text?
In FreeHand, you can format text in both the Object Panel and the Text toolbar. In
Illustrator, you can format selected text directly in the Control panel or by using the
Character and Paragraph panels.
Where are the text effects?
In Illustrator, there are no text-specic eects such as highlight, shadow, or zoom.
You apply text eects from the Eect menu just as you would with any graphic
element. You’ll nd strikethrough and underline in the Character panel (if you do
not see these options, choose Show Options from the panel menu).
How do I create rows and columns in a text area?
In FreeHand, you create multiple columns and rows in the Object panel; in
Illustrator, you use the Area Type Options dialog box. Select the text box in which
you want to add columns or rows, and choose Type > Area Type Options.
Type on a path
In FreeHand, you attach text to a path; Illustrator lets you type text on a path. You
can then move or ip text along the path by dragging handles on the sides of the text.
Choose Type > Type On A Path to specify eects and other options, such as spacing.
Control panel
Text formatting tools
Character panel
Paragraph panel
Font selection
Size, leading, kerning,
and tracking
Horizontal and vertical scale,
baseline shift, and text rotation
Underline and strikethrough
Language for hyphenation
and spell checking
Alignment
Indents
Space before and after paragraph
Automatic hyphenation
Glyphs panel
WORKING WITH TEXT
Type path eects include (from top to bottom)
Rainbow, Skew, and 3D Ribbon.
Coee Te
for Breakfa
Coffee & Tea
for Breakfast
Coee Te
for Breakfa
Coffee & Tea
for Breakfast
FreeHand to Illustrator Migration Guide—Working with Text 33
Linking text objects
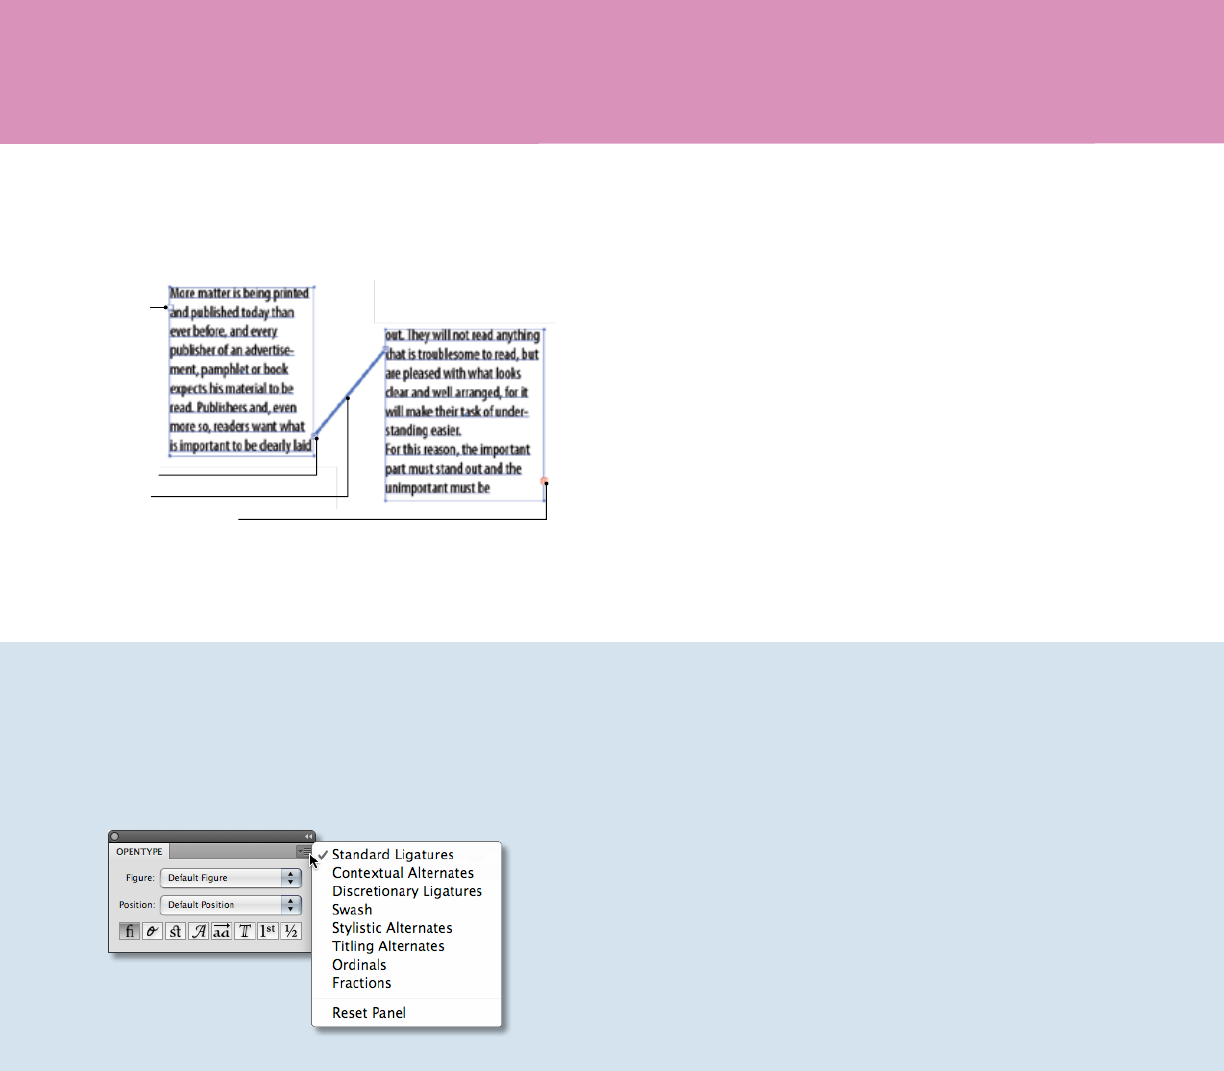
If you want to insert text that will ow from one text area to another,
you must link the areas. Each area shows an in port and an out port;
an empty port indicates that all text is visible. An arrow indicates that
the object is linked to another object. A red plus sign in an out port
indicates that the object contains additional text (overow text).
When working with text that threads among objects, it can be useful
to show the threads; if they are hidden, choose View > Show Text
reads, and then select a linked object.
Out port
In port
Thread
Overflow text indicator
OpenType support
e OpenType font standard was developed jointly by Adobe and Microso, and
it brings the advantages of the PostScript Type 1 and TrueType font formats into
a format that takes advantage of Unicode character encoding. OpenType fonts
use a single font le for both Windows and Macintosh computers.
When working with OpenType fonts, you can automatically activate alternate
glyphs, such as ligatures, small capitals, fractions, and old style proportional
gures. In Illustrator, these options are available in the OpenType panel
(Window > Type > OpenType).
Illustrator CS4 threads text between objects. Click the in or out port of a selected type object,
and then click and drag the loaded text icon to create a second threaded object. To break a
thread, select a linked type object, and then double-click the port on either end of the thread.
WORKING WITH TEXT
Use the OpenType panel
to apply such special
characters as ligatures,
true fractions, ordinals,
and stylistic alternatives.
Tip: To create a style based on any selected
text, click the Create New Style button in the
Character Styles or Paragraph Styles panel.
Paragraph and character styles
In FreeHand, text formatting is saved at the object level; Illustrator allows you to save both
paragraph styles and character styles to quickly apply them to other text. If you modify
a paragraph or character style, the changes aect all text in the document with that style
applied. And you do not lose local formatting such as bold or italic when you update a style.
Converting text to paths
e Create Outlines command lets you turn type into a set of compound paths that you can
edit and manipulate as you would any other graphic object. Outlined text is converted in its
current position and characters retain all graphics formatting, such as stroke and ll.
For more information, see Working with Type in Illustrator CS2 on the Adobe website (www.
adobe.com/products/illustrator/pdfs/Text_in_AICS2.pdf).
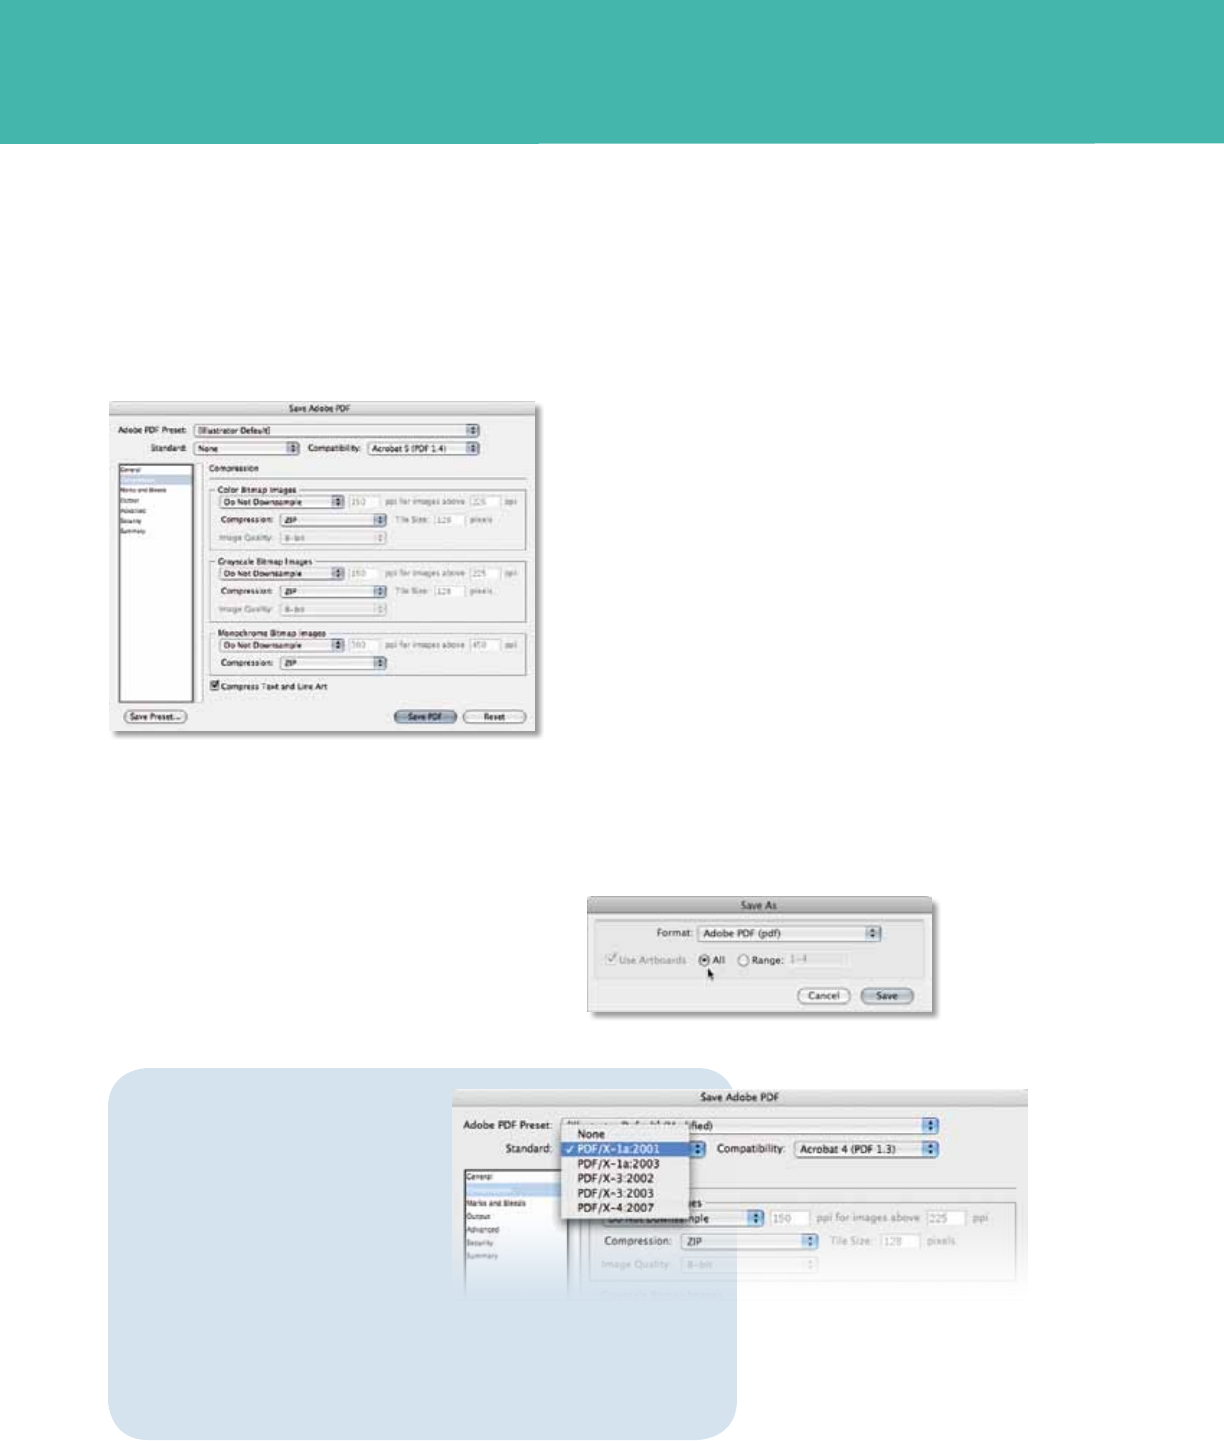
The Save Adobe PDF dialog box allows you to save your artwork
for distribution, review cycles, and high-quality printing.
FreeHand to Illustrator Migration Guide—Saving and Exporting Files 34
Saving
In FreeHand, you can save your pages as a FreeHand document, template,
or editable EPS. In Illustrator, you can save your work as an Illustrator le
or template, Illustrator EPS, Adobe PDF, and SVG (all are native formats
easily reused or imported because they preserve all Illustrator data).
If you need to use the Illustrator le in an Adobe workow, you can leave
it in the Illustrator le format (select the Create PDF Compatible File
option in the Save As dialog box). You will then be able to place the le
into InDesign layouts or further edit the le in Photoshop.
If you need to use your Illustrator artwork in applications outside of
Creative Suite you can save it as EPS, which is accepted by virtually all
page layout, word-processing, and graphic applications. Note that EPS
les can contain both vector and bitmap graphics.
Adobe PDF is the standard for the secure, reliable distribution and
exchange of electronic documents around the world. PDF is highly
eective in print publishing workows and you can also choose to create
a PDF/X-compliant le to eliminate many of the color, font, and trapping
variables that can lead to printing problems.
Saving multiple artboards
Multiple artboards can be saved as multiple pages in a single PDF
document, or can be saved as individual les that are automatically
numbered sequentially in, for example, EPS format.
Saving and Exporting Files
When saving Illustrator les as PDF,
you can also choose from several
PDF/X standards.
About PDF/X
PDF/X (Portable Document Format
Exchange) is an ISO standard used
for graphic content exchange and
professional workows.
The benet of using PDF/X is that
the produced PDF will not contain
unnecessary information and will not
include elements that may cause problems during output (such as RGB images).
Choose an Adobe PDF standard from the Standard menu at the top of the
Save Adobe PDF dialog box. For more information on PDF/X, visit
www.adobe.com/designcenter/acrobat/articles/acr8ap_pdfx.html.
SAVING AND EXPORTING FILES
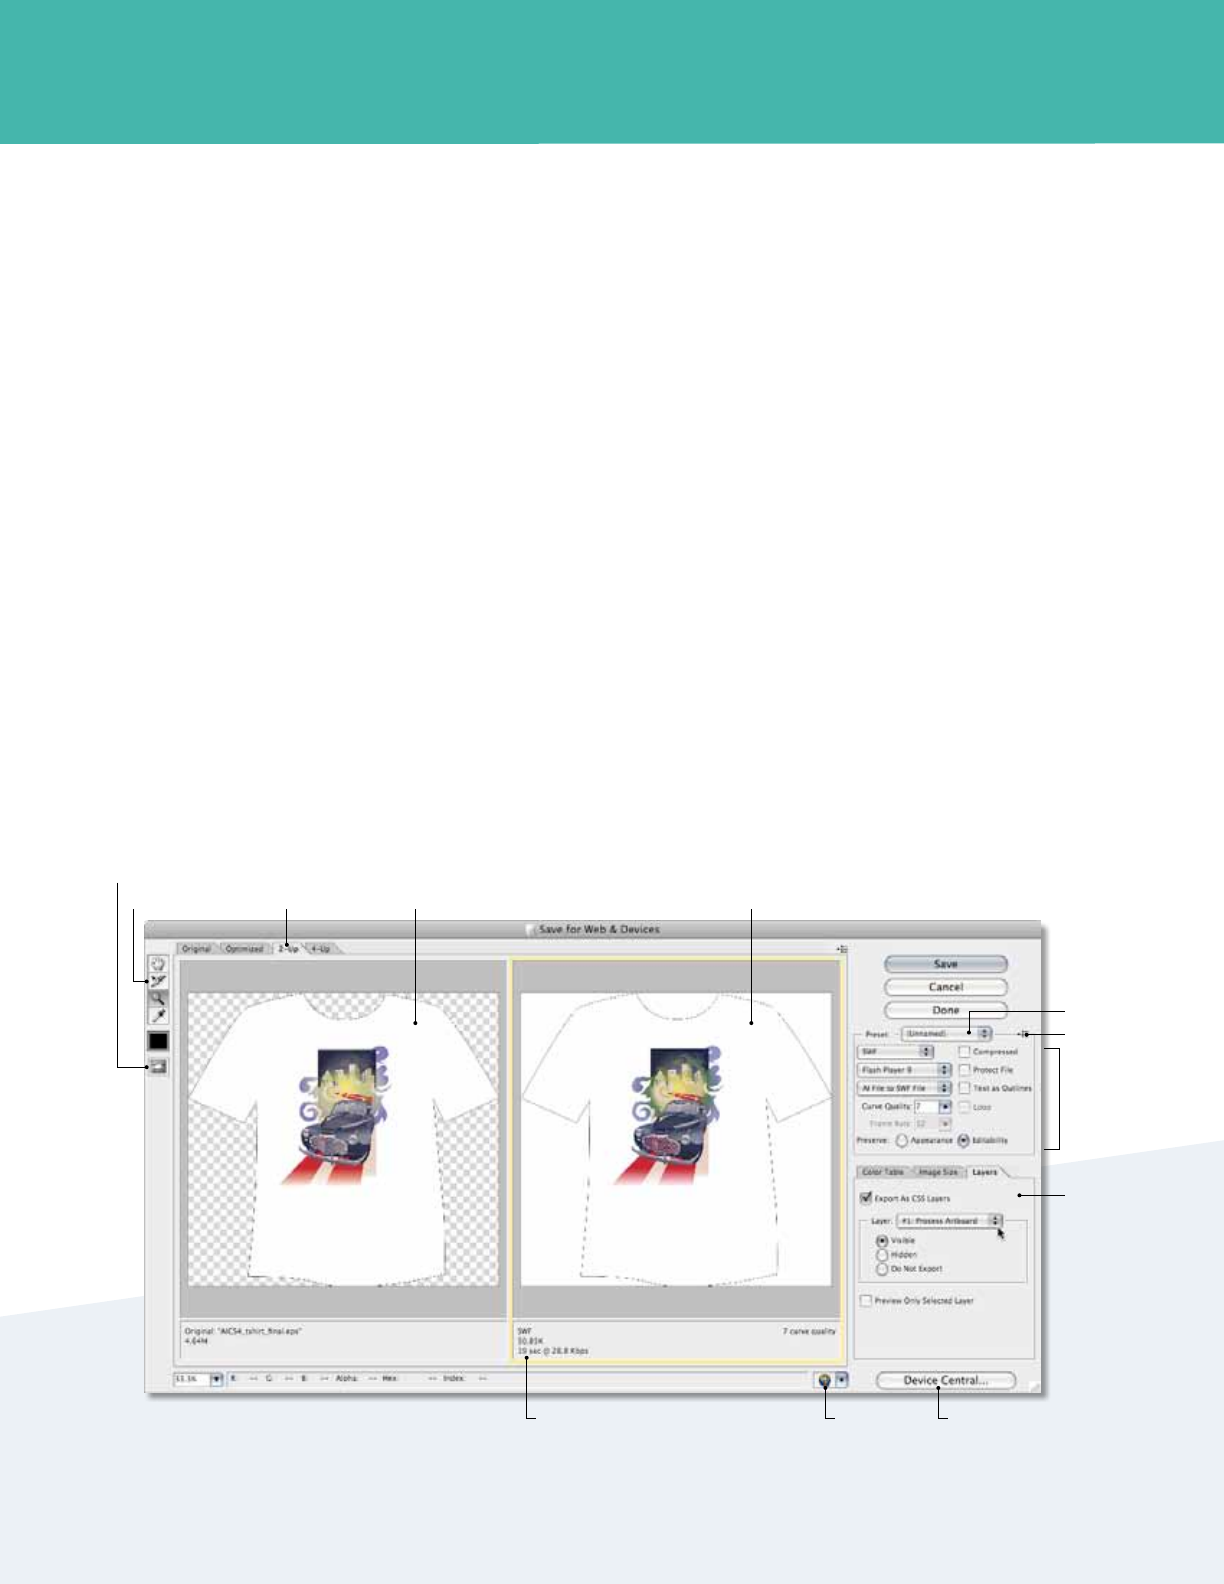
FreeHand to Illustrator Migration Guide—Saving and Exporting Files 35
Adobe Device Central
With Adobe Device Central CS4, you can preview how your artwork will display on mobile
devices. It helps preview, test, and optimize your content as you work by providing specic
target device templates so you can quickly switch back and forth between your Illustrator
view and device preview. Use Adobe Device Central to streamline your mobile publishing
workow and save time when working on mobile content.
Saving for the web and for devices
Although you can save your artwork as web-friendly les using the Export command, it is
much simpler to use the Save For Web & Devices command.
Save For Web & Devices allows you to choose web le formats, select compression and color
options, and preview the optimized artwork. Additionally, you can change the image size
and export CSS (cascading style sheets) layers.
In Illustrator, you can use slices to dene the boundaries of dierent web elements (such
as HTML text, bitmap images, or vector graphics) in your artwork. For example, if your
artwork contains a bitmap image that needs to be optimized in JPEG format, while the rest
of the image is better optimized as a GIF, you can isolate the bitmap image using a slice.
When you save the artwork as a web page using the Save For Web & Devices command, you
can choose to save each slice as an independent le with its own format, settings, and color
panel. Slices in an Illustrator document correspond to table cells in the resulting web page.
SAVING AND EXPORTING FILES
Save For Web & Devices dialog box
2-Up tab Original artwork Preview of optimized artwork
Optimized file size and
approximate download time
Preview in
Browser
Slice Select tool
Toggle Slices Visibility
Presets
SWF and
other file
format
options
CSS
layers
for SWF
Preview in Adobe
Device Central
Optimize
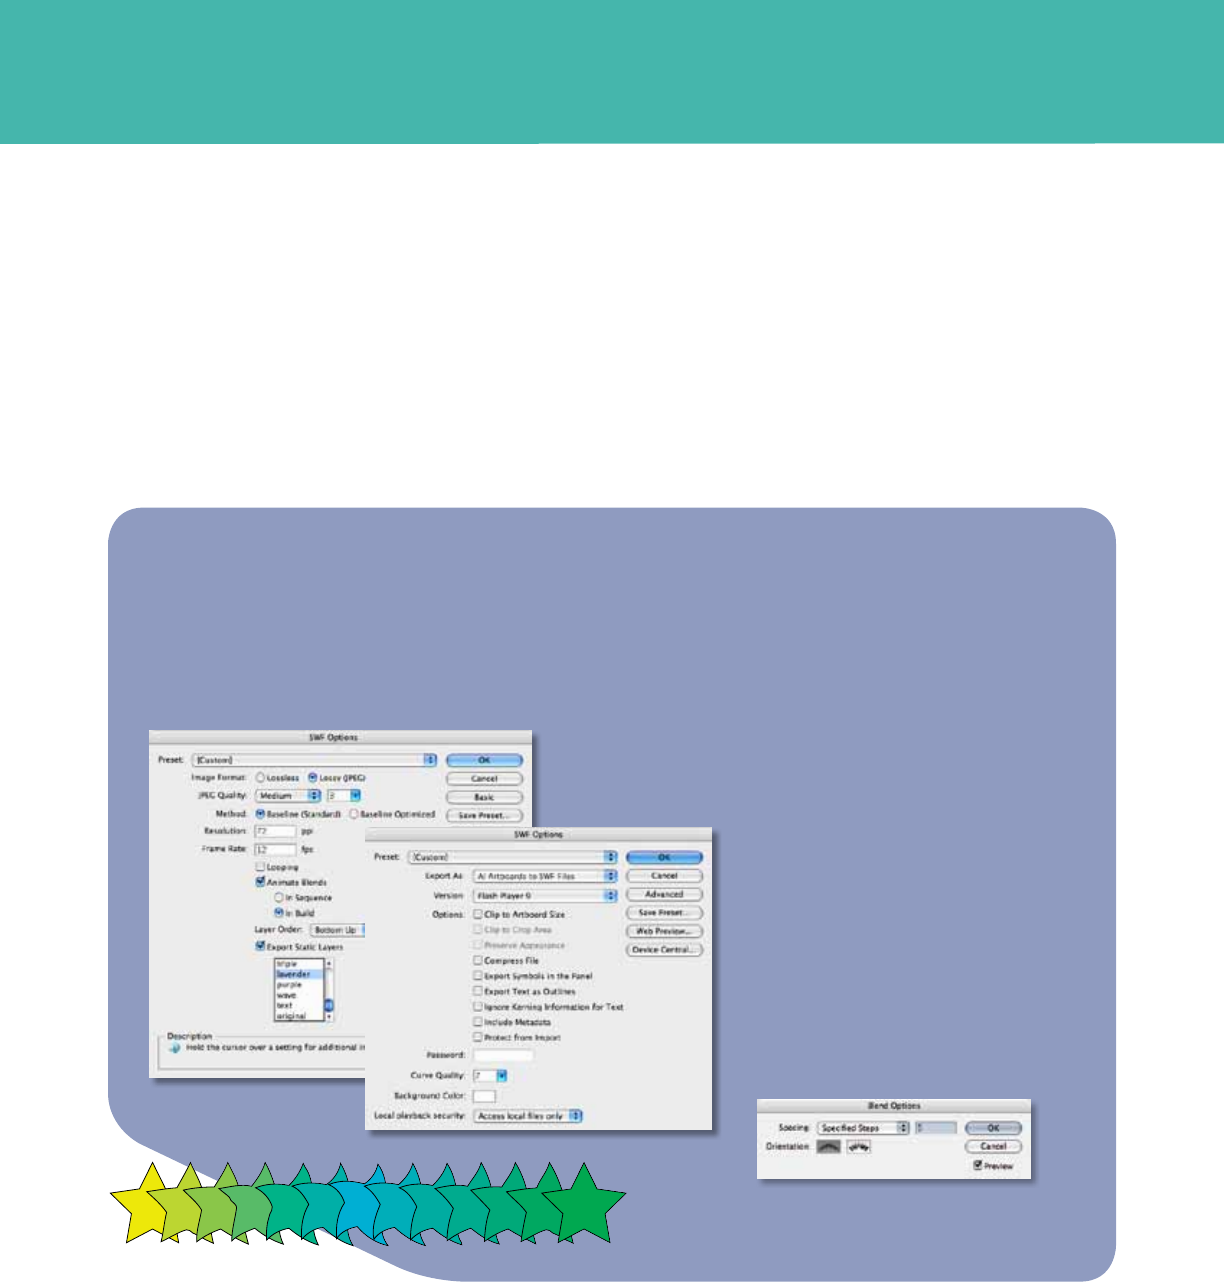
FreeHand to Illustrator Migration Guide—Saving and Exporting Files 36
Adobe Flash CS4 Professional integration
Kick o your Flash projects with Illustrator CS4 and have condence that your vectors will copy/paste and import reliably. e integrity of
critical elements is fully maintained in Flash Professional CS4, with intact paths—and correct anchor point positions—as well as gradients,
clipping masks, and symbols. Plus, your entire Illustrator layer and grouping structure is preserved, along with all object names. Use the
strengths of Illustrator to create intricate and unique vectors for your animations.
Features of particular interest to Flash designers include Illustrator symbols and type tools. Save any Illustrator shape as a symbol to paste
into Flash, and use Symbol tool options that are similar. Take advantage of the power of Illustrator type tools to create text for Flash,
choosing to dene it as Regular Text, Dynamic Text, or Input Text, and assigning properties accordingly.
SAVING AND EXPORTING FILES
Export artwork as SWF les using the Export command or the Save For Web &
Devices command. Options in the Export dialog box provide control over animation
and bitmap compression options, while options in the Save For Web & Devices dialog
box give you control over the mix of SWF and bitmap formats in a sliced layout. You
can also use Save For Web & Devices to preview animation in a web browser.
Blend
options
Advanced and Basic SWF options
In this example, the star in the center has a Warp eect applied to it.
Exporting Flash animation from Illustrator Creating frame-based animation
Flash animation is frame based. Keep that in
mind when working with layers; each layer of
your Illustrator document can become a frame
of animation. For Flash animation that plays at
12 frames per second, you will need 12 layers for
each second of animation.
Using symbols
If you create a layer-based animation of repeated
shapes, you can use symbols instead of adding
complex art to every layer. Each symbol instance
is linked to the symbol in the Symbols panel or
a symbols library, resulting in smaller le sizes.
And after you place a symbol, you can edit the
instances and redene the original symbol.
Using blends to animate objects
Illustrator blends are useful if you want to morph
shapes or change colors during the animation.
You can modify the blend’s path using drawing
tools to create very intricate movements.
Exporting
If you need to use your le in workows that do not support native Illustrator le formats, you can export the artwork into many alter-
nate le types, including AutoCAD Drawing (DWG), Flash (SWF), or TIFF. ese formats are called non-native because Illustrator doesn’t
include all of the data necessary to reopen the le in Illustrator. For this reason, it is recommended that you save artwork in AI format until
you completed it, and then export the artwork to the desired format.
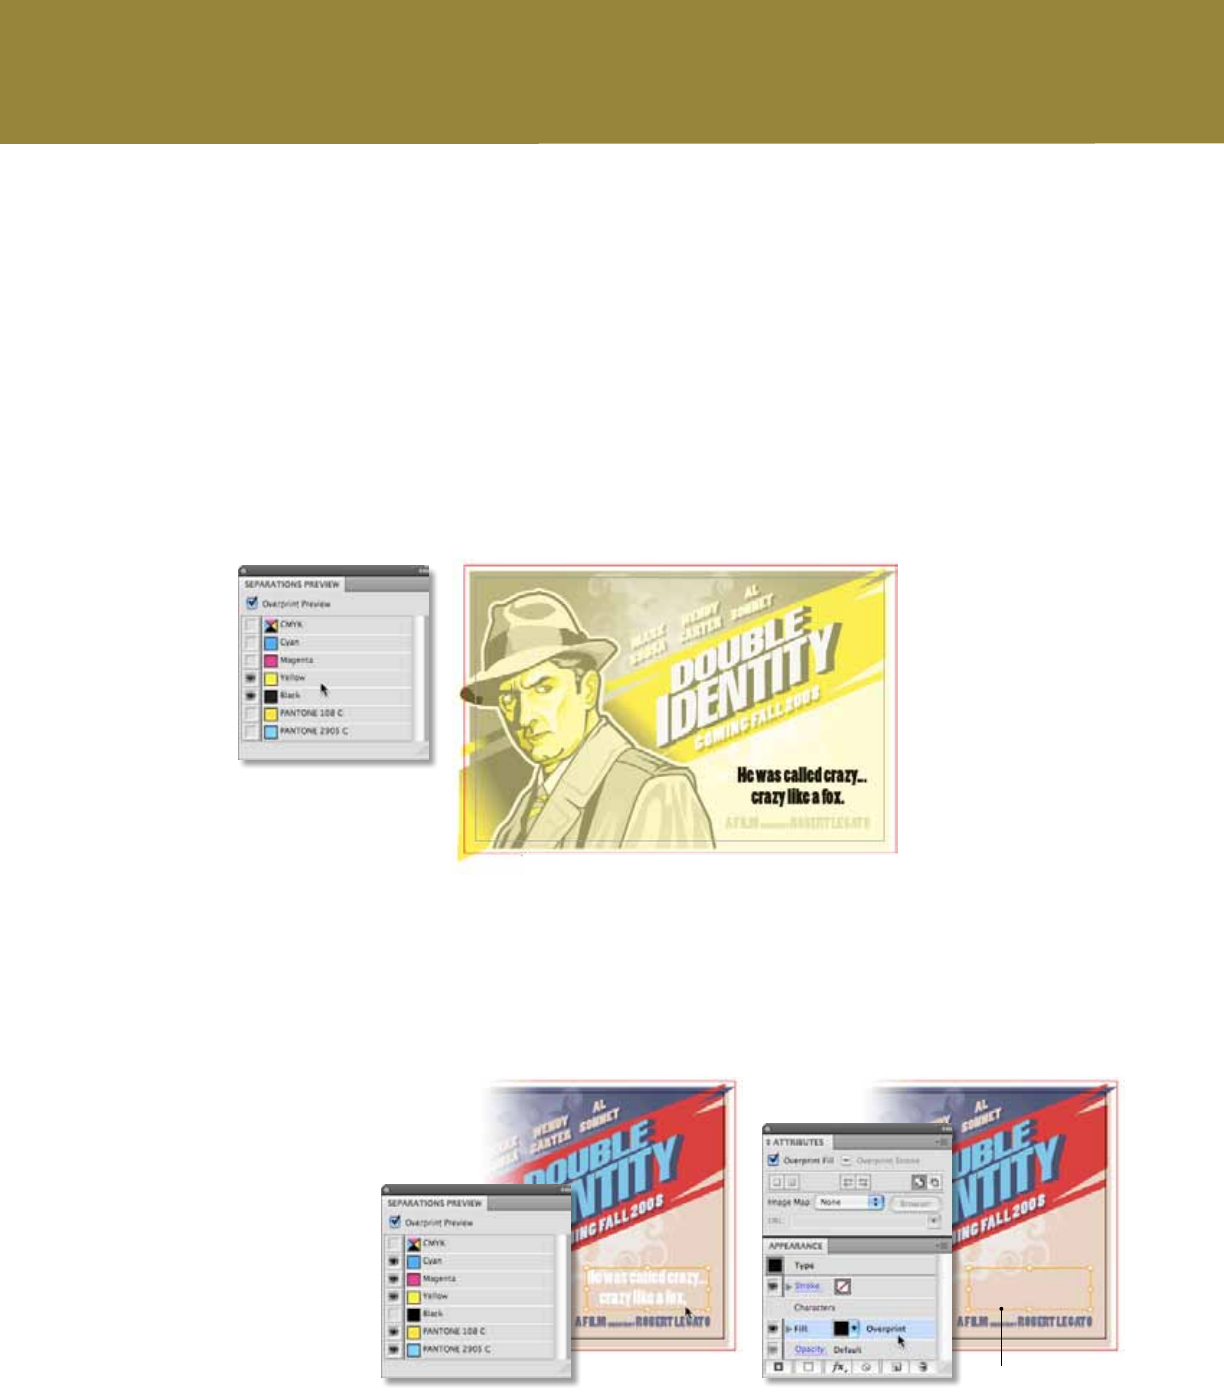
FreeHand to Illustrator Migration Guide—Printing 37
Illustrator CS4 output for print is reliable and accurate, thanks to features such as
transparency attening and overprint preview, whether you are sending your artwork
directly to a printer or exporting as Adobe PDF. You can be condent that your work will
print just as you have created it.
Separations Preview
Deliver reliably to print using Separations Preview to check your colors. Avoid color output
surprises such as unexpected spot colors, unwanted overprinting, overprints that don’t
overprint, white overprinting, and CMYK blacks in text and placed les. e Separations
Preview panel displays a list of spot and process colors; you can choose to display individual
colors for previewing color separations onscreen.
PRINTING
Printing
Use Separations Preview to identify
overprint problems, in this case,
where black knocks out the color
Preview overprint ll
The Separations Preview panel
shows spot colors as well as
CMYK separations.
Check how your color
separations will look,
individually or in
combination, by turning
on the visibility of each
color in the Separations
Preview panel.
See the preview on your
artboard while you work.
Overprint setup
In the Attributes panel, you can set the lls and strokes of elements of your artwork to over-
print when it is separated for professional printing. Select the object or objects that you want
to overprint, and in the Attributes panel, select Overprint Fill, Overprint Stroke, or both.
Use the Attributes panel to
set up the black for the type
object as an overprint ll
Tip: Ensure all your blacks are the same
and set them all to overprint at once.
Select your black swatch or a black object
and choose Select > Same > Fill Color.
Add to your selection if needed. Then click
Overprint Fill in the Attributes panel. Check
your work using Separations Preview.
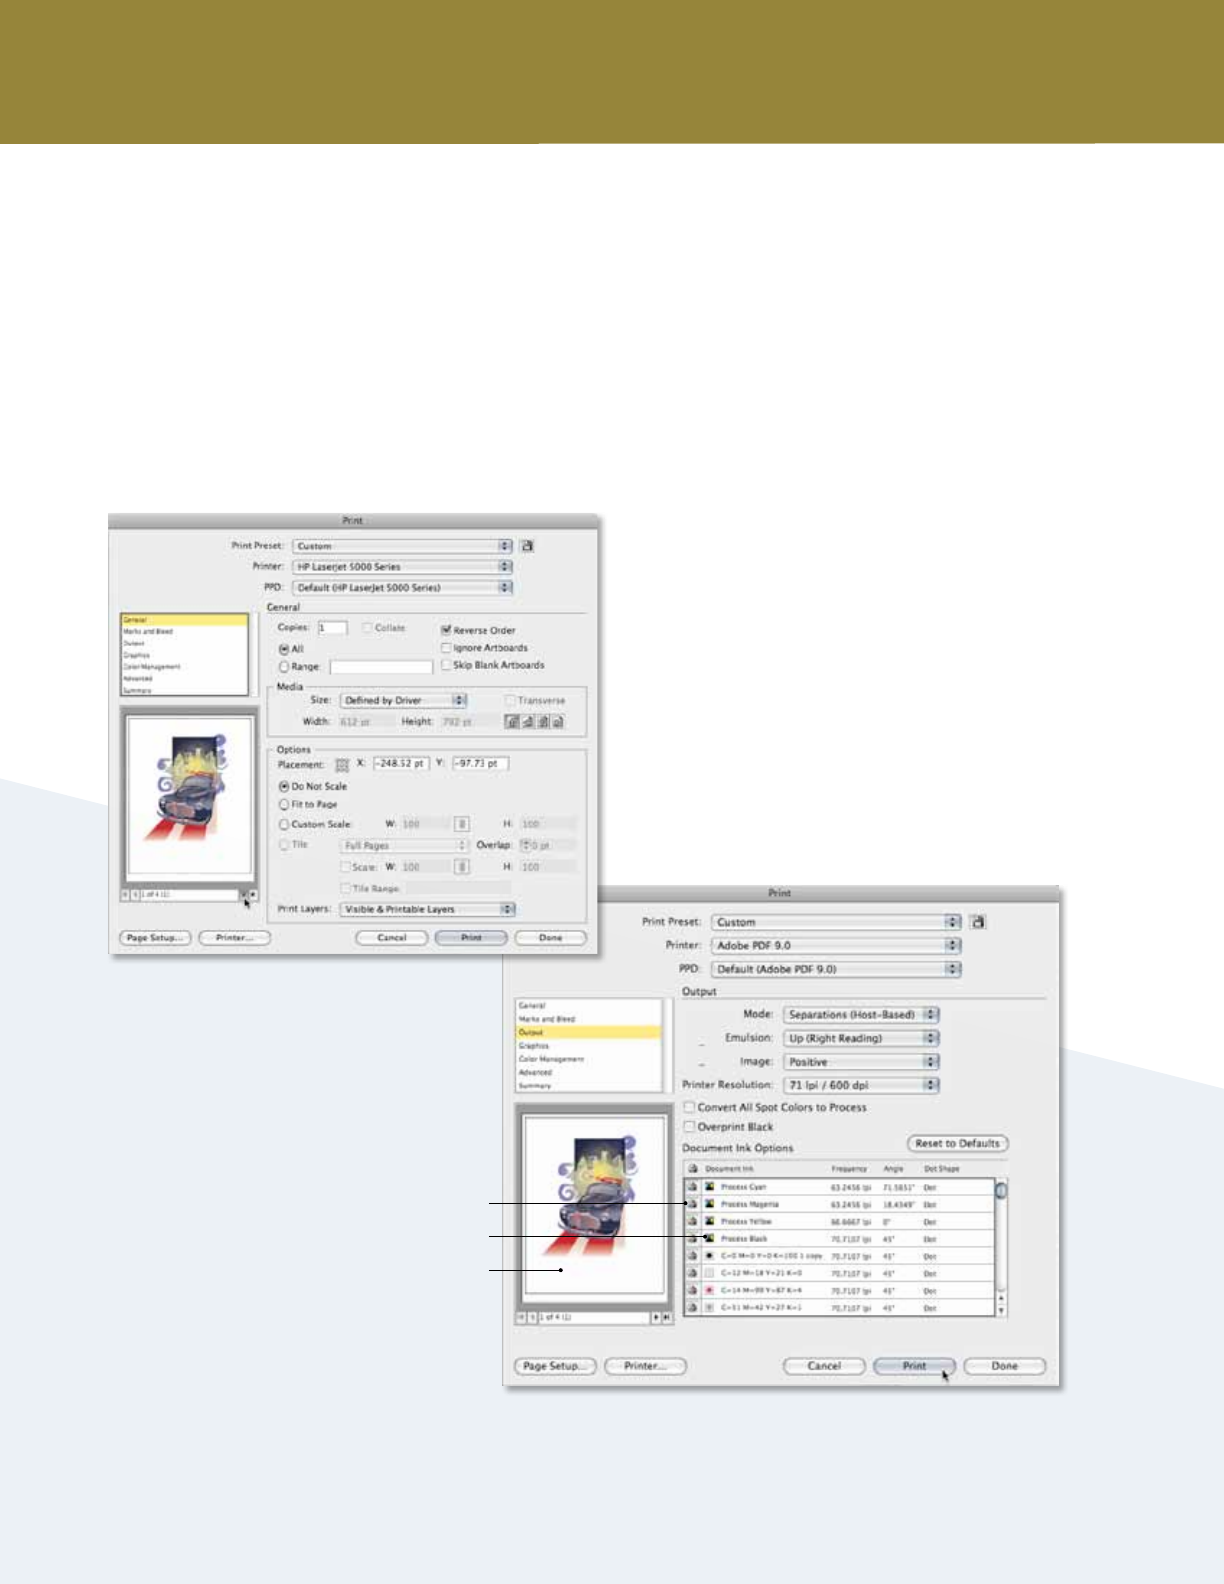
FreeHand to Illustrator Migration Guide—Printing 38
The Print dialog box
Printing your artwork in Illustrator is very similar to using the Advanced Print Settings
in FreeHand. e Print dialog box lets you click through panes that provide controls
over general settings, document setup, marks and bleeds, output, graphics, and color
management. Click Page Setup to specify page setup options.
Each category of options in the Print dialog box in Illustrator—from General to Summary—
is organized to guide you through the printing process:
• General—Set the page size and orientation, specify how many
pages and artboards to print, dene your media, and choose
which layers to print. Scale and change placement of artwork
on the page, and control tiling.
• Marks&Bleed—Select printer’s marks and create a bleed.
• Output—Create color separations or choose plates to print.
• Graphics—Set printing options for paths, fonts, PostScript
les, gradients, meshes, and blends.
• ColorManagement Select—a color prole and rendering
intent for printing.
• Advanced—Control the attening (rasterization) of vector
artwork during printing.
• Summary—View and save a summary of print settings and
warnings about possible output problems.
Toggle to print plate
CMYK plate
Print preview
In the Output pane of the Print dialog box choose to print color
separations and specify ink, screen, and lm or plate settings.
The Print dialog box
PRINTING
Specify print options and preview multiple
artboards in the Print dialog box.
Tip: Visit the Adobe Print Resource Center for
a variety of resources that can help you acheive
high-quality print results, quickly and reliably.
http://www.adobe.com/studio/print/index.html.
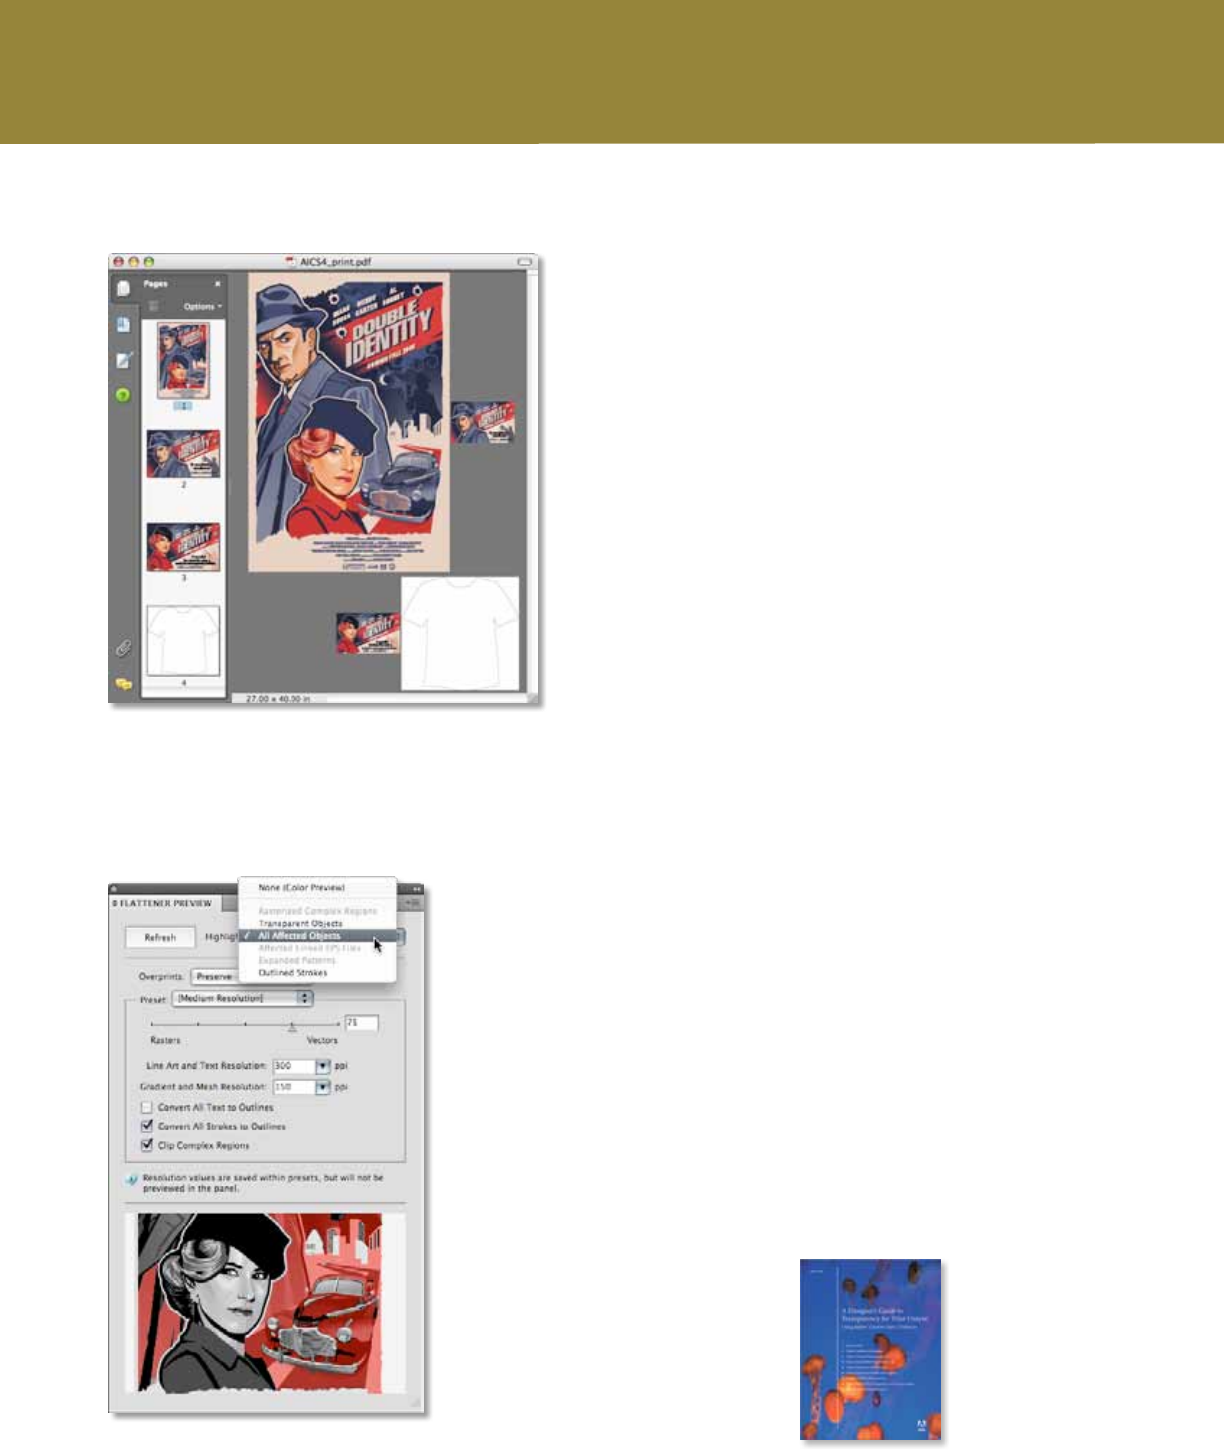
Multipage PDF creation is even more compelling
when you have artboards of dierent sizes. Send a
variety of artwork to print using one PDF le.
FreeHand to Illustrator Migration Guide—Printing 39
Printing multiple artboards and tiled artwork
Illustrator provides maximum exibility in printing pages and artboards:
• Printallartboardsasseparatepages,choosinganyorallartboards
• Printalltheartworktogetherasasinglepagebyignoringartboards
• Printartfromasingleartboardthathasbeentiledorscaledtotpages.
By default, Illustrator prints each artboard on a single sheet of paper, and
you can choose to print all artboards, or a range of artboards. You can also
save multiple artboards to multipage print-ready PDF les.
If your artwork on an artboard is larger than available print page sizes, you
can print onto multiple sheets of paper by tiling the artboard. Choose a
tiling option in the General section of the Print dialog box and view tiling
boundaries on the artboard by choosing View > Show Print Tiling.
Tip: For more about
attening, download
A Designer’s Guide to
Transparency for Print
Output by visiting
www.adobe.com/
products/creativesuite/
pdfs/dgt.pdf.
PRINTING
Flattener Preview panel with highlight menu
Flattening transparency
Transparent eects in artwork must be attened before they can be printed. Flattening
divides transparent artwork into vector-based areas and rasterized areas. To see areas that
need to be attened, choose Window > Flattener Preview, and then click Refresh. To ne-
tune the transparency attening settings or select another preset, choose Show Options from
the panel menu. Click Refresh again to preview the results. Or, select an object, and then
choose Object > Flatten Transparency.
Illustrator CS4 oers three attening presets—Low, Medium, and High Resolution—so that
you can quickly and easily atten artwork for common print conditions. To edit these
presets or to create your own, choose Edit > Transparency Flattener Presets.
Illustrator allows you to apply very complex transparency eects such as blends and fades,
so drop shadows, and feathered edges to your graphics. Furthermore, you can change the
opacity and apply blending modes to any object in Illustrator. anks to the integration
between components in Creative Suite, you can place native transparent Photoshop (PSD)
les into your Illustrator artwork without rasterizing your compositions.
If you are new to native transparency, note
that transparency is attened when you
export a document to a le format that
doesn’t support native transparency from
Illustrator, or when you print the document.

FreeHand to Illustrator Migration Guide—Keyboard Shortcuts 40
Creating objects (Hold down keys until after releasing the mouse button.)
W i n d o W s M ac os
Constrains objects horizontally, vertically, or proportionally. Shift Shift
Draws objects from their centers. Alt Option
Opens dialog boxes with transformation tools. Alt-click Option-click
Turns the cursor into the Hand tool. Spacebar Spacebar
Repositions an object while it is being drawn. Spacebar-drag Spacebar-drag
Maintains star inner radius. Star tool+Ctrl-drag Star tool+Command-drag
Adds/subtracts sides, corner radius, star points, Start drawing, and press Start drawing, and
or spiral coils. press the Up or Down Arrow press the Up or Down Arrow
Changes the pointer to a cross hair for selected tools. Caps lock Caps lock
Viewing objects
W i n d o W s M ac os
Fits active artboard in window. Double-click Hand Double-click Hand
tool or Ctrl+0 tool or Command+0
Fits all artboards in window. Ctrl+Alt+0 Command+Option+0
Sets magnification to 100%. Double-click Zoom Double-click Zoom
tool or Ctrl+1 tool or Command+1
Turns the cursor into the Zoom-in tool. Click or select an area to zoom in. Ctrl+spacebar Command+spacebar
Turns the cursor into the Zoom-out tool. Click to zoom out. Ctrl+Alt+spacebar Command+Option
+spacebar
Locks/unlocks guides. Ctrl+Alt+; Command+Option+;
Illustrator CS4 oers keyboard shortcuts to functions otherwise available
in menus or panels. You can customize your own sets of shortcuts, change
individual shortcuts within a set, and switch between sets by choosing
Edit > Keyboard Shortcuts.
Here are some of the most useful Illustrator CS4 keyboard shortcuts.
KEYBOARD SHORTCUTS
Keyboard Shortcuts

FreeHand to Illustrator Migration Guide—Keyboard Shortcuts 41
Selecting and moving objects (Watch the cursor to make sure you’ve pressed the correct keys.)
W i n d o W s M ac os
Switches to the last-used selection tool. Ctrl Command
Switches between the Direct Selection tool and the Group Selection tool. Alt Option
Chooses whether an object, path, or point is selected or deselected. Shift-click Shift-click
Toggles selection/deselection for an object, path, point or group Shift-click Shift-click
when using the Direct Selection or Group Selection tools.
Duplicates selection when using a selection or transformation tool. Alt-drag Option-drag
Moves selection in user-defined increments. Arrow keys Arrow keys
Moves selection in 10x user-defined increments. Shift+arrow keys Shift+arrow keys
Constrains movement to a 45-degree angle (except Reflect). Shift Shift
Transforming objects (Hold down keys until after releasing the mouse button.)
W i n d o W s M ac os
Constrains transformation proportionally, vertically, or horizontally. Shift Shift
Leaves the original object and transforms a copy. Drag transformation Drag transformation
tool+Alt tool+Option
Performs an Undo. Ctrl+Z Command+Z
Performs a Redo. Shift+Ctrl+Z Shift+Command+Z
Transforms pattern independent of object Tilde (~)-drag Tilde (~)-drag
when using the Selection, Scale, Reflect, or Shear tool.
Resizes selection proportionally when using Shift-drag Shift-drag
the Free Transform or Direct Selection tool.
Resizes selection from center when using Alt-drag Option-drag
the Free Transform or Direct Selection tool.
KEYBOARD SHORTCUTS

KEYBOARD SHORTCUTS
FreeHand to Illustrator Migration Guide—Keyboard Shortcuts 42
KEYBOARD SHORTCUTS
Painting
W i n d o W s M ac os
Interchanges fill and stroke colors. Shift+X Shift+X
Samples color from an image or intermediate Shift-click Shift-click
color from a gradient when using the eyedropper.
Samples the style and appends the appearance of Alt+Shift-click Option+Shift-click
the currently selected item when using the eyedropper.
Tints process color. Shift-drag color slider Shift-drag color slider
Cycles through color modes. Shift-click color Shift-click color
spectrum bar spectrum bar
Live Paint Bucket tool
W i n d o W s M ac os
Applies new paint to fill color (ignoring stroke). Click Click
Applies new paint to stroke color (ignoring fill). Shift-click Shift-click
Changes to the eyedropper, which picks up stroke and fill. Alt Option
Live Paint Bucket setting determines which is applied.
Changes to the eyedropper, which picks up pixel value of object. Alt+Shift Option+Shift
Fills all adjoining areas of the same paint fill that are not separated Double-click Double-click
with a painted stroke.
Paints similarly painted faces/edges that aren’t connected. Triple-click Triple-click
Live Paint Selection tool
W i n d o W s M ac os
Switches to the eyedropper, which applies the current Alt Option
appearance to selected objects.
Switches to the eyedropper, which applies the pixel Alt+Shift Option+Shift
value of an object, such as selection along gradient,
to selected objects.
Adds/subtracts from selection. Shift-click Shift-click
Selects all adjoining areas of the same paint fill Double-click Double-click
that are not separated with a painted stroke.
Selects similarly painted faces/edges Triple-click Triple-click
that aren’t connected.

KEYBOARD SHORTCUTS
FreeHand to Illustrator Migration Guide—Keyboard Shortcuts 43
KEYBOARD SHORTCUTS
Live Trace button
W i n d o W s M ac os
Creates a tracing object and converts it to paths. Alt-click button Option-click button
Isolation mode
W i n d o W s M ac os
Enters Isolation mode when using the Selection tool. Double-click a path Double-click a path
or a group or a group
Exits Isolation mode when using the Selection tool. Double-click outside the Double-click outside the
isolated path or group isolated path or group
Document control
W i n d o W s M ac os
Switches between open Illustrator documents. Ctrl+Tab Command+tilde (~)
KEYBOARD SHORTCUTS

FreeHand to Illustrator Migration Guide—Keyboard Shortcuts 44
is guide is not meant to replace documentation that comes with Illustrator CS4 or to be
a comprehensive reference for the features in Illustrator CS4. To that end, this guide has
mentioned many documents that oer more information on specic topics. In addition,
Adobe oers many other useful resources for anyone who wants to learn more about
Illustrator features, tools, and techniques.
Illustrator Help
Choose Help > Illustrator Help to explore Adobe Community Help, which aggregates the
best learning and support content available for Illustrator CS4, and features a powerful new
online search that pulls the most current resources from Adobe and from today's experts in
the Adobe community.
Adobe Bridge CS4
Adobe Bridge CS4 is a powerful, easy-to-use media manager for visual people, letting you
easily organize, browse, locate, and view creative assets. Available in all six editions of
Adobe Creative Suite 4 soware and in most of Adobe's professional creative applications,
Bridge provides centralized access to project les and global settings, as well as to XMP
metadata tagging and searching capabilities. Open Bridge from within Illustrator CS4 by
clicking the icon located in the Application bar. Find out more about Bridge by visiting
http://www.adobe.com/products/creativesuite/bridge.
Adobe TV
For training, techniques, and a creative jump-start, watch videos on Adobe TV. Choose from
tutorials, demos, tips and tricks, and inspirational programs. See how tools work between
Adobe applications and get step-by-step instruction on what it takes to achieve certain
eects. Check out proles of industry-leading designers who present how-to's and let you in
on their secrets to great design. Visit http://tv.adobe.com, and nd videos on a huge array of
topics and for every level of expertise.
Illustrator Design Center
Find a wealth of artist galleries, design ideas, links, plug-ins, actions, and instructional
content by visiting http://www.adobe.com/designcenter. See how today’s designers engage with
technology and what their experiences mean for design, design tools, and society.
Adobe Illustrator product pages
Go to the Adobe website at www.adobe.com/products/illustrator for complete information
about Illustrator CS4 and for links to useful documents. Navigate to the Features pages to
learn, in detail, about all the features in Illustrator CS4.
Support Center
e Support Center on the Adobe website at www.adobe.com/support oers a searchable
knowledgebase, user forums, and other timely information about all Adobe products.
ADDITIONAL RESOURCES