Adobe InCopy In Copy CC (2015) Help 2015 En
User Manual: adobe InCopy - CC (2015) - Help Free User Guide for Adobe InCopy Software, Manual
Open the PDF directly: View PDF ![]() .
.
Page Count: 393 [warning: Documents this large are best viewed by clicking the View PDF Link!]
- Legal notices
- Contents
- Chapter 1: What’s new
- Chapter 2: Creative Cloud
- Download and install apps
- Sync files and folders
- Add fonts from Typekit
- Search for assets on Adobe Stock
- Search for assets on Creative Cloud Market
- Share and discover work on Behance
- Home and activity feed
- Preferences
- Need more help?
- Browse, sync, and manage assets
- Add fonts from Typekit
- Creative Cloud Market
- Creative Cloud Extract
- Creative Cloud Libraries
- Share files and folders
- Collaborate on folders and libraries
- Launch Creative Cloud apps
- Manage your Creative Cloud for teams membership
- Chapter 3: Workspace
- Workspace basics
- Viewing stories
- Recovery and undo
- Moving through documents
- Customizing preferences and defaults
- Chapter 4: InCopy documents
- Using an InCopy workflow
- Transforming graphics
- Stand-alone documents
- Saving and exporting
- Importing graphics
- Import graphics
- Import options for graphics
- Fit a graphic to its frame
- Links panel overview
- Update, restore, and replace links
- Choose how relinked graphics are scaled
- Update modified links
- Replace a link with a different source file
- Restore missing links
- Find missing links
- Specify a default Relink folder
- Copy links to a different folder
- Relink to a different folder
- Relink files with different file extensions
- Replace an imported file using the Place command
- Copy the link pathname
- Edit original artwork
- Control layer visibility in imported images
- Importing InDesign (.indd) pages
- Including metadata in a story
- Controlling graphics display
- Frame grids
- Frames, grids, rulers, and guides
- Chapter 5: InCopy and InDesign
- Sharing content
- Working with managed files
- Understanding a basic managed-file workflow
- Adjusting your workflow
- Assignment packages
- Chapter 6: Text
- Using the thesaurus
- Using text macros
- Using editorial notes
- About editorial notes
- Notes panel overview
- Use Notes Mode
- Add a note
- Convert text to a note
- Convert notes to text
- Navigate between notes
- Split a note
- Expand or collapse notes
- Select and open a note in Layout view
- Edit a note
- Check spelling or find/change text in notes
- Move or duplicate notes
- Delete notes
- Printing and exporting notes
- Specify note preferences
- Tracking and reviewing changes
- Text variables
- Hyperlinks
- Adding text
- Checking spelling
- Check spelling
- Hyphenation and spelling dictionaries
- Create or add user dictionaries
- Set the default language dictionary for the current document
- Set the default language dictionary for all new documents
- Remove, relink, and reorder user dictionaries
- Add words to dictionaries
- Remove or edit words in dictionaries
- Export a word list
- Import a word list
- Change dictionary preferences
- Using dictionaries in a workgroup
- Assign a language dictionary to selected text
- Cross-references
- Copyfitting text
- Editing text
- Find/Change
- Footnotes
- Glyphs and special characters
- Chapter 7: Styles
- Working with styles
- Paragraph and character styles
- About character and paragraph styles
- Styles panel overview
- Add paragraph and character styles
- Map styles to export tags | CC, CS6, CS5.5
- Convert Word styles to InDesign styles
- Apply styles
- Edit character and paragraph styles
- Delete character or paragraph styles
- Override character and paragraph styles
- Convert style bullets and numbering to text
- Find and replace character and paragraph styles
- Drop caps and nested styles
- Chapter 8: Typography
- Bullets and numbering
- Create bulleted or numbered lists
- Format a bulleted or numbered list
- Change bullet characters
- Change numbered list options
- Defining lists
- Create a paragraph style for running lists
- Create multi-level lists
- Create running captions for figures and tables
- Restart or continue numbering for a list
- Convert list bullets or numbers to text
- Formatting CJK characters
- Using fonts
- Text composition
- Tabs and indents
- Leading
- Kerning and tracking
- Aligning text
- Composing CJK characters
- CJK composition
- Change CJK composition preferences
- Use mojikumi
- Change mojikumi settings
- Use kinsoku settings
- Turn bunri-kinshi on or off
- Use rensuuji
- Absorb ideographic space
- Turn off Roman word wrap
- Apply kinsoku hanging
- Rotate half-width characters in vertical text
- Turn warichu on or off
- Change warichu options
- Changing spacing between characters in CJK text
- Formatting characters
- Apply baseline shift
- Make characters superscript or subscript in a non-OpenType font
- Apply underline or strikethrough
- Apply ligatures to letter pairs
- Change the color, gradient, or stroke of text
- Change the color and gradient of text
- Add transparency effects to text
- Assign a language to text
- Change the case of type
- Scale type
- Skew type
- Formatting paragraphs
- Formatting text
- Bullets and numbering
- Chapter 9: Tables
- Selecting and editing tables
- Select table cells, rows, and columns
- Insert rows and columns
- Delete rows, columns, or tables
- Change the alignment of a table within a frame
- Navigate within a table
- Cut, copy, and paste table contents
- Move or copy a table
- Convert tables to text
- Combine tables
- Working with tables in Story Editor
- Working with tables in Galley/Story view
- Table and cell styles
- About table and cell styles
- Table/Cell Styles panels overview
- Define table and cell styles
- Load (import) table styles from other documents
- Apply table and cell styles
- Base one table or cell style on another
- Edit table and cell styles
- Delete table and cell styles
- Redefine table or cell styles based on current formatting
- Override table and cell styles
- Break the link to table or cell styles
- Table strokes and fills
- Creating tables
- Formatting tables
- Selecting and editing tables
- Chapter 10: Printing
- Chapter 11: PDF
- Chapter 12: XML
- Working with XML
- Using XML files
- Tagging content for XML
- Structuring documents for XML
- Exporting to XML
- Chapter 13: Keyboard shortcuts
- Default keyboard shortcuts
- Keys for tools
- Keys for navigating through documents
- Keys for moving and transforming graphics
- Keys for working with text
- Keys for working with type
- Keys for finding and changing text
- Keys for tables
- Keys for type panels and dialog boxes
- Keys for the character and paragraph styles
- Keys for the Thesaurus
- Keys for working with XML
- Other useful keyboard shortcuts
- Keys for resolving conflicts between Mac OS 10.3x and 10.4
- Default keyboard shortcuts
- Chapter 14: System requirements

Adobe® InCopy®
CC
Help


iii
Last updated 6/13/2015
Contents
Chapter 1: What’s new
Usability and productivity . . . . . . . . . . . . . . . . . . . . . . . . . . . . . . . . . . . . . . . . . . . . . . . . . . . . . . . . . . . . . . . . . . . . . . . . . . . . . . . . . . . . . . . . . . . . . .1
Text changes . . . . . . . . . . . . . . . . . . . . . . . . . . . . . . . . . . . . . . . . . . . . . . . . . . . . . . . . . . . . . . . . . . . . . . . . . . . . . . . . . . . . . . . . . . . . . . . . . . . . . . . . . . .2
Collaboration . . . . . . . . . . . . . . . . . . . . . . . . . . . . . . . . . . . . . . . . . . . . . . . . . . . . . . . . . . . . . . . . . . . . . . . . . . . . . . . . . . . . . . . . . . . . . . . . . . . . . . . . . .2
Chapter 2: Creative Cloud
. . . . . . . . . . . . . . . . . . . . . . . . . . . . . . . . . . . . . . . . . . . . . . . . . . . . . . . . . . . . . . . . . . . . . . . . . . . . . . . . . . . . . . . . . . . . . . . . . . . . . . . . . . . . . . . . . . . . . . . .4
Browse, sync, and manage assets . . . . . . . . . . . . . . . . . . . . . . . . . . . . . . . . . . . . . . . . . . . . . . . . . . . . . . . . . . . . . . . . . . . . . . . . . . . . . . . . . . . . . 16
Add fonts from Typekit . . . . . . . . . . . . . . . . . . . . . . . . . . . . . . . . . . . . . . . . . . . . . . . . . . . . . . . . . . . . . . . . . . . . . . . . . . . . . . . . . . . . . . . . . . . . . . . 22
Creative Cloud Market . . . . . . . . . . . . . . . . . . . . . . . . . . . . . . . . . . . . . . . . . . . . . . . . . . . . . . . . . . . . . . . . . . . . . . . . . . . . . . . . . . . . . . . . . . . . . . . . 29
Creative Cloud Extract . . . . . . . . . . . . . . . . . . . . . . . . . . . . . . . . . . . . . . . . . . . . . . . . . . . . . . . . . . . . . . . . . . . . . . . . . . . . . . . . . . . . . . . . . . . . . . . . 34
Creative Cloud Libraries . . . . . . . . . . . . . . . . . . . . . . . . . . . . . . . . . . . . . . . . . . . . . . . . . . . . . . . . . . . . . . . . . . . . . . . . . . . . . . . . . . . . . . . . . . . . . . 37
Share files and folders . . . . . . . . . . . . . . . . . . . . . . . . . . . . . . . . . . . . . . . . . . . . . . . . . . . . . . . . . . . . . . . . . . . . . . . . . . . . . . . . . . . . . . . . . . . . . . . . 41
Collaborate on folders and libraries . . . . . . . . . . . . . . . . . . . . . . . . . . . . . . . . . . . . . . . . . . . . . . . . . . . . . . . . . . . . . . . . . . . . . . . . . . . . . . . . . . . 44
Launch Creative Cloud apps . . . . . . . . . . . . . . . . . . . . . . . . . . . . . . . . . . . . . . . . . . . . . . . . . . . . . . . . . . . . . . . . . . . . . . . . . . . . . . . . . . . . . . . . . . 50
Manage your Creative Cloud for teams membership . . . . . . . . . . . . . . . . . . . . . . . . . . . . . . . . . . . . . . . . . . . . . . . . . . . . . . . . . . . . . . . . . . . 54
Chapter 3: Workspace
Workspace basics . . . . . . . . . . . . . . . . . . . . . . . . . . . . . . . . . . . . . . . . . . . . . . . . . . . . . . . . . . . . . . . . . . . . . . . . . . . . . . . . . . . . . . . . . . . . . . . . . . . . . 62
Viewing stories . . . . . . . . . . . . . . . . . . . . . . . . . . . . . . . . . . . . . . . . . . . . . . . . . . . . . . . . . . . . . . . . . . . . . . . . . . . . . . . . . . . . . . . . . . . . . . . . . . . . . . . 72
Recovery and undo . . . . . . . . . . . . . . . . . . . . . . . . . . . . . . . . . . . . . . . . . . . . . . . . . . . . . . . . . . . . . . . . . . . . . . . . . . . . . . . . . . . . . . . . . . . . . . . . . . . 80
Moving through documents . . . . . . . . . . . . . . . . . . . . . . . . . . . . . . . . . . . . . . . . . . . . . . . . . . . . . . . . . . . . . . . . . . . . . . . . . . . . . . . . . . . . . . . . . . 81
Customizing preferences and defaults . . . . . . . . . . . . . . . . . . . . . . . . . . . . . . . . . . . . . . . . . . . . . . . . . . . . . . . . . . . . . . . . . . . . . . . . . . . . . . . . 83
Chapter 4: InCopy documents
Using an InCopy workflow . . . . . . . . . . . . . . . . . . . . . . . . . . . . . . . . . . . . . . . . . . . . . . . . . . . . . . . . . . . . . . . . . . . . . . . . . . . . . . . . . . . . . . . . . . . . 85
Transforming graphics . . . . . . . . . . . . . . . . . . . . . . . . . . . . . . . . . . . . . . . . . . . . . . . . . . . . . . . . . . . . . . . . . . . . . . . . . . . . . . . . . . . . . . . . . . . . . . . . 86
Stand-alone documents . . . . . . . . . . . . . . . . . . . . . . . . . . . . . . . . . . . . . . . . . . . . . . . . . . . . . . . . . . . . . . . . . . . . . . . . . . . . . . . . . . . . . . . . . . . . . . 88
Saving and exporting . . . . . . . . . . . . . . . . . . . . . . . . . . . . . . . . . . . . . . . . . . . . . . . . . . . . . . . . . . . . . . . . . . . . . . . . . . . . . . . . . . . . . . . . . . . . . . . . . 91
Importing graphics . . . . . . . . . . . . . . . . . . . . . . . . . . . . . . . . . . . . . . . . . . . . . . . . . . . . . . . . . . . . . . . . . . . . . . . . . . . . . . . . . . . . . . . . . . . . . . . . . . . 94
Including metadata in a story . . . . . . . . . . . . . . . . . . . . . . . . . . . . . . . . . . . . . . . . . . . . . . . . . . . . . . . . . . . . . . . . . . . . . . . . . . . . . . . . . . . . . . . . 108
Controlling graphics display . . . . . . . . . . . . . . . . . . . . . . . . . . . . . . . . . . . . . . . . . . . . . . . . . . . . . . . . . . . . . . . . . . . . . . . . . . . . . . . . . . . . . . . . . 110
Frame grids . . . . . . . . . . . . . . . . . . . . . . . . . . . . . . . . . . . . . . . . . . . . . . . . . . . . . . . . . . . . . . . . . . . . . . . . . . . . . . . . . . . . . . . . . . . . . . . . . . . . . . . . . 113
Frames, grids, rulers, and guides . . . . . . . . . . . . . . . . . . . . . . . . . . . . . . . . . . . . . . . . . . . . . . . . . . . . . . . . . . . . . . . . . . . . . . . . . . . . . . . . . . . . . 115
Chapter 5: InCopy and InDesign
Sharing content . . . . . . . . . . . . . . . . . . . . . . . . . . . . . . . . . . . . . . . . . . . . . . . . . . . . . . . . . . . . . . . . . . . . . . . . . . . . . . . . . . . . . . . . . . . . . . . . . . . . . 123
Working with managed files . . . . . . . . . . . . . . . . . . . . . . . . . . . . . . . . . . . . . . . . . . . . . . . . . . . . . . . . . . . . . . . . . . . . . . . . . . . . . . . . . . . . . . . . . 128
Understanding a basic managed-file workflow . . . . . . . . . . . . . . . . . . . . . . . . . . . . . . . . . . . . . . . . . . . . . . . . . . . . . . . . . . . . . . . . . . . . . . . 133
Adjusting your workflow . . . . . . . . . . . . . . . . . . . . . . . . . . . . . . . . . . . . . . . . . . . . . . . . . . . . . . . . . . . . . . . . . . . . . . . . . . . . . . . . . . . . . . . . . . . . . 140
Assignment packages . . . . . . . . . . . . . . . . . . . . . . . . . . . . . . . . . . . . . . . . . . . . . . . . . . . . . . . . . . . . . . . . . . . . . . . . . . . . . . . . . . . . . . . . . . . . . . . 142

iv
INCOPY
Contents
Last updated 6/13/2015
Chapter 6: Text
Using the thesaurus . . . . . . . . . . . . . . . . . . . . . . . . . . . . . . . . . . . . . . . . . . . . . . . . . . . . . . . . . . . . . . . . . . . . . . . . . . . . . . . . . . . . . . . . . . . . . . . . . 146
Using text macros . . . . . . . . . . . . . . . . . . . . . . . . . . . . . . . . . . . . . . . . . . . . . . . . . . . . . . . . . . . . . . . . . . . . . . . . . . . . . . . . . . . . . . . . . . . . . . . . . . . 148
Using editorial notes . . . . . . . . . . . . . . . . . . . . . . . . . . . . . . . . . . . . . . . . . . . . . . . . . . . . . . . . . . . . . . . . . . . . . . . . . . . . . . . . . . . . . . . . . . . . . . . . 150
Tracking and reviewing changes . . . . . . . . . . . . . . . . . . . . . . . . . . . . . . . . . . . . . . . . . . . . . . . . . . . . . . . . . . . . . . . . . . . . . . . . . . . . . . . . . . . . . 154
Text variables . . . . . . . . . . . . . . . . . . . . . . . . . . . . . . . . . . . . . . . . . . . . . . . . . . . . . . . . . . . . . . . . . . . . . . . . . . . . . . . . . . . . . . . . . . . . . . . . . . . . . . . 157
Hyperlinks . . . . . . . . . . . . . . . . . . . . . . . . . . . . . . . . . . . . . . . . . . . . . . . . . . . . . . . . . . . . . . . . . . . . . . . . . . . . . . . . . . . . . . . . . . . . . . . . . . . . . . . . . . 162
Adding text . . . . . . . . . . . . . . . . . . . . . . . . . . . . . . . . . . . . . . . . . . . . . . . . . . . . . . . . . . . . . . . . . . . . . . . . . . . . . . . . . . . . . . . . . . . . . . . . . . . . . . . . . 168
Checking spelling . . . . . . . . . . . . . . . . . . . . . . . . . . . . . . . . . . . . . . . . . . . . . . . . . . . . . . . . . . . . . . . . . . . . . . . . . . . . . . . . . . . . . . . . . . . . . . . . . . . 174
Cross-references . . . . . . . . . . . . . . . . . . . . . . . . . . . . . . . . . . . . . . . . . . . . . . . . . . . . . . . . . . . . . . . . . . . . . . . . . . . . . . . . . . . . . . . . . . . . . . . . . . . . . 181
Copyfitting text . . . . . . . . . . . . . . . . . . . . . . . . . . . . . . . . . . . . . . . . . . . . . . . . . . . . . . . . . . . . . . . . . . . . . . . . . . . . . . . . . . . . . . . . . . . . . . . . . . . . . 188
Editing text . . . . . . . . . . . . . . . . . . . . . . . . . . . . . . . . . . . . . . . . . . . . . . . . . . . . . . . . . . . . . . . . . . . . . . . . . . . . . . . . . . . . . . . . . . . . . . . . . . . . . . . . . 190
Find/Change . . . . . . . . . . . . . . . . . . . . . . . . . . . . . . . . . . . . . . . . . . . . . . . . . . . . . . . . . . . . . . . . . . . . . . . . . . . . . . . . . . . . . . . . . . . . . . . . . . . . . . . . 200
Footnotes . . . . . . . . . . . . . . . . . . . . . . . . . . . . . . . . . . . . . . . . . . . . . . . . . . . . . . . . . . . . . . . . . . . . . . . . . . . . . . . . . . . . . . . . . . . . . . . . . . . . . . . . . . . 217
Glyphs and special characters . . . . . . . . . . . . . . . . . . . . . . . . . . . . . . . . . . . . . . . . . . . . . . . . . . . . . . . . . . . . . . . . . . . . . . . . . . . . . . . . . . . . . . . . 221
Chapter 7: Styles
Working with styles . . . . . . . . . . . . . . . . . . . . . . . . . . . . . . . . . . . . . . . . . . . . . . . . . . . . . . . . . . . . . . . . . . . . . . . . . . . . . . . . . . . . . . . . . . . . . . . . . 228
Paragraph and character styles . . . . . . . . . . . . . . . . . . . . . . . . . . . . . . . . . . . . . . . . . . . . . . . . . . . . . . . . . . . . . . . . . . . . . . . . . . . . . . . . . . . . . . . 229
Drop caps and nested styles . . . . . . . . . . . . . . . . . . . . . . . . . . . . . . . . . . . . . . . . . . . . . . . . . . . . . . . . . . . . . . . . . . . . . . . . . . . . . . . . . . . . . . . . . 238
Chapter 8: Typography
Bullets and numbering . . . . . . . . . . . . . . . . . . . . . . . . . . . . . . . . . . . . . . . . . . . . . . . . . . . . . . . . . . . . . . . . . . . . . . . . . . . . . . . . . . . . . . . . . . . . . . 246
Formatting CJK characters . . . . . . . . . . . . . . . . . . . . . . . . . . . . . . . . . . . . . . . . . . . . . . . . . . . . . . . . . . . . . . . . . . . . . . . . . . . . . . . . . . . . . . . . . . . 256
Using fonts . . . . . . . . . . . . . . . . . . . . . . . . . . . . . . . . . . . . . . . . . . . . . . . . . . . . . . . . . . . . . . . . . . . . . . . . . . . . . . . . . . . . . . . . . . . . . . . . . . . . . . . . . . 261
Text composition . . . . . . . . . . . . . . . . . . . . . . . . . . . . . . . . . . . . . . . . . . . . . . . . . . . . . . . . . . . . . . . . . . . . . . . . . . . . . . . . . . . . . . . . . . . . . . . . . . . . 270
Tabs and indents . . . . . . . . . . . . . . . . . . . . . . . . . . . . . . . . . . . . . . . . . . . . . . . . . . . . . . . . . . . . . . . . . . . . . . . . . . . . . . . . . . . . . . . . . . . . . . . . . . . . 275
Leading . . . . . . . . . . . . . . . . . . . . . . . . . . . . . . . . . . . . . . . . . . . . . . . . . . . . . . . . . . . . . . . . . . . . . . . . . . . . . . . . . . . . . . . . . . . . . . . . . . . . . . . . . . . . . 282
Kerning and tracking . . . . . . . . . . . . . . . . . . . . . . . . . . . . . . . . . . . . . . . . . . . . . . . . . . . . . . . . . . . . . . . . . . . . . . . . . . . . . . . . . . . . . . . . . . . . . . . . 285
Aligning text . . . . . . . . . . . . . . . . . . . . . . . . . . . . . . . . . . . . . . . . . . . . . . . . . . . . . . . . . . . . . . . . . . . . . . . . . . . . . . . . . . . . . . . . . . . . . . . . . . . . . . . . 288
Composing CJK characters . . . . . . . . . . . . . . . . . . . . . . . . . . . . . . . . . . . . . . . . . . . . . . . . . . . . . . . . . . . . . . . . . . . . . . . . . . . . . . . . . . . . . . . . . . . 295
Changing spacing between characters in CJK text . . . . . . . . . . . . . . . . . . . . . . . . . . . . . . . . . . . . . . . . . . . . . . . . . . . . . . . . . . . . . . . . . . . . 309
Formatting characters . . . . . . . . . . . . . . . . . . . . . . . . . . . . . . . . . . . . . . . . . . . . . . . . . . . . . . . . . . . . . . . . . . . . . . . . . . . . . . . . . . . . . . . . . . . . . . . 310
Formatting paragraphs . . . . . . . . . . . . . . . . . . . . . . . . . . . . . . . . . . . . . . . . . . . . . . . . . . . . . . . . . . . . . . . . . . . . . . . . . . . . . . . . . . . . . . . . . . . . . . 318
Formatting text . . . . . . . . . . . . . . . . . . . . . . . . . . . . . . . . . . . . . . . . . . . . . . . . . . . . . . . . . . . . . . . . . . . . . . . . . . . . . . . . . . . . . . . . . . . . . . . . . . . . . 323
Chapter 9: Tables
Selecting and editing tables . . . . . . . . . . . . . . . . . . . . . . . . . . . . . . . . . . . . . . . . . . . . . . . . . . . . . . . . . . . . . . . . . . . . . . . . . . . . . . . . . . . . . . . . . 328
Table and cell styles . . . . . . . . . . . . . . . . . . . . . . . . . . . . . . . . . . . . . . . . . . . . . . . . . . . . . . . . . . . . . . . . . . . . . . . . . . . . . . . . . . . . . . . . . . . . . . . . . 334
Table strokes and fills . . . . . . . . . . . . . . . . . . . . . . . . . . . . . . . . . . . . . . . . . . . . . . . . . . . . . . . . . . . . . . . . . . . . . . . . . . . . . . . . . . . . . . . . . . . . . . . . 340
Creating tables . . . . . . . . . . . . . . . . . . . . . . . . . . . . . . . . . . . . . . . . . . . . . . . . . . . . . . . . . . . . . . . . . . . . . . . . . . . . . . . . . . . . . . . . . . . . . . . . . . . . . . 343
Formatting tables . . . . . . . . . . . . . . . . . . . . . . . . . . . . . . . . . . . . . . . . . . . . . . . . . . . . . . . . . . . . . . . . . . . . . . . . . . . . . . . . . . . . . . . . . . . . . . . . . . . 347
Chapter 10: Printing
Setting up a printer . . . . . . . . . . . . . . . . . . . . . . . . . . . . . . . . . . . . . . . . . . . . . . . . . . . . . . . . . . . . . . . . . . . . . . . . . . . . . . . . . . . . . . . . . . . . . . . . . . 353
Printing stories . . . . . . . . . . . . . . . . . . . . . . . . . . . . . . . . . . . . . . . . . . . . . . . . . . . . . . . . . . . . . . . . . . . . . . . . . . . . . . . . . . . . . . . . . . . . . . . . . . . . . . 354

v
INCOPY
Contents
Last updated 6/13/2015
Chapter 11: PDF
Understanding Adobe PDF . . . . . . . . . . . . . . . . . . . . . . . . . . . . . . . . . . . . . . . . . . . . . . . . . . . . . . . . . . . . . . . . . . . . . . . . . . . . . . . . . . . . . . . . . . 357
Exporting to Adobe PDF . . . . . . . . . . . . . . . . . . . . . . . . . . . . . . . . . . . . . . . . . . . . . . . . . . . . . . . . . . . . . . . . . . . . . . . . . . . . . . . . . . . . . . . . . . . . . 358
Chapter 12: XML
Working with XML . . . . . . . . . . . . . . . . . . . . . . . . . . . . . . . . . . . . . . . . . . . . . . . . . . . . . . . . . . . . . . . . . . . . . . . . . . . . . . . . . . . . . . . . . . . . . . . . . . . 362
Using XML files . . . . . . . . . . . . . . . . . . . . . . . . . . . . . . . . . . . . . . . . . . . . . . . . . . . . . . . . . . . . . . . . . . . . . . . . . . . . . . . . . . . . . . . . . . . . . . . . . . . . . . 366
Tagging content for XML . . . . . . . . . . . . . . . . . . . . . . . . . . . . . . . . . . . . . . . . . . . . . . . . . . . . . . . . . . . . . . . . . . . . . . . . . . . . . . . . . . . . . . . . . . . . 366
Structuring documents for XML . . . . . . . . . . . . . . . . . . . . . . . . . . . . . . . . . . . . . . . . . . . . . . . . . . . . . . . . . . . . . . . . . . . . . . . . . . . . . . . . . . . . . . 372
Exporting to XML . . . . . . . . . . . . . . . . . . . . . . . . . . . . . . . . . . . . . . . . . . . . . . . . . . . . . . . . . . . . . . . . . . . . . . . . . . . . . . . . . . . . . . . . . . . . . . . . . . . . 381
Chapter 13: Keyboard shortcuts
Default keyboard shortcuts . . . . . . . . . . . . . . . . . . . . . . . . . . . . . . . . . . . . . . . . . . . . . . . . . . . . . . . . . . . . . . . . . . . . . . . . . . . . . . . . . . . . . . . . . . 383
Chapter 14: System requirements
System requirements for Incopy . . . . . . . . . . . . . . . . . . . . . . . . . . . . . . . . . . . . . . . . . . . . . . . . . . . . . . . . . . . . . . . . . . . . . . . . . . . . . . . . . . . . . 391

1
Last updated 6/13/2015
Chapter 1: What’s new
Usability and productivity
Enhanced layers
The Layers panel in InCopy gives you more control over your documents. You can hide or lock individual page items
in a layer. See Use layers.
Save performance improvements
Close documents and save changes to multiple stories faster than before due to multithreading implementation. Use
the Background Tasks panel (Window > Utilities > Background Tasks) to view the progress of ongoing processes.
Tool Hints panel
The Tool Hints panel lists all the hidden modifier key behaviors available for the currently selected tool. See View tool
hints.
Community Help
Adobe Community Help offers access to complete Adobe product documentation as well as to community-created
learning content and other learning content on Adobe.com. Adobe Community Help includes an AIR-based viewer
that displays the latest online Help or defaults to a local version of Help when a web connection is unavailable.
Community Help also includes expert-moderated comments and user ratings on Adobe documentation,
knowledgebase articles, tutorials, and other content.
Edit Original for multiple selected items
If you select multiple placed images on your page or in the Links panel, you can choose the Edit Original command to
open the images in their respective editing applications. See Edit original artwork.
Miscellaneous enhancements
Zoom from dialog boxes You can now use the keyboard shortcuts to zoom in and out of your document when you have
a modal dialog box open in Layout view. Press Ctrl+- or Ctrl+= (Windows) or Command+- or Command +=.
Sticky Preview check boxes InCopy now remembers whether the Preview checkbox is selected in a dialog box after you
exit and restart.
Collate option The Print dialog box includes a Collate option that helps you avoid manually sorting the printout.
New default font The default font is changed from Times (Mac) and Times New Roman (Windows) to the
crossplatform OpenType version of Minion Pro Regular.
Collapse multiple links to same source In InCopy CS5, links to images placed multiple times in a document are
collapsed into a single row in the Links panel. You can now turn off this collapsing behavior with a new option in the
Panel Options dialog box.
Menu commands changed or moved The following menu commands have new locations.

2
What’s new
Last updated 6/13/2015
Tip: Choose Window > Workspace > [New in CS5] to highlight menu commands of new and enhanced features.
Text changes
New Eyedropper tool
Use the Eyedropper tool to copy text formatting from one text selection and apply that formatting to different text.
Customize which attributes to apply in the Eyedropper Tool Options dialog box. See Copy type attributes (Eyedropper).
Paragraphs that span columns
In InCopy CS5, you can make a paragraph span multiple columns. You can also split a paragraph into multiple columns
within the same text frame. See Create paragraphs that span or split columns.
Caption variables
In InDesign CS5, you can generate captions based on image metadata using a number of methods. Live captions use a
new text variable called Metadata Caption. You can create or edit caption text variables for use in InDesign. See Define
caption variables.
Collaboration
Track change feature enhancements
The Track Changes feature is now available in both InCopy CS5 and InDesign CS5. In InCopy, the Track Changes
toolbar includes icons that are more intuitive. The Changes menu includes additional options for accepting and
rejecting changes in either the current story or in all stories. You can also accept and reject changes from individual
participants. See Tracking and reviewing changes .
Mini Bridge
Mini Bridge is a subset of Adobe Bridge that is available as a panel within InCopy. See previews of files on your local
hard drive or server without launching Adobe Bridge and leaving InCopy. Drag and drop files into editable frames or
open files directly in InCopy in fewer steps and in less time.
Improved Adobe Bridge integration
A new File Handling preference option lets you generate page thumbnails for more than the first page of InCopy files.
The default number of pages to generate thumbnails for is set to 2, but you can change it to 1, 2, 5, 10, or All. You can
now see previews of pages in the Preview pane of Bridge. Choosing more thumbnail pages may cause your InCopy
document to take longer to save.
InCopy CS4 command InCopy CS5 command
View > Show/Hide Frame Edges, Show/Hide Assigned Frames,
Show/Hide Hyperlinks
View > Extras > Show/Hide Frame Edges, Show/Hide Assigned Frames,
Show/Hide Hyperlinks
Window > Type & Tables > Cell Styles / Character Styles / Paragraph
Styles > Table Styles
Window > Styles > Cell Styles / Character Styles / Paragraph Styles /
Table Styles
Window > Tags Window > Utilities > Tags
Window > Scripts Window > Utilities > Scripts

3
What’s new
Last updated 6/13/2015
See Using Adobe Bridge with InCopy.
Document installed fonts
In InDesign CS5, if you choose to include the document fonts when using the Package command, InDesign generates
a folder named “Document Fonts.” If you open an InDesign or InCopy file located in the same parent folder that this
Document Fonts folder is located in, these fonts are automatically installed for you. See Document installed fonts.
Buzzword integration
Buzzword is a web-based text editor that lets users create and store text files on a web server. In InCopy CS5, you can
import and export text from Buzzword documents. See Import Buzzword documentsand Export content to Buzzword.
6
Creative Cloud
Last updated 6/13/2015
Download and install apps
Download, install, and update your Creative Cloud apps. Discover new Creative Cloud apps and install them on your
computer. You can browse apps by popularity and design segments.
Creative Cloud desktop app is installed automatically when you download a product. If you already have Adobe
Application Manager installed, it auto-updates itself to the Creative Cloud desktop app. To download it manually, visit
the Creative Cloud desktop app page.
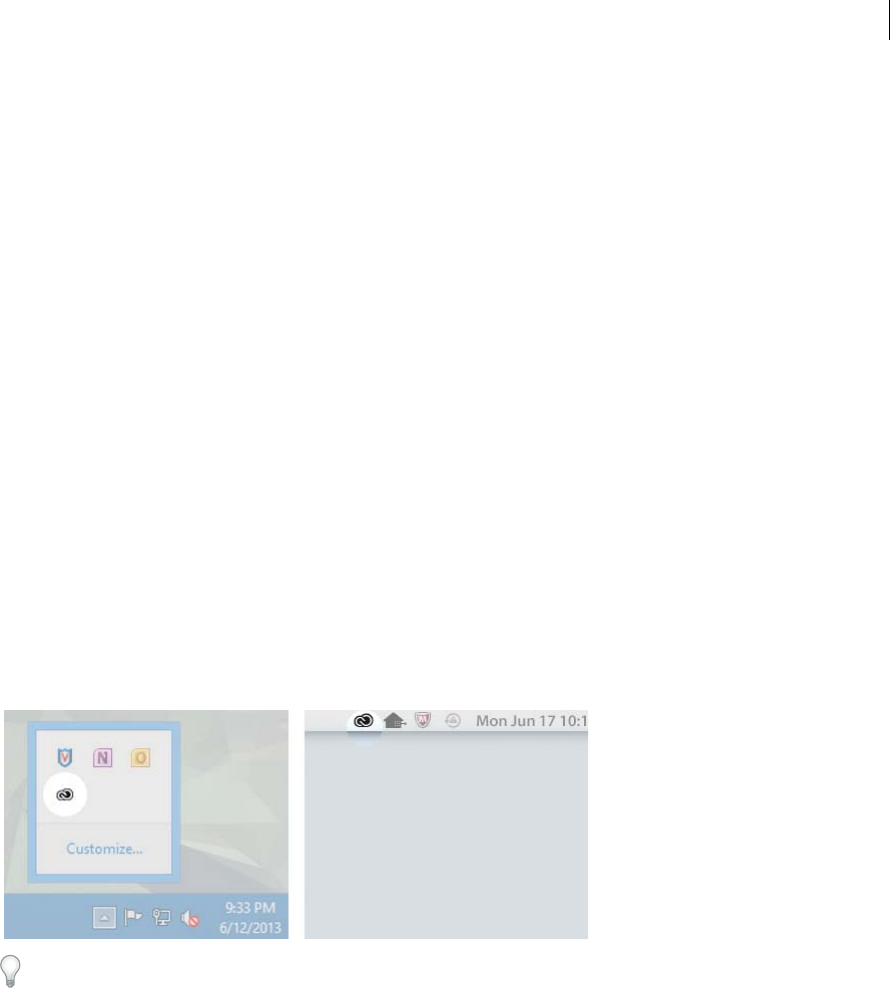
1Access Adobe Creative Cloud from the Taskbar (Windows) or the Apple toolbar (Mac OS).
By default, Adobe Creative Cloud is launched when you log in to your computer.
2Click the Apps panel. Recently installed apps on your computer appear at the top of the panel. The list may include
previously installed versions.
Chapter 2: Creative Cloud
Adobe® Creative Cloud™ allows you to download, install, and update apps. You can also sync files and fonts, and
showcase and discover creative work on Behance.
7
Creative Cloud
Last updated 6/13/2015
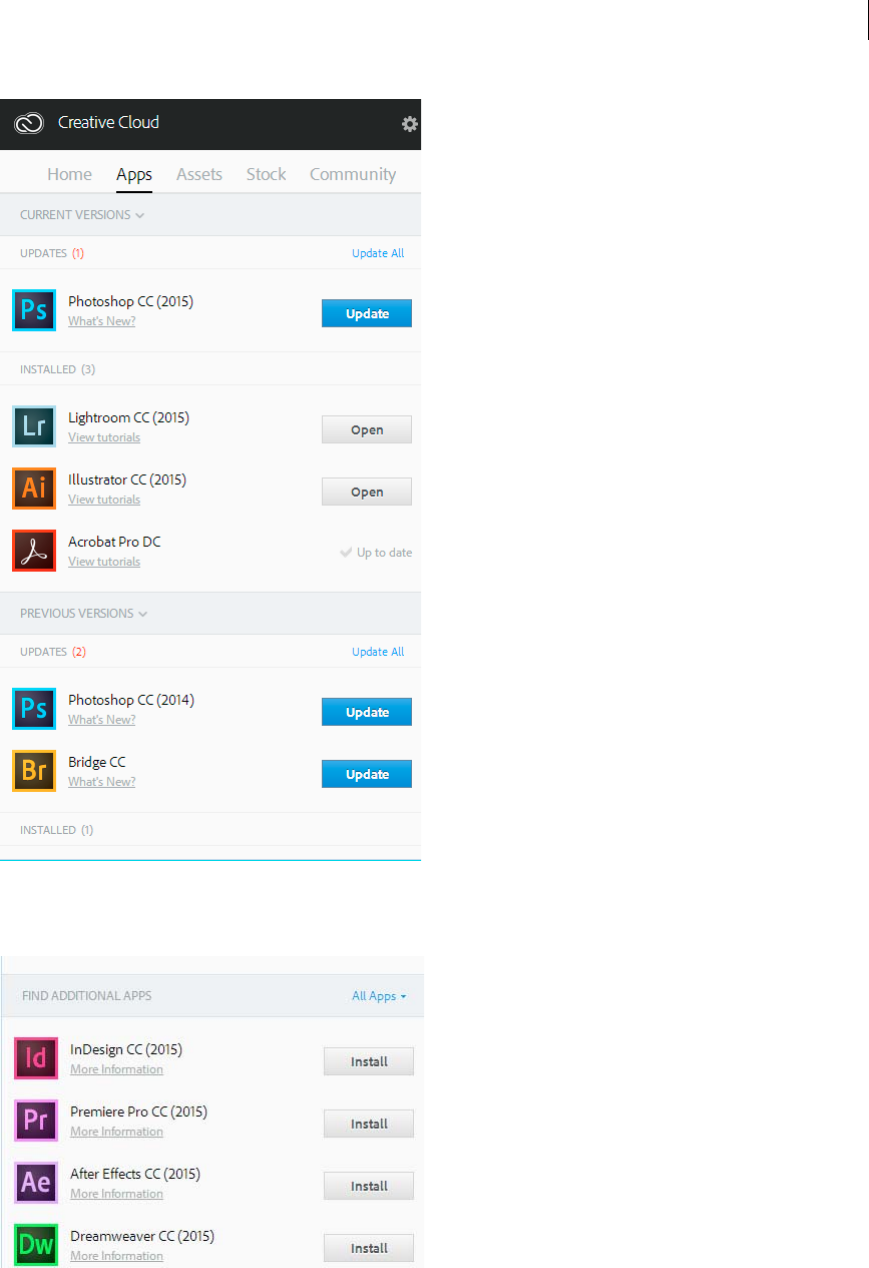
3Scroll down to find additional apps. You can also filter by category to find apps that you need.
8
Creative Cloud
Last updated 6/13/2015
4Click Install or Update.
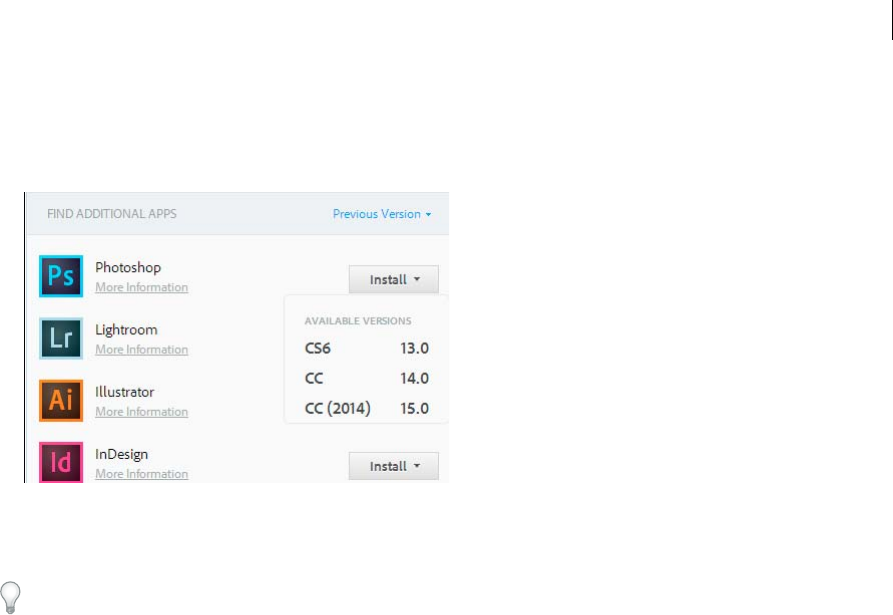
5To download and install a previous version of an app, select Previous Version, and then choose a version from the
Install menu.
For more information on installing CC or CS6 apps, see .
The apps, for example Photoshop, Illustrator, are downloaded and installed on your computer. You need to launch them
from your computer. For detailed instructions, see .
Sync files and folders
Sync files from your computer to Creative Cloud and access them from anywhere. Files are instantly available on all
your connected devices, computers, and on your Creative Cloud Files page. To sync files, download and install Creative
Cloud desktop app on all computers.
9
Creative Cloud
Last updated 6/13/2015
To sync files, do one of the following:
•Copy, paste, or move files to the Creative Cloud Files directory on your computer
•In an app, choose File > Save or File > Save As and navigate to the Creative Cloud Files directory on your computer.
The original files are always on your computer or device. Files are synced via Creative Cloud to all connected devices.
You can view your files online on the Creative Cloud Assets page. Once the files are synced, you don't need to be online
and you can view them from the Creative Cloud Files directory or folder on your computer.
For information to work with files uploaded on Creative Cloud, see .
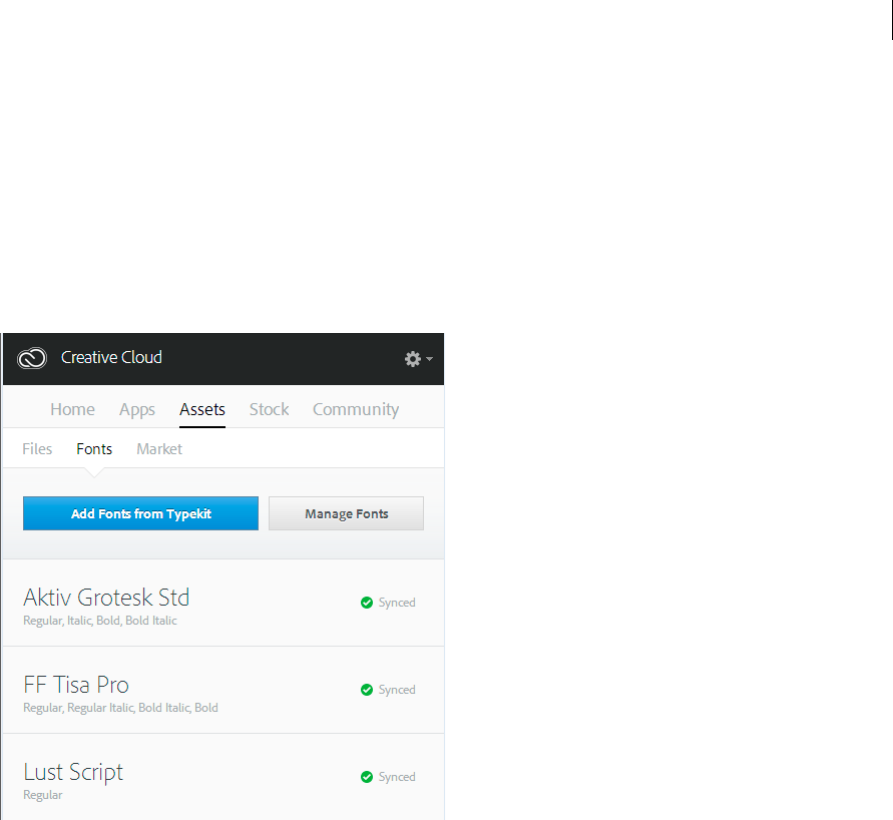
Add fonts from Typekit
Choose a typeface from one of Typekit's many foundry partners and sync it to your desktop with Creative Cloud.
Synced fonts are available for use in all Creative Cloud apps and other desktop software.
10
Creative Cloud
Last updated 6/13/2015
You must have a paid Creative Cloud membership or an eligible Typekit account to sync fonts to your desktop
computer.
The Fonts panel displays fonts synced to your computer. To sync fonts, do the following:
1In Creative Cloud desktop app, click the Fonts panel.
2Click Add Fonts from Typekit. A Typekit window opens in your browser.
3In the Typekit window, move your mouse over a font card and click + Use Fonts.
4Select the fonts from the selected family and click Sync selected fonts.
Have questions about syncing fonts? Here’s a to cover everything step by step.
Search for assets on Adobe Stock
Adobe Stock is a service that sells millions of royalty-free high-quality photos, illustrations and graphics. You can
purchase Adobe Stock on an as-needed basis as a single image, illustration, or graphic; or you can purchase a multi-
image subscription. There are a number of subscription packages available.
You can search for stock images from right within the Creative Cloud desktop app.

11
Creative Cloud
Last updated 6/13/2015
1On the Stock tab, enter keywords for the stock image search and click Go.
2If prompted, provide your date of birth and click Update. You are taken to an Adobe Stock website page that displays
stock images relevant to your search.
12
Creative Cloud
Last updated 6/13/2015
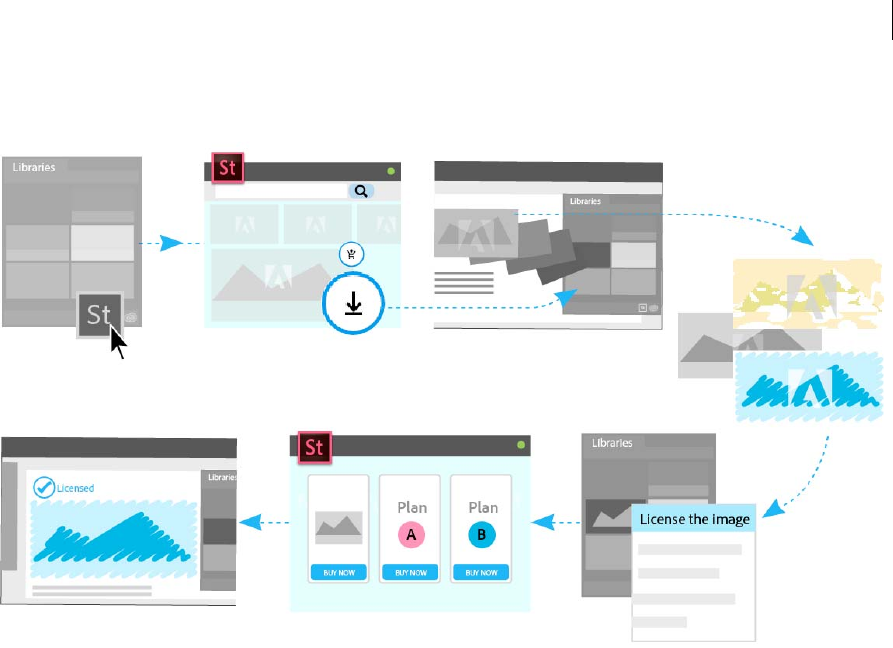
Adobe Stock and Creative Cloud Libraries
Once you've found a stock image of interest, you can add its watermarked preview to any of your libraries directly using
the Adobe Stock website. Then, in Creative Cloud apps that support Libraries—Photoshop, lllustrator, InDesign,
Premiere Pro, and After Effects—you can drag the watermarked stock image from the Libraries panel to your creative
project. When you're satisfied that the stock image is appropriate for your project, you can choose to license the stock
image directly from within the Libraries panel in the desktop app.
Creative Cloud apps that support library-linked smart objects—Photoshop, Illustrator, and InDesign—take this
integration a notch deeper. When you license the stock image, all linked instances of the stock image in your open
documents are automatically updated to the licensed, high-resolution stock image without the watermark.
For more information, see Using Adobe Stock .
Search for assets on Creative Cloud Market
Creative Cloud Market is a collection of high-quality, curated content for creatives by creatives. Creative Cloud
subscribers can access assets from Market for free on both desktop and mobile (via Creative Cloud connected apps),
choosing from an incredible selection of vector graphics, icons, patterns, UI kits, and more. Creative Cloud subscribers
can download up to 500 unique, royalty-free assets each month. This powerful new service will allow creatives to
seamlessly find assets to build upon, manipulate, and modify to jumpstart their creative process.
13
Creative Cloud
Last updated 6/13/2015
For more information, see .
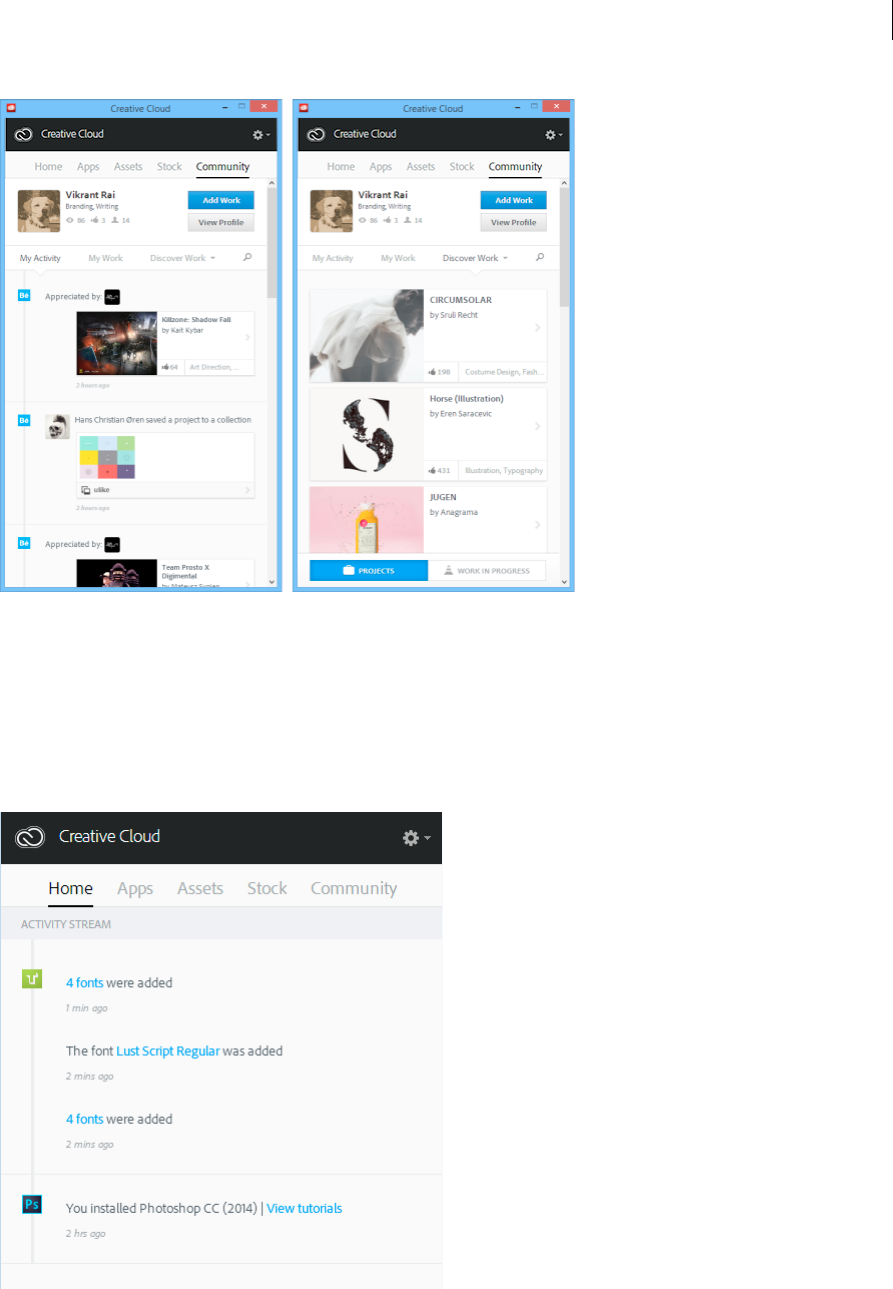
Share and discover work on Behance
Showcase & discover creative work on Behance. As a member, you can create a portfolio of your work and broadcast it
widely and efficiently. Or, explore the latest creative work on a global scale by browsing featured or popular work across
fields.
•Login or sign up to access your Behance Activity Feed, Portfolio, and Share & Discover New Work. If you already
have an account, you'll be prompted to log in. If you don't have an account already, signup is quick and easy.
•Or, even without a Behance account, you can explore Featured Projects and Works-in-Progress from within the
panel.
14
Creative Cloud
Last updated 6/13/2015
For more information, see Share on Behance or visit the Adobe Behance Forum.
Home and activity feed
The Activity Stream on the Home panel contains your interactions with Creative Cloud. Events and activities, such as
new app availability, updates, and installation status are displayed here.

15
Creative Cloud
Last updated 6/13/2015
Preferences
Choose > Preferences to open the Preferences screen.
•To sign out of the Creative Cloud desktop app, click General and then click Sign Out.
•Select the Show notifications setting.
•Select Always Keep Creative Cloud Desktop Up To Date to enable automatic updates.
•Enable Login to AEM Assets to connect to your AEM Assets repository. For more information, see Work with AEM
Assets .
•Select Creative Cloud and use the Apps tab to specify App Language and Install Location.
•Use the Files, Fonts, and Behance tabs to specify the respective settings.
•Specify the Show OS Notifications setting in each tab.
Need more help?
More Help
•Release Notes | Creative Cloud desktop app
•
•
•Update apps to Creative Cloud 2015
•Creative Cloud 2015 OS support
•Troubleshoot installation and download
•Creative Cloud FAQ
•Adobe ID FAQ
Ask the Community
Post, discuss and be part of our awesome community
Contact Us
Start here to connect with our staff
16
Creative Cloud
Last updated 6/13/2015
Browse, sync, and manage assets
Your Adobe Creative Cloud account comes with online storage so that your files are available to you anywhere and on
any device or computer. You can preview many creative file types directly in a web browser on your computer, tablet,
or smartphone. These file types include: PSD, AI, INDD, JPG, PDF, GIF, PNG, Photoshop Touch, Ideas, and others.
Adobe Creative Cloud for desktop keeps all the files in sync. Any additions, modifications, or deletions are reflected on
all connected computers and devices. For example, if you upload an .ai file using the Creative Cloud Assets page, it is
automatically downloaded on all connected computers.
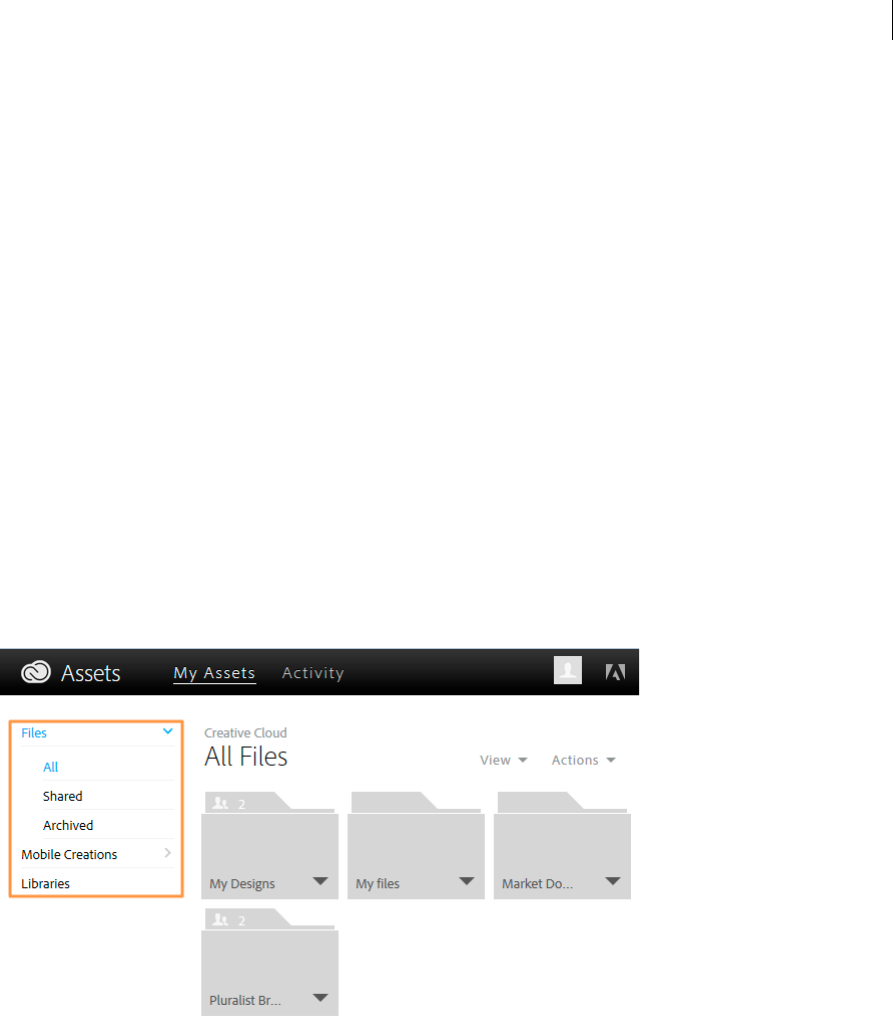
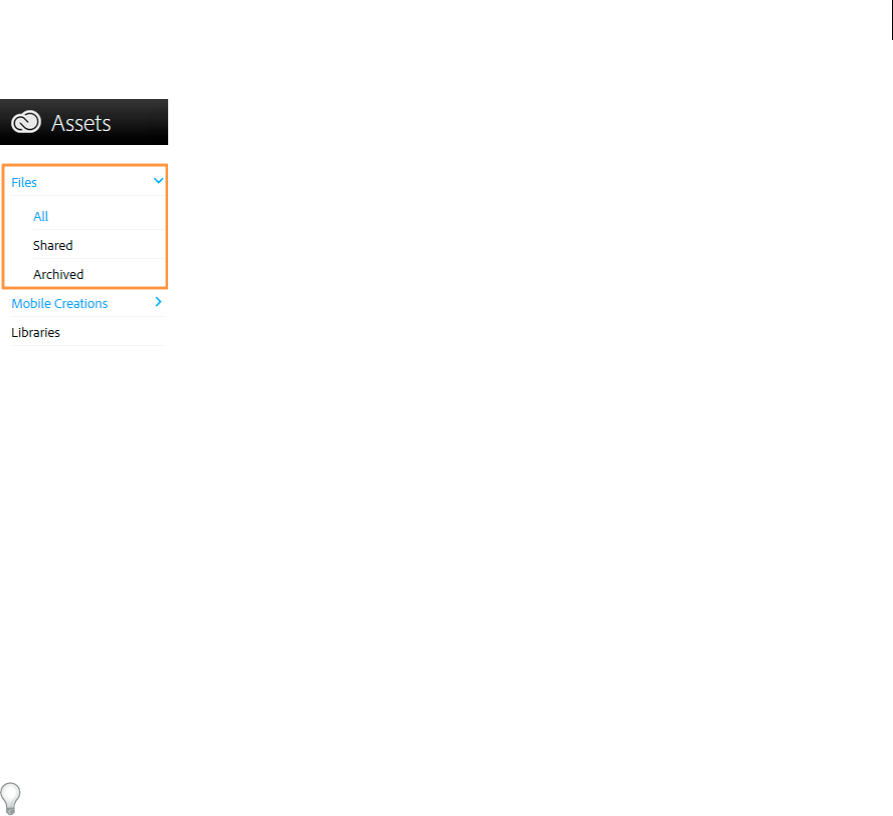
Browse assets
Your Creative Cloud assets include files synced with your desktop, assets created using Creative Cloud enabled mobile
apps, and Creative Cloud libraries. You can browse all of these assets using the Creative Cloud Assets page, which
organizes assets as follows:
Files shows assets synced with Creative Cloud Files directory on your desktop
Mobile Creations shows assets created using Creative Cloud enabled mobile apps
Libraries shows design libraries created by you
Note: While you can perform several operations such as rename, share, download, replace, and archive on desktop assets
(under Files), you can only view assets under Mobile Creations and Libraries, on the Creative Cloud Assets page.
When you click an asset category, it expands to show subcategories, if any. For example, assets under Files are further
organized as All, Shared, and Archived.
17
Creative Cloud
Last updated 6/13/2015
All: shows all files synced with Creative Cloud Files directory
Shared: shows files shared between you and other Creative Cloud users
Archived: shows deleted files
Similarly, you can browse assets created using Creative Cloud mobile apps under Mobile Creations, where the assets
are further categorized based on the creating mobile app.
For information about Libraries, see .
Sync or upload files
To sync files from your computer, do one of the following:
•Copy, paste, or move files to the Creative Cloud Files directory on your desktop.
•In an app, choose File > Save or File > Save As and navigate to the Creative Cloud Files directory.
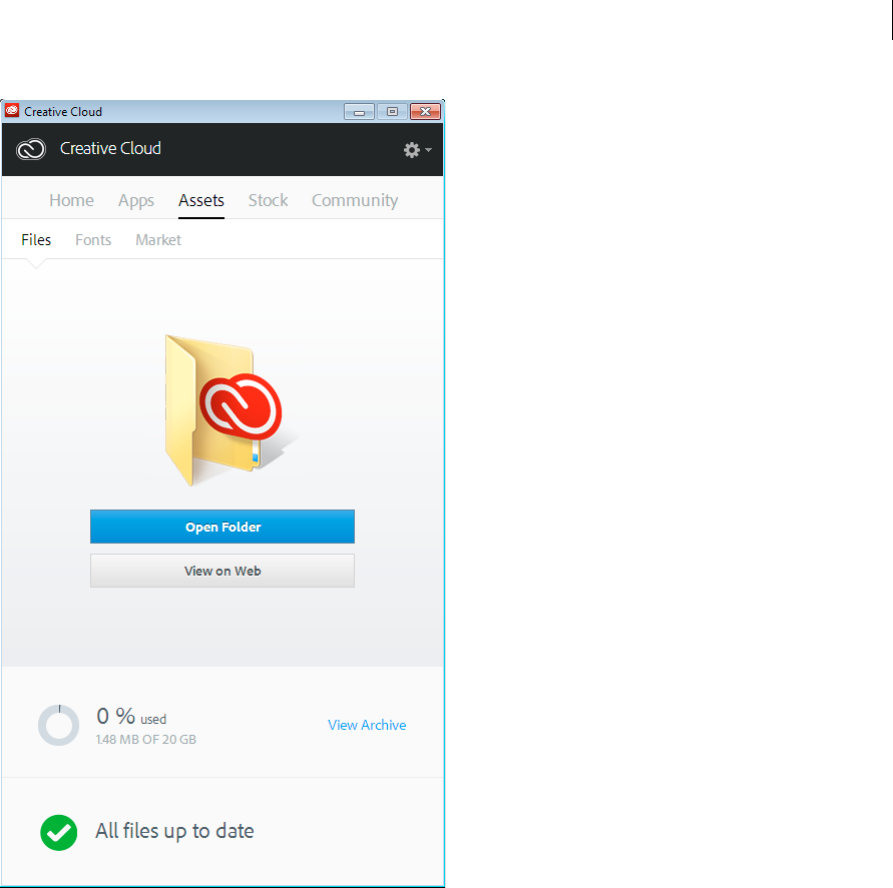
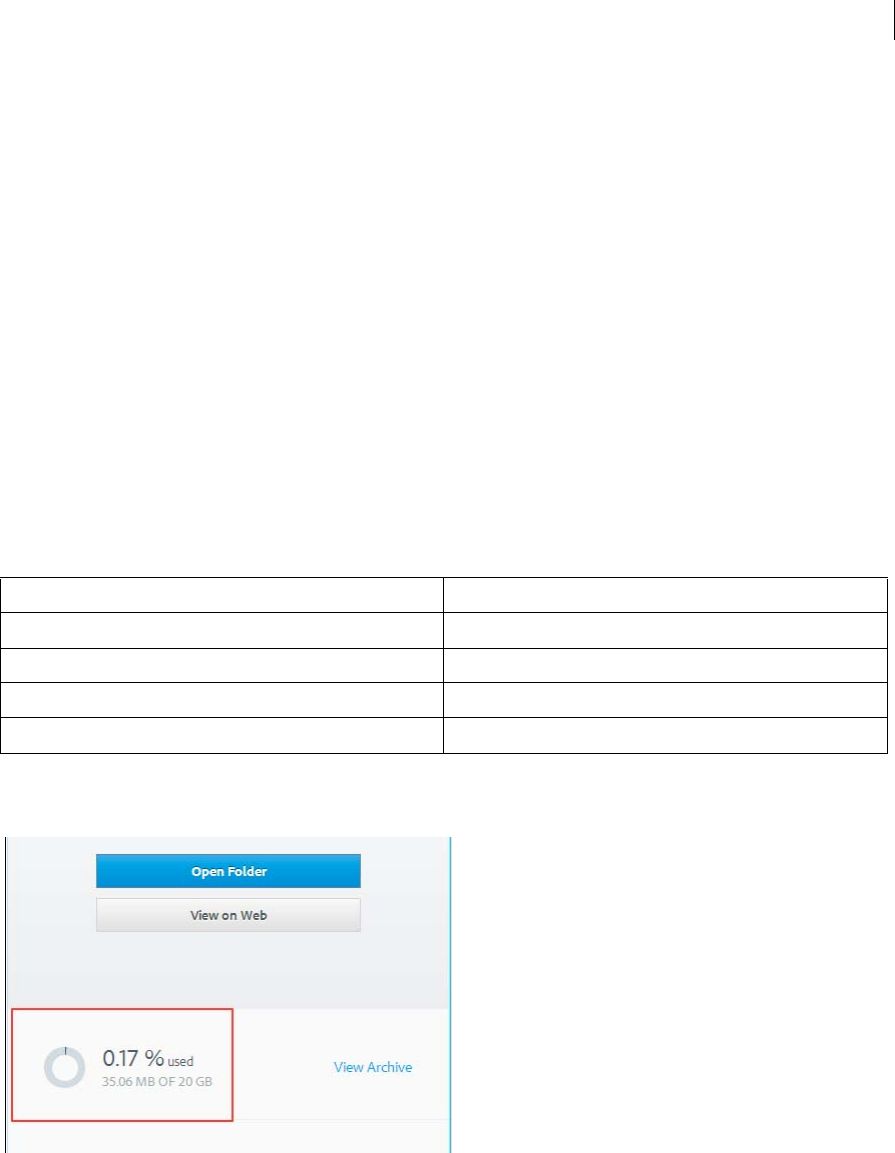
To open the Creative Cloud Files directory from Creative Cloud desktop app, select Assets > Files and click Open Folder.
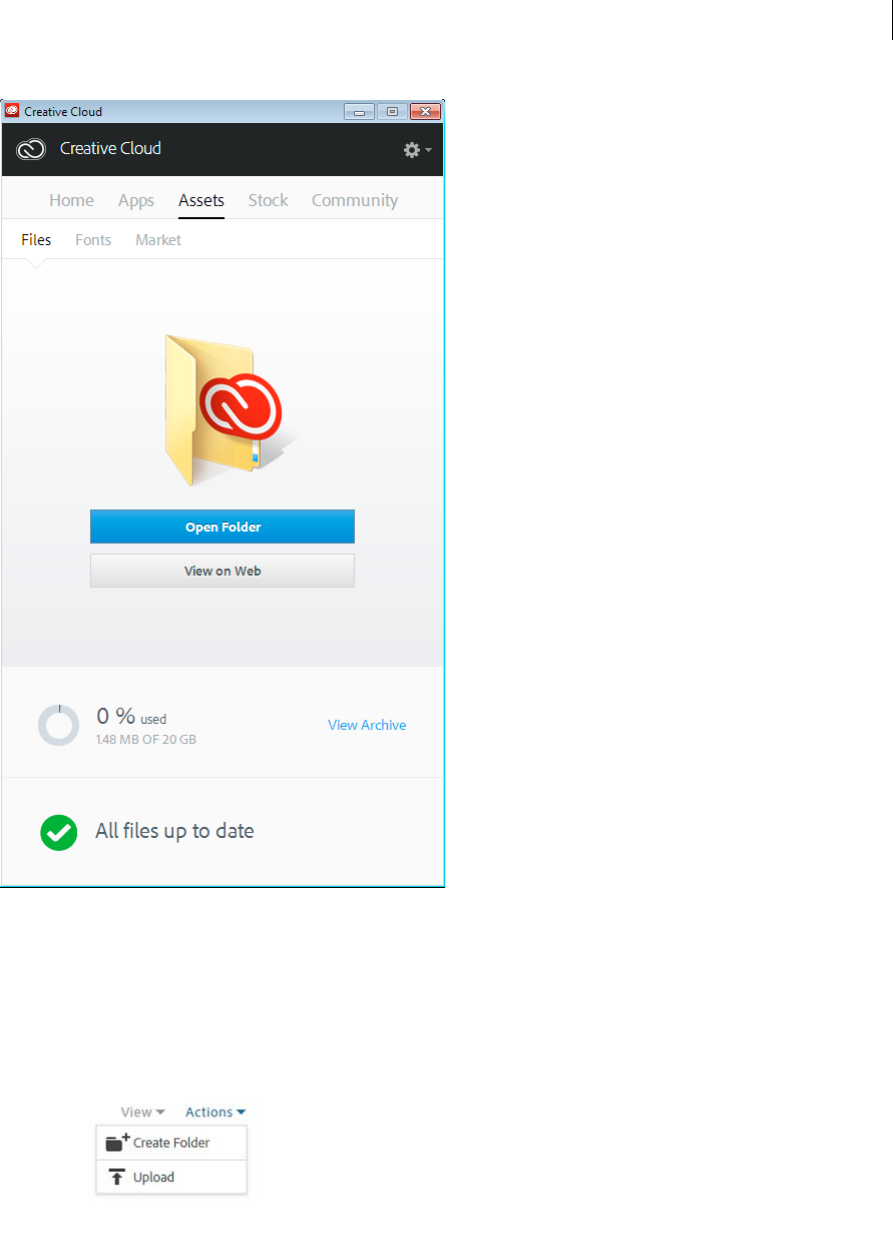
18
Creative Cloud
Last updated 6/13/2015
Note: Filenames that contain special characters such as |, ", ?, <, >, /, *, or : are not synced. Neither do files with reserved
names, such as AUX or Com1. If you receive an error, rename the file to sync it to Creative Cloud. For more information,
see Error: Unable to Sync Files .
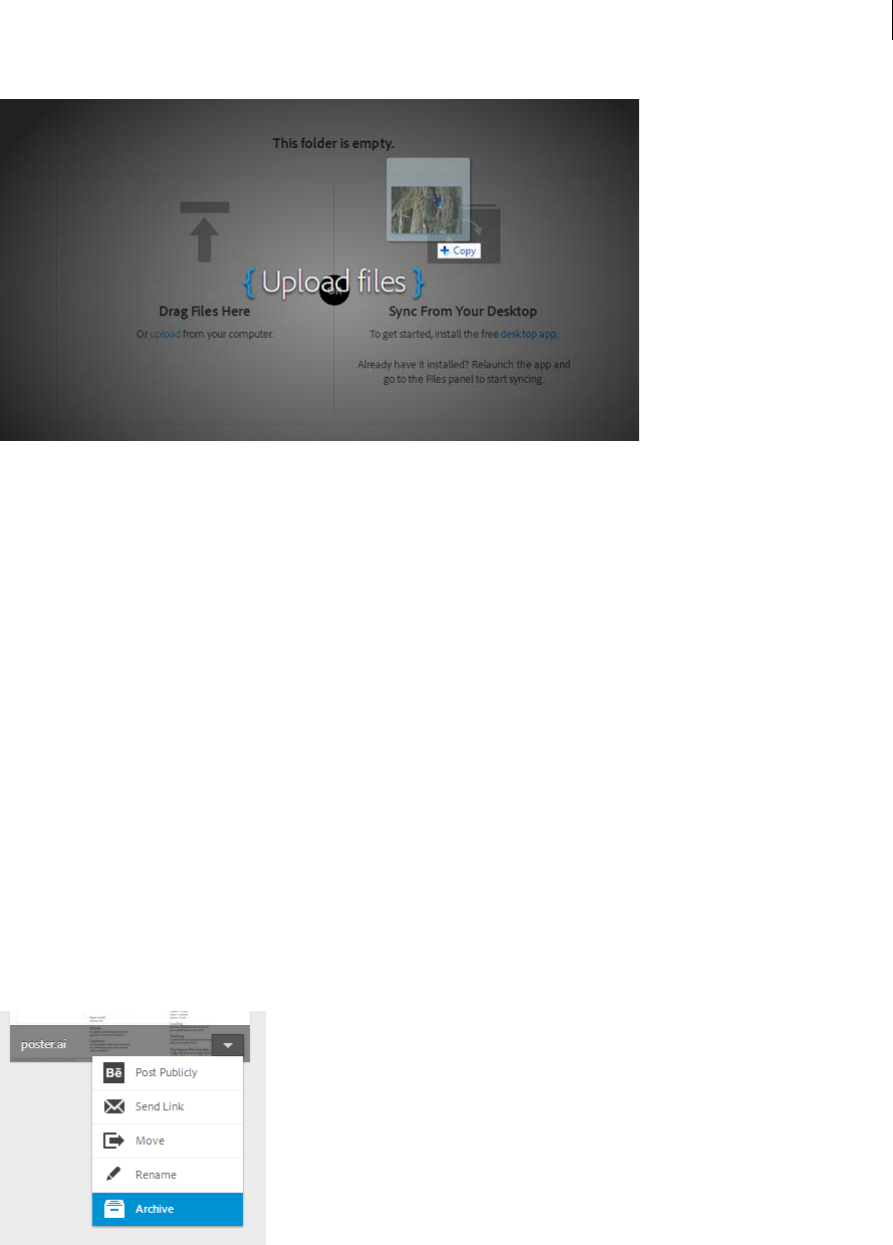
Additionally, you can upload files directly to the Creative Cloud Assets page using any of the following methods.
Upload and manage your files on Creative Cloud using the Actions menu on the Creative Cloud Assets page.
19
Creative Cloud
Last updated 6/13/2015
Drag and drop assets from your desktop to the Creative Cloud Assets page.
Replace a file
Uploading the file again, creates a version of the file and replaces the existing file with a new one. Creative Cloud also
keeps a copy of every change you make to a file and sync through Photoshop Touch, Adobe Ideas, and the Creative
Cloud desktop app.
To replace a file, using the Creative Cloud Assets page, do the following:
1Navigate to and open the file for viewing.
2Select Actions > Replace or drag the file from the folder to the browser window.
Note: The new file must be the same file type as the file being replaced. For example, you can't replace a .PSD file with
a .AI file. For information on versioning, see Versioning FAQs .
Delete files
You can delete files from the Creative Cloud website or Adobe Touch Apps. You can also use the OS commands to delete
files from the Creative Cloud Files directory on your desktop. All file deletions are synced with your account, and files
are archived in Creative Cloud. The original files are always on your computer with a copy available on Creative Cloud
so that you can access it anywhere.
20
Creative Cloud
Last updated 6/13/2015
Archived files continue to occupy online storage. You can permanently delete or restore files from the Archive folder.
Permanently deleting the files frees up the storage quota.
Permanently delete or restore files
Deleting assets permanently is a two-step process:
1Archive a file from your Creative Cloud Files directory on your desktop, Creative Cloud enabled touch apps, or the
Creative Cloud Assets page. Archived files move to the Archived category under My Assets > Files.
2On the Archived page, select the files to delete permanently and click Permanently Delete.
3In the confirmation dialog, click Permanently Delete.
You can also restore an archived file:
1On the Archived page, select the files to restore and click Restore.
2In the confirmation dialog, click Restore.
Storage plans and quota
The storage quota depends on your Creative Cloud membership.
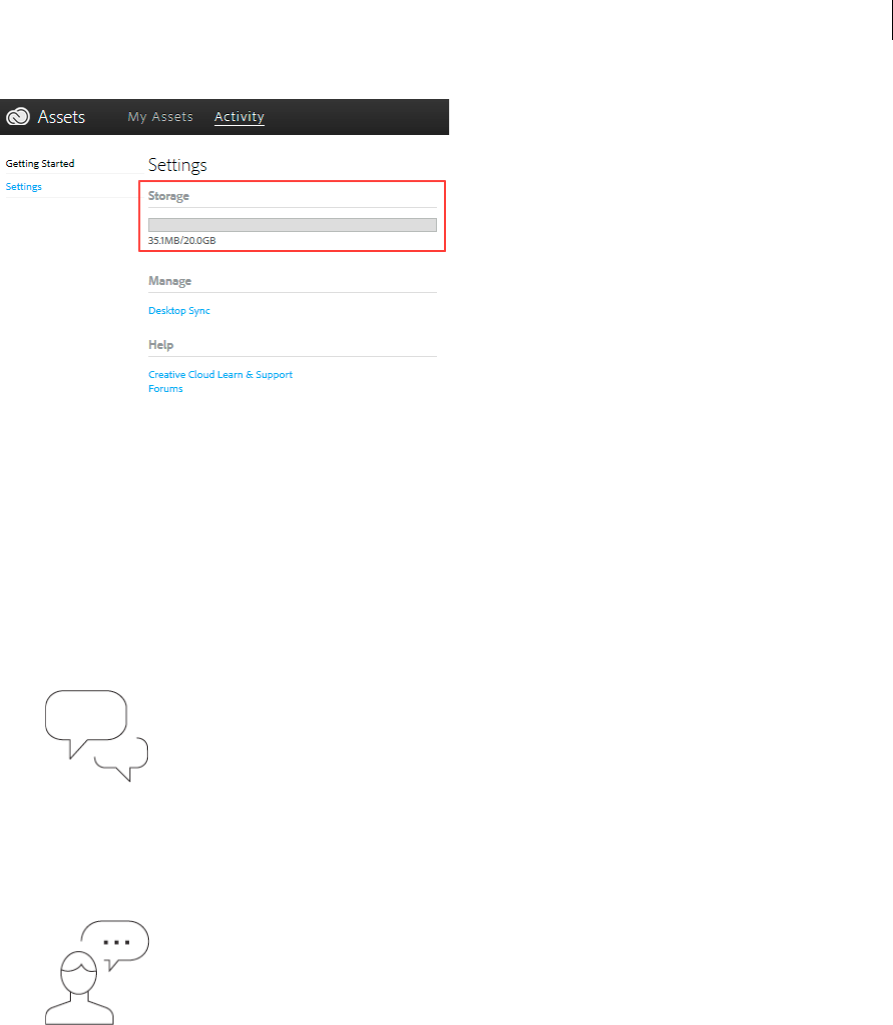
You can view your storage status from the Files tab under Assets panel of the Creative Cloud for desktop app or on the
Settings page of the Creative Cloud Activity page.
Membership plan Free storage quota
Free 2 GB
Creative Cloud (Photography) 2 GB
Creative Cloud (Single App and Complete) 20 GB
Creative Cloud for teams 100 GB
21
Creative Cloud
Last updated 6/13/2015
The Creative Cloud syncs up to 1 GB of overflow from any device. After that, the desktop app stops syncing new files
and notifies that you are over quota. A red exclamation point marks any files that are unable to upload. You can still
move, rename, or delete files. To continue to sync files, permanently delete other files to free up space.
Note: A small portion of storage is used for administrative purposes. Therefore, the actual storage space is slightly less than
allocated. It varies from 100 KB to 500 KB based on number of user files.
Troubleshooting
See Also
•Get started with Creative Cloud Assets
•
•
•Sync and share files with collaborators (video, 10 min)
Ask the Community
Post, discuss, and be part of our awesome community
Contact Us
Start here to connect with our staff

22
Creative Cloud
Last updated 6/13/2015
•Adobe Creative Cloud Status
•Error: Unable to Sync Files
•Versioning FAQ
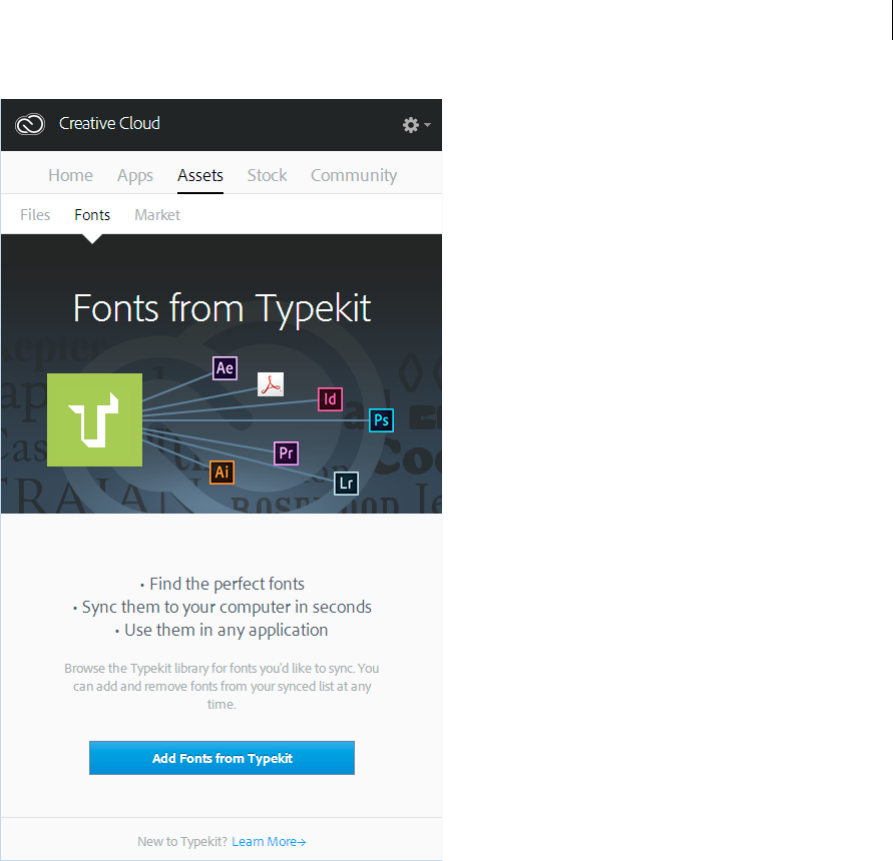
Add fonts from Typekit
Typekit is a subscription service offering access to a vast library of fonts for use in desktop applications and on websites.
A Typekit Portfolio plan is included with your Creative Cloud subscription, and free Creative Cloud members have
access to a selection of fonts from Typekit for web and desktop use.
Subscribe to Creative Cloud (complete, single app, or free) or a standalone Typekit plan to sync fonts to your desktop.
For more details, see the Typekit product page and Typekit’s plan options.
Getting started
You can choose a typeface from one of Typekit's many foundry partners, then sync it to your desktop with Creative
Cloud—or use it on the web. Synced fonts are available for use inside all Creative Cloud apps, such as Photoshop or
InDesign as well as other desktop applications, such as MS Word.
The Creative Cloud for desktop application must be installed on your computer to sync fonts. If it is not already
installed, download and install it. For more information, see Creative Cloud on your desktop.
By default, Typekit is turned on, so that it can sync fonts and make them available in your desktop applications.
At this point, if you already have fonts selected for sync in your web browser, they automatically begin syncing with
your computer.
Browse and add fonts from Typekit
You can access the Typekit library from multiple places. Use any combination of these methods to best fit new font
selection within your existing workflow.
From Creative Cloud for desktop app:
In the Fonts tab, click Add Fonts from Typekit. A browser window opens and you are signed in to Typekit.com.
23
Creative Cloud
Last updated 6/13/2015
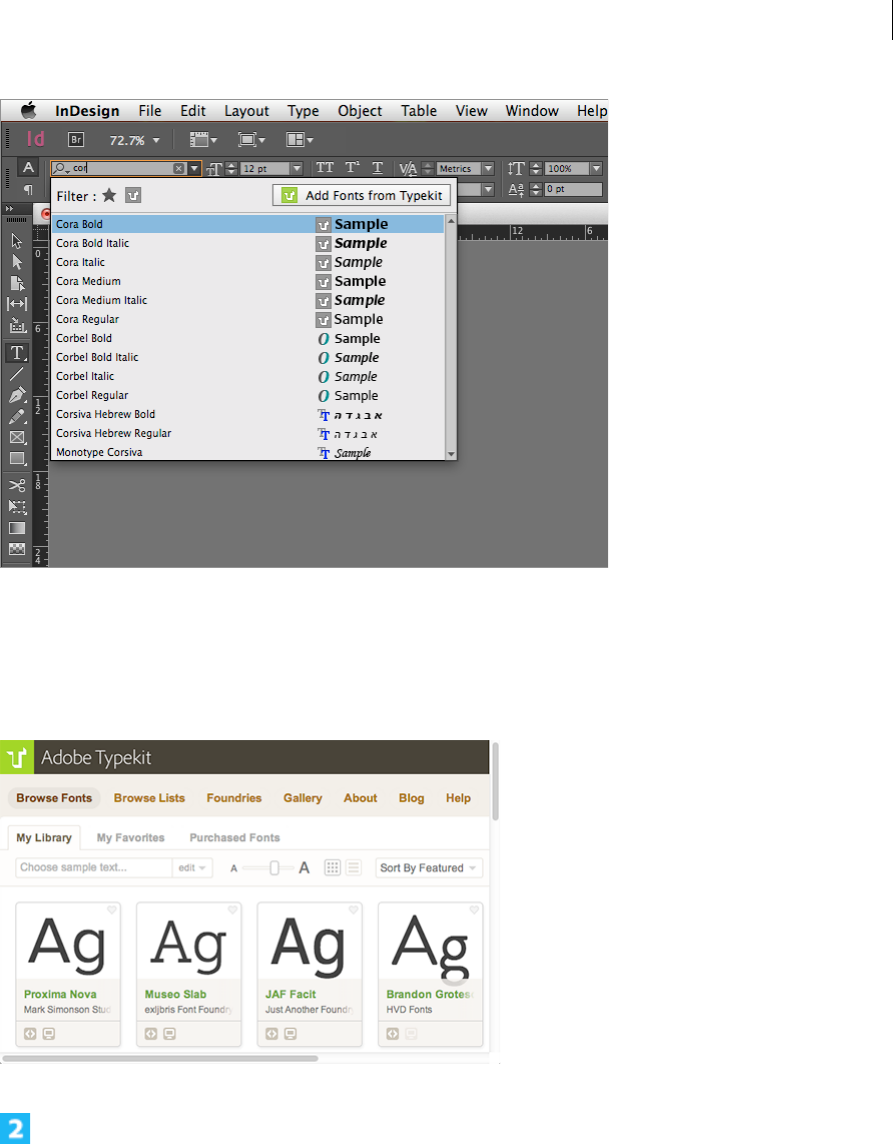
From a Typekit integrated app:
In the applications' font menu, click Add Fonts from Typekit. A browser window is launched directly from within the
app.
25
Creative Cloud
Last updated 6/13/2015
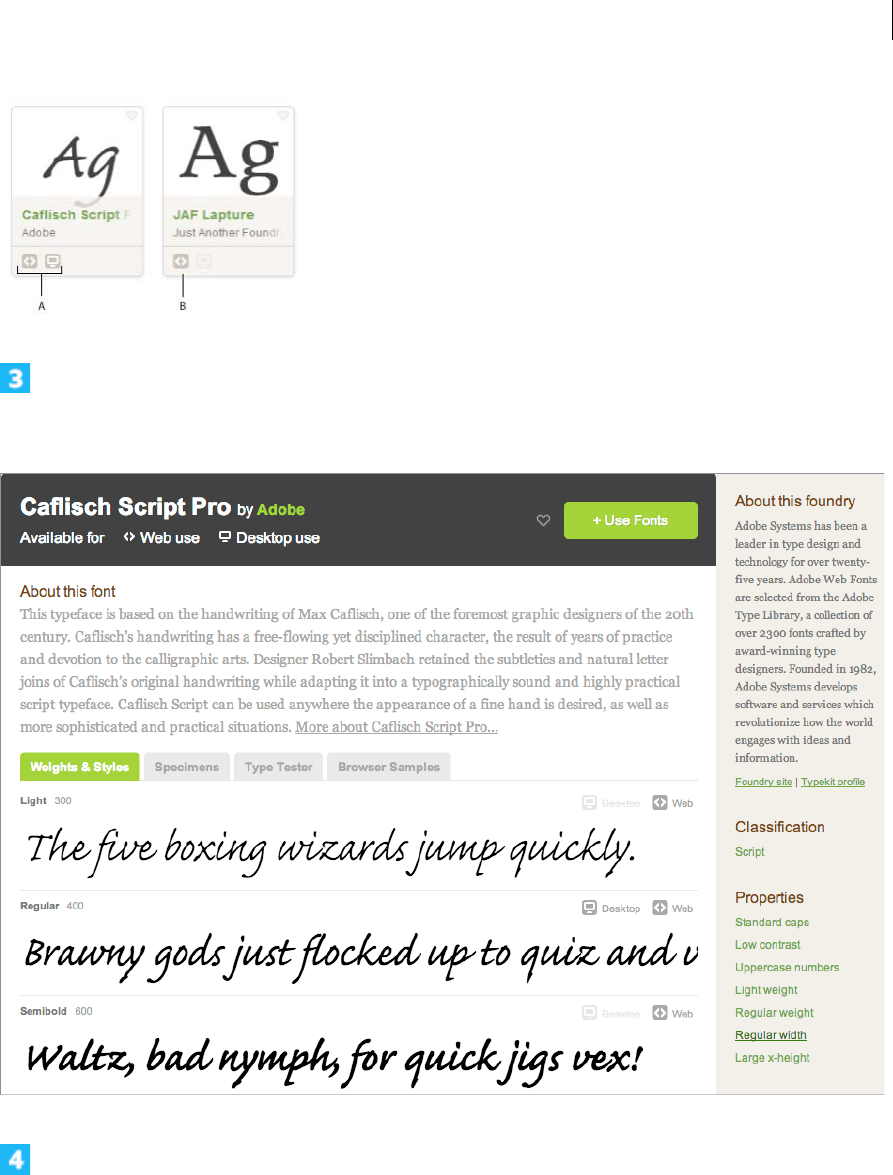
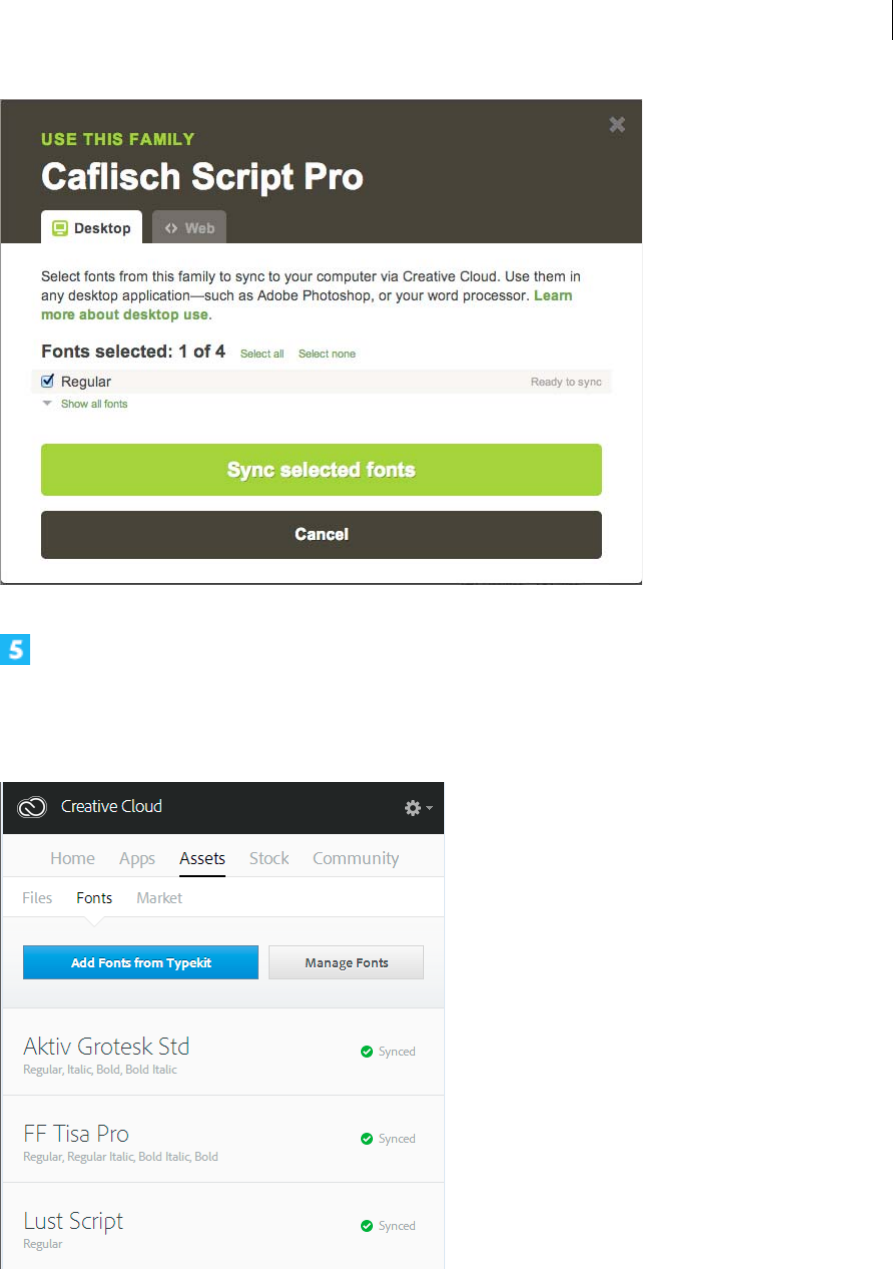
A Web and Desktop B Web
Click an individual font's card to see more details about the typeface, including type specimens for all available weights
and styles.
Click Use Fonts. In the Use This Family window, specify where you’d like to sync the font to your desktop or add it to
a kit for use on the web.
26
Creative Cloud
Last updated 6/13/2015
Select the styles you need from the font family and then click Sync Selected Fonts.
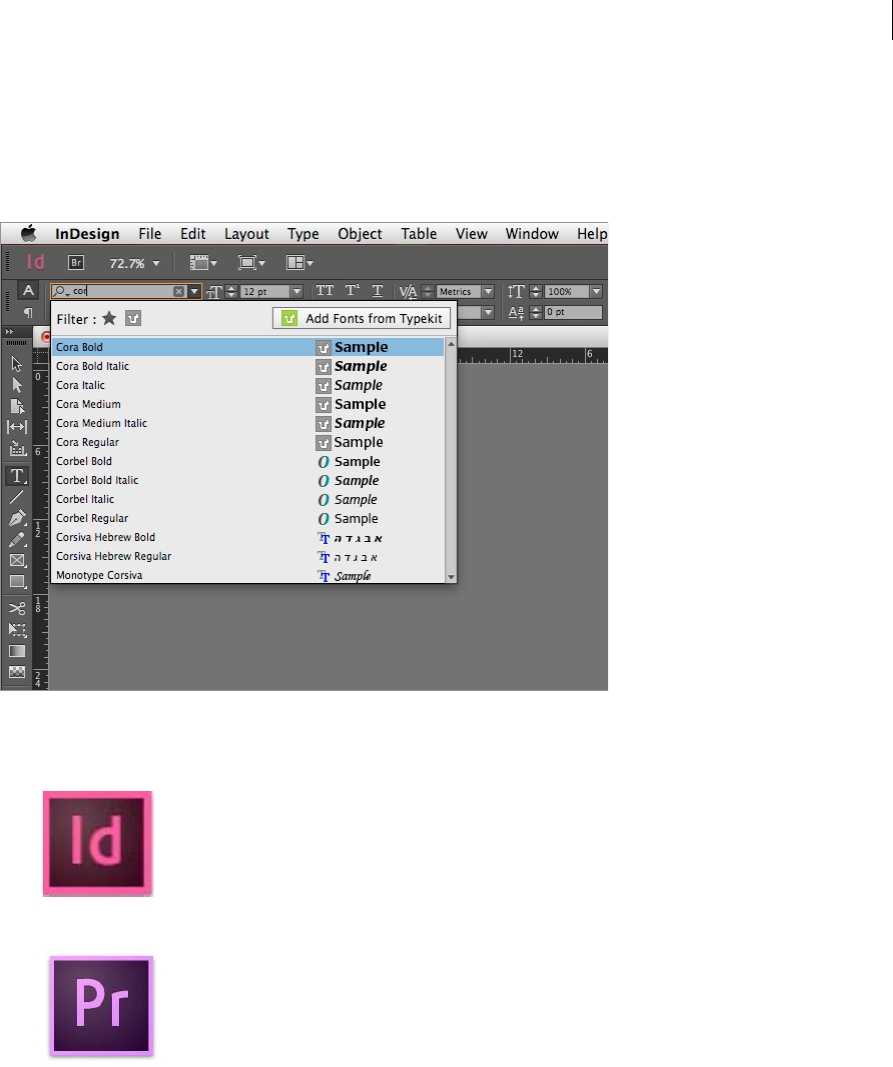
The fonts are synced to all computers where you've installed the Creative Cloud application. To view fonts, open
Creative Cloud application and click theFontspanel.
27
Creative Cloud
Last updated 6/13/2015
Use synced fonts
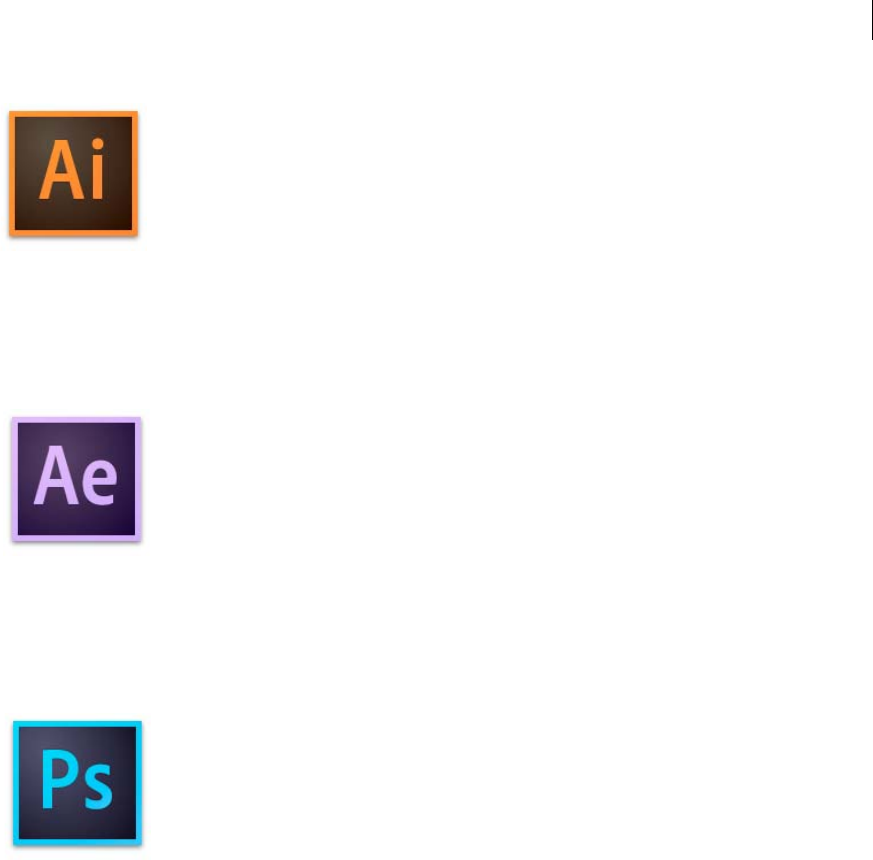
To use the fonts you’ve synced, simply open any desktop application and go to the font menu. You will see your synced
fonts in the list of options. Some desktop applications like Microsoft Office may require a restart after a new font has
been synced.
For more information on how to work with fonts from Typekit within a Creative Cloud application, see the following:
Work with fonts from Typekit in InDesign CC
Work with fonts from Typekit in Premiere Pro CC
28
Creative Cloud
Last updated 6/13/2015
Manage sync fonts
You can view synced fonts on your computer using the Fonts panel in Adobe Creative Cloud app or on Typekit.com
account.
Remove synced fonts
To remove synced fonts from your computer:
1In Adobe Creative Cloud Fonts panel, click Manage Fonts. The Synced Fonts page opens in a browser window. You
can also log in to Typekit.com and go to your Synced Fonts page directly.
2To the right of any fonts you no longer wish to use, click Remove.
Work with fonts from Typekit in Illustrator CC
Work with fonts from Typekit in After Effects CC
Work with fonts from Typekit in Photoshop CC
29
Creative Cloud
Last updated 6/13/2015
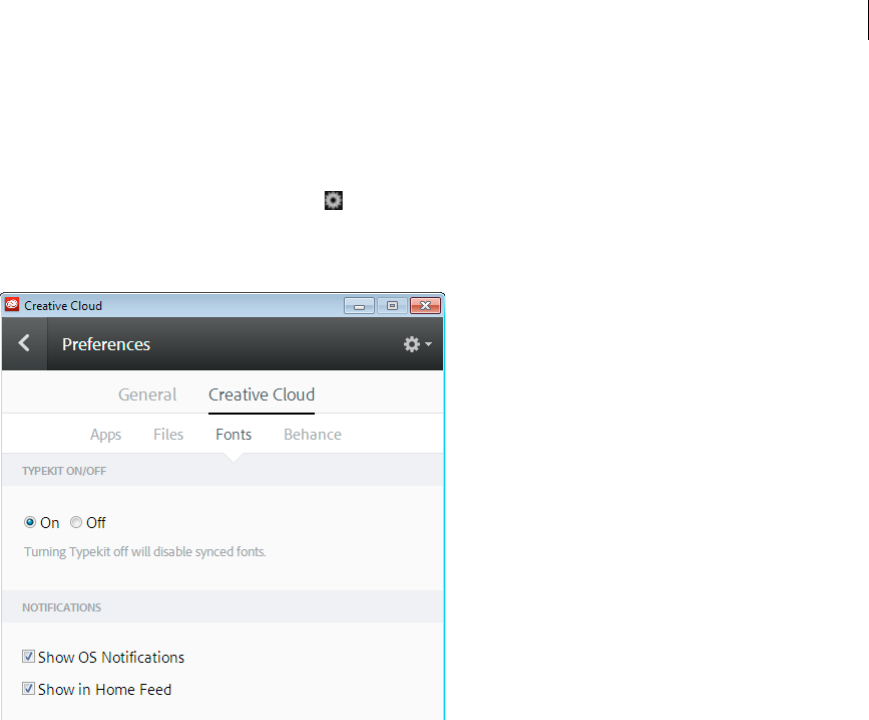
Turn off Typekit
You can enable or disable Font Sync. Disabling Font Sync will stop syncing fonts and remove any synced fonts from
your computer.
1In the Creative Cloud desktop app, choose > Preferences> Creative Cloud.
2Click Fonts.
3To enable or disable font sync, select either On or Off from the Typekit On/Off settings.
Use Typekit while offline
If you go offline while the Creative Cloud application is running and signed in, any synced fonts will still be available
to use. Any changes you make to your font sync selection on Typekit.com will not be reflected until you restore
connectivity.
If you launch the Creative Cloud application while offline, fonts will not be available and will not display in standard
font menus.
More Help topics
Syncing fonts to the desktop | Typekit.com
Add fonts to desktop apps through Creative Cloud
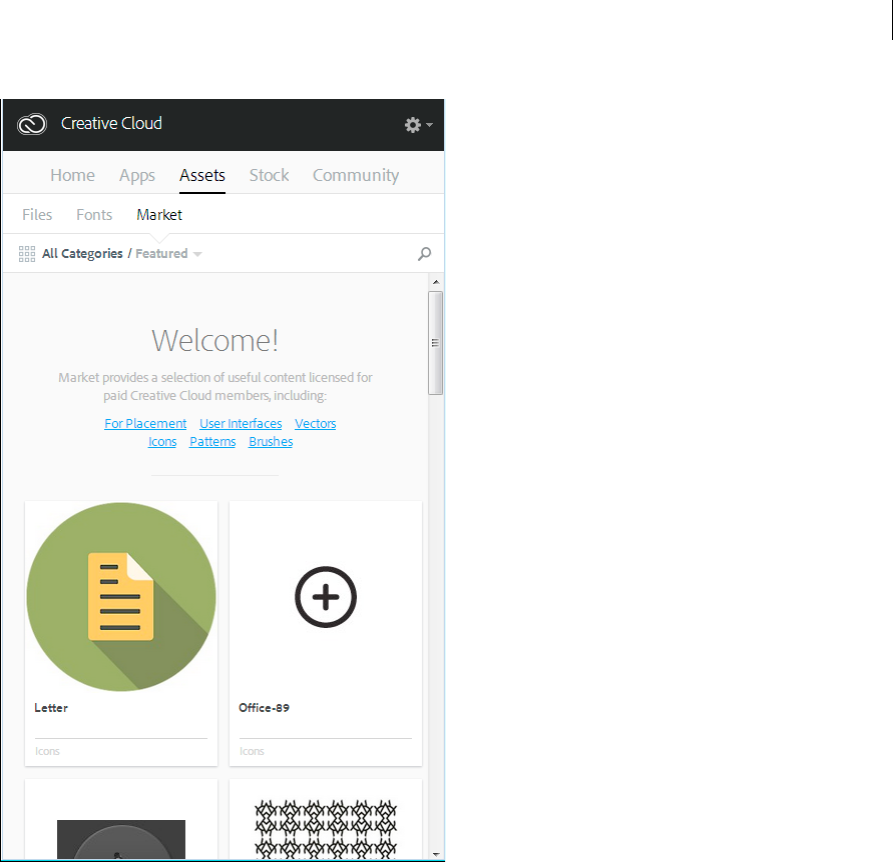
Creative Cloud Market
Creative Cloud Market is a collection of high-quality, curated content for creatives by creatives, available to all paid
Creative Cloud members except photography plan customers. Creative Cloud members can access assets from Market
for free on both desktop and mobile (via Creative Cloud connected apps), choosing from an incredible selection of
vector graphics, icons, patterns, UI kits, and more. Creative Cloud subscribers can download up to 500 unique, royalty-
free assets each month. This powerful new service allows you to seamlessly find assets to build upon, manipulate, and
modify to jumpstart your creative process.

30
Creative Cloud
Last updated 6/13/2015
To access Market, you'll first need to install the Creative Cloud for desktop application or a supported mobile app such
as Adobe Photoshop Sketch. For instructions to download, see Creative Cloud for desktop. Watch and learn more in
this short video tutorial: Access Creative Cloud Market design assets .
Discover and download creative assets
You can browse thousands of high-quality assets from within the Creative Cloud for desktop app. Choose Assets >
Market. You can also expand the drop-down to search by category, or search by keywords to find the most relevant
assets for your project.
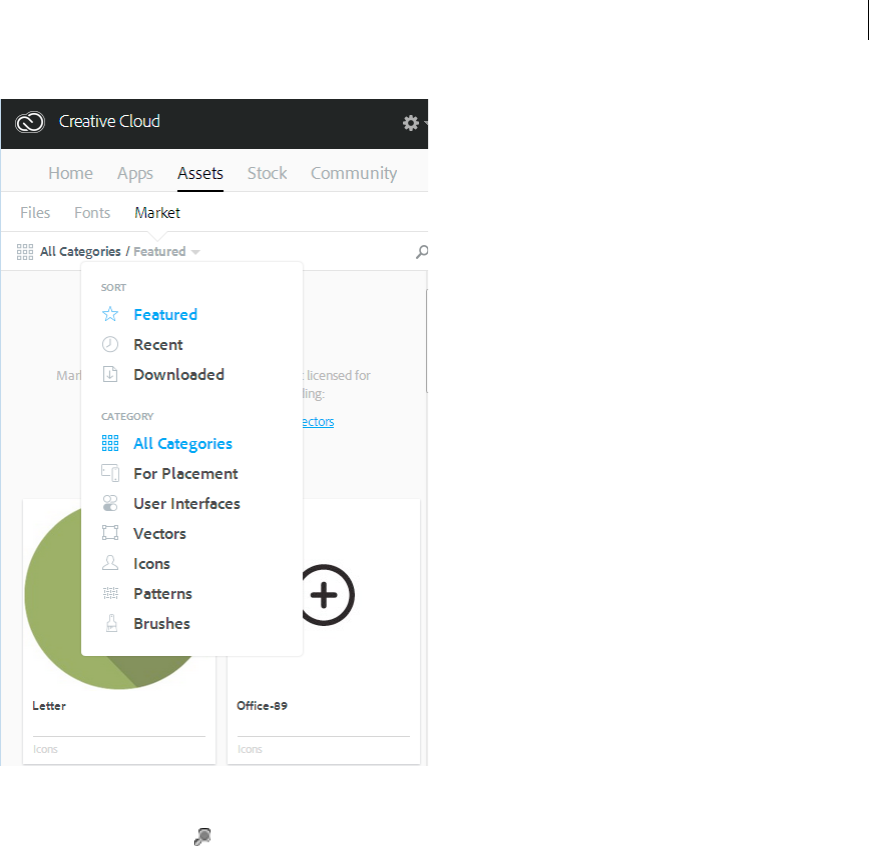
1In Creative Cloud for desktop, choose Assets > Market.
2Creative Cloud Market includes a selection of high-quality curated content, spanning the following categories:
•For Placement: photo and digital based templates with organized layers and professional masking (PSD files).
•User Interfaces: layered PSDs including full kits, forms, charts, navigation, and widgets for both mobile and web
(PSD files)
•Vec tor Shapes: scalable objects and shapes that integrate with Photoshop, InDesign, and Illustrator (SVG files)
•Icons: a series of glyph, outline, flat and 3D symbols for print, web and way finding (PNG/SVG files)
•Patterns: infinitely repeatable geometric, illustrated, and textured patterns and backgrounds PNG/SVG files)
•Brushes: high quality natural media and abstract Photoshop brushes (ABR/TPL files)
To filter assets, select a category from the Market pop-up menu.
31
Creative Cloud
Last updated 6/13/2015
3To search for assets, click and enter a search term.
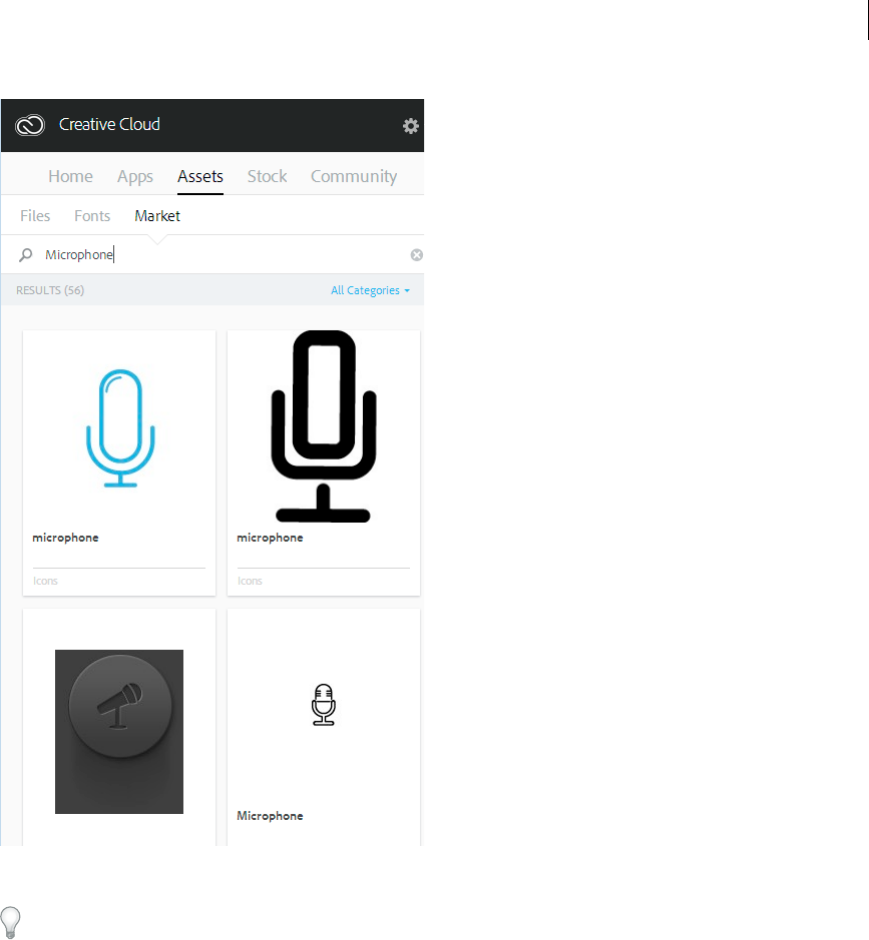
32
Creative Cloud
Last updated 6/13/2015
You can filter and sort the search results.
4Click an asset thumbnail to view additional information and the details for the asset.
5Click Download and choose a Library to download the asset to. You can also create a new library. For more
information, see .
In addition to the Library, the Assets are also automatically downloaded to the Market Downloads folder in your
main Creative Cloud Files folder.

33
Creative Cloud
Last updated 6/13/2015
FAQs
Do I need a Creative Cloud membership?
Creative Cloud Market is available to all paid Creative Cloud members. Single app and complete members with any
plan—single user, Team, Education, or Enterprise—are eligible. Users can access Creative Cloud Market through
Creative Cloud for desktop app.
Creative Cloud Photography plan members are not eligible to access Market through Creative Cloud for desktop. Free
members can browse Market assets through Creative Cloud for desktop but cannot download content.
Do downloaded assets count toward my storage quota?
Yes. Downloaded assets are stored on your Creative Cloud Files folder, and count toward the storage. If you exceed your
storage quota, you'll be unable to download assets unless you delete old files and create some space. See .
Can I use these assets in my projects?
Yes. These assets are unique and provided royalty free for use in your projects.
Can I copy or back up these assets for future use?
Yes, you can back up assets obtained from Creative Cloud Market for future use.
Can I share these assets after I've downloaded them?

34
Creative Cloud
No. While the assets are royalty-free for eligible Creative Cloud members to use in their publications, productions, and
projects, you cannot share or redistribute the assets.
How does Adobe source content for Creative Cloud Market?
Adobe sources content from the best creative talent in the industry direct from Behance, the leading free online
platform to showcase & discover creative work.
Can my work be considered for inclusion in Creative Cloud Market?
To draw exposure to your work, Adobe recommends that all potential artists post their work on Behance. Adobe
searches for and curates future content on Behance.
How do I get Creative Cloud Market?
Creative Cloud Market is available to all paid Creative Cloud members except for photography plan customers
(Photoshop Photography plan and Creative Cloud Photography plan). For a limited time, Adobe Creative Cloud
Market is accessible to all Creative Cloud members through the Adobe Sketch iPad app. Creative Cloud free members
and photography plan members can browse Market through Creative Cloud for desktop but cannot download content.
To download and use Creative Cloud Market content, upgrade to either Creative Cloud Single App or Complete plans.
Why don't photography plan customers get access to Creative Cloud Market?
Creative Cloud Market is a new benefit that has been added to certain paid Creative Cloud plans, and is not included
in the entitlements for photography plan customers. Some Creative Cloud services, such a Creative Cloud Market,
TypeKit, and ProSite are only available to Single App or Complete Creative Cloud plans. To download and use Creative
Cloud Market content, upgrade to either Creative Cloud Single App or Complete plans.
Creative Cloud Extract
Photoshop compositions are a widely used method for sharing design specifications to web developers, who then need
to convert the design intent into HTML and CSS. In a typical workflow, designers create Photoshop comps for a web
or mobile design. Production designers then prepare the PSD file for developers, where they slice assets and create
redline specs. Web developers are tasked with taking those design elements and assets and turn them into code.
Extract reinvents this workflow, enabling web designers to export optimized assets in record time in Photoshop CC,
and share their PSDs with developers via Creative Cloud Assets so they can unlock key design info and download
assets within their browsers. Developers can then access and apply this information as they code in Dreamweaver
CC.
Last updated 6/13/2015
Use Creative Cloud Extract to make the Photoshop design to code workflow easier. Extract simplifies the process
for both web designers and web developers, and greatly improves the efficiency in transforming a web design to
workable code.

35
Creative Cloud
Last updated 6/13/2015
Extract is powered by Creative Cloud, and is available to you at various places in the PSD design to code workflow.
Using Extract gives you the freedom to choose wherever you're the most comfortable with the tools and technologies,
and enables you to transform your design to reality.
•Designers can work in the familiar environment of Photoshop CC to define and extract image assets from layers or
layer groups.
•Web developers can access the PSD file on Creative Cloud Assets and use Extract to export image assets,
measurements, and CSS styles. These assets and CSS styles can then be used to turn design comps into code.
•Web designers and developers can use Extract from within Dreamweaver, a complete self-contained solution that
offers contextual code hinting, assets extraction, and more directly within the coding environment.
Extract assets in Photoshop
Designers who create Photoshop comps can quickly define and package image assets from individual layers or
layer groups, using a simple, visual interface built on top of Adobe Generator. This dramatically speeds up
production time so designers can spend more time designing.
Extract in Dreamweaver
Web designers and developers can now view PSDs in Dreamweaver and use contextual code hinting to easily
define fonts, colors, and gradients in their CSS. They can also drag and drop optimized images into the Live View
surface, copy text, and more.

36
Creative Cloud
Last updated 6/13/2015
You can further simplify your design workflow by using other Creative Cloud services to keep your assets such as files,
fonts, and colors in sync so that everyone has access to the latest designs.
Sync and store PSD files and extracted images in Creative Cloud Assets, so that you have access to the updated files on
all your devices.
Use Creative Cloud Assets to share folders, so that the entire team is working on the same set of files. You can also
review and add comments to files. Creative Cloud Assets also provides basic version control.
Creative Cloud provides access to fonts from Typekit, and members can download fonts from Typekit as required by
the design.
Extract in Creative Cloud Assets
Web designers can share PSDs directly from Creative Cloud Assets in the browser, so that developers can quickly
extract design information — colors, gradients, fonts, text, CSS, and more — that helps them turn the comp into
code. Plus, they can export optimized PNG, SVG, and JPG images for the web.
Extract for Brackets (Preview)
Extract integration in Brackets brings the power of Extract to a lightweight, modern code editor. Using Extract for
Brackets (Preview), you can pull out design information from a PSD as clean, minimal CSS via contextual code
hints. You can also extract layers as images, use information from the PSD to define preprocessor variables, and
easily get dimensions/distances between objects.
More Information Ask the Community Contact Us
Creative Cloud Extract tutorial Post, discuss and be part of our awesome
community
Start here to connect with our staff
Watch now > Ask now > Start now >
37
Creative Cloud
Last updated 6/13/2015
Creative Cloud Libraries
What you can do with Libraries
Capture
Creative Cloud Libraries provide a mechanism to capture design assets from a variety of apps, and is not limited to
desktop applications only. You can capture inspiration, whenever it strikes, using the family of Creative Cloud mobile
apps or even download assets from the Creative Cloud Market.
Manage
Creative Cloud Libraries makes your favorite assets available to you anywhere. Create images, colors, text styles,
and more in several Creative Cloud desktop applications and mobile apps, and then easily access them across
other desktop and mobile apps for a seamless creative workflow.
Creative Cloud Libraries connects to your Creative Profile, putting the creative assets you care about at your
fingertips. Your Creative Profile moves with you from app-to-app while automatically surfacing your assets in the
right apps and at the right time for your projects.
For an overview, watch Get started with Creative Cloud Libraries .
38
Creative Cloud
Last updated 6/13/2015
You can organize design assets into multiple Creative Cloud Libraries. These may be based on projects, types of assets,
or even your personal favorites that you reuse to create your signature style.
Reuse and create
Reuse and create designs and artwork by using objects from Creative Cloud Libraries.
Support for Libraries in Creative Cloud applications
•Desktop and browser applications
•Mobile apps
App or service Support for saving assets to
Libraries
Support for using assets
from Libraries
Resource offering more
information
Desktop applications
Photoshop ??Creative Cloud Libraries in
Photoshop
Illustrator ??Creative Cloud Libraries in
Illustrator
InDesign ??Creative Cloud Libraries in
InDesign
Premiere Pro ??Creative Cloud Libraries in
Premiere Pro
After Effects ??Creative Cloud Libraries in
After Effects
Creative Cloud Market
(through the Creative Cloud
desktop app)
?N/A
Browser
Creative Cloud Assets View & manage (rename,
delete) only
Creative Cloud Assets | Store
and share content
App Support for saving assets to
Libraries
Support for using assets
from Libraries
Resource offering more
information
Shape CC Vector shapes N/A Adobe Shape CC FAQ
Color CC Color themes N/A Adobe Color CC FAQ
Brush CC Brushes N/A Adobe Brush CC FAQ
Illustrator Draw N/A Images and shapes Adobe Illustrator Draw FAQ
Photoshop Sketch N/A Brushes Adobe Photoshop Sketch FAQ
Illustrator Line N/A Color and graphics Adobe Illustrator Line CC FAQ
Hue CC ?N/A Adobe Hue CC FAQ
Comp CC N/A ?Adobe Comp CC FAQ
Premiere Clip N/A ?Adobe Premiere Clip FAQ

39
Creative Cloud
Last updated 6/13/2015
Overview: Work with Creative Cloud Libraries
Add to library
Creative Cloud Libraries provide a mechanism to capture design assets from a variety of apps, and is not limited to
desktop applications. You can capture inspiration, whenever it strikes, using the family of Creative Cloud mobile apps
or even download assets from the Creative Cloud Market.
Mobile
You can add assets to your library using a growing family of Adobe mobile apps. Consult to understand how.
Desktop
Add assets to Creative Cloud Libraries on your computer using a Creative Cloud desktop application. Drag assets to
the Libraries panel in the desktop application. You can also view and browse through the libraries on the Creative Cloud
Assets page.
See the for more information on using Libraries with it.
Creative Cloud Market
Discover and add assets to Libraries from Creative Cloud Market. Use the Creative Cloud desktop app to browse and
add assets from . You can also add assets to a library using Creative mobile apps.
Reuse and create
Desktop
In a desktop application supporting Libraries, open the Libraries panel (Windows > Libraries) and drag objects to the
canvas.
Mobile apps
Select an object from the Library to place it in your project using mobile apps.
Browser
Browse and view libraries on the Creative Cloud Assets page. You can also delete a library.
Collaborate
Desktop
Open the Libraries panel (Windows > Libraries) in a desktop application that supports Creative Cloud Libraries. Now,
from the panel flyout menu, choose Collaborate.
Browser
In the Creative Cloud Assets left pane, click Libraries. Now, from the library folder menu, choose Collaborate.

40
Creative Cloud
Last updated 6/13/2015
Adobe Stock and Creative Cloud Libraries
Adobe Stock is deeply integrated with Creative Cloud Libraries. You can add a watermarked preview of a stock image
to any of your libraries directly using the Adobe Stock website. Then, in Creative Cloud apps that support Libraries—
Photoshop, lllustrator, InDesign, Premiere Pro, and After Effects—you can drag the watermarked stock image from the
Libraries panel to your creative project. When you're satisfied that the stock image is appropriate for your project, you
can choose to license the stock image directly from within the Libraries panel.
Creative Cloud apps that support library-linked smart objects—Photoshop, Illustrator, and InDesign—take this
integration a notch deeper. When you license the stock image, all linked instances of the stock image in your open
documents are automatically updated to the licensed, high-resolution stock image without the watermark.
For more information, see Using Adobe Stock .
FAQ
How many items can I add to a library?
A library can contain up to 1000 assets.
Is there a limit to the number of libraries I can create?
No, there are no limits to the number of Libraries you can create.
Are all assets stored in Libraries usable by all supported apps?
While you're working in an app, you can view and use Libraries content relevant to that particular. For example, while
you can add layer styles to a library, those styles are only relevant to Photoshop.
What type of color information is supported?
Libraries support color data for a single swatch or color themes. Libraries only support process colors. Spot colors are
not supported and are added as process colors to Libraries.
Can I reuse any asset stored in Libraries across Creative Cloud desktop applications?
Most assets are reusable between the desktop applications. Photoshop layer styles are a notable exception; they are
currently reusable only in Photoshop.

41
Creative Cloud
Last updated 6/13/2015
If you use an InDesign text style asset in Illustrator or Photoshop, those applications will attempt to map the properties
of the asset with the properties for text styles available in the host application. Any properties not found in the host
application are ignored.
Where are the assets stored?
Your assets are stored locally on your device and synchronized with Creative Cloud.
Can I share a library with others?
Yes. S e e .
Some mobile apps integrated with Creative Cloud Libraries—Brush, Color, and Shape—do not yet support
collaboration on libraries. Also, any libraries shared with you are not available when you're working within these mobile
apps. However, if you shared a library with other users, that library is available to you in Creative Cloud desktop
applications as well as in mobile apps.
Do I need a Creative Cloud membership?
You'll need either a free or a paid Creative Cloud membership to use Creative Cloud Libraries.
Where can I learn more about Creative Cloud Libraries?
You can learn more about Libraries with these resources:
Video tutorials
•How to get started with Creative Cloud libraries (overview)
•Creative Cloud Libraries in Illustrator and mobile
•Creative Cloud Libraries in Photoshop and mobile
Video tutorials where Creative Cloud Libraries are demonstrated in mobile apps
•Shape CC
•Brush CC
•Color CC
•Illustrator Draw
•Photoshop Sketch
Share files and folders
Creative Cloud Assets lets you share public links to files and folders to gather quick feedback and work more efficiently
with others. When you share a link with someone, they can view a high fidelity preview of the assets directly in the web
browser, without having to install Creative Cloud apps or sign in to the website. In addition to viewing the assets, users
can write comments or download a copy of the files (if you permit them).
Public sharing of files and folders ensures that you retain complete control over your content. Recipients get read-only
access to your assets, which means they cannot upload, update, or delete them. The shared assets are accessed using a
unique Adobe.ly short URL that you send via email or copy/paste to send. At any time, you can turn the URL off to
revoke access.
42
Creative Cloud
Last updated 6/13/2015
To collaborate with co-workers (share assets with read-write access), see .
To share your work and seek feedback from a wider network of creatives, see Share your work on Behance .
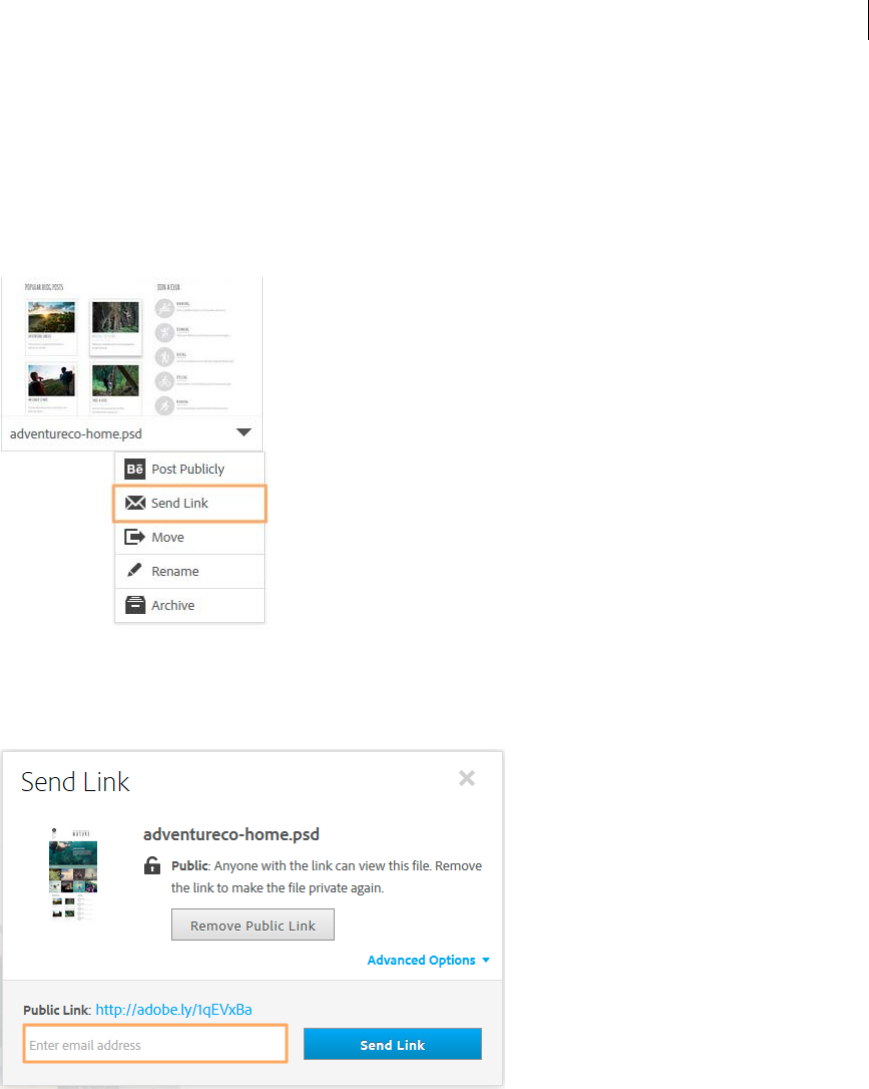
To share links to files or folders with others, do the following:
1On the Creative Cloud Assets page, navigate to a file or folder to share.
2From the Share menu, choose Send Link.
3The file is shared and a short public URL is created. On the Send Link dialog, specify the email addresses you want
to send this link to.
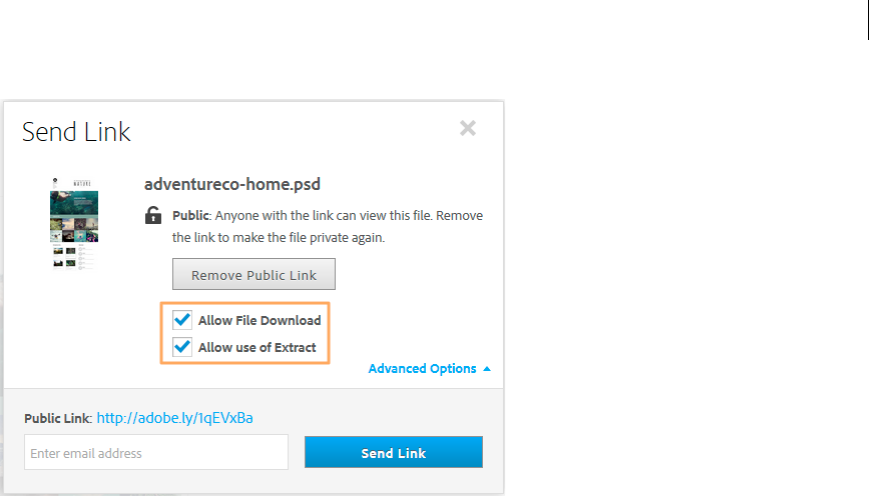
4Click Advanced Options. The following options are enabled by default.
•Allow File Download: allows link recipients to download the file
•Allow use of Extract: allows link recipients to extract image information and assets
Note: The Allow use of Extract option is available only when sharing a Photoshop (.psd) file. For more information how
Extract works, see .
Optionally, you can choose to disable the options.
43
Creative Cloud
Last updated 6/13/2015
5Click Send Link.
An email is sent to the recipients with the link (short URL) to access the shared file or folder.
Clicking the short URL opens the shared file or folder in a web browser. Recipients don't have to be Creative Cloud
members to view or access publicly shared files and folders.

44
Creative Cloud
Last updated 6/13/2015
More Help topics
Get started with Creative Cloud Assets
Collaborate with others
Share on Behance
Collaborate on folders and libraries
You can collaborate with other users and share a folder or library from your Creative Cloud account with specified
Creative Cloud users. All invited users can then work co-operatively with the assets in the shared folder or library.
Collaborators can view, edit, rename, move, or delete contents of the shared folder or library.
To share public links to files and folders with others (share assets with read-only access), see .
45
Creative Cloud
Last updated 6/13/2015
For more information about libraries in Creative Cloud, see .
To share your work and seek feedback from a wider network of creatives, see Share your work on Behance .
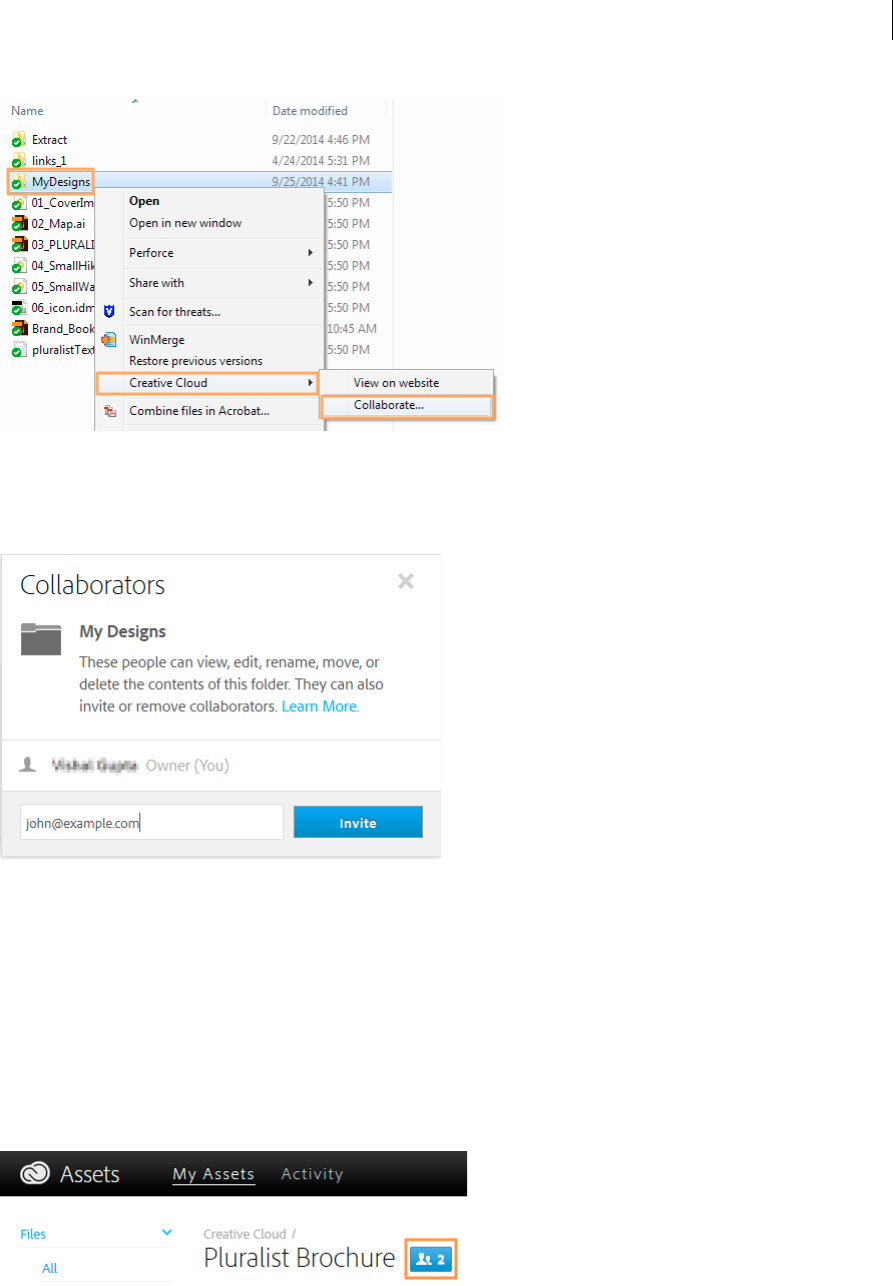
Collaborate on folders
Add collaborators
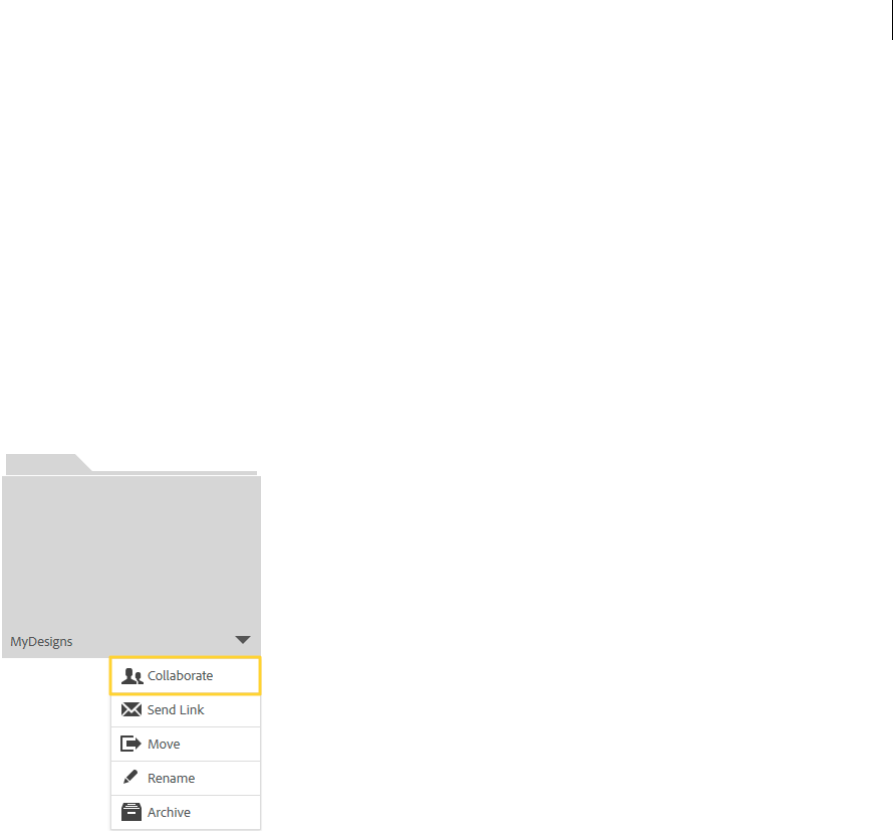
1. You can share a folder, either using the website or using the Creative Cloud Files folder on your desktop. Do one of
the following:
Website
From the folder menu, choose Collaborate. If you’re viewing the contents of a folder, choose Share > Collaborate.
Desktop
From the folder context-menu, choose Creative Cloud > Collaborate.
46
Creative Cloud
Last updated 6/13/2015
2. In the Collaborators pop-up widget, enter an email address. To invite multiple collaborators, enter a list of email
addresses separated by a comma or semicolon. Click Invite.
Your collaborators receive an email inviting them join the collaboration. Existing Creative Cloud members also receive
a notification via the Creative Cloud desktop app and website.
Note: Collaborators will need an Adobe ID; if they don't have one already, they can create one when they accept the
invitation. It's free and it's easy.
Manage collaborators
Shared folders display a Manage Collaborators button next to the folder name. The button also displays the number of
collaborators.
47
Creative Cloud
Last updated 6/13/2015
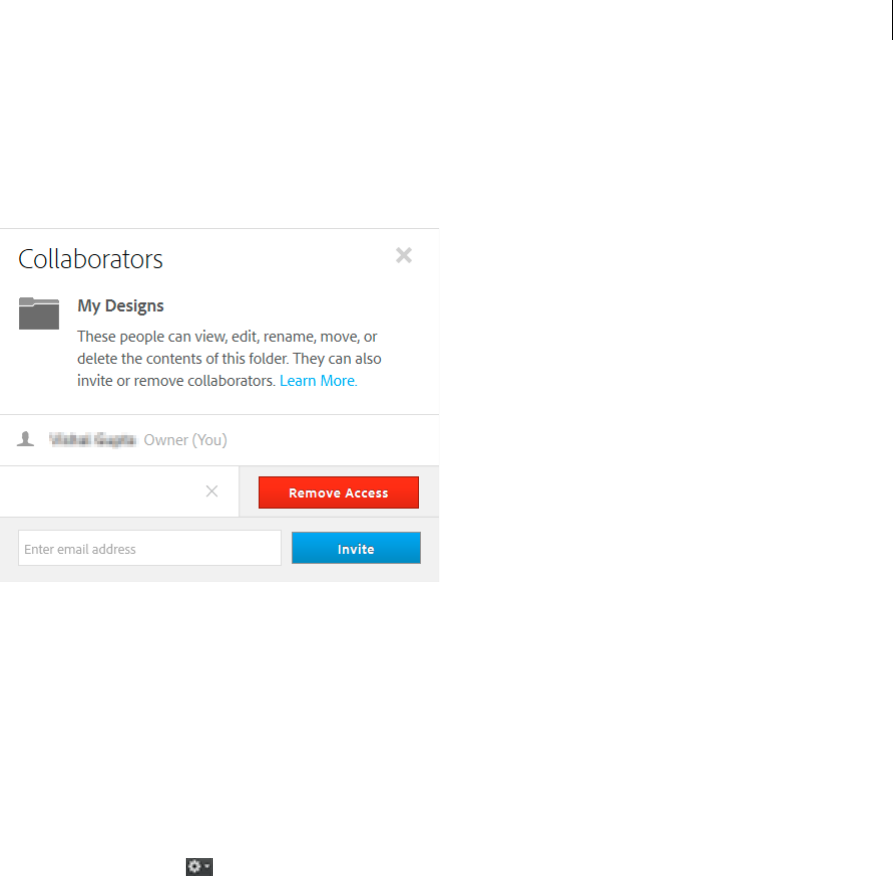
Click Manage Collaborators to open the Collaborators pop-up widget.
•To invite another user, enter an email address and click Invite.
•To remove a user, click the X icon next to the user and click Remove Access (if the collaborator has accepted the
invitation) or Remove Invitation (if the collaborator hasn't accepted the invitation yet).
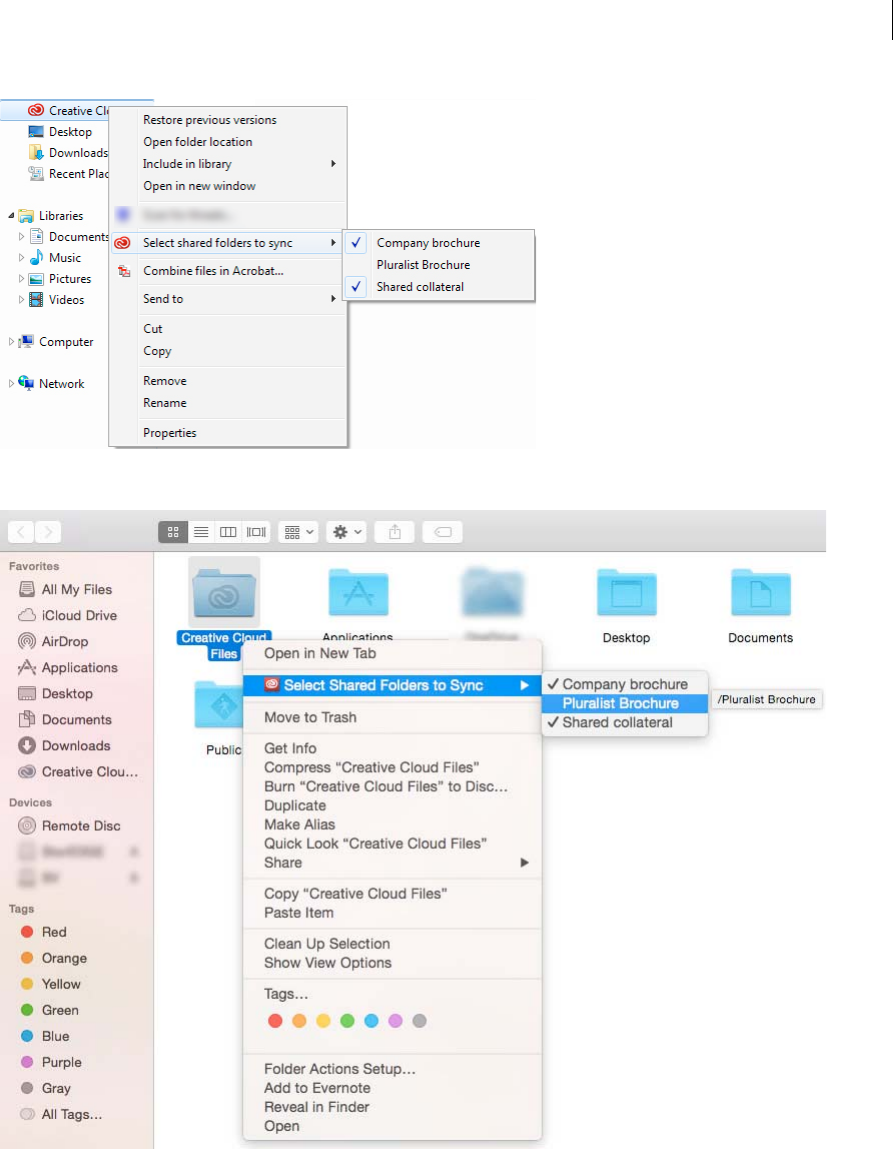
Selectively synchronize shared folders
If you've accepted invitations to collaborate on one or more shared folders, you can choose whether you want to
synchronize those folders with the Files folder on your desktop. Selectively synchronizing shared folders helps conserve
disk space and gives you greater control over what content is synchronized with Creative Cloud.
If you choose not to synchronize a folder, that folder is removed from the Files folder on your desktop. By default, all
folders for which you've accepted collaboration invitations are synchronized.
❖Navigate to the Creative Cloud Files folder on your desktop.
•(Windows) Click the icon in Creative Cloud for desktop and then select Creative Cloud Files.
•(Mac) Open your Home folder. Select Go > Home or press the Shift+Command+H key combination. Ensure that
the Creative Cloud Files folder is listed in the Finder right pane. If your Creative Cloud Files folder does not reside
in your Home folder, open the parent folder containing Creative Cloud Files instead.
1(Windows) In the folder hierarchy, right-click the Creative Cloud Files folder and choose Select Shared Folders To
Sync.(Mac) In the Finder right pane, Control-click the Creative Cloud Files folder and then choose Select Shared
Folders To Sync.
2Deselect one or more shared folders that you don't want to synchronize. Creative Cloud removes that folder from
the Files folder on your desktop.
48
Creative Cloud
Last updated 6/13/2015
Note: Simply select the folder from the Files folder context-menu to begin synchronizing it again.
49
Creative Cloud
Last updated 6/13/2015
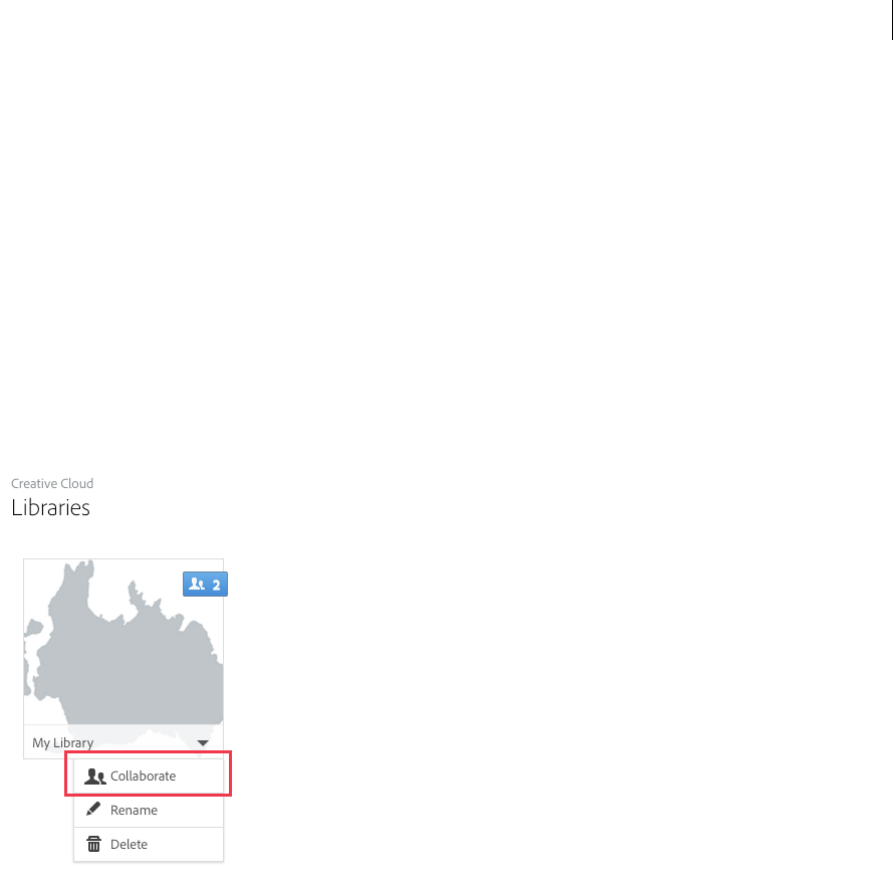
Collaborate on libraries
Creative Cloud Libraries connects to your Creative Profile, putting the creative assets you care about at your fingertips.
Your Creative Profile moves with you from app-to-app while automatically surfacing your assets in the right apps and
at the right time for your projects.
You can share libraries with collaborators using the Creative Cloud website or from within Creative Cloud apps.
For a list of Creative Cloud apps currently supporting Libraries, see .
Note: Collaborators need to have an Adobe ID. If they don't already have an Adobe ID, they can create one when they
accept the invitation. Creating an Adobe ID is free and easy.
Share libraries using the Creative Cloud website
1In the Creative Cloud Assets left pane, click Libraries.
2From the library folder menu, choose Collaborate.
1In the Collaborators dialog, enter the email addresses of one or more collaborators. Optionally, enter a message to
be included in the collaboration invite.
2Click Invite. Creative Cloud sends out the collaboration invites.
Your collaborators receive an email message inviting them join the collaboration. Existing Creative Cloud members
also receive a notification via the Creative Cloud desktop app and website.
Share libraries from within a desktop application
Do the following to share a library from within a desktop application supporting Creative Cloud Libraries:
1In the Libraries panel, select a library from the pop-up menu.
2Open the flyout menu and choose Collaborate.
3In the browser page that opens up, provide email addresses and an optional message for one or more collaborators
with whom you want to share the library.
4Click Invite to send out the collaboration invites.

50
Creative Cloud
Last updated 6/13/2015
Your collaborators receive an email message inviting them join the collaboration. Existing Creative Cloud members
also receive a notification via the Creative Cloud desktop app and website.
Manage collaborators
The Collaborators dialog displays the status of the invites. Collaborators who haven't yet accepted the invite have
Invited displayed next to their names/email IDs. Once a collaborator has accepted the invite, this string is no longer
displayed.
To remove a user, click the X icon next to the user and click Remove Access (if the collaborator has accepted the
invitation) or Remove Invitation (if the collaborator hasn't accepted the invitation yet).
More Help topics
Get started with Creative Cloud Assets
Collaboration FAQ
Manage and sync files
Sync and share files with collaborators (video, 10 min)
Creative Cloud Libraries
How to: Choose which Creative Cloud shared folders you sync
Launch Creative Cloud apps
The Creative Cloud for Desktop application makes it easy to download and install individual Creative Cloud apps, such
as Photoshop or Premiere Pro, onto your computer. After installation, you can launch the Creative Cloud apps either
from the Apps panel or from the installed location on your computer (just like any other application).
Launch apps from the Creative Cloud Desktop application
1Open the Creative Cloud Desktop application from the Taskbar (Windows) or the Apple toolbar (Mac OS).

51
Creative Cloud
Last updated 6/13/2015
By default, the Adobe CC Desktop application is started when you log in to your computer.
2Click the Apps panel. To launch an installed app, click Open.
Note: For a few apps, such as Touch App Plugins or Gaming SDK, the launch from the Creative Cloud Desktop application
feature is not available. To launch such apps, use the alternate method described below.
Launch apps from installed location
Mac OS
The Creative Cloud Desktop app downloads and installs apps in the Applications folder. It also creates shortcuts in the
Launchpad for quick access to the installed applications.
Finder
Use the Finder to navigate to the Applications folder and then double-click to launch the application.
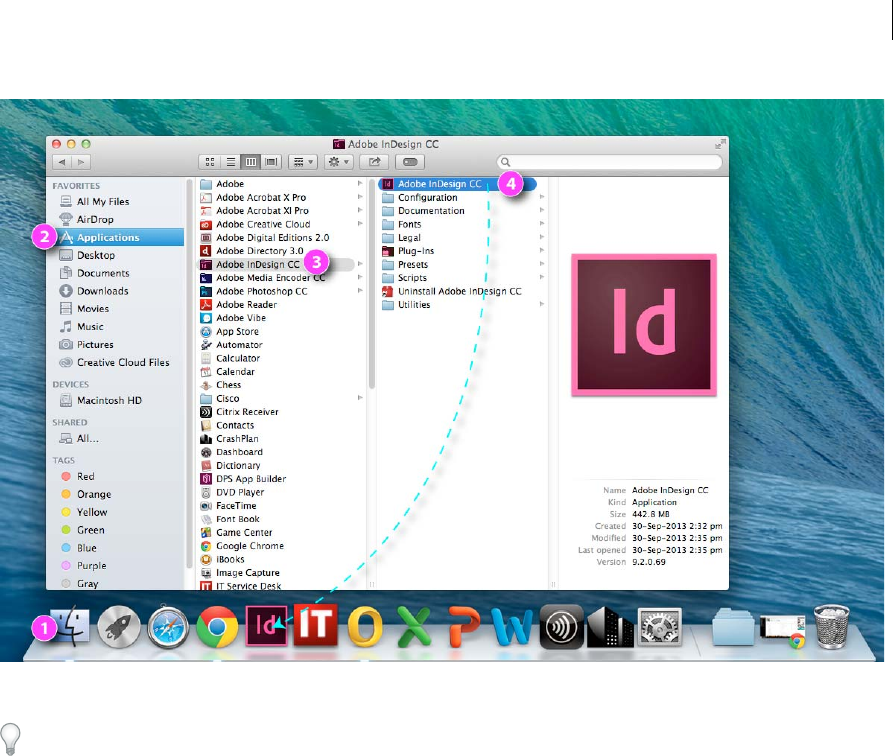
52
Creative Cloud
Last updated 6/13/2015
For easier access to the apps, you can drag the icon to the Dock. For more information, see Mac Basics: The Dock on
the Apple website.
Launchpad
The Launchpad is the fastest way to find and launch apps on your Mac. Open Launchpad, and then click the app to
launch it. You can also filter the list to locate the app quickly.
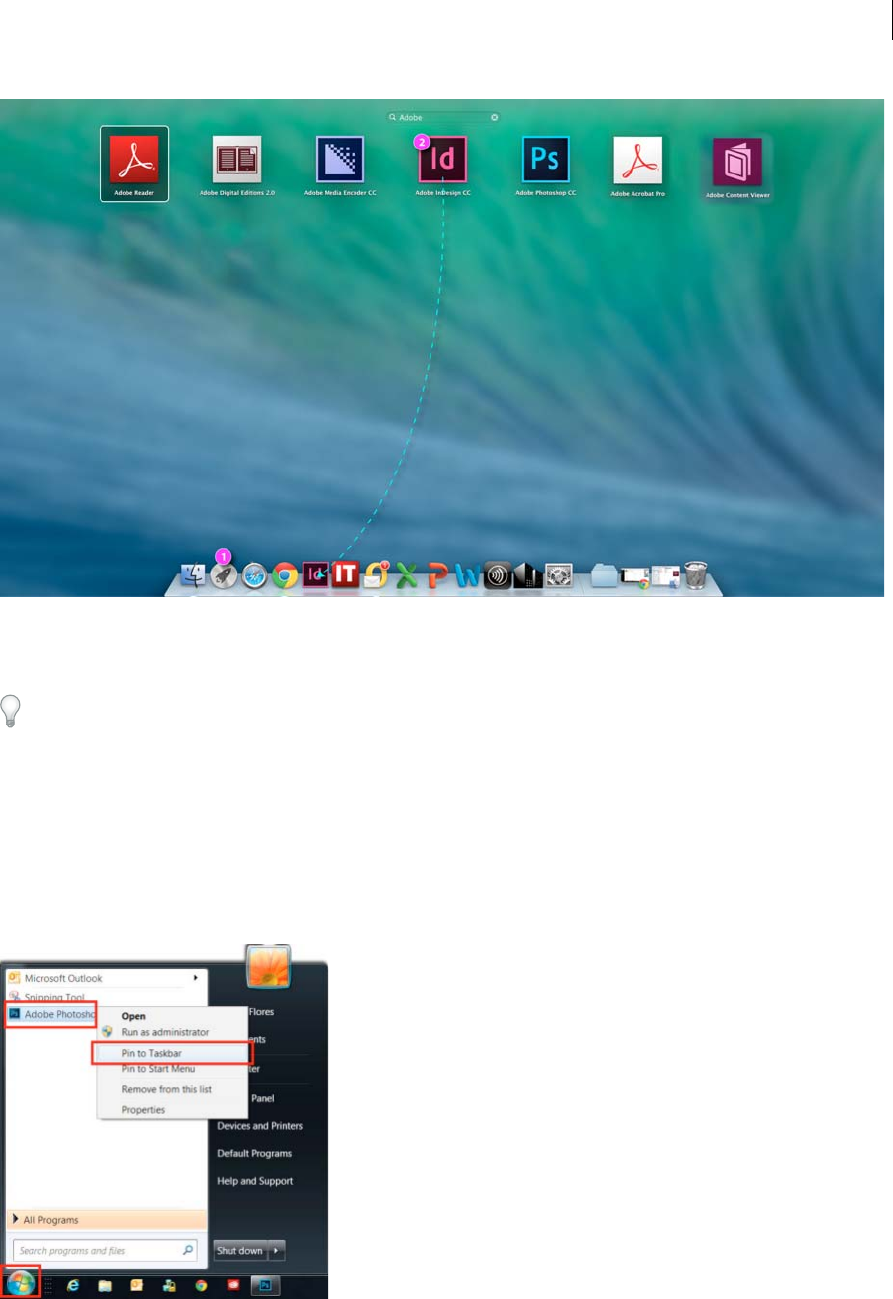
53
Creative Cloud
Last updated 6/13/2015
For more information, see Mac Basics: Launchpad on the Apple website.
For easier access to the apps, you can drag the icon to the Dock.
Windows
The Creative Cloud Desktop app downloads and installs the apps in the Program Files folder. It also creates shortcuts
in the Start screen or the Start menu.
Windows 8
App shortcuts are added to the Windows product menus. Choose Start > All Programs and then click the app.
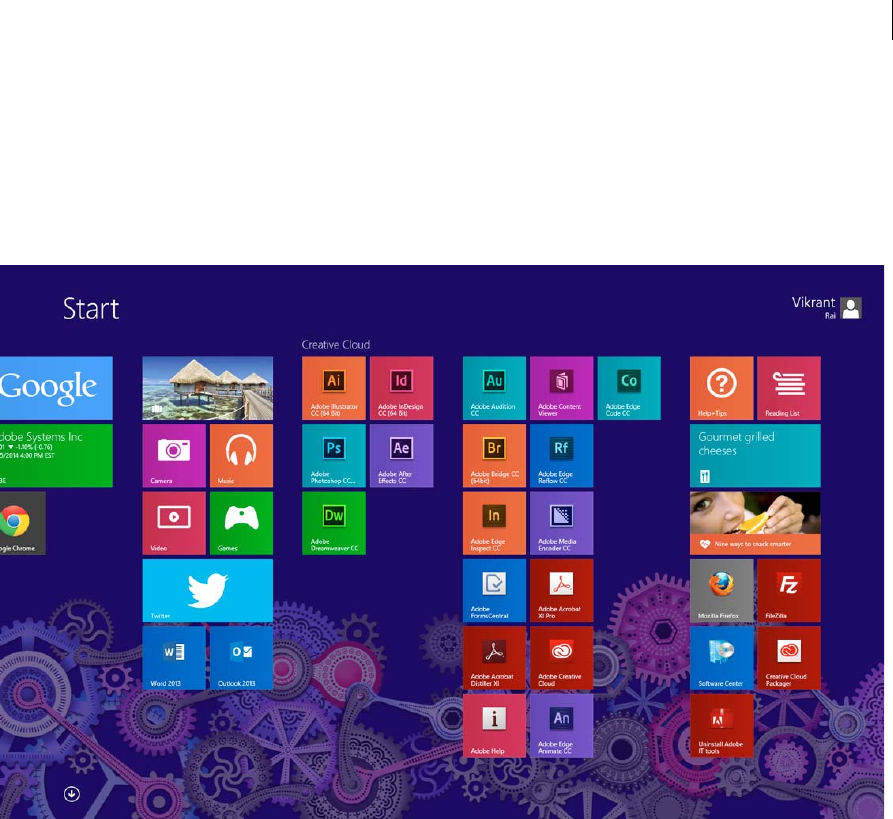
54
Creative Cloud
Last updated 6/13/2015
For easier access, you can also pin the shortcut to the Taskbar. Choose Start > All Programs, and right-click the
application name and choose "Pin to Taskbar".
Windows 7
Launch the installed apps from the Start screen. You can access the Start screen by using the Windows key or icon. Scroll
the screen to locate the app and then click to launch it.
For more information, see Start Screen tutorial on the Microsoft website.
More Help topics
Creative Cloud Help
Creative Cloud Desktop application
Install and update apps
Troubleshoot CC download and install issues
Manage your membership and payments
Manage your Creative Cloud for teams membership

55
Creative Cloud
Last updated 6/13/2015
Purchase a Creative Cloud for teams membership
You can purchase a Creative Cloud for teams membership either directly from Adobe.com or join the VIP program via
a reseller.
•Directly from Adobe.com: https://creative.adobe.com/plans?plan=team
•From a reseller: http://www.adobe.com/volume-licensing/vip-resellers.html
The Adobe ID used to purchase the Creative Cloud for teams membership is designated as the primary admin. All
payment and billing-related information is sent to the primary admin only. You can also add additional admins to
manage your team.
Manage your team
Once you have purchased a Creative Cloud for teams membership, you can manage and administer your account using
the Admin Console. Assign users to invite them to join your team before they can use Creative Cloud software and
services.
Note: Adobe Admin Console works best on:
•Mac OS: Safari 7.x, Google Chrome, Firefox 4 or later
•Win 7: IE 9, IE 10, IE 11, Google Chrome, Firefox 4 or later
•Win 8: IE 10, IE 11, Google Chrome, Firefox 4 or later
To access the Admin Console:
1Sign in to adobe.com: click Sign In on the top global navigation bar and then sign in with your Adobe ID and
password.
-or-
If you're signed in from any other adobe.com pages, click your name in the top navigation bar.
2In the navigation pane or pop-up menu, click Manage Team.
The Manage your team page is displayed.
•To sort licenses on name, product, or status, click the respective column in the header row.
•Team admins are not assigned licenses by default. Assign a license to yourself for access to Creative Cloud apps and
services.
Assign licenses to users
When you assign licenses to users, invitations are sent to the users. Once they accept the invitation, licenses are assigned
to them. You must have unassigned licenses to be able to invite a user.
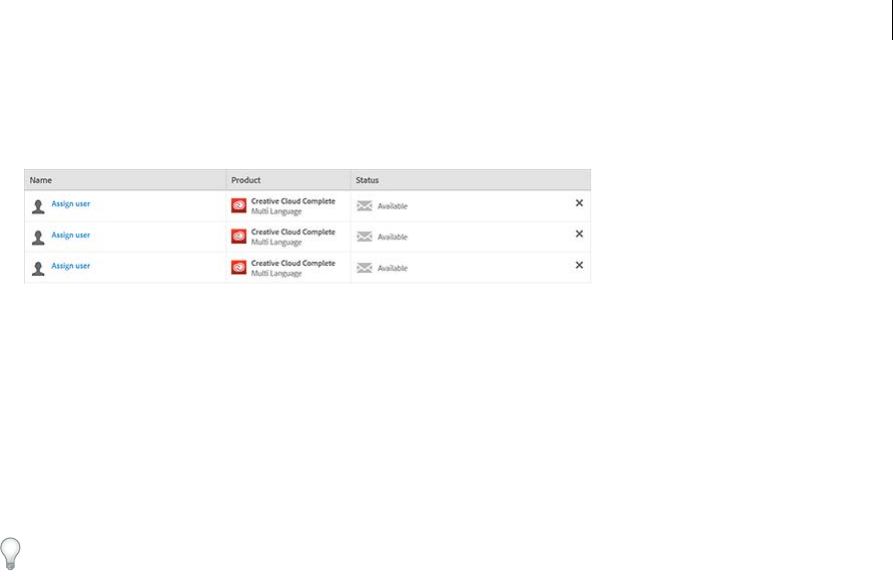
56
Creative Cloud
Last updated 6/13/2015
To assign a license to a single user:
1Click Unassigned Licenses in the left navigation pane to open the Unassigned Licenses tab.
2Click Assign User in the Name column. The Assign User dialog box is displayed.
3Enter the user's email address and click Assign User. You can also choose to include the name of the user along with
a personal message before sending the invitation.
An email invitation is sent to the user. When the user accepts the invitation, a license is assigned to the user.
Note: When assigning a user to a seat, either type the email address directly. If using copy-paste, use ctrl+v instead of
Right-Click > Paste.
Team admins are not assigned licenses by default. Assign a seat to yourself for access to Creative Cloud apps and
services.
To assign licenses to multiple users:
1Click Assign Users in the top toolbar.
2Copy/paste email addresses, or upload a csv file that contains a list of email addresses delimited by either a comma
or a tab.
You can also add a personal message.
Note: If you are copy-pasting information, use ctrl+v instead of Right-Click > Paste.
3Click Assign Users.
Email invitations are sent to the users. When a user accepts the invitation, a license is assigned to the user.
Note: If a user does not accept the invitation, remove and re-add the user to trigger another invitation.
•What happens if an invited user has an active individual Creative Cloud membership?
While accepting an invitation, if the user signs in with an Adobe ID that is associated with an active individual
Creative Cloud membership (complete or single app), the user has an option to cancel the individual plan and join
the team or keep the individual plan and join the team.
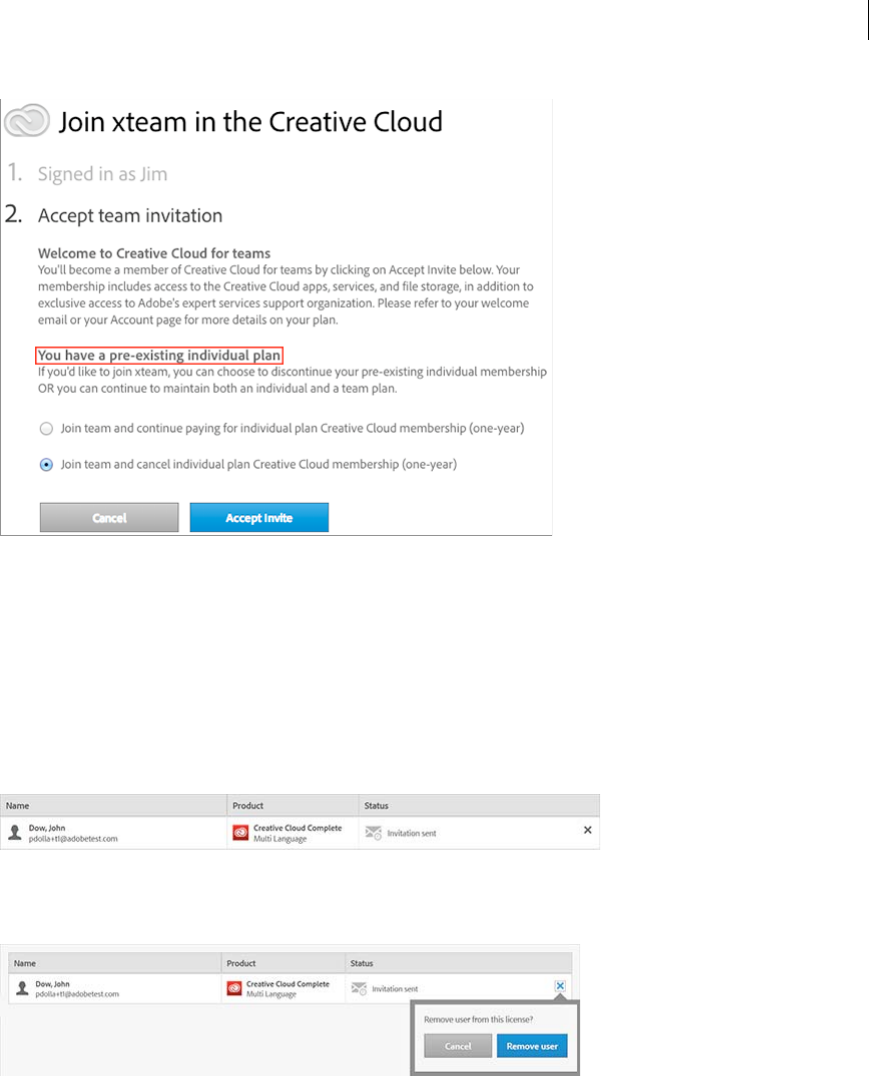
57
Creative Cloud
Last updated 6/13/2015
Resend Invitation
If a user hasn’t accepted an invitation to join the team, the invitation status appears in the list of Pending Users. If you
want to resend the invitation, you can revoke the pending invitation and invite the user again.
To res en d t he invi tation:
1Click Pending Users in the left navigation pane to open the Pending Users tab.
2Click X for the user to whom you want to resend the invitation.
3Click Remove user.
The pending invitation is revoked, and the license is now unassigned. This unassigned license is moved to the
Unassigned Licenses tab - the number of unassigned licenses is increased by 1.
4Invite the user again – follow the steps listed in the section above.

58
Creative Cloud
Last updated 6/13/2015
Export users to CSV
•If you are using Safari, Chrome, or Firefox, click here and follow the steps.
•In the top toolbar, click Export CSV. The csv file is downloaded. Open the file to see the list of users.
For multi-byte languages (CJK - Chinese, Japanese, Korean) on Mac, do the following to open the downloaded
CSV file:
1Launch Microsoft Excel and open an Excel Workbook.
2On the File menu, choose Import. In the Import dialog, click the Tex t file radio button and then click Import.
3In the Choose a File dialog box, choose the saved CSV file and then click Get Data.
4In the Text Import Wizard (Step 1 of 3), choose Delimited and select an appropriate CJK language in the File
Origin drop-drown and then click Next.
5On the next screen, select the Comma check box under the Delimiters section. Clear all other check boxes except
the Comma.
6Click Next. On the next screen, click Finish. On the final Import Data prompt, click OK.
•If you are using Internet Explorer, click here and follow the steps.
1In the top toolbar, click Export Team.
2In the Export Team pop-up, click Select All.
3Right-click the selected details and click Copy.
4Paste the copied details into a spreadsheet program (such as Microsoft Excel). The text is in a tab delimited
format for ease of pasting into your spreadsheet.
Search for a user
1Click All Licenses in the left navigation pane.
2In the top toolbar, enter the user's name in the search box. The matching results appear in the right pane.
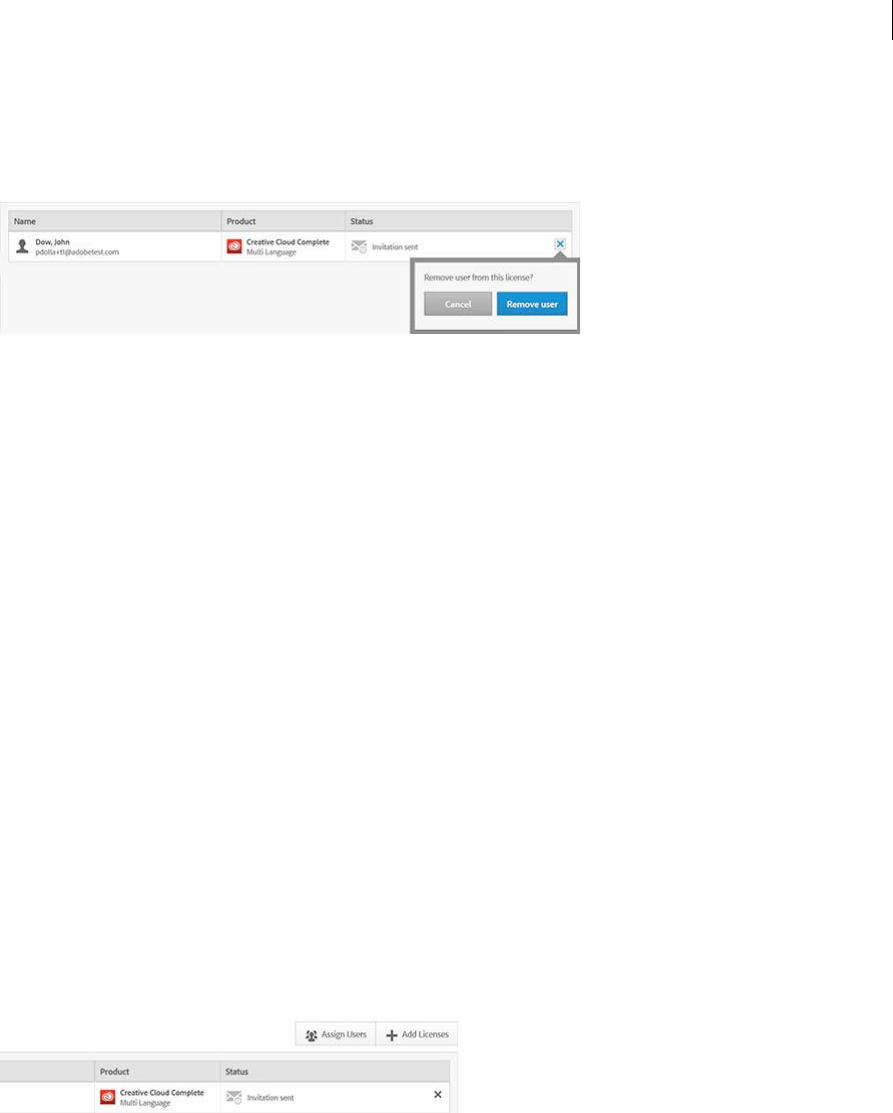
59
Creative Cloud
Last updated 6/13/2015
Remove a user
You can choose to remove a user from your team. The assigned license is then available to be assigned to another user.
1. To remove a user, click X corresponding to the user in the All Licenses tab.
2. Click Removeuser.
The license is now unassigned. This unassigned license is moved to the Unassigned Licenses tab - the number of
unassigned licenses is increased by 1.
Note: All end-user files stored on the available cloud storage are dictated by the EULA. When a user is removed from a
team, the team admin and all other workers can only access those files that were shared by the user. All unshared files
remain inaccessible.
Reassign a license
You can reassign a license to another user. This is a two step process:
1Remove an existing user
2
Purchase additional licenses
If you've purchased Creative Cloud for teams through Adobe.com, you can purchase additional licenses at any time and
will be billed in your next billing cycle. Similarly, if you purchase licenses through a reseller, you can add licenses at any
time. However, you will need to place an order with your reseller within 30 days to complete the transaction. If you do
not place your purchase order within 30 days, you will not be able to add any more licenses and your unpaid licenses
may be deactivated. All additional licenses will co-terminate with your original anniversary date.
If you do not know who your VIP reseller is, please contact customer service.
1. Click Add Licenses in the top toolbar.
2. Select the number of licenses you want to purchase.
3. Click Continueand follow the onscreen instructions.
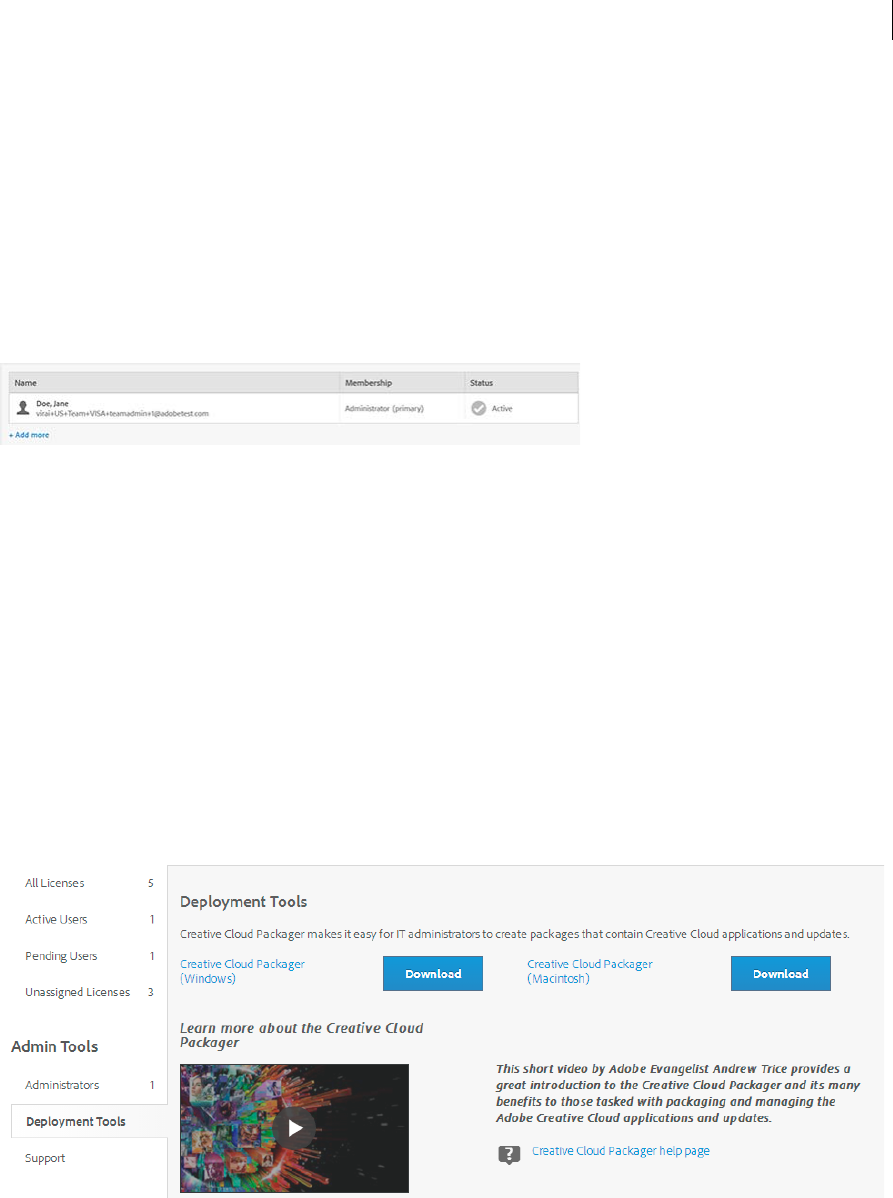
60
Creative Cloud
Last updated 6/13/2015
Remove licenses
A license is committed for one year or prorated to the anniversary. Therefore, you must maintain the committed
number of licenses until your anniversary date. If you have purchased your Creative Cloud for teams membership
directly from Adobe.com, you can remove licenses, however, a cancelation fee will be charged. Contact Adobe
Customer Support for details.
Note: If you have purchased your Creative Cloud for teams membership via a reseller, you cannot return or cancel your
membership after 30 days. Also, you cannot remove a license after 30 days.
Manage Administrators
1Click Administrators in the left navigation pane to open the Administrators tab.
2Click + Add more link located at the bottom of the table.
3Enter the email address and name of the person to invite as an administrator.
4Click Add Administrator.
The status appears as pending, and an email invitation is sent to the person. The invitation must be accepted to
complete the process.
Deploy Creative Cloud for teams with Creative Cloud Packager
Adobe Creative Cloud Packager makes it easy for IT administrators to create packages that contain Creative Cloud
products and updates, to deploy within their organizations.
You can download Creative Cloud Packager and access documentation from the Deployment Tools panel.


62
Last updated 6/13/2015
Chapter 3: Workspace
Workspace basics
Workspace overview
You create and manipulate your documents and files using various elements, such as panels, bars, and windows. Any
arrangement of these elements is called a workspace. The workspaces of the different applications in Adobe® Creative
Suite® 5 share the same appearance so that you can move between the applications easily. You can also adapt each
application to the way you work by selecting from several preset workspaces or by creating one of your own.
Although the default workspace layout varies in different products, you manipulate the elements much the same way
in all of them.
•The Application bar across the top contains a workspace switcher, menus (Windows only), and other application
controls. On the Mac for certain products, you can show or hide it using the Window menu.
•The Tools panel contains tools for creating and editing images, artwork, page elements, and so on. Related tools are
grouped.
•The Control panel displays options for the currently selected tool. In Illustrator, the Control panel displays options
for the currently selected object. (In Adobe Photoshop® this is known as the Options bar. In Adobe Flash®, Adobe
Dreamweaver®, and Adobe Fireworks® this is known as the Property Inspector and includes properties of the
currently selected element.)
•The Document window displays the file you’re working on. Document windows can be tabbed and, in certain cases,
grouped and docked.
•Panels help you monitor and modify your work. Examples include the Timeline in Flash, the Brush panel in
Illustrator, the Layers panel in Adobe Photoshop®, and the CSS Styles panel in Dreamweaver. Panels can be grouped,
stacked, or docked.
•The Application frame groups all the workspace elements in a single, integrated window that lets you treat the
application as a single unit. When you move or resize the Application frame or any of its elements, all the elements
within it respond to each other so none overlap. Panels don’t disappear when you switch applications or when you
accidentally click out of the application. If you work with two or more applications, you can position each
application side by side on the screen or on multiple monitors.
If you are using a Mac and prefer the traditional, free-form user interface, you can turn off the Application frame.
In Adobe Illustrator®, for example, select Window > Application Frame to toggle it on or off. (In Flash, the
Application frame is on permanently for Mac, and Dreamweaver for Mac does not use an Application frame.)
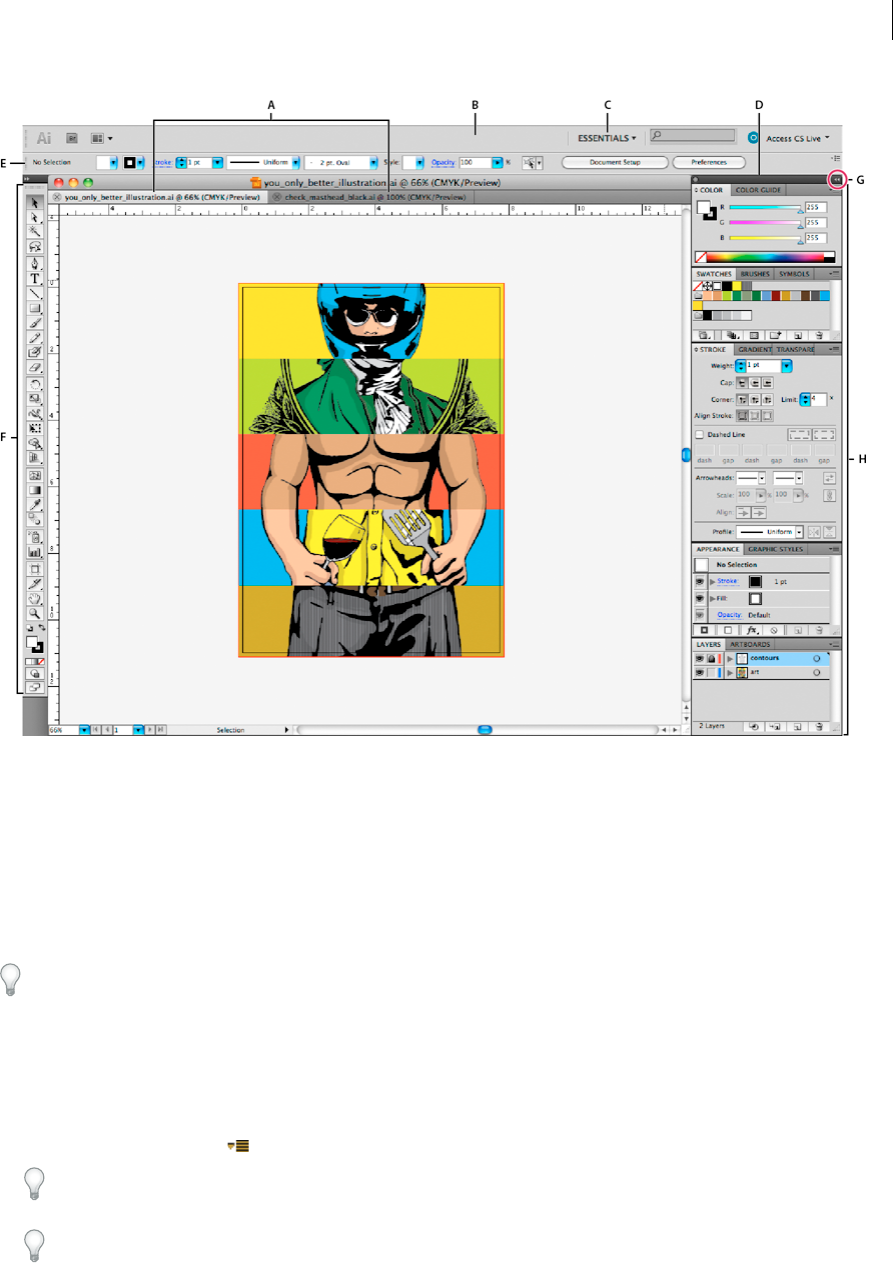
63
Workspace
Last updated 6/13/2015
A Tabbed Document windows B Application bar C Workspace switcher D Panel title bar E Control panel F Tools panel G Collapse To Icons
button H Four panel groups in vertical dock
Hide or show all panels
•(Illustrator, Adobe InCopy®, Adobe InDesign®, Photoshop, Fireworks)To hide or show all panels, including the Tools
panel and Control panel, press Tab.
•(Illustrator, InCopy, InDesign, Photoshop) To hide or show all panels except the Tools panel and Control panel,
press Shift+Tab.
You can temporarily display hidden panels if Auto-Show Hidden Panels is selected in Interface preferences. It’s always
on in Illustrator. Move the pointer to the edge of the application window (Windows®) or to the edge of the monitor (Mac
OS®) and hover over the strip that appears
•(Flash, Dreamweaver, Fireworks) To hide or show all panels, press F4.
Display panel options
❖Click the panel menu icon in the upper-right corner of the panel.
You can open a panel menu even when the panel is minimized.
In Photoshop, you can change the font size of the text in panels and tool tips. In the Interface preferences, choose a
size from the UI Font Size menu.

64
Workspace
Last updated 6/13/2015
(Illustrator) Adjust panel brightness
❖ In User Interface preferences, move the Brightness slider. This control affects all panels, including the Control panel.
Reconfigure the Tools panel
You can display the tools in the Tools panel in a single column, or side by side in two columns. (This feature is not
available in the Tools panel in Fireworks and Flash.)
In InDesign and InCopy, you also can switch from single-column to double-column (or single-row) display by setting
an option in Interface preferences.
❖Click the double arrow at the top of the Tools panel.
Manage windows and panels
You can create a custom workspace by moving and manipulating Document windows and panels. You can also save
workspaces and switch among them. For Fireworks, renaming custom workspaces can lead to unexpected behavior.
Note: The following examples use Photoshop for demonstration purposes. The workspace behaves the same in all the
products.
Rearrange, dock, or float document windows
When you open more than one file, the Document windows are tabbed.
•To rearrange the order of tabbed Document windows, drag a window’s tab to a new location in the group.
•To undock (float or untab) a Document window from a group of windows, drag the window’s tab out of the group.
Note: In Photoshop you can also choose Window > Arrange > Float in Window to float a single Document window, or
Window > Arrange > Float All In Windows to float all of the Document windows at once. See tech note kb405298 for more
information.
Note: Dreamweaver does not support docking and undocking Document windows. Use the Document window’s Minimize
button to create floating windows (Windows), or choose Window > Tile Vertically to create side-by-side Document
windows. Search “Tile Vertically” in Dreamweaver Help for more information on this topic. The workflow is slightly
different for Macintosh users.
•To dock a Document window to a separate group of Document windows, drag the window into the group.
•To create groups of stacked or tiled documents, drag the window to one of the drop zones along the top, bottom, or
sides of another window. You can also select a layout for the group by using the Layout button on the Application bar.
Note: Some products do not support this functionality. However, your product may have Cascade and Tile commands in
the Window menu to help you lay out your documents.
•To switch to another document in a tabbed group when dragging a selection, drag the selection over the document’s
tab for a moment.
Note: Some products do not support this functionality.
Dock and undock panels
A dock is a collection of panels or panel groups displayed together, generally in a vertical orientation. You dock and
undock panels by moving them into and out of a dock.
•To dock a panel, drag it by its tab into the dock, at the top, bottom, or in between other panels.
•To dock a panel group, drag it by its title bar (the solid empty bar above the tabs) into the dock.
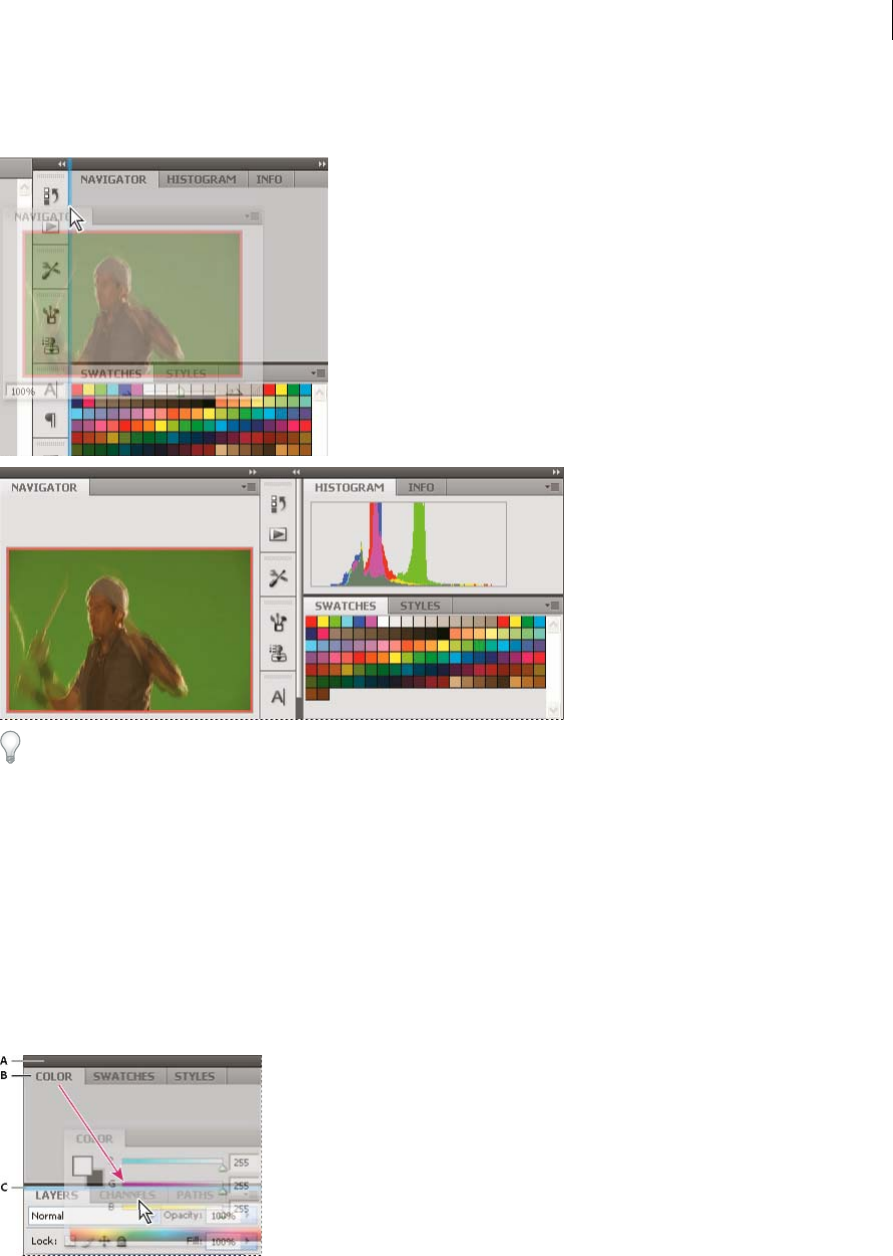
65
Workspace
Last updated 6/13/2015
•To remove a panel or panel group, drag it out of the dock by its tab or title bar. You can drag it into another dock or
make it free-floating.
You can prevent panels from filling all the space in a dock. Drag the bottom edge of the dock up so it no longer meets
the edge of the workspace.
Move panels
As you move panels, you see blue highlighted drop zones, areas where you can move the panel. For example, you can
move a panel up or down in a dock by dragging it to the narrow blue drop zone above or below another panel. If you
drag to an area that is not a drop zone, the panel floats freely in the workspace.
Note: The position of the mouse (rather than the position of the panel), activates the drop zone, so if you can’t see the drop
zone, try dragging the mouse to the place where the drop zone should be.
•To move a panel, drag it by its tab.
•To move a panel group, drag the title bar.
A Title bar B Tab C Drop zone
66
Workspace
Last updated 6/13/2015
Press Ctrl (Windows) or Command (Mac OS) while moving a panel to prevent it from docking. Press Esc while moving
the panel to cancel the operation.
Add and remove panels
If you remove all panels from a dock, the dock disappears. You can create a dock by moving panels to the right edge of
the workspace until a drop zone appears.
•To remove a panel, right-click (Windows) or Control-click (Mac) its tab and then select Close, or deselect it from
the Window menu.
•To add a panel, select it from the Window menu and dock it wherever you want.
Manipulate panel groups
•To move a panel into a group, drag the panel’s tab to the highlighted drop zone in the group.
•To rearrange panels in a group, drag a panel’s tab to a new location in the group.
•To remove a panel from a group so that it floats freely, drag the panel by its tab outside the group.
•To move a group, drag the title bar (the area above the tabs).
Stack floating panels
When you drag a panel out of its dock but not into a drop zone, the panel floats freely. The floating panel allows you to
position it anywhere in the workspace. You can stack floating panels or panel groups so that they move as a unit when
you drag the topmost title bar.
•To stack floating panels, drag a panel by its tab to the drop zone at the bottom of another panel.
•To change the stacking order, drag a panel up or down by its tab.
Note: Be sure to release the tab over the narrow drop zone between panels, rather than the broad drop zone in a title bar.
•To remove a panel or panel group from the stack, so that it floats by itself, drag it out by its tab or title bar.
Resize panels
•To minimize or maximize a panel, panel group, or stack of panels, double-click a tab. You can also double-click the
tab area (the empty space next to the tabs).
•To resize a panel, drag any side of the panel. Some panels, such as the Color panel in Photoshop, cannot be resized
by dragging.
Collapse and expand panel icons
You can collapse panels to icons to reduce clutter on the workspace. In some cases, panels are collapsed to icons in the
default workspace.
67
Workspace
Last updated 6/13/2015
•To collapse or expand all panel icons in a column, click the double arrow at the top of the dock.
•To expand a single panel icon, click it.
•To resize panel icons so that you see only the icons (and not the labels), adjust the width of the dock until the text
disappears. To display the icon text again, make the dock wider.
•To collapse an expanded panel back to its icon, click its tab, its icon, or the double arrow in the panel’s title bar.
In some products, if you select Auto-Collapse Icon Panels from the Interface or User Interface Options preferences, an
expanded panel icon collapses automatically when you click away from it.
•To add a floating panel or panel group to an icon dock, drag it in by its tab or title bar. (Panels are automatically
collapsed to icons when added to an icon dock.)
•To move a panel icon (or panel icon group), drag the icon. You can drag panel icons up and down in the dock, into
other docks (where they appear in the panel style of that dock), or outside the dock (where they appear as floating
icons).
Save and switch workspaces
By saving the current size and position of panels as a named workspace, you can restore that workspace even if you
move or close a panel. The names of saved workspaces appear in the workspace switcher in the Application bar.
Save a custom workspace
1With the workspace in the configuration you want to save, do one of the following:
•(Illustrator) Choose Window > Workspace > Save Workspace.
•(Photoshop, InDesign, InCopy) Choose Window > Workspace > New Workspace.
•(Dreamweaver) Choose Window > Workspace Layout > New Workspace.
•(Flash) Choose New Workspace from the workspace switcher in the Application bar.
•(Fireworks) Choose Save Current from the workspace switcher in the Application bar.
2Type a name for the workspace.

68
Workspace
Last updated 6/13/2015
3(Photoshop, InDesign) Under Capture, select one or more options:
Panel Locations Saves the current panel locations (InDesign only).
Keyboard shortcuts Saves the current set of keyboard shortcuts (Photoshop only).
Menus or Menu Customization Saves the current set of menus.
Display or switch workspaces
❖Select a workspace from the workspace switcher in the Application bar.
In Photoshop, you can assign keyboard shortcuts to each workspace to navigate among them quickly.
Delete a custom workspace
•Select Manage Workspaces from the workspace switcher in the Application bar, select the workspace, and then click
Delete. (The option is not available in Fireworks.)
•(Photoshop, InDesign, InCopy) Select Delete Workspace from the workspace switcher.
•(Illustrator) Choose Window > Workspace > Manage Workspaces, select the workspace, and then click the Delete
icon.
•(Photoshop, InDesign) Choose Window > Workspace >Delete Workspace, select the workspace, and then click
Delete.
Restore the default workspace
1Select the Default or Essentials workspace from the workspace switcher in the application bar. For Fireworks, see
the article http://www.adobe.com/devnet/fireworks/articles/workspace_manager_panel.html.
Note: In Dreamweaver, Designer is the default workspace.
2For Fireworks (Windows), delete these folders:Wi ndow s
Vista\\Users\<username>\AppData\Roaming\Adobe\Fireworks CS4\ Windows XP\\Documents and
Settings\<username>\Application Data\Adobe\Fireworks CS4
3(Photoshop, InDesign, InCopy) Select Window > Workspace > Reset [Workspace Name].
(Photoshop) Restore a saved workspace arrangement
In Photoshop, workspaces automatically appear as you last arranged them, but you can restore the original, saved
arrangement of panels.
•To restore an individual workspace, choose Window > Workspace > Reset Workspace Name.
•To restore all the workspaces installed with Photoshop, click Restore Default Workspaces in the Interface
preferences.
To rearrange the order of workspaces in the application bar, drag them.
Change Interface preferences
1Choose Edit > Preferences > Interface (Windows) or InCopy > Preferences > Interface (Mac OS).
2Choose the settings you want to specify, and click OK.
Tool Tips Tool tips appear when you hold the mouse pointer over interface items such as tools in the toolbar and
options in the Control panel. Choose None to turn off tool tips.

69
Workspace
Last updated 6/13/2015
Show Thumbnails On Place When you place a graphic, a thumbnail of the image appears in the loaded graphics cursor.
Similarly, a thumbnail of the first few lines of text appears in the loaded text cursor. Deselect this option if you don’t
want thumbnails to appear when placing graphics or text.
Show Transformation Values When you’re creating, sizing, or rotating an object, the cursor displays the [x,y]
coordinates, width and height, or rotation information.
Enable Multi-Touch Gestures Select this option to allow Windows and Mac OS multi-touch mouse gestures to work in
InDesign. For example, when you use the Magic Mouse in Mac OS, the swipe gesture scrolls up or down or moves to
the previous or next page or spread, and the rotate gesture rotates the spread.
Highlight Object Under Selection Tool Select this option to highlight the frame edges of objects when the direct
selection tool is moved over it.
Floating Tools Panel Specify whether the toolbar appears as a single column, double column, or single row.
Auto-Collapse Icon Panels When this option is selected, clicking the document window closes the open panel
automatically.
Auto-Show Hidden Panels When you hide panels by pressing Tab, holding the mouse pointer over the side of the
document window temporarily reveals the panels if this option is selected. If this option is not selected, you must press
Tab again to display panels.
Open Documents As Tabs When this option is deselected, documents you create or open appear as floating windows
rather than tabbed windows.
Enable Floating Document Window Docking If this option is selected, you can dock floating documents with each
other as tabbed windows. If this option is deselected, floating document windows aren’t docked with other document
windows, unless you hold down Ctrl (Windows) or Command (Mac OS) while dragging.
Hand Tool To control whether to greek text and images when you scroll a document, drag the Hand Tool slider to the
desired level of performance versus quality.
Live Screen Drawing Select an option to determine whether the image redraws as you drag an object. If Immediate is
selected, the image redraws while you drag. If Never is selected, dragging an image moves only the frame, and then
image is moved when you release the mouse button. If Delayed is selected, the image redraws only if you pause before
dragging. Delayed offers the same behavior as in InDesign CS4.
Use toolbars
The basic toolbars contain buttons for many commonly used tools and commands, such as opening, saving, printing,
scrolling, and zooming. Tool tips identify each tool button.
Show or hide a toolbar
❖Choose the toolbar name from the Window menu. A check mark appears next to the toolbar name if it’s currently
visible.
Customize a toolbar
You can specify which tools appear on a toolbar, change the toolbar orientation, and combine or separate toolbars.
❖Do any of the following:
•To specify which tools appear on a toolbar, click the triangle at the end of the toolbar, select Customize, and select
tools. The menu contains options specific to the toolbar.
•To move a toolbar, drag its title bar.
70
Workspace
Last updated 6/13/2015
•To combine toolbars, click the gripper area of a toolbar, and drag the toolbar on top of another or along the same
edge of the application window (Windows®) or screen (Mac OS®).
•To switch a toolbar to a floating panel, click the gripper area of the toolbar and drag the toolbar away from the
edge of the application window (Windows) or screen (Mac OS).
•To separate a grouped toolbar, click the gripper area of the toolbar, and drag the toolbar away from the group.
Dragging a toolbar out of an existing group creates a new toolbar.
View tool hints
The Tool Hints panel describes how modifier keys work with the selected tool.
1Choose Window > Utilities > Tool Hints to display the Tool Hints panel.
2Select a tool in the toolbox to view a description of that tool and its modifier keys and shortcuts.
Use context menus
Unlike the menus that appear at the top of your screen, context-sensitive menus display commands related to the active
tool or selection. You can use context menus as a quick way to choose commonly used commands.
1Position the pointer over the document, object, or panel.
2Click the right mouse button.
Note: (Mac OS) If you don’t have a two-button mouse, you can display a context menu by pressing the Control key as you
click with the mouse.
Customize menus
Hiding and colorizing menu commands is a way to remove menu clutter and emphasize commands you frequently use.
Note that hiding menu commands simply removes the menu command from view; it doesn’t disable any features. At
any time, you can view hidden commands by selecting the Show All Menu Items command at the bottom of a menu,
or you can choose Window > Workspace > Show Full Menus to show all the menus for the selected workspace. You can
include customized menus in workspaces you save.
You can customize the main menu, context menus, and panel menus. Context menus appear when you right-click
(Windows) or Control-click (Mac OS) an area. Panel menus appear when you click the icon in the upper right of a
panel.
Note: If you select a different workspace, such as Getting Started, some menu commands are hidden. To display menu
commands, choose Show All Menu Items at the bottom of the menu, or choose a different workspace, such as Advanced.
Create a custom menu set
1Choose Edit > Menus.
You cannot edit the default menu set.

71
Workspace
Last updated 6/13/2015
2Click Save As, type the name of the menu set, and click OK.
3From the Category menu, choose Application Menus or Context & Panel Menus to determine which menus are
customized.
4Click the arrows to the left of the menu categories to display subcategories or menu commands. For each command
you want to customize, click the eye icon under Visibility to show or hide the command; click None under Color to
select a color from the menu.
5Click Save, and then click OK.
Select a custom menu set
1Choose Edit > Menus.
2Choose the menu set from the Set menu, and then click OK.
Edit or delete a custom menu set
1Choose Edit > Menus.
2Choose the menu set from the Set menu, and then do one of the following:
•To edit a menu set, change the visibility or color of menu commands, click Save, and then click OK.
•To delete a menu set, click Delete and then click Yes. If you’ve modified the menu set without saving it, you’re
prompted to save the current menu set. Click Yes to save the menu set, or click No to discard changes.
Show hidden menu items
•Choose Window > Workspace > Show Full Menus. This command turns on all menus for the selected workspace.
You can hide the menus again by resetting the workspace.
•Choose Show All Menu Items at the bottom of the menu that includes hidden commands.
Holding down Ctrl (Windows) or Command (Mac OS) and clicking a menu name temporarily displays any menu
commands you’ve hidden by customizing menus.
Use keyboard shortcut sets
InCopy provides keyboard shortcuts for many menu commands, options, scripts, and controls. You can also define
your own keyboard shortcuts. Using the Keyboard Shortcuts dialog box, you can:
•Choose the set you want to use.
•View existing shortcut commands.
•Generate a complete list of shortcuts.
•Create your own shortcuts and shortcut sets.
•Edit current shortcuts.
The Keyboard Shortcuts dialog box also lists all commands that can accept shortcuts but don’t have shortcuts
defined for them in the default shortcut set.
Change the active shortcut set
1Choose Edit > Keyboard Shortcuts.
2Select a shortcut set from the Set menu.
3Click OK.

72
Workspace
Last updated 6/13/2015
View shortcuts
1Choose Edit > Keyboard Shortcuts.
2For Set, select a shortcut set.
3For Product Area, select the area containing the commands you want to view.
4From Commands, select a command. The shortcut appears in the Current Shortcuts section.
Generate a list of shortcuts
1Choose Edit > Keyboard Shortcuts.
2Select a shortcut set from the Set menu.
3Click Show Set.
A text file opens with all current and undefined shortcuts for that set.
Create a new shortcut set
1Choose Edit > Keyboard Shortcuts.
2Click New Set.
3Type a name for the new set, select a shortcut set from the Based On Set menu, and click OK.
Create or redefine a shortcut
1Choose Edit > Keyboard Shortcuts.
2For Set, select a shortcut set, or click New Set to create a new shortcut set.
Note: You can make changes to the Default shortcut set, but it’s not recommended. Instead, edit a copy of the Default
shortcut set.
3For Product Area, select the area containing the command you want to define or redefine.
4In the Commands list, select the command you want to define or redefine.
5Click inside the New Shortcut box and press the keys for your new keyboard shortcut. If the key sequence is
currently used for another command, InCopy displays that command under Current Shortcuts. You can change the
original shortcut also, or try another shortcut.
Note: Assigning single-key shortcuts to menu commands interferes with entering text. If an insertion point is active
when you type a single-key shortcut, InCopy carries out the command instead of inserting the character.
6Do one of the following:
•Click Assign to create a new shortcut where none currently exists.
•Click Assign to add another shortcut to the command.
7Click OK to close the dialog box, or click Save to keep the dialog box open and enter more shortcuts.
More Help topics
Keyboard shortcuts
Viewing stories
73
Workspace
Last updated 6/13/2015
Galley, Story, and Layout view overview
InCopy offers three views of a story: Galley, Story, and Layout. These terms correspond to the terms used in traditional
publishing.
Galley view Displays text with line breaks established in the corresponding Adobe InDesign® document. If text doesn’t
fit into the assigned layout space, an overset indicator marks the point at which the InCopy text exceeds the space.
Although you can use InCopy to apply formatting, such as paragraph indents and font size, these formats don’t appear
in Galley view.
Story view Displays text in a continuous stream, wrapping the text at the document window. Story view doesn’t show
accurate line endings, so you can concentrate on content. However, if text doesn’t fit into the assigned layout space, an
overset indicator marks the point at which the InCopy text exceeds the space. In Story view, the information area
displays only paragraph styles. Line numbers aren’t visible in Story view.
Story view opens by default when you create a new InCopy story.
To change the default view for new documents, close all documents and select the view you want as the default from
the View menu.

74
Workspace
Last updated 6/13/2015
Layout view Displays text as it will print, with all formatting. When you use InCopy to synchronize with an InDesign
layout, you can view text in context with all other page elements in the InDesign document—frames, columns,
graphics, and so on.
In Layout view, you can zoom in and out to inspect different aspects of the layout.
Switch between Galley, Story, or Layout view
❖Do either of the following:
•Choose the view from the View menu.
•Click the Galley, Story, or Layout tab at the top of the editing area.

75
Workspace
Last updated 6/13/2015
About Galley view
Galley view provides an environment for efficient text processing; text is easy to read and annotate. You can also use
Galley view to perform copyfitting and other production-related tasks.
When you open an InDesign document in InCopy, working in Galley view is analogous to working with galley proofs
in traditional typesetting. Within the viewing area, the text wraps exactly as it will in the final InDesign layout, and all
text is displayed in one column, regardless of how many columns exist in the layout. Page breaks, frame breaks, and
column breaks are shown by a line with the words “Page break,” “Frame break,” or “Column break” in the center of the
line.
Note: When multiple breaks are represented by a single boundary, such as a page break coinciding with a frame break, the
break with the highest priority is displayed. Page breaks have the highest priority, and column breaks have the lowest.
Galley view includes the Copyfit break feature, which indicates the point at which the InCopy text exceeds the layout
space assigned for it in InDesign.
By default, Galley view displays text at 12 points. You can change the font, size, or spacing to make text easier to read
or edit. You can also change the background and font colors.
Note: The font display size applies to all stories, rather than individual characters, words, or paragraphs.
The Galley & Story Appearance toolbar at the bottom of the workspace controls several settings that you might want
to change frequently when working on a document. These settings include:
•Display font type and size
•Display leading (single space, 150% space, double space, or triple space)
•Show/hide line number and styles columns
•Customize Galley & Story Appearance controls
Customize Galley and Story views
You can customize Galley and Story views in a variety of ways.
Change the Galley view display settings
❖Select an option from the Galley & Story Appearance toolbar. (If the toolbar is hidden, choose Window > Galley &
Story Appearance. The toolbar appears at the bottom of the application window by default.)
Note: It’s important to understand the difference between changing the font display size and applying text formatting.
Both can be done in Galley view. Changing the font display size doesn’t affect the way text looks in a publication,
whereas applying text formatting does change the text appearance in Layout view and in the published document.
Set Galley view display preferences
1Choose Edit > Preferences > Galley & Story Display (Windows) or InCopy > Preferences > Galley & Story Display
(Mac OS).
2In the Text Display Options section, specify the following:
Text Color Controls text color in the viewing area. Black is the default text color.
Background Controls the background color of the viewing area. White is the default background color.
Theme Assigns preset text and background colors.

76
Workspace
Last updated 6/13/2015
Override Preview Font Enables you to display one additional font using the correct typeface in the Galley and Story
view. InCopy automatically displays the Symbol, Zapf Dingbats, Webdings, and Wingdings® fonts accurately,
overriding the display font you’ve chosen.
Enable Anti-aliasing Smooths the jagged edges of type and bitmap images by softening the color transition between
edge pixels and background pixels. Because only the edge pixels change, no detail is lost. You can choose the level of
anti-aliasing to apply. The Default option uses shades of gray to smooth text. The LCD Optimized option uses
colors, rather than shades of gray, and works best on light-colored backgrounds with black text. The Soft option uses
shades of gray, but produces a lighter, fuzzier appearance.
Cursor Options Controls the cursor display. Choose from four different cursors. Select or deselect Blink.
Note: Any settings made in the Galley & Story Display section apply to both the Galley and Story views.
Show or hide the information column
The information column appears on the left side of the document window in Galley and Story views. This column
contains read-only information about paragraph styles, line numbers, and the vertical depth of text; you cannot type in
this area.
❖Do one of the following:
•To change the view in the current document only, choose View > Show Info Column or View > Hide Info
Column.
•To change the default view in the application, close all documents, and choose View > Show Info Column or View
> Hide Info Column.
Note: Paragraph styles make it much easier to maintain consistency in your publications. Consult any workflow
documentation your team has adopted concerning in-house guidelines for your project.
Set Story view preferences
Use the Galley & Story Display section of the Preferences dialog box to customize the display of the Story view.
1Choose Edit > Preferences > Galley & Story Display (Windows) or InCopy > Preferences > Galley & Story Display
(Mac OS).
2Specify the options you want.
3Click OK.
Show or hide paragraph break marks
You can show or hide paragraph break marks in Galley and Story view. An arrow symbol indicates the start of a new
paragraph.
❖Choose View > Show Paragraph Break Marks or View > Hide Paragraph Break Marks.
Use the vertical depth ruler
When you type text, it’s sometimes useful to know the physical depth of a story as it will appear in Layout view, in
addition to the number of lines. The vertical depth ruler draws a ruler along the left edge of the Galley and Story views.
Each tick mark in the ruler aligns to the bottom of a line of text. A value is displayed every five tick marks to show the
total vertical depth of the text to that point. The depth is updated dynamically when layout composition for the portion
of the document is complete.
The depth measurement uses the vertical units setting in Units & Increments preferences.

77
Workspace
Last updated 6/13/2015
Note: To aid in copyfitting, the depth of overset text is also calculated and displayed.
1Click the Galley or Story tab at the top of the editing area.
2Do either of the following:
•To show or hide the depth ruler, choose View > Show/Hide Depth Ruler.
•To show or hide the information column, choose View > Show/Hide Info Column.
Layout view overview
In Layout view, you see text and other elements exactly as they are formatted and positioned in an InDesign document.
Stories are laid out in frames, just as they appear in InDesign.
If you work with a linked story—a managed story within an open InDesign document or assignment file—you cannot
modify the story layout with InCopy. You can work only with the text and text attributes.
If you work with a stand-alone InCopy document—an individual InCopy document that isn’t within an open InDesign
document or assignment file—you can work with the text and text attributes, and you can change the page size using
the Document Setup command.
Layout view offers more tools and View-menu commands than the other views. You can use the Hand tool, the Zoom
tool, and the Zoom commands to view a spread at various magnifications. You can also use various layout aids, such as
rulers, document grids, and baseline grids.
Note: These viewing options don’t affect formatting. For example, zooming in to enlarge your view of the page doesn’t
change the way the story appears in InDesign or when printed.
About frames
In the Layout view of a document in progress, you see one or more boxes on the page. These nonprinting boxes might
contain text, graphics, or nothing. The boxes represent frames—spaces in the layout reserved for specific elements. Each
frame is defined to contain either text or a graphic. Non-managed stories in an InDesign document or in an assignment
file are dimmed so that they can be identified easily.
Text frames Control which stories appear where, and how much page area they cover. For linked stories, frames are
defined by the InDesign user. If multiple frames are set aside for a story, the frame configuration determines how the
story text flows through the layout.
Graphics frames Can function as borders and background, and can crop or mask graphics. You can work with graphics
inside frames in InCopy, and you can see the graphics frames from InDesign layouts when you work with linked
documents. You can also work with the frames of inline graphics (embedded in text), but you cannot work with other
graphics frames. (See Create an inline graphic.)
Empty frames Are placeholders. You can distinguish empty text frames from empty graphics frames by their
appearance. An empty box represents an empty text frame; a box with an X across it indicates an empty graphics frame.
You can add text to an empty text frame only if the frame is associated with the story exported to InCopy from
InDesign. You can also import or paste graphics into an empty graphics frame in InCopy.
78
Workspace
Last updated 6/13/2015
Show or hide frame edges
Hiding frame edges also hides the X in an empty graphics frame.
❖In Layout view, choose View > Extras > Show Frame Edges or View > Extras > Hide Frame Edges.
View documents
Use the Zoom tool or View options to zoom in on or out of documents.
Zoom in or out
In Layout view, you can magnify or reduce the view of a page. The application bar displays the zoom percentage.
❖Do any of the following:
•To magnify a specific area, select the Zoom tool and click the area you want to magnify. Each click magnifies
the view to the next preset percentage, centering the display around the point you click. At maximum
magnification, the center of the Zoom tool appears blank. To zoom out, hold down Alt (Windows) or Option
(Mac OS) to activate the Zoom Out tool , and click the area you want to reduce. Each click reduces the view
to the previous preset percentage.
•To magnify the view to the next preset percentage, activate the window you want to view, and choose View
>Zoom In. Choose View > Zoom Out to reduce the view to the previous preset percentage.
•To set a specific magnification level, type or choose a magnification level in the Zoom box in the application bar.
•While pressing Alt (Windows) or Option (Mac OS), use the mouse scroll wheel or sensor to zoom in or out.
Use power zoom
Power zoom offers a quick way to scroll through your document pages. Using the grabber hand, you can use zoom in
or out and scroll through your entire document. This feature is especially useful for long documents.
You must be in Layout view to use power zoom.
1Click the Hand tool .
To activate the grabber hand, you can also hold down the spacebar or hold down Alt/Option while in text mode.
2With the grabber hand active, click and hold down the mouse button.
79
Workspace
Last updated 6/13/2015
The document zooms out so that you can see more of the spread. A red box indicates the view area.
3With the mouse button still held down, drag the red box to scroll through the document pages. Press arrow keys or
use the mouse scroll wheel to change the size of the red box.
4Release the mouse button to zoom in on the new area of the document.
The document window returns to its original zoom percentage or to the size of the red box.
Magnify by dragging
1Select the Zoom tool .
2Drag to select the area you want to magnify.
To activate the Zoom In tool while using another tool, press Ctrl+spacebar (Windows) or Command+spacebar (Mac
OS). To activate the Zoom Out tool while using another tool, press Ctrl+Alt+spacebar (Windows) or
Command+Option+spacebar (Mac OS).
Display the document at 100%
❖Do any of the following:
•Double-click the Zoom tool .
•Choose View > Actual Size.
•Type or choose a magnification level of 100% in the Zoom box in the application bar.
Fit the page, spread, or pasteboard within the active window
❖Do any of the following:
•Choose View > Fit Page In Window.
•Choose View > Fit Spread In Window.
•Choose View > Entire Pasteboard.
Working with ConnectNow
Adobe® ConnectNow provides you with a secure, personal online meeting room where you can meet and collaborate
with others via the web in real time. With ConnectNow, you can share and annotate your computer screen, send chat
messages, and communicate using integrated audio. You can also broadcast live video, share files, capture meeting
notes, and control an attendee's computer.
You can access ConnectNow directly from the application interface.
1Choose File > Share My Screen.
2In the Sign In to Adobe CS Live dialog box, enter your email address and password, and click Sign In. If you don’t
have an Adobe ID, click the Create Adobe ID button.

80
Workspace
Last updated 6/13/2015
3To share your screen, click the Share My Computer Screen button at the center of the ConnectNow application
window.
For complete instructions on using ConnectNow, see Adobe ConnectNow Help.
For a video tutorial about using ConnectNow, see Using ConnectNow to share your screen (7:12). (This demonstration
is in Dreamweaver.)
More Help topics
Keys for navigating through documents
Editing overset text
Working with tables in Galley/Story view
Sharing content between InCopyand InDesign
Recovery and undo
Recover documents
InCopy guards your data against unexpected power or system failures using an automatic recovery feature.
Automatically recovered data exists in a temporary file that is separate from the original document file on disk. Under
normal circumstances you don’t need to think about automatically recovered data, because any document updates
stored in the automatic recovery file are automatically added to the original document file when you choose the Save
or Save As command or exit from InCopy normally. Automatically recovered data is important only if you’re unable to
save successfully before an unexpected power or system failure.
Even though these features exist, you should save your files often and create backup files in case of unexpected power
or system failures.
Find recovered documents
1Restart your computer.
2Start InCopy .
If automatically recovered data exists, InCopy automatically displays the recovered document. The word
[Recovered] appears after the filename in the title bar of the document window to indicate that the document
contains unsaved changes that were automatically recovered.
Note: If InCopy fails after attempting to open a document using automatically recovered changes, the automatically
recovered data may be corrupted.
3Do one of the following:
•For Adobe InCopy® files linked to an InDesign publication, choose File > Save.
•For stand-alone InCopy files, choose File >Save As, specify a location and a new filename, and click Save. The
Save As command creates a new file that includes the automatically recovered data.
•To discard any automatically recovered changes and use the last saved version of the file, choose File > Revert
Content.

81
Workspace
Last updated 6/13/2015
4Do one of the following:
•To save the recovered data, choose File >Save As, specify a location and a new filename, and click Save. The Save
As command keeps the recovered version that includes the automatically recovered data; the word [Recovered]
disappears from the title bar.
•To discard automatically recovered changes and use the most recent version of the document that was explicitly
saved to disk before the failure occurred, close the file without saving it and open the file on disk, or choose File
> Revert.
Change the location of recovered documents
1Choose Edit > Preferences > File Handling (Windows) or InCopy > Preferences > File Handling (Mac OS).
2Under Document Recovery Data, click Browse (Windows) or Choose (Mac OS).
3Specify the new location for the recovered document, click Select (Windows) or Choose (Mac OS), and then click
OK.
Undo mistakes
If necessary, you can cancel a lengthy operation before it’s completed, undo recent changes, or revert to a previously
saved version. You can undo or redo up to several hundred of the most recent actions (the amount is limited by the
amount of RAM available and the kinds of actions you performed). The series of actions is discarded when you choose
the Save As command, close a document, or when you exit from the program.
❖Do one of the following:
•To undo the most recent change, choose Edit > Undo [action]. (You cannot undo certain actions, such as
scrolling.)
•To redo an action, choose Edit > Redo [action].
•To undo all changes made since the last time you saved the project, choose File > Revert (InDesign) or File >
Revert Content (InCopy).
•To close a dialog box without applying changes, click Cancel.
Moving through documents
Scrolling through documents
You can use the scroll bars (along the bottom and right sides of the InCopy window) or scroll with a mouse wheel or
sensor in any view.
You can also use the Page Up, Page Down, and arrow keys on the keyboard to move through a story. In Layout view,
pressing Page Up or Page Down shifts to the next or previous page in the layout. In Galley or Story view, Page Up and
Page Down shift the view by one screen; the view doesn’t necessarily go to the next page break. The Up Arrow and
Down Arrow keys move the insertion point within the copy and scroll the view as necessary so that you can always see
the insertion point.
In Layout view only, you can also use the Hand tool to move the document view in any direction.
82
Workspace
Last updated 6/13/2015
Move through a document with the Hand tool
Some options for moving around within a story depend on whether you’re working in Galley, Story, or Layout view. In
Galley and Story view, you must use the scroll bars to see text that doesn’t fit in the view. In Layout view, you can also
use the Hand tool, page buttons, and commands.
❖In Layout view, select the Hand tool , and then drag the document to move it.
To use power zoom when the Hand tool is selected, hold down the mouse button. This technique offers a quick way to
scroll through multiple document pages.
Go to another page in Layout view
❖Do one of the following:
•Click the buttons in the status bar, as shown in the following illustration.
A First-spread button B Previous-spread button C Page number display box D Next-spread button E Last-spread button
•Choose the page number from the pop-up menu on the status bar.
Jump to position markers
You can set a marker at a specific location in the text so that you can easily return to it using a command or shortcut.
A position marker is useful if you change your place in the document to do another action, for example, to verify a fact
in another area of text. A document can have only one position marker per session; inserting a marker deletes a
previously placed marker. Closing a document also deletes a marker.
❖Choose Edit > Position Marker, and do any of the following:
•To add a marker, place the insertion point in the text and then select Insert Marker.
•To replace an existing marker, select Replace Marker.
•To delete a marker, select Remove Marker.
•To return to a marker, selec t Go To Marker.

83
Workspace
Last updated 6/13/2015
Reorder InCopy stories
When you open an assignments file or an InDesign document, you can change the order of the stories in Galley or Story
view. Reordering stories doesn’t affect their layout position.
1Make sure that you are in Galley or Story view.
2Drag the story’s title to a new location.
More Help topics
Use power zoom
Keys for navigating through documents
Keys for navigating through documents
Customizing preferences and defaults
About preferences
Preferences include settings such as panel positions, measurement options, and display options for graphics and
typography.
The difference between preferences and defaults is the area to which each applies. Preference settings specify the initial
appearance and behavior of certain InCopy features. Default settings apply to InCopy documents.
Note: InCopy preference settings are fully scriptable. To share a consistent set of preferences across user groups, develop a
script to set the preferences, and then have all users in the group run the script on their computers. Don’t copy and paste
one user’s preferences files onto another computer, as doing so might cause application instability. For more information
about scripting, see the InCopy Scripting Guide on the Adobe website.
Set defaults
If you change settings when no documents are open, your changes set the defaults for new documents. If a document
is open when you change settings, the changes affect only that document.
Similarly, if you change settings when no objects are selected, your changes set the defaults for new objects.
Change default settings for new documents
1Close all documents.
2Change any menu items or panel or dialog box settings.
If you use the same page size and language for most of your documents, you can change these defaults with no document
open. For example, to change the default page size, close all documents, choose File > Document Setup, and select a
desired page size. To set a default dictionary, close all documents, choose Edit > Preferences > Dictionary (Windows) or
InCopy > Preferences > Dictionary (Mac OS), and select an option from the Language menu.
Specify default settings for new objects in a document
1With document open, choose Edit >Deselect All.

84
Workspace
Last updated 6/13/2015
2Change any menu items or panel or dialog box settings.
Restore all preferences and default settings
❖Do one of the following:
•(Windows) Start InCopy, and then press Shift+Ctrl+Alt. Click Yes when asked if you want to delete the
preference files.
•(Mac OS) While pressing Shift+Option+Command+Control, start InCopy. Click Yes when asked if you want to
delete the preference files.
Reset warning dialog boxes
1Choose Edit > Preferences > General (Windows) or InCopy > Preferences > General (Mac OS).
2Click Reset All Warning Dialogs to display all warnings, even the ones you’ve already dismissed. (As warnings
appear, you can select an option to indicate you do not want to see the warning again.)
More Help topics
Adding text

85
Last updated 6/13/2015
Chapter 4: InCopy documents
Using an InCopy workflow
In Adobe® InCopy®, you can create stand-alone documents, or you can work with documents that are linked to Adobe®
InDesign®. When you work with linked documents, you can have more than one InCopy story in an InDesign file,
depending on your workflow system. Writers, editors, and designers can work simultaneously on the same InDesign
document, without overwriting each other’s work.
About InCopy workflows
Tight integration between InCopy and InDesign enables a workflow that lets writers, editors, and designers work
simultaneously on the same InDesign document, without overwriting each other’s work. The workflow system allows
users to check files out and in, thereby preserving file integrity.
InCopy users can view their content contributions within the context of layouts without installing InDesign. Using
InCopy, writers and editors can take full control of text, including typesetting functions such as applying formatting
styles (usually imported from InDesign), copyfitting, adjusting line and page breaks, setting hyphenation, kerning, and
so on. InCopy users can import graphics to enhance their stories, and make limited transformations on those graphics,
such as scaling and cropping. After the content is saved in InCopy, the document can be updated in InDesign. In
addition, InDesign users can share design updates with InCopy users, ensuring they are working with the latest layouts.
Typically, a system integrator customizes the interaction between InCopy and InDesign, setting up and defining the
workflow system for the group. The workflow system controls file creation, synchronization (with the master server),
and viewing. InCopy and InDesign work with several different workflow systems, including the built-in system enabled
by the InCopy® LiveEdit Workflow plug-ins for small workgroups. For specific details about your workflow system, talk
to the system integrator.
About linked (managed) documents
A linked InCopy document is a content file (either text or graphics) that is placed in an open InDesign document or
assignment file. The content is associated with an InDesign layout, and therefore managed by the InDesign document.
The InDesign user makes this connection from within InDesign; you cannot create or manage the link from InCopy.
The InDesign connection can be made before the InCopy user starts writing and editing text, while the writing is in
progress, or after the text work is finished. Once the content is linked, the InCopy user can see (but not change) the
page layouts, styles, and so on, as they appear in the InDesign document.
Linked documents have the following additional characteristics:
•With a linked InCopy file, you can do just about anything that concerns the text itself. For example, you can specify
text-formatting options, change fonts, and carry out other editing and copyfitting functions within the design and
formatting limits of the InDesign layout and your workflow system. You cannot, however, change the text or
graphics frames, column layout, threading sequence, or any other design elements; these are set up in InDesign.
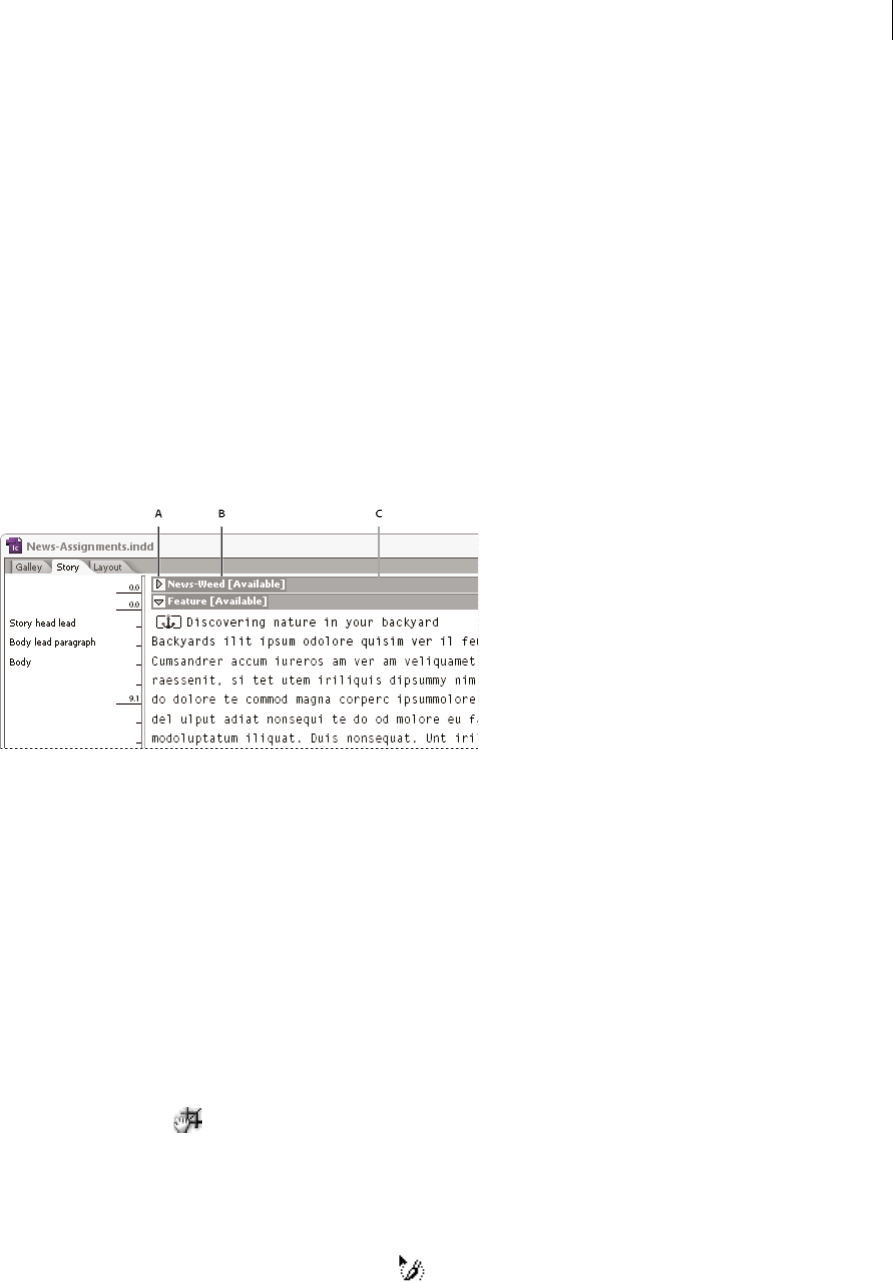
86
InCopy documents
Last updated 6/13/2015
•Linked content is managed by your workflow system, where it is locked for access control. Your system might offer
several options for opening a linked story, such as checking out each InCopy file so that you alone can work on it.
For instructions, see your workflow system documentation or ask your system administrator, or check out content
using InCopy if your workflow uses the InCopy LiveEdit Workflow plug-ins.
Working with multistory files
When you work with linked documents, you can have more than one InCopy story in an InDesign file, depending on
your workflow system. A file with multiple stories must be created in InDesign as either an assignment file or an
InDesign file with linked InCopy content. You cannot use InCopy to create a multistory document. See your workflow
system documentation for details.
Multiple stories are shown and separated in Galley and Story views with a story separator bar. The story separator bar
provides easy access to each story created within an InDesign document.
The story separator bar contains the story title and an expand and collapse button which enables you to show or hide
each story. When a story is collapsed, the text is hidden and the story separator bar remains visible within the edit pane.
A Expand and collapse button B Story name C Story separator bar
More Help topics
Sharing content between InCopyand InDesign
Ways to work with content inInCopy
Transforming graphics
Position tool overview
Click the Position tool in the toolbox to manipulate selected graphics, either directly, in conjunction with a
Transform command (Object > Transform) or a command on a context menu, or by using keyboard shortcuts to nudge
the graphic within its frame.
The Position tool is dynamic, automatically changing to reflect different states:
•When placed directly over an empty graphics frame or frame with unassigned content after using the File > Place
command, it changes to the loaded graphics icon to indicate that you can import the graphic into that frame.
•When it’s placed directly over a graphic, it changes to the Hand tool to indicate that you can select the graphic and
manipulate it within the frame.

87
InCopy documents
Last updated 6/13/2015
•When placed over the bounding box handle of an inline graphic, it changes to the resize arrow to indicate that
dragging will resize the graphic.
•When placed over a graphics frame or the top-level container of nested frames, it changes to the object select icon
to indicate that you can select the graphic or nested frame under the pointer. You cannot select the frame itself.
•When placed over a text frame, it changes to the I-beam to indicate a text insertion point.
Set Position tool options
When using the Position tool to move a graphic, you can hold down the mouse button for a few seconds to display a
dynamic graphics preview (a ghosted-back image) of any part of the image that is outside the frame. You can control
the display and delay of the preview.
1Double-click the Position tool in the toolbox.
2From the Show Masked Portion of Image menu, select the rate at which the entire image will appear while dragging,
or select to turn it off entirely.
Transform graphics
You can use commands to move, scale, rotate, and shear graphics.
Move a graphic
1Make sure the frame with the desired object is checked out to you, and then select the object using the Position tool
.
2Choose Object > Transform > Move.
3In the Move dialog box, do one of the following:
•Enter the horizontal and vertical distances that you want the graphic to move. Positive values move the object
down and to the right of the x axis; negative values move the object up and to the left.
•To move an object a precise distance and angle, enter the distance and angle for the move. The angle you enter is
calculated in degrees from the x axis. Positive angles specify a counterclockwise move; negative angles specify a
clockwise move. You can also enter values between 180° and 360°; these values are converted to their
corresponding negative values (for example, a value of 270° is converted to –90°).
4Do one of the following:
•To preview the effect before you apply it, select Preview.
•To move the object, click OK.
Scale a graphic
1Make sure the frame with the desired object is checked out to you, and then select the object using the Position tool
.
2Choose Object > Transform > Scale.
3In the Scale dialog box, make sure the Constrain Proportions icon is selected if you want to preserve the relative
height and width of the object. Deselect this icon if you want to scale the X and Y values separately, which may result
in the image being skewed.
4Enter the horizontal and vertical scale values as either percentages (such as 90%) or distance values (such as 6p).
The scale values can be negative numbers.

88
InCopy documents
Last updated 6/13/2015
5Do one of the following:
•To preview the effect before you apply it, select Preview.
•To scale the object, click OK.
To scale the graphic in a specific direction, use the Position tool to drag the handle of a selected graphic. Pressing Shift
forces proportional scaling.
Rotate a graphic
1Make sure the frame with the desired object is checked out to you, and then select the object using the Position tool
.
2Choose Object > Transform > Rotate.
3Enter the rotation angle, in degrees, in the Angle text box. Enter a negative angle to rotate the object clockwise; enter
a positive angle to rotate the object counterclockwise.
4Do one of the following:
•To preview the effect before you apply it, select Preview.
•To rotate the object, click OK.
Shear a graphic
1Make sure the frame with the desired object is checked out to you, and then select the object using the Position tool
.
2Choose Object > Transform > Shear.
3In the Shear dialog box, enter the new shear angle.
The shear angle is the amount of slant to be applied to the object, relative to a line perpendicular to the shear axis.
(Shear angle is calculated clockwise from the current axis.)
4Specify the axis along which the object is to be sheared. You can shear an object along a horizontal, a vertical, or an
angled axis.
If you choose an angled axis, enter the angle of the axis that you want, in degrees, relative to the perpendicular axis.
5Do one of the following:
•To preview the effect before you apply it, select Preview.
•To shear the object, click OK.
Clear transformations to a graphic
1Make sure the frame with the desired object is checked out to you, and then select the object using the Position tool
.
2Choose Object > Transform > Clear Transformations.
Stand-alone documents

89
InCopy documents
Last updated 6/13/2015
Work with stand-alone documents
An InCopy document that is not associated with an InDesign document is called a stand-alone document. You can set
up and modify the text area, page size, and orientation for stand-alone documents. However, if the story is later linked
to an InDesign document, the InDesign settings override the settings used in InCopy.
Note: You can also click Save Preset to save document settings for future use. When creating a new document, you can
simply choose it from the Document Preset menu and click OK without having to change any settings. If you’re working in
an editorial workgroup, these saved presets can be shared with other members of your team. (See Define custom document
presets.)
Create a stand-alone document
1Choose File > New.
2To create a document that does not have facing pages in each spread, deselect Facing Pages.
3From the Text Area menu, choose Frame Grid to create a document with a grid into which Japanese characters are
set, or choose Text Frame to create a plain text frame. (See About frame grids in InCopy documents.)
4Under Text Area, type values for Width and Depth. Text dimensions provide accurate line break information
without relying on InDesign for copyfit information.
5Specify whether the text direction is horizontal or vertical.
You can change this setting any time by choosing Type > Writing Direction > Horizontal or Vertical.
6In the Grid Attributes section, specify the frame grid characteristics for vertical and horizontal scaling, character
aki, and line aki. (See Document setup options for frame grids.) These grid attributes do not appear if you’re creating
a plain text frame.
7Choose a page size from the list, or type values for Width and Height. Page size represents the final size you want
after bleeds or other marks outside the page are trimmed.
8Click OK.
Open a stand-alone document
You can open an InCopy content file (.icml) that has been created in InCopy or exported from InDesign. When opened
in InCopy, these InCopy content files will not show the page geometry from the InDesign layout. You can also open
documents from previous versions of InCopy, and you can open InCopy template files (.icmt).
You can also open Microsoft® Word and text files directly in InCopy, and then save them as Text Only (.TXT) or Rich
Text Format (.RTF).
1Choose File > Open.
2Select the document, and then click Open.
You can also choose File > Open Recent, and select one of the documents you saved recently. To specify how many
recent documents are displayed, choose Edit > Preferences > File Handling (Windows), or InCopy > Preferences > File
Handling, and then specify a number for Number Of Recent Items To Display.
Change document layout
1In any view of a stand-alone document, choose File > Document Setup.
2Select basic layout options in the dialog box that appears.
3Click OK.

90
InCopy documents
Last updated 6/13/2015
Define custom document presets
You can create custom document settings and then share them with others in your workgroup to save time and ensure
consistency when creating similar documents.
1Choose File > Document Presets > Define.
2Do one of the following:
•To create a new preset, click New and specify a name for the preset.
•To base a preset on an existing one, select a preset from the list and click Edit.
•To use a different set of settings, click Load, open a document settings file (.icst), and then click Edit.
3Select basic layout options in the dialog box that appears. (See Work with stand-alone documentsfor a description
of each option.)
4Click OK twice.
You can save a document preset to a separate file and distribute it to other users. To save and load document preset files,
use the Save and Load buttons in the Document Presets dialog box.
Linking InCopy files to InDesign
When a stand-alone InCopy story is linked to an InDesign document, the InDesign formatting overrides the InCopy
layout and design settings.
The link between InCopy files and InDesign layouts can be made a number of ways in InDesign, usually by placing an
InCopy (.icml) file into an InDesign layout.
Using Adobe Bridge with InCopy
Adobe Bridge is a cross-platform application included with AdobeCreative Suite components that helps you locate,
organize, and browse the assets you need to create print, web, video, and audio content. You can start Adobe Bridge
from any Creative Suitecomponent (except Adobe Acrobat), and use it to access both Adobe and non-Adobe asset
types.
From Adobe Bridge, you can:
•Manage image, footage, and audio files: Preview, search, sort, and process files in Adobe Bridge without opening
individual applications. You can also edit metadata for files, and use Adobe Bridge to place files into your
documents, projects, or compositions.
•View the links inside an InDesign or InCopy document as thumbnails while in Adobe Bridge, without actually
having to open the document.
•Perform automated tasks, such as batch commands.
•Synchronize color settings across color-managed Creative Suite components.
•Start a real-time web conference to share your desktop and review documents.
Browse for files by using Adobe Bridge
Adobe Bridge lets you efficiently organize, browse, and locate the assets you need to create content for print, the web,
and mobile devices.
❖To open the Adobe Bridge Browser, choose File >Browse In Bridge or click the Adobe Bridge icon in the
application bar.

91
InCopy documents
Last updated 6/13/2015
Scripting in InCopy
Scripting is a great tool for performing a variety of tasks. A script can be as simple as an automated common task or as
complex as an entire new feature. You can create your own scripts, and you can run scripts that other people have
created. Use the Scripts panel (Window > Utilities > Scripts) to run scripts within InCopy.
For more information about scripting, see the InCopy Scripting Guide on the Adobe website.
More Help topics
Save documents
Place (import) text
Working with managed files
Saving and exporting
Save documents
❖Do one of the following:
•To save an existing document under the same name, choose File > Save Content.
•To save a document under a new name, choose File > Save Content As, specify a location and filename, and click
Save. The newly named document becomes the active document.
•To save a copy of a story or graphic under a new document name, choose File > Save Content Copy, specify a
location and filename, and click Save. The saved copy does not become the active document.
•To save a copy of a document as a template, choose File > Save Content As, specify a location and filename, and
then choose InCopy Template from Save As Type (Windows) or Format (Mac OS).
•To save all stories in the document, choose File > Save All Content.
•To save a copy of a document in a text format, choose File > Save Content As, specify a location and filename,
and then choose Text Only or Rich Text Format from Save As Type (Windows) or Format (Mac OS).
Note: Saving a managed (linked) document does not update the link in the InDesign file. To update the story on the file
system, follow the process described in your workflow system documentation or ask your system administrator for
information.
Include previews in saved documents
Thumbnail previews of documents and templates provide easy identification of those files in Adobe Bridge and Adobe
Mini Bridge. A preview is created when you save a document or template. A document preview includes a JPEG image
of only the first spread; a template preview includes a JPEG image of each page in the template. You can control the size
of the preview and the number of pages to suit your needs. For example, Extra Large 1024x1024 enables you to quickly
scan the contents of a page at high-resolution before you open the file.

92
InCopy documents
Last updated 6/13/2015
You can enable the option in Preferences or in the Save As dialog box. Because previews increase both file size and the
time it takes to save the document, you may prefer to enable the option on demand using the Save Asdialog box.
1Do one of the following:
•To include a preview every time you save a document, choose Edit > Preferences > File Handling (Windows) or
InCopy > Preferences > File Handling (Mac OS).
•To include a preview for a specific document, choose File >Save As.
•To include a preview for a specific document, choose File > Save Content As.
2Select Always Save Preview Images With Documents.
3If you are setting the preview using the Preferences dialog box, choose the number of preview pages from the Pages
menu, and choose an option from the Preview Size menu.
Note: Selecting the preview option in the Save As dialog box also selects the option in the Preferences dialog box, and
uses the default Pages and Preview Size settings.
InCopy file types
You can work with several different file types in InCopy.
InCopy content files (.icml) This is the default file type when exporting stories or graphics from InDesign, and when
saving or creating new documents using InCopy. This file type appears as InCopy Document in the Export or Save As
dialog box.
InCopy CS3 Interchange files (.incx) This is a legacy file type used in InCopy CS3 and earlier.
Assignment files (.icma) These files are a subset of an InDesign document. They display content and styles, as well as
page geometry from the parent InDesign file. Assignment files can display different levels of visual fidelity (wireframe,
assigned spreads, or all spreads). The InDesign user sets these options while creating the assignment file. Only InDesign
users can create assignment files; only InCopy users can open assignment files.
Legacy assignment files for InCopy CS3 used the .inca extension.
Assignment package files (.icap) These files are assignment files that have been compressed in InDesign for
distribution. Assignment packages include the assignment file, the assigned story files, and any linked images.
Legacy InCopy CS3 assignment packages used the .incp extension.
Template files (.icmt) Templates are useful starting points for stand-alone documents, because you can preset them
with page size dimensions, text area dimensions, styles (paragraph and character), XML tags, swatches, pretagged
sample content, and so on. Template files open as “Untitled” documents and display content and styles, but no page
geometry (layout information from an InDesign document). This file type appears as InCopy Template in the Save As
dialog box.
InDesign files (.indd) When viewed in InCopy, these files provide full fidelity with the InDesign document, including
content, styles, and layout of all page items. InCopy users can edit only those content items made available to them by
InDesign users. Other items can be viewed but not edited.
You can open several different types of text files, including Microsoft Word, RTF, and TXT files, directly in InCopy.
When you do so, the import options for that file type appear.

93
InCopy documents
Last updated 6/13/2015
Export InCopy documents
You can save all or part of an InCopy document in a different file format. In most cases, each component (for example,
text frames and graphics) in an InCopy document is exported to a separate file. The exception is exporting an InCopy
document to Adobe PDF, which copies all of the text and graphics in a document to a single PDF file.
1Do one of the following:
•To export text, click in the text with the Type tool .
•To export a graphic, click the graphic with the Position tool .
2Choose File > Export.
3Specify a name and location for the exported content, and then select a format under Save As Type.
The XML format appears in the list only if XML tags have been added to the document. If you are exporting text
and don’t see a listing for your word-processing application, you might need to export the text in a format that the
application can import, such as Rich Text Format. If your word-processing application doesn’t support any of the
InCopy export formats, use the Text Only (ASCII) format.
Note: Exporting in ASCII format removes all character attributes from the text. To retain all formatting, use the InCopy
Tagged Text export filter.
4Click Save to export the content in the format you’ve selected.
Rename InCopy stories
When a story is exported from InDesign, it is given a document filename with a .icml extension. InCopy automatically
uses this filename as the story name that appears in the Assignments panel in InDesign and the story separator bar.
Unlike the filename, the story name is embedded in the file.
1To change a story name manually, open a story file in InCopy.
2Choose File > Content File Info.
3Make sure that the Description tab is selected, and then type a new name for Document Title.
Note: Depending on the workflow processes of your system, an administrator might have to change the story name for you.
If you are unable to rename the story by following the steps above, talk to your workflow administrator.
You can also change the story name in the Assignments panel when the story is checked out. However, the filename is
not changed on disk.
Export content to Buzzword
Buzzword is a web-based text editor that lets users create and store text files on a web server. When you export a story
to Buzzword, you create a text file on the Buzzword server.
1Select text or place the insertion point in a text frame that is part of the story you want to export.
2Do one of the following:
•In InDesign choose File > Export For > Buzzword.
•In InCopy choose File > Export to Buzzword.
3If you haven’t already signed in to CS Live, click Sign In, specify your e-mail address and password, and then click
Sign In.
4In the Export Story For Buzzword dialog box, specify the name of the Buzzword document to be created and then
click OK.

94
InCopy documents
Last updated 6/13/2015
The Buzzword document is opened on Acrobat.com. You can then move the document to a different workspace and
share it with other people.
More Help topics
Save changes (InCopy)
Place (import) text
Import Buzzword documents
Importing graphics
Import graphics
InCopy allows you to import graphics into existing frames. This is especially useful where content is created before the
layout, because you can choose the graphics for your articles as you write.
You can import graphics into existing frames only. Only InDesign users can create graphics frames. In standalone
InCopy documents, you can insert a graphic into the default text frame, making it an inline graphic.
InCopy supports the same wide range of graphics file formats as InDesign, including graphics created using Adobe®
Illustrator® 8.0 and later, bitmap formats such as PDF, PSD, TIFF, GIF, JPEG, and BMP, and vector formats such as EPS.
You can even import InDesign (INDD) pages as images. Other supported formats include DCS, PICT, WMF, EMF,
PCX, PNG, and Scitex CT (.SCT).
Notes on placing graphics in InCopy
When you import graphics into InCopy, keep the following in mind:
•For managed content, you must check out a frame before you can import a graphic into it.
•Once you import a graphic, you can transform (move, scale, rotate, shear) it inside the frame, fit the graphic to the
frame, and control the graphic’s appearance. You can also tag a selected frame for future XML use by selecting
commands from the context menu.
•When InDesign users create a new frame, they specify whether it is a text, graphics, or unassigned frame. InCopy
users cannot change this frame type within InCopy. Therefore, if you try to import a graphic into a text frame, for
example, it may appear as a large inline graphic.
•You can select and modify the graphics but not the frames in InCopy, unless they are nested or inline frames. Only
InDesign users can modify graphics frames.
•You can place, paste, or drag graphics into an anchored, floating, or inline graphics frame. You can import a graphic
into a text frame only if that frame has an active insertion point or is an inline graphics frame.
•If you import a graphic into a nested frame, the graphic is imported into the deepest-level frame under the pointer.
Nested frames that contain graphics, unlike top-level frames, can be selected with the Position tool. (See Position
tool overview.)
•If an effect, such as transparency, drop shadow, or feathering, is applied to a frame in InDesign, it will be visible in
an assignment file or InDesign (.indd) file open in InCopy. It will not be visible in a linked (.icml) file open in
InCopy.

95
InCopy documents
Last updated 6/13/2015
Place a graphic in an InCopy document
1Do one of the following:
•To place a graphic in a standalone InCopy document, place the insertion point in the text frame.
•To place a graphic in a linked document, make sure the graphics frame is checked out to you. The Editing icon
appears in the upper left corner of the frame.
2Choose File > Place and select a graphics file.
3To set format-specific import options, select Show Import Options to see format-specific settings, and then click
Open.
Note: When you place a graphic created in lllustrator 9.0 or later by using the Show Import Options dialog box, the
options are identical to those for PDF files. When you place an Illustrator 8.x graphic, the options are identical to those
for EPS files.
4If another dialog box appears, select your import options, and click OK.
5To import into a frame, click the loaded graphics icon in the frame. To place a specified page of a multipage PDF
document, click the loaded graphics icon in a frame.
If you accidently replace an existing graphic with an image you’re placing, press Ctrl+Z (Windows) or Command+Z
(Mac OS) to return the original image to the frame and display the loaded graphics icon.
Drag a graphic into a frame
❖Do one of the following:
•To place a graphic in an existing graphics frame, make sure the frame is checked out to you, and then drag the
graphic file’s icon from the file system to the frame.
•To place a graphic at an active text insertion point, drag the graphic file’s icon to any place in the text frame. This
method is available only in Layout view.
Paste a graphic into a frame
1Make sure the graphics frame is checked out to you. The Editing icon appears in the upper left corner of the
frame.
2Cut or copy a graphic.
3Hold the Hand tool over the graphics frame, right-click (Windows) or Control-click (Mac OS), and then choose
Paste Into.
Create an inline graphic
1Make sure the text frame is checked out to you. The Editing icon appears in the upper left corner of the frame.
2Do one of the following:
•To place a graphic in an existing inline graphics frame, use the Place or Cut command to select a graphic. Click
the loaded graphics icon in the frame.
•To place a graphic at an active text insertion point, drag the graphic file’s icon to any place in the text frame, or
use the Place command to import the graphic.
Import options for graphics
The options for importing graphics vary depending on the type of image being imported. To display import options,
make sure that Show Import Options is selected in the Place dialog box.

96
InCopy documents
Last updated 6/13/2015
Encapsulated PostScript (.eps) import options
When you place an EPS graphic (or a file saved with Illustrator 8.0 or earlier) and select Show Import Options in the
Place dialog box, you’ll see a dialog box containing these options:
Read Embedded OPI Image Links This option tells InCopy to read links from OPI comments for images included (or
nested) in the graphic.
Deselect this option if you’re using a proxy-based workflow and plan to have your service providers perform the image
replacement using their OPI software. When this option is deselected, InDesign preserves the OPI links but does not
read them. When you print or export, the proxy and the links are passed on to the output file.
Select this option if you’re using a proxy-based workflow and you want InDesign, instead of your service provider, to
perform image replacement when you output the final file. When you select this option, the OPI links appear in the
Links panel.
Also select this option when you import EPS files containing OPI comments that are not part of a proxy-based
workflow. For example, if you import an EPS file containing OPI comments for an omitted TIFF or bitmap image, you’ll
want to select this option so that InDesign can access the TIFF information when you output the file.
Apply Photoshop Clipping Path Regardless of whether this option is selected, a placed EPS file includes a clipping path
in InDesign. However, deselecting this option may result in a different bounding box size.
Proxy Generation This creates a low-resolution bitmap representation of an image when drawing the file to the screen.
The following settings control how the proxy will be generated:
Use TIFF Or PICT Preview Some EPS images contain an embedded preview. Select this option to generate the proxy
image of the existing preview. If a preview does not exist, the proxy will be generated by rasterizing the EPS to an
offscreen bitmap.
Rasterize The PostScript Select this option to ignore the embedded preview. This option is typically slower but provides
the highest-quality results.
Note: When you import more than one single file into the same document, all instances share the proxy setting of the first
instance of the imported file.
Bitmap import options
You can apply color-management options to individual imported graphics when using color-management tools with a
document. You can also import a clipping path or an alpha channel saved with an image created in Photoshop. Doing
so lets you directly select an image and modify its path without changing the graphics frame.
Note: Although Adobe InCopy does not include color-management options, these import options are relevant when the
images you place in InCopy are transferred to InDesign.
When you place a PSD, TIFF, GIF, JPEG, or BMP file and select Show Import Options in the Place dialog box, you’ll
see a dialog box containing these options:
Apply Photoshop Clipping Path If this option isn’t available, the image wasn’t saved with a clipping path, or the file
format doesn’t support clipping paths. If the bitmap image doesn’t have a clipping path, you can create one in InDesign.
Alpha channel Select an alpha channel to import the area of the image saved as an alpha channel in Photoshop. InCopy
uses the alpha channel to create a transparent mask on the image. This option is available only for images that contain
at least one alpha channel.
Click the Color tab to view the following options:

97
InCopy documents
Last updated 6/13/2015
Profile If Use Document Default is selected, leave this option unchanged. Otherwise, choose a color source profile that
matches the gamut of the device or software used to create the graphic. This profile enables InDesign to properly
translate its color to the gamut of the output device.
Rendering Intent Choose a method for scaling the color range of the graphic to the color range of the output device.
Typically, you’ll choose Perceptual (Images) because it accurately represents colors in photographs. The Saturation
(Graphics), Relative Colorimetric, and Absolute Colorimetric options are better for areas of solid color; they don’t
reproduce photographs well. Rendering Intent options aren’t available for bitmap, grayscale, and index-color mode
images.
Portable Network Graphics (.png) import options
When you place a PNG image and select Show Import Options in the Place dialog box, you’ll see a dialog box with three
sections of import settings. Two sections contain the same options available for other bitmap image formats. The other
section, PNG Settings, contains the following settings:
Use Transparency Information This option is enabled by default when a PNG graphic includes transparency. If an
imported PNG file contains transparency, the graphic interacts only where the background is transparent.
White Background If a PNG graphic does not contain a file-defined background color, this option will be selected by
default. However, it is only enabled if Use Transparency Information is activated. If this option is selected, white is used
as the background color when applying transparency information.
File Defined Background Color If a PNG graphic was saved with a non-white background color, and Use Transparency
Information is selected, this option is selected by default. If you don’t want to use the default background color, click
White Background to import the graphic with a white background, or deselect Use Transparency Information to
import the graphic without any transparency (displaying areas of the graphic that are currently transparent). Some
image-editing programs can’t specify a non-white background color for PNG graphics.
Apply Gamma Correction Select this option to adjust the gamma (midtone) values of a PNG graphic as you place it.
This option lets you match image gamma to the gamma of the device you will use to print or display the graphic (such
as a low-resolution or non-PostScript printer or computer monitor). Deselect this option to place the image without
applying any gamma correction. By default, this option is selected if the PNG graphic was saved with a gamma value.
Gamma Value This option, available only if Apply Gamma Correction is selected, displays the gamma value that was
saved with the graphic. To change the value, type a positive number from 0.01 to 3.0.
When PNG files are imported, the settings in the Image Import Options dialog box are always based on the selected
file, not on the default or last-used settings.
Acrobat (.pdf) and Illustrator (.ai) import options
The layout, graphics, and typography in a placed PDF are preserved. As with other placed graphics, you cannot edit a
placed PDF page within InCopy . You can control the visibility of layers in a layered PDF. You can also place more than
one page of a multipage PDF.
When you place a PDF that was saved with passwords, you’ll be prompted to enter the required passwords. If the PDF
file was saved with usage restrictions (for example, no editing or printing), but no passwords, you can place the file.

98
InCopy documents
Last updated 6/13/2015
When you place a PDF (or a file saved with Illustrator 9.0 or later) and select Show Import Options in the Place dialog
box, you’ll see a dialog box containing the following options:
Show Preview Preview a page in the PDF before you place it. If you’re placing a page from a PDF that contains multiple
pages, click the arrows, or type a page number under the preview image to preview a specific page.
Pages Specify the pages you want to place: the page displayed in the preview, all pages, or a range of pages. For
Illustrator files, you can specify which artboard to place.
If you specify multiple pages, hold down Alt (Windows) or Option (Mac OS) while placing the file to place them all at
the same time, overlapping each other.
Crop To Specify how much of the PDF page to place:
Bounding Box Places the PDF page’s bounding box, or the minimum area that encloses the objects on the page,
including page marks. The Bounding Box (Visible Layers Only) option uses the bounding box only of the visible layers
of the PDF file. The Bounding Box (All Layers) option places the bounding box of the entire layer area of the PDF file,
even if layers are hidden.
Art Places the PDF only in the area defined by a rectangle that the author created as a placeable artwork (for example,
clip art).
Crop Places the PDF only in the area that is displayed or printed by Adobe Acrobat.
Trim Identifies the place where the final produced page will be physically cut in the production process, if trim marks
are present.
Bleed Places only the area that represents where all page content should be clipped, if a bleed area is present. This
information is useful if the page is being output in a production environment. Note that the printed page may include
page marks that fall outside the bleed area.
Media Places the area that represents the physical paper size of the original PDF document (for example, the
dimensions of an A4 sheet of paper), including page marks.
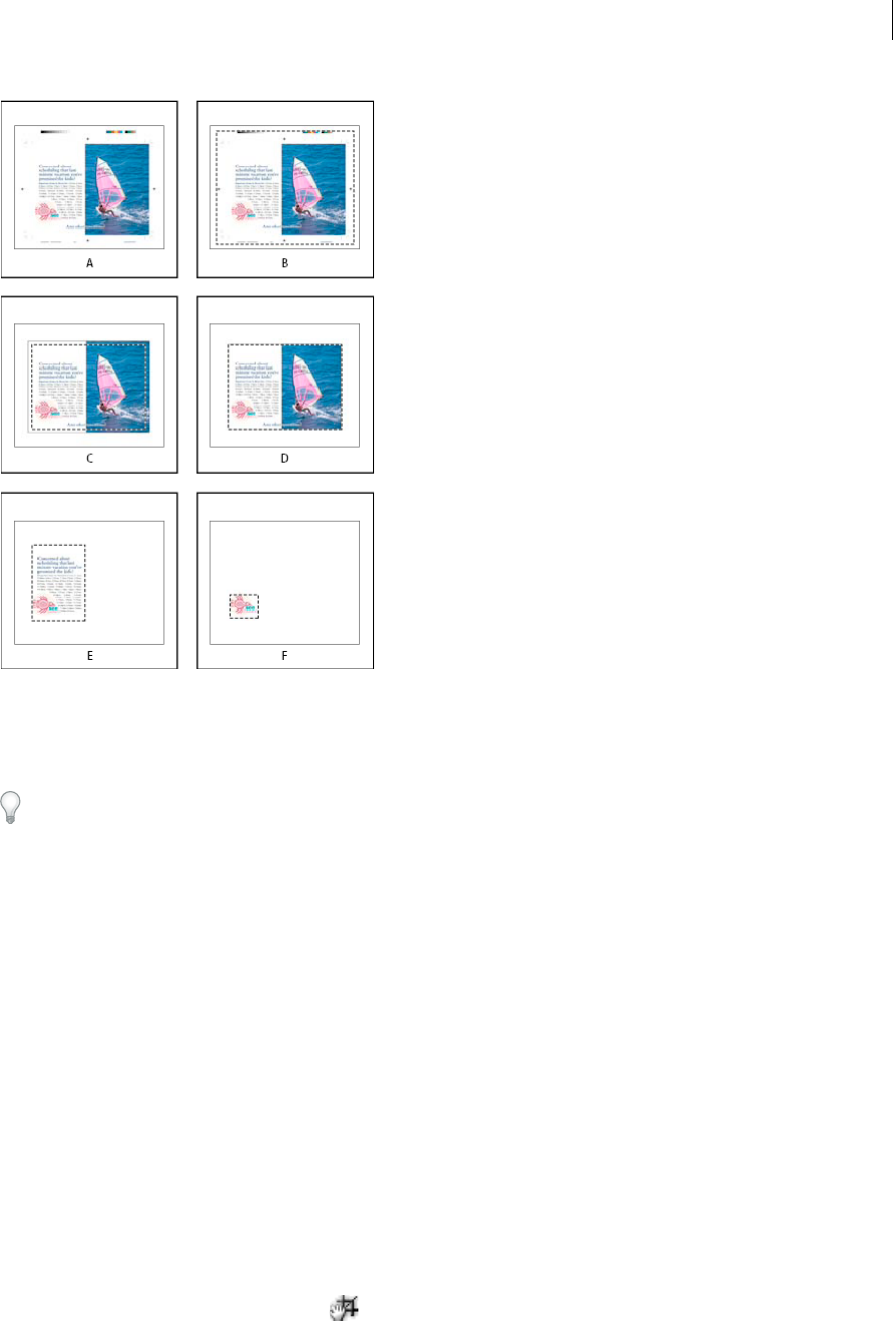
99
InCopy documents
Last updated 6/13/2015
A Media B Trim C Bleed D Content E Crop F Art
Transparent Background Select this option to reveal text or graphics that fall beneath the PDF page in the InCopy
layout. Deselect this option to place the PDF page with an opaque white background.
If you make the background transparent in a frame containing a PDF graphic, you can make it opaque later by adding
a fill to the frame.
InDesign (.indd) import options
InDesign preserves the layout, graphics, and typography in a placed INDD file. However, the file is treated as an object,
and you can’t edit it, although you can control the visibility of layers and choose which pages of a multi-page INDD file
to import.
When you place an InDesign file and select Show Import Options in the Place dialog box, you’ll see a dialog box
containing the following options:
Show preview Preview a page before you place it. You can type a page number or click the arrows to preview a page in
a multi-page document.
Pages Specify the pages you want to place: the page displayed in the preview, all pages, or a range of pages.
Crop to Specify how much of the page or pages to place, the page itself or the bleed or slug areas on the pasteboard.
Fit a graphic to its frame
When you place or paste a graphic into a frame, it appears at the upper left corner of the frame by default. If the frame
and its content are different sizes, you can use the Fitting commands to achieve a perfect fit.
1Select the graphic with the Position tool .
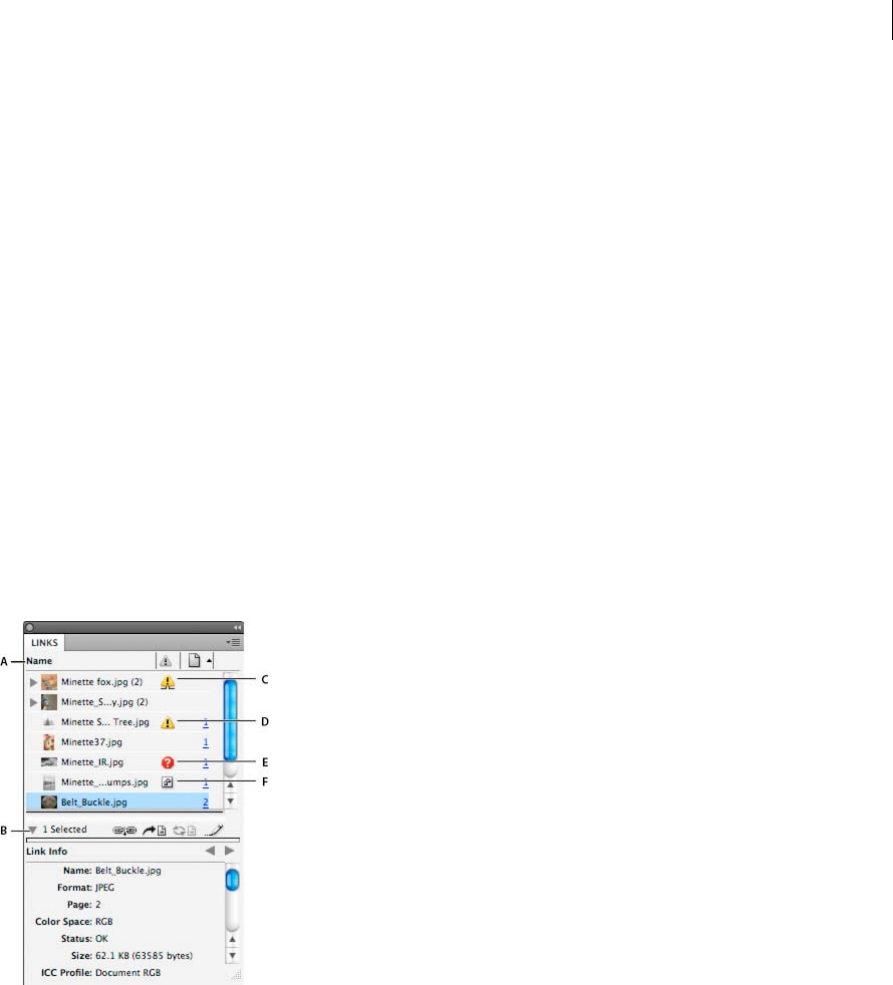
100
InCopy documents
Last updated 6/13/2015
2Choose Object > Fitting and one of the following options:
Fit Content To Frame Resizes content to fit a frame and allows the content proportions to be changed. The frame
will not change, but the content may appear to be stretched if the content and the frame have different proportions.
Center Content Centers content within a frame. The proportions of the frame and its content are preserved.
Fit Content Proportionally Resizes content to fit a frame while preserving the content proportions. The frame’s
dimensions are not changed. If the content and the frame have different proportions, some empty space will result.
Fill Frame Proportionally Resizes content to fit a frame completely while preserving the content proportions. The
frame’s dimensions are not changed.
Note: The Fitting commands fit the content outer edges to the center of the frame’s stroke. If the frame has a thick stroke
weight, outer edges of the content will be obscured. You can adjust the frame’s stroke alignment to the center, inside, or
outside of a frame edge.
Links panel overview
All files placed in a document are listed in the Links panel. These include both local (on disk) files and assets that are
managed on a server. However, files that are pasted from a website in Internet Explorer do not display in this panel.
In InCopy, the Links panel also displays linked stories. When you select a linked story in the Links panel, the Link Info
section displays information such as the number of notes, the managed status, and the status of tracked changes.
A Category columns B Show/Hide Link Information C One or more instances modified icon D Modified icon E Missing-link icon F Embedded-
link icon
When the same graphic appears several times in the document, the links are combined under a disclosure triangle in
the Links panel. When a linked EPS graphic or InCopy document contains links, the links are also combined under a
disclosure triangle.
A linked file can appear in the Links panel in any of the following ways:
Up to Date An up-to-date file is blank in the Status column.
Modified This icon means that the version of the file on disk is more recent than the version in your document. For
example, this icon appears if you import a Photoshop graphic into InCopy , and then you or someone else edits and
saves the original graphic in Photoshop.

101
InCopy documents
Last updated 6/13/2015
A slightly different version of the Modified icon appears when a graphic is modified and one or more instances are
updated while others are not.
Missing The graphic is no longer in the location from which it was imported, although it may still exist somewhere.
Missing links can happen if someone deletes the original file or moves it to a different folder or server after it’s been
imported. You can’t know whether a missing file is up to date until its original is located. If you print or export a
document when this icon is displayed, the file may not print or export at full resolution.
Embedded Embedding the contents of a linked file suspends management operations for that link. If the selected link
is currently in an “edit in place” operation, this option is not enabled. Unembedding the file restores management
operations to the link.
If a linked object does not appear on a specific document page, the following codes indicate where the object appears:
PB (pasteboard), MP (master page), OV (overset text), and HT (hidden text).
For a video tutorial on using the Links panel, see www.adobe.com/go/lrvid4027_id.
InDesign Secrets provides a videocast on Links panel tips and techniques at Saving time with the Links panel.
Use the Links panel
•To display the Links panel, choose Window > Links. Each linked file and automatically embedded file is identified
by name.
•To select and view a linked graphic, select a link in the Links panel and then click the Go To Link button , click
the page number of the link in the Page column, or choose Go To Link in the Links panel menu. InCopy centers the
display around the selected graphic. To view a hidden object, you show the layer (or condition if it’s an anchored
object).
•To expand or collapse nested links, click the triangle icon to the left of the link. Nested links occur when the same
graphic appears several times in the document or when the linked EPS graphic or InCopy document contains links.
•To sort links in the panel, click the category title at the top of the Links panel to sort by that category. Click the same
category again to reverse the order. For example, if you click the Page category, the links appear in their order from
the first page to the last page. If you click Page again, the links are sorted from last page to first. Use Panel Options
to add columns to the Links panel.
Work with Links panel columns
You can display additional categories, such as Creation Date and Layer, in the Links panel to display more information
about the graphics. For each category, you can determine whether the information appears as a column in the Links
panel and in the Link Info section at the bottom of the Links panel.
1Choose Panel Options from the Links panel menu.
2Select the check boxes under Show Column to add columns in the Links panel.
Folder 0 is the folder that contains the linked file; Folder 1 is the folder that contains Folder 0, and so on.
3Select the check boxes under Show In Link Info to display the information in the Link Info section at the bottom of
the Links panel.
4Click OK.
You can change the order of columns by selecting a column and dragging it to a different location. Drag the column
boundaries to change the column width. Click a category title to sort the links by that category in ascending order. Click
again to sort in descending order.

102
InCopy documents
Last updated 6/13/2015
Change the Links panel rows and thumbnails
1Choose Panel Options from the Links panel menu.
2For Row Size, select Small Rows, Regular Rows, or Large Rows.
3For Thumbnails, determine whether thumbnail representations of the graphics appear in the Name column and in
the Link Info section at the bottom of the Links panel.
4Click OK.
Display link information
The Link Info section of the Links panel lists information about the selected linked file.
To change the information displayed in the Link Info section of the Links panel, choose Panel Options from the Links
panel menu, and select check boxes in the Show In Link Info column.
❖Double-click a link, or select a link and click the Show/Hide Link Information icon, which is a triangle on the left
side of the panel.
View metadata via the Links panel
If a linked or embedded file contains metadata, you can view the metadata using the Links panel. You cannot edit or
replace metadata associated with a linked file.
❖Select a file in the Links panel and choose Utilities > XMP File Info from the panel menu.
Update, restore, and replace links
Use the Links panel to check the status of any link, or to replace files with updated or alternate files.
When you update or reestablish (relink) a link to a file, any transformations performed in InCopy are preserved (if you
choose Relink Preserved Dimensions in the File Handling preferences). For example, if you import a square graphic
and rotate it 30°, and then you relink it to an unrotated graphic, InCopy rotates it 30° to match the layout of the graphic
it’s replacing.
Note: Placed EPS files may contain OPI links, which appear in the Links panel. Don’t relink OPI links to files other than
those originally intended by the creator of the EPS file; doing so can cause problems with font downloading and color
separations.
Choose how relinked graphics are scaled
When you relink to replace one graphic with a different source file, you can keep the image dimensions of the file that’s
being replaced, or you can display the incoming file in its actual dimensions.
1Choose Edit > Preferences > File Handling (Windows) or InCopy > Preferences > File Handling (Mac OS).
2Choose Preserve Image Dimensions When Relinking if you want images to appear at the same size as the images
they’re replacing. Deselect this option to have relinked images appear at their actual size.
Update modified links
InDesign first looks for a missing link in the folder in which another file has been relinked in the current session. Next,
it looks for a link in the same folder where the document is located. If it’s still not found, it looks in the parent folder of
the document.
103
InCopy documents
Last updated 6/13/2015
Modified links are also called “out of date” links.
❖In the Links panel, do one of the following:
•To update specific links, select one or more links marked with the modified-link icon . Then click the Update
Link button , or choose Update Link from the Links panel menu.
•To update all modified links, choose Update All Links from the Links panel menu, or select a modified link and
Alt-click (Windows) or Option-click (Mac OS) the Update Link button.
•To update only one link to a graphic that appears in several places in the document, select only the sublink and
choose Update Link. If you select the “parent” link, you can update all links to the modified graphic.
Replace a link with a different source file
1Select any link in the Links panel, and click the Relink button or choose Relink from the Links panel menu. If
a “parent” link of multiple instances is selected, choose Relink All Instances Of [Filename] from the Links panel
menu.
Relink is disabled in managed stories unless a story is checked out.
2In the dialog box that appears, select Search For Missing Links In This Folder if you want InCopy to search the folder
for files that have the same names as other missing linked files. If this option is not selected, only the selected image
is relinked.
3Choose Show Import Options to control how the new source file is imported.
4Locate and double-click the new source file.
5Choose import options if you clicked the Show Import options option. (See Import options for graphics.)
Restore missing links
1To restore a missing link, select any link marked with the missing link icon in the Links panel, and click the
Relink button .
2In the dialog box that appears, select Search For Missing Links In This Folder to relink any missing file that appears
in the specified folder. Locate and double-click a file.
Find missing links
By default, InCopy checks for missing links and tries to resolve them when you open a document. Two preference
options let InCopy check for and find missing links automatically when you open a document.
Check Links Before Opening Document If you turn off this option, InCopy opens the document immediately, and the
link statuses remain pending until links are determined to be up-to-date, missing, or modified. If you turn on this
option, InCopy checks for modified or missing links.
Find Missing Links Before Opening Document If you turn off this option, InCopy does not attempt to resolve the
missing links. You may want to turn off this option if links slow performance to a server or if unexpected linkings occur.
This option is dimmed if Check Links Before Opening Document is turned off.
Search For Missing Links Use the Search For Missing Links command to search for and resolve missing links in your
document. This command is useful if you turned off the preferences option that checks for missing links when you
open a document, and now you have missing links. This command is also useful if you mount a server where images
are stored after opening a document.
•To change link settings, open the File Handling section of the Preferences dialog box, and determine whether the
Check Links Before Opening Document and Find Missing Links Before Opening Document options are selected.

104
InCopy documents
Last updated 6/13/2015
•To let InCopy attempt to resolve missing links, choose Utilities > Search For Missing Links from the Links panel
menu.
This command is dimmed if the document contains no missing links.
Specify a default Relink folder
1In the Preferences dialog box, select File Handling.
2From the Default Relink Folder menu, choose either of the following options, and then click OK:
Most Recent Relink Folder This option displays the most recently used folder you selected when relinking,
matching InCopy CS3 behavior.
Original Link Folder This option displays the original location of the linked file, matching the behavior of InCopy
CS2 and earlier.
Copy links to a different folder
Use the Copy Link(s) To command to copy graphics files to a different folder and redirect the links to the copied files.
This command is especially useful for moving files to a different drive, such as moving files from a DVD to a hard drive.
1Select the links to the files you want to copy, and choose Utilities > Copy Link(s) To from the Links panel menu.
2Specify the folder where the linked files will be copied and choose Select (Windows) or Choose (Mac OS).
Relink to a different folder
When you use the Relink To Folder command, you can point to a folder that contains files with the same names as your
out-of-date links. For example, if your current links point to low-resolution images, you can specify a different folder
that contains high-resolution images. You can specify a different extension for the files, allowing you to change links
from .jpg to .tiff, for example.
The Relink To Folder command is dimmed in a managed InCopy story unless the story is checked out.
1Select one or more links in the Links panel.
2Choose Relink To Folder from the Links panel menu.
3Specify the location of the new folder.
4To use a different extension, select Match Same Filename But This Extension, and specify the new extension (such
as AI, TIFF, or PSD).
5Click Select (Windows) or Choose (Mac OS).
Relink files with different file extensions
The Relink File Extension command lets you replace images based on file extensions. For example, if you have several
JPEG images in your document, you can replace them with PSD files. The files with different extensions must be in the
same folder as the linked files being replaced.
1Make sure the files with different file extensions appear in the same folder as the original files.
2Select one or more links in the Links panel.
3Choose Relink File Extensions from the Links panel menu.
4Specify the file extension to replace the selected files, and click Relink.

105
InCopy documents
Last updated 6/13/2015
Replace an imported file using the Place command
1Do one of the following:
•To replace the contents of a graphics frame, such as an imported graphic, use the Selection tool to select the
frame.
To replace the contents of a graphics frame, such as an imported graphic, use the Position tool to select the image.
•To replace the contents of a text frame, use the Type tool to click an insertion point in a text frame, and choose
Edit > Select All.
2Choose File > Place.
3Locate and select the new file.
4Make sure that Replace Selected Item is selected, and then click Open.
5Click Open.
Copy the link pathname
You can copy either the full path of the linked image or the platform style path. Copying the full path of the image is
useful for notifying team members where art is located. For example, you can copy the full path and paste it into an
email message. Copying the platform path is useful for scripting or for specifying image fields in a data merge.
1Select a link in the Links panel.
2From the Links panel menu, choose Copy Info > Copy Full Path or Copy Platform Style Path.
3Paste the path.
Edit original artwork
The Edit Original command lets you open most graphics in the application in which you created them so that you can
modify them as necessary. Once you save the original file, the document in which you linked it is updated with the new
version.
Note: In InDesign, if you check out and select a managed graphics frame (one that has been exported to InCopy), rather
than the graphic itself, the graphic opens in InCopy.
Edit original artwork using the default application
By default, InCopy relies on the operating system to determine which application is used when opening the original.
1Select one or more images on the page or in the Links panel.
2Do any of the following:
•In the Links panel, click the Edit Original button .
•Choose Edit > Edit Original.
3After making changes in the original application, save the file.
Edit original artwork using a different application
1Select the image.
2Choose Edit > Edit With, and then specify the application you want to use to open the file. If the application does
not appear, choose Other, and browse to locate the application.

106
InCopy documents
Last updated 6/13/2015
Control layer visibility in imported images
When you import Photoshop PSD files, layered PDFs, and INDD files, you can control the visibility of top-level layers.
Adjusting layer visibility in InCopy lets you vary an illustration depending on context. For example, in a multilanguage
publication, you can create a single illustration that includes one text layer for each language.
You can adjust layer visibility either when you place a file or by using the Object Layer Options dialog box. In addition,
if the Photoshop file contains layer comps, you can display the desired comp.
Set layer visibility
1Do one of the following:
•To import a graphic without first creating a frame, make sure that nothing in the document is selected.
•To import a graphic into an existing frame, select the frame.
•To replace an existing image, select the graphics frame.
2Choose File > Place and select a graphics file.
3To replace a selected object, select Replace Selected Item.
4Select Show Import Options, and then click Open.
5In the Image Import Options or Place dialog box, click the Layers tab.
6To view a preview of the image, click Show Preview.
7(PDFs only) If you’re placing a page from a multipage PDF, click the arrows, or type a page number under the
preview image to preview a specific page.
8(Photoshop PSD files only) If the image contains layer comps, choose the layer comp you want to display from the
Layer Comp pop-up menu.
9Do one of the following:
•To open or close a layer set, click the triangle to the left of the folder icon.
•To hide a layer or layer set, click the eye icon next to the layer or layer set.
•To display the layer or layer set, click the empty eye column next to the layer or layer set.
•To display only the content of a particular layer or layer set, Alt-click (Windows) or Option-click (Mac OS) its
eye icon. Alt-click or Option-click the eye icon again to restore the original visibility settings of the other layers.
•To change the visibility of multiple items, drag through the eye column.
10 Set the When Updating Link option as desired:
Use Photoshop’s/PDF’s Layer Visibility Matches the layer visibility settings to those of the linked file when you
update the link.
Keep Layer Visibility Overrides Maintains the layer visibility settings as they were when the file was originally
placed.
11 Click OK.
12 Click OK, and do one of the following:
•To import into a new frame, click the loaded graphics icon in the layout at the place where you want the upper
left corner of the graphic to appear.
•To import into an existing, unselected frame, click the loaded graphics icon anywhere in that frame.
•To import into an existing selected frame, you don’t need to do anything. The image automatically appears in that
frame.

107
InCopy documents
Last updated 6/13/2015
If you accidently replace an existing graphic with an image you’re placing, press Ctrl+Z (Windows) or Command+Z
(Mac OS) to return the original image to the frame and display the loaded graphics icon.
Set layer visibility for placed AI, PSD, PDF, and INDD files
After you place a Photoshop PSD or layered PDF, an Illustrator AI file, or an InDesign INDD file, you can control the
visibility of its layers by using the Object Layer Options dialog box. If the Photoshop PSD file contains layer comps, you
can choose which comp you want to display. In addition, you can choose whether to maintain the visibility settings or
match the settings of the original file each time you update the link.
1Select the file in the InCopy document.
2Choose Object > Object Layer Options.
3To view a preview of the image, select Preview.
4(Photoshop PSD files only) If the image contains layer comps, choose the layer comp you want to display from the
Layer Comp pop-up menu.
5Do one of the following:
•To open or close a layer set, click the triangle to the left of the folder icon.
•To hide a layer or layer set, click the eye icon next to the layer or layer set.
•To display the layer or layer set, click the empty eye column next to the layer or layer set.
•To display only the content of a particular layer or layer set, Alt-click (Windows) or Option-click (Mac OS) its
eye icon. Alt-click or Option-click the eye icon again to restore the original visibility settings of the other layers.
•To change the visibility of multiple items, drag through the eye column.
6Set the Updating Link Options as desired:
Use Layer Visibility Matches the layer visibility settings to those of the linked file when you update the link.
Keep Layer Visibility Overrides Maintains the layer visibility settings as they were when the file was originally
placed.
7Click OK.
Importing InDesign (.indd) pages
Using the Place command, you can import pages from one InDesign document into another. You can import a page, a
page range, or all of the pages in the document. The pages are imported as objects (much the same way that PDFs are
imported).
Add pages in your document to hold the pages you want to import. After you choose File > Place and select an INDD
file, you can choose Show Import Options and then choose which pages to import, which layers to make visible, and
how to crop the imported pages. You can scroll in the Preview window to examine the thumbnail pages closely. The
page or pages you select are loaded in the graphics icon. If you place multiple pages, InCopy loads the graphics icon
with the following page so you can import pages one after the other.
Note: The Links panel lists the names of each page you imported. If a page you imported contains a graphic or other item
that was imported into it, this item is listed as well in the Links panel. The names of these secondary imported items are
listed under a disclosure triangle in the Links panel to distinguish them from imported pages.

108
InCopy documents
Last updated 6/13/2015
More Help topics
Keys for moving and transforming graphics
Links panel video
Importing Adobe Illustrator graphics
Create a layered PDF in Adobe Illustrator
Importing Adobe Photoshop (.PSD) files
About layers
Place (import) graphics
Including metadata in a story
Work with metadata
Metadata is a set of standardized information about a file, such as author name, resolution, color space, copyright, and
keywords applied to it. You can use metadata to streamline your workflow and organize your files.
About the XMP standard
Metadata information is stored using the Extensible Metadata Platform (XMP) standard, on which Adobe Bridge ,
Adobe Illustrator, Adobe InDesign, and Adobe Photoshop are built. XMP is built on XML, and in most cases the
metadata is stored in the file. If it isn’t possible to store the information in the file, metadata is stored in a separate file
called a sidecar file. XMP facilitates the exchange of metadata between Adobe applications and across publishing
workflows. For example, you can save metadata from one file as a template, and then import the metadata into other
files.
Metadata that is stored in other formats, such as Exif, IPTC (IIM), GPS, and TIFF, is synchronized and described with
XMP so that it can be more easily viewed and managed. Other applications and features also use XMP to communicate
and store information such as version comments, which you can search using Adobe Bridge.
In most cases the metadata remains with the file even when the file format changes, for example, from PSD to JPG.
Metadata is also retained when files are placed in an Adobe document or project.
You can use the XMP Software Development Kit to customize the creation, processing, and interchange of metadata.
For example, you can use the XMP SDK to add fields to the File Infodialog box. For more information on XMP and the
XMP SDK, visit the Adobe website.
Working with metadata in Adobe Bridge and Adobe Creative Suite components
Many of the powerful Adobe Bridge features that allow you to organize, search, and keep track of your files and versions
depend on XMP metadata in your files. Adobe Bridge provides two ways of working with metadata: through the
Metadata panel and through the File Infodialog box (InDesign) or the Content File Info dialog box (InCopy).
In some cases, multiple views exist for the same metadata property. For example, a property may be labeled Author in
one view and Creator in another, but both refer to the same underlying property. Even if you customize these views for
specific workflows, they remain standardized through XMP.

109
InCopy documents
Last updated 6/13/2015
Add metadata using the File Info dialog box
The File Info dialog box displays camera data, file properties, an edit history, copyright, and author information of the
current document. The File Info dialog box also displays custom metadata panels. You can add metadata directly in the
File Information dialog box. Any information you enter in a field overrides existing metadata and applies the new value
to all selected files.
1Choose File > File Info (InDesign) or File > Content File Info (InCopy).
2Select any of the following from the tabs at the top of the dialog box:
Use the Right and Left arrows to scroll the tabs, or click the down-pointing arrow and choose a category from the list.
Description Lets you enter document information about the file, such as document title, author, description, and
keywords that can be used to search for the document. To specify copyright information, select Copyrighted from
the Copyright Status pop-up menu. Then enter the copyright owner, notice text, and the URL of the person or
company holding the copyright.
IPTC Includes four areas: IPTC Content describes the visual content of the image. IPTC Contact lists the contact
information for the photographer. IPTC Image lists descriptive information for the image. IPTC Status lists
workflow and copyright information.
Camera Data Includes two areas: Camera Data 1 displays read-only information about the camera and settings used
to take the photo, such as make, model, shutter speed, and f-stop. Camera Data 2 lists read-only file information
about the photo, including pixel dimensions and resolution
Video Data Lists information about the video file, including video frame width and height, and lets you enter
information such as tape name and scene name.
Audio Data Lets you enter information about the audio file, including the title, artist, bit rate, and loop settings.
Mobile SWF Lists information about mobile media files, including title, author, description, and content type.
Categories Lets you enter information based on Associated Presscategories.
Origin Lets you enter file information that is useful for news outlets, including when and where the file was created,
transmission information, special instructions, and headline information.
DICOM Lists patient, study, series, and equipment information for DICOM images.
History Displays Adobe Photoshop history log information for images saved with Photoshop. The History tab
appears only if Adobe Photoshop is installed.
Illustrator Lets you apply a document profile for print, web, or mobile output.
Advanced Displays fields and structures for storing metadata by using namespaces and properties, such as file
format and XMP, Exif, and PDF properties.
Raw Data Displays XMP text information about the file.
3Type the information to add in any displayed field.
4Click OK to apply the changes.
Export metadata as an XMP file
You can save metadata in an XMP file to share with other users. These XMP files can be used as templates for populating
InCopy documents and other documents created with XMP-enabled applications. Templates you export are stored in
a shared location that all XMP-enabled applications can access. They also appear in the pop-up menu at the bottom of
the File Infodialog box.
1Choose File >File Info (InDesign) or File > Content File Info (InCopy).

110
InCopy documents
Last updated 6/13/2015
2Choose Export from the pop-up menu at the bottom of the dialog box.
3Type a filename, choose a location for the file, and click Save.
To view metadata templates in Explorer (Windows) or the Finder (Mac OS), click the pop-up menu at the bottom
of the File Info dialog box and choose Show Templates Folder.
Import metadata from an XMP file
When you import metadata into a document from an exported XMP template file, you can specify whether to clear all
metadata in the current document and add the new metadata, keep all but the matching metadata, or add matching
metadata to the existing metadata.
❖Choose File >File Info (InDesign) or File > Content File Info (InCopy).
•Choose an XMP file from the pop-up menu at the bottom of the dialog box, select an import option, and click
OK.
•Choose Import from the pop-up menu at the bottom of the dialog box, select an import option, and click OK.
Then double-click the XMP template file you want to import.
Edit metadata in image files
When you generate captions of placed images in InDesign, the metadata from the placed image is used. Although you
can edit the metadata of InDesign documents, you cannot edit the metadata of placed files in InDesign. Instead, change
the metadata of placed images using their original applications, using Finder or Explorer, or using Adobe Bridge or
Adobe Mini Bridge.
1In InDesign, right-click (Windows) or Control-click (Mac OS) the image, and then choose Edit Original.
You can also choose Edit With and then choose an application such as Adobe Illustrator or Adobe Photoshop.
2In the original application, choose File > File Info.
3Edit the metadata, and then click OK.
You can also select an image in Adobe Bridge and choose File > File Info to edit the image metadata. See Add metadata
using the File Info dialog box.
More Help topics
Work with metadata in Adobe
Controlling graphics display
Control graphics’ display performance
You can control the resolution of graphics placed in your document. You can change the display settings for the entire
document or for individual graphics. You can also change a setting that either allows or overrides the display settings
for individual documents.
Change a document’s display performance
A document always opens using the default Display Performance preferences. You can change the display performance
of a document while it is open, but the setting won’t be saved with the document.

111
InCopy documents
Last updated 6/13/2015
If you’ve set the display performance of any images separately, you can override the settings so all objects use the same
settings.
1Choose View > Layout View.
2Choose View > Display Performance, and select an option from the submenu.
3To force objects that you have set individually to display using the document setting, deselect View > Display
Performance > Allow Object-Level Display Settings. (A check mark indicates it is selected.)
Change an object’s display performance
1Choose View > Layout View.
2To preserve the display performance for individual objects when the document is closed and reopened, make sure
Preserve Object-Level Display Settings is selected in Display Performance preferences.
3Choose View > Display Performance, and make sure Allow Object-Level Display Settings is selected.
4With the Selection tool or Direct Selection tool , select an imported graphic.
5Select an imported graphic using the Position tool .
6Do one of the following:
•Select Object > Display Performance, and choose a display setting.
•Right-click (Windows) or Control-click (Mac OS) the image, and choose a display setting from the Display
Performance submenu.
To remove an object’s local display setting, choose Use View Setting in the Display Performance submenu. To remove
local display settings for all graphics in the document, select Clear Object-Level Display Settings in the View > Display
Performance submenu.
Display performance options
These options control how graphics are displayed on the screen, but they do not affect the print quality or exported
output.
Use Display Performance preferences to set the default option used to open all documents, and customize the settings
that define those options. Each display option has separate settings for displaying raster images, vector graphics, and
transparencies.
Fast Draws a raster image or vector graphic as a gray box (default). Use this option when you want to quickly page
through spreads that have lots of images or transparency effects.
Typical Draws a low-resolution proxy image (default) appropriate for identifying and positioning an image or vector
graphic. Typical is the default option, and is the fastest way to display an identifiable image.
High Quality Draws a raster image or vector graphic at High Resolution (default). This option provides the highest
quality but the slowest performance. Use this option when you want to fine-tune an image.
Note: Image display options don’t affect output resolution when exporting or printing images within a document. When
printing to a PostScript device, exporting to XHTML, or exporting to EPS or PDF, the final image resolution depends on
the output options you choose when you print or export the file.

112
InCopy documents
Last updated 6/13/2015
Set default display performance
The Display Performance preferences let you set the default display option, which InCopy uses for every document.
You can change a document’s display performance using the View menu, or change the setting for individual objects
using the Object menu. For example, if you work on projects that contain numerous high-resolution photos (such as a
catalog), you may prefer to have all your documents open quickly. You can set the default display option to Fast. When
you want to see the images in more detail, you can switch the document view to Typical or High Quality (leaving the
preference set to Fast).
You can also choose to view or override display settings applied to individual objects. If Preserve Object-Level Display
Settings is selected, any settings applied to objects are saved with the document.
1Select Edit > Preferences > Display Performance (Windows) or InCopy > Preferences > Display Performance (Mac
OS).
2For Default View, select Typical, Fast, or High Quality. The display option you choose applies to all documents you
open or create.
3Do one of the following:
•To save display settings applied to individual objects, select Preserve Object-Level Display Settings.
•To display all graphics using the default display option, deselect Preserve Object-Level Display Settings.
4For Adjust View Settings, choose the display option you want to customize, and then move the slider for Raster
Images or Vector Graphics to the desired setting.
5Click OK.
Each display option has separate settings for raster (bitmap) images, vector graphics, and transparency effects.
Customize the display performance options
You can customize the definitions of each display performance option (Fast, Typical, and High Quality). Each display
option has separate settings for raster (bitmap) images, vector graphics, and transparency effects.
Managed (linked) InCopy stories include low-resolution proxy data for images so that the full-resolution image doesn’t
have to be downloaded from the server whenever the file is checked out.
1Select Edit > Preferences > Display Performance (Windows) or InCopy > Preferences > Display Performance (Mac
OS).
2For Adjust View Settings, choose the display option you want to customize.
3For each display option, move the slider for Raster Images or Vector Graphics to the desired setting:
Gray Out Draws an image as a gray box.
Proxy Draws images at proxy resolution (72 dpi).
High Resolution Draws images at the maximum resolution supported by the monitor and current view settings.
4For each display option, move the slider for Transparency to the desired setting:
Off Displays no transparency effects.
Low Quality Displays basic transparency (opacity and blend modes), and transparency effects (drop shadow and
feather) are shown in a low-resolution approximation.

113
InCopy documents
Last updated 6/13/2015
Note: In this mode, page contents are not isolated from the background; therefore, objects with blend modes other than
Normal might appear different in other applications and final output.
Medium Quality Displays low-resolution drop shadows and feathers. This mode is recommended for most work
unless the document is particularly transparency-heavy, or has many transparency effects.
High Quality Displays higher-resolution (144 dpi) drop shadows and feathers, CMYK mattes, and spread isolation.
Note: When a document’s blending space is CMYK and you have either enabled the overprint preview mode or soft
proofing, opacity matting is done in CMYK rather than RGB. This means that partially transparent CMYK colors
display as tinted CMYK colors.
5To view anti-aliasing for text, stroke, fill, and other page items, choose Enable Anti-aliasing. If text is converted to
outlines, then the resulting outlines can be anti-aliased (Mac OS only).
6To set the point size below which text displays as a dimmed bar, type a value for Greek Type Below.
7Click OK.
To reset all controls back to the original default settings, click Use Defaults.
Frame grids
About frame grids in InCopy documents
When you create a new document in InCopy, you can decide whether the text area will contain a frame grid or plain
text frame. A frame grid includes a set of squares into which Japanese characters appear. Frame grids are essentially the
same as plain text frames in function and appearance except that they contain grids that can affect the appearance of
text.
Frame grids have the following characteristics:
•Frame grids contain character attribute settings. These preset character attributes are applied to placed text. Plain
text frames, meanwhile, do not have character attribute settings. When text is placed, it takes on the character
attributes currently selected in the Character panel.
•Frame grid character attributes can be changed using File >Document Setup. Because plain text frames have no
character attributes, you will need to select some placed text and set attributes using the Character panel. You can
also select text placed in a frame grid and use the Character panel to change the character attributes.
•The grid of the frame grid is determined by the grid attributes (text direction, vertical and horizontal percentage,
character aki, and line aki). You cannot change the color of a frame grid in InCopy.
•When you place the InCopy document into an existing InDesign frame grid or text frame, the InDesign settings are
used to format the text. If you click the loaded text icon while placing the InCopy document, the InCopy document
maintains the text area setting defined in InCopy.
•Unlike InDesign, InCopy does not have a layout grid or named grids.
•Frame grids appear only in Layout View when Show Frame Grid is selected. Show Frame Grid is turned on by
default.

114
InCopy documents
Last updated 6/13/2015
Document setup options for frame grids
When Frame Grid is selected for Text Area in the New Document or Document Setupdialog box, the following options
are available:
Vertical and Horizontal Grid Scaling Specify the grid scaling for full-width Japanese characters in percentage.
Char Aki Specify the spacing between characters. This value is used for the grid mesh spacing.
Line Aki Enter a value to specify the grid line spacing. The value used here is the distance between the bottom (or left)
edge of the character embox for the first line to the top (or right) edge of the character embox for the next line.
View frame grids
Frame grids are shown by default.
1Choose View > Layout View.
2Choose View > Grids & Guides > Show Frame Grid.
If the frame grid still does not appear, choose File >Document Setup, and make sure that Frame Grid is selected from
theWork Area menu.
Convert text frames and frame grids
In stand-alone documents, you can convert plain text frames into grid frames or frame grids into text frames. When
plain text frames are converted into frame grids, for text that has not had a character style or paragraph style applied in
the story, the frame grid's document defaults are applied. (See About frame grids in InCopy documents.)
You cannot apply grid format directly to documents that don’t have frame grids. After converting the text area into a
frame grid, you can apply grid format attributes by applying a predetermined grid format to a frame grid using text that
has not been given a paragraph style. (See Apply grid format to text.)
Note: Since character attributes are not set for text frames, changing a frame grid with character attributes into a plain text
frame may cause reformatting. For example, when a frame grid with Character Aki set to -1H is converted into a plain text
frame, character spacing becomes 0H, and the characters will be slightly spread out. Since the frame grid settings are
preserved, converting back to a frame grid will display character spacing at the original value of -1H.
Convert a text frame into a frame grid
1Choose File > Document Setup.
The Document Setup option is dimmed if you’re working with content that is linked to InDesign. For linked content,
change the settings in InDesign.
2From the Text Area menu, choose Frame Grid.
3Specify the frame grid attributes. (See Document setup options for frame grids.)
4Click OK.
To reformat the text according to grid attributes, select the text, and choose Edit > Apply Grid Format.
Convert a frame grid to a plain text frame
1Choose File > Document Setup.
The Document Setup option is dimmed if you’re working with content that is linked to InDesign. For linked content,
change the settings in InDesign.
2From the Text Area menu, choose Text Frame.
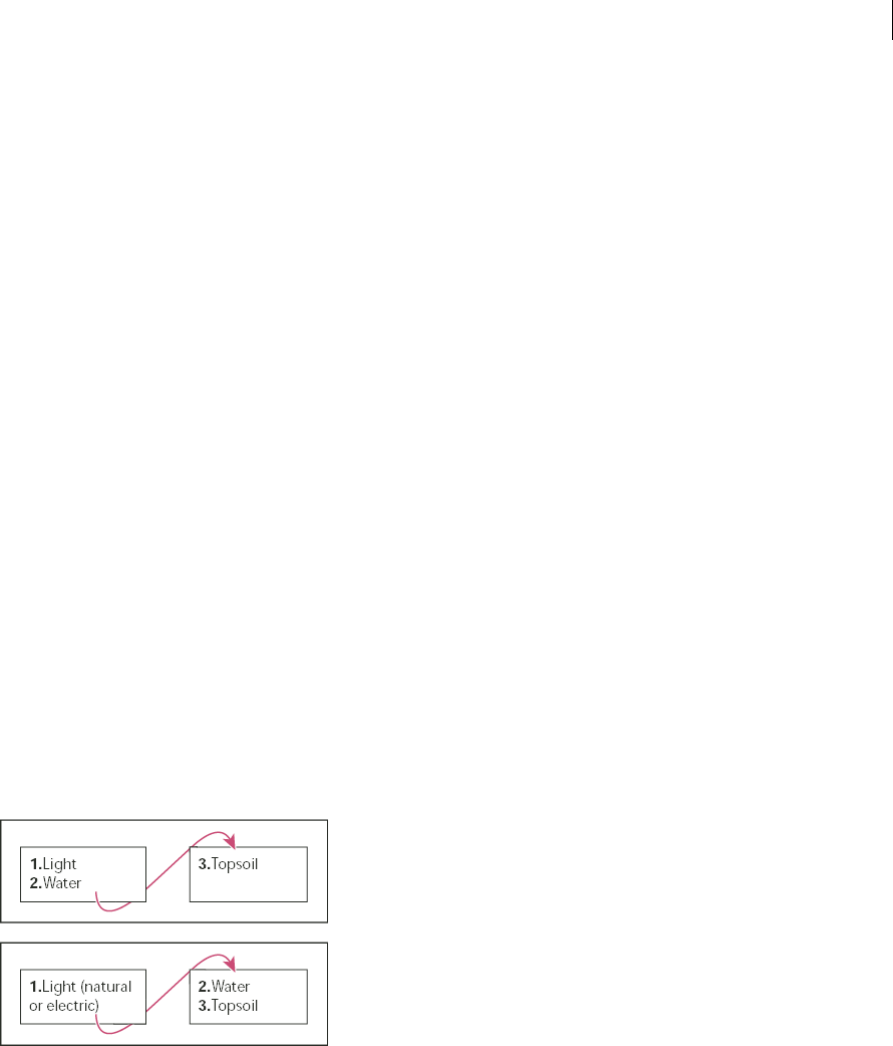
115
InCopy documents
Last updated 6/13/2015
3Click OK.
More Help topics
Work with stand-alone documents
Frames, grids, rulers, and guides
About frames in InCopy files
As in Adobe InDesign, all InCopy text and graphics appear inside frames. For linked documents, InDesign controls the
frame placement and design for a publication. You can see the frame structure of the InDesign document in InCopy
Layout view.
Modifying frames
You (or someone on your team) must make any changes to frames from within the InDesign document, unless the
frames are for inline graphics. You can move, scale, rotate, or shear inline graphics frames, but not other frames. For
more information, see your workflow documentation.
Threading text
A long story can flow from one frame to other frames that are connected in sequence, or threaded. A threaded story
begins on a particular column of a page and can continue on any other columns and pages of the publication. The
InDesign user always sets up the threading sequence for an InCopy story.
When you add text to a threaded story, the story flows through each successive frame until all of the assigned frames
are full.
If the text doesn’t fit in its allotted frame space, the hidden part of the story is called overset text.
Change measurement units and rulers
InCopy includes a vertical depth ruler for copyfitting text in Galley and Story views, as well as horizontal and vertical
rulers in Layout view for measuring layouts. By default, rulers begin measuring from the upper-left corner of a page or
spread. You can change this by moving the zero point.
You can work with several standard measurement units, change these settings at any time, and temporarily override the
current measurement units as you enter a value. Changing the measurement units doesn’t move guides, grids, and
objects, so when ruler tick marks change, they might not line up with objects aligned to the old tick marks.
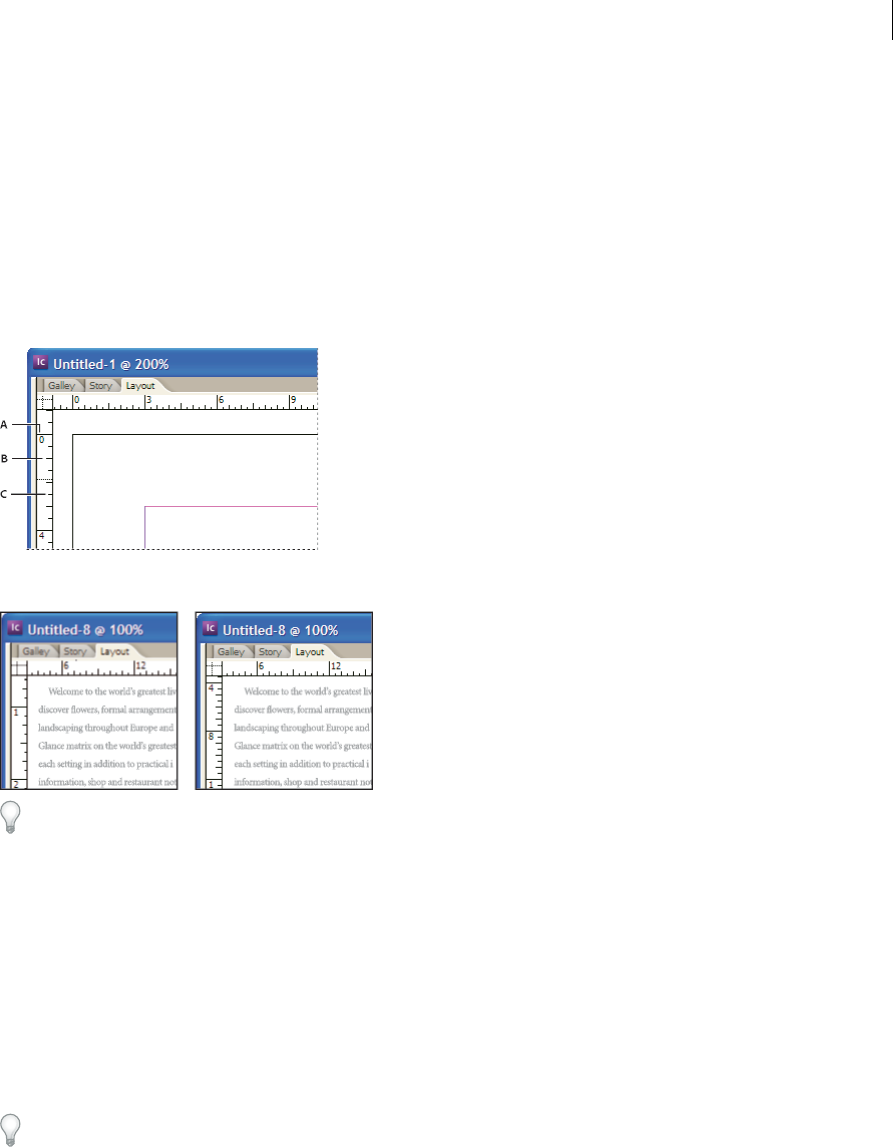
116
InCopy documents
Last updated 6/13/2015
You can set up different measurement systems for horizontal and vertical rulers. For example, many newspapers
measure horizontal layouts in picas and vertical text stories in inches. The system you select for the horizontal ruler
governs tabs, margins, indents, and other measurements. Each spread has its own vertical ruler; however, all vertical
rulers use the same settings you specify in the Units & Increments section of the Preferences dialog box.
The default unit of measure for the rulers is picas (a pica equals 12 points). You can change the ruler units and control
where the major tick marks appear on a ruler. For example, if you change the ruler unit for the vertical ruler to 12 points,
a major ruler increment appears every 12 points (if such a display is possible in the current magnification). The tick
mark labels include your customized major tick marks, so when the ruler reads 3 in the same example, it marks the
third instance of the 12-point increment, or 36 points.
A Labeled tick marks B Major tick marks C Minor tick marks
Setting custom ruler increments in the vertical ruler is useful for lining up a ruler’s major tick marks with a baseline
grid.
Specify the measurement units
You can set custom measurement units for the on-screen rulers and for use in panels and dialog boxes. You can also
change these settings at any time and temporarily override the current measurement units as you enter a value.
1Choose Edit > Preferences > Units & Increments (Windows) or InCopy > Preferences > Units & Increments (Mac
OS).
2For Horizontal and Vertical, choose the measurement system you want to use for horizontal and vertical dimensions
in rulers, dialog boxes, and panels; choose Custom, and type the number of points at which you want the ruler to
display major tick marks. Click OK.
You can also change ruler units by right-clicking (Windows) or Control-clicking (Mac OS) a ruler, and choosing the
units from the context menu.
Override default measurement units
You can specify a unit of measurement that is different from the default.
❖Highlight the existing value in a panel or dialog box, and type the new value using the notation in the following table:

117
InCopy documents
Last updated 6/13/2015
Japanese measurement units
Q and Ha are units used in a Japanese manual or automatic photo composer to show font size, tracking or leading
length. Each unit has a value of 0.25mm. Q is used only to express font size, Ha can be used to express direction and
length for leading, object spacing and similar elements.
You can also use points (also known as American points) to indicate font size on computers, or Adobe PostScript®
points to indicate leading or spacing. One American point is 0.35146 millimeters, and there are 72.27 American points
in 1 inch and 72 PostScript points in 1 inch.
Change the zero point
The zero point is the position at which the zeros on the horizontal and vertical rulers intersect. By default, the zero point
is at the top left corner of the first page of each spread. This means that the default position of the zero point is always
the same relative to a spread, but may seem to vary relative to the pasteboard.
The X and Y position coordinates in the Control panel, Info panel, and Transform panel are displayed relative to the
zero point. You can move the zero point to measure distances, to create a new reference point for measurement, or to
tile oversized pages. By default, each spread has one zero point at the upper left corner of the first page, but you can also
locate it at the binding spine, or specify that each page in a spread has its own zero point.
To specify: Type these letters after the
value:
Examples Result
Q q 6q 6 Q
Ha h6h 6 Ha
Inches i
in
inch
"
5.25i
5.25in
5.25inch
5.25”
5 1/4 inches
Millimeters mm 48mm 48 millimeters
Centimeters cm 12cm 12 centimeters
Picas p3p 3 picas
Points pt
p (before value)
6pt
p6
6 points
American points ap 6ap 6 American points
Picas and points p (between values) 3p6 3 picas, 6 points
Pixels px 5px 5 pixels
Ciceros c5c 5 ciceros
Agates ag 5ag agates
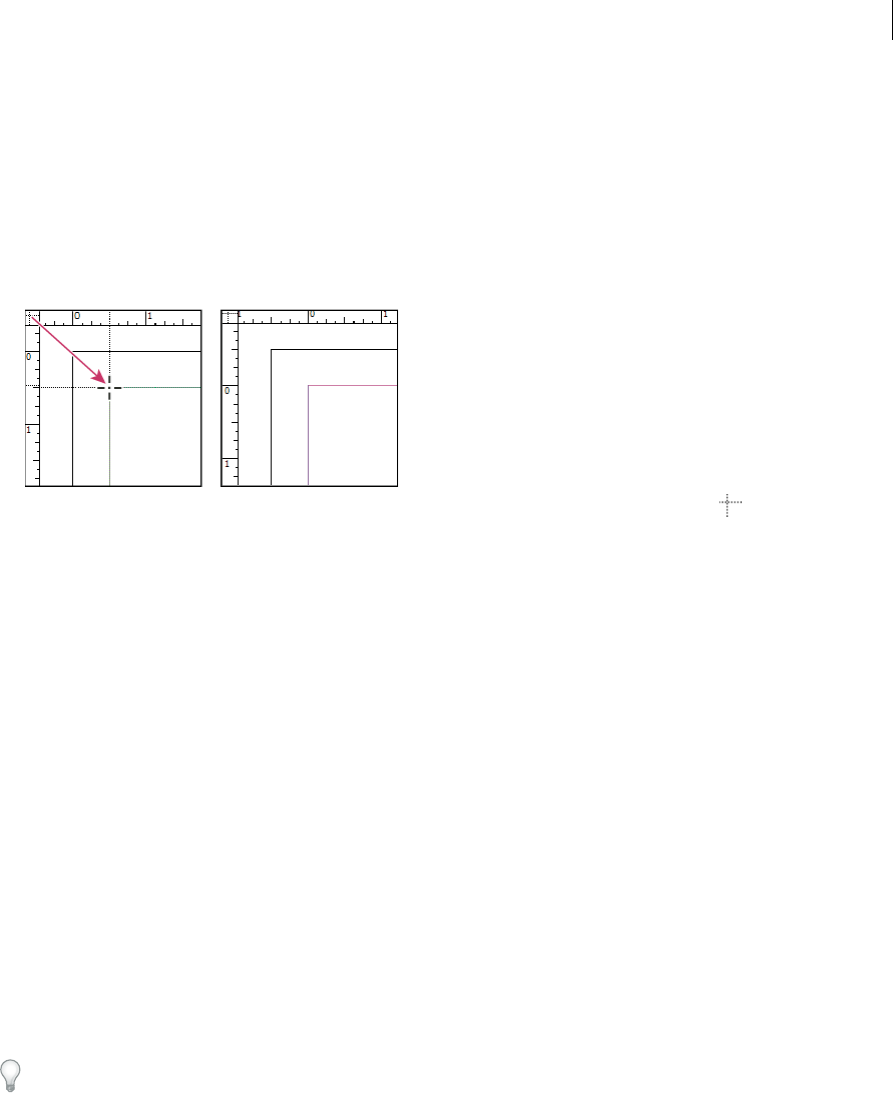
118
InCopy documents
Last updated 6/13/2015
Adjust the zero point
When you move the zero point, it moves to the same relative location in all spreads. For example, if you move the zero
point to the top left corner of the second page of a page spread, it will appear in that position on the second page of all
other spreads in the document.
❖Do one of the following:
•To move the zero point, drag from the intersection of the horizontal and vertical rulers to the position on the
layout where you want to set the zero point.
•To reset the zero point, double-click the intersection of the horizontal and vertical rulers .
•To lock or unlock the zero point, right-click (Windows) or Control-click (Mac OS) the zero point of the rulers,
and choose Lock Zero Point in the context menu.
Change the default zero point
Using the Origin setting in the Preferences dialog box, you can set the default zero point for rulers as well as the scope
of the horizontal ruler. The scope determines whether the ruler measures across the page, across the entire spread, or,
for multipage spreads, from the center of the spine.
If you set the ruler origin at each spread’s binding spine, the origin becomes locked at the spine. You won’t be able to
reposition the ruler origin by dragging it from the intersection of the rulers unless you choose another origin option.
1Choose Edit > Preferences > Units & Increments (Windows) or InCopy > Preferences > Units & Increments (Mac
OS).
2In the Ruler Units section, in the Origin menu, do one of the following:
•To set the ruler origin at the top-left corner of each spread, choose Spread. The horizontal ruler measures across
the entire spread.
•To set the ruler origin at the top-left corner of each page, choose Page. The horizontal ruler starts at zero for each
page in a spread.
•To set the ruler origin at the center of the spine, choose Spine. The horizontal ruler measures in negative numbers
to the left of the spine and positive numbers to the right of the spine.
You can also change horizontal ruler origin settings using the context menu that appears when you right-click
(Windows) or Control-click (Mac OS) the horizontal ruler.
Use grids
In Layout view, you can view (or hide) a framework of grids and guides to show the position and alignment of objects.
In most work systems, a designer working with InDesign sets up the grids and guides for the publication. InCopy users
can see these layout aids after an InCopy story is linked to the InDesign document.
You can create grids within InCopy. But, because InDesign grids override InCopy settings when files are linked, this
feature is more useful for stand-alone documents that you publish directly from InCopy.
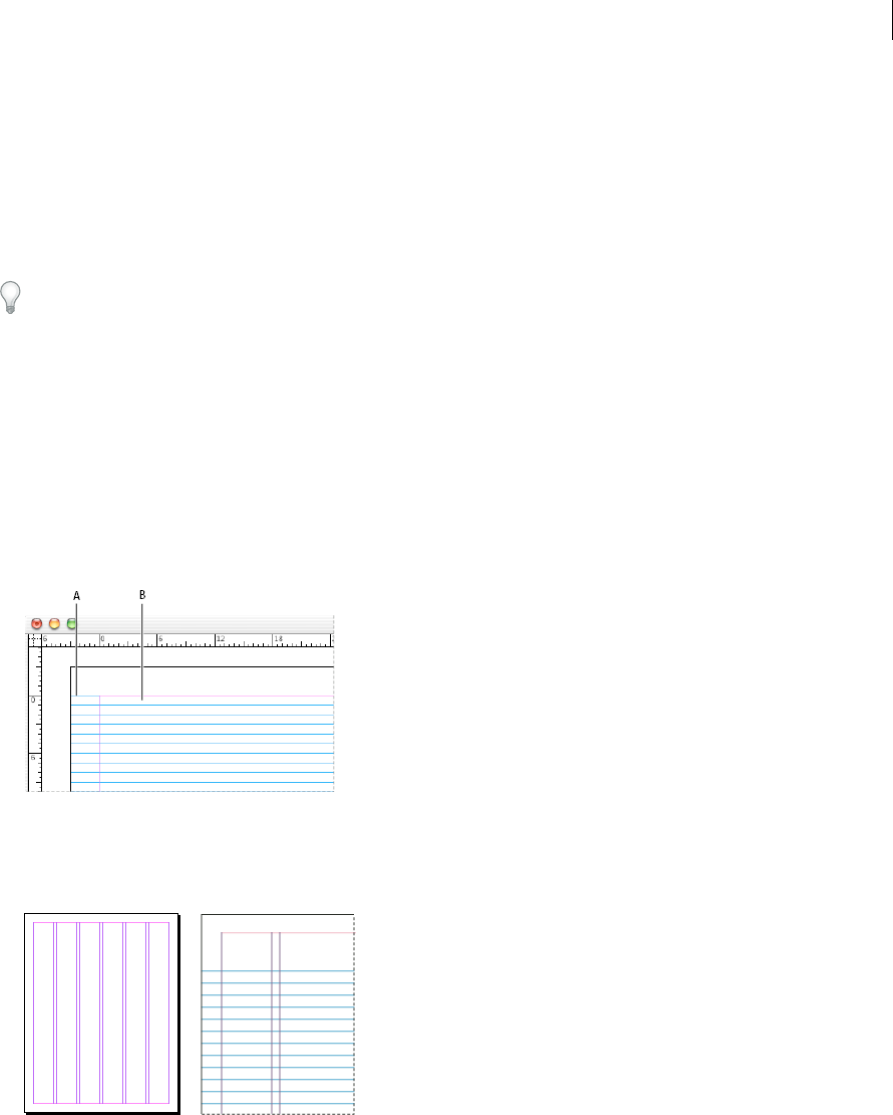
119
InCopy documents
Last updated 6/13/2015
These grids and guides are never visible on printed or exported output. One set of rulers and grids exists per page, but
a guide can exist across all pages of a spread or within only a single page.
Note: Grids, rulers, and guides are not available in Galley or Story view.
Set up a baseline grid
Use Grid Preferences to set up a baseline grid for the entire document.
You can set up a baseline grid for a frame by using the Text Frame Options. (See Change text frame properties .)
1Choose Edit > Preferences > Grids (Windows) or InCopy > Preferences > Grids (Mac OS).
2Specify a baseline grid color by choosing a color in the Color menu. You can also choose Custom in the Color menu.
3For Relative To, specify whether you want the grid to start at the top of the page or the top margin.
4For Start, type a value to offset the grid from either the top of the page or the top margin of the page, depending on
the option you choose from the Relative To menu. If you have trouble aligning the vertical ruler to this grid, try
starting with a value of zero.
5For Increment Every, type a value for the spacing between grid lines. In most cases, type a value that equals your
body text leading, so that lines of text align perfectly to this grid.
A First grid line B Increment between grid lines
6For View Threshold, type a value to specify the magnification below which the grid does not appear. Increase the
view threshold to prevent crowded grid lines at lower magnifications.
7Click OK.
Note: The Snap To Guides command controls both snapping to guides and snapping to the baseline grid.
Set up a document grid
1Choose Edit > Preferences > Grids (Windows) or InCopy > Preferences > Grids (Mac OS).
2Specify a document grid color by choosing a color in the Color menu. You can also choose Custom in the Color
menu.
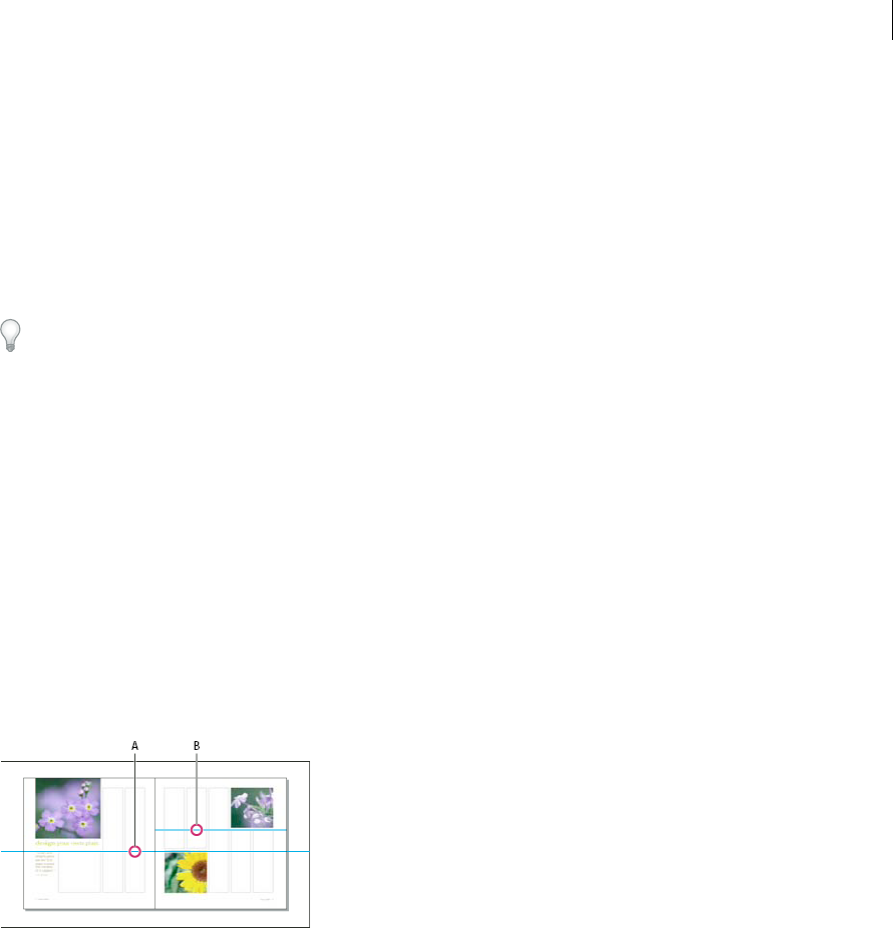
120
InCopy documents
Last updated 6/13/2015
3To set horizontal grid spacing, specify a value for Gridline Every in the Horizontal section of the Document Grid
section, and then specify a value for Subdivisions between each grid line.
4To set vertical grid spacing, specify a value for Gridline Every in the Vertical section of the Document Grid section,
and then specify a value for Subdivisions between each grid line.
5Do one of the following, and click OK:
•To put the document and baseline grids behind all other objects, make sure that Grids In Back is selected.
•To put the document and baseline grids in front of all other objects, deselect Grids In Back.
To put guides behind all other objects, you can also choose Guides In Back in the context menu that appears when you
right-click (Windows) or Control-click (Mac OS) an empty area of the document window.
Show or hide grids
•To show or hide the baseline grid, choose View > Grids & Guides > Show/Hide Baseline Grid.
•To show or hide the document grid, choose View > Grids & Guides > Show/Hide Document Grid.
•To show or hide the layout grid, choose View > Grids & Guides > Show/Hide Layout Grid.
•To show or hide frame grids, choose View > Grids & Guides > Show/Hide Frame Grid.
View ruler guides
Ruler guides are different from grids in that they can be positioned freely on a page or on a pasteboard. InDesign users
can create two kinds of ruler guides: pageguides, which appear only on the page on which they create them, or
spreadguides, which span all pages and the pasteboard of a multiple-page spread. You can view ruler guides if they exist
in the InDesign document or assignment file, but you cannot create them in InCopy.
A Spread guide B Page guide
Show or hide ruler guides
1Make sure that you are in Layout view; if necessary, click the Layout view tab at the top of the edit pane.
2Choose View > Grids & Guides > Show/Hide Guides.
Display ruler guides behind objects
By default, ruler guides appear in front of all other guides and objects. However, some ruler guides may block your view
of objects, such as lines with narrow stroke widths.
You can change the Guides In Back preference to display ruler guides in front of or behind all other objects. However,
regardless of the Guides In Back setting, objects and ruler guides are always in front of margin and column guides.
1Choose Edit > Preferences > Guides & Pasteboard (Windows) or InCopy > Preferences > Guides & Pasteboard (Mac
OS).
2Select Guides In Back, and click OK.
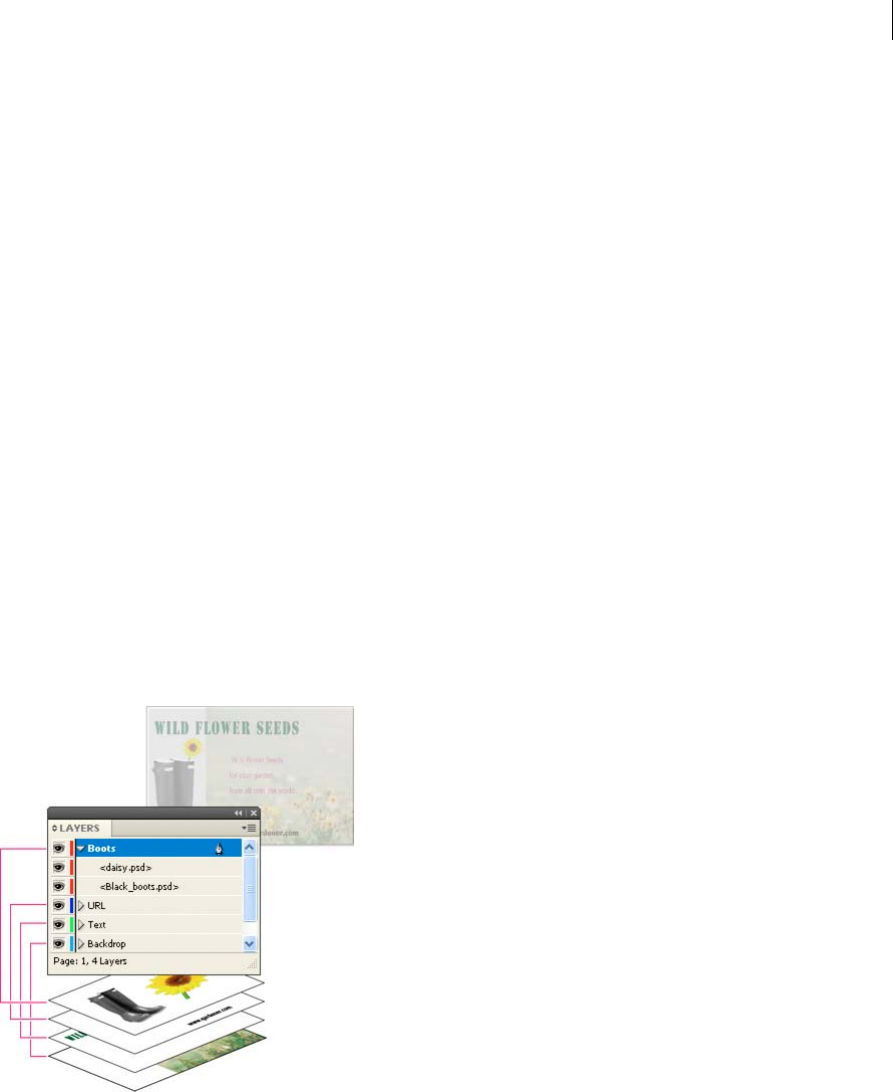
121
InCopy documents
Last updated 6/13/2015
Customize the pasteboard and guides
1In the Edit menu (Windows) or InCopy menu (Mac OS), choose Preferences > Guides & Pasteboard.
2To change the color of margin or column guides, choose a preset color from a menu, or choose Custom and specify
a color using the color picker.
3To make the pasteboard bigger or smaller, enter a value for Minimum Vertical Offset.
4Click OK.
Use layers
Layers are like transparent sheets stacked on top of each other. If a layer doesn’t have objects on it, you can see through
it to any objects on layers behind it.
Only InDesign users can create layers. InCopy users can show or hide layers, show or hide objects on layers, and change
layers settings. If the InDesign user created multiple layers in the document, you can hide layers in InCopy, letting you
edit specific areas or kinds of content in the document without affecting other areas or kinds of content. For example,
if your document prints slowly because it contains many large graphics, you can hide all non-text layers and quickly
print the text layer for proofreading.
Additional layer notes:
•Objects on masters appear at the bottom of each layer. Master objects can appear in front of document page objects
if the master page objects are on a higher layer.
•Layers involve all pages of a document, including masters. For example, if you hide Layer 1 while editing page 1 of
your document, the layer is hidden on all pages until you decide to show it again.
Show and hide layers
1Choose Window > Layers.
2In the Layers panel, do any of the following:
•To hide a specific layer, click the eye icon to the left of the layer name.
•To show a specific layer, click the space to the left of the layer name.
•Click a triangle next to a layer name to display the layer objects. Click the eye icon to show or hide individual
objects.


123
Last updated 6/13/2015
Chapter 5: InCopy and InDesign
Sharing content
Exporting content from InDesign
Exporting content from InDesign to InCopy establishes a link between the two applications. You export InDesign text
frames, graphics frames, and their contents to InCopy using either of two methods:
•Create a container file (*.icma)—called an assignment—and add related groupings of document items (such as the
text and graphics of a story) to the assignment so they can be worked on together. Content within assignments is
exported as *.icml files.
•Export text and graphics frames separately (including placeholder frames) using the Edit > InCopy > Export menu
commands. Exported content is saved as *.icml files.
After content is exported, small icons appear at the top left of exported frames in InDesign and InCopy, and in the
Assignments panel. A link to the exported file appears in the Links panel. These icons indicate the status of managed
frames and they differentiate managed frames from those that aren’t part of the workflow. All exported content appears
in the Assignments panel. Content exported using the Export menu commands appears in the Unassigned InCopy
Content section of the Assignments panel list. While both methods establish a controlled connection between InCopy
content and an InDesign document, the primary method is to use assignment files.
Exporting content makes the content available for users to check out while maintaining a link to the original InDesign
document. (This link is made from within InDesign; you cannot create the link from InCopy.)
Once the content is exported, InCopy users can see (but not change) the page layouts, styles, and so forth as they appear
in the InDesign document.
Note: You can also create text or anchored graphics using InCopy and then place them in InDesign.
Assignments panel overview
The primary tool for working with assignments is the Assignments panel (Window > Assignments in InCopy, Window
> Editorial > Assignments in InDesign). The Assignments panel displays the files exported from the currently active
InDesign document, and an icon indicates their status. The Assignments panel menu also contains commands that
control import version and file-management functions between InCopy and InDesign. When you open an assignment
in InCopy, the assignment name and its contents appear in the Assignments panel. You can double-click text and
graphics frames in the Assignments panel to select them in the document window.
Note: All content exported to InCopy or added to an assignment is also listed in the Links panel. Although you can do some
workflow management tasks, such as checking out and checking in content, the recommended panel for these tasks is the
Assignments panel.
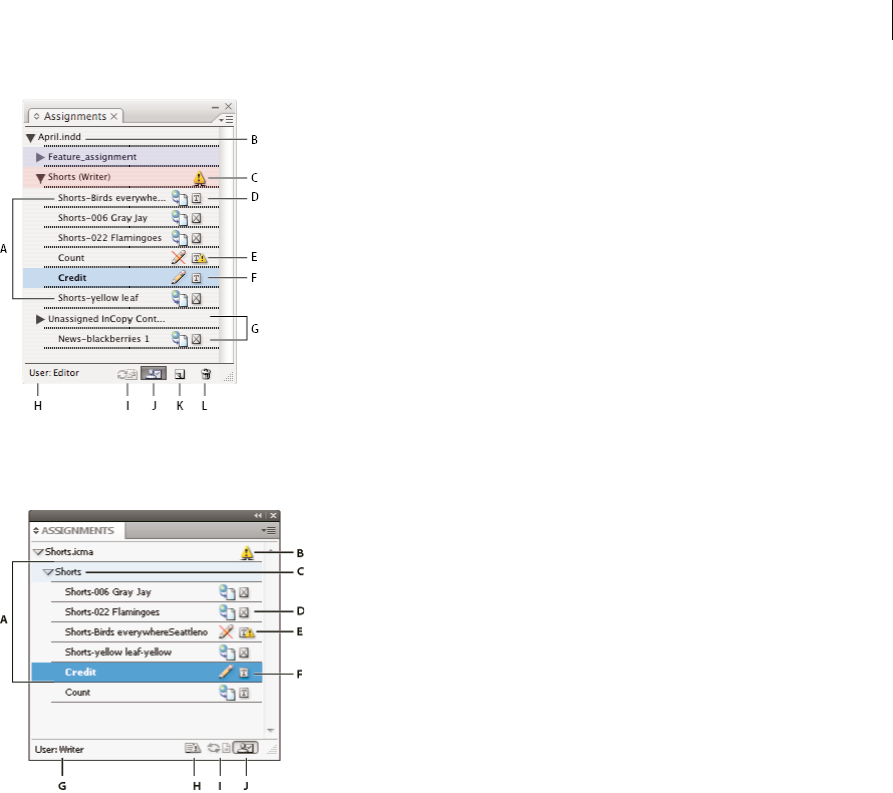
124
InCopy and InDesign
Last updated 6/13/2015
A InCopy content names B InDesign document name C Assignment Out Of Date status D Available And Text Up To Date status E In Use And
Text Out Of Date status F Editing And Text Up To Date status G Unassigned content H User name I Update Content button J Check Out/Check
In Selection button K New Assignment button L Delete Selected Assignments/Remove button
A InCopy content names B Assignment Out Of Date status C Assignment name D Available And Text Up To Date status E In Use And Text
Out Of Date status F Editing And Text Up To Date status G User name H Update Design button I Update Content button J Check Out/Check
In Selection button
Assignment files
In InDesign, assignment files are containers for organizing collections of page items. For example, you might want to
select all the items in a story (headline, byline, copy, graphics, and captions), and then assign them to one InCopy user.
Adding those items to an assignment provides a convenient way for InCopy users to access only the content for which
they are responsible. Assignment files (*.icma) appear in the file system, in the InCopy story bar, and in status messages.
Only InDesign users can create assignment files; only InCopy users can open them.
When you create an assignment, a folder is created in the same location as the InDesign document by default. This
assignment folder includes the *.icma assignment files and a content subfolder that contains any exported InCopy story
files (in .icml format) that are part of images or other resources. Once the assignment is created, store the project folder
in a location where all users have access to it, or create and distribute an assignment package. If content is exported
before it’s added to an assignment, the files on disk are not moved to the content folder of the assignment file.
Assignment files include the following:
•Links or pointers to the associated page items, including placeholder frames. These elements let the InCopy user
open a single file in InCopy and have editorial access to multiple page items.
•Any transformations on the graphics included in the assignment, such as moving, scaling, rotating, or shearing.
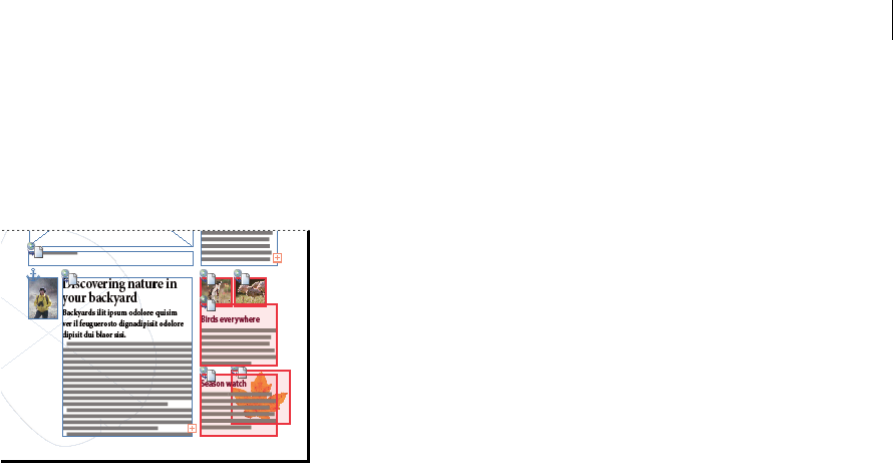
125
InCopy and InDesign
Last updated 6/13/2015
•Page geometry, so InCopy users can see the layout of the frame and its content that they’re editing without opening
the entire InDesign file.
•Color-coding of assigned frames in the document.
Create assignments and add content (InDesign)
Only InDesign users can create assignments and add content to them. There are several ways to create assignments.
The method you choose usually depends on whether you have content to add at the time you create the assignment.
•Create empty assignment files. From your InDesign document, you can create a series of empty assignments to act
as templates for content to come later.
•Create assignments and add content at the same time.
•Add content to an existing assignment file. You can add linked content—text and graphics that have already been
exported as InCopy content—or you can add selected page items to become linked InCopy content. If one or more
of the selected frames already contain InCopy content files, and none is part of an assignment, you can add them to
a new or existing assignment file.
By default, the assignment folder you create is saved in the same folder as the InDesign document. You can then place
this folder on a server or create and send a package.
Note: If you don’t want InCopy users to place and fit graphics, don’t add graphics frames to an assignment.
Create empty assignment files (InDesign)
1In InDesign, save the document.
2In the Assignments panel, choose New Assignment from the panel menu.
3In the New Assignment dialog box, specify assignment file options and click OK.
Simultaneously create assignments and add content (InDesign)
1In InDesign, create a document that has one or more text frames, graphics frames, or placeholder items, and then
save the document.
2Select the text and graphics frames you want to add.
3Do one of the following:
•From the Assignments panel menu, choose Add To Assignment, and then select New.
•Choose Edit > InCopy > Add [option] To Assi gnment > New.
4In the New Assignment dialog box, specify assignment file options and click OK.

126
InCopy and InDesign
Last updated 6/13/2015
The newly created assignment file includes any frames selected in the document window.
Add content to existing assignments (InDesign)
1Save the InDesign document.
2Select the text and graphics frames you want to add.
3Do one of the following:
•From the Assignments panel menu, choose Add To Assignment, and then select the assignment.
•Drag content from the Unassigned InCopy Content section of the Assignments panel into an existing
assignment.
•Select page items with the Selection tool and drag them to an existing Assignment in the Assignments panel.
•Choose Edit > InCopy > Add [option] To Assignment, and then select the assignment.
4Choose Update All Assignments from the Assignments panel menu to make the content files available to InCopy
users.
Note: You can add content only to assignments in the same document. However, you can import the same content into
multiple documents and add it to an assignment in each of those documents.
Assignment file options (InDesign)
When you create or modify an assignment file, you can set the following options:
Assignment Name The unique identification of the assignment in the Assignments panel, for example “Ocean article.”
This name must conform to the file naming conventions of the operating system.
Assigned To The unique identification of the user assigned to the files. The user’s name appears in parentheses
following the assignment name in the Assignments panel. Entering a name here is for informational purposes only; it
doesn’t grant special rights or permissions to the user.
Color Displays a list of colors for adding a distinctive highlight to the frames of the current assignment in the document
window, and to the assignment names in the Assignments panel. This color coding differentiates frames that belong to
one assignment from frames that belong to another, and it differentiates from unassigned frames. To toggle the display
of this color coding, choose View > Extras > Show/Hide Assigned Frames. In InCopy, the color coding is visible only
in Layout view.
Note: If toggling the display of assigned frames produces unexpected results, those frames might be tagged for XML and
View > Structure > Show Tagged Frames might be enabled. You cannot show assigned frames and tagged frames at the
same time.
Change Click the Change button to specify the location of the assignments folder. By default, the assignments folder is
created in the same location as the InDesign file.
Placeholder Frames Lets InCopy users see the text and graphics frames in the assignment as well as boxes (or other
shapes) representing all other frames on those InDesign pages. All frames and placeholders accurately reflect the size,
shape, and location of the InDesign originals. Placeholder frames are empty shapes that don’t show any of the content
in the InDesign document. The Placeholder Frames option provides the least amount of fidelity, and therefore provides
the fastest performance. In InCopy, the placeholder frames are visible only in Layout view. InCopy users cannot check
out and edit placeholder frames.
Assigned Spreads Lets InCopy users see all assigned frames, as well as the entire contents of other frames that aren’t
part of the assignment, on the same spread. In InCopy, content in frames outside an assignment isn’t editable and is
visible only in Layout view.

127
InCopy and InDesign
Last updated 6/13/2015
All Spreads Exports all content in the InDesign document to the assignment file. This option provides the maximum
amount of fidelity; it also provides the slowest performance because the assignment file displays the design and layout
of every page, including pages not relevant to the section a user is editing.
Linked Image Files When Packaging Includes a copy of linked images in the assignment package. Selecting this option
gives InCopy users access to images but increases the package’s file size. InCopy users can include images while
returning a package.
Export content as separate InCopy files (InDesign)
If your workgroup prefers working with separate files rather than using assignments, you can export InCopy content
without using an assignments file. Compared with creating a single assignment file with references to multiple content
files and layout information, this method creates a separate file (.icml) for each text or graphics frame you specify in
the document. To see the context of the content you are editing, you must also open the associated InDesign document
(.indd).
Cater the InDesign document to suit your workflow needs. For example, if you want all of the editor’s comments to be
exported in a single file, create a layer for the editor to make comments. You can then export all the content on the
selected layer.
Note: A quick way to export content as separate InCopy files is to use the Selection tool to drag selected frames into the
Unassigned InCopy Content in the Assignments panel.
1In InDesign, create a document with one or more text frames, graphics frames, or placeholder items.
2Do either of the following:
•Select the text or graphics frame of a single story, or Shift-click to select multiple frames.
•Click an insertion point in a story, or select some text in a text frame.
3Choose Edit > InCopy > Export, and then choose one of the following options:
Selection Exports all selected text and graphics frames.
Layer Exports all content on the selected layer.
All Stories Exports every story that has not been exported already.
All Graphics Exports every graphic that has not been exported already.
All Graphics And Stories Exports every story and graphic that has not been exported already.
If you export all content in the document, and then add more text or graphics frames to the same document, you
can save time exporting the new ones by using the Export > All Stories (or All Graphics or All Graphics And Stories)
command again. InDesign exports only the new content.
4Enter a name and location for the files, and then click Save.
The file name you specify is used as a prefix for identifying each exported content file in the file system. If you export
multiple text frames, the first several characters of the text are automatically appended to the file name; for example,
“mystory-Upcoming cycling events.icml.” For multiple graphics frames, the file names are formed as “mystory-
graphic,” “mystory-graphic-1,” and so on. The file name appears in the file system, in the InCopy story bar, and in
status messages.
5When prompted, save your InDesign file.
The InCopy content is now managed, and is available to be checked out and edited by other users in the workflow.
Shared content appears in the Links panel just like imported graphics. If you move a shared file manually, you can use
the Links panel to update its link.

128
InCopy and InDesign
Last updated 6/13/2015
When you export content, you see the Available icon on the text frame (InDesign and InCopy), and in the
Assignments panel (InCopy). The word [Editing] appears in the story bar (InCopy).
More Help topics
Workflow icons
Placing InCopy files in InDesign documents
Relink missing assignment files (InDesign)
Best practices for working with managed files
Working with managed files
Open shared content
Only InCopy users can open assignment files (.inca). If an InCopy user opens an InDesign file that contains
assignments, the user will have access to all the managed content, regardless of assignments.
❖Do one of the following.
•In InCopy, choose File > Open, select an assignment file (.icma or .inca), and click Open.
•In InDesign or InCopy, choose File > Open, select an InDesign file (.indd) that contains assigned content, and
click Open.
•Open an assignment package. See Receive packages (InCopy).
The assignment names and their contents appear in the Assignments panel.
Check out content
When you check out an item, a hidden lock file (.idlk) is placed on the file system. Once the content is checked out, you
have exclusive control over its content, and others are locked out from making changes. You can check out InCopy
content only; you cannot check out InDesign documents with layout information.
If you attempt to close an InDesign document containing one or more InCopy content files that are checked out to you,
an alert message appears, prompting you to check in all content. If you close the document without checking in the
content files, they will still be checked out to you the next time you open the InDesign document. Saving the InDesign
document automatically saves every editable InCopy content file.
Check out content (InDesign)
❖Do one of the following:
•In the layout, select the text or graphics frames to edit and choose Edit > InCopy > Check Out.
•In the Assignments panel, select the files and choose Check Out from the panel menu.
When you check out available content in InDesign, you see the Editing icon on the InDesign frame. In InCopy, the
In Use icon appears on the InCopy frame and in the Assignments panel if the assignment files are stored on a local
server.

129
InCopy and InDesign
Last updated 6/13/2015
Check out content (InCopy)
1Do one of the following:
•If the content you want is part of an assignment, choose File > Open and select the assignment file (.icma or
.inca).
•If the content you want was exported as individual files, choose File > Open and select the InCopy file (.icml or
.incx). To see the layout so you can do copyfitting, select the InDesign document.
2Do one of the following:
•To check out a single InCopy content file, choose File > Check Out.
•To check out all content in an assignment at once, select the assignment in the Assignments panel, and choose
Check Out from the panel menu.
•To check out individual items in an assignment, open the assignments list in the Assignments panel, select an
item or multiple items, and choose Check Out from the panel menu.
The Editing icon appears next to the item or items in the Assignments panel, indicating that the content is
checked out to you for your exclusive use.
3If prompted to update the content with changes, click OK.
When you check out available content in InCopy, you see the Editing icon on the InCopy frame, and in the
Assignments panel. In InDesign, the In Use icon appears on the InDesign frame.
Opening managed files (InCopy)
Opening a managed content file (.icml or .incx) directly in InCopy and working with it in Story view may be more
appropriate for quick writing and editing. You do not have to check out an individual managed file to edit it; InCopy
automatically checks it out. When you save and close the file, InCopy automatically checks in the content. The Save
commands are different when you open individual files.
Update assignment files (InDesign)
You can save changes to assignments manually or when you close the current document. Updating an assignment file
is the only way to make layout changes available to InCopy users.
❖Do one of the following:
•To update selected assignments, select them in the Assignments panel and choose Update Selected Assignments
from the Assignments panel menu.
•To update all out-of-date assignments in the current document, choose Update Out-Of-Date Assignments from
the Assignments panel menu. Only assignments that are out of date are updated.
•To update all assignments in the current document, choose Update All Assignments from the Assignments panel
menu.
Note: If an InCopy user has an assignment open when you update the assignment, the Out Of Date icon appears next
to the assignment in the InCopy Assignments panel.
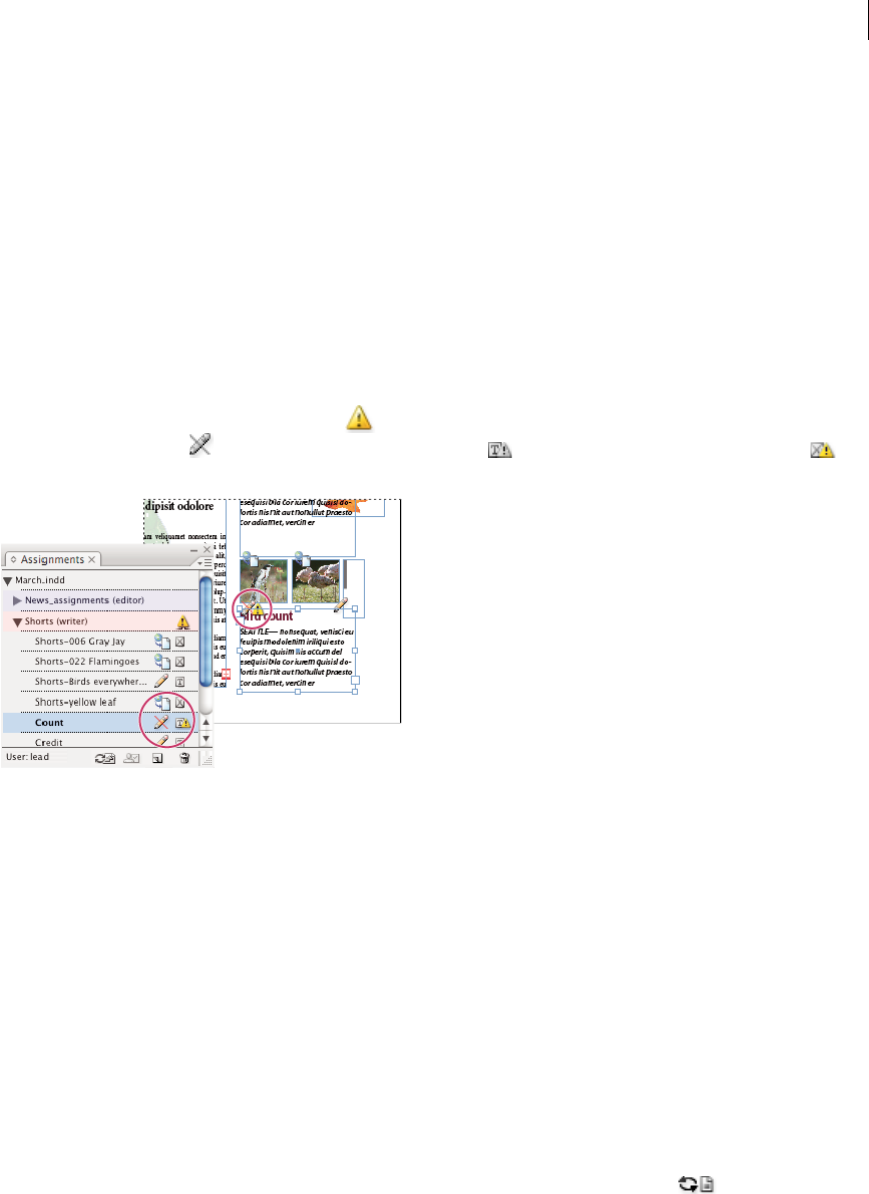
130
InCopy and InDesign
Last updated 6/13/2015
Update content
To make sure that you’re always working on the most up-to-date content, be sure to watch for Out Of Date icons in the
Assignments panel, and then update content accordingly. Updating an InCopy assignment file and its contents or
updating individual content files copies data from the latest file system copy so that the version displayed on your
computer matches the one on the file system. Updating does not require checking in or out and does not give you
editing rights. However, updating can cause problems if another user has deleted your lock.
Note: Updating content does not update content in assignment packages that have not been returned.
A typical updating workflow is as follows:
1The InCopy user opens an assignment file or checks out an individual content file and edits the content.
2The InCopy user saves the content file, which updates the copy on the file system, and continues working.
3The InDesign user sees the Out Of Date icon in both the Assignments panel and the Links panel next to the
selection, and the In Use and Text Content Out Of Date icon or Graphics Content Out Of Date icon on
the associated frame.
4The InDesign user updates the content.
Update content while opening a managed document (InDesign)
1Choose File > Open, locate the file you want to open, and click Open.
2Click Yes when prompted to update the document with the modified content on the file system.
3Do one of the following:
•To let InDesign update the links, click Fix Links Automatically.
•To fix links manually, click Don’t Fix, and then, in the Links panel, select the file to update and choose Update
Link from the panel menu.
Update content while working (InDesign)
❖Do one of the following:
•Select the text or graphics frames in the layout and choose Edit > InCopy > Update Content.
•Select the text or graphics frames in the Links panel, and click the Update Link button or choose Update
Link from the Assignments panel menu.
Update content while working (InCopy)
❖Do one of the following:
•Click an insertion point in the text frame to select it, and then choose File > Update Content.

131
InCopy and InDesign
Last updated 6/13/2015
•Select the content in the Assignments panel, and then click the Update Content button or choose Update
Content from the Assignments panel menu.
You can also update content using the Links panel.
Accidentally updating your work
In most cases, the update commands are disabled for content you have checked out, because that content would always
be up to date. However, an undesirable situation can occur if a different user deletes the lock on checked-out content
(by dragging the lock file [.idlk] to the Recycle Bin [Windows] or Trash [Mac OS]), and modifies the content. In this
case, the update commands can become enabled even while the content is checked out to you, essentially allowing two
people to edit the content at the same time. Updating the content results in lost work. For best results, do not delete the
lock files.
Update the InDesign layout
InDesign users can modify the layout (for example, change the size or location of the text frames of a story) and save
the changes while InCopy users are modifying the text of these text frames. In a shared server workflow, the way InCopy
users are notified about layout changes depends on whether they have opened an assignment file or have checked out
individual content files and also opened the linked InDesign file.
Consider the following:
•If an InDesign user changes the layout of frames in an assignment, the user must update the assignment to make the
design changes available to InCopy users. InDesign does not automatically update assignment files when the
document is saved.
•Once the InDesign user updates the assignment stored on a shared server, the Out Of Date icon appears next to
the assignment in the InCopy Assignments panel. The InCopy user must update the design to see the current layout.
•If an InDesign user changes the layout of exported content that is not part of an assignment, the Out Of Date icon
appears next to the InDesign document name in the Assignments panel, and the document title bar indicates the
layout is out-of-date. InCopy users can update the currently active InDesign document with the latest layout and
style changes.
Updating the layout in InCopy is useful for copyfitting tasks, because the latest appearance and line breaks are visible
in Layout and Galley views.
❖Do one of the following:
•If you have an assignment file open and the Assignments panel shows the Out Of Date icon next to the
assignment name, click the Update Design button , or choose File > Update Design. You cannot undo this
command.
•If you are not working with assignment files and you have more than one InDesign document open, select the
one you want to make active, and choose File > Update Design.
Check in content
When you check in a managed content file, you save it to a shared location on a file system where it can be checked out
by others for editing or other changes. Exporting a text or graphics frame from InDesign also checks it in automatically.
Although a checked-in file is available for editing, it is not actually editable until it is checked out (unless you edit the
content in stand-alone mode in InCopy). Checking in content relinquishes editing control, but does not close the file.
The content remains open on your screen, but in a read-only state.

132
InCopy and InDesign
Last updated 6/13/2015
The LiveEdit Workflow plug-ins do not create multiple file versions. Instead, files are overwritten when updated in
either InCopy or InDesign.
If you are working on an assignment package, return or forward the assignment package after checking it in.
Check in managed content (InDesign)
❖Do one of the following:
•Select the content in the layout and choose Edit > InCopy > Check In.
•In the Assignments panel, select the content and choose Check In from the panel menu.
Check in managed content (InCopy)
❖Do one of the following:
•Select the content in Layout view and choose File > Check In.
•In the Assignments panel, select the content and choose Check In from the panel menu.
Note: You can undo the most recent changes before you check in content.
When you check in a file, the Available icon appears on the text or graphics frame in the InDesign layout, in the
InCopy Layout view, in the Assignments panel, and in the story bar (InCopy).
Save changes (InDesign)
As you work on content you have checked out, you can save your changes and update the file-system copy.
❖Do one of the following:
•To save the selected content without saving changes to the InDesign document or any of its linked files, select the
content in the layout and choose Edit > InCopy > Save Content.
•To save every content file checked out to you, choose File > Save. This type of save does not automatically update
assignment files or checked-out content files in InCopy. However, the checked-out files in InCopy will show the
Out Of Date icon in the Assignments panel.
•To save the InDesign document under a new name with links to any existing InCopy files, choose File > Save As.
This action causes the assignments in the InDesign file to appear as missing until they are updated.
•To save a copy of the currently active document, choose File > Save A Copy. You can choose to give the copy a
new name and location with links to any existing InCopy files.
Save changes (InCopy)
❖Do one of the following:
•To save the InCopy file under the same name and location on the file system, choose File > Save Content. The
file is still checked out to you.
•To save the InCopy content file under a new name, choose File > Save Content As. The newly created content file
is not managed in the workflow. The Save Content As command is available only if you have opened the InCopy
content file (.icml or .incx) directly.
•To save a copy of the currently active InCopy content file, choose File > Save Content Copy. You can choose to
give the copy a new name and location. The saved copy is not managed in the workflow. The Save Content Copy
command is available only if you have opened the InCopy content file (.icml or .incx) directly.

133
InCopy and InDesign
Last updated 6/13/2015
•To save all currently open and checked-out InCopy content files, choose File > Save All Content. This saves all
files to their current locations. The Save All Content command is available only if you have opened an assignment
or InDesign file.
More Help topics
Assignment files
Managed files
Managed files
Managed files
Create and send packages (InDesign)
Links panel overview
Exporting content from InDesign
Work with stand-alone documents
Managed files
Understanding a basic managed-file workflow
For detailed information and instructions, click the links below.
Sharing content
The Adobe InCopy LiveEdit Workflow plug-ins let writers and editors develop copy in InCopy at the same time as
designers prepare layouts in Adobe InDesign. This workflow includes container files, called assignments, for grouping
related pieces of content, and file-locking and notification tools for sharing and updating files in InCopy or InDesign
over a shared network or in compressed packages that can be distributed via e-mail.
In the shared network workflow, InDesign users export text and graphics to a shared location on a file system, where
the files become available to InCopy users who will write and edit the content. Selected text frames and graphics frames
are either exported to the assignment or exported as separate InCopy files, where they become part of the managed
process and are linked to the InDesign document. These shared files are referred to as managed files. When users work
in the assignment file or in the InDesign file on a local server, changes to the associated layout or content are
communicated to all users involved in the workflow for that document.
Multiple InCopy or InDesign users can open the same content file simultaneously, and multiple InCopy users can open
the same assignment file simultaneously. However, only one user at a time can check out the InCopy file for editing.
Others can view the file on a read-only basis. The user who checks out a managed InCopy file can share his or her work
with other users by saving the file to the shared server or by returning the file to the InDesign user; however, other users
can’t make changes to the file until it’s checked back in. This system allows multiple users to access the same file but
prevents users from overwriting each other’s work.
For more information, see the InCopy LiveEdit Workflow guide (PDF) at www.adobe.com/go/learn_liveedit.
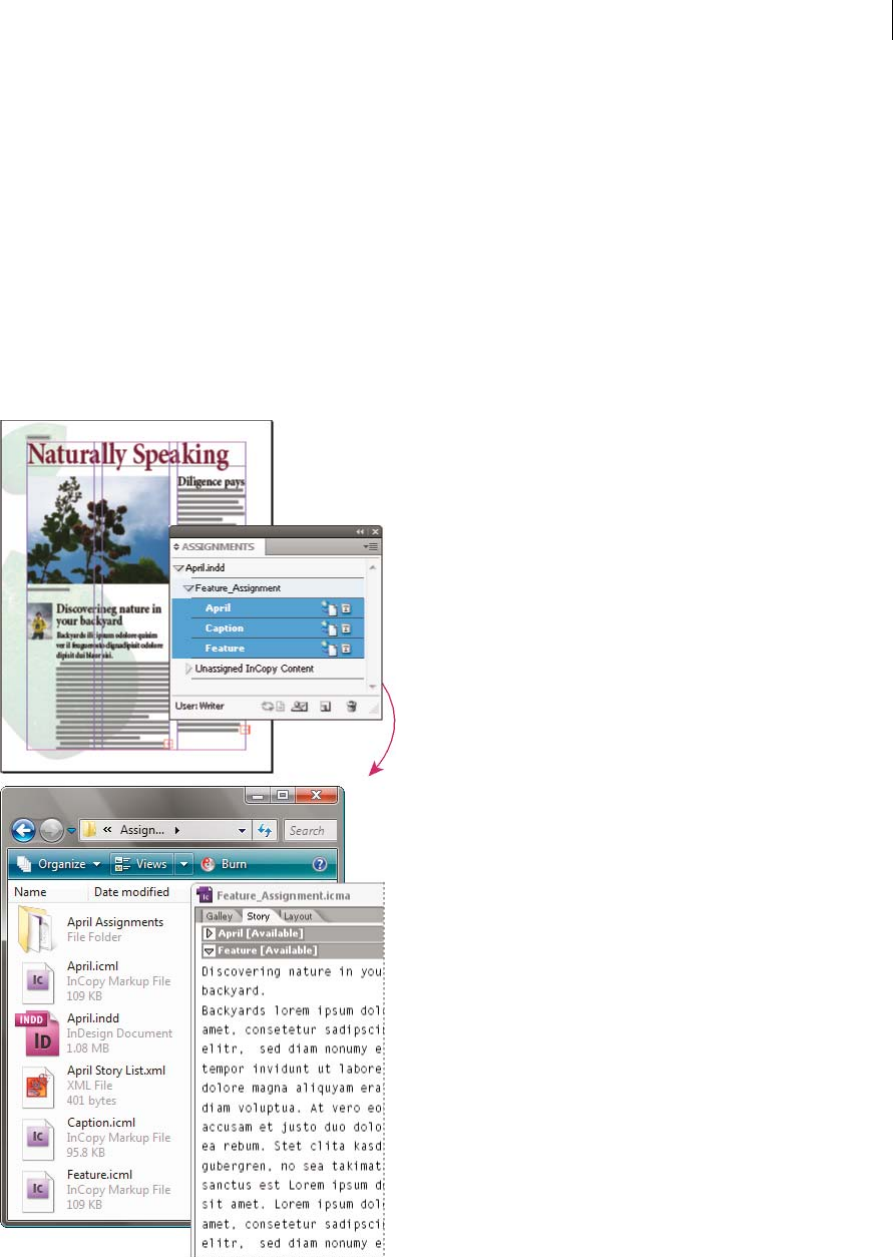
134
InCopy and InDesign
Last updated 6/13/2015
Ways to work with content in InCopy
Content is either a body of text that flows through one or more frames, or an imported graphic. There are five basic
ways to work on content in InCopy: open an assignment file, open an assignment package, open a linked InCopy file,
open an InDesign file that has linked InCopy files, or compose content entirely in InCopy.
Open assignment files created in InDesign
InDesign users can create an assignment file and designate content for sharing. This method lets the InDesign user
associate related components (heading, body, graphics, captions, and so on), and then assign them to different InCopy
users for writing and editing. InCopy users open the assignment file and work on only the components assigned to
them. The live layout view shows how their edited copy relates to the InDesign layout, without opening the entire
InDesign document. However, if the layout changes, the InDesign user must update assignments to notify InCopy users
about the changes. You can share assignment files on a server or through assignment packages.
Open assignment packages

135
InCopy and InDesign
Last updated 6/13/2015
The assignment packages workflow is especially useful when designers and writers are working on the same project but
don’t have access to a local server. In such cases, the InDesign user can create one or more packages and send the
compressed files to the assigned InCopy users via e-mail. InCopy users can open the assignment packages, edit the
contents, and return the packages to the InDesign user, who can then update the document.
Open linked InCopy files exported from InDesign
In certain workflows, InDesign users might export text and graphics as separate files, rather than wrapping them inside
an assignment file. Exporting separate files is useful if you work on unrelated graphics or bodies of text. However,
InCopy users aren’t able to see how the content fits within the InDesign layout.
Open InDesign documents that have linked InCopy files
To see all page items in the context of an entire layout, InCopy users can open and edit an InDesign document in
InCopy. This approach can be useful for editing and copyfitting if seeing the overall layout is important, or for editing
most of the stories in a document rather than a few. After the InCopy user edits the stories, the InDesign user can then
update the links to the modified files. If the InDesign user changes the layout, the InCopy user is notified when the
InDesign document is saved.
Compose content entirely in InCopy

136
InCopy and InDesign
Last updated 6/13/2015
You can create content in InCopy that isn’t associated with an InDesign file. In these stand-alone documents, you can
type text, assign fonts and styles, and import graphics from other applications (such as Adobe Illustrator and Adobe
Photoshop) to enhance the text. You can also assign tags for future XML use. This approach is a good option in an
editorial workflow where the content precedes the design. You can also set up and modify the text area, page size, and
orientation for stand-alone InCopy documents. But if the story is later linked to an InDesign document, the InDesign
settings override the settings used in InCopy.
Managed files
For a file to be managed, it must be added to an assignment file, exported from InDesign as InCopy content, or placed
as InCopy content into InDesign. Managed files communicate both content status and ownership. With managed files,
you can:
•Lock and unlock stories to help preserve file integrity.
•Notify InCopy users when the associated InDesign layout is outdated.
•Identify the user working on a file.
•Notify users when an InCopy content file is outdated, being used by someone, or available for editing. Notification
methods include alert messages, frame icons, status icons in the Links panel, and status icons in the Assignments
panel.
Read-only files
Once a content file becomes managed, it’s read-only to all users in the workflow at all times, except to the person who
has checked it out. The software creates a lock file (*.idlk) when a user checks out a content file, giving that user
exclusive editing control. Read-only files have the following characteristics:
•An InCopy user cannot manually format the text in it. However, if text has been assigned character or paragraph
styles, an InDesign user can change the definition of those styles, thereby changing the formatting of the text even
when the file is checked out to someone else. These style definition changes are reflected in the text once the
InDesign user updates the file.
•In general, neither an InCopy nor InDesign user can change objects, such as text and applied styles, in locked
InCopy content. Some objects, such as character and paragraph styles, are only used by the content. For example,
you can’t change how a character style is applied to objects in locked content, but you can change the character style
itself, thereby changing the appearance of the text.
•An InDesign user can change the margins and columns of the text content as well as the shape, location, and number
of text frames the story occupies.
•An InDesign user can change the geometry and formatting of a graphics frame without checking out the graphic.
An InCopy user cannot change a graphics frame or any formatting on the frame. However, both InDesign and
InCopy users have to check out the graphics frame in order to modify the graphic itself (for example, to rotate or
scale it).
Best practices for working with managed files
Use the following practices to make sure that you work with the most up-to-date content and don’t overwrite someone
else’s work:
•Store assignment files on a server where all team members have access. If team members don’t have access to a
server, you can create and distribute assignment packages.

137
InCopy and InDesign
Last updated 6/13/2015
•When you create an assignment, a special folder is created to hold the assignment file and the content. Use these
assignment folders to maintain assignment and content files. They simplify managing the shared files across a
workgroup and help ensure that users open the correct files.
•In InCopy, open the assignment file instead of an individual InCopy story. That way, you can see the copyfit and
layout information in Galley and Layout views. If you export content without using assignment files, you can see
copyfit and layout information only by opening the InDesign file.
•As soon as you open an assignment file, open an InDesign document, or check out content in either InDesign or
InCopy; make sure that frame edges are showing (View > Extras > Show Frame Edges) so that you can see the frame
icons when they appear.
•In InDesign, if you must remove files from the workflow (because of a production deadline, for example), you can
unlink them or cancel an assignment package.
Managed-file workflow examples
When you establish workflow management between InCopy and InDesign, writers and editors can compose, rewrite,
expand, and edit documents at the same time that designers prepare the layout. Common workflows include managing
files on a local server, sharing files via e-mail packages, or using some combination of the two methods.
These workflows assume that you have a basic InDesign template with layout geometries, styles, and placeholder text.
Layout geometries include page dimensions as well as text and graphics frames. InCopy uses these items to show proper
copyfit information.
Local server workflow
1.In InDesign, create assignments and add content to them.
This step incorporates exported text and graphics frames into the managed process, where they become available to
InCopy users for writing and editing.
2.Make the assignment files available to InCopy users.
Save the files to a server that all workflow users have access to.
3.In InCopy, open the assignment file, and check out and edit a story or graphic.
In InCopy, the files containing content assigned to you appear in the Assignments panel. Whenever you save the file on
a local server, the changes are saved on the file system and anyone working on that document (the InDesign layout or
another managed content file in the document) receives notification of the changes. Those users can update the content
to view the latest changes. The content remains checked out to you until you check it in.
4.In InDesign, work on the layout.
Regardless of whether the content files are being edited in InCopy, InDesign users can work on the document layout;
they don’t have to check out the document. Whenever the InCopy user saves the checked-out content, the InDesign
user can update that content within the layout to see the latest revisions.
5.In InCopy, continue working.
When finished with your edits, check in the content. Other users are then able to check out the content and work on it.
If a user is modifying the layout in InDesign simultaneously, you can update and view the layout geometry as you work.
6.In InDesign, make sure that all the content is checked in.
The managed workflow makes it possible to know who has checked out files. After content files are checked in,
InDesign users can check out the files to finalize the layout as necessary.

138
InCopy and InDesign
Last updated 6/13/2015
E-mail package workflow
1.In InDesign, create and send assignment packages.
Create assignment packages and assign contents to the appropriate InCopy users, and then send the packages to the
InCopy users. The packaged files are automatically checked out to help avoid editing conflicts.
2.In InCopy, open the assignment package, and check out and edit a story or graphic.
If you receive an assignment package in e-mail, double-click the package to open it in InCopy. Changes you make to
the file are saved only locally. Other users are not notified when you make changes.
3.In InDesign, work on the layout.
Regardless of whether the content files are packaged, InDesign users can work on the document layout; they don’t have
to check out the document. If you need to update the layout or assignments, you can send an updated package to the
InCopy users.
4.In InCopy, return the edited package.
When finished with your edits, check in the content and return the modified package. Other users are then able to
check out the content, view the latest revisions, and work on the file.
5.In InDesign, make sure that all the content is checked in.
The managed workflow makes it possible to know who has checked out files. After assignment packages are returned,
stories in assignment packages are checked in. InDesign users can check out the files to finalize the layout as necessary.
Enter user identification
All users in the workflow must have a user name. This identification reveals who has checked out a particular file and
makes this information available to other users. It’s also required in order to check out a file for editing.
If you’ve already specified a user name and want to change it, you must check in any content you have checked out.
Otherwise, changing user identification during an editing session would forfeit your ability to edit content that you
have checked out—it would be checked out to you under a different name.
User identification is application-specific; no single user can have multiple user identifications per application.
Note: The InCopy Notes and Track Changes features also use the specified name to identify the author of a note or a tracked
change.
1Do either of the following:
•Choose File > User.
•Choose User from the Assignments panel menu.
2Type a unique name and click OK.
If you forget to specify a user name using this method, you’re prompted to enter one when you attempt your first
workflow action.
Note: The Color pop-up menu in this dialog box is for identifying editorial notes and tracked changes. You can choose the
color now if you want, but it doesn’t affect anything you do in a managed workflow.
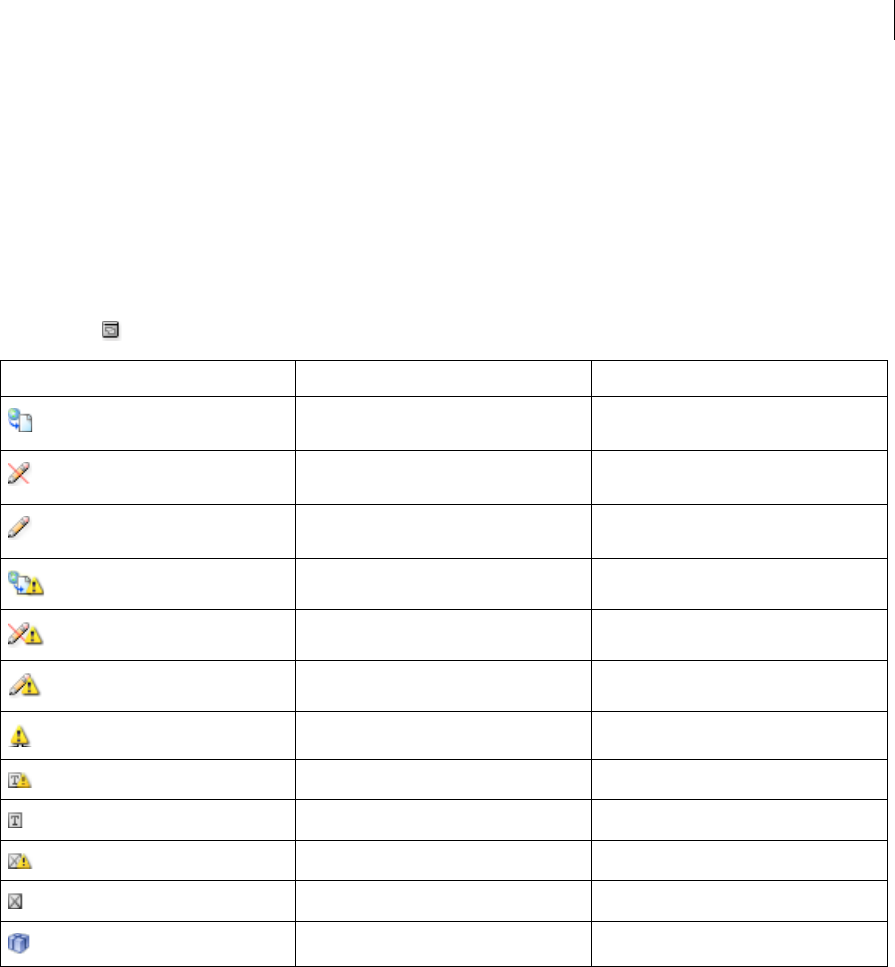
139
InCopy and InDesign
Last updated 6/13/2015
Workflow icons
Icons can appear on text and graphics frames, the Assignments panel, and in the story bar (InCopy only). Edit status
icons appear next to the managed file in the Links panel and Assignments panel, and communicate content status. Icons
appear on frames that contain a linked InCopy story (in the Layout view in both InDesign and InCopy). These icons
also communicate content status and can be used to differentiate between managed and unmanaged content. The
associated tool tip indicates editing status and ownership. To view the frame icons, make sure that frame edges are
showing in InDesign and InCopy (View > Extras > Show Frame Edges).
Note: (InDesign) The InDesign document window must be in Normal Mode for the frame edges to show. (Click the Normal
Mode button at the lower left of the toolbox.)
Note: The Out Of Date icon on the Available, In Use, Editing, Text Content, and Graphics Content icons indicates that the
content is out of date; that is, the version on the file system is newer than the version displayed on your computer.
More Help topics
Export content as separate InCopy files (InDesign)
Work with stand-alone documents
Unlink content files (InDesign)
Tracking and reviewing changes
Using editorial notes
Adding editorial notes in InDesign
Icon Name Location
Available Assignments panel (InDesign and InCopy),
text frames, and graphics frames
In Use By [name] Assignments panel, text frames, and graphics
frames
Editing Assignments panel, text frames, and graphics
frames
Available And Out Of Date Text and graphics frames
In Use By [name] And Out Of Date Text and graphics frames
Editing And Out Of Date Text and graphics frames
Out Of Date Assignments panel
Text Content Out Of Date Assignments panel and text frames
Text Content Up To Date Assignments panel and text frames
Graphics Content Out Of Date Assignments panel and graphics frames
Graphics Content Up To Date Assignments panel and graphics frames
Packaged Content Assignments panel

140
InCopy and InDesign
Last updated 6/13/2015
Adjusting your workflow
Move content between assignments (InDesign)
InDesign users can move content between existing assignments as well as from the Unassigned InCopy Content section
of the Assignments panel. You can also create a new assignment and move content to it.
1Save the InDesign document.
2In the Assignments panel, click the arrow to the left of the assignment name to display the contents of the
assignment.
3Select an item in an assignment.
4Do one of the following:
•Drag the content from one assignment to another.
•To move content to an existing assignment, choose Add To Assignment from the Assignments panel menu, and
then select the desired assignment.
•To create a new assignment as you move content, from the Assignments panel menu, choose Add To Assignment
> New, and then specify options in the New Assignment dialog box.
5Choose Update All Assignments from the Assignments panel menu.
If the assignment lists are short, you might prefer dragging content items to and from assignments and the Unassigned
InCopy Content section.
Delete assignments (InDesign)
❖In the Assignments panel, select one or more assignments and choose Delete Assignment in the panel menu.
Deleting assignments accomplishes the following:
•Removes the assignment data from the document.
•Deletes the assignment file from the file system.
•Removes the assignment name from the list.
•Moves any InCopy content to the Unassigned InCopy Content section in the Assignments panel.
Note: If an InCopy user has an assignment open when it is deleted in InDesign, an alert message notifies the InCopy user
that the assignment has been deleted. However, the content files are not deleted and can be updated without loss of changes.
Relink missing assignment files (InDesign)
If you move or delete an assignment file from disk, and then open the InDesign document from which it was created,
InDesign won’t know where the assignment file is located. You need to re-create the assignment file so InDesign can
find it.
Re-create the assignment file in the original location
❖In the Assignments panel, do one of the following:
•Select the missing assignment (it will still be listed in the panel) and choose Update Selected Assignments from
the panel menu.

141
InCopy and InDesign
Last updated 6/13/2015
•Choose Update All Assignments from the panel menu.
Change the assignment location
❖To re-create the assignment file in a new location, do one of the following in the Assignments panel:
•Select the assignment and choose Change Assignment Location from the panel menu. Specify a location and
name for the new file.
•Double-click the assignment name. In the Assignment Options dialog box, click Change and specify a location
and name for the new file.
Correct mistakes
If you make a mistake, you can discard changes made since the last Save command and restore the content from the file
system.
Because InDesign automatically saves every editable InCopy content file when you save the InDesign document, the
Cancel Checkout command restores only versions since the last time the document was changed.
❖Do one of the following:
•To undo the most recent change, choose Edit > Undo [action].
•To undo all changes made since the last time you saved the document, choose File > Revert Content.
•To undo changes since the last saved version and remove the lock file, select the content in the Assignments panel
and choose Cancel Check Out from the panel menu. This action makes the content read-only and available for
others to check out.
Overriding locked files (InDesign)
Users might not immediately realize how their actions affect others in the workflow, and might accidentally create
situations where conflicts exist between content status and ownership. If necessary, the InDesign user can resolve
conflicts by unlinking a locked file checked out to a different user and taking control over the file. Unlinking a file stores
the content in the InDesign document, but the content is no longer shared with InCopy.
Unlink content files (InDesign)
If necessary (because of a production deadline, for example), InDesign users can remove a content file from the
managed workflow and from the Links panel by unlinking it. If you want to make the content available again for editing,
you must reexport it as InCopy content using a different file name. This ensures that the old lock file won’t prevent users
from editing the file.
Note: Unlinking your own checked-out file removes it from the workflow and deletes the lock file from disk. You can re-
export the content and overwrite the file name without conflict.
❖To unlink an InCopy content file, select the file (.icml or .incx extension) in the Links panel and choose Unlink from
the panel menu. Unlinking embeds the content into the document and removes the link to the InCopy file on disk.
To relink the file, choose Edit > Undo Unlink.
You can also unlink by deleting a frame, or using the InDesign Links panel to relink a content file to another file. You
can also select the story in the Assignments panel and drag it to the Trash icon.

142
InCopy and InDesign
Last updated 6/13/2015
Placing InCopy files in InDesign documents
Although a typical workflow begins in InDesign, where the basic layout and text and graphics placeholders are defined
and exported to InCopy, a different workflow can start with a stand-alone InCopy content file (.icml or .incx) that you
place in InDesign using the File > Place command.
Consider the following dependencies when you place InCopy content files in an InDesign document:
Styles If the InCopy text file has styles applied, they are added to the InDesign list of styles for the document. In the
event of a style-name conflict, InDesign overwrites the imported style with its existing style.
Layout You can create the basic layout geometry for the content in InDesign, and then create or import the text and
styles from a word-processing application. (Text files placed within InCopy are embedded in the InCopy document and
are not linked to any external file.)
Placing/Duplicating If you place an InCopy content file more than once, each instance of the content appears in the
InDesign Links panel, but they are all managed as one content file. The same is true for any exact copies of a content
file (by any means of duplication).
Note: f you copy and paste some, but not all, of the text in a managed InCopy content file, the result is a new content file
that is not connected to the original and has no link to any external file (InCopy or otherwise). The original and the pasted
portions can be edited independently of each other.
Updates/Management Once multiple instances of a managed content file are present in an InDesign document, they
behave as if they were open in two applications. For example, checking out one instance of the content file locks all other
instances so that you can edit only the checked-out instance. In this case, you would use the appropriate Update
command to refresh the other (open) instances of the content.
More Help topics
Update, restore, and replace links
Accidentally updating your work
Assignment packages
Create and send packages (InDesign)
Under ideal circumstances, all InDesign and InCopy users on the team have access to a server where assignment files
are stored. However, if one or more users don’t have access to a common server, you can create and distribute
compressed assignment packages. After working on the assignment, the InCopy user repackages the assignment and
returns it to be integrated into the InDesign document. Package files created in InDesign include the .icap extension.
The return package files created in InCopy include the .idap extension.
There are two commands for packaging files: Package For InCopy and Package And Email. Use Package For InCopy to
create a compressed package that you can distribute manually; use Package And Email to create a compressed package
that is attached automatically to an e-mail message.
Note: Do not confuse an assignment package with the File > Package command in InDesign that lets you bundle and send
a document and its assets to a printer.

143
InCopy and InDesign
Last updated 6/13/2015
Create a package for manual distribution
1Create an assignment and add the content you want to include in the package.
Only content that is checked in can be included in the packaged assignment. If any content is checked out, you’re
prompted to check in content.
2In the Assignments panel, select the assignment and choose Package For InCopy from the panel menu.
3Specify a name and location for the package file, and click Save.
You can attach the package file to an e-mail message, upload it to an FTP server, or copy it to a disk or other external
media.
Note: Choosing Edit > Undo after you create a package cancels the package and unlocks the items in the assignment, but
it doesn’t delete the package file from your computer or unsend the e-mail.
Create a package for e-mail (InDesign)
1Create an assignment and add the content you want to include in the package.
Only content that is checked in is included in the packaged assignment. If any content is checked out, you’re
prompted to check in content.
2In the Assignments panel, select the assignment and choose Package For InCopy And Email from the panel menu.
A compressed assignment package is created and attached to an e-mail message of your default e-mail application.
Note: If you want to use a different e-mail application, change the default e-mail application. See your system
documentation for details.
3Edit the e-mail message by adding a recipient and providing any instructions. Send the message.
All items in the assignment are checked out to the assigned user. However, the contents of the package itself aren’t
locked, so anyone can open the package and edit them.
Cancel a package
In some cases, the package you send isn’t returned. For example, the message may have gotten lost, or the recipient may
no longer work on the project. In such a situation, you can cancel a package.
1In the Assignments panel, select the packaged assignment, and choose Cancel Package from the panel menu.
2Click OK to cancel the package.
Canceling a package doesn’t remove the package file from your computer.
When a package is cancelled, the package’s contents are available for editing. Be aware that if someone returns a package
that has been cancelled, conflicts may occur.
Update a package
After you create a package, you may want to add, remove, or resize items.
1Add, remove, or resize one or more stories to the packaged assignment.
2Select the assignment in the Assignments panel, and do one of the following:
•Choose Update Package from the Assignments panel menu. Specify the name and location of the file. Make the
updated package available to users by placing it on a shared server or by e-mail. Remember to notify InCopy
users that the package has been updated.
•Choose Update Package And Email from the Assignments panel menu, and then send the message.

144
InCopy and InDesign
Last updated 6/13/2015
When InCopy users open the updated package, only new content is added automatically to the assignment; InCopy
users can decide whether to overwrite existing content, allowing them to preserve previous edits.
Receive packages (InCopy)
You may receive a package from an InDesign user who created the package or from an InCopy user who forwarded the
package to you. When you open an assignment package, the package is decompressed, and the contents are copied to
a new subfolder in an InCopy Assignments folder.
Open a package (InCopy)
❖To open an InCopy package (*.icap or *.incp), do any of the following:
•Launch the package using the e-mail application. For example, double-click the attachment file.
•Use Explorer or Finder to open the file. For example, double-click the file or drag it to the InCopy application
icon.
•In InCopy, choose File > Open, and double-click the packaged assignment file.
•In InCopy, choose Open Package from the Assignments panel menu, and then double-click the package file.
You can now edit the stories in the package. When you begin editing a story, you’re prompted to check out the contents
of the frame. When you’ve finished editing, save all content and return or forward the package.
Return or forward a package (InCopy)
After you open and edit a package, you can send it to another InCopy user or you can return it to the InDesign user
who created the package. Package files created for other InCopy users include the .icap extension; return package files
created for InDesign users include the .idap extension.
1Edit and check in the content you want to include in the package.
2From the Assignments panel menu, choose one of the following:
Forward For InCopy Create a package for another InCopy user. Specify the name and location of the package file,
and then make it available to the InCopy user.
Forward For InCopy And Email Create and send a package for another InCopy user via e-mail. The package appears
as an attachment in a new message in your default e-mail application. Specify the recipient, provide instructions,
and send the e-mail message.
Return For InDesign Create a package to return to the InDesign user.
Return For InDesign And Email Create and return a package to the InDesign user by e-mail. The package appears as
an attachment in a new message in your default e-mail application. Specify the recipient, provide instructions, and
send the e-mail message.
Receive return packages (InDesign)
❖To open an InDesign package (*.idap or *.indp), do any of the following:
•Launch the package using the e-mail application. For example, double-click the attachment file.
•Use Explorer or Finder to open the file. For example, double-click the file or drag it to the InDesign application
icon.
•In InDesign, choose File > Open, and double-click the package file.
•In InDesign, choose Open Package from the Assignments panel menu, and then double-click the package file.

145
InCopy and InDesign
Last updated 6/13/2015
You’re prompted to update all links when opening the package. If a story has been modified since the assignment was
packaged, you can determine whether to update or unlink the content in the InDesign file. When the stories in the files
are returned and checked in, you can check out and edit the content.
More Help topics
Package files
Check in content
Save changes (InCopy)
Update assignment files (InDesign)
Unlink content files (InDesign)
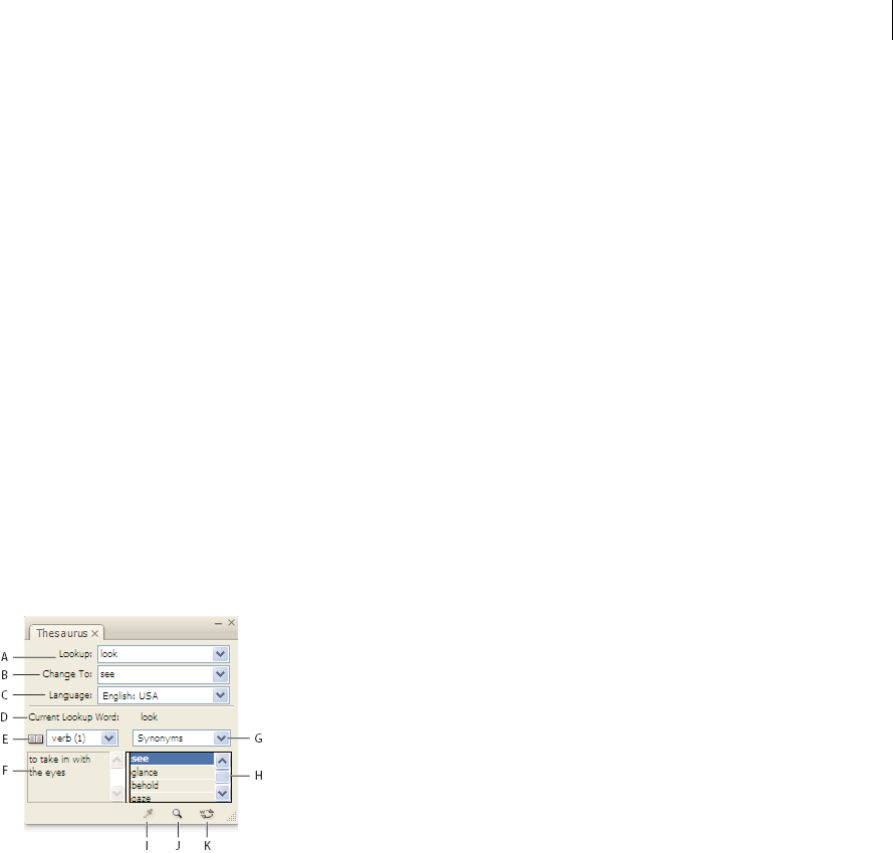
146
Last updated 6/13/2015
Chapter 6: Text
Using the thesaurus
About the thesaurus
The thesaurus lets you look up synonyms, related words, and antonyms for words you specify. For example, if you
specify “figment,” the InCopy thesaurus provides synonyms such as “fiction” and “fable,” related words such as
“concoction” and “fantasy,” and antonyms such as “fact.”
The search for a word doesn’t need to end with the first set of synonyms, related words, and antonyms you find. You
can look up any one of the suggested words and display its synonyms, related words, and antonyms. You can quickly go
back to any of the last 10 words you looked up.
A .Lookup B .Change To C .Language menu D . Current Lookup Word E . Meanings menu F .Definition G .Category menu H .Result list
I .Load Word J .Lookup Word K .Change Word
InCopy provides the following categories for looking up words:
Synonyms Words having the same or nearly the same meaning as the lookup word.
Antonyms Words having the opposite or nearly the opposite meaning as the lookup word.
See Also Words that are conceptually related to the lookup word, although neither a synonyms nor antonyms.
Near Synonyms Words having a somewhat similar meaning as the lookup word.
Near Antonyms Words having a meaning that is somewhat akin to the opposite meaning of the lookup word.
Look up words in the thesaurus
You can use the thesaurus to look up synonyms, antonyms, and brief definitions of words.
Look up a word visible in the document window
1Choose Window > Thesaurus to open the Thesaurus panel.

147
Text
Last updated 6/13/2015
2Using the Type tool , select the word you want to look up, and do one of the following:
•Copy and paste the word into the Lookup text box.
•Click the Load Word button .
3Select the language you want to use.
4Click the Lookup Word button or press Enter.
A brief definition of the word is displayed in the Definition area of the Thesaurus panel. The Result list displays
related words based on the selections you made from the Meanings and Category menus.
Note: You can drag the vertical bar that separates the Definition area and the Result list from side to side to adjust the
relative width of the two areas.
5Select the part of speech you want to look up from the Meanings menu. For example, if you want the noun meaning
for the word, select noun. If you want the verb meaning, select verb. Not all meanings are available for all words.
6Select the category (such as Synonyms or Antonyms) you want to look up from the Categories menu. Not all
categories are available for all words.
To replace the word in the Lookup field, Alt-click (Windows) or Option-click (Mac OS) a word in the Result list, and
then click the Lookup Word button. To replace the word in the Change To field, click a word in the Result list.
Look up a word not visible in the document window
1Choose Window > Thesaurus to open the Thesaurus panel.
2Type the word you want to look up in the Lookup text box, and press Enter.
Look up a word again
1Choose Window > Thesaurus to open the Thesaurus panel.
2Choose the word from the Lookup pop-up menu in the Thesaurus panel. This menu lists the last 10 words you
looked up.
3Click the Lookup Word button .
Insert a word from the Thesaurus panel
You can use the Thesaurus panel to add or replace words in your document. When replacing a selected word in your
document with a word from the Thesaurus panel, you replace only the selected word—not all occurrences of the word.
To replace all occurrences, use the Find/Change command.
Note: If the thesaurus cannot find a matching entry for the string of text in the Lookup text box, all other text boxes in the
Thesaurus panel remain empty.
1Do one of the following:
•To add the word, place the insertion point in the document where you want to add the word.
•To replace a word in the document, select the word.
2Select a word from the Result list in the Thesaurus panel.
3Click the Change Word button , or double-click a word in the Result list.
More Help topics
Find and change text

148
Text
Last updated 6/13/2015
Using text macros
Create a text macro
A textmacro is a shortcut for a sequence of keystrokes. A macro can be simple—it can type a word or phrase you use
often—or it can be complex, such as a formatted address. A macro code is the name of the text macro you create. For
example, instead of repeatedly typing “Centers for Disease Control and Prevention,” you can create a macro code (such
as “cdc”) that changes to the full name.
1Choose Window > Text Macros.
2If you want to create a text macro from existing text, select the text in the document.
3Choose New Macro from the Text Macros panel menu, or click the New Macro button in the Text Macros panel.
4Enter a macro code in the Macro Code text box. Note that macro codes are case-sensitive.
The code appears in the Text Macros list.
5For Macro Text, type the text string that you want entered when you activate the text macro.
6To include text attributes from the existing text when inserting or swapping macro text, select Remember Text
Attributes.
By default, inserted or swapped macro text uses the style attributes of the destination paragraph.
7To assign a keyboard shortcut for activating the macro, place the cursor in the Macro Key Shortcut text box, and
press the keys you want to use for the shortcut.
Shortcuts are especially useful if you turn off Automatically Swap Macro Text in the Text Macros panel.
If the keyboard shortcut you want to assign to the macro is already assigned to another function, the alert symbol
appears at the bottom of the dialog box with the message “Currently Assigned To: [function].” If you choose to assign
the keyboard shortcut to the macro, the previous keyboard shortcut function is overridden.
8Click OK.
You can replace the macro code with macro text automatically while typing, by using a macro key shortcut, or by
cho osing Swap Macro Text from the Text Macros panel menu.
Edit a text macro
1From the list in the Text Macros panel, double-click the text macro you want to edit, or select it and click the Edit
Text Macro button in the Text Macros panel.
2Enter your changes in the text box, and click OK.
Duplicate a macro
Use the Duplicate Macro command to create a copy of an existing macro. The duplicate macro is assigned the same
code as the original, but with a number appended to it, and is listed immediately after the original macro in the Text
Macros panel. For example, duplicating the macro “DOT” creates a copy of the macro, named “DOT1.”
1Select the text macro you want to duplicate from the list in the Text Macros panel.
2Choose Duplicate Macro from the Text Macros panel menu.

149
Text
Last updated 6/13/2015
Delete a text macro
1Select the text macro you want to delete from the Text Macros panel list.
2Choose Delete Macro from the Text Macros panel menu.
Note: Once you delete a macro, you cannot undo the deletion.
Insert or swap macro text
You can insert macro text in three different ways: Using the Insert Macro Text command to insert macro text at the
insertion point, having macro text inserted automatically while typing, or swapping existing text with macro text.
Insert macro text automatically
If Automatically Swap Macro Text is selected, macro codes are automatically converted to macro text while you type.
For example, if you created a macro code named “cdc,” when you type cdc followed by a word-ending character such a
space or period, Center for Disease Control and Prevention appears. The macro code is case-sensitive.
1Make sure that Automatically Swap Macro Text from the Text Macros panel menu is selected. (A check mark should
appear next to it.)
2Type the macro code followed by a word-ending character (space, comma, period, or paragraph return).
If you want to restore the macro code text, choose Edit > Undo until the macro code reappears.
Insert macro text at the insertion point
The Insert Macro Text command places the selected macro text at the current text insertion point.
1Using the Type tool , click the location where you want to insert the macro text.
2Do one of the following:
•Press the macro keyboard shortcut for the macro you want.
•Select the macro you want from the Text Macros panel, and choose Insert Macro Text from the panel menu, or
click the Insert Macro Text button .
Swap text with macro text
The Swap Macro Text command searches the text immediately preceding the current text insertion point for any
defined macro code (case-sensitive) and, if one is found, removes the macro code and replaces it with the associated
macro text. For example, you have created a text macro for Centers for Disease Control and Prevention, and the macro
code is CDC. To use the macro, type The CDC, and then with the text insertion point placed immediately following
the macro code, choose Swap Macro Text. InCopy then searches the text immediately preceding the insertion point and
replaces CDC with the macro text Centers for Disease Control and Prevention.
1Using the Type tool , click to the immediate right of the macro code that you want to replace, or select the text
you want to replace.
2Choose Swap Macro Text from the Text Macros panel menu, or choose Edit > Swap Macro Text.
Note: The Swap Macro Text command does not continue to search the entire document for every occurrence of the macro
code. To find and replace all instances of a word or phrase, use the Find/Change command.
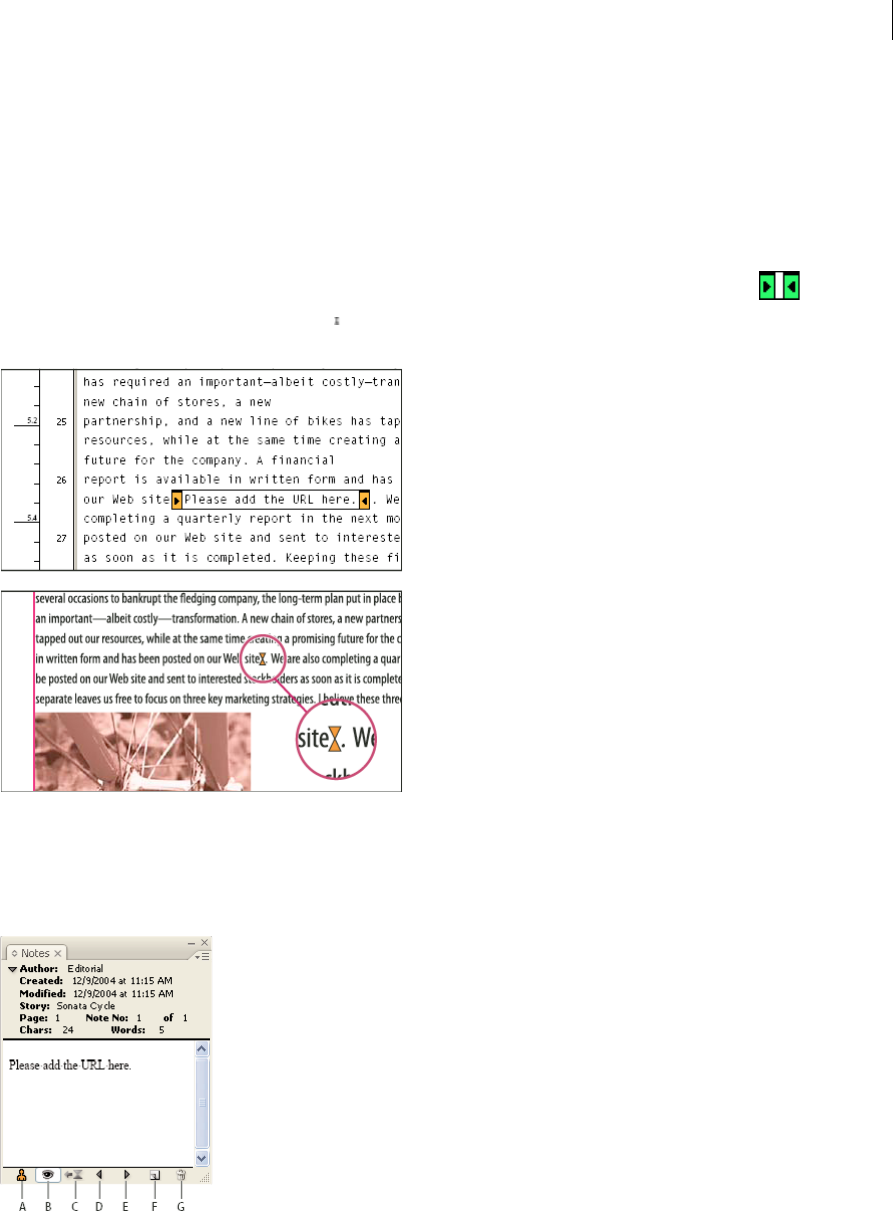
150
Text
Last updated 6/13/2015
Using editorial notes
About editorial notes
Editorial notes are brief comments or annotations for yourself or other contributors. In Galley and Story views, all notes
are displayed inline (within the text), and the content of the note is displayed between note bookends . In Layout
view, each note is indicated by a note anchor . The content of the note is displayed in the Notes panel and can be color-
coded for each user.
Notes panel overview
The Notes panel contains the name of the note’s author, the date and time it was last modified, the story label, the page
number, the note number out of total notes, the number of characters and words, and the content of the note.
A User color B Show/Hide notes C Go to note anchor D Go to previous note E Go to next note F New note G Delete note
Note: Regardless of which view you are using, the content of the Notes panel appears the same.

151
Text
Last updated 6/13/2015
Open the Notes panel
❖Do one of the following:
•Choose Window > Notes.
•In Layout view, choose Notes > New Note.
Use Notes Mode
Notes Mode is a convenient way to add, split, or delete notes, depending on where the insertion point is located or what
text is selected.
1Do any of the following:
•To create a new note, place the insertion point in text.
•To convert text to a note, select the text.
•To split a note, place the insertion point inside a note.
•To convert the note to text, select the note bookends (in Galley view or Story view).
•To move the insertion point out of a note, place the insertion point at the beginning or end of the note.
2Choose Notes > Notes Mode.
Add a note
1Do either of the following:
•Using the Type tool , click where you want to place the note, and choose Notes > New Note.
•Using the Note tool , click where you want to place the note.
Adding a note in Layout view opens the Notes panel if it is not already open.
2In Galley or Story view, type your note between the note bookends. In Layout view, type your note in the Notes
panel.
You can add as many notes as you want in any location. However, you cannot create a note within another note.
You can also add a note using Notes Mode.
Convert text to a note
1Select the text that you want to move into a new note.
2Choose Notes > Convert To Note.
A new note is created. The selected text is removed from the body of the story and pasted into the new note. The note
anchor or bookend is located where the text you selected was cut.
If you add notes to a linked InCopy story, they also appear in the story in InDesign, and can be edited in InDesign.
You can also convert text to a note using Notes Mode.
You can assign keyboard shortcuts to convert a word, line, paragraph, or story to a note. Choose Edit > Keyboard
Shortcuts, and then choose Notes Menu from the Product Area menu. Add a shortcut to the command, and then click
OK.

152
Text
Last updated 6/13/2015
Convert notes to text
1Open the Notes panel.
2Select the text in the Notes panel that you want to add to the text of the document. Or, in Galley view, select the text
in the inline note.
3Choose Notes > Convert To Text.
You can also convert notes to text using Notes Mode.
Note: If you select only a portion of the note contents when you convert the contents to text, the original note will be divided
into two separate notes, and the portion of the note contents that is converted to text will appear between the two new notes.
Navigate between notes
When you navigate through notes, the active text insertion point moves from the current note anchor to the anchor of
the next or previous note. When navigating between notes in Layout view, click the Go to Note Anchor button to
view the note anchor associated with the note displayed in the Notes panel.
1Click anywhere within the contents of a story.
2Do one of the following:
•Choose Notes > Previous Note or Notes > Next Note.
•Select Previous Note or Next Note from the Notes panel menu.
•Click the Go To Previous Note button or the Go To Next Note button in the Notes panel.
Note: In the Galley and Story views, you can use the Find/Change command to locate a note. The Notes section of the
Preferences dialog box contains a setting to include notes in Find/Change searches.
Split a note
1In the Notes panel or in the note itself, place the insertion point where you want to split the note.
You cannot split a note if the insertion point is at the beginning or end of the note, or if the note is empty.
2Do one of the following:
•Choose Notes > Split Note.
•Choose Split Note from the Notes panel menu. The active text insertion point is placed between the two split
notes.
You can also split a note using Notes Mode.
Expand or collapse notes
When expanded, the content of the note appears between the bookends. As you enter the content of the note, the
bookends move apart to accommodate the text. You can collapse the bookends to hide the content of the note.
1Select the Type tool , and then click the begin-note bookend or the end-note bookend .
2If the insertion point is in a note container, choose Notes > Collapse Note.
To expand or collapse all notes in the active story, choose Notes > Expand/Collapse Notes In Story.

153
Text
Last updated 6/13/2015
Select and open a note in Layout view
A note anchor marks the location of a note in Layout view. The Notes panel displays the contents of the note, along
with specific information about the note.
1Select the Type tool or Note tool .
2Move the pointer over the note anchor until the pointer appears as a pointing hand.
3Do one of the following:
•Click the note anchor.
•Choose Notes > Previous Note or Notes > Next Note.
Edit a note
•In Galley view or Story view, select the Type tool , and then click between the bookends of the note you want
to edit, and make your changes.
•In Layout View, select the Type tool , click the note anchor to open the note in the Notes panel, and make your
changes.
Check spelling or find/change text in notes
1Select the Galley or Story view tab.
2Expand the notes you want to spell-check or search. Choose Notes > Expand/Collapse Notes In Story to expand all
notes.
3Choose Edit > Spelling > Check Spelling or Edit > Find/Change.
Note: If you choose Change All while spell-checking or finding text, text in collapsed notes is ignored in Galley View or Story
View, but all occurrences of the text are replaced in Layout View.
Move or duplicate notes
You can move or duplicate notes.
Move or duplicate notes in Galley and Story views
1Shift+Alt-click (Windows) or Shift+Option-click (Mac OS) the start-note or end-note bookend to select the note.
2Do one of the following:
•Drag the selected note to move it.
•Shift-drag the selected note to duplicate it.
Duplicate a note anchor in Layout view
❖Do one of the following:
•Using the Type tool , drag across the note anchor to highlight it, and then choose Edit > Copy. Paste it in a
different location.
•Using the Note tool or Type tool, hold down Shift, and drag the anchor to where you want to place it in the text.

154
Text
Last updated 6/13/2015
Delete notes
•To delete a single note, Shift+Alt-click (Windows) or Shift+Option-click (Mac OS) the start-note or end-note
bookend to select the note, and then choose Notes > Delete Note.
•To delete all notes in the active story, choose Notes > Remove Notes From Story.
•To delete all notes in the document, choose Notes > Remove All Notes.
Printing and exporting notes
When you print an InCopy document, you can print any notes that are included in the document at the same time. You
can also export notes from InCopy as PDF annotations. However, notes in tables are not exported as PDF annotations.
Specify note preferences
Preferences settings let you set the color for note anchors, bookends, and backgrounds when inline in the Galley and
Story views. You can also choose to display note info as a tool tip, as well as choose whether to include note content in
Find/Change operations and spell checking in the Galley and Story views.
1Choose Edit > Preferences > Notes (Windows) or InCopy > Preferences > Notes (Mac OS).
2Select a color for note anchors and note bookends from the Note Color menu. Select [User Color] to use the color
specified in the User dialog box. This is especially useful if more than one person is working on the file.
3Select Show Note Tool Tips to display note information and some or all of the note content as a tool tip when the
mouse pointer hovers over a note anchor in Layout view or a note bookend in Galley or Story view.
4Specify whether you want to include inline note content when using the Find/Change and Spell Check commands
(in Galley and Story views only).
Note: In Layout view, you cannot use the Find/Change and Spell Check commands to search for the contents of notes,
regardless of the settings in the Preferences dialog box. However, Change All does edit the contents of notes.
5Select either [None] or [Note Color] (the color you chose in step 2) to use for the background color of an inline note.
6Click OK.
To show or hide notes, choose View > Show Notes or Hide Notes.
More Help topics
Keys for working with text
Printing
Exporting to Adobe PDF
Change the user name and color
Tracking and reviewing changes
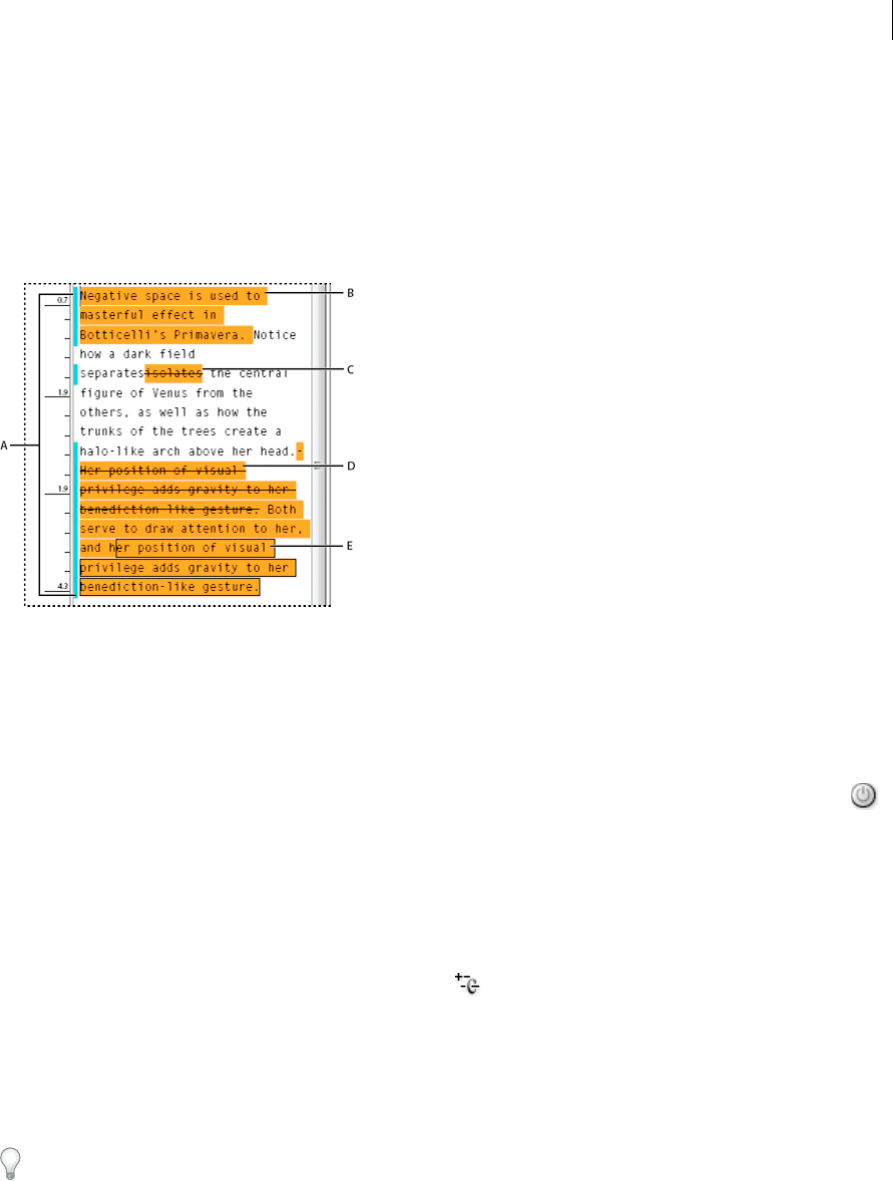
155
Text
Last updated 6/13/2015
Track changes
A valuable feature is the ability to track changes made to a story by each contributor in the writing and editing process.
Whenever anyone adds, deletes, or moves text within an existing story, the change is marked in the Story Editor in
InDesign or the Galley and Story views in InCopy. You can then accept or reject the changes.
Use the Track Changes panel in InDesign or the Track Changes toolbar in InCopy to turn Track Changes on or off and
to show, hide, accept, or reject changes made by contributors.
A Change bars B Added text C Deleted text D Moved text (from) E Moved text (to)
Turn on change tracking
1Choose Window > Editorial > Track Changes to open the Track Changes panel (InDesign), or choose Window >
Track Changes to open the Track Changes toolbar (InCopy).
2With the insertion point in text, do any of the following:
•To enable change-tracking in only the current story, click the Enable Track Changes In Current Story icon .
•(InDesign) To enable tracking in all stories, choose Enable Track Changes In All Stories from the Track Changes
panel menu.
•(InCopy) To enable tracking in all open stories in a multistory document, choose Changes > Enable Tracking In
All Stories.
3Add, delete, or move text within the story as needed.
Note: When Track Changes is turned on, a track changes icon appears at the right end of the Story bar in Galley view
and Story view.
How change tracking is displayed
When Track Changes is turned on, each change is marked by default as follows in Story Editor (InDesign) or in Galley
and Story views (InCopy):
The Track Changes section of the Preferences dialog box lets you choose a color to identify your changes. It also lets you
select which changes (adding, deleting, or moving text) you want tracked and the appearance of tracking.
Added text Highlighted.
Deleted text Highlighted and marked with a strikethrough.
Moved (cut-and-pasted) text Highlighted and marked with a strikethrough in its original location; highlighted and
boxed in the new location.

156
Text
Last updated 6/13/2015
Note: If you cut text from one document and paste it into another, it is displayed as deleted text in the document of its
original location and as added text in its new location.
Copied text Highlighted in the new location. The original text is unchanged.
Change bars A change bar is a vertical line that appears to the left of a line of text that has been changed. You can choose
whether to show or hide change bars as you work. You can also specify what color to use for displaying the change bars.
Show or hide changes
When changes are hidden, the text appears as it would with the change-tracking feature turned off. That is, added text
is visible, deleted text is invisible, and moved or pasted text appears where it has been inserted.
(InDesign) When change-tracking is turned on, editing is tracked regardless of whether you work in Story Editor or in
the document layout. You can view changes only in Story Editor, not in the layout.
(InCopy) When change-tracking is turned on, editing is tracked regardless of whether you work in Galley, Story, or
Layout view. You can view changes only in the Galley and Story views, not the Layout view.
❖In the Track Changes panel (InDesign) or the Track Changes toolbar (InCopy), click the Show/Hide Changes button
.
Turn off change tracking
❖With the insertion point in text, do any of the following:
•To disable change-tracking in only the current story, click the Disable Track Changes In Current Story icon .
•(InDesign) To disable tracking in all stories, choose Disable Track Changes In All Stories from the Track Changes
panel menu.
•(InCopy) To disable tracking in all open stories in a multistory document, choose Changes > Disable Tracking
In All Stories.
Note: If you disable tracking, no further changes are tracked. Previously tracked changes are not affected.
View change information in the Track Changes panel
1Choose Window > Track Changes.
2Click the insertion point in a change. The Track Changes panel displays the date, time, and other change
information.
Accept and reject changes
When changes have been made to a story, whether by you or by others, the change-tracking feature enables you to
review all changes and decide whether to incorporate them into the story. You can accept or reject single changes, only
portions of a tracked change, or all changes at once.
When you accept a change, it becomes a normal part of the text flow and is no longer highlighted as a change. When
you reject a change, the text reverts to how it was before the change was made.
1In Story Editor (InDesign) or Galley or Story view (InCopy), position the insertion point at the beginning of the
story.
2In the Track Changes panel (InDesign) or the Track Changes toolbar (InCopy), click the Next Change button .
3Do any of the following:
•To accept the highlighted change and incorporate it into the text flow, click the Accept Change button .

157
Text
Last updated 6/13/2015
•To reject the change and revert to the original text, click the Reject Change button
To accept or reject the highlighted change and go to the next change, Alt-click (Windows) or Option-click (Mac OS)
the Accept Change or Reject Change button.
•To move back to the previous change or skip over a change and go to the next one, click the Previous Change
button or Next Change button .
•To accept or reject all changes without reviewing, click the Accept All Changes In Story button or the Reject
All Changes In Story button .
•To accept or reject all changes in the story or in the document, or to accept or reject all changes by a certain
participant, choose the appropriate option from the Track Changes panel menu (InDesign) or from the Changes
menu (InCopy).
Note: If you change your mind about accepting or rejecting a change, you can undo the change by choosing Edit > Undo or
pressing Ctrl+Z (Windows) or Command+Z (Mac OS).
Choosing an Accept All Changes or Reject All Changes command also applies to hidden conditional text.
Set Track Changes preferences
Preference settings let you control many tracking options. You can choose a color to identify your changes and select
what changes you want tracked: adding, deleting, or moving text. You can also set the appearance of each type of
tracked change, and you can have changes identified with colored change bars in the margins.
1Choose Edit > Preferences > Track Changes (Windows) or InCopy > Preferences > Track Changes (Mac OS).
2Select each type of change that you want to track.
3For each type of change, specify the text color, background color, and marking method.
4Select Prevent Duplicate User Colors to ensure that all users are assigned different colors.
5To show change bars, select the Change Bars option. Choose a color from the Change Bar Color menu, and specify
whether you want change bars to appear in the left or right margin.
6Select Include Deleted Text When Spellchecking if you want to spell-check text marked to be deleted.
7Click OK.
Change the user name and color
1Close all open stories.
2Choose File > User.
3Specify the user name and color to be used for change-tracking and notes, and then click OK.
More Help topics
Using editorial notes
Adding editorial notes in InDesign
Text variables

158
Text
Last updated 6/13/2015
Create and edit text variables
A text variable is an item you insert in your document that varies according to the context. For example, the Last Page
Number variable displays the page number of the last page of the document. If you add or remove pages, the variable
is updated accordingly.
InCopy includes several preset text variables that you can insert in your document. You can edit the format of these
variables, or you can create your own. Some variables, such as Running Header and Chapter Number, are especially
useful for adding to master pages to ensure consistent formatting and numbering. Other variables, such as Creation
Date and File Name, are useful for adding to the slug area for printing.
Note: Adding too much text to a variable may cause overset or compressed text. Variable text does not break across lines.
Create or edit text variables
The options available for creating the variable depend on the type of variable you specify. For example, if you choose
the Chapter Number type, you can specify text to appear both before and after the number, and you can specify the
numbering style. You can create several different variables based on the same variable type. For example, you can create
one variable that displays “Chapter 1” and another that displays “Ch. 1.”
Similarly, if you choose the Running Header type, you can specify which style is used as the basis for the header, and
you can select options for deleting end punctuation and changing the case.
1If you want to create text variables for use in all new documents you create, close all documents. Otherwise, the text
variables you create appear only in the current document.
2Choose Type > Text Variables > Define.
3Click New, or select an existing variable and click Edit.
4Type a name for the variable, such as “Full Chapter” or “Running Title.”
5From the Type menu, choose a variable type, specify the options for that type, and then click OK.
Different options are available depending on the variable type you select.
Text Before / Text After For all variable types (except Custom Text), you can specify text that will be added before or
after the variable. For example, you can add the word “of” before the Last Page Number variable and the phrase
“total pages” after the variable to create an “of 12 total pages” effect. You can also paste text into the boxes, but special
characters such as tabs and auto page numbers are stripped out. To insert special characters, click the triangle to the
right of the text box.
Style For all numbered variable types, you can specify the numbering style. If [Current Numbering Style] is
selected, the variable uses the same numbering style selected in the document’s Numbering & Section Options
dialog box.
Variable types
Chapter Number
A variable created with the Chapter Number type inserts the chapter number. You can insert text before or after the
chapter number, and you can specify a numbering style.
If the document’s chapter number is set to continue from the previous document in the book, you may need to update
the book’s numbering in order for the appropriate chapter number to appear.
Creation Date, Modification Date, and Output Date

159
Text
Last updated 6/13/2015
Creation Date inserts the date or time the document is first saved; Modification Date inserts the date or time the
document was last saved to disk; Output Date inserts the date or time the document starts a print job, exports to PDF,
or packages the document. You can insert text before and after the date, and you can modify the date format for all date
variables.
Date Format You can type date formats directly into the Date Format box, or you can choose format options by clicking
the triangle to the right of the box. For example, the date format “MM/dd/yy” displays as 12/22/07. By changing the
format to “MMM. d, yyyy” the date will display as Dec. 22, 2007.
Date variables use the language applied to text. For example, the creation date may appear in Spanish text as “01
diciembre 2007” and in German as “01 Dezember 2007.”
File Name
This variable inserts the name of the current file into the document. It’s commonly added to the slug area of the
document for printing or used in headers and footers. In addition to Text Before and Text After, you can choose the
following options.
Include Entire Folder Path Select to include the full folder path with the file name. The standard path conventions for
either Windows or Mac OS are used.
Abbreviation Description Example
MMonth number, no leading zero 8
MM Month number, leading zero 08
MMM Abbreviated month name Aug
MMMM Full month name August
dDay number, no leading zero 5
dd Day number, leading zero 05
EWeekday name, abbreviated Fri
EEEE Full weekday name Friday
yy or YY Year number, last two digits 07
y (Y) or yyyy (YYYY) Full year number 2007
G or GGGG Era, abbreviated or expanded AD or Anno Domini
hHour, no leading zero 4
hh Hour, leading zero 04
HHour, no leading zero, 24-hour format 16
HH Hour, leading zero, 24-hour format 16
mMinute, no leading zero 7
mm Minute leading zero 07
sSecond, no leading zero 7
ss Second, leading zero 07
aAM or PM, two characters PM
z or zzzz Time zone, abbreviated or expanded PST or Pacific Standard Time

160
Text
Last updated 6/13/2015
Include File Extension Select to include the file name extension.
The File Name variable is updated whenever you save the file with a new name or to a new location. The path or
extension does not appear in the document until it’s saved.
Image Name
The Image Name variable is useful for generating automatic captions from metadata. The Image Name variable
includes a Metadata Caption variable type. If a text frame containing this variable is adjacent to or grouped with an
image, the variable displays the metadata of that image. You can edit the Image Name variable to determine which
metadata field is used.
See Define caption variables.
Last Page Number
The Last Page Number type is useful for adding the total number of pages in a document to headers and footers using
the common “Page 3 of 12” format. In this case, the number 12 is generated by the Last Page Number, and it’s updated
whenever pages are added or removed. You can insert text before or after the last page number, and you can specify a
numbering style. From the Scope menu, choose an option to determine whether the last page number in the section or
document is used.
Note that the Last Page Number variable does not count the pages in the document.
Running Header (Paragraph or Character Style)
The Running Header variables insert the first or last occurrence on the page of the text to which the specified style is
applied. If no text on the page is formatted with the specified style, the text from a previous page is used.
See Create variables for running headers and footers.
Custom Text
This variable is commonly used for inserting placeholder text, or a text string that may need to be changed quickly. For
example, if you’re working on a project that uses a code name for a company, you can create a custom text variable for
the code name. When you are able to use the real company name, you can simply change the variable to update all the
occurrences.
To insert special characters in a text variable, click the triangle to the right of the text box.
Insert text variables
1Place the insertion point where you want the variable to appear.
2Choose Type > Text Variables > Insert Variable, and then choose the variable you want to insert.
The variable appears on the page as if you’d typed it in the document. For example, the Creation Date variable might
appear as December 22, 2007. If you choose Type > Show Hidden Characters, the variable instance is surrounded by a
box using the current layer color.
Note: Text variables do not break across lines.
Delete, convert, and import text variables
Use the Text Variables dialog box to delete, convert, and import text variables.

161
Text
Last updated 6/13/2015
Delete text variables
If you want to delete an instance of a text variable inserted in a document, simply select the variable and press Backspace
or Delete. You can also delete the variable itself. When you do so, you can decide how to replace the variables inserted
in the document.
1Choose Type > Text Variables > Define.
2Select the variable, and then click Delete.
3Specify how the variable will be replaced by specifying a different variable, converting the variable instances to text,
or deleting the variable instances altogether.
Convert text variables to text
•To convert a single instance, select the text variable in the document window, and then choose Type > Text Variables
> C onver t Variable To Text.
•To convert all instances of the text variable in the document, choose Type > Text Variables > Define, select the
variable, and then click Convert To Text.
Import text variables from another document
1Choose Type > Text Variables > Define.
2Click Load, and then double-click the document that has the variables you want to import.
3In the Load Text Variables dialog box, make sure that a check mark appears next to the variables you want to import.
If any existing variable has the same name as one of the imported variables, choose one of the following options
under Conflict With Existing Text Variable, and then click OK:
Use Incoming Definition Overwrites the existing variable with the loaded variable and applies its new attributes to
all text in the current document that used the old variable. The definitions of the incoming and existing variables
are displayed at the bottom of the Load Text Variables dialog box so that you can view a comparison.
Auto-Rename Renames the loaded variable.
4Choose OK, and then click Done.
You can also copy variables to other documents when you synchronize a book file.
Create variables for running headers and footers
By default, the Running Header variables insert the first occurrence (on the page) of the text to which the specified style
is applied. Running Header variables are especially useful for displaying the current heading or title in the header or
footer.
1If your content is not already formatted, create and apply the paragraph style or character style for the text you want
to appear in the header (such as a title or heading style).
2Choose Type > Text Variables > Define.
3Click New, and then type a name for the variable.
4From the Type menu, choose Running Header (Paragraph Style) or Running Header (Character Style).
5Specify the following options:
Style Choose the style to display in your header or footer.

162
Text
Last updated 6/13/2015
Use Decide whether you want the first or last occurrence of the style that’s applied on the page. First On Page is the
first paragraph (or character) that begins on a page. If there is no occurrence of the style on the page, the previous
occurrence of the applied style is used. If there is no previous occurrence in the document, the variable is empty.
Delete End Punctuation If selected, the variable displays the text minus any end punctuation (periods, colons,
exclamation points, and question marks).
Change Case Select this option to change the case of the text that appears in the header or footer. For example, you
may want to use sentence case in your footer, even though the heading on the page appears in title case.
6Click OK, and then click Done in the Text Variables dialog box.
You can now insert the variable in a header or footer you create on the master page.
If a header or footer text frame has been created on the master page of the InDesign document, you can insert the
variable in the header or footer. (See Edit text on a master page.)
Define caption variables
Caption variables are updated automatically when a text frame containing a caption variable is moved next to an image.
By default, the Name metadata is used for the variable type when you choose Type > Text Variables > Insert Variable >
Image Name. You can edit the Image Name variable, or you can create new variables that specify image metadata.
1Choose Type > Text Variables > Define.
2Choose New to create a variable or Edit to edit an existing variable.
3For Type, select Metadata Caption.
4Choose an option from the Metadata menu.
5Specify text that appears before or after the metadata, and then choose OK.
More Help topics
Create headers and footers
Hyperlinks
Hyperlinks panel overview
You can create hyperlinks so that when you export to Adobe PDF or SWF in InDesign, a viewer can click a link to jump
to other locations in the same document, to other documents, or to websites. Hyperlinks you export to PDF or SWF in
InCopy are not active.
A source is hyperlinked text, a hyperlinked text frame, or a hyperlinked graphics frame. A destination is the URL, file,
email address, page text anchor, or shared destination to which a hyperlink jumps. A source can jump to only one
destination, but any number of sources can jump to the same destination.
A source is hyperlinked text or a hyperlinked graphic. A destination is the URL, file, email address, page, text anchor, or
shared destination to which a hyperlink jumps. A source can jump to only one destination, but any number of sources
can jump to the same destination.
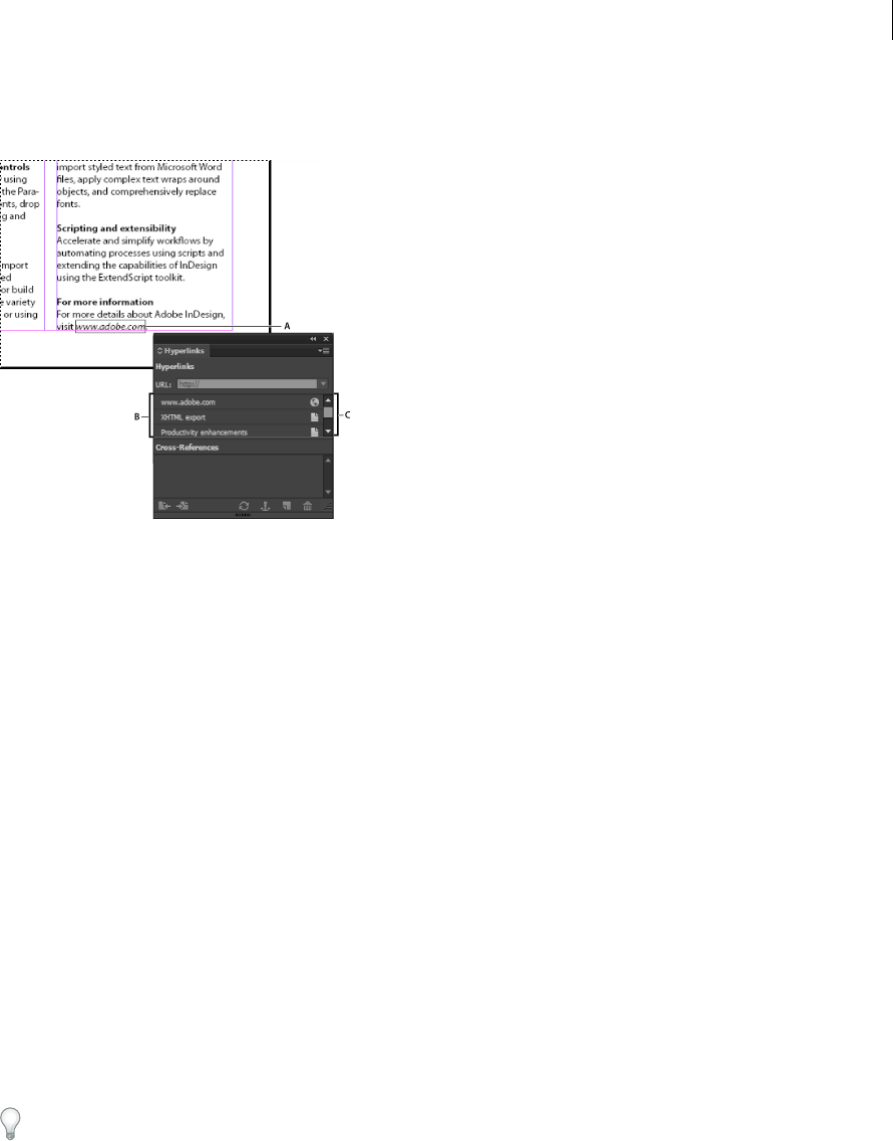
163
Text
Last updated 6/13/2015
Note: If you want the source text to be generated from the destination text, insert a cross-reference instead of adding a
hyperlink. See Cross-references.
A Hyperlink source B List of hyperlinks in the current document C Hyperlink status icons
Open the Hyperlinks panel
•Choose Window > Interactive > Hyperlinks.
•Choose Window > Hyperlinks.
•Choose Window > Type & Tables > Cross-References.
Sort hyperlinks in the Hyperlinks panel
❖Choose Sort from the Hyperlinks panel menu, and then choose any of the following:
Manually Displays the hyperlinks in the order in which they were added to the document.
By Name Displays the hyperlinks in alphabetical order.
By Type Displays the hyperlinks in groups of similar type.
Display hyperlinks in smaller rows
❖Choose Small Panel Rows from the Hyperlinks panel menu.
Create hyperlinks
You can create hyperlinks to pages, URLs, text anchors, email addresses, and files. If you create a hyperlink to a page or
text anchor in a different document, make sure that the exported files appear in the same folder.
To show or hide hyperlinks, choose View > Extras > Show Hyperlinks or Hide Hyperlinks.
Note: Hyperlinks are included in exported Adobe PDF files if Hyperlinks is selected in the Export Adobe PDF dialog box in
InDesign. Hyperlinks are included in the exported SWF file if Include Hyperlinks is selected in the Export SWF dialog box.
Create a hyperlink to a web page (URL)
You can use several different methods to create hyperlinks to URLs. When you specify a URL, you can use any valid
Internet resource protocol: http://, file://, ftp://, or mailto://.

164
Text
Last updated 6/13/2015
You can also use the Buttons feature to link to web pages. (See Buttons .)
You may want to create a character style for hyperlinks. Hyperlinks are often formatted in underlined blue text.
1Select the text, frame, or graphic you want to be the hyperlink’s source. For example, you can select the text, “See the
Adobe website.”
2In the Hyperlinks panel, use any of the following methods to create a hyperlink to a URL:
•In the URL text box, type or paste the URL name (such as http://www.adobe.com), and then choose New
Hyperlink from the Hyperlinks panel. Choose URL from the Link To menu, specify appearance options, and
click OK.
•If a URL is selected in your document, choose New Hyperlink From URL in the Hyperlinks panel menu. Double-
click the hyperlink in the Hyperlinks panel, and then choose URL from the Link To menu, specify appearance
options, and click OK.
•Select a previously added URL from the URL menu. The hyperlink appearance is the same as that used in the
previous URL.
•Choose New Hyperlink in the Hyperlinks panel menu. Choose URL from the Link To menu, specify appearance
options, and click OK.
Note: If a URL hyperlink isn’t working in the exported PDF, there may be a problem with the hyperlink being a “Shared
Destination.” Double-click the hyperlink in the Hyperlinks panel, choose URL from the Link To menu, deselect Shared
Hyperlink Destination, and click OK.
Create a hyperlink to a file
When you create a hyperlink to a file, clicking the hyperlink in the exported PDF or SWF file opens the file in its native
application, such as Microsoft Word for .doc files.
Make sure the file you specify is available to anyone opening the PDF or SWF file you export. For example, if you’re
sending the exported PDF to a coworker, specify a file located on a shared server rather than your hard drive.
1Select the text, frame, or graphic you want to be the source of the hyperlink.
2Choose New Hyperlink in the Hyperlinks panel menu, or click the Create New Hyperlink button at the bottom of
the Hyperlinks panel.
3In the New Hyperlink dialog box, choose File from the Link To menu.
4For Path, type the pathname or click the folder button to locate and double-click the filename.
5Select Shared Hyperlink Destination if you want the file to be stored in the Hyperlinks panel for easy reuse.
6Specify the appearance of the hyperlink source, and then click OK.
Create a hyperlink to an email message
1Select the text, frame, or graphic you want to be the source of the hyperlink.
2Choose New Hyperlink in the Hyperlinks panel menu, or click the Create New Hyperlink button at the bottom of
the Hyperlinks panel.
3In the New Hyperlink dialog box, choose Email from the Link To menu.
4For Address, type the email address, such as username@company.com.
5For Subject Line, type the text that appears in the subject line of the email message.

165
Text
Last updated 6/13/2015
6Select Shared Hyperlink Destination if you want the email message to be stored in the Hyperlinks panel for easy
reuse.
7Specify the appearance of the hyperlink source, and then click OK.
Create a hyperlink to a page
You can create a hyperlink to a page without first creating a destination. However, by creating a page destination, you
can specify a page number and view setting.
1Select the text, frame, or graphic you want to be the source of the hyperlink.
2Choose New Hyperlink in the Hyperlinks panel menu, or click the Create New Hyperlink button at the bottom of
the Hyperlinks panel.
3In the New Hyperlink dialog box, choose Page from the Link To menu.
4For Document, select the document containing the destination that you want to jump to. All open documents that
have been saved are listed in the pop-up menu. If the document you’re looking for isn’t open, select Browse in the
pop-up menu, locate the file, and then click Open.
5For Page, specify the page number you want to jump to.
6For Zoom Setting, do one of the following to select the view state of the page being jumped to:
•Select Fixed to display the magnification level and page position that were in effect when you created the link.
•Select Fit View to display the visible portion of the current page as the destination.
•Select Fit In Window to display the current page in the destination window.
•Select Fit Width or Fit Height to display the width or height of the current page in the destination window.
•Select Fit Visible to display the page so that its text and graphics fit the width of the window, which usually means
that the margins are not displayed.
•Select Inherit Zoom to display the destination window at the magnification level the reader uses when the
hyperlink is clicked.
7Specify appearance options, and then click OK.
Create a hyperlink destination
Creating a hyperlink destination is necessary only if you’re creating a hyperlink or cross-reference to a text anchor. A
text anchor can point to a selection of text or to the insertion point location. Then you create the hyperlink or cross-
reference that points to the hyperlink destination. You can also create hyperlink destinations for pages and URLs, but
a destination isn’t necessary for those links.
Hyperlink destinations you create do not appear in the Hyperlinks panel; they appear in the dialog box that appears
when you’re creating or editing hyperlinks.
1If you’re creating a text anchor, use the Type tool to place the insertion point, or select the range of text that you want
to be the anchor.
You cannot set up an anchor destination for text on a master page.
2Choose New Hyperlink Destination in the Hyperlinks panel menu.
3Choose Text Anchor in the Type menu. Specify a name for the text anchor, and then click OK.
4Do any of the following, and then click OK:
•Choose Text Anchor in the Type menu. Specify a name for the text anchor.

166
Text
Last updated 6/13/2015
•Choose Page in the Type menu. Specify the page number you want to jump to and the Zoom Setting. Type a name
for the page, or select Name With Page Number to name the destination automatically based on the page number
and zoom setting you specify.
•Choose URL in the Type menu. Type or paste a URL, such as http://www.adobe.com. You can use any valid
Internet resource protocol: http://, file://, ftp://, or mailto://.
Create a hyperlink to a text anchor
1Select the text, frame, or graphic you want to be the source of the hyperlink.
2Choose New Hyperlink in the Hyperlinks panel menu, or click the Create New Hyperlink button at the bottom of
the Hyperlinks panel.
3Choose Text Anchor from the Link To menu.
4For Document, select the document containing the destination that you want to jump to. All open documents that
have been saved are listed in the pop-up menu. If the document you’re looking for isn’t open, select Browse in the
pop-up menu, locate the file, and then click Open.
5From the Text Anchor menu, choose the text anchor destination you created.
6Specify hyperlink appearance options, and then click OK.
Create a hyperlink to any shared destination
While creating a hyperlink, if you choose Shared Destination from the Link To menu, you can specify any named
destination. A destination is named when you add a URL using the URL text box or when you select Shared Hyperlink
Destination while creating a hyperlink to a URL, file, or email address.
1Select the text, frame, or graphic you want to be the source of the hyperlink.
2Choose New Hyperlink in the Hyperlinks panel menu, or click the Create New Hyperlink button at the bottom of
the Hyperlinks panel.
3In the New Hyperlink dialog box, choose Shared Destination from the Link To menu.
4For Document, select the document containing the destination that you want to jump to. All open documents that
have been saved are listed in the pop-up menu. If the document you’re looking for isn’t open, select Browse in the
pop-up menu, locate the file, and then click Open.
5Choose a destination from the Name menu.
6Specify hyperlink appearance options, and then click OK.
Hyperlink appearance options
The options determine the appearance of the hyperlink or cross-reference source in the exported PDF or SWF file.
These appearance options are also displayed in the InDesign document if you choose View > Extras > Show Hyperlinks.
Character Style Choose a character style to apply to the hyperlink source. The Character Style option is available only
if the hyperlink source is selected text, not a selected frame or graphic.
If you’re inserting a cross-reference, you can apply a character style when you edit a cross-reference format. You can
also apply character styles to building blocks within a format. See Using cross-reference formats.
Type Select Visible Rectangle or Invisible Rectangle.
Highlight Select Invert, Outline, Inset, or None. These options determine the appearance of the hyperlink when it’s
being clicked in the PDF or SWF file.
Color Select a color for the visible hyperlink rectangle.

167
Text
Last updated 6/13/2015
Width Select Thin, Medium, or Thick to determine the thickness of the hyperlink rectangle.
Style Select Solid or Dashed to determine the appearance of the hyperlink rectangle.
Convert URLs to hyperlinks
You can find and convert URLs (such as “www.adobe.com”) in your document and convert them to hyperlinks.
1Choose Convert URLs To Hyperlinks from the Hyperlinks panel menu.
2For Scope, indicate whether your want to convert URLs in the entire document, the current story, or the current
selection.
3To apply a character style to the hyperlink, select a character style from the Character Style menu.
4Do any of the following, and then click Done.
•Click Find to locate the next URL.
•Click Convert to convert the current URL to a hyperlink.
•Click Convert All to convert all URLs to hyperlinks.
Manage hyperlinks
Use the Hyperlinks panel to edit, delete, reset, or locate hyperlinks. In InCopy, you can manage hyperlinks only if the
story is checked out for editing.
Edit hyperlinks
1In the Hyperlinks panel, double-click the item you want to edit.
2In the Edit Hyperlinks dialog box, make changes to the hyperlink as necessary, and then click OK.
Note: To edit a hyperlink to a URL, select the hyperlink, edit the URL in the URL text box, and then press Tab or Enter.
Delete hyperlinks
When you remove a hyperlink, the source text or graphic remains.
❖Select the item or items you want to remove in the Hyperlinks panel, and then click the Delete button at the bottom
of the panel.
Rename a hyperlink source
Renaming the hyperlink source changes the way it appears in the Hyperlinks panel.
1In the Hyperlinks panel, select the hyperlink.
2Choose Rename Hyperlink from the Hyperlinks panel menu, and specify a new name.
Edit or delete hyperlink destinations
1Open the document in which the destination appears.
2Choose Hyperlink Destination Options in the Hyperlinks panel menu.
3For Destination, select the name of the destination you want to edit.
4Do one of the following:
•Click Edit, and then make changes to the destination as necessary.
•Click Delete to remove the destination.

168
Text
Last updated 6/13/2015
5When you have finished editing or deleting destinations, click OK.
Reset or update hyperlinks
1Select the range of text, the text frame, or the graphic frame that will act as the new hyperlink source. For example,
you may want to select additional text to include in the source.
2Select the hyperlink in the Hyperlinks panel.
3Do either of the following:
•Choose Reset Hyperlink in the Hyperlinks panel menu.
•To update hyperlinks to external documents, choose Update Hyperlink in the Hyperlinks panel menu.
Go to a hyperlink source or anchor
•To locate the source of a hyperlink or cross-reference, select the item you want to locate in the Hyperlinks panel.
Choose Go To Source in the Hyperlinks panel menu. The text or frame will be selected.
•To locate the destination of a hyperlink or cross-reference, select the item you want to locate in the Hyperlinks panel.
Choose Go To Destination in the Hyperlinks panel menu.
If the item is a URL destination, InDesign starts or switches to your web browser to display the destination. If the item
is a text anchor or page destination, InDesign jumps to that location.
Editing hyperlinks imported from Word
When a Microsoft Word document with hyperlinks is imported into an InDesign document, you may notice a box or
border around the hyperlink URLs (such as www.adobe.com). The InDesign document inherits a blue swatch called
Word_R0_G0_B255. The document also inherits a character style called “Hyperlink” that underlines the text and
applies the blue color.
To remove the box, in the Hyperlinks panel, double-click the hyperlink. Under Appearance, choose Invisible Rectangle
from the Type menu, and click OK.
You may also want to delete the imported swatch. While doing so, you can replace it with a different swatch. See Delete
individual swatches .
Before you place the Word document in InDesign, you may want to remove the hyperlinks from the URLs in the Word
document to avoid inheriting this formatting. See your Word documentation. Another option is to create a character
style named “Hyperlink” in the InDesign document before you import. When you import the Word document, the InDesign
style that has the same name is used by default.
More Help topics
Add automatic page numbers for story
Export to PDF for printing
Cross-references
Adding text

169
Text
Last updated 6/13/2015
Adding text
You can add text by typing, pasting, or importing text from another file. In general, you use standard word-processing
techniques to work with text in InCopy. Select the Type tool on the toolbox, and then use the techniques described
below. These methods work the same way in Galley, Story, and Layout views, whether or not the content is linked to
Adobe InDesign®.
Typing Click the insertion point where you want to add text, and begin typing.
Selecting Drag, double-click, or triple-click to select individual characters, words, lines, or paragraphs (depending on
the Preferences settings). Or click anywhere in the content, and choose Edit >Select All.
Pasting Copy or cut text, click at the location you want, and choose Edit > Paste. If you want to remove the formatting
of the pasted text, choose Edit > Paste Without Formatting. If you want to add or remove spacing as necessary, select
Adjust Spacing Automatically When Cutting And Pasting Words in the Type section of the Preferences dialog box.
You can also use Edit > Paste Without Grid Format to paste text into a frame grid so that the pasted text retains its font,
font size, and character spacing settings of the copied text.
Deleting Select the text you want to delete, and choose Edit > Clear.
You can also import text directly from another text document.
Importing files
You can import text from other InCopy stories, Microsoft® Word, Microsoft Excel, and any application that can export
text in Rich Text Format (RTF) or text-only format. All importable file formats are listed in the InCopy Place dialog box
(in the Files Of Type menu for Windows®, and in the right list pane for Mac OS).
Document formatting and styles
You can import files with or without formatting. If you import the files with formatting, InCopy imports most
character and paragraph formatting attributes from text files, but ignores most page-layout information, such as page
breaks, margins, and column settings (which you can set in InDesign). In general, InCopy imports all formatting
information specified in the word-processing application, except for features not available in InCopy.
If InCopy has an import filter for an application, you can determine which styles are imported, and which formatting
to use if there is a name conflict.
Note: InDesign controls the styles in linked InCopy stories. When you place an InCopy story in InDesign, any imported
styles in the InCopy document are overridden in InDesign if there are conflicting style names.
Saving files for import
If your word-processing application can save files in more than one file format, try using the format capable of retaining
the most formatting—either the application’s native file format or an interchange format such as Rich Text Format
(RTF).
You can import files created in the recent versions of Microsoft Word. If you are placing a file from a different word-
processing application or from Word 95 for Windows or earlier, such as Word 6, open the file in its original application
and save it in a compatible Word format or in RTF, which preserves most formatting.

170
Text
Last updated 6/13/2015
Place (import) text
For large amounts of text, the Place command is the most useful way to import content. InCopy supports a variety of
word-processing, spreadsheet, and text file formats. The degree to which the original formatting is preserved depends
on the import filter for the file type and the options you choose as you place the file. You can also open Word, text, and
RTF files directly in InCopy.
1Using the Type tool , click where you want the text to appear.
2Choose File > Place.
3In the Place dialog box, select Show Import Options if you want to display a dialog box containing import options
for the type of file you’re placing.
4Select the text file you want to place, and then click Open. (If you Shift-click Open, the Import Options dialog box
appears, even if Show Import Options isn’t selected.)
5Do any of the following:
•If a dialog box displays import options for the type of file you’re placing, select any options you want, and click
OK.
•If the document you’re importing contains fonts that aren’t available on your system, a dialog box opens to
inform you of the font substitution. If you prefer to specify other substitution fonts, click Find Font and choose
alternatives.
If the text you import into your document includes pink, green, or another color of highlighting, you likely have one or
more composition preference options turned on. Open the Composition section of the Preferences dialog box, and notice
which options are turned on under Highlight. For example, if the placed text is formatted with fonts not available in InCopy,
the text is highlighted in pink.
Import options
When you import Word, Excel, and tagged text files, you can determine how the files are imported.
Microsoft Word and RTF import options
If you select Show Import Options when placing a Word file or an RTF file, you can choose from these options:
Table Of Contents Text Imports the table of contents as part of the text in the story. These entries are imported as text
only.
Index Text Imports the index as part of the text in the story. These entries are imported as text only.
Footnotes Imports Word footnotes. Footnotes and references are preserved, but renumbered based on the document’s
footnote settings. If the Word footnotes are not imported properly, try saving the Word document in RTF format and
importing the RTF file.
Endnotes Imports endnotes as part of the text at the end of the story.
Use Typographer’s Quotes Ensures that imported text includes left and right quotation marks (“ ”) and apostrophes (’)
instead of straight quotation marks (" ") and apostrophes (').
Remove Styles And Formatting From Text And Tables Removes formatting, such as typeface, type color, and type style,
from the imported text, including text in tables. Paragraph styles and inline graphics aren’t imported if this option is
selected.
Preserve Local Overrides When you choose to remove styles and formatting from text and tables, you can select
Preserve Local Overrides to maintain character formatting, such as bold and italics, that is applied to part of a
paragraph. Deselect this option to remove all formatting.

171
Text
Last updated 6/13/2015
Convert Tables To When you choose to remove styles and formatting from text and tables, you can convert tables to
either basic, unformatted tables or unformatted, tab-delimited text.
If you want to import unformatted text and formatted tables, import the text without formatting, and then paste the
tables from Word into InCopy .
Preserve Styles And Formatting From Text And Tables Preserves the Word document’s formatting in the InDesign or
InCopy document. You can use the other options in the Formatting section to determine how styles and formatting are
preserved.
Manual Page Breaks Determines how page breaks from the Word file are formatted in InDesign or InCopy. Select
Preserve Page Breaks to use the same page breaks used in Word, or select Convert To Column Breaks or No Breaks.
Import Inline Graphics Preserves inline graphics from the Word document in InCopy .
Import Unused Styles Imports all styles from the Word document, even if the styles aren’t applied to text.
Convert Bullets & Numbers To Text Imports bullets and numbers as actual characters, preserving the look of the
paragraph. However, in numbered lists, the numbers are not automatically updated when the list items are changed.
Track Changes Selecting this option causes Track Changes markups from the Word document to appear in the InCopy
document. In InDesign, view track changes in Story Editor.
Import Styles Automatically Imports styles from the Word document into the InDesign or InCopy document. If a
yellow warning triangle appears next to Style Name Conflicts, then one or more paragraph or character styles from the
Word document have the same name as an InCopy style.
To determine how these style name conflicts are resolved, select an option from the Paragraph Style Conflicts and
Character Style Conflicts menu. Choosing Use InCopy Style Definition causes the imported style text to be formatted
based on the InCopy style. Choosing Redefine InCopy Style causes the imported style text to be formatted based on the
Word style, and changes existing InCopy text formatted with the Word style. Choosing Auto Rename causes the
imported Word styles to be renamed. For example, if InCopy and Word have a Subheading style, the imported Word
style is renamed Subheading_wrd_1 when Auto Rename is selected.
Note: InCopy converts paragraph and character styles but not bulleted and numbered list styles.
Customize Style Import Lets you use the Style Mapping dialog box to select which InCopy style should be used for each
Word style in the imported document.
Save Preset Stores the current Word Import Options for later reuse. Specify the import options, click Save Preset, type
the name of the preset, and click OK. The next time you import a Word style, you can select the preset you created from
the Preset menu. Click Set As Default if you want the selected preset to be used as the default for future imports of Word
documents.
Text-file import options
If you select Show Import Options when placing a text file, you can choose from these options:
Character Set Specifies the computer language character set, such as ANSI, Unicode UTF8, or Windows CE, that was
used to create the text file. The default selection is the character set that corresponds to the default language and
platform of InDesign or InCopy.
Specifies the computer language character set, such as ANSI, Unicode UTF8, Shift JIS, or Chinese Big 5, that was used
to create the text file. The default selection is the character set that corresponds to the default language and platform of
InDesign or InCopy.
Platform Specifies whether the file was created in Windows or Mac OS.
Set Dictionary To Specifies the dictionary to be used by the imported text.

172
Text
Last updated 6/13/2015
Extra Carriage Returns Specifies how extra paragraph returns are imported. Choose Remove At End Of Every Line or
Remove Between Paragraphs.
Replace Replaces the specified number of spaces with a tab.
Use Typographer’s Quotes Ensures that imported text includes left and right quotation marks (“ ”) and apostrophes (’)
instead of straight quotation marks (" ") and apostrophes (').
Microsoft Excel import options
You can choose from these options when importing an Excel file:
Sheet Specifies the worksheet you want to import.
View Specifies whether to import any stored custom or personal views, or to ignore the views.
Cell Range Specifies the range of cells, using a colon (:) to designate the range (such as A1:G15). If there are named
ranges within the worksheet, these names appear in the Cell Range menu.
Import Hidden Cells Not Saved In View Includes any cells formatted as hidden cells in the Excel spreadsheet.
Table Specifies how the spreadsheet information appears in the document.
Formatted Table InCopy tries to preserve the same formatting used in Excel, although the formatting of text within
each cell may not be preserved. If the spreadsheet is linked rather than embedded, updating the link will override any
formatting applied to the table in InCopy .
Unformatted Table The table is imported without any formatting from the spreadsheet. When this option is selected,
you can apply a table style to the imported table. If you format text using paragraph and characters styles, the formatting
is preserved even if you update the link to the spreadsheet.
Unformatted Tabbed Text The table is imported as tab-delimited text, which you can then convert to a table in
InDesign or InCopy.
Formatted Only Once InDesign preserves the same formatting used in Excel during the initial import. If the
spreadsheet is linked rather than embedded, formatting changes made to the spreadsheet are ignored in the linked table
when you update the link. This option isn’t available in InCopy.
Table Style Applies the table style you specify to the imported document. This option is available only if Unformatted
Table is selected.
Cell Alignment Specifies the cell alignment for the imported document.
Include Inline Graphics Preserves inline graphics from the Excel document in InCopy .
Number Of Decimal Places To Include Specifies the number of decimal places of spreadsheet figures.
Use Typographer’s Quotes Ensures that imported text includes left and right quotation marks (“ ”) and apostrophes (’)
instead of straight quotation marks (" ") and apostrophes (').
Tagged-text import options
You can import (or export) a text file capable of taking advantage of InCopy formatting capabilities by using the tagged
text format. Tagged-text files are text files containing information describing the formatting you want InCopy to apply.
Properly tagged text can describe almost anything that can appear in an InCopy story, including all paragraph-level
attributes, character-level attributes, and special characters.
For information on specifying tags, view the Tagged Text PDF at www.adobe.com/go/learn_id_taggedtext_cs5_en
(PDF).

173
Text
Last updated 6/13/2015
The following options are available when you import a tagged-text file and select Show Import Options in the Place
dialog box.
Use Typographer’s Quotes Ensures that imported text includes left and right quotation marks (“ ”) and apostrophes (’)
instead of straight quotation marks (" ") and apostrophes (').
Remove Text Formatting Removes formatting, such as typeface, type color, and type style, from the imported text.
Resolve Text Style Conflicts Using Specifies which character or paragraph style to apply when there is a conflict
between the style in the tagged-text file and the style in the InDesign document. Select Publication Definition to use
the definition that already exists for that style in the InDesign document. Select Tagged File Definition to use the style
as defined in the tagged text.
Show List Of Problem Tags Before Place Displays a list of unrecognized tags. If a list appears, you can choose to cancel
or continue the import. If you continue, the file may not look as expected.
Import Buzzword documents
Buzzword is a web-based text editor that lets users create and store text files on a web server. In InCopy CS5, you can
import and export text from Buzzword documents.
When you import a Buzzword document, a URL-based link is created to the Buzzword document on the server. When
the Buzzword document is updated outside InCopy , you can use the Links panel to update the imported version in
InCopy . However, doing so removes any changes to the Buzzword text you’ve made in InCopy .
Note: The Acrobat.com Buzzword application is available only in English, French, and German.
1Choose File > Place From Buzzword.
2If you haven’t already signed in to CS Live, click Sign In, specify your e-mail address and password, and then click
Sign In.
Once you sign in, the Place Buzzword Documents dialog box displays a list of the Buzzword documents you can
import.
3Select one or more documents you want to import, or paste the URL of the Buzzword document into the Paste URL
field.
4Select any of the following options, and then click OK.
Show Import Options If you select this option, the Buzzword Import Options dialog box appears before you place
the file.
Replace Selected Item Select this option to replace the object currently selected in the document.
Link To Document Select this option to create a link between the Buzzword document and the placed text. If you
establish a link and update the Buzzword document, the Links panel indicates that the file has been modified. If you
update the link, the text in InCopy is updated. However, formatting changes you’ve made to this text in InCopy are
lost.
Apply Grid Format Reformat the imported text according to grid attributes.
5If you selected Show Import Options, specify settings in the Buzzword Import Options dialog box.
This dialog box includes most of the same options found in the RTF Import Options dialog box. See Microsoft Word
and RTF import options. Buzzword currently does not have a styles feature, so none of the style options are valid at
this time.
6With the loaded text cursor, click or drag to create a text frame.

174
Text
Last updated 6/13/2015
Type Asian text using inline input
1Choose Edit > Preferences > Advanced Type (Windows) or InCopy > Preferences > Advanced Type (Mac OS).
2Select Use Inline Input For Non-Latin Text, and then click OK.
You can use a system input method, if available, for adding 2-byte and 4-byte characters. This method is especially
useful for entering Asian characters.
You can use a special input program to input Asian text directly into text frames.
More Help topics
Paste text
Import graphics
Convert Word styles to InDesign styles
Work with stand-alone documents
Export content to Buzzword
Checking spelling
Check spelling
You can check the spelling in a document or in all open stories. InCopy highlights misspelled or unknown words,
repeated words (such as “the the”), uncapitalized words, and uncapitalized sentences. When performing a spell check,
InCopy checks all XML content and expanded inline notes.
When you check spelling, InCopy uses the dictionary for the languages you assigned to the text in your document.
InCopy uses the Proximity language dictionaries for both spelling and hyphenation. Each dictionary contains hundreds
of thousands of words with standard hyphenation breaks.
For stand-alone stories (stories not linked to an InDesign layout), you can customize language dictionaries to ensure
that any unique vocabulary you use is recognized and treated correctly. For example, when you run a spelling check
(Edit > Spelling > Check Spelling), you can click Add and enter the settings you want.
Set spelling preferences
1Choose Edit > Preferences > Spelling (Windows) or InCopy > Preferences > Spelling (Mac OS).
2Do any of the following:
•Select Misspelled Words to find words that do not appear in the language dictionary.
•Select Repeated Words to find duplicate words such as “the the.”
•Select Uncapitalized Words to find words (such as “germany”) that appear in the dictionary only as capitalized
words (“Germany”).
•Select Uncapitalized Sentences to find uncapitalized words following periods, exclamation points, and question
marks.
3Select Enable Dynamic Spelling to underline potentially misspelled words while you type.

175
Text
Last updated 6/13/2015
4Specify the underline color of misspelled words (words not found in the user dictionaries), repeated words (such as
“the the”), uncapitalized words (such as “nigeria” instead of “Nigeria”), and uncapitalized sentences (sentences that
don’t begin with a capital letter).
Note: To spell-check notes, make sure that Include Note Content When Checking Spelling is selected in Notes preferences.
To spell-check deleted text, make sure that Include Deleted Text When Spellchecking is selected in the Track Changes
preferences.
Check spelling
1If your document includes foreign-language text, select the text and use the Language menu on the Character panel
to specify the language for that text.
2Choose Edit > Spelling > Check Spelling.
Spell-checking begins.
Note: The Check Spelling command does not check collapsed stories in a multistory file. However, when you select
Change All or Ignore All, all collapsed stories and tables are affected.
3If you want to change the range of your spell-checking, do any of the following, and then click Start to begin checking
the spelling:
•Select Document to check the entire document.Select All Documents to check all open documents.
•Select Story to check all text in the currently selected frame, including text in other threaded text frames and
overset text. Select Stories to check stories in all selected frames.
•Select To End Of Story to check from the insertion point.
•Select Selection to check only selected text. This option is available only if text is selected.
4When unfamiliar or misspelled words or other possible errors are displayed, choose an option:
•Click Skip to continue spell-checking without changing the highlighted word. Click Ignore All to ignore all
occurrences of the highlighted word, until InCopy is restarted.
•Select a word from the Suggested Corrections list or type the correct word in the Change To box, and then click
Change to change only that occurrence of the misspelled word. You can also click Change All to change all
occurrences of the misspelled word in your document.
•To add a word to a dictionary, select the dictionary from the Add To menu, and click Add.
•Click Dictionary to display the Dictionary dialog box, where you can specify the target dictionary and language,
and specify hyphenation breaks in the added word. If you want to add the word to all languages, choose All
Languages from the Language menu. Click Add.
Correct spelling errors as you type
By turning on Autocorrect, you can allow capitalization errors and common typing mistakes to be replaced while you
type. Before Autocorrect will work, you must create a list of commonly misspelled words and associate them with the
correct spelling.
1Choose Edit > Preferences > Autocorrect (Windows) or InCopy > Preferences > Autocorrect (Mac OS).
2Choose Enable Autocorrect. (You can also choose Edit > Spelling > Autocorrect to turn this feature on or off
quickly.)
3From the Language menu, choose which language the autocorrections are applied to.
4To correct capitalization errors (such as typing “germany” instead of “Germany”), select Autocorrect Capitalization
Errors. You don’t need to add the capitalized words to the list of autocorrections.

176
Text
Last updated 6/13/2015
5To add a word that you commonly misspell, click Add, type the misspelled word (such as “teh”), type the correction
(such as “the”), and then click OK.
6Continue to add words that you commonly misspell, and then click OK.
When you type any misspelled word you added to the list, the word is automatically replaced by the word you entered
as the correction.
To remove autocorrect words you’ve added, select the word in the list and choose Remove. To edit autocorrect words,
select the word, click Edit, retype the correction, and click OK.
Use dynamic spelling
When dynamic spelling is enabled, you can correct spelling errors by using the context menu. Potentially misspelled
words are underlined (based on the dictionary associated with the language of the text). If you type text in different
languages, select the text and assign the correct language.
1To enable dynamic spelling, choose Edit > Spelling > Dynamic Spelling.
Potentially misspelled words are underlined in your document.
2Right-click (Windows) or Control-click (Mac OS) the underlined word, and do one of the following:
•Select a suggested correction. If a word is repeated or needs to be capitalized, you can choose Delete Repeated
Word [word] or Capitalize [word].
•Select Add [word] To User Dictionary. This automatically adds the word to the current dictionary without
opening the Dictionary dialog box. The word remains unchanged in the text.
•Select Dictionary. This opens the Dictionary dialog box where you can select the Target dictionary, change
hyphenation breaks, and specify a language. If you want to add the word to all languages, choose All Languages
from the Language menu, and then click Add. The word is added to the selected dictionary and remains
unchanged in the text.
•Select Ignore All to ignore occurrences of this word in all documents. When InCopy is restarted, the word is
flagged again as a misspelling.
Note: If you select Ignore All and then decide that you don’t want to ignore that word after all, Choose Ignored Words from
the Dictionary List menu in the Dictionary dialog box and remove the word from the list.
Hyphenation and spelling dictionaries
InCopy uses Proximity dictionaries for most languages to verify spelling and to hyphenate words. You can add words
to each dictionary to customize it. You can assign different languages to text, and InCopy uses the appropriate
dictionary to handle spelling and hyphenation. You can create additional user dictionaries, and you can import or
export word lists saved in a plain text file.
When you customize the words in a dictionary, you actually create lists of added words (words that aren’t already in the
dictionary) and removed words (existing dictionary words that you want to be flagged as a potential misspelling). The
Dictionary dialog box lets you display and edit added words, removed words, and ignored words (words that are
ignored for the current session because you clicked Ignore All). You can add words that apply to all languages, which
is especially useful for last names, street names, and other items that aren’t specific to a language.
If you want to use the language dictionaries from a previous version of InDesign or InCopy, use your system Find
command to locate the user dictionary files (.udc), and then add them to your list of dictionaries in Dictionary
preferences.
Where dictionary words are stored

177
Text
Last updated 6/13/2015
By default, hyphenation and spelling exceptions are located in user dictionary files stored outside the document on the
computer where InCopy is installed (dictionary file names end with a .clam or .not extension). However, you can also
store exception lists inside any InCopy document. In addition, you can store word lists in an external user dictionary,
in the document, or in both. The location of existing dictionaries appears in the Dictionary preferences.
Storing hyphenation and spelling exceptions inside a document makes it easier to treat text consistently when you move
that document to other computers. For this reason, you can merge the user dictionary into the document in Dictionary
preferences. You can also control the location of exceptions from the Create Package Folder dialog box (see Package
files ). In contrast, storing an exception list outside the document makes it easier to use the same list of exceptions for
multiple documents.
Note: If the user dictionary is merged into the exceptions list, the entire user dictionary is added to the document, even if
the words are not used, thereby increasing the document’s file size.
Applying languages to text
You can use the Language menu in the Character panel to apply a language to selected text. You can also specify a
default language for an entire document, or for all new documents. InCopy also includes a language locking feature that
prevents the language setting in Asian text from being changed when it is part of a selection and a non-Asian language
is chosen from the Language menu. (See Assign a language to text.)
You can use the Language menu in the Control panel or Character panel to apply a language to selected text. You can
also specify a default language for an entire document, or for all new documents. (See Assign a language to text.)
Exception word lists
You can exclude words from being considered. For example, if you want to use an alternate spelling for a common word
such as “bicycle,” which you may need to spell in a different way for your company name or for a specific document,
add the word to the list of excluded words so that it will be flagged during a spell check. InCopy can maintain a separate
set of added and removed words for each installed language.
Create or add user dictionaries
You can create a user dictionary, or you can add user dictionaries from previous InDesign or InCopy versions, from
files that others have sent you, or from a server where your workgroup’s user dictionary is stored. The dictionary you
add is used for all your InCopy documents.
1Choose Edit > Preferences > Dictionary (Windows) or InCopy > Preferences > Dictionary (Mac OS).
2From the Language menu, choose the language with which you want to associate the dictionary.
3Do one of the following:
•To create a new dictionary, click the New User Dictionary icon below the Language menu. Specify the name
and location of the user dictionary (which includes a .udc extension), and then click Save.
•To add an existing dictionary, click the Add User Dictionary icon , select the user dictionary file, which
includes a .udc or .not extension, and then click Open.
Note: If you can’t find the dictionary file, you might want to use your system Find command to locate the .udc files (try
using *.udc), note the location, and then try again.
The dictionary is added to the list under the Language menu. You can add words to the dictionary when checking
spelling or by using the Dictionary dialog box.

178
Text
Last updated 6/13/2015
Set the default language dictionary for the current document
You can change the default language dictionary for a document or for all new documents you create. Changing the
default dictionary in an existing document doesn’t affect text that has already been created or text that you type into an
existing text frame.
Use the Character Style or Paragraph Style panel to set a specific dictionary for a specific style. The Language menu
appears in the Advanced Character Formats section.
1Open the document.
2Select the Selection tool from the toolbar and make sure no items are selected in the document.
3Choose Type > Character.
4Choose the desired dictionary from the Language menu on the Character panel. If you cannot see the language
option in the Character panel, select Show Options and then select your language from the list.
Set the default language dictionary for all new documents
1Start InCopy , but do not open a document.
2Choose Type > Character.
3Choose the desired dictionary from the Language pop-up menu on the Character panel. If you cannot see the
language option in the Character panel, select Show Options and then select your language from the list.
Remove, relink, and reorder user dictionaries
1Choose Edit > Preferences > Dictionary (Windows) or InCopy > Preferences > Dictionary (Mac OS).
2From the Language menu, choose the language to which the dictionary belongs.
3Do any of the following:
•To remove a dictionary from the list, select it and click the Remove User Dictionary icon . You must have at
least one dictionary per language.
•If the language dictionary includes a question mark icon next to it, select the dictionary, click the Relink User
Dictionary icon , and then locate and open the user dictionary.
•To change the order of the user dictionaries, drag and drop them. The order of the dictionaries in the list is the
order in which the dictionaries are checked.
Add words to dictionaries
If, during a spell check, InDesign displays an unfamiliar word in the Check Spelling dialog box, select the dictionary
from the Add To menu, and then click Add. You can also use the Dictionary dialog box to let you specify the target
dictionary and language, and to indicate how words are added to an exception word list.
For stand-alone stories (stories not linked to an InDesign layout), you can add words to the language dictionaries.
Customizing your dictionaries ensures that any unique vocabulary you use is recognized and treated correctly.
1Choose Edit > Spelling > User Dictionary.
2In the Language menu, choose a language. Each language contains at least one dictionary. If you want the word to
be added to all languages, choose All Languages.
3In the Target menu, choose the dictionary where you want to store the word. The Target menu lets you store the
changes in an external user dictionary or in any open document.
4In the Dictionary List menu, choose Added Words.
5In the Word box, type or edit the word to be added to the word list.

179
Text
Last updated 6/13/2015
6Click Hyphenate to see the word’s default hyphenation. Tildes (~) indicate possible hyphenation points.
7If you don’t like the hyphenation points, follow these guidelines to indicate your preferred hyphenation of the word:
•Type one tilde (~) to indicate the best possible hyphenation points, or the only acceptable hyphenation point, in
the word.
•Type two tildes (~~) to indicate your second choice.
•Type three tildes (~~~) to indicate a poor but acceptable hyphenation point.
•If you want the word never to be hyphenated, type a tilde before its first letter.
If you need to include an actual tilde in a word, type a backslash before the tilde (\~).
8Click Add, and then click Done. The word is added to the currently selected Dictionary List.
Note: Remember that hyphenation points interact with the hyphenation settings in your documents. As a result, the word
might not break where you expect it to. Control these settings by choosing Hyphenation in the Paragraph panel menu. (See
Hyphenate text.)
Remove or edit words in dictionaries
1Choose Edit > Spelling > User Dictionary.
2In the Language menu, choose a language.
3In the Target menu, choose the dictionary from which you want to remove the word. The Target menu lets you
choose an external user dictionary or any open document.
4In the Dictionary List menu, do one of the following:
•To modify the list of additions to the selected Target word list, choose Added Words.
•To modify the list of words that are flagged as misspelled, choose Removed Words.
•To modify the list of words that are being ignored during the current InCopy session, choose Ignored Words.
This list includes all the words for which you’ve chosen Ignore All.
5In the word list, edit the word, or select the word and click Remove.
6Click Done.
Export a word list
You can export word lists to a text file (.txt) and then import that list of words into a user dictionary in InCopy . The
words in the text file must be separated by a space, tab, or paragraph return. You can export added words and removed
words, but you cannot export ignored words, which are used only in the current session.
1Choose Edit > Spelling > User Dictionary.
2Choose the language from the Language menu and the dictionary from the Target menu that contains the list of
words you want to export.
3Click Export, specify the file name and location, and then click Save.
The list of words is saved in a text file. You can edit this list of words in any text editor, and then import the word list.
You can also send the word list to others, who can import it into their user dictionaries.
Import a word list
1Choose Edit > Spelling > User Dictionary.
2Choose the language from the Language menu and the dictionary from the Target menu.

180
Text
Last updated 6/13/2015
3Click Import, locate the text file containing your list of spelling exceptions, and then click Open.
Change dictionary preferences
Use Dictionary preferences to specify how InCopy handles hyphenation and spelling dictionaries. Most languages in
InCopy use Proximity dictionaries to verify spelling and to hyphenate words. If you have installed hyphenation or
spelling components from a different company, you can select a different vendor for each installed language.
Note: The Dictionary Preferences dialog box does not enable you to specify the language dictionary used for spell checking
or hyphenating text. This dialog box is used to specify which hyphenation and spelling plug-ins InCopy uses for the language
specified in the Language field. If you use only the default hyphenation and spelling plug-in, you don't need to change any
settings in the Dictionary Preferences dialog box. If you install a different spelling or hyphenation plug-in provided by a
third-party developer, it appears as an option in the Hyphenation Vendor and Spelling Vendor menus in this dialog box.
This would let you select one vendor's hyphenation or spelling engine for some languages and another vendor's hyphenation
or spelling engine for other languages.
1Choose Edit > Preferences > Dictionary (Windows) or InCopy > Preferences > Dictionary (Mac OS).
2For Language, specify the language for which you want to edit settings or change the hyphenation or spelling vendor.
3Create, add, or remove user dictionaries. (See Create or add user dictionaries.)
4If you have installed a hyphenation component from a company other than Adobe, select it in the Hyphenation
menu.
5If you have installed a spelling dictionary component from a company other than Adobe, select it in the Spelling
menu.
6In the Compose Using menu in the Hyphenation Exceptions menu, do one of the following:
•To compose text using the hyphenation exceptions list stored in the external user dictionary, choose User
Dictionary.
•To compose text using the hyphenation exceptions list stored inside the document, choose Document.
•To compose text using both lists, choose User Dictionary And Document. This is the default setting.
7To add the exceptions list stored in the external user dictionary to the exceptions list stored within the document,
select Merge User Dictionary Into Document.
Note: If you work with many different partners or clients, you might want to deselect the Merge User Dictionary Into
Document option. For example, if you’re a service provider, you probably don’t want your user dictionary merged with
every customer’s file.
8To recompose all stories when certain settings are changed, select Recompose All Stories When Modified. Selecting
this option recomposes stories when you change the Compose Using settings (see step 6) or when you use the
Dictionary command to add or remove words. Recomposing all stories can take some time, depending on the
amount of text in the document.
9Click OK.
Using dictionaries in a workgroup
Make sure that each station in your workgroup has the same customized user dictionaries installed and added, so that
a document uses the same spelling and hyphenation rules regardless of who is working on it. You can either make sure
that everyone adds the same dictionaries to their computer, or you can share a user dictionary over the network server.
181
Text
Last updated 6/13/2015
A lock icon indicates that a dictionary is locked and can be used, but not edited. When a user dictionary is stored on
a server, the first user to load the dictionary locks the file; all subsequent users see that the dictionary is locked. Files
can also be locked through the operating system, when the file is made read-only. If you share a user dictionary over
the network server, you may want to lock the file so that it’s read-only for all users, allowing only the administrator to
add words.
Make sure that everyone in the workgroup uses the customized user dictionary installed on the common network
workstation, and not the dictionary stored with a document. However, before you take a document to a service
provider, you might want to merge the user dictionary into the document.
If you don’t share a customized user dictionary on a common network workstation, locate user dictionary files and copy
them from one workstation to another. The location of user dictionaries appear in the Dictionary preferences.
After you update a shared workstation’s user dictionary, the changes don’t appear in individual workstations until a user
restarts InCopy or presses Ctrl+Alt+/ (Windows) or Command+ Option+/ (Mac OS) to recompose all text.
Assign a language dictionary to selected text
If you use more than one language in a stand-alone story (stories not linked to an InDesign layout), you can tell InCopy
which language dictionary to use for spell checking and hyphenating words in a particular language. You can assign
different language dictionaries to the various parts of your document down to a single character of text.
A Glockenspiel in English B Glockenspiel in Traditional German C Glockenspiel in Reformed German
1Select the text to which you want to assign a dictionary.
2Choose Type > Character to open the Character panel.
3At the bottom of the Character panel, choose a dictionary from the Language menu. (If the Language menu doesn’t
appear in the Character panel, choose Customize from the Character panel menu, select Language, and click OK.)
Note: If the InCopy story is linked to an InDesign layout with an embedded hyphenation list, the embedded list governs
spell checking and hyphenation.
Cross-references
If you’re writing a manual or reference document, you may want to include a cross-reference to refer the reader from
one part of your document to another. Example: For more information, see “Field mice” on page 249. You can specify
whether a cross-reference derives from a paragraph style, such as a heading style, or from a text anchor you’ve created.
You can also determine the cross-reference format, such as Page Number Only or Full Paragraph & Page Number.
Insert cross-references
Use the Hyperlinks panel to insert cross-references into your document. The text being referred to is the destination
text. The text that is generated from the destination text is the source cross-reference.
182
Text
Last updated 6/13/2015
When you insert a cross-reference in your document, you can choose from several predesigned formats, or you can
create your own custom format. You can apply a character style to the entire cross-reference source, or to text within
the cross-reference. Cross-reference formats can be synchronized across a book.
Cross-reference source text is editable and can break across lines.
Note: Cross-references are included in exported Adobe PDF files if Hyperlinks is selected in the Export Adobe PDF dialog
box in InDesign. Cross-references are included in the exported SWF file if Include Hyperlinks is selected in the Export SWF
dialog box.
In InCopy standalone documents, you can create and edit cross-references as you can in InDesign. In checked-out
stories, you can create and edit cross-references to paragraphs in the same story as the source, to paragraphs in another
checked-out story if the InDesign document is open, or to text anchors in any story of any InDesign document.
A Cross-reference source in document B Selected destination paragraph C Click here to create or edit cross-reference format.
For a video tutorial on inserting cross-references, see www.adobe.com/go/lrvid4024_id.
1Place the insertion point where you want the cross-reference to be inserted.
2Do any of the following:
•Choose Type > Hyperlinks & Cross-References > Insert Cross-Reference.
•Choose Window > Type & Tables > Cross-References, and then choose Insert Cross-Reference from the
Hyperlinks panel menu.
•Click the Create New Cross-Reference button in the Hyperlinks panel.
3In the New Cross-Reference dialog box, choose Paragraph or Text Anchor from the Link To menu.
If you choose Paragraph, you can create a cross-reference to any paragraph in the document you specify.
If you choose Text Anchor, you can create a cross-reference to any text in which you have created a hyperlink
destination. (See Create a hyperlink destination.) Creating a text anchor is especially useful if you want to use
different text than the actual destination paragraph.

183
Text
Last updated 6/13/2015
4For Document, select the document containing the destination that you want to refer to. All open documents that
have been saved are listed in the pop-up menu. If the document you’re looking for isn’t open, choose Browse, locate
the file, and then click Open.
5Click a paragraph style (such as Head1) in the left box to narrow down the choices, and then select the paragraph
you want to refer to. (Or, if Text Anchor is selected, choose the text anchor.)
6Choose the cross-reference format you want to use from the Format menu.
You can edit these cross-reference formats or create your own. See Using cross-reference formats.
7Specify the appearance of the source hyperlink. See Hyperlink appearance options.
8Click OK.
When you insert a cross-reference, a text anchor marker appears at the beginning of the destination paragraph. You
can view this marker when you choose Type > Show Hidden Characters. If this marker is moved or deleted, the cross-
reference becomes unresolved.
Using cross-reference formats
Several cross-reference formats appear in the New Cross-Reference dialog box by default. You can edit these formats,
delete them, or create your own.
Note: If you’ve deleted or edited cross-reference formats in your document and want to return them to the default formats,
you can choose Load Cross-Reference Formats from the panel menu and choose a document with unedited formats. You
can also synchronize cross-reference formats in a book.
For a video tutorial on editing cross-reference formats, see www.adobe.com/go/lrvid4024_id.
Create or edit cross-reference formats
Unlike other presets, cross-reference formats can be edited or deleted. When you edit a cross-reference format, any
source cross-reference that uses that format is automatically updated.
In InCopy, you can create or edit cross-reference formats only in stand-alone documents. In assignment files, the cross-
reference formats are determined by the InDesign document.
1Do any of the following:
•Choose Define Cross-Reference Formats from the Hyperlinks panel menu.
•While creating or editing a cross-reference, click the Create Or Edit Cross-Reference Formats button .
2In the Cross-Reference Formats dialog box, do one of the following:
•To edit a format, select the format on the left.
•To create a format, select a format to base the new format on, and then click the Create Format button . This
creates a duplicate of the selected format.
3For Name, specify the name of the format.
4In the Definition text box, add or remove any text as needed. Click the Building Block icon to insert building
blocks from a menu. Click the Special Characters icon to select dashes, spaces, quotation marks, and other
special characters.
5To apply a character style to the entire cross-reference, select Character Style For Cross-Reference, and then choose
or create the character style from the menu.
You can also use the Character Style building block to apply a character style to text within the cross-reference.
6Click Save to save the changes. Click OK when finished.
184
Text
Last updated 6/13/2015
Cross-reference building blocks
Creating cross-references to partial paragraphs
You can design cross-reference formats to include only the first part of a paragraph. For example, if you have headings
in your document that look like, “Chapter 7—Granada to Barcelona,” you can create a cross-reference that refers only
to “Chapter 7.”
Building block What it does Example
Page Number Inserts the page number. on page <pageNum/>
on page 23
Paragraph Number Inserts the paragraph number in a cross-
reference to a numbered list.
See <paraNum/>
See 1
In this example, only “1” is used from the
paragraph, “1. Animals.”
Paragraph Text Inserts the paragraph text without the
paragraph number in a cross-reference to a
numbered list.
See “<paraText/>”
See “Animals”
In this example, only “Animals” is used from
the paragraph, “1. Animals.”
Full Paragraph Inserts the entire paragraph, including
paragraph number and paragraph text.
See “<fullPara/>”
See “1. Animals”
Partial Paragraph Lets you create a cross-reference to the first
part of a paragraph, up to the specified
delimiter, such as a colon or em dash.
See <fullPara delim=”:”
includeDelim=”false”/>
See Chapter 7
In this example, only “Chapter 7” is used from
the title “Chapter 7: Dogs and Cats.”
Specify the delimiter (such as : in this
example), and indicate whether the delimiter
is excluded (“false” or “0”) or included (“true”
or “1”) in the source cross-reference.
See Creating cross-references to partial
paragraphs.
Text Anchor Name Inserts the text anchor name. You can create
text anchors by choosing New Hyperlink
Destination from the Hyperlinks panel menu.
See <txtAnchrName/>
See Figure 1
Chapter Number Inserts the chapter number. in chapter <chapNum/>
in chapter 3
File Name Inserts the filename of the destination
document.
in <fileName/>
in newsletter.indd
Character Style Applies a character style to text within a cross-
reference.
See <cs name=”bold”><fullPara/></cs> on
page <pageNum>
See Animals on page 23.
Specify the character style name, and include
the text you want to apply the character style
to between the <cs name=””> and </cs> tags.
See Apply character styles within a cross-
reference.
185
Text
Last updated 6/13/2015
A The cross-reference source ends at an em dash (^_) B “false” excludes the em dash from the source
When you insert the Partial Paragraph building block, you must do two things. First, specify the delimiter between the
quotation marks. The delimiter is the character that ends the paragraph. Common delimiters include colons (Chapter
7: Granada), periods (Chapter 7. Granada), and dashes (Chapter 7—Granada). To insert special characters such as em
dashes (^_), em spaces (^m), and bullet characters (^8), choose an option from the menu that appears when you click
the Special Characters icon.
Second, indicate whether the delimiter character is excluded (Chapter 7) or included (Chapter 7—). Use
includeDelim=”false” to exclude the delimiter and includeDelim=”true” to include the delimiter. Instead of “false” or
“true,” you can use “0” or “1,” respectively.
Apply character styles within a cross-reference
If you want to emphasize a section of text within a cross-reference, you can use the Character Style building block. This
building block consists of two tags. The <cs name=”stylename”> tag indicates which style is applied, and the </cs> tag
ends the character style. Any text or building blocks between these tags is formatted in the specified style.
186
Text
Last updated 6/13/2015
A This tag applies a character style named “Red.” B This tag ends the character style formatting. C A character style named “Bold” is applied to
the rest of the cross-reference source.
1Create the character style you want to use.
2In the Cross-Reference Formats dialog box, create or edit the format you want to apply.
3Under Definition, select the text and building blocks to which you want to apply the character style.
4Choose Character Style from the menu to the right of the definition list.
5Type the name of the character style between the quotation marks exactly as it appears in the Character Styles panel.
Style names are case sensitive. If the character style is in a group, type the name of the group followed by a colon
before the character style, such as Style Group 1: Red.
6Click Save to save the format, and then click OK.
Load (import) cross-reference formats
When you load cross-reference formats from another document, the incoming formats replace any existing formats
that share the same name.
In InCopy, you can import cross-reference formats only in standalone documents. You cannot import formats from an
InCopy document into an InDesign document. If the new or modified format in InCopy conflicts with a format in the
InDesign document when the story is checked in, the InDesign format takes precedence.
1Choose Load Cross-Reference Formats from the Hyperlinks panel menu.
2Double-click the document containing the cross-reference formats you want to import.
You can also share cross-reference formats across documents by synchronizing a book.
Delete cross-reference formats
You cannot delete a cross-reference format that has been applied to cross-references in the document.
1In the Cross-Reference Formats dialog box, select the format you want to delete.
2Click the Delete Format button .

187
Text
Last updated 6/13/2015
Manage cross-references
When you insert a cross-reference, the Hyperlinks panel indicates the status of the cross-reference. For example, icons
indicate if the destination text appears on the pasteboard , a master page , a hidden layer , in overset text ,
or in hidden text . Cross-references that link to such destination areas are unresolved. The panel also lets you know
if the destination paragraph has been edited (also called out-of-date) or is missing . Destination text is missing if
either the destination text or the file containing the destination text cannot be found. Hold the mouse pointer over any
icon to view a tool tip description.
In InCopy, you can manage cross-references only if the story is checked out for editing.
Update cross-references
An update icon indicates that the cross-reference destination text has changed or that the cross-reference source text
has been edited. You can easily update the cross-reference. If the destination moves to a different page, the cross-
reference is updated automatically.
When you update a cross-reference, any formatting changes you’ve made to the source text are removed.
When printing or outputting, you are notified if cross-references are out of date or unresolved.
You can also use the Preflight panel to notify you when cross-references are out of date or unresolved. When defining a
profile, select Cross-References in the Text section. See Define preflight profiles .
1Select one or more out-of-date cross-references. To update all cross-references, make sure that none are selected.
2Do any of the following:
•Click the Update Cross-References button in the Hyperlinks panel.
•Choose Update Cross-Reference from the Hyperlinks panel menu.
•Choose Type > Hyperlinks & Cross-References > Update Cross-Reference.
To update all cross-references in a book, choose Update All Cross-References from the book panel menu. You are
notified if any cross-references remain unresolved.
Relink cross-references
If the missing destination text has been moved to a different document, or if the document containing the destination
text is renamed, you can relink the cross-reference. When you relink, any changes made to the source cross-reference
are removed.
1In the Cross-References section of the Hyperlinks panel, select the cross-reference you want to relink.
2Choose Relink Cross-Reference from the Hyperlinks panel menu.
3Locate the document in which the destination text appears, and then click Open.
If any other destination text appears in that document, you can relink additional cross-references.
Edit cross-references
To change the appearance of the source cross-reference or specify a different format, you can edit the cross-reference.
If you edit a cross-reference that links to a different document, the document is opened automatically.
1Do any of the following:
•Choose Type > Hyperlinks & Cross References > Cross-Reference Options.
•In the Cross-References section of the Hyperlinks panel, double-click the cross-reference you want to edit.
•Select the cross-reference, and choose Cross-Reference Options from the Hyperlinks panel menu.

188
Text
Last updated 6/13/2015
2Edit the cross-reference, and then click OK.
Delete cross-references
When you delete a cross-reference, the source cross-reference is converted to text.
1In the Cross-References section of the Hyperlinks panel, select the cross-reference or cross-references you want to
delete.
2Click the Delete icon, or choose Delete Hyperlink/Cross-Reference from the panel menu.
3Click Yes to confirm.
To completely remove a cross-reference, you can also select the cross-reference source and delete it.
Editing cross-reference source text
You can edit cross-reference source text. The advantage of editing cross-reference text is that you can change tracking
or word spacing as needed for copyfitting, or make other changes. The disadvantage is that if you update or relink the
cross-reference, any local formatting changes are removed.
Copyfitting text
Copyfitting text
InCopy keeps track of several text statistics and makes this data available in the Copyfit Info toolbar. As you write your
story, the Copyfit Info toolbar automatically displays the number of lines, words, and characters, and the vertical depth
at the bottom of the work area for both linked and stand-alone stories in Galley and Layout views.
Note: You can make the Copyfit Info toolbar a floating panel. (See Use toolbars.)
For linked InCopy documents or for stand-alone documents with a Depth setting, the Copyfit Progress Info box
indicates the precise amount by which a story is too long or too short. If the story doesn’t fill the frames assigned to it,
the copyfit box turns blue and displays a count. The length of the blue bar indicates roughly what percentage of the
frame is currently filled with text. The shorter the blue bar, the more text you need to add to fill the space.
If the text overflows the assigned frame space, a copyfit line indicates where overset text begins, and the Copyfit
Progress Info box turns red and displays the amount you need to cut to fit copy into the frame. (See Editing overset
text.)
Note: The red bar is always the same length. It does not reflect any percentage of the space available.
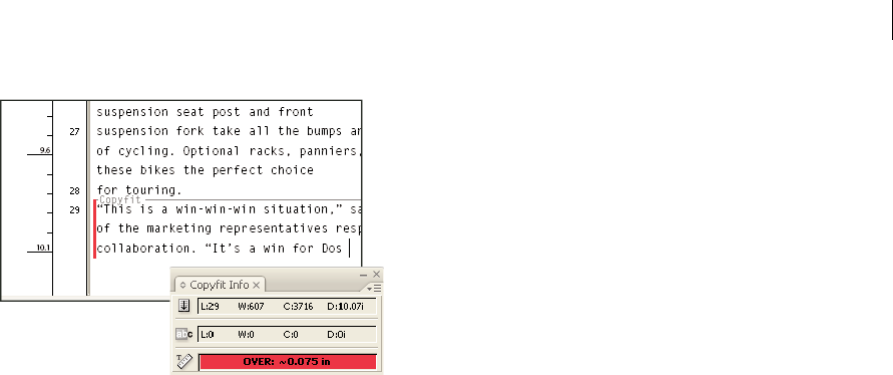
189
Text
Last updated 6/13/2015
The Copyfit Info toolbar also includes options for displaying the number of lines, words, and characters, and the
vertical depth in the current selection, from the beginning of the current story to the current insertion point, or from
the current insertion point to the end of the current story. (See Customize Copyfit Info settings.)
When you show hidden characters (choose Type > Show Hidden Characters), InCopy displays a number sign (#) at the
end of the last character to indicate the end of the text flow for a story. (See View hidden characters.)
Customize Copyfit Info settings
•To add Copyfit Info controls, click the triangle on the right side of the Copyfit Info toolbar, choose Customize, select
which items you want to appear in the toolbar, and then click OK.
•To include footnote text in text statistics, choose Include Footnotes In Text Statistics from the Copyfit Info toolbar
menu.
•To define word count based on a specified number of characters rather than actual words, choose Define Word
Count from the Copyfit Info toolbar menu, select Count Every, specify the number of characters, and click OK.
•To stop updating text statistics while you type, turn off Update Info Automatically from the Copyfit Info toolbar
menu.
•To display additional statistics such as kanji, kana, and romanji characters, choose Show Details from the Copyfit
Info toolbar menu.
Editing overset text
If a story is linked to an InDesign layout, the story is limited to the frames the designer specifies. If you specified a Depth
setting when creating a stand-alone InCopy document, the story is limited to that depth. When you type more than the
allowed length of text, the text is overset. When the story is underset, there is space available to be filled with text. As
you write and edit, you can tell when your story fits perfectly into the InDesign layout. You can still edit overset text.
In Galley view or Story view, overset text is set apart from the rest of the story by a copyfit break line. You use the same
procedures to write and edit the text, whether it is above or below the copyfit break line.
In Layout view, overset text is not visible, but the Copyfit Progress Info box indicates the number of overset lines in the
document.
If you’re writing or editing a threaded story in Layout view, you don’t need to do anything special when you reach the
end of a frame. The insertion point automatically follows the story thread from frame to frame as you type.
Show or hide the depth ruler
❖In Galley or Story view, choose View > Show Depth Ruler or Hide Depth Ruler.

190
Text
Last updated 6/13/2015
To change the units of measurement used for the depth ruler, change the Vertical setting in Units & Increments
Preferences.
Editing text
Select text
❖Using the Type tool, do one of the following:
•Drag the I-bar cursor over a character, word, or an entire text block to select it.
•Double-click a word to select it. Spaces next to the word are not selected.
•Double-click a character to select contiguous characters of the same type. For example, when Roman text, kanji,
and hiragana all appear in a paragraph, and you double-click on a kanji, the adjoining kanji in the same string
will be selected.
•Triple-click anywhere in a line to select a line. If the Triple Click To Select A Line preferences option is deselected,
triple-clicking selects the entire paragraph.
•If the Triple Click To Select A Line option is selected, quadruple-click anywhere in a paragraph to select the entire
paragraph.
•Quintuple-click to select the entire story, or click anywhere in a story and choose Edit > Select All.
Note: If you select text that contains a note anchor, using any of the above procedures, the note and its contents are also
selected.
If you cannot select text in a frame, the text frame could be on a locked layer or on a master page. Try unlocking the
layer or going to the master page. The text frame may also be beneath another text frame or transparent object. See
Select text in a frame that is covered.
Change what triple-clicking does
1Choose Edit > Preferences > Type (Windows) or InCopy > Preferences > Type (Mac OS).
2Select Triple Click To Select A Line to enable triple-clicking to select a line (this is the default). Deselect this option
if you want triple-clicking to select a paragraph.
Select text in a frame that is covered
1Using the Selection tool , hold down Ctrl (Windows) or Command (Mac OS) and click to select the text frame.
2Select the Type tool, and then click inside the text frame or select text.
Paste text
You can paste text from another application or from Adobe InCopy.
If the insertion point is not inside a text frame when you paste text into InDesign, a new plain text frame will be created.
If the insertion point is inside a text frame, the text will be pasted inside that frame. If you have text selected when you
paste, the pasted text will overwrite the selected text.

191
Text
Last updated 6/13/2015
When you use Edit > Paste Without Grid Format to paste text into a frame grid, the pasted text retains its font, font size,
and character spacing settings of the copied text. You can select text and choose Edit > Apply Grid Format to format
the pasted text according to the character attributes of the frame grid.
Paste text from another application
1To preserve formatting and information such as styles and index markers, open the Clipboard Handling section of
the Preferences dialog box, and select All Information under Paste. To remove these items and other formatting
when pasting, select Text Only.
2Cut or copy text in another application or in an InCopy document.
3If you like, select text or click in a text frame. Otherwise, the text will be pasted into its own new frame.
4Do one of the following:
•Choose Edit > Paste. If the pasted text doesn’t include all the formatting, you may need to change settings in the
Import Options dialog box for RTF documents.
•Choose Edit > Paste Without Formatting. (Paste Without Formatting is dimmed if you paste text from another
application when Text Only is selected in Clipboard Handling Preferences.)
•Choose Edit > Paste Without Grid Format.
You can also drag text from another application and drop it into an InDesign document, or you can insert a text file or
word-processing file into an InDesign document directly from Windows Explorer or Mac OS Finder. The text will be
added to a new frame. Shift-dragging removes the formatting. The option you select in the Clipboard Handling section of
the Preferences dialog box determines whether information such as index markers and swatches is preserved.
Adjust spacing automatically when pasting text
When you paste text, spaces can be automatically added or removed, depending on the context. For example, if you cut
a word and then paste it between two words, a space appears before and after the word. If you paste that word at the
end of a sentence, before the period, a space is not added.
Note: This feature is used primarily for working with Roman text. Also, this feature is available only when the Roman text
to be pasted is set to a Roman language in the Character panel.
1Choose Edit > Preferences > Type (Windows) or InCopy > Preferences > Type (Mac OS).
2Select Adjust Spacing Automatically When Cutting And Pasting Words, and then click OK.
Paste text to a frame grid
You can paste text that retains its source formatting attributes. When you copy text with modified attributes from one
frame grid and paste to a different frame grid, the text will be pasted with only those changed attributes preserved. You
can also paste without grid formatting.
1Cut or copy text in another application or in an InCopy document.
2In the frame grid, display the text insertion point or select a block of text.
3Do one of the following:
•To paste text that conforms to the grid format, choose Edit > Paste.
•To paste text without grid formatting, choose Edit > Paste Without Grid Format.
You can always apply grid formatting later by choosing Edit > Apply Grid Format. The grid format attributes specified
in the Named Grids panel will be applied to the text.

192
Text
Last updated 6/13/2015
Apply grid format to text
You can apply the grid format to any text that doesn’t conform to the grid format.
1Select the text.
2Choose Edit > Apply Grid Format.
Change the text direction
1Select the text frame.
2Do either of the following:
•Choose Type > Writing Direction > Horizontal or Vertical.
•Choose Type > Story to show the Story panel. Select Horizontal or Vertical for Story Direction.
In Galley view and Story view, text appears as horizontal, even if Vertical is selected. In Layout View, text is vertical if
Vertical is selected.
A vertical text frame or frame grid is converted to a horizontal one, or a horizontal text frame or frame grid is converted
to a vertical one. Changing this causes the entire story to be changed, and all frames threaded to the selected frames
will be affected.
Note: To change the direction of individual characters in a frame, use the Tate-chu-yoko feature, or use the Character
Rotation feature in the Character panel.
Drag and drop text
You can use the mouse to drag and drop text in the Story Editor or in the Layout View. You can even drag text from the
Story Editor to the layout window (or vice versa), or into some dialog boxes such as Find/Change. Dragging the text
from a locked or checked-in story copies the text rather than moves it. You can also copy text or create a new frame
when dragging and dropping text.
You can use the mouse to drag and drop text in Galley View, Story View, or Layout View. You can even drag text into
some dialog boxes, such as Find/Change. Dragging text from a locked or checked-in story copies the text rather than
moves it. You can also copy text when dragging.
Jeff Witchel provides a video tutorial about drag and drop at Using InDesign Drag and Drop Text.
1To enable drag and drop, choose Edit > Preferences > Type (Windows) or InCopy > Preferences > Type (Mac OS),
select Enable In Layout View, Enable In Story Editor (InDesign), or Enable In Galley/Story View (InCopy), and then
click OK.
2Select the text that you want to move or copy.
3Hold the pointer over the selected text until the drag and drop icon appears, and then drag the text.
As you drag, the selected text remains in place, but a vertical bar indicates where the text will appear when you
release the mouse button. The vertical bar appears in any text frame that you drag the mouse over.
4Do any of the following:
•To drop the text in a new location, position the vertical bar where you would like the text to appear and release
the mouse button.
•To drop the text in a new frame, hold down Ctrl (Windows) or Command (Mac OS) after you start dragging, and
then release the mouse button before releasing the key.
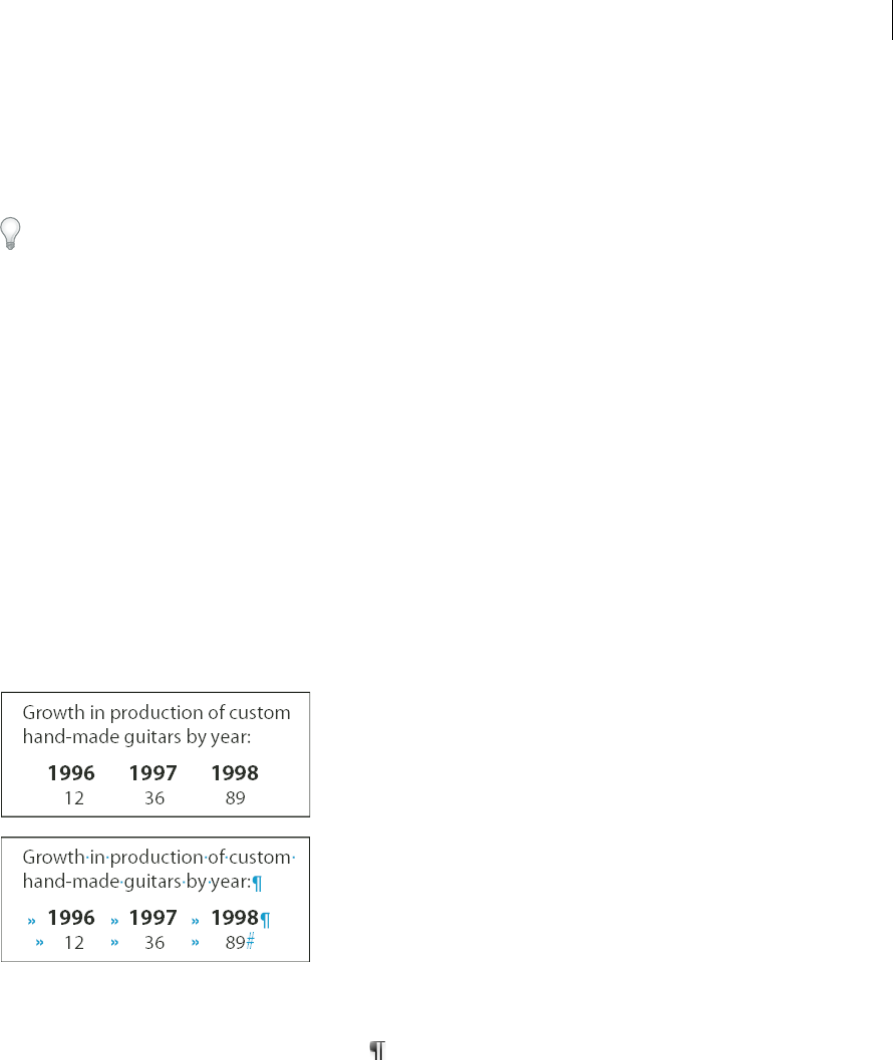
193
Text
Last updated 6/13/2015
•To drop the text without formatting, hold down Shift after you start dragging, and then release the mouse button
before releasing the key.
•To copy the text, hold down Alt (Windows) or Option (Mac OS) after you start dragging, and then release the
mouse button before releasing the key.
You can also use a combination of these modifier keys. For example, to copy unformatted text to a new frame, hold
down Alt+Shift+Ctrl (Windows) or Option+Shift+Command (Mac OS) after you start dragging.
If the text you drop doesn’t have the proper spacing, select the Adjust Spacing Automatically option in Type Preferences.
Transpose characters
If you transpose two adjacent characters as you type, you can correct them with the Transpose command. For example,
if you typed 1243 instead of 1234, the Transpose command switches the 4 and the 3.
1Place the insertion point between the two characters you want to transpose.
2Choose Edit > Transpose.
Note: The Transpose command applies only to characters and numbers within stories. It cannot move InCopy note anchors,
tables, spaces, or other nonprinting characters. You cannot use Transpose in a locked story.
View hidden characters
When you’re editing text, it’s often useful to see nonprinting characters, such as spaces, tabs, and paragraph symbols.
These characters are visible only in a document window; they won’t output or print.
❖Do one of the following:
•Choose Type > Show Hidden Characters. A check mark appears next to the menu command.
•Click the Show Hidden Characters button on the horizontal toolbar.
Edit text on a master page
In InDesign documents, a master page is a kind of template that applies to multiple pages. Master pages typically specify
only common layout elements that appear on all pages of the document, such as the margins, page numbers, headers,
and footers. You can use InCopy to edit the text on an InDesign master page if the text is a linked file. However, you
cannot change any of the frame attributes controlled by the master, and you cannot edit master-page text from any other
(regular) pages in the document.
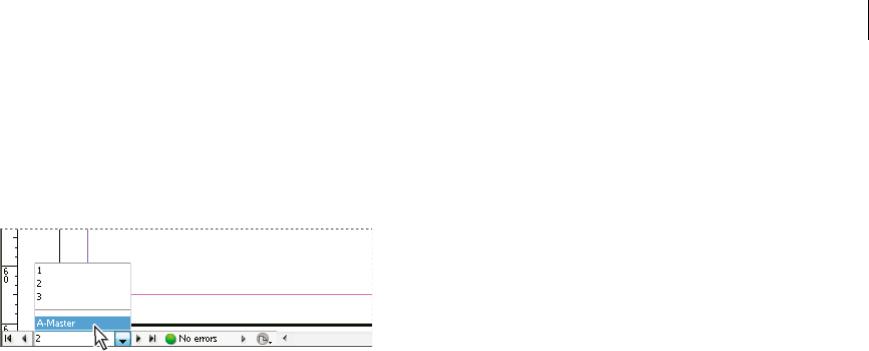
194
Text
Last updated 6/13/2015
Note: If you can’t click an insertion point into a nonlocked text frame on a regular page, that text might be on a master
page. Check with the person who set up the frames and with your design team.
1Choose View > Layout View if your document is not already in Layout view.
2Choose the master page from the page box at the lower left of the document window.
3On the master page, select the text that you want to edit, and make the changes.
To edit text on a master page, the master page must include managed stories that are checked out.
Undo actions
You can undo or redo up to several hundred of the most recent actions. The exact number of actions you can undo is
limited by the amount of RAM available and the kinds of actions you have performed. The record of recent actions is
erased when you save, close, quit, or exit, so they can no longer be undone. You can also cancel an operation before it
completes, or revert to a previously saved version.
❖Do one of the following:
•To undo the most recent change, choose Edit > Undo [action]. (You cannot undo certain actions, such as
scrolling.)
•To redo an action you just undid, choose Edit > Redo [action].
•To undo all changes made since the last time you saved the project, choose File > Revert Content.
•To stop a change that InCopy hasn’t finished processing (for example, if you see a progress bar), press the Escape
key.
•To close a dialog box without applying changes, click Cancel.
Jump to a position marker
A position marker is like a bookmark, and it is used to mark a location in a document. This is useful if you need to return
to that location quickly or frequently. A document can have only one position marker.
1Place the insertion point where you want to insert the marker.
2Choose Edit > Position Marker > Insert Marker. (If you’ve already inserted a marker, choose Replace Marker.)
To jump to the marker from anywhere in the document, choose Edit > Position Marker > Go To Marker.
To clear the marker, choose Edit > Position Marker > Remove Marker. The marker is removed automatically when you
close and reopen the document.
Add column, frame, and page breaks
Control column, frame, and page breaks by inserting special break characters in the text.
1Using the Type tool, click to place the insertion point where you want the break to occur.
2Choose Type > Insert Break Character, and then choose a break option from the submenu.

195
Text
Last updated 6/13/2015
You can also create breaks by using the Enter key on the numeric keypad. For a column break, press Enter; for a frame
break, press Shift+Enter; and for a page break, press Ctrl+Enter (Windows) or Command+Return (Mac OS).
To remove a break character, choose Type > Show Hidden Characters so that you can see nonprinting characters, and
then select and delete the break character.
Note: If you create a break by changing paragraph settings (as in the Keep Options dialog box), the break precedes the
paragraph that contains the setting. If you create a break using a special character, the break occurs immediately after the
special character.
Break options
The following options appear on the Type > Insert Break Character menu:
Column break
Flows text to the next column in the current text frame. If the frame has only one column, the text goes to the next
threaded frame.
Frame break
Flows text to the next threaded text frame, regardless of the current text frame’s column setup.
Page break
Flows text to the next page with a text frame threaded to the current text frame.
Odd page break
Flows text to the next odd-numbered page with a text frame threaded to the current text frame.
Even page break
Flows text to the next even-numbered page with a text frame threaded to the current text frame.
Paragraph Return
Inserts a paragraph return (the same as pressing Enter or Return).
Forced Line Break
Forces a line to break where the character is inserted, starting a new line without starting a new paragraph (the same as
pressing Shift+Enter or Shift+Return). A forced line break is also called a soft return.
Discretionary Line Break
Indicates where a line of text should break if the line needs to break. A discretionary line break is similar to a
discretionary hyphen, only no hyphen is added where the line breaks.
Related break options are available in the Keep Options dialog box and in the Paragraph Style Options dialog box.
Use conditional text
Conditional text is a way to create different versions of the same document. After you create conditions, you apply them
to ranges of text. You can then create different versions of documents by showing and hiding conditions. For example,
if you’re creating a computer manual, you can create separate conditions for Mac OS and Windows. Before you print
the Mac OS version of the user guide, you can show all text to which the “Mac” condition is applied and hide all text to
which the “Windows” condition is applied. You can then reverse the condition states for printing the user guide for
Windows.
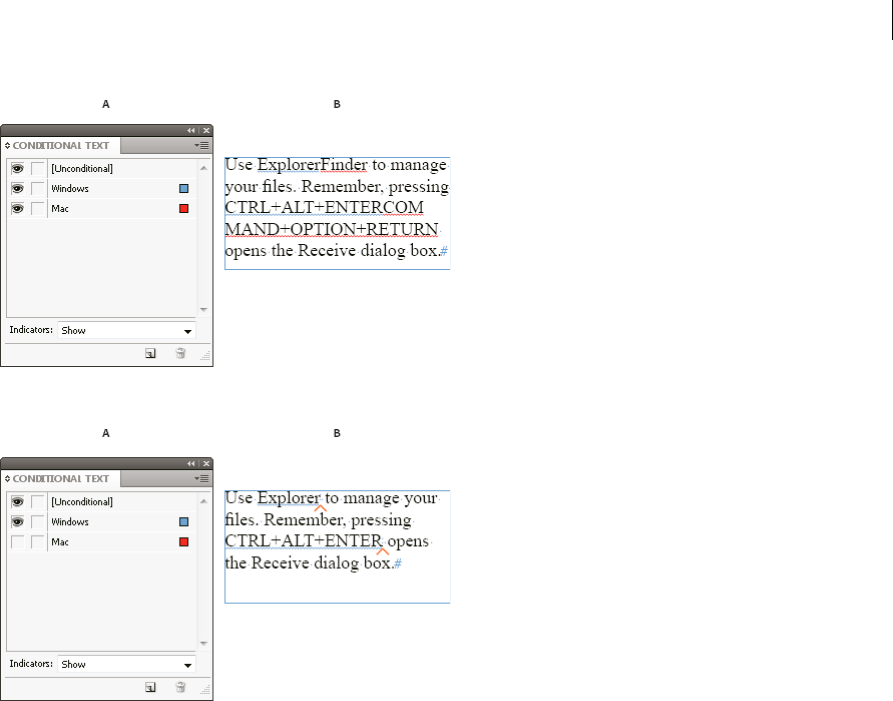
196
Text
Last updated 6/13/2015
A All conditions shown B Conditional indicators
A “Mac” condition hidden B Hidden condition symbols
Conditions can be applied only to text. You can make anchored objects conditional, but only by selecting the anchored
object marker. You can apply conditions to text within table cells, but you cannot apply conditions to table cells,
columns, or rows. You cannot apply conditions to text in locked InCopy stories.
For a video tutorial on using conditional text, see www.adobe.com/go/lrvid4026_id.
Planning conditional documents
When planning a project with conditional text, examine the nature of the material and look at how several people can
take turns working with it if the document is handed off. Plan to treat conditional text consistently to make the
document easier to use and maintain. Use the following guidelines.
Number of versions Define how many versions your finished project will contain. For example, if you’re creating a
manual that describes a program that runs on both Windows and Mac OS platforms, you might want to produce at least
two versions: a Windows version and a Mac OS version. If you want to produce these versions with editorial comments
sprinkled in the text during the review process, you’ll want even more versions: Mac OS with comments, Mac OS
without comments, Windows with comments, and Windows without comments.
For documents with many conditions, you can define condition sets that can be applied to the document for quick
versioning.
Number of condition tags required Decide how many condition tags you need to produce the desired versions. A
version of a document is defined by a unique set of condition tags. For example, a version of a finished Windows manual
might be defined by having a Windows condition tag showing, a Mac OS condition tag hidden, and a Comments
condition tag hidden. In this example, you would need to decide whether to use one condition tag for Windows

197
Text
Last updated 6/13/2015
comments and another for Mac OS comments, or whether to use a single condition tag for both Windows and Mac OS
comments.
Organization of content Evaluate the extent to which the document can be conditional and how you can organize the
material to simplify development and maintenance. For example, you might be able to organize a book so that
conditional text is limited to a few documents. Or you might choose to keep versions of a particular chapter in separate
files rather than in conditional text, and then use a different book file for each version of the book.
In some instances, such as when working with multiple languages, you may want to create separate layers that you can
show or hide rather than using conditions, with each layer including text from a different language.
Tagging strategy Determine the smallest unit of conditional text. For example, if a document will be translated to
another language, a whole sentence should be the smallest amount of text you make conditional. Because word order
often changes during translation, using conditional text for part of a sentence could complicate translation.
Inconsistency in applying conditions to spaces and punctuation can result in extra spacing or misspelled words. Decide
whether to make spaces and punctuation conditional. If conditional text begins or ends with punctuation, make the
punctuation conditional too. This makes the text easier to read when you're viewing more than one version.
To avoid word spacing problems, such as having an unconditional space followed by a conditional space, set standards
for handling spaces following conditional text (either always conditional or always unconditional).
To avoid confusion, decide the order in which conditional text will appear and use this order throughout the document.
Indexes and cross-references When indexing a document, pay attention to whether index markers are placed inside or
outside conditional text. Keep in mind that index markers in hidden conditional text are not included in the generated
index.
If you create a cross-reference to conditional text, make sure that the source text has the same condition. For example,
if you add a cross-reference in a “Windows” paragraph and the text anchor appears in a “Mac” condition, the cross-
reference is unresolved when the “Mac” condition is hidden. “HT” appears next to the cross-reference in the Hyperlinks
panel.
If you create a cross-reference to a paragraph in which some text is conditional and then change the visibility settings
of that condition, update the cross-reference.
Create conditions
Conditions you create are saved in the current document. If no documents are open when you create a condition, that
condition appears in all new documents you create.
You can make conditional text easy to identify by specifying condition indicators, such as wavy red underlines.
In managed InCopy files, you can apply existing conditions, but you cannot create or delete conditions. You can hide
or show conditional text in InCopy, but the changes do not appear in InDesign when the managed file is checked in. In
InCopy standalone documents, you can create, apply, and change the visibility of conditions as in InDesign.
1Choose Window > Type & Tables > Conditional Text to display the Conditional Text panel.
2Choose New Condition from the Conditional Text panel menu, and type a name for the condition.
3In the Indicator group, specify the appearance of the indicator to which the condition is applied.
By default, indicators (such as wavy red lines) are set to appear in the document but not be printed or output. You
can choose an option from the Indicators menu in the Conditional Text panel to hide indicators or to print and
output them, which can be useful for review purposes.
4Click OK.

198
Text
Last updated 6/13/2015
Apply conditions to text
You can apply multiple conditions to the same text. By default, condition indicators identify conditional text. However,
if indicators are hidden, you can use the Conditional Text panel to determine which conditions have been applied to
the current text. A solid check mark indicates the condition is applied to the current text. A dim check mark indicates
that the condition is applied only to part of the selection.
1Select the text to which you want to apply the condition.
2In the Conditional Text panel (Windows > Type & Tables > Conditional Text), do any of the following:
•To apply a condition, click the condition, or click the box next to the condition name.
•To apply a condition and remove other conditions applied to the text, Alt-click (Windows) or Option-click (Mac
OS) a condition.
•To remove a condition, click the box next to the condition name to remove the check mark. Or, click
[Unconditional] to remove all conditions from the selected text.
Note: You cannot apply keyboard shortcuts to specific conditions. However, you can apply conditions using Quick Apply.
Show or hide conditions
When you hide a condition, all text to which that condition is applied is hidden. Hiding conditions often causes the
page numbering to change in a document or book. You can use the Smart Text Reflow feature to add and remove pages
automatically as you hide and show conditions.
Hidden conditional text is generally ignored in the document. For example, hidden text is not printed or exported,
index markers in hidden conditional text are not included in a generated index, and hidden conditional text is not
included when searching or spell-checking text.
When you hide a condition, the hidden text is stored in a hidden condition symbol . If you select text that contains
a hidden condition symbol and try to delete it, InCopy prompts you to confirm that you want to delete the hidden
conditional text. You cannot apply other conditions, styles, or formatting to hidden conditional text.
If text has several conditions applied to it and at least one of those conditions is shown while another is hidden, the text
is not hidden.
•To show or hide individual conditions, click the visibility box next to a condition name. The eye icon indicates the
condition is shown.
•To show or hide all conditions, choose Show All or Hide All from the Conditional Text panel menu.
Use condition sets
A condition set captures the visibility settings for all conditions so that you can quickly apply different document
renditions. For example, suppose you have a complex document with platform conditions for Mac OS, Windows XP,
Vista, UNIX , language conditions for English, French, German, and Spanish, and editorial conditions such as Editorial
Review and Internal Comments. For reviewing the Vista version in French, you can create a set that shows only the
Vista, French, and Editorial Review conditions, and hides all the rest.
While sets aren’t necessary to do this, they help you quickly and reliably change different condition visibility settings.
1Apply conditions to text as necessary.
2If the Set menu doesn’t appear in the Conditional Text panel, choose Show Options from the Conditional Text panel
menu.
3In the Conditional Text panel, make the conditions visible or hidden as needed.
4Choose Create New Set from the Set menu, specify a name for the set, and click OK.

199
Text
Last updated 6/13/2015
The new set becomes the active set.
5Do any of the following:
•To apply the condition set to a document, choose the condition set name from the Set menu.
•To override a condition set, select the set to make it active, and change the visibility setting of any condition. A
plus sign (+) appears next to the condition set. Choose the condition set again to remove overrides. Choose
Redefine “[Condition Set]” to update the condition set with the new visibility settings.
•To delete a condition set, select the condition set, and then choose Delete “[Condition Set].” D e l e t i ng a c o n d it i o n
set does not delete the set’s conditions, nor does it remove the conditions from wherever they are applied.
Manage conditions
❖Do any of the following:
Delete a condition Select a condition and click the Delete Condition icon at the bottom of the Conditional Text
panel. Specify a condition to replace the deleted condition and click OK. The condition you specify is applied to all
text to which the deleted condition was applied.
To delete multiple conditions, Shift-click to select contiguous conditions, or Ctrl-click (Windows) or Command-
click (Mac OS) to select non-contiguous conditions, and then click the Delete Condition icon.
Remove a condition from text Removing a condition tag from text is different from deleting a tag from a document.
When you remove a tag from text, the tag remains in the document so it can be applied again later.
To remove a condition from text, select the text and click the box next to the condition to remove the check mark,
or click [Unconditional] to remove all conditions from the selected text.
Load (import) conditions Choose Load Conditions (to load only conditions) or Load Conditions And Sets from the
Conditional Text panel menu. Select the InDesign document from which you want to import the conditions, and
click Open. Loaded conditions and sets replace any condition or set that has an identical name.
You cannot load conditions from an InCopy file in InDesign, but you can load conditions from an InDesign file in
both InDesign and InCopy.
Loaded sets ignore the visibility settings of the conditions currently in the Conditional Text panel.
Synchronize conditions in a book To make sure you’re using the same conditions in all documents in a book, create
the conditions you want in the style source document, select Conditional Text Settings in the Synchronize Options
dialog box, and then synchronize the book.
Show or hide condition indicators Choose Show or Hide from the Indicators menu in the Conditional Text panel to
show or hide condition indicators. If you’re showing one version and want to see which areas are conditional, show
the condition indicators. If you find the condition indicators distracting while viewing the layout, hide the condition
indicators. Choose Show And Print if you want the condition indicators to be printed and output.
Change a condition name In the Conditional Text panel, click a condition, pause, and then click the condition name
to select it. Type a different name.
Edit condition indicators In the Conditional Text panel, double-click a condition, or select a condition and choose
Condition Options from the panel menu. Specify indicator settings, and click OK.

200
Text
Last updated 6/13/2015
Find and change conditional text
Use the Find/Change dialog box to find text to which one or more conditions have been applied and replace it with one
or more other conditions.
1Show any conditional text you want included in the search.
Hidden text is excluded from the search.
2Choose Edit > Find/Change.
3If the Find Format and Change Format boxes don’t appear at the bottom of the dialog box, click More Options.
4Click the Find Format box to display the Find Format Settings dialog box. Under Conditions, select [Any Condition]
to search for text in which any conditon is applied, [Unconditional] to search for text in which no condition is
applied, or select the specific condition or conditions you want to search for. Click OK.
This feature finds text that perfectly matches the selected conditions. For example, if you select both Condition 1
and Condition 2, text to which only one of the conditions are applied isn’t found, nor is text found to which these
two conditions and another is applied.
5Click the Change Format box to display the Change Format Settings dialog box. Specify the different formatting
option, such as a condition or a character style, and then click OK.
If you select the Conditions section in the Change Format Settings dialog box, the [Any Condition] makes no
changes to the found conditional text. This option is useful if you want to apply different formatting, such as a
character style. Select [Unconditional] to remove all conditions from the found text. If you select a specific
condition, specify whether you want it to replace any condition applied to the found text or be added to it.
6Click Find, and then use the Change, Change/Find, or Change All buttons to replace the condition.
More Help topics
Keys for navigating through and selecting text
Keys for working with text
Import grid formats from other documents
Use tate-chu-yoko
Rotate half-width characters in vertical text
Keys for working with text
Ways to control paragraph breaks
Use Smart Text Reflow
Find/Change
Find/Change overview
The Find/Change dialog box contains tabs that let you specify what you want to find and change.
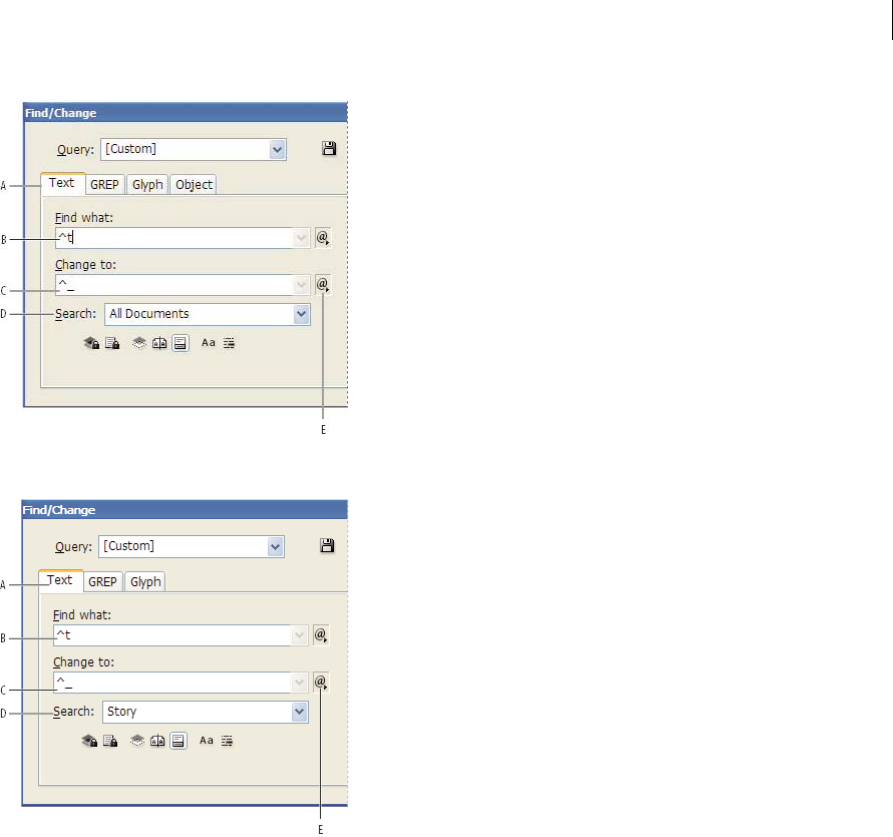
201
Text
Last updated 6/13/2015
A Find/Change tabs B Find a tab character C Replace with an em dash D Search options E Metacharacters menu
A Find/Change tabs B Find a tab character C Replace with an em dash D Search options E Metacharacters menu
Text Search for and change specific occurrences of characters, words, groups of words, or text formatted a certain way.
You can also search for and replace special characters such as symbols, markers, and white space characters. Wildcard
options help to broaden your search.
GREP Use advanced, pattern-based search techniques to search for and replace text and formatting.
Glyph Search for and replace glyphs using Unicode or GID/CID values, especially useful to search for and replace
glyphs in Asian languages.
Object Search for and replace formatting effects and attributes in objects and frames. For example, you can find objects
with a 4-pt stroke and replace the stroke with a drop shadow.
Transliterate You can also convert the character type of Asian-language text. For example, you can search for half-
width katakana and replace it with full-width katakana in Japanese text.
For a video tutorial on finding and changing text, objects, and expressions, see www.adobe.com/go/vid0080.
Find and change text
If you want to list, find, and replace fonts in your document, you might want to use the Find Font command instead of
the Find/Change command.
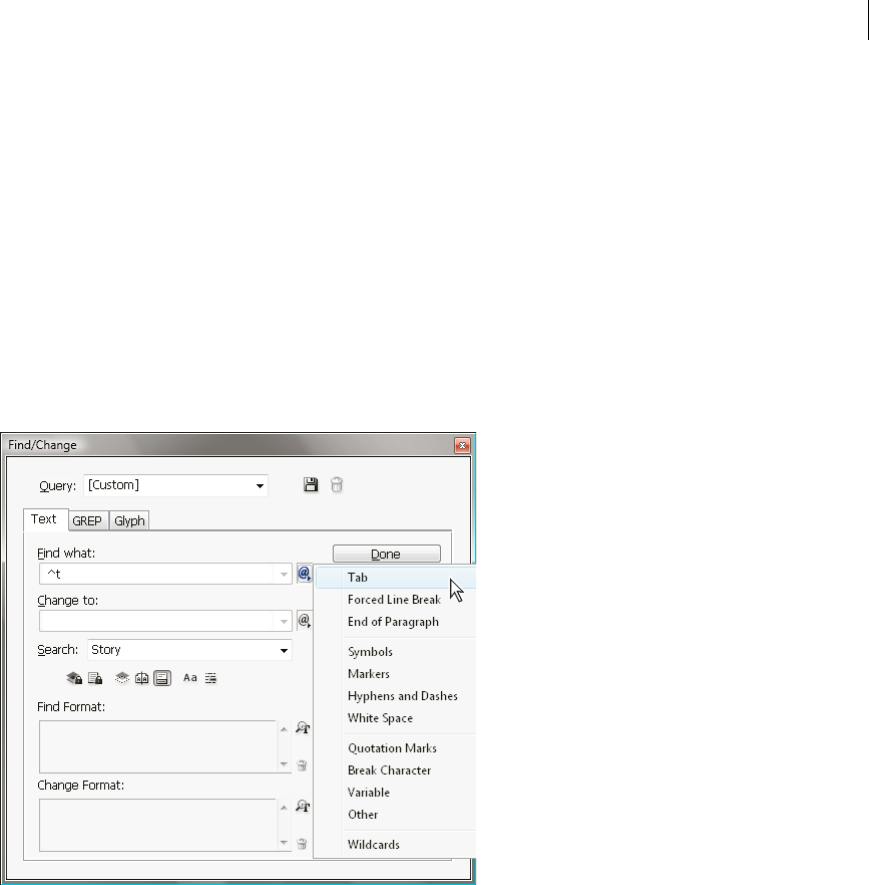
202
Text
Last updated 6/13/2015
Find and change text
1To search a range of text or a story, select the text or place the insertion point in the story. To search more than one
document, open the documents.
2Choose Edit > Find/Change, and then click the Text tab.
3Specify the range of your search from the Search menu, and click icons to include locked layers, master pages,
footnotes, and other items in the search.
4In the Find What box, describe what you want to search for:
• Type or paste the text you want to find.
•To search for or replace tabs, spaces, or other special characters, select a representative character (metacharacter)
from the pop-up menu to the right of the Find What box. You can also choose wildcard options such as Any Digit
or Any Character.
•Use a predefined query to find and replace text. (See Find/change items using queries.)
5In the Change To box, type or paste the replacement text. You can also select a representative character from the
pop-up menu to the right of the Change To box.
6Click Find.
7To continue searching, click Find Next, Change (to change the current occurrence), Change All (a message indicates
the total number of changes), or Change/Find (to change the current occurrence and search for the next one).
8Click Done.
If you don’t get the search results you expected, make sure that you clear any formatting you may have included in a
previous search. You may also need to expand your search. For example, you may be searching only a selection or a
story instead of the document. Or, you may be searching for text that appears on an item, such as a locked layer,
footnote, or hidden conditional text, that is currently excluded from the search.
If you change your mind about replacing text, choose Edit > Undo Replace Text (or Undo Replace All Text).
To find the next occurrence of a previously searched-for phrase without having to open the Find/Change dialog box,
choose Edit > Find Next. In addition, previous search strings are stored in the Find/Change dialog box. You can select
a search string from the menu to the right of the option.

203
Text
Last updated 6/13/2015
Find and change formatted text
1Choose Edit > Find/Change.
2If the Find Format and Change Format options don’t appear, click More Options.
3Click the Find Format box, or click the Specify Attributes To Find icon to the right of the Find Format Settings
section.
4On the left side of the Find Format Settings dialog box, select a type of formatting, specify the format attributes, and
then click OK.
Some OpenType formatting options appear in both the OpenType Options and Basic Character Formats (Position
menu) sections. For information on OpenType and other formatting attributes, search for the related topic in
InCopy Help.
Note: To search for (or replace with) formatting only, leave the Find What or Change To box blank.
5If you want to apply formatting to the text found, click the Change Format box, or click the Specify Attributes To
Change icon in the Change Format Settings section. Then select a type of formatting, specify the format
attributes, and click OK.
6Use the Find and Change buttons to format the text.
If you specify formatting for your search criteria, info icons appear above the Find What or Change To boxes. These
icons indicate that formatting attributes have been set and that the find or change operation will be restricted
accordingly.
To quickly remove all formatting attributes in the Find Format Settings or Change Format Settings sections, click the
Clear button.
Common Find/Change techniques
Wildcard searches Specify wildcards, such as Any Digit or Any White Space, to broaden your search. For example,
typing “s^?ng” in the Find What box searches for words beginning with an “s” and ending with “ng,” such as “sing,”
“sang,” “song,” and “sung.” You can either type wildcard characters or choose an option from the Wildcards submenu in
the pop-up menu next to the Find What text field.
Clipboard for metacharacter searches To search for metacharacters such as em dashes or bullet characters, you may
want to select the text first and paste it into the Find What box to spare the trouble of entering metacharacters. InCopy
automatically converts pasted special characters to their metacharacter equivalent.
Replace with clipboard contents You can replace search items with either formatted or unformatted content copied to
the clipboard. You can even replace text with a graphic you copied. Simply copy the item, and then, in the Find/Change
dialog box, choose an option from the Other submenu from the pop-up menu to the right of the Change To box.
Find and remove unwanted text To remove unwanted text, define the text you want to remove in the Find What box
and leave the Change To box empty (make sure that no formatting is set in this box).
XML tagging You can apply XML tags to text you search for.
Notes on finding and changing text in InCopy
•If the Track Changes command is turned on when you are changing or replacing text, all added and deleted text is
tracked.
•All finding and changing procedures work essentially the same way in Galley, Story, and Layout views, whether you
work with a linked or stand-alone story. If you work with a linked story, you’re limited to character and paragraph
styles defined in InDesign. When you work in Galley or Story view, you cannot see all of the typographical effects
you apply. You can see these effects only in Layout view.

204
Text
Last updated 6/13/2015
•In Galley view or Story view, the Find/Change command omits all collapsed stories. However, if you choose Change
All, collapsed stories are affected. For best results, use Find/Change in Layout View.
•The Include Note Content in Find/Change Operations in Notes preferences determines whether notes are searched.
If this option is selected, you can use the Find/Change command to search notes in Galley and Story views, not in
Layout view. Closed notes and footnotes are omitted from the search.
Search options for finding and changing text
Search menu Contains options that determine the range of the search.
Documents
Search the entire document or All Documents to search all open documents.
Story
Search all text in the currently selected frame, including text in other threaded text frames and overset text. Select
Stories to search stories in all selected frames. This option appears only if a text frame is selected or an insertion point
is placed.
To E nd Of Stor y
Search from the insertion point. This option appears only if an insertion point is placed.
Selection
Search only selected text. This option appears only if text is selected.
Include Locked Layers
Searches for text on layers that have been locked using the Layer Options dialog box. You cannot replace text on locked
layers.
Include Locked Stories
Searches for text in stories that have been checked out as part of an InCopy workflow. You cannot replace text in locked
stories.
Include Hidden Layers
Searches for text on layers that have been hidden using the Layer Options dialog box. When text on a hidden layer is
found, you can see highlighting where the text appears, but you cannot see the text. You can replace text on hidden
layers.
Text in a hidden condition is always omitted from searching.
Include Master Pages
Searches for text on master pages.
Include Footnotes
Searches footnote text.
Case Sensitive
Searches for only the word or words that exactly match the capitalization of the text in the Find What box. For example,
a search for PrePress won’t find Prepress, prepress, or PREPRESS.
Whole Word

205
Text
Last updated 6/13/2015
(Roman text only) Disregards search characters if they are part of a Roman word. For example, if you are searching for
any as a whole word, InDesign disregards many.
Whole Word
Disregards search characters if they are part of another word. For example, if you search for any as a whole word,
InDesign disregards many.
Kana Sensitive
Distinguishes between hiragana and katakana. For example, if you search for Tango in hiragana, InDesign disregards
Tango in katakana.
Full-Width/Half-Width Sensitive
Distinguishes between half-width and full-width characters. For example, if you search for ka in half-width katakana,
InDesign disregards ka in full-width katakana.
Search using GREP expressions
On the GREP tab of the Find/Change dialog box, you can construct GREP expressions to find alphanumeric strings
and patterns in long documents or many open documents. You can enter the GREP metacharacters manually or choose
them from the Special Characters For Search list. GREP searches are case-sensitive by default.
InDesign Secrets provides a list of GREP resources at InDesign GREP.
1Choose Edit > Find/Change, and click the GREP tab.
2At the bottom of the dialog box, specify the range of your search from the Search menu, and click icons to include
locked layers, master pages, footnotes, and other items in the search.
3In the Find What box, do any of the following to construct a GREP expression:
•Enter the search expression manually. (See Metacharacters for searching.)
•Click the Special Characters For Search icon to the right of the Find What option and choose options from the
Locations, Repeat, Match, Modifiers, and Posix submenus to help construct the search expression.
4In the Change To box, type or paste the replacement text.
5Click Find.
6To continue searching, click Find Next, Change (to change the current occurrence), Change All (a message indicates
the total number of changes), or Change/Find (to change the current occurrence and search for the next one.
You can also use GREP Styles to apply a character style to text that conforms to a GREP expression. In fact, the GREP
Styles dialog box is a good way to test your GREP expression. Add the examples you want to find to a paragraph, and
then specify a character style and GREP expression in the GREP Styles dialog box. When you turn on Preview, you can edit
the expression until it affects all your examples properly.
Tips for constructing GREP searches
Here are some tips for constructing GREP expressions.
•Many searches under the GREP tab are similar to those under the Text tab, but be aware that you need to insert
different codes depending on which tab you’re using. In general, the Text tab metacharacters begin with a ^ (such
as ^t for a tab) and GREP tab metacharacters begin with a \ (such as \t for a tab). However, not all metacharacters
follow this rule. For example, a paragraph return is ^p in the Text tab and \r in the GREP tab. For a list of the
metacharacters used for the Text and GREP tabs, see Metacharacters for searching.
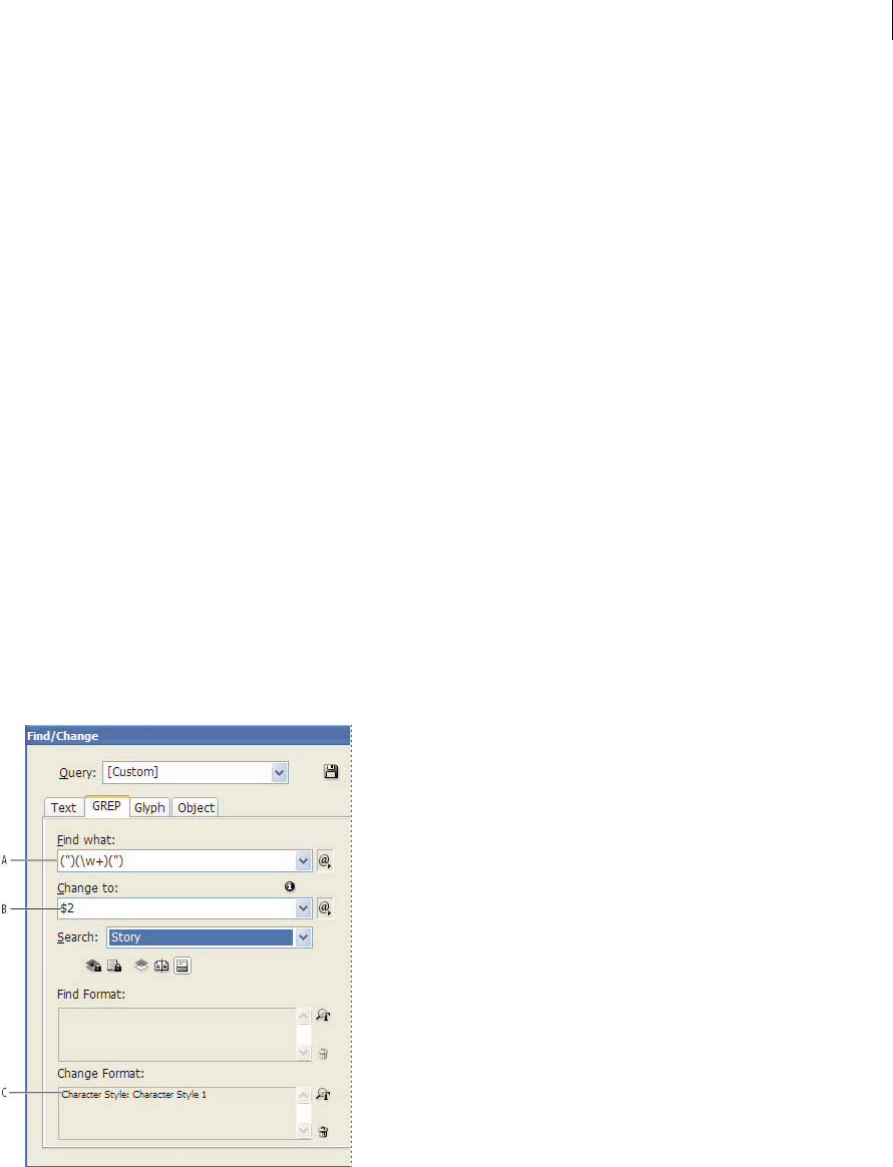
206
Text
Last updated 6/13/2015
•To search for a character that has symbolic meaning in GREP, enter a backslash (\) before the character to indicate
that the character that follows is literal. For example, a period ( . ) searches for any character in a GREP search; to
search for an actual period, enter “\.”
•Save the GREP search as a query if you intend to run it often or share it with someone else. (See Find/change items
using queries.)
•Use parentheses to divide your search into subexpressions. For example, if you want to search for “cat” or “cot,” you
can use the c(a|o)t string. Parentheses are especially useful to identify groupings. For example, searching for “the
(cat) and the (dog)” identifies “cat” as Found Text 1 and “dog” as Found Text 2. You can use the Found Text
expressions (such as $1 for Found Text 1) to change only part of the found text.
GREP search examples
Follow these examples to learn how to take advantage of GREP expressions.
Example 1: Finding text within quotation marks
Suppose you want to search for any word enclosed in quotation marks (such as “Spain”), and you want to remove the
quotation marks and apply a style to the word (so that it becomes Spain instead of “Spain”). The expression (")(\w+)(")
includes three groupings, as indicated by parentheses ( ). The first and third groupings search for any quotation mark,
and the second grouping searches for one or more word characters.
You can use the Found Text expressions to refer to these groupings. For example, $0 refers to all found text, and $2 refers
to only the second grouping. By inserting $2 in the Change To field and specifying a character style in the Change
Format field, you can search for a word within quotation marks, and then replace the word with a character style.
Because only $2 is specified, the $1 and $3 groupings are removed. (Specifying $0 or $1$2$3 in the Change To field
would apply the character style to the quotation marks as well.)
A Finds all word characters enclosed in quotation marks B The character style is applied to the second grouping (the word) while the first and
third groupings (open and close quotes) are removed C Character style specified
This example searches only for single words enclosed in quotation marks. If you want to search for phrases enclosed in
parentheses, add wildcard expressions, such as (\s*.*\w*\d*), which looks for spaces, characters, word characters, and
digits.

207
Text
Last updated 6/13/2015
Example 2: Phone numbers
InDesign includes a number of search presets that you can choose from the Queries menu. For example, you can choose
the Phone Number Conversion query, which looks like this:
\(?(\d\d\d)\)?[-. ]?(\d\d\d)[-. ]?(\d\d\d\d)
Phone numbers in the United States can appear in a variety of formats, such as 206-555-3982, (206) 555-3982,
206.555.3982, and 206 555 3982. This string looks for any of these variations. The first three digits (\d\d\d) of the phone
number may or may not be enclosed in parentheses, so a question mark appears after the parentheses: \(? and \)?. Note
that the backslash \ indicates that the actual parenthesis is being searched for and that it’s not part of a subexpression.
The brackets [ ] locate any character within them, so in this case, [-. ] finds either a hyphen, a period, or a space. The
question mark after the brackets indicate that the items within it are optional in the search. Finally, the digits are
enclosed in parentheses, which signify groupings that can be referred to in the Change To field.
You can edit the grouping references in the Change To field to suit your needs. For example, you could use these
expressions:
206.555.3982 = $1.$2.$3
206-555-3982 = $1-$2-$3
(206) 555-3982 = ($1) $2-$3
206 555 3982 = $1 $2 $3
Additional GREP examples
Experiment with the examples in this table to learn more about GREP searches.
Expression Search string Sample text Matches (in bold)
Class of characters
[ ]
[abc]
Finds the letter a, b, or c.
Maria cuenta bien. Mariacuentabien.
Beginning of paragraph
^
^~_.+
This searches the beginning of the
paragraph (^) for an em dash (~_)
followed by any character ( . ) one
or more times (+).
“We saw—or at least we think we
saw—a purple cow.”
—Konrad Yoes
“We saw—or at least we think we
saw—a purple cow.”
—Konrad Yoes
Negative lookahead
(?!pattern)
InDesign (?!CS.*?)
The negative lookahead matches
the search string only if it is not
followed by the specified pattern.
InDesign, InDesign 2.0, InDesign
CS, and InDesign CS2
InDesign, InDesign 2.0, InDesign
CS, and InDesign CS2
Positive lookahead
(?=pattern)
InDesign (?=CS.*?)
The positive lookahead matches
the search string only if it is
followed by the specified pattern.
Use similar patterns for negative
lookbehinds (?<!pattern) and
positive lookbehinds
(?<=pattern).
InDesign, InDesign 2.0, InDesign
CS, and InDesign CS2
InDesign, InDesign 2.0, InDesign
CS, and InDesign CS2

208
Text
Last updated 6/13/2015
Groupings
( )
(quick) (brown) (fox) The quick brown fox jumps up
and down.
The quick brown fox jumps up
and down.
All found text = quick brown fox;
Found Text 1= quick; Found Text 2
= brown; Found Text 3= fox
Non-marking parentheses
(?:expression)
(quick) ($:brown) (fox) The quick brown fox jumps up
and down.
The quick brown fox jumps up
and down.
All found text = quick brown fox;
Found Text 1= quick; Found Text 2
= fox
Case-insensitive on
(?i)
(?i)apple
You can also use (?i:apple)
Apple apple APPLE AppleappleAPPLE
Case-insensitive off
(?-i)
(?-i)apple Apple apple APPLE Apple apple APPLE
Multiline on
(?m)
(?m)^\w+
In this example, the expression
looks for one or more (+) word
characters (\w) at the beginning
of a line (^). The (?m) expression
allows all lines within the found
text to be treated as separate
lines.
(?m)^\w matches the beginning
of each paragraph. (?-m)^\w
matches only the beginning of
the story.
One Two Three Four Five Six
Seven Eight
One Two ThreeFour Five
SixSeven Eight
Multiline off
(?-m)
(?-m)^\w+ One Two Three Four Five Six
Seven Eight
One Two Three Four Five Six
Seven Eight
Expression Search string Sample text Matches (in bold)
209
Text
Last updated 6/13/2015
Metacharacters for searching
Metacharacters represent a character or symbol in InDesign. Metacharacters in the Text section of the Find/Change
dialog box begin with a caret (^); metacharacters in the GREP section begin with a tilde (~) or backslash (\). You can
type metacharacters in the Text tab or GREP tab of the Find/Change dialog box.
Save time fixing punctuation errors by saving search strings as queries.
Single-line on
(?s)
(?s)c.a
The searches for any character ( . )
between the letters c and a. The
(?s) expression matches any
character, even if it falls on the
next line.
(.) matches anything other than a
paragraph return. (?s)(.) matches
anything, including paragraph
returns.
abc abc abc abc abc abcabc abc
Single-line off (?-s)c.a abc abc abc abc abc abc abc abc
Repeat number of times
{ }
b{3} matches exactly 3 times
b(3,} matches at least 3 times
b{3,}? matches at least 3 times
(shortest match)
b{2,3} matches at least 2 times
and not more than 3
b{2,3}? matches at least 2 times
and not more than 3 (shortest
match)
abbc abbbc abbbbc abbbbbc abbc abbbc abbbbc abbbbbc
abbc abbbc abbbbc abbbbbc
abbc abbbc abbbbc abbbbbc
abbc abbbc abbbbc abbbbbc
abbc abbbc abbbbc abbbbbc
Character: Text tab metacharacter: GREP tab metacharacter:
Tab Character ^t \t
End of Paragraph ^p \r
Forced Line Break ^n \n
Any Page Number ^# ~#
Current Page Number ^N ~N
Next Page Number ^X ~X
Previous Page Number ^V ~V
* Any Variable ^v ~v
Section Marker ^x ~x
* Anchored Object Marker ^a ~a
* Footnote Reference Marker ^F ~F
* Index Marker ^I ~I
Expression Search string Sample text Matches (in bold)

210
Text
Last updated 6/13/2015
Bullet Character ^8 ~8
Japanese Bullet ^5 ~5
Caret Character ^^ \^
Backslash Character \\\
Copyright Symbol ^2 ~2
Ellipsis ^e ~e
Tilde ~\~
Paragraph Symbol ^7 ~7
Registered Trademark Symbol ^r ~r
Section Symbol ^6 ~6
Trademark Symbol ^d ~d
Open Parenthesis Character (\(
Close Parenthesis Character )\)
Open Brace Character {\{
Close Brace Character }\}
Open Bracket Character [\[
Close Bracket Character ]\]
Em Dash ^_ ~_
En Dash ^= ~=
Discretionary Hyphen ^- ~-
Nonbreaking Hyphen ^~ ~~
Ideographic Space ^( ~(
Em Space ^m ~m
En Space ^> ~>
Third Space ^3 ~3
Quarter Space ^4 ~4
Sixth Space ^% ~%
Flush Space ^f ~f
Hair Space ^| ~|
Nonbreaking Space ^s ~s
Nonbreaking Space (fixed width) ^S ~S
Thin Space ^< ~<
Figure Space ^/ ~/
Punctuation Space ^. ~.
Character: Text tab metacharacter: GREP tab metacharacter:

211
Text
Last updated 6/13/2015
^ Clipboard Contents, Formatted ^c ~c
^ Clipboard Contents, Unformatted ^C ~C
Any Double Quotation Mark " "
Any Single Quotation Mark ' '
Straight Double Quotation Mark ^" ~"
Double Left Quotation Mark ^{ ~{
Double Right Quotation Mark ^} ~}
Straight Single Quotation Mark ^' ~'
Single Left Quotation Mark ^[ ~[
Single Right Quotation Mark ^] ~]
Standard carriage return ^b ~b
Column Break ^M ~M
Frame Break ^R ~R
Page Break ^P ~P
Odd Page Break ^L ~L
Even Page Break ^E ~E
Discretionary Line Break ^k ~k
Right Indent Tab ^y ~y
Indent to Here ^i ~i
End Nested Style Here ^h ~h
Nonjoiner ^j ~j
* Running header (paragraph style) variable ^Y ~Y
* Running header (character style) variable ^Z ~Z
* Custom text variable ^u ~u
* Last page number variable ^T ~T
* Chapter number variable ^H ~H
* Creation date variable ^S ~S
* Modification date variable ^o ~o
* Output date variable ^D ~D
* File name variable ^l (lowercase L) ~l (lowercase L)
* Any Digit ^9 \d
* Any character that is not a digit \D
* Any Letter ^$ [\l\u]
* Any Character ^? . (inserts period in Change To)
Character: Text tab metacharacter: GREP tab metacharacter:

212
Text
Last updated 6/13/2015
* White Space (any space or tab) ^w \s (Inserts space in Change To)
* Any character that is not a white space \S
* Any word character \w
* Any character that is not a word character \W
* Any uppercase letter \u
* Any character that is not an uppercase letter \U
* Any lowercase letter \l
* Any character that is not a lowercase letter \L
^ All Found Text $0
Found Text 1-9 $1 (specifies the number of the grouping
found, such as $3 for the third grouping;
groupings are enclosed in parentheses)
* Kanji ^K ~K
* Beginning of Word \<
* End of Word \>
* Word Boundary \b
* Opposite of Word Boundary \B
* Beginning of Paragraph ^
* End of Paragraph [location] $
* Zero or One Time ?
* Zero or More Times *
* One or More Times +
* Zero or One Time (Shortest Match) ??
* Zero or More Times (Shortest Match) *?
* One or More Times (Shortest Match) +?
* Marking Subexpression ( )
* Non-marking Subexpression (?: )
* Character Set [ ]
* Or |
* Positive Lookbehind (?<= )
* Negative Lookbehind (?<! )
* Positive Lookahead (?= )
* Negative Lookahead (?! )
* Case-insensitive On (?i)
* Case-insensitive Off (?-i)
Character: Text tab metacharacter: GREP tab metacharacter:

213
Text
Last updated 6/13/2015
* Can be entered in the Find What box only, not the Change To box.
^ Can be entered in the Change To box, not the Find What box.
Convert double-byte character type
Use the Find/Change dialog box to convert the character type of Asian-language text.
1Choose Edit > Find/Change.
2Click the Transliterate tab.
3At the bottom of the dialog box, specify the range from the Search menu, and click icons to determine whether items
such as locked layers, master pages, and footnotes are included in the search.
4Specify the character type in Find What.
5Specify the replacement character type in Change To. Depending on the character type specified in Find What, some
options in Change To may be unavailable. For example, if you select full-width hiragana in the Find What field, you
cannot select full-width roman symbols in the Change To field.
6Click the Find Next button, and then click the Change button.
Find and change objects
You can use the Find/Change command to find and replace the attributes and effects applied to objects, graphics
frames, and text frames. For example, to give drop shadows a uniform color, transparency, and offset distance, you can
use the Find/Change command to search for and replace drop shadows throughout a document.
1Choose Edit > Find/Change.
* Multiline On (?m)
* Multiline Off (?-m)
* Single-line On (?s)
* Single-line Off (?-s)
* Any alphanumeric character [[:alnum:]]
* Any alphabetic character [[:alpha:]]
* Any blank character, either space or tab [[:blank:]]
* Any control character [[:control:]]
* Any graphical character [[:graph:]]
* Any printable character [[:print:]]
* Any punctuation character [[:punct:]]
* Any character whose code is greater than
255 (applies only to the wide character traits
classes)
[[:unicode:]]
* Any hexadecimal digit character 0-9, a-f, and
A-F
[[:xdigit:]]
* Any character of a certain glyph set, such as
a, à, á, â, ã, ä, å, A, À, Á, Â, Ã, Ä and Å
[[=a=]]
Character: Text tab metacharacter: GREP tab metacharacter:

214
Text
Last updated 6/13/2015
2Click the Object tab.
3Click the Find Object Format box, or click the Specify Attributes To Find icon .
4On the left side of the Find Object Format Options dialog box, select a type of formatting, specify the format
attributes, and then click OK.
Make sure that the categories you want to search for are in the appropriate state. You can use one of three states for
each Effects category: turned on, turned off, or ignored. For example, setting Drop Shadow to On includes drop
shadow formatting in the search; setting Drop Shadow to Off searches for objects in which drop shadow formatting
is turned off; setting Drop Shadow to Ignore leaves drop shadows out of the search.
5If you want to apply formatting to the object found, click the Change Object Format box, or click the Specify
Attributes To Change icon in the Change Format Settings section. Then select a type of formatting, specify the
format attributes, and click OK.
6Click the Find and Change buttons to format the objects.
Find and change glyphs
The Glyph section of the Find/Change dialog box is especially useful for replacing glyphs that share the same unicode
value with other similar glyphs, such as alternate glyphs.
InDesign Secrets provides a clear example about finding and changing glyphs at Finding and Changing Glyphs.
1Choose Edit > Find/Change.
2At the bottom of the dialog box, specify a range from the Search menu, and click icons to determine whether items
such as locked layers, master pages, and footnotes are included in the search.
3Under Find Glyph, select the Font Family and Font Style in which the glyph is located.
The Font Family menu displays only those fonts that are applied to text in the current document. Fonts in unused
styles do not appear.
4Do one of the following to enter the glyph you want to find in the Glyph box:
•Click the button beside the Glyph box, and then double-click a glyph on the panel. This panel works like the
Glyphs panel.
•Choose Unicode or GID/CID, and enter the code for the glyph.
You can use other methods to enter the glyph you want to find in the Glyph box. Select a glyph in the document
window and choose Load Selected Glyph In Find from the context menu, or select a glyph in the Glyphs panel and
choose Load Glyph In Find from the context menu.
5Under Change Glyph, enter the replacement glyph by using the same techniques you use to enter the glyph you’re
searching for.
6Click Find.
7To continue searching, click Find Next, Change (to change the most recently found glyph), Change All (a message
indicates the total number of changes), or Change/Find (to change the current occurrence and search for the next
one).
8Click Done.
215
Text
Last updated 6/13/2015
Find and change fonts
Use the Find Font command to search for and list the fonts used throughout your document. You can then replace any
fonts (except those in imported graphics) with any other fonts available on your system. You can even replace a font
that’s part of a text style. Note the following:
•A font name is listed once for its use in the layout and listed each time in imported graphics. For example, if you use
the same font three times in the layout and three times in imported graphics, it will be listed in the Find Font dialog
box four times—once for all layout instances, and three more times for each imported graphic. If fonts are not
completely embedded in graphics, the font name may not be listed in the Find Font dialog box.
•Find Font is not available in a Story Editor window.
•The Find Font dialog box displays icons to indicate the kinds of fonts or font conditions, such as Type 1 fonts ,
imported images , TrueType fonts , OpenType fonts , and missing fonts .
•You can find and change composite fonts, but you cannot change component fonts that are part of composite fonts.
•Use the Type > Find Font command to help ensure consistent output by analyzing font usage on pages and in
imported graphics. To find and change specific text attributes, characters, or styles, use the Edit > Find/Change
command instead.
1Choose Type > Find Font.
2Select one or more font names in the Fonts In Document list.
3Do one of the following:
•To find the first occurrence in the layout of the font selected in the list, click Find First. The text using that font
moves into view. The Find First button is unavailable if the selected font is used in an imported graphic or if you
selected multiple fonts in the list.
•To select an imported graphic that uses a font marked in the list by an imported image icon , click Find
Graphic. The graphic also moves into view. The Find Graphic button isn’t available if the selected font is used
only in the layout or if you selected multiple fonts in the Fonts In Document list.
4To see details about a selected font, click More Info. To hide the details, click Less Info. The Info area is blank if you
selected multiple fonts in the list.
A font may be listed as Unknown if the file of the selected graphic doesn’t supply information about it. Fonts in
bitmap graphics (such as TIFF images) won’t appear in the list at all because they aren’t true characters.
5To replace a font, select the new font you want to use from the Replace With list, and do one of the following:
•To change just one occurrence of the selected font, click Change. This option is not available if multiple fonts are
selected.
•To change the font in that occurrence, and then find the next instance, click Change/Find. This option is not
available if multiple fonts are selected.
•To change all instances of the font selected in the list, click Change All. If you want any paragraph or character
style that includes the font being searched for to be redefined, select Redefine Style When Changing All.
•To change all instances of the font selected in the list, click Change All. If you want any paragraph style, character
style, or named grid that includes the font being searched for to be redefined, select Redefine Style And Named
Grid When Changing All.
When there are no more occurrences of a font in your file, its name is removed from the Fonts In Document list.
Note: To change fonts in imported graphics, use the program that originally exported the graphic, and then replace the
graphic or update the link using the Links panel.
6If you clicked Change, click Find Next to locate the next instance of the font.

216
Text
Last updated 6/13/2015
7Click Done.
You can open the Find Font dialog box while preflighting a document. In the Preflight dialog box, switch to the Fonts
tab and click Find Font.
To view the system folder in which a font appears, select the font in the Find Font dialog box and choose Reveal In
Explorer (Windows) or Reveal In Finder (Mac OS).
Find/change items using queries
You can find and change text, objects, and glyphs by using or constructing a query. A query is a defined find-and-change
operation. InDesign offers several preset queries for changing punctuation formats and other useful actions, such as
changing telephone number formats. By saving a query you constructed, you can run it again and share it with others.
Search using queries
1Choose Edit > Find/Change.
2Choose a query from the Query list.
The queries are grouped by type.
3Specify a range to search on the Search menu.
The search range is not stored with the query.
4Click Find.
5To continue searching, click Find Next, Change (to change the most recently found text or punctuation mark),
Change All (a message indicates the total number of changes), or Change/Find (to change text or punctuation marks
and continue your search).
After you select a search query, you can adjust the settings to fine-tune your search.
Save queries
Save a query in the Find/Change dialog box if you want to run it again or share it with others. The names of queries you
save appear in the Query list in the Find/Change dialog box.
1Choose Edit > Find/Change.
2Select Text, GREP, or a different tab to undertake the search you want.
3Below the Search menu, click icons to determine whether items such as locked layers, master pages, and footnotes
are included in the search.
These items are included in the saved query. However, the range of the search isn’t saved with the query.
4Define the Find What and Change To fields. (See Metacharacters for searchingand Search using GREP expressions.)
5Click the Save Query button in the Find/Change dialog box and enter a name for the query.
If you use the name of an existing query, you are asked to replace it. Click Yes if you want to update the existing query.
Delete queries
❖Select it on the Query list and click the Delete Query button.

217
Text
Last updated 6/13/2015
Load queries
Customized queries are stored as XML files. The names of customized queries appear in the Query list in the
Find/Change dialog box.
❖To load a query that was given to you so that it appears in the Query list, copy the query file to the appropriate
location:
Mac OS Users\[username]\Library\Preferences\Adobe InCopy \[Version]\[Language]\Find-Change
Queries\[query type]
Windows XP Documents and Settings\[username]\Application Data\Adobe\InCopy \[Version]\[Language]\Find-
Change Queries\[query type]
Windows Vista and Windows 7 Users\[username]\AppData\Roaming\Adobe\InCopy \[Version]\[Language]\Find-
Change Queries\[query type]
More Help topics
Find/Change video
Create GREP styles
Footnotes
Create footnotes
A footnote consists of two linked parts: the footnote reference number that appears in text, and the footnote text that
appears at the bottom of the column. You can create footnotes or import them from Word or RTF documents.
Footnotes are automatically numbered as they are added to a document. Numbering restarts in each story. You can
control the numbering style, appearance, and layout of footnotes. You cannot add footnotes to tables or to footnote text.
The width of the footnote text is based on the width of the column containing the footnote reference marker. Footnotes
cannot space columns in a text frame.
You cannot create endnotes in InDesign. However, Bob Bringhurst provides a workaround for creating endnotes at
Endnotes in InDesign. Endnotes in converted Microsoft Word documents are formatted as text, not footnotes.
For a video tutorial on creating footnotes, see www.adobe.com/go/vid0218.
1Place the insertion point where you want the footnote reference number to appear.
2Choose Type > Insert Footnote.
3Type the footnote text.
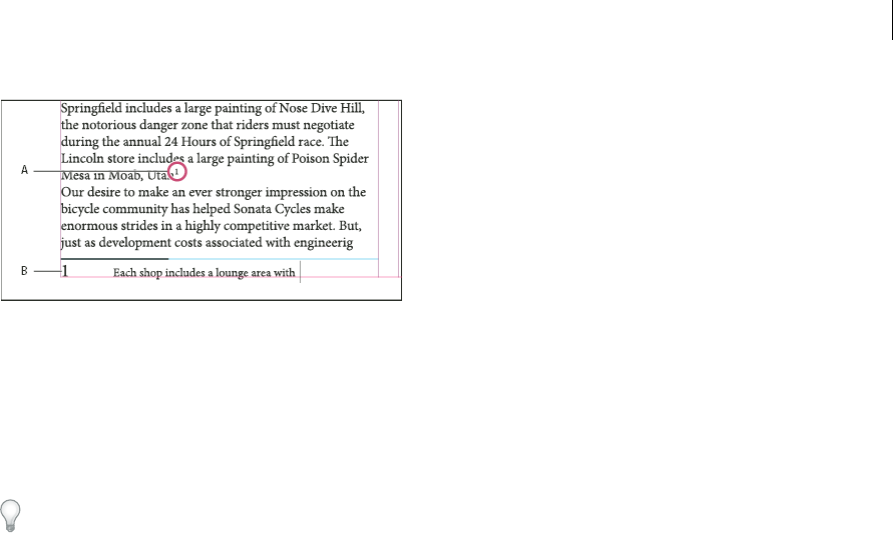
218
Text
Last updated 6/13/2015
A Reference number B Footnote text
As you type in Layout view, the footnote area expands while the text frame remains the same size. The footnote area
continues to expand upward until it reaches the line with the footnote reference. At that point, the footnote is split to
the next page, if possible. If the footnote cannot be split, and if more text is added than can fit in the footnote area, the
line containing the footnote reference is moved to the next page, or an overset icon appears. In such a case, you should
considering changing the text formatting.
When the insertion point is in a footnote, you can choose Type > Go To Footnote Reference to return to where you were
typing. If you use this option frequently, consider creating a keyboard shortcut.
Change footnote numbering and layout
Changes you make to footnote numbering and layout affect existing footnotes and all new ones.
Note: In InCopy, change footnote numbering and layout options only for standalone documents. The InDesign document’s
footnote settings will override any changes you make to a linked (managed) file in InCopy.
1Choose Type > Document Footnote Options.
2In the Numbering And Formatting tab, select options that determine the numbering scheme and formatting
appearance of the reference number and footnote text.
3Click the Layout tab, and select options that control the look of the footnote section on the page.
4Click OK.
Footnote numbering and formatting options
The following options appear in the Numbering And Formatting section of the Footnote Options dialog box:
Numbering Style Choose the numbering style for footnote reference numbers.
Start At Specify the number used for the first footnote in the story. Each story in a document begins with the same Start
At number. If you have multiple documents in a book with continued page numbering, you may want to start the
footnote numbering in each chapter to continue where the last chapter left off.
The Start At option is especially useful for documents in a book. Footnote numbering is not continued across
documents in a book.
Restart Numbering Every If you want numbering to restart within the document, select this option and choose Page,
Spread, or Section to determine when footnote numbering is restarted. Some numbering styles, such as asterisks (*),
work best when reset every page.
Show Prefix/Suffix In Select this option to show prefixes or suffixes in the footnote reference, the footnote text, or both.
Prefixes appear before the number (such as [1) and suffixes appear after the number (such as 1]). This option is
especially useful for placing footnotes within characters, such as [1]. Type a character or characters or select an option

219
Text
Last updated 6/13/2015
for Prefix, Suffix, or both. To select special characters, click the icons next to the Prefix and Suffix controls to display a
menu.
If you think the footnote reference number is too close to the preceding text, adding one of the space characters as a
prefix might improve the appearance. You can also apply a character style to the reference number.
Position This option determines the appearance of the footnote reference number, which is superscript by default. If
you prefer to format the number using a character style (such as a character style that includes OpenType superscript
settings), choose Apply Normal, and specify the character style.
This option determines the appearance of the footnote reference number, which is Ruby by default. Choosing Apply
Normal is useful if you want to format the reference number’s position using a character style.
Character Style You may want to choose a character style to format the footnote reference number. For example,
instead of using superscript, you might want to use a character style at a normal position with an elevated baseline. The
menu displays the character styles available in the Character Styles panel.
Paragraph Style You may want to choose a paragraph style that formats the footnote text for all footnotes in the
document. The menu displays the paragraph styles available in the Paragraph Styles panel. By default, the [Basic
Paragraph] style is used. Note that the [Basic Paragraph] style may not have the same appearance as the default font
settings for the document.
Separator The separator determines the white space that appears between the footnote number and the start of the
footnote text. To change the separator, first select or delete the existing separator, and then choose a new separator. You
can include multiple characters. To insert white space characters, use the appropriate metacharacter, such as ^m for em
space.
Footnote layout options
The following options appear in the Layout section of the Footnote Options dialog box:
Minimum Space Before First Footnote This option determines the minimum amount of space between the bottom of
the column and the first footnote line. You cannot use a negative value. Any Space Before setting in the footnote
paragraph is ignored.
Space Between Footnotes This option determines the distance between the last paragraph of one footnote and the first
paragraph of the next footnote in a column. You cannot use a negative value. The Space Before/Space After values in a
footnote’s paragraph apply only if the footnote includes multiple paragraphs.
First Baseline Offset This option determines the distance between the start of the footnote area (where the footnote
divider appears by default) and the first line of footnote text.
For information on the First Baseline options, see Change text frame properties .
Place End Of Story Footnotes At Bottom Of Text Select this option if you want the last column’s footnotes to appear just
below the text in the last frame of the story. If this option is not selected, any footnote in the last frame of the story
appears at the bottom of the column.
Allow Split Footnotes Select this option if you want footnotes to break across a column when the footnote exceeds the
amount of space available for it in that column. If splitting is not allowed, the line containing the footnote reference
number moves to the next column, or the text becomes overset.
If Allow Split Footnotes is turned on, you can still prevent an individual footnote from splitting by placing the insertion
point in the footnote text, choosing Keep Options from the Paragraph panel menu, and selecting the Keep Lines Together
and All Lines In Paragraph options. If the footnote contains multiple paragraphs, use the Keep With Next X Lines option
in the first paragraph of the footnote text. You can choose Type > Insert Break Character > Column Break to control where
the footnote is split.

220
Text
Last updated 6/13/2015
Rule Above Specify the location and appearance of the footnote divider line that appears above the footnote text. A
divider line (also called a “separator line”) also appears above any footnote text continued in a separate frame. The
options you select apply to either the First Footnote In Column or Continued Footnotes, whichever is selected in the
menu. These options are similar to those that appear when you specify a paragraph rule. If you want to remove the
footnote divider line, deselect Rule On.
Delete footnotes
❖To delete a footnote, select the footnote reference number that appears in text, and then press Backspace or Delete.
If you delete only the footnote text, the footnote reference number and footnote structure remain.
Work with footnote text
As you edit footnote text, note the following:
•When the insertion point is in footnote text, choosing Edit > Select All selects all the footnote text for that footnote,
but no other footnote or text.
•Use the arrow keys to navigate among footnotes.
•Footnote numbering is not continued across documents in a book. If you don’t want numbering to restart in each
document with the book, you need to change the Start At value manually in each document after the editing is final.
•In Story Editor, you can click the footnote icon to expand or collapse a footnote. You can expand or collapse all
footnotes by choosing View > Story Editor > Expand All Footnotes or Collapse AllFootnotes.
•In Galley view or Story view, you can click the footnote icon to expand or collapse footnotes. You can expand or
collapse all footnotes by right-clicking (Windows) or Ctrl-clicking (Mac OS) a footnote and choosing Expand All
Footnotes or Collapse All Footnotes.
•You can select and apply character and paragraph formatting to footnote text. You can also select and change the
appearance of the footnote reference number, but the recommended method is using the Document Footnote
Options dialog box.
•When you cut or copy text that includes the footnote reference number, the footnote text is also added to the
clipboard. If you copy the text to a different document, the footnotes in that text use the characteristics of the new
document’s numbering and layout appearance.
•If you accidentally delete the footnote number at the start of the footnote text, you can add it back by placing the
insertion point at the beginning of the footnote text, right-clicking (Windows) or Control-clicking (Mac OS), and
choosing Insert Special Character > Markers > Footnote Number.
•Text wrap has no effect on footnote text.
•If you clear overrides and character styles on a paragraph that includes a footnote reference marker, the footnote
reference numbers lose the attributes you applied in the Document Footnote Options dialog box.
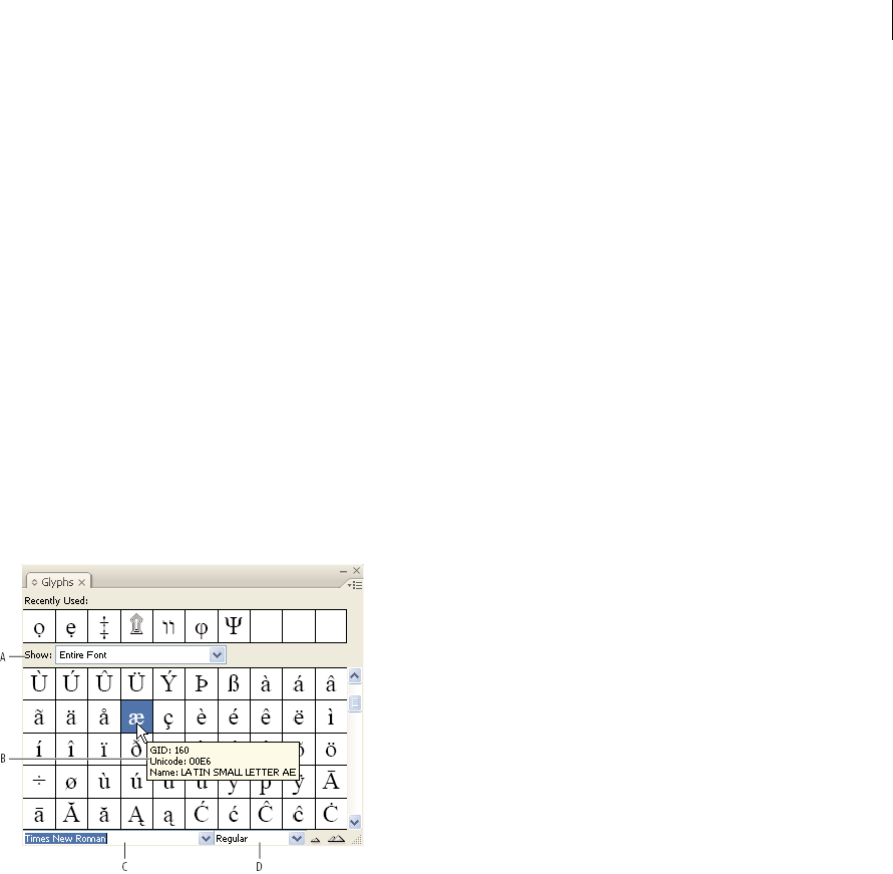
221
Text
Last updated 6/13/2015
More Help topics
Place (import) text
Place (import) text
Creating Footnotes video
Overprint rules above footnotes
Glyphs and special characters
Glyphs panel overview
Enter glyphs by way of the Glyphs panel. The panel initially shows glyphs in the font where the cursor is located, but
you can view a different font, view a type style in the font (for example, Light, Regular, or Bold), and make the panel
display a subset of glyphs in the font (for example, math symbols, numbers, or punctuation symbols).
A Show subset of glyphs B Tool tip C Font list D Font style
By moving the pointer over a glyph, you can read its CID/GID value, Unicode value, and name in a tool tip.
Open the Glyphs panel
❖Choose Type > Glyphs or Window > Type & Tables > Glyphs.
Change the Glyphs panel view
•Click the cycle widget (it’s located to the left of the word “Glyphs” on the Glyphs panel) to change views of the panel.
Clicking the widget presents these views in succession: the collapsed panel, the entire panel, and the panel without
recently used glyphs.
•Click the Zoom In or Zoom Out buttons in the lower-right corner of the Glyphs panel.
•Resize the Glyphs panel by dragging the lower-right corner.

222
Text
Last updated 6/13/2015
Filter the glyphs that appear
❖Do one of the following on the Show list to determine which glyphs appear on the Glyphs panel:
•Choose Entire Font to display all glyphs available in the font.
•Choose an option below Entire Font to narrow the list to a subset of glyphs. For example, Punctuation displays
only punctuation glyphs; Math Symbols narrows the choices to mathematical symbols.
Sort glyphs in the Glyphs panel
❖Choose By CID / GID or By Unicode to determine how glyphs are sorted in the Glyphs panel.
Insert glyphs and special characters
A glyph is a specific form of a character. For example, in certain fonts, the capital letter A is available in several forms,
such as swash and small cap. You can use the Glyphs panel to locate any glyph in a font.
OpenType fonts such as Adobe Caslon™ Pro provide multiple glyphs for many standard characters. Use the Glyphs
panel when you want to insert these alternate glyphs in your document. You can also use the Glyphs panel to view and
insert OpenType attributes such as ornaments, swashes, fractions, and ligatures.
Insert special characters
You can insert common characters such as em dashes and en dashes, registered trademark symbols, and ellipses.
1Using the Type tool, position the insertion point where you want to insert a character.
2Choose Type > Insert Special Character, and then select an option from any of the categories in the menu.
If special characters that you use repeatedly do not appear on the list of special characters, add them to a glyph set that
you create.
Insert a glyph from a specified font
1Using the Type tool, click to place the insertion point where you want to enter a character.
2Choose Type > Glyphs to display the Glyphs panel.
3To display a different set of characters in the Glyphs panel, do any of the following:
•Select a different font and type style, if available. From the Show menu, choose Entire Font. Or, if you selected an
OpenType font, choose from a number of OpenType categories.
•Choose a custom glyph set from the Show menu. (See Create and edit custom glyph sets.)
4Scroll through the display of characters until you see the glyph you want to insert. If you selected an OpenType font,
you can display a pop-up menu of alternate glyphs by clicking and holding the glyph box.
5Double-click the character you want to insert. The character appears at the text insertion point.
Insert a recently used glyph
InCopy tracks the previous 35 distinct glyphs you inserted and makes them available under Recently Used in the first
row of the Glyphs panel (you have to expand the panel to see all 35 glyphs on the first row).
❖Do one of the following:
•Double-click a glyph under Recently Used.
•Choose Recent Glyphs on the Show list to display all recently used glyphs in the main body of the Glyphs panel,
and then double-click a glyph.
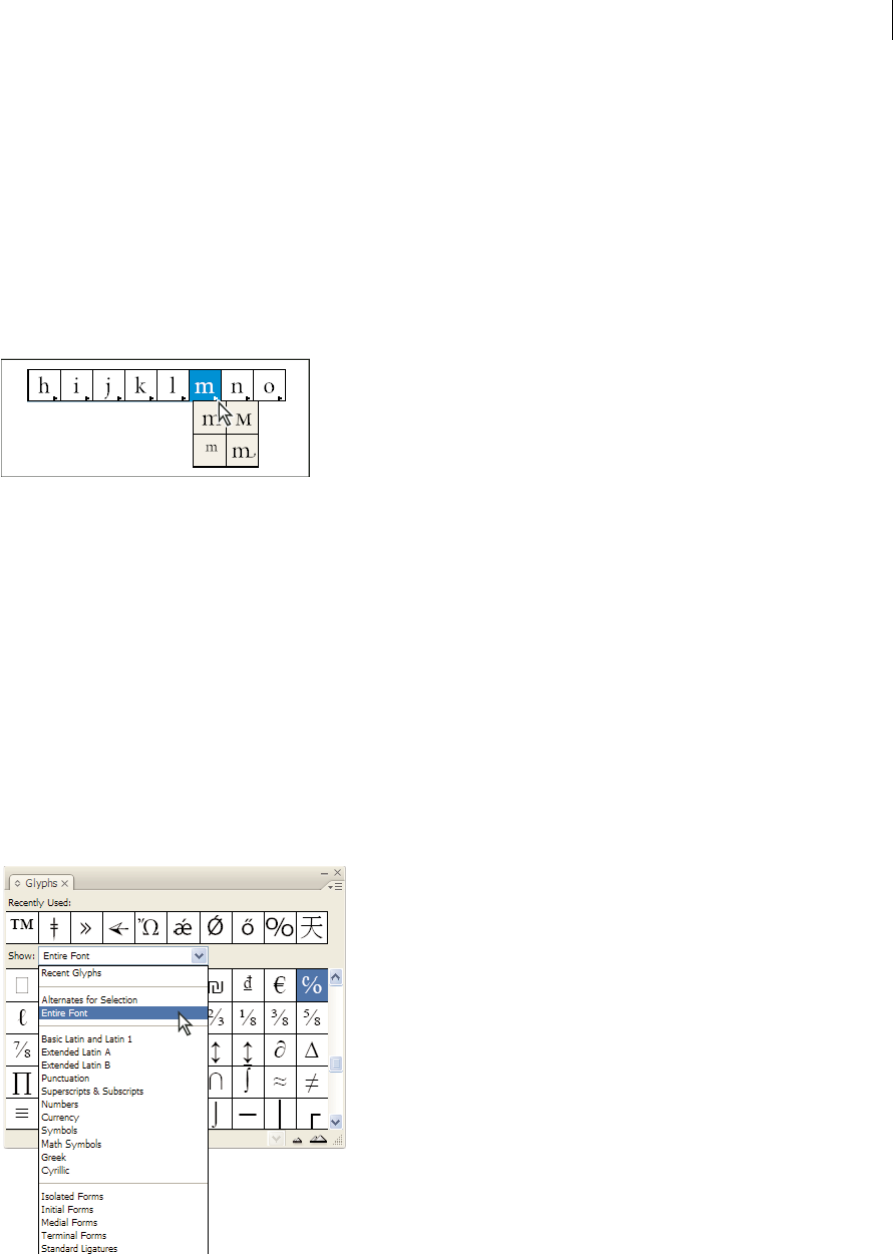
223
Text
Last updated 6/13/2015
Clear recently used glyphs
•To clear a selected glyph from the Recently Used section, right-click (Windows®) or Control-click (Mac OS) a glyph
in the Recently Used section, and then choose Delete Glyph From Recently Used.
•To clear all recently used glyphs, choose Clear All Recently Used.
Replace a character with an alternate glyph
When a character includes alternate glyphs, it appears in the Glyphs panel with a triangle icon in the lower-right corner.
You can click and hold the character in the Glyphs panel to display a pop-up menu of the alternate glyphs, or you can
display alternate glyphs in the Glyphs panel.
1Choose Type > Glyphs to display the Glyphs panel.
2Select Alternates For Selection from the Show list.
3Using the Type tool, select a character in your document.
4Do one of the following to replace the selected character in the document:
•Double-click a glyph in the Glyphs panel.
•Select a glyph on the menu.
Display OpenType glyph attributes in the Glyphs panel
For easy selection, the Glyphs panel allows you to display characters for only the selected OpenType attributes. You can
select various options from the Show menu in the Glyphs panel.
Note: Do not confuse these options with those that appear on the Glyphs panel menu, which let you apply forms to selected
text. (See Apply OpenType font attributes .)
1In the Glyphs panel, choose an OpenType font from the font list.
2Choose an option from the Show menu.

224
Text
Last updated 6/13/2015
The options displayed vary depending on which font is selected. For information on applying OpenType font attributes,
see Apply OpenType font attributes . For more information on OpenType fonts, see www.adobe.com/go/opentype.
Highlight alternate glyphs in the text
1Choose Edit > Preferences > Composition (Windows) or InCopy > Preferences > Composition (Mac OS).
2Select Substituted Glyphs, and then click OK. Substituted glyphs in the text are highlighted in nonprinting yellow.
Create and edit custom glyph sets
A glyph set is a named collection of glyphs from one or more fonts. Saving commonly used glyphs in a glyph set prevents
you from having to look for them each time you need to use them. Glyph sets are not attached to any particular
document; they are stored with other InDesign preferences in a separate file that can be shared.
You can determine whether the font is remembered with the added glyph. Remembering fonts is useful, for example,
when you are working with dingbat characters that may not appear in other fonts. If a glyph’s font is remembered, but
the font is missing, the font’s square appears in pink in the Glyphs panel and the Edit Glyph Set dialog box. If a font is
not remembered with an added glyph, a “u” appears next to the glyph, indicating that the font’s unicode value
determines the appearance of the glyph.
Create a custom glyph set
1Choose Type > Glyphs.
2Do one of the following:
•From the Glyphs panel menu, choose New Glyph Set.
•Open the context menu on the Glyphs panel and choose New Glyph Set.
3Type the name of the glyph set.
4Choose the insert order in which glyphs will be added to the glyph set, and click OK:
Insert At Front Each new glyph is listed first in the set.
Append At End Each new glyph is listed last in the set.
Unicode Order All glyphs are listed by the order of their unicode values.
5To add glyphs to the custom set, select the font containing the glyph at the bottom of the Glyphs panel, click the
glyph to select it, and then choose the name of the custom glyph set from the Add To Glyph Set menu on the Glyphs
panel menu.
View a custom glyph set
❖Do one of the following on the Glyphs panel:
•Choose the glyph set on the Show list.
•On the Glyphs panel menu, choose View Glyph Set, and then the name of the glyph set.
Edit custom glyph sets
1Choose Edit Glyph Set from the Glyph panel menu, and then choose the custom glyph set.
2Select the glyph you want to edit, do any of the following, and then click OK:
•To bind the glyph to its font, select Remember Font With Glyph. A glyph that remembers its font ignores the font
applied to the selected text in the document when the glyph is inserted into that text. It also ignores the font
specified in the Glyph panel itself. If you deselect this option, the Unicode value of the current font is used.

225
Text
Last updated 6/13/2015
•To view additional glyphs, choose a different font or style. If the glyph is not defined with a font, you cannot select
a different font.
•To remove a glyph from the custom glyph set, choose Delete From Set.
•To change the order in which glyphs are added to the set, choose an Insert Order option. Unicode Order is not
available if Insert At Front or Append At End was selected when the glyph set was created.
Delete glyphs from custom glyph sets
1In the Glyphs panel, choose the Custom Glyph Set from the Show menu.
2Right-click (Windows) or Control-click (Mac OS) a glyph, and then choose Delete Glyph From Set.
Delete custom glyph sets
1Do one of the following:
•From the Glyphs panel menu, choose Delete Glyph Set.
•From the context menu, choose Delete Glyph Set.
2Click the name of a custom glyph set.
3Click Yes to confirm.
Save and load glyph sets
Custom glyph sets are stored in files kept in the Glyph Sets folder, a subfolder of the Presets folder. You can copy glyph
set files to other computers and in so doing make custom glyph sets available to others. Copy glyph set files to and from
these folders to share them with others:
Mac OS Users\[username]\Library\Preferences\Adobe InCopy \[Version]\[Language]\Glyph Sets
Windows XP Documents and Settings\[username]\Application Data\Adobe\InCopy \[Version]\[Language]\Glyph Sets
Windows Vista and Windows 7 Users\[username]\AppData\Roaming\Adobe\InCopy \[Version]\[Language]\Glyph
Sets
Use quotation marks
You can specify different quotation marks for different languages. These quotation mark characters appear
automatically during typing if the Use Typographer’s Quotes option is selected in the Type section of the Preferences
dialog box.
Specify which quotation marks to use
1Choose Edit > Preferences > Dictionary (Windows) or InCopy > Preferences > Dictionary (Mac OS).
2Choose a language from the Language menu.
3Do any of the following, and then click OK:
•For Double Quotes, select a pair of quotation marks, or type the pair of characters you want to use.
•For Single Quotes, select a pair of quotation marks, or type the pair of characters you want to use.
Insert straight quotation marks
❖Do one of the following:
•Choose Type > Insert Special Character > Quotation Marks > Straight Double Quotation Marks or Straight
Single Quotation Mark (Apostrophe).

226
Text
Last updated 6/13/2015
•Deselect the Use Typographer’s Quotes option in the Type section of the Preferences dialog box, and then type
the quotation mark or apostrophe.
•Press Shift+Ctrl+Alt+' (Windows) or Shift+Command+Option+' (Mac OS) to switch between turning on and
off the Use Typographer’s Quotes preferences option.
The character frequently used to indicate feet, arcminutes, or minutes of time is the prime mark. It looks like a slanted
apostrophe. The character frequently used to indicate inches, arcseconds, or seconds of time is the double prime mark.
These symbols are different from apostrophes and double quotation marks. Some fonts include the prime and double prime
marks. Use the Glyphs panel to insert these marks. If the font doesn’t have a prime or double prime mark, insert the straight
quotation mark, and italicize it.
Insert white space characters
A white space character is a blank space that appears between characters. You can use white-space characters for many
different purposes, such as preventing two words from being broken at the end of a line.
1Using the Type tool, position the insertion point where you want to insert a certain amount of white space.
2Choose Type > Insert White Space, and then select one of the spacing options (such as Em Space) in the context
menu.
Representative symbols of the white-space characters appear when you choose Type > Show Hidden Characters.
White space options
The following options appear on the Type > Insert White Space menu:
Ideographic Space
This is a space that is based on a full-width character in Asian languages. It wraps to the next line as with other full-
width characters.
Em Space
Equal in width to the size of the type. In 12-point type, an em space is 12 points wide.
En Space
One-half the width of an em space.
Nonbreaking Space
The same flexible width as pressing the spacebar, but it prevents the line from being broken at the space character.
Nonbreaking Space (Fixed Width)
A fixed width space prevents the line from being broken at the space character, but does not expand or compress in
justified text. The fixed width space is identical to the Nonbreaking Space character inserted in InCopy CS2.
Third Space
One-third the width of an em space.
Quarter Space
One-fourth the width of an em space.
Sixth Space
One-sixth the width of an em space.

227
Text
Last updated 6/13/2015
Flush Space
Adds a variable amount of space to the last line of a fully justified paragraph, useful for justifying text in the last line.
(See Change Justification settings.)
Hair Space
One-twenty-fourth the width of an em space.
Thin Space
One-eighth the width of an em space. You may want to use a thin space on either side of an em dash or en dash.
Figure Space
Same width as a number in the typeface. Use a figure space to help align numbers in financial tables.
Punctuation Space
Same width as an exclamation point, period, or colon in the typeface.
About Adobe SING Glyphlet Manager
The Adobe SING Glyphlet Manager is a utility for installing and searching for glyphlets. It is not included in Adobe
Creative Suite 5.
More Help topics
OpenType fonts
Create hanging punctuation

228
Last updated 6/13/2015
Chapter 7: Styles
Working with styles
Duplicate styles or style groups
❖Right-click (Windows) or Control-click (Mac OS) a style or style group in the Styles panel, and then choose
Duplicate Style.
A new style or group appears in the Styles panel, with the same name followed by “copy.” If you duplicated a group
of styles, the style names within the new group remain the same.
You can also duplicate styles by copying them to another group.
Group styles
You can organize styles by grouping them into separate folders in the Character Styles, Paragraph Styles, Object Styles,
Table Styles, and Cell Styles panels. You can even nest groups within groups. Styles do not need to be in a group; you
can add them to a group or to the root level of the panel.
Create a style group
1In the Styles panel:
•To create the group at the root level, deselect all styles.
•To create a group within a group, select and open a group.
•To include existing styles in the group, select the styles.
2Choose New Style Group from the Styles panel menu, or choose New Group From Styles to move the selected styles
into the new group.
3Type the name of the group and click OK.
4To move a style into the group, drag the style over the style group. When the style group is highlighted, release the
mouse button.
Copy styles to a group
When you copy a style to a different group, the styles are not linked. Even though they have the same name, editing one
style does not change the attributes of the other style.
1Select the style or group you want to copy.
2Choose Copy To Group from the Styles panel menu.
3Select the group (or [Root] level) that you want to copy the styles or group to, and then click OK.
If the group already contains style names identical to those being copied, incoming styles are renamed.

229
Styles
Last updated 6/13/2015
Expand or collapse style groups
•To expand or collapse only one group, click the triangle icon next to it.
•To expand or collapse the group and all its subgroups, Ctrl-click (Windows) or Command-click (Mac OS) the
triangle icon.
Delete style groups
Deleting a style group deletes the group and everything inside it, including styles and other groups.
1Select the group you want to delete.
2Choose Delete Style Group from the Styles panel menu, and then click Yes.
3For each style in the group, specify a replacement style or choose [None], and then click OK.
If you want to use the same replacement style for all styles, select Apply To All.
If you cancel the replacement of any style, the group is not deleted. You can recover deleted styles by choosing Edit >
Undo Delete Styles.
Move and reorder styles
By default, styles you create appear at the bottom of the style group or panel.
•To alphabetize all groups and styles within groups, choose Sort By Name from the Styles panel menu.
•To move a single style, drag it to a new location. A black line indicates where the style will be moved to; a highlighted
group folder indicates that the style will be added to that group.
Paragraph and character styles
About character and paragraph styles
A character style is a collection of character formatting attributes that can be applied to text in a single step. A paragraph
style includes both character and paragraph formatting attributes, and can be applied to a paragraph or range of
paragraphs. Paragraph styles and character styles are found on separate panels. Paragraph and characters styles are
sometimes called text styles.
A named grid format can be applied to a frame grid in the Frame Grid format settings. (See Named Grids panel
overview .) You can also use create an object style with grid characteristics. (See About object styles .)
When you change the formatting of a style, all text to which the style has been applied will be updated with the new
format.
You can create, edit, and delete styles in stand-alone Adobe InCopy documents or in InCopy content that is linked to
an Adobe InDesign CS4 document. When the contents are updated in InDesign, new styles are added to the InDesign
document, but any style modifications made in InCopy will be overridden by the InDesign style. For linked content, it
is usually best to manage your styles in InDesign.
For a video tutorial on making a paragraph style, see www.adobe.com/go/lrvid4277_id. For a video tutorial on using
text styles, see www.adobe.com/go/vid0076.

230
Styles
Last updated 6/13/2015
Thomas Silkjaer provides samples of styles at Free InDesign Style Template.
[Basic Paragraph] styles
By default, each new document contains a [Basic Paragraph] style that is applied to text you type. You can edit this style,
but you can’t rename or delete it. You can rename and delete styles that you create. You can also select a different default
style to apply to text.
Character style attributes
Unlike paragraph styles, character styles do not include all the formatting attributes of selected text. Instead, when you
create a character style, InDesign makes only those attributes that are different from the formatting of the selected text
part of the style. That way, you can create a character style that, when applied to text, changes only some attributes, such
as the font family and size, ignoring all other character attributes. If you want other attributes to be part of the style, add
them when editing the style.
Next Style
You can automatically apply styles as you type text. If, for example, your document’s design calls for the style “body text”
to follow a heading style named “heading 1,” you can set the Next Style option for “heading 1” to “body text.” After
you’ve typed a paragraph styled with “heading 1,” pressing Enter or Return starts a new paragraph styled with “body
text.”
If you use the context menu when applying a style to two or more paragraphs, you can cause the parent style to be
applied to the first paragraph and the Next Style to be applied to the additional paragraphs. (See Apply styles.)
To use the Next Style feature, choose a style from the Next Style menu when you’re creating or editing a style.
Jeff Witchel provides a video tutorial about using the Next Style feature at Using the Next Style feature.
Styles panel overview
Use the Character Styles panel to create, name, and apply character styles to text within a paragraph; use the Paragraph
Styles panel to create, name, and apply paragraph styles to entire paragraphs. Styles are saved with a document and
display in the panel each time you open that document.
When you select text or position the insertion point, any style that has been applied to that text is highlighted in either
of the Styles panels, unless the style is in a collapsed style group. If you select a range of text that contains multiple styles,
no style is highlighted in the Styles panel. If you select a range of text to which multiple styles are applied, the Styles
panel displays “(Mixed).”
Open the Paragraph Styles panel
❖Choose Type > Paragraph Styles, or click the Paragraph Styles tab, which appears by default on the right side of the
application window.
Open the Character Styles panel
❖Choose Type > Character Styles, or click the Character Styles tab on the right side of the application window.
Add paragraph and character styles
If the styles you want already exist in another InDesign, InCopy, or word-processing document, you can import those
styles for use in your current document. If you are working with a stand-alone story, you can also define character and
paragraph styles in InCopy.

231
Styles
Last updated 6/13/2015
Define paragraph or character styles
1If you want to base a new style on the formatting of existing text, select that text or place the insertion point in it.
If a group is selected in the Styles panel, the new style will be part of that group.
2Choose New Paragraph Style from the Paragraph Styles panel menu, or choose New Character Style from the
Character Styles panel menu.
3For Style Name, type a name for your new style.
4For Based On, select which style the current style is based on.
Note: The Based On option lets you link styles to each other, so that changes in one style ripple through the styles that
are based on it. By default, new styles are based on [No Paragraph Style] for paragraph styles or [None] for character
styles, or on the style of any currently selected text.
5For Next Style (Paragraph Styles panel only), specify which style is applied after the current style when you press
Enter or Return.
6To add a keyboard shortcut, position the insertion point in the Shortcut box, and make sure Num Lock is turned
on. Then hold down any combination of Shift, Alt, and Ctrl (Windows), or Shift, Option, and Command (Mac OS),
and press a number on the numeric keypad. You cannot use letters or non-keypad numbers for defining style
shortcuts. If your keyboard does not have a Num Lock key, you cannot add keyboard shortcuts to styles.
7If you want the new style to be applied to the selected text, select Apply Style To Selection.
8To specify the formatting attributes, click a category (such as Basic Character Formats) on the left, and specify the
attributes you want to add to your style.
When specifying a Character Color in the Style Options dialog box, you can create a new color by double-clicking
the fill or stroke box.
9For character styles, attributes you do not specify are ignored; when the style is applied, text will retain the paragraph
style formatting for that attribute. To remove an attribute setting from a character style:
•From a setting’s menu, choose (Ignore).
•In a text box, delete the option text.
•In a check box, click until you see a small box (Windows) or a hyphen (-) (Mac OS).
•For a character color, hold down Ctrl (Windows) or Command (Mac OS) and click the color swatch.
10 When you’ve finished specifying the formatting attributes, click OK.
Styles you create appear only in the current document. If no document is open, the styles you create will appear in all
new documents.
Base one paragraph or character style on another
Many document designs feature hierarchies of styles sharing certain attributes. The headings and subheads, for
example, often use the same font. You can easily create links between similar styles by creating a base, or parent, style.
When you edit the parent style, the child styles will change as well. You can then edit the child styles to distinguish them
from the parent style.
To create a style that’s nearly identical to another style, but without the parent-child relationship, use the Duplicate Style
command and then edit the copy.
1Create a new style.
2In the New Paragraph Style or New Character Style dialog box, select the parent style in the Based On menu. The
new style becomes the child style.

232
Styles
Last updated 6/13/2015
By default, new styles are based on [No Paragraph Style] or [None], or on the style of any currently selected text.
3Specify formatting in the new style to distinguish it from the style on which it’s based. For example, you might want
to make the font used in a subheading slightly smaller than the one used in the heading (parent) style.
If you make changes to the formatting of a child style and decide you want to start over, click Reset To Base. That restores
the child style’s formatting to be identical to the style on which it’s based. Then you can specify new formatting. Similarly,
if you change the Based On style of the child style, the child style definition is updated to match its new parent style.
Import styles from other documents
You can import paragraph and character styles from another InDesign document (any version) into the active
document. During import, you can determine which styles are loaded and what should occur if a loaded style has the
same name as a style in the current document. You can also import styles from an InCopy document.
You can import paragraph styles and character styles from an InDesign or InCopy document into a stand-alone InCopy
document or InCopy content that is linked to InDesign. You can determine which styles are loaded, and what should
occur if a loaded style has the same name as a style in the current document.
Note: If you import styles into linked content, new styles are added to the InDesign document when the content is updated,
and any style with a name conflict is overridden by the InDesign style with the same name.
1In the Character Styles or Paragraph Styles panel, do one of the following:
•Choose Load Character Styles or Load Paragraph Styles in the Styles panel menu.
•Choose Load All Text Styles in the Styles panel menu to load both character and paragraph styles.
2Double-click the InDesign document containing the styles you want to import.
3In the Load Styles dialog box, make sure that a check mark appears next to the styles you want to import. If any
existing style has the same name as one of the imported styles, choose one of the following options under Conflict
With Existing Style, and then click OK:
Use Incoming Style Definition Overwrites the existing style with the loaded style and applies its new attributes to all
text in the current document that used the old style. The definitions of the incoming and existing styles are displayed
at the bottom of the Load Styles dialog box so that you can view a comparison.
Auto-Rename Renames the loaded style. For example, if both documents have a Subheading style, the loaded style
is renamed “Subheading copy” in the current document.
You can also use the Books feature to share styles. (See Synchronize book documents .)
Map styles to export tags | CC, CS6, CS5.5
Introduction to export tags
Use Export Tagging to define how text with InDesign styles is marked up in HTML, EPUB, or tagged PDF output.
You can also specify CSS class names to add to the exported content. In EPUB/HTML export, CSS classes can be used
to differentiate between slight variations in styling. It is not required that you enter a class name - InDesign
automatically generates one based on the Style Name.
You cannot preview Export Tagging within the InDesign layout, as it only impacts the exported EPUB, HTML, or PDF
file.
Edit All Export Tags lets you efficiently view and modify the mappings in a single dialog box.

233
Styles
Last updated 6/13/2015
Define style-tag mapping
1For the style to map, open the paragraph, character, or Object Style Options dialog box.
2Click Export Tagging in the left pane, and do one of the following:
•Choose a Tag to map for EPUB and HTML output.
•Specify a Class to map for EPUB and HTML output. Class names are used to generate style definitions for default
tags.
•If you want to include this style in the CSS, select the Emit CSS checkbox. If you don’t select the checkbox, no
CSS class will be generated for this style. If you have two or more styles having the same class assigned, InDesign
displays an error/warning message while exporting. This option is available only in InDesign CC.
•Choose a Tag to map for PDF output. This option is available only for paragraph styles.
Edit all export tags
You can view and modify all export tags together in a single window.
1Select Edit All Export Tags in the Paragraph, Character, or Object style panel menu.
2Click EPUB and HTML, or PDF.
3Click the tag corresponding to the style. It gets converted to a list; choose the new value.
Convert Word styles to InDesign styles
While importing a Microsoft Word document into InDesign or InCopy, you can map each style used in Word to a
corresponding style in InDesign or InCopy. By doing so, you specify which styles format the imported text. A disk icon
appears next to each imported Word style until you edit the style in InDesign or InCopy.
1Do one of the following:
•To add the Word document to existing text in InDesign or InCopy, choose File > Place. Select Show Import
Options, and then double-click the Word document.
•To open the Word document in a stand-alone InCopy document, start InCopy, choose File > Open, and then
double-click the Word file.
2Select Preserve Styles And Formatting From Text And Tables.
3Select Customized Style Import, and then click Style Mapping.
4In the Style Mapping dialog box, select the Word style, and then select an option from the menu under InCopy style.
You can choose the following options:
•If there is no style name conflict, choose New Paragraph Style, New Character Style, or choose an existing InCopy
style.
•If there is a style name conflict, choose Redefine InCopy Style to format the imported style text with the Word
style. Choose an existing InCopy style to format the imported style text with the InCopy style. Choose Auto
Rename to rename the Word style.
5Click OK to close the Style Mapping dialog box, and then click OK to import the document.

234
Styles
Last updated 6/13/2015
Apply styles
By default, applying a paragraph style won’t remove any existing character formatting or character styles applied to part
of a paragraph, although you have the option of removing existing formatting when you apply a style. A plus sign (+)
appears next to the current paragraph style in the Styles panel if the selected text uses a character or paragraph style and
also uses additional formatting that isn’t part of the applied style. Such additional formatting is called an override or
local formatting.
Character styles remove or reset character attributes of existing text if those attributes are defined by the style.
Apply a character style
1Select the characters to which you want to apply the style.
2Do one of the following:
•Click the character style name in the Character Styles panel.
•Select the character style name from the drop-down list in the Control panel.
•Press the keyboard shortcut you assigned to the style. (Make sure that Num Lock is on.)
Apply a paragraph style
1Click in a paragraph, or select all or part of the paragraphs to which you want to apply the style.
2Do one of the following:
•Click the paragraph style name in the Paragraph Styles panel.
•Select the paragraph style name from the menu in the Control panel.
•Press the keyboard shortcut you assigned to the style. (Make sure that Num Lock is on.)
3If any unwanted formatting remains in the text, choose Clear Overrides from the Paragraph Styles panel.
Apply sequential styles to multiple paragraphs
The Next Style option specifies which style will be automatically applied when you press Enter or Return after applying
a particular style. It also lets you apply different styles to multiple paragraphs in a single action.
For example, suppose you have three styles for formatting a newspaper column: Title, Byline, and Body. Title uses Byline
for Next Style, Byline uses Body for Next Style, and Body uses [Same Style] for Next Style. If you select an entire article,
including the title, the author’s byline, and the paragraphs in the article, and then apply the Title style using the special
“Next Style” command in the context menu, the article’s first paragraph will be formatted with the Title style, the second
paragraph will be formatted with the Byline style, and all other paragraphs will be formatted with the Body style.
1Select the paragraphs to which you want to apply the styles.

235
Styles
Last updated 6/13/2015
2In the Paragraph Styles panel, right-click (Windows) or Control-click (Mac OS) the parent style, and then choose
Apply [Style Name] Then Next Style.
If the text includes formatting overrides or character styles, the context menu also lets you remove overrides, character
styles, or both.
Edit character and paragraph styles
One of the advantages of using styles is that when you change the definition of a style, all of the text formatted with that
style changes to match the new style definition.
Note: If you edit styles in InCopy content that’s linked to an InDesign document, the modifications are overridden when
the linked content is updated.
Edit a style using the dialog box
1Do one of the following:
•If you don’t want the style to be applied to selected text, right-click (Windows) or Control-click (Mac OS) the
style name in the Styles panel, and choose Edit [style name].
•In the Styles panel, double-click the style name, or select the style and choose Style Options in the Styles panel
menu. Note that this applies the style to any selected text or text frame or, if no text or text frame is selected, sets
the style as the default style for any text you type in new frames.
2Adjust settings in the dialog box, and then click OK.
Redefine a style to match selected text
After you apply a style, you can override any of its settings. If you decide you like the changes you made, you can
redefine the style so that it matches the formatting of the text you changed.
Note: If you redefine styles in InCopy content linked to an InDesign document, the modifications are overridden when the
linked content is updated.
1Using the Type tool , select the text formatted with the style you want to redefine.
2Make changes to the paragraph or character attributes as necessary.
3Choose Redefine Style in the Styles panel menu.
Delete character or paragraph styles
When you delete a style, you can select a different style to replace it, and you can choose whether to preserve the
formatting. When you delete a style group, you delete all styles within the group. You are prompted to replace each style
in the group one at a time.
1Select the style name in the Styles panel.
2Do one of the following:
•Choose Delete Style in the panel menu or click the Delete icon at the bottom of the panel.
•Right-click (Windows) or Control-click (Mac OS) the style, and then choose Delete Style. This method is
especially useful for deleting a style without applying it to text.
3In the Delete Paragraph Style dialog box, select the style to replace it.

236
Styles
Last updated 6/13/2015
If you select [No Paragraph Style] to replace a paragraph style or [None] to replace a character style, select Preserve
Formatting to keep the formatting of text to which the style is applied. The text preserves its formatting but is no
longer associated with a style.
4Click OK.
To delete all unused styles, choose Select All Unused in the Styles panel menu, and then click the Delete icon. When you
delete an unused style, you are not prompted to replace the style.
Override character and paragraph styles
When you apply a paragraph style, character styles and other previous formatting remain intact. After you apply a style,
you can override any of its settings by applying formatting that’s not part of the style. When formatting that is not part
of a style is applied to text with that style applied, it is called an override or local formatting. When you select text with
an override, a plus sign (+) appears next to the style name. In character styles, an override is displayed only if the applied
attribute is part of the style. For example, if a character style only changes text color, applying a different font size to the
text does not appear as an override.
You can clear character styles and formatting overrides when you apply a style. You can also clear overrides from a
paragraph to which a style has been applied.
If a style has a plus sign (+) next to it, hold the mouse pointer over the style to view a description of the override
attributes.
Preserve or remove overrides when applying paragraph styles
•To apply a paragraph style and preserve character styles, but remove overrides, hold down Alt (Windows) or Option
(Mac OS) as you click the name of the style in the Paragraph Styles panel.
•To apply a paragraph style and remove both character styles and overrides, hold down Alt+Shift (Windows) or
Option+Shift (Mac OS) as you click the name of the style in the Paragraph Styles panel.
Right-click (Windows) or Control-click (Mac OS) the style in the Paragraph Styles panel, and then choose an option
from the context menu. You can then clear overrides, character styles, or both while applying the style.
Clear paragraph style overrides
1Select the text containing the overrides. You can even select multiple paragraphs with different styles.
2In the Paragraph Styles panel, do any of the following:
•To remove paragraph and character formatting, click the Clear Overrides icon , or choose Clear Overrides
from the Paragraph Styles panel.
•To remove character overrides, but preserve paragraph formatting overrides, hold down Ctrl (Windows) or
Command (Mac OS) as you click the Clear Overrides icon.
•To remove paragraph-level overrides, but preserve character-level overrides, in the Paragraph Styles panel, hold
down Shift+Ctrl (Windows) or Shift+Command (Mac OS) as you click the Clear Overrides icon.
Note: When you clear overrides, paragraph-level overrides are removed from the entire paragraph, even if only part of
the paragraph is selected. Character-level overrides are removed only from the selection.
Clearing overrides does not remove character style formatting. To remove character style formatting, select the text
containing the character style, and then click [None] in the Character Styles panel.

237
Styles
Last updated 6/13/2015
Break the link between text and its style
When you break the link between text and its style, the text retains its current formatting. However, future changes to
that style will not be reflected in the text that was separated from the style.
1Select the text that is marked with the style that you want to break from.
2Choose Break Link To Style from the Styles panel menu.
If no text is selected when you choose Break Link To Style, any new text you type uses the same formatting as the
selected style, but no style is assigned to that text.
Convert style bullets and numbering to text
When you create a style that adds bullets or numbering to paragraphs, these bullets and numbers may be lost if the text
is copied or exported to a different application. To avoid this problem, convert the style bullets or numbering to text.
Note: If you convert style bullets in an InCopy story linked to an InDesign layout, the change may be overridden when the
content is updated in InDesign.
1In the Paragraph Styles panel, select the style that contains the bullets and numbering.
2In the Paragraph Styles panel menu, choose Convert “[style]” Bullets and Numbering to Text.
If you convert bullets and numbering to text in a style on which another style is based (a parent style), the bullets and
numbering in the child style are also converted to text.
After you convert numbering to text, you may need to update numbers manually if you edit the text.
Find and replace character and paragraph styles
Use the Find/Change dialog box to find instances of a particular style and replace it with another.
1Choose Edit > Find/Change.
2For Search, select Document to change the style throughout the document.
3Leave the Find What and Change To options blank. If the Find Format and Change Format boxes don’t appear at
the bottom of the dialog box, click More Options.
4Click the Find Format box to display the Find Format Settings dialog box. Under Style Options, select the character
or paragraph style you want to search for, and then click OK.
5Click the Change Format box to display the Change Format Settings dialog box. Under Style Options, select the
replacement character or paragraph style, and then click OK.
6Click Find, and then use the Change, Change/Find, or Change All buttons to replace the style.
More Help topics
Group styles
Create nested styles
Create named grid formats
Duplicate styles or style groups
EPUB Contents options
Place (import) text
Place (import) text

238
Styles
Last updated 6/13/2015
Paste text
Use Quick Apply
Group styles
Create a paragraph style for running lists
Find and change text
Find and change fonts
Drop caps and nested styles
There are three main ways to use Drop Caps and Nested Styles feature: to apply a character style to a drop cap, to apply
a nested style to text at the beginning of a paragraph, and to apply a nested line style to one or more lines in a paragraph.
Apply a character style to a drop cap
You can apply a character style to the drop-cap character or characters in a paragraph. For example, if you want a drop-
cap character to have a different color and font than the rest of the paragraph, you can define a character style that has
these attributes. Then you can either apply the character style directly to a paragraph, or you can nest the character style
in a paragraph style.
Note: You cannot create new styles in InCopy content linked to an InDesign layout.
1Create a character style that has the formatting you want to use for the drop-cap character.
2Do one of the following:
•To apply the drop cap to a single paragraph, choose Drop Caps And Nested Styles from the Paragraph panel
menu.
•To nest the character style in a paragraph style, double-click the paragraph style, and then click Drop Caps And
Nested Styles.
3Specify the number of drop-cap lines and characters, and then choose the character style.
4If the drop cap is aligned too far away from the left edge, select Align Left Edge.
Selecting this option uses the original left side bearing of the drop-cap character rather than the larger value. It’s
particularly useful for drop caps formatted in sans serif fonts.
5If the drop cap character overlaps the text below it, select Scale For Descenders.
6To control how text that wraps around the drop cap is adjusted relative to the frame grid, choose an option from the
menu.
Ignore Frame Grid The drop cap and text are not adjusted, so text may not align to the frame’s grid.

239
Styles
Last updated 6/13/2015
Pad To Frame Grid The drop cap is not scaled and the text is aligned to the grid, so there may be extra white space
between the drop cap and text that wraps around it.
Scale Up To Grid This option scales the drop cap to be wider for horizontal text or taller for vertical text so that the
text aligns with the grid.
Scale Down To Grid This option scales the drop cap to be narrower for horizontal text for shorter for vertical text so
that the text aligns with the grid.
7Click OK.
If you want to apply a different nested style to any characters after the drop cap, use the New Nested Style option. (See
Create nested styles.)
Create nested styles
You can specify character-level formatting for one or more ranges of text within a paragraph or line. You can also set
up two or more nested styles to work together, one taking over where the previous one ends. For paragraphs with
repetitive and predictable formatting, you can even loop back to the first style in the sequence.
Nested styles are especially useful for run-in headings. For example, you can apply one character style to the first letter
in a paragraph and another character style that takes effect through the first colon (:). For each nested style, you can
define a character that ends the style, such as a tab character or the end of a word.
Note: You can create new styles in a stand-alone InCopy document, but not in content linked to an InDesign layout.
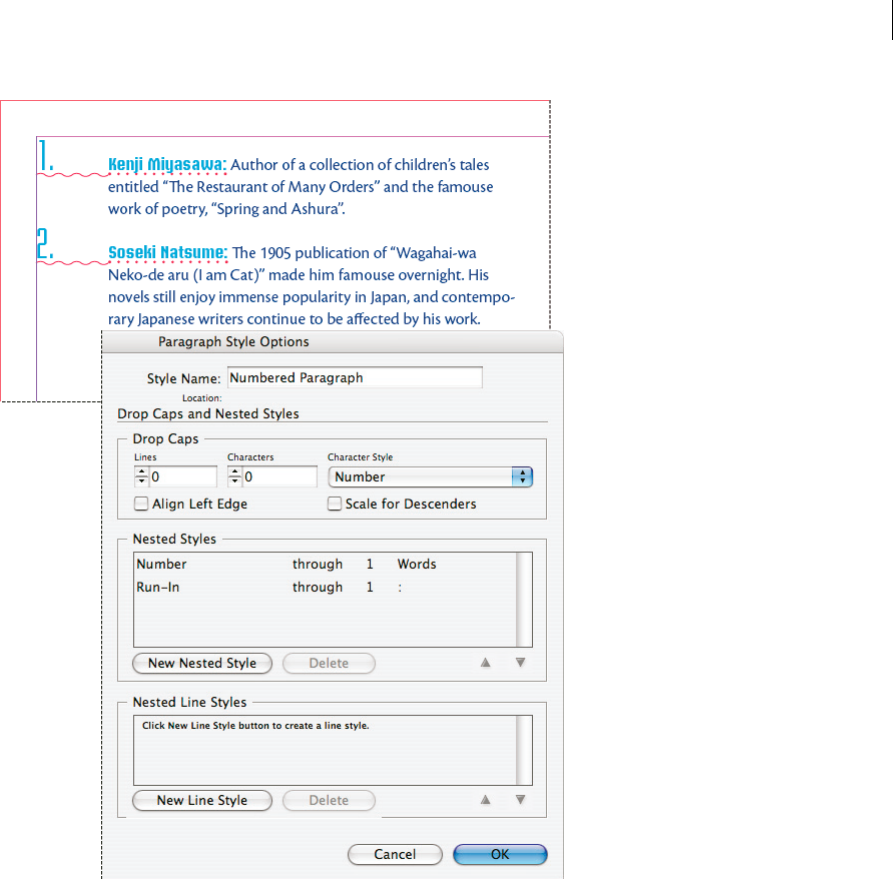
240
Styles
Last updated 6/13/2015
Michael Murphy provides an article on nested styles at InDesign's Nested Styles Auto-Format Multiple Paragraphs. He
also provides a series of video tutorials that starts at Nested Style Sheets.
Create one or more nested styles
1Create one or more character styles that you want to use to format text.
2Do one of the following:
•To add nested styles to a paragraph style, double-click the paragraph style, and then click Drop Caps And Nested
Styles.
•To add nested styles to a single paragraph, choose Drop Caps And Nested Styles from the Paragraph panel menu.
Note: For best results, apply nested styles as part of paragraph styles. If you apply nested styles as local overrides to a
paragraph, subsequent editing or formatting changes in the nested style can produce unexpected character formatting
in the styled text.
3Click New Nested Style one or more times.

241
Styles
Last updated 6/13/2015
4Do any of the following for each style, and then click OK:
•Click the character style area, and then select a character style to determine the appearance of that section of the
paragraph. If you haven’t created a character style, choose New Character Style and specify the formatting you
want to use.
•Specify the item that ends the character style formatting. You can also type the character, such as a colon (:) or a
specific letter or number. You cannot type a word.
•Specify how many instances of the selected item (such as characters, words, or sentences) are required.
•Choose Through or Up To. Choosing Through includes the character that ends the nested style, while choosing
Up To formats only those characters that precede this character.
•Select a style and click the up button or down button to change the order of the styles in the list. The order
of the styles determines the sequence in which the formatting is applied. The formatting defined by the second
style begins where the formatting of the first style concludes. If you apply a character style to the drop cap, the
drop-cap character style acts as the first nested style.
Create nested line styles
You can apply a character style to a specified number of lines in a paragraph. As with nested styles, you can set up two
or more nested line styles to work together, and you can create a repeating sequence.
Attributes applied by nested line styles can co-exist with attributes applied by nested styles. For example, a nested line
style can apply a color while a nested style can apply italics. If both set conflicting settings of the same attribute, such
as red and blue, the nested style takes precedence over the nested line style.
1Create one or more character styles that you want to use to format text.
2Do one of the following:
•To add nested line styles to a paragraph style, double-click the paragraph style, and then click Drop Caps And
Nested Styles.
•To add nested line styles to a single paragraph, choose Drop Caps And Nested Styles from the Paragraph panel
menu.
3Click New Nested Line Style one or more times.
4Click the character style area, and then select a character style to determine the appearance of that section. If you
haven’t created a character style, choose New Character Style and specify the formatting you want to use.
5Specify the number of paragraph lines you want the character style to affect.
Select a style and click the up button or down button to change the order of the styles in the list. The order
determines the sequence in which the formatting is applied.
6Click OK.
Loop through nested styles
You can repeat a series of two or more nested styles throughout a paragraph. A simple example would be to alternate
red and green words in a paragraph. Or, in nested line styles you could alternate red and green lines in a paragraph. The
repeating pattern remains intact even if you add or remove words in the paragraph.
1Create the character styles you want to use.
2Edit or create a paragraph style, or place the insertion point in the paragraph you want to format.
3In the Drop Caps And Nested Styles section or dialog box, click New Nested Style (or New Nested Line Style) at least
twice and choose settings for each style.
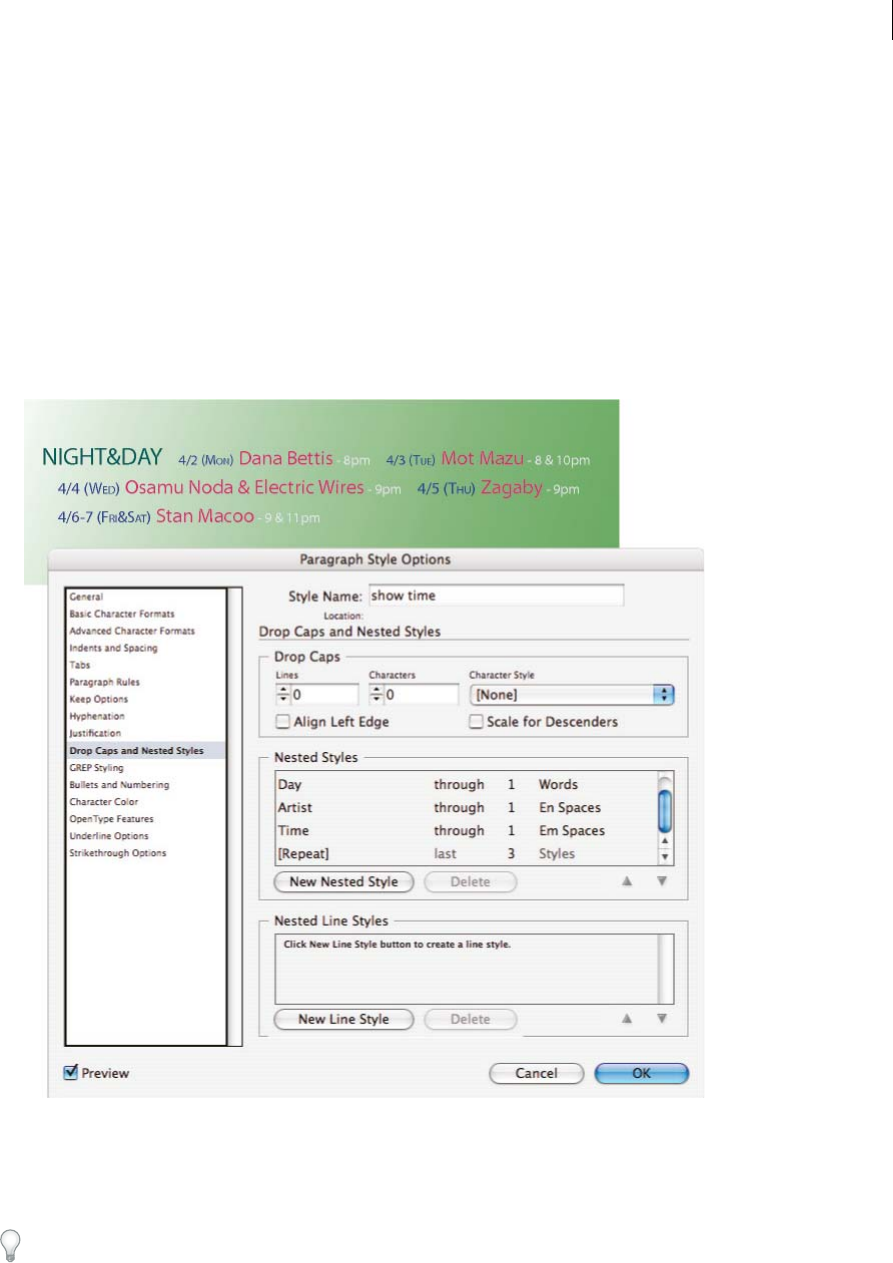
242
Styles
Last updated 6/13/2015
4Do either of the following:
•For nested styles, click New Nested Style again, choose [Repeat] in the character style area, and specify how many
nested styles will be repeated.
•For nested line styles, click New Nested Line Style again, choose [Repeat] in the character style area, and specify
how many lines will be repeated.
In some cases, you may want to skip the first style or styles. For example, an events calendar paragraph may include
“This Week’s Events” followed by days of the week and their events. In this case, you could create five nested styles:
one for “This Week’s Events,” one each for the day, event, and event time, and a final style with a [Repeat] value of
3, thereby excluding the first nested style from the loop.
The [Repeat] item should be the last in the list. Any nested style below [Repeat] is ignored.
5Click OK.
Nested style character style options
To determine how a nested character style ends, select any of the following:
If you don’t want the character to be included in the nested style formatted, choose Up To instead of Through when you
define the nested style.
Sentences Periods, question marks, and exclamation points indicate the end of a sentence. If a quotation mark follows
the punctuation, it is included as part of the sentence.

243
Styles
Last updated 6/13/2015
Words Any space or white space character indicates the end of a word.
Alphabet The endpoint for Arabic numerals is defined by a space. For double-byte characters, it is the same as for
letters.
Characters Any character other than zero-width markers (for anchors, index markers, XML tags and so on) is
included.
Note: If you select Characters, you can also type a character, such as a colon or a period, to end the nested style. If you type
multiple characters, any of those characters will end the style. For example, if your run-in headings end with a hyphen,
colon, or question mark, you can type -:? to end the nested style where any of these characters appears.
Letters Any character that does not include punctuation, white space, digits, and symbols.
Digits The Arabic numerals 0–9 are included.
End Nested Style Character Extends the nested style up to or through the appearance of the End Nested Style character
you insert. To insert this character, choose Type > Insert Special Character > Other > End Nested Style Here.
Tab Characters Extends the nested style up to or through the tab character (not the tab setting).
Forced Line Break Extends the nested style up to or through the forced line break. (Choose Type > Insert Break
Character > Forced Line Break.)
Indent To Here Character Extends the nested style up to or through the Indent To Here character. (Choose Type >
Insert Special Character > Other > Indent To Here.)
Em Spaces, En Spaces, or Non-breaking Spaces Extends the nested style up to or through the space character. (Choose
Type > Insert White Space > [space character].)
Anchored Object Marker Extends the nested style up to or through an inline graphic marker, which appears where an
inline graphic is inserted.
Auto Page Number / Section Marker Extends the nested style up to or through the page number or section name
marker.
End a nested style
In most cases, a nested style ends where the condition of the defined style is met, such as after three words or where a
period appears. However, you can also end a nested style before the condition is met using the End Nested Style Here
character.
1Place the insertion point where you want the nested style to end.
2Choose Type > Insert Special Character > Other > End Nested Style Here.
This character ends the nested style at that point, regardless of the nested style definition.
Remove the formatting of a nested style
•In the Drop Caps And Nested Styles dialog box, or in the Drop Caps And Nested Styles section of the Paragraph
Style Options dialog box, select the nested style and click Delete.
•Apply a different paragraph style.
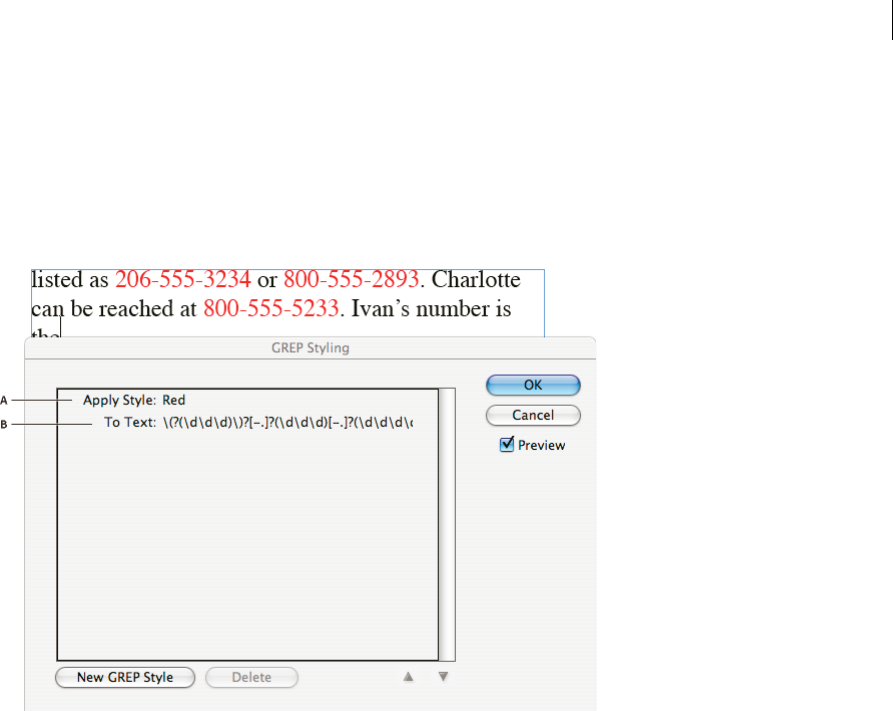
244
Styles
Last updated 6/13/2015
Create GREP styles
GREP is an advanced, pattern-based search technique. You can use GREP styles to apply a character style to text that
conforms to the GREP expression you specify. For example, suppose you want to apply a character style to all the phone
numbers in text. When you create a GREP style, you select the character style and specify the GREP expression. All
paragraph text that matches the GREP expression is formatted with the character style.
A Character style B GREP expression
For a video tutorial on creating GREP styles, see www.adobe.com/go/lrvid4028_id.
David Blatner provides real-world examples of GREP styles at 5 Cool Things You Can Do with GREP Styles. Cari
Jansen provides a four-part series about GREP styles that begins at Introducing GREP Styles.
1Do one of the following:
•To apply GREP styling to individual paragraphs, select the paragraphs and choose Grep Styles from the
Paragraph or Control panel menu.
•To apply GREP styling to individual paragraphs, select the paragraphs and choose Grep Styles from the
Paragraph panel menu.
•To use GREP styles in a paragraph style, create or edit a paragraph style, and click the GREP Styling tab on the
left side of the Paragraph Style Options dialog box.
2Click New GREP Style.
3Click to the right of Apply Style, and then specify a character style. If you haven’t created a character style to use,
choose New Character Style and specify the formatting you want to use.
4Click to the right of To Text and do any of the following to construct a GREP expression:
•Enter the search expression manually. (See Metacharacters for searching.)
•Click the Special Characters For Search icon to the right of the To Text field. Choose options from the Locations,
Repeat, Match, Modifiers, and Posix submenus to help construct the GREP expression.
5Click OK.

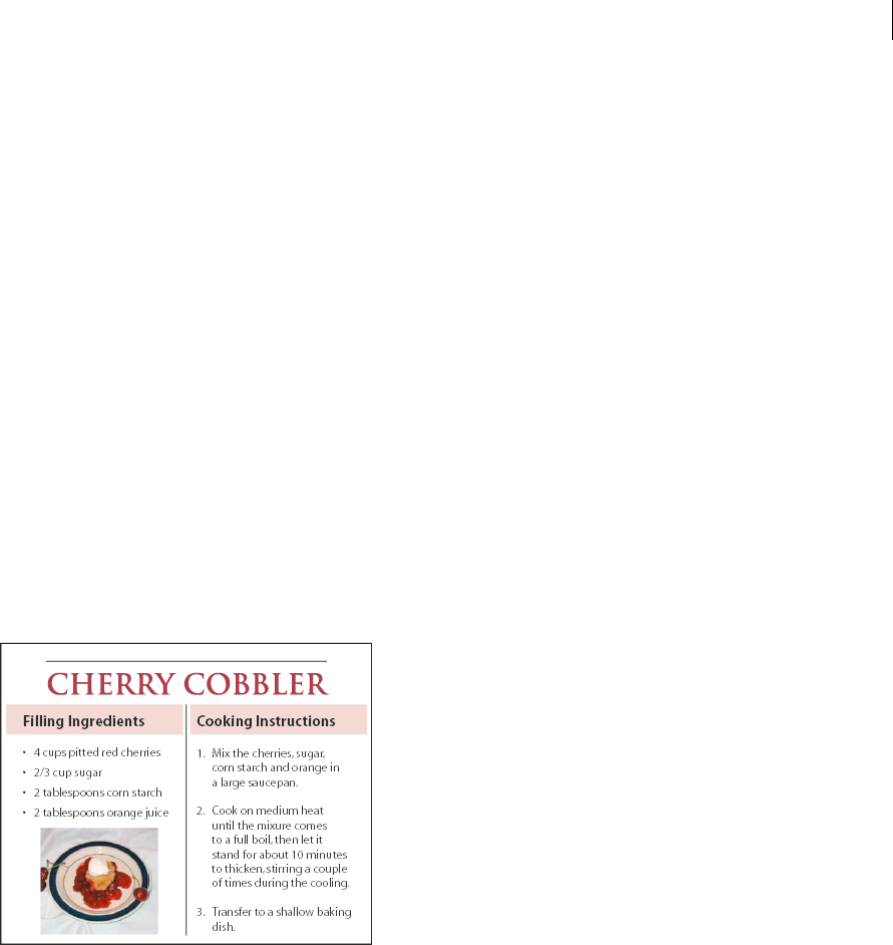
246
Last updated 6/13/2015
Chapter 8: Typography
Bullets and numbering
Create bulleted or numbered lists
In bulleted lists, each paragraph begins with a bullet character. In numbered lists, each paragraph begins with an
expression that includes a number or letter and a separator such as a period or parenthesis. The numbers in a numbered
list are updated automatically when you add or remove paragraphs in the list. You can change the type of bullet or
numbering style, the separator, the font attributes and character styles, and the type and amount of indent spacing.
You cannot use the Type tool to select the bullets or numbers in a list. Instead, edit their formatting and indent spacing
using the Bullets And Numbering dialog box, the Paragraph panel, or the Bullets And Numbering section of the
Paragraph Styles dialog box (if the bullets or numbers are part a style).
A quick way to create a bulleted or numbered list is to type the list, select it, and then click the Bulleted List or
Numbered List button in the Control panel. These buttons let you turn the list on or off and switch between bullets and
numbers. You can also make bullets and numbering part of a paragraph style and construct lists by assigning styles to
paragraphs.
Note: Automatically generated bullet and number characters aren’t actually inserted in the text. Therefore, they cannot be
found during a text search or selected with the Type tool unless you convert them to text. In addition, bullets and numbering
don’t appear in the story editor window (except in the paragraph style column).
For a video tutorial on creating bulleted and numbered lists, see www.adobe.com/go/vid0077.

247
Typography
Last updated 6/13/2015
InDesign Docs provides a series of articles about using bullets and numbering to create outlines, multi-level lists, figure
captions, and numbered steps.
1Select the set of paragraphs that will become the list, or click to place the insertion point where you want the list to
begin.
2Do any of the following:
•Click the Bulleted List button or the Numbered List button in the Control panel (in Paragraph mode).
Hold down Alt (Windows) or Option (Mac OS) while clicking a button to display the Bullets And Numbering
dialog box.
•Choose Bullets And Numbering from the Paragraph panel or Command panel. For List Type, choose either
Bullets or Numbers. Specify the settings you want, and then click OK.
•Apply a paragraph style that includes bullets or numbering.
3To continue the list in the next paragraph, move the insertion point to the end of the list and press Enter or Return.
4To end the list (or list segment, if the list is to be continued later in the story), click the Bulleted List or Numbered
List button in the Control panel again, or choose Bullets And Numbering from the Paragraph panel menu.
Format a bulleted or numbered list
1Using the Type tool , select the bulleted or numbered paragraphs you want to reformat.
2Do any of the following to open the Bullets And Numbering dialog box:
•Choose Bullets And Numbering from the Control panel menu (in Paragraph mode) or the Paragraph panel
menu.
•Alt-click (Windows) or Option-click (Mac OS) either the Bulleted List button or the Numbered List button
.
3In the Bullets And Numbering dialog box, do any of the following:
•Change the bullet character.
•Change the numbered list options.
•Choose a style for the numbers or bullets from the Character Style list.
4To change the position of the bullet or number, specify any of the following:
Alignment Left-aligns, centers, or right-aligns the bullets or numbers within the horizontal space allotted for
numbers. (If this space is narrow, the difference between the three options is negligible.)
Left Indent Specifies how far the lines after the first line are indented.
First Line Indent Controls where the bullet or number is positioned.
Increase the First Line Indent value if you want the punctuation in long lists to be aligned. For example, if you want
“9.” and “10.” to be aligned on the period, change the Alignment to Right and gradually increase the first line indent
until the numbers align (make sure Preview is turned on).
To create the hanging indent effect, specify a positive Left Indent value (such as 2p0), and then specify an equal
negative value (such as -2p0) for First Line Indent.
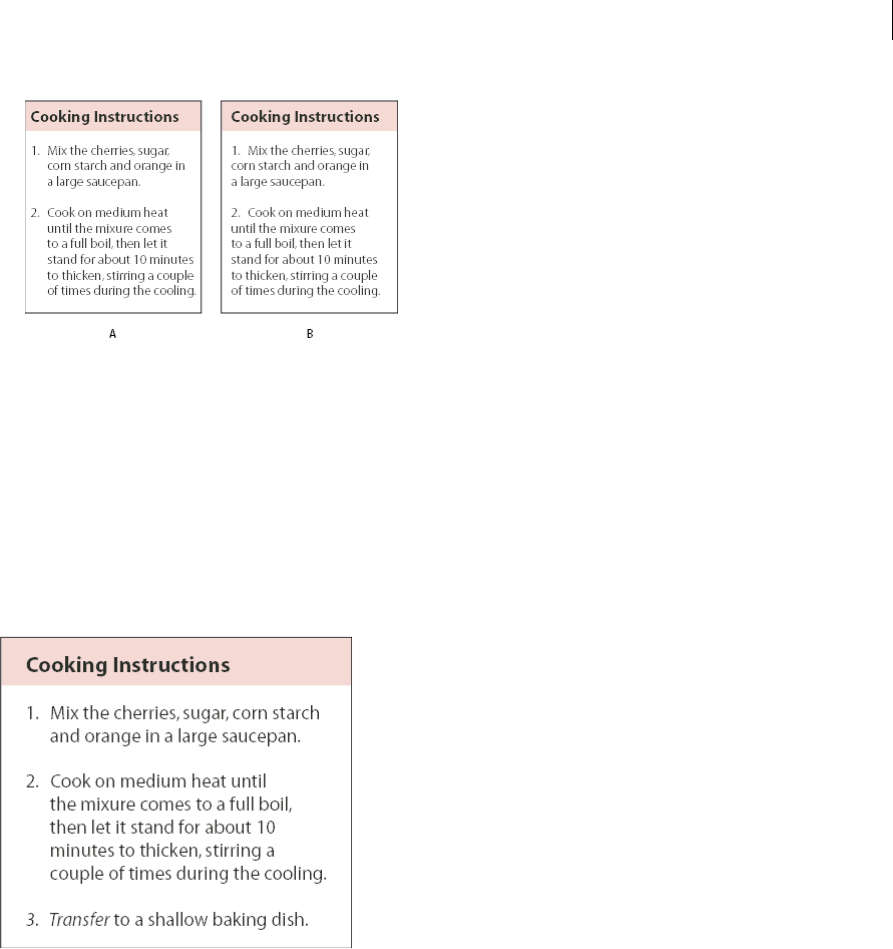
248
Typography
Last updated 6/13/2015
Note: The Left Indent, First Line Indent, and Tab Position settings in the Bullets And Numbering dialog box are
paragraph attributes. For that reason, changing these settings in the Paragraph panel also changes bulleted and
numbered list formats
Tab Position Activates the tab position to create space between the bullet or number and the start of the list item.
By default, bullets and numbers inherit some of their text formatting from the first character in the paragraph to which
they’re attached. If the first character in one paragraph is different from the first characters in other paragraphs, the
numbering or bullet character may appear inconsistent with the other list items. If this is not the formatting you desire,
create a character style for numbers or bullets and apply it to your list by using the Bullets And Numbering dialog box.
Change bullet characters
If you don’t want to use one of the existing bullet characters, you can add other bullet characters to the Bullet Character
grid. A bullet character that is available in one font may not be available in another font. You can choose whether the
font is remembered with any bullet character you add.
If you want to use a bullet found in a specific font (such as the pointing hand from Dingbats), be sure to set the bullet
to remember that font. If you use a basic bullet character, it’s probably best not to remember the font, because most fonts
have their own version of that bullet character. Depending on whether you select the Remember Font With Bullet
option, a bullet you add can reference either a Unicode value and a specific font family and style, or just a Unicode value.
Note: Bullets that reference only the Unicode value (without a remembered font) appear with a red “u” indicator.
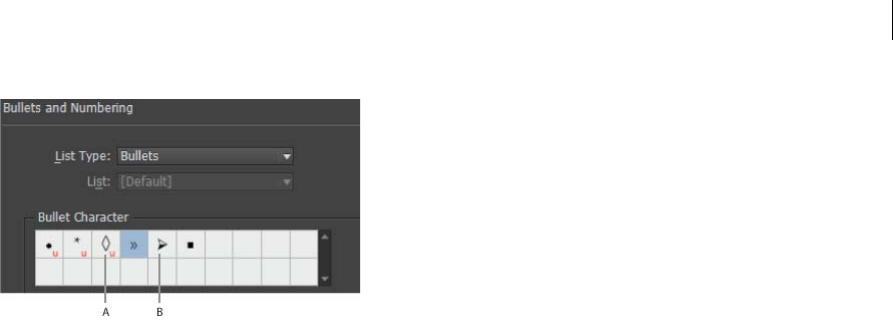
249
Typography
Last updated 6/13/2015
A Bullet without remembered font B Bullet with remembered font
Change the bullet character
1On the Control panel menu or Paragraph panel menu, select Bullets And Numbering.
2In the Bullets And Numbering dialog box, select Bullets from the List Type menu.
3Select a different bullet character, and then click OK.
Add a bullet character
1In the Bullets And Numbering dialog box, select Bullets from the List Type menu, then click Add.
2Select the glyph that you want to use as the bullet character. (Different font families and font styles contain different
glyphs.)
3If you want the new bullet to remember the currently chosen font and style, select Remember Font With Bullet.
4Click Add.
Note: The list of bullet characters is stored in the document, like paragraph and character styles. When you paste or load
paragraph styles from another document, any bullet character used in those styles appears in the Bullets And Numbering
dialog box, along with the other bullets defined for the current document.
Remove a bullet character
1In the Bullets And Numbering dialog box, select Bullets from the List Type menu.
2Select the bullet character you want to remove, and click Delete. (The first preset bullet character cannot be deleted.)
Change numbered list options
In a numbered list, the numbers are updated automatically when you add or remove paragraphs in the list. Paragraphs
that are part of the same list are numbered sequentially. These paragraphs do not have to be consecutive to one another
as long as you define a list for the paragraphs.
You can also create a multi-level list, in which list items are numbered in outline form and are indented by different
degrees.
1Open the Bullets And Numbering dialog box.
2Under Numbering Style, select the type of numbering you want to use from the Format menu.
3In the Number box, use the default expression—period (.) and tab space (^t)—or construct a number expression of
your own. To enter a number expression, delete the period after the number metacharacter (^#) and do one of the
following:
•Type a character (such as a closing parenthesis) or more than one character in place of the period.

250
Typography
Last updated 6/13/2015
You can also input a full-width separator instead of a half-width period separator, which is especially useful for
vertical text.
•Choose an item (such as Em Dash or Ellipses) from the Insert Special Character menu.
•Type a word or character before the number metacharacter. For example, to number questions in a list, you can
type the word Question.
4Choose a character style for the expression. (The style you choose applies to the entire number expression, not just
to the number.)
5For Mode, choose one of the following options:
Continue From Previous Number Numbers lists sequentially.
Start At Starts numbering at a number or other value that you enter in the text box. Enter a number, not a letter,
even if your list uses letters or Roman numerals for numbering.
6Specify any other options, and then click OK.
Defining lists
A defined list can be interrupted by other paragraphs and lists, and can span different stories and different documents
in a book. For example, use defined lists to create a multi-level outline, or to create a running list of numbered table
names throughout your document. You can also define lists for separately numbered or bulleted items that are mixed
together. For example, in a list of questions and answers, define one list for numbering the questions and another for
numbering the answers.
Defined lists are often used to track paragraphs for numbering purposes. When you create a paragraph style for
numbering, you can assign the style to a defined list, and paragraphs are numbered in that style according to where they
appear in the defined list. The first paragraph to appear is given number 1 (“Table 1”), for example, and the next
paragraph is given number 2 (“Table 2”), even if it appears several pages later. Because both paragraphs belong to the
same defined list, they can be numbered consecutively no matter how far apart they are in the document or book.
Define a new list for each type of item you want to number—step-by-step instructions, tables, and figures, for example.
By defining multiple lists, you can interrupt one list with another and maintain number sequences in each list.
If list items appear in unthreaded frames on the same page, items are numbered in the order in which the text frames
are added to the page. To reorder the items, cut and paste the text frames one by one in the order in which you want
them to be listed.

251
Typography
Last updated 6/13/2015
For a video tutorial on creating bulleted and numbered lists, see www.adobe.com/go/vid0077.
Define a list
1Choose Type > Bulleted And Numbered Lists > Define Lists.
2Click New in the Define Lists dialog box.
3Enter a name for the list, choose whether you want to continue numbering across stories, and continue numbering
from previous documents in your book.
4Click OK twice.
After you define a list, you can use it in a paragraph style, such as a style for tables, figures, or ordered lists, as well as
apply it by way of the Control panel and Paragraph panel.
Note: Some lists are defined automatically. For example, when you import a numbered list from a Microsoft Word
document, InDesign defines a list automatically for your document.
Edit a defined list
1Choose Type > Bulleted And Numbered Lists > Define Lists.
2Select a list and click Edit.
3Enter a new name for the list or change your selection of Continue Numbers options.
Paragraph styles that are assigned to the list are reassigned to the list under its new name.

252
Typography
Last updated 6/13/2015
Delete a defined list
1Choose Type > Bulleted And Numbered Lists > Define Lists.
2Select a list.
3Click Delete, and then select a different list or the [Default] list to replace your list with.
Create a paragraph style for running lists
To create a running list—a list that is interrupted by other paragraphs or that spans multiple stories or documents—
create a paragraph style and apply the style to paragraphs that you want to be part of the list. For example, to create a
running list of the tables in your document, create a paragraph style called Tables, make a defined list part of the style,
and then apply the Tables paragraph style to all paragraphs you want in your Table list.
InDesign Docs provides a series of articles about using bullets and numbering to create figure captions and numbered
steps.
1Choose New Paragraph Style from the Paragraph Styles panel menu.
2Enter a style name.
3On the left side of the New Paragraph Style dialog box, click Bullets And Numbering.
4For List Type, select Bullets or Numbering.
5If you are creating a style for numbered lists, choose a defined list from the List menu, or choose New List and define
the list.
6Specify the bullet or numbering characteristics.
7Use the Bullet or Number Position section of the New Paragraph Style dialog box to change the indent spacing. For
example, to create a hanging indent, type 2p for Left Indent and -2p for First Line Indent.
8Specify other paragraph style attributes for the style, and then click OK.
Create multi-level lists
A multi-level list is a list that describes hierarchical relationships between the list paragraphs. These lists are also called
outline lists because they resemble outlines. The list’s numbering scheme (as well as indentations) show rank as well as
how items are subordinate to one another. You can tell where each paragraph fits in the list with respect to the
paragraphs before and after it. You can include up to nine levels in a multi-level list.

253
Typography
Last updated 6/13/2015
To create a multi-level list, define the list and then create a paragraph style for each level you want. For example, a list
with four levels requires four paragraph styles (each one assigned the same defined list). As you create each style, you
define its numbering format and paragraph formatting.
Bob Bringhurst provides a series of articles about using bullets and numbering to create outlines, multi-level lists, figure
captions, and numbered steps.
1Choose New Paragraph Style from the Paragraph Styles panel menu.
2Enter a style name.
3If you already created a style for your multi-level list, choose the style you will assign to levels above this one from
the Based On menu; otherwise, choose No Paragraph Style or Basic Paragraph.
4On the left side of the New Paragraph Style dialog box, click Bullets And Numbering.
5Choose Numbers from the List Type menu.
6Choose a list you defined from the List menu. If you haven’t yet defined your list, you can choose New List from the
menu and define it now.
7In the Level box, enter a number that describes which level of the multi-level list you’re creating a style for.
8From the Format menu, choose the type of numbering you want to use.
9In the Number box, enter metacharacters or select metacharacters from the menus to describe the number
formatting you want for list items at this level.
•To include numbering prefixes from higher levels, enter text or click at the start of the Number box and choose
Insert Number Placeholder and then select a Level option (for example, Level 1), or enter ^ and then the list level
(for example, enter ^1). In a list with first levels numbered 1, 2, 3, and so on, and second levels numbered a, b, c,
and so on, including the first-level prefix in the second level renders second-level numbers as 1a, 1b, 1c; 2a, 2b,
2c; 3a, 3b, 3c.
•To create a number expression, enter punctuation, enter metacharacters, or select options on the Insert Special
Character list.
10 Select Restart Numbers At This Level After to renumber beginning at 1 when a paragraph at this level appears after
a paragraph at a higher level; deselect this option to number paragraphs at this level consecutively throughout the
list without regard for where the paragraphs appear in the list hierarchy.

254
Typography
Last updated 6/13/2015
To restart numbers after a specific level or range of levels, type the level number or range (such as 2-4) in the Restart
Numbers At This Level After field.
11 In the Bullet or Number Position area, choose Indent or Tab Position options to indent list items at this level farther
than list items at higher levels. Indenting helps subordinate items in lists stand out.
12 Click OK.
In some cases, such as with numbered steps, you may want to restart numbering within the same story. To avoid
restarting the numbered list manually, create a separate style that’s identical to the Level 1 style with one exception. For
Mode, chose Start At, and then specify 1. Name this style something like “Level 1 Restart.”
Create running captions for figures and tables
Running captions number figures, tables, and other items consecutively in a document. For example, the first figure
caption starts with the words “Figure 1,” the second with “Figure 2,” and so on. To make sure that figures, tables, or
similar items are numbered consecutively, define a list for the item, and then create a paragraph style that includes the
list definition. You can also add descriptive words such as “Figure” or “Table” to the numbering scheme of the paragraph
style.
Bob Bringhurst provides an article about creating figure captions at Numbered Lists Part III - Figure Captions.
List items are numbered in the order in which they are added to the page. To reorder the items, cut and paste the items
one by one in the order in which you want them to be listed.
1Create a new paragraph style and, in the Bullets And Numbering section of the Paragraph Style Options dialog box,
choose Numbers from the List Type menu.
2Choose a defined list from the List menu (or choose New List to define a list).
3Under Numbering Style, select the type of numbering you want to use from the Format menu.
For example, select the A, B, C, D... option to create a list for “Figure A,” “Figure B,” and so on.
4In the Number box, enter a descriptive word and any spacing or punctuation (as needed) along with the numbering
metacharacters.
For example, to create a “Figure A” effect, enter the word “Figure” and a space before the numbering metacharacters
(such as Figure ^#.^t). This adds the word “Figure” followed by a sequential number (^#), a period, and a tab (^t).
Note: To include chapter numbers in running captions, choose Insert Number Placeholder > Chapter Number from the
Number list, or enter ^H where you want the chapter number to appear in the number scheme.
5Finish creating the style and click OK.
After you create the style, apply it to text figure captions or table titles.
You can use the Table Of Contents feature to generate a list of tables or figures.
Restart or continue numbering for a list
InDesign offers commands for restarting a list and continuing a list:
Restarting a numbered list Place the insertion point in the paragraph and choose Restart Numbering from the context
menu or choose Type > Bulleted And Numbered Lists > Restart Numbering. In normal lists, this command assigns the
number 1 (or letter A) to a paragraph and makes it the first paragraph in a list. In multi-level lists, this command assigns
the first lower-level number to a nested paragraph.

255
Typography
Last updated 6/13/2015
Continuing a numbered list Choose Continue Numbering from the context menu or choose Type > Bulleted And
Numbered Lists > Continue Numbering. This command resumes numbering a list that was interrupted by
commentary, graphics, or nested list items. InDesign also offers commands for numbering lists that begin in one story
or book and cross into the next story or book.
Number a list from the previous or current story
Whether a list resumes numbering from the previous story or starts numbering anew in the current story depends on
how the list is defined.
1Choose Type > Bulleted And Numbered Lists > Define Lists.
2Select a list and click the Edit button.
Don’t choose the Default list because it can’t run across stories.
3Select Continue Numbers Across Stories to resume numbering the list from the previous story, or deselect this
option to start the list in the current story at 1 (or A).
4Click OK twice.
Number a list from the previous or current document in a book
Whether a list resumes numbering from the previous document in a book or starts numbering anew in the current
document depends on how the list is defined.
1Choose Type > Bulleted And Numbered Lists > Define Lists.
2Select a list and click the Edit button.
3Select Continue Numbers From Previous Document In Book to resume numbering the list from the previous
document (you must choose Continue Numbers Across Stories to activate this option), or deselect this option to
start the list in the current document at 1 (or A).
4Click OK twice.
To make sure that numbering is updated properly in a book, synchronize the documents in the book and choose Update
Numbering > Update All Numbers from the books panel menu.
Convert list bullets or numbers to text
1Select the paragraphs containing the bulleted or numbered list.
2Do one of the following:
•From the Paragraph panel menu, choose Convert Numbering To Text or Convert Bullets To Text.
•Right-click (Windows) or Command-click (Mac OS) the selection, and then choose Convert Numbering To Text
or Convert Bullets To Text.
Note: To remove the list numbers or bullets, click the Numbered List button or Bulleted List button to unapply list
formatting to the selected text.
More Help topics
Bulleted and Numbered Lists video
Add paragraph and character styles
Creating a table of contents
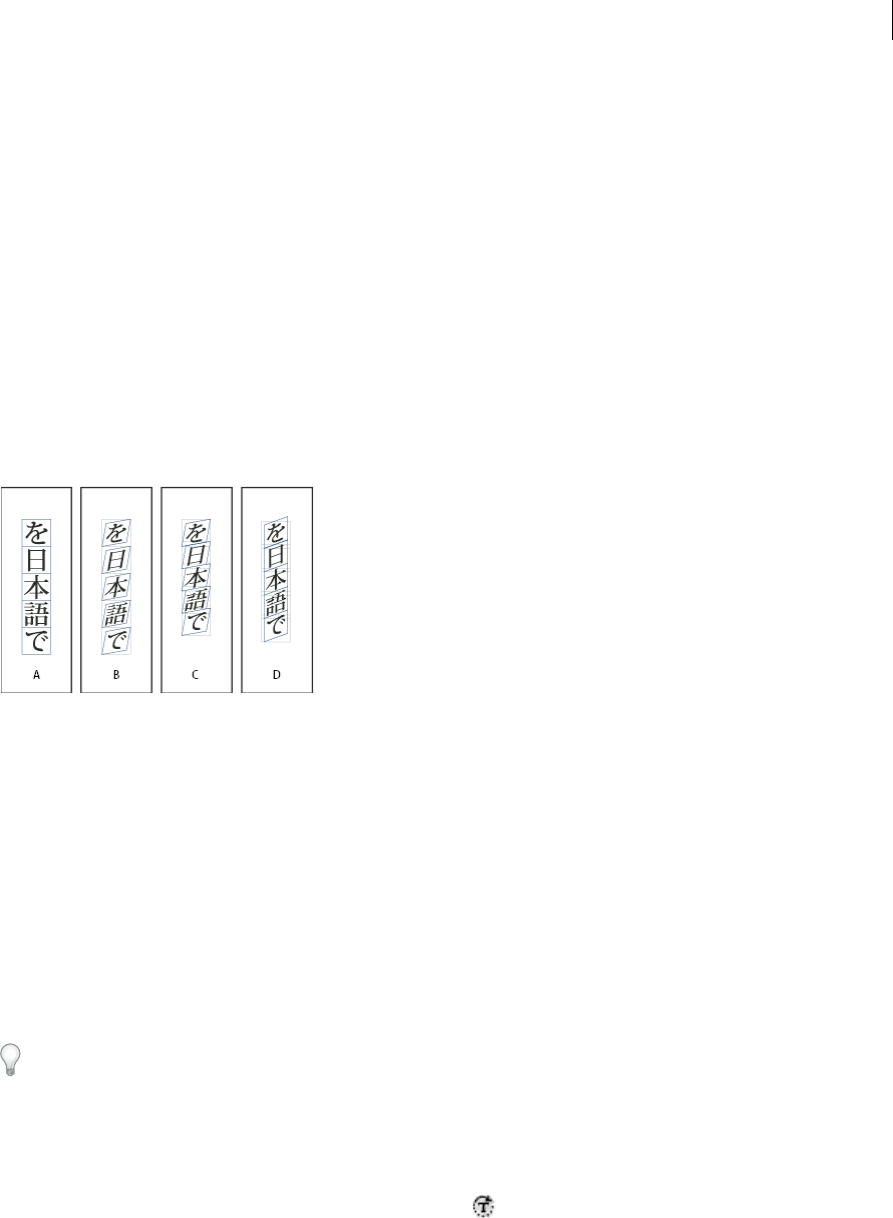
256
Typography
Last updated 6/13/2015
Captions
Convert style bullets and numbering to text
Formatting CJK characters
Apply shatai to text
In traditional typesetting technology, characters were slanted by using a lens to distort the glyphs when being set on
film. This oblique style is known as shatai. Shatai is distinct from a simple slant of the glyphs, because it also scales the
glyphs. You can adjust the magnification or angle of text you want to slant from the center point, without changing the
height of the glyph, using the shatai feature in InDesign.
A No scale applied B Magnification 30%, 45 shatai C Selecting the Adjust Tsume option D Selecting the Adjust Rotation option
1Select text.
2Select Shatai from the Character panel menu or Control panel menu.
3Specify the following options, and click OK:
•Specify the degree of skew in Magnification (In traditional typesetting technology terms, 10% magnification is
lens 1, and 40% magnification is lens 4).
•Set the angle of obliqueness to 30, 45, or 60, in Angle.
•Select Adjust Rotation to rotate the glyphs, and display horizontal lines horizontally for horizontal text, and
vertical lines vertically for vertical text.
•Select Adjust Tsume to apply jidori.
You can fine tune the rotated oblique effect for individual characters, after applying shatai to text.
Rotate characters
1Select the characters.
2In the Character panel, type a value for Character Rotation Specify a minus value to rotate the character to the
right (clockwise).
Adjust aki before and after characters
1Select opening parenthesis or closing parenthesis with the type tool.
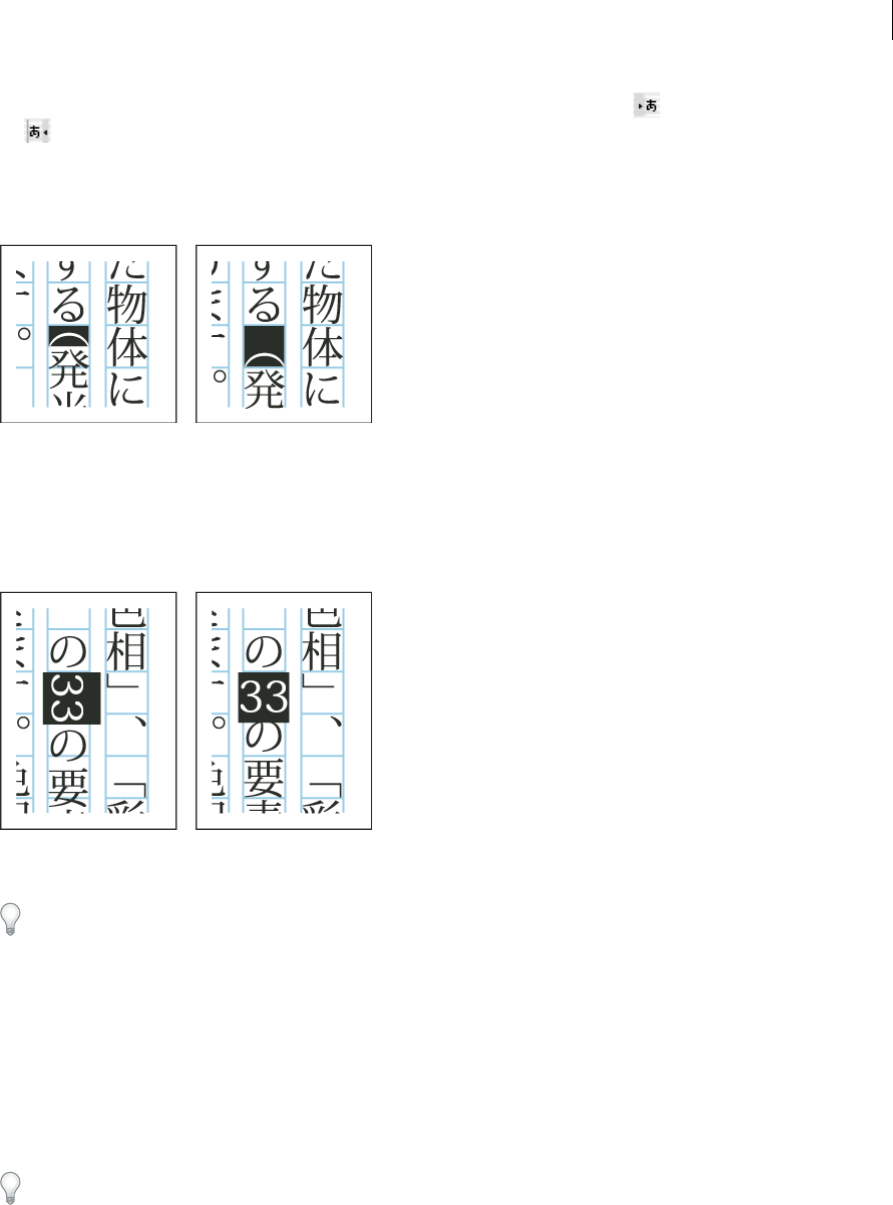
257
Typography
Last updated 6/13/2015
2Choose the amount of aki you want to add from the Mojikumi Before Character or Mojikumi After Character
pop-up menu, in the Character panel.
For example, if you specify 2bu, half a full-width space is added, and if you specify 4bu, a quarter of a full-width space
is added. This aki will not be adjusted when the line is set to full justification. Adjusting aki is especially useful to
override Mojikumi Akiryo Settings for certain characters.
Use tate-chu-yoko
Using tate-chu-yoko (also known as kumimoji or renmoji) is an option to make a part of the text horizontal, in vertical
text. It is easier to read half-width characters such as numbers, dates, and short foreign words in a vertical text frame,
by rotating the text.
You can move text left, right, up, and down when you turn on the Tate-chu-yoko option. You can also set Auto Tate-
chu-yoko for special half-width characters. Auto Tate-chu-yoko is set in the paragraph attributes.
Use tsume or tracking in the Character panel to adjust the character spacing for Tate-chu-yoko.
Apply tate-chu-yoko
1Select the text to which you want to apply tate-chu-yoko.
2Do one of the following:
•Choose Tate-chu-yoko from the Character panel menu or Control panel menu.
•Choose Tate-chu-yoko Settings from the Character panel menu or Control panel menu, choose Tate-chu-yoko
in the Tate-chu-yoko dialog box, and click OK.
If multiple instances of tate-chu-yoko appear next to each other, use the Non-joiner character to keep them separate.
Choose Type > Insert Special Character > Other > Non-joiner.
Remove tate-chu-yoko
1Select the text to which you want to apply tate-chu-yoko.

258
Typography
Last updated 6/13/2015
2Do one of the following:
•Choose and cancel Tate-chu-yoko from the Character panel menu or Control panel menu.
•Choose Tate-chu-yoko Settings from the Character panel menu, deselect Tate-chu-yoko in the Tate-chu-yoko
dialog box, and then click OK.
Change tate-chu-yoko settings
1Choose Tate-chu-yoko Settings from the Character panel menu.
2Specify a value for moving the text up or down in X Offset. If you specify a plus value, the text will move up, and if
you specify a minus value, it will move down.
3Specify a value for moving the text left or right in Y Offset. If you specify a plus value, the text will move to the right,
and if you specify a minus value, it will move to the left.
Set Auto Tate-chu-yoko for specific paragraphs
1Select the text to be set to Auto Tate-chu-yoko, or place the text insertion point in the paragraph.
2Choose Auto Tate-chu-yoko from the Paragraph panel menu.
3In KumiNumber, specify the number of successive half-width characters that you want to rotate to vertical
orientation. For example, if this is set to 2, the character string "123" will not rotate, while "12" will.
4If you want to apply tate-chu-yoko to roman text, select Include Roman Characters, and click OK.
Add Ruby to text
In Japanese, Ruby (also known as furigana) is normally used to show the kanji yomi in hiragana. In Simplified Chinese,
Ruby is called Pinyin, while in Traditional Chinese, Ruby is called Chuyin. InDesign provides full support to Japanese
Ruby and limited support to Chinese Pinyin or Chuyin. You can adjust Ruby settings to specify Ruby location, size, or
color. Furthermore, when the ruby is longer than the parent you can specify the ruby distribution. You can also apply
tate-chu-yoko to Ruby.
When the parent to which you want to attach ruby covers two lines, the ruby will follow when the parent moves to the
next line.
Note: In some instances, such as when applying a style that includes a variable, Ruby characters may be removed.
1Select the text to which you want to attach ruby. You cannot attach ruby when there are forced line breaks in the
selected text.
2Select Ruby > Ruby from the Character panel menu or Control panel menu.
3Enter the ruby characters in Ruby.
4Change Ruby settings by clicking an option on the left side of the dialog box and specifying settings.
5Click OK.

259
Typography
Last updated 6/13/2015
Ruby settings
The following options appear in the different panels of the Ruby dialog box.
Ruby Placement and Spacing
•From the Type menu, choose Per-Character or Group Ruby. When Per Character Ruby is selected, enter a half or
full width space when inputting Ruby characters to separate them in line with their parent characters. For
"hakunetsutou" for example, enter as "haku netsu tou" (example of a word composed of Japanese characters and its
phonetic spelling is given).
•From the Alignment menu, specify the position of the Ruby characters. You can check the position with the graphic
shown in the sample field.
•To attach ruby above horizontal text or to the right of vertical text, select Above/Right, and to attach below
horizontal text or to the left of vertical text, select Below/Left in Placement.
•Specify the spacing between the ruby and the parent in XOffset and YOffset. When you enter a minus value, the
ruby moves closer to the parent.
Ruby Font and Size
•Select a font family and font style in Font.
•Specify the size of the ruby characters in Size. The default ruby size is half the size of the parent.
•Specify the scale for the height and width of the ruby characters in Horizontal Scale and Vertical Scale.
•Select Use Open Type Pro Ruby Glyphs to use alternate glyphs for ruby (when possible). Specific kana characters
are available for some Open Type Pro fonts. When you select this option, the specific font for ruby characters, and
not the standard kana font, will be used.
•In KumiNumber, specify the number of successive half-width characters that you want to rotate to vertical
orientation. For example, if this is set to 2, the character string "123" will not rotate, while "12" will.
•Select Include Roman Characters to apply tate-chu-yoko to roman text.
•Select Scale to Fit to force the tate-chu-yoko to have the same dimensions (1 em x 1 em) in the ruby string, either
using an OpenType feature or scaling the glyphs.
Adjustment When Ruby Is Longer Than Parent
•With Overhang, when the total Ruby width is greater than that of their parent characters, the specified Ruby will
overflow widthways into the space above characters either side of the parents. For Japanese, character types
compatible with Overhang comply with the JISx4051-1995 specification.
•Specify the parent character spacing necessary for attaching ruby in Spacing. When you select a different option, the
graphics displayed in the sample field are updated.
•To automatically adjust the ruby character width, select Char Width Scaling, and specify the compression scale for
the width of the ruby characters.

260
Typography
Last updated 6/13/2015
•Select Auto Align at Line Edges to align the parent with the start and end of the line.
Ruby Color
•Select a color swatch in the list box.
•Specify the degree of tinting and line weight, as necessary.
•Select Overprint Fill or Overprint Stroke to set filling or stroke overprint for ruby characters.
(See Determining when to overprint manually .)
Apply kenten
Kenten (also known as Boten) are points which you attach to text you want to highlight. You can select the type of points
from existing kenten forms, or specify customized kenten characters. You can also specify the position, scale, and color
by adjusting the kenten settings.
Apply kenten
1Choose the characters you want to highlight.
2Choose a kenten character, such as Fisheye or White Circle, from Kenten in the Character panel menu or Control
panel menu.
Change kenten settings and color
1Choose Kenten > Kenten from the Character panel menu or Control panel menu.
2For Kenten Settings, specify the options below:
Kenten Type Select a kenten character, such as Fisheye or White Circ le. Choose Custom to specify a custom
character. You can enter characters directly, or you can specify a character code value for the specified character set.
Position Specify the spacing between the kenten and characters.
Location Select Above/Right to attach kenten above horizontal text or to the right of vertical text, and Below/Left
to attach below horizontal text or to the left of vertical text.
Size Specify the size of the kenten character.
Align Specify whether the kenten should be displayed in the center (Center) or to the left (Left) (above for vertical
text) of the character's embox.
H/Scale and V/Scale Specify the scale for the height and width of the kenten character.
3To change the color of the kenten, choose Kenten Color from the list box, and then specify the options below:
•Select a color swatch from the list box.
•Specify the degree of tinting and line weight, as necessary.
•Select Overprint Fill or Overprint Stroke to set filling or stroke overprint for kenten characters.
(See Determining when to overprint manually .)

261
Typography
Last updated 6/13/2015
4Click OK.
Align text of different sizes
You can specify how to align text to the largest characters in a line using the Character Alignment option, when
positioning characters of different sizes in 1 line. It is possible to align characters to the top, center or bottom of the
embox (right, center, and left for vertical frames), to the roman baseline, and to the top or bottom of the ICF box (right
or left for vertical frames). ICF (Ideographic Character Face) is the average height and width used by the font designer
to design the ideographic characters which comprise a font.
A Align different size letters above full space letters B Align different size letters in the middle of full space letters C Align different size letters
below full space letters
Note: The Character Alignment option is not effective, even if applied, when all characters are the same size in a line.
1Select a range of text or lines for the characters you want to align, or select a text frame using the selection tool.
2Choose one of the following options from Character Alignment in the Character panel menu or Control panel
menu.
•Roman Baseline aligns the small characters in a line to the large character baseline grid.
•Embox Top/Right, Center, or Embox Bottom/Left align the small characters in a line to the specified position of
the large characters embox. In vertical text frames, Embox Top/Right aligns the text to the right of the embox,
and Embox Bottom/Left aligns the paragraph to the left of the embox.
•ICF Top/Right and ICF Bottom/Left align the small characters in a line to the ICF specified by the large
characters. In vertical text frames, ICF Top/Right aligns the text to the right of the ICF, and ICF Bottom/Left to
the left of the ICF.
More Help topics
Change the text direction
Align paragraphs to a baseline grid
Using fonts
About fonts
A font is a complete set of characters—letters, numbers, and symbols—that share a common weight, width, and style,
such as 10-pt Adobe Garamond Bold.

262
Typography
Last updated 6/13/2015
Typefaces (often called type families or font families) are collections of fonts that share an overall appearance, and are
designed to be used together, such as Adobe Garamond.
A type style is a variant version of an individual font in a font family. Typically, the Roman or Plain (the actual name
varies from family to family) member of a font family is the base font, which may include type styles such as regular,
bold, semibold, italic, and bold italic.
For CJK-language fonts, the font style name is often determined by the variation in thickness (also called weight). For
example, the Japanese font Kozuka-Mincho Std includes six weights: Extra Light, Light, Regular, Medium, Bold and
Heavy. The font style name which is displayed depends on the font manufacturer. Each font style is a stand-alone file.
If the font style file has not been installed, that font style cannot be selected from Font Style.
Installing fonts
When you install InCopy or Adobe Creative Suite, fonts are automatically installed in the system fonts folder.
•Windows: On Windows the fonts are located in the “\Windows\Fonts” folder. For example, c:\Windows\Fonts\
•Mac OS: On Mac, the fonts are located in the “/Library/Fonts”
For information on installing and activating fonts to be used in all applications, see your system documentation or your
font manager documentation.
You can make fonts available in InCopy by copying the font files into the Fonts folder inside the InDesign application
folder on your hard drive. However, fonts in this Fonts folder are available only to InCopy .
If two or more fonts are active in InCopy and use the same family name but have different Adobe PostScript names, the
fonts are available in InCopy . Duplicate fonts are listed in the menus with their font technologies abbreviated in
parentheses. For example, a Helvetica TrueType font appears as “Helvetica (TT),” a Helvetica PostScript Type 1 font
appears as “Helvetica (T1),” and a Helvetica OpenType font appears as “Helvetica (OTF).” If two fonts have the same
PostScript name and one includes .dfont in its name, the other font is used.
Apply a font to text
When you specify a font, you can select the font family and its type style independently. When you change from one
font family to another, InCopy attempts to match the current style with the style available in the new font family. For
example, Arial Bold would change to Times Bold when you change from Arial to Times.
When you apply a bold or italic style to type, InCopy applies the typeface style specified by the font. In most cases, the
specific version of bold or italic is applied as expected. However, some fonts may apply a bold or italic variation that
isn’t exactly labeled bold or italic, respectively. For example, some font designers specify that when you apply bold to a
font, the semibold variation is applied.
When applying a Roman font to text containing both CJK and Roman characters, a message is displayed to indicate
that this operation will only apply to and override Roman text. By selecting text containing both CJK and Roman
characters, and pressing Ctrl+Alt (Windows) or Command+Option (Mac OS) while selecting and overriding the
Roman font you will apply Roman font to CJK characters, and garbled characters will be displayed.
Furthermore, when you apply a CJK font to text that includes Japanese and Roman characters, the CJK font is applied
to the entire text, including the Roman text (CJK fonts without Roman characters will not be applied).
In the Font List displayed in the Character panel and by selecting Type > Font, CJK fonts are displayed before Roman
fonts. In addition, when composite fonts have been created and specified, they are displayed above the CJK fonts.
1Select the text you want to change.

263
Typography
Last updated 6/13/2015
2Do any of the following:
•In the Character panel or Control panel, select a font in the Font Family menu or a style in the Type Style menu.
(In Mac OS, you can select type styles in the Font Family submenus.)
•In the Character panel or Control panel, click in front of the font family name or type style name (or double-click
its first word) and type in the first few characters of the name you want. As you type, InCopy displays font family
or type style names that match the characters you’ve typed.
•Choose a font in the Type > Font menu. Note that you choose both a font family and a type style when you use
this menu.
Specify a typeface size
By default, typeface size is measured in points (a point equals 1/72 of an inch). You can specify any typeface size from
0.1 to 1296 points, in 0.001-point increments.
Note: In Fireworks, the typeface size is measured in pixels by default.
1Select the characters or type objects you want to change. If you don’t select any text, the typeface size applies to new
text you create.
2Do one of the following:
•In the Character panel or Control bar set the Font Size option.
•Choose a size from the Type > Size menu. Choosing Other lets you type a new size in the Character panel.
You can change the unit of measurement for type in the Preferences dialog box. This option is not available in
Fireworks.
Previewing fonts
You can view samples of a font in the font family and font style menus in the Character panel and other areas in the
application from where you can choose fonts. The following icons are used to indicate different kinds of fonts:
•OpenType
•Type 1
•TrueType
•Multiple Master
•Composite
You can turn off the preview feature or change the point size of the font names or font samples in Type preferences.
OpenType fonts
OpenType fonts use a single font file for both Windows® and Macintosh® computers, so you can move files from one
platform to another without worrying about font substitution and other problems that cause text to reflow. They may
include a number of features, such as swashes and discretionary ligatures, that aren’t available in current PostScript and
TrueType fonts.
OpenType fonts display the icon.
When working with an OpenType font, you can automatically substitute alternate glyphs, such as ligatures, small
capitals, fractions, and old style proportional figures, in your text.

264
Typography
Last updated 6/13/2015
A Ordinals B Discretionary ligatures C Swashes
OpenType fonts may include an expanded character set and layout features to provide richer linguistic support and
advanced typographic control. OpenType fonts from Adobe that include support for central European (CE) languages
include the word “Pro,” as part of the font name in application font menus. OpenType fonts that don’t contain central
European language support are labeled “Standard,” and have an “Std” suffix. All OpenType fonts can also be installed
and used alongside PostScript Type 1 and TrueType fonts.
For more information on OpenType fonts, see www.adobe.com/go/opentype.
Installing OpenType fonts
InCopy includes fonts from various OpenType families, including Adobe Garamond Pro, Adobe Caslon Pro, Trajan
Pro, Caflisch Script Pro, Myriad Pro, Lithos, and Adobe Jenson Pro.
In addition to Roman Open Type fonts such as Adobe Garamond Pro, Adobe Caslon Pro, Trajan Pro, Caflisch Script
Pro, Myriad Pro, Lithos, and Adobe Jenson Pro, InCopy comes with Japanese Open Type fonts including Kozuka
Mincho Pro and Kozuka Gothic Pro.
OpenType fonts are installed automatically when you install InCopy or Adobe Creative Suite 4. Additional OpenType
fonts are located in the Adobe Fonts folder in the Goodies folder on the application DVD. For information on installing
and using OpenType fonts, browse the application DVD or see the Adobe website.
Apply OpenType font attributes
Use the Character panel or Control panel to apply OpenType font attributes, such as fractions and swashes to text.
For more information on OpenType fonts, see www.adobe.com/go/opentype.
Apply OpenType font attributes
1Select text.
2In the Character panel or Control panel, make sure that an OpenType font is selected.
3Choose OpenType from the Character panel menu, and then select an OpenType attribute, such as Discretionary
Ligatures or Fractions.
Features not supported in the current font appear in square brackets, such as [Swash].
You can also select OpenType font attributes when defining a paragraph or character style. Use the OpenType Features
section of the Style Options dialog box.
OpenType font attributes
When you use an OpenType font, you can select specific OpenType features from the Control panel or Character panel
menu when formatting text or when defining styles.

265
Typography
Last updated 6/13/2015
Note: OpenType fonts vary greatly in the number of type styles and kinds of features they offer. If an OpenType feature is
unavailable, it’s surrounded in square brackets (such as [Swash]) in the Control panel menu.
Discretionary Ligatures Font designers may include optional ligatures that shouldn’t be turned on in all circumstances.
Selecting this option allows these additional optional ligatures to be used, if they are present. For more information on
ligatures, see Apply ligatures to letter pairs.
Many compound character glyphs for Japanese katakana words, such as “me-toru” and for Kanji compounds, such as
“yuugenkaisha,” can be accessed using the discretionary ligature feature.
Fractions Numbers separated by a slash (such as 1/2) are converted to a fraction character, when fractions are available.
Ordinal Ordinal numbers such as 1st and 2nd are formatted with superscript letters (1st and 2nd) when ordinals are
available. Letters such as the superscript a and o in the Spanish words segunda (2a) and segundo (2o) are also typeset
properly.
Swash When available, regular and contextual swashes, which may include alternate caps and end-of-word
alternatives, are provided.
Titling Alternatives When available, characters used for uppercase titles are activated. In some fonts, selecting this
option for text formatted in both uppercase and lowercase letters can yield undesired effects.
Contextual Alternatives When available, contextual ligatures and connecting alternates are activated. Alternate
characters are included in some script typefaces to provide better joining behavior. For example, the letter pair “bl” in
the word “bloom” can be joined so that it looks more like handwriting. This option is selected by default.
All Small Caps For fonts that include real small caps, selecting this option turns characters into small caps. For more
information, see Change the case of type.
Slashed Zero Selecting this options displays the number 0 with a diagonal slash through it. In some fonts (especially
condensed fonts), it can be difficult to distinguish between the number 0 and the capital letter O.
Stylistic Sets Some OpenType fonts include alternate glyph sets designed for esthetic effect. A stylistic set is a group of
glyph alternates that can be applied one character at a time or to a range of text. If you select a different stylistic set, the
glyphs defined in the set are used instead of the font’s default glyphs. If a glyph character in a stylistic set is used in
conjunction with another OpenType setting, the glyph from the individual setting overrides the character set glyph.
You can see the glyphs for each set using the Glyphs panel.
Positional Forms In some cursive scripts and in languages such as Arabic, what a character looks like can depend on
its position inside a word. The character may change form when it appears at the start (initial position), middle (medial
position), or end (final position) of a word, and it may change form as well when it appears alone (isolated position).
Select a character and choose a Positional Forms option to format it correctly. The General Form option inserts the
common character; the Automatic Form option inserts a form of the character according to where the character is
located in the word and whether the character appears in isolation.
Superscript/Superior & Subscript/Inferior Some OpenType fonts include raised or lowered glyphs that are sized
correctly relative to the surrounding characters. If an OpenType font doesn’t include these glyphs for non-standard
fractions, consider using the Numerator and Denominator attributes.
Numerator & Denominator Some OpenType fonts convert only basic fractions (such as 1/2 or 1/4) to fraction glyphs,
not non-standard fractions (such as 4/13 or 99/100). Apply Numerator and Denominator attributes to these non-
standard fractions in such cases.
Tabular Lining Same widths are provided for full-height figures. This option is appropriate in situations where
numbers need to line up from one line to the next, as in tables.
Proportional Oldstyle Varying-height figures with varying widths are provided. This option is recommended for a
classic, sophisticated look in text that doesn’t use all caps.

266
Typography
Last updated 6/13/2015
Proportional Lining Full-height figures with varying widths are provided. This option is recommended for text that
uses all caps.
Tabular Oldstyle Varying-height figures with fixed, equal widths are provided. This option is recommended when you
want the classic appearance of old-style figures, but you need them to align in columns, as in an annual report.
Default Figure Style Figure glyphs use the default figure style of the current font.
Use Proportional Metrics Characters are composed using the proportional metrics of the font.
Use H or V Kana For fonts that include Kana for vertical or horizontal writing, Kana glyphs most appropriate for
horizontal or vertical settings are provided.
Roman Italics If the font contains italic glyphs, the proportional Roman glyph switches to italic type.
Apply OpenType glyph forms
The Glyphs panel includes a number of options, such as Expert Forms or JIS 90 Forms, that you can apply to selected
text.
1Choose Type > Glyphs to open the Glyphs panel.
2Select the character or characters to which you’d like to apply glyph forms.
3Choose an option such as Expert Forms or JIS 90 from the Glyphs panel menu.
For more information on OpenType fonts, see www.adobe.com/go/opentype.
Composite fonts
In InDesign, you can mix parts of different fonts and use them as a composite font in InDesign or Adobe InCopy®.
Normally this technique is used to mix parts of a roman font and a CJK font. Composite fonts that you’ve created in
InDesign are displayed at the beginning of the font list in InCopy. You can apply these fonts to text, but you cannot
create or edit composite fonts in InCopy. For details, see InDesign Help.
Use composite fonts
You can mix parts of different fonts and use them as a composite font. Normally this technique is used to mix parts of
a Roman font and a CJK font. You can also add characters to a font. Composite fonts are displayed at the beginning of
the font list.
A Character categories B Input menu for each category change C Scale at the center of the character
Create composite fonts
1Choose Type > Composite Font.

267
Typography
Last updated 6/13/2015
2Click New, enter the name, specify the composite font on which the new composite font will be based, and then click
OK.
3Select a category (roman or other), and specify the font attributes under the list box.
You can specify font attributes by clicking Show Sample to display the sample edit window, and clicking the button
on the right to choose Show or Hide for the colored lines that indicate the ICF box, embox, baseline and so on.
Furthermore, from the Horizontal Text and Vertical Text options, you can switch the text direction of the sample
text and display it horizontally or vertically.
4Click Save to save the settings for the composite font created, and then click OK.
Composite font categories
Fonts are classified in the following categories:
Kanji (or Hangul) Kanji characters are used in Japanese and Chinese. Hangul characters are used in Korean. You cannot
edit the size, baseline, vertical scale, or horizontal scale for kanji or hangul.
Kana Specifies fonts used for hiragana and katakana. When you are making composite fonts using a language other
than Japanese, use the same font for Kana as you use in your base font.
Punctuation Specifies the font used for punctuation. You cannot edit the size, vertical scale, or horizontal scale for
punctuation.
Full Width Symbols Specifies the font used for symbols. You cannot edit the size, vertical scale, or horizontal scale for
symbols.
Roman Specifies the font used for half-width roman characters. This is normally a roman font.
Numbers Specifies the font used for half-width numbers. This is normally a roman font.
The font attributes that can be set for composite fonts are as follows:
Units Select the units for font attribute settings.
Size Set the size in relation to the font size used for input. The size may differ for different fonts, even when the same
font size is used. You can adjust the size, depending on the fonts used in the composite font.
Baseline Set a baseline for each font.
Vertical scale and horizontal scale Scale the font vertically and horizontally. You can only use these settings for kana,
half-width roman characters, and numbers.
Enlarge/Shrink from Center of Character Set whether to scale from the center of the character or the roman baseline,
when editing vertical and horizontal scales for kana. If you select this option, the characters will be scaled from the
center.
Make custom font settings in a composite font
You can set the font in character units by setting Custom for composite fonts.
1Click Custom in the Composite Font Editor dialog box.
2Do one of the following:
•If there is an existing character set, select it.
•Click the New button, enter a name for the character set, choose Custom Set From Based On, and click OK. The
following base sets are provided: Hiragana, Katakana, Punctuation, Symbols, Double Byte Numbers, Single Byte
Numbers, Single-Byte Gaiji 0-11. Using these, you can easily create character sets to meet your requirements. If
Based On is not needed, choose None and click OK.

268
Typography
Last updated 6/13/2015
If you have selected a base set, the characters stored in the selected set will be shown in the Custom Set Edit dialog
box. If None is selected, no characters will be displayed.
3Use Font to specify the font to use with the Custom Set. If Single Byte Gaiji is specified as the base set, choose the
single byte Gaiji you would like to use.
4To add a glyph directly, choose Direct Entry from the pop-up menu, enter the characters in the text box, and click
Add. You can also copy and paste characters directly into the dialog box from the IME panel.
5To enter a code, specify the encoding type (such as Shift-JIS for Japanese) from the pop-up menu, enter the code or
hyphenated code range (such as 8169-8174 for Japanese), and click Add.
6Select characters you want to delete. The Add button becomes a Delete button; the selected characters will be deleted
when you click Delete.
7If multiple custom sets have been created, choose the edited character set from the Custom Set pop-up menu. You
can delete sets that are no longer needed by clicking Delete on the right side of the dialog box.
8When you have completed editing, click Save to save the character and then click OK.
9The custom set that was set in the Composite Font Edit dialog box will be displayed, allowing you to set the
composite font.
Note: When there are several custom characters in 1 composite font, the bottom set takes precedence over all the above sets.
MM (multiple master) fonts are not displayed in the Composite Font Edit dialog box.
Import composite fonts
1Click Import in the Composite Font Editor dialog box.
2Double-click the InDesign document containing the composite fonts you want to import.
Delete a composite font
1Select the composite font you want to delete in the Composite Font Editor dialog box.
2Click Delete Font, and then click Yes.
Use missing glyph protection
By default, InCopy protects you from typing characters that the current font does not support or from applying a font
to a selection of text when that font does not contain one or more of the glyphs selected. However, you can turn off
preference settings to remove this protection.
1Choose Edit > Preferences > Advanced Type (Windows) or InCopy > Preferences > Advanced Type (Mac OS).
2Do any of the following and then click OK.
Protect While Typing Select this option so that you cannot type glyphs that the current font does not support.
Protect When Applying Fonts Select this option to avoid introducing unsupported glyphs when a different font,
such as a Roman font, is applied to Asian-language text.
Work with missing fonts
When you open or place documents that include fonts not installed on your system, an alert message appears,
indicating which fonts are missing. If you select text that uses a missing font, the Character panel or Control panel
indicates that this font is missing by displaying it in brackets in the font style pop-up menu.

269
Typography
Last updated 6/13/2015
InCopy substitutes missing fonts with an available font. When this happens, you can select the text and apply any other
available font. Missing fonts for which others have been substituted will appear at the top of the Type > Font menu in
a section marked “Missing Fonts.” By default, text formatted with missing fonts appears in pink highlighting.
If a TrueType font is installed and the document contains a Type 1 (T1) version of the same font, the font is displayed
as missing.
You can choose Type > Find Font to find and change missing fonts. If a missing font is part of a style, you can update
the font in that style by changing its style definition.
Make missing fonts available
❖Do any of the following:
•Install the missing fonts on your system.
•Place the missing fonts in the Fonts folder, which is located in the InCopy application folder. Fonts in this folder
are available only to InCopy . See Installing fonts.
•Activate the missing fonts using a font-management application.
If you don’t have access to the missing fonts, use the Find Font command to search for and replace missing fonts.
Highlight substituted fonts in your document
If the Select Substituted Fonts preferences option is selected, text formatted with missing fonts appears in pink
highlighting so that you can easily identify text formatted with a missing font.
1Choose Edit > Preferences > Composition (Windows®) or InCopy > Preferences > Composition (Mac OS®).
2Select Substituted Fonts, and then click OK.
Document installed fonts
Fonts in a Document Fonts folder that is in the same location as an InCopy document are temporarily installed when
the document is opened. The Package command can generate a Document Fonts folder when you want to share your
document or move it to a different computer.
Fonts in the Document Fonts folder are not the same as fonts available from the standard operating system font
locations. They are installed when the document is opened and supersede any font of the same PostScript name.
However, they supersede only fonts within the document. Fonts installed by one document are not available to other
documents. When you close the document, the fonts that were installed for the document are uninstalled. Document
installed fonts are listed in a submenu of the Font menu.
Some Type1 fonts are not available in the document. In addition, Mac OS fonts are not available when running
InDesign in Windows.
For a video on using document installed fonts, see http://tv.adobe.com/go/4955/.
Multiple master fonts
Multiple master fonts are customizable Type 1 fonts whose typeface characteristics are described in terms of variable
design axes, such as weight, width, style, and optical size.

270
Typography
Last updated 6/13/2015
Some multiple master fonts include an optical size axis, which lets you use a font specifically designed for optimal
readability at a particular size. Generally, the optical size for a smaller font, such as 10 point, is designed with heavier
serifs and stems, wider characters, less contrast between thick and thin lines, taller x height, and looser spacing between
letters than the optical size for a larger font, such as 72 point.
1Choose Edit > Preferences > Type (Windows) or InCopy > Preferences > Type (Mac OS).
2Select Automatically Use Correct Optical Size, and click OK.
More Help topics
Insert glyphs and special characters
Find and change fonts
Package files
Text composition
Compose text
The appearance of text on your page depends on a complex interaction of processes called composition. Using the word
spacing, letterspacing, glyph scaling, and hyphenation options you’ve selected, InCopy composes your type in a way
that best supports the specified parameters.
InCopy offers two composition methods: Adobe Paragraph Composer (the default) and Adobe Single-line Composer
(both are available from the Control panel menu). You can select which composer to use from the Paragraph panel
menu, the Justification dialog box, or the Control panel menu.
InCopy supports four methods developed for typesetting, including Adobe Japanese Single-line Composer, Adobe
Japanese Paragraph Composer, Adobe Paragraph Composer, and Adobe Single-line Composer. Each Composer
evaluates possible breaks for Japanese and Roman text, and chooses those which best support the hyphenation and
justification options specified for a given paragraph. The Adobe Japanese Paragraph Composer is selected by the
default. For details on these options, see InCopy Help.
For a video tutorial on working with text, see www.adobe.com/go/vid0075.
InDesign Magazine provides an article about fixing composition problems at Mind the Gaps.
Composition methods
InCopy offers two composition methods: Adobe Paragraph Composer (the default) and Adobe Single-line Composer.
Both composition methods evaluate possible breaks, and choose those that best support the hyphenation and
justification options you’ve specified for a given paragraph.
The Adobe Paragraph Composer
Considers a network of breakpoints for an entire paragraph, and thus can optimize earlier lines in the paragraph in
order to eliminate especially unattractive breaks later on. Paragraph composition results in more even spacing with
fewer hyphens.
The Paragraph Composer approaches composition by identifying possible breakpoints, evaluating them, and assigning
a weighted penalty to them based on such principles as evenness of letterspacing, word spacing, and hyphenation.

271
Typography
Last updated 6/13/2015
You can use the Hyphenation dialog box to determine the relationship between better spacing and fewer hyphens. (See
Hyphenate text.)
The Adobe Single-line Composer
Offers a traditional approach to composing text one line at a time. This option is useful if you want to restrict
composition changes from late-stage edits.
Choose a composition method for a paragraph
❖Do any of the following:
•From the Paragraph panel menu, choose Adobe Paragraph Composer (the default) or Adobe Single-line
Composer.
•From the Paragraph panel menu or the Control panel menu, choose Justification, and then choose an option
from the Composer menu.
Note: Additional composition engine plug-ins from other companies may be available, along with interfaces that let you
customize an engine’s parameters.
Set composition preferences
1Choose Edit > Preferences > Composition (Windows) or InCopy > Preferences > Composition (Mac OS).
2To use on-screen highlighting to identify compositional problems, select Keep Violations And H&J Violations
(hyphenation and justification).
3To justify text that wraps around an object, selec t Justify Text Next To An Object.
4Under Mojikumi Compatibility Modes, determine whether you want to select Use New Vertical Scaling or Use CID-
Based Mojikumi.
5Click OK.
Hyphenate text
The settings you choose for hyphenation and justification affect the horizontal spacing of lines and the aesthetic appeal
of type on your pages. Hyphenation options determine whether words can be hyphenated and, if they can, which breaks
are allowable.
Justification is controlled by the alignment option you choose, the word spacing and letterspacing you specify, and
whether or not you have used glyph scaling. You can also justify single words in narrow columns of fully justified text.
Eda Warren provides an article about avoiding composition problems at Mind the Gaps.
Adjust hyphenation manually
You can hyphenate words manually or automatically, or you can use a combination of the two methods. The safest way
to hyphenate manually is to insert a discretionary hyphen, which is not visible unless the word needs to be broken at the
end of a line. Placing a discretionary hyphen at the beginning of a word prevents it from being broken.
1Using the Type tool , click where you want to insert the hyphen.
2Do one of the following:
•Choose Type > Insert Special Character > Hyphens And Dashes > Discretionary Hyphen.
•Press Ctrl+Shift+- (Windows) or Command+Shift+- (Mac OS) to insert a discretionary hyphen.

272
Typography
Last updated 6/13/2015
Note: Entering a discretionary hyphen in a word does not guarantee that the word will be hyphenated. Whether or not the
word breaks depends on other hyphenation and composition settings. However, entering a discretionary hyphen in a word
does guarantee that the word can be broken only where the discretionary hyphen appears.
Adjust hyphenation automatically
Hyphenation is based on word lists that can be stored either in a separate user dictionary file on your computer, or in
the document itself. To ensure consistent hyphenation, you may want to specify which word list to refer to, especially
if you will be taking your document to a service provider or if you work in a workgroup.
❖To turn automatic hyphenation on or off for a paragraph, in the Paragraph panel or Control panel, select or deselect
the Hyphenation option. (You can also include this option in a paragraph style.)
When you set automatic hyphenation options, you can determine the relationship between better spacing and fewer
hyphens. You can also prevent capitalized words and the last word in a paragraph from being hyphenated.
Set automatic hyphenation options for a paragraph
1Click in a paragraph or select the range of paragraphs you want to affect.
2Choose Hyphenation from the Paragraph panel menu.
3Select the Hyphenate option.
4Make changes to the following settings as needed, and then click OK:
Words With At Least _ Letters Specify the minimum number of characters for hyphenated words.
After First _ Letters / Before Last _ Letters Specify the minimum number of characters at the beginning or end of a
word that can be broken by a hyphen. For example, by specifying 3 for these values, aromatic would be hyphenated
as aro- matic instead of ar- omatic or aromat- ic.
Hyphen Limit _ Hyphens Specify the maximum number of hyphens that can appear on consecutive lines. Zero
means unlimited hyphens.
Hyphenation Zone Specify the amount of white space allowed at the end of a line of unjustified text before
hyphenation begins. This option applies only when you’re using the Single-line Composer with nonjustified text.
Better Spacing / Fewer Hyphens To alter the balance between these settings, adjust the slider at the bottom of the
dialog box.
Hyphenate Capitalized Words To prevent capitalized words from being hyphenated, deselect this option.
Hyphenate Last Word To prevent last words in paragraphs from being hyphenated, deselect this option.
Hyphenate Across Column To prevent words from being hyphenated across a column, frame, or page, deselect this
option.
Prevent unwanted word breaks
By using nonbreaking hyphens, you can prevent certain words from breaking at all—for example, proper names or
words which, when broken, become unattractive fragments. By using nonbreaking spaces, you can also keep multiple
words from breaking—for example, clusters of initials and a last name (P. T. Barnum).
Prevent text from breaking
1Select the text you want to keep on the same line.
2Choose No Break from the Character panel menu or the Control panel menu.

273
Typography
Last updated 6/13/2015
Another way to prevent a word from breaking is to place a discretionary hyphen at the beginning of the word. Press
Ctrl+Shift+- (Windows) or Command+Shift+- (Mac OS) to insert a discretionary hyphen.
Create a nonbreaking hyphen
1Using the Type tool , click where you want to insert the hyphen.
2Choose Type > Insert Special Character > Hyphens And Dashes > Nonbreaking Hyphen.
Create a nonbreaking space
1Using the Type tool , click where you want to insert the space.
2Choose Type > Insert White Space> Nonbreaking Space (or any other white space character).
The Nonbreaking Space varies in width depending on point size, the justification setting, and word space settings,
whereas the Nonbreaking Space (Fixed Width) character maintains the same width regardless of context.
Change Justification settings
Use the Justification panel to precisely control how word spacing, letterspacing, and glyph scaling. Adjusting spacing is
especially useful with justified type, although you can also adjust spacing for unjustified type.
Word spacing, character spacing, and glyph scalings for justification settings, are ignored for CJK text. To set CJK text
character spacing, use the Mojikumi dialog box.
Adjust word and letterspacing in justified text
1Insert the cursor in the paragraph you want to change, or select a type object or frame to change all of its paragraphs.
2Choose Justification from the Paragraph panel menu.
3Enter values for Word Spacing, Letter Spacing, and Glyph Spacing. The Minimum and Maximum values define a
range of acceptable spacing for justified paragraphs only. The Desired value defines the desired spacing for both
justified and unjustified paragraphs:
Word Spacing The space between words that results from pressing the spacebar. Word Spacing values can range
from 0% to 1000%; at 100%, no additional space is added between words.
Letter Spacing The distance between letters, including kerning or tracking values. Letter Spacing values can range
from -100% to 500%: at 0%, no space is added between letters; at 100%, an entire space width is added between
letters.
Glyph Scaling The width of characters (a glyph is any font character). Glyph Scaling values can range from 50% to
200%.
Spacing options are always applied to an entire paragraph. To adjust the spacing in a few characters, but not an
entire paragraph, use the Tracking option.
4Set the Single Word Justification option to specify how you want to justify single-word paragraphs.
In narrow columns, a single word can occasionally appear by itself on a line. If the paragraph is set to full
justification, a single word on a line may appear to be too stretched out. Instead of leaving such words fully justified,
you can center them or align them to the left or right margins.
Set glyph scaling in justified text
1Click an insertion point in a paragraph or select the paragraphs you want to affect.
2Choose Justification from the Paragraph panel menu.
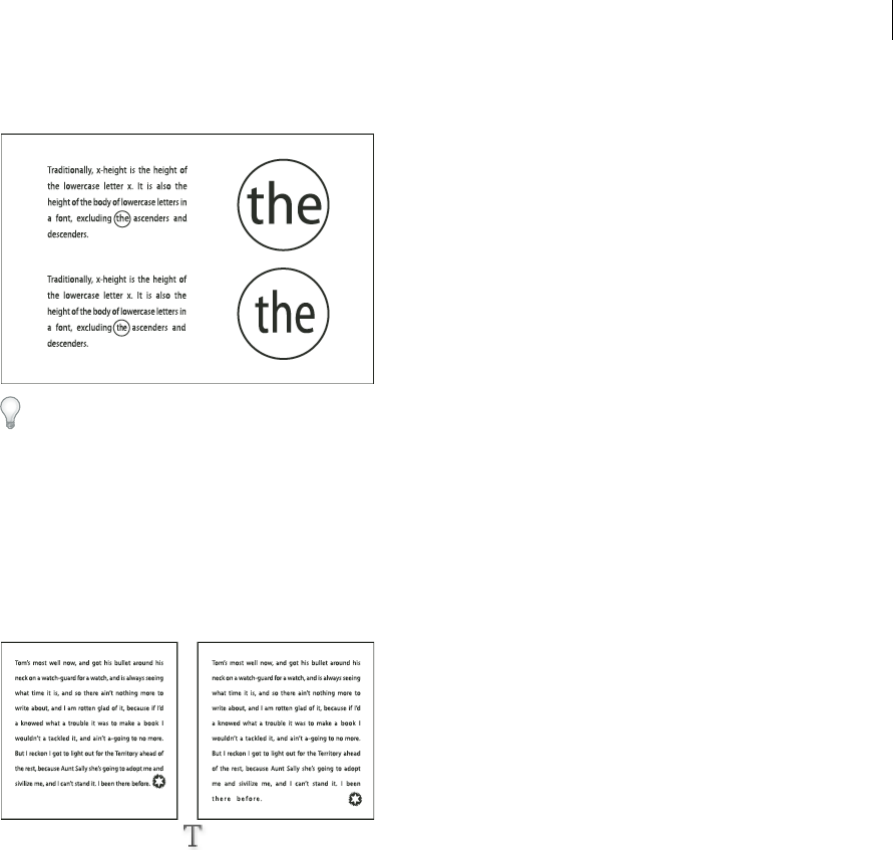
274
Typography
Last updated 6/13/2015
3Type values for Glyph Scaling Minimum, Desired, and Maximum. Then click OK.
Glyph scaling can help in achieving even justification; however, values more than 3% from the 100% default value may
result in distorted letter shapes. Unless you’re striving for a special effect, it’s best to keep glyph scaling to subtle values,
such as 97–100–103.
Use a flush space with justified text
Using a flush space character adds a variable amount of space to the last line of a fully justified paragraph—between the
last word and an end-of-story character from a decorative font. Used with nonjustified text, the flush space appears as
a normal word space. In justified text, it expands to absorb all available extra space on the last line. Using a flush space
can make a dramatic difference in the way the entire paragraph is formatted by the Adobe Paragraph Composer.
1Using the Type tool , click directly in front of the end-of-story character.
2Choose Type > Insert White Space > Flush Space.
Note: The effect of a flush space isn’t apparent until you apply the Justify All Lines option to the paragraph.
Highlight lines that are too loose or tight
Because composing a line of type involves factors in addition to word spacing and letterspacing (hyphenation
preferences, for example), InDesign cannot always honor your settings for word spacing and letterspacing. However,
compositional problems in lines of text can be highlighted in yellow; the darkest of three shades indicates the most
serious problems.
1Choose Edit > Preferences > Composition (Windows) or InCopy > Preferences > Composition (Mac OS).
2Select H&J Violations and click OK.
More Help topics
Working with Text video
Justify text next to wrap objects
Change CJK composition preferences
Hyphenation and spelling dictionaries
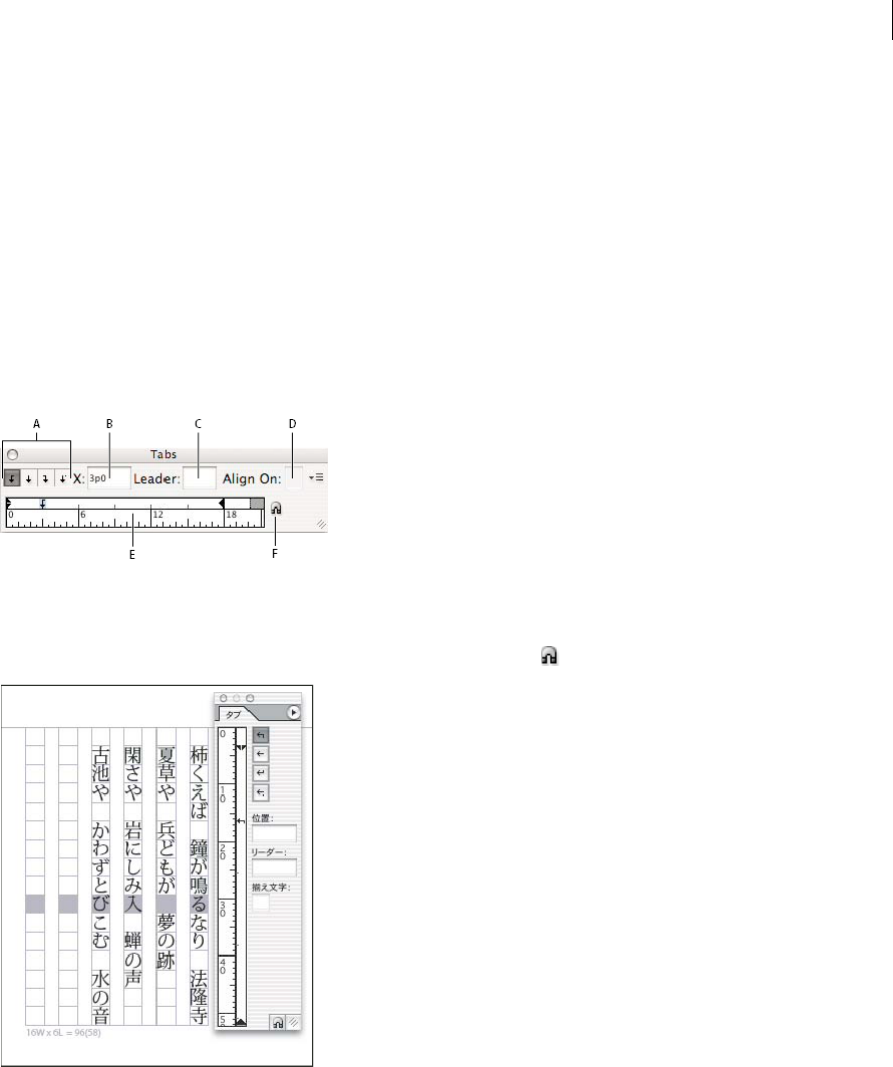
275
Typography
Last updated 6/13/2015
Tabs and indents
Tabs dialog box overview
Tabs position text at specific horizontal locations in a frame. The default tab settings depend on the Horizontal ruler
units setting in the Units & Increments preferences dialog box.
Tabs apply to an entire paragraph. The first tab you set deletes all default tab stops to its left. Subsequent tabs delete all
default tabs between the tabs you set. You can set left, center, right, and decimal or special-character tabs.
You set tabs using the Tabs dialog box.
A Tab alignment buttons B Tab position C Tab Leader box D Align On box E Tab ruler F Snap above frame
When you do this in a vertical text frame, the Tabs dialog box also becomes vertical. When the Tabs dialog box direction
is not consistent with the text frame direction, click on the magnet icon to snap the rulers to the current text frame.
Open the Tabs dialog box
1Using the Type tool, click in the text frame.
2Choose Type > Tabs.
If the top of the frame is visible, the Tabs dialog box snaps to the current text frame and matches its width to the current
column.
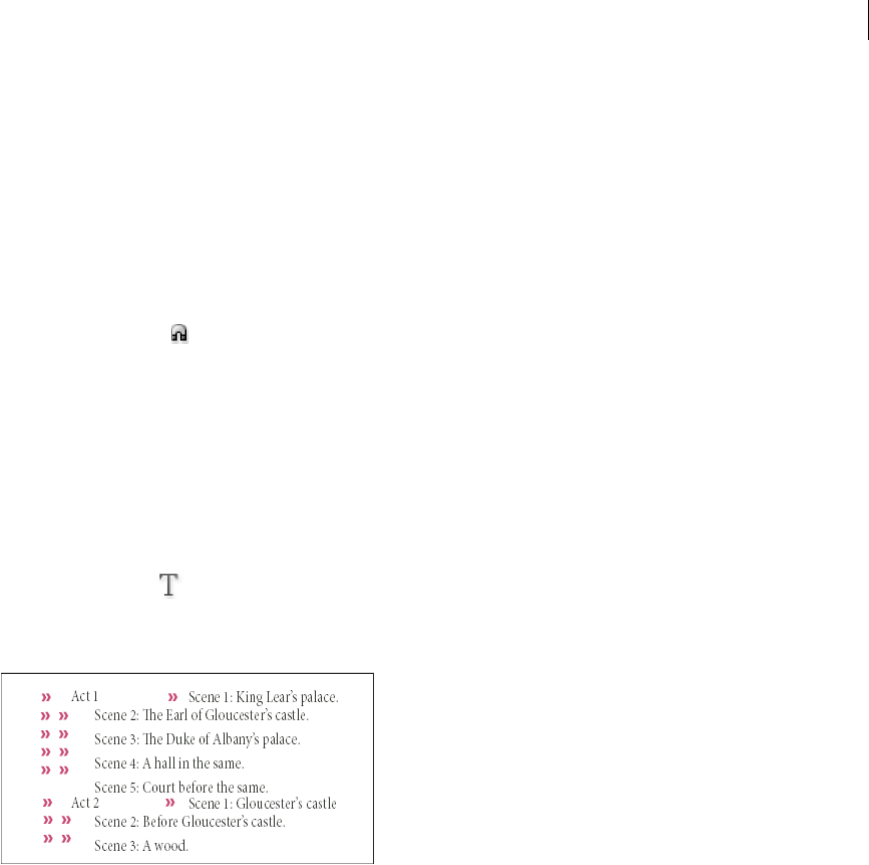
276
Typography
Last updated 6/13/2015
When the top of a horizontal frame is displayed, the Tabs dialog box will snap to the top of the current text frame, and
the width will change to conform to the width of the current column. When there is a text insertion point in a vertical
frame, the Tabs dialog box will snap to the right side of the text frame, and the length displayed will conform to the
length of the current column.
Align the Tabs dialog box ruler with your text
1In Layout View, scroll through your document to display the top of the content.
2Scroll through your document to display the top of the text frame.
3Click the magnet icon on the Tabs dialog box. The Tabs dialog box snaps to the top of the column that includes
the selection or the insertion point.
Set tabs
You can set left, center, right, and decimal or special-character tabs. When you use the special-character tab, you can
set a tab to align to any character you choose, such as a colon or a dollar sign.
Bob Bringhurst provides an article about various tab and indent effects at Tabs and Indents Gallery.
1To see the effect of changing tab settings, choose View > Layout View.
2Using the Type tool , click an insertion point in the paragraph.
3Press the Tab key. Add tabs in the paragraphs where you want to add horizontal space. (You can also add tabs after
you create your tab settings.)
4Choose Type > Tabs to display the Tabs dialog box.
5To specify which paragraphs will be affected, select a paragraph or a group of paragraphs.
Note: In Galley view and Story view, adding a tab at the beginning of the paragraph indents the text the same amount,
regardless of the tab position. Layout view shows the actual distance of the tab.
6For the first tab, click a tab-alignment button (left, right, center, or decimal) in the Tabs dialog box to specify how
text will align to the tab’s position.
7Do one of the following:
•Click a location on the tab ruler to position a new tab.
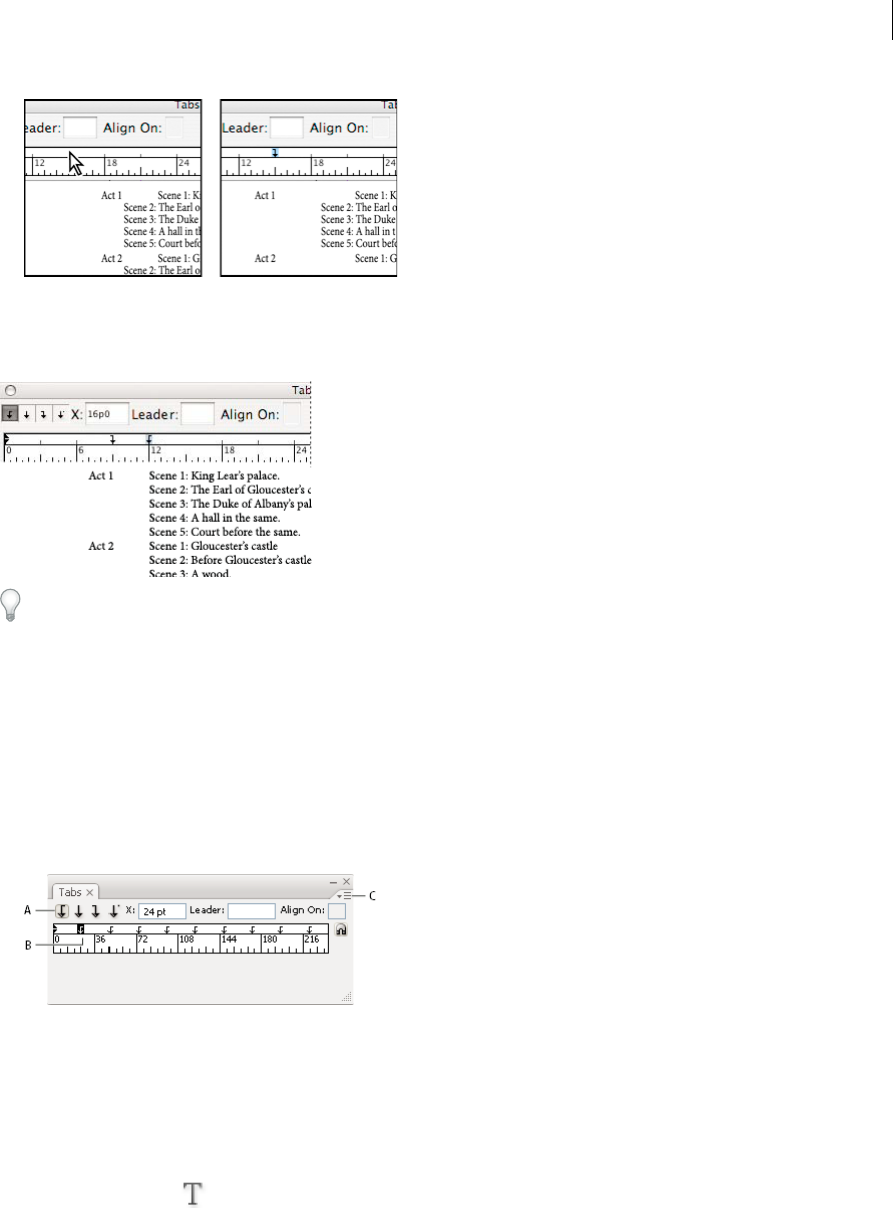
277
Typography
Last updated 6/13/2015
•Type a position in the X box and press Enter or Return. If the X value is selected, press the up or down arrow key
to increase or decrease the tab value by 1 point, respectively.
8For subsequent tabs with different alignments, repeat steps 3 and 4.
To insert a tab character in a table, choose Type > Insert Special Character > Other > Tab.
Repeat tabs
The Repeat Tab command creates multiple tabs based on the distance between the tab and the left indent or the
previous tab stop.
1Click an insertion point in the paragraph.
2In the Tabs panel, select a tab stop on the ruler.
3Choose Repeat Tab from the panel menu.
A Tab-alignment buttons B Tab stop on the ruler C Panel menu
Move, delete, and edit tab settings
Use the Tabs dialog box to move, delete, and edit tab settings.
Move a tab setting
1Using the Type tool , click an insertion point in the paragraph.
2In the Tabs dialog box, select a tab on the tab ruler.
3Do one of the following:
•Type a new location for X and press Enter or Return.
•Drag the tab to a new location.
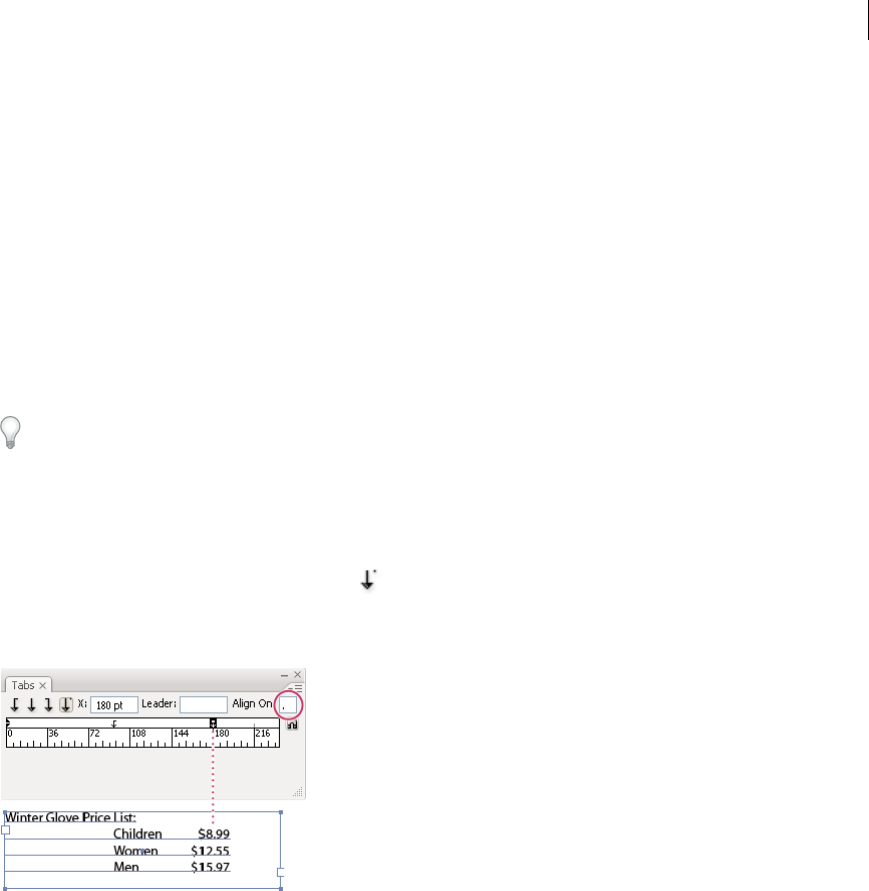
278
Typography
Last updated 6/13/2015
Delete a tab setting
1Click an insertion point in the paragraph.
2Do one of the following:
•Drag the tab off the tab ruler.
•Select the tab, and choose Delete Tab from the panel menu.
•To return to the default tab stops, choose Clear All from the panel menu.
Change a tab from one alignment to another
1In the Tabs dialog box, select a tab on the tab ruler.
2Click a tab-alignment button.
You can also hold down Alt (Windows) or Option (Mac OS) while clicking the tab setting to cycle through the four
alignment options.
Specify characters for decimal tabs
You use decimal tabs to align text with a character you specify, such as a period or a dollar sign.
1In the Tabs panel, create or select a decimal tab on the tab ruler.
2In the Align On box, type the character to which you want to align. You can type or paste any character. Make sure
that the paragraphs you’re aligning contain that character.
Add tab leaders
A tab leader is a repeated pattern of characters, such as a series of dots or dashes, between a tab and the following text.
1In the Tabs panel, select a tab stop on the ruler.
2Type a pattern of as many as eight characters in the Leader box, and then press Enter or Return. The characters you
entered repeat across the width of the tab.
3To change the font or other formatting of the tab leader, select the tab character in the text frame, and use the
Character panel or Type menu to apply formatting.
Insert right indent tabs
In one step, you can add a right-aligned tab at the right indent, making it easier to prepare tabular text that spans an
entire column. Right indent tabs are slightly different from regular tabs. A right indent tab:
•Aligns all subsequent text to the right edge of the text frame. If the same paragraph includes any tabs after the right
indent tab, those tabs and their text are pushed to the next line.
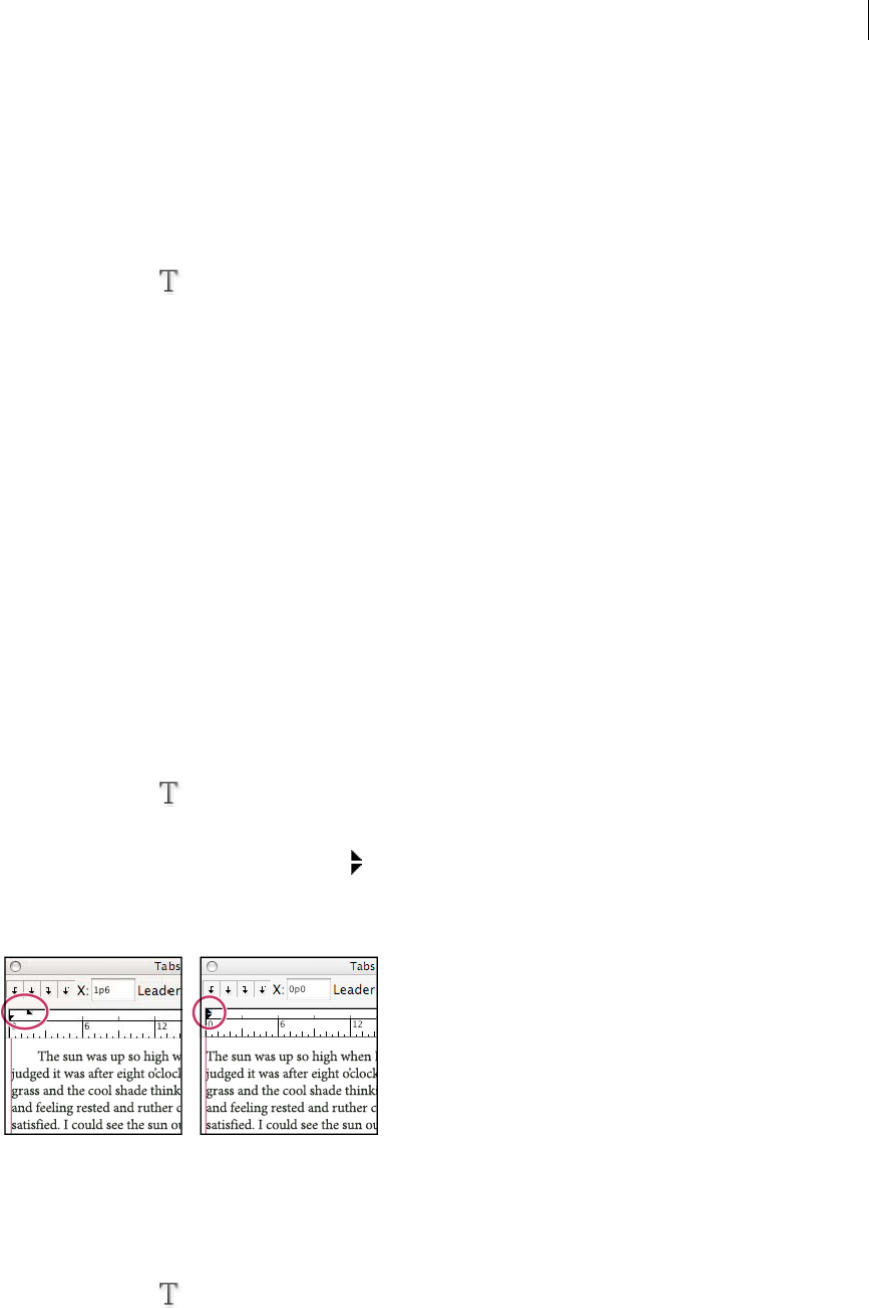
279
Typography
Last updated 6/13/2015
•Is a special character located in the text, not in the Tabs dialog box. You add a right indent tab using a context menu,
not the Tabs dialog box. As a result, a right indent tab can’t be part of a paragraph style.
•Is different from the Right Indent value in the Paragraph panel. The Right Indent value keeps the entire right edge
of the paragraph away from the right edge of the text frame.
•Can be used with a tab leader. Right indent tabs use the tab leader of the first tab stop past the right margin, or, if
there isn't one, the last tab stop before the right margin.
1Using the Type tool , click on the line where you want to add the right indent tab.
2Choose Type > Insert Special Character > Other > Right Indent Tab.
Set indents
Indents move text inward from the right and left edges of the frame. In general, use first-line indents, not spaces or tabs,
to indent the first line of a paragraph.
A first-line indent is positioned relative to the left-margin indent. For example, if a paragraph’s left edge is indented one
pica, setting the first-line indent to one pica indents the first line of the paragraph two picas from the left edge of the
frame or inset.
You can set indents using the Tabs dialog box, the Paragraph panel, or the Control panel. You can also set indents when
you create bulleted or numbered lists.
When setting CJK characters, you can use the mojikumi setting to specify the indent for the first line. However, for text
in which the first line indent was specified in the Paragraph panel, if you specify indents in mojikumi settings, you can
make the text indent the sum value of both indents.
Bob Bringhurst provides an article about various tab and indent effects at Tabs and Indents Gallery.
Set an indent using the Tabs dialog box
1Using the Type tool , click in the paragraph you want to indent.
2Choose Type > Tabs to display the Tabs dialog box.
3Do one of the following to the indent markers in the Tabs dialog box:
•Drag the top marker to indent the first line of text. Drag the bottom marker to move both markers and indent
the entire paragraph.
•Select the top marker and type a value for X to indent the first line of text. Select the bottom marker and type a
value for X to move both markers and indent the entire paragraph.
For more information on using the Tabs dialog box, see Tabs dialog box overview.
Set indents using the Paragraph panel or the Control panel
1Using the Type tool , click in the paragraph you want to indent.
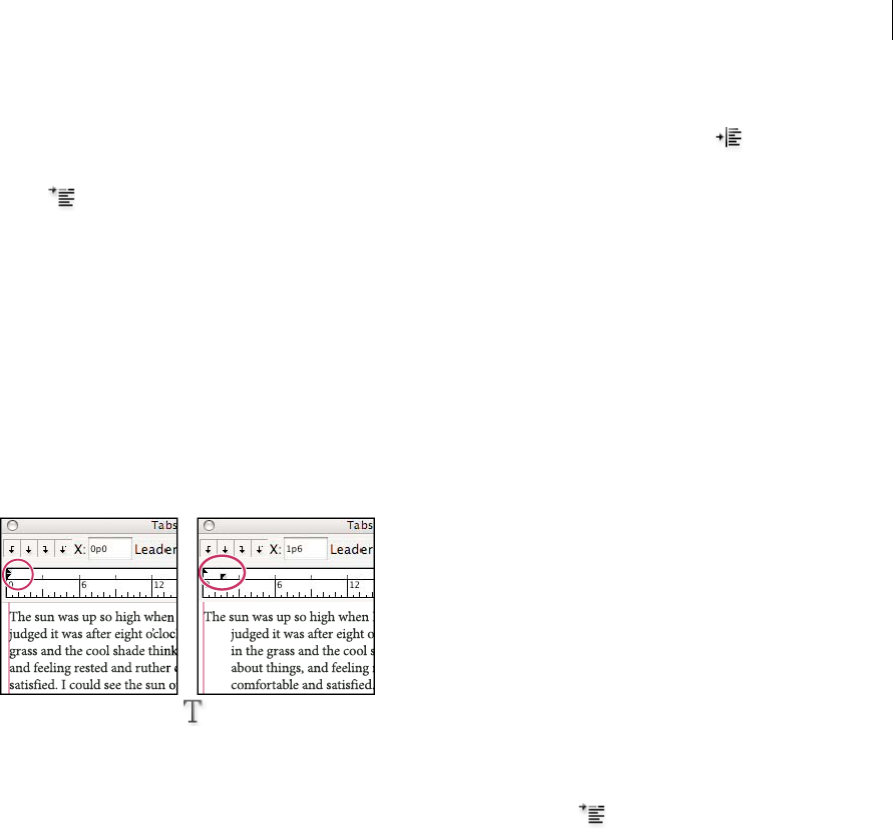
280
Typography
Last updated 6/13/2015
2Adjust the appropriate indent values in the Paragraph panel or Control panel. For example, do the following:
•To indent the entire paragraph one pica, type a value (such as 1p) in the Left Indent box .
•To indent only the first line of a paragraph one pica, type a value (such as 1p) in the First Line Left Indent box
.
•To create a hanging indent of one pica, type a positive value (such as 1p) in the Left Indent box and type a
negative value (such as -1p) in the First Line Left Indent box. See Set indents.
Reset indents
1Click in the paragraph in which you want to reset indents to the zero mark.
2Choose Reset Indents from the Tabs dialog box menu.
Create a hanging indent
In a hanging indent, all the lines in a paragraph are indented except for the first line. Hanging indents are especially
useful when you want to add inline graphics at the beginning of the paragraph.
1Using the Type tool , click in the paragraph you want to indent.
2In the Tabs dialog box or the Control panel, specify a left indent value greater than zero.
3To specify a negative first-line left indent value, do one of the following:
•In the Control panel, type a negative value for the first-line left indent .
•In the Tabs dialog box, drag the top marker to the left, or select the marker and type a negative value for X.
In most cases, you’ll specify the negative equivalent of the value you entered in step 2; for instance, if you specified a
left indent of 2 picas, your first-line left indent will typically be –2 picas.
Right-indent the last line of a paragraph
You can use the Last Line Right Indent option to add a hanging indent on the right side of the last line in a paragraph.
This option is especially useful for right-aligning prices in a sales catalog.
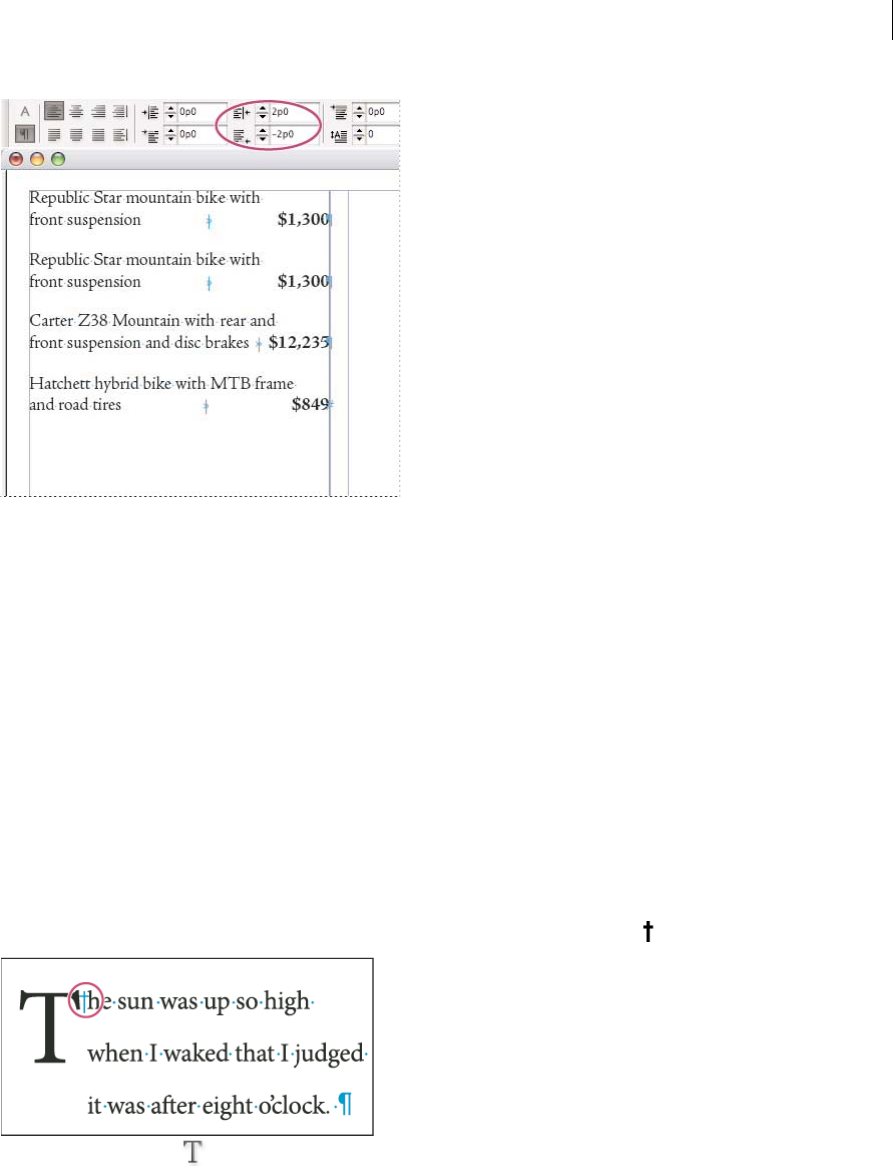
281
Typography
Last updated 6/13/2015
1Type your paragraphs. In the last line of each paragraph, place the insertion point before the text to be indented, and
choose Type > Insert Special Character > Other > Right Indent Tab.
2Select the paragraphs.
3To create a right indent for paragraphs, specify a value (such as 2p) in the Right Indent field of the Paragraph panel
or Control panel.
4To offset the right indent value for the text that follows the tab, type a negative value (such as -2p) in the Last Line
Right Indent field of the Paragraph panel or Control panel.
Use Indent To Here
You can use the Indent To Here special character to indent lines in a paragraph independently of a paragraph’s left
indent value. The Indent To Here special character is different from the paragraph’s left indent in the following ways:
•Indent To Here is part of the text flow, as if it were a visible character. If text reflows, the indent moves with it.
•Indent To Here affects all lines after the line where you’ve added its special characters, so you can indent just some
of the lines in a paragraph.
•When you choose Type > Show Hidden Characters, the Indent To Here character is visible.
1Using the Type tool , click the insertion point where you would like to indent.
2Choose Type > Insert Special Character > Other > Indent To Here.
More Help topics
Create bulleted or numbered lists
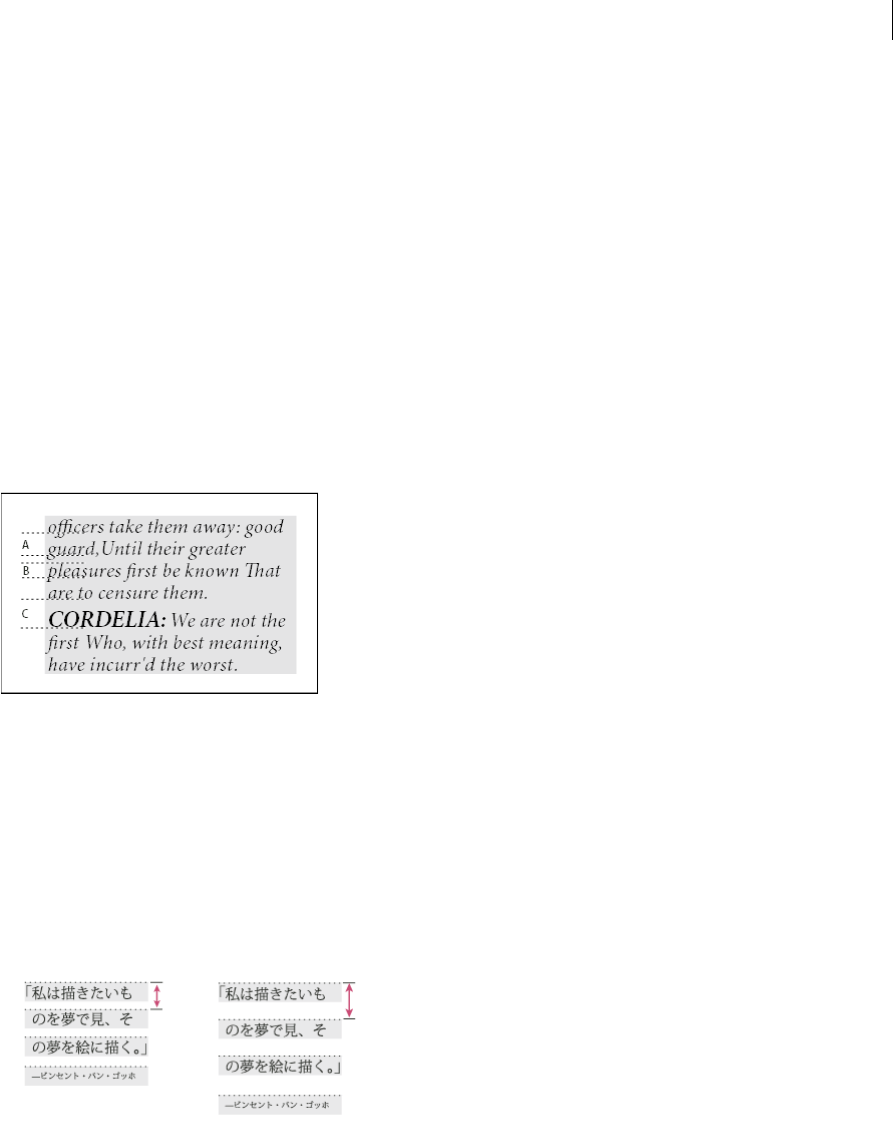
282
Typography
Last updated 6/13/2015
Leading
About leading
This topic refers to how leading is implemented in Roman composition. For information on leading in CJK text, see
About leading in Asian text.
The vertical space between lines of type is called leading. Leading is measured from the baseline of one line of text to
the baseline of the line above it. Baseline is the invisible line on which most letters—that is, those without descenders—
sit.
The default auto-leading option sets the leading at 120% of the type size (for example, 12-point leading for 10-point
type). When auto-leading is in use, InCopy displays the leading value in parentheses in the Leading menu of the
Character panel.
A Leading B Te xt he ight C Larger text size of one word increases leading for that one line.
About leading in Asian text
The basis position for leading can be set through the Leading Basis Position setting in the Paragraph panel menu. With
the default setting (Embox Top/Right), the text line leading is measured from the top of its embox to the top of the next
line's embox. By selecting the line and increasing the leading value using the Embox top/Right setting, the space
between the selected line and the next line will grow, because the direction leading is measured from the current line
to the next line. All other Leading Basis Position settings measure leading from the current line to the previous line, so
changing the leading amount with those settings will increase the line aki above the current line.
Set leading from Leading in the Character panel or Control panel. This is set to Automatic by default. When Auto
Leading is set, the leading value is displayed in parentheses in Leading in the Character panel. This Automatic value
varies for text frames and text in frame grids. The Automatic Leading value can be set from the Justification menu item
in the Paragraph panel. The default setting for the automatic leading value for text in text frames in InCopy is 175% of
the set font size. For text in frame grids, it is 100%, which allows for the grid alignment to spread out the lines of the
text in the grid.

283
Typography
Last updated 6/13/2015
When grid alignment is set to None, set text leading in the text frame with the Leading value in the Character panel.
When grid alignment is set to anything other than None, leading will be applied according to the baseline grid settings.
Note: When copying text placed on the frame grid and pasting into a text frame, the text is pasted with the frame grid
attributes intact, so Automatic in Leading is set to 100%. If line spacing appears squeezed, set a value for Leading instead
of using the automatic setting.
To set Leading for text in frame grids use Line Gap in the Frame Grid Settings dialog box instead of the leading value.
The leading value for text in the frame grid is the sum of the Line Gap value and the grid size (font size). In other words,
if the grid size is 13Q and line gap is 10H, the actual leading value will be "23H".
Please note that for text placed in the frame grid, the default grid justification is set to Center. In this case, the value
between the grid center and the center of the next grid will be the leading value. When grid justification has been set
to None, leading will be applied from the location specified in the grid. When grid justification is set to None, leading
will be applied according to the value set in Leading in the Character panel.
Leading within a frame grid is complex. For placed text, the actual leading value changes depending on the Font Size,
Leading value and also the Gyoudori settings in the Paragraph panel. Take note of the following:
•If you leave the font size for the frame grid unchanged, but make the font size or leading value of placed text smaller
than the grid size in the Character panel, the text will be aligned to the grid according to the Grid Justification
settings.
•If you leave the font size (grid size) for a frame grid unchanged but use the Character panel to make the font size of
placed text larger than the grid size+line gap, gyoudori will be determined automatically, and you can align to the
grid in increments of 0.5 lines, therefore 1.5, 2, 2.5 and 3 and so on if Gyoudori is set to Automatic. If Gyoudori is
set to anything other than Automatic, text will be aligned to the grid according to this setting, and for a large font
size the characters will overlap.
•If you leave the font size (grid size) of the frame grid unchanged but use the Character panel to set the gyoudori of
placed text to a value larger than the grid size+line gap, leading will apply to the next line when leading is set to
Automatic. For example, if the frame grid size is 13Q and the line gap is set to 10H, when leading is set to 24H, text
will be placed on every other line. If set to 47H, text will be placed on every third line. For any leading setting other
than Automatic, the value set in Leading will be ignored.
Change leading
By default, leading is a character attribute, which means that you can apply more than one leading value within the same
paragraph. The largest leading value in a line of type determines the leading for that line. However, you can select a
preferences option so that leading applies to the entire paragraph, instead of to text within a paragraph. This setting
does not affect the leading in existing frames.
Change leading of selected text
1Select the text you want to change.
2Do any of the following:
•In the Character panel or Control panel, choose the leading you want from the Leading menu .
•In the Character panel or Control panel, choose the leading you want from the Leading menu .
•Select the existing leading value and type a new value.
•While creating a paragraph style, change the leading using the Basic Character Formats panel.

284
Typography
Last updated 6/13/2015
If InCopy ignores the leading change, it may be due to Vertical Justification or Align To Baseline Grid being selected.
Choose Object > Text Frame Options and make sure Vertical Justification is set to Top, and make sure Do Not Align
To Baseline Grid is selected in the Paragraph panel, Control panel, or paragraph style.
You can also adjust vertical space by aligning text to the baseline grid. When baseline grid is set, the baseline grid setting
takes precedence over the leading value.
Change the default leading percentage
1Select the paragraphs that you want to change.
2Choose Justification from the Paragraph panel menu or from the Control panel menu.
3Choose Roman Justification from the Paragraph panel menu.
4For Auto Leading, specify a new default percentage. The minimum value is 0%, and the maximum value is 500%.
Note: The Auto option in the Leading pop-up menu of the Control panel menu sets Auto Leading value in the Justification
dialog box as a ratio (%) of character size. The default is 175% for text frames and 100% for frame grids.
Apply leading to whole paragraphs
1Choose Edit > Preferences > Type (Windows) or InCopy > Preferences > Type (Mac OS).
2Select Apply Leading To Entire Paragraph, and then click OK.
Note: When you use a character style to apply leading to text, the leading affects only the text to which the style is applied,
not the entire paragraph, regardless of whether the Apply Leading To Entire Paragraph option is selected.
Adjust line height based on character proportion
By changing the text orientation in a frame grid to its opposite (for horizontal text, it is vertical; for vertical text, it is
horizontal), the line height will be changed by default regardless of the grid size. For example, for 13Q characters placed
in a horizontal type 13Q frame grid, when setting the character's vertical proportion to 200%, regardless of grid size,
the line height will be doubled and become 26Q. If this function is turned off, the line height will be the same as the
character height and only the character proportion will be changed.
1Select text for which you would like to change the line height based on character proportion.
2From the Character panel menu or Control panel menu, select Adjust Line Height With Character Scale.
The line height is adjusted. As a character attribute, this feature is set for each character, but line height is applied to
an entire line containing the set characters.
To disable this feature, select the text for which the feature was enabled, and reselect Adjust Line Height with Character
Scale from the Character panel menu or Control panel menu, and turn it off.
Apply the leading basis position
If you set grid alignment to None, leading is applied from the top or right of the embox of the current line to the top or
right of the embox of the next line by default. Increasing the leading value causes the new value to be applied to all
selected lines.
1Select the text and set Grid Alignment to None in the Paragraph panel menu or the Control panel menu.
2Specify Leading in the Character panel. Specify a value other than Automatic and set to Static Value Leading.
3Select the appropriate leading basis from Leading Basis Position in the Paragraph panel menu or the Control panel
menu.

285
Typography
Last updated 6/13/2015
To set even leading regardless of font size, you can use Embox Center to set leading from the center of the line.
For frame grids, to align to the grid line spacing for lines with different font sizes, set grid alignment to Center and set
Gyoudori to anything other than Automatic in the Paragraph panel.
Leading Basis Position options
From Leading Basis Position in the Paragraph panel menu or Control panel menu, select from the following options
for leading basis.
Embox Top/Right Leading will be based on the top of the embox for horizontal type or on the right of the embox for
vertical type. Leading is measured from the top or right of the current line to the top or right of the next line. These
settings are the default settings.
Embox Center Leading will be based from the center of the current line to the center of the previous line. If different
font sizes exist within the same paragraph, the space between the embox edges of each line will be uneven. When
Embox Center is selected, by setting fixed leading for text with differing font sizes, you can align line spacing for
surrounding lines because leading will occur based on the center of the current embox.
Roman Baseline Leading occurs based on the Roman Baseline. Leading is measured from the baseline of the current
line to the baseline of the previous line. This leading method is the same as that which is used in the Roman composer.
The Roman Baseline is different for each font. The character position may vary even within the same font size if the
fonts are different.
Embox Bottom/Left Leading occurs based from the bottom of the embox for horizontal type or from the left of the
embox for vertical type. Leading is measured from the left or bottom of the current line to the left or bottom of the
previous line.
Note: The same item is present in Grid Alignment in both the Paragraph panel menu and in the Control panel menu. These
items are the bases for aligning to the grid, and not bases for leading. Do not confuse these.
More Help topics
Frame grid properties
Align paragraphs to a baseline grid
Kerning and tracking
About kerning and tracking
Kerning is the process of adding or subtracting space between specific pairs of characters. Tracking is the process of
loosening or tightening a block of text.
Note: Values for kerning and tracking affect Japanese text but normally these options are used to adjust the aki between
roman characters.
Types of kerning
You can automatically kern type using metrics kerning or optical kerning. Metrics kerning uses kern pairs, which are
included with most fonts. Kern pairs contain information about the spacing of specific pairs of letters. Some of these
are: LA, P., To, Tr, Ta, Tu, Te, Ty, Wa, WA, We, Wo, Ya, and Yo.
286
Typography
Last updated 6/13/2015
InCopy uses metrics kerning by default so that specific pairs are automatically kerned when you import or type text.
To disable metrics kerning, select "0".
Optical kerning adjusts the spacing between adjacent characters based on their shapes. Some fonts include robust kern-
pair specifications. However, when a font includes only minimal built-in kerning or none at all, or if you use two
different typefaces or sizes in one or more words on a line, you may want to use the optical kerning option.
Optical kerning adjusts the spacing between adjacent characters based on their shapes, and is optimized for use with
Roman glyphs. Some fonts include robust kern-pair specifications. However, when a font includes only minimal built-
in kerning or none at all, or if you use two different typefaces or sizes in one or more words on a line, you may want to
use the optical kerning option for the Roman text in your document.
You c a n a l s o u s e manual kerning, which is ideal for adjusting the space between two letters. Tracking and manual
kerning are cumulative, so you can first adjust individual pairs of letters, and then tighten or loosen a block of text
without affecting the relative kerning of the letter pairs.
Word kerning isn’t the same as the Word Spacing option in the Justification dialog box; word kerning changes the
kerning value only between a specific word’s first character and the word space preceding that character.
A Original B Kerning applied between “W” and “a” C Tracking applied
How kerning and tracking are measured
You can apply kerning, tracking, or both to selected text. Tracking and kerning are both measured in 1/1000 em, a unit
of measure that is relative to the current type size. In a 6-point font, 1 em equals 6 points; in a 10-point font, 1 em equals
10 points. Kerning and tracking are strictly proportional to the current type size.
Tracking and manual kerning are cumulative, so you can first adjust individual pairs of letters, and then tighten or
loosen a block of text without affecting the relative kerning of the letter pairs.
When you click to place the insertion point between two letters, InCopy displays kerning values in the Character panel
and the Control panel. Metrics and optical kerning values (or defined kern pairs) appear in parentheses. Similarly, if
you select a word or a range of text, InCopy displays the tracking values in the Character panel and Control panel.

287
Typography
Last updated 6/13/2015
Apply kerning to text
You apply either of two types of automatic kerning: metrics kerning or optical kerning, or you can adjust the spacing
between letters manually.
Use metrics kerning
1Set the text insertion point between the characters you want to pair kern, or select text.
2In the Character panel or Control panel, select Metrics in the Kerning menu.
3In the Character panel or Control panel, select Metrics or Metrics - Roman Only in the Kerning menu.
Note: If Metrics is applied to fonts (including some Japanese OpenType fonts) which do not contain pair kerning
information, spacing for each character will be set to “0” and character compression will not occur.
To avoid using the built-in kerning information of a font for selected text, choose “0” in the Kerning menu.
Note: The default setting is Metrics – Roman Only. When Metrics - Roman Only is applied to Roman OpenType fonts,
kerning is the same as when Metrics is selected. When Metrics - Roman Only is applied to CJK OpenType fonts, only the
Roman characters will be kerned with kerning pairs as if Metrics were set. The CJK characters will not be kerned, as if '0'
were set. For this reason, choose '0' to turn off pair kerning.
Note: If you use font metrics kerning in a Japanese OpenType font, it is recommended that you choose OpenType > Use
Proportional Metrics from the Control panel menu. That way, you can avoid making unnecessary manual kerning
adjustments.
Use optical kerning
1Set the text insertion point between characters you want to pair kern or select the text you want to kern.
2In the Character panel or Control panel, select Optical in the Kerning menu.
Note: Optical Kerning is designed on the basis of Roman character forms. You can use this feature with CJK fonts, but you
should always check the results of the operation.
Adjust kerning manually
1Using the Type tool , click to place an insertion point between two characters.
Note: If a range of text is selected, you can’t manually kern the text (you can choose only Metrics, Optical, or 0). Instead,
use tracking.
Note: If a range of text is selected, you can’t manually kern the text (you can choose only Metrics, Metrics - Roman Only,
Optical, or 0). Instead, use tracking.
2Do any of the following:
•In the Character panel or the Control panel, type or select a numeric value in the Kerning menu.
•Press Alt+Left/Right Arrow (Windows) or Option+Left/Right Arrow (Mac OS) to decrease or increase the
kerning between two characters.
The amount of the word kerning adjustment is the same as the Kerning value in the Units & Increments Preferences
dialog box. When you press the shortcut and hold down the Ctrl or Command key, the kerning amount is the Kerning
preferences value multiplied by 5.
Change the default kerning increment value
❖In the Units & Increments section of the Preferences dialog box, type a new value for the Kerning option and click
OK.

288
Typography
Last updated 6/13/2015
Turn off kerning for selected text
1Select text.
2In the Character panel or Control panel, type or choose 0 in the Kerning menu.
You can also press Alt+Ctrl+Q (Windows) or Option+Command+Q (Mac OS) to reset kerning and tracking. When
you do so, kerning is set to Metrics regardless of which kerning option was previously applied.
Adjust tracking
1Select a range of characters.
2In the Character panel or Control panel, type or select a numeric value for Tracking .
Highlight text containing custom kerning and tracking
In some instances, you’ll want to be aware of text that has custom tracking and kerning applied. If you select the Custom
Tracking/Kerning preferences option, green highlighting appears over text with custom tracking or kerning.
1Choose Edit > Preferences > Composition (Windows) or InCopy > Preferences > Composition (Mac OS).
2Select Custom Tracking/Kerning, and then click OK.
Adjust kerning between words
❖With the Type tool , select a range of text and do one of the following:
•To add space between selected words, press Alt+Ctrl+\ (Windows) or Option+Command+\ (Mac OS).
•To remove space between selected words, press Alt+Ctrl+Backspace (Windows) or Option+Command+Delete
(Mac OS).
•To multiply the kerning adjustment by 5, hold down Shift as you press the keyboard shortcut.
More Help topics
Adjust aki before and after characters
Keys for working with type
Keys for working with type
Aligning text
Align or justify text
Text can be aligned with one or both edges (or insets) of a text frame. Text is said to be justified when it is aligned with
both edges. You can choose to justify all text in a paragraph excluding the last line (Justify Left or Justify Right), or you
can justify text in a paragraph including the last line (Justify All). When you have only a few characters on the last line,
you may want to use a special end-of-story character and create a flush space.
289
Typography
Last updated 6/13/2015
Note: When you justify all lines of text and you are using the Adobe Paragraph Composer, InDesign shifts text to ensure
that the paragraph has consistent text density and is visually appealing. You can fine-tune spacing in justified text.
When you set center or justify for text in a frame grid, the text will no longer align exactly with the grid. You can also
specify paragraph alignment for all the paragraphs in the frame grid.
1Select text.
2Click one of the Alignment buttons (Align Left, Align Center, Align Right, Left Justify, Center Justify, Right Justify
and Full Justify) in the Paragraph panel or Control panel.
3(Optional) Click Align Towards Spine or Align Away From Spine.
When you apply Align Towards Spine to a paragraph, text on a left-hand page is right-aligned, but when the same
text flows onto (or if the frame is moved to) a right-hand page, it becomes left aligned. Similarly, when you apply
Align Away From Spine to a paragraph, text on a left-hand page is left aligned, while text on a right-hand page is
right aligned.
In vertical frames, aligning to or away from the spine has no effect, since text alignment is parallel to the spine
direction.
If you want the left side of a line of text to be left-aligned and the right side to be right-aligned, position the insertion
point where you want to right-align the text, press Tab, and then right-align the rest of the line.
Align paragraphs to a baseline grid
When formatting paragraphs in a plain text frame, you might find it particularly useful to align paragraphs to the
baseline grid. By default, text in a frame grid is aligned to the embox center, but you can also change individual
paragraph grid alignment to align to the roman baseline, the frame grid embox, or the frame grid ICF.
The baseline grid represents the leading for body text in a document. You can use multiples of this leading value for all
elements of the page to ensure that text always lines up between columns and from page to page. For example, if the
body text in your document has 12-point leading, you could give your heading text 18-point leading and add 6 points
of space before the paragraphs that follow the headings.
A Text aligned to the embox center B Text aligned to the embox top C Text aligned to the ICF

290
Typography
Last updated 6/13/2015
Apart from specifying grid alignment, you can also specify whether or not to align only the first line of a paragraph to
the grid. Furthermore, when characters of different sizes are in the same line, you can specify how to align the small
characters to the larger ones. For more information, see Align text of different sizes.
Note: When the text is the same size as the default frame grid settings, the text position won’t change even if you change
the grid alignment. When you use a font or size different to the default frame settings for text in a frame grid, changing the
grid alignment has an effect.
Change settings for the baseline grid by using the Grids section of the Preferences dialog box.
To view the baseline grid, choose View > Grids & Guides > Show Baseline Grid. The baseline grids appear in the same
direction as the writing direction of the text frame.
Note: The baseline grid is visible only if the document zoom level is greater than the view threshold setting in Grids
Preferences. You may need to zoom in to view the baseline grid.
Align paragraphs to the baseline grid
1Select text.
2Choose Grid Alignment > Roman Baseline from the Paragraph panel menu.
Align only the first line to the baseline grid
1Select the paragraphs you want to align.
2Choose Only Align First Line to Grid from the Paragraph menu or Control panel menu.
3In the Paragraph panel or Control panel, click Align to Baseline Grid .
4Choose an option other than None from Grid Alignment in the Paragraph panel or Control panel menu.
When the leading is set to a value greater than the baseline grid, automatic gyoudori occurs, snapping the line to the
next line in the grid. For example, when the leading is 16-point and the baseline grid is 14-point, the text will snap to
the grid line every second line.
To align text in the center of a baseline grid, above or below virtual body, or above or bottom of average printing surface,
select an option other than None from the Grid Alignment menu.
Align paragraphs to a baseline grid
The baseline grid represents the leading for body text in a document. You can use multiples of this leading value for all
elements of the page to ensure that text always lines up between columns and from page to page. For example, if the
body text in your document has 12-point leading, you could give your heading text 18-point leading and add 6 points
of space before the paragraphs that follow the headings.
Using a baseline grid ensures consistency in the location of text elements on a page. You can adjust the leading for the
paragraph to ensure that its baselines align to the page’s underlying grid. This is useful if you want the baselines of text
in multiple columns or adjacent text frames to align. Change settings for the baseline grid by using the Grids section of
the Preferences dialog box.
You can also align only the first line of a paragraph to the baseline grid, allowing the rest of the lines to follow the
specified leading values.
To view the baseline grid, choose View > Grids & Guides > Show Baseline Grid.
Note: The baseline grid is visible only if the document zoom level is greater than the view threshold setting in Grids
Preferences. You may need to zoom in to view the baseline grid.

291
Typography
Last updated 6/13/2015
Align paragraphs to the baseline grid
1Select text.
2In the Paragraph panel or Control panel, click Align To Baseline Grid .
To ensure that the leading of your text does not change, set the baseline grid leading to the same leading value as your
text, or to a factor thereof.
Align only the first line to the baseline grid
1Select the paragraphs you want to align.
2Choose Only Align First Line To Grid from the Paragraph menu or Control panel menu.
3In the Paragraph panel or Control panel, click Align To Baseline Grid .
Create balanced headline text
You can balance ragged aligned text across multiple lines. This feature is especially useful for multiline headings, pull-
quotes, and centered paragraphs.
1Click in the paragraph you want to balance.
2In the Paragraph panel or Control panel, choose Balance Ragged Lines from the menu.
This feature takes effect only when the Adobe Paragraph Composer is selected.
This function is only available when Alignment is set to Align Left/Top, Center Justify or Align Right/Bottom and when
Adobe Paragraph Composer has been used.
Set Gyoudori
Gyoudori aligns a specified number of lines in the center of a paragraph. You can use gyoudori to highlight single line
paragraphs, such as headings or titles. If the paragraph has more than one line, you can choose Paragraph Gyoudori so
that the entire paragraph spans the number of lines.
292
Typography
Last updated 6/13/2015
1From Gyoudori in the Paragraph panel or Control panel, specify the number of lines you want to center justify.
2To center the entire paragraph across the specified number of lines, choose Paragraph Gyoudori from the Paragraph
panel menu or Control panel menu.
Note: Gyoudori is set to the baseline grid value as standard in text frames.
Set paragraph gyoudori
When you apply gyoudori to a paragraph of more than one line, choosing Paragraph Gyoudori allows the entire
paragraph to span the specified number of gyoudori lines, often 2 paragraph lines on 3 grid lines. If this option is not
selected, each line in the paragraph spans the specified number of gyoudori lines, such as 2 paragraph lines on 6 grid
lines.
1Select the paragraph to which you want to apply paragraph gyoudori.
2Choose Paragraph Gyoudori from the Paragraph panel menu or the Control panel menu.
3Adjust the leading of the gyoudori paragraph to suit your layout needs.
When Paragraph Gyoudori is used to center the paragraph on a number of grid lines, the line spacing of each line is
governed by the leading amount, not by the grid aki. It may be necessary to adjust the leading of each line to space them
out if the default 100% auto leading amount for frame grid text is used.
Create paragraphs that span or split columns
You can make a paragraph span across multiple columns in a text frame to create a straddle head effect. You can choose
whether a paragraph spans all columns or a specified number of columns. When a paragraph is set to span across
columns in a multicolumn text frame, any text before the spanning paragraph becomes balanced as a result.
You can also split a paragraph into multiple columns within the same text frame.
For a video tutorial on creating paragraphs that span or split columns, go to www.adobe.com/go/lrvid5151_id_en or
http://tv.adobe.com/go/4952/.
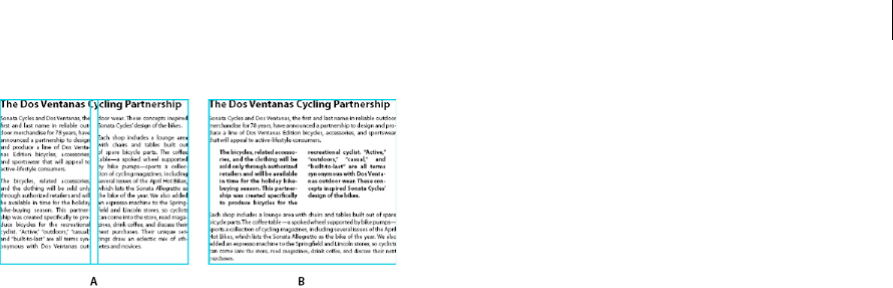
293
Typography
Last updated 6/13/2015
A Heading that spans columns B Split column
Span a paragraph across columns
1Place the insertion point inside the paragraph.
You can also make this feature part of a paragraph style, such as a heading style.
2Choose Span Columns from the Control panel menu or a Paragraph panel menu.
3Choose Span Columns from the Paragraph Layout menu.
4Choose the number of columns you want the paragraph to span from the Span menu. Choose All if you want the
paragraph to span across all the columns.
5To add extra space before or after the span paragraph, specify Space Before Span and Space After Span values, and
then click OK.
Split a paragraph into columns
1Place the insertion point inside the paragraph.
You can also make this feature part of a paragraph style, such as a heading style.
2Choose Span Columns from the Control panel menu or a Paragraph panel menu.
3Choose Split Columns from the Paragraph Layout menu.
4Specify the following options, and then click OK:
Sub-columns Choose the number of columns you want the split the paragraph into.
Space Before Split / Space After Split Add space before or after the split paragraph.
Inside Gutter Determine the space between the split paragraphs.
Outside Gutter Determine the space between the outside of the split paragraphs and the margins.
Align or justify text vertically within a text frame
You can align or distribute lines of text in a frame along its vertical axis to help keep type vertically consistent among
frames and their columns.
Using frame alignment, you can align text vertically (horizontally when using vertical type) in a plain-text frame with
the frame as a base.
You can align text to the top, center, or bottom of the frame using each paragraph’s leading and paragraph spacing
values. You can also justify text vertically, which evenly spaces lines regardless of their leading and paragraph spacing
values.
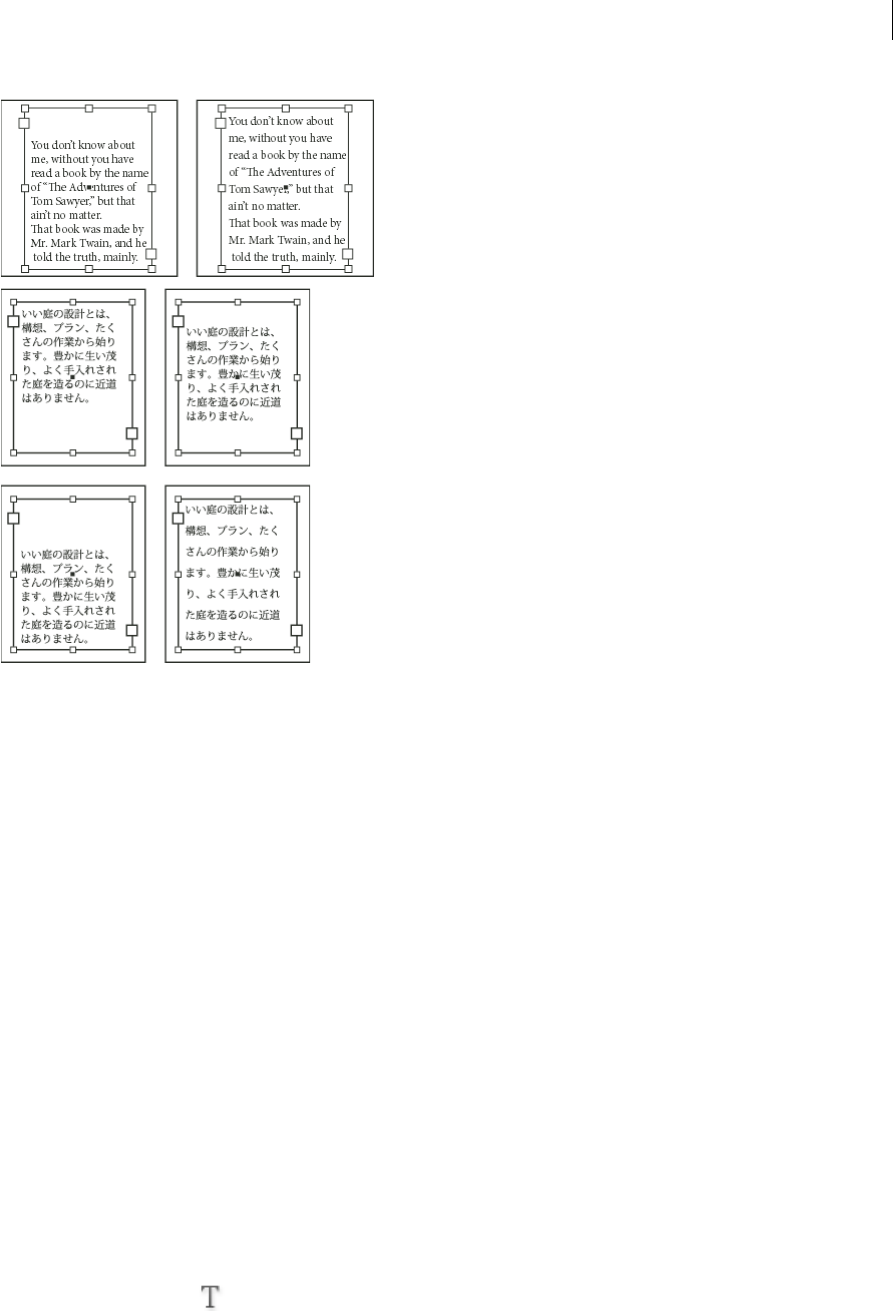
294
Typography
Last updated 6/13/2015
Vertical text alignment and justification is calculated from the baseline positions of each line of text in the frame. Keep
the following in mind as you adjust vertical alignment:
•Align Top/Right is defined as the baseline of the first line of top-aligned text. The First Baseline Offset option in the
Text Frame Options dialog box affects this value. Align Bottom/Left is defined as the baseline of the last line of
bottom-aligned text.
•When the Grid Alignment option is applied to paragraphs with Align Top/Right, Center Justify, Align Bottom/Left,
all lines will be aligned to the baseline grid. With the Justified option, only the first and last lines will be aligned to
the baseline grid.
•If you adjust a text frame’s Top or Bottom Inset values in the Text Frame Options dialog box, you change the location
of the first or last baseline, respectively.
•The top of the frame is defined as the baseline of the first line of top-aligned text. The First Baseline Offset option
in the Text Frame Options dialog box affects this value.
•The bottom of the frame is defined as the baseline of the last line of bottom-aligned text. Footnote text is not
justified.
•When the Align to Baseline Grid option is applied to paragraphs with Top, Center, or Bottom alignment, all lines
will be aligned to the baseline grid. With the Justified option, only the first and last lines will be aligned to the
baseline grid.
•If you adjust a text frame’s Top or Bottom Inset values in the Text Frame Options dialog box, you change the location
of the first or last baseline, respectively.
1Do one of the following:
•With the Selection tool, select a text frame.
•With the Type tool , click in a text frame.
2Choose Object > Text Frame Options.
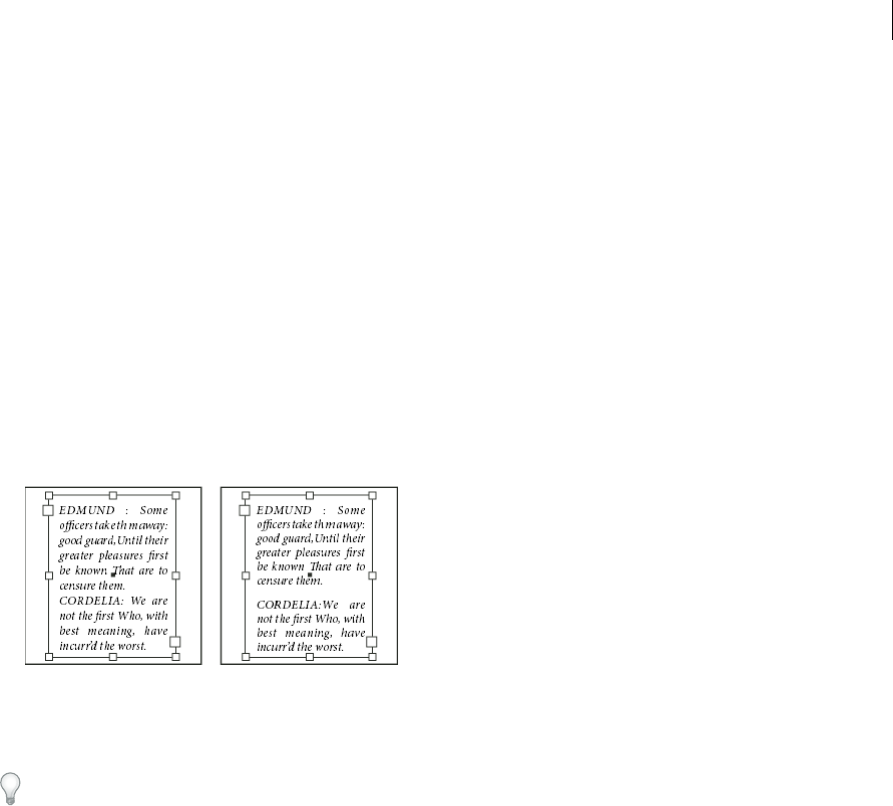
295
Typography
Last updated 6/13/2015
3In the Vertical Justification section of the Text Frame Options dialog box, choose Top/Right, Center, Bottom/Left,
or Justify.
4In the Vertical Justification section of the Text Frame Options dialog box, choose one of the following options in the
Align menu:
•To vertically align text down from the top of the frame, choose Top. (This is the default setting.)
•To center lines of text in the frame, choose Center.
•To vertically align lines of text up from the bottom of the frame, choose Bottom.
•To evenly distribute lines of text vertically between the top and bottom of the frame, choose Justify.
5If you choose Justify and you want to prevent the leading value from becoming disproportionately larger than the
paragraph spacing value, specify a Paragraph Spacing Limit value. The space between paragraphs is expanded up to
the value you specify; if the text still doesn’t fill the frame, the space between lines is adjusted until the frame is filled.
The paragraph spacing limit value is applied in addition to the Space Before or Space After values entered on the
Paragraph panel.
Note: Be careful about vertically justifying multi-column text frames. If the last column contains only a few lines, too
much white space may appear between the lines.
6Click OK.
An easy way to adjust the Paragraph Spacing Limit value is to select Preview, and then click the up or down arrow next
to the Paragraph Spacing Limit value until paragraph spacing appears to be balanced with leading.
More Help topics
Change Justification settings
Change the grid display
Frame grid properties
Align text of different sizes
Grids
Set baseline grids for a text frame
Composing CJK characters

296
Typography
Last updated 6/13/2015
CJK composition
InCopy supports four methods developed for typesetting, including Adobe Japanese Single-line Composer, Adobe
Japanese Paragraph Composer, Adobe Paragraph Composer, and Adobe Single-line Composer. Each Composer
evaluates possible breaks in CJK and Roman text, and chooses those that best support the hyphenation and justification
options specified for a given paragraph.
The Adobe Paragraph Composer
Considers a network of breakpoints for an entire paragraph, and thus can optimize earlier lines in the paragraph in
order to eliminate especially unattractive breaks later on.
The Paragraph Composer approaches composition by identifying possible breakpoints, evaluating them, and assigning
a weighted penalty to them based on such principles as evenness of letterspacing, word spacing, and hyphenation, or
Roman words set to a language that supports hyphenation dictionaries.
You can use the Hyphenation dialog box to determine the relationship between better spacing and fewer hyphens.
Adobe Japanese Paragraph Composer
Adobe Japanese Paragraph Composer, like the Paragraph Composer, evaluates breaks (where to wrap to the next line)
in units of paragraphs. If characters are added to or deleted from a paragraph specified for this Composer, mojikumi
may be modified on the line before the edit point because the Composer re-evaluates mojikumi in the whole paragraph
in order to optimize it.
The Paragraph Composer approaches composition by identifying possible breakpoints, evaluating them, and assigning
a weighted penalty to them based on such principles as evenness of letterspacing, word spacing, and hyphenation.
Paragraph Composer evaluates breaks for the entire paragraph and fits mojikumi on the basis of character spacing,
word spacing, and rules for even hyphenation. For CJK text, this is calculated as the difference between the actual value
of mojikumi aki inserted for full justification or kinsoku processing and the optimum value set in the Mojikumi
Settings dialog box. When the aki necessary for full line justification is more than the maximum aki, or when the aki
necessary for kinsoku processing is less than the minimum aki, an H&J violation occurs.
The Adobe Single-line Composer
Offers a traditional approach to composing text one line at a time. This option is useful if you want to restrict
composition changes from late stage edits, and you don’t care about some lines in the paragraph being very loose while
others fit perfectly.
Adobe Japanese Single-line Composer
Adobe Japanese Single-line Composer applies mojikumi by evaluating line breaks one line at a time, in the same way
as Single-line Composer.
Change CJK composition preferences
1Choose Edit > Preferences > Composition (Windows) or InCopy > Preferences > Composition (Mac OS).

297
Typography
Last updated 6/13/2015
2Under Mojikumi Compatibility Mode, do any of the following:
•Select Use New Vertical Scaling to use the InDesign CS2 method of vertical scaling. Roman text is typically
rotated on its side, whereas CJK text may be upright. In previous versions of InDesign, when you set glyph scaling
in the Character panel, the X Scale and Y Scale attributes cause different results depending on the orientation of
the characters being scaled. In CS2 or later versions of InDesign and InCopy, scaling affects all text in the line the
same way, regardless of whether it’s rotated or upright. If the text isn’t upright in vertical, the X Scaling and Y
Scaling will be exchanged, resulting in the Roman text being scaled in the same direction as the CJK upright text.
This option is turned on for new documents and turned off for documents from InDesign CS and earlier.
•Select Use CID-Based Mojikumi to determine the correct JIS X 4051 Mojikumi Class using the glyphs (jikei) of
the font used instead of Unicode. Selecting this option is especially useful when you’re using OpenType fonts.
This feature supports all CID fonts of AdobeJapan1-0 through AdobeJapan1-6. Unicode will be used with all
other fonts.
3Click OK.
Use mojikumi
Mojikumi specifies text composition for spacing of Japanese and Chinese characters, roman characters, punctuation,
special characters, line start, line end and numbers. For Korean text, mojikumi may not be applicable. You can also
specify paragraph indents.
For Japanese text, the existing character spacing rules in InDesign follow the Japanese Industrial Standards (JIS)
specification, JISx4051-1995. You can also select from InDesign predefined mojikumi sets. Furthermore, you can create
specific mojikumi sets, and change the values for character spacing.
For Chinese text, you can use mojikumi display settings for Traditional Chinese and Simplified Chinese. If these
options do not appear in the Mojikumi Set list, you can select them in the Mojikumi Options section of the Preferences
dialog box.
InCopy includes 14 types of mojikumi presets for Japanese and 2 for Chinese. You can also modify the presets to be
displayed in Preferences, and you can determine whether CID-Based Mojikumi is used.
In InCopy, you can change the mojikumi settings of a paragraph, but you can’t create a custom mojikumi set or change
custom mojikumi settings as in InDesign. For details, see InDesign Help.
For more information on using mojikumi in InDesign, see www.adobe.com/go/learn_id_mojikumi_en.
Apply a mojikumi set to a paragraph
1Select the target paragraph or frame. To change the default setting, confirm that no paragraph or frame is selected.
2Choose a set from the Mojikumi pop-up menu in the Paragraph panel or Control panel.
To disable mojikumi settings, choose None from the Mojikumi pop-up menu.
Note: To determine which mojikumi settings appear in the Mojikumi pop-up menu, select the settings in the Mojikumi
Options section of the Preferences dialog box.
Change the display of mojikumi presets
1Choose Edit > Preferences > Mojikumi Options (Windows) or InCopy > Preferences > Mojikumi Options (Mac OS).
2Select the items you wish to display in the Mojikumi pop-up menu and click OK.
The Mojikumi Preset section item names are shown in gray, and items that cannot be selected are mojikumi sets, which
are currently applied to paragraphs or default mojikumi sets.
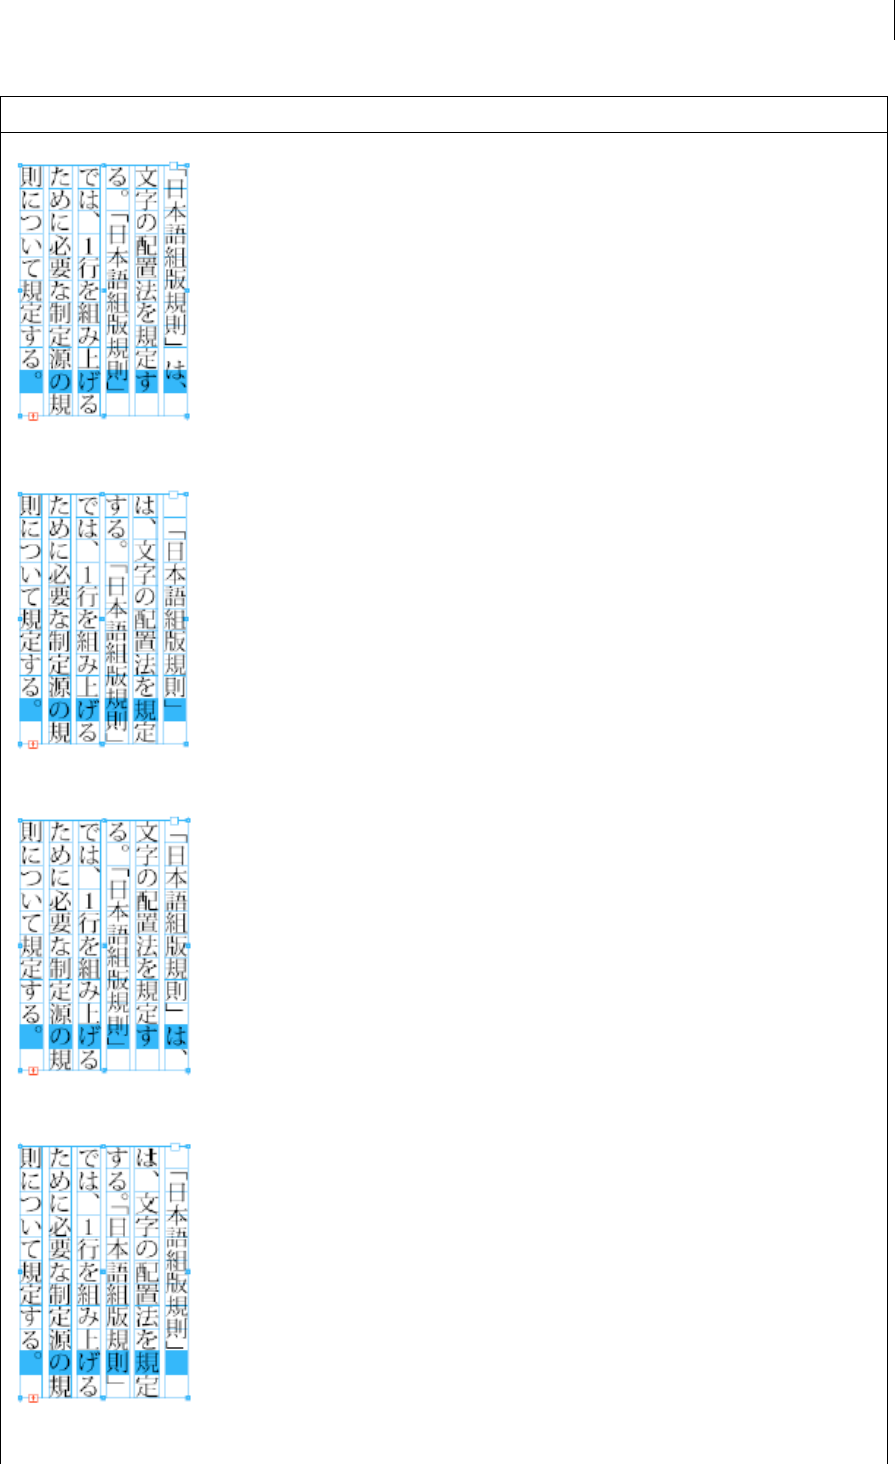
299
Typography
Last updated 6/13/2015
Mojikumi Presets
Line end all 1/2 em
1 em indent line end uke 1/2 em
1 or 1/2 em indent line end uke 1/2 em
1 or 1/2 em indent line end all 1 em
300
Typography
Last updated 6/13/2015
1 em indent line end all no float
1 em indent line end uke no float
1 or 1/2 em indent line end uke no float
1 em indent line end all 1/2 em in mojibake
Mojikumi Presets
301
Typography
Last updated 6/13/2015
Line end uke no float
1 or 1/2 em indent line end period 1 em
1 em indent line end period 1 em
line end period 1 em
Mojikumi Presets
302
Typography
Last updated 6/13/2015
Change mojikumi settings
You can edit the settings for spacing that you use a lot, such as the spacing between a period and following opening
parenthesis, in a mojikumi set you create.
For example, when you want to compress the character spacing for parentheses in the text, from Okoshi yakumono in
Yakumono, change the Middle Line setting for Open Parentheses, or Close Parentheses in Uke yakumono. The
following settings are available: 50% Fixed, 50%(0%-50%), 50%(25%-50%), 0% Fixed, 0%(0%-50%). For opening
parentheses, 50% Fixed leaves a half-width 50% aki before the parenthesis. In other words, it doesn’t compress the aki.
50%(0%-50%) puts a half-width aki before the parenthesis, but depending on mojikumi settings may not make an aki
at all. 50%(25%-50%) makes a half-width aki before the parenthesis, but depending on mojikumi settings may make an
aki which is half the size (25%) of a half-width character. 0% Fixed always compresses aki. 0%(0-50%) compresses aki,
but depending on mojikumi settings may allow a half-width aki. Choose 0% Fixed if you always want to compress
spacing before and after parentheses.
TradChinese default
SimpChinese default
Mojikumi Presets

303
Typography
Last updated 6/13/2015
By clicking the triangular to the left of Open Parenthesis, Close Parenthesis, commas, periods, and middle punctuation
in each of Okoshi Yakumono, Uke Yakumono and Chuzuki Yakumono within Yakumono, items such as round
parentheses, corner brackets, Japanese commas, commas, Japanese periods, periods, nakaguro and colons are
displayed, allowing setting of aki for each character type. If you apply these settings, brackets won’t be compressed but
you can adjust aki for round parentheses.
Furthermore, if you display Detailed, you can edit all classes, set the processing order for each class, and indicate
differences between a specified mojikumi set and the current settings.
You can specify the desired value, minimum value, maximum value and order of priority to apply character spacing for
each option. The minimum and maximum values are applied when you adjust the spacing for text that is fully justified
by kinsoku. The more the Minimum and Maximum percentage values differ from the Desired percentage, the more
scope you can give to InDesign to increase or decrease spacing when justifying the line.
For more information on using mojikumi in InDesign, see www.adobe.com/go/learn_id_mojikumi_en.
Create a new mojikumi set
1Do one of the following:
•Choose Type > Mojikumi Settings > Basic or Detailed.
•Choose Basic or Detailed from the Mojikumi Set menu in the Paragraph panel or Control panel.
2Click New in the Mojikumi Settings dialog box.
3Enter the name of the mojikumi set, specify the existing set on which the new one will be based, and click OK.
4From Units, choose whether to use percentage (%) or Bu units, or to use Character Width/Bu.
5Specify values for Begin Line, End Line and Middle Line for items in each section of Yakumono, Contiguous
Yakumono, Paragraph Mojikumi Indent and Between CJK and Roman. The Middle Line value is used to compress
lines for kinsoku (specify a value less than the Begin Line value). The End Line value is used to spread lines for fully
justified text (specify a value greater than the Middle Line value).
6For item names in each section that has a triangle indicator, you can specify mojikumi settings in further detail for
each character. For example, to display items, click the triangle to the left of Open Parenthesis in Okoshi Yakumono
in the Yakumono section. The three items Open Bracket, Open Round Parenthesis, and Other Opening Parenthesis
are displayed, allowing you to set mojikumi settings for each character class.
7When settings are complete, click Save or OK to save the settings. Click Cancel if you don't want to save the settings.
Depending on the character type, you can specify the same values for Begin Line, Middle Line, and End Line if you don't
want to change the spacing.
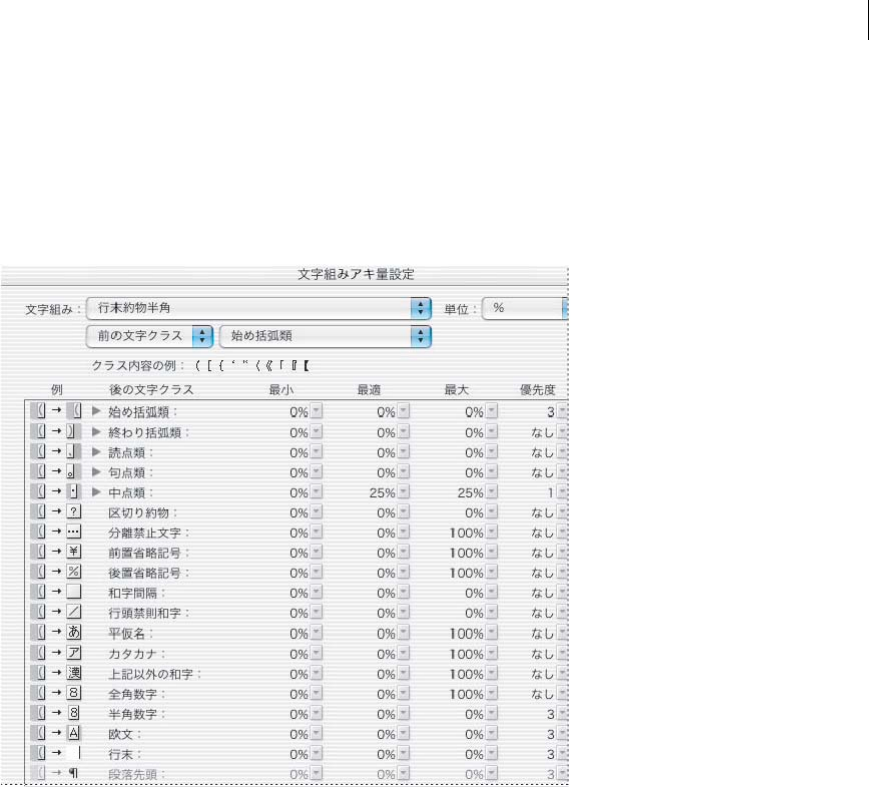
304
Typography
Last updated 6/13/2015
Edit detailed settings for mojikumi
1Do one of the following:
•Select Type > Mojikumi Settings > Detailed.
•In the Paragraph panel or Control panel, choose Advanced Settings From Mojikumi.
•Click Detailed in the Mojikumi Settings dialog box.
2Select a mojikumi set to edit from the Mojikumi pop-up menu or click New to create a new set. You can also import
a mojikumi set from another document by clicking Import.
3From the Character Class pop-up menu at the bottom of the Mojikumi menu, select the character class to edit its
character aki settings. A list of settings that can be edited is included in the class. You can individually set Open
Parenthesis, Close Parenthesis, commas, periods or middle punctuation items, but you can also specify aki in more
detail for individual characters such as Japanese periods or Roman periods.
4Choose Previous Class or Next Class from the Before & After pop-up menu, and set whether the class aki value is
to be entered before or after the entered character. To set the aki for a character following a Japanese period, for
example, choose Japanese Period from the Character Class popup menu, and select previous character class from
the Before & After pop-up menu.
5For each item, set Minimum, Desired, and Maximum values. The Minimum value is used to compress lines for
kinsoku (specify a value less than the Desired value). The maximum value is used to spread lines for fully justified
text (specify a value greater than the Desired value).
6For item names that have a triangle indicator, you can further specify mojikumi settings in detail for each character.
For example, click the triangle to the left of Open Parenthesis to display the items. The three items Open Bracket,
Open Round Parenthesis, Other Opening Parenthesis are displayed, allowing you to set mojikumi settings for each
character.

305
Typography
Last updated 6/13/2015
7Specify the order of compression priority in Priority for each class, to determine the order of compression for each.
When you specify 1 for any character class, characters given greater values will be processed afterwards, in
increasing order of priority, and when you specify None they are processed last. You can assign the same value (1 to
9) in several aki options.
8From the Indicate Differences menu, specify an option to indicate which mojikumi table is being compared. When
a different table is selected, any values that are different from that table are highlighted in blue.
9Click Save, or click Cancel if you don’t want to save the settings.
Change the name of a custom mojikumi set
1In the Mojikumi Settings dialog box, choose a custom mojikumi set from the Mojikumi pop-up menu, and click
Rename.
2Enter the new name in the Rename dialog box and click OK.
You cannot rename default mojikumi sets.
Delete a custom mojikumi set
❖In the Mojikumi Settings dialog box, choose a custom mojikumi set from the Mojikumi pop-up menu, and click
Delete Set.
All the text to which the mojikumi set was applied will return to default settings. You cannot delete predefined
mojikumi sets. You cannot delete default InDesign mojikumi sets.
When you compose Japanese text with a lot of half-width spaces or Roman parenthesis, problems that need to be
resolved relating to text composition increase. It is recommended that you avoid using Roman parenthesis, and use
full-width parenthesis for Japanese composition. Only use Roman parenthesis when using relatively long English
sentences in Japanese text, or when a more serious problem results if you don't use Roman parenthesis.
Use kinsoku settings
Kinsoku specifies line breaks for Asian text. Characters that cannot be placed at the beginning or end of a line are known
as kinsoku characters. For Japanese text, you can use hard kinsoku sets and soft kinsoku sets. Soft kinsoku sets omit
long vowel symbols and small hiragana characters. You can use these existing sets, or add or delete kinsoku characters
to create new sets. Chinese and Korean versions include special kinsoku sets.
Select kinsoku settings for a paragraph
1Select a paragraph or frame.
2In the Paragraph panel, choose an option from the Kinsoku Set list.
Create a new kinsoku set
1Do one of the following.
•Select Type > Kinsoku Settings.
•In the Paragraph panel or Control panel, choose Settings from the Kinsoku pop-up menu, and display the
Kinsoku Settings dialog box.
2Click New in the Kinsoku Settings dialog box. It is possible to import from other documents, but there is no import
button as with the Mojikumi Settings.
3Enter the name of the kinsoku set, and specify the existing set on which the new one will be based.

306
Typography
Last updated 6/13/2015
4To add a character to a field, select the field, and do one of the following:
•Enter a character in the Add Character box, and click Add to insert in the list box.
•In the Add Character pop-up menu, specify the code system (Shift JIS, JIS, Kuten, Big5, GB, Johab, or Unicode),
enter the code into the Add Character box and click Add.
5To delete a character in the list box, select the character and press Backspace (Windows) or Delete (Mac OS).
6To check the currently selected character code, from the Add Character pop-up menu select Shift JIS, JIS, Kuten,
Big5, GB, Johab, or Unicode. The code system is displayed in the Add Character text box.
7Click Save to save the settings. Click Cancel if you do not want to save the settings.
Delete a kinsoku set
1In the Kinsoku Shori Set dialog box, choose the kinsoku setting you want to delete from the Kinsoku Settings
pop-up menu.
2Click Delete Set.
You cannot delete predefined kinsoku settings.
Specify whether to push in or push out kinsoku text
You can determine whether text is pushed in or pushed out to prevent kinsoku characters from beginning or ending
the line.
1Select the paragraph or frame.
2From the Paragraph panel menu or Control panel menu, choose an option from the Kinsoku Break Type menu:
•Choose Push In First to prioritize fitting kinsoku characters onto the same line.
•Choose Push Out First to prioritize moving kinsoku characters to the next line.
•Choose Push Out Only to always move kinsoku characters to the next line.
•Choose Prioritize Adjustment Amount to push in text when pushing out that text would result in greater
expansion of character space than pushing it in would compress the character space.
Force highlighting of kinsoku text
You may want to check where kinsoku has been applied, as several elements may affect the text composition. When you
set the option to highlight kinsoku text to on, kinsoku items are highlighted in blue-gray. Kinsoku items that have been
pushed in to keep on the same line are highlighted in red, and kinsoku items that have been pushed out so as not to be
on the previous line are highlighted in blue. You can edit and amend the composition of these highlighted items
manually.
1Select Edit > Preferences > Composition (Windows) or InCopy > Preferences > Composition (Mac OS).
2Select Kinsoku, and then click OK.
Turn bunri-kinshi on or off
When bunri-kinshi is on, the characters specified in the Bunri-kinshi Characters section of the Kinsoku Settings dialog
box will not be split across lines, and will not be spaced out during full justification.
1Select the text you want to affect.
2Choose Bunri-Kinshi from the Paragraph panel menu or Control panel menu.

307
Typography
Last updated 6/13/2015
Use rensuuji
Rensuuji protects numbers from breaking. Furthermore, this option processes punctuation spacing in number strings
according to JIS specifications.
1Select the text you want to affect.
2To turn rensuuji on, choose Rensuuji from the Paragraph panel menu or Control panel menu.
Absorb ideographic space
If a space falls at the end of the line, the space may wrap to the next line, causing an jagged appearance. You can select
an option to prevent a line from beginning with a space.
1Select the text you want to affect.
2Choose Absorb Ideographic Space At Line End in the Paragraph panel menu or Control panel menu to prevent a
line from beginning with a space.
You can also make this option part of a paragraph style. This option is located in the Japanese Composition Settings
section when creating or editing a style.
Turn off Roman word wrap
When the Arbitrary Hyphenation option is selected, Roman words can be broken without using Roman hyphenation
rules, and no hyphen character (-) appears at the end of the line. If this option is not selected, Roman hyphenation rules
are used for word breaks.
The Arbitrary Hyphenation option takes effect only if a CJK language is applied to the text. This option has no effect
on text to which Roman languages are applied.
1Select the text you want to affect.
2Choose Arbitrary Hyphenation in the Paragraph panel menu or Control panel menu.
You can also make this option part of a paragraph style. This option is located in the Japanese Composition Settings
section when creating or editing a style.
Apply kinsoku hanging
Hanging controls whether or not you hang Japanese punctuation marks such as periods or commas outside the margin,
and align to the edge of the text frame. Specify hanging characters in Hanging Punctuation in the Kinsoku Settings
dialog box.
1Select the text you want to affect.
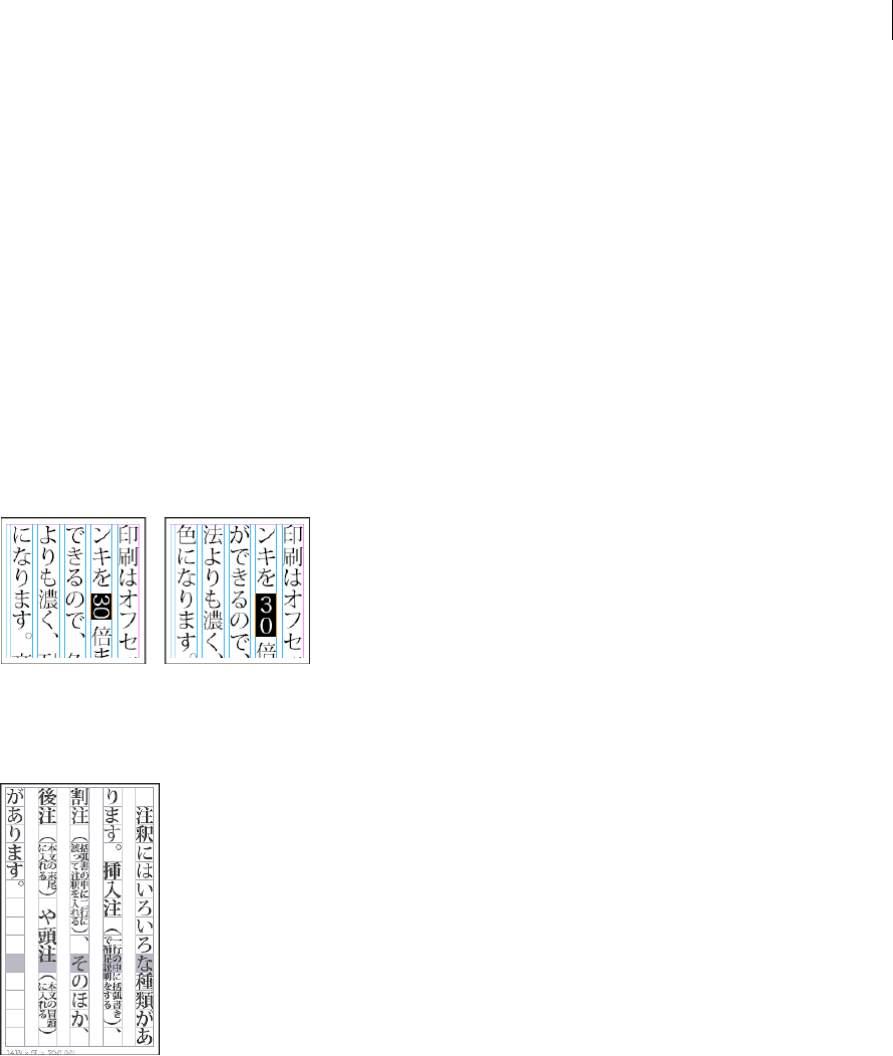
308
Typography
Last updated 6/13/2015
2To turn on hanging, choose one of the following hanging methods from the Kinsoku Hang Type command in the
Paragraph panel menu or Control panel menu.
None No hanging.
Regular When the paragraph is set to justify or justify all lines, positioning is applied to include hanging characters.
Forced Forced When the paragraph is set to justify or align on both sides, the hanging characters are first forced to
hang before positioning is applied. Forced hanging is only applied when paragraph justification is applied.
Rotate half-width characters in vertical text
1Select the text you want to affect.
2From the Paragraph panel menu or Control panel menu, choose Roman rotation in Vertical Text.
The direction of half-width characters such as Roman text or numbers changes in vertical text. By setting Roman
Rotation in Vertical Text, you can rotate these characters vertically in the paragraph.
When you set this option to on, half-width characters are rotated individually.
Turn warichu on or off
Warichu can be set as inline note for the body text. Warichu usually consists of two lines enclosed within parentheses.
1Select the text.
2Do one of the following.
•Choose Warichu from the Character panel menu or Control panel menu.
•Choose Warichu Settings from the Character panel menu or Control panel menu, select Warichu in the Warichu
Settings dialog box, and then click OK.
Change warichu options
1Select the text you want to affect.
2Choose Warichu Settings from the Character panel menu or Control panel menu.

309
Typography
Last updated 6/13/2015
3For Number Of Lines, specify how many lines of text will appear as warichu characters.
4For Line Spacing, specify the distance between the lines of warichu characters.
5For Warichu Size, select the size of warichu characters as a percentage of the size of the parent text.
6To align Warichu characters, select an alignment option. For example, in a vertical frame grid, selecting Left/Top
aligns the beginning of the warichu characters at the top of the frame. In addition, if Auto is set, justification occurs
automatically based on the warichu size or the parent text. The alignment proxy shows how the warichu text appears
relative to the parent text.
7In the Line Breaking Options section, specify the minimum number of characters required before and after the line
breaks to start a new line, and then click OK
More Help topics
Hyphenate text
Change Justification settings
Use tate-chu-yoko
Changing spacing between characters in CJK text
Adjust kerning for the half-width space between Roman words
❖With the Type tool , select a range of text, and do one of the following:
•To add space between selected words, press Alt+Ctrl+\ (Windows) or Option+Command+\ (Mac OS).
•To remove space between selected words, press Alt+Ctrl+Backspace (Windows) or Option+Command+Delete
(Mac OS).
•To multiply the kerning adjustment by 5, hold down Shift as you press the keyboard shortcut.
Adjust character tsume in CJK composition
Applying tsume to characters causes the space around them to be compressed proportionally. However, the vertical and
horizontal scaling of the characters remains unchanged.
1Select the text to which you want to apply tsume.
2Input the percentage in Tsume in the Character panel or the Control panel.
You can also check which tsume or tracking was applied for each character by highlighting the affected text.

310
Typography
Last updated 6/13/2015
Using grid tracking to adjust character spacing
One way in which you can compress aki between characters is to specify the line spacing for the frame grid itself and
adjusting tracking for placed text. This is a form of character compression that uses a feature called Adjust Tracking
With CJK Grid in the Character panel menu or the Control panel (also called grid tracking).
Some characters in CJK fonts are smaller than the embox, resulting in a large aki between characters when they are
placed on the frame grid. Setting tsume in this way for the grid itself is convenient because it allows mojikumi where
characters are properly aligned in the grid. This setting can also be saved as a grid format.
The Character Aki default in the Frame Grid Settings dialog box is set to “0”. In automated typography, this tracking is
known as “Beta”. Setting this to a negative value for mojikumi causes the right grid to overlap the left grid in accordance
with the set value. Characters input to the grid will be aligned on the basis of the center of the each grid, so the spacing
for each character will be compressed. In addition, depending on the mojikumi settings, character forms adjusted to
less than the maximum width will change on the basis of the value proportion of Line Spacing Tsume. For instance,
when mojikumi is set to half spacing for yakumono such as parentheses, by setting the Character Aki in the grid to -1H,
yakumono will be compressed to half of -1H, thus -0.5H. However, because character spacings based on tracking in this
grid are not applied to Roman text, character spacing for Roman text will not be compressed in line with tracking. In
addition, because this tracking value is applied to the grid itself, it is handled as an absolute value. For this reason, even
if the text font size changes, the tracking value does not.
This feature is enabled by default. To disable this feature, select Adjust Tracking With CJK Grid from the Character
panel menu or Control panel, and deselect the box to the left of the item name.
Adjust tracking by using Grid Jidori
You can justify text for specified grid characters by setting grid jidori. For example, if you select 3 characters entered
and set jidori to 5, the 3 characters will be spread evenly across the grid for 5 character spaces.
1Select a range of characters.
2In Grid Jidori in the Character panel or Control panel, enter a value in the text box or select one from the pop-up
menu.
Note: Use the Grid Jidori feature in the frame grid. It may not function properly in a text frame.
More Help topics
Highlight text containing custom kerning and tracking
Use mojikumi
Set paragraph gyoudori
Formatting characters
For a video tutorial on formatting characters, see www.adobe.com/go/lrvid4275_id.
Apply baseline shift
Use Baseline Shift to move a selected character up or down relative to the baseline of the surrounding text. This option
is especially useful when you’re hand-setting fractions or adjusting the position of inline graphics.
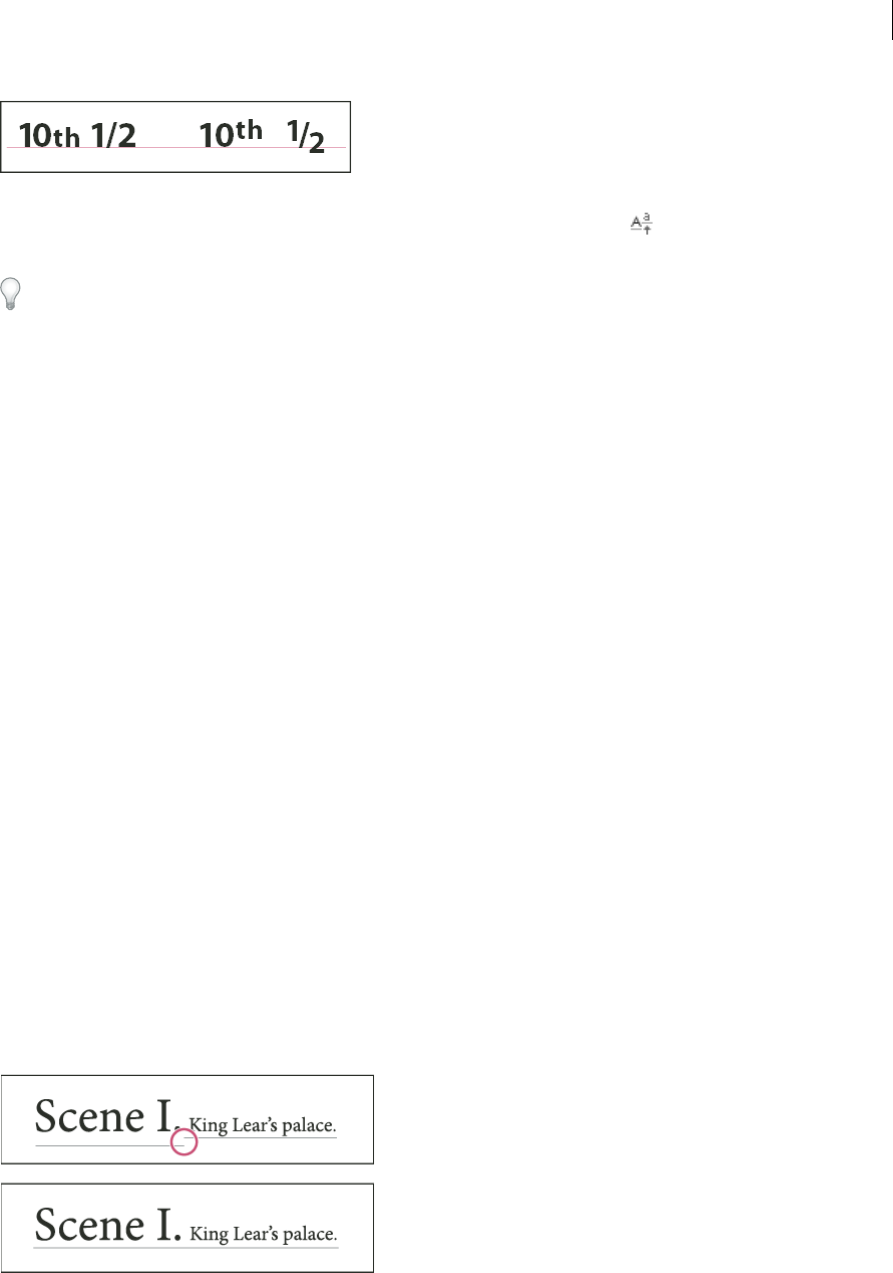
311
Typography
Last updated 6/13/2015
1Select text.
2In the Character panel or Control panel, type a numeric value for Baseline Shift . Positive values move the
character’s baseline above the baseline of the rest of the line; negative values move it below the baseline.
To increase or decrease the value, click in the Baseline Shift box, and then press the Up or Down Arrow key. Hold down
Shift while you press the Up or Down Arrow key to change the value in greater increments.
To change the default increment for baseline shift, specify a value for Baseline Shift in the Units & Increments section
of the Preferences dialog box.
Make characters superscript or subscript in a non-OpenType font
1Select text.
2Choose Superscript or Subscript in the Character panel menu or in the Control panel.
When you choose Superscript or Subscript, a predefined baseline shift value and type size are applied to the selected
text.
The values applied are percentages of the current font size and leading, and are based on settings in the Type Preferences
dialog box. These values do not appear in the Baseline Shift or Size boxes of the Character panel when you select the
text.
Note: You can change the default size and position of superscripts and subscripts using Advanced Type preferences.
Apply underline or strikethrough
The default weight of an underline and strikethrough depends on the size of the type.
Jeff Witchel provides a video tutorial about underlining at Custom Underlines in InDesign.
Apply underline or strikethrough
1Select text.
2Choose Underline or Strikethrough in the Character panel menu or the Control panel.
Change underline or strikethrough options
Creating custom underlining is especially useful when you want to create an even underline below characters of
different sizes, or for creating special effects, such as background highlighting.
1From the Character panel menu or the Control panel menu, choose Underline Options or Strikethrough Options.
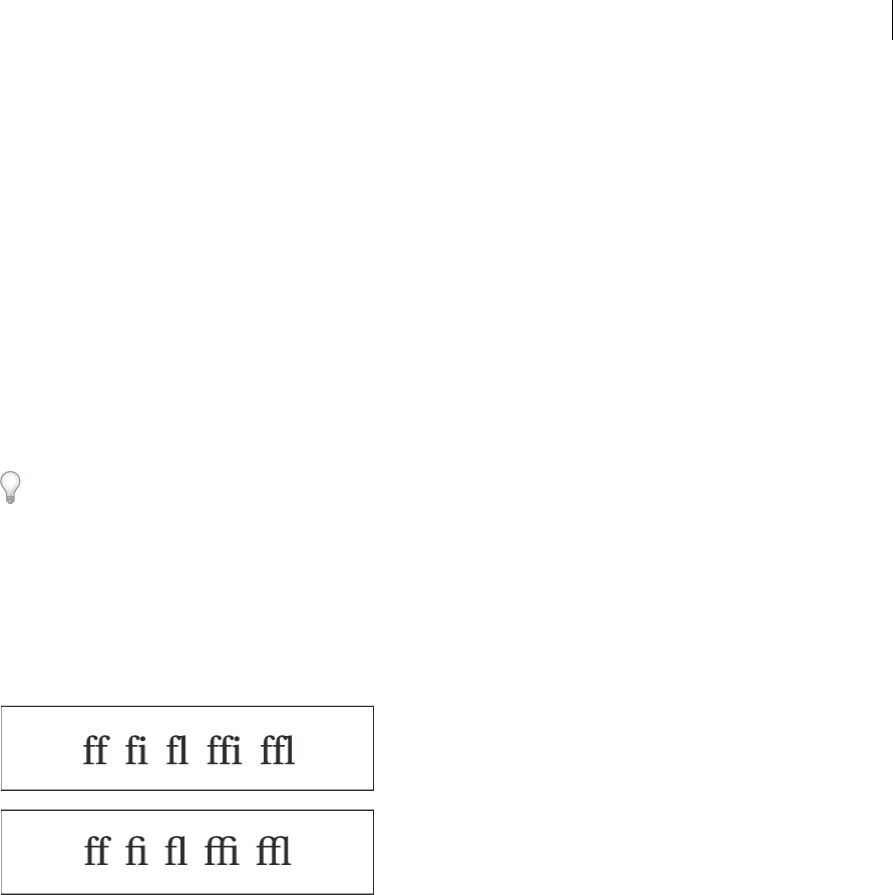
312
Typography
Last updated 6/13/2015
2Do any of the following, and then click OK:
•Select Underline On or Strikethrough On to turn on underline or strikethrough for the current text.
•For Weight, choose a weight or type a value to determine the thickness of the underline or strikethrough line.
•For Type, select one of the underline or strikethrough options.
•For Offset, determine the vertical position of the line. The offset is measured from the baseline. Negative values
move the underline above the baseline and the strikethrough below the baseline.
•Select Overprint Stroke when you want to make sure that the stroke doesn’t knock out underlying inks on a
printing press.
•Choose a color and tint. If you specified any line type other than solid, choose a gap color or gap tint to change
the appearance of the area between dashes, dots, or lines.
•Select Overprint Stroke or Overprint Gap if the underline or strikethrough will be printed over another color,
and you want to avoid errors that can occur with printing misregistration.
To change the underline or strikethrough options in a paragraph or character style, use the Underline Options or
Strikethrough Options section of the dialog box that appears when you create or edit the style.
Apply ligatures to letter pairs
InDesign can automatically insert ligatures, which are typographic replacement characters for certain letter pairs, such
as “fi” and “fl,” when they are available in a given font. The characters that InDesign uses when the Ligature option is
selected appear and print as ligatures, but are fully editable, and do not cause the spell checker to flag a word
erroneously.
With OpenType fonts, when you choose Ligatures from the Character panel menu or Control panel menu, InDesign
produces any standard ligature defined in the font, as determined by the font designer. However, some fonts include
more ornate, optional ligatures, which can be produced when you choose the Discretionary Ligatures command.
1Select text.
2Choose Ligatures from the Character panel menu or the Control panel menu.
Change the color, gradient, or stroke of text
You can apply colors, gradients, and strokes to characters and continue to edit the text. Use the Swatches panel and
Stroke panel to apply colors, gradients, and strokes to text, or change Character Color settings when creating or editing
a style.
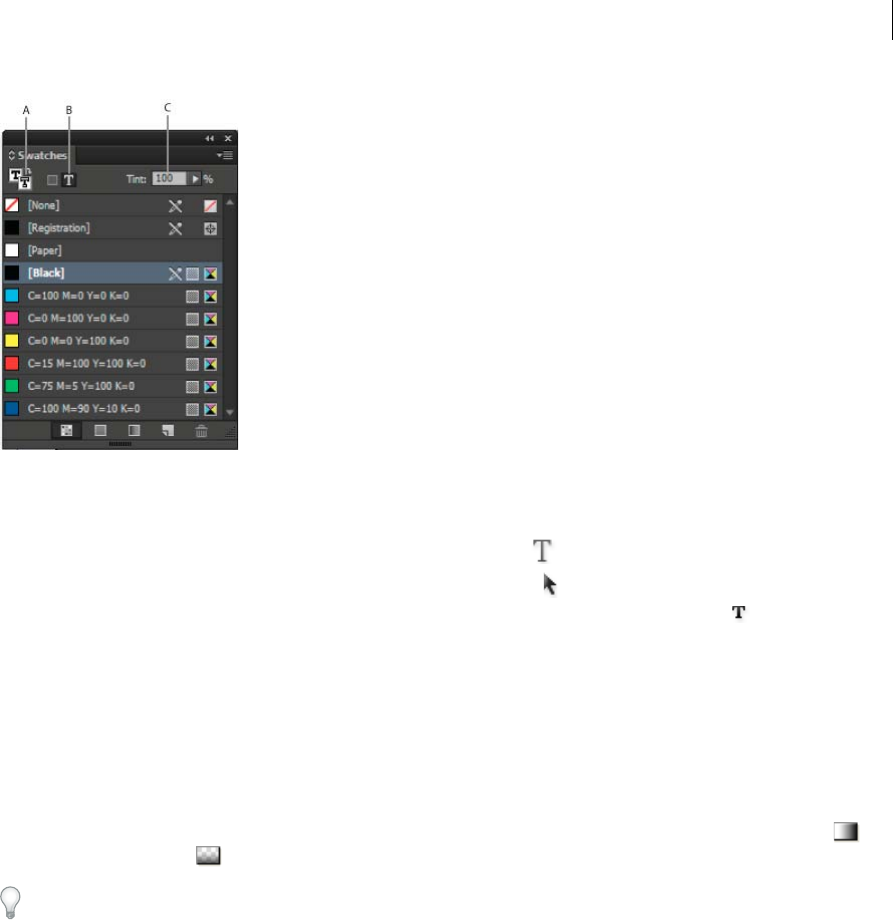
313
Typography
Last updated 6/13/2015
A Swatch affects fill or stroke B Swatch affects container or text C Tint percentage
1Do one of the following:
•To apply color changes to text inside a frame, use the Type tool to select text.
•To apply color changes to all text in a frame, use the Selection tool to select the frame. When applying color to
the text rather than the container, make sure that you select the Formatting Affects Text icon in the Tools panel
or in the Swatches panel.
2In the Tools panel or in the Swatches panel, select whether you want to apply the color change to the fill or stroke.
If you select Stroke, the color change affects only the outline of characters.
3Do any of the following:
•In the Swatches panel, click a color or gradient swatch.
•In the Stroke panel, specify a weight or other stroke options. (See Stroke panel options .)
You can also apply a gradient to text by dragging across the selected text using either the Gradient Swatch tool or
the Gradient Feather tool .
To create reverse type, you can change the text fill color to white or [Paper] and the frame’s fill color to a dark color. You
can also create reverse type by using a paragraph rule behind text; however, if the rule is black, you’ll need to change
the type to white.
Change the color and gradient of text
You can apply colors and gradients to the stroke and fill of characters with the Swatches panel. For a linked story, you
can apply any colors or gradients defined by the linked InDesign layout. For a stand-alone story, you can apply any of
the default colors or new colors you create for the document.
Note: You cannot create gradients in InCopy. Gradients only appear when imported from InDesign.
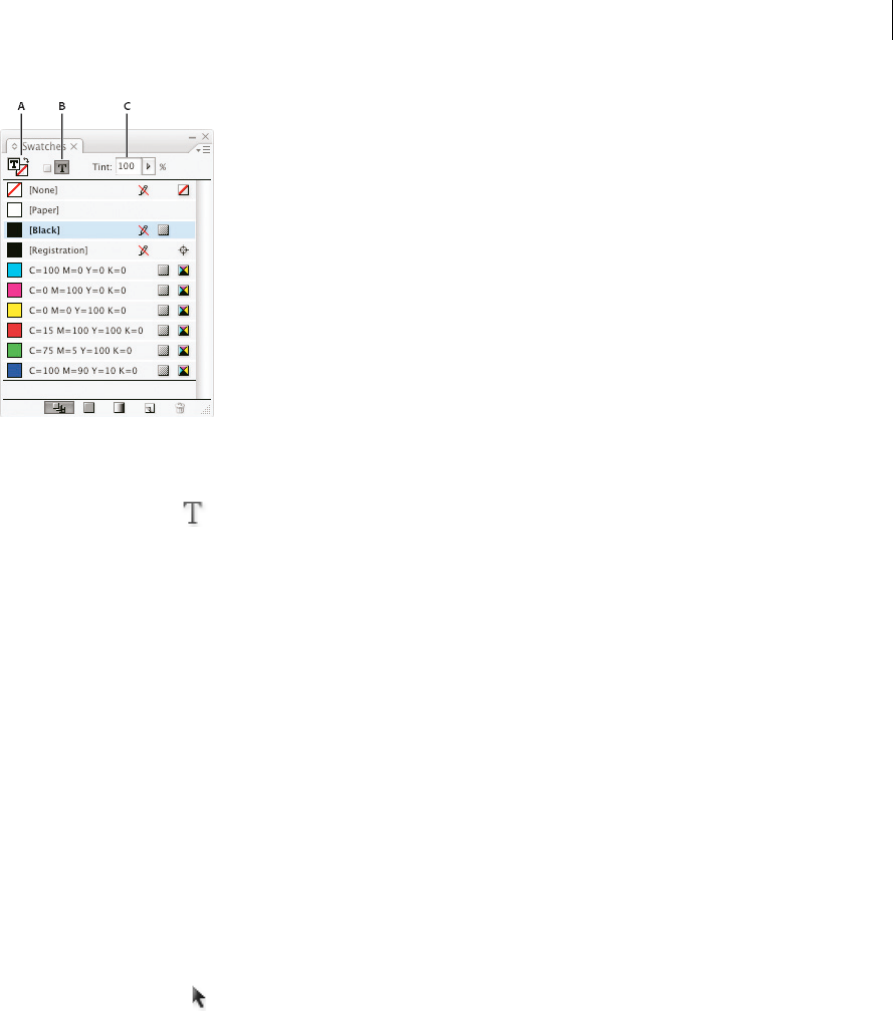
314
Typography
Last updated 6/13/2015
A Swatch affects fill or stroke B Swatch affects container or text C Tint percentage
Change the color of text
1Using the Type tool , select the text you want to color.
2In the Swatches panel (choose Window > Swatches), click a color or gradient swatch.
Note: You can apply colors to text in either Galley, Story, or Layout view; however, color changes are visible only in Layout
view.
Specify the type of swatches to display
1Choose Window > Swatches to open the Swatches panel.
2At the bottom of the panel, specify one of the following:
•To see all color, tint, and gradient swatches, click the Show All Swatches button.
•To see only process color, spot color, and tint swatches, click the Show Color Swatches button.
•To see only gradient swatches, click the Show Gradient Swatches button.
Add transparency effects to text
Use the Effects panel to add transparency effects, such as drop shadows, to text.
Mike Rankin provides examples about transparency effects at InDesign Eye Candy, Part I.
1Use the Selection tool to select the text frame.
2Choose Object > Effects > [effect].
3Choose Text from the Settings For menu.
You can choose Object if you want the effects you choose to apply to the text frame’s stroke and fill as well as the text
inside it.
4Specify the effect attributes and click OK.
If you want to change the text’s blending mode or opacity settings, make these changes on the Effects panel.

315
Typography
Last updated 6/13/2015
Assign a language to text
Assigning a language to text determines which spelling and hyphenation dictionary is used. Assigning a language does
not change the actual text.
1Do any of the following:
•To apply the language only to selected text, select the text.
•To change the default dictionary used in InDesign, choose the language with no documents open.
•To change the default dictionary for a specific document, open the document, choose Edit > Deselect All, and
then choose the language.
2In the Character panel, choose the appropriate dictionary in the Language menu.
InDesign uses Proximity (and WinSoft for some languages) dictionaries for both spelling and hyphenation. These
dictionaries let you specify a different language for as little as a single character of text. Each dictionary contains
hundreds of thousands of words with standard syllable breaks. Changing the default language does not affect existing
text frames or documents.
You can customize language dictionaries to ensure that any unique vocabulary you use is recognized and treated
correctly.
InDesign includes a language locking feature that prevents CJK text from being assigned a non-CJK language.
A “Glockenspiel” in English B “Glockenspiel” in Traditional German C “Glockenspiel” in Reformed German
Change the case of type
The All Caps or Small Caps commands change the appearance of text, but not the text itself. Conversely, the Change
Case command changes the case setting of selected text. This distinction is important when searching or spell-checking
text. For example, suppose you type “spiders” in your document and apply All Caps to the word. Using Find/Change
(with Case Sensitive selected) to search for “SPIDERS” will not find the instance of “spiders” to which All Caps was
applied. To improve search and spell-check results, use the Change Case command rather than All Caps.
Anne-Marie Concepcion provides an article about small caps at Small Caps vs OpenType All Small Caps.
Change text to All Caps or Small Caps
All caps is a method used to capitalize all Roman text. Small caps is a method used to capitalize all Roman text and
make it the approximate size of lowercase characters.
InDesign can automatically change the case of selected text. When you format text as small caps, InDesign
automatically uses the small-cap characters designed as part of the font, if available. Otherwise, InDesign synthesizes
the small caps using scaled-down versions of the regular capital letters. The size of synthesized small caps is set in the
Type Preferences dialog box.

316
Typography
Last updated 6/13/2015
If you select All Caps or Small Caps in an OpenType font, InDesign creates more elegant type. If you’re using an
OpenType font, you can also choose All Small Caps from the Character panel menu or the Control panel. (See Apply
OpenType font attributes .)
1Select text.
2Choose All Caps or Small Caps in the Character panel menu or in the Control panel. If the text was originally typed
in all caps, selecting Small Caps will not change the text.
Specify the size for small caps
1Choose Edit > Preferences > Advanced Type (Windows) or InCopy > Preferences > Advanced Type (Mac OS).
2For Small Caps, type a percentage of the original font size for text to be formatted as small caps. Then click OK.
Change capitalization
1Select text.
2Choose one of the following in the Type > Change Case submenu:
•To change all characters to lowercase, choose Lowercase.
•To capitalize the first letter of each word, choose Title Case.
•To change all characters to uppercase, choose Uppercase.
•To capitalize the first letter of each sentence, choose Sentence Case.
Note: The Sentence Case command assumes that the period (.), exclamation point (!), and question mark (?) characters
mark the ends of sentences. Applying Sentence Case may cause unexpected case changes when these characters are used in
other ways, as in abbreviations, file names, or Internet URLs. In addition, proper names may become lowercase when they
should be uppercase.
Scale type
You can specify the proportion between the height and width of the type, relative to the original width and height of
the characters. Unscaled characters have a value of 100%. Some type families include a true expanded font, which is
designed with a larger horizontal spread than the plain type style. Scaling distorts the type, so it is generally preferable
to use a font that is designed as condensed or expanded, if one is available.
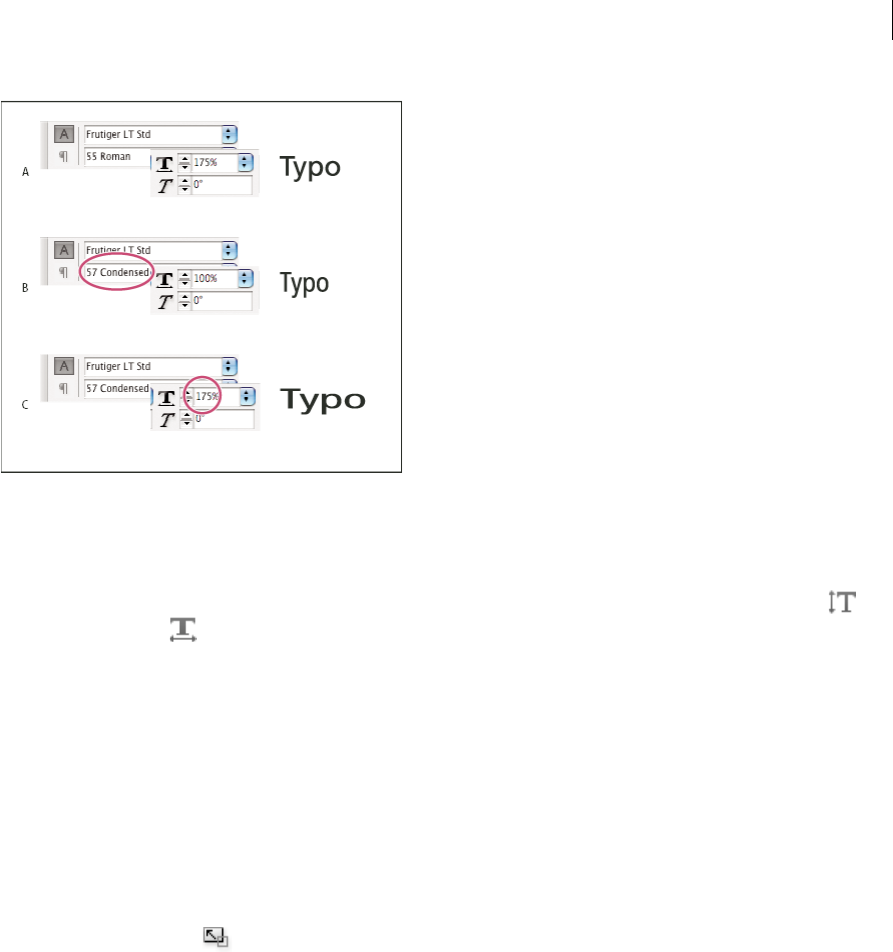
317
Typography
Last updated 6/13/2015
A Unscaled type B Unscaled type in condensed font C Scaled type in condensed font
Adjust vertical or horizontal scaling
1Select text you want to scale.
2In the Character panel or Control panel, type a numeric value to change the percentage of Vertical Scaling or
Horizontal Scaling .
If the Use New Vertical Scaling in Vertical preference option is selected, the X and Y scale for Roman glyphs in vertical
text will be reversed, making all text in the line scale in the same direction. (See Change CJK composition preferences.)
If the Adjust Line Height With Char Scale option is selected in the Character panel menu, the Y scale of glyphs affects
line height. When scaling frame grids, the Y scale is affected, so you may want to adjust the line height to avoid auto-
gyoudori occurring on the scaled grid.
Scale text by resizing the text frame in InDesign
❖Do any of the following:
•Using the Selection tool, hold down Ctrl (Windows) or Command (Mac OS), and then drag a corner of the text
frame to resize it.
•Using the Scale tool , resize the frame.
(See Scale objects .)
Determine the appearance of scaled text values
When you change the scale of a frame, the text inside the frame is also scaled. For example, when you double the size
of a text frame, the text also doubles in size; 20-point text increases to 40 points.
David Blatner provides an article about scaled text frames at Making a Magnifying Glass Text Frame in InDesign.
You can change a preferences option to indicate how scaled text appears in panels:
•By default, with Apply To Content selected, the Font Size boxes in the Control panel and Character panel list the
new size of text (such as 40 pt). If you select the Adjust Scaling Percentage option, the Font Size boxes display both
the original and the scaled size of the text, such as “20 pt (40).”

318
Typography
Last updated 6/13/2015
•The scaling values in the Transform panel tell you the horizontal and vertical percentage by which the frame was
scaled. By default, with Apply To Content selected, scaling values display at 100% after a text is scaled. If you select
the Adjust Scaling Percentage option, the scaling values reflect the scaled frame, so doubling the scale of a frame
displays as 200%.
Tracking scale changes to frames is useful if you have to revert a frame and the text inside it to their original size. It’s
useful as well for finding out by how much you changed the size of a frame. To track scale changes to frames and the
text inside these frames:
1Choose Edit > Preferences > General (Windows) or InDesign > Preferences > General (Mac OS).
2Select Adjust Scaling Percentage, and then click OK.
Note the following:
•The Adjust Scaling Percentage preference applies to frames that you scale after the preference is turned on, not to
existing frames.
•The Adjust Scaling Percentage preference stays with the text. The scaled point size continues to appear in
parentheses even if you turn off the Adjust Scaling Percentage preference and scale the frame again.
•To remove the scaled point size from the Transform panel, choose Redefine Scaling as 100% in the Transform panel.
Choosing this option doesn’t change the appearance of the scaled frame.
•If you edit the text or scale a frame within threaded frames when the Adjust Scaling Percentage preference is
selected, the text is scaled, even if it moves to a different frame. However, if Apply To Content is selected, any text
that flows to a different frame as a result of editing is no longer scaled.
Skew type
1Select text.
2In the Character panel, type a numeric value for Skewing . Positive values slant type to the right; negative values
slant type to the left.
Note that applying an angle to type does not produce true italic characters.
More Help topics
Apply OpenType font attributes
OpenType fonts
Applying color
Add rules (lines) above or below paragraphs
Applying gradients to text
Transparency effects
Hyphenation and spelling dictionaries
Formatting paragraphs
For a video tutorial on formatting paragraphs, see www.adobe.com/go/lrvid4276_id.

319
Typography
Last updated 6/13/2015
Adjust paragraph spacing
You can control the amount of space between paragraphs. If a paragraph begins at the top of a column or frame, InCopy
does not honor the Space Before value. In such a case, you can increase the leading of the first line of the paragraph or
increase the top inset of the text frame in InDesign.
1Select text.
2In the Paragraph panel or the Control panel, adjust the appropriate values for Space Before and Space After .
To ensure formatting consistency, change paragraph spacing in the paragraph styles you define.
Use drop caps
You can add drop caps to one or more paragraphs at a time. The drop cap’s baseline sits one or more lines below the
baseline of the first line of a paragraph.
The size of drop cap text differs depending on whether the drop cap characters in the first line are half-width roman or
full-width CJK. When the drop cap characters in the first line are half-width roman, the cap height of the drop cap
matches the cap height of the first line of text in the paragraph, and the Roman baseline of the drop cap matches the
baseline of the last drop cap line in the paragraph. The embox top of the drop cap matches the embox top of the first
line of the paragraph, and the embox bottom of the drop cap matches the embox bottom of the last drop cap line in the
paragraph.
You can also create a character style that can be applied to the drop-cap characters. For example, you can create a tall
cap (also called a raised cap) by specifying a 1-line, 1-character drop cap and applying a character style that increases
the size of the first letter.
Create a drop cap
1With the Type tool selected, click in the paragraph where you want the drop cap to appear.
2In the Paragraph panel or Control panel, type a number for Drop Cap Number Of Lines to indicate the number
of lines you want the drop cap to occupy.
3For Drop Cap One Or More Characters , type the number of drop cap characters you want.
4To apply a character style to the drop cap character, choose Drop Caps And Nested Styles from the Paragraph panel
menu, and then choose the character style you created.
You can also use the Drop Caps And Nested Styles dialog box to align the drop cap to the text edge, reducing the
amount of space on the left side of the drop cap, and adjust for drop cap letters with descenders, such as “g” and “y.”
If you want to resize, skew, or change the typeface of the drop cap letter for added effect, select the letter or letters and
make the formatting changes.
You can also use the Drop Caps And Nested Styles dialog box to adjust the drop cap in different way. You can align
the drop cap to the text edge, scale for descenders, ignore the frame grid, pad to the frame grid, and scale up or down
to the grid.

320
Typography
Last updated 6/13/2015
Remove a drop cap
1With the Type tool selected, click in the paragraph where the drop cap appears.
2In the Paragraph panel or Control panel, type 0 for Drop Cap Number Of Lines or Drop Cap Number Of Characters.
Add rules (lines) above or below paragraphs
Rules are paragraph attributes that move and are resized along with the paragraph on the page. If you’re using a rule
with headings in your document, you may want to make the rule part of a paragraph style definition. The width of the
rule is determined by the column width.
The offset for a rule above a paragraph is measured from the baseline of the top line of text to the bottom of the rule.
The offset for a rule below a paragraph is measured from the baseline of the last line of text to the top of the rule.
A Rule above paragraph B Rule below paragraph
Michael Murphy provides a video tutorial about creating special effects using paragraph rules at Paragraph Rules Rule.
Creative Curio provides an article about creative uses of paragraph rules at Creative Uses for Paragraph Rules in
InDesign, Pt 1.
Add a rule above or below a paragraph
1Select text.
2Choose Paragraph Rules from the Paragraph panel menu or Control panel menu.
3At the top of the Paragraph Rule dialog box, select Rule Above or Rule Below.
4Select Rule On.
Note: If you want both a rule above and below, make sure that Rule On is selected for both Rule Above and Rule Below.
5Select Preview to see what the rule will look like.
6For Weight, choose a weight or type a value to determine the thickness of the rule. For Rule Above, increasing the
weight expands the rule upwards. For Rule Below, increasing the weight expands the rule downward.
7Select Overprint Stroke when you want to make sure that the stroke doesn’t knock out underlying inks on a printing
press.
8Do one or both of the following:
•Choose a color. The available colors are those listed in the Swatches panel. Select the Text Color option to make
the rule the same color as the first character in the paragraph for Rule Above and the last character for Rule
Below.

321
Typography
Last updated 6/13/2015
•Choose a tint or specify a tint value. The tint is based on the color you specified. Note that you can’t create tints
of the built-in colors None, Paper, Registration, or Text Color.
•If you specified any line type other than solid, choose a gap color or gap tint to change the appearance of the area
between dashes, dots, or lines.
9Choose the width of the rule. You can choose either Text (from the left edge of text to the line end) or Column (from
the left edge of the column to the right edge of the column). If the left edge of the frame has a column inset, the rule
begins at the inset.
10 To determine the vertical position of the rule, type a value for Offset.
11 To make sure that the rule above text is drawn within the text frame, select Keep In Frame. If this option isn’t
selected, the rule can appear outside the text frame.
To make sure the paragraph rule at the top of one column aligns with the text at the top of the adjacent column,
select Keep In Frame.
12 Set left or right indents for the rule (not for text) by typing values for Left Indent and Right Indent.
13 Select Overprint Stroke if the paragraph rule will be printed over another color and you want to avoid errors that
can occur with printing misregistration. Then click OK.
Remove a paragraph rule
1Using the Type tool , click in the paragraph containing the paragraph rule.
2Choose Paragraph Rules from the Paragraph panel menu or Control panel menu.
3Deselect Rule On and click OK.
Ways to control paragraph breaks
You can eliminate orphans and widows, words or single lines of text that become separated from the other lines in a
paragraph. Orphans fall at the bottom of a column or page, and widows fall at the top of a column or page. Another
typographic problem to avoid is a heading that stands alone on a page with the following paragraph on the next page.
You have several options for fixing widows, orphans, short exit lines, and other paragraph break problems:
Discretionary hyphens A discretionary hyphen (Type > Insert Special Character > Hyphens And Dashes >
Discretionary Hyphen) appears only if the word breaks. This option prevents the common typographic problem of
hyphenated words, such as “care-giver,” appearing in the middle of a line after text reflows. Similarly, you can also add
a discretionary line break character.
No Break Choose No Break from the Character panel menu to prevent selected text from breaking across a line.
Nonbreaking spaces Insert a nonbreaking space (Type > Insert White Space > [nonbreaking space]) between words you
want to keep together.
Keep Options Choose Keep Options from the Paragraph panel menu to specify how many lines in the following
paragraph remain with the current paragraph.
Start Paragraph Use Start Paragraph in the Keep Options dialog box to force a paragraph (usually a title or heading)
to appear at the top of a page, column, or section. This option works especially well as part of a heading paragraph style.
Hyphenation Settings Choose Hyphenation from the Paragraph panel menu to change hyphenation settings.
Edit text Editing text may not be an option depending on the kind of document you work with. If you have license to
rewrite, then subtle rewording can often create a better line break.

322
Typography
Last updated 6/13/2015
Use a different composer In general, use Adobe Paragraph Composer to let InDesign compose paragraphs
automatically. If a paragraph isn’t composed the way you’d like, choose Adobe Single-line Composer from the
Paragraph panel menu or Control panel menu and adjust selected lines individually. See Compose text.
In general, use Adobe Japanese Paragraph Composer or Adobe Paragraph Composer to let InDesign compose
paragraphs automatically. If a paragraph isn’t composed the way you’d like, choose Adobe Japanese Single-line
Composer or Adobe Single-line Composer from the Paragraph panel menu or Control panel menu and adjust selected
lines individually.
Control paragraph breaks using Keep Options
You can specify how many lines of the following paragraph remain with the current paragraph as it moves between
frames—a convenient way to ensure that headings don’t become isolated from the body text they introduce. InDesign
can highlight the paragraphs that sometimes break in violation of your settings.
You may not want to use Keep Options if your document does not require your columns to share the same last baseline.
To highlight paragraphs that violate Keep Options, choose Edit > Preferences > Composition (Windows) or InCopy >
Preferences > Composition (Mac OS), select Keep Violations, and click OK.
1Select the paragraph or paragraphs you want to affect.
2Choose Keep Options in the Paragraph panel menu or Control panel menu. (You can also change keep options when
creating or editing a paragraph style.)
3Choose Keep Options in the Paragraph panel menu. (You can also change keep options when creating or editing a
paragraph style.)
4Select any of these options and then click OK:
•Select Keep With Previous to keep the first line of the current paragraph with the last line of the previous
paragraph.
•For Keep With Next _ Lines, specify the number of lines (up to five) of the subsequent paragraph that the last
line of the current paragraph stays with. This option is especially useful for making sure that a heading stays with
the next few lines of the paragraph that follows it.
•Select the Keep Lines Together option and select All Lines In Paragraph to prevent the paragraph from breaking.
•Select the Keep Lines Together option, select At Start/End Of Paragraph, and specify the number of lines that
must appear at the beginning or ending of the paragraph to prevent orphans and widows.
•For Start Paragraph, choose an option to force InDesign to push the paragraph to the next column, frame, or
page. If Anywhere is selected, the start position is determined by the Keep Line Settings option. For other
options, they will be forced to start from these positions.
When you create paragraph styles for headings, use the Keep Options panel to make sure that your headings remain
with the paragraph that follows them.
Create hanging punctuation
The Optical Margin Alignment function is for Roman text. For more information on hanging of punctuation marks in
CJK text, see Apply kinsoku hanging.
Punctuation marks and letters such as “W” can make the left or right edges of a column appear to be misaligned.
Optical Margin Alignment controls whether punctuation marks (such as periods, commas, quotation marks, and
dashes) and edges of letters (such as W and A) hang outside the text margins, so that the type looks aligned.

323
Typography
Last updated 6/13/2015
1Select a text frame, or click anywhere in the story.
2Choose Type > Story.
3Select Optical Margin Alignment.
4Select a font size to set the appropriate amount of overhang for the size of type in your story. For optimal results, use
the same size as the text.
To turn off Optical Margin Alignment for an individual paragraph, choose Ignore Optical Margin from the Paragraph
panel menu or Control panel menu.
More Help topics
Add paragraph and character styles
Drop caps and nested styles
Apply a character style to a drop cap
Add column, frame, and page breaks
Formatting text
Format text
Use the Control panel to change the appearance of text. When text is selected or when the insertion point is placed in
text, the Control panel displays either the character formatting controls or the paragraph formatting controls, or a
combination of both, depending on your monitor resolution. These same text formatting controls appear in the
Character panel and Paragraph panel. You can also use the Character panel and Paragraphs panel to change the
appearance of text.
For a video tutorial on formatting characters, see www.adobe.com/go/lrvid4275_id. For a video tutorial on formatting
paragraphs, see www.adobe.com/go/lrvid4276_id.
Use the Character panel and Paragraphs panel to change the appearance of text. In InDesign, you can also use the
Control panel to format text. The Control panel is not available in InCopy.
Note the following methods of formatting text:
•To format characters, you can use the Type tool to select characters, or you can click to place the insertion point,
select a formatting option, and then begin typing.
•To format paragraphs, you don’t need to select an entire paragraph—selecting any word or character, or placing the
insertion point in a paragraph will do. You can also select text in a range of paragraphs.
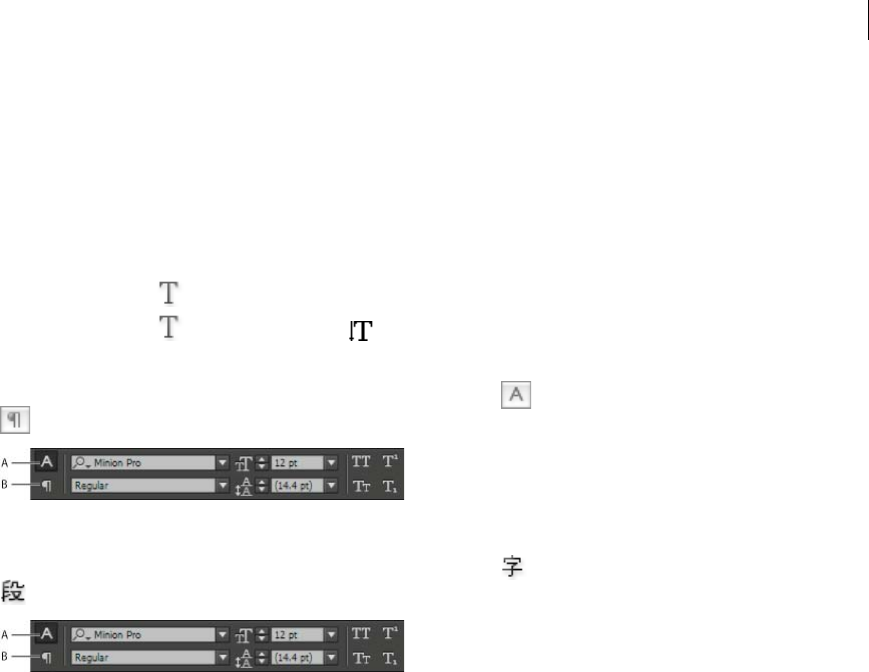
324
Typography
Last updated 6/13/2015
•To set the formatting for all future text frames that you’ll create in the current document, make sure that the
insertion point is not active and that nothing is selected, and then specify text formatting options. To set default text
formatting for all new documents, close all documents, and then specify the text settings. See Set defaults.
•Select a frame to apply formatting to all text inside it. The frame cannot be part of a thread.
•Use paragraph styles and character styles to format text quickly and consistently.
For a video tutorial on working with text, see www.adobe.com/go/vid0075.
1Select the Type tool .
2Select the Type tool or Vertical Type tool .
3Click to place an insertion point, or select the text that you want to format.
4In the Control panel, click the Character Formatting Control icon or the Paragraph Formatting Control icon
.
A Character formatting controls B Paragraph formatting controls
5In the Control panel, click the Character Formatting Control icon or the Paragraph Formatting Control icon
.
A Character formatting controls B Paragraph formatting controls
6Choose Type > Paragraph or Type > Character to display the Paragraph or Character panel.
7Specify formatting options.
Text formatting precedence
To format text with attributes such as font style and text direction, you can use several different methods. For example,
you can use the Control panel, frame grid options, or named grids or text styles. If you use more than one method and
attributes conflict with each other, InDesign must choose which attribute to use. The order of precedence is as follows:
1Character attribute overrides
2Character style
3Paragraph attribute overrides
4Paragraph style
5CJK grid attributes (either from a named grid or from Frame Grid Options dialog box)
6Application default (root paragraph style)
For example, if you specify one font size in the Frame Grid Options dialog box and a different font size in a character
style, the font size from character style is used. Similarly, if you include both a paragraph style and a named grid in an
object style, the paragraph style takes precedence over the named grid.
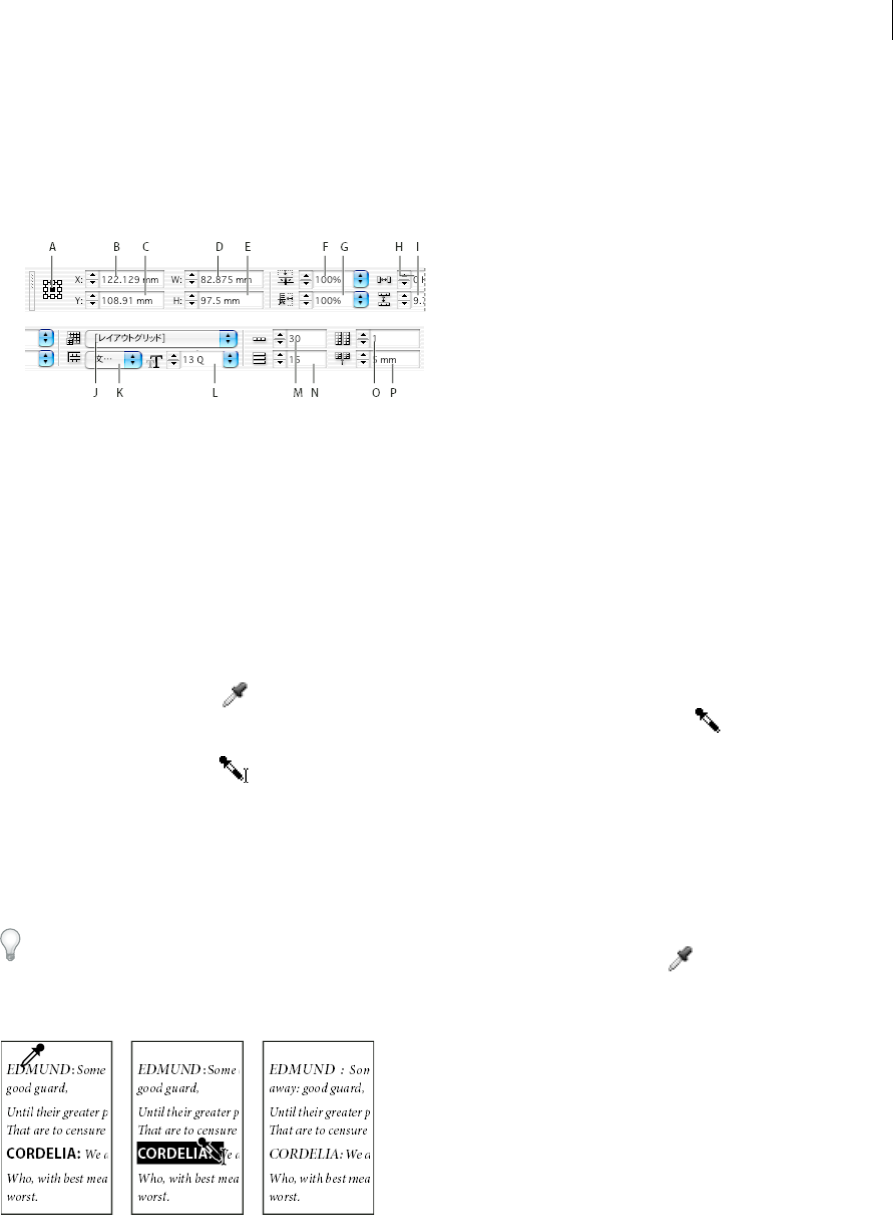
325
Typography
Last updated 6/13/2015
Format a frame grid
When you select a frame grid, options for formatting the grid are displayed in the Control panel.
1Using a selection tool, select a frame grid.
2Select any options in the Control panel.
A Reference point B X Location C Y Location D Width E Height F Vertical scaling G Horizontal scaling H Character aki I Line aki J Grid
format name K Grid view L Font size M Frame grid characters per line N Number of lines O Number of columns P Column gutter
Copy type attributes (Eyedropper)
You can use the Eyedropper tool to copy type attributes such as character, paragraph, fill, and stroke settings, and then
apply those attributes to other type. By default, the Eyedropper tool copies all type attributes. To customize the
attributes you want to copy with the Eyedropper tool, use the Eyedropper Options dialog box.
The Eyedropper tool is available only in Layout View.
Copy type attributes to unselected text
1With the Eyedropper tool , click the text that is formatted with the attributes you want to copy. (The text can be
in another open document.) The eyedropper pointer reverses direction, and appears full , to indicate that it’s
loaded with the attributes you copied. When you position the eyedropper pointer over text, an I-beam appears next
to the loaded eyedropper .
2With the Eyedropper tool, select the text you want to change.
The selected text takes on the attributes loaded in the eyedropper. As long as the Eyedropper tool is selected, you
can continue to select text to apply formatting.
3To deselect the Eyedropper tool, click another tool.
To clear the formatting attributes currently held by the eyedropper tool, press Alt (Windows) or Option (Mac OS) while
the Eyedropper tool is loaded. The Eyedropper tool reverses direction and appears empty , to indicate that it’s ready
to pick up new attributes. Click an object containing the attributes you want to copy, and then drop the new attributes on
another object.
If you use the Eyedropper tool to copy a paragraph style from text in one document to text in another, and the
paragraph style has the same name but different sets of attributes, any style differences will appear as local overrides to
the destination style.
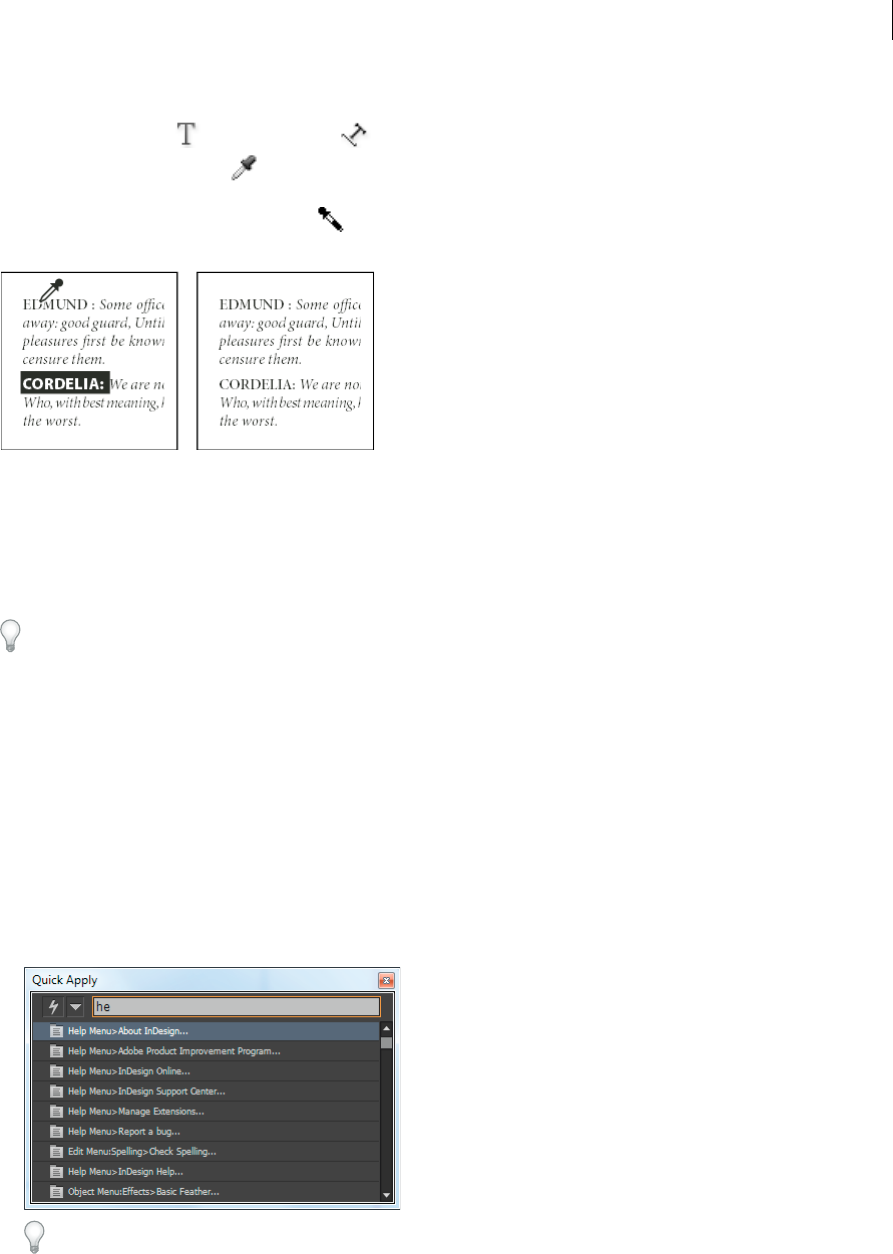
326
Typography
Last updated 6/13/2015
Copy type attributes to selected text
1With the Type tool or Path Type tool , select the text to which you want to copy attributes.
2Using the Eyedropper tool , click the text from which you want to copy attributes. (The text from which you
want to copy attributes must be in the same InDesign document as the text you want to change.) The Eyedropper
tool reverses direction and appears full , to indicate that it’s loaded with the attributes you copied. The attributes
are applied to the text you selected in step 1.
Change which text attributes the Eyedropper tool copies
1In the toolbox, double-click the Eyedropper tool.
2Choose Character Settings or Paragraph Settings in the Eyedropper Options dialog box.
3Select the attributes you want to copy with the Eyedropper tool, and then click OK.
To copy or apply paragraph attributes only without having to change settings in the Eyedropper Options dialog box,
hold down Shift as you click text with the Eyedropper tool.
Use Quick Apply
Use Quick Apply to find and apply styles, menu commands, scripts, variables, and most other commands that can be
found in the Keyboard Shortcuts dialog box.
1Select the text or frame to which you want to apply the style, menu command, script, or variable.
2Choose Edit > Quick Apply, or press Ctrl+Enter (Windows) or Command+Return (Mac OS).
3Start typing the name of the item you want to apply.
The name you type doesn’t need to be an exact match. For example, typing he will locate styles such as Head 1, Head
2, and Subhead, as well as Help menu commands such as Help Menu > InDesign Help.
You can narrow the search to only a single category by typing the appropriate prefix at the beginning of the search,
such as m: for menu or p: for paragraph styles. To view a list of prefixes, click the down arrow to the left of the Quick
Apply text box. You can deselect categories in this list that you don’t want to appear.

327
Typography
Last updated 6/13/2015
4Select the item you want to apply, and then:
•To apply a style, menu command, or variable, press Enter or Return.
•To apply a paragraph style and remove overrides, press Alt+Enter (Windows) or Option+Return (Mac OS).
•To apply a paragraph style and remove overrides and character styles, press Alt+Shift+Enter (Windows) or
Option+Shift+Return (Mac OS).
•To apply an item without closing the Quick Apply list, press Shift+Enter (Windows) or Shift+Return (Mac OS).
•To close the Quick Apply list without applying an item, press Esc or click anywhere else in the document window.
•To edit a style, press Ctrl+Enter (Windows) or Command+Return (Mac OS).
When the Quick Apply list is displayed, press the left and right arrow keys to scroll through the edit field; press the up
and down arrow keys to scroll through the list of items.
More Help topics
Working with Text video
Control panel overview
Apply colors using the Eyedropper tool

328
Last updated 6/13/2015
Chapter 9: Tables
Selecting and editing tables
Select table cells, rows, and columns
When you select part or all of the text in a cell, that selection has the same appearance as would text selected outside a
table. However, if the selection spans more than one cell, the cells and their contents are both selected.
If a table spans more than one frame, holding the mouse pointer over any header or footer row that is not the first
header or footer row causes a lock icon to appear, indicating that you cannot select text or cells in that row. To select
cells in a header or footer row, go to the beginning of the table.
Select cells
❖Using the Type tool , do any of the following:
•To select a single cell, click inside a cell, or select text, and then choose Table > Select > Cell.
•To select multiple cells, drag across a cell border. Be careful not to drag the column or row line so that you don’t
resize the table.
To switch between selecting all of the text in a cell and selecting the cell, press Esc.
Select entire columns or rows
❖Using the Type tool , do any of the following:
•Click inside a cell, or select text, and then choose Table > Select > Column or Row.
•Move the pointer over the top edge of a column or the left edge of a row so that the pointer becomes an arrow
shape ( or ), and then click to select the entire column or row.
Select all header, body, or footer rows
1Click inside a table, or select text.
2Choose Table > Select > Header Rows, Body Rows, or Footer Rows.

329
Tables
Last updated 6/13/2015
Select the entire table
❖Using the Type tool , do any of the following:
•Click inside a table, or select text, and then choose Table > Select > Table.
•Move the pointer over the upper left corner of the table so that the pointer becomes an arrow shape , and then
click to select the entire table.
•Drag the Type tool across the entire table.
You can also select a table in the same way you select an anchored graphic—place the insertion point immediately before
or after a table, and then hold down Shift while pressing the Right Arrow key or Left Arrow key, respectively, to select
the table.
Insert rows and columns
You can insert rows and columns using a number of different methods.
Insert a row
1Place the insertion point in a row below or above where you want the new row to appear.
2Choose Table > Insert > Row.
3Specify the number of rows you want.
4Specify whether the new row or rows should appear before or after the current row, and then click OK.
The new cells have the same formatting as the text in the row in which the insertion point was placed.
You can also create a new row by pressing Tab when the insertion point is in the last cell.
Insert a column
1Place the insertion point in a column next to where you want the new column to appear.
2Choose Table > Insert > Column.
3Specify the number of columns you want.
4Specify whether the new column or columns should appear before or after the current column, and then click OK.
The new cells have the same formatting as the text in the column in which the insertion point was placed.
Insert multiple rows and columns
1With the insertion point in a cell, choose Table > Table Options > Table Setup.
2Specify a different number of rows and columns, and then click OK.
New rows are added to the bottom of the table; new columns are added to the right side of the table.
You can also change the number of rows and columns using the Table panel. To display the Table panel, choose Window
> Type & Tables > Table.

330
Tables
Last updated 6/13/2015
Insert a row or column by dragging
When adding columns, if you drag more than one and one-half times the width of the column being dragged, new
columns are added that have the same width as the original column. If you drag to insert only one column, that column
can have a narrower or wider width than the column from where you dragged. The same behavior is true of rows, unless
the Row Height for the row being dragged is set to At Least. In this case, if you drag to create only one row, InDesign
will resize the new row, if necessary, so that it’s tall enough to contain text.
1Position the Type tool over the border of a column or row so that a double-arrow icon ( or ) appears.
2Hold down the mouse button, and then hold down Alt (Windows) or Option (Mac OS) while dragging down to
create a new row, or to the right to create a new column. (If you press Alt or Option before holding down the mouse
button, the Hand tool appears—so make sure you begin dragging before you press Alt or Option.)
Note: Dragging to insert rows or columns doesn’t work at the top or left edges of a table. These fields are used to select rows
or columns.
Note: Dragging to insert rows or columns doesn’t work at the top or left edges of a table in horizontal tables, or at the top
or right edges of a table in vertical tables. These fields are used to select rows or columns.
Delete rows, columns, or tables
•To delete a row, column, or table, place the insertion point inside the table, or select text in the table, and then choose
Table > Delete > Row, Column, or Table.
•To delete rows and columns by using the Table Options dialog box, choose Table > Table Options > Table Setup.
Specify a different number of rows and columns, and then click OK. Rows are deleted from the bottom of the table;
columns are deleted from the right side of the table.
Note: In a vertical table, rows are deleted from the left side of the table; columns are deleted from the bottom of the table.
•To delete a row or column by using the mouse, position the pointer over the border of the bottom or right side of
the table so that a double-arrow icon ( or ) appears; hold down the mouse button; and then hold down Alt
(Windows) or Option (Mac OS) while dragging either up to delete rows, or to the left to delete columns.
Note: If you press Alt or Option before holding down the mouse button, the Hand tool will appear—so press Alt or Option
after you begin dragging.
•To delete cell contents without deleting cells, select the cells containing the text you want to delete, or use the Type
tool to select the text within the cells. Press Backspace or Delete, or choose Edit > Clear.
Change the alignment of a table within a frame
A table assumes the width of the paragraph or table cell in which it is created. However, you can change the size of the
text frame or table so that the table is wider or narrower than the frame. In such a case, you can decide where you want
the table to be aligned within the frame.
1Place the insertion point to the right or left of the table. Make sure that the text insertion point is placed on the table
paragraph and not inside the table. The insertion point becomes as tall as the table in the frame.
2Click an alignment button (such as Align Center) in the Paragraph panel or Control panel.
Navigate within a table
Use the Tab or arrow keys to move within a table. You can also jump to a specific row, especially useful in long tables.

331
Tables
Last updated 6/13/2015
Move within a table using Tab
•Press Tab to move to the next cell. If you press Tab in the last table cell, a new row is created. For information on
inserting tabs and indents in a table, see Format text within a table.
•Press Shift+Tab to move to the previous cell. If you press Shift+Tab in the first table cell, the insertion point moves
to the last table cell.
The first cell, last cell, previous cell, and next cell differ depending on the writing direction of the story. For horizontal
writing, the first cell is in the upper left corner, the last cell is in the lower right, the previous cell is the cell to the left (the
previous cell of a cell on the left edge is the rightmost cell on the row above), and the next cell is the cell to the right (the next
cell of a cell on the right edge is the leftmost cell on the row below). For vertical writing, the first cell is in the upper right
corner, the last cell is in the lower left, the previous cell is the cell above (the previous cell of a cell on the upper edge is the
bottom cell of the row on the right), and the next cell is the cell below (the next cell of a cell on the lower edge is the top cell
of the row on the left).
Move within a table using arrow keys
1Press the arrow keys to navigate within and between table cells. If you press the Right Arrow key when the insertion
point is at the end of the last cell in a row, the insertion point moves to the beginning of the first cell in the same row.
Similarly, if you press the Down Arrow key when the insertion point is at the end of the last cell in a column, the
insertion point moves to the beginning of the first cell in the same column.
2If you press the Down Arrow key when the insertion point is at the end of the last cell in a row in a vertical table, the
insertion point moves to the beginning of the first cell in the same row. Similarly, if you press the Left Arrow key
when the insertion point is at the end of the last cell in a column in a vertical table, the insertion point moves to the
beginning of the first cell in the same column.
Jump to a specific row in a table
1Choose Table > Go To Row.
2Do any of the following:
•Specify the row number you want to jump to, and then click OK.
•If a header or footer row is defined in the current table, choose Header or Footer from the menu, and then click
OK.
Cut, copy, and paste table contents
When text is selected within a cell, cutting, copying, and pasting actions are the same as for text selected outside a table.
You can also cut, copy, and paste cells and their contents. If the insertion point is in a table when you paste, multiple
pasted cells appear as a table within a table. You can also move or copy the entire table.
1Select the cells you want to cut or copy, and then choose Edit > Cut or Copy.
2Do any of the following:
•To embed a table within a table, place the insertion point in the cell where you want the table to appear, and then
choose Edit > Paste.
•To replace existing cells, select one or more cells in the table—making sure that there are sufficient cells below
and to the right of the selected cell—and then choose Edit > Paste.
Move or copy a table
1To select the entire table, place the insertion point in the table and choose Table > Select > Table.

332
Tables
Last updated 6/13/2015
2Choose Edit > Cut or Copy, move the insertion point where you want the table to appear, and then choose Edit >
Paste.
Convert tables to text
1Using the Type tool , place the insertion point inside the table, or select text in the table.
2Choose Table > Convert Table To Text.
3For both Column Separator and Row Separator, specify the separators you want to use.
For best results, use a different separator for columns and rows, such as tabs for columns and paragraphs for rows.
4Click OK.
When you convert a table to text, the table lines are removed and the separator you specify is inserted at the end of each
row and column.
Combine tables
Use the Paste command to merge two or more tables into a single table.
1In the target table, insert at least as many blank rows as you’ll be pasting from the other tables. (If you insert fewer
rows than are copied, you cannot paste.)
2In the source table, select the cells you want to copy. (If you copy more column cells than are available in the target
table, you cannot paste.)
3Select at least one cell where you want the incoming rows to be inserted, and then choose Edit > Paste.
If the pasted rows use different formatting than the rest of the table, define one or more cell styles, and then apply the
cell styles to the pasted cells. Hold down Alt (Windows) or Option (Mac OS) while clicking the cell style to override
existing formatting.
Anne-Marie Concepcion provides an article about combining tables at Joining Tables.
Working with tables in Story Editor
When you choose Edit > Edit In Story Editor, tables and their contents appear in Story Editor. You can edit tables in
Story Editor.
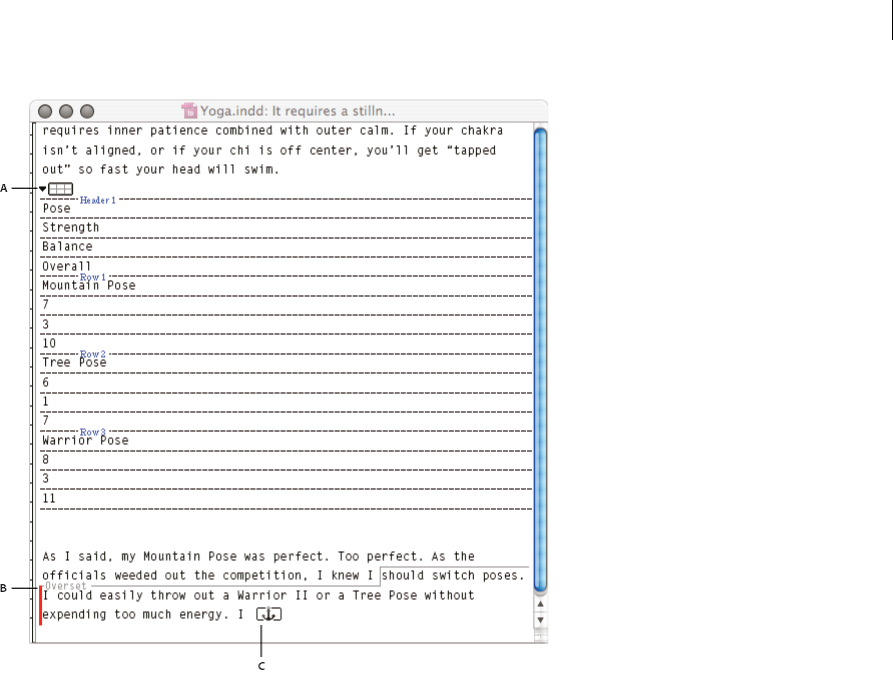
333
Tables
Last updated 6/13/2015
A Table icon B Overset graphic
•To expand or collapse the table in Story Editor, click the triangle to the left of the table icon at the top of the table.
•To determine whether the table is sorted by rows or columns, right-click (Windows) or Ctrl-click (Mac OS) the table
icon and choose Arrange By Rows or Arrange By Columns.
•Use Layout view to modify and format the table. You cannot select columns or rows in Story Editor.
Working with tables in Galley/Story view
When you’re working in Galley or Story view, you can edit tables and their contents.
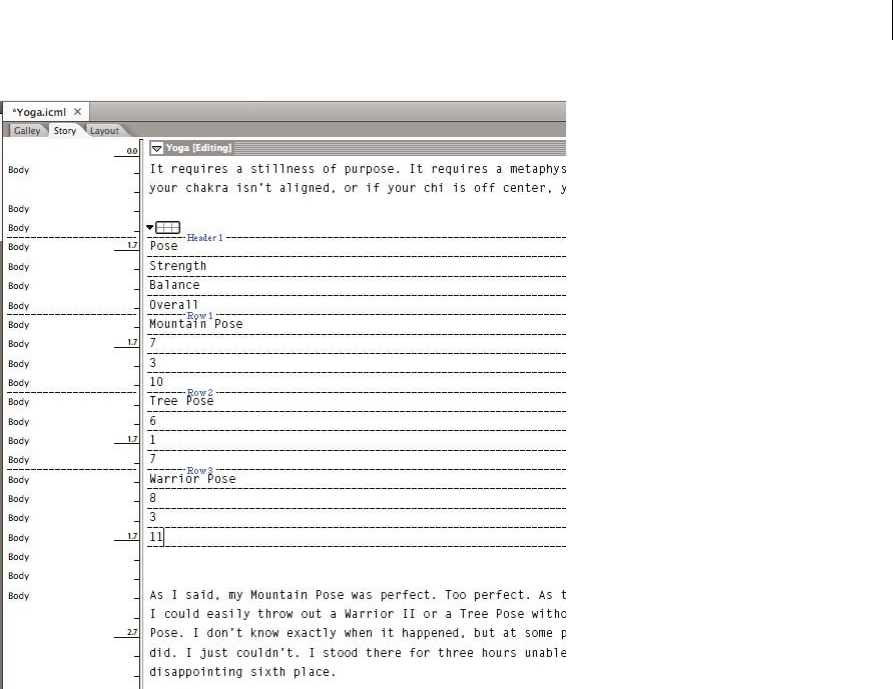
334
Tables
Last updated 6/13/2015
•To expand or collapse the table in Galley or Story view, click the triangle to the left of the table icon at the top of the
table.
•To determine whether the table is sorted by rows or columns, right-click (Windows) or Ctrl-click (Mac OS) the table
icon and choose Arrange By Rows or Arrange By Columns.
•Use Layout view to modify and format the table. You cannot select columns or rows in Galley or Story view.
More Help topics
Keys for tables
Keys for tables
Resize columns, rows, and tables
Keys for tables
Keys for tables
Table and cell styles
Table and cell styles
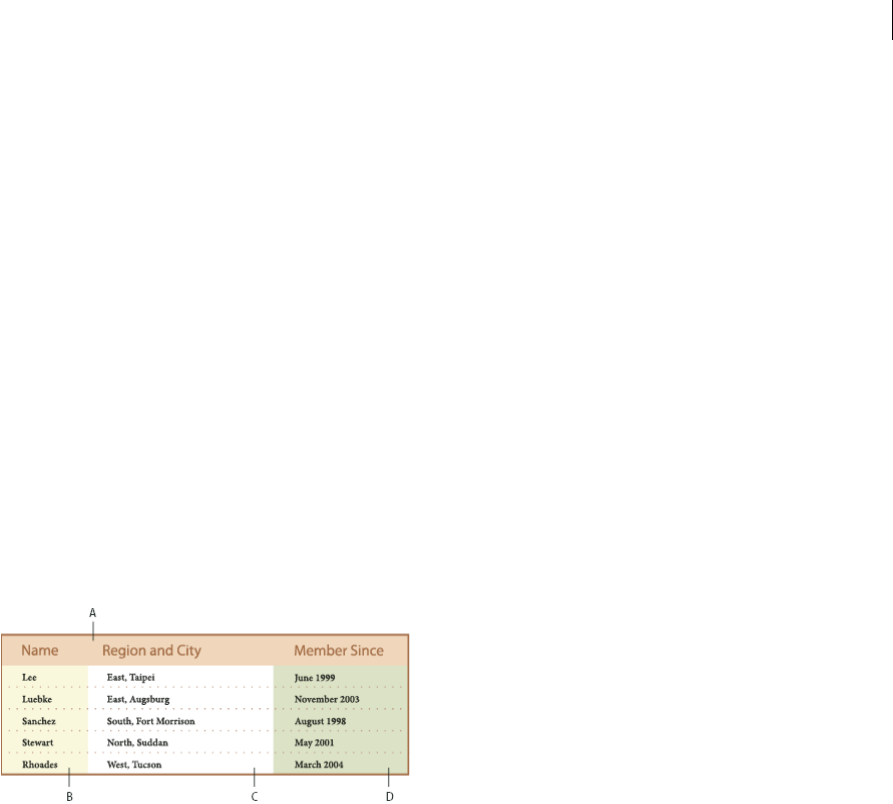
335
Tables
Last updated 6/13/2015
About table and cell styles
Just as you use text styles to format text, you can use table and cell styles to format tables. A table style is a collection of
table formatting attributes, such as table borders and row and column strokes, that can be applied in a single step. A cell
style includes formatting such as cell insets, paragraph styles, and strokes and fills. When you edit a style, all tables or
cells to which the style is applied are updated automatically.
Note: There is one important difference between text styles and table styles. While all character styles attributes can be part
of a paragraph style, cell style attributes are not part of the table style. For example, you cannot use a table style to change
the border color of interior cells. Instead, create a cell style and include it in the table style.
[Basic Table] and [None] styles
By default, each new document contains a [Basic Table] style that can be applied to tables you create and a [None] style
that can be used to remove cell styles applied to cells. You can edit the [Basic Table] style, but you can’t rename or delete
either [Basic Table] or [None].
Using cell styles in table styles
When you create a table style, you can specify which cell styles are applied to different regions of the table: header and
footer rows, left and right columns, and body rows. For example, for the header row, you can assign a cell style that
applies a paragraph style, and for the left and right columns, you can assign different cell styles that apply shaded
backgrounds.
A Header row formatted with cell style that includes paragraph style B Left column C Body cells D Right column
Cell style attributes
Cell styles do not necessarily include all the formatting attributes of a selected cell. When you create a cell style, you can
determine which attributes are included. That way, applying the cell style changes only the desired attributes, such as
cell fill color, and ignores all other cell attributes.
Formatting precedence in styles
If a conflict occurs in formatting applied to a table cell, the following order of precedence determines which formatting
is used:
Cell style precedence 1. Header/Footer 2. Left column/Right column 3. Body rows. For example, if a cell appears in
both the header and the left column, the formatting from the header cell style is used.
Table style precedence 1. Cell overrides 2. Cell style 3. Cell styles applied from a table style 4. Table overrides 5. Table
styles. For example, if you apply one fill using the Cell Options dialog box and another fill using the cell style, the fill
from the Cell Options dialog box is used.
For a video tutorial on using table styles, see www.adobe.com/go/vid0084.

336
Tables
Last updated 6/13/2015
Table/Cell Styles panels overview
Use the Table Styles panel (Window > Styles >Table Styles) to create and name table styles, and to apply the styles to
existing tables or tables you create or import. Use the Cell Styles panel (Window > Styles > Cell Styles) to create and
name cell styles, and to apply the styles to table cells. Styles are saved with a document and appear in the panel each
time you open that document. You can save table and cell styles in groups for easier management.
When you position the insertion point in a cell or table, any style that is applied is highlighted in either of the panels.
The name of any cell style that is applied through a table style appears in the lower left corner of the Cell Styles area. If
you select a range of cells that contains multiple styles, no style is highlighted and the Cell Styles panel displays
“(Mixed).”
Open the Table Styles or Cell Styles panel
❖Choose Window > Styles, and choose Table Styles or Cell Styles.
Change how styles are listed in the panel
•Select Small Panel Rows to display a condensed version of the styles.
•Drag the style to a different position. You can also drag styles to groups that you create.
•Choose Sort By Name from the panel menu to list the styles alphabetically.
Define table and cell styles
If you work with a standalone story, you can define, modify, and apply table and cell styles in InCopy. If the styles you
want exist in another InCopy document, you can import those styles into the current document. You cannot import
table or cell styles from an InDesign document.
For a video tutorial on using table styles, see www.adobe.com/go/vid0084.
1If you want to base a new style on the formatting of an existing table or cell, place the insertion point in a cell.
2If desired, define a paragraph style for the cell style.
3Choose Window > Styles >Table Styles to open the Table Style panel, or choose Window > Styles > Cell Styles to
open the Cell Styles panel.
4Choose New Table Style from the Table Styles panel menu, or choose New Cell Style from the Cell Styles panel menu.
5For Style Name, type a name.
6For Based On, select which style the current style is based on.
7To define a style shortcut, position the insertion point in the Shortcut text box and make sure that Num Lock is on.
Then hold down any combination of Shift, Alt, or Ctrl (Windows) or Shift, Option, and Command (Mac OS), and
press a number on the numeric keypad. You cannot use letters or non-keypad numbers for defining style shortcuts.
8To specify the formatting attributes, click a category on the left and specify the attributes you want. For example, to
assign a paragraph style to a cell style, click the General category, and then choose the paragraph style from the
Paragraph Style menu.
For cell styles, options that don’t have a setting specified are ignored in the style. If you don’t want a setting to be part
of the style, choose (Ignore) from the setting’s menu, delete the contents of the field, or click a check box until a small
box appears in Windows or a hyphen (-) appears in Mac OS.
9If you want the new style to appear in a style group you’ve created, drag it to the style group folder.

337
Tables
Last updated 6/13/2015
Load (import) table styles from other documents
You can import table and cell styles from another InDesign document into the active document. During import, you
can determine which styles are loaded and what should occur if a loaded style has the same name as a style in the
current document. You can also import styles from an InCopy document.
You can import table and cell styles from an InDesign or InCopy document into a standalone InCopy document or
InCopy content that is linked to InDesign. You can determine which styles are loaded, and what should occur if a
loaded style has the same name as a style in the current document.
Note: If you import styles into linked content, new styles are added to the InDesign document when the content is updated,
and any style with a name conflict is overridden by the InDesign style with the same name.
1From the menu of the Cell Styles or Table Styles panel, choose Load Cell Styles, Load Table Styles, or Load Table
And Cell Styles.
2Double-click the InDesign document containing the styles you want to import.
3In the Load Styles dialog box, make sure that a check mark appears next to the styles you want to import. If any
existing style has the same name as one of the imported styles, choose one of the following options under Conflict
With Existing Style, and then click OK:
Use Incoming Style Definition Overwrites the existing style with the loaded style and applies its new attributes to all
cells in the current document that used the old style. The definitions of the incoming and existing styles appear at
the bottom of the Load Styles dialog box so you can compare them.
Auto-Rename Renames the loaded style. For example, if both documents have a style named “Table Style 1,” the
loaded style is renamed “Table Style 1 copy” in the current document.
Apply table and cell styles
Unlike paragraph and character styles, table and cell styles do not share attributes, so applying a table style does not
override cell formatting, and applying a cell style does not override table formatting. By default, applying a cell style
removes formatting applied by any previous cell style, but does not remove local cell formatting. Similarly, applying a
table style removes formatting applied by any previous table style, but does not remove overrides made using the Table
Options dialog box.
In the Styles panel, a plus sign (+) appears next to the current cell or table style if the selected cell or table has additional
formatting that isn’t part of the applied style. Such additional formatting is called an override.
1Position the insertion point in a table, or select the cells to which you want to apply the style.
2Do one of the following:
•Click the table or cell style in the Table Styles or Cell Styles panel (chose Window > Styles >Table Styles or Cell
Styles). If the style is in a style group, expand the style group to locate the style.
•Press the shortcut you defined for the style. (Make sure that Num Lock is on.)
Base one table or cell style on another
You can create links between similar table or cell styles by creating a base, or parent, style. When you edit the parent
style, any changed attribute that appears in the child styles will change as well. By default, table styles are based on [No
Table Style], and cell styles are based on [None].
1Create a new style.
2In the New Table Style or New Cell Style dialog box, select the parent style in the Based On menu. The new style
becomes the child style.

338
Tables
Last updated 6/13/2015
3Specify formatting for the new style to distinguish it from the parent style.
Edit table and cell styles
One of the advantages of using styles is that when you change the definition of a style, all of the tables or cells formatted
with that style change to match the new style definition.
Note: If you edit styles in InCopy content that’s linked to an InDesign document, the modifications are overridden when
the linked content is updated.
1Do one of the following:
•If you don’t want the style to be applied to a selected table or cell, right-click (Windows) or Control-click (Mac
OS) the style in the Styles panel, and choose Edit [style name].
•In the Styles panel, double-click the style, or select the style and choose Style Options from the Styles panel menu.
Note that this method applies the cell style to any selected cell or the table style to any selected table. If no table
is selected, double-clicking a table style sets it as the default style for any table you create.
2Adjust settings in the dialog box, and then click OK.
Delete table and cell styles
When you delete a style, you can select a different style to replace it, and you can choose whether to preserve the
formatting.
1Select the style in the Styles panel.
2Do one of the following:
•Choose Delete Style from the panel menu.
•Click the Delete icon at the bottom of the panel, or drag the style to the Delete icon.
•Right-click (Windows) or Control-click (Mac OS) the style, and then choose Delete Style. This method is
especially useful for deleting a style without applying it to the selected cell or table.
3Select the style to replace it.
If you select [No Table Style] to replace a table style or [None] to replace a cell style, select Preserve Formatting to
keep the formatting of the table or cell to which the style is applied. The table or cell preserves its formatting but is
no longer associated with a style.
4Click OK.
Redefine table or cell styles based on current formatting
After you apply a style, you can override any of its settings. If you decide you like the changes, you can redefine the style
to retain the new formatting.
Note: If you redefine styles in InCopy content linked to an InDesign document, the modifications are overridden when the
linked content is updated.
1Place the insertion point in the table or cell that is formatted with the style you want to redefine.
2Make changes to the table or cell as necessary.
3Choose Redefine Style from the Styles panel menu.

339
Tables
Last updated 6/13/2015
Note: For cell styles, changes to only those attributes that are part of the cell style will enable the Redefine Style command.
For example, if the cell style includes a red fill and you override a cell to use a blue fill, you can redefine the style based on
that cell. But if you change an attribute that is ignored in the cell style, you can’t redefine the style with that attribute.
Override table and cell styles
After you apply a table or cell style, you can override any of its settings. To override a table style, you can change options
in the Table Options dialog box. To override a cell, you can change options in the Cell Options dialog box or use other
panels to change the stroke or fill. If you select a table or cell that has an override, a plus sign (+) appears next to the
style in the Styles panel.
You can clear table and cell overrides when you apply a style. You can also clear overrides from a table or cell to which
a style has already been applied.
If a style has a plus sign (+) next to it, hover over the style to view a description of the override attributes.
Preserve or remove overrides while applying a table style
•To apply a table style and preserve cell styles but remove overrides, hold down Alt (Windows) or Option (Mac OS)
as you click the style in the Table Styles panel.
•To apply a table style and remove both cell styles and overrides, hold down Alt+Shift (Windows) or Option+Shift
(Mac OS) as you click the style in the Table Styles panel.
Right-click (Windows) or Control-click (Mac OS) the style in the Table Styles panel, and then choose Apply [table style],
Clear Cell Styles to apply a style and clear cell styles.
Remove overrides while applying a cell style
❖To apply a cell style and remove overrides, hold down Alt (Windows) or Option (Mac OS) as you click the name of
the style in the Cell Styles panel.
Note: Only those attributes that are part of the cell style are considered overrides. For example, if the cell style includes
a red fill and all other attributes are ignored, changing a different cell option is not considered an override.
Clear attributes not defined by a cell style
❖Choose Clear Attributes Not Defined By Style from the Cell Styles panel menu.
Clear table or cell overrides
1Select the table or cells containing the overrides.
2In the Styles panel, click the Clear Overrides In Selection icon , or choose Clear Overrides from the Styles panel
menu.
Break the link to table or cell styles
When you break the link between tables or cells and the style applied to them, the tables or cells retain their current
formatting. However, future changes to that style won’t affect them.
1Select the cells to which the style has been applied.
2Choose Break Link To Style from the Styles panel menu.

340
Tables
Last updated 6/13/2015
More Help topics
Group styles
Table Styles video
Use Quick Apply
Duplicate styles or style groups
Table strokes and fills
About table strokes and fills
You can add strokes and fills to your tables in a number of ways. Use the Table Options dialog box to change the stroke
of the table border, and to add alternating strokes and fills to columns and rows. To change the strokes and fills of
individual cells or header/footer cells, use the Cell Options dialog box, or use the Swatches, Stroke, and Color panels.
By default, the formatting you select using the Table Options dialog box overrides any corresponding formatting
previously applied to table cells. However, if you select the Preserve Local Formatting option in the Table Options dialog
box, the strokes and fills applied to individual cells are not overridden.
If you use the same formatting repeatedly for tables or cells, create and apply table styles or cell styles.
Change the table border
You can change the table border by using either the Table Setup dialog box or the Stroke panel.
1With the insertion point in a cell, choose Table > Table Options > Table Setup.
2Under Table Border, specify the desired weight, type, color, tint, and gap settings. (See Table stroke and fill options.)
3Under Stroke Drawing Order, select the drawing order from the following options:
Best Joins If selected, row strokes will appear to the front at the points where strokes of different colors cross. In
addition, when strokes such as double lines cross, the strokes are joined and the crossing points are connected.
Row Strokes In Front If selected, row strokes appear in front.
Column Strokes In Front If selected, column strokes appear in front.
InDesign 2.0 Compatibility If selected, row strokes appear in front. In addition, when strokes such as double lines
cross, they are joined and the crossing points are connected only at points where strokes cross in a T-shape.
4If you do not want stroke formatting of individual cells to be overridden, select Preserve Local Formatting.
5Click OK.
If you remove the stroke and fill from a table, choose View > Extras > Show Frame Edges to display the cell boundaries
of a table.
Add stroke and fill to cells
You can add stroke and fill to cells using the Cell Options dialog box, Stroke panel, or Swatches panel.
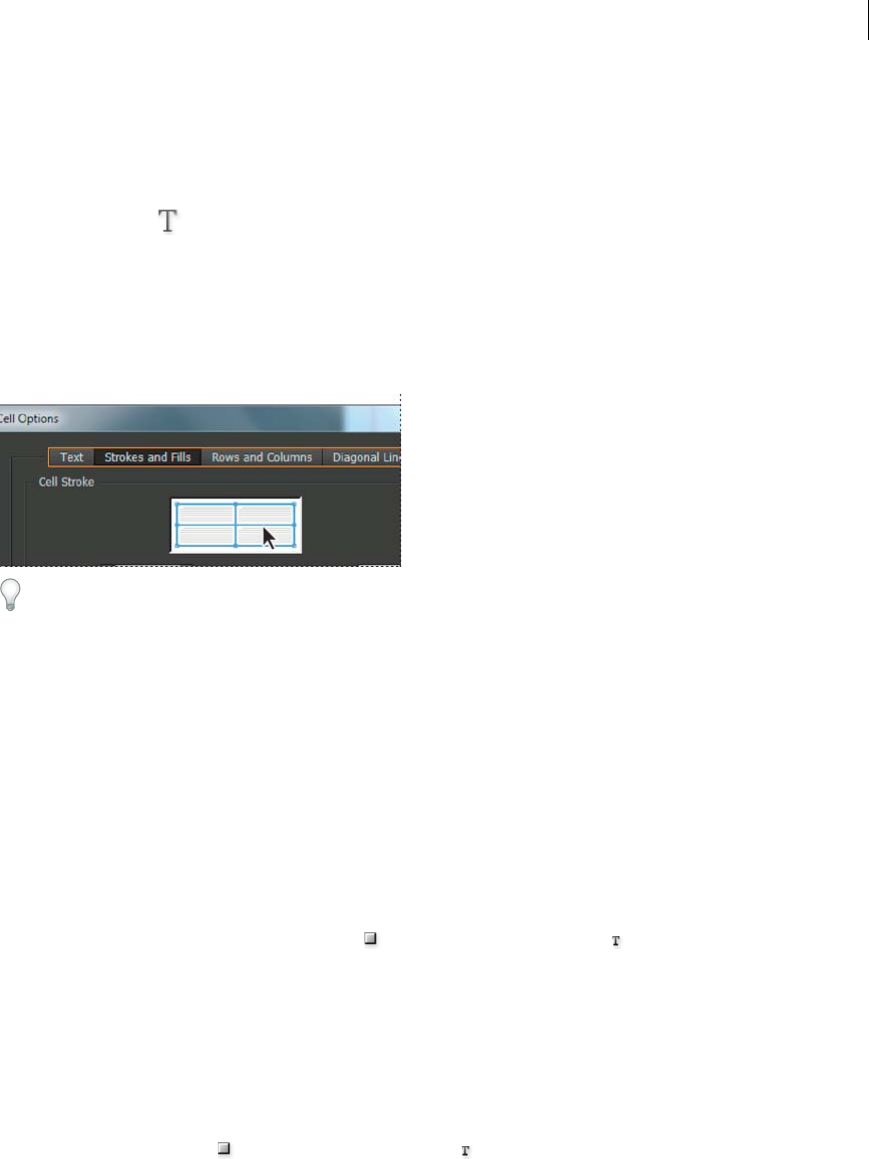
341
Tables
Last updated 6/13/2015
Add stroke and fill using Cell Options
You can determine which cell lines are formatted with a stroke or fill by selecting or deselecting lines in the Preview
proxy. If you want to change the appearance of all rows or columns in the table, use an alternating stroke or fill pattern
in which the second pattern is set to 0.
1Using the Type tool , place the insertion point in or select the cell or cells in which you want to add a stroke or
fill. To add a stroke or fill to header/footer rows, select the header/footer cells at the beginning of the table.
2Choose Table > Cell Options > Strokes And Fills.
3In the proxy preview area, specify which lines will be affected by stroke changes. For example, if you want to add a
heavy stroke to the outside lines but not to the inside lines of the selected cells, click an inside line to deselect it.
(Selected lines are blue; deselected lines are gray.)
In the proxy preview area, double-click any outside line to select the entire outer selection rectangle. Double-click
any inside line to select the inside lines. Triple-click anywhere in the proxy to select or deselect all lines.
4For Cell Stroke, specify desired weight, type, color, tint, and gap settings. (See Table stroke and fill options.)
5For Cell Fill, specify desired color and tint settings.
6Select Overprint Stroke and Overprint Fill if desired, and then click OK.
Add a stroke to cells using the Stroke panel
The Stroke panel is available in InDesign, not InCopy.
1Select the cell or cells you want to affect. To apply a stroke to header or footer cells, select the header or footer row.
2Choose Window > Stroke to display the Stroke panel.
3In the proxy preview area, specify which lines will be affected by stroke changes.
4In the Tools panel, make sure the Object button is selected. (If the Text button is selected, the stroke changes
will affect the text, not the cells.)
5Specify a weight value and stroke type.
Add a fill to cells using the Swatches panel
1Select the cell or cells you want to affect. To apply a fill to header or footer cells, select the header or footer row.
2Choose Window > Color > Swatches to display the Swatches panel.
3Make sure the Object button is selected. (If the Text button is selected, the color changes will affect the text, not
the cells.)
4Select a swatch.
Add a gradient to cells using the Gradient panel
1Select the cells you want to affect. To apply a gradient to header or footer cells, select the header or footer row.
2Choose Window > Color > Gradient to display the Gradient panel.

342
Tables
Last updated 6/13/2015
3Click in the Gradient Ramp to apply a gradient to the selected cells. Adjust the gradient settings as necessary.
Add diagonal lines to a cell
1Using the Type tool , place the insertion point in or select the cell or cells in which you want to add diagonal
lines.
2Choose Table > Cell Options > Diagonal Lines.
3Click the button for the type of diagonal line you want to add.
4Under Line Stroke, specify desired weight, type, color, and gap settings; specify a Tint percentage and Overprint
options.
5From the Draw menu, choose Diagonal In Front to place the diagonal line in front of the cell contents; choose
Content In Front to place the diagonal line behind the cell contents, and then click OK.
Table stroke and fill options
When selecting strokes and fills for the table or cells, use the following options:
Weight Specifies the line thickness for the table or cell border.
Type Specifies the line style, such as Thick - Thin.
Color Specifies the color of the table or cell border. The choices listed are those available in the Swatches panel.
Tint Specifies the percentage of ink of the specified color to be applied to the stroke or fill.
Gap Color Applies a color to the areas between the dashes, dots, or lines. This option is not available if Solid is selected
for Type.
Gap Tint Applies tint to the areas between the dashes, dots, or lines. This option is not available if Solid is selected for
Type.
Overprint When selected, causes the ink specified in the Color drop-down list to be applied over any underlying colors,
rather than knocking out those inks.
Alternate strokes and fills in a table
You can alternate strokes and fills to enhance readability or improve the appearance of your table. Alternating strokes
and fills in table rows does not affect header and footer rows. However, alternating strokes and fills in columns does
affect header and footer rows.
Alternating stroke and fill settings override cell stroke formatting, unless you select the Preserve Local Formatting
option in the Table Options dialog box.
If you want to apply a fill or stroke to every body cell in the table, and not just alternating patterns, you can still use the
alternating stroke and fill settings to create such non-alternating patterns. To create such an effect, specify 0 for Next in
the second pattern.

343
Tables
Last updated 6/13/2015
Add alternating strokes to a table
1With the insertion point in a cell, choose Table > Table Options > Alternating Row Strokes or Alternating Column
Strokes.
2For Alternating Pattern, select the type of pattern you want to use. Select Custom if you want to specify a pattern;
for example, one column with a thick black line followed by three columns with thin yellow lines.
3Under Alternating, specify the fill options for both the first pattern and the next pattern. For example, you may want
to add a solid stroke to the first column and a Thick - Thin line to the next column, so that they alternate. Specify 0
for Next if you want the strokes to affect every row or column.
Note: In tables that span multiple frames, alternating strokes and fills for rows do not restart at the beginning of
additional frames in the story. (See Break tables across frames.)
4Select Preserve Local Formatting if you want formatted strokes previously applied to the table to remain in effect.
5For Skip First and Skip Last, specify the number of rows or columns at the beginning and end of the table in which
you do not want stroke attributes to appear, and then click OK.
Add alternating fills to a table
1With the insertion point in a cell, choose Table > Table Options > Alternating Fills.
2For Alternating Pattern, select the type of pattern you want to use. Select Custom if you want to specify a pattern,
such as one row shaded in gray followed by three rows shaded in yellow.
3Under Alternating, specify the fill options for both the first pattern and the subsequent pattern. For example, if you
selected Every Second Column for Alternating Pattern, you may want to shade the first two columns in a gray tint
and leave the next two columns blank. Specify 0 for Next if you want the fill to apply to every row.
4Select Preserve Local Formatting if you want previously formatted fills applied to the table to remain in effect.
5For Skip First and Skip Last, specify the number of rows or columns at the beginning and end of the table in which
you do not want fill attributes to appear, and then click OK.
Turn off alternating strokes and fills in a table
1Place the insertion point in the table.
2Choose Table > Table Options > Alternating Row Strokes, Alternating Column Strokes, or Alternating Fills.
3For Alternating Pattern, choose None, and then click OK.
More Help topics
Table and cell styles
Creating tables
A table consists of rows and columns of cells. A cell is like a text frame in which you can add text, anchored frames, or
other tables. Create tables in Adobe InDesign CS5 or export them from other applications.
Note: To create, edit, and format tables in Adobe InCopy, make sure you are in Layout view.

344
Tables
Last updated 6/13/2015
Create tables
A table consists of rows and columns of cells. A cell is like a text frame in which you can add text, inline graphics, or
other tables. You can create tables from scratch or by converting them from existing text. You can also embed a table
within a table.
When you create a table, the new table fills the width of the container text frame. A table is inserted on the same line
when the insertion point is at the beginning of the line, or on the next line, when the insertion point is in the middle of
a line.
Tables flow with surrounding text just as inline graphics do. For example, a table moves through threaded frames when
the text above it changes in point size or when text is added or deleted. However, a table cannot appear on a text-on-
path frame.
You can create vertical tables the same way you create horizontal ones. The writing direction of a table depends on that
of the text frame used to create the table, and the writing direction of the table changes when that of the text frame is
changed. This behavior is the same when you create a table within a frame grid. However, the writing direction for cells
within a table can be changed, irrespective of the writing direction of the table.
Confirm the writing direction of the text frame before creating a table.
For a video tutorial on creating and formatting tables, see www.adobe.com/go/vid0081.
Michael Murphy provides an article on creating and formatting tables at Mind Your Table Manners.
Jeff Witchell from InfiniteSkills.com provides a video demonstration on The basics of setting up tables.
Create a table from scratch
The table you create fills the width of the text frame.
1Using the Type tool , place the insertion point where you want the table to appear.
2Choose Table > Insert Table.
3Specify the numbers of rows and columns.
4Specify the number of horizontal cells in the body row and the number of vertical cells in the Column.
5If your table contents will continue on more than one column or frame, specify the number of header or footer rows
in which you want the information to be repeated.
6(Optional) Specify a table style.
7Click OK.
The row height of a table is determined by the specified table style. For example, a table style may use cell styles to
format different parts of the table. If any of these cell styles include paragraph styles, the leading value of the paragraph
styles determines the row height of that area. If no paragraph style is used, the document’s default slug determines the
row height. (The slug is based on the leading value. In this context, a slug is the approximate height of the highlighting
in selected text.)
Create a table from existing text
Before you convert text to a table, make sure that you set up the text properly.
1To prepare the text for conversion, insert tabs, commas, paragraph returns, or another character to separate
columns. Insert tabs, commas, paragraph returns, or another character to separate rows. (In many instances, text
can be converted to a table without having to be edited.)

345
Tables
Last updated 6/13/2015
2Using the Type tool , select the text you want to convert to a table.
3Choose Table > C onvert Text To Table.
4For both Column Separator and Row Separator, indicate where new rows and columns should begin. Choose Tab,
Comma, or Paragraph, or type the character, such as a semicolon (;), in the Column Separator and Row Separator
field. (Any character you type appears in the menu the next time you create a table from text.)
5If you specify the same separator for columns and rows, indicate the number of columns you want the table to
include.
6(Optional) Specify a table style to format the table.
7Click OK.
If any row has fewer items than the number of columns in a table, empty cells fill out the row.
Embed a table within a table
1Do one of the following:
•Select the cells or table you want to embed, and then choose Edit > Cut or Copy. Place the insertion point in the
cell where you want the table to appear, and then choose Edit > Paste.
•Click inside a cell, choose Table > Insert Table, specify the number of rows and columns, and then click OK.
2Adjust the cell inset as necessary. (See Format text within a table.)
If you create a table within a cell, you cannot use the mouse to select any part of the table that oversets the cell boundary.
Instead, expand the row or column; or place the insertion point in the first part of the table, and use keyboard shortcuts
to move the insertion point and select text.
Importing tables from other applications
When you use the Place command to import a Microsoft Word document that includes tables, or a Microsoft Excel
spreadsheet, imported data is an editable table. You can use the Import Options dialog box to control the formatting.
You can also paste data from an Excel spreadsheet or a Word table into an InDesign or InCopy document. The
Clipboard Handling preference settings determine how text pasted from another application is formatted. If Text Only
is selected, the information appears as unformatted tabbed text, which you can then convert to a table. If All
Information is selected, the pasted text appears in a formatted table.
If you’re pasting text from another application into an existing table, insert enough rows and columns to accommodate
the pasted text, select the Text Only option in Clipboard Handling preferences, and make sure that at least one cell is
selected (unless you want to embed the pasted table into a cell).
If you want more control over formatting the imported table, or if you want to maintain spreadsheet formatting, use
the Place command to import the table. If you want to maintain a link to the spreadsheet, select the Create Links When
Placing Text And Spreadsheet Files option in File Handling preference settings.
You can also copy and paste tabbed text across a selection of table cells. This technique is a great way to replace content
while preserving formatting. For example, suppose you want to update the content of a formatting table in a monthly
magazine. One possibility is to link to an Excel spreadsheet. However, if your content comes from a different source, you
can copy the tabbed text containing the new content, select the range of cells in the formatted InDesign table, and paste.

346
Tables
Last updated 6/13/2015
Add text to a table
You can add text, anchored objects, XML tags, and other tables to table cells. The height of a table row expands to
accommodate additional lines of text, unless you set a fixed row height. You cannot add footnotes to tables.
❖Using the Type tool , do any of the following:
•Position the insertion point in a cell, and type text. Press Enter or Return to create a new paragraph in the same
cell. Press Tab to move forward through cells (pressing Tab in the last cell inserts a new row). Press Shift+Tab to
move backwards through cells.
•Copy text, position the insertion point in a cell, and then choose Edit > Paste.
•Position the insertion point in a cell where you want to add text, choose File > Place, and then double-click a text
file.
Add graphics to a table
To add a graphic to a table in a standalone InCopy document, make sure that you’re in Layout view. To add a graphic
to a table in a linked InDesign document, use InDesign so that you have more control over resizing the text frame.
For a video tutorial on placing images into a table, see www.adobe.com/go/vid0083.
❖Do any of the following:
•Position the insertion point where you want the graphic, choose File > Place, and then double-click the graphic’s
filename.
•Position the insertion point where you want the graphic, choose Object > Anchored Object > Insert, and then
specify settings. You can later add a graphic to the anchored object.
•Copy a graphic or a frame, position the insertion point, and then choose Edit > Paste.
When you add a graphic that is larger than the cell, the cell height expands to accommodate the graphic, but the width
of the cell doesn’t change—the graphic may extend beyond the right side of the cell. If the row in which the graphic is
placed is set to a fixed height, a graphic that is taller than the row height causes the cell to be overset.
To avoid an overset cell, you may want to place the image outside the table, resize the image, and then paste it into the
table cell.
Add table headers and footers
When you create a long table, the table may span more than one column, frame, or page. You can use headers or footers
to repeat the information at the top or bottom of each divided portion of the table.
You can add header and footer rows when you create the table. You can also use the Table Options dialog box to add
header and footer rows and change how they appear in the table. You can convert body rows to header or footer rows.
To number tables sequentially, such as Table 1A, Table 1B, and so on, add a variable to the table header or footer. (See
Create running captions for figures and tables.)
For a video tutorial on creating table headers and footers, see www.adobe.com/go/vid0082.

347
Tables
Last updated 6/13/2015
Convert existing rows to header or footer rows
1Select the rows at the top of the table to create header rows, or at the bottom of the table to create footer rows.
2Choose Table > Convert Rows > To Header or To Footer.
Change header or footer row options
1Place the insertion point in the table, and then choose Table > Table Options > Headers And Footers.
2Specify the number of header or footer rows. Blank rows may be added to the top or bottom of the table.
3Specify whether the information in the header or footer appears in every text column (if text frames have more than
one column), once per frame, or only once per page.
4Select Skip First if you don’t want the header information to appear in the first row of the table. Select Skip Last if
you don’t want the footer information to appear in the last row of the table.
The Skip First option is especially useful if you want to indicate that the header or footer is continued. For example,
for a table that spans multiple pages, you may want the header text to be “Table 2 (Continued).” Since you don't want
“(Continued)” to appear at the beginning of the table, select Skip First, and simply type Table 2 in the first row of
the table.
5Click OK.
Remove header or footer rows
❖Do any of the following:
•Place the insertion point in the header or footer row, and then choose Table > Convert Rows > To Body.
•Choose Table > Table Options > Headers And Footers, and then specify a different number of header rows or
footer rows.
More Help topics
Formatting tables
Creating and Formatting Tables video
Place (import) text
Place (import) text
Resize columns, rows, and tables
Work with overset cells
Tag items
Break tables across frames
Create variables for running headers and footers
Formatting tables
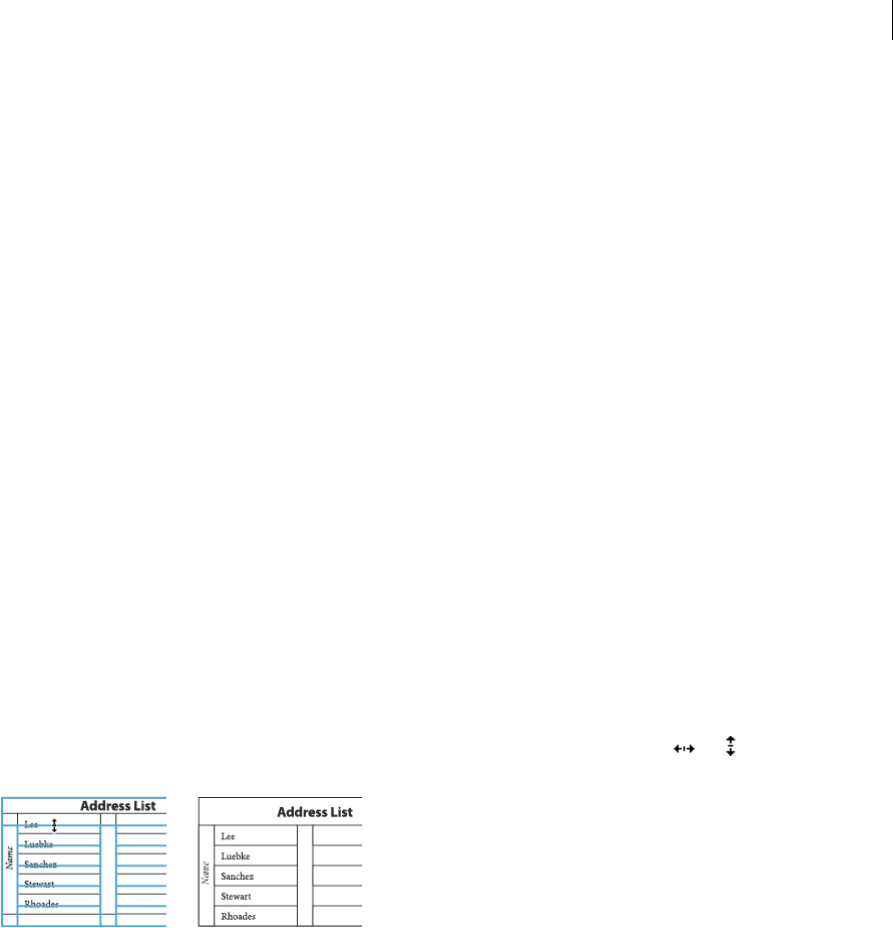
348
Tables
Last updated 6/13/2015
Formatting tables
Use the Control panel or Character panel to format text within a table—just like formatting text outside a table. In
addition, two main dialog boxes help you format the table itself: Table Options and Cell Options. Use these dialog boxes
to change the number of rows and columns, to change the appearance of the table border and fill, to determine the
spacing above and below the table, to edit header and footer rows, and to add other table formatting.
Use the Table panel, the Control panel, or the context menu to format the table structure. Select one or more cells and
then right-click (Windows) or Control-click (Mac OS) to display a context menu with table options.
For a video tutorial on creating and formatting tables, see www.adobe.com/go/vid0081.
Resize columns, rows, and tables
You can resize columns, rows, and tables using a number of different methods.
Resize columns and rows
1Select cells in the columns and rows you want to resize.
2Do one of the following:
•In the Table panel, specify Column Width and Row Height settings.
•Choose Table > Cell Options > Rows And Columns, specify Row Height and Column Width options, and then
click OK.
Note: If you select At Least to set a minimum row height, rows increase in height as you add text or increase the point
size. If you select Exactly to set a fixed row height, the row height does not change when you add or remove text. A fixed
row height often results in an overset condition in the cell. (See Work with overset cells
•Position the pointer over the edge of a column or row so that a double-arrow icon ( or ) appears, and then
drag left or right to increase or decrease the column width, or drag up or down to increase or decrease row height.
By default, row height is determined by the slug height of the current font. Thus, row height also changes if you change
the point size of type for entire rows of text, or if you change the row height setting. The maximum row height is
determined by the Maximum setting in the Rows And Columns section of the Cell Options dialog box.
Resize rows or columns without changing the table width
•Hold down Shift while dragging an inside row or column edge (not the table boundary). One row or column gets
bigger as the other gets smaller.
•To resize rows or columns proportionally, hold down Shift while dragging the right table border or bottom table
edge.
Holding down Shift while dragging the right table edge will resize all the columns proportionally; holding down Shift
while dragging the bottom table edge will resize all rows proportionally.
Dragging the lower edge of the table (in the case of vertical text, the left hand corner) while holding down Shift will
cause the height of the rows (or the width of vertical text rows) to resize proportionally.

349
Tables
Last updated 6/13/2015
Resize the entire table
❖Using the Type tool , position the pointer over the lower-right corner of the table so that the pointer becomes
an arrow shape , and then drag to increase or decrease the table size. Hold down Shift to maintain the table’s
height and width proportions.
For a vertical table, use the type tool to position the pointer over the lower left corner of the table so that the pointer
becomes an arrow shape and then drag to increase or decrease the table size.
Note: If the table spans more than one frame in a story, you cannot use the pointer to resize the entire table.
Distribute columns and rows evenly
1Select cells in the columns or rows that should be the same width or height.
2Choose Table > Distribute Rows Evenly or Distribute Columns Evenly.
Change the spacing before or after a table
1Place the insertion point in the table and choose Table > Table Options > Table Setup.
2Under Table Spacing, specify different values for Space Before and Space After, and then click OK.
Note that changing the spacing before the table does not affect the spacing of a table row that falls at the top of a frame.
Break tables across frames
Use Keep options to determine how many rows should remain together, or to specify where a row breaks, such as at the
top of a column or frame.
When you create a table that is taller than the frame in which it resides, the frame is overset. If you thread the frame to
another frame, the table continues in that frame. Rows move into threaded frames one at a time—you can’t break a
single row across multiple frames. Specify header or footer rows to repeat information in the new frame.
1Position the insertion point in the appropriate row, or select a range of cells in the rows you want to keep together.
2Choose Table > Cell Options > Rows And Columns.
3To keep the selected rows together, select Keep With Next Row.
4To cause the row to break in a specified location, select an option (such as In Next Frame) from the Start Row menu,
and then click OK.
If you create a single table that spans both pages of a spread, you may want to add a blank column in the middle of the
table to create inset margins.
Add text before a table
A table is anchored to the paragraphs that immediately precede and follow it. If you insert a table at the beginning of
the text frame, you can’t click above the table to place an insertion point. Instead, use the arrow keys to move the
insertion point before the table.
1Place the insertion point at the beginning of the paragraph in the first cell, press the Left Arrow key, and begin
typing.
2Do one of the following:
•Place the insertion point at the beginning of the paragraph in the first cell, press the left arrow key, and begin
typing.

350
Tables
Last updated 6/13/2015
•For vertical tables, place the insertion point at the beginning of the paragraph in the first cell, press the Up Arrow
key, and begin typing.
Format text within a table
In general, use the same methods to format text in a table that you would use to format text that’s not in a table.
Insert tabs into a table cell
When the insertion point is in a table, pressing Tab moves the insertion point to the next cell. However, you can insert
a tab within a table cell. Use the Tabs panel to define tab settings in the table. Tab settings affect the paragraph in which
the insertion point is placed.
1Using the Type tool , place the insertion point where you want to insert a tab.
2Choose Type > Insert Special Character > Other > Tab.
To change tab settings, select the columns or cells you want to affect, choose Type > Tabs to display the Tabs panel, and
then adjust tab settings.
Note: When you use the Tabs ruler to apply a decimal tab to a cell or group of cells, you usually don’t need to press Tab at
the beginning of each paragraph to decimal-align the text in the cells. Paragraphs are automatically aligned on the decimal
character, unless the paragraph contains additional formatting, such as center alignment, that overrides the decimal tab.
Change the alignment of text within a table cell
1Using the Type tool , select the cell or cells you want to affect.
2Choose Table > Cell Options > Text.
3Under Vertical Justification, select an Align setting: Align Top, Align Center, Align Bottom, or Justify Vertically.
If you select Justify, specify the Paragraph Spacing Limit; this will set a maximum amount of space to be added
between paragraphs. (See Align or justify text vertically within a text frame.)
4For First Baseline, select an option to determine how text is to be offset from the top of the cell.
The settings are the same as the corresponding settings in the Text Frame Options dialog box. (See Change text
frame properties .)
5Click OK.
Note: To change the horizontal alignment of text within a cell, use the alignment option in the Paragraph panel. To align
text in a cell to a decimal tab, use the Tabs panel to add a decimal tab setting.
Rotate text in a cell
1Position the insertion point in the cell you want to rotate, or select the cells you want to affect.
2Choose Table > Cell Options > Text, or display the Table panel.
3Select a value for Rotation, and click OK.
Change cell inset spacing
1Using the Type tool , place the insertion point in or select the cell or cells you want to affect.
2Choose Table > Cell Options > Text, or display the Table panel.
3Under Cell Insets, specify values for Top, Bottom, Left, and Right, and then click OK.

351
Tables
Last updated 6/13/2015
In many cases, increasing the cell inset spacing will increase the row height. If the row height is set at a fixed value, make
sure that you leave enough room for the inset values, to avoid causing overset text.
Merge and split cells
You can merge (combine) or split (divide) cells in a table.
Merge cells
You can combine two or more cells in the same row or column into a single cell. For example, you can merge the cells
in the top row of the table to create a single cell to be used for the table title.
1Using the Type tool , select the cells you want to merge.
2Choose Table > Merge Cells.
Unmerge cells
❖Place the insertion point in the merged cell and choose Table > Unmerge Cells.
Split cells
You can split cells horizontally or vertically, which is especially useful when creating form tables. You can select multiple
cells and split them vertically or horizontally.
1Place the insertion point in the cell you want to split, or select a row, column, or block of cells.
2Choose Table > Split Cell Vertically or Split Cell Horizontally.
Work with overset cells
In most cases, a table cell will expand vertically to accommodate new text and graphics being added. However, if you
set a fixed row height and add text or graphics that are too large for the cell, a small red dot appears in the lower-right
corner of the cell, indicating that the cell is overset.
You cannot flow overset text into another cell. Instead, edit or resize the contents, or expand the cell or the text frame
in which the table appears.
In the case of inline graphics or text with fixed leading, it is possible for the cell contents to extend beyond cell edges.
You can select the Clip Contents To Cell option, so that any text or inline graphics that otherwise extend beyond any
cell edge are clipped to the cell boundary. However, when inline graphics are overset to extend beyond cell bottom edges
(Horizontal), this does not apply.
Display the contents of an overset cell
❖Do one of the following:
•Increase the size of the cell.
•Change the text formatting. To select the cell’s contents, click in the overset cell, press Esc, and then use the
Control panel to format the text.
Clip an image in a cell
If an image is too large for a cell, it extends beyond the cell borders. You can clip the parts of the image that extend
beyond the cell borders.
1Place the insertion point in the cell you want to clip, or select the cell or cells you want to affect.

352
Tables
Last updated 6/13/2015
2Choose Table > Cell Options > Text.
3Select Clip Contents To Cell, and then click OK.
Change the cell writing direction
1Place the text insertion point in the cell for which you want to change direction, or select the cell or cells you want
to affect.
2Choose Table > Cell Options > Text.
3Select the type direction in the cell from the Writing Direction menu and click OK.
You can also select the type direction from the Writing Direction pop-up menu in the Table panel, or you can select
Cell Direction Runs Against Story Direction in the Text section when creating a cell style.
More Help topics
Table strokes and fills
Creating and Formatting Tables video
Change the alignment of a table within a frame
Add table headers and footers
Specify characters for decimal tabs
Combine tables
Create tables
Define table and cell styles

353
Last updated 6/13/2015
Chapter 10: Printing
Setting up a printer
Typically, the final printing process is done in Adobe® InDesign®, but you can use Adobe InCopy® to print drafts of your
stories in Galley, Story, or Layout view.
Printing with InCopy
InCopy typically links with an InDesign master document. The InDesign document is usually the ultimate source for
the final printing process, so many of the controls needed for production-quality printing are reserved for InDesign.
However, you can use InCopy to print drafts of your stories in either Galley, Story, or Layout view. The printed copy
looks similar to the document on the screen, depending on the view and print settings:
•In the Galley or Story view, InCopy prints unformatted text in a continuous column (or columns). You do not see
the document layout and formatting features.
•In the Layout view, InCopy prints the document as it appears on the screen, with frames and all other page elements
intact.
InCopy works with both Adobe PostScript® and non-PostScript printers, as well as other kinds of printing devices.
If you are using a PostScript printer, make sure that you have the printer driver with the correct, properly installed
PostScript Printer Description (PPD) file.
Note: InCopy does not support the format used by PDF Writer. If you attempt to print to PDF Writer, you will experience
delays or errors in printing.
About printer drivers
A printer driver lets you directly access printer features from applications on your computer. Having the correct driver
ensures that you have access to all of the features a particular printer supports.
Adobe recommends using the latest printer drivers, which are listed in the following table. If you encounter problems
with an older driver, upgrade to the latest driver for your operating system.
For more information on recommended and supported PostScript printer drivers, including installation instructions,
search the section on printer drivers on the Adobe website.
Some InCopy printing features appear in both the Print dialog box of InCopy and the printer driver dialog boxes. In
general, you should set options for such overlapping features only in the InCopy Print dialog box; InCopy ignores
duplicate settings specified in the printer driver dialog box. The instructions in this section can help you work with the
overlapping options.
Operating system Printer driver
Windows® XP Pscript 5 (system driver)
Mac OS 10.2 (or later) Built-in PS Driver for Mac OS X

354
Printing
Last updated 6/13/2015
Printer drivers may support features that are not included in InCopy, such as duplex printing. Support for these features
varies depending on the printer driver you have. Check with your printer manufacturer for details.
If you want to specify settings for a specific printer, InCopy provides access to the printer driver through the Setup
button in the InCopy Print dialog box. In Windows, this button opens the Properties dialog box for the currently
selected printer. In Mac OS, this button displays the standard Mac OS Print dialog box.
Select a PPD file
A PPD file (PostScript Printer Description file) customizes the behavior of the driver for your specific PostScript
printer. It contains information about the output device, including printer-resident fonts, available media sizes and
orientation, optimized screen frequencies, screen angles, resolution, and color output capabilities. It’s important to set
up the correct PPD before you print. Selecting the PPD that corresponds to your PostScript printer or imagesetter
populates the Print dialog box with the available settings for the output device. You can switch to a different one to suit
your needs. Applications use the information in the PPD file to determine which PostScript information to send to the
printer when printing a document.
For best printing results, Adobe recommends that you obtain the latest version of the PPD file for your output device
from the manufacturer. Many print service providers and commercial printers have PPDs for the imagesetters they use.
Be sure to store PPDs in the location specified by the operating system. For details, consult the documentation for your
operating system.
❖In Windows and in Mac OS, you select a PPD file in the same way you add a printer. The steps for selecting a PPD
file are different for each platform. See your operating system documentation for details.
More Help topics
Exporting to Adobe PDF
Printing stories
Print the Galley or Story view
When you print the Galley or Story view, InCopy prints unformatted text in a continuous column (or columns),
without layout and formatting features. Printing in Galley or Story view gives you a hard copy that resembles galleys in
traditional publishing. The galley format makes it easy to concentrate on the textual content of a story, and to see the
changes made by you and other contributors.
1Choose File > Print.
2Choose Galley & Story from the View option in the Print dialog box.
3In the Print dialog box, specify the following options:
•Type the number of copies to print.
•Select the paper size from the list.
•Choose the paper orientation.
•Choose whether to print All stories, Current Story, or All Expanded.
Note: The All Expanded option is active only when you are working with linked InCopy files.

355
Printing
Last updated 6/13/2015
4In the Options section, specify whether you want to Use Current Galley Settings or Override Current Galley
Settings. If you choose Override Current Galley Settings, select which information you want to print.
5To include the document name, number of pages, and print time on the printed page, select Print Page Information.
6For a summary of information related to the story, select Print Story Information. This prints the information
contained in the Content File Info dialog box.
7Click Print.
Note: If your document does not print correctly, make sure that the correct printer driver is installed.
Print the Layout view
When you print the Layout view, InCopy prints the document as it appears on the screen, with frames and all other
page elements intact.
Note: Because InCopy is not designed for production-quality printing, it does not include controls for trapping, printer’s
marks, color separations, and certain graphics-related printing functions. InCopy handles only composite printing.
1Choose File > Print.
2Select Layout from the View options in the Print dialog box.
3Specify the following options:
•Type the number of copies to print.
•Select the paper size from the list.
•Choose the paper orientation.
•Choose to print all stories or specify the range of pages to print in the Current story.
4Choose whether or not you want to scale the document.
5To print the images included in the document, select Print Images.
6To print facing pages on the same sheet, select Print Spreads.
7To include the document name, number of pages, and print time on the printed page, select Print Page Information.
8Click Print.
Note: If your document does not print correctly, make sure that the correct print driver is installed.
Create a standard PostScript file
As an alternative to printing a document to a printer, you can save an Adobe PostScript® language description of the
document as a file for printing on remote printers. A standard PostScript (.ps) file contains a description of everything
in your document, including information about linked files and instructions tailored to the currently selected output
device.
A PostScript file is usually larger than the original InCopy document. Once you create the PostScript file, you can copy
it to a disk or other removable storage device, or send it to another computer for printing.
Note: Be sure to save the PostScript file to your hard drive before transferring the file to a network drive or removable
media. The slower access time between the hard drive and other drives can cause file corruption or loss of data, and might
damage your document.
1Choose File > Print.
2Click Setup.

356
Printing
Last updated 6/13/2015
3Depending on your operating system, do one of the following:
•(Windows) Select Print To File. Click Print.
•(Mac OS) From the PDF menu, choose Save PDF As PostScript. Enter a name and location for the file when
prompted, and click Save.
4Change the existing settings in the InCopy Print dialog box, if necessary. InCopy uses the current page range when
creating the PostScript file.
5Click Print.
6(Windows) Enter a name and location for the file, and click Save.
Change the default print setting
You can save print settings with the application, so that new InCopy documents use the same print settings. In Mac OS,
these print settings also become the default for the printer. You can override individual print settings.
1Choose File > Print, and adjust the default print settings as desired.
2Click Save Settings.
Any subsequent overrides to these saved settings are discarded at the completion of the print job.
Scale documents
When you print from Layout view, you can control how your document pages fit on the chosen paper size by scaling.
The maximum page size you can print from a Windows system is 129 by 129 inches. To fit an oversized document on
a smaller piece of paper, you can scale the document width and height either symmetrically or asymmetrically. You can
also automatically scale the pages to fit the imageable area of the current paper size. Scaling does not affect the size of
the pages in the document.
Scale a document manually
1In Layout view, choose File > Print.
2To maintain the current document proportions of width to height, select Constrain Proportions. To scale the
document asymmetrically, make sure this option is deselected.
3Type percentages from 1 to 1000 in the Width and Height boxes. If you selected Constrain Proportions, you need to
enter only one value; the other is updated automatically.
4Click Print.
Scale a document automatically
1In Layout view, choose File > Print.
2Select Scale To Fit. The scaling percentage, which is determined by the imageable area defined by the selected PPD,
appears next to the Scale To Fit option.
3Click Print.
More Help topics
Setting up a printer
Exporting to Adobe PDF

357
Last updated 6/13/2015
Chapter 11: PDF
Understanding Adobe PDF
About Adobe PDF
Portable Document Format (PDF) is a universal file format that preserves the fonts, images, and layout of source
documents created on a wide range of applications and platforms. Adobe PDF is the standard for the secure, reliable
distribution and exchange of electronic documents and forms around the world. Adobe PDF files are compact and
complete, and can be shared, viewed, and printed by anyone with free Adobe Reader® software.
Adobe PDF is highly effective in print publishing workflows. By saving a composite of your artwork in Adobe PDF, you
create a compact, reliable file that you or your service provider can view, edit, organize, and proof. Then, at the
appropriate time in the workflow, your service provider can either output the Adobe PDF file directly, or process it
using tools from various sources for such post-processing tasks as preflight checks, trapping, imposition, and color
separation.
When you save in Adobe PDF, you can choose to create a PDF/X-compliant file. PDF/X (Portable Document Format
Exchange) is a subset of Adobe PDF that eliminates many of the color, font, and trapping variables that lead to printing
problems. PDF/X may be used wherever PDFs are exchanged as digital masters for print production—whether at the
creation or output stage of the workflow, as long as the applications and output devices support PDF/X.
Adobe PDFs can solve the following problems associated with electronic documents:
Embedding and substituting fonts
InCopy embeds a font only if it contains a setting by the font vendor that permits it to be embedded. Embedding
prevents font substitution when a reader views or prints the file, and ensures that readers see the text in its original font.
Embedding increases the file size only slightly, unless the document uses CID (multibyte) fonts, a font format
commonly used for Asian languages, where multiple characters are combined to create a single glyph.
Common problem Adobe PDF solution
Recipients can't open files because they don't have the applications
used to create the files.
Anyone, anywhere can open a PDF. All you need is the free Adobe
Reader software.
Combined paper and electronic archives are difficult to search, take up
space, and require the application in which a document was created.
PDFs are compact and fully searchable, and can be accessed at any
time using Reader. Links make PDFs easy to navigate.
Documents appear incorrectly on handheld devices. Tagged PDFs allow text to reflow for display on mobile platforms such
as Palm OS®, Symbian™, and Pocket PC® devices.
Documents with complex formatting are not accessible to visually
impaired readers.
Tagged PDFs contain information on content and structure, which
makes them accessible on-screen readers.

358
PDF
Last updated 6/13/2015
For each font embedded, InCopy can embed the entire font or just a subset—the particular characters, called glyphs,
used in the file. Subsetting ensures that your fonts and font metrics are used at print time by creating a custom font
name. The subsetting options you choose affect disk space and your ability to do late-stage editing.
If InCopy cannot embed a font, it temporarily substitutes the font with a Multiple Master typeface: either AdobeSerMM
for a missing serif font, or AdobeSanMM for a missing sans serif font.
These typefaces can stretch or condense to fit, to ensure that line and page breaks are maintained from the original
document. The substitution cannot always match the shape of the original characters, however, especially if the
characters are unconventional ones, such as script typefaces.
About compression
When exporting to Adobe PDF, InCopy automatically downsamples images, crops image data to the image’s frame, and
compresses text and line art using the lossless ZIP method. ZIP works well on images with large areas of single colors
or repeating patterns, and for black-and-white images that contain repeating patterns. Because InCopy uses the lossless
ZIP method, data is not removed to reduce file size, so image quality is not affected.
More Help topics
Exporting to Adobe PDF
Exporting to Adobe PDF
Export an InCopy document to Adobe PDF
You can export InCopy documents directly to Adobe PDF. You can export in the Galley, Story, or Layout view. If you
export in Layout view, the result is a PDF document with layout and design elements intact. In contrast, a document
exported in Galley or Story view resembles the text-only look that you see in Galley or Story view within InCopy. You
might want to export the Galley or Story view of an InCopy story to PDF for writers, editors, and others in a document-
review cycle who may not have InCopy on their computers. The PDF document has the same advantages that an
InCopy Galley and Story view offers, including maximum text readability and annotation features.
Note: Adobe PDF files exported from Adobe InDesign® documents that contain overprints or transparency effects are best
viewed in Acrobat 6.0 and later with the Overprint Preview option selected.
1Choose File > Export.
2For Save As Type (Windows) or Format (Mac OS), choose Adobe PDF. Type a file name, choose a location for the
file, and then click Save.
3Select Galley & Story or Layout from the View menu.

359
PDF
Last updated 6/13/2015
4Change settings as desired.
The settings you specify are saved with the application, and are applied to every new InCopy document you export
to PDF until you choose new settings.
5Click Export.
Note: When exporting to PDF, InCopy preserves links from Open Prepress Interface (OPI) comments for images in the
InDesign document. OPI links let the InDesign user include fast, low-resolution versions (proxies) of images for positioning
on a page. For final output, either InDesign or a prepress service provider can automatically replace the proxies with high-
resolution versions.
Common Adobe PDF options
There are several options that are common to the Galley, Story, and Layout views when exporting a document to PDF.
Compatibility Sets the compatibility level of the Adobe PDF file. For documents that will be distributed widely,
consider choosing Acrobat 5 (PDF 1.4) to ensure that all users can view and print the document. If you create files with
Acrobat 8/9 (PDF 1.7) compatibility, the resulting PDF files may not be compatible with earlier versions of Acrobat.
Subset Fonts When Percent Of Characters Used Is Less Than Sets the threshold for embedding complete fonts based on
how many of the fonts’ characters are used in the document. If the percentage of characters used in the document for
any given font is exceeded, then that specific font is completely embedded. Otherwise, the font is subsetted. Embedding
complete fonts increases PDF file size, but if you want to make sure you completely embed all fonts, enter 0 (zero).
Include Page Information Includes the document name, page number, and date and time the file was exported.
View PDF After Exporting Opens the PDF file in the latest version of Acrobat currently installed on your computer. For
accurate results, make sure that the compatibility option matches the latest version of Acrobat installed.
Adobe PDF options for Galley and Story views
The PDF Export dialog box contains options specific to Galley and Story views.
Stories Exports a single story or multiple stories.
Fonts Includes settings for font family and style, type size, and leading for the exported file. These settings do not
change the screen view settings in the Galley & Story Display preferences.
Include Story Information The document title, author, and description appear in the exported PDF file.
Include Paragraph Styles Paragraph style information from the information column shown in Galley and Story views
appears in the exported PDF file.
Include Inline Notes Exports all (or only visible) inline notes contained in the document. To include the note colors
assigned to individuals on the project, select Show Notes Backgrounds In Color.
Include Tracked Changes Exports all (or only visible) tracked changes contained in the document. To include the
editing colors assigned to individuals on the project, select Show Tracked Changes Backgrounds In Color.
Include Accurate Line Endings Exports line endings as they appear in the story. If unchecked, the lines of text wrap
according to the width and orientation of the widest story window.
Include Line Numbers Exports with line numbers displayed in the information column. This option is available only if
Include Accurate Line Endings is selected.

360
PDF
Last updated 6/13/2015
Fill Page (Use Multiple Columns) Exports the story using the number and width of columns you specify. This option is
available only if Include Accurate Line Endings is selected.
Note: Selecting a small column width and a large font size (in the Fonts section of this section) can cause text to overlap in
the exported output.
Adobe PDF options for Layout view
The following options are available only when exporting from Layout view:
All Exports all pages in the current document or book. This is the default setting.
Range Specifies the range of pages to export in the current document. You can type a range by using a hyphen, and
separate multiple pages or ranges by using commas. This option is unavailable when you’re exporting books.
Spreads Exports pages together as if they were bound, or printed on the same sheet.
Note: Do not select Spreads for commercial printing; if you do, the service provider cannot impose the pages.
Include Notes As Annotation Exports all notes as PDF annotations.
Interactive Elements Choose Include Appearance to include items such as buttons and movie posters in the PDF.
Optimize For Fast Web View Reduces PDF file size, and optimizes the PDF file for faster viewing in a web browser by
restructuring the file for page-at-a-time downloading (byte serving).
Embed Page Thumbnails Creates thumbnail images within the exported PDF file.
Create secure PDF documents
You can restrict access to an Adobe PDF file when you export it. When files use security restrictions, any tools and
menu items related to those features are dimmed.
You can secure a PDF file so that a user password is required to open it and a master password is required to change
security settings. If you set any security restrictions in your file, you should also specify a master password; otherwise,
anyone who opens the file could remove the restrictions. If a file is opened with a master password, the security
restrictions are temporarily disabled. If the file has both passwords, you can open it with either one.
Note: The Compatibility setting determines the encryption level. The Acrobat 4 (PDF 1.3) option uses a low encryption
level (40-bit RC4), while the other options use a high encryption level (128-bit RC4 or AES).
1Choose File > Export.
2For Save As Type (Windows) or Format (Mac OS), choose Adobe PDF. Specify a name and location for the file, and
click Save.
3Click Security Settings.
4In the Passwords section, specify the password protection you want:
•Select Password Required To Open Document and, in the Document Open Password text box, enter the
password users must enter before they can open the PDF file.
•Select Password Required To Change Permissions And Passwords and, in the Permissions Password text box,
enter the password users must enter before they can set or change any security options in the PDF file.
Note: You cannot use the same password in both text boxes.

361
PDF
Last updated 6/13/2015
5In the Permissions section, define the level of user actions allowed:
No Printing Prevents users from printing the Adobe PDF file.
No Changing The Document Prevents users from filling in forms or making any other changes to the Adobe PDF
file.
No Content Copying Or Extraction, Disable Accessibility Prevents users from selecting text and graphics.
No Adding Or Changing Comments And Form Fields Prevents users from adding or changing notes and form fields
if they open the PDF file in Adobe Acrobat or another PDF editor.
6Click Save, and then click Export.

362
Last updated 6/13/2015
Chapter 12: XML
Working with XML
Adobe InDesign CS5 is one of many applications that can produce and use XML. After you tag content in an InDesign
file, you save and export the file as XML so that it can be repurposed in another InDesign file or another application.
Similarly, you can import an XML file into InDesign and instruct InDesign to display and format the XML data any
way you want.
About XML
XML (Extensible Markup Language) is a way to repurpose data in a file or automate the process of replacing the data
in one file with data from another file. XML employs tags to describe parts of a file—a heading or a story, for example.
These tags mark data so it can be stored in an XML file and handled appropriately when it is exported to other files.
Think of XML as a translation mechanism for data. XML tags label text and other content in a file so that applications
can recognize and present the data.
Extensible language
XML is considered an extensible language because individuals create their own XML tags—they can create one tag for
each type of information that they want to repurpose. XML tags don’t carry information about how data is supposed to
be displayed or formatted. XML tags are strictly for identifying content.
In InCopy , for example, you can create a Heading1 tag and assign it to each first-level heading in a document. After
you save the document as an XML file, the Heading1 content can be imported and put to use—by any application that
can read XML—as a web page, printed catalog, directory, price list, or database table.
InDesign is one of many applications that can produce and use XML. After you tag content in an InDesign file, you save
and export the file as XML so that it can be repurposed in another InDesign file or another application. Similarly, you
can import an XML file into InDesign and instruct InDesign to display and format the XML data any way you want.
Adobe InCopy is one of many applications that can produce and use XML. After you tag content in an InCopy file, you
save and export the file as XML so that it can be repurposed in another InCopy file, InDesign file, or another
application.
In InCopy , you can create XML tags and tag parts of a document even if you’re not experienced with XML. InCopy
handles XML programming behind the scenes and creates the XML for you when you export a document in XML
format.
Note: Do not confuse XML tags with InCopy tagged text. For more information about tagged text, which is a different
method of exporting and importing InCopy content, view the Tagged Text PDF at
www.adobe.com/go/learn_id_taggedtext_cs5_en (PDF).
XML data structure
The element is the building block of XML data; an element is data that has been tagged. In XML files, elements are
nested within other elements to create a hierarchical structure for the data.
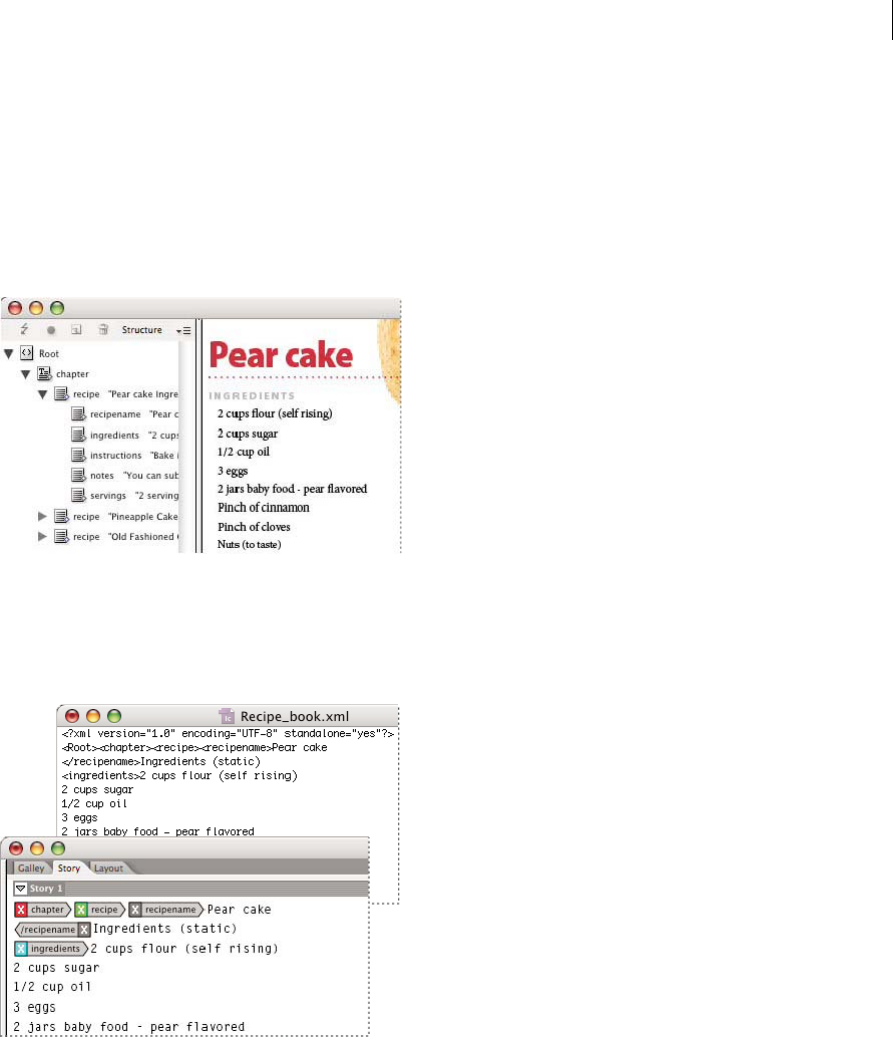
363
XML
Last updated 6/13/2015
You can see the structure of XML data in the Structure pane, which displays the hierarchy and sequence of elements.
In the XML structure, child elements are contained by parent elements, which in turn may also be child elements. Or,
seen from the other direction, parent elements contain child elements, and these child elements may in turn be parent
elements to other child elements.
For example, in the following image, you can see a chapter element that contains (is the parent of) several recipe
elements. Each recipe element, in turn, is the parent of elements called recipename, ingredients, instructions, notes, and
servings. All elements are contained inside the Root element, which appears at the top of the Structure pane.
For example, in the following image, you can see a chapter element that contains (is the parent of) a recipe element. The
recipe element, in turn, is the parent of elements called recipename and ingredients. All elements are contained inside
the Story element, which always appears at the top of the Structure pane.
For more information on using XML in InDesign, visit www.adobe.com/go/learn_id_XMLscript.
XML tools
InCopy provides the Structure pane and the Tags panel for working with XML content. The Structure pane displays all
the elements in the document and their hierarchical structure. To help you identify each element, InCopy displays its
element tag and an icon that indicates what type of content it holds. In addition, the Structure pane can display the first
few words of text in an element, called a text snippet, which is not to be confused with snippet files that store objects for
reuse.
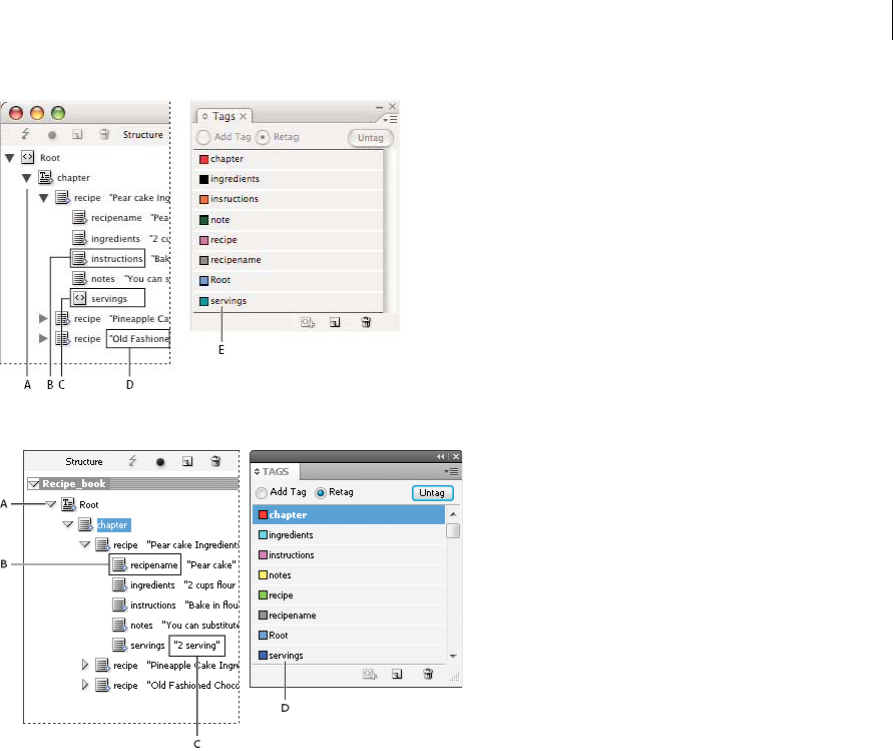
364
XML
Last updated 6/13/2015
A Triangle to expand or collapse elements B Element (placed in layout) C Element (not in layout) D Text snippet E Element tag
A Triangle to expand or collapse elements B Element placed in layout C Text snippet D Element tag
The Structure pane lets you view, edit, and manage XML elements. You use the Structure pane in many ways when
working with XML. For example, to place imported XML content into the layout, you can drag elements from the
Structure pane directly to a page. You also use the Structure pane to adjust the hierarchy of the elements. You can add
elements, attributes, comments, and processing instructions by way of the Structure pane.
The Tags panel lists tags for elements. You can import, export, add, delete, and rename tags. You use the Tags panel to
apply element tags to content that you plan to export to XML, and to apply tags to frames before importing XML
content into them.
The Tags panel lists tags for elements. You can import, export, add, delete, and rename tags. You use the Tags panel to
apply element tags to content that you plan to export to XML.
About DTD files
To share XML data with others, you need to agree on a standard set of tag names and element attributes so that everyone
in your group uses and applies tags the same way. One method for handling the sharing of XML data is to use a
document type definition (DTD) file.
A DTD file provides a set of elements and attributes for members of the group to use. It also defines the rules about
where elements can appear in the structural hierarchy. For example, the DTD file may require the Title element to be a
child of the Story element because the title is supposed to appear inside the story; if you tag a title without tagging the
story it appears in, the DTD file marks the Title element as invalid. You can search for and flag invalid structural errors
in an InDesign file with a DTD file. This process is called validating.
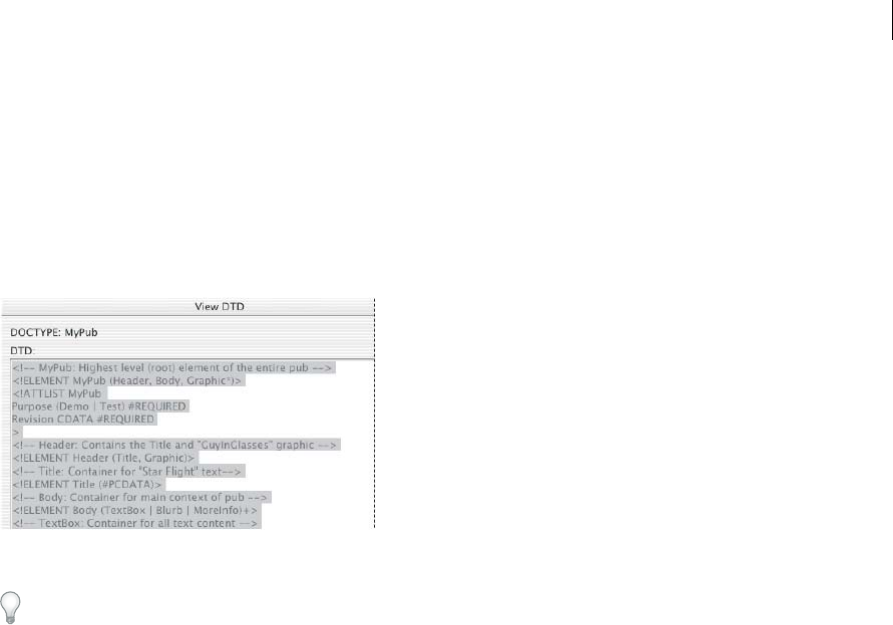
365
XML
Last updated 6/13/2015
To use a DTD file (if your document doesn’t already contain one), you load it into your document. This imports the
element names from the DTD into the Tags panel. Others who have loaded the same DTD file have the same element
names, which ensures that everyone in the group uses the same elements. The imported elements are locked, which
means they can’t be deleted or renamed unless the DTD file is deleted from the document.
Although you cannot import a DTD file into InCopy, DTD files you import in InDesign are available when you edit
the story in InCopy. You can view the DTD file in InCopy and validate stories against it to ensure that tags have been
applied correctly.
You may find that a DTD file created by a group or industry similar to yours includes tags and structures that meet
your needs. For a current list of registered DTDs, visit www.xml.com/pub/rg/DTD_Repositories (English only).
XML rule sets
XML rule sets are sets of instructions written in a scripting language (such as JavaScript or AppleScript) that evaluate
XML data and take certain actions if that data meets certain conditions. Each rule consists of at least one condition and
at least one action. A rule evaluates the XML data against the conditions, and if a condition is met, then it takes the
appropriate action. For example, an XML rule can specify that whenever the Paragraph element appears under the
Subhead element (a condition), a specific style (an action) is applied; or that whenever the Product element (a
condition) appears, a new frame is created and a product image is imported (actions). XML rules are a means of
dynamically creating and formatting layouts based on XML.
For information on XML rule sets and other XML scripting resources, see www.adobe.com/go/learn_id_XMLscript.
Preparing XML files for K4 or InCopy workflows
To prepare files with XML tagging for use within the K4 or InDesign/InCopy workflow environments, you may need
to adjust how you prepare the structure and import XML into InDesign files.
There are two methods for importing XML into InDesign: merge and append. Merge can replace the existing structure,
whereas append adds to any existing structure. In both cases, it is important that the root element is not associated with
a text frame. Either use the default element named "Root" or rename this element based on your current workflow or
requirement as needed, again being sure that it is not associated with a text frame.
For more information on using XML in K4 or InCopy workflows, contact your system administrator.
More Help topics
Structure pane overview
Place (import) text

366
XML
Last updated 6/13/2015
Structure pane overview
Use DTD files to validate XML
Using XML files
Open an XML file in InCopy
You can open any existing XML file in InCopy for editing and tagging.
Note: You can import Ruby used in XML files when the Ruby is compliant with the W3C standard Ruby definition and
uses the InDesign namespaces. InDesign uses the following namespaces.
xmlns:aid="http://ns.adobe.com/AdobeInDesign/3.0/_ver3.0"
1Choose File > Open.
2Locate and select the XML file you want to use.
3Click Open.
Save an XML file as an InCopy story
You can save XML files as InCopy stories.
1Open the XML file in InCopy.
2Choose File > Save Content As.
3Type the name and specify the location for the file.
4From the Save As Type menu (Windows®) or Save As menu (Mac OS®), choose InCopy Document, and click Save.
Tagging content for XML
Create and load XML tags
Before you tag page items, create (or load) tags to identify each content type or item in your document. You can create
tags from scratch or load them from another source, such as an InDesign document, InCopy document, or DTD file.
Use any of the following methods to create or load XML tags for your document:
•Create a tag with the New Tag command.
•Load tags from an XML file or another document.
•Import a DTD file.
•Import tags (and content) using the Import XML command.
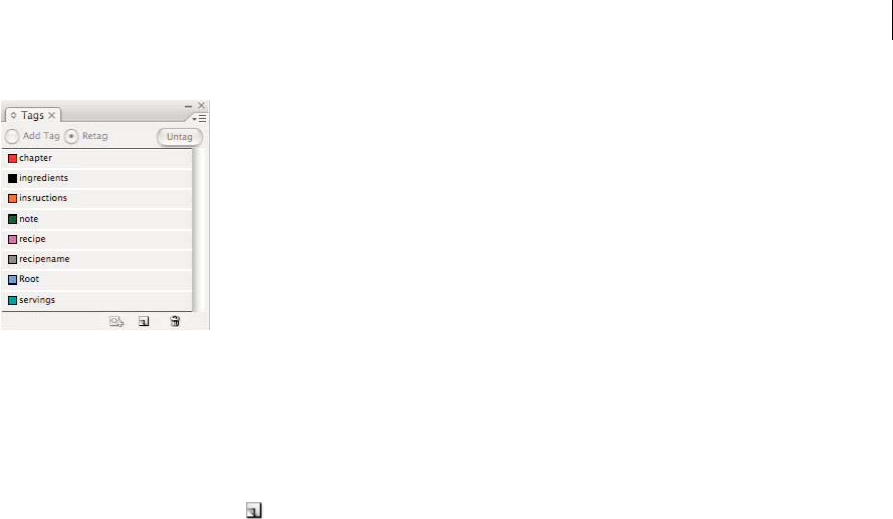
367
XML
Last updated 6/13/2015
Create an XML tag
1Choose Window > Utilities > Tags to open the Tags panel.
2Do one of the following:
•Choose New Tag from the Tags panel menu.
•Click the New Tag button on the Tags panel.
3Type a name for the tag. The name must conform to XML standards. If you include a space or an illegal character
in the tag name, an alert message appears.
4Select a color for the tag if you created your tag from the Tags panel menu. (If you created your tag with the New
Tag button, you can choose a color by changing the color of the tag.)
Note: You can assign the same color to different tags. The color you select appears when you apply the tag to a frame
and choose View > Structure > Show Tagged Frames, or when you apply the tag to text within a frame and choose View
> Structure > Show Tag Markers. (Tag colors do not appear in exported XML files.)
5Click OK.
Load XML tags from another source
You can load tags from an XML file, an InDesign document, or an InCopy document.
Note: InCopy automatically adds tags to the Tags panel when you load an XML file.
1Choose Load Tags from the Tags panel menu.
2Select the file containing the tags you want to load into the Tags panel, and then click Open.
Change tag name or color
1Double-click a tag name in the Tags panel or choose Tag Options in the Tags panel menu.
2Change the name or the color of the tag, and click OK.
Note: You cannot change the name of locked tags. InCopy automatically locks tags specified in a loaded DTD file. To change
the name of these tags, you must edit the DTD file and reload it into the document.
Tagging items
Before you export content to an XML file, you must tag the text and other items (such as frames and tables) that you
want to export. You also need to tag items that you have created as placeholders for imported XML content. Items that
have been tagged appear as elements in the Structure pane.
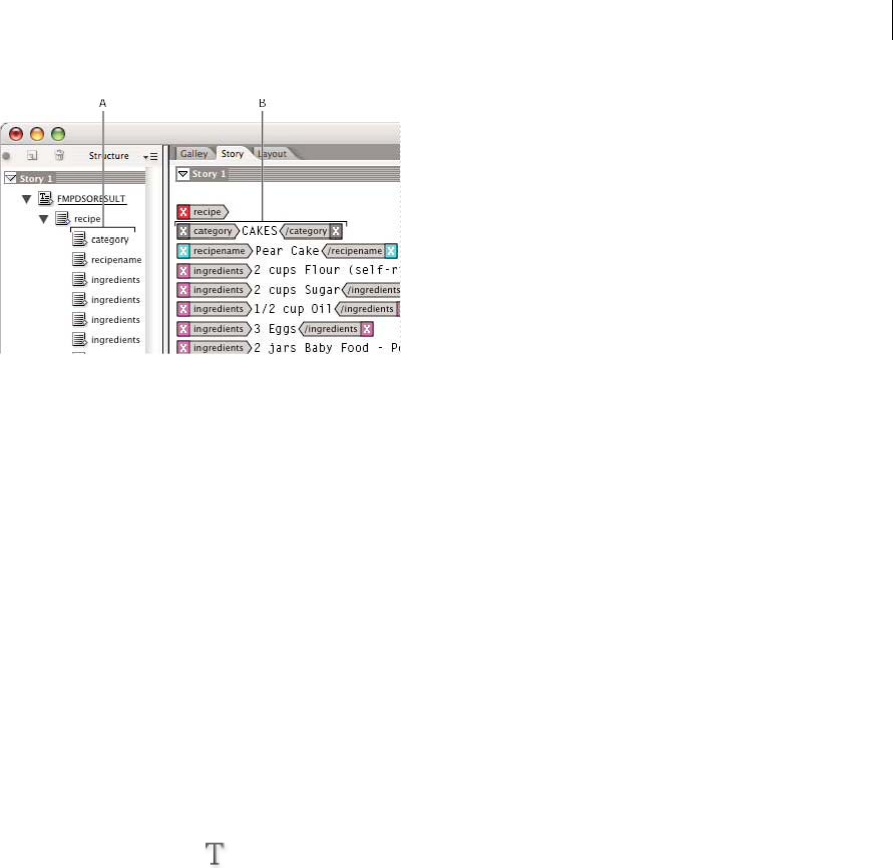
368
XML
Last updated 6/13/2015
A Elements appear in the Structure pane. B Tag markers surround text to which tags have been applied.
When tagging page items, note the following:
•Text frames must be tagged before you can tag the text inside them.
•You c a n app ly on l y one tag t o a f r ame.
•Threaded text frames share a single tag, which applies to all text in the thread, including overset text.
•When you tag text within a tagged element (for example, when you tag a paragraph within a tagged story), the text
appears as a child element of an existing element in the Structure pane.
•When you tag an element within a frame with the Autotag button, InCopy automatically tags the frame using the
tag specified in the Tagging Preset Options dialog box.
Tag text within a text frame
1Choose View > Layout View.
2Make sure that the text frame in which the text appears is tagged. (If the frame isn’t tagged when you try to tag text
within the frame, InCopy tags the story using default tags.)
3Do one of the following:
•Using the Type tool , select text within a text frame, and then click a tag in the Tags panel. If you select all of
the text within the frame, the tag is applied to the frame, not to the block of text (unless you’ve selected Add Tag
in the Tags panel).
•Select the text frame, table, table cells, or image that you want to tag, and click the Autotag icon in the Tags panel
to apply a default tag. (See Specify Autotag defaults.)
•Automatically tag text to which paragraph or character styles have been applied using the Map Styles To Tags
command.
Tag text in tables
When you tag a table for export to XML, you create a table element as well as one cell element for each cell in the table.
The cell elements are child elements of the table element and are created automatically.
1Choose View > Layout View.
2Click in the table and choose Table > Select > Table.
3Select a tag for the table in the Tags panel.
InCopy creates a cell element for each cell in the table (you can display them in the Structure pane). The tag applied
to table cell elements depends on your tagging present options.
4If needed, tag table cells with a different tag.
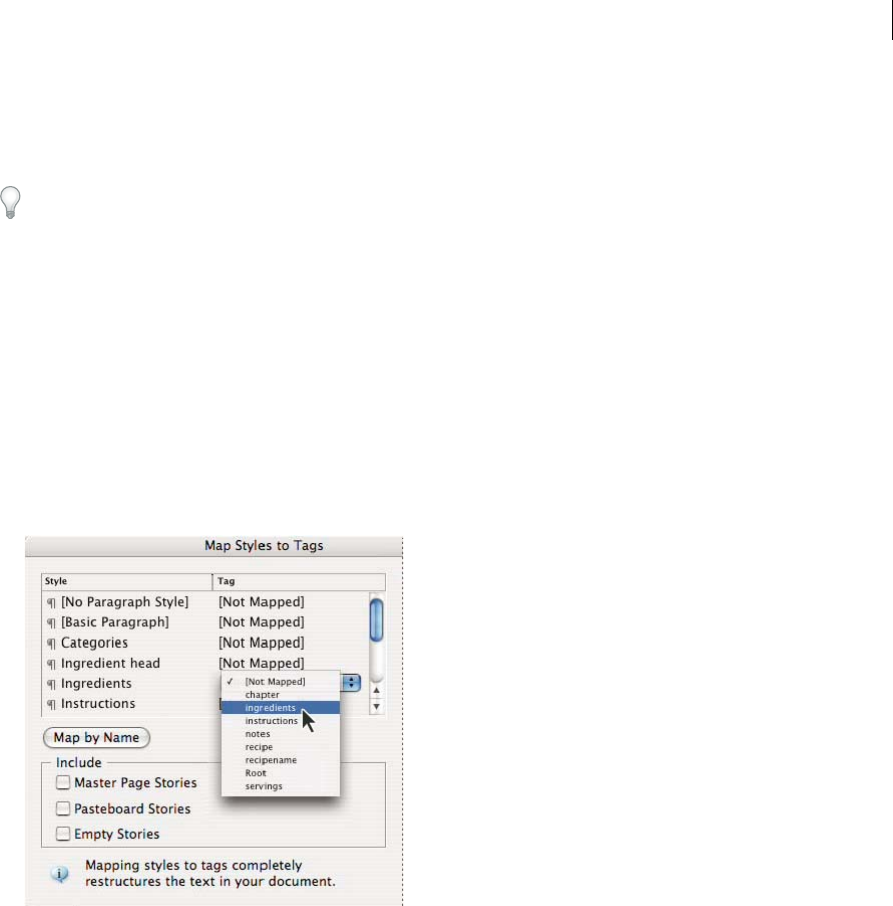
369
XML
Last updated 6/13/2015
For example, you can tag the first-row cells with a different tag to identify them as heading cells. To apply tags to
cells, select the actual table cells in your document, and then select a tag. (Selecting cells in the table also selects the
corresponding cell elements in the Structure pane.)
You can also tag a table by selecting it and then clicking the Autotag icon in the Tags panel. The Table tag (or another
tag of your choice) is applied immediately to the table, according to your Autotag default settings.
Tag content according to styles
Paragraph, character, table, and cells styles you assign to text can be used as a means of tagging text for XML. For
example, a paragraph style called Body can be associated with a tag called StoryText. Then, using the Map Styles To
Tags command, you can apply the StoryText tag to all paragraphs in your document that are assigned the Body
paragraph style. You can map more than one style to the same tag.
Note: The Map Styles To Tags command tags content automatically, including paragraphs and characters that have been
tagged already. To retain existing tags, apply tags manually.
1Choose Map Styles To Tags from the Tags panel menu or Structure pane menu.
2For each style in your document, specify the tag that you want it to be mapped to.
3To match style names to tag names, click Map By Name. Styles that are named identically to tag names are selected
in the dialog box. Map By Name is case-sensitive; Head1 and head1, for example, are treated as different tags.
4To use style mappings set up in an InDesign file, click Load and select the file.
5Select or deselect Include options:
Master Pages Stories Maps styles found on the master page to tags.
Pasteboard Stories Maps styles found on stories on the pasteboard to tags. (Deselect this option to keep stories on
the pasteboard from being tagged.)
Empty Stories Maps styles located in empty stories to tags. (Deselect this option to keep styles on empty stories from
being tagged.)
6Click OK.
The new XML tags are applied throughout your document to paragraph, character, table, and cell styles that you
specified in the Map Styles To Tags dialog box.

370
XML
Last updated 6/13/2015
Untag a page item
Untag an item to remove its tag but retain the associated content.
1Select the element in the Structure pane window, or select the page item in the document layout.
2Do one of the following:
•Click Untag Element in the Structure pane menu.
•Click the Untag button in the Tags panel.
Retag a page item
Retag an item to replace the existing tag (you don’t need to untag it first).
1Select the Type tool .
2Do one of the following:
•Select the text or text frame, and then click a different tag in the Tags panel.
•Place the insertion point in a tagged text frame within a story element (not a child element). Select Retag at the
top of the Tags panel, and click a different tag in the Tags panel.
•Select the entire block of text to which a tag has been applied, select Retag at the top of the Tags panel, and click
a different tag. (If you select Add Tag at the top of the Tags panel, and then click a different tag, a new child
element will appear in the Structure pane.)
Specify Autotag defaults
When you select a text frame, table, table cells, or an image, and then click the Autotag icon in the Tags panel, InDesign
applies a default tag to the item you selected. You can specify these default tags in the Tagging Preset Options dialog box.
When you select a text frame, table, table cells, or an image, and then click the Autotag icon in the Tags panel, InCopy
applies a default tag to the item you selected. You can specify these default tags in the Tagging Preset Options dialog box.
Note: InCopy applies a default tag when you create an element that requires a parent element, but doesn’t yet have one. For
example, if you tag text within a text frame but the frame itself isn’t tagged, InCopy assigns the frame a tag according to the
Tagging Preset Options. The capability to apply default tags helps InCopy maintain correct XML structure.
1Choose Tagging Preset Options from the Tags panel menu.
2Choose a default tag for text frames, tables, table cells, and images.
If the tag you need isn’t listed, you can choose New Tag from the menu and create a tag.
Map XML tags to styles
XML tags are merely data descriptions; they carry no formatting instructions. As such, you need to format XML
content after you import it and lay it out. One way to do that is to map XML tags to paragraph, character, table, or cell
styles. For example, the Byline tag could be mapped to the Author character style, so that all imported and placed XML
content that is tagged Byline is automatically assigned the Author character style. Mapping tags to styles makes
formatting imported XML content easier and less time-consuming.
You don’t need to map every tag to a paragraph or character style. Some elements may not appear in the layout and
others may be easier to format one at a time. Moreover, child elements take on the paragraph or character style that is
assigned to their parent, which can cause confusion unless you are careful to map parent and child elements separately.
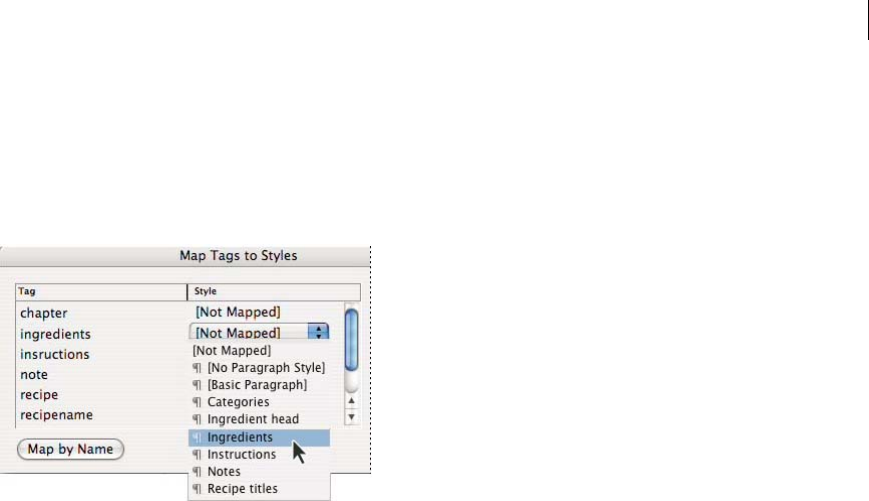
371
XML
Last updated 6/13/2015
Note: The Map Tags To Styles command reapplies styles throughout a document, sometimes with unwanted results. When
you map a tag to a style, text that was previously assigned to one style may be reassigned to another, depending on its XML
tag. If you’ve already formatted some text, you might prefer to apply styles manually to prevent your paragraph and
character style choices from being overridden.
1Choose Map Tags To Styles from the Tags panel menu or the Structure pane menu.
2Do any of the following:
•To import styles, tags, and mapping definitions from another document, click Load, choose a document, and
click Open.
•To map tags to styles individually, click the Style column adjacent to a tag, and choose a paragraph or character
style from the menu that appears. (The paragraph symbol identifies paragraph styles in the menu; an “A”
identifies character styles.) Repeat for each tag you want to map.
•To automatically map tags to styles with the same names, click Map By Name. Styles with names that are identical
to tag names are selected in the Style column. To match, a tag and style must not only have the same name, but
the same case; H1 and h1, for example, are not considered a match. (If the same style name exists in two different
style groups, Map By Name doesn’t work and you are alerted to rename one of the styles.)
3Click OK.
Show or hide tagged frames or tag markers
In Galley and Story views, tag markers indicate where items on a page have been tagged. In Layout view, tagged frames
indicate where items such as tables and images have been tagged. The tag color determines the color of the marker or
frame.
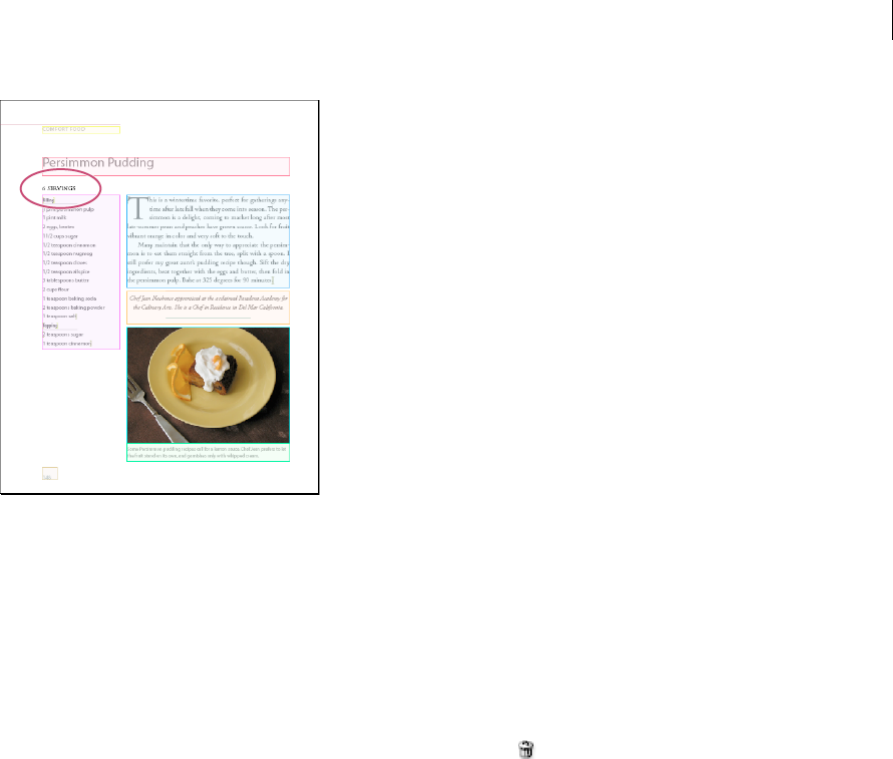
372
XML
Last updated 6/13/2015
❖Do any of the following:
•To display tagged frames in color, choose View > Structure > Show Tagged Frames.
•To hide the color-coding of tagged frames, choose View > Structure > Hide Tagged Frames.
•To display color brackets around tagged text, choose View > Structure > Show Tag Markers.
•To hide color brackets around tagged text, choose View > Structure > Hide Tag Markers.
Delete tags or elements
•To delete a tag from the Tags panel, drag it to the Delete Tag icon at the bottom of the panel. If the tag has been
applied to content, an alert message appears. Select another tag to replace the deleted tag, and then click OK.
•To delete all unused tags, choose Select All Unused Tags from the Tags panel menu, and click the Delete Tag icon at
the bottom of the panel.
•To delete an element from the Structure pane, select the element, and then click the Structure pane Delete icon or
choose Delete from the Structure pane menu. If the element contains any content, an alert message appears. Click
Untag to leave the content in the document; click Delete to delete both the element and its content.
Note: Tags that were loaded with an imported DTD file cannot be deleted until the DTD file is deleted.
More Help topics
About XML
About DTD files
Add paragraph and character styles
Structuring documents for XML
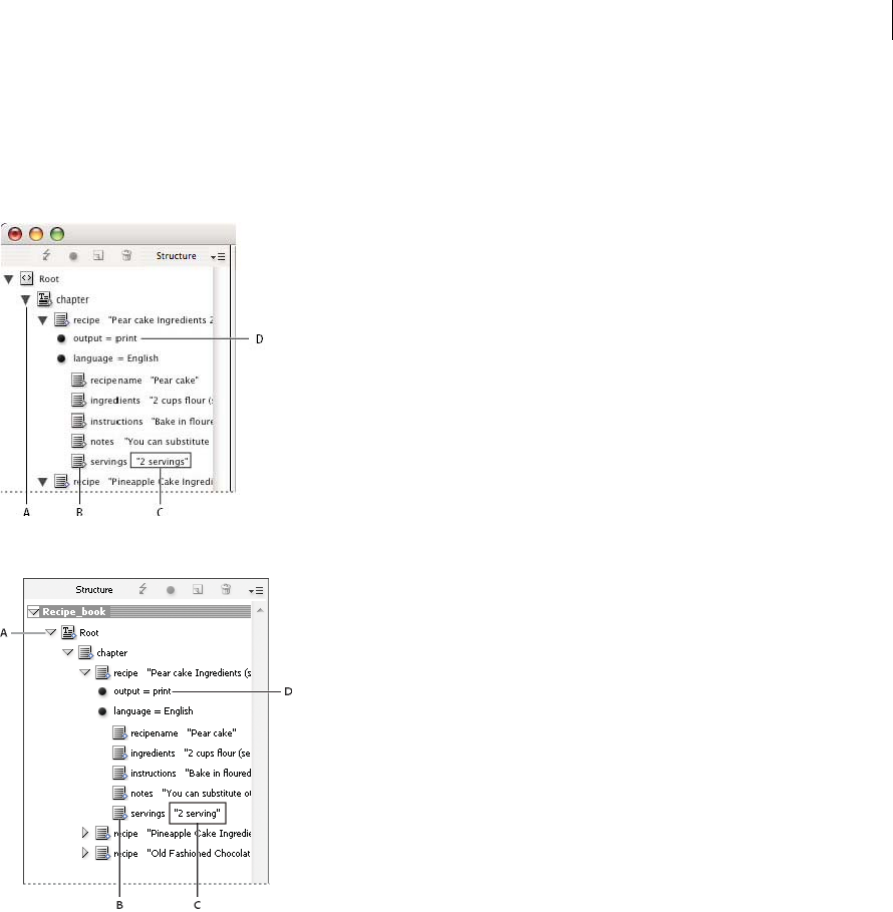
373
XML
Last updated 6/13/2015
Structure pane overview
The Structure pane displays, in hierarchical form, items in a document that have been marked with XML tags. These
items are called elements. You can move elements in the Structure pane to define the order and hierarchy of items. An
element consists of an icon indicating the element type and a tag name.
A Triangle to expand or collapse elements B Element C Text snippet D Attribute
A Triangle to expand or collapse elements B Element C Text snippet D Attribute
Additionally, elements may provide this information:
Blue diamond A blue diamond on an element icon means that the element is attached to an item on the page; the
absence of a blue diamond means that the element has not been attached to a page item.
Underline The tag name is underlined if the item on the page to which the element corresponds is selected. For
example, if you select text to which you assigned the Title tag, the word Title in the text’s element is underlined in the
Structure pane. Underlining shows you whether selected items on the page and elements in the Structure pane
correspond.
Text snippet The first 32 characters of tagged text, called a text snippet, can appear to the right of the element. These
snippets help you identify the page item to which an element corresponds.
Dot and attribute Attributes provide metadata information about an element. If attributes are attached to an element,
a black dot along with attribute names and values appear below the element.
374
XML
Last updated 6/13/2015
Use the Structure pane
•To open the Structure pane, choose View > Structure > Show Structure.
•To close the Structure pane, choose View > Structure > Hide Structure, or click the splitter button.
•To expand or collapse an element (and display or hide any of its child elements), click the triangle next to the
element.
•To adjust the size of the Structure pane, drag the splitter button.
•To expand or contract an element as well as all elements contained within it, hold down Ctrl (Windows) or
Command (Mac OS) while clicking the triangle next to the element.
•To show or hide text snippets, choose Show Text Snippets or Hide Text Snippets from the Structure pane menu.
Structure pane icons
The following icons appear in the Structure pane:
Icon Name Use
Root element Each document includes one root element at
the top, which can be renamed but cannot be
moved or deleted.
Story element Represents tagged stories (one or more linked
frames).
Text element Represents tagged text within a frame.
Graphic element Represents a tagged frame that includes a
placed image. Each graphic element includes
an href attribute that defines the path or URL
to the linked file.
Unplaced text element Unplaced text element not yet associated
with a page item.
Unplaced graphic element Unplaced graphic element not yet associated
with a page item.
Table element Represents a table.
Header cell element Represents a cell in the header row of a table.
Body cell element Represents a cell within the body of a table.
Footer cell element Represents a cell in the footer row of a table.
Empty element An empty frame is associated with this
element.
Attribute Includes metadata, such as keywords or
location of a linked image (HREF attribute).
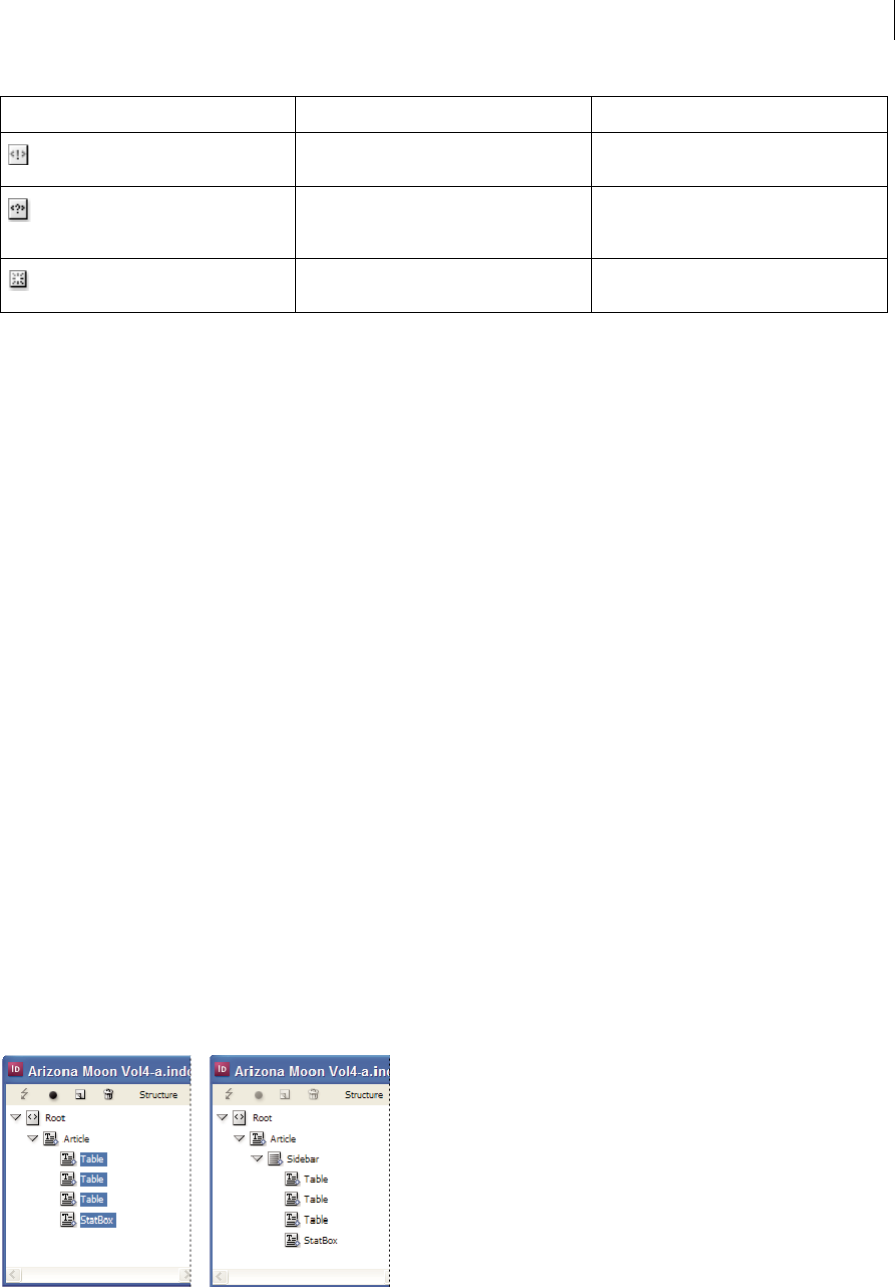
375
XML
Last updated 6/13/2015
Rearrange structured elements
You can change the order and hierarchical rank of elements in the Structure pane. However, observe these rules:
•An XML document is required to have a single root element at the top of the structure. The root element contains
and is the parent to all other elements. Only the DTD (appearing as a DOCTYPE element), comments, and
processing instructions may appear above the root element in the Structure pane.
•Changes to the XML hierarchy structure may affect the appearance of tagged items on InCopy pages. For example,
making a text element the child of an element elsewhere in the structure also moves the text in the layout.
•You cannot drag a table cell element into a table element or move elements into a table element.
❖In the Structure pane, do one of the following:
•To move an element, drag it to a new location within the structure. A line appears when you drag to indicate
where you are inserting the element. The width of the line marks the level within the hierarchy.
•To make an element a child of another element, either position it over the parent element to highlight it or place
it amongst the parent’s other child elements, and then release the mouse button.
•To demote an element by one level in the hierarchy, drag it just above another parent element and move it to the
left slightly until the line indicating its placement spans the width of the parent element.
•To copy or cut an element, select the element or elements in the Structure pane, and then choose Edit > Copy or
Edit > Cut. Select the element directly above where you want to insert the element, and choose Edit > Paste.
Note: When you cut an element, the element and contents are cut to the clipboard, but the frame remains intact.
Insert a parent element
Insert a parent element in the Structure pane to maintain the proper XML structure or organize content better. Before
you can insert a new parent element, you must select the elements that will be the children of the new parent. When
the new parent element is inserted, the selected child elements are demoted by one rank in the structural hierarchy.
Comment Includes comments that appear in the XML
file, but not the InDesign document.
Processing instruction Includes an instruction that triggers an action
in applications that can read processing
instructions.
DOCTYPE element Tells InDesign which DTD file to use when
validating the XML file.
Icon Name Use

376
XML
Last updated 6/13/2015
1In the Structure pane, select the elements that will be child elements to the new parent element you want to insert.
Note the following:
•You can’t select the Root or a root-level element.
•You can’t select the Story or a story-level element.
•The elements must be on the same level of the structural hierarchy.
•The elements must be contiguous.
•The selection must not include table cells or attributes.
2On the Structure pane menu, choose New Parent Element, or right-click (Windows) or Control-click (Mac OS) and
choose New Parent Element.
3Select a tag for the new parent element and click OK.
Insert a new parent element quickly by selecting Add Tag in the Tags panel and then clicking a tag in the panel. You can
also right-click (Windows) or Control-click (Mac OS) an element you selected in the Structure pane, choose New Parent
Element, and then choose an element.
Work with attributes
An attribute provides additional information about an XML element. Each attribute consists of a name and a value.
Attributes appear in the Structure pane; they are not placed in the document or used as content in the document.
Include attributes with elements for the benefit of files and applications that will use the XML files you create in InCopy
.
When you tag an image, InDesign automatically creates an href attribute with a value that defines the on-disk location
of the image file. This href attribute allows other files and applications to locate the image on disk so it can be displayed.
You can add attributes to any element except the DOCTYPE element (a DTD file), comments, and processing
instructions. For example, to include keywords for searching in a downstream application, you can create an attribute
called keywords. You could also create attributes to indicate substituted text, track article titles, and record other
content-related information.

377
XML
Last updated 6/13/2015
If you are using a DTD file, view its contents to see which attributes it allows. Attribute names, like tag names, must
conform to the DTD.
Note: InCopy recognizes special namespace attributes that can specify paragraph or character styles, tables and table cell
styles, as well as control whitespace. For more information, see the XML technical reference and other resources at
www.adobe.com/go/learn_id_XMLscript.
Add an attribute
1Select an element.
2Do one of the following:
•Click the Add An Attribute button .
•Choose New Attribute on the Structure pane menu.
•Right-click (Windows) or Control-click (Mac OS) the selected element and choose New Attribute.
3Specify a name and a value for the attribute, and then click OK.
Show or hide attributes in the Structure pane
❖Choose Show Attributes or Hide Attributes from the Structure pane menu.
You may need to click the triangle icon next to an element to display its attributes.
Edit or delete an attribute
1Select an attribute in the Structure pane.
2Do one of the following:
•To edit the attribute, double-click it or choose Edit from the Structure pane menu.
•To delete the attribute, click the Delete icon or choose Delete from the Structure pane menu.
Edit href attributes
InCopy creates href attributes automatically to handle image files. The href attribute defines the on-disk location of the
image file so that the image file can be displayed. When you tag a placed image, InCopy creates an href attribute value
that lists the image’s path and filename.
The path can be an absolute link, a relative link to the same folder as the XML file, or a relative link to the Images
subfolder of the folder where the XML file is located. Relative paths are specific to the path where the document is saved.
•An href attribute with an absolute link looks like the following (in Windows and the Mac OS):
href=file:///C:/Images/Meadow.psd
href=file:///Users/abhayc//Desktop/abc.jpg
•An href attribute to an image file in the same folder as the XML file looks like the following:
href=file:Meadow.psd
•An href attribute to an image file in the Images subfolder looks like the following:
href=file:///Images/Meadow.psd
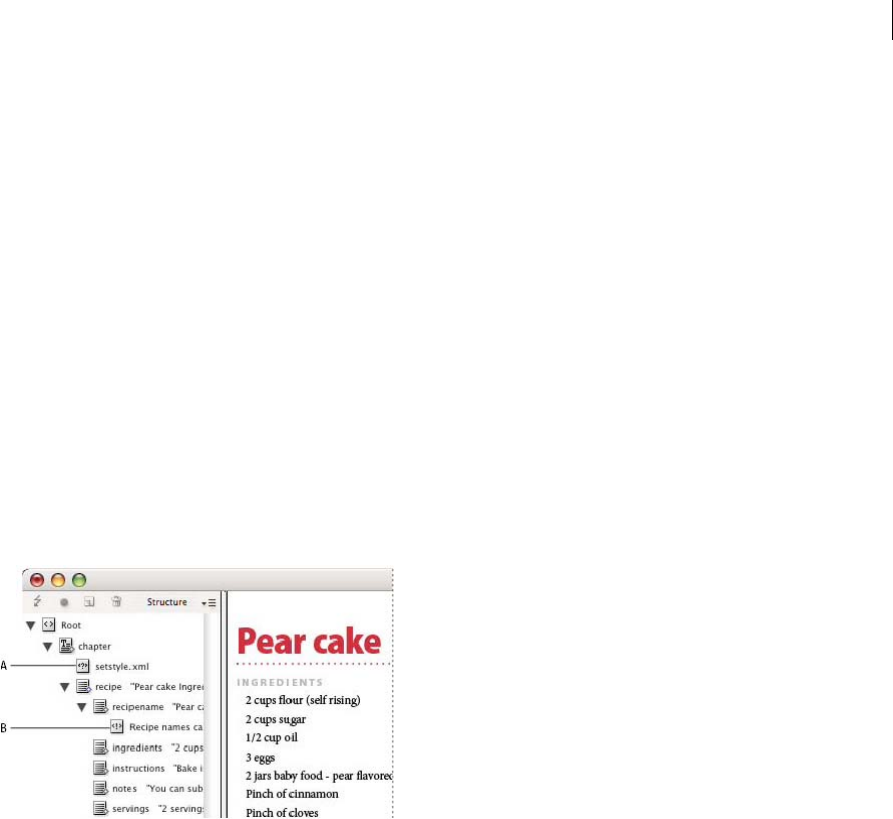
378
XML
Last updated 6/13/2015
You can edit the href attribute to specify a new link to an image. For example, you can edit an absolute link to make it
a relative link, thereby making the image file accessible when you export the file.
1In the Structure pane, double-click the href attribute. (You may need to click the triangle icon next to the image
element to display the attribute.)
2For Value, enter the new path to the image, and then click OK.
Add comments and processing instructions
Using InCopy , you can include comments and processing instructions in an XML file. Enter a comment to include
descriptive information about an element. Comments can be viewed in web browsers and text editors. They help others
understand XML structure and XML tags. A processing instruction is a special, application-specific command. For
example, you can enter a page-break processing instruction so that an application to which you export your XML file
understands where to enter a page break. InCopy user-created processing instructions are meant for use in other
programs; InCopy itself does not act on processing instructions.
Comments and processing instructions appear in the Structure pane. You can move, edit, and delete comments and
processing instructions as you can other elements in the Structure pane. They cannot, however, contain child elements
or attributes.
A Processing instruction B Comment
Add a comment
1Select the element about which you will comment.
Note: To add a comment to a table, select a table cell element. You can add comments to table cells, not tables.
2Choose New Comment in the Structure pane menu.
3Type the comment in the New Comment dialog box.
Add a processing instruction
1Select an element for the processing instruction.
Note: To add a processing instruction to a table, select a table cell element. You can add processing instructions to table
cells, not tables.
2Choose New Processing Instruction in the Structure pane menu.
3For Target, enter a name that identifies the processing instruction to an application that reads exported XML files.
4For Data, enter a value that tells the application what to do with the processing instruction.
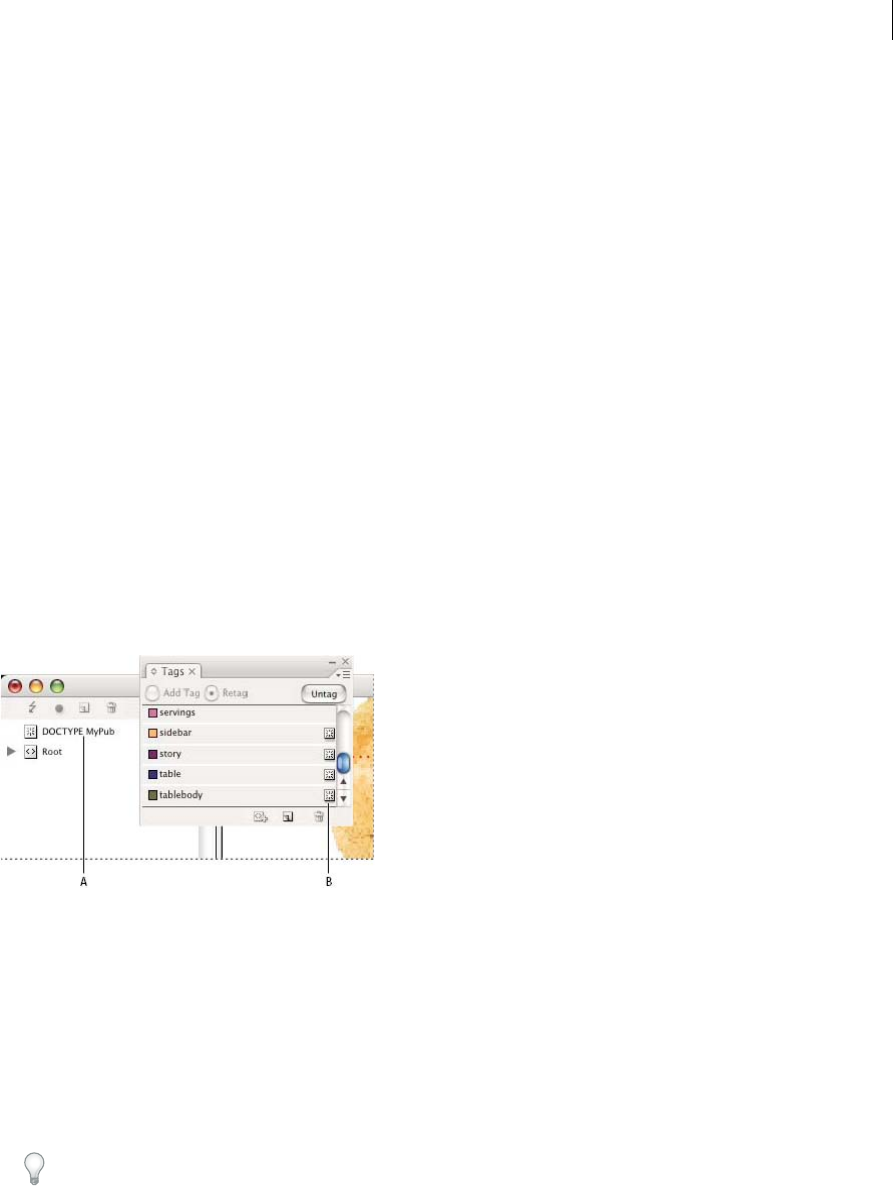
379
XML
Last updated 6/13/2015
View comments and processing instructions
❖Choose Show Comments or Show Processing Instructions in the Structure pane menu.
Edit comments and processing instructions
1Select the comment or processing instruction.
2Do any of the following:
•Double-click the comment or processing instruction.
•Choose Edit on the Structure pane menu.
3Edit the comment or processing instruction and click OK.
Use DTD files to validate XML
Validating the XML in a document means to compare the structure, element tag names, and attributes against the
specifications of a DTD file. To validate against a DTD file, you must first load it into your document in InDesign.
Note: Loading a DTD file imports tag names into the Tags panel. These imported tag names are locked; they can’t be deleted
or renamed except by deleting the DTD file from the document.
The DOCTYPE element appears at the top of the Structure pane if a DTD file has been loaded into your document.
(DTDs are sometimes loaded automatically when you import an XML file.) To replace the DTD file in a document,
delete the existing DTD and then load a new one.
A DOCTYPE element from the DTD file (Structure pane) B Locked tag from the DTD file (Tags panel)
Load a DTD file
When you load a DTD file, InDesign embeds the file in the document.
1Do one of the following:
•In the Structure pane, choose Load DTD from the Structure pane menu.
•In the Tags panel, choose Load DTD from the panel menu.
2Select a DTD file to import, and click Open.
To view tags defined in the DTD file, open the Tags panel by choosing Window > Utilities > Tags.
View a DTD file
DTDs are written in ASCII text. They may contain embedded instructions and explanations that describe how to apply
tags and order elements correctly. In InDesign, you can only view a DTD that is loaded in a document.
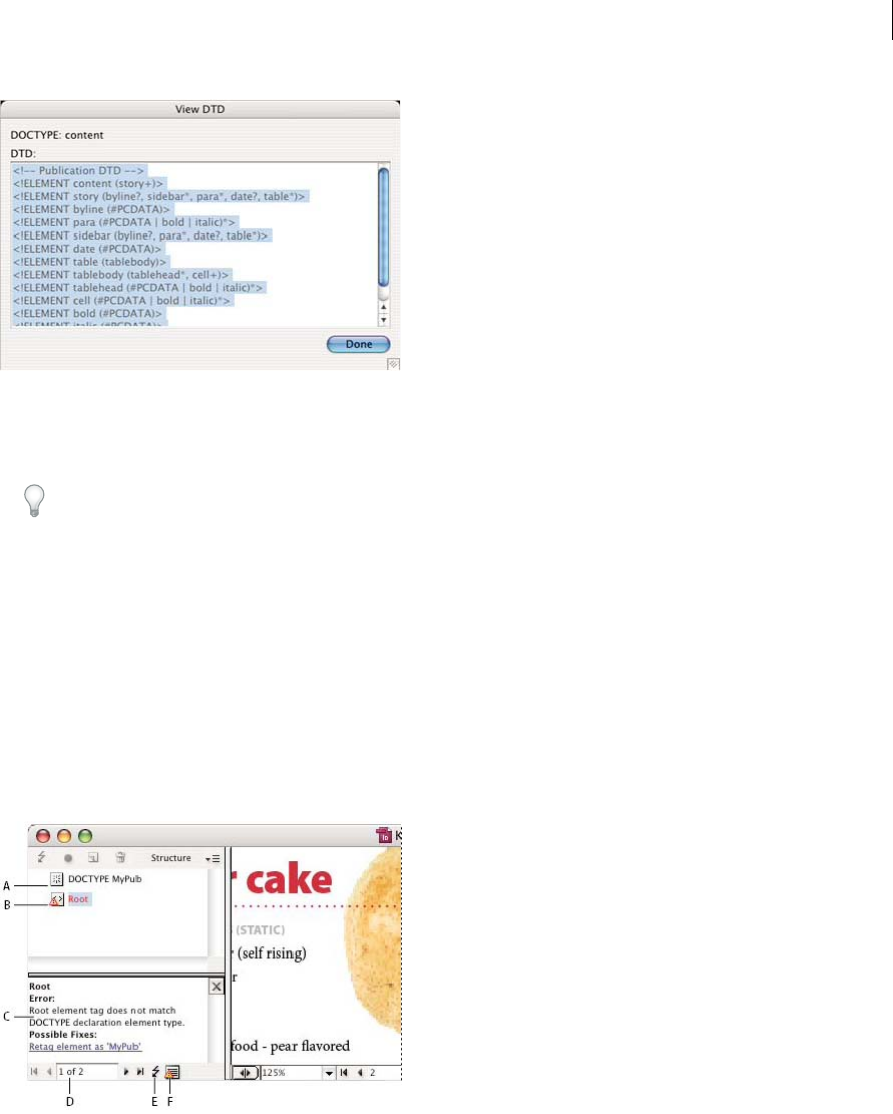
380
XML
Last updated 6/13/2015
❖Do one of the following:
•In the Structure pane menu, choose View DTD.
•Double-click the DOCTYPE element in the Structure pane.
To print a DTD file, copy code from the View DTD window and paste it in a text editor.
Delete a DTD file
❖Choose Delete DTD from the Structure pane menu.
InDesign deletes the copy of the DTD file stored in the InDesign document, not the original DTD file. Tags that
were imported with the DTD file remain in the Tags panel but are unlocked.
Validate XML structure
When you validate your document, InCopy alerts you if the XML deviates from rules established by the DTD file. It
suggests ways to make the XML meet DTD file requirements. You can fix errors one at a time or view all errors in a
separate window.
A Loaded DTD B Error or invalidating condition C Description of error with suggested fix D Error count E Validate button F View all errors
in a separate window
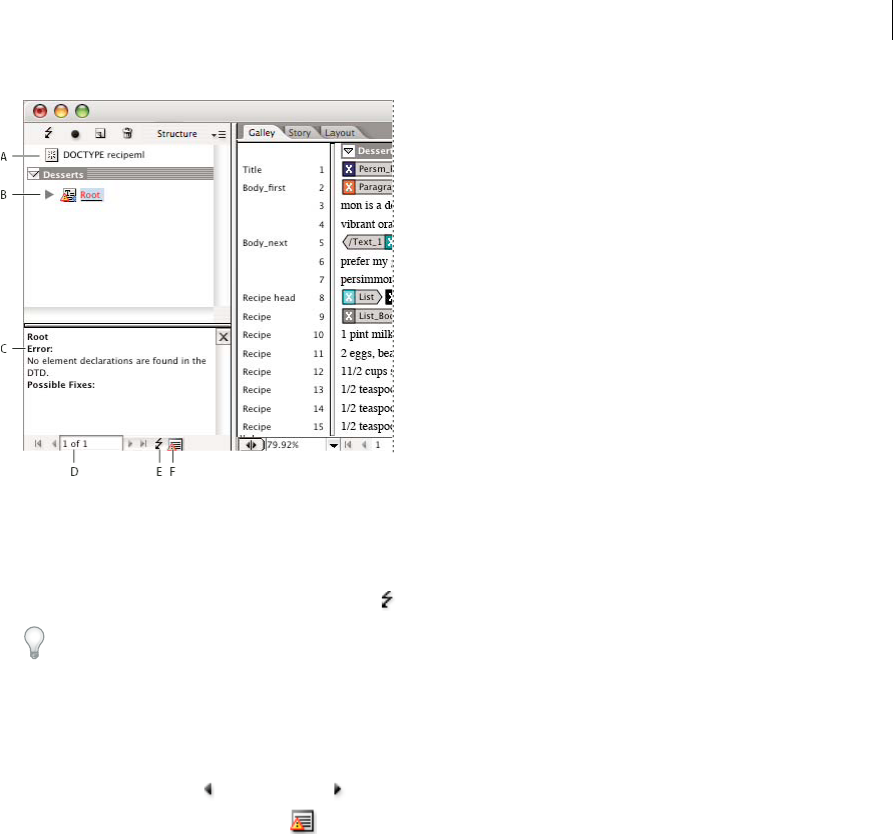
381
XML
Last updated 6/13/2015
A DOCTYPE element from assigned DTD file B Error or invalidating condition C Description of error with suggested fixes D Error count
E Validate button F View all errors at once in a separate window
1Choose View > Structure > Show Structure.
2In the Structure pane, click the Validate button .
To change the root element from which InDesign validates, choose DTD Options in the Structure pane menu.
3To fix errors displayed in the Suggestion pane, either click a suggested fix to try it, or edit the XML structure and
tags directly using the Structure pane and the Tags panel.
4To view other errors, do one of the following:
•Click the Left arrow or Right arrow .
•Click the Error Window button to view all errors in a separate window.
•Choose View List Of Errors on the Structure pane menu.
Note: InCopy stops validating after detecting 250 errors. A plus sign in the Error Count box appears when this limit is
reached.
More Help topics
Keys for working with XML
Exporting XML
Exporting to XML
About DTD files
Exporting to XML

382
XML
Last updated 6/13/2015
Export an InCopy file to XML
Before you can convert InCopy stories to XML data, you must have done the following:
•Created or loaded element tags.
•Applied tags to items in stories.
•Rearranged elements in the Structure pane, if needed.
You can export all or a portion of the XML content in your document. Only content that is tagged can be exported.
1If you intend to export only a portion of the document, select the element in the Structure pane where you want
exporting to begin.
2Choose File > Export.
3Choose XML for Save As Type (Windows) or Format (Mac OS).
4Type the name and specify the location of the XML file, and then click Save.
5In the Export XML dialog box, select the desired encoding scheme: UTF-8 or UTF-16.
6Do any of the following:
Include DTD Declaration Exports the loaded DTD file along with the XML file. This option is only available if you
loaded a DTD file in your document.
View XML Using Opens the exported file in a browser, XML-editing application, or text editor. Choose the browser
or application from the list.
Export From Selected Element Starts exporting from the element you selected in the Structure pane. This option is
only available if you selected an element before choosing File > Export.
Export Untagged Tables AS CASL XML Exports any untagged tables in CALS XML format.
Remap Break, Whitespace, And Special Characters Exports break, whitespace, and special characters as decimal
character entities rather than straight characters.
Apply XSLT Applies a stylesheet to define the transformation of the exported XML to HTML or another format.
Select Browse (Windows) or Choose (Mac OS) to select an XSLT from the file system.
7Click Export to export the XML file.
Export tags only
1Choose Save Tags from the Tags panel menu.
2Type a name and specify a location for the file.
3For Encoding, select UTF-8, UTF-16, or Shift-JIS (for Japanese characters), and then click Save. InCopy saves the
tags as an XML file.
More Help topics
Create and load XML tags
Tagging items
Rearrange structured elements

383
Last updated 6/13/2015
Chapter 13: Keyboard shortcuts
Default keyboard shortcuts
Adobe® InCopy® provides shortcuts to help you quickly work in documents. Many keyboard shortcuts appear next to
the command names in menus. You can use the default InCopy shortcut set, a Microsoft® Word shortcut set, or a
shortcut set that you create.
You can generate a list of the current keyboard set by choosing Show Set in the Keyboard Shortcuts dialog box. This
option is especially useful for printing a copy of your custom shortcuts.
Keys for tools
This table isn’t a complete list of keyboard shortcuts. It lists only those shortcuts that aren’t displayed in menu
commands or tool tips.
Keys for navigating through documents
This table isn’t a complete list of keyboard shortcuts. It lists only those shortcuts that aren’t displayed in menu
commands or tool tips.
Result Windows® Mac OS®
Switch between Text tool and Note tool Shift+Esc Shift+Esc
Temporarily switch from Text tool to Note Tool Alt+Shift Option+Shift
Temporarily switch to Hand tool (Layout view) Alt+spacebar Option+spacebar
Temporarily switch to Zoom tool (Layout
view)
Ctrl+spacebar Command+spacebar
Temporarily switch to Zoom In tool (Layout
view)
Ctrl+spacebar Command+spacebar
Temporarily switch to Zoom Out tool (Layout
view)
Ctrl+Alt+spacebar Command+Option+spacebar
Result Windows Mac OS
Go to first/last page (Layout view) Ctrl+Shift+Page Up/ Page Down Command+Shift+Page Up/Page Down
Go to previous/next page (Layout view) Shift+Page Up/Page Down Shift+Page Up/Page Down
Move right/left one character Right Arrow/Left Arrow Right Arrow/Left Arrow
Move up/down one line Up Arrow/Down Arrow Up Arrow/Down Arrow
Move right/left one word Ctrl+Right Arrow/Left Arrow Command+Right Arrow/ Left Arrow
Go to beginning of sentence
forward/backward (Galley and Story views)
Ctrl+]/[ Command+]/[

384
Keyboard shortcuts
Last updated 6/13/2015
Keys for moving and transforming graphics
This table isn’t a complete list of keyboard shortcuts. It lists only those shortcuts that aren’t displayed in menu
commands or tool tips.
Go to beginning/end of line Home/End Home/End
Go to previous/next paragraph Ctrl+Up Arrow/Down Arrow Command+Up Arrow/Down Arrow
Go to next story (Galley view) Ctrl+Alt+] Command+Option+]
Go to previous story (Galley view) Ctrl+Alt+[ Command+Option+[
Go to beginning/end of story Ctrl+Home/End Command+Home/ End
Select one character to the right/left Shift+Right Arrow/Left Arrow Shift+Right Arrow/Left Arrow
Select one word to the right/left Ctrl+Shift+Right Arrow/Left Arrow Command+Shift+Right Arrow/Left Arrow
Select to the start/end of the line Shift+Home/End Shift+Home/End
Select current paragraph (Galley and Story
views)
Ctrl+Shift+P Command+Shift+P
Select sentence forward/backward (Galley
and Story views)
Ctrl+Alt+Shift+Right Arrow/Left Arrow Command+Option+Shift +Right Arrow/Left
Arrow
Select one line above/below Shift+Up Arrow/Down Arrow Shift+Up Arrow/Down Arrow
Select one paragraph before/after Ctrl+Shift+Up Arrow/ Down Arrow Command+Shift+Up Arrow/Down Arrow
Select to beginning/end of story Ctrl+Shift+Home/End Command+Shift+Home/End
Delete word in front of insertion point (Galley
and Story views)
Ctrl+Backspace or Delete Command+Delete or Del (numeric keypad)
Delete current sentence (Galley and Story
views)
Ctrl+Shift+Backspace or Delete Command+Shift+Delete
Delete current paragraph (Galley and Story
views)
Ctrl+Alt+Shift+Delete Command+Option+Shift +Del on number
pad
Recompose all stories Ctrl+Alt+/ Command+Option+/
Toggle current and previous view Ctrl+Alt+2 Command+Option+2
Go to Next window Ctrl+F6 Command+F6
Go to Previous window Ctrl+Shift+F6 Command+Shift+F6
Scroll up/down one screen Page Up/Page Down Page Up/Page Down
Go to first/last spread Alt+Shift+Page Up/ Page Down Option+Shift+Page Up/ Page Down
Go to first previous/ next spread Ctrl+Alt+Page Up/Page Down Command+Alt+Page Up/Page Down
Fit selection in window Ctrl+Alt+= Command+Option+=
Increase screen to 50%/ 200%/400% Ctrl+5/2/4 Command+5/2/4
Access view percent field Ctrl+Alt+5 Command+Option+5
Result Windows Mac OS
385
Keyboard shortcuts
Last updated 6/13/2015
Keys for working with text
This table isn’t a complete list of keyboard shortcuts. It lists only those shortcuts that aren’t displayed in menu
commands or tool tips.
Result Windows Mac OS
Increase/Decrease size/scale by 1% Ctrl+. [period] or, [comma] Command+. [period] or, [comma]
Increase/Decrease size/scale by 5% Ctrl+Alt+. [period] or, [comma] Command+Option+. [period or, [comma]
Move selection* Left Arrow, Right Arrow, Up Arrow, Down
Arrow key
Left Arrow, Right Arrow, Up Arrow, Down
Arrow
Move selection by 1/10th* Ctrl+Shift+ Left Arrow, Right Arrow, Up Arrow,
Down Arrow
Command+Shift+Left Arrow, Right Arrow, Up
Arrow, Down Arrow
Move selection by 10 times* Shift+Left Arrow, Right Arrow, Up Arrow,
Down Arrow
Shift+Left Arrow, Right Arrow, Up Arrow,
Down Arrow
*Amount is set in Edit > Preferences > Units &
Increments (Windows) or Adobe InCopy >
Preferences > Units & Increments (Mac OS).
Result Windows Mac OS
Enables the Position tool in text Esc Esc
Normal horizontal scale Ctrl+Shift+X Command+Shift+X
Normal vertical scale Ctrl+Alt+Shift+X Command+Option+Shift+X
Increase/Decrease text point size Ctrl+Shift+>/< Command+Shift+>/<
Increase/Decrease text point size five times Ctrl+Alt+Shift+>/< Command+Option+Shift+ >/<
Increase/Decrease leading (horizontal text) Alt+Up Arrow/Down Arrow Option+Up Arrow/ Down Arrow
Increase/Decrease leading (vertical text) Alt+Right Arrow/Left Arrow Option+Right Arrow/Left Arrow
Increase/Decrease leading five times
(horizontal text)
Ctrl+Alt+Up Arrow/Down Arrow Command+Option+Up Arrow/Down Arrow
Increase/Decrease leading five times (vertical
text)
Ctrl+Alt+Right Arrow/Left Arrow Command+Option+Right Arrow/Left Arrow
Auto leading Ctrl+Alt+Shift+A Command+Option+Shift+ A
Increase/Decrease kerning/tracking Alt+Right Arrow/Left Arrow Option+Right Arrow/Left Arrow
Increase/Decrease kerning/tracking five times Ctrl+Alt+Right Arrow/Left Arrow Command+Option+Right Arrow/Left Arrow
Reset all manual kerning preferences (reset
track to 0)
Ctrl+Alt+Q Command+Option+Q
Increase/Decrease baseline shift (horizontal
text)
Alt+Shift+Up Arrow/Down Arrow Option+Shift+Up Arrow/Down Arrow
Increase/Decrease baseline shift (vertical text) Alt+Shift+Right Arrow/Left Arrow Option+Shift+Right Arrow/Left Arrow
Increase/Decrease baseline shift five times
(horizontal text)
Ctrl+Alt+Shift+Up Arrow/Down Arrow Command+Option+Shift+Up Arrow/Down
Arrow
Increase/Decrease word space kerning Ctrl+Alt+\ or Backspace Command+Option+\ or Delete
386
Keyboard shortcuts
Last updated 6/13/2015
Keys for working with type
This table isn’t a complete list of keyboard shortcuts. It lists only those shortcuts that aren’t displayed in menu
commands or tool tips.
Increase/Decrease word space kerning five
times
Ctrl+Alt+Shift+\ or Backspace Command+Option+Shift +\ or Delete
Align text left/center/right Ctrl+Shift+L/C/R Command+Shift+L/C/R
Justify with last line aligned left Ctrl+Shift+J Command+Shift+J
Justify all lines Ctrl+Shift+F Command+Shift+F
Insert right indent tab Shift+Tab Shift+Tab
Update missing font list Ctrl+Alt+Shift+/ Command+Option+Shift+/
Toggle typographer’s quotes preference Ctrl+Alt+Shift+' Command+Option+Shift+'
Expand/Collapse all notes except current note Alt+click expanded/collapsed note bookend Option+click expanded/collapsed note
bookend
Result Windows Mac OS
Open Justification dialog box Ctrl+Alt+Shift+J Command+Option+Shift+J
Open Keep Options dialog box Ctrl+Alt+K Command+Option+K
Open Paragraph Rules dialog box Ctrl+Alt+J Command+Option+J
Redefine character style Ctrl+Alt+Shift+C Command+Option+Shift+C
Open Drop Caps and Nested Styles dialog box Ctrl+Alt+R Command+Option+R
Redefine paragraph style Ctrl+Alt+Shift+R Command+Option+Shift+R
Toggle all caps (on/off) Ctrl+Shift+K Command+Shift+K
Toggle small caps (on/off) Ctrl+Alt+L Command+Option+H
N/A
Superscript Ctrl+Shift+=
N/A
Command+Shift+=
Subscript Ctrl+Alt+Shift+= Command+Option+Shift+=
Underline Ctrl+Shift+U Command+Shift+U
Strikethrough Ctrl+Shift+/ Control+Command+Shift+/
Bold Ctrl+B, Ctrl+Shift+B Command+B, Command+Shift+B
Italic Ctrl+Shift+I Command+Shift+I
Normal Ctrl+Shift+Y Command+Shift+Y
Toggle align to grid (on/off) Ctrl+Alt+Shift+G Command+Option+Shift+G
Toggle auto-hyphenate (on/off) Ctrl+Alt+Shift+H Command+Option+Shift+H
Result Windows Mac OS

387
Keyboard shortcuts
Last updated 6/13/2015
Keys for finding and changing text
This table isn’t a complete list of keyboard shortcuts. It lists only those shortcuts that aren’t displayed in menu
commands or tool tips.
Keys for tables
This table isn’t a complete list of keyboard shortcuts. It lists only those shortcuts that aren’t displayed in menu
commands or tool tips.
Keys for type panels and dialog boxes
This table isn’t a complete list of keyboard shortcuts. It lists only those shortcuts that aren’t displayed in menu
commands or tool tips.
Result Windows Mac OS
Insert selected text into Find What box Ctrl+F1 Command+F1
Insert selected text into Find What box and
find next
Shift+F1 Shift+F1
Replace selected text with Change To text Ctrl+F3 Command+F3
Replace selected text with Change To text and
find next
Shift+F3 Shift+F3
Insert selected text into Replace box Ctrl+F2 Command+F2
Result Windows Mac OS
Clear cell Backspace or Delete Delete
Move to next cell Tab, Left Arrow, or Right Arrow Tab, Left Arrow, or Right Arrow
Move to previous cell Shift+Tab Shift+Tab
Move up/down through table cells Up Arrow/Down Arrow Up Arrow/Down Arrow
Move to first/last cell in column Alt+Page Up/Page Down Option+Page Up/Page Down
Move to first/last cell in row Alt+Home/End Option+Home/End
Move to first/last row in frame Page Up/Page Down Page Up/Page Down
Select cells above/below Shift+Up Arrow/Down Arrow Shift+Up Arrow/Down Arrow
Select cells to the right/left Shift+Right Arrow/Left Arrow Shift+Right Arrow/Left Arrow
Start row on next column Enter (numeric keypad) Enter (numeric keypad)
Start row on next frame Shift+Enter (numeric keypad) Shift+Enter (numeric keypad)
Result Windows Mac OS
Open Justification dialog box Alt+Ctrl+Shift+J Option+Command+Shift+J
Open Paragraph Rules dialog box Alt+Ctrl+J Option+Command+J

388
Keyboard shortcuts
Last updated 6/13/2015
Keys for the character and paragraph styles
This table isn’t a complete list of keyboard shortcuts. It lists only those shortcuts that aren’t displayed in menu
commands or tool tips.
Keys for the Thesaurus
This table isn’t a complete list of keyboard shortcuts. It lists only those shortcuts that aren’t displayed in menu
commands or tool tips.
Keys for working with XML
This table isn’t a complete list of keyboard shortcuts. It lists only those shortcuts that aren’t displayed in menu
commands or tool tips.
Open Keep Options dialog box Alt+Ctrl+K Option+Command+K
Activate Character panel Ctrl+T Command+T
Activate Paragraph panel Ctrl+Alt+T Command+Option+T
Result Windows Mac OS
Make character style definition match text Select text and press Shift+Alt+Ctrl+C Select text and press
Shift+Option+Command+C
Make paragraph style definition match text Select text and press Shift+Alt+Ctrl+R Select text and press
Shift+Option+Command+R
Change options without applying style Shift+Alt+Ctrl-double-click style Shift+Option+Command-double-click style
Remove style and local formatting Alt-click paragraph style name Option-click paragraph style name
Clear overrides from paragraph style Alt+Shift-click paragraph style name Option+Shift-click paragraph style name
Show/hide Paragraph and Character Styles
panels, respectively
F11, Shift+F11 Command+F11, Command+Shift+F11
Result Windows Mac OS
Load word Ctrl+Shift+5 Command+Shift+5
Look up word Ctrl+Shift+6 Command+Shift+6
Change word Ctrl+Shift+7 Command+Shift+7
Result Windows Mac OS
Expand/Collapse element Right Arrow/Left Arrow Right Arrow/Left Arrow
Expand/Collapse element and child elements Alt+Right Arrow/Left Arrow Option+Right Arrow/Left Arrow
Extend XML selection up/down Shift+Up Arrow/Down Arrow Shift+Up Arrow/Down Arrow
Move XML selection up/down Up Arrow/Down Arrow Up Arrow/Down Arrow
Scroll structure pane up/down one screen Page Up/Page Down Page Up/Page Down
Select first/last XML node Home/End Home/End
Result Windows Mac OS
389
Keyboard shortcuts
Last updated 6/13/2015
Other useful keyboard shortcuts
This table isn’t a complete list of keyboard shortcuts. It lists only those shortcuts that aren’t displayed in menu
commands or tool tips.
Keys for resolving conflicts between Mac OS 10.3x and 10.4
This table isn’t a complete list of keyboard shortcuts. It lists only those shortcuts that aren’t displayed in menu
commands or tool tips.
Extend selection to first/last XML node Shift+Home/End Shift+Home/End
Go to previous/next validation error Ctrl+Left Arrow/Right Arrow Command+Left Arrow/Right Arrow
Automatically tag text frames and tables Ctrl+Alt+Shift+F7 Command+Option+Shift+F7
Result Windows Mac OS
Close current document Ctrl+Shift+W Command+Shift+W
Close all documents Ctrl+Alt+Shift+W Command+Option+Shift+W
Save all documents Ctrl+Alt+Shift+S Command+Option+Shift+S
Expand all stories Ctrl+Alt+Z Command+Option+Z
Collapse all stories Ctrl+Alt+Shift+Z Command+Option+Shift+Z
Show/Hide all toolbars and panels Ctrl+Alt+Tab Command+Tab (Conflicts with Mac OS)
New default document Ctrl+Alt+N Command+Option+N
Display Links panel Ctrl+Shift+D Command+Shift+D
Activate last-used field in panel Ctrl+Alt+` [accent grave] Command+Option+` [accent grave]
Update beginning to cursor info Ctrl+Alt+Shift+6 Command+Option+Shift+6
Update copyfit progress info Ctrl+Alt+Shift+8 Command+Option+Shift+8
Update cursor to end info Ctrl+Alt+Shift+7 Command+Option+Shift+7
Update selection info Ctrl+Alt+Shift+5 Command+Option+Shift+5
Update whole story info Ctrl+Alt+Shift+4 Command+Option+Shift+4
Force redraw Shift+F5 Shift+F5
Toggle units Ctrl+Alt+Shift+U Command+Option+Shift+U
New text macro Ctrl+Alt+F8 Command+Option+F8
Edit text macro Ctrl+Alt+Shift+F8 Command+Option+Shift+F8
Insert macro text Alt+Shift+F8 Option+Shift+F8
Result Windows Mac OS

390
Keyboard shortcuts
Last updated 6/13/2015
More Help topics
Use keyboard shortcut sets
Result Mac OS
Open Preferences dialog box Command+K
Open Paragraph Styles panel Command+F11
Open Character Styles panel Command+Shift+F11
Open Text Macros panel Control+Command+Shift+F10
Open Swatches panel F5
Show/Hide toolbox Control+Command+F12
Minimize application window Command+M
Hide application Command+H

