Adobe InDesign In Design CS5.5 Troubleshooting Cs5 5 En
User Manual: adobe InDesign - CS5.5 - Troubleshooting Free User Guide for Adobe InDesign Software, Manual
Open the PDF directly: View PDF ![]() .
.
Page Count: 68
- Legal notices
- Contents
- Anchored objects lose corner options | InDesign CS5
- Anchored objects missing | Print, PDF | InDesign CS5
- Error: "Filepath is not valid" | Applescript | InDesign
- Cannot open PDF file in Acrobat created from InDesign or Illustrator (Mac, InDesign and Illustrator)
- Crash | Clicking folder selection icons | InDesign CS5, CS5.5 | Mac OS X
- Crash when selecting font menu, or browsing it's contents | InDesign/InCopy CS5
- Crash when setting frame fitting options | InDesign CS5
- Disable access to CS4 service extensions | System administrator
- Enter and Return keys give unexpected results - InDesign CS5 - German and Swedish - Mac OS
- Error "Access denied" | Adobe Help application | CS5.5 products
- Error "Critical Errors were found in Setup" when you install InDesign CS3
- Error: "This document may contain binary EPS files, which can cause the print job to fail." (Adobe InDesign 2.0 - CS5)
- Error "Installation failed" | InDesign and InCopy CS5 7.0.3 update
- Error "Installation failed" when installing InDesign 7.0.1 update (Mac OS)
- Error "The Package Operation Failed" | Return package for InDesign | InCopy CS5
- Folio Builder panel isn't functional | InDesign CS5.5
- Determine table Oversets through threaded Frames | JavaScript DOM | InDesign SDK
- Hyperlinks do not work in SWF files exported from InDesign (InDesign CS4, CS5)
- iBooks returns error and stops rendering ePub | InDesign CS5.5
- InCopy assignment links are missing or cannot be edited when working in cross-platform workflow (InCopy CS3 - CS5)
- Issue
- Solution
- Solution 1: Upgrade to InDesign/InCopy CS5
- Solution 2: Rename *.icml files and edit links in the *.icma file
- Finder (Mac) or Windows Explorer
- Text Editor
- Solution 3: Recreate your assignment content so that it does not contain non-lower ASCII characters
- Solution 4: Compress your files before moving them through another file system
- Additional Information
- InCopy CS5 known issues and bugs
- Incorrect spacing | Leader tab , left-justified tab | PDF export | InDesign CS5
- Crash, blank dialog boxes | Mac OS X Lion 10.7.4
- InDesign crashes upon launch while attempting to recover a damaged document
- InDesign CS5.5 crashes on launch | Mac OS 10.5.7 and earlier
- InDesign Debug fails to load Font Manager and SING plug-ins then crashes
- Recover InDesign documents
- InDesign/InCopy CS5 fail to recognize file/assignment usage of users on cross platforms
- InDesign or InCopy freezes or quits when you start on Mac OS
- InDesign preferences and support file locations
- InDesign quits when SWF is deselected | CS5 | Windows
- InDesign Server CS5 known issues and bugs
- InDesign support for World-Ready Composer | CS4, CS5
- InDesign tools and panels don't respond to mouse clicks (Windows 7/Vista)
- Known issues, bugs | InDesign CS5
- Known Issues with Flash Export from InDesign CS5
- Known issues with Microsoft Office 2007/2008 (InDesign CS4 and CS5)
- Known Issues InDesign CS5
- 1. Paragraph rules imported from word 2007 files are not shown in InDesign.
- 2. Footnote text is incorrectly shown under Endnotes on import.
- 3. Importing an Excel (.xls) file containing GB18030 characters fails to display the characters.
- 4. InDesign does not display "-1" value for an imported Microsoft Excel 2007 spreadsheet that contains the value "-1".
- 5. Some straight quotation marks are not converted to typographic quotation marks when imported.
- 6. When cross-references of type Footnote & Endnote are present in either footnotes or endnotes in a Microsoft Office Word document, and the document is imported into InDesign, the cross-references aren't imported. This occurs with several file forma...
- Known Issues InDesign CS5
- Layout format isn't maintained when using InDesign's Export for Dreamweaver or EPUB
- Manual kerning incorrect | TrueType, Type 1 fonts | InDesign, InCopy | CS5
- Missing plug-ins
- PDF export background task hangs | InDesign CS5, CS5.5
- After you place a digital photograph into InDesign, the Actual ppi value is higher than the expected image resolution
- Pantone+ Solid Uncoated Red 032 U spot color converted to CMYK
- Pressing the Return key doesn't produce a paragraph break | InDesign CS5.5 Swedish | Mac OS
- Printing tints of black with Color Management enabled to "Composite Gray" PostScript produce different tint values
- The ''Remove blank lines when empty'' Data Merge option does not work consistently (InDesign CS4)
- Problem in roundtripping custom objects in InDesign
- Open InDesign files in previous versions
- Silent PDF export failure or "Internal Error" | Place, print, export PSD | InDesign
- Slow performance | InDesign CS5
- Small caps ignored | Adobe OpenType fonts older than version 2.0 | InDesign CS5
- Some faces of Type 1 fonts, such as Helvetica Neue, aren't available in InDesign on Mac 10.6
- Supported file formats for InDesign CS5
- Suppress the user interface
- Tables don't obey center vertical alignment | InDesign CS5
- Thin white, dark lines (stitching) | Export to PDF | InDesign CS2 and later
- Issue
- Solution
- Solution 1: Export as PDF 1.4 or later.
- Solution 2: Turn off the Smooth Line Art option in Acrobat.
- Solution 3: Convert spot color to process color.
- Solution 4: Move the spot color to the top of the layer.
- Solution 5: Use layers to arrange the colors.
- Solution 6: Set the opacity for the spot color to less than 100% and export to PDF again.
- Additional Information
- Third-party plug-ins don't load | InDesign, InCopy | CS5.5 v.7.5.1
- Troubleshoot damaged InDesign documents
- Troubleshoot InDesign third-party plug-ins (InDesign)
- Troubleshoot printing, PDF export | InDesign
- Unable to save documents | InDesign CS5 | Mac OS
- Uploading exported InDesign CS5 Flash (SWF) files to a web server

Adobe InDesign
CS5-5.5 Troubleshooting

Last updated 11/12/2015
Legal notices
Legal notices
For legal notices, see http://help.adobe.com/en_US/legalnotices/index.html.
A note to our customers
Adobe provides this searchable PDF of archived technical support documents as a service to our
customers who own and continue to enjoy older, unsupported versions of our software products. The
information in these documents is not updated, and will become increasingly less accurate as
hardware, browsers, and operating systems continue to evolve. Please be aware that these archived
documents reflect historical issues and solutions for products that are no longer supported. Adobe
does not warrant that the information in this document is accurate.

iii
Last updated 11/12/2015
Contents
Anchored objects lose corner options | InDesign CS5 . . . . . . . . . . . . . . . . . . . . . . . . . . . . . . . . . . . . . . . . . . . . . . . . . . . . . . . . . . . . . . . . . . . .1
Anchored objects missing | Print, PDF | InDesign CS5 . . . . . . . . . . . . . . . . . . . . . . . . . . . . . . . . . . . . . . . . . . . . . . . . . . . . . . . . . . . . . . . . . . . .1
Error: "Filepath is not valid" | Applescript | InDesign . . . . . . . . . . . . . . . . . . . . . . . . . . . . . . . . . . . . . . . . . . . . . . . . . . . . . . . . . . . . . . . . . . . . . .2
Cannot open PDF file in Acrobat created from InDesign or Illustrator (Mac, InDesign and Illustrator) . . . . . . . . . . . . . . . . . . . . . . .2
Crash | Clicking folder selection icons | InDesign CS5, CS5.5 | Mac OS X . . . . . . . . . . . . . . . . . . . . . . . . . . . . . . . . . . . . . . . . . . . . . . . . . . .4
Crash when selecting font menu, or browsing it's contents | InDesign/InCopy CS5 . . . . . . . . . . . . . . . . . . . . . . . . . . . . . . . . . . . . . . . .4
Crash when setting frame fitting options | InDesign CS5 . . . . . . . . . . . . . . . . . . . . . . . . . . . . . . . . . . . . . . . . . . . . . . . . . . . . . . . . . . . . . . . . .5
Disable access to CS4 service extensions | System administrator . . . . . . . . . . . . . . . . . . . . . . . . . . . . . . . . . . . . . . . . . . . . . . . . . . . . . . . . .5
Enter and Return keys give unexpected results - InDesign CS5 - German and Swedish - Mac OS . . . . . . . . . . . . . . . . . . . . . . . . . . .8
Error "Access denied" | Adobe Help application | CS5.5 products . . . . . . . . . . . . . . . . . . . . . . . . . . . . . . . . . . . . . . . . . . . . . . . . . . . . . . . . .9
Error "Critical Errors were found in Setup" when you install InDesign CS3 . . . . . . . . . . . . . . . . . . . . . . . . . . . . . . . . . . . . . . . . . . . . . . . 10
Error: "This document may contain binary EPS files, which can cause the print job to fail." (Adobe InDesign 2.0 - CS5) . . . . 10
Error "Installation failed" | InDesign and InCopy CS5 7.0.3 update . . . . . . . . . . . . . . . . . . . . . . . . . . . . . . . . . . . . . . . . . . . . . . . . . . . . . . . 12
Error "Installation failed" when installing InDesign 7.0.1 update (Mac OS) . . . . . . . . . . . . . . . . . . . . . . . . . . . . . . . . . . . . . . . . . . . . . . . 12
Error "The Package Operation Failed" | Return package for InDesign | InCopy CS5 . . . . . . . . . . . . . . . . . . . . . . . . . . . . . . . . . . . . . . . 13
Folio Builder panel isn't functional | InDesign CS5.5 . . . . . . . . . . . . . . . . . . . . . . . . . . . . . . . . . . . . . . . . . . . . . . . . . . . . . . . . . . . . . . . . . . . . 13
Determine table Oversets through threaded Frames | JavaScript DOM | InDesign SDK . . . . . . . . . . . . . . . . . . . . . . . . . . . . . . . . . . 14
Hyperlinks do not work in SWF files exported from InDesign (InDesign CS4, CS5) . . . . . . . . . . . . . . . . . . . . . . . . . . . . . . . . . . . . . . . 15
iBooks returns error and stops rendering ePub | InDesign CS5.5 . . . . . . . . . . . . . . . . . . . . . . . . . . . . . . . . . . . . . . . . . . . . . . . . . . . . . . . . 16
InCopy assignment links are missing or cannot be edited when working in cross-platform workflow (InCopy CS3 - CS5) . 17
InCopy CS5 known issues and bugs . . . . . . . . . . . . . . . . . . . . . . . . . . . . . . . . . . . . . . . . . . . . . . . . . . . . . . . . . . . . . . . . . . . . . . . . . . . . . . . . . . . 19
Incorrect spacing | Leader tab , left-justified tab | PDF export | InDesign CS5 . . . . . . . . . . . . . . . . . . . . . . . . . . . . . . . . . . . . . . . . . . . . 20
Crash, blank dialog boxes | Mac OS X Lion 10.7.4 . . . . . . . . . . . . . . . . . . . . . . . . . . . . . . . . . . . . . . . . . . . . . . . . . . . . . . . . . . . . . . . . . . . . . . . 20
InDesign crashes upon launch while attempting to recover a damaged document . . . . . . . . . . . . . . . . . . . . . . . . . . . . . . . . . . . . . 21
InDesign CS5.5 crashes on launch | Mac OS 10.5.7 and earlier . . . . . . . . . . . . . . . . . . . . . . . . . . . . . . . . . . . . . . . . . . . . . . . . . . . . . . . . . . 22
InDesign Debug fails to load Font Manager and SING plug-ins then crashes . . . . . . . . . . . . . . . . . . . . . . . . . . . . . . . . . . . . . . . . . . . . 23
InDesign/InCopy CS5 fail to recognize file/assignment usage of users on cross platforms . . . . . . . . . . . . . . . . . . . . . . . . . . . . . . . 24
InDesign or InCopy freezes or quits when you start on Mac OS . . . . . . . . . . . . . . . . . . . . . . . . . . . . . . . . . . . . . . . . . . . . . . . . . . . . . . . . . 25
InDesign preferences and support file locations . . . . . . . . . . . . . . . . . . . . . . . . . . . . . . . . . . . . . . . . . . . . . . . . . . . . . . . . . . . . . . . . . . . . . . . 26
InDesign quits when SWF is deselected | CS5 | Windows . . . . . . . . . . . . . . . . . . . . . . . . . . . . . . . . . . . . . . . . . . . . . . . . . . . . . . . . . . . . . . . 30
InDesign Server CS5 known issues and bugs . . . . . . . . . . . . . . . . . . . . . . . . . . . . . . . . . . . . . . . . . . . . . . . . . . . . . . . . . . . . . . . . . . . . . . . . . . 30
InDesign support for World-Ready Composer | CS4, CS5 . . . . . . . . . . . . . . . . . . . . . . . . . . . . . . . . . . . . . . . . . . . . . . . . . . . . . . . . . . . . . . . 31
InDesign tools and panels don't respond to mouse clicks (Windows 7/Vista) . . . . . . . . . . . . . . . . . . . . . . . . . . . . . . . . . . . . . . . . . . . . 31
Known issues, bugs | InDesign CS5 . . . . . . . . . . . . . . . . . . . . . . . . . . . . . . . . . . . . . . . . . . . . . . . . . . . . . . . . . . . . . . . . . . . . . . . . . . . . . . . . . . . . 33
Known Issues with Flash Export from InDesign CS5 . . . . . . . . . . . . . . . . . . . . . . . . . . . . . . . . . . . . . . . . . . . . . . . . . . . . . . . . . . . . . . . . . . . . 35
Known issues with Microsoft Office 2007/2008 (InDesign CS4 and CS5) . . . . . . . . . . . . . . . . . . . . . . . . . . . . . . . . . . . . . . . . . . . . . . . . . 38
Layout format isn't maintained when using InDesign's Export for Dreamweaver or EPUB . . . . . . . . . . . . . . . . . . . . . . . . . . . . . . . . 41
Manual kerning incorrect | TrueType, Type 1 fonts | InDesign, InCopy | CS5 . . . . . . . . . . . . . . . . . . . . . . . . . . . . . . . . . . . . . . . . . . . . . 41
Missing plug-ins . . . . . . . . . . . . . . . . . . . . . . . . . . . . . . . . . . . . . . . . . . . . . . . . . . . . . . . . . . . . . . . . . . . . . . . . . . . . . . . . . . . . . . . . . . . . . . . . . . . . . . 42
PDF export background task hangs | InDesign CS5, CS5.5 . . . . . . . . . . . . . . . . . . . . . . . . . . . . . . . . . . . . . . . . . . . . . . . . . . . . . . . . . . . . . . 43

iv
INDESIGN
Contents
Last updated 11/12/2015
After you place a digital photograph into InDesign, the Actual ppi value is higher than the expected image resolution . . 44
Pantone+ Solid Uncoated Red 032 U spot color converted to CMYK . . . . . . . . . . . . . . . . . . . . . . . . . . . . . . . . . . . . . . . . . . . . . . . . . . . . 45
Pressing the Return key doesn't produce a paragraph break | InDesign CS5.5 Swedish | Mac OS . . . . . . . . . . . . . . . . . . . . . . . . . 46
Printing tints of black with Color Management enabled to "Composite Gray" PostScript produce different tint values . . . . 47
The ''Remove blank lines when empty'' Data Merge option does not work consistently (InDesign CS4) . . . . . . . . . . . . . . . . . . 48
Problem in roundtripping custom objects in InDesign . . . . . . . . . . . . . . . . . . . . . . . . . . . . . . . . . . . . . . . . . . . . . . . . . . . . . . . . . . . . . . . . . 48
Silent PDF export failure or "Internal Error" | Place, print, export PSD | InDesign . . . . . . . . . . . . . . . . . . . . . . . . . . . . . . . . . . . . . . . . . 50
Slow performance | InDesign CS5 . . . . . . . . . . . . . . . . . . . . . . . . . . . . . . . . . . . . . . . . . . . . . . . . . . . . . . . . . . . . . . . . . . . . . . . . . . . . . . . . . . . . . 50
Small caps ignored | Adobe OpenType fonts older than version 2.0 | InDesign CS5 . . . . . . . . . . . . . . . . . . . . . . . . . . . . . . . . . . . . . . 51
Some faces of Type 1 fonts, such as Helvetica Neue, aren't available in InDesign on Mac 10.6 . . . . . . . . . . . . . . . . . . . . . . . . . . . . 51
Supported file formats for InDesign CS5 . . . . . . . . . . . . . . . . . . . . . . . . . . . . . . . . . . . . . . . . . . . . . . . . . . . . . . . . . . . . . . . . . . . . . . . . . . . . . . . 52
Suppress the user interface . . . . . . . . . . . . . . . . . . . . . . . . . . . . . . . . . . . . . . . . . . . . . . . . . . . . . . . . . . . . . . . . . . . . . . . . . . . . . . . . . . . . . . . . . . . 55
Tables don't obey center vertical alignment | InDesign CS5 . . . . . . . . . . . . . . . . . . . . . . . . . . . . . . . . . . . . . . . . . . . . . . . . . . . . . . . . . . . . 56
Thin white, dark lines (stitching) | Export to PDF | InDesign CS2 and later . . . . . . . . . . . . . . . . . . . . . . . . . . . . . . . . . . . . . . . . . . . . . . . 56
Third-party plug-ins don't load | InDesign, InCopy | CS5.5 v.7.5.1 . . . . . . . . . . . . . . . . . . . . . . . . . . . . . . . . . . . . . . . . . . . . . . . . . . . . . . . 58
Troubleshoot InDesign third-party plug-ins (InDesign) . . . . . . . . . . . . . . . . . . . . . . . . . . . . . . . . . . . . . . . . . . . . . . . . . . . . . . . . . . . . . . . . . 61
Unable to save documents | InDesign CS5 | Mac OS . . . . . . . . . . . . . . . . . . . . . . . . . . . . . . . . . . . . . . . . . . . . . . . . . . . . . . . . . . . . . . . . . . . . 69
Uploading exported InDesign CS5 Flash (SWF) files to a web server . . . . . . . . . . . . . . . . . . . . . . . . . . . . . . . . . . . . . . . . . . . . . . . . . . . . 69

1
Last updated 11/12/2015
Anchored objects lose corner options | InDesign CS5
Issue
When you open documents authored in CS4 or earlier in InDesign CS5, corner options applied to anchored rectangles
are lost on all but the upper-left corner.
Solution
Apply the corner effect to all corners.
1Select the anchored object.
2Choose Object > Corner Options.
3Click the "Make all settings the same" icon (chain links).
4Click OK.
Additional information
InDesign CS5 introduced the ability to set different corner effects for each corner of a rectangle. For this specific case,
the conversion process doesn't populate all corners with the value from the original object. Adobe hopes to address this
issue in a future version of InDesign.
Anchored objects missing | Print, PDF | InDesign CS5
Issue
Anchored objects are missing when you print an InDesign CS5 document or export it to PDF. The object is not on the
same page as its anchor, and you printed just the page range that contains the object.
Solutions
Do one of the following:

2
Last updated 11/12/2015
Solution 1: Release the anchored object.
1Select the object and choose Object > Anchored Object > Release.
2Print or export your content.
3Choose Edit > Undo to restore the anchor relationship to the document.
Solution 2: Print or export a page range that includes both the object and its anchor.
Additional information
Adobe hopes to address this issue in a future release.
Error: "Filepath is not valid" | Applescript | InDesign
Issue:
It sometimes happens when trying to use applescript with references that using finder it works fine in Applescript
editor, but doesn't work in InDesign and the following error is thrown:
"Filepath is not valid"
Solution:
The solution to this is when you are setting the basepath in the script for Indesign, you need to specify the startup Disk
as well before Users. So your path would look something like: MacintoshHD:Users:username>:foldername>
To access the Volumes drive, you would need to prefix the root drive of the Mac to it, since Volumes is a part of the root
. So the path would look something like this: MacintoshHD:Volumes:<foldername>
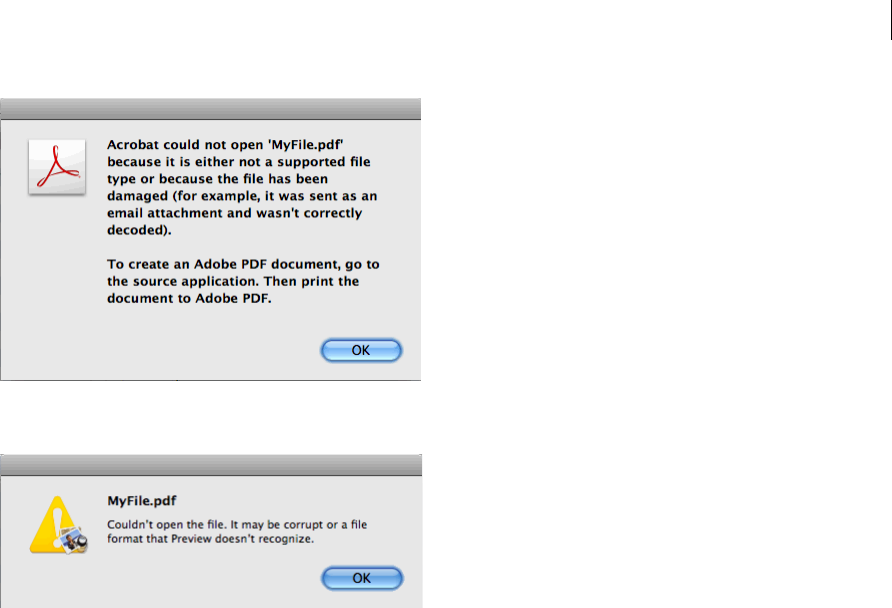
Cannot open PDF file in Acrobat created from InDesign
or Illustrator (Mac, InDesign and Illustrator)
Issue
When trying to open a PDF generated from InDesign or Illustrator, Acrobat displays the following error message:
"Acrobat could not open '[name of file]' because it is either not a supported file type or because the file has been
damaged (for example, it was sent as an email attachment and wasn't correctly decoded).
To create an Adobe PDF document, go to the source application. Then print the document to Adobe PDF."
3
Last updated 11/12/2015
Using Apple Preview, the error is, "Couldn't open the file. It may be corrupt or a file format that Preview doesn't
recognize."
Reason
The file was created by selecting the option "Save as PDF" from the Mac OS Print dialog.
This workflow is not supported.
Solution
Solution 1:Use the Export PDF (InDesign) or Save As > Adobe PDF (Illustrator) methods
InDesign
1Choose File > Export and select Adobe PDF as the Format.
2Select the desired PDF options.
3Click Export.
Illustrator
1Choose File Save and select Adobe PDF as the Format.
2Select the desired PDF options.
3Click Save PDF.
Solution 2: Print to Adobe PDF
InDesign and Illustrator
1Choose File > Print.
2Select Adobe PDF [version] from the Printer list.

4
Last updated 11/12/2015
3Select the desired printer options.
4Click Print.
Crash | Clicking folder selection icons | InDesign CS5,
CS5.5 | Mac OS X
Issue
When you click folder icons in Extension panels, InDesign crashes. For example, if you choose to import an article with
the Folio Builder panel open, then click the folder icon to locate assets, the application crashes.
Solution
Manually type the path into the text field next to the folder icon. For example:
Additional information
This issue largely affects the Overlay Creator and Folio Builder panels. These panels are part of the Folio Producer tools
used in conjunction wit the Adobe Digital Publishing Suite. However, it is conceivable that other panels produced by
third parties, using the Adobe Creative Suite Extensions architecture could also be impacted. Adobe hopes to find a
resolution to this issue and address it in a future update.
Crash when selecting font menu, or browsing it's
contents | InDesign/InCopy CS5
Issue
When Choosing Font from the Type menu, or the font list in other locations, such as the Paragraph or Character panels,
InDesign or InCopy crashes.
Solution
Install the InDesign/InCopy CS5 7.0.3 update or later. Updates can be found by choosing Updates from the Help menu
in InDesign, or by visiting the InDesign update downloads pages:InDesign Mac:
http://www.adobe.com/support/downloads/product.jsp?product=31&platform=MacintoshInDesign Win:
http://www.adobe.com/support/downloads/product.jsp?product=31&platform=Windows

5
Last updated 11/12/2015
InCopy Mac: http://www.adobe.com/support/downloads/product.jsp?product=30&platform=MacintoshInCopy Win:
http://www.adobe.com/support/downloads/product.jsp?product=30&platform=Windows
Additional information
This issue is caused when parsing fonts that have upper ASCII characters in their Postscript names. The InDesign and
InCopy CS5 7.0.3 and later updates contain a fix for this issue.
Crash when setting frame fitting options | InDesign CS5
Issue
When setting frame fitting options with an empty frame selected, InDesign quits unexpectedly.
Solution
Install the InDesign/InCopy CS5 7.0.3 update or later. Updates can be found by choosing Updates from the Help menu
in InDesign, or by visiting the InDesign update downloads pages:InDesign Mac:
http://www.adobe.com/support/downloads/product.jsp?product=31&platform=MacintoshInDesign Win:
http://www.adobe.com/support/downloads/product.jsp?product=31&platform=Windows
Additional information
This issue is caused when a mix of empty and non-empty frames are selected while applying frame fitting options. The
InDesign CS5 7.0.3 and later updates contain a fix for this issue.
Disable access to CS4 service extensions | System
administrator
Adobe Creative Suite 4 offers a number of services that connect to the Internet to provide enhanced functionality. These
services can also download updates automatically. In certain circumstances, system administrators want to disable
these connections and updated downloads. The document lists the changes required in the registry (Windows XP,
Vista) or preference files (Mac OS X) to disable these network activities. This document applies to the following
Creative Suite 4 services:
•Kuler (Extensions > Kuler)
•Adobe ConnectNow (File > Share my Screen)
•Service Manager (Extensions > Connections)
•Search for Help (Search field in the app bar)
•Help > [Product Name] Help

6
Last updated 11/12/2015
Deactivate the Adobe Online Services and Service Update preferences at a
system level
Set the following data values to deactivate the Adobe Online Services and Service Update preferences at a system level.
When these connections are disabled at the system level, it overrides the users' ability to enable connections or updates
through the user interface. When online access for Help search is disabled, this feature and the Help > [Product] Help
command searches .html Help files on the local hard disk.
Windows XP, Vista, or Windows 7 32-bit systems
•HKEY_LOCAL_MACHINE\SOFTWARE\Adobe\ AdobeOnlineDefault; Controls online connections for Search
for Help and Help > [Product Name] Help
•HKEY_LOCAL_MACHINE\SOFTWARE\Adobe\CSXSPreferences\ AdobeOnlineDefault; Controls online
connections for the other services UpdatesAllowed; Controls download of updates to these service extensions
Windows XP, Vista, or Windows 7 64-bit systems
•HKEY_LOCAL_MACHINE\SOFTWARE\Wow6432Node\Adobe\AdobeOnlineDefault; Controls online
connections for Search for Help and Help > [Product Name] Help
•HKEY_LOCAL_MACHINE\SOFTWARE\Wow6432Node\Adobe\CSXSPreferences\ AdobeOnlineDefault;
Controls online connections for the other services UpdatesAllowed; Controls download of updates to these service
extensions
Do the following:
1Choose Start > Run and type regedit to open the registry editor.
2Navigate to the locations listed above.
3If the string value AdobeOnlineDefault does not exist, create one (right-click the container object, and choose New
> String Value).
4Double-click this string value and set its Value Data to "0" to disable it. Click OK.
Mac OS X
On Mac OS, you can find these keys in a file in the following Property List (.plist) files:
•/Library/Preferences/com.adobe.AdobeOnlineHelp.plist AdobeOnlineDefault; controls online connects for Search
for Help and Help > [Product Name] Help
•/Library/Preferences/com.adobe.CSXSPreferences.plist AdobeOnlineDefault; controls online connections for the
other services UpdatesAllowed; controls download of updates to these service extensions
Do the following:
1Open the Apple Property List Editor (supplied with the Apple SKD) or other property list editor application.
2Open /Library/Preferences/com.adobe.CSXSPreferences.plist.
3Select Root to see the subentries.
4Change the value of the key AdobeOnlineDefault to "0" to disable it.
5Change the value of the key UpdatesAllowed to "0" to disable it.
6Open /Library/Preferences/com.adobe.AdobeOnlineHelp.plist.
7Select Root to see the subentries.
8Change the value of the key AdobeOnlineDefault to "0" to disable it.

7
Last updated 11/12/2015
9Save the plist file.
10 Restart the Adobe application.
If any of these keys does not exist, then complete the following steps:
1Select the Root object in the applicable plist file and click the triangle to display its contents.
2Click the New Child button and name it "AdobeOnlineDefault" or "UpdatesAllowed" as appropriate.
3For Class, select String.
4Set the value to "0" to disable it.
5Save the plist file.
6Restart the Adobe application.
Sample plist files and registry keys
Attached below are sample plist files and registry keys that you can use as reference, or in place of manually performing
the steps above. To add the plist files, navigate to the locations indicated in the steps above. Replace the files with those
files supplied in the attached .zip file. To add the registry keys, double-click the registry files in the provided .zip file,
authenticate with an administrative password, and click Yes to add the entries.
•PlistFiles.zip (Mac OS)
•RegEntries.zip (Windows)
Note: For information about disabling the CS3 or CS4 Adobe Update Manager (Help > Product Updates), see Disable
Adobe Update Manager for CS3 or CS4 applications, for system administrators (kb408711).
Additional Information
•User Settings are controlled through the application Interface. For example, the Connections panel has the
commands "Check for Updates," "Update Preferences" and "Offline Options" in its pop-up menu. These options
don't appear if the system-level registry entries or plist keys have disabled the functions.
•If the Administrator disables AdobeOnlineDefault in the CSXS preferences, the Connections panel displays the
following: "This feature is disabled. Please contact your internal IT for more information."
•If the User preference is set through the application interface, it affects the application immediately. If an
Administrator changes it in the registry, it affects the application immediately. If an administrator changes it in a
plist file, it doesn't have an affect until the application is relaunched.
•Setting only the UpdatesAllowed key doesn't restrict the services from accessing the Internet.
•These settings do not affect other online connections from features such as:
•Resource Central
•Help > Online Registration
•Help > Product Updates
•Help > Adobe Product Improvement
More Help topics
Disable CS Live internet access from CS5 applications for system administrators

8
Last updated 11/12/2015
Enter and Return keys give unexpected results -
InDesign CS5 - German and Swedish - Mac OS
Issue
When you use the German or Swedish language version of InDesign CS5 on Mac OS, pressing Enter or Return has no
effect or an undesired effect. For example, pressing Return incorrectly inserts a column break rather than a new
paragraph.
The problem can occur with the following actions:
•Entering text
•Accepting a default response in a dialog box
•Pressing Enter or Return as part of a keyboard shortcut
Solution: Install the InDesign or InCopy 7.0.1 update
First, confirm whether you already have the update:
1From the Apple menu, choose About InDesign or About InCopy.
2In the About InDesign or About InCopy dialog box, verify if you have Version 7.0 or Version 7.0.1:
•If the version is 7.0.1, no further steps are required.
•If the version is 7.0, install the update. See the download options below.
Option 1 - Download the update from Adobe.com
•InDesign CS5 7.0.1 Update
•InCopy CS5 7.0.1 Update
Option 2 - Download the update from within InDesign or InCopy
As of May 18th, 2010, the update is available from within the InDesign CS5 or InCopy CS5 application:
1Choose Help > Updates.
2In the Updates dialog box, follow the instructions to download the update.
Reason
Keyboard functions for InDesign are defined in a table that maps strings for keys to internal values. With InDesign
CS5, the terms "Return" and "Enter," previously represented with different words, were remapped to allow Windows
and Mac OS to have separate key names. During this change, the two Mac OS terms incorrectly used the same word,
resulting in the unexpected behavior.

9
Last updated 11/12/2015
Error "Access denied" | Adobe Help application | CS5.5
products
Issue
When opening the Adobe Community Help application in CS5.5, the following error appears:
"Access denied."
Solution
Update the Adobe Help application.
1Make sure that you have the latest version of the AIR runtime. If you are not sure, download the latest version.
2Navigate to the following directory:Windows:
%appdata%/chc.4875E02D9FB21EE389F73B8D1702B320485DF8CE.1 Tip: To find this directory in Windows,
copy the preceding phrase into the Windows Explorer file manager.Mac OS:
/[username]/Library/Preferences/chc.4875E02D9FB21EE389F73B8D1702B320485DF8CE.1
3Within the Local Store folder, look for and delete the "HelpCfg" folder only. Note: It's unnecessary to delete the entire
CHC or Local Store folder. If you do, it's necessary to download content again.
4In your browser, navigate to http://www.adobe.com/support/chc/.
5Choose the relevant product in Step 1.
6Click Install Now in Step 2.
7Click Open in the installation dialog box, and then click Run Now to fully update the application.
8Repeat this process to add additional Adobe products.
Additional information
This error is a result of a malformed property in the Help configuration file. The file was mistakenly published with a
staging URL instead of the production URL. The file has since been corrected and has been redeployed to the proper
production servers.
This issue affects the following products:
•Adobe After Effects CS5.5
•Adobe InDesign CS5.5
•Adobe InCopy CS5.5
•Adobe Illustrator CS5.5
•Adobe Encore CS5.5

10
Last updated 11/12/2015
Error "Critical Errors were found in Setup" when you
install InDesign CS3
Issue
When you install Adobe InDesign CS3, you receive the error message, "Critical Errors were found in Setup."
Reason
A pre-release version of InDesign CS3 is currently, or was previously, installed on your computer.
Solution
Do one or more of the following solutions:
Solution 1: Remove previous versions of InDesign CS3.
1Remove the application by starting the installer located in /Applications/Utilities/Adobe Installers (Mac OS) or
Add/Remove Programs Control Panel (Windows).
2Follow the on-screen instructions to remove InDesign CS3.
Solution 2: Run the Adobe CS5 Cleaner Tool before you install InDesign CS3.
The CS5 Cleaner Tool helps resolve installation problems for C5, CS4, and CS3 products. For information on
downloading and running it, see Resolve installation problems with CS5 Cleaner Tool (cpsid_82947). Follow the
onscreen instructions to remove InDesign CS3.
Additional Information
If the prerelease version of InDesign CS3 was not fully removed or is still installed, the retail version cannot install.
Running the Adobe CS3Clean script removes the previous version and enables installation of the retail version.
Error: "This document may contain binary EPS files,
which can cause the print job to fail." (Adobe InDesign
2.0 - CS5)
Issue
When printing form Adobe InDesign you get the error :
"This document may contain binary EPS files, which can cause the print job to fail. If the printer produces output, then
the binary data did not interfere with printing. Do you want to print this document?"

11
Last updated 11/12/2015
Reason
Some PostScript printing configurations include modules which will sometimes interpret certain character
combinations in binary data as commands. When interpretted as a command, this may cause the job to fail, or to begin
to print the binary data directly such that the printer generates many pages of single line output of a binary text string.
As a precaution, InDesign gives the warning above when there is a possibility of this. This includes the following cases:
•The job contains a placed EPS that has a %%DocumentData comment which states Binary
•The job contains a placed EPS that has a %%DocumentData comment which is missing it's value
•The job contains a placed EPS that has a is missing it's %%DocumentData comment
•The job contains a placed EPS to a printer configuration who's data format cannot be certain. This tends to be
common when printing from Mac OS X systems, as the downstream data pipe cannot be fully evaluated.
Solution
Do one of the following solutions:
Solution 1: Click OK to test printing of the document
If you click OK and send the print job to the printer/device, and it prints successfully, then your print configuration
supports binary data and you can safely ignore the warning. If, on the other hand, you click OK and send the job to the
device and get many pages of what looks like binary data printed in one line on each page, then your print stream does
not support binary printing, in which case, you should use one of the solutions below.
Solution 2: Resave the graphic in a file format other than EPS
PSD, TIFF, PDF, or other formats, are not at risk for this issue.
Solution 2: Use an EPS with no binary data.
This is sometimes possible by resaving the EPS from the source application with a different setting. However,
sometimes the data is further encapsulated in that file such that it's data format cannot be changed.
Solution 3: Use an EPS from Photoshop.
InDesign treats most Photoshop EPS files in a way that it can reformat the data to match the ASCII/Binary switch set
in the InDesign print dialog. Simply open the EPS into Photoshop, and choose Save As and choose another name, or
same name and click yes to replace.
Solution 4: Change the settings on your printer to support Binary printing protocols.
This is usually done through the control panel on the front of the printer. Consult your printer's user documentation
for how to do this.
Additional Information
If an an EPS file which contains binary data is placed into an Indesign document and you then print the publication
with the output Data Format set to ASCII, the EPS data goes through the PostScript pass through route in the code and
binary data will be produced. This is a possible cause for the print job to fail. Currently, InDesign determines if an EPS
contains binary data by checking for the existance of the %%DocumentData comment. If present, InDesign searches
for three valid parameters for this DSC comment: Clean7Bit, Clean8Bit or Binary.

12
Last updated 11/12/2015
If the parameter is set to Binary, or if the %%DocumentData comment is missing from the EPS, InDesign will give a
warning message and allows to cancel the print job.InDesign will only check for this condition when printing and
output data format is set to ASCII.
InDesign will not check when exporting to EPS, since the error message is designed for printing. InDesign will not
check Photoshop EPS files.
Error "Installation failed" | InDesign and InCopy CS5
7.0.3 update
Issue
When you try to install the InDesign or InCopy CS5 7.0.3 update, the Adobe Application Manager returns the error,
"Some updates failed to install." In the details section, it lists the following:
Adobe InDesign (InCopy) CS5 7.0.3.535
Installation failed.
Note: If your message indicates version 7.0.3.533, you have an update that is not the proper final release. To obtain the
correct version, use the Help > Updates command from InDesign or InCopy.
Solution
Before proceeding, ensure that you have your original installation media.
1Uninstall InDesign and InCopy CS5.
2Reinstall InDesign and InCopy CS5 from the original media.
3Choose Help > Updates and locate the InDesign and InCopy CS5 7.0.3.535 update and install it.
Error "Installation failed" when installing InDesign 7.0.1
update (Mac OS)
Issue
When you try to install the InDesign 7.0.1 update for the German or Swedish versions of InDesign, you receive the error
message "Installation failed."

13
Last updated 11/12/2015
Solution
Reinstall InDesign CS5, and then apply the update.
1Install InDesign CS5 (7.0.0) again. (You don't have to uninstall first.)
2Apply the update using one of the following methods:
•Choose Help > Updates.
•Download the update from the InDesign Download website and install it manually.
Additional Information
This solution is only applicable for German and Swedish versions of InDesign CS5 for Mac OS. Adobe updated these
versions because of an issue with Enter and Return keys. For more information, see Enter and Return keys give
unexpected results - InDesign CS5 - German and Swedish - Mac OS (cpsid_84345),
Error "The Package Operation Failed" | Return package
for InDesign | InCopy CS5
Issue
When you choose Package > Return To InDesign in InCopy CS5 to create a return package, you receive the following
error message:
"The package operation failed."
The workflow started with an InDesign CS4 assignment.
Solution
Update to InCopy CS5 7.0.3 or later. To obtain the latest InCopy updates, choose Help > Updates in InCopy, or visit
http://www.adobe.com/downloads/updates. Select InCopy for your platform and find the latest update for InCopy CS5.
Folio Builder panel isn't functional | InDesign CS5.5
Issue
When you first install Adobe InDesign CS 5.5, the Folio Builder panel only contains a link to download updates.
Solution
1Click the link in the Folio Builder panel to open the InDesign updates download page.

14
Last updated 11/12/2015
2Save the DMG (Mac) or ZIP (Win) file to your desktop.
3Double-click the DMG to mount the disk image, or double-click the ZIP to open its folder and extract its contents
to your desktop.
4Run the installer executable. If asked to replace existing versions of files, choose yes.
5The update installer installs an AIR application, the Desktop Content Viewer. Click Yes if prompted to install the
Adobe Content Viewer.
Additional information
The panel's functionality was expected to require additional work in step with the Digital Publishing Suite's May
release. The May release was completed after InDesign CS 5.5 went into its production phase for creation of physical
materials. The Digital Publishing Suite's online services were in development right up until Adobe was ready to release
them, as the code is based in the cloud.
Determine table Oversets through threaded Frames |
JavaScript DOM | InDesign SDK
The goal here is to check if there is a table in a linked TextFrame.
So, normally one would follow these steps:
1Create two TextFrames
2Link the first TextFrame with the second one.
3Create a Table that flows from the first to the second TextFrame.
Assuming the second TextFrame is "myTextFrame," myTextFrame.Tables.Count return zero. So, there is no obvious
way to check if there is an overset table in the second TextFrame.
You can get the text containing the table using the insertion points surrounding it. Then, examine the
parentTextFrames property of that text to get a list of the text frames that the table flows through. See the example
below.

15
Last updated 11/12/2015
//Given a document containing a single story that contains a table…
var myDocument = app.documents.item(0);
var myStory = myDocument.stories.item(0);
var myTable = myStory.tables.item(0);
var myOffset = myTable.storyOffset.index;
var myText =
myStory.texts.itemByRange(myStory.insertionPoints.item(myOffset),
myStory.insertionPoints.item(myOffset+1)); var myTextFrames = myText.parentTextFrames;
if(myTextFrames[0].length == 1)
{
alert("Table exists in a single text frame.");
}
else{
alert("Table spans " + myTextFrames[0].length + " text frames");
}
try{
myTable.cells.item(-1).insertionPoints.item(-1).baseline ;
alert("Table is entirely in placed text.");
}
catch(myError){
alert("Table continues into overset (unplaced) text");
}
If the table continues into overset text, then you get an error when you try to get the baseline of the insertion point
following the character containing the table. (The error also occurs when you try to get the baseline of the insertion
point in the last cell in the table.)
Hyperlinks do not work in SWF files exported from
InDesign (InDesign CS4, CS5)
Issue
When testing the link in the SWF file locally, hyperlinks do not work in Flash SWF files that have been exported from
InDesign CS4 or InDesign CS5.
Solution
Solution 1: Upload the Flash SWF file to a web server
Solution 2: Set the Flash Player Security Settings to allow access to the file on the Hard Drive
When you click the hyperlink in the SWF running in a web browser (or the standalone Flash Player) from your local
disk, you are presented with an "Adobe Flash Player Security" dialog.
1Click the Settings button.
2In the web page set the Flash Player to approve access the folder on the local drive.

16
Last updated 11/12/2015
Note: If you have no intention of uploading the SWF to a web server, you can declare the top-level directory of the hard
drive as “Safe” to the Flash Player. Thus you don’t have to set the access permission for every SWF file you want to run
locally.
Solution 3: Use the Preview Panel (InDesign CS5 only)
To open the Preview Panel do one of the following:
•Click the Preview icon in your Motion, or Animation Panel.
•Use the keyboard shortcut: Cmd+Option+Return ( Mac), or Ctrl+Alt+Enter ( Windows).
Additional information
For hyperlinks in SWF files not to work locally is expected behavior.
By default, you cannot mix local and network references (URLs) in the same SWF when running the SWF locally. If
you deploy the SWF to a web server, the hyperlinks should work as expected. In order to preview this correctly when
running the SWF locally, you have to declare your local directory as "safe" to the Flash Player.
iBooks returns error and stops rendering ePub |
InDesign CS5.5
Issue
When you view ePubs created by InDesign CS5.5 in iBooks on an iPad, the following error appears:
This page contains the following errors:error on line <number> at column <number>: Entity 'shy' not definederror on
line <number> at column <number>: Entity 'nbsy' not definedBelow is a rendering of the page up to the first error.
Solution
Edit the HTML code for the ePub and remove the extra space in the DTD declaration.
1Open the HTML file inside the ePub package.
2In the <!DOCTYPE...> declaration, remove the space after "1.1"Before: <!DOCTYPE html PUBLIC "-//W3C//DTD
XHTML 1.1 //EN" "http://www.w3.org/TR/xhtml11/DTD/xhtml11.dtd">After: <!DOCTYPE html PUBLIC "-
//W3C//DTD XHTML 1.1//EN" "http://www.w3.org/TR/xhtml11/DTD/xhtml11.dtd">
3Save the HTML file.
Note: If you have multiple HTML files, do these steps for all files. You can use a batch mode using the Search & Replace
feature in Dreamweaver or a text editor that supports batch find/change operations.

17
Last updated 11/12/2015
Additional information
A typographical error in the DTD declaration causes this error. This error causes iBooks to ignore the DTD resulting
in undefined entity errors for nonbreaking spaces ( ) and discretionary hyphens (­). Most people
misdiagnose the error as a webkit issue, and unnecessarily removing nonbreaking spaces or discretionary hyphens.
Adobe hopes to address this issue in a future release.
InCopy assignment links are missing or cannot be edited
when working in cross-platform workflow (InCopy CS3 -
CS5)
Issue
When you open an .indd file in InDesign, links to *.icml files are shown as missing, and cannot be checked in.
Or...
When opening an *.icma or other file with links to *.icml files in InCopy, the assignments are shown as missing and
cannot be checked out.
Solution
Solution 1: Upgrade to InDesign/InCopy CS5
This issue has been addressed in the CS5 release of InDesign and InCopy.
Solution 2: Rename *.icml files and edit links in the *.icma file
Note: At some point, the *.icml files moved from one type of file system to another where the font encodings were
different. This move caused remapping of a character in the *.icml filename. Due to this change in the filename, the
link from the InCopy Assignment file cannot find the *.icml content file. Remapping of one or more filename
characters occurs in workflows where some users are on Mac OS X and others on Windows systems, or when files were
moved via a remote file server, e-mail server, FTP server, or other. Characters affected by this issue are usually extended
or Upper ASCII characters, like Umlauts or accented characters.
Perform both of the following procedures:
Finder (Mac) or Windows Explorer
1Edit the *.icml files in the so that they contain no extended characters, like Umlauts or accented characters.
2Remove all spaces.
3Note the filename for use when modifying the content of the .icma files in the next part of this solution.
Note: Removing all spaces and other non-alphanumeric characters makes it easier to write a matching name in the
*.icma file.

18
Last updated 11/12/2015
Text Editor
1Open the *.icma file in a text editor and search for all instances of "<link".
2Locate the portion of the path that is the filename. Replace it with the new name you created in the first part of this
solution.
3Save the file.
4Open the .indd file that contains links to the .icml files.
5Choose > WIndows > Links to display the Links panel.
6Selelct the affected .icml file, and click the Relink button and select the renamed file.
Solution 3: Recreate your assignment content so that it does not contain non-lower ASCII
characters
1Unlink the *.icml.
2Resave the *.indd so that it has more than 26 characters that are all lower ASCII.
3Re-export the assignments.
Solution 4: Compress your files before moving them through another file system
Compress the files, for example, as a *.zip, before sharing it on a different operating system, uploading it to an FTP
server, e-mailing it, or distributing it in any other way.
Example: If all users are on Mac, but the files are distributed via Windows file server, keep the files compressed during
this transfer. Unzip them when they reach the destination workstation that uses the same character encoding as the
others workstations involved with the files.
Additional Information
InDesign CS3-CS4 automatically names *.icml files that it creates in the Contents folder while generating InCopy
Assignment files (.icma), using this formula:
Trim to 26 characters ([.indd file name] + [story text]) + .icma
If the INDD filename is 26 characters or greater, then the story text never contributes to the names of the .icma, and
the subsequent .icma files in the same Assignment file are clipped and incremented, for
example:123456789a123456789b123456.icml123456789a123456789b1234-2.icml...123456789a123456789b123-
10.icmlEtc...
If your InDesign filename is less than 26 characters, and if the algorithm takes text from your story content and the
story content has non-lower ASCII characters, you run the risk that cross-platform workflow modifies the filenames
due to platform font encoding differences. Thus the link object in the *.icml points to something like:
LinkResourceURI="file:/Users/joe/Desktop/InCopyTest%20Assignments/content/InCopyTest-
Upp%C3%A9r%20ASCII.icml"
But the string %C3%A9, which resolves to an accented e (é), makes the file not found because the file on disk
has gone from:InCopyTest-Uppér ASCII.icmlto:InCopyTest-Upper ASCII.icml or...InCopyTest-Uppr
ASCII.icml or...InCopyTest-Upp[notdef char]r ASCII.icml

19
Last updated 11/12/2015
InCopy CS5 known issues and bugs
Adobe InCopy CS5 known issues and bugs
Welcome to Adobe InCopy CS5. This document contains known issues and troubleshooting tips not covered in the
InCopy documentation.
Please refer to Adobe Support for late-breaking information and known issues for all Creative Suite 5 applications.
•Fonts that are hidden/disabled in Windows 7 are still listed in the InCopy Fonts Menu and are usable. (#BG081881)
•Exporting text containing double-byte characters to the Buzzword service results in missing glyphs in the Buzzword
online document. Note that the Buzzword service does not support double byte characters at time of InCopy CS5
release. (#2367410)
•Round-tripping text containing double-byte characters to and from the Buzzword service results in missing glyphs
in the InCopy document. To fix this, re-apply the original double-byte font. (#2367410)
•Extension Manager displays extension paths in English instead of the localized path. This is a display issue only,
plug-in files can still be correctly installed. (#BG093507)
GB18030 support for Windows XP (Chinese Simplified version only)
In order to support the display of all characters of the Chinese standard GB18030 on Windows XP systems, Adobe
recommends the installation of the Microsoft GB18030 Support Package. This support package will update an XP
system with, among other things, fonts and input-method-editors (IMEs) to correctly support GB18030. The support
package is available as a download from the Microsoft website. (#BG061690)
SetNewUIfont and ClearNewUIfont for GB18030-2000 standard support
On Microsoft Windows XP, set the registry to enable 4-byte GB18030-2000 characters in the UI by running the registry
script file "SetNewUIfont.reg". This will only affect UI in InCopy and not your OS. The registry script is an optional
procedure and doesn’t need to be run unless there is a need to display 4-byte characters in the UI.
Note: This work around will not work for the dialogs managed by the operating system (i.e. Open, Save...etc).
To set the UI font to enable 4-byte GB18030-2000 characters:
Make sure the Adobe InCopy application is not currently running.
1Copy the file “SetNewUIfont.reg” to your desktop. This file may be found on either the InCopy CS5 DVD or the
InDesignFamily_7_Content_ALL as part of an electronic software download package. Locate it in the ???? > InCopy
folder.
2Double click the “SetNewUIfont.reg” to set the UI font for InCopy.
3Launch InCopy again, the UI should be enabled to view 4-byte GB18030-2000 characters in all dialogs managed by
InCopy.
To revert the UI font to original settings:
1Make sure the Adobe InCopy application is not currently running.
Copy the file “ClearNewUIFont.reg” to your desktop. This file may be found on either the InCopy CS5 DVD or the
InDesignFamily_7_Content_ALL as part of an electronic software download package. Locate it in the ???? > InCopy
folder.
Double-click the “ClearNewUIFont.reg” to clear the new UI font for InCopy.

20
Last updated 11/12/2015
Launch InCopy again, the UI should be reset to InCopy standard UI font.
NOTE: The registry script is created to display GB18030 standard 4-byte characters in InCopy UI, and should be run
on native Simplified Chinese Win XP.
© 2010 Adobe Systems Incorporated. All rights reserved.
Incorrect spacing | Leader tab , left-justified tab | PDF
export | InDesign CS5
Issue
In documents with a right-justified tab leader followed by a left-justified tab, the tab leader collapses when you export
the document to PDF. The character spacing is incorrect in the PDF file.
Solution
Print the InDesign file to PostScript and distill it.
1Choose File > Print.
2From the Printer list, choose PostScript File.
3Set any other necessary print options.
4Click Save.
5Open the PostScript file using Acrobat Distiller to convert it to PDF.
Additional information
Adobe hopes to address this issue in a future release of InDesign.
Crash, blank dialog boxes | Mac OS X Lion 10.7.4
Issue
When you use InDesign or InCopy CS4 or later on a 2012 Mac OS X Lion system, you receive a blank warning dialog
box. The application crashes when you perform certain functions.
Solutions
Solution 1
•InDesign CS4 and later: Update Mac OS X 10.7 to Mac OS X 10.8.

21
Last updated 11/12/2015
•InDesign CS6 only: Install the latest updates for InDesign CS6 by going to Help > Updates within the application.
Solution 2
1Download and run the following script.
IDIcons_1074_Script.app.zip
2The script asks you to choose a copy of InDesign/InCopy to update. Direct the script to your current installation.
Solution 3
The following steps are the same solution as Solution 1, but the files are copied manually. Do them if Solution 2 is not
successful.
1Close InDesign and download the zip archive containing three InDesign icons.
IDIcons_1074_Fix.zip
Note: Placing these files should continue to allow additional updates. But be aware that you are modifying the existing
application file. Moving or changing the contents of the application can make it necessary to reinstall the
application.Adobe recommends installing all official updates before placing these files within the application. You can
access these updates through Help > Updates or on the Adobe website.
2Extract the icons from the zip file to an easy to find location, such as your desktop.
3Navigate to: /Applications/Adobe InDesign CS6/ or where the application is installed on your system.
4Right click or CTRL+Click the InDesign application file and choose "Show Package Contents."
5Within the InDesign application file, navigate to: /Contents/MacOS/Required/ and locate the file "Application
UI.InDesignPlugin" and again "Show Package Contents."
6Within the plug-in, navigate to the Resources folder and then into the folder "idrc_PNGA."
7Copy the three icon files from the extracted zip file to the folder "idrc_PNGA."
8Relaunch InDesign.
Solution 4
Do not install the Mac OS X (Mid 2012) Software Update to 10.7.4. Or, uninstall it if possible, by using the recovery
function of Mac OS X Lion.
Additional information
The latest update for Mac OS X Lion has removed an API file that InDesign uses to work with system icons. By placing
the files directly within the applications, you are working around the function the API served.
Adobe has been able to work with Apple to help make sure these APIs are present within their latest release of Mac OS
10.8.
At this time, the only working solution for CS4 is to install the more recent Mac OS 10.8.
InDesign crashes upon launch while attempting to
recover a damaged document

22
Last updated 11/12/2015
Issue
InDesign continues to crash each time you try to re-start.
Reason
Documents can become damaged while working on them in InDesign, or they can contain damaged information, for
example, due to hard drive or other disk read/write errors. The situation can occur when InDesign opens the file
initially, but then cause a crash because InDesign tries to read or write from or to a damaged portion of the file.
The InDesign document recovery feature tries to automatically open InDesign documents which were open during the
time of an application crash. If the document it is trying to open is damaged, then it can cause InDesign to crash each
time you restart InDesign.
Solution
Remove the file or files from the document recovery folder.
Move these files to your desktop, and attempt to recover them using the methods described in, "Troubleshoot damaged
InDesign documents" (TechNote kb403982).
You can change the document recovery folder in the user preferences. The default path is listed below, but check the
location in Preferences > File Handling > Document Recovery Data to be certain.
•On Mac OS: /[Hard Drive]/Users/[User Name]/Library/Caches/Adobe InDesign/Version [#.0]/InDesign Recovery
•On Windows XP: C:\Documents and Settings\[User Name]\Local Settings\Application
Data\Adobe\InDesign\Version [#.0]\en_US\Caches\InDesign Recovery
•On Windows Vista and Windows 7: C:\Users\[User Name]\AppData\Local\Adobe\InDesign\Version
[#.0]\en_US\Caches\InDesign Recovery
InDesign CS5.5 crashes on launch | Mac OS 10.5.7 and
earlier
Issue
When trying to start InDesign CS5.5 on a computer using Mac OS 10.5.7 or earlier, the application quits near the end
of it's startup process.
Solution
Update your computer to meet the minimum Mac OS System version for InDesign CS5.5, 10.5.8 or higher.
Additional information
For more information about InDesign CS5.5's system requirements, see InDesign CS5.5 / Tech Specs.

23
InDesign Debug fails to load Font Manager and SING
plug-ins then crashes
This is a known issue in the debug versions of InDesign CS5 and CS5.5. It does not affect the release version.
On launching InDesign debug you may see the warnings:
•Cannot load plugin Font Manager.rpln
•Cannot load plug-in SING.apln
•About to use nil interface ptr! Queried IID was FontMgrPrefix + 1 (0x3e01), on Boss kSessionBoss
InDesign Debug will then crash.
The issue is caused by a component which has a dependency on Visual Studio 2005 SP1 and you may also see this error
if you installed Visual Studio 2005 SP1 after the debug version of InDesign.
To resolve this you should follow these steps:
1 Uninstall InDesign debug and Visual Studio
2 Install Visual Studio 2005 Service Pack1
3 Install Visual Studio 2008
4 Install InDesign Debug
Note: http://adobe.com
Last updated 11/12/2015

24
Last updated 11/12/2015
InDesign/InCopy CS5 fail to recognize file/assignment
usage of users on cross platforms
Issue:
When opening InDesign documents (.indd) InDesign/InCopy create an InDesign Lock file (.idlk) that other instances
of InDesign/InCopy check for to determine if the file is in use. If the file is in use, other instances of InDesign/InCopy
are designed to alert the user that the document is in use by another user, and not allow it to open. When this is done
in InDesign CS5 versions 7.0 and 7.0.1 (Swedish/German only versions), the user gets no alert, however, the document
is opened in a read-only mode which makes it impossible for anyone but the first user to open the file able to save it to
that same name and location.
A similar function exists when checking out a linked InCopy story from within an InCopy assignment (.icma) or layout
(.indd). Subsequent users should be alerted that the content is currently be edited by another user. Instead, subsequent
users can open the same document or check-out the same assignment without receiving any warning. This leads to a
state where multiple users can edit the contents, and only the changes from the last user to save the document are
preserved.
This primarily applies when users are opening the files from both a Windows and a Mac OS system. However, some
users have also reported experiencing the problem when all clients on are Mac OS, bu the files are stored on some types
of non-Mac OS file servers.
Solution:
Install the InDesign CS5 7.0.2 update. This can be found by choosing Help > Updates from any CS5 application, or by
downloading from http://www.adobe.com/downloads/updates/.

25
Last updated 11/12/2015
InDesign or InCopy freezes or quits when you start on
Mac OS
Issue
When you start Adobe InDesign or Adobe InCopy on Mac OS, the application crashes, freezes, or quits with one of the
following error messages:
•"The application Adobe InDesign has unexpectedly quit."
•"The application Adobe InCopy has unexpectedly quit."
Solution
Do one or more of the following solutions:
Solution 1: Delete all Adobefnt10.lst files.
Search for and delete all copies of the AdobeFnt10.lst file that you find on the hard disk:
1In the Finder, choose File > Find (Command + F).
2Type Adobefnt10.lst, select the system drive, and then click the Search icon.
3Click within the search results. Choose Edit > Select All, and then drag the selected files to the Trash.
4Choose Finder > Empty Trash.
5Restart InDesign.
Solution 2: Troubleshoot fonts by disabling a few at a time.
1Deactivate all font management utilities, such as Adobe Type Manager or Extensis Suitcase.
2Start Font Book from the Applications folder.
3In the Collection column, select Computer.
4Choose Edit > Disable Computer. Click Disable, when asked to confirm.
5Run the application installer. Then do one of the following:
•If the problem recurs, repeat steps 4-5 to disable the User and Classic collections.
•If the problem doesn't recur, the problem font is in the collection you disabled. In Font Book, enable one font at a
time in the collection and try to reproduce problem until you find the problem font.Note: If you identify problem
fonts, Adobe requests that you complete a bug report at www.adobe.com/misc/bugreport.html. Be sure to include
the font name, the font creation date, and the font type (for example, OpenType fonts from Adobe, TrueType, dfont,
or Type 1).
Solution 3: Remove third-party plug-ins from the Plug-ins folder.
Identify third-party plug-ins and then remove the plug-in files for each of those plug-ins.To identify third-party plug-
ins in CS4 and earlier, choose choose Help > Configure Plug-ins (Windows) or InDesign > Configure Plug-ins (Mac
OS).To identify third-party plug-ins/extensions in CS5 and later, choose Help > Manage Extensions (Windows) or
InDesign > Manage Extensions (Mac OS).
To remove third-party plug-ins: Move the plug-in file for each plug-in from the Adobe InDesign [version]/Plug-ins
folder to a backup folder and restart InDesign/InCopy.

26
Last updated 11/12/2015
If you identify problems with third-party plug-ins, then please complete a bug report, available on the Adobe website
at www.adobe.com/misc/bugreport.html. Be sure to include the plug-in name, version and manufacturer.
Solution 4: Disable the Font Agent plug-in.
If you've installed Extensis Suitcase on the system, disable the FontAgent plug-in that comes with the application. You
may also want to check the Extensis website (www.extensis.com) for updates to Suitcase.
Solution 5: Start the application in Safe mode and disable Font Preview.
1Restart the computer, and then hold down the Shift key immediately after you hear the startup tone.
2Release the Shift key when the Apple logo appears. "Safe Boot" appears on the Mac OS X startup screen.
3Start the application.
4Choose InDesign > Preferences > Type (for InDesign), or InCopy > Preferences > Type (for InCopy).
5In Type Options, deselect Font Preview Size.
Additional Information
If an Adobefnt10.lst file becomes damaged, it can cause InDesign or InCopy to crash, freeze, or quit when you try to
start it. Adobefnt.lst files (for example, Adobefnt10.list) are font cache files that Adobe applications use to quickly
gather and store information about available fonts. If you delete or rename an Adobefnt.lst file, the application will re-
create it the next time you start the application.
InDesign preferences and support file locations
InDesign preferences and support files
The preference and support files for InDesign have similar locations. These files are primarily grouped into three
locations, though there is data in additional locations as noted below.
•The Application folder: At the location of the application, or executable, are subfolders for presets and other support
files. These subfolders are typically where the "canned" presets are located.
•The application "roaming data folder." This folder is intended for "normal" preference data that you would want to
roam from machine to machine in a roaming profile environment.
•The application "local cached data folder." This folder is designed for large data caches that you don't want to roam
from machine to machine in a roaming profiles environment on Windows. It is also for data that can easily be
regenerated if deleted.
Mac OS X
Application "Roaming Data Folder"
•/Users/[User Name]/Library/Preferences/Adobe InDesign/Version #

27
Last updated 11/12/2015
Preference files saved into this location include the following:
•Color Settings
•Composite Fonts
•Find-Change Queries
•InDesign Defaults
•Scripts
•Workspaces
Preference files saved into this location include the following:
•Color Settings
•Composite Fonts
•Find-Change Queries
•InDesign Defaults
•Scripts
•Workspaces
Preference files saved into this location include the following:
•Color Settings
•Composite Fonts
•Find-Change Queries
•InDesign Defaults
•Scripts
•Workspaces
Preference files saved into this location include the following:
•Color Settings
•Composite Fonts
•Find-Change Queries
•InDesign Defaults
•Scripts
•Workspaces
Preference files saved into this location include the following:
•Color Settings
•Composite Fonts
•Find-Change Queries
•InDesign Defaults
•Scripts
•Workspaces
28
Last updated 11/12/2015
Application "local cached data folder"
•/Users/[User Name]/Library/Caches/Adobe InDesign/Version [#]
Windows
Wind ows X P
Roaming Data Folder:
•C:\Documents and Settings\[User Name]\Application Data\Adobe\InDesign\Version [#]
Local Cached Data Folder:
•C:\Documents and Settings\[User Name]\Local Settings\Application Data\Adobe\InDesign\Version [#]
Wind ows 8 /Windows 7/Windows Vista
Roaming Data Folder:
•C:\Users\[User Name]\AppData\Roaming\Adobe\InDesign\Version [#]
Local Cached Data Folder:
•C:\Users\[User Name]\AppData\Local\Adobe\InDesign\Version [#]\en_US\Cache
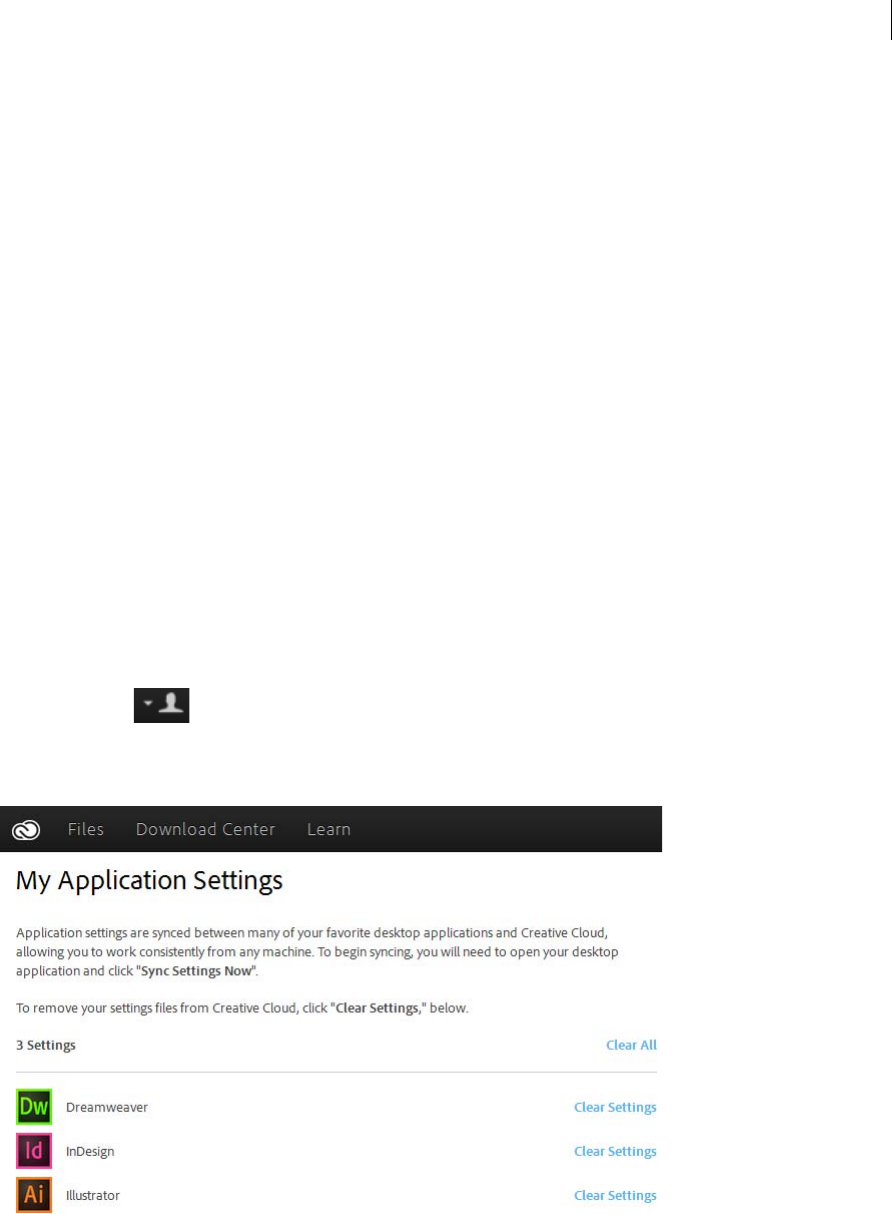
Reset preferences in Creative Cloud
To clear the preferences store in the Cloud, follow the steps below:
1Go to creative.adobe.com and Sign in with your adobe ID.
2Click the icon in the upper-right corner of the page.
3Click My Application Settings to see a list of Applications who's preferences are stored in the cloud.
4Click Clear Settings next to the application name to remove the preferences stored in the Cloud.
Learn more about Preferences in Creative Cloud.

29
Last updated 11/12/2015
Delete InDesign preferences with shortcuts
You can delete the replaceable InDesign SaveData and InDesign Defaults files by holding down the following keys while
InDesign is launching:
•Windows: Shift+Ctrl+Alt
•Mac OS: Shift+Control+Option+Command
InDesign version and preferences version number
•InDesign CS3 Version 5.0
•InDesign CS4 Version 6.0
•InDesign CS5 Version 7.0
•InDesign CS5.5 Version 7.5
•InDesign CS6 Version 8.0
•InDesign CC Version 9.x
Additional information
Here is a brief Description of what is stored in different locations:
Local Cached Data folder
•InDesign Recovery folder (+data)
•Scripting Support folder
•FindChangeData
•FindChangeDataTmp
•FontMask
•Cacheidletask log
•InDesign ClipboardScrap
•InDesign DragDropScrap
•InDesign SavedData
Roaming Data folder
•Color Settings
•Composite Fonts
•Find-Change Queries
•InDesign Defaults
•InDesign Scripts folder
•Workspaces folder
•Menu Sets folder
Also attached is a PDF document that contains further information of a range of preferences and their functions. This
document was written for InDesign and was posted on indesignsecrets.com.

30
Last updated 11/12/2015
Adobe believes that the information in this document is correct. However, Adobe cannot give support on the accuracy
of the content.
ID Preferences PDF
InDesign quits when SWF is deselected | CS5 | Windows
Issue
When you preview a SWF file in the Media panel, deselecting the SWF file causes InDesign CS5 to quit.
Solution
Close or collapse the Media panel before changing your selection.
Additional information
This issue is more likely to occur when the SWF file contains ActionScript 2.0. Adobe hopes to address this issue in a
future release.
InDesign Server CS5 known issues and bugs
Adobe InDesign CS5 Server known issues and bugs
Welcome to Adobe InDesign CS5 Server. This document contains known issues and troubleshooting tips not covered
in the InDesign Server documentation.
Please refer to Adobe Support for late-breaking information and known issues for InDesign CS5 Server.
•InDesign CS5 Server is certified to operate on Mac OS X 10.5.x. Please refer to Adobe Support for late-breaking
information on this specific issue. (2389388)
•The Layout Adjustment feature is once again supported in InDesign CS5 Server. The Layout Adjustment feature was
omitted in InDesign CS4 Server due to challenges in porting to 64-bit.
•Arabic and Hebrew languages are now officially supported with InDesign CS5 Server.
•InDesign CS5 Server does not include the InDesign desktop application features for CS Live or Acrobat.com, or any
related features including CS Review, Share My Screen, Buzzword import, Access CS Live, CS News and Resources,
and kuler.
•InDesign CS5 Server does not support placing URL-based movies.
•Placing InDesign files into InDesign files results in an inflated file size. Perform a Save As in order to reduce the file
size. (#2536202)
•Importing an .xls file containing GB18030 characters results in missing glyphs. As a workaround, change the font of
the file to Arial Unicode MS or SimSun-18030 before importing to InDesign Server. (#1840859)

31
Last updated 11/12/2015
FLA/SWF Export Issues
•Some document installed fonts shift vertically when the file is exported to FLA and then opened in Flash Authoring.
The workaround is to install the needed font into the system font folder and then replace that font in the document.
(#2487723)
•Text position in a FLA file exported from InDesign Server with TLF Text option selected is higher on the page when
opened in Flash. As a workaround, set it as lineHeight or manually set it as a number that matches in Flash
Authoring. (#2523394)
•Some Transparency Effects (Outer Bevel, Outer Glow, Emboss, and Pillow Emboss) applied to text that is over
another transparent object render incorrectly to SWF Preview and FLA export. For example, the background is
lighter in color. As a workaround, change the screen mode applied to the highlight to normal, or remove the opacity
on the background element and replace it with a 33% tint. (#2536205)
•Multi-state objects in an InDesign document exported to FLA and then exported to SWF from Flash Authoring
continuously cycle through states in the exported movie. This is expected behavior, and ActionScript can be added
in Flash Authoring to stop the animation. (#2496987)
•Some document installed fonts shift vertically when the file is exported to FLA and then opened in Flash Authoring.
The workaround is to install the needed font into the system font folder and then replace that font in the document.
(#2487723)
© 2010 Adobe Systems Incorporated. All rights reserved.
InDesign support for World-Ready Composer | CS4, CS5
Adobe InDesign CS4 and CS5 don't support World-Ready Composer. World-Ready Composer is the GUI-less,
scriptable method that enables support for “complex script" languages, such as Arabic and Hebrew.
While the World-Ready Composer exists in InDesign CS5, it has never been marketed as an official feature. Although
there are references to it in the InDesign code, there is no InDesign documentation that covers World-Ready
Composer.
If you want to report issues with World-Ready Composer and InDesign, use the bug report form on Adobe.com:
Feature Request/Bug Report Form.
InDesign tools and panels don't respond to mouse clicks
(Windows 7/Vista)
Issue
When you try to access a tool or panel item in Adobe InDesign by clicking on it, nothing happens.

32
Last updated 11/12/2015
Reason
The DPI setting for fonts is set too high or there is a conflict with Aero being enabled on your Microsoft Windows
7/Vista system.
Solutions:
Solution 1: Change the DPI scale back to the default.
Wind ows Vista
1Open Personalization by clicking the Start button Picture of the Start button, clicking Control Panel, clicking
Appearance and Personalization, and then clicking Personalization.
2In the left pane, click Adjust font size (DPI). Administrator permission required If you are prompted for an
administrator password or confirmation, type the password or provide confirmation.
3In the DPI Scaling dialog box decrease the size of text and other items on the screen, click Default scale (96 DPI)–
fit more information, and then click OK.
4To see the changes, close all of your programs, and then restart Windows.
Wind ows 7
1Click on the Start button, click on Control Panel, click on Appearance and Personalization, and then, under Display,
click on Make text and other items larger or smaller.
2Choose Smaller - 100% (default).
3Click Apply.
4To see the change, close all of your programs and then log off of Windows. This change will take effect the next time
you log on.
Solution 2: Disable Windows Aero
Wind ows 7
1Choose Start > Control Panel.
2Double-click Personalization.
3Scroll down to the Basic and High Contrast Themes.
4Select one of the Basic or High Contrast themes, then wait for that theme to take effect.
5Re-create the problem behavior, and then do one of the following:
•If the problem doesn't recur, then Aero is the cause. Choose a Color Scheme other than Windows Aero to set up
your Appearance of your desktop.
•If the problem recurs, then Aero isn't the cause. Re-enable Aero.
To re-enable Aero:
1Choose Start > Control Panel.
2Double click Personalization
3Choose one of the Windows Aero themes and close the Personalization control panel.
Wind ows Vista
1Choose Start > Control Panel.
2Double-click Personalization .

33
Last updated 11/12/2015
3Select Window Color and Appearance.
4Click Open Classic Appearance Properties For More Color Options.
5Select a color scheme other than Windows Aero and click OK.
6Re-create the problem behavior, and then do one of the following:
•If the problem doesn't recur, then Aero is the cause. Choose a Color Scheme other than Windows Aero to set up
your Appearance of your desktop.
•If the problem recurs, then Aero isn't the cause. Re-enable Aero.
To re-enable Aero:
1Choose Start > Control Panel.
2Double click Personalization
3Select Windows Color And Appearance.
4Choose Windows Aero from the Color Scheme menu and click OK.
Additional information
A larger DPI is often used to help make the text on the screen easier to read. Yet altering this setting beyond the defaults
can cause issues with program functionality.
Aero is a new hardware-based graphical user interface in Windows 7/Vista. It is intended to offer more advanced
features than are available in the standard interface, including new transparencies and animations.
Known issues, bugs | InDesign CS5
Adobe InDesign CS5 known issues and bugs
Welcome to Adobe InDesign CS5. This document contains known issues and troubleshooting tips not covered in the
InDesign documentation.
Please refer to Adobe Support for late-breaking information and known issues for all Creative Suite 5 applications.
•Using certain CTRL/CMD modifier key shortcuts with an extension panel open (e.g. kuler, Search for Help,
Connections Home) will result in garbage characters (Win) or the shortcut itself (Mac) appearing in the input field
instead of the desired command being executed. (#BG095705)
•Fonts that are hidden/disabled in Windows 7 are still listed in the InDesign Fonts Menu and are usable.
(#BG081881)
•Exporting text containing double-byte characters to the Buzzword service results in missing glyphs in the Buzzword
online document. Note that the Buzzword service does not support double byte characters at time of InDesign CS5
release. (#2367410)
•Round-tripping text containing double-byte characters to and from the Buzzword service results in missing glyphs
in the InDesign document. To fix this, re-apply the original double-byte font. (#2367410)
•Extension Manager displays extension paths in English instead of the localized path. This is a display issue only,
plug-in files can still be correctly installed. (#BG093507)

34
Last updated 11/12/2015
•PICT file placed into InDesign document shifts on the page when Overprint Preview is turned on. This is a screen
display issue and only happens the first time Overprint Preview is selected. Subsequent selections of this option do
not trigger the behavior. (#2498853)
•InDesign takes a long time or enters a non responsive state when cancelling the save of a very large document
(hundreds of pages), if Always Save Preview Images was selected under File Handling Preferences. (#2530281)
•Text frames scale or rotate off center with certain text attributes or optical margin alignment is applied. As a
workaround, either group the text frame with a larger graphic frame and apply rotation or scale to that group.
(#2539854)
•PICT files are not listed under Importable Files. They can still be placed successfully. (#2459866)
•Self-click animations located close to page corners are difficult to trigger if page curl is enabled. If page curl is turned
off, the self-click animation behaves normally and can be triggered with one click. (#2447777)
•Animations placed on the pasteboard of a master page do not play when previewed on a document page. To work
around, place the object so that it is barely touching the page edge and choose Hide Until Animated. Or, place the
object on the page, apply Move Left, and then choose Animate To Current Appearance. (#2532603)
•Live corner shape edit diamonds are not available for rectangular buttons. As a workaround, double click to select
individual elements of the button and then enter the corner edit mode by clicking the live corner (yellow) button.
(#2375720)
•Placing InDesign files into InDesign files results in an inflated file size. Perform a Save As in order to reduce the file
size. (#2536202)
•Importing an .xls file containing GB18030 characters results in missing glyphs. As a workaround, change the font of
the file to Arial Unicode MS or SimSun-18030 before importing to InDesign. (#1840859)
FLA/SWF Export Issues
•Some document installed fonts shift vertically when the file is exported to FLA and then opened in Flash Authoring.
The workaround is to install the needed font into the system font folder and then replace that font in the document.
(#2487723)
•Text position in a FLA file exported from InDesign with TLF Text option selected is higher on the page when opened
in Flash. As a workaround, set it as lineHeight or manually set it as a number that matches in Flash Authoring.
(#2523394)
•Some Transparency Effects (Outer Bevel, Outer Glow, Emboss, and Pillow Emboss) applied to text that is over
another transparent object render incorrectly to SWF Preview and FLA export. For example, the background is
lighter in color. As a workaround, change the screen mode applied to the highlight to normal, or remove the opacity
on the background element and replace it with a 33% tint. (#2536205)
•When viewing a placed SWF's animation in the Preview Panel, animation restarts itself before fully completed. The
SWF does export correctly however. (#2382094)
•Multi-state objects in an InDesign document exported to FLA and then exported to SWF from Flash Authoring
continuously cycle through states in the exported movie. This is expected behavior, and ActionScript can be added
in Flash Authoring to stop the animation. (#2496987)
GB18030 support for Windows XP (Chinese Simplified version only)
In order to support the display of all characters of the Chinese standard GB18030 on Windows XP systems, Adobe
recommends the installation of the Microsoft GB18030 Support Package. This support package will update an XP
system with, among other things, fonts and input-method-editors (IMEs) to correctly support GB18030. The support
package is available as a download from the Microsoft website. (#BG061690)
SetNewUIfont and ClearNewUIfont for GB18030-2000 standard support

35
Last updated 11/12/2015
On Microsoft Windows XP, set the registry to enable 4-byte GB18030-2000 characters in the UI by running the registry
script file "SetNewUIfont.reg". This will only affect UI in InDesign and not your OS. The registry script is an optional
procedure and doesn’t need to be run unless there is a need to display 4-byte characters in the UI.
Note: This work around will not work for the dialogs managed by the operating system (i.e. Open, Save...etc).
To set the UI font to enable 4-byte GB18030-2000 characters:
Make sure the Adobe InDesign application is not currently running.
1Copy the file “SetNewUIfont.reg” to your desktop. This file may be found on either the InDesign CS5 DVD or the
InDesignFamily_7_Content_ALL as part of an electronic software download package. Locate it in the ???? >
InDesign folder.
2Double click the “SetNewUIfont.reg” to set the UI font for InDesign.
3Launch InDesign again, the UI should be enabled to view 4-byte GB18030-2000 characters in all dialogs managed
by InDesign.
To revert the UI font to original settings:
1Make sure the Adobe InDesign application is not currently running.
Copy the file “ClearNewUIFont.reg” to your desktop. This file may be found on either the InDesign CS5 DVD or the
InDesignFamily_7_Content_ALL as part of an electronic software download package. Locate it in the ???? > InDesign
folder.
Double-click the “ClearNewUIFont.reg” to clear the new UI font for InDesign.
Launch InDesign again, the UI should be reset to InDesign standard UI font.
NOTE: The registry script is created to display GB18030 standard 4-byte characters in InDesign UI, and should be run
on native Simplified Chinese Win XP.
© 2010 Adobe Systems Incorporated. All rights reserved.
Known Issues with Flash Export from InDesign CS5
Issue
This document lists behaviors and known issues that occur when export an InDesign CS5 document to Flash Player
(SWF) and Flash Pro (FLA)
•Known behaviors
•Known issues
Known Behaviors
Document setup issues
How InDesign pages are convertedWhen you export to SWF or FLA, InDesign spreads become separate clips in a
timeline, like slides in a slideshow. Each spread is mapped to a new keyframe. In Flash Player, you advance through the
spreads of the exported document by pressing arrow keys or clicking interactive buttons.

36
Last updated 11/12/2015
Page size
When you create a document, you can choose a specific resolution, such as 800 x 600, from the Page Size menu in the
New Document dialog box. During export, you can also adjust the scale or resolution of the exported SWF or FLA file.
Note: When creating a document intended for the web, choose Web from the Intent menu in the New Document dialog
box.
Interactivity features
Buttons, page transitions, hyperlinks, animation, and media files can be included in exported SWF and FLA files.
Buttons
For buttons in an exported SWF or FLA file, the Next Page and Previous Page actions are especially useful controls for
playback in Flash Player. However, some actions that work in interactive PDF files have no effect in Flash Player. When
you choose an action in the Buttons panel, do not select an option from the PDF Only section.
HyperlinksCreate links to websites or to other pages in the document. Hyperlinks are broken in FLA files.
Movies and sound clips
•Movies and sound clips are included in an exported SWF file if they’re in a supported format, such as SWF, FLV,
F4V, and MP4 for movies and MP3 for sound clips.
•When you export to FLA, only the poster image is included in the FLA file. Supported media files appear in a
resources folder saved in the same location as the exported FLA file.
Conversion issues
Color
•SWF and FLA files use RGB color.
•When a document is exported to SWF or FLA, InDesign converts all color spaces (such as CMYK and LAB) to
sRGB. InDesign converts spot colors to equivalent RGB process colors.
•To avoid unwanted color changes in artwork with text with transparency, choose Edit > Transparency Blend
Space > Document RGB.
•To avoid unwanted color changes in images with transparency, avoid using a lossy compression during export.
TextWhen exporting to SWF or FLA, you can determine whether text is output as Flash text or converted to outlines
or pixels. Text exported as Flash Classic Text remains fully editable when the FLA file is opened in Adobe Flash CS5
Professional and can be searched in web browsers when saved as SWF files.
Images
•When you export images to SWF or FLA, you can change image compression, JPEG quality, and resolution settings
during export.
•When you export images to FLA, an image placed multiple times in your InDesign document is saved as a single
image asset with a shared location.
•A large number of vector images in the InDesign document may cause performance problems in the exported file.To
reduce file size, place repeating images on master pages, and avoid copying and pasting images. If the same image
is placed multiple times in the document and not transformed or cropped, only one copy of the file is exported in
the FLA file.
•Images that are copied and pasted are treated as separate objects.

37
Last updated 11/12/2015
•By default, a placed Illustrator file is treated as a single image in the FLA file, whereas an Illustrator file that’s copied
and pasted generates many individual objects. For best results, place the Illustrator image as a PDF file instead of
copying and pasting from Illustrator. Copying and pasting results in multiple editable paths. You can change
preference options to make sure that Illustrator objects are pasted as one object instead of a collection of small
vectors. In Illustrator File Handling & Clipboard preferences, select PDF and deselect AICB (No Transparency
Support). In InDesign Clipboard Handling preferences, select both Prefer PDF When Pasting and Copy PDF To
Clipboard.
Transparency
•Before exporting to SWF, make sure that transparent objects do not overlap any interactive element, such as a button
or hyperlink. If an object with transparency overlaps an interactive element, the interactivity may be lost during
export. You may want to flatten transparency before exporting to FLA.
•In some instances, choosing a lossy compression reduces the quality of images with transparency. When exporting,
choose PNG (Lossless) to improve the quality.
3D attributes3D attributes are not supported in the exported SWF and FLA files.
Known issues
Issue 1: Objects appear to drop out in unflattened FLA when both the contents of a group and the group have the
same transparency effects applied. (2537818)
Workaround:
•Remove the drop shadow on the group or the individual objects.
•Change the blending space on the group to Normal.
•Export to SWF
•Apply a different transparency effect to the group
Issue 2: Multi State Objects (MSO) continuously cycles through states in exported SWF movie (2496987)
Workaround: Add a stop in Flash Pro.
Note: This is consistent with how InDesign treats the FLA as a whole. InDesign does not include a 'stop' and thus the
default behavior is to flip through all the pages.
Issue 3: Some document installed fonts are shifting vertically in Flash text (2497723)
•Note workaround.
•InDesign uses CoolType, not platform APIs.
•Flash text relies on the platform API to get ascent/descent to adjust the text position. The platfrom dependent API
call can only get legitimate values if font is installed on the system foler. If the font is installed in our app folder or
the document installed font folder, the return value may not be legitimate.
Issue 4: Middel Eastern (Hebrew, Arabic) drop caps are shifting horizontally in SWF files with Flash text (2486484,
2499126)
Workaround: Use the ME version of InDesign
Issue 5: Animations on the master page will drop in SWF if one spread contains mutliple pages. ( for example 4
page spread) (2475343)
Now workaround. This workflow is not supported in the current architecture.

38
Last updated 11/12/2015
Issue 6: Transparency effects applied to the contents of a placed graphic frame do not output to FLA/SWF
flattened or native. (2375074)
Workaround: Apply transparency to the frame itself.
Issue 7: Error message occur when exporting bitmap type, Courier (Courier system font in MS Word,) to SWF
(2295686)
No workaround: Indesign does not support bitmap font on Windows. Bitmap fonts are filtered in the font menu.
Japanese specific:
J: Text shifts up in TLF text (2523394)
Workaround:
•Set it as lineHeight in Flash Authoring or manually set it as a number that matches or apply underline to the original
text in InDesign.
•This behavior is by design due to the fact that TLF does not have the same first baseline offset supports as InDesign.
For J document, InDesign always uses auto for the first baseline even though the setting for InDesign is
EmboxHeight. The workaround for user is to
Additional Information
For Information regards InDesign CS4 and Flash publishing functionality, please refer to Background information on
InDesign CS4 Flash publishing functionality(SWF/XFL)
Known issues with Microsoft Office 2007/2008 (InDesign
CS4 and CS5)
There are some known issues when importing Microsoft Office 2007/2008 files into Adobe InDesign CS4 and InDesign
CS5. If you encounter an issue while importing Microsoft office 2007/2008 documents, then try saving back to a
previous version or to another file format within the Microsoft Office product, and then import the new file.
Known Issues InDesign CS4
Known Issues InDesign CS5
Known Issues InDesign CS4
1. Footnotes are not imported from .docx, .doc, or .rtf files when a graphic is present in the text. The footnote
reference displays as a missing glyph, and the footnote text is not present.
Workaround: Deselect the Import Inline Graphics option in the Microsoft Word Import Options dialog box while
importing the Microsoft Office document.
2. In the Excel Import Options dialog box, the user defined cell range is not populated while you import an .xlsx
file.

39
Last updated 11/12/2015
Workaround: Type the range manually in the cell range box, and then import the desired cell data.
3. InDesign does not display "-1" value for an imported Microsoft Excel 2007 spreadsheet that contains the value
"-1".
Workaround: In Microsoft Excel, save the .xlsx document in the .xls file format, and then reimport the document in
InDesign CS4.
4. InDesign CS4 does not apply the correct font when importing a .docx file for some font types.
Workaround: In Microsoft Word, resave the document in the .doc file format, and then reimport the document.
5. When a Microsoft Office Word 2007/2008 text document (.docx) with black only fill is imported into InDesign
CS4, it displays as rich black in the Separations dialogue box.
Workaround: Resave the document in the .doc file format, and then reimport the new file.
6. InDesign may quit unexpectedly when importing a .docx file that contains cross-references of type Footnote &
Endnote.
Workaround: No valid workaround.
7. InDesign displays the error message "Failed to open PDF file" when a chart is copied from Microsoft Excel
2007/2008 to InDesign CS4.
Workaround: Save the Excel document in the .xls file format, and then copy and paste the chart into inDesign CS4.
8. Text does not display as text when you copy from Microsoft Excel 2007/2008 and paste into InDesign CS4. When
you paste the text, it appears as a bitmap graphic rather than as text.
Workaround: Save the document in the .xls file format, and then copy the desired text and paste it into InDesign CS4.
9. InDesign may quit unexpectedly while importing a .docx file with different cross-references.
Workaround: Resave the document in the .doc file format, and then reimport the new file.
10. InDesign may freeze or quit unexpectedly while importing a Microsoft Excel file that contains blank cells with
formatting applied. InDesign attempts to import blank cells with formatting applied.
Workaround: Remove all formatting from blank cells in the Microsoft Excel document.
11. InDesign may quit unexpectedly when importing .docx files that contain nested tables.
Workaround: Save the file in the .doc file format, and reimport into InDesign CS4.
12. Some straight quotation marks are not converted to typographic quotation marks when imported.
Workaround: No valid workaround
13. When cross-references of type Footnote & Endnote are present in either footnotes or endnotes in a Microsoft
Office Word document, and the document is imported into InDesign, the cross-references aren't imported. This
occurs with several file formats from Microsoft Office documents.
Workaround: No valid workaround
14. Hyperlinks defined in Microsoft Office documents are not preserved when that document is imported to InDesign.
Workaround: InDesign's import filters are not capable of converting these to it's native hyperlink objects. The
hyperlinks must be recreated in InDesign via the Cross References/Hyperlinks panel.

40
Last updated 11/12/2015
Known Issues InDesign CS5
1. Paragraph rules imported from word 2007 files are not shown in InDesign.
This is likely to happen with use of drop cap characters.
Workaround: Save as a 2003 Word (doc) document.
2. Footnote text is incorrectly shown under Endnotes on import.
Workaround: Save as a 2003 Word (doc) document, or Rich Text Format (RTF)
3. Importing an Excel (.xls) file containing GB18030 characters fails to display the characters.
When importing an Excel document, InDesign displays GB18030 Chinese characters as squares.
Workaround: Apply a different font before importing the document. For example, use Arial Unicode MS or SimSun-
18030.
4. InDesign does not display "-1" value for an imported Microsoft Excel 2007 spreadsheet
that contains the value "-1".
Workaround: In Microsoft Excel, save the .xlsx document in the .xls file format, and then reimport the document in
InDesign CS5.
5. Some straight quotation marks are not converted to typographic quotation marks when
imported.
Workaround: No valid workaround.
6. When cross-references of type Footnote & Endnote are present in either footnotes or
endnotes in a Microsoft Office Word document, and the document is imported into InDesign,
the cross-references aren't imported. This occurs with several file formats from Microsoft
Office documents.
Workaround: No valid workaround.

41
Last updated 11/12/2015
Layout format isn't maintained when using InDesign's
Export for Dreamweaver or EPUB
The page layout of InDesign documents exported as Dreamweaver (.html) or .epub files isn't accurately represented
when you view the files in a web browser or epub reader. For example, text on top of an image in the InDesign document
isn't on top of the image in the resulting output. Instead, the text appears following the image. In other cases, stylistic
text formatting is removed.
This behavior is expected for these formats. Both of these export options are designed to export the content of the
document so that it can be repurposed in other publishing workflows. The Export for Dreamweaver option reformats
content so that it's more appropriate for display from within a web browser. The Export to EPUB option exports content
that is free of formatting. EPUB content is intended for display on various devices in which the screen size, orientation,
and text size varies. The EPUB reader determines the format.
For information about controlling the reading order of content for accessibility, see Adobe InDesign CS5 read order.
(This information is also applicable to Export for Dreamweaver and EPUB.)
For more about the options associated with these two export formats, see the following InDesign Help topics:
•Export content to Dreamweaver
•Export content for Digital Editions (EPUB)
For more information about the EPUB format, see the following resources:
•eBooks: Exporting EPUB files from Adobe® InDesign® white paper
•International Digital Publishing Forum
•EPUB WIkipedia Entry
Manual kerning incorrect | TrueType, Type 1 fonts |
InDesign, InCopy | CS5
Issue
When you apply manual kerning to fonts that have built-in kerning values, InDesign or InCopy CS5 incorrectly
positions the glyphs. Documents from CS4 show a shift of these glyphs when opened in CS5 and recomposed.
Solution
Install the InDesign/InCopy CS5 7.0.3 update by choosing Help > Updates, or by visiting the Adobe product updates
page: http://www.adobe.com/downloads/updates

42
Last updated 11/12/2015
Additional information
In the failure mode, InDesign and InCopy concatenate the manual kerning values onto the automatic kerning values
obtained from inside the font.
Missing plug-ins
This article is for plug-in developers who store persistent data within an InDesign document. It discusses strategies for
handling situations when you open a document containing that data, but the plug-in isn't present. Plug-ins you create
can add data to the document. When your plug-in is present and loaded, it can open and interpret the data. However,
if you remove the plug-in, or give the document to someone who doesn't have it, the plug-in isn't available to interpret
the data.
You can control what warning is shown when the document is opened without the plug-in. The application can warn
when a document that contains data created by a plug-in that isn't available. There are three warning levels: critical,
default, and ignore. By setting the warning level, the plug-in can specify the relative importance of its data. Data created
by the plug-in has the “default” warning level. However, you can override the setting and identify the data as more
important (critical) or less important (ignored). You can modify this important setting by adding resources to the plug-
in’s boss definition file:
•CriticalTags — A “critical” warning tells the user that the document contains data from missing plug-ins and advises
the user not to open the document. If the user opens the document, the application opens an untitled copy, to
preserve the original document. Use this level when the data is visible in the document or contributes objects owned
by another object in the database. (For example, use it when the document has text attributes, owned by the text
model.)
•DefaultTags — A “default” warning tells the user that the document contains data from missing plug-ins. It asks
whether to continue the open operation. If the user continues the open operation, the application opens the original
document. Use this level when the data is self-contained and invisible to the user, but the user could encounter
missing function that would have been provided by the plug-in.
•IgnoreTags — An “ignore” warning provides no warning message at all. The application proceeds with the open
operation as if there were no missing plug-ins. Use this level when the data is invisible to the user and self-contained.
In this case, it's unnecessary to know the plug-in was involved in the construction of this document. If the plug-in
stored data in the document, but that data is used only by this plug-in and does not reference objects supplied by
other plug-ins, the user sees no difference in the document when the plug-in is missing. For example, the plug-in
could store preferences information in every document for its own use.
You can set these warnings to use ClassID (when the plug-in creates new bosses) or ImplementationID (when the plug-
in adds interfaces to existing bosses) values as triggers. Use kImplementationIDSpace to specify a list of
ImplementationID values, and kClassIDSpace for ClassID values. You can put any number of IDs in the list, but all the
IDs must be of the same type. Use a second resource to mark IDs of another type. The following examples set the
warning level to ignore data stored by the PersistentList plug-in in the SDK by adding two resources to PstLst.fr:
This example marks implementation IDs as ignored:

43
Last updated 11/12/2015
resource IgnoreTags(1) {
kImplementationIDSpace, {
kPstLstDataPersistImpl,
kPstLstUIDListImpl,
}
};
This example marks boss classes as ignored:
resource IgnoreTags(2) {
kClassIDSpace, {
kPstLstDataBoss,
}
};
It's unnecessary to mark any IDs that do not appear in the document (for example, data that was written out to saved
data). It's also unnecessary to mark implementations that are not persistent. You do not need to mark IDs if you want
the default behavior.
“Missing plug-in alert” is activated when a document is opened and contains data from one or more missing plug-ins
that cannot be ignored. The document contains a list of the plug-ins that added data to it. Each piece of data added has
an importance attached to it. This importance can be critical, default, or ignorable. Data marked as ignorable does not
cause the alert to activate. Data marked as critical or default causes the alert to activate. With critical data, the alert
works more strongly. The alert is the only difference between critical and default data. The alert tells the user that data
is missing, presents a list of missing plug-ins, and allows the user to continue or cancel the open operation. Each missing
plug-in has the chance to add a string to the alert that specifies additional useful information (for example, a URL for
purchasing or downloading the plug-in). The alert is modeled on the missing-font alert. The “Don’t Warn Again For
These Plug-ins” option is deselected by default. If this option is selected, the alert is not activated the next time a
document is opened and any subset of the listed plug-ins is missing (and no other plug-ins are missing). This option
allows users accustomed to seeing (and ignoring) alerts concerning specific plug-ins to automatically bypass the alert,
while still getting warned about data from any plug-ins newly found to be missing. The alert is activated again if a
document is opened that uses other missing plug-ins. The alert is activated again if the “Don’t Warn Again For These
Plug-ins” option is deselected.
For more help, see the programming guides in the docs\guide folder of the InDesign SDK.
PDF export background task hangs | InDesign CS5,
CS5.5
Issue
Exporting to PDF (Print) results in a hung background task that cannot be cancelled. If you attempt to quit InDesign,
you get the message, "InDesign cannot quit because one or more tasks are running in the background."
Solutions

44
Last updated 11/12/2015
Solution 1: Install the latest InDesign updates.
Install the Iatest InDesign updates by choosing Help > Updates, or by visiting the Adobe product updates page:
http://www.adobe.com/downloads/updates
Solution 2: Disable preflight and restart InDesign.
1Choose Window > Output > Preflight.
2Deselect the On checkbox.
3Quit InDesign and restart it.
4Export your document to PDF.
Solution 3: Add the document to a new book and export from the book panel
1Choose File > New > Book.
2From the Book panel, click Add Documents.
3Select the INDD document that is affected and click Open.
4From the Book Panel pop-up menu, choose Export Book to PDF.
Solution 4: Disable background exporting
1Create an empty text file and save it as "DisableAsyncExports.txt".
2Navigate to the location of the InDesign executable, for example:Win: C:\Program Files\Adobe\Adobe InDesign
CS5\Mac: /Applications/Adobe InDesign CS5.5/Adobe InDesign CS5.5.app/Contents/MacOS/
3Move the text file from step 1 into this location.
Note: For a startup script that provides a menu choice to control background export, see this link.
Additional information
InDesign CS5 introduced PDF export as a background task via multi-threading capabilities. Some third-party and
InDesign native operations become confused by this new method and result in a hang.
After you place a digital photograph into InDesign, the
Actual ppi value is higher than the expected image
resolution
Issue
When you place a digital image into Adobe InDesign, the info palette displays a much higher actual ppi value (for
example, 288) than the expected 72ppi resolution.
Reason
•Your image was captured at high resolution and with low compression. For example, Large format or high pixel
values and fine quality.

45
Last updated 11/12/2015
•Your image was not edited and/or saved from Adobe Photoshop.
•Your image was saved at a resolution of 72ppi.
Solution
Do one or more of the following solutions:
Solution 1: Use photo editing software to save the image at the desired size and resolution
before placing the image into InDesign
1Prior to placing your image into InDesign determine the appropriate physical dimensions (for example, 5x7").
2Open your image in an image editing application such as Adobe Photoshop and resample the image to the correct
ppi resolution at the correct physical dimensions (for example, 5x7" and 72ppi).
3Place the image into InDesign.
Solution 2: Open and resave the image from Adobe Photoshop
1Open your image in Photoshop.
2Choose File > SaveAs and save your file to a new name or the same name.Note: If the image is not resampled before
being saved it will be quite large when placed into InDesign.
Additional Information
Some digital cameras omit data that applications use to generate a preview for the image. In some cases, ommission of
the preview data results in a preview that is saved at a ppi resolution of 72ppi. High resolution images typically contain
millions of pixels. When those pixels are mapped to a low pixels-per-inch ratio, such as 72ppi, the physical dimensions
of the image preview are quite large.
For example, if your image was captured at a pixel depth of 2560 wide by 1920 high and then those pixels are mapped
to a ppi resolution of 72ppi, the physical dimensions of the image become 35.5556" wide by 26.6667" high.
When a high resolution image mapped to a low ppi resolution is placed into InDesign it will usually need to be resized.
Resizing an image in InDesign does not resample the image. This means that no pixels are lost when the image is
decreased in size after placement into InDesign. Since the image contains the same total number of pixels (eg: 2560 X
1920) when you reduce the size of the image each inch of image will contain more pixels.
For example, if you reduce your 35.5556x26.6667" image in InDesign by 50% so that it is 17.7778x13.333", the number
of pixels per inch doubles to 144ppi. If you reduce your orignal image to 25% of its original size the image dimensions
will be 8.8889 X 6.6667 and the ppi resolution will be 288ppi.
Pantone+ Solid Uncoated Red 032 U spot color
converted to CMYK
Issue
When you open a document created in InDesign CS5.5 with Pantone+ Solid Uncoated / Red 032 U swatch with
InDesign CS6, the swatch is automatically converted to CMYK.

46
Last updated 11/12/2015
This is a known bug within InDesign CS6 and currently being investigated.
Solution
This issue is a known bug in InDesign CS6, and Adobe is investigating it.
Pressing the Return key doesn't produce a paragraph
break | InDesign CS5.5 Swedish | Mac OS
Issue
When you press the Return key while working with text in InDesign CS5.5, no carriage return (paragraph break) is
inserted. In a multicolumn text frame, a column break is inserted instead.
Solutions
Do one of the following:
Solution 1: Install the InDesign and/or InCopy CS5.5 7.5.1 update.
In InDesign or InCopy, choose Help > Updates. Alternatively, download the update from
http://www.adobe.com/downloads/updates/.
Solution 2: Create a new keyboard shortcut set.
1Create a copy of the standard keyboard shortcut set.
2Remove the Enter key shortcut from the following two locations:
•Product Area > Type Menu
•Product Area > Text and Tables
?Save that new keyboard shortcut set.
Note: After you remove the Enter key shortcuts, they will no longer be functional. You can create custom keyboard
shortcuts to replace them, using keys other than the Enter key.
Product Area > Type Menu
Product Area > Text and Tables

47
Last updated 11/12/2015
Printing tints of black with Color Management enabled
to "Composite Gray" PostScript produce different tint
values
Issue
Tints of the "[Black]" swatch, or CMYK color definitions in which only black contributes (for example, C=0, M=0, Y=0,
K=60) will print with slightly different tint values in Composite Gray PostScript output from InDesign if Color
Management is enabled in the Color Settings.
Example
Print an InDesign document that contains a rectangle filled with an 80% tint of the swatch "[Black]" to the Adobe PDF
printer with "Composite Gray" as the Color option in the Output panel of the Print dialog box.
Place the resulting PDF file back into InDesign and view with the Separations Preview enabled (Window > Output >
Separations Preview). Hover over the rectangle in the placed PDF and you'll see that it contains approximately a 73%
tint of black, depending on your Color Management setup.
Reason
You have Color Management enabled. InDesign is converting your source color numbers to the active document profile
space prior to the conversion to grayscale.
Solution
Do one of the following:
Solution 1: Disable color management.
1Choose Edit > Color Settings
2Change the Settings selection to "Emulate Adobe InDesign 2.0 CMS Off "
3Click OK
4Print the document with "Composite Gray" Color option in the Output pane
Solution 2: Print with "Composite Leave Unchanged".
Note: This will produce DeviceCMYK colorspace for your black objects, which could produce different numbers based
on down-stream processes in your workflow. Also, this doesn't convert any non-black colors to grayscale so you'll need
to set your printer or other RIP to convert the colors to grayscale.
1In the Print dialog box, set the Color setting to "Composite Leave Unchanged"
2Ensure the Print dialog box's Color Management setting is set to "No Color Management"
Solution 3: Convert to Grayscale in Acrobat.
1Print with "Composite Leave Unchanged"
2Distill with "Leave Unchanged" in the Acrobat Distiller color settings

48
Last updated 11/12/2015
3Use the Advanced > Print Production > Convert Colors command to bring up the Convert Colors command
4Set all colors to be converted to the destination space
5Set the destination space to a grayscale profile.Note: Most grayscale profiles will cause a shift in the values of CMYK
blacks. To avoid this, you'll need to use a custom profile that meets your needs.
The ''Remove blank lines when empty'' Data Merge
option does not work consistently (InDesign CS4)
Issue
When you merge documents the 'Remove blank lines when empty' option is sometimes ignored.
Delete empty lines manually in the merged InDesign document.
1Choose Edit > Find/Change > Text.
2In the Find What field enter : ^p^p ; or two times: End Of Paragraph
3In the Change To field enter : ^p ; or once: End of Paragraph
4Click Done.
Problem in roundtripping custom objects in InDesign
Issue
A new object is parented to a story and rectangle object. When you round-trip a snippet, the property added to the the
new script object is not imported for rectangle objects. For story objects, the roundtrip works as expected.
Solution
To export custom settings, define metadata and the INXSnippetAttrImprtState for those custom objects:
1Include "INXMetadataDefs.h" in the .fr file of the project.
2Define metadata for the new element which is parented to the story and rectangle in the .fr file.
3Declare the PMID for the above defined Metadata in the IID file of the project.
After these changes, custom tags are imported for rectangle objects as desired.
Additional information
The fix and support has been there since InDesign CS5 and is a result of a bug fix done at that time. Custom settings
objects added to page item objects in scripting DOM cannot be round-tripped through snippet (INDS) files. So those
custom settings are exported only when metadata is defined and the INXSnippetAttrImprtState is set for those custom
objects.

50
Last updated 11/12/2015
Silent PDF export failure or "Internal Error" | Place, print,
export PSD | InDesign
Issue
When you place a PSD file or print or export a file that contains a link to a PSD, InDesign returns the error, "Internal
Error." Or, if you export a document with a PSD file from InDesign CS5 to PDF, the export fails without an error. The
PSD file has a spot channel defined with a color book that is not installed in your instance of InDesign
Solution
Work with the file creator to determine which color books were used in the definition of spot channels, and install those
color books on your system. Alternatively, the file creator can edit the image as described below, using a color book that
you both have in common.file
1Open the PSD in an instance of Photoshop that contains the necessary color books.
2Open the Channels panel and double click the Spot channel.
3Click the Color swatch in the Spot Channel Options dialog box.
4Write down the LAB values then choose a common color book from the Books pop-up menu.
5Click the Picker button and adjust the LAB values if necessary.
6Click OK twice to exit from the Spot Channel Options dialog box.
7Save As and save a version of the file, or replace the existing file.
Additional information
One of the most common causes of this issue is the use of the new PANTONE PLUS Digital Libraries for Adobe CS.
Make sure that when you define spot channels with these libraries that other users who work with the files also install
them. For more information, see New PANTONE PLUS Digital Libraries available | Creative Suite (cpsid_85803).
More Help topics
New PANTONE® PLUS Digital Libraries available | Creative Suite
Pantone color books dont' toggle between CMYK, RGB | Illustrator CS5 | Dutch
Error "The file is not readable" placing PSD or opening file with linked PSD | Illustrator
Error, "Could not complete your request because the specified color book cannot be found." | Photoshop
Slow performance | InDesign CS5
Issue
When moving page items, the responsiveness of InDesign CS5 is slower than previous versions.

51
Last updated 11/12/2015
Solutions
Do one or more of the following:
Solution 1: Install the InDesign CS5 7.0.4 update
An issue involving display of pages when transparency is involved and thumbnails are being shown in the Pages panel
was addressed in the 7.0.4 release:http://www.adobe.com/downloads/updates
Solution 2: Disable thumbnail previews in the pages panel.
Open the Pages Panel options and deselect Show Thumbnails, which is turned on by default.
Solution 3: Disable the Always Preview Images With Documents preference.
Choose Preferences > File Handling. Then deselect Always Save Preview Images With Documents.
Solution 4: Reenable Patient User mode.
Choose Preferences > Interface. Then set Live Screen Drawing mode to either Delayed or Never.
Solution 5: Disable or reduce the Active Preflight profiles.
Choose Window > Output > Preflight. Then deselect Live Preflight.
Alternatively, ensure that you select only the smallest number of the most important preflight rules.
Small caps ignored | Adobe OpenType fonts older than
version 2.0 | InDesign CS5
Issue
No small caps effect appears when you apply the small caps attribute to text assigned with an Adobe OpenType font
older than version 2.0. Additionally, opening an InDesign CS4 or earlier document in InDesign CS5 causes the
previously applied small caps effects to disappear.
Solution
Contact Adobe Technical Support or your font vendor to receive upgrades of the affected fonts to the most recent
version available. When contacting Adobe Technical Support, reference this Knowledgebase article number.
Some faces of Type 1 fonts, such as Helvetica Neue,
aren't available in InDesign on Mac 10.6

52
Last updated 11/12/2015
Issue
Some Type 1 (PostScript) fonts don't appear in the InDesign fonts lists on Mac OS 10.6 and later. For example, when
you look at the font Helvetica Neue in the Font submenu of the Type menu, you see Medium Italic, but no Medium.
The missing faces do appear under the TrueType version of the font.
Faces listed under Type 1 Helvetica Neue
Faces listed under TrueType Helvetica Neue
Solution 1: Update to InDesign CS5 7.0.2
Install the InDesign CS5 7.0.2 update. This can be found by choosing Help > Updates from any CS5 application, or by
downloading from http://www.adobe.com/downloads/updates/.
Solution 2: Use the InDesign Font Folder
Put the affected Type 1 font files into the Adobe InDesign application font folder, for example:
•CS3: /Applications/Adobe InDesign CS3/Fonts
•CS4: /Applications/Adobe InDesign CS4/Fonts
•CS5: /Applications/Adobe InDesign CS5/Fonts
Additional information
InDesign has an order of preference for dealing with font conflicts. For fonts with the same PostScript name (as with
Helvetica Neue), the /System/Library/Fonts folder is preferred over the /Library/Fonts folder. Additionally, a preference
is made in favor of other fonts when conflicts include a .dfont type font. In earlier versions of Mac OS,
/System/Library/Fonts was always populated with .dfont type fonts. Now with other types of fonts included, the
preference is to suppress the Type 1 face when it conflicts with the System TrueType version.
Supported file formats for InDesign CS5
What's Covered
•File > Open formats
•File > Save As formats
•File > Export formats
•File > Place formats (Import in graphics, media, and text files)
•Save for InCopy
•Other
These tables list the file formats that Adobe InDesign CS4 supports for various functions.

53
Last updated 11/12/2015
For more information on settings and option when opening, importing, exporting, and saving files, see Adobe
InDesign CS4 Online Help.
File > Open
File > New
File > Save As
File > Export formats
Extension Filename Version Comments
indd InDesign document CS5 and earlier
indl InDesign library CS5 and earlier
indt InDesign template CS5 and earlier
indb InDesign book CS5 and earlier
inx InDesign interchange CS4 and earlier
idml InDesign Markup Language CS5 and earlier
pmd Adobe PageMaker 6.0 - 7.0
xqx QuarkXPress Passport 4.1.x save newer versions in Quark to
these accepted versions
xqx QuarkXPress 3.3 - 4.1.x save newer versions in Quark to
these accepted versions
Extension Filename Version Comments
indd InDesign document CS5
indl InDesign Library CS5
indb InDesign Book CS5
Extension File name Version Comments
indd InDesign document CS5
indt InDesign template CS5
Extension Filename Version Comments
pdf Portable Document Format PDF 1.3 - 1.7
eps Encapsulated PostScript PS level 2 - 3
fla Flash CS5 Professional CS5
swf Shockwave Flash 10.x For Flash Player
idml InDesign Markup Language CS5
jpg JPEG
xml Extensible Markup Language

54
Last updated 11/12/2015
Note: For backwards compatibility to InDesign CS4 export to InDesign Markup Language (idml). For backwards
compatibility to InDesign CS3, open the .IDML in CS4 and export as InDesign CS3 Interchange (inx).
File > Place formats (Import in graphics and text files)
txt Adobe InDesign Tagged Text
icml Adobe InCopy document CS5
rtf Rick Text Format
txt Text only
Extension Filename Version Comments
tiff Tagged Image File Format
gif Graphic Interchange Format
jpg, jpeg Joint Photographic Experts Group
bmp Bitmap
eps Encapsulated PostScript
dcs Desktop Color Separation
pict Picture file format (Mac)
wmf MS Windows Metafile
emf MS Windows Enhanced Metafile
pcx PC Paintbrush File format
png Portable Network Graphic
sct Scitec CT
ai Adobe Illustrator
psd Adobe Photoshop
pdf Portable Document Format since ID CS3 support of multipage
PDF files
indd InDesign document
txt Text documents
doc, docx Microsoft Word document
xls, xlsx Microsoft Excel documents
rtf Rich Text Format
swf Shockwave File
flv, f4v Flash Video
mp4 MPEG-4 Video H.264 encoding
avi Audio Video Interface
mov QuickTime Video H.264 encoding
mp3 MPEG Audio Layer

55
Last updated 11/12/2015
Save for InCopy
Edit> InCopy> Export, or options from Link or Assignment panels.
Other
Suppress the user interface
This article is for InDesign plug-in developers trying to suppress different user interface components opened by default
by InDesign application. Using the APIs exposed through InDesign SDK, you can develop your own plug-ins.
Companies around the world develop plug-ins to provide customized user interfaces to their respective customers as
per their needs.
Whenever you open an InDesign document that contains fonts or links that are not available, InDesign shows a dialog
box about the missing fonts or links. Similarly, whenever you reopen InDesign after a crash, InDesign displays a
recovery dialog box. These behaviors are the default. Here are some other default elements of InDesign and ways that
developers can suppress them.
1Document recovery dialog box.
2Missing font dialog box.
3Missing links dialog box.
4Print dialog box.
5Modal Welcome screen that appears at first launch.
1Document recovery dialog box: Whenever InDesign crashes, it keeps information about state (valid state) of
document in its cache. So, when InDesign starts up, it displays a Recovery dialog box. Once user clicks Yes, InDesign
restores the document. If you remove the contents of InDesign Recovery folder at C:\Documents and Settings\{user
name}\Local Settings\Application Data\Adobe\InDesign\Version 5.0\Caches\InDesign Recovery\, the dialog box
doesn't appear. You can also find this address within "Document Recovery Data" frame of the dialog box that opens
when you choose Edit > Preferences > File Handling.
Extension Filename Version Comments
icma Assignment file CS5 is .inca in ID CS3
icml Content file, Exported file CS5 is .incx in ID CS3
icap Package for InCopy CS5 is .incp in ID CS3
idap Package for InDesign CS5 is .indp in ID CS3
Extension Filename Version Comments
xml Extensible Markup Language File > Import XML
N/A Buzzword Document File > Place from Buzzword
epub Open Publication Structure eBook File > Export for > EPUB
html Hypertext Markup Language File > Export for > Dreamweaver
N/A Buzzword document File > Export for > Buzzword

56
Last updated 11/12/2015
2Missing font dialog box: Whenever you open an InDesign document that contains unavailable fonts, InDesign
displays a Missing Fonts dialog box. You can suppress this dialog box by specifying the "kSuppressUI" flag when
opening the document. IOpenFileCmdData::Set () and IDocumentCommands::Open() take UIFlags as parameter
where you can pass kSuppressUI. This enum comes from public/includes/BaseTypes.h. By using kSupporessUI, all
user interface components are suppressed.
3Missing links dialog box: Whenever you open an InDesign document containing missing links, you receive a
missing links dialog box. You can suppress this dialog box by specifying kSuppressUI flag (as above) when opening
the document.
4Print dialog box: You can suppress the print user interface that appears when you choose File > Print in InDesign.
The IPrintCmdData has a PrintUIOptions enum that lets you suppress user interface during print. This option
works for both print and EPS export. See the following sample code snippet:
/source/sdksamples/codesnippets/SnpPrintDocument.cpp.
5Modal Welcome screen that appears at first launch: Whenever you open InDesign, you get a Welcome screen. You
can suppress this screen by placing an empty file called NoModalStartupUI at the root of your system drive. (It could
be the drive that contains InDesign.)
Tables don't obey center vertical alignment | InDesign
CS5
Issue
Text in a table that is inside a text frame in InDesign moves to the bottom of the frame, or lower than the center. You
set the Text Frame Options Vertical Justification Align option to Center.
Solution
1Using the Text tool, click anywhere inside the frame, but outside the table.
2Type any character.
3Delete the character that you typed.
Additional information
This issue is under investigation and Adobe hopes to address it in a future release.
Thin white, dark lines (stitching) | Export to PDF |
InDesign CS2 and later

57
Last updated 11/12/2015
Issue
When you export to Adobe PDF from InDesign, white or dark lines are visible in the PDF file. One or more of the
following is true:
•White or dark lines appear in areas where process colors and spot colors interact during flattening.
•You have an image file behind objects or text that have transparency applied, including drop shadows.
•You exported with Acrobat 4 (PDF 1.3) compatibility.
Solution
Do one of the following solutions:
Solution 1: Export as PDF 1.4 or later.
In the Export Adobe PDF General settings, select Acrobat 5 (PDF 1.4) or higher from the Compatibility options.
Solution 2: Turn off the Smooth Line Art option in Acrobat.
1Choose Edit > Preferences (Windows), or Acrobat > Preferences (Mac OS) to open the preference dialog box.
2In Categories > Page Display deselect the option Smooth Line Art, and then click OK.
Solution 3: Convert spot color to process color.
1Choose Window > Swatches to open the Swatches palette.
2Double-click the spot color to open the Swatch Options dialog box.
3Choose Process from the Color Type pop-up menu.
Solution 4: Move the spot color to the top of the layer.
Change the stacking order of the objects, so that the object with the spot color is at the top, before flattening the image.
1Select the object.
2Choose Object > Arrange > Bring to Front.
Solution 5: Use layers to arrange the colors.
Place the spot colored object on a different layer, then arrange that layer above the layer that contains the transparent
objects.
Solution 6: Set the opacity for the spot color to less than 100% and export to PDF again.
If your print shows dark lines on the printout of a created PDF file, then lower the opacity and create the PDF file again.
1Select the object that contains the spot color.
2Choose Window > Transparency to open the Transparency palette.
3In the Opacity field, enter a value like 99.9%.
4Export or print to PDF again.
Additional Information
White or dark lines can be caused by anti-aliasing of an application where the two regions intersect. Turning off the
anti-aliasing in Acrobat's display preferences (Smooth Line Art/Smooth Images) eliminates these lines.

58
Acrobat 4 PDF compatibility (PDF 1.3) does not support transparency. Therefore, InDesign flattens the file during the
conversion process. Consider changing the settings in the Transparency Flattener presets.
Converting the spot color to a process color allows InDesign to flatten the image without stitching. By moving the spot
colored object to the top of the stacking order or moving it to a different layer, you can also prevent stitching.
White lines are likely to be only a display issue in Acrobat. They do not appear when you print a file.
Dark lines are likely only to occur when you print a file. Setting the opacity can create white lines when you view a file
in Acrobat, but these white lines don't print.
Third-party plug-ins don't load | InDesign, InCopy |
CS5.5 v.7.5.1
Issue
InDesign and InCopy CS5.5 incorrectly allowed CS5 compatible plug-ins to load, leading to code conflicts and
instability. This issue has been fixed in the 7.5.1 update for InDesign and InCopy CS5.5. After you install the update,
some third-party plug-ins don't load, and produce errors at startup. This issue occurs for plug-ins that have not been
updated to be compatible with the new CS5.5 products.
Solution
To ensure compatibility and reliability, disable any third-party plug-ins that have not been updated to be compatible
with CS5.5. If you want to use the plug-ins at your own risk, avoid installing the 7.5.1 update. Or, if it's already installed,
reinstall CS5.5 from your original installer.
Additional information
It's necessary to update third-party plug-ins designed to work with InDesign CS5 so they work with InDesign CS5.5.
Because of a coding error, CS5.5 incorrectly allows these CS5-compatible plug-ins to load. This error was fixed in the
7.5.1 update. Third parties are working on updates to be compatible with InDesign CS5.5. Contact your plug-in authors
regarding their schedule for delivering CS5.5 compatible updates.
Last updated 11/12/2015

61
Last updated 11/12/2015
Troubleshoot InDesign third-party plug-ins (InDesign)
This document can help you troubleshoot the following:
•Problems and errors that may occur after you install a third-party plug-in for Adobe InDesign.
•Errors when using certain plug-ins included with InDesign
•Errors referring to plug-ins that are accociated with particular documents.
•Errors indicating that certain plug-ins are missing.
•Problems and errors when a particular plugin is referenced in a crash log file
Please search the Adobe Knowledgebase for possible issues with specific third-party plugins before you contact Adobe
Technical Support or the manufacturer of the third party plug-in.
Adobe Technical Support can help you isolate problems related to plug-ins. However, if it has been determined that the
problem is directly relates to a plug-in created by another company, you will need to contact that company for further
support.
Beginning troubleshooting
If you experience problems after installing a third-party plug-in (for example, a trapping or imposition plug-in), or if a
third-party plug-in suddenly causes errors in InDesign, then ask yourself the following questions to narrow down the
source of the problem:
•Has the plug-in ever worked properly? If so, what has changed on the system?
•Are other plug-ins and the InDesign application working?
If, after answering these questions, you are convinced the problem is specifically with the plug-in and not the result of
broader, system-level issues, then proceed through the steps in this document.
1. Re-create the InDesign preferences file.
The steps below are written for InDesign CS5,version 7.x, as an example. Replace the version number with "6" for
InDesign CS4.
Mac OS:
1Quit InDesign.
2Drag the "Version 7.0" folder from Users/[user name]/Library/Preferences/Adobe InDesign/ to the desktop.
3Drag the "Version 7.0" folder from Users/[user name]/Library/Caches/Adobe InDesign/ to the desktop.
4Restart InDesign.
or: Hold down Command+Option+Control+Shift immediately after launching InDesign again.
WIN OS:

62
Last updated 11/12/2015
Quit InDesign
5Drag the "Version 7.0" folder from C:\Documents and Settings\[user name]\Application Data\Adobe\InDesign\ to
the desktop.
6Drag the "Caches" folder from C:\Documents and Settings\[user name]\Local Settings\Application
Data\Adobe\InDesign\Version 7.0 to the desktop.
7Restart InDesign.
Or: hold down the Ctrl+Alt+Shift Keys immediately after launching InDesign again.
InDesign creates new preference files on launch of the application.
The folders you moved to the desktop contain InDesign's old preference files, "InDesign SavedData" file and "InDesign
Defaults." These can be moved back, if the issue is not resolved by creating new preference files.
2. Ensure that your system meets minimum requirements for InDesign and the plug-in.
In some cases, plug-ins or suites of plug-ins designed for complex tasks may require more memory than InDesign
requires.
Memory and other system requirements for InDesign can be found on the outside sleeve of the InDesign box as well as
in the Introduction chapter of the InDesign user guide. System requirements for the third-party plug-in should be
included in the plug-in documentation.
If you used third-party plugins to create an earlier version of a document, then check with the manufacturer to make
sure that they are installed correctly for and compatible with the version of InDesign you are using before you convert
the document.
3. Install the latest version of your plug-in.
•InDesign CS4
•InDesign CS5
Indesign CS4
The text below explains how to display your third-party plug-ins. Alternatively, you can view a video.
The latest version of your plug-in may be more compatible with the operating system and drivers. Before you install an
update or upgrade, make sure that the system meets the requirements.
To get information on installed third-party plug-ins:
1Open the Configure Plug-ins dialog box from the InDesign (Mac OS) or Help (Windows) menu.
2Select "All Plug-ins" from the Set list and select all but the "Adobe" option in the Display field.
3Highlight the third-party plugin and click on Show Info.
InDesign CS5
To get information on installed third-party plug-ins:
1Open the Extension Manager dialog box from the InDesign (Mac OS) or Help (Windows) menu.
2Select InDesign from the Product list.

63
Last updated 11/12/2015
3In the Author tab, search for the plug-in authors other than Adobe Systems Incorporated.
4Highlight the third-party plugin. Click on the Description and Advanced tab to display information and the location
of the plug-in.
Intermediate troubleshooting
4. Disable or remove third-party plug-ins
•InDesign CS4
•InDesign CS5
InDesign CS4
The text below explains how to disable your third-party plug-ins. Alternatively, you can view a video.
Disable or remove third-party plug-ins from the InDesign Plug-ins folder, and then restart InDesign. If the problem
does not occur after you disable or remove third-party plug-ins, then reinstall the plug-ins to ensure they are correctly
installed. Otherwise contact the manufacturer of the plug-ins to inquire about updates.
To identify which third-party plug-ins are installed for InDesign, use the Configure Dialog box.
1Open the Configure Plug-ins dialog from the Help (Windows) or InDesign (Mac OS) menu.
2Select All Plug-ins from the Set list, and select all but the "Adobe" option in the Display field.
Note: If you click Show Info, you can also see the path where they are installed.
To disable the third-party plug-ins:
1Create a New Set by following the steps to verify your third-party plug-ins, and then click on the check mark to the
left of the third-party plug-ins' names.
2Click Yes, when InDesign displays the warning message: Cannot modify the "all Plug-ins" set. Create a new set based
on the "All Plug-ins" set.
3Enter a name for the set and click OK.
4Restart InDesign.
Note:You can choose the set Adobe Plug-ins, and then restart InDesign to disable third-party plug-ins. When you
enable or disable plug-ins or choose a different plug-in set, you must restart InDesign so the change can take effect.
To remove the third-party plug-ins:
1Quit InDesign.
2Remove any identified third-party plug-ins from Program Files\Adobe\Adobe InDesign [version number]\Plug-Ins
(Windows), or Application/Adobe InDesign [version number]/Plug-Ins (Mac OS) folder to a backup folder.
3Remove the InDesign Preference files. For more information, see solution 1 in the Beginning troubleshooting
section of this document.
4Restart InDesign.
To reinstall following the instructions from the plug-ins manufacturer.
Most third-party plug-ins are installed into a subfolder in these locations:
•Windows: Program Files/Adobe/Adobe InDesign [version number]/Plug-Ins
•Mac OS X: Applications/Adobe InDesign [version number]/Plug-Ins

64
Last updated 11/12/2015
InDesign CS5
To disable the third-party plug-ins:
1Open the Extension Manager dialog box from the InDesign (Mac OS) or Help (Windows) menu.
2Select InDesign from the Product list.
3In the Author tab and search for the plug-in authors other than Adobe Systems Incorporated
4Highlight the third-party plugins.
5Click on the Check mark in the Enabled column to disable the plug-in
6Restart InDesign.
To remove the third-party plug-ins:
1Open the Extension Manager dialog box from the InDesign (Mac OS) or Help (Windows) menu.
2Select InDesign from the Product list.
3In the Author tab and search for the plug-in authors other than Adobe Systems Incorporated
4Highlight the third-party plug-ins.
5Click on the Remove button.
6Restart InDesign.
To reinstall follow the instructions from the plug-in manufacturer.
Most third-party plug-ins are installed into a subfolder in these locations:
•Windows: Program Files/Adobe/Adobe InDesign [version number]/Plug-Ins
•Mac OS X: Applications/Adobe InDesign [version number]/Plug-Ins
5. Reinstall missing or damaged plug-ins.
If you receive an error stating a plug-in is no longer available or is damaged, reinstall the plug-in from the original
source. If you have removed a plug-in on which another plug-in depends, reinstall it.
Ensure that the plug-in is installed in the proper location and the files required for this plug-in have the correct file size
and date (contact the plug-in vendor for the appropriate size and date of the plug-in files and their install locations). If
your plug-in lists an incorrect file size or date, it could be damaged.
6. Restart in Safe Boot (Mac OS) or with Start up items disabled (Windows).
Mac OS
To restart your system in Safe Boot, please refer to the following technical document:
http://www.adobe.com/go/kb404936
Wind ows X P
To restart your Windows XP with disabled startup items and services, please refer to the following technical document:
http://go.adobe.com/kb/ts_kb404984_en-us
Wind ows Vista
To restart your Windows Vista with disabled startup items and services, please refer to the following technical
document: http://kb2.adobe.com/cps/404/kb404913.html
7. Check your hard disk for damage and scan for viruses.

65
Last updated 11/12/2015
A damaged disk sector or virus can prevent a plug-in from launching or from working properly. Make sure you scan
your disk for errors using a disk utility (for example, Apple Disk Utility, Disk First Aid, or Scandisk) and also scan it
using a virus-detection utility that uses the latest virus definitions. For more information on these procedures, refer to
the troubleshooting documents listed at the end of this document.
What to do if the solutions don't work
If InDesign functions without the plug-in, and none of preceding steps help, contact the plug-in's developer for further
assistance. Most plug-in vendors provide either a technical support phone number or e-mail address for support
questions.
If you would like to try further system-level troubleshooting, then please refer to one or more of the following
documents:
•Troubleshoot system errors and freezes | Adobe software on Mac OS (cpsid_82414)
•Troubleshoot system errors and freezes | Adobe software on Windows (cpsid_82252)

69
Last updated 11/12/2015
Unable to save documents | InDesign CS5 | Mac OS
Issue
The Save and Save As commands stop working and are dimmed in the File menu in InDesign on Mac OS.
Solution
Save your work by exporting to IDML, force the application to quit, then relaunch and open the IDML files.
1For each open file that you can't save, choose File > Export and select InDesign Markup Language as the format.
2Export the file with a name that you can associate with the .INDD file.
3Choose Apple Menu > Force Quit (Mac OS) or press Command + Alt + Delete > Task Manager (Windows) and force
InDesign to quit.
4Relaunch InDesign, open the IDML files you exported, and save them as new .INDD files.
Additional information
Attempting to save the file via a scripting interface also fails. Adobe has been unable to reproduce this failure, and hasn't
found a root case that can be resolved. Some customers report they have been able to avoid this issue by disabling
Preflight. But others report that disabling Preflight did not solve this issue for them. Adobe will continue to try to
uncover the root cause for additional solutions.
Uploading exported InDesign CS5 Flash (SWF) files to a
web server
This document contains advice and information on exporting to Flash (SWF) from InDesign CS5.

70
Last updated 11/12/2015
Location of files necessary for uploading
The SWF file saving location is determined by user selection at the time of exporting to SWF.
If you have selected the "Generate HTML File" option, an HTML file will be saved to the same location as the SWF file.
InDesign CS5 can also place animation (SWF), video (FLV, F4V, etc), and audio (MP3) files.
When exporting a SWF that includes audio and video, InDesign creates a Resources folder. The folder's name is the file
SWF name preceded by an underscore, for example publishing MySWF.swf will produce a folder named
“MySWF_Resources.” This folder is saved to the same location as the SWF and the HTML file. Some animation, video,
and audio files used in the resulting Flash file are saved in the Resources folder.
Uploading files to the server
Upload the SWF and its Resources folder to the web server to deploy the final result. The Resources folder cannot be
renamed, and must live in the same path as the SWF file; otherwise, the SWF's relative links to those external resources
will be broken and they will not load.
Note: Uploading an HTML file, either the one produced by InDesign's SWF export function, or another, is optional. A
URL pointing directly to the SWF can be shared with users or linked to from various other HTML pages or sources.
Additional information
It is be advisable to create a project folder as part of the export process so that all files and resources are in a single folder
already. Or, simply create a folder after the export process and move all three files to the folder manually.
