Adobe InDesign CS6 Server Scripting Guide In Design
User Manual: adobe InDesign - CS6 Server - Scripting Guide Free User Guide for Adobe InDesign Software, Manual
Open the PDF directly: View PDF ![]() .
.
Page Count: 52
- Introduction
- Getting Started
- Constructing a Document
- Middle Eastern Scripting Guide

ADOBE® INDESIGN® CS6
ADOBE INDESIGN CS6 SERVER
SCRIPTING GUIDE

2012 Adobe Systems Incorporated. All rights reserved.
Adobe® InDesign® CS6 Server Scripting Guide
If this guide is distributed with software that includes an end user agreement, this guide, as well as the software
described in it, is furnished under license and may be used or copied only in accordance with the terms of such license.
Except as permitted by any such license, no part of this guide may be reproduced, stored in a retrieval system, or
transmitted, in any form or by any means, electronic, mechanical, recording, or otherwise, without the prior written
permission of Adobe Systems Incorporated. Please note that the content in this guide is protected under copyright law
even if it is not distributed with software that includes an end user license agreement.
The content of this guide is furnished for informational use only, is subject to change without notice, and should not be
construed as a commitment by Adobe Systems Incorporated. Adobe Systems Incorporated assumes no responsibility or
liability for any errors or inaccuracies that may appear in the informational content contained in this guide.
Please remember that existing artwork or images that you may want to include in your project may be protected under
copyright law. The unauthorized incorporation of such material into your new work could be a violation of the rights of
the copyright owner. Please be sure to obtain any permission required from the copyright owner.
Any references to company names in sample templates are for demonstration purposes only and are not intended to
refer to any actual organization.
Adobe, the Adobe logo, Adobe Bridge, Creative Suite, InCopy, InDesign, Reader, and Version Cue are either registered
trademarks or trademarks of Adobe Systems Incorporated in the United States and/or other countries. Microsoft and
Windows are either registered trademarks or trademarks of Microsoft Corporation in the United States and/or other
countries. Macintosh and Mac OS are trademarks of Apple Computer, Incorporated, registered in the United States and
other countries. All other trademarks are the property of their respective owners.
Adobe Systems Incorporated, 345 Park Avenue, San Jose, California 95110, USA. Notice to U.S. Government End Users.
The Software and Documentation are “Commercial Items,” as that term is defined at 48 C.F.R. §2.101, consisting of
“Commercial Computer Software” and “Commercial Computer Software Documentation,” as such terms are used in 48
C.F.R. §12.212 or 48 C.F.R. §227.7202, as applicable. Consistent with 48 C.F.R. §12.212 or 48 C.F.R. §§227.7202-1 through
227.7202-4, as applicable, the Commercial Computer Software and Commercial Computer Software Documentation are
being licensed to U.S. Government end users (a) only as Commercial Items and (b) with only those rights as are granted
to all other end users pursuant to the terms and conditions herein. Unpublished-rights reserved under the copyright
laws of the United States. Adobe Systems Incorporated, 345 Park Avenue, San Jose, CA 95110-2704, USA. For U.S.
Government End Users, Adobe agrees to comply with all applicable equal opportunity laws including, if appropriate, the
provisions of Executive Order 11246, as amended, Section 402 of the Vietnam Era Veterans Readjustment Assistance Act
of 1974 (38 USC 4212), and Section 503 of the Rehabilitation Act of 1973, as amended, and the regulations at 41 CFR
Parts 60-1 through 60-60, 60-250, and 60-741. The affirmative action clause and regulations contained in the preceding
sentence shall be incorporated by reference.
Document Update Status
CS5.5 Minor edits Content not guaranteed to be current.
3
Contents
1 Introduction . . . . . . . . . . . . . . . . . . . . . . . . . . . . . . . . . . . . . . . . . . . . . . . . . . . . . . . . . . . . . . 4
Intended audience . . . . . . . . . . . . . . . . . . . . . . . . . . . . . . . . . . . . . . . . . . . . . . . . . . . . . . . . . . . . . . . . . . . . . . . . . . . 4
For more information . . . . . . . . . . . . . . . . . . . . . . . . . . . . . . . . . . . . . . . . . . . . . . . . . . . . . . . . . . . . . . . . . . . . . . . . 4
2 Getting Started . . . . . . . . . . . . . . . . . . . . . . . . . . . . . . . . . . . . . . . . . . . . . . . . . . . . . . . . . . . 6
What you need for InDesign Server scripting . . . . . . . . . . . . . . . . . . . . . . . . . . . . . . . . . . . . . . . . . . . . . . . . . . 6
Using Scripts from this Document . . . . . . . . . . . . . . . . . . . . . . . . . . . . . . . . . . . . . . . . . . . . . . . . . . . . . . . . . . . . 7
Other JavaScript development options . . . . . . . . . . . . . . . . . . . . . . . . . . . . . . . . . . . . . . . . . . . . . . . . . . . . . . . 7
InDesign and InDesign Server . . . . . . . . . . . . . . . . . . . . . . . . . . . . . . . . . . . . . . . . . . . . . . . . . . . . . . . . . . . . . . . . 8
Your first InDesign Server script . . . . . . . . . . . . . . . . . . . . . . . . . . . . . . . . . . . . . . . . . . . . . . . . . . . . . . . . . . . . . . . 9
Adding features to “Hello World” . . . . . . . . . . . . . . . . . . . . . . . . . . . . . . . . . . . . . . . . . . . . . . . . . . . . . . . . . . . . 11
A simple script for running scripts . . . . . . . . . . . . . . . . . . . . . . . . . . . . . . . . . . . . . . . . . . . . . . . . . . . . . . . . . . . 15
Converting an InDesign script to InDesign Server . . . . . . . . . . . . . . . . . . . . . . . . . . . . . . . . . . . . . . . . . . . . 16
3 Constructing a Document . . . . . . . . . . . . . . . . . . . . . . . . . . . . . . . . . . . . . . . . . . . . . . . . 18
Overview . . . . . . . . . . . . . . . . . . . . . . . . . . . . . . . . . . . . . . . . . . . . . . . . . . . . . . . . . . . . . . . . . . . . . . . . . . . . . . . . . . . 18
Setting up measurement units and master spread margins . . . . . . . . . . . . . . . . . . . . . . . . . . . . . . . . . . . 19
Adding a baseline grid . . . . . . . . . . . . . . . . . . . . . . . . . . . . . . . . . . . . . . . . . . . . . . . . . . . . . . . . . . . . . . . . . . . . . . 21
Adding master page items . . . . . . . . . . . . . . . . . . . . . . . . . . . . . . . . . . . . . . . . . . . . . . . . . . . . . . . . . . . . . . . . . . 22
Adding master text frames . . . . . . . . . . . . . . . . . . . . . . . . . . . . . . . . . . . . . . . . . . . . . . . . . . . . . . . . . . . . . . . . . . 24
Overriding master page items and adding text . . . . . . . . . . . . . . . . . . . . . . . . . . . . . . . . . . . . . . . . . . . . . . . 26
Adding and applying a paragraph style . . . . . . . . . . . . . . . . . . . . . . . . . . . . . . . . . . . . . . . . . . . . . . . . . . . . . . 27
Placing a text file . . . . . . . . . . . . . . . . . . . . . . . . . . . . . . . . . . . . . . . . . . . . . . . . . . . . . . . . . . . . . . . . . . . . . . . . . . . . 29
Placing a graphic . . . . . . . . . . . . . . . . . . . . . . . . . . . . . . . . . . . . . . . . . . . . . . . . . . . . . . . . . . . . . . . . . . . . . . . . . . . . 30
4 Middle Eastern Scripting Guide . . . . . . . . . . . . . . . . . . . . . . . . . . . . . . . . . . . . . . . . . . . 34
Setting up a document . . . . . . . . . . . . . . . . . . . . . . . . . . . . . . . . . . . . . . . . . . . . . . . . . . . . . . . . . . . . . . . . . . . . . . 34
Working with text . . . . . . . . . . . . . . . . . . . . . . . . . . . . . . . . . . . . . . . . . . . . . . . . . . . . . . . . . . . . . . . . . . . . . . . . . . . 36
Setting paragraph attributes . . . . . . . . . . . . . . . . . . . . . . . . . . . . . . . . . . . . . . . . . . . . . . . . . . . . . . . . . . . . . . . . 42
Setting character attributes . . . . . . . . . . . . . . . . . . . . . . . . . . . . . . . . . . . . . . . . . . . . . . . . . . . . . . . . . . . . . . . . . . 44
Using styles . . . . . . . . . . . . . . . . . . . . . . . . . . . . . . . . . . . . . . . . . . . . . . . . . . . . . . . . . . . . . . . . . . . . . . . . . . . . . . . . . 47
Working with tables . . . . . . . . . . . . . . . . . . . . . . . . . . . . . . . . . . . . . . . . . . . . . . . . . . . . . . . . . . . . . . . . . . . . . . . . . 49

4
1Introduction
Adobe® InDesign® Server is a powerful addition to your Adobe InDesign tool set. In addition to the high
quality typesetting, page-layout, color, and output features of InDesign, InDesign Server provides extra
capabilities for enterprise-wide document processing.
This document gives important background information for creating scripts for InDesign Server. It
provides simple examples of common scripting operations.
NOTE: We strongly recommend that you develop InDesign Server scripts using InDesign CS6.
Intended audience
This document is for software developers who want to extend the capabilities of Adobe InDesign by
writing plug-ins or by writing applications that integrate InDesign with a publication workflow. This
document assumes that:
You are a programmer with a working understanding of one of the supported scripting languages:
AppleScript, JavaScript, or Visual Basic.
You have a basic understanding of the InDesign scripting object model.
You have a basic understanding of TCP/IP-based, client-server environments.
You are familiar with SOAP and know how to use it.
You are familiar with your system’s and your network server’s port configurations and know how to
configure them.
You or your team are experienced at building and supporting customer solutions.
For more information
Getting Started with Adobe InDesign Server Development provides basic information about running
InDesign Server, including installation instructions and system requirements. It includes a simple
demonstration of InDesign Server’s capabilities.
To learn scripting terminology and to understand the InDesign object model, read "Scripting and the
InDesign object model" in the Adobe InDesign Scripting Tutorial.
Adobe InDesign Scripting Guide provides details on creating scripts for InDesign.
For details about AppleScript, VBScript, or JavaScript, see the documentation for those languages.
InDesign online scripting resources
For more information on InDesign Server scripting, see the following Web sites:
http://partners.adobe.com/public/developer/scripting/index.html

CHAPTER Introduction For more information 5
http://forums.adobe.com/community/indesign/indesign_scripting— The InDesign scripting
user-to-user forum. In the forum, scripters can ask questions, post answers, and share their newest
scripts. The forum contains hundreds of sample scripts.
http://www.adobe.com/products/indesign/scripting/index.html

6
2Getting Started
This chapter introduces the languages used for scripting and the differences between scripting for
InDesign Server and for InDesign. It provides instructions for creating a simple script and for converting
InDesign scripts to InDesign Server scripts. And it provides a simple script for running scripts.
What you need for InDesign Server scripting
The language you use to write scripts depends on the scripting system of your platform: AppleScript for
Mac OS®, VBScript for Windows®, or JavaScript for either platform. Although the scripting languages differ,
the ways in which they work with InDesign are very similar.
Each sample script in this document is shown in all three scripting languages. Translating a script from one
language to another is fairly easy.
JavaScript
InDesign supports JavaScript for cross-platform scripting in both Mac OS and Windows. InDesign’s
JavaScript support is based on an Adobe implementation of JavaScript known as ExtendScript. The
ExtendScript interpreter conforms to the current, ECMA 262 standard for JavaScript. All language features
of JavaScript 1.5 are supported. Adobe Illustrator®, Adobe Photoshop®, and other Adobe Creative Suite®
products also use the ExtendScript JavaScript interpreter.
While you can write scripts using other versions of JavaScript, like Microsoft® JScript (on Windows) or Late
Night Software’s OSA JavaScript (on Mac OS), the terms you use in those languages are not the same as the
terms you use in ExtendScript. ExtendScript examples do not work in other JavaScript versions.
Because ExtendScript tools and features are used in several Adobe products, we consolidated all
ExtendScript documentation. To learn more about JavaScript utilities like the ScriptUI user-interface
module and the ExtendScript Toolkit (a JavaScript development environment and object-model
inspector), see JavaScript Tools Guide.
You can also create scripts for InDesign Server that interact with other Creative Suite 5 applications, using
ActionsScript and the Creative Suite extensibility model; see “Other JavaScript development options” on
page 7.
Windows
To use InDesign scripting in Windows, you can use JavaScript or some version of Microsoft Visual Basic, like
VBScript.
The Visual Basic tutorial scripts in this document are written in VBScript. We chose VBScript because no
added software is required to run or edit VBScripts.
Other versions of Visual Basic include Visual Basic 5 Control Creation Edition (CCE), Visual Basic 6, Visual
Basic .NET, and Visual Basic 2005 Express Edition. Versions of Visual Basic before Visual Basic .NET work well
with InDesign scripting. Visual Basic .NET and newer versions do not work as well, because they lack the
Variant data type, which is used extensively in InDesign scripting.
CHAPTER Getting Started Using Scripts from this Document 7
Many applications contain Visual Basic for Applications (VBA), such as Microsoft Word, Microsoft Excel,
Microsoft Visio, or AutoCAD. Although you can use VBA to create InDesign scripts, InDesign does not
include VBA.
To use VBScript or Visual Basic for InDesign scripting in Windows XP, you must install InDesign from a user
account that has Administrator privileges. After you complete the installation, any user can run InDesign
scripts, and any user can add scripts to the InDesign Scripts panel.
Mac OS
To use InDesign scripting on Mac OS, you can use AppleScript or JavaScript. To write AppleScripts, you
must have AppleScript version 1.6 or higher and an AppleScript script editor. AppleScript comes with all
Apple® systems, and it can be downloaded gratis from the Apple Web site. The Apple Script Editor is
included with the Mac OS. Third-party script editors also are available; for example, Script Debugger (from
Late Night Software, http://www.latenightsw.com).
Using Scripts from this Document
To use any script from this document:
1. Copy the script from this Adobe PDF document and paste it into your script editor, such as the Apple
Script Editor (for AppleScript examples), ExtendScript Toolkit (for JavaScript examples), or a text editor
like Notepad (for VBScript examples).
2. Save the script as a plain text file, using the appropriate file extension:
AppleScript: .applescript
JavaScript: .jsx
VBScript: .vbs
3. Run the script from your script editor, or send the script to InDesign Server using the sample client.
NOTE: If you are entering the JavaScript examples, it is very important to use the same capitalization shown
in the example. JavaScript is case-sensitive, and the scripts will fail if they do not use the capitalization
shown. The AppleScript and VBScript examples are not case-sensitive.
NOTE: If you are copying and pasting scripts from this document, be aware that line breaks caused by the
layout of the document can cause errors in your script. As it can be very difficult to find such errors, we
recommend that you use the scripts in the zip archive.
Other JavaScript development options
You can use the ExtendScript Toolkit to create JavaScript scripts explicitly for InDesign Server, or you can
use the Creative Suite Extension Builder (CS Extension Builder) to develop CS extensions in ActionScript. CS
extensions are Flash-based (SWF) and can potentially work in a variety of Creative Suite applications.
Creative Suite applications have an extensibility infrastructure that allows developers to extend the
capabilities of the applications; the infrastructure is based on Flash/Flex technology, and each CS
extension is delivered as a compiled Flash (SWF) file. Creative Suite includes the Extension Manager to
enable installation of CS extensions.
CHAPTER Getting Started InDesign and InDesign Server 8
An example of a Creative Suite extension that ships with the point products is Adobe Kuler. Kuler has a
consistent user interface across the different suite applications, but has different logic in each, adapted to
the host application.
The user interface for an extension is written in ActionScript, using the Flex framework. A CS extension is
typically accessed through its own menu item in the application’s Extensions menu. CS Extension Builder
allows you to design the user interface interactively using the Design view of FlashBuilder. It also allows
you to develop all of the application logic for your CS6 extension in ActionScript; you can develop and
debug your extension in the familiar FlashBuilder environment.
To develop your application logic, we recommend using the Creative Suite ActionScript Wrapper Library
(CSAWLib), which exposes the scripting DOM of each host application as an ActionScript library. This is
tightly integrated with the CS Extension Builder environment, which includes wizards to help you build
your extension’s basic structure, and run and debug your code against suite applications such as Adobe
InDesign, Photoshop and Illustrator.
The methods, properties, and behavior of the scripting DOM is as described in the JavaScript Scripting
Reference for the host application. For details of how to use CS Extension Builder and the wrapper libraries,
see the Creative Suite SDK documentation, which is accessible from within the Flash Builder or Eclipse
Help system when you have installed CS Extension Builder.
InDesign and InDesign Server
This document presents scripts that show how to create simple documents using InDesign Server. The
bulk of the scripting documentation for InDesign Server, however, is in the documentation for the desktop
(that is, nonserver) version of InDesign.
We assume that you are developing your InDesign Server scripts using InDesign CS6, and that you have
read Adobe InDesign Scripting Tutorial and Adobe InDesign Scripting Guide for the scripting language you
want to use.
We also assume that you are familiar with the details of your InDesign Server installation. For the purposes
of this document, we present sample scripts that work with a copy of InDesign Server on the same system
as your scripting development environment.
InDesign is an essential tool for developing scripts for InDesign Server. We assume that you will develop
scripts using InDesign before using them with InDesign Server, because it is much easier to test and debug
scripts when you can see the objects being created. To see the result of your script in InDesign Server, you
would have to save the document and open it using InDesign, or export the document and view the
exported file in another program (like Acrobat® or Adobe Reader®). If you use InDesign to develop your
InDesign Server scripts, you can reduce your development time dramatically.
Though the two programs are very similar, their scripting object models differ slightly. The following
sections discuss objects, properties, and methods in InDesign that are not in InDesign Server. Keep these
in mind as you convert scripts from InDesign to InDesign Server.
Active document
Many InDesign scripts refer to the front-most document in the user interface using the active document
(AppleScript), activeDocument (JavaScript), or ActiveDocument (VBScript) property of the application
object. This property does not exist in InDesign Server. Instead, you can refer to documents by their index
or name.
CHAPTER Getting Started Your first InDesign Server script 9
Active script
Many InDesign scripts refer to the currently running script to locate other script files or resources. InDesign
Server does not have this property. Instead, locate the assets the script will need in specific locations on
your server or system, then refer to those locations using complete file paths.
Active windows and spreads
InDesign scripts often refer to the active window or the active spread of the active window. These
user-interface properties are not supported by InDesign server.
Selection
As you would expect, InDesign server does not have an object corresponding to the user selection. When
you convert scripts from InDesign, you must remove any reference to the selection and provide references
to objects based on other qualities (like the object id, index, or label).
Dialogs
InDesign can create modal dialog boxes using the dialog object and populate them with common
user-interface controls, like check boxes, text-entry fields, and radio buttons. InDesign server does not
support the dialog object or any user-interface controls.
Copy and paste
Because InDesign Server has no user interface, it also lacks the copy and paste features of InDesign.
Instead of using copy and paste, use duplicate and move. Both methods can create copies of objects, and
can move objects from one document to another.
Your first InDesign Server script
The traditional first project in any programming language is to display, or print, the message “Hello World!”
In this example, we create a new InDesign Server publication, add a frame containing this message, and
save the document. At that point, you can open and view the document using InDesign.
NOTE: These examples assume that you are entering and running the script on the system on which
InDesign Server is installed. For instructions on running scripts using the Test Client or SOAP commands,
see Introduction to Adobe InDesign Server Development.
AppleScript
To create an AppleScript script:
1. Locate and open the AppleScript Editor.
2. Enter the following script. The lines preceded by double dashes (--) are comments and are ignored by
the scripting system. They are included to describe the operation of the program. As you look through
the script, you will see how we create, then address, each object in turn. The AppleScript command
tell specifies which object will receive the next message we send.
CHAPTER Getting Started Your first InDesign Server script 10
--HelloWorld.applescript
tell application "InDesignServer"
--Create a new document.
set myDocument to make document
--Get a reference to the first page.
tell myDocument
--Create a new text frame on the first page.
tell page 1
set myTextFrame to make text frame
--Change the size of the text frame.
set geometric bounds of myTextFrame to {"6p", "6p", "18p", "18p"}
--Enter text in the text frame.
set contents of myTextFrame to "Hello World!"
end tell
--Save the file (fill in a valid file path).
save to "Macintosh HD:HelloWorld.indd"
end tell
--Close the document.
close document 1
end tell
3. Save the script as a text file with the file extension .applescript.
4. To run the script from the Script Editor, click the Run button.
5. Open and view the document with InDesign.
JavaScript
To create a JavaScript:
1. Using the ExtendScript Toolkit, enter the following script:
//HelloWorld.jsx
//Create a new document.
var myDocument = app.documents.add();
//Get a reference to the first page.
var myPage = myDocument.pages.item(0);
//Create a text frame.
var myTextFrame = myPage.textFrames.add();
//Specify the size and shape of the text frame.
myTextFrame.geometricBounds = ["6p0", "6p0", "18p0", "18p0"];
//Enter text in the text frame.
myTextFrame.contents = "Hello World!";
//Save the document (fill in a valid file path).
myDocument.save(new File("/c/HelloWorld.indd"));
//Close the document.
app.documents.item(0).close();
2. Save the text as a plain text file with the file extension .jsx.
3. Choose InDesign Server from the target drop-down menu.
4. Click Run.
5. Open and view the document with InDesign.
CHAPTER Getting Started Adding features to “Hello World” 11
VBScript
To create a VBScript:
1. Using any text editor (such as Notepad), enter the following script:
Rem HelloWorld.vbs
Set myInDesignServer = CreateObject("InDesignServer.Application")
Rem Create a new document.
Set myDocument = myInDesignServer.Documents.Add
Rem Get a reference to the first page.
Set myPage = myDocument.Pages.Item(1)
Rem Create a text frame.
Set myTextFrame = myPage.TextFrames.Add
Rem Specify the size and shape of the text frame.
myTextFrame.GeometricBounds = Array("6p0", "6p0", "18p0", "18p0")
Rem Enter text in the text frame.
myTextFrame.Contents = "Hello World!"
Rem Save the document (fill in a valid file path).
myDocument.Save "c:\HelloWorld.indd"
Rem Close the document.
myInDesignServer.Documents.Item(1).Close
2. Save the file as text with the file extension .vbs.
3. Use the InDesign Server sample client to run the script.
4. Open and view the document with InDesign.
Adding features to “Hello World”
Next, we create a script that creates another “Hello World” document. Our second script will do the
following:
Use a function (or handler in AppleScript) to get the page dimensions and page margins of a
document.
Resize a text frame.
Change the formatting of the text in the text frame.
Export as PDF.
AppleScript
To create the script:
1. Choose File > New in the Script Editor and enter the following script:
CHAPTER Getting Started Adding features to “Hello World” 12
--ImprovedHelloWorld.applescript
tell application "InDesignServer"
set myDocument to make document
set myPage to page 1 of myDocument
tell myPage
set myTextFrame to make text frame
end tell
set contents of myTextFrame to "Hello World!"
--Get page width and page height using the function "myGetBounds".
set myBounds to my myGetBounds(myDocument, myPage)
--Resize the text frame to match the publication margins.
set geometric bounds of myTextFrame to myBounds
set myParagraph to object reference of paragraph 1 of myTextFrame
--Change the font, size, and alignment.
--Enter the name of a font on your system, if necessary.
try
set myFont to font "Arial" of application "InDesignServer"
set applied font of myParagraph to myFont
end try
--Change the size of the text.
set point size of myParagraph to 48
--Set the justification of the paragraph to center align.
set justification of myParagraph to center align
--Set the first baseline offset of the text frame to ascent.
set first baseline offset of text frame preferences of myTextFrame
to ascent offset
--Set the vertical justification of the text frame to center.
set vertical justification of text frame preferences of
myTextFrame to center align
--Export the document as PDF (fill in a valid file path).
tell myDocument
--You'll need to fill in a valid file path on your system.
export format PDF type to "Macintosh HD:ImprovedHelloWorld.pdf"
end tell
--Close the document.
close document 1 saving no
end tell
on myGetBounds(myDocument, myPage)
tell application "InDesignServer"
set myPageHeight to page height of document preferences of myDocument
set myPageWidth to page width of document preferences of myDocument
tell margin preferences of myPage
if side of myPage is left hand then
set myX2 to left
set myX1 to right
else
set myX1 to left
set myX2 to right
end if
set myY1 to top
set myY2 to bottom
end tell
set myX2 to myPageWidth - myX2
set myY2 to myPageHeight - myY2
return {myY1, myX1, myY2, myX2}
end tell
end myGetBounds
2. Save the script as a text file with the file extension .applescript.
CHAPTER Getting Started Adding features to “Hello World” 13
3. To run the script, click the Run button in the Script Editor.
4. Open and view the exported PDF with Acrobat or Adobe Reader.
JavaScript
To create the script:
1. Using the ExtendScript Toolkit, enter the following script:
//ImprovedHelloWorld.jsx
var myDocument = app.documents.add();
var myPage = myDocument.pages.item(0);
var myTextFrame = myPage.textFrames.add();
myTextFrame.contents = "Hello World!";
//Get page width and page height using the function "myGetBounds".
myBounds = myGetBounds(myDocument, myPage);
//Resize the text frame to match the publication margins.
myTextFrame.geometricBounds = myBounds;
var myParagraph = myTextFrame.paragraphs.item(0);
//Change the font, size, and alignment.
//Enter the name of a font on your system, if necessary.
try {
var myFont = app.fonts.item("Arial");
myParagraph.appliedFont = myFont;
}
catch (e){}
//Change the size of the text.
myParagraph.pointSize = 48;
//Set the justification of the paragraph to center align.
myParagraph.justification = Justification.centerAlign
//Set the first baseline offset of the text frame to ascent.
myTextFrame.textFramePreferences.firstBaselineOffset = FirstBaseline.ascentOffset;
//Set the vertical justification of the text frame to center.
myTextFrame.textFramePreferences.verticalJustification =
VerticalJustification.centerAlign;
//Export the document as PDF (fill in a valid file path).
myDocument.exportFile(ExportFormat.pdfType, new
File("/c/ImprovedHelloWorld.pdf"));
//Close the document.
app.documents.item(0).close();
function myGetBounds(myDocument, myPage){
var myPageWidth = myDocument.documentPreferences.pageWidth;
var myPageHeight = myDocument.documentPreferences.pageHeight
if(myPage.side == PageSideOptions.leftHand){
var myX2 = myPage.marginPreferences.left;
var myX1 = myPage.marginPreferences.right;
}
else{
var myX1 = myPage.marginPreferences.left;
var myX2 = myPage.marginPreferences.right;
}
var myY1 = myPage.marginPreferences.top;
var myX2 = myPageWidth - myX2;
var myY2 = myPageHeight - myPage.marginPreferences.bottom;
return [myY1, myX1, myY2, myX2];
}
CHAPTER Getting Started Adding features to “Hello World” 14
2. Save the text as a plain text file with the file extension .jsx.
3. Choose InDesign Server from the target drop-down menu.
4. Click the Run button.
5. Open and view the exported PDF with Acrobat or Adobe Reader.
VBScript
To create the script:
1. Start any text editor (such as Notepad) and enter the following script:
Rem ImprovedHelloWorld.vbs
Set myInDesignServer = CreateObject("InDesignServer.Application")
Set myDocument = myInDesignServer.Documents.Add
Set myPage = myDocument.Pages.Item(1)
Set myTextFrame = myPage.TextFrames.Add
myTextFrame.Contents = "Hello World!"
Rem Get page width and page height using the function "myGetBounds".
myBounds = myGetBounds(myDocument, myPage)
Rem Resize the text frame to match the publication margins.
myTextFrame.GeometricBounds = myBounds
Set myParagraph = myTextFrame.Paragraphs.Item(1)
Rem Change the font, size, and alignment.
Rem Enter the name of a font on your system, if necessary.
If TypeName(myInDesignServer.Fonts.Item("Arial"))<>"Nothing" Then
Set myFont = myInDesignServer.Fonts.Item("Arial")
myParagraph.AppliedFont = myFont
End If
myParagraph.PointSize = 48
Rem If you are running the script using the Application.DoScript
Rem method, you can use the full name of the justification enumeration:
Rem myParagraph.Justification = idJustification.idCenterAlign
Rem If you are running the script from Windows Explorer, use
Rem the decimal version of the enumeration:
myParagraph.Justification = 1667591796
Rem Set the first baseline offset of the text frame to ascent.
Rem If you are running the script using the Application.DoScript
Rem method, you can use the full name of the justification enumeration:
Rem myTextFrame.TextFramePreferences.FirstBaselineOffset =
idFirstBaseline.idAscentOffset
Rem If you are running the script from Windows Explorer, use
Rem the decimal version of the enumeration:
myTextFrame.TextFramePreferences.FirstBaselineOffset = 1296135023
Rem Set the vertical justification of the text frame to center.
Rem If you are running the script using the Application.DoScript
Rem method, you can use the full name of the justification enumeration:
Rem myTextFrame.TextFramePreferences.VerticalJustification =
idVerticalJustification.idCenterAlign
Rem If you are running the script from Windows Explorer, use
Rem the decimal version of the enumeration:
myTextFrame.TextFramePreferences.VerticalJustification = 1667591796
Rem Export the document as PDF (fill in a valid file path).
Rem myDocument.Export idExportFormat.idPDFType "c:\ImprovedHelloWorld.indd"
myDocument.Export 1952403524, "c:\ImprovedHelloWorld.pdf"
Rem Close the document.
CHAPTER Getting Started A simple script for running scripts 15
myInDesignServer.Documents.Item(1).Close
Function myGetBounds(myDocument, myPage)
myPageWidth = myDocument.documentPreferences.pageWidth
myPageHeight = myDocument.documentPreferences.pageHeight
If myPage.Side = idPageSideOptions.idLeftHand Then
myX2 = myPage.marginPreferences.Left
myX1 = myPage.marginPreferences.Right
Else
myX1 = myPage.marginPreferences.Left
myX2 = myPage.marginPreferences.Right
End If
myX2 = myPageWidth - myX2
myY1 = myPage.marginPreferences.Top
myY2 = myPageHeight - myPage.marginPreferences.bottom
myGetBounds = Array(myY1, myX1, myY2, myX2)
End Function
2. Save the text as a plain text file with the file extension .vbs.
3. Use the InDesign Server sample client to run the script.
4. Open and view the exported PDF with Acrobat or Adobe Reader.
A simple script for running scripts
Another way to run a script in InDesign Server is to take advantage of the do script (in AppleScript;
doScript in JavaScript; or DoScript in VBScript) method to send a script to the application. This gives you
a way to send JavaScripts directly to the application, rather than running them from the ExtendScript
Toolkit. In this section, we provide AppleScript and VBScript examples that you can run from the Finder (on
Mac OS) or Explorer (on Windows). For more information about working with the do script method, see
Adobe InDesign Scripting Guide.
This script is something like a miniature sample client for use on your local system.
AppleScript
set myScript file to choose file with prompt "Select a script file:"
tell application "Finder"
set myFileExtension to name extension of myScriptFile
end tell
tell application "Adobe InDesign Server CS6"
if myFileExtension is "jsx" then
do script myScriptFile language javascript
else
do script myScriptFile language applescript language
end if
end tell
CHAPTER Getting Started Converting an InDesign script to InDesign Server 16
VBScript
Set myDialog = CreateObject("UserAccounts.CommonDialog")
myDialog.Filter = "JavaScript Files|*.jsx|VBScript Files|*.vbs|"
myDialog.FilterIndex = 1
myDialog.InitialDir = "C:\"
myResult = myDialog.ShowOpen
If myResult = True Then
myScriptFile = myDialog.FileName
Set myFileSystemObject = CreateObject("Scripting.FileSystemObject")
myFileExtension = myFileSystemObject.GetExtensionName(myScriptFile)
If myFileExtension = "jsx" Or myFileExtension = "vbs" Then
Set myInDesign = CreateObject("InDesign.Application")
Rem Use the decimal form of the enumerations, since this script
Rem will be run from Explorer.
If myFileExtension = "jsx" Then
Rem idScriptLanguage.idJavaScript = 1246973031
myInDesign.DoScript myScriptFile, 1246973031
Else
Rem idScriptLanguage.idVisualBasic = 1447185511
myInDesign.DoScript myScriptFile, 1447185511
End If
End If
End If
Converting an InDesign script to InDesign Server
InDesign comes with a variety of sample scripts, some of which might be useful in an InDesign Server
production environment. The FindChangeByList script is a good example; it performs a series of
find/change operations defined by a tab-delimited text file. The functions in this script could be very
useful if your use of InDesign server involves many find/change operations.
The following steps show how to convert FindChangeByList to an InDesign Server script (see
FindChangeByList for the complete script).
AppleScript
1. Replace the main handler with the following:
on main()
tell application "InDesign Server"
if (count documents) is greater than 0 then
--Provide a story object or a document object
my myFindChangeByList(document 1, false)
end if
end tell
end main
2. Delete the myDisplayDialog handler.
3. Change the line:
set myFindChangeFile to my myFindFile("FindChangeSupport:FindChangeList.txt")
to (you will have to fill in a valid file path for your system):
CHAPTER Getting Started Converting an InDesign script to InDesign Server 17
set myFindChangeFile to "yukino:FindChangeSupport:FindChangeList.txt"
Delete the "myFindChangeFile" handler
4. Delete the myGetScriptPath handler.
JavaScript
1. Replace the main function with the following:
function main(){
if(app.documents.length > 0){
//Provide a story object or a document object.
myFindChangeByList(app.documents.item(0), false);
}
}
2. Delete the myDisplayDialog function.
3. Change the line:
var myFindChangeFile = "/c/FindChangeSupport/FindChangeList.txt";
to (you will have to fill in a valid file path for your system):
set myFindChangeFile to "yukino:FindChangeSupport:FindChangeList.txt"
4. Delete the myFindChangeFile function.
5. Delete the myGetScriptPath function.
VBScript
1. Replace the main function with the following:
Function main()
Set myInDesign = CreateObject("InDesignServer.Application")
If myInDesign.Documents.Count > 0 then
Rem Provide a story object or a document object.
myFindChangeByList myInDesign.Documents.Item(1), False
End If
End Function
Delete the "myDisplayDialog" handler.
2. Change the line:
myFindChangeFile = "\FindChangeSupport\FindChangeList.txt"
to (you will have to fill in a valid file path for your system):
myFindChangeFile = "c:\FindChangeSupport\FindChangeList.txt"
3. Delete the myFindChangeFile function.
4. Delete the myGetScriptPath function.
18
3Constructing a Document
Obviously, our “Hello World!” script is not very useful in your daily work. While you can use an InDesign
script at any point in your production process, we start by creating scripts that start at the same point you
do—creating new documents, setting page margins, and creating and applying master pages.
Overview
In this chapter, we create one long script by adding short blocks of scripting code. Each block
demonstrates a specific area or task in InDesign Server scripting. As you enter each block, you can run the
script to see what happens. If you are using AppleScript, you will need to add the text end tell to the end
of the script before you run it, then remove the text before continuing.
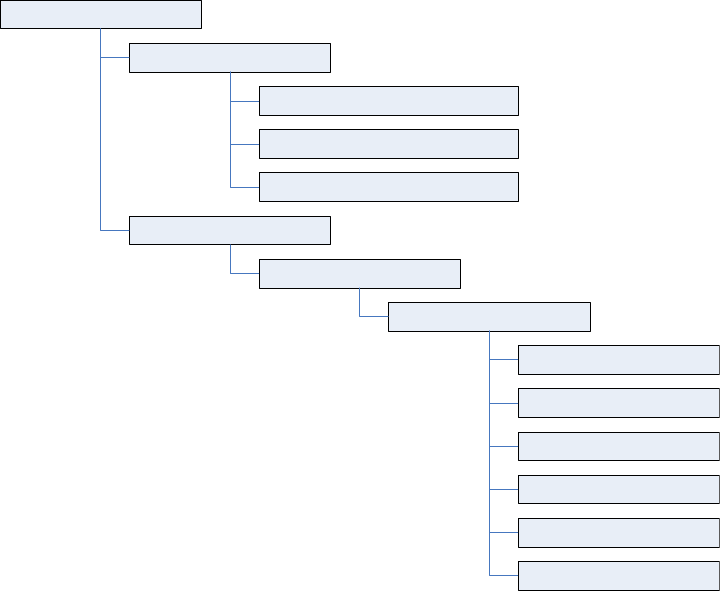
The following figure shows the objects with which we will work in this chapter.
.
NOTE: The preceding figure uses the JavaScript version of the scripting terms. For AppleScript, you would
add spaces between words (view preferences, rather than viewPreferences). For VBScript, you would
use an item index starting at 1, rather than 0 (masterSpreads.item(1), rather than
masterSpreads.item(0)).
document
viewPreferences
horizontalMeasurementUnits
masterSpreads.item(0)
pages.item(0)
verticalMeasurementUnits
rulerOrigin
marginPreferences
top
left
bottom
right
columnCount
columnGutter
CHAPTER Constructing a Document Setting up measurement units and master spread margins 19
Setting up measurement units and master spread margins
The following script shows how to create a new document and set the margins of the first master spread.
In this section, we show how to build a complex script using simple building blocks of scripting code. Start
your script editor and enter the following lines in the scripting language of your choice.
AppleScript
Enter the following code in the Script Editor, or open the DocumentConstruction.applescript tutorial
script:
tell application "Adobe InDesign Server CS6"
--Create a new document.
set myDocument to make document
--Set the measurement units and ruler origin.
set horizontal measurement units of view preferences to points
set vertical measurement units of view preferences to points
set ruler origin of view preferences to page origin
--Get a reference to the first master spread.
set myMasterSpread to master spread 1 of myDocument
--Get a reference to the margin preferences of
--the first page in the master spread.
set myMarginPreferences to margin preferences of page 1 of myMasterSpread
--Now set up the page margins and columns.
set left of myMarginPreferences to 84
set top of myMarginPreferences to 70
set right of myMarginPreferences to 70
set bottom of myMarginPreferences to 78
set column count of myMarginPreferences to 3
set column gutter of myMarginPreferences to 14
--Page margins and columns for the right-hand page.
set myMarginPreferences to margin preferences of page 2 of myMasterSpread
set left of myMarginPreferences to 84
set top of myMarginPreferences to 70
set right of myMarginPreferences to 70
set bottom of myMarginPreferences to 78
set column count of myMarginPreferences to 3
set column gutter of myMarginPreferences to 14
CHAPTER Constructing a Document Setting up measurement units and master spread margins 20
JavaScript
Enter the following code in the ExtendScript Toolkit, or open the DocumentConstruction.jsx tutorial
script:
//Create a new document.
var myDocument = app.documents.add();
//Set the measurement units and ruler origin.
myDocument.viewPreferences.horizontalMeasurementUnits = MeasurementUnits.points;
myDocument.viewPreferences.verticalMeasurementUnits = MeasurementUnits.points;
myDocument.viewPreferences.rulerOrigin = RulerOrigin.pageOrigin;
//Get a reference to the first master spread.
var myMasterSpread = myDocument.masterSpreads.item(0);
//Get a reference to the margin preferences of the first page in the master spread.
var myMarginPreferences = myMasterSpread.pages.item(0).marginPreferences;
//Now set up the page margins and columns.
myMarginPreferences.left = 84;
myMarginPreferences.top = 70;
myMarginPreferences.right = 70;
myMarginPreferences.bottom = 78;
myMarginPreferences.columnCount = 3;
myMarginPreferences.columnGutter = 14;
//Page margins and columns for the right-hand page.
var myMarginPreferences = myMasterSpread.pages.item(1).marginPreferences;
myMarginPreferences.left = 84;
myMarginPreferences.top = 70;
myMarginPreferences.right = 70;
myMarginPreferences.bottom = 78;
myMarginPreferences.columnCount = 3;
myMarginPreferences.columnGutter = 14;

CHAPTER Constructing a Document Adding a baseline grid 21
VBScript
Enter the following code in your script or text editor, or open the DocumentConstruction.vbs tutorial
script.
Set myInDesign = CreateObject("InDesign.Application")
Rem Create a new document.
Set myDocument = myInDesign.Documents.Add()
Rem Set the measurement units and ruler origin.
myDocument.ViewPreferences.HorizontalMeasurementUnits =
idMeasurementUnits.idPoints
myDocument.ViewPreferences.VerticalMeasurementUnits = idMeasurementUnits.idPoints
myDocument.ViewPreferences.RulerOrigin = idRulerOrigin.idPageOrigin
Rem Get a reference to the first master spread.
Set myMasterSpread = myDocument.MasterSpreads.Item(1)
Rem Get a reference to the margin preferences of the first page in the master spread.
Set myMarginPreferences = myMasterSpread.Pages.Item(1).MarginPreferences
Rem Now set up the page margins and columns.
myMarginPreferences.Left = 84
myMarginPreferences.Top = 70
myMarginPreferences.Right = 70
myMarginPreferences.Bottom = 78
myMarginPreferences.ColumnCount = 3
myMarginPreferences.ColumnGutter = 14
Rem Page margins and columns for the right-hand page.
Set myMarginPreferences = myMasterSpread.Pages.Item(2).MarginPreferences
myMarginPreferences.Left = 84
myMarginPreferences.Top = 70
myMarginPreferences.Right = 70
myMarginPreferences.Bottom = 78
myMarginPreferences.ColumnCount = 3
myMarginPreferences.ColumnGutter = 14
Adding a baseline grid
Now that we have a master spread set up, we add a baseline grid. Add the following script lines (from the
appropriate language) to the end of the script you created earlier. Here is a diagram (with the scripting
terms shown in their JavaScript form):
:
AppleScript
set myGridPreferences to grid preferences
set baseline division of myGridPreferences to 14
set baseline start of myGridPreferences to 70
set baseline grid shown of myGridPreferences to true
document
gridPreferences
baselineDivision
baselineStart
baselineGridShown
CHAPTER Constructing a Document Adding master page items 22
JavaScript
var myGridPreferences = myDocument.gridPreferences;
myGridPreferences.baselineDivision = 14;
myGridPreferences.baselineStart = 70;
myGridPreferences.baselineGridShown = true;
VBScript
Set myGridPreferences = myDocument.GridPreferences
myGridPreferences.BaselineDivision = 14
myGridPreferences.BaselineStart = 70
myGridPreferences.BaselineGridShown = True
Adding master page items
Next, we add two text frames to the master pages. These frames will contain the auto-page-number
special character and be positioned at the bottom of the page.
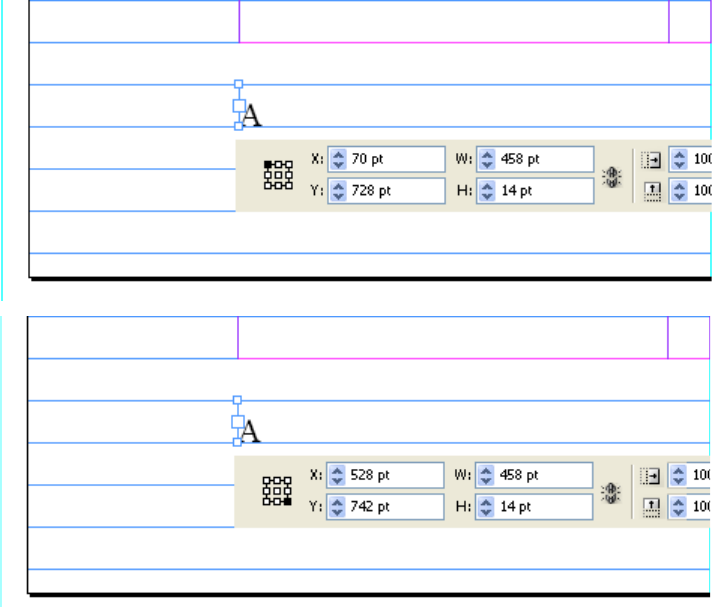
In the “Hello World” example, we created a text frame and specified its position and size using the
geometric bounds property—an array containing the top, left, bottom, and right coordinates for the
frame. The coordinates correspond to the corners of the frame, just as they would appear in the Control
panel. The geometric bounds are as follows: top = 728, left = 70, bottom = 742, and right = 528, as shown
in the following two figures (which show what it would look like in InDesign):
CHAPTER Constructing a Document Adding master page items 23
AppleScript
set myLeftPage to page 1 of myMasterSpread
set myRightPage to page 2 of myMasterSpread
tell myLeftPage
set myLeftFooter to make text frame
set geometric bounds of myLeftFooter to {728, 70, 742, 528}
set first baseline offset of text frame preferences of myLeftFooter to leading
offset
set contents of myLeftFooter to auto page number
set point size of character 1 of parent story of myLeftFooter to 11
set leading of character 1 of myLeftFooter to 14
end tell
tell myRightPage
set myRightFooter to make text frame
set geometric bounds of myRightFooter to {728, 84, 742, 542}
set first baseline offset of text frame preferences of myRightFooter to leading
offset
set contents of myRightFooter to auto page number
set point size of character 1 of parent story of myRightFooter to 11
set leading of character 1 of myRightFooter to 14
set justification of character 1 of myRightFooter to right align
end tell
JavaScript
var myMasterSpread = myDocument.masterSpreads.item(0);
var myLeftPage = myMasterSpread.pages.item(0);
var myRightPage = myMasterSpread.pages.item(1);
var myLeftFooter = myLeftPage.textFrames.add();
myLeftFooter.geometricBounds = [728, 70, 742, 528];
myLeftFooter.textFramePreferences.firstBaselineOffset = FirstBaseline.leadingOffset;
myLeftFooter.contents = SpecialCharacters.autoPageNumber;
myLeftFooter.parentStory.characters.item(0).pointSize = 11;
myLeftFooter.parentStory.characters.item(0).leading = 14;
var myRightFooter = myRightPage.textFrames.add();
myRightFooter.geometricBounds = [728, 84, 742, 542];
myRightFooter.textFramePreferences.firstBaselineOffset = FirstBaseline.leadingOffset;
myRightFooter.contents = SpecialCharacters.autoPageNumber;
myRightFooter.parentStory.characters.item(0).pointSize = 11;
myRightFooter.parentStory.characters.item(0).leading = 14;
myRightFooter.parentStory.characters.item(0).justification =
Justification.rightAlign;
CHAPTER Constructing a Document Adding master text frames 24
VBScript
Set myMasterSpread = myDocument.MasterSpreads.Item(1)
Set myLeftPage = myMasterSpread.Pages.Item(1)
Set myRightPage = myMasterSpread.Pages.Item(2)
Set myLeftFooter = myLeftPage.TextFrames.Add
myLeftFooter.GeometricBounds = Array(728, 70, 742, 528)
myLeftFooter.TextFramePreferences.FirstBaselineOffset =
idFirstBaseline.idLeadingOffset
myLeftFooter.Contents = idSpecialCharacters.idAutoPageNumber
myLeftFooter.ParentStory.Characters.Item(1).PointSize = 11
myLeftFooter.ParentStory.Characters.Item(1).Leading = 14
Set myRightFooter = myRightPage.TextFrames.Add()
myRightFooter.GeometricBounds = Array(728, 84, 742, 542)
myRightFooter.TextFramePreferences.FirstBaselineOffset =
idFirstBaseline.idLeadingOffset
myRightFooter.Contents = idSpecialCharacters.idAutoPageNumber
myRightFooter.ParentStory.Characters.Item(1).PointSize = 11
myRightFooter.ParentStory.Characters.Item(1).Leading = 14
myRightFooter.ParentStory.Characters.Item(1).Justification =
idJustification.idRightAlign
Adding master text frames
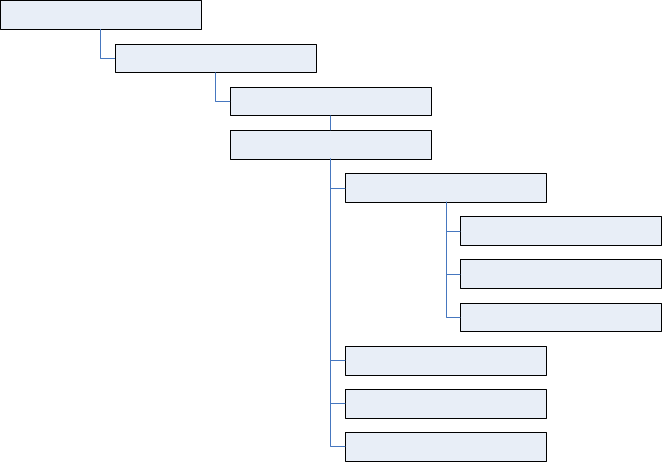
Next, we add master text frames. The following block diagram shows the objects and properties with
which we will work (the diagram uses the JavaScript form of the scripting terms):
document
masterSpreads.item(0)
pages.item(0)
textFrames.item(0)
textFramePreferences
firstBaselineOffset
textColumnCount
textColumnGutter
geometricBounds
label
nextTextFrame
CHAPTER Constructing a Document Adding master text frames 25
AppleScript
tell myLeftPage
set myLeftTextFrame to make text frame
set geometric bounds of myLeftTextFrame to {70, 70, 714, 528}
set first baseline offset of text frame preferences of myLeftTextFrame to leading
offset
set text column count of text frame preferences of myLeftTextFrame to 3
set text column gutter of text frame preferences of myLeftTextFrame to 14
--Add a label to make the frame easier to find later on.
set label of myLeftTextFrame to "BodyTextFrame"
end tell
tell myRightPage
set myRightTextFrame to make text frame
set geometric bounds of myRightTextFrame to {70, 84, 714, 542}
set first baseline offset of text frame preferences of myRightTextFrame to leading
offset
set text column count of text frame preferences of myRightTextFrame to 3
set text column gutter of text frame preferences of myRightTextFrame to 14
--Add a label to make the frame easier to find later on.
set label of myRightTextFrame to "BodyTextFrame"
end tell
--Link the two frames using the next text frame property.
set next text frame of myLeftTextFrame to myRightTextFrame
JavaScript
var myLeftPage = myMasterSpread.pages.item(0);
var myRightPage = myMasterSpread.pages.item(1);
var myLeftTextFrame = myLeftPage.textFrames.add();
myLeftTextFrame.geometricBounds = [70, 70, 714, 528];
myLeftTextFrame.textFramePreferences.firstBaselineOffset =
FirstBaseline.leadingOffset;
myLeftTextFrame.textFramePreferences.textColumnCount = 3;
myLeftTextFrame.textFramePreferences.textColumnGutter = 14;
//Add a label to make the frame easier to find later on.
myLeftTextFrame.label = "BodyTextFrame";
var myRightTextFrame = myRightPage.textFrames.add();
myRightTextFrame.geometricBounds = [70, 84, 714, 542];
myRightTextFrame.textFramePreferences.firstBaselineOffset =
FirstBaseline.leadingOffset;
myRightTextFrame.textFramePreferences.textColumnCount = 3;
myRightTextFrame.textFramePreferences.textColumnGutter = 14;
//Add a label to make the frame easier to find later on.
myRightTextFrame.label = "BodyTextFrame";
//Link the two frames using the nextTextFrame property.
myLeftTextFrame.nextTextFrame = myRightTextFrame;
CHAPTER Constructing a Document Overriding master page items and adding text 26
VBScript
Set myLeftTextFrame = myLeftPage.TextFrames.Add
myLeftTextFrame.GeometricBounds = Array(70, 70, 714, 528)
myLeftTextFrame.TextFramePreferences.FirstBaselineOffset =
idFirstBaseline.idLeadingOffset
myLeftTextFrame.TextFramePreferences.TextColumnCount = 3
myLeftTextFrame.TextFramePreferences.TextColumnGutter = 14
Rem Add a label to make the frame easier to find later on.
myLeftTextFrame.Label = "BodyTextFrame"
Set myRightTextFrame = myRightPage.TextFrames.Add
myRightTextFrame.GeometricBounds = Array(70, 84, 714, 542)
myRightTextFrame.TextFramePreferences.FirstBaselineOffset =
idFirstBaseline.idLeadingOffset
myRightTextFrame.TextFramePreferences.TextColumnCount = 3
myRightTextFrame.TextFramePreferences.TextColumnGutter = 14
Rem Add a label to make the frame easier to find later on.
myRightTextFrame.Label = "BodyTextFrame"
Rem Link the two frames using the nextTextFrame property.
myLeftTextFrame.NextTextFrame = myRightTextFrame
Overriding master page items and adding text
Next, we override one of the master text frames we created and add text to it. Again, add this script to the
end of the script we have been working on.
AppleScript
tell text frame 1 of page 2 of master spread 1 of myDocument
set myTextFrame to override destination page page 1 of myDocument
end tell
--Add text by setting the contents of an insertion point to a string.
--In AppleScript, "return" is a return character.
set contents of insertion point 1 of myTextFrame to "Headline!" & return
JavaScript
var myTextFrame =
myDocument.masterSpreads.item(0).pages.item(1).textFrames.item(0).override(myDocument
.pages.item(0));
//Add text by setting the contents of an insertion point to a string.
//In JavaScript, "\r" is a return character.
myTextFrame.insertionPoints.item(0).contents = "Headline!\r";
VBScript
Set myTextFrame =
myDocument.MasterSpreads.Item(1).Pages.Item(2).TextFrames.Item(1).Override(myDocument
.Pages.Item(1))
Rem Add text by setting the contents of an insertion point to a string.
Rem In VBScript, vbCr is a return character.
myTextFrame.InsertionPoints.Item(1).Contents = "Headline!" & vbCr
CHAPTER Constructing a Document Adding and applying a paragraph style 27
Adding and applying a paragraph style
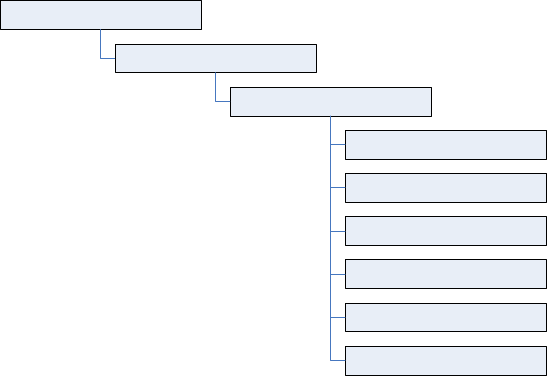
Our headline looks plain, so we format it using a paragraph style. First, we must create the paragraph style.
The following diagram shows the objects and properties we will work with (again, the text in this diagram
uses the JavaScript form of the scripting terms):
AppleScript
--First, check to see if the paragraph style already exists.
try
set myParagraphStyle to paragraph style "Heading 1" of myDocument
on error
--The paragraph style did not exist, so create it.
tell myDocument
set myParagraphStyle to make paragraph style with properties {name:"Heading 1"}
end tell
end try
--We'll need to create a color. Check to see if the color already exists.
try
set myColor to color "Red"
on error
--The color did not exist, so create it.
set myColor to make color with properties {name:"Red", model:process, color
value:{0, 100, 100, 0}}
end try
--Now set the formatting of the paragraph style.
set applied font of myParagraphStyle to "Arial"
set font style of myParagraphStyle to "Bold"
set point size of myParagraphStyle to 24
set space after of myParagraphStyle to 24
set space before of myParagraphStyle to 24
set fill color of myParagraphStyle to color "Red" of myDocument
--Apply the style to the paragraph.
tell paragraph 1 of myTextFrame to apply paragraph style using myParagraphStyle with
clearing overrides
--You could also use:
--set applied paragraph style of paragraph 1 of myTextFrame to myParagraphStyle
appliedFont
pointSize
spaceBefore
spaceAfter
fillColor
document
paragraphStyle
paragraphStyles
fontStyle
CHAPTER Constructing a Document Adding and applying a paragraph style 28
JavaScript
var myParagraphStyle = myDocument.paragraphStyles.item("Heading 1");
try {
var myName = myParagraphStyle.name;
}
catch (myError){
//The paragraph style did not exist, so create it.
myParagraphStyle = myDocument.paragraphStyles.add({name:"Heading 1"});
}
//We'll need to create a color. Check to see if the color already exists.
var myColor = myDocument.colors.item("Red");
try {
myName = myColor.name;
}
catch (myError){
//The color did not exist, so create it.
myColor = myDocument.colors.add({name:"Red", model:ColorModel.process,
colorValue:[0,100,100,0]});
}
//Now set the formatting of the paragraph style.
myParagraphStyle.appliedFont = "Arial";
myParagraphStyle.fontStyle = "Bold";
myParagraphStyle.pointSize = 24;
myParagraphStyle.spaceAfter = 24;
myParagraphStyle.spaceBefore = 24;
myParagraphStyle.fillColor = myDocument.colors.item("Red");
//Apply the style to the paragraph.
myDocument.pages.item(0).textFrames.item(0).paragraphs.item(0).applyParagraphStyle(
myParagraphStyle, true);
//You could also use:
//myDocument.pages.item(0).textFrames.item(0).paragraphs.item(0).appliedParagraphStyl
e = myParagraphStyle;
VBScript
Rem First, check to see if the paragraph style already exists.
Rem to do this, we disable error checking:
On Error Resume Next
Set myParagraphStyle = myDocument.ParagraphStyles.Item("Heading 1")
Rem if an error occurred on the previous line, then the paragraph
Rem style did not exist.
If Error.Number <> 0 Then
Set myParagraphStyle = myDocument.ParagraphStyles.Add
myParagraphStyle.Name = "Heading 1"
Error.Clear
End If
Rem We'll need to create a color. Check to see if the color already exists.
Set myColor = myDocument.Colors.Item("Red")
If Error.Number <> 0 Then
Set myColor = myDocument.Colors.Add
myColor.Name = "Red"
myColor.Model = idColorModel.idProcess
myColor.colorValue = Array(0, 100, 100, 0)
Error.Clear
End If
Rem Resume normal error handling.
On Error GoTo 0
CHAPTER Constructing a Document Placing a text file 29
Rem Now set the formatting of the paragraph style.
myParagraphStyle.AppliedFont = "Arial"
myParagraphStyle.FontStyle = "Bold"
myParagraphStyle.PointSize = 24
myParagraphStyle.SpaceAfter = 24
myParagraphStyle.SpaceBefore = 24
myParagraphStyle.FillColor = myDocument.Colors.Item("Red")
Rem Apply the style to the paragraph.
myDocument.Pages.Item(1).TextFrames.Item(1).Paragraphs.Item(1).ApplyParagraphStyle
myParagraphStyle, True
Rem You could also use:
Rem
myDocument.pages.item(1).textFrames.item(1).paragraphs.item(1).appliedParagraphStyle
= myParagraphStyle
Placing a text file
Next, we import a text file. We add the text after the headline in the first text frame on the first page. The
script displays a dialog box you can use to select the text file you want to import. Again, add this script to
the end of the script we have been working on.
AppleScript
--Display a standard open file dialog box to select a text file.
set myTextFile to choose file ("Choose a text file")
--If a text file was selected, and if you didn't press Cancel,
--place the text file at the first insertion point after the headline.
if myTextFile is not "" then
tell insertion point -1 of myTextFrame to place myTextFile
end if
JavaScript
//Display a standard open file dialog box to select a text file.
var myTextFile = File.openDialog("Choose a text file");
//If a text file was selected, and if you didn't press Cancel,
//place the text file at the first insertion point after the headline.
if((myTextFile != "")&&(myTextFile != null)){
myTextFrame.insertionPoints.item(-1).place(myTextFile);
}
CHAPTER Constructing a Document Placing a graphic 30
VBScript
Rem Display a standard open file dialog box to select a text file.
Rem VBScript does not have the ability to do this, so we'll use
Rem a JavaScript to get a file name. We'll run the JavaScript using
Rem InDesign's DoScript feature.
Rem Disable normal error handling.
On Error Resume Next
Rem Create a JavaScript as a string.
myJavaScriptString = "var myTextFile = File.openDialog(""Choose a text
file"");myTextFile.fsName;"
Rem Run the JavaScript using DoScript.
myFileName = myInDesign.DoScript(myJavaScriptString, idScriptLanguage.idJavascript)
If Error.Number = 0 Then
Rem Place the text file at the end of the text frame.
myTextFrame.InsertionPoints.Item(-1).Place myFileName
Error.Clear
End If
Rem Restore normal error handling.
On Error GoTo 0
Placing a graphic
Placing a graphic is like importing a text file. Again, the script displays a dialog box you can use to select
the graphic you want to place. When we place the graphic, InDesign Server returns a reference to the
graphic itself, rather than to the frame containing the graphic. To get a reference to the frame, use the
parent property of the graphic. Once we have that reference, we can apply an object style to the frame.
Again, add this script to the end of the script we have been working on.
AppleScript
--Display a standard open file dialog box to select a graphic file.
set myGraphicFile to choose file "Choose graphic file."
--If a graphic file was selected, and if you didn't press Cancel,
--place the graphic file on the page.
if myGraphicFile is not "" then
set myGraphic to place myGraphicFile on page 1 of myDocument
--Since you can place multiple graphics at once, the place method
--returns an array. To get the graphic you placed, get the first
--item in the array.
set myGraphic to item 1 of myGraphic
--Create an object style to apply to the graphic frame.
try
set myObjectStyle to object style "GraphicFrame" of myDocument on error
--The object style did not exist, so create it.
tell myDocument
set myObjectStyle to make object style with properties
{name:"GraphicFrame"}
end tell
end try
set enable stroke of myObjectStyle to true
set stroke weight of myObjectStyle to 3
set stroke type of myObjectStyle to stroke style "Solid" of myDocument
set stroke color of myObjectStyle to color "Red" of myDocument
CHAPTER Constructing a Document Placing a graphic 31
--The frame containing the graphic is the parent of the graphic.
set myFrame to parent of myGraphic
tell myFrame to apply object style using myObjectStyle
--Resize the frame to a specific size.
set geometric bounds of myFrame to {0, 0, 144, 144}
--Fit the graphic to the frame proportionally.
fit myFrame given proportionally
--Next, fit frame to the resized graphic.
fit myFrame given frame to content
set myBounds to geometric bounds of myFrame
set myGraphicWidth to (item 4 of myBounds) - (item 2 of myBounds)
--Move the graphic frame.
set myPageWidth to page width of document preferences of myDocument
set myMarginPreferences to margin preferences of page 1 of myDocument
set myTopMargin to top of myMarginPreferences
move myFrame to {myPageWidth - myGraphicWidth, myTopMargin}
--Apply a text wrap to the graphic frame.
set text wrap type of text wrap preferences
of myFrame to bounding box text wrap
set text wrap offset of text wrap preferences of myFrame to {24, 12, 24, 12}
end if
end tell
JavaScript
//Display a standard open file dialog box to select a graphic file.
var myGraphicFile = File.openDialog("Choose a graphic file");
//If a graphic file was selected, and if you didn't press Cancel,
//place the graphic file on the page.
if((myGraphicFile != "")&&(myGraphicFile != null)){
var myGraphic = myDocument.pages.item(0).place(myGraphicFile);
//Since you can place multiple graphics at once, the place method
//returns an array. To get the graphic you placed, get the first
//item in the array (JavaScript arrays start with item 0).
myGraphic = myGraphic[0];
//Create an object style to apply to the graphic frame.
var myObjectStyle = myDocument.objectStyles.item("GraphicFrame");
try {
var myName = myObjectStyle.name;
}
catch (myError){
//The object style did not exist, so create it.
myObjectStyle = myDocument.objectStyles.add({name:"GraphicFrame"});
}
myObjectStyle.enableStroke = true;
myObjectStyle.strokeWeight = 3;
myObjectStyle.strokeType = myDocument.strokeStyles.item("Solid");
myObjectStyle.strokeColor = myDocument.colors.item("Red");
//The frame containing the graphic is the parent of the graphic.
var myFrame = myGraphic.parent;
myFrame.applyObjectStyle(myObjectStyle, true);
//Resize the frame to a specific size.
myFrame.geometricBounds = [0,0,144,144];
//Fit the graphic to the frame proportionally.
myFrame.fit(FitOptions.proportionally);
//Next, fit frame to the resized graphic.
myFrame.fit(FitOptions.frameToContent);
var myBounds = myFrame.geometricBounds;
var myGraphicWidth = myBounds[3]-myBounds[1];
CHAPTER Constructing a Document Placing a graphic 32
//Move the graphic frame.
var myPageWidth = myDocument.documentPreferences.pageWidth;
var myTopMargin = myDocument.pages.item(0).marginPreferences.top;
myFrame.move([myPageWidth-myGraphicWidth, myTopMargin]);
//Apply a text wrap to the graphic frame.
myFrame.textWrapPreferences.textWrapType = TextWrapTypes.boundingBoxTextWrap;
myFrame.textWrapPreferences.textWrapOffset = [24, 12, 24, 12];
}
VBScript
Rem create an object style
On Error Resume Next
Set myObjectStyle = myDocument.ObjectStyles.Item("GraphicFrame")
If Error.Number <> 0 Then
Set myObjectStyle = myDocument.ObjectStyles.Add
myObjectStyle.Name = "GraphicFrame"
Error.Clear
End If
On Error GoTo 0
myObjectStyle.EnableStroke = True
myObjectStyle.StrokeWeight = 3
myObjectStyle.StrokeType = myDocument.StrokeStyles.Item("Solid")
myObjectStyle.StrokeColor = myDocument.Colors.Item("Red")
Rem Again, we'll use a JavaScript to get a file name.
Rem Disable normal error handling.
On Error Resume Next
Rem Create a JavaScript as a string.
myJavaScriptString = "var myTextFile = File.openDialog(""Choose a graphic
file"");myTextFile.fsName;"
Rem Run the JavaScript using DoScript.
myGraphicFileName = myInDesign.DoScript(myJavaScriptString,
idScriptLanguage.idJavascript)
If Error.Number = 0 Then
On Error GoTo 0
Set myGraphic = myDocument.Pages.Item(1).Place(myGraphicFileName)
Rem Since you can place multiple graphics at once, the place method
Rem returns an object collection. To get the graphic you placed, get the first
Rem item in the collection.
Set myGraphic = myGraphic.Item(1)
Rem Create an object style to apply to the graphic frame.
Rem The frame containing the graphic is the parent of the graphic.
Set myFrame = myGraphic.Parent
myFrame.ApplyObjectStyle myObjectStyle, True
Rem Resize the frame to a specific size.
myFrame.GeometricBounds = Array(0, 0, 144, 144)
Rem Fit the graphic to the frame proportionally.
myFrame.Fit idFitOptions.idProportionally
Rem Next, fit frame to the resized graphic.
myFrame.Fit idFitOptions.idFrameToContent
myBounds = myFrame.GeometricBounds
myGraphicWidth = myBounds(3) - myBounds(1)
Rem Move the graphic frame.
myPageWidth = myDocument.DocumentPreferences.PageWidth
myTopMargin = myDocument.Pages.Item(1).MarginPreferences.Top
myFrame.Move Array(myPageWidth - myGraphicWidth, myTopMargin)
CHAPTER Constructing a Document Placing a graphic 33
Rem Apply a text wrap to the graphic frame.
myFrame.TextWrapPreferences.TextWrapType = idTextWrapTypes.idBoundingBoxTextWrap
myFrame.TextWrapPreferences.TextWrapOffset = Array(24, 12, 24, 12)
End If
34
4Middle Eastern Scripting Guide
The Middle Eastern feature of InDesign Server provides support for designing and publishing documents
in Middle Eastern languages. This gives you unprecedented capability to build multilingual publications,
mixing Roman and Middle Eastern scripts with ease and flexibility in your layouts.
This chapter shows how to use Middle Eastern features with scripting. This chapter assumes that you are
familiar with Middle Eastern features in InDesign.
Setting up a document
Setting page binding
In a Roman publication, the binding of documents is always on the left. Conversely, in an Arabic or Hebrew
publication, binding is on the right. With InDesign Server, you can create a document in which the pages
are bound on the left edge or on the right edge. From InDesign Scripting, you can control this using the
pageBinding property. This property is part of the DocumentPreferences object and can get one value
from the PageBindingOptions enumeration (default, leftToRight or rightToLeft).
The following sample script creates a new document, and then sets or gets the page binding for the
created document (for the complete script, see PageBinding).
AppleScript
set myDocument to make document
tell document preferences of myDocument
set page binding to right to left
end tell
JavaScript
var myDocument = app.documents.add();
with(myDocument){
//set number of pages
documentPreferences.pagesPerDocument = 4;
documentPreferences.pageBinding = PageBindingOptions.rightToLeft;
}
VBScript
Set myDocument = myInDesign.Documents.Add
with myDocument
Rem set number of pages
.DocumentPreferences.PagesPerDocument = 4
.DocumentPreferences.PageBinding = idPageBindingOptions.idRightToLeft
End With
CHAPTER 4: Middle Eastern Scripting Guide Setting up a document 35
Numbering
InDesign Server comes with special styles for page, paragraph, and footnote numbering. You can choose
to apply standard, Arabic (Arabic Abjad and Arabic Alif Ba Tah) or Hebrew (Hebrew Biblical Standard and
Hebrew Non-Standard Decimal) styles. With InDesign scripting, you can access these settings with the
PageNumberStyle and FootnoteNumberingStyle properties.
Settings for page numbering
The following script shows how to set these settings for pages (for the complete script, see
NumberingME).
AppleScript
set page number style of item 1 of sections of myDocument to arabic alif ba tah
set page number style of item 2 of sections of myDocument to arabic abjad
JavaScript
myDocument.sections.item(0).pageNumberStyle = PageNumberStyle.arabicAlifBaTah;
myDocument.sections.item(1).pageNumberStyle = PageNumberStyle.arabicAbjad;
VBScript
myDocument.Sections.Item(1).PageNumberStyle = idPageNumberStyle.idArabicAlifBaTah
myDocument.Sections.Item(2).PageNumberStyle = idPageNumberStyle.idArabicAbjad
Settings for footnote numbering
The following script shows how to set ME numbering settings for footnotes (for the complete script, see
NumberingME):
AppleScript
set (footnote numbering style of footnote options of myDocument) to arabic abjad
JavaScript
myDocument.footnoteOptions.footnoteNumberingStyle =
FootnoteNumberingStyle.hebrewBiblical;
VBScript
myDocument.FootnoteOptions.FootnoteNumberingStyle =
idFootnoteNumberingStyle.idHebrewBiblical
Setting composer
The composer that is used to create text frames in a Roman publication is different from the ME Composer.
InDesign Server comes with a document method changeComposer that can be used in a Roman
publication to changes the composer for all text frames to the Adobe World-Ready Composer. Adobe
Paragraph Composer is changed to Adobe World-Ready Paragraph Composer; Adobe Single-line
Composer is changed to Adobe World-Ready Single-line Composer.
The following script shows how to use this method (for the complete script, see ChangeComposer):
CHAPTER 4: Middle Eastern Scripting Guide Working with text 36
AppleScript
tell application "InDesignServer"
set myDocument to make document
tell myDocument
change composer
end tell
end tell
JavaScript
myDocument.changeComposer();
VBScript
myDocument.ChangeComposer()
Working with text
Inserting special ME character
Using enumerations, InDesign Server gives you the ability to insert three Hebrew characters (Geresh,
Gershayim, Maqaf) and four Arabic ones (Kashida, Arabic comma, Arabic Semicolon, and Arabic Question
mark), as well as a right-to-left marker or left-to-right marker. The following script shows how to insert
special Middle Eastern characters (for the complete script, see SpecialCharactersME).
CHAPTER 4: Middle Eastern Scripting Guide Working with text 37
AppleScript
set contents of insertion point -1 to "Hebrew Maqaf: "
set contents of insertion point -1 to hebrew maqaf
set contents of insertion point -1 to return
set contents of insertion point -1 to "Hebrew Geresh: "
set contents of insertion point -1 to hebrew geresh
set contents of insertion point -1 to return
set contents of insertion point -1 to "Hebrew Gershayim: "
set contents of insertion point -1 to hebrew gershayim
set contents of insertion point -1 to return
set contents of insertion point -1 to "Arabic Kashida: "
set contents of insertion point -1 to arabic kashida
set contents of insertion point -1 to return
set contents of insertion point -1 to "Arabic Comma: "
set contents of insertion point -1 to arabic comma
set contents of insertion point -1 to return
set contents of insertion point -1 to "Arabic Semicolon: "
set contents of insertion point -1 to arabic semicolon
set contents of insertion point -1 to return
set contents of insertion point -1 to "Arabic Question Mark: "
set contents of insertion point -1 to arabic question mark
set contents of insertion point -1 to return
set contents of insertion point -1 to "Right To Left Mark: "
set contents of insertion point -1 to right to left mark
set contents of insertion point -1 to return
set contents of insertion point -1 to "Left To Right Mark: "
set contents of insertion point -1 to left to right mark
set contents of insertion point -1 to return
JavaScript
//Entering InDesign special ME characters by their enumerations:
myTextFrame.parentStory.insertionPoints.item(-1).contents = "Hebrew Maqaf: ";
myTextFrame.parentStory.insertionPoints.item(-1).contents =
SpecialCharacters.hebrewMaqaf;
myTextFrame.parentStory.insertionPoints.item(-1).contents = "\r";
myTextFrame.parentStory.insertionPoints.item(-1).contents = "Hebrew Geresh: ";
myTextFrame.parentStory.insertionPoints.item(-1).contents =
SpecialCharacters.hebrewGeresh;
myTextFrame.parentStory.insertionPoints.item(-1).contents = "\r";
myTextFrame.parentStory.insertionPoints.item(-1).contents = "Hebrew Gershayim: ";
myTextFrame.parentStory.insertionPoints.item(-1).contents =
SpecialCharacters.hebrewGershayim;
myTextFrame.parentStory.insertionPoints.item(-1).contents = "\r";
myTextFrame.parentStory.insertionPoints.item(-1).contents = "Arabic Kashida: ";
myTextFrame.parentStory.insertionPoints.item(-1).contents =
SpecialCharacters.arabicKashida;
myTextFrame.parentStory.insertionPoints.item(-1).contents = "\r";
myTextFrame.parentStory.insertionPoints.item(-1).contents = "Arabic Comma: ";
myTextFrame.parentStory.insertionPoints.item(-1).contents =
SpecialCharacters.arabicComma;
myTextFrame.parentStory.insertionPoints.item(-1).contents = "\r";
myTextFrame.parentStory.insertionPoints.item(-1).contents = "Arabic Semicolon: ";
myTextFrame.parentStory.insertionPoints.item(-1).contents =
CHAPTER 4: Middle Eastern Scripting Guide Working with text 38
SpecialCharacters.arabicSemicolon;
myTextFrame.parentStory.insertionPoints.item(-1).contents = "\r";
myTextFrame.parentStory.insertionPoints.item(-1).contents =
"Arabic Question Mark: ";
myTextFrame.parentStory.insertionPoints.item(-1).contents =
SpecialCharacters.arabicQuestionMark;
myTextFrame.parentStory.insertionPoints.item(-1).contents = "\r";
myTextFrame.parentStory.insertionPoints.item(-1).contents = "Right To Left Mark: ";
myTextFrame.parentStory.insertionPoints.item(-1).contents =
SpecialCharacters.rightToLeftMark;
myTextFrame.parentStory.insertionPoints.item(-1).contents = "\r";
myTextFrame.parentStory.insertionPoints.item(-1).contents = "Left To Right Mark: ";
myTextFrame.parentStory.insertionPoints.item(-1).contents =
SpecialCharacters.leftToRightMark;
myTextFrame.parentStory.insertionPoints.item(-1).contents = "\r";
VBScript
Rem Entering InDesign special ME characters by their enumerations:
myTextFrame.ParentStory.InsertionPoints.Item(-1).contents = "Hebrew Maqaf: "
myTextFrame.ParentStory.InsertionPoints.Item(-1).contents =
idSpecialCharacters.idHebrewMaqaf
myTextFrame.ParentStory.InsertionPoints.Item(-1).contents = vbCr
myTextFrame.ParentStory.InsertionPoints.Item(-1).contents = "Hebrew Geresh: "
myTextFrame.ParentStory.InsertionPoints.Item(-1).contents =
idSpecialCharacters.idHebrewGeresh
myTextFrame.ParentStory.InsertionPoints.Item(-1).contents = vbCr
myTextFrame.ParentStory.InsertionPoints.Item(-1).contents = "Hebrew Gershayim: "
myTextFrame.ParentStory.InsertionPoints.Item(-1).contents =
idSpecialCharacters.idHebrewGershayim
myTextFrame.ParentStory.InsertionPoints.Item(-1).contents = vbCr
myTextFrame.ParentStory.InsertionPoints.Item(-1).contents = "Arabic Kashida: "
myTextFrame.ParentStory.InsertionPoints.Item(-1).contents =
idSpecialCharacters.idArabicKashida
myTextFrame.ParentStory.InsertionPoints.Item(-1).contents = vbCr
myTextFrame.ParentStory.InsertionPoints.Item(-1).contents = "Arabic Comma: "
myTextFrame.ParentStory.InsertionPoints.Item(-1).contents =
idSpecialCharacters.idArabicComma
myTextFrame.ParentStory.InsertionPoints.Item(-1).contents = vbCr
myTextFrame.ParentStory.InsertionPoints.Item(-1).contents = "Arabic Semicolon: "
myTextFrame.ParentStory.InsertionPoints.Item(-1).contents =
idSpecialCharacters.idArabicSemicolon
myTextFrame.ParentStory.InsertionPoints.Item(-1).contents = vbCr
myTextFrame.ParentStory.InsertionPoints.Item(-1).contents =
"Arabic Question Mark: "
myTextFrame.ParentStory.InsertionPoints.Item(-1).contents =
idSpecialCharacters.idArabicQuestionMark
myTextFrame.ParentStory.InsertionPoints.Item(-1).contents = vbCr
myTextFrame.ParentStory.InsertionPoints.Item(-1).contents = "Right To Left Mark: "
myTextFrame.ParentStory.InsertionPoints.Item(-1).contents =
idSpecialCharacters.idRightToLeftMark
myTextFrame.ParentStory.InsertionPoints.Item(-1).contents = vbCr
myTextFrame.ParentStory.InsertionPoints.Item(-1).contents = "Left To Right Mark: "
myTextFrame.ParentStory.InsertionPoints.Item(-1).contents =
idSpecialCharacters.idLeftToRightMark
myTextFrame.ParentStory.InsertionPoints.Item(-1).contents = vbCr
CHAPTER 4: Middle Eastern Scripting Guide Working with text 39
Finding and replacing ME text
With InDesign scripting, you can find and replace Middle Eastern text. The following sample script shows
how to find and replace words in the Middle Eastern text (for the complete script, see
MENAFindAndReplaceText).
AppleScript
--Clear the find/change text preferences.
set find text preferences to nothing
set change text preferences to nothing
--Search the document for the string "Adobe".
set find what of find text preferences to ""
--Set the find options.
set case sensitive of find change text options to false
set include footnotes of find change text options to false
set include hidden layers of find change text options to false
set include locked layers for find of find change text options to false
set include locked stories for find of find change text options to false
set include master pages of find change text options to false
set whole word of find change text options to false
tell myDocument
set myFoundItems to find text
display dialog ("Found " & (count myFoundItems) & " instances of the search
string.")
end tell
--Replace the text in myString
repeat with i from 1 to count myFoundItems
set contents of item i of myFoundItems to "Adobe"
end repeat
CHAPTER 4: Middle Eastern Scripting Guide Working with text 40
JavaScript
var myDocument = app.activeDocument;
//Clear the find/change text preferences.
app.findTextPreferences = NothingEnum.nothing;
app.changeTextPreferences = NothingEnum.nothing;
//Search the document for the string "Adobe".
app.findTextPreferences.findWhat = "";
//Set the find options.
app.findChangeTextOptions.caseSensitive = false;
app.findChangeTextOptions.includeFootnotes = false;
app.findChangeTextOptions.includeHiddenLayers = false;
app.findChangeTextOptions.includeLockedLayersForFind = false;
app.findChangeTextOptions.includeLockedStoriesForFind = false;
app.findChangeTextOptions.includeMasterPages = false;
app.findChangeTextOptions.wholeWord = false;
var myFoundItems = myDocument.findText();
alert("Found " + myFoundItems.length + " instances of the search arabic string.");
app.findTextPreferences = NothingEnum.nothing;
app.changeTextPreferences = NothingEnum.nothing;
//Replace the text in myString
for(var i = 0; i < myFoundItems.length; i++)
{
myFoundItems[i].contents = "Adobe";
}
VBScript
Rem Clear the find/change text preferences.
myInDesign.FindTextPreferences = idNothingEnum.idNothing
myInDesign.ChangeTextPreferences = idNothingEnum.idNothing
REM Search the document for the string "Adobe".
myInDesign.FindTextPreferences.FindWhat = ""
REM Set the find options.
myInDesign.FindChangeTextOptions.CaseSensitive = False
myInDesign.FindChangeTextOptions.IncludeFootnotes = False
myInDesign.FindChangeTextOptions.IncludeHiddenLayers = False
myInDesign.FindChangeTextOptions.IncludeLockedLayersForFind = False
myInDesign.FindChangeTextOptions.IncludeLockedStoriesForFind = False
myInDesign.FindChangeTextOptions.IncludeMasterPages = False
myInDesign.FindChangeTextOptions.WholeWord = False
Set myFoundItems = myInDesign.Documents.Item(1).FindText
MsgBox ("Found " & CStr(myFoundItems.Count) & " instances of the search string.")
Rem Clear the find/change text preferences after the search.
myInDesign.FindTextPreferences = idNothingEnum.idNothing
myInDesign.ChangeTextPreferences = idNothingEnum.idNothing
REM Replace the text in myString
For i = 1 To myFoundItems.Count
myFoundItems(i).contents = "Adobe"
Next
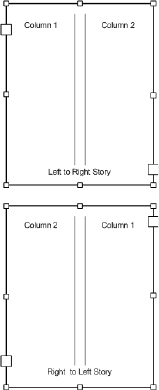
CHAPTER 4: Middle Eastern Scripting Guide Working with text 41
Setting story direction property
The concept of story direction becomes clearer in a multicolumn text frame. A
right-to-left story begins to fill columns from the right edge of the text frame and a
left-to-right story begins to fill columns from the left edge of the text frame.
With InDesign Scripting, if you need to change the main direction of an existing text
story, even after typing or placing some text inside, use the storyDirection
property. This property is part of the StoryPreferences object and can get one
value from the StoryDirectionOptions enumeration (leftToRightDirection and
rightToLeftDirection). The following sample script creates a two-column text
frame, then sets the story direction (for the complete script, see StoryDirection).
AppleScript
set myTextFrame to make text frame with properties {geometric bounds:{70, 200, 300,
500}}
tell myTextFrame
set text column count of text frame preferences to 2
set contents to " "
set justification of parent story to right justified
set (story direction of story preferences of parent story) to (right to left
direction)
end tell
JavaScript
with(myTextFrame){
//Set the bounds of the text frame.
geometricBounds = [70, 200, 300, 500];
//Fill the text frame with placeholder text in 2 column.
textFramePreferences.textColumnCount = 2;
contents = " 1 "
parentStory.justification = Justification.rightJustified;
//Now set the story direction left to right
parentStory.storyPreferences.storyDirection =
StoryDirectionOptions.leftToRightDirection;
}
CHAPTER 4: Middle Eastern Scripting Guide Setting paragraph attributes 42
VBScript
with myTextFrame
Rem Set the bounds of the text frame.
.geometricBounds = Array(70, 200, 300, 500)
Rem Fill the text frame with placeholder text in 2 column.
.TextFramePreferences.TextColumnCount = 2
.contents = " 1 "
.ParentStory.Justification = idJustification.idRightJustified
Rem Now set the story direction left to right
.ParentStory.StoryPreferences.StoryDirection =
idStoryDirectionOptions.idLeftToRightDirection
End With
Setting paragraph attributes
InDesign Server comes with special paragraph settings, such as Paragraph Direction and Justification, for
laying out Arabic/Hebrew text.
ParagraphDirection
Paragraph direction controls the order of multidirectional text inside the paragraph. By default, the
paragraph direction is Left To Right.
With InDesign scripting, if you need to change the main direction of an existing paragraph, use the
paragraphDirection property. This property is part of the Text objects and can get one value from the
ParagraphDirectionOptions enumeration (leftToRightDirection and rightToLeftDirection). The
following sample script shows how to set this property (for the complete script, see
MEParagraphAttributes).
AppleScript
tell myTextFrame
set paragraph direction of item 1 of paragraphs to left to right direction
end tell
JavaScript
with(myTextFrame){
//Set ME paragraph attributes.
paragraphs.item(0).paragraphDirection =
ParagraphDirectionOptions.leftToRightDirection;
}
VBScript
with myTextFrame
Rem Set ME paragraph attributes.
.Paragraphs.Item(1).ParagraphDirection =
idParagraphDirectionOptions.idLeftToRightDirection
End With
CHAPTER 4: Middle Eastern Scripting Guide Setting paragraph attributes 43
Paragraph direction for application and document
You can also use this property to set text defaults both for the application and for each document:
AppleScript
set paragraph direction of text defaults of myDocument to right to left direction
JavaScript
myDocument.textDefaults.paragraphDirection =
ParagraphDirectionOptions.rightToLeftDirection;
VBScript
myDocument.TextDefaults.ParagraphDirection =
idParagraphDirectionOptions.idRightToLeftDirection
Justification
With InDesign scripting, you can change the default or the existing attribute of a paragraph with the
ParagraphJustification property. This property is part of the Text objects and can get one value from
the ParagraphJustificationOptions enumeration (defaultJustification, arabicJustification,
and naskhJustification). The following sample script shows how to set this property (for the complete
script, see MEParagraphAttributes).
Justification for an existing paragraph
AppleScript
tell myTextFrame
set paragraph justification of item 2 of paragraphs to naskh justification
end tell
JavaScript
with(myTextFrame){
//Set ME paragraph attributes.
paragraphs.item(1).paragraphJustification =
ParagraphJustificationOptions.naskhJustification;
}
VBScript
with myTextFrame
Rem Set ME paragraph attributes.
.Paragraphs.Item(2).ParagraphJustification =
idParagraphJustificationOptions.idNaskhJustification
End With
CHAPTER 4: Middle Eastern Scripting Guide Setting character attributes 44
Justification for text defaults
AppleScript
set paragraph justification of text defaults of myDocument to arabic justification
JavaScript
myDocument.textDefaults.paragraphJustification =
ParagraphJustificationOptions.arabicJustification;
sVBScript
myDocument.TextDefaults.ParagraphJustification =
idParagraphJustificationOptions.idArabicJustification
Setting character attributes
InDesign Server comes with special character settings for laying out Arabic/Hebrew text. These settings
allow you to finely tune your Arabic/Hebrew text. With InDesign scripting, these settings correspond to a
number of properties that can be applied to a Text object. The MECharactersAttributes tutorial script
shows how to set every Middle Eastern property of a text object.
Digits
You can choose the language in which you want your numeric digits to be displayed. The Default setting
means that the numbers will be in the same language as that of the previous character. Otherwise, you can
choose between Arabic, Hindi, and Farsi numbers. The corresponding text object property is DigitsType.
AppleScript
set contents of myTextFrame to "Farsi Digits: 1234567890"
set digits type of item 1 of paragraphs of myTextFrame to farsi digits
JavaScript
myTextFrame.contents = "Farsi Digits: 1234567890";
myTextFrame.paragraphs.item(0).digitsType = DigitsTypeOptions.farsiDigits;
VBScript
myTextFrame.contents = "Farsi Digits: 1234567890"
myTextFrame.Paragraphs.Item(1).DigitsType = idDigitsTypeOptions.idFarsiDigits
Kashidas
The Arabic and Naskh justification algorithms insert kashidas and spaces. If you don’t want Kashidas to be
inserted in the Arabic text, with InDesign scripting, you can change the Kashidas property to set it to
kashidasOff; otherwise, set it to defaultKashidas.
CHAPTER 4: Middle Eastern Scripting Guide Setting character attributes 45
AppleScript
set contents of myTextFrame to "
َ
بِتُك Kashidas Off"
set kashidas of item 1 of paragraphs of myTextFrame to kashidas off
set justification of item 1 of paragraphs of myTextFrame to fully justified
set paragraph justification of item 1 of paragraphs of myTextFrame to
naskh justification
JavaScript
myTextFrame.contents = "
َ
بِتُك Kashidas Off";
myTextFrame.paragraphs.item(0).kashidas = KashidasOptions.kashidasOff;
myTextFrame.paragraphs.item(0).justification = Justification.fullyJustified;
myTextFrame.paragraphs.item(0).paragraphJustification =
ParagraphJustificationOptions.naskhJustification;
VBScript
myTextFrame.contents = "
َ
بِتُك Kashidas Off"
myTextFrame.Paragraphs.Item(1).Kashidas = idKashidasOptions.idKashidasOff
myTextFrame.Paragraphs.Item(1).Justification = idJustification.idFullyJustified
myTextFrame.Paragraphs.Item(1).ParagraphJustification =
idParagraphJustificationOptions.idNaskhJustification
Characters direction
To correctly handle bidirectional text, InDesign Server stores character direction information. With
scripting, this information can be changed using the CharacterDirection property which can get one
value from the CharacterDirectionOptions enumeration (defaultDirection,
leftToRightDirection and rightToLeftDirection).
AppleScript
set contents of myTextFrame to "
OpenType"
set diacritic position of item 1 of paragraphs of myTextFrame to opentype position
set contents of myTextFrame to "
Loose"
set diacritic position of item 1 of paragraphs of myTextFrame to loose position
JavaScript
myTextFrame.contents = "Farsi + L dir: 1234567890";
for (i=15 ; i < 25 ; i++) {
myTextFrame.parentStory.characters.item(i).characterDirection =
CharacterDirectionOptions.leftToRightDirection;
}
CHAPTER 4: Middle Eastern Scripting Guide Setting character attributes 46
VBScript
myTextFrame.contents = "Farsi + L dir: 1234567890"
For i = 16 To 25
myTextFrame.ParentStory.Characters.Item(i).CharacterDirection =
idCharacterDirectionOptions.idLeftToRightDirection
Next
Diacritic positioning
Short Arabic vowels are floating diacritics, written either over or under the consonants. Therefore, it is
important that the diacritics be properly placed over the consonants, both horizontally and vertically.
Diacritic Positioning can be accessed with scripting using the DiacriticPosition to choose from five
predefined positions (defaultPosition, loosePosition, mediumPosition, tightPosition, and
opentypePosition) or a custom position using the XOffsetDiacritic for horizontal adjustment and
YOffsetDiacritic for vertical adjustment.
AppleScript
set contents of myTextFrame to "
OpenType"
set diacritic position of item 1 of paragraphs of myTextFrame to opentype position
set contents of myTextFrame to "
Loose"
set diacritic position of item 1 of paragraphs of myTextFrame to loose position
JavaScript
myTextFrame.contents = "
Loose";
myTextFrame.paragraphs.item(0).diacriticPosition =
DiacriticPositionOptions.loosePosition;
myTextFrame.contents = "
Custom";
myTextFrame.parentStory.characters.item(1).xOffsetDiacritic = 150;
myTextFrame.parentStory.characters.item(1).yOffsetDiacritic = -150;
VBScript
myTextFrame.contents = "
Loose"
myTextFrame.Paragraphs.Item(1).DiacriticPosition =
idDiacriticPositionOptions.idLoosePosition
myTextFrame.contents = "
Custom"
myTextFrame.ParentStory.Characters.Item(2).XOffsetDiacritic = 150
myTextFrame.ParentStory.Characters.Item(2).YOffsetDiacritic = -150
Open Type features
If you are using an Open Type Font in your layout, then you have access to special Open Type features.
These features can be accessed with scripting using the OtfOverlapSwash, OtfStylisticAlternate,
OtfJustificationAlternate, or OtfStretchedAlternate properties.
CHAPTER 4: Middle Eastern Scripting Guide Using styles 47
AppleScript
set OTF stylistic alternate of item 1 of paragraphs of myTextFrame to true
set OTF justification alternate of item 1 of paragraphs of myTextFrame to true
set OTF stretched alternate of item 1 of paragraphs of myTextFrame to true
JavaScript
myTextFrame.paragraphs.item(0).otfOverlapSwash = true;
myTextFrame.paragraphs.item(0).otfStylisticAlternate = true;
myTextFrame.paragraphs.item(0).otfJustificationAlternate = true;
myTextFrame.paragraphs.item(0).otfStretchedAlternate = true;
VBScript
myTextFrame.Paragraphs.Item(1).OtfOverlapSwash = true
myTextFrame.Paragraphs.Item(1).OtfStylisticAlternate = true
myTextFrame.Paragraphs.Item(1).OtfJustificationAlternate = true
myTextFrame.Paragraphs.Item(1).OtfStretchedAlternate = true
Using styles
Paragraph and character styles are the keys to text formatting productivity and should be a central part of
any script that applies text formatting. While creating a Character or Paragraph style, you will access all the
preceding explained Character and Paragraph attribute properties on the CharacterStyles and
ParagraphStyles Objects.
The following example script fragment shows how to create paragraph and character styles with Middle
Eastern attributes (for the complete script, see CreateStyles).
AppleScript
--Create a character style named "myCharacterStyleME" if
--no style by that name already exists.
try
set myCharacterStyleME to character style "myCharacterStyleME"
--If the style does not exist, trying to get its name will generate an error.
set myName to name of myCharacterStyleME
on error
--The style did not exist, so create it
set myCharacterStyleME to make character style
end try
tell myCharacterStyleME
set name to "myCharacterStyleME"
set applied font to "Adobe Arabic"
set digits type to farsi digits
set character direction to left to right direction
end tell
--Create a paragraph style named "myParagraphStyle" if
--no style by that name already exists
try
set myParagraphStyleME to paragraph style "myParagraphStyleME"
--If the paragraph style does not exist, trying to get its name will generate an
CHAPTER 4: Middle Eastern Scripting Guide Using styles 48
error.
set myName to name of myParagraphStyleME
on error
--The paragraph style did not exist, so create it
set myParagraphStyleME to make paragraph style
end try
tell myParagraphStyleME
set justification to fully justified
set paragraph direction to right to left direction
set paragraph justification to naskh justification
set point size to 12
set kashidas to default kashidas
set digits type to hindi digits
set applied font to "Adobe Arabic"
set OTF justification alternate to true
end tell
JavaScript
//Create a character style named "myCharacterStyleME" if
//no style by that name already exists.
try{
myCharacterStyleME = myDocument.characterStyles.item("myCharacterStyleME");
//If the style does not exist, trying to get its name will generate an error.
myName = myCharacterStyleME.name;
}
catch (myError){
//The style did not exist, so create it.
myCharacterStyleME =
myDocument.characterStyles.add({name:"myCharacterStyleME"});
}
with(myCharacterStyleME){
appliedFont = app.fonts.item("Adobe Arabic");
digitsType = DigitsTypeOptions.farsiDigits;
characterDirection = CharacterDirectionOptions.leftToRightDirection;
}
//Create a paragraph style named "myParagraphStyle" if
//no style by that name already exists.
try{
myParagraphStyleME = myDocument.paragraphStyles.item("myParagraphStyleME");
}
catch (myError){
//The paragraph style did not exist, so create it.
myParagraphStyleME =
myDocument.paragraphStyles.add({name:"myParagraphStyleME"});
}
with(myParagraphStyleME){
justification = Justification.fullyJustified;
paragraphDirection = ParagraphDirectionOptions.rightToLeftDirection;
paragraphJustification = ParagraphJustificationOptions.naskhJustification;
pointSize = 12;
kashidas = KashidasOptions.defaultKashidas;
digitsType = DigitsTypeOptions.hindiDigits;
appliedFont = app.fonts.item("Adobe Arabic");
otfJustificationAlternate = true;
}
CHAPTER 4: Middle Eastern Scripting Guide Working with tables 49
VBScript
Rem Create a character style named "myCharacterStyleME" if
Rem no style by that name already exists.
Set myCharacterStyleME = myAddStyle(myDocument, "myCharacterStyleME", 1)
with myCharacterStyleME
.AppliedFont = myInDesign.Fonts.Item("Adobe Arabic")
.DigitsType = idDigitsTypeOptions.idFarsiDigits
.CharacterDirection = idCharacterDirectionOptions.idLeftToRightDirection
End With
Rem Create a paragraph style named "myParagraphStyleME" if
Rem no style by that name already exists.
Set myParagraphStyleMe = myAddStyle(myDocument, "myParagraphStyleME", 2)
with myParagraphStyleME
.Justification = idJustification.idFullyJustified
.ParagraphDirection = idParagraphDirectionOptions.idRightToLeftDirection
.ParagraphJustification = idParagraphJustificationOptions.idNaskhJustification
.PointSize = 12
.Kashidas = idKashidasOptions.idDefaultKashidas
.DigitsType = idDigitsTypeOptions.idHindiDigits
.AppliedFont = myInDesign.Fonts.Item("Adobe Arabic")
.OtfJustificationAlternate = true
End With
Working with tables
Creating a table and setting its direction
With InDesign scripting, when you insert a table in a text frame, the direction of the table and text cell
alignment is the same as the paragraph direction and alignment. You can use the TableDirection
property to change the direction of the table. This property also affects the text cell alignment. The
following script shows how to set table direction (for the complete script, see TableDirection).
AppleScript
--Fill the text frame with text
set myString to "Table 1 LTR (paragraph direction LTR)" & return
set myString to myString & "Column 1,Column 2,Column 3;1a,1b,1c;2a,2b,2c;3a,3b,3c" &
return
set myString to myString & "Table 2 RTL, right Align (paragraph direction LTR)" & return
set myString to myString & "Column 1,Column 2,Column 3;1a,1b,1c;2a,2b,2c;3a,3b,3c" &
return
set myString to myString & "Table 3 RTL, left align (paragraph direction RTL)" & return
set myString to myString & "Column 1,Column 2,Column 3;1a,1b,1c;2a,2b,2c;3a,3b,3c" &
return
set myString to myString & "Table 4 LTR (paragraph direction RTL)" & return
set myString to myString & "Column 1,Column 2,Column 3;1a,1b,1c;2a,2b,2c;3a,3b,3c" &
return
set contents of myTextFrame to myString
set myStory to story 1 of myDocument
set myParagraph to object reference of paragraph 2 of myStory
set paragraph direction of myParagraph to left to right direction
set myStartCharacter to index of character 1 of myParagraph
set myEndCharacter to index of character -2 of myParagraph
CHAPTER 4: Middle Eastern Scripting Guide Working with tables 50
set myText to object reference of text from character myStartCharacter to character
myEndCharacter of myStory
tell myText
set myTable to (convert to table column separator "," row separator ";")
end tell
set myParagraph to object reference of paragraph 4 of myStory
set paragraph direction of myParagraph to left to right direction
set myStartCharacter to index of character 1 of myParagraph
set myEndCharacter to index of character -2 of myParagraph
set myText to object reference of text from character myStartCharacter to character
myEndCharacter of myStory
tell myText
set myTable to (convert to table column separator "," row separator ";")
end tell
--Change Table direction (paragraph direction is LTR, the converted table is LTR
--use table direction property to have table RTL), this change also the align
set table direction of table 2 of myStory to right to left direction
set myParagraph to object reference of paragraph 6 of myStory
set paragraph direction of myParagraph to right to left direction
set myStartCharacter to index of character 1 of myParagraph
set myEndCharacter to index of character -2 of myParagraph
set myText to object reference of text from character myStartCharacter to character
myEndCharacter of myStory
tell myText
set myTable to (convert to table column separator "," row separator ";")
end tell
set myParagraph to object reference of paragraph 8 of myStory
set paragraph direction of myParagraph to right to left direction
set myStartCharacter to index of character 1 of myParagraph
set myEndCharacter to index of character -2 of myParagraph
set myText to object reference of text from character myStartCharacter to character
myEndCharacter of myStory
tell myText
set myTable to (convert to table column separator "," row separator ";")
end tell
--Change Table direction (paragraph direction is RTL, the converted table is RTL
--use table direction property to have table LTR)
set table direction of table 4 of myStory to left to right direction
JavaScript
//Fill the text frame with placeholder text.
var myString = "Table 1 LTR (pargraph direction LTR)\r";
myString += "Column 1,Column 2,Column 3;1a,1b,1c;2a,2b,2c;3a,3b,3c\r";
myString += "Table 2 RTL, right Align (pargraph direction LTR)\r";
myString += "Column 1,Column 2,Column 3;1a,1b,1c;2a,2b,2c;3a,3b,3c\r";
myString += "Table 3 RTL, left align (pargraph direction RTL)\r";
myString += "Column 1,Column 2,Column 3;1a,1b,1c;2a,2b,2c;3a,3b,3c\r";
myString += "Table 4 LTR(pargraph direction RTL)\r";
myString += "Column 1,Column 2,Column 3;1a,1b,1c;2a,2b,2c;3a,3b,3c\r";
myTextFrame.contents = myString;
var myStory = myDocument.stories.item(0);
var myPargraph = myStory.paragraphs.item(1);
myPargraph.paragraphDirection = ParagraphDirectionOptions.leftToRightDirection;
var myStartCharacter = myPargraph.characters.item(0);
var myEndCharacter = myPargraph.characters.item(-2);
CHAPTER 4: Middle Eastern Scripting Guide Working with tables 51
var myText = myStory.texts.itemByRange(myStartCharacter, myEndCharacter);
var myTable = myText.convertToTable(",",";");
var myPargraph = myStory.paragraphs.item(3);
myPargraph.paragraphDirection = ParagraphDirectionOptions.leftToRightDirection;
var myStartCharacter = myPargraph.characters.item(0);
var myEndCharacter = myPargraph.characters.item(-2);
var myText = myStory.texts.itemByRange(myStartCharacter, myEndCharacter);
var myTable = myText.convertToTable(",",";");
//Change Table direction (paragraph direction is LTR, the converted table is LTR
//use table direction property to have table RTL), this change also the align
myStory.tables.item(1).tableDirection = TableDirectionOptions.rightToLeftDirection;
var myPargraph = myStory.paragraphs.item(5);
myPargraph.paragraphDirection = ParagraphDirectionOptions.rightToLeftDirection;
var myStartCharacter = myPargraph.characters.item(0);
var myEndCharacter = myPargraph.characters.item(-2);
var myText = myStory.texts.itemByRange(myStartCharacter, myEndCharacter);
var myTable = myText.convertToTable(",",";");
var myPargraph = myStory.paragraphs.item(7);
myPargraph.paragraphDirection = ParagraphDirectionOptions.rightToLeftDirection;
var myStartCharacter = myPargraph.characters.item(0);
var myEndCharacter = myPargraph.characters.item(-2);
var myText = myStory.texts.itemByRange(myStartCharacter, myEndCharacter);
var myTable = myText.convertToTable(",",";");
//Change Table direction (paragraph direction is RTL, the converted table is RTL
//use table direction property to have table LTR)
myStory.tables.item(3).tableDirection = TableDirectionOptions.leftToRightDirection;
VBScript
Rem Fill the text frame with placeholder text.
myString = "Table 1 LTR (pargraph direction LTR)" & vbCr
myString = myString &
"Column 1,Column 2,Column 3;1a,1b,1c;2a,2b,2c;3a,3b,3c" & vbCr
myString = myString & "Table 2 RTL, right Align (pargraph direction LTR)" & vbCr
myString = myString &
"Column 1,Column 2,Column 3;1a,1b,1c;2a,2b,2c;3a,3b,3c" & vbCr
myString = myString & "Table 3 RTL, left align (pargraph direction RTL)" & vbCr
myString = myString &
"Column 1,Column 2,Column 3;1a,1b,1c;2a,2b,2c;3a,3b,3c" & vbCr
myString = myString & "Table 4 LTR(pargraph direction RTL)" & vbCr
myString = myString &
"Column 1,Column 2,Column 3;1a,1b,1c;2a,2b,2c;3a,3b,3c" & vbCr
myTextFrame.Contents = myString
Set myStory = myDocument.Stories.Item(1)
Set myPargraph = myStory.paragraphs.item(2)
myPargraph.ParagraphDirection = idParagraphDirectionOptions.idLeftToRightDirection
Set myStartCharacter = myPargraph.Characters.Item(1)
Set myEndCharacter = myPargraph.Characters.Item(-2)
Set myText = myStory.Texts.ItemByRange(myStartCharacter, myEndCharacter).Item(1)
Set myTable = myText.ConvertToTable(",", ";")
Set myPargraph = myStory.paragraphs.item(4)
myPargraph.ParagraphDirection = idParagraphDirectionOptions.idLeftToRightDirection
Set myStartCharacter = myPargraph.Characters.Item(1)
Set myEndCharacter = myPargraph.Characters.Item(-2)
Set myText = myStory.Texts.ItemByRange(myStartCharacter, myEndCharacter).Item(1)
Set myTable = myText.ConvertToTable(",", ";")
Rem Change Table direction (paragraph direction is LTR, the converted table is LTR
Rem use table direction property to have table RTL), this change also the align
myStory.Tables.item(2).TableDirection =
CHAPTER 4: Middle Eastern Scripting Guide Working with tables 52
idTableDirectionOptions.idRightToLeftDirection
Set myPargraph = myStory.paragraphs.item(6)
myPargraph.ParagraphDirection = idParagraphDirectionOptions.idRightToLeftDirection
Set myStartCharacter = myPargraph.Characters.Item(1)
Set myEndCharacter = myPargraph.Characters.Item(-2)
Set myText = myStory.Texts.ItemByRange(myStartCharacter, myEndCharacter).Item(1)
Set myTable = myText.ConvertToTable(",", ";")
Set myPargraph = myStory.paragraphs.item(8)
myPargraph.ParagraphDirection = idParagraphDirectionOptions.idRightToLeftDirection
Set myStartCharacter = myPargraph.Characters.Item(1)
Set myEndCharacter = myPargraph.Characters.Item(-2)
Set myText = myStory.Texts.ItemByRange(myStartCharacter, myEndCharacter).Item(1)
Set myTable = myText.ConvertToTable(",", ";")
Rem Change Table direction (paragraph direction is RTL, the converted table is RTL
Rem use table direction property to have table LTR)
myStory.Tables.item(4).TableDirection =
idTableDirectionOptions.idLeftToRightDirection
