Adobe Media Encoder CC (2016) Help Guide Mediaencoder CC2016 EN
User Manual: adobe Media Encoder - CC (2016) - Help Guide Free User Guide for Adobe Media Encoder Software, Manual
Open the PDF directly: View PDF ![]() .
.
Page Count: 59
- Legal notices
- Contents
- Chapter 1: What's new
- New features summary
- Media Browser
- Ingest and Transcode
- Export directly from Audition and Character Animator
- Destination Publishing Support for Twitter
- New Folder Import feature
- Panasonic AVC-LongG export support
- AS-10 export support
- FCP XML Time Remapping Support
- Direct Export to XDCAM HD Disc
- QT XDCAM HD to MXF XDCAM HD Smart Rendering
- HEVC Support for 10-bit output
- New checkbox added to remove XAVC-Intra spec limitation on duration
- Match Source option for still image formats
- New features summary
- Chapter 2: Encoding quick start and basics
- Overview of Adobe Media Encoder
- Using the Preset Browser
- System presets
- Custom presets, preset groups, and aliases
- Managing Presets
- Apply presets or preset groups to the Queue
- Apply presets or preset groups to Watch Folders
- Apply presets to Premiere Pro sequences, After Effects compositions, and media assets during import
- Using Ingest Presets with Media Encoder
- Adding Metadata to Files During Ingest
- Renaming files during ingest
- Working with Ingest Outputs in the Queue Panel
- Encode video or audio items in Adobe Media Encoder
- File formats supported for import for Media Encoder
- Working with log files
- Files supported for export with Media Encoder
- About video and audio encoding and compression
- Compression tips
- Preferences
- Keyboard shortcuts
- Chapter 3: Encoding and exporting
- Create custom presets for Media Encoder
- Sync preferences and settings
- Using the GoPro CineForm codec in After Effects
- IRT compliance
- Export settings reference for Media Encoder
- Encode and export video and audio with Media Encoder
- Managing the media cache database

Adobe® Media Encoder
CC
Help

iii
Last updated 6/16/2016
Contents
Chapter 1: What's new
New features summary . . . . . . . . . . . . . . . . . . . . . . . . . . . . . . . . . . . . . . . . . . . . . . . . . . . . . . . . . . . . . . . . . . . . . . . . . . . . . . . . . . . . . . . . . . . . . . . . .1
Chapter 2: Encoding quick start and basics
Overview of Adobe Media Encoder . . . . . . . . . . . . . . . . . . . . . . . . . . . . . . . . . . . . . . . . . . . . . . . . . . . . . . . . . . . . . . . . . . . . . . . . . . . . . . . . . . . . .4
Using the Preset Browser . . . . . . . . . . . . . . . . . . . . . . . . . . . . . . . . . . . . . . . . . . . . . . . . . . . . . . . . . . . . . . . . . . . . . . . . . . . . . . . . . . . . . . . . . . . . . . .9
Encode video or audio items in Adobe Media Encoder . . . . . . . . . . . . . . . . . . . . . . . . . . . . . . . . . . . . . . . . . . . . . . . . . . . . . . . . . . . . . . . . . 16
File formats supported for import for Media Encoder . . . . . . . . . . . . . . . . . . . . . . . . . . . . . . . . . . . . . . . . . . . . . . . . . . . . . . . . . . . . . . . . . . 20
Working with log files . . . . . . . . . . . . . . . . . . . . . . . . . . . . . . . . . . . . . . . . . . . . . . . . . . . . . . . . . . . . . . . . . . . . . . . . . . . . . . . . . . . . . . . . . . . . . . . . 22
Files supported for export with Media Encoder . . . . . . . . . . . . . . . . . . . . . . . . . . . . . . . . . . . . . . . . . . . . . . . . . . . . . . . . . . . . . . . . . . . . . . . . 23
About video and audio encoding and compression . . . . . . . . . . . . . . . . . . . . . . . . . . . . . . . . . . . . . . . . . . . . . . . . . . . . . . . . . . . . . . . . . . . . 24
Compression tips . . . . . . . . . . . . . . . . . . . . . . . . . . . . . . . . . . . . . . . . . . . . . . . . . . . . . . . . . . . . . . . . . . . . . . . . . . . . . . . . . . . . . . . . . . . . . . . . . . . . . 27
Preferences . . . . . . . . . . . . . . . . . . . . . . . . . . . . . . . . . . . . . . . . . . . . . . . . . . . . . . . . . . . . . . . . . . . . . . . . . . . . . . . . . . . . . . . . . . . . . . . . . . . . . . . . . . 28
Keyboard shortcuts . . . . . . . . . . . . . . . . . . . . . . . . . . . . . . . . . . . . . . . . . . . . . . . . . . . . . . . . . . . . . . . . . . . . . . . . . . . . . . . . . . . . . . . . . . . . . . . . . . . 30
Chapter 3: Encoding and exporting
Create custom presets for Media Encoder . . . . . . . . . . . . . . . . . . . . . . . . . . . . . . . . . . . . . . . . . . . . . . . . . . . . . . . . . . . . . . . . . . . . . . . . . . . . . 31
Sync preferences and settings . . . . . . . . . . . . . . . . . . . . . . . . . . . . . . . . . . . . . . . . . . . . . . . . . . . . . . . . . . . . . . . . . . . . . . . . . . . . . . . . . . . . . . . . 32
Using the GoPro CineForm codec in After Effects . . . . . . . . . . . . . . . . . . . . . . . . . . . . . . . . . . . . . . . . . . . . . . . . . . . . . . . . . . . . . . . . . . . . . . 34
IRT compliance . . . . . . . . . . . . . . . . . . . . . . . . . . . . . . . . . . . . . . . . . . . . . . . . . . . . . . . . . . . . . . . . . . . . . . . . . . . . . . . . . . . . . . . . . . . . . . . . . . . . . . . 37
Export settings reference for Media Encoder . . . . . . . . . . . . . . . . . . . . . . . . . . . . . . . . . . . . . . . . . . . . . . . . . . . . . . . . . . . . . . . . . . . . . . . . . . 38
Encode and export video and audio with Media Encoder . . . . . . . . . . . . . . . . . . . . . . . . . . . . . . . . . . . . . . . . . . . . . . . . . . . . . . . . . . . . . . 52
Managing the media cache database . . . . . . . . . . . . . . . . . . . . . . . . . . . . . . . . . . . . . . . . . . . . . . . . . . . . . . . . . . . . . . . . . . . . . . . . . . . . . . . . . 56
1
Last updated 6/16/2016
Chapter 1: What's new
New features summary
The Adobe Media Encoder CC 2015.3 Release(June 2016) comes with a host of new features to help streamline the full
production workflow - from initial ingest through to final output. The familiar media browser functionality is now
available in this release and this helps lets you preview media files before you add them to the queue. Additional notable
features include a new Publish to Twitter feature that allows for easy sharing with your followers.
Media Browser
The familiar media browser is now included in Media Encoder and this feature helps you easily find and preview your
media.
For more information, see Using the new media browser .

2
What's new
Last updated 6/16/2016
Ingest and Transcode
Adobe Media Encoder now allows you to ingest media files from a camera onto a local drive so that you can quickly
start editing in Premiere Pro.
For more information, see Using Ingest Preset with Media Encoder
Export directly from Audition and Character Animator
Using Adobe Media Encoder you can export directly from Audition and Character Animator.
For more information, see Export directly from Audition through Media Encoder and Export directly from
Character Animator through Media Encoder .
Destination Publishing Support for Twitter
Twitter has been added to Adobe Media Encoder’s extensive destination publishing workflow, joining other popular
social media publishing options such as YouTube, Facebook and Vimeo. Now users can render and share videos directly
to Twitter from Adobe Media Encoder.
For more information, see Export settings reference for Media Encoder.
New Folder Import feature
AME now supports drag & drop of folders to the Queue from the desktop or Media Browser panel. All valid media files
within the folder are added as new sources to the queue, including files within sub-folders. A new import progress
dialog lets you monitor progress during longer imports and provides a Cancel button to stop import. For more
information, see Overview of Adobe Media Encoder.
Panasonic AVC-LongG export support
Adobe Media Encoder has added support for the Panasonic AVC-LongG codecs (AVC-LongG6/12/25/50) in an MXF
OP1a wrapper. These codecs are available under the MXF OP1a format.
AS-10 export support
Adobe Media Encoder now allows you to export using the AS-10 export option.
FCP XML Time Remapping Support
Adobe Media Encoder supports the import of Speed ramps and exporting the same to Final Cut Pro XML documents.
Direct Export to XDCAM HD Disc
With this release, Adobe Media Encoder supports an option to directly export to an XDCAMHD Disc.
QT XDCAM HD to MXF XDCAM HD Smart Rendering
You can smart render your QuickTime XDCAM HD sources in to an MXF wrapper. It’s as simple as selecting the Enable
Smart Rendering checkbox of a matching MXF OP1a preset.
Note: Adobe Media Encoder does not support smart rendering MXF XDCAM sources to QuickTime XDCAM.

3
What's new
Last updated 6/16/2016
HEVC Support for 10-bit output
Adobe Media Encoder supports HEVC 10-bit output. You can choose your preferred bit depth by selecting either Main
or Main10 (for 8 or 10-bit respectively) under the Profiles setting of the HEVC Video tab.
New checkbox added to remove XAVC-Intra spec limitation on duration
A new checkbox, Sony device compatibility has been added to XAVC export settings. By default, this setting is
unchecked and generates output that always matches the full duration of your source. When checked, the output will
adhere to Sony specifications that may truncate the end of your file.
Match Source option for still image formats
Match Source is now offered for all still image formats supported by AME, matching the source frame height, width,
rate, field order and aspect ratio. Older presets have been removed and replaced with the new Match Source versions.

4
Last updated 6/16/2016
Chapter 2: Encoding quick start and basics
Overview of Adobe Media Encoder
Adobe Media Encoder functions as an encoding engine for Adobe Premiere Pro, Adobe After Effects, Adobe Audition,
Adobe Character Animator and Adobe Prelude. You can also use Adobe Media Encoder as a stand-alone encoder.
For an overview of using all the features in Adobe Media Encoder, see this video by Jan Ozer.
Getting started with Adobe Media Encoder
Using Adobe Media Encoder, you can export videos to video-sharing websites like YouTube and Vimeo, devices
ranging from professional tape decks to DVD players, mobile phones, and high-definition TV sets.
Additional resources
•Workflow and overview of exporting video and audio from Premiere Pro using Adobe Media Encoder
•Apply effects using Adobe Media Encoder
•Export closed captions from Premiere Pro to Adobe Media Encoder
•See this blog on Adobe Video Applications that includes a video on the Destination Publishing feature with Adobe
Media Encoder
Adobe Media Encoder workspace
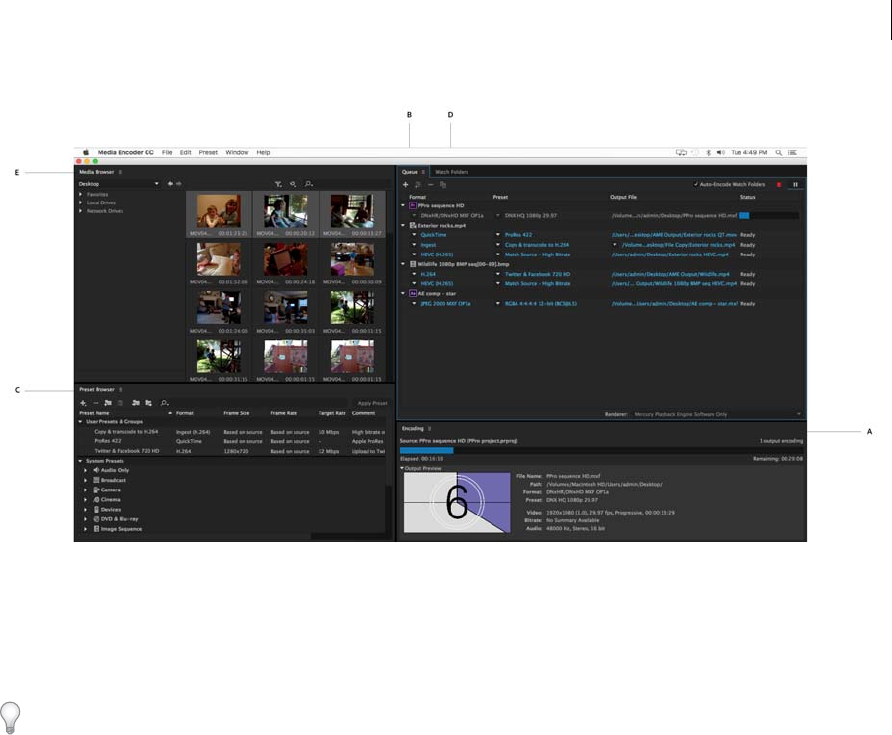
There are five main panels in Adobe Media Encoder that you use while encoding your files. You can group panels as
tabs in a single frame or float them as separate panels.
5
Encoding quick start and basics
Last updated 6/16/2016
A Encoding panel B Queue panel C Preset Browser D Watch Folder E Media Browser
After you customize the workspace to your requirements, select Window > Workspace > New Workspace to create a
custom workspace.
Many commands in Adobe Media Encoder have keyboard shortcuts to help you complete tasks quickly, with minimal
use of the mouse. See this page for default keyboard shortcuts in Adobe Media Encoder.
Encoding panel
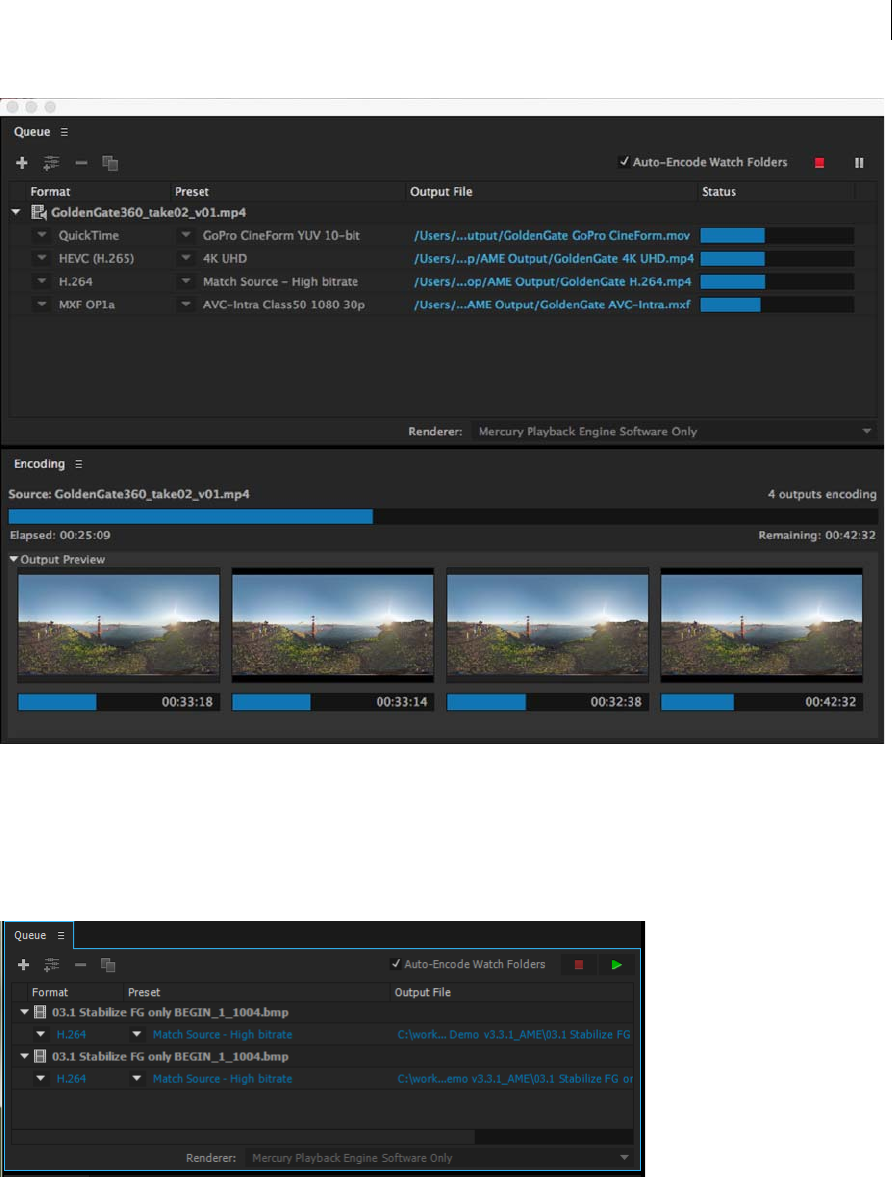
The Encoding panel provides information on the status of each item being encoded.
When you encode multiple outputs simultaneously, the Encoding panel displays a thumbnail preview, progress bar, and
the completion time estimate of each encoding output. For more information, see Parallel Encoding .
6
Encoding quick start and basics
Last updated 6/16/2016
Queue panel
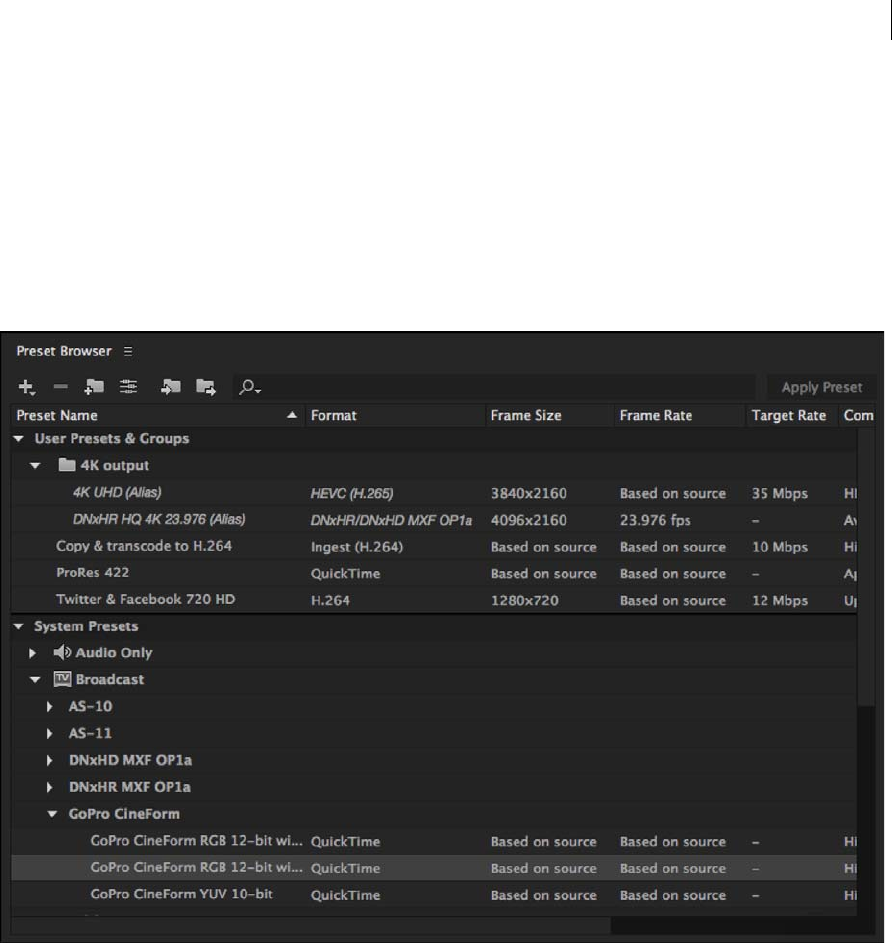
You add files that you want to encode to the Queue panel. You can add source video or audio files, Adobe Premiere Pro
sequences, and Adobe After Effects compositions to a queue of items to encode. You can drag-and-drop the files into
the queue or click Add Source and select the source files to encode.
The items added to the encoding queue are encoded when you start the queue. You can instruct Adobe Media Encoder
to start encoding after you add an item to the queue, or wait until you decide to start encoding. You can also set a
preference to begin the encoding when the specified amount of time has elapsed after a new item is added to the
encoding queue.
7
Encoding quick start and basics
Last updated 6/16/2016
You can add, remove, or reorder items in the queue panel. For more information, see Encode video or audio items in
Adobe Media Encoder
After adding video and audio items to the encoding queue, you can apply additional presets using the Preset Browser
or adjust output settings in the Export Settings or Ingest Settings dialogs. For more information, Encode and export
video and audio with Media Encoder.
Preset Browser
The Preset Browser provides you with options that help streamline your workflow in Adobe Media Encoder.
System presets in the browser are organized as categories based on their use (such as Broadcast, Web Video) and device
destination (such as DVD, Blu-ray, Camera, Tablet). You can modify these presets to create custom presets, also called
User Presets.
In the Preset Browser, you can quickly find a preset using search, or using the enhanced navigation provided by the
collapsible folder structure. For more information on the Preset Browser, Using the Preset Browser
For more information on encoding using presets, see Create custom presets for Media Encoder.
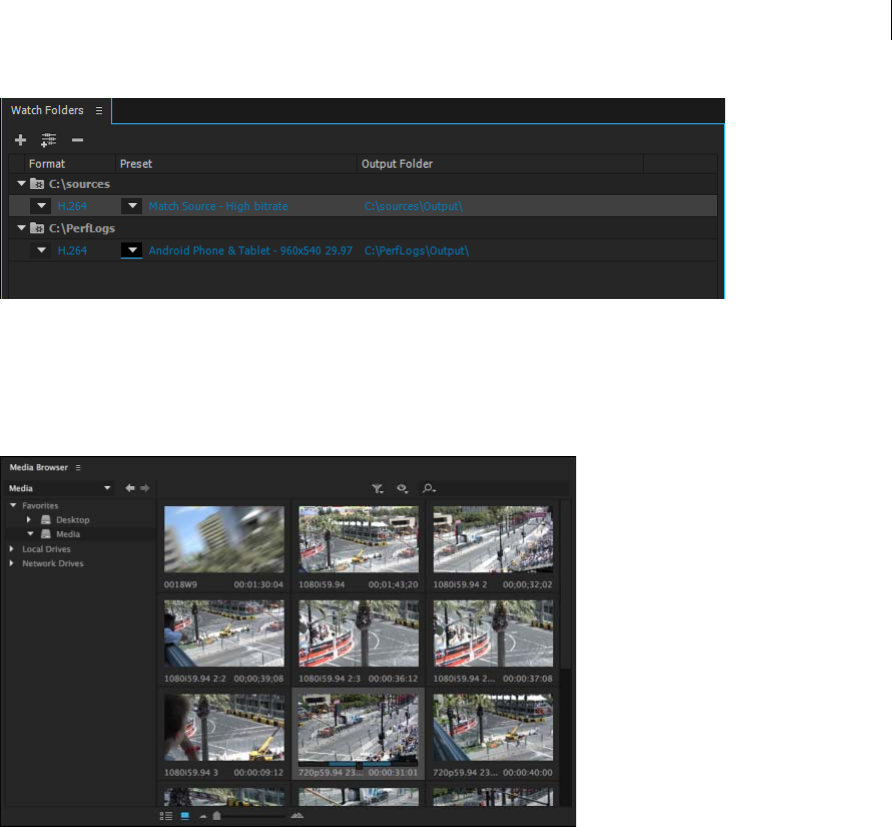
Watch Folder
Any folder on your hard drive can be designated as a Watch Folder. Once you select your Watch Folder, any files that
you add into the folder are encoded using the selected presets. Adobe Media Encoder automatically detects media files
being added to the Watch Folder and starts the encoding.
For more information, see Add a Watch folder to the encoding queue .
8
Encoding quick start and basics
Last updated 6/16/2016
To export a single source into multiple outputs using Watch Folders, see this video from video2brain.
Working with the new media browser
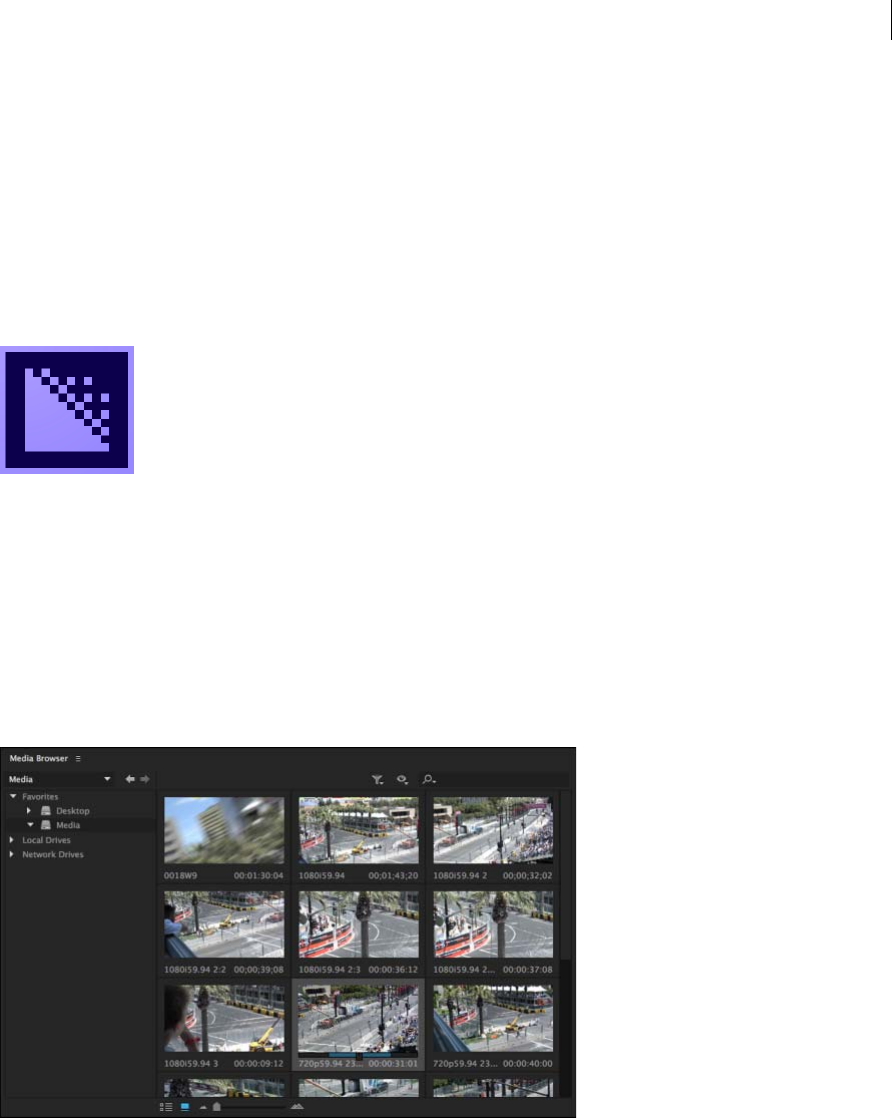
The media browser lets you preview media files before you add them to the queue. The left side of the panel shows all
local and networked drives on your system plus a Favorites section where you can save links to directories you use most
often. The right side of the panel displays the contents of the selected drive or directory. You can filter your content
based on file type or use the Search field. Folder-based file structures used by camera manufacturers like Canon, Sony,
and Panasonic can be easily navigated, as well the contents of After Effects and Premiere Pro projects.
You can add files to the encoding queue by double-clicking them in the Media Browser, or dragging them directly to
the Queue panel. To assign specific encoding or ingest presets to your files, drag them to presets in the Preset Browser.
•To view content as Thumbnails, click the Icon View button.
•To view content as a list, click the List View button.
•To quickly preview the contents of a file, drag the cursor across the thumbnail. You can also click the thumbnail and
use the playhead to scrub the movie. Alternatively, use the JKL keys to control playback of the selected thumbnail.
•To change the thumbnail size of files, use the Zoom slide bar.
•To view files of a specific file type, select an option from the Files Of Type menu. Repeat the procedure to choose
more than one option. By default, all supported file types are displayed.

9
Encoding quick start and basics
Last updated 6/16/2016
•To view files from a specific source, select that option from the View As menu. If ingesting from a device, ensure
that it is connected to your computer.
•To ingest just a specific portion of a file, click its thumbnail and use the JKL keyboard shortcuts or drag the playhead
to navigate through the clip. Press the I and O keys to set In and Out Point at the desired frames.
Note: Custom duration ingest is only supported by the Transcode option. The Copy option always copies the entire source
file.
Using the Preset Browser
The Preset Browser provides you with options that help streamline your workflow in Adobe Media Encoder.
To learn more about using the preset browser, see this video from video2brain.
System presets
System presets in the browser are organized as categories based on their use (such as Broadcast, Web Video) and device
destination (such as DVD, Blu-ray, Camera, Tablet). You can modify these presets to create custom presets, also called
User Presets.
In the Preset Browser, you can quickly find a preset using search, or using the enhanced navigation provided by the
collapsible folder structure.
Custom presets, preset groups, and aliases
To create a new custom User preset, do one of the following:
•Choose Preset > Create Encoding Preset to create a new encoding preset.
•Choose Preset > Create Ingest Preset to create a new ingest preset. To see more information about this feature, see
Ingest Preset.
•Click the Create New Preset button in the Preset Browser and choose New Encoding Preset or New Ingest Preset
from the popup menu.
To create a new Preset Group, do one of the following:
•Choose Preset > Create Group
•Click the Create New Preset Group button in the Preset Browser
Preset Groups can contain user presets, aliases to presets, or other preset groups.
To create an alias to a system or user preset, do one of the following:
•Select a system or user preset in the Preset Browser and choose Preset > Create Alias
•Drag a system preset to the User Presets & Groups section of the Preset Browser
•Hold the Alt (Windows) or Opt (Mac) key down and drag a user preset to a different location in the User Presets &
Groups section of the Preset Browser.
Managing Presets
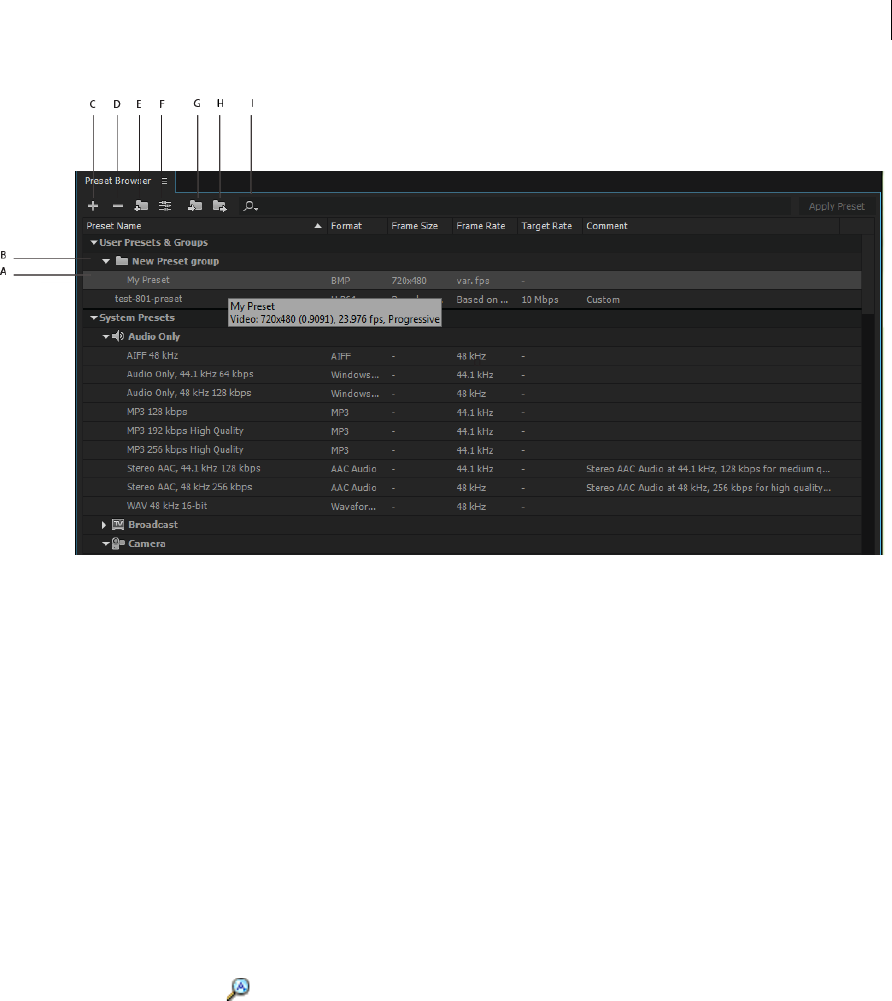
To manage presets, use the Preset menu or the options in The Preset Browser (Window>Preset Browser). You can also
right-click a preset in the Preset Browser to view the context menu for the available options.
10
Encoding quick start and basics
Last updated 6/16/2016
A Custom preset B Preset group C Create new preset D Delete preset E Create new preset group F Preset settings G Import presets H Export
presets I Search for presets
Modify user presets
•To rename a preset, click the name of a selected preset. Type a name for the preset and press Enter. Alternatively,
select Preset > Rename to rename a preset.
•To modify preset settings, select a preset, and select Preset > Settings.
•To delete a preset, select the preset and press Delete. Alternatively, select Preset > Delete.
Note: Only custom presets can be edited. Changes to system presets can be saved as new user presets by clicking the Save A
Copy button in the Preset Settings dialog.
Show the location of a preset in Finder or Explorer
Right-click the preset in the Preset Browser and select Reveal Preset File.
Quickly find a preset in the browser
As you type in the search field , the Preset Browser filters the preset list to match your search string. All columns are
scanned for matching results.
Import and export presets
Presets can be imported and exported as EPR files. EPR files are saved in the XML format.
•Select Preset > Import to import EPR files. Imported presets appear in the User Presets and Groups section.
•Select Preset > Export to export selected presets as EPR files.
Note: You can also drag-and-drop EPR files to the User Presets and Groups section.

11
Encoding quick start and basics
Last updated 6/16/2016
Apply presets or preset groups to the Queue
To apply presets to sources in the Queue, do one of the following:
•Drag presets, preset groups, or aliases from the Preset Browser and drop them on sources or outputs in the Queue.
•Dropping a preset on a source adds an output to the source.
•Dropping a preset on an existing output replaces the settings of the output with the settings of the preset.
•To add an output to the source, drag a source from the Queue to a preset, preset group, or alias in the Preset Browser.
•To replace the settings of the output with the settings of the preset, drag an output from the Queue to a preset, preset
group, or alias in the Preset Browser.
•Select a source in the Queue and double-click a preset, preset group, or alias in the Preset Browser.
•Select a source in the Queue. Select presets, preset groups, or aliases selected in the Preset Browser. Click Apply
Preset.
Apply presets or preset groups to Watch Folders
To apply presets to watch folders in the Watch Folders panel, do one of the following:
•Drag presets, preset groups, or aliases from the Preset Browser and drop them on watch folders or outputs in the
Watch Folders panel.
•Dropping presets on a watch folder adds new outputs to the watch folder.
•Dropping presets on an existing output replaces the settings of the output with the settings of the preset.
•To add an output to the watch folder, drag a watch folder from the Watch Folders panel to a preset, preset group, or
alias in the Preset Browser.
•To replace the settings of the output with the settings of the preset, drag an output from the Watch Folders panel to
a preset, preset group, or alias in the Preset Browser.
•Select a watch folder in the Watch Folders panel. Alt + double-click (Win) or Opt + double-click (Mac) a preset,
preset group, or alias in the Preset Browser.
•Select a watch folder in the Watch Folders panel. Select presets, preset groups, or aliases in the Preset Browser. Alt
+ click (Win) or Opt + click (Mac) the Apply Preset button.
Apply presets to Premiere Pro sequences, After Effects compositions, and
media assets during import
To apply presets to Adobe Premiere Pro sequences, do one of the following:
•Navigate within an Adobe Premiere Pro project in the Media Browser and drag-and-drop sequences to a preset,
preset group or alias in the Preset Browser.
•Drag a sequence from the Project panel of an open Adobe Premiere Pro project and drop it on a preset, alias, or
preset group in the Preset Browser.
Note: This procedure is the only way to add multiple presets to Adobe Premiere Pro sequences in a single step. The Export
Settings dialog in Adobe Premiere Pro allows you to apply single presets when exporting sequences to Adobe Media Encoder.
Apply presets to After Effects compositions
•Navigate within an Adobe After Effects project in the Media Browser and drag-and-drop compositions to a preset,
preset group or alias in the Preset Browser.

12
Encoding quick start and basics
Last updated 6/16/2016
•Drag a composition from the Project panel of an open After Effects project to a preset, preset group, or alias in the
Preset Browser.
Apply presets to video and audio assets
•Drag media files from the Media Browser to a preset, preset group or alias in the Preset Browser.
•Drag video and audio assets from Finder or Windows Explorer and drop them on a preset, preset group, or alias in
the Preset Browser.
Important considerations when applying presets
•Dropping a single preset on an output replaces the output. The new outputs inherit the output path, output name,
and source range settings from the targeted output
•Dropping a single preset on a source adds an output.
•Dropping a preset group (or multiple selected presets) on an output adds outputs. The new outputs inherit the
output path, output name, and source range settings from the targeted output.
•Dropping a preset group (or multiple selected presets) on a source adds outputs. Settings such as output path from
existing outputs are not inherited.
Using Ingest Presets with Media Encoder
Adobe Media Encoder now allows you to ingest media files from a camera onto a local drive so that you can quickly
start editing in Premiere Pro. You can now launch AME, select the clips you want to ingest using the Media Browser
and set In/Out points if necessary.
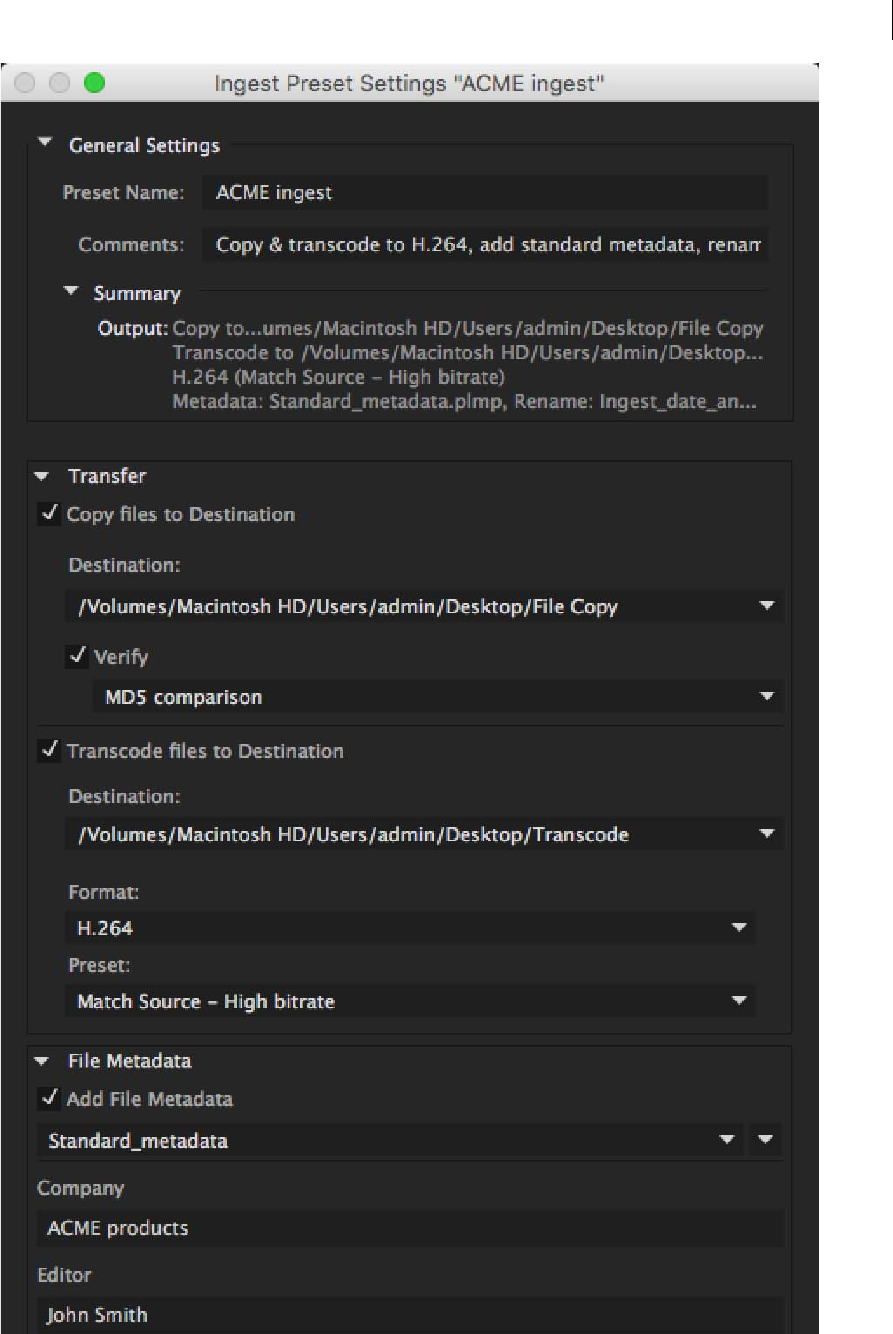
Ingest the clips by dragging them to an Ingest preset in the Preset Browser, or by dragging them directly to the Queue
and applying an Ingest preset to the new sources there. The Ingest Preset Settings dialog lets you choose a destination
on your local machine to copy the camera files to, choose a Transcode format, and set up Metadata or rename your
assets if necessary. When the queue is done processing, you can import the files to your Premiere Pro project to begin
editing.
13
Encoding quick start and basics
Last updated 6/16/2016

14
Encoding quick start and basics
Last updated 6/16/2016
To copy files from a camera or networked volume, turn on 'Copy files to destination' and specify a location for the
ingested files by clicking 'Browse For Location' and selecting a destination folder. To ensure that the copied files match
the original, select Verify and choose one of the following options:
•MD5 Comparison: Performs an MD5 check and ensures that the source file is the same as the ingested file.
•File Size Comparison: Checks whether the file size of the ingested file is the same as the size of the original movie
clip.
•Bit by Bit Comparison: Does a CRC check and verifies whether the checksum of the source file is the same as the
ingested file. If the files are different, the checksums don't match, and the test fails.
To transcode files during ingest, turn on 'Transcode files to destination' and specify a location for the ingested files by
clicking 'Browse For Location' and selecting a destination folder.Next, choose a transcoding Format and Preset from
any of the installed system presets or choose a custom Encoding preset that you previously created or imported to the
Preset Browser.
Adding Metadata to Files During Ingest
You can add metadata during ingest by creating a custom form (or schema) to be applied to each ingested file as XMP
metadata. To add metadata, turn on 'Add File Metadata' in the File Metadata section. To create a preset, do the
following:
1Click the downward arrow icon next to the list of metadata presets and choose "New Preset".
2Click "+" to add a metadata field.
3Enter a name for the metadata field. Ensure that the name doesn't contain spaces.
4For mandatory fields, click the check box next to the asterisk (*).
5Optionally, in Input Metadata Value, enter the value for the preset.
6To add additional fields, click the "+" button again.
7Click Save to save the preset.
Note: The metadata name and the metadata value together are called the metadata pair or key-value pair. You can choose
to provide a default value to the name or add the value dynamically during ingest.
To edit a preset, do the following:
1Select a preset in the menu.
2Click the downward icon next to the menu and select Edit. Edit the values as required and click Save.
3To save the preset with a different name, select Save As. Enter a new name for the preset.
4To go back to the Metadata panel without saving changes, click "x". To delete a preset, click the Trash icon.
Metadata presets can be shared with other users by sending them the preset file. This can be helpful by establishing
consistent sets of metadata that your teams can leverage when organizing assets and content. To locate the presets on
your computer, click the downward icon next to the Preset menu, and select Show in Explorer or Show in Finder. To
import a preset, click the downward arrow next to the Preset menu and select Import Preset. Select the presets that you
want to import and click Open. File Metadata presets are saved as .PLMP files in the following location:
•Windows: C:\Users\\Documents\Adobe\Adobe Media Encoder\10.0\Presets\Metadata\
•Mac: HD/Users//Documents/Adobe/Adobe Media Encoder/10.0/Presets/Metadata/

15
Encoding quick start and basics
Last updated 6/16/2016
Renaming files during ingest
You can rename files during ingest by creating renaming presets that add specific strings to the output file name.
Note: Files that are a part of a complex folder structure (like P2) are not renamed.
To rename files on ingest, turn on 'Rename files' in the File Rename section. To create a preset for naming files, do the
following:
1Click the downward arrow icon next to the list of renaming presets and choose New Preset.
2Click "+" to add an element to your custom naming preset.
3Custom Text: Type characters you want added to the output file name. For example, your company's name, the
project name, or a separator between two elements.
4Date: Choose 'Ingest Date' to use the date files are added to the queue. Choose 'Creation Date' to use the timestamp
date from the source files.
5Time: Choose 'Ingest Time' to use the time files are added to the queue. Choose 'Creation Time' to use the timestamp
time from the source files.
6File Name: Adds the source file name (without the extension) as an elements in the new output name.
To add additional elements, click the "+" button again. Click Save to save the preset, enter a name for the preset and
ensure that the name doesn't contain spaces.
To edit file renaming presets follow these steps:
1Select the preset in the menu.
2Click the downward icon next to the menu, and select
3Edit the values as required and click Save.
4To save the preset with a different name select Save As and enter a new name for the preset.
5To go back to the File Rename panel without saving changes, click "x".
6To delete a preset, click the Trash icon.
Consistent naming conventions can be very useful in collaborative workflows. You can share renaming presets with
other users by sending them the preset file. To locate the presets on your computer, click the downward icon next to the
Preset menu and select Show in Explorer or Show in Finder. To import a preset, click the downward arrow next to the
Preset menu and select Import Preset. Select the presets that you want to import and click Open. File Rename presets
are saved as .PLRP files in the following location:
•Windows: C:\Users\\Documents\Adobe\Adobe Media Encoder\10.0\Presets\Rename\
•Mac: HD/Users//Documents/Adobe/Adobe Media Encoder/10.0/Presets/Rename/
Working with Ingest Outputs in the Queue Panel
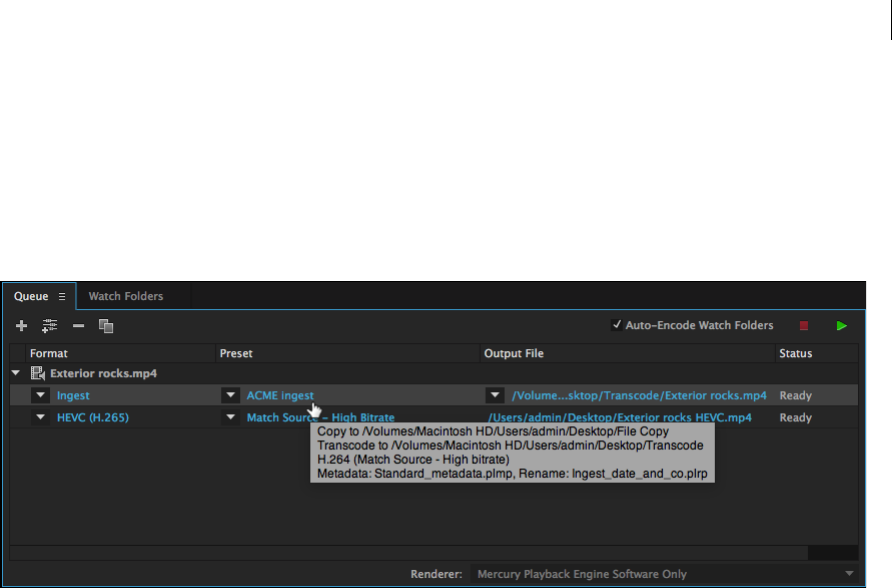
Ingest outputs in the queue behave in a way similar to Encoding outputs but with some important differences. The
format of ingest outputs is always shown as 'Ingest'. If transcoding is enabled, the ingest output's tool tip will show the
format and preset of the encoding preset it is associated with. For example: 'H.264 (Match Source - High bitrate)'
You can change an ingest output to an encoding output by choosing a different format from the Format popup menu.
Conversely, you can change an encoding output to an ingest output by changing it's format to 'Ingest'. To edit an ingest
output, do one of the following:
•Select the output and choose Edit > Export Settings
16
Encoding quick start and basics
Last updated 6/16/2016
•Click the hot-text in the Format or Preset columns
This opens the Ingest Settings dialog where you can make any necessary changes. In order to save your settings click
the OK button. This changes the ingest output’s Preset Name to 'Custom' in the Queue.
Ingest destinations are shown in the Output File column. If both Copy and Transcode option are enabled you can toggle
between the two paths by using the popup arrow to the left of the destination path. Click the destination's hot-text link
to open the destination folder.
Encode video or audio items in Adobe Media Encoder
The encoding process
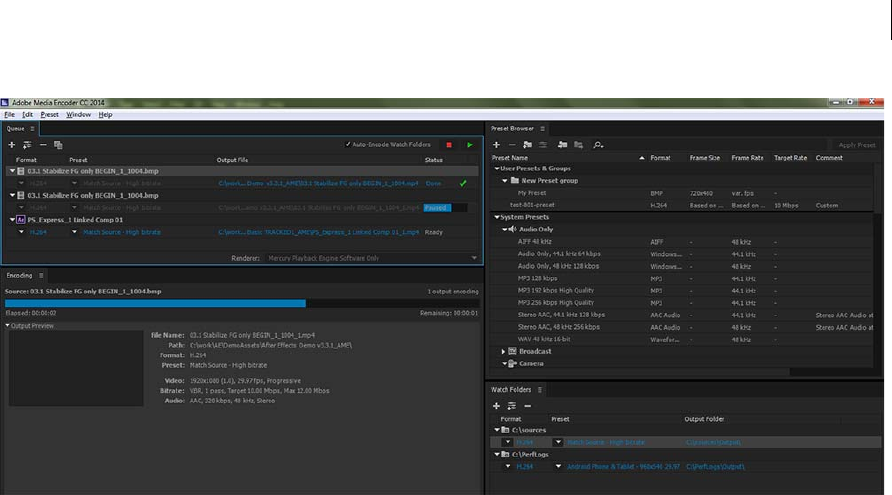
To encode a video or audio item, add the item to the encoding queue in Adobe Media Encoder, and then select
encoding presets or create your own custom settings. You can instruct the application to start encoding after you add
an item to the queue, or you can tell the application to wait until you decide to start encoding.
Add an item to the encoding queue - Drag video or audio files into the queue in Adobe Media Encoder.
Encode the item using presets - Select formats and presets from the Format and Presets pop-up menus with the item
in the queue. Or choose a preset from the Preset Browser and drag it to any item in the Queue. For more information,
see Encode using presets.
Encode the item using custom settings - Select the item and select Edit > Export Settings, and then choose your
settings. For more information, see Encode using custom settings.
To start encoding items in the queue automatically (or to turn off the feature), select or deselect the Start Queue
Automatically When Idle For option in the Preferences dialog box. For more information, see the Preferencesarticle.
17
Encoding quick start and basics
Last updated 6/16/2016
Import items into the encoding queue
•To add video or audio files, do one of the following:
•Drag one more files into the queue from the desktop or the media browser.
•Click the Add Source button and choose one or more files.
•Double-click an open area in the Queue panel and choose one or more files.
•To add a Adobe Premiere Pro sequence, do one of the following:
•Navigate within an Adobe Premiere Pro project in the Media Browser and drag-and-drop sequences to the
Queue.
•Choose File > Add Premiere Pro Sequence, select a Premiere Pro project, and select one or more sequences from
that project.
•Drag-and-drop a sequence from the Project panel in Adobe Premiere Pro into the queue.
•Drag-and-drop a Premiere Pro project from the desktop on the Queue.
•To add an Adobe After Effects composition, do one of the following:
•Navigate within an Adobe After Effects project in the Media Browser and drag-and-drop compositions to the
Queue.
• Choose File > Add After Effects Composition, select an After Effects project, and select a composition from that
project.
•Drag-and-drop a composition from the Project panel in After Effects into the queue.
•Drag-and-drop an After Effects project from the desktop on the Queue.
•
Stop encoding
•Choose File > Stop Current File to stop encoding the current item. Adobe Media Encoder continues encoding the
remaining items in the Queue.
•Choose File > Stop Queue to stop encoding all items in the Queue.

18
Encoding quick start and basics
Last updated 6/16/2016
Interpret items in the encoding queue
When Adobe Media Encoder imports a video asset, it attempts to determine the pixel aspect ratio, frame rate, and field
order for that asset, as well as how to interpret the alpha channel (transparency) information. If Adobe Media Encoder
is wrong about any of these characteristics, you can explicitly assign the correct interpretation.
1Select one or more items in the encoding queue.
2Choose File > Interpret Footage. You can also right click on the file and choose > Interpret Footage
3Choose the appropriate interpretation settings.
Watch folders in Adobe Media Encoder
You can configure Adobe Media Encoder to look for files in certain folders called watch folders. When Adobe Media
Encoder finds a video or audio file in a watch folder, it encodes the file using the encoding settings assigned to the
folder, and then exports the encoded file to an Output folder created inside the watch folder.
The Watch Folders panel in In Adobe Media Encoder can be used to add and manage folders. You can add a watch
folder in one of the following ways:
1Choose File > Add Watch Folder and select a folder.
2Double-click an empty area in the Watch Folders panel and select a folder.
3Create a folder in Explorer (Windows) or Finder (Mac OS), and then drag it to the Watch Folders panel.
You can see the name of the folder in the left column of the Watch Folders panel after you have created it.
The items added to the encoding queue by the watch folder will be encoded along with other items in the queue when
you start the queue.
Note: If you have the “start queue automatically when idle for” preference selected, encoding begins when the specified
amount of time has elapsed after the watch folder has added a new item to the encoding queue.
Keep the Auto-Encode Watch Folders checkbox enabled to automatically encode items when they are added to the
watch folder.
Adding presets
You can choose a format and preset from the pop-up menus in the watch folder next to the folder name. Or drag a preset
to the watch folder from the preset browser.
Create output in multiple formats from a single source item using watch folders
You can generate multiple outputs with a single operation by using watch folders. For example, you want to generate an
AVI movie, and a JPEG thumbnail image whenever you transcode a video asset. Follow these steps to create these files
with a single user operation:
1Create a folder using Explorer (Windows) or Finder (Macintosh) called, “My_WatchFolder,” for example.
2Create a new watch folder by clicking the Add Folder button, and then navigate to the folder you just made,
“My_Watchfolder.”
aSelect “MPEG” as the format from the Format menu.
bSelect a preset from the Preset pop-up menu, and then click OK.
cClick on “Output To.” Select a location where you would like the result to be generated.

19
Encoding quick start and basics
Last updated 6/16/2016
3Create a new Watch Folder item that also points to the folder “My_Watchfolder,” just like you created in Step 2.
aSelect “AVI” as the format from the Format menu.
bSelect a preset from the Preset Menu, and then click OK.
cClick on “Output To.” Select a location where you would like the result to be generated.
4Create a new Watch Folder item that also points to the folder “My_Watchfolder,” just like you created in Step 2 and
Step 3.
aSelect “JPEG” as the format from the Format menu.
bSelect a preset from the Preset Menu, and then click OK.
cClick on “Output To.” Select a location where you would like the result to be generated.
5Drag-and-drop the source file into “My_WatchFolder,” and then click the Start Queue button. The encoding process
begins automatically if Auto-Encode Watch Folders is enabled.
When complete, each file is in its expected output locations.
Note: The preset should be custom and have Export As Sequence unchecked. This will only export the first frame of the
video, which is often black.
Note: Still Image Sequences are not supported as source footage through Watch Folders. If a set of still images is placed in
the folder being watched, each individual still file will be added as a separate item to the Queue rather than the entire
sequence as a single piece of footage.
Save the encoding queue
The encoding queue and all encoding settings are saved automatically when you exit Adobe Media Encoder.
The encoding queue is also saved automatically when a user starts an encode.
To manually save the encoding queue, choose File > Save Queue.
Note: Turn off the Preferences > Remove completed files from the queue on exit checkbox if you want to keep completed
encoded items in the Queue when you close and restart Adobe Media Encoder.
Remove items from the encoding queue
1Select the item, or items that you want to remove from the encoding queue.
2Click the Remove button, choose Edit > Clear, or press the Delete key.
Duplicate items in the encoding queue
1Select the item, or items that you want to duplicate in the encoding queue.
2Do one of the following:
•Click the Duplicate button, choose Edit > Duplicate
•Press Ctrl-D (Windows), or Command-D (Mac OS)
•Right-click the file and choose Edit > Duplicate.

20
Encoding quick start and basics
Last updated 6/16/2016
Skip items in the encoding queue
Skip items
1Select the item, or items that you want to skip in the encoding queue.
2Choose Edit > Skip Selection or you can right-click the file and choose Edit > Skip Selection.
Reset a skipped file for encoding
1Select the items in the encoding queue that you want to reset to the Ready state.
2Choose Edit > Reset Status or you can also right-click the file and choose Edit > Reset Status.
File formats supported for import for Media Encoder
Some filename extensions—such as MOV, AVI, MXF, and FLV—denote container file formats rather than denoting a
specific audio, video, or image data format. Container files can contain data encoded using various compression and
encoding schemes. Adobe Media Encoder can import these container files, but the ability to import the data that they
contain is dependent on which codecs (specifically, decoders) are installed.
By installing additional codecs, you can extend the ability of Adobe Media Encoder to import additional file types.
Many codecs must be installed into the operating system and work as a component inside the QuickTime or Video for
Windows formats. Contact the manufacturer of your hardware or software for more information about codecs that
work with the files that your specific devices or applications create.
Video and animation formats
•3GP
•Animated GIF (GIF) (Windows only)
•DV (in MOV or AVI container, or as a containerless DV stream)
•FLV, F4V
Note: The FLV and F4V formats are container formats, each of which is associated with a set of video and audio
formats. F4V files generally contain video data that is encoded using an H.264 video codec and the AAC audio
codec. FLV files generally contain video data that is encoded using the On2 VP6 or Sorenson Spark codec and audio
data encoded using an MP3 audio codec. Adobe Media Encoder, however, can import FLV files using the On2 VP6
video codec, not the Sorenson Spark codec.
•QuickTime movie (MOV; on Windows, requires QuickTime player)
•MPEG-1, MPEG-2, and MPEG-4 formats (MPEG, MPE, MPG, M2V, MPA, MP2, M2A, MPV, M2P, M2T, MTS,
AC3, MP4, M4V, M4A, VOB, 3GP, AVC, h.264)
Note: Several formats associated with specific modern cameras use MPEG-4 encoding. For example, the XDCAM
EX format uses MP4 files, and the AVCHD format uses MTS files.
•Media eXchange Format (MXF)
•MXF OP1a

21
Encoding quick start and basics
Last updated 6/16/2016
Note: MXF is a container format. Adobe Media Encoder can only import some kinds of data contained within MXF
files. Adobe Media Encoder can import the Op-Atom variety used by Panasonic cameras using the DV, DVCPRO,
DVCPRO50, DVCPRO HD, and AVC-Intra codecs to record to Panasonic P2 media. Adobe Media Encoder can
also import XDCAM HD files in MXF format.
•P2 Movie (MXF)
•Netshow (ASF, Windows only)
•RED Raw (R3D)
•Video for Windows (AVI, WAV; on Mac OS, requires QuickTime Player)
•Windows Media (WMV, WMA, ASF; Windows only)
•Cinema DNG (.dng)
•Phantom (.cine)
•Canon RAW (.rmf)
Audio formats
•Adobe Sound Document (ASND; multi-track files imported as merged single track)
•Advanced Audio Coding (AAC, M4A)
•Audio Interchange File Format (AIF, AIFF)
•Dolby
•QuickTime (MOV; on Windows, requires QuickTime player)
•MP3 (MP3, MPEG, MPG, MPA, MPE)
•Video for Windows (AVI, WAV; on Mac OS, requires QuickTime Player)
•Windows Media Audio (WMA; Windows only)
•Wavefor m (WAV)
Still-image formats
•Adobe Illustrator (AI, EPS)
•Photoshop (PSD)
•Bitmap (DIB, RLE) (Windows only)
•Bitmap (BMP)
•Cineon/DPX (CIN, DPX)
•GIF
•Icon File (ICO; Windows only)
•JPEG (JPE, JPG, JPEG, JFIF)
•PICT (PIC, PCT)
•Portable Network Graphics (PNG)
•Targa (TGA, ICB, VDA, VST)
•TIFF (TIF)
•ARRIRAW (.ari)

22
Encoding quick start and basics
Last updated 6/16/2016
Note: You can import files of any still-image format as a sequence. For more information, see Import items into the
encoding queue.
Closed captioning formats
•Scenarist Closed Caption (.scc)
•MacCaption VANC (.mcc)
•W3C/SMPTE/EBU Timed Text (.xml)
•EBU N19 Subtitle (.stl)
•Distribution Format Exchange Profile (.dfxp)
Project file formats
•Adobe Premiere Pro (PRPROJ)
•After Effects (AEP, AEPX)
Working with log files
Encoding log file
The encoding log file is a plain-text file that contains a record of all files that were queued for encoding, whether
successfully completed or not. The encoding status of each file you encode is appended to the end of the file (placing
the newest entry at the end of the file). The log file adds entries until you manually clear them. To clear log file entries,
open the file in a text editor, select all of the entries, delete them, and save the empty file using the default filename
(AMEEncodingLog.txt).
The log file is stored in the following location:
•Windows 7 & 8: C:\Users\[user]\Documents\Adobe\Adobe Media Encoder\8.0\AMEEncodingLog.txt
•Mac OS: /Users/[user]/Documents/Adobe/Adobe Media Encoder/8.0/AMEEncodingLog.txt
To view the log file, choose File > Show Log or press Ctrl + L.
There are two log files:
•AMEEncodingLog.txt: for successfully encoded jobs.
•AMEEncodingErrorLog.txt: for jobs that failed, or were stopped by the user.
Error log file
The log files, and error log files are stored in the same location as the Adobe Media Encoder files.
To view the error log file, choose File > Show Errors.

23
Encoding quick start and basics
Last updated 6/16/2016
Files supported for export with Media Encoder
To export a file using Adobe Media Encoder, select a format in the Export Settings dialog box for the output. The
selected format determines the Preset options that are available. Select the format best suited for your output goal.
Adobe Media Encoder is used both as a standalone application and as a component of Adobe Premiere Pro, After
Effects, Prelude, and Flash Professional. The formats that Adobe Media Encoder can export depend on which of these
applications are installed.
Some filename extensions—such as MOV, AVI, and MXF —denote container file formats rather than denoting a
specific audio, video, or image data format. Container files can contain data encoded using various compression and
encoding schemes. Adobe Media Encoder can encode video and audio data for these container files, depending on
which codecs (specifically, encoders) are installed. Many codecs must be installed into the operating system and work
as a component inside the QuickTime or Video for Windows formats.
Depending on other software applications that you have installed, the following options may be available:
Video and animation
•AS-11 (AVCI for HD Shim, IMX for SD Shim). IMX is MPEG-2
•Animated GIF (Windows only)
•H.264 (AAC, 3GP, MP4, M4V, MPA (audio), AC3 (audio), WAV (PCM audio)). Audio options are AAC, Dolby
Digital, and MPEG. MPEG audio option includes MPEG-1, Layer I & MPEG-1, Layer II. Dolby Digital audio option
includes Dolby Digital, and Dolby Digital Plus.
•H.264 Blu-ray (M4V, WAV (PCM audio)). Audio options are Dolby Digital, and PCM. MPEG audio option includes
MPEG-1, Layer I & MPEG-1, Layer II, Blu-ray-compliant primary stream, and Blu-ray-compliant secondary audio
stream.
•HEVC (H.265). 4K HD, 8K HD, HD 720p, HD 1080p, Match Source - High Bit Rate, SD 480p, and SD 480p Wide.
•MPEG-2 (MPA, M2V, MPG, M2T, WAV (PCM audio), AC3 (Dobly audio)). Audio options are Dolby Digital,
MPEG, and PCM.
•MPEG-2 DVD (M2V, MPG, MPA (audio), WAV (PCM audio), AC3 (Dolby audio))
•MPEG-2 Blu-ray (M2V, M2T, WAV, AC3)
•MPEG-4 (3GP, MP4, M4V, AAC (audio)). Audio option is AAC.
•JPEG 2000 MXF OP1a
•DNxHR/DNxHD MXF OP1a
•DNxHD MXF OP1a
Note: MXF is a container format. Adobe Media Encoder can encode and export movies in the Op-Atom variety of
MXF containers using the DVCPRO25, DVCPRO50, and DVCPRO100, and AVC-Intra codecs. Premiere Pro can
export MXF files containing the MPEG-2 essence items that comply with the XDCAM HD format used by such
systems as Avid Unity. The standalone Adobe Media Encoder can also export files in this format.
•MXF OP1a (AVC-Intra, XAVC, IMX, XDCAM, DV and DVCPRO)
•QuickTime movie (MOV; on Windows, requires QuickTime)
•Windows Media (WMV; Windows only)
•Web Video (DG Fast Channel 480/512 MPEG-2, Facebook 720HD, Vimeo 480p SD/480p SD Wide/720p HD/1080p
HD, YouTube 480p SD/480p SD Wide/720p HD/1080p HD/2160p 4K)

24
Encoding quick start and basics
Last updated 6/16/2016
•Video for Windows (AVI, AVI (uncompressed); Windows only)
•Wraptor DCP
•P2 Movie (DVCPRO & AVC-Intra)
Still image and still-image sequence
•Bitmap (BMP; Windows only)
•DPX
•GIF (Windows only)
•JPEG
•PNG
•Targa (TGA)
•TIFF (TIF)
Note: To export a movie as a sequence of still-image files, select Export As Sequence on the Video tab when a still-image
format is selected.
Audio
•Audio Interchange File Format (AIFF)
•MP3
•Wavefor m Audio (WAV)
•Advanced Audio Coding (AAC Audio)
•Dolby Digital
Codecs installed for different installations of Adobe Media Encoder
•Adobe Premiere Pro, After Effects, and Prelude: All codecs. HEVC is not supported during a trial period in Adobe
Premeire Pro, After Effects, and Prelude.
•All other products: All codecs except MPEG2, MPEG2 DVD, MPEG2 Blu-ray, MXF OP1a, HEVC, and AS-11 SD
About video and audio encoding and compression
Recording video and audio to a digital format involves balancing quality with file size and bitrate. Most formats use
compression to reduce file size and bitrate by selectively reducing quality. Compression is essential for reducing the size
of movies so that they can be stored, transmitted, and played back effectively.
When exporting a movie file for playback on a specific type of device at a certain bandwidth, you must first choose an
encoder (codec). Various encoders use different compression schemes to compress the information. Each encoder has
a corresponding decoder that decompresses and interprets the data for playback.
A wide range of codecs is available; no single codec is best for all situations. For example, the best codec for compressing
cartoon animation is generally not efficient for compressing live-action video.
Compression can be lossless (in which no data is discarded from the image) or lossy (in which data is selectively
discarded).

25
Encoding quick start and basics
Last updated 6/16/2016
You can control many of the factors that influence compression and other aspects of encoding in the Export Settings
dialog box. See Encoding and exporting .
John Dickinson provides a video tutorial on the Adobe website that demonstrates the use of Adobe Media Encoder with
After Effects and Premiere Pro.
For more information about encoding and compression options, see this FAQ entry: "FAQ: What is the best format for
rendering and exporting from After Effects?"
Temporal compression and spatial compression
The two general categories of compression for video and audio data are spatial and temporal. Spatial compression is
applied to a single frame of data, independent of any surrounding frames. Spatial compression is often called intraframe
compression.
Temporal compression identifies the differences between frames and stores only those differences, so that frames are
described based on their difference from the preceding frame. Unchanged areas are repeated from the previous frames.
Temporal compression is often called interframe compression.
Bitrate
The bitrate (data rate) affects the quality of a video clip and the audience that can download the file given their
bandwidth constraints.
When you deliver video using the Internet, produce files using lower bitrates. Users with fast Internet connections can
view the files with little or no delay, but users with poor connections must wait for files to download. Make short video
clips to keep the download times within acceptable limits if you think a majority of users may not have good internet
speeds.
Frame rate
Video is a sequence of images that appear on the screen in rapid succession, giving the illusion of motion. The number
of frames that appear every second is known as the frame rate, and it is measured in frames per second (fps). The higher
the frame rate, the more frames per second are used to display the sequence of images, resulting in smoother motion.
The trade-off for higher quality, however, is that higher frame rates require a larger amount of data, which uses more
bandwidth.
When working with digitally compressed video, the higher the frame rate, the larger the file size. To reduce the file size,
lower either the frame rate or the bitrate. If you lower the bitrate and leave the frame rate unchanged, the image quality
is reduced.
Because video looks much better at native frame rates (the frame rate at which the video was originally recorded),
Adobe recommends leaving the frame rate high if your delivery channels and playback platforms allow it. For full-
motion NTSC video, use 29.97 fps; for PAL video, use 25 fps. If you lower the frame rate, Adobe Media Encoder drops
frames at a linear rate. However, if you must reduce the frame rate, the best results come from dividing evenly. For
example, if your source has a frame rate of 24 fps, then reduce the frame rate to 12 fps, 8 fps, 6 fps, 4 fps, 3 fps, or 2 fps.
For mobile devices, use the device-specific encoding presets from the Preset Browser panel.
Note: If you are creating a SWF file with embedded video, the frame rate of the video clip and the SWF file must be the
same. If you use different frame rates for the SWF file and the embedded video clip, playback is inconsistent.

26
Encoding quick start and basics
Last updated 6/16/2016
Key frames
Key frames are complete video frames (or images) that are inserted at consistent intervals in a video clip. The frames
between the key frames contain information on changes that occurs between key frames.
Note: Key frames are not the same as keyframes, the markers that define animation properties at specific times.
By default, Adobe Media Encoder automatically determines the key frame interval (key frame distance) to use based
on the frame rate of the video clip. The key frame distance value tells the encoder how often to re-evaluate the video
image and record a full frame, or key frame, into a file.
If your footage has a lot of scene changes or rapidly moving motion or animation, then the overall image quality may
benefit from a lower key frame distance. A smaller key frame distance corresponds to a larger output file.
When you reduce the key frame distance value, raise the bitrate for the video file to maintain comparable image quality.
Image aspect ratio and frame size
As with the frame rate, the frame size for your file is important for producing high-quality video. At a specific bitrate,
increasing the frame size results in decreased video quality.
The image aspect ratio is the ratio of the width of an image to its height. The most common image aspect ratios are 4:3
(standard television), and 16:9 (widescreen and high-definition television).
Pixel aspect ratio
Most computer graphics use square pixels, which have a width-to-height pixel aspect ratio of 1:1.
In some digital video formats, pixels aren’t square. For example, standard NTSC digital video (DV), has a frame size of
720x480 pixels, and it’s displayed at an aspect ratio of 4:3. This means that each pixel is non-square, with a pixel aspect
ratio (PAR) of 0.91 (a tall, narrow pixel).
Interlaced versus noninterlaced video
Interlaced video consists of two fields that make up each video frame. Each field contains half the number of horizontal
lines in the frame; the upper field (Field 1) contains all of the odd-numbered lines, and the lower field (Field 2) contains
all of the even-numbered lines. An interlaced video monitor (such as a television) displays each frame by first drawing
all of the lines in one field and then drawing all of the lines in the other field. Field order specifies which field is drawn
first. In NTSC video, new fields are drawn to the screen 59.94 times per second, which corresponds to a frame rate of
29.97 frames per second.
Noninterlaced video frames are not separated into fields. A progressive-scan monitor (such as a computer monitor)
displays a noninterlaced video frame by drawing all of the horizontal lines, from top to bottom, in one pass.
Adobe Media Encoder deinterlaces video before encoding whenever you choose to encode an interlaced source to a
noninterlaced output.
High-definition (HD) video
High-definition (HD) video refers to any video format with pixel dimensions greater than those of standard-definition
(SD) video formats. Typically, standard-definition refers to digital formats with pixel dimensions close to those of
analog TV standards, such as NTSC and PAL (around 480 or 576 vertical lines, respectively). The most common HD
formats have pixel dimensions of 1280x720 or 1920x1080, with an image aspect ratio of 16:9.

27
Encoding quick start and basics
Last updated 6/16/2016
HD video formats include interlaced and noninterlaced varieties. Typically, the highest-resolution formats are
interlaced at the higher frame rates, because noninterlaced video at these pixel dimensions would require a
prohibitively high data rate.
HD video formats are designated by their vertical pixel dimensions, scan mode, and frame or field rate (depending on
the scan mode). For example, 1080i60 denotes interlaced scanning of 60 interlaced 1920x1080 fields per second,
whereas 720p30 denotes progressive scanning of 30 noninterlaced 1280x720 frames per second. In both cases, the
frame rate is approximately 30 frames per second.
Compression tips
Compression tips for video
Work with video in the native format of your project until your final output Use raw footage or the least compressed
footage that is available to you. Each time that you compress video using a lossy encoder, you reduce the quality of the
video. Though one generation of quality loss is often acceptable, re-encoding and recompressing already compressed
video can degrade the quality beyond what is acceptable. Also, video that has already been encoded and compressed
may contain noise and artifacts that make the next encoding and compression step take more time or produce a larger
file.
Make your video as short as possible Trim the beginning and end of your video, and edit your video to remove any
unnecessary content. See Crop and trim source before encoding.
Adjust your compression settings If you compress footage and it looks great, try changing your settings to reduce the
file size. Test your footage, and modify compression settings until you find the best setting possible for the video you
are compressing. All video has varying attributes that affect compression and file size; each video needs its own setting
for the best results. See Encoding and exporting .
Limit rapid movement Limit movement if you are concerned about file size. Any movement increases file size. Shaky
camera work, rolls, and zooms are particularly bad in this regard. You can use motion stabilization features in After
Effects to remove extraneous movement.
Choose appropriate dimensions See Image aspect ratio and frame size.
Select an appropriate frame rate See Frame rate.
Choose an appropriate number of key frames See Key frames.
Reduce noise and grain Noise and grain in source images increase the size of encoded files. Ideally, use utilities in
Adobe Premiere Pro or After Effects to reduce noise and grain.
Compression tips for audio
The same considerations exist for audio production as for video production. To achieve good audio compression, you
must begin with an audio file that is free of distortion and audible artifacts introduced from the source recording.
If you are encoding material from a CD, try to record the file using direct digital transfer rather than the analog input
of a sound card. The sound card introduces an unnecessary digital-to-analog and analog-to-digital conversion that can
create noise in your transferred audio. Direct digital transfer tools are available for both Windows and Mac OS. If you
must record from an analog source, use the highest quality sound card available.
Note: If your source audio file is monaural (mono), it is recommended that you encode in mono for use with Flash. If you
are encoding with Adobe Media Encoder, and using an encoding preset, be sure to check if the preset encodes in stereo or
mono, and select mono if necessary.
28
Encoding quick start and basics
Last updated 6/16/2016
Preferences
•To open the Preferences dialog box, choose Edit > Preferences (Windows) or Adobe Media Encoder > Preferences
(Mac OS).
•To restore default preference settings, hold down the Shift key while the application is starting (for both Windows
and Mac OS).
The user Preferences file and the Presets folder is located in the Documents folder.
•<drive>:\Users\<user>\Documents\Adobe\Adobe Media Encoder\8.0 (Windows)
•/Users/<user>/Library/Application Support/Adobe/Adobe Media Encoder/8.0/ (Mac OS)
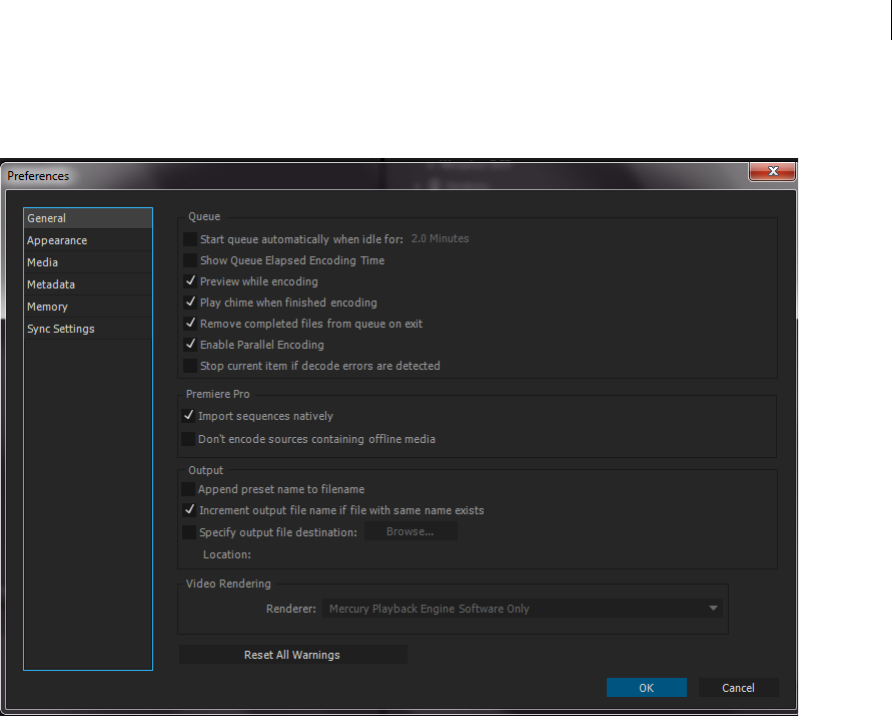
General Preferences
Start Queue Automatically When Idle For The encoding process begins automatically within the specified time after an
item has been added to the queue. The countdown timer is reset when you interact with the application. Deselect this
option to disable this automatic starting. This preference is switched off by default.
Show Queue Elapsed Encoding Time Shows the amount of time that has elapsed since the encoding was started.
Preview While Encoding Video frames are shown as they are being encoded in the Encoding Panel.
Play Chime When Finished Encoding A chime is played when encoding is done.
Remove Completed Files From Queue On Exit Removes any encoded items from the encoding queue when you quit the
application.

29
Encoding quick start and basics
Last updated 6/16/2016
Increment Output File Name If File With Same Name Exists By default, if you tell Adobe Media Encoder to create an
output file with the same name as an existing file in the same location, Adobe Media Encoder will increment the name
of the new file. For example, if you encode a video clip and create the output file video.avi, and then re-encode the same
file without first deleting video.avi, Adobe Media Encoder names the next file video_1.avi.
If Increment output File Name checkbox is disabled, name your files in such a way so that they don't indvertently
overwrite one another.
Specify Output File Destination By default, Adobe Media Encoder places exported files in the same folder as the source
video clip. To choose a different destination folder in which to place encoded media clips, navigate to the desired folder
on your system.
Appearance
Brightness Adjust the brightness of the interface.
Language Specify the language used in the application.
Media
Media Cache Files - Save Media Cache files next to originals when possible A default location is provided. Click
Browse to navigate to the desired location.
Media Cache Database A default location for the database is provided. Click Browse... to navigate to the desired
location. Click Clean to clean the database.
Indeterminate Media Timebase Set the frame rate for sources without an inherent time base, such as image sequences.
Include Captions on Import Check this box to include captions when you import files into Adobe Media Encoder.
For more information, see Managing the media cache database article.
Metadata
Write XMP ID To Files On Import Writes unique identifier to imported files that don’t already contain one.
For information about other settings in the Metadata category, see Export and thin XMP metadata.
Memory
RAM Reserved For Other Applications Adobe Media Encoder shares a memory pool with Adobe Premiere Pro, After
Effects, SpeedGrade, Prelude and Photoshop. The RAM reserved for other applications value indicates how much
memory is in this memory pool. You can affect this value by giving more or less RAM to other applications (and the
operating system). Give more RAM to the applications that share the memory pool by decreasing the RAM Reserved
For Other Applications value.
Note: Don’t set the RAM Reserved For Other Applications preference to be very low. Depriving the operating system
and other applications of memory can cause poor performance.
Sync Settings
Keep your settings synchronized across multiple machines with the Sync Settings preferences. You can upload
preferences related to your workspace layouts, keyboard shortcuts, and presets to your Creative Cloud account. You can
then download the settings and apply them to other machines.
For more information, see the Sync preferences and settingsarticle.

30
Encoding quick start and basics
Last updated 6/16/2016
Keyboard shortcuts
Keyboard shortcuts are a great way to speed up your tasks and also work more efficiently. Download the following pdf
for a complete list of Adobe Media Encoder's shortcuts :
AME-KBSC.pdf
You can view the html version of the keyboard shortcuts here .

31
Last updated 6/16/2016
Chapter 3: Encoding and exporting
Create custom presets for Media Encoder
Create and save a custom preset
Choosing a format automatically makes available a list of associated presets designed for particular delivery scenarios.
Adobe Media Encoder uses characteristics of the source item to make its best guess about the best preset to select. You
can create and save your own presets, export them, or import additional ones.
You can change the presets settings in the Export Settings dialog. Click Preset > Settings or press Ctrl+Alt+E to open
the Export Settings dialog.
Note: Adobe Technical Support supports only Adobe Media Encoder presets that are included with Adobe applications.
1In the Format menu, select a format.
2In the Preset menu, select the preset that most closely matches the settings you want. If the preset has been edited,
you will see Custom next to the preset.
3Click the format or preset name to open the Export Settings dialog box and edit the settings.
4Click the Save Preset button.
5Type a name for the preset, choose whether to save specific categories of parameters as prompted, and click OK.
Note: The encoding presets are located in the same location as the Adobe Media Encoder files. To access presets quickly,
right-click a user preset in the Preset Browser and choose Reveal Preset File.
Import a preset
1Click the Import Preset button.
2Navigate to the location of the preset, select it, and then click Open.
3Type a name for the imported preset, specify other options, and then click OK.
You can only import a preset for a given format when that format is selected in the Format menu. For example, If you
try to add an MPEG 2 preset, you will get an error if the format is set to MP3, for example. Set the format to MPEG 2
first before creating a new preset.
Export a preset
1In the Export Settings dialog box, choose the preset you want to export.
2Alt-click (Windows) or Option-click (Mac OS) the Save Preset button.
3Choose the location to save the preset, name it, and then click Save.
The preset is saved as a file with the filename extension .epr.
32
Encoding and exporting
Last updated 6/16/2016
Delete custom presets
1In the Export Settings dialog box, choose the custom preset you want to delete.
2Do either of the following:
•To delete a single preset, click the Delete Preset button.
•To delete all custom presets, Ctrl+Alt-click (Windows) or Command+Option-click (Mac OS) the Delete Preset
button.
Manage presets using the Preset Browser
You can create custom presets, import and export presets, and delete presets using the Preset Browser. See Using Preset
Browser to learn how to manage presets with the Preset Browser.
Sync preferences and settings
The latest version of Adobe Media Encoder includes the Sync Settings feature similar to the feature available in Adobe
Premiere Pro, After Effects, and several other Creative Cloud applications.
Sync Settings enable to keep your settings such as keyboard shortcuts, preferences, and user presets synchronized
across multiple machines. All settings can be uploaded to your Creative Cloud account and then downloaded and
applied on other machines.
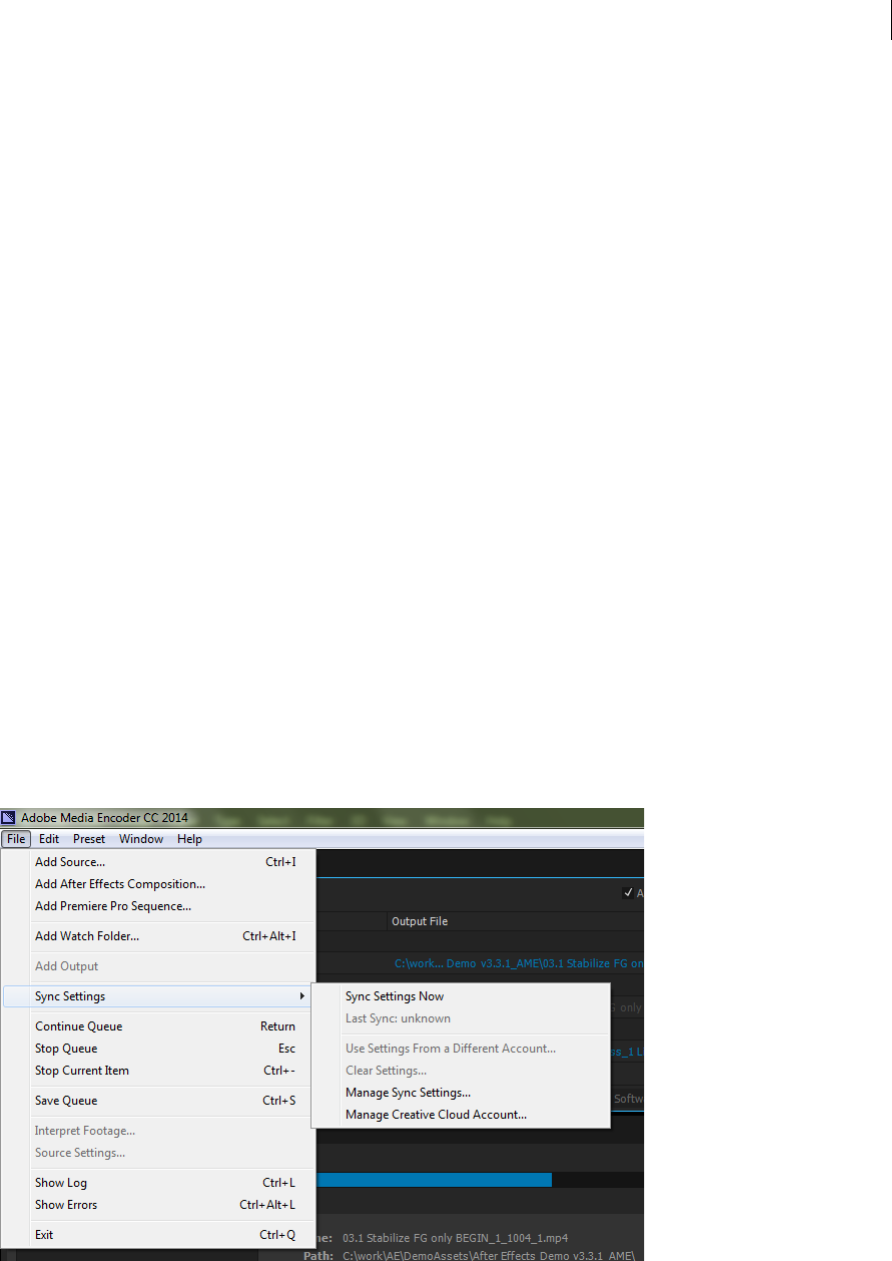
Sync settings
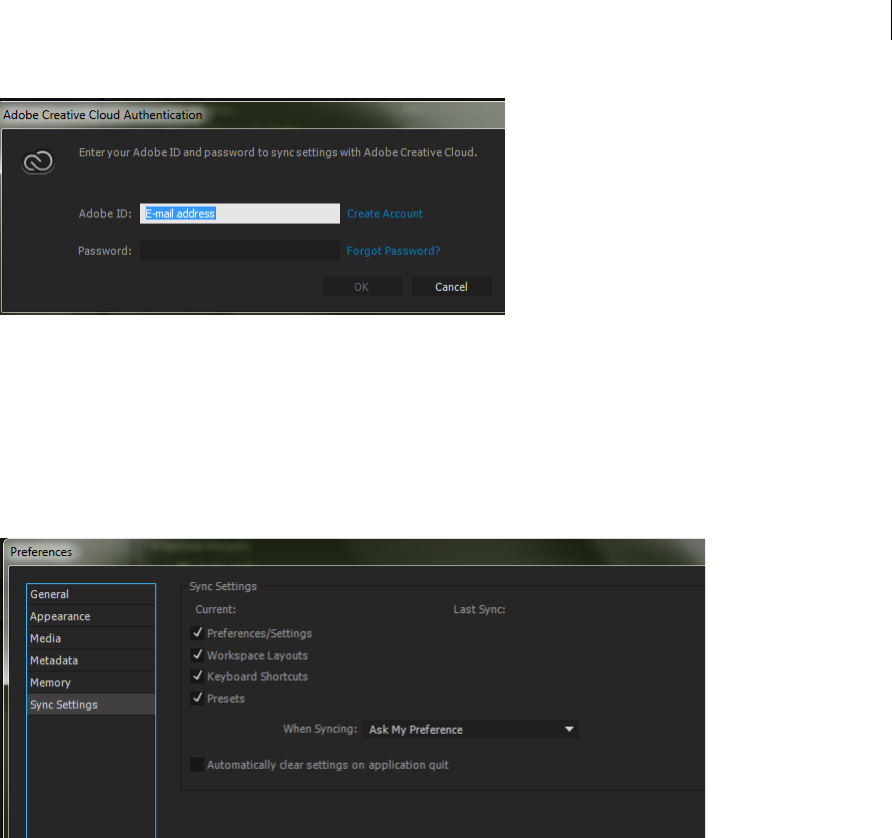
To start synchronizing your settings, click File > Sync Settings > Sync Settings Now.
Enter your Adobe ID and password to authenticate your account to the Creative Cloud.
33
Encoding and exporting
Last updated 6/16/2016
Sync settings from a different account
You can also synchronize your settings from a different Adobe account. Click File > Sync Settings > Use Settings From
a Different Account to use a different Adobe ID and password.
Manage Sync Settings
To manage the settings that are synchronized, choose Edit > Preferences (Windows) or Media Encoder > Preferences
(Mac OS) and click Sync Settings.
Select the preferences to synchronize and the frequency when Adobe Media Encoder should synchronize them:
•Current:
•Preferences/Settings
•Worksp ace Layouts
•Keyboard Shortcuts
•Presets
•Last Sync:
•Date when the settings were last synchronized
•When Syncing:
•Ask My Preference
•Always upload settings
34
Encoding and exporting
Last updated 6/16/2016
•Always download settings
•Automatically clear settings on application quit - Enable this option to clear the user profile when you quit the
Adobe Media Encoder application. When the application starts up the next time, the original preferences that were
set (before you logged in with your Adobe ID) will be restored.
Note: Preferences that specify absolute paths or are dependent on system hardware will not be synchronized.
Using the GoPro CineForm codec in After Effects
About the GoPro CineForm codec
The GoPro CineForm codec is a cross-platform intermediate codec that is commonly used in film and television
workflows that use HD or higher resolution media.
In the latest version of After Effects CC and Adobe Media Encoder CC, the GoPro CineForm codec can be used to
natively decode and encode QuickTime files (.mov). Hence you do not need to install additional codecs to create and
use QuickTime files.
GoPro CineForm codec settings
There are five compression quality settings and two pixel format settings that you can use to adjust your output when
using the GoPro CineForm codec. To export your After Effects projects with the GoPro CineForm codec, do the
following:
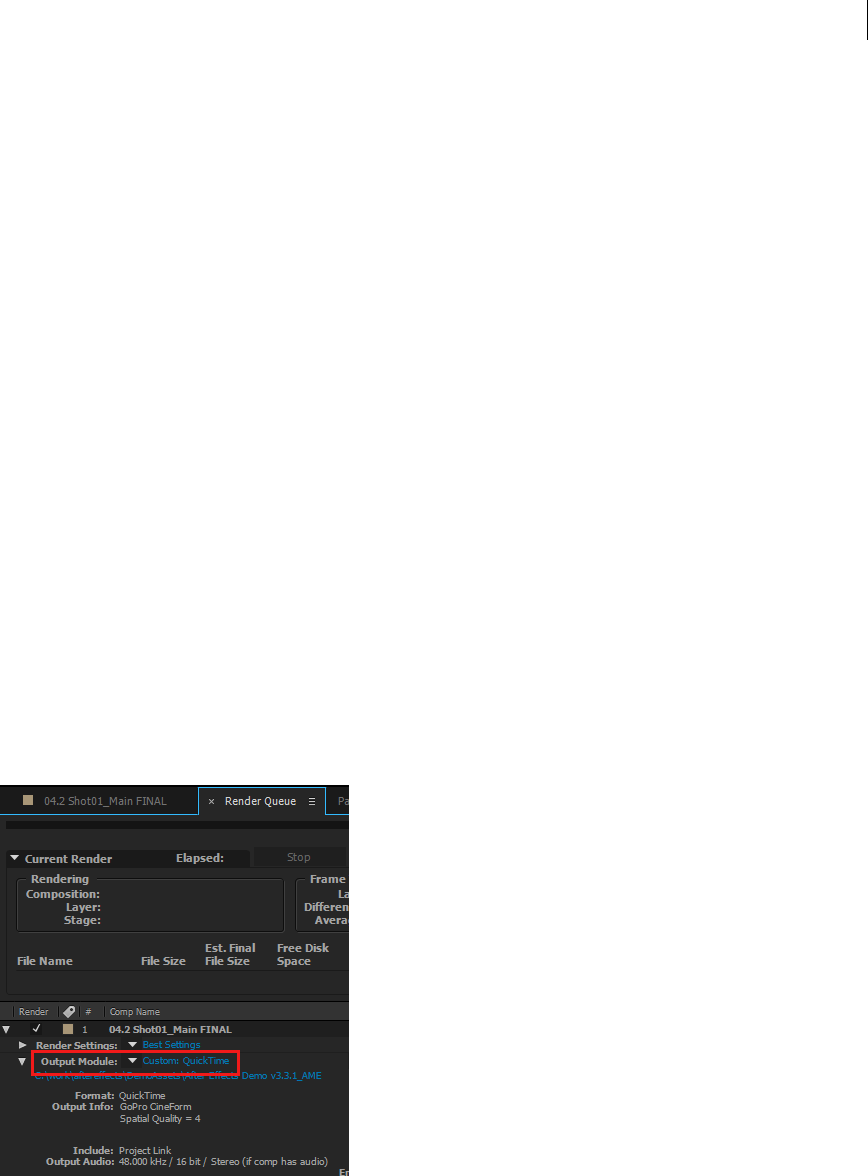
1Select a project in the Render Queue and click the Output Module setting.
2Choose QuickTime as the output format in the Format drop-down list and click Format Options.
35
Encoding and exporting
Last updated 6/16/2016
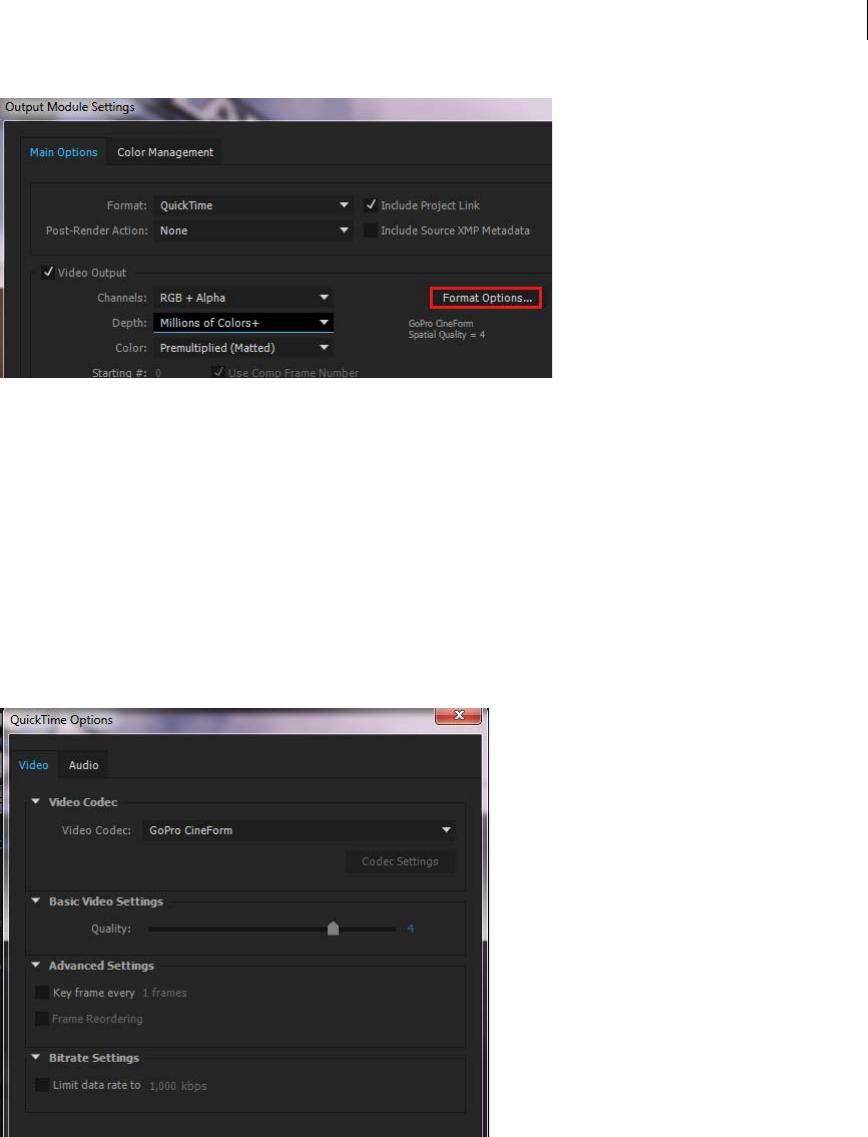
3Choose GoPro CineForm as the video codec in the QuickTime Options dialog box. Adjust the compression settings
using the Quality slider under the Basic Video Settings. The slider can be moved from a range of 1 to 5, with 1 for
the Low setting and 5 for Film Scan 2 setting. The default value is 4 (Film Scan).
1. Low
2. Medium
3. High
4. Film Scan
5. Film Scan 2
See the Understanding CineForm Quality settings article on the CineForm website for detailed information about
this setting.
4The GoPro CineForm codec can encode pixels in YUV 4:2:2 at 10 bits per channel, or RGBA 4:4:4:4 at 12 bits per
channel.
36
Encoding and exporting
Last updated 6/16/2016
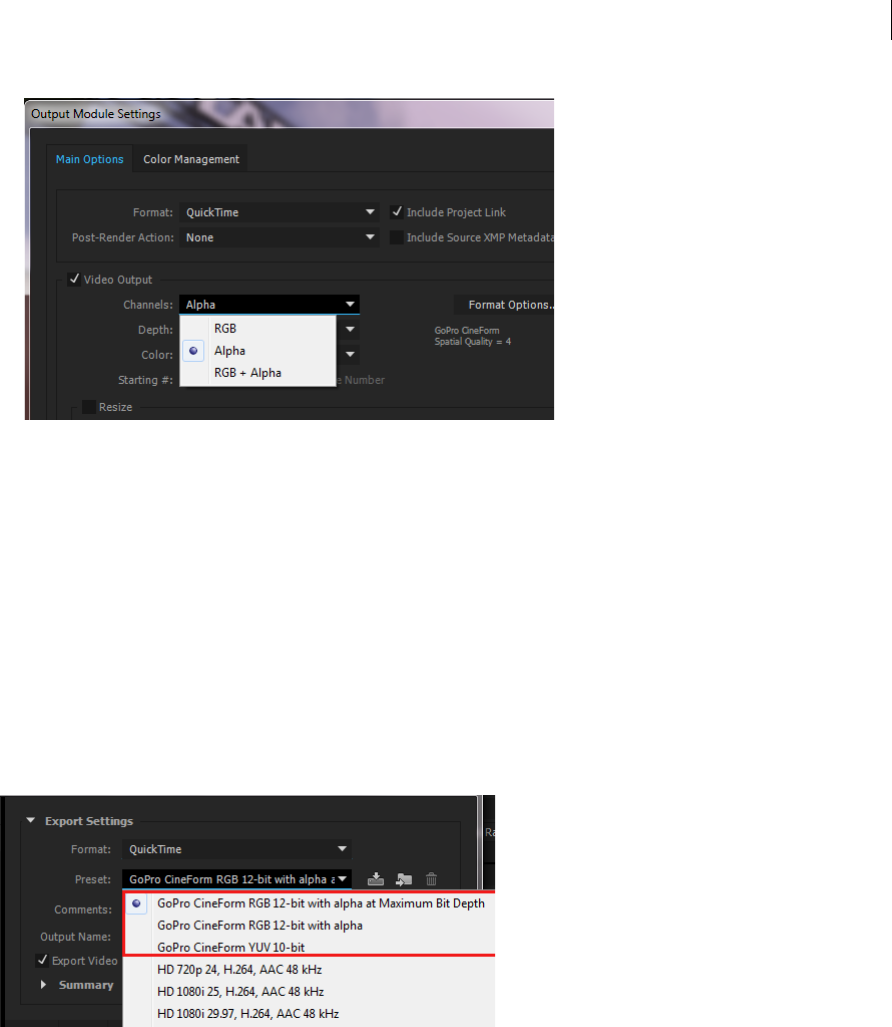
The encoded pixel format is based on the color depth and alpha channel settings that you choose in the Output
Module Settings dialog box. There are three Channels settings that can be set, RGB, Alpha, and RGB+Alpha:
•Set Channels to RGB or Alpha to encode to 10bpc YUV. In this case, Depth can only be set to Millions Of Colors.
•Set Channels to RGB+Alpha to encode to 12bpc RGBA. In this case Depth can be set to Millions of Colors+ or
Trillions of Colors+.
Note: After Effects renders the composition at the color depth specified in the Project and Render Settings, and the GoPro
CineForm encoder will resample the frames to 10-bit YUV or 12 bpc RGBA as appropriate.
5Click Render in the Render Panel to begin rendering your project with the GoPro CineForm settings.
GoPro CineForm settings in Adobe Media Encoder
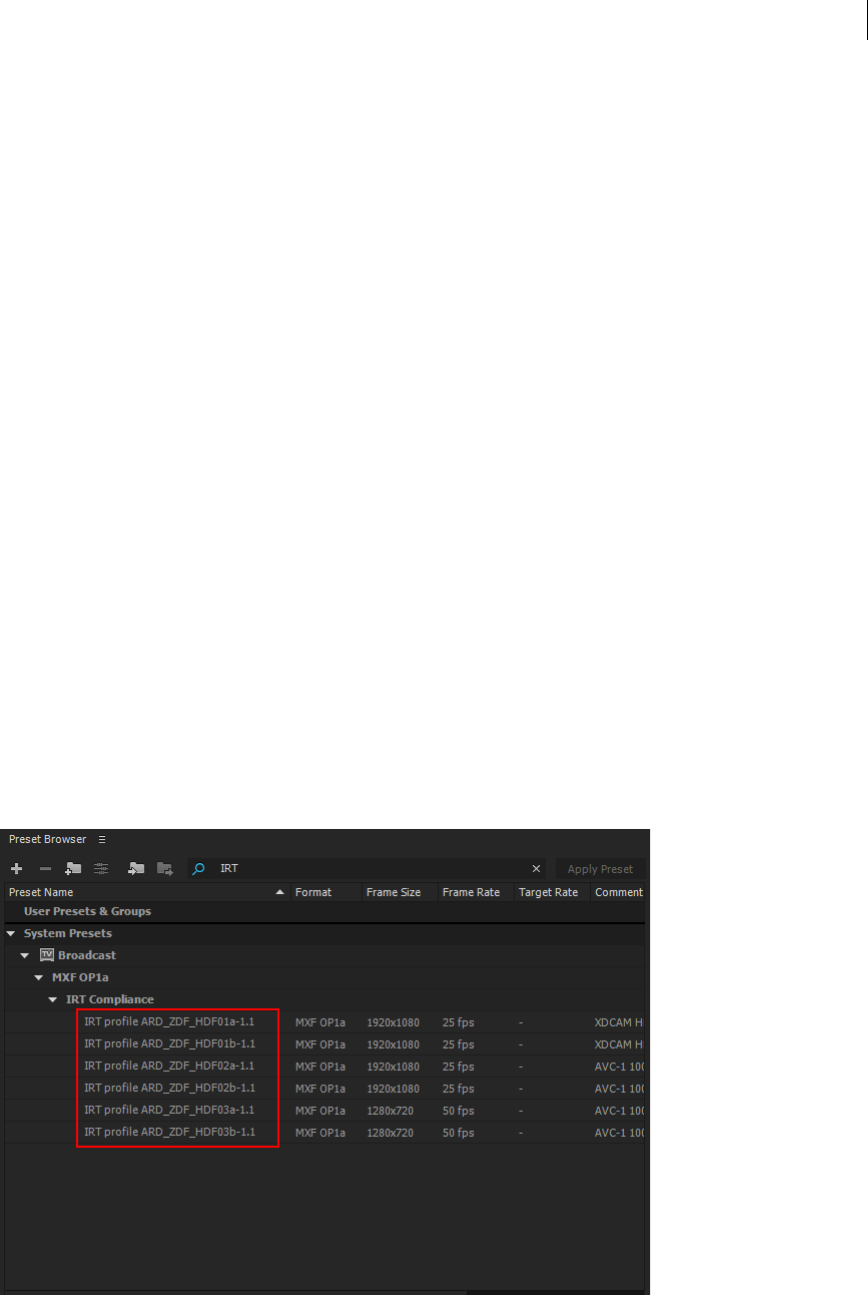
When you want to output to QuickTime format in Adobe Media Encoder using the GoPro CineForm encoder, there
are three presets that you can use in the Export Settings dialog box:
1GoPro CineForm RGB 12-bit with alpha at Maximum Bit Depth
2GoPro CineForm RGB 12-bit with alpha
3GoPro CineForm YUV 10-bit
Note: The frames may be rendered at a higher or lower quality by Adobe Media Encoder, depending on the sources in use
and whether the Maximum Bit Depth option is enabled. The GoPro CineForm encoder will resample the frames to 10 bpc
YUV or 12 bpc RGBA as appropriate.
37
Encoding and exporting
Last updated 6/16/2016
Other considerations
•You can edit the basic video settings, such as Frame Rate and Aspect ratio by unchecking the boxes next to each of
these settings. For unsupported sizes such as GoPro 2.7K, change the resolution settings and down-scale to 1080,2K,
or 4K or upscale to 6K.
•Due to the frame size limitations, frame width sizes should be divisible by 16, and frame height sizes should be
divisible by 8, regardless of bit depth. For example, the frame size of GoPro 2.7 is 2704x1524 and hence this is
currently not supported as its width of 1524 results in a partial frame size of 95.25.
More Help topics
CineForm codec support in Premiere Pro
IRT compliance
Overview
IRT (Institut für Rundfunktechnik) publishes the technical guidelines and specifications of Germany’s public
broadcasters. There are six MXF Profiles for HD program material as specified by ARD, ZDF, ORF and ARTE. There
are presets in Adobe Media Encoder that correspond to each of these profiles.
The IRT compliance in Media Encoder CC ensures that your content conforms with German broadcast standards. The
only way to get an output from Media Encoder CC that is IRT-compliant is to use one of the six presets.
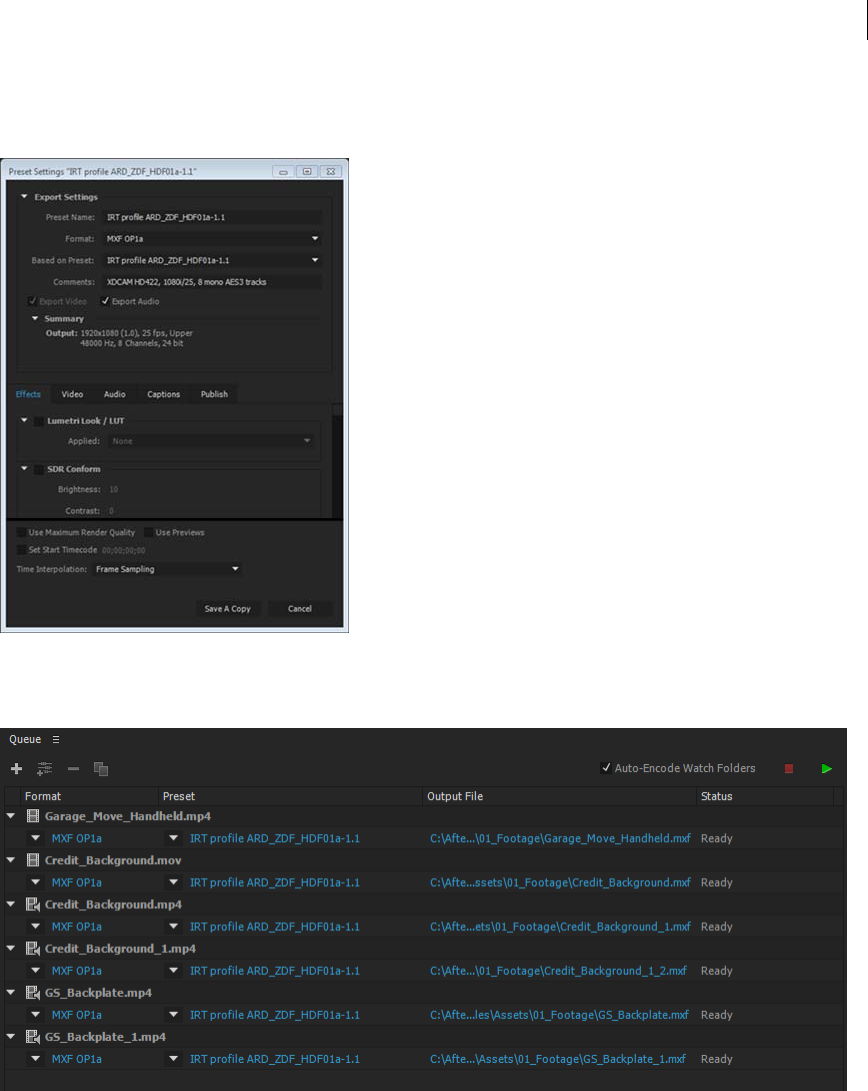
Applying an IRT preset to a media file
1To view the list of IRT presets, type IRT in the search bar in Preset Browser panel.
38
Encoding and exporting
Last updated 6/16/2016
2To see the settings of an IRT preset, choose a preset and click Preset Settings. Choose an appropriate encoding
format.
3Add a media source in the Queue panel. Ensure that the media file has an IRT preset.
4Click Start Queue to encode the files with IRT presets.
Export settings reference for Media Encoder
39
Encoding and exporting
Last updated 6/16/2016
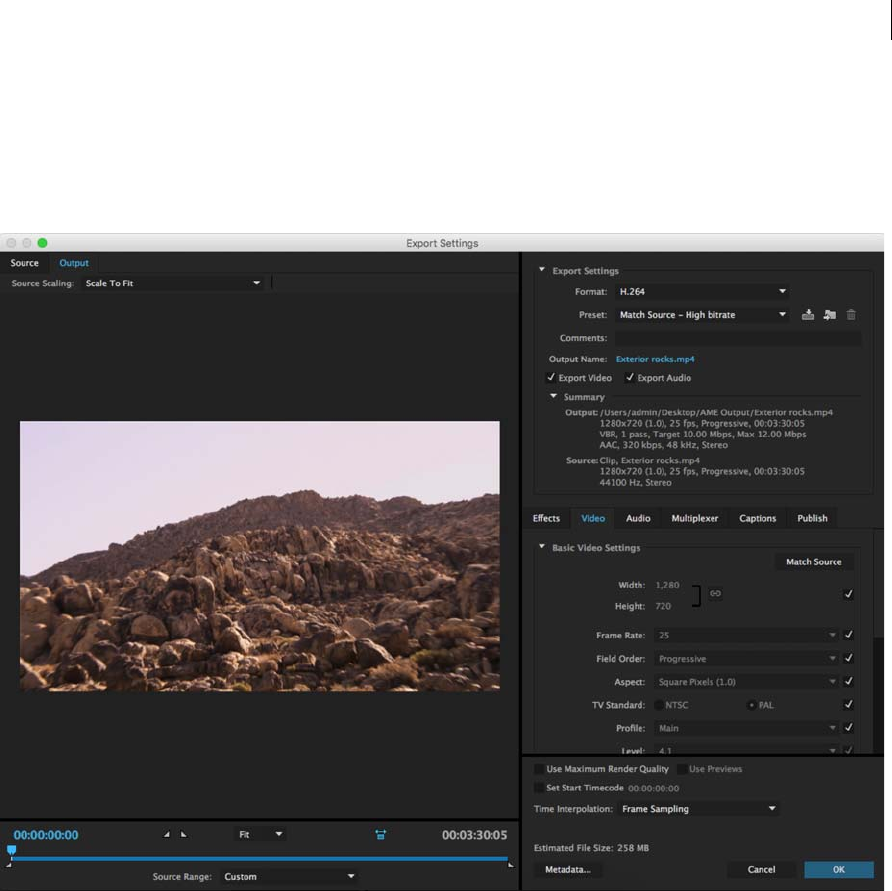
Export Settings dialog box overview
To open the Export Settings dialog, select Export Settings from the Context menu of the asset, or select Edit > Export
Settings.
The Export Settings dialog includes a large viewing area on the left, which includes Source and Output panels.
Other tabs in the Export Settings dialog box include available effects, video and audio encoding, closed captions, and
Publish settings for the selected format.
For information about using the various encoding options in the Export Settings dialog box, see Encode and export
video and audio with Media Encoder.
For information about using the controls in the timeline area and the image viewing area to crop and trim the source
item, see Crop and trim source before encoding.
Image viewing area
•To toggle between previewing an image with or without pixel aspect ratio correction, click the Aspect Ratio
Correction toggle button to the right of the Zoom menu.
•To zoom into and out of the preview image, choose zoom level from the Select Zoom Level menu above the timeline.

40
Encoding and exporting
Last updated 6/16/2016
You can also zoom out by pressing Ctrl+- (hyphen) (Windows), or Command+- (hyphen) (Mac OS). Zoom in by
pressing Ctrl+= (equal sign) (Windows) or Command+= (equal sign) (Mac OS). These keyboard shortcuts use the main
keyboard, not the similar keys on the numeric keypad.
Timeline and time display
A time display and a timeline are located under the image viewing area in both the Source panel and Output panel. The
timeline includes a current-time indicator, a viewing area bar, and buttons for setting In points and Out points.
To move the current-time indicator, click or drag the current-time display or drag the current-time indicator. You can
also type the timecode directly in the current time display to move the CTI to the specific frame.
Crop and trim source before encoding
You can trim the video such that you encode and export only a part of the duration of the source video or audio item.
1In the Export Settings dialog box, click either the Source tab or the Output tab.
2To trim the video, set an In point (first frame) and Out point (last frame). You can set the In point or Out point to
the current time by clicking the Set In Point or Set Out Point button above the timeline, or by dragging the In point
or Out point icon in the timeline. You can also use the 'I' key to set an In point and the 'O' key to set an Out point.
The Source Range menu can contain the following choices:
•Work Area - Trims to the work area specified in Premiere Pro and After Effects projects
•In/Out - Trims to the In and Out marks set on clips or sequences from Premiere Pro and After Effects
•Entire Clip/Sequence - Uses the entire duration of the clip or sequence
•Custom - Trims to the In and Out marks set in the Export Settings dialog.
Note: Adobe Media Encoder honors timecode information in a source file. If the source starts from 00:00:05:00, then
the timeline for the item in Adobe Media Encoder also starts from 00:00:05:00, and not from zero. This timecode
information is included in the encoded output file.
3To crop the image, click the Crop button in the upper-left corner of the Source panel, which will crop the output
video.
4To constrain the proportions of the cropped image, choose an option from the Crop Proportions menu.
5Do any of the following:
•Drag the sides or corner handles of the crop box.
•Enter values for Left, Top, Right, Bottom, in pixels.
6Click the Output tab to preview the cropped image.
7From the Source Scaling menu on the Output panel, select the required scaling option. For more information on the
different scaling options, see Scaling source frames.
Note: To revert to an uncropped image, click the Crop button again.
Scaling source frames
Use the options in the Source Scaling menu of the Export Settings dialog for better scaling of source frames within
output frames of a different size. This setting is available for any output format with editable frame dimensions.
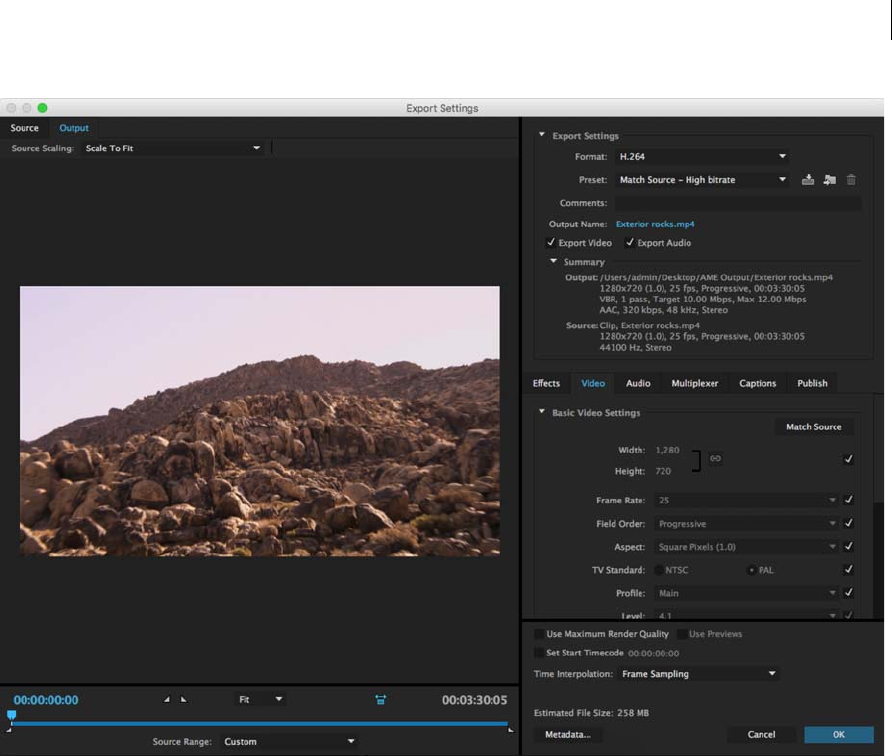
41
Encoding and exporting
Last updated 6/16/2016
Scale To Fit Scales the source frame to fit within the output frame while maintaining pixel aspect ratio of the source.
Source frames are letter-boxed or pillar-boxed within the output frame as necessary.
If you have cropped the video, the dimensions of the cropped video are adjusted to fit within the Frame Width and
Frame Height specified in the Video tab. If the aspect ratio defined by those values do not match that of the cropped
video, then you will necessarily have black bars on encoded footage.
Scale To Fill Scales the source frame to completely fill the output frame while cropping the source frame as necessary.
Pixel aspect ratio of the source frame is maintained.
Stretch To Fill Resizes the source frame to completely fill the output frame. Pixel aspect ratio of the source is not
maintained, hence distortions may occur if the output frame does not have the same aspect as the source.
Scale To Fit With Black Borders Source frame, including the cropped area, is fit within the output frame. Pixel aspect
ratio is maintained. A black border is applied to the video, even if the target dimension is smaller than the source video.
Change Output Size To Match Source Automatically sets the height and width of the output to the height and width of
the cropped frame, overriding the output frame size settings.
Select this setting if you want to export content for use with web applications without black borders such as those used
with letterboxing or pillarboxing.
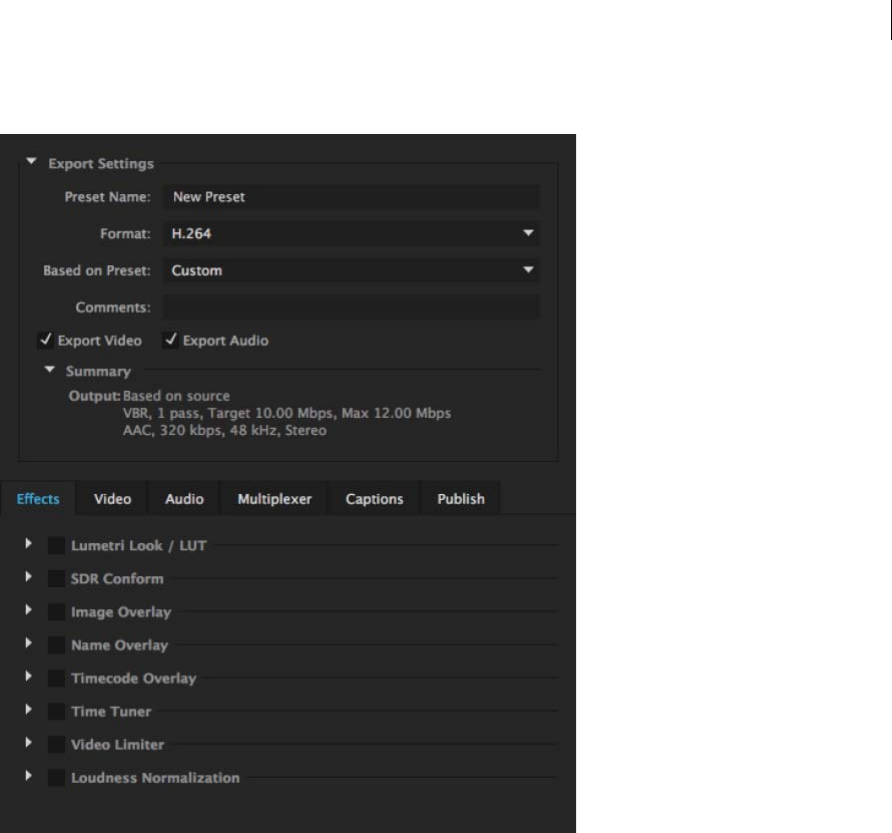
42
Encoding and exporting
Last updated 6/16/2016
Effects settings
Lumetri Effect
Use the Lumetri effect to apply various color grades to your video sequence. The four main categories of Lumetri effects
available are:
•Cinematic
•Desaturation
•Style
•Temperature
You can also apply custom Looks and LUTs created in Adobe SpeedGrade or other color grading application. Choose
the Select... option from the Applied drop-down menu to apply a custom Look or LUT file.
SDR Conform
Use SDR Conform to convert your HDR video to SDR for playback on non-HDR devices. Set the following values in
percentage:
•Brightness
•Contrast

43
Encoding and exporting
Last updated 6/16/2016
•Soft Knee (controls the transition to full compression mode)
Image Overlay
Use Image Overlay to overlay an image on your sequence. The following options are available:
•Applied - Browse and choose the image to overlay
•Position - Sets the relative position of the overlay within the output frame. For example, Center, Top Left, Bottom
Right.
•Offset - Used to specify the horizontal and vertical offsets (in pixels) for the image
•Size - Adjusts the size of the image. By default, the image overlay's size will auto-adjust to the current output frame
size. This means that the image will be overlaid according to its relative size regardless of the output resolution.
When Absolute Sizing is enabled, the image overlay's size is linked to the native size of the source image. When
Absolute Sizing option is checked, the image overlay will appear smaller at higher output resolutions and larger at
lower output resolutions.
•Opacity - Specifies the opacity of the image
Name Overlay
Overlays text on your video sequence. The following options are available with this effect:
•Prefix - Text added to the beginning of the file name.
•Suffix - Text added to the end of the file name.
•Format - Specifies the options the name is displayed with. The following options are available:
•Prefix and Suffix Only
•Source File Name
•Source File Name (without extension)
•Output File Name
•Output File Name (without extension)
•Position - Sets the relative position of the text within the output frame. For example, Center, Top left, and Top
Center.
•Offset - Specifies the horizontal and vertical offsets (in pixels) for the name
•Size - Adjusts the size of the name
•Opacity - Specifies the opacity of the black background behind the text
Timecode Overlay
Overlays a timecode on your video output. The following additional options are available for the Timecode Overlay
effect:
•Position - Sets the relative position of the timecode within the output frame. For example, Center, Top left, Top
Center
•Offset - Lets you adjust the horizontal and vertical offsets (in pixels) of the timecode within the output frame
•Size - Adjusts the size of the timecode

44
Encoding and exporting
Last updated 6/16/2016
•Time Source - Specifies how timecode is generated
•Media File - Reads Timecode from the source media. If the source media is not detected, timecode overlay starts
at zero and matches the source's frame rate.
•Offset in Frames - Specifies the number of frames by which the source timecode should be offset. You can
give either positive or negative values for this offset.
•Generate Timecode - Lets you specify custom timecode to overlay over the video. When this option is selected,
choose a frame rate and counting method from the Format drop-down menu. You can also specify a custom
starting Timecode.
Time Tuner
Time Tuner allows you to extend or reduce of the output file by duplicating or removing frames at specific times so that
the overall change in duration is unnoticeable. The following options are available within the Time Tuner Effect:
•Current Duration - Duration of the original source file.
•Target Duration - New duration of the output file after effect is applied.
•Duration Change - Percentage by which the output duration differs from the source duration. You can set this from
-10% (shorter duration) to +10% (longer duration).
•In Preset Use - Select the option you want Time Tuner to use when using the Time Tuner preset. The following
options are available:
•Target Duration - Adjusts the output to a specific target duration, regardless of the source's original duration.
•Duration Change - Adjusts the output duration to a percentage of the source's original duration.
Video Limiter
Video Limiter constrains the luminance and color values of source files so that they fall within safe broadcasting limits.
•Reduction Axis - Sets the limits defining the range of luminance (Luma), color (Chroma), both color and
luminance (Chroma and Luma), or the overall video signal (Smart Limit).
•Signal: Sets the minimum and maximum range for the effect. Values outside this range will be constrained. Min and
Max values will change depending on the Reduction Axis option chosen.
•Reduction Method: Sets the tonal range for compression based on Highlights, Midtones, Shadows, or a
combination of these.
•Shadow: Sets the Threshold and Softness of darker values. Threshold adjusts the lower limit of darker values while
Softness adjusts the boundary between tonal ranges.
•Highlight: Sets the Threshold and Softness of lighter values. Threshold adjusts the upper limit of lighter values
while Softness adjusts the boundary between tonal ranges.
Loudness Normalization
See Automatic Loudness Correction for more information.
Video exports settings
Adobe Media Encoder is used both as a standalone application and as a component of Adobe Premiere Pro, After
Effects, and Flash Professional. In some contexts—including rendering and exporting from Premiere Pro—you set
encoding options in the full Adobe Media Encoder Export Settings dialog box. In other contexts—including rendering
and exporting from After Effects—you set encoding options in a format-specific Options dialog box that only presents
a subset of the encoding options.

45
Encoding and exporting
Last updated 6/16/2016
Adobe Media Encoder ships with many presets, each of which sets the various options to meet the requirements for a
common target output. In the Export Settings or format-specific Options dialog box, the options available on the Video
tab depend on the format you’ve specified.
Options not documented here are either specific to the selected format or do not require documentation. For detailed
information, consult the specifications for the selected format. For example, MPEG formats include many advanced
options not listed here. For detailed information on options not listed, consult the specifications for the MPEG-2
(ISO/IEC 13818) format and the Wikipedia website.
Note: Some capture cards and plug-in software provide their own dialog boxes with specific options. If the options you see
are different from the options described here, see the documentation for your capture card or plug-in.
For general information about compression settings, see Compression tips.
TV Standard Conforms the output to the NTSC standard or to the PAL standard. When set to Match Source, Adobe
Media Encoder automatically sets this value to match the source. For example, if the source file frame rate is 25 fps,
Adobe Media Encoder sets the TV standard to PAL.
Frame Dimensions Dimensions, in pixels, of the output frame. When set to Match Source, Adobe Media Encoder
automatically sets this value to match the frame dimensions of the source. (See Image aspect ratio and frame size.)
Frame Rate Frame rate of the output file in frames per second. Some codecs support a specific set of frame rates. When
set to Match Source, Adobe Media Encoder automatically sets this value to match the frame rate of the source. (See
Frame rate.)
Field Order or Field Type Specifies whether the output file has progressive frames or frames made up of interlaced
fields, and if the latter, which field will be written first. Progressive is the correct setting for computer display and
motion picture film. Choose Upper First or Lower First when exporting video for an interlaced medium, such as NTSC,
or PAL. When set to Match Source, Adobe Media Encoder automatically sets this value to match the field order of the
source. (See Interlaced versus noninterlaced video.)
Aspect or Pixel Aspect Ratio Select the pixel aspect ratio appropriate for the output type. When the pixel aspect ratio
(displayed in parentheses) is 1.0, the output will have square pixels; all others will have non-square pixels. Because
computers generally display pixels as squares, content using non-square pixel aspect ratios appear stretched when
viewed on a computer but appear with the correct proportions when viewed on a video monitor. When set to Match
Source, in H.264 and MPEG-2 formats, Adobe Media Encoder automatically sets this value to match the pixel aspect
ratio of the source. (See Pixel aspect ratio.)
Profile Specifies whether Adobe Media Encoder will use the Baseline, Main, or High profile.
Note: Profile and Level settings are relevant to formats that use variants of MPEG encoding, including H.264.
Recommended settings are often a combination of Profile and Level settings. For example, a common recommendation for
high-quality encoding for Internet distribution is a setting of High Profile, Level 5.1. For more information, see the
Wikipedia website.
Level Level used by Adobe Media Encoder, with ranges that differ depending on output format. The different level
choices can constrain the Frame Size, Frame Rate, Field Order, Aspect, and Bitrate settings.
Export As Sequence For still-image export, select this option to export as a sequentially numbered series of still-image
files.
Header Type Specifies SMPTE/DPX or Cineon header.
Depth Color depth in bits per pixel.
Encoding Passes Number of times the encoder will analyze the clip before encoding. Multiple passes increase the time
it takes to encode the file, but generally result in more efficient compression and higher image quality.

46
Encoding and exporting
Last updated 6/16/2016
M Frames Number of B frames (bi-directional frames) between consecutive I frames (intra-frames) and P frames
(predicted frames).
N Frames Number of frames between I frames (intra-frames). This value must be a multiple of the M frames value.
Closed GOP Every Frequency of each closed group of pictures (closed GOP), which cannot reference frames outside of
the closed GOP. A GOP consists of a sequence of I, B, and P frames. (This option is available if you choose MPEG-2 as
the format.)
Bitrate Number of megabits per second. Different formats present different bitrate options. The minimum bitrate
differs according to the format. For example, for MPEG-2 DVD, the minimum bitrate is 1.5 Mbps.
Bitrate Mode or Bitrate Encoding Specifies the type of variable bit the codec produces in the exported file:
VBR, 1 Pass Variable bitrate, with the encoder making a single pass through the file from beginning to end. Single-pass
encoding takes less time than dual-pass encoding, but doesn’t achieve the same quality in the output.
VBR, 2 Pass Variable bitrate, with the encoder making two passes through the file, from beginning to end, and then
from end to beginning. The second pass prolongs the process, but it ensures greater encoding efficiency, and often a
higher-quality output.
Note: When comparing CBR and VBR files of the same content and file size, you can make the following generalizations:
A CBR file may play back more reliably over a wider range of systems, because a fixed data rate is less demanding on a
media player and computer processor. However, a VBR file tends to have a higher image quality, because VBR tailors the
amount of compression to the image content.
Bitrate Level (H.264 Blu-ray, and MPEG-2 Blu-ray formats only) When the Bitrate level is set to Custom, the output
bitrate can be changed to any value. When the Bitrate Level is set to High, Medium, or Low, the bitrate is set
automatically based on frame dimensions as a read-only value and cannot be changed. Adobe Media Encoder has
default presets for the formats which have the Bitrate Level set to automatic.
Key Frame Interval [Seconds] or Set Key Frame Distance (Frames) Number of frames after which the codec will create a
key frame when exporting video. (See Key frames.)
Optimize Stills or Expand Stills Select this option to use still images efficiently in exported video files. For example, if a
still image has a duration of 2 seconds in a project set to 30 fps, Adobe Premiere Pro creates one 2-second frame instead
of 60 frames at 1/30 of a second each. Selecting this option can save disk space for sequences and clips containing still
images. Deselect this option only if the exported video file exhibits playback problems when displaying the still images.
Time interpolation settings
The Time Interpolation settings allow you to change the frame rate of the exported file by leveraging Optical Flow to
interpolate the missing frames. For example, if you have a 30 fps footage that you want to export at 60 fps without
repeating every frame, you can export the media with the Optical Flow option in the Time Interpolation drop-down
box selected.

47
Encoding and exporting
Last updated 6/16/2016
In some footage, using Optical Flow for creating smoother motion may not produce the desired results. In such
scenarios, you can use one the other time interpolation options--Frame Sampling or Frame Blending. Frame Sampling
repeats or removes frames as needed to reach the desired speed. Frame Blending repeats frames, but it also blends
between them as needed to help smooth the motion.
Multiplexer export settings
The Multiplexer preset options (sometimes called Format) control how MPEG video and audio data are merged into a
single stream. The exact options available depend on the MPEG format you choose. Multiplexing settings are available
for H.264 and HEVC formats as well
When you choose the MPEG-2 format, all Multiplexer options provided by the MPEG standard are available for
manual control. In most cases, it’s better to select an MPEG preset specifically targeted to your output medium (such
as MPEG-2 DVD).
For more information about MPEG options, see the relevant MPEG specifications for MPEG-4 (ISO/IEC 14496) and
MPEG-2 (ISO/IEC 13818) and the Wikipedia website.
Audio export settings
In the Export Settings dialog box, the options available in the Audio tab depend on the format you’ve specified. Options
not documented here are either specific to the selected format or do not require documentation because their names
are self-documenting. For detailed information, consult the specifications for the selected format.
Some audio formats support only uncompressed audio, which has the highest quality but uses more disk space. Some
formats provide only one codec. Others allow you to choose from a list of supported codecs.
Sample Rate Choose a higher rate to increase the frequency at which audio is converted into discrete digital values, or
sampled. Higher sample rates increase audio quality and file size; lower sample rates decrease quality and file size.
Setting the sample rate in the Export Settings dialog box higher than the sample rate of the audio source doesn’t increase
quality. Setting a sample rate different from the sample rate of the source file requires resampling and additional
processing time. You can avoid resampling by capturing audio at the same rate at which you want to export it. (See
Compression tips.)
Channels or Output Channels Specify how many audio channels are in the exported file. If you choose fewer channels
than are in the master track of a sequence or project, Adobe Media Encoder downmixes the audio. The options available
for many formats are Stereo, mono or 5.1.
QuickTime channelization option lets you save time and streamline your rendering by exporting multiple audio output
configurations in the same QuickTime file, including stereo and 5.1 channelization.
Sample Size Choose a higher bit depth to increase accuracy of audio samples. Higher bit depth can improve dynamic
range and reduce distortion, especially if you add additional processing, such as filtering or resampling. Higher bit
depths also increase processing time and file size; lower bit rates reduce processing time and file size.
Setting the bit depth in the Export Settings dialog box higher than the bit depth of the source audio doesn’t increase
quality.
Bitrate [Kbps] The output bit rate of the audio. Generally, higher bit rates increase both quality and file size.
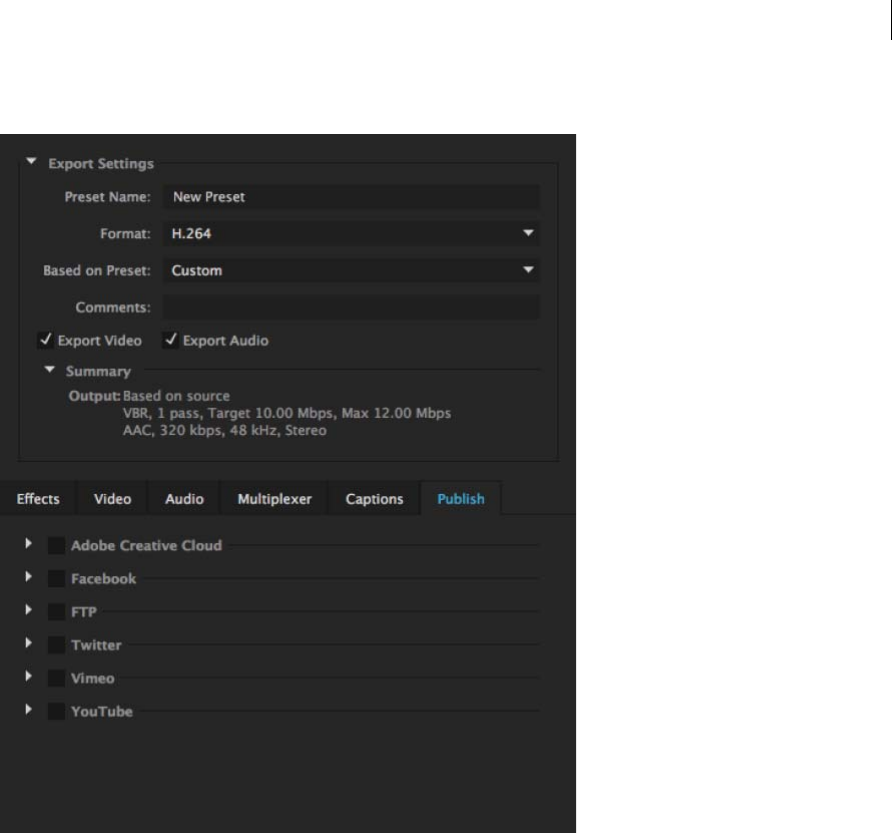
48
Encoding and exporting
Last updated 6/16/2016
Publish settings
Use the Publish tab to upload files to the following destinations:
1Adobe Creative Cloud
2Facebook
3FTP
4Vimeo
5YouTube
6Twitter
Note: If the current format is not supported by a publishing destination it will not be displayed in the Publish tab. For
example, Twitter is only available when the Format is set to 'H.264'.
Media Encoder provides system presets to help you choose the best settings for YouTube, Facebook, Vimeo, and Twitter
destinations.

49
Encoding and exporting
Last updated 6/16/2016
Creative Cloud settings
Check the Creative Cloud box to copy exported file(s) from Adobe Media Encoder to your Creative Cloud folder, where
they will be synced to the cloud via the Creative Cloud desktop application. Files will be copied to the root directory of
the Creative Cloud folder by default.
The Creative Cloud option includes the following settings:
Creative Cloud folder Creative Cloud folder where the files will be copied to.
Add sub-folder Sub-folder under the Creative Cloud folder to which the files are copied. You can create nested sub-
folders by adding \ (backward-slash) for Windows and / (forward-slash) for Mac OS between folder names.
Note: Ensure that you have enabled file synchronization under Preferences > Files > Sync On/Off in the CC desktop
application.
If you close the Adobe Media Encoder application when uploads are in progress, a warning dialog is displayed that asks
you if you want to finish uploading the files before closing the application.
Facebook settings
Check the Facebook settings box and login to Facebook to upload your encoded file to Facebook.
1Click the Log in button. You will be redirected to the Facebook login page.
2Enter your credentials and allow Adobe Media Encoder to manage your Facebook videos.
3In the Privacy box, select your privacy setting.
4In the Description box, type a description for your video.
5To delete the local file after uploading to Facebook, select the Delete the local file after upload option.
Watch this video to see how you can publish to Facebook: Publish to Facebook
Twitter settings
Check the Twitter settings box and login to Twitter to upload your encoded file to Twitter.
1Click the Log in button. You will be redirected to the Twitter login page.
2Enter your credentials and allow Adobe Media Encoder to manage your Twitter videos.
3In the Status box, type a description for your video.
4To delete the local file after uploading to Twitter, select the Delete the local file after upload option.
Watch this video to see how you can publish to Twitter: Publish to Twitter
Note: Twitter videos should be 30 seconds or less in duration and the Status text should contain no more than 110
characters.
YouTube s et t in gs
Check the box next to the YouTube setting and log in to YouTube to be able to upload your encoded files to YouTube.
1Click the Log in button. You will be redirected to the log in screen on the YouTube/Google site.
2Enter your credentials and allow Adobe Media Encoder to manage your YouTube videos.
3Close the browser. Adobe Media Encoder is brought back into focus automatically. The account you used to log in
to YouTube is displayed under the Account setting.
Note: If you deny permission to Adobe Media Encoder to manage your YouTube videos, you will see a "Authorization
denied" message and you will be taken back to the Adobe Media Encoder application.

50
Encoding and exporting
Last updated 6/16/2016
The YouTube option has the following settings:
Privacy Set the privacy settings for who can view your video:
•Private
•Public
•Unlisted (default)
Tags Add words separated by commas to create keywords for the uploaded video.
Description Enter a description for your uploaded video.
Delete local file after upload (Checkbox) If checked, deletes the local copy of the uploaded file.
Vimeo settings
Check the box next to the Vimeo setting and log in to Vimeo to upload your encoded files to Vimeo.
1Click the Log in button. You will be redirected to the log in screen on the Vimeo site.
2Enter your credentials and permit Adobe Media Encoder to manage your Vimeo videos.
3Close the browser. The focus is brought back to Adobe Media Encoder automatically. The account you used to log
in to Vimeo is displayed under the Account setting.
Note: If you deny permission to Adobe Media Encoder to manage your Vimeo videos, you will see a "Authorization denied"
message and you will be taken back to the Adobe Media Encoder application.
The Vimeo option has the following settings:
Viewable by Set the preference so that your videos are viewable by:
•Only me (default)
•Anybody
•Anybody with a password
Password Set the password so that your videos are viewable by anybody who has the password. This option is enabled
only when Viewable by is set to Anybody with a password.
Tags Add words separated by commas to create keywords for the uploaded video.
Description Enter a description for your uploaded video.
Delete local file after upload (Checkbox) If checked, deletes the local copy of the uploaded file.
FTP settings
Check the FTP box to upload the exported file to a File Transfer Protocol (FTP) server that has storage space allocated
for file sharing. FTP is a common method for transferring files over a network and is especially useful for sharing
relatively large files using an Internet connection. The server’s administrator can provide you with the details for
connecting to the server.
The FTP option includes the following settings:
Username User's identity, as specified by the server administrator.
Password User password required to log in to the server.
Server Enter the DNS or IP address of the server on which the FTP site is located.
Port The number assigned to the FTP server’s command port, which is 21 by default.

51
Encoding and exporting
Last updated 6/16/2016
Remote Path The location on the FTP server to access, expressed as a file path.
Retries Number of attempts to contact the server if a connection isn’t established.
Delete local file after transfer (Checkbox) If checked, deletes the local copy of the exported file after the file has been
uploaded to the FTP server.
Export and thin XMP metadata
You can choose what XMP metadata (if any) to include in the output file.
To open the Metadata Export dialog box, click the Metadata button in the lower-right corner of the Export Settings
dialog box.
Note: You can perform many of the same actions in the Metadata category in the Preferences dialog box. (See Preferences.)
Changes made in the Preferences dialog box don’t apply to selected items in the encoding queue, but the templates and rules
are available for later assignment through the Metadata Export dialog box.
Specifying how and whether to include XMP metadata on output
Use the Export Options menu to specify whether XMP metadata should be embedded in the output file, stored in a
sidecar (.xmp) file, both, or neither.
If you choose None, then no XMP metadata from the source will be embedded in the file, and none of the other controls
for XMP metadata export are available. Basic XMP metadata about the exported file—such as export settings and start
timecode—is always exported, even when None is chosen.
Note: The Embed In Output File options are disabled for files of kinds for which XMP metadata can’t be embedded.
Preserving XMP metadata from sources
Many source assets contain XMP metadata. You can choose which XMP metadata from source assets should be
preserved in the encoded output files by using a preservation rule.
For single-source clips, preserving XMP metadata ensures that the production metadata from the original source flows
through to the re-encoded output file. For sequences and compositions, including source metadata preserves the
metadata from each of the items used to make up that sequence or composition. Excluding existing source metadata is
often referred to as thinning. You may want to exclude source metadata for security purposes or privacy concerns, or to
reduce the size of the output file as much as possible.
A preservation rule acts as a filter to specify which XMP metadata from a source item is passed through to an encoded
output file. The preset preservation rules are Preserve All and Exclude All. Preserve All is the default.
To create your own preservation rule, click New next to the Preservation Rules menu. You can enable individual fields
or categories by selecting them in the Preservation Rules Editor dialog box. To find specific fields, use the search field
near the top of the Preservation Rules Editor dialog box. Be sure to give your preservation rule a descriptive name.
You can edit an existing custom preservation rule by choosing it from the Preservation Rules menu and clicking Edit.
Two kinds of source XMP metadata are handled separately from the source XMP metadata controlled by the
preservation rules: sequence markers and the XMP metadata that is created by the speech analysis features in Adobe
Premiere Pro. To include the speech XMP metadata and sequence markers, select Export Master Speech Track And
Sequence Markers.
Note: Speech-to-text has been removed in the latest release of Adobe Media Encoder. However, any speech to text metadata
that has already been generated can be used in exactly the same way as it was before.

52
Encoding and exporting
Last updated 6/16/2016
Adding XMP metadata
An export template specifies what XMP metadata will be written to the output file. For example, you can create an
export template that includes various XMP metadata from the source files as well as adding your contact information
and rights-management information to each output file.
The export template acts as a filter; any fields that are not explicitly enabled by the current template will be filtered out.
The only exceptions are internal properties that are automatically populated with data by the creator application, which
are always included and are not editable.
To create your own export template, click New next to the Export Template menu. You can enable individual fields or
categories by selecting them in the Export Template Editor dialog box. To find specific fields, use the search field near
the top of the Export Template Editor dialog box. Be sure to give your export template a descriptive name.
You can edit an existing custom export template by choosing it from the Export Template menu and clicking Edit.
After you have applied an export template, you can also manually enter values to add specific XMP metadata to the
current encoding queue items.
Some fields are uneditable and can’t be excluded from output—such as fields that are written automatically by the
creator application. For example, the Format field in the Dublin Core schema and the Video Frame Rate field in the
Dynamic Media schema are set by Adobe Media Encoder to accurately describe the output file, and these fields are not
user-editable. Also, values that are specified by the current export template appear as uneditable; to change these values,
change the template or apply a different template.
Any field that doesn’t contain data—either from the template or manually entered—will be excluded from the exported
XMP metadata. Empty fields are not written to the output file.
Match Source presets
When exporting video files in DPX, BMP, DNxHD MXF OP1a, H.264, HEVC, JPEG, MPEG, OpenEXR, PNG,
QuickTime, Targa, and TIFF formats, Adobe Media Encoder lets you automatically match the video settings of the
source file using Match Source presets.
Closed Captions
Closed captions are typically used to display the audio portion of a video as text on televisions and other devices that
support the display of closed captions.
See the Exporting Closed Caption data section for detailed information.
Encode and export video and audio with Media Encoder
After adding video and audio items to the encoding queue, you can encode and export them from the queue using
presets or custom settings.
Encode using presets
1Add items to the Queue panel. For information, see Add and manage items in the encoding queue .
2Choose a video format most suitable for your output from the Format pop-up menu.
3Choose a video preset most suitable for your output from the Presets pop-up menu. Or drag a preset from the Preset
Browser and drop it in the Queue.

53
Encoding and exporting
Last updated 6/16/2016
4Choose a location for your export by clicking the text for Output File, and then finding the directory or folder for
your exports in the Save As dialog box. Click Save.
5Allow encoding to start automatically, or press the Start Queue button.
Your files will begin to be encoded to your desired format, using your chosen preset, and in the location that you chose.
Encode using custom settings
1Add items to the Queue panel. For information, see Add and manage items in the encoding queue .
2Select one or more items in the queue and open the Export Settings dialog box by choosing Edit > ExportSettings.
You can also right-click the file and select Export Settings, or click the Format or Preset name to open the Export
Settings dialog box.
3Set export options. For more information, see Export settings reference for Media Encoder.
4Click OK. With the Export Settings dialog box closed, click Start Queue to begin encoding your files.
You can close the Encoding panel for optimum performance during encoding. View progress of the encoding process with
the progress bars in the Queue panel instead.
You can do any of the following in the Export Settings dialog box:
•Choose a video, audio, or still-image format from the Format menu. For more information, see File formats
supported for export .
•(Optional) Choose an encoding preset from the Preset menu.
•Select Export Video, Export Audio, or both.
•(Optional) Specify pre-encoding options, including cropping, trimming. For more information, see the Crop and
trim source before encodingsection.
•(Optional) Set options for XMP metadata export. For more information, see Export and thin XMP metadata.
•(Optional) Select Use Maximum Render Quality or Render At Maximum Bit Depth.
Note: Rendering at a higher color bit depth requires more RAM and slows rendering substantially.
•(Optional) Select Use Frame Blending.
•Specify a filename and location for the encoded file by clicking the underlined text next to Output Name in the
upper-right section of the Export Settings dialog box and entering a filename and location. If you don’t specify a
filename, Adobe Media Encoder uses the filename of the source video clip.
Note: When the format is set to P2 Movie, the user-assigned filename is not applied. Instead, such encodes are given
a six character alphanumeric name by Adobe Media Encoder. The Output Name is saved to the clip’s metadata, and
is shown as the clip name in Adobe Premiere Pro.
You can specify a destination folder in which to save the encoded file relative to the folder containing the source
video clip. When specifying a destination folder, ensure that the destination folder you specify exists. If you specify
a folder that does not exist, an error message informs you that the file cannot be encoded because the folder cannot
be found.
Check Preferences > Specify Output File Destination, and click Browse to specify the destination of encoded files. For
more information, see the Preferencessection.

54
Encoding and exporting
Last updated 6/16/2016
Monitor encoding progress
While an item is being encoded, the Status column of the encoding queue provides information on the status of each
item. Adobe Media Encoder can encode multiple outputs from a single source simultaneously. However, source files
are processed sequentially based on their order in the Queue.
You can continue to work in the application while encoding is in progress. You can add, remove, or reorder items in the
queue or watch folder. However, outputs that are currently being encoded cannot be edited.
Ready The item is in the encoding queue but has not been encoded. You can remove a file from the queue that has not
been encoded and is not being encoded.
Done The item has been successfully encoded.
Done with Warnings Item has been successfully encoded but a warning condition exists. See the encoding and error
logs for more information.
Stopped The user canceled the encoding process while the item was being encoded.
Failed Adobe Media Encoder encountered an error when attempting to encode the specified item.
Skip The user can skip one, or more selected files. With the files selected, choose Edit > Skip Selection.
Audible alerts when jobs completed (successfully and with errors) Adobe Media Encoder has audible alerts. It plays an
audible alert at the completion of the jobs in the Queue. A different alert sounds if any error conditions are detected.
These alerts can be disabled in preferences, if you do not want to hear them.
During the encoding process, click the Start Queue button once more if you would like to pause the encoding process.
Hover over the status icon to see a tool tip with the error message. Click on the status to open the log for any item for
which encoding is has completed successfully, stopped, or failed.
Parallel encoding
Adobe Media Encoder encodes all sources in sequence, but encodes all outputs of a source in parallel.
Parallel encoding is on by default. To disable parallel encoding, select Edit > Preferences, and deselect Enable Parallel
Encoding.
When you encode multiple outputs simultaneously, the Encoding panel displays a thumbnail preview, progress bar, and
the completion time estimate of each encoding output.
In certain cases, export settings require an output to encode in serial rather than in parallel mode. In such cases, the
queue returns to parallel encoding after temporary serial encoding is complete.
Watch this video2Brain video to learn more about parallel encoding in Adobe Media Encoder.
Important notes
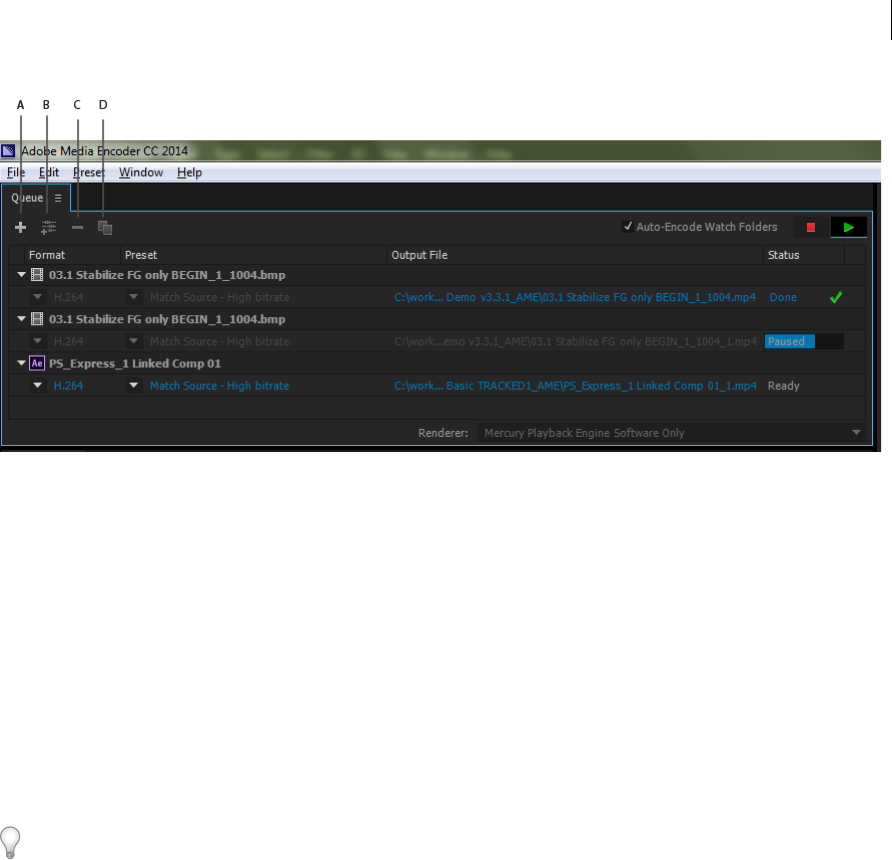
55
Encoding and exporting
Last updated 6/16/2016
A Add Source B Add Output C Remove Source/Output D Duplicate
•You can associate multiple outputs with a source. Each output can have a different format, preset, and output file
location assigned to it.
•You can reorder outputs in the output list. You can also reorder sources in the Queue. However, you cannot move
them to other sources.
•Clicking the output file path opens the folder containing the encoded file. Previous to encoding, however, the Save
As dialog appears.
•To change the output path and filename, click the Output File link for that output.
•To access an encoded file, click the Output File link for that output
•Use the Add Output button to quickly add an output to a source.
•Both sources and outputs can be duplicated. A duplicated source uses all the outputs from the original source.
Follow the steps below to change the Output File path for multiple outputs (at the same time):
1Select multiple outputs in the Queue using Shift-click or drag-select.
2Click the Output File link of one output in the current selection.
3Choose a path in the Select an output folder dialog and click Choose.
Selected outputs will all point to the new directory but retain their unique output file names.
Use preview files from Adobe Premiere Pro
When encoding Adobe Premiere Pro sequences, choose Use Previews to use existing preview files (which have already
been rendered and encoded) for the parts of the sequence for which they are available.
Note: Launch Adobe Media Encoder from Adobe Premiere Pro to use preview files. Choose File > Export > Media in
Premiere Pro to launch Adobe Media Encoder. Ensure that Match Sequence Settings is selected.
Using existing preview files can make encoding much faster. The disadvantage, however, is that the preview files may
have been encoded using different settings than those used for the rest of the sequence—for example, the preview files
may have been encoded using lossy compression.

56
Encoding and exporting
Last updated 6/16/2016
More Help topics
Log files
Preferences
Managing the media cache database
When Adobe Media Encoder imports video and audio in some formats, it processes and caches versions of these items
that it can readily access. Imported audio files are each conformed to a new .cfa file, and MPEG files are indexed to a
new .mpgindex file.
Note: When you first import a file, you may experience a delay while the media is being processed and cached.
A database retains links to each of the cached media files. This media cache database is shared with Adobe Media
Encoder, Adobe Premiere Pro, and After Effects so that each of these applications can each read from and write to the
same set of cached media files. If you change the location of the database from within any of these applications, the
location is updated for the other applications, too. Each application can use its own cache folder, but the same database
keeps track of them all.
You can change the locations of the media cache database and the cached files using settings in the Media category of
preferences. (See Preferences.)
To change the location of the media cache database or the media cache itself, click one of the Browse buttons in the
Media preferences.
To remove conformed and indexed files from the cache and to remove their entries from the database, click Clean. This
command only removes files associated with items for which the source file is no longer available.
Note: Before clicking the Clean button, make sure that any storage devices that contain your currently used source media
are connected to your computer. If footage is determined to be missing because the storage device on which it is located is
not connected, the associated files in the media cache will be removed. This removal results in the need to reconform or re-
index the footage when you attempt to use the footage later.
Cleaning the database and cache with the Clean button does not remove files that are associated with footage items for
which the source files are still available. To manually remove conformed files and index files, navigate to the media
cache folder and delete the files. The location of the media cache folder is shown in the Media preferences. If the path is
truncated, click the Browse button to show the path.
