Adobe Media Server 5.0.6 Developer’s Guide Mediaserver 506 Dg En
User Manual: adobe Adobe Media Server - 5.0.6 - Developer’s Guide Free User Guide for Adobe Media Server Software, Manual
Open the PDF directly: View PDF ![]() .
.
Page Count: 338 [warning: Documents this large are best viewed by clicking the View PDF Link!]
- Legal notices
- Contents
- Chapter 1: Getting started streaming media
- Supported clients, encoders, codecs, and file formats
- Pre-built media players
- Stream live media (HTTP)
- Prerequisites for live streaming over HTTP
- Publish and play a single live stream over HTTP
- Publish and play live multi-bitrate streams over HTTP
- Setting the record option while publishing to livepkgr
- Packaging an audio-only stream (HLS)
- Publish an audio-only stream (HLS)
- URLs for publishing and playing live streams over HTTP
- Differences in HTTP live URLs from Flash Media Server 4.0 to Adobe Media Server 5
- Configure DVR (HDS)
- Configure a sliding window (HLS)
- Duplicate the livepkgr service
- Modify server-side code in the livepkgr service
- Removing all HDS segments
- Stream live media (RTMP)
- Stream on-demand media (HTTP)
- Stream on-demand media (RTMP)
- Stream on-demand encrypted media (pRTMP)
- Multicast media (RTMFP)
- Configure closed captioning
- Configure alternate audio
- Configure content protection
- Configure HTTP Dynamic Streaming and HTTP Live Streaming
- Overview of HTTP Dynamic Streaming and HTTP Live Streaming
- Differences in HTTP Dynamic Streaming between Flash Media Server 4.0 and 4.5
- Create and configure live events
- Write server-side code to assign a stream to a live event
- Content storage (HDS and HLS)
- Configure set-level F4M/M3U8 files for multi-bitrate streaming
- Configure absolute time on the server
- Configure F4F and TS fragment duration
- Configure the size of the IO buffer
- Disk management
- Configure content caching (HDS)
- Encrypt content for Adobe Access protection
- HTTP streaming configuration file reference
- Build custom media players
- Offline packaging
- Offline packaging for HDS
- About packaging multi-bitrate files
- Package multi-bitrate files
- Generate a common key
- Use a configuration file to package and encrypt content
- Use the command line to package and encrypt content
- Updating DRM information
- Update DRM information using the command line
- Update DRM information using configuration parameters
- Setting fragment duration based on frames or time
- Offline packaging for HLS
- Licensing configurations and restrictions (HDS and HLS)
- Troubleshoot issues with streaming media
- Chapter 2: Content protection
- Configuring content protection for HDS
- Configuring content protection for HLS
- Overview
- Live use case
- Vanilla
- PHLS and Adobe Access
- PHLS
- Adobe Access
- Application level
- Vanilla
- PHLS
- Adobe Access
- Event level
- Vanilla
- PHLS
- Adobe Access
- VOD use case
- Vanilla
- PHLS
- Adobe Access
- Vanilla
- PHLS
- Adobe Access
- License chaining
- Key rotation
- Out-of-Band DRM metadata
- Player binding
- Serve encryption keys to the client
- Dynamic Content Encryption Key
- Delivering Content Encryption Keys
- Adaptive bitrate streaming
- Chapter 3: Getting started developing applications
- Chapter 4: Developing streaming media applications
- Connecting to the server
- Managing connections
- Streaming media files
- Checking video files
- Handling errors
- Working with playlists
- Dynamic streaming
- Reconnecting streams when a connection drops
- Fast switching between streams
- Smart Seeking
- Detecting bandwidth
- Detecting stream length
- Chapter 5: Working with live video
- Capturing live video
- Adding DVR features to live video
- Adding metadata to a live stream
- Capturing timecode sent from Flash Media Live Encoder
- Publishing live video in RAW file format
- Multi-point publishing between servers
- Chapter 6: Building peer-assisted networking applications
- Real-Time Media Flow Protocol (RTMFP)
- RTMFP groups
- Create a group
- Bootstrap a peer to a group
- Server-side RTMFP groups
- Flash Player peer-assisted networking security dialog
- ActionScript classes for working with RTMFP groups
- Post messages to a group
- Route messages directly to a peer
- Replicate an object within a group
- Multicasting
- Peer-assisted networking application examples
- Distribute peer introductions across servers
- Workflow for distributing introductions
- How peer introductions work
- Configure the server to dispatch events to the script engine
- Deploy servers in a robust server-only group
- Distributed Introductions API
- Example: Distribute introductions across servers
- Filter introduction requests
- Use the Administration API to monitor distributed introductions
- Chapter 7: Developing social applications
- Chapter 8: Securing applications
- Chapter 9: Developing Plug-ins
- What’s new with plug-ins in Flash Media Server 4.5.1
- What’s new with plug-ins in Flash Media Server 4.5
- Versioning, upgrading, and server editions
- Working with plug-ins
- General development tasks
- Developing an Access plug-in
- Developing an Authorization plug-in
- Developing a File plug-in

ADOBE ®MEDIA SERVER
Developer’s Guide


iii
Last updated 9/4/2014
Contents
Chapter 1: Getting started streaming media
Supported clients, encoders, codecs, and file formats . . . . . . . . . . . . . . . . . . . . . . . . . . . . . . . . . . . . . . . . . . . . . . . . . . . . . . . . . . . . . . . . . . . 1
Pre-built media players . . . . . . . . . . . . . . . . . . . . . . . . . . . . . . . . . . . . . . . . . . . . . . . . . . . . . . . . . . . . . . . . . . . . . . . . . . . . . . . . . . . . . . . . . . . . . . . . 3
Stream live media (HTTP) . . . . . . . . . . . . . . . . . . . . . . . . . . . . . . . . . . . . . . . . . . . . . . . . . . . . . . . . . . . . . . . . . . . . . . . . . . . . . . . . . . . . . . . . . . . . . . 5
Stream live media (RTMP) . . . . . . . . . . . . . . . . . . . . . . . . . . . . . . . . . . . . . . . . . . . . . . . . . . . . . . . . . . . . . . . . . . . . . . . . . . . . . . . . . . . . . . . . . . . . . 17
Stream on-demand media (HTTP) . . . . . . . . . . . . . . . . . . . . . . . . . . . . . . . . . . . . . . . . . . . . . . . . . . . . . . . . . . . . . . . . . . . . . . . . . . . . . . . . . . . . . 19
Stream on-demand media (RTMP) . . . . . . . . . . . . . . . . . . . . . . . . . . . . . . . . . . . . . . . . . . . . . . . . . . . . . . . . . . . . . . . . . . . . . . . . . . . . . . . . . . . . 24
Stream on-demand encrypted media (pRTMP) . . . . . . . . . . . . . . . . . . . . . . . . . . . . . . . . . . . . . . . . . . . . . . . . . . . . . . . . . . . . . . . . . . . . . . . . 29
Multicast media (RTMFP) . . . . . . . . . . . . . . . . . . . . . . . . . . . . . . . . . . . . . . . . . . . . . . . . . . . . . . . . . . . . . . . . . . . . . . . . . . . . . . . . . . . . . . . . . . . . . 36
Configure closed captioning . . . . . . . . . . . . . . . . . . . . . . . . . . . . . . . . . . . . . . . . . . . . . . . . . . . . . . . . . . . . . . . . . . . . . . . . . . . . . . . . . . . . . . . . . . 39
Configure alternate audio . . . . . . . . . . . . . . . . . . . . . . . . . . . . . . . . . . . . . . . . . . . . . . . . . . . . . . . . . . . . . . . . . . . . . . . . . . . . . . . . . . . . . . . . . . . . 49
Configure content protection . . . . . . . . . . . . . . . . . . . . . . . . . . . . . . . . . . . . . . . . . . . . . . . . . . . . . . . . . . . . . . . . . . . . . . . . . . . . . . . . . . . . . . . . . 51
Configure HTTP Dynamic Streaming and HTTP Live Streaming . . . . . . . . . . . . . . . . . . . . . . . . . . . . . . . . . . . . . . . . . . . . . . . . . . . . . . . . . 51
HTTP streaming configuration file reference . . . . . . . . . . . . . . . . . . . . . . . . . . . . . . . . . . . . . . . . . . . . . . . . . . . . . . . . . . . . . . . . . . . . . . . . . . . 76
Build custom media players . . . . . . . . . . . . . . . . . . . . . . . . . . . . . . . . . . . . . . . . . . . . . . . . . . . . . . . . . . . . . . . . . . . . . . . . . . . . . . . . . . . . . . . . . . . 91
Offline packaging . . . . . . . . . . . . . . . . . . . . . . . . . . . . . . . . . . . . . . . . . . . . . . . . . . . . . . . . . . . . . . . . . . . . . . . . . . . . . . . . . . . . . . . . . . . . . . . . . . . . 97
Troubleshoot issues with streaming media . . . . . . . . . . . . . . . . . . . . . . . . . . . . . . . . . . . . . . . . . . . . . . . . . . . . . . . . . . . . . . . . . . . . . . . . . . . 111
Chapter 2: Content protection
Configuring content protection for HDS . . . . . . . . . . . . . . . . . . . . . . . . . . . . . . . . . . . . . . . . . . . . . . . . . . . . . . . . . . . . . . . . . . . . . . . . . . . . . . 115
Configuring content protection for HLS . . . . . . . . . . . . . . . . . . . . . . . . . . . . . . . . . . . . . . . . . . . . . . . . . . . . . . . . . . . . . . . . . . . . . . . . . . . . . . 157
Chapter 3: Getting started developing applications
Application architecture . . . . . . . . . . . . . . . . . . . . . . . . . . . . . . . . . . . . . . . . . . . . . . . . . . . . . . . . . . . . . . . . . . . . . . . . . . . . . . . . . . . . . . . . . . . . . 179
Set up a development environment . . . . . . . . . . . . . . . . . . . . . . . . . . . . . . . . . . . . . . . . . . . . . . . . . . . . . . . . . . . . . . . . . . . . . . . . . . . . . . . . . . 179
Example: Hello World application . . . . . . . . . . . . . . . . . . . . . . . . . . . . . . . . . . . . . . . . . . . . . . . . . . . . . . . . . . . . . . . . . . . . . . . . . . . . . . . . . . . . 180
Overview of creating an application . . . . . . . . . . . . . . . . . . . . . . . . . . . . . . . . . . . . . . . . . . . . . . . . . . . . . . . . . . . . . . . . . . . . . . . . . . . . . . . . . . 182
Test an application . . . . . . . . . . . . . . . . . . . . . . . . . . . . . . . . . . . . . . . . . . . . . . . . . . . . . . . . . . . . . . . . . . . . . . . . . . . . . . . . . . . . . . . . . . . . . . . . . . 184
Deploy an application . . . . . . . . . . . . . . . . . . . . . . . . . . . . . . . . . . . . . . . . . . . . . . . . . . . . . . . . . . . . . . . . . . . . . . . . . . . . . . . . . . . . . . . . . . . . . . . 185
Chapter 4: Developing streaming media applications
Connecting to the server . . . . . . . . . . . . . . . . . . . . . . . . . . . . . . . . . . . . . . . . . . . . . . . . . . . . . . . . . . . . . . . . . . . . . . . . . . . . . . . . . . . . . . . . . . . . 188
Managing connections . . . . . . . . . . . . . . . . . . . . . . . . . . . . . . . . . . . . . . . . . . . . . . . . . . . . . . . . . . . . . . . . . . . . . . . . . . . . . . . . . . . . . . . . . . . . . . 193
Streaming media files . . . . . . . . . . . . . . . . . . . . . . . . . . . . . . . . . . . . . . . . . . . . . . . . . . . . . . . . . . . . . . . . . . . . . . . . . . . . . . . . . . . . . . . . . . . . . . . 195
Checking video files . . . . . . . . . . . . . . . . . . . . . . . . . . . . . . . . . . . . . . . . . . . . . . . . . . . . . . . . . . . . . . . . . . . . . . . . . . . . . . . . . . . . . . . . . . . . . . . . . 201
Handling errors . . . . . . . . . . . . . . . . . . . . . . . . . . . . . . . . . . . . . . . . . . . . . . . . . . . . . . . . . . . . . . . . . . . . . . . . . . . . . . . . . . . . . . . . . . . . . . . . . . . . . 205
Working with playlists . . . . . . . . . . . . . . . . . . . . . . . . . . . . . . . . . . . . . . . . . . . . . . . . . . . . . . . . . . . . . . . . . . . . . . . . . . . . . . . . . . . . . . . . . . . . . . . 207
Dynamic streaming . . . . . . . . . . . . . . . . . . . . . . . . . . . . . . . . . . . . . . . . . . . . . . . . . . . . . . . . . . . . . . . . . . . . . . . . . . . . . . . . . . . . . . . . . . . . . . . . . . 210
Reconnecting streams when a connection drops . . . . . . . . . . . . . . . . . . . . . . . . . . . . . . . . . . . . . . . . . . . . . . . . . . . . . . . . . . . . . . . . . . . . . 219
Fast switching between streams . . . . . . . . . . . . . . . . . . . . . . . . . . . . . . . . . . . . . . . . . . . . . . . . . . . . . . . . . . . . . . . . . . . . . . . . . . . . . . . . . . . . . 223
Smart Seeking . . . . . . . . . . . . . . . . . . . . . . . . . . . . . . . . . . . . . . . . . . . . . . . . . . . . . . . . . . . . . . . . . . . . . . . . . . . . . . . . . . . . . . . . . . . . . . . . . . . . . . . 224
Detecting bandwidth . . . . . . . . . . . . . . . . . . . . . . . . . . . . . . . . . . . . . . . . . . . . . . . . . . . . . . . . . . . . . . . . . . . . . . . . . . . . . . . . . . . . . . . . . . . . . . . . 227
Detecting stream length . . . . . . . . . . . . . . . . . . . . . . . . . . . . . . . . . . . . . . . . . . . . . . . . . . . . . . . . . . . . . . . . . . . . . . . . . . . . . . . . . . . . . . . . . . . . . 232

iv
ADOBE MEDIA SERVER 5.0.6 DEVELOPER’S GUIDE
Contents
Last updated 9/4/2014
Chapter 5: Working with live video
Capturing live video . . . . . . . . . . . . . . . . . . . . . . . . . . . . . . . . . . . . . . . . . . . . . . . . . . . . . . . . . . . . . . . . . . . . . . . . . . . . . . . . . . . . . . . . . . . . . . . . 235
Adding DVR features to live video . . . . . . . . . . . . . . . . . . . . . . . . . . . . . . . . . . . . . . . . . . . . . . . . . . . . . . . . . . . . . . . . . . . . . . . . . . . . . . . . . . . . 237
Adding metadata to a live stream . . . . . . . . . . . . . . . . . . . . . . . . . . . . . . . . . . . . . . . . . . . . . . . . . . . . . . . . . . . . . . . . . . . . . . . . . . . . . . . . . . . . 244
Capturing timecode sent from Flash Media Live Encoder . . . . . . . . . . . . . . . . . . . . . . . . . . . . . . . . . . . . . . . . . . . . . . . . . . . . . . . . . . . . . 251
Publishing live video in RAW file format . . . . . . . . . . . . . . . . . . . . . . . . . . . . . . . . . . . . . . . . . . . . . . . . . . . . . . . . . . . . . . . . . . . . . . . . . . . . . . 251
Multi-point publishing between servers . . . . . . . . . . . . . . . . . . . . . . . . . . . . . . . . . . . . . . . . . . . . . . . . . . . . . . . . . . . . . . . . . . . . . . . . . . . . . . 254
Chapter 6: Building peer-assisted networking applications
Real-Time Media Flow Protocol (RTMFP) . . . . . . . . . . . . . . . . . . . . . . . . . . . . . . . . . . . . . . . . . . . . . . . . . . . . . . . . . . . . . . . . . . . . . . . . . . . . . . 257
RTMFP groups . . . . . . . . . . . . . . . . . . . . . . . . . . . . . . . . . . . . . . . . . . . . . . . . . . . . . . . . . . . . . . . . . . . . . . . . . . . . . . . . . . . . . . . . . . . . . . . . . . . . . . . 258
Distribute peer introductions across servers . . . . . . . . . . . . . . . . . . . . . . . . . . . . . . . . . . . . . . . . . . . . . . . . . . . . . . . . . . . . . . . . . . . . . . . . . . 270
Chapter 7: Developing social applications
About social applications . . . . . . . . . . . . . . . . . . . . . . . . . . . . . . . . . . . . . . . . . . . . . . . . . . . . . . . . . . . . . . . . . . . . . . . . . . . . . . . . . . . . . . . . . . . . 283
About shared objects . . . . . . . . . . . . . . . . . . . . . . . . . . . . . . . . . . . . . . . . . . . . . . . . . . . . . . . . . . . . . . . . . . . . . . . . . . . . . . . . . . . . . . . . . . . . . . . . 283
Remote shared objects . . . . . . . . . . . . . . . . . . . . . . . . . . . . . . . . . . . . . . . . . . . . . . . . . . . . . . . . . . . . . . . . . . . . . . . . . . . . . . . . . . . . . . . . . . . . . . 284
SharedBall example . . . . . . . . . . . . . . . . . . . . . . . . . . . . . . . . . . . . . . . . . . . . . . . . . . . . . . . . . . . . . . . . . . . . . . . . . . . . . . . . . . . . . . . . . . . . . . . . . 285
Broadcast messages to many users . . . . . . . . . . . . . . . . . . . . . . . . . . . . . . . . . . . . . . . . . . . . . . . . . . . . . . . . . . . . . . . . . . . . . . . . . . . . . . . . . . . 287
Chapter 8: Securing applications
Allow or deny access to assets . . . . . . . . . . . . . . . . . . . . . . . . . . . . . . . . . . . . . . . . . . . . . . . . . . . . . . . . . . . . . . . . . . . . . . . . . . . . . . . . . . . . . . . 288
Authenticate clients . . . . . . . . . . . . . . . . . . . . . . . . . . . . . . . . . . . . . . . . . . . . . . . . . . . . . . . . . . . . . . . . . . . . . . . . . . . . . . . . . . . . . . . . . . . . . . . . . 289
Authenticate users . . . . . . . . . . . . . . . . . . . . . . . . . . . . . . . . . . . . . . . . . . . . . . . . . . . . . . . . . . . . . . . . . . . . . . . . . . . . . . . . . . . . . . . . . . . . . . . . . . 293
Chapter 9: Developing Plug-ins
What’s new with plug-ins in Flash Media Server 4.5.1 . . . . . . . . . . . . . . . . . . . . . . . . . . . . . . . . . . . . . . . . . . . . . . . . . . . . . . . . . . . . . . . . . 295
What’s new with plug-ins in Flash Media Server 4.5 . . . . . . . . . . . . . . . . . . . . . . . . . . . . . . . . . . . . . . . . . . . . . . . . . . . . . . . . . . . . . . . . . . . 295
Versioning, upgrading, and server editions . . . . . . . . . . . . . . . . . . . . . . . . . . . . . . . . . . . . . . . . . . . . . . . . . . . . . . . . . . . . . . . . . . . . . . . . . . . 295
Working with plug-ins . . . . . . . . . . . . . . . . . . . . . . . . . . . . . . . . . . . . . . . . . . . . . . . . . . . . . . . . . . . . . . . . . . . . . . . . . . . . . . . . . . . . . . . . . . . . . . . 297
General development tasks . . . . . . . . . . . . . . . . . . . . . . . . . . . . . . . . . . . . . . . . . . . . . . . . . . . . . . . . . . . . . . . . . . . . . . . . . . . . . . . . . . . . . . . . . . 300
Developing an Access plug-in . . . . . . . . . . . . . . . . . . . . . . . . . . . . . . . . . . . . . . . . . . . . . . . . . . . . . . . . . . . . . . . . . . . . . . . . . . . . . . . . . . . . . . . . 301
Developing an Authorization plug-in . . . . . . . . . . . . . . . . . . . . . . . . . . . . . . . . . . . . . . . . . . . . . . . . . . . . . . . . . . . . . . . . . . . . . . . . . . . . . . . . 303
Developing a File plug-in . . . . . . . . . . . . . . . . . . . . . . . . . . . . . . . . . . . . . . . . . . . . . . . . . . . . . . . . . . . . . . . . . . . . . . . . . . . . . . . . . . . . . . . . . . . . 331

1
Last updated 9/4/2014
Chapter 1: Getting started streaming
media
Supported clients, encoders, codecs, and file formats
Supported clients and servers for streaming services
Streaming services are pre-built Adobe Media Server applications. Use streaming services to stream media to Flash,
AIR, and Apple (iOS and QuickTime) clients. The services are installed to rootinstall/applications/servicename.
The following table lists the streaming services and their earliest supported server versions, server editions, and client
runtimes:
Streaming type Service
name
Server version Server
edition(earliest
supported)
Client runtime
(earliest supported)
On-demand streaming over
RTMP.
See Stream on-demand media
(RTMP).
vod 3 All Flash Player 6
AIR 1
On-demand streaming over
HTTP.
See “Stream on-demand media
(HTTP)” on page 19.
None 4.5 All Flash Player 10.1
AIR 2
iOS 3.0
QuickTime X
Live streaming over RTMP.
See “Stream live media (RTMP)”
on page 17
live 3 All Flash Player 6
AIR 1
Live streaming over HTTP.
See “Stream live media (HTTP)”
on page 5.
livepkgr 4 4—Adobe Media
Server Extended,
Adobe Media Server
Professional
4.5—All
4—Flash Player 10.1,
AIR 2
4.5—Flash Player
10.1, AIR 2, iOS 3.0,
QuickTime X

2
ADOBE MEDIA SERVER 5.0.6 DEVELOPER’S GUIDE
Getting started streaming media
Last updated 9/4/2014
Important: On Adobe Media Server 5 Standard, you cannot modify the server-side code in the streaming services. In all
other editions of the server, you can modify the code.
Supported file formats and codecs
Adobe Flash Platform
For a complete list of supported file formats and codecs, see Supported file formats and codecs.
Live HTTP Dynamic Streaming supports the H.264, VP6, MP3, and AAC codecs.
For on-demand HTTP Dynamic Streaming, the just-in-time packager supports F4V/MP4 files. This document
explains how to use the just-in-time packager. To package FLV files for HTTP Dynamic Streaming, use the offline File
Packager tool. See File Packager reference.
In addition, see the following Flash Platform articles:
Smart phone and tablet video encoding recommendations for Flash Player and AIR by Adobe encoding
evangelist, Maxim Levkov, and Adobe Product Manager, Tom Nguyen.
Video encoding and transcoding recommendations for HTTP Dynamic Streaming on the Flash Platform by
Adobe encoding evangelist, Maxim Levkov.
Multicast streaming over RTMFP.
See “Multicast media (RTMFP)”
on page 36.
multicast 4 Adobe Media Server
Professional supports
IP Multicast
Adobe Media Server
Extended supports IP
Multicast,
Application-level
Multicast, and
Multicast Fusion.
Multicast Fusion
technology
combines IP and
Application-level
Multicast.
The server editions
have changed with
server version 5.
Adobe Flash Media
Streaming Server is
Adobe Media Server
5 Standard. Adobe
Flash Media
Interactive Server is
Adobe Media Server
5 Professional. Adobe
Flash Media
Enterprise Server is
Adobe Media Server
5 Extended. Adobe
Flash Media
Development Server
is Adobe Media
Server 5 Starter.
Flash Player 10.1
AIR 2
Streaming type Service
name
Server version Server
edition(earliest
supported)
Client runtime
(earliest supported)

3
ADOBE MEDIA SERVER 5.0.6 DEVELOPER’S GUIDE
Getting started streaming media
Last updated 9/4/2014
For a longer list of articles about encoding, see the Video Encoding page on Adobe Developer Connection.
Apple HTTP Live Streaming
Adobe Media Server support for Apple HTTP Live Streaming includes H.264 and AAC/HE-AAC for audio-video
content and AAC/HE-AAC for audio-only content.
For more information, see Apple HTTP Live Streaming Overview - FAQ.
For recommended encoding settings, see Best Practices for Creating and Deploying HTTP Live Streaming Media for
the iPhone and iPad and Recommended Encoding Settings for HTTP Live Streaming Media.
Supported encoders
Use the following encoders to publish a live stream to Adobe Media Server:
•Flash Media Live Encoder
•Server-side scripts running on Adobe Media Server Extended, Adobe Media Server Professional, and Adobe Media
Server Starter. When you call the Server-side ActionScript method Stream.play(), the stream is considered “live”.
•A custom-built Flash Player or AIR application. See “Working with live video” on page 235.
•Third-party encoding solutions. See Adobe Media Server Solution Partners.
Pre-built media players
Flash and AIR media players
Media player Supported protocols Media player location
Flash Media Playback RTMP/x, HTTP
Note: Flash Media Playback
doesn’t support Set-level
Manifest files.
www.adobe.com/products/flashmediapl
ayback/
Strobe Media Playback RTMP/x, HTTP osmf.org/developers.html
Adobe Media Server sample video
player
The AMS sample video player is
Strobe Media Playback in a
wrapper. The wrapper includes
sample and generates HTML
embed code.
RTMP/x, HTTP
To use this player for multicast
playback, use the multicast
configurator to create a
manifest file. Use the manifest
file as the source.
rootinstall/samples/videoPlayer
Adobe Media Server multicast
sample player
RTMFP rootinstall/tools/multicast/multicastplaye
r
Flash FLVPlayback component RTMP/x fl.video.FLVPlayback
FLV playback 2.5 supports DVR
Flex components RTMP/x mx.controls.VideoDisplay
spark.components.VideoPlayer
spark.components.VideoDisplay

4
ADOBE MEDIA SERVER 5.0.6 DEVELOPER’S GUIDE
Getting started streaming media
Last updated 9/4/2014
Note: The previous table is not a complete list of supported media players. Many third parties have developed excellent
media players. When using a third party media player, please check with the third party to verify which features the media
player supports.
Play media in Flash Media Playback
Flash Media Playback is a compiled SWF file hosted on Adobe.com. Flash Media Playback is built on the Open Source
Media Framework (OSMF). Flash Media Playback is not open source, but it is fully configurable and supports
dynamically loaded plug-ins from third-party service providers. It runs in Flash Player 10.1 and AIR 2 and supports
multi-bitrate streaming, Adobe HTTP Dynamic Streaming (streaming over HTTP), and DVR.
Note: Flash Media Playback does not support set-level manifest files; use Strobe Media Playback instead. Or, to use multi-
bitrate HTTP Dynamic Streaming with Flash Media Playback, use a Manifest.xml file.
For more information about Flash Media Playback, see www.adobe.com/products/flashmediaplayback.
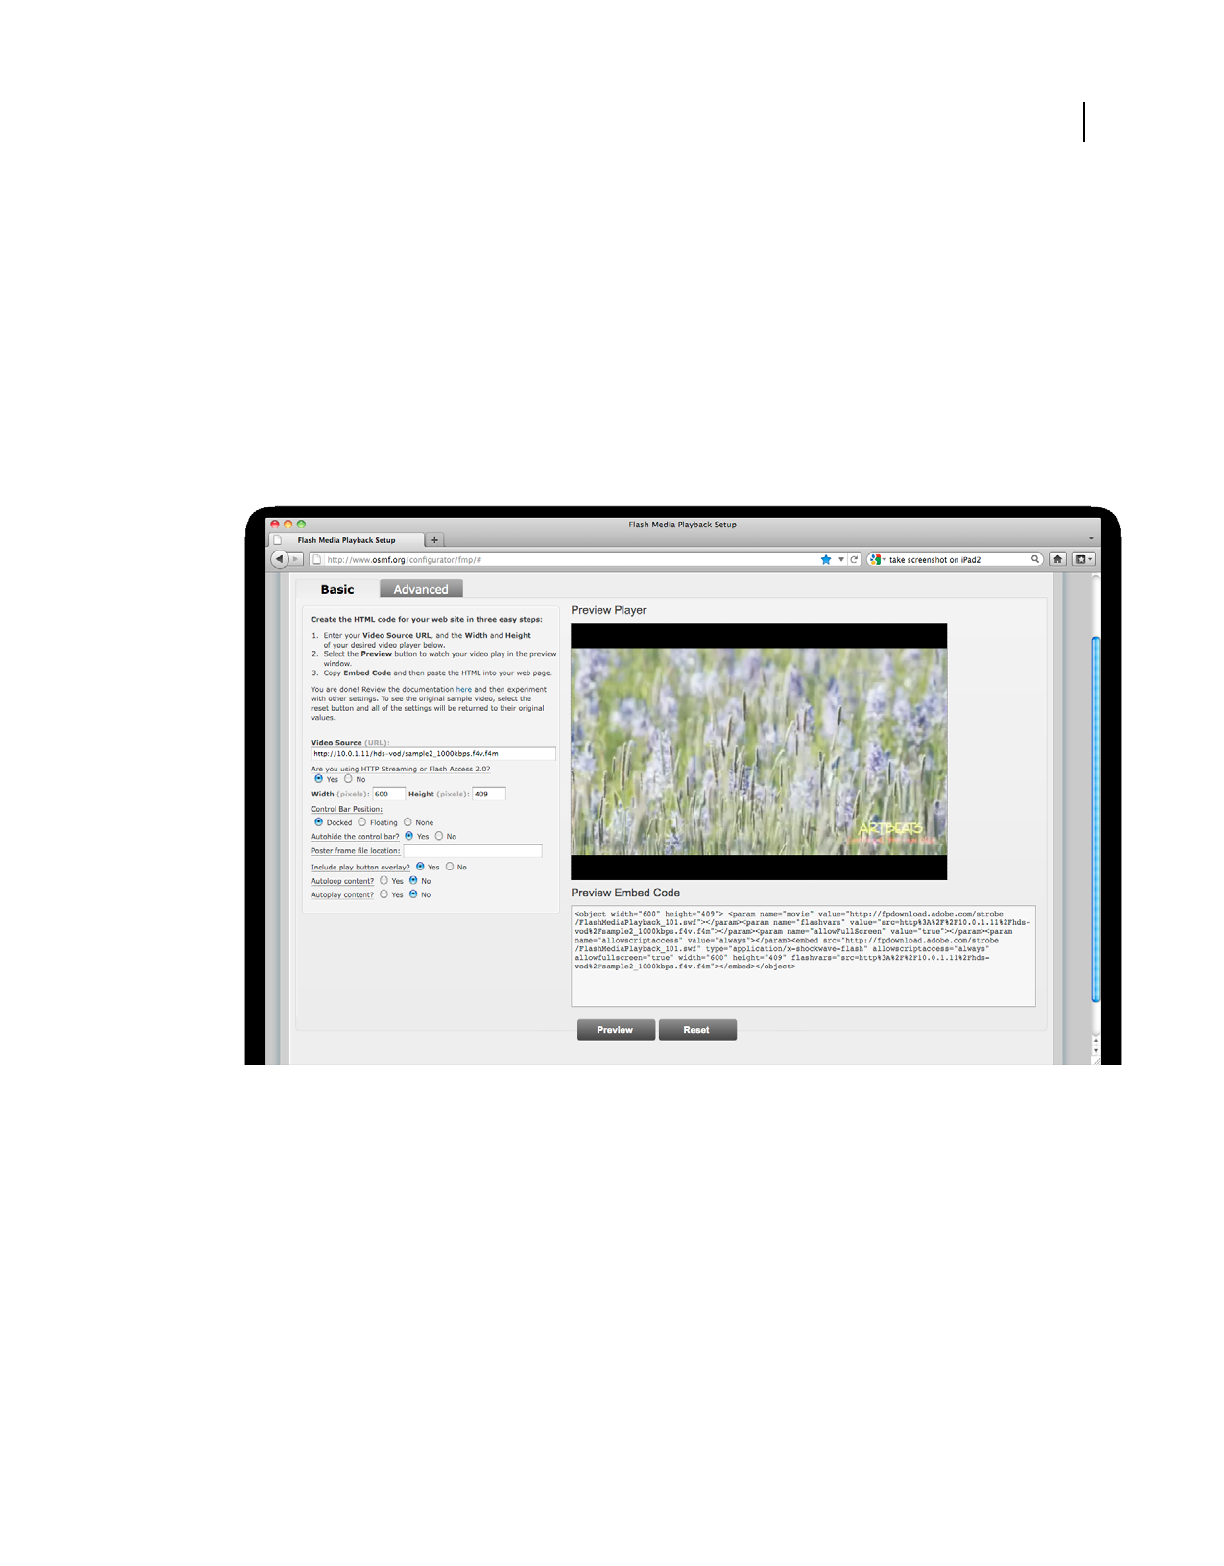
1Load the Flash Media Playback Setup page in a web browser: www.osmf.org/configurator/fmp/.
2Enter the Video Source.
3Indicate whether the video uses HTTP Dynamic Streaming or Adobe Access.
4To use DVR, click the Advanced tab and select Stream Type DVR.
5Click Preview to update the embed code.
6Click Play to test the code.
7To use the player in your own HTML page, copy the embed code and paste it into your page.
Play media in Strobe Media Playback
Strobe Media Playback is built with the Open Source Media Framework (OSMF). It supports progressive download,
RTMP streaming, HTTP Dynamic Streaming (including adaptive bitrate manifest files), multicast streaming, and
content protection with Adobe® Flash® Access™. You must host Strobe Media Playback on your own server.
Download the latest Strobe Media Playback and its documentation from osmf.org.
Play media in the Adobe Media Server sample video player
The sample player that installs with Adobe Media Server to rootinstall/samples/videoPlayer is based on Strobe Media
Playback. You can use the sample player to generate HTML embed code to use in your own HTML page.
Important: To play the sample F4M manifest files in the sample video player, enter a localhost address in the Stream URL
box. For example, http://localhost/vod/hds_sample1_manifest.f4m.
Embed the Adobe Media Server sample video player in an HTML file
1Browse to the sample video player and open it in a browser. The file is located at
rootinstall/samples/videoPlayer/videoplayer.html.
2
Enter the URL of the video to play and click Stream. The sample player adds the URL of the video file to the embed code.
To play an on-demand file from the vod service, copy the file to the rootinstall/applications/vod/media folder. The
URL is something like the following:
rtmp://localhost/vod/mp4:sample1_1500kbps.f4v
For more information, see “URLs for playing on-demand media files over RTMP” on page 26, “URLs for publishing
and playing live streams over RTMP” on page 18, “URLs for publishing and playing live streams over HTTP” on
page 12, and “URLs for playing on-demand streams over HTTP” on page 23.

5
ADOBE MEDIA SERVER 5.0.6 DEVELOPER’S GUIDE
Getting started streaming media
Last updated 9/4/2014
3Find the section on the page labeled “Embed Code”.
4Copy the code from the text field at the bottom of the page. The code begins and ends with <object> tags.
5Create a new HTML page.
6Paste the code from the sample video player into the HTML file between the <body></body> tags.
7Save the HTML page to the rootinstall/webroot folder.
Important: Do not name the file “index.html”. The Adobe Media Server Start Screen is the index.html file in the
webroot folder. If you save a file named index.html to the webroot folder, the file will overwrite the Start Screen.
The embed code looks for the SampleMediaPlayback.swf file at swfs/SampleMediaPlayback.swf. The
SampleMediaPlayback.swf is installed to this folder by default. To serve the HTML page from a different web server,
use the same folder structure.
8Open your HTML file in a browser.
Apple media players
Apple HTTP Live Streaming supports both live content and on-demand content.
For more information about Apple media players, see Apple HTTP Live Streaming Overview.
Stream live media (HTTP)
Prerequisites for live streaming over HTTP
To use HTTP Dynamic Streaming (HDS) and HTTP Live Streaming (HLS) to serve live streams to clients over HTTP,
publish the streams to the HTTP Live Packager service on Adobe Media Server (rootinstall/applications/livepkgr). The
livepkgr service ingests the streams, packages them into fragments, and delivers the fragments to Flash and iOS clients
in real-time.
To complete these tutorials, use the following software:
•Adobe Media Server 5. See the video Install Adobe Media Server 5 and verify HTTP streaming to Flash and iOS.
•Flash Media Live Encoder
Note: Flash Media Live Encoder on Windows doesn’t support AAC encoding. To add support for AAC, purchase the
MainConcept AAC Encoder.
•(Adobe HTTP Dynamic Streaming) Adobe Media Server sample video player (which uses Strobe Media Playback)
and Flash Player 10.1.
•(Apple HTTP Live Streaming) iOS 3.0 or later device or Mac OS 10.6 with Safari 4.0 or QuickTime X.
For more information, see “Supported clients, encoders, codecs, and file formats” on page 1 and “Pre-built media
players” on page 3.
Media player Supported streaming type
Devices running iOS 3.0 and later include built-in client
software.
On-demand and live (HTTP)
On Mac OS 10.6 and later, Safari 4.0 and QuickTime X. On-demand and live (HTTP)

6
ADOBE MEDIA SERVER 5.0.6 DEVELOPER’S GUIDE
Getting started streaming media
Last updated 9/4/2014
Publish and play a single live stream over HTTP
1Install Adobe Media Server 5 and choose to install Apache HTTP Server.
2Install Flash Media Live Encoder and configure it to use absolute time.
aClose Flash Media Live Encoder.
bOpen the Flash Media Live Encoder rootinstall\conf\config.xml file in a text editor.
The default installation location on Windows is C:\Program Files\Adobe\Flash Media Live Encoder 3.2.
The default installation location on Mac OS is Macintosh HD:Applications:Adobe:Flash Media Live Encoder 3.2.
cSet the tag //flashmedialiveencoder_config/mbrconfig/streamsynchronization/enable to true:
<flashmedialiveencoder_config>
<mbrconfig>
<streamsynchronization>
<!-- "true" to enable this feature, "false" to disable.-->
<enable>true</enable>
dSave the file.
3To publish a live stream to Adobe Media Server, start Flash Media Live Encoder and do the following:
aIn the Encoding Options panel, from the Preset pop-up menu, choose High Bandwidth (800 Kbps) — H.264.
For Audio Format, choose AAC.
Note: Flash Media Live Encoder on Windows doesn’t support AAC encoding. To add support for AAC, purchase
the MainConcept AAC Encoder.
Flash Media Live Encoder Encoding Options panel
bClick the wrench next to Format to open Advanced Encoder Settings and do the following:
•Profile—Main
•Level—3.1
•Keyframe Frequency—4 or a multiple of <FragmentDuration> in the
applications/livepkgr/events/_definst_/liveevent/Event.xml file. The default value of <FragmentDuration>
is 4000 milliseconds.
Note: For information about profile and level support, see “Supported file formats and codecs” on page 2.

7
ADOBE MEDIA SERVER 5.0.6 DEVELOPER’S GUIDE
Getting started streaming media
Last updated 9/4/2014
Flash Media Live Encoder Advanced Encoder Settings
cIn the AMS URL text box enter the following:
rtmp://localhost/livepkgr
Note: Use the RTMP protocol to stream the content to the livepkgr application on Adobe Media Server. You can
substitute an IP address or a domain name for “localhost”.
dIn the Stream text box enter the following:
livestream?adbe-live-event=liveevent
Note: The applications/livepkgr/main.asc file expects this value.
eDeselect Save to File.
fClick Start.
4(Adobe HTTP Dynamic Streaming) To play the media in Flash Media Playback, do the following:
aOpen Flash Media Playback in a web browser:
http://www.osmf.org/configurator/fmp/
Note: Flash Media Playback requires Flash Player 10.1 to support HTTP Dynamic Streaming.
bIn Video Source, enter:
http://localhost/hds-live/livepkgr/_definst_/liveevent/livestream.f4m
For information about the request URL, see “URLs for publishing and playing live streams over HTTP” on
page 12.
cSelect Yes under the question “Are you using HTTP Streaming or Adobe Access 2.0?”.
dClick Preview. Click Play.
5(Adobe HTTP Dynamic Streaming) To play the media in Strobe Media Playback, do the following:
aOpen the Adobe Media Server sample video player in a web browser. Browse to
rootinstall/samples/videoPlayer/videoplayer.html
bIn STREAM URL, enter:
http://localhost/hds-live/livepkgr/_definst_/liveevent/livestream.f4m
For information about the request URL, see “URLs for publishing and playing live streams over HTTP” on
page 12.

8
ADOBE MEDIA SERVER 5.0.6 DEVELOPER’S GUIDE
Getting started streaming media
Last updated 9/4/2014
cSelect LIVE and Click PLAY STREAM.
6(Apple HTTP Live Streaming) Use the following URL:
http://10.0.1.11/hls-live/livepkgr/_definst_/liveevent/livestream.m3u8
For information about where to use the URL to serve various iOS devices, QuickTime, and Safari, see HTTP Live
Streaming Overview in the iOS Reference Library.
For information about the request URL, see “URLs for publishing and playing live streams over HTTP” on page 12.
Note: Replace “localhost” or “10.0.1.11” with the domain name or IP address of the computer hosting Adobe Media
Server. If you’re using a Adobe Media Server hosting provider, they can give you this value.
More Help topics
“Troubleshoot issues with streaming media” on page 111
“Disk management” on page 70
“Content storage (HDS and HLS)” on page 56
“Configure HTTP Dynamic Streaming and HTTP Live Streaming” on page 51
“Stream live media (RTMP)” on page 17
Publish and play live multi-bitrate streams over HTTP
1Install Adobe Media Server 5 and choose to install Apache HTTP Server.
2Install Flash Media Live Encoder and configure it to use absolute time.
aClose Flash Media Live Encoder.
bOpen the Flash Media Live Encoder rootinstall\Conf\config.xml file in a text editor.
cSet the tag //flashmedialiveencoder_config/mbrconfig/streamsynchronization/enable to true:
<flashmedialiveencoder_config>
<mbrconfig>
<streamsynchronization>
<!-- "true" to enable this feature, "false" to disable.-->
<enable>true</enable>
dSave the file.
3Browse to rootinstall/applications/livepkgr/events/_definst_/liveevent and do the following:
•Edit the Event.xml file to look like the following:
<Event>
<EventID>liveevent</EventID>
<Recording>
<FragmentDuration>4000</FragmentDuration>
<SegmentDuration>16000</SegmentDuration>
<DiskManagementDuration>3</DiskManagementDuration>
</Recording>
</Event>
•Remove the Manifest.xml file from the liveevent folder or rename it.

9
ADOBE MEDIA SERVER 5.0.6 DEVELOPER’S GUIDE
Getting started streaming media
Last updated 9/4/2014
4(Adobe HTTP Dynamic Streaming) For multi-bitrate streaming, Flash and AIR media players request an F4M
manifest file that contains the location and bitrate of each live stream. This type of F4M file is called a set-level
manifest. To create an set-level manifest, do the following:
aOpen rootinstall/tools/f4mconfig/configurator/f4mconfig.html in a browser.
bSelect the f4m file type.
cStream URIs can be absolute or relative to a Base URI. Enter the following for the Base URI:
http://localhost/hds-live/livepkgr/_definst_/liveevent
dEnter the following for each stream and click Add:
eTo preview the file, click View Manifest. The manifest file looks like this:
<manifest xmlns="http://ns.adobe.com/f4m/2.0">
<baseURL>http://localhost/hds-live/livepkgr/_definst_/liveevent/</baseURL>
<media href="livestream1.f4m" bitrate="150"/>
<media href="livestream2.f4m" bitrate="500"/>
<media href="livestream3.f4m" bitrate="700"/>
</manifest>
fClick Save Manifest and save the file as liveevent.f4m to rootinstall/webroot.
The media player requests this file from a web server. This tutorial saves the file to rootinstall/webroot, but the
file can be served from any location on any webserver. This file does not need to live on Adobe Media Server.
This file can also have any name.
5 (Apple HTTP Live Streaming) iOS devices request an M3U8 variant playlist file that contains the location, bitrate,
and optionally the codec of each stream. To create an M3U8 file, do the following:
aIf the Set-level F4M/M3U8 File Generator tool isn’t open, double-click
rootinstall/tools/f4mconfig/configurator/f4mconfig.html to open it in a browser.
bSelect m3u8.
cEnter the Stream URI and bitrate for each stream. Stream URIs can be absolute or relative. If they are relative,
they are relative to the m3u8 file.
Note: You can’t use a Base URI when generating an M3U8 file.
This tutorial uses the following Stream URI settings:
dFor m3u8 files, you can optionally add a codec for each stream.
If one stream is audio-only, specify an audio codec. Specify audio and video codecs for the other streams in the
manifest. See “Publish an audio-only stream (HLS)” on page 11.
Stream URI Bitrate
livestream1.f4m 150
livestream2.f4m 500
livestream3.f4m 700
Stream URI Bitrate
http://localhost/hls-live/livepkgr/_definst_/liveevent/livestream1.m3u8 150
http://localhost/hls-live/livepkgr/_definst_/liveevent/livestream2.m3u8 500
http://localhost/hls-live/livepkgr/_definst_/liveevent/livestream3.m3u8 700

10
ADOBE MEDIA SERVER 5.0.6 DEVELOPER’S GUIDE
Getting started streaming media
Last updated 9/4/2014
eTo view the file, click View Manifest. The m3u8 file looks like this:
#EXTM3U
#EXT-X-STREAM-INF:PROGRAM-ID=1,BANDWIDTH=150000
http://localhost/hls-live/livepkgr/_definst_/liveevent/livestream1.m3u8
#EXT-X-STREAM-INF:PROGRAM-ID=1,BANDWIDTH=500000
http://localhost/hls-live/livepkgr/_definst_/liveevent/livestream2.m3u8
#EXT-X-STREAM-INF:PROGRAM-ID=1,BANDWIDTH=700000
http://localhost/hls-live/livepkgr/_definst_/liveevent/livestream3.m3u8
fSave the file as liveevent.m3u8 to the folder rootinstall/webroot.
The media player requests this file from a web server. This tutorial saves the file to rootinstall/webroot, but the
file can be served from any location on any webserver. This file does not need to live on Adobe Media Server.
6To publish a live stream to Adobe Media Server, start Flash Media Live Encoder and do the following:
aIn the Encoding Options panel, from the Preset pop-up menu, choose Multi Bitrate - 3 Streams (1500 Kbps) -
H.264. Choose Audio Format AAC.
Note: Flash Media Live Encoder on Windows doesn’t support AAC encoding. To add support for AAC, purchase
the MainConcept AAC Encoder.
bClick the wrench next to Format to open Advanced Encoder Settings. For Keyframe frequency, select 4 seconds.
Note: This value matches the <FragmentDuration> value in the
applications/livepkgr/events/_definst_/liveevent/Event.xml file. The <FragmentDuration> value is in
milliseconds.
cFor Bit Rate, choose 150, 500, and 700.
dIn the AMS URL text box, enter the following:
rtmp://localhost/livepkgr
Note: This application is installed with Adobe Media Server and contains a main.asc file and configuration files
for live HTTP Dynamic Streaming.
eIn the Stream text box, enter the following:
livestream%i?adbe-live-event=liveevent
Note: The applications/livepkgr/main.asc file expects this value. Flash Media Live Encoder uses the variable %i to
create multiple stream names: livestream1, livestream2, livestream3, and so on. To use another encoder, provide
your own unique stream names, for example, livestream1?adbe-live-event=liveevent, livestream2?adbe-live-
event=liveevent.
fDeselect Save to File.
gClick Start.
7(Adobe HTTP Dynamic Streaming) Flash Media Playback does not support set-level manifest files. To play the
media, use Strobe Media Playback. Strobe Media Playback is used in the sample video player that installs with
Adobe Media Server.
aCopy the videoPlayer directory from rootinstall/samples/videoPlayer to rootinstall/webroot.
bBrowse to the sample player in a web browser:
http://localhost/videoPlayer/videoplayer.html
cIn Video Source, enter the following:
http://localhost/liveevent.f4m

11
ADOBE MEDIA SERVER 5.0.6 DEVELOPER’S GUIDE
Getting started streaming media
Last updated 9/4/2014
8(Apple HTTP Live Streaming) In iOS, enter the following URL in Safari:
http://localhost/liveevent.m3u8
For information about where to use the URL to serve various iOS devices, QuickTime, and Safari, see HTTP Live
Streaming Overview in the iOS Reference Library.
Note: You can replace localhost with the domain name or IP address of the computer hosting Adobe Media Server. If
you’re using a Adobe Media Server hosting provider, they can give you this value.
Setting the record option while publishing to livepkgr
You can define the record option by adding a query parameter string adbe-record-mode. The value of this string can
be “record” or “append”. If the parameter is not specified, “append” will be used. In case of “record”, livepkgr
overwrites the previous recording for the same stream and event name. In case of “append”, livepkgr application
appends to the previous recording for the same stream and event name.
For example, to publish a stream in record mode, use:
livestream%i?adbe-live-event=liveevent&adbe-record-mode=record
To publish a stream in append mode (default case), use:
livestream%i?adbe-live-event=liveevent&adbe-record-mode=append
Packaging an audio-only stream (HLS)
To serve streams over a cellular network, one of the streams must be audio-only. For more information, see HTTP Live
Streaming Overview.
AAC-encoded audio files (MP4/F4V) are packaged as .aac file. Also, the M3U8 file will list the file names as .aac instead
of .ts. An audio-only stream functionality will be available only if the M3U8 URL has the following embedded tags:
Here is an example of a valid M3U8 URL:
http://myserver/hls-vod/audio-only-aac/sample1_1500kbps.f4v.m3u8
Here is an example M3U8 file snippet:#EXTM3U_#EXT-X-STREAM-INF:PROGRAM-
ID=1,BANDWIDTH=1500000,CODECS="avc1.42001e, mp4a.40.2"http://10.40.23.222/hls-
vod/sample1_1500kbps.f4v.m3u8#EXT-X-STREAM-INF:PROGRAM-
ID=1,BANDWIDTH=150000,CODECS="avc1.42001e, mp4a.40.2"_http://10.40.23.222/hls-
vod/sample1_150kbps.f4v.m3u8#EXT-X-STREAM-INF:PROGRAM-
ID=1,BANDWIDTH=1000000,CODECS="avc1.42001e, mp4a.40.2"_http://10.40.23.222/hls-
vod/sample1_1000kbps.f4v.m3u8#EXT-X-STREAM-INF:PROGRAM-
ID=1,BANDWIDTH=64000,CODECS="mp4a.40.2"http://10.40.23.222/hls-vod/audio-only-
aac/sample1_1000kbps.f4v.m3u8
Publish an audio-only stream (HLS)
To publish an audio-only stream, enter the following in the Adobe Media Encoder Stream field:
Tag Description
audio-only Specifies whether the stream/file is audio-only. If the tag is not present, the
audio-only stream will be extracted from the A/V stream.
audio-only-mp3/audio-only-aac Specifies the audio codec of the requested stream file. If this tag is not present,
the file/segment will be segmented as TS.

12
ADOBE MEDIA SERVER 5.0.6 DEVELOPER’S GUIDE
Getting started streaming media
Last updated 9/4/2014
livestream%i?adbe-live-event=liveevent&adbe-audio-stream-name=livestream1_audio_only&adbe-audio-
stream-src=livestream1
If the encoder specifies individual query strings for each stream, use individual stream names instead of the variable %i:
livestream1?adbe-live-event=liveevent&adbe-audio-stream-name=livestream1_audio_only
livestream2?adbe-live-event=liveevent&adbe-audio-stream-name=livestream2_audio_only
Note: You can use the values in italics or replace them with your own values. The default live event is called “liveevent”.
To generate a set-level variant playlist when using an audio-only stream, specify the audio codec of the audio-only
stream. Specify the audio and the video codec of the streams that contain audio and video. For more information about
using the Set-level F4M/M3U8 File Generator, see “Publish and play live multi-bitrate streams over HTTP” on page 8.
Note: It is highly recommended to use the "Audio-only packaging" as mentioned in previous section rather than
publishing audio-only streams.
URLs for publishing and playing live streams over HTTP
Important: The format for HDS request URLs has changed in Adobe Media Server 5. The Apache httpd.conf file redirects
requests in the 4.0 format to the 4.5 format. The path /live/events/livepkgr/events redirects to the path /hds-live/livepkgr.
Use the following URL to publish a single live stream to Adobe Media Server for streaming over HTTP:
rtmp://ams-ip-or-dns/livepkgr/livestream?adbe-live-event=liveevent
Use the following URL to publish multiple live streams to Adobe Media Server for adaptive bitrate streaming:
rtmp://ams-ip-or-dns/livepkgr/livestream%i?adbe-live-event=liveevent
Note: Publish the stream over RTMP. Clients play the stream over HTTP.
Use the following URLs to play live streams over HTTP:
Parameter Description
adbe-audio-stream-name The name of the audio-only stream.
adbe-audio-stream-src The name of the stream from which to extract the audio for the audio-only
stream. If this parameter is not specified, the server uses the stream on which
the adbe-audio-stream-name parameter was specified.
Client Single stream or
Adaptive Bitrate
Request URL
Adobe HDS Single stream http://<ams-dns-or-ip>/hds-
live/livepkgr/<instname>/<eventname>/<streamname>.f4m
Apple HLS Single stream http://<ams-dns-or-ip>/hls-
live/livepkgr/<instname>/<eventname>/<streamname>.m3u8
Adobe HDS Adaptive bitrate The media player requests a set-level manifest file:
http://<webserver-dns-or-ip>/<set-level-manifest>.f4m
The set-level manifest file contains URLs for each live stream in the
following format:
http://<ams-dns-or-ip>/hds-
live/livepkgr/<instname>/<eventname>/<streamname>.f4m

13
ADOBE MEDIA SERVER 5.0.6 DEVELOPER’S GUIDE
Getting started streaming media
Last updated 9/4/2014
Important: To play streaming media over HTTP, a media player requests a manifest file (F4M or M3U8). The server
generates manifest files in real-time. The files are not written to disk; you cannot see them on the server.
The path /hds-live is a <Location> directive in the Apache httpd.conf file that tells the server to package the content
for Adobe HTTP Dynamic Streaming (HDS).
The path /hls-live is a <Location> directive in the Apache httpd.conf file that tells the server to package the content
for Apple HTTP Live Streaming (HLS).
For adaptive streaming, the client requests a set-level manifest. For HDS, this file is a .f4m file. For HLS, this file is a
.m3u8 file. The set-level manifest can live on any web server. You can create multiple set-level manifest files for a single
set of live streams.
The set-level manifest contains the paths to the F4M manifest files (HDS) and M3U8 variant playlists (HLS) of each
live stream. The paths must begin with /hds-live or /hls-live to tell the server to package the streams for HTTP.
Note: Do not include /hds-live or /hls-live in the URL that requests the set-level manifest.
You can configure the <Location> directive settings and the content location in the Apache httpd.conf file. For more
information, see Content storage (HDS and HLS).
Differences in HTTP live URLs from Flash Media Server 4.0 to Adobe Media
Server 5
The default URL to play a live stream over HTTP has changed in Adobe Media Server 5. In Flash Media Server 4.0, the
URL to play a live stream was http://<servername>/live/events/livepkgr/events/<eventname>. The Adobe Media
Server 5 Apache httpd.conf file uses a 301 redirect to redirect requests that use a 4.0 URL to the 4.5 URL.
For more differences, see “Differences in HTTP Dynamic Streaming between Flash Media Server 4.0 and 4.5” on
page 54.
Configure DVR (HDS)
Configure DVR on the server
1Open the Set-level F4M/M3U8 File Generator in a browser:
rootinstall/tools/f4mconfig/configurator/f4mconfig.html.
2In addition to entering values for Stream URI and Bitrate, enter a value for DVR Window Duration. This value sets
the amount of viewable content, in minutes, before the live point.
Use the following guidelines to set a Window Duration:
•Set Window Duration to a value greater than 0.
Setting the Window Duration to 0 can cause a bad user experience.
Apple HLS Adaptive bitrate The media player requests a set-level variant playlist file:
http://<webserver-dns-or-ip>/<set-level-variant-playlist>.m3u8
The set-level variant playlist contains URLs for each live stream in the
following format:
http://<ams-dns-or-ip>/hls-
live/livepkgr/<instname>/<eventname>/<streamname>.m3u8
Client Single stream or
Adaptive Bitrate
Request URL

14
ADOBE MEDIA SERVER 5.0.6 DEVELOPER’S GUIDE
Getting started streaming media
Last updated 9/4/2014
•A value of -1 indicates that the available recorded content behind the live point is unlimited.
3In the Event.xml file, configure the DiskManagementDuration element to specify the amount of content the server
caches. By default, the server caches 3 hours of content. Use the following formula to determine the value of the
Window Duration in relation to the value of DiskManagementDuration:
HDSWindowDuration <= (DiskManagementDuration - SegmentDuration)
For more information about disk managment, see “Disk management” on page 70.
Publish a DVR stream
To publish a DVR stream from Flash Media Live Encoder, do not click Record or check DVR Auto Record. Publish
the stream just as you publish any live stream.
Play DVR streams
Strobe Media Playback supports DVR streams by default.
Note: Flash Media Playback does not support set-level manifest files. To use Flash Media Playback, configure a
Manifest.xml file. See “Manifest.xml” on page 86.
Configure a sliding window (HLS)
Configure a sliding window on the server
A sliding window is the seekable portion of the stream for Apple HTTP Live Streaming. Clients cannot seek beyond
the sliding window length. HTTP Live Streaming clients use the sliding window to configure the seek bar.
Configure a sliding window at the following levels:
Use the following parameters:
The time within the sliding window is:
HLSSlidingWindowLength * HLSMediaFileDuration
SlidingWindowLength * MediaFileDuration
Level Configuration file
Server rootinstall/Apache2.2/conf/httpd.conf
Application rootinstall/applications/livepkgr/Application.xml
The livepkgr application is the default application for HTTP streaming. You can
duplicate and rename this application.
Event rootinstall/applications/livepkgr/events/_definst_/liveevent/Event.xml
The liveevent folder is the default live event. You can create multiple live events within
an application.
Parameter Configuration file Description
HLSSlidingWindowLength httpd.conf The number of TS files available for seeking
in a sliding window.
SlidingWindowLength Application.xml and Event.xml The number of TS files available for seeking
in a sliding window.
HLSMediaFileDuration httpd.conf The length of a TS file, in milliseconds.
MediaFileDuration Application.xml and Event.xml The length of a TS file, in milliseconds.

15
ADOBE MEDIA SERVER 5.0.6 DEVELOPER’S GUIDE
Getting started streaming media
Last updated 9/4/2014
By default, HLSSlidingWindowLength is set to 6 and HLSMediaFileDuration is set to 8000 milliseconds. Therefore,
by default, all HLS live events are seekable within a window that is 48 seconds wide.
The sliding window is relative to the current position of the live stream. For example, if sliding window is configured to
have 15 minutes of data and the event starts at time 0, when the live stream is at 30, the last seek position possible is 15.
To make an entire live event seekable, set SlidingWindowLength or HLSSlidingWindowLength to 0. However, doing
so may impact performance.
Configure the sliding window to be smaller than the duration of content cached on disk. In the Event.xml file, the
DiskManagementDuration element specifies the amount of content the server caches. By default, the server caches 3
hours of content. The size of the HLS sliding window must be as follows:
HLSSlidingWindow <= (DiskManagementDuration - SegmentDuration)
For more information about disk managment, see “Disk management” on page 70.
Configure a sliding window at the event level
The following Event.xml file creates a 1 hour sliding window for a single HLS live event:
<Event>
<EventID>liveevent</EventID>
<Recording>
<FragmentDuration>4000</FragmentDuration>
<SegmentDuration>400000</SegmentDuration>
<DiskManagementDuration>3</DiskManagementDuration>
</Recording>
<HLS>
<MediaFileDuration>8000</MediaFileDuration>
<SlidingWindowLength>450</SlidingWindowLength>
</HLS>
</Event>
Configure a sliding window at the application level
The following Application.xml file creates a 1 hour sliding window for all HLS live events within the livepkgr
application:
<Application>
<StreamManager>
<Live>
<AssumeAbsoluteTime>true</AssumeAbsoluteTime>
</Live>
</StreamManager>
<HLS>
<MediaFileDuration>8000</MediaFileDuration>
<SlidingWindowLength>450</SlidingWindowLength>
</HLS>
</Application>
Reload the livepkgr application.
Configure a sliding window at the server level
The following Apache configuration sets HLSSlidingWindowLength to 450. This configuraiton creates a 1 hour
sliding window for all HLS live events on the server:

16
ADOBE MEDIA SERVER 5.0.6 DEVELOPER’S GUIDE
Getting started streaming media
Last updated 9/4/2014
...
<IfModule hlshttp_module>
<Location /hls-live>
HLSHttpStreamingEnabled true
HttpStreamingLiveEventPath "../applications"
HttpStreamingContentPath "../applications"
HLSMediaFileDuration 8000
HLSSlidingWindowLength 450
HLSFmsDirPath ".."
HLSM3U8MaxAge 2
HLSTSSegmentMaxAge -1
Options -Indexes FollowSymLinks
</Location>
Restart Apache HTTP Server.
Publish streams with a sliding window
You don’t need to configure any encoder settings to publish a stream with a sliding window.
Play streams with a sliding window
Devices that support HTTP Live Streaming support the sliding window feature by default.
Duplicate the livepkgr service
The server supports an unlimited number of instances of the livepkgr service.
❖Duplicate the rootinstall/applications/livepkgr folder in the applications folder and give it a new name, for example,
livepkgr2. In this case, the new livepkgr service is located at rootinstall/applications/livepkgr2.
You can create as many instances of the livepkgr service as you need.
Modify server-side code in the livepkgr service
Note: You cannot modify server-side code on Adobe Media Server Standard.
❖Remove the rootinstall/applications/livepkgr/main.far file and replace it with the
rootinstall/samples/applications/livepkgr/main.asc file.
Removing all HDS segments
To remove all the existing HDS segments when the application unloads, you can use the clearOnAppStop tag as
shown below:
<ScriptEngine>
<ApplicationObject>
<config>
<clearOnAppStop>true</clearOnAppStop>
</config>
</ApplicationObject>
</ScriptEngine>

17
ADOBE MEDIA SERVER 5.0.6 DEVELOPER’S GUIDE
Getting started streaming media
Last updated 9/4/2014
Stream live media (RTMP)
Tutorial: stream live media (RTMP)
To complete this tutorial, install the following software:
•Flash Media Live Encoder
Flash Media Live Encoder captures live audio and video, encodes it, and streams it to Adobe Media Server. Flash
Media Live Encoder is free so it’s a good idea to download the latest version.
•Adobe Media Server
You can use any edition of Adobe Media Server to stream live media, including the free developer edition. For
information about installing the server, see Installing the server.
•Flash Player
This tutorial uses a video player that requires Flash Player 10.
For more information, see “Supported clients, encoders, codecs, and file formats” on page 1 and “Pre-built media
players” on page 3.
Publish a live stream to Adobe Media Server
1Connect a camera to the computer.
2Open Flash Media Live Encoder and do the following in the Encoding Options panel:
aFrom the Preset menu, choose High Bandwidth (300 Kbps) - H.264.
You can choose any of the single stream options (not Multi Bitrate) from the Preset menu. The information on
the left side of the panel is filled in when you choose a preset.
bSelect Stream to Adobe Media Server.
cFor AMS URL, enter rtmp://localhost/live.
Use localhost for testing when Flash Media Live Encoder and Adobe Media Server are on the same computer. In
a production environment, use the domain name or IP address of the computer hosting Adobe Media Server,
for example, rtmp://ams.mycompany.com/live.
If you’re using a Adobe Media Server hosting provider, they can give you the domain name or IP address of the
server.
You must use the name live in the AMS URL unless you duplicate and rename the live service. The live service
is a pre-built application on Adobe Media Server installed to rootinstall/applications/live. For more information,
see “Duplicate the live service” on page 18.
dFor Stream, enter livestream.
eTo save a recording of the stream on your hard drive, select Save to File, click Browse, and choose a location. If
you chose an H.264 preset, use an .f4v filename extension. If you chose a VP6 preset, use an .flv filename
extension.
Note that the server is not recording the file; Flash Media Live Encoder is recording the file. To serve the file on-
demand when the live event is over, copy the file to the local disk of the server. For more information, see
“Stream on-demand media (RTMP)” on page 24.
To play an F4V file recorded by Flash Media Live Encoder without streaming it from the server, use the F4V
Flattener tool to flatten the file. You can play FLV files without flattening them.

18
ADOBE MEDIA SERVER 5.0.6 DEVELOPER’S GUIDE
Getting started streaming media
Last updated 9/4/2014
fClick Start to connect to the server and start streaming.
Use the Adobe Media Server sample player to play a live stream
1Double-click the rootinstall/samples/videoPlayer/videoplayer.html file to open the sample video player in a
browser.
Note: Substitute the Adobe Media Server installation directory for rootinstall.
2In the sample video player, do one of the following:
•In the list of videos, click “livestream”.
•Enter rtmp://localhost/live/livestream, check the LIVE checkbox, and click PLAY STREAM.
If the media player isn’t on the same computer as Adobe Media Server, replace localhost with the domain name
or IP address of the computer hosting Adobe Media Server.
Use this URL to play this stream from any compatible video player, including Flash Media Playback and Strobe
Media Playback. For more information about the sample video player and other video players, see “Pre-built
media players” on page 3.
Use Flash Media Playback to play a live stream
1Load the Flash Media Playback Setup page in a web browser: www.osmf.org/configurator/fmp/.
2Enter the Video Source:
rtmp://localhost/live/livestream
You can replace localhost with the domain name or IP address of the server.
3Click Preview to update the embed code.
4Click Play to test the code.
5To use the player in your own HTML page, copy the embed code and paste it into your page. Flash Media Playback
is a compiled SWF file hosted by Adobe.
More Help topics
“Troubleshoot issues with streaming media” on page 111
“Stream live media (HTTP)” on page 5
URLs for publishing and playing live streams over RTMP
Use the following values to publish a single live stream to Adobe Media Server for streaming over RTMP:
AMS URL: rtmp://ams-ip-or-dns/live
Stream: streamname
Use the following URL to play a live stream:
rtmp://ams-ip-or-dns/live/streamname
Duplicate the live service
You can create as many instances of the live service as you need.
1Create a folder in the rootinstall/applications folder, for example, rootinstall/applications/live2

19
ADOBE MEDIA SERVER 5.0.6 DEVELOPER’S GUIDE
Getting started streaming media
Last updated 9/4/2014
2Copy the main.far, Application.xml, allowedHTMLdomains.txt, and allowedSWFdomains.txt files from the
rootinstall/applications/live folder to the live2 folder.
3Open the ams.ini file (located in rootinstall/conf) and add a parameter to set the content path for the new service,
for example:
LIVE2_DIR = C:\Program Files\Adobe\Adobe Media Server 5\applications\live2
4Open the Application.xml file in the rootinstall/applications/live2 folder and edit the virtual directory to the
following:
<Streams>/;${LIVE2_DIR}</Streams>
5Restart the server.
6Clients can connect to the new publishing point at the URL:
rtmp://ams-ip-or-dns/live2
Modify server-side code in the live service
Note: You cannot modify server-side code in the live service on Adobe Media Server Standard.
❖Remove the rootinstall/applications/live/main.far file and replace it with the
rootinstall/samples/applications/live/main.asc file.
Disable live services
❖Move any live services folders out of the applications folder.
Stream on-demand media (HTTP)
Prerequisites for streaming on-demand media (HTTP)
To complete these tutorials, use the following software:
•Adobe Media Server 5. See the video Install Adobe Media Server 5 and verify HTTP streaming to Flash and iOS.
•(Adobe HTTP Dynamic Streaming) Adobe Media Server sample video player (which uses Strobe Media Playback)
and Flash Player 10.1
•(Apple HTTP Live Streaming) iOS 3.0 or later device or Mac OS 10.6 with Safari 4.0 or QuickTime X
For more information, see “Supported clients, encoders, codecs, and file formats” on page 1 and “Pre-built media
players” on page 3.
Play a single on-demand media file over HTTP
A community member has created a screencast that walks you through similar steps: Stream on-demand video to
Flash and iOS over HTTP.
1Install Adobe Media Server 5 and choose to install Apache HTTP Server.
2Copy an F4V/MP4 file to the following location:
rootinstall/webroot/vod
Note: Replace rootinstall with the Adobe Media Server installation folder.
20
ADOBE MEDIA SERVER 5.0.6 DEVELOPER’S GUIDE
Getting started streaming media
Last updated 9/4/2014
This tutorial uses the file sample2_1000kbps.f4v which installs with Adobe Media Server to the
rootinstall/webroot/vod folder.
3(Adobe HTTP Dynamic Streaming) To play the media in Flash Media Playback, do the following:
aOpen Flash Media Playback in a web browser:
http://www.osmf.org/configurator/fmp/
Note: Flash Media Playback requires Flash Player 10.1 to support HTTP Dynamic Streaming. To see which version
of Flash Player is installed on your computer, go to Adobe Flash Player.
bIn Video Source, enter:
http://localhost/hds-vod/sample2_1000kbps.f4v.f4m
HDS on-demand streaming in Flash Media Playback
Although the media file lives in the /webroot/vod directory, the URL request is /hds-vod. The path /hds-vod is
a <Location> directive in the Apache httpd.conf file. When a request URL begins with /hds-vod, the server
looks for media in the /webroot/vod folder and packages it for HTTP Dynamic Streaming. For information
about the request URL syntax, see “URLs for playing on-demand streams over HTTP” on page 23.
cSelect Yes under the question “Are you using HTTP Streaming or Adobe Access 2.0?”.
dClear the text from the Poster frame file location text box.
eClick Preview to update the embed code.
fClick the Play button to test the code.
gTo use the player in your own HTML page, copy the embed code and paste it into the body of the page. Flash
Media Playback is a compiled SWF file hosted by Adobe. For more information, see Flash Media Playback.

21
ADOBE MEDIA SERVER 5.0.6 DEVELOPER’S GUIDE
Getting started streaming media
Last updated 9/4/2014
4(Adobe HTTP Dynamic Streaming) To play the media in Strobe Media Playback, do the following:
aOpen the Adobe Media Server sample video player in a web browser. Double-click
rootinstall/samples/videoPlayer/videoplayer.html.
bIn STREAM URL, enter:
http://localhost/hds-vod/sample2_1000kbps.f4v.f4m
cSelect VOD and click PLAY STREAM.
dTo use the player in your own HTML page, copy the embed code and paste it into the body of the page.
5(Apple HTTP Live Streaming) On iOS, enter the following URL in the Safari address bar:
http://10.0.1.11/hls-vod/sample2_1000kbps.f4v.m3u8
HLS on-demand streaming in Safari on an iPad
To test in Safari on Mac OS 10.6, use the following HTML code:
<video src="http://10.0.1.11/hls-vod/sample2_1000kbps.f4v.m3u8"
controls="controls"></video>
Note: You can replace “localhost” and “10.0.1.11” with the domain name or IP address of the computer hosting Adobe
Media Server. If you’re using a Adobe Media Server hosting provider, they can give you this value.
More Help topics
“Troubleshoot issues with streaming media” on page 111
“Supported file formats and codecs” on page 2

22
ADOBE MEDIA SERVER 5.0.6 DEVELOPER’S GUIDE
Getting started streaming media
Last updated 9/4/2014
“Content storage (HDS and HLS)” on page 56
“Configure HTTP Dynamic Streaming and HTTP Live Streaming” on page 51
“Stream on-demand media (RTMP)” on page 24
Play on-demand multi-bitrate media files over HTTP
A community member, Jody Bleyle has created a screencast that walks you through similar steps: HTTP adaptive
bitrate streaming to Flash and iOS.
1Install Adobe Media Server 5 and choose to install Apache HTTP Server.
2Do one of the following:
•Encode an F4V/MP4 file at 3 different bitrates.
•Use the multi-bitrate sample files that install with Adobe Media Server to the rootinstall/webroot/vod folder.
This tutorial uses the following files installed to the webroot/vod folder:
rootinstall/webroot/vod/sample1_150kbps.f4v
rootinstall/webroot/vod/sample1_700kbps.f4v
rootinstall/webroot/vod/sample1_1500kbps.f4v
3(Adobe HTTP Dyanmic Streaming) To stream multi-bitrate content, Flash and AIR media players request a set-
level manifest file. This is a .f4m file that contains the location and bitrate of each stream. To create a set-level F4M
file, do the following:
aOpen rootinstall/Adobe Media Server/tools/f4mconfig/configurator/f4mconfig.html in a browser.
bSelect the f4m file type.
cStream URIs can be absolute or relative to a Base URI. Enter the following for the Base URI:
http://localhost/hds-vod/
dEnter the following for each stream and click Add:
eTo view the file, click View Manifest. The manifest file looks like this:
<manifest xmlns="http://ns.adobe.com/f4m/2.0">
<media href="http://localhost/hds-vod/sample1_150kbps.f4v.f4m" bitrate="150"/>
<media href="http://localhost/hds-vod/sample1_700kbps.f4v.f4m" bitrate="700"/>
<media href="http://localhost/hds-vod/sample1_1500kbps.f4v.f4m" bitrate="1500"/>
</manifest>
fClick Save Manifest to save the file as sample1.f4m to rootinstall/webroot.
The media player requests this file from a web server. This tutorial saves the file to rootinstall/webroot, but
the file can be served from any location on any webserver. This file does not need to live on Adobe Media
Server. This file can have any name.
Stream URI Bitrate
sample1_150kbps.f4v.f4m 150
sample1_700kbps.f4v.f4m 700
sample1_1500kbps.f4v.f4m 1500

23
ADOBE MEDIA SERVER 5.0.6 DEVELOPER’S GUIDE
Getting started streaming media
Last updated 9/4/2014
4 (Apple HTTP Live Streaming)For multi-bitrate streaming, iOS devices request a set-level M3U8 variant playlist
file that contains the location, bitrate, and optionally the codec of each stream. To create a set-level M3U8 file, do
the following:
aIf the File Generator tool isn’t open, double-click rootinstall/Adobe Media
Server/tools/f4mconfig/configurator/f4mconfig.html to open it in a browser.
bSelect the m3u8 file type.
cEnter the Stream URI, bitrate, program-ID, and optionally a resolution and codec for each stream. Stream URIs
can be absolute or relative. If they are relative, they are relative to the m3u8 file. The program-ID must be the
same for each stream.
Note: For information about supported codecs, see Apple HTTP Live Streaming Overview.
This tutorial uses the following Stream URI settings:
dTo view the file, click View Manifest. The m3u8 file looks like this:
#EXTM3U
#EXT-X-STREAM-INF:PROGRAM-ID=1,BANDWIDTH=150000
http://10.0.1.11/hls-vod/sample1_150kbps.f4v.m3u8
#EXT-X-STREAM-INF:PROGRAM-ID=1,BANDWIDTH=700000
http://10.0.1.11/hls-vod/sample1_700kbps.f4v.m3u8
#EXT-X-STREAM-INF:PROGRAM-ID=1,BANDWIDTH=1500000
http://10.0.1.11/hls-vod/sample1_1500kbps.f4v.m3u8
eClick Save Manifest and save the file as sample1.m3u8 to the folder rootinstall/webroot.
The media player requests this file from a web server. This tutorial saves the file to rootinstall/webroot, but the
file can be served from any location on any webserver. This file does not need to live on Adobe Media Server.
5(Adobe HTTP Dynamic Streaming) Flash Media Playback does not support set-level manifest files. To play the
media, use Strobe Media Playback. Strobe Media Playback is used in the sample video player that installs with
Adobe Media Server.
aDouble-click rootinstall/samples/videoPlayer/videoplayer.html to open it in a browser.
bIn Video Source, enter the following:
http://localhost/sample1.f4m
6(Apple HTTP Live Streaming) On iOS, enter the following URL in the Safari address bar:
http://10.0.1.11/sample1.m3u8
To test in Safari on Mac OS 10.6, use the following HTML code:
<video src="http://10.0.1.11/sample1.m3u8" controls="controls"></video>
For more information, see HTTP Live Streaming Overview in the iOS Reference Library.
URLs for playing on-demand streams over HTTP
Use the following URLs to play on-demand streams over HTTP:
Stream URI Bitrate
http://10.0.1.11/hls-vod/sample1_150kbps.f4v 150
http://10.0.1.11/hls-vod/sample1_700kbps.f4v 700
http://10.0.1.11/hls-vod/sample1_1500kbps.f4v 1500

24
ADOBE MEDIA SERVER 5.0.6 DEVELOPER’S GUIDE
Getting started streaming media
Last updated 9/4/2014
The path /hds-vod is a <Location> directive in the Apache httpd.conf file. The directive tells the server to look for the
content in the rootinstall/webroot/vod folder. It also tells the server to package the content for delivery to Flash and
AIR over HTTP (called HTTP Dynamic Streaming or HDS).
The path /hls-vod is a <Location> directive in the Apache httpd.conf file. The directive tells the server to look for the
content in the rootinstall/webroot/vod folder. It also tells the server to package the content for delivery to Apple HTTP
Live Streaming.
Note: Apple HTTP Live Streaming supports live and on-demand streaming.
For adaptive bitrate streaming, the client requests a set-level manifest file. For HDS, this file is an .f4m file. For HLS,
this file is a .m3u8 file. Set-level manifest files contain the paths to the physical locations of the media files. The paths
to the media files must begin with /hds-vod or /hls-vod to tell the server to package them for HTTP.
More information
“Content storage (HDS and HLS)” on page 56
Stream on-demand media (RTMP)
Tutorial: Stream on-demand media (RTMP)
Prerequisites
To complete this tutorial, install the following software:
•Adobe Media Server
You can use any edition of Adobe Media Server to stream on-demand media, including the free developer edition.
For information about installing the server, see Installing the server.
Client Live or
VOD
Single stream or
Adaptive Bitrate
Request URL
Adobe HTTP
Dynamic
Streaming
VOD Single stream http://<ams-dns-or-ip>/hds-
vod/<streamname>.<fileextension>.f4m
Apple HTTP Live
Streaming
VOD Single stream http://<ams-dns-or-ip>/hls-
vod/<streamname>.<fileextension>.m3u8
Adobe HTTP
Dynamic
Streaming
VOD Adaptive bitrate The media player requests a set-level manifest file:
http://<webserver-dns-or-ip>/<set-level-manifest>.f4m
The URLs in the set-level manifest point to the individual
streams and use the following URL:
http://<ams-dns-or-ip>/hds-
vod/<streamname>.<fileextension>.f4m
Apple HTTP Live
Streaming
VOD Adaptive bitrate The media player requests a set-level variant playlist file:
http://<webserver-dns-or-ip>/<set-level-variant-
playlist>.m3u8
The URLs in the set-level variant playlist point to the
individual streams and use the following URL:
http://<ams-dns-or-ip>/hls-
vod/<streamname>.<fileextension>.m3u8

25
ADOBE MEDIA SERVER 5.0.6 DEVELOPER’S GUIDE
Getting started streaming media
Last updated 9/4/2014
•Flash Player
This tutorial uses a video player that requires Flash Player 10.
To see which version of Flash Player is installed in a browser, go to www.adobe.com/software/flash/about/.
Copy on-demand files to Adobe Media Server
Use the vod (video on demand) service on Adobe Media Server to stream recorded media to clients. Simply copy
recorded media files to the server and clients can stream them. The vod service streams files to media players from the
following two folders:
rootinstall/applications/vod/media
rootinstall/webroot/vod
You can also create subfolders of these folders to hold media files. This tutorial creates a subfolder and copies a file to
the subfolder to stream.
1Browse to the following folder:
rootinstall/applications/vod/media
Note: Replace rootinstall with the Adobe Media Server installation folder. For example, on Windows the default
installation folder is C:\Program Files\Adobe\Adobe Media Server 5.
2Create the folder “tests” in the “media” folder, as follows:
rootinstall/applications/vod/media/tests
3Copy an F4V/MP4 or FLV file to the /tests folder.
This tutorial uses the following file:
rootinstall/applications/vod/media/tests/polymorphics.f4v
If you don’t have a video file, you can download a file from the Moving Images Archive at
www.archive.org/details/movies. You can also use a sample file included with the server. For learning purposes,
copy a sample file from rootinstall/applications/vod/media to rootinstall/applications/vod/media/tests.
For information about supported file formats and codecs, see Supported file formats.
Use the Adobe Media Server sample player to play an on-demand file
1To open the sample video player in a browser, double-click the rootinstall/samples/videoPlayer/videoplayer.html
file.
2Enter the address of the video in the STREAM URL textbox, check VOD, and click PLAY STREAM. This tutorial
plays the following file:
rtmp://localhost/vod/mp4:tests/polymorphics.f4v
If you’re using a Adobe Media Server hosting provider, replace localhost with the domain name or IP address of the
server that they provided.
Important: Although you copy the media file to the vod/media folder, you do not need to specify /media in the path
when you play the file. The server is configured by default to look for media files in the vod/media folder. If you specify
/media in the path, the server looks in the /vod/media/media folder.
Begin paths to F4V/MP4 files with the prefix mp4:. Use the filename extension of the file, whether it’s F4V, MP4,
MOV, and so on.

26
ADOBE MEDIA SERVER 5.0.6 DEVELOPER’S GUIDE
Getting started streaming media
Last updated 9/4/2014
Use Flash Media Playback to play an on-demand stream
1Load the Flash Media Playback Setup page in a web browser: www.osmf.org/configurator/fmp/.
2Enter the Video Source:
rtmp://localhost/vod/mp4:tests/polymorphics.f4v
You can replace localhost with the domain name or IP address of the server.
3Click Preview to update the embed code.
4Click the Play button to test the code.
5To use the player in your own HTML page, copy the embed code and paste it into the body of the page. Flash Media
Playback is a compiled SWF file hosted by Adobe. For more information, see “Play media in Flash Media Playback”
on page 4.
More Help topics
“Supported file formats and codecs” on page 2
“Troubleshoot issues with streaming media” on page 111
“Stream on-demand media (HTTP)” on page 19
URLs for playing on-demand media files over RTMP
After completing the tutorial once, learn more about how to build a URL that requests a file from the server. Run
through the tutorial again using different files and different paths.
The syntax for requesting a file from Adobe Media Server is as follows:
protocol://server-domain-or-IP/ams-app-name/[ams-app-instance-name/][codec-prefix:]file-
path[filename-extension]
Element Required Description
protocol Yes The protocol for media delivery. For information about the
protocols Adobe Media Server supports, see RTMP, RTMFP, and
HTTP in the Technical Overview.
server-domain-or-IP Yes The domain name or IP address of the computer hosting Adobe
Media Server. If the client is on the same computer as Adobe
Media Server, you can use localhost for testing purposes.
ams-app-name Yes The Adobe Media Server application that the client connects to.
The default folder that holds Adobe Media Server applications is
rootinstall/applications. This tutorial uses the application
rootinstall/applications/vod.
ams-app-instance-name No Applications can have an unlimited number of instances. For
example, you could have clients connect to
rtmp://localhost/vod/instance1, rtmp://localhost/vod/instance2,
and so on.
codec-prefix Required for
F4V/MP4 and
MP3 files
The F4V/MP4 and MP3 file formats require a codec prefix in the
request URL. For F4V/MP4 files, use the prefix mp4:. For MP3 files,
use the prefix mp3:. FLV files do not require a codec prefix.

27
ADOBE MEDIA SERVER 5.0.6 DEVELOPER’S GUIDE
Getting started streaming media
Last updated 9/4/2014
Use the following addresses to stream on-demand media files over RTMP:
To download a file progressively over HTTP from the Apache web server installed with Adobe Media Server, use a
standard HTTP address. The following file is in the rootinstall/webroot/vod folder:
http://server-domain-or-IP/vod/filename.xxx
Note: To use localhost over HTTP, append the port number 8134, for example, http://localhost:8134/vod/video.f4v. The
server uses port 8134 internally for HTTP.
Configure the location of media files
Two parameters in the rootinstall/conf/ams.ini file determine the locations of the folders in which the vod application
looks for media files:
VOD_COMMON_DIR = C:\Program Files\Adobe\Adobe Media Server 5\webroot\vod
VOD_DIR = C:\Program Files\Adobe\Adobe Media Server 5\applications\vod\media
When a client connects to the vod application and plays a file, the server looks for the file in these two folders.
Files in the folder specified in the VOD_DIR parameter can stream over RTMP only.
Files in the folder specified in the VOD_COMMON_DIR parameter can stream over RTMP and can download progressively
over HTTP. Write code in the client that checks for a successful NetConnection to the server over RTMP. If the client
doesn’t connect successfully, write code that requests the file over HTTP. The server does not automatically fall back
to HTTP.
file-path Yes The path from the folder configured to hold media files to the
media file. For the vod application, the following folders are
configured to hold media files:
rootinstall/applications/vod/media
rootinstall/webroot/vod
In the tutorial, the request URL is:
rtmp://localhost/vod/mp4:tests/polymorphics.f4v. The file-path is
tests/polymorphics.
If the file polymorphics.f4v were in the /vod/media folder instead
of in the /vod/media/tests folder, the full request URL would be
rtmp://localhost/vod/mp4:polymorphics.f4v. The file-path would
be polymorphics.
Configure the folders to hold media files in the
rootinstall/conf/ams.ini file.
filename-extension Required for
F4V/MP4 and
MP3 files.
Use the filename extension of the file you want to play. For
example, if the file is an F4V file, use .f4v. If the file is an MOV file,
use .mov.
File format Address
F4V rtmp://server-domain-or-IP/vod/mp4:filename
rtmp://server-domain-or-IP/vod/mp4:filename.f4v
rtmp://server-domain-or-IP/vod/mp4:subfolder/fileName.f4v
FLV rtmp://server-domain-or-IP/vod/filename
rtmp://server-domain-or-IP/vod/filename.flv
Element Required Description

28
ADOBE MEDIA SERVER 5.0.6 DEVELOPER’S GUIDE
Getting started streaming media
Last updated 9/4/2014
Important: Although you copy media to the vod/media folder, do not specify /media in the path when you play the file.
The server is configured by default to look for media in the vod/media folder. If you specify /media in the path, the server
looks in the /vod/media/media folder.
Change the storage location of media files
1Open the rootinstall/conf/ams.ini file in a text editor.
2Edit the VOD_DIR and VOD_COMMON_DIR parameters.
3Restart Adobe Media Server.
Add new media storage locations
1Open the rootinstall/conf/ams.ini file in a text editor.
2Add a new parameter and point it to the desired location, for example:
VOD_DIR_2 = C:\hrvideos
3Open the rootinstall/applications/vod/Application.xml file in a text editor.
The parameters in the ams.ini file are used in the Application.xml configuration file.
<Application>
<StreamManager>
<VirtualDirectory>
<Streams>/;${VOD_COMMON_DIR}</Streams>
<Streams>/;${VOD_DIR}</Streams>
</VirtualDirectory>
</StreamManager>
4Add a <Streams> tag with the new parameter, for example:
<Streams>/hr;${VOD_DIR_2}</Streams>
To play streams stored in this folder, use the following address:
rtmp://localhost/vod/hr/mp4:somefilename.f4v
The <Streams> tag tells the server to look for media in the location specified in the VOD_DIR_2 parameter if the
media path starts with /hr.
5Restart Adobe Media Server.
Duplicate the vod service
The server supports an unlimited number of instances of the vod service.
1Duplicate the rootinstall/applications/vod folder in the applications folder and give it a new name, for example,
vod2. In this case, the new vod service is located at rootinstall/applications/vod2.
You can create as many instances of the vod service as you need.
2Clients can connect to the vod service at the URL rtmp://adobemediaserver/vod2.
3Open the ams.ini file (located in rootinstall/conf) and do the following:
•Add a parameter to set the content path for the new service, for example: VOD2_DIR = C:\Program
Files\Adobe\Adobe Media Server 5\applications\vod2\media.
•If you installed Apache and want the media files to be available over HTTP, add a new VOD2_COMMON_DIR
parameter: VOD2_COMMON_DIR = C:\Program Files\Adobe\Adobe Media Server 5\webroot\vod2.

29
ADOBE MEDIA SERVER 5.0.6 DEVELOPER’S GUIDE
Getting started streaming media
Last updated 9/4/2014
4Open the Application.xml file in the rootinstall/applications/vod2 folder and do the following:
•Edit the virtual directory to the following: <Streams>/;${VOD2_DIR}</Streams>.
•Edit the virtual directory to the following: <Streams>/;${VOD2_COMMON_DIR}</Streams>.
5Place recorded media files into the following locations:
•Place files that stream only over RTMP in the C:\Program Files\Adobe\Adobe Media Server
5\applications\vod\media folder.
•Place files that stream over RTMP or HTTP in the C:\Program Files\Adobe\Adobe Media Server
5\webroot\vod2.
Note: You do not have to specify the media folder in the URL; the media folder is specified in the path you set in the
ams.ini file.
Modify server-side code in the vod service
Note: You cannot modify server-side code in the live service on Adobe Media Server Standard.
❖Remove the rootinstall/applications/vod/main.far file and replace it with the
rootinstall/samples/applications/vod/main.asc file.
Disable the vod service
❖Move any vod service folders out of the rootinstall/applications folder.
Stream on-demand encrypted media (pRTMP)
Use protected RTMP (pRTMP) to encrypt and deliver on-demand content to Flash Player and AIR.
Note: Protected RTMP isn’t a protocol. It delivers encrypted content over the RTMP protocol.
System requirements
Protected RTMP is supported in origin-only configurations. Unlike RTMPE, pRTMP does not work in an edge-origin
configuration.
Applications that share media files must use the same protected RTMP configuration settings for the shared files.
Flash Player 11.0 and AIR 3.0 are required to play protected RTMP content. Protected RTMP supports all the on-
demand file formats and codecs that RTMP supports except F4M, RAW, and F4F.
Note: In Adobe Media Server 5, protected RTMP is supported for VOD streaming, it is not supported for live streaming.
About protected RTMP
Adobe Media Server encrypts on-demand media files and embeds a Adobe Access 3.0 license in the DRM metadata of
the content. Flash Player and AIR clients communicate with Adobe Media Server to play the media. Protected RTMP
does not require a license server; the license is embedded in the content metadata and a client receives it along with the
media.
Protected RTMP is more secure than RTMPE because it uses Adobe Access 3.0 DRM content protection. Protected
RTMP encrypts the content whereas RTMPE protects the communication channel.

30
ADOBE MEDIA SERVER 5.0.6 DEVELOPER’S GUIDE
Getting started streaming media
Last updated 9/4/2014
Because the content is encrypted, unauthorized replay is impossible. Protected RTMP content can be decrypted only
by Flash Player and AIR clients that have the Protected Streaming private key.
There is no way to use an RTMPE connection between servers and decrypt the content on Adobe Media Server.
Different applications that access common media files must have consistent setup with respect to Protected RTMP.
That is, you should not access the same media file over both protected and unprotected RTMP.
Separate applications that include common media files must have consistent settings with respect to Protected RTMP.
When AMS receives requests for media file playback (VOD) it applies the application-specified protection to the
media and then caches it in memory. Each time the server receives a new request for an already cached media file it
compares the protection settings of the cached media with the settings of the application in the new request. If those
settings are inconsistent AMS replaces the cached media with content processed according to the settings of the
application of the current request and then sends the media to the client. AMS generates an error log entry every time
it identifies inconsistency between cached media settings and requested media settings.
Protected RTMP simplifies deployment and increases security because:
•Adobe Media Server is the only server required.
•No license server is required.
•No domain server is required.
•All media can be packaged with the same common key.
•Content is encrypted with Adobe Access 3.0 DRM protection.
•Protected RTMP uses 128-bit AES encryption. RTMPE uses 128-bit RC4.
Configure protected RTMP at the vhost, application, or application instance level. Use the Application.xml file, Server-
Side ActionScript, and the Authorization Plug-in to configure protected RTMP.
Note: The DRM used for Protected RTMP is the same DRM used for Protected HTTP streaming..
Quick start: Use protected RTMP to play on-demand media
To complete this tutorial, install the following software:
•Adobe Media Server 5
For information about installing the server, see Installing the server.
•Flash Player 11
This tutorial requires Flash Player 11.
Configure protected RTMP on Adobe Media Server
1Configure protected RTMP for the VOD application.
2Open amsrootinstall/applications/vod/Application.xml in a text editor.
3
Add the
<ProtectedRTMP enabled="true"></ProtectedRTMP>
element. The Application.xml file looks like this:
<Application>
<ProtectedRTMP enabled="true"></ProtectedRTMP>
...
</Application>
4Save and close the file.

31
ADOBE MEDIA SERVER 5.0.6 DEVELOPER’S GUIDE
Getting started streaming media
Last updated 9/4/2014
5If the VOD application is running, close it to reload the Application.xml file. If the Adobe Media Server Start Screen
is open, the VOD application is running. Closing the Start Screen closes the VOD application (unless another client
is also connected to the VOD application).
Play on-demand media
1Double-click the Adobe Media Server Sample Video Player to open it in a browser:
amsrootinstall/samples/videoPlayer/videoplayer.html.
2
Click any link in the /applications/vod/media list. Every file that the VOD application streams uses protected RTMP.
Configure protected RTMP
You can configure protected RTMP in the following locations:
•Application.xml file:
•Configure the Application.xml file in an application folder to configure pRTMP for a single application.
•Configure the Application.xml file in a vhost folder to configure pRTMP for all applications in a virtual host.
•Server-Side ActionScript:
•Set properties on the application object.
•Authorization plug-in:
•Set fields in the in the E_APPSTART event of the Authorization plug-in.
Use the Application.xml file to configure protected RTMP
To configure protected RTMP, add a <ProtectedRTMP> section to the Application.xml file at the application level or
at the vhost level and set the enabled attribute to "true". The other pRTMP parameters have default values. You can
use the default values or set the parameters to new values. The following is a sample <ProtectedRTMP> section:
<Application>
<ProtectedRTMP enabled="true">
<CommonKeyFile>creds/common-key.bin</CommonKeyFile>
<UpdateInterval>60</UpdateInterval>
<SWFVerification enabled="true">
<WhiteListFolder>whitelists</WhiteListFolder>
</SWFVerification>
</ProtectedRTMP>
</Application>
Use the following parameters in an Application.xml file to configure protected RTMP:

32
ADOBE MEDIA SERVER 5.0.6 DEVELOPER’S GUIDE
Getting started streaming media
Last updated 9/4/2014
Use the Authorization plug-in to configure protected RTMP
To configure protected RTMP at the plug-in level, write code in the E_APPSTART event to set the F_APP_PRTMP field
to true. The other pRTMP fields have default values. You can use the default values or set the fields to new values.
Protected RTMP settings in the Application.xml file are overridden in the Authorization plug-in.
The E_APPSTART event is an application-level event that supports reading all application-level fields, including the
following:
The E_APPSTART event supports the following new fields for protected RTMP:
Parameter Description Default
CommonKeyFile A relative path to a file containing a base
key. The path is relative to the folder that
contains the Application.xml file.
The server generates the base key file
during installation. The server uses the base
key (along with the content ID) to generate
the final content encryption key. The key
data is scrambled and Base64 encoded
using the scramble tool. The server
generates the content ID automatically.
rootinstall/creds/common-key.bin
UpdateInterval Optional configuration that specifies how
often (in minutes) the server updates the
DRM metadata.
60
SWFVerification Container for SWFVerification. To enable
SWF verification, set the enabled attribute
to "true".
"false"
WhiteListFolder The folder that contains the SWF whitelist
for SWF verification. The folder can contain
more than one whitelist file. Relative paths
are relative to the application folder.
The folder containing the application folder.
Field Description Read/Write
F_APP_URI The URI of the application to which the client connected.
The value does not include the server name or port
information.
Read-only
F_APP_NAME The application name. Read-only
F_APP_NAME The application instance name. Read-only
Field Description Read/Write
F_APP_PRTMP A Boolean value indicating whether RTMP
streaming is protected.
Read/Write
F_APP_PRTMP_COMMON_KEY_FILE A string to specify the path to the common key
file. The path can be absolute or relative.
Relative paths are relative to the location of the
application folder.
Read/Write
F_APP_PRTMP_UPDATE_INTERVAL A number to specify how often (in minutes) the
DRM metadata will be updated.
Read/Write
F_APP_PRTMP_SWF_VERIFICATION A Boolean value indicating whether SWF
Verification is enabled.
Read/Write

33
ADOBE MEDIA SERVER 5.0.6 DEVELOPER’S GUIDE
Getting started streaming media
Last updated 9/4/2014
The E_PRTMP_WHITELIST event is an application-level event that AMS calls every n minutes (according to the update
interval), enabling you to update the SWF/AIR whitelists through the F_APP_PRTMP_SWF_WHITELIST and
F_APP_PRTMP_AIR_WHITELIST fields.
Use Server-side ActionScript to configure protected RTMP
Use the following Server-side ActionScript properties to configure protected RTMP:
Note: The prtmpCommonKeyFile and prtmpSwfWhitelistFolder properties specify a path to a file or folder. The
server resolves relative paths to an application directory.
These properties are filled in by values retrieved from configuration files during the application.onAppStart()
event. You can also set values in this event, as follows:
F_APP_PRTMP_SWF_WHITELIST_FOLDER A string to specify the path to the whitelist
folder for SWF verification.
The path can be absolute or relative. Relative
paths are relative to the location of the
application folder.
Read/Write
F_APP_PRTMP_SWF_WHITELIST A string containing one or more SWF digests,
separated by '\n'. SWF digests are sha256
hashes of the SWF, base64 encoded. You
generate a whitelist using the whitelist tool that
ships with AMS. This string can also contain the
comments and empty lines that are in the
whitelist generated by the tool, which are
ignored.
Read/Write
F_APP_PRTMP_AIR_WHITELIST A string containing one or more AIR identifiers,
separated by '\n'. AIR identifiers are derived
from the signature.xml file that is used to sign
an AIR app. You generate a whitelist using the
whitelist tool that ships with AMS. This string
can also contain the comments and empty lines
that are in the whitelist generated by the tool,
which are ignored.
Read/Write
Property Data type
application.prtmpEnabled Boolean
application.prtmpCommonKeyFile String
application.prtmpUpdateInterval Int
application.prtmpSWFVEnabled Boolean
application.prtmpSwfWhitelistFolder String
Field Description Read/Write

34
ADOBE MEDIA SERVER 5.0.6 DEVELOPER’S GUIDE
Getting started streaming media
Last updated 9/4/2014
application.onAppStart = function()
{
trace ("----------prtmp on start----------");
trac e("prtmp " + application.prtmpEnabled);
trace("prtmpCommonKeyFile " + application.prtmpCommonKeyFile);
trace("prtmpUpdateInterval " + application.prtmpUpdateInterval);
trace("prtmpSwfVerification " + application.prtmpSWFVEnabled);
trace("prtmpSwfWhitelist " + application.prtmpSwfWhitelistFolder);
trace ("------------prtmp on start------- -");
application.prtmpEnabled = false;
application.prtmpCommonKeyFile = "TEST ";
application.prtmpUpdateInterval = 12000 ;
application.prtmpSWFVEnabled = true;
application.prtmpSwfWhitelistFolder = "";
}
Trace the new values in the application.onConnect() event:
{
trace("----------prtmp on connect----------");
trace("prtmp " + application.prtmpEnabled);
trace("prtmpCommonKeyFile " + application.prtmpCommonKeyFile);
trace("prtmpUpdateInterval " + application.prtmpUpdateInterval);
trace("prtmpSwfVerification " + application.prtmpSWFVEnabled);
trace("prtmpSwfWhitelist " + application.prtmpSwfWhitelistFolder);
trace("------------prtmp on connect--------");
}
The previous code prints an application.log file similar to the following:
#Version: 1.0
#Start-Date: 2011-10-19 12:20:41
#Software: Adobe Media Server 5 d430 x64
#Date: 2011-10-19
#Fields: date time x-pid x-status x-ctx x-comment
2011-10-19 12:20:41 7832 (s)2641173 ----------prtmp on start---------- -
2011-10-19 12:20:41 7832 (s)2641173 prtmp true -
2011-10-19 12:20:41 7832 (s)2641173 prtmpCommonKeyFile c:\Program Files\Adobe\Adobe Media
Server 5\conf\_defaultRoot_\_defaultVHost_\streamtest\creds\common-key.bin -
2011-10-19 12:20:41 7832 (s)2641173 prtmpUpdateInterval 3600000 -
2011-10-19 12:20:41 7832 (s)2641173 prtmpSwfVerification false -
2011-10-19 12:20:41 7832 (s)2641173 prtmpSwfWhitelist c:\Program Files\Adobe\Adobe Media
Server 5\conf\_defaultRoot_\_defaultVHost_\streamtest -
2011-10-19 12:20:41 7832 (s)2641173 ------------prtmp on start-------- -
2011-10-19 12:20:41 7832 (s)2641173 ----------prtmp on connect---------- -
2011-10-19 12:20:41 7832 (s)2641173 prtmp false -
2011-10-19 12:20:42 7832 (s)2641173 prtmpCommonKeyFile c: \Program Files\Adobe\Adobe Media
Server 5\conf\_defaultRoot_\_defaultVHost_\streamtest\TEST -
2011-10-19 12:20:42 7832 (s)2641173 prtmpUpdateInterval 12000 -
2011-10-19 12:20:42 7832 (s)2641173 prtmpSwfVerification true -
2011-10-19 12:20:42 7832 (s)2641173 prtmpSwfWhitelist c:\Program Files\Adobe\Adobe Media
Server 5\WhiteListFolder -
2011-10-19 12:20:42 7832 (s)2641173 ------------prtmp on connect-------- -

35
ADOBE MEDIA SERVER 5.0.6 DEVELOPER’S GUIDE
Getting started streaming media
Last updated 9/4/2014
Tune server performance
The pRTMP operations that use the most CPU power are generating the DRM metadata and generating a license.
Adobe Media Server generates DRM metadata the first time a client requests a media file. The server caches the
metadata and reuses it for subsequent request for the same media file.
The media license in the DRM metadata imposes a 24-hour time limit on media playback from the point at which the
license was generated. Therefore, the server refreshes the license periodically and generates new DRM metadata with
a new time-stamp. Configure the <UpdateInterval> parameter to control how often the server generates DRM
metadata. The default value is 60 minutes. To use less CPU power, generate the license less frequently.
Certificates and policy files
All certificates and the policy file for protected RTMP are installed to the Adobe Media Server rootinstall/creds folder.
Add Protected Streaming certificates
Adobe Media Server uses Protected Streaming certificates (.cer files) for protected RTMP. The server installs with
three Protected Streaming certificates. It uses different certificates for desktop, mobile, and set-top.
In the event of a security breach, Adobe will release a security alert telling you to download new Protected Streaming
certificates.
To add a Protected Streaming certificate, copy it to the rootinstall/creds/sd folder.
Understand static security files
The following files are installed with Adobe Media Server to the rootinstall/creds/static folder. Do not replace
or modify these files.
Policy file
Adobe Media Server installs with the policy file rootinstall/creds/static/creds_24hr_policy.pol. The policy is set as:
anonymous; not use license chaining; 24 hours limited license caching; and Protected Streaming
is permitted.
This policy file lets clients start playing content within 24 hours from when the server generated the DRM metadata.
Users can continue watching the content until the end, even if that time is beyond the 24 hour window. The 24 hour
window starts when the server generates the DRM metadata and stores it in a cache. The <UpdateInterval>
parameter in the Application.xml file determines the frequency at which the server generates DRM metadata. The
default value is 60 minutes.
License server certificate
An Adobe-issued DER-encoded license server certificate. The license server certificate specifies the private key used to
sign the license.
Transport certificate
An Adobe-issued DER-encoded X.509 transport certificate file. The transport certificate file is used when the client
communicates with a server (for example, an authentication server). This feature is not supported in Adobe Media
Server 5 but the certificate is still required.
Packager credential
An Adobe-issued packager server credential (a certificate and its associated key) PFX file. The server uses this file to
apply a signature to the metadata while encrypting content files.

36
ADOBE MEDIA SERVER 5.0.6 DEVELOPER’S GUIDE
Getting started streaming media
Last updated 9/4/2014
Multicast media (RTMFP)
About the multicast service
Flash Media Server 4.0, Flash Player 10.1
Important: The Multicast service (rootinstall/applications/multicast) does not run on Adobe Media Server Standard.
The multicast service is part of the Adobe Media Server multicast solution. The multicast solution is an end-to-end
solution for live, corporate, multicast events. The multicast solution delivers a single, live stream to Flash Player clients
over IP multicast, P2P multicast, and the combination of both (called fusion multicast).
The multicast solution consists of the following components:
•The multicast config tool (rootinstall/tools/multicast/configurator)
Collects information to describe and configure a multicast event. Generates a live stream name to copy and paste
into Flash Media Live Encoder that embeds required multicast event settings as parameters within the stream
name's query string. Generates a manifest.f4m file that you copy to the same folder as the multicast player.
•Flash Media Live Encoder
Captures, encodes, and publishes the live video to the multicast service on the Adobe Media Server.
•The multicast service (rootinstall/applications/multicast)
A server-side Adobe Media Server application that republishes the live stream as a multicast stream into a target
RTMFP Group.
•The multicast player (rootinstall/tools/multicast/multicastplayer)
A client-side Flash Player application that connects to the multicast service, joins the group, and plays the live
stream.
Configure the multicast event
Do the following to configure the multicast event:
1Open rootinstall/tools/multicast/configurator/configurator.html in a browser.
2Select one of the following multicast types:
•Fusion (simultaneous, cooperative IP and P2P multicast)
•IP Multicast
•Peer to Peer
•Peer to Peer with Peer Discovery
Note: The tool contains descriptions of each type.
3For Fusion and Peer to Peer, enter the server name (or IP address) and the full path to the multicast application, for
example, rtmfp://ams.example.com/multicast. If the server is configured to use a port other than 1935, specify the
port, for example, rtmfp://ams.example.com:1940/multicast.
Note: IP Multicast events do not require a connection URI. IP Multicast events use the URI rtmfp: which puts the
NetConnection object in “connectionless” mode.
4Enter the name of the live stream, for example, CorpAllHandsQ2_2010, or livestream.
5Enter a publish password.

37
ADOBE MEDIA SERVER 5.0.6 DEVELOPER’S GUIDE
Getting started streaming media
Last updated 9/4/2014
The password ensures that only the multicast server can publish a multicast stream into the group. Other peers do
not have the publish password and can only play the stream, not publish a stream.
6Enter a name for the group. To make the group name unique, select Make Unique.
Use unique group names for streaming events occuring at the same time.
7 For IP Multicast and Fusion, enter an IP multicast address and port to use for the live event. This is the address and
port to which the live stream is broadcast.
Note: Get the IP multicast address from your IT department. The IT department sets up the multicast router and
multicast address. The multicast address delivers data to all members of the group on the network.
8(Optional) If the server hosting Adobe Media Server has more than one network interface card (NIC), enter the IP
address for one NIC in the Interface Address text box. Adobe Media Server uses this IP address to determine the
appropriate interface to use when publishing.
9(Optional) To use source-specific multicast, enter an IP address and port in the Source-specific Multicast Address
text box. For more information, see “Source-specific IP multicast” on page 266.
10 Click Generate. The multicast config tool generates the following:
•A name for the live stream. To publish a stream, you’ll click Copy and paste this value into the Flash Media Live
Encoder Stream field.
•An F4M file to use with the client multicast player. To view the F4M file, click View Manifest File.
This tutorial uses the following settings:
11 To use the Multicast Sample Player, do the following:
aClick Save Manifest File.
bSave the manifest.f4m file to the same location as the multicastplayer.html and multicastplayer.swf files. By
default, this location is rootinstall/tools/multicast/multicastplayer.
12 To use Strobe Media Playback, leave the Configurator open. After you set up Strobe Media Playback, you will return
to the Configurator and save the manifest.f4m file to the same folder as Strobe Media Playback.
Publish a stream from Flash Media Live Encoder
1Launch Flash Media Live Encoder 3.1 or later and do the following:
2From the Preset menu, select a single stream preset. The multicast solution does not support multi-bitrate
streaming.
3For AMS URL, enter the URL of the multicast service. If you’re testing on the same computer that Adobe Media
Server is running on, enter rtmp://localhost/multicast.
Note: Flash Media Live Encoder connects to Adobe Media Server over the RTMP protocol, not over the RTMFP
protocol.
4Paste the Publisher Stream Name you copied from the Multicast Config Tool to the Stream field.
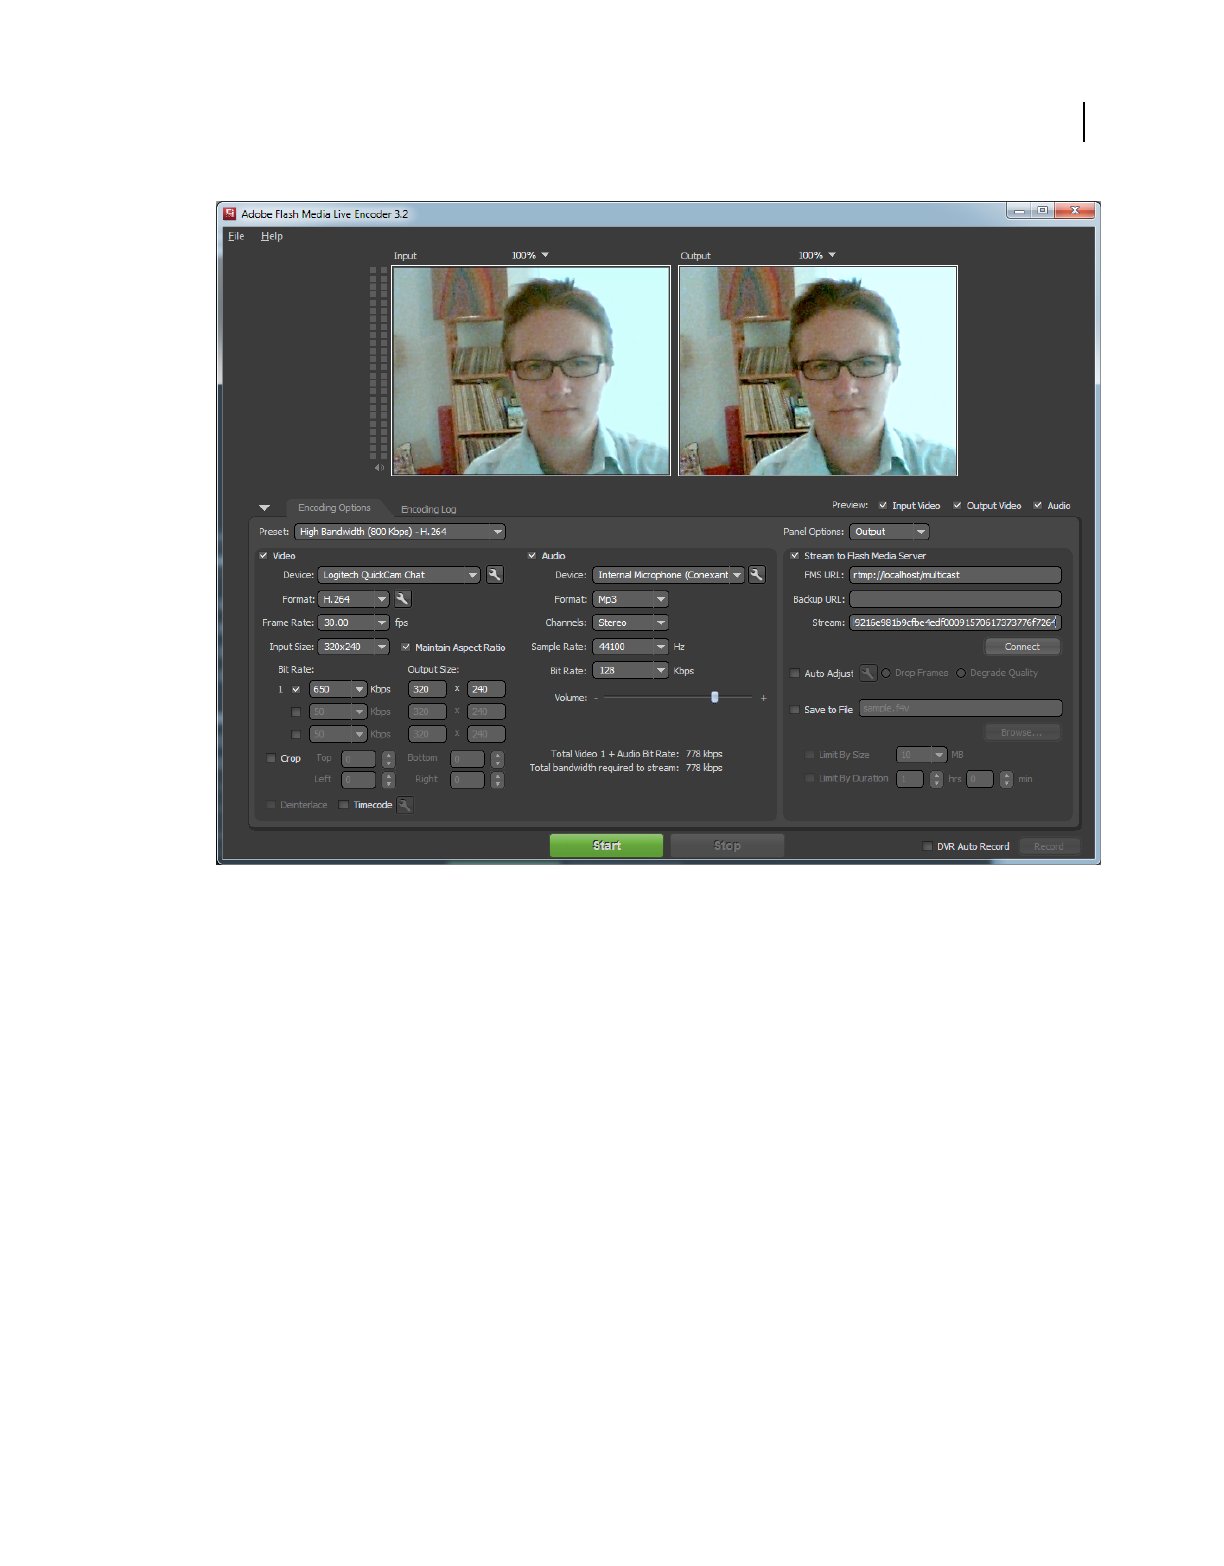
38
ADOBE MEDIA SERVER 5.0.6 DEVELOPER’S GUIDE
Getting started streaming media
Last updated 9/4/2014
Flash Media Live Encoder configured to stream to the multicast application
5Click Start to connect to the multicast service and start streaming.
6Launch the Adobe Media Server Administration Console and click on View Applications > Clients. The RTMP
client is the connection from FMLE to the server. The RTMFP client is a server-side peer established by the
multicast service to republish the live stream into the target RTMFP Group.
Play a multicast stream
Play a stream in the multicast sample player:
1Open rootinstall/tools/multicast/multicastplayer/multicastplayer.html in a browser.
2To run Flash Player from the local file system, right-click on the screen, choose Global Settings, and do one of the
following:
•On the Flash Player Help page, from the list in the top left, choose Global Security Settings panel. Click Edit
locations > Add location > Browse for folder. Select folder containing the multicastplayer.swf file
(rootinstall/tools/multicast/multicastplayer).
•In the Flash Player Settings Manager, choose Advanced and click Trusted Location Settings. Click Add, browse
to the folder containing the multicastplayer.swf file (rootinstall/tools/multicast/multicastplayer). Click Confirm.
3Reload the multicastplayer.html file in the browser. The Adobe Flash Player Settings manager displays a Peer
Assisted Networking dialog. Click Allow to allow the peer-to-peer connection.

39
ADOBE MEDIA SERVER 5.0.6 DEVELOPER’S GUIDE
Getting started streaming media
Last updated 9/4/2014
The multicastplayer plays the stream that Flash Media Live Encoder is publishing.
4Open the Adobe Media Administration Console to see the new client connection.
Play a stream in the Adobe Media Server sample video player
1Double-click rootinstall/samples/videoPlayer/videoplayer.html to open the sample video player in a browser.
The Adobe Media Server sample video player is built on OSMF Strobe Media Player 1.6.
2Copy the manifest.f4m file you generated using the Multicast Config Tool from the
rootinstall/tools/multicast/configurator folder to the rootinstall/samples/videoPlayer folder. Both the multicast
sample player and the Adobe Media Server sample player must use the same manifest file.
3In the sample video player, in the Stream URL text box, enter manifest.f4m. Click Play.
4Open the Adobe Media Administration Console to see the new client connection. There are now 4 connections: 1
from Flash Media Live Encoder (RTMP), 1 from the multicast application publishing into the group (RTMFP), 1
from the multicast sample player, (RMTFP), and 1 from the Adobe Media Server sample video player (RTMFP).
More Help topics
“Building peer-assisted networking applications” on page 257
“Troubleshoot issues with streaming media” on page 111
Configure closed captioning
Closed captioning (CC) allows the content provider to display text overlayed on the video content thus providing
additional information about the video content to the consumers. Closed captioning is primarily used as an
accessibilty tool to show a transcription of the audio portion of the video content as it occurs. The term “closed” in
closed captioning indicates that the captions are not made part of the video by default. Hence, the captions have to be
decoded/extracted by an external tool. Adobe Media Server (AMS) 5.0.1 supports injecting closed caption data into
the video stream supporting the following streaming techniques:
•HDS (Live and VOD)
•HLS (Live and VOD)
•RTMP
Closed captioning in AMS is implemented by injecting/embedding caption data within the H264 SEI NALU as
specified in ANSI/SCTE 128 2010 Section 8. Adobe Media Server supports industry standard 608/708 closed
captioning for video streaming to the following output channels/devices:
•Adobe Flash Player/AIR (through the OSMF framework)
•iOS devices (through HLS)
This document defines the input and output workflows, use cases, and configurations for supporting the 608/708
closed caption data in AMS. The closed caption data will be embedded inside the VOD stream and can be viewed
through HDS, HLS, or RTMP based subscribers.

40
ADOBE MEDIA SERVER 5.0.6 DEVELOPER’S GUIDE
Getting started streaming media
Last updated 9/4/2014
Closed captioning workflows
There are many techniques for implementing the caption data within the video stream. Few of these techniques are:
•Embedding the caption data in the video content. For instance, media stream or storage format can hold 608/708
caption data embedded inside the H264 SEI NALU as part of ATSC picture data.
•MP4 video content can contain a timed track, which can hold the caption data.
The following closed captioning workflows are supported in AMS:
•Type 1 – Streaming captioning data stored in ATSC Picture User Data.
•Type 2 – Extracting the caption data from a timed track and embed the data in a ATSC Picture User Data inside
H264 SEI NALU (Network Abstraction layer Units).
•Type 3 – Embedding captioning data inside an AMS-defined onCaptionInfo AMS message.
Type 1 – CC in ATSC Picture User Data
In this type, the CC input is natively supported for HLS. The Type 1 input can be just-in-time converted to an
OnCaptionInfo message to support caption display on HDS and RTMP. The content providers can embed closed
captioning data as part of the ATSC Picture User Data inside an H264 SEI NALU. However, this method is only
suitable for video streams supporting H264 codec types.
Closed caption in ATSC picture user data
Note: This type is widely used for MPEG2 TS streams.
HLS players can natively support such modified stream. AMS can be used to just-in-time package this embedded
format into AMS defined onCaptionInfo messages to display captions over HDS and RTMP. Note that this is the
ideal way of embedding the caption data. To prepare/package video content in this form, you can:
•Use AMS for packaging the caption data.
•Convert a natively available MPEG2 TS stream to this type.
Type 2 – Extracting CC in Timed Track
The closed caption data can also reside inside a separate timed track. Apple has defined a timed track format for
QuickTime movie files.You can use the tool provided by AMS to convert this type of timed tracks containing caption
data into an ATSC Picture User Data of Type I.
41
ADOBE MEDIA SERVER 5.0.6 DEVELOPER’S GUIDE
Getting started streaming media
Last updated 9/4/2014
Closed captions in timed track
Type 3 – CC in AMF Message
The closed caption data can be just-in-time extracted from Type 1 data and stored inside the AMS-defined
onCaptionInfo AMF message. The following file types are supported:
•MP4
•F4V
You can use AMS to package such files capitalizing on the onCaptionInfo message as a way of sending caption data
as part of the live/VOD stream.
Closed captions in AMF messages
Note: If content is recorded in this format, it can be played through RTMP and HDS without any additional
packaging/streaming support from AMS.
Note that HLS is not supported for this type.

42
ADOBE MEDIA SERVER 5.0.6 DEVELOPER’S GUIDE
Getting started streaming media
Last updated 9/4/2014
The following table shows the summary of supported types for HLS, HDS, and RTMP:
Closed caption types
Packaging captions
The HLS protocol demands packaging the caption data as user_data_registered_itu_t_t35, embedded as H264
SEI NALU in video access unit within the MPEG2 TS stream. Therefore, input video frames will be exactly translated
into the MPEG2 transport stream. No repackaging in terms of caption data will be required. In case of HDS and
RTMP, H264 SEI NALU will be converted to the onCaptionInfo data messages. In the incoming video stream, a NALU
of type 6 with a payload of type 4 (user_data_registered_itu_t_t35) will be parsed for caption data. If there are multiple
NALU in one access unit of the video frame, they will be packaged into a single data message. In this case, original
caption data and corresponding NALU inside H264 access unit will remain intact. This will be done at the time of
content packaging.
Configurations
AMS provides easy configurations to turn on and off the processing of the caption data on the server side. However,
these configurations will not extract out the caption data encapsulated in any of the types defined in the previous
section.
VOD use case
Configuring httpd.conf at the Server level (Only for HDS-VOD)
You can configure closed captioning at the server level by modifying the JitGenerateCaptionInfo element in
Apache Server’s httpd.conf file as follows:
<Location /hds-vod>
JitGenerateCaptionInfo true
...
</Location>
Configuring jit.conf at the content level (Only for HDS-VOD)
You can configure closed captioning at the content level by modifying the cc-info-enabled element in jit.conf
file as follows:

43
ADOBE MEDIA SERVER 5.0.6 DEVELOPER’S GUIDE
Getting started streaming media
Last updated 9/4/2014
<hds>
<cc-info-enabled>
true
</cc-info-enabled>
</hds>
Configuring server.xml (only for RTMP)
For RTMP, you can configure closed captioning by adding the following code snippet in the server.xml file:
<Mp4>
<Playback>
<GenerateCCInfo>true</GenerateCCInfo >
</Playback>
</Mp4>
Note: In case of VOD, closed captioning data is supported only for H264-encoded MP4/F4V content.
Live use case
Application level (HDS and RTMP)
You can configure closed captioning at the application level by modifying the GenerateCCInfo element in
Application.xml file as follows:
<StreamManager>
<Live>
<GenerateCCInfo>true</GenerateCCInfo >
</Live>
</StreamManager >
Note: If any of the tags is not present, it will be considered as “false” by AMS. Closed captioning will also be turned off in
the Application.xml file.
Stream level (HDS and RTMP)
You can also override the application level configuration by modifying the application’s main.asc file by setting the
Stream function generateCCInfo:
Stream.generateCCInfo = true;
Note: For both the VOD and live use cases, you must ensure that if the captions are already being supplied from the
encoder or the VOD file in the Type 3 format, then these configuration must be turned off to avoid duplicates of the
onCaptionInfo messages.
Note: For the live use case, the onCaptionInfo message generation can be turned on and off through configuration only
on the stream ingest server. If the stream is being relayed from another server, then these configuration won't be effective
and by default will be off.
Support for OSMF
Closed captioning can be enabled for OSMF players through the OSMFCCDecoder class. The OSMFCCDecoder class uses
the displayObject, updates the video size, and resets the decoder. You can perform the following actions using the
OSMFCCDecoder:
•Enable or disable the display of captions.
•Select caption channels.

44
ADOBE MEDIA SERVER 5.0.6 DEVELOPER’S GUIDE
Getting started streaming media
Last updated 9/4/2014
•Modify various caption display attributes like font, text, and background colors.
The following sections describe the steps needed to get started with closed captioning in OSMF:
Step 1 - Preparing the assets
Before you begin, you need to prepare your assets to hold the closed captionining data.
Enable GenerateCCInfo in Server.xml for VOD playback as follows:
<Root>
<Server>
<Streams>
<Mp4>
<Playback>
<GenerateCCInfo>true</GenerateCCInfo>
</Playback>
</Mp4>
</Streams>
</Server>
</Root>
When the GenerateCCInfo option is enabled, AMS will process the video packets for closed captions and will
generate the onCaptionInfo message, which will be sent to the client.
Enable GenerateCCInfo in Application.xml for live playback as follows:
<Application>
<StreamManager>
<Live>
<GenerateCCInfo>true</GenerateCCInfo>
</Live>
</StreamManager>
</Application>
Step 2 - Writing the ActionScript code
You need to initialize the OSMFCCDecoder and expose any customisable attributes as follows:

45
ADOBE MEDIA SERVER 5.0.6 DEVELOPER’S GUIDE
Getting started streaming media
Last updated 9/4/2014
var player:MediaPlayer = ...;
// Initialize the player.
// Listen for MediaPlayerStateChangeEvent on player and
// when the state is MediaPlayerState.READY, then initialize the
// decoder as shown below:
var ccDecoder:OSMFCCDeco d er;
// Create a new instance
ccDecoder = new OSMFCCDecoder();
// Bind the instance to your media player
ccDecoder.mediaPlayer = player;
// Bind the instance to the media player view area
// that can be used to render.
ccDecoder.mediaContainer = mediaContainer;
// Enable the instance
ccDecoder.enabled = true;
// Optionally, select a type and service
// At present, only one type is supported; CEA-708 wrapped over 608,
// which is identified by the value CCType.CEA708.
ccDecoder.type = CCType.CEA708;
ccDecoder.service = CEA708Service.CC1;
Note: You must have atleast one instance of OSMFCCDecoder for a video player.
The OSMFCCDecoder contains a number of properties that can be exposed through the UI controls. Most of these
properties enable overriding the font and color attributes and are required under the FCC guidelines. You are
responsible for adding the UI controls to expose these properties. Also, you should add the necessary code to save and
restore the settings between sessions. UI controls must be provided in the video player to enable/disable closed
captioning display and to select the desired caption service/channel. UI controls may be provided to allow the end user
to select values for the displayed font size, background color, and opacity.
The following code snippet describes the steps involved in exposing custom attributes through ActionScript:
/**
* The type of closed captioning data to decode and render.
* A value of null indicates no selected type.
* Valid values are values of the CC Type enumeration class.
* The default value is null .
*
* @throws ArgumentError if the specified type is not supported.
* /
public function gettype():String;
public function settype(value:String):void;
/ **
* The MediaPlayer this OSMFCCDecoder is associated with.
* Assig ning any value disassociates the OSMFCCDecoder from a
* currently assigned MediaPlayer (if any).
* If the assigned value is non-null, the OSMFCCDecoder will
* automatically register itself as an event listener on
* the provided MediaPlayer and access its view property
* to use as the video surface to render captions over.
*/
public function get mediaPlayer():MediaPlayer
public function set mediaPlayer(value:MediaPlayer):void
/**

46
ADOBE MEDIA SERVER 5.0.6 DEVELOPER’S GUIDE
Getting started streaming media
Last updated 9/4/2014
* Whether caption data decoding and rendering is enabled or disabled.
* The default value is true.
* When this property transitions from true to false a side-effect
* is a reset of internal decoder state and
* any currently rendered captions are cleared.
*/
public function get enabled():Boolean
public function set enabled(value:Boolean):void
/**
* The caption "service" to decode and render.
* For CEA-708 wrapped over 608 closed captioning, supported values
* are values of the CEA708Service enumeration class.
* CEA708Service.CC1, CEA708Service.CC2, CEA708Service.CC3, CEA708Service.CC4
* @throws ArgumentError if the assigned service value is not supported
* or available for the closed captioning
* type specified at construction time.
*/
public function get service():String
public function set service(value:String):void
/**
* Font override to apply to rendered text.
* Default value is null, indicating no override, and text will
* assume its intrinsic font according to caption
* authoring.
* To override the font assign an embedded or system font
* name and to disable an override assign null.
*/
public function get font():String
public function set font(value:String):void
/**
* Text color override to apply to rendered text.
* Default value is -1, indicating no override, and text
* will assume its intrisic color which may vary according
* to caption authoring.
* To override the text color assign a RGB hex value (e.g. 0xFF00FF)
* and to disable an override assign -1.
* @throws ArgumentError if the value is not -1 and not within the RGB hex range.
*/
public function get textColor():int
public function set textColor(value:int):void
/**
* Background color override to apply to the background of text character cells.
* Default value is -1, indicating no override, and cell backgrounds
* will assume their intrinsic color which
* may vary according to caption authoring.
* To override the background color assign a RGB hex value (e.g. 0xFF00FF)
* and to disable an override assign -1.
* @throws ArgumentError if the value is not -1 and not within the RGB hex range.
*/
public function get backgroundColor():int
public function set backgroundColor(value:int):void
/**
* Text opacity override to apply to rendered text.
* Default value is -1, indicating no override, and text
* will assume its intrinsic opacity which may vary
* according to caption authoring.
* To override text opacity assign a value between 0 (fully transparent)

47
ADOBE MEDIA SERVER 5.0.6 DEVELOPER’S GUIDE
Getting started streaming media
Last updated 9/4/2014
* to 1 (fully opaque) and to disable
* an override assign -1.
* @throws ArgumentError if the value is not -1 and not within the range of [0, 1].
*/
public function get textOpacity():Number
public function set textOpacity(value:Number):void
/**
* Background opacity override to apply to the background of text character cells.
* Default value is -1, indicating no override, and backgrounds will
* assume their intrinsic opacity which may
* vary according to caption authoring.
* To override background opacity assign a value between 0 (fully transparent)
* to 1 (fully opaque) and to
* disable an override assign -1.
* @throws ArgumentError if the value is not -1 and not within the range of [0, 1].
*/
public function get backgroundOpacity():Number
public function set backgroundOpacity(value:Number):void
/**
* Resets the OSMFCCDecoder's internal state, clearing any
* currently rendered captions.
* The currently selected caption service and display overrides are not changed.
*/
public function reset():void
/**
* The default font to use when no custom font is specified.
* This is set to a reasonable default for the device. When using custom devices,
* you may alter this property to change the default font.
*/
public function get defaultFont():String
public function set defaultFont(value:String):void
/**
* Edge type override to apply to rendered text.
*
* Valid values are indicated by the EdgeType enumeration, or null to
* indicate no override. Valid Values:
* EdgeType.NONE: Indicates that no edge decoration should be used.
* EdgeType.DEPRESSED: Indicates that the edge will appear as depressed.
* EdgeType.UNIFORM: Indicates that the edge will with a uniform border.
* EdgeType.LEFT_DROP_SHADOW: Indicates that the edge will with a
* shadow falling to the left.
* EdgeType.RIGHT_DROP_SHADOW: Indicates that the edge will with a
* shadow falling to the right.
*

48
ADOBE MEDIA SERVER 5.0.6 DEVELOPER’S GUIDE
Getting started streaming media
Last updated 9/4/2014
* @default null
*
* @throws ArgumentError if the value is not null and not a memory of
* the EdgeType enumeration.
**/
public function get edgeType():String
public function set edgeType(value:String):void
/**
* Edge color override to apply to rendered text.
* The value should be an RGB hex value (e.g. 0xFF00FF).
*
* A value of -1 indicates no override. A reasonable
* default edge color will be selected.
*
* @default -1
*
* @throws ArgumentError if the value is not -1 and not within the RGB hex range.
**/
public function get edgeColor():int
public function set edgeColor(value:int):void
Note: The server side closed captioning support is only available for H.264 videos. The DXP and TTML specifications are
supported in the side-car files to playback closed captions (for VOD) in OSMF, HDS, or RTMP.
Using the ccConvertor tool
The ccConvertor tool is a command line utility (bundled with Adobe Media Server) that can be used to convert any
MOV files with Closed Caption content (clcp tracks) into an MP4 file with embedded caption NALUs in 708 format
(having 608 wrapped in it).
Usage
The usage of the ccConvertor tool on Windows is as follows:
ccConvertor.exe --input-file=<file> --[setting]=[arg]...
Parameters
The following table describes the supported input parameters:
Note that if a relative path is passed through the configuration file, the path is relative to the directory containing the
configuration file.
To understand the configuration file format, see the sample configuration file available at
<AMS_INSTALL_DIR>\tools\ccConvertor\sample_cfg.xml.
Parameter Description
--input-file arg Signifies the path to the source container file. The path can be an absolute path
or a relative path.
--output-file arg The path to the destination file. Note that this path should not be the same as
the input file. The path can be an absolute path or a relative path.
--conf-file arg The configuration file that contains the settings for the packaging process.
49
ADOBE MEDIA SERVER 5.0.6 DEVELOPER’S GUIDE
Getting started streaming media
Last updated 9/4/2014
Configure alternate audio
Adobe Media Server has support for including multiple language tracks for HTTP video streams, without requiring
duplication and repackaging of the video for each audio track. This feature, called as “late” binding of audio tracks
allow content providers to easily provide multiple language tracks for a given video asset, at any time before or after
the asset’s initial packaging. The initial packaging of the video asset can include an audio track, and the publisher can
still choose to provide one or more additional audio tracks for the video. Video players can provide support for
allowing the viewers to switch between audio tracks either before or during playback.
Clients can pick the appropriate audio
The primary use case of this feature is that content providers can publish video content in multiple languages. Viewers
can subscribe to such videos using the OSMF player, which allows audio track switching before or during playback.
Playback workflow for HDS-VOD
The following steps provide an overview of the content publishing workflow in case of HDS-VOD:
1The content providers will load videos in the ‘vod’ directory along with its set level manifest F4M file. This set level
manifest file must contain information on which video to play by default and which audio track to be used as an
alternate audio. For instance, if you want to publish a video stream, video1.mp4 along with the language tracks
video1_french.mp4 and video1_spanish.mp4, providing the users a choice to switch audio, you can create a set level
manifest F4M video1_master.f4m and place it in the vod sub directory. The set level manaifest file can have the
following content:
<?xml version="1.0" encoding="utf-8"?>
<manifest xmlns="http://ns.adobe.com/f4m/2.0">
<media href="../hds-vod/video1.mp4.f4m" bitrate="1000" />
<media href="../hds-vod/audio-only/video1_french.mp4.f4m"
bitrate="200" type="audio" label="french" lang="fr" alternate="true" />
<media href="../hds-vod/audio-only/video1_spanish.mp4.f4m" bitrate="200"
type="audio" label="spanish" lang="es" alternate="true" />
</manifest>
2When a viewer plays the stream, the player will load this set level manifest file and will play video1.mp4 by default
with its embedded audio data. The player will request the manifest file video1.mp4.f4m from the server. The
Apache module for on demand HDS will create the manifest file and will send it to the player. The player will then
request for fragments of the video1.mp4 file and will play the fragments.
3When the viewer switches to another audio label (in this case, french or spanish), the player will request for the
manifest file for the selected option. For instance, if the viewer has opted for the french track, the player requests
for the manifest video1_french.mp4.f4m file to get the audio-only stream.
4The Adobe Media Server will know that the request for F4M is coming with the ‘audio-only’ element, hence will
create the manifest file just in time almost similar to step 2.
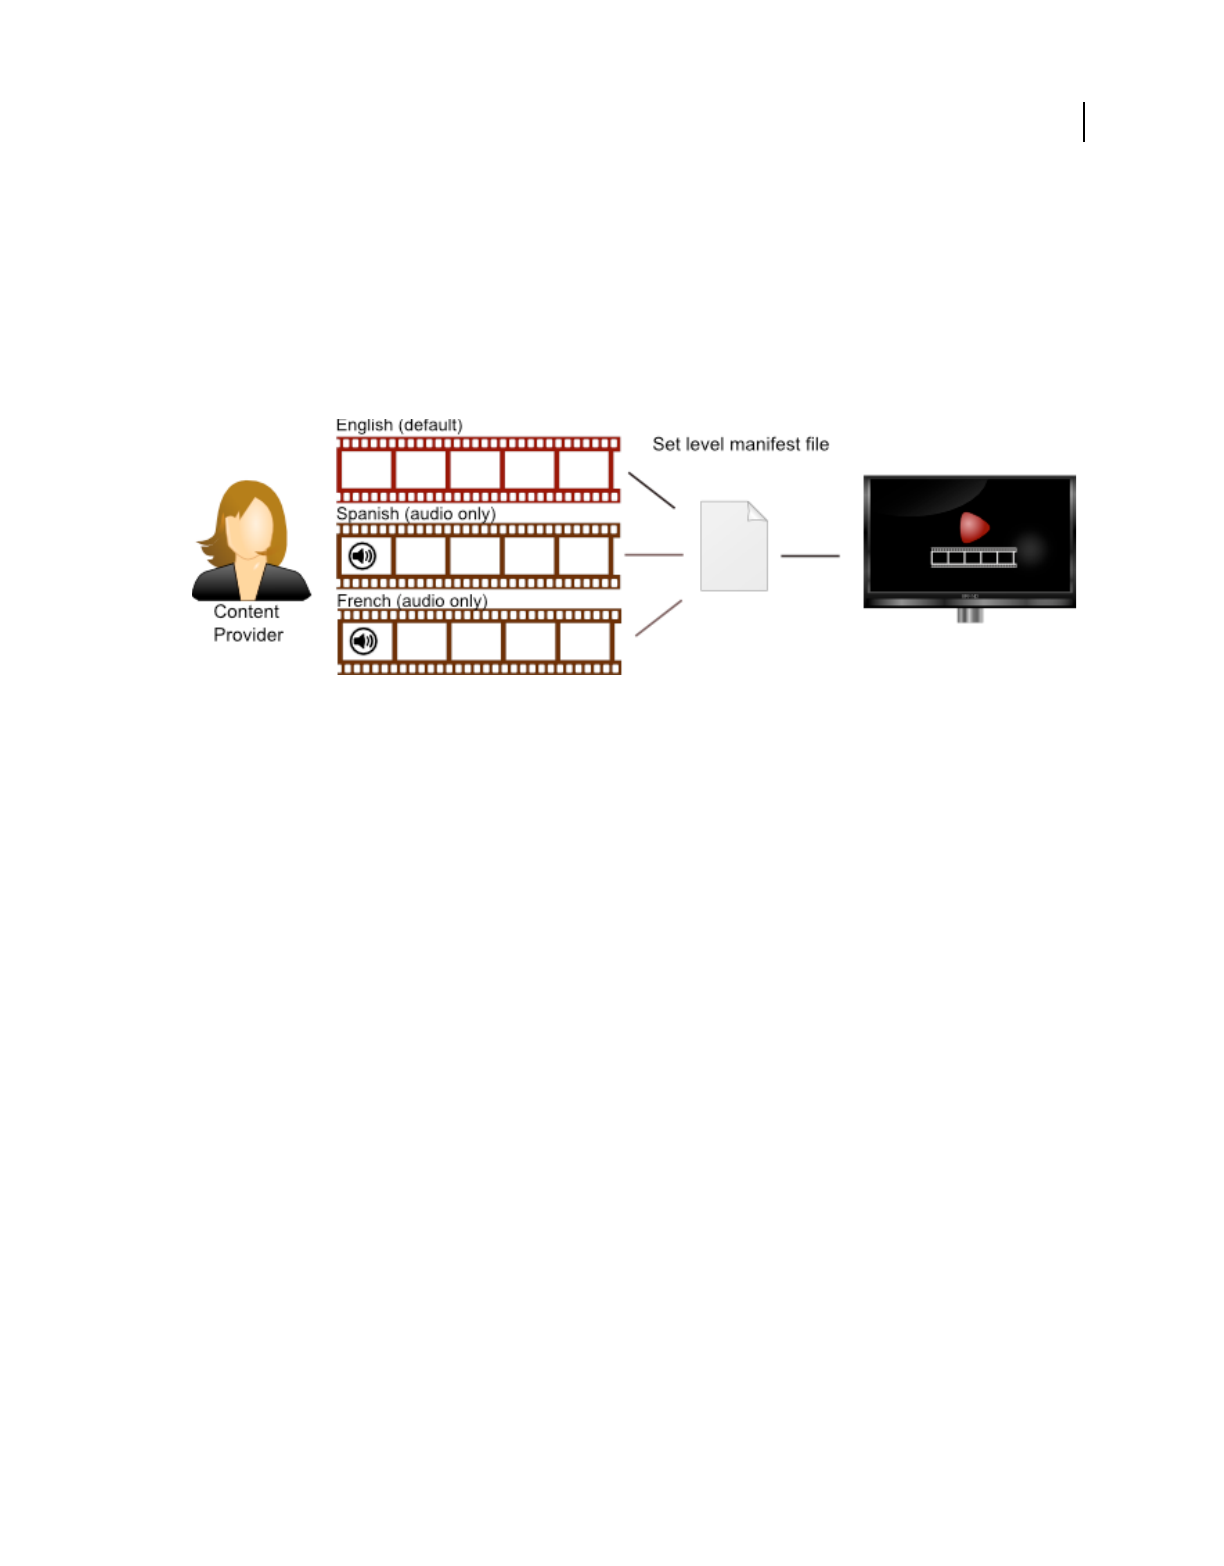
50
ADOBE MEDIA SERVER 5.0.6 DEVELOPER’S GUIDE
Getting started streaming media
Last updated 9/4/2014
5Now, the player will request for fragments from both the media files (video1.mp4 and video1_french.mp4) using
their respective manifest F4M files. For the first media file, the player will continue fetching fragments. But for the
second media file, video1_french.mp4, the player will try to get fragments for the media URL with ‘audio-only’
value in the URL as supplied in its manifest F4M file. The request for fragment for this media file will be of this
format '/hds-vod/audio-only/video1_french.mp4Seg1-Frag1'
6While serving the fragment request, Adobe Media Server understands the 'audio-only' request and sends only the
audio data for the requested fragment of file 'video1_french.mp4'. These fragments are made just in time and
served. If the 'audio-only' element is not present, video data for the fragment is served.
Streaming alternate audio on demand
Playback workflow for HLS-VOD
The following steps provide an overview of the content publishing workflow in case of HLS-VOD:
1The content providers will load videos in the ‘vod’ directory along with its variant playlist M3U8 file. This variant
playlist file must contain information on which video to play by default and which audio track to be used as an
alternate audio. For instance, if you want to publish a video stream, video1.mp4 along with the language tracks
video1_french.mp4 and video1_spanish.mp4, providing the users a choice to switch audio, you can create a variant
playlist M3U8 video1_master.m3u8 and place it in the vod sub directory. The variant playlist file can have the
following content:
#EXTM3U
#EXT-X-MEDIA:TYPE=AUDIO,GROUP-ID="aac",NAME="English",
DEFAULT=YES,AUTOSELECT=YES,LANGUAGE="en", URI="../hls-vod/audio-only/video1.mp4.m3u8"
#EXT-X-MEDIA:TYPE=AUDIO,GROUP-ID="aac",NAME="French",
DEFAULT=NO,AUTOSELECT=NO,LANGUAGE="fr", URI="../hls-vod/audio-only/video1_french.mp4.m3u8"
#EXT-X-MEDIA:TYPE=AUDIO,GROUP-ID="aac",NAME="Spanish",
DEFAULT=NO,AUTOSELECT=NO,LANGUAGE="es", URI="../hls-vod/audio-
only/video1_spanish.mp4.m3u8"
#EXT-X-STREAM-INF:BANDWIDTH=1280000,CODECS="mp4a.40.5",AUDIO="aac"
../hls-vod/video1.mp4.m3u8
2When a viewer plays the stream, the player will load this variant playlist file and will play video1.mp4 by default
with its embedded audio data. The player will request the playlist file video1.mp4.m3u8 from the server. The
Apache module for on demand HLS will create the playlist file and will send it to the player. The player will then
request for fragments of the video1.mp4 file and will play the fragments.
3When the viewer switches to another audio label (in this case, french or spanish), the player will request for the
playlist file for the selected option. For instance, if the viewer has opted for the french track, the player requests for
the playlist video1_french.mp4.m3u8 file to get the audio-only stream.
4The Adobe Media Server will know that the request for M3U8 is coming with the ‘audio-only’ element, hence will
create the playlist file just in time almost similar to step 2.

51
ADOBE MEDIA SERVER 5.0.6 DEVELOPER’S GUIDE
Getting started streaming media
Last updated 9/4/2014
5Now, the player will request for fragments from both the media files (video1.mp4 and video1_french.mp4) using
their respective playlist M3U8 files. For the first media file, the player will continue fetching fragments. But for the
second media file, video1_french.mp4, the player will try to get fragments for the media URL with ‘audio-only’
value in the URL as supplied in its playlist M3U8 file. The request for fragment for this media file will be of this
format '/hds-vod/audio-only/video1_french.mp4Seg1-Frag1'
6While serving the fragment request, Adobe Media Server understands the 'audio-only' request and sends only the
audio data for the requested fragment of file 'video1_french.mp4'. These fragments are made just in time and
served. If the 'audio-only' element is not present, video data for the fragment is served.
Note: To package an audio-only stream for HLS, see “Packaging an audio-only stream (HLS)” on page 11. To publish an
audio-only stream for HLS, see “Publish an audio-only stream (HLS)” on page 11
Configure content protection
See “Content protection” on page 115.
Configure HTTP Dynamic Streaming and HTTP Live
Streaming
Overview of HTTP Dynamic Streaming and HTTP Live Streaming
Streaming media over HTTP
Delivering content over HTTP is usually called “progressive download”. The content must transfer from the server to
the client in a progression from the beginning to the end of a file. A client cannot seek to a forward location until that
location and all the data before it has downloaded.
Delivering content over RTMP is called “streaming”. The client creates a socket connection to the server (such as
Adobe Media Server) over which the content is sent in a continuous stream. The client can seek to any point in the
content instantly, regardless of how much data has been transferred.
Adobe HTTP Dynamic Streaming combines these approaches to introduce HTTP streaming to the Flash Platform.
HTTP Dynamic Streaming packages media files into fragments that Flash Player clients can access instantly without
downloading the entire file. Adobe HTTP Dynamic Streaming contains several components that work together to
package media and stream it over HTTP to Flash Player and AIR. HTTP Dynamic Streaming supports multi-bitrate
streaming, DVR, and Adobe® Flash® Access™ protection.
In Adobe Media Server 5, Adobe HTTP Dynamic Streaming supports Apple HTTP Live Streaming. Use the same
HTTP Dynamic Streaming workflow to package and stream live and on-demand content to all devices that support
Apple HTTP Live Streaming.
Note: Adobe Media Server does not support adding Timed Metadata for HTTP Live Streaming.

52
ADOBE MEDIA SERVER 5.0.6 DEVELOPER’S GUIDE
Getting started streaming media
Last updated 9/4/2014
HTTP Dynamic Streaming components
The Adobe HTTP Streaming solution contains the following components:
Live Packager Live Packager is a Adobe Media Server application installed to rootinstall/applications/livepkgr. The
server ingests a live stream over RTMP and the Live Packager translates it into F4F files and MPEG-2 TS files in real-
time.
F4F HTTP Module An Apache HTTP Server module that serves files to Flash Player and AIR. The F4F module (also
known as the HTTP Origin Module), serves live content. It also serves on-demand content that was packaged offline
with the File Packager tool.
The F4F HTTP Module installs with Flash Media Server 4 and later to rootinstall/Apache2.2/modules/mod_f4fhttp.so.
The module is also available from adobe.com as a stand-alone Apache module.
HLS HTTP Module An Apache HTTP Server module that serves files to iOS devices and Mac OS.
The HTTP HLS Module installs with Adobe Media Server 5 and later to
rootinstall/Apache2.2/modules/mod_hlshttp.so. It is not available as a stand-alone Apache module.
JIT HTTP Module An Apache HTTP Server module that packages on-demand files just-in-time and serves them to
Flash Player and AIR. “Just-in-time” means that media files are packaged in real-time when clients request them.
The JIT HTTP Module installs with Adobe Media Server 5 and later to rootinstall/Apache2.2/modules/mod_jithttp.so.
It is not available as a stand-alone Apache module.
File Packager A command-line, offline tool that translates on-demand media into F4F fragments. The File Packager
is located in the rootinstall/tools/f4fpackager folder and is available from adobe.com.
OSMF media players There are several media players built on the Open Source Media Framework (OSMF) that
support HTTP Dynamic Streaming to Flash Player and AIR. See “Pre-built media players” on page 3.
F4F File Format Specification The F4F file format describes how to divide media content into segments and fragments.
The Live Packager, the File Packager, and the JIT HTTP module output content based on this specification. Each
fragment has its own bootstrap information that provides cache management and fast seeking. For more information,
see F4F File Format Specification.
F4M File Format Specification The Adobe Media Manifest file format contains information about a package of files
that the HTTP Origin Module can serve. Manifest information includes codecs, resolutions, and the availability of files
encoded at multiple bit rates. Manifest information also includes DRM data. The media player uses the F4M file to play
a piece of media. For more information, see F4M File Format Specification.
Adobe Access Adobe Access delivers protected media to Flash Player. To use HTTP Dynamic Streaming with Adobe
Access, use the File Packager and Adobe Media Server to both package and encrypt content. For more information,
see Protecting content with Adobe Access.
Adobe Media Server 5 adds support for Adobe Access level protection without using a Adobe Access server.
Workflow for streaming live media over HTTP
The best way to experience the workflow for live HTTP streaming is to complete a tutorial. See “Stream live media
(HTTP)” on page 5.
The following is the workflow for all Adobe HTTP Dynamic Streaming and Apple HTTP Live Streaming use cases:
1Use the default live event or create a live event.
The default live event is rootinstall/applications/livepkgr/events/_definst_/liveevent. Each live event contains
configuration settings for one set of content. For more information, see “Create and configure live events” on
page 54.

53
ADOBE MEDIA SERVER 5.0.6 DEVELOPER’S GUIDE
Getting started streaming media
Last updated 9/4/2014
2(Optional) To configure multi-bitrate streaming, use the Set-level F4M/M3U8 File Generator tool to generate an
set-level manifest file. The set-level manifest file contains information about each stream. See “Publish and play live
multi-bitrate streams over HTTP” on page 8.
3(Optional) To configure DVR for Adobe HTTP Dynamic Streaming, create a set-level manifest file.
To configure a Sliding Window for Apple HTTP Live Streaming, configure the httpd.conf, Application.xml, or
Event.xml file.
See “Configure DVR (HDS)” on page 13 and “Configure a sliding window (HLS)” on page 14.
4(Optional—Adobe HTTP Dynamic Streaming) To encrypt content for protected HDS, see “Configuring content
protection for HDS” on page 115.
To encrypt content for use with Adobe Access, edit the Event.xml file. See “Encrypt content for Adobe Access
protection” on page 72.
5(Optional—Apple HTTP Live Streaming) To encrypt content for Apple HTTP Live Streaming, see Configuring
content protection for HLS.
6Create a crossdomain.xml file and copy it to the rootinstall\webroot folder.
A crossdomain.xml file allows Flash Player clients hosted on other domains to access data from this domain. For
more information, see Website controls (policy files) in the ActionScript 3.0 Developer’s Guide.
7Publish a stream to the server.
8(Adobe HTTP Dynamic Streaming) Use Strobe Media Playback to play media. Strobe Media Playback is installed
with Adobe Media Server.
9(Apple HTTP Live Streaming) Play the content on iOS or MacOS.
For supported devices, see Apple HTTP Live Streaming documentation.
Workflow for streaming on-demand media over HTTP
The best way to experience the workflow for on-demand HTTP streaming is to complete a tutorial. See “Stream on-
demand media (HTTP)” on page 19.
The following is the workflow for Adobe HTTP Dynamic Streaming and Apple HTTP Live Streaming use cases:
1Encode media files and copy them to the rootinstall/webroot/vod directory on Adobe Media Server.
To configure this location, see Configure the location of content (HDS and HLS).
2(Optional) To configure multi-bitrate streaming, use the Set-level F4M/M3U8 File Generator tool to generate a set-
level manifest file. See “Play on-demand multi-bitrate media files over HTTP” on page 22.
3(Optional—Adobe HTTP Dynamic Streaming) To encrypt content for protected HDS (without Adobe Access), see
“Configuring content protection for HDS” on page 115.
To encrypt content for use with Adobe Access, edit the jit.conf file. See “Encrypt content for Adobe Access
protection” on page 72.
4(Optional—Apple HTTP Live Streaming) To encrypt content for Apple HTTP Live Streaming, configure the
jit.conf file or the Apache httpd.conf file. See Protect content for Apple HLS.
5Create a crossdomain.xml file and copy it to the rootinstall\webroot folder.
A crossdomain.xml file allows Flash Player clients hosted on other domains to access data from this domain. For
more information, see Website controls (policy files) in the ActionScript 3.0 Developer’s Guide.

54
ADOBE MEDIA SERVER 5.0.6 DEVELOPER’S GUIDE
Getting started streaming media
Last updated 9/4/2014
6(Adobe HTTP Dynamic Streaming) Use Strobe Media Playback to play media. Strobe Media Playback is installed
with Adobe Media Server.
7(Apple HTTP Live Streaming) Play the content on an iOS device or on MacOS.
For supported devices, see Apple HTTP Live Streaming documentation.
Differences in HTTP Dynamic Streaming between Flash Media Server 4.0 and
4.5
The following are differences in HTTP Dynamic Streaming (HDS) between Flash Media Server 4.0 and 4.5:
•Simplified request URLs for live streaming.
See “Differences in HTTP live URLs from Flash Media Server 4.0 to Adobe Media Server 5” on page 13.
•Support for just-in-time on-demand packaging.
When a media player requests an on-demand media files from the rootinstall/webroot/vod folder using HDS,
Apache packages the stream in real-time. You do not need to pre-package the media files for HTTP streaming as
you did with Flash Media Server 4.0. See “Stream on-demand media (HTTP)” on page 19.
•Use a jit.conf file to configure on-demand streaming at the stream-level. Copy the jit.conf file to the same folder as
the media. See “Configure on-demand HTTP streaming” on page 88.
•Use set-level F4M and M3U8 files to configure a set of streams for adaptive bitrate streaming.
The set-level files describe the bitrates of the media. The live and just-in-time packagers generate stream-level F4M
and M3U8 files to describe the individual pieces of media. The set-level files can live on any webserver. See “Publish
and play live multi-bitrate streams over HTTP” on page 8 and “Play on-demand multi-bitrate media files over
HTTP” on page 22.
Create and configure live events
You can use the livepkgr application to serve an unlimited number of live streaming events over HTTP (for example,
a debate, a sporting event, and a town hall meeting). Each live streaming event requires its own configuration settings
for multi-bitrate streaming, DVR, and content protection.
A live event is a configuration level within the livepkgr application. Like a Adobe Media Server application, a live event
is a folder on the server. The folder contains two configuration files: Manifest.xml and Event.xml. Use these
configuration files to configure a set of streams.
Also like a Adobe Media Server application, the name of the live event folder is the name of the live event. The Adobe
Media Server application that packages live content for HTTP streaming is called “livepkgr”. The livepkgr application
contains a live event called “liveevent”:
rootinstall/applications/livepkgr/events/_definst_/liveevent
Note: You can configure the location of the “applications” folder. You can also configure virtual directory mappings for
the “streams” folder. However, you cannot configure virtual directory mappings for the “events” folders.
Streams in a live event are packaged as fragments and written to disk. A live event (the stream content and the
metadata) exists until you delete it. A media player can access the content after the source stream has stopped
publishing.
Create a live event

55
ADOBE MEDIA SERVER 5.0.6 DEVELOPER’S GUIDE
Getting started streaming media
Last updated 9/4/2014
For each live streaming event, create a live event folder.
1Create the following “events” folder structure in the livepkgr application folder:
rootinstall/applications/livepkgr/events/applicationinstancename/liveeventname
The following is a new live event called “liveevent2”:
rootinstall/applications/livepkgr/events/_definst_/liveevent2
You can also create a live event for a different instance of the livepkgr application, as in the following:
rootinstall/applications/livepkgr/events/anotherappinstance/liveevent
2Copy the Events.xml file from the default liveevent folder to the new folder:
rootinstall/applications/livepkgr/events/_definst_/liveevent2/Events.xml
3Copy the Manifest.xml file from the default liveevent folder to the new folder:
rootinstall/applications/livepkgr/events/_definst_/liveevent2/Manifest.xml
4Open the Events.xml file in a text editor and change the event name:
<Event>
<EventID>liveevent2</EventID>
<Recording>
<FragmentDuration>4000</FragmentDuration>
<SegmentDuration>400000</SegmentDuration>
<DiskManagementDuration>3</DiskManagementDuration>
<Recording>
</Event>
Configure a live event
For information about the features you can configure in the Event.xml file, see “Configure live HTTP streaming at the
event level (Event.xml)” on page 83.
Write server-side code to assign a stream to a live event
Important: You do not need to write server-side code for HTTP Dynamic Streaming. The livepkgr application has a
Server-Side ActionScript file that assigns streams to a live event. To see the code, open
rootinstall/applications/livepkgr/main.asc in a text editor. Read this section to understand the code.
The Live Packager processes streams that are prefixed with f4f:. Flash Media Live Encoder doesn’t support the f4f:
prefix so you must add it to the stream name in a server-side script or in a Adobe Media Server Authorization Plug-in.
An application can contain more than one live event. For that reason, a stream published to an application is not
associated with a live event by default. Use a server-side script or the Adobe Media Server Authorization Plug-in (not
both) to associate a live stream with a live event. You can associate a live stream with only one live event.
Associate a stream during the publish event. When the stream is published and associated, the server creates a stream
record file (.stream) for the stream in the event directory:
applications/appname/events/appinstancename/liveeventname/livestream.stream
The stream record file contains information about the location of the packaged stream files. The HTTP Origin Module
uses this information to generate an .f4m manifest file. For more information, see “Understanding the application flow
for live HTTP Dynamic Streaming” on page 94.
Use Server-Side ActionScript

56
ADOBE MEDIA SERVER 5.0.6 DEVELOPER’S GUIDE
Getting started streaming media
Last updated 9/4/2014
To see an example of this code, open rootinstall/applications/livepkgr/main.asc in a text editor.
❖In the Server-Side ActionScript code, use the application.onPublish event to do the following:
•Use the Stream.liveEvent property to associate a live stream with a live event before the server starts
recording.
•Add the f4f: prefix to the stream name. This tells the server to package the stream.
•Call Stream.record() to record the stream.
Use an Authorization Plug-in
To perform these tasks with an Authorization plug-in, you must write the plug-in code.
❖In the Authorization Plug-in code, use the E_PUBLISH event to do the following:
•Set the F_STREAM_TYPE field to "f4f".
•Set the F_STREAM_LIVE_EVENT field to "liveeventname". This example uses “liveevent”.
•Set the F_STREAM_PUBLISH_TYPE field to 0 which means "record".
The following is sample C++ code that handles the E_PUBLISH event:
case IFmsAuthEvent::E_PUBLISH:
{
// The name of the FMS app to which the live stream is published.
char* pLiveApp = "livepkgr";
// The stream type used for HTTP Dynamic Streaming.
char* pStreamType = "f4f";
// The name of the live event defined in the livepkgr app.
char* pLiveEvent = "liveevent";
// The Auth Plug-in affects all apps on the server.
// We only want to process streams published to the livehttp app.
char* pAppName = getStringField(m_pAev, IFmsAuthEvent::F_APP_NAME);
if (pAppName && !strncmp(pAppName, pLiveApp, strlen(pLiveApp)))
{
// Set the stream type.
setStringField(m_pAev, IFmsAuthEvent::F_STREAM_TYPE, pStreamType);
// Set the publish type to record.
//0 record, 1 append, -1 live
setI32Field(m_pAev, IFmsAuthEvent::F_STREAM_PUBLISH_TYPE, 0);
// Associate the stream with a live event.
setStringField(m_pAev, IFmsAuthEvent::F_STREAM_LIVE_EVENT, pLiveEvent);
}
}
Content storage (HDS and HLS)
Configure the beginning of the request URL
When a media player requests content from the server, it passes the server a request URL. The section of the request
URL following the server name (and optional port number) is defined in the Location directive path in the Apache
httpd.conf file. For example, the following is the Location directive for HDS on-demand streaming:

57
ADOBE MEDIA SERVER 5.0.6 DEVELOPER’S GUIDE
Getting started streaming media
Last updated 9/4/2014
<IfModule jithttp_module>
<Location /hds-vod>
HttpStreamingJITPEnabled true
HttpStreamingContentPath "../webroot/vod"
JitFmsDirPath ".."
Options -Indexes FollowSymLinks
</Location>
</IfModule>
When Apache receives a request with the path /hds-vod, it uses the jithttp_module (just-in-time) to process the
request. The jithttp_module uses the values of the directives nested within the Location directive.
To configure HTTP streaming for multiple tenants, or for multiple applications, add Location directives with
different paths. The following table lists the syntax for request URLs, the Location directive paths are in bold:
Add a Location directive
Note: This task uses HDS on demand, but the steps apply to all types of HTTP streaming.
1Open rootinstall/Apache2.2/conf/httpd.conf in a text editor.
2Location the Location directive for the streaming type you want to edit, copy it, and paste it.
3For example, to create a Location for HDS on-demand streaming, copy the /hds-vod section and paste it
underneath the existing section.
<IfModule jithttp_module>
<Location /hds-vod>
HttpStreamingJITPEnabled true
HttpStreamingContentPath "../webroot/vod"
JitFmsDirPath ".."
Options -Indexes FollowSymLinks
# Uncomment the following directives to enable encryption
# for this location.
# EncryptionScope server
# ProtectionScheme phds
</Location>
</IfModule>
4In the copied section, change the Location path to /flash-vod. You can also edit the HttpStreamingContentPath
directive to change the location of the on-demand media on disk.
Streaming type Request URL syntax
Adobe HDS live http://<fms-dns-or-ip>/hds-
live/livepkgr/<appinstname>/<eventname>/<streamname>.f4m
Apple HLS live http://<fms-dns-or-ip>/hls-
live/livepkgr/<appinstname>/<eventname>/<streamname>.m3u8
Adobe HDS on-demand with
just-in-time packaging
http://<fms-dns-or-ip>/hds-vod/<streamname>.<fileextension>.f4m
Apple HLS on-demand http://<fms-dns-or-ip>/hls-vod/<streamname>.<fileextension>.m3u8

58
ADOBE MEDIA SERVER 5.0.6 DEVELOPER’S GUIDE
Getting started streaming media
Last updated 9/4/2014
<IfModule jithttp_module>
<Location /flash-vod>
HttpStreamingJITPEnabled true
HttpStreamingContentPath "../webroot/vod2"
JitFmsDirPath ".."
Options -Indexes FollowSymLinks
# Uncomment the following directives to enable encryption
# for this location.
# EncryptionScope server
# ProtectionScheme phds
</Location>
</IfModule>
Note: To change the location of content for live streaming, see “Configure the location of live HDS and HLS content”
on page 59.
5Create the rootinstall/webroot/vod2 folder and copy the sample1_1500kbps.f4v file to it from the /webroot/vod
folder.
6Restart Apache HTTP Server. The service name is FMSHttpd.
7Double-click rootinstall/samples/videoPlayer/videoplayer.html to open the Adobe Media Server sample video
player.
8Enter the following in the Stream URL text box:
http://localhost/flash-vod/sample1_1500kbps.f4v.f4m
You can play any file from the /webroot/vod2 folder.
Configure the location of on-demand HDS and HLS content
To configure the location of on-demand content on disk, edit the Apache httpd.conf file. Use the following directives:
1Open rootinstall/Apache2.2/conf/httpd.conf
2To change the location on the server where media is stored for on-demand streaming, edit the
HttpStreamingContentPath directive. For example, the following changes the location to c:\hds_vod_content:
Directive Description
HttpStreamingContent
Path
The root location of the streams. This value can be absolute or relative to the Apache
root folder.
By default, the location for on-demand HDS and HLS is "../webroot/vod".

59
ADOBE MEDIA SERVER 5.0.6 DEVELOPER’S GUIDE
Getting started streaming media
Last updated 9/4/2014
<IfModule jithttp_module>
<Location /hds-vod>
HttpStreamingJITPEnabled true
#HttpStreamingContentPath "../webroot/vod"
HttpStreamingContentPath "C:\hds_vod_content"
JitFmsDirPath ".."
Options -Indexes FollowSymLinks
# Uncomment the following directives to enable encryption
# for this location.
# EncryptionScope server
# ProtectionScheme phds
</Location>
</IfModule>
<Location /hls-vod>
HLSHttpStreamingEnabled true
HLSMediaFileDuration 8000
#HttpStreamingContentPath "../webroot/vod"
HttpStreamingContentPath "C:\hds_vod_content"
HLSFmsDirPath ".."
# Uncomment the following directives to enable encryption
# for this location.
# HLSEncryptionScope server
# HLSEncryptCipherKeyFile "../creds/vodkey.bin"
# HLSEncryptKeyURI "https://<ServerName>/hls-key/vodkey.bin"
Options -Indexes FollowSymLinks</Location>
3Restart the Apache HTTP Server. The service name is FMSHttpd.
4Copy a sample file from /webroot/vod to c:\hds_vod_content. This task uses sample1_1500kbps.f4v.
5(HDS) Open rootinstall/samples/videoPlayer/videoplayer.html in a browser and in the Stream URL text box, enter:
http://localhost/hds-vod/sample1_1500kbps.f4v.f4m
6(HLS) On a device running iOS, open Safari and enter the following:
http://localhost/hls-vod/sample1_1500kbps.f4v.m3u8
The request URL is the same as it was before the Apache configuration change, but the content is in a different location
on the disk. When Apache receives a request that start with /hds-vod, it resolves the rest of the path based on the value
of HttpStreamingContentPath.
To verify that the Apache configuration took effect, try to stream a sample file that isn’t in the c:\hds_vod_content
folder. For example, try to stream http://localhost/hds-vod/sample1_1000kbps.f4v.f4m. The sample video player
displays an error, “We are unable to connect to the content you’ve requested. We apologize for the inconvenience.”
Configure the location of live HDS and HLS content
To configure the location of live HDS and HLS content on disk, edit the Apache httpd.conf file. Use the following
directives:

60
ADOBE MEDIA SERVER 5.0.6 DEVELOPER’S GUIDE
Getting started streaming media
Last updated 9/4/2014
Configure the location of the live content on disk
1Open rootinstall/conf/ams.ini in a text editor. Set the VHOST.APPSDIR in parameter to one of the following:
•(Windows) C:/applications
•(Linux) /opt/applications
2Restart the server.
3Create a folder at the location in step 1 and copy the livepkgr application to it.
4Open rootinstall/Apache2.2/conf/httpd.conf in a text editor.
5To change the location of the HDS live content, edit the directives in bold:
Directive Description
HttpStreamingContent
Path
The root location of the streams on disk (livepkgr/streams, by default). By default,
the location is "../applications". This location must be a subfolder of the
livepkgr application.
This value can be absolute or relative to the Apache root folder.
HttpStreamingLiveEve
ntPath
The root location of live events on disk (livepkgr/events, by default). The default
value is "../applications". This location must be a subfolder of the livepkgr
application.
This value can be absolute or relative to the Apache root folder.
For HLS, this value is dependant on the value of the
HttpStreamingURLSandboxLevel directive.
HttpStreamingURLSand
boxLevel
Defines the scope at which HttpStreamingLiveEventPath is configured.
Possible values are "App", "Inst", and "Server". The default value is
"Server".
If HttpStreamingLiveEventPath is configured to a particular application, use
the value "App". In this case, the client request URL can omit the application name,
as in the following:
HttpStreamingLiveEventPath "..application/livepkgr"
HttpStreamingURLSandboxLevel "App"
The request URL is:
http://<fms-dns-or-ip>/hls-live/<app-instance>/<event-
name>/<stream-name>.m3u8
If HttpStreamingLiveEventPath is configured to an application instance, use
the value "Inst". In this case, the client request URL can omit the application
name and the application instance, as in the following:
HttpStreamingLiveEventPath
"..application/livepkgr/events/_definst_"
HttpStreamingURLSandboxLevel "Inst"
The request URL is:
http://<fms-dns-or-ip>/hls-live/<event-name>/<stream-
name>.m3u8

61
ADOBE MEDIA SERVER 5.0.6 DEVELOPER’S GUIDE
Getting started streaming media
Last updated 9/4/2014
<Location /hds-live>
HttpStreamingEnabled true
#HttpStreamingLiveEventPath "../applications"
#HttpStreamingContentPath "../applications"
HttpStreamingLiveEventPath "C:\applications"HttpStreamingContentPath "C:\applications"
HttpStreamingF4MMaxAge 2
HttpStreamingBootstrapMaxAge 2
HttpStreamingFragMaxAge -1
HttpStreamingDrmmetaMaxAge 3600
Options -Indexes FollowSymLinks
</Location>
</IfModule>
Note: On Linux, use "/opt/applications".
6To change the location of HLS live content, edit the directives in bold:
<IfModule hlshttp_module>
<Location /hls-live>
HLSHttpStreamingEnabled true
#HttpStreamingLiveEventPath "../applications"
#HttpStreamingContentPath "../applications"
HttpStreamingLiveEventPath "C:\applications"HttpStreamingContentPath "C:\applications"
HLSMediaFileDuration 8000
HLSSlidingWindowLength 6
HLSFmsDirPath ".."
HLSM3U8MaxAge 2
HLSTSSegmentMaxAge -1
# Uncomment the following directives to enable encryption
# for this location.
# HLSEncryptionScope server
# HLSEncryptCipherKeyFile "../creds/liveeventkey.bin"
# HLSEncryptKeyURI "https://<ServerName>/hls-key/liveeventkey.bin"
Options -Indexes FollowSymLinks
</Location>
7Restart Apache HTTP Server. The service name is FMSHttpd.
8Open Flash Media Live Encoder and publish a stream with the following settings:
•Video codec—H.264
•Audio codec—AAC
•Keyframe Frequency—4 seconds
•AMS URL—rtmp://localhost/livepkgr
•Stream—livestream?adbe-live-event=liveevent
9(HDS) Open rootinstall/samples/videoPlayer/videoplayer.html in a browser and in the Stream URL text box, enter:
http://localhost/hds-live/livepkgr/_definst_/liveevent/livestream.f4m
10 (HLS) On a device running iOS, open Safari and enter:
http://localhost/hls-live/livepkgr/_definst_/liveevent/livestream.m3u8
Note: To play content in Safari 4.0 on Mac OS, create an HTML document that uses the <video> tag.

62
ADOBE MEDIA SERVER 5.0.6 DEVELOPER’S GUIDE
Getting started streaming media
Last updated 9/4/2014
Configure the scope of the request URL
1Open rootinstall/Apache2.2/conf/httpd.conf in a text editor.
2To change the scope of the request URL (also called the URL sandbox level) for HDS, edit the directives in bold:
<Location /hds-live>
HttpStreamingEnabled true
#HttpStreamingLiveEventPath "../applications"
#HttpStreamingContentPath "../applications"
HttpStreamingLiveEventPath "c:\applications\livepkgr"
HttpStreamingContentPath "c:\applications"
HttpStreamingURLSandboxLevel "App"
HttpStreamingF4MMaxAge 2
HttpStreamingBootstrapMaxAge 2
HttpStreamingFragMaxAge -1
Options -Indexes FollowSymLinks
</Location></IfModule>
To change the scope of the request URL for HLS, edit the directives in bold:
<IfModule hlshttp_module>
<Location /hls-live>
HLSHttpStreamingEnabled true
#HttpStreamingLiveEventPath "../applications"
#HttpStreamingContentPath "../applications"
HttpStreamingLiveEventPath "C:\applications\livepkgr"
HttpStreamingContentPath "C:\applications"
HttpStreamingURLSandboxLevel "App"
HLSMediaFileDuration 8000
HLSSlidingWindowLength 6
HLSFmsDirPath ".."
HLSM3U8MaxAge 2
HLSTSSegmentMaxAge -1
# Uncomment the following directives to enable encryption
# for this location.
# HLSEncryptionScope server
# HLSEncryptCipherKeyFile "../creds/liveeventkey.bin"
# HLSEncryptKeyURI "https://<ServerName>/hls-key/liveeventkey.bin"
Options -Indexes FollowSymLinks
</Location>
3Restart the Apache HTTP Server. The service name is FMSHttpd.
4Open Flash Media Live Encoder and publish a stream with the following settings:
•Video codec—H.264
•Audio codec—AAC
•Keyframe Frequency—4 seconds
•AMS URL—rtmp://localhost/livepkgr
•Stream—livestream?adbe-live-event=liveevent
5(HDS) Double-click rootinstall/samples/videoPlayer/videoplayer.html to open the Adobe Media Server sample
video player. Enter the following for Stream URL and click play:
http://<host>/hds-live/_definst_/liveevent/livestream.f4m

63
ADOBE MEDIA SERVER 5.0.6 DEVELOPER’S GUIDE
Getting started streaming media
Last updated 9/4/2014
6On a device running iOS, open Safari and enter:
http://<host>/hls-live/_definst_/liveevent/livestream.m3u8
Because the URL sandbox level is configured to “App” instead of the default “Server”, the URL does not include the
application name (livepkgr).
Configure set-level F4M/M3U8 files for multi-bitrate streaming
Adobe Media Server 5
Configuration information about multi-bitrate streams has been divided into multiple levels: set-level F4M and M3U8
files and stream-level F4M and M3U8 files. For HDS, the files are F4M manifest files. For HLS, the files are M3U8
variant playlists. (The documentation sometimes uses the generic term “manifest” to refer to both.)
Set-level F4M and M3U8 files Contain the URL to the stream-level manifest file and the bit rate information for each
stream in a multi-bitrate set. For HDS, the set-level F4M file can also contain information about a DVR rolling
window. For HLS, the set-level M3U8 file can also contain codec information.
Adobe Media Server 5 includes a Set-level F4M/M3U8 File Generator tool. This tool is installed to
rootinstall/tools/f4mconfig/configurator/f4mconfig.html. Use the tool to generate set-level files. Copy the set-level
files to a web server. The media player requests set-level files to play multi-bitrate content.
The following is a set-level F4M file:
<manifest xmlns="http://ns.adobe.com/f4m/2.0">
<baseURL>http://localhost/hds-live/livepkgr/_definst_/liveevent/</baseURL>
<media href="livestream1.f4m" bitrate="150"/>
<media href="livestream2.f4m" bitrate="500"/>
<media href="livestream3.f4m" bitrate="700"/>
</manifest>
The following is a set-level M3U8 file:
#EXTM3U
#EXT-X-STREAM-INF:PROGRAM-ID=1,BANDWIDTH=150000
http://10.0.1.11/hls-live/livepkgr/_definst_/liveevent/livestream1.m3u8
#EXT-X-STREAM-INF:PROGRAM-ID=1,BANDWIDTH=500000
http://10.0.1.11/hls-live/livepkgr/_definst_/liveevent/livestream2.m3u8
#EXT-X-STREAM-INF:PROGRAM-ID=1,BANDWIDTH=700000
http://10.0.1.11/hls-live/livepkgr/_definst_/liveevent/livestream3.m3u8
Stream-level F4M and M3U8 files contain bootstrap information and DRM metadata. The live packager and the HTTP
modules generate stream-level F4M and M3U8 files in real time when a media player requests the content.
Flash/AIR media players that support set-level files To play set-level F4M files, use a media player that uses OSMF 1.6
or later. Strobe Media Playback that installs to rootinstall/samples/videoPlayer supports set-level F4M files.
Apple media players that support set-level files To play set-level M3U8 files, use any device that supports Apple
HTTP Live Streaming. See the Apple HTTP Live Streaming documentation.
F4M specification For detailed information about the F4M file format, see the F4M File Format Specification.
M3U8 specification For detailed information about the M3U8 file format, see HTTP Live Streaming Internet-Draft.
Tutorials that use set-level files The following tutorials use set-level files for multi-bitrate streaming:
•“Publish and play live multi-bitrate streams over HTTP” on page 8
•“Play on-demand multi-bitrate media files over HTTP” on page 22

64
ADOBE MEDIA SERVER 5.0.6 DEVELOPER’S GUIDE
Getting started streaming media
Last updated 9/4/2014
•“Publish an audio-only stream (HLS)” on page 11
•“Configure DVR (HDS)” on page 13
Configure absolute time on the server
Note: The livepkgr application is configured by default to use absolute time. Use this section to understand HTTP
streaming and to duplicate the livepkgr application.
The livepkgr ingest application is configured by default to use absolute time. To see the configuration, open
rootinstall/applications/livepkgr/Application.xml in a text editor.
To publish live, multi-bitrate streams, configure the live encoder to publish the streams using absolute time. See
“Stream live media (HTTP)” on page 5.
1Copy an Application.xml file to the application folder.
For example, if you’re publishing streams to the application “livepkgr2”, copy an Application.xml file from the
conf\_defaultRoot_\_defaultVHost_ folder to the applications/livepkgr2 folder.
2Open the Application.xml file in a text editor.
3Set the tag //Application/StreamManager/Live/AssumeAbsoluteTime to true:
<Application>
...
<StreamManager>
...
<Live>
...
<AssumeAbsoluteTime>true</AssumeAbsoluteTime>
4Save the file.
5Restart the server. See Starting and stopping the server.
Important: Set <AssumeAbsoluteTime> to true only when all streams published to the application use absolute time. If
this value is set to true and the application ingests a stream that does not use absolute time, you may see warnings in the
server logs about time going backwards when streams are stopped and re-published.
Configure F4F and TS fragment duration
The server records ingested (live) streams into fragments. It records on-demand files into fragments when a client
requests the files.
Adobe HDS fragments are F4F files. Apple HLS fragments are TS files.
Specify the size of content fragments based on frames or based on time. The frame-based configuration overrides the
time-based configuration.
Use frame-based configuration when the source media contains video encoded at a constant frame rate. Use frame-
based configuration to match the fragment size to the video's keyframe interval. Use time-based configuration for
media that contains audio or data but not video.
The server’s fragment duration must be a multiple of the encoder’s keyframe interval. The value of
KeyframeIntervalsPerFragment defines the multiple.
Configure fragment size for live HDS and HLS
Server-level configurations for live HDS

65
ADOBE MEDIA SERVER 5.0.6 DEVELOPER’S GUIDE
Getting started streaming media
Last updated 9/4/2014
Set the following directive in the Apache httpd.conf to configure fragment size for all live HDS events on the server:
Server-level configurations for live HLS
Set the following directive in the Apache httpd.conf to configure a time-based fragment size for all live HLS events on
the server:
Application-level and event-level configurations for live HDS
To configure fragment size at the application-level, use the Application.xml file in the directory of the Live Packager
application (livepkgr, by default).
To configure fragment size at the event-level, use the Event.xml file in the live event directory
(applications/livepkgr/events/_definst_/liveevent, by default).
Use the elements in the <Recording> container to configure how the server writes files to disk. In the Application.xml
file, the elements are located at //Application/HDS. In the Event.xml file, the elements are located at //Event.
Directive Description Default
HttpStreamingFragmentDu
ration
The default fragment duration, in milliseconds. This is the time-
based configuration, and can be overridden by selecting frame-
based values.
4000
HttpStreamingFrameRate For frame-based fragment duration configuration, this is the frame
rate of the source content.
None
HttpStreamingFramesPerK
eyframeInterval
For frame-based fragment duration configuration, this is the
number of frames in each keyframe interval (group of pictures).
None
HttpStreamingKeyframeIn
tervalsPerFragment
For frame-based fragment duration configuration, this is the
number of keyframe intervals (GOPs) per fragment.
1
Directive Description Default
HLSMediaFileDuration The duration of TS files, in milliseconds. Use a value that is a
multiple of the keyframe intervals for the media.
8000
Element Description Default
/Recording The section that configures how the file is written to disk. None
/Recording/FragmentDur
ation
The length of each fragment, in milliseconds. Each
segment can contain one or more fragments.
Time-based configuration.
4000
/Recording/FramePrecis
ion
The rounding precision for the fragment run table, in
frame units. Frame units are derived from the specified
frame rate (1/rate).
Frame-based configuration.
1
/Recording/FrameRate The frame rate of the original content, in frames per
second (fps). The value is floating point; for NTSC, use the
value 29.97.
Frame-based configuration
None

66
ADOBE MEDIA SERVER 5.0.6 DEVELOPER’S GUIDE
Getting started streaming media
Last updated 9/4/2014
Application-level and event-level configurations for live HLS
To configure fragment size at the application-level, use the Application.xml file in the directory of the Live Packager
application (livepkgr, by default).
To configure fragment size at the event-level, use the Event.xml file in the live event directory
(applications/livepkgr/events/_definst_/liveevent, by default).
Use the elements in the <Recording> and <HLS> containers to configure how the server writes files to disk. In the
Application.xml file, the elements are located at //Application/HDS. In the Event.xml file, the elements are located
at //Event/.
Specify fragment size for live HDS and HLS based on frames
Use the following elements for HDS: KeyframeIntervalsPerFragment, FrameRate,
FramesPerKeyframeInterval, FramePrecision.
Use the following elements for HLS: FrameRate, FramesPerKeyframeInterval, and
KeyframeIntervalPerMediaFile.
/Recording/FramesPerKe
yframeInterval
The number of frames between each keyframe. For
example, 30 fps video with a keyframe every 2 seconds
contains 60 frames per keyframe interval.
Frame-based configuration.
None
/Recording/KeyframeInt
ervalsPerFragment
The number of keyframe intervals per fragment. The
default value is 1, which means that the fragment size is
the same as the keyframe interval.
Frame-based configuration.
1
/Recording/SegmentDura
tion
The length of each segment, in milliseconds. Each .f4f file
contains one segment.
Time-based configuration. Frame-based configurations
override time-based configurations
400000
Element Description Default
/Recording/FrameRate The frame rate of the original content, in frames per
second (fps). The value is floating point; for NTSC, use the
value 29.97.
Frame-based configuration.
None
/Recording/FramesPerKe
yframeInterval
The number of frames between each keyframe. For
example, 30 fps video with a keyframe every 2 seconds
contains 60 frames per keyframe interval.
Frame-based configuration.
None
/HLS/KeyframeIntervalP
erMediaFile
The number of keyframe intervals per media file (TS). The
default value is 1, which means that the fragment size is
the same as the keyframe interval.
Frame-based configuration.
1
/HLS/MediaFileDuration The length of each media file (TS), in milliseconds.
Time-based configuration. Frame-based configurations
override time-based configurations
8000
Element Description Default

67
ADOBE MEDIA SERVER 5.0.6 DEVELOPER’S GUIDE
Getting started streaming media
Last updated 9/4/2014
<Event>
<EventID>liveevent</EventID>
<Recording>
<FrameRate>29.97</FrameRate>
<FramesPerKeyframeInterval>120</FramesPerKeyframeInterval>
<KeyframeIntervalsPerFragment>1</KeyframeIntervalsPerFragment>
<FramePrecision>1</FramePrecision>
</Recording>
<HLS>
<KeyframeIntervalPerMediaFile>3</KeyframeIntervalPerMediaFile>
</HLS>
</Event>
The server calculates the HLS media file duration according to the following formula:
MediaFileDurationInSeconds = FramesPerKeyframeInterval * KeyframeIntervalPerMediaFile /
FrameRate
Specify fragment size for live HDS and HLS based on time
Use the following elements for HDS: FragmentDuration, SegmentDuration.
Use the following element for HLS: MediaFileDuration.
Use the following elements: FragmentDuration, MediaFileDuration.
<Event>
<EventID>liveevent</EventID>
<Recording>
<FragmentDuration>4000</FragmentDuration>
<SegmentDuration>400000</SegmentDuration>
</Recording>
<HLS>
<MediaFileDuration>8000<MediaFileDuration>
</HLS>
</Event>
Configure fragment size for on-demand HDS and HLS
Server-level configurations for on-demand HDS
Set the following directive in the Apache httpd.conf to configure fragment size for all on-demand HDS on the server:
Server-level configurations for on-demand HLS
Directive Description Default
HttpStreamingFragmentDu
ration
The default fragment duration, in milliseconds.
This is the time-based configuration. Frame-based configurations
override time-based configurations.
4000
HttpStreamingFrameRate The frame rate of the source content.
Frame-based configuration.
None
HttpStreamingFramesPerK
eyframeInterval
The number of frames in each keyframe interval (group of pictures.
Frame-based configuration.
None
HttpStreamingKeyframeIn
tervalsPerFragment
The number of keyframe intervals (GOPs) per fragment.
Frame-based configuration.
1

68
ADOBE MEDIA SERVER 5.0.6 DEVELOPER’S GUIDE
Getting started streaming media
Last updated 9/4/2014
Set the following directive in the Apache httpd.conf to configure fragment size for all on-demand HLS on the server:
Stream-level configurations for on-demand HDS
To configure a set of on-demand media files (or a single file), copy a jit.conf file to the same directory as the media files.
All media files in a directory use the same jit.conf file.
Use a jit.conf file with the following elements to configure fragment size for HDS at the stream-level:
Stream-level configurations for on-demand HLS
To configure a set of on-demand media files (or a single file), copy a jit.conf file to the same directory as the media files.
All media files in a directory use the same jit.conf file. Use a jit.conf file with the following elements to configure
fragment size for HLS at the stream-level:
Directive Description Default
HLSMediaFileDuration The duration of TS files, in milliseconds. Use a value that is a
multiple of the keyframe intervals for the media.
8000
HttpStreamingFrameRate The frame rate of the source content. This is a frame-based
configuration.
None
HLSKeyframeIntervalsPerMed
iaFile
The number of keyframe intervals (group of pictures) per
media file. This is a frame-based configuration.
1
HttpStreamingFramesPerKeyf
rameInterval
The number of frames in each keyframe interval (group of
pictures). This is a frame-based configuration.
None
Element Description Default
//manifest/hds:fragment-duration The fragment duration for the set of content, in
seconds. The value can be fractional (for example,
to specify 2002 milliseconds, use the value 2.002).
Time-based configuration. Frame-based
configurations override time-based configurations
None
//manifest/hds:frame-rate The frame rate of the set of content. Units are
frames/second, and can be fractional (i.e. 29.97 for
NTSC) .
Frame-based configuration.
None
//manifest/hds:frames-per-
keyframe-interval
The number of frames per keyframe interval (GOP).
Units are frames, and should be a whole integer
value.
Frame-based configuration.
None
//manifest/hds:keyframe-
intervals-per-fragment
The number of keyframe intervals per fragment.
Units are keyframe intervals per fragment, and
should be a whole integer value.
Frame-based configuration.
1

69
ADOBE MEDIA SERVER 5.0.6 DEVELOPER’S GUIDE
Getting started streaming media
Last updated 9/4/2014
Specify fragment size for on-demand HDS and HLS based on frames
Use the following elements for HDS: hds:frame-rate, hds:frames-per-keyframe-interval, and
hds:keyframe-intervals-per-fragment.
Use the following elements for HLS: hds:frame-rate, hds:frames-per-keyframe-interval, and hds:keyframe-
intervals-per-media-file.
<?xml version="1.0" encoding="utf-8"?>
<manifest xmlns="http://ns.adobe.com/f4m/1.0" xmlns:hds="http://ns.adobe.com/hds-
package/1.0">
<hds:frame-rate>29.97</hds:frame-rate>
<hds:frames-per-keyframe-interval>60</hds:frames-per-keyframe-interval>
<hds:keyframe-intervals-per-fragment>2</hds:keyframe-intervals-per-fragment>
<hds:hls>
<hds:keyframe-intervals-per-media-file>2</hds:keyframe-intervals-per-media-file>
</hds:hls>
</manifest>
Specify fragment size for on-demand HDS and HLS based on time
Use the following element for HDS: hds:fragment-duration.
Use the following element for HLS: hds:media-file-duration.
<?xml version="1.0" encoding="utf-8"?>
<manifest xmlns="http://ns.adobe.com/f4m/1.0" xmlns:hds="http://ns.adobe.com/hds-
package/1.0">
<hds:fragment-duration>8000</hds:fragment-duration>
<hds:hls>
<hds:media-file-duration>8000</hds:media-file-duration>
</hds:hls>
</manifest>
Element Description Default
//manifest/hds:frame-rate The frame rate of the set of content. Units are
frames/second, and can be fractional (i.e. 29.97 for
NTSC) .
Frame-based configuration.
None
//manifest/hds:frames-per-
keyframe-interval
The number of frames per keyframe interval (GOP).
Units are frames, and should be a whole integer
value.
Frame-based configuration.
None
//manifest/hds:hls Container for Apple HTTP Live Streaming
configurations.
None
//manifest/hds:hls/hds:keyframe-
intervals-per-media-file
The number of keyframe intervals per TS file
duration. The value must be a whole integer.
Frame-based configuration.
None
//manifest/hds:hls/hds:media-
file-duration
The TS file duration, in milliseconds, for the set of
content associated with this file. Use a value that is
a multiple of the fragment duration.
Time-based configuration. Frame-based
configurations override time-based configurations
None

70
ADOBE MEDIA SERVER 5.0.6 DEVELOPER’S GUIDE
Getting started streaming media
Last updated 9/4/2014
Known issue
Note that when the normal recording is on, the HLS module returns an HTTP 503 (Service Unavailable) error
intermittenly for TS requests, if the TS duration is less than the fragment duration.
Configure the size of the IO buffer
Adobe Media Server 5
The IO buffer improves the read and write performance of the Apache f4f module. The IO buffer loads the disk file
into an in-memory buffer. It reads and writes to the in-memory buffer instead of making system calls.
Note: This feature impacts both HTTP Dynamic Streaming and HTTP Live Streaming.
When the buffer is full, or if the read/write head needs to move beyond the buffer boundaries, the server commits the
contents of the buffer to the disk file and pre-loads new content into the buffer from the disk file.
The default value of the IO buffer is 4096 bytes. To increase or decrease the value, edit the Event.xml file. Use a multiple
of 4096 bytes.
1Open the Event.xml file in a text editor.
For live HTTP streaming, the Event.xml file is located in the live event folder. For example,
rootinstall/applications/livepkgr/events/_definst_/liveevent/Event.xml.
2Set the IOBufferSize to a value that is a multiple of the cluster size of the underlying operating system.
IOBufferSize is the size of the IO buffer in bytes.
<Event>
<EventID>liveevent</EventID>
<Recording>
<FragmentDuration>4000</FragmentDuration>
<IOBufferSize>4096</IOBufferSize>
</Recording>
</Event>
3Save the file.
Disk management
Adobe Media Server 5
Set the DiskManagementDuration configuration parameter in the Application.xml file or the Event.xml file to specify
how much of the latest live content is on disk. The limit set at the application level cannot be overriden at the event
level. If the limit has been set in the Application.xml file, the Event.xml file can set a duration that is equal to or lower
than that limit.
All live HTTP streaming uses disk management to prevent the disk from filling. Disk management allows you to create
24/7 live streaming events. In addition, when using DVR, configure disk management in relation to the DVR settings.
See “Configure DVR (HDS)” on page 13.
By default, disk management keeps 3 hours of a live stream. The server constantly checks the content and if the content
duration is above the value of DiskManagmentDuration, the server deletes the .f4f files and the .f4x files for segments
beyond the limit.
If SegmentDuration or DiskManagmentDuration have values (both do by default), the following formula must be
true for the server to start recording:

71
ADOBE MEDIA SERVER 5.0.6 DEVELOPER’S GUIDE
Getting started streaming media
Last updated 9/4/2014
FragmentDuration < SegmentDuration < DiskManagementDuration
Also, the value of SegmentDuration must be greater than 0. (The value 0 creates 1 segment.) The value of
SegmentDuration specifies how rapidly segments are removed. The smaller the value of SegmentDuration, the faster
segments are deleted.
The server maintains the total duration of all the content available. After a segment is created, the server checks if the
segment does not have any fragments that are in the disk management window. If so, the server removes the segment
from the bootstrap entries, then removes the segment from disk.
Note: This behavior is a change from Flash Media Server 4.0 which allowed FragmentDuration to be greater than
SegmentDuration.
The value of DiskManagementDuration in the Application.xml file cannot be overridden by the value in the
Event.xml file. If a value is not set in Application.xml, you can set a value in Event.xml.
The following sets disk management duration to 4 hours in the Application.xml file. This value impacts all live events
running in this application.
<Application>
...
<HDS>
<Recording>
<FragmentDuration>4000</FragmentDuration>
<SegmentDuration>16000</SegmentDuration>
<DiskManagementDuration>4</DiskManagementDuration>
</Recording>
</HDS>
</Application>
The following sets the disk management duration to 1 hour in the Event.xml file. This value limits the content duration
on the server for the event called “liveevent.”
<Event>
<EventID>liveevent</EventID>
<Recording>
...
<DiskManagementDuration>1</DiskManagementDuration>
</Recording>
</Events>
For more information, see “Configure live HTTP streaming” on page 81.
Element Default Description
DiskManagementDuration 3The maximum duration of the content on the server, in hours.
The default value is 3. Use a fractional value to specify
minutes.

72
ADOBE MEDIA SERVER 5.0.6 DEVELOPER’S GUIDE
Getting started streaming media
Last updated 9/4/2014
Configure content caching (HDS)
To improve the performance of live and on-demand HTTP Dynamic Streaming, enable Apache content caching on
the origin server. When caching is enabled, the server caches content that it packages for HDS. When the server
receives a request, it checks the cache before it serves content. Content caching is disabled by default.
1Run the htcacheclean tool.
To limit the amount of storage the disk cache uses, run the Apache htcacheclean tool when content caching is
enabled. The tool can run manually or as a daemon. The htcacheclean tool is located at rootinstall/Apache2.2/bin/.
For information about how to run the tool, see the Apache documentation.
2In the Apache httpd.conf file, uncomment the caching configuration section.
# Uncomment this to enable caching
LoadModule cache_module modules/mod_cache.so
<IfModule mod_cache.c>
LoadModule disk_cache_module modules/mod_disk_cache.so
IfModule mod_disk_cache.c>
CacheEnable disk /hds-vod
CacheEnable disk /hls-vod
CacheRoot cacheroot
CacheMaxFileSize 10000000
CacheLock On
</IfModule>
</IfModule>
Verify that the directory specified by the CacheRoot directive exists. The default cacheroot directory is located at
rootinstall/Apache2.2/cacheroot.
3Restart Apache.
For more information about content caching, see the Apache documentation.
Encrypt content for Adobe Access protection
Important: Use the HTTP Dynamic Streaming packagers to both encrypt and fragment content. Do not use the Adobe
Access packaging tools to encrypt content. The HTTP Dynamic Streaming packagers cannot fragment content that has
already been encrypted.
To deliver live or on-demand content with HTTP Dynamic Streaming and protect it with Adobe Access, use Adobe
Access Server for Protected Streaming. This server is a Adobe Access license server implementation optimized for use
with HTTP Dynamic Streaming. See Adobe Access Protecting Content.
Note: The Adobe Access SDK and the Adobe Access license server reference implementation can also issue licenses for
HTTP Dynamic Streaming.
After you’ve deployed Adobe Access Server for Protected Streaming, configure Adobe Media Server to package and
encrypt the content in real-time.
Configure Adobe Media Server to encrypt live content
You can configure live content encryption with Adobe Access at the application level and at the event level.
To configure Adobe Access at the application level, use the Application.xml file located here:
rootinstall/applications/livepkgr/Application.xml
In the Application.xml file, the FlashAccessV2 container element is located here:
//Application/HDS/Recording/ContentProtection/FlashAccessV2

73
ADOBE MEDIA SERVER 5.0.6 DEVELOPER’S GUIDE
Getting started streaming media
Last updated 9/4/2014
To configure Adobe Access at the event level, use the Event.xml file located here:
rootinstall/applications/livepkgr/events/_definst_/liveevent/Event.xml
In the Event.xml file, the FlashAccessV2 container element is located here:
//Event/Recording/ContentProtection/FlashAccessV2
1Open the file rootinstall/applications/livepkgr/events/_definst_/liveevent/Event.xml in a text editor.
2Add the XML tags required for encrypting the streams. The following is a sample Event.xml file:
<Event>
<EventID>liveevent</EventID>
<Recording>
<FragmentDuration>4000</FragmentDuration>
<SegmentDuration>10000</SegmentDuration>
<ContentProtection enabled="true">
<ProtectionScheme>FlashAccessV2</ProtectionScheme>
<FlashAccessV2>
<ContentID>foo</ContentID>
<CommonKeyFile>common-key.bin</CommonKeyFile>
<LicenseServerURL>http://dill.corp.adobe.com:8090</LicenseServerURL>
<TransportCertFile>production_transport.der</TransportCertFile>
<LicenseServerCertFile>license_server.der</LicenseServerCertFile>
<PackagerCredentialFile>production_packager.pfx</PackagerCredentialFile>
<PackagerCredentialPassword>hbXX5omIhzI=</PackagerCredentialPassword>
<PolicyFile>policy01.pol</PolicyFile>
</FlashAccessV2>
</ContentProtection>
</Recording>
</Event>
Note: The certificates that you use with the Live Packager must match the license server.
Element Description Default value
FlashAccessV2 A container for settings used by Adobe
Access to protect content.
None
FlashAccessV2/CommonKeyFile A path to a common key file used to
generate a content encryption key. The
path should be absolute or relative to the
configuration file.
The base key used with the content ID to
generate the content encryption key. This
is a binary file containing a 16-byte/128-
bit binary key.
For adaptive bitrate streaming, use the
same common key and content ID for an
entire set of content. Using the same key
and id allows a single license to decrypt a
set of content.
None
FlashAccessV2/ContentID The content ID used with the common key
to generate the content encryption key.
None
FlashAccessV2/LicenseServer
CertFile
The DER encoded license server certificate
file used for content protection.
None
FlashAccessV2/LicenseServer
URL
The URL of the license server that handles
license acquisition for this content.
None

74
ADOBE MEDIA SERVER 5.0.6 DEVELOPER’S GUIDE
Getting started streaming media
Last updated 9/4/2014
The Live Packager outputs the fragmented and protected files needed for HTTP Dynamic Streaming. Each fragment
is persistently protected in both the CDN cache and the browser cache.
Configure Adobe Media Server to encrypt on-demand content:
1Create a file called jit.conf and copy it to the same folder as the on-demand media files. The settings in the jit.conf
file apply to all the files in the folder.
2Add the XML tags required for encrypting the streams. The following is a sample jit.conf file:
<?xml version="1.0" encoding="utf-8"?>
<manifest xmlns="http://ns.adobe.com/f4m/1.0" xmlns:hds="http://ns.adobe.com/hds-
package/1.0">
<hds:frame-rate>29.97</hds:frame-rate>
<hds:frames-per-keyframe-interval>60</hds:frames-per-keyframe-interval>
<hds:content-protection enabled="true">
<hds:protection-scheme>FlashAccessV2</hds:protection-scheme>
<hds:FlashAccessV2>
<hds:content-id>myfile.manifest</hds:content-id>
<hds:common-key-file>common.bin</hds:common-key-file>
<hds:license-server-url>http://mylicenseserver.myhost.com</hds:license-server-
url>
<hds:transport-cert-file>transport.der</hds:transport-cert-file>
<hds:license-server-cert-file>server.der</hds:license-server-cert-file>
<hds:packager-credential-file>packager.pfx</hds:packager-credential-file>
<hds:packager-credential-password>??????</hds:packager-credential-password>
<hds:policy-file>policy.pol</hds:policy-file>
</hds:FlashAccessV2>
</hds:content-protection>
</manifest>
FlashAccessV2/PackagerCrede
ntialFile
The PFX file containing the packager's
protection credentials.
None
FlashAccessV2/PackagerCrede
ntialPassword
The password string used to secure the
packager credentials.
None
FlashAccessV2/PolicyFile The file containing the policy for this
content. Currently only a single policy can
be applied to content packaged with this
tool.
None
FlashAccessV2/TransportCert
File
The DER encoded transport certificate file. None
Element Description Default value

75
ADOBE MEDIA SERVER 5.0.6 DEVELOPER’S GUIDE
Getting started streaming media
Last updated 9/4/2014
Publish live streams
❖Publish a live stream or multi-bitrate streams from a supported encoder to the livepkgr service. Adobe Access
doesn’t require any special settings.
Play encrypted streams
❖OSMF media players do the following:
aRequest the file fragments and play them back seamlessly.
bObtain a content license from Adobe Access Server for Protected Streaming. The content license contains the
key required to play the content to legitimate clients.
cDecrypt the content in real-time.
Element Description Default
//manifest/hds:content-
protection/hds:flash-
access/hds:common-key-file
The path to common key file. File contains 16-
byte/128-bit random key.
The path must be absolute or relative to the jit.conf
file.
None
//manifest/hds:content-
protection/hds:flash-
access/hds:content-id
The Content ID to be used for content protection.
If not specified, the salt is the filename. If specified,
the salt is shared with all content in the directory.
None
//manifest/hds:content-
protection/hds:flash-
access/hds:license-server-url
The License Server URL. None
//manifest/hds:content-
protection/hds:flash-
access/hds:transport-cert-file
The path to transport cert file. The file is in DER
format.
The path should be absolute or relative to the
jit.conf file.
None
//manifest/hds:content-
protection/hds:flash-
access/hds:license-server-cert-
file
The path to transport cert file. File is in DER format.
The path should be absolute or relative to the
jit.conf file.
None
//manifest/hds:content-
protection/hds:flash-
access/hds:packager-credential-
file
The path to packager credential cert file. File is in
PFX format.
The path should be absolute or relative to the
jit.conf file.
None
//manifest/hds:content-
protection/hds:flash-
access/hds:packager-credential-
password
The packager credential password. None
//manifest/hds:content-
protection/hds:flash-
access/hds:policy-file
The path to a policy file. File is in FAXS policy
format.
The path should be absolute or relative to the
jit.conf file.
None

76
ADOBE MEDIA SERVER 5.0.6 DEVELOPER’S GUIDE
Getting started streaming media
Last updated 9/4/2014
HTTP streaming configuration file reference
Configure live and on-demand HTTP Streaming at the server level (httpd.conf)
Apache HTTP Server that installs with Adobe Media Server is configured by default for Adobe HTTP Dynamic
Streaming (to Flash Player and AIR) and Apple HTTP Live Streaming (to iOS and Mac OS). The Adobe Media Server
Apache installation includes four custom modules that handle HTTP streaming.
The following table describes the types of streaming that each modules handles, and where the module is configured
in the httpd.conf file:
Note: Despite the name, Apple HTTP Live Streaming supports live and on-demand content.
The configuration of the modules determines the format of the URL that the player requests from the server, the
location of the content, the content fragmentation settings, and additional settings. Configure the settings at the
server-level in the Apache httpd.conf file:
rootinstall/Apache2.2/conf/httpd.conf
To see the default configurations, open the httpd.conf file.
Directives for all the HTTP streaming modules
Use the following directives to configure all the HTTP streaming modules (jithttp_module, f4fhttp_module, and
hlshttp_module):
Streaming type Module Location directive in
httpd.conf
Live Adobe HTTP Dynamic Streaming f4fhttp_module <Location /hds-live>
On-demand Adobe HTTP Dynamic Streaming packaged
offline by the File Packager tool
f4fhttp_module <Location /vod>
On-demand Adobe HTTP Dynamic Streaming packaged
in real-time
jithttp_module <Location /hds-vod>
Live Apple HTTP Live Streaming hlshttp_module <Location /hls-live>
On-demand Apple HTTP Live Streaming hlshttp_module <Location /hls-vod>
HTTP Streaming failover ctrlplane_module <Location /ctrlplane
Directive Required Description
HttpStreamingContentPath Yes The physical location of the content path. For live streaming,
the location of livepkgr/streams.
This value can be absolute or relative to the Apache root
folder. See “Content storage (HDS and HLS)” on page 56.
HttpStreamingLiveEventPath Yes
For live
streaming
only.
The location of the live event directory (by default
livepkgr/events). The default value is "../applications".
This value can be absolute or relative to the Apache root
folder. See “Content storage (HDS and HLS)” on page 56.
HTTP streaming file operations are routed through the File
plug-in. You can optionally use a File plug-in to manage
content. For more information, see “Use the File plug-in to
manage content for live HTTP streaming” on page 333.

77
ADOBE MEDIA SERVER 5.0.6 DEVELOPER’S GUIDE
Getting started streaming media
Last updated 9/4/2014
For more information, see Configure HTTP Streaming failover.
Directives for Adobe HTTP Dynamic Streaming
Use the following directives to configure the Adobe HTTP Dynamic Streaming modules (jithttp_module for on-
demand and f4fhttp_module for live):
HttpStreamingURLSandboxLev
el
No
For live
streaming
only
Defines the scope at which
HttpStreamingLiveEventPath is configured. Possible
values are "App", "Inst", and "Server". The default value
is "Server".
Location Yes The section of the request URL after the server name (and
optional port number). This path tells Apache which module
to use to process the request.
Parameter Module Required Description
EncryptionScope jithttp_module,
f4fhttp_module
No The scope at which protected HTTP
Dynamic Streaming (PHDS) is configured.
Possible values are:
server—The server uses configuration
settings in the httpd.conf file.
content—The server uses configuration
settings in the Event.xml or
Application.xml file (live), or in the jit.conf
file (on-demand).
See Protected HTTP Dynamic Streaming
(PHDS).
HttpStreamingBootstrapMaxAge f4fhttp_module No The time to live for bootstrap files, in
seconds. The default value is 2.
HttpStreamingEnabled f4fhttp_module Yes Setting HttpStreamingEnabled to true
enables the Origin module to process
requests matching the Location directive.
Possible values are true and false.
HttpStreamingFragMaxAge f4fhttp_module
jithttp_module
No The time to live for fragment files, in
seconds. The default value is -1 which is
unlimited.
HttpStreamingDrmmetaMaxAge f4fhttp_module No The time to live for DRM MetaData, in
seconds. The default value is 3600 (1 hour).
HttpStreamingFragmentDuration jithttp_module No The length of an F4F file, in milliseconds.
The default value is 4000. See Configure
F4M and TS duration.
HttpStreamingFrameRate jithttp_module
hlshttp_module
No For frame-based fragment duration
configuration, this is the frame rate of the
source content. This value is overridden if a
jit.conf file is provided. See Configure F4M
and TS duration.
Directive Required Description

78
ADOBE MEDIA SERVER 5.0.6 DEVELOPER’S GUIDE
Getting started streaming media
Last updated 9/4/2014
HttpStreamingFramesPerKeyframeI
nterval
jithttp_module
hlshttp_module
No For frame-based fragment duration
configuration, this is the number of frames
in each keyframe interval (group of
pictures). This value is overridden if a
jit.conf file is provided. See Configure F4M
and TS duration.
HttpStreamingF4MMaxAge f4fhttp_module No The time to live for F4M files, in seconds.
The default value is 2.
HttpStreamingJITConfAllowed jithttp_module No Indicates whether jit.conf processing is
allowed. The default is true. Setting this
to false means that jit.conf will not be
processed, even if present, and the server
will not even attempt to load a jit.conf file.
HttpStreamingJITPEnabled jithttp_module Yes Indicates whether just-in-time packaging
is enabled (true) or not (false).
HttpStreamingKeyframeIntervalsP
erFragment
jithttp_module No For frame-based fragment duration
configuration, this is the number of
keyframe intervals (GOPs) per fragment.
The default value is 1.
This value is overridden if a jit.conf file is
provided. See Configure F4M and TS
duration.
HttpStreamingMaxFragmentDuratio
n
jithttp_module,
f4fhttp_module
No This is the maximum allowed size of a
fragment (in milliseconds). Set this
directive to a value that prevents user-
supplied overrides from creating large
fragments that can clog the network.
HttpStreamingMinFragmentDuratio
n
jithttp_module,
f4fhttp_module
No This is the minimum allowed size of a
fragment (in milliseconds).Set this
directive to a value that prevents user-
supplied overrides from creating many
small fragments. When media is packaged
into too many fragments, the client has to
make too many requests.
JitFmsDirPath jithttp_module Yes The location of the Adobe Media Server
installation.
JitGenerateCaptionInfo jithttp_module No You can configure closed captioning at the
server level by providing true as a value
for this element.
cc-info-enabled jithttp_module No You can configure closed captioning at the
server level by providing true as a value
for this element.
PHDSSWFVerification jithttp_module,
f4fhttp_module
No Enables SWF verification for PHDS (true)
or not (false).
If EncryptionScope is set to content,
this value can be set in the jit.conf file.
Parameter Module Required Description

79
ADOBE MEDIA SERVER 5.0.6 DEVELOPER’S GUIDE
Getting started streaming media
Last updated 9/4/2014
For more HDS directives that can be used for content protection, see “Configuring content protection for HDS” on
page 115
Directives for Apple HTTP Live Streaming
Use the following directives to configure the Apple HTTP Live Streaming module for live and on-demand streaming
(hlshttp_module):
PHDSSWFWhiteListFolder jithttp_module,
f4fhttp_module
No A path to the folder containing the
whitelist for on-demand SWF verification.
The folder can contain more than one
whitelist file.
The default value is the content folder
(which contains both media and the
jit.conf file ).
If EncryptionScope is set to content,
this value can be set in the jit.conf file..
PHDSSWFMaxTimeToVerify jithttp_module,
f4fhttp_module
No Specifies the maximum time for SWF
verification for PHDS. The default value is
100s.
ProtectionScheme jithttp_module,
f4fhttp_module
No The type of protection to apply to content.
Possible values are phds and
FlashAccessV2.
Directive Required Description
HLSEncryptCipherKeyFile No The path of the default cipher key used to encrypt the content for
PHLS.
HLSEncryptionScope No The scope at which protected HTTP Live Streaming (PHLS) is
configured. Possible values are:
server—The server uses configuration settings in the
httpd.conf file.
content—The server uses configuration settings in the
Event.xml or Application.xml file (live), or in the jit.conf file (on-
demand).
See Protected HTTP Live Streaming (PHLS).
HLSEncryptKeyURI No The URI that the client uses to fetch the encryption key for PHLS.
HLSFmsDirPath Yes The location of the Adobe Media Server installation. The default
value is "..".
This value can be absolute or relative to the Apache root folder.
See “Content storage (HDS and HLS)” on page 56.
HLSHttpStreamingEnabled Yes Indicates whether or not HLS is enabled (true) or not (false).
The default value is false.
HLSJITConfAllowed No Indicates whether jit.conf processing is allowed. The default is
true. Setting this to false means that jit.conf will not be
processed, even if present, and the server will not even attempt
to load a jit.conf file.
Parameter Module Required Description

80
ADOBE MEDIA SERVER 5.0.6 DEVELOPER’S GUIDE
Getting started streaming media
Last updated 9/4/2014
HLSMediaFileDuration No The duration of the TS file to be served, in milliseconds. This
number must be a multiple of the fragment duration specified in
Flash Media Live Encoder. The default value is 8000. See
Configure F4M and TS duration.
In the case of HLS-VOD, HLSMediaFileDuration can be in
between 500 ms to 30000ms. These bound values can be
modified using the following directives:
•HLSMaxMediaFileDuration
•HLSMinMediaFileDuration
HLSM3U8MaxAge No Specifies the max-age to set in the cache-control header for
M3U8 responses, in seconds. The default value for HLS Live is 2.
The default value for HLS on-demand is 86400 (1 day). The value
-1 does not set a cache-control header.
HLSSlidingWindowLength No The number of TS files in a playlist and available for seeking
within a sliding window. The time within the window is the value
of HLSSlidingWindowLength * HLSMediaFileDuration.
HTTP Live Streaming clients use the sliding window to configure
the seek bar. The default value is 6.
See Configure a sliding window (HLS).
HLSTSSegmentMaxAge No Specifes the max-age to set in the cache-control header for TS
segment responses, in seconds. The default value for HLS Live is
-1 which doesn’t set a cache-control header. The default value for
HLS on-demand is 86400 (1 day).
HttpStreamingUnavailableR
esponseCode
No The HTTP response code that FMS returns for unavailable
fragments (end-of-program, gaps, etc.)
The default is 503.
HLSMaxEventAge No The maximum number of seconds FMS allows the bootstrap to
age before marking it as stale. If the bootstrap age is greater than
this value, the stream is considered to be down.
The default is 300.
HLSAddPadPacketsForCont No Specifies whether or not to allow adding padding TS packets to
maintain continuity across media files.
HLSAllowExtractAudioOnly No Specifies whether or not to allow audio-only extraction from
audio-video sources.
HLSEncryptKeyURIPrefix No A text string prefixed to the event ID to generate the encryption
key.
HLSEncryptKeyURISuffix No A string suffixed to the event ID to generate the encryption key.
HLSFAXSUseUniqueContentID No Set the value to true to use a unique content ID.
HLSKeyframeIntervalsPerMe
diaFile
No Specifies the total number of keyframes per HLS media file in the
VOD content.
HLSHttpUnavailableMaxAge No Specifies the maximum duration (in seconds) to set the Cache-
Control header for unavailable fragment responses.
HttpStreamingFrameRate No Specifies the frame rate in the VOD content.
HttpStreamingFramesPerKey
frameInterval
No Specifies the number of frames per KFI in the VOD content.
Directive Required Description

81
ADOBE MEDIA SERVER 5.0.6 DEVELOPER’S GUIDE
Getting started streaming media
Last updated 9/4/2014
For more HLS directives that can be used for content protection, see “Configuring content protection for HLS” on
page 157.
Directives for HTTP Streaming failover
Use the following directives to configure HTTP Streaming failover (ctrlplane_module):
Configure live HTTP streaming
You can configure live HTTP Dynamic Streaming and live HTTP Live Streaming at the following levels:
Configure live HTTP streaming at the application level (Application.xml)
To configure HTTP streaming for all live events in an application, use the Application.xml file. The Application.xml
file overrides settings in the httpd.conf file for a single application.
Place the Application.xml file in the application folder. For example,
rootinstall/applications/livepkgr/Application.xml.
Directive Required Description
HdsHttpStreamingLiveEvent
Path
Yes The physical location of the root of the event path for HDS. This
can be relative to the Apache installation root.
For example, “C:\Program Files\Adobe\Adobe Media Server
5\applications"or "..\applications.”
HlsHttpStreamingLiveEvent
Path
Yes The physical location of the root of the event path for HLS. This
can be relative to the Apache installation root.
For example, “C:\Program Files\Adobe\Adobe Media Server
5\applications"or "..\applications.”
MaxBootstrapAge No The maximum number of seconds the Control Plane module lets
the bootstrap age before marking it as stale. If the bootstrap age
is greater than this value, the stream is considered to be down
and the Control Plane module sets the up status to false.
The default is 300.
HttpStreamingURLSandboxLe
vel
No The Level at which HttpStreamingLiveEventPath
sandboxes the access. You should set this to match
corresponding settings in HDS and HLS configurations. Valid
values include App, Application, Inst, Instance, and Server. The
default is Server.
For example, if HdsHttpStreamingLiveEventPath is set to
../applications/livepkgr/events/_definst_, set
HttpStreamingURLSandboxLevel to Inst. if
HdsHttpStreamingLiveEventPath is set to
../applications/livepkgr/, set
HttpStreamingURLSandboxLevel to App.
For information on similar HDS and HLS settings, see “Configure
live and on-demand HTTP Streaming at the server level
(httpd.conf)” on page 76
Level Configuration file
Server rootinstall/Apache2.2/conf/httpd.conf
Application rootinstall/applications/livepkgr/Application.xml
Event rootinstall/applications/livepkgr/events/_definst_/liveevent/Event.xml

82
ADOBE MEDIA SERVER 5.0.6 DEVELOPER’S GUIDE
Getting started streaming media
Last updated 9/4/2014
Note: Configuring HTTP streaming in the Application.xml file at the vhost level is not supported.
The following is an Application.xml file with all possible configuration elements for HTTP streaming:
<Application>
<StreamManager>
<Live>
<AssumeAbsoluteTime></AssumeAbsoluteTime>
</Live>
</StreamManager>
<HDS>
<HLS>
<KeyframeIntervalPerMediaFile></KeyframeIntervalPerMediaFile>
<MediaFileDuration></MediaFileDuration>
<SlidingWindowLength></SlidingWindowLength>
<Encryption enabled="true">
<KeyFile></KeyFile>
<KeyURI></KeyURI>
</Encryption>
</HLS>
<Recording>
<FragmentDuration></FragmentDuration>
<SegmentDuration></SegmentDuration>
<FrameRate></FrameRate>
<FramesPerKeyframeInterval></FramesPerKeyframeInterval>
<KeyframeIntervalsPerFragment></KeyframeIntervalPerFragment>
<FramePrecision></FramePrecision>
<DiskManagementDuration></DiskManagementDuration>
<ContentProtection enabled="true">
<ProtectionScheme></ProtectionScheme>
<PHDS>
<CommonKeyFile></CommonKeyFile>
<VideoEncryptionLevel></VideoEncryptionLevel>
<UpdateInterval></UpdateInterval>
<SWFVerification enabled="true">
<WhiteListFolder></WhiteListFolder>
<UpdateInterval></UpdateInterval>
</SWFVerfication>
</PHDS>
<FlashAccessV2>
<ContentID></ContentID>
<CommonKeyFile></CommonKeyFile>
<LicenseServerURL></LicenseServerURL>
<TransportCertFile></TransportCertFile>
<LicenseServerCertFile></LicenseServerCertFile>
<PackagerCredentialFile></PackagerCredentialFile>
<PackagerCredentialPassword></PackagerCredentialPassword>
<PolicyFile></PolicyFile>
</FlashAccessV2>
</ContentProtection>
</Recording>
</HDS>
</Application>
For information about each element, see “Application.xml and Event.xml” on page 84.

83
ADOBE MEDIA SERVER 5.0.6 DEVELOPER’S GUIDE
Getting started streaming media
Last updated 9/4/2014
Configure live HTTP streaming at the event level (Event.xml)
To configure a single event, use an Event.xml file. Copy the Event.xml file to a live event folder. The default live event
is rootinstall/applications/livepkgr/events/_definst_/liveevent. The Event.xml file overrides the Application.xml file
and the Apache httpd.conf file for a single live event. Every live event folder must have a single Event.xml file.
Note: There are a few exceptions in which the Event.xml configuration does not override the Application.xml
configuration. These exceptions are noted with the configuration parameter.
The following is an Event.xml file with all possible configuration elements for HTTP streaming:
<Event>
<EventID></EventID>
<HLS>
<KeyframeIntervalPerMediaFile></KeyframeIntervalPerMediaFile>
<MediaFileDuration></MediaFileDuration>
<SlidingWindowLength></SlidingWindowLength>
<Encryption enabled="true">
<KeyFile></KeyFile>
<KeyURI></KeyURI>
</Encryption>
</HLS>
<Recording>
<FragmentDuration></FragmentDuration>
<SegmentDuration></SegmentDuration>
<FrameRate></FrameRate>
<FramesPerKeyframeInterval></FramesPerKeyframeInterval>
<KeyframeIntervalsPerFragment></KeyframeIntervalPerFragment>
<FramePrecision></FramePrecision>
<DiskManagementDuration></DiskManagementDuration>
<ContentProtection enabled="true">
<ProtectionScheme></ProtectionScheme>
<PHDS>
<CommonKeyFile></CommonKeyFile>
<VideoEncryptionLevel></VideoEncryptionLevel>
<PlaybackExpiration></PlaybackExpiration>
<UpdateInterval></UpdateInterval>
<SWFVerification enabled="true">
<WhiteListFolder></WhiteListFolder>
<UpdateInterval></UpdateInterval>
</SWFVerfication>
</PHDS>
<FlashAccessV2>
<ContentID></ContentID>
<CommonKeyFile></CommonKeyFile>
<LicenseServerURL></LicenseServerURL>
<TransportCertFile></TransportCertFile>
<LicenseServerCertFile></LicenseServerCertFile>
<PackagerCredentialFile></PackagerCredentialFile>
<PackagerCredentialPassword></PackagerCredentialPassword>
<PolicyFile></PolicyFile>
</FlashAccessV2>
</ContentProtection>
</Recording>
</Event>

84
ADOBE MEDIA SERVER 5.0.6 DEVELOPER’S GUIDE
Getting started streaming media
Last updated 9/4/2014
Application.xml and Event.xml
Root elements
Configurations for HTTP Live Streaming
Use the elements in the <HLS> container to configure HTTP Live Streaming. In the Application.xml file, the elements
are located at //Application/HDS/HLS. In the Event.xml file, the elements are located at //Event/HLS.
Configurations for recording
Use the elements in the <Recording> container to configure how the server writes files to disk. In the Application.xml
file, the elements are located at //Application/HDS/Recording. In the Event.xml file, the elements are located at
//Event/Recording.
Element Description Default
//Application The root element for an Application.xml configuration file. N/A
//Event The root element for an Event.xml configuration file. N/A
//Event/EventID The name of a live event. This name is the same as the
name of the event folder and the value of the Server-Side
ActionScript Stream.liveEvent property.
liveevent
Element Description Default
/HLS/KeyframeIntervalPerMedi
aFile
Sets frame-based file duration.
See “Configure F4F and TS fragment duration” on
page 64.
None
/HLS/MediaFileDuration The duration of the TS file to be served, in
milliseconds. This number must be a multiple of the
FragmentDuration.
See “Configure F4F and TS fragment duration” on
page 64.
None
/HLS/SlidingWindowLength The seekable portion of the stream for Apple HTTP
Live Streaming. The time within the window is the
value of SlidingWindowLength *
MediaFileDuration. HTTP Live Streaming clients
use the sliding window to configure the seek bar.
The sliding window is relative to the current position
of the live stream.
See “Configure a sliding window (HLS)” on page 14.
6
/HLS/Encryption Set the enabled attribute to "allow" to allow
PHLS configurations in the Event.xml file to override
settings in the Application.xml file.
Set the enabled attribute to "true" to configure
PHLS in the Application.xml file. These
configurations apply to all live events in the
application.
None
/HLS/Encryption/KeyFile The path of the default cipher key used to encrypt
the content.
None
/HLS/Encryption/KeyURI The URI that the client uses to fetch the decryption
key.
None

85
ADOBE MEDIA SERVER 5.0.6 DEVELOPER’S GUIDE
Getting started streaming media
Last updated 9/4/2014
Configurations for content protection
Use the ContentProtection and ProtectionScheme elements to enable content protection with Protected HTTP
Dynamic Streaming or Adobe Access.
Configurations for Protected HTTP Dynamic Streaming (PHDS)
Element Description Default
/Recording The section that configures how the file is written to disk. None
/Recording/DiskManagem
entDuration
The maximum duration of live content on disk, in hours.
Use a fractional value to specify minutes. When this value
is set in Application.xml, it cannot be overridden in
Event.xml.
See “Disk management” on page 70.
3
/Recording/FragmentDur
ation
The length of each fragment, in milliseconds. Each
segment can contain one or more fragments. See
“Configure F4F and TS fragment duration” on page 64.
4000
/Recording/FramePrecis
ion
The rounding precision for the fragment run table, in
frame units. Frame units are derived from the specified
frame rate (1/rate). See “Configure F4F and TS fragment
duration” on page 64.
1
/Recording/FrameRate The frame rate of the original content, in frames per
second (fps). The value is floating point; for NTSC, use the
value 29.97. See “Configure F4F and TS fragment
duration” on page 64.
None
/Recording/FramesPerKe
yframeInterval
The number of frames between each keyframe. For
example, 30 fps video with a keyframe every 2 seconds
contains 60 frames per keyframe interval. See “Configure
F4F and TS fragment duration” on page 64.
None
/Recording/IOBufferSiz
e
The size of the IO buffer for the recording, in bytes. The IO
buffer loads the disk file into a buffer in memory. It reads
and writes to the buffer in the memory instead of making
system calls. See “Configure the size of the IO buffer” on
page 70.
4096
/Recording/KeyframeInt
ervalsPerFragment
The number of keyframe intervals per fragment. The
default value is 1, which means that the fragment size is
the same as the keyframe interval. See “Configure F4F and
TS fragment duration” on page 64.
1
/Recording/SegmentDura
tion
The length of each segment, in milliseconds. Each .f4f file
contains one segment.
See “Configure F4F and TS fragment duration” on
page 64.
400000
Element Description Default
/ContentProtection Whether to enable content for protection with Protected
HTTP Dynamic Streaming or Adobe Access. To enable
content protection, set the enabled attribute to true.
None
/ContentProtection/Pro
tectionScheme
The type of protection. Possible values are phds and
FlashAccessV2.
None

86
ADOBE MEDIA SERVER 5.0.6 DEVELOPER’S GUIDE
Getting started streaming media
Last updated 9/4/2014
Use the elements in the PHDS container to configure Protected HTTP Dynamic Streaming. In the Application.xml file,
the elements are located at //Application/HDS/Recording/ContentProtection/PHDS. In the Event.xml file, the
elements are located at //Event/Recording/ContentProtection/PHDS.
Configurations for Adobe Access
Use the elements in the FlashAccessV2 container to configure content protection with Adobe Access. In the
Application.xml file, the elements are located at
//Application/HDS/Recording/ContentProtection/FlashAccessV2. In the Event.xml file, the elements are
located at //Event/Recording/ContentProtection/FlashAccessV2.
For information about the elements in the FlashAccessV2 container, see “Encrypt content for Adobe Access
protection” on page 72.
Manifest.xml
Adobe Media Server 5 introduces set-level manifest files that replace Manifest.xml files. However, Adobe Media Server
5 supports Manifest.xml files and, in some cases, you may want to use them.
For example, Flash Media Playback does not support set-level manifest files. To use Flash Media Playback for DVR or
multi-bitrate streaming, configure a Manifest.xml file.
The following is the default Manifest.xml file with an added <dvrInfo> element:
<manifest xmlns="http://ns.adobe.com/f4m/1.0">
<dvrInfo beginOffset="0"></dvrInfo>
<media streamId="livestream1" bitrate="100">
</media>
<media streamId="livestream2" bitrate="200">
</media>
<media streamId="livestream3" bitrate="350">
</media>
</manifest>
Element Attribute Description
dvrInfo
beginOffset An offset, in seconds, from the beginning
of the recorded stream. Clients can begin
viewing the stream at this location. The
default value is 0.
endOffset An offset, in seconds, before the current
duration of the recorded stream. Clients
cannot view the stream before this
location. The default value is 0.
Negative values are treated as 0. If neither
endOffset nor beginOffset is set, the
start time is the beginning of the content.
media Represents one stream.
streamID The name of the publishing stream.
bitrate The bitrate at which the stream was
encoded.

87
ADOBE MEDIA SERVER 5.0.6 DEVELOPER’S GUIDE
Getting started streaming media
Last updated 9/4/2014
Note: Manifest.xml files support F4M v1.0 only (if not using best-effort fetch).
bestEffortF
etchInfo
Parent element for best effort
fetchconfiguration. If thiselement is
present, AMS enables best effort fetch.
The bestEffortFetchInfo element is
expected to be a part of F4M 2.0. To
specify your Manifest.xml as F4M 2.0, you
must change the xmlns attribute to
"http://ns.adobe.com/f4m/2.0". AMS
currently honors this syntax. However,
since the official F4M specification 2.0 is
not yet complete, this element may
change in future releases.
maxForwardFetches Maximum total number of forward
fetches that the OSMF player performs
when it encounters a liveness or dropout
error that is encountered. If the forward
fetches fail, the OSMF player reverts to
non-best-effort behavior.
The default is 2.
maxBackwardFetches Maximum number of consecutive failed
backward fetches that OSMF player
performs before reverting to non-best-
effort behavior. A value of 0 indicates that
no backward fetches will be performed.
The default is 2.
fragmentDuration Corresponds to the fragment interval (in
seconds) that is currently in use on the
packaging server. You can specify up to 3
decimal points.
Ensure that this value matches the
configured FragmentInterval in your
Event.xml file. Differences of as little as a
millisecond can result in incorrect best
effort fetch behavior.
This attribute is required.
segmentDuration Corresponds to the segment interval (in
seconds) that is currently in use on the
packaging server. You can specify up to 3
decimal points.
Ensure that this value matches the
configured SegmentInterval in your
Event.xml file. Differences of as little as a
millisecond can result in incorrect best
effort fetch behavior.
This attribute is required.
For more on fragmentDuration and
segmentDuration, see “Configure live
HTTP streaming” on page 81.
Element Attribute Description

88
ADOBE MEDIA SERVER 5.0.6 DEVELOPER’S GUIDE
Getting started streaming media
Last updated 9/4/2014
Note: The bestEffortFetchInfo element is expected to be a part of F4M 2.0. To use best-effort fetch, specify your
Manifest.xml as F4M 2.0 by changing the xmlns attribute to "http://ns.adobe.com/f4m/2.0". AMS currently honors this
syntax. However, since the official F4M specification 2.0 is not yet complete, this element may change in future releases.
Specify the bestEffortFetchInfo element in the set-level manifest. AMS ignores bestEffortFetchInfo elements
specified in the stream-level manifest.
Configure on-demand HTTP streaming
You can configure on-demand HTTP Dynamic Streaming and HTTP Live Streaming at the following levels:
Configure on-demand HTTP streaming at the stream level (jit.conf)
Configure stream-level configuration live in a jit.conf file. Create a jit.conf file and copy it to the same directory as the
on-demand stream or streams. A directory can contain only 1 jit.conf file. The settings in the file apply to all content
in the directory.
The following is a jit.conf file with all possible configurations:
Level Configuration file
Server rootinstall/Apache2.2/conf/httpd.conf
Stream jit.conf

89
ADOBE MEDIA SERVER 5.0.6 DEVELOPER’S GUIDE
Getting started streaming media
Last updated 9/4/2014
<?xml version="1.0" encoding="utf-8"?>
<manifest xmlns="http://ns.adobe.com/f4m/1.0" xmlns:hds="http://ns.adobe.com/hds-
package/1.0">
<hds:frame-rate></hds:frame-rate>
<hds:frames-per-keyframe-interval></hds:frames-per-keyframe-interval>
<hds:fragment-duration></hds:fragment-duration>
<hds:keyframe-intervals-per-fragment><hds:keyframe-intervals-per-fragment>
<hds:hls>
<hds:keyframe-intervals-per-media-file></hds:keyframe-intervals-per-media-file>
<hds:media-file-duration></hds:media-file-duration>
<hds:encryption enabled="true">
<hds:keyfile></hds:keyfile>
<hds:keyuri></hds:keyuri>
</hds:encryption>
</hds:hls>
<hds:content-protection enabled="true">
<hds:protection-scheme>phds</hds:protection-scheme>
<hds:phds>
<hds:common-key-file></hds:common-key-file>
<hds:video-encryption-level></hds:video-encryption-level>
<hds:playback-expiration></hds:playback-expiration>
</hds:phds>
<hds:FlashAccessV2>
<hds:content-id></hds:content-id>
<hds:common-key-file></hds:common-key-file>
<hds:license-server-url></hds:license-server-url>
<hds:transport-cert-file></hds:transport-cert-file>
<hds:license-server-cert-file></hds:license-server-cert-file>
<hds:packager-credential-file></hds:packager-credential-file>
<hds:packager-credential-password></hds:packager-credential-password>
<hds:policy-file></hds:policy-file>
</hds:FlashAccessV2>
</hds:content-protection>
</manifest>
Configurations for recording to disk
For more information about elements in this table, see “Configure F4F and TS fragment duration” on page 64.

90
ADOBE MEDIA SERVER 5.0.6 DEVELOPER’S GUIDE
Getting started streaming media
Last updated 9/4/2014
Configurations for content protection
Element Description Default
//manifest/hds:fragment-duration Use this element to configure fragment duration
by time.
The fragment duration for the set of content, in
seconds. The value can be fractional (for example,
to specify 2002 milliseconds, use the value 2.002).
If this value is not specified, the value is taken from
the module configurations in httpd.conf.
See “Configure F4F and TS fragment duration” on
page 64.
None
//manifest/hds:frame-rate Use this element to configure fragment duration
by frame rate.
The frame rate that determines the fragment
duration for the set of content. Units are
frames/second, and can be fractional (i.e. 29.97 for
NTSC) .
See “Configure F4F and TS fragment duration” on
page 64.
None
//manifest/hds:frames-per-
keyframe-interval
Use this element to configure fragment duration
by frame rate.
The number of frames per keyframe interval (GOP).
Units are frames, and should be a whole integer
value.
See “Configure F4F and TS fragment duration” on
page 64.
None
//manifest/hds:keyframe-
intervals-per-fragment
Use this element to configure fragment duration
by frame rate.
The number of keyframe intervals per fragment.
Units are keyframe intervals per fragment, and
should be a whole integer value.
See “Configure F4F and TS fragment duration” on
page 64.
1
//manifest/hds:hls Container for Apple HTTP Live Streaming
configurations.
N/A
//manifest/hds:hls/hds:keyframe-
intervals-per-media-file
Use this element to configure a frame-based file
duration.
The number of keyframe intervals per TS file
duration. The value must be a whole integer.
See “Configure F4F and TS fragment duration” on
page 64.
None
//manifest/hds:hls/hds:media-
file-duration
Use this element to configure a time-based file
duration.
The TS file duration, in milliseconds, for the set of
content associated with this file. Use a value that is
a multiple of the fragment duration.
See “Configure F4F and TS fragment duration” on
page 64.
None

91
ADOBE MEDIA SERVER 5.0.6 DEVELOPER’S GUIDE
Getting started streaming media
Last updated 9/4/2014
Use the ContentProtection and ProtectionScheme elements to enable content protection with Protected HTTP
Dynamic Streaming or Adobe Access.
Configurations for protected HTTP Dynamic Streaming (PHDS)
Use the elements in the <hds:phds> container to configure content protection with PHLS.
Configurations for protected HTTP Live Streaming (PHLS)
Use the elements in the <hds:hls> container to configure content protection with PHLS.
Configurations for Adobe Access
Use the elements in the <hds:FlashAccessV2> container to configure content protection with Adobe Access.
For more information, see “Encrypt content for Adobe Access protection” on page 72.
Build custom media players
Build media players for the live and vod services
Adobe has developed the Open Source Media Framework (OSMF) to make it easier to build media players. OSMF is
an open software framework for building robust, feature rich video players and applications based on the Flash
Platform. For information about building a media player with the OSMF library, see Building streaming video players
in Flash with the Adobe Open Source Media Framework.
You can also use ActionScript to build a media player from scratch. For more information, see the following:
•“Developing streaming media applications” on page 188
•“Build an HTTP Dynamic Streaming media player” on page 94
Connect to a streaming service
Like all Adobe Media Server applications, streaming services expect a NetConnection.connect() URI in the
following format:
rtmp://ams-ip-or-dna/serviceName/[formatType:][instanceName/]fileOrStreamName
hostName The Adobe Media Server domain name.
serviceName Either live or vod.
instanceName If the client is connecting to the default instance, you can either omit the instance name or use
_definst_. If the client is connecting to an instance you have created, such as room1, use that name.
formatType For mp3 files, mp3:. For MP4/F4V files, mp4:. Not required for FLV files.
Element Description Default
//manifest/hds:content
-protection
Whether to enable content for protection with Protected
HTTP Dynamic Streaming or Adobe Access. To enable
content protection, set the enabled attribute to "true".
None
//manifest/hds:content
-
protection/hds:protect
ion-scheme
The type of protection. Possible values are phds and
FlashAccessV2.
None

92
ADOBE MEDIA SERVER 5.0.6 DEVELOPER’S GUIDE
Getting started streaming media
Last updated 9/4/2014
fileOrStreamName Either a filename (for example, my_video.mp4) or a path (for example,
subdir/subdir2/my_video.mp4), for example,
rtmp://www.examplemediaserver.com/vod/mp4:ClassicFilms/AnOldMovie.mp4. For MPEG-4-based files, if
the file on the server uses a filename extension (.mp4, .f4v, and so on), specify it. If the stream is live and the publisher
specified a filename extension, specify it. For instance, rtmp://www.examplemediaserver.com/live/livestream.
Unsupported ActionScript APIs
Clients for the vod and live services can use any ActionScript APIs except remote shared objects
(SharedObject.getRemote()).
You cannot edit the server-side code for streaming services. However, the services do have a custom API that lets you
access information from the server. Call the NetConnection.call() method from client-side code and pass it the
name of the API you want to call.
More Help topics
“Streaming services API” on page 93
Allow connections from specific domains
By default, clients can connect to the live and vod services from any domain. You can limit the domains from which
clients can connect.
❖Navigate to the rootinstall/applications/live or rootinstall/applications/vod folder and do one of the following:
•To add a domain for SWF clients, edit the allowedSWFdomains.txt file.
•To add a domain for HTML clients, edit the allowedHTMLdomains.txt file.
The TXT files contain detailed information about adding domains.
Access raw audio and video data
Note: Adobe Media Server Standard supports this feature through the Access plug-in only.
Beginning with Flash Media Server 3 and Flash Player 9.0.115, you can access raw audio and video data in streams. Use
this data to create snapshots in your applications. To access the data, call the ActionScript 3.0 BitmapData.draw()
and SoundMixer.computeSpectrum() methods. For more information, see ActionScript 3.0 Reference for Flash
Platform.
By default, Adobe Media Server prevents you from accessing streams. To allow stream access, do the following:
1Move the main.far file from rootinstall/applications/live or rootinstall/applications/vod to
rootinstall/samples/applications/live or rootinstall/samples/applications/vod.
You cannot edit FAR files, so you must replace main.far with main.asc.
2Copy the main.asc file from rootinstall/samples/applications/live or rootinstall/samples/applications/vod to
rootinstall/applications/live or rootinstall/applications/vod.
3Open the main.asc file in a text editor.
4Uncomment the following code to allow all clients to access all streams:
//p_client.audioSampleAccess = "/";
//p_client.videoSampleAccess = "/";
5Save the main.asc file.
Note: The application instance requires restarting in order for the changes in the main.asc to take affect.

93
ADOBE MEDIA SERVER 5.0.6 DEVELOPER’S GUIDE
Getting started streaming media
Last updated 9/4/2014
Streaming services API
getStreamLength()
getStreamLength(streamObj)
Returns the length of a stream, in seconds. Call this method from a client-side script and specify a response object to
receive the returned value.
Availability
Flash Media Server 3, vod streaming service
Parameters
streamObj A Stream object.
Returns
A number.
Example
The following client-side code gets the length of the sample_video stream and returns the value to returnObj:
nc.call("getStreamLength", returnObj, "sample_video");
getPageUrl()
getPageUrl()
Returns the URL of the web page in which the client SWF file is embedded. If the SWF file isn’t embedded in a web
page, the value is the location of the SWF file. The following code shows the two examples:
// trace.swf file is embedded in trace.html.
getPageUrl returns: http://www.example.com/trace.html
// trace.swf is not embedded in an HTML file.
getPageUrl returns: http://www.example.com/trace.swf
The value must be an HTTP address. For security reasons, local file address (for example, file:///C:/Adobe Media
Server applications/example.html) are not displayed.
Availability
Flash Media Server 3, vod streaming service, live streaming service
Example
The following example calls the getPageUrl() method on the server:
nc.call("getPageUrl", returnObj);
getReferrer()
getReferrer()
Returns the URL of the SWF file or the server where the connection originated.
Availability
Flash Media Server 3, vod streaming service, live streaming service

94
ADOBE MEDIA SERVER 5.0.6 DEVELOPER’S GUIDE
Getting started streaming media
Last updated 9/4/2014
Example
The following code calls the getReferrer() method on the server:
myNetConnection.call("getReferrer", returnObj);
Build an HTTP Dynamic Streaming media player
Use Open Source Media Framework (OSMF)
You don’t need to build an HTTP Dynamic Streaming media player—Strobe Media Playback and Flash Media
Playback support HDS by default.
If you do decide to build a custom player, Adobe strongly recommends using OSMF. OSMF is a robust framework
designed to deliver high-quality video. Use the OSMF Sample Player for HTTP Dynamic Streaming as a reference
implementation. The OSMF Sample Player uses the ActionScript 3.0 NetStream.appendBytes() API to deliver bytes
to Flash Player and AIR.
Understanding the application flow for live HTTP Dynamic Streaming
To play a stream, a media player requests a .f4m file. The player contains logic that requests additional files when a user
seeks, pauses, and plays media. The Adobe Media Server Live Packager (livepkgr application) creates these files when
the server ingests a live stream or when a client requests an on-demand media file.
The HTTP Origin Module generates the .f4m file when it is requested. The file is not physically present on the disk.
However, you can request the file even when a live stream has stopped publishing.
Streaming media using Adobe HDS requires Adobe Media Manifest files (.f4m).
The manifest file contains information about a media asset or information about each stream in a multiple stream
event. This information can include the location of the media, DRM additional header data, media bootstrap
information, adaptive streaming bitrates, and so on.
The Apache HTTP modules create the F4M and M3U8 files as the streams are packaged and written to disk. To create
these files, the HTTP modules use metadata from the Event.xml file (if it exists) and data from the .f4f, .f4x, .meta,
.bootstrap, .stream, and .drmmeta files.
Important: Do not move the files from their original locations.
To generate the file, the HTTP modules follow these steps:
1Combine the request URL and the HttpStreamingLiveEventPath directive to locate the live event.
2Retrieve metadata about the event from the Event.xml file and the multi-level manifest file.
3Scan the event directory for stream record files (.stream).
4Retrieve the path to the corresponding content from each .stream file. Each .stream file becomes a <media> element
in the manifest file.
5Retrieve metadata from the .meta file.
6Create links to the bootstrap information and DRM additional header data (if the content is protected).
7Return the generated manifest document (.f4m or .m3u8).
For more information, see the F4M File Format Specification at adobe.com.
For more information, sabout the M3U8 file, see the the HTTP Live Streaming Internet-Draft.

95
ADOBE MEDIA SERVER 5.0.6 DEVELOPER’S GUIDE
Getting started streaming media
Last updated 9/4/2014
In the rootinstall\applications\livepkgr\streams\_definst_ folder, the Live Packager creates a folder with the name of
each stream: livestream1, livestream2, and livestream3. The Live Packager creates the following files in each folder:
•livestream#.bootstrap
•livestream#.control
•livestream#.meta
•livestream#Seg#.f4f
•livestream#Seg#.f4x
These are the files that an HTTP Dynamic Streaming media player requests to handle pausing, fast forwarding,
rewinding, and so on. The following table describes each file type:
The following are the URL request formats for these files when Apache is configured for HTTP Dynamic Streaming:
For more information about configuring Apache for HTTP Dynamic Streaming, see Apache configurations for HTTP
Dynamic Streaming.
Stream record files
A stream record file (.stream) is an XML document that contains the physical location of the stream. The server creates
the stream record file when an incoming stream is associated with a live event. The server creates the file with an
encoded name in the following location:
applications/appname/events/appinstancename/eventname/MTg1ODAyNjgwNg=.stream
The HTTP Origin Module reads the stream record file to locate the content for the stream. The following is the format
of the .stream file:
File Description
livestream#Seg#.f4f A segment. The Live Packager outputs one or more F4F files. Each file contains a segment
of the source file. Each segment contains the fragmented (and optionally protected)
content.
livestream#Seg#.f4x An index file listing the fragment offsets in each .f4f file. The Live Packager outputs one or
more F4X files. The HTTP Origin Module uses this file to deliver fragments.
livestream#.meta Contains the stream metadata (bitrate, screen size, and so on).
livestream#.bootstrap Contains the bootstrap information for the stream.
livestream#.control Contains internal metadata that the Live Packager uses to manage stream state.
livestream#.drmmeta Contains additional header information when a stream is encrypted for use with Adobe
Access.
Request type URL Form
Fragment http://<host>/<location-tag-alias>/streams/<app-
name>/streams/<app-instance>/<stream name>Seg<segment #>-
Frag<fragment #>
Note:You cannot request an F4F file directly. Request a Fragment.
Bootstrap (.bootstrap) http://<host>/<location-tag-alias>/streams/<app-
name>/streams/<app-instance>/<stream name>.bootstrap

96
ADOBE MEDIA SERVER 5.0.6 DEVELOPER’S GUIDE
Getting started streaming media
Last updated 9/4/2014
<?xml version="1.0" encoding="UTF-8"?>
<stream xmlns="http://www.adobe.com/liveevent/1.0">
<type>
f4f
</type>
<name>
livestream
</name>
<path>
C:\Program Files\Adobe\Adobe Media Server
5\applications\myapp\streams\_definst_\livestream
</path>
</stream>
Sample .f4m manifest file
The player uses the manifest file to request a content fragment. In the following example, there are two streams
associated with the live event, “livestream” and “livestream1”. The <media> elements provide the absolute URL path
to the content location with the prefix “/live/streams”.
If .bootstrap and .drmmeta are found in the same location as the .f4f file, <bootstrap> and <drmAdditionalHeader>
elements are included in the manifest file. The .drmmeta file can be shared across multiple streams, therefore there is
only one <drmAdditionalHeader> element in the sample manifest file. Both myStream and myStream1 refer to the
same .drmmeta file through the drmAdditionalHeaderId attribute.
The metadata element contains the metadata for one piece of media in Base64 encoding. The metadata is the same
information dispatched in the ActionScript NetStream.onMetaData() event.
<?xml version="1.0" encoding="UTF-8" ?>
<manifest xmlns="http://ns.adobe.com/f4m/1.0">
<id>live_mbr_event</id>
<streamType>live</streamType>
<duration>0</duration>
<bootstrapInfo
profile="named"
url="/live/streams/myStream.bootstrap"
id="bootstrap2267" />
<drmAdditionalHeader
url="/live/streams/myStream.drmmeta"
drmContentId="live_mbr_event"
id="drmMetadata9996" />
<media>
url="/live/streams/myStream"
bitrate="408"
bootstrapInfoId="bootstrap2267"
drmAdditionalHeaderId="drmMetadata9996">
<metadata>
AgAKb25NZXRhRGF0YQgAAAAAAAhkdXJhdGlvbgBARo9cKPXCjwAFd2lkdGgAQJQAAAAAAAAABmhlaWdodABAho
AAAAAAAAAMdmlkZW9jb2RlY2lkAgAEYXZjMQAMYXVkaW9jb2RlY2lkAgAEbXA0YQAKYXZjcHJvZmlsZQBAWQAA
AAAAAAAIYXZjbGV2ZWwAQEAAAAAAAAAABmFhY2FvdAAAAAAAAAAAAAAOdmlkZW9mcmFtZXJhdGUAQD34U+JVay
gAD2F1ZGlvc2FtcGxlcmF0ZQBA53AAAAAAAAANYXVkaW9jaGFubmVscwBAAAAAAAAAAAAJdHJhY2tpbmZvCgAA
AAIDAAZsZW5ndGgAQTSinwAAAAAACXRpbWVzY2FsZQBA3UwAAAAAAAAIbGFuZ3VhZ2UCAANlbmcAAAkDAAZsZW
5ndGgAQUCGAAAAAAAACXRpbWVzY2FsZQBA53AAAAAAAAAIbGFuZ3VhZ2UCAANlbmcAAAkAAAk=
</metadata>

97
ADOBE MEDIA SERVER 5.0.6 DEVELOPER’S GUIDE
Getting started streaming media
Last updated 9/4/2014
</media>
<bootstrapInfo
profile="named"
url="/live/streams/myStream1.bootstrap"
id="bootstrap7975" />
<media>
url="/live/streams/myStream1"
bitrate="1108"
bootstrapInfoId="bootstrap7975"
drmAdditionalHeaderId="drmMetadata9996">
<metadata>
AgAKb25NZXRhRGF0YQgAAAAAAAhkdXJhdGlvbgBARo9cKPXCjwAFd2lkdGgAQJQAAAAAAAAABmhlaWdodABAho
AAAAAAAAAMdmlkZW9jb2RlY2lkAgAEYXZjMQAMYXVkaW9jb2RlY2lkAgAEbXA0YQAKYXZjcHJvZmlsZQBAWQAA
AAAAAAAIYXZjbGV2ZWwAQEAAAAAAAAAABmFhY2FvdAAAAAAAAAAAAAAOdmlkZW9mcmFtZXJhdGUAQD34U+JVay
gAD2F1ZGlvc2FtcGxlcmF0ZQBA53AAAAAAAAANYXVkaW9jaGFubmVscwBAAAAAAAAAAAAJdHJhY2tpbmZvCgAA
AAIDAAZsZW5ndGgAQTSinwAAAAAACXRpbWVzY2FsZQBA3UwAAAAAAAAIbGFuZ3VhZ2UCAANlbmcAAAkDAAZsZW
5ndGgAQUCGAAAAAAAACXRpbWVzY2FsZQBA53AAAAAAAAAIbGFuZ3VhZ2UCAANlbmcAAAkAAAk=
</metadata>
</media>
</manifest>
Offline packaging
Offline packaging for HDS
The File Packager is a command-line tool that packages on-demand media files into a format that can stream over
HTTP. The File Packager can also encrypt files for protection with Adobe Access.
Note: To package on-demand content for HTTP streaming in real-time when a client requests the content, see Stream on-
demand media (HTTP) in the Adobe Media Server Developer’s Guide.
Packaging on-demand media
File Packager location
The File Packager is available from the following locations:
•Adobe Media Server rootinstall/tools/f4fpackager folder
The File Packager requires several libraries to run. These libraries are located in the f4fpackager folder. To move the
File Packager, move the f4fpackager folder and all its contents.
Input file formats and output file formats
To stream on-demand media over HTTP, process the file with the File Packager. The File Packager parses the content,
translates it into segments and fragments, and writes the segments and fragments to the F4F format. You can also
choose to have the File Packager encrypt the content for use with Adobe Access.
The File Packager supports the following file formats:
•F4V/MP4 compatible files
•FLV

98
ADOBE MEDIA SERVER 5.0.6 DEVELOPER’S GUIDE
Getting started streaming media
Last updated 9/4/2014
Important: The file formats can contain any codec the format supports, except Speex audio. You can package a file that
includes Speex audio, the File Packager does not throw an error, but the audio will not play. The packager can package
video-only and audio-only streams.
The File Packager outputs the following files:
Segments And Fragments
An F4F file contains one segment of a media file. Each segment can contain multiple fragments. Use the --segment-
duration and --fragment-duration options to set the length of each segment and fragment, in seconds. Specifying
a segment-duration greater than 0 will create multiple files. A good size fragment is small enough to send over the
internet and long enough to prevent multiple calls to Apache HTTP Server.
Run The File Packager
To package a file, pass the File Packager the name of the input file.
There are two ways to specify the name:
•Enter the --input-file option at the command line.
•Create a configuration file that specifies the input file and enter the --conf-file option at the command line.
Package content on Windows
1Open a Command Window.
2Change directories to the directory containing f4fpackager.exe.
3Enter the name of the tool and any options:
f4fpackager --input-file=sample.f4v --output-path=c:\sampleoutput
The following files are output: sampleSeg1.f4f, sample.f4x, and sample.f4m.
Package content on Linux
1Open a terminal window.
2On a clean installation of Linux, set the LD_LIBRARY_PATH to the directory containing the File Packager libraries.
3At the shell prompt, enter the name of the tool and any options:
f4fpackager --input-file=sample.f4v --output-path=/sampleoutput
The following files are output: sampleSeg1.f4f, sample.f4x, and sample.f4m.
File type Description
.f4f A segment. The tool outputs one or more F4F files. Each file contains a segment of the source
file. Each segment contains one or more fragments of content. A player can use a URL to
address each fragment.
.f4m Flash Media Manifest file. Contains information about codec, resolution, and the availability
of multi-bitrate files.
.f4x Index file. Contains the location of specific fragments within a stream.
.bootstrap Bootstrap file. Contains the bootstrap information for each segment of the file. The tool
creates an external .bootstrap file only if you specify the --external-bootstrap option.
If you don’t specify that option, the bootstrap information is included in the manifest file.
.drmmeta DRM Additional Header file. Contains additional header information about an encrypted file.
The tool creates this file only if you specify the --external-bootstrap option and
encrypt the file. Otherwise, the information is included in the manifest file.

99
ADOBE MEDIA SERVER 5.0.6 DEVELOPER’S GUIDE
Getting started streaming media
Last updated 9/4/2014
Packaging multi-bitrate content
To stream multi-bitrate content, encode a piece of media at multiple bitrates, creating multiple files. Use the File
Packager to process each media file individually. The media files share a manifest file that lists information about each
media file. The OSMF Player uses this information for playback.
About packaging multi-bitrate files
Each time you run the File Packager, it creates a manifest file with the filename of the input file. When you pass the -
-manifest-file option, the File Packager adds the information from the manifest file you specify to the manifest file
it creates. For example, suppose you run the following:
--input-file=sample1.f4v
The tool creates the files: sample1Seg1.f4f, sample1.f4x, and sample1.f4m.
Suppose you then run the following:
--input-file=sample2.f4v --manifest-file=sample1.f4m
The tool creates the files sample2Seg1.f4f, sample2.f4x, and sample2.f4m. The manifest file sample2.f4m contains
information about sample2.f4v and sample1.f4v.
To create a manifest file for multi-bitrate content, pass the --manifest-file option and specify the manifest file of
the previously processed file. Package the files from lowest bitrate to highest bitrate. Do not pass the --manifest-file
option for the first file you process.
Package multi-bitrate files
Note: This example uses Windows. For Linux commands, see “Package content on Linux” on page 98.
1Encode a media file at several bitrates, for example, 150 kbps, 700 kbps, and 1500 kbps.
This example uses three files: sample1_150kbps.f4v, sample1_700kbps.f4v, and sample1_1500kbps.f4v. On Adobe
Media Server, these files are installed to rootinstall\applications\vod\media.
2Copy the files to the same folder as the File Packager.
On Adobe Media Server 5, the File Packager is located in the rootinstall\tools\f4fpackager folder.
3Open a Command Window.
4Change directories to the directory containing f4fpackager.exe.
5Enter the following:
f4fpackager --input-file=sample1_150kbps.f4v --bitrate=150
The following files are output: sample1_150kbpsSeg1.f4f, sample1_150kbps.f4x, and sample1_150kbps.f4m.
6Enter the following to process the second file:
f4fpackager --input-file=sample1_700kbps.f4v --manifest-file=sample1_150kbps.f4m --
bitrate=700
The following files are output: sample1_700kbpsSeg1.f4f, sample1_700kbps.f4x, and sample1_700kbps.f4m. The
manifest file sample1_700kbps.f4m includes information from the input file and information from the
sample1_150kbps.f4m manifest file.
7Enter the following to process the third file:
f4fpackager --input-file=sample1_1500kbps.f4v --manifest-file=sample1_700kbps.f4m --
bitrate=1500

100
ADOBE MEDIA SERVER 5.0.6 DEVELOPER’S GUIDE
Getting started streaming media
Last updated 9/4/2014
The following files are output: sample1_1500kbpsSeg1.f4f, sample1_1500kbps.f4x, and sample1_1500kbps.f4m.
The manifest file sample1_1500kbps.f4m includes information from the input file and information from the
sample1_700kbps.f4m manifest file. The sample1_700kbps.f4m file contains information about the
sample1_150kbps.f4v file and the sample1_700kbps.f4v file.
8To play the file, pass the URL of the sample1_1500kbps.f4m file to OSMF Player. Because this manifest file was
created last, it contains information about all three files.
Packaging and encrypting content
Use the File Packager to both package and encrypt content for use with Adobe Access.
Adobe Access includes a license server implementation based on the Adobe Access SDK called Adobe® Access™ Server
for Protected Streaming. Adobe Access Server for Protected Streaming is designed for use with HTTP Dynamic
Streaming. For more information about this Adobe Access, see Adobe Access documentation.
Generate a common key
To use the File Packager to encrypt content, you must generate a common key file. The common key file must contain
128 bytes of randomly generated data. The File Packager uses this key with the content ID to generate the content
encryption key.
Note: Although the base key is 128 bytes, only the first 128 bits (16 bytes) are used to generate the key.
You can use the open source tool Open SSL or Adobe’s Scramble utility to generate random data and output a common
key file. Download Open SSL from www.openssl.org.
Generate random data and output a common key file:
openssl rand -out commonKey.bin 128
Pass commonKey.bin as the --common-key command line option or in the <common-key> element of a configuration
file.
Use a configuration file to package and encrypt content
Many command-line options are required to encrypt a file. It’s easier to use a configuration file to set options than it
is to set options at the command line.
1Open the file f4fpackager_config.xml in a text editor.
By default, the tool looks for f4fpackager_config.xml in the same directory as the File Packager. However, you can
move it to any directory and give it any name.
2Enter values for the following required options (sample values are included here):
<offline>
<input-file>someFile.f4v</input-file>
<content-id>contentId</content-id>
<common-key>commonKey.bin</common-key>
<license-server-url>http://server1.com:9999</license-server-url>
<license-server-cert>licenseServer.der</license-server-cert>
<transport-cert>transportCert.der</transport-cert>
<packager-credential>packagerCredential.pfx</packager-credential>
<credential-pwd>mYpwd</credential-pwd>
<policy-file>policyFile.pol</policy-file>
</offline>
You can add additional elements to change their default values.

101
ADOBE MEDIA SERVER 5.0.6 DEVELOPER’S GUIDE
Getting started streaming media
Last updated 9/4/2014
3Save the configuration file.
4Open a Command Window.
5Change directories to the directory containing f4fpackager.exe.
6Enter the following:
f4fpackager --conf-file=f4fpackager_config.xml
Use the command line to package and encrypt content
1Open a Command Window.
2Change directories to the directory containing the File Packager.
3Enter the following:
f4fpackager --input-file=someFile.f4v --license-server-url=http://server1.com:9999 --
transport-cert=transportCert.der --license-server-cert=licenseServer.der --packager-
credential=packagerCredential.pfx --credential-pwd=mYpwd --policy-file=policyFile.pol --
common-key=commonKey.bin --content-id=contentId
Updating DRM information
Broadcasters who use different license servers for testing and production, package the content individually for each
license server causing bottlenecks during testing and publishing. The f4fpackager enhancements enable
broadcasters to package content only once using multiple Adobe Access license servers.
f4packager package-once model

102
ADOBE MEDIA SERVER 5.0.6 DEVELOPER’S GUIDE
Getting started streaming media
Last updated 9/4/2014
The packager enhancements include updates to various DRM parameters, such as license server URL, license server
certificate, and usage policies using a new command-line option.
You can also use the update-drm-info option to generate a new manifest file with updated DRM metadata from the
source manifest file. When you pass this option to the packager, repackaging of the original content is not performed.
The remaining contents of the generated manifest file are similar to those of the source manifest file.
Update DRM information using the command line
To generate multiple manifest files that contain different license server URLs embedded in the DRM metadata, follow
this workflow:
1Generate the manifest file with single-bitrate or multi-bitrate encrypted streams, using the f4fpackager.
2Generate a manifest file with modified license server URL by running the f4fpackager again with the following
parameters:
aSpecify the no value parameter --update-drm-info.
bSpecify the manifest file generated in Step 1 through the --manifest-file option.
cSpecify the encryption parameters with the same values as specified in Step 1, except for the --license-
server-url parameter, which contains the new value.
d(Optional) Specify the --output-manifest-file option. If you use the packager to update the DRM
information without specifying the --output-manifest-file option, a name from the input manifest file is
generated with a number. For example, <input-manifest>_<n>.f4m, where n denotes a natural number.
If a file with the generated name exists in the output directory, an incremental number is used in the file name.
The --output-manifest-file option works while performing the packaging operation. In this case, the
manifest file is created with the given name. Other assets (.f4f, .booststrap, and .drmmeta) are created using the
base name (without extension) of this parameter. Any existing files are overwritten without any warning.
3Repeat Step 2 for all the new manifest files to be generated with the various license server URLs.
Update DRM information using configuration parameters
You can use a configuration file to package and encrypt content. The following snippet shows the sample values for
the f4fpackager_config.xml file:
<offline>
<input-file>someFile.f4v</input-file>
<output-manifest-file>sample.f4m</
output-manifest-file>
<update-drm-info>true<update-drm-info>
<content-id>contentId</content-id>
<common-key>commonKey.bin</common-key>
<license-server-url>http://server1.com:9999</license-server-url>
<license-server-cert>licenseServer.der</license-server-cert>
<transport-cert>transportCert.der</transport-cert>
<packager-credential>packagerCredential.pfx</packager-credential>
<credential-pwd>mYpwd</credential-pwd>
<policy-file>policyFile.pol</policy-file>
</offline>
Note: For an MBR manifest file, the DRM metadata of the streams are updated with the encryption parameter values
specified in Step 2c. You cannot use different DRM metadata for individual bitrate streams of an MBR manifest file.

103
ADOBE MEDIA SERVER 5.0.6 DEVELOPER’S GUIDE
Getting started streaming media
Last updated 9/4/2014
You can use the previously mentioned workflow to update encryption parameters in the DRM metadata of the source
manifest file (including license server URL, license server certificate, and usage policies). You cannot use this method
to update encryption parameters, such as content ID and common key. You shouldn’t update content ID and CEK in
the DRM metadata because they are unique.
File Packager reference
Command-line options to fragment files
You can use the command line to set all the options for the File Packager. Options set at the command line override
any options set in the configuration file. The only required option is --input-file.
Option Description Required Default value
--allowed-drift As the tool rounds off durations, it drifts from the
real time. This option specifies how far the tool
can vary from the real time, in seconds.
No 1
--bitrate Specifies the bitrate of the content to fragment
and adds it to the manifest file. Use this option to
serve files encoded at multiple bitrates. Use this
option or manually edit the manifest file to add
the bitrate.
No 0
--config-dump Dumps the configuration settings. This option
does not fragment the file.
No None
--conf-file The configuration file that contains settings for
the packaging process.
You can specify an absolute path or a path
relative to the directory containing the tool. You
can use the filename f4fpackager_config.xml or
any other legal filename.
Suppose the tool is in the c:\media directory and
the configuration file is in the c:\media\test
directory. Run the following from the command
line: f4fpackager --conf-
file=test\f4fpackager_config.xml.
No f4fpackager_conf
ig.xml
If the
f4fpackager_conf
ig.xml file is not in
the current
directory, the
default value is
“none”.
--duration-precision How precise the fragment durations are, in
seconds. When using a time-based fragment
duration, duration precision controls how much
rounding is applied to the fragment durations in
the fragment run tables. This prevents small
variations in the fragment durations from
causing the run tables to grow too large.
No 0.1
--edit-list If you specify this option, the File Packager
follows the edit list in the input file. By default,
the packager does not follow the edit list.
No None
--external-bootstrap Outputs the bootstrap box to a .bootstrap file. If
you omit this option, the information in the
bootstrap box is placed in the manifest file (F4M).
Outputs DRM additional header information to a
.drmmeta file when a file is encrypted. If you omit
this option, the additional header information is
included in the manifest file.
No None

104
ADOBE MEDIA SERVER 5.0.6 DEVELOPER’S GUIDE
Getting started streaming media
Last updated 9/4/2014
--fragment-duration The target length of each fragment, in seconds.
The actual length of each fragment depends on
properties of the input file, such as the keyframe
interval.
No 4
--frame-precision This option is the frame-based equivalent to the
--duration-precision option. This value is the
number of frames to round to in the fragment
run tables.
No 1
--frame-rate The frame rate of the original content, in frames
per second (fps). The value is floating point; for
NTSC, use the value 29.97.
No
--frames-per-keyframe-
interval
The number of frames between each keyframe.
For example, 30 fps video with a keyframe every
2 seconds contains 60 frames per keyframe
interval.
No
--input-file The path to the source container file. The path
can be absolute or relative to the directory
containing the File Packager.
If you specify the --conf-file option and the
configuration file contains an <input-file> value,
you do not need to use the --input-file
option.
Yes None
--inspect-bootstrap Inspects the bootstrap file. If a .bootstrap file is
provided as an input, it inspects the file. If not, it
inspects the bootstrap box in an F4F file.
No None
--inspect-fragments Inspects the F4F fragments in an F4F file. No None
--inspect-index Inspects the AFRA index file if an AFRA file is
provided.
No None
--keyframe-intervals-per-
fragment
The number of keyframe intervals per fragment.
The default value is 1 which sets the fragment
size to the same size as the keyframe interval.
No 1
--manifest-file Updates an existing manifest file. Use this option
to package a file encoded at multiple bitrates for
dynamic streaming. For example, you could
package three files (sample_500kpbs.f4v,
sample_1000kbps.f4v, and
sample_1500kbps.f4v) and add them all to the
same manifest file.
If you omit this option, the tool creates a Flash
Media Manifest file (F4M).
No None
--output-manifest-file Creates a manifest file with the name provided. No None
--output-path The path to the directory to which the packaged
files are output. If the directory doesn’t exist, the
tool creates it. The path can be absolute or
relative to the directory containing the File
Packager.
No Current directory
--sample-dump Dumps the samples and the fragments they’re
set to. This option does not fragment the file.
No None
--segment-duration The length, in seconds, of a segment. The default
value is 0 which creates 1 segment.
No 0
Option Description Required Default value

105
ADOBE MEDIA SERVER 5.0.6 DEVELOPER’S GUIDE
Getting started streaming media
Last updated 9/4/2014
Setting fragment duration based on frames or time
The File Packager has options that determine the size of fragments. There is a frame-based option, --keyframe-
interval-per-fragment, and a time-based option, --fragment-duration. Each option has additional options that
refine how the tool creates fragments.
Use the frame-based option when the source media contains video encoded at a constant frame rate. The frame-based
option lets you carefully match the fragment size to the video's keyframe interval. Use the time-based option for media
that contains audio or data but not video.
Frame-based options: --keyframe-interval-per-fragment, --frames-per-keyframe-interval, --frame-
rate, --frame-precision. Time-based options: --fragment-duration, --duration-precision. The frame-
based option overrides the time-based option. If you don't provide a --keyframe-interval-per-fragment option,
the File Packager uses the --fragment-duration option. If you don't provide values for --keyframe-interval-
per-fragment or --fragment-duration, the File Packager uses the default fragment duration, which is 4 seconds.
Command-line options to encrypt files
Use the File Packager to encrypt files for use with Adobe Access. Some of the following options require digital
certificates. To obtain digital certificates, see the Adobe Access Certificate Enrollment Site.
Option Description Required Default
--transport-cert The DER encoded transport certificate file. Yes None
--license-server-url The URL of the license server that handles
license acquisition for this content.
Yes None
--license-server-cert The DER encoded license server certificate file
used for content protection.
Yes None
--packager-credential The PFX file containing the packager's
protection credentials.
Yes None
--credential-pwd The password string used to secure the
packager credentials.
Yes None
--common-key A file containing the common key. The
common key is used with the content ID to
generate the content encryption key. The
common key must be randomly generated
and 128 bytes. Although the common key is
128 bytes, only the first 128 bits (16 bytes) are
used to generate the key.
For dynamic streaming, use the same
common key and content ID for an entire set
of content. Using the same key and id allows a
single license to decrypt a set of content.
Yes None
--content-id The content ID used with the common key to
generate the content encryption key.
Yes None
--policy-file The file containing the policy for this content.
Currently only a single policy can be applied to
content packaged with this tool.
Yes None
--encrypt-audio Specifies whether to encrypt the audio in the
file.
No true
--encrypt-video Specifies whether to encrypt the video in the
file.
No true

106
ADOBE MEDIA SERVER 5.0.6 DEVELOPER’S GUIDE
Getting started streaming media
Last updated 9/4/2014
File Packager configuration file
The File Packager uses an XML configuration file to read values for command-line options. The default configuration
file, f4fpackager_config.xml, is located in the same directory as the File Packager. It is often easier to specify options in
a text file that you can reuse than it is to enter options at the command line.
Options you set at the command line override options set in the configuration file. This feature lets you create a
configuration file for a set of content but edit a few settings for individual files.
Note: You do not need to use the configuration file to run the tool.
Enter the
--conf-file
option at the command line to pass the name and location of a configuration file. If you don’t enter
the
--conf-file
option, the tool checks for a file called f4fpackager_config.xml file in the same directory as the tool.
You can enter all the options for packaging and encrypting, including the input file, in the configuration file.
The following is the format of the configuration file:
<offline>
<input-file>/media/input-file.f4v</input-file>
<output-path>/media/http</output-path>
<fragment-duration></fragment-duration>
... You can set as many options as you want ...
</offline>
For options that take a path, you can specify absolute paths or paths relative to the directory containing the tool.
Errors
The File Packager outputs the following errors:
--encrypt-data Specifies whether to encrypt the data in the
file. This option supports both FLV and
F4V/MP4 formats.
No true
--ms-unencrypted The number of milliseconds at the beginning
of the content that remains unencrypted. Use
this option to improve stream start times
because it allows the client to acquire the
license asynchronously as playback begins.
No 0
--video-encrypt-level The level of encryption for H.264 content.
Possible values are 0 (low), 1(medium), and 2
(high). The default value is 2.
Note: Using this option on non-H.264 content
won’t generate an error, but it won’t change the
encryption level.
The values “0” and “1” mean “partial
encryption”; only important samples like video
keframes are encrypted. This setting creates
fewer frames to decrypt. Use this setting to
improve playback performance on the client.
The value "2", encrypts all video samples (after
--ms-unencrypted, if specified)..
No 2
Option Description Required Default

107
ADOBE MEDIA SERVER 5.0.6 DEVELOPER’S GUIDE
Getting started streaming media
Last updated 9/4/2014
Offline packaging for HLS
The Adobe Media Server installation includes a command line tool for packaging on-demand media files into
fragmented video content that can be streamed over HTTP. This offline packager can also encrypt files for protection
with Adobe Access.
The hlspackager is the command line tool that takes F4V source and produces fragmented HLS VOD content. You
can pass various options to the packager either through the command line or through a configuration file. However,
options passed through the command line will override the corresponding options specified in the configuration file.
Note: The packager can recognize only F4Vand MP4 files.
The packager tool generates several types of output files during the packaging process. They are:
•m3u8 file (single-stream playlist)
•TS segments listed in the m3u8 file
Error code Error message Description
1File not found The input file, the manifest file or the configuration file
could not be found.
2Input File not given No input file has been specified. To run the File Packager,
you must specify a path to a supported file type.
3 Invalid input file The input file, manifest file, or configuration file is an
invalid input file.
4Can’t access file The input file, manifest file, or configuration file cannot be
accessed.
5 Unsupported codec The input file contains unsupported codecs.
6 No supported tracks The input file doesn’t contain any supported tracks.
7Write error A write error occurred. Verify that the input file is
structured correctly and that there is enough memory to
run the File Packager.
8 XML library error An error occur ed when parsing the configuration file.
Verify that the XML is structured correctly.
9Program Options error The program options library failed. Verify that the
command line arguments are structured correctly.
10 Offline Encryption info error The File Packager doesn’t have enough information to
encrypt the file. Verify that there aren’t any missing inputs.
11 Encryption library error The encryption library threw an error while encrypting the
content.
12 Standard error A Standard Exception has occur ed. Verify that there is
enough memory to run the File Packager.
13 Invalid Bootstrap error The bootstrap file is corrupt and cannot be parsed.
14 FLV Error The FLV file cannot be read.
999 Internal error There has been an internal error in the File Packager.
1000 Invalid Input file warning Invalid input file warning.
2000 Invalid Error code The error code is invalid.

108
ADOBE MEDIA SERVER 5.0.6 DEVELOPER’S GUIDE
Getting started streaming media
Last updated 9/4/2014
The following command shows the syntax of hlspackager:
hlspackager --input-file=<input> --output-path=<output> --base-url=<baseurl> --audio-
only=<bool> --config-dump --help --media-target-duration=<fragmentLength> --conf-
file=<confFile>
Note: The HLS Offline Packager does not prefix the names of the assets generated by the stream or filename. Hence, it
will overwrite any files in the output directory that has the same file name as the generated content. You must use the
output-path option to specify different directory paths for generated content for MBR and batch job use cases.
The various supported options are described in the following table:
Option Description Default Required
--input-file Path to the source file. None Yes
--output-path Path for the HLS files to be created. Current directory No
--base-url Base URL to append in the TS file
names in the m3u8 file.
No base URL,
relative to the m3u8
file
No
--media-target-duration Target duration for each TS
segment.
8000 ms No
--conf-file Specifies the configuration file that
contains additional settings for the
packaging process.
hlspackager_config
.xml in working
directory
No
--config-dump Output the finally applied
configuration. In this case,
packaging does not happen.
No output by
default
No
--audio-only Whether to extract audio only
stream ("true"/"false") .
false No
--protection-scheme Encryption scheme to be used
("Vanilla" or
"FlashAccessV4").
None (No
encryption)
Yes
--transport-cert Specifies the DER-encoded
transport certificate file to be used
for content protection.
None Yes, if scheme is
FlashAccessV4
--license-server-url The URL of the license server that
will handle license acquisition for
this content.
None Yes, if scheme is
FlashAccessV4
--license-server-cert Specifies the DER-encoded license
server certificate file to be used for
content protection.
None Yes, if scheme is
FlashAccessV4
--packager-credential Specifies the PFX file containing
the packager’s protection
credentials.
None Yes, if scheme is
FlashAccessV4
--credential-pwd Specifies the password string used
to secure the packager credentials.
None Yes, if scheme is
FlashAccessV4

109
ADOBE MEDIA SERVER 5.0.6 DEVELOPER’S GUIDE
Getting started streaming media
Last updated 9/4/2014
--common-key-file The base key used (along with the
content ID) to generate the final
content encryption key.
Using the same common key and
content ID for an entire set of
content allows a single license to
decrypt a set on content, which is
useful for multi-bitrate use cases.
To generate the common key, see
“Hosting and key generation” on
page 110
None Yes, if scheme is
FlashAccessV4
--content-id The content ID for this content.
Used along with the common key
to generate the final content
encryption key.
input-file-name Optional (only for the
FlashAccessV4
scheme)
--policy-file Specifies the file containing the
policy to be used for this content.
Currently only a single policy can
be applied to content packaged
with this tool.
None Yes, if scheme is
FlashAccessV4
--key-rotation-interval The Key rotation interval for the
"FlashAccessV4" protection
scheme. Specifies after how many
segments, keys should be rotated.
0 , -1, or invalid values mean key
rotation will be disabled.
No key rotation Optional (only for the
FlashAccessV4
scheme)
--embed-leaf-license Whether to embed the leaf license
or not.
false Optional (only for the
FlashAccessV4
scheme)
--license-server-cred-
file
License server credential used
when protecting content for the
specified location.
None Yes, if embed-leaf-
license is set to true
(only for the
FlashAccessV4
scheme)
--license-server-cred-
pwd
License server credential password
for the configured license server
credential file.
None Yes, if embed-leaf-
license is set to true
(only for the
FlashAccessV4
scheme)
--key-file-path Key file path for “Vanilla”
encryption (Base-64 encoded key).
To generate the common key, see
“Hosting and key generation” on
page 110
None Yes, if scheme is
Vanilla
--key-file-url Key file URL for "Vanilla"
encryption (plain 16-bit key only) .
To generate the common key, see
“Hosting and key generation” on
page 110
None Yes, if scheme is
Vanilla
Option Description Default Required

110
ADOBE MEDIA SERVER 5.0.6 DEVELOPER’S GUIDE
Getting started streaming media
Last updated 9/4/2014
Instead of passing the options along with the command, you can also pass a configuration file containing the options
to the packager. The configuration file is an XML file that can be used to specify settings for the packaging process.
The packager checks whether a configuration file has been passed by the user. If not, it checks for the
hlspackager_config.xml file in the same directory as the command-line program. The configuration file is not
needed to run the packager. The format of the configuration file is:
<offline>
<input-file>/media/input-file.f4v</input-file>
<output-path>/media/http</output-path>
<media-target-duration></media-target-duration>
... other options...
</offline>
Hosting and key generation
You can host the fragmented content directly from the server’s webroot directory. For instance, if you keep the
fragmented content inside the webroot/myOfflineContent/ directory, you can playback the content through the URL
- http://server-name/myOfflineContent/prog_index.m3u8.
Key generation for Vanilla content
The content fragmentation for the Vanilla encryption protection scheme will take base-64 encoded key as input. To
generate the base-64 encoded key, run the OpenSSL command as shown below:
openssl rand -out keyfile.bin -base64 16
The generated keyfile.bin file has the base-64 key and can be used for content fragmentation. To generate the key
for hosting, run:
openssl base64 -d -in keyfile.bin -out plain-keyfile.bin
The plain-keyfile.bin file can be hosted for key delivery.
Key generation for Adobe Access content
To generate the base-64 encoded key, run the OpenSSL command as shown below:
openssl rand -out keyfile.bin -base64 16
Error codes
The following table describes the various error codes raised by the packager:
--faxskey-server-url The URL of the Adobe Access key
Server that will handle serving
keys to the iOS clients.
None Yes, if scheme is
FlashAccessV4
--key-server-cert-file Key server certificate file for the
remote key serving.
None Yes, if scheme is
FlashAccessV4
Error Code Description Example
1 Input file is not found or invalid Wrong or invalid input file path is
specified.
2 Input file parameter is not mentioned --input-file parameter is missing.
Option Description Default Required

111
ADOBE MEDIA SERVER 5.0.6 DEVELOPER’S GUIDE
Getting started streaming media
Last updated 9/4/2014
Licensing configurations and restrictions (HDS and HLS)
You can add a license path by adding the license-path element. This element must contain the path to the license
directory in Adobe Media Server. If the value is not explicitly specified, '../../' will be assumed as the license path
considering that the offline packagers for both HDS and HLS are in the tools directoy.The path specified by the
license-path element in the configuration file can be absolute or relative to the directory containing the offline
packagers. For instance:
<license-path>C:\Program Files\Adobe\Adobe Media Server 5\</license-path>
Note: The license configurations and restrictions are applicable for both f4fpackager and hlspackager.
Troubleshoot issues with streaming media
Troubleshoot live streaming (HTTP)
1Use the Services Control Panel applet (Windows) or the service window (Linux) to verify that the Adobe Media
Server (AMS), Adobe Media Administration Server, and FMSHttpd services are running.
2Verify that the request URL is correct. See “URLs for publishing and playing live streams over HTTP” on page 12.
3Verify that the server is listening to the port to which the client is trying to connect. The rootinstall/logs/edge.xx.log
file shows on which ports the server is listening.
By default, Adobe Media Server listens on port 80 and proxies HTTP requests to Apache HTTP Server on port 8134.
Proxying traffic can cause issues with HTTP streaming. If Adobe Media Server is listening on port 80, use port 8134
in the request URL. For example, http://ams.example.com:8134/hds-
live/livepkgr/_definst_/liveevent/livestream.f4m.
Otherwise, configure Apache HTTP Server to listen on port 80 and configure Adobe Media Server not to listen on
port 80. See Configure ports for HTTP streaming.
3 Input file is not valid or corrupt Corrupted mp4 file.
4 Cannot access the input file Unable to open or access the input file .
7Write error to disk Unable to write m3u8 or ts segments to
disk.
8 Unable to parse input xml file Parsing issue.
9 Invalid program options Parsing issues in the command line errors.
10 Invalid encryption parameters Wrong license file or invalid key file.
12 System standard input or output errors Inputs casting issue.
16 m3u8 generation error Not able to generate m3u8 files.
17 ts file generation issues Not able to generate the ts file.
18 Invalid target duration Target duration is too less or too large.
19 Protection scheme is not valid If a scheme other than "FlashAccessV4" or
"Vanilla" is specified,
999 Internal processing error -
Error Code Description Example

112
ADOBE MEDIA SERVER 5.0.6 DEVELOPER’S GUIDE
Getting started streaming media
Last updated 9/4/2014
4To allow a Flash player hosted on another web server to access content from the Adobe Media Server web server,
copy a crossdomain.xml file to the rootinstall/webroot directory. The crossdomain.xml file grants a web client
permission to handle data across multiple domains. For more information, see Cross-domain policy file
specification.
5In Flash Media Live Encoder, select the Encoding Options tab, choose Output from the Panel options menu, and
verify the following:
•The value of AMS URL is rtmp://ams-dns-or-ip/livepkgr. If you’re testing on the same server as Adobe Media
Server, you can use the value localhost for ams-dns-or-ip.
•For a single stream, the value of Stream is livestream?adbe-live-event=liveevent.
•For adaptive bitrate streaming, the value of Stream is livestream%i?adbe-live-event=liveevent.
Flash Media Live Encoder uses this value to create unique stream names. To use another encoder, provide your
own unique stream names, for example, livestream1?adbe-live-event=liveevent, livestream2?adbe-live-
event=liveevent.
•Check the logs for errors. Adobe Media Server logs are located in the rootinstall/logs folder. The master.xx.log
file and the core.xx.log file show startup failures.
Apache logs are located in the rootinstall/Apache2.2/logs folder.
6Use the Administration Console to verify that the encoder and the client connected to the livepkgr application.
See Connect to the Administration Console.
Troubleshoot live streaming (RTMP)
1Use the Services Control Panel applet (Windows) or the service window (Linux) to verify that the Adobe Media
Server (AMS) and Adobe Media Administration Server services are running.
If you’re using the Apache HTTP server, verify that the AMSHttpd service is running.
2Use the Administration Console to verify that the encoder and the client connected to the live application.
See Connect to the Administration Console.
3Verify that the server is listening to the port to which the client is trying to connect. The rootinstall/logs/edge.xx.log
file shows on which ports the server is listening. By default, the server listens on ports 1935 and 80. If the server is
not listening on port 1935, open the rootinstall/ams.ini file, set ADAPTOR.HOSTPORT = :1935,80 and restart the
server.
In the access.00.log file, the s-uri and cs-uri-stem fields indicate the port to which the client attempted to
connect. Unless you specify a port number in the URL, RTMP and RTMFP clients connect to the server over port
1935 and fall back to port 80.
For more information, see Port requirements.
4In Flash Media Live Encoder, select the Encoding Options tab, choose Output from the Panel options menu, and
verify the following:
•The value of AMS URL is rtmp://ams-dns-or-ip/live. If you’re testing on the same server as Adobe Media Server,
you can use the value localhost for ams-dns-or-ip.
•For a single stream, the value of Stream is livestream.
•For adaptive bitrate streaming, the value of Stream is livestream%i.
5Verify that the request URL is correc. See “URLs for publishing and playing live streams over RTMP” on page 18.
6The live service does not support DVR recording.

113
ADOBE MEDIA SERVER 5.0.6 DEVELOPER’S GUIDE
Getting started streaming media
Last updated 9/4/2014
Use the DVRCast application available from Adobe Media Server Tools. For more information, see the article
Using DVRCast with Flash Media Live Encoder in the Adobe Media Server Developer Center.
7Check the logs for errors. Adobe Media Server logs are located in the rootinstall/logs folder. The master.xx.log file
and the core.xx.log file show startup failures.
Apache logs are located in the rootinstall/Apache2.2/logs folder.
Troubleshoot on-demand streaming (HTTP)
Note: When you play a video over HTTP, the client does not connect to the vod application. Instead, Apache serves the
video to the client.
1Use the Services Control Panel applet (Windows) or the service window (Linux) to verify that the Adobe Media
Server (AMS) and AMSHttpd services are running.
2Verify that the server is listening to the port to which the client is trying to connect. The rootinstall/logs/edge.xx.log
file shows on which ports the server is listening.
By default, Adobe Media Server proxies requests on port 80 to Apache HTTP Server on port 8134. Proxying HTTP
streaming traffic can cause issues. If Adobe Media Server is listening on port 80, use port 8134 in the request URL.
For example, http://ams.example.com:8134/hds-vod/sample1_1500.f4v.f4m. Otherwise, configure Apache HTTP
Server to listen on port 80 and configure Adobe Media Server not to listen on port 80. See Configure ports for HTTP
streaming.
3Verify that the request URL is correct. See “URLs for playing on-demand streams over HTTP” on page 23.
4By default, Apache streams on-demand media from the rootinstall/webroot/vod folder. To change this location, see
“Content storage (HDS and HLS)” on page 56.
5Check the logs for errors. Apache logs are located in the rootinstall/Apache2.2/logs folder.
Troubleshoot on-demand streaming (RTMP)
1Use the Services Control Panel applet (Windows) or the service window (Linux) to verify that the Adobe Media
Server (AMS) and Adobe Media Administration Server services are running.
If you’re using the Apache HTTP Server, verify that the FMSHttpd service is running.
2Use the Administration Console to verify that the client is connected to the vod application.
See Connect to the Administration Console.
3Verify that the server is listening to the port to which the client is trying to connect. The rootinstall/logs/edge.xx.log
file shows on which ports the server is listening. By default, the server listens on ports 1935 and 80. If the server is
not listening on port 1935, open the rootinstall/ams.ini file, set ADAPTOR.HOSTPORT = :1935,80 and restart the
server.
In the access.00.log file, the s-uri and cs-uri-stem fields indicate the port to which the client attempted to
connect. Unless you specify a port number in the URL, RTMP and RTMFP clients connect to the server over port
1935 and fall back to port 80.
For more information, see Port requirements.
4Open the Administration Console (rootinstall/tools/fms_adminConsole.htm) and choose View Applications to
verify that the client is connecting to the vod application. To reset your password, see Reset Administration Console
password.
5Verify that the request URL is correct. See “URLs for playing on-demand media files over RTMP” on page 26

114
ADOBE MEDIA SERVER 5.0.6 DEVELOPER’S GUIDE
Getting started streaming media
Last updated 9/4/2014
6Do not include the /media folder in the stream URL to play the file. When you specify a filename, for example,
mp4:mymediafile.f4v, the server is configured to look for /applications/vod/media/mymediafile.f4v.
7Verify that the rootinstall/applications/vod directory is installed. If any files are missing, uninstall and reinstall the
server.
8Check the logs. Adobe Media Server logs are located in the rootinstall/logs folder. The master.xx.log file and the
core.xx.log file show startup failures.
Troubleshoot multicast streaming (RTMFP)
1Use the Services Control Panel applet (Windows) or the service window (Linux) to verify that the Adobe Media
Server (AMS) and Adobe Media Administration Server services are running.
If you’re using the Apache HTTP Server, verify that the FMSHttpd service is running.
2Use the Administration Console to verify that the encoder and the client connected to the multicast application.
See Connect to the Administration Console.
3Follow the steps in the tutorial “Multicast media (RTMFP)” on page 36.
4Verify that the correct ports are open. The rootinstall/logs/edge.xx.log file shows on which ports the server is
listening.
Open UDP 1935 and 19350-65535. If the server is located behind a NAT, specify its public (outside NAT) address
in the rootinstall/conf/_defaultRoot_/Adaptor.xml file in the Adaptor/RTMFP/Core/HostPortList element. See
Configure ports.
5Check the logs. Adobe Media Server logs are located in the rootinstall/logs folder. The master.xx.log file and the
core.xx.log file show startup failures.
Contact Support
•Post a question to the Adobe Media Server forum at forums.adobe.com/community/flash/flash_media_server.
Many members of the Adobe Media Server engineering and support teams answer questions in the forum.
•Contact Adobe Support at www.adobe.com/support.

115
Last updated 9/4/2014
Chapter 2: Content protection
Configuring content protection for HDS
You can use Protected HTTP Dynamic Streaming (PHDS) or Adobe Access for protecting content for HDS.
Overview
Configure PHDS/Adobe Access for live streaming at the following levels:
•Server—rootinstall/Apache2.2/conf/httpd.conf
•Application—rootinstall/applications/livepkgr/Application.xml
•Event—rootinstall/applications/livepkgr/events/_definst_/liveevent/Event.xml
PHDS
Use Adobe Media Server 5 to serve live and on-demand protected content to Flash Player and AIR over HTTP without
using a DRM License Server. When Adobe Media Server packages the content, it generates the license and embeds it
into the DRM metadata of the content stream. This feature is called Protected HTTP Dynamic Streaming (PHDS). In
addition to encrypting content, PHDS also supports SWF verification for HTTP Dynamic Streaming.
The F4F packaging process for on-demand and live PHDS generates a license, embeds it in the DRM metadata, and
delivers it with the media. Flash Player 11 and AIR 3 clients can retrieve the license from the content stream, which
eliminates communication between the client and a License Server.
The Adobe Media Server installer generates credentials, certificates, and policy files to the rootinstall/creds directory.
The installer also creates a common-key.bin file in the /creds directory. You can change the content of this file or create
a new common key file. To create a common key file (common-key.bin), which is used to derive the Content
Encryption Key, use the Scramble tool. See the Scramble tool.
Use the following policy files to generate licenses for on-demand and live PHDS (AMS 5 includes four new policy files
to support output protection):
Policy name Description
phds_24hr_policy.pol 24 Hour limited policy
anonymous; 24 hours limited license caching.
This is the default policy.
Users can start playback within 24 hours of the time the content was packaged. Users can
continue watching the content until the end of the content (users may pause content).
The 24 hours window starts when the DRM metadata is generated.
phds_policy.pol Unlimited policy
anonymous; unlimited license caching; and binding to Protected
Streaming is permitted
This policy allows playback at any time.

116
ADOBE MEDIA SERVER 5.0.6 DEVELOPER’S GUIDE
Content protection
Last updated 9/4/2014
The simple unlimited policy is not intended for a regular use. It is provided as a temporary work around in case there
is an issue with the network. When media is cached on network devices between Adobe Media Server and Flash Player,
clients may receive expired policy data from the network instead of the expected media from the server. If media that
was generated with the 24 hours policy is cached for more than 24 hours the player does not allow playback. Switch to
the unlimited PHDS policy as a temporary solution until the network configuration is fixed and the caches are flushed.
This solution allows you to distribute media with lower protection instead of not distributing the media. After
switching to the Unlimited Policy, flush the caches to allow the unlimited license to propagate to clients.
Adobe Access
To deliver live or on-demand content with HDS, you can enable HDS with Adobe Access for protected streaming. The
Adobe Access server for protected streaming is a license server implementation optimized for use with HDS. See the
Adobe Access documentation for more details.
Important: Use the HDS packagers to both encrypt and fragment content. Do not use the Adobe Access packaging
tools to encrypt content. The HDS packagers cannot fragment encrypted content.
Note: The Adobe Access SDK and the Adobe Access license server reference implementation can issue licenses for HDS.
After you have deployed Adobe Access Server for protected streaming, configure Adobe Media Server to package and
encrypt the content in real-time.
phds-24hr-OPBestEffort.pol (AMS 5)
24 Hours Limited / Best Effort Output Protection Policy
Set in the same way as the 24 Hours Limited / No Output Protection Policy policy with an
additional restriction to use hardware content protection, if available. Users are still able to
playback media if the client hardware doesn't support Output Protection. If the client
hardware supports Output Protection but it is disabled, Flash Player returns DRM Run Time
Error: 3342 (NoDigitalProtectionAvail).
phds-OPBestEffort.pol (AMS 5)
Unlimited / Best Effort Protection Policy
Set in the same way as the Unlimited / No Output Protection Policy policy with an
additional restriction to use hardware content protection, if available. Users arestill able to
playback media if the client hardware doesn't support Output Protection. If the client
hardware supports Output Protection, but it is disabled, Flash Player returns DRM Run Time
Error: 3342 (NoDigitalProtectionAvail).
phds-24hr-OPRequired.pol (AMS 5)
24 Hours Limited / Required Output Protection Policy
Set in the same way as the 24 Hours Limited / No Output Protection Policy policy with an
additional restriction to use hardware content protection. Users cannot playback media if
the client hardware doesn't support Output Protection. If the client hardware doesn't
support Output Protection or if it supports Output Protection, but it is disabled, Flash Player
returns DRM Run Time Error: 3342 (NoDigitalProtectionAvail).
phds-OPRequired.pol (AMS 5)
Unlimited / Required Output Protection Policy
Set in the same way as the Unlimited / No Output Protection Policy policy with an
additional restriction to use hardware content protection. Users cannot playback media if
the client hardware doesn't support Output Protection. If the client hardware doesn't
support Output Protection or if it supports Output Protection but, it is disabled, Flash Player
returns DRM Run Time Error: 3342 (NoDigitalProtectionAvail).
Policy name Description

117
ADOBE MEDIA SERVER 5.0.6 DEVELOPER’S GUIDE
Content protection
Last updated 9/4/2014
Live use case
In httpd.conf, ContentProtection tag is specified under <Location hds-live>.
Whereas, both the Application.xml file and the Event.xml file have a ContentProtection container that holds the live
PHDS configuration settings. In Application.xml, the container is located under
//Application/HDS/Recording/ContentProtection. In Event.xml, the container is located under
//Event/Recording/ContentProtection.
Getting Started
To quickly get started with PHDS, you need to understand the following directives:
To configure PHDS with basic settings, perform the following steps:
1After installing Adobe Media Server, navigate to the <root-install>/Apache 2.2/conf/ directory. Edit the httpd.conf
file and add the following tags under <Location hds-live>:
<Location /hds-live>
HttpStreamingEnabled true
HttpStreamingLiveEventPath "../applications"
HttpStreamingContentPath "../applications"
HdsFmsDirPath ".."
HttpStreamingF4MMaxAge 2
HttpStreamingBootstrapMaxAge 2
HttpStreamingDrmmetaMaxAge 3600
HttpStreamingFragMaxAge -1
HttpStreamingEncryptionScope serverHttpStreamingProtectionScheme PHDS
</Location>
Note: This configuration change will enable PHDS at the server level.
2Publish a live stream called “livestream?adbe-live-event=liveevent” to livepkgr.
3Playback the stream using the URI http://<server-ip>:8134/hds-live/livepkgr/_definst_/liveevent/livetsream.f4m.
Detailed configuration
The following sections provides detailed configurations for both PHDS and Adobe Access schemes.
Directive Default Value Description
HttpStreamingEncryptionScope content Possible values are off, content, and
server. When the value is off, content
remains in the unprotected format. When
the value is content, configuration
settings in the application.xml or
event.xml files are used to protect the
content. When the value is server,
configuration settings in the httpd.conf
are used to protect the content.
HttpStreamingProtectionScheme PHDS Encryption type for the content. It can be
FlashAccessV3, FlashAccessV2 or PHDS.
HttpStreamingProtectionScheme is
applicable if encryption is enabled. Use
HttpStreamingEncryptionScope to
determine the scope of the encryption.

118
ADOBE MEDIA SERVER 5.0.6 DEVELOPER’S GUIDE
Content protection
Last updated 9/4/2014
Server level
Server-level configurations for live PHDS/Adobe Access
When server level configuration is specified, the protection parameters specified are applied server wide. Encryption
parameters specified in Application/Event level will be ignored.
Flash Media Server 4.5.3 and higher allows setting the encryption configurations at the server level. These settings will
apply to live events recorded on the server. To enable or disable encryption, configure the following directives for the
f4fhttp_module in the Apache httpd.conf file:
Common configuration:
PHDS configuration
Adobe Access configuration
Directive Default Value Description
HdsFmsDirPath None Relative path of the Adobe Media Server
root directory. Use '..' as Relative path.
HttpStreamingEncryptionScope content Possible values are off, content, and
server. When the value is off, content
remains in the unprotected format. When
the value is content, configuration
settings in the application.xml or
event.xml files are used to protect the
content. When the value is server,
configuration settings in the httpd.conf
are used to protect the content.
HttpStreamingProtectionScheme PHDS Encryption type for the content. It can be
FlashAccessV3, FlashAccessV2 or PHDS.
HttpStreamingProtectionScheme is
applicable if encryption is enabled. Use
HttpStreamingEncryptionScope to
determine the scope of the encryption.
Directive Default Value Description
PHDSCommonKeyFile <AMSInstallDir>/creds/c
ommon-key.bin
A common key used to protect content at
this location. PHDSCommonKeyFile path
is relative to rootinstall/Apache2.2.
PHDSVideoEncryptionLevel 2 The level of encryption for the content (0-
low,1-medium, 2-high). Lower settings
provide partial encryption. A subset of the
samples (like video keyframes) are
encrypted. Partial encryption can improve
playback performance on the client,
because there are fewer frames to
decrypt.
PHDSPlaybackExpiration 24Hours The duration within which the content
playback is available. Possible values are
24Hours and Unlimited.
PHDSOutputProtection none The required hardware Output Protection
of media on the client. Possible values are
None, BestEffort, and Required.

119
ADOBE MEDIA SERVER 5.0.6 DEVELOPER’S GUIDE
Content protection
Last updated 9/4/2014
The following example enables and configures PHDS in the httpd.conf file. These settings apply to every live event
configured for this server.
<Location /hds-live>
HttpStreamingEnabled true
HttpStreamingLiveEventPath "../applications"
HttpStreamingContentPath "../applications"
HdsFmsDirPath ".."
HttpStreamingF4MMaxAge 2
HttpStreamingBootstrapMaxAge 2
HttpStreamingDrmmetaMaxAge 3600
HttpStreamingFragMaxAge -1
Options -Indexes FollowSymLinks
HttpStreamingEncryptionScope server
HttpStreamingProtectionScheme PHDS
PHDSCommonKeyFile "../creds/common-key.bin"
PHDSPlaybackExpiration 24Hours
PHDSOutputProtection None
</Location>
Directive Default Value Description
HdsDrmCommonKeyFile None A common key used to protect content at
this location. HdsDrmCommonKeyFile
path is relative to rootinstall/Apache2.2.
HdsDrmLicenseServerURL None The URL of the license server used for
protecting content.
HdsDrmTransportCertFile None The transport certificate used for
protecting content.
HdsDrmLicenseServerCertFile None The License server certificate used for
protecting content.
HdsDrmPackagerCredentialFile None The Packager credential used for
protecting content.
HdsDrmPackagerCredentialPassword None The Packager credential password for the
configured packager credential file.
HdsDrmPolicyFile None Policy for protecting content.
HdsDrmUseUniqueContentID false By default, Adobe Media Server uses non-
unique content ID if the protection
scheme is set. The file path is used as the
content ID. Hence, the content IDs for the
files present in a directory will be the
same.
This feature is used in allowing content ID
encryption for multi-bitrate stream where
all the files with different bit rate are kept
in the same directory. If you want to use
unique content IDs for each file, add this
element.
HdsDrmContentID None You can manually specify the content ID,
which will be used for all the files. Note
that this element must not be used when
HdsDrmUseUniqueContentID is set to
true.

120
ADOBE MEDIA SERVER 5.0.6 DEVELOPER’S GUIDE
Content protection
Last updated 9/4/2014
The following example enables and configures Adobe Access (FlashAccessV2) in the httpd.conf file. These settings
apply to every live event configured for this server.
<Location /hds-live-faxs>
HttpStreamingEnabled true
HttpStreamingLiveEventPath "../applications"
HttpStreamingContentPath "../applications"
HdsFmsDirPath ".."
HttpStreamingF4MMaxAge 2
HttpStreamingBootstrapMaxAge 2
HttpStreamingDrmmetaMaxAge 3600
HttpStreamingFragMaxAge -1
HttpStreamingEncryptionScope server
HttpStreamingProtectionScheme FlashAccessV2
HdsDrmCommonKeyFile "../creds/common-key.bin"HdsDrmLicenseServerURL http://<aaxs-test-
server>/HdsDrmTransportCertFile "aaxs-test-server-trnsCert.der"
HdsDrmLicenseServerCertFile "aaxs-test-server-licCert.der"
HdsDrmPackagerCredentialFile " aaxs-test-server-
pkgrCert.pfx"HdsDrmPackagerCredentialPassword pwd=HdsDrmPolicyFile "sample_policy.pol"
Options -Indexes FollowSymLinks
</Location>
The following example enables and configures Adobe Access (FlashAccessV3) in the httpd.conf file. These settings
apply to every live event configured for this server.
<Location /hds-live-faxs>
HttpStreamingEnabled true
HttpStreamingLiveEventPath "../applications"
HttpStreamingContentPath "../applications"
HdsFmsDirPath ".."
HttpStreamingF4MMaxAge 2
HttpStreamingBootstrapMaxAge 2
HttpStreamingDrmmetaMaxAge 3600
HttpStreamingFragMaxAge -1
HttpStreamingEncryptionScope server
HttpStreamingProtectionScheme FlashAccessV3
HdsDrmCommonKeyFile "../creds/common-key.bin"HdsDrmLicenseServerURL http://<aaxs-test-
server>/HdsDrmTransportCertFile "aaxs-test-server-trnsCert.der"
HdsDrmLicenseServerCertFile "aaxs-test-server-licCert.der"
HdsDrmPackagerCredentialFile " aaxs-test-server-
pkgrCert.pfx"HdsDrmPackagerCredentialPassword pwd=HdsDrmPolicyFile "sample_policy.pol"
Options -Indexes FollowSymLinks
</Location>
Application level
When Application level configuration is specified, the protection parameters specified are applied to the particular
application (to all the events under the application). Encryption parameters specified in Event/Server level will be
ignored.
Common configuration

121
ADOBE MEDIA SERVER 5.0.6 DEVELOPER’S GUIDE
Content protection
Last updated 9/4/2014
PHDS configuration
Adobe Access configuration
Element Default Description
HDS/Recording/Content
Protection
"allow" in
Application.xml
"false" in Event.xml
Container element for content protection
configurations.
In Application.xml, set the enabled attribute to
"true" to enable content protection, "false" to
disable content protection, or "allow" to allow
settings in the Event.xml file to override the
ContentProtection section of the Application.xml file.
When enabled="allow", the server uses none of
the settings in the ContentProtection section of
the Application.xml file. If a ContentProtection
section is not specified in Event.xml, content
protection is disabled because the default value is
"false" in Event.xml.
In Event.xml, set the enabled attribute to "true"or
"false".
HDS/Recording/Content
Protection/Protection
Scheme
None Possible values are phds, FlashAccessV2,and
FlashAccessV3. For PHDS, use PHDS.
Element Default Description
HDS/Recording/Content
Protection/PHDS
None Container for PHDS encryption settings.
HDS/Recording/Content
Protection/PHDS/Commo
nKeyFile
None A relative path to the common-key.bin file containing
a base key used (along with the content ID) to
generate the final content encryption key.
This file is generated during installation to
rootinstall/creds/common-key.bin.
If you define the CommonKeyFile in the
Application.xml file, the server looks for the file
relative to the application directory.
If you define the CommonKeyFile in the Event.xml
file, the server looks for the file relative to the event
folder.
HDS/Recording/Content
Protection/PHDS/Playb
ackExpiration
24Hours The protection policy. The policy determines the
duration within which content playback is available.
Possible values are 24Hours and Unlimited.
HDS/Recording/Content
Protection/PHDS/Video
EncryptionLevel
2 The level of encryption for the content (0-low,1-
medium,2-high). Lower settings mean "partial
encryption", where a subset of the samples (like video
keyframes) are encrypted. This can improve playback
performance on the client, since there will be fewer
frame to decrypt.
HDS/Recording/Content
Protection/PHDS/Updat
eInterval
60 The frequency at which the server generates the drm
metadata, in minutes.
HDS/Recording/Content
Protection/PHDS/Outpu
tProtection
None The required hardware Output Protection of media on
the client. Possible values are None, BestEffort, and
Required.

122
ADOBE MEDIA SERVER 5.0.6 DEVELOPER’S GUIDE
Content protection
Last updated 9/4/2014
Configure the httpd.conf as given below to allow protection configurations at the application level.
<Location /hds-live>
HttpStreamingEnabled true
HttpStreamingLiveEventPath "../applications"
HttpStreamingContentPath "../applications"
HdsFmsDirPath ".."
HttpStreamingF4MMaxAge 2
HttpStreamingBootstrapMaxAge 2
HttpStreamingDrmmetaMaxAge 3600
HttpStreamingFragMaxAge -1
Options -Indexes FollowSymLinks
HttpStreamingEncryptionScope content
</Location>
The following example enables and configures PHDS in the Application.xml file. These settings apply to every live
event configured for this application.
Element Default Description
HDS/Recording/ContentProtec
tion/FlashAccessV2
None Container for FlashAccessV2 encryption settings.
HDS/Recording/ContentProtec
tion/FlashAccessV3
None Container for FlashAccessV3 encryption settings.
HDS/Recording/ContentProtec
tion/FlashAccessV3(or
FlashAccessV2)/ContentID
None The content ID used when protecting the streams in the
live event
HDS/Recording/ContentProtec
tion/FlashAccessV3(or
FlashAccessV2)/CommonKeyFil
e
None The file containing the common key
HDS/Recording/ContentProtec
tion/FlashAccessV3(or
FlashAccessV2)/LicenseServe
rURL
None The URL of the license server that will provide licensing
services for the protected content
HDS/Recording/ContentProtec
tion/FlashAccessV3(or
FlashAccessV2)/TransportCer
tFile
None The file containing the transport certificate, in DER format
HDS/Recording/ContentProtec
tion/FlashAccessV3(or
FlashAccessV2)/LicenseServe
rCertFile
None The file containing the license server certificate, in DER
format
HDS/Recording/ContentProtec
tion/FlashAccessV3(or
FlashAccessV2)/PackagerCred
entialFile
None The file containing the packager credentials, in PFX
format
HDS/Recording/ContentProtec
tion/FlashAccessV3(or
FlashAccessV2)/PackagerCred
entialPassword
None The password for the packager credentials
HDS/Recording/ContentProtec
tion/FlashAccessV3(or
FlashAccessV2)/ PolicyFile
None The file containing the content protection policy

123
ADOBE MEDIA SERVER 5.0.6 DEVELOPER’S GUIDE
Content protection
Last updated 9/4/2014
<Application>
<StreamManager>
<Live>
<AssumeAbsoluteTime>true</AssumeAbsoluteTime>
<PublishTimeout>0</PublishTimeout>
<AdjustForZeroTimeStampMessages>2</AdjustForZeroTimeStampMessages>
<AdjustForRecordingRollover>false</AdjustForRecordingRollover>
</Live>
</StreamManager>
<HDS>
<Recording >
<ContentProtection enabled="true" >
<ProtectionScheme>PHDS</ProtectionScheme>
<PHDS>
<CommonKeyFile>common-key.bin</CommonKeyFile>
<VideoEncryptionLevel>2</VideoEncryptionLevel>
<PlaybackExpiration>24Hours</PlaybackExpiration>
<OutputProtection>None</OutputProtection>
</PHDS>
</ContentProtection>
</Recording>
</HDS>
</Application>
The following example enables and configures Adobe Access V2 in the Application.xml file. These settings apply to
every live event configured for this application.

124
ADOBE MEDIA SERVER 5.0.6 DEVELOPER’S GUIDE
Content protection
Last updated 9/4/2014
<Appl ication>
<S treamManager>
< Live>
<Assume Ab soluteTime> true</ AssumeAbsoluteTime>
<PublishTimeou t >0</Pu blishTimeout>
<AdjustForZeroTimeStampMessages>2< /AdjustF orZeroTimeStampMessages>
< AdjustForRe cordingRollover>false</AdjustForRecordingRollover>
</Live>
</Str eamManager>
<HDS>
<Re cording>
<ContentProtection enab led="true">
<ProtectionScheme>FlashAccessV2</ProtectionScheme>
<FlashAccessV2>
<ContentID>liveevent</ContentID>
<CommonKeyFile>common-key.bin</CommonKeyFile>
<LicenseServerURL>http://<aaxs-test-server>/</LicenseServerURL>
<TransportCertFile>
aaxs-test-server-trnsCert.der
</TransportCertFile>
<LicenseServerCertFile>
aaxs-test-server-licCert.der
</LicenseServerCertFile>
<PackagerCredentialFile>
aaxs-test-server-pkgrCert.pfx</PackagerCredentialFile>
<PackagerCredentialPassword>pwd=</PackagerCredentialPassword>
<PolicyFile>sample_policy.pol</PolicyFile>
</FlashAccessV2>
</ContentProtection>
</Recording>
</HDS>
</Application>
The following example enables and configures Adobe Access V3 in the Application.xml file. These settings apply to
every live event configured for this application.

125
ADOBE MEDIA SERVER 5.0.6 DEVELOPER’S GUIDE
Content protection
Last updated 9/4/2014
<Application >
<StreamManager>
<Live>
<AssumeAbsoluteTime>true</AssumeAbsoluteTime>
<PublishTimeout>0</PublishTimeout>
<AdjustForZeroTimeStampMessages>2</AdjustForZeroTimeStampMessages>
<AdjustForRecordingRollover>false</AdjustForRecordingRollover>
</Live>
</StreamManager>
<HDS>
<Recording>
<ContentProtection enabled="true">
<ProtectionScheme>FlashAccessV3</ProtectionScheme>
<FlashAccessV3>
<ContentID>liveevent</ContentID>
<CommonKeyFile>common-key.bin</CommonKeyFile>
<LicenseServerURL>http://<aaxs-test-server>/</LicenseServerURL>
<TransportCertFile>
aaxs-test-server-trnsCert.der
</TransportCertFile>
<LicenseServerCertFile>
aaxs-test-server-licCert.der</LicenseServerCertFile>
<PackagerCredentialFile>
aaxs-test-server-pkgrCert.pfx
</PackagerCredentialFile>
<PackagerCredentialPassword>pwd=</PackagerCredentialPassword>
<PolicyFile>sample_policy.pol</PolicyFile>
</FlashAccessV3>
</ContentProtection>
</Recording>
</HDS>
</Application>
Note: In this case, copy the common-key.bin file from the rootinstall/creds directory to the root-
install/applications/livepkgr/ directory.
Event level
When Event level configuration is specified, the protection parameters specified are applied to the particular event.
Encryption parameters specified in Application/Server level will be ignored.
Common configuration

126
ADOBE MEDIA SERVER 5.0.6 DEVELOPER’S GUIDE
Content protection
Last updated 9/4/2014
PHDS configuration
Adobe Access configuration
Element Default Description
Recording/ContentProt
ection
"allow" in
Application.xml
"false" in Event.xml
Container element for content protection
configurations.
In Application.xml, set the enabled attribute to
"true" to enable content protection, "false" to
disable content protection, or "allow" to allow
settings in the Event.xml file to override the
ContentProtection section of the Application.xml file.
When enabled="allow", the server uses none of
the settings in the ContentProtection section of
the Application.xml file. If a ContentProtection
section is not specified in Event.xml, content
protection is disabled because the default value is
"false" in Event.xml.
In Event.xml, set the enabled attribute to "true"or
"false".
Recording/ContentProt
ection/ProtectionSche
me
None Possible values are phds, FlashAccessV2,and
FlashAccessV3. For PHDS, use PHDS.
Element Default Description
Recording/ContentProt
ection/PHDS
None Container for PHDS encryption settings.
Recording/ContentProt
ection/PHDS/CommonKey
File
None A relative path to the common-key.bin file containing
a base key used (along with the content ID) to
generate the final content encryption key.
This file is generated during installation to
rootinstall/creds/common-key.bin.
If you define the CommonKeyFile in the
Application.xml file, the server looks for the file
relative to the application directory.
If you define the CommonKeyFile in the Event.xml
file, the server looks for the file relative to the event
folder.
Recording/ContentProt
ection/PHDS/PlaybackE
xpiration
24Hours The protection policy. The policy determines the
duration within which content playback is available.
Possible values are 24Hours and Unlimited.
Recording/ContentProt
ection/PHDS/VideoEncr
yptionLevel
2 The level of encryption for the content (0-low,1-
medium,2-high). Lower settings mean "partial
encryption", where a subset of the samples (like video
keyframes) are encrypted. This can improve playback
performance on the client, since there will be fewer
frame to decrypt.
Recording/ContentProt
ection/PHDS/UpdateInt
erval
60 The frequency at which the server generates the drm
metadata, in minutes.
Recording/ContentProt
ection/PHDS/OutputPro
tection
None The required hardware Output Protection of media on
the client. Possible values are None, BestEffort, and
Required.

127
ADOBE MEDIA SERVER 5.0.6 DEVELOPER’S GUIDE
Content protection
Last updated 9/4/2014
Configure the httpd.conf as given below to allow protection configurations at the event level:
Element Default Description
Recording/ContentProt
ection/FlashAccessV2
None Container for FlashAccessV2 encryption settings.
Recording/ContentProt
ection/FlashAccessV3
None Container for FlashAccessV3 encryption settings.
Recording/ContentProt
ection/FlashAccessV3(
or
FlashAccessV2)/Conten
tID
None The content ID used when protecting the streams in
the live event
Recording/ContentProt
ection/FlashAccessV3(
or
FlashAccessV2)/Common
KeyFile
None The file containing the common key
Recording/ContentProt
ection/FlashAccessV3(
or
FlashAccessV2)/Licens
eServerURL
None The URL of the license server that will provide
licensing services for the protected content
Recording/ContentProt
ection/FlashAccessV3(
or
FlashAccessV2)/Transp
ortCertFile
None The file containing the transport certificate, in DER
format
Recording/ContentProt
ection/FlashAccessV3(
or
FlashAccessV2)/Licens
eServerCertFile
None The file containing the license server certificate, in DER
format
Recording/ContentProt
ection/FlashAccessV3(
or
FlashAccessV2)/Packag
erCredentialFile
None The file containing the packager credentials, in PFX
format
Recording/ContentProt
ection/FlashAccessV3(
or
FlashAccessV2)/Packag
erCredentialPassword
None The password for the packager credentials
Recording/ContentProt
ection/FlashAccessV3(
or FlashAccessV2)/
PolicyFile
None The file containing the content protection policy

128
ADOBE MEDIA SERVER 5.0.6 DEVELOPER’S GUIDE
Content protection
Last updated 9/4/2014
<Location /hds-live>
HttpStreamingEnabled true
HttpStreamingLiveEventPath "../applications"
HttpStreamingContentPath "../applications"HdsFmsDirPath ".."
HttpStreamingF4MMaxAge 2
HttpStreamingBootstrapMaxAge 2
HttpStreamingDrmmetaMaxAge 3600
HttpStreamingFragMaxAge -1
Options -Indexes FollowSymLinks
HttpStreamingEncryptionScope content
</Location>
The following is an example of an Application.xml file that allows protection configurations at the event level and tells
the server to look for configurations in the Event.xml file for each live event:
<Application>
<StreamManager>
<Live>
<AssumeAbsoluteTime>true</AssumeAbsoluteTime>
</Live>
</StreamManager>
<HDS>
<Recording>
<ContentProtection enabled="allow">
</ContentProtection>
</Recording>
</HDS>
</Application>
The following Event.xml file configures PHDS for a single live event:
<Event>
<EventID>liveevent</EventID>
<Recording>
<FragmentDuration>4000</FragmentDuration>
<SegmentDuration>400000</SegmentDuration>
<DiskManagementDuration>3</DiskManagementDuration>
<ContentProtection enabled="true">
<ProtectionScheme>PHDS</ProtectionScheme>
<PHDS>
<CommonKeyFile>common-key.bin</CommonKeyFile>
<VideoEncryptionLevel>2</VideoEncryptionLevel>
<PlaybackExpiration>24Hours</PlaybackExpiration>
<OutputProtection>None</OutputProtection>
</PHDS>
</ContentProtection>
</Recording>
</Event>
In this case, copy the common-key.bin file from the rootinstall/creds directory to the
rootinstall/applications/livepkgr/events/_definst_/liveevent directory.
The following Event.xml file configures Adobe Access V2 for a single live event:

129
ADOBE MEDIA SERVER 5.0.6 DEVELOPER’S GUIDE
Content protection
Last updated 9/4/2014
<Event>
<EventID>liveevent</EventID>
<Recording>
<FragmentDuration>4000</FragmentDuration>
<SegmentDuration>400000</SegmentDuration>
<DiskManagementDuration>3</DiskManagementDuration>
<ContentProtection enabled="true">
<ProtectionScheme>FlashAccessV2</ProtectionScheme>
<FlashAccessV2>
<ContentID>liveevent</ContentID>
<CommonKeyFile>common-key.bin</CommonKeyFile>
<LicenseServerURL>
http://<aaxs-test-server>/
</LicenseServerURL>
<TransportCertFile>
aaxs-test-server-trnsCert.der
</TransportCertFile>
<LicenseServerCertFile>
aaxs-test-server-licCert.der
</LicenseServerCertFile>
<PackagerCredentialFile>
aaxs-test-server-pkgrCert.pfx
</PackagerCredentialFile>
<PackagerCredentialPassword>pwd=</PackagerCredentialPassword>
<PolicyFile>sample_policy.pol</PolicyFile>
</FlashAccessV2>
</ContentProtection>
</Recording>
</Event>
The following Event.xml file configures Adobe Access V3 for a single live event:

130
ADOBE MEDIA SERVER 5.0.6 DEVELOPER’S GUIDE
Content protection
Last updated 9/4/2014
<Event>
<EventID>liveevent</EventID>
<Recording>
<FragmentDuration>4000</FragmentDuration>
<SegmentDuration>400000</SegmentDuration>
<DiskManagementDuration>3</DiskManagementDuration>
<ContentProtection enabled="true">
<ProtectionScheme>FlashAccessV3</ProtectionScheme>
<FlashAccessV3>
<ContentID>liveevent</ContentID>
<CommonKeyFile>common-key.bin</CommonKeyFile>
<LicenseServerURL>
http://<aaxs-test-server>/
</LicenseServerURL>
<TransportCertFile>
aaxs-test-server-trnsCert.der
</TransportCertFile>
<LicenseServerCertFile>
aaxs-test-server-licCert.der
</LicenseServerCertFile>
<PackagerCredentialFile>
aaxs-test-server-pkgrCert.pfx
</PackagerCredentialFile>
<PackagerCredentialPassword>pwd=</PackagerCredentialPassword>
<PolicyFile>sample_policy.pol</PolicyFile>
</FlashAccessV3>
</ContentProtection>
</Recording>
</Event>
Note: In this case, copy the common-key.bin file from the rootinstall/creds directory to the
rootinstall/applications/livepkgr/events/_definst_/liveevent directory.
License chaining
Adobe Media Server will support embedding leaf licenses in the DRM metadata from the policy generated using a
chained license. Adobe Media Server will need the license server credential and the credential password configured so
that the root license from the policy can be used to encrypt the CEK contained in the embedded leaf license.
If the configuration for embedding the leaf license is turned off, Adobe Media Server will still support such a policy
except that the leaf license will not be embedded in the DRM metadata.
Note: The support will be limited to a single license server credential and credential-password pair.
The following table provides the required configuration:
Parameter Description Default value
HdsDrmEmbedLeafLicense (Server level)
EmbedLeafLicense (Application and event
level)
Enables embedding of leaf
licenses in DRM metadata.
Possible values are "true" or
"false".
Note: The policy file
must be created using a
chained license.
false

131
ADOBE MEDIA SERVER 5.0.6 DEVELOPER’S GUIDE
Content protection
Last updated 9/4/2014
The following example shows the license chaining configuration at the application level:
<Application>
<HDS>
<Recording>
<ContentProtection enabled="true">
<ProtectionScheme>FlashAccessV3</ProtectionScheme>
<FlashAccessV3>
<ContentID>liveevent</ContentID>
<CommonKeyFile>common-key.bin</CommonKeyFile>
<LicenseServerURL>http://<aaxs-test-server>/</LicenseServerURL>
<TransportCertFile>
aaxs-test-server-trnsCert.der
</TransportCertFile>
<LicenseServerCertFile>
aaxs-test-server-licCert.der
</LicenseServerCertFile>
<PackagerCredentialFile>
aaxs-test-server-pkgrCert.pfx
</PackagerCredentialFile>
<PackagerCredentialPassword>pwd=</PackagerCredentialPassword>
<PolicyFile>sample_policy.pol</PolicyFile>
<EmbedLeafLicense>true</EmbedLeafLicense>
<LicenseServerCredentialFile>
aaxs-test-server-pkgrCertLic.pfx
</LicenseServerCredentialFile>
<LicenseServerCredentialPassword>
pwd_lic=
</LicenseServerCredentialPassword>
</FlashAccessV3>
</ContentProtection>
</Recording>
</HDS>
</Application>
The following example shows the license chaining configuration at the event level:
HdsDrmLicenseServerCredentialFile (Server
level)
LicenseServerCredentialFile (Application and
event level)
Required if
HdsDrmEmbedLeafLicense
is set to true. The license
server credential used when
protecting content at this
location.
NA
HdsDrmLicenseServerCredentialPassword
(Server level)
LicenseServerCredentialPassword
(Application and event level)
Required if
HdsDrmEmbedLeafLicense
is set to true. The license
server credential password
for the configured license
server credential file.
NA
Parameter Description Default value

132
ADOBE MEDIA SERVER 5.0.6 DEVELOPER’S GUIDE
Content protection
Last updated 9/4/2014
<Event>
<Recording>
<ContentProtection enabled="true">
<ProtectionScheme>FlashAccessV3</ProtectionScheme>
<FlashAccessV3>
<ContentID>liveevent</ContentID>
<CommonKeyFile>common-key.bin</CommonKeyFile>
<LicenseServerURL>
http://<aaxs-test-server>/
</LicenseServerURL>
<TransportCertFile>
aaxs-test-server-trnsCert.der
</TransportCertFile>
<LicenseServerCertFile>
aaxs-test-server-licCert.der
</LicenseServerCertFile>
<PackagerCredentialFile>
aaxs-test-server-pkgrCert.pfx
</PackagerCredentialFile>
<PackagerCredentialPassword>
pwd=
</PackagerCredentialPassword>
<PolicyFile>sample_policy.pol</PolicyFile>
<EmbedLeafLicense>true</EmbedLeafLicense>
<LicenseServerCredentialFile>
aaxs-test-server-pkgrCertLic.pfx
</LicenseServerCredentialFile>
<LicenseServerCredentialPassword>
pwd_lic=
</LicenseServerCredentialPassword>
</FlashAccessV3>
</ContentProtection>
</Recording>
</Event>
Note: License chaining is not supported for the “VOD use case” on page 141.
Key rotation
Adobe Media Server 5 supports Key Rotation for protected HTTP Dynamic Streaming when used with Adobe Access
and PHDS. You can encrypt content packaged with AMS 5 using a set of keys. You can periodically change the
encryption key and specify how often the content encryption key is to be changed.
Server level - Adobe Access
The following httpd.conf will enable key rotation at server level :
Parameter Description Default value
HdsDrmEnableKeyRotation Whether to use Key Rotation
with AAXS protection
scheme
false
HdsDrmKeyRotationInterval Key rotation interval to be
used (in seconds), when
enabling key rotation.
900 seconds

133
ADOBE MEDIA SERVER 5.0.6 DEVELOPER’S GUIDE
Content protection
Last updated 9/4/2014
<Location /hds-live>
HttpStreamingEnabled true
HttpStreamingLiveEventPath "../applications"
HttpStreamingContentPath "../applications" HdsFmsDirPath ".."
HttpStreamingF4MMaxAge 2
HttpStreamingBootstrapMaxAge 2
HttpStreamingDrmmetaMaxAge 3600
HttpStreamingFragMaxAge -1
Options -Indexes FollowSymLinks
HttpStreamingEncryptionScope server
HttpStreamingProtectionScheme FlashAccessV3
HdsDrmCommonKeyFile "../creds/common-key.bin"
HdsDrmLicenseServerURL http://<aaxs-test-server>/
HdsDrmTransportCertFile aaxs-test-server-trnsCert.der
HdsDrmLicenseServerCertFile aaxs-test-server-licCert.der
HdsDrmPackagerCredentialFile aaxs-test-server-pkgrCert.pfx
HdsDrmPackagerCredentialPassword pwd=
HdsDrmPolicyFile sample_policy.pol
HdsDrmEnableKeyRotation true
HdsDrmKeyRotationInterval 500
</Location>
Application level - Adobe Access
The following Application.xml will enable key rotation at Application level :
Parameter Description Default value
HDS/Recording/ContentProtection/FlashAcc
essV3/EnableKeyRotation
Whether to use Key Rotation
with AAXS protection
scheme
false
HDS/Recording/ContentProtection/FlashAcc
essV3/KeyRotationInterval
Key rotation interval to be
used (in seconds), when
enabling key rotation.
900 seconds
HDS/Recording/ContentProtection/FlashAcc
essV3/KeyRotationFilePath
The file containing the
rotation keys to be used.
This file will contain a
sequence of rotated keys
used to encrypt content. If
no file is specified, randomly
generated keys will be used.
The keys must be 16 bytes in
length and specified as hex
values.
Randomly
generated keys will
be used (as
described below)

134
ADOBE MEDIA SERVER 5.0.6 DEVELOPER’S GUIDE
Content protection
Last updated 9/4/2014
<Application>
<StreamMana ger>
<Live>
<AssumeAbsoluteTime>true</AssumeAbsoluteTime>
<PublishTimeout>0</PublishTim eout>
<Adj ustForZeroTimeStampMessages>2</AdjustForZeroTimeStampMessages>
<AdjustForRecordingRollover>false</AdjustForRecordingRollover>
</Live>
</StreamManager >
<HDS>
<Recording>
<ContentProtection enabled="true">
<ProtectionScheme>FlashAccessV3</ProtectionScheme>
<FlashAccessV3>
<ContentID >liveevent</ContentID>
<CommonKeyFile>common-key.bin</CommonKeyFile>
<LicenseServerURL>http://<aaxs-test-server>/</LicenseServerURL>
<TransportCertFile>
aaxs-test-server-trnsCert.der
</TransportCertFile>
<Licens eServerCertFile>
aaxs-test-server-licCert.der
</LicenseServerCertFile>
< PackagerCredentialFile>
aaxs-test-server-pkgrCert.pfx
</PackagerCredentialFile>
<PackagerCredentialPassword>pwd=</PackagerCredentialPassword>
<PolicyFil e>sample _policy.pol</PolicyFile>
<EnableKeyRotation>true</EnableKeyRotation>
<KeyRotationInterval>500</KeyRotationInterval>
<KeyRotationFilePath>sample_keys.txt</KeyRotationFilePath>
</FlashAccessV3>
</ContentProtection>
</Recording>
</HDS>
</Application>
Event level - Adobe Access
Parameter Description Default value
Recording/ContentProtection/FlashAccessV
3/EnableKeyRotation
Whether to use Key Rotation
with AAXS protection
scheme
false
Recording/ContentProtection/FlashAccessV
3/KeyRotationInterval
Key rotation interval to be
used (in seconds), when
enabling key rotation.
900 seconds
Recording/ContentProtection/FlashAccessV
3/KeyRotationFilePath
The file containing the
rotation keys to be used.
This file will contain a
sequence of rotated keys
used to encrypt content. If
no file is specified, randomly
generated keys will be used.
The keys must be 16 bytes in
length and specified as hex
values.
Randomly
generated keys will
be used (as
described below)

135
ADOBE MEDIA SERVER 5.0.6 DEVELOPER’S GUIDE
Content protection
Last updated 9/4/2014
The following Event.xml will enable key rotation at Event level :
<Event>
<EventID>liveevent</EventID>
<Recording>
<FragmentDuration>4000</FragmentDuration>
<SegmentDuration>400000</SegmentDuration>
<DiskManagementDuration>3</DiskManagementDuration>
<ContentProtection enabled="true">
<ProtectionScheme>FlashAccessV3</ProtectionScheme>
<FlashAccessV3>
<ContentID>liveevent</ContentID>
<CommonKeyFile>common-key.bin</CommonKeyFile>
<LicenseServerURL>http://<aaxs-test-server>/</LicenseServerURL>
<TransportCertFile>aaxs-test-server-trnsCert.der</TransportCertFile>
<LicenseServerCertFile>
aaxs-test-server-licCert.der
</LicenseServerCertFile>
<PackagerCredentialFile>
aaxs-test-server-pkgrCert.pfx
</PackagerCredentialFile>
<PackagerCredentialPassword>pwd=</PackagerCredentialPassword>
<PolicyFile>sample_policy.pol</PolicyFile>
<EnableKeyRotation>true</EnableKeyRotation>
<KeyRotationInterval>500</KeyRotationInterval>
<KeyRotationFilePath>sample_keys.txt</KeyRotationFilePath>
</FlashAccessV3>
</ContentProtection>
</Recording>
</Event>
Note: HdsDrmKeyRotationFilePath takes path relative to <AMS-Install>/applications/<application-name>/.
Server level - PHDS
The following httpd.conf will enable key rotation at server level :
Parameter Description Default value
PHDSEnableKeyRotation Whether to use Key Rotation
with PHDS protection
scheme
false
PHDSKeyRotationInterval Key rotation interval to be
used (in seconds), when
enabling key rotation.
900 seconds

136
ADOBE MEDIA SERVER 5.0.6 DEVELOPER’S GUIDE
Content protection
Last updated 9/4/2014
<Location /hds-live>
HttpStreamingEnabled true
HttpStreamingLiveEventPath "../applications"
HttpStreamingContentPath "../applications" HdsFmsDirPath ".."
HttpStreamingF4MMaxAge 2
HttpStreamingBootstrapMaxAge 2
HttpStreamingDrmmetaMaxAge 3600
HttpStreamingFragMaxAge -1
Options -Indexes FollowSymLinks
HttpStreamingEncryptionScope server
HttpStreamingProtectionScheme PHDS
PHDSVideoEncryptionLevel 2
PHDSPlaybackExpiration 24Hours
PHDSOutputProtection None
PHDSEnableKeyRotation true
PHDSKeyRotationInterval 500
</Location>
Application level - PHDS
The following Application.xml will enable key rotation at Application level :
<Application>
<StreamMana ger>
<Live>
<AssumeAbsoluteTime>true</AssumeAbsoluteTime>
<PublishTimeout>0</PublishTim eout>
<Adj ustForZeroTimeStampMessages>2</AdjustForZeroTimeStampMessages>
<AdjustForRecordingRollover>false</AdjustForRecordingRollover>
</Live>
</StreamManager >
<HDS>
<Recording>
<ContentProtection enabled="true">
<ProtectionScheme>PHDS</ProtectionScheme>
<PHDS>
<VideoEncryptionLevel>2</VideoEncryptionLevel>
<OutputProtection>None</OutputProtection>
<PlaybackExpiration>24Hours</PlaybackExpiration>
<EnableKeyRotation>true</EnableKeyRotation>
<KeyRotationInterval>500</KeyRotationInterval>
</PHDS>
</ContentProtection>
</Recording>
< /HDS>
</Application>
Parameter Description Default value
HDS/Recording/ContentProtection/PHDS/E
nableKeyRotation
Whether to use Key Rotation
with PHDS protection
scheme
false
HDS/Recording/ContentProtection/PHDS/K
eyRotationInterval
Key rotation interval to be
used (in seconds), when
enabling key rotation.
900 seconds

137
ADOBE MEDIA SERVER 5.0.6 DEVELOPER’S GUIDE
Content protection
Last updated 9/4/2014
Event level - PHDS
The following Event.xml will enable key rotation at Event level :<Event>
<Event>
<EventID>liveevent</EventID>
<Recording>
<FragmentDuration>4000</FragmentDuration>
<SegmentDuration>400000</SegmentDuration>
<DiskManagementDuration>3</DiskManagementDuration>
<ContentProtection enabled="true">
<ProtectionScheme>PHDS</ProtectionScheme>
<PHDS>
<VideoEncryptionLevel>2</VideoEncryptionLevel>
<OutputProtection>None</OutputProtection>
<PlaybackExpiration>24Hours</PlaybackExpiration>
<EnableKeyRotation>true</EnableKeyRotation>
<KeyRotationInterval>500</KeyRotationInterval>
</PHDS>
</ContentProtection>
</Recording>
</Event>
Disable JIT encryption for F4F content
When PHDS/Adobe Access protection is enabled, the server ingests a stream and packages it into F4F stream data. The
unencrypted F4F data is taken as source and encrypted using the PHDS/Adobe Access configurations.In order to force
the server to store the ingested stream as encrypted F4F data, and disable the just-in-time encryption of the F4F data,
a special configuration is required.
The following table contains the configuration directive for enabling and disabling JIT encryption at server level:
httpd.conf tags:
<AMS-Install>conf/_defaultRoot_/_defaultVHost_/Application.xml tags:
Note: The tags HttpStreamingJITEncryption and JITEncryption both must be set to false to disable JIT encryption.
Parameter Description Default value
Recording/ContentProtection/PHDS/Enable
KeyRotation
Whether to use Key Rotation
with PHDS protection
scheme
false
Recording/ContentProtection/PHDS/KeyRot
ationInterval
Key rotation interval to be
used (in seconds), when
enabling key rotation.
900 seconds
Directive Description Default value
HttpStreamingJITEncryption To disable just in time
encryption, set the value to
“false”
true
Directive Description Default value
HDS/Recording/JITEncryption To disable just in time
encryption, set the value to
“false”
false

138
ADOBE MEDIA SERVER 5.0.6 DEVELOPER’S GUIDE
Content protection
Last updated 9/4/2014
When JITEncryption is set to false:
•Specify server level encryption settings (PHDS/Adobe Access) at <AMS-
Install>conf/_defaultRoot_/_defaultVHost_/Application.xml.
•The ingested stream is stored as encrypted F4F content. So, DRMmeta file is stored on the server inside the F4F
content.
The following configurations in httpd.conf will disable JIT encryption server wide:
<Location /hds-live>
HttpStreamingEnabled true
HttpStreamingLiveEventPath "../applications"
HttpStreamingContentPath "../applications" HdsFmsDirPath ".."
HttpStreamingF4MMaxAge 2
HttpStreamingBootstrapMaxAge 2
HttpStreamingDrmmetaMaxAge 3600
HttpStreamingFragMaxAge -1
HttpStreamingJITEncryption false
Options -Indexes FollowSymLinks
</Location>
The following configurations for <AMSInstall>conf/_defaultRoot_/_defaultVHost_/Application.xml enables PHDS
protection:
<Application>
<!-- This section provides th e means to control the behavior of -->
<!-- application-specific HTTP dynamic s treaming f unctionality. -->
<HDS>
<!-- This section cont rols the behavior of HTTP live recording -->
<Recording>
<!-- The enabled attribute can be set to "true", "false" or "allow". -->
<!-- Content prote cted is enabled when the attribute is set to "true", -->
<!-- and disabled when set to "false". -->
<!-- If enabled is set to "allow", only then Event.xml have right to -->
<!-- override the ContentProtection tag completely. And none of the -->
<!-- settings inside the ContentProtection here will be used. And if -->
<!-- ContentProtection is also not specified in Event.xml, content -->
<!-- protection will be disabled by default. -->
<JITEncryption>false</JITEncryption>
<ContentProtection enabled="true">
<ProtectionScheme>PHDS</ProtectionScheme>
<PHDS>
<CommonKeyFile>common-key.bin</CommonKeyFile>
<VideoEncryptionLevel>2</VideoEncryptionLevel>
<PlaybackExpiration>24Hours</PlaybackExpiration>
<OutputProtection>None</OutputProtection>
</PHDS>
</ContentProtection>
</Recording>
</HDS>
</Application>
The following configurations at <AMS-Install>conf/_defaultRoot_/_defaultVHost_/Application.xml enables Adobe
Access protection:

139
ADOBE MEDIA SERVER 5.0.6 DEVELOPER’S GUIDE
Content protection
Last updated 9/4/2014
<Application>
<!-- This section provides t he means to control the behavior of - ->
<!-- application-specific HTTP dynamic streaming fu nctionality. -->
<HDS>
<!-- This section controls the behavior of HTTP live recording -->
<Recording>
<!-- The enabled attribute can be set to "true", "false" or "allow". -->
<!-- Content protection is enabled when the attribute is set to "true ", -->
<!-- and disabled when set to "false". -->
<!-- If enabled is set to "allow", then Event.xml will -->
<!-- override the ContentProtection tag completely. And none of the -->
<!-- settings inside the ContentProtection will be used. And if -->
<!-- ContentProtection is not specified in Event.xml, then content -->
<!-- protection will be disabled by default. -->
<JITEncryption>false</JITEncryption>
<ContentProtection enabled="true">
<ProtectionScheme>FlashAccessV2</ProtectionScheme>
< FlashAccessV2>
<ContentID>liveevent</ContentID>
<CommonKeyFile>common-key.bin</CommonKeyFile>
<LicenseServerURL>
http://<aaxs-test-server>/
</LicenseServerURL>
<TransportCertFile>
aaxs-test-server-trnsCert.der
</TransportCertFile>
<LicenseServerCertFile>
aaxs-test-server-licCert.der</LicenseServerCertFile>
<PackagerCredentialFile>
aaxs-test-server-pkgrCert.pfx
</PackagerCredentialFile>
<PackagerCredentialPassword>pwd=</PackagerCredentialPassword>
<PolicyFile>sample_policy.pol</PolicyFile>
</ FlashAccessV2>
</ContentProtection>
</Recording>
</HDS>
</Application>
Configure system for encrypted live stream in HLS and HDS
You do not need two different recording applications for HDS and HLS if JIT encryption is ON. The live content is
stored unencrypted on the disk, and later encrypted dynamically using the HDS or HLS modules of Apache.By default
JIT encryption is on unless the HttpStreamingJITEncryption and JITEncryption tags are set to false.Publishing
one set of streams to Adobe Media Server for delivery with live PHLS and PHDS requires special configuration when
JIT Encryption is off.When PHDS is enabled when JIT encryption is off , the server ingests a stream and packages it
into encrpypted F4F data. However, PHLS requires unencrypted data as its source. It’s not possible to take the
encrypted F4F data and encrypt it again for PHLS.To deliver protected content to Flash Player/AIR and iOS devices,
configure your encoder to publish to two different applications, one for HDS and one for HLS.
1Create two copies of the livepkgr application. Name them “livepkgr_hds” and “livepkgr_hls”.
2Configure the <AMS-Install>/conf/_defaultRoot_/_defaultVHost_/Application.xml as following:

140
ADOBE MEDIA SERVER 5.0.6 DEVELOPER’S GUIDE
Content protection
Last updated 9/4/2014
<Application>
<!-- This section provides the ways to control the behavi or of -->
<!-- application-specific HTTP dynamic streaming functionality. -->
< HDS>
<!-- This section controls the behavior of HTTP live recording -->
<Recording>
<!-- The enabled attribute can be set to "true", "false" or "allow" . -->
<!-- Content protected is enabled when the attribute is set to "true", -->
<!-- and disabled when set to "false". -->
<!-- If enabled is set to "allow", only then Event.xml have right to -->
<!-- override the ContentProtection tag completely. And none of the -->
<!-- settings inside the ContentProtection here will be used. And if -->
<!-- ContentProtection is also not specified in Event.xml, content -->
<!-- protection will be disabled by default. -->
< JITEncryption>false</JITEncryption>
<ContentProtection enabled="allow">
</ContentProtection>
</Recording>
</HDS>
</Application>
3Configure the <AMS-Install>/applications/livepkgr_hds/Application.xml as following:
<Application>
<StreamManager>
<Live>
<AssumeAbsoluteTime>true</AssumeAbsoluteTime>
<PublishTimeout>0</PublishTimeout>
<AdjustForZeroTimeStampMessages>2</AdjustForZeroTimeStampMessages>
<AdjustForRecordingRollover>false</AdjustForRecordingRollover>
</Live>
</StreamManager>
<HDS>
<Recording >
<ContentProtection enabled="true" >
<ProtectionScheme>PHDS</ProtectionScheme>
<PHDS>
<CommonKeyFile>common-key.bin</CommonKeyFile>
<VideoEncryptionLevel>2</VideoEncryptionLevel>
<PlaybackExpiration>24Hours</PlaybackExpiration>
<OutputProtection>None</OutputProtection>
</PHDS>
</ContentProtection>
</Recording>
</HDS>
</Application>
4Configure the httpd.conf files as follows:
For PHDS, use the following Location directive:

141
ADOBE MEDIA SERVER 5.0.6 DEVELOPER’S GUIDE
Content protection
Last updated 9/4/2014
<Location /hds-live>
HttpStreamingEnabled true
HttpStreamingLiveEventPath "../applications/livepkgr_hds"
HttpStreamingContentPath "../applications/livepkgr_hds"
HttpStreamingURLSandboxLevel "App"
HttpStreamingF4MMaxAge 2
HttpStreamingBootstrapMaxAge 2
HttpStreamingDrmmetaMaxAge 3600
HttpStreamingFragMaxAge -1
HttpStreamingJITEncryption false
Options -Indexes FollowSymLinks
</Location>
For PHLS, use the following Location directive:
<Location /hls-live>
HLSHttpStreamingEnabled true
HttpStreamingLiveEventPath "../applications/livepkgr_hls"
HttpStreamingContentPath "../applications/livepkgr_hls"
HttpStreamingURLSandboxLevel "App"
HLSMediaFileDuration 8000
HLSSlidingWindowLength 6
HLSFmsDirPath ".."
HttpStreamingUnavailableResponseCode 503
HLSEncryptionScope server
HLSProtectionScheme PHLS
</Location>
5Restart Apache.
6Publish streams from Flash Media Live Encoder to the livepkgr_hds and livepkgr_hls applications. Use the stream
name livestream%i?adbe-live-event=liveevent.
7The request URL for PHDS is http://<serveruri>/hds-live/_definst_/<liveevent>.f4m and the request URL for
PHLS is http://<serveruri>/hls-live/_definst_/<liveevent>.m3u8. Because the directive
HttpStreamingURLSandboxLevel is set to "App", the request URL doesn’t use the application name.
Note: In this case, copy the common-key.bin from <AMS Install>/creds directory to <AMS
Install>/applications/livepkgr_hds/.
Similarly, by following the above mentioned steps, Adobe Access configurations can also be used with HDS and HLS.
VOD use case
Configure PHDS for on-demand streaming at the following levels:
Server—rootinstall/Apache2.2/conf/httpd.conf
Stream—create a jit.conf file and copy it to the same directory as the content.
Getting started
To quickly get started with PHDS, you need to understand the following directives:

142
ADOBE MEDIA SERVER 5.0.6 DEVELOPER’S GUIDE
Content protection
Last updated 9/4/2014
The simplest way to configure on-demand PHDS is to uncomment two lines in the Apache httpd.conf file:
<IfModule jithttp_module>
<Location /hds-vod>
HttpStreamingJITPEnabled true
HttpStreamingContentPath "../webroot/vod"
JitFmsDirPath ".."
Options -Indexes FollowSymLinks
# Uncomment the following directives to enable encryption
# for this location.
EncryptionScope server
ProtectionScheme phds
</Location>
</IfModule>
Note: This configuration will enable PHDS at the server level.
The sample1_1500kbps.f4v media file comes with the default installation of AMS under <root-install>/webroot. Play
back the media file sample1_1500kbps.f4v using the following URI:http://<server-ip>/hds-vod/
sample1_1500kbps.f4v.f4m
Detailed configuration
The following sections provides details configurations for both PHDS and Adobe Access.
Server level
The following sections explain how content protection can be applied across the server:
Common configurations
Directive Default value Description
EncryptionScope None Possible values are content and
server.
When the value is content, PHDS
configuration settings in the jit.conf
file override settings in the
httpd.conf. file.
When the value is server, the server
uses configuration settings in the
httpd.conf file.
ProtectionScheme None A string determining the type of
protection. For PHDS, use PHDS.

143
ADOBE MEDIA SERVER 5.0.6 DEVELOPER’S GUIDE
Content protection
Last updated 9/4/2014
PHDS configurations
Configure the following directives for the jithttp_module in the Apache httpd.conf file:
Adobe Access configurations
Directive Default value Description
EncryptionScope content Possible values are content and
server.
When the value is content, PHDS
configuration settings in the jit.conf
file override settings in the
httpd.conf. file.
When the value is server, the server
uses configuration settings in the
httpd.conf file.
Serverwide configuration that sets
encryption policy.server - ALL
content is protected according to the
apache configuration (jit.conf is
ignored).content - Content is
protected/unprotected according
the to jit.conf file.off - ALL content are
unprotected (jit.conf is ignored) .
ProtectionScheme PHDS A string determining the type of
protection. Possible values are PHDS
and FlashAccessV2.
Directive Default value Description
PHDSCommonKeyFile creds/common-key.bin
This file is generated during
installation.
A common key used to protect
content at this location.
PHDSPlaybackExpiration 24Hours The duration within which content
playback is available. Possible values
are 24Hours and Unlimited
PHDSOutputProtection None The required hardware Output
Protection of media on the client.
Possible values are None, BestEffort,
and Required.
PHDSVideoEncryptionLevel 2 The level of encryption for the
content (0-low,1-medium, 2-high).
Lower settings provide partial
encryption. A subset of the samples
(like video keyframes) are encrypted.
Partial encryption can improve
playback performance on the client,
because there are fewer frames to
decrypt.
Directive Default Value Description
JitDrmCommonKeyFile None A common key used to protect content at
this location. JitDrmCommonKeyFile path
is relative to rootinstall/Apache2.2.

144
ADOBE MEDIA SERVER 5.0.6 DEVELOPER’S GUIDE
Content protection
Last updated 9/4/2014
The following example adds a new Location directive. Request that include /phds serve protected content. This
configuration doesn’t define PHDSPlaybackExpiration, PHDSVideoEncryptionLevel, or PHDSCommonKeyFile,
but relies on their default values:
LoadModule jithttp_module modules/mod_jithttp.so
<IfModule jithttp_module>
<Location /phds>
HttpStreamingJITPEnabled true
HttpStreamingContentPath "../webroot/vod"
JitFmsDirPath ".."
Options -Indexes FollowSymLinks
EncryptionScope server
ProtectionScheme phds
</Location>
When a media player request content from the /webroot/vod folder, it is protected. For example, request the following
URL from the sample video player:
http://localhost:8134/phds/sample1_1500kbps.f4v.f4m
To verify that the content is protected, enter the same URL into the address bar of a web browser. The XML response
contains a <drmAdditionalHeader> element like the following:
<?xml version="1.0" encoding="UTF-8" ?>
- <manifest xmlns="http://ns.adobe.com/f4m/1.0">
<id>sample1_1500kbps.f4v</id>
<streamType>recorded</streamType>
<duration>114.61450000000001</duration>
<bootstrapInfo profile="named" id="bootstrap3628">AAABq2Fic3QAAAAAAAA</bootstrapInfo>
<drmAdditionalHeader drmContentId="sample1_1500kbps.f4v"
id="drmMetadata9839">AgARfEFkZGl0aW9uYWxIZWFkZXIDAAp</drmAdditionalHeader>
- <media streamId="sample1_1500kbps.f4v" url="sample1_1500kbps.f4v"
bootstrapInfoId="bootstrap3628" drmAdditionalHeaderId="drmMetadata9839">
<metadata>AgAKb25NZXRhRGF0</metadata>
</media>
</manifest>
Note: The <bootstrapInfo>, <drmAdditionalHeader>, and <metadata> information has been abridged for
readability.
The following example adds a new Location directive. Request that include /hds-vod-fax serve protected content
through Adobe Access:
JitDrmLicenseServerURL None The URL of the license server used for
protecting content.
JitDrmTransportCertFile None The transport certificate used for
protecting content.
JitDrmPackagerCredentialFile None The Packager credential used for
protecting content.
JitDrmPackagerCredentialPassword None The Packager credential password for the
configured packager credential file.
JitDrmPolicyFile None Policy for protecting content.
Directive Default Value Description

145
ADOBE MEDIA SERVER 5.0.6 DEVELOPER’S GUIDE
Content protection
Last updated 9/4/2014
<Location /hds-vod-fax>
HttpStreamingJITPEnabled true
HttpStreamingContentPath "../webroot/vod"
HttpStreamingJITConfAllowed true
JitFmsDirPath ".."
Options -Indexes FollowSymLinks
EncryptionScope server
ProtectionScheme FlashAccessV2
JitDrmCommonKeyFile common-key.bin
// Common key to be used to protect content at this location. No default
JitDrmLicenseServerURL http:
// License server URL used when protecting content at this location. No default
JitDrmTransportCertFile aaxs-test-server-trnsCert.der
// Transport certification used when protecting content at this location. No default
JitDrmLicenseServerCertFile aaxs-test-server-licCert.der
// License server certificate used when protecting content at this location.
// No default.
JitDrmPackagerCredentialFile aaxs-test-server-pkgrCert.pfx
// Packager credential used when protecting content at this location. No default
JitDrmPackagerCredentialPassword pwd=
// Packager credential password for the configured packager credential file.
// No default
JitDrmPolicyFile sample_policy.pol
//Policy to be used when protecting content at this location . No default
</Location>
Note: JitDrmCommonKeyFile takes path relative to <AMS-Install>/Apache2.2.
Stream level
To configure encryption parameters for individual sets of media, follow the configurations mentioned below.
Common configurations
PHDS configurations
Element Default value Description
//manifest/hds:content-
protection enabled
false To enable content protection with
Adobe Access or PHDS, set the
enabled attribute to "true".
//manifest/hds:content-
protection/hds:protection-
scheme
PHDS The type of protection. The possible
values are PHDS and
FlashAccessV2 only. For PHDS, use
PHDS.

146
ADOBE MEDIA SERVER 5.0.6 DEVELOPER’S GUIDE
Content protection
Last updated 9/4/2014
Adobe Access configurations
Element Default value Description
//manifest/hds:content-
protection/hds:phds/hds:com
mon-key-file
creds/common-key.bin Path to a common key file generated
when the server installs. The file
contains a16-byte/128-bit random
key. This path can be absolute or
relative to the jit.conf file.
//manifest/hds:content-
protection/hds:phds/hds:vid
eo-encryption-level
2 The level of encryption for the
content (0-low,1-medium,2-high).
Lower settings provide partial
encryption. A subset of the samples
(like video keyframes) are encrypted.
Partial encryption can improve
playback performance on the client
because there are fewer frames to
decrypt.
//manifest/hds:content-
protection/hds:phds/hds:pla
yback-expiration
24Hours The protection policy. The policy
determines the duration within
which content playback is available.
Possible values are 24Hours and
Unlimited.
//manifest/hds:content-
protection/hds:phds/hds:out
put-protection
None The required hardware Output
Protection of media on the client.
Possible values are None, BestEffort,
and Required.
Element Default value Description
//manifest/hds:content-
protection/hds:flash-
access/hds:common-key-file
None The path to common key file. File
contains 16-byte/128-bit random
key.The path must be absolute or
relative to the jit.conf file.
//manifest/hds:content-
protection/hds:flash-
access/hds:content-id
None The Content ID to be used for content
protection. If not specified, the salt is
the filename. If specified, the salt is
shared with all content in the
directory.
//manifest/hds:content-
protection/hds:flash-
access/hds:license-server-
url
None The License Server URL.
//manifest/hds:content-
protection/hds:flash-
access/hds:transport-cert-
file
None The path to transport cert file. The file
is in DER format.The path should be
absolute or relative to the jit.conf file.
//manifest/hds:content-
protection/hds:flash-
access/hds:license-server-
cert-file
None The path to license cert file. File is in
DER format.The path should be
absolute or relative to the jit.conf file.

147
ADOBE MEDIA SERVER 5.0.6 DEVELOPER’S GUIDE
Content protection
Last updated 9/4/2014
The following httpd.conf file sets EncryptionScope to content. This setting tells the server that configuration
settings in the jit.conf file override settings in the httpd.conf file. Use this setting to configure PHDS/AdobeAccess for
individual sets of media.
LoadModule jithttp_module modules/mod_jithttp.so
<IfModule jithttp_module>
<Location /hds-vod>
HttpStreamingJITPEnabled true
HttpStreamingContentPath "../webroot/vod"
JitFmsDirPath ".."
Options -Indexes FollowSymLinks
EncryptionScope content
</Location>
The following is the accompanying jit.conf file, which is in the same directory as the on-demand media files
(/webroot/vod), which will enable PHDS:
<?xml version="1.0" encoding="utf-8"?>
<manifest xmlns="http://ns.adobe.com/f4m/1.0" xmlns:hds="http://ns.adobe.com/hds-package/1.0>
<frame-rate>29.97</frame-rate>
<frames-per-keyframe-interval>60</frames-per-keyframe-interval>
<hds:content-protection enabled="true">
<hds:protection-scheme>phds</hds:protection-scheme>
<hds:phds>
<hds:common-key-file>
C:\Program Files\Adobe\Adobe Media Server 5\creds\common-key.bin
</hds:common-key-file>
<hds:video-encryption-level>0</hds:video-encryption-level>
<hds:playback-expiration>unlimited</hds:playback-expiration>
</hds:phds>
</hds:content-protection>
</manifest>
The following is the accompanying jit.conf file, which is in the same directory as the on-demand media files
(/webroot/vod), which will enable Adobe Access:
//manifest/hds:content-
protection/hds:flash-
access/hds:packager-
credential-file
None The path to packager credential cert
file. File is in PFX format.The path
should be absolute or relative to the
jit.conf file.
//manifest/hds:content-
protection/hds:flash-
access/hds:packager-
credential-password
None The packager credential password.
//manifest/hds:content-
protection/hds:flash-
access/hds:policy-file
None The path to a policy file. File is in
Adobe Access policy format.The path
should be absolute or relative to the
jit.conf file.
Element Default value Description

148
ADOBE MEDIA SERVER 5.0.6 DEVELOPER’S GUIDE
Content protection
Last updated 9/4/2014
<?xml version="1.0" encoding="utf-8"?>
<manifest xmlns="http://ns.adobe.com/f4m/1.0" xmlns:hds="http://ns.adobe.com/hds-
package/1.0">
<hds:FlashAccessV2>
<hds:content-id>jit_fax2</hds:content-id>
<hds:common-key-file>common-key.bin</hds:common-key-file>
<hds:license-server-url>http://<aaxs-test-server></hds:license-server-url>
<hds:transport-cert-file>aaxs-test-server-trnsCert.der</hds:transport-cert-file>
<hds:license-server-cert-file>aaxs-test-server-licCert.der</hds:license-server-
cert-file>
<hds:packager-credential-file>aaxs-test-server-pkgrCert.pfx</hds:packager-
credential-file>
<hds:packager-credential-password>pwd=</hds:packager-credential-password>
<hds:policy-file>sample_policy.pol</hds:policy-file>
</hds:FlashAccessV2>
</hds:content-protection>
</manifest>
Note: -key-file takes path relative to <AMS-Install>/webroot/vod.
Key rotation
Adobe Media Server 5 supports Key Rotation for protected HTTP Dynamic Streaming when used with Adobe Access
and PHDS. You can encrypt content packaged with AMS 5 using a set of keys. You can periodically change the
encryption key and specify how often the content encryption key is to be changed.
Adobe Access Settings
The following httpd.conf will enable key rotation at server level :
Parameter Description Default value
JitDrmEnableKeyRotation Whether to use Key Rotation
with FAXS protection
scheme. In this case,
randomly generated keys
are used.
false
JitDrmKeyRotationInterval Key rotation interval to be
used (in seconds), when
enabling key rotation.
900 seconds

149
ADOBE MEDIA SERVER 5.0.6 DEVELOPER’S GUIDE
Content protection
Last updated 9/4/2014
<Location /hds-vod>
HttpStreamingJITPEnabled true
HttpStreamingContentPath "../webroot/vod"
HttpStreamingJITConfAllowed true
JitFmsDirPath ".."
Options -Indexes FollowSymLinks
EncryptionScope server
ProtectionScheme FlashAccessV3
JitDrmCommonKeyFile ../creds/common-key.bin
JitDrmLicenseServerURL http://ip-address:8090
JitDrmTransportCertFile dme/transport-cert-file.der
JitDrmLicenseServerCertFile dme/transport-cert-file.der
JitDrmPackagerCredentialFile dme/transport-cert-file.pfx
JitDrmPackagerCredentialPassword kY2IUPnQuG0=
JitDrmPolicyFile dme/local_chain.pol
JitDrmEnableKeyRotation true
JitDrmKeyRotationInterval 16
</Location>
Jit.conf
<?xml version="1.0" encoding="utf-8"?>
<manifest xmlns="http://ns.adobe.com/f4m/1.0" xmlns:hds="http://ns.adobe.com/hds-
package/1.0">
<hds:content-protection enabled="true">
<hds:protection-scheme> FlashAccessV3 </hds:protection-scheme>
<hds:Flashaccessv3>
<hds:content-id>jit_fax3</hds:content-id>
<hds:common-key-file>../../creds/common-key.bin</hds:common-key-file>
<hds:license-server-url>http://10.192.37.195:8090/</hds:license-server-url>
<hds:transport-cert-file>../dme/transport-cert-file.der</hds:transport-cert-
file>
<hds:license-server-cert-file>../dme/transport-cert-file.der</hds:license-
server-cert-file>
<hds:packager-credential-file>../dme/transport-cert-file.pfx</hds:packager-
credential-file>
<hds:packager-credential-password>kY2IUPnQuG0=</hds:packager-credential-
password>
<hds:policy-file>../dme/local_chain.pol</hds:policy-file>
<hds:enable-key-rotation>true</hds:enable-key-rotation>
<hds:key-rotation-interval>900</hds:key-rotation-interval>
</hds:Flashaccessv3>
</hds:content-protection>
</manifest>
PHDS - Settings
This section explains key rotation settings for PHDS.
Parameter Description Default value
PHDSEnableKeyRotation Whether to use Key Rotation
with PHDS protection
scheme. In this case,
randomly generated keys
are used.
false

150
ADOBE MEDIA SERVER 5.0.6 DEVELOPER’S GUIDE
Content protection
Last updated 9/4/2014
The following httpd.conf will enable key rotation at server level :
<Location /hds-vod>
HttpStreamingJITPEnabled true
HttpStreamingContentPath "../webroot/vod"
HttpStreamingJITConfAllowed true
JitFmsDirPath ".."
Options -Indexes FollowSymLinks
EncryptionScope server
ProtectionScheme PHDS
PHDSCommonKeyFile ../creds/common-key.bin
PHDSEnableKeyRotation true
PHDSKeyRotationInterval 16
</Location>
Jit.conf
<?xml version="1.0" encoding="utf-8"?>
<manifest xmlns="http://ns.adobe.com/f4m/1.0" xmlns:hds="http://ns.adobe.com/hds-
package/1.0">
<hds:content-protection enabled="true">
<hds:protection-scheme> PHDS </hds:protection-scheme>
<hds:PHDS>
<hds:content-id>jit_phds</hds:content-id>
<hds:common-key-file>../../creds/common-key.bin</hds:common-key-file>
<hds:enable-key-rotation>true</hds:enable-key-rotation>
<hds:key-rotation-interval>900</hds:key-rotation-interval>
</hds:PHDS>
</hds:content-protection>
</manifest>
License chaining
Adobe Media Server will support embedding leaf licenses in the DRM metadata from the policy generated using a
chained license. Adobe Media Server will need the license server credential and the credential password configured so
that the root license from the policy can be used to encrypt the CEK contained in the embedded leaf license.
If the configuration for embedding the leaf license is turned off, Adobe Media Server will still support such a policy
except that the leaf license will not be embedded in the DRM metadata.
Note: The support will be limited to a single license server credential and credential-password pair.
The following table provides the required configuration:
PHDSKeyRotationInterval Key rotation interval to be
used (in seconds), when
enabling key rotation.
900 seconds
Parameter Description Default value

151
ADOBE MEDIA SERVER 5.0.6 DEVELOPER’S GUIDE
Content protection
Last updated 9/4/2014
The following httpd.conf will enable key rotation at server level :
<Location /hds-vod>
HttpStreamingJITPEnabled true
HttpStreamingContentPath "../webroot/vod"
HttpStreamingJITConfAllowed true
JitFmsDirPath ".."
Options -Indexes FollowSymLinks
EncryptionScope server
ProtectionScheme FlashAccessV3
JitDrmCommonKeyFile ../creds/common-key.bin
JitDrmLicenseServerURL http://ip-address:8090
JitDrmTransportCertFile dme/transport-cert-file.der
JitDrmLicenseServerCertFile dme/transport-cert-file.der
JitDrmPackagerCredentialFile dme/transport-cert-file.pfx
JitDrmPackagerCredentialPassword kY2IUPnQuG0=
JitDrmPolicyFile dme/local_chain.pol
JitDrmEmbedLeafLicense true
JitDrmLicenseServerCredentialFile dme/transport-cert-file.pfx
JitDrmLicenseServerCredentialPassword kY2IUPnQuG0=
</Location>
Jit.conf
Parameter Description Default value
JitDrmEmbedLeafLicense Enables embedding of leaf
licenses in DRM metadata.
Possible values are "true" or
"false".
Note: The policy file
must be created using a
chained license.
false
JitDrmLicenseServerCredentialFile Required if
HdsDrmEmbedLeafLicense
is set to true. The license
server credential used when
protecting content at this
location.
NA
JitDrmLicenseServerCredentialPassword Required if
HdsDrmEmbedLeafLicense
is set to true. The license
server credential password
for the configured license
server credential file.
NA

152
ADOBE MEDIA SERVER 5.0.6 DEVELOPER’S GUIDE
Content protection
Last updated 9/4/2014
<?xml version="1.0" encoding="utf-8"?>
<manifest xmlns="http://ns.adobe.com/f4m/1.0" xmlns:hds="http://ns.adobe.com/hds-
package/1.0">
<hds:content-protection enabled="true">
<hds:protection-scheme> FlashAccessV3 </hds:protection-scheme>
<hds:Flashaccessv3>
<hds:content-id>jit_fax3</hds:content-id>
<hds:common-key-file>../../creds/common-key.bin</hds:common-key-file>
<hds:license-server-url>http://localhost:8090/</hds:license-server-url>
<hds:transport-cert-file>../dme/transport-cert-file.der</hds:transport-cert-
file>
<hds:license-server-cert-file>../dme/transport-cert-file.der</hds:license-
server-cert-file>
<hds:packager-credential-file>../dme/transport-cert-file.pfx</hds:packager-
credential-file>
<hds:packager-credential-password>kY2IUPnQuG0=</hds:packager-credential-
password>
<hds:policy-file>../dme/local_chain.pol</hds:policy-file>
<hds:embed-leaf-license>true</hds:embed-leaf-license>
<hds:license-server-credential-file>../dme/transport-cert-file.pfx</hds:license-
server-credential-file>
<hds:license-server-credential-password>kY2IUPnQuG0=</hds:license-server-
credential-password>
</hds:Flashaccessv3>
</hds:content-protection>
</manifest>
SWF verification for Protected HTTP Dynamic Streaming
SWF verification prevents unauthorized SWF files from accessing content. To use SWF verification, you must enable
Protected HTTP Dynamic Streaming (PHDS).
Create a list of authorized SWF files, called a whitelist. These files are specified in the embedded license and sent to the
client inside the DRM metadata. On the client, SWF verification is enforced by Adobe Access inside of Flash Player
and AIR.
To create the whitelist, use Whitelist tool (rootinstall/tools/Whitelist).
Workflow
1Enable PHDS.
2Use the whitelist tool to generate a whitelist of authorized SWF files. The whitelist file can have any name. It must
have the .whitelist or .airwhitelist extension.
3Copy the whitelist to the server.
4Enable SWF verification and indicate the location of the whitelist in the following locations:
•(Live)—Application.xml or Event.xml
•(On-demand)—httpd.conf or jit.conf
5Publish a stream to the livepkgr application on Adobe Media Server.
6Request a stream from an OSMF media player. The syntax of the request URL does not change for SWF verification.
The server embeds the SWF hashes from the whitelist into the .drmmeta file. Flash Player attempts to verify the
SWF hash during DRM authentication.

153
ADOBE MEDIA SERVER 5.0.6 DEVELOPER’S GUIDE
Content protection
Last updated 9/4/2014
7(Live) The server looks for the whitelist in the following order:
aThe application folder. (The default application for live HTTP streaming is rootinstall/applications/livepkgr).
bA path in the /SWFVerification/WhitelistFolder element of Application.xml
cA path in the /SWFVerification/WhitelistFolder element of Event.xml
8(On-demand) The server looks for the whitelist in the httpd.conf/jit.conf file in the same folder as the on-demand
content.
If the hashes don’t match, Flash Player throws an runtime error (3310) and the OSMF media player stops requesting
fragments.
SWF verification configurations for live PHDS
To enable SWF verification for live PHDS, enable PHDS at the server level (httpd.conf), the application level
(Application.xml) or the event level (Event.xml).
Configure SWF verification for live HDS at the server level (httpd.conf)
Add the following elements to the hds-live directive to enable SWF verification:
Configure SWF verification for live HDS at the application level (Application.xml) or at the event level
(Event.xml).
In Application.xml, SWFVerification is located at
//Application/HDS/Recording/ContentProtection/PHDS/SWFVerification.In Event.xml, SWFVerification
is located at //Event/Recording/ContentProtection/PHDS/SWFVerification.
Element Description Default
PHDSSWFVerification The container for SWF verification
configuration. To enable SWF verification,
set the enabled attribute to "true".
"false"
PHDSSWFWhiteListFolder
Specify the location of SWF whitelist The application folder of the live event.
Element Description Default
/SWFVerifica
tion
The container for SWF verification
configuration. To enable SWF verification,
set the enabled attribute to "true".
"false"
/SWFVerifica
tion/WhiteLi
stFolder
A path to the folder containing the
whitelist. The folder can contain more than
one whitelist file.
The path can be absolute or relative. A
relative path in the Application.xml file is
relative to the application folder. A relative
path in the Event.xml file is relative to the
event folder. Backwards relative paths are
not supported for security reasons.
This configuration is optional. If no value is
given, the server looks in the application
folder of the live event.
The application folder of the live event.

154
ADOBE MEDIA SERVER 5.0.6 DEVELOPER’S GUIDE
Content protection
Last updated 9/4/2014
Configure the following settings in the Apache httpd.conf file to configure cache control for the bootstrap, fragment,
manifest and drmmeta responses:
•HttpStreamingBootstrapMaxAge
•HttpStreamingFragMaxAge
•HttpStreamingF4MMaxAge
•HttpStreamingDrmmetaMaxAge
For detailed information about each configuration, see “Configure live and on-demand HTTP Streaming at the server
level (httpd.conf)” on page 76.
SWF verification configurations for on-demand PHDS
SWF verification is configured under PHDS. To enable SWF verification, enable PHDS. You can enable on-demand
PHDS at the server level (httpd.conf) or at the stream level (jit.conf).
Configure SWF verification for on-demand PHDS at the server level (httpd.conf) or at the stream level (jit.conf).
Use the following elements to enable and configure SWF verification in the httpd.conf file:
Use the following elements to enable and configure SWF verification in the jit.conf file. Copy the jit.conf file to the
same directory as the on-demand media.
Element Description Default
PHDSSWFVerification The container for SWF verification
configuration. To enable SWF verification,
set the enabled attribute to "true".
"false"
PHDSSWFWhiteListFolder Optional setting to specify where the SWF
whitelist can be found. The folder can
contain more than one whitelist files.
This can be overridden by jit.conf if the
Apache configuration is overridable.
This configuration is optional. If no value is
given, the server looks in the folder
containing the jit.conf file.
The folder containing the media.
Element Description Default
//manifest/hds:content-
protection/hds:phds/hds:swf
-verification
The container for SWF verification
configuration. To enable SWF verification,
set the enabled attribute to "true".
"false"
//manifest/hds:content-
protection/hds:phds/hds:swf
-verification/hds:white-
list-folder
A path to the folder containing the whitelist.
The folder can contain more than one
whitelist file.
The path can be absolute or relative. A
relative path is relative to the folder
containing the jit.conf file. Backwards
relative paths are not supported for security
reasons.
This configuration is optional. If no value is
given, the server looks in the folder
containing the jit.conf file.
The folder containing the media.

155
ADOBE MEDIA SERVER 5.0.6 DEVELOPER’S GUIDE
Content protection
Last updated 9/4/2014
Whitelist tool
Use the whitelist tool to generate a list of verified SWF and AIR files. The server uses the whitelist to perform SWF
verification for Flash Player and AIR applications.
The whitelist tool takes SWF files, AIR certificate files, and AIR signature files and creates a SHA256 hash for each file.
The tool writes the hashes as Base64 encoded text to one or more text files and outputs the text files. The text files use
the filename extensions .whitelist and .airwhitelist.
The whitelist tool is located in the following directory:
rootinstall/tools/Whitelist
Use the following command line syntax to run the whitelist tool:
whitelist --in <file|dir> [--outDir <output dir>] [--out <output file>] [--version]
The following table lists the command line options and arguments for the whitelist tool:
The following table lists examples of running the whitelist tool:
Option Optional Description
--in <file|dir> No A SWF file, an AIR signature file, or an AIR certificate file. A
directory containing SWF files. The dir parameter does
not support AIR files.
To specify multiple files or directories, use multiple --in
options.
For SWF files, the tool outputs a file with the extension
.whitelist. For AIR signature and certificate files, the tool
outputs a file with the extension .airwhitelist.
--log <file|dir> Yes An existing directory path where default
whitelist.properties file is present or the full path name to
the properties file. Customize logging in the .properties
file.
The whitelist tool supports log4j Apache logging. By
default, logging messages are routed to the console. To
reroute them, use the --log option.
--out <output file> Yes The name for the .whitelist file and the .airwhitelist file. If -
-out is not specified, creates .whitelist and .airwhitelist
files for each .swf file and .xml file.
If --out is specified, --outDir is ignored and the file is
saved to the directory the tool is being run from.
--outDir <outputdir> Yes Creates an output directory and saves the .whitelist file to
the directory.
If --outDir is not specified, the .whitelist files and
.airwhitelist files are created in the directory the tool is
being run from. If --outDir is a relative path, it is relative
to the directory the tool is being run from.
--version Yes Prints the SWF verification version number in the .whitelist
file.

156
ADOBE MEDIA SERVER 5.0.6 DEVELOPER’S GUIDE
Content protection
Last updated 9/4/2014
If an input files has the same name as a previously input file, both files are added to the whitelist.
whitelist --in c:\myfolder\signature.xml --in c:\yourfolder\signature.xml --outDir
c:\out\signature.xml
The following is the output:
# c:\myfolder\signature.xml
XXXXXXXXXXXXXXXXXXXXXX
# c:\yourfolder\signature.xml
XXXXXXXXXXXXXXXXXXXXXXXXXXX
The following is the whitelist format for an individual hash:
# foo.swf
PGfcEwgUKWScivIRucIwG5jT
The following is the whitelist format for an AIR file:
# C:\air\signatures.xml
A167FBF93528C87BBCDAC2B8CD0829479DDA6912.2
Example Result
whitelist --in foo.swf --in bar.swf Creates a foo.swf.whitelist and a bar.swf.whitelist in the
current directory.
whitelist --in signature.xml --in bar.swf Creates signature.xml.airwhitelist and bar.swf.whitelist in
the current directory.
whitelist --in foo.swf --in mydir
In this example, mydir is a directory containing bar.swf.
Creates a foo.swf.whitelist and a bar.swf.whitelist in the
current directory.
whitelist --in signature.xml --in mydir
In this example, mydir is a directory containing bar.swf.
Creates a signature.xml.airwhitelist and a
bar.swf.whitelist in the current directory.
whitelist --in foo.swf --in bar.swf --outDir
outputdir
Creates an outputdir/foo.swf.whitelist file and an
outputdir/bar.swf.whitelist file.
whitelist --in signature.xml --in bar.swf --outDir
outputdir
Creates an outputdir/signature.xml.airwhitelist file and
an outputdir/bar.swf.whitelist file.
whitelist --in foo.swf --in mydir --out outputfile
In this this example, mydir is a directory containing bar.swf.
Creates an outputfile.whitelist file in the current directory
containing hashes for foo.swf and mydir/bar.swf.
whitelist --in signature.xml --in mydir --out
outputfile
In this this example, mydir is a directory containing bar.swf.
Creates a an outputfile.airwhitelist file containing hashes
for signature.xml. Creates an outputfile.whitelist file
contaning hashes for bar.swf. Both files are created in the
current directory.
whitelist --in foo.swf --in mydir -out outputfile
-outDir outputdir
This example, mydir is a directory containing bar.swf.
Creates an outputfile.whitelist in the current directory
containing a hash for foo.swf and mydir/bar.swf.
Warning: When the --out option is specified, the tool
ignores the --outDir option.
whitelist --in signature.xml --in mydir --out
outputfile --outDir outputdir
In this example, mydir is a directory containing bar.swf.
Creates an outputfile.airwhitelist file that contains the
hashes for signature.xml. Creates an outputfile.whitelist
file that contains hashes for mydir/bar.swf. Both files are
created in the current directory.
Warning: When the --out option is specified, the tool
ignores the --outDir option.
whitelist --version Displays "version 1.0".

157
ADOBE MEDIA SERVER 5.0.6 DEVELOPER’S GUIDE
Content protection
Last updated 9/4/2014
The following is the whitelist format for multiple hashes when using the --out option:
# foo.swf
PGfcEwgUKWScivIRucIwG5jT
# bar.swf
TcsQWLLi7h7WNjHqcLzzl0J15Srvdzkz2inCTKQLOHw=
# mydir/bar.swf
TcsQWLLi7h7WNjHqcLzzl0J15Srvdzkz2inCTKQLOHw=
Configuring content protection for HLS
Use Adobe Media Server 5 to serve protected content over HTTP to devices that support Apple HTTP Live Streaming.
The Adobe Media Server installer generates the required certificates and keys to the rootinstall/creds directory. To
generate new keys, use the scramble tool. See Scramble tool.
Overview
The content can be protected using three modes:
•Vanilla
•PHLS
•Adobe Access 4.0
To enable a specific encryption scheme, use the HLSProtectionScheme directive.
Vanilla
Vanilla mode is used for plain AES encryption.
PHLS
PHLS mode is a non-DRM solution. You do not need to set up a license or key server. The key is always served in a
local mode.
Adobe Access
Adobe Access mode offers a complete DRM solution. It supports all the Adobe Access 3.0 features, along with remote
key serving for HLS. Local key serving mode also works with Adobe Access 2.0 or higher license servers. The remote
key serving mode works only with an Adobe Access 4.0 compliant server.
Adobe Access SDK is a Digital Rights Management (DRM) platform that makes it possible to protect and securely
deliver video and audio content for playback on consumer devices such as personal computers. Adobe Access is a
flexible platform that enables content owners to protect their content and maintain control over distribution. Content
owners can protect and manage their rights by creating licenses for each digital media file, ensuring that a wide variety
of the highest-quality content is made available to consumers.
Adobe Access supports a wide range of business models, including video on demand, rental, and electronic sell-
through. You can distribute content protected with Adobe Access by streaming through Adobe Media Server software,
offering progressive download via HTTP using Adobe's HTTP Dynamic Streaming technology, or permitting
downloads to a content library for local playback at the consumer's convenience.

158
ADOBE MEDIA SERVER 5.0.6 DEVELOPER’S GUIDE
Content protection
Last updated 9/4/2014
To enable DRM support for HTTP Live Streaming, use Adobe Access iOS library. The policy files generated for Adobe
Access 2.0 and Adobe Access 3.0 will also work in local key serving mode.
AMS supports different content encryption keys for content at the different levels (server, application, stream, and
event). The keys are generated according to the location of the content and the location of the Common Key.
Key rotation
You can periodically change the encryption key and specify how often the content encryption key is to be changed.
Out-of-Band DRM metadata
The HLS module of AMS supports serving of BER encoded DRM metadata out-of-band. The requested URL format
is same as for a playlist except that the URL format has .drmmeta instead of .m3u8 at the end of the URL. The metadata
embedded in the m3u8 file is base64-encoded but the metadata served out-of-band in the .drmmeta file is binary data.
Player binding
Adobe Media Server supports whitelist-based player binding when the protection scheme is PHLS. This is similar to
the HTTP SWF Verification.
License chaining
Adobe Media Server will support embedding leaf licenses in the DRM metadata from the policy generated using a
chained license. Adobe Media Server will need the license server credential and the credential password configured so
that the root license from the policy can be used to encrypt the CEK contained in the embedded leaf license.
Live use case
Getting started
To configure PHLS with basic settings, perform the following steps:
1Navigate to the <root-install>/Apache 2.2/conf/ directory. Edit the httpd.conf file and add the following tags under
<Location hls-live>:
<Location /hls-live>
HLSHttpStreamingEnabled true
HttpStreamingLiveEventPath "../applications"
HttpStreamingContentPath "../applications"
HLSMediaFileDuration 8000
HLSSlidingWindowLength 6
HLSFmsDirPath ".."
HttpStreamingUnavailableResponseCode 503
HLSEncryptionScope server
HLSProtectionScheme PHLS
</Location>
Note: This configuration will enable PHLS at the server level.
2Publish a live stream called “livestream?adbe-live-event=liveevent” to livepkgr.
3Playback the stream using the URI http://<server-ip>:8134/hls-live/livepkgr/_definst_/liveevent/livetsream.m3u8
Detailed configuration
The following sections provides detailed configurations.

159
ADOBE MEDIA SERVER 5.0.6 DEVELOPER’S GUIDE
Content protection
Last updated 9/4/2014
Server level
You can configure HLS at the server level to apply content protection across all deployed applications.
Vanilla
The following table contains the directives for the hlshttp_module in the Apache httpd.conf file:
Publishing and playback
1Open the rootinstall/Apache2.2/conf/httpd.conf file and locate the hlshttp_module:
<IfModule hlshttp_module>
...
<Location /hls-live>
...
2Uncomment the following:
# Uncomment the following directives to enable encryption
# for this location:
HLSEncryptionScope server
HLSEncryptionCipherKeyFile "../creds/liveeventkey.bin"
HLSEncryptKeyURI "https://<ServerName>/hls-key/liveeventkey.bin"
Substitute the fully qualified domain name of your Adobe Media Server for the <ServerName> parameter.
3Follow the steps in “Serve encryption keys to the client” on page 176 to configure the server to serve keys with or
without SSL. These steps configure the /hls-key path in the HLSEncryptKeyURI directive.
4Open Flash Media Live Encoder and publish a stream with the following settings:
•Format—H.264
•Keyframe Frequency—4 seconds
•AMS URL—rtmp://<server-name>/livepkgr
•Stream—encryption?adbe-live-event=encryption
5Request the following URL from an iOS device:
http://<servername>/hls-live/livepkgr/_definst_/encryption/encryption.m3u8
Directive Default Description
HLSEncryptionScope Off Defines the encryption scope. The following are
possible values:
server —Apache encryption settings are applied to
all content. The server ignores content-specific
encryption configurations in Event.xml and
Application.xml (live) and jit.conf (on-demand).
content —Apache encryption settings are ignored.
The server uses encryption settings from Event.xml or
Application.xml (live) or from jit.conf (on-demand).
Off —Encryption is off for the whole server.
HLSEncryptCipherKeyFile None The path of the default cipher key used to encrypt the
content.
HLSEncryptKeyURI None The URI that the client uses to fetch the encryption key.

160
ADOBE MEDIA SERVER 5.0.6 DEVELOPER’S GUIDE
Content protection
Last updated 9/4/2014
6To verify that the stream is encrypted, run the Apple Media Stream Validator Tool on the stream. See Technical
Note TN2224.
PHLS and Adobe Access
The following table contains the directives for the hlshttp_module in the Apache httpd.conf file:
Parameter Required With Default Description
HLSProtectionScheme Adobe Access 4.0, PHLS Vanilla Determines the protection
scheme used for content.
Protection scheme can be Vanilla,
AdobeAccessV4 or PHLS.
HLSProtectionScheme is effective
if encryption is enabled.Use
HLSEncryptionScope parameter
to determine the status of
encryption.
HLSEmbedMetadata Adobe Access 4.0, PHLS true for VOD and false for
live
(Optional) Enables embedding of
metadata in the playlist. The
possible values are "true" or
"false". Note that false will only
work when
HLSMetaPackagingEnabled is
set to true.
HLSMetaPackagingEna
bled
Adobe Access 4.0, PHLS true (Optional) Enables just in time
packaging of metadata for this
location. The possible values are
"true" or "false". This configuration
is not valid for the Vanilla
protection scheme.
HLSMetaMaxAge Adobe Access 4.0, PHLS 60*60 secs (1 hour) (Optional) Specifies the max-age
to set in the Cache-Control header
for M3U8 responses.
Specified in secs. -1 means no
Cache-Control header is set. If not
specified, the default value will be
assumed.
This configuration is used only
when the
HLSMetaPackagingEnabled
value is set to true.
PHLSCommonKeyFile (Optional) PHLS For PHLS
../creds/commonKey.bin
Contains the name of the
Common key file in
../creds/common-key.bin.
HLSDrmContentID/
PHLSContentID
(Optional) PHLS eventId Content ID for mapping the
license.
HLSDrmLicenseServer
URL
Adobe Access 4.0 None URL of License server used for
protecting content
HLSDrmTransportCertF
ile
Adobe Access 4.0 None Transport certificate file used for
protecting content

161
ADOBE MEDIA SERVER 5.0.6 DEVELOPER’S GUIDE
Content protection
Last updated 9/4/2014
PHLS
Edit the httpd.conf file and add the following tags under <Location hls-live>:
<Location /hls-live>
HLSHttpStreamingEnabled true
HttpStreamingLiveEventPath "../applications"
HttpStreamingContentPath "../applications"
HLSMediaFileDuration 10000
HLSSlidingWindowLength 6
HLSFmsDirPath ".."
HttpStreamingUnavailableResponseCode 503
HLSEncryptionScope server
HLSProtectionScheme PHLS
PHLSContentID httpd_conf
PHLSCommonKeyFile "../creds/liveeventkey.bin"
PHLSOutputProtection None
PHLSPlaybackExpiration Unlimited
</Location>
For details on the configuration elements, see the table mentioned above.
Adobe Access
Edit the httpd.conf file and add the following tags under <Location hls-live>:
HLSDrmLicenseServer
CertFile
Adobe Access 4.0 None File containing license server
certificate used for protecting
content
HLSDrmPackagerCred
entialFile
Adobe Access 4.0 None File containing Packager
credential used for protecting
content
HLSDrmPackagerCred
entialPassword
Adobe Access 4.0 None Packager credential password for
the configured packager
credential file
HLSDrmPolicyFile Adobe Access 4.0 None Path and Name of the Policy File to
be used for protecting content
HLSDrmKeyServerURL Adobe Access 4.0 None Key server URL for embedding in
the served playlist.
PHLSOutputProtection (Optional) PHLS None The required hardware Output
Protection of media on the client.
Possible values are None,
BestEffort, and Required.
PHLSPlaybackExpiratio
n
(Optional) PHLS 24Hours The duration of the time for which
the content is available for
playback. Possible values are
24Hours and Unlimited.
Parameter Required With Default Description

162
ADOBE MEDIA SERVER 5.0.6 DEVELOPER’S GUIDE
Content protection
Last updated 9/4/2014
<Location /hls-live>
HLSHttpStreamingEnabled true
HttpStreamingLiveEventPath "../applications"
HttpStreamingContentPath "../applications"
HLSMediaFileDuration 10000
HLSSlidingWindowLength 6
HLSFmsDirPath ".."
HttpStreamingUnavailableResponseCode 503
HLSEncryptionScope server
HLSProtectionScheme AdobeAccessV4
HLSDrmContentID httpd_conf
HLSDrmCommonKeyFile "<path to common key file>"
HLSDrmLicenseServerURL "<url of license server"
HLSDrmTransportCertFile "path to transport certificate file"
HLSDrmLicenseServerCertFile "<path to license server certificate file>"
HLSDrmPackagerCredentialFile "<path to packager credential file>"
HLSDrmPackagerCredentialPassword ??????
HLSDrmPolicyFile "<path to policy file"
HLSDrmKeyServerURL "<key server url>"
</Location>
For details on the configuration elements, see the table mentioned abo
Note: For local key delivery it is recommended that HLSDrmKeyServerURL be set to the dummy URL
http://faxs.adobe.com.
For information on publishing and playback, see “Vanilla” on page 159.
Application and Event level
You can also configure HLS at an application or event level.
Both the Application.xml file and the Event.xml file have an HLS container that holds the live vanilla encryption
configuration settings. In Application.xml, the container is located under //Application/HDS/HLS. In Event.xml,
the container is located under //Event/HLS.
Application level
Vanilla
Element Default Description
/HLS None Container for content protection settings.

163
ADOBE MEDIA SERVER 5.0.6 DEVELOPER’S GUIDE
Content protection
Last updated 9/4/2014
Configure live vanilla encryption at the application level
1Open the rootinstall/Apache2.2/conf/httpd.conf file and locate the hlshttp_module:
<IfModule hlshttp_module>
...
<Location /hls-live>
...
2Uncomment the HLSEncryptionScope directive and set it to content:
# Uncomment the following directives to enable encryption
# for this location:
HLSEncryptionScope content
# HLSEncryptionCipherKeyFile "../creds/liveeventkey.bin"
# HLSEncryptKeyURI "https://<ServerName>/hls-key/liveeventkey.bin"
Substitute the IP address or DNS of your Adobe Media Server for the <ServerName> parameter.
3Edit the Application.xml file in the rootinstall/applications/livepkgr folder to include the following:
<Application>
<HDS>
<HLS>
<Encryption enabled="true">
<KeyFile>C:\Program Files\Adobe\Adobe Media Server
5\creds\liveeventkey.bin</KeyFile>
<KeyURI>http://<server-ip>/hls-key/liveeventkey.bin</KeyURI>
</Encryption>
</HLS>
</HDS>
</Application>
4Follow the steps in “Serve encryption keys to the client” on page 176to configure the server to serve keys with or
without SSL. These steps configure the /hls-key path in the KeyURI directive.
5Open Flash Media Live Encoder and publish a stream with the following settings:
•Format—H.264
•Keyframe Frequency—4 seconds
•AMS URL—rtmp://<server-name>/livepkgr
/HLS/Encryption None Set the enabled attribute to "allow" to allow vanilla
encryption configurations in the Event.xml file to
override settings in the Application.xml file.
Set the enabled attribute to "true" to configure
vanilla encryption in the Application.xml file. These
configurations apply to all live events in the
application.
The default value of the enabled attribute in the
Application.xml file is "allow". The default value in
the Event.xml file is "false".
/HLS/Encryption/KeyFi
le
None The path of the default cipher key used to encrypt the
content.
/HLS/Encryption/KeyUR
I
None The URI that the client uses to fetch the encryption
key.
Element Default Description

164
ADOBE MEDIA SERVER 5.0.6 DEVELOPER’S GUIDE
Content protection
Last updated 9/4/2014
•Stream—encryption?adbe-live-event=encryption
6Request the following URL from an application developed using the SDK on an iOS device:
http://<servername>/hls-live/livepkgr/_definst_/encryption/encryption.m3u8
7To verify that the stream is encrypted, run the Apple Media Stream Validator Tool on the stream. See Technical
Note TN2224.
Note: To create a live event, create a copy of the livepkgr directory located at
rootinstall/applications/livepkgr/events/_definst_/liveevent. The name of the copied directory must be the same as the
name of the event.
PHLS
Edit the Application.xml file in the rootinstall/applications/livepkgr folder to include the following:
<Application>
<HDS>
<HLS>
<Encryption enabled="true" protection-scheme="PHLS" >
<PHLS>
<ContentID>app_event_xml</ContentID>
<CommonKeyPath>common.bin</CommonKeyPath>
<KeyServerURL>faxs://example.com</KeyServerURL>
<OutputProtection>None</OutputProtection>
<PlaybackExpiration>Unlimited</PlaybackExpiration>
</PHLS>
</Encryption >
</HLS>
</HDS>
</Application>
For more information about the elements, see the table in the server level configuration.
For information on publishing and playback, see “Vanilla” on page 162.
Adobe Access
Edit the Application.xml file in the rootinstall/applications/livepkgr folder to include the following:

165
ADOBE MEDIA SERVER 5.0.6 DEVELOPER’S GUIDE
Content protection
Last updated 9/4/2014
<Application>
<HDS>
<HLS>
<Encryption enabled="true" protection-scheme="AdobeAccessV4" >
<AdobeAccessV4>
<ContentID>app_event_xml</ContentID>
<CommonKeyPath>common.bin</CommonKeyPath>
<LicenseServerURL>license server url </LicenseServerURL>
<TransportCertPath>transport.der</TransportCertPath>
<LicenseServerCertPath>server.der</LicenseServerCertPath>
<PackagerCredentialPath>
production_packager.pfx
</PackagerCredentialPath>
<PackagerCredentialPwd>??????</PackagerCredentialPwd>
<PolicyPath>policy.pol</PolicyPath>
<KeyServerURL>http://faxs.adobe.com</KeyServerURL>
</AdobeAccessV4>
</Encryption >
</HLS>
</HDS>
</Application>
For more information about the elements, see the table in the server level configuration.
For information on publishing and playback, see “Vanilla” on page 162.
Event level
Vanilla
1Open the rootinstall/Apache2.2/conf/httpd.conf file and locate the hlshttp_module:
<IfModule hlshttp_module>
...
<Location /hls-live>
...
2Uncomment the HLSEncryptionScope directive and set it to content:
# Uncomment the following directives to enable encryption
# for this location:
HLSEncryptionScope content
# HLSEncryptionCipherKeyFile "../creds/liveeventkey.bin"
# HLSEncryptKeyURI "https://<ServerName>/hls-key/liveeventkey.bin"
Substitute the IP address or DNS of your Adobe Media Server for the <ServerName> parameter.
3Edit the Event.xml file in the rootinstall/applications/livepkgr/_definst_/encryption folder to include the following:

166
ADOBE MEDIA SERVER 5.0.6 DEVELOPER’S GUIDE
Content protection
Last updated 9/4/2014
<Event>
<HLS>
<Encryption enabled="true">
<KeyFile>
C:\Program Files\Adobe\Adobe Media Server5
\creds\liveeventkey.bin
</KeyFile>
<KeyURI>http://<server-ip>/hls-key/liveeventkey.bin</KeyURI>
</Encryption>
</HLS>
</Event>
4Follow the steps in “Serve encryption keys to the client” on page 176 to configure the server to serve keys with or
without SSL. These steps configure the /hls-key path in the KeyURI directive.
5Open Flash Media Live Encoder and publish a stream with the following settings:
•Format—H.264
•Keyframe Frequency—4 seconds
•AMS URL—rtmp://<server-name>/livepkgr
•Stream—encryption?adbe-live-event=encryption
6Request the following URL from an iOS device:
http://<ServerName>/hls-live/livepkgr/_definst_/encryption/encryption.m3u8
7To verify that the stream is encrypted, run the Apple Media Stream Validator Tool on the stream. See Technical
Note TN2224.
PHLS
Edit the Event.xml file in the rootinstall/applications/livepkgr/_definst_/encryption folder to include the following:
<Event>
<HLS>
<Encryption enabled="true" protection-scheme="PHLS" >
<PHLS>
<ContentID>app_event_xml</ContentID>
<CommonKeyPath>common.bin</CommonKeyPath>
<KeyServerURL>faxs://example.com</KeyServerURL>
<OutputProtection>None</OutputProtection>
<PlaybackExpiration>Unlimited</PlaybackExpiration>
</PHLS>
</Encryption >
</HLS>
</Event>
For more information about the elements, see the table in the server level configuration.
For more information on publishing and playback, see “Vanilla” on page 165.
Adobe Access
Edit the Event.xml file in the rootinstall/applications/livepkgr/_definst_/encryption folder to include the
following:<Event>

167
ADOBE MEDIA SERVER 5.0.6 DEVELOPER’S GUIDE
Content protection
Last updated 9/4/2014
<Event>
<HLS>
<Encryption enabled="true" protection-scheme="AdobeAccessV4" >
<AdobeAccessV4>
<ContentID>app_event_xml</ContentID>
<CommonKeyPath>common.bin</CommonKeyPath>
<LicenseServerURL>license server url </LicenseServerURL>
<TransportCertPath>transport.der</TransportCertPath>
<LicenseServerCertPath>server.der</LicenseServerCertPath>
<PackagerCredentialPath>
production_packager.pfx
</PackagerCredentialPath>
<PackagerCredentialPwd>??????</PackagerCredentialPwd>
<PolicyPath>policy.pol</PolicyPath>
<KeyServerURL>http://faxs.adobe.com</KeyServerURL>
</AdobeAccessV4>
</Encryption >
</HLS>
</Event>
For more information about the elements, see the table in the server level configuration.
For more information on publishing and playback, see “Vanilla” on page 165.
Live events
To generate unique content encryption keys (CEKs) for Adobe Access, the URL path (relative to the configured
content path) up to the stream, but not including the stream name, is used as the Content ID. For example, Content
ID for path http://example.com/hls-live/livepkgr/definst/liveevent/livestream.m3u8 would be
livepkgr/definst/liveevent.
VOD use case
Configure PHLS for on-demand streaing at the following levels:
Server—rootinstall/Apache2.2/conf/httpd.conf
Stream—create a jit.conf file and copy it to the same directory as the content.
Getting started
To configure PHLS with basic settings, perform the following steps:
❖Navigate to <root-install>/Apache 2.2/conf/. Edit the file httpd.conf and add the tags HLSEncryptionScope and
HLSProtectionScheme under the <Location /hls-vod> directive:
<Location /hls-vod>
HLSHttpSt reamingEna bled true
HLSMediaFileDuration 8000
HttpStreamingContentPath "../webroot/vod"
HLSFmsDirPath ".."
HLSJITConfAllowed true
HLSEncryptionScope server
HLSProtectionScheme PHLS
Options -Indexes FollowSymLinks
</Location>
Note: This configuration will enable PHLS at the server level with default configurations.

168
ADOBE MEDIA SERVER 5.0.6 DEVELOPER’S GUIDE
Content protection
Last updated 9/4/2014
The sample1_1500kbps.f4v media file comes with the default installation of AMS under <root-install>/webroot. You
can play the media file using the following URI:http://<server-ip>/hls-vod/sample1_1500kbps.f4v.m3u8
Detailed configuration
The following sections provides the detailed configurations.
Server level
You can configure HLS at the server level to apply content protection at server level to all streams requested through
the location directives.
Vanilla
Configure the following directives for the hlshttp_module in the Apache httpd.conf file:
To configure vanilla content protection at the server level, set HLSEncryptionScope to server in the httpd.conf file.
This configuration tells the server to use the settings in the httpd.conf file for all requests to this Location directive.
1Open the rootinstall/Apache2.2/conf/httpd.conf file and locate the hlshttp_module:
<IfModule hlshttp_module>
...
<Location /hls-vod>
...
2Uncomment the following:
# Uncomment the following directives to enable encryption
# for this location:
HLSEncryptionScope server
HLSEncryptionCipherKeyFile "../creds/vodkey.bin"
HLSEncryptKeyURI "https://<ServerName>/hls-key/vodkey.bin"
Substitute the IP address or DNS of your Adobe Media Server for the <ServerName> parameter.
3Follow the steps in “Serve encryption keys to the client” on page 176to configure the server to serve keys with or
without SSL. These steps configure the /hls-key path in the HLSEncryptKeyURI directive.
4Request the following URL from an iOS device:
http://<ServerName>/hls-vod/sample2_1000kbps.f4v.m3u8
Directive Default Description
HLSEncryptionScope Off Defines the encryption scope. The following are
possible values:
server —Apache encryption settings are applied to
all content. The server ignores content-specific
encryption configurations in Event.xml and
Application.xml (live) and jit.conf (on-demand).
content —Apache encryption settings are ignored.
The server uses encryption settings from Event.xml or
Application.xml (live) or from jit.conf (on-demand).
Off —Encryption is off for the whole server.
HLSEncryptCipherKeyFile None The path of the default cipher key used to encrypt the
content.
HLSEncryptKeyURI None The URI that the client uses to fetch the encryption key.
See “Serve encryption keys to the client” on page 176.

169
ADOBE MEDIA SERVER 5.0.6 DEVELOPER’S GUIDE
Content protection
Last updated 9/4/2014
5To verify that the stream is encrypted, run the Apple Media Stream Validator Tool on the stream. See Technical
Note TN2224.
The following table contains the directives for the hlshttp_module in the Apache httpd.conf file:
PHLS
Edit the file httpd.conf and update the <Location /hls-vod> directive as follows:
Parameter Required With Default Description
HLSProtectionScheme Adobe Access 4.0, PHLS Vanilla Determines the protection
scheme used for content.
Protection scheme can be Vanilla,
AdobeAccessV4 or PHLS.
HLSProtectionScheme is effective
if encryption is enabled.Use
HLSEncryptionScope parameter
to determine the status of
encryption.
HLSDrmCommonKeyFi
le
Adobe Access 4.0,
(Optional) PHLS
For PHLS
../creds/commonKey.bin
Contains the name of the
Common key file in
../creds/common-key.bin.
HLSDrmContentID /
PHLSContentID
(Optional) Adobe Access
4.0, (Optional) PHLS
eventId Content ID for mapping the
license.
HLSDrmLicenseServer
URL
Adobe Access 4.0 None URL of License server used for
protecting content
HLSDrmTransportCertF
ile
Adobe Access 4.0 None Transport certificate file used for
protecting content
HLSDrmLicenseServer
CertFile
Adobe Access 4.0 None File containing license server
certificate used for protecting
content
HLSDrmPackagerCred
entialFile
Adobe Access 4.0 None File containing Packager
credential used for protecting
content
HLSDrmPackagerCred
entialPassword
Adobe Access 4.0 None Packager credential password for
the configured packager
credential file
HLSDrmPolicyFile Adobe Access 4.0 None Path and Name of the Policy File to
be used for protecting content
HLSDrmKeyServerURL Adobe Access 4.0 None Key server URL for embedding in
the served playlist.
PHLSOutputProtection (Optional) PHLS None The required hardware Output
Protection of media on the client.
Possible values are None,
BestEffort, and Required.
PHLSPlaybackExpiratio
n
(Optional) PHLS 24 Hours The duration of the time for which
the content is available for
playback. Possible values are
24Hours and Unlimited.

170
ADOBE MEDIA SERVER 5.0.6 DEVELOPER’S GUIDE
Content protection
Last updated 9/4/2014
<Location /hls-vod>
HLSHttpStreamingEnabled true
HLSMediaFileDuration 8000
HttpStreamingContentPath "../webroot/vod"
HLSFmsDirPath ".."
HLSJITConfAllowed true
HLSEncryptionScope server
HLSProtectionScheme PHLS
PHLSContentID httpd_conf
PHLSCommonKeyFile "../creds/liveeventkey.bin"
PHLSOutputProtection None
PHLSPlaybackExpiration Unlimited
</Location>
Request the following URL from an iOS device:
http://<ServerName>/hls-vod/sample2_1000kbps.f4v.m3u8
For more information on the elements, see “Vanilla” on page 168.
Adobe Access
Edit the file httpd.conf and update the <Location /hls-vod> directive as follows:
<Location /hls-vod>
HLSHttpStreamingEnabled true
HLSMediaFileDuration 8000
HttpStreamingContentPath "../webroot/vod"
HLSFmsDirPath ".."
HLSJITConfAllowed true
HLSEncryptionScope server
HLSProtectionScheme AdobeAccessV4
HLSDrmContentID httpd_conf
HLSDrmCommonKeyFile "<path to common key file>"
HLSDrmLicenseServerURL "<url of license server>"
HLSDrmTransportCertFile "path to transport certificate file"
HLSDrmLicenseServerCertFile "<path to license server certificate file>"
HLSDrmPackagerCredentialFile "<path to packager credential file>"
HLSDrmPackagerCredentialPassword ??????
HLSDrmPolicyFile "<path to policy file"
HLSDrmKeyServerURL "<key server url>"
</Location>
Request the following URL from an iOS device:
http://<ServerName>/hls-vod/sample2_1000kbps.f4v.m3u8
Note: For local key delivery, it is recommended that HLSDrmKeyServerURL be set to the dummy URL
http://faxs.adobe.com.
For more information on the elements, see “Vanilla” on page 168.
Stream level
To configure individual sets of media, in the httpd.conf file, set HLSEncryptionScope to content. This setting tells
the server that configuration settings in the jit.conf file override settings in the httpd.conf file.
Configure the following elements in a jit.conf file in the same directory as the on-demand media:

171
ADOBE MEDIA SERVER 5.0.6 DEVELOPER’S GUIDE
Content protection
Last updated 9/4/2014
Vanilla
1To configure live PHLS at the stream level, open the rootinstall/Apache2.2/conf/httpd.conf file and locate the
hlshttp_module:
<IfModule hlshttp_module>
...
<Location /hls-vod>
...
2Uncomment HLSEncryptionScope and set it to content:
# Uncomment the following directives to enable encryption
# for this location:
HLSEncryptionScope content
# HLSEncryptCipherKeyFile
# HLSEncryptKeyURI
3Create a jit.conf configuration file and copy it to the same directory as the on-demand media files.
<hds:hls>
<hds:encryption enabled="true">
<hds:keyfile>../creds/content.key</hds:keyfile>
<hds:keyuri>https://<server-name>/hls-key/content.key</hds:keyuri>
</hds:encryption>
</hds:hls>
4Follow the steps in “Serve encryption keys to the client” on page 176to configure the server to serve keys with or
without SSL. These steps configure the /hls-key path in the /hds:keyuri element.
5Copy the vodkey.bin file from rootinstall/creds to rootinstall/webroot/keys.
6Request the following URL from an iOS device:
http://<servername>/hls-vod/sample2_1000kbps.f4v.m3u8
7To verify that the stream is encrypted, run the Apple Media Stream Validator Tool on the stream. See Technical
Note TN2224.
PHLS
See the following sample configuration:
Element Default value Description
//manifest/hds:encryption None The parent element for
configuration. This element has with
an enabled attribute. To enable
content for protection with PHLS, set
the enabled attribute to "true". The
value is "false" by default.
//manifest/hds:encryption/hds
:keyfile
None The path of the default cipher key
used to encrypt the content.
//manifest/hds:encryption/h
ds:keyuri
None The URI that the client uses to fetch
the encryption key. See “Serve
encryption keys to the client” on
page 176.

172
ADOBE MEDIA SERVER 5.0.6 DEVELOPER’S GUIDE
Content protection
Last updated 9/4/2014
<?xml version="1.0" encoding="utf-8"?>
<manifest xmlns="http://ns.adobe.com/f4m/1.0"
xmlns:hds="http://ns.adobe.com/hds-package/1.0">
<hds:hls>
<hds:encryption enabled="true" protection-scheme="PHLS" >
<hds:PHLS>
<hds:content-id>jit_conf</hds:content-id>
<hds:common-key-file>
root_install/creds/vodkey.bin
</hds:common-key-file>
<hds:output-protection>None</hds:output-protection>
<hds:playback-expiration>Unlimited</hds:playback-expiration>
</hds:PHLS>
</hds:encryption>
</hds:hls>
</manifest>
Request the following URL from an iOS device:
http://<ServerName>/hl-vod/sample2_1000kbps.f4v.m3u8
For configuring the server with PHLS, see the steps mentioned in the Vanilla section. For details on the configuration
elements, see the table above.
Adobe Access
See the following sample configuration:

173
ADOBE MEDIA SERVER 5.0.6 DEVELOPER’S GUIDE
Content protection
Last updated 9/4/2014
<?xml version="1.0" encoding="utf-8"?>
<manifest xmlns="http://ns.adobe.com/f4m/1.0"
xmlns:hds="http://ns.adobe.com/hds-package/1.0">
<hds:hls>
<hds:encryption enabled="true" protection-scheme="AdobeAccessV4">
<hds:AdobeAccessV4>
<hds:content-id>jit_conf</hds:content-id>
<hds:common-key-file>
root_install/creds/vodkey.bin
</hds:common-key-file>
<hds:license-server-url>
http://mylicenseserver.myhost.com
</hds:license-server-url>
<hds:transport-cert-file>
production_transport.der
</hds:transport-cert-file>
<hds:license-server-cert-file>
production_license_server.der
</hds:license-server-cert-file>
<hds:packager-credential-file>
production_packager.pfx
</hds:packager-credential-file>
<hds:packager-credential-password>
??????
</hds:packager-credential-password>
<hds:policy-file>policy.pol</hds:policy-file>
<hds:key-server-url>http://faxs.adobe.com</hds:key-server-url>
</hds:AdobeAccessV4>
</hds:encryption>
</hds:hls>
</manifest>
For local key delivery, it is recommended that HLSDrmKeyServerURL be set to the dummy URL
http://faxs.adobe.com.
Request the following URL from an iOS device:
http://<ServerName>/hl-vod/sample2_1000kbps.f4v.m3u8
For configuring the server with PHLS, see the steps mentioned in the Vanilla section. For details on the configuration
elements, see the table above.
VOD streams
To generate unique content encryption keys (CEKs) for Adobe Access, the URL path (relative to the configured
content path) including the stream name is used as Content ID. For example, Content ID for path
http://example.com/hls-vod/mymedia/sample.f4v.m3u8 would be mymedia/sample.f4v.
To change the default Content ID, specify the new Content ID in the configuration files event.xml, application.xml or
jit.conf.
Multiple renditions of the same content require the same CEK for each rendition. To enable the same CEK across
multiple renditions of the same content, configure the content-id in:
•application.xml
•event.xml (for Live Events) or jit.conf (for VOD Events).
You can protect the renditions using the Adobe Access configurations.

174
ADOBE MEDIA SERVER 5.0.6 DEVELOPER’S GUIDE
Content protection
Last updated 9/4/2014
License chaining
If the configuration for embedding the leaf license is turned off, Adobe Media Server will still support such a policy
except that the leaf license will not be embedded in the DRM metadata.
Note: The support will be limited to a single license server credential and credential-password pair.
The following table provides the configuration details:
Key rotation
To enable the feature, you must add the following configuration directives in the httpd.conf file:
Parameter Description Required with Default value
HLSDrmEmbedLeafLicense (Server level)
HLS/Encryption/AdobeAccessV4/EmbedLea
fLicense( Application and Eventlevel)
hds:hls/hds:encryption/hds:AdobeAccessV4
/hds:embed-leaf-license (VOD Use case -
Stream level)
(Optional) Enables
embedding of leaf licenses
for policies generated using
chained licenses. Possible
values are "true" or "false".
AdobeAccessV4 false
HLSDrmLicenseServerCredentialFile (Server
level)
HLS/Encryption/AdobeAccessV4/LicenseSer
verCredentialFile (Application and
Eventlevel)
hds:hls/hds:encryption/hds:AdobeAccessV4
/hds:license-server-credential-file (VOD Use
case -Stream level)
Required if
HLSDrmEmbedLeafLicense
is set to true. The license
server credential used when
protecting content at this
location.
AdobeAccessV4 NA
HLSDrmLicenseServerCredentialPassword
(Server level)
HLS/Encryption/AdobeAccessV4/LicenseSer
verCredentialPassword (Application and
Eventlevel)
hds:hls/hds:encryption/hds:AdobeAccessV4
/hds:li cense-server-credential-password
(VOD Use case -Stream level)
Required if
HLSDrmEmbedLeafLicense
is set to true. The license
server credential password
for the configured license
server credential file.
AdobeAccessV4 NA
Directive Require
d with
Default Value Description
HLSDrmEnableKeyRotation /
PHLSEnableKeyRotation (Server
level)
EnableKeyRotation (Application
and Eventlevel)
hds:hls/hds:encryption/hds:FlashAc
cessV4/hds:enable-key-rotation
(VOD Use case -Stream leve)
Optional
with
FlashAcc
essV4
and PHLS
true Enabled by default. To enable key rotation set
the attribute to "false".

175
ADOBE MEDIA SERVER 5.0.6 DEVELOPER’S GUIDE
Content protection
Last updated 9/4/2014
For HDS streams, the key rotation does not have any impact on the performance of the client or on scaling impact of
the license server because rotating the key is handled in-band.
In HLS key rotation results in a key request from the key server when using remote key delivery. For local, the rotated
key is in the updated M3U8 file.
Out-of-Band DRM metadata
To enable this feature, you must add the following configuration directives in the httpd.conf file:
Player binding
A whitelist file (with extension .airwhitelist) is a text file that contains multiple entries where each entry corresponds
to an application identifying four fields (publisher-id, app-id, min-ver, max-ver). The publisher-id is mandatory and
rest of the fields are optional. The file can be generated by passing the certificate(s) used to sign the application(s) to
the whitelist tool . Currently the whitelist tool only supports extracting publisher-id but the rest of the fields (if
required) can be updated manually. Player binding can be enabled by configuration and a folder needs to be specified
from where Adobe Media Server can locate the whitelist files (multiple whitelist files and multiple entries in a whitelist
files are supported). Adobe Media Server will add the list of identifiers picked up from the whitelist files to the license
it embeds in the metadata.
To enable the feature, you must add the following configuration directives in the httpd.conf file:
HLSDrmKeyRotationInterval /
PHLSKeyRotationInterval (Server
level)
KeyRotationInterval (Application
and Eventlevel)
hds:hls/hds:encryption/hds:FlashAc
cessV4/hds:key-rotation-interval
(VOD Use case -Stream leve)
Optional
with
FlashAcc
essV4
and PHLS
15 The key is changed after the specified number of
seconds.
Directive Require
d
Default Value Description
HLSEmbedMetadata No For VOD, true
For Live, false
Enables embedding of metadata in the playlist.
The false value is applicable only when
HLSMetaPackagingEnabled is set to true.
HLSMetaMaxAge No 3600 seconds The maximum age in the Cache-Control header
for m3u8 responses. A value of -1 specifies that
no Cache-Control header is set. If no value is
specified, default value,3600 seconds, is
assumed.
HLSMetaPackagingEnabled No true (Optional) Enables just in time packaging of
metadata for this location. The possible values
are "true" or "false".
Directive Require
d with
Default Value Description

176
ADOBE MEDIA SERVER 5.0.6 DEVELOPER’S GUIDE
Content protection
Last updated 9/4/2014
Serve encryption keys to the client
The following PHLS configurations specify the path the client uses to fetch the encryption key:
•HLSEncryptKeyURI
•//manifest/hds:hls/hds:encryption/hds:keyuri
•//Application/HDS/HLS/Encryption/KeyURI
•//Event/HLS/Encryption/KeyURI
For both on-demand and live vanilla encryption, serve encryption keys to the client through the Apache HLS module.
The module unscrambles the key before serving the request.
Note: Note that the key files used for configuring encryption always needs to scrambled.
You can enable client authentication over SSL to ensure that key files are served securely. A reference configuration
file and the Apple CA bundle are installed to the following locations:
rootinstall/Apache2.2/conf/httd-hls-secure.conf
rootinstall/creds/certs/ca
The httpd-hls-secure.conf file demonstrates how to configure a virtual host at the default SSL port with client
authentication enabled for the location /hls-key with cipher key hosting enabled. However, this is only a reference
configuration. To guarantee authentication for a production system, customize the configuration for your
deployment.
Note: The SSL certificate presented by the iOS client must be current. If the client presents an expired certificate, client
authentication fails and an error message displays to the user (on the client). iOS clients with older iOS installations may
encounter this problem.
Serve key files with SSL client authentication
1Uncomment the following lines in the Apache httpd.conf file:
"#LoadModule ssl_module"
"#Include conf/httpd-hls-secure.conf"
Directive Require
d with
Default Value Description
PHLSPlayerBindingEnabled (Server
level)
HLS/Encryption/PHLS/PlayerBindin
gEnabled (Application and
Eventlevel)
hds:hls/hds:encryption/hds:phls/hd
s:player-binding (VOD Use case -
Stream leve)
PHLS false Enables player binding using white-list. Possible
values are "true" or "false".
PHLSWhitelistFolder (Server level)
HLS/Encryption/PHLS/WhitelistFold
er (Application and Eventlevel)
hds:hls/hds:encryption/hds:phls/hd
s:whitelist-folder (VOD Use case -
Stream leve)
PHLS NA (Required if HLSDrmPlayerBindingEnabled
is true) The directory location containing the
white-list files. This will work only when
HLSDrmPlayerBindingEnabled is set to true.

177
ADOBE MEDIA SERVER 5.0.6 DEVELOPER’S GUIDE
Content protection
Last updated 9/4/2014
2Customize the SSL properties in the rootinstall/Apache2.2/conf/httpd-hls-secure.conf file based on the
deployment. This customization includes getting an SSL certificate from a recognized CA.
Important: The SSL certificate generated for the server must have a CN that is a FQDN (Fully Qualified Domain
Name), even in a test environment. If not, the iOS client may not present its client certificate and client authentication
fails. If client authentication fails, the key file is not served and the iOS client crashes. This is a known Apple bug.
3 Restart Apache.
Serve key files without SSL
1Add the following to the Apache httpd.conf file under the line <IfModule hlshttp_module>:
<Location /hls-key>
HLSEncryptHostCipherKey true
HLSFmsDirPath ".."
HLSEncryptKeyRepository "../creds"
</Location>
The Location path can be any value. Point the HLSEncryptKeyRepository directive to the location of the keys.
The keys are in the rootinstall/creds folder by default.
2Restart Apache.
Use the following parameters in the Apache httpd.conf file to configure key hosting:
Dynamic Content Encryption Key
AMS supports different content encryption keys for content at the different levels (server, application, stream, and
event). The keys are generated according to the location of the content and the location of the Common Key.
Delivering Content Encryption Keys
The Content Encryption Key delivery mode is specified in the policy file. For the Adobe Access 4.0 protection scheme,
set the policy using HLSDrmPolicyFile parameter. To select the policy file for the PHDS protection scheme,
HLSDrmOutputProtection and HLSDrmPlaybackExpiration are used.
The key server URL is based on the key delivery mode specified in the policy file. For remote key serving, use the
KeyServerURL parameter to specify the URL of key server. The URL format for remote key serving is
https://<customers-keyserver-uri>. For example, https://faxs.adobe.com. For local key serving, the value of
KeyServerURL should always be faxs://faxs.adobe.com.
Note: PHLS supports only local key delivery and AMS cannot deliver CEKs as long as DRM is enabled.
Parameter Description Default value
HLSEncryptHostCipherKey Enable (true) or disable (false) cipher
key hosting from this location.
false
HLSEncryptKeyRepository The path of the folder that contains the
key file.
None

178
ADOBE MEDIA SERVER 5.0.6 DEVELOPER’S GUIDE
Content protection
Last updated 9/4/2014
Adaptive bitrate streaming
In order to support adaptive bitrate, HTTP Live Streaming requires a variant playlist file that referes to individual
playlist files having different renditions of the same content. The Adobe Access for iOS SDK requires that each stream
referred to in a variant playlist must be encrypted using the same policy and the same content encryption key. Hence
each encrypted stream will have the same DRM metadata referred in #EXT-X-FAXS-CM tag (embedded or served out
of band).
The Adobe Access Server protected variant playlist also needs to include the #EXT-X-FAXS-CM tag. The value of #EXT-
X-FAXS-CM tag in variant playlist is the relative URI referring to the DRM metadata of one of the individual streams.At
the client, the #EXT-X-FAXS-CM tag in variant playlist will be used to create the DRM session. The same DRM session
will be used for all encrypted M3U8 files inside the variant playlist.
Here’s an example of Adobe Access protected variant playlist:
#EXTM3U
#EXT-X-FAXS-CM:URI="hls-vod-
faxsv4/sample_mbr_mp4_main_3_1/8_mp4_AAC_212Kbps_720_480_main_3_1.mp4.drmmeta"
#EXT-X-STREAM-INF:PROGRAM-ID=41,BANDWIDTH=212000, CODECS="avc1.77.31, mp4a.40.5" hls-vod-
faxsv4/sample_mbr_mp4_main_3_1/8_mp4_AAC_212Kbps_720_480_main_3_1.mp4.m3u8
#EXT-X-STREAM-INF:PROGRAM-ID=41,BANDWIDTH=307000, CODECS="avc1.77.31, mp4a.40.5" hls-vod-
faxsv4/sample_mbr_mp4_main_3_1/8_mp4_AAC_307Kbps_720_480_main_3_1.mp4.m3u8
#EXT-X-STREAM-INF:PROGRAM-ID=41,BANDWIDTH=512000, CODECS="avc1.77.31, mp4a.40.5"
http://my.server.com/hls-vod-
faxsv4/sample_mbr_mp4_main_3_1/8_mp4_AAC_512Kbps_720_480_main_3_1.mp4.m3u8
Note: This variant playlist needs to be served in Adobe Access M3U8 format. For instance, you need to append ?faxs=1
to the URL like http://my.server.com/variantPlaylist.m3u8?faxs=1.

179
Last updated 9/4/2014
Chapter 3: Getting started developing
applications
Application architecture
The client application is written in ActionScript™ and compiles to a SWF file. The server application is written in
Server-Side ActionScript (which is like ActionScript 1.0, but runs on the server, rather than on the client). A media
application usually has recorded or live audio and video that it streams from server to client, client to server, or server
to server.
A typical Adobe Media Server application has these parts:
Client The client displays a user interface, such as controls to start, stop, or pause a video. The client can run in Flash
Player, Adobe AIR, or Flash Lite 3. You can develop clients with Adobe Flash Professional, Adobe Flash Builder, or the
Flex SDK. You can also use prebuilt clients. Adobe recommends using a player that is based on OSMF (Open Source
Media Framework), such as Strobe Media Playback.
Client-side ActionScript The client contains ActionScript code that handles user interaction and connects to the
server. Adobe Media Server 3 and later support ActionScript 3.0, ActionScript 2.0, and ActionScript 1.0.
Video or audio files Many media applications stream recorded audio or video from the server to clients or between
clients. Adobe Media Server supports playback of a variety of stream formats, including Flash Video (FLV), MPEG-3
(MP3), MPEG-4 (MP4 and F4V), and RAW.
Camera or microphone You can use Flash Media Live Encoder to stream live video or audio to the server. You can also
create your own client that captures live audio and video. In both cases, you need a camera and a microphone to
capture the video and audio.
Server-Side ActionScript Most applications use Server-Side ActionScript code written in a file with the suffix .asc,
called an ActionScript Communication File. The file is named either main.asc, or myApplication.asc. You can use
server-side code to control access to applications, define what happens when users connect and disconnect, create
playlists, connect to external data sources, and so on.
Adobe Media Server installs with four server-side applications (also called streaming services): live, vod, livepkgr, and
multicast. Each service provides a different type of streaming.
Set up a development environment
You can use any edition of the server, including the free developer edition, to develop and test applications. To write
client-side code, use Flash Professional, Flash Builder, or the Flex SDK. To write server-side code, you can use any text
editor or IDE, including Flash Professional and Flash Builder.
You can write client-side code and server-side code on the same computer running Adobe Media Server, or you can
write it on a remote computer. To test the application, copy the server-side code to Adobe Media Server.
If you have an account with a Adobe Media Server solution partner, the partner tells you how to configure your
development environment to use their resources.

180
ADOBE MEDIA SERVER 5.0.6 DEVELOPER’S GUIDE
Getting started developing applications
Last updated 9/4/2014
Set up a development environment:
1Run the Adobe Media Server installer to install the server.
2Verify that the server is installed successfully.
3Do one of the following:
•Install Flash Professional from www.adobe.com/go/flash.
•Install Flash Builder from www.adobe.com/go/flashbuilder.
•Install the Flex SDK from opensource.adobe.com.
4To capture and encode live video, do the following:
aConnect a camera and a microphone to the computer.
bDownload and install Adobe Media Live Encoder from www.adobe.com/go/fmle.
Note: Adobe Media Live Encoder captures audio and video, encodes it, and sends it to Adobe Media Server. You
can also build custom applications that capture and encode audio and video.
Example: Hello World application
Overview
Note: The following sections do not apply to Adobe Media Streaming Server because you cannot write server-side code
for that server edition.
This sample shows simple communication from the client to the server and back again. When a user clicks a button,
the client connects to the server. The client calls a server-side function that returns a string. When the server replies,
the client displays the string sent from the server.
The sample files are in the rootinstall\documentation\samples\HelloWorld folder.
Create the user interface
1Start Flash and select Create New > Flash File (ActionScript 3.0).
2In the Document Class field, enter HelloWorld. If you see an ActionScript Class Warning message about a missing
definition—click OK. You will add the class file in the next section.
3Choose Windows > Components. Click User Interface and double-click Button to add it to the Stage. On the
Properties tab, enter the instance name connectBtn.
4Add a Label component above the button, and give it the instance name textLbl.
5Save the file as HelloWorld.fla.
You can save the client files to any location.

181
ADOBE MEDIA SERVER 5.0.6 DEVELOPER’S GUIDE
Getting started developing applications
Last updated 9/4/2014
Write the client-side script
This script provides two button actions, either connecting to or disconnecting from the server. When connecting, the
script calls the server with a string (“World”), which triggers a response that displays the returned string (“Hello,
World!”).
1Choose File > New > ActionScript File. Check that the Target box has HelloWorld.fla.
2Declare the package and import the required Flash classes:
package {
import flash.display.MovieClip;
import flash.net.Responder;
import flash.net.NetConnection;
import flash.events.NetStatusEvent;
import flash.events.MouseEvent;
public class HelloWorld extends MovieClip {
}
}
3Inside the HelloWorld class declaration, declare variables for the connection and the server responder:
private var nc:NetConnection;
private var myResponder:Responder = new Responder(onReply);
4Define the class constructor. Set the label and button display values, and add an event listener to the button:
public function HelloWorld() {
textLbl.text = "";
connectBtn.label = "Connect";
connectBtn.addEventListener(MouseEvent.CLICK, connectHandler);
}
5Define the event listener actions, which depend on the button’s current label:
public function connectHandler(event:MouseEvent):void {
if (connectBtn.label == "Connect") {
trace("Connecting...");
nc = new NetConnection();
// Connect to the server.
nc.connect("rtmp://localhost/HelloWorld");
// Call the server's client function serverHelloMsg, in HelloWorld.asc.
nc.call("serverHelloMsg", myResponder, "World");
connectBtn.label = "Disconnect";
} else {
trace("Disconnecting...");
// Close the connection.
nc.close();
connectBtn.label = "Connect";
textLbl.text = "";
}
}
6Define the responder function, which sets the label’s display value:
private function onReply(result:Object):void {
trace("onReply received value: " + result);
textLbl.text = String(result);
}
7Save the file as HelloWorld.as to the same folder as the HelloWorld.fla file.

182
ADOBE MEDIA SERVER 5.0.6 DEVELOPER’S GUIDE
Getting started developing applications
Last updated 9/4/2014
Write the server-side script
1Choose File > New > ActionScript Communications File.
2Define the server-side function and the connection logic:
application.onConnect = function( client ) {
client.serverHelloMsg = function( helloStr ) {
return "Hello, " + helloStr + "!";
}
application.acceptConnection( client );
}
3Save the file as HelloWorld.asc in the rootinstall/applications/HelloWorld folder. (Create the “HelloWorld” folder
when you save the file.)
Compile and run the application
1Verify that the server is running.
2Select the HelloWorld.fla file tab.
3Choose Control > Test Movie.
4Click the Connect button.
“Hello, World!” is displayed, and the button label changes to Disconnect.
5Click the Disconnect button.
The output of the trace() statements is displayed in the Flash Output window.
Overview of creating an application
Client-side code
A client has code written in ActionScript that connects to the server, handles events, and does other work. Working in
Flash Professional, you can use ActionScript 3.0 or 2.0. Flash Builder and the Flex SDK use ActionScript 3.0.
For information about learning ActionScript and working with video, see the following resources:
•To simply stream media, you can use a pre-built media player. For more information, see “Build custom media
players” on page 91.
•To build a social media application, see “Server-side code” on page 183.
•Flash Help Resource Center at www.adobe.com/devnet/flash.
•Flex Help Resource Center at www.adobe.com/devnet/flex.
More Help topics
“Copy client-side files to a web server” on page 187

183
ADOBE MEDIA SERVER 5.0.6 DEVELOPER’S GUIDE
Getting started developing applications
Last updated 9/4/2014
Server-side code
In general, applications require server-side code written in Server-Side ActionScript if they need to do any of the
following:
Authenticate clients By user name and password, or by credentials stored in an application server or database.
Implement connection logic By taking some action when a client connects or disconnects.
Update clients By calling remote methods on clients or updating shared objects that affect all connected clients.
Handle streams By allowing you to play, record, and manage streams sent to and from the server.
Connect to other servers By calling a web service or creating a network socket to an application server or database.
Place the server-side code in a file named main.asc or yourApplicationName.asc, where yourApplicationName is a
folder in the rootinstall/applications folder. For example, to create an application called skatingClips, create the folder
rootinstall/applications/skatingClips. The server-side code would be in a file called main.asc or skatingClips.asc in the
skatingClips folder.
The server-side code goes at the top level of the application directory, or in its scripts subdirectory. For example, you
can use either of these locations:
rootinstall/applications/appName
rootinstall/applications/appName/scripts
By default, the applications folder is in the root installation folder (C:\Program Files\Adobe\Adobe Media Server
5\applications, on Windows). To configure the location of the applications folder, edit the fms.ini or the Vhost.xml
configuration file. In the fms.ini file, edit the following parameter: VHOST.APPSDIR = C:\Program
Files\Adobe\Adobe Media Server 5\applications. In the Vhost.xml file, edit the AppsDir element.
More Help topics
“Copy server-side script files to the server” on page 186
Client and application objects
Server-side scripts have access to two special objects, the Client object and the application object. When a client
connects to an application on Adobe Media Server, the server creates an instance of the server-side Client class to
represent the client. An application can have thousands of clients connected. In your server-side code, you can use the
Client object to send and receive messages to individual clients.
Each application also has a single application object, which is an instance of the server-side Application class. The
application object represents the application instance. You can use it to accept clients, disconnect them, shut down the
application, and so on.
Writing double-byte applications
If you use Server-Side ActionScript to develop an application that uses double-byte text (such as an Asian language
character set), place your server-side code in a main.asc file that is UTF-8 encoded. Use a JavaScript editor, such as the
Script window in Flash or Adobe® Dreamweaver®, that encodes files to the UTF-8 standard. Use built-in JavaScript
methods, such as Date.toLocaleString(), to convert the string to the locale encoding for that system.
Some simple text editors might not encode files to the UTF-8 standard. However, some editors provide a Save As
option to encode files in the UTF-8 standard.
184
ADOBE MEDIA SERVER 5.0.6 DEVELOPER’S GUIDE
Getting started developing applications
Last updated 9/4/2014
Set UTF-8 encoding in Dreamweaver
1Check the document encoding setting by selecting Modify > Page Properties, then Document Encoding. Choose
Unicode (UTF-8).
2Change the inline input setting by selecting Edit > Preferences (Windows) or Dreamweaver > Preferences (Mac
OS), and then click General. Select Enable Double-Byte Online Input to enable double-byte text.
Use double-byte characters as method names
❖Assign method names using the object array operator, not the dot operator:
// This is the CORRECT way to create double-byte method names
obj["Any_hi_byte_name"] = function(){}
// This is the INCORRECT way to create double-byte method names.
obj.Any_hi_byte_name = function() {}
Test an application
Test and debug a client-side script
To help test a client-side script, use trace() statements to monitor each processing point. The output is shown in the
Flash Output window (this example is from the “Example: Hello World application” on page 180):
To debug a client-side script, use the Debug menu in Flash to set breakpoints, step into functions, and so forth. You
can inspect the state of the script with Windows
> Debug Panels.
Test and debug a server-side script
To test a server-side script, use trace() statements to monitor each processing point. View the output of trace()
statements in the Live Log in the Administration Console.
To open the Administration Console, choose Start > All Programs > Adobe > Adobe Media Server 3.5 > Adobe Media
Administration Console.
When a client connects to an application on the server, the application is loaded and can be seen in the Administration
Console. To load an application directly from the Administration Console, select from the New Instance list of
available application names. You can also stop an application or reload it—in either case, all clients are disconnected.
Note: When you edit and save an .asc file, the changes do not take effect until the application is restarted. Use the
Administration Console to restart the application, then connect to the application again.
For each application instance, you can observe its live log, clients, shared objects, if any, streams in use, and
performance statistics.
View the output of a server-side script
The output of the trace() statements in a main.asc file is sent to the following log file:

185
ADOBE MEDIA SERVER 5.0.6 DEVELOPER’S GUIDE
Getting started developing applications
Last updated 9/4/2014
rootinstall/logs/_defaultVHost_/yourApplicationName/yourInstanceName/application.xx.log
Where yourInstanceName is _definst_ by default and xx is the instance number, 00 for the most recent log file, 01 for
the previous instance, and so on. You can view a log file with any text editor.
While an application is running, you can view the Live Log in the Administration Console. In the Administration
Console opens, click View Applications, then Live Log.
Debug with the Administration Console
To playback streams and inspect data about shared objects, an application must make a special debug connection to
the Administration Console.
The availability and number of debugging sessions is set in the AllowDebugDefault and
MaxPendingDebugConnections elements of the Application.xml configuration file. By default, debugging is not
allowed. To override the debug setting in the Application.xml file, add the following code to an application’s server-
side code:
application.allowDebug = true;
Note: Set allowDebug to false before deploying the application.
To start a debugging session:
1Open the Administration Console.
2Choose View Applications.
3Select the application to debug from the list or choose New Instance and create a new instance of an application.
4Press the Streams button to see the list of playing streams, if any.
5Click on one of the streams.
6Press the Play Stream button.
7A pop-up window will open and the stream will play.
8Press the Shared Objects button to see the application’s shared objects, if any.
9Select a shared object.
10 Press the Close Debug button to end the debug session.
Deploy an application
Register an application with the server
To connect to an application, the server must know that the application exists. This process is called registering the
application with the server. To register an application with the server, create a folder for the application in the
applications folder. For example, create the following folder to register an application called “myApplication”:
rootinstall/applications/myApplication
The client-side code that connects to the application looks like the following:
myNetConnection.connect("rtmp://fms.examples.com/myApplication");
To create instances of an application, create subfolders. For example, the following folder creates an instance of
myApplication called “room1”:

186
ADOBE MEDIA SERVER 5.0.6 DEVELOPER’S GUIDE
Getting started developing applications
Last updated 9/4/2014
rootinstall/applications/myApplication/room1.
The client-side code that connects to the application instance looks like the following:
myNetConnection.connect("rtmp://fms.examples.com/myApplication/room1");
Every application must have a folder in the applications folder. Usually, the application folder contains the server-side
script and any media assets, but the folder can also be empty. It can also contain an application-specific
Application.xml file.
By default, the applications folder is in the root installation folder (C:\Program Files\Adobe\Adobe Media Server
5\applications, on Windows). To configure the location of the applications folder, edit the fms.ini or the Vhost.xml
configuration file. In the fms.ini file, edit the following parameter: VHOST.APPSDIR = C:\Program
Files\Adobe\Adobe Media Server 5\applications. In the Vhost.xml file, edit the AppsDir element.
Copy server-side script files to the server
Copy server-side script files for an application to the folder you registered on the server. For example, for an
application called “videoPlayer”, copy the main.asc file to rootinstall/applications/videoPlayer. You can also place
server-side scripts in “scripts” subfolder. For example, you can use either of these locations:
rootinstall/applications/appName
rootinstall/applications/appName/scripts
Note: To replace a running application, copy the new files, then use the Administration Console to restart the application.
Packaging server-side files
Adobe Media Server includes a command-line archive compiler utility, far.exe, which lets you package server-side
scripts into a FAR file, which is an archive file like a ZIP file, to simplify deployment. You can also use the archive
compiler utility to compile server-side script files to bytecode (with the file extension .ase) to speed the time required
to load an application instance.
A large application can contain multiple server-side script files stored in different locations. Some files are located in
the application directory and others are scattered in the script library paths that are defined in the server configuration
file. To simplify deployment of your media application, you can package your server-side JS, ASC, and ASE files in a
self-contained Adobe Media Server archive file (a FAR file).
The FAR file is a package that includes the main script file (which is either main.js, main.asc, main.ase,
applicationName.js, applicationName.asc, or applicationName.ase) and any other script files that are referred to in the
main script.
The syntax for running the archive compiler utility to create a script package is as follows:
c:\> far -package -archive <archive> -files <file1> [<file2> ... <fileN>]
The following table describes the command-line options available for far -package.
Note: If the main script refers to scripts in a subdirectory, the hierarchy must be maintained in the archive file. To
maintain this hierarchy, Adobe recommends that you run the FAR utility in the same directory where the main script is
located.
Option Description
-archive archive Specifies the name of the archive file, which has a .far extension.
-files file1 [ file2 ... fileN ] Specifies the list of files to be included in the archive file. At least one file is required.

187
ADOBE MEDIA SERVER 5.0.6 DEVELOPER’S GUIDE
Getting started developing applications
Last updated 9/4/2014
Copy media files to the server
Copy video and audio files to the streams/_definst_ folder in the application folder:
rootinstall/applications/someapplication/streams/_definst_/
If an application connects to an instance of the application, for example,
nc.connect("rtmp://fms.example.com/someapplication/someinstance"), place the streams in the following
folder:
rootinstall/applications/someapplication/streams/someinstance/
There are several ways to configure the server to look for media files stored in other locations. For example, the vod
streaming service that installs with the server is configured to look for media files in the
rootinstall/applications/vod/media folder.
More Help topics
“Stream on-demand media (RTMP)” on page 24
Copy client-side files to a web server
You can deploy SWF files and HTML files on any web server. The SWF file contains the NetConnection.connect()
call that connects to the application on Adobe Media Server. The HTML file is a container for the SWF file. For more
information, see the Flash documentation at www.adobe.com/support/flash.
For more information about deploying AIR applications, see the Adobe AIR documentation at
www.adobe.com/support/air.
By default, Adobe Media Server 5.0 and later install with Apache HTTP Server. If you installed and enabled the web
server, you can deploy SWF files and HTML files from the same computer on which Adobe Media Server is installed.
You can also deploy JPG, GIF, and many other file types. For a complete list of the file types Apache serves by default,
see the rootinstall/Apache2.2/conf/httpd.conf file.
By default, Apache is configured with the following aliases:
To serve files over HTTP, place the files in the rootinstall/webroot folder or an appropriate subfolder. To serve CGI
programs, place the files in the rootinstall/Apache2.2/cgi-bin folder.
You can also add subfolders to these folders. Subfolders cannot use the following names from the fmshttpd.conf file:
icons, error, SWFs, vod, or cgi-bin. In addition, subfolder names cannot use the following reserved words: open, send,
idle, fcs, fms.
By default, Apache is configured to serve all HTTP content from the rootinstall/webroot folder. If you want to
provision the server to serve files from application-specific directories, edit the httpd.conf Apache configuration file.
Alias Path
/rootinstall/webroot
/cgi-bin/ rootinstall/Apache2.2/cgi-bin

188
Last updated 9/4/2014
Chapter 4: Developing streaming media
applications
Adobe® Flash® Media Server can stream live video and recorded video to and from Flash Player and AIR. Recorded
video is called on-demand, or VOD (video on demand).
Live applications capture, encode, and stream live media. Live video is typically used for events such as corporate
meetings, education, sports events, and concerts.
Connecting to the server
About the NetConnection class
Before a client can play or publish audio and video, it must connect to the server. The connection request is accepted
or rejected by an application instance on the server. The server sends information messages back to the client. Once
the application accepts the connection request, a connection is available to both the client and the server.
The NetConnection class connects a client to an application instance on the server. To connect, create an instance of
the NetConnection class and call the connect() method. Pass an application instance URI to the connect() method:
var nc:NetConnection = new NetConnection();
nc.connect("rtmp://localhost/HelloServer");
The server sends back a NetStatusEvent that tells the client whether it has connected successfully.
A NetConnection object is like a pipe that streams audio, video, and data from client to server, or from server to client.
Once you create the NetConnection object, you can attach one or more streams to it. Streams handle the flow of audio,
video, and data over a network connection.
A stream can carry more than one type of content (audio, video, and data). However, a stream flows in only one
direction, from server to client or client to server.
More Help topics
“Managing connections” on page 193
About the application URI
The application instance URI can be absolute or relative and has the following syntax (items in brackets are optional):
protocol:[//host][:port]/appname/[instanceName]
The parts of the URI are described in the following table.

189
ADOBE MEDIA SERVER 5.0.6 DEVELOPER’S GUIDE
Developing streaming media applications
Last updated 9/4/2014
If the client and the application are on the same server, as they often are while developing an application, the only parts
of the URI that are required are the protocol and the application name. You can also use //localhost or 127.0.0.1 for
the domain name:
rtmp:/vod/
rtmp://localhost/vod
rtmp://127.0.0.1/vod
To test these connections, open rootinstall/samples/videoPlayer/videoplayer.html in a browser. Open the Adobe
Media Administration Console (rootinstall/tools/fms_adminConsole.htm) in a browser. In the sample video player,
enter each URL in the Stream URL box, and click Play Stream. In the Adobe Media Administration Console, choose
View Applications > Live Log to see the connection.
When the client and the application aren’t on the same server, specify a host domain name or IP address, as in any of
the following:
rtmp://www.fmsserver.com/vod
rtmp://www.fmsserver.com/vod/mediaplayer1
rtmp://www.fmsserver.com/vod/mediaplayer2
Example: Hello Server application
Note: Adobe Media Streaming Server does not support this example.
You can find the HelloServer application in the rootinstall/documentation/samples/HelloServer folder. This simple
Flash application displays two buttons that enable you to connect to the server and close the connection.
Part Example Description
protocol: rtmp: The protocol used to connect to Adobe Media Server, Real-Time Messaging Protocol and
its variations. For possible values, see the NetConnection.connect() entry in the
ActionScript 3.0 Reference.
//host //www.example.com
//localhost
The host name of a local or remote computer. To connect to a server on the same host
computer as the client, use //localhost or omit the //host identifier.
:port :8080 The port number to connect to on the server.
For RTMP and its variations, the default port is 1935. For HTTP and its variations, the default
port is 80. To connect over the default port, do not specify the port number. Specify the
port number only to connect to a port not configured as the default.
/appname/ /sudoku/ The name of a subdirectory of the rootinstall/applications folder.
You can specify another location for the “applications” directory in the fms.ini
configuration file (at rootinstall/conf/fms.ini).
instanceName room1 An instance of the application to which the client connects. For example, a chat room
application can have many chat rooms: chatroom/room1, chatroom/room2, and so on.
If you do not specify an instance name, the client connects to the default application
instance, named _definst_.
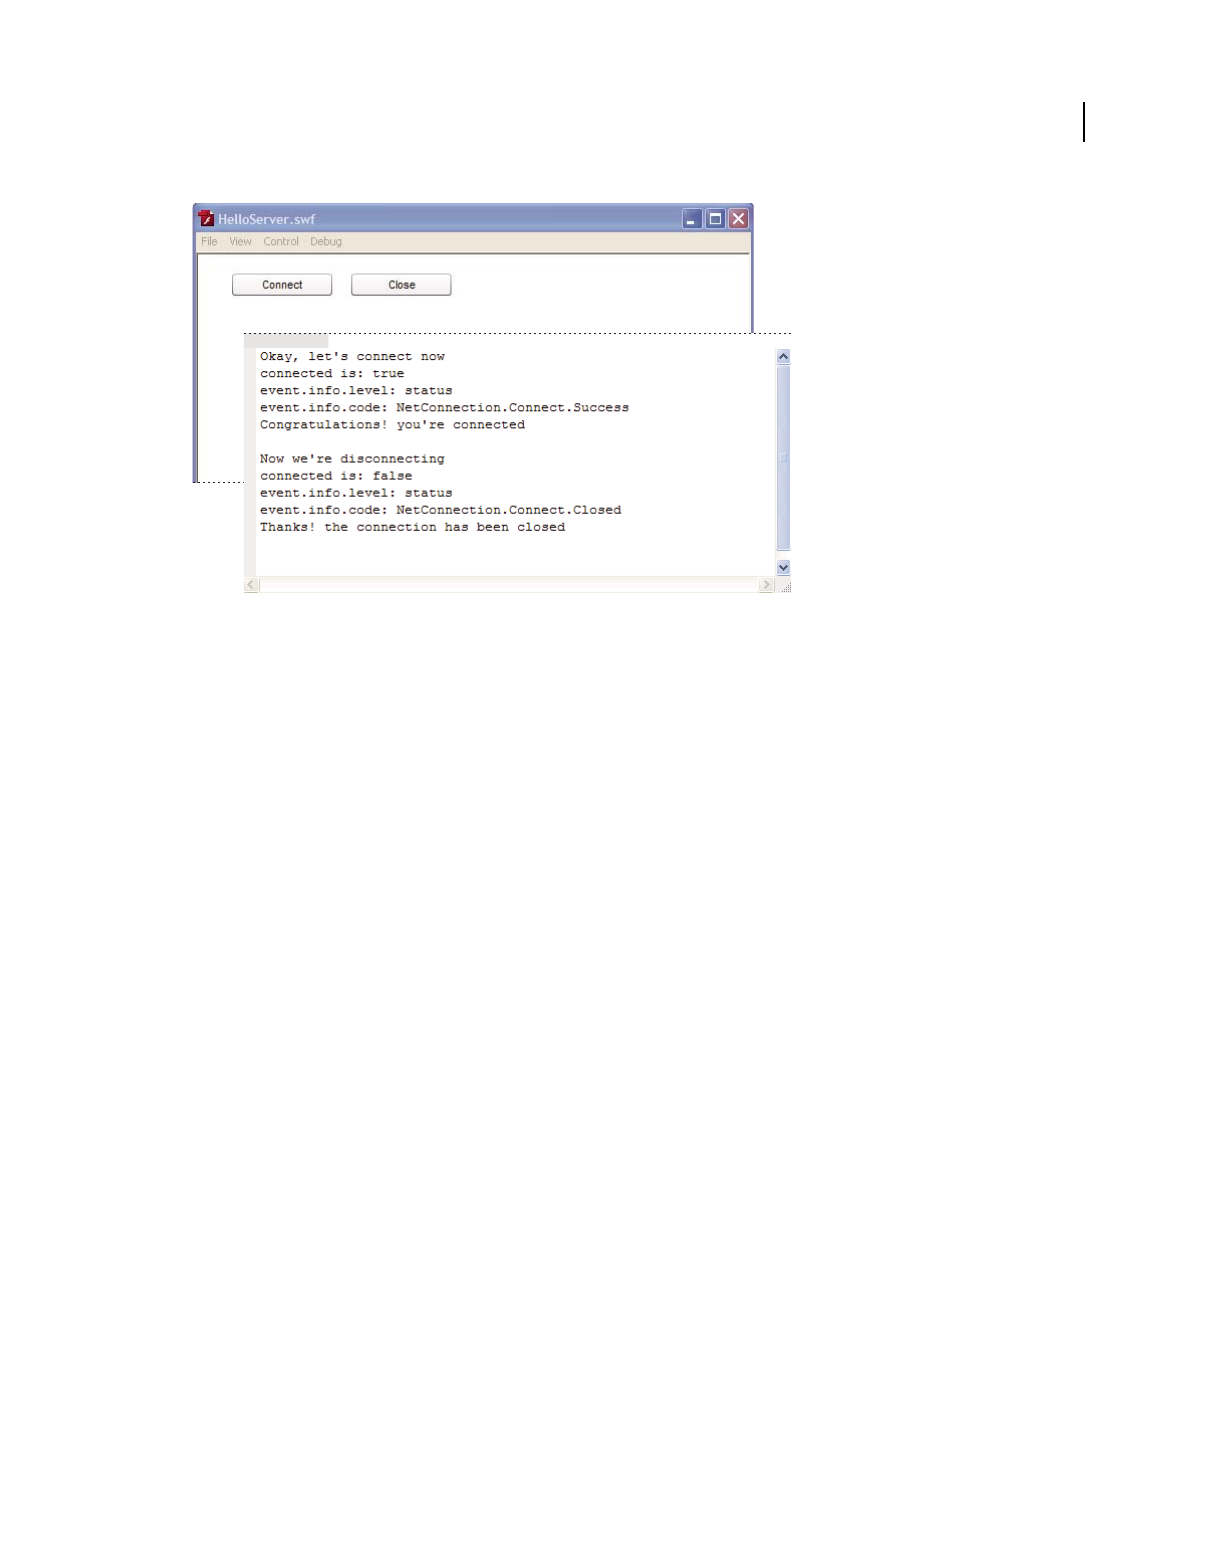
190
ADOBE MEDIA SERVER 5.0.6 DEVELOPER’S GUIDE
Developing streaming media applications
Last updated 9/4/2014
The Output window displays messages about the connection status
Run the application
The easiest way to run the sample is to install it on the same computer as the server.
1Register the application by creating a folder in the server’s applications folder:
rootinstall/applications/HelloServer
2(Optional) To run the sample on a server installed on a different computer, open HelloServer.as and edit this line
to add the URL to your server:
nc.connect("rtmp://localhost/HelloServer");
Design the Flash user interface
The sample is already built and included in the samples folder. However, these instructions show you how to recreate
it, so that you can build it on your own and add to it.
1In Flash Professional, choose File > New > Flash File (ActionScript 3.0), and click OK.
2Choose Window > Components to open the Components panel.
3Double-click the Button component to add it to the Stage.
4In the Properties Inspector, click the Properties tab. Select MovieClip as the instance behavior, and enter the
instance name connectBtn.
5Click the Parameters tab, then Label. Enter Connect as the button label.
6Drag a second button component to the Stage.
7Give the second button the instance name closeBtn and the label Close.
8Save the FLA file, naming it HelloServer.fla.
Write the client-side code
1In Flash Professional, choose File > New > ActionScript File, and click OK.
2Save the ActionScript file as HelloServer.as.
3Return to the FLA file. Choose File > Publish Settings. Click the Flash tab, then Settings.

191
ADOBE MEDIA SERVER 5.0.6 DEVELOPER’S GUIDE
Developing streaming media applications
Last updated 9/4/2014
4In the Document Class box, enter HelloServer. Click the green check mark to make sure the class file can be located.
Click OK, then OK again.
5In the ActionScript file, enter a package declaration. If you saved the file to the same directory as the FLA file, do
not use a package name, for example:
package {
}
However, if you saved the file to a subdirectory below the FLA file, the package name must match the directory path
to your ActionScript file, for example:
package samples {
}
6Within the package, import the ActionScript classes you’ll use in the script:
import flash.display.MovieClip;
import flash.net.NetConnection;
import flash.events.NetStatusEvent;
import flash.events.MouseEvent;
7After the import statements, create a class declaration. Within the class, define a variable of type NetConnection:
public class HelloServer extends MovieClip {
private var nc:NetConnection;
}
Because the class extends the MovieClip class, it inherits all the properties and methods of the MovieClip class.
8Write the class constructor, registering an event listener on each button:
public function HelloServer() {
// register listeners for mouse clicks on the two buttons
connectBtn.addEventListener(MouseEvent.CLICK, connectHandler);
closeBtn.addEventListener(MouseEvent.CLICK, closeHandler);
}
Use addEventListener() to call an event handler named connectHandler() when a click MouseEvent occurs
on the Connect button. Likewise, call closeHandler() when a click MouseEvent occurs on the Close button.
9Write the connectHandler() function to connect to the server when a user clicks the Connect button:
public function connectHandler(event:MouseEvent):void {
trace("Okay, let's connect now");
nc = new NetConnection();
nc.addEventListener(NetStatusEvent.NET_STATUS, netStatusHandler);
nc.connect("rtmp://localhost/HelloServer");
}
In connectHandler(), add an event listener to listen for a netStatus event returned by the NetConnection object.
Then, connect to the application instance on the server by calling NetConnection.connect() with the correct
URI. This URI connects to an application instance named HelloServer, where the server runs on the same computer
as the client.
10 Write the closeHandler() function to define what happens when a user clicks the Close button:
public function closeHandler(event:MouseEvent):void {
trace("Now we're disconnecting");
nc.close();
}
It’s a best practice to explicitly call close() to close the connection to the server.

192
ADOBE MEDIA SERVER 5.0.6 DEVELOPER’S GUIDE
Developing streaming media applications
Last updated 9/4/2014
11 Write the netStatusHandler() function to handle netStatus objects returned by the NetConnection object:
public function netStatusHandler(event:NetStatusEvent):void {
trace("connected is: " + nc.connected);
trace("event.info.level: " + event.info.level);
trace("event.info.code: " + event.info.code);
switch (event.info.code)
{
case "NetConnection.Connect.Success":
trace("Congratulations! you're connected" + "\n");
break;
case "NetConnection.Connect.Rejected":
trace ("Oops! the connection was rejected" + "\n");
break;
case "NetConnection.Connect.Closed":
trace("Thanks! the connection has been closed" + "\n");
break;
}
}
A netStatus object contains an info object, which in turn contains a level and a code that describes the connection
status.
Understand the connection messages
When you run the sample and click the Connect button, you see messages like this, as long as the connection is
successful:
Okay, let's connect now
connected is: true
event.info.level: status
event.info.code: NetConnection.Connect.Success
Congratulations! you're connected
The line connected is: true shows the value of the NetConnection.connected property, meaning whether Flash
Player is connected to the server over RTMP. The next two lines describe the netStatus event the NetConnection
object sends to report its connection status:
event.info.level: status
event.info.code: NetConnection.Connect.Success
The level property can have two values, status or error. The code property describes the status of the connection.
You can check for various code values in your netStatusHandler function and take action. Always check for a
successful connection before you create streams or do other work in your application.
Likewise, when you click the Close button, you see the following:
Now we're disconnecting
connected is: false
event.info.level: status
event.info.code: NetConnection.Connect.Closed
Thanks! the connection has been closed

193
ADOBE MEDIA SERVER 5.0.6 DEVELOPER’S GUIDE
Developing streaming media applications
Last updated 9/4/2014
Managing connections
Connection status codes
After the connection between client and server is made, it can break for various reasons. The network might go down,
the server might stop, or the connection might be closed from the server or the client. Any change in the connection
status creates a netStatus event, which has both a code and a level property describing the change. This is one code
and level combination:
See NetStatus.info in the ActionScript 3.0 Reference for a complete list of all code and level values that can be
returned in a netStatus event.
When the event is returned, you can access the connection code and level with event.info.code and
event.info.level. You can also check the NetConnection.connected property (which has a value of true or
false) to see if the connection still exists. If the connection can’t be made or becomes unavailable, you need to take
some action from the application client.
Managing connections in server-side code
An application can have server-side code in a main.asc or applicationName.asc file that manages clients trying to
connect.
The server-side code has access to Client objects, which represent individual clients on the server side, and a single
application object, which enables you to manage the application instance. In the server code, you use Server-Side
ActionScript and the server-side information objects (see the Server-Side ActionScript Language Reference).
In the server-side code, the application can accept or reject connections from clients, shut down the application, and
perform other tasks to manage the connection. When a client connects, the application receives an
application.onConnect event. Likewise, when the client disconnects, the application receives an
application.onDisconnect event.
To manage the connection from the server, start with application.onConnect() and
application.onDisconnect() in Server-Side ActionScript.
More Help topics
“Server-side code” on page 183
Example: Managing connections
This example shows how to manage connections from both the application client and the server-side code.
Write the client code
In the client code, you need to check for specific connection codes and handle them. Create live streams or play
recorded streams only when the client receives NetConnection.Connect.Success.
Note: See the SimpleConnectManage sample, SimpleConnectManage.as file.
1Create a NetConnection object and call the connect() method to connect to the server.
Code Level Meaning
NetConnection.Connect.Success status A connection has been established successfully.

194
ADOBE MEDIA SERVER 5.0.6 DEVELOPER’S GUIDE
Developing streaming media applications
Last updated 9/4/2014
2Write a netStatus event handler. In it, check for specific connection codes, and take an action for each:
public function netStatusHandler(event:NetStatusEvent):void
{
trace("connected is: " + nc.connected );
trace("event.info.level: " + event.info.level);
trace("event.info.code: " + event.info.code);
switch (event.info.code)
{
case "NetConnection.Connect.Success":
trace("Congratulations! you're connected");
// create live streams
// play recorded streams
break;
case "NetConnection.Connect.Rejected":
trace ("Oops! the connection was rejected");
// try to connect again
break;
case "NetConnection.Connect.Failed":
trace("The server may be down or unreachable");
// display a message for the user
break;
case "NetConnection.Connect.Closed":
trace("The connection was closed successfully - goodbye");
// display a reconnect button
break;
}
}
Run the code
Note: These instructions apply to any ActionScript 3.0 example without a Flash user interface. The ActionScript 3.0
examples are provided for your convenience.
1Check the client-side code to see which application it connects to:
nc.connect("rtmp://localhost/HelloServer");
2Register the application on the server by creating an application instance directory for it in the applications
directory, for example:
rootinstall/applications/HelloServer
3(Optional) Or, to use an application you have registered with the server, change the URI used in the call to
connect():
nc.connect("rtmp://localhost/MyApplication");
4In Flash Builder, create an ActionScript project named SimpleConnectManage (choose File > New > ActionScript
Project, and follow the wizard).
5Add the SimpleConnectManage sample files to the project.
6Choose Run > Debug. In the Debug window, enter SimpleConnectManage for Project and
SimpleConnectManage.as for Application file. Click Debug.
7Close the empty application window that opens and return to Flash Builder. Check the messages in the Console
window.
If the connection is successful, you should see output like this:

195
ADOBE MEDIA SERVER 5.0.6 DEVELOPER’S GUIDE
Developing streaming media applications
Last updated 9/4/2014
connected is: true
event.info.level: status
event.info.code: NetConnection.Connect.Success
Congratulations! you're connected
[SWF] C:\samples\SimpleConnectManage\bin\SimpleConnectManage-debug.swf - 2,377 bytes after
decompression
Get the server version number
Use the ActionScript 3.0 NetStatusEvent to get the server version number. The server version number is in the
event.info.data.version property. The following code connects to the vod service and outputs the server version
number:
import flash.net.NetConnection;
import flash.events.NetStatusEvent;
import flash.events.AsyncErrorEvent;
var nc:NetConnection = new NetConnection();
nc.client = this;
nc.addEventListener(NetStatusEvent.NET_STATUS, netStatusHandler);
nc.addEventListener(AsyncErrorEvent.ASYNC_ERROR, asyncErrorHandler);
function netStatusHandler(event:NetStatusEvent):void{
trace("Adobe Media Server version: " + event.info.data.version);
trace(event.info.code);
}
function asyncErrorHandler(event:AsyncErrorEvent):void{
trace(event);
}
// The vod applicatin expects this function to check bandwidth.
function onBWDone(...data):Number{
return 0;
}
nc.connect("rtmp://localhost/vod");
You can also add the following line of code inside the netStatusHandler() function in the HelloServer example
application:
trace("Adobe Media Server version: " + event.info.data.version);
Streaming media files
Playing media files
To play a stream, use the NetStream class. Create a NetStream object and pass the contructor a NetConnection object:
ns:NetStream = new NetStream(nc);
Call the NetStream.play() method or the NetStream.play2() method and pass the URI of the media file:
ns.play("bikes");
ns.play2("bikes");
This code plays the recorded stream named “bikes.flv” within the application to which you are connected with
NetConnection.connect().
Different file types require prefixes and file extensions. For example, the following code plays the file “bikes.f4v”,

196
ADOBE MEDIA SERVER 5.0.6 DEVELOPER’S GUIDE
Developing streaming media applications
Last updated 9/4/2014
ns.play("mp4:bikes.f4v");
For detailed information about play() and play2(), their parameters, and when to use each method, see the
NetStream class in the ActionScript 3.0 Reference.
Playing streams nested in subfolders
To play a stream, specify the codec before you specify the path to the stream. FLV streams don’t require a codec prefix,
but F4V/MP4 files, MP3 files, and RAW files do.
Suppose you’re using the default vod application. By default, the vod application is configured to look for streams in
the applications/vod/media folder. Suppose a stream called “sample” is nested in the applications/vod/media/final
folder. The following examples are for the client-side NetStream.play() method:
ns.play("mp4:final/sample.f4v",0,-1) // F4V/MP4 files
ns.play("raw:final/sample",0,-1) // RAW files
ns.play("mp3:final/sample",0,-1) //MP3 files
ns.play("final/sample",0,-1). // FLV files
The following are examples for the Server-Side ActionScript Stream.play() method:
myStream.play("mp4:final/sample.f4v",0,-1) // F4V/MP4 files
myStream.play("raw:final/sample",0,-1) // RAW files
myStream.play("mp3:final/sample",0,-1) // MP3 files
myStream.play("final/sample",0,-1) // FLV files
Naming streams
Stream names cannot contain any of the following characters: \ / : * ? " < > |.
Managing the client buffer
•Very low frame rate H.264 videos can take a long time to start if the buffer is too short.
H.264 video requires 64 messages before it begins playback. For example, at 15 fps, 2 seconds of buffer holds 30
samples. In this case, the server and the player wait for over 4 seconds for the 64 images to arrive, even if they're
small.
•Server-side streams do not play if the file size is less than either the configured buffer time (MinBufferTime tag in
the Application.xml configuration file), or 2 seconds.
•When playing a stream, set NetStream.bufferTime to at least .1. Set the value smaller for live applications. Set
the value larger (3-5 seconds) for on-demand applications.
Mapping URIs to local and network drives
Use virtual directories to simplify mapping URIs to local and network drives. Virtual directories let you publish and
store media files in different, predetermined locations, which can help you organize your media files. Configure virtual
directories in the VirtualDirectory/Streams tag of the Vhost.xml file.
One way you can use directory mapping is to separate storage of different kinds of resources. For example, your
application could allow users to view either high-bandwidth video or low-bandwidth video, and you might want to
store high-bandwidth and low-bandwidth video in separate folders. You can create a mapping wherein all streams that
start with low are stored in a specific directory, C:\low_bandwidth, and all streams that start with high are stored in a
different directory:

197
ADOBE MEDIA SERVER 5.0.6 DEVELOPER’S GUIDE
Developing streaming media applications
Last updated 9/4/2014
<VirtualDirectory>
<Streams>low;c:\low_bandwidth</Streams>
<Streams>high;c:\high_bandwidth</Streams>
</VirtualDirectory>
When the client wants to access low-bandwidth video, the client calls ns.play("low/sample"). This call tells the
server to look for the sample.flv file in the c:\low_bandwidth folder.
Similarly, a call to ns.play("high/sample") tells the server to look for the sample.flv file in the c:\high_bandwidth
folder.
The following table shows three examples of different virtual directory configurations, including mapping to a local
drive and a network drive, and how the configurations determine the directory to which a recorded stream is
published. In the first case, because the URI specified ("myStream") does not match the virtual directory name that is
specified ("low"), the server publishes the stream to the default streams directory.
More Help topics
“Getting started streaming media” on page 1
Capturing video snapshots
This feature enables you to get a thumbnail snapshot of a given video, including sound, for display purposes.
Flash Player clients are permitted to access data from streams in the directories specified by the
Client.audioSampleAccess and Client.videoSampleAccess properties. See .
To access data, call BitmapData.draw() and SoundMixer.computeSpectrum() on the client. For more information
about accessing raw audio, see Accessing raw sound data.
Handling metadata in streams
A recorded media file often has metadata encoded in it by the server or a tool. The Flash Video Exporter utility (version
1.1 or later) is a tool that embeds a video’s duration, frame rate, and other information into the video file itself. Other
video encoders embed different sets of metadata, or you can explicitly add your own metadata.
The NetStream object that plays the stream on the client dispatches an onMetaData event when the stream encounters
the metadata. To read the metadata, you must handle the event and extract the info object that contains the metadata.
For example, if a file is encoded with Flash Video Exporter, the info object contains these properties:
Mapping in Vhost.xml
<VirtualDirectory><Streams> tag
URI in NetStream call Location of published stream
low;e:\fmsstreams "myStream" c:\...\rootinstall\applications\yourApp\streams\_definst_\myStream.flv
low;e:\fmsstreams "low/myStream" e:\fmsstreams\myStream.flv
low;\\mynetworkDrive\share\fmsstreams "low/myStream" \\mynetworkDrive\share\fmsstreams\myStream.flv
duration The duration of the video.
width The width of the video display.
height The height of the video display.
framerate The frame rate at which the video was encoded.

198
ADOBE MEDIA SERVER 5.0.6 DEVELOPER’S GUIDE
Developing streaming media applications
Last updated 9/4/2014
More Help topics
“Example: Add metadata to live video” on page 246
Using XMP metadata
You can deliver Adobe Extensible Metadata Platform (XMP) metadata embedded video streaming through Adobe
Media Server to Flash Player. Adobe Media Server supports XMP metadata embedded in FLV and MP4/F4V formats.
Adobe Media Server 3.5 supports one XMP metadata packet per MP4/F4V file.
With XMP metadata, you have a communication system that provides critical media information from media creation
to the point where media is viewed. XMP information you add during the production process can add to the interactive
experience of the media. In addition, speech-to-text metadata embedded within files and encoded from Adobe
encoding tools such as Adobe Media Encoder can be delivered. AMF0 and AMF3 connections are supported. XMP
metadata can be internal information about the file or information for end users.
For example, you could create a trailer in Adobe® Premiere® and transfer the metadata to the FLV file. When users view
the file, they can use Flash Player 10 search to look for metadata and jump to a specific location in the file. When
NetStream plays the content, an onXMPData message with the single field data is sent as a callback. The data field
contains the entire XMP message from the media file.
For detailed information about XMP, see www.adobe.com/go/learn_fms_xmp_en.
Example: Media player
This tutorial uses ActionScript 3.0 to add a Video object to the Stage to display video. For more information about
working with video, see the “Working with Video” chapter in ActionScript 3.0 Developer’s Guide at
www.adobe.com/go/learn_fms_video_en.
This tutorial provides the simplest example of displaying video for learning. To build a more robust video player, see
the Open Source Media Framework.
Note: This example uses the MediaPlayer sample, MediaPlayer.as, from the rootinstall/documentation/samples folder.
Run the example in Flash
1Create a rootinstall/applications/mediaplayer folder.
2Copy the rootinstall/documentation/samples/MediaPlayer/streams folder to the
rootinstall/applications/mediaplayer folder so you have the following:
rootinstall/applications/mediaplayer/streams/_definst_/bikes.flv
3In Flash, open the MediaPlayer.fla file from the rootinstall/documentation/samples/MediaPlayer folder.
4Select Control > Test Movie. The video plays without sound and the Output window displays messages.
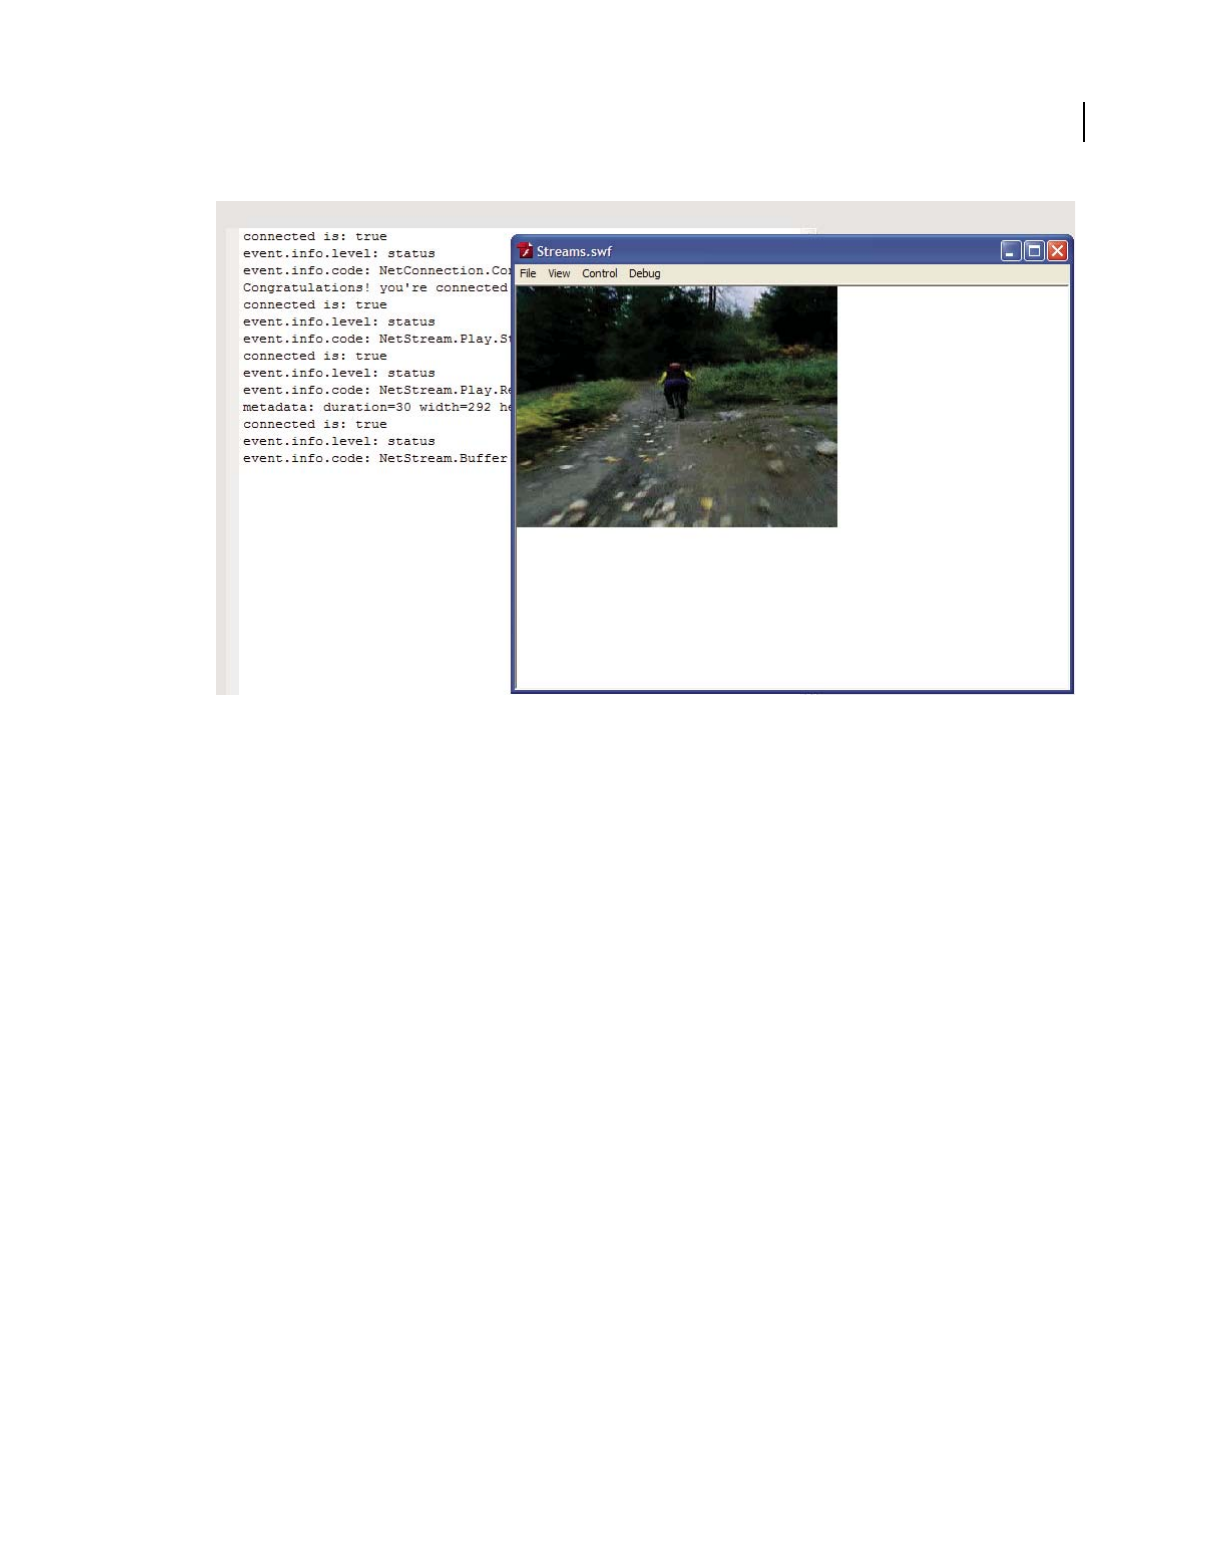
199
ADOBE MEDIA SERVER 5.0.6 DEVELOPER’S GUIDE
Developing streaming media applications
Last updated 9/4/2014
The Output window and the video in test-movie mode
You can watch the output as the stream plays and the connection status changes. The call to NetStream.play()
triggers the call to onMetaData, which displays metadata in the console window, like this:
metadata: duration=30 width=292 height=292 framerate=30
Run the example in Flash Builder
1Open MediaPlayer.as in Flash Builder.
2Choose Run > Debug. For Project, choose MediaPlayer. For Application file, choose MediaPlayer.as.
3Click Debug.
The video runs in an application window. Click the Flash Builder window to see the output messages.
Write the main client class
1Create an ActionScript 3.0 class. Import NetConnection, NetStream, and any other classes you need:
package {
import flash.display.Sprite;
import flash.net.NetConnection;
import flash.events.NetStatusEvent;
import flash.net.NetStream;
import flash.media.Video;
...
}
2Create a new class, MediaPlayer, and declare the variables you’ll need within it:

200
ADOBE MEDIA SERVER 5.0.6 DEVELOPER’S GUIDE
Developing streaming media applications
Last updated 9/4/2014
public class MediaPlayer extends Sprite
{
var nc:NetConnection;
var ns:NetStream;
var video:Video;
...
}
3Define the constructor: create a NetConnection object and add an event listener to it, and connect to the server:
public function MediaPlayer()
{
nc = new NetConnection();
nc.addEventListener(NetStatusEvent.NET_STATUS, netStatusHandler);
nc.connect("rtmp://localhost/mediaplayer");
}
4Create a netStatusHandler function that handles both NetConnection and NetStream events:
private function netStatusHandler(event:NetStatusEvent):void{
trace("event.info.level: " + event.info.level + "\n", "event.info.code: " +
event.info.code);
switch (event.info.code){
case "NetConnection.Connect.Success":
// Call doPlaylist() or doVideo() here.
doPlaylist(nc);
break;
case "NetConnection.Connect.Failed":
// Handle this case here.
break;
case "NetConnection.Connect.Rejected":
// Handle this case here.
break;
case "NetStream.Play.Stop":
// Handle this case here.
break;
case "NetStream.Play.StreamNotFound":
// Handle this case here.
break;
case "NetStream.Publish.BadName":
trace("The stream name is already used");
// Handle this case here.
break;
}
}
Note: To see the full list of event codes that are available, see NetStatusEvent.info in the ActionScript 3.0 Reference.
1Create a NetStream object and register a netStatus event listener:
private function connectStream(nc:NetConnection):void {
ns = new NetStream(nc);
ns.addEventListener(NetStatusEvent.NET_STATUS, netStatusHandler);
ns.client = new CustomClient();
...
Notice that you set the client property to an instance of the CustomClient class. CustomClient is a separate class
that defines some special event handlers.
2Create a Video object and attach the stream to it:

201
ADOBE MEDIA SERVER 5.0.6 DEVELOPER’S GUIDE
Developing streaming media applications
Last updated 9/4/2014
video = new Video();
video.attachNetStream(ns);
In ActionScript 3.0, call Video.attachNetStream()—not Video.attachVideo() as in ActionScript 2.0—to
attach the stream to the Video object.
3Call NetStream.play() to play the stream and addChild() to add it to the Stage:
...
ns.play("bikes", 0);
addChild(video);
}
The URI of the stream you pass to NetStream.play() is relative to the URI of the application you pass to
NetConnection.connect().
Write the client event handler class
You also need to write the CustomClient class, which contains the onMetaData and onPlayStatus event handlers.
You must handle these events when you call NetStream.play(), but you cannot use the addEventListener()
method to register the event handlers.
1In your main client class, attach the new class to the NetStream.client property:
ns.client = new CustomClient();
2Create the new client class:
class CustomClient {
}
3Write a function named onMetaData() to handle the onMetaData event:
public function onMetaData(info:Object):void {
trace("metadata: duration=" + info.duration + " width=" + info.width +
" height=" + info.height + " framerate=" + info.framerate);
}
4Write a function named onPlayStatus() to handle the onPlayStatus event:
public function onPlayStatus(info:Object):void {
trace("handling playstatus here");
}
Checking video files
Checking video files created or modified with third-party tools
Third-party tools are available to create and modify FLV and F4V files, but some of the tools create files that do not
comply with the FLV and F4V standards. Common problems include bad timestamps, invalid onMetaData messages,
bad message headers, and corrupted audio and video. The FLVCheck tool can be used to analyze FLV and F4V files
before they are deployed on the server. In addition, the tool can also add or update metadata to reflect file duration
correctly. The tool verifies that metadata is readable, specifies an accurate duration, and checks that the file is seekable
by the server. The tool supports unicode filenames.
Note: The FLVCheck tool does not correct file content corruption. The tool does fix metadata by scanning the Duration
and Can Seek To End metadata fields. The tool can then merge the server metadata with the data present in the file.

202
ADOBE MEDIA SERVER 5.0.6 DEVELOPER’S GUIDE
Developing streaming media applications
Last updated 9/4/2014
Checking other video files
Adobe Media Server supports playback and recording of H.264-encoded video and HE-AAC-encoded audio within
an MPEG-4–based container format. A subset of the MPEG-4 standards are supported. All MP4 files and Adobe F4V
files are part of the supported subset.
For MPEG-4–based container formats, use the FLVCheck tool to verify that the server can play back your files.
Note: The FLVCheck tool does not correct corrupted H.264-encoded files or make any other fixes to MP4/F4V files.
Check a video file with the FLVCheck tool
The FLVCheck tool is a command line program; the executable is named flvcheck.
1Open your operating system’s command prompt and change directories to rootinstall/tools.
2Use the following syntax to run the FLVCheck tool:
flvcheck [-option] <file ...>
For example, to check two files:
flvcheck -f abc.flv ../test/123.flv
The following table describes the command line options available.
Option Description
-f [ --file ] file ... Specifies the path to the video file(s) being checked. Relative paths may be used. (Avoid
using the “\\xd3 character; try the “/” character instead.)
-v [--verbose] Sets the verbose flag.
-V [ --version ] Prints version information.
-n [ --nobanner ] Turns off header.
-h [ --help ] Provides a description of options and an example.
-d [ --duration ] Specifies the margin of error, in seconds, that FLVCheck reports. (The default is 2 seconds.)
When validating metadata, the absolute difference between metadata_duration and
actual_duration is calculated and compared against the margin specified in this
command. If the margin is exceeded, the server logs a warning that the metadata duration
is incorrect. If the margin has not been exceeded, nothing will be logged.
To get the exact duration, specify -d 0.
-q [ --quiet ] Specifies that only the status code, not the text output, be returned. The --help option
overrides this option.
-w [ --warnings] Display warnings.
-W [--warnings_as_errors] Treat warnings as errors.
-s [ --fixvideostall ] Fix a stall in video playback (FLV only).
-u [ --usage ] Displays an example and information about command-line parameters.
-m [ --fixmeta ] (FLV files only) If a metadata tag is corrupted, creates a new copy of the original FLV file in
the same directory as the original, with corrected metadata. (If the file contains no errors, a
backup file is not created.) Only the Duration and Can Seek To End metadata fields are
corrected.

203
ADOBE MEDIA SERVER 5.0.6 DEVELOPER’S GUIDE
Developing streaming media applications
Last updated 9/4/2014
3If the FLVCheck tool finds no errors in the FLV file, the status code returned is 0. If there are one or more errors,
a positive number indicating the total number of invalid files found is returned. If a return code of -1 is returned,
an invalid command-line parameter was specified.
Errors and warnings are logged in a log file (stdout).
4(FLV files only) If an error is returned from an FLV file due to a metadata error, you can use the tool to try to correct
the problem. Try the following:
aUse the -m option to try to fix the metadata in the file:
flvcheck -m <file> [-quiet] [-help]
bUse the -d option to change the duration field margin of error. The duration field in the metadata may be
inaccurate by a few seconds. For example, flvcheck -f abc.flv -d 5 would allow the metadata duration to
be inaccurate +/- 5 seconds.
Other types of errors cannot be fixed using the FLVCheck tool. MP4/F4V files cannot be fixed using the
FLVCheck tool.
FLVCheck errors
If an error is found, the error is logged to the stdout file in the following format: Date, Time, ErrorNumber,
ErrorMessage, and FileName. The possible error numbers, types of errors, and messages are as follows.
Error numbers Error type Error messages
-2 General Invalid file system path specified.
-3 General File not found.
-4 General Cannot open file.
-5 General File read error.
Adobe Media Server cannot read the file, indicating that the encoding of part or all
of the file is not compatible with the codecs that are supported.
-6 General Cannot create corrected file.
This error occurs if you run the tool with the -m option set, but the tool cannot create
a file with corrected metadata.
-7 FLV Invalid FLV signature.
-8 FLV Invalid FLV data offset.
-9 FLV Invalid FLV message footer.
-10 FLV Unrecognized message type.
-11 FLV Found backward timestamp.
-12 FLV Unparsable data message.
-13 MP4 File does not contain a movie box.
This error occurs if the MP4 file is empty.
-14 MP4 File does not contain any valid tracks.
This error could occur if the MP4 file contains audio or video encoded with
unsupported codecs.
-15 MP4 Too many tracks. Maximum allowed is 64.

204
ADOBE MEDIA SERVER 5.0.6 DEVELOPER’S GUIDE
Developing streaming media applications
Last updated 9/4/2014
FLVCheck warnings
Generally, warnings are informative and are not fatal errors; Adobe Media Server will ignore the error that caused the
warning and continue to load and play back the video or audio file, but you may experience problems with playback.
Warnings are logged to the stdout file in the following format: Date, Time, Warning Number, Warning Message, and
File Name.
-16 MP4 Only one sample type allowed per track.
-17 MP4 Box is too large.
-18 MP4 Truncated box. The reported length of a box is longer than the remaining length of
the file. The file may have been truncated, or the reported box length may be invalid.
-19 MP4 Duplicate box.
-20 MP4 Invalid box version.
-21 MP4 Invalid movie time scale.
-22 MP4 Invalid number of data entries in box.
-23 MP4 Invalid sample size.
-24 MP4 Invalid chapter time.
-25 MP4 Too many tag boxes. Max is 64.
-26 General File appears to be FLV with wrong extension.
-27 MP4 Unsupported DRM scheme.
-28 MP4 Error reading MP4 tables.
-29 MP4 File contains unexpected movie fragments.
-30 MP4 File contains out-of-order movie fragments.
-32 RAW Index or Contexts file missing or corrupted.
-33 RAW Index File Version %x Not Supported. FMS Requires Version %x.
-34 RAW Failed read in segment file %s. File missing or corrupted.
-35 RAW Truncated message in segment file %s.
-36 RAW Unrecognized message type in segment file %s.
-37 RAW Invalid message footer in segment file %s.
-38 RAW Segment file %s does not match index file.
Warning number Warning type Message
-100 General Metadata duration is missing or is incorrect.
-101 FLV canSeekToEnd is false.
-102 MP4 Unrecognized box.
-103 MP4 Found incomplete track.
-104 MP4 Found duplicate video track. Ignoring...
Error numbers Error type Error messages

205
ADOBE MEDIA SERVER 5.0.6 DEVELOPER’S GUIDE
Developing streaming media applications
Last updated 9/4/2014
Handling errors
About error handling
As you build video applications, it is important to learn the art of managing connections and streams. In a networked
environment, a connection attempt might fail for any of these reasons:
•Any section of the network between client and server might be down.
•The URI to which the client attempts to connect is incorrect.
•The application instance does not exist on the server.
•The server is down or busy.
•The maximum number of clients or maximum bandwidth threshold may have been exceeded.
-105 MP4 Found duplicate audio track. Ignoring...
-106 MP4 Found duplicate data track. Ignoring...
-107 MP4 Track has unsupported sample type.
Adobe Media Server ignores (will not play back) tracks that are encoded with
unsupported codecs.
-108 MP4 Invalid video codec.
This warning indicates that a track has an invalid video codec. Adobe Media Server
cannot play back the track.
-109 MP4 Invalid audio codec.
This warning indicates that a track has an invalid audio codec. Adobe Media Server
cannot play back the track.
-110 FLV Video may appear stalled due to lack of audio data.
-111 MP4 File has unsupported metadata format.
-112 MP4 Box has extraneous bytes at end.
-113 FLV Video messages found but video flag not set.
-114 FLV Audio messages found but audio flag not set.
-115 FLV Video flag set but no video messages found.
-116 FLV Audio flag set but no audio messages found.
-117 MP4 File is truncated. Will only be partially playable.
-118 MP4 Track contains unsupported edit list.
-119 FLV and RAW Missing FLV metadata.
-120 MP4 Bad NellyMoser Frequency. Sample(s) skipped.
-121 MP4 Invalid Track Extends Box.
-122 MP4 Track contains unsupported sample flags.
-126 RAW Found backward timestamp in segment file %s.
Warning number Warning type Message

206
ADOBE MEDIA SERVER 5.0.6 DEVELOPER’S GUIDE
Developing streaming media applications
Last updated 9/4/2014
If a connection is established successfully, you can then create a NetStream object and stream video. However, the
stream might encounter problems. You might need to monitor the current frame rate, watch for buffer empty
messages, downsample video and seek to the point of failure, or handle a stream that is not found. Inform customers
of errors that occur during playback:
•The network connection fails during playback.
•The buffer empties before playback is complete.
To be resilient, your application needs to listen for and handle netStatus events that affect connections and streams.
As you test and run your application, you can also use the Administration Console to troubleshoot various connection
and stream events.
Handle a failed connection
If a connection cannot be made, handle the netStatus event before you create a NetStream object or any other objects.
You may need to retry connecting to the server’s URI, ask the user to reenter a user name or password, or take some
other action.
The event codes to watch for and sample actions to take are as follows:
Note: Use the SimpleConnectManage sample, SimpleConnectManage.as, written in ActionScript 3.0.
Write client code to handle NetStatus events
❖Create a NetConnection object and connect to the server. Then, write a netStatus event handler in which you
detect each event and handle it appropriately for your application, for example:
Event Action
NetConnection.Connect.Failed Display a message for the user that the server is down.
NetConnection.Connect.Rejected Try to connect again.
NetConnection.Connect.AppShutDown Disconnect all stream objects and close the connection.

207
ADOBE MEDIA SERVER 5.0.6 DEVELOPER’S GUIDE
Developing streaming media applications
Last updated 9/4/2014
public function netStatusHandler(event:NetStatusEvent):void
{
trace("connected is: " + nc.connected );
trace("event.info.level: " + event.info.level);
trace("event.info.code: " + event.info.code);
switch (event.info.code)
{
...
case "NetConnection.Connect.Rejected":
trace ("Oops! the connection was rejected");
// try to connect again
break;
case "NetConnection.Connect.Failed":
trace("The server may be down or unreachable");
break;
case "NetConnection.Connect.AppShutDown":
trace("The application is shutting down");
// this method disconnects all stream objects
nc.close();
break;
...
}
}
Handle a stream not found
If a stream your application attempts to play is not found, a netStatus event is triggered with a code of
NetStream.Play.StreamNotFound. Your netStatus event handler should detect this code and take some action,
such as displaying a message for the user or playing a standard stream in a default location.
Write the client code
❖In your netStatus event handler, check for the StreamNotFound code and take some action:
private function onNetStatus(event:NetStatusEvent):void {
switch (event.info.code) {
case "NetStream.Play.StreamNotFound":
trace("The server could not find the stream you specified");
ns.play( "public/welcome");
break;
...
}
Working with playlists
About playlists
A playlist is a list of streams to play in a sequence. The server handles the list of streams as a continuous stream and
provides buffering, so that the viewer experiences no interruption when the stream changes. You can use both client-
side ActionScript and Server-Side ActionScript to create playlists.
Adobe Evangelist Jens Loeffler has written an Adobe DevNet article that uses client-side and server-side playlists to
edit live streams into a highlight reel.

208
ADOBE MEDIA SERVER 5.0.6 DEVELOPER’S GUIDE
Developing streaming media applications
Last updated 9/4/2014
Create a client-side playlist
Important: There is a bug that impacts client-side playlists that are missing their first item. The first time a user plays such
a playlist, the playlist skips the item and plays. Every subsequent time a user plays the playlist, the playlist does not play.
This playlist uses the names of streams that are stored on the server. To change the playlist, you need to change the
code in your application client.
Note: Use the MediaPlayer sample, MediaPlayer.as, written in ActionScript 3.0.
1Create a NetConnection object, connect to the server, and add a netStatus event handler.
2Create a NetStream object and listen for netStatus events:
private function createPlayList(nc:NetConnection):void {
stream = new NetStream(nc);
stream.addEventListener(NetStatusEvent.NET_STATUS, netStatusHandler);
stream.client = new CustomClient();
...
}
3Attach the NetStream object to a Video object:
video = new Video();
video.attachNetStream(stream);
4Define a series of play() methods on the NetStream object:
stream.play( "advertisement", 0, 30 );
stream.play( "myvideo", 10, -1, false );
stream.play( "bikes", 0, -1, false );
stream.play( "parade", 30, 120, false);
addChild(video);
5Listen for NetStream event codes in your netStatus event handler:
private function netStatusHandler(event:NetStatusEvent):void
{
...
case "NetStream.Play.Stop":
trace("The stream has finished playing");
break;
case "NetStream.Play.StreamNotFound":
trace("The server could not find the stream");
break;
}
This playlist plays these streams:
•A recorded stream named advertisement.flv, from the beginning, for 30 seconds
•The recorded stream myvideo.flv, starting 10 seconds in, until it ends
•The recorded stream bikes.flv, from start to end
•The recorded stream parade.flv, starting 30 seconds in and continuing for 2 minutes

209
ADOBE MEDIA SERVER 5.0.6 DEVELOPER’S GUIDE
Developing streaming media applications
Last updated 9/4/2014
Swap streams in a playlist
Flash Player 10 and Adobe Media Server 3.5
Swapping streams means to exchange one stream for another. While stream switching occurs at keyframes, swapping
streams occurs at the stream boundary. Swapping streams is, therefore, useful with playlists. One use case is with
playlists that contain content with advertising segments. After collecting statistics about usage patterns, you can swap
one advertisement for another.
Use the NetStream.play2() method with the transition mode SWAP to swap streams in a playlist. The
NetStream.play2()method takes a NetStreamPlayOptions object as a parameter. In the NetStreamPlayOptions
object, specify the old stream, the stream to switch to, and the kind of transition to use—in this case,
NetStreamPlayTransitions.SWAP.
For example, suppose a playlist is set to play Stream A, Stream B, and Stream C, in that order.
ns.play("streamA", 0, -1, true);
ns.play("streamB", 0, -1, false);
ns.play("streamC", 0, -1, false);
...
While Stream A plays, and before the server begins sending Stream C, you determine that you want to play Stream Z
instead of Stream C. To perform this transition, use code like the following sample:
var param:NetStreamPlayOptions = new NetStreamPlayOptions();
param.oldStreamName = "streamC";
param.streamName = "streamZ";
param.transition = NetStreamPlayTransitions.SWAP
ns.play2(param);
The SWAP transition differs from the SWITCH transition. The call to swap streams must occur before the server delivers
the old stream (in this example, streamC). If streamC is already in play, the server does not swap the content and sends
a NetStream.Play.Failed event. If the server has not yet delivered streamC, the server swaps the content. The result
is that streamA, streamB, and streamZ play.
When the server swaps to a stream with different content, the client application resets the buffer. The server swaps the
stream at the start of the new stream, ensuring an uninterrupted experience.
Create a server-side playlist
A server-side playlist is a list of media played in sequence over a Server-Side ActionScript Stream object. A playlist can
contain both live and recorded media.
A server-side playlist plays over a live stream (the Stream object). You can record the stream as an FLV or F4V file as
it plays. If a playlist contains only FLV files, you can record it as an FLV file or as an F4V file. Otherwise , record it as
an F4V file.
The following code creates a server-side playlist of two live streams and one recorded stream:

210
ADOBE MEDIA SERVER 5.0.6 DEVELOPER’S GUIDE
Developing streaming media applications
Last updated 9/4/2014
// Start the playlist when the application loads.
// This is a live playlist, it is not recorded.
application.onAppStart = function(){
this.myStream = Stream.get("serverplaylist");
// Play a live stream for 30 seconds.
this.myStream.play("liveStream1", -1, 30);
// Play a recorded stream in full after liveStream1 plays.
this.myStream.play("mp4:recordedStream1.f4v", 0, -1, false);
// Play another live stream for 30 seconds after recordedStream1 plays.
this.myStream.play("liveStream2", -1, 30, false)
}
To play the playlist, call NetStream.play("serverplaylist") on the client. To play the playlist smoothly, set the
client-side NetStream.bufferTime property to at least 1 second. (The default value is 0.1 seconds.)
To add media to a playlist, call Stream.play() and pass false for the reset parameter. When you pass false, the
media doesn’t start playing until the media currently playing has stopped.
The following server-side code plays two recorded media files consecutively and records them to the file “playlist.f4v”.
Each media file plays in its entirety. To play the playlist, call NetStream.play("mp4:playlist.f4v") on the client.
application.onAppStart = function(){
this.clientStream = Stream.get("mp4:playlist.f4v");
this.clientStream.record();
this.clientStream.play("mp4:british.mp4", 0, -1);
this.clientStream.play("mp4:shadows.mp4", 0, -1, false);
};
The following example was provided by Jens Loeffler on his blog flashstreamworks.com.
Use a server-side playlist to export a highlight clips during a DVR-enabled live event. Build the playlist (for
example, an opening clip, then a selected part of the live event, then a section of an archived clip), and record it as an
.f4v file. To play the highlight reel, just point your streaming player to the exported .f4v file.
application.myStream = Stream.get("mp4.highlights.f4v");
if (application.myStream){
application.myStream.record();
application.myStream.play("mp4:titles.f4v", 0, 15);
application.myStream.play("livesmith", -1, 30, false);
application.myStream.play("mp4:smitharchive.mp4", 0, 30, false);
application.myStream.play("mp4:closing.f4v", 0, 15, false);
}
};
To play this example, the client calls NetStream.play("mp4:highlights.f4v").
To play a server-side playlist, set the client-side NetStream.bufferTime property to at least 1 second. (The default
value is 0.1 seconds.)
Dynamic streaming
About dynamic streaming
Note: The dynamic streaming API discussed is supported in Adobe Media Server 3.5 and later and Flash Player 10 and
later.
211
ADOBE MEDIA SERVER 5.0.6 DEVELOPER’S GUIDE
Developing streaming media applications
Last updated 9/4/2014
Adobe Media Server can receive commands to switch between versions of a content stream that are encoded at
different bit rates. This feature lets your media application adapt to changing network conditions. It also lets your
application adapt to clients with different capabilities, such as mobile devices with lower processing power and smaller
screens. For example, suppose the server is streaming high-definition video to a client application but encounters poor
network conditions. The server can switch to a standard-definition stream at a lower bit rate. If network conditions
improve, the server can switch back to HD video. The transitions occur seamlessly in the client. Although network
conditions have changed, the video streaming to the client is uninterrupted.
The server delivers streams that match bandwidth changes to maintain QoS
For optimal user experience, dynamic streaming requires the following:
•The different versions or pieces of content are synchronized: the video timelines must match.
•Audio or other data in each content stream is synchronized with the video data in that stream.
The server implements a transition between two pieces of recorded content in three possible ways, depending on the
type of content that is being streamed:
•Video-only streams. Transitions occur at the nearest keyframe in the target timeline.
•Video and audio streams. Transitions occur at the audio sample that immediately precedes the nearest keyframe in
the timeline of the target stream. The audio timelines of the initial and target streams must match, or an audio
artifact results.
•Audio-only streams. Transitions occur at the nearest possible sample.
Implementing transitions between live video content is slightly more complicated. The streams must have timestamps
that are synchronized closely enough, within 3-5 milliseconds, so that the server can select accurate transition points.
Using ActionScript to switch streams
Stream transitions occur on the server, but the command to switch streams and the determination to do so comes from
the client application. The application developer includes logic to monitor download and playback statistics and to
switch from the old stream to the new stream when appropriate.
Use the ActionScript 3.0 NetStream.info property and the NetStreamInfo class to monitor download and playback
statistics. Use the NetStream.play2() method and the associated NetStreamPlayOptions class to change streams in
mid-play.
Use the NetStreamPlayOptions.offset property to perform fast switching between streams. Use the default value
of NetStreamPlayOptions.offset which is -1. The default value of -1 indicates a fast switch time of
netstream.time + 3. You can also specify a greater value, such as netstream.offset + 4, but do not use a lower
value.
Important: Do not use an value for NetStreamPlayOptions.offset that is lower than the default value.
User Bandwidth
Content Stream
1.5 Mbps
700 kbps
500 kbps
Bandwidth
150 kbps
0 kbps
0 min 2 min 4 min 6 min 8 min
Time

212
ADOBE MEDIA SERVER 5.0.6 DEVELOPER’S GUIDE
Developing streaming media applications
Last updated 9/4/2014
The application developer must also ensure that the client application has a playback buffer that is large enough to
absorb any delay caused by the transition. Two factors that can cause a delay are the keyframe interval of the live stream
and if the two streams being switched are not synchronized. For example, a 2-second buffer cannot accommodate a 3-
second transition delay.
Important: Set a value for NetStream.bufferTime of 10 seconds or greater.
Adobe developed a new class called DynamicStream that extends the NetStream class. The DynamicStream class
contains event listeners that monitor bandwidth, buffer usage, and dropped frames. The class switches streams based
on that information. You can use the DynamicStream class to implement dynamic streaming, or you can use the
DynamicStream class as a reference to write your own dynamic streaming algorithms. If you’re migrating legacy code,
it’s a good idea to use the DynamicStream class.
Download the ActionScript class files and documentation for these classes from
www.adobe.com/go/fms_dynamicstreaming.
Note: These classes are not part of the ActionScript 3.0 library. These are custom classes developed by Adobe for Adobe
Media Server users.
Determining when to use dynamic streaming
Adobe recommends that you use dynamic streaming for content that meets some or all of the following criteria:
•Video with long duration
•Video with large file size
•HD video
•Video with larger dimensions, such as full screen video
•Content distributed to users who are more susceptible to bandwidth issues, such as home users, rather than
corporate users
Encoding recommendations
To provide users with the best experience, when you encode the content, follow the recommendations in this DevNet
article and in Will Law's presentation at Adobe MAX 2008.
The following is a summary of the recommendations:
•For the smoothest switching, encode audio with AAC.
•For streams with MP3 audio, keep the audio bit rates the same.
•Use the same audio sample rate when possible.
•To encode streams for lower bandwidth usage, encode the audio with a single channel (mono).
•Ensure that the video timelines of the streams are related and compatible.
•Use the same codecs and audio bitrates in all streams. If you don’t, you may hear small audio pops when the streams
switch.
•While not required, it is helpful if the keyframe interval (keyframe frequency) and frame rate (fps) are consistent
across the different versions of content. A shorter keyframe interval lets the server switch streams more quickly,
which means that the client can have a smaller playback buffer.
The following table shows various bit rates that you could use to encode a single piece of content:

213
ADOBE MEDIA SERVER 5.0.6 DEVELOPER’S GUIDE
Developing streaming media applications
Last updated 9/4/2014
Determining when to switch streams
You can consider many factors when determining when to switch streams, such as the buffer length, number of bytes
downloaded, and number of frames dropped. The DynamicStream and DynamicStreamItem classes, which you can
download from adobe.com, are built with these factors in mind and contain the logic required for a dynamic streaming
application.
If you prefer to develop your own application logic, it may be helpful to use the following strategy for streaming video:
1For initial playback, select the lowest bit rate that is appropriate for the screen or device. For example, if the video
plays in the web browser on a standard computer, an appropriate stream for initial playback is 300 kbps at 320 x 240.
2To start playback quickly, select a small buffer length.
3Once playback begins, increase the buffer length to at least 10 seconds.
4Do not use a value for NetStreamPlayOptions.offset that is lower than the default.
5Begin monitoring the client bandwidth (NetStream.info.maxBytesPerSecond) and buffer size
(NetStream.bufferLength) as it fills.
When current bandwidth is sufficient, the buffer fills quickly and stays steady. If the bandwidth begins to drop, the
buffer starts to empty.
6If the client bandwidth exceeds the requirements of the stream and the buffer is filling or is full, you can switch to
higher-resolution content.
Verify that client bandwidth is sufficient before switching. In addition to client bandwidth and buffer length, you
can check additional statistics, such as the number of dropped frames (NetStream.info.droppedFrames).
7After each transition to higher-resolution content, continue to monitor the buffer every 5 seconds, using a timer.
If the buffer begins to empty, switch to lower-resolution content and monitor the buffer more frequently, such as
after every 2 seconds.
8Continue to upgrade while bandwidth is plentiful and the buffer is filling or full. For the best user experience, be
conservative. Upgrade only when the reported bandwidth exceeds stream requirements by a solid margin.
More Help topics
Using the DynamicStream classes
ActionScript Guide to Dynamic Streaming
Check client bandwidth
Monitor the client bandwidth to help determine when switching streams is desirable. When client bandwidth is good,
the client application can request the server to switch to a higher video bit rate. When client bandwidth is low, the client
application can request the server to switch to a lower bit rate.
Bit rate
150 kbps
300 kbps
500 kbps
700 kbps
1.5 Mbps (full web HD)

214
ADOBE MEDIA SERVER 5.0.6 DEVELOPER’S GUIDE
Developing streaming media applications
Last updated 9/4/2014
To measure bandwidth, use the NetStream.info property. A call to NetStream.info returns a NetStreamInfo object
with properties that reflect the rate of incoming audio, video, and data bytes of the stream. With information about
the incoming data rate, you can deduce the quality of the bandwidth.
Specifically, use the *byteCount and *bytesPerSecond properties in the NetStreamInfo class (or, in ActionScript 2.0,
the object returned by NetStream.getInfo()). For details on these properties, see the ActionScript Language
References.
One way to measure the client bandwidth is to measure the NetStreamInfo.byteCount property over a period of
time to get the value of bytes per second and when a NetStream.Buffer.Full status event is received. This value
approximates the maximum bandwidth available. Then compare the available bandwidth to the available bit rates and
implement transitions as needed.
Note: The byteCount property does not return the same value as sc-stream-bytes in the server Access log. The
byteCount property is a Quality of Service designed to provide data that can help you decide when to switch streams. Do
not use the byteCount property for billing.
Check for dropped frames
In addition to monitoring the buffer, check for dropped frames. Switch to a stream with a lower bit rate if too many
frames are being dropped. Use the NetStreamInfo.droppedFrames property. This read-only property is a number
and returns the number of video frames dropped in the current NetStream playback session.
One strategy to determine the rate of dropped frames is as follows: using a timer, calculate the difference between the
current value of dropped frames and a previous value. Store that difference in a variable, droppedFPS. Monitor the
current number of incoming frames per second in another variable, currentFPS. If droppedFPS exceeds 20% of the
value of currentFPS, switch to a lower bit rate.
Switch streams
To request a transition between streams with the same content encoded at different bit rates, the client application uses
the NetStream.play2() method. This method takes as a parameter a NetStreamPlayOptions object, which indicates
how the server switches streams.
Note: The NetStream.play2() method extends the NetStream.play() method.
The NetStreamPlayOptions object contains the following properties:
Property Description
oldStreamName The name of the stream currently being played (the old stream).
streamName The name of the new stream to play; the stream to switch to.
start The start time of the new stream to play.
For most dynamic streaming purposes, the default value of -2 is appropriate. It tells the application to play the live
stream specified in streamName. If a live stream of that name is not found, Flash Player plays the recorded stream
specified in streamName. If a live or a recorded stream is not found, Flash Player opens a live stream named
streamName, even though no one is publishing on it. When someone does begin publishing on that stream, the
application begins playing it.
len The duration (length) of the playback.
For most dynamic streaming purposes, the default value of -1 is appropriate. This value means that the application
plays a live stream until it is no longer available or plays a recorded stream until it ends.

215
ADOBE MEDIA SERVER 5.0.6 DEVELOPER’S GUIDE
Developing streaming media applications
Last updated 9/4/2014
The following code example uses the SWITCH option to tell the server to switch to a higher bit rate stream. The example
does not pass a value for oldStreamName, which tells the server to switch to the new stream at the next logical
keyframe. This technique provides the smoothest viewing experience. (When using playlists, pass a value for
oldStreamName; see “Swap streams in a playlist” on page 209.) In most dynamic stream-switching cases with a
recorded video+audio stream, you can keep the default values of start and len, as in the example.
When the client requests a transition, the server sends a NetStatusEvent.NET_STATUS event with the code
NetStream.Play.Transition. (In ActionScript 2.0, it sends an onStatus event with the same code.) The server
sends this event to the client almost immediately, which indicates that the operation has succeeded. When the first
frames of the new stream render, the server sends an onPlayStatus message with the code
NetStream.Play.TransitionComplete. This event lets the client know exactly when the new stream has started to
render.
If a client seeks after Flash Player sends a NetStream.Play.Transition message, the streams switch successfully, but
Flash Player does not send a NetStream.Play.TransitionComplete message. The player doesn’t send the message
because after the seek it enters a new state and cannot send status events about the old state. The player behaves the
same way for other callback methods such as onMetaData().
The following example handles a stream transition:
var stream:NetStream = new NetStream(connection);
stream.addEventListener(NetStatusEvent.NET_STATUS, netStatusHandler);
stream.client = new CustomClient();
var video:Video = new Video();
video.attachNetStream(stream);
stream.play("streamA_150kbps");
addChild(video);
...
//Set up the transition to 700 kpbs content
var param:NetStreamPlayOptions = new NetStreamPlayOptions();
param.streamName = streamA_700kpbs;
param.transition = NetStreamPlayTransitions.SWITCH;
stream.play2(param);
//Handler function for the Transition event
class CustomClient{
public function onPlayStatus(info:Object):void {
trace("switch time: time=" + info.time + " name=" + info.name + " type=" + info.type);
}
}
transition The transition mode.
Possible values are constants in the NetStreamPlayTransition class. The one most applicable to switching between
the same content at different bit rates is SWITCH. For information on other modes, see the
NetStreamPlayTransition class in the ActionScript 3.0 Language Reference.
Property Description

216
ADOBE MEDIA SERVER 5.0.6 DEVELOPER’S GUIDE
Developing streaming media applications
Last updated 9/4/2014
The NetStream.Play.Transition status event contains a reason field. Use this field to get additional information
about the state of a transition request. The reason field usually contains the code
"NetStream.Transition.Success", meaning the transition request succeeded and was processed normally. When
switching between live streams, it is possible that the server could not find a synchronization point between the two
streams. In this case, the server forces a transition to occur at an arbitrary frame and the reason field contains the code
"NetStream.Transition.Forced". This situation can occur under the following circumstances:
•The two streams being switched don't have the same timeline, and therefore the server cannot select a time to
perform the switch.
•The keyframe interval of the new stream is longer than the client's playback buffer, which is the maximum amount
of time the server will wait for a transition. Since the server did not see a keyframe, it cannot select a frame for the
switch.
•The live queue delay for the live streams is longer than the client's playback buffer, which creates a delay similar to
a long keyframe interval.
Handling metadata during stream transitions
Adobe Media Server sends a NetStream.Play.TransitionComplete status event when the bits of a stream
transition render to the client. When switching to a new stream, the onMetadata message for the new stream is sent
immediately following the NetStream.Play.TransitionComplete status event. Listen for the
TransitionComplete event before capturing the metadata. If the stream is live, all data keyframes associated with the
stream are transmitted.
Setting the client buffer
Buffering manages fluctuations in bandwidth while a video is playing.
To create a good experience for users, set the buffer to a small value initially. A smaller value lets the stream begin
playing relatively quickly. Once playback begins, increase the buffer to a larger value. A larger value ensures that the
stream plays more smoothly regardless of noise or interruptions on the network.
To create the best experience for users, monitor the progress of a video and manage buffering as the video downloads.
Consider setting different buffer sizes for different users, to ensure the best playback experience. One choice is to
measure client bandwidth and set an initial buffer size based on it.
Monitor the buffer size in the client to determine when to switch streams. When client bandwidth is good, the amount
of data in the buffer grows or the buffer is full. The client can request the server to switch to a higher video bit rate.
When client bandwidth is low, the amount of data in the buffer shrinks or the buffer empties. The client can request
the server to switch to a lower bit rate.
Call NetStream.info() to get a NetStreamInfoObject with properties that reflect the current statistics of the
stream. The properties that deal with the buffer are the BufferLength and BufferByteLength properties. For details
on these properties, see the ActionScript 3.0 Reference.
While the stream is playing, you can also detect and handle netStatus events. For example, when the buffer is full,
the netStatus event returns an info.code value of NetStream.Buffer.Full. When the buffer is empty, another
event fires with a code value of NetStream.Buffer.Empty. When the data has finished streaming, the
NetStream.Buffer.Flush event is dispatched. You can listen for these events and set the buffer size smaller when
empty and larger when full.

217
ADOBE MEDIA SERVER 5.0.6 DEVELOPER’S GUIDE
Developing streaming media applications
Last updated 9/4/2014
Note: Flash Player 9 Update 3 and later no longer clear the buffer when a stream is paused. This feature allows viewers
to resume playback without experiencing any hesitation. You can also use NetStream.pause() in code to buffer data.
You could buffer data while viewers are watching a commercial, for example, and then unpause the stream when the
main video starts. For more information, see the NetStream.pause().
Set buffer time
To change the buffer time, in seconds, set the NetStream.bufferTime property:
ns.bufferTime(10);
The right size for the buffer varies depending on user bandwidth, and the following values are only suggestions. 5-10
seconds is a good initial buffer size for fast connections; 10 seconds is a good initial buffer size for slow connections.
After playback starts, 30-60 seconds is a good buffer size.
Handle buffer events
This example shows how to detect buffer events and adjust the buffer time dynamically, as events occur. Highlights of
the code are shown here; to see the complete sample, see the Buffer.as sample file.
1In the constructor function of your main client class, create a NetConnection object and connect to the server (see
Buffer.as in the documentation/samples/Buffer directory in the Adobe Media Server root install directory):
nc = new NetConnection();
nc.addEventListener(NetStatusEvent.NET_STATUS, netStatusHandler);
nc.connect("rtmp://localhost/Buffer");
2Write a netStatus event handler, checking for success, failure, and full buffer and empty buffer events and
changing buffer size accordingly:
private function netStatusHandler(event:NetStatusEvent):void {
switch (event.info.code) {
case "NetConnection.Connect.Success":
trace("The connection was successful");
connectStream(nc);
break;
case "NetConnection.Connect.Failed":
trace("The connection failed");
break;
case "NetConnection.Connect.Rejected":
trace("The connection was rejected");
break;
case "NetStream.Buffer.Full":
ns.bufferTime = 30;
trace("Expanded buffer to 30");
break;
case "NetStream.Buffer.Empty":
ns.bufferTime = 8;
trace("Reduced buffer to 8");
break;
}
}
3Write a custom method to play a stream. In the method, set an initial buffer time, for example, 2 seconds:

218
ADOBE MEDIA SERVER 5.0.6 DEVELOPER’S GUIDE
Developing streaming media applications
Last updated 9/4/2014
private function connectStream(nc:NetConnection):void {
ns:NetStream = new NetStream(nc);
ns.addEventListener(NetStatusEvent.NET_STATUS, netStatusHandler);
ns.client = new CustomClient();
video = new Video();
video.attachNetStream(ns);
ns.play( "bikes", 0 );
ns.bufferTime = 8;
trace("Set an initial buffer time of 8 seconds");
addChild(video);
}
4Create the onMetaData() and onPlayStatus() event handlers:
public function onMetaData(info:Object):void {
trace("Metadata: duration=" + info.duration + " width=" + info.width + " height=" +
info.height + " framerate=" + info.framerate);
}
public function onPlayStatus(info:Object):void {
switch (info.code) {
case "NetStream.Play.Complete":
trace("The stream has completed");
break;
}
}
These event handlers are needed when you call NetStream.play().
Recognizing transitions in log files
You can track stream events through access logs. Use the logs to differentiate a single stream play with transitions from
multiple plays of a stream or different streams. When a transition for a single content stream occurs, the server tracks
the status of the stream as a transition. The server logs a stop event for the original stream and a play event for the new
stream. Normal stop and play events (that is, a stop or play without a transition) have a status code of 200. Stream
transitions have a status code of 210. The access logs provide the following additional information:
If you use a log processor, ensure that it looks at both the status codes and the x-sid values. Look at both values to
recognize that a transition occurred on a single logical stream. As with normal streams, stream transitions occur in
play/stop pairs. Your log processor can track stream transitions by recognizing stop events that have a 210 status code
followed by play events with a 210 status code on the same stream. By looking at the status code, the log processor can
also differentiate a stream transition from a play or stop event without a transition.
Field Description
x-sid The ID of a stream. This ID is unique for the client session but not across sessions
x-trans-sname The name of the stream that the server is transitioning from (the original stream)
x-trans-sname-query The query stream portion of the stream name for the stream that the server is transitioning from
x-trans-file-ext The filename extension portion of the stream name for the stream that the server is transitioning from

219
ADOBE MEDIA SERVER 5.0.6 DEVELOPER’S GUIDE
Developing streaming media applications
Last updated 9/4/2014
Reconnecting streams when a connection drops
Adobe Media Server 3.5.3, Flash Player 10.1
About reconnecting streams
You can build applications that support seamless playback when a connection is dropped or when a client switches
from a wired to a wireless network connection. For an example of reconnecting streams, see the Stream Reconnect and
Smart Seek example hosted by Adobe.
To provide seamless playback, use the ActionScript 3.0 NetStream.attach() method to attach the same NetStream
object to a reconnected NetConnection object. You can also use this feature for load balancing.
Note: If the Flash Player version is less than 10.1 or the Adobe Media Server version is less than 3.5.3, the stream closes
when the connection drops.
Stream Reconnect ActionScript API
Note: The Stream Reconnect ActionScript API is ActionScript 3.0. These APIs are not supported in ActionScript 2.0.
The following ActionScript 3.0 APIs enable you to reconnect a stream:
•NetStream.attach(connection:NetConnection)
Attaches a stream to a NetConnection object.
•NetStreamPlayTransitions.RESUME
The RESUME mode causes Flash Player 10.1 and greater to request data from a new connection at the same location
where it dropped the previous connection. Flash Player aligns the stream across the two connections so no artifacts
or jumps are observed in the video playback. Use this mode when you reconnect a stream that was dropped due to
server issues or other connection problems.
•NetStreamPlayTransitions.APPEND_AND_WAIT
The APPEND_AND_WAIT mode tells the server to build the playlist but not to stream it. Use this mode to rebuild a
playlist after losing a connection and establishing a new connection.
•NetConnection.Connect.Closed
Use this event to reconnect a stream, NetConnection.Connect.Closed.
•NetConnection.Connect.NetworkChange
Notifies the client that a network connection has changed. Don’t use this event to reconnect a stream, use
NetConnection.Connect.Closed.
For detailed information about these APIs, see the ActionScript 3.0 Language Reference.
Using the Stream Reconnect ActionScript API
When a NetConnection closes due to a network change, the stream keeps playing using the existing buffer. Meanwhile,
client-side ActionScript code reconnects to the server and resumes playing the stream.
Note: If the Flash Player version is less than 10.1 or the Adobe Media Server version is less than 3.5.3, the stream closes
as soon as the network connection is lost.

220
ADOBE MEDIA SERVER 5.0.6 DEVELOPER’S GUIDE
Developing streaming media applications
Last updated 9/4/2014
Reconnecting a single stream
The following workflow reconnects a single stream:
1Call NetConnection.connect() to connect to server A.
2Create a NetStream. Set NetStream.bufferTime to at least a few seconds so there is enough data to play while the
connection is down.
3Call NetStream.play2() and use NetStreamPlayTransitions.RESET to play a stream called “myStream”.
4Monitor the NetConnection for the "NetConnection.Connect.Closed" event. Reconnect to server A if the
connection drops.
5Call the NetStream.attach(connection:NetConnection) method to attach the NetStream to the new
connection.
6Call NetStream.play2() and use NetStreamPlayTransitions.RESUME to play the stream “myStream”.
Flash Player tells the server where to resume playing the stream.
7Do not call NetConnection.close() or NetStream.close() if you intend to reconnect it. Calling close closes
and cleans up the connection or the stream, so it will stop playback right away and future reconnects will not be
possible.
After a attach is done to the new NetConnection, a close on the older NetConnection can be called.
Reconnecting a playlist
The following workflow reconnects a playlist:
1Call NetConnection.connect() to connect to server A.
2Create a NetStream. Set NetStream.bufferTime to at least a few seconds so there is enough data to play while the
connection is down.
3Call NetStream.play2()and use NetStreamPlayTransitions.RESET to play a stream called “myStream1”.
4Call NetStream.play2() and use NetStreamPlayTransitions.APPEND to play a second stream called
“myStream2”.
5Monitor the NetConnection for the "NetConnection.Connect.Closed" event. Reconnect to server A if the
connection drops.
6Call the NetStream.attach(connection:NetConnection) method to attach the NetStream to the new
connection.
7Call NetStream.play2() and use NetStreamPlayTransitions.APPEND_AND_WAIT to add “myStream1” to the
playlist.
8Call NetStream.play2() and use NetStreamPlayTransitions.RESUME to add “myStream2” to the playlist and
resume the stream.
Flash Player tells the server where to resume playing the stream.
Balancing a server load
The following workflow uses the smart reconnect API to balance a load:
1Call NetStream.attach(connection:NetConnection) to attach a stream to a NetConnection object on another
server.
2After the stream is successfully attached to the new connection, call NetConnection.close() on the prior
connection to prevent data leaks.

221
ADOBE MEDIA SERVER 5.0.6 DEVELOPER’S GUIDE
Developing streaming media applications
Last updated 9/4/2014
3Call NetStream.play2() and use NetStreamPlayOptions.transition to RESUME. Set the rest of the
NetStreamPlayOptions properties to the same values you used when you originally called NetStream.play() or
NetStream.play2() to start the stream.
Monitoring a network interface change
To monitor changes to the network interface, monitor the NetConnection for the
"NetConnection.Connect.NetworkChange" event. This event detects a network change (for example, connecting
to a wireless network, disconnecting from a wireless network, disconnecting a network cable, and so on).
Note: Do not use this event to monitor a dropped NetConnection or to write logic for to reconnect a stream. Use
"NetConnection.Connect.Closed".
Monitoring a connection on a mobile device
Some mobile devices cannot receive a "NetConnection.Connect.Closed" message. In this case, you can monitor
the NetStream.bufferLength and NetStreamInfo.byteCount properties in a timer to discover network issues.
When NetStream.bufferLength is less than NetStream.bufferTime, and NetStreamInfo.byteCount is not
increasing, there are probably network issues.
netStreamMonitorTimer.start();
netStreamMonitorTimer.addEventListener(TimerEvent.TIMER, timerHandler);
lastByteCount = 0;
private function timerHandler(e:TimerEvent):void{
if(netstream.bufferLength < netstream.bufferTime && netstream.info.byteCount ==
lastByteCount) {
// Network has issues.. reconnect to a new NetConnection
netconnection2 = new NetConnection(); ///on NetConnection.Connect.Success:
netStream.attach(netconnection2);
}
lastByteCount = netstream.info.byteCount;
}
Monitoring an RTMPS or RTMPT connection
For RTMPS and RTMPT connections, when you call NetStream.attach(), the
"NetConnection.Connect.Closed" event may arrive late or may never arrive.
In this case, monitor the NetStream.bufferLength and NetStreamInfo.byteCount properties in a timer to
discover network issues. When NetStream.bufferLength is less than NetStream.bufferTime, and
NetStreamInfo.byteCount is not increasing, there are probably network issues.
netStreamMonitorTimer.start();
netStreamMonitorTimer.addEventListener(TimerEvent.TIMER, timerHandler);
lastByteCount = 0;
private function timerHandler(e:TimerEvent):void{
if(netstream.bufferLength < netstream.bufferTime && netstream.info.byteCount ==
lastByteCount) {
// Network has issues.. reconnect to a new NetConnection
netconnection2 = new NetConnection(); ///on NetConnection.Connect.Success:
netStream.attach(netconnection2);
}
lastByteCount = netstream.info.byteCount;
}

222
ADOBE MEDIA SERVER 5.0.6 DEVELOPER’S GUIDE
Developing streaming media applications
Last updated 9/4/2014
Authorization plug-in events and properties
Use the E_PLAY event of the Authorization plug-in to control streaming that occurs after a reconnection. The following
table summarizes the events and properties for the Stream Reconnect feature:
There is one new property: F_STREAM_OFFSET. The F_STREAM_OFFSET property indicates where to resume streaming
after a reconnection, in seconds.
The F_STREAM_TRANSITION property indicates the transition mode sent by the client in the NetStream.play2() call.
The values for Stream Reconnect are “resume” and “appendAndWait”.
For more information about
More Help topics
“Developing an Authorization plug-in” on page 303
Server logging
The following events are written to the Adobe Media Server access log for the Stream Reconnect feature:
The following fields are new for the Stream Reconnect feature:
These fields are disabled by default. You can optionally display these fields in the authEvent.log and in the access.log.
Property Server version E_PLAY
Notification and Authorization
F_STREAM_OFFSET 3.5.3 Read-only.
F_STREAM_TRANSITION 3.5 Read and write.
Event Category Description
connect session A client has connected to a Adobe Media Server application. This event is logged when you re-
establish a connection after it drops.
play stream A stream has resumed playing.
stop stream A stream has stopped playing.
Field Description
x-trans-mode The transition mode sent by the client in the NetStream.play2() call. For Stream Reconnect, the transition modes are
“resume” and “appendAndWait”.
x-soffset The offset value indicates where to resume streaming after you attach a NetStream.

223
ADOBE MEDIA SERVER 5.0.6 DEVELOPER’S GUIDE
Developing streaming media applications
Last updated 9/4/2014
Fast switching between streams
Adobe Media Server 4.0, Flash Player 10.1
About fast switch
Use the NetStreamPlayOptions.offset property to tell the server when to switch between streams of different
bitrates. The offset is the time, in seconds, at which the streams switch.
The default value of offset is -1, which is the fast switching mode. In this mode, switching occurs at the first available
keyframe after netstream.time + 3, which is about 3 seconds later than the playback point.
Important: Best practice for fast switching is to set NetStream.bufferLength to 10 seconds and
NetStreamPlayOptions.offset to 3, 4, or 5 seconds.
Any data buffered from a previous stream is flushed. Fast switch is faster than standard switch mode because clients
don’t have to wait for buffered data to play.
To use standard switch mode, set offset to a value greater than the buffer (offset > NetStream.time +
NetStream.bufferLength).
Writing the fast switching code
Use the NetStreamPlayTransitions.SWITCH constant to trigger stream switches. Use the
NetStreamPlayOptions.offset property to specify the absolute stream time at which the switch occurs. The offset
property is absolute stream time, it is not an offset from the playback point. For example, to switch 5 seconds from the
playback point, set the offset property to netstream.time + 5, not to 5.
var ns:NetStream = new NetStream(nc);
var nso:NetStreamPlayOptions = new NetStreamPlayOptions();
nso.streamName = streamName;
nso.transition = NetStreamPlayTransitions.SWITCH;
nso.start = 10;
nso.len = -1; // play until the end of the file
nso.offset = ns.time + 5; // switch 5 secs. after the playback point.
ns.play2(nso);
Note: The default value of offset is netStream.time + 3. The default value causes the server to switch the stream 3
seconds after the playback point.
NetStatus events for fast switching
NetStatus Event Description
NetStream.Play.Failed The value of offset is less than the current playhead time.
The stream cannot switch.
NetStream.Play.Transition A SWITCH call was made successfully and the server starts
streaming data for the new stream.

224
ADOBE MEDIA SERVER 5.0.6 DEVELOPER’S GUIDE
Developing streaming media applications
Last updated 9/4/2014
Smart Seeking
Adobe Media Server 3.5.3, Flash Player 10.1
About Smart Seek
Adobe Media Server 3.5.3 and Flash Player 10.1 work together to support smart seeking in VOD streams and in live
streams that have a buffer. Smart seeking uses back and forward buffers to seek without requesting data from the
server. You can step forward and backward a specified number of frames. (Standard seeking flushes buffered data and
asks the server to send new data based on the seek time.) Smart seeking reduces server load and improves seeking
performance. Use smart seeking to create:
•Client-side DVR functionality. Seek a live stream within the client-side buffer instead of going to the server for
delivery of new video.
•Trick modes. Create players that step through frames, fast-forward, fast-rewind, and advance in slow-motion.
For an example of smart seek, see the Stream Reconnect and Smart Seek example hosted by Adobe.
Note: Smart seeking is not supported in peer-assisted networking applications or with progressive download.
Smart Seek ActionScript API
Note: The Smart Seek ActionScript API is ActionScript 3.0. These APIs are not supported in ActionScript 2.0.
Flash Player maintains a back buffer and a forward buffer. The back buffer is a cache of data that has been displayed.
The forward buffer is a cache of data that hasn’t been displayed. Smart seeking retrieves data from within these buffers.
To turn on Smart Seek set NetStream.inBufferSeek to true.
To control the buffers, use the following APIs:
•NetStream.backBufferLength
[read-only] The number of seconds of previously displayed data cached for rewinding and playback. This is the
bufferLength property for the back buffer.
•NetStream.backBufferTime
Specifies how much previously displayed data is cached for rewinding and playback, in seconds. The default value
is 30 on the desktop and 3 on mobile.
•NetStream.bufferLength
[read-only] The number of seconds of data currently in the buffer.
•NetStream.bufferTime
Specifies how long to buffer messages before starting to display the stream, in seconds. The default value is 0.1.
NetStream.Play.TransitionComplete A new stream starts playing.
In fast switching mode, the time between the
NetStream.Play.Transition event and the
NetStream.Play.TransitionComplete event is much
shorter than in standard switching mode.
NetStatus Event Description

225
ADOBE MEDIA SERVER 5.0.6 DEVELOPER’S GUIDE
Developing streaming media applications
Last updated 9/4/2014
To seek and step within the buffers, use the following APIs:
•NetStream.seek()
Moves the playhead to the time specified in the call.
•NetStream.step()
Steps the playhead forward or back the specified number of frames, relative to the currently displayed frame.
To detect a smart seek, use the following events:
•NetStatusEvent.info.description contains the string "client-inBufferSeek".
Dispatched when a call to NetStream.seek() is successful.
•NetStream.Step.Notify
Dispatched when a call to NetStream.step() is successful.
For detailed information about these APIs, see the ActionScript 3.0 Language Reference.
Using the Smart Seek ActionScript API
Smart Seek is supported in Flash Player 10.1 and greater. Before running code, test for Flash Player version. For
example, you could expose step back and forward buttons only to clients with Flash Player 10.1 and greater. The
following code tests for Flash Player version and returns true for 10.1 and greater:
public var fp10_1:Boolean;
public function onStart():void{
debug("Flash Player Version: " + Capabilities.version);
fp10_1 = isFP10_1();
debug("fp10.1: "+fp10_1);
}
public function isFP10_1():Boolean {
var va:Array = Capabilities.version.split(" ")[1].toString().split(",");
if(int(va[0]) > 10) { return true; }
if(int(va[0]) < 10) { return false; }
if(int(va[1]) > 1) { return true; }
if(int(va[1]) < 1) { return false; }
return true;
}
The following code sets NetStream.inBufferSeek to true to turn on Smart Seek if the Flash Player version is greater
than 10.1:
// Call this function when you catch NetConnection.Connect.Success
public function createNetStream():void{
// Write code to create a NetStream object and a Video object...
//...
// Set the forward buffer, in seconds.
ns.bufferTime = 10;
try {
if(fp10_1) {
// If Flash Player is greater than 10.1, turn on smart seeking
// and set the size of the back buffer, in seconds.
ns.inBufferSeek = true;
ns.backBufferTime = 30;
}
} catch(e:Error) {}

226
ADOBE MEDIA SERVER 5.0.6 DEVELOPER’S GUIDE
Developing streaming media applications
Last updated 9/4/2014
When Smart Seek is turned on, calls to NetStream.seek() use the buffer. (Standard seeking flushes the buffer and
sends a request for data to the server.) The following function can seek forward or backward to a number specified in
a text field called seekText:
public function seekHandler():void {
if(ns != null) {
ns.seek(Number(seekText.text));
}
}
To create players that step through frames, fast-forward, fast-rewind, and advance in slow-motion, adjust the number
you pass to the step() and seek() functions.
To create client-side DVR functionality, set the NetStream.backBufferTime and NetStream.bufferTime
properties. These properties specify the amount of data Flash Player stores in the client-side buffer. For example, to
allow users to rewind 30 minutes before live, set backBufferTime to 1800 (60 seconds x 30 minutes). The cache is
stored in memory. Set the buffer properties to lower values if the content is intended for netbooks or mobile devices.
Testing for a Smart Seek
A Smart Seek is a call to NetStream.seek() or a call to NetStream.step() when NetStream.inBufferSeek is true.
When a call to NetStream.seek() is successful, the NetStatusEvent info.description property contains the string
"client-inBufferSeek".
When a call to NetStream.step() is successful, the NetStatusEvent info.code property contains the string
"NetStream.Step.Notify". If a step has not completed, another call to step may return without executing. Get the
"NetStream.Step.Notify" for the previous call before you call step again.
The following code tests for a call to NetStream.seek() and a call to NetStream.step():
private function netStatusHandler(event:NetStatusEvent):void {
switch (event.info.code) {
case "NetStream.Seek.Notify":
var desc:String = new String(event.info.description);
if(desc.indexOf("client-inBufferSeek") >= 0)
trace("A smart seek occured");
else
trace("A standard seek occured");
break;
case "NetStream.Step.Notify":
trace("Successful NetStream.step() call");
break;
}
}
Smart Seek requires the following:
•NetStream.inBufferSeek = true
The default value of inBufferSeek is false.
•Adobe Media Server 3.5.3
•Flash Player 10.1
•ActionScript 3.0
•The value of the buffers (backBufferLength and bufferLength) must be large enough to fulfill the seek request.

227
ADOBE MEDIA SERVER 5.0.6 DEVELOPER’S GUIDE
Developing streaming media applications
Last updated 9/4/2014
If any of the previous requirements are not met, Flash Player uses standard seeking but throws no compile-time or
runtime errors.
Authorization plug-in events and properties
Use Authorization plug-in events and properties to log information about smart seeking and to block clients from
sending Smart Seek commands to the server.
More Help topics
“Smart seeking” on page 309
Server logging
The following events are written to the Adobe Media Server access.log:
Note: If a user interface lets users step through frames, there could be thousands of calls to NetStream.step(). For
performance reasons, the server does not write these calls to the log file. These calls do trigger a client-side
"NetStream.Step.Notify" NetStatusEvent.
Detecting bandwidth
ActionScript 3.0 native bandwidth detection
Adobe Media Server 3.0 and later support native bandwidth detection from the server to the client. After the client
connects to the server, call NetConnection.call("checkBandwidth", null) to intiate bandwidth detection. The
server sends chunks of data to the client and waits for a return value from the client. You do not need to write any
server-side code.
Note: This example is based on the rootinstall/documentation/samples/bandwidthcheck/Bandwidth.as sample.
Enable bandwidth detection in the Application.xml file
❖Verify that bandwidth detection is enabled in the Application.xml file:
Event Category Description
client-seek stream The seek position when the client calls NetStream.seek() and NetStream.inBufferSeek =
true which sends a seekRaw command to the server.
The client sends a seekRaw command only for seeks inside the buffer. If a client seeks outside the
buffer, the client sends a “seek” event.
start-transmit stream The server received a startTransmit command. This command asks the server to transmit more
data because the buffer is running low.
stop-transmit stream The server received a stopTransmit command. This command asks the server to suspend
transmission until the client sends a startTransmit event because there is enough data in the
buffer.

228
ADOBE MEDIA SERVER 5.0.6 DEVELOPER’S GUIDE
Developing streaming media applications
Last updated 9/4/2014
<BandwidthDetection enabled="true">
<MaxRate>-1</MaxRate>
<DataSize>16384</DataSize>
<MaxWait>2</MaxWait>
</BandwidthDetection>
Bandwidth detection is enabled by default. In addition to enabling and disabling bandwidth detection, you can
configure the size of the data chunks the server sends to the client, the rate at which the data is sent, and the amount
of time the server waits between data chunks.
You can edit the Application.xml file at the application level or at the vhost level. See Configuring a single
application.
Write the client event handler class
❖Create an ActionScript 3.0 class that handles events and calls bandwidth detection on the server. It must implement
the onBWCheck and onBWDone functions:
class Client {
public function onBWCheck(... rest):Number {
return 0;
}
public function onBWDone(... rest):void {
var bandwidthTotal:Number;
if (rest.length > 0){
bandwidthTotal = rest[0];
// This code runs
// when the bandwidth check is complete.
trace("bandwidth = " + bandwidthTotal + " Kbps.");
}
}
}
The onBWCheck() function is required by native bandwidth detection. It takes an argument, ...rest. The function
must return a value, even if the value is 0, to indicate to the server that the client has received the data. You can call
onBWCheck() multiple times.
The server calls the onBWDone() function when it finishes measuring the bandwidth. It takes four arguments. The
first argument is the bandwidth measured in Kbps. The second and third arguments are not used. The fourth
argument is the latency in milliseconds.
Write the main class
1Create a main ActionScript 3.0 class, giving it a package and class name of your choice:
package {
import flash.display.Sprite;
import flash.net.NetConnection;
import flash.events.NetStatusEvent;
import flash.events.AsyncErrorEvent;
public class Bandwidth extends Sprite
{
}
}
You can create the main and client classes in the same file, like the Bandwidth.as example file.

229
ADOBE MEDIA SERVER 5.0.6 DEVELOPER’S GUIDE
Developing streaming media applications
Last updated 9/4/2014
2In the constructor of the main class, create a NetConnection object, set the NetConnection.client property to
an instance of the client class, and connect to the server:
private var nc:NetConnection;
public function Bandwidth()
{
nc = new NetConnection();
nc.addEventListener(NetStatusEvent.NET_STATUS, netStatusHandler);
nc.addEventListener(AsyncErrorEvent.ASYNC_ERROR, asyncErrorHandler);
nc.client = new Client();
nc.connect("rtmp://localhost/bandwidthcheck");
}
3In the netStatus event handler, call NetConnection.call() if the connection is successful, passing
checkBandwidth as the command to execute and null for the response object:
public function netStatusHandler(event:NetStatusEvent):void
{
trace(event.info.code);
switch (event.info.code)
{
case "NetConnection.Connect.Success":
// Calls native bandwidth detection code on the server.
// You don't need to write any server-side code.
nc.call("checkBandwidth", null);
break;
}
}
Note: The checkBandwidth() method belongs to the Client class on the server.
Run the sample
❖Test the main class from Flash or Flash Builder. The following is the Flash Builder output showing the client’s
bandwidth:
[SWF] C:\samples\Bandwidth\bin\Bandwidth-debug.swf - 2,137 bytes after decompression
The connection was made successfully
Bandwidth from server to client is 17287 Kpbs
In this example, the Client class displays the bandwidth value. In your client, you can take some action, such as
choosing a video to stream to the client based on the client’s bandwidth.
ActionScript 2.0 native bandwidth detection
You can also use native bandwidth detection from ActionScript 2.0. Just as in ActionScript 3.0, define functions named
onBWCheck() and onBWDone(). When the client connects to the server , call to
NetConnection.call("checkBandwidth").
Note: This example uses the rootinstall/documentation/samples/bandwidthcheck/BandwidthAS2.fla sample.
1On the server, create a rootinstall/applications/bandwidthcheck folder.
2Do one of the following to verify that native bandwidth detection is enabled:
•Open the rootinstall/conf/_defaultRoot_/_defaultVHost_/Application.xml file and verify that
<BandwidthDetection enabled="true">.

230
ADOBE MEDIA SERVER 5.0.6 DEVELOPER’S GUIDE
Developing streaming media applications
Last updated 9/4/2014
•Create an Application.xml with the following code and copy it to the rootinstall/applications/bandwidthcheck
folder:
<Application>
<Client>
<BandwidthDetection enabled="true">
</BandwidthDetection>
</Client>
</Application>
3In Flash Professional, choose File > New > ActionScript 2.0 to create a new ActionScript 2.0 file.
4Open the Actions panel and paste the following code into frame 1:
nc = new NetConnection();
nc.onStatus = function(info){
trace(info.code);
if(info.code == "NetConnection.Connect.Success"){
checkBandwidth();
}
}
nc.onBWCheck = function(dataChunk){
return 0;
}
nc.onBWDone = function(bandwidth){
trace("Bandwidth from server to client is: " + bandwidth + " Kbps");
}
function checkBandwidth(){
nc.call("checkBandwidth");
}
nc.connect("rtmp://localhost/bandwidthcheck");
5Choose Control > Test Movie. The onStatus messages and the bandwidth measurement are traced to the Output
panel.
Initiate native bandwidth detection from a server-side script
You can initiate native bandwidth detection from a server-side script. In this case, the server-side code calls the native
checkBandwidth() function on the server:
application.onConnect = function (clientObj){
this.acceptConnection(clientObj);
clientObj.checkBandwidth();
}
When initiating bandwidth detection from the server, do not call checkBandwidth() from the client.
The main.asc server-side script that Adobe provides with the vod application calls the checkBandwidth function. To
see an example, open rootinstall/samples/applications/vod/main.asc.
Server-side script-based bandwidth detection
You can disable native bandwidth detection and use a server-side script that defines the checkBandwidth function.
For example, if you have a legacy application that uses a server-side script to perform bandwidth detection, disable
native bandwidth detection. You can disable native bandwidth detection at the application level or at the vhost level.

231
ADOBE MEDIA SERVER 5.0.6 DEVELOPER’S GUIDE
Developing streaming media applications
Last updated 9/4/2014
Script-based bandwidth detection is not as reliable as native bandwidth detection. If you use edge servers, native
bandwidth detection is performed at the outermost edge server to reduce the load on the origin servers. Script-based
bandwidth detection determines the bandwidth from the origin server to the client, not from the edge server to the
client. If latency exists between the origin server and the edge server, it might affect the bandwidth calculation.
Latency between the origin server and the edge server can affect the bandwidth measurement.
A. Origin server B. Edge server C. Client
To disable native bandwidth detection at the application level:
1Open a text editor, create a new file, and save it as Application.xml to the rootinstall/applications/applicationname
folder.
2Copy the following XML into the file:
<Application>
<Client>
<BandwidthDetection enabled="false">
</BandwidthDetection>
</Client>
</Application>
3Save the file. You do not need to restart the server.
To disable native bandwidth detection at the vhost level:
1Open the rootinstall\conf\_defaultRoot_\_defaultVHost_\Application.xml file in a text editor.
Note: This path is for the default vhost. You can edit the Application.xml file for any vhost.
2Locate the BandwidthDetection tag and set the enabled attribute to false, as in the following:
<Application>
...
<Client>
...
<BandwidthDetection enabled="false">
</BandwidthDetection>
...
</Client>
...
</Application>
3Save the file. Restart the server or vhost.
ABC

232
ADOBE MEDIA SERVER 5.0.6 DEVELOPER’S GUIDE
Developing streaming media applications
Last updated 9/4/2014
Detecting stream length
About detecting stream length
Call the server-side Stream.length() method to get the length, in seconds, of an audio or video stream. The length
is measured by Adobe Media Server and differs from the duration that onMetaData returns, which is set by a user or
a tool.
Pass the stream name to the Stream.length() method. You can pass a virtual stream name or a stream name in a
URI relative to the application instance.
For example, the following code gets the length of a stream located in the streams/_definst_ folder of an application:
// for an FLV file
length = Stream.length("parade");
// for an MP3 file
length = Stream.length("mp3:parade.mp3");
// for an MP4 file
length = Stream.length("mp4:parade.mp4");
Get the length of a stream
This example uses Server-Side ActionScript to get the length of a stream.
Note: Use the StreamLength sample, main.asc (Server-Side ActionScript) and StreamLength.as (ActionScript 3.0). To run
the sample, see “Deploy an application” on page 185.
Write the server-side code
A client might need to retrieve the length of a stream stored on the server, for example, if a Flash presentation displays
the length of a video to let the user decide whether to play it.
To do this, define a method in server-side code that calls Stream.length(), and then have the client call it using
NetConnection.call().
❖In main.asc, define a function on the client object that calls Stream.length(). Do this within the onConnect
handler:
application.onConnect = function( client ) {
client.getStreamLength = function( streamName ) {
trace("length is " + Stream.length( streamName ));
return Stream.length( streamName );
}
application.acceptConnection( client );
}
Write the main client class
From the main client class, you call getStreamLength() in the server-side code. You need to create a Responder
object to hold the response:
var responder:Responder = new Responder(onResult);
This line specifies that the onResult() function will handle the result. You also need to write onResult(), as shown
in the following steps.
1In your client code, create a package, import classes, and define variables as usual:

233
ADOBE MEDIA SERVER 5.0.6 DEVELOPER’S GUIDE
Developing streaming media applications
Last updated 9/4/2014
package {
import flash.display.Sprite;
import flash.net.NetConnection;
import flash.events.NetStatusEvent;
import flash.net.NetStream;
import flash.net.Responder;
import flash.media.Video;
...
2Create a new class, StreamLength:
public class StreamLength extends Sprite
{
var nc:NetConnection;
var stream:NetStream;
var video:Video;
var responder:Responder;
}
...
3In the constructor for the StreamLength class, call NetConnection.connect() to connect to the server:
public function StreamLength()
{
nc = new NetConnection();
nc.addEventListener(NetStatusEvent.NET_STATUS, netStatusHandler);
nc.connect("rtmp://localhost/StreamLength");
}
4Add a netStatus event handler to handle a successful connection, rejected connection, and failed connection:
private function netStatusHandler(event:NetStatusEvent):void
{
trace("connected is: " + nc.connected );
trace("event.info.level: " + event.info.level);
trace("event.info.code: " + event.info.code);
switch (event.info.code)
{
case "NetConnection.Connect.Success":
trace("Congratulations! you're connected");
connectStream(nc);
break;
case "NetConnection.Connect.Rejected":
case "NetConnection.Connect.Failed":
trace ("Oops! the connection was rejected");
break;
}
}
5Write a function to play the stream when a successful connection is made. In it, create a Responder object that
handles its response in a function named onResult(). Then call NetConnection.call(), specifying
getStreamLength as the function to call on the server, the Responder object, and the name of the stream:

234
ADOBE MEDIA SERVER 5.0.6 DEVELOPER’S GUIDE
Developing streaming media applications
Last updated 9/4/2014
// play a recorded stream on the server
private function connectStream(nc:NetConnection):void {
stream = new NetStream(nc);
stream.addEventListener(NetStatusEvent.NET_STATUS, netStatusHandler);
stream.client = new CustomClient();
responder = new Responder(onResult);
nc.call("getStreamLength", responder, "bikes" );
}
6Write the onResult() function to handle the stream length returned by getStreamLength() on the server:
private function onResult(result:Object):void {
trace("The stream length is " + result + " seconds");
output.text = "The stream length is " + result + " seconds";
}
Write the client event handler class
❖Write a separate class to handle the onMetaData and onPlayStatus events:
class CustomClient {
public function onMetaData(info:Object):void {
trace("metadata: duration=" + info.duration + " width=" + info.width +
" height=" + info.height + " framerate=" + info.framerate);
}
public function onPlayStatus(info:Object):void {
trace("handling playstatus here");
}
}

235
Last updated 9/4/2014
Chapter 5: Working with live video
Adobe Media Server can broadcast live audio and video content to Flash Player, AIR, and Flash Lite clients. To capture
and encode live content and stream it to Adobe Media Server, you can use Flash Media Live Encoder or build a custom
Flash Player or AIR application.
You can capture live events in real time and stream them to large audiences or create social media applications that
include live audio and video. For example, Adobe® Acrobat® Connect™ Pro is a web conferencing application that uses
Adobe Media Server to capture and broadcast live audio and video.
Capturing live video
Using Flash Media Live Encoder to capture video
Flash Media Live Encoder is a free application that captures live video, encodes it, and streams it to Adobe Media
Server. By default, Flash Media Live Encoder is configured to stream video to the live service at rtmp://localhost/live.
Adobe Media Server installs with a sample video player that can play streams from the live service. The video player is
installed to the folder rootinstall\samples\videoPlayer.
The sample video player is based on Strobe Media Playback built on Open Source Media Framework. For more
information, see osmf.org.
For more information about Flash Media Live Encoder, see www.adobe.com/go/fme.
More Help topics
“Stream live media (RTMP)” on page 17
Example: Custom video capture application
The following steps build an application in ActionScript 3.0 that:
•Captures and encodes video.
•Displays the video as it’s captured.
•Streams video from the client to Adobe Media Server.
•Streams video from Adobe Media Server back to the client.
•Displays the video streamed from the server.
Note: To test this code, create a rootinstall/applications/publishlive folder on the server. Open the
rootinstall/documentation/samples/publishlive/PublishLive.swf file to connect to the application.
1. In a new .as file, create a NetConnection object. To connect to the server, pass the URI of the application to the
NetConnection.connect() method.

236
ADOBE MEDIA SERVER 5.0.6 DEVELOPER’S GUIDE
Working with live video
Last updated 9/4/2014
var nc:NetConnection;
var ns:NetStream;
var nsPlayer:NetStream;
var vid:Video;
var vidPlayer:Video;
var cam:Camera;
var mic:Microphone;
nc = new NetConnection();
nc.addEventListener(NetStatusEvent.NET_STATUS, onNetStatus);
nc.connect("rtmp://localhost/publishlive");
2. Define a function to handle NetStatusEvent events. If the client makes a successful connect to the server, the code
calls functions that run the application.
function onNetStatus(event:NetStatusEvent):void{
trace(event.info.code);
if(event.info.code == "NetConnection.Connect.Success"){
publishCamera();
displayPublishingVideo();
displayPlaybackVideo();
}
}
3. Publish the video being captured by the camera and the audio being captured by the microphone. First, get
references to the camera and microphone data. Create a NetStream object on the NetConnection you made to the
server. Then call NetStream.attachCamera() to attach the captured video to the NetStream object. Call
NetStream.attachAudio() to attach the live audio. Finally, call NetStream.publish("streamName", "live")to
send the audio and video to the server.
function publishCamera() {
cam = Camera.getCamera();
mic = Microphone.getMicrophone();
ns = new NetStream(nc);
ns.attachCamera(cam);
ns.attachAudio(mic);
ns.publish("myCamera", "live");
}
4. Display the video the client is streaming to the server. Create a Video object. The Video object is a display object.
Call Video.attachCamera(cam) to attach the camera video feed to the video object. Call addChild(vid) to add the
Video object to the display list so that it appears in Flash Player.
function displayPublishingVideo():void {
vid = new Video();
vid.x = 10;
vid.y = 10;
vid.attachCamera(cam);
addChild(vid);
}
5. Display the video the server is streaming to the client. A client that creates a stream to send to a server is publishing,
while a client playing a stream is subscribing. The client in this example publishes a stream and subscribes to a stream.
The client must create two streams, an outgoing (publishing) stream and an incoming (subscribing) stream. In this
example, the outgoing stream is ns and the incoming stream is nsPlayer. You can use the same NetConnection object
for both streams.

237
ADOBE MEDIA SERVER 5.0.6 DEVELOPER’S GUIDE
Working with live video
Last updated 9/4/2014
To play the audio and video as it returns from the server, call NetStream.play() and pass it the name of the stream
you published. To display the incoming video, call Video.attachNetStream():
function displayPlaybackVideo():void{
nsPlayer = new NetStream(nc);
nsPlayer.play("myCamera");
vidPlayer = new Video();
vidPlayer.x = cam.width + 20;
vidPlayer.y = 10;
vidPlayer.attachNetStream(nsPlayer);
addChild(vidPlayer);
}
Use ActionScript to allow users to control playback, display video fullscreen, use cuepoints, and use metadata. For
more information, see the “Working with video” chapter in ActionScript 3.0 Developer’s Guide.
Adding DVR features to live video
About DVR support
Flash Media Server 3.5 or higehr
A DVR (digital video recorder) lets viewers pause live video and resumes playback from the paused location. Viewers
can also rewind a live event, play the recorded section, and seek to the live section again. Just write a few lines of code
and a video player can act like a DVR. Examples of DVR applications are instant replay and “catch-up” services.
Note: The FLVPlayback component version 2.5 supports DVR. Download the component from the Adobe Media Server Tools
Using DVR with dynamic streaming
Flash Media Server 4.0 or higher, Flash Player 10.1
To use DVR with a dynamic streaming application, enable absolute time code on the server. Absolute time code keeps
DVR-enabled, multi-bitrate streams synchronized at the server.
The encoder must use absolute time code. Flash Media Live Encoder supports absolute time code, Flash Player does
not. Third-party encoders also use absolute time code. Contact your encoder vendor to learn how to enable absoulte
time code for your encoder.
Important: The streams must be in sync, the server does not sync the streams. Absolute time code ensures that the server
captures all the information required to keep encoder-synchronized streams in sync.
Enable absolute time code
Enable absolute time code in the Application.xml configuration file at the application level. When enabled, the server
assumes that incoming live streams have timestamps that are based on an absolute clock, such as a SMPTE time signal
contained within the encoder's input source. The default value is false.
1Create a new text or XML file and save it to the application’s folder as “Application.xml”.
Note: For an example of an application-level Application.xml file, open rootinstall/applications/vod/Application.xml
in a text editor.
2Add the following to the XML file:

238
ADOBE MEDIA SERVER 5.0.6 DEVELOPER’S GUIDE
Working with live video
Last updated 9/4/2014
<Application>
<StreamManager>
<Live>
<AssumeAbsoluteTime>true</AssumeAbsoluteTime>
</Live>
</StreamManager>
</Application
3Save the file.
For more information about working with configuration files, see Configuring a single application.
Publish and record streams for DVR with dynamic streaming
To publish and record DVR streams with dynamic streaming, pass "appendWithGap" to the NetStream.publish()
or Stream.record() methods. When you publish or record a stream in "appendWithGap" mode, the recorded
stream preserves gaps created when a stream stops and restarts. In "append" mode, the server eliminates the gaps
which can cause streams to lose sync. Gaps can occur when an encoder goes offline and comes back online. Gaps are
visible to the client when a recorded file is played.
Publishing, playing, and seeking DVR video
To publish a stream for a DVR video player from a client, use "record" or "append" flags, as in the following:
NetStream.publish("myvideo", "record")
NetStream.publish("myvideo", "append")
To publish a stream for a DVR video player from the server, call Stream.record(). The Stream.record() method
has two new parameters, maxDuration and maxSize, that let you specify the maximum length and file size of a stream.
The following code publishes a stream with a maximum recording length of 10 mins (600 seconds) and an unlimited
file size:
Stream.record("record", 600, -1)
When a client plays a stream published for a DVR video player, they don’t play a live stream, they play a recorded
stream. When a client views the stream “live”, they’re really viewing the recorded stream just after it was recorded.
To subscribe to a stream published for a DVR video player, use the following code:
NetStream.play("myvideo", 0, -1)
The previous code allows viewers joining an event late to view from the beginning.
To return to the beginning of a stream at any time, call the following:
NetStream.seek(0)
To start recording in the middle of an event, call the Server-Side ActionScript Stream.record() method. Calling this
method lets you start and stop recording at any time.
To create a button that seeks to the latest available part of the recording (which is considered “live”), seek to the
duration of the stream (the length of the data recorded on the server) minus the value of NetStream.bufferTime.
Subtract bufferTime to make playback as close to instanteous as possible. Flash Player doesn’t resume playback until
the buffer is full.
To calculate a stream's duration, set a time stamp in the onMetaData callback function.

239
ADOBE MEDIA SERVER 5.0.6 DEVELOPER’S GUIDE
Working with live video
Last updated 9/4/2014
public function onMetaData(info:Object):void{
trace("metadata:duration=" + info.duration);
duration = info.duration;
trace("stamp: " + stamp);
stamp = getTimer();
}
To calculate the value to pass to the seek() method, calculate the current duration, and subtract the bufferTime
minus an additional 2 seconds for safety.
private function getSeekToLiveValue():uint{
currentDuration = Number((getTimer()-stamp)/1000) + duration;
trace("currentDuration: " + currentDuration);
seekVal = (currentDuration - nsPlayer.bufferLength) - 2;
return seekVal;
}
To seek to “live”, call the getSeekToLiveValue() function on the playback NetStream object:
private function onClick(event:MouseEvent):void {
switch(event.currentTarget){
case rewindBtn:
nsPlayer.seek(nsPlayer.time - 5);
break;
case seekBtn:
trace("seekToEndValue " + getSeekToEndValue());
nsPlayer.seek(getSeekToLiveValue());
break;
}
}
Note: The previous code is in the DVR sample in the rootinstall/documentation/samples/dvr folder on the server.
Using Flash Media Live Encoder to capture video for DVR playback
You can use Flash Media Live Encoder 3 to capture video for DVR playback. Earlier versions of Flash Media Live
Encoder do not support recording to the server. For more information, see http://www.adobe.com/go/fme.
Example: Custom capture, publish, and DVR playback
This example is a client application that does the following:
•Captures and encodes video.
•Displays the video as it’s captured.
•Streams video from the client to Adobe Media Server.
•Streams video from Adobe Media Server back to the client.
•Displays the video streamed from the server in a player that lets you rewind and pause live video.
Note: To test this code, create a RootInstall/applications/dvr folder on the server. Open the
RootInstall/documentation/samples/dvr/DVR.swf file to connect to the application.
1On Adobe Media Server, create a RootInstall/applications/dvr folder.
2In Flash, create an ActionScript file and save it as DVR.as.
3Copy and paste the following code into the Script window:

240
ADOBE MEDIA SERVER 5.0.6 DEVELOPER’S GUIDE
Working with live video
Last updated 9/4/2014
package {
import flash.display.MovieClip;
import flash.utils.getTimer;
import flash.net.NetConnection;
import flash.events.*;
import flash.net.NetStream;
import flash.media.Video;
import flash.media.Camera;
import flash.media.Microphone;
import fl.controls.Button;
public class DVR extends MovieClip
{
private var nc:NetConnection;
private var ns:NetStream;
private var nsPlayer:NetStream;
private var vid:Video;
private var vidPlayer:Video;
private var cam:Camera;
private var mic:Microphone;
private var pauseBtn:Button;
private var rewindBtn:Button;
private var playBtn:Button;
private var seekBtn:Button;
private var dvrFlag:Boolean;
private var stamp:uint;
private var duration:uint;
private var currentDuration:uint;
private var seekVal;uint;
public function DVR()
{
nc = new NetConnection();
nc.addEventListener(NetStatusEvent.NET_STATUS, onNetStatus);
nc.connect("rtmp://localhost/dvr");
setupButtons();
dvrFlag = true;
}
private function onNetStatus(event:NetStatusEvent):void{
trace(event.info.code);
switch(event.info.code){
case "NetConnection.Connect.Success":
publishCamera();
displayPublishingVideo();
displayPlaybackVideo();
break;
case "NetStream.Play.Start":
trace("dvrFlag " + dvrFlag);
if(dvrFlag){
nsPlayer.seek(getSeekToLiveValue());
dvrFlag = false;
}
break;
}
}
private function onAsyncError(event:AsyncErrorEvent):void{
trace(event.text);
}
private function onClick(event:MouseEvent):void {

241
ADOBE MEDIA SERVER 5.0.6 DEVELOPER’S GUIDE
Working with live video
Last updated 9/4/2014
switch(event.currentTarget){
case rewindBtn:
nsPlayer.seek(nsPlayer.time - 5);
break;
case pauseBtn:
nsPlayer.pause();
break;
case playBtn:
nsPlayer.resume();
break;
case seekBtn:
nsPlayer.seek(getSeekToLiveValue());
break;
}
}
private function publishCamera() {
cam = Camera.getCamera();
mic = Microphone.getMicrophone();
ns = new NetStream(nc);
ns.client = this;
ns.addEventListener(NetStatusEvent.NET_STATUS, onNetStatus);
ns.addEventListener(AsyncErrorEvent.ASYNC_ERROR, onAsyncError);
ns.attachCamera(cam);
ns.attachAudio(mic);
ns.publish("video", "record");
}
private function displayPublishingVideo():void {
vid = new Video(cam.width, cam.height);
vid.x = 10;
vid.y = 10;
vid.attachCamera(cam);
addChild(vid);
}
private function displayPlaybackVideo():void{
nsPlayer = new NetStream(nc);
nsPlayer.client = this;
nsPlayer.addEventListener(NetStatusEvent.NET_STATUS, onNetStatus);
nsPlayer.addEventListener(AsyncErrorEvent.ASYNC_ERROR, onAsyncError);
nsPlayer.play("video", 0, -1);
vidPlayer = new Video(cam.width, cam.height);
vidPlayer.x = cam.width + 20;
vidPlayer.y = 10;
vidPlayer.attachNetStream(nsPlayer);
addChild(vidPlayer);
}
private function getSeekToLiveValue():uint{
currentDuration = Number((getTimer()-stamp)/1000) + duration;
trace("currentDuration: " + currentDuration);
seekVal = (currentDuration - nsPlayer.bufferTime) - 2;
trace("seekVal: " + seekVal);
return seekVal;
}
private function setupButtons():void {
rewindBtn = new Button();
pauseBtn = new Button();
playBtn = new Button();

242
ADOBE MEDIA SERVER 5.0.6 DEVELOPER’S GUIDE
Working with live video
Last updated 9/4/2014
seekBtn = new Button();
rewindBtn.width = 52;
pauseBtn.width = 52;
playBtn.width = 52;
seekBtn.width = 100;
rewindBtn.move(180,150);
pauseBtn.move(235,150);
playBtn.move(290,150);
seekBtn.move(345, 150);
rewindBtn.label = "Rew 5s";
pauseBtn.label = "Pause";
playBtn.label = "Play";
seekBtn.label = "Seek to Live";
rewindBtn.addEventListener(MouseEvent.CLICK, onClick);
pauseBtn.addEventListener(MouseEvent.CLICK, onClick);
playBtn.addEventListener(MouseEvent.CLICK, onClick);
seekBtn.addEventListener(MouseEvent.CLICK, onClick);
addChild(rewindBtn);
addChild(pauseBtn);
addChild(playBtn);
addChild(seekBtn);
}
public function onMetaData(info:Object):void {
trace("metadata:duration = " + info.duration);
stamp = getTimer();
trace("stamp: " + stamp);
duration = info.duration;
}
}
}
4Save the DVR.as file.
5Choose File > New > Flash File (ActionScript 3.0) and click OK.
6Save the file as DVR.fla in the same folder as the DVR.as file.
7Open the Components Panel, drag a Button to the Stage, and delete it.
This action adds the button to the Library. The button is added to the application at runtime.
8Choose File > Publish Settings. Click the Flash tab. Click Script Settings and enter DVR as the Document class.
Click the checkmark to validate the path.
9Save the file and choose Control > Test Movie to run the application.
Limiting the size and duration of recordings
You can limit the maximum size and duration of recordings using parameters in the Application.xml configuration
file, Server-Side ActionScript, and the Authorization plug-in. Set these values to prevent using excessive disk space.
The following are the Application.xml file parameters:

243
ADOBE MEDIA SERVER 5.0.6 DEVELOPER’S GUIDE
Working with live video
Last updated 9/4/2014
In addition to setting maximum values, in the Application.xml file you can set maximum cap values. Server-side
scripts cannot override these caps. CDNs can use these caps to set a limit that clients cannot override.
Note: The Authorization plug-in can override any values set in the Application.xml file.
To set values in Server-Side ActionScript, call Stream.record() and pass values for the maxDuration and maxSize
parameters. The following code limits the recording to 5 minutes and sets an unlimited maximum file size (up to the
value of MaxSizeCap):
s.record("record", 300, -1);
The server truncates recordings greater than MaxCapSize and MaxCapDuration.
More Help topics
“Developing an Authorization plug-in” on page 303
Scaling DVR applications
To build large-scale applications, use the server-side NetConnection class to chain multiple servers together. In this
scenario, a client can request a stream that does not reside on the server to which it is connected. Use the server-side
ProxyStream class to create a look-up mechanism for finding streams in the server chain.
You can set values in the Vhost.xml configuration file to configure the disk cache that holds the streams:
XML element Description
Application/StreamManager/Recording/MaxDuration The maximum duration of a recording, in seconds. The default
value is -1, which enforces no maximum duration.
Application/StreamManager/Recording/MaxDurationCap The maximum duration of a recording cap, in seconds. The
default value is -1, which enforces no cap on maximum
duration.
The server-side Stream.record() method cannot override
this value. The Authorization plug-in can override this value.
Application/StreamManager/Recording/MaxSize The maximum size of a recording, in kilobytes. The default value
is -1, which enforces no maximum size.
Application/StreamManager/Recording/MaxSizeCap The maximum size of a recording cap, in kilobytes. The default
value is -1, which enforces no cap on maximum size.
The server-side Stream.record() method cannot override
this value. The Authorization plug-in can override this value.
XML element Attribute Description
VirtualHost/Proxy/CacheDir enabled Determines whether the disk cache is enabled.
useAppDir Specifies whether to separate the cache subdirectories by
application.
VirtualHost/Proxy/CacheDir/Path The root directory of the disk cache.
VirtualHost/Proxy/CacheDir/MaxSize The maximum size of the disk in gigabytes. The default value is
32. The value 0 disables the disk cache. The value -1 specifies no
maximum value.
VirtualHost/Proxy/RequestTimeout The maximum amount of time to wait for a response to a
request (for metadata, content, and so on) from an upstream
server., in seconds. The default value is 2 seconds.

244
ADOBE MEDIA SERVER 5.0.6 DEVELOPER’S GUIDE
Working with live video
Last updated 9/4/2014
If a server has multiple virtual hosts, point each virtual host to its own cache directory.
If the server runs out of disk space on an intermediate or edge server while writing to the CacheDir, it logs the
following warning message in the core.xx.log for each segment that fails to write to disk:I/O Failed on cached stream
file C:\Program Files\Adobe\Adobe Media Server 3.5\cache\streams\00\proxyapp\<IP>\C\Program
Files\Adobe\Adobe Media Server
3.5_361\applications\primaryapp\streams\_definst_\sample1_1500kbps.f4v\0000000000000000 during write: 28 No
space left on device.
Logging
Streams played in a DVR video player are played as recorded streams. These streams log the same events in the log files
as every recorded stream.
More Help topics
“Dynamic streaming” on page 210
Adding metadata to a live stream
About metadata
See Adobe Evangelist Jens Loeffler’s article Working with metadata for live Flash video streaming.
Metadata in streaming media gives subscribers the opportunity to get information about the media they are
viewing. Metadata can contain information about the video, such as title, copyright information, duration of the video,
or creation date. A client can use the metadata to set the width and height of the video player.
In a recorded stream, a special data message is inserted at the beginning of the media file that provides metadata. Any
client that connects to Adobe Media Server receives the metadata when it plays the recorded stream. However, when
a client connects to a live stream during the broadcast, they miss receiving the data keyframe.
You can write code that tells Adobe Media Server to send metadata to clients whenever they connect to a live stream.
Any client connecting to the server, even if they connect late, receives the metadata when it plays the live video.
You can also use this feature to add metadata to a live stream at any time during a broadcast.
Note: Because DVR applications use recorded streams, you do not need to use data keyframes to push metadata to the
client. In DVR applications (and in all recorded video applications) the onMetaData() method is called at the beginning
of the stream and during events such as seek and pause.
Sending metadata to a live stream
To send metadata to clients when they connect to a live stream, pass a special command, @setDataFrame, to the
client-side NetStream.send()method or to the server-side Stream.send() method. Whether the command is sent
from the client or the server, handle the data on the client the same way you would handle any message from the
send() method. Pass a handler name to the send() method and define a function with that name to handle the data.
To send the command from the client, call the NetStream.send() method:
NetStream.send(@setDataFrame, onMetaData [,metadata ])
The onMetaData parameter specifies a function that handles the metadata when it’s received. You can create multiple
data keyframes. Each data keyframe must use a unique handler (for example, onMetaData1, onMetaData2, and so on).

245
ADOBE MEDIA SERVER 5.0.6 DEVELOPER’S GUIDE
Working with live video
Last updated 9/4/2014
The metadata parameter is an Object or Array (or any subclass) that contains the metadata to set in the stream. Each
metadata item is a property with a name and a value set in the metadata object. You can use any name, but Adobe
recommends that you use common names, so that the metadata you set can be easily read.
To add metadata to a live stream in a client-side script, use the following code:
var metaData:Object = new Object();
metaData.title = "myStream";
metaData.width = 400;
metaData.height = 200;
ns.send("@setDataFrame", "onMetaData", metaData);
To clear metadata from a live stream in a client-side script, use the following code:
ns.send("@clearDataFrame", "onMetaData");
To add metadata to a live stream in a server-side script, use the following code:
s = Stream.get("myStream");
metaData = new Object();
metaData.title = "myStream";
metaData.width = 400;
metaData.height = 200;
s.send("@setDataFrame", "onMetaData", metaData);
To clear metadata from a live stream in a server-side script, use the following code:
s.send("@clearDataFrame", "onMetaData");
Retrieving metadata
You can retrieve metadata from client-side code only. You cannot retreive metadata from server-side code. Even if you
send the @setDataFrame message from the server, use client-side code to retrieve it.
To retrieve metadata, assign the NetStream.client property to an object. Define an onMetaData function on that
object, as in the following:
netstream.client = this;
function onMetaData(info:Object):void {
var key:String;
for (key in info) {
trace(key + ": " + info[key]);
}
}
This function outputs the metadata added by the server and the metadata sent with @setDataFrame.
To have the server add metadata in addition to any messages you send with the @setDataFrame message, publish the
video with the "record" flag or the "append" flag, as in the following:
netstream.publish("mycamera", "record");
netstream.publish("mycamera", "append");
Note: If you publish a live video to the server with the "live" flag or without a type parameter, the server does not record
the video. In this case, the server does not add standard metadata to the file.
To play the stream, call NetStream.play() and pass a value for the start parameter to indicate that the stream is a
recorded live stream:
netstream.play("mycamera", 0); // Plays a recorded live stream.

246
ADOBE MEDIA SERVER 5.0.6 DEVELOPER’S GUIDE
Working with live video
Last updated 9/4/2014
If you pass 0 or greater for the start parameter, the client plays the recorded stream starting from the time given. The
recorded stream includes the standard metadata added by the server. If the server doesn’t find a recorded stream, it
ignores the play() method.
If you pass -2 or -1 for the start parameter, the client plays the live video and does not receive the standard metadata:
netstream.play("mycamera", -2); // Looks for a live stream first.
netstream.play("mycamera", -1); // Plays a live stream.
Example: Add metadata to live video
This example is a client application that does the following:
•Captures and encodes video.
•Displays the video as it’s captured.
•Streams video from the client to Adobe Media Server.
•Sends metadata to the server that the server sends to clients when they play the live stream.
•Streams video from Adobe Media Server back to the client when you click a button.
•Displays the video streamed from the server.
•Displays the metadata sent from the server in a TextArea component.
Note: To test this code, create a RootInstall/applications/publishlive folder on the server. Open the
RootInstall/documentation/samples/metadata/Metadata.swf file to connect to the application.
1On Adobe Media Server, create a RootInstall/applications/publishlive folder.
2In Flash, create an ActionScript file and save it as Metadata.as.
3Copy and paste the following code into the Script window:
package {
import flash.display.MovieClip;
import flash.net.NetConnection;
import flash.events.NetStatusEvent;
import flash.events.MouseEvent;
import flash.events.AsyncErrorEvent;
import flash.net.NetStream;
import flash.media.Video;
import flash.media.Camera;
import flash.media.Microphone;
import fl.controls.Button;
import fl.controls.Label;
import fl.controls.TextArea;
public class Metadata extends MovieClip {
private var nc:NetConnection;
private var ns:NetStream;
private var nsPlayer:NetStream;
private var vid:Video;
private var vidPlayer:Video;
private var cam:Camera;
private var mic:Microphone;
private var clearBtn:Button;
private var startPlaybackBtn:Button;
private var outgoingLbl:Label;
private var incomingLbl:Label;
private var myMetadata:Object;

247
ADOBE MEDIA SERVER 5.0.6 DEVELOPER’S GUIDE
Working with live video
Last updated 9/4/2014
private var outputWindow:TextArea;
public function Metadata(){
setupUI();
nc = new NetConnection();
nc.addEventListener(NetStatusEvent.NET_STATUS, onNetStatus);
nc.connect("rtmp://localhost/publishlive");
}
/*
* Clear the MetaData associated with the stream
*/
private function clearHandler(event:MouseEvent):void {
if (ns){
trace("Clearing MetaData");
ns.send("@clearDataFrame", "onMetaData");
}
}
private function startHandler(event:MouseEvent):void {
displayPlaybackVideo();
}
private function onNetStatus(event:NetStatusEvent):void {
trace(event.target + ": " + event.info.code);
switch (event.info.code)
{
case "NetConnection.Connect.Success":
publishCamera();
displayPublishingVideo();
break;
case "NetStream.Publish.Start":
sendMetadata();
break;
}
}
private function asyncErrorHandler(event:AsyncErrorEvent):void {
trace(event.text);
}
private function sendMetadata():void {
trace("sendMetaData() called")
myMetadata = new Object();
myMetadata.customProp = "Welcome to the Live feed of YOUR LIFE, already in progress.";
ns.send("@setDataFrame", "onMetaData", myMetadata);
}
private function publishCamera():void {
cam = Camera.getCamera();
mic = Microphone.getMicrophone();
ns = new NetStream(nc);
ns.client = this;
ns.addEventListener(NetStatusEvent.NET_STATUS, onNetStatus);
ns.addEventListener(AsyncErrorEvent.ASYNC_ERROR, asyncErrorHandler);
ns.attachCamera(cam);
ns.attachAudio(mic);
ns.publish("myCamera", "record");
}

248
ADOBE MEDIA SERVER 5.0.6 DEVELOPER’S GUIDE
Working with live video
Last updated 9/4/2014
private function displayPublishingVideo():void {
vid = new Video(cam.width, cam.height);
vid.x = 10;
vid.y = 10;
vid.attachCamera(cam);
addChild(vid);
}
private function displayPlaybackVideo():void {
nsPlayer = new NetStream(nc);
nsPlayer.client = this;
nsPlayer.addEventListener(NetStatusEvent.NET_STATUS, onNetStatus);
nsPlayer.addEventListener(AsyncErrorEvent.ASYNC_ERROR, asyncErrorHandler);
nsPlayer.play("myCamera", 0);
vidPlayer = new Video(cam.width, cam.height);
vidPlayer.x = cam.width + 100;
vidPlayer.y = 10;
vidPlayer.attachNetStream(nsPlayer);
addChild(vidPlayer);
}
private function setupUI():void {
outputWindow = new TextArea();
outputWindow.move(250, 175);
outputWindow.width = 250;
outputWindow.height = 150;
outgoingLbl = new Label();
incomingLbl = new Label();
outgoingLbl.width = 150;
incomingLbl.width = 150;
outgoingLbl.text = "Publishing Stream";
incomingLbl.text = "Playback Stream";
outgoingLbl.move(30, 150);
incomingLbl.move(300, 150);
startPlaybackBtn = new Button();
startPlaybackBtn.width = 150;
startPlaybackBtn.move(250, 345)
startPlaybackBtn.label = "View Live Event";
startPlaybackBtn.addEventListener(MouseEvent.CLICK, startHandler);
clearBtn = new Button();

249
ADOBE MEDIA SERVER 5.0.6 DEVELOPER’S GUIDE
Working with live video
Last updated 9/4/2014
clearBtn.width = 100;
clearBtn.move(135,345);
clearBtn.label = "Clear Metadata";
clearBtn.addEventListener(MouseEvent.CLICK, clearHandler);
addChild(clearBtn);
addChild(outgoingLbl);
addChild(incomingLbl);
addChild(startPlaybackBtn);
addChild(outputWindow);
}
public function onMetaData(info:Object):void {
var key:String;
for (key in info){
outputWindow.appendText(key + ": " + info[key] + "\n");
}
}
}
}
4Save the file.
5Choose File > New > Flash File (ActionScript 3.0) and click OK.
6Save the file as Metadata.fla in the same folder as the Metadata.as file.
7Open the Components Panel, drag a Button and a TextArea component to the Stage, and delete them.
This action adds the components to the Library. The components are added to the application at runtime.
8Choose File > Publish Settings. Click the Flash tab. Click Script Settings and enter Metadata as the Document class.
Click the checkmark to validate the path.
9Save the file and choose Control > Test Movie to run the application.
Flash Media Live Encoder metadata properties
Flash Media Live Encoder sets the following metadata properties and values. You do not need to add this metadata to
live streams:
Metadata property name Data type Description
lastkeyframetimestamp Number The timestamp of the last video keyframe recorded.
width Number The width of the video, in pixels.
height Number The height of the video, in pixels.
videodatarate Number The video bit rate.
audiodatarate Number The audio bit rate.
framerate Number The frames per second at which the video was recorded.
creationdate String The creation date of the file.
createdby String The creator of the file.

250
ADOBE MEDIA SERVER 5.0.6 DEVELOPER’S GUIDE
Working with live video
Last updated 9/4/2014
Metadata properties for recorded live streams
If you record the file as you stream it, Adobe Media Server adds the metadata listed in the following table. To record a
file as you publish it to the server, use the "record" parameter, as in the following:
ns.publish("myCamera", "record");
audiocodecid Number The audio codec ID used in the file. Values are:
0 Uncompressed
1 ADPCM
2 MP3
5 Nellymoser 8 kHz Mono
6 Nellymoser
10 HE-AAC
11 Speex
videocodecid Number The video codec ID used in the file. Values are:
2 Sorenson H.263
3 Screen video
4 On2 VP6
5 On2 VP6 with transparency
7 H.264
audiodelay Number The delay introduced by the audio codec, in seconds.
Metadata property name Data type Description
audiocodecid Number The audio codec ID used in the file. Values are:
0 Uncompressed
1 ADPCM
2 MP3
5 Nellymoser 8kHz Mono
6 Nellymoser
10 HE-AAC
11 Speex
canSeekToEnd Boolean Whether the last video frame is a keyframe (true if yes, false if no).
createdby String The name of the file creator.
Metadata property name Data type Description

251
ADOBE MEDIA SERVER 5.0.6 DEVELOPER’S GUIDE
Working with live video
Last updated 9/4/2014
When you use the "record" flag with the NetStream.publish() call, the server attempts to merge your metadata
properties with the standard metadata properties. If there is a conflict between the two, the server uses the standard
metadata properties. For example, suppose you add these metadata properties:
duration=5
x=200
y=300
When the server starts to record the video, it begins to write its own metadata properties to the file, including
duration. If the recording is 20 seconds long, the server adds duration=20 to the metadata, overwriting the value
you specified. However, x=200 and y=300 are still saved as metadata, because they create no conflict. The other
properties the server sets, such as audiocodecid, videocodecid, creationdate, and so on, are also saved in the file.
When a stream is recorded, the recording starts at a keyframe. Recordings stop immediately on keyframes or I-frames.
Capturing timecode sent from Flash Media Live Encoder
Flash Media Live Encoder can embed SMPTE timecode, Vertical Interval Timecode (VITC), and Visual Timecode
(BITC) in a stream and pass to Adobe Media Server. To capture the timecode, implement the OnFI method on the
NetStream object.
Publishing live video in RAW file format
Flash Media Server 3.5.3
About the RAW file format
The RAW (Record and Watch) file format records media into configurable chunks that stream to any version of Flash
Player. Use the RAW file format to serve long-length, multi-bitrate DVR streams without running into performance
issues. The RAW file format records and plays back all streams that Adobe Media Server supports, including H.264
video, data-only, audio-only, and so on.
The RAW file format is a server feature; any version of Flash Player can publish or play a RAW stream. However,
multi-bitrate stream support (also called dynamic streaming) requires Flash Player 10 and higher.
duration Number The length of the file, in seconds.
creationdate String The date the file was created.
videocodecid Number The video codec ID used in the file. Values are:
2 Sorenson H.263
3 Screen video
4 On2 VP6
5 On2 VP6 with transparency
7 H.264
Metadata property name Data type Description

252
ADOBE MEDIA SERVER 5.0.6 DEVELOPER’S GUIDE
Working with live video
Last updated 9/4/2014
Important: The RAW file format is internal to Adobe Media Server. At this time, you cannot edit these files with third-
party tools or convert the files to FLV format or MP4 format.
The RAW file format is an FLV file fragmented into the following files:
The files are stored in a folder whose name is the name of the stream. Suppose the stream “foo” is stored in a folder
named “foo”. The “foo” folder contains the following files: index, context, 0000000000000000, 00000000000001C3,
0000000000000386, and so on.
The RAW file format enables Adobe Media Server to handle up to the following scenario:
Note: Raw streams with long durations create many files in a single directory. Depending on system resources, the file
system may not be able to access the directory fast enough for recording or playback to keep up.
More Help topics
“Dynamic streaming” on page 210
Streaming RAW files
Note: Both ActionScript 2.0 and ActionScript 3.0 support the RAW file format. Flash Media Live Encoder 3.0 does not
support the RAW file format.
To record a live stream as a RAW stream, use the prefix raw: in the NetStream.publish() call or in the
Stream.get() call.
The following client-side ActionScript uses the RAW file format to publish a live stream:
nc:NetConnection = new NetConnection();
nc.connect("rtmp://fms.example.com/live");
// In production code, test for a successful NetConnection here
ns:NetStream = new NetStream(nc);
ns.publish("raw:livestream", "record");
// You can use the "record" or the "append" flag.
The following Server-Side ActionScript records a live stream as a RAW stream:
Filename Description
index Contains the list of segment files and their timestamp ranges.
context Contains all the “context messages” for the stream.
A 16-digit hexadecimal number There is one file for each segment of the stream. The number of files is the stream index of the first
message in the segment. The first segment name is always 0. If the first segment contains 234
messages, the next segment name is EA, and so on.
Parameter Value
Simultaneous DVR streams 25
Bit rate of each stream 2 Mbit
Codecs H.264 and AAC
Stream duration 4 hours (x 2 Mbit = 7 GB size)
Number of clients Depends on origin-edge configuration.

253
ADOBE MEDIA SERVER 5.0.6 DEVELOPER’S GUIDE
Working with live video
Last updated 9/4/2014
s = Stream.get("raw:recordedStream");
s.record();
s.play("livestream", -1, -1);
The following client-side ActionScript plays the RAW stream:
ns.play("raw:livestream", 0, -1)
To use Flash Media Live Encoder, use the prefix raw: in the Stream field. Use a server-side script to record the stream.
You can use the server-side script in the DVRCast application. Download the DVRCast application from
www.adobe.com/go/ams_tools. The following example uses Flash Media Live Encoder and the DVRCast application.
Example: Publish and play a RAW stream
1Download and install Flash Media Live Encoder from www.adobe.com/go/fmle.
2Download the DVRCast application from www.adobe.com/go/ams_tools and do the following:
aUnzip the package.
bCopy the dvrcast1_1\DVRCast1.1\adobe\fms\samples\applications\dvrcast_origin folder and its contents to
the Adobe Media Server rootinstall/applications folder.
cTo verify that the application is registered with the server, open the Adobe Media Server Administration
Console. Click View Applications and select dvrcast_origin from the New Instance menu at the bottom of the
screen.
3Connect a camera to your computer.
4Open Flash Media Live Encoder and do the following:
aChoose a preset. The RAW format supports all the codecs that Flash Player supports.
bIn the Output section, for the FMS URL, enter rtmp://localhost/dvrcast_origin.
cFor stream, enter raw:livestream.
dSelect DVR Auto Record
eClick Start
5Browse to rootinstall\applications\dvrcast_origin\streams\_definst_\livetream. The raw files are generated in this
folder.
6To view playback, do the following:
aOpen rootinstall/samples/videoPlayer/videoplayer.html in a browser.
bFor Stream URL, enter rtmp://localhost/dvrcast_origin/raw:livestream.
cSelect VOD.
dClick Play Stream.
Validating RAW files and reading error messages
To check if a RAW stream is valid, pass a folder to the FLVCheck tool. For example, if you have a RAW stream named
“foo” in the folder “C:\media\foo”, pass the following command to the FLVCheck tool:
flvcheck -f C:\media\foo -v -w
The following errors are reported by the FLVCheck tool version 2.0 and written to the log files:
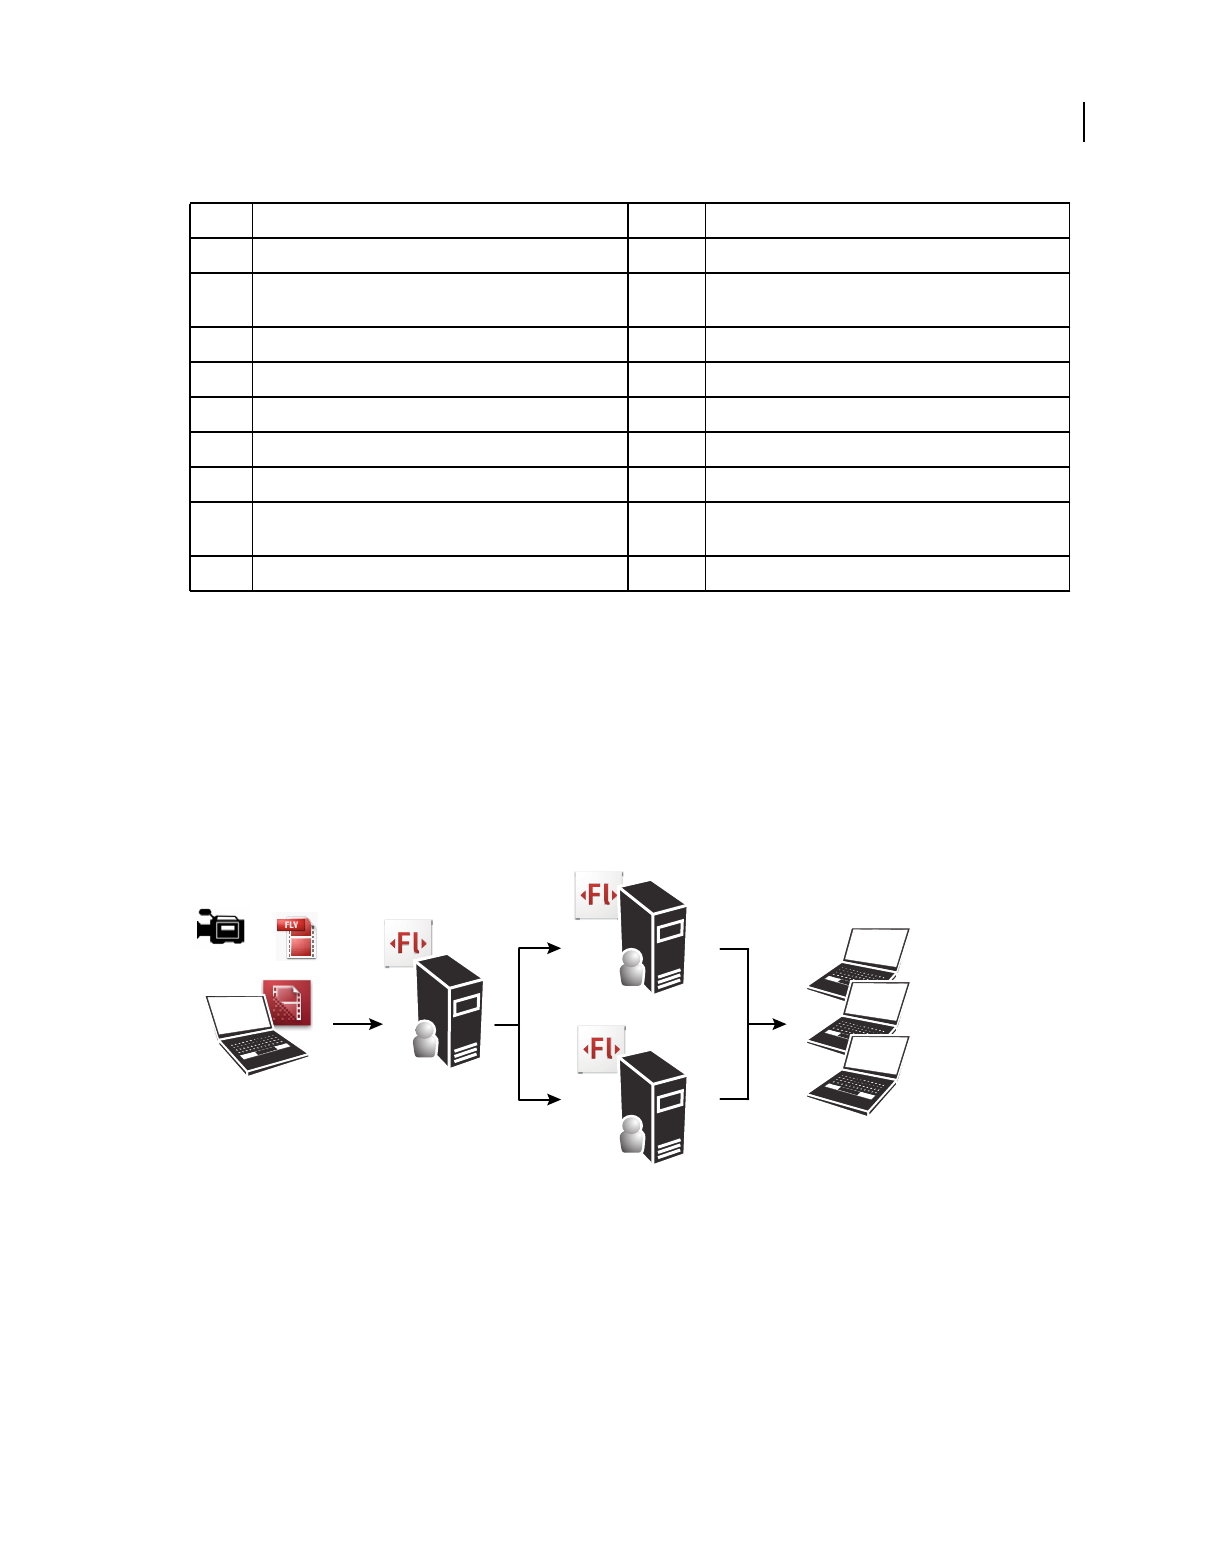
254
ADOBE MEDIA SERVER 5.0.6 DEVELOPER’S GUIDE
Working with live video
Last updated 9/4/2014
Multi-point publishing between servers
About multi-point publishing
Multi-point publishing allows clients to publish to servers with only one client-to-server connection. This feature
enables you to build large-scale live broadcasting applications, even with servers or subscribers in different geographic
locations.
Using multipoint publishing to publish content from server to server, even across geographic boundaries
A. Live Video B. Server 1 (New York City) C. Server 2 (Chicago) and Server 3 (Los Angeles) D. Users
The application flow that corresponds to this illustration works like as follows:
1A client connects to an application on Server 1 in New York City and calls NetStream.publish() to publish a live
stream. This client can be a custom Flash Player or AIR application or Flash Media Live Encoder.
2The server-side script on Server 1 receives an application.onPublish() event with the name of the published
stream.
3The application.onPublish() handler creates a NetStream object and calls NetStream.publish() to
republish the live stream to Server 2 (Chicago) and Server 3 (Los Angeles).
Code Error Level Message
-32 Missing/Corrupted Index or Context file Error Index or Contexts file missing or corrupted.
-33 Raw file index version doesn't match FMS version Error Index File Version %x Not Supported. FMS Requires
Version %x.
-34 Segment file missing or corrupted Error Failed read in segment file %s. File missing or corrupted.
-35 Truncated message in segment file Error Truncated message in segment file %s.
-36 Bad message type Error Unrecognized message type in segment file %s.
-37 Message backtag does not match length Error Invalid message footer in segment file %s.
-38 Segment data does not match segment bounds Error Segment file %s does not match index file.
-119 Contexts file contains no onMetadata message (and there
is at least one segment file)
Warning Missing FLV metadata.
-126 Timestamp decreases from one message to the next Warning Found backward timestamp in segment file %s.
BC DA

255
ADOBE MEDIA SERVER 5.0.6 DEVELOPER’S GUIDE
Working with live video
Last updated 9/4/2014
4Subscribers connecting to Server 2 and Server 3 receive the same live stream.
5The applications receive application.onUnpublish() events when the clients stops publishing.
Example: Multipoint publishing
In this example, the client captures, encodes, and publishes the stream to the server. You can also use Flash Media Live
Encoder for the same purpose.
Note: To test this code, create a RootInstall/applications/livestreams folder on the server. Open the Administration
Console and create an instance of the livestreams application. Click Live Logs to see the server-side trace() statements
as the application runs. Open the RootInstall/documentation/samples/livestreams/LiveStreams.swf file to connect to the
application.
1In a client-side script, call the NetStream.publish() method to publish a live stream:
ns.publish("localnews", "live");
Note: To use Flash Media Live Encoder as a publishing client, enter the FMS URL
rtmp://localhost/livestreams and the Stream localnews.
2In the server-side main.asc file, define an application.onPublish() event handler. This handler accepts the
stream name that was published from the client, connects to the remote server, and republishes the stream to the
remote server. (In this example, the remove server is another instance of the same application).
// Called when the client publishes
application.onPublish = function(client, myStream) {
trace(myStream.name + " is publishing into application " + application.name);
// This is an example of using the multi-point publish feature to republish
// streams to another application instance on the local server.
if (application.name == "livestreams/_definst_"){
trace("Republishing the stream into livestreams/anotherinstance");
nc = new NetConnection();
nc.connect( "rtmp://localhost/livestreams/anotherinstance" );
ns = new NetStream(nc);
// called when the server NetStream object has a status
ns.onStatus = function(info) {
trace("Stream Status: " + info.code)
if (info.code == "NetStream.Publish.Start") {
trace("The stream is now publishing");
}
}
ns.setBufferTime(2);
ns.attach(myStream);
ns.publish( myStream.name, "live" );
}
}
Calling NetStream.publish() publishes the stream from your server to the remote server.
3In the main.asc file, handle events that occur on the NetStream object you used to publish from your server to the
remote server:
ns.onStatus = function(info) {
trace("Stream Status: " + info.code)
if (info.code == "NetStream.Publish.Start") {
trace("The stream is now publishing");
}
}

256
ADOBE MEDIA SERVER 5.0.6 DEVELOPER’S GUIDE
Working with live video
Last updated 9/4/2014
The server-side NetStream.publish() method triggers a NetStatus event with a NetStream.Publish.Start
code, just like the client-side NetStream.publish() method.
4Define what happens when the client stops publishing:
application.onUnpublish = function( client, myStream ) {
trace(myStream.name + " is unpublishing" );
}

257
Last updated 9/4/2014
Chapter 6: Building peer-assisted
networking applications
Real-Time Media Flow Protocol (RTMFP)
Flash Player 10, AIR 1.5, Flash Media Server 3.5
Flash Player 10 and AIR 1.5 support Real-Time Media Flow Protocol (RTMFP). RTMFP is built on User Datagram
Protocol (UDP). RTMP is built on Transmission Control Protocol (TCP). UDP provides lower latency than TCP. It
also enables end-to-end peering—that is, direct data transmission between two clients. You can substitute RTMFP for
RTMP in traditional unicast (one-to-many or one-to-one) applications to take advantage of the lower latency and
lower bandwidth costs.
RTMFP provides the following features: NAT/firewall traversal, congestion control and prioritization, IP address
mobility, and partial reliability.
RTMFP network traffic is encrypted with a 128-bit cipher. To play a stream over RTMFP, a client must know the name
of the stream and know the peer ID of the publisher. The peer ID is a 256-bit value associated with the publisher's
identity. The publisher must accept a peer request before a connection is made.
Adobe Computer Scientist Jozsef Vass explains RTMFP in an Adobe DevNet article, Best practices for real-time
collaboration using Adobe Media Server.
About peer IDs
Each client has a peer ID, and the peer ID space is server-specific. The peer ID is the SHA256 of the client's Diffie-
Hellman public key.
For a client-server connection, peer IDs are available in the ActionScript 3.0 NetConnection.nearID and
NetConnection.farID properties. The nearID is the peer ID of the client, the farID is the peer ID of the server.
Peer IDs are also available in the Server-Side ActionScript Client.nearID and Client.farID properties. The
nearID is the peer ID of the server, the farID is the peer ID of the client.
For a connection between Flash Player and Adobe Media Server, the client-side NetConnection.nearID and the
server-side Client.farID properties share the same value. The client-side NetConnection.farID and the server-
side Client.nearID properties share the same value.
Server-Side ActionScript also has NetConnection.nearID and NetConnection.farID properties that contain the
peer IDs of both sides of a server-side RTMFP connection. In this case, the NetConnection is a client.
Unicast, broadcast, and multi-point publishing over RTMFP
Although RTMFP is often used for peer-assisted networking applications, you can use RTMFP in unicast, broadcast,
and multi-point publishing applications as well. Simply replace the RTMP protocol in the
NetConnection.connect() call with the RTMFP protocol:
netconnection.connect("rtmfp://fms.example.com/vod");
To use RTMFP with multi-point publishing, create a server-side NetConnection and use an RTMFP URL to connect
to the target server (for example, "rtmfp://localhost/myapp").

258
ADOBE MEDIA SERVER 5.0.6 DEVELOPER’S GUIDE
Building peer-assisted networking applications
Last updated 9/4/2014
To stream audio, video, and data, create a NetStream just as you would with an RTMP connection. Do not pass a
GroupSpecifier to the NetStream constructor as you would with a peer-assisted networking application.
When you use an RTMFP connection, updates to shared objects are sent over the RTMP chunk stream data channel
within the RTMFP connection with full reliability. The RTMFP protocol supports a wide range of reliability settings
(from zero to full) for audio, video, and data transfer, along with excellent retransmission and congestion handling.
See NetStream.audioReliable, NetStream.videoReliable, and NetStream.dataReliable in the ActionScript
3.0 Reference for Flash Platform.
RTMFP groups
Flash Player 10.1, AIR 2, Flash Media Server 4
Flash Player 10.1, AIR 2, and Flash Media Server 4 support RTMFP groups. Clients make an RTMFP connection to
Adobe Media Server and join a group.
Peer A member of a group, also called a “node”. A peer is a Flash Player or AIR client that connects to Adobe Media
Server over RTMFP and joins a group.
Group A group is a collection of one or more RTMFP nodes who agree on certain parameters and capabilities. There
is a path between every peer in a group that forms a peer-to-peer mesh. There may not be a direct connection between
two peers, but there is a always a path through other peers. A group is also called a “peer group” an “RTMFP group”
and a “NetGroup”.
Bootstrapping Connecting to at least one member of a group in order to join the group. You can write application
logic to bootstrap a client to a group, or you can ask Adobe Media Server to bootstrap clients automatically. There is
no random probing for peers and the server does not flood the network looking for peers.
Adobe Media Server handles introducing a client to a group. Flash Player handles peer communication within a group,
organizing and optimizing a group for latency, and maintaining the full-connectedness of a group.
The group maintains the connections between peers automatically. Once peers are fully meshed into a group, then they
can pass data within the group. Data does not need to be sent to the server to be distributed to each client. Peers can
share data such as audio, video, and ActionScript objects. RTMFP and groups allow you to build peer-to-peer
applications that can scale to millions of clients.
Use the ActionScript 3.0 GroupSpecifier class to define the parameters and capabilities of a group in a string called a
“groupspec”. Pass the groupspec to the NetGroup and NetStream constructors. Use the NetGroup class to manage a
group and send ActionScript data within a group. Use the NetStream class to multicast audio and video data within a
group.
Groupspecs are Strings that start with “G:” followed by hexadecimal digits, for example “G:01010b...”. The first part of
the string is the unchangeable identity of the group and contains the group permissions. If a peer changes any
permissions or properties of the group, they start a new group. The string is case-sensitive.
Groups allow you to do the following things:
•“Multicasting” on page 264 streams
Use multicasting for one sender or a few senders to deliver a streams of data to everyone in a group.
•“Post messages to a group” on page 262
Use posting for lots of senders to deliver a small amount of data to everyone in a group.
•“Route messages directly to a peer” on page 263

259
ADOBE MEDIA SERVER 5.0.6 DEVELOPER’S GUIDE
Building peer-assisted networking applications
Last updated 9/4/2014
Use directed routing to send a message through the overlay routing structure to one peer.
•“Replicate an object within a group” on page 264
Use object replication to synchronize everyone in a group on a (potentially large) number of objects.
To multicast streams and post messages, call ActionScript methods and pass them the data to send. The data arrives
at the other nodes in the group.
To route messages directly to a peer and replicate an object within a group, you must write ActionScript code to help
deliver the data.
Create a group
1Connect to Adobe Media Server. Pass an “rtmfp” URL to the NetConnection.connect() method:;
NetConnection.connect("rtmfp://fms.example.com/p2pexample/test1")
Note: If RTMFP is disabled in the Adaptor.xml file, it can take up to 2 minutes for the client to receive the
"NetConnection.Connect.Failed" status. To prevent this delay, verify that <RTMFP enable="true"> in the
Adpator.xml file. It is enabled by default.
2On "NetConnection.Connect.Success", use the GroupSpecifier class to create a groupspec. Pass the groupspec
to the NetGroup constructor.
// Called in the "NetConnection.Connect.Success" case in the NetStatusEvent handler.
private function OnConnect():void{
connected = true;
// Create a GroupSpecifier object to pass to the NetGroup constructor.
// The GroupSpecifier determines the properties of the group
var groupSpecifier:GroupSpecifier;
groupSpecifier = new GroupSpecifier("com.example.p2papp");
groupSpecifier.postingEnabled = true;
groupSpecifier.multicastEnabled = true;
// The serverChannel lets the server do auto-bootstrapping
groupSpecifier.serverChannelEnabled = true;
netGroup = new NetGroup(netConnection, groupSpecifier.groupspecWithAuthorizations());
netGroup.addEventListener(NetStatusEvent.NET_STATUS, NetStatusHandler);
}
3On "NetGroup.Connect.Success", you can manually bootstrap or automatically bootstrap peers to the group.
The example enables the server channel to perform automatic bootstrapping. There are several additional options
for bootstrapping described in the next section.
Additional information
Tom Krcha has written an in-depth article about the GroupSpecifier class on his blog Flash Realtime.
Bootstrap a peer to a group
After the initial connection to the server, a peer must be introduced to one or more peers of the same group, this
technique is called “bootstrapping”. Bootstrapping allows members of the same group to see each another. After
bootstrapping, the peer self-organizes into the group and meshes with the other members.
To join a group, a client must know the GroupSpecifier that defines the group. If two sets of clients use the same
GroupSpecifier, and never touch, they are in separate groups. If the two groups touch, they merge into a single larger
group.

260
ADOBE MEDIA SERVER 5.0.6 DEVELOPER’S GUIDE
Building peer-assisted networking applications
Last updated 9/4/2014
Each client has a peer ID, and the peer ID space is server-specific. The peer ID is the SHA256 of the client's Diffie-
Hellman public key. Both client-side and server-side ActionScript can access the peer ID as a property of each RTMFP
client. Peer IDs are available in the ActionScript 3.0 NetConnection.nearID and NetConnection.farID properties.
Peer IDs are also available in the Server-Side ActionScript Client.nearID and farID properties. Client-side
NetConnection.nearID and server-side Client.farID share the same value. Client-side NetConnection.farID
and server-side Client.nearID share the same value.
Peers within an RTMFP group can be bootstrapped in the following ways:
•Server channel automatic bootstrapping.
When clients connect over an RTMFP connection, the server bootstraps them with peers who are members of the
same NetGroup. To enable automatic bootstrapping on the client-side, set
GroupSpecifier.serverChannelEnabled to true.
•Manual bootstrapping.
To manually bootstrap peers into a mesh, call the NetGroup.addNeighbor() method.
•LAN peer discovery
Use the GroupSpecifier class to enable LAN peer discovery. LAN peer discovery allows an RTMFP NetConnection
and its NetStream and NetGroup objects to automatically locate peers and join a group on the current subnet. Peers
cannot discover each other unless they’re in the same group on the same subnet of the LAN. If peers with matching
groupspecs are on different subnets, no error or other event is dispatched if they fail to discover each other.
The following code shows how to enable LAN peer discovery:
var nc = new NetConnection();
// Protocol must be RTMFP
nc.connect("rtmfp://fms.example.com/appname/appinstance");
var gs = new GroupSpecifier("com.example.discovery-test");
// Must be enabled for LAN peer discovery to work
gs.ipMulticastMemberUpdatesEnabled = true;
// Multicast address over which to exchange peer discovery.
gs.addIPMulticastAddress("224.0.0.255:30000");
// Additional GroupSpecifier configuration...
var ns = new NetStream(nc, gs.toString());
Note: Call the Administration API getServerStats()command to get RTMFP peer lookup statistics. For more information,
see getServerStats().
Server-side RTMFP groups
Use Server-Side ActionScript to create an RTMFP NetConnection. You can connect to an application on the same
server or to an application on another Adobe Media Server. After you create an RTMFP NetConnection, define a
GroupSpecifier to create a NetGroup and a NetStream. The server application joins the group and becomes a peer in
the group mesh. A single client can join multiple groups. Once connected, you can interact with other peers in the
RTMFP group. You can also publish streams into the group.
A server-side netConnection is a virtual Flash client. It has its own RTMFP stack. As far as the server is concerned, a
server-side script that joins a group is the same as any client.
Note: Server-Side ActionScript doesn't support creating a connection directly between peers.

261
ADOBE MEDIA SERVER 5.0.6 DEVELOPER’S GUIDE
Building peer-assisted networking applications
Last updated 9/4/2014
Flash Player peer-assisted networking security dialog
When a NetStream or NetGroup object is constructed with a groupspec, Flash Player displays a “Peer-assisted
Networking” dialog. The dialog asks users if Flash Player can use their connection to share data with their peers.
If the user clicks “Allow for this domain”, the dialog is not displayed the next time the user connects to this application.
If a user does not allow peer-assisted networking, all peer features within the group (posting, directed routing, and
object replication, and multicast) are disabled. You can use RTMFP to subscribe to a pure native-IP multicast stream.
In this case, the dialog is not displayed.
When using IP multicast with no peer-assisted functionality, you can disable the security dialog. Set the
GroupSpecifier.peerToPeerDisabled property to true. By default, this property is false (peer-assisted
connections are enabled). When peerToPeerDisabled is true, the security dialog does not appear.
ActionScript classes for working with RTMFP groups
Use the following ActionScript 3.0 classes and Server-Side ActionScript classes to create applications that use RTMFP
groups:
•NetConnection
Use the NetConnection class to create a two-way RTMFP connection between a Flash Player or AIR application
and a Adobe Media Server application. Use the RTMFP protocol in the URL you pass to the
NetConnection.connect() method.
•GroupSpecifier
Use the GroupSpecifier class to define the capabilities, restrictions, and authorizations of an RTMFP peer-to-peer
group. After you define the capabilities, pass a groupspec string or a GroupSpecifier object to the NetStream and
NetGroup constructors. A groupspec is an opaque string that you pass to the NetStream and NetGroup
constructors.
In server-side code, you can pass the GroupSpecifier object or a groupspec string.
In client-side code, you can only pass a groupspec string. To generate a groupspec string, call one of the following
methods: toString(), groupSpecWithAuthorizations(), and groupSpecWithoutAuthorizations().
•NetGroup
Use the NetGroup class to manage an RTMFP group. The class properties provide information about group
members. Call the class methods to post messages to the group, route messages to a group member, and to replicate
objects among the group. To create a NetGroup, pass a GroupSpecifier object to the NetGroup constructor.
•NetGroupInfo
The NetGroupInfo class specifies Quality of Service (QoS) statistics about a NetGroup object's RTMFP peer-to-
peer data transport. The NetGroup.info property returns a NetGroupInfo object which is a snapshot of the
current QoS state.
•NetStream
Use the NetStream class to multicast audio and video data over a group. Pass a groupspec to the NetStream
constructor and use the standard publish() and play() methods.
•NetStreamMulticastInfo
The NetStreamMulticastInfo class specifies Quality of Service (QoS) statistics about a NetStream object's RTMFP
peer-to-peer and IP multicast stream transport. The NetStream.multicastInfo property returns a
NetStreamMulticastInfo object which is a snapshot of the current QoS state.

262
ADOBE MEDIA SERVER 5.0.6 DEVELOPER’S GUIDE
Building peer-assisted networking applications
Last updated 9/4/2014
Post messages to a group
Flash Player 10.1, AIR 2, Flash Media Server 4
Call the NetGroup.post() method to broadcast an ActionScript message to all members of a NetGroup (also called
a “group”). Use the "NetGroup.Posting.Notify" code to do something when a post has been received.
You can post messages to a group from the client-side ActionScript 3.0 NetGroup.post() method or from the Server-
Side ActionScript NetGroup.post() method.
Use the post() method to broadcast non-stateful data. For example, use posting for text chat, opinion polls, and
sensor reporting. Use posting to allow many clients to send small amounts of data.
This method is similar to the Server-Side ActionScript Application.broadcastMsg() method, but the post()
method propagates messages from node to node in a group. Posting is not similar to using shared objects. Unlike
shared objects, posting does not manage changes.
Understand the following about posting messages:
•The GroupSpecifier.postingEnabled property must be true in the groupspec passed to the NetGroup
constructor.
•Receive a NetGroup.Neighbor.Connect event before you call post().
•Messages are serialized in AMF. A message can be any AMF object. A message cannot be a MovieClip.
•Messages must be unique to be considered new. Use a sequence number to make messages unique.
•Message delivery is not ordered. Message delivery is not guaranteed.
•The post() method returns the messageID for this message, or null on error. The messageID is the hexadecimal
of the SHA256 of the raw bytes of the serialization of the message.
•The post() method sends a NetStatusEvent to the NetGroup's event listener with "NetGroup.Posting.Notify"
in the info.code property.
The NetGroup.post() entry in the ActionScript 3.0 Reference contains a chat application example. The following is
an excerpt from that example:

263
ADOBE MEDIA SERVER 5.0.6 DEVELOPER’S GUIDE
Building peer-assisted networking applications
Last updated 9/4/2014
private function OnConnect():void{
StatusMessage("Connected\n");
connected = true;
// Create a GroupSpecifier object to pass to the NetGroup constructor.
// The GroupSpecifier determines the properties of the group
var groupSpecifier:GroupSpecifier;
groupSpecifier = new GroupSpecifier("com.aslrexample/" + groupNameText.text);
groupSpecifier.postingEnabled = true;
groupSpecifier.serverChannelEnabled = true;
netGroup = new NetGroup(netConnection, groupSpecifier.groupspecWithAuthorizations());
netGroup.addEventListener(NetStatusEvent.NET_STATUS, NetStatusHandler);
StatusMessage("Join \"" + groupSpecifier.groupspecWithAuthorizations() + "\"\n");
}
// Called when you the chatText field has focus and you press Enter.
private function DoPost(e:ComponentEvent):void{
if(joinedGroup){
// Build the message to post.
var message:Object = new Object;
message.user = userNameText.text;
message.text = chatText.text;
message.sequence = sequenceNumber++;
message.sender = netConnection.nearID;
// Post the message to the group.
netGroup.post(message);
StatusMessage("==> " + chatText.text + "\n")
} else {
StatusMessage("Click Connect before sending a chat message");
}
ClearChatText();
}
Route messages directly to a peer
A client can send short ActionScript messages directly to a member of a peer-to-peer group without having a direct
connection to that member. This feature is called directed routing. Directed routing leverages the full transitive
connectivity and the geometric properties of the Group's self-organized structure to route messages through the group.
Use directed routing to send a message to a specific client, or to construct a DHT (distributed hash table).
Successful routing of the message requires the direct participation of all peers along the dynamic path between the
sender and intended recipient. Each peer acts as a relay point for the message. Peers do not automatically relay received
messages. Use ActionScript to handle the receipt and local processing or forwarding of a message. Message delivery is
not guaranteed.
The bandwidth load of message routing is distributed among the members of the group, it is not concentrated at the
server.
Adobe Evangelist Tom Krcha explains directed routing in an article on his blog, Flash Realtime: Directed routing
explained.
The following are the Server-Side ActionScript directed routing APIs:
•NetGroup.sendToAllNeighbors()
•NetGroup.sendToNearest()
•NetGroup.sendToNeighbor()

264
ADOBE MEDIA SERVER 5.0.6 DEVELOPER’S GUIDE
Building peer-assisted networking applications
Last updated 9/4/2014
The following are the client-side ActionScript 3.0 directed routing APIs:
•NetGroup.sendToAllNeighbors()
•NetGroup.sendToNearest()
•NetGroup.sendToNeighbor()
Replicate an object within a group
Clients can send ActionScript objects through the peer group reliably. This feature is called object replication. Object
replication allows all members of an RTMFP group to have a consistent view of a set of objects. Use it to replicate
workspaces, create whiteboards, and transfer files, synchronize nodes with a log of operations, and so on.
Object replication uses the full transitive connectivity of the group’s self-organized structure. It replicates objects
through the group from nodes that have the objects to nodes that need the objects. Each object is indexed by a number
that must be unique across the entire group. The objects must remain immutable.
For a detailed explanation of object replication, including a sample application, see Adobe Evangelist Tom
Krcha’s blog post File Sharing over P2P in Flash Player 10.1 with Object Replication.
Use the following client-side ActionScript 3.0 APIs to replicate an object within a group:
•NetGroup.addHaveObjects()
•NetGroup.addWantObjects()
•NetGroup.denyRequestedObject()
•NetGroup.removeHaveObjects()
•NetGroup.removeWantObjects()
•NetGroup.writeRequestedObject()
Use the following Server-Side ActionScript APIs for object replication and other RTMFP group features:
•ByteArray class
•File.readBytes()
•File.writeBytes()
Multicasting
Flash Player 10.1, AIR 2, Flash Media Server 4
To complete a tutorial before learning more about the details of multicasting, see “Multicast media (RTMFP)” on
page 36.
Multicasting is distributing audio and video data among members of a group. The server doesn’t send data to each
client—the data is distributed among peers. Multicasting allows few publishers to send a large amount of data. To
multicast media, pass a groupspec to the NetStream constructor. Call NetStream.publish() or NetStream.play()
to multicast the data. You can use the client-side NetStream class and the server-side NetStream class to multicast data.
Adobe Media Server supports both application-level multicast and IP multicast. You can also use application-level
multicast and IP multicast cooperatively for a single stream, this use case is called multicast fusion. Multicast fusion
combines both broadcast techniques to support higher quality of service. Within a firewall, use IP multicast. Outside
the firewall, or on networks that don’t support IP multicast, use application-level multicast. Multicast fusion lets your
neighbor outside the firewall receive fragments of video that it cannot receive via IP multicast.

265
ADOBE MEDIA SERVER 5.0.6 DEVELOPER’S GUIDE
Building peer-assisted networking applications
Last updated 9/4/2014
Adobe Media Server can multicast streams delivered to it over RTMP connections. For example, Adobe Media Live
Encoder can deliver a stream to Adobe Media Server over RTMP and Adobe Media Server can multicast it to groups
over RTMFP.
Understand the following about multicast:
•Any number of streams can be published into a group. However, this practice is not recommended because each
group member consumes and relays all streams, even if the streams aren’t playing at that specific client.
•Streams of the same name can be published into a group.
When a client requests to play the stream name, it plays the first stream with that name that it can find. If the
publisher for that instance of the named stream stops, the playing client resets to another instance of the named
stream and a "NetStream.MulticastStream.Reset" event is dispatched. Within an RTMFP group, there is no
single arbiter of stream state that prevents multiple clients from publishing streams with the same name. (In
traditional, unicast stream publishing, Adobe Media Server is aware of stream state.) This is a significant reason for
the improved scalability of multicast streams. However, to protect against stream name collisions or hijacking,
define a publish password for the group and providing the groupspec with authorizations to trusted publishers
only. Pass a groupspec without authorization to all other clients to prevent them from publishing competing
streams under the same name.
•Publishers can call NetStream.send() to inject data into a group.
•When a client is in an RTMFP group in which a live multicast stream is playing, the client may act as a relay point
for that stream to some number of direct neighbors. To control this number, use the
NetStream.multicastPushNeighborLimit property. The default value is to 4. All the peers within a group work
co-operatively to get the stream to each other. Each client is not pulling the stream from the server independently.
For this reason, consider the expected average client uplink capacity when selecting the bitrate for the multicast
stream you publish. Choosing a bitrate that's too high may result in peers not being able to relay the stream
smoothly.
Note: This requirement is specific to P2P multicast. IP multicast, which can be used simultaneously with P2P
multicast, can be used for higher bitrate, live multicast streams in a local area network.
Additional information
Multicast explained in Flash Player 10.1, an article on Tom Krcha’s Flash Realtime blog.
Application-level multicast
By default, the peer-to-peer mesh distributes streams published into an RTMFP group. This technology is known as
“application-level multicast”.
IP multicast
IP multicast uses routers to send data to a specified IP address. The routers send the data to any client registered to an
IP multicast group. To set up IP multicast, work with your IT department. Ask them to set up an address to publish to
and to configure the enterprise multicast routers to forward the traffic appropriately.
To publish streams to a IP multicast address, call the Server-Side ActionScript
NetStream.setIPMulticastPublishAddress() method before you start publishing.
All subscribing (playing) peers in the group must add the IP multicast address to their GroupSpecifier. Call
GroupSpecifier.addIPMulticastAddress()when you create a groupspec. Adding a IP multicast address allows a
client to listen for and receive the IP multicast traffic.

266
ADOBE MEDIA SERVER 5.0.6 DEVELOPER’S GUIDE
Building peer-assisted networking applications
Last updated 9/4/2014
By default, application-level multicast runs concurrently with IP multicast. This technology is called “fusion
multicast”. To run IP multicast without application-level multicast, set up the following in the GroupSpecifier:
•GroupSpecifier.peerToPeerDisabled=true
This setting turns off peer-to-peer multicast.
•GroupSpecifier.multicastEnabled=true
•Call GroupSpecifier.addIPMulticastAddress()
Call this method in the client-side application only. To publish from the server, the stream publishes to the address
you passed to the Server-Side ActionScript NetStream.setIPMulticastPublishAddress()method. That
address is the same address the clients are using.
Source-specific IP multicast
Flash Media Server 4.5
Source-specific multicast (SSM) allows the client to specify an IP address from which it wants to receive data. The
client receives data only from this source. SSM reduces the burden on the network. To configure SSM, use the
Multicast Config tool installed at rootinstall/tools/multicast/configurator. The tutorial “Multicast media (RTMFP)” on
page 36 uses the Multicast Config tool.
Source-specific multicast limits receipt of IP multicast data to data coming from the “source”. On a multi-homed
system (a system with multiple IP addresses), the server-side publisher can use the following API to bind to the desired
local interface IP address:
netConn.rtmfpBindAddresses = ["10.58.117.135"];
At the subscriber, indicate the desired source address when you add the IP multicast address to the GroupSpecifier:
gs.addIPMulticastAddress("{mcastAddr}", {port}, "10.58.117.135");
Not all host operating systems support SSM (for example, pre-Lion Mac OS). If the operating system doesn’t support
SSL, the client does not receive data.
Create a client-side serverless RTMFP connection
Flash Media Server 4.0
You can create a network endpoint for RTMFP group and IP multicast communication without connecting to a server,
but the functionality is limited. This mode is called “serverless mode”. Use severless mode to receive a pure IP multicast
stream from a publisher without requiring clients to connect to a server or bootstrap into the peer-to-peer mesh.
Note: In Server-Side ActionScript, use serverless mode to create a robust server-only group for distributing peer
introductions. See “Distribute peer introductions across servers” on page 270.
Because clients don’t connect to a server, there is no automatic bootstrapping. In serverless mode, configure peers to
discover each other on a LAN using IP multicast. After they discover each other, they can communicate within the
group. In serverless mode, clients can do the following:
•Use IP multicast to discover peers on the LAN.
•Receive streams over IP multicast.
•
Send and receive streams in a NetGroup. (The NetGroup consists only of peers discovered over IP multicast on the LAN.)
The following code creates a connection in serverless mode:

267
ADOBE MEDIA SERVER 5.0.6 DEVELOPER’S GUIDE
Building peer-assisted networking applications
Last updated 9/4/2014
var nc:NetConnection = new NetConnection;
nc.connect("rtmfp:");
The NetConnection instance nc is a serverless RTMFP NetConnection. The following code uses the NetConnection
to make a NetStream that can receive a pure IP multicast. It also suppresses the peer-assisted networking permission
dialog
var gs:GroupSpecifier = new GroupSpecifier("com.adobe.pureIPMulticastGroup");
gs.multicastEnabled = true;
// Prevents the P2P permission dialog from appearing.
gs.peerToPeerDisabled = true;
// Receive multicast stream on 239.255.255.1 port 30000
gs.addIPMulticastAddress("239.255.255.1:30000");
var ns:NetStream = new NetStream(nc, gs.groupspecWithAuthorizations());
Wait for the "NetStream.Connect.Success" message, which is required before you can use a group NetStream.
Attach the NetStream to a video display object and call ns.play(streamName). Or, you can create an group on your
LAN for any of the RTMFP group modes (including peer-to-peer multicast), as in the following:
var gs:GroupSpecifier = new GroupSpecifier("com.adobe.myAdHocGroup");
gs.multicastEnabled = true;
gs.postingEnabled = true;
gs.ipMulticastMemberUpdatesEnabled = true;
// Peers find each other on 239.255.255.11 port 30001
gs.addIPMulticastAddress("239.255.255.11:30001");
var ns:NetStream = new NetStream(nc, gs.groupspecWithAuthorizations());
var ng:NetGroup = new NetGroup(nc, gs.groupspecWithAuthorizations());
Wait for NetStream.Connect.Success and NetGroup.Connect.Success. After receiving them, you can publish or
play a peer-to-peer multicast stream on the NetStream, and post on the NetGroup.
See Adobe Evangelist Tom Krcha’s video tutorial, Controlling the desktop with your mobile device via P2P.
Fusion multicast
By default, when you run IP multicast, you are also running application-level multicast. This technique is called
“fusion multicast”. Both IP and application-level multicast run coordinated and concurrently. The application-level
multicast runs slightly behind the IP multicast to take advantage of the greater efficiency of IP multicast.
Checking multicast quality of service
To check whether a client is multicasting, and to check on quality of service, use the ActionScript 3.0
NetStream.multicastInfo property. This property is an instance of the NetStreamMulticastInfo class which
specifies various QoS metrics for statistics when multicasting. For example, the
NetStreamMulticastInfo.bytesReceivedFromIPMulticast property tells much data a client is receiving over
pure IP multicast (as opposed to application-level multicast).
In Server-Side ActionScript, use the NetStreamMulticastInfo class and the MulticastStreamIngest class.
Prevent the server from unloading an application
Adobe Media Server considers an application with no inbound connections idle. Eventually, the server unloads the
application. To prevent the server from unloading the application, define an Application.onAppStop() handler that
returns false.
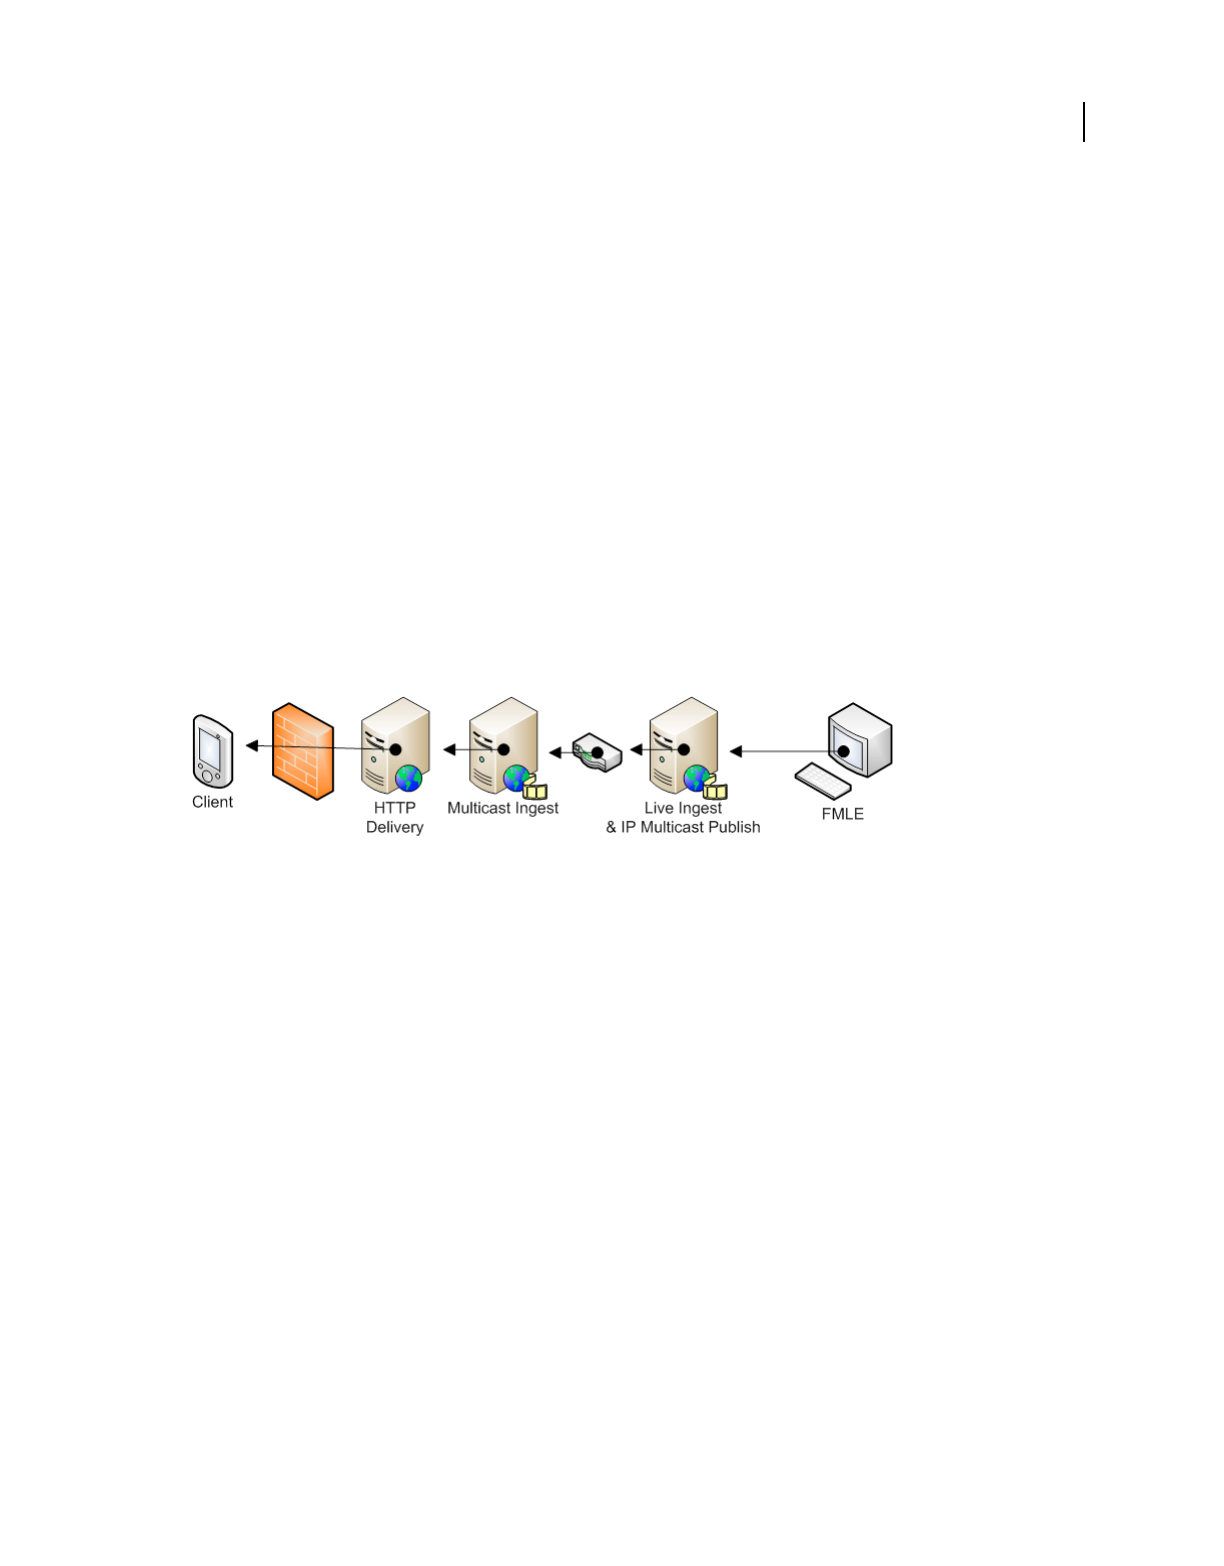
268
ADOBE MEDIA SERVER 5.0.6 DEVELOPER’S GUIDE
Building peer-assisted networking applications
Last updated 9/4/2014
For example, consider the following scenario involving two Adobe Media Server installations, Server A and Server B.
Server A acts as the peer introducer and ingests live streams. An application on Server B pulls a stream from Server A
and calls Stream.play() to publish it to an RTMFP group. The application on Server B has outbound connections to
server A, but it doesn’t have inbound client connections. When an application doesn’t have incoming client
connections, the server considers the application idle and unloads it.
Ingest, convert, and record a multicast stream
Flash Media Server 4.5
Use Server-Side ActionScript to ingest a multicast RTMFP stream. After the server ingests the multicast stream, write
a script to do the following:
•Convert the multicast stream to a Stream object.
•Deliver the Stream to clients over HTTP.
Connect to the livepkgr application and package the Stream for delivery using HTTP Dynamic Streaming and
HTTP Live Streaming.
•Deliver the Stream object to clients over RTMP/T/S/E.
•Record the Stream object.
Use multicast ingest to deliver live content across server tiers
Note: You cannot directly bridge an RTMFP multicast stream to another RTMFP group (by attaching the Stream to a
multicast NetStream). You can bridge indirectly to another RTMFP group by publishing into the target group via a
NetStream that has been attached to a MulticastStreamIngest created Stream.
Multicast Stream Ingest API
•MulticastStreamIngest class
Use the MulticastStreamIngest class to bind to a multicast stream in a group and transform the multicast messages
to non-multicast messages. Use the class to access QoS information and to control the ingest.
•MulticastStreamIngest.close()
Stops ingesting the source multicast stream.
•MulticastStreamIngest.ingesting
Indicates whether the target multicast stream is bound and being ingested or not.
•MulticastStreamIngest.multicastInfo
A MulticastStreamInfo object whose properties contain statistics about the stream quality of service.
•MulticastStreamIngest.multicastPushNeighborLimit
The maximum number of peers to which to push multicast media.
•MulticastStreamIngest.multicastWindowDuration
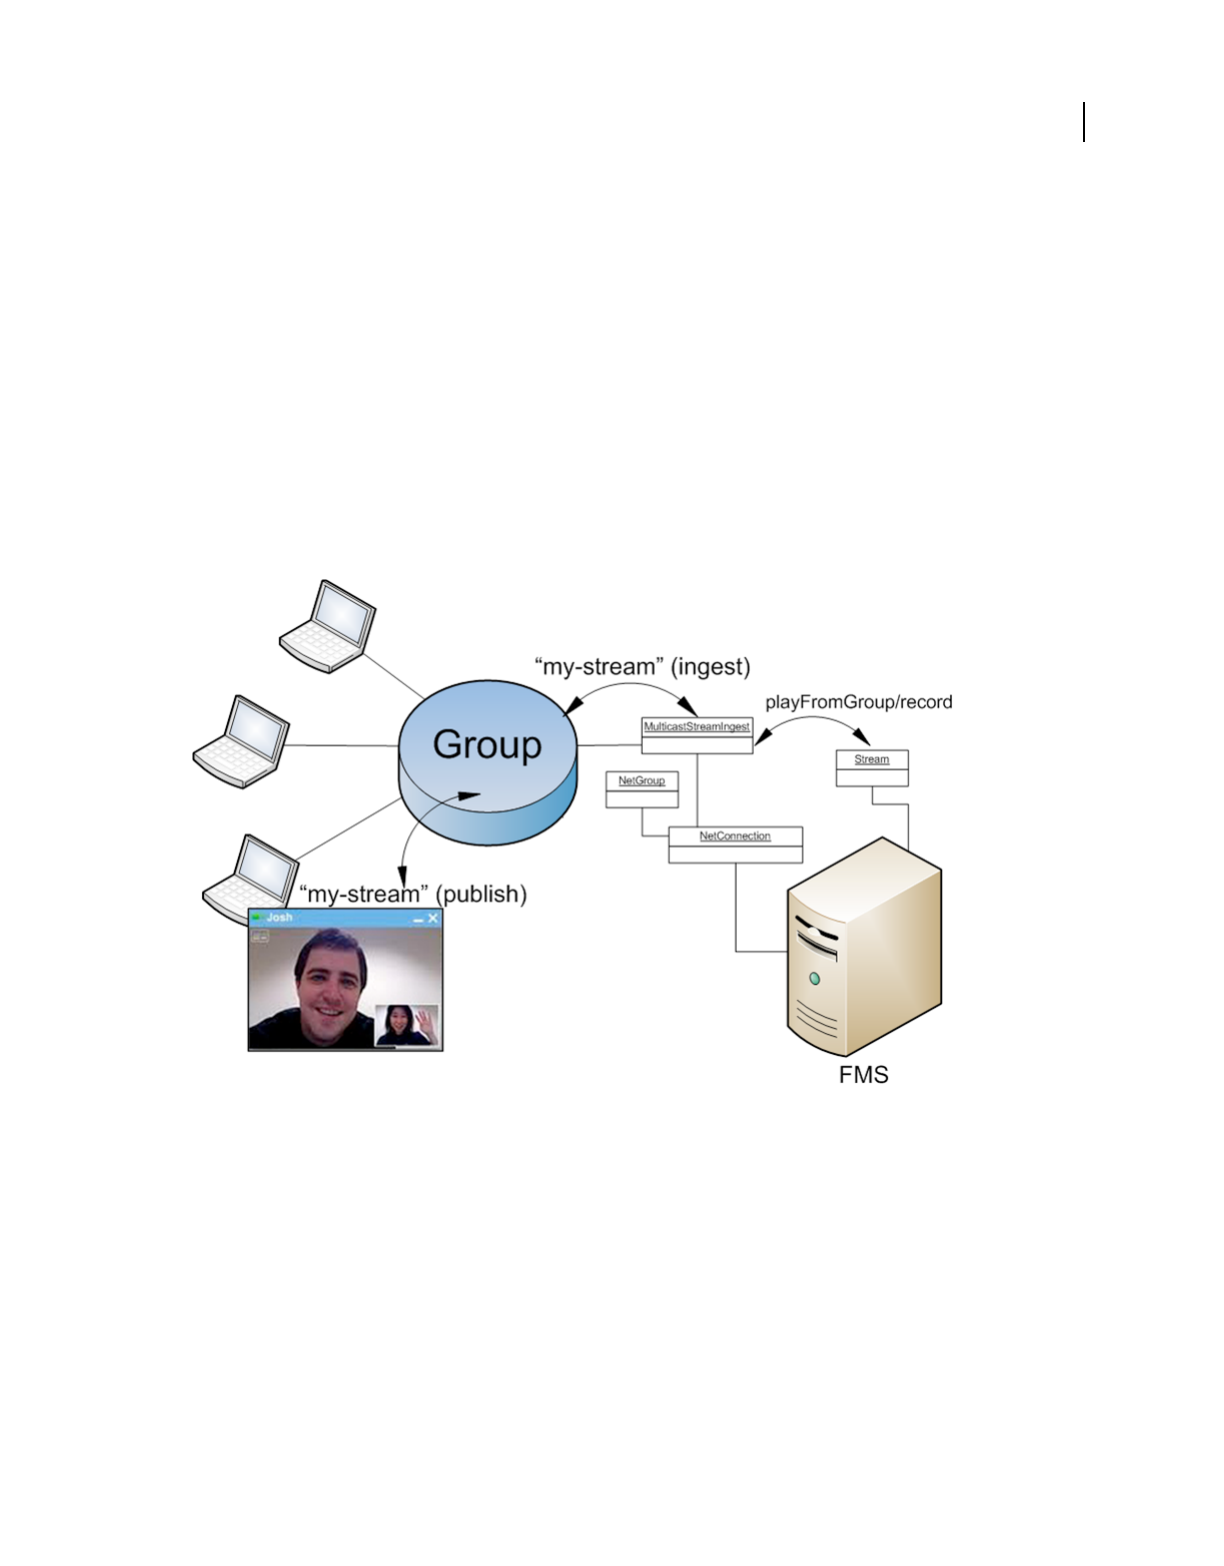
269
ADOBE MEDIA SERVER 5.0.6 DEVELOPER’S GUIDE
Building peer-assisted networking applications
Last updated 9/4/2014
The duration in seconds of the peer-to-peer multicast reassembly window.
•NetGroup.getMulticastStreamIngest("livestream")
A factory method that constructs and returns a MulticastStreamIngest object that is bound to the named stream
being published into the group the NetGroup has joined.
•Stream.playFromGroup(ingest)
Sets the data source for a Stream object. The ingest parameter is a MulticastStreamIngest object that is ingesting
a multicast stream from a group.
Use the MulticastStreamIngest API
To create a MulticastStreamIngest instance and ingest a live stream, call NetGroup.getMulticastStreamIngest().
To play the ingested stream, call Stream.playFromGroup(). Use the MulticastStreamIngest class to check QoS and
publishing status, stop ingesting a stream, and configure ingest settings. For more information about these APIs, see
Server-Side ActionScript Reference.
Multicast ingest application flow
The following pseudocode provides a high-level description. First, set up a Stream instance that plays and records the
multicast ingest:
var stream = Stream.get("mp4:multicast-ingest.f4v");
Next, set up a server-side NetConnection and NetGroup to join the group into which the multicast stream is being
published:

270
ADOBE MEDIA SERVER 5.0.6 DEVELOPER’S GUIDE
Building peer-assisted networking applications
Last updated 9/4/2014
var nc = new NetConnection();
nc.onStatus = function(info) {
if (info.code == "NetConnection.Connect.Success") {
ng = new NetGroup(nc, groupspec);
ng.onStatus = ngStatusHandler;
}
};
nc.connect("rtmfp://<fms-introduction-server>...");
Write code to handle NetGroup status events. When joining the group succeeds, indicated by a
"NetGroup.Connect.Success" event, attempt to start ingesting the multicast stream.
function ngStatusHandler(info) {
if (info.code == "NetGroup.Connect.Success") {
ingest = ng.getMulticastStreamIngest(sourceStreamName);
}
}
Play the ingested multicast stream, record the multicast stream, and stop playback:
stream.playFromGroup(ingest);
// The stream can be recorded locally.
stream.record();
...
stream.record(false); // And recording stopped.
// To stop playback of a multicast stream, pass the Boolean false.
stream.playFromGroup(false);
Note: Server-side playlists aren’t supported. However, there is a workaround. Create a remote Stream playback from an
ingested Stream to a second Stream object. Use the second Stream object as part of a playlist.
Peer-assisted networking application examples
The NetGroup entry in ActionScript 3.0 Reference contains a peer-assisted video and text chat example. The example
is a Flex MXML file. To use Flash Pro instead of Flash Builder, see the example for the NetGroup.post() entry which
is an AS file.
Adobe Evangelist Tom Krcha has several tutorials and video tutorials on his blog, FlashRealtime.com.
Distribute peer introductions across servers
Flash Media Server 4.5
Workflow for distributing introductions
Note: You can distribute introductions only among origin servers. You cannot distribute introductions among edge
servers. Also, you cannot use the Authorization Plug-in to distribute introductions.
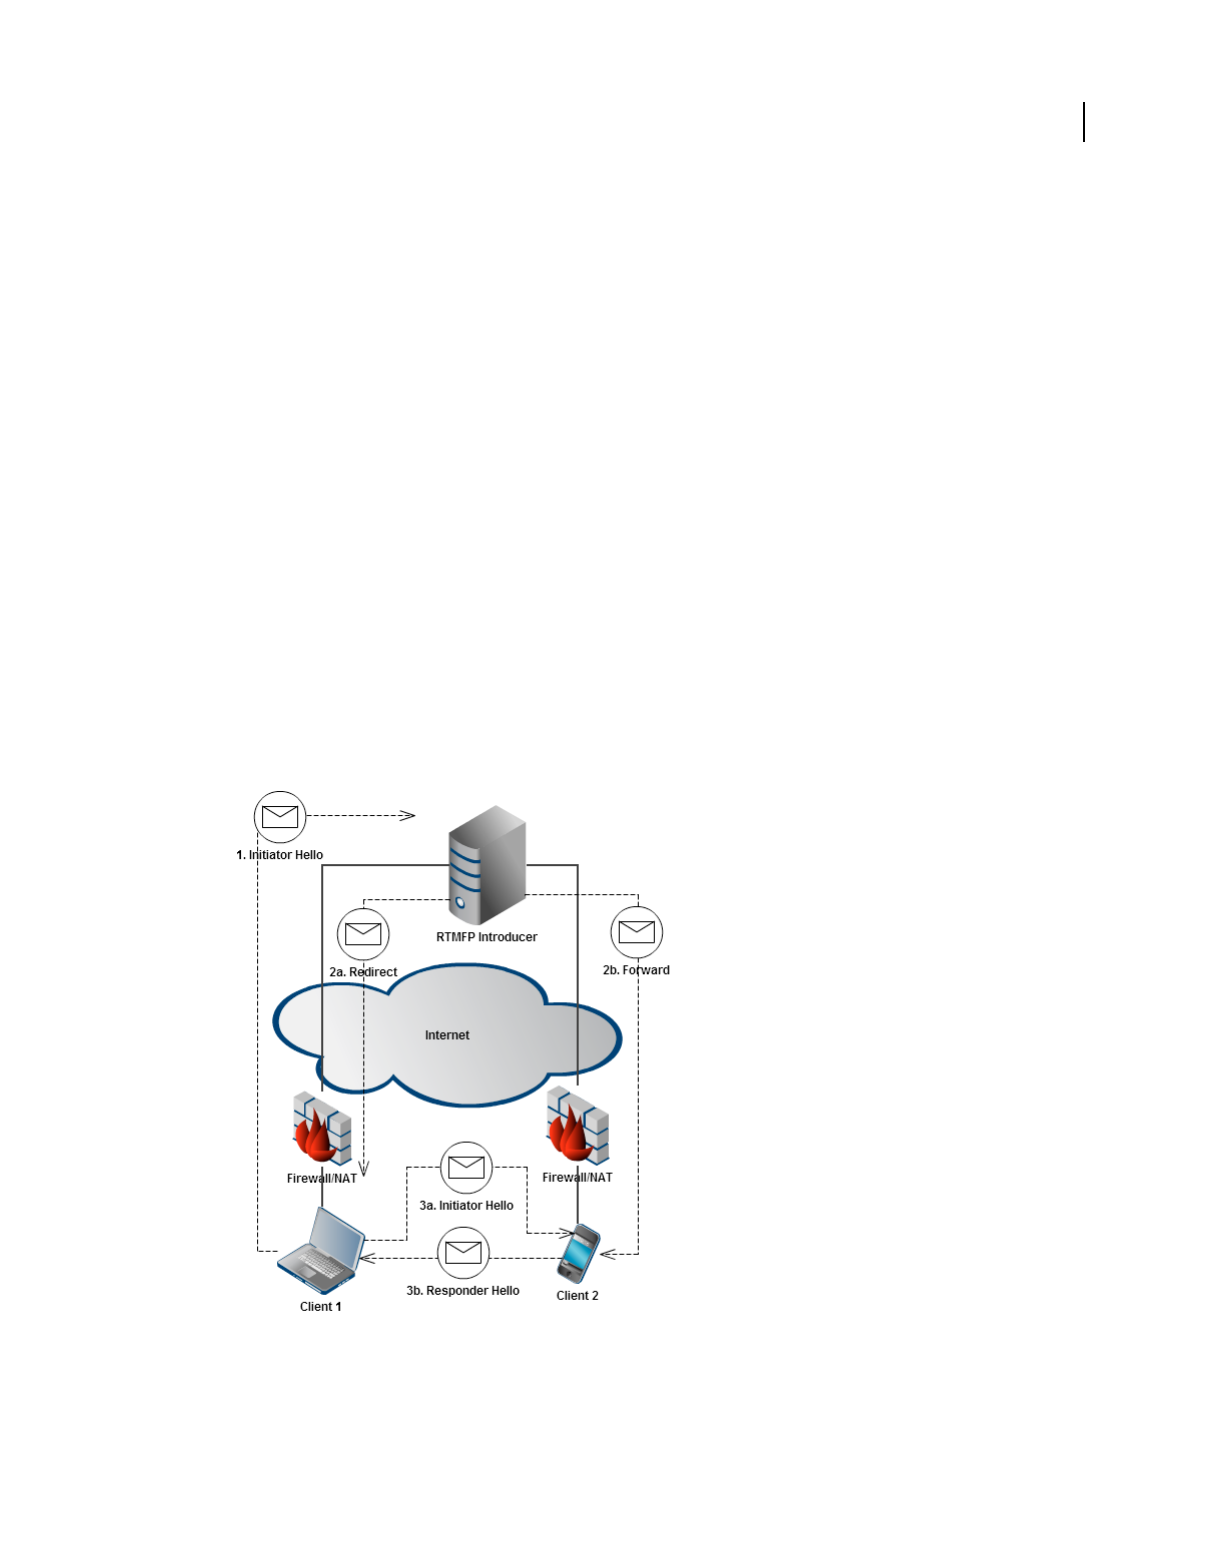
271
ADOBE MEDIA SERVER 5.0.6 DEVELOPER’S GUIDE
Building peer-assisted networking applications
Last updated 9/4/2014
Adobe Media Server introduces RTMFP clients to each other so the clients can connect to each other directly and in a
group. When Adobe Media Server plays this role, it’s called an introducer. Flash Media Server 4.0 can introduce clients
to each other and help them join a group only if the clients are connected to a single server. Use Server-Side
ActionScript APIs added in Flash Media Server 4.5 to introduces clients to each other and let them join a group even
if the clients are connected to separate servers. Distributing introductions across servers allows you to scale peer-
assisted networking applications.
These steps describe the workflow for distributing peer introductions:
1Configure the server to dispatch peer lookup events to the server-side script engine. See “Configure the server to
dispatch events to the script engine” on page 274.
2Write a server-side script that creates a robust Group of servers to act as introducers. See “Deploy servers in a robust
server-only group” on page 274.
3Write a server-side script that distributes peer introductions across servers. See “Distributed Introductions API” on
page 279.
How peer introductions work
Note: For information about port and IP configuration and NAT traversal, see Configure ports and IP addresses for peer-
assisted networking.
Peer introduction flow on a single server
By default, the server introduces clients to each other if they connect to the same server.
The introduction flow for clients connected to a single RTMFP introducer.

272
ADOBE MEDIA SERVER 5.0.6 DEVELOPER’S GUIDE
Building peer-assisted networking applications
Last updated 9/4/2014
Client 1 and Client 2 have established connections through their local NATs/firewalls to the same Adobe Media Server.
Client 1 has discovered Client 2 either manually or through automatic peer discovery. Client 1 wants to connect
directly to Client 2. The following steps describe the introduction flow:
1Client 1 sends a peer lookup request to the introducer (Adobe Media Server). The peer lookup request contains the
NetConnection.nearID of Client 2. The nearID is a globally unique fingerprint for the client and its active
connection to an introducer.
2The introducer does the following:
aReplies to Client 1 with a redirect message that contains the IP address of Client 2.
bSends a forward message to Client 2. The message tells Client 2 that Client 1 wants to connect.
3 The clients do the following:
aClient 1 resends its peer lookup request to the addresses it received in the redirect message.
bClient 2 sends a responder hello message to the addresses of Client 1.
Because of the common introducer, the clients establish a direct connection even though they're behind
NATs/firewalls.
Peer introduction application flow on multiple servers
Use Server-side ActionScript to distribute client introductions across multiple Adobe Media Server introducers.
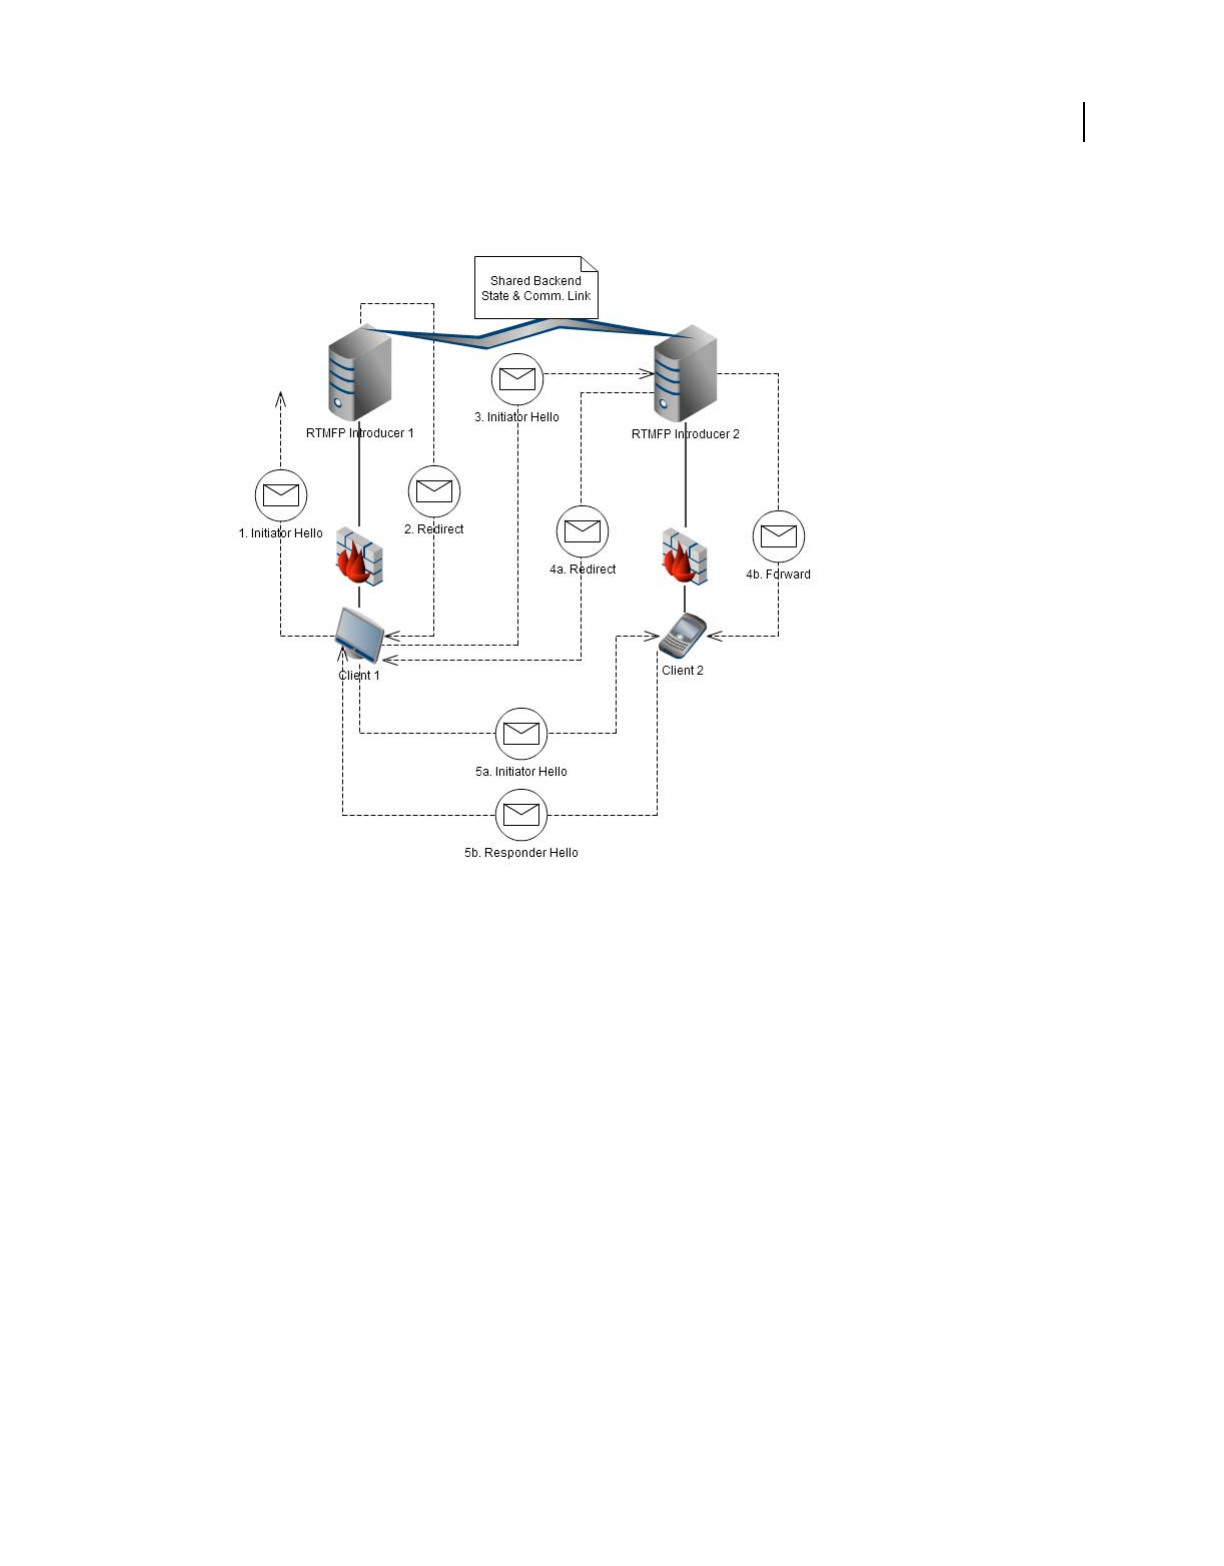
273
ADOBE MEDIA SERVER 5.0.6 DEVELOPER’S GUIDE
Building peer-assisted networking applications
Last updated 9/4/2014
The introduction flow for clients connected to different RTMFP introducers.
In this scenario, Client 1 is connected to Server A and Client 2 is connected to Server B. Client 1 knows the peer ID for
Client 2 and wants to establish a direct connection. However, Client 2 is not connected to the same introducer as Client
1. Use Server-Side ActionScript to allow the servers to introduce these clients to each other. The following steps
describe the introduction flow:
1Client 1 sends a peer lookup request to Introducer 1.
The peer lookup request calls the application.onPeerLookup() event in a server-side script. The peer passes the
IP address of Client 1, the peer ID of Client 2, a tag that identifies the request, and an ID for the RTMFP interface
on which the request was received.
2In the application.onPeerLookup() callback, Introducer 1 calls application.sendPeerRedirect() to reply
to Client 1 with a redirect message. The redirect message includes the known addresses for Client 2 and the public
address for Introducer 2.
Note: To prevent a client from establishing a peer connection, Introducer 1 does not reply to the peer lookup request.
See “Filter introduction requests” on page 282.
3Client 1 resends a peer lookup request to the address for Introducer 2.

274
ADOBE MEDIA SERVER 5.0.6 DEVELOPER’S GUIDE
Building peer-assisted networking applications
Last updated 9/4/2014
4Introducer 2 does the following to handle the peer lookup request:
aReplies to Client 1 with a redirect message containing the IP addresses for Client 2.
b Sends a forward message to Client 2 informing it that Client 1 wants to connect.
5The clients do the following:
aClient 1 resends its peer lookup request to the addresses for Client 2 that it received from Introducer 2.
bThe server-script calls Client.introducePeer() on the Client 2 object to send a responder hello message to
the addresses for Client 1.
Configure the server to dispatch events to the script engine
By default, the server handles peer lookup events internally. To write a script that distributes introductions across
multiple servers, configure the server to dispatch peer lookup events to the script engine. In the Application.xml file,
set the mode attribute of PeerLookupEvents to "All".
By default, the server handles a peer joining and leaving a group internally. To write a script that uses the server
channel to bootstrap peers within a group, configure the server. Set the mode attribute of JoinLeaveEvents to
"All"to dispatch these events to the script engine.
<Application>
...
<RTMFP>
<PeerLookupEvents mode="All"/>
<GroupControl>
<JoinLeaveEvents mode="All"/>
</GroupControl>
</RTMFP>
...
</Application>
The following are possible values of the mode attributes:
Deploy servers in a robust server-only group
To deploy servers to act as distributed RTMFP introducers, use the following techniques:
•Use a serverless RTMFP NetConnection and a NetGroup to join a server-only group (in this case, the groupspec is
private and not shared with clients).
•Add permanent group members at known addresses.
•Use the server channel to distribute peer bootstrapping across servers in the group.
Value Element Description
"None" PeerLookupEvents and
JoinLeaveEvents
The default value. The server handles all peer lookup events.
You cannot use Server-Side ActionScript to distribute peer
introductions or filter peer introductions.
"Partial" PeerLookupEvents The server handles peer lookup events for clients connected
to the same fmscore process. Handle other peer lookup
events with Server-Side ActionScript.
"All" PeerLookupEvents and
JoinLeaveEvents
Handle all lookup events with Server-Side ActionScript.
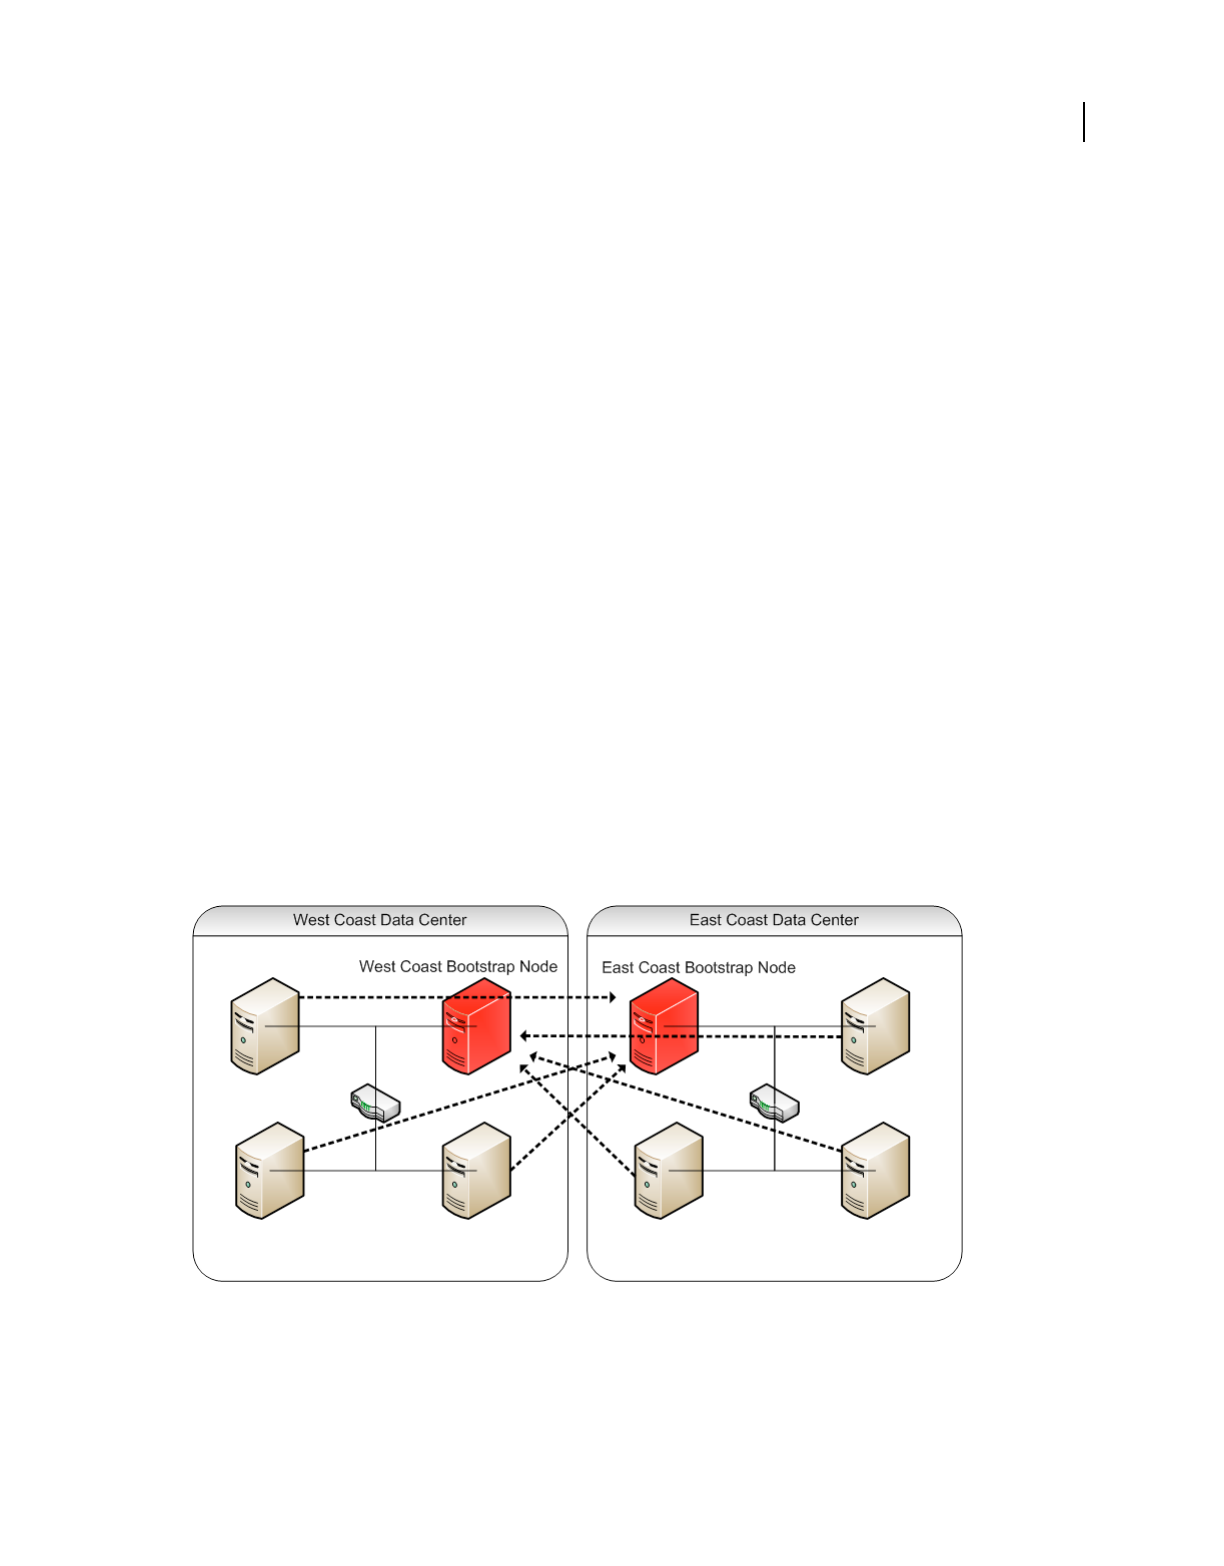
275
ADOBE MEDIA SERVER 5.0.6 DEVELOPER’S GUIDE
Building peer-assisted networking applications
Last updated 9/4/2014
Use a serverless RTMFP NetConnection to create a NetGroup
To distribute introductions, the servers must share state. All the servers must know about each other and they must
know the peer ID and near and far IP addresses of all connected clients. The easiest way to share state is to connect the
servers in a NetGroup (also called a group).
To distribute introductions, the server group should be robust. When the servers are joined in a NetGroup, if an
introducer fails, all the peers connected to that introducer fail. To create a robust group, use serverless mode to create
the RTMFP NetConnections between servers. In serverless mode, if any of the peer servers fail, the other servers stay
connected to each other and are informed about the failed server leaving the group.
Use a serverless connection between servers so that the server-side “peer” cannot loose connectivity and its peer ID
never changes. The group can use GroupSpecifier.ipMemberUpdatesEnabled to discover neighbors on the same
subnet.
The following code creates a connection in serverless mode:
var nc:NetConnection = new NetConnection;
nc.connect("rtmfp:");
Add permanent members to a server-only group
Use this technique to join groups of peers across different subnets. Choose servers to act as permanent group members.
For example, you can identify a known address for one server on each subnet, or for one server at each data center.
Distribute the known address to the other servers using a configuration file. The server at the known address is a
member of the group and opens peer-to-peer connections to other nodes that contact it over this known address. Once
connected, this “bootstrap node” automatically informs its neighbors of other peers in the group. The built-in gossip
functionality within groups creates a server-only group with full transitive connectivity.
Choose a server in each data center to act as a permanent group member. Assign these servers endpoint names and IP
addresses. On the other servers, write application logic that reads the endpoint names and IP addresses from a
configuration file. Use this information to add members directly.
Red servers are bootstrap nodes in server-only groups
In the previous diagram, red servers are bootstrap nodes. Solid lines are connections to permanent members. Dotted
lines are peer connections created through the automatic gossip functionality of a group.
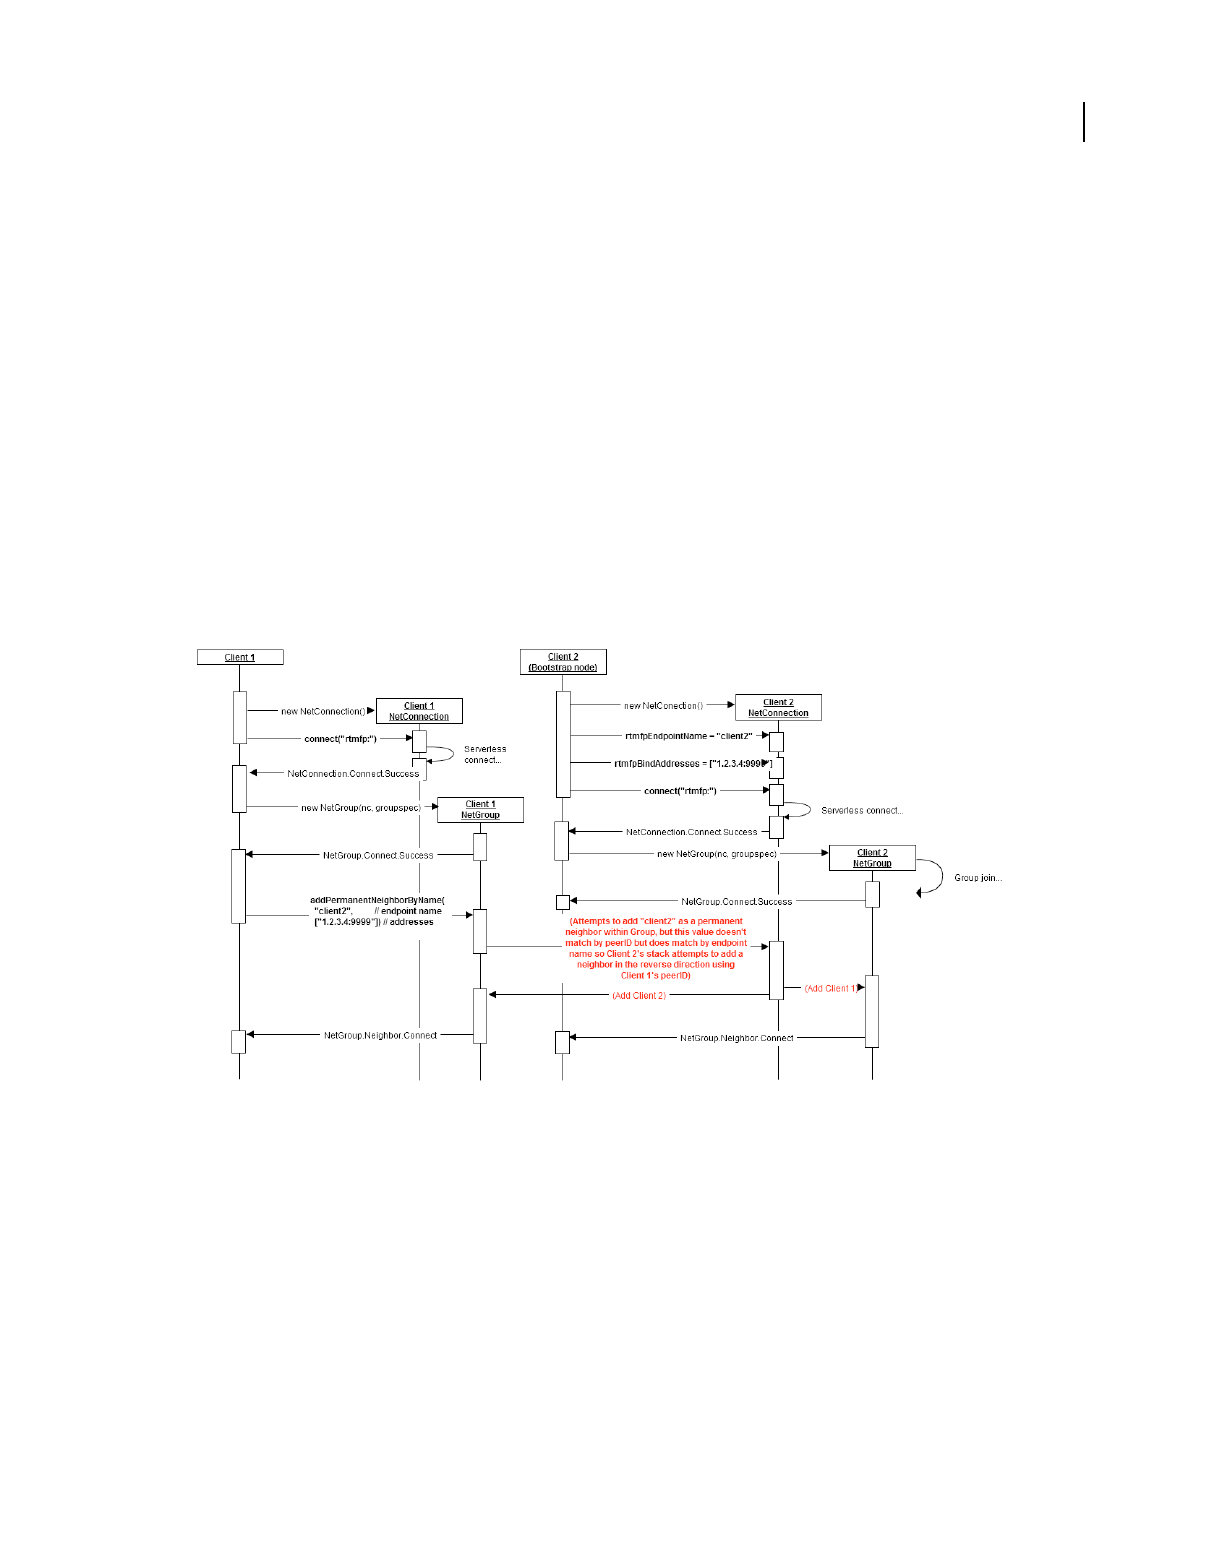
276
ADOBE MEDIA SERVER 5.0.6 DEVELOPER’S GUIDE
Building peer-assisted networking applications
Last updated 9/4/2014
Use the following Server-Side ActionScript API to add permanent members to a server-only group:
•NetConnection.rtmfpBindAddresses
An Array of Strings representing the specific address or addresses that the NetConnection binds locally when it
opens its RTMFP protocol stack.
•NetConnection.rtmfpEndpointName
The endpoint name for the local RTMFP protocol stack.
•NetGroup.addPermanentNeighborByName()
Manually adds a neighbor by RTMFP endpoint name, instead of by peer ID. If a peer is disconnected from this
neighbor, it automatically attempts to reconnect.
•NetGroup.removePermanentNeighborByName()
Manually removes the “permanent” status for a neighbor by RTMFP endpoint name. Calling this method does not
drop a connection. However, if either end chooses to drop the connection at a future time, the drop is allowed.
The following image describes the application flow for bootstrapping a server-only group:
Note: The calls in bold are the new Server-Side ActionScript APIs.
This type of bootstrapping is unique because Client 1 initiates the interaction with Client 2 but doesn't know its peer
ID. Client 1 knows only the IP address and the rtmfpEndpointName.
When Client 1 calls addPermanentNeighborByName() and passes the rtmfpEndpointName of Client 2, Client 2
retrieves the peer ID of Client 1. Client 2 uses that peer ID to add Client 1 as a neighbor in the reverse direction.
Once these two peers become neighbors, they both receive NetGroup.Neighbor.Connect events in Server-Side
ActionScript. Their respective RTMFP stacks gossip to each other about other peers, which eventually results in a
connected Group.

277
ADOBE MEDIA SERVER 5.0.6 DEVELOPER’S GUIDE
Building peer-assisted networking applications
Last updated 9/4/2014
There isn't a security risk because the initiator must use the proper groupspec value to add a neighbor. You can
distribute this value securely and make it unguessable. If Client 1 does not know the groupspec, the server ignores the
request to add Client 2 as a permanent neighbor.
Unlike NetGroup.addNeighbor() or NetGroup.addMemberHint(), the NetGroup.addPermanentNeighbor()
method causes the local RTMFP stack to automatically add this neighbor if it is removed. Permanent neighbors allow
a group to maintain full connectedness across groups that have member nodes in separate subnets.
To determine whether the local node is a member of a connected Group, call NetGroup.post() from the bootstrap
node on a set interval. Other nodes can listen for these messages to detect whether they are connected to the slice of
the Group containing the bootstrap node. If they aren’t receiving the messages, they could notify an admin or
shutdown.
For detailed information about these APIs, see Server-Side ActionScript Language Reference.
Use the server channel to distribute peer bootstrapping across servers
Server-Side ActionScript provides the following techniques to bootstrap peers to a group:
•GroupSpecifier.addBootstrapPeer(peerID)
Adds a peer ID to the group specifier before the peer joins the group.
•NetGroup.addNeighbor(peerID) and NetGroup.addMemberHint(peerID)
Manually add a peer to a group. These methods require an external framework to distribute peer IDs.
•GroupSpecifier.ipMulticastMemberUpdatesEnabled
Allows peers to find each other on a LAN.
•Use the server channel.
This method does not require a LAN and does not require knowledge of peer IDs.
Use the following APIs to bootstrap a server to a group over the server channel:
•Client.onGroupJoin(groupcontrol)
Called when a peer joins a group. By default, the server handles the join and leave events internally. To handle these
events in a server-side script, configure the Application.xml file. See “Configure the server to dispatch events to the
script engine” on page 274.
•Client.onGroupLeave(groupspecDigest)
Called when a peer leaves a group.
•GroupControl.addMemberHint(peerID)
Manually adds a record specifying that peerID is a member of the group. An immediate connection to this peer is
attempted only if needed for the topology.
•GroupControl.addNeighbor(peerID)
Manually adds a neighbor by immediately connecting directly to the specified peerID, which must already be in
this group.
•GroupControl.groupspecDigest
A digest of the canonical groupspec, which securely identifies the group the client has joined.

278
ADOBE MEDIA SERVER 5.0.6 DEVELOPER’S GUIDE
Building peer-assisted networking applications
Last updated 9/4/2014
Use the GroupControl object to tell a peer to add a neighbor. In your application code, as you receive the
onGroupJoin() and onGroupLeave() events, maintain a table of group names and peers in the group. Send a message
to peers in the group telling them to add the new peer as a neighbor.
When a client joins a group with the GroupSpecifier.serverChannelEnabled flag set to true, a
Client.onGroupJoin() callback event is sent to Server-Side ActionScript. The parameter to this method is a
GroupControl object, which contains a digest of the canonical GroupSpecifier String for the group. In a script, this
groupspecDigest String may be used as a key into a table that stores the list of connected Clients and the GroupControl
object representing their membership in the group. When a Client joins a group, search in this table for other
connected Clients who have joined the same group. If the search is successful, call the groupControl.addNeighbor()
or groupControl.addMemberHint() methods to bootstrap the new client with peer connections to other neighbors
within the group.
To maintain a mapping of groupspecDigests to a specific NetGroup object that joined a group, call the server-side
GroupSpecifier.encodeGroupspecDigest() method. If you have a source GroupSpecifier, this method generates
the groupspecDigest. Otherwise, the server must treat the groupspecDigest property in GroupControl objects as
opaque strings. You cannot go from a digest to the starting groupspec String value.
The following server-side script uses the server channel bootstrapping API:
var groups = {};
Client.prototype.onGroupJoin = function(groupControl)
{
groupControl["client"] = this; // Remember the associated Client.
var groupControlArray = groups[groupControl.groupspecDigest];
if (groupControlArray)
{
trace("Register Client in existing Group (by groupspec digest): " +
groupControl.groupspecDigest +
", current Group size is: " +
groupControlArray.length);
// find a random member to bootstrap with
r = Math.random();
index = Math.floor(r * groupControlArray.length);
var peerGroupControl = groupControlArray[index];
groupControl.addNeighbor(peerGroupControl["client"].farID);
groupControlArray.push(groupControl);
}
else
{
trace("Track client joining new Group (by groupspec digest): " +
groupControl.groupspecDigest);
groupControlArray = [];
groupControlArray.push(groupControl);
groups[groupControl.groupspecDigest] = groupControlArray;
}
}
For detailed information about these APIs, see Server-Side ActionScript Language Reference.

279
ADOBE MEDIA SERVER 5.0.6 DEVELOPER’S GUIDE
Building peer-assisted networking applications
Last updated 9/4/2014
Distributed Introductions API
Use the distributed introductions Server-Side ActionScript API to control the peer introduction process and to create
a shared peer registry.
Control the peer introduction process
•Application.onPeerLookup()
Called when a client initiates a peer look-up. This event receives an object with the following properties:
•Application.sendPeerRedirect()
Call this method from the application.onPeerLookup() callback function to send the initiating peer an Array
of addresses for the target peer.
•Client.introducePeer()
Call on a target peer to open a connection with the peer that initiated the request to connect.
For detailed information about these APIs, see Server-Side ActionScript Language Reference.
Create a peer registry
Use these APIs to create a peer registry. The peer registry lists the peer ID and IP addresses of every client that connects
to an introducer. Every server acting as an introducer in a distributed environment shares this peer registry and uses
it to locate peers when they receive a peer lookup. Write the application logic to create and share the peer registry.
•Client.farAddress
The IP address and port number from which the server sees the client connection originate.
•Client.nearAddress
The public address on the server to which the client connected.
•Client.potentialNearAddresses
The public interfaces available for communication with the server.
•Client.reportedAddresses
The addresses at which a client can receive RTMFP traffic. The client can update this value multiple times over the
lifetime of its RTMFP connection to the server. This value can contain IP addresses and ports that the client has
opened behind its NAT. If so, use these addresses and ports for interacting with other peers behind a common NAT.
•Client.onFarAddressChange()
Called when a client's farAddress has changed. For example, an address changes when a client transitions from a
LAN to a wireless connection.
Property Data type Description
targetPeerID String The peer ID of the target peer to which the initiating peer wants
to connect.
initiatorAddr
ess
String The IP address of the peer initiating the request to connect. Send
redirect information to this address.
tag ByteArray A value that uniquely identifies this lookup request.
interfaceID Number Identifies the RTMFP interface on which the request was
received.

280
ADOBE MEDIA SERVER 5.0.6 DEVELOPER’S GUIDE
Building peer-assisted networking applications
Last updated 9/4/2014
•Client.onReportedAddressChange()
Called when a client reports new addresses.
For detailed information about these APIs, see Server-Side ActionScript Language Reference.
Example: Distribute introductions across servers
This example explains at a high level how to distribute introductions across servers.
To distribute introductions across a group of servers, every server must know the peer ID and IP addresses for every
connected client. Track these values in a peer registry. In the following example, assume the following functions exist
to control the peer registry:
•addClient(peerId, clientAddresses)
When a client connects to the server, add the peer ID and address to the peer registry.
•removeClient(peerId)
When a client disconnects from the server, delete it from the peer registry.
•updateClient(peerId, clientAddresses)
When a far address in the reported addresses changes, update the reported addresses in the peer registry.
•getClientIfLocal(peerId)
Returns the Client object if the client with the given peerId is connected to the current server, otherwise returns null.
•getRemoteClientAddrs(peerId)
Returns the client addresses from the peer registry for the given peer ID. If the client is not found, returns null.
To create the peer registry of client addresses, create a helper function that returns all the client addresses:
function getClientRedirectAddrs(client)
{
var redirectAddresses = client.reportedAddresses.slice(0);
redirectAddresses.push(client.farAddress);
redirectAddresses.concat(client.potentialNearAddresses);
return redirectAddresses;
}
When a client connects over RTMFP, add it to the peer registry:
application.onConnect = function(client) {
if (client.protocol == "rtmfp")
{
addClient(client.farID, getClientRedirectAddrs(client));
client.onFarAddressChange = function() {
updateClient(this.farId, getClientRedirectAddrs(client));
};
client.onReportedAddressesChange = function() {
updateClient(this.farId, getClientRedirectAddrs(client));
};
}
}
application.onDisconnect = function(client) {
removeClient(client.farId);
}

281
ADOBE MEDIA SERVER 5.0.6 DEVELOPER’S GUIDE
Building peer-assisted networking applications
Last updated 9/4/2014
Send redirect messages and responder hello messages in the application.onPeerLookup() callback function:
application.onPeerLookup = function(event) {
// Check whether the target peer is local
// (connected to the same server as the initiating peer).
var targetPeer = getClientIfLocal(event.targetPeerID);
if (targetPeer)
{
// Send the addresses of the target peer to the initiating peer.
application.sendPeerRedirect(getClientRedirectAddrs(targetPeer), event);
// Note: getClientIfLocal() must return the actual client object,
// because that allows us to call introducePeer()
// The target peer sends a responder hello to the initiating peer.
targetPeer.introducePeer(event.initiatorAddress, event.tag);
}
else
{
// Client is not connected locally.
targetPeerAddrs = getRemoteClientAddrs(event.targetPeerID);
if (!targetPeerAddrs)
{
// Returning without calling application.sendPeerRedirect()
// prevents the peer-to-peer connection.
return;
}
// Send the addresses of the target peer to the initiating peer.
application.sendPeerRedirect(targetPeerAddrs, event);
}
}
Consider the following scenario in which the previous code is used on two Adobe Media Server introducers: Server A
and Server B. Client 1 is connected to Server A and Client 2 is connected to Server B. Client 1 wants to connect to Client 2.
•Client 1 sends a peer lookup request to Server A.
•The peer lookup request calls the callback function application.onPeerLookup()in the server-side script.
•Because Client 2 is not connected to Server A, the else branch of code runs that does not have the local Client
object. Server A calls getRemoteClientAddrs() to get the target addresses out of the shared store. These addresses
include the addresses of Server B (to which Client 2 is directly connected). The script calls
application.sendPeerRedirect()to pass the target addresses to Client 1.
•When the redirect reaches Client 1, Flash Player sends a peer lookup request to all the target addresses, including
the address of Server B.
•When the request arrives at Server B, the if branch of the code runs that has the local target Client object. The code
calls sendPeerRedirect() again to send information to Client 1. But now that the script has the Client object
representing Client 2 at Server B, it can also call introducePeer() on Client 2. This call tells Client 2 to start
sending packets to Client 1. (Client 1 has been trying to send packets toward Client 2 since it got the first
sendPeerRedirect() address set from Server A).
•When both clients are sending traffic at each other, the necessary NAT hole-punching has happened. Both clients
can see each other's traffic and establish a peer-to-peer connection. (Assuming that both clients are behind well-
behaved NATs.)

282
ADOBE MEDIA SERVER 5.0.6 DEVELOPER’S GUIDE
Building peer-assisted networking applications
Last updated 9/4/2014
Filter introduction requests
Flash Media Server 4.5
You can also use the distributed introduction API to filter introduction requests. The following sample script creates
a map of peer IDs and client addresses. When the server receives a peer lookup request, the
application.onPeerLookup() callback checks to see whether the target peer is in the map. If it isn’t, the server
denies the lookup request.
// A registry mapping peer ID values to Client objects
// for this application instance.
var peerIDToClientMap = {};
// On client connect, add RTMFP clients to the peer ID registry.
application.onConnect = function(client) {
if (client.protocol == "rtmfp")
peerIDToClientMap[client.farID] = client;
}
//
application.onPeerLookup = function(event) {
var targetPeer = peerIDToClientMap[event.targetPeerID];
if(!targetPeer){
// Returning without calling application.sendPeerRedirect()
// prevents the peer-to-peer connection.
return;
}
}
For detailed information about these APIs, see Server-Side ActionScript Language Reference.
Use the Administration API to monitor distributed introductions
Use the following properties returned in a call to the getServerStats()Administration API method to monitor
distributed introductions:
•rtmfp_forwards
•rtmfp_lookups
•rtmfp_lookups_denied
•rtmfp_redirects
There are many ways to use these statistics. The number of lookups minus the number of redirects yields the number
of lookup queries that were ignored or denied. The number of redirects minus the number of forwards yields the
number of lookups in which the initiating client was redirected to a different Adobe Media Server node to connect
with the target peer. The rtmfp_lookups_denied statistic is a counter that tracks the number of lookups that were
explicitly denied (for example, because they were invalid). It is incremented when application.denyPeerLookup()
is called. If there are too many denials, it could indicate a DOS attack.
Use the following properties returned in a call to the getServerStats()Administration API method to monitor peers
joining and leaving a group:
•group_join
•group_leave

283
Last updated 9/4/2014
Chapter 7: Developing social applications
About social applications
Important: Adobe Media Server Standard does not support server-side scripting and therefore does not support social
applications.
In addition to streaming video applications, Adobe Media Server Extended, Adobe Media Server Professional, and
Adobe Media Server Starter can host social and other real-time communication applications. Users can capture live
audio and video, upload them to the server, record them, and share them with others. These server editions also
provide access to remote shared objects that synchronize data between many users, and so is ideal for developing
online games.
You can use Server-Side ActionScript to connect to other systems, including Java 2 Enterprise servers, web services,
and Microsoft .NET servers. This connectivity allows applications to take advantage of services such as database
authentication, real-time updates from web services, and e-mail.
About shared objects
Use shared objects to synchronize users and store data. Shared objects can do anything from holding the position of
pieces on a game board to broadcasting chat text messages. Shared objects let you keep track of what users are doing
in real time.
Create and use remote shared objects, which share data between multiple client applications. When one user makes a
change that updates the shared object on the server, the shared object sends the change to all other users. The remote
shared object acts as a hub to synchronize many users. In the section “SharedBall example” on page 285, when any user
moves the ball, all users see it move.
Note: Adobe Media Server Standard does not support remote shared objects.
All editions of the server support local shared objects, which are similar to browser cookies. Local shared objects are
stored on the client computer and don’t require a server.
Shared objects, whether local or remote, can also be temporary or persistent:
•A temporary shared object is created by a server-side script or by a client connecting to the shared object. When
the last client disconnects and the server-side script is no longer using the shared object, it is deleted.
•Persistent shared objects retain data after all clients disconnect and even after the application instance stops
running. Persistent shared objects are available on the server for the next time the application instance starts. They
maintain state between application sessions. Persistent objects are stored in files on the server or client.
Persistent local shared objects To create persistent local shared objects, call the client-side
SharedObject.getLocal() method. Persistent local shared objects have the extension .sol. You can specify a
storage directory for the object by passing a value for the localPath parameter of the SharedObject.getLocal()
command. By specifying a partial path for the location of a locally persistent remote shared object, you can let
several applications from the same domain access the same shared objects.
Remotely persistent shared objects To create remote shared objects that are persistent on the server, pass a value
of true for the persistence parameter in the client-side SharedObject.getRemote() method or in the server-
side SharedObject.get() method. These shared objects are named with the extension .fso and are stored on the

284
ADOBE MEDIA SERVER 5.0.6 DEVELOPER’S GUIDE
Developing social applications
Last updated 9/4/2014
server in a subdirectory of the application that created the shared object. Adobe Media Server creates these
directories automatically; you don’t have to create a directory for each instance name.
Remotely and locally persistent shared objects You create remote shared objects that are persistent on the client
and the server by passing a local path for the persistence parameter in your client-side
SharedObject.getRemote() command. The locally persistent shared object is named with the extension .sor and
is stored on the client in the specified path. The remotely persistent .fso file is stored on the server in a subdirectory
of the application that created the shared object.
Remote shared objects
Before you create a remote shared object, create a NetConnection object and connect to the server. Once you have the
connection, use the methods in the SharedObject class to create and update the remote shared object. The general
sequence of steps for using a remote shared object is outlined below:
1Create a NetConnection object and connect to the server:
nc = new NetConnection();
nc.connect("rtmp://localhost/SharedBall");
This is the simplest way to connect to the server. In a real application, you would add event listeners on the
NetConnection object and define event handler methods. For more information, see “SharedBall example” on
page 285.
2Create the remote shared object. When the connection is successful, call SharedObject.getRemote() to create a
remote shared object on the server:
so = SharedObject.getRemote("ballPosition", nc.uri, false);
The first parameter is the name of the remote shared object. The second is the URI of the application you are
connecting to and must be identical to the URI used in the NetConnection.connect() method. The easiest way
to specify it is with the nc.uri property. The third parameter specifies whether the remote shared object is
persistent. In this case, false is used to make the shared object temporary.
3Connect to the remote shared object. Once the shared object is created, connect the client to the shared object using
the NetConnection object you just created:
so.connect(nc);
You also need to add an event listener for sync events dispatched by the shared object:
so.addEventListener(SyncEvent.SYNC, syncHandler);
4Synchronize the remote shared object with clients. Synchronizing the remote shared object requires two steps. First,
when an individual client makes a change or sets a data value, you need to update the remote shared object. Next,
update all other clients from the remote shared object.
aTo update the remote shared object when a client makes a change, use setProperty():
so.setProperty("x", sharedBall.x);
You must use setProperty() to update values in the shared object. The remote shared object has a data
property that contains attributes and values. However, in ActionScript 3.0, you cannot write values directly to
it, as in:
so.data.x = sharedBall.x; // you can't do this

285
ADOBE MEDIA SERVER 5.0.6 DEVELOPER’S GUIDE
Developing social applications
Last updated 9/4/2014
bWhen the shared object is updated, it dispatches a sync event. Synchronize the change to the remaining clients
by reading the value of the shared object’s data property:
sharedBall.x = so.data.x;
This is usually done in a sync event handler, as shown in “SharedBall example” on page 285.
SharedBall example
The SharedBall sample creates a temporary remote shared object. It’s similar to a multiplayer game. When one user
moves the ball, it moves for all other users.
Note: Use the SharedBall sample files (SharedBall.fla, SharedBall.as, and SharedBall.swf) in the
documentation/samples/SharedBall directory in the Adobe Media Server root install directory.
The SharedBall application running in Flash Player
Run the application
1Register the application with your server by creating an application directory named SharedBall:
RootInstall/applications/SharedBall
2Open the SharedBall samples files from the documentation/samples/SharedBall directory in the Adobe Media
Server root install directory.
3Open SharedBall.swf in a web browser.
4Open a second instance of SharedBall.swf in a second browser window.
5Move the ball in one window and watch it move in the other.
Design the user interface
1In Flash, choose File > New > Flash File (ActionScript 3.0) and click OK.
2From the toolbox, select the Rectangle tool. Drag to the lower-right corner, then select the Oval tool.
3Draw a circle on the Stage. Give it any fill color you like.
4Double-click the circle and choose Modify > Convert to Symbol.
5In the Convert to Symbol dialog box, name the symbol ball, check that Movie Clip is selected, and click OK.

286
ADOBE MEDIA SERVER 5.0.6 DEVELOPER’S GUIDE
Developing social applications
Last updated 9/4/2014
6Select the ball symbol on the Stage and in the Property Inspector (Window > Properties) give it the instance name
sharedBall.
7Save the file as SharedBall.fla.
Write the client-side code
Be sure to look at the SharedBall.as sample file. These steps present only highlights.
1In Flash Professional, create a new ActionScript file.
2Create the class, extending MovieClip:
public class SharedBall extends MovieClip {...}
The class must extend MovieClip, because the sharedBall symbol in the FLA file is a Movie Clip symbol.
3Create the constructor, in which you add event listeners and connect to the server:
public function SharedBall()
{
nc = new NetConnection();
addEventListeners();
nc.connect("rtmp://localhost/SharedBall");
}
4Add event listeners for netStatus, mouseDown, mouseUp, and mouseMove events:
private function addEventListeners() {
nc.addEventListener(NetStatusEvent.NET_STATUS, netStatusHandler);
// sharedBall is defined in the FLA file
sharedBall.addEventListener(MouseEvent.MOUSE_DOWN, pickup);
sharedBall.addEventListener(MouseEvent.MOUSE_UP, place);
sharedBall.addEventListener(MouseEvent.MOUSE_MOVE, moveIt);
}
5In your netStatus handler, create a remote shared object when a connection is successful. (You’ll also want to
create error handlers for rejected and failed connections, shown in the sample AS file.) Connect to the shared object
and add a sync event listener:
switch (event.info.code)
{
case "NetConnection.Connect.Success":
trace("Congratulations! you're connected");
so = SharedObject.getRemote("ballPosition", nc.uri, false);
so.connect(nc);
so.addEventListener(SyncEvent.SYNC, syncHandler);
break;
...
}
6As a user moves the mouse, use setProperty() to set the changing ball location in the remote shared object:
function moveIt( event:MouseEvent ):void {
if( so != null )
{
so.setProperty("x", sharedBall.x);
so.setProperty("y", sharedBall.y);
}
}
When the remote shared object is updated, it dispatches a sync event.

287
ADOBE MEDIA SERVER 5.0.6 DEVELOPER’S GUIDE
Developing social applications
Last updated 9/4/2014
7Write a sync event handler that updates all clients with the new ball position:
private function syncHandler(event:SyncEvent):void {
sharedBall.x = so.data.x;
sharedBall.y = so.data.y;
}
You can read the value of so.data, even though you can’t write to it.
Broadcast messages to many users
A remote shared object allows either a client or server to send a message using SharedObject.send() to all clients
connected to the shared object. The send() method can be used for text chat applications, for example, where all users
subscribed to your shared object receive your message.
When you use SharedObject.send(), you, as broadcaster, also receive a copy of the message.
1Write a method that SharedObject.send() will call:
private function doSomething(msg:String):void {
trace("Here's the message: " + msg);
}
2Call send() to broadcast the message:
so = SharedObject.getRemote("position", nc.uri, false);
so.connect(nc);
so.send("doSomething", msg);

288
Last updated 9/4/2014
Chapter 8: Securing applications
You can configure the server and your application to allow and deny access to assets such as streams and shared
objects. You can also authenticate clients that connect to an application.
For more information about securing applications, see the “Developer Guidelines” section in the Adobe DevNet
article, Hardening Guide for Adobe Media Server. The guidelines include modifying the Application.xml file,
writing Server-Side ActionScript, securing communication with the server, and performing authentication.
Graeme Bull has several video tutorials about security on his site fmsguru.com:
•Taking advantage of the Application.xml file settings to help protect your server
•Using the client Agent and Referrer to help protect your server
•Using the client IP to help protect your server
•Using server side client permissions to help protect your server
•Using writeAccess to help protect your server
Allow or deny access to assets
About access control
When users access the server, by default, they have full access to all streams and shared objects. However, you can use
Server-Side ActionScript to create a dynamic access control list (ACL) for shared objects and streams. You can control
who has access to create, read, or update shared objects or streams.
When a client connects to the server, the server-side script (main.asc or yourApplicationName.asc) is passed a Client
object. Each Client object has readAccess and writeAccess properties. You can use these properties to control
access for each connection.
Implement dynamic access control
The Client.readAccess and Client.writeAccess properties take string values. These values can contain multiple
strings separated by semicolons, like this:
client.readAccess = "appStreams;/appSO/";
client.writeAccess = "appStreams/public/;appSO/public/";
By default, readAccess and writeAccess are set to /, which means the client can access every stream and shared
object on the server.
Allow access to streams
❖In main.asc, add an onConnect() function that specifies a directory name on the server in your main.asc file:

289
ADOBE MEDIA SERVER 5.0.6 DEVELOPER’S GUIDE
Securing applications
Last updated 9/4/2014
application.onConnect = function(client, name) {
// give this new client the same name as passed in
client.name = name;
// give write access
client.writeAccess = "appStreams/public/";
// accept the new client's connection
application.acceptConnection(client);
}
This main.asc file grants access to all URIs that start with appStreams/public.
Deny access to streams
❖In main.asc, add an onConnect() function that specifies a null value for client.writeAccess:
application.onConnect = function(client, name) {
...
// deny write access to the server
client.writeAccess = "";
}
Define access to shared objects
❖In main.asc, add an onConnect() function that specifies shared object names, using the same URI naming
conventions:
application.onConnect = function(client, name) {
...
client.writeAccess = "appSO/public/";
}
This gives the client write access to all shared objects whose URIs begin with appSO/public/.
Authenticate clients
Use properties of the Client object
When a client connects to an application, the server creates a Client object that contains information about the client
and passes it to the application.onConnect() handler in Server-Side ActionScript. You can write server-side code
to access the properties of the Client object and use the values to verify the validity of the connecting client:
application.onConnect = function( pClient ) {
for (var i in pClient) {
trace( "key: " + i + ", value: " + pClient[i] );
}
}
Check the client’s IP address
❖In main.asc, check the value of client.ip and, if needed, reject the client’s connection to the application:

290
ADOBE MEDIA SERVER 5.0.6 DEVELOPER’S GUIDE
Securing applications
Last updated 9/4/2014
if (client.ip.indexOf("60.120") !=0) {
application.rejectConnection(client, {"Access Denied"} );
}
Check an originating URL
❖In main.asc, check the value of client.referrer against a list of URLs that should be denied access. Make sure
that SWF files that are connecting to your application are coming from a location you expect. If you find a match,
reject the client’s connection:
referrerList = {};
referrerList["http://www.example.com"] = true;
referrerList["http://www.abc.com"] = true;
if (!referrerList[client.referrer]) {
application.rejectConnection(client, {"Access Denied"} );
}
Use a unique key
1In client-side ActionScript, create a unique key, as in the following code, which concatenates the local computer
time with a random number:
var keyDate = String(new Date().getTime());
var keyNum = String(Math.random());
var uniqueKey = keyDate + keyNum;
2Send the key to the server in the connection request:
nc.connect("rtmp://www.example.com/someApplication", uniqueKey);
3The following code in the main.asc file looks for the unique key in the connection request. If the key is missing or
has already been used, the connection is rejected. This way, if a connection is replayed by an imposter, the replay
attempt fails.
clientKeyList = new Object(); // holds the list of clients by key
application.onConnect = function( pClient, uniqueKey ) {
if ( uniqueKey != undefined ) { // require a unique key with connection request
if ( clientKeyList[uniqueKey] == undefined ) { // first time -- allow connection
pClient.uniqueKey = uniqueKey;
clientKeyList[uniqueKey] = pClient;
this.acceptConnection(pClient);
} else {
trace( "Connection rejected" );
this.rejectConnection(pClient);
}
}
}
application.onDisconnect = function( pClient ) {
delete clientKeyList[pClient.uniqueKey];
}
Use an Access plug-in
An Access plug-in intercepts incoming requests before passing them to the application. You can program an Access
plug-in to use any form of authentication.

291
ADOBE MEDIA SERVER 5.0.6 DEVELOPER’S GUIDE
Securing applications
Last updated 9/4/2014
More Help topics
“Developing an Access plug-in” on page 301
Use Flash Player version
You can protect your content from clients that aren’t running in Flash Player, based on the user agent string received
from the connection. The user agent string identifies the platform and Flash Player version, for example:
WIN 8,0,0,0
MAC 9,0,45,0
There are two ways to access these strings:
Virtual keys Configure the server to remap the stream based on the Flash Player client.
Client.agent Challenge the connection using Server-Side ActionScript:
application.onConnect = function( pClient ) {
var platform = pClient.agent.split(" ");
var versionMajor = platform[1].split(",")[0];
var versionMinor = platform[1].split(",")[1];
var versionBuild = platform[1].split(",")[2];
}
// output example
// Client.agent: WIN 9,0,45,0
// platform[0]: "WIN"
// versionMajor: 9
// versionMinor: 0
// versionBuild: 45
Verify connecting SWF files
You can configure the server to verify the authenticity of client SWF files before allowing them to connect to an
application. Verifying SWF files prevents someone from creating their own SWF files that attempt to stream your
resources. SWF verification is supported in Flash Player 9 Update 3 and later.
Allow or deny connections from specific domains
If you know the domains from which the legitimate clients will be connecting, you can whitelist those domains.
Conversely, you can blacklist known bad domains.
You can enter a static list of domain names in the Adaptor.xml file.
You can also maintain these lists in your own server-side code and files. In the following example, a file named
bannedIPList.txt contains a list of excluded IP addresses, which can be edited on the fly:

292
ADOBE MEDIA SERVER 5.0.6 DEVELOPER’S GUIDE
Securing applications
Last updated 9/4/2014
// bannedIPList.txt file contents:
// 192.168.0.1
// 128.493.33.0
function getBannedIPList() {
var bannedIPFile = new File ("bannedIPList.txt") ;
bannedIPFile.open("text","read");
application.bannedIPList = bannedIPFile.readAll();
bannedIPFile.close();
delete bannedIPFile;
}
application.onConnect = function(pClient) {
var isIPOK = true;
getBannedIPList();
for (var index=0; index<this.bannedIPList.length; index++) {
var currentIP = this.bannedIPList[index];
if (pClient.ip == currentIP) {
isIPOK = false;
trace("ip was rejected");
break;
}
}
if (isIPOK) {
this.acceptConnection(pClient);
} else {
this.rejectConnection(pClient);
}
}
In addition, you can create server-side code to check if requests are coming in too quickly from a particular domain:

293
ADOBE MEDIA SERVER 5.0.6 DEVELOPER’S GUIDE
Securing applications
Last updated 9/4/2014
application.VERIFY_TIMEOUT_VALUE = 2000;
Client.prototype.verifyTimeOut = function() {
trace (">>>> Closing Connection")
clearInterval(this.$verifyTimeOut);
application.disconnect(this);
}
function VerifyClientHandler(pClient) {
this.onResult = function (pClientRet) {
// if the client returns the correct key, then clear timer
if (pClientRet.key == pClient.verifyKey.key) {
trace("Connection Passed");
clearInterval(pClient.$verifyTimeOut);
}
}
}
application.onConnect = function(pClient) {
this.acceptConnection(pClient);
// create a random key and package within an Object
pClient.verifyKey = ({key: Math.random()});
// send the key to the client
pClient.call("verifyClient",
new VerifyClientHandler(pClient),
pClient.verifyKey);
// set a wait timer
pClient.$verifyTimeOut = setInterval(pClient,
$verifyTimeOut,
this.VERIFY_TIMEOUT_VALUE,
pClient);
}
application.onDisconnect = function(pClient) {
clearInterval(pClient.$verifyTimeOut);
}
Authenticate users
Authenticate using an external resource
For a limited audience, it is feasible to request credentials (login and password) and challenge them using an external
resource, such as a database, LDAP server, or other access-granting service.
1The SWF supplies the user credentials in the connection request.
The client provides a token or username/password using client-side ActionScript:

294
ADOBE MEDIA SERVER 5.0.6 DEVELOPER’S GUIDE
Securing applications
Last updated 9/4/2014
var sUsername = "someUsername";
var sPassword = "somePassword";
nc.connect("rtmp://server/secure1/", sUsername, sPassword);
2Adobe Media Server validates the credentials against a third-party system.
You can use the following classes to make calls from Server-Side ActionScript to external sources: WebService,
LoadVars, XML classes, NetServices (connects to a Flash Remoting gateway). For more information about Flash
Remoting, see www.adobe.com/go/learn_fms_flashremoting_en.

295
Last updated 9/4/2014
Chapter 9: Developing Plug-ins
Adobe® Media Server provides a plug-in architecture written in C++ that lets you extend the functionality of the server.
Use the Access, Authorization, and File plug-ins to build unique deployments with expanded access, authorization,
and file management solutions.
For example, you can use the plug-ins to accept, reject, or redirect clients before they reach your application-level code
(Access plug-in), control access to streams and server events (Authorization plug-in), and create a file I/O mechanism
(File plug-in).
For detailed information about each plug-in’s API, see Flash Media Server plug-in API Reference.
For information about the Adobe Media Server Plug-in architecture, see Using plug-ins to configure and
optimize Flash Media Server 4.5 by Denis Bulichenko.
What’s new with plug-ins in Flash Media Server 4.5.1
Adobe Media Server 4.5.1 includes the following updates to the plug-ins:
•Protected RTMP streaming can be configured through the Authorization plug-in. See “Use the Authorization plug-
in to configure protected RTMP” on page 32.
What’s new with plug-ins in Flash Media Server 4.5
Flash Media Server 4.5 includes the following updates to the plug-ins:
•The HTTP Dynamic Streaming and HTTP Live Streaming file operations are routed through the File plug-in. See
“Use the File plug-in to manage content for live HTTP streaming” on page 333.
Versioning, upgrading, and server editions
Server edition support
Flash Media Enterprise Server, Flash Media Interactive Server, and Flash Media Development Server support the
following plug-ins:
•Access plug-in
•Authorization plug-in
•File plug-in
Flash Media Streaming Server supports the following plug-in:
•Access plug-in

296
ADOBE MEDIA SERVER 5.0.6 DEVELOPER’S GUIDE
Developing Plug-ins
Last updated 9/4/2014
About versioning
The Authorization plug-in and the File plug-in have versioning and accompanying create and destroy methods. The
Access plug-in does not have versioning. The server detects the plug-in version number for the File and Authorization
plug-ins based on the value returned by the create and destroy methods. To use the methods of a certain server version,
use the correct create or destroy method and return the correct version number. For example, to use Flash Media
Server 4.0 features with the Authorization plug-in, call FmsCreateAuthAdaptor3() and return 2.0.
Note: To limit a plug-in to Adobe Media Server 3.0 features, return version 0.0 from a call to
FmsCreateXXXAdaptor2().
For more information on the versioning APIs, see Adobe Media Server Plug-in API Reference.
The File plug-in has the following versioning:
The Authorization plug-in has the following versioning:
Upgrading a plug-in
All Flash Media Server 3.5.x plug-ins work on 32-bit Flash Media Server 4. To use new features in Flash Media Server
4, including new APIs, upgrade your plug-in. If you do not intend to use the new features, you can continue to use your
existing plug-in code.
To use 32-bit plug-ins on a 64-bit system, recompile the plug-ins with a 64-bit Flash Media Server library.
Recompile 32-bit plug-ins for a 32-bit server
1Recompile the plug-in with Microsoft® Visual C++ 2003, Microsoft® Visual C++ 2005, or Microsoft Visual C++
2008. On Linux, recompile the plug-in with GNU Compiler Collection 4.x, for example, GCC 4.1 which installs
with CentOS.
2For the File plug-in, use the FmsCreateFileAdaptor2() and FmsDestroyFileAdaptor2() methods and return
version 1.0.
Server version Plug-in version Create and Destroy method
Adobe Media Server 3.0 and earlier 0.0 FmsCreateFileAdaptor()
FmsDestroyFileAdaptor()
Adobe Media Server 3.5 1.0 FmsCreateFileAdaptor2()
FmsDestroyFileAdaptor2()
Adobe Media Server 4.0 1.0 FmsCreateFileAdaptor2()
FmsDestroyFileAdaptor2()
Server version Plug-in version Create and Destroy method
Adobe Media Server 3.0 and earlier 0.0 FmsCreateAuthAdaptor()
FmsDestroyAuthAdaptor()
Adobe Media Server 3.5 1.0 FmsCreateAuthAdaptor2()
FmsDestroyAuthAdaptor2()
Adobe Media Server 4.0 2.0 FmsCreateAuthAdaptor3()
FmsDestroyAuthAdaptor3()

297
ADOBE MEDIA SERVER 5.0.6 DEVELOPER’S GUIDE
Developing Plug-ins
Last updated 9/4/2014
3For the Authorization plug-in, use the FmsCreateAuthAdaptor3() and FmsDestroyAuthAdaptor3() methods
and return version 2.0.
See the Adobe Media Server plug-in API Reference.
Recompile 32-bit plug-ins for a 64-bit server
•When porting 32-bit plug-in code to 64-bit code, be aware that the data types of some fields have changed.
•Use the include files and libraries in the rootinstall/samples/plugins/include folder to compile the plug-ins.
•On Linux, there are two makefiles: MakeFile.AuthModule64 and MakeFile.AuthModule. To compile for 64-bit, use
MakeFile.AuthModule64.
•On Windows, install the 64-bit compiler for Visual C++ in Visual Studio 2008 or later. Choose Build >
Configuration Manager and select Release x64. Build the 64-bit installation.
Working with plug-ins
Workflow for developing and deploying a plug-in
Note: For information about upgrading a plug-in, see “Upgrading a plug-in” on page 296.
1Modify the sample plug-in to meet your organization’s needs or write your own plug-in.
See “Sample files” on page 297.
2Build and compile the plug-in for your platform.
See “Compile a plug-in” on page 299.
3Deploy the plug-in.
See “Deploy a plug-in” on page 299.
More Help topics
Flash Media Server Plug-In API Reference
Sample files
The server includes sample files for each plug-in. Use these samples to learn how to use the API or use them as starting
points for your own plug-ins.
Note: To build the default plug-ins, use the make files. Use the make command with the -f option to run the make file.
Access plug-in
The following sample files are installed to rootinstall\samples\plugins\access.

298
ADOBE MEDIA SERVER 5.0.6 DEVELOPER’S GUIDE
Developing Plug-ins
Last updated 9/4/2014
Authorization plug-in
The following sample files are installed to rootinstall\samples\plugins\auth.
File plug-in
The following sample files are installed to rootinstall\samples\plugins\file.
Header files
The following header files define the plug-in API and are installed to rootinstall\samples\plugins\include:
FmsAdaptor.h, FmsAuthActions.h, FmsAuthAdaptor.h, FmsAuthEvents.h, FmsFileAdaptor.h, FmsMedia.h, and
IFCAccessAdaptor.h.
Filename Description
adaptor.cpp
sample.cpp
adaptor.h
Sample Access plug-in C++ files and header file.
AccessModuleSample.sln
AccessModuleSample.vcproj
Work files used with Microsoft Visual C++ for building an Access plug-in in a Windows environment.
You can modify the files’ values to reflect the practices in your environment.
Makefile.access Use this file to build the default Access plug-in on Linux.
StdAfx.h
StdAfx.cpp
Sample includes file declaration files.
Filename Description
AuthModule.cpp Sample Authorization plug-in C++ file.
AuthModule.sln
AuthModule.vcproj
Work files used with Microsoft Visual C++ for building an Authorization plug-in in a Windows
environment. You can modify the files’ values to reflect the practices in your environment.
Makefile.AuthModule Use this file to build the default Authorization plug-in on Linux.
StdAfx.h
StdAfx.cpp
Sample includes file declaration files.
Filename Description
SimpleFileAdaptor.cpp
SimpleFileAdaptor.h
Sample File plug-in C++ file and header file.
FileModule.h A header file that defines create and destroy functions for the plug-in.
FileUtil.cpp Utility functions for working with files and directories.
FileModule.sln
FileModule.vcproj
Work files used with Microsoft Visual C++ for building a File plug-in in a Windows environment. You
can modify the files’ values to reflect the practices in your environment.
Makefile.FileModule Use this file to build the default File plug-in on Linux.
StdAfx.h
StdAfx.cpp
Sample includes file declaration files.

299
ADOBE MEDIA SERVER 5.0.6 DEVELOPER’S GUIDE
Developing Plug-ins
Last updated 9/4/2014
Compile a plug-in
Use Microsoft® Visual Studio .NET 2003, Microsoft Visual C++ 2005, or Microsoft Visual Studio .NET 2008 to
compile plug-ins in Windows. Use GNU Compiler Collection 3.4.x to compile plug-ins in Linux.
Note: The Authorization plug-in and the Access plug-in have compilation warnings that are harmless. Ignore the
warnings as you compile.
Build the plug-in as a Release. If you build the plug-in as Debug the modules don’t load with the server process.
Plug-ins are implemented as shared library (DLL) files in Windows systems and as shared object (SO) files in Linux
systems. The filenames are: libconnect.dll/libconenct.so, AuthModule.dll/AuthModule.so, and
FileModule.dll/FileModule.so.
To build on a 64-bit version of a linux GCC compiler, use the -m32 switch and -B option for GCC. Point the -B switch
to the /usr/lib32 libraries.
An Access plug-in must have the name libconnect.dll/libconnect.so. Authorization plug-ins and File plug-ins can have
any name.
Deploy a plug-in
Once deployed, a plug-in plugs into a server process. The plug-in is loaded during the process start-up and unloaded
during process shutdown. For example, when a vhost is restarted a new core process starts up and loads a copy of an
Authorization plug-in. When the vhost stops, the core process unloads the Authorization plug-in.
1Do one of the following to stop the server:
•In Windows, choose Start > Control Panel > Administrative Tools > Services. Select Adobe Media Server (FMS)
from the Services list and click Stop.
•In Linux, open a shell window and go to the directory where the server is installed: cd /opt/adobe/ams. Enter
the following: ./server stop.
2Copy the compiled plug-in DLL or SO files to one of the following folders:
•rootinstall/modules/access
•rootinstall/modules/auth
•rootinstall/modules/fileio
Note: Do not change the folder names. If you’re deploying multiple Authorization plug-ins, copy all the plug-ins into
the /auth folder.
3Do one of the following to start the server:
•In Windows, choose Start > Control Panel > Administrative Tools > Services. Select Adobe Media Server (FMS)
from the Services list and click Start.
•In Linux, open a shell window and go to the directory where the server is installed: cd /opt/adobe/ams. Enter
the following: ./server start.

300
ADOBE MEDIA SERVER 5.0.6 DEVELOPER’S GUIDE
Developing Plug-ins
Last updated 9/4/2014
General development tasks
Sending data from a plug-in to a log file
Call the log() function of the IFmsServerContext class in a plug-in to send custom messages to log files from the
Authorization and File plug-ins. Plug-in log files are located in the RootInstall/logs directory and are named
fileio.NN.log and authMessage.NN.log, by default.
Note: In addition to client connections, the Authorization plug-in logs the connections made when a server-side
Stream.play() method is called. These connections are distinguished by the IP address 127.0.0.1 in the access.log files
and in the authEvent.log files.
The log() function has an argument that specifies whether the log message should also be logged to the system log
(Windows Event Viewer or Linux syslog). The default value is false. Excessive logging to the system log can cause
performance problems.
Edit the Logging section of the Server.xml configuration file (located in RootInstall/conf) to enable or disable each log
file. Edit the Logger.xml file (located in RootInstall/conf) to add or change the configuration information, including
the location and name of the log files. For detailed information, see the comments in the XML files.
The Access plug-in is hosted by a process that closes standard out and standard error, therefore plug-in developers
cannot rely on these to log messages. Instead, for the Access plug-in, log messages explicitly to a file. The sample Access
plug-in demonstrates a workaround. Search for the line FILE* logFile = fopen("SampleAdaptor.log", "a");
in the RootInstall/samples/plugins/access/adaptor.cpp file.
More Help topics
Adobe Media Server Plug-In API Reference
Retrieving data from a configuration file
Call the getConfig() function of the IFmsServerContext class in an Authorization plug-in or a File plug-in to retrieve
custom data stored in the Server.xml configuration file. You can analyze this data in the plug-in to activate different
functionality in the plug-in, depending on the server configuration.
Plug-ins can retrieve data stored in the Plugins XML element. To add custom data, open the Server.xml file (located
in the RootInstall\conf folder) in a text editor and add data. Verify the XML and restart the server.
Calls to getConfig() can get only text node values. Calls to the method cannot get values added as attributes to
elements, multiple elements, or nested elements.
For an example of a call to IFmsServerContext->getConfig(), see the AuthModule.cpp file.
Handling time-critical calls
Every call from the server to a File or Authorization plug-in—for example, authorize() in the Authorization
plug-in—is time-critical. A call should be processed and returned back to the server as fast as possible, because the
server remains in a pending state until the call is returned. If processing the call is time consuming and requires a wait
or sleep operation, the passed arguments should be preserved and passed to a thread pool that is created by the plug-in.
For an example, see the FileModule sample.

301
ADOBE MEDIA SERVER 5.0.6 DEVELOPER’S GUIDE
Developing Plug-ins
Last updated 9/4/2014
Developing an Access plug-in
Access plug-in overview
Important: Every edition of the server supports Access plug-ins. However, the Access plug-in is not supported over
RTMFP connections.
For information about developing an Access Plug-in, see Using plug-ins to configure and optimize Flash Media
Server 4.5 by Denis Bulichenko.
An Access plug-in adds another layer of security to the server; it intercepts connection requests and lets you examine
the client and the server to determine whether requests should be accepted, rejected, or redirected before the requests
reach the server’s script layer. You can only use one Access plug-in.
You can code the plug-in to accept, reject, or redirect requests based on criteria like how many users are connected to
the server and the amount of bandwidth being consumed.
You can query your organization’s database of users and passwords to determine which connection requests should
be allowed. Once the plug-in accepts the connection, you can update the database with a record of the user’s access to
the server.
You can set read and write access for files and folders on the server, set permissions to access audio and video bitmap
data, and inspect client properties.
More Help topics
Adobe Media Server Plug-In API Reference
Access plug-in connection flow
Once you’ve installed an Access plug-in, it is initialized with a context pointer when the server starts. The context
pointer and plug-in pointer provide two-way communication between the Access plug-in and the server.
When a client attempts to connect to the server, the server determines whether or not an Access plug-in exists. If the
Access plug-in is available, it examines the connection request and either authorizes, rejects, or redirects the
connection. If an Access plug-in is not available, connection requests proceed as usual.
Note: There can only be one Access plug-in per server installation.
Rewriting connections to the server
Both the Access and Authorization plug-ins let you authorize connections to the server. However, the plug-ins run at
different places and are active in different stages of the connection process.
New connections arrive at the edge process (amsedge), and the data in the connection message is sent to the Access
plug-in (which runs in the edge process). At this stage, the plug-in has information about the client such as IP address,
the originating URL of the SWF file, the connection (or target) URI, user agent, and so on. Using this information, the
Access plug-in can accept, reject, or redirect the connection, or rewrite the target URI. Rewriting the target URI forces
the connection to a different vhost, application, or application instance. The plug-in can’t rewrite a connection to a
different adaptor because the socket-level connection to the adaptor has already been made.
You must use the Access plug-in to force incoming connections to a different vhost, application, or application instance;
it is too late to rewrite the target URI by the time the Authorization plug-in is notified. Also, since the Access plug-in
runs early in the connection process, it is the most efficient way to screen connections. If you want authorization to be
as lightweight as possible, use the Access plug-in, even if you don’t need to rewrite the connection URI.

302
ADOBE MEDIA SERVER 5.0.6 DEVELOPER’S GUIDE
Developing Plug-ins
Last updated 9/4/2014
The Authorization plug-in runs in the core process (fmscore) after the connection has been forwarded to the
application. The Authorization plug-in can accept, reject, or redirect attempts by clients to connect to applications, but
it cannot rewrite connections to different URIs.
Note: Redirecting a connection is different than rewriting a connection URI. Redirecting a client sends a redirection
message containing a new URI back to the client and terminates the current connection. The client then attempts to
connect to the new URI.
Writing the code in an Access plug-in
You can either modify the code in the sample Access plug-in file provided by Adobe, or you can write your own
plug-in.
A client connection request triggers the onAccess() callback function in the Access plug-in. Write the code that
examines connection requests, modifies client properties, and accepts, rejects, or redirects the requests in the
onAccess() callback function.
Call getValue() to query client fields. Call setValue() to modify client fields. For a list of fields, see the fms_access
namespace in the Flash Media Server Plug-in API Reference. The field x-page-url, the URL of the SWF file or the
server in which a connection originated, was added in Adobe Media Server 3.5.
Call getStats() to query the following server statistics: eTOTAL_CONNECTED, eBYTES_IN, and eBYTES_OUT.
After you’ve queried the fields and written your connection logic, call accept(), reject(), or redirect() to allow
a client to connect to an application on the server or not.
Assigning an application to a core process
You can dynamically assign an application to a core process. Use this feature to balance a load across core processes
based on real-time performance counters, for example, CPU consumption and the size of the recorded media cache.
You can also use this feature to provide a higher quality of service (QoS) to certain customers.
To specify which core process handles an application, pass the field "coreIdNum" and a core number to the
setValue()function. The core number can be any positive integer. The server uses the following formula to
determine which core process to use: core_number % number_of_ cores. For example, the following code assigns a
core number of 3:
char* coreId = "3";
if(!setValue("coreIdNum", coreId)) {
FILE * pFile = fopen ("error.log","a");
fprintf(pFile, "Core id = %s", coreId);
}
You can call getValue() to find out which core process a client connection is assigned to, as in the following:
const char* coreId = getValue("coreIdNum");
FILE * pFile = fopen ("output.txt","a");
fprintf(pFile, "Core id = %s", coreId);

303
ADOBE MEDIA SERVER 5.0.6 DEVELOPER’S GUIDE
Developing Plug-ins
Last updated 9/4/2014
Load balancing
You can code the Access plug-in to monitor performance metrics, such as CPU usage and the size of the recorded
media cache, and balance loads accordingly. Distribution of applications across core processes is defined by numprocs
and scope elements in Application.xml. For example, if numprocs is 3 and scope is set to application, each
application gets three core processes to handle incoming connections. If a core process is overloaded, you can develop
an Access plug-in that ensures new incoming connections are not sent to the overloaded core process. One strategy is
to write plug-in code to do the following:
1Track statistics for each core process. Use the Administration APIs: getFileCacheStats(), getAppStats(),
getInstanceStats().
2Whenever a new client connects, the plug-in code must determine if the core process is overloaded. If it is, the
plug-in code determines the core ID of a different process (one that isn't overloaded) and sends the new connection
to that process.
Quality of Service (QoS)
To provide higher QoS to certain clients, you can use certain core processes exclusively for certain clients. For example,
suppose you want to provide the best possible performance to certain clients that are paying a premium subscription
fee to access content. You can develop an Access plug-in that distributes an application among six core processes and
monitors the statistics for each process. Different core processes handle the connections to the application, depending
on the client. Three core processes are reserved for the top clients; the remaining three are available to all other clients.
The plug-in monitors statistics for each process. If a particular process becomes overloaded, the plug-in ensures that
the overloaded process does not handle any new connections. The plug-in can route new connections to processes that
can handle them.
Configuring folder permissions on the server
The Access section of the Application.xml configuration file (located in each virtual host directory and possibly in
application directories) lets you configure folder-level permissions for the Access plug-in. If the FolderAccess
element is set to true, you cannot use the readAccess and writeAccess fields in the Access plug-in to set
permissions for individual files, you can only set permissions at the folder level. The default value is false, which lets
you set permissions for individual files, as in the following:
<!-- Controls libconnect.dll access configurations -->
<Application>
...
<Client>
...
<Access>
<FolderAccess>false</FolderAccess>
</Access>
...
...
</Application>
Developing an Authorization plug-in
Authorization plug-in overview
For information about developing an Authorization Plug-in, see Using plug-ins to configure and optimize Flash
Media Server 4.5 by Denis Bulichenko.

304
ADOBE MEDIA SERVER 5.0.6 DEVELOPER’S GUIDE
Developing Plug-ins
Last updated 9/4/2014
The Authorization plug-in authorizes client access to server events and fields associated with those events. Use the
Authorization plug-in to do the following:
•Authorize connections to the server
Note: The Access plug-in can also authorize connections and is more lightweight. For more information, see “Access
plug-in overview” on page 301.
•Authorize playing a stream or seeking in a stream
•Authorize a dynamic stream transition
•Authorize publishing a stream or recording a stream
•Map logical URLs to physical locations
For example, if the video player plays a stream “foo” —ns.play("myvideos/foo")— when the request is
processed by the server, this virtual name could map to c:\apps\vidapp\myvideos\. The Authorization plug-in lets
you remap this to a different physical location; for example, c:\myvideos\.
•Disconnect clients from the server
•Call a method in Server-Side ActionScript
•Access client statistics
•Identify when a new codec is discovered in a publishing stream
•Restrict the size of a recording by size or duration
Use the Authorization plug-in to deliver content to clients according to one or more of the following criteria:
•Geographic location
•Subscription level
•Stream origin
•Time and duration of a user’s access to specific streams
You can also use the Authorization plug-in to monitor stream quality of service (QoS). The plug-in reports live stream
QoS information to an external log file, which could then be read to another custom built tool.
More Help topics
Adobe Media Server Plug-In API Reference
Using multiple Authorization plug-ins
You can use a chain of plug-ins to sequentially perform actions on the incoming event. Allocate specific types of events
to individual plug-ins: for example, auth1.dll (or auth1.so) could authorize playing a stream; auth2.dll (or auth2.so)
could authorize publishing a stream, and so on.
Note: For cross-platform compatibility, use lowercase naming.
The server loads the plug-ins in alphabetical order. When the server processes client requests for events, it follows
alphabetical order. Each plug-in filters the incoming requests.
Writing the code in an Authorization plug-in
When the server loads an Authorization plug-in, it expects one of the following entry points:

305
ADOBE MEDIA SERVER 5.0.6 DEVELOPER’S GUIDE
Developing Plug-ins
Last updated 9/4/2014
FmsCreateAuthAdaptor() // Creates an Authorization plug-in.
FmsDestroyAuthAdaptor() // Destroys an Authorization plug-in.
FmsCreateAuthAdaptor2() // Creates an Authorization plug-in with versioning information.
FmsDestroyAuthAdaptor2() // Destroys an Authorization plug-in with versioning.
FmsCreateAuthAdaptor3() // Creates an Authorization plug-in with versioning information.
FmsDestroyAuthAdaptor3() // Destroys an Authorization plug-in with versioning.
Use the correct method for the version of the server you’re using. For more information, see “About versioning” on
page 296.
Implement the IFmsAuthAdaptor interface to process events as they occur. This class includes the functions
authorize(), notify(), and getEvents().
Once the plug-in is created, the server calls the getEvents() function to find out which events the plug-in wants to
process. The server calls getEvents() once, and the events are good for the lifetime of the plug-in.
Important: If the E_CODEC_CHANGE event is not excluded, the plug-in scans all messages to detect a codec change.
Subscribe to this event only as needed. This event is disabled in the Authorization plug-in sample code installed with the
server.
Some events must be authorized by the plug-in before the server executes them; other events only require the plug-in
to notify the server that the plug-in received notification of the event. When authorization events occur, the server calls
the authorize() function on the plug-in. When notification events occur, the server calls the notify() function on
the plug-in. You write code in these functions that runs when the events occur.
The server suspends operations until the plug-in calls the onAuthorize() function of the IFmsAuthServerContext
class. Call onAuthorize() in the last line of the authorize() function. Pass it a pointer to the event and a boolean
value indicating whether the event is authorized or not. This call completes any pending operations on the server.
The server continues operating when it calls the notify() function of the IFmsAuthServerContext class. Call
onNotify() in the last line of the notify() function. Pass it a pointer to the event. This call notifies the server that
notification is complete and the event is no longer needed.
There are two ways to process events: assign an action to an event, and write code in the authorize() and notify()
functions that processes the event.
Assigning actions to events
There are two actions you can assign to an event: IFmsDisconnectAction and IFmsNotifyAction. The
IFmsDisconnectAction disconnects one or more clients when the event occurs and the IFmsNotifyAction calls a
function on the Client object or the application object in a server-side script when the event occurs. You can add as
many actions as needed. Actions are executed in the order they are assigned right before the event is disposed.
To assign an action to an event, call addDisconnectAction() or addNotifyAction() from an IFmsAuthEvent
instance. Actions execute right before the event is disposed. If multiple actions are attached to an event, the actions
execute in the order in which they were attached.
The following code adds the IFmsNotifyAction instance pAction to the IFmsAuthEvent instance m_pAev. The
action calls method() in a server-side script and passes it the parameter 12345.

306
ADOBE MEDIA SERVER 5.0.6 DEVELOPER’S GUIDE
Developing Plug-ins
Last updated 9/4/2014
FmsVariant field;
//action to notify SSAS by calling "method" with U16 variable = 12345
//and I64 variable client id
if (m_pAev->getField(IFmsAuthEvent::F_CLIENT_ID, field) == IFmsAuthEvent::S_SUCCESS)
{
I64 clientId = field.i64;
IFmsNotifyAction* pAction = m_pAev->addNotifyAction("Notified by adaptor");
pAction->setClientId(field);
const char mtd[] = "method";
field.setString(reinterpret_cast<I8*>(const_cast<char*>(mtd)));
pAction->setMethodName(field);
field.setU16(12345);
///script does not work with I64 and returns invalid type
//should be preset to double or string
//field.setI64(clientId); //wrong!!!
field.setDouble((double)clientId);
pAction->addParam(field);
}
Note: The previous sample code is excerpted from the AuthModule.cpp file in the rootinstall/samples/plugins/auth folder.
You can call addParam() on a IFmsNotifyAction instance to pass parameters to a method. You must define the
method in a server-side script. If you pass a value to setClientId(), the method is called on the server-side Client
object. If you don’t pass a value to setClientId(), the method is called on the server-side application object. For
example, the following Server-Side ActionScript code defines someMethod() on the Client object:
application.onConnect = function(client){
client.someMethod = function(msg){
trace("inside someMethod");
}
}
Mapping stream paths
Important: Use the characters “%3A” to escape a colon in a URL parameter. For example, if the URL is "rtmp://ip-
addr/clientid/filename?foo=Smith:Joe", change it to "rtmp://ip-addr/clientid/filename?foo=Smith%3AJoe".
Use the authorize() function to remap virtual stream paths to different physical locations. For example, if client 1
and client 2 both request to play the stream foo.flv, two E_FILENAME_TRANSFORM events are called, and you can remap
the stream differently for each client. For example, client 1 could remap stream foo to c:\yourpath1\foo.flv and client
2 could remap stream foo to c:\yourpath2\foo.flv.
To map a logical stream to a different physical path, set a parameter in the Application.xml file, as follows:
<Application>
...
<StreamManager>
...
<QualifiedStreamsMapping enable="true" />
Every time a client plays or publishes a stream or executes a Stream call in Server-Side ActionScript, an
E_FILENAME_TRANSFORM event occurs. The E_FILENAME_TRANSFORM event lets you modify the F_STREAM_PATH
property to change the path to a stream’s physical location.
The E_FILENAME_TRANSFORM event is a link between the Authorization plug-in and the File plug-in. The path to the
physical location of a stream that you specify in this event is passed to the File plug-in for use in certain file operations.

307
ADOBE MEDIA SERVER 5.0.6 DEVELOPER’S GUIDE
Developing Plug-ins
Last updated 9/4/2014
Events occur in the following order:
1E_PLAY or E_PUBLISH The logical stream name may be changed here.
2E_FILENAME_TRANSFORM The resulting physical stream name may be changed here.
3Playback occurs.
4E_STOP or E_UNPUBLISH
About the E_FILENAME_TRANSFORM event
The behavior of the E_FILENAME_TRANSFORM event has improved with each release of Adobe Media Server.
Version2.5.2 the E_FILENAME_TRANSFORM event is called once for each stream in a application instance. Client fields
are not available. For example, if client1 plays the file foo.flv from the application streamtest/inst1, the
E_FILENAME_TRANSFORM event is called with the physical path to foo.flv (c:\defaultpath\foo.flv). Suppose you remap
the physical path to c:\yourpath\yourfoo.flv. The E_FILENAME_TRANSFORM for the application streamtest/inst1 foo.flv
is not called again and the new path, c:\yourpath\yourfoo.flv, is used for all clients.
Version 2.5.3 The E_FILENAME_TRANSFORM event is called for each client every time they play or publish a stream.
Client fields are available. For example, suppose client1 and client2 both play the file foo.flv. Two
E_FILENAME_TRANSFORM events are called and you can remap them for each client.
Version 3.0 The behavior of the E_FILENAME_TRANSFORM event was improved to handle playlists. In the case of a
playlist, a client plays many clips in a row. The E_FILENAME_TRANSFORM event is called every time a clip is played, as
in the following sequence:
play("clip0") / E_FILENAME_TRANSFORM / stop()
play("clip1") / E_FILENAME_TRANSFORM / stop()
The E_FILENAME_TRANSFORM event is not called when a client plays the same clip multiple times in row in a playlist,
as in the following sequence:
play("clip0") / E_FILENAME_TRANSFORM / stop()
play("clip1") / E_FILENAME_TRANSFORM / stop()
play("clip0") / E_FILENAME_TRANSFORM / stop()
play("clip0") / stop()
play("clip1")/ E_FILENAME_TRANSFORM / stop()
Version 3.5 The E_FILENAME_TRANSFORM event is called every time a client plays a new clip in a playlist, as in the
following sequence:
play("clip0") / E_FILENAME_TRANSFORM / stop()
play("clip1") / E_FILENAME_TRANSFORM / stop()
play("clip0") / stop()
play("clip0") / stop()
play("clip1") / stop()
To use the E_FILENAME_TRANSFORM event to remap a path when a client plays the same clip multiple times in a playlist,
set <QualifiedStreamsMapping enable="true"/> in the Application.xml file. The following is an example of the
sequence:
play("clip0") / E_FILENAME_TRANSFORM - Path 1/ stop()
play("clip1") / E_FILENAME_TRANSFORM - Path 1/ stop()
play("clip0") / E_FILENAME_TRANSFORM - Path 2/ stop()
play("clip0") / E_FILENAME_TRANSFORM - Path 3/ stop()
play("clip1") / E_FILENAME_TRANSFORM - Path 2/ stop()
When <QualifiedStreamsMapping enable="false"/>, the E_FILENAME_TRANSFORM event is called only the first
time a clip plays.

308
ADOBE MEDIA SERVER 5.0.6 DEVELOPER’S GUIDE
Developing Plug-ins
Last updated 9/4/2014
Differences between edge and origin deployments
Authorization plug-ins can be deployed on origin servers and edge servers; the functionality is different in each case.
Origin When an Authorization plug-in is installed on an origin server, the E_PLAY (for a live stream) or
E_LOADSEGMENT (for recorded stream) event is called to play the clip. To block play for a recorded stream, process the
E_LOADSEGMENT event rather than E_PLAY.
Edge (Core) Server-Side ActionScript is not executed on edge servers, so the NOTIFY action cannot be used and should
always return a failure status.
Handling errors
Authorization plug-ins are loaded by the FMSCore process. Exceptions inside a plug-in crash FMSCore.
Important: Authorization plug-ins must handle exceptions to prevent FMSCore from crashing.
Specify a reason string for an authorization failure
Adobe Media Server 4.0
In the Authorization plug-in, specify a reason string for the authorization failure. In the Authorization plug-in, the
Interface IFmsAuthServerContext has been extended to IFmsAuthServerContext2. This interface overrides the
IFmsAuthServerContext::OnAuthorize method to include the AuthFailureDesc structure. Use the AuthFailureDesc
structure to specify a reason string for the authorization failure, error code, and status code. To use this feature use
FmsCreateAuthAdaptor3() and pass it IFmsAuthServerContext2 as the parameter.
The server uses the IFmsAuthServerContext2::StatusCode enum to send the client a NetStatus message about the
failure.
For more information, see the IFmsAuthServerContext2 class in the Flash Media Server Plug-in API Reference.
Accessing client statistics
Accessing client statistics through the Authorization plug-in in the C++ layer can provide better server performance
than accessing client statistics in a server-side script. The Authorization plug-in aggregates requests before sending
them to the server.
The following client statistics are defined in the FmsClientStats struct in the FmsAuthAdaptor.h file:
To access client statistics, implement the FmsCreateAuthAdaptor2() function. For an example, see the
AuthModule.cpp file installed to RootInstall\samples\plugins\auth.
Statistic Description
bytes_in Total number of bytes received.
bytes_out Total number of bytes sent.
msg_in Total number of messages received.
msg_out Total number of messages sent.
msg_dropped Total number of dropped messages.

309
ADOBE MEDIA SERVER 5.0.6 DEVELOPER’S GUIDE
Developing Plug-ins
Last updated 9/4/2014
When a client connects to the server, the server sends an E_CONNECT event to the Authorization plug-in. After the
plug-in receives the E_CONNECT event, you can call IFmsAuthServerContext::getClientStats() to get statistics.
Every event, such as E_PLAY and E_STOP, contains a field called F_CLIENT_STATS_HANDLE. Pass this client stats handle
back to the server in the getClientStats() call. If you use F_CLIENT_STATS_HANDLE during any notification event
(except E_CONNECT and E_DISCONNECT), you do not need to save the handle.
To verify that a client is connected, check the return status of the call to getClientStats(). This check is especially
necessary if you are using multiple Authorization plug-ins. For example, if plug-in A subscribes to the E_CONNECT
event and plug-in B subscribes to the E_DISCONNECT event. When the client disconnects from the server, the adaptor
A does not receive the E_DISCONNECT message.
When the server receives a disconnect message from the client, it notifies the Authorization plug-in with an
E_DISCONNECT event. The F_CLIENT_STATS_HANDLE field is invalid after the E_DISCONNECT event.
Smart seeking
Flash Media Server 3.5.3
When the client NetStream.inBufferSeek property is true, “smart seek” is enabled. Smart seek lets Flash Player
seek within a back buffer and a foward buffer. The player sends commands to Adobe Media Server to manage the
buffer. The commands are “seekRaw”, “startTransmit”, and “stopTransmit”.
When smart seek is enabled and a client calls NetStream.seek(), the Authorization plug-in receives an
E_CLIENT_SEEK event. Use this event to write seek events to a log. The F_STREAM_SEEK_POSITION property is
available for this event. This read-only property is the position to which the client wants to seek.
Note: The E_CLIENT_SEEK event is a notification event. You cannot use it to prevent the client from seeking within the
client-side buffer.
The E_START_TRANSMIT event is a notification and authorization event. The E_STOP_TRANSMIT event is a notification
event. Use the E_START_TRANSMIT event to block the client from asking the server to start sending data.
The Authorization plug-in receives an E_START_TRANSMIT event when the Flash Player buffer falls below a threshold.
This command asks the server to transmit more data because the buffer is running low. The
F_STREAM_TRANSMIT_POSITION property is available for this event. This read-only property is the position (in
milliseconds) from which the client wants the server to start transmission.The Authorization plug-in receives an
E_STOP_TRANSMIT event when the Flash Player buffer is above a threshold. This command asks the server to suspend
transmission because there is enough data in the buffer. The F_STREAM_TRANSMIT_POSITION property is available
during this event. This read-only property is the position (in milliseconds) of the data at the end of the client buffer
when the client sends a stopTransmit command.
Stream reconnecting
Flash Media Server 3.5.3
Flash Media Server 3.5.3 and Flash Player 10.1 allow you to build applications that reconnect streams seamlessly when
a connection is dropped or when a client switches from a wired to a wireless network connection.
Use the E_PLAY event to capture information from the F_STREAM_OFFSET property and the F_STREAM_TRANSITION
property. The F_STREAM_OFFSET property (read-only) indicates where to resume streaming after a reconnection, in
seconds.The F_STREAM_TRANSITION property (read/write) indicates the transition mode sent by the client in the
NetStream.play2() call. The values for Stream Reconnect are "resume" and "appendAndWait".

310
ADOBE MEDIA SERVER 5.0.6 DEVELOPER’S GUIDE
Developing Plug-ins
Last updated 9/4/2014
More Help topics
“Reconnecting streams when a connection drops” on page 219
Accessing events and fields
The server provides an interface to an event object, IFmsAuthEvent, that gives the plug-in access to events. The
plug-in has access to certain fields during each event. Not all fields are accessible during all events and each field is
either read-only or read/write.
Fields can pertain to an application, a client, or a stream. For example, the value of fields with a name in the form
F_CLIENT_*, such as F_CLIENT_URI and F_CLIENT_REDIRECT_URI, come from a client. An event object associated
with a client event contains values for these fields.
Events associated with server-side scripts aren’t necessarily associated with a client, and therefore do not always
contain values for F_CLIENT_* fields. If it is necessary to have values for the F_CLIENT_* fields from server-side script
calls, the server-side script call must be invoked by a method attached to a Client object. For example, the play()
method invokes the E_FILENAME_TRANSFORM event.
Authorization plug-in events
The following table lists the Authorization plug-in events and whether the event is available in the notify() function,
the authorize() function, or both:
Event name Server
availability
Notify or Authorize Description
E_APPSTART 2.5 notify Start an application.
E_APPSTOP 2.5 notify Stop an application.
E_CONNECT 2.5 notify, authorize A client established a TCP control connection to
the server.
E_DISCONNECT 2.5 notify The TCP connection between the client and the
server is broken.
E_FILENAME_TRANSFORM 2.5 notify, authorize The server has requested permission to map the
logical filename requested by a client.
E_PLAY 2.5 notify, authorize Play a stream.
E_STOP 2.5 notify Stop a stream.
E_SEEK 2.5 notify, authorize Seek a stream.
E_PAUSE 2.5 notify, authorize Pause delivery of a stream.
E_PUBLISH 2.5 notify, authorize Publish a stream.
E_UNPUBLISH 2.5 notify Unpublish a stream.
E_LOADSEGMENT 2.5 notify, authorize Load a segment.
E_ACTION 2.5 N/A An action attached to an event was executed.
E_CODEC_CHANGE 3.5 notify A new codec is discovered in the stream.
E_RECORD 3.5 notify, authorize Record a stream.
E_RECORD_STOP 3.5 notify Stop recording a stream.
E_CLIENT_PAUSE 3.5 notify Client smart-pauses a stream.

311
ADOBE MEDIA SERVER 5.0.6 DEVELOPER’S GUIDE
Developing Plug-ins
Last updated 9/4/2014
Authorization plug-in fields
The following table lists the Authorization plug-in fields:
E_SWF_VERIFY 3.5.3 notify, authorize Called before the SWF Verification process begins.
Use this event to disallow the verification which
terminates the connection. You can also use this
event to provide a digest for the calling SWF. Use
this mechanism to manage an inventory of SWFs
that sit outside the server and aren't cached and
managed by the server. This event is called
multiple times if the SWF is large enough to
require partial matching.
E_SWF_VERIFY_COMPLETE 3.5.3 notify SWF Verification has completed successfully for
this client.
E_CLIENT_SEEK 3.5.3 notify Client smart-seeks a stream.
E_START_TRANSMIT 3.5.3 notify, authorize Start stream transmission.
E_STOP_TRANSMIT 3.5.3 notify Stop stream transmission.
E_MAXEVENT 2.5 N/A The total number of events in the enum field.
Field Server
version
Data type Description
F_APP_INST 2.5 String The application instance name.
F_APP_NAME 2.5 String The application name.
F_APP_URI 2.5 String The URI of the application to which the client
connected. The value does not include the server
name or port information.
F_CLIENT_AMF_ENCODI
NG
2.5 I8 The AMF (Action Message Format) encoding of the
client.
F_CLIENT_AUDIO_CODE
CS
2.5 I32 A list of audio codecs supported on the client.
F_CLIENT_AUDIO_SAMP
LE_ACCESS
2.5 String Gives the client access to raw, uncompressed audio
data from streams in the specified folders.
F_CLIENT_AUDIO_SAMP
LE_ACCESS_LOCK
2.5 I8 A Boolean value preventing a server-side script from
setting the Client.audioSampleAccess property
(true), or not (false).
F_CLIENT_CONNECT_TI
ME
3.5.3 I64 The time the client connected to the server, in
seconds since Jan 1, 1970. You can retrieve this value
from any event that has an associated client. The
getField() function returns S_SUCCESS if this field
is successfully retrieved.
F_CLIENT_DIFFSERV_B
ITS
3.5.2 U8 DSCP bits to be used in setsockopt for a particular
NetConnection.
F_CLIENT_DIFFSERV_M
ASK
3.5.2 U8 DSCP mask to be used in setsockopt.
F_CLIENT_FAR_ID 3.5 String The far ID of the client
Event name Server
availability
Notify or Authorize Description

312
ADOBE MEDIA SERVER 5.0.6 DEVELOPER’S GUIDE
Developing Plug-ins
Last updated 9/4/2014
F_CLIENT_FAR_NONCE 3.5 String The far nonce of the client.
F_CLIENT_FORWARDED_
FOR
4.0 String Any x-forwarded-for header included by an HTTP
Proxy on an RTMPT session.
F_CLIENT_ID 2.5 I64 A 64-bit integer value that uniquely identifies the
client (this value is not unique across processes).
F_CLIENT_IP 2.5 String The client IP address.
F_CLIENT_NEAR_ID 3.5 String The near ID of the client
F_CLIENT_NEAR_NONCE 3.5 String The near nonce of the client.
F_CLIENT_PAGE_URL 2.5 String The URL of the client SWF file. (This field is set only
when clients use Flash Player 8 or above).
F_CLIENT_PROTO 2.5 String The protocol the client used to connect to the server.
F_CLIENT_PROTO_VER 3.5 String The version of the protocol that the client used to
connect to the server.
F_CLIENT_READ_ACCES
S
2.5 String A string of directories containing application
resources (shared objects and streams) to which the
client has read access.
F_CLIENT_READ_ACCES
S_LOCK
2.5 I8 A Boolean value preventing a server-side script from
setting the Client.readAccess property (true),
or not (false).
F_CLIENT_REDIRECT_U
RI
3.0 String A URI to redirect the connection to.
F_CLIENT_REFERRER 2.5 String The URL of the SWF file or server where this
connection originated.
F_CLIENT_SECURE 2.5 I8 A Boolean value indicating whether a connection is
secure (true) or not (false).
F_CLIENT_STATS_HAND
LE
3.5 I64 A string that uniquely identifies the client stats
handle.
F_CLIENT_SWFV_DEPTH 3.5.3 I64 During SWF Verification, the 64-bit size of the original
SWF that corresponds with the digest.
F_CLIENT_SWFV_DIGES
T
3.5.3 U8* During SWF Verification, the 32-byte hash digest, as a
byte buffer.
F_CLIENT_SWFV_EXCEP
TION
3.5.3 I8 A Boolean value indicating whether this client is an
exception to SWF Verification (true) or not (false).
Set this value to true if you want a client who would
normally be subject to SWF Verification to be
excepted from that requirement. This field is similar to
the UserAgentExceptions function in the
Application.xml configuration file but in this case you
except a single client.
F_CLIENT_SWFV_RESUL
T
4.0 None The completed result of a SWF Verification attempt.
Possible values are in the eSWFMatch enum.
F_CLIENT_SWFV_TTL 3.5.3 I32 During SWF Verification, the time to live (in seconds)
of each SWF hash in the cache.
F_CLIENT_SWFV_VERSI
ON
3.5.3 I8 During SWF Verification, the version of the protocol.
Field Server
version
Data type Description

313
ADOBE MEDIA SERVER 5.0.6 DEVELOPER’S GUIDE
Developing Plug-ins
Last updated 9/4/2014
F_CLIENT_TYPE 2.5 I32 The client type. Possible values are Normal, Group,
GroupElement (a client connected through an edge
server), Service, All.
F_CLIENT_URI 2.5 String The URI the client specified to connect to the server.
The value does not include the application name or
instance name.
F_CLIENT_URI_STEM 2.5 String The stem of the URI the client specified to connect to
the server, without the query string.
F_CLIENT_USER_AGENT 2.5 String The client user-agent.
F_CLIENT_USERDATA 3.5.3 U8* Use this field to associate some user data with a client.
Set this field from any authoization event that has an
associated client. Retrieve this field in any subsequent
event associated with the client. The getField()
and setField() functions return S_SUCCESS if user
data is successfully get or set. You can set anything
that can be stored in an FmsVariant. When setting
data, the server makes a copy before saving. When
getting data, the plug-in should make a copy if the
data needs to remain valid past the lifetime of the
event.
F_CLIENT_VHOST 2.5 String The virtual host of the application the client is
connected to.
F_CLIENT_VIDEO_CODE
CS
2.5 I32 A list of video codecs supported on the client.
F_CLIENT_VIDEO_SAMP
LE_ACCESS
2.5 String Gives the client access to raw, uncompressed video
data from streams in the specified folders.
F_CLIENT_VIDEO_SAMP
LE_ACCESS_LOCK
2.5 I8 A Boolean value preventing a server-side script from
setting the Client.videoSampleAccess property
(true), or not (false).
F_CLIENT_WRITE_ACCE
SS
2.5 String A string of directories containing application
resources (shared objects and streams) to which the
client has write access.
F_CLIENT_WRITE_ACCE
SS_LOCK
2.5 I8 A Boolean value preventing a server-side script from
setting the Client.writeAccess property (true),
or not (false)."
F_MAXFIELD 3.5 None The total number of fields in the enum field.
F_OLD_STREAM_NAME 3.5 String The old stream for a switch or a swap.
F_OLD_STREAM_QUERY 3.5 String The old stream query string for a switch or a swap.
F_OLD_STREAM_TYPE 3.5 String The old stream type for a switch or a swap.
F_SEGMENT_END 3.0 I64 The segment end boundary in bytes; available in
E_LOADSEGMENT only.
F_SEGMENT_START 3.0 I64 The segment start boundary in bytes; available in
E_LOADSEGMENT only.
F_STREAM_CODEC 3.5 U16 The codec value discovered in the stream; available in
E_CODEC only.
Field Server
version
Data type Description

314
ADOBE MEDIA SERVER 5.0.6 DEVELOPER’S GUIDE
Developing Plug-ins
Last updated 9/4/2014
F_STREAM_CODEC_TYPE 3.5 U16 The codec type discovered in the stream; available in
E_CODEC only.
F_STREAM_ID 3.5 I32 The stream ID.
F_STREAM_IGNORE 2.5 I8 A Boolean value indicating whether to ignore
timestamps (true), or not (false).
F_STREAM_LENGTH 2.5 Float The length of the stream. For stream events other
than E_PLAY, use the F_STREAM_SEEK_POSITION,
F_SEGMENT_START and F_SEGMENT_END fields.
F_STREAM_LIVE_EVENT 3.0 None Use this field to assign a stream to a live event. The
server uses the live event to place the stream into the
HTTP Dynamic Streaming manifest file. This field is
the same as the Server-Side ActionScript
Stream.liveEvent property.
F_STREAM_LIVE_PUBLI
SH_PENDING
3.5.2 I32 A Boolean value. If false, when a client plays a
stream and issues a SWITCH transition and the stream
is not yet published the client receives a
NetStream.Play.StreamNotFound message. If
true, the client does not receive the message
because the server waits for the stream to publish.
F_STREAM_NAME 2.5 String The stream name.
F_STREAM_OFFSET 3.8 Float The offset value when F_STREAM_TRANSITION is
offset.
F_STREAM_PATH 2.5 String The physical path of the stream on the server. When
the plug-in is deployed on an edge server, the
physical path of the cache.
F_STREAM_PAUSE 3.0 I8 A Boolean value indicating whether to pause or
unpause; available in E_PAUSE only.
F_STREAM_PAUSE_TIME 3.0 Float The time at which a stream is paused; available in
E_PAUSE only.
F_STREAM_PAUSE_TOGG
LE
3.0 I8 The stream pause toggle; available in E_PAUSE only.
F_STREAM_POSITION 2.5 Float The position of the stream; for stream events other
than E_PLAY, use the F_STREAM_SEEK_POSITION,
F_STREAM_PAUSE_TIME, F_SEGMENT_START, and
F_SEGMENT_END fields.
F_STREAM_PUBLISH_BR
OADCAST
3.0 I32 Broadcast or multicast; currently not supported.
F_STREAM_PUBLISH_TY
PE
3.0 I32 The stream publishing type (available for E_PUBLISH
only): 0 for record, 1 for record and append to existing
stream, 2 for record and append to existing stream
while preserving gaps in the recording, -1 for live.
F_STREAM_QUERY 2.5 String A query appended to a stream, for example,
streamName?streamQuery.
F_STREAM_RECORD_MAX
DURATION
3.5 Float The maximum duration (in seconds) of a stream
recording; available in E_RECORD only.
F_STREAM_RECORD_MAX
SIZE
3.5 Float The maximum size (in kb) of a stream recording;
available in E_RECORD only.
Field Server
version
Data type Description

315
ADOBE MEDIA SERVER 5.0.6 DEVELOPER’S GUIDE
Developing Plug-ins
Last updated 9/4/2014
Authorization plug-in events and fields support matrix
The following tables shows the fields you can access from each event. A single table is too wide to display because there
are too many events. Therefore, the matrix is divided into mulitple tables. Each table lists all the fields and some events.
F_STREAM_RESET 3.0 I8 A Boolean value indicating whether to allow adding a
stream to a playlist (true), or not (false); for stream
events other than E_PLAY, use
F_STREAM_PUBLISH_TYPE.
F_STREAM_SEEK_POSIT
ION
3.0 I8 The position to which the stream should seek;
available in E_SEEK only.
F_STREAM_TRANSITION 3.5 String The transition mode string for a switch or a swap.
F_STREAM_TRANSMIT_P
OSITION
3.0 Float The position to which the stream should start/stop;
available in E_START_TRANSMIT and
E_STOP_TRANSMIT only.
F_STREAM_TYPE 2.5 String The file type of the stream.
E_APPSTART E_APPSTOP E_CONNECT E_DISCONNECT
F_APP_INST Read-only Read-only Read-only Read-only
F_APP_NAME Read-only Read-only Read-only Read-only
F_APP_URI Read-only Read-only Read-only Read-only
F_CLIENT_AMF_ENCO
DING
N/A N/A Read-only Read-only
F_CLIENT_AUDIO_CO
DECS
N/A N/A Read-only Read-only
F_CLIENT_AUDIO_SA
MPLE_ACCESS
N/A N/A Read/Write Read-only
F_CLIENT_AUDIO_SA
MPLE_ACCESS_LOCK
N/A N/A Read/Write Read-only
F_CLIENT_CONNECT_
TIME
N/A N/A Read-only Read-only
F_CLIENT_DIFFSERV
_BITS
N/A N/A Read/Write N/A
F_CLIENT_DIFFSERV
_MASK
N/A N/A Read/Write N/A
F_CLIENT_FAR_ID N/A N/A Read-only Read-only
F_CLIENT_FAR_NONC
E
N/A N/A Read-only Read-only
F_CLIENT_FORWARDE
D_FOR
N/A N/A Read-only Read-only
F_CLIENT_ID N/A N/A Read-only Read-only
F_CLIENT_IP N/A N/A Read-only Read-only
F_CLIENT_NEAR_ID N/A N/A Read-only Read-only
Field Server
version
Data type Description

316
ADOBE MEDIA SERVER 5.0.6 DEVELOPER’S GUIDE
Developing Plug-ins
Last updated 9/4/2014
F_CLIENT_NEAR_NON
CE
N/A N/A Read-only Read-only
F_CLIENT_PAGE_URL N/A N/A Read-only Read-only
F_CLIENT_PROTO N/A N/A Read-only Read-only
F_CLIENT_PROTO_VE
R
N/A N/A Read-only Read-only
F_CLIENT_READ_ACC
ESS
N/A N/A Read/Write Read-only
F_CLIENT_READ_ACC
ESS_LOCK
N/A N/A Read/Write Read-only
F_CLIENT_REDIRECT
_URI
N/A N/A Read/Write Read-only
F_CLIENT_REFERRER N/A N/A Read-only Read-only
F_CLIENT_SECURE N/A N/A Read-only Read-only
F_CLIENT_STATS_HA
NDLE
N/A N/A Read-only Read-only
F_CLIENT_SWFV_DEP
TH
N/A N/A N/A N/A
F_CLIENT_SWFV_DIG
EST
N/A N/A N/A N/A
F_CLIENT_SWFV_EXC
EPTION
Read-only Read-only Read/Write Read-only
F_CLIENT_SWFV_RES
ULT
N/A N/A N/A N/A
F_CLIENT_SWFV_TTL N/A N/A N/A N/A
F_CLIENT_SWFV_VER
SION
N/A N/A N/A N/A
F_CLIENT_TYPE N/A N/A Read-only Read-only
F_CLIENT_URI N/A N/A Read-only Read-only
F_CLIENT_URI_STEM N/A N/A Read-only Read-only
F_CLIENT_USER_AGE
NT
N/A N/A Read-write Read-only
F_CLIENT_USERDATA N/A N/A Read-write Read-only
F_CLIENT_VHOST N/A N/A Read-only Read-only
F_CLIENT_VIDEO_CO
DECS
N/A N/A Read-only Read-only
F_CLIENT_VIDEO_SA
MPLE_ACCESS
N/A N/A Read/Write Read-only
F_CLIENT_VIDEO_SA
MPLE_ACCESS_LOCK
N/A N/A Read/Write Read-only
E_APPSTART E_APPSTOP E_CONNECT E_DISCONNECT

317
ADOBE MEDIA SERVER 5.0.6 DEVELOPER’S GUIDE
Developing Plug-ins
Last updated 9/4/2014
F_CLIENT_WRITE_AC
CESS
N/A N/A Read/Write Read-only
F_CLIENT_WRITE_AC
CESS_LOCK
N/A N/A Read/Write Read-only
F_MAXFIELD N/A N/A N/A N/A
F_OLD_STREAM_NAME N/A N/A N/A N/A
F_OLD_STREAM_QUER
Y
N/A N/A N/A N/A
F_OLD_STREAM_TYPE N/A N/A N/A N/A
F_SEGMENT_END N/A N/A N/A N/A
F_SEGMENT_START N/A N/A N/A N/A
F_STREAM_CODEC N/A N/A N/A N/A
F_STREAM_CODEC_TY
PE
N/A N/A N/A N/A
F_STREAM_ID N/A N/A N/A N/A
F_STREAM_IGNORE N/A N/A N/A N/A
F_STREAM_LENGTH N/A N/A N/A N/A
F_STREAM_LIVE_EVE
NT
N/A N/A N/A N/A
F_STREAM_LIVE_PUB
LISH_PENDING
N/A N/A N/A N/A
F_STREAM_NAME N/A N/A N/A N/A
F_STREAM_OFFSET N/A N/A N/A N/A
F_STREAM_PATH N/A N/A N/A N/A
F_STREAM_PAUSE N/A N/A N/A N/A
F_STREAM_PAUSE_TI
ME
N/A N/A N/A N/A
F_STREAM_PAUSE_TO
GGLE
N/A N/A N/A N/A
F_STREAM_POSITION N/A N/A N/A N/A
F_STREAM_PUBLISH_
BROADCAST
N/A N/A N/A N/A
F_STREAM_PUBLISH_
TYPE
N/A N/A N/A N/A
F_STREAM_QUERY N/A N/A N/A N/A
F_STREAM_RECORD_M
AXDURATION
N/A N/A N/A N/A
F_STREAM_RECORD_M
AXSIZE
N/A N/A N/A N/A
F_STREAM_RESET N/A N/A N/A N/A
E_APPSTART E_APPSTOP E_CONNECT E_DISCONNECT

318
ADOBE MEDIA SERVER 5.0.6 DEVELOPER’S GUIDE
Developing Plug-ins
Last updated 9/4/2014
The following table displays all the fields and more events:
F_STREAM_SEEK_POS
ITION
N/A N/A N/A N/A
F_STREAM_TRANSITI
ON
N/A N/A N/A N/A
F_STREAM_TRANSMIT
_POSITION
N/A N/A N/A N/A
F_STREAM_TYPE N/A N/A N/A N/A
E_FILENAME_TRAN
SFORM
E_PLAY E_STOP
F_APP_INST Read-only Read-only Read-only
F_APP_NAME Read-only Read-only Read-only
F_APP_URI Read-only Read-only Read-only
F_CLIENT_AMF_ENCODI
NG
Read-only Read-only Read-only
F_CLIENT_AUDIO_CODE
CS
Read-only Read-only Read-only
F_CLIENT_AUDIO_SAMP
LE_ACCESS
Read-only Read-only Read-only
F_CLIENT_AUDIO_SAMP
LE_ACCESS_LOCK
Read-only Read-only Read-only
F_CLIENT_CONNECT_TI
ME
Read-only Read-only Read-only
F_CLIENT_DIFFSERV_B
ITS
N/A Read/Write Read-only
F_CLIENT_DIFFSERV_M
ASK
N/A Read/Write Read-only
F_CLIENT_FAR_ID Read-only Read-only Read-only
F_CLIENT_FAR_NONCE Read-only Read-only Read-only
F_CLIENT_FORWARDED_
FOR
Read-only Read-only Read-only
F_CLIENT_ID Read-only Read-only Read-only
F_CLIENT_IP Read-only Read-only Read-only
F_CLIENT_NEAR_ID Read-only Read-only Read-only
F_CLIENT_NEAR_NONCE Read-only Read-only Read-only
F_CLIENT_PAGE_URL Read-only Read-only Read-only
F_CLIENT_PROTO Read-only Read-only Read-only
F_CLIENT_PROTO_VER Read-only Read-only Read-only
E_APPSTART E_APPSTOP E_CONNECT E_DISCONNECT

319
ADOBE MEDIA SERVER 5.0.6 DEVELOPER’S GUIDE
Developing Plug-ins
Last updated 9/4/2014
F_CLIENT_READ_ACCES
S
Read-only Read-only Read-only
F_CLIENT_READ_ACCES
S_LOCK
Read-only Read-only Read-only
F_CLIENT_REDIRECT_U
RI
Read-only Read-only Read-only
F_CLIENT_REFERRER Read-only Read-only Read-only
F_CLIENT_SECURE Read-only Read-only Read-only
F_CLIENT_STATS_HAND
LE
Read-only Read-only Read-only
F_CLIENT_SWFV_DEPTH N/A N/A N/A
F_CLIENT_SWFV_DIGES
T
N/A N/A N/A
F_CLIENT_SWFV_EXCEP
TION
Read-only Read-only Read-only
F_CLIENT_SWFV_RESUL
T
N/A N/A N/A
F_CLIENT_SWFV_TTL N/A N/A N/A
F_CLIENT_SWFV_VERSI
ON
N/A N/A N/A
F_CLIENT_TYPE Read-only Read-only Read-only
F_CLIENT_URI Read-only Read-only Read-only
F_CLIENT_URI_STEM Read-only Read-only Read-only
F_CLIENT_USER_AGENT Read-write Read-write Read-only
F_CLIENT_USERDATA Read-write Read-write Read-only
F_CLIENT_VHOST Read-only Read-only Read-only
F_CLIENT_VIDEO_CODE
CS
Read-only Read-only Read-only
F_CLIENT_VIDEO_SAMP
LE_ACCESS
Read-only Read-only Read-only
F_CLIENT_VIDEO_SAMP
LE_ACCESS_LOCK
Read-only Read-only Read-only
F_CLIENT_WRITE_ACCE
SS
Read-only Read-only Read-only
F_CLIENT_WRITE_ACCE
SS_LOCK
Read-only Read-only Read-only
F_MAXFIELD N/A N/A N/A
F_OLD_STREAM_NAME N/A Read-write N/A
F_OLD_STREAM_QUERY N/A Read-write N/A
F_OLD_STREAM_TYPE N/A Read-write N/A
E_FILENAME_TRAN
SFORM
E_PLAY E_STOP

320
ADOBE MEDIA SERVER 5.0.6 DEVELOPER’S GUIDE
Developing Plug-ins
Last updated 9/4/2014
The following table displays all the fields and more events:
F_SEGMENT_END N/A N/A N/A
F_SEGMENT_START N/A N/A N/A
F_STREAM_CODEC N/A N/A N/A
F_STREAM_CODEC_TYPE N/A N/A N/A
F_STREAM_ID Read-only Read-only Read-only
F_STREAM_IGNORE Read-only Read-write Read-only
F_STREAM_LENGTH Read-only Read-write Read-only
F_STREAM_LIVE_EVENT N/A N/A N/A
F_STREAM_LIVE_PUBLI
SH_PENDING
N/A Read-write N/A
F_STREAM_NAME N/A Read-write N/A
F_STREAM_OFFSET N/A Read-only N/A
F_STREAM_PATH Read-write Read-only Read-only
F_STREAM_PAUSE N/A N/A N/A
F_STREAM_PAUSE_TIME N/A N/A N/A
F_STREAM_PAUSE_TOGG
LE
N/A N/A N/A
F_STREAM_POSITION Read-only Read-write Read-only
F_STREAM_PUBLISH_BR
OADCAST
N/A N/A N/A
F_STREAM_PUBLISH_TY
PE
N/A N/A N/A
F_STREAM_QUERY Read-only Read-write Read-only
F_STREAM_RECORD_MAX
DURATION
N/A N/A N/A
F_STREAM_RECORD_MAX
SIZE
N/A N/A N/A
F_STREAM_RESET Read-only Read-write Read-only
F_STREAM_SEEK_POSIT
ION
N/A N/A N/A
F_STREAM_TRANSITION N/A Read-write N/A
F_STREAM_TRANSMIT_P
OSITION
N/A N/A N/A
F_STREAM_TYPE Read-write Read-write Read-only
E_FILENAME_TRAN
SFORM
E_PLAY E_STOP

321
ADOBE MEDIA SERVER 5.0.6 DEVELOPER’S GUIDE
Developing Plug-ins
Last updated 9/4/2014
E_CLIENT_SEEK E_SEEK E_CLIENT_PAUSE E_PAUSE
F_APP_INST Read-only Read-only N/A Read-only
F_APP_NAME Read-only Read-only N/A Read-only
F_APP_URI Read-only Read-only N/A Read-only
F_CLIENT_AMF_ENCODI
NG
Read-only Read-only N/A Read-only
F_CLIENT_AUDIO_CODE
CS
Read-only Read-only N/A Read-only
F_CLIENT_AUDIO_SAMP
LE_ACCESS
Read-only Read-only N/A Read-only
F_CLIENT_AUDIO_SAMP
LE_ACCESS_LOCK
Read-only Read-only N/A Read-only
F_CLIENT_CONNECT_TI
ME
Read-only Read-only N/A Read-only
F_CLIENT_DIFFSERV_B
ITS
N/A N/A N/A N/A
F_CLIENT_DIFFSERV_M
ASK
N/A N/A N/A N/A
F_CLIENT_FAR_ID Read-only Read-only N/A Read-only
F_CLIENT_FAR_NONCE Read-only Read-only N/A Read-only
F_CLIENT_FORWARDED_
FOR
Read-only Read-only N/A Read-only
F_CLIENT_ID Read-only Read-only N/A Read-only
F_CLIENT_IP Read-only Read-only N/A Read-only
F_CLIENT_NEAR_ID Read-only Read-only N/A Read-only
F_CLIENT_NEAR_NONCE Read-only Read-only N/A Read-only
F_CLIENT_PAGE_URL Read-only Read-only N/A Read-only
F_CLIENT_PROTO Read-only Read-only N/A Read-only
F_CLIENT_PROTO_VER Read-only Read-only N/A Read-only
F_CLIENT_READ_ACCES
S
Read-only Read-only N/A Read-only
F_CLIENT_READ_ACCES
S_LOCK
Read-only Read-only N/A Read-only
F_CLIENT_REDIRECT_U
RI
Read-only Read-only N/A Read-only
F_CLIENT_REFERRER Read-only Read-only N/A Read-only
F_CLIENT_SECURE Read-only Read-only N/A Read-only
F_CLIENT_STATS_HAND
LE
Read-only Read-only N/A Read-only
F_CLIENT_SWFV_DEPTH N/A N/A N/A N/A

322
ADOBE MEDIA SERVER 5.0.6 DEVELOPER’S GUIDE
Developing Plug-ins
Last updated 9/4/2014
F_CLIENT_SWFV_DIGES
T
N/A N/A N/A N/A
F_CLIENT_SWFV_EXCEP
TION
Read-only Read-only Read-only Read-only
F_CLIENT_SWFV_RESUL
T
N/A N/A N/A N/A
F_CLIENT_SWFV_TTL N/A N/A N/A N/A
F_CLIENT_SWFV_VERSI
ON
N/A N/A N/A N/A
F_CLIENT_TYPE N/A Read-only N/A Read-only
F_CLIENT_URI N/A Read-only N/A Read-only
F_CLIENT_URI_STEM N/A Read-only N/A Read-only
F_CLIENT_USER_AGENT N/A Read-only N/A Read-only
F_CLIENT_USERDATA N/A Read-only N/A Read-write
F_CLIENT_VHOST N/A Read-only N/A Read-only
F_CLIENT_VIDEO_CODE
CS
N/A Read-only N/A Read-only
F_CLIENT_VIDEO_SAMP
LE_ACCESS
N/A Read-only N/A Read-only
F_CLIENT_VIDEO_SAMP
LE_ACCESS_LOCK
N/A Read-only N/A Read-only
F_CLIENT_WRITE_ACCE
SS
N/A Read-only N/A Read-only
F_CLIENT_WRITE_ACCE
SS_LOCK
N/A Read-only N/A Read-only
F_MAXFIELD N/A N/A N/A N/A
F_OLD_STREAM_NAME N/A N/A N/A N/A
F_OLD_STREAM_QUERY N/A N/A N/A N/A
F_OLD_STREAM_TYPE N/A N/A N/A N/A
F_SEGMENT_END N/A N/A N/A N/A
F_SEGMENT_START N/A N/A N/A N/A
F_STREAM_CODEC N/A N/A N/A N/A
F_STREAM_CODEC_TYPE N/A N/A N/A N/A
F_STREAM_ID N/A Read-only N/A Read-only
F_STREAM_IGNORE N/A Read-only Read-only Read-only
F_STREAM_LENGTH N/A Read-write Read-only Read-only
F_STREAM_LIVE_EVENT N/A N/A N/A N/A
F_STREAM_LIVE_PUBLI
SH_PENDING
N/A N/A N/A N/A
E_CLIENT_SEEK E_SEEK E_CLIENT_PAUSE E_PAUSE

323
ADOBE MEDIA SERVER 5.0.6 DEVELOPER’S GUIDE
Developing Plug-ins
Last updated 9/4/2014
The following table displays all the fields and more events:
F_STREAM_NAME N/A N/A Read-only N/A
F_STREAM_OFFSET N/A N/A N/A N/A
F_STREAM_PATH N/A Read-only N/A Read-only
F_STREAM_PAUSE N/A N/A Read-only Read-only
F_STREAM_PAUSE_TIME N/A N/A Read-only Read-only
F_STREAM_PAUSE_TOGG
LE
N/A N/A Read-only Read-only
F_STREAM_POSITION N/A Read-only Read-only Read-only
F_STREAM_PUBLISH_BR
OADCAST
N/A N/A N/A N/A
F_STREAM_PUBLISH_TY
PE
N/A N/A N/A N/A
F_STREAM_QUERY N/A Read-only Read-only Read-only
F_STREAM_RECORD_MAX
DURATION
N/A N/A N/A N/A
F_STREAM_RECORD_MAX
SIZE
N/A N/A N/A N/A
F_STREAM_RESET N/A Read-only Read-only Read-only
F_STREAM_SEEK_POSIT
ION
Read-only N/A N/A N/A
F_STREAM_TRANSITION N/A N/A N/A N/A
F_STREAM_TRANSMIT_P
OSITION
N/A N/A N/A N/A
F_STREAM_TYPE N/A Read-only Read-only Read-only
E_PUBLISH E_UNPUBLISH E_LOADSEGMENT E_CODEC_CHANGE
F_APP_INST Read-only Read-only Read-only Read-only
F_APP_NAME Read-only Read-only Read-only Read-only
F_APP_URI Read-only Read-only Read-only Read-only
F_CLIENT_AMF_ENCODI
NG
Read-only Read-only Read-only Read-only
F_CLIENT_AUDIO_CODE
CS
Read-only Read-only Read-only Read-only
F_CLIENT_AUDIO_SAMP
LE_ACCESS
Read-only Read-only Read-only Read-only
F_CLIENT_AUDIO_SAMP
LE_ACCESS_LOCK
Read-only Read-only Read-only Read-only
F_CLIENT_CONNECT_TI
ME
Read-only Read-only Read-only Read-only
E_CLIENT_SEEK E_SEEK E_CLIENT_PAUSE E_PAUSE

324
ADOBE MEDIA SERVER 5.0.6 DEVELOPER’S GUIDE
Developing Plug-ins
Last updated 9/4/2014
F_CLIENT_DIFFSERV_B
ITS
N/A N/A N/A N/A
F_CLIENT_DIFFSERV_M
ASK
N/A N/A N/A N/A
F_CLIENT_FAR_ID Read-only Read-only Read-only Read-only
F_CLIENT_FAR_NONCE Read-only Read-only Read-only Read-only
F_CLIENT_FORWARDED_
FOR
Read-only Read-only Read-only Read-only
F_CLIENT_ID Read-only Read-only Read-only Read-only
F_CLIENT_IP Read-only Read-only Read-only Read-only
F_CLIENT_NEAR_ID Read-only Read-only Read-only Read-only
F_CLIENT_NEAR_NONCE Read-only Read-only Read-only Read-only
F_CLIENT_PAGE_URL Read-only Read-only Read-only Read-only
F_CLIENT_PROTO Read-only Read-only Read-only Read-only
F_CLIENT_PROTO_VER Read-only Read-only Read-only Read-only
F_CLIENT_READ_ACCES
S
Read-only Read-only Read-only Read-only
F_CLIENT_READ_ACCES
S_LOCK
Read-only Read-only Read-only Read-only
F_CLIENT_REDIRECT_U
RI
Read-only Read-only Read-only Read-only
F_CLIENT_REFERRER Read-only Read-only Read-only Read-only
F_CLIENT_SECURE Read-only Read-only Read-only Read-only
F_CLIENT_STATS_HAND
LE
Read-only Read-only Read-only Read-only
F_CLIENT_SWFV_DEPTH N/A N/A N/A N/A
F_CLIENT_SWFV_DIGES
T
N/A N/A N/A N/A
F_CLIENT_SWFV_EXCEP
TION
Read-only Read-only Read-only Read-only
F_CLIENT_SWFV_RESUL
T
N/A N/A N/A N/A
F_CLIENT_SWFV_TTL N/A N/A N/A N/A
F_CLIENT_SWFV_VERSI
ON
N/A N/A N/A N/A
F_CLIENT_TYPE Read-only Read-only Read-only Read-only
F_CLIENT_URI Read-only Read-only Read-only Read-only
F_CLIENT_URI_STEM Read-only Read-only Read-only Read-only
F_CLIENT_USER_AGENT Read-only Read-only Read-only Read-only
E_PUBLISH E_UNPUBLISH E_LOADSEGMENT E_CODEC_CHANGE

325
ADOBE MEDIA SERVER 5.0.6 DEVELOPER’S GUIDE
Developing Plug-ins
Last updated 9/4/2014
F_CLIENT_USERDATA Read-write Read-only Read-write Read-only
F_CLIENT_VHOST Read-only Read-only Read-only Read-only
F_CLIENT_VIDEO_CODE
CS
Read-only Read-only Read-only Read-only
F_CLIENT_VIDEO_SAMP
LE_ACCESS
Read-only Read-only Read-only Read-only
F_CLIENT_VIDEO_SAMP
LE_ACCESS_LOCK
Read-only Read-only Read-only Read-only
F_CLIENT_WRITE_ACCE
SS
Read-only Read-only Read-only Read-only
F_CLIENT_WRITE_ACCE
SS_LOCK
Read-only Read-only Read-only Read-only
F_MAXFIELD N/A N/A N/A N/A
F_OLD_STREAM_NAME N/A N/A N/A N/A
F_OLD_STREAM_QUERY N/A N/A N/A N/A
F_OLD_STREAM_TYPE N/A N/A N/A N/A
F_SEGMENT_END N/A N/A Read-only N/A
F_SEGMENT_START N/A N/A Read-only N/A
F_STREAM_CODEC N/A N/A N/A Read-only
F_STREAM_CODEC_TYPE N/A N/A N/A Read-only
F_STREAM_ID Read-only Read-only Read-only Read-only
F_STREAM_IGNORE Read-only Read-only Read-only Read-only
F_STREAM_LENGTH Read-write Read-only Read-only Read-only
F_STREAM_LIVE_EVENT Read-write N/A N/A N/A
F_STREAM_LIVE_PUBLI
SH_PENDING
N/A N/A N/A N/A
F_STREAM_NAME N/A N/A N/A N/A
F_STREAM_OFFSET N/A N/A N/A N/A
F_STREAM_PATH Read-only Read-only Read-only Read-only
F_STREAM_PAUSE N/A N/A N/A N/A
F_STREAM_PAUSE_TIME N/A N/A N/A N/A
F_STREAM_PAUSE_TOGG
LE
N/A N/A N/A N/A
F_STREAM_POSITION Read-only Read-only Read-only Read-only
F_STREAM_PUBLISH_BR
OADCAST
Read-write Read-only N/A Read-only
F_STREAM_PUBLISH_TY
PE
Read-write Read-only N/A Read-only
E_PUBLISH E_UNPUBLISH E_LOADSEGMENT E_CODEC_CHANGE

326
ADOBE MEDIA SERVER 5.0.6 DEVELOPER’S GUIDE
Developing Plug-ins
Last updated 9/4/2014
The following table displays all the fields and more events:
F_STREAM_QUERY Read-write Read-only Read-only Read-only
F_STREAM_RECORD_MAX
DURATION
N/A N/A N/A N/A
F_STREAM_RECORD_MAX
SIZE
N/A N/A N/A N/A
F_STREAM_RESET Read-only Read-only Read-only Read-only
F_STREAM_SEEK_POSIT
ION
N/A N/A N/A N/A
F_STREAM_TRANSITION N/A N/A N/A N/A
F_STREAM_TRANSMIT_P
OSITION
N/A N/A N/A N/A
F_STREAM_TYPE Read-write Read-only Read-only Read-only
E_RECORD E_RECORD_STOP
F_APP_INST Read-only Read-only
F_APP_NAME Read-only Read-only
F_APP_URI Read-only Read-only
F_CLIENT_AMF_ENCODING Read-only Read-only
F_CLIENT_AUDIO_CODECS Read-only Read-only
F_CLIENT_AUDIO_SAMPLE_ACC
ESS
Read-only Read-only
F_CLIENT_AUDIO_SAMPLE_ACC
ESS_LOCK
Read-only Read-only
F_CLIENT_CONNECT_TIME Read-only Read-only
F_CLIENT_DIFFSERV_BITS N/A N/A
F_CLIENT_DIFFSERV_MASK N/A N/A
F_CLIENT_FAR_ID Read-only Read-only
F_CLIENT_FAR_NONCE Read-only Read-only
F_CLIENT_FORWARDED_FOR Read-only Read-only
F_CLIENT_ID Read-only Read-only
F_CLIENT_IP Read-only Read-only
F_CLIENT_NEAR_ID Read-only Read-only
F_CLIENT_NEAR_NONCE Read-only Read-only
F_CLIENT_PAGE_URL Read-only Read-only
F_CLIENT_PROTO Read-only Read-only
F_CLIENT_PROTO_VER Read-only Read-only
E_PUBLISH E_UNPUBLISH E_LOADSEGMENT E_CODEC_CHANGE

327
ADOBE MEDIA SERVER 5.0.6 DEVELOPER’S GUIDE
Developing Plug-ins
Last updated 9/4/2014
F_CLIENT_READ_ACCESS Read-only Read-only
F_CLIENT_READ_ACCESS_LOCK Read-only Read-only
F_CLIENT_REDIRECT_URI Read-only Read-only
F_CLIENT_REFERRER Read-only Read-only
F_CLIENT_SECURE Read-only Read-only
F_CLIENT_STATS_HANDLE N/A N/A
F_CLIENT_SWFV_DEPTH N/A N/A
F_CLIENT_SWFV_DIGEST N/A N/A
F_CLIENT_SWFV_EXCEPTION Read-only Read-only
F_CLIENT_SWFV_RESULT N/A N/A
F_CLIENT_SWFV_TTL N/A N/A
F_CLIENT_SWFV_VERSION N/A N/A
F_CLIENT_TYPE Read-only Read-only
F_CLIENT_URI Read-only Read-only
F_CLIENT_URI_STEM Read-only Read-only
F_CLIENT_USER_AGENT Read-only Read-only
F_CLIENT_USERDATA Read-write Read-only
F_CLIENT_VHOST Read-only Read-only
F_CLIENT_VIDEO_CODECS Read-only Read-only
F_CLIENT_VIDEO_SAMPLE_ACC
ESS
Read-only Read-only
F_CLIENT_VIDEO_SAMPLE_ACC
ESS_LOCK
Read-only Read-only
F_CLIENT_WRITE_ACCESS Read-only Read-only
F_CLIENT_WRITE_ACCESS_LOC
K
Read-only Read-only
F_MAXFIELD N/A N/A
F_OLD_STREAM_NAME N/A N/A
F_OLD_STREAM_QUERY N/A N/A
F_OLD_STREAM_TYPE N/A N/A
F_SEGMENT_END Read-only N/A
F_SEGMENT_START N/A N/A
F_STREAM_CODEC N/A N/A
F_STREAM_CODEC_TYPE N/A N/A
F_STREAM_ID Read-only Read-only
F_STREAM_IGNORE Read-only Read-only
E_RECORD E_RECORD_STOP

328
ADOBE MEDIA SERVER 5.0.6 DEVELOPER’S GUIDE
Developing Plug-ins
Last updated 9/4/2014
The following table displays all the fields and more events:
F_STREAM_LENGTH Read-only Read-only
F_STREAM_LIVE_EVENT N/A N/A
F_STREAM_LIVE_PUBLISH_PEN
DING
N/A N/A
F_STREAM_NAME N/A N/A
F_STREAM_OFFSET N/A N/A
F_STREAM_PATH Read-only Read-only
F_STREAM_PAUSE N/A N/A
F_STREAM_PAUSE_TIME N/A N/A
F_STREAM_PAUSE_TOGGLE N/A N/A
F_STREAM_POSITION Read-only Read-only
F_STREAM_PUBLISH_BROADCAS
T
N/A N/A
F_STREAM_PUBLISH_TYPE N/A N/A
F_STREAM_QUERY Read-only Read-only
F_STREAM_RECORD_MAXDURATI
ON
Read-write Read-only
F_STREAM_RECORD_MAXSIZE Read-write Read-only
F_STREAM_RESET Read-only Read-only
F_STREAM_SEEK_POSITION N/A N/A
F_STREAM_TRANSITION N/A N/A
F_STREAM_TRANSMIT_POSITIO
N
N/A N/A
F_STREAM_TYPE Read-only Read-only
E_SWF_VERIFY E_SWF_VERIFY_CO
MPLETE
E_START_TRANSMI
T
E_STOP_TRANSMIT
F_APP_INST Read-only Read-only N/A N/A
F_APP_NAME Read-only Read-only N/A N/A
F_APP_URI Read-only Read-only N/A N/A
F_CLIENT_AMF_ENCODI
NG
Read-only Read-only N/A N/A
F_CLIENT_AUDIO_CODE
CS
Read-only Read-only N/A N/A
F_CLIENT_AUDIO_SAMP
LE_ACCESS
Read-only Read-only N/A N/A
F_CLIENT_AUDIO_SAMP
LE_ACCESS_LOCK
Read-only Read-only N/A N/A
E_RECORD E_RECORD_STOP

329
ADOBE MEDIA SERVER 5.0.6 DEVELOPER’S GUIDE
Developing Plug-ins
Last updated 9/4/2014
F_CLIENT_CONNECT_TI
ME
Read-only Read-only N/A N/A
F_CLIENT_DIFFSERV_B
ITS
N/A N/A N/A N/A
F_CLIENT_DIFFSERV_M
ASK
N/A N/A N/A N/A
F_CLIENT_FAR_ID Read-only Read-only N/A N/A
F_CLIENT_FAR_NONCE Read-only Read-only N/A N/A
F_CLIENT_FORWARDED_
FOR
Read-only Read-only N/A N/A
F_CLIENT_ID Read-only Read-only N/A N/A
F_CLIENT_IP Read-only Read-only N/A N/A
F_CLIENT_NEAR_ID Read-only Read-only N/A N/A
F_CLIENT_NEAR_NONCE Read-only Read-only N/A N/A
F_CLIENT_PAGE_URL Read-only Read-only N/A N/A
F_CLIENT_PROTO Read-only Read-only N/A N/A
F_CLIENT_PROTO_VER Read-only Read-only N/A N/A
F_CLIENT_READ_ACCES
S
Read-only Read-only N/A N/A
F_CLIENT_READ_ACCES
S_LOCK
Read-only Read-only N/A N/A
F_CLIENT_REDIRECT_U
RI
Read-only Read-only N/A N/A
F_CLIENT_REFERRER Read-only Read-only N/A N/A
F_CLIENT_SECURE Read-only Read-only N/A N/A
F_CLIENT_STATS_HAND
LE
N/A N/A N/A N/A
F_CLIENT_SWFV_DEPTH Read-only Read-only N/A N/A
F_CLIENT_SWFV_DIGES
T
Read/Write Read-only N/A N/A
F_CLIENT_SWFV_EXCEP
TION
Read-only Read-only Read-only Read-only
F_CLIENT_SWFV_RESUL
T
N/A N/A N/A N/A
F_CLIENT_SWFV_TTL Read/Write Read-only N/A N/A
F_CLIENT_SWFV_VERSI
ON
Read-only Read-only N/A N/A
F_CLIENT_TYPE Read-only Read-only N/A N/A
F_CLIENT_URI Read-only Read-only N/A N/A
E_SWF_VERIFY E_SWF_VERIFY_CO
MPLETE
E_START_TRANSMI
T
E_STOP_TRANSMIT

330
ADOBE MEDIA SERVER 5.0.6 DEVELOPER’S GUIDE
Developing Plug-ins
Last updated 9/4/2014
F_CLIENT_URI_STEM Read-only Read-only N/A N/A
F_CLIENT_USER_AGENT Read-only Read-only N/A N/A
F_CLIENT_USERDATA Read-only Read-only N/A N/A
F_CLIENT_VHOST Read-only Read-only N/A N/A
F_CLIENT_VIDEO_CODE
CS
Read-only Read-only N/A N/A
F_CLIENT_VIDEO_SAMP
LE_ACCESS
Read-only Read-only N/A N/A
F_CLIENT_VIDEO_SAMP
LE_ACCESS_LOCK
Read-only Read-only N/A N/A
F_CLIENT_WRITE_ACCE
SS
Read-only Read-only N/A N/A
F_CLIENT_WRITE_ACCE
SS_LOCK
Read-only Read-only N/A N/A
F_MAXFIELD N/A N/A N/A N/A
F_OLD_STREAM_NAME N/A N/A N/A N/A
F_OLD_STREAM_QUERY N/A N/A N/A N/A
F_OLD_STREAM_TYPE N/A N/A N/A N/A
F_SEGMENT_END N/A N/A N/A N/A
F_SEGMENT_START N/A N/A N/A N/A
F_STREAM_CODEC N/A N/A N/A N/A
F_STREAM_CODEC_TYPE N/A N/A N/A N/A
F_STREAM_ID N/A N/A N/A N/A
F_STREAM_IGNORE N/A N/A N/A N/A
F_STREAM_LENGTH N/A N/A N/A N/A
F_STREAM_LIVE_EVENT N/A N/A N/A N/A
F_STREAM_LIVE_PUBLI
SH_PENDING
N/A N/A N/A N/A
F_STREAM_NAME N/A N/A N/A N/A
F_STREAM_OFFSET N/A N/A N/A N/A
F_STREAM_PATH Read-only Read-only N/A N/A
F_STREAM_PAUSE N/A N/A N/A N/A
F_STREAM_PAUSE_TIME N/A N/A N/A N/A
F_STREAM_PAUSE_TOGG
LE
N/A N/A N/A N/A
F_STREAM_POSITION N/A N/A N/A N/A
E_SWF_VERIFY E_SWF_VERIFY_CO
MPLETE
E_START_TRANSMI
T
E_STOP_TRANSMIT

331
ADOBE MEDIA SERVER 5.0.6 DEVELOPER’S GUIDE
Developing Plug-ins
Last updated 9/4/2014
Developing a File plug-in
File plug-in overview
The File plug-in gives you control over where and how the server reads content from the file system. The plug-in
provides an interface between the operating system’s file I/O mechanism and the server. You can configure or modify
the sample file to create an alternative to the default operating-system-based file system I/O.
Previous versions of the server supported synchronous access to the file system. Each request for a read operation on
a file had to wait for the previous requests in the queue to be completed. The File plug-in supports asynchronous
access, making it easier to implement network-based file I/O.
You can code the File plug-in to do the following:
•Grab files from a remote location over HTTP and serve them to clients through the core server process to off-load
content management duties.
•Remap files to a different physical location.
•Retrieve external SWF files for verification.
Note: The File plug-in works with stream files and SWF files.
If a custom File plug-in is not present or is inactive, the server uses the standard operating system file system for
backwards compatibility. You can only use one File plug-in.
More Help topics
Flash Media Server Plug-In API Reference
F_STREAM_PUBLISH_BR
OADCAST
N/A N/A N/A N/A
F_STREAM_PUBLISH_TY
PE
N/A N/A N/A N/A
F_STREAM_QUERY N/A N/A N/A N/A
F_STREAM_RECORD_MAX
DURATION
N/A N/A N/A N/A
F_STREAM_RECORD_MAX
SIZE
N/A N/A N/A N/A
F_STREAM_RESET N/A N/A N/A N/A
F_STREAM_SEEK_POSIT
ION
N/A N/A N/A N/A
F_STREAM_TRANSITION N/A N/A N/A N/A
F_STREAM_TRANSMIT_P
OSITION
N/A N/A Read-only Read-only
F_STREAM_TYPE N/A N/A N/A N/A
E_SWF_VERIFY E_SWF_VERIFY_CO
MPLETE
E_START_TRANSMI
T
E_STOP_TRANSMIT

332
ADOBE MEDIA SERVER 5.0.6 DEVELOPER’S GUIDE
Developing Plug-ins
Last updated 9/4/2014
Responding to server calls
The File plug-in is asynchronous—when the server calls the plug-in, the plug-in doesn’t respond immediately. The
server calls the plug-in, and the plug-in calls the server back on the response interface.
When the server calls a function on the plug-in, the plug-in interface can return an error code (-1) indicating that the
operation failed. If the function returns an error, the plug-in should not call the server back.
If a call to the plug-in returns successfully (returns 0), the plug-in should call the server back and pass the context
received from the server.
The close() and remove() calls are an exception to this rule. When the server calls the close() and remove()
functions on the plug-in, the server is not interested in the response. To free resources associated with the request
before the callback occurs, the server sometimes passes NULL as the pCtx pointer. If the context is NULL, then it is not
necessary to call the server back. If the plug-in calls the server back with the NULL context, the server ignores it.
Retrieving external SWF files for verification
Verifying SWF files ensures that only legitimate applications can access this instance of Adobe Media Server. This
feature prevents third parties from creating their own applications that attempt to stream your resources.
In Content Distribution Networks, the SWF files that you want to verify reside in an external content repository or on
another server in a cluster. You can use the File plug-in to retrieve SWF files that are stored in external locations so
that the server can verify them. By using the File plug-in, SWF files do not have to reside locally on Adobe Media
Server. Developers can update SWF files frequently without impacting the server. Using the File plug-in facilitates and
simplifies content management by developers.
When using the File plug-in, the server verifies SWF files at the file level, regardless of the application. You cannot
enable SWF verification through the File plug-in on a per-application basis.
Note: The ability to retrieve SWF files using the File plug-in is only available in version 1.0 of the plug-in (Adobe Media
Server 3.5 or later).
To verify SWF files through the File plug-in, follow this workflow:
•Enable SWF verification in Application.xml.
•Enable SWF verification in Server.xml.
•Implement the File plug-in.
Enable SWF verification in Application.xml
1In an XML editor, open Application.xml.
2Set the enabled attribute in the SWFVerification tag to true.
<SWFVerification enabled="true">
This tag enables verification for all applications, regardless of whether this file is the vhost-level or application-level
XML file.
3Leave the SWFFolder tag empty. By doing so, the server passes the default SWFFolder value to the plug-in. The
default value is the application’s folder appended with SWFs. For example, applications/application_name/SWFs.
Your File plug-in must redirect this value to your external content repository.
4(optional) Configure additional verification tags.

333
ADOBE MEDIA SERVER 5.0.6 DEVELOPER’S GUIDE
Developing Plug-ins
Last updated 9/4/2014
Enable SWF verification in Server.xml
1In an XML editor, open Server.xml.
2In the Plugins tag, set the enabled attribute in the FilePlugin tag to true:
<Plugins>
<FilePlugin enabled="true">
<Content type="Streams">true</Content>
<Content type="SWF">false</Content>
</FilePlugin>
</Plugins>
3To enable verification of SWF files, set the <Content type="SWF"> attribute to true.
4(optional) To configure global verification, leave the SWFFolder tag empty. By doing so, the server passes the
default SWFFolder value to the plug-in. Your File plug-in must redirect this value to your external content
repository.
With global verification, you can configure verification for a group of SWF files that are common to all applications.
5(optional) Configure additional verification settings: DirLevelSWFScan, MaxNumberofRequests, and any desired
user-defined keys in the UserDefined element. See the XML reference in the Configuration and Administration
Guide.
Implement the File plug-in
The File plug-in can open directories or files in external locations and pass a list of directories and files to the server.
The File plug-in does not contain a specific attribute to distinguish stream files from SWF files. The server performs
verification like it does when SWF files are stored on the server.
See the File plug-in sample included with the server. Some highlights of the code are presented here.
The File plug-in sample file includes a function that calls IFmsFileAdaptor::open. The open() function includes a
parameter, sFileName. The value of sFileName is passed to the File plug-in by the server; it is the default value of the
SWFFolder tag in either Application.xml or Server.xml.
The plug-in redirects the SWFFolder value to the external content repository. The sample creates a handle to that
repository and passes it back to the server. The getAttributes() function also takes sFileName as a parameter.
After calling the open() function, the sample includes code that determines if the value of sFileName is a file or a
directory. Files are opened. Directories are opened and written to a temporary file. The sample uses the new attribute
FMSFileAttribute::kMode to determine if sFileName is a file or directory (1 for a stream, 0 for a directory.)
The File plug-in returns a handle to this temporary file to the server. If the directory contains any subdirectories or
SWF files, the server opens the directory or file, and continues the process until all the subdirectories and files are read.
Through the plug-in's read() method, the server reads the file and performs verification. Through the plug-in's
close() method, the server closes the file when fully read.
Use the File plug-in to manage content for live HTTP streaming
Adobe Media Server 4.5
Use the File plug-in to manage content for live HTTP streaming, including asynchronous file IO operations. The live
packager application (livepkgr) ingests a live stream and packages it into fragments (F4F files) and additional helper
files. The server operations that record these files are routed through the File plug-in. Use the File plug-in to manage
the location of the following files:
•.f4f

334
ADOBE MEDIA SERVER 5.0.6 DEVELOPER’S GUIDE
Developing Plug-ins
Last updated 9/4/2014
•.f4x
•.bootstrap
•.control
•.drmmeta
•.meta
Adobe Media Server 4.5 adds the following APIs:
•rename()
Moves a file. Pass the absolute path of the source file and the destination file. This call overwrites a file of the same
name in the destination path.
The server calls this method on the File plug-in synchronously or asynchronously. If the server calls this method
asynchronously, call onRename() to resume operations to the server.
•truncate()
Truncates a file to a specified file size. The server calls this method on the File plug-in synchronously or
asynchronously. If the server calls this method asynchronously, call onTruncate() to resume operations on the
server.
•onRename()
Calls the resume operation on the server after the server has called rename() on the File plug-in asynchronously.
•onTruncate()
Calls the resume operation on the server after the server has called truncate() on the File plug-in asynchronously.
For detailed information about each API, see Flash Media Server Plug-in API Reference. In addition, these APIs are
used in the sample File plug-in installed to rootinstall/samples/plugins/file/SimpleFileAdaptor.h.
