Adobe Using Photoshop Elements 9 9.0 Instruction Manual Photoshopelements En
User Manual: adobe Photoshop Elements - 9.0 - Instruction Manual Free User Guide for Photoshop Software, Manual
Open the PDF directly: View PDF ![]() .
.
Page Count: 322 [warning: Documents this large are best viewed by clicking the View PDF Link!]
- Contents
- Chapter 1: Getting started
- What to do first
- Using Help and getting support
- Converting a catalog from a previous version (Windows only)
- About backing up/synchronizing files
- Working in Organize and Edit workspaces
- Importing and organizing photos and video
- Creating photo projects
- Printing and sharing photos
- Fixing (editing) photos
- Troubleshooting tips
- Chapter 2: Photoshop Elements workspace
- About workspaces
- Tools
- Panels and bins
- Multitouch support
- Using Windows 7 features
- Use Application frames on Mac
- Undo, redo, and cancel
- Scratch disks and plug-ins
- Chapter 3: Working in Photoshop Elements
- Opening files in the Edit workspace
- Importing in the Edit workspace
- File information
- Viewing images in the Edit workspace
- Guides, grids, and rulers
- Saving and exporting images
- Guided Edit
- Use the Guided Edit options
- The Crop Photo Guided Edit
- The Recompose Photo Guided Edit
- The Rotate And/Or Straighten Guided Edit
- The Sharpen Photo Guided Edit
- The Lighten Or Darken Guided Edit
- The Brightness And Contrast Guided Edit
- The Adjust Levels Guided Edit
- The Enhance Colors Guided Edit
- The Remove A Color Cast Guided Edit
- The Correct Skin Tone Guided Edit
- The Touch Up Photo Guided Edit
- The “Guide For Editing A Photo” Guided Edit
- The Fix Keystone Distortion Guided Edit
- The Photomerge Group Shot Guided Edit
- The Photomerge Faces Guided Edit
- The Photomerge Scene Cleaner Guided Edit
- The Photomerge Exposure Guided Edit
- The Photomerge Style Match Guided Edit
- The Automated Action Player Guided Edit
- The Line Drawing Guided Edit
- The Old Fashioned Photo Guided Edit
- The Saturated Slide Film Effect Guided Edit
- Fun Edits
- Chapter 4: Using layers
- Chapter 5: Camera raw files
- Chapter 6: Selecting parts of an image
- Making selections
- About selections
- About the selection tools
- Use the Rectangular and Elliptical Marquee tools
- Use the Lasso tool
- Use the Polygonal Lasso tool
- Use the Magnetic Lasso tool
- Use the Magic Wand tool
- Use the Quick Selection tool
- Use the Selection Brush tool
- Use the Magic Extractor
- Delete a selected area
- Select and deselect areas using commands
- Modifying selections
- Move a selection border
- Invert a selection
- Add to or subtract from a selection
- Select an area that intersects an existing selection
- Expand or contract a selection by a specific number of pixels
- Frame an existing selection with a new selection border
- Include areas of similar color in a selection
- Remove stray pixels from a color-based selection
- Defringe a selection
- Smoothing selection edges with anti-aliasing and feathering
- Moving and copying selections
- Saving selections
- Making selections
- Chapter 7: Color and tonal correction
- Color and tonal correction basics
- Adjusting shadows and light
- Adjust color and tonality using the Smart Brush tools
- Apply the Smart Brush tools
- About Levels adjustments
- Improve shadow and highlight detail
- Adjust shadows and brightness using Levels
- Adjust brightness and contrast in selected areas
- Quickly lighten or darken isolated areas
- Quickly saturate or desaturate isolated areas
- Correcting color casts
- Adjusting color saturation and hue
- Adjustment filters
- Chapter 8: Cropping, resizing, retouching, and transforming photos
- Cropping
- Resizing
- Retouching
- Sharpening
- Transforming
- Recomposing
- Stitching together panoramas
- Chapter 9: Understanding color
- Chapter 10: Filters, effects, styles, and artwork
- Chapter 11: Painting
- Chapter 12: Adding text and shapes
- Chapter 13: Creating projects in the Edit workspace
- Chapter 14: Optimizing for the web
- Chapter 15: Printing and sharing photos
- Chapter 16: Photoshop Elements keyboard shortcuts
- Windows 7 keyboard shortcuts
- Keys for viewing images (Full Edit)
- Keys for selecting tools
- Keys for selecting and moving objects
- Keys for the Magic Extractor dialog box
- Keys for transforming selections
- Keys for painting and brushes
- Keys for using text
- Keys for the Layers panel
- Keys for using blending modes
- Keys for the Info panel
- Keys for the Color Swatches panel
- Keys for showing or hiding panels (Full Edit)
- Keys for the Filter Gallery
- Keys for the Liquify filter
- Keys for using Photomerge Panorama
- Keys for the Camera Raw dialog box
- Chapter 17: Glossary

Using
ADOBE® PHOTOSHOP® ELEMENTS 9

Last updated 1/3/2012
Copyright
© 2010 Adobe Systems Incorporated. All rights reserved.
Using Adobe® Photoshop® Elements 9
This user guide is protected under copyright law, furnished for informational use only, is subject to change without notice, and should not be construed as a
commitment by Adobe Systems Incorporated. Adobe Systems Incorporated assumes no responsibility or liability for any errors or inaccuracies that may appear
in the informational content contained in this guide.
This user guide is licensed for use under the terms of the Creative Commons Attribution Non-Commercial 3.0 License. This License allows users to copy,
distribute, and transmit the user guide for noncommercial purposes only so long as (1) proper attribution to Adobe is given as the owner of the user guide; and
(2) any reuse or distribution of the user guide contains a notice that use of the user guide is governed by these terms. The best way to provide notice is to include
the following link. To view a copy of this license, visit http://creativecommons.org/licenses/by-nc-sa/3.0/
Adobe, the Adobe logo, Adobe Premiere, Acrobat, Dreamweaver, , Illustrator, InDesign, Photoshop, PostScript, Reader, and XMP are either registered
trademarks or trademarks of Adobe Systems Incorporated in the United States and/or other countries.
Windows and Windows Vista are either registered trademarks or trademarks of Microsoft Corporation in the United States and/or other countries. Apple,
Macintosh and Mac OS are trademarks of Apple Inc., registered in the United States and other countries. Java is a trademark or registered trademark of Sun
Microsystems, Inc. in the United States and other countries. OS/2 is a trademark of International Business Machines Corporation in the United States, other
countries, or both. Dolby is a trademark of Dolby Laboratories. UNIX is a registered trademark of The Open Group in the US and other countries. SGI is a
trademark of Silicon Graphics, Inc. All other trademarks are the property of their respective owners.
Updated Information/Additional Third Party Code Information available at http://www.adobe.com/go/thirdparty.
Portions include software under the following terms:
This product includes software developed by the Apache Software Foundation (http://www.apache.org/).
This Program was written with MacApp®: ©1985-1988 Apple Computer, Inc. APPLE COMPUTER, INC. MAKES NO WARRANTIES WHATSOEVER,
EITHER EXPRESS OR IMPLIED, REGARDING THIS PRODUCT, INCLUDING WARRANTIES WITH RESPECT TO ITS MERCHANTABILITY OR ITS
FITNESS FOR ANY PARTICULAR PURPOSE. The MacApp software is proprietary to Apple Computer, Inc. and is licensed to Adobe for distribution only for
use in combination with Adobe Photoshop Elements.
Portions copyright © Eastman Kodak Company, 1999.
Portions copyright Focoltone Colour System.
This software is based in part on the work of the Independent JPEG Group.
Portions copyright Nellymoser (www.nellymoser.com).
Flash 10 video compression and decompression is powered by On2 TrueMotion video technology. © 1992-2005 On2 Technologies, Inc. All Rights Reserved.
http://www.on2.com.
PANTONE® colors displayed here may not match PANTONE-identified standards. PANTONE® and other Pantone, Inc. trademarks are the property of
Pantone, Inc. © Pantone, Inc., 2009.
The spelling portion of this product is based on Proximity Linguistic Technology. The Proximity Hyphenation System©1989. All rights reserved. Proximity
Technology, Inc. Proximity and Linguibase are registered trademarks of Proximity Tecnology, Inc.
This product contains either BSAFE and/or TIPEM software by RSA Security, Inc.
Sorenson Spark™ video compression and decompression technology licensed from Sorenson Media, Inc.
MPEG Layer-3 audio compression technology licensed by Fraunhofer IIS and THOMSON Licensing (http://www.iis.fhg.de/amm/).
Adobe Systems Incorporated, 345 Park Avenue, San Jose, California 95110, USA.
Notice to U.S. Government End Users. The Software and Documentation are “Commercial Items,” as that term is defined at 48 C.F.R. §2.101, consisting of
“Commercial Computer Software” and “Commercial Computer Software Documentation,” as such terms are used in 48 C.F.R. §12.212 or 48 C.F.R. §227.7202,
as applicable. Consistent with 48 C.F.R. §12.212 or 48 C.F.R. §§227.7202-1 through 227.7202-4, as applicable, the Commercial Computer Software and
Commercial Computer Software Documentation are being licensed to U.S. Government end users (a) only as Commercial Items and (b) with only those rights
as are granted to all other end users pursuant to the terms and conditions herein. Unpublished-rights reserved under the copyright laws of the United States.
Adobe Systems Incorporated, 345 Park Avenue, San Jose, CA 95110-2704, USA. For U.S. Government End Users, Adobe agrees to comply with all applicable
equal opportunity laws including, if appropriate, the provisions of Executive Order 11246, as amended, Section 402 of the Vietnam Era Veterans Readjustment
Assistance Act of 1974 (38 USC 4212), and Section 503 of the Rehabilitation Act of 1973, as amended, and the regulations at 41 CFR Parts 60-1 through 60-60,
60-250, and 60-741. The affirmative action clause and regulations contained in the preceding sentence shall be incorporated by reference.

iii
Last updated 1/3/2012
Contents
Chapter 1: Getting started
What to do first . . . . . . . . . . . . . . . . . . . . . . . . . . . . . . . . . . . . . . . . . . . . . . . . . . . . . . . . . . . . . . . . . . . . . . . . . . . . . . . . . . . . . . . . . . . . . . . . . . . . . . . . 1
Using Help and getting support . . . . . . . . . . . . . . . . . . . . . . . . . . . . . . . . . . . . . . . . . . . . . . . . . . . . . . . . . . . . . . . . . . . . . . . . . . . . . . . . . . . . . . . . 2
Converting a catalog from a previous version (Windows only) . . . . . . . . . . . . . . . . . . . . . . . . . . . . . . . . . . . . . . . . . . . . . . . . . . . . . . . . . . 3
About backing up/synchronizing files . . . . . . . . . . . . . . . . . . . . . . . . . . . . . . . . . . . . . . . . . . . . . . . . . . . . . . . . . . . . . . . . . . . . . . . . . . . . . . . . . . 4
Working in Organize and Edit workspaces . . . . . . . . . . . . . . . . . . . . . . . . . . . . . . . . . . . . . . . . . . . . . . . . . . . . . . . . . . . . . . . . . . . . . . . . . . . . . . 6
Importing and organizing photos and video . . . . . . . . . . . . . . . . . . . . . . . . . . . . . . . . . . . . . . . . . . . . . . . . . . . . . . . . . . . . . . . . . . . . . . . . . . . 6
Creating photo projects . . . . . . . . . . . . . . . . . . . . . . . . . . . . . . . . . . . . . . . . . . . . . . . . . . . . . . . . . . . . . . . . . . . . . . . . . . . . . . . . . . . . . . . . . . . . . . . 9
Printing and sharing photos . . . . . . . . . . . . . . . . . . . . . . . . . . . . . . . . . . . . . . . . . . . . . . . . . . . . . . . . . . . . . . . . . . . . . . . . . . . . . . . . . . . . . . . . . . 10
Fixing (editing) photos . . . . . . . . . . . . . . . . . . . . . . . . . . . . . . . . . . . . . . . . . . . . . . . . . . . . . . . . . . . . . . . . . . . . . . . . . . . . . . . . . . . . . . . . . . . . . . . 11
Troubleshooting tips . . . . . . . . . . . . . . . . . . . . . . . . . . . . . . . . . . . . . . . . . . . . . . . . . . . . . . . . . . . . . . . . . . . . . . . . . . . . . . . . . . . . . . . . . . . . . . . . . 13
Chapter 2: Photoshop Elements workspace
About workspaces . . . . . . . . . . . . . . . . . . . . . . . . . . . . . . . . . . . . . . . . . . . . . . . . . . . . . . . . . . . . . . . . . . . . . . . . . . . . . . . . . . . . . . . . . . . . . . . . . . . . 14
Tools . . . . . . . . . . . . . . . . . . . . . . . . . . . . . . . . . . . . . . . . . . . . . . . . . . . . . . . . . . . . . . . . . . . . . . . . . . . . . . . . . . . . . . . . . . . . . . . . . . . . . . . . . . . . . . . . . 17
Panels and bins . . . . . . . . . . . . . . . . . . . . . . . . . . . . . . . . . . . . . . . . . . . . . . . . . . . . . . . . . . . . . . . . . . . . . . . . . . . . . . . . . . . . . . . . . . . . . . . . . . . . . . 20
Multitouch support . . . . . . . . . . . . . . . . . . . . . . . . . . . . . . . . . . . . . . . . . . . . . . . . . . . . . . . . . . . . . . . . . . . . . . . . . . . . . . . . . . . . . . . . . . . . . . . . . . . 24
Using Windows 7 features . . . . . . . . . . . . . . . . . . . . . . . . . . . . . . . . . . . . . . . . . . . . . . . . . . . . . . . . . . . . . . . . . . . . . . . . . . . . . . . . . . . . . . . . . . . . 24
Use Application frames on Mac . . . . . . . . . . . . . . . . . . . . . . . . . . . . . . . . . . . . . . . . . . . . . . . . . . . . . . . . . . . . . . . . . . . . . . . . . . . . . . . . . . . . . . . 24
Undo, redo, and cancel . . . . . . . . . . . . . . . . . . . . . . . . . . . . . . . . . . . . . . . . . . . . . . . . . . . . . . . . . . . . . . . . . . . . . . . . . . . . . . . . . . . . . . . . . . . . . . . 25
Scratch disks and plug-ins . . . . . . . . . . . . . . . . . . . . . . . . . . . . . . . . . . . . . . . . . . . . . . . . . . . . . . . . . . . . . . . . . . . . . . . . . . . . . . . . . . . . . . . . . . . . 27
Chapter 3: Working in Photoshop Elements
Opening files in the Edit workspace . . . . . . . . . . . . . . . . . . . . . . . . . . . . . . . . . . . . . . . . . . . . . . . . . . . . . . . . . . . . . . . . . . . . . . . . . . . . . . . . . . . 30
Importing in the Edit workspace . . . . . . . . . . . . . . . . . . . . . . . . . . . . . . . . . . . . . . . . . . . . . . . . . . . . . . . . . . . . . . . . . . . . . . . . . . . . . . . . . . . . . . 35
File information . . . . . . . . . . . . . . . . . . . . . . . . . . . . . . . . . . . . . . . . . . . . . . . . . . . . . . . . . . . . . . . . . . . . . . . . . . . . . . . . . . . . . . . . . . . . . . . . . . . . . . 36
Viewing images in the Edit workspace . . . . . . . . . . . . . . . . . . . . . . . . . . . . . . . . . . . . . . . . . . . . . . . . . . . . . . . . . . . . . . . . . . . . . . . . . . . . . . . . 39
Guides, grids, and rulers . . . . . . . . . . . . . . . . . . . . . . . . . . . . . . . . . . . . . . . . . . . . . . . . . . . . . . . . . . . . . . . . . . . . . . . . . . . . . . . . . . . . . . . . . . . . . . 42
Saving and exporting images . . . . . . . . . . . . . . . . . . . . . . . . . . . . . . . . . . . . . . . . . . . . . . . . . . . . . . . . . . . . . . . . . . . . . . . . . . . . . . . . . . . . . . . . . 43
Guided Edit . . . . . . . . . . . . . . . . . . . . . . . . . . . . . . . . . . . . . . . . . . . . . . . . . . . . . . . . . . . . . . . . . . . . . . . . . . . . . . . . . . . . . . . . . . . . . . . . . . . . . . . . . . 49
Chapter 4: Using layers
Creating layers . . . . . . . . . . . . . . . . . . . . . . . . . . . . . . . . . . . . . . . . . . . . . . . . . . . . . . . . . . . . . . . . . . . . . . . . . . . . . . . . . . . . . . . . . . . . . . . . . . . . . . . 56
Editing layers . . . . . . . . . . . . . . . . . . . . . . . . . . . . . . . . . . . . . . . . . . . . . . . . . . . . . . . . . . . . . . . . . . . . . . . . . . . . . . . . . . . . . . . . . . . . . . . . . . . . . . . . . 60
Copying and arranging layers . . . . . . . . . . . . . . . . . . . . . . . . . . . . . . . . . . . . . . . . . . . . . . . . . . . . . . . . . . . . . . . . . . . . . . . . . . . . . . . . . . . . . . . . . 63
Opacity and blending modes . . . . . . . . . . . . . . . . . . . . . . . . . . . . . . . . . . . . . . . . . . . . . . . . . . . . . . . . . . . . . . . . . . . . . . . . . . . . . . . . . . . . . . . . . 68
Adjustment and fill layers . . . . . . . . . . . . . . . . . . . . . . . . . . . . . . . . . . . . . . . . . . . . . . . . . . . . . . . . . . . . . . . . . . . . . . . . . . . . . . . . . . . . . . . . . . . . . 70
Layer masks . . . . . . . . . . . . . . . . . . . . . . . . . . . . . . . . . . . . . . . . . . . . . . . . . . . . . . . . . . . . . . . . . . . . . . . . . . . . . . . . . . . . . . . . . . . . . . . . . . . . . . . . . . 75
Clipping masks . . . . . . . . . . . . . . . . . . . . . . . . . . . . . . . . . . . . . . . . . . . . . . . . . . . . . . . . . . . . . . . . . . . . . . . . . . . . . . . . . . . . . . . . . . . . . . . . . . . . . . . 75
Layer styles . . . . . . . . . . . . . . . . . . . . . . . . . . . . . . . . . . . . . . . . . . . . . . . . . . . . . . . . . . . . . . . . . . . . . . . . . . . . . . . . . . . . . . . . . . . . . . . . . . . . . . . . . . 76

iv
USING PHOTOSHOP ELEMENTS 9
Contents
Last updated 1/3/2012
Chapter 5: Camera raw files
Processing camera raw image files . . . . . . . . . . . . . . . . . . . . . . . . . . . . . . . . . . . . . . . . . . . . . . . . . . . . . . . . . . . . . . . . . . . . . . . . . . . . . . . . . . . . 80
Settings and controls . . . . . . . . . . . . . . . . . . . . . . . . . . . . . . . . . . . . . . . . . . . . . . . . . . . . . . . . . . . . . . . . . . . . . . . . . . . . . . . . . . . . . . . . . . . . . . . . . 83
Color and camera raw . . . . . . . . . . . . . . . . . . . . . . . . . . . . . . . . . . . . . . . . . . . . . . . . . . . . . . . . . . . . . . . . . . . . . . . . . . . . . . . . . . . . . . . . . . . . . . . . 84
Chapter 6: Selecting parts of an image
Making selections . . . . . . . . . . . . . . . . . . . . . . . . . . . . . . . . . . . . . . . . . . . . . . . . . . . . . . . . . . . . . . . . . . . . . . . . . . . . . . . . . . . . . . . . . . . . . . . . . . . . 88
Modifying selections . . . . . . . . . . . . . . . . . . . . . . . . . . . . . . . . . . . . . . . . . . . . . . . . . . . . . . . . . . . . . . . . . . . . . . . . . . . . . . . . . . . . . . . . . . . . . . . . . 97
Smoothing selection edges with anti-aliasing and feathering . . . . . . . . . . . . . . . . . . . . . . . . . . . . . . . . . . . . . . . . . . . . . . . . . . . . . . . . . 101
Moving and copying selections . . . . . . . . . . . . . . . . . . . . . . . . . . . . . . . . . . . . . . . . . . . . . . . . . . . . . . . . . . . . . . . . . . . . . . . . . . . . . . . . . . . . . . 102
Saving selections . . . . . . . . . . . . . . . . . . . . . . . . . . . . . . . . . . . . . . . . . . . . . . . . . . . . . . . . . . . . . . . . . . . . . . . . . . . . . . . . . . . . . . . . . . . . . . . . . . . . 104
Chapter 7: Color and tonal correction
Color and tonal correction basics . . . . . . . . . . . . . . . . . . . . . . . . . . . . . . . . . . . . . . . . . . . . . . . . . . . . . . . . . . . . . . . . . . . . . . . . . . . . . . . . . . . . 107
Adjusting shadows and light . . . . . . . . . . . . . . . . . . . . . . . . . . . . . . . . . . . . . . . . . . . . . . . . . . . . . . . . . . . . . . . . . . . . . . . . . . . . . . . . . . . . . . . . . 116
Correcting color casts . . . . . . . . . . . . . . . . . . . . . . . . . . . . . . . . . . . . . . . . . . . . . . . . . . . . . . . . . . . . . . . . . . . . . . . . . . . . . . . . . . . . . . . . . . . . . . . 123
Adjusting color saturation and hue . . . . . . . . . . . . . . . . . . . . . . . . . . . . . . . . . . . . . . . . . . . . . . . . . . . . . . . . . . . . . . . . . . . . . . . . . . . . . . . . . . 127
Adjustment filters . . . . . . . . . . . . . . . . . . . . . . . . . . . . . . . . . . . . . . . . . . . . . . . . . . . . . . . . . . . . . . . . . . . . . . . . . . . . . . . . . . . . . . . . . . . . . . . . . . . 133
Chapter 8: Cropping, resizing, retouching, and transforming photos
Cropping . . . . . . . . . . . . . . . . . . . . . . . . . . . . . . . . . . . . . . . . . . . . . . . . . . . . . . . . . . . . . . . . . . . . . . . . . . . . . . . . . . . . . . . . . . . . . . . . . . . . . . . . . . . . 138
Resizing . . . . . . . . . . . . . . . . . . . . . . . . . . . . . . . . . . . . . . . . . . . . . . . . . . . . . . . . . . . . . . . . . . . . . . . . . . . . . . . . . . . . . . . . . . . . . . . . . . . . . . . . . . . . . 143
Retouching . . . . . . . . . . . . . . . . . . . . . . . . . . . . . . . . . . . . . . . . . . . . . . . . . . . . . . . . . . . . . . . . . . . . . . . . . . . . . . . . . . . . . . . . . . . . . . . . . . . . . . . . . 147
Sharpening . . . . . . . . . . . . . . . . . . . . . . . . . . . . . . . . . . . . . . . . . . . . . . . . . . . . . . . . . . . . . . . . . . . . . . . . . . . . . . . . . . . . . . . . . . . . . . . . . . . . . . . . . 161
Transforming . . . . . . . . . . . . . . . . . . . . . . . . . . . . . . . . . . . . . . . . . . . . . . . . . . . . . . . . . . . . . . . . . . . . . . . . . . . . . . . . . . . . . . . . . . . . . . . . . . . . . . . . 163
Recomposing . . . . . . . . . . . . . . . . . . . . . . . . . . . . . . . . . . . . . . . . . . . . . . . . . . . . . . . . . . . . . . . . . . . . . . . . . . . . . . . . . . . . . . . . . . . . . . . . . . . . . . . 166
Stitching together panoramas . . . . . . . . . . . . . . . . . . . . . . . . . . . . . . . . . . . . . . . . . . . . . . . . . . . . . . . . . . . . . . . . . . . . . . . . . . . . . . . . . . . . . . . 169
Chapter 9: Understanding color
Understanding color . . . . . . . . . . . . . . . . . . . . . . . . . . . . . . . . . . . . . . . . . . . . . . . . . . . . . . . . . . . . . . . . . . . . . . . . . . . . . . . . . . . . . . . . . . . . . . . . 173
Using image modes and color tables . . . . . . . . . . . . . . . . . . . . . . . . . . . . . . . . . . . . . . . . . . . . . . . . . . . . . . . . . . . . . . . . . . . . . . . . . . . . . . . . . 175
Setting up color management . . . . . . . . . . . . . . . . . . . . . . . . . . . . . . . . . . . . . . . . . . . . . . . . . . . . . . . . . . . . . . . . . . . . . . . . . . . . . . . . . . . . . . . 180
Chapter 10: Filters, effects, styles, and artwork
Effects . . . . . . . . . . . . . . . . . . . . . . . . . . . . . . . . . . . . . . . . . . . . . . . . . . . . . . . . . . . . . . . . . . . . . . . . . . . . . . . . . . . . . . . . . . . . . . . . . . . . . . . . . . . . . . 183
Filters . . . . . . . . . . . . . . . . . . . . . . . . . . . . . . . . . . . . . . . . . . . . . . . . . . . . . . . . . . . . . . . . . . . . . . . . . . . . . . . . . . . . . . . . . . . . . . . . . . . . . . . . . . . . . . . 187
Artistic filters . . . . . . . . . . . . . . . . . . . . . . . . . . . . . . . . . . . . . . . . . . . . . . . . . . . . . . . . . . . . . . . . . . . . . . . . . . . . . . . . . . . . . . . . . . . . . . . . . . . . . . . . 192
Blur filters . . . . . . . . . . . . . . . . . . . . . . . . . . . . . . . . . . . . . . . . . . . . . . . . . . . . . . . . . . . . . . . . . . . . . . . . . . . . . . . . . . . . . . . . . . . . . . . . . . . . . . . . . . . 194
Brush Stroke filters . . . . . . . . . . . . . . . . . . . . . . . . . . . . . . . . . . . . . . . . . . . . . . . . . . . . . . . . . . . . . . . . . . . . . . . . . . . . . . . . . . . . . . . . . . . . . . . . . . 196
Distort filters . . . . . . . . . . . . . . . . . . . . . . . . . . . . . . . . . . . . . . . . . . . . . . . . . . . . . . . . . . . . . . . . . . . . . . . . . . . . . . . . . . . . . . . . . . . . . . . . . . . . . . . . 197
Noise filters . . . . . . . . . . . . . . . . . . . . . . . . . . . . . . . . . . . . . . . . . . . . . . . . . . . . . . . . . . . . . . . . . . . . . . . . . . . . . . . . . . . . . . . . . . . . . . . . . . . . . . . . . 201
Pixelate filters . . . . . . . . . . . . . . . . . . . . . . . . . . . . . . . . . . . . . . . . . . . . . . . . . . . . . . . . . . . . . . . . . . . . . . . . . . . . . . . . . . . . . . . . . . . . . . . . . . . . . . . 202
Render filters . . . . . . . . . . . . . . . . . . . . . . . . . . . . . . . . . . . . . . . . . . . . . . . . . . . . . . . . . . . . . . . . . . . . . . . . . . . . . . . . . . . . . . . . . . . . . . . . . . . . . . . . 203
Sketch filters . . . . . . . . . . . . . . . . . . . . . . . . . . . . . . . . . . . . . . . . . . . . . . . . . . . . . . . . . . . . . . . . . . . . . . . . . . . . . . . . . . . . . . . . . . . . . . . . . . . . . . . . 206
Stylize filters . . . . . . . . . . . . . . . . . . . . . . . . . . . . . . . . . . . . . . . . . . . . . . . . . . . . . . . . . . . . . . . . . . . . . . . . . . . . . . . . . . . . . . . . . . . . . . . . . . . . . . . . 208
Texture filters . . . . . . . . . . . . . . . . . . . . . . . . . . . . . . . . . . . . . . . . . . . . . . . . . . . . . . . . . . . . . . . . . . . . . . . . . . . . . . . . . . . . . . . . . . . . . . . . . . . . . . . 210
Video filters . . . . . . . . . . . . . . . . . . . . . . . . . . . . . . . . . . . . . . . . . . . . . . . . . . . . . . . . . . . . . . . . . . . . . . . . . . . . . . . . . . . . . . . . . . . . . . . . . . . . . . . . . 210
Other filters . . . . . . . . . . . . . . . . . . . . . . . . . . . . . . . . . . . . . . . . . . . . . . . . . . . . . . . . . . . . . . . . . . . . . . . . . . . . . . . . . . . . . . . . . . . . . . . . . . . . . . . . . 211

v
USING PHOTOSHOP ELEMENTS 9
Contents
Last updated 1/3/2012
Chapter 11: Painting
Painting overview . . . . . . . . . . . . . . . . . . . . . . . . . . . . . . . . . . . . . . . . . . . . . . . . . . . . . . . . . . . . . . . . . . . . . . . . . . . . . . . . . . . . . . . . . . . . . . . . . . . 213
Choosing colors . . . . . . . . . . . . . . . . . . . . . . . . . . . . . . . . . . . . . . . . . . . . . . . . . . . . . . . . . . . . . . . . . . . . . . . . . . . . . . . . . . . . . . . . . . . . . . . . . . . . . 217
Painting tools . . . . . . . . . . . . . . . . . . . . . . . . . . . . . . . . . . . . . . . . . . . . . . . . . . . . . . . . . . . . . . . . . . . . . . . . . . . . . . . . . . . . . . . . . . . . . . . . . . . . . . . 221
Setting up brushes . . . . . . . . . . . . . . . . . . . . . . . . . . . . . . . . . . . . . . . . . . . . . . . . . . . . . . . . . . . . . . . . . . . . . . . . . . . . . . . . . . . . . . . . . . . . . . . . . . 228
Fills and strokes . . . . . . . . . . . . . . . . . . . . . . . . . . . . . . . . . . . . . . . . . . . . . . . . . . . . . . . . . . . . . . . . . . . . . . . . . . . . . . . . . . . . . . . . . . . . . . . . . . . . . 232
Patterns . . . . . . . . . . . . . . . . . . . . . . . . . . . . . . . . . . . . . . . . . . . . . . . . . . . . . . . . . . . . . . . . . . . . . . . . . . . . . . . . . . . . . . . . . . . . . . . . . . . . . . . . . . . . . 233
Gradients . . . . . . . . . . . . . . . . . . . . . . . . . . . . . . . . . . . . . . . . . . . . . . . . . . . . . . . . . . . . . . . . . . . . . . . . . . . . . . . . . . . . . . . . . . . . . . . . . . . . . . . . . . . 235
Presets and libraries . . . . . . . . . . . . . . . . . . . . . . . . . . . . . . . . . . . . . . . . . . . . . . . . . . . . . . . . . . . . . . . . . . . . . . . . . . . . . . . . . . . . . . . . . . . . . . . . . 239
Chapter 12: Adding text and shapes
Add and edit text . . . . . . . . . . . . . . . . . . . . . . . . . . . . . . . . . . . . . . . . . . . . . . . . . . . . . . . . . . . . . . . . . . . . . . . . . . . . . . . . . . . . . . . . . . . . . . . . . . . . 243
Work with Asian type . . . . . . . . . . . . . . . . . . . . . . . . . . . . . . . . . . . . . . . . . . . . . . . . . . . . . . . . . . . . . . . . . . . . . . . . . . . . . . . . . . . . . . . . . . . . . . . . 249
Creating shapes . . . . . . . . . . . . . . . . . . . . . . . . . . . . . . . . . . . . . . . . . . . . . . . . . . . . . . . . . . . . . . . . . . . . . . . . . . . . . . . . . . . . . . . . . . . . . . . . . . . . . 250
Editing shapes . . . . . . . . . . . . . . . . . . . . . . . . . . . . . . . . . . . . . . . . . . . . . . . . . . . . . . . . . . . . . . . . . . . . . . . . . . . . . . . . . . . . . . . . . . . . . . . . . . . . . . 254
Chapter 13: Creating projects in the Edit workspace
Project basics . . . . . . . . . . . . . . . . . . . . . . . . . . . . . . . . . . . . . . . . . . . . . . . . . . . . . . . . . . . . . . . . . . . . . . . . . . . . . . . . . . . . . . . . . . . . . . . . . . . . . . . 256
Making photo projects . . . . . . . . . . . . . . . . . . . . . . . . . . . . . . . . . . . . . . . . . . . . . . . . . . . . . . . . . . . . . . . . . . . . . . . . . . . . . . . . . . . . . . . . . . . . . . 256
Create a photo book . . . . . . . . . . . . . . . . . . . . . . . . . . . . . . . . . . . . . . . . . . . . . . . . . . . . . . . . . . . . . . . . . . . . . . . . . . . . . . . . . . . . . . . . . . . . . . . . . 260
Create a greeting card . . . . . . . . . . . . . . . . . . . . . . . . . . . . . . . . . . . . . . . . . . . . . . . . . . . . . . . . . . . . . . . . . . . . . . . . . . . . . . . . . . . . . . . . . . . . . . . 262
Create photo calendars . . . . . . . . . . . . . . . . . . . . . . . . . . . . . . . . . . . . . . . . . . . . . . . . . . . . . . . . . . . . . . . . . . . . . . . . . . . . . . . . . . . . . . . . . . . . . . 265
Editing photo projects . . . . . . . . . . . . . . . . . . . . . . . . . . . . . . . . . . . . . . . . . . . . . . . . . . . . . . . . . . . . . . . . . . . . . . . . . . . . . . . . . . . . . . . . . . . . . . . 266
Create a VCD with a menu of slide shows . . . . . . . . . . . . . . . . . . . . . . . . . . . . . . . . . . . . . . . . . . . . . . . . . . . . . . . . . . . . . . . . . . . . . . . . . . . . . 269
Flipbooks . . . . . . . . . . . . . . . . . . . . . . . . . . . . . . . . . . . . . . . . . . . . . . . . . . . . . . . . . . . . . . . . . . . . . . . . . . . . . . . . . . . . . . . . . . . . . . . . . . . . . . . . . . . 269
Chapter 14: Optimizing for the web
Optimizing images . . . . . . . . . . . . . . . . . . . . . . . . . . . . . . . . . . . . . . . . . . . . . . . . . . . . . . . . . . . . . . . . . . . . . . . . . . . . . . . . . . . . . . . . . . . . . . . . . . 270
Using transparency and mattes . . . . . . . . . . . . . . . . . . . . . . . . . . . . . . . . . . . . . . . . . . . . . . . . . . . . . . . . . . . . . . . . . . . . . . . . . . . . . . . . . . . . . . 278
Dithering in web images . . . . . . . . . . . . . . . . . . . . . . . . . . . . . . . . . . . . . . . . . . . . . . . . . . . . . . . . . . . . . . . . . . . . . . . . . . . . . . . . . . . . . . . . . . . . . 280
Previewing web images . . . . . . . . . . . . . . . . . . . . . . . . . . . . . . . . . . . . . . . . . . . . . . . . . . . . . . . . . . . . . . . . . . . . . . . . . . . . . . . . . . . . . . . . . . . . . 282
Chapter 15: Printing and sharing photos
Printing photos . . . . . . . . . . . . . . . . . . . . . . . . . . . . . . . . . . . . . . . . . . . . . . . . . . . . . . . . . . . . . . . . . . . . . . . . . . . . . . . . . . . . . . . . . . . . . . . . . . . . . 284
Print options . . . . . . . . . . . . . . . . . . . . . . . . . . . . . . . . . . . . . . . . . . . . . . . . . . . . . . . . . . . . . . . . . . . . . . . . . . . . . . . . . . . . . . . . . . . . . . . . . . . . . . . . 289
Send photos to online sharing services . . . . . . . . . . . . . . . . . . . . . . . . . . . . . . . . . . . . . . . . . . . . . . . . . . . . . . . . . . . . . . . . . . . . . . . . . . . . . . . 290
Sharing photos . . . . . . . . . . . . . . . . . . . . . . . . . . . . . . . . . . . . . . . . . . . . . . . . . . . . . . . . . . . . . . . . . . . . . . . . . . . . . . . . . . . . . . . . . . . . . . . . . . . . . . 290
Chapter 16: Photoshop Elements keyboard shortcuts
Windows 7 keyboard shortcuts . . . . . . . . . . . . . . . . . . . . . . . . . . . . . . . . . . . . . . . . . . . . . . . . . . . . . . . . . . . . . . . . . . . . . . . . . . . . . . . . . . . . . . 291
Keys for viewing images (Full Edit) . . . . . . . . . . . . . . . . . . . . . . . . . . . . . . . . . . . . . . . . . . . . . . . . . . . . . . . . . . . . . . . . . . . . . . . . . . . . . . . . . . . 291
Keys for selecting tools . . . . . . . . . . . . . . . . . . . . . . . . . . . . . . . . . . . . . . . . . . . . . . . . . . . . . . . . . . . . . . . . . . . . . . . . . . . . . . . . . . . . . . . . . . . . . . 292
Keys for selecting and moving objects . . . . . . . . . . . . . . . . . . . . . . . . . . . . . . . . . . . . . . . . . . . . . . . . . . . . . . . . . . . . . . . . . . . . . . . . . . . . . . . 294
Keys for the Magic Extractor dialog box . . . . . . . . . . . . . . . . . . . . . . . . . . . . . . . . . . . . . . . . . . . . . . . . . . . . . . . . . . . . . . . . . . . . . . . . . . . . . . 294
Keys for transforming selections . . . . . . . . . . . . . . . . . . . . . . . . . . . . . . . . . . . . . . . . . . . . . . . . . . . . . . . . . . . . . . . . . . . . . . . . . . . . . . . . . . . . . 295
Keys for painting and brushes . . . . . . . . . . . . . . . . . . . . . . . . . . . . . . . . . . . . . . . . . . . . . . . . . . . . . . . . . . . . . . . . . . . . . . . . . . . . . . . . . . . . . . . 295
Keys for using text . . . . . . . . . . . . . . . . . . . . . . . . . . . . . . . . . . . . . . . . . . . . . . . . . . . . . . . . . . . . . . . . . . . . . . . . . . . . . . . . . . . . . . . . . . . . . . . . . . . 296
Keys for the Layers panel . . . . . . . . . . . . . . . . . . . . . . . . . . . . . . . . . . . . . . . . . . . . . . . . . . . . . . . . . . . . . . . . . . . . . . . . . . . . . . . . . . . . . . . . . . . . 297

vi
USING PHOTOSHOP ELEMENTS 9
Contents
Last updated 1/3/2012
Keys for using blending modes . . . . . . . . . . . . . . . . . . . . . . . . . . . . . . . . . . . . . . . . . . . . . . . . . . . . . . . . . . . . . . . . . . . . . . . . . . . . . . . . . . . . . . 297
Keys for the Info panel . . . . . . . . . . . . . . . . . . . . . . . . . . . . . . . . . . . . . . . . . . . . . . . . . . . . . . . . . . . . . . . . . . . . . . . . . . . . . . . . . . . . . . . . . . . . . . . 298
Keys for the Color Swatches panel . . . . . . . . . . . . . . . . . . . . . . . . . . . . . . . . . . . . . . . . . . . . . . . . . . . . . . . . . . . . . . . . . . . . . . . . . . . . . . . . . . . 299
Keys for showing or hiding panels (Full Edit) . . . . . . . . . . . . . . . . . . . . . . . . . . . . . . . . . . . . . . . . . . . . . . . . . . . . . . . . . . . . . . . . . . . . . . . . . . 299
Keys for the Filter Gallery . . . . . . . . . . . . . . . . . . . . . . . . . . . . . . . . . . . . . . . . . . . . . . . . . . . . . . . . . . . . . . . . . . . . . . . . . . . . . . . . . . . . . . . . . . . . 299
Keys for the Liquify filter . . . . . . . . . . . . . . . . . . . . . . . . . . . . . . . . . . . . . . . . . . . . . . . . . . . . . . . . . . . . . . . . . . . . . . . . . . . . . . . . . . . . . . . . . . . . . 300
Keys for using Photomerge Panorama . . . . . . . . . . . . . . . . . . . . . . . . . . . . . . . . . . . . . . . . . . . . . . . . . . . . . . . . . . . . . . . . . . . . . . . . . . . . . . . 300
Keys for the Camera Raw dialog box . . . . . . . . . . . . . . . . . . . . . . . . . . . . . . . . . . . . . . . . . . . . . . . . . . . . . . . . . . . . . . . . . . . . . . . . . . . . . . . . . 301
Chapter 17: Glossary
Find definitions for terms . . . . . . . . . . . . . . . . . . . . . . . . . . . . . . . . . . . . . . . . . . . . . . . . . . . . . . . . . . . . . . . . . . . . . . . . . . . . . . . . . . . . . . . . . . . . 302
Digital imaging terms . . . . . . . . . . . . . . . . . . . . . . . . . . . . . . . . . . . . . . . . . . . . . . . . . . . . . . . . . . . . . . . . . . . . . . . . . . . . . . . . . . . . . . . . . . . . . . . 302

1
Last updated 1/3/2012
Chapter 1: Getting started
Adobe® Photoshop® Elements 9 software combines power and simplicity so you can easily make your photos look their
best. You can also share them in imaginative ways, and easily find and view all your photos and video clips.
What to do first
Check the system requirements
If you’re not sure whether Adobe Photoshop Elements can run on your computer, review the complete system
requirements and recommendations for your Adobe® software. See the ReadMe file included on your software
installation disc.
For the system requirements of Adobe® Photoshop® Elements 9 for Windows, see
www.adobe.com/go/learn_pse_systemreq_win_en
For the system requirements of Adobe® Photoshop® Elements 9 for Mac OS, see
www.adobe.com/go/learn_pse_systemreq_mac_en
Install the software
1Close any other Adobe applications open on your computer.
2Insert the installation disc into your disc drive. In Windows, follow the onscreen instructions. In Mac OS, double-
click the mounted disk icon, browse to the Adobe Photoshop Elements 9 folder, and then double-click Setup.app.
Note: You can specify the language and select the country while installing the application. If you want to change these
settings after installing the application, you need to uninstall the application and then re-install it.
Should I uninstall my previous version of Adobe Photoshop Elements? If you’ve installed a trial version of
Adobe
Photoshop Elements, it’s a good idea to uninstall it first. However, it’s not necessary to uninstall a previous
version of Adobe Photoshop
Elements. But, you can uninstall a previous version if you want to.
How do I uninstall a version of Adobe Photoshop Elements? In the Windows® OS, click the Start menu, and then select
Control Panel. Double-click Add Or Remove Programs. Select the version of Adobe Photoshop
Elements that you
want to uninstall, and click Remove. Confirm the uninstallation when prompted.
In Mac OS, select Applications > Utilities > Adobe Installers, and double-click Uninstall Adobe Photoshop Elements
<version_number>.
Register
After installing Adobe Photoshop Elements, register your software to receive complimentary installation support,
notifications of updates, and other services.
Note: Users in non-US locations, can register at any time by choosing Help > Product Registration.
Adobe Product Improvement Program
After you have used your Adobe software a certain number of times, a dialog box appears, asking whether you want
to participate in the Adobe Product Improvement Program.

2
USING PHOTOSHOP ELEMENTS 9
Getting started
Last updated 1/3/2012
If you choose to participate, data about your use of Adobe software is sent to Adobe. No personal information is
recorded or sent. The Adobe Product Improvement Program only collects information about the features and tools
that you use in the software and how often you use them.
You can opt in to or opt out of the program at any time:
•To participate, choose Help > Adobe Product Improvement Program and click Yes, Participate.
•To stop participating, choose Help > Adobe Product Improvement Program and click No, Thank You.
Adobe provides more information about the Adobe Product Improvement Program in a frequently asked questions
(FAQ) list on the Adobe website.
ReadMe file
The installation disc contains the ReadMe file for your software. Open the file to read important information.
Sign up with your Adobe ID
Important: Free online benefits and Plus benefits for Photoshop Elements are available in the United States only. Internet
access required.
Sign up with your Adobe ID to receive free online benefits, such as 2 GB of free storage, automatic online backup,
automatic syncing of your photos and video clips on multiple computers, tutorials that appear when you need them,
access to your photos and videos at Photoshop.com, and a personal URL for sharing your photo/video albums. If you
purchased Adobe Photoshop Elements 9 Plus, sign up with your Adobe ID to receive all the above plus additional
storage space, artwork, and tutorials. For more information, see www.adobe.com/go/learn_pse9_membership_en.
How do I sign up? Click the Create New Adobe ID link in the Welcome screen or in the menu bar of
Photoshop
Elements to sign up. You can sign up at any time from the Welcome screen. To display the Welcome
screen, click the Welcome screen icon in the menu bar. If you don't have an Adobe ID, click the link in the Welcome
screen or in the menu bar to create one.
New and enhanced features
Visit www.adobe.com/go/learn_pse_features_en to learn about new and enhanced features. Improving your photos
and doing more with them is easier than ever.
Using Help and getting support
Learning Adobe Photoshop Elements
The Photoshop Elements Help and Support page on the web provides links to articles and video tutorials to help you
get started with Adobe Photoshop Elements. The Help and Support page also includes top troubleshooting tips,
advanced articles, and links to help and forums. Go to www.adobe.com/support/photoshopelements.
How do I ask a question You can also ask questions and get advice from other Adobe Photoshop Elements and
Adobe
Premiere Elements users at www.adobe.com/go/forums.
Using Photoshop Elements Help
To see the complete Help for Adobe Photoshop Elements, see Elements Organizer Help and Photoshop Elements Help.

3
USING PHOTOSHOP ELEMENTS 9
Getting started
Last updated 1/3/2012
Help is available in several ways:
Help in the application Select Help > Photoshop Elements Help (or press the F1 key on your keyboard) to launch the
Community Help application. This companion application lets you search and browse Adobe and community content
on Photoshop Elements. You can access Help content after the first download even when you are offline. However,
you must be online to get the maximum benefits from the Help system.
Help on the web To view Help in a browser, see www.adobe.com/go/learn_pse9_en. Your computer must be
connected to the Internet to access Help on the web. Use the Search field to search Photoshop Elements Help.
Help PDF Help is also available as a PDF that is optimized for printing. To access the PDF, see
www.adobe.com/go/learn_pse9_printpdf_en, or click the View Help PDF link at the top of each Help page.
Links in the application Some Help links are within Photoshop Elements. Clicking these links takes you to the
corresponding topic in Help.
How to search for troubleshooting topics You can view top issues and search for common problems and error
messages by going to www.adobe.com/support/photoshopelements. You can also ask questions to other
Adobe Photoshop Elements users at www.adobe.com/go/forums.
Forum You can access the Elements user community forum through the application. To access the forum page from
Photoshop Elements, select Help > Forum. To access the forum page from Elements Organizer, select Help > Forum
> Photoshop Elements. If your computer is connected to the Internet, Photoshop
Elements launches the forum page.
The forum is used to ask other Photoshop Elements users for suggestions on your designs and also to post useful tips
and tricks that help other users.
Look for Photoshop Elements updates If your computer is connected to the Internet, you’ll receive notifications
whenever Photoshop
Elements is updated. You can also find out about the latest updates by going to
www.adobe.com/downloads/updates.
How do I get customer support?
You can get support by contacting Adobe directly or submitting a web case. Visit www.adobe.com/support/contact for
contact information. Visit the Adobe Support website at www.adobe.com/go/support. Adobe Support has
troubleshooting information and also information about free and paid technical support options.
Converting a catalog from a previous version (Windows
only)
When you open Elements Organizer in Adobe Photoshop Elements 9, you could experience difficulties opening a
catalog you used in an earlier version of Adobe Photoshop Elements. Convert the catalog to view the photos.
1Select File > Catalog.
2Click Convert in the Catalog Manager.
3In the Convert Catalog window, select the catalog you want to convert.
Note: Catalogs saved to a folder in a location other than the default location do not appear in the Convert Catalog
window automatically. Click Find More Catalogs, and then select the folder where your catalog is located. Catalogs
located in that folder are added to the list of catalogs that can be converted.
4Click Convert.

4
USING PHOTOSHOP ELEMENTS 9
Getting started
Last updated 1/3/2012
Convert a Windows catalog for Mac
If you have a previous version of Photoshop Elements installed on Windows and want to use Photoshop Elements 9 on
both Windows and Mac OS computers, you can convert existing catalogs to use them both in Windows and Mac OS.
1Convert the older catalogs to Photoshop Elements 9 catalogs on the Windows computer.
2Back up the catalogs onto an external hard disk or a CD drive using the Backup Catalog feature.
3Copy the backed up files to the Mac computer.
4Launch Elements Organizer and select File > Restore Catalog From Hard Drive. Browse to the path where the
backup is present and then restore the catalog.
Show Previously Converted Catalogs
You can view the catalogs that have previously been converted or that were backed up by an earlier version. The
Convert Catalog window does not display these catalogs by default. Select Show Previously Converted Catalogs to view
a list of the previously converted catalogs.
Note: You cannot use the converted catalog with earlier versions. However, when the catalog is converted, it copies the
data into a new catalog file, and the original catalog file remains unchanged. You can continue to use the original catalog
in the earlier versions.
About backing up/synchronizing files
Back up/synchronize files
Note: Adobe Photoshop Elements free online benefits and Photoshop Elements Plus are available in the United States
only. Internet access required.
When you sign in with your Adobe ID, you can back up your albums and catalogs to Photoshop.com servers. Backing
up and synchronizing your albums and catalogs are essential for protecting your photos and media files. For example,
if you add keyword tags to media files on your computer, the corresponding photos on Photoshop.com are updated
with the tags. The albums and catalogs must be marked for Backup/Synchronization on each computer.
Important: All images within a stack are automatically backed up/synchronized across all machines. However, you must
manually re-create the stack on each machine.
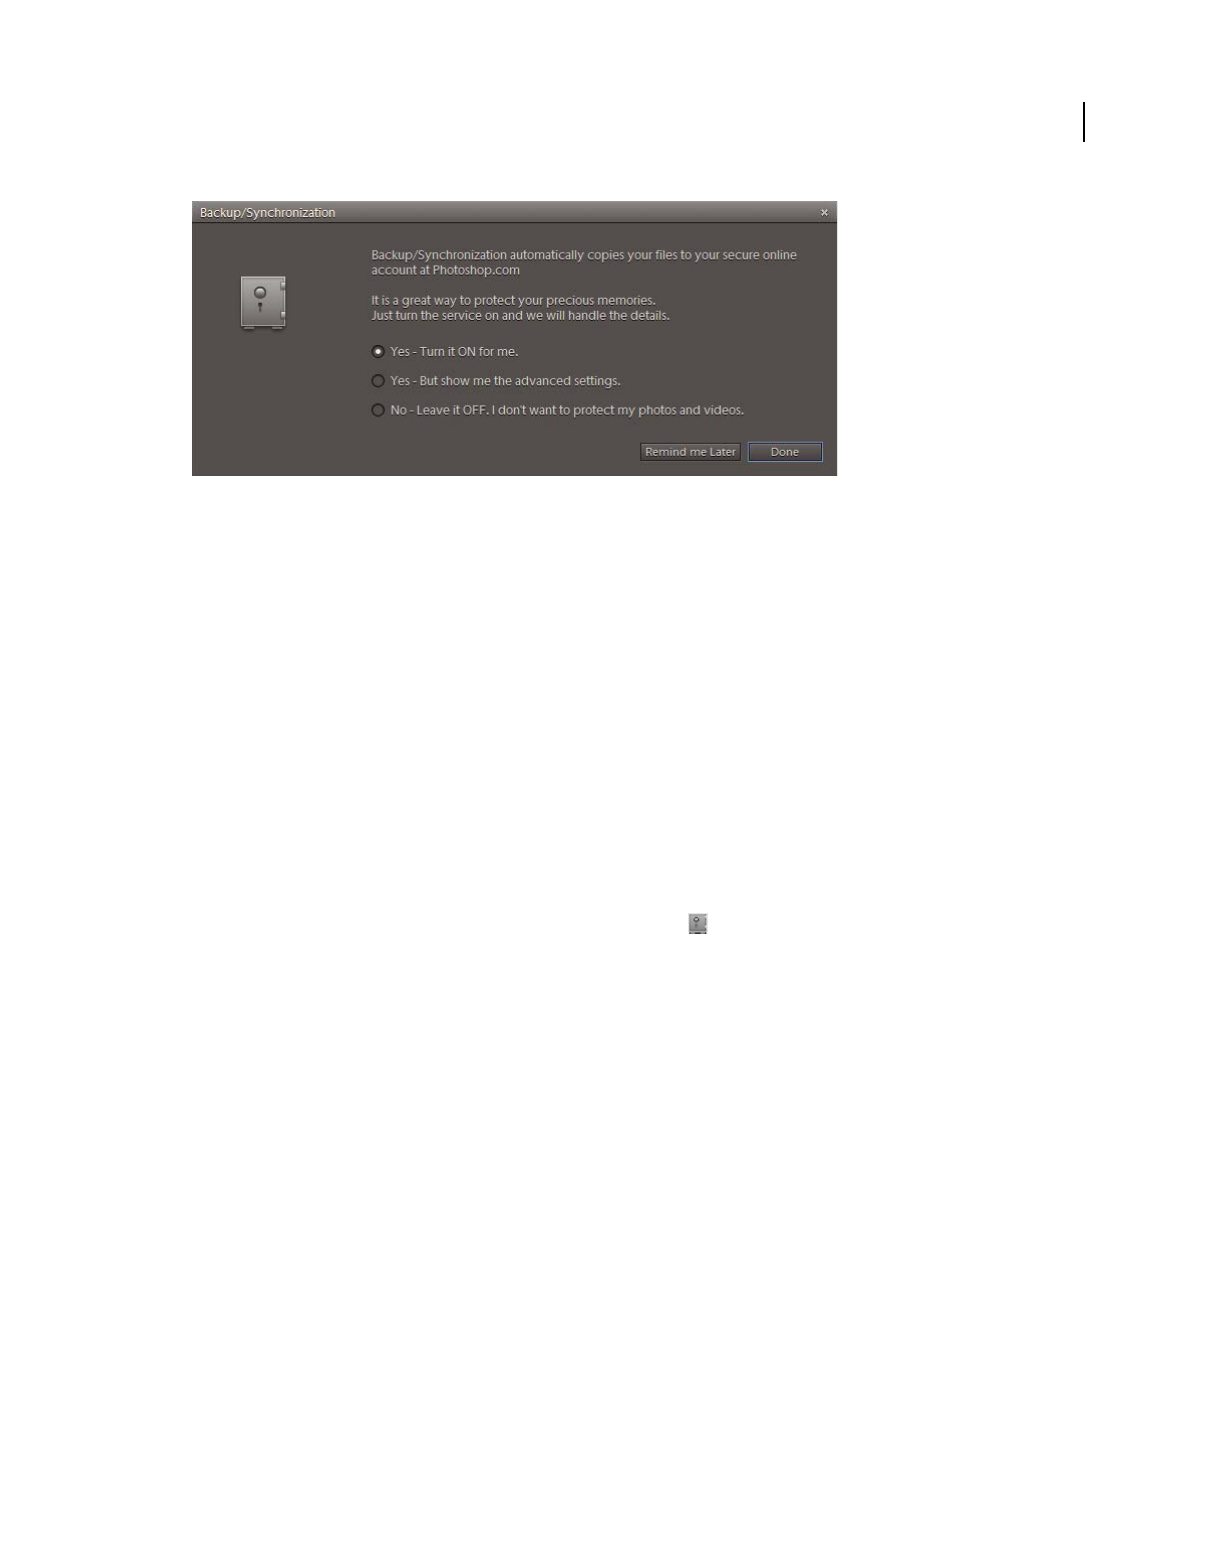
The Backup/Synchronization wizard is automatically launched when the user activates Backup/Synchronization for
the first time.
5
USING PHOTOSHOP ELEMENTS 9
Getting started
Last updated 1/3/2012
Backup/Synchronization window
1Start Elements Organizer, and then sign in with your Adobe ID.
2Choose an option from the Backup/Synchronization dialog box.
Yes - Turn It On For Me Enables you to set your entire catalog for Backup/Synchronization. All your videos and photos
securely get uploaded to your online account.
Yes - But Show Me The Advanced Settings Enables you to set advanced Backup/Synchronization settings in the
Preferences dialog box.
No - Leave It OFF. I Don’t Want To Protect My Photos And Videos Your videos and photos don’t get backed up and
synchronized online.
3Select the required option, and then follow the onscreen instructions to enable Backup/Synchronization.
View Backup/Synchronization activity status
❖Do one of the following:
•Right-click the Elements Backup/Synchronization Agent icon in the system tray and select View
Backup/Synchronization Status.
•Double-click the Elements Backup/Synchronization Agent icon in the system tray.
•Click the Elements Backup/Synchronization Agent icon in the status bar of Elements Organizer, and then select
View Backup/Synchronization Status.
The Elements Backup/Synchronization Status dialog box is displayed. The dialog box displays the following
information:
•The total number of assets that are being synchronized
•The overall progress of the synchronization activity
•The online storage capacity being used
•The asset that is being synchronized
The dialog box also allows you to pause and resume the Backup/Synchronization activity.

6
USING PHOTOSHOP ELEMENTS 9
Getting started
Last updated 1/3/2012
View Backup/Sync activity status
Start backup and synchronization activity manually
Backup/Synchronization is a scheduled activity. The Elements Backup/Synchronization Agent checks for assets to
synchronize at regular intervals. Between these periods of activity, the Elements Backup/Synchronization Agent is idle.
To synchronize right away instead of waiting for the next scheduled synchronization, click Backup/Sync Now in the
system tray. The Backup/Synchronization process starts, and any changes that you have made are synced to
Photoshop.com immediately.
Working in Organize and Edit workspaces
For a video overview, see www.adobe.com/go/lrvid916_pse_en.
Adobe Photoshop Elements has two basic workspaces— Organize and Edit—that you switch between, depending on
the task you’re performing. You start by importing photos in the Organize workspace, where Elements Organizer helps
you view, manage, and find all of your photos and video clips. You can also make quick fixes in the Organize
workspace.
In the Edit workspace, you can refine your photos, make basic edits, follow step-by-step guided editing tasks, or use
advanced editing tools.
After working with your photos in either workspace, you can create photo projects, such as scrapbook pages, slide
shows, photo books, and online albums. You can easily share these projects with family and friends.
Note: Flipbook, slide show, and HTML-based photo mail creation are not supported in Mac OS.
To access the Organize workspace from the Edit workspace, click the icon .
Importing and organizing photos and video
As you work in Adobe Photoshop Elements, you start by importing photos into Elements Organizer. In Elements
Organizer, you can view, manage, and find all your photos and video clips.
Use the Photo Downloader to download files
1Connect your camera or card reader to your computer. (See the documentation that came with your device, if
necessary.)
Note: (Windows) If autoplay is enabled, the Windows AutoPlay dialog box opens with a list of options for getting the
photos. In the Windows AutoPlay dialog box, select Organize, and Edit using Adobe Elements 9 Organizer, and then click
OK. If Elements Organizer is not already open, the Photo Downloader dialog box opens. Click Get Photos. Elements
Organizer opens and imports the media files.

7
USING PHOTOSHOP ELEMENTS 9
Getting started
Last updated 1/3/2012
2In the Organize workspace, select File > Get Photos and Videos > From Camera or Card Reader.
3In the Photo Downloader dialog box under Source, choose from the Get Photos From drop-down list to specify
where to copy/import the photos from.
4In the Import Settings area, set the following options:
Location Specifies the folder to which images are downloaded. To change the default folder location, click Browse, and
then specify a new location.
Create Subfolder(s) Creates a subfolder using the naming scheme chosen from the pop-up menu. If you choose
Custom Name, type a subfolder name in the box.
Rename Files Changes the filenames using the naming scheme selected from the pop-up menu. If you choose Custom
Name, type a base filename and a starting number for assigning sequentially numbered filenames to the photos.
Note: If the name you entered exists, the copied image filename is appended with “-1” or another appropriately numbered
designator.
Preserve Current Filename In XMP Select this option to use the current filename as the filename stored in the metadata
of the photo.
Delete Options Specifies whether to leave the photos on your camera or card, verify and delete the files, or delete the
files after they are copied. Photos that you do not import into Adobe Photoshop
Elements are not deleted from the
camera or card.
5(Optional) (Windows) To automatically download photos to Photoshop Elements after a device is connected,
select Automatic Download. Automatic download options are set in the Camera Or Card Reader preferences.
6(Optional) For more download options, click the Advanced Dialog button. See
www.adobe.com/go/learn_org9_advanceddownload_en.
7Click Get Photos.
The photos are copied to your hard drive.
8Click OK in the Files Successfully Copied dialog box.
Note: If Elements Organizer is launched while copying the photos, click Yes in the Files Successfully Copied box.
Organizing your photos and video clips
Use Elements Organizer to manage your files. Elements Organizer enables you to find photos, video files, audio clips,
and Adobe PDF documents, even if they’re stored in different locations on your computer.
Adobe Photoshop Elements automatically organizes photos by date as they download. Elements Organizer has a
Timeline (choose Window > Timeline) and Date View for finding photos by date. It’s a good idea to put related photos
into an album. Albums are great for sharing photos in projects, creations, online albums, and they also make it easy to
find related photos.
You can further sort and categorize photos by adding star ratings, by stacking photos, and by assigning keyword
tags
. For more information on using keyword tags, see www.adobe.com/go/learn_org9_photos_tag_en.
Do I have to use Elements Organizer? No. You can copy photos to your computer and fix your photos in the Edit
workspace of Photoshop Elements. However, there are lots of great things you can do with your photos in Elements
Organizer. Also, after collecting hundreds and thousands of photos on your computer, you’ll discover that finding and
managing photos with Elements Organizer is much easier.
8
USING PHOTOSHOP ELEMENTS 9
Getting started
Last updated 1/3/2012
Create an album
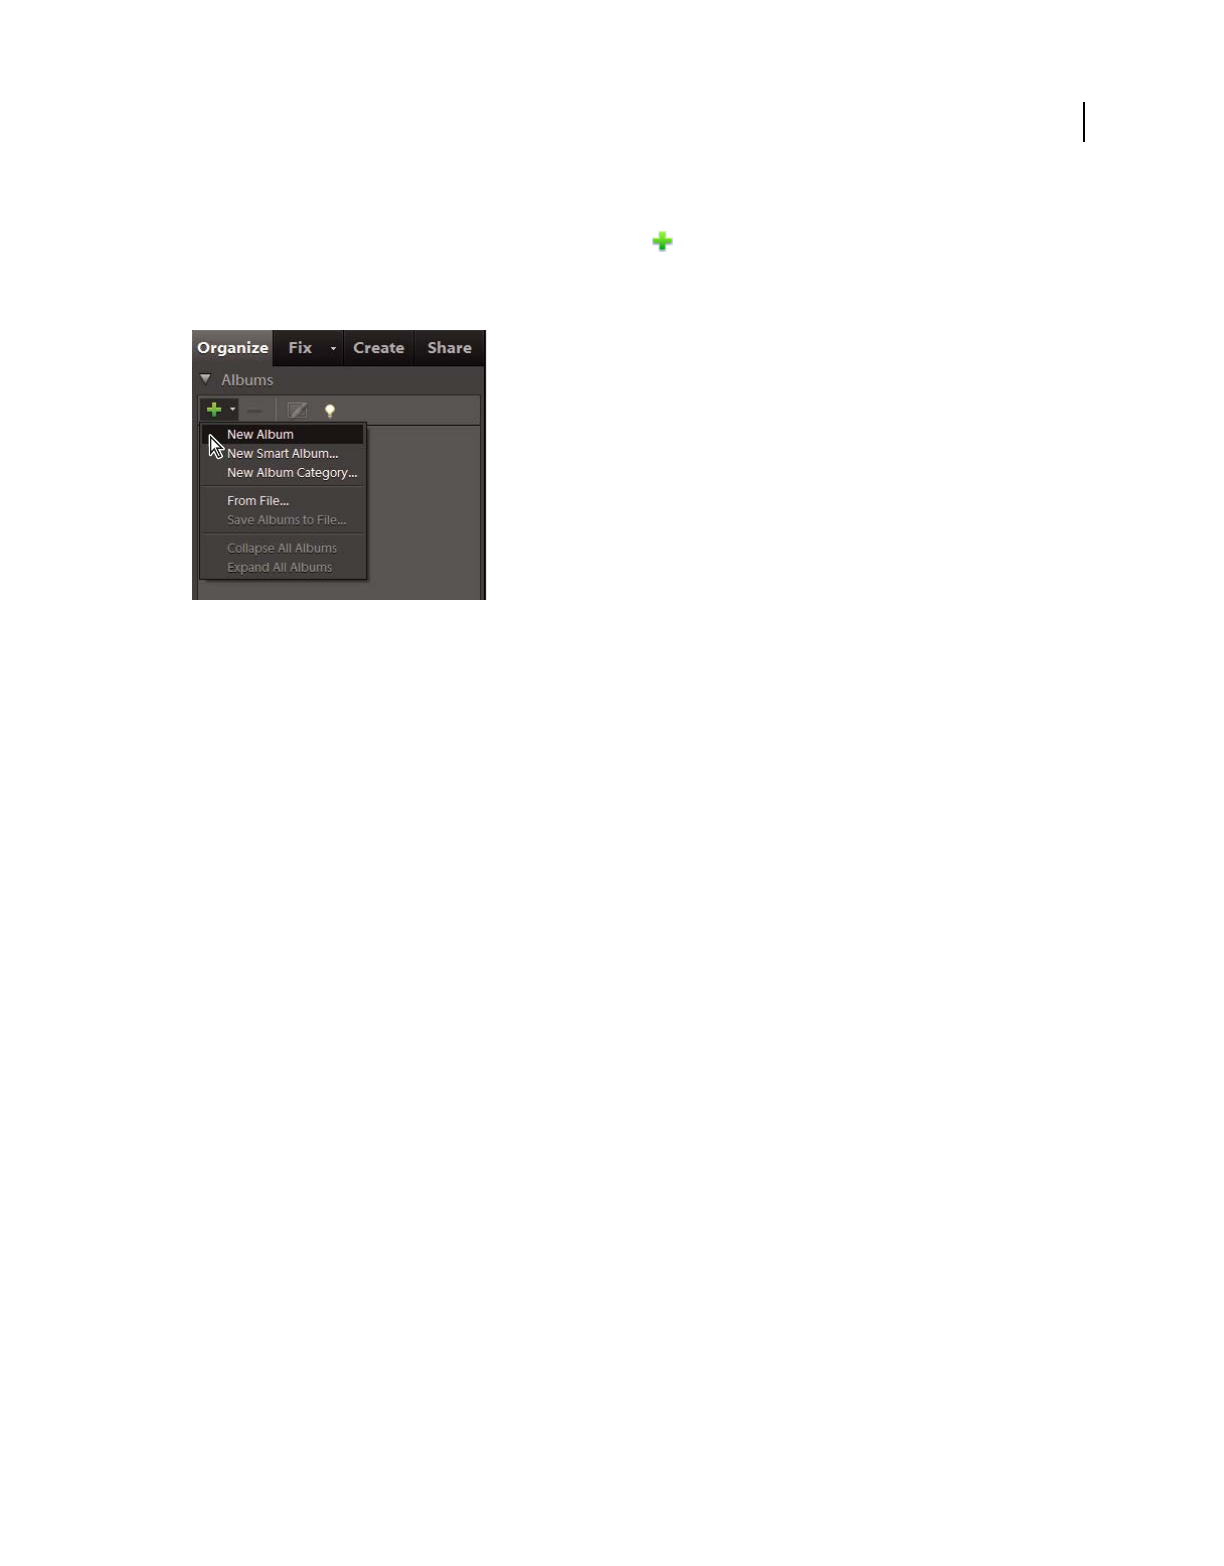
1Click the Create New Album Or Album Category button in the Albums panel of the Organize tab, and then
choose New Album.
2(Optional) From the Albums Category menu, choose a category into which to place the album.
Albums Category menu
3In the Album Name box, type a name for the album.
4Drag photos into the Items area.
The album appears in the Albums panel under the album category you specified. For more information about creating
an album, see www.adobe.com/go/learn_org9_albums_create_en.
Finding photos and video clips
You can find photos and video files by date, star rating, album, folder location, filename, media type, keyword tag, text,
or other criteria. For more information, see www.adobe.com/go/learn_org9_photos_find_en.
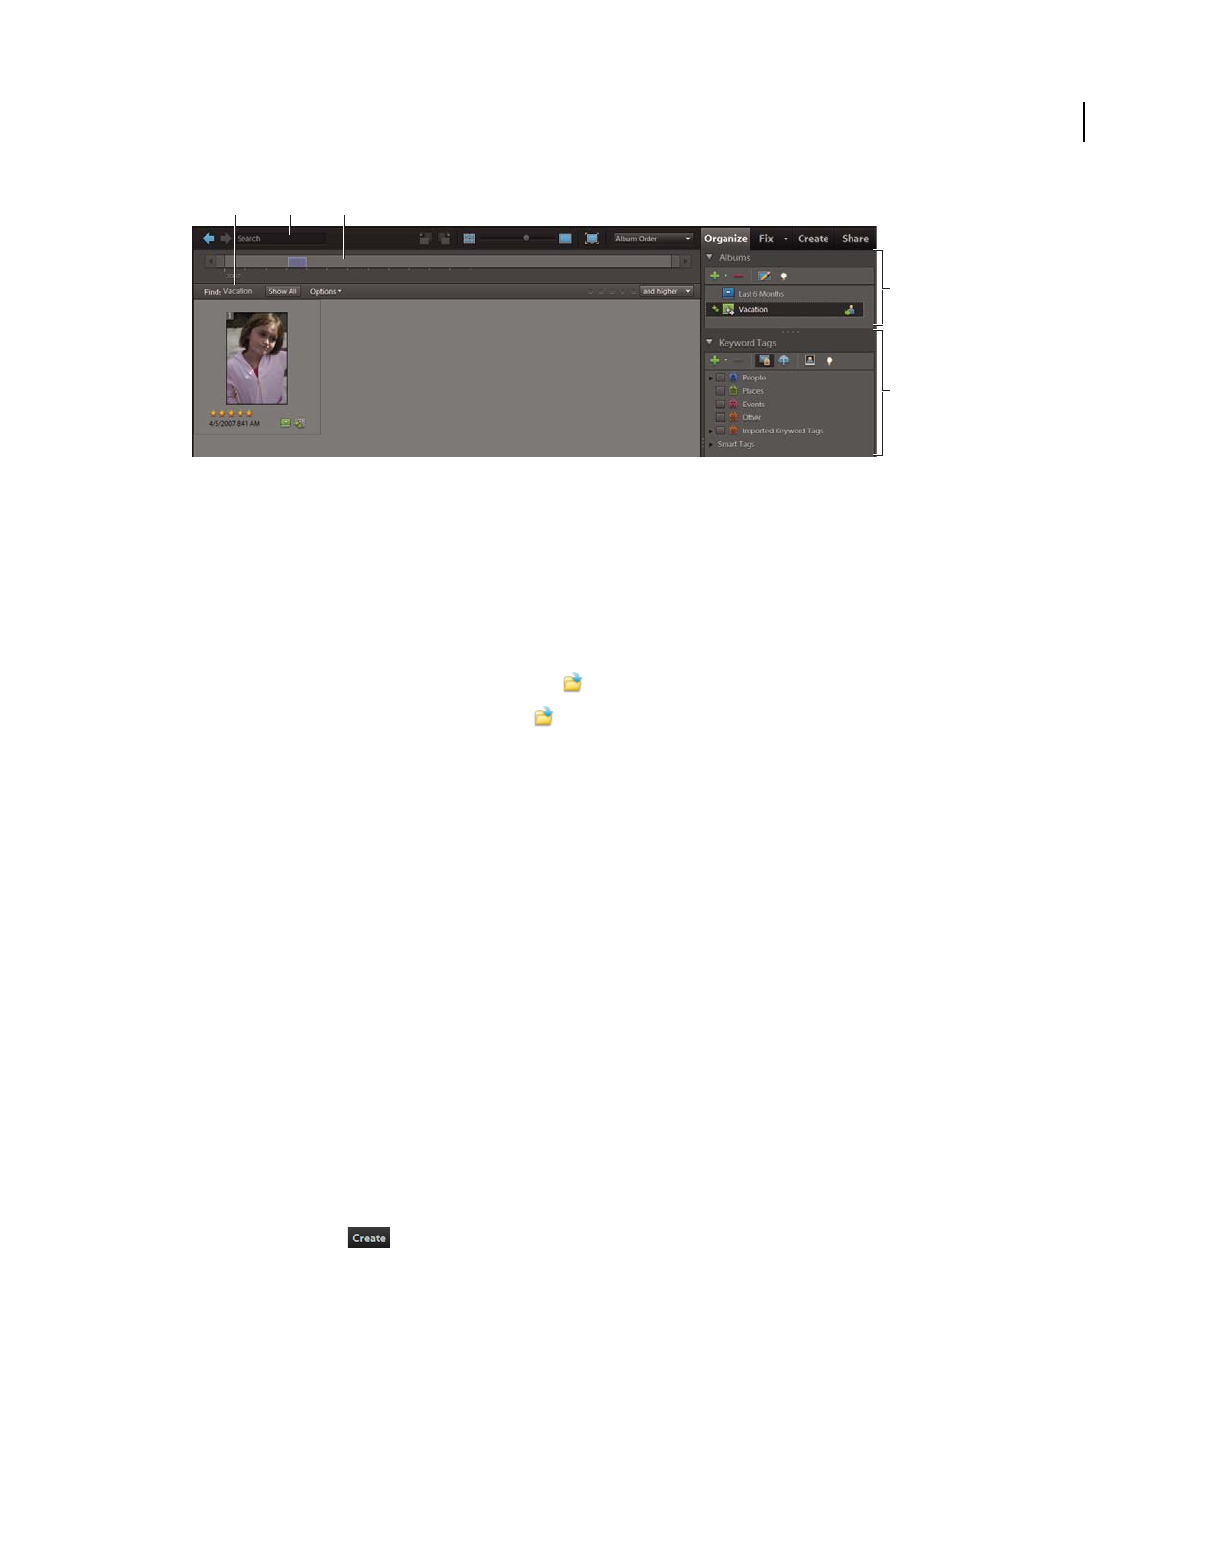
Here are a few of the features in Elements Organizer to find photos:
Find bar Drag a photo, keyword tag, project, or album onto the Find bar to find matching or similar photos and media
files.
Albums panel Select an album to view only the media files in it.
Keyword Tags panel Select a keyword tag to see only the files with that tag.
Text box Type text in the Search box to find files with matching text. Matches can include items such as filenames,
metadata, keyword tags, captions, notes, album names, album groups, camera information, dates, folders, and formats.
Timeline Click a month or set a range to find photos and media files chronologically by date, import batch, or folder
location.
Note: Select Window > Timeline to display the timeline.
9
USING PHOTOSHOP ELEMENTS 9
Getting started
Last updated 1/3/2012
Elements Organizer has many tools and features for finding photos.
A. Find bar B. Text box C. Timeline D. Albums panel E. Keyword Tags panel
Find the actual file of a photo or media clip
1In Elements Organizer, select the photo or media clip whose file you want to find.
2Press Alt + Enter (Windows) or Option + Enter (Mac OS) to open the Properties-General window.
3Do one of the following:
•(Windows) Click the Reveal In Explorer icon .
•(Mac OS) Click the Reveal In Finder icon .
Creating photo projects
You can use your photos in various fun projects that you can share with family and friends. For example, you can create
photo projects, such as albums, greeting cards, CD/DVD labels and jackets, and photo collages. You can print these
photo projects at home, or you can upload them to an online printing service. You can also use your photos in online
photo galleries, photo slide shows, and flipbooks. For more information, see
www.adobe.com/go/learn_org9_projects_en.
Give your projects a personal look by customizing the project templates. Adjust layout colors to better complement
your photos, and add new graphical elements, text, and effects, such as drop shadows and glows. Use the Contents
panel to quickly browse hundreds of frames, themes, backgrounds, clip art, and effects to apply to your photos and
photo projects.
Note: Flipbook, slide show, and HTML-based photo mail creation are not supported in Mac OS.
Create and share a slide show (Windows only)
1In Elements Organizer, select the photos you want in the slide show.
2In the Create tab , click Slide Show to show the Slide Show Preferences.
3Change any of the preferences, or click OK to use the default options.
All the tools for creating your slide show are in the Slide Show dialog box. The photos you chose to use in the slide
show appear at the bottom of the screen.
4In the Slide Show Editor, have fun adding effects, text, small graphics, music, or your own narration. The Slide Show
Editor provides lots of possibilities for creativity.
ABC
E
D

10
USING PHOTOSHOP ELEMENTS 9
Getting started
Last updated 1/3/2012
5If you want to reorder your slides, drag the slide’s thumbnail image to a new location. The image thumbnails are at
the bottom of the Slide Show Editor. Drag one forward or back until you see the blue bar, and then release the
mouse button.
6To preview your slide show with all its effects, use the VCR-style buttons under the slide preview. You can return
to editing slides at any time by pressing the VCR-style button.
Note: You can also preview your slide show with all its effects using the Full Screen Preview icon. You can return to editing
slides from the Full screen preview by pressing the Esc key.
7
Click Save Project (in the upper left of the Slide Show Editor). It’s a good idea to save the slide show regularly as you work.
8To output your slide show for viewing or sharing, click Output (in the upper left of the Slide Show Editor). Choose
how you want to share your slide show. You can save it as a movie file or a PDF file. You can also burn it to a disc
(VCD/DVD) so you can play it on a TV or computer. You must have Adobe Premiere Elements installed to burn
your movie files to DVD.
Printing and sharing photos
Photoshop Elements offers many ways to quickly share your photos. You can let people view your photos through an
interactive online album. You can send photos to people via e-mail. You can print photos to your home printer or
order professionally printed photos. Or, you can put your files or albums on CDs/DVDs.
In Elements Organizer, you first select photos you want to share. Click the Share tab, and then select the way you want
to share photos. For more information, see www.adobe.com/go/learn_org9_share_en.
Print from Elements Organizer (Windows only)
1Select photos or video clips in the Photo Browser. If you select a video clip, only the first frame of the clip is printed.
2Choose File > Print.
3Specify printing options in the Prints dialog box, and then click Print.
Print online
1In Elements Organizer, select the photos you want to print.
2Do one of the following and follow the instructions in the Order Prints dialog box that opens.
•Click File > Order Prints > Order Shutterfly Prints.
Note: Sign up for Shutterfly to use their services.
•Click File > Order Prints > Order Kodak Prints.
Note: Sign up for Kodak membership to use their services.
Share photos using e-mail
Photoshop Elements streamlines sharing photos by e-mail. You can either attach photos to an e-mail or, in Windows,
embed a photo in an e-mail using Photo Mail.
1Make sure your e-mail client is specified in Preferences. In Windows, choose Edit > Preferences > Sharing.
Note: In Mac OS, you can find the Preferences option in the Adobe Elements 9 Organizer menu.

11
USING PHOTOSHOP ELEMENTS 9
Getting started
Last updated 1/3/2012
2In Windows, choose Microsoft Outlook®, Outlook Express, or Adobe E-mail Service. In Mac OS, choose Entourage
or Mail.
Note: In Windows Vista®, choose Microsoft Outlook®, Windows mail, or Adobe E-mail Service.
3Select a photo in the Media Browser or Date view, and then click Share and E-Mail Attachments.
4To add more items to the e-mail, select them in the Media Browser, then click the Add button .
Note: You can also remove items by selecting them in the Items list, and then clicking the Remove button .
5Choose an option from the Maximum Photo Size menu, and use the Quality slider to adjust image clarity.
6Click Next.
7Type a message in the Message text box.
8Select recipients of the e-mail by doing one of the following:
•Select a name from the Select Recipients list (the names you see are from your contact book).
•If you want, add the recipient to your contact book by selecting New Contact in the Contact Book dialog. Click OK;
the recipient appears selected in the Select Recipients list.
9Click Next.
Photoshop Elements opens the message in your default e-mail application.
What if I use a web-based e-mail service? If you use a web-based e-mail service such as Gmail™ or Yahoo® Mail, you
can export your photos and attach them to e-mail messages. Click the Share tab, and select E-mail Attachments. The
E-mail Attachments wizard leads you through the steps for creating versions of your photos that are suitable for e-mail.
Fixing (editing) photos
Adobe Photoshop Elements offers several levels of editing, from simple one-click fixes in the Organize workspace to
advanced color correction and composition in the Edit workspace.
Fix photos in the Organize workspace
In the Organize workspace, you can perform various basic image adjustments: Auto Smart Fix, Auto Color, Auto
Contrast, Auto Red Eye, and Auto Sharpen, for example. For more information, see
www.adobe.com/go/learn_org9_fix_organizer_en.
1In the Organize workspace, select the photos you want to fix.
2Click the Fix tab, and select Edit Photos (In Mac OS, Edit Photos appears under More Options). Make the required
adjustments.
If you don’t like the results, click Undo , or press Ctrl + Z (Windows) or Command + Z (Mac OS).
Crop a photo in the Organize workspace
Cropping removes unwanted areas from a photo.
1In the Organize workspace, select the photo you want to crop.
2Click the Fix tab, select Crop, and then follow the instructions in the Crop dialog box.
12
USING PHOTOSHOP ELEMENTS 9
Getting started
Last updated 1/3/2012
Fix photos in the Edit workspace
Photoshop Elements provides additional editing modes in the Edit workspace: Full, Quick, and Guided. The level of
your editing expertise and complexity of the image editing determine which mode is appropriate for your task. For
more information, see www.adobe.com/go/learn_pse9_photos_fix_en.
1In Elements Organizer, select the photos you want to work with in the Edit workspace.
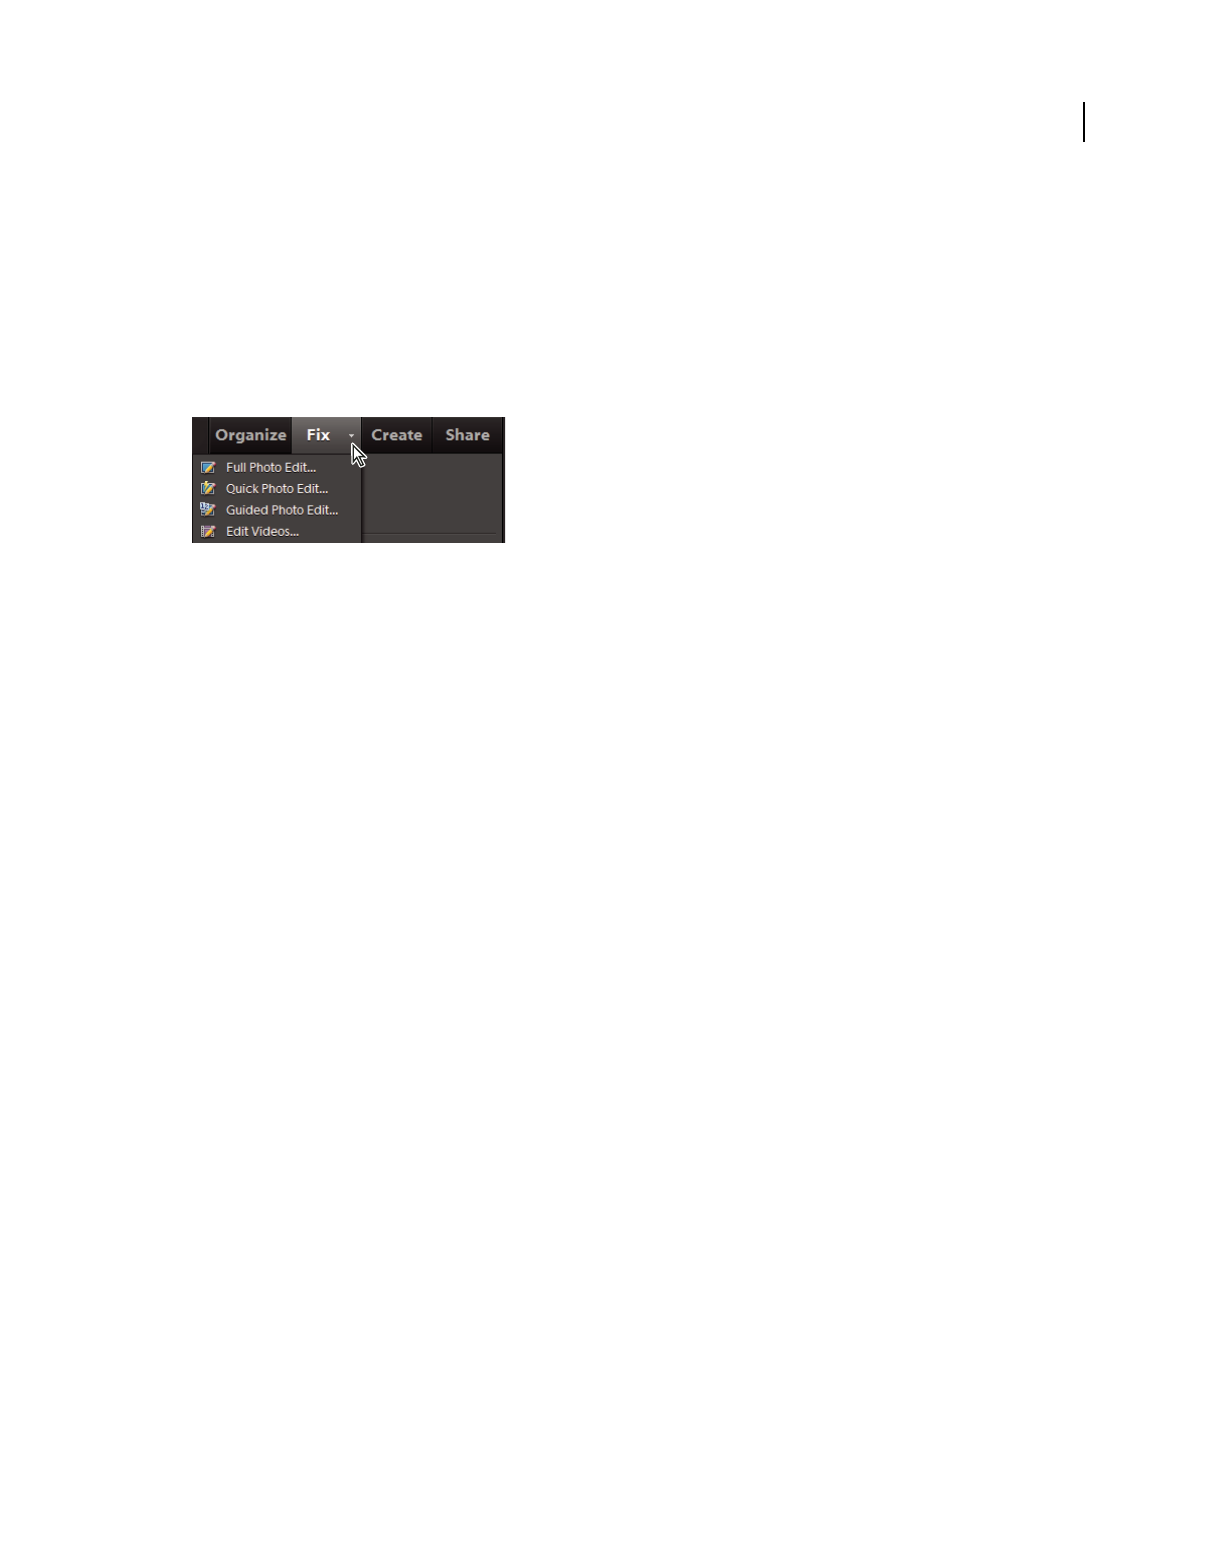
2Click the triangle beside the Fix tab, and then select one of the following: Full Photo Edit, Quick Photo Edit, or
Guided Photo Edit.
Organizer bar
In the Edit workspace, photos appear in the Project Bin. You can move between the photos you want to fix by double-
clicking them in the Project Bin.
Do I have to use Elements Organizer to open images in the Edit workspace? No. You can open photos from the Edit
workspace too. Choose File > Open and navigate to the photos you want to open.
What if I switch to Elements Organizer while fixing photos in the Edit workspace? If you switch to Elements Organizer
while files are open in the Edit workspace, you’ll see a banner over the thumbnails of the opened files. The files cannot
be changed in the Organize workspace until they are closed in the Edit workspace.
More Help topics
“Color and tonal correction basics” on page 107
“Guided Edit” on page 49
Saving your edits
After you edit an image in the Edit workspace, save it, or you’ll lose your work. Fixes you make in the Organize are
saved automatically.
❖In the Edit workspace, choose File > Save.
Photos saved from the Edit workspace are saved as a version and grouped with other saved versions and the original
photo. These version sets are stacked together in Elements Organizer with the latest saved version at the top of the
stack.
What if I don’t want to save versions of a photo? It’s recommended that you save versions of a photo to preserve the
original file. If for some reason, you don’t want to save a version of a photo, choose File > Save after you’ve finished
editing a photo. Under Save Options in the Save As dialog box, deselect the Save In Version Set With Original option.
By default, Photoshop Elements saves the file in PSD format without a version number appended to the filename.

13
USING PHOTOSHOP ELEMENTS 9
Getting started
Last updated 1/3/2012
Troubleshooting tips
Here are some things to consider when troubleshooting Photoshop Elements. For more tips, visit
www.adobe.com/go/forums.
•Restart Photoshop Elements, or restart your computer.
•Reset the Photoshop Elements preferences. Hold down the Ctrl + Alt + Shift keys (Windows) or Option +
Command + Shift keys (Mac OS) immediately after starting Photoshop
Elements. Then, choose a task on the
Welcome screen.
•Turn off other programs, including anti-virus, firewall, and CD/DVD burning applications that run in the
background, until you find the cause.
•Make sure that the computer operating system is up-to-date. Install the latest drivers for your video card, sound
card, printer, and other devices.
•Remove any recent additions to your computer. What was the last thing you changed on your computer before the
problem began? Did you install a new printer, font, or other software?
•If something in Photoshop Elements doesn’t seem to work properly, check Photoshop Elements Help.
•If a problem occurs when you open or edit a photo, does the problem occur with all photos? Does it occur with
photos from different cameras or sources?

14
Last updated 1/3/2012
Chapter 2: Photoshop Elements workspace
Adobe® Photoshop® Elements 9 has two main workspaces: the Organize workspace and the Edit workspace. Use the
Organize workspace for finding, organizing, and sharing your photos and media files. Use the Edit workspace for
creating, editing, and fixing your images. You can also add functionality with plug-in modules and expand system
memory by using scratch disks.
To open a photo in the Edit workspace, select the photo in Organize workspace. Click the triangle beside the Fix tab,
and then choose Full Photo Edit, Quick Photo Edit, or Guided Photo Edit. When you are working in the Edit
workspace, click the Organizer button
to open the Organize workspace.
You can move between the two workspaces by clicking the corresponding button in the Windows® OS task bar or in
the Mac® dock.
About workspaces
The Welcome screen
When you start Photoshop Elements, the Welcome screen opens by default. The Welcome screen is a convenient
starting place, or hub, for major tasks.
Note: The Photoshop Elements free online benefits and Photoshop Elements Plus are available in the United States only.
Internet access required.
Click Organize to import, tag, or organize your photos. Click Edit to enhance your images or add special effects.
Click the Close button (X) in the upper-right corner of the Welcome screen to close the Welcome screen. You can
reopen the Welcome screen at any time by clicking the Welcome Screen button
in the Edit workspace or the
Organize workspace. It’s not necessary to return to the Welcome screen to open other workspaces—you can open
different workspaces from within any other workspace.
When you click the settings icon , the Adobe Photoshop Elements 9 dialog box is displayed with options to control
the Adobe Photoshop Elements launch behavior. Select one of the options and click OK:
•Just Show The Welcome Screen
•Always Launch Elements Organizer Behind The Welcome Screen
•Always Launch Photoshop Elements Editor Behind The Welcome Screen
More Help topics
“Sign up with your Adobe ID” on page 2
The Edit workspace
For a video, see www.adobe.com/go/lrvid905_pse_en.
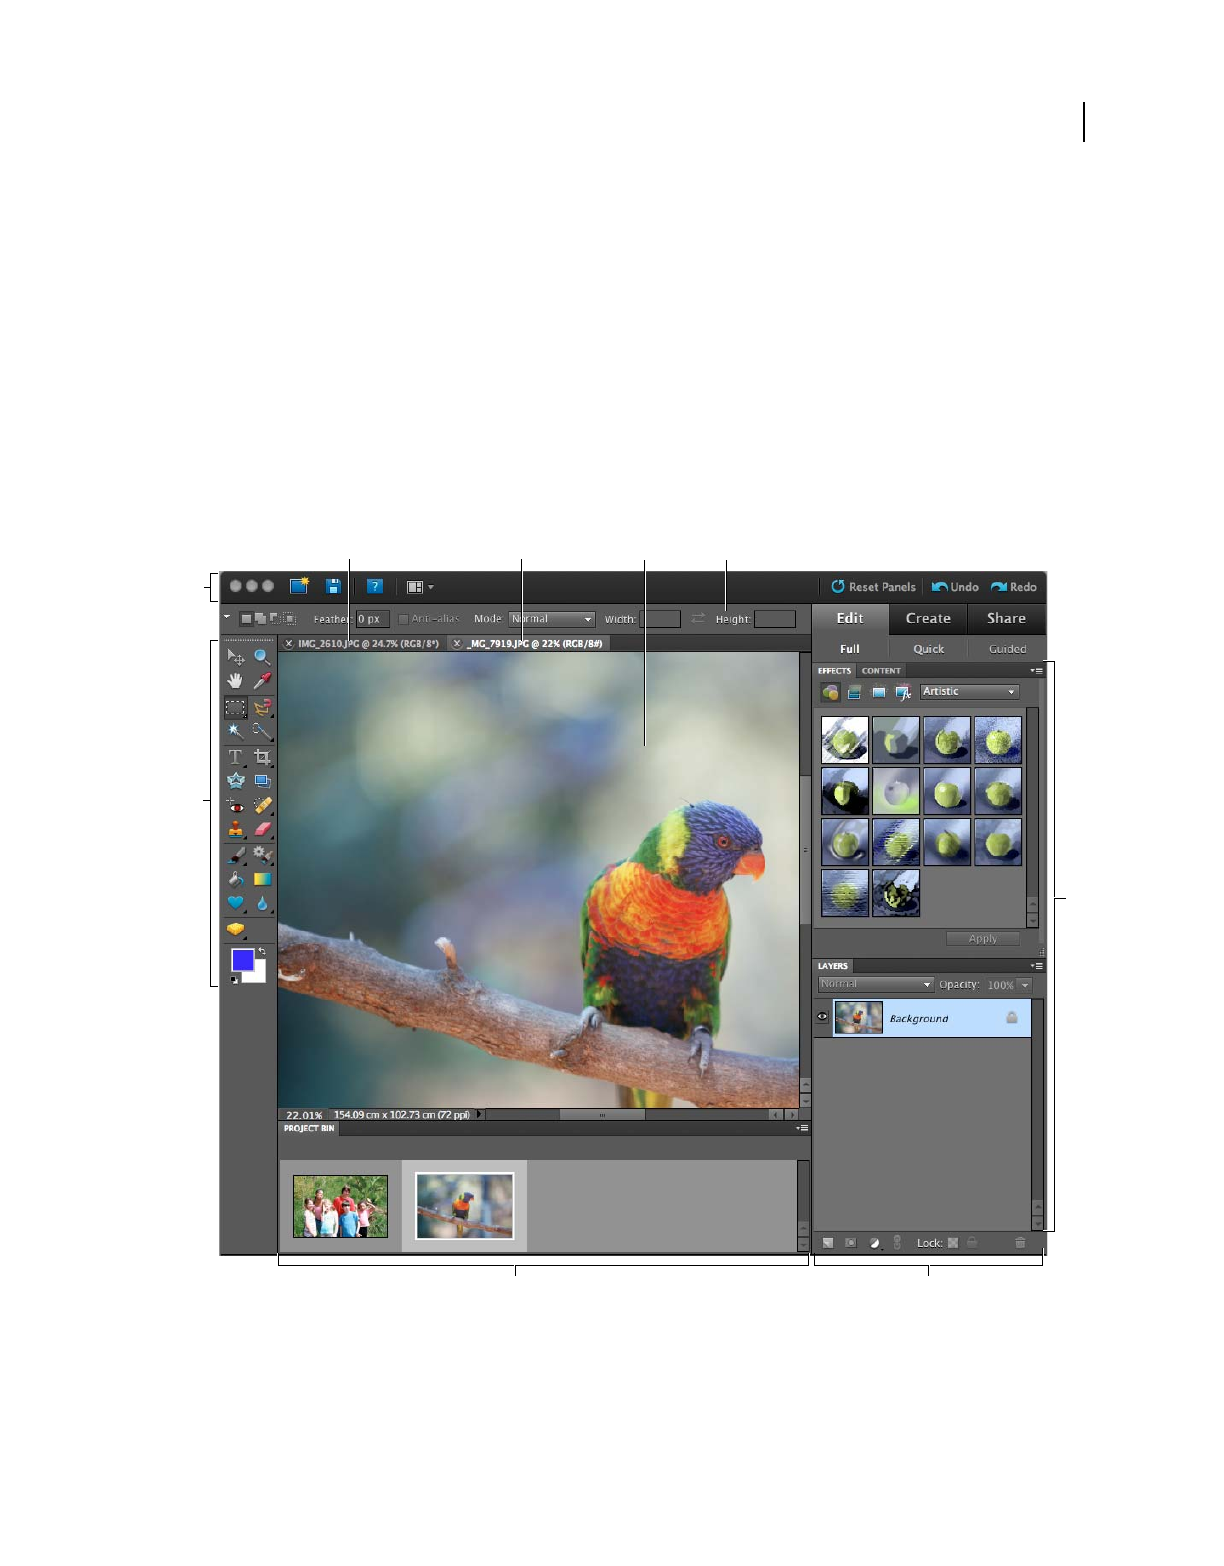
The Edit workspace provides modes to create and edit images. Select one of the following options:
Full Enables you to edit photos in the Full Edit mode.
15
USING PHOTOSHOP ELEMENTS 9
Photoshop Elements workspace
Last updated 1/3/2012
Quick Enables you to edit photos in the Quick Fix mode.
Guided Enables you to edit photos in the Guided Edit mode.
The Full Edit workspace has tools to correct color problems, create special effects, and enhance photos. The Quick Fix
workspace contains simple tools for correcting color and lighting, and commands to quickly fix common problems,
such as red eye. The Guided Edit workspace contains tools for basic photo edits, guided activities, and photographic
effects. If you are new to digital imaging, Quick Fix or Guided Edit is a good place to start fixing photos.
If you’ve worked with image-editing applications before, you’ll find that the Full Edit workspace provides a flexible
and powerful image-correction environment. It has lighting and color-correction commands, along with tools for
fixing image defects, making selections, adding text, and painting on your images. You can rearrange the Full Edit
workspace to best suit your needs. You can move, hide, and show panels, and arrange panels in the Panel Bin. You can
also zoom in or out of the photo, scroll to a different area of the document window, and create multiple windows and
views.
Full Edit workspace
A. Inactive tab B. Active tab C. Active image area D. Menu bar E Tool box F. Organizer button G. Options bar H. Panels I. Project bin
J. Panel bin
Menu bar Contains menus for performing tasks. The menus are organized by topic. For example, the Enhance menu
contains commands for applying adjustments to an image.
A
E
F
BCD
G
HI
16
USING PHOTOSHOP ELEMENTS 9
Photoshop Elements workspace
Last updated 1/3/2012
Toolbox Holds tools for editing images.
Options bar Provides options for the tool you select.
Project Bin Displays thumbnails of opened images, and lets you easily manage them.
Panels Help you monitor and modify images.
Panel Bin Helps you organize the panels in your work area.
Status bar In the Edit workspace, the Status bar has buttons for showing or hiding the Project Bin.
Note: Photoshop Elements users in the United States can also access special services in the Status bar.
More Help topics
“Correct color in Quick Fix” on page 107
“Display file information in the Info panel or status bar” on page 38
“Sign up with your Adobe ID” on page 2
Launch the Elements Inspiration Browser
The Inspiration Browser lets you access and organize tutorials that contain ideas and ways to do more with your media
files.
❖To launch the Inspiration Browser, select Help > Elements Inspiration Browser.
If you are not signed in with your Adobe ID, a dialog box opens up enabling you to sign in.
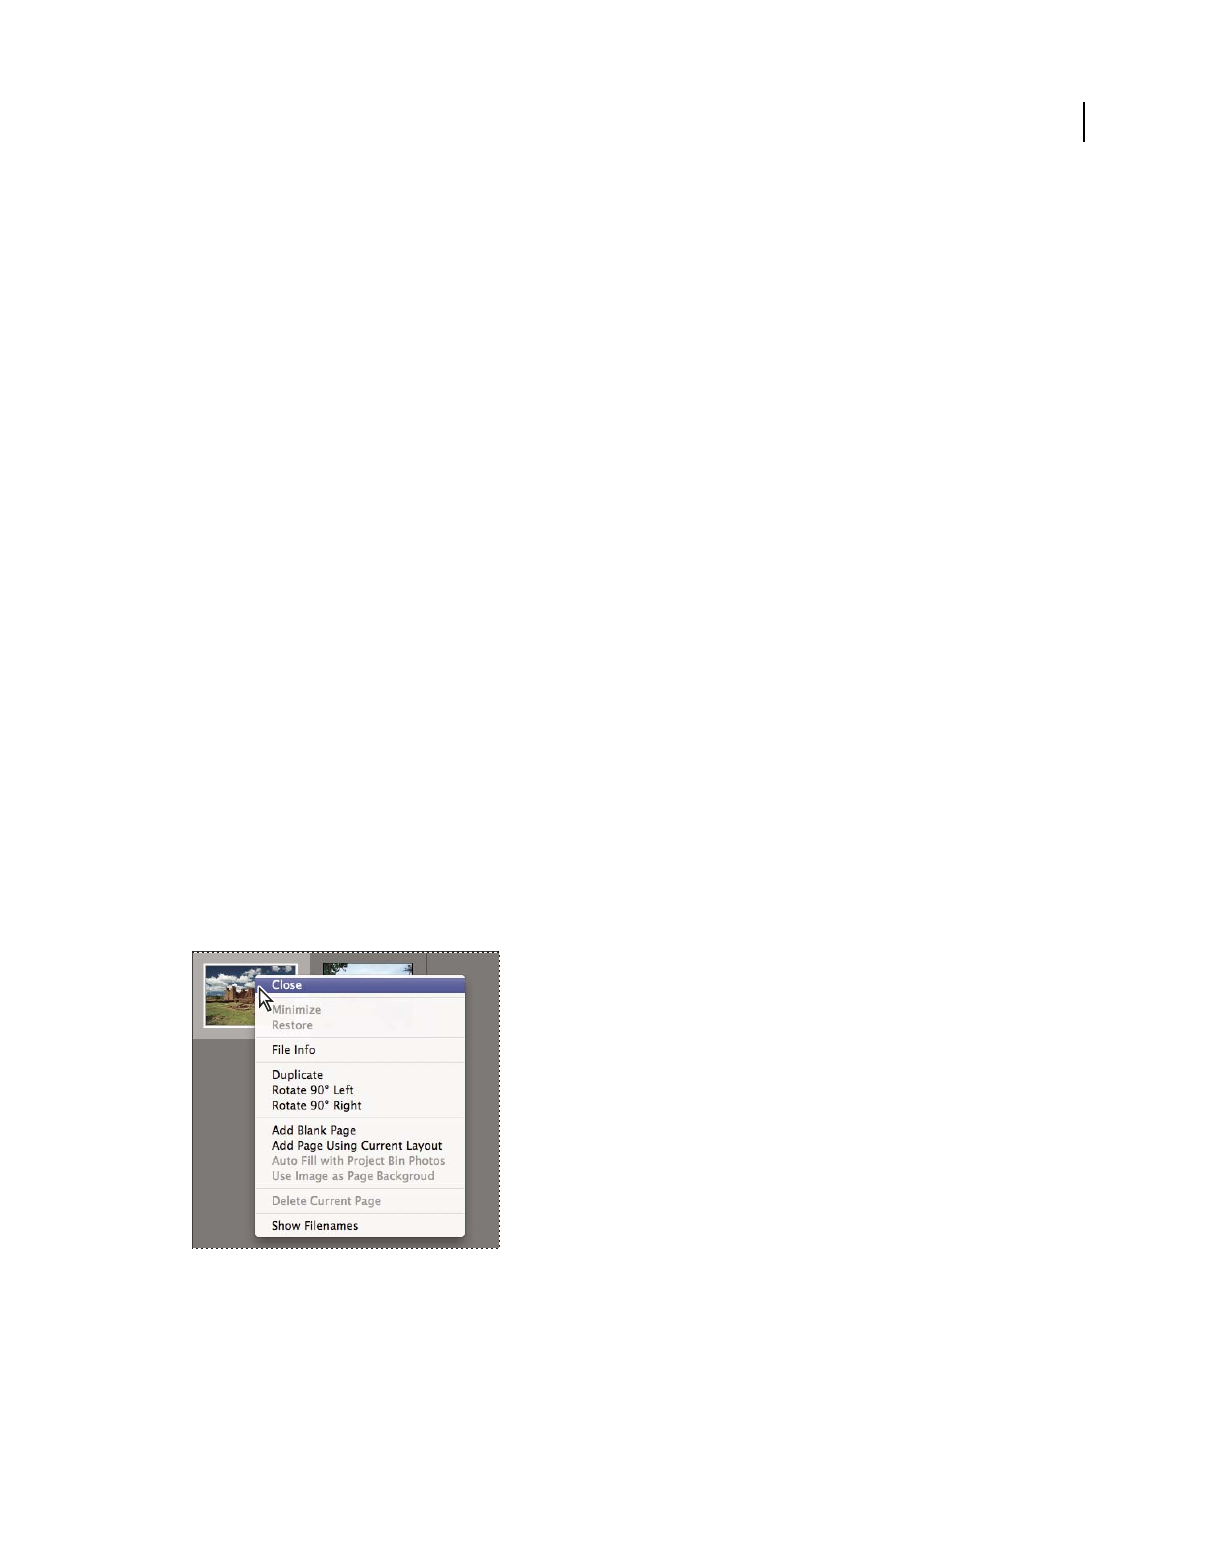
Use context menus
You can use context menus in both the Edit and Organize workspaces. Context-sensitive menus display commands
that are relevant to the active tool, selection, or panel. These menus are often another way to access the commands in
the main menus.
Right-click to open a context menu. This menu appears in the Project Bin in Full Edit.
1Position the pointer over an image or panel item.
Note: Not all panels offer context menus.
2Right-click and choose a command from the menu.

17
USING PHOTOSHOP ELEMENTS 9
Photoshop Elements workspace
Last updated 1/3/2012
Using keyboard commands and modifier keys
You can use keyboard shortcuts in both the Edit and Organize workspaces. Keyboard commands let you quickly
execute commands without using a menu; modifier keys let you alter how a tool operates. When available, the
keyboard command appears to the right of the command name in the menu.
More Help topics
“Photoshop Elements keyboard shortcuts” on page 291
“Keys for selecting tools” on page 292
Exit Photoshop Elements
To exit Photoshop Elements, you need to close both the Edit and Organize workspaces—closing one does not
automatically close the other.
1From any workspace, do one of the following:
•In Windows, choose File > Exit. In Mac, choose Photoshop Elements > Quit Photoshop Elements.
•Click the Close button (X) in the upper-right corner of the workspace.
2When closing the Edit workspace, choose whether to save any open files.
More Help topics
“Save changes in different file formats” on page 45
Tools
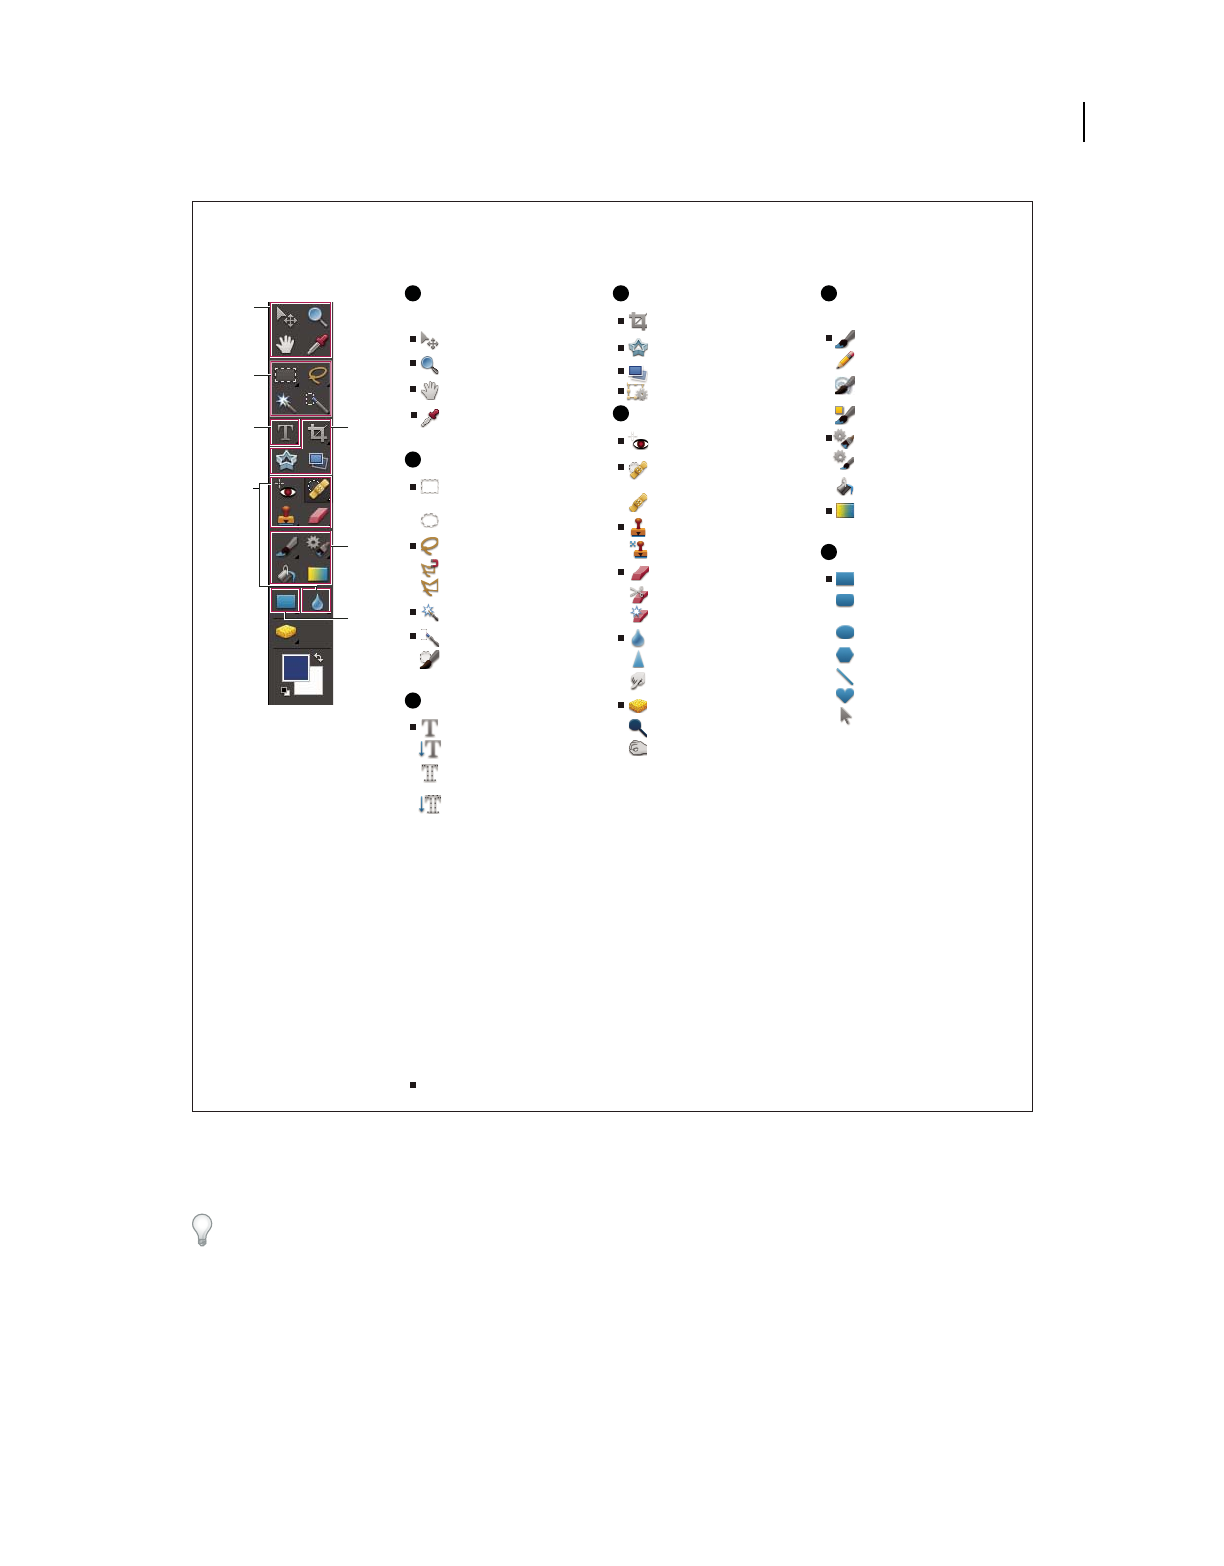
About the toolbox
You can access tools in the Edit workspace. You use tools in the toolbox to select, edit, and view images; some tools let
you paint, draw, and type. The toolbox appears on the left side of the Full Edit and Quick Fix workspaces. In the Full
Edit workspace, you can move the toolbox by dragging the gripper bar at the top of the box.
Select a tool in the toolbox to use it. Once selected, the tool is highlighted in the toolbox. Optional settings for the tool
appear in the options bar, which is located below the shortcuts bar at the top of the Edit workspace. Some tools in the
toolbox have additional tools beneath them. These tools are called hidden tools. A small triangle at the lower right of
the tool icon indicates the presence of hidden tools. When you select a tool, any additional hidden tools appear in the
options bar.
Note: You cannot deselect a tool—once you select a tool, it remains selected until you select a different tool. For example,
if you’ve selected the Lasso tool, and you want to click your image without selecting anything, select the Hand tool.
You can view information about any tool in the toolbox by positioning the pointer over it. The name of the tool appears
below the pointer—this name is called the tool tip. You can click a link in some tool tips to see additional information
about the tool.
18
USING PHOTOSHOP ELEMENTS 9
Photoshop Elements workspace
Last updated 1/3/2012
Toolbox overview
Select a tool
For videos about automatic and manual selection of tools, see www.adobe.com/go/lrvid907_pse_en and
www.adobe.com/go/lrvid908_pse_en.
❖Do one of the following:
•Click a tool in the toolbox. If there is a small triangle in a tool’s lower-right corner, hold down the mouse button to
view the hidden tools nested with the tool. Then, click the tool you want to select.
•Press the tool’s keyboard shortcut. The keyboard shortcut is displayed in its tool tip. For example, you can select
the Move tool by pressing the V key.
Navigation and
measuring tools
Move (V)
Zoom (Z)
Hand (H)
Eyedropper (I)
Selection tools
Rectangular
Marquee (M)
Elliptical Marquee (M)
Lasso (L)
Magnetic Lasso (L)
Polygonal Lasso (L)
Magic Wand (W)
Quick Selection (A)
Selection Brush (A)
Type tools
Horizontal Type (T)
Vertical Type (T)
Horizontal Type
Mask (T)
Vertical Type
Mask (T)
Crop tools
Crop (C)
Cookie Cutter (Q)
Straighten (P)
Retouching tools
Red Eye Removal (Y)
Spot Healing
Brush (J)
Healing Brush (J)
Clone Stamp (S)
Pattern Stamp (S)
Eraser (E)
Background Eraser (E)
Magic Eraser (E)
Blur (R)
Sharpen (R)
Smudge (R)
Sponge (O)
Dodge (O)
Burn (O)
Painting and
drawing tools
Brush (B)
Pencil (N)
Impressionist
Brush (B)
Color Replacement (B)
Smart Brush (F)
Detail Smart Brush (F)
Paint Bucket (K)
Gradient (G)
Shape tools
Rectangle (U)
Rounded
Rectangle (U)
Ellipse (U)
Polygon (U)
Line (U)
Custom Shape (U)
Shape Selection (U)
Toolbox overview
A
B
D
F
G
C
E
Recompose (C+C)
Indicates default tool * Keyboard shortcuts appear in parenthesis
A D F
G
E
B
C
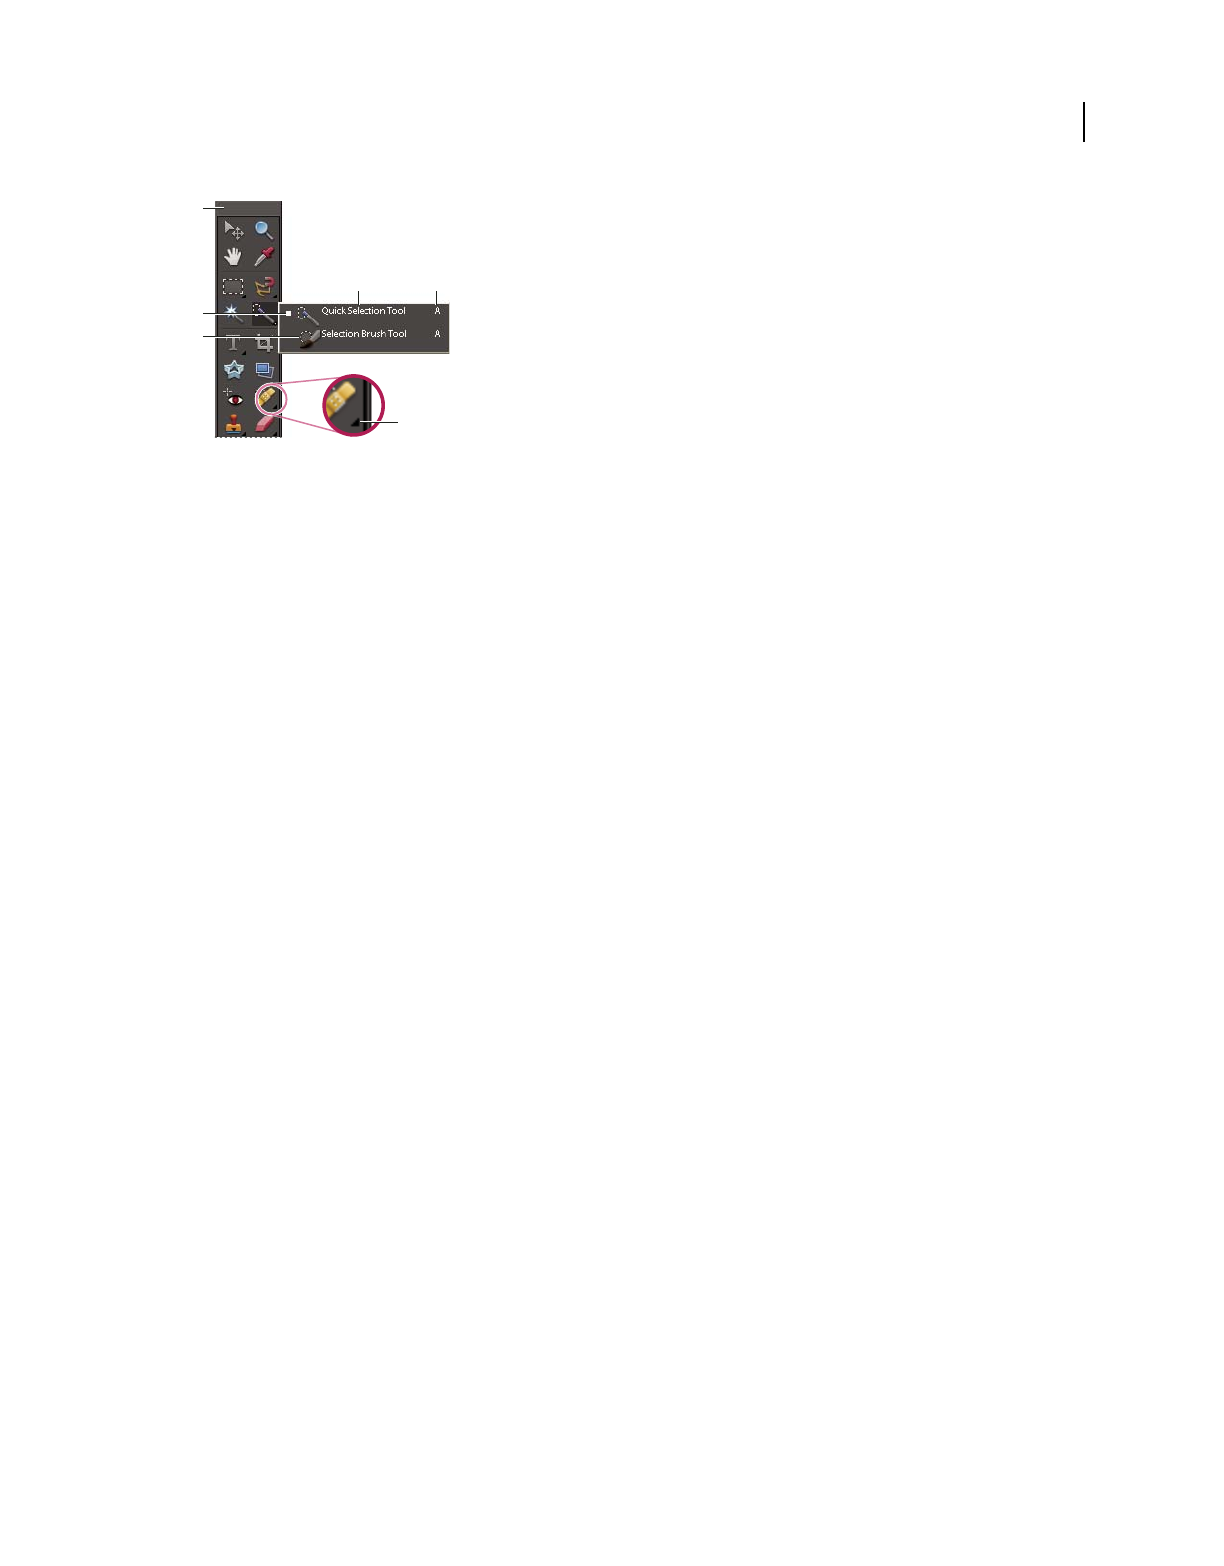
19
USING PHOTOSHOP ELEMENTS 9
Photoshop Elements workspace
Last updated 1/3/2012
Using tools
A. Toolbox B. Active tool C. Hidden tools D. Tool name E. Tool shortcut F. Hidden tool triangle
More Help topics
“Keys for selecting tools” on page 292
Set Edit preferences
1In Windows, choose Edit > Preferences > General. In Mac, choose Photoshop Elements > Preferences > General.
2Set one or more of the following options, and click OK.
•Select Show Tool Tips to show or hide tool tips.
•Select Use Shift Key For Tool Switch to cycle through a set of hidden tools by holding down the Shift key. When
this option is deselected, you can cycle through a set of hidden tools by pressing the shortcut key (without holding
down Shift).
Set the appearance of a tool pointer
1In Windows, choose Edit > Preferences > Display & Cursors. In Mac, choose Photoshop Elements > Preferences >
Display & Cursors.
2Select a setting for the Painting Cursors:
Standard Displays pointers as tool icons.
Precise Displays pointers as cross-hairs.
Normal Brush Tip Displays pointers as circles at 50% of the size you specify for the brush.
Full Size Brush Tip Displays pointers as circles at the full size you specify for the brush.
Show Crosshair In Brush Tip Displays cross-hairs in the circles when you choose either Normal Brush Tip or Full Size
Brush Tip.
3Select a setting for Other Cursors:
Standard Displays pointers as tool icons.
Precise Displays pointers as cross-hairs.
Resize or change the hardness of painting cursors by dragging
You can resize or change the hardness of a painting cursor by dragging in the image. As you drag, you preview both
the size and hardness of the painting tool.
•To resize a cursor, right-click + press Alt (Windows) or Control + Option (Mac OS) and drag to the left or right.
A
B
D E
C
F
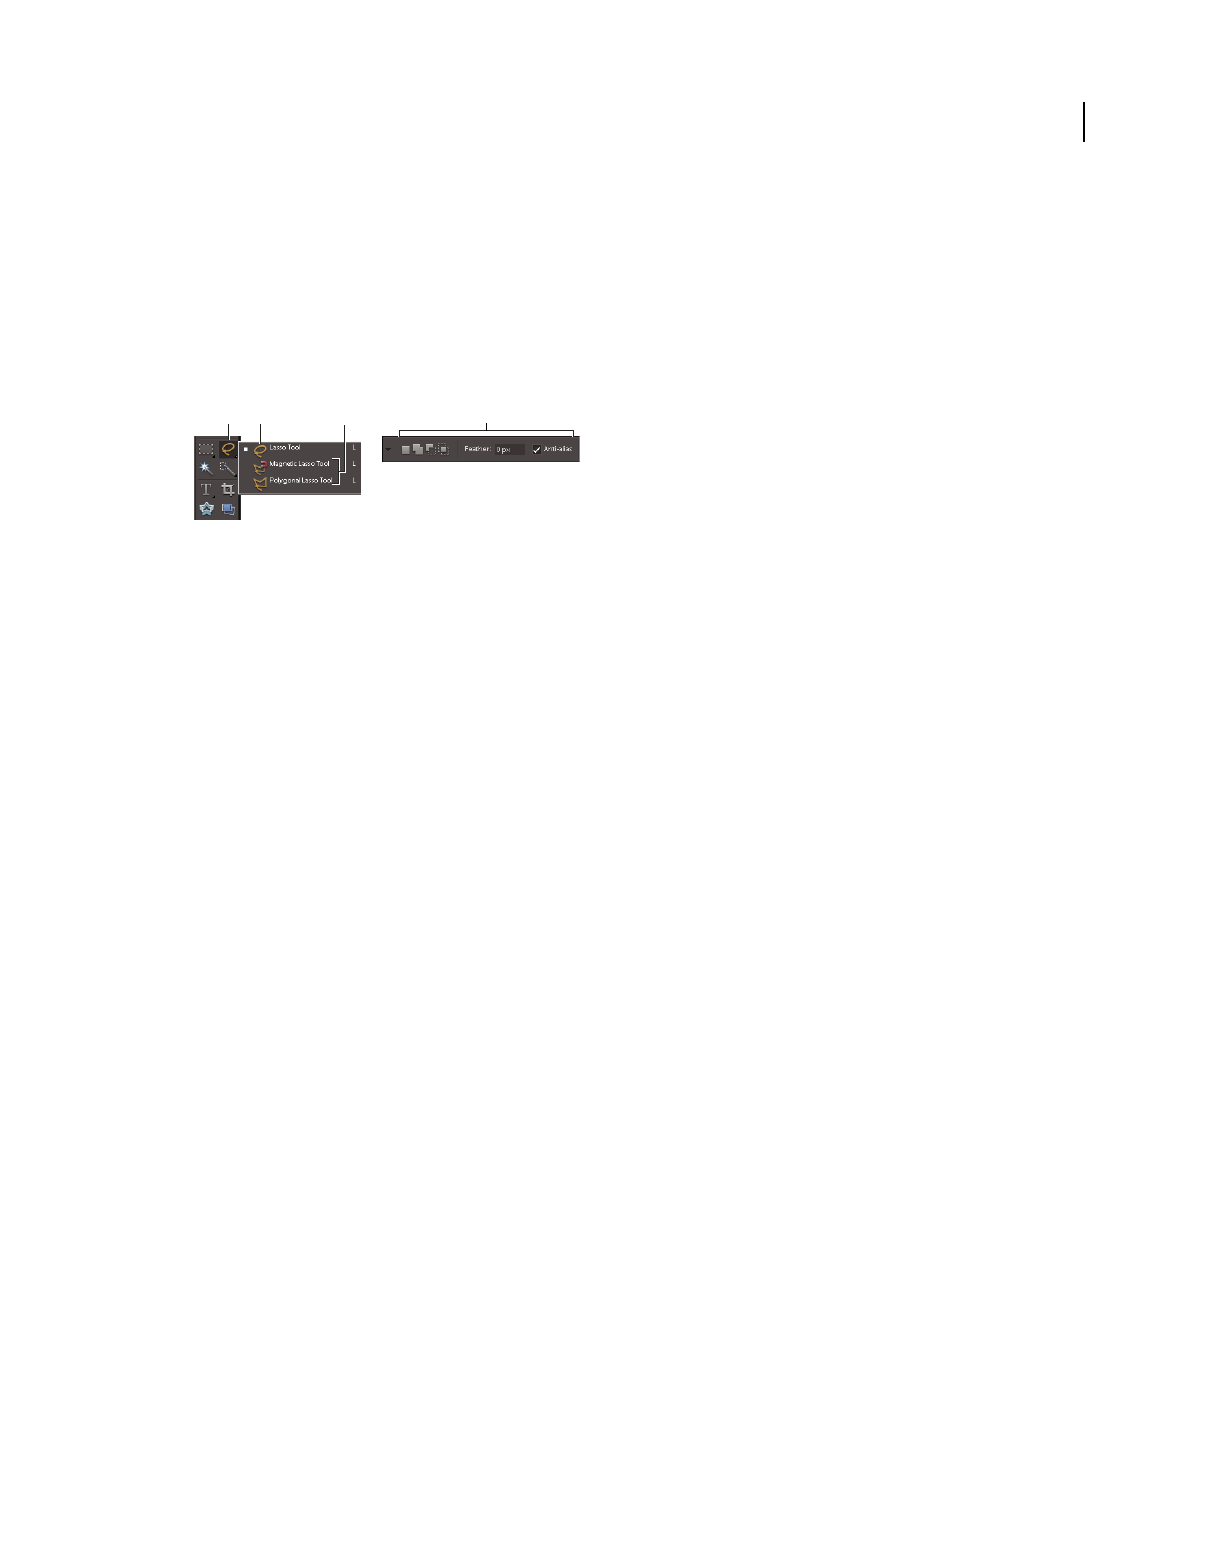
20
USING PHOTOSHOP ELEMENTS 9
Photoshop Elements workspace
Last updated 1/3/2012
•To change the hardness of a cursor, press Shift + right-click + Alt (Windows) or Control + Option + Command
(Mac OS) and drag to the left or right.
Set tool options
The options bar appears below the shortcuts bar at the top of the Edit workspace. The options bar is context sensitive—
it changes as you select different tools. Some settings in the options bar are common to several tools, and some are
specific to one tool.
Lasso options bar
A. Tool icon B. Active tool C. Hidden tools D. Tool options
1Select a tool.
2Look in the options bar to see the available options. For more information on setting options for a specific tool,
search for the tool’s name in Photoshop
Elements Help.
Note: To return a tool or all tools to their default settings, click the tool icon, and then click the triangle in the options bar,
then choose Reset Tool or Reset All Tools from the context menu.
More Help topics
“Keys for selecting tools” on page 292
Set a completed operations alert
1In Windows, choose Edit > Preferences > General. In Mac, choose Photoshop Elements > Preferences > General.
2Select Beep When Done, and click OK.
Panels and bins
About panels
Panels are available in both the Edit and Organize workspaces; however, they behave a little differently in each. Panels
help you manage, monitor, and modify images. Some panels have menus that provide additional commands and
options. You can organize panels in the workspace in many different ways. You can store panels in the Panel Bin to
keep them out of your way, but easily accessible, or you can keep frequently used panels open in the workspace.
Another option is to group panels together or dock one panel at the bottom of another panel.
Note: Drag a panel out of the Panel Bin if you want to remove it from the Panel Bin and keep it open.
B
AD
C
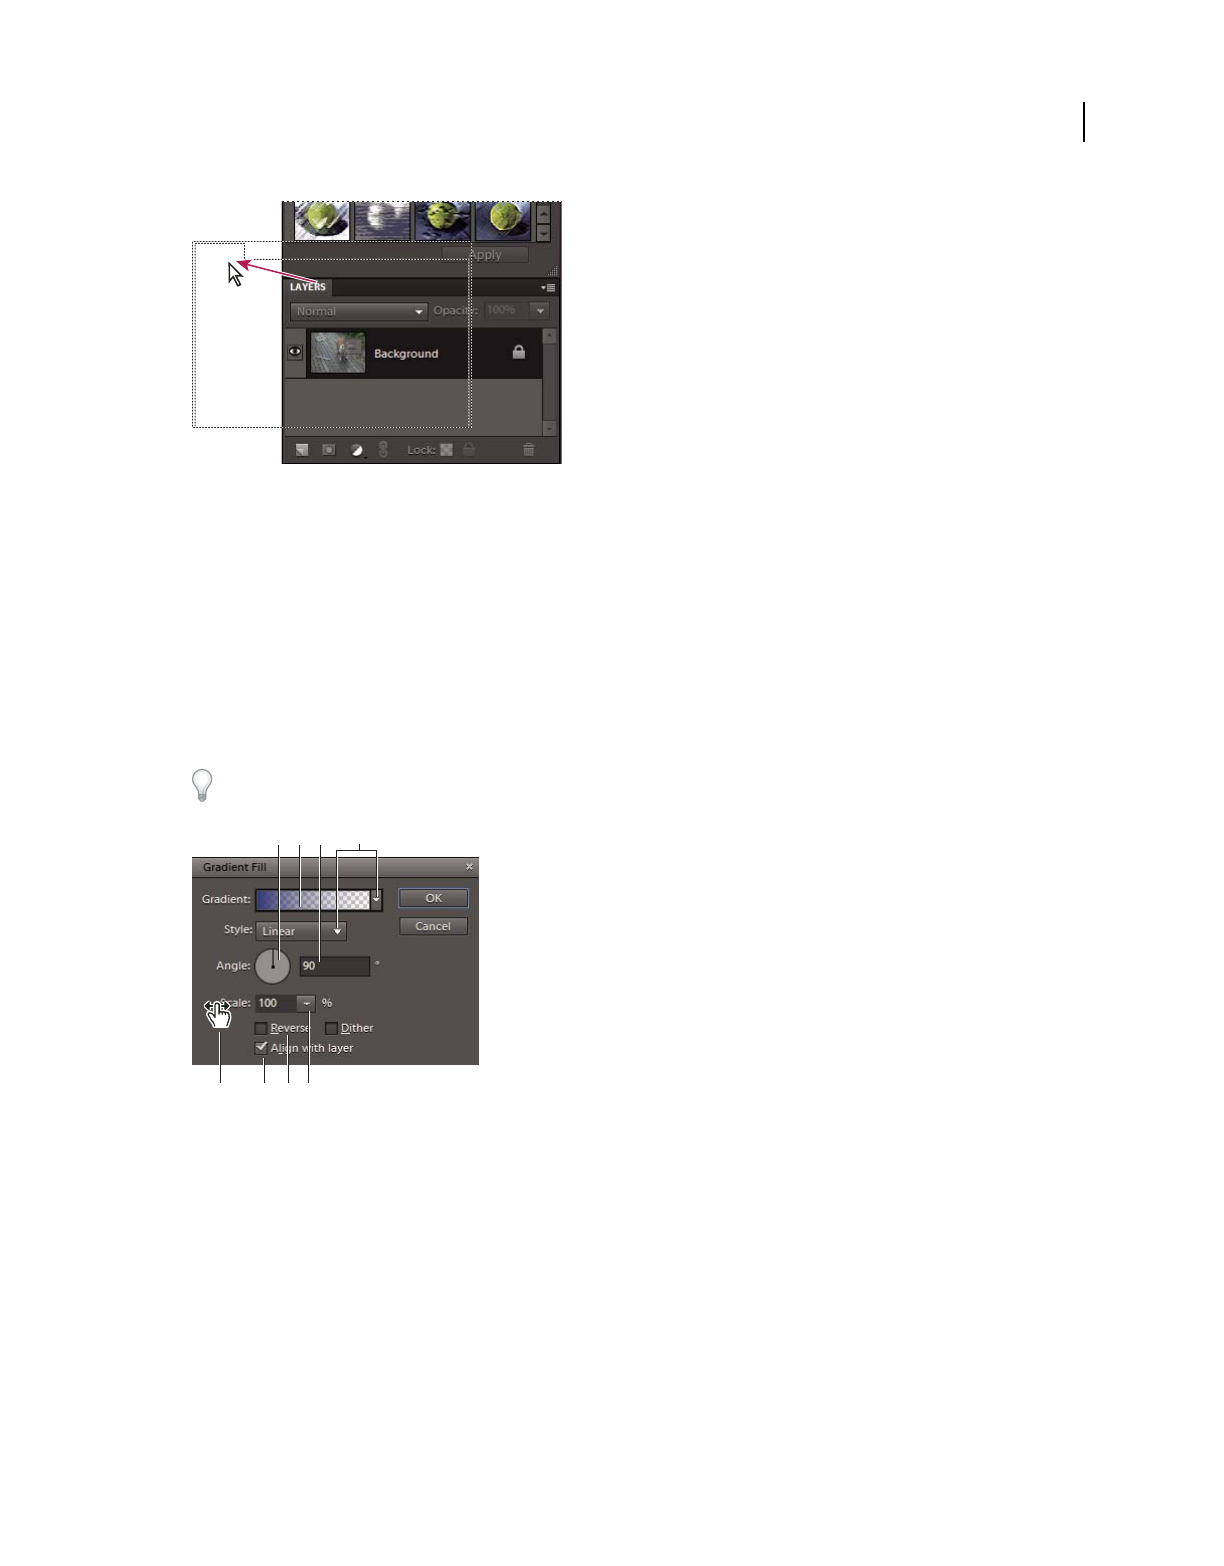
21
USING PHOTOSHOP ELEMENTS 9
Photoshop Elements workspace
Last updated 1/3/2012
Dragging a panel.
Panel menus
Some commands appear in both the panel menu and the menu bar. Other commands are exclusive to panel menus.
Click panel menu to view the different commands in each panel.
Pop-up sliders within panels
Some panels and dialog boxes contain settings that use pop-up sliders (for example, the Opacity option in the Layers
panel). If there is a triangle next to the text box, you can activate the pop-up slider by clicking the triangle. Position the
pointer over the triangle next to the setting, hold down the mouse button, and drag the slider or angle radius to the
desired value. Click outside the slider box or press Enter to close the slider box. To cancel changes, press Esc.
To increase or decrease values in 10% increments when the pop-up slider box is open, hold down Shift and press the
Up Arrow or Down Arrow key.
Different ways to enter values
A. Dial B. Click to open window C. Text box D. Menu arrow E. Scrubby slider F. Check box G. Slider H Pop-up slider triangle
Work with panels in the Edit worspace
The Panel Bin in the Edit workspace lets you store multiple panels in a single area. You can easily configure, close, or
keep open the Panel Bin for easy and fast access. By default, the Panel Bin appears on the right side of the workspace.
When you adjust panels, they remain as you leave them until you reset or change them.
A
EF G H
C
BD
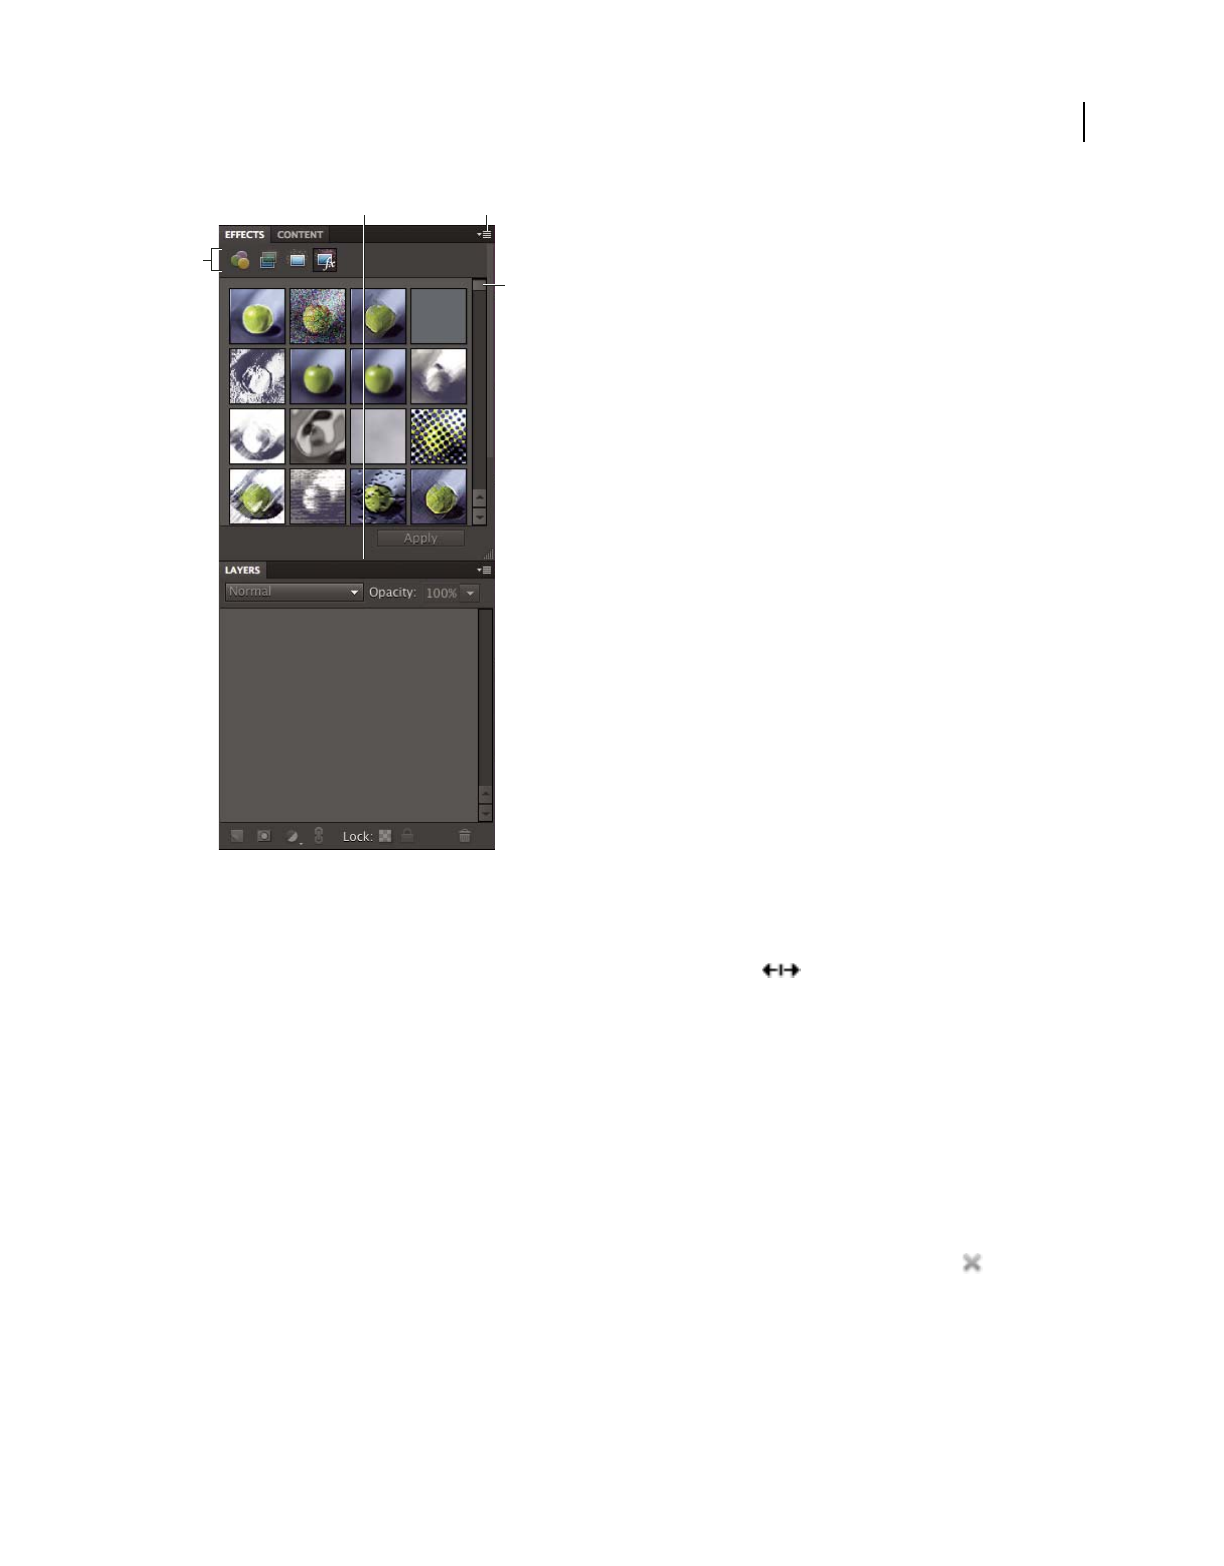
22
USING PHOTOSHOP ELEMENTS 9
Photoshop Elements workspace
Last updated 1/3/2012
The Panel Bin
A. Change panel tools B. Adjust panel height C. Panel menu D. Scroll to view rest of panel
1To show or hide the Panel Bin, Choose Window > Panel Bin.
2To adjust the height of a panel, select the panel and a handle bar appears at the bottom of the panel. Drag the
panel using the handle bar.
3To use panels in the Panel Bin, do any of the following:
•To remove a panel from the Panel Bin, drag the title bar of the panel out of the Panel Bin.
•To add a panel to the Panel Bin, drag the title bar of the panel into the Panel Bin.
•To rearrange panels in the Panel Bin, drag the title bar of the panel to a new location.
•To expand or collapse panels in the Panel Bin, double-click the name of the panel.
4To use panels outside the Panel Bin, do any of the following:
•To open a panel, choose the name of the panel from the Window menu.
•To close a panel, choose the name of the panel from the Window menu. Or click the Close button in the title
bar of the panel.
•To change the size of a panel, drag any corner of the panel.
•To group panels (one panel with multiple tabs), drag the panel onto the body of the target panel. A thick line
appears around the body of the target panel when the pointer is over the correct area for grouping to occur. If you
want to move a panel to another group, drag the tab of the panel to that group. To separate a panel from a group,
drag the tab of the panel outside the group.
A
B C
D
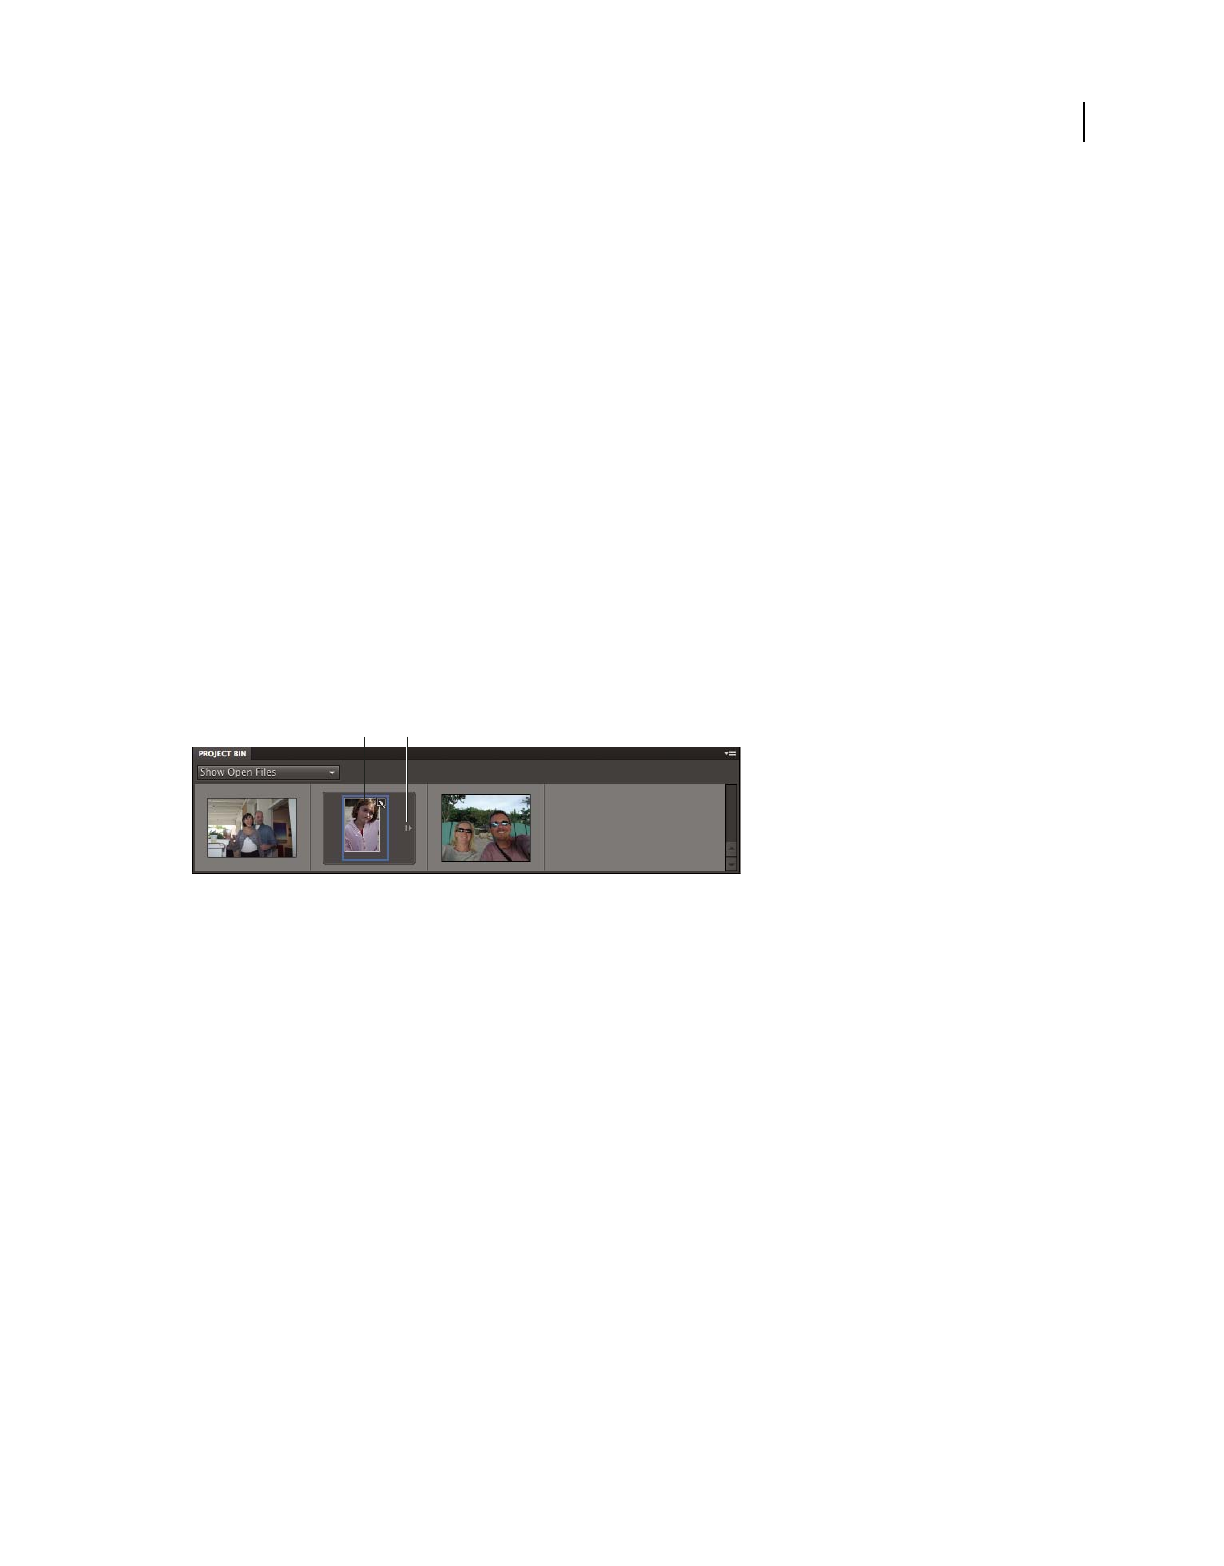
23
USING PHOTOSHOP ELEMENTS 9
Photoshop Elements workspace
Last updated 1/3/2012
•To move a panel group, drag the title bar.
•To expand or collapse a panel or panel group, double-click the tab of the panel or title bar.
•To dock panels together (stacked panels), drag a tab of the panel or the title bar to the bottom of another panel. A
double line appears at the bottom of the target panel when the pointer is over the correct area. You cannot dock
entire panel groups.
•To reset panels to their default positions, choose Window > Reset Panels.
Note: If you want panels to always open in their default positions in the Edit workspace, choose Edit > Preferences >
General in Windows (Photoshop Elements > Preferences > General in Mac), and then deselect Save Panel Locations. The
change takes effect the next time you start the application.
Use the Project Bin in the Edit workspace
Located at the bottom of the Full Edit and Quick Fix workspaces, the Project Bin displays thumbnails of open photos.
It’s useful for switching between multiple open photos in your workspace. The Project Bin has controls that let you
open or close images, hide images, navigate through open images, make a specific image the frontmost image,
duplicate an image, rotate an image, or view file information. Because the Project Bin appears in both Full Edit and
Quick Fix, you can easily bring open images into Quick Fix for editing. Multipage projects are highlighted by a gray
frame around the page thumbnails. To show or hide the individual pages, click the right edge of the frame. Multipage
projects created using the Create tab open in the Create panel.
The Project Bin
A. Collapsed multipage photo (selected) B. Click to expand multipage photo
❖Do any of the following:
•(Windows only) To open an image, drag a file from any location on your computer (including the Photo Browser)
or from any storage device connected to your computer into the Project Bin. To open files using the drag and drop
operation on a Mac OS, see “Open a file in an Application Frame (Mac OS)” on page 31.
•To bring an opened image forward as the frontmost image, double-click a thumbnail.
•To rearrange photos, drag thumbnails in the Project Bin. The order here does not impact the photo’s order in the
Elements Organizer.
•To close an image, right-click a thumbnail in the Project Bin and choose Close.
•To hide an image that is in a floating window, right-click the thumbnail and choose Minimize from the context
menu.
Note: To show an image after hiding it, double-click its thumbnail in the Project Bin, or right-click the thumbnail and
choose Restore from the context menu.
•To view a photo’s file information, right-click a thumbnail and choose File Info from the context menu.
•To duplicate an image, right-click a thumbnail, choose Duplicate from the context menu, and name the file.
•To rotate an image, right-click a thumbnail and choose Rotate 90° Left or Rotate 90° Right from the context menu.
•To add a blank page and save the photo as a PSE file, choose Add Blank Page from the context menu.
AB

24
USING PHOTOSHOP ELEMENTS 9
Photoshop Elements workspace
Last updated 1/3/2012
•To delete the current page, choose Delete Current Page from the context menu.
•To show filenames, right-click in the Project Bin and choose Show Filenames from the context menu.
•To open or close the Project Bin, choose Window > Project Bin.
•To manually show or hide the Project Bin, click the title bar of the Project Bin.
Multitouch support
If the hardware and operating system of your computer supports the Touch functionality, you can scroll, rotate, and
zoom in on an image. Multitouch is supported in all three workspaces: Full Edit, Quick Fix, and Guided Edit.
Flicking Scrolls the image horizontally or vertically. To scroll an image, touch the trackpad with two fingers and move
the finger left or right, and up or down.
Twisting Rotates the image clockwise or counterclockwise by 90 degrees. To rotate an image, touch two spots on the
trackpad and twist the image just like you would twist a real photo. Move two fingers in the opposite direction or use
one finger to pivot around the other.
Pinching in or out Zooms in or out of the image. To zoom in, place two fingers on the trackpad and pinch. Similarly,
to zoom out of the image, pinch and move the two fingers apart.
Using Windows 7 features
Photoshop Elements supports the following Windows 7 features:
Live Taskbar Displays icons for all running and pinned applications. The icons for all running applications are
highlighted with a border. Point to an icon to view images of the open files and applications. To work with an
application, point to its icon, move over the images to preview in full screen, and click on the full screen image.
Aero Peek Makes all open windows transparent, allowing you to view the desktop. To view a hidden window, point to
its taskbar icon.
Aero Shake Allows you to focus on a window by hiding all others. To work in an application, click its pane and shake
the mouse. This hides all open windows except the selected window. To display the hidden windows, shake the mouse
again.
Aero Snap Allows you to quickly resize and organize windows. To resize a window, drag it to a side of the display and
expand vertically or horizontally.
Use Application frames on Mac
On the Mac, the Application frame groups all the workspace elements into a single, integrated window that enables
you to treat the application as a single unit. When you move or resize the Application frame or any of its elements, all
the elements within it respond to each other so that none overlap. Panels don’t disappear when you switch applications
or when you accidentally click out of the application. If you work with two or more applications, you can position each
application side by side on the screen or on multiple monitors. If you prefer the traditional, free-form user interface of
the Mac, you can turn off the application frame. You can show or hide the application frame using the Window menu.
Select Window > Application Frame to toggle the application frame on or off. Similarly, you can show or hide the
Application Bar using Window > Application Bar.
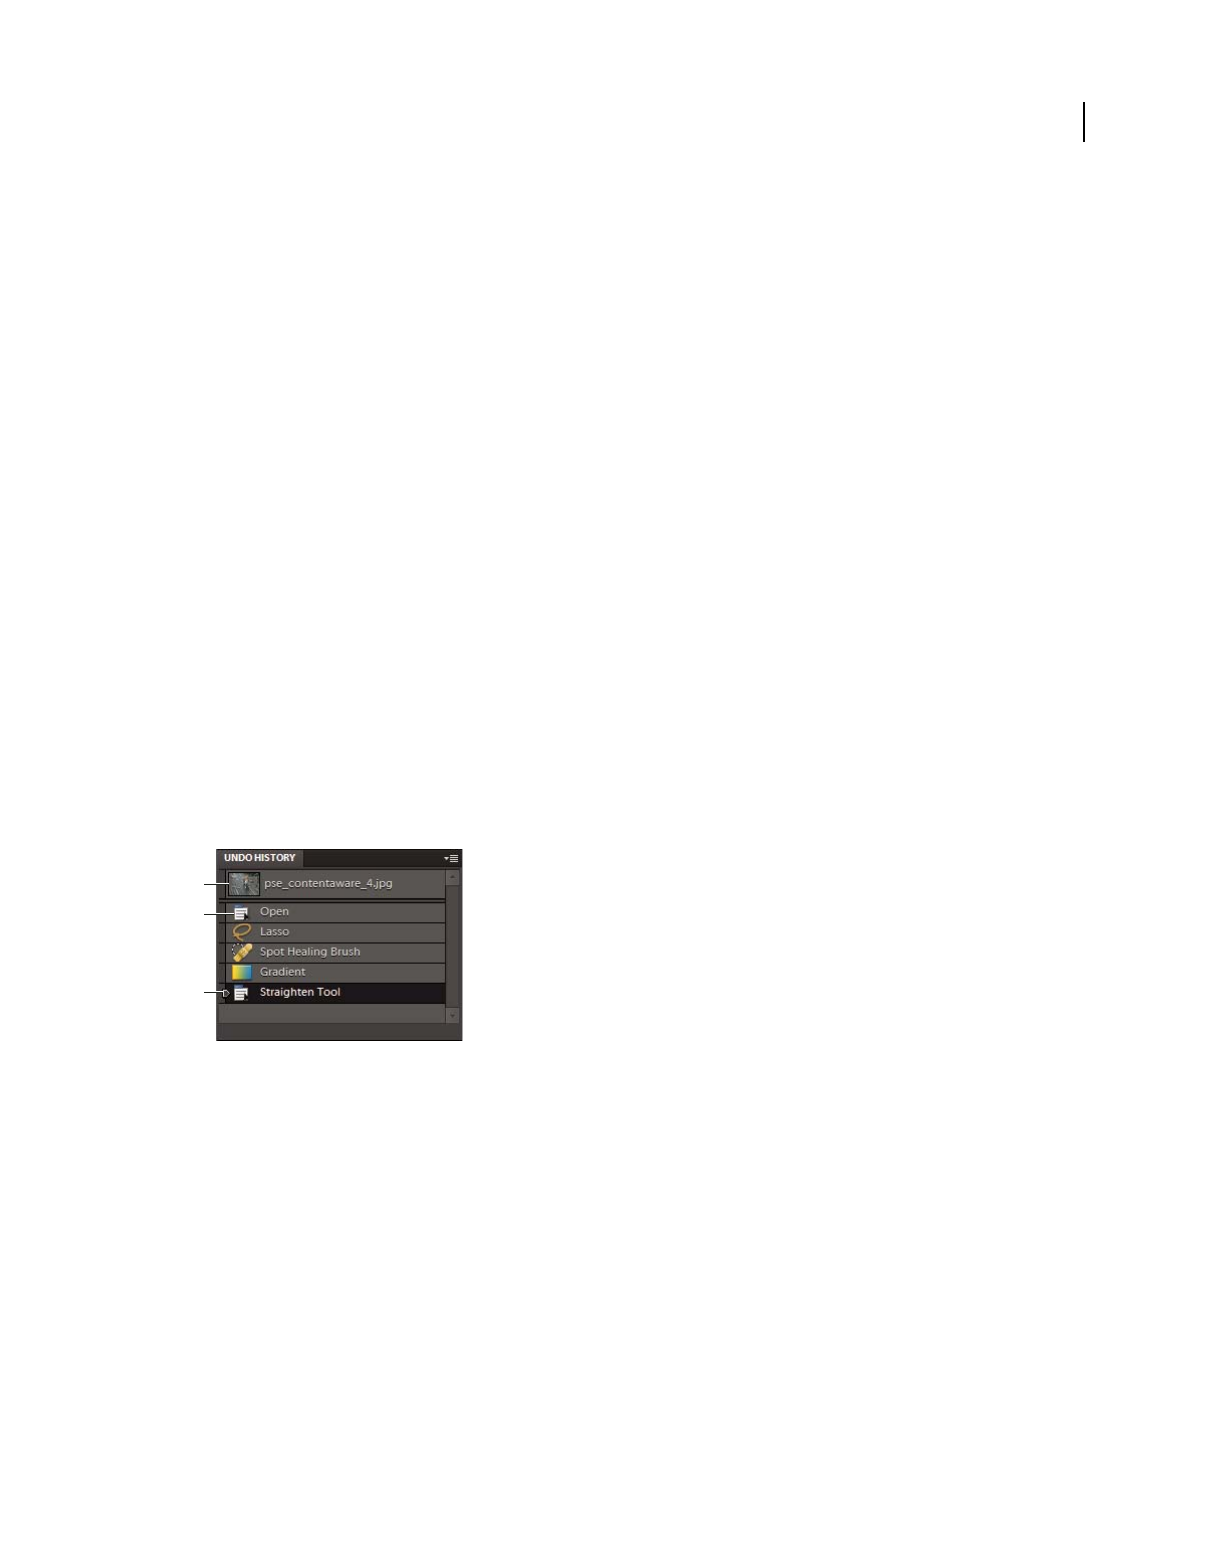
25
USING PHOTOSHOP ELEMENTS 9
Photoshop Elements workspace
Last updated 1/3/2012
More Help topics
“Open a file in an Application Frame (Mac OS)” on page 31
Undo, redo, and cancel
Undo, redo, or cancel operations
Many operations in both the Organize and Edit workspaces can be undone or redone. For instance, you can restore all
or part of an image to its last saved version. Available memory may limit your ability to use these options.
1To undo or redo an operation, Choose Edit > Undo or choose Edit > Redo.
2To cancel an operation, hold down the Esc key until the operation in progress has stopped.
Using the Undo History panel while editing
The Undo History panel (Window > Undo History) lets you jump to any recent state of the image created during the
current work session. Each time you apply a change to pixels in an image, the new state of that image is added to the
Undo History panel. You don’t need to save a change in order for the change to appear in the History.
For example, if you select, paint, and rotate part of an image, each of those states is listed separately in the panel. You
can then select any of the states, and the image reverts to how it looked when that change was first applied. You can
then work from that state.
Actions, such as zooming and scrolling, do not affect pixels in the image and do not appear in the Undo History panel.
Nor do program-wide changes, such as changes to panels, color settings, and preferences.
The Undo History panel
A. Original state B. State C. Selected state and state slider
Note the following guidelines when using the Undo History panel:
•By default, the Undo History panel lists 50 previous states. Older states are automatically deleted to free more
memory for Photoshop
Elements. You can change the number of states displayed in the Undo History panel in
Performance Preferences (in Windows, Edit > Preferences> Performance; in Mac, Photoshop Elements >
Preferences> Performance). The maximum number of states is 1000.
•The original state of the photo is always displayed at the top of the Undo History panel. You can always revert an
image to its original state by clicking this top state. Clicking the original state is also handy for comparing before
and after versions of your editing.
•When you close and reopen the document, all states from the last working session are cleared from the panel.
•States are added to the bottom of the list. That is, the oldest state is at the top of the list, the most recent one is at
the bottom.
A
B
C

26
USING PHOTOSHOP ELEMENTS 9
Photoshop Elements workspace
Last updated 1/3/2012
•Each state is listed with the name of the tool or command used to change the image.
•Selecting a state dims those below. This way you can easily see which changes will be discarded if you continue
working from the selected state.
•Selecting a state and then changing the image eliminates all states that came after it. Likewise, deleting a state deletes
that state and those that came after it.
Revert to the last saved version
When editing a photo in Full Edit or Quick Fix, you can revert to the last saved version.
❖Choose Edit > Revert.
Note: Revert is added as a history state in the Undo History panel and can be undone.
Revert to a previous state of an image
❖In Full Edit or Quick Fix, do any of the following:
•Click the name of the state in the Undo History panel.
•Drag the slider at the left of the state up or down to a different state in the Undo History panel.
•Click the Undo or Redo buttons on the shortcuts bar.
•Choose Undo or Redo from the Undo History panel menu or the Edit menu.
To set the keyboard command for Step Forward and Step Backward, choose Edit > Preferences > Generalin Windows
(Photoshop Elements > Preferences > General in Mac), and choose from the Step Back/Fwd menu.
Delete one or more states from the Undo History panel
❖Do one of the following:
•To delete a state, click the name of the state, and choose Delete from the Undo History panel menu. States following
the one you selected are also deleted.
•To delete the list of states from the Undo History panel, without changing the image, choose Clear Undo History
from the panel menu or choose Edit > Clear > Undo History. Clearing is useful for freeing up memory, especially
if you get an alert that Photoshop
Elements is low on memory.
Note: Clearing the Undo History panel cannot be undone.
Clear memory used by the clipboard and the Undo History panel
You can delete items copied to the clipboard or states in the Undo History panel to free up memory.
❖In Full Edit, do one of the following:
•To clear memory used by the clipboard, choose Edit > Clear > Clipboard Contents.
•To clear memory used by the Undo History panel, choose Edit > Clear > Undo History or choose Clear Undo
History from the Undo History panel menu.
•To clear the memory used in both the clipboard and the Undo History panel simultaneously, choose Edit > Clear
> All.
Note: Clearing the Undo History panel or clipboard cannot be undone.

27
USING PHOTOSHOP ELEMENTS 9
Photoshop Elements workspace
Last updated 1/3/2012
Restore default preferences
Preference settings control how Photoshop Elements displays images, cursors, and transparencies, saves files, uses
plug-ins and scratch disks, and so on. If the application exhibits unexpected behavior, the preferences file may be
damaged. You can restore all preferences to their defaults.
❖Press and hold Alt+Control+Shift immediately after Photoshop Elements begins launching. Click Yes to delete the
Adobe Photoshop Elements settings file.
A new preferences file is created the next time you start Photoshop Elements. For information on a specific preference
option, search for the preference name in Help.
Redisplay disabled warning messages
In certain situations, messages containing warnings or prompts are displayed. You can disable the display of these
messages by selecting the Don’t Show Again option in the message, and reset the messages you’ve disabled at a later time.
1In Windows, choose Edit > Preferences > General. In Mac, choose Photoshop Elements > Preferences > General.
2Click Reset All Warning Dialogs, and click OK.
Scratch disks and plug-ins
About scratch disks
When your system does not have enough RAM to perform an operation, Photoshop Elements uses scratch disks. A
scratch disk is any drive or partition of a drive with free memory. By default, Photoshop
Elements uses the hard drive
on which the operating system is installed as its primary scratch disk.
You can change the primary scratch disk or designate a second, third, or fourth scratch disk to be used when the
primary disk is full. Your primary scratch disk should be your fastest hard disk and have plenty of defragmented space
available.
For best performance, use the following guidelines when assigning scratch disks:
•Scratch disks should not be on the same physical drive as Photoshop Elements or any large files you are editing.
•Scratch disks should not be on the same physical drive as the one used for the operating system’s virtual memory.
•Scratch disks should be on a local drive. That is, they should not be accessed over a network.
•Scratch disks should be conventional (non-removable) media.
•RAID disks/disk arrays are good choices for dedicated scratch disk volumes.
•Drives with scratch disks should be defragmented regularly. Or better yet, use an empty drive or a drive with plenty
of unused space to avoid fragmentation issues.

28
USING PHOTOSHOP ELEMENTS 9
Photoshop Elements workspace
Last updated 1/3/2012
Change scratch disks
Photoshop Elements needs contiguous hard drive space to create a scratch disk. For this reason you should frequently
defragment your hard drive. Adobe recommends that you use a disk tool utility, such as Windows Disk Defragmenter,
to defragment your hard drive on a regular basis. See your Windows documentation for information on
defragmentation utilities.
1In Windows, choose Edit > Preferences > Performance. In Mac, choose, Photoshop Elements > Preferences >
Performance.
2Select the desired disks from the Scratch Disks menu (you can assign up to four scratch disks), and click OK.
3Restart Photoshop Elements for the change to take effect.
About plug-in modules
Plug-in modules are software programs developed by Adobe Systems and other software developers to add
functionality to Photoshop
Elements. A number of importing, exporting, and special-effects plug-ins come with your
program; they are inside the Photoshop
Elements Plug-Ins and Optional Plug-Ins folders.
Once installed, plug-in modules appear as options added to the Import or Export menu, as filters added to the Filter
menu, or as file formats in the Open and Save As dialog boxes. If you install a large number of plug-ins,
Photoshop
Elements may not be able to list them all in their appropriate menus. If so, newly installed plug-ins appear
in the Filter > Other submenu. To prevent a plug-in or folder of plug-ins from loading, add a tilde character (~) at the
beginning of the plug-in name, folder, or directory. That file (or all files in the folder) is ignored by the application
when you restart it. To view information about installed plug-ins, choose Help > About Plug-In and select a plug-in
from the submenu.
Note: To use an optional plug-in module, copy the plug-in module from the Optional Plug-Ins folder to the relevant
subfolder in the Plug-Ins folder, install the plug-in module, and then relaunch Photoshop
Elements.
You can select an additional plug-ins folder in which to load compatible plug-ins stored with another application. You
can also create a shortcut for a plug-in stored in another folder on your system. You can then add the shortcut or alias
to the Plug-ins folder to use that plug-in with Photoshop
Elements.
More Help topics
“Plug-in filters” on page 212
Install plug-in modules
❖Do one of the following:
•Use the plug-in installer, if provided.
•Follow the installation instructions that came with the plug-in module.
•Make sure the plug-in files are uncompressed, and then copy them to the appropriate Plug-ins folder in the
Photoshop
Elements folder.
Select an additional plug-ins folder
You can select an additional plug-ins folder in which to load compatible plug-ins stored with another application.
1In Windows, choose Edit > Preferences > Plug-Ins. In Mac, choose Photoshop Elements > Preferences > Plug-Ins.

29
USING PHOTOSHOP ELEMENTS 9
Photoshop Elements workspace
Last updated 1/3/2012
2In the Preferences dialog, select Additional Plug-ins Folder, select a folder from the list, and click Choose.
3To display the contents of a folder, double-click the directory. The path to the folder appears in the preferences
window.
Note: Do not select a location inside the Plug-ins folder for Photoshop Elements.
4Restart Photoshop Elements to load the plug-ins.

30
Last updated 1/3/2012
Chapter 3: Working in Photoshop
Elements
Working in the Edit workspace of Photoshop Elements gives you choices about working with your files. You can set
options for opening, saving, and exporting files by type, by file size, and resolution. You can also process and save
camera raw files. These tools make it easy to combine files of different types and optimize them in
Adobe®
Photoshop® Elements 9.
In the Edit workspace, you can create a blank file, open a recently used file, specify which files types to open in
Photoshop
Elements, and more.
An additional option for working in the Edit workspace is to use the Guided Edit feature. Guided Edits help you when
you’re unsure of a workflow or how to accomplish a task. With Fun Edits, you can complete complex editing
workflows in a small number of easy steps.
Opening files in the Edit workspace
Create a new blank file
You may want to create a web graphic, banner, or company logo and letterhead, in which case you need to start from
a new blank file.
1In the Edit workspace, choose File > New > Blank File.
2Enter options for the new image and click OK.
Name Names the new image file.
Preset Provides options for setting the width, height, and resolution of images that you intend to print or to view
on-screen. Select Clipboard to use the size and resolution of data that you copied to the clipboard. You can also base a
new image on the size and resolution of any open image by choosing its name from the bottom of the Preset menu.
Width, Height, and Resolution Sets these options individually. The default values are based on the last image you
created, unless you’ve copied data to the clipboard.
Color Mode Sets an image to RGB color, grayscale, or bitmap (1-bit mode).
Background Contents Sets the color of the image Background layer. White is the default. Select Background Color to
use the current background color (shown in the toolbox). Select Transparent to make the default layer transparent,
with no color values—the new image will have a Layer 1 instead of a Background layer.
You can also right-click the background of an image to choose a background color (gray, black, or a custom color).
Open a file
In the Edit workspace, you can open and import images in various file formats. The available formats appear in the
Open dialog box, the Open As dialog box, and the Import submenu.

31
USING PHOTOSHOP ELEMENTS 9
Working in Photoshop Elements
Last updated 1/3/2012
To open a file from the Media Browser in Elements Organizer, select it, click the triangle beside the Fix tab and select
Full Photo Edit .
1In the Edit workspace, choose File > Open.
2
Locate and select the file you want to open. If the file does not appear, choose All Formats from the Files Of Type menu.
3Click Open. In some cases, a dialog box appears, letting you set format-specific options.
There may be instances when Photoshop Elements cannot determine the correct format of a file. For example,
transferring a file between Mac OS® and Windows can cause the format to be mislabeled. In such cases, you must
specify the correct format in which to open the file.
More Help topics
“Save changes in different file formats” on page 45
Open a file in an Application Frame (Mac OS)
1Drag a file from any location on your computer into the Application Frame. You can also drag photos from the
Photo Browser and any storage device connected to your computer.
The image opens in a tabbed window, which completely covers the Application Frame.
2To drag additional images into the Application Frame to open them, enable floating document windows (see “View
and arrange multiple windows” on page 41). Convert open images into floating document windows to view the
Application Frame.
More Help topics
“Use Application frames on Mac” on page 24
“View and arrange multiple windows” on page 41
“Use the Project Bin in the Edit workspace” on page 23
Open a recently used file
❖In the Edit workspace, choose File > Open Recently Edited File, and select a file from the submenu.
Note: To specify the number of files that are available in the Open Recently Edited File submenu, choose Edit >
Preferences > Saving Files, and enter a number in the Recent File List Contains text box.
Specify the file format in which to open a file
❖Choose File > Open As, and select the file you want to open. Then choose the desired format from the Open As
menu, and click Open.
Important: If the file does not open, then the chosen format may not match the file’s true format, or the file may be
damaged.
Open a PDF file
Portable Document Format (PDF) is a versatile file format that can represent both vector and bitmap data and can
contain electronic document search and navigation features. PDF is the primary format for Adobe® Acrobat®.

32
USING PHOTOSHOP ELEMENTS 9
Working in Photoshop Elements
Last updated 1/3/2012
With the Import PDF dialog box, you can preview the pages and images in a multipage PDF file, then decide if you
want to open them in the Edit workspace. You can choose to import full pages (including text and graphics), or you
can import just the images from a PDF file. If you import only the images, the resolution, size, and color mode of the
images remains unchanged. If you import pages, you can change the resolution and color mode.
Each page is shown as a thumbnail. To increase the size, choose an option from the Thumbnail Size menu.
Importing pages from a PDF file.
1In the Edit workspace, choose File > Open.
2Select the name of the file, and click Open. You can change which types of files are shown by selecting an option
from the Files Of Type menu.
3To import just the images from a PDF file, choose Image from the Select menu in the Import PDF dialog box. Select
the image or images you want to open. (To select multiple images, hold Ctrl (Command key in Mac OS) and click
each image.)
4To import pages from a PDF file, choose Page from the Select menu, and then do any of the following:
•If the file contains multiple pages, select the page or pages you want to open, and click OK. (To select multiple pages,
Ctrl (Command key in Mac OS) and click each page.)
•Under Page Options, accept the existing name, or type a new filename in the Name box.
•Choose an option from the Mode menu (RGB to keep the photos in color, or Grayscale to automatically make them
black and white). If the file has an embedded ICC (International Color Consortium) profile, you can choose the
profile from the menu.
•For Resolution, accept the default (300 ppi) or type a new value. A higher resolution increases the file size.
•Select Anti-aliased to minimize the jagged edges as the image is rasterized (bitmapped).
5Select Suppress Warnings to hide any error messages during the import process.
6Click OK to open the file.
Open an EPS file
Encapsulated PostScript® (EPS) can represent both vector and bitmap data and is supported by virtually all graphics,
illustration, and page-layout programs. Adobe applications that produce PostScript artwork include Adobe
Illustrator®. When you open an EPS file containing vector art in the Edit workspace, it is rasterized—the
mathematically defined lines and curves of the vector artwork are converted into the pixels or bits of a bitmap image.
Elements Organizer does not support EPS files.
1In the Edit workspace, choose File > Open.
2Select the file you want to open, and click Open.

33
USING PHOTOSHOP ELEMENTS 9
Working in Photoshop Elements
Last updated 1/3/2012
3Indicate the desired dimensions, resolution, and mode. To maintain the same height-to-width ratio, select
Constrain Proportions.
4Select Anti-aliased to minimize the jagged appearance of edges, and then click OK.
Anti-aliasing lets you produce smooth-edged objects by blending the edges of the objects into the background.
You can also bring PostScript artwork into Photoshop Elements using the Place command and the Paste command.
Place a PDF, Adobe Illustrator, or EPS file in a new layer
You can place PDF, Adobe® Illustrator®, or EPS files into a new layer in an image. Because the placed artwork is
rasterized (bitmapped), you cannot edit text or vector data in placed artwork. The artwork is rasterized at the
resolution of the file into which it is placed.
1In the Edit workspace, open the image into which you want to place the artwork.
2Choose File > Place, select the file you want to place, and click Place.
3If you are placing a PDF file that contains multiple pages, select the page you want to place from the provided dialog
box, and click OK.
The placed artwork appears inside a bounding box at the center of the Photoshop Elements image. The artwork
maintains its original aspect ratio; however, if the artwork is larger than the Photoshop
Elements image, it is resized to fit.
4(Optional) Reposition the placed artwork by positioning the pointer inside the bounding box of the placed artwork
and dragging.
5(Optional) Scale the placed artwork by doing one or more of the following:
•Drag one of the handles at the corners or sides of the bounding box. Hold down Shift as you drag a corner handle
to constrain the proportions.
•In the options bar, enter values for W and H to specify the width and height of the artwork. By default, these options
represent scale as a percentage. However, you can enter a different unit of measurement—in (inches), cm
(centimeters), or px (pixels). To constrain the proportions of the artwork, click the Constrain Proportions box. This
option is on when the icon has a white background.
6(Optional) Rotate the placed artwork by doing one or more of the following:
•Position the pointer outside the bounding box of the placed artwork (the pointer turns into a curved arrow), and
drag.
•In the options bar, enter a value (in degrees) for the Rotation option .
7(Optional) Skew the placed artwork by holding down Ctrl (Command in Mac OS) and dragging a side handle of
the bounding box.
8Set the Anti-alias option in the options bar. To blend edge pixels during rasterization, select the Anti-alias option.
To produce a hard-edged transition between edge pixels during rasterization, deselect the Anti-alias option.
9To commit the placed artwork to a new layer, do one of the following:
•Click the Commit button .
•Press Enter.
To cancel the placement, click the Cancel button , or press Esc.

34
USING PHOTOSHOP ELEMENTS 9
Working in Photoshop Elements
Last updated 1/3/2012
Process multiple files
The Process Multiple Files command applies settings to a folder of files. If you have a digital camera or a scanner with
a document feeder, you can also import and process multiple images. (Your scanner or digital camera may need an
acquire plug-in module that supports these actions.)
When processing files, you can leave all the files open, close and save the changes to the original files, or save modified
versions of the files to a new location (leaving the originals unchanged). If you are saving the processed files to a new
location, you may want to create a new folder for the processed files before starting the batch.
Note: The Process Multiple Files command does not work on multiple page files.
1Choose File > Process Multiple Files.
2Choose the files to process from the Process Files From pop-up menu:
Folder Processes files in a folder you specify. Click Browse to locate and select the folder.
Import Processes images from a digital camera or scanner.
Opened Files Processes all open files.
3Select Include All Subfolders if you want to process files in subdirectories of the specified folder.
4For Destination, click Browse and select a folder location for the processed files.
5If you chose Folder as the destination, specify a file-naming convention and select file compatibility options for the
processed files:
•For Rename Files, select elements from the pop-up menus or enter text into the fields to be combined into the
default names for all files. The fields let you change the order and formatting of the components of the filename.
You must include at least one field that is unique for every file (for example, filename, serial number, or serial letter)
to prevent files from overwriting each other. Starting Serial Number specifies the starting number for any serial
number fields. If you select Serial Letter from the pop-up menu, serial letter fields always start with the letter “A”
for the first file.
•For Compatibility, choose Windows, Mac OS, and UNIX® to make filenames compatible with the Windows, Mac
OS, and UNIX operating systems.
6Under Image Size, select Resize Images if you want each processed file resized to a uniform size. Then type in a
width and height for the photos, and choose an option from the Resolution menu. Select Constrain Proportions to
keep the width and height proportional.
7To apply an automatic adjustment to the images, select an option from the Quick Fix panel.
8To attach a label to the images, choose an option from the Labels menu, then customize the text, text position, font,
size, opacity, and color. (To change the text color, click the color swatch and choose a new color from the Color
Picker.)
Note: The Watermark option enables you to add a permanent visual watermark to images. For more information, see
this article.
9Select Log Errors That Result From Processing Files to record each error in a file without stopping the process. If
errors are logged to a file, a message appears after processing. To review the error file, open with a text editor after
the Batch command has run.
10 Click OK to process and save the files.

35
USING PHOTOSHOP ELEMENTS 9
Working in Photoshop Elements
Last updated 1/3/2012
Close a file
1Do one of the following in the Edit workspace:
•Choose File > Close.
•Choose File > Close All.
2Choose whether or not to save the file:
•Click Yes to save the file.
•Click No to close the file without saving it.
Importing in the Edit workspace
Import frames from video
You can play a video from within Photoshop Elements and grab frames to edit and save as images.
1Select File > Import > Frame From Video.
2Browse and select the video.
3Click Play.
The video starts playing in the Frame From Video dialog box. You can use the playback controls to display the
frames your want to grab. If you find the audio distracting, select Mute.
4Click Grab Frame.
Photoshop Elements places the grabbed frames as images in new files., ready for editing.
5Click Done.
Import images from a digital camera using WIA (Windows only)
Certain digital cameras import images using Windows Image Acquisition (WIA) support. When you use WIA,
Photoshop Elements works with Windows and your digital camera or scanner software to import images directly into
Photoshop Elements.
1Choose File > Import > WIA Support.
2Choose a destination in which to save your image files on your computer.
3Make sure that Open Acquired Image(s) in Photoshop is selected. If you are importing a large number of images,
or if you want to edit the images later, deselect this option.
4To save the imported images directly into a folder whose name is the current date, select Create Unique Subfolder
Using Date Today.
5Click Start.
6Select the digital camera from which to import images.
Note: If the name of your camera does not appear in the submenu, verify that the software and drivers were properly
installed and that the camera is connected.
7Choose the image or images you want to import:
•Click the image from the list of thumbnails to import the image.

36
USING PHOTOSHOP ELEMENTS 9
Working in Photoshop Elements
Last updated 1/3/2012
•Hold down Shift and click multiple images to import them at the same time.
•Click Select All to import all available images.
8Click Get Picture to import the image.
File information
About file information (metadata)
When you take a photo with your digital camera, each image file includes information such as the date and time the
photo was taken, the shutter speed and aperture, the specific camera model, and so on. All of this information is called
metadata, and you can view it and add to it in the Properties panel of the Elements Organizer and the File Info dialog
box in the Edit workspace.
You can add file information, such as a title, keyword tags, and descriptions, to help identify your images as you
manage and organize your collection. As you edit your images, Photoshop
Elements automatically keeps track of the
file’s edit history and adds this information to the file’s metadata.
In addition, opened images are automatically scanned for Digimarc watermarks. If a watermark is detected,
Photoshop
Elements displays a copyright symbol in the image window’s title bar and includes the information in the
Copyright Status, Copyright Notice, and Copyright Info URL sections of the File Info dialog box.
You can add visual watermarks to images to indicate them as your own work. Visual watermarks are not tracked in
file information. For information about how to create visual watermarks, see the following articles:
•Adding permanent watermarks to a batch of photos
•Create a watermark using text layering
•Create a watermark brush
For a video about creating a watermark, see www.adobe.com/go/lrvid927_pse_en.
View or add file information in the Edit workspace
In the Edit workspace, the File Info dialog box displays camera data, caption, and copyright and authorship
information that has been added to the file. Using this dialog box, you can modify or add information to files saved in
Photoshop
Elements. The information you add is embedded in the file using XMP (Extensible Metadata Platform).
XMP provides Adobe applications and workflow partners with a common XML framework that standardizes the
creation, processing, and interchange of document metadata across publishing workflows. If you have metadata that
you repeatedly enter for different files, you can create metadata templates to expedite the adding of information to files.
You cannot edit the information displayed for the Camera Data metadata category.
Important: Tags added to a file in the Photo Browser appear as keywords in the File Info dialog box. Some file formats,
such as PDF and BMP, do not support tags as keywords.
1With an image open, choose File > File Info. (You can also right-click a thumbnail in the Project Bin and choose
File Info.)
2Click the Description attribute on the left of the dialog box to display specific information. In Description, you can
add or modify the document title, author information, keywords, and copyright information. Type in the
appropriate text boxes and click OK to embed the information. For copyright status, choose from the Copyright
Status drop-down list.

37
USING PHOTOSHOP ELEMENTS 9
Working in Photoshop Elements
Last updated 1/3/2012
Use the Info panel in the Edit workspace
In the Full Edit workspace, the Info panel displays file information about an image and also provides feedback as you
use a tool. Make sure the Info panel is visible in your work area if you want to view information while dragging in the
image.
1Display the Info panel by clicking its triangle if it’s in the Panel Bin. If the Info panel isn’t visible in the Panel Bin
or the work area, choose Window > Info to display the panel.
2Select a tool.
3Move the pointer into the image, or drag within the image to use the tool. The following information may appear,
depending on which tool you’re using:
The numeric values for the color beneath the pointer.
The x- and y-coordinates of the pointer.
The width (W) and height (H) of a marquee or shape as you drag, or the width and height of an active selection.
The x- and y-coordinates of your starting position (when you click in the image).
The change in position along the x-coordinate, , and y-coordinate, , as you move a selection, layer, or
shape.
The angle (A) of a line or gradient, the change in angle as you move a selection, layer, or shape, or the angle of
rotation during a transformation. The change in distance (D) as you move a selection, layer, or shape.
The percentage of change in width (W) and height (H) as you scale a selection, layer, or shape.
The angle of horizontal skew (H) or vertical skew (V) as you skew a selection, layer, or shape.
More Help topics
“About color” on page 173
“About image modes” on page 175
Set color modes and units of measurement in the Info panel
❖Do one of the following:
•To change the mode of color values displayed, click an eyedropper icon in the Info panel, and choose a color
mode from the pop-up menu. You can also choose Panel Options from the More menu in the Info panel, then
choose a color mode for First Color Readout and/or Second Color Readout:
Grayscale Displays the grayscale values beneath the pointer.
RGB Color Displays the RGB (red, green, blue) values beneath the pointer.
Web Color Displays the hexadecimal code for the RGB values beneath the pointer.
HSB Color Displays the HSB (hue, saturation, brightness) values beneath the pointer.
•To change the unit of measurement displayed, click the cross hair in the Info panel, and choose a unit of
measurement from the pop-up menu. You can also choose Panel Options from the More menu in the Info panel.
Choose a unit of measurement from the Ruler Units menu, and click OK.

38
USING PHOTOSHOP ELEMENTS 9
Working in Photoshop Elements
Last updated 1/3/2012
Display file information in the Info panel or status bar
In the Edit workspace, you can change the information displayed in the Info panel or the status bar. (The leftmost
section of the status bar, which is located at the bottom of the document window, displays the current magnification.
The section next to the leftmost one displays information about the current file.)
1Do one of the following:
•In the Info panel, choose Panel Options from the More menu.
•In the status bar, click the black triangle.
2Select a view option:
Document Sizes Displays information on the amount of data in the image. The number on the left represents the
printing size of the image—approximately the size of the saved, flattened file in PSD format. The number on the right
indicates the file’s approximate size, including layers.
Document Profile Displays the name of the color profile used by the image.
Document Dimensions Displays the size of the image in the currently selected units.
Scratch Sizes Displays RAM and scratch disk usage and allocation. The number on the left indicates the RAM used
and scratch disk space allocated to Photoshop
Elements. The number on the right indicates the amount of RAM that
Photoshop
Elements can use for image storage or the scratch disk.
Efficiency Displays the percentage of time actually spent performing an operation instead of reading from or writing
to the scratch disk. If the value is below 100%, Photoshop
Elements is using the scratch disk and, therefore, is operating
more slowly.
Timing Shows how long it took to complete the last operation.
Current Tool Shows the name of the active tool.
More Help topics
“About color” on page 173
“About scratch disks” on page 27
“About rulers, grids, and guides” on page 42
Save or delete metadata templates in the Edit workspace
If you have metadata that you repeatedly enter, you can save the metadata entries in metadata templates. The templates
can be used for entering information, and they save you the effort of retyping metadata in the File Info dialog box. In
the Photo Browser, you can search for metadata to locate files and photos.
❖In the Edit workspace, open the File Info dialog box and do one of the following:
•To save metadata as a template, click the drop-down button in the row of buttons in the File Info dialog box, and
select Export. Enter a template name, and click Save.
•To delete a metadata template, click Show Templates Folder. Browse and select the template you want to delete, and
press Delete.
Use a saved metadata template in the Edit workspace
1In the Edit workspace, choose File > File Info, click the drop-down button in the row of buttons in the File Info
dialog box, and select Import.
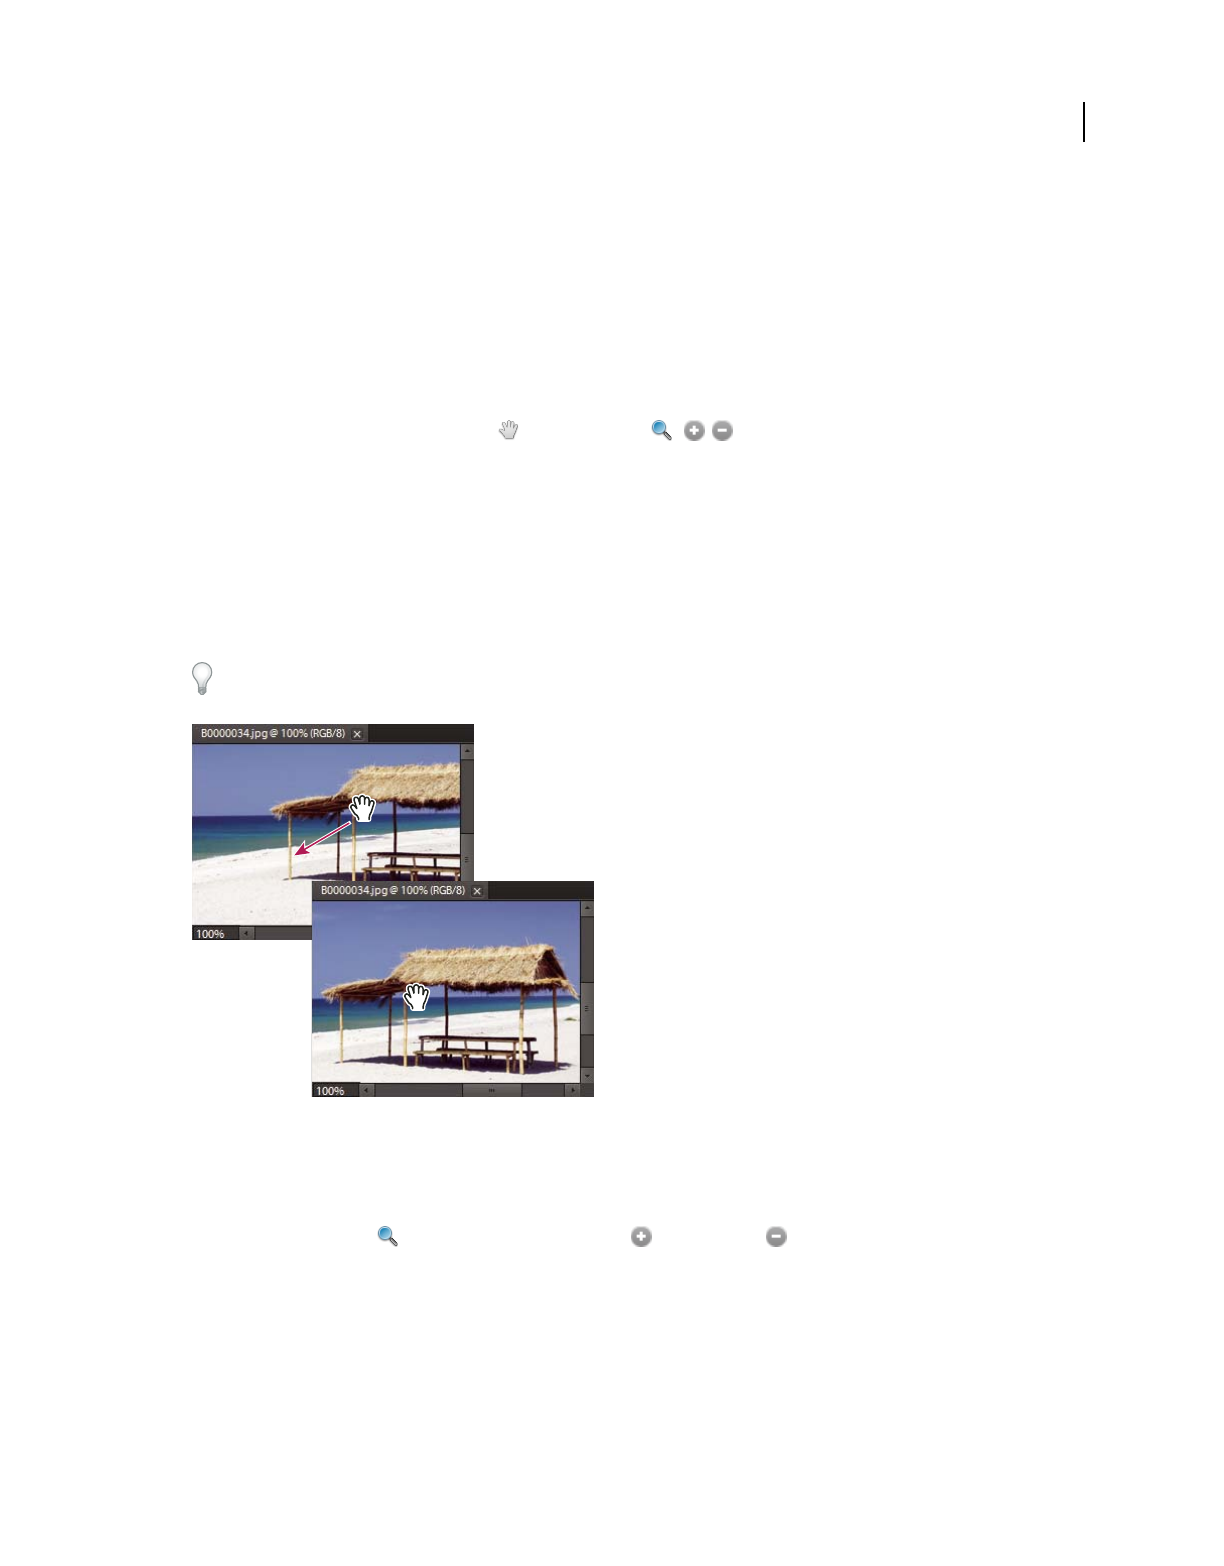
39
USING PHOTOSHOP ELEMENTS 9
Working in Photoshop Elements
Last updated 1/3/2012
2Select an import option and click OK.
3Choose a template from the list of saved metadata templates and click Open.
Viewing images in the Edit workspace
Viewing images in Full Edit or Quick Fix
In Full Edit or Quick Fix, the Hand tool , the Zoom tools , the Zoom commands, and the Navigator
panel let you view different areas of an image at different magnifications. The document window is where your image
appears. You can open additional windows to display several views of an image at once (such as different
magnifications).
You can magnify or reduce your view using various methods. The window’s title bar displays the zoom percentage
(unless the window is too small for the display to fit).
If you want to view another area of an image, either use the window scroll bars or select the Hand tool and drag to pan
over the image. You can also use the Navigator panel.
To use the Hand tool while another tool is selected, hold down the spacebar as you drag within the image.
Dragging the Hand tool to view another area of an image.
Zoom in or out
❖In Full Edit or Quick Fix, do one of the following:
•Select the Zoom tool , and click either the Zoom In or Zoom Out button in the options bar. Click the
area you want to magnify. Each click magnifies or reduces the image to the next preset percentage, and centers the
display around the point you click. When the image has reached its maximum magnification level of 3200% or
minimum reduction level of 1 pixel, the magnifying glass appears empty.
Note: You can drag a Zoom tool over the part of an image you want to magnify. Make sure that the Zoom In button is
selected in the options bar. To move the zoom marquee around the image, begin dragging a marquee, and then hold down
the spacebar while dragging the marquee to a new location.
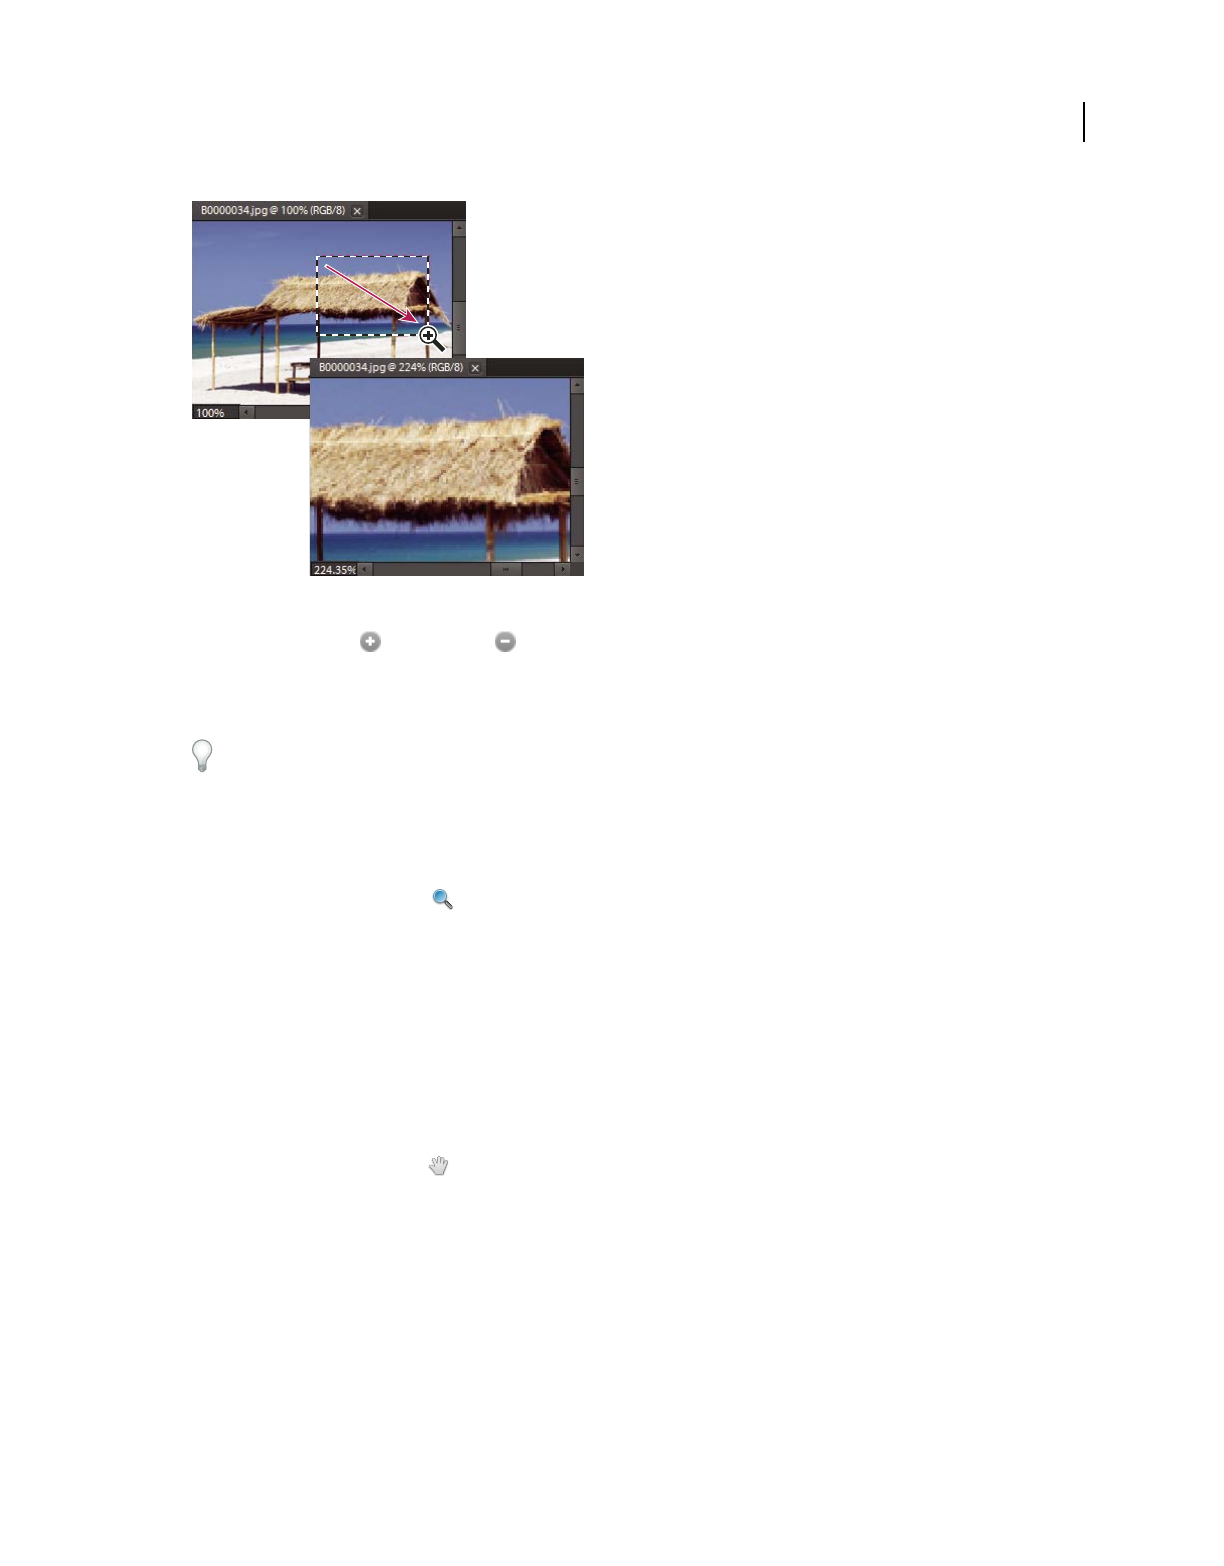
40
USING PHOTOSHOP ELEMENTS 9
Working in Photoshop Elements
Last updated 1/3/2012
Dragging the Zoom tool to magnify the view of an image.
•Click the Zoom In or Zoom Out button in the Navigator panel.
•Choose View > Zoom In or View > Zoom Out.
•Enter the desired magnification level in the Zoom text box, either in the status bar or in the Navigator panel.
When using a Zoom tool, hold down Alt to switch between zooming in and zooming out.
Display an image at 100%
❖In Full Edit or Quick Fix, do one of the following:
•Double-click the Zoom tool in the toolbox.
•Select a Zoom tool and click the 1:1 button in the options bar.
•Select the Hand tool, and click Actual Pixels.
•Choose View > Actual Pixels, or right-click the image and choose Actual Pixels.
•Enter 100% in the status bar and press Enter.
Fit an image to the screen
❖In Full Edit or Quick Fix, do one of the following:
•Double-click the Hand tool in the toolbox.
•Select a Zoom tool or the Hand tool, and then click the Fit Screen button in the options bar. Or, right-click the
image and choose Fit On Screen.
•Choose View > Fit On Screen.
These options scale both the zoom level and the window size to fit the available screen space.
Resize the window while zooming
❖With a Zoom tool active, select Resize Windows To Fit in the options bar. The window changes size as you magnify
or reduce the view of the image.
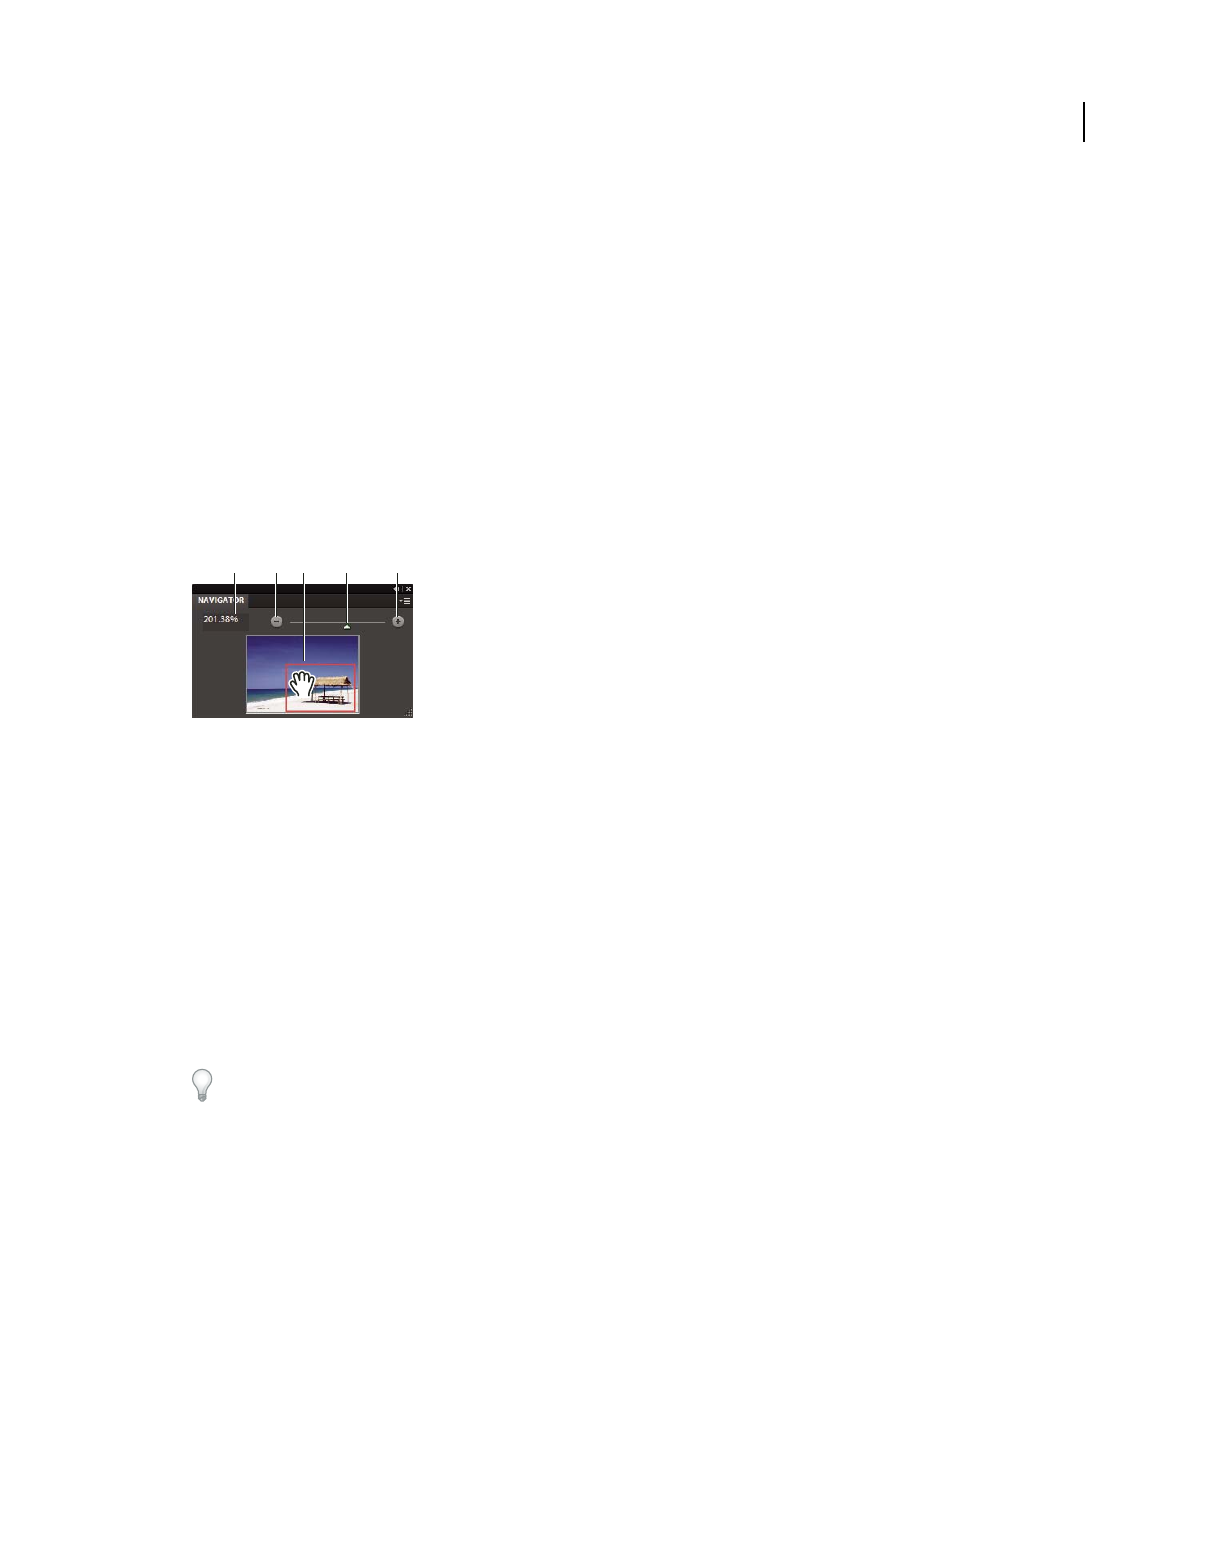
41
USING PHOTOSHOP ELEMENTS 9
Working in Photoshop Elements
Last updated 1/3/2012
When Resize Windows To Fit is deselected, the window maintains a constant size regardless of the image’s
magnification. This can be helpful when you are using smaller monitors or working with tiled images.
Note: To automatically resize the window when using keyboard shortcuts to reduce or magnify an image view, in the Edit
workspace, choose Edit > Preferences > General, and then select the Zoom Resizes Windows preference and click OK.
Using the Navigator panel
The Navigator panel lets you adjust the image’s magnification and area of view. Typing a value in the text box, clicking
the Zoom Out or Zoom In button, or dragging the zoom slider changes the magnification. Drag the view box in the
image thumbnail to move the view of an image. The view box represents the boundaries of the image window. You can
also click in the thumbnail of the image to designate the area of view.
Note: To change the color of the view box, choose Panel Options from the Navigator panel menu. Choose a color from the
Color menu or click the color swatch to open the Color Picker and select a custom color. Click OK.
The Navigator panel
A. Zoom text box B. Zoom Out C. Drag the view box to move the view D. Zoom slider E. Zoom In
More Help topics
“Fit an image to the screen” on page 40
Open multiple windows of the same image
In Full Edit, you can open multiple windows to display different views of the same file. A list of open windows appears
in the Window menu, and thumbnails of each open image appear in the Photo Bin. Available memory may limit the
number of windows per image.
❖Choose View > New Window For [image filename]. Depending on the position of the first window, you may have
to move the second window to view both simultaneously.
You can use the New Window command when you’re working with a zoomed image to see what the image will look
like at 100% size in a separate window.
View and arrange multiple windows
❖In Full Edit, do one of the following:
•To display windows stacked and cascading from the upper left to the lower right of the screen, choose Window >
Images > Cascade.
•To display windows edge-to-edge, choose Window > Images > Tile. As you close images, the open windows are
resized to fill the available space.
•To view all open images at the same magnification as the active image, choose Window > Images > Match Zoom.
•To view the same section (upper-left corner, center, lower-right corner, and so on) of all open photos, choose
Window > Images > Match Location. The view in all windows shifts to match the active (frontmost) image. The
zoom level does not change.
ABCD E
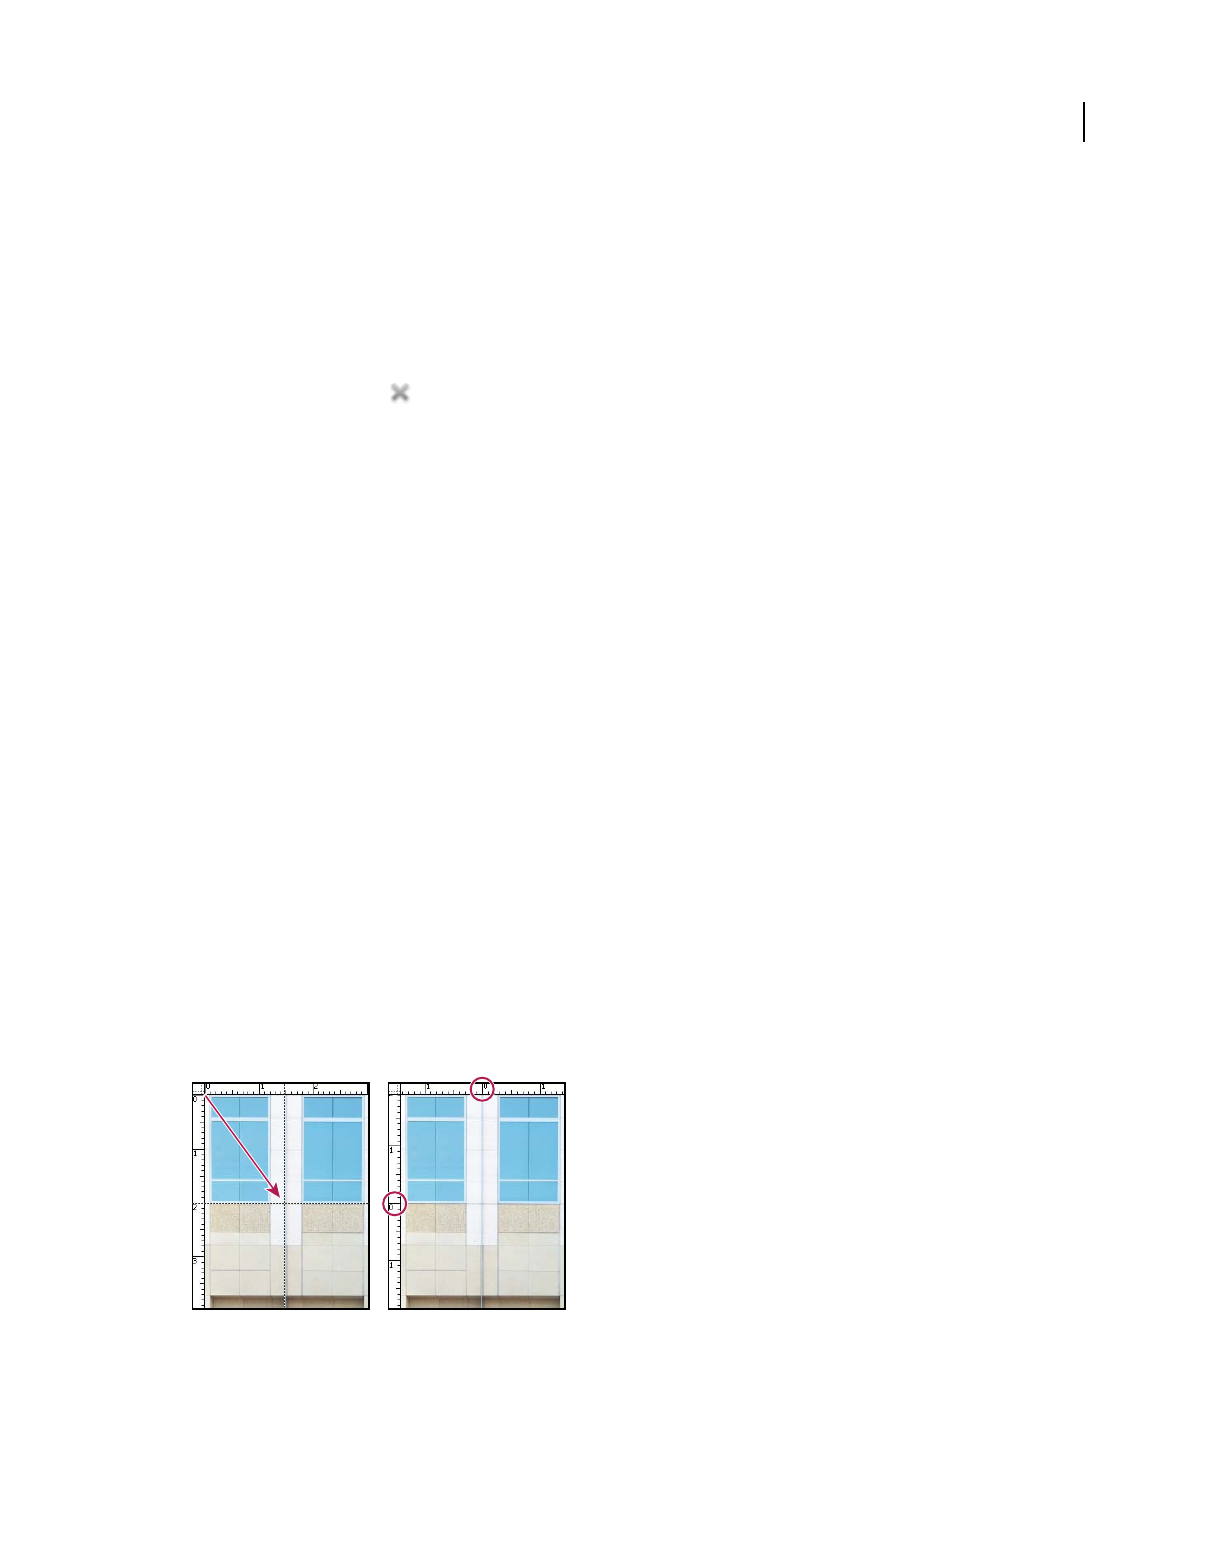
42
USING PHOTOSHOP ELEMENTS 9
Working in Photoshop Elements
Last updated 1/3/2012
Note: The Window > Images options are enabled only when Allow Floating Documents In Full Edit Mode is selected in
preferences.
Close windows
❖In Full Edit, do one of the following:
•Choose File > Close to close the active window.
•Click the Close button on the title bar of the active window.
•Right-click a thumbnail in the Project Bin and choose Close.
•Choose File > Close All to close all open windows.
Guides, grids, and rulers
About rulers, grids, and guides
In Full Edit, rulers, grids, and guides help you position items (such as selections, layers, and shapes) precisely across
the width or length of an image. In Quick Fix, only guides and grids are available.
When visible, rulers appear along the top and left side of the active window. Markers in the ruler display the pointer’s
position when you move it. Changing the ruler origin (the 0, 0 mark on the top and left rulers) lets you measure from
a specific point on the image. The ruler origin also determines the grid’s point of origin.
Use the View menu to show or hide the rulers (Full Edit only), the grid, or the guide. The View menu also helps you
to enable or disable the snapping of items to the grid or guide.
Change the rulers’ zero origin and settings
❖In Full Edit, do one of the following:
•To change the rulers’ zero origin, position the pointer over the intersection of the rulers in the upper-left corner of
the window, and drag diagonally down onto the image. A set of cross hairs appears, marking the new origin on the
rulers. The new zero origin will be set where you release the mouse button.
Note: To reset the ruler origin to its default value, double-click the upper-left corner of the rulers.
Dragging to create a new ruler origin.
•To change the rulers’ settings, double-click a ruler, or choose Edit > Preferences > Units & Rulers. For Rulers,
choose a unit of measurement. For Column size, enter values for Width and Gutter. Click OK.

43
USING PHOTOSHOP ELEMENTS 9
Working in Photoshop Elements
Last updated 1/3/2012
Some layout programs use the column width setting to specify the display of an image across columns. The Image Size
and Canvas Size commands also use this setting.
Note: Changing the units on the Info panel automatically changes the units on the rulers.
More Help topics
“Use the Info panel in the Edit workspace” on page 37
“Change the size of the canvas” on page 140
“Change print dimensions and resolution without resampling” on page 145
Change the grid settings
1In Full Edit or Quick Fix, choose Edit > Preferences > Guides & Grid.
2For Color, choose a preset color, or click the color swatch to choose a custom color.
3For Style, choose the line style for the grid. Choose Lines for solid lines, or choose Dashed lines or Dots for broken
lines.
4For Gridline Every, enter a number value, and then choose the unit of measurement to define the spacing of major
grid lines.
5For Subdivisions, enter a number value to define the frequency of minor grid lines, and click OK.
Change the guide settings
1In Full Edit or Quick Fix, choose Edit > Preferences > Guides & Grid.
2For Color, choose a preset color, or click the color swatch to choose a custom color.
3For Style, choose the line style for the guide. Choose Lines for solid lines, and Dashed Lines for broken lines.
Saving and exporting images
About saving images and file formats
For a video about this process, see www.adobe.com/go/lrvid2321_pse9_en.
After you edit an image in the Edit workspace, ensure that you save it. To ensure that all the image data is preserved,
save regular images in Photoshop (PSD) format. Multiple-page creations are always saved in Photo Creations (PSE)
format. These formats don’t compress your image data.
Save your photos in PSD format (instead of JPEG), unless you plan to share your photos or use them in a web page.
Each time you save in JPEG format, the image data is compressed, potentially causing some data to be lost. You may
start to notice reduced image quality after saving the file as a JPEG 2-3 times. The disadvantage of saving in PSD format
is that the file size increases significantly because the file is not compressed.
Photoshop Elements can save images in several file formats, depending on how you plan to use them. If you are
working with web images, the Save For Web command provides many options for optimizing images. To convert
several images to the same file format, or the same size and resolution, use the Process Multiple Files command.

44
USING PHOTOSHOP ELEMENTS 9
Working in Photoshop Elements
Last updated 1/3/2012
More Help topics
“Using the Save For Web dialog box” on page 270
“Process multiple files” on page 34
File formats for saving
Photoshop Elements can save images in the following file formats:
BMP A standard Windows image format. You can specify either Windows or OS/2 format and a bit depth for the
image. For 4-bit and 8-bit images using Windows format, you can also specify RLE compression.
CompuServe GIF (Graphics Interchange Format) Commonly used to display graphics and small animations in web
pages. GIF is a compressed format designed to minimize file size and transfer time. GIF supports only 8-bit color
images (256 or fewer colors). You can also save an image as a GIF file using the Save For Web command.
JPEG (Joint Photographic Experts Group) Used to save photographs, JPEG format retains all color information in an
image but compresses file size by selectively discarding data. You can choose the level of compression. Higher
compression results in lower image quality and a smaller file size; lower compression results in better image quality
and a larger file size. JPEG is a standard format for displaying images over the web.
PCX A bitmap format widely supported on a variety of platforms.
Photoshop (PSD) The standard Photoshop Elements format for images. You should generally use this format for
edited images to save your work and preserve all your image data and layers in a single page file.
Photo Creations Format (PSE) The standard Photoshop Elements format for multiple page creations. You should
generally use this format for photo creations to save your work and preserve all your image data and layers in a multiple
page file.
Photoshop PDF (Portable Document Format) A cross-platform and cross-application file format. PDF files accurately
display and preserve fonts, page layouts, and both vector and bitmap graphics.
Note: PDF and PDP are the same except that PDPs are opened in Adobe Photoshop® and PDFs are opened in Acrobat.
Photoshop EPS (Encapsulated PostScript) Used to share Photoshop files with many illustration and page-layout
programs. For best results, print documents with EPS images to PostScript-enabled printers.
PICT Used with Mac OS graphics and page-layout applications to transfer images between applications. PICT is
especially effective at compressing images with large areas of solid color.
When saving an RGB image in PICT format, you can choose either 16-bit or 32-bit pixel resolution. For a grayscale
image, you can choose from 2, 4, or 8 bits per pixel.
Pixar Used for exchanging files with Pixar image computers. Pixar workstations are designed for high-end graphics
applications, such as those used for three-dimensional images and animation. Pixar format supports RGB and
grayscale images.
PNG (Portable Network Graphics) Used for lossless compression and for displaying images on the web. Unlike GIF,
PNG supports 24-bit images and produces background transparency without jagged edges; however, some web
browsers do not support PNG images. PNG preserves transparency in grayscale and RGB images.
Photoshop Raw Used for transferring images between applications and computer platforms when other formats don’t
work.
Scitex CT Used in the prepress industry.
TGA (Targa) Designed for systems using the Truevision video board. When saving an RGB image in this format, you
can choose a pixel depth of 16, 24, or 32 bits per pixel and RLE compression.

45
USING PHOTOSHOP ELEMENTS 9
Working in Photoshop Elements
Last updated 1/3/2012
TIFF (Tagged-Image File Format) Used to exchange files between applications and computer platforms. TIFF is a
flexible bitmap image format supported by most paint, image-editing, and page-layout applications. Most desktop
scanners can produce TIFF files.
In addition, Photoshop Elements can open files in several other older formats: PS 2.0, Pixel Paint, Alias Pix, IFF format,
Portable Bit Map, SGI RGB, Soft Image, Wavefront RLA, and ElectricImage.
More Help topics
“Optimized file formats for the web” on page 271
Save changes in different file formats
You can set options for saving image files, such as the format, and whether to include the saved file in the Photo
Browser catalog or to preserve layers in an image. Depending on the format you select, other options may be available
to set.
More Help topics
“Set file-saving preferences” on page 48
“About transparent and matted web images” on page 278
“About the JPEG format” on page 272
“Optimized file formats for the web” on page 271
“About the GIF format” on page 273
“Convert an image to indexed color” on page 177
“About the PNG-8 format” on page 273
“About the PNG-24 format” on page 274
Change file-saving options
1In the Edit workspace, choose File > Save.
2To change file-saving options, such as the filename or format, choose File > Save As, set any of the following file-
saving options, and then click Save.
Note: Some file formats open another dialog box with additional options.
File Name Specifies the filename for the saved image.
Format Specifies the file format for the saved image.
Include In The Elements Organizer Includes the saved file in your catalog so that it displays in the Photo Browser. Note
that some file formats supported in the Edit workspace are not supported in the Elements Organizer. If you save a file
in one of these formats, like EPS, this option is unavailable.
Save In Version Set With Original Saves the file, then adds it to a version set in the Photo Browser to keep the different
versions of the image organized. This option is unavailable unless Include In The Organizer is selected.
Layers Preserves all layers in the image. If this option is disabled or unavailable, there are no layers in the image. A
warning icon
at the Layers check box indicates that the layers in your image will be flattened or merged for the
selected format. In some formats, all layers are merged. To preserve layers, select another format.
As a Copy Saves a copy of the file while keeping the current file open. The copy is saved to the folder containing the
currently open file.

46
USING PHOTOSHOP ELEMENTS 9
Working in Photoshop Elements
Last updated 1/3/2012
ICC Profile Embed a color profile in the image for certain formats.
Thumbnail Saves thumbnail data for the file. This option is available when the Ask When Saving option for Image
Previews is set in the Preferences dialog box.
Use Lower Case Extension Makes the file extension lowercase.
Note: UNIX file servers are often used to help send information over networks and the Internet. Some of these servers do
not recognize uppercase extensions. To make sure your images arrive at their destinations, use lowercase extensions.
Save a file in GIF format
1In the Edit workspace, choose File > Save As.
2Specify a filename and location, and choose CompuServe GIF Format from the format list.
Your image is saved as a copy in the specified directory (unless it's already in indexed-color mode).
3If you are creating an animated GIF, select the Layers As Frames option. Each layer in the final file will play as a
single frame in the animated GIF.
4Click Save. If your original image is RGB, the Indexed Color dialog box appears.
5If necessary, specify indexed color options in the Indexed Color dialog box and click OK.
6In the GIF Options dialog box, select a row order for the GIF file and click OK:
Normal Displays the image in a browser only when the image is fully downloaded.
Interlaced Displays a series of low-resolution versions of the image while the full image file is downloaded to the
browser. Interlacing can make downloading time seem shorter and assures viewers that downloading is in progress.
However, interlacing also increases file size.
Save a file in JPEG format
1In the Edit workspace, choose File > Save As, and choose JPEG from the format list.
Note: You cannot save indexed-color and bitmap mode images in JPEG format.
2Specify a filename and location, select file-saving options, and click Save.
The JPEG Options dialog box opens.
3If the image contains transparency, select a Matte color to simulate the appearance of background transparency.
4Specify image compression and quality by choosing an option from the Quality menu, dragging the Quality slider,
or entering a value between 1 and 12.
5Select a format option:
Baseline (“Standard”) Uses a format that is recognizable to most web browsers.
Baseline Optimized Optimizes the color quality of the image and produces a slightly smaller file size. This option is
not supported by all web browsers.
Progressive Creates an image that is gradually displayed as it is downloaded to a web browser. Progressive JPEG files
are slightly larger in size, require more RAM for viewing, and are not supported by all applications and web browsers.
6To view the estimated download time of the image, select a modem speed from the Size pop-up menu. (The Size
preview is available only when Preview is selected.)
Note: If a Java application cannot read your JPEG file, try saving the file without a thumbnail preview.
7Click OK.

47
USING PHOTOSHOP ELEMENTS 9
Working in Photoshop Elements
Last updated 1/3/2012
Save a file in Photoshop EPS format
1In the Edit workspace, choose File > Save As, and choose Photoshop EPS from the format list.
2Specify a filename and location, select file-saving options, and click Save.
3In the EPS Options dialog box, set the following options:
•For Preview, choose TIFF (8 bits/pixel) for better display quality, or choose TIFF 1-bit/pixel for a smaller file size.
•For Encoding, choose an encoding method from the following options:
•ASCII
•ASCII85
•Binary
•JPEG (Low Quality)
•JPEG (Medium Quality)
•JPEG (High Quality)
•JPEG (Maximum Quality)
4To display white areas in the image as transparent, select Transparent Whites. This option is available only for
images in bitmap mode.
5If you want to apply anti-aliasing to a printed low-resolution image, select Image Interpolation.
6Click OK.
Save a file in Photoshop PDF format
1In the Edit workspace, choose File > Save As, and choose Photoshop PDF from the format list.
2Specify a filename and location, select file-saving options, and click Save.
3In the Save Adobe PDF dialog box, select a compression method. (See “Understanding file compression” on
page 48.)
4Choose an option from the Image Quality menu.
5To view the PDF file, select View PDF After Saving to launch Adobe Acrobat or Adobe® Reader (depending on
which application is installed on your computer).
6Click Save PDF.
If you've made changes to an Acrobat Touchup file, but the changes are not reflected when you open the file, check the
Saving File preferences dialog box. Choose Edit > Preferences > Saving Files, and then choose Save Over Current File
from the On First Save menu.
Save a file in PNG format
1In the Edit workspace, choose File > Save As, and choose PNG from the format list.
2Specify a filename and location, select file-saving options, and click Save.
3In the PNG Options dialog box, select an Interlace option and click OK.
None Displays the image in a web browser only after it is completely downloaded.
Interlaced Displays low-resolution versions of the image while the full image file is downloading to the browser.
Interlacing can make downloading time seem shorter and assures viewers that downloading is in progress. However,
interlacing also increases file size.

48
USING PHOTOSHOP ELEMENTS 9
Working in Photoshop Elements
Last updated 1/3/2012
Save a file in TIFF format
1In the Edit workspace, choose File > Save As, and choose TIFF from the format list.
2Specify a filename and location, select file-saving options, and click Save.
3In the TIFF Options dialog box, select options:
Image Compression Specifies a method for compressing the composite image data.
Pixel Order Choose Interleaved to be able to add the photo to the Elements Organizer.
Byte Order Most recent applications can read files using Mac or Windows byte order. However, if you don’t know
what kind of program the file may be opened in, select the platform on which the file will be read.
Save Image Pyramid Preserves multiresolution information. Photoshop Elements does not provide options for
opening multiresolution files; the image opens at the highest resolution within the file. However, Adobe InDesign® and
some image servers provide support for opening multiresolution formats.
Save Transparency Preserves transparency as an additional alpha channel when the file is opened in another
application. (Transparency is always preserved when the file is reopened in Photoshop
Elements.)
Layer Compression Specifies a method for compressing data for pixels in layers (as opposed to composite data).
Many applications cannot read layer data and skip it when opening a TIFF file. Photoshop Elements can read layer
data in TIFF files. Although files that include layer data are larger than those that don’t, saving layer data eliminates
the need to save and manage a separate PSD file to hold the layer data.
Understanding file compression
Many image file formats compress image data to reduce file size. Lossless compression preserves all image data without
removing detail; lossy compression removes image data and loses some detail.
The following are commonly used compression techniques:
RLE (Run Length Encoding) Lossless compression technique that compresses the transparent portions of each layer in
images with multiple layers containing transparency.
LZW (Lemple-Zif-Welch) Lossless compression that provides the best results in compressing images that contain large
areas of a single color.
JPEG Lossy compression that provides the best results with photographs.
CCITT A family of lossless compression techniques for black-and-white images.
ZIP Lossless compression technique that is most effective for images that contain large areas of a single color.
Set file-saving preferences
❖In the Edit workspace, choose Edit > Preferences > Saving Files, and set the following options:
On First Save Gives you the ability to control how files are saved:
•Ask If Original (default) opens the Save As dialog box the first time you edit and save the original file. All
subsequent saves overwrite the previous version. If you open the edited copy in the Edit workspace (from Elements
Organizer), the first save, as well as all subsequent saves, overwrites the previous version.
•Always Ask opens the Save As dialog box the first time you edit and save the original file. All subsequent saves
overwrite the previous version. If you open the edited copy in the Edit workspace (from Elements Organizer), the
first save opens the Save As dialog box.
•Save Over Current File does not open the Save As dialog box. The first save overwrites the original.

49
USING PHOTOSHOP ELEMENTS 9
Working in Photoshop Elements
Last updated 1/3/2012
Image Previews Saves a preview image with the file. Select Never Save to save files without previews, Always Save to
save files with specified previews, or Ask When Saving to assign previews on a file-by-file basis.
File Extension Specifies an option for the three-character file extensions that indicate a file’s format: Select Use Upper
Case to append file extensions using uppercase characters, or Use Lower Case to append file extensions using
lowercase characters. Generally, it’s a good idea to keep this option set to Use Lower Case.
Prefer Adobe Camera Raw For Supported Raw Files Ensures that all the supported raw files are opened with Adobe
Camera Raw instead of other software. Select this option if you have added other plug-ins to Plug-Ins folder.
Ignore Camera Data (EXIF) Profiles Select this option to automatically discard any color profiles used by your digital
camera. The color profile you use in Photoshop
Elements is saved with the image.
Maximize PSD File Compatibility Saves a composite image in a layered Photoshop file so that it can be imported or
opened by a wider range of applications. Do one of the following:
•Select Never to skip this step
•Select Always to automatically save the composite
•Select Ask if you’d like to be prompted each time you save a file
Recent File List Contains: _ Files Specifies how many files are available in the File > Open Recently Edited File
submenu. Enter a value from 0 to 30. The default value is 10.
More Help topics
“Save changes in different file formats” on page 45
Guided Edit
The Guided Edit mode provides more structure around specific tasks, helping you accomplish those tasks more easily,
and with explanations throughout the process. The Guided Edit tab is located in the Edit tab of the Panel Bin in the
Edit workspace.
With Guided Edit, you can complete these tasks:
Basic Photo Edits Crop, recompose, rotate and straighten or both, and sharpen photos.
Lighting And Exposure Lighten or darken, adjust brightness and contrast, and adjust levels.
Color Correction Enhance colors, remove a color cast, and correct skin tone.
Guided Activities Touch up scratches, blemishes or tear marks, guide for editing a photo, and fix keystone distortion.
Photomerge Intelligently merge multiple images of group shots or faces, or use the scene cleaner to remove unwanted
elements in a photo.
Note: The Guided Edits available may vary in your version of Photoshop Elements.
Automated Actions Lets you perform a series of tasks on a photo. Photoshop Elements comes with a set of actions.
You can also play actions created in Adobe Photoshop CS3. Keep in mind that the custom actions can only perform
tasks that use features supported in Photoshop
Elements, and may not work on all file types or layers.
Photographic Effects Lets you apply effects to create a line drawing, create an old-fashioned photo look, and make a
photo look saturated like slide film images.
Fun Edits Lets you complete complex workflows in a small number of easy steps. You can add a Lomo effect, create an
Out Of Bounds effect, create a perfect portrait, transform an image into pop art, and add a reflection effect.

50
USING PHOTOSHOP ELEMENTS 9
Working in Photoshop Elements
Last updated 1/3/2012
Use the Guided Edit options
1Click the Edit tab in the Edit workspace.
2Click the Guided tab.
3Choose from the list of Guided Edits.
4Do one of the following:
•Follow the steps that appear and click Done.
•Click Cancel to choose a different Guided Edit, or go back to the Edit workspace.
Note: If you enter a Guided Edit, then click on the “After Only” button at the bottom of the image to see the Before and
After view of your photo, when you exit the Guided Edit, that view will remain. To reset the view back to After only (the
default), click on the window mode button again until the After only view is restored, or simply click on either Full or
Quick modes to reset to a single view.
The Crop Photo Guided Edit
Use the Crop Photo Guided Edit to crop an image.
You can view the after image only, or view both the before and after images either vertically or horizontally.
For more information on cropping, see “Cropping” on page 138.
The Recompose Photo Guided Edit
For more information on the features used in the Recompose Photo Guided Edit, see “Recomposing” on page 166.
The Rotate And/Or Straighten Guided Edit
Use the Rotate and/or Straighten Photo Guided Edit to rotate a picture in 90-degree increments or draw a line through
an image to realign it.
You can view the after image only, or view both the before and after images either vertically or horizontally.
For more on rotating an image, see “Rotate or flip an item” on page 163.
For more on straightening an image, see “Straighten an image” on page 141.
The Sharpen Photo Guided Edit
Use the Sharpen Photo Guided Edit to sharpen an image.
You can view the after image only, or view both the before and after images either vertically or horizontally.
For more on sharpening images, see “Sharpening overview” on page 161 or “Sharpen an image” on page 162.
The Lighten Or Darken Guided Edit
Use the Lighten or Darken Guided Edit to lighten or darken an image.
You can view the after image only, or view both the before and after images either vertically or horizontally.
For more on lightening or darkening an image, see “Adjusting shadows and light” on page 116.

51
USING PHOTOSHOP ELEMENTS 9
Working in Photoshop Elements
Last updated 1/3/2012
The Brightness And Contrast Guided Edit
Use the Brightness And Contrast Guided Edit to adjust brightness or contrast in an image.
You can view the after image only, or view both the before and after images either vertically or horizontally.
For more on adjusting brightness and contrast, see “Adjusting shadows and light” on page 116.
The Adjust Levels Guided Edit
For more information on using Levels, see “About Levels adjustments” on page 118.
The Enhance Colors Guided Edit
Use the Enhance Colors Guided Edit to enhance the hue, saturation, and lightness in an image.
You can view the after image only, or view both the before and after images either vertically or horizontally.
For more on enhancing colors, see “Adjusting color saturation and hue” on page 127.
The Remove A Color Cast Guided Edit
Use the Remove a Color Cast Guided Edit to correct color casts in an image.
You can view the after image only, or view both the before and after images either vertically or horizontally.
For more on correcting color casts, see “Correcting color casts” on page 123.
The Correct Skin Tone Guided Edit
Use the Correct Skin Tone Guided Edit to correct skin tones (tan, blush, and ambient light) in an image.
You can view the after image only, or view both the before and after images either vertically or horizontally.
For more on correcting color casts, see “Adjust the color of skin tone” on page 129.
The Touch Up Photo Guided Edit
Use the Touch Up Photo Guided Edit to fix (large or small) flaws in an image (using the Healing Brush or the Spot
Healing Brush).
You can view the after image only, or view both the before and after images either vertically or horizontally.
For more on correcting color casts, see “Fix large imperfections” on page 149 or “Remove spots and small
imperfections” on page 148.
The “Guide For Editing A Photo” Guided Edit
Use the “Guide for Editing a Photo” Guided Edit to follow the recommended sequence of applying common editing
steps to your photos. This sequence is how Adobe recommends you make your various edits, and the order in which
you should do them. This will help you get the best results for all your basic photo retouching tasks.
The Fix Keystone Distortion Guided Edit
For more information on the features used in this Guided Edit, see “Correct camera distortion” on page 153 and
“Freely transform an item” on page 165.

52
USING PHOTOSHOP ELEMENTS 9
Working in Photoshop Elements
Last updated 1/3/2012
The Photomerge Group Shot Guided Edit
For more information on Photomerge Group Shot, see “Use Photomerge Group Shot” on page 155.
The Photomerge Faces Guided Edit
For more information on Photomerge Faces, see “Use Photomerge Faces” on page 155.
The Photomerge Scene Cleaner Guided Edit
For more information on Photomerge Scene Cleaner, see “Use Photomerge Scene Cleaner” on page 156.
The Photomerge Exposure Guided Edit
For more information on Photomerge Exposure, see “Photomerge Exposure” on page 157.
The Photomerge Style Match Guided Edit
For more information on Photomerge Style Match, see “Photomerge Style Match” on page 159.
The Automated Action Player Guided Edit
An action is a series of tasks that Photoshop Elements performs with a click of a button. Photoshop Elements comes
with a set of actions. You can also play actions that are created in Photoshop as long as the actions use features
supported by Photoshop
Elements. Keep in mind that the Automated Actions may not work on all file types or layers.
1In the Edit workspace with the Edit Guided tab selected, make sure that Automated Actions is expanded and then
click Action Player.
2Follow the instructions and choose an action from the menu.
3Click Play Action.
Install actions created in Photoshop
The Action Player in the Automated Actions guided edit can play actions created in Photoshop. Keep in mind that you
can only play actions that use features supported in Photoshop
Elements.
❖Copy the .atn file to one of the following locations:
Windows XP C:\Documents and Settings\All Users\Application Data\Adobe\Photoshop
Elements\9.0\Locale\en_US\Workflow Panels\actions
Vista C:\ProgramData\Adobe\Photoshop Elements\9.0\Locale\en_US\Workflow Panels\actions
Mac System library/Application Support /Adobe /Photoshop Elements /9.0/Locale/en_US/Workflow Panels/actions
The next time you start Photoshop Elements, the action will appear in the Automated Actions guided edit menu.
The Line Drawing Guided Edit
For more information on the features used in this Guided Edit. See “Precisely convert to black and white” on page 131,
“About Levels adjustments” on page 118, “Add Noise” on page 201, and “Adjust saturation and hue” on page 127.

53
USING PHOTOSHOP ELEMENTS 9
Working in Photoshop Elements
Last updated 1/3/2012
The Old Fashioned Photo Guided Edit
For more information on the features used in this Guided Edit, see “Using the Effects panel” on page 183, “Specify the
opacity of a layer” on page 69, and “About Levels adjustments” on page 118.
The Saturated Slide Film Effect Guided Edit
For more information on saturation adjustment, see “Adjust saturation and hue” on page 127.
Fun Edits
Fun Edits help you complete complex editing workflows in a small number of easy steps.
Add a Lomo camera effect
In Guided Edit, apply the effect of the Lomo camera.
1Click Fun Edits and select Lomo Camera Effect.
2Click Cross Process Image .
3Click Apply Vignette.
Each time you click Cross Process Image or Apply Vignette, Photoshop Elements intensifies the last applied effect. At
any point, you can click Reset to remove all the applied effects and restore the original image.
Create an Out of Bounds effect
Note: For a video about this process, see www.adobe.com/go/lrvid902_pse_en.
The Out Of Bounds option in Guided Edit helps you add a frame to an image and display a selected part of the image
outside the frame.
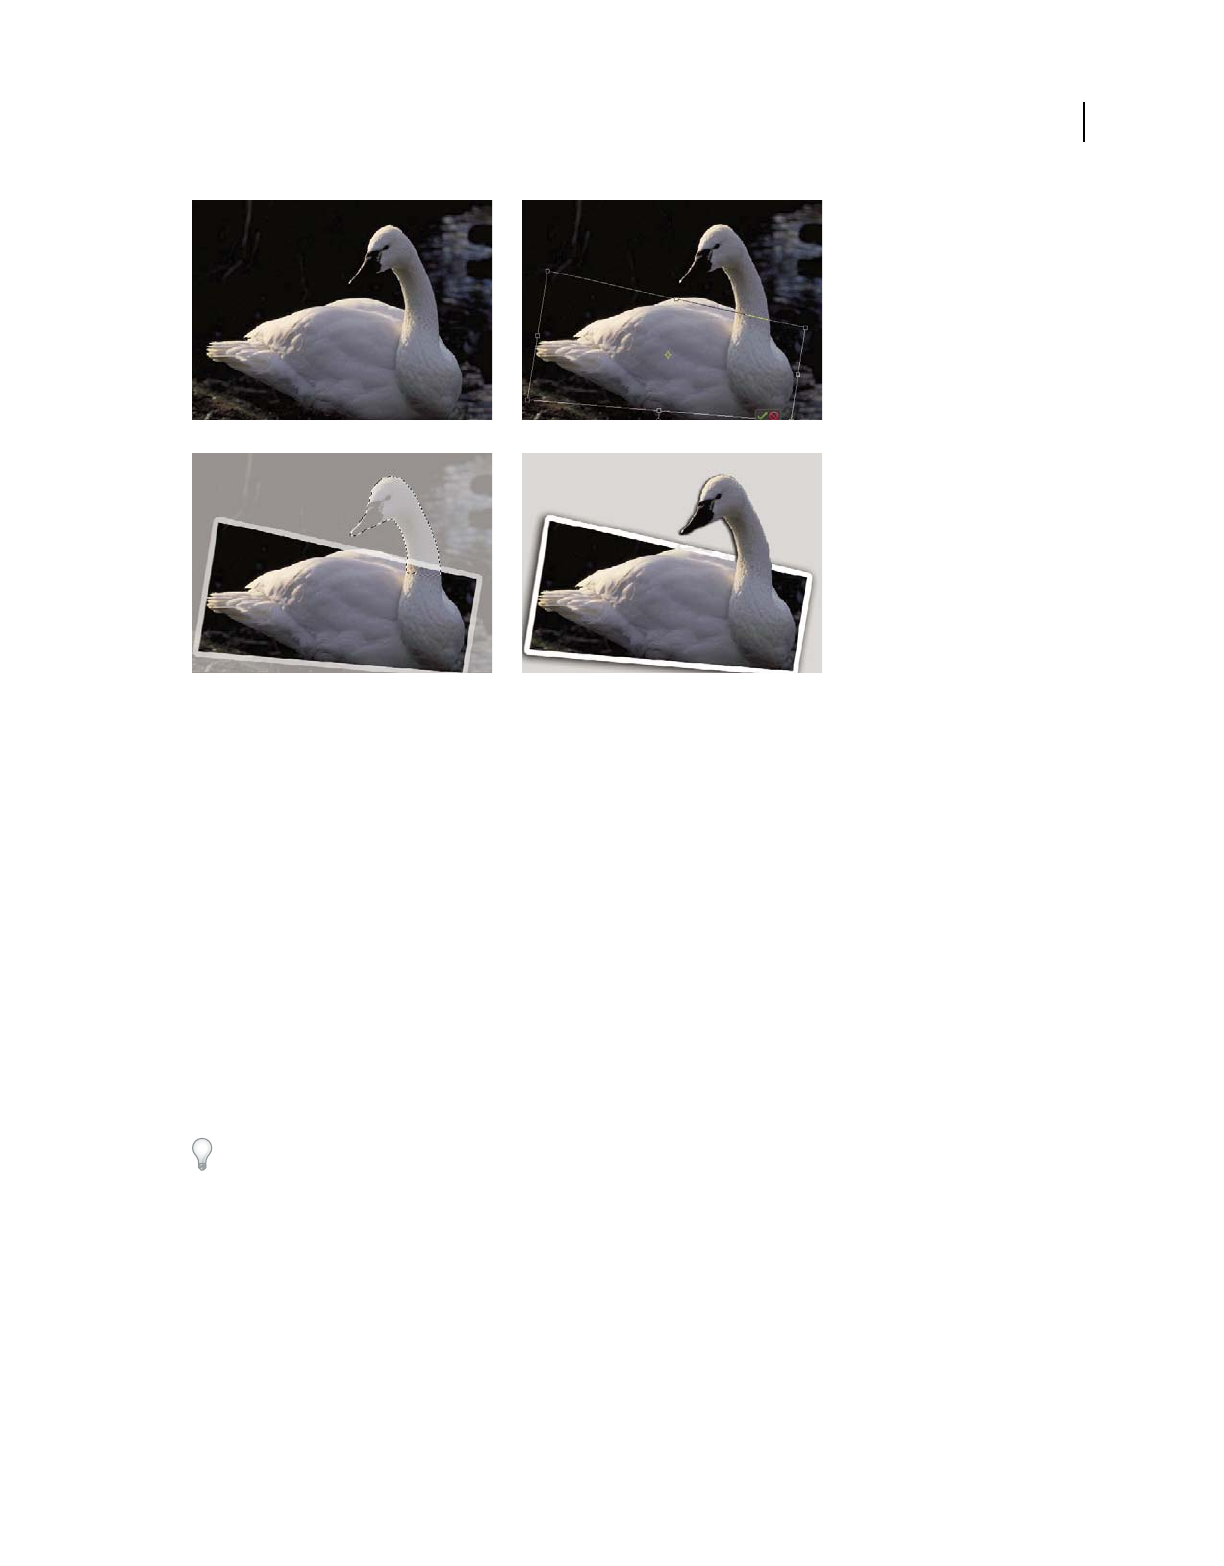
54
USING PHOTOSHOP ELEMENTS 9
Working in Photoshop Elements
Last updated 1/3/2012
A. Original image B. After adding a frame C. After selecting the part to extend D. Final image
1Click Fun Edits and select Out Of Bounds.
2Click Add Frame to add a frame to the image.
3Drag the corners of the frame to leave a part of the main subject outside the frame.
4Add a perspective by pressing Control + Alt + Shift (Command + Option + Shift in Mac OS) and dragging the
handles of the frame. Click Commit.
5Adjust the width of the frame border by dragging the boundaries. Click Commit.
6Using the Quick Selection tool, select the part of the image that should extend outside the frame.
7Click Create Out Of Bounds.
8(Optional) Add a shadow.
9(Optional) Click Add A Gradient.
Create a perfect portrait
For a video about this process, see www.adobe.com/go/lrvid903_pse_en.
In Guided Edit, create a perfect portrait by removing blemishes and enhancing various parts of the image with easy-
to-use tools.
1Click Fun Edits and select Perfect Portrait.
2Enhance the texture of the skin.
aClick Apply Smart Blur to smoothen the skin and remove wrinkles. For information about Smart Blur controls,
see “Smart Blur” on page 195.
bClick Reveal Original. When the original skin is revealed from beneath the blurred skin, use the Blur brush to
brush in the smooth skin where it is required.
AB
CD

55
USING PHOTOSHOP ELEMENTS 9
Working in Photoshop Elements
Last updated 1/3/2012
cClick Increase Contrast to add clarity.
3Enhance facial features.
aClick Spot Healing Tool to fix small flaws. For help with using the Spot Healing brush, see “Remove spots and
small imperfections” on page 148.
bClick Red Eye Removal Tool to precisely remove red eye. See “Precisely remove red eye” on page 147.
cClick Dodge Tool to brighten the eyes.
dClick Burn Tool to darken the eye lashes and eye brows. See “Quickly lighten or darken isolated areas” on
page 122.
eClick White Teeth Tool to brighten the smile.
4Add special touch-ups.
aClick Add Glow. Adjust the sliders until you achieve the desired results.
bClick Slim.
Note: Each click intensifies the effect.
Transform an image into pop art
In Guided Edit, transform an image into pop art in three simple steps. What’s more, you have a choice of two styles.
1Click Fun Edits and select Pop Art.
2Choose a style and follow the onscreen instructions:
Style A Convert the image mode, add color, and duplicate the image with different pop colors.
Style B Posterize the image, add a neon glow, and duplicate the image with different pop colors.
Add a reflection
Note: For a video about this process, see www.adobe.com/go/lrvid901_pse_en.
In Guided Edit, choose a predefined reflection effect and apply it to an image in a few steps.
For best results, avoid skipping a step or performing the steps in a random order.
1Click Fun Edits and select Reflection.
2Click Add Reflection to create an inverted duplicate layer.
3Choose a color from the image and click Fill Background.
4Click one of the following buttons to apply a reflection type:
•Floor Reflection
•Glass Reflection
•Water Reflection
5(Optional) Adjust the intensity of reflection.
6(Optional) Click Add Distortion to distort the reflection in a realistic way.
7(Optional) Click Crop Tool to remove unnecessary areas.
8(Optional) Click Gradient Tool and drag a gradient line from the bottom of the reflection to the bottom of the
image.
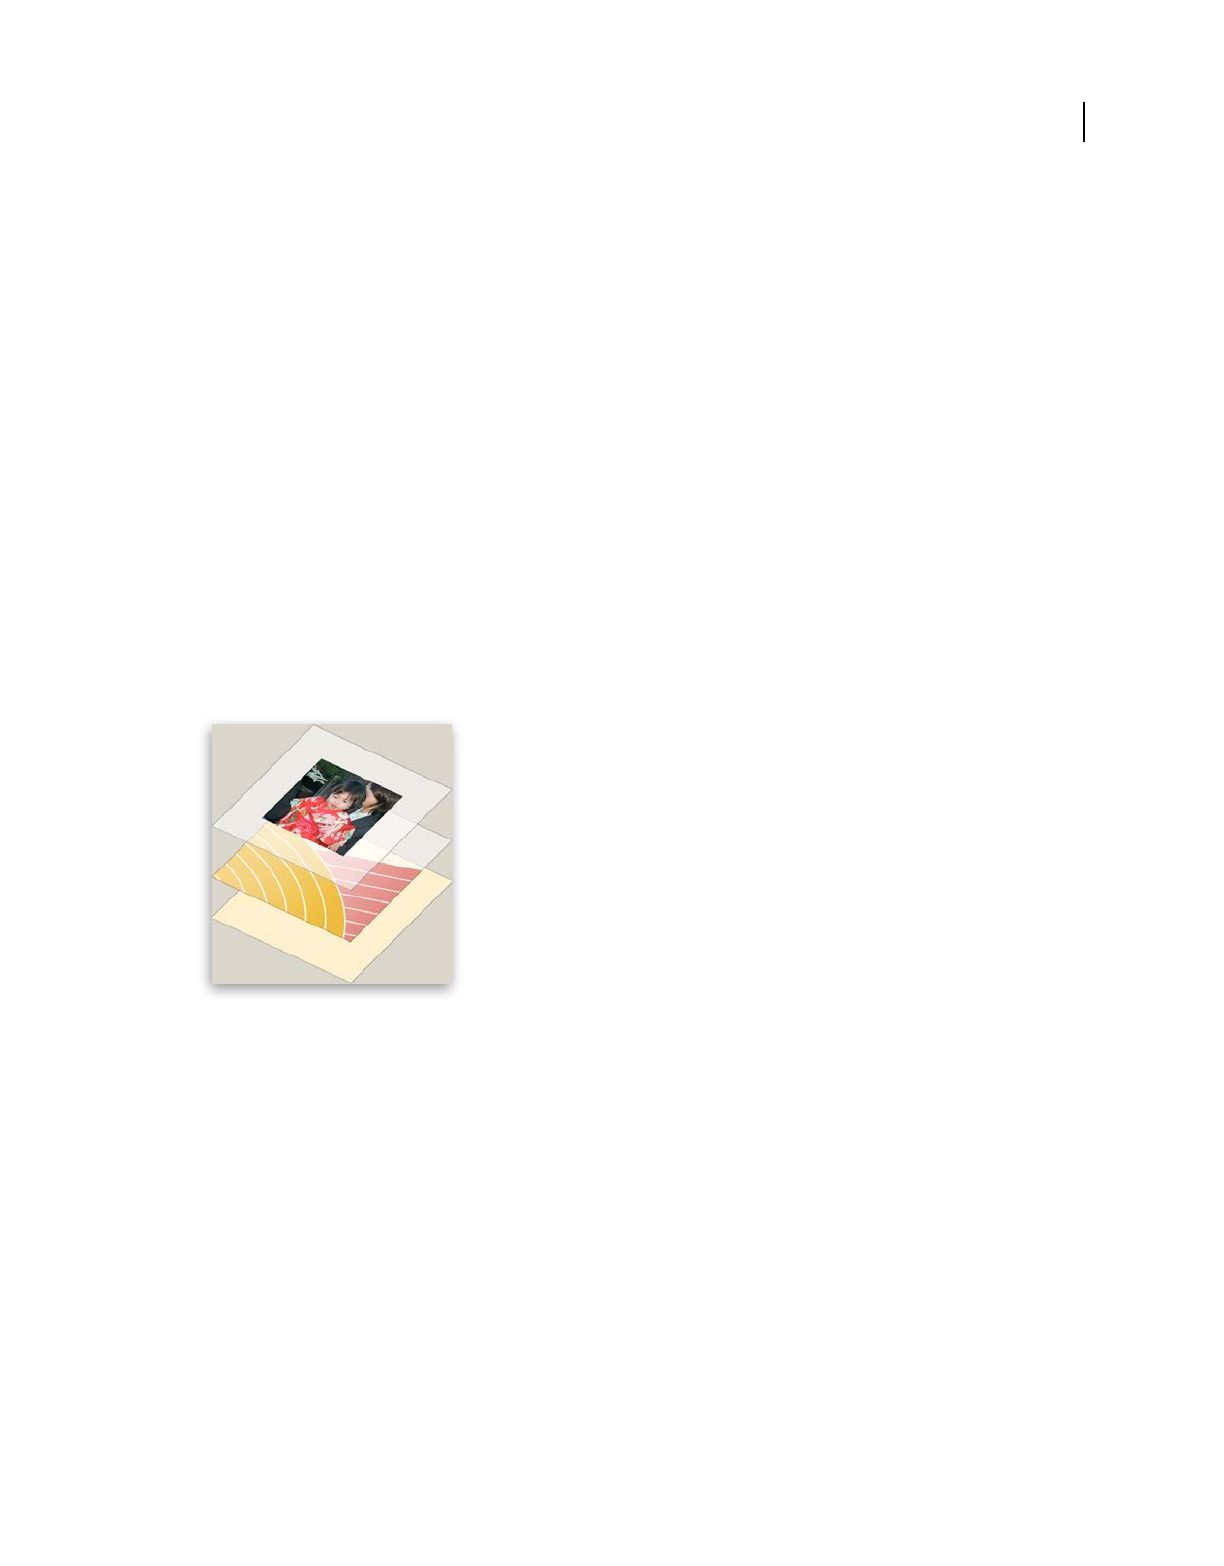
56
Last updated 1/3/2012
Chapter 4: Using layers
Layers are useful because they let you add components to an image and work on them one at a time, without
permanently changing your original image. For each layer, you can adjust color and brightness, apply special effects,
reposition layer content, specify opacity and blending values, and so on. You can also rearrange the stacking order, link
layers to work on them simultaneously, and create web animations with layers.
Creating layers
Understanding layers
Layers are like stacked, transparent sheets of glass on which you can paint images. You can see through the transparent
areas of a layer to the layers below. You can work on each layer independently, experimenting to create the effect you
want. Each layer remains independent until you combine (merge) the layers. The bottommost layer in the Layers
panel, the Background layer, is always locked (protected), meaning you cannot change its stacking order, blending
mode, or opacity (unless you convert it into a regular layer).
Transparent areas on a layer let you see through to the layers below.
Layers are organized in the Layers panel. It’s a good idea to keep this panel visible whenever you’re working in
Adobe®
Photoshop® Elements 9. With one glance, you can see the active layer (the selected layer that you are editing).
You can link layers, so they move as a unit, helping you manage layers. Because multiple layers in an image increase
the file size, you can reduce the file size by merging layers that you’re done editing. The Layers panel is an important
source of information as you edit photos. You can also use the Layer menu to work with layers.
Ordinary layers are pixel-based (image) layers. There are several other layer types you can use to create special effects:
Fill layers Contain a color gradient, solid color, or pattern.
Adjustment layers Enable you to fine-tune color, brightness, and saturation without making permanent changes to
your image (until you flatten, or collapse, the adjustment layer).
Type layers and shape layers Let you create vector-based text and shapes.
You can’t paint on an adjustment layer, although you can paint on its mask. To paint on fill or type layers, you first
convert them into regular image layers.
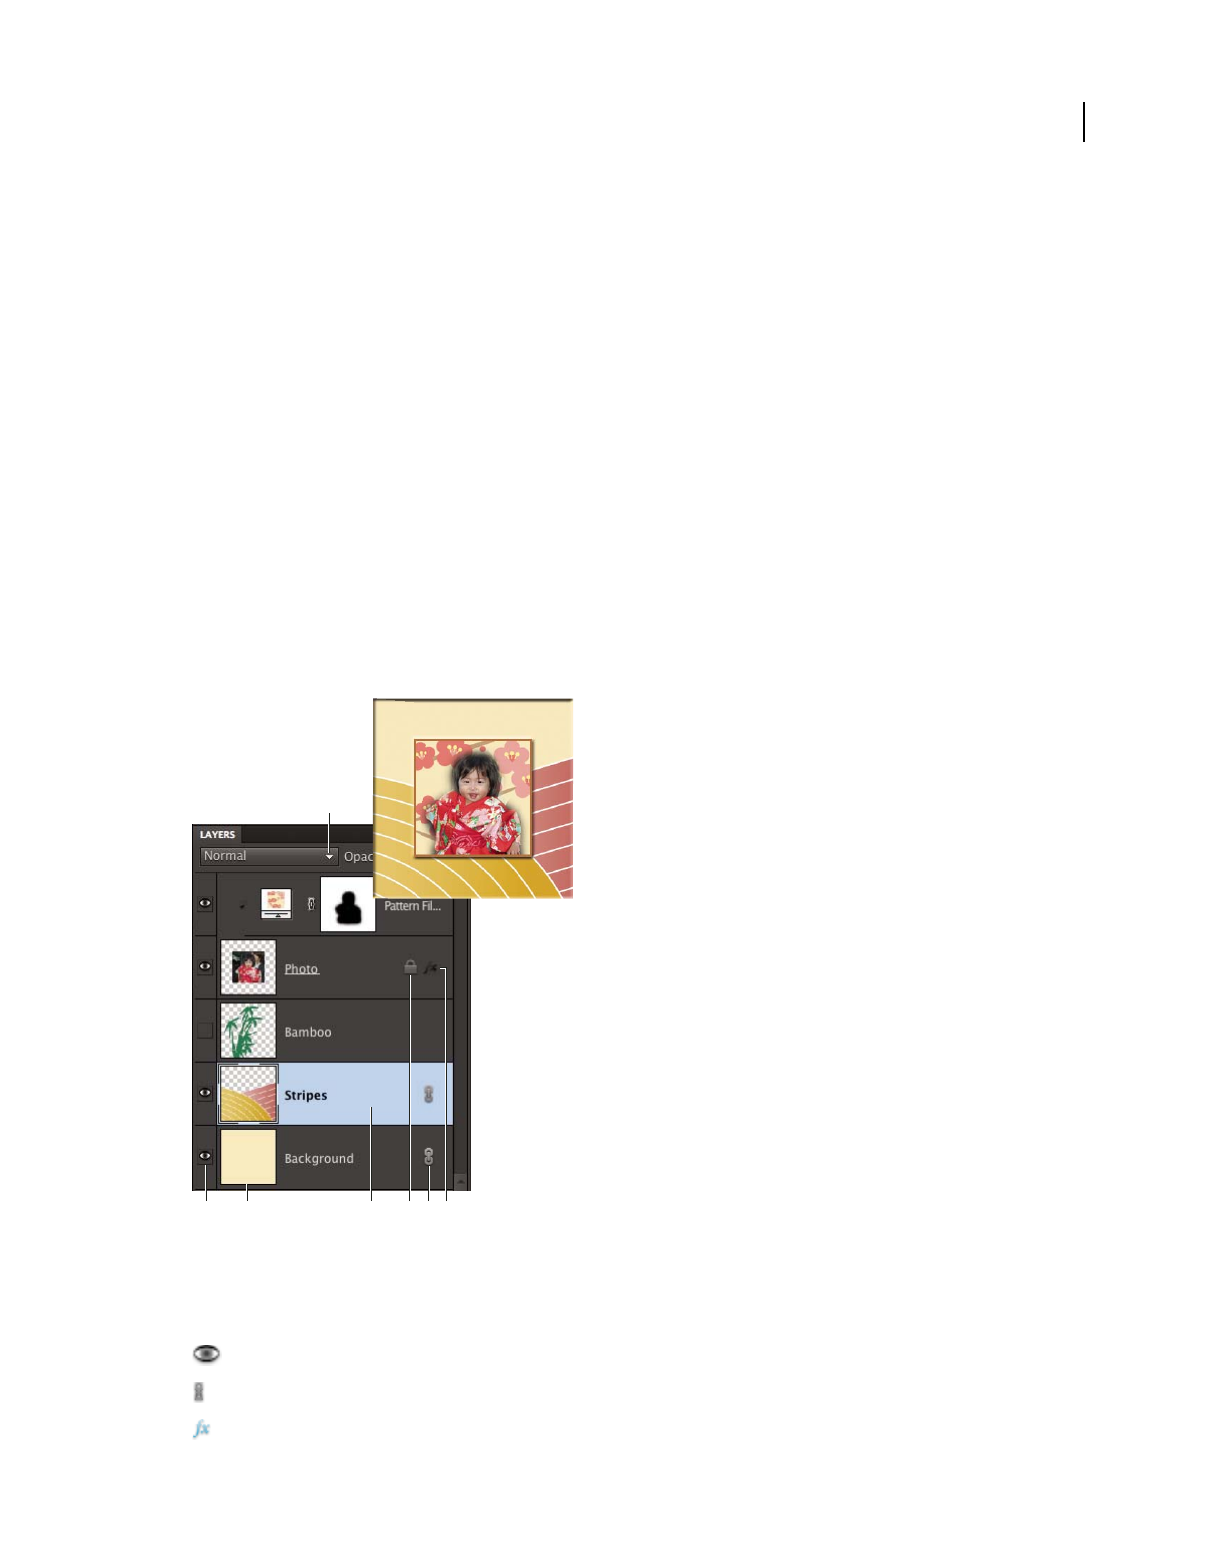
57
USING PHOTOSHOP ELEMENTS 9
Using layers
Last updated 1/3/2012
More Help topics
“About adjustment and fill layers” on page 70
“About layer clipping masks” on page 75
“Lock or unlock a layer” on page 61
“About opacity and blending options in layers” on page 68
About the Layers panel
The Layers panel (Window > Layers) in the Edit workspace lists all layers in an image, from the top layer to the
Background layer at the bottom. You can drag the panel by its title out of the Panel Bin to keep it visible as you work
with it.
The active layer, or the layer that you are working on, is highlighted for easy identification. As you work in an image,
it’s a good idea to check which layer is active to make sure that the adjustments and edits you perform affect the correct
layer. For example, if you choose a command and nothing seems to happen, check to make sure that you’re looking at
the active layer.
Using the icons in the panel, you can accomplish many tasks—such as creating, hiding, linking, locking, and deleting
layers. With some exceptions, your changes affect only the selected, or active, layer, which is highlighted.
Layers panel
A. Blending mode menu B. Show/Hide layer C. Layer thumbnail D. Highlighted layer is active layer E. Locked layer F. Layer is linked to
another layer G. Layer has style applied
In the list of layers, the panel shows a thumbnail, a title, and one or more icons that give information about each layer:
The layer is visible. Click the eye to show or hide a layer. (Hidden layers are not printed.)
The layer is linked to the active layer.
The layer has a style applied to it. Click to edit the layer style in the Style Settings dialog box.
A
B C D FE G

58
USING PHOTOSHOP ELEMENTS 9
Using layers
Last updated 1/3/2012
The layer is locked.
The image contains layer groups and was imported from Adobe Photoshop. Photoshop Elements doesn’t support
layer groups and displays them in their collapsed state. You must simplify them to create an editable image.
You use the buttons at the bottom of the panel to perform actions:
Create a new layer.
Create a new fill or adjustment layer.
Delete a layer.
The layer is linked to another layer.
Lock transparent pixels.
Lock all layers.
Also at the top are the panel Blending Mode menu (Normal, Dissolve, Darken, and so on), an Opacity text box, and a
More button displaying a menu of layer commands and panel options.
More Help topics
“About adjustment and fill layers” on page 70
“About opacity and blending options in layers” on page 68
“Simplify a layer” on page 62
Adding layers
Newly added layers appear above the selected layer in the Layers panel. You can add layers to an image by using any
of the following methods:
•Create new, blank layers or turn selections into layers.
•Convert a background into a regular layer or vice versa.
•Paste selections into the image.
•Use the Type tool or a shape tool.
•Duplicate an existing layer.
You can create up to 8000 layers in an image, each with its own blending mode and opacity. However, memory
constraints may lower this limit.
More Help topics
“About text” on page 243
“About shapes” on page 250
“Delete a layer” on page 62
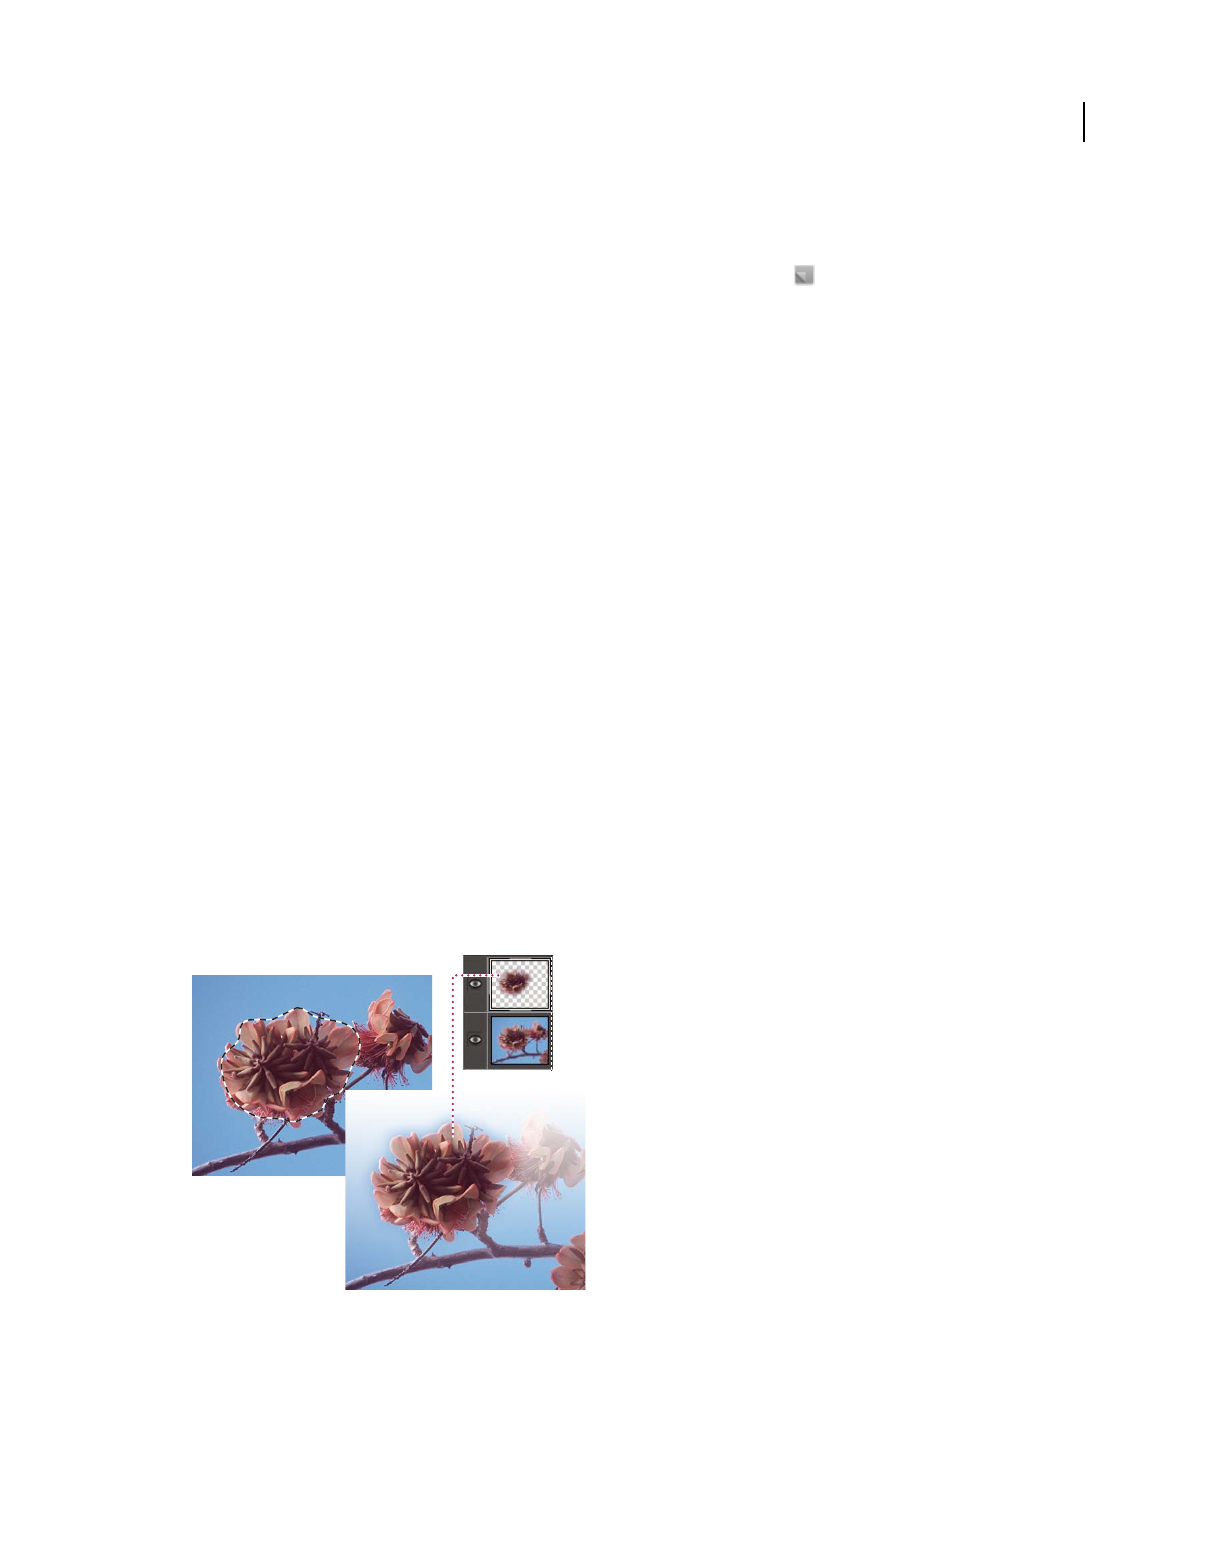
59
USING PHOTOSHOP ELEMENTS 9
Using layers
Last updated 1/3/2012
Create and name a new blank layer
❖Do one of the following in the Edit workspace:
•To create a layer with default name and settings, click the New Layer button at the bottom of the Layers panel.
The resulting layer uses Normal mode with 100% opacity, and is named according to its creation order. (To rename
the new layer, double-click it and type a new name.)
•To create a layer and specify a name and options, choose Layer > New > Layer, or choose New Layer from the
Layers panel menu. Specify a name and other options, and then click OK.
The new layer is automatically selected and appears in the panel above the layer that was last selected.
More Help topics
“Copy a layer from one image to another” on page 64
“Delete a layer” on page 62
“Duplicate a layer within an image” on page 63
“Specify a blending mode for a layer” on page 69
“Specify the opacity of a layer” on page 69
Create a new layer from part of another layer
You can move part of an image from one layer to a newly created one, leaving the original intact.
1In the Edit workspace, select an existing layer, and make a selection.
2Choose one of the following:
•Layer > New > Layer Via Copy to copy the selection into a new layer.
•Layer > New > Layer Via Cut to cut the selection and paste it into a new layer.
The selected area appears in a new layer in the same position relative to the image boundaries.
Creating a new layer by copying part of another layer and pasting it into a new layer
More Help topics
“Duplicate a layer within an image” on page 63
“About selections” on page 88

60
USING PHOTOSHOP ELEMENTS 9
Using layers
Last updated 1/3/2012
Convert the Background layer into a regular layer
The Background layer is the bottom layer in an image. Other layers stack on top of the Background layer, which usually
(but not always) contains the actual image data of a photo. To protect the image, the Background layer is always locked.
If you want to change its stacking order, blending mode, or opacity, you must first convert it into a regular layer.
1In the Edit workspace, do one of the following:
•Double-click the Background layer in the Layers panel.
•Choose Layer > New > Layer From Background.
•Select the Background layer, and choose Duplicate Layer from the More menu in the Layers panel to leave the
Background layer intact and create a copy of it as a new layer.
You can create a duplicate layer of the converted Background layer no matter how you convert the layer; simply select
the converted Background layer and choose Duplicate Layer from the More menu.
2Name the new layer.
If you drag the Background Eraser tool onto the Background layer, it is automatically converted into a regular layer,
and erased areas become transparent.
Make a layer the Background layer
You can’t convert a layer into the Background layer if the image already has a Background layer. In this case, you must
first convert the existing Background layer into a regular layer.
1In the Edit workspace, select a layer in the Layers panel.
2Choose Layer > New > Background From Layer.
Any transparent areas in the original layer are filled with the background color.
Editing layers
Select a layer
Any change you make to an image only affects the active layer. If you don’t see the desired results when you manipulate
an image, make sure that the correct layer is selected.
❖In the Edit workspace, do one of the following:
•In the Layers panel, select a layer’s thumbnail or name.
•To select more than one layer, hold down Ctrl (Command in Mac OS) and click each layer.
To select layers interactively as you use the Move tool, select Auto Select Layer in the options bar. To see which layer
will be highlighted, select Show Highlight On Rollover. Drag to select multiple layers at a time.
More Help topics
“Understanding layers” on page 56
“Select all opaque areas in a layer” on page 70
“Copy selections with the Move tool” on page 103

61
USING PHOTOSHOP ELEMENTS 9
Using layers
Last updated 1/3/2012
Show or hide a layer
In the Layers panel, the eye icon in the leftmost column next to a layer means that the layer is visible.
1In the Edit workspace, choose Window > Layers if the Layers panel is not already open.
2Do one of the following:
•To hide a layer, click its eye icon. Click in the eye column again to show the layer.
•Drag through the eye column to show or hide more than one layer.
•To display just one layer, Alt-click (Option-click in Mac OS) the eye icon for that layer. Alt-click (Option-click in
Mac OS) in the eye column again to show all the layers.
More Help topics
“About the Layers panel” on page 57
Resize or hide layer thumbnails
1In the Edit workspace, choose Panel Options from the More menu in the Layers panel.
2Select a new size, or select None to hide the thumbnails. Then click OK.
More Help topics
“About the Layers panel” on page 57
Lock or unlock a layer
You can fully or partially lock layers to protect their contents. When a layer is locked, a lock icon appears to the right
of the layer name, and the layer cannot be deleted. Except for the Background layer, you can move locked layers to
different locations in the stacking order of the Layers panel.
❖In the Edit workspace, select the layer in the Layers panel, and do one of the following:
•Click the Lock All icon at the bottom of the Layers panel to lock all layer properties. Click the icon again to
unlock them.
•Click the Lock Transparency icon at the bottom of the Layers panel to lock the transparent areas of the layer, so
that no painting occurs in them. Click the icon again to unlock.
Note: For type and shape layers, transparency is locked by default and cannot be unlocked without first simplifying the
layer.
More Help topics
“About the Layers panel” on page 57
Rename a layer
As you add layers to an image, it’s helpful to rename layers according to their content. Use descriptive layer names so
that you can easily identify layers in the Layers panel.
Note: You can’t rename the Background layer unless you change it into a normal layer.
❖In the Edit workspace, do one of the following:
•Double-click the layer’s name in the Layers panel, and enter a new name.

62
USING PHOTOSHOP ELEMENTS 9
Using layers
Last updated 1/3/2012
•(Windows only) Right-click the layer and choose Rename Layer from the context menu.
More Help topics
“Understanding layers” on page 56
“About the Layers panel” on page 57
“Convert the Background layer into a regular layer” on page 60
Simplify a layer
You simplify a smart object, frame layer, type layer, shape layer, solid color layer, gradient layer, or pattern fill layer
(or a layer group imported from Photoshop) by converting it into an image layer. You need to simplify these layers
before you can apply filters to them or edit them with the painting tools. However, you can no longer use the type- and
shape-editing options on simplified layers.
1In the Edit workspace, select a type layer, shape layer, fill layer, or a Photoshop layer group in the Layers panel.
2Simplify the layer or imported layer group:
•If you selected a shape layer, click Simplify in the options bar.
•If you selected a type, shape, or fill layer, or a Photoshop layer group, choose Simplify Layer from either the Layer
menu or the Layers panel More menu.
More Help topics
“About adjustment and fill layers” on page 70
“Understanding layers” on page 56
Delete a layer
Deleting layers that you no longer need reduces the size of your image file.
1In the Edit workspace, select the layer in the Layers panel.
2Do one of the following:
•Drag the layer to the Delete Layer icon at the bottom of the Layers panel.
•Click the Delete Layer icon at the bottom of the Layers panel, and click Yes in the delete confirmation dialog box.
To bypass this dialog box, press Alt (Option in Mac OS) as you click the Delete icon.
•Choose Delete Layer from either the Layer menu or the Layers panel More menu, and click Yes.
More Help topics
“Understanding layers” on page 56
“Create and name a new blank layer” on page 59
Sample color from all visible layers
By default, when you work with certain tools, the color you apply is sampled only from the active layer. With this
default behavior, you can smudge or sample in a single layer even when other layers are visible, and you can sample
from one layer and paint in another one.

63
USING PHOTOSHOP ELEMENTS 9
Using layers
Last updated 1/3/2012
If you want to paint using sampled data from all visible layers, do the following:
1In the Edit workspace, select the Magic Wand tool, Paint Bucket tool, Smudge tool, Blur tool, Sharpen tool, or Clone
Stamp tool.
2In the options bar, select All Layers.
More Help topics
“Understanding layers” on page 56
“About painting tools” on page 213
Copying and arranging layers
Duplicate a layer within an image
You can duplicate any layer, including the Background layer, within an image.
❖In the Edit workspace, select one or more layers in the Layers panel, and do one of the following to duplicate it:
•To duplicate and rename the layer, choose Layer > Duplicate Layer, or choose Duplicate Layer from the Layers
panel More menu. Name the duplicate layer, and click OK.
•To duplicate without naming, select the layer and drag it to the New Layer button at the bottom of the Layers
panel.
•Right-click the layer name or thumbnail, and choose Duplicate Layer.
More Help topics
“Understanding layers” on page 56
Duplicate one or more layers in another image
You can take any layer, including the Background layer, from one image and duplicate it in another. Keep in mind that
the pixel dimensions of the destination image determine how large the printed copy of the duplicated layer can be.
Also, if the pixel dimensions of the two images are not the same, the duplicated layer may appear smaller or larger than
you’d expect.
1In the Edit workspace, open the source image. If you plan to copy a layer to an existing image rather than a new
one, open the destination image as well.
2In the source document’s Layers panel, select the name of the layer or layers you want to duplicate. To select more
than one layer, hold down the Ctrl key (Command key in Mac OS) and click each layer’s name.
3Choose Layer > Duplicate Layer, or choose Duplicate Layer from the More menu in the Layers panel.
4Type a name for the duplicate layer in the Duplicate Layer dialog box, and choose a destination document for the
layer, and then click OK:
•To duplicate the layer in an existing image, choose a filename from the Document pop-up menu.
•To create a new document for the layer, choose New from the Document menu, and enter a name for the new file.
An image created by duplicating a layer has no background.
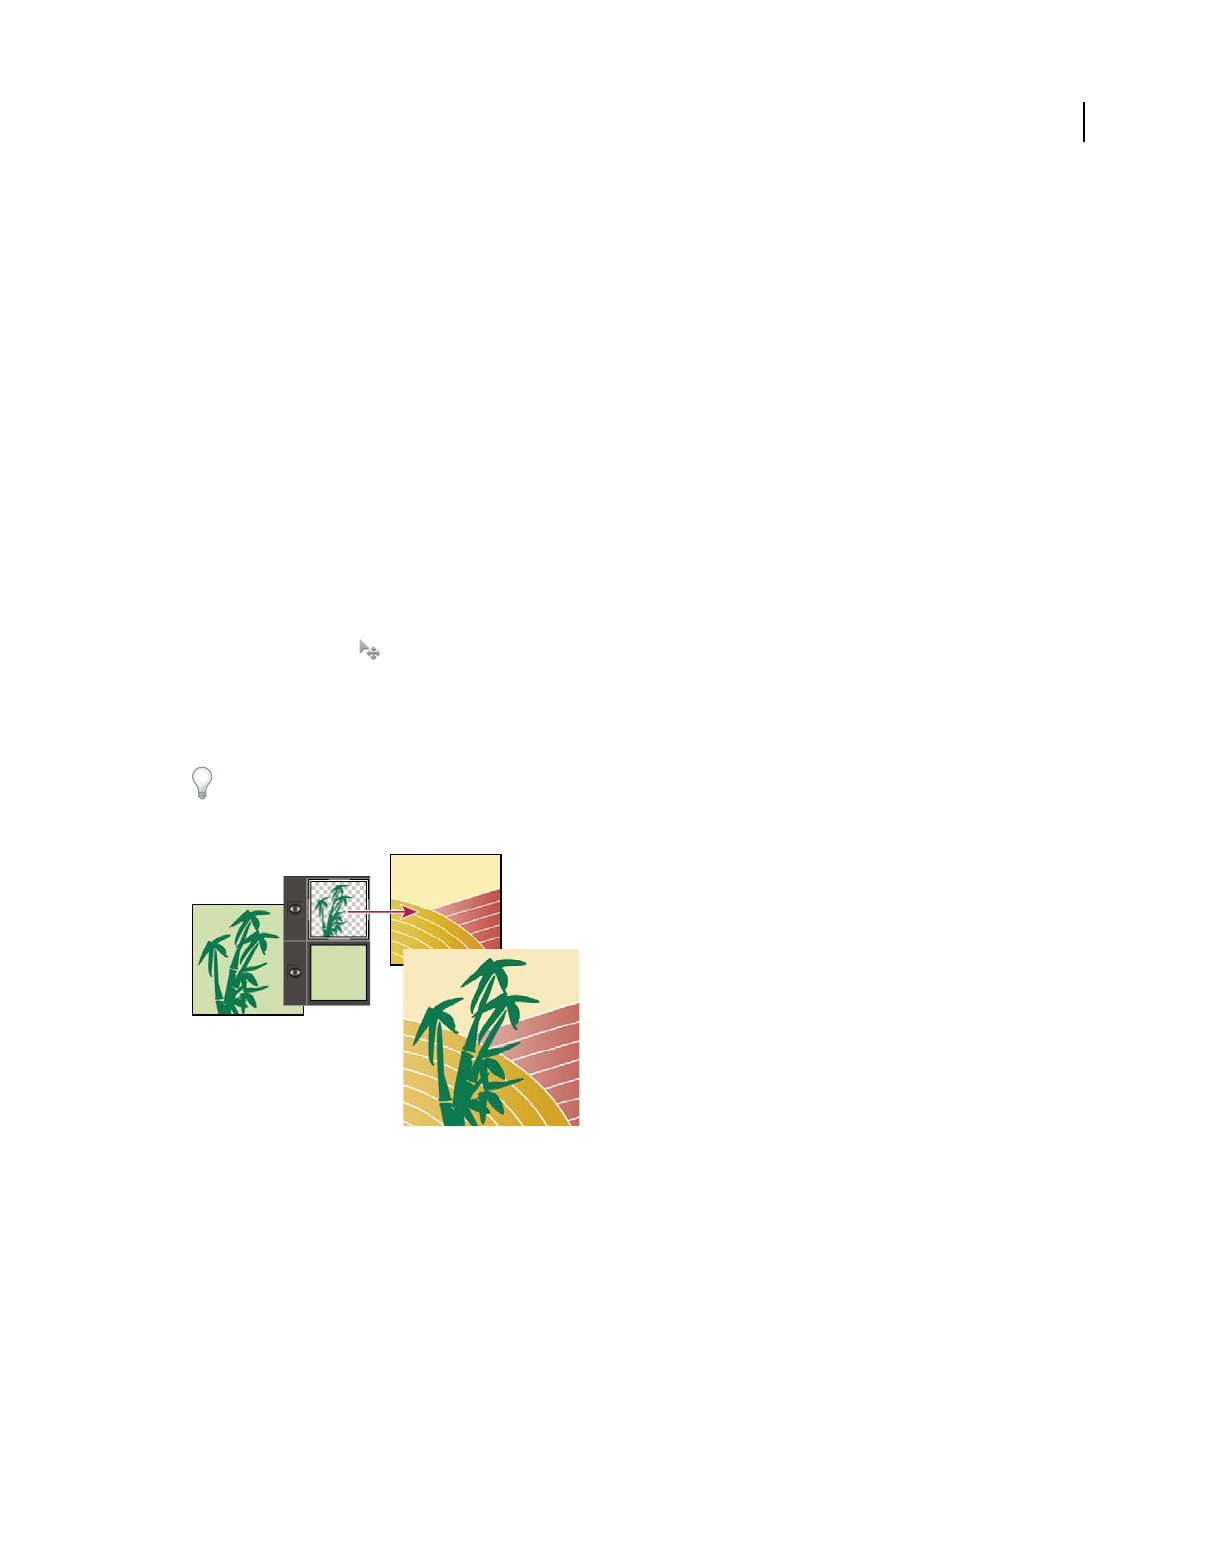
64
USING PHOTOSHOP ELEMENTS 9
Using layers
Last updated 1/3/2012
More Help topics
“Understanding layers” on page 56
“About image size and resolution” on page 143
Copy a layer from one image to another
You can copy any layer, including the Background layer, from one image to another. Keep in mind that the resolution
of the destination image determines how large the printed copy of the layer can be. Also, if the pixel dimensions of the
two images are not the same, the copied layer may appear smaller or larger than you’d expect.
1In the Edit workspace, open the two images you want to use.
2In the Layers panel of the source image, select the layer that you want to copy.
3Do one of the following:
•Choose Select > All to select all of the pixels in the layer, and choose Edit > Copy. Then make the destination image
active, and choose Edit
> Paste.
•Drag the layer’s name from the Layers panel of the source image into the destination image.
•Use the Move tool to drag the layer from the source image to the destination image.
The copied layer appears in the destination image, above the active layer in the Layers panel. If the layer you’re
dragging is larger than the destination image, only part of the layer is visible. You can use the Move tool to drag other
sections of the layer into view.
Hold down Shift as you drag a layer to copy it to the same position it occupied in the source image (if the source and
destination images have the same pixel dimensions) or to the center of the destination image (if the source and
destination images have different pixel dimensions).
Dragging the bamboo layer to another image
More Help topics
“Understanding layers” on page 56
“About image size and resolution” on page 143
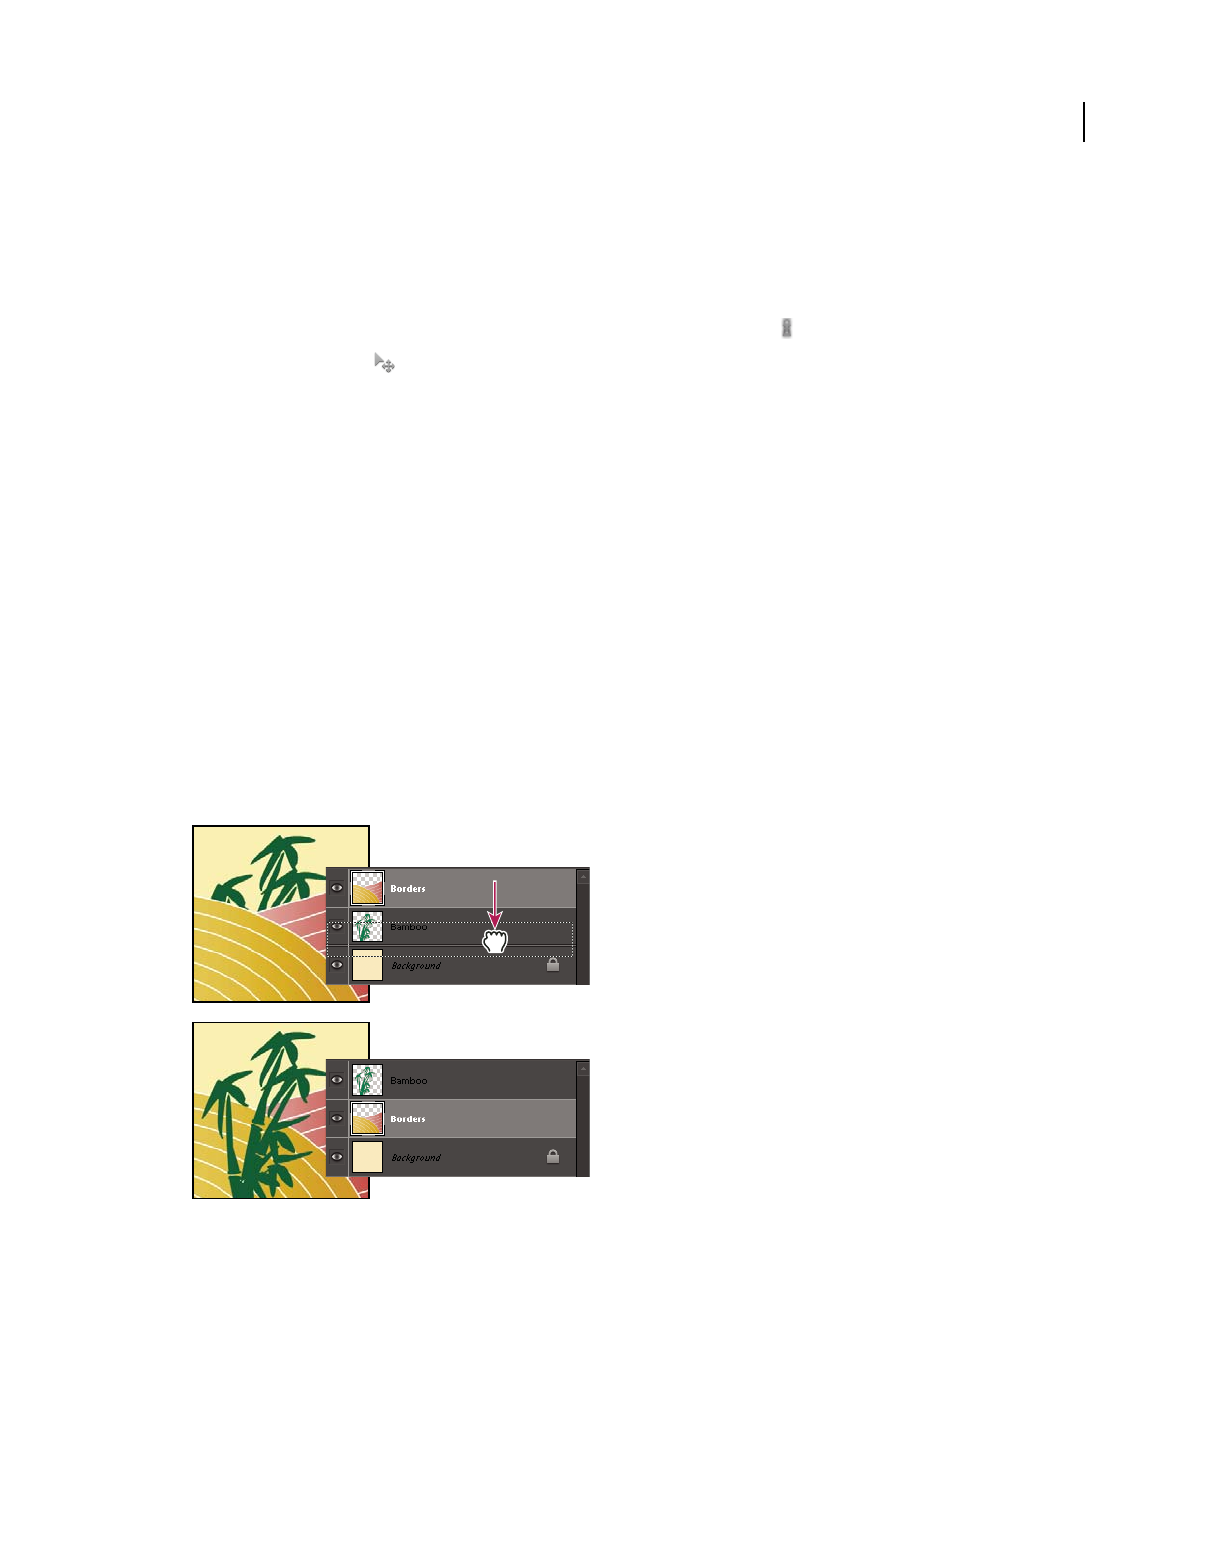
65
USING PHOTOSHOP ELEMENTS 9
Using layers
Last updated 1/3/2012
Move the content in a layer
Layers are like stacked images on panes of glass. You can “slide” a layer in a stack to change what portion of its content
is visible in relation to the layers above and below.
1In the Edit workspace, in the Layers panel. To move multiple layers at the same time, link the layers together in the
Layers panel by selecting the layers and then clicking the Link Layers icon
.
2Select the Move tool .
3Do one of the following:
•Drag within the image to slide the selected layer or layers to the desired position.
•Press the arrow keys on your keyboard to move the layer or layers in 1-pixel increments, or press Shift and an arrow
key to move the layer in 10-pixel increments.
•Hold down Shift as you drag to move the layer or layers directly up or down, directly to either side, or on a 45°
diagonal.
More Help topics
“Understanding layers” on page 56
Change the stacking order of layers
The stacking order determines whether a layer appears in front of or behind other layers.
By default, the Background layer must remain at the bottom of the stack. To move the Background layer, you need to
convert it into a regular layer first.
Dragging a layer below another layer changes the stacking order
1In the Layers panel, select one or more layers. To select more than one layer, hold down the Ctrl key and click each
layer.
2To change the stacking order, do one of the following:
•Drag the layer or layers up or down the Layers panel to the new position.
•Choose Layer > Arrange, and then choose Bring To Front, Bring Forward, Send Backward, or Send To Back.
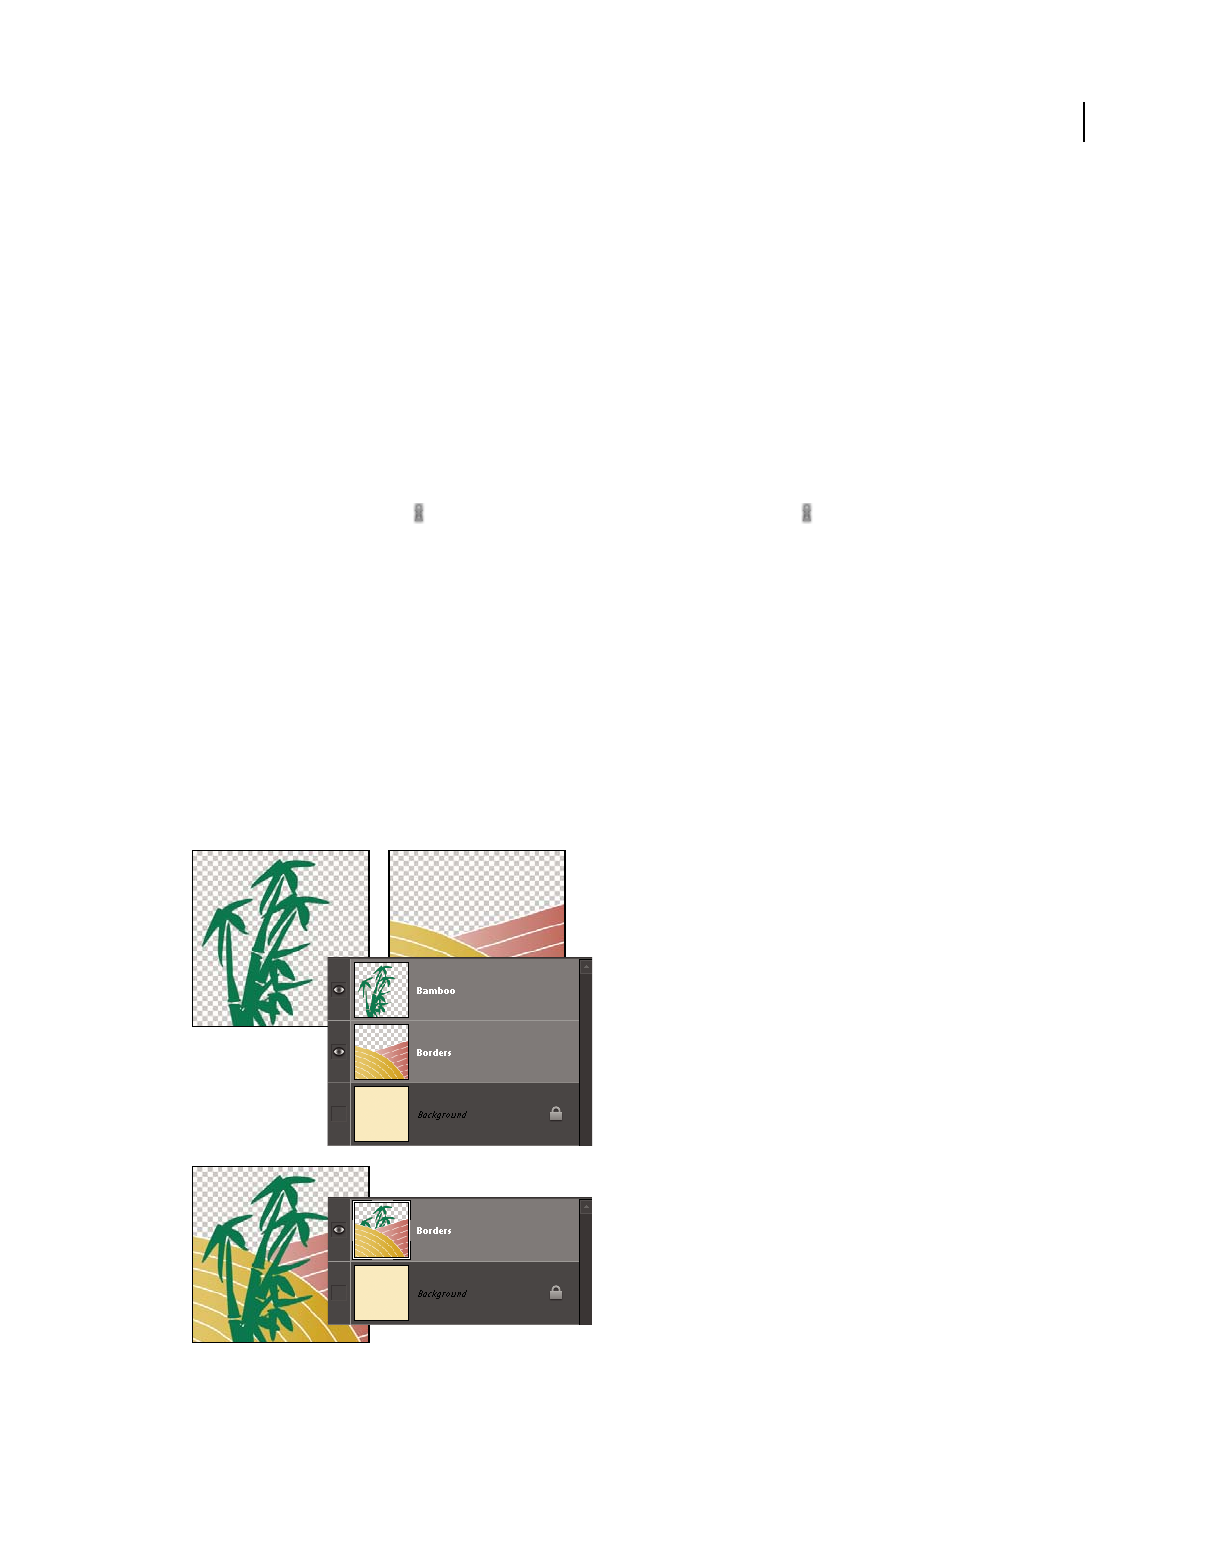
66
USING PHOTOSHOP ELEMENTS 9
Using layers
Last updated 1/3/2012
More Help topics
“Understanding layers” on page 56
“Convert the Background layer into a regular layer” on page 60
Link and unlink layers
When layers are linked, you can move their contents together. You can also copy, paste, merge, and apply
transformations to all linked layers simultaneously. At some point, you may want to edit or move one linked layer. You
can simply unlink the layers to work on one layer at a time
1In the Edit workspace, select the layers you’d like to link in the Layers panel. To select more than one layer, hold
down Ctrl (Command in Mac OS) and click each layer.
2Click the Link Layer icon at the bottom of the Layers panel. A linked icon appears in the linked layers.
3To unlink layers, select a linked layer in the Layers panel and click the Link Layers icon at the bottom of the Layers
panel.
More Help topics
“Understanding layers” on page 56
“About layer clipping masks” on page 75
Merge layers
Layers can greatly increase the file size of an image. Merging layers in an image reduces file size. You should merge
layers only after you have finished manipulating them to create the image you want.
Example of merging

67
USING PHOTOSHOP ELEMENTS 9
Using layers
Last updated 1/3/2012
You can choose to merge only the linked layers, only the visible layers, only a layer with the layer below it, or only
selected layers. You can also merge the contents of all visible layers into a selected layer, yet not delete the other visible
layers (in this case, there is no reduction in file size).
When you complete work on an image, you can flatten it. Flattening merges all visible layers, discards all hidden layers,
and fills transparent areas with white.
1In the Edit workspace, go to the Layers panel and make sure that an eye icon appears next to each of the layers
you want to merge.
2Do one of the following:
•To merge selected layers, select more than one layer by holding down the Ctrl key (Command key in Mac OS) and
clicking each layer. Then choose Merge Layers from the Layers panel More menu.
•To merge a layer with the one below, select the top layer of the pair and choose Merge Down from either the Layer
menu or the Layers panel More menu.
Note: If the bottom layer in the pair is a shape, type, or fill layer, you must simplify the layer. If the bottom layer in the
pair is linked to another layer or is an adjustment layer, you can’t choose Merge Down.
•To merge all visible layers, hide any layers you don’t want to merge and choose Merge Visible from the Layer menu
or Layers panel More menu.
•To merge all visible linked layers, select one of the linked layers and choose Merge Linked from the Layer menu or
Layers panel More menu.
Note: If the bottom-most merged layer is a type, shape, solid color fill, gradient fill, or pattern fill layer, you must first
simplify the layer.
More Help topics
“Merging adjustment layers” on page 73
“Simplify a layer” on page 62
Merge layers into another layer
Use this procedure when you want to keep the layers you are merging intact. The result is a new merged layer plus all
the original layers.
1In the Edit workspace, click the eye icon next to layers you don’t want to merge, and make sure that the eye icon is
visible for the layers you do want to merge.
2Specify a layer in which to merge all visible layers. You can either create a new layer in which to merge or select an
existing layer in the Layers panel.
3Hold down Alt (Option in Mac OS), and choose Merge Visible from either the Layers menu or the Layers panel
More menu. Photoshop Elements merges a copy of all visible layers into the selected layer.
More Help topics
“Understanding layers” on page 56
“Merging adjustment layers” on page 73

68
USING PHOTOSHOP ELEMENTS 9
Using layers
Last updated 1/3/2012
Flatten an image
When you flatten an image, Photoshop Elements merges all visible layers into the background, greatly reducing the
file size. Flattening an image discards all hidden layers, and fills any transparent areas with white. In most cases, you
won’t want to flatten a file until you’ve finished editing individual layers.
1Make sure that the layers you want to keep in your image are visible.
2Choose Flatten Image from either the Layer menu or the Layers panel More menu.
You can see the difference between your image’s layered file size and its flattened file size by choosing Document Sizes
from the status bar pop-up menu at the bottom of the image window.
More Help topics
“Understanding layers” on page 56
Opacity and blending modes
About opacity and blending options in layers
For a video about this process, see www.adobe.com/go/lrvid2306_pse9_en.
A layer’s opacity determines the degree to which it obscures or reveals the layer beneath it. A layer with 1% opacity is
nearly transparent, while a layer with 100% opacity is opaque. Transparent areas remain transparent regardless of the
opacity setting.
You use layer blending modes to determine how a layer blends with the pixels in layers beneath it. Using blending
modes, you can create various special effects.
A layer’s opacity and blending mode interact with the opacity and blending mode of painting tools. For example, a
layer uses Dissolve mode at 50% opacity. You paint on this layer with the Paintbrush tool set to Normal mode at 100%
opacity. The paint appears in Dissolve mode at 50% opacity. Similarly, if a layer uses Normal mode at 100% opacity,
and you use the Eraser tool at 50% opacity, only 50% of the paint disappears from the layer as you erase.
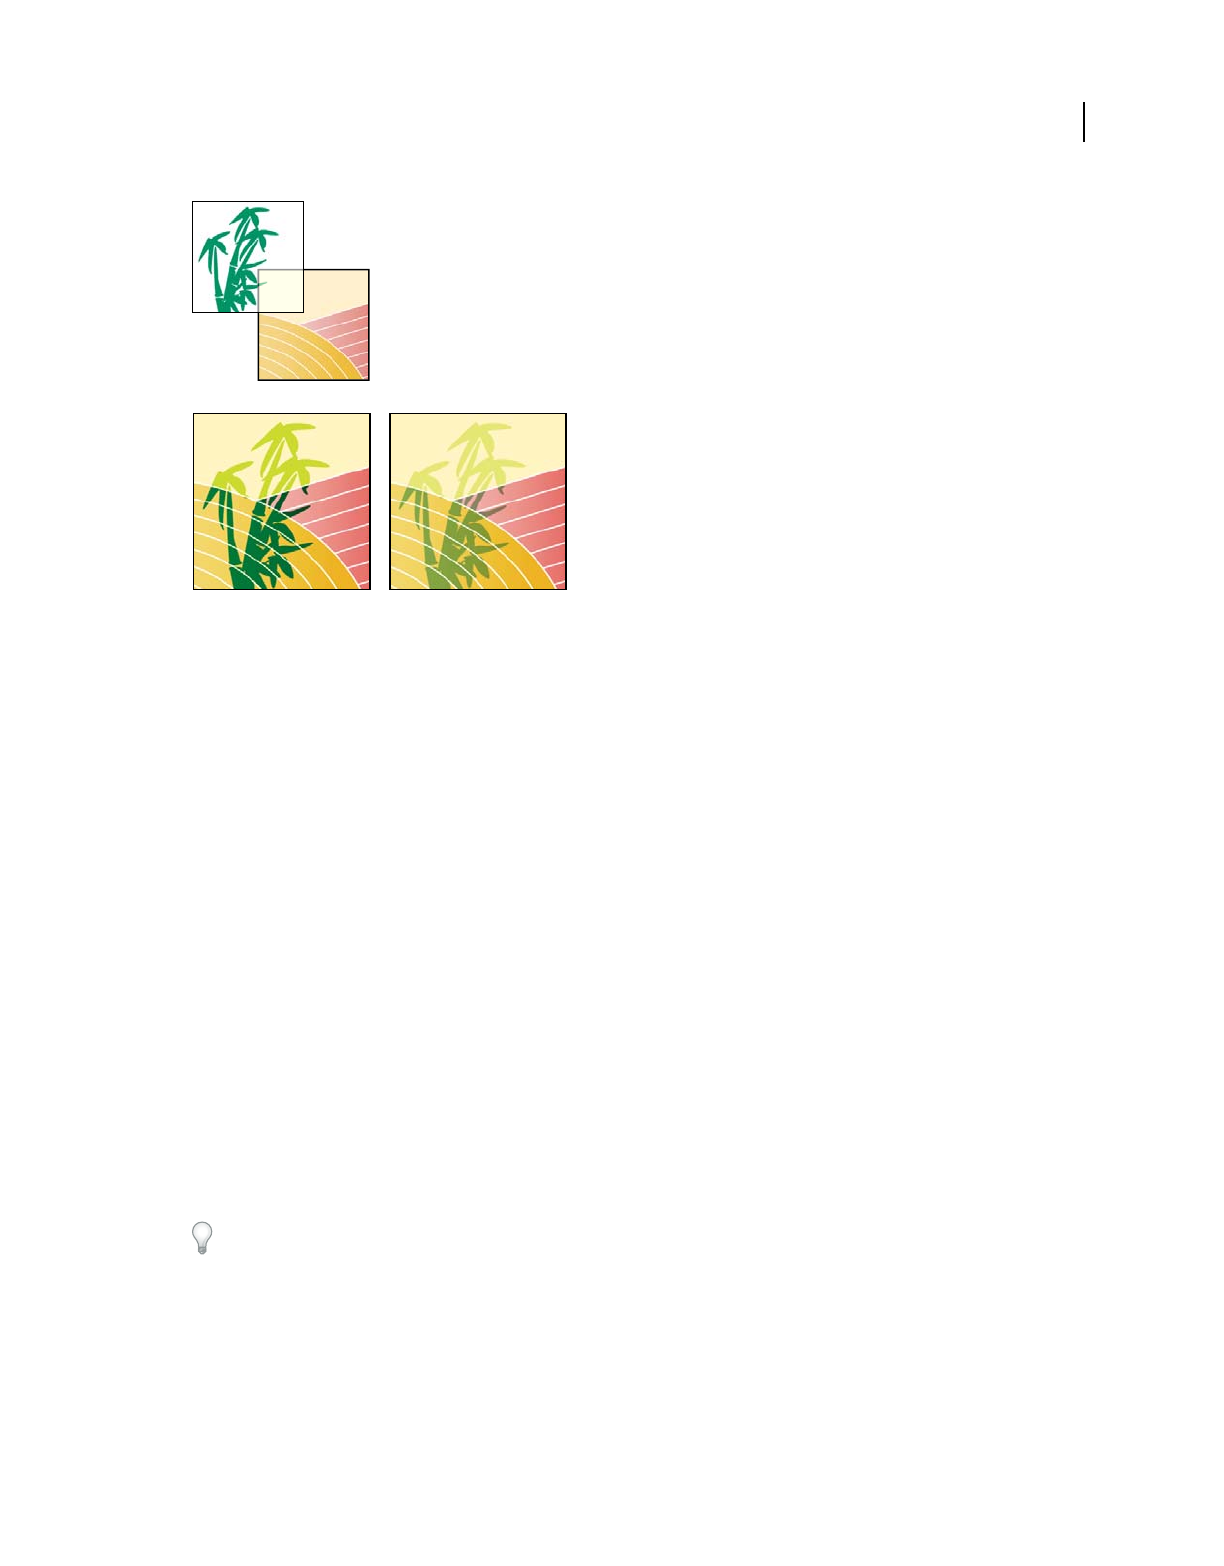
69
USING PHOTOSHOP ELEMENTS 9
Using layers
Last updated 1/3/2012
Blending layers.
A. Bamboo layer and Borders layer B. Bamboo layer with 100% opacity and Color Burn mode C. Bamboo layer with 50% opacity and Color
Burn mode
More Help topics
“Understanding layers” on page 56
“About blending modes” on page 214
“About painting tools” on page 213
Specify the opacity of a layer
1In the Edit workspace, select the layer in the Layers panel.
2In the Layers panel, enter a value between 0 and 100 for Opacity, or click the arrow at the right of the Opacity box
and drag the Opacity slider that appears.
More Help topics
“Understanding layers” on page 56
Specify a blending mode for a layer
1In the Edit workspace, select the layer in the Layers panel.
2Choose an option from the Blending Mode menu.
(Windows) Immediately after you choose a blending mode, you can press the up or down arrows on your keyboard to
try other blending mode options in the menu.
More Help topics
“Understanding layers” on page 56
“About blending modes” on page 214
B
A
C

70
USING PHOTOSHOP ELEMENTS 9
Using layers
Last updated 1/3/2012
Select all opaque areas in a layer
You can quickly select all the opaque areas in a layer. This procedure is useful when you want to exclude transparent
areas from a selection.
1In the Layers panel, Ctrl-click (Command-click in Mac OS) the layer thumbnail:
2To add the pixels to an existing selection, press Ctrl+Shift (Command+Shift in Mac OS) and click the layer
thumbnail in the Layers panel.
3To remove the pixels from an existing selection, press Ctrl+Alt (Command+Option in Mac OS) and click the layer
thumbnail in the Layers panel.
4To load the intersection of the pixels and an existing selection, press Ctrl+Alt+Shift (Command+Option+Shift in
Mac OS) and click the layer thumbnail in the Layers panel.
More Help topics
“Understanding layers” on page 56
“About selections” on page 88
Customize the transparency grid
The checkerboard grid identifies transparency in a layer. You can change the appearance of this grid; however, do not
change it to solid white because you’ll eliminate the visual distinction between opaque (white) and transparent
(checkerboard).
1In Windows, choose Edit > Preferences > Transparency. In Mac, choose Photoshop Elements > Preferences >
Transparency.
2Choose a pattern size from the Grid Size menu.
3Choose a pattern color from the Grid Colors menu. To choose a custom color instead, click one of the two boxes
below the Grid Colors menu and select a color from the Color Picker.
More Help topics
“About the Layers panel” on page 57
“Use the Adobe Color Picker” on page 220
Adjustment and fill layers
About adjustment and fill layers
Adjustment layers let you experiment with color and make tonal adjustments without permanently modifying the
pixels in an image. You can think of an adjustment layer as a veil coloring the underlying layers. By default, an
adjustment layer affects all layers below it, although you can change this behavior. When you create an adjustment
layer, the Layers panel displays a white box representing the adjustment for that layer.
Fill layers let you fill a layer with a solid color, gradient, or pattern. Unlike adjustment layers, fill layers do not affect
the layers below them. To paint on a fill layer, you must first convert it (simplify it) into a regular layer.
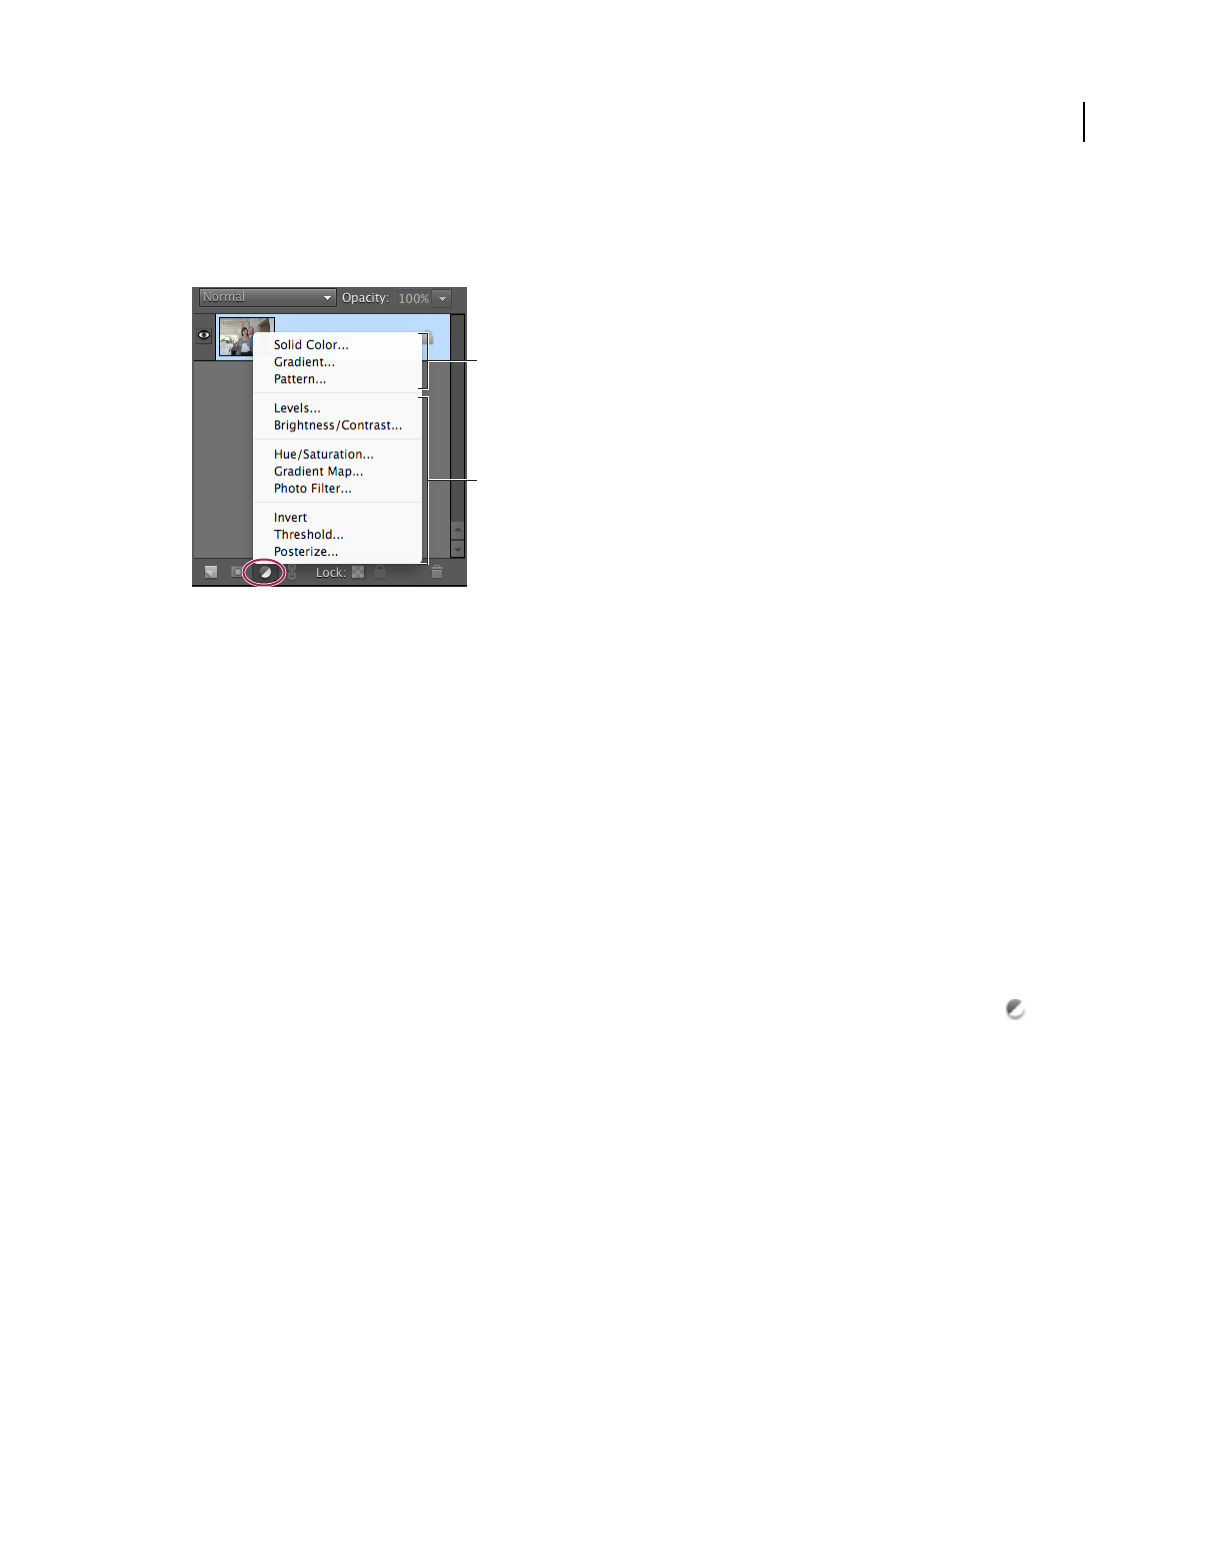
71
USING PHOTOSHOP ELEMENTS 9
Using layers
Last updated 1/3/2012
Adjustment and fill layers have the same opacity and blending mode options as image layers, and you can move and
reposition them just as you do image layers. By default, adjustment and fill layers are named for their type (for example,
Solid Color fill layer and Invert adjustment layer).
Create Adjustment Layer menu
A. Fill layers B. Adjustment layers
More Help topics
“Edit the layer masks” on page 74
“About opacity and blending options in layers” on page 68
“Apply the Smart Brush tools” on page 117
“Simplify a layer” on page 62
Create adjustment layers
1In the Layers panel, select the topmost layer you want to affect.
2To confine the effects of the adjustment layer to a selected area in that layer, make a selection.
3Do one of the following:
•To affect all the layers below the adjustment layer, click the Create New Fill or Adjustment Layer button at the
bottom of the Layers panel. Then, choose one of the following adjustment types. (The first three options in the
menu are fill layers, not adjustment layers.)
A
B
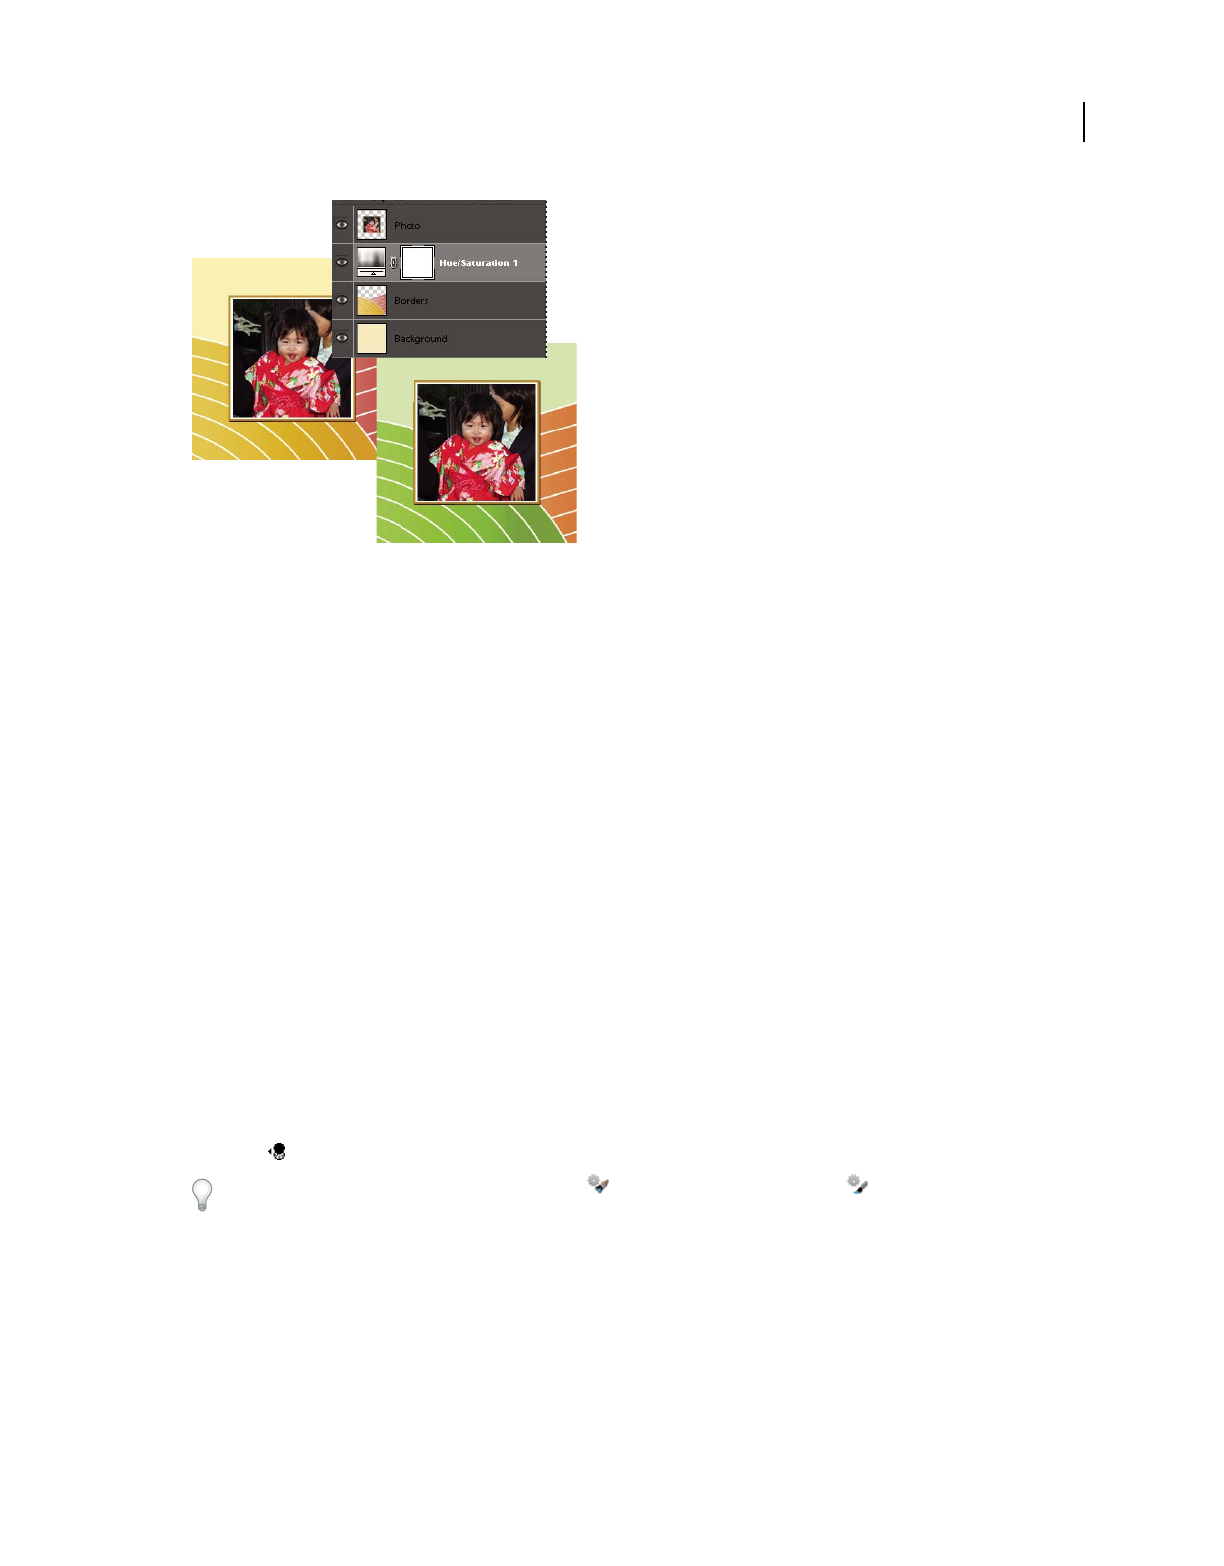
72
USING PHOTOSHOP ELEMENTS 9
Using layers
Last updated 1/3/2012
Original image, and image with Hue/Saturation adjustment applied. Only the layers under the adjustment layer are affected.
•To affect only one layer or several successive layers below the adjustment layer, choose Layer > New Adjustment
Layer
> [adjustment type]. In the New Layer dialog box, select Use Previous Layer to Create Clipping Mask, and
then click OK.
Levels Corrects tonal values in the image.
Brightness/Contrast Lightens or darkens the image.
Hue/Saturation Adjusts colors in the image.
Gradient Map Maps pixels to the color in the selected gradient.
Photo Filter Adjusts the color balance and color temperature of the image.
Invert Produces a photo negative effect by creating a negative based on the brightness values of the image.
Threshold Renders the image in monochrome with no gray, so that you can locate the lightest and darkest areas.
Posterize Gives a flat, poster-like appearance to a photo by reducing the number of brightness values (levels) in the
image, thus reducing the number of colors.
4In the dialog box, specify options and click OK. (Invert has no options.)
Selecting Use Previous Layer to Create Clipping Mask in step 3, groups the adjustment layer with the layer immediately
below it and the effect is confined to the group.
5To add more layers to the group, press Alt (Option in Mac OS) and position the pointer over the line dividing the
bottom most layer in the group from the layer below it. Click when the pointer changes to two overlapping
circles
.
Applying a correction using the Smart Brush tool or the Detail Smart Brush tool automatically creates an
adjustment layer.
More Help topics
“Apply the Smart Brush tools” on page 117
“About histograms” on page 113
Create fill layers
1In the Layers panel, select the layer above which the fill layer should be.

73
USING PHOTOSHOP ELEMENTS 9
Using layers
Last updated 1/3/2012
2To confine the effects of the fill layer to a selected area, make a selection.
3Do one of the following:
•Click the Create New Fill or Adjustment Layer button at the bottom of the Layers panel, and choose the fill type
you want to create. (The first three options listed in the panel are fill layers, the others are adjustment layers.)
•Choose Layer > New Fill Layer > [fill type]. In the New Layer dialog box that appears, click OK.
Solid Color Creates a layer filled with a solid color chosen from the Color Picker.
Gradient Creates a layer filled with a gradient. You can choose a predefined gradient from the Gradient menu. To edit
the gradient in the Gradient Editor, click the color gradient. You can drag within the image window to move the center
of the gradient.
You can also specify the shape of the gradient (Style) and the angle at which it is applied (Angle). Select Reverse to flip
its orientation, Dither to reduce banding, and Align With Layer to use the layer’s bounding box to calculate the
gradient fill.
Pattern Creates a layer filled with a pattern. Click the pattern, and choose a pattern from the pop-up panel. You can
scale the pattern and choose Snap To Origin to position the origin of the pattern with that of the document window.
To specify that the pattern moves with the Fill layer as it is relocated, select Link With Layer. When this option is
selected, you can drag within the image to position the pattern while the Pattern Fill dialog box is open. To create a
new preset pattern after editing pattern settings, click the New Preset button
.
Edit an adjustment or fill layer
1In the Edit workspace, open the adjustment or fill options dialog box by doing one of the following:
•Double-click the adjustment or fill layer’s leftmost thumbnail in the Layers panel.
•Select the layer in the panel and choose Layer > Layer Content Options.
2Make your changes, and click OK.
Merging adjustment layers
You can merge an adjustment or fill layer in several ways: with the layer below it, with other selected layers, with the
layers in its own group, with the layers it’s linked to, and with all other visible layers. You cannot, however, use an
adjustment layer or fill layer as the base or target layer for a merge.
When you merge an adjustment layer or fill layer with the layer below it, the adjustments are simplified and
permanently applied to the merged layer. The adjustment no longer affects other layers below the merged adjustment
layer. You can also convert (simplify) a fill layer into an image layer without merging it.
Adjustment layers and fill layers with masks (the layer’s rightmost thumbnail in the Layers panel) that contain only
white values do not add significantly to the file size, so you don’t need to merge these adjustment layers to conserve
file space.
More Help topics
“Merge layers” on page 66
“Simplify a layer” on page 62
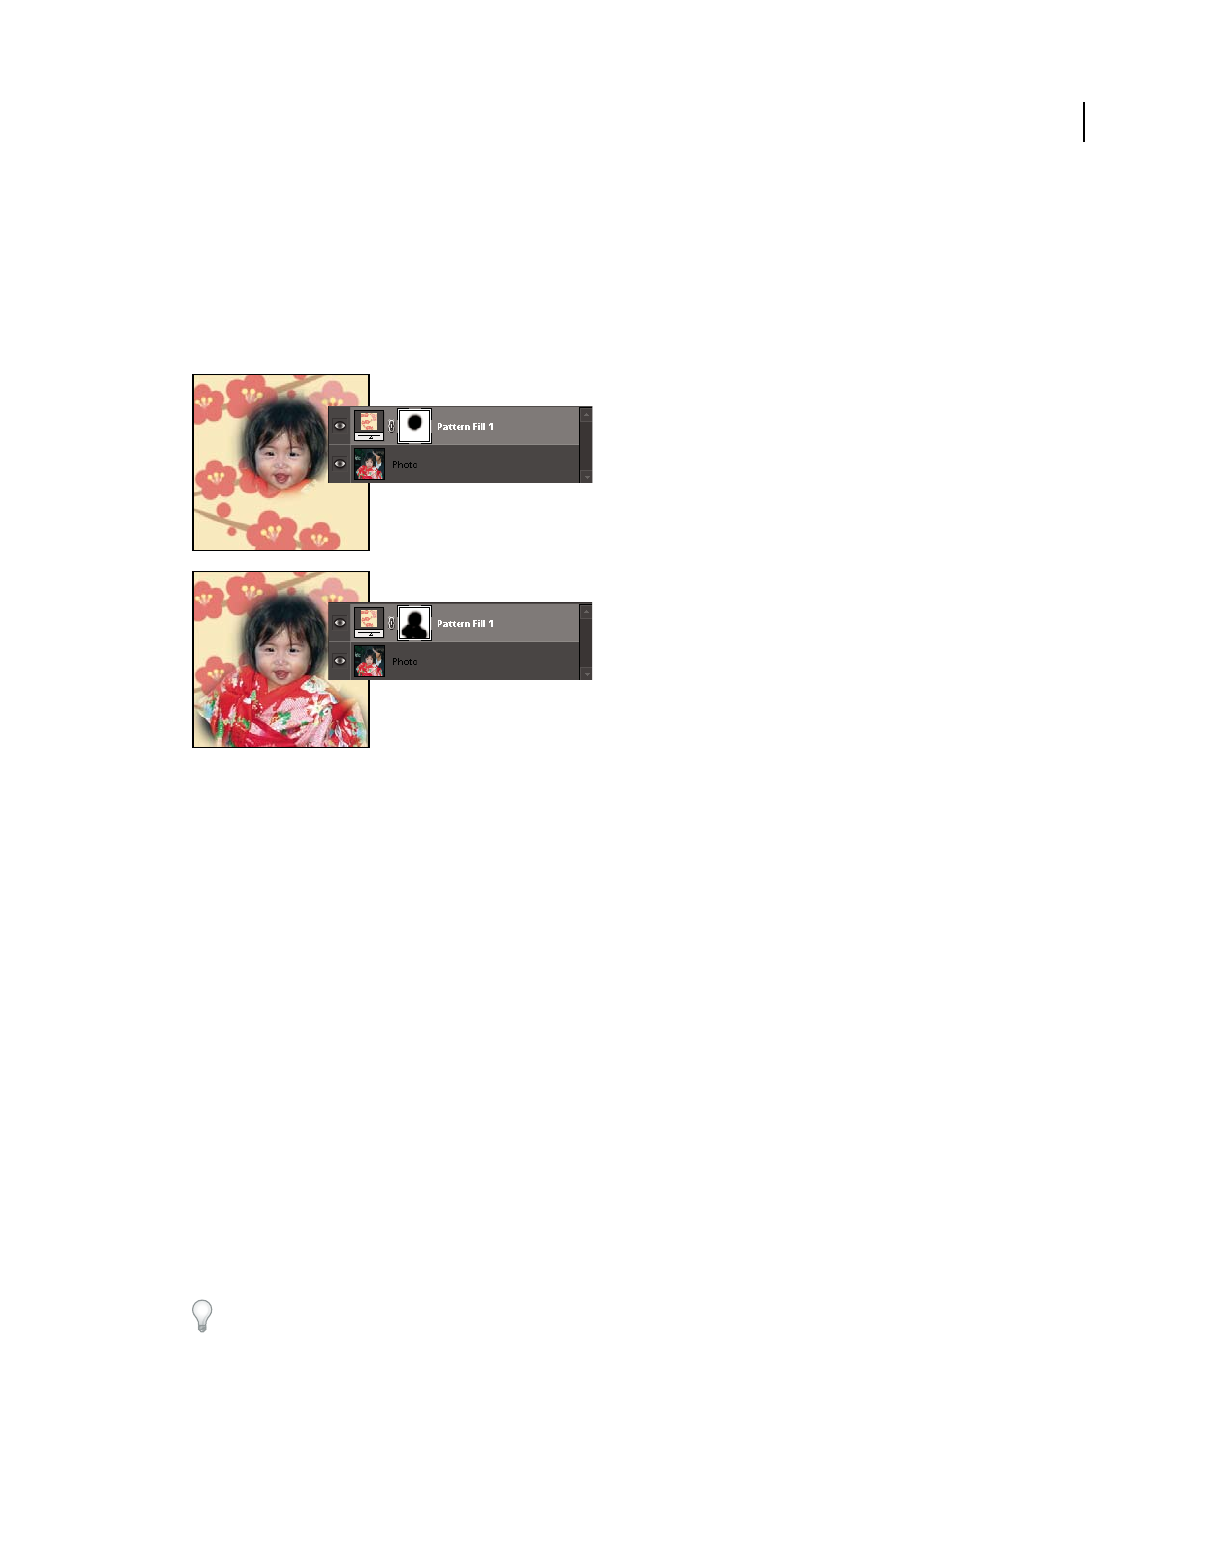
74
USING PHOTOSHOP ELEMENTS 9
Using layers
Last updated 1/3/2012
Edit the layer masks
A layer mask prevents sections of a layer, or an entire layer, from being visible. You use the mask to show or hide
sections of an image or an effect. When the layer mask (right thumbnail) attached to an adjustment layer is completely
white, the adjustment effect is applied to all underlying layers. If you don’t want to apply the effect to certain portions
of the underlying layers, paint the corresponding area of the mask with black. When attached to a fill layer, the mask
defines the filled-in area in the fill layer.
Painting a mask with black increases the area protected.
1In the Edit workspace, select the adjustment or fill layer in the Layers panel.
2Select the Paintbrush tool, or any painting or editing tool.
3Use the following methods to view the layer mask:
•To view only the mask, Alt-click (Option-click in Mac OS) the layer mask’s thumbnail (the rightmost thumbnail).
Alt-click (Option-click in Mac OS) the thumbnail again to redisplay the other layers.
•To view the mask in a red masking color, hold down Alt+Shift (Option+Shift in Mac OS) and click the layer mask’s
thumbnail (the rightmost thumbnail). Hold down Alt+Shift (Option+Shift in Mac OS) and click the thumbnail
again to turn off the red display.
•To constrain editing to part of the mask, select the corresponding pixels.
4Edit the layer mask:
•To remove areas of the adjustment effect or fill, paint the layer mask with black.
•To add areas to the adjustment effect or fill, paint the layer mask with white.
•To partially remove the adjustment effect or fill so that it shows in various levels of transparency, paint the layer
mask with gray. (Single-click the foreground color swatch in the toolbox to choose a gray shade from the Swatches
panel.) The extent to which the effect or fill is removed depends on the tones of gray you use to paint. Darker shades
result in more transparency; lighter shades in more opacity.
Shift-click the mask thumbnail (the layer’s rightmost thumbnail) in the Layers panel to turn off the mask; click the
thumbnail again to turn on the mask.
More Help topics
“About selections” on page 88
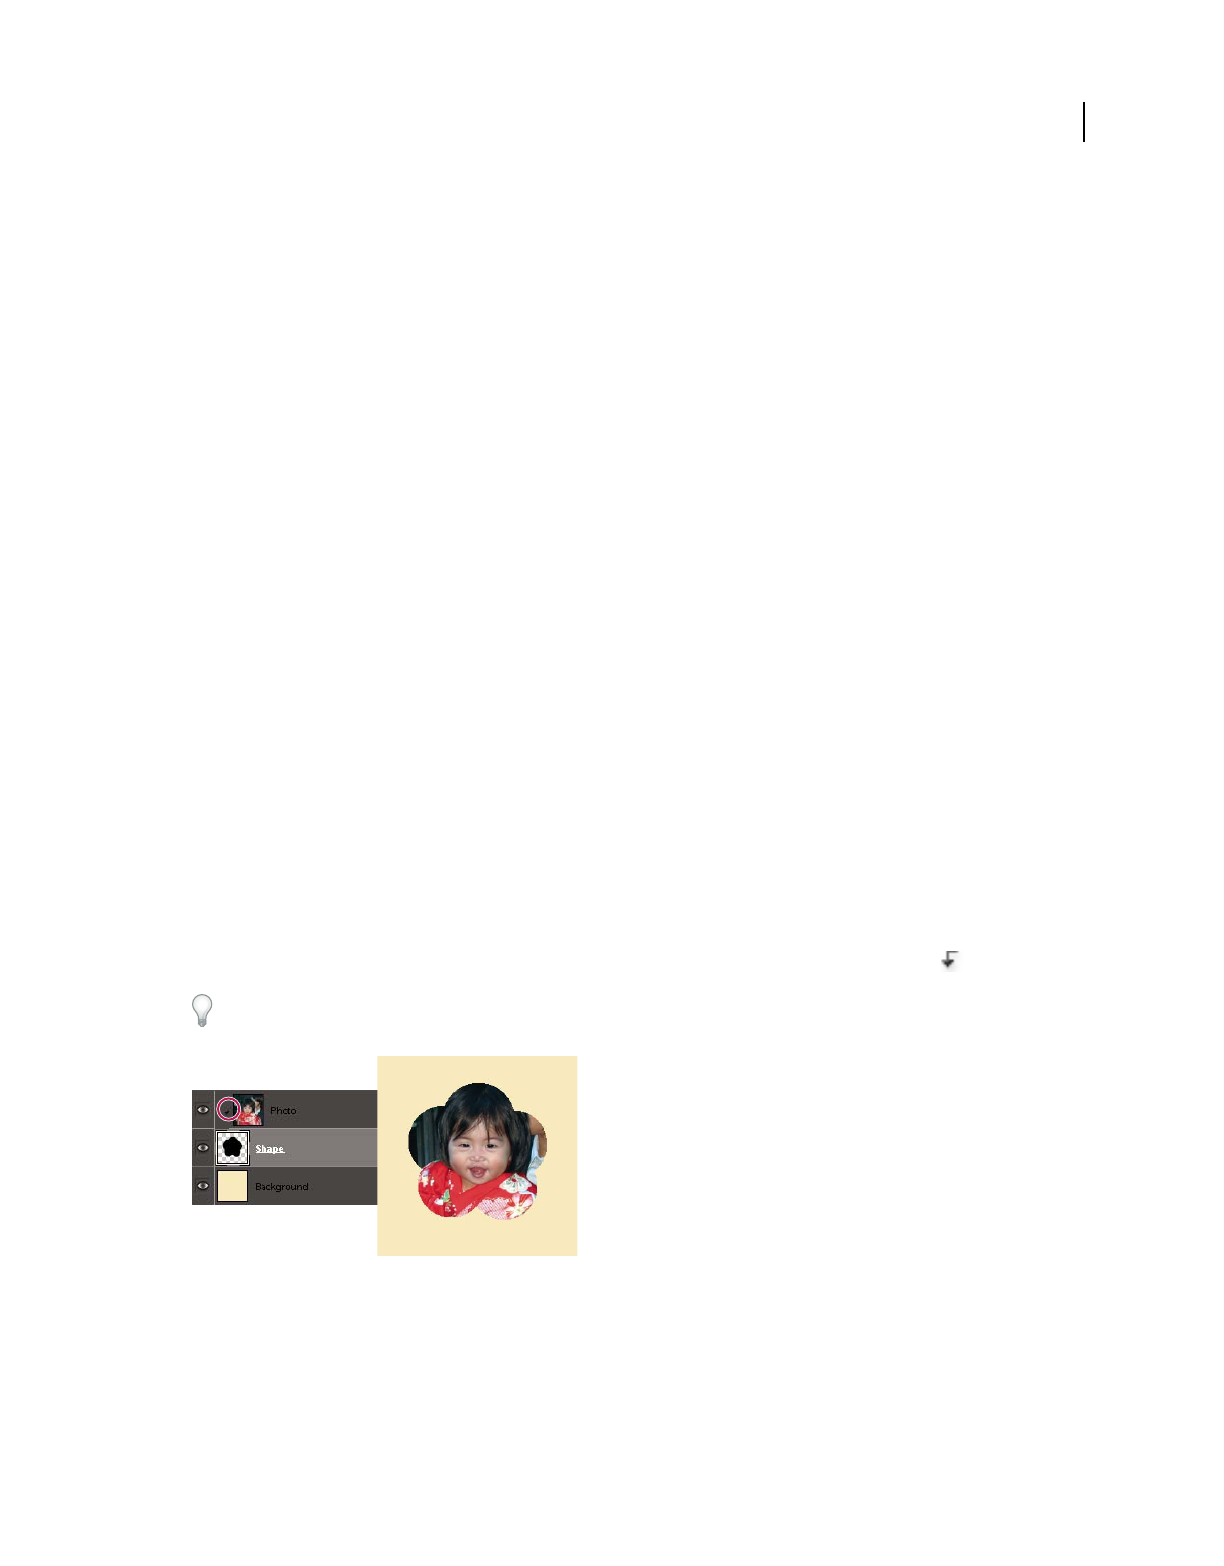
75
USING PHOTOSHOP ELEMENTS 9
Using layers
Last updated 1/3/2012
Layer masks
About layer masks
Layer masks are resolution-dependent bitmap images that are edited with the painting or selection tools. A layer mask
controls the visibility of the layer to which it is added. You can edit a layer mask to add or subtract from the masked
region without losing the layer pixels.
A layer mask is a grayscale image, so areas you paint in black are hidden, areas you paint in white are visible, and areas
you paint in shades of gray appear in various levels of transparency. You can use the paint brush or the eraser to paint
over the mask.
Add a layer mask to an image
❖To add a layer mask, select the part of the image that you want to show and click the Add Layer Mask button in the
Layers panel.
Note: A mask thumbnail linked with the layer thumbnail is added. This thumbnail represents the grayscale channel
that is created when you add the layer mask.
Clipping masks
About layer clipping masks
A clipping mask is a group of layers to which a mask is applied. The bottommost layer, or base layer, defines the visible
boundaries of the entire group. For example, suppose you have a shape in the base layer, a photograph in the layer
above it, and text in the topmost layer. If the photograph and text appear only through the shape outline in the base
layer, they also take on the opacity of the base layer.
You can group only successive layers. The name of the base layer in the group is underlined, and the thumbnails for
the overlying layers are indented. Additionally, the overlying layers display the clipping mask icon
.
You can link the layers in a clipping mask so that they move together.
The shape in the bottom layer of the clipping mask determines what area of the photo layer above shows through.
More Help topics
“Understanding layers” on page 56
“Link and unlink layers” on page 66

76
USING PHOTOSHOP ELEMENTS 9
Using layers
Last updated 1/3/2012
Create a clipping mask
1In the Edit workspace, do one of the following:
•Hold down Alt (Option in Mac OS), position the pointer over the line dividing two layers in the Layers panel (the
pointer changes to two overlapping circles
), and then click.
•
In the Layers panel, select the top layer of a pair of layers you want to group, and choose Layer > Create Clipping Mask.
2When making a clipping mask from an existing layer and one you are about to create, first select the existing layer
in the Layers panel. Then choose New Layer from the Layer menu or the Layers panel More menu. In the New Layer
dialog box, select Use Previous Layer To Create Clipping Mask, and click OK.
The layers in the clipping mask have the opacity and mode attributes of the bottommost base layer in the group.
To change the stacking order of the clipping mask relative to other layers in the image, select all layers in the group.
Then drag the group’s base layer up or down in the Layers panel. (Dragging a layer without selecting all the layers in
the group removes that layer from the group.)
More Help topics
“Link and unlink layers” on page 66
Remove a layer from a clipping mask
Ungrouping the base layer from the layer above it ungroups all layers in the clipping mask.
❖In the Edit workspace, do one of the following:
•Hold down Alt (Option in Mac OS), position the pointer over the line separating two grouped layers in the Layers
panel (the pointer changes to two overlapping circles
), and click.
•In the Layers panel, select a layer in the clipping mask, and choose Layer > Release Clipping Mask. This command
removes the selected layer and any layers above it from the clipping mask.
•In the Layers panel, select any layer in the group except the base layer. Either drag the layer below the base layer, or
drag it between two ungrouped layers in the image.
Release clipping mask
1In the Layers panel, select any layer other than the base layer in the clipping mask.
2Choose Layer > Release Clipping Mask.
Layer styles
About layer styles
Layer styles let you quickly apply effects to an entire layer. In the Effects panel, you can view a variety of predefined
layer styles and apply a style with just a click of the mouse.

77
USING PHOTOSHOP ELEMENTS 9
Using layers
Last updated 1/3/2012
Three different layer styles applied to text
The boundaries of the effect are automatically updated when you edit that layer. For example, if you apply a drop
shadow style to a text layer, the shadow changes automatically when you edit the text.
Layer styles are cumulative, which means that you can create a complex effect by applying multiple styles to a layer.
You can apply one style from each style library per layer. You can also change a layer’s style settings to adjust the final
result.
When you apply a style to a layer, a style icon appears to the right of the layer’s name in the Layers panel. Layer
styles are linked to the layer contents. When you move or edit the contents of the layer, the effects are modified
correspondingly.
Once you choose Layer > Layer Style > Style Settings, you can edit the settings of a layer’s style or apply other style
settings or attributes available in the dialog box.
Lighting Angle Specifies the lighting angle at which the effect is applied to the layer.
Drop Shadow Specifies the distance of a drop shadow from the layer’s content. You can also set the size and opacity
with the sliders.
Outer Glow Size Specifies the size of a glow that emanates from the outside edges of the layer’s content. You can also
set the opacity with the slider.
Inner Glow Size Specifies the size of a glow that emanates from the inside edges of the layer’s content. You can also set
the opacity with the slider.
Bevel Size Specifies the size of beveling along the inside edges of the layer’s content.
Bevel Direction Specifies the direction of the bevel, either up or down.
Stroke Size Specifies the size of the stroke.
Stroke Opacity Specifies the opacity of the stroke.
More Help topics
“Using the Effects panel” on page 183
Work with layer styles
You can apply special effects to a layer, hide or show the styles in a layer, and even change the scale of a layer style (for
example, decrease or increase the size of a glow effect). It’s easy to copy a style from one layer to another.
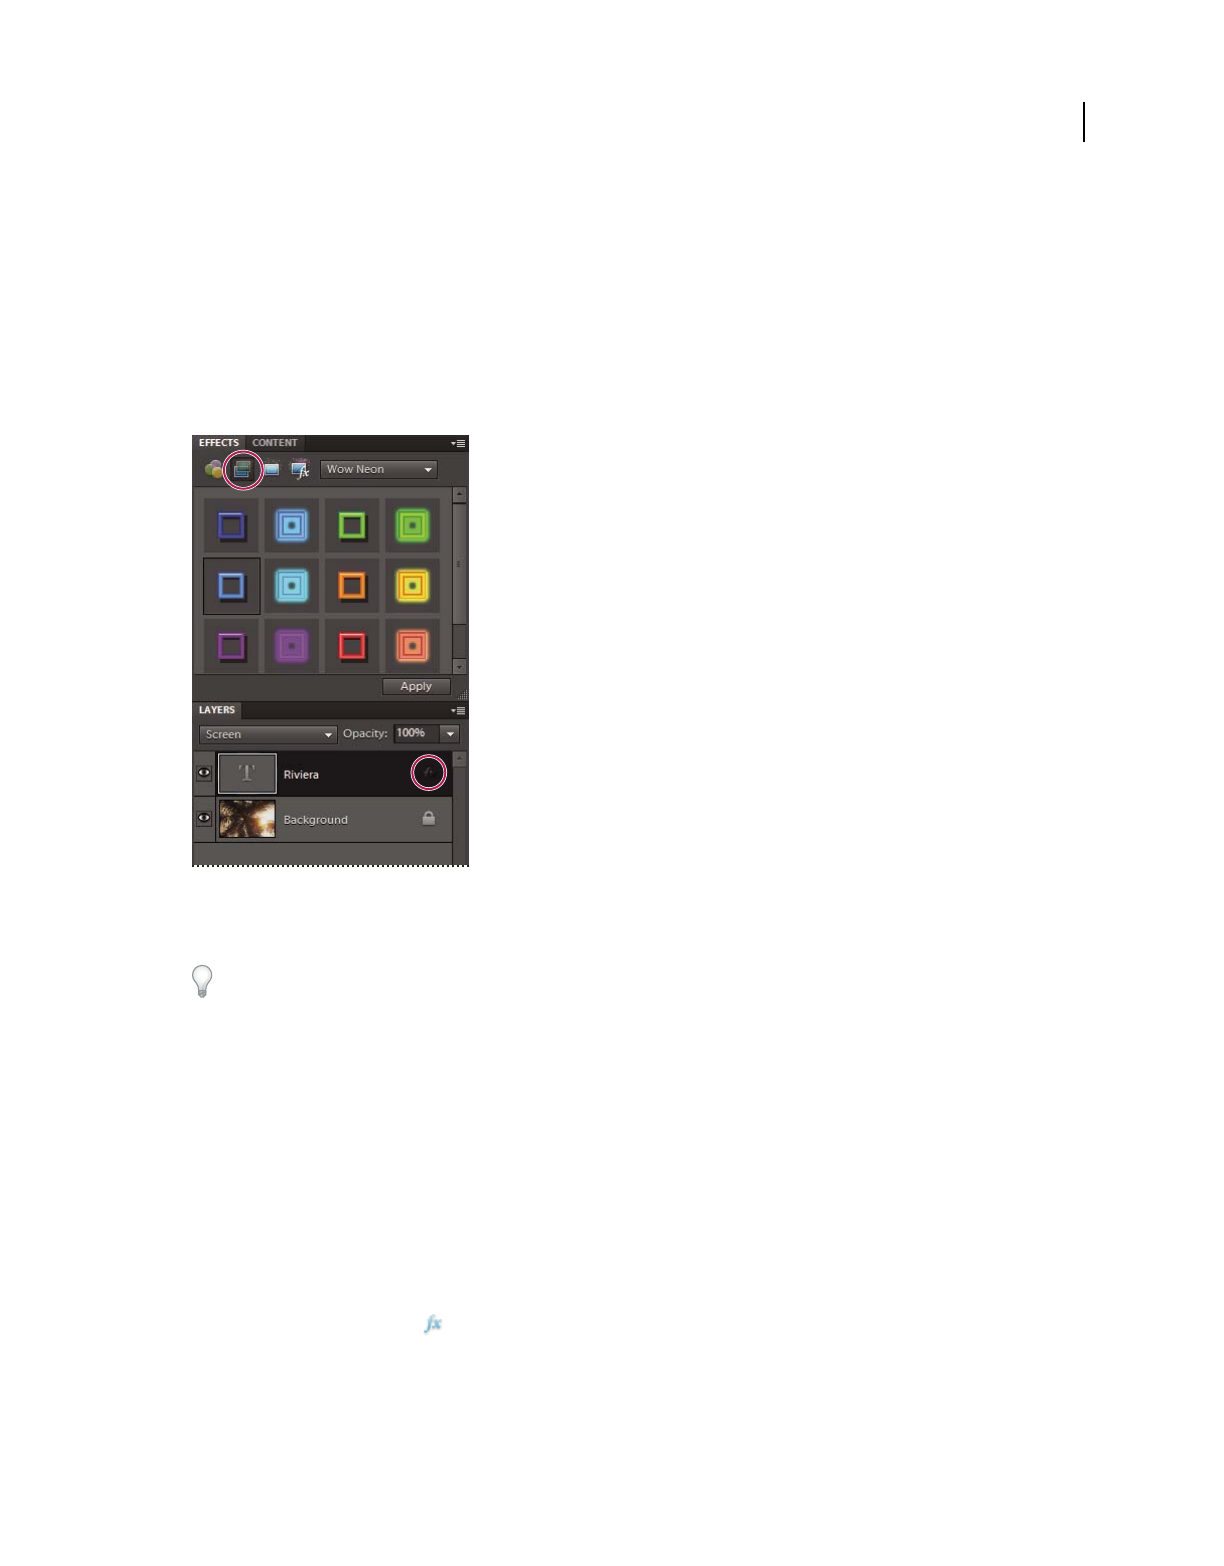
78
USING PHOTOSHOP ELEMENTS 9
Using layers
Last updated 1/3/2012
Apply a layer style
1Select a layer in the Layers panel.
2In the Effects panel, choose Layer Styles from the category menu.
3Do any of the following:
•Select a style, and click Apply.
•Double-click a style.
•Drag a style onto a layer.
A style icon indicates a layer style is applied to the layer.
If you don’t like the result, press Ctrl+Z (Command + Z in Mac OS) to remove the style, or choose Edit > Undo.
You can also drag the style to the image, where it is applied to the selected layer.
Hide or show all layer styles in an image
❖Choose one of the following:
•Layer > Layer Style > Hide All Effects.
•Layer > Layer Style > Show All Effects.
Edit a layer’s style settings
You can edit a layer’s style settings to adjust the effect. You can also copy style settings between layers and remove a
style from a layer.
1Do one of the following:
•Double-click the style icon in the Layers panel.
•Choose Layer > Layer Style > Style Settings.
2To preview the changes in your image, select Preview.
3Adjust one or more of the layer style settings or add new ones, and click OK.

79
USING PHOTOSHOP ELEMENTS 9
Using layers
Last updated 1/3/2012
Change the scale of a layer style
1In the Layers panel, select the layer containing style effects you want to scale.
2Choose Layer > Layer Style > Scale Effect.
3To preview the changes in your image, select Preview.
4Specify how much you want to scale the effects. For example, if you are increasing the size of an outer glow, 100%
is the current scale; 200% doubles the glow size. Then click OK.
Copy style settings between layers
1In the Layers panel, select the layer containing the style settings you want to copy.
2Choose Layer > Layer Style > Copy Layer Style.
3Select the destination layer in the Layers panel, and choose Layer > Layer Style > Paste Layer Style.
Remove a layer style
1In the Layers panel, select the layer containing the style you want to remove.
2Choose Layer > Layer Style > Clear Layer Style.

80
Last updated 1/3/2012
Chapter 5: Camera raw files
You can process camera raw files with the help of preset camera profiles supported by Adobe® Photoshop® Elements 9
and set certain values that are common to all image file formats (such as contrast, tonal range, and sharpness). After
you process the raw image files, you can open the file, edit it, and then save it in any format supported by
Photoshop
Elements. By processing the raw files, which are like digital negatives, and then working on them in
Photoshop
Elements, you can experiment with your images while keeping the original “raw” files.
Processing camera raw image files
About camera raw image files
A camera raw file contains unprocessed picture data from a camera’s image sensor. Think of camera raw files as photo
negatives. Many digital cameras can save raw format files. You can open a raw file in Photoshop
Elements, process it,
and save it, rather than relying on the camera to process the file. Working with camera raw files lets you set the proper
white balance, tonal range, contrast, color saturation, and sharpness.
You can reprocess the file repeatedly to achieve the results you want. Photoshop Elements doesn’t save your changes
to the original raw file; it saves the last settings you specified before importing the file from your camera to your
computer.
After processing the raw image file using the features of the Camera Raw dialog box, you open the image in
Photoshop
Elements, where you can edit it in the same way that you edit any photo, such as fixing red eye or making
color adjustments. Then, you can save the file in any format supported by Photoshop
Elements. It’s best to use PSD.
To use raw files, you need to set your camera to save files in its own raw file format. When you download the files from
the camera, they have file extensions like NEF, CRW, and so on. Photoshop Elements can open raw files only from
supported cameras. Visit the Adobe website to view a list of supported cameras.
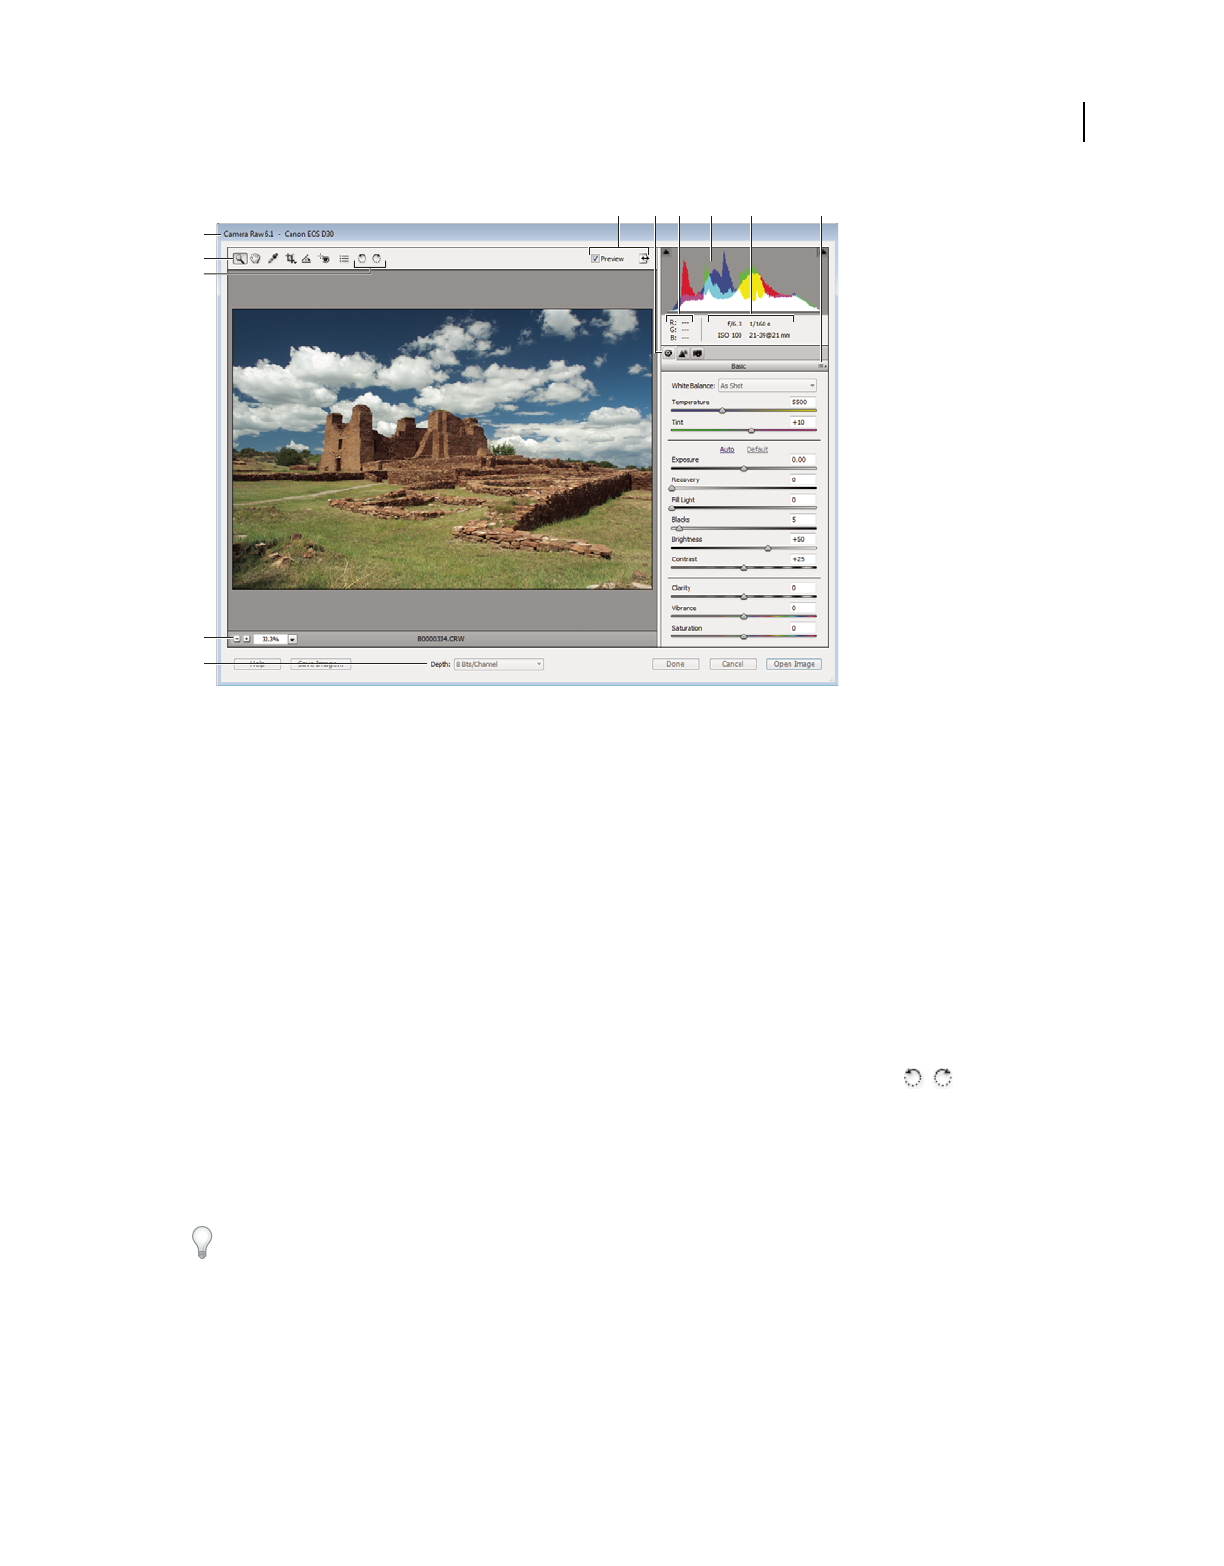
81
USING PHOTOSHOP ELEMENTS 9
Camera raw files
Last updated 1/3/2012
Camera Raw dialog box
A. View options B. Click the Basic or Detail tab to access different controls C. RGB values D. Histogram E. Image settings F. More menu
G. Camera and some EXIF information H. Tools I. Rotate buttons J. Zoom levels K. Bit depth options
Open and process camera raw files
1In the Edit workspace, choose File > Open.
2Browse to select one or more camera raw files, and click Open.
The histogram in the Camera Raw dialog box shows the tonal range of the image at the current settings. As you make
settings adjustments, the histogram automatically updates.
3(Optional) Adjust the image view using the controls, such as the Zoom tool, and options, such as Shadows and
Highlights, which reveal clipping in the preview area. (See “Camera raw controls” on page 83.)
Note: Selecting Preview displays a preview of the image with the settings changes you make. Deselecting Preview displays
the camera raw image at the original settings of the current tab combined with the settings in the hidden tabs.
4To rotate the image 90° counterclockwise or 90° clockwise, click the Rotate Image buttons .
5To apply the settings used in the previous camera raw image or the default settings for your camera, choose an
option from the Settings menu. Using the same options is useful, for example, if you want to quickly process images
with similar lighting conditions. (See “Set custom camera settings” on page 84.)
6(Optional) Set options to adjust the white balance. (See “White balance controls for camera raw” on page 85.)
You can monitor the RGB values of pixels in your image as you adjust them in the Camera Raw dialog box. Position
the Zoom tool, Hand tool, White Balance tool, or Crop tool over the preview image to display the RGB values directly
beneath the pointer.
7Make tonal adjustments using the Exposure, Brightness, Contrast, and Saturation sliders. (See “Tonal and image
adjustments in camera raw files” on page 86.)
To undo your manual adjustments and make the adjustments automatically, select Auto. To restore all options to their
initial settings, press Alt (Option in Mac OS) and click Reset.
A D
H
I
G
K
J
CF
BE

82
USING PHOTOSHOP ELEMENTS 9
Camera raw files
Last updated 1/3/2012
8Do one of the following:
•To open a copy of the camera raw image file (with the camera raw settings applied) in Photoshop Elements, click
Open. You can edit the image and save it in a Photoshop Elements-supported format. The original camera raw file
remains unaltered.
•To save the adjustments to a DNG file, click Save Image. (See “Save changes to camera raw images” on page 83.)
•To cancel the adjustments and close the dialog box, click Cancel.
Note: The Digital Negative (DNG) format is Adobe’s proposed standard format for camera raw files. DNG files are useful
for archiving camera raw images because they contain the raw camera sensor data and data specifying how the image
should look. Camera raw image settings can be stored in DNG files instead of in sidecar XMP files or the camera raw
database.
Adjust sharpness in camera raw files
The Sharpness slider adjusts the image sharpness to provide the edge definition you want. The Sharpness adjustment
is a variation of the Adobe Photoshop Unsharp Mask filter, which locates pixels that differ from surrounding pixels
based on the threshold you specify and increases the pixels’ contrast by the amount you specify. When opening a
camera raw file, the Camera Raw plug-in calculates the threshold to use based on the camera model, ISO, and exposure
compensation. You can choose whether sharpening is applied to all images or just to previews.
1Zoom the preview image to at least 100%.
2Click the Detail tab.
3Move the Sharpness slider to the right to increase sharpening and to the left to decrease it. A value of zero turns off
sharpening. In general, set the Sharpness slider to a lower value for cleaner images.
If you don’t plan to edit the image extensively in Photoshop Elements, use the camera raw Sharpness slider. If you do
plan to edit the image extensively in Photoshop Elements, turn off camera raw sharpening. Then use the sharpening
filters in Photoshop Elements as the last step after all other editing and resizing are complete.
Reducing noise in camera raw images
The Detail tab in the Camera Raw dialog box contains controls for reducing image noise—the extraneous visible
artifacts that degrade image quality. Image noise includes luminance (grayscale) noise, which makes an image look
grainy, and chroma (color) noise, which is usually visible as colored artifacts in the image. Photos taken at high ISO
speeds or with less sophisticated digital cameras can have noticeable noise.
Moving the Luminance Smoothing slider to the right reduces grayscale noise, and moving the Color Noise Reduction
slider to the right reduces chroma noise.
When making Luminance Smoothing or Color Noise Reduction adjustments, it’s a good idea to preview images at
100% for a better view.
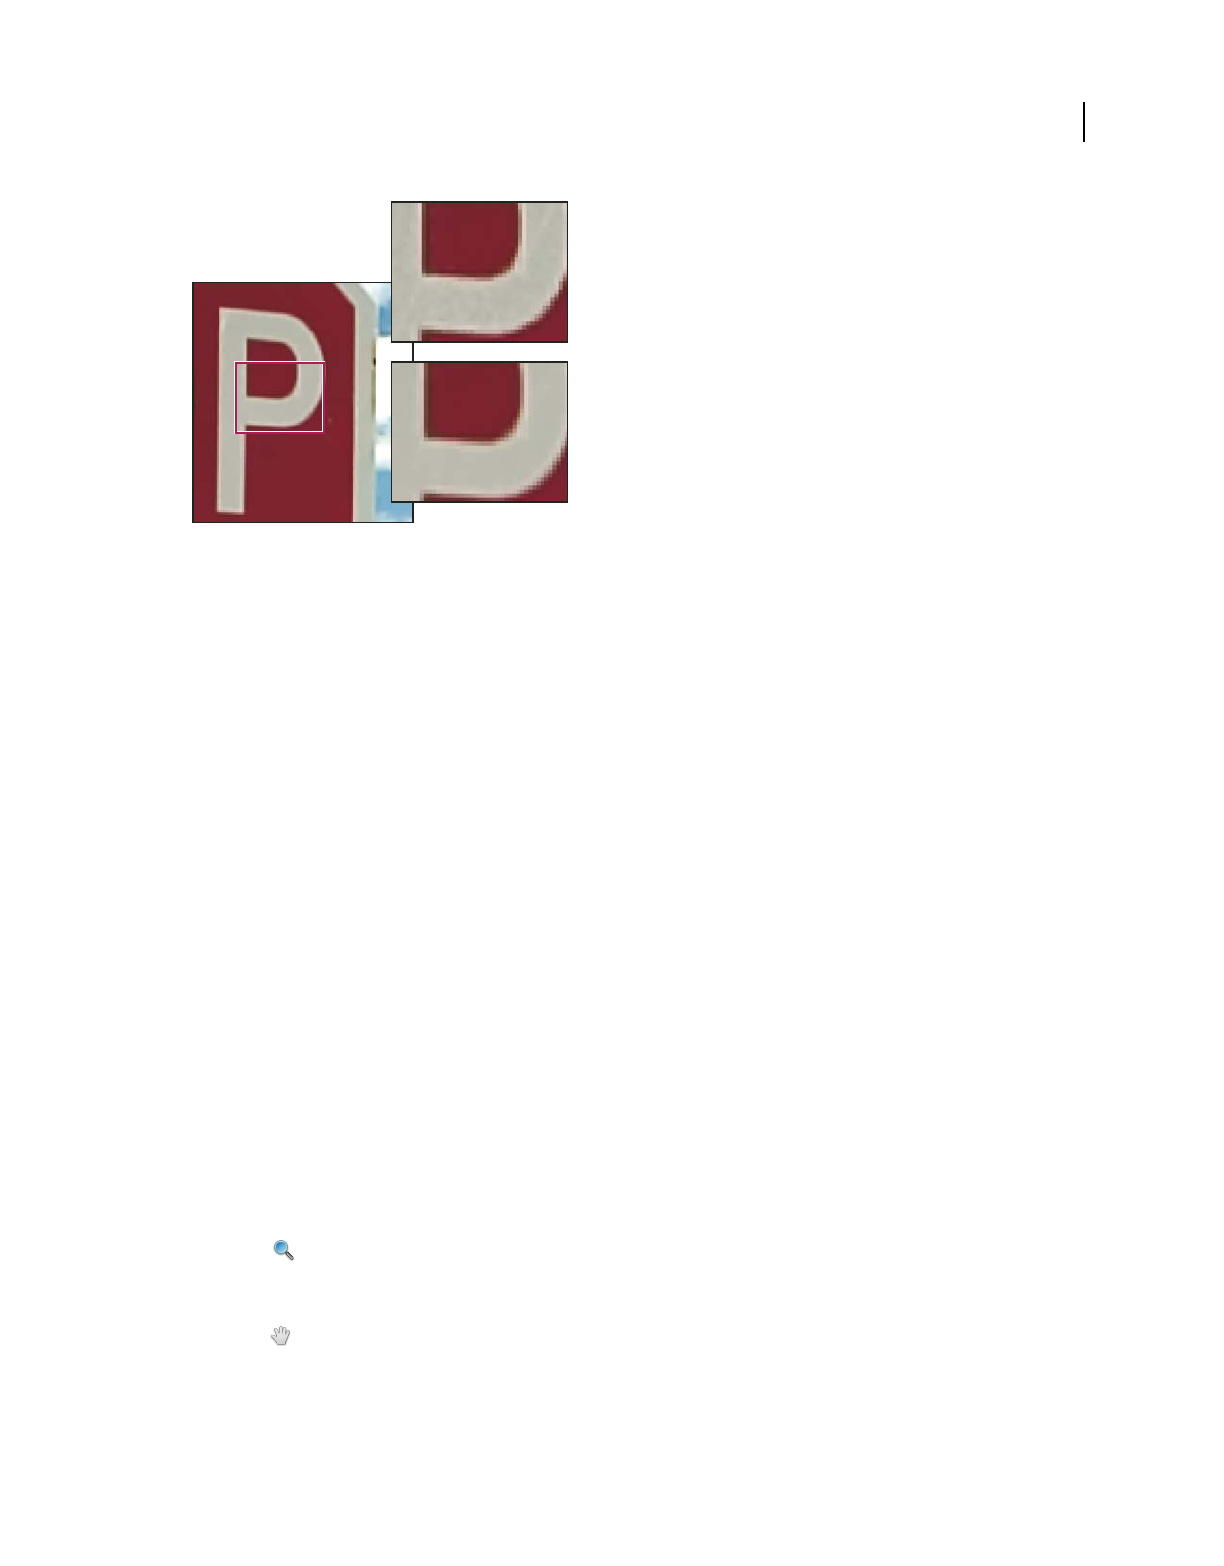
83
USING PHOTOSHOP ELEMENTS 9
Camera raw files
Last updated 1/3/2012
Moving the Luminance Smoothing slider to the right reduces grayscale noise.
Save changes to camera raw images
You can save changes you’ve made to a camera raw file. The Camera Raw dialog box saves the camera raw image with
your changes in a .dng file. Be aware that saving the file does not open it in Photoshop Elements. (To open a camera
raw file, just use the Open command, like you would with any other file. Then you can edit and save the file like any
other image.)
1In the Camera Raw dialog box, apply adjustments to one or more camera raw images.
2Click the Save Image button.
3In the Save Options dialog box, specify where to save the file and how to name the file if you're saving more than
one camera raw file.
4Click Save.
Open a camera raw image in the Edit workspace
After you process a camera raw image in the Camera Raw dialog box, you can open the image and edit it in the Edit
workspace.
1In the Camera Raw dialog box, apply adjustments to one or more camera raw images.
2Click the Open Image button. The Camera Raw dialog box closes, and the photo opens in the Edit workspace.
Settings and controls
Camera raw controls
Zoom tool Sets the preview zoom to the next preset zoom value when you click within the preview image. Alt-click
(Option-click in Mac OS) to zoom out. Drag the Zoom tool in the preview image to zoom in on a selected area. To
return to 100%, double-click the Zoom tool.
Hand tool Moves the image in the preview window if the preview image is set at a zoom level higher than 100%.
Hold down the spacebar to access the Hand tool while using another tool. Double-click the Hand tool to fit the preview
image in the window.
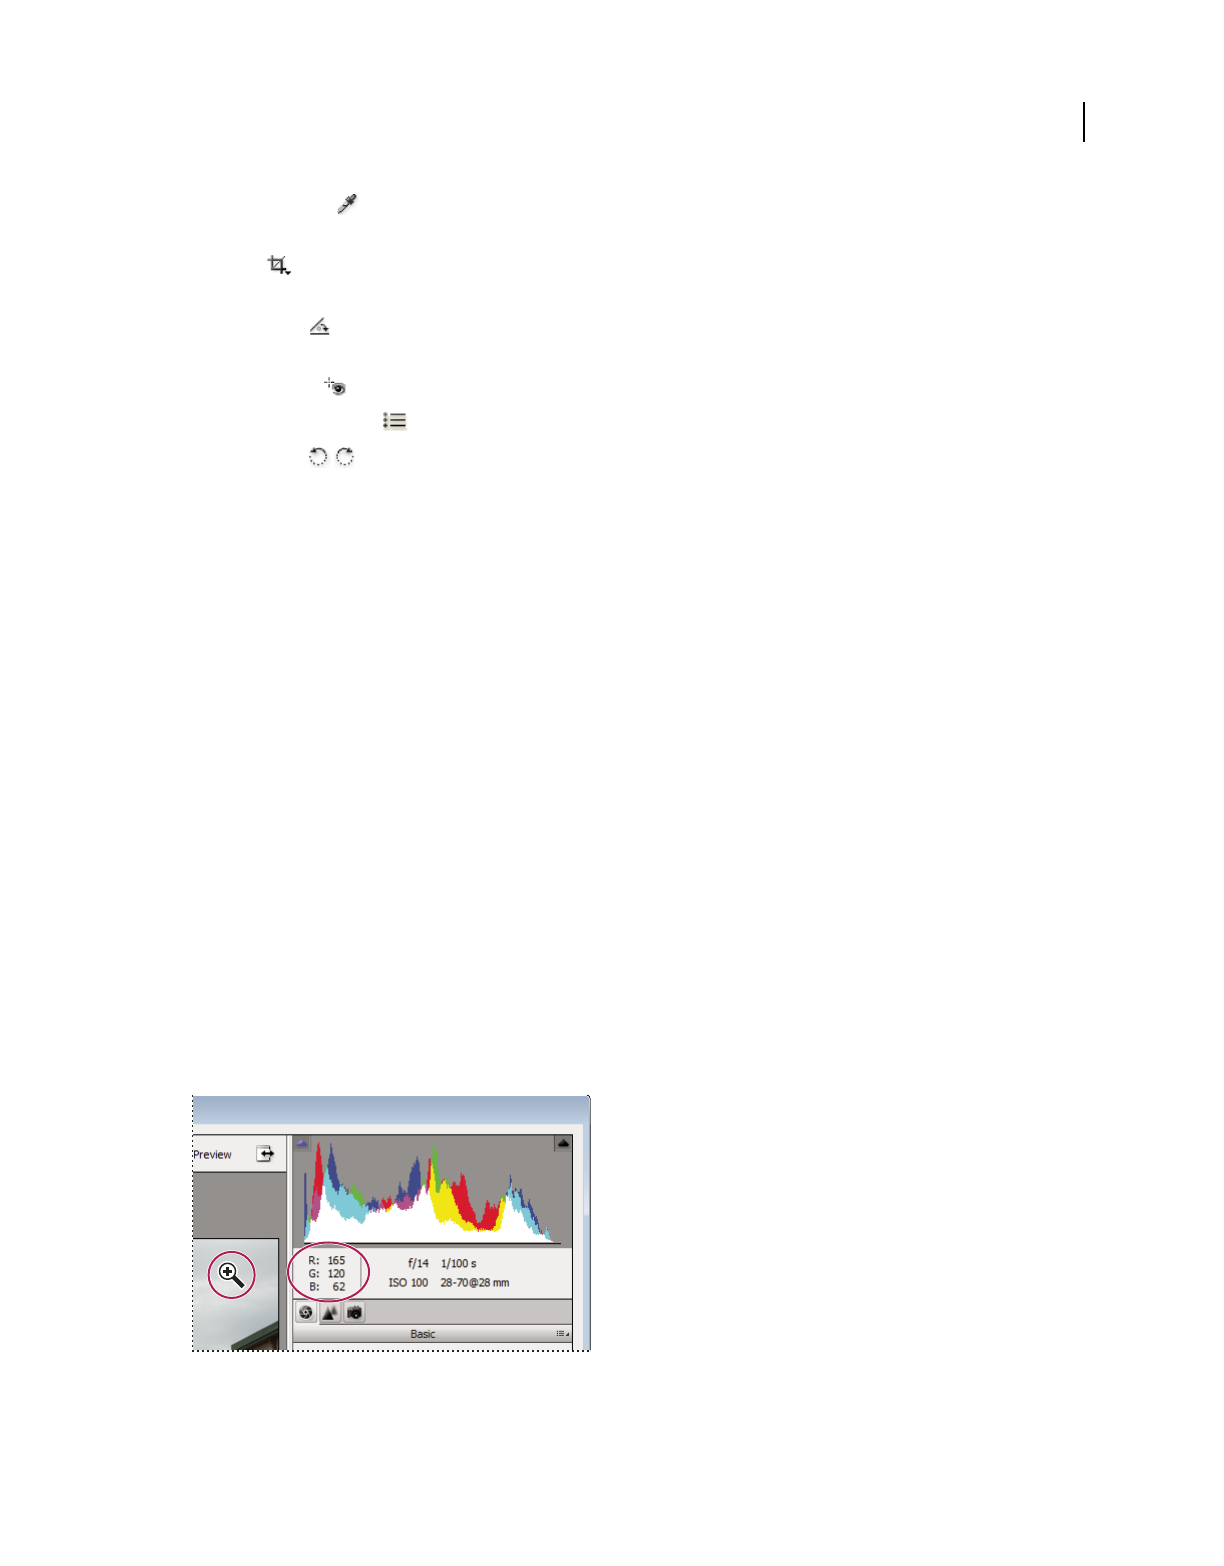
84
USING PHOTOSHOP ELEMENTS 9
Camera raw files
Last updated 1/3/2012
White Balance tool Sets the area you click to a neutral gray tone to remove color casts and adjust the color of the
entire image. The Temperature and Tint values change to reflect the color adjustment.
Crop tool Removes part of an image. Drag the tool within the preview image to select the portion you want to
keep, and then press Enter.
Straighten tool You can use the Straighten tool to realign an image vertically or horizontally. This tool also resizes
or crops the canvas to accommodate straightening the image.
Red Eye Removal Removes red eye in flash photos of people and green or white eye in pets.
Open Preferences Dialog Opens the Camera Raw Preferences dialog.
Rotate buttons Rotates the photo either counterclockwise or clockwise.
Set custom camera settings
When you open a camera raw file, Photoshop Elements reads information in the file to see which model of camera
created it, and then applies the appropriate camera settings to the image. If you are always making similar adjustments,
you can change the default settings of your camera. You can also change settings for each model of camera you own,
but not for multiple cameras of the same model.
1In the Edit workspace, open a camera raw file and adjust the image.
2To save the current settings as the default for the camera that created the image, click the triangle next to the
Settings menu and choose Save New Camera Raw Default.
3To use the Photoshop Elements default settings for your camera, click the triangle next to the Settings menu and
choose Reset Camera Raw Default.
Color and camera raw
Using the histogram and RGB values in camera raw
The Camera Raw histogram shows all three channels (red, green, and blue) of the image simultaneously. The
histogram changes automatically as you adjust the settings in the Camera Raw dialog box.
As you move the Zoom tool, Hand tool, or White Balance tool over the preview image, you see the RGB values in the
upper-right corner of the dialog box.
RGB values of an image
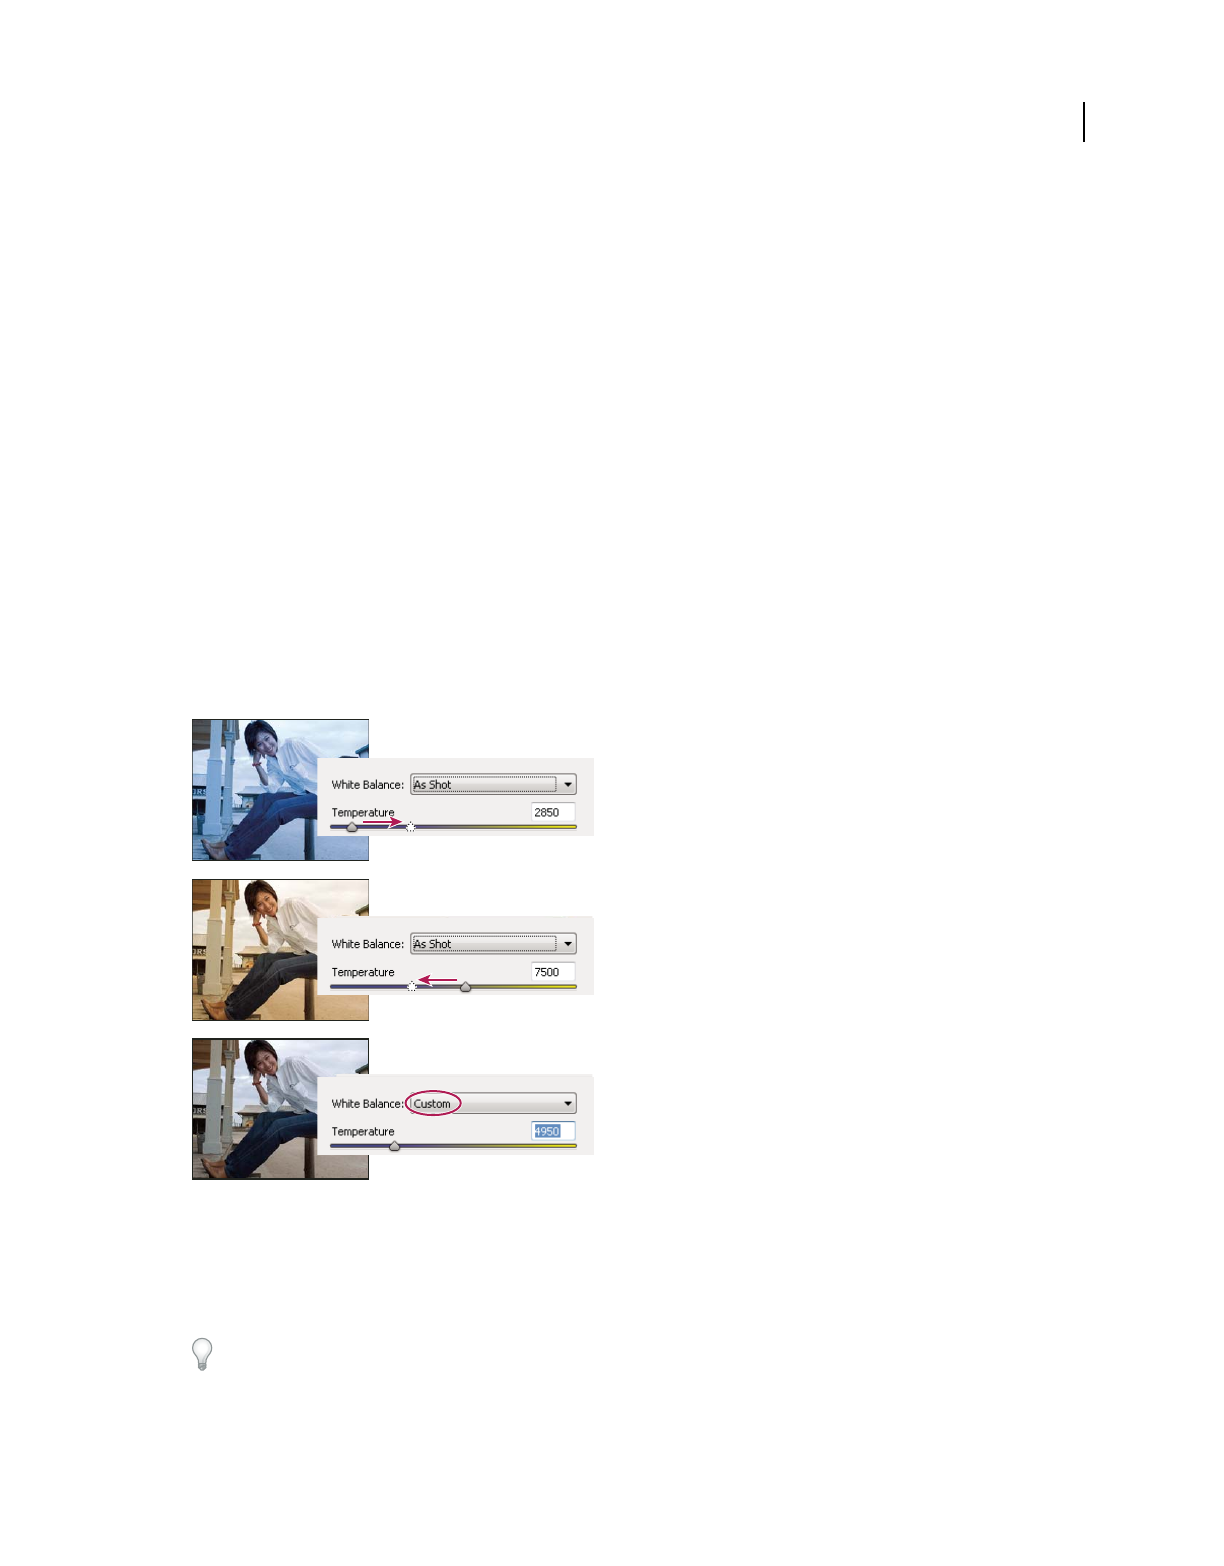
85
USING PHOTOSHOP ELEMENTS 9
Camera raw files
Last updated 1/3/2012
White balance controls for camera raw
A digital camera records the white balance at the time of exposure as metadata, which you can see when you open the
file in the Camera Raw dialog box. This setting usually yields the correct color temperature. You can adjust it if the
white balance is not quite right.
The Adjust tab in the Photoshop Camera Raw dialog box includes the following three controls for correcting a color
cast in your image:
White Balance Sets the color balance of the image to reflect the lighting conditions under which the photo was taken.
In some cases, choosing a white balance from the White Balance menu provides satisfactory results. In many cases,
you may want to customize the white balance using the Temperature and Tint adjustments.
Note: The Camera Raw plug-in can read the white balance settings of some cameras. Leave White Balance set to As Shot
to use the camera’s white balance settings. For cameras whose white balance settings are not recognized, selecting As Shot
is the same as choosing Auto: the Camera Raw plug-in reads the image data and automatically adjusts the white balance.
Temperature Fine-tunes the white balance to a custom color temperature. Set the color temperature using the Kelvin
color temperature scale. Move the slider to the left to correct a photo taken at a lower color temperature of light: the
plug-in makes the image colors cooler (bluish) to compensate for the lower color temperature (yellowish) of the
ambient light. Conversely, move the slider to the right to correct a photo taken at a higher color temperature of light:
the
plug-in makes the image colors warmer (yellowish) to compensate for the higher color temperature (bluish) of the
ambient light.
Correcting the white balance
A. Moving the Temperature slider to the right corrects a photo taken at a higher color temperature of light. B. Moving the Temperature slider
to the left corrects a photo taken at a lower color temperature of light. C. Photo after the color temperature has been adjusted.
Tint Fine-tunes the white balance to compensate for a green or magenta tint. Move the slider to the left (negative
values) to add green to the photo; move it to the right (positive values) to add magenta.
To adjust the white balance quickly, select the White Balance tool, and then click an area in the preview image that
should be a neutral gray or white. The Temperature and Tint sliders automatically adjust to make the selected color
exactly neutral (if possible). If
you’re clicking whites, choose a highlight area that contains significant white detail rather
than a specular highlight.
A
C
B
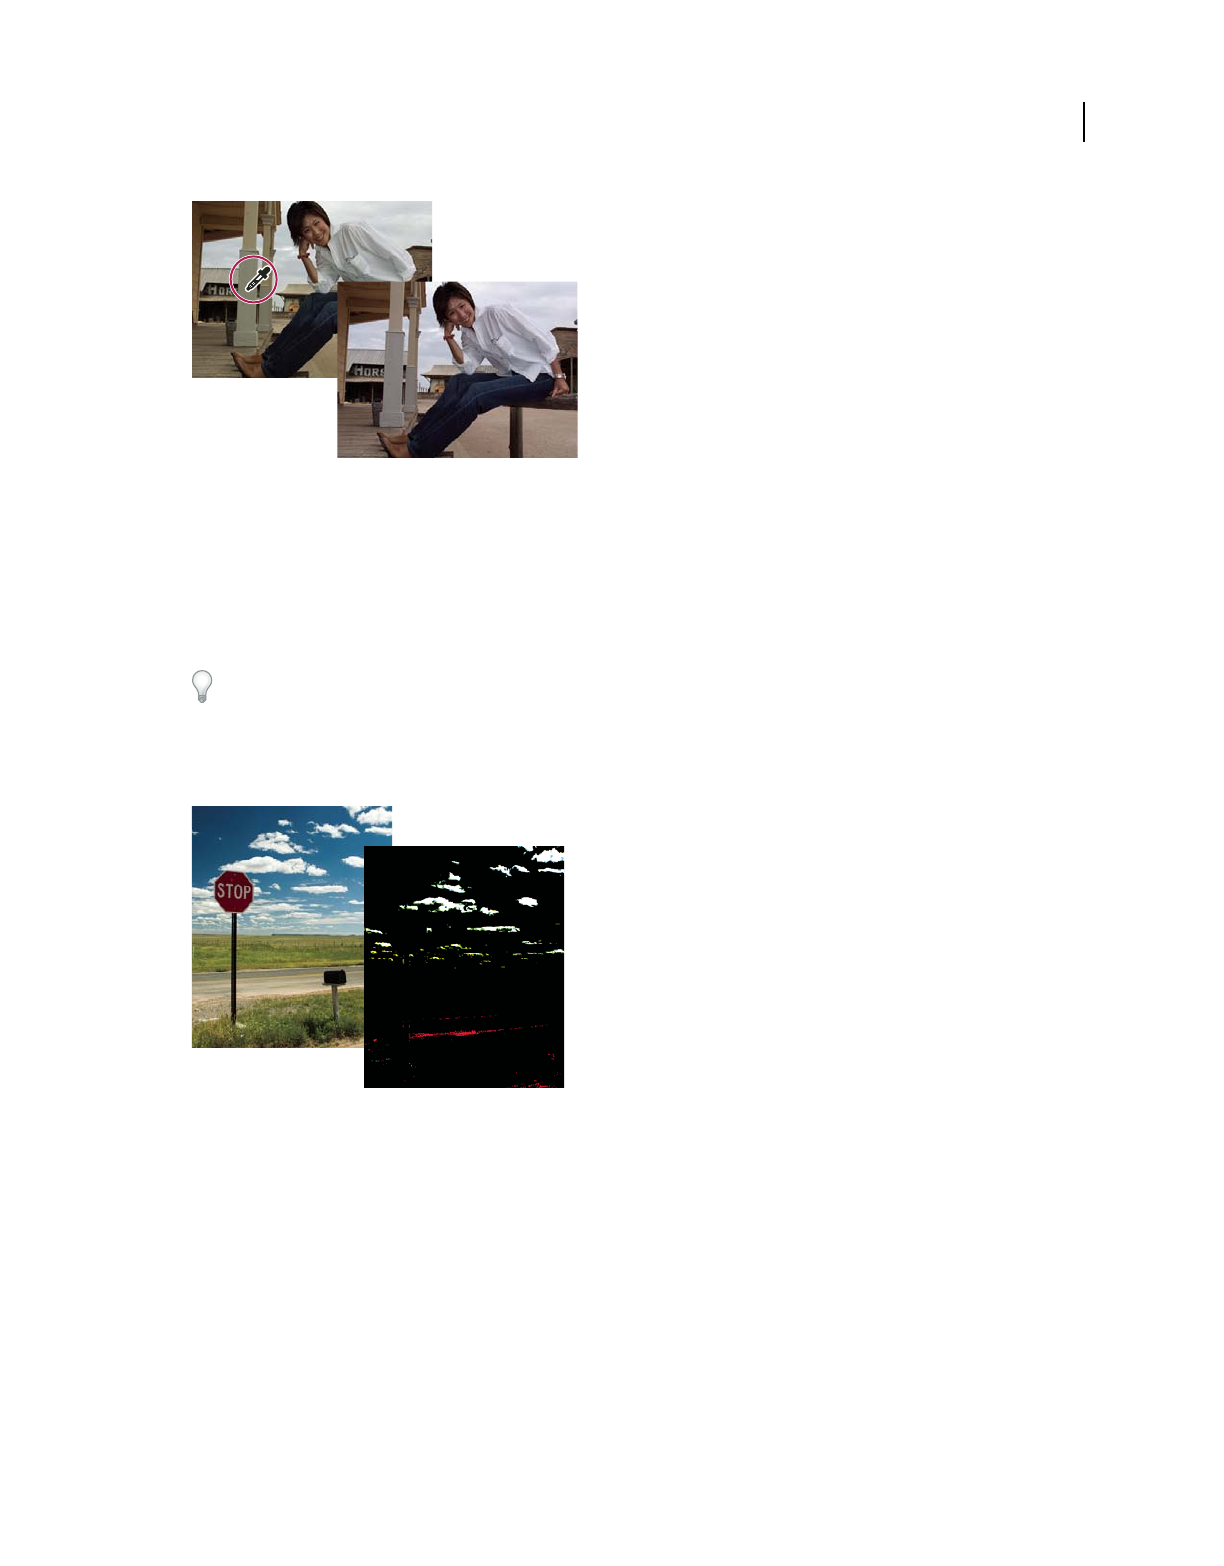
86
USING PHOTOSHOP ELEMENTS 9
Camera raw files
Last updated 1/3/2012
Using White Balance to click a neutral white area, and resulting correction
Tonal and image adjustments in camera raw files
Exposure Adjusts the brightness or darkness of an image. Move the slider to the left to darken the image; move it to
the right to brighten the image. The values are in increments equivalent to f-stops. An adjustment of +1.50 is similar
to widening the aperture one and one-half stops. Likewise, an adjustment of -1.50 is similar to reducing the aperture
one and one-half stops.
Hold down Alt (Option key in Mac) while moving the Exposure slider to preview where the highlights are clipped.
(Clipping is the shifting of pixel values to either the highest highlight value or the lowest shadow value. Clipped areas
are either completely white or completely black and have no image detail.) Move the slider until the highlights (not
specular highlights) are completely clipped, and then reverse the adjustment slightly. Black indicates unclipped areas, and
color indicates areas clipped in only one or two channels.
Hold down Alt (Option key in Mac) while moving the Exposure slider to show clipped highlights.
Recovery Attempts to recover details from highlights. Camera Raw can reconstruct some details from areas in which
one or two color channels are clipped to white.
Fill Light Attempts to recover details from shadows, without brightening blacks. Camera Raw can reconstruct some
details from areas in which one or two color channels are clipped to black. Using Fill Light is similar to using the
shadows portion of the Photoshop Shadow/Highlight filter or the After Effects Shadow/Highlight effect.
Blacks Specifies which input levels are mapped to black in the final image. Increasing Blacks expands the areas that
are mapped to black. This sometimes creates the appearance of increased contrast in the image. The greatest change is
in the shadows, with less change in the midtones and highlights. Using the Blacks slider is similar to using the black
point slider for input levels when using the Photoshop Levels command or the After Effects Levels effect.
Brightness Adjusts the brightness of the image, much as the Exposure slider does. However, instead of clipping the
image in the highlights (areas that are completely white, with no detail) or shadows (areas that are completely black,

87
USING PHOTOSHOP ELEMENTS 9
Camera raw files
Last updated 1/3/2012
with no detail), Brightness compresses the highlights and expands the shadows when you move the slider to the right.
In general, use the Brightness slider to adjust the overall brightness after you set the white and black clipping points
with the Exposure and Shadow sliders.
Contrast Adjusts the midtones in an image. Higher values increase the midtone contrast, and lower values produce an
image with less contrast. Generally, use the Contrast slider to adjust the contrast of the midtones after setting the
Exposure, Shadow, and Brightness values.
Clarity Sharpens the clarity of edges in the image. This process helps restore detail and sharpness that tonal
adjustments may reduce.
Vibrance Adjusts the saturation so that clipping is minimized as colors approach full saturation, changing the
saturation of all lower-saturated colors with less impact on the higher-saturated colors. Vibrance also prevents skin
tones from becoming oversaturated.
Saturation Adjusts the color saturation of the image from –100 (pure monochrome) to +100 (double the saturation).
Sharpening Sharpening enhances the definition of edges in an image. Additional controls are available in the Detail
panel. The zoom level must be set to 100% or greater in order to view the effects of these controls.
•Amount: Adjusts edge definition. Increase the Amount value to increase sharpening. A value of zero turns off
sharpening. In general, set Amount to a lower value for cleaner images. The adjustment locates pixels that differ
from surrounding pixels based on the threshold you specify and increases the pixels’ contrast by the amount you
specify.
•Radius: Adjusts the size of the details that sharpening is applied to. Photos with very fine details may need a lower
radius setting. Photos with larger details may be able to use a larger radius. Using too large a radius generally results
in unnatural results.
•Detail: Adjusts how much high-frequency information is sharpened in the image and how much the sharpening
process emphasizes edges. Lower settings primarily sharpen edges to remove blur. Higher values are useful for
making the textures in the image more pronounced.
•Masking: Controls an edge mask. At a setting of zero, everything in the image receives the same amount of
sharpening. At a setting of 100, sharpening is mostly restricted to areas near the strongest edges.
Noise Reduction Adjusts the color saturation of the image from –100 (pure monochrome) to +100 (double the
saturation).
•Luminance: Adjusts grayscale noise.
•Color: Adjusts chroma noise.
Camera Profile Chooses the Adobe Camera Raw (ACR) profile. For each camera model it supports, Camera Raw uses
profiles to process raw images. To choose from the various camera profiles present in Camera Calibration tab, choose
either ACR 4.4, ACR 2.4,or Adobe Standard. The higher version number represents the newer and improved camera
profile for some cameras. You may want to choose the lower version number for consistent behavior with legacy
images.
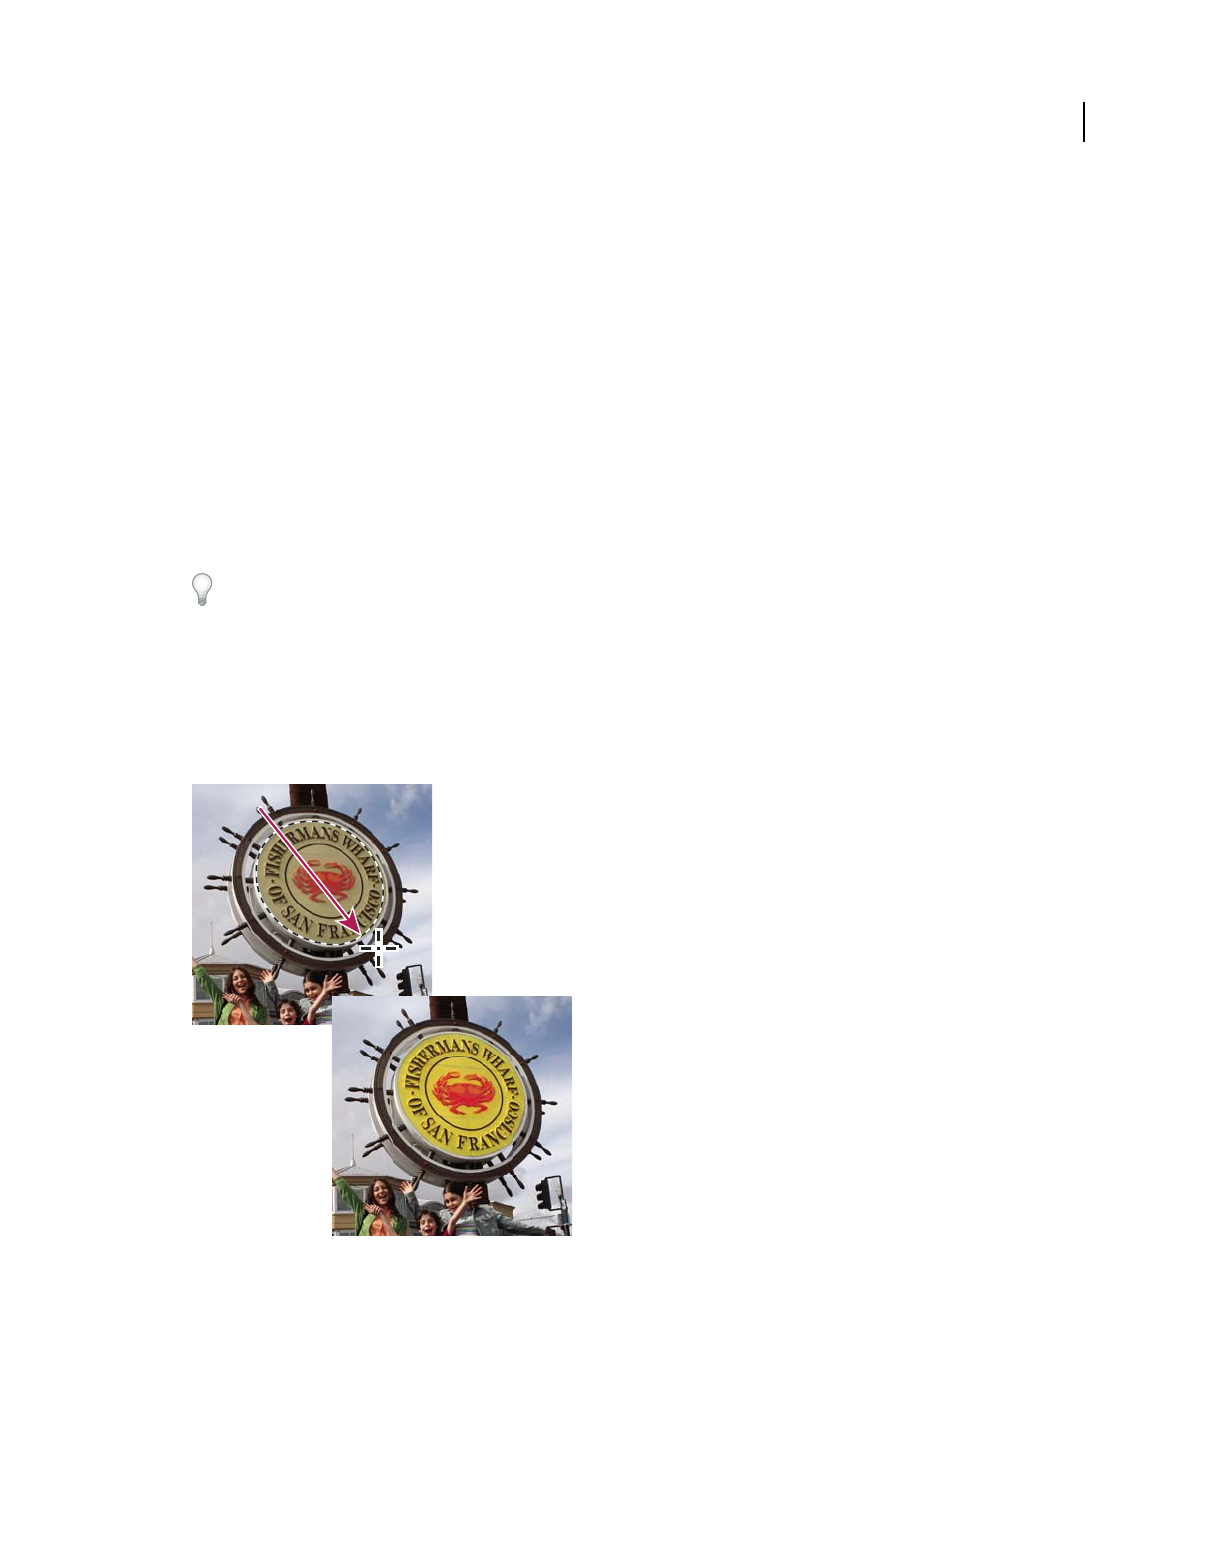
88
Last updated 1/3/2012
Chapter 6: Selecting parts of an image
A selection defines the editable area in a photo (for example, you might want to lighten one part of a photo without
affecting the rest). You can make a selection with either a selection tool or a selection command. A selection border,
which you can hide, surrounds the selection. You can change, copy, or delete pixels inside the selection border, but you
can’t touch areas outside the selection border until you deselect the selection.
Making selections
About selections
For videos about selection, see www.adobe.com/go/lrvid2322_pse9_en and www.adobe.com/go/lrvid2323_pse9_en.
Adobe® Photoshop® Elements 9 contains several selection tools that suit different kinds of selections. For example, the
Elliptical Marquee tool selects circular and elliptical areas, and the Magic Wand tool can select an area of similar colors
with one click. More complex selections can be made with one of the Lasso tools. You can even smooth the edges of a
selection with feathering and anti-aliasing.
Note: Selections are limited to the active layer—to make changes to all layers at once, you first need to flatten the image.
Selection made with Elliptical Marquee tool, color adjusted in selected area
More Help topics
“Flatten an image” on page 68
“Define a feathered edge for a selection tool” on page 101
“Smooth the edges of a selection by anti-aliasing” on page 101
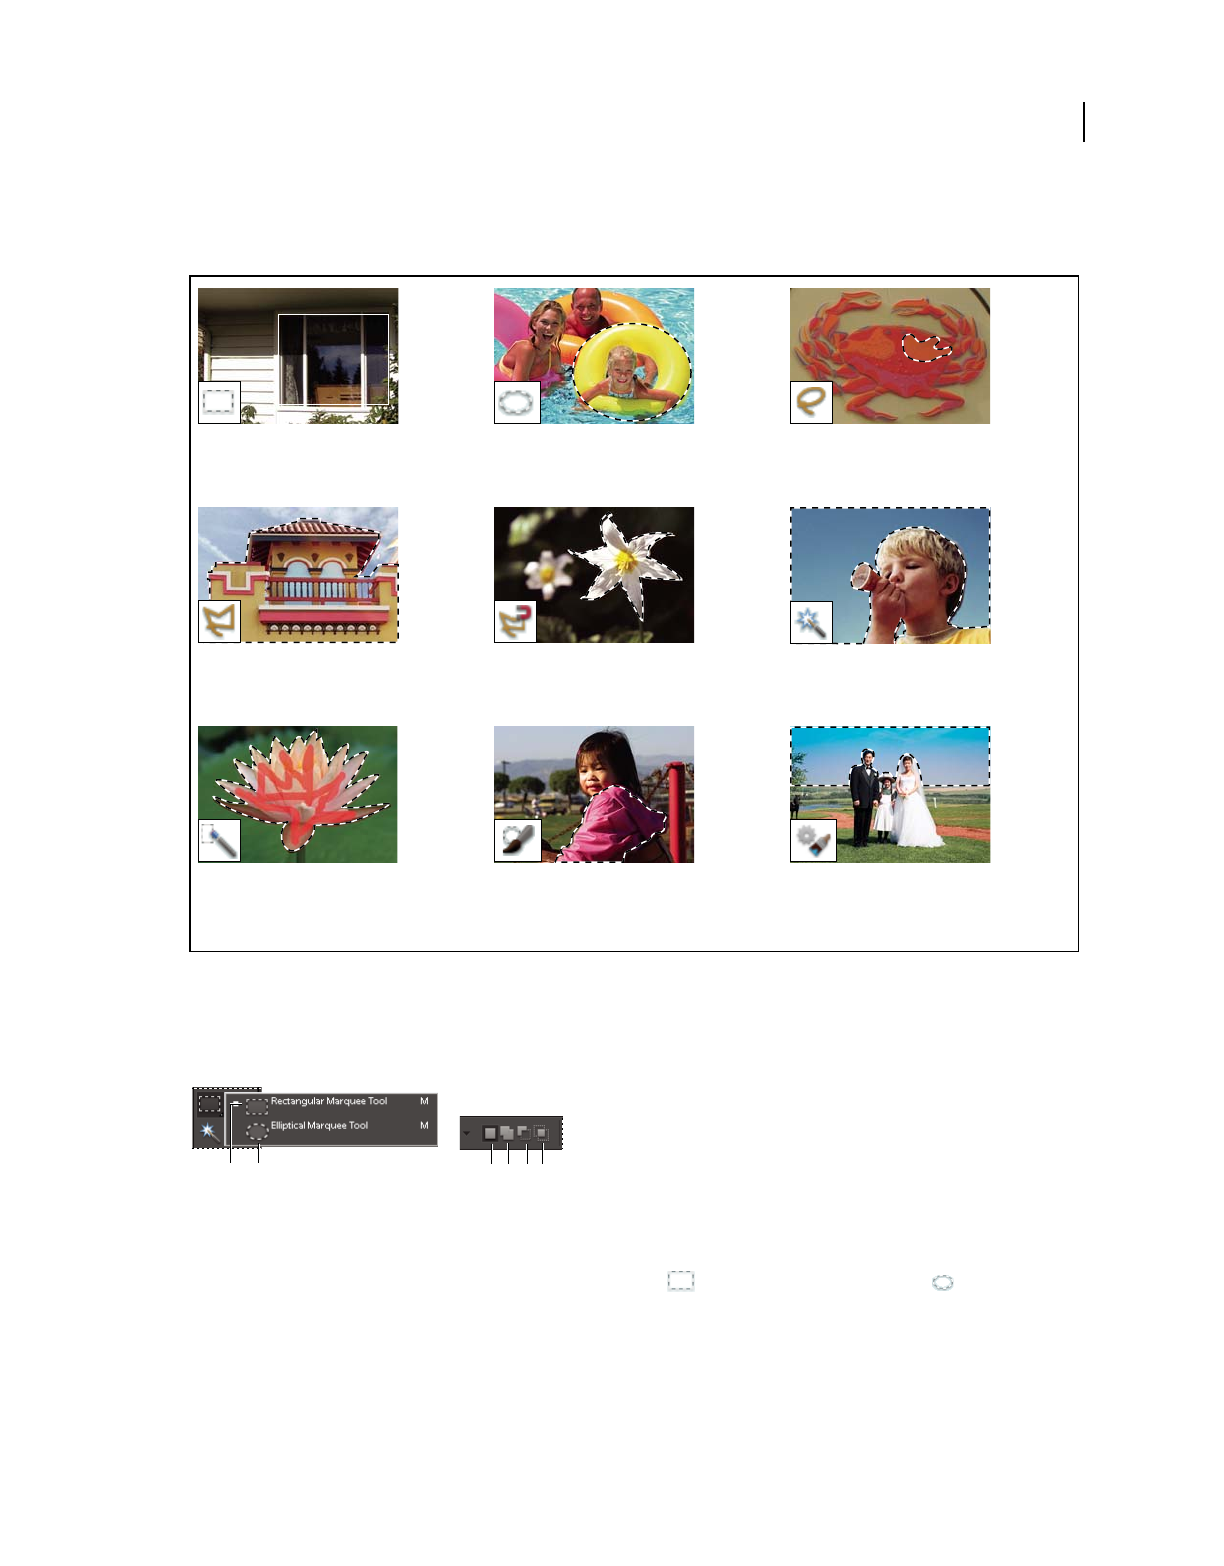
89
USING PHOTOSHOP ELEMENTS 9
Selecting parts of an image
Last updated 1/3/2012
About the selection tools
The selection tools are located in the Tools panel, which is located, by default, on the left side of your screen.
Use the Rectangular and Elliptical Marquee tools
The Rectangular Marquee tool draws square or rectangular selection borders, and the Elliptical Marquee tool draws
round or elliptical selection borders.
Rectangular and Elliptical Marquee tool options
A. Rectangular Marquee tool B. Elliptical Marquee tool C. New selection D. Add to selection E. Subtract from selection F. Intersect with
selection
1In the Edit workspace, select the Rectangular Marquee tool or the Elliptical Marquee tool in the toolbox.
2(Optional) Set marquee tool options in the options bar located above your image:
•Specify whether to create a new selection, add to a selection, subtract from a selection, or select an area intersected
by other selections.
•To soften the selection border so that it blends into the area outside the selection, enter a Feather value.
Rectangular Marquee tool Draws square or
rectangular selection borders.
Elliptical Marquee tool Draws round or
elliptical selection borders.
Lasso tool Draws freehand selection borders.
This tool is great for making very precise
selections.
Polygonal Lasso tool Draws multiple
straight-edged segments of a selection border.
Magnetic Lasso tool Draws a selection border
that automatically snaps to edges you drag
over in the photo.
Magic Wand tool Selects pixels of similar
color with one click.
Quick Selection tool Quickly and
automatically makes selection based on color
and texture when you click or click-drag an
area.
Selection Brush tool Automatically selects or
deselects the area you paint, depending on
whether you’re in selection or mask mode.
Smart Brush tool Applies color and tonal
adjustments and effects to a selection. The
tool automatically creates an adjustment
layer for non-destructive editing.
CD
ABE F
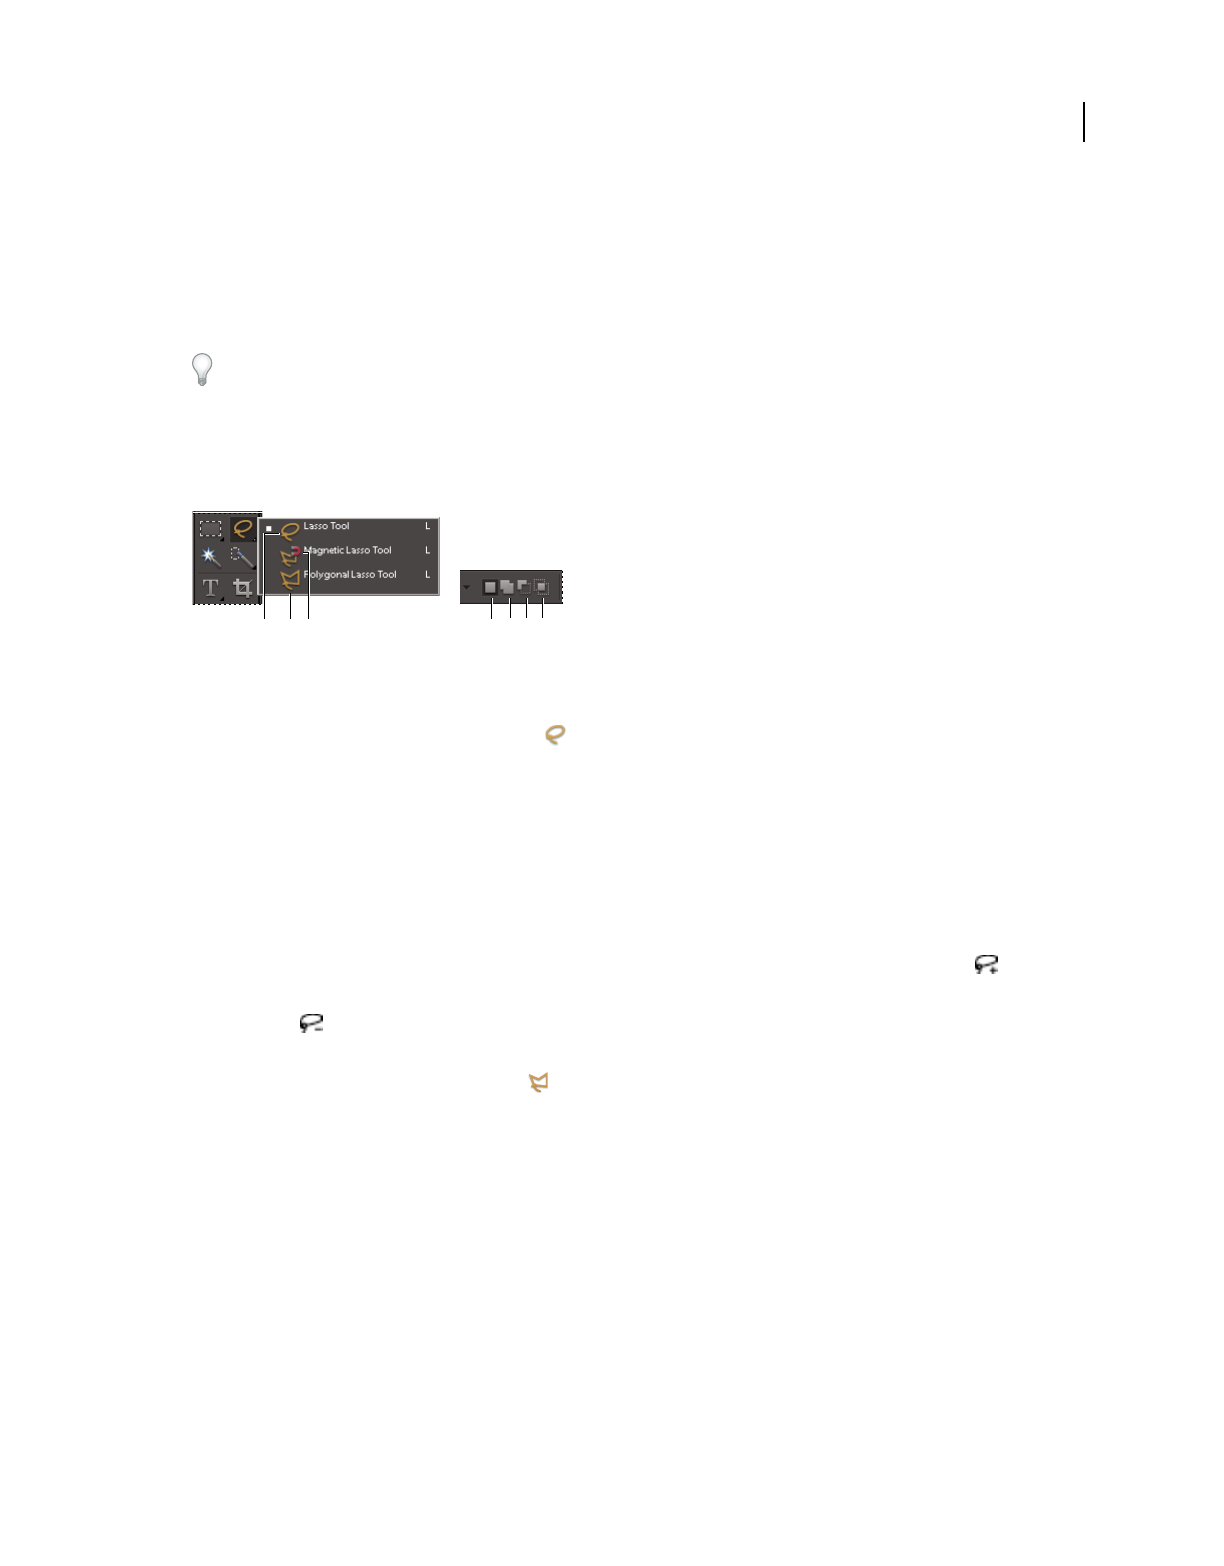
90
USING PHOTOSHOP ELEMENTS 9
Selecting parts of an image
Last updated 1/3/2012
•To smooth the edges of your selection, select Anti-aliased (Elliptical Marquee tool only).
•From the Mode pop-up menu, choose Normal to visually set the size and proportions of the selection border; Fixed
Ratio to set a width-to-height ratio for the selection border; or Fixed Size to specify the marquee’s height and width.
3Drag over the area you want to select. Hold down the Shift key as you drag to constrain the selection marquee to a
square or circle.
To reposition a marquee tool selection border, hold down the spacebar as you drag with the selection tool. Release the
spacebar once the selection border is in the correct area.
Use the Lasso tool
The Lasso tool draws freehand selection borders. This tool lets you make very precise selections.
Lasso tool options
A. Lasso tool B. Polygonal Lasso tool C. Magnetic Lasso tool D. New selection E. Add to selection F. Subtract from selection G. Intersect with
selection
1In the Edit workspace, select the Lasso tool from the toolbox.
2(Optional) Set Lasso tool options in the options bar located above your image:
•Specify whether to create a new selection, add to an existing selection, subtract from a selection, or select an area
intersected by other selections.
•To soften the selection border so that it blends into the area outside the selection, enter a Feather value.
•To smooth the edges of your selection, select Anti-aliased.
3Drag to draw a freehand selection border:
•To add to the selection, release the mouse button; then press Shift and, when the pointer changes to , drag.
•To subtract from the selection, release the mouse button; then press Alt (Option in Mac OS) and when the pointer
changes to
, drag.
•To add straight-edge segments, hold the mouse button and press Alt (Option in Mac OS); then release the mouse
button and, when the pointer changes to
, click where you want to position the end of the segment.
4To close the selection border, release the mouse button. A straight selection segment is drawn from where you
released the mouse button to the starting point of your selection.
Use the Polygonal Lasso tool
The Polygonal Lasso tool draws straight-edged segments of a selection border. You can create as many segments as
you need to draw a selection border.
A B D E F G
C
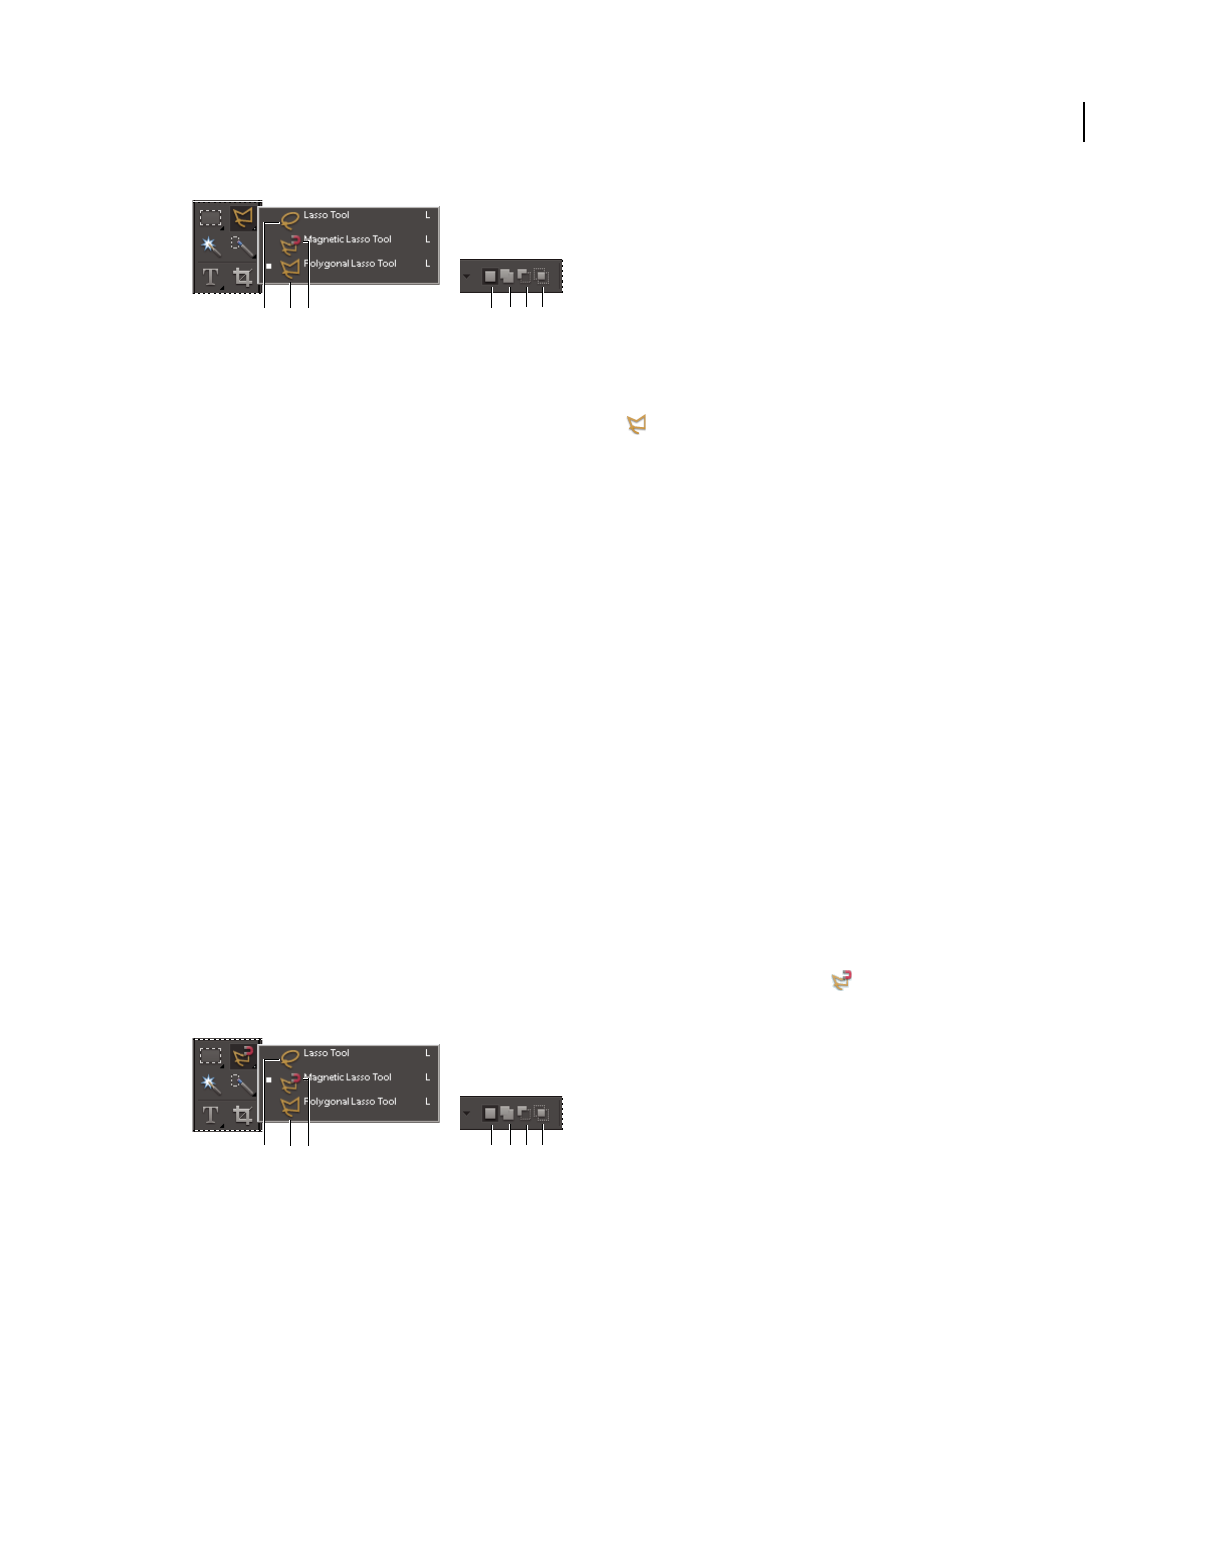
91
USING PHOTOSHOP ELEMENTS 9
Selecting parts of an image
Last updated 1/3/2012
Polygonal Lasso tool options
A. Lasso tool B. Polygonal Lasso tool C. Magnetic Lasso tool D. New selection E. Add to selection F. Subtract from selection G. Intersect with
selection
1In the Edit workspace, select the Polygonal Lasso tool from the toolbox.
2(Optional) Set Polygonal Lasso tool options in the options bar located above your image:
•Specify whether to create a new selection, add to an existing selection, subtract from a selection, or select an area
intersected by other selections.
•To soften the selection border so that it blends into the area outside the selection, enter a Feather value.
•To smooth the edges of your selection, select Anti-aliased.
3Click where you want the first straight segment to begin, and click a second time where you want the segment to
end and the next one to begin. Continue clicking to create segments.
If you make a mistake, press the Delete key to erase segments. You can switch from creating straight-edge segments to
drawing freehand by pressing Alt (Option in Mac OS).
4Close the selection border by doing one of the following:
•Position the pointer over the starting point and click. A closed circle appears next to the pointer when you are over
the starting point.
•If the pointer is not over the starting point, double-click, or Ctrl (Command in Mac OS) + click. A straight selection
segment is drawn from your pointer to the starting point of your selection.
Use the Magnetic Lasso tool
The Magnetic Lasso tool draws a selection border that automatically snaps to the edges of objects you drag over in the
photo. This makes it easy to draw precise selection borders. The Magnetic Lasso tool
is useful for quickly selecting
objects with complex edges set against high-contrast backgrounds.
Magnetic Lasso tool options
A. Lasso tool B. Polygonal Lasso tool C. Magnetic Lasso tool D. New selection E. Add to selection F. Subtract from selection G. Intersect with
selection
1In the Edit workspace, select the Magnetic Lasso tool from the toolbox.
To switch between the Magnetic Lasso and other lasso tools when the Magnetic Lasso tool is selected, do one of the
following:
•To activate the Lasso tool, press Alt (Option in Mac OS) and drag.
•To activate the Polygonal Lasso tool, press Alt (Option in Mac OS) and click.
A B D E F G
C
A B D E F G
C
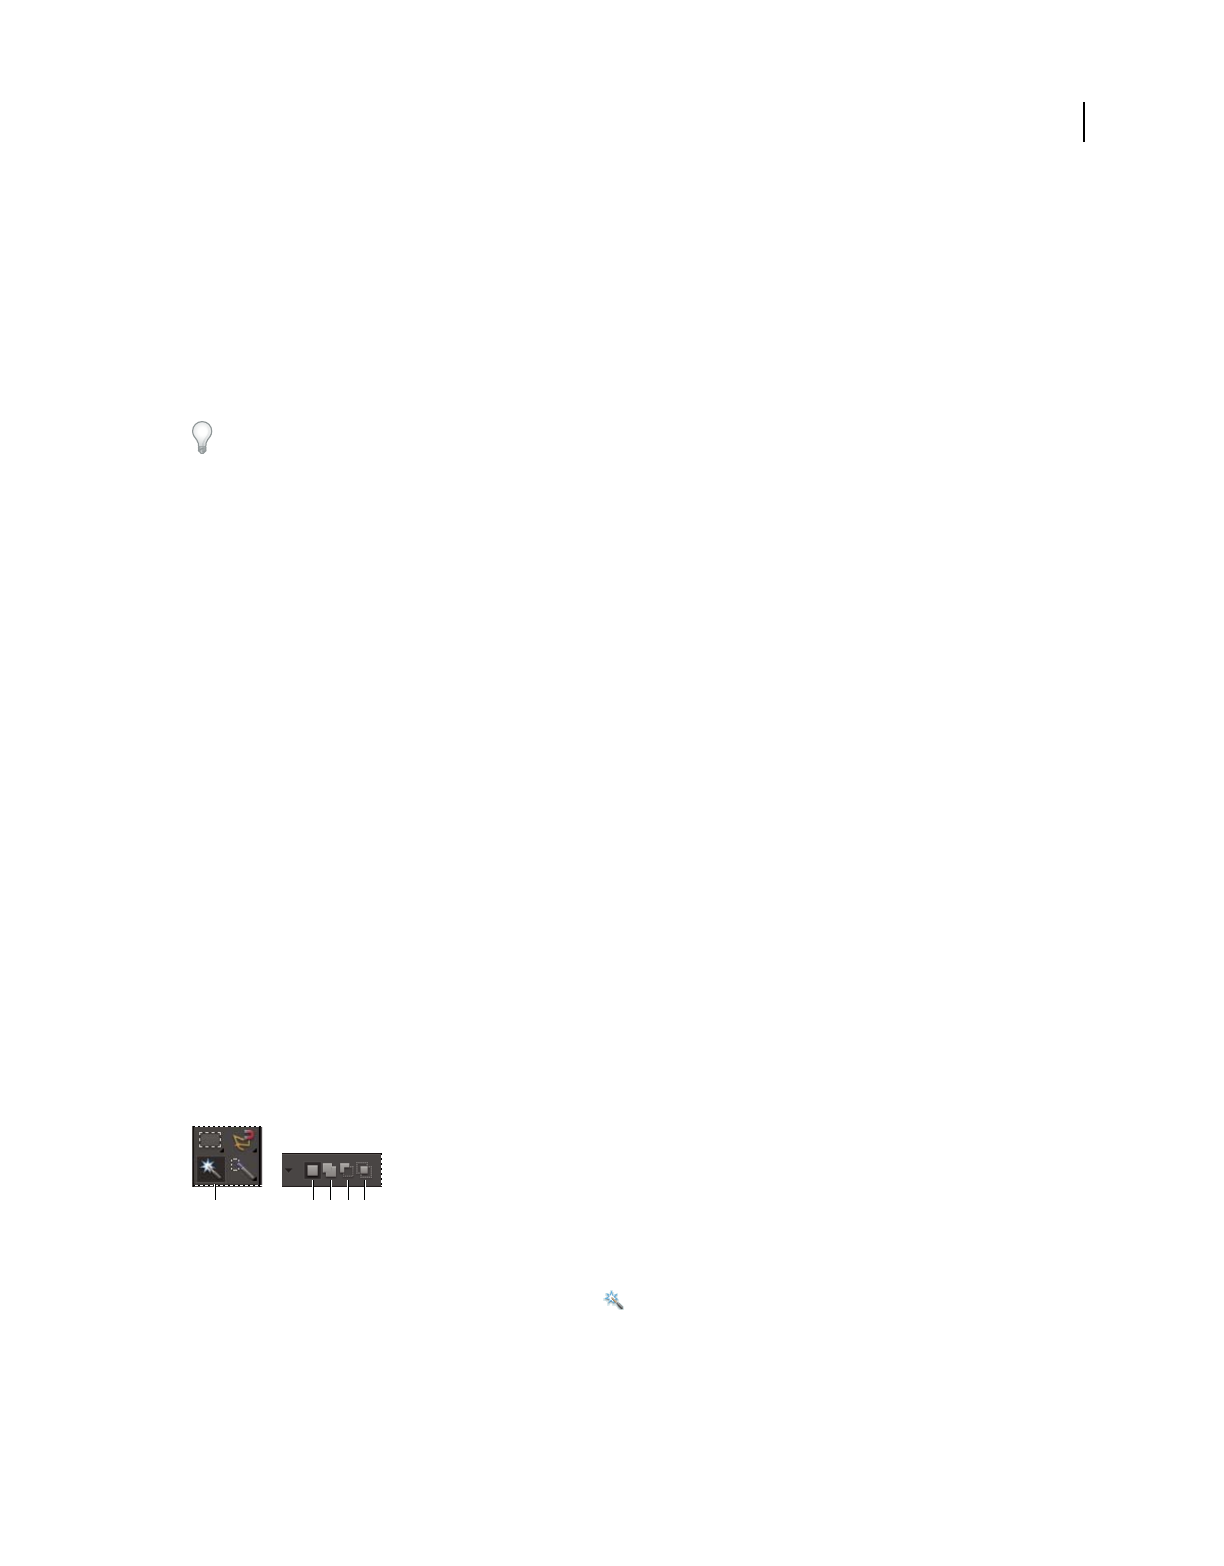
92
USING PHOTOSHOP ELEMENTS 9
Selecting parts of an image
Last updated 1/3/2012
2(Optional) Set Magnetic Lasso tool options in the options bar located above your image:
•Specify whether to create a new selection, add to an existing selection, subtract from a selection, or select an area
intersected by other selections.
•To soften the selection border so that it blends into the area outside the selection, enter a Feather value.
•To smooth the edges of your selection, select Anti-aliased.
•To specify the area of edge detection, enter a pixel value between 1 and 256 for Width. The tool detects edges only
within the specified distance from the pointer.
To change the Magnetic Lasso pointer so that it indicates the area of edge detection (the Width value), press the Caps
Lock key.
•To specify the Magnetic Lasso tool’s sensitivity to edges in the photo, enter a value between 1% and 100% for Edge
Contrast. A higher value detects only edges that contrast sharply with their surroundings; a lower value detects
lower-contrast edges.
•To specify the rate at which the Magnetic Lasso tool sets fastening points, enter a value between 0 and 100 for
Frequency. A higher value anchors the selection border in place more quickly.
3Add segments of a selection border by doing one of the following:
•Click points along the edge.
•Drag along the edge while pressing the mouse button.
The selection border snaps to the edge in the photo. If the border doesn’t snap to the desired edge, click once to add a
point manually; then continue tracing the border and clicking points as needed. If you make a mistake, press the Delete
key to erase points along the border.
4Close the selection border by doing one of the following:
•To close the border manually, drag back over the starting point and click. A closed circle appears next to the pointer
when you are over the starting point.
•To close the border with a freehand magnetic segment, double-click or press Enter.
•To close the border with a straight segment, double-click while pressing Alt (Option in Mac OS).
Use the Magic Wand tool
The Magic Wand tool selects pixels within a similar color range with one click. You specify the color range, or
tolerance, for the Magic Wand tool’s selection. Use the Magic Wand tool when you have an area of similar colors, like
a blue sky.
Magic Wand tool options
A. Magic Wand tool B. New selection C. Add to selection D. Subtract from selection E. Intersect with selection
1In the Edit workspace, select the Magic Wand tool .
2(Optional) Set Magic Wand tool options in the options bar located above your image:
•For Tolerance, enter a value between 0 to 255. Enter a low value to select colors very similar to the pixel you click,
or enter a higher value to select a broader range of colors.
•To define a smooth selection edge, select Anti-aliased.
B C
AD E
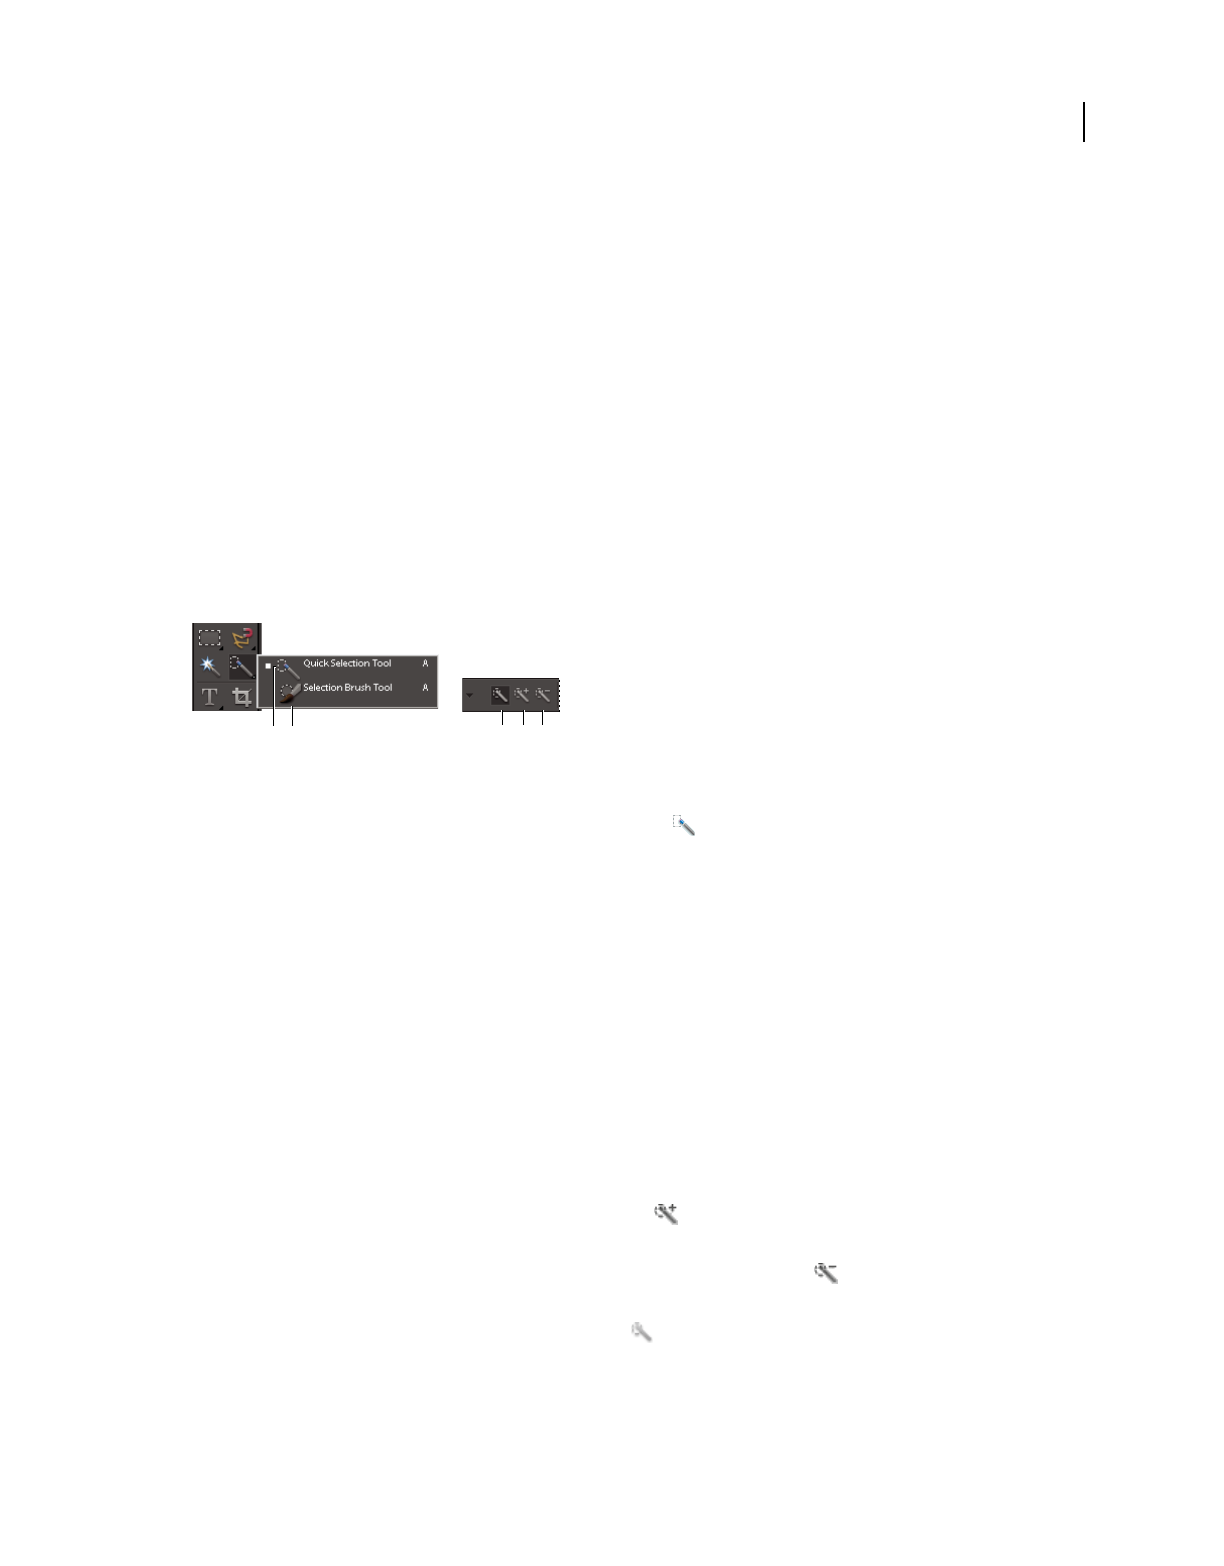
93
USING PHOTOSHOP ELEMENTS 9
Selecting parts of an image
Last updated 1/3/2012
•To select only adjacent areas using the same colors, select Contiguous. When this option is deselected, pixels using
the same colors are selected throughout the entire photo.
•To select colors using data from all the visible layers, select Sample All Layers. When this option is deselected, the
Magic Wand tool selects colors from only the active layer.
3In the photo, click the color you want to select.
4To add to the selection, Shift+click unselected areas. To remove an area from the selection, press Alt (Option in
Mac OS) and click the area you want to remove.
Use the Quick Selection tool
The Quick Selection tool makes a selection based on color and texture similarity when you click or click-drag the area
you want to select. The mark you make doesn’t need to be precise, because the Quick Selection tool automatically and
intuitively creates a border.
Note: The Smart Brush tool makes selections like the Quick Selection tool and simultaneously applies a color or tonal
adjustment. See “Apply the Smart Brush tools” on page 117.
Quick Selection Brush tool and Selection Brush tool options
A. Quick Selection tool B. Selection Brush tool C. New selection D. Add to selection E. Subtract from selection
1In the Edit workspace, select the Quick Selection Brush tool .
2In the options bar, choose one of the following:
New Selection Lets you draw a new selection. This option is selected by default.
Add To Selection Lets you add to an existing selection.
Subtract From Selection Lets you subtract from an existing selection. This option is only available after you make a
selection.
3Choose a brush from the Brush Picker in the options bar. If you want to select a large area, you can use a larger
brush. For more precise selections, choose a smaller brush size.
4Click or click-drag over the area that covers the range of colors in the object you want to select, and then release the
mouse button.
The selection border appears.
5Do any of the following to refine the selection:
•To add to the selection, click the Add To Selection button in the options bar, and click or click-drag across the
area you want to add.
•To remove an area from the selection, click the Subtract From Selection button in the options bar, and click or
click-drag across the area you want to subtract from the selection.
•To start a new selection, click the New Selection brush in the options bar, and click or draw to specify the new
selection area.
CD
A B E
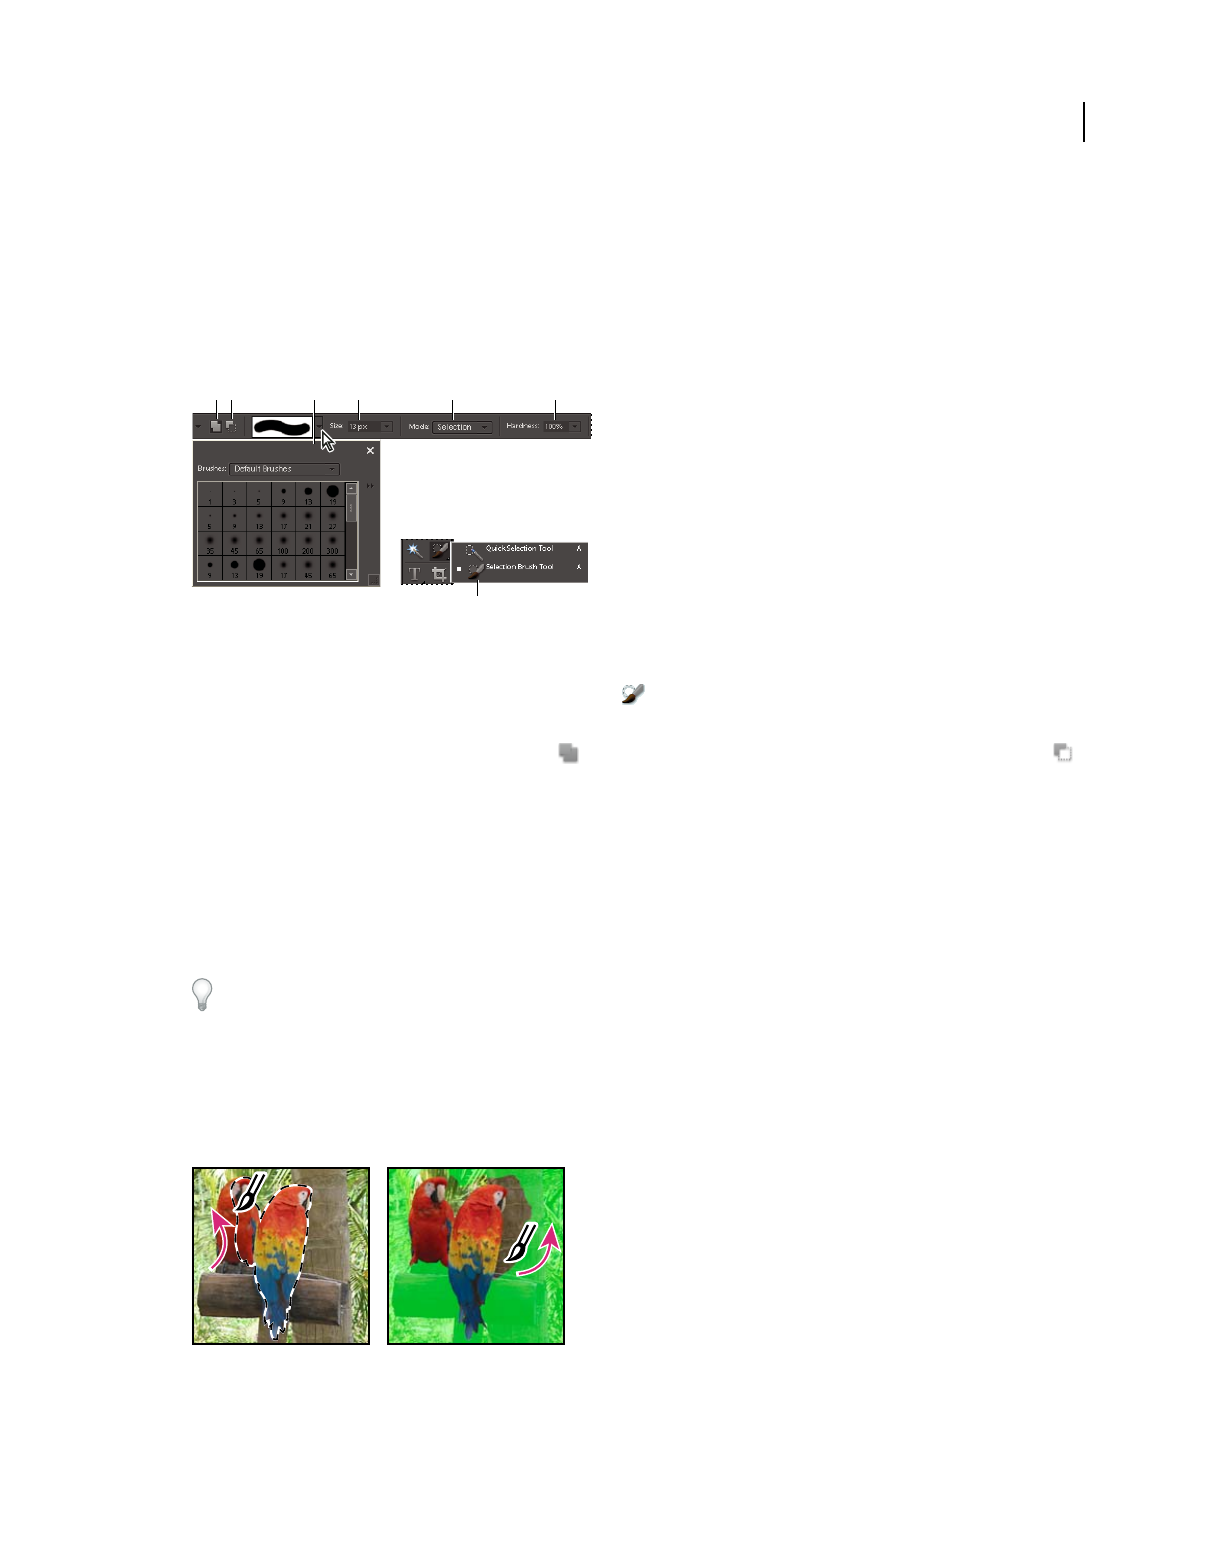
94
USING PHOTOSHOP ELEMENTS 9
Selecting parts of an image
Last updated 1/3/2012
Use the Selection Brush tool
The Selection Brush tool makes selections two ways: you can paint over the area you want to select in Selection mode,
or you can paint over areas you don’t want to select using a semiopaque overlay in Mask mode.
You can first make a rough selection with a marquee tool, Quick Selection tool, or other selection tool, and then fine-
tune your selection with the Selection Brush tool. You can add to the selection using the Selection Brush tool in
Selection mode, or subtract from it in Mask mode.
Selection Brush tool options
A. Add to selection B. Subtract from selection C. Brush pop-up panel D. Brush size E. Mode F. Hardness G. Selection Brush tool
1In the Edit workspace, select the Selection Brush tool from the toolbox. You may need to click the Quick
Selection tool in the toolbox and select the Selection Brush from the list of hidden tools that appears.
2By default, the tool is set to Add To Selection . To subtract from the selection, click Subtract From Selection
in the options bar.
3(Optional) Set Selection Brush tool options in the options bar located above your image:
•Choose a brush from the brush presets pop-up panel.
•Specify the brush size.
•Choose Selection (to add to the selection) or Mask (to subtract from the selection) from the Mode menu.
•Set the brush tip’s hardness to a value between 1% and 100%.
If you use a soft-edged brush with the Selection Brush tool, changing the Mode option to Mask can help you see the
soft edges of the selection.
•When using Mask mode, specify an Overlay Opacity between 1% and 100%.
•When using Mask mode, click the Overlay Color swatch and select a color in the Color Picker to set the mask color.
This is useful when the mask color (Overlay Color) is too similar to the colors in the photo.
4Draw in your photo to select or deselect areas.
Adding to a selection while in Selection mode (left) and subtracting from a selection while in Mask mode (right)
A DDB C
G
E F
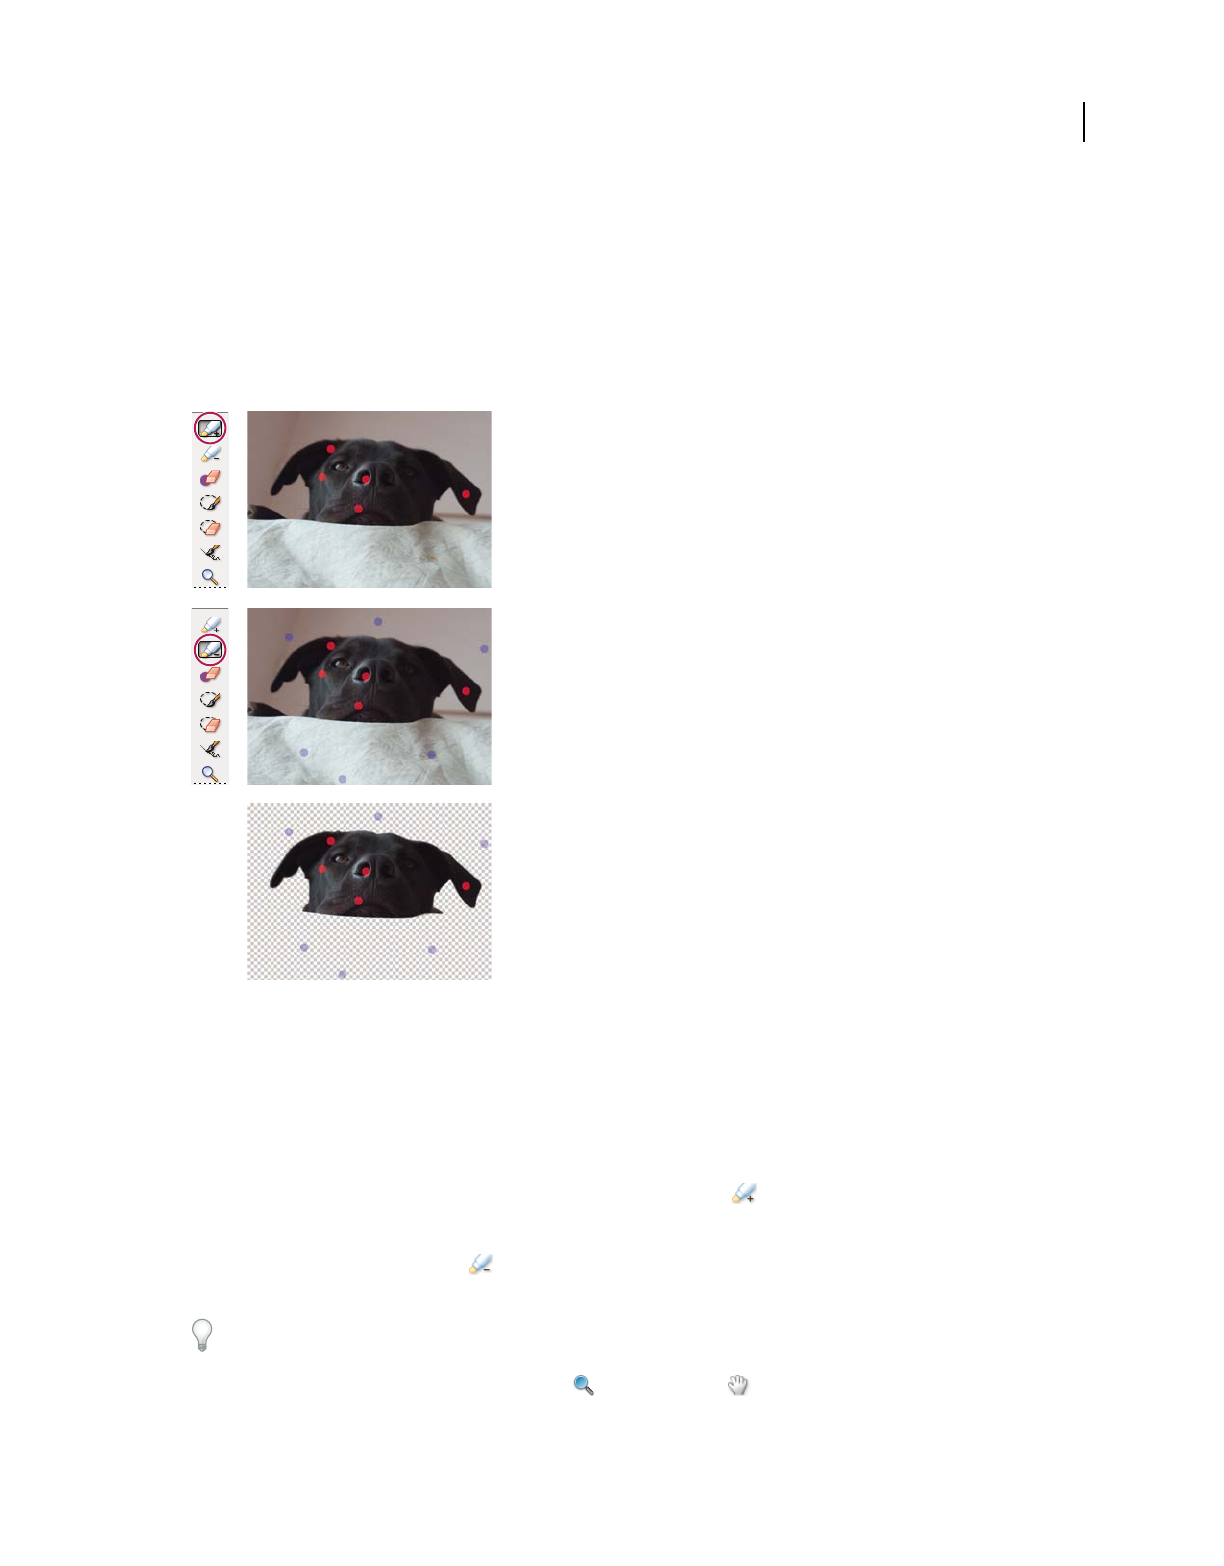
95
USING PHOTOSHOP ELEMENTS 9
Selecting parts of an image
Last updated 1/3/2012
Use the Magic Extractor
Use the Magic Extractor to make accurate selections based on the appearance of foreground and background areas that
you specify. You can specify these areas by placing colored marks in the areas you want to select. After you mark the
areas and close the dialog box, only the foreground area appears in the photo in the Edit workspace.
The Magic Extractor makes it easy to select people or objects so that you can superimpose them on other backgrounds.
For example, you can remove yourself from a photo of you on your bicycle at home, and superimpose it on a photo of
cyclists in the Tour de France. You can save the extracted image as a file that you can use again and again.
Using the Magic Extractor
A. Area you want to extract marked with red dots B. Background marked with blue dots C. Extracted image
1In the Edit workspace, open the photo containing the object you want to extract.
2To limit what appears in the Magic Extractor dialog box, make a preliminary selection using the Oval or
Rectangular selection tool.
3Choose Image > Magic Extractor.
The Magic Extractor dialog box opens with the Foreground Brush tool selected by default.
4Click multiple times or draw lines to mark the area you want to extract.
5Click the Background Brush tool and click multiple times or draw lines to mark the area that you do not want
included in your selection.
When selecting objects with varied colors and textures, drag across all the colors and textures to ensure a more
accurate selection.
6To help mark your selection, use the Zoom tool or the Hand tool to magnify and navigate around the photo.
Press Alt (Option in Mac OS) as you use the Zoom tool to zoom out.
A
B
C

96
USING PHOTOSHOP ELEMENTS 9
Selecting parts of an image
Last updated 1/3/2012
7To specify a different brush size or color, do one of the following:
•Choose a new size from the Brush Size menu.
•
Click the Foreground Color or Background Color swatch, choose a new color in the Color Picker, and then click OK.
8Click Preview to see the current selection.
9To specify preview settings, do one of the following:
•To change what is displayed in the preview area, choose either Selection Area or Original Photo from the Display
menu. Or press the X key on your keyboard to switch between the two views.
•To specify a different background, choose an option from the Background menu.
10 Do any of the following to fine-tune the selection, and then preview the results again:
•To add to or subtract from the selection, draw more dots or lines using either the Foreground or Background Brush
tool.
Note: When you change the foreground or background color, the related brush tool becomes active.
•To erase foreground or background dots, select the Point Eraser tool and click or drag over the marks you want
to remove.
•To add areas to a selection, select the Add To Selection tool , and click or drag over the area you want to add.
•To remove areas from the selection, select the Remove From Selection tool and drag over the areas you want
to remove.
•To smooth the edges of your foreground selection, select the Smoothing Brush tool and drag over the areas you
want to smooth.
•To soften the edges of your selection, specify a higher value in the Feather box.
•To fill remaining holes in the main selection, click Fill Holes.
•To separate and remove an area from the main selection, select the Remove From Selection Tool and drag a
line between the main selection and the area you want to remove. Then click Fill Holes.
•To remove fringe colors left between the foreground and background, click Defringe. To increase or decrease the
amount of fringe removed, specify a value from the Defringe Width menu.
11 Click OK to extract the selected areas. If you want to start over, click Reset to remove all marks.
Delete a selected area
If you delete a selection on a Background layer or a layer that uses the Lock Transparency option, the selected area is
replaced with the background color or checkerboard background pattern.
❖In the Edit workspace, do any of the following:
•Choose Edit > Delete to remove the selection. (If you delete a selection by mistake, you can choose Edit > Undo to
get it back.)
•Press the Backspace or Delete key to remove the selection.
•Choose Edit > Cut to cut the selection to the Clipboard. You can then paste it elsewhere.
More Help topics
“Understanding layers” on page 56
“Lock or unlock a layer” on page 61

97
USING PHOTOSHOP ELEMENTS 9
Selecting parts of an image
Last updated 1/3/2012
Select and deselect areas using commands
1Do any of the following in the Edit workspace:
•To select all pixels in a layer, select the layer in the Layers panel and choose Select > All.
•To deselect selections, choose Select > Deselect. This is the safest way to deselect the area.
•To reselect the most recent selection, choose Select > Reselect.
2To show or hide selection borders, choose View > Selection.
Note: You can also deselect by clicking anywhere in the photo outside the selected area. However, you might accidentally
make further selections if you’re using a selection tool that selects based on clicking, such as the Magic Wand tool.
Modifying selections
Move a selection border
Moving a selection border repositions just the border without altering the photo.
1Using any selection tool in the Edit workspace, click New Selection in the options bar, and position the pointer
inside an existing selection border. The pointer changes to indicate that you can move the selection .
Note: The New Selection option appears in the options bar when any selection tool is selected—except the Selection Brush
tool. Switch to another selection tool temporarily, if necessary, to select this option.
2Do one of the following:
•Drag the border to enclose a different area of the photo. You can drag a selection border beyond the canvas
boundaries; however, this makes it hard to get back. You can also drag the selection border to another image
window.
•To move the selection in 1-pixel increments, use an arrow key.
•To move the selection in 10-pixel increments, hold down Shift, and use an arrow key.
•To constrain the direction to multiples of 45°, begin dragging, and then hold down Shift as you continue to drag.
More Help topics
“Move a selection” on page 102
Invert a selection
Inverting a selection changes the unselected areas into selected areas, protecting the area you previously selected.
❖In a photo with an existing selection border, choose Select > Inverse.
You can use this command to easily select an object that appears against a solid-colored area. Select the solid color
using the Magic Wand tool, and then choose Select > Inverse.
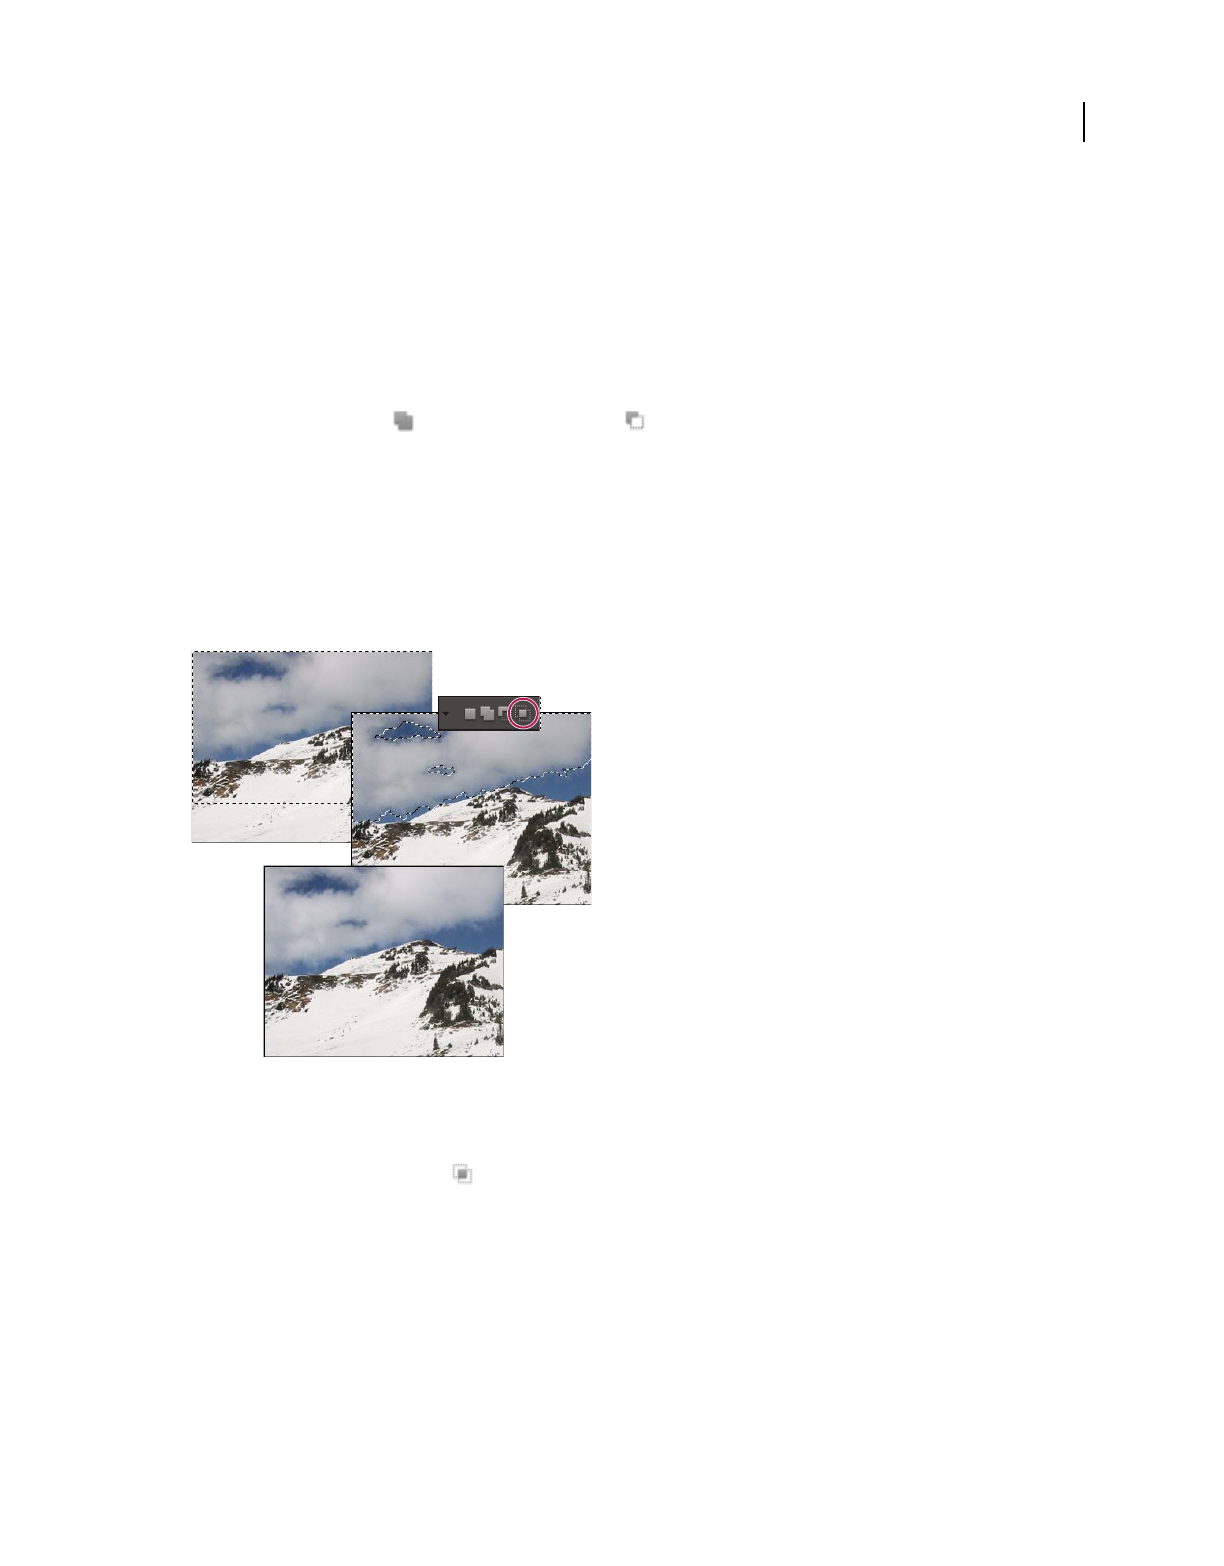
98
USING PHOTOSHOP ELEMENTS 9
Selecting parts of an image
Last updated 1/3/2012
Add to or subtract from a selection
You can add to or subtract from an existing selection to fine-tune selection borders. For example, you could make a
donut-shaped selection by first making a circular selection and then subtracting a circular selection within it.
❖In the Edit workspace, select a selection tool, and do one of the following:
•Hold down Shift (a plus sign appears next to the pointer) to add to the selection, or hold down Alt (Option in Mac
OS) to subtract (a minus sign appears next to the pointer) from a selection. Then select the area to add or subtract
and make another selection.
•Click Add To Selection or Subtract From Selection in the options bar, and make another selection. (The Add
To Selection and Subtract From Selection options appear in the options bar when any selection tool is selected.)
Select an area that intersects an existing selection
You can limit the area a selection affects. For example, in a picture of snow-capped mountains, you can select white
clouds in the sky without selecting parts of the white mountain below them by selecting the entire sky, and then using
the Magic Wand tool with Intersect With Selection selected and Contiguous deselected to select only the white areas
included within the existing sky selection.
Selecting the sky and top of mountains with the Rectangular Marquee tool (top). Selecting the Intersect With Selection option and using the
Magic Wand tool to select the clouds (middle). Resulting image after increasing the brightness of the clouds (bottom).
❖In the Edit workspace, select a selection tool, and do one of the following:
•Select Intersect With Selection in the options bar, and select an area that intersects the existing selection.
•Hold down Alt (Option in Mac OS) + Shift so that cross-hairs appear next to the pointer, and select an area that
intersects the existing selection.
Expand or contract a selection by a specific number of pixels
You can use commands in the Select menu to increase or decrease the size of an existing selection and to clean up stray
pixels left inside or outside a color-based selection.
1In the Edit workspace, use a selection tool to make a selection.
2Choose Select > Modify > Expand or Contract.
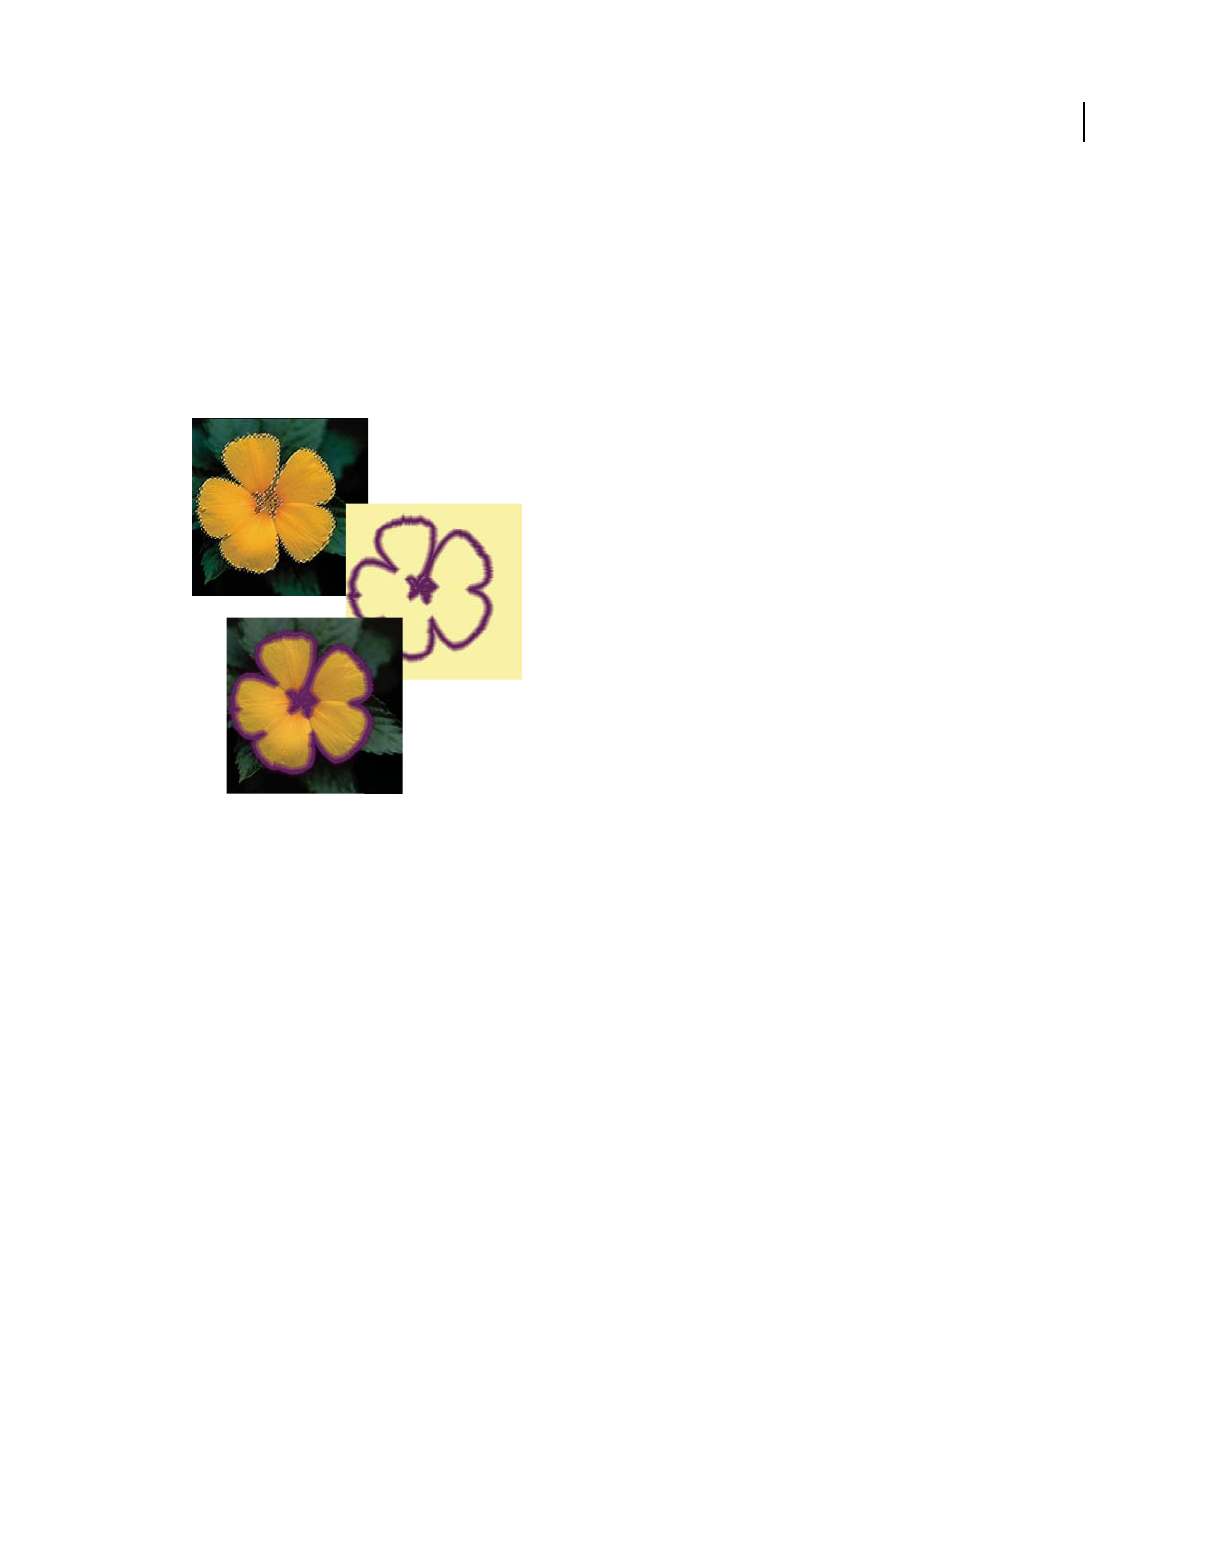
99
USING PHOTOSHOP ELEMENTS 9
Selecting parts of an image
Last updated 1/3/2012
3For Expand By or Contract By, enter a pixel value between 1 and 100, and click OK.
The selection border is moved outward or inward by the specified number of pixels. Any portion of the selection
border that runs along the canvas edge is unaffected.
Frame an existing selection with a new selection border
The Border command creates a soft-edged, anti-aliased selection border. When you add the new selection border, only
pixels between the two selection borders are selected.
Using the Border command to create a 4-pixel border selection (top). Copying the selection to a new layer and filling to make an outline of the
image (center). Filling the selection into the original image to create an outline around the image (bottom).
1In the Edit workspace, use a selection tool to make a selection.
2Choose Select > Modify > Border.
3Enter a value between 1 and 200 pixels in the Width text box, and click OK.
More Help topics
“Blur the edges of a selection by feathering” on page 101
Include areas of similar color in a selection
1In the Edit workspace, make a selection with a selection tool and do one of the following:
•Choose Select > Grow to include all adjacent pixels falling within the tolerance range specified in the options bar.
(You may have to switch to a selection tool that includes a tolerance range, such as the Magic Wand tool.) A higher
Tolerance value adds a broader range of colors.
•Choose Select > Similar to include pixels throughout the photo, not just adjacent ones, that fall within the tolerance
range.
2To increase the selection incrementally, choose either command multiple times.
Note: You cannot use the Grow and Similar commands on photos in bitmap mode.
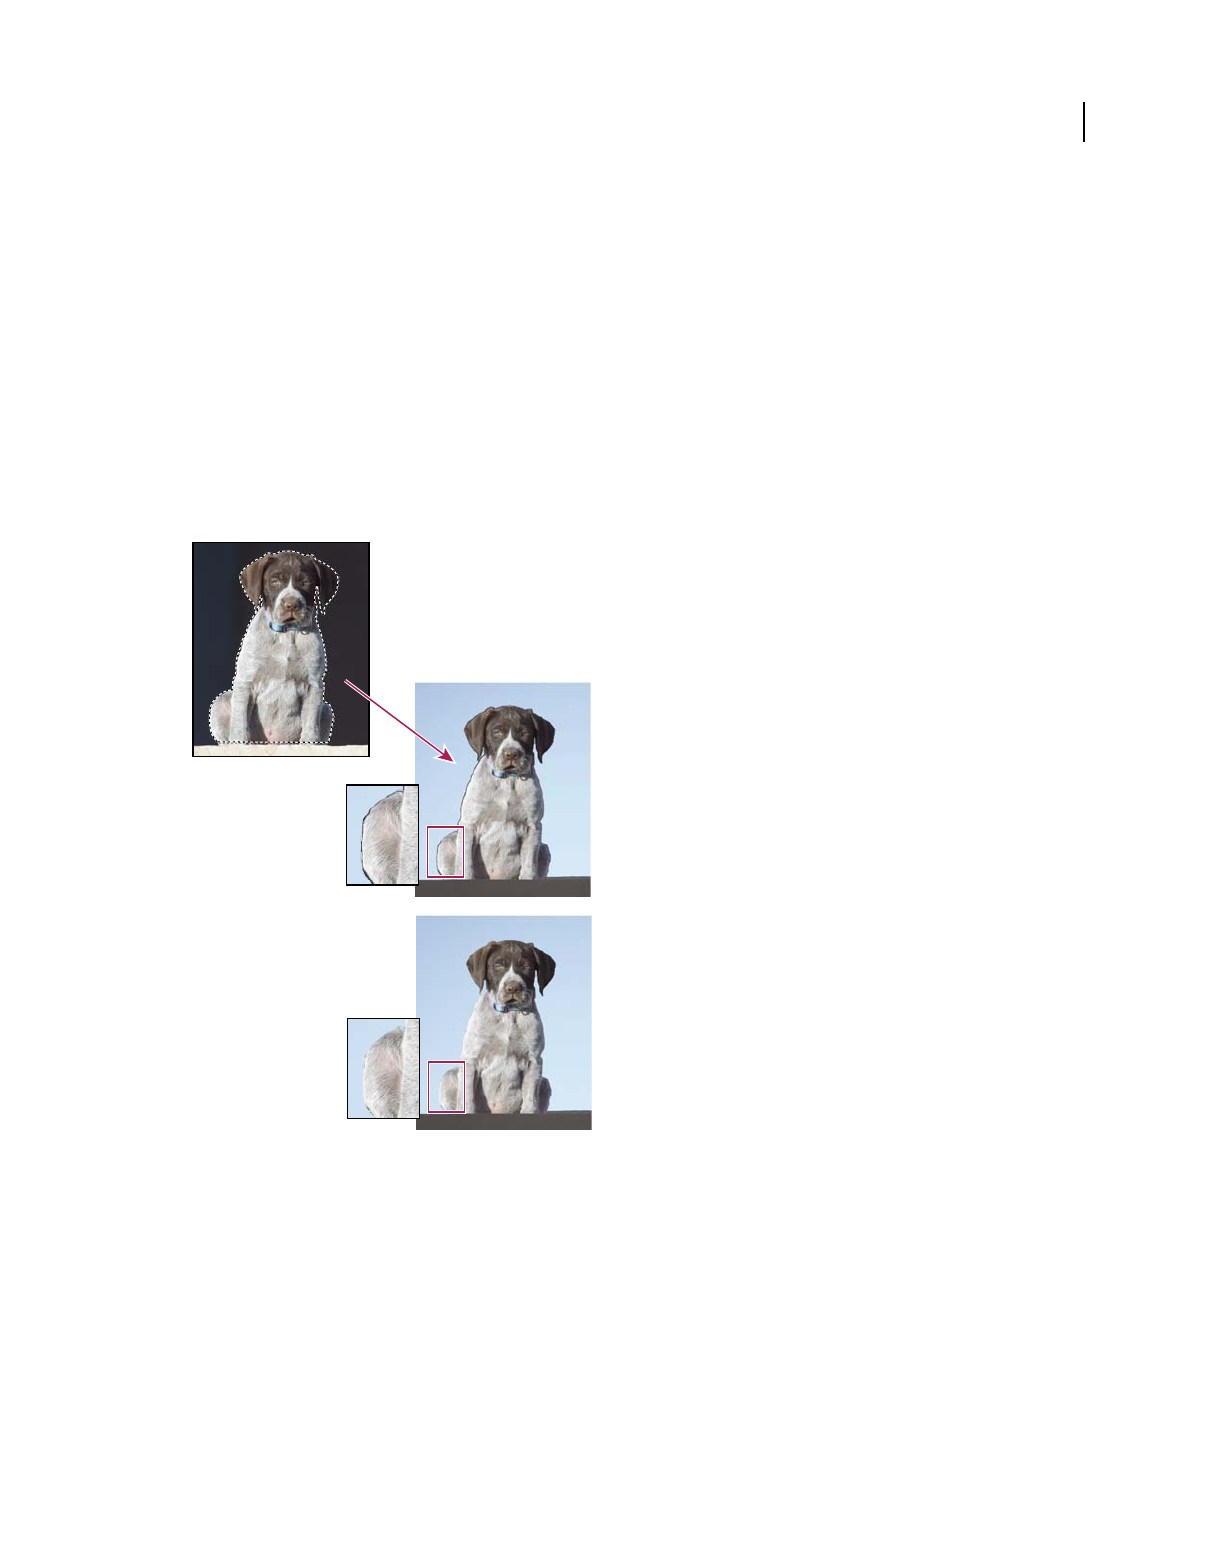
100
USING PHOTOSHOP ELEMENTS 9
Selecting parts of an image
Last updated 1/3/2012
Remove stray pixels from a color-based selection
The Smooth command searches around each selected pixel for other pixels within the specified color range and selects them.
1In the Edit workspace, make a selection with a selection tool and choose Select > Modify > Smooth.
2For Sample Radius, enter a pixel value between 1 and 100, and click OK.
Defringe a selection
When you move or paste a selection, some of the pixels surrounding the selection border are included with the
selection. These extra pixels can result in a fringe or halo around the edges of the selection. The Defringe Layer
command replaces the color of any fringe pixels with the colors of nearby pixels containing pure colors (those without
background color). For example, if you select a yellow object on a blue background and then move the selection, some
of the blue background is moved with the object. Defringe Layer replaces the blue pixels with yellow pixels.
Dog selected and copied to a new image where artifacts from the dark background are visible (top). Image after using the Defringe Layer
command (bottom).
1Copy and paste a selection into a new or existing layer.
2Choose Enhance > Adjust Color > Defringe Layer.
3In the Defringe dialog box, type the number of pixels you’d like to replace around the object. A value of 1 or 2 should
be sufficient.
4Click OK.
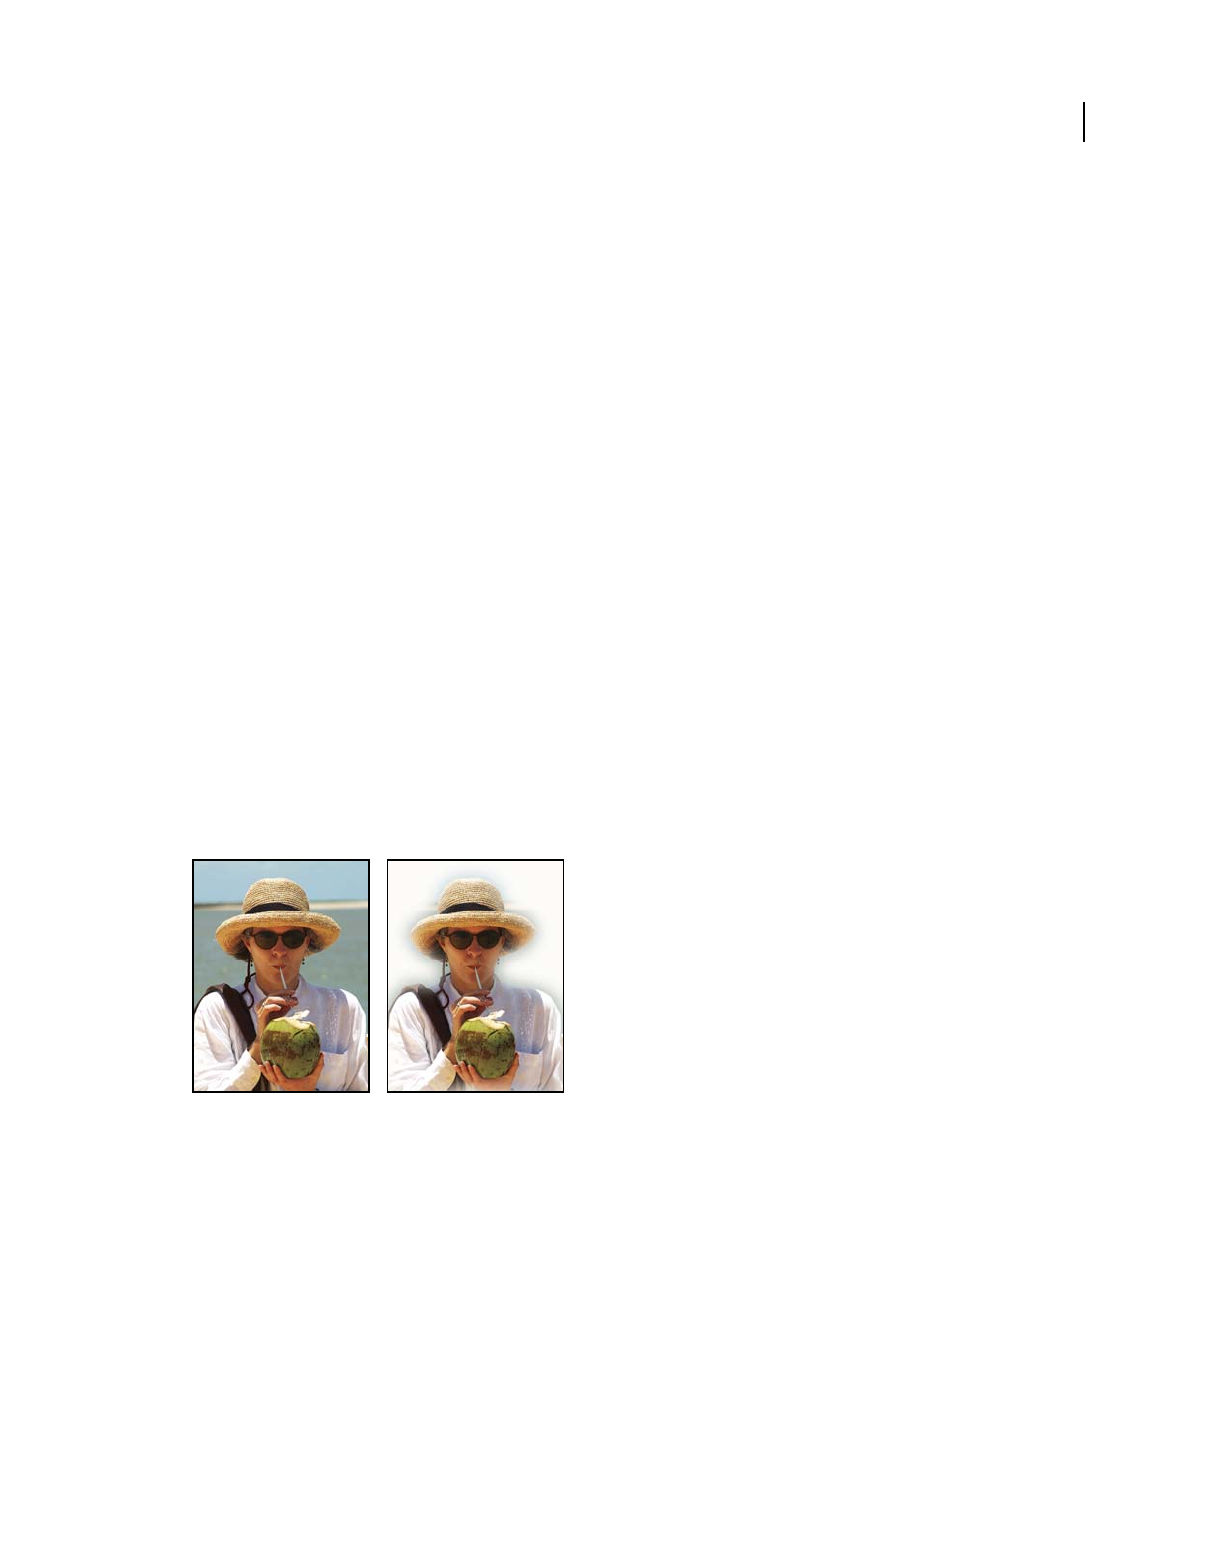
101
USING PHOTOSHOP ELEMENTS 9
Selecting parts of an image
Last updated 1/3/2012
Smoothing selection edges with anti-aliasing and
feathering
Smooth the edges of a selection by anti-aliasing
You can smooth the hard edges of a selection by anti-aliasing or feathering. Anti-aliasing smoothes the jagged edges
of a selection by softening the color transition between edge pixels and background pixels. Because only the edge pixels
change, no detail is lost. Anti-aliasing is useful when cutting, copying, and pasting selections to create composite
images.
You can select anti-aliasing with the Lasso, Polygonal Lasso, Magnetic Lasso, Elliptical Marquee, and Magic Wand
tools. To anti-alias, you must select the Anti-Alias option before making the selection; you cannot add anti-aliasing to
an existing selection.
1In the Edit workspace, select the Lasso, Polygonal Lasso, Magnetic Lasso, Elliptical Marquee, or Magic Wand tool.
2Select Anti-aliased in the options bar.
3Make a selection in the image window.
Blur the edges of a selection by feathering
❖You can smooth the hard edges of a selection by feathering. Feathering blurs edges by building a transition between
the selection and surrounding pixels. This blurring can cause some loss of detail at the edge of the selection.
You can create a feathered selection with the Elliptical Marquee, Rectangular Marquee, Lasso, Polygonal Lasso, or
Magnetic Lasso tool. You can also add feathering to an existing selection by using the Select menu. Feathering effects
are apparent when you move, cut, copy, or fill the selection.
Original image (left), and after making a feathered selection, applying the Inverse command, and filling with white (right)
Define a feathered edge for a selection tool
1In the Edit workspace, do one of the following:
•Select any of the lasso or marquee tools from the toolbox, and enter a Feather value in the options bar to define the
width of the feathering. The feathering begins at the selection border.
•Select the Selection Brush tool, and select a soft-edged brush from the brushes pop-up panel in the options bar.
2Make a selection in the image window.
Define a feathered edge for an existing selection
1In the Edit workspace, use a selection tool from the toolbox to make a selection.
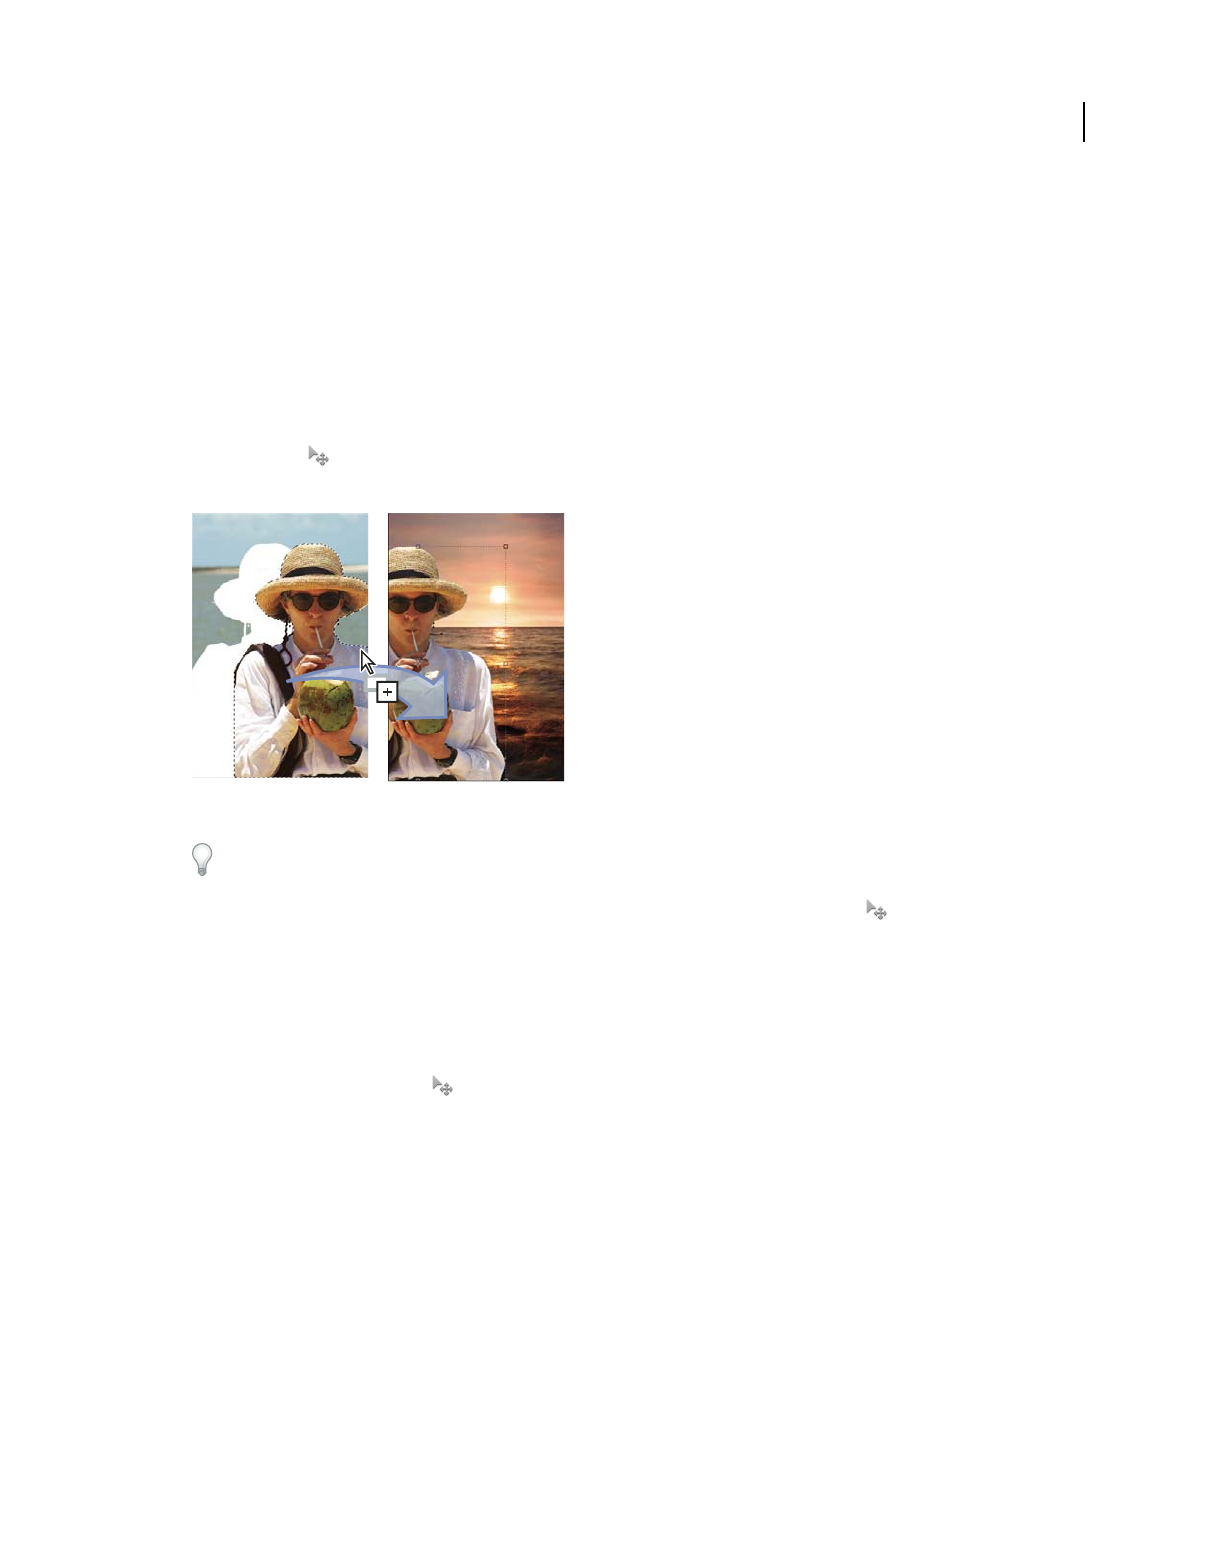
102
USING PHOTOSHOP ELEMENTS 9
Selecting parts of an image
Last updated 1/3/2012
2Choose Select > Feather.
3Type a value between .2 and 250 in the Feather Radius text box, and click OK. The feather radius defines the width
of the feathered edge.
Moving and copying selections
Move a selection
The Move tool lets you cut and drag a pixel selection to a new location in the photo. You can also use the tool to
move or copy selections between photos and between photos in other applications.
Moving a selection from one photo into another using the Move tool
To activate the Move tool when another tool is selected, hold down Ctrl (Command in Mac OS). (This technique does
not work with the Hand tool.)
1In the Edit workspace, make a selection with a selection tool and select the Move tool from the toolbox.
2(Optional) Change Move tool settings in the options bar.
3Move the pointer inside the selection border, and drag the selection to a new position. If you’ve selected multiple
areas, all pixel selections move as you drag.
Move tool options
When you select the Move tool , you can change the following settings in the options bar:
Auto Select Layer Selects the topmost layer that has pixels under the Move tool, rather than the selected layer.
Show Bounding Box Displays the bounding box around the selected item. The boxes on the sides and corners of the
selection border allow you to resize the selection.
Show Highlight On Rollover Highlights individual layers as the mouse hovers over the image. Click on a highlighted
layer to select and move it. Layers that are already selected do not highlight on rollover.
Arrange menu Moves the selected layer in front, in between, or in back of other layers. Options include Bring To
Front, Bring Forward, Send Backward, and Send To Back. To arrange a layer, select the layer, and then choose an item
from the Arrange menu.
Align menu Aligns the selected layers. Options include Top Edges, Vertical Centers, Bottom Edges, Left Edges,
Horizontal Centers, and Right Edges. Multiple layers can be aligned simultaneously. To align layers, select a layer, hold
down Shift, select another layer, and then choose an item from the Align menu.

103
USING PHOTOSHOP ELEMENTS 9
Selecting parts of an image
Last updated 1/3/2012
Distribute menu Spaces selected layers apart. Options include Top Edges, Vertical Centers, Bottom Edges, Left Edges,
Horizontal Centers, and Right Edges. Multiple layers can be spaced simultaneously. To space layers apart, select a
layer, hold down Shift, select another layer, and then choose an item from the Distribute menu.
Copying selections or layers
You can copy and paste selections using the Move tool or the Copy, Copy Merged, Cut, Paste, or Paste Into Selection
commands in the Edit menu.
Keep in mind that when a selection or layer is pasted between photos with different resolutions, the pasted data retains
its original pixel dimensions. This can make the pasted portion appear out of proportion to the new image. Use the
Image
> Resize > Image Size command to make the source and destination photos the same resolution before copying
and pasting.
Selections that you cut or copy are stored in the Clipboard. Only one selection is stored in the Clipboard at a time.
When you exit Photoshop Elements, anything in the Clipboard is lost unless Export Clipboard is selected in the
General Preferences.
Copy selections with the Move tool
When copying between photos, drag the selection from the active image window into the other image window. A
border highlights the image window when you can drop the selection into it.
1Select the part of the image you want to copy.
2In the Edit workspace, select the Move tool from the toolbox.
3Press Alt (Option in Mac OS) while dragging the selection you want to copy and move.
4To make additional copies of the same selection, do one of the following:
•Hold down Alt (Option in Mac OS) while dragging the selection to each new location.
•To offset the duplicate by 1 pixel, hold down Alt (Option in Mac OS), and press an arrow key. (This moves the pixels
and copies the pixels, creating a blur effect.)
•To offset the duplicate by 10 pixels, press Alt (Option in Mac OS) + Shift and press an arrow key. (This moves the
pixels rather than copying them.)
Copy a selection using commands
1In the Edit workspace, use a selection tool to select the area you want to copy.
2Do one of the following:
•Choose Edit > Copy to copy the selection to the Clipboard.
•Choose Edit > Copy Merged to copy all layers in the selected area to the Clipboard.
When you exit Photoshop Elements, anything in the Clipboard is lost unless Export Clipboard is selected in the
General Preferences.
Paste one selection into another
You can use the Paste Into Selection command to paste one selection into another. This command lets you take
advantage of elements within the selected area and prevent the pasted image from looking flat and unnatural. For
example, you can use a Hard Light blending mode at 85% opacity to retain the reflection in a pair of sunglasses. When
using blending modes this way, you need to create a new layer and paste the selection into that layer.
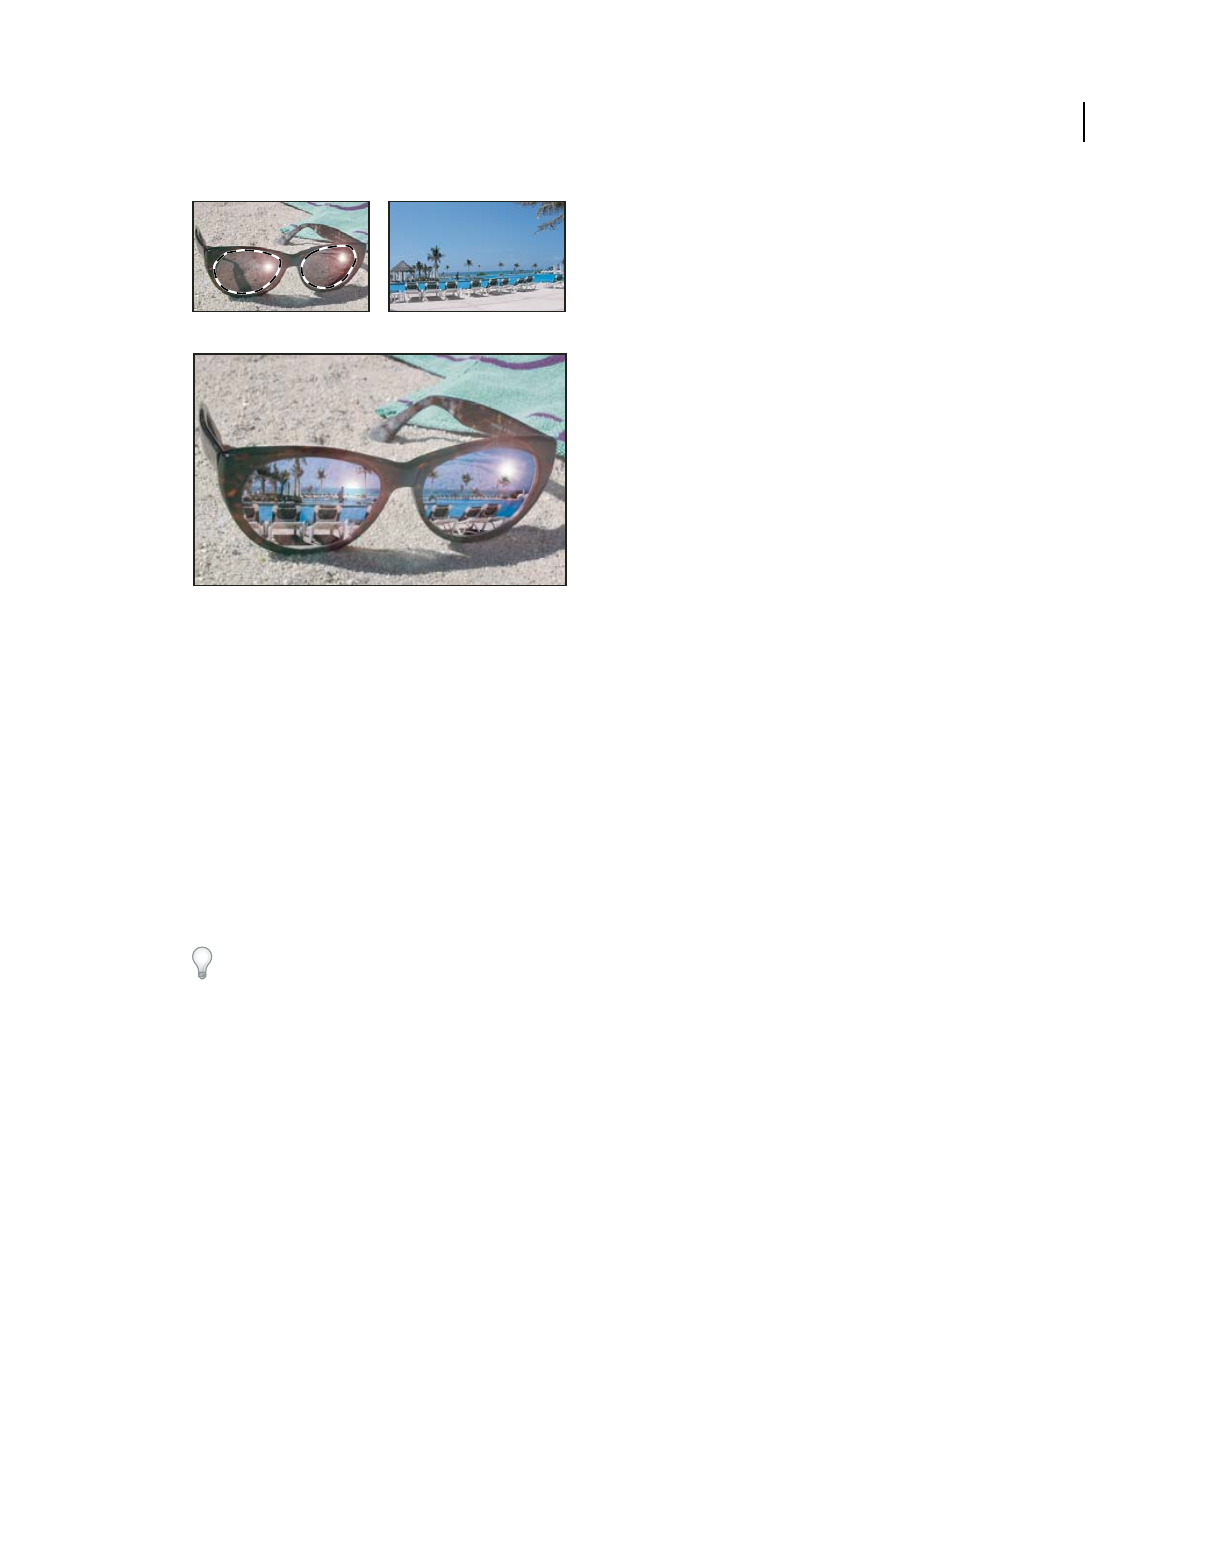
104
USING PHOTOSHOP ELEMENTS 9
Selecting parts of an image
Last updated 1/3/2012
Copying a selection from one image to another
A. Part of the original photo selected B. Photo to copy and paste into original C. Resulting image
1In the Edit workspace, use the Copy command to copy the part of the photo you want to paste. (You can even copy
from photos in other applications.)
2Make a selection in the photo into which you want to paste the copied photo.
Note: The copied photo appears only within the selection border. You can move the copied photo within the border, but
if you move it completely out of the border, it won’t be visible.
3Choose Edit > Paste Into Selection.
4With your pointer within the selection border, drag the pasted image to the proper location.
5When you’re satisfied with the results, deselect the pasted image to commit the changes.
To activate the Move tool when another tool is selected, hold down Ctrl (Command in Mac OS). (This technique does
not work with the Hand tool.)
Saving selections
Save, load, or delete a selection
Saving a selection allows you to edit a selected area of a photo at a later time. You can work on other parts of the photo
before loading the saved selection.
AB
C
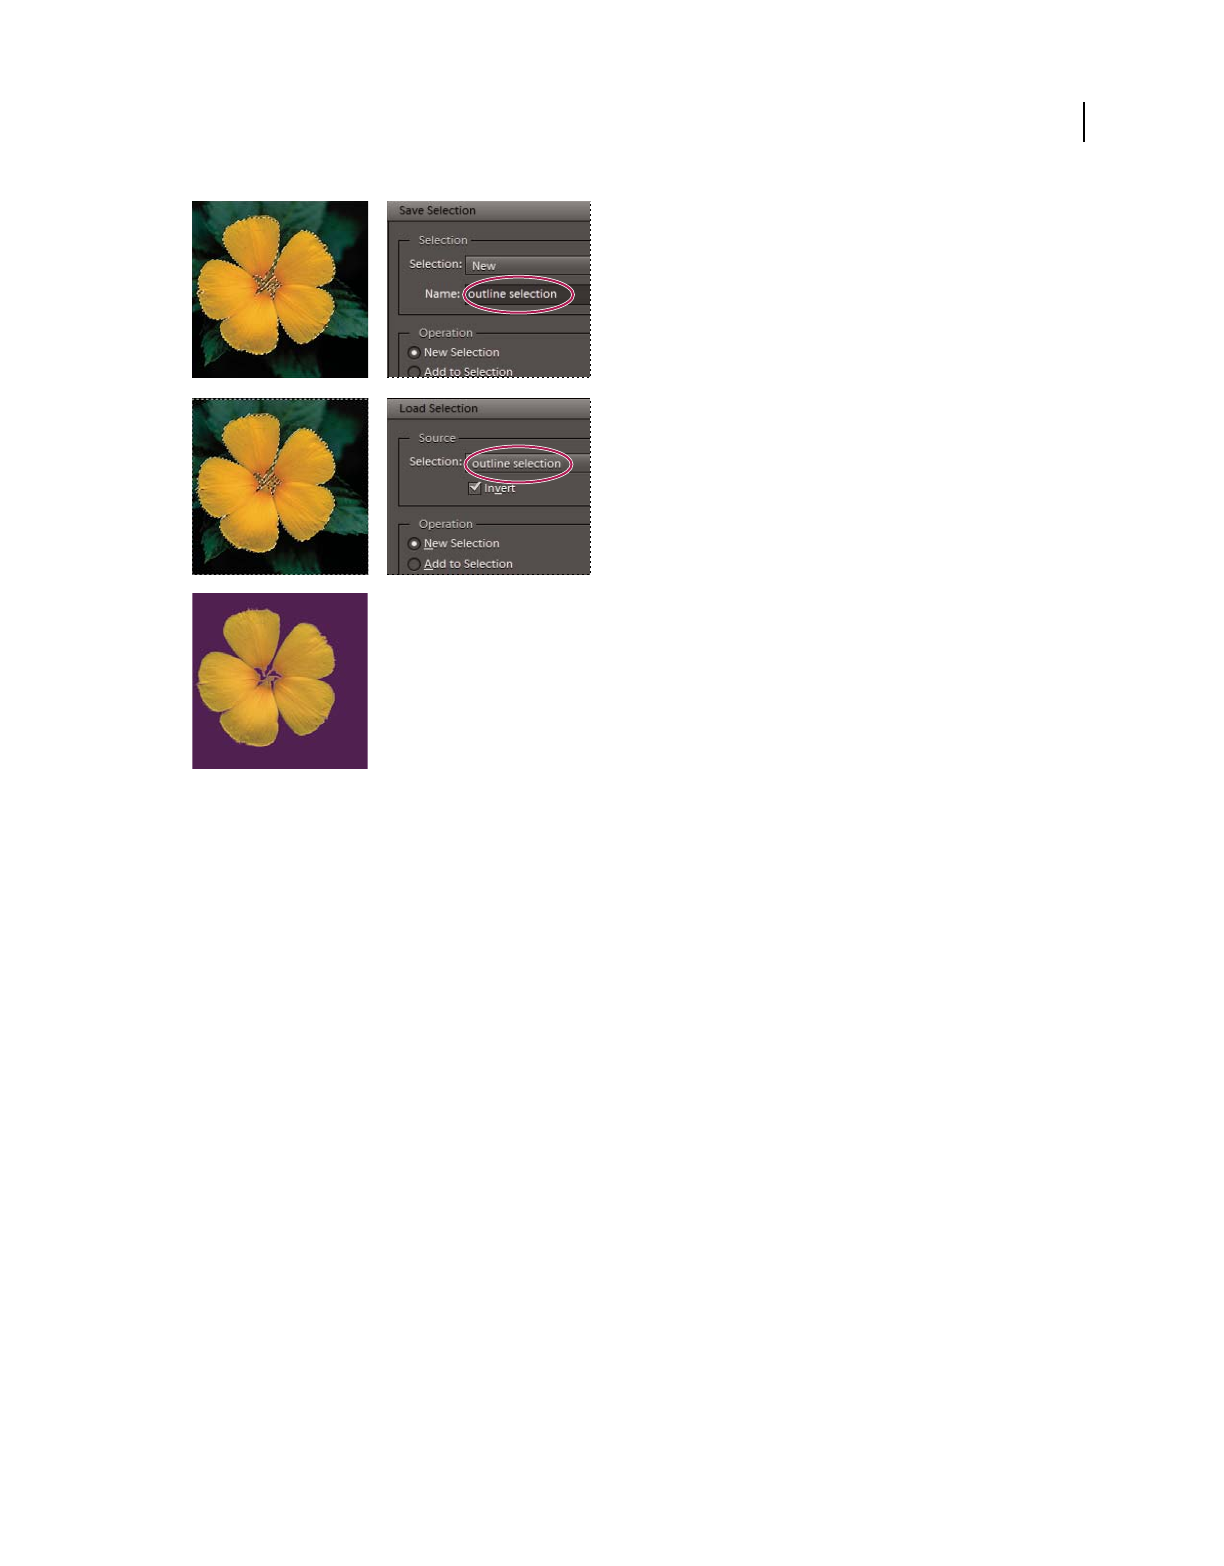
105
USING PHOTOSHOP ELEMENTS 9
Selecting parts of an image
Last updated 1/3/2012
Saving selection (top), loading selection (center), and using the selection to fill with a solid color (bottom)
1In the Edit workspace, make a selection in your photo.
2Choose Select > Save Selection.
3In the Save Selection dialog box, choose New from the Selection pop-up menu.
4Enter a name for the selection in the Name box, and then click OK.
5To load the selection, choose Select > Load Selection, choose the saved selection from the Selection menu, and then
click OK.
6To delete a selection, choose Select > Delete Selection, choose a saved selection from the Selection menu, and then
click OK.
Modify a saved selection
You can modify saved selections by replacing, adding to, or subtracting from them.
1In the Edit workspace, make a selection in your photo.
2Choose Select > Save Selection.
3In the Save Selection dialog box, choose the selection you want to modify from the Selection menu.
4Select one of the following and click OK:
Replace Selection Replaces the saved selection with the current selection.
Add To Selection Adds the current selection to the saved selection.
Subtract From Selection Subtracts the current selection from the saved selection.

106
USING PHOTOSHOP ELEMENTS 9
Selecting parts of an image
Last updated 1/3/2012
Intersect With Selection Replaces the saved selection with the intersection between the current selection and the saved
selection.
You can also modify a saved selection by loading it and using selection tools to add to it (Shift-drag) or subtract from
it (Alt-drag in Windows, Option-drag in Mac). (See “Add to or subtract from a selection” on page 98.)
Modify a new selection with a saved selection
1In the Edit workspace, open a photo that contains a saved selection.
2Make a new selection in your photo.
3Choose Select > Load Selection.
4Choose a saved selection from the Selection menu.
5Select one of the following operations:
Add To Selection Adds the saved selection to the current selection.
Subtract From Selection Subtracts the saved selection from the current selection.
Intersect With Selection Replaces the current selection with the intersection between the current selection and the
saved selection.
6To invert the selected area, select Invert and click OK.

107
Last updated 1/3/2012
Chapter 7: Color and tonal correction
Adobe® Photoshop® Elements 9 has tools that let you adjust the tonal range, color, and sharpness of your photos. You
can also remove dust spots or other defects from your photos. You can accomplish these tasks in different modes,
depending on your experience and needs.
Color and tonal correction basics
Color correction overview
Photoshop Elements provides several tools and commands for fixing the tonal range, color, and sharpness in your
photos, and for removing dust spots or other defects. You can work in one of three workspaces, depending on your
experience and needs.
Guided Edit If you are new to digital imaging and Photoshop Elements, you can use Guided Edit to guide you through
the color correction task. This is also a good way to increase your understanding of the workflow.
Quick Fix If you have limited knowledge of digital imaging, Quick Fix is a good place to start fixing photos. It has many
of the basic tools for correcting color and lighting.
Full Edit If you’ve worked with images before, you’ll find that the Full Edit workspace provides the most flexible and
powerful image-correction environment. It has the lighting and color-correction commands, along with tools for
fixing image defects, making selections, adding text, and painting on your images.
When working with some of the adjustment commands in the Edit workspace, you can make adjustments directly to
the image pixels. Or you can use adjustment layers to make nondestructive adjustments that you can easily tweak until
your image is right. In Full Edit, the Smart Brush tool
and Detail Smart Brush tool automatically create an
adjustment layer for the correction you’re applying. See “Apply the Smart Brush tools” on page 117.
Camera Raw If you shoot digital images in your camera’s raw format, you can open and correct raw files in the Camera
Raw dialog box. Because your camera has not yet processed the raw files, you can adjust the color and exposure to
improve the images. Often you won’t have to make other adjustments in Photoshop
Elements. To open camera raw
files in Photoshop
Elements, first save them in a supported file format.
More Help topics
“About camera raw image files” on page 80
Correct color in Quick Fix
Quick Fix conveniently assembles many of the basic photo-fixing tools in Photoshop Elements. As you work in Quick
Fix, limit the number of color and lighting controls that you apply to a photo. Generally, you use only one of the auto
controls on a photo. If that control doesn’t achieve what you want, click the Reset button and try another one. You can
also adjust your image using the slider controls, whether you’ve used an auto control or not. Perform the Sharpening
fix last on an image.
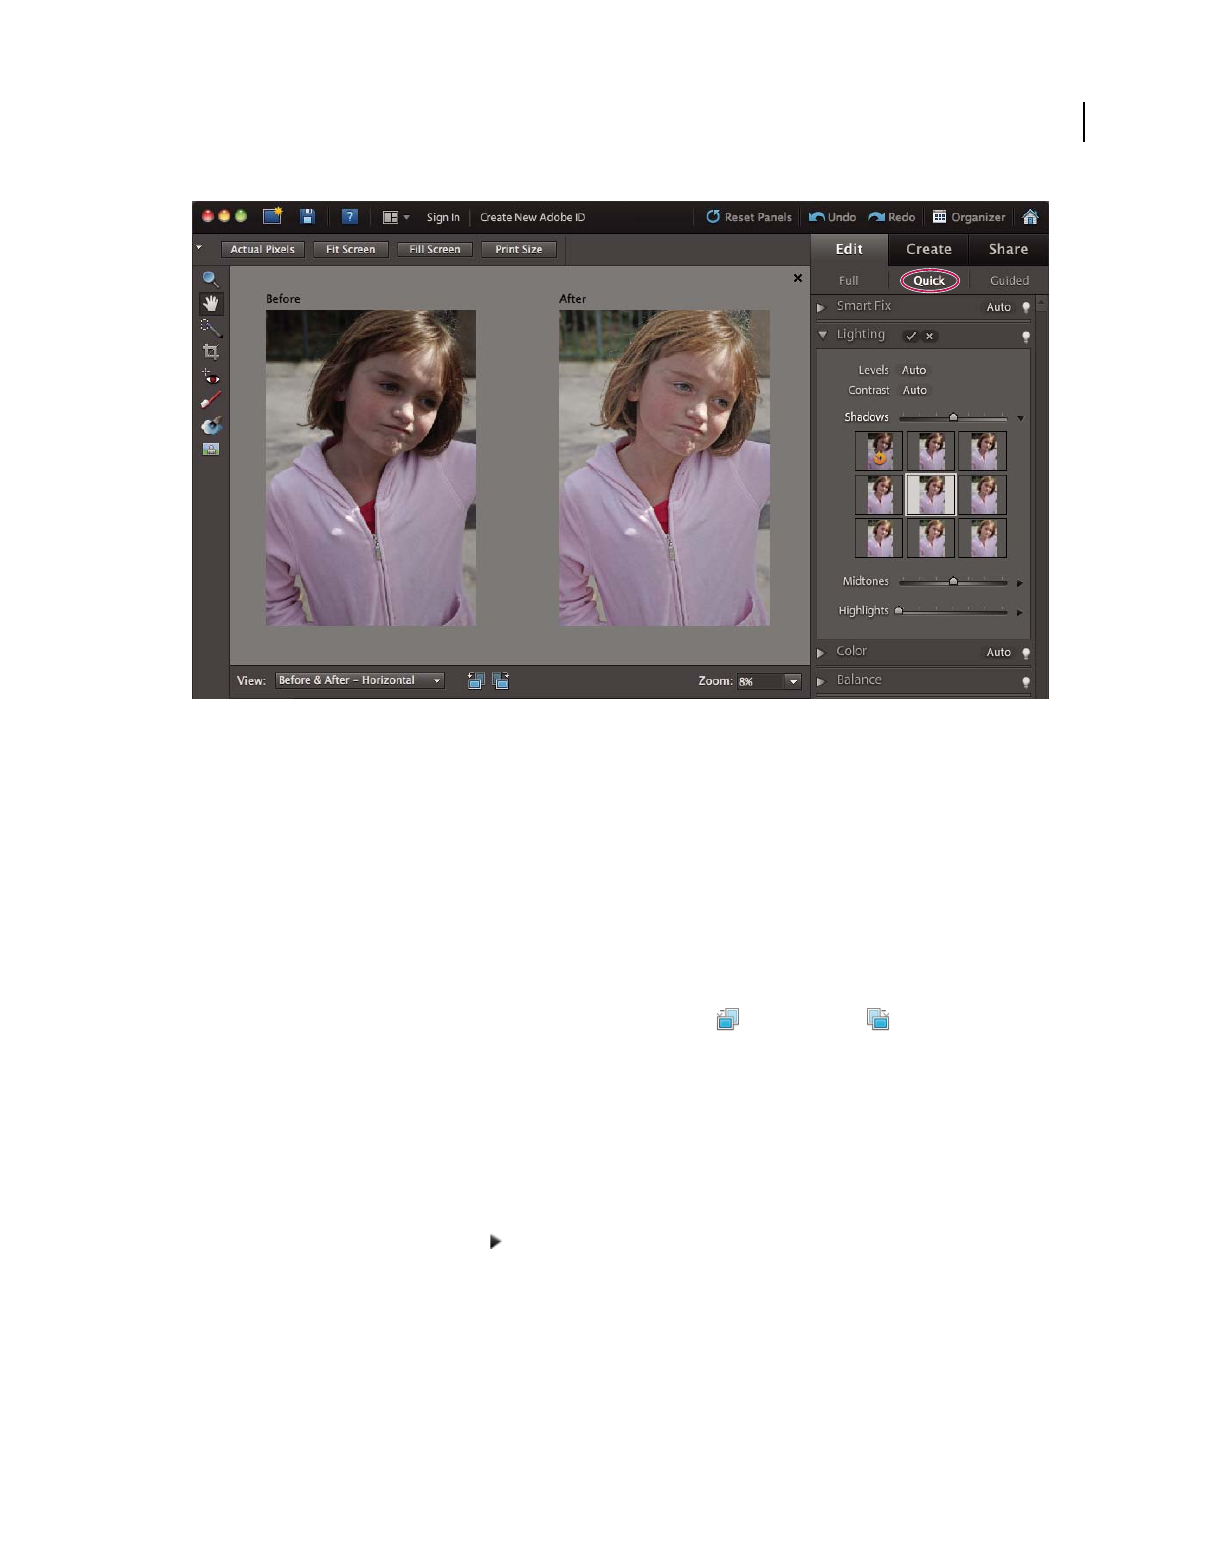
108
USING PHOTOSHOP ELEMENTS 9
Color and tonal correction
Last updated 1/3/2012
Using the Auto Lighten Shadows adjustment in Quick Fix to instantly fix the photo
1Do one of the following:
•Select one or more photos in Elements Organizer, click the arrow beside Fix, and click Edit Photos.
•With a photo open in the Edit workspace, click the arrow beside Edit, and select Edit Quick.
Any photos that you have stored in the Photo Bin are accessible while you are in Quick Fix.
2
(Optional) Set preview options by making a selection from the View menu (located under the image preview). You
can set the preview to show how the photo looks before and after you make a fix, or to show both previews side by side.
3(Optional) Use the Quick Fix tools to zoom, move, and crop the image. You can also make a selection, fix red eye,
whiten teeth, and make dull skies blue.
4To rotate the image in 90° increments, click either the Rotate Left or Rotate Right button at the bottom of
the window.
5Set any of the image fixing options on the right side of the window. Click the Reset button if you don’t get the result
you are looking for, and then try the other controls. If necessary, click the triangle to view the image fixing options
in a panel.
Quick Fix preview
Photoshop Elements enables you to preview how a photo looks after adjustments, before you apply the adjustment to
the image. Use Quick Fix preview icon to preview how a photo looks after adjustments, before you apply the
adjustment to the image. For example, you can preview a color change in an image before you apply the change.
1In the Quick Fix panel, make the necessary adjustment using the sliders, and click the Quick Fix preview icon beside
the slider.
You can view thumbnails of the variations available.
2Hover the mouse over the thumbnails to preview the adjustment on the photo.
3Click the thumbnail to apply the adjustment on the image temporarily.
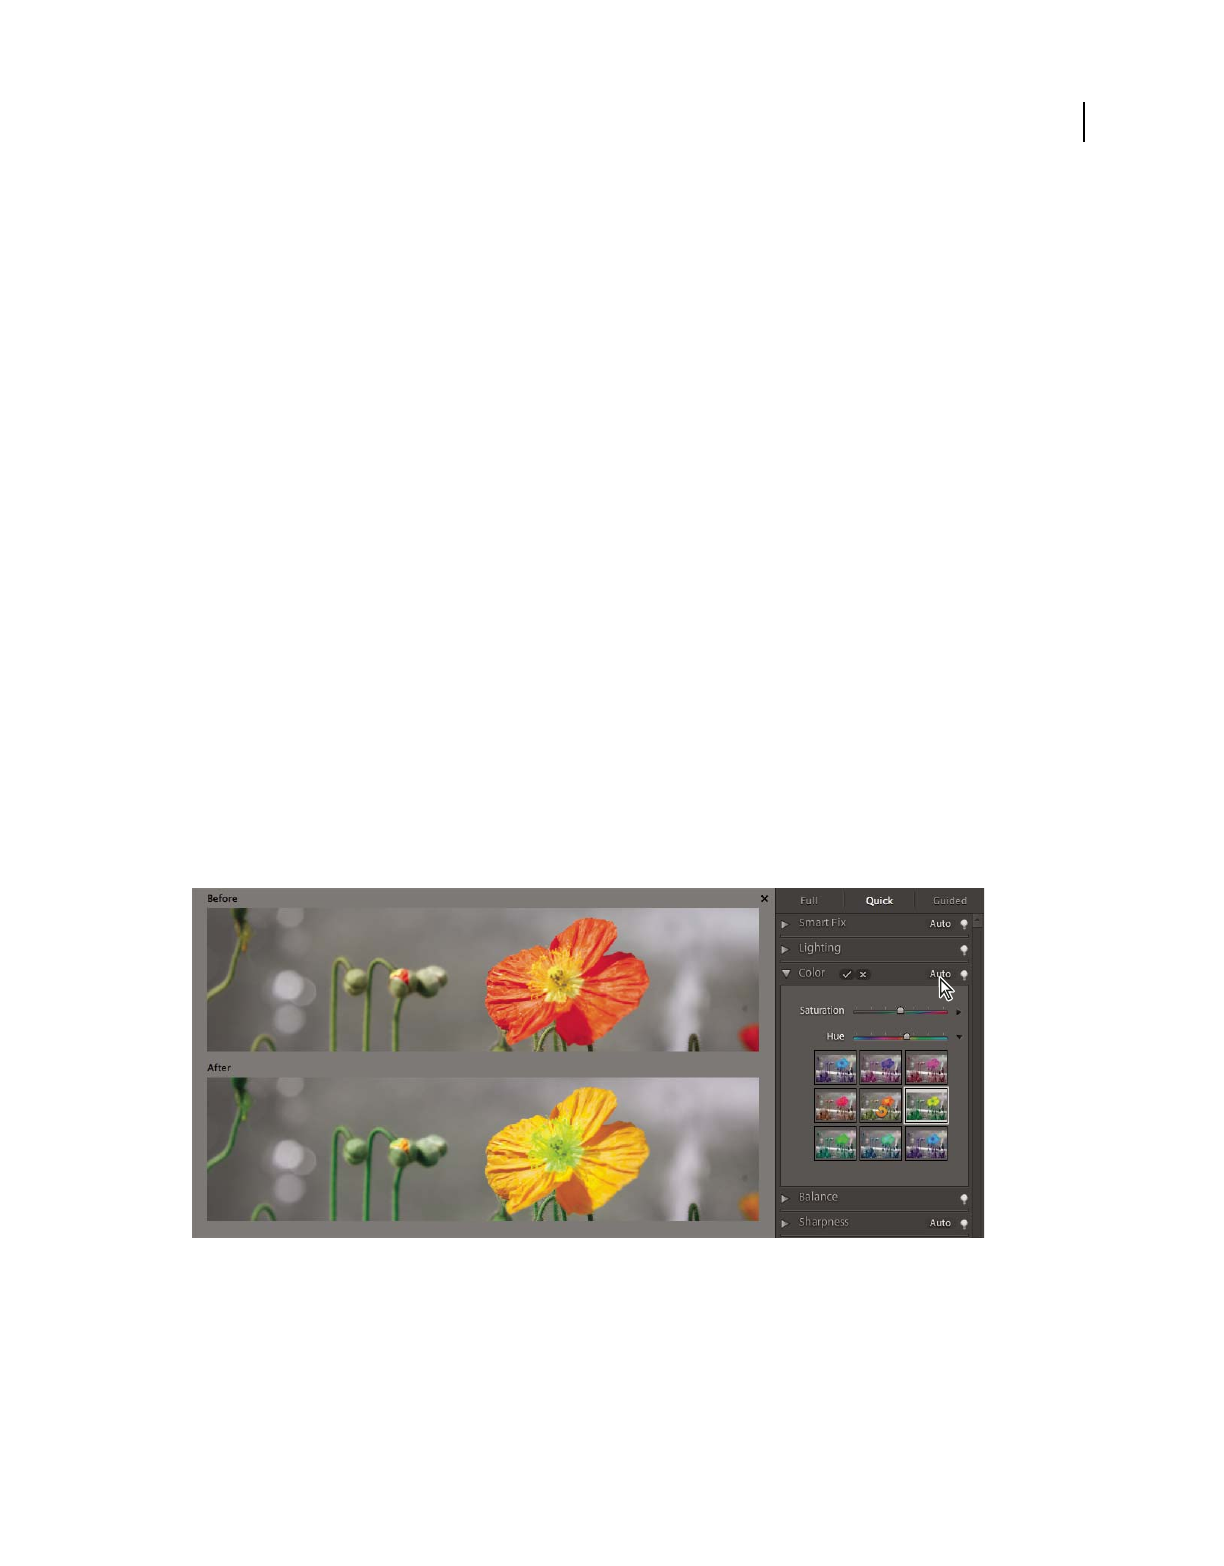
109
USING PHOTOSHOP ELEMENTS 9
Color and tonal correction
Last updated 1/3/2012
4Click the Commit button to save the adjustment, or Cancel to cancel the change.
To fine-tune a picture using a preview as the starting point, click and hold the mouse button, and then drag right or left.
The Quick Fix panel provides the following tools to refine your photos:
Smart Fix Adjusts lighting and color. Smart Fix corrects overall color balance and improves shadow and highlight
detail, if necessary. Click the Auto button to apply this command.
•Fix Drag the slider to vary the amount of the adjustment.
Lighting Adjusts the overall contrast of an image, and sometimes affects its color. If your image needs more contrast
and it has a color cast, you can use the following two options:
•Levels
•Contrast
These options work by individually mapping the lightest and darkest pixels in each color channel to monochrome. To
apply the settings, click the Auto button beside any of these options. (See “About Levels adjustments” on page 118 or
“The Adjust Levels Guided Edit” on page 51.)
•Shadows Drag the slider to lighten the darkest areas of your photo without affecting the highlights. Pure black
areas are not affected.
•Midtones Adjusts the contrast within the middle tonal values (values that are about half way between pure white
and pure black). It does not affect the extreme highlights and shadows.
•Highlights Drag the slider to darken the lightest areas of your photo without affecting the shadows. Pure white
areas are not affected.
Color Adjusts the color by identifying shadows, midtones, and highlights in the image rather than in individual color
channels. It neutralizes the midtones, and clips the white and black pixels using a default set of values. Click the Auto
button to apply this command.
Adjusting color values in Quick Fix
•Saturation Drag the slider to make colors more vivid or more muted.
•Hue Shifts all colors in an image. This control is best used in small amounts or with selected objects whose color
you want to change.

110
USING PHOTOSHOP ELEMENTS 9
Color and tonal correction
Last updated 1/3/2012
Balance Adjusts the color balance of an image without affecting its contrast.
•Temperature Drag the slider to make the colors warmer (red) or cooler (blue). Use this control to enhance sunsets
or skin tones, or when the color balance set by your camera is off.
•Tint Drag the slider to make the color more green or more magenta. Use this control to fine-tune the colors after
using the Temperature control.
Sharpness Adjusts the sharpness of your image. Click Auto to use the default amount of sharpening.
•Sharpen Drag the slider to vary the amount of sharpening. Zoom your preview at 100% to get a more accurate view
of the amount of sharpening you are trying to apply.
Fix photos with Touch Up buttons in the Quick Fix Tools panel
The Touch Up buttons in Quick Fix tools panel enable you to apply corrections and adjustments to selected parts of
an image. Except for Red Eye Removal, all Touch Up button adjustments are applied to an adjustment layer. As a
result, they do not discard, or permanently edit any information on the image layer. You can always change adjustment
settings without degrading the original image. The Whiten Teeth, Make Dull Skies Blue, and Black and White-High
Contrast Touch Up buttons apply adjustments found in the Smart Brush tool. See “Adjust color and tonality using the
Smart Brush tools” on page 116 and “About adjustment and fill layers” on page 70.
1In the Quick Fix Tools panel, do any of the following:
•Click the Red Eye Removal button to remove red eye from a photo. This tool removes red eye in flash photos
of people. Drag the tool in the image around an eye you want to fix, or click the Auto button in the options bar. See
“Precisely remove red eye” on page 147.
•Click the Whiten Teeth button to apply a Pearly Whites adjustment. Drag in the image area with the teeth that
you want to brighten.
•Click the Make Dull Skies Blue button to apply a Blue Skies adjustment. Drag in the image where you want to
add blueness to the sky.
•Click the Black And White-High Contrast button to apply a High Contrast Red Filter adjustment. Drag in the
image area that you want to convert to a high-contrast monochrome image. This adjustment simulates the image
effects that photographers produce by placing a red filter over the camera lens and using monochrome film.
2(Optional) If you carried out Pearly Whites, Blue Skies, or a High Contrast Red Filter adjustment, you can do any
of the following:
•Add the adjustment to more parts of the photo, by clicking the Add To Selection button , and dragging in the
image.
•Remove the adjustment from parts of the photo, by clicking the Subtract From Selection button , and dragging
in the image.
Quick Fix and Edit workspace options
These tools work the same way in Quick Fix and the Edit workspace.
Zoom tool Sets the magnification of the preview image. Controls and options work like the Zoom tool in the
toolbox. (See “Zoom in or out” on page 39.)
Hand tool Moves the image around in the preview window if the entire image is not visible. Press the spacebar to
access the Hand tool when another tool is selected. (See “Viewing images in Full Edit or Quick Fix” on page 39.)
Quick Selection tool Selects portions of the image based on where you click or drag the tool. (See “Use the Quick
Selection tool” on page 93.)
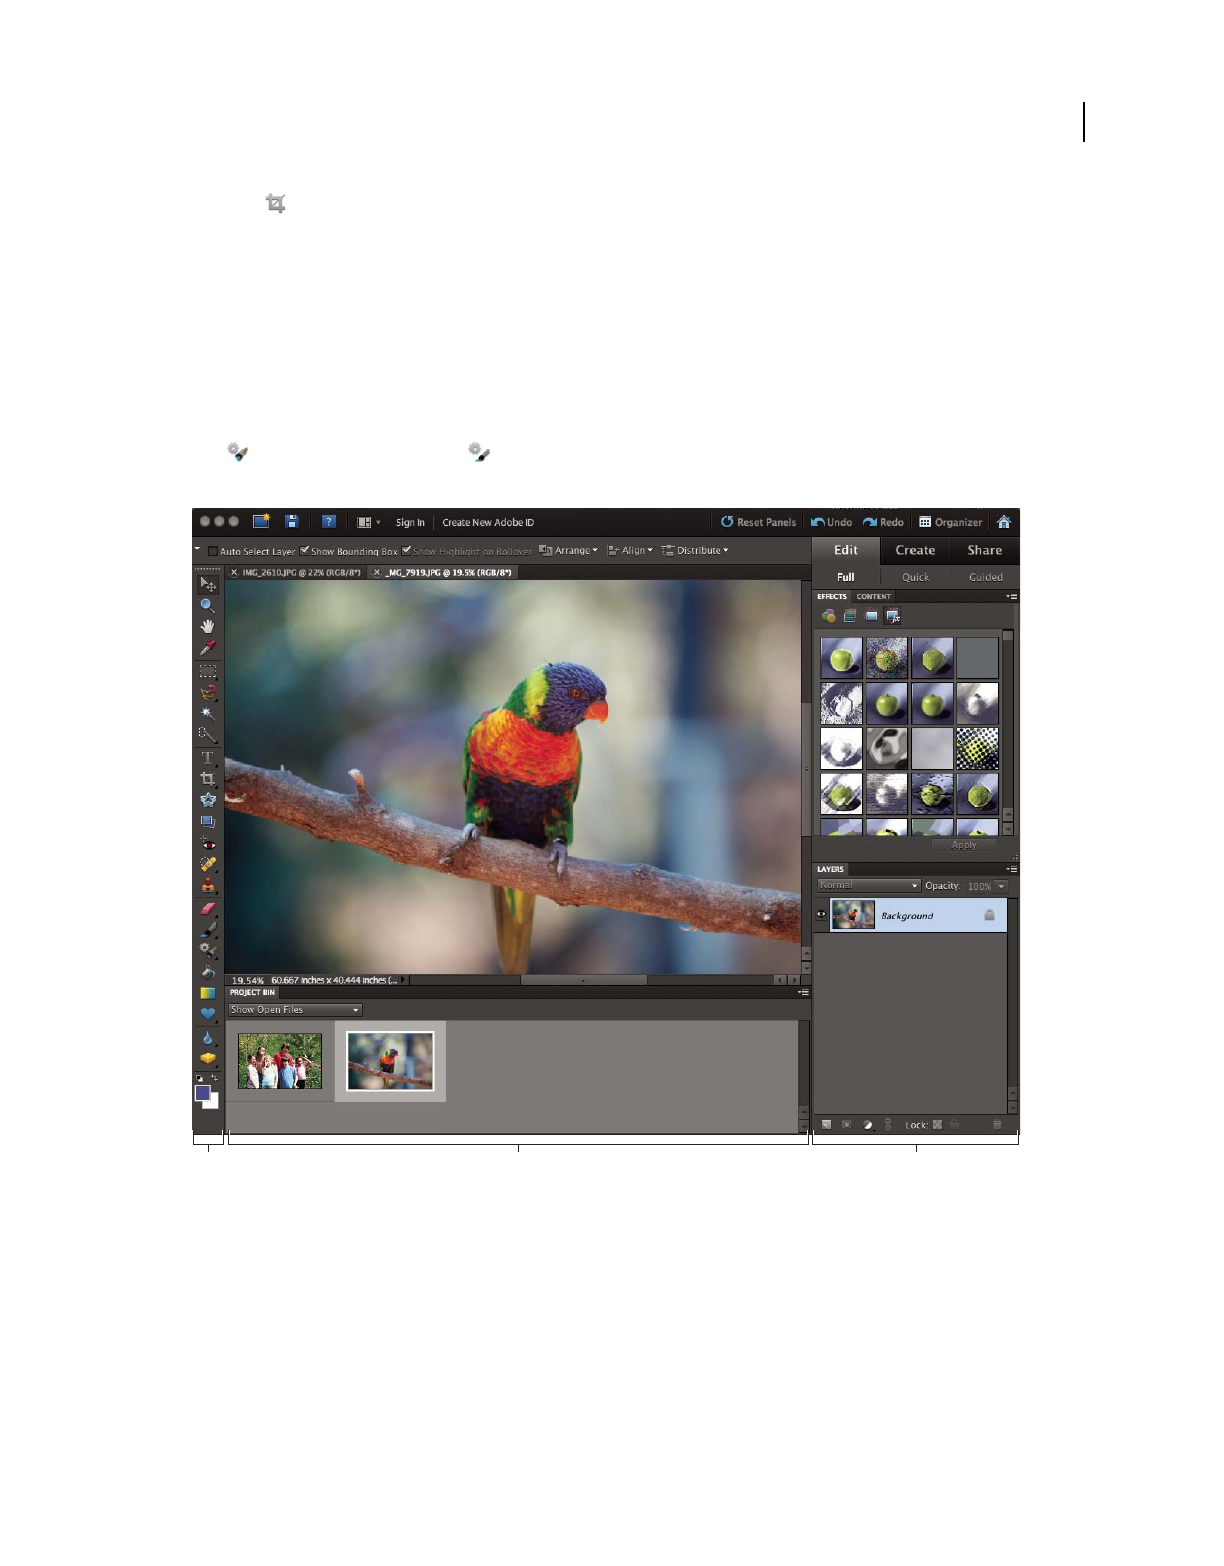
111
USING PHOTOSHOP ELEMENTS 9
Color and tonal correction
Last updated 1/3/2012
Crop tool Removes part of an image. Drag the tool within the preview image to select the portion you want to keep,
and then press Enter. (See “Crop an image” on page 138.)
Correcting color in Full Edit
If you’ve worked with images before, you’ll find that the Edit workspace provides the most flexible and powerful
image-correction environment. It has lighting and color-correction commands, along with tools for fixing image
defects, making selections, adding text, and painting on your images. When working with some of the adjustment
commands in the Edit workspace, you can make adjustments directly on the image pixels. Or you can use adjustment
layers to make nondestructive adjustments that you can easily tweak until your image is right. The Smart Brush
tool
and Detail Smart Brush tool automatically create an adjustment layer as you apply a correction. See “Apply
the Smart Brush tools” on page 117 or “About adjustment and fill layers” on page 70.
Full Edit
A. There are many tools for correcting problems and selecting portions of a photo. B. The Project Bin lets you see which photos are open in the
Edit workspace. C. The Panel Bin holds panels that you use to transform and enhance photos.
As you work on your photos in the Edit workspace, perform the following tasks that apply to your image. Not all tasks
are required for every image, but the following list is a recommended workflow:
1. Specify a color management option.
Specify color management options. (See “Set up color management” on page 181.)
AB C

112
USING PHOTOSHOP ELEMENTS 9
Color and tonal correction
Last updated 1/3/2012
2. View the image at 100% and crop, if necessary.
Before making any color corrections, view the image at a zoom percentage of 100%. At 100%, Photoshop Elements
displays the image most accurately. You can also check for image defects, such as dust spots and scratches. If you plan
to crop the file, do it now to reduce memory requirements and to ensure that the histogram uses only relevant
information. Using the Zoom tool to zoom out may optimize the view before cropping an image, so that you crop a
well-centered selection.
3. Check the scan quality and tonal range.
Look at the image’s histogram to evaluate whether the image has sufficient detail to produce high-quality output.
4. Resize your image, if necessary.
Resize your image to the size that you need if you are going to use it in another application or project. If you are going
to print it or use it in a Photoshop
Elements project, you generally don’t need to resize it. (See “About image size and
resolution” on page 143.)
5. Adjust the highlights and shadows.
Begin corrections by adjusting the values of the extreme highlight and shadow pixels in the image (also known as the
tonal range). Setting an overall tonal range allows for the most detail possible throughout the image. This process is
known as setting the highlight and shadow or setting the white and black points. (See “About Levels adjustments” on
page 118 or “The Adjust Levels Guided Edit” on page 51.)
6. Adjust the color balance.
After correcting the tonal range, you can adjust the image’s color balance to remove unwanted color casts or to correct
oversaturated or undersaturated colors. With some Photoshop
Elements auto commands, both the tonal range and
color are corrected in one step. (See “Adjust saturation and hue” on page 127.)
7. Make other special color adjustments.
Once you have corrected the overall color balance of your image, you can make optional adjustments to enhance
colors. For example, you can increase the vividness of color in your image by increasing its saturation.
8. Retouch the image.
Use the retouching tools, like the Spot Healing Brush, to remove any dust spots or defects in the image. (See “Remove
spots and small imperfections” on page 148.)
9. Sharpen the clarity of the image.
As a final step, sharpen the clarity of edges in the image. This process helps restore detail and sharpness that tonal
adjustments may reduce. (See “Sharpening overview” on page 161.)
More Help topics
“About camera raw image files” on page 80
Automatically correct lighting and color
Photoshop Elements provides several automatic lighting and color-correction commands in both Full Edit and Quick
Fix. The command you choose depends on the needs of your image.

113
USING PHOTOSHOP ELEMENTS 9
Color and tonal correction
Last updated 1/3/2012
You can experiment with each of the auto commands. If you don’t like the result of one, undo the command by
choosing Edit
> Undo, and try another command. You will rarely need to use more than one auto command to fix an
image.
1To adjust a specific image area, select it with one of the selection tools. If no selection is made, the adjustment
applies to the entire image.
2Choose one of the following commands from the Enhance menu:
Auto Smart Fix Corrects overall color balance and improves shadow and highlight detail, if necessary.
Auto Levels Adjusts the overall contrast of an image and may affect its color. If your image needs more contrast, and
it has a color cast, try this command. Auto Levels works by individually mapping the lightest and darkest pixels in each
color channel to black and white.
Auto Contrast Adjusts the overall contrast of an image without affecting its color. Use when your image needs more
contrast, but the colors look right. Auto Contrast maps the lightest and darkest pixels in the image to white and black,
which makes highlights appear lighter and shadows appear darker.
Auto Color Correction Adjusts the contrast and color by identifying shadows, midtones, and highlights in the image,
rather than in individual color channels. It neutralizes the midtones and sets the white and black points using a default
set of values.
Auto Sharpen Adjusts the sharpness of the image by clarifying the edges and adding detail that tonal adjustments may
reduce.
Auto Red Eye Fix Automatically detects and repairs red eye in an image.
More Help topics
“Precisely remove red eye” on page 147
“Replace colors in an image” on page 152
“Sharpen an image” on page 162
About histograms
You can use the histogram to analyze the image’s tonal distribution to see if you need to correct it. A histogram shows
the distribution of an image’s pixel values in a bar chart. The left side of the chart shows the values of the image shadow
(starting at level 0), and the right side shows the highlight (level 255). The vertical axis of the chart represents the total
number of pixels within a given level.
You can view an image’s histogram in the Histogram panel. Histograms are also available in the Levels dialog box and
the Camera Raw dialog box. You can update the histogram as you work so that you can see how your adjustments are
affecting the tonal range. When the Cached Data Warning icon
appears, click it to refresh the histogram’s data.
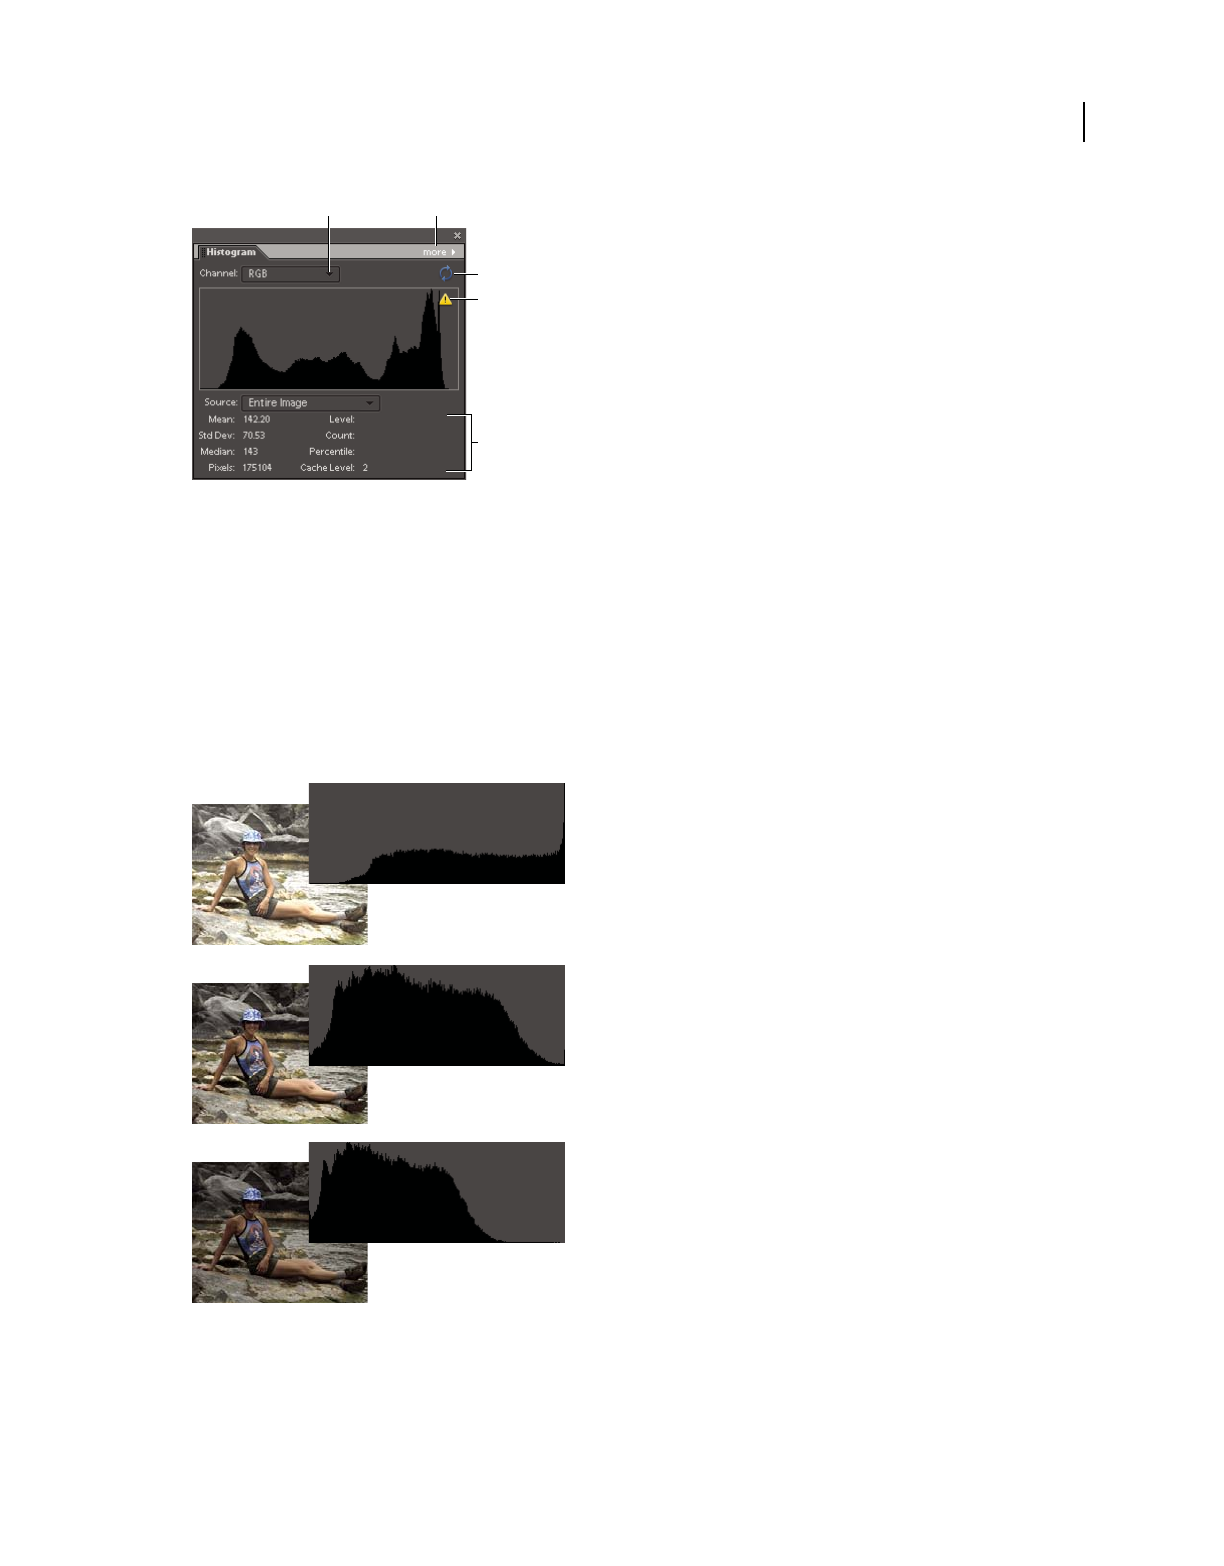
114
USING PHOTOSHOP ELEMENTS 9
Color and tonal correction
Last updated 1/3/2012
Histogram panel
A. Channel menu B. Panel menu C. Uncached Refresh button D. Cache Data Warning icon E. Statistics
If many pixels are bunched up at either the shadow or highlight ends of the chart, it may indicate that image detail in
the shadows or highlights may be clipped—blocked up as pure black or pure white. There is little you can do to recover
this type of image. If you are working with a scanned image, you can try rescanning to produce a better tonal range. If
your digital camera can display an image histogram, check it to see whether your exposure is correct and make
exposure adjustments if necessary. See your camera’s documentation for more information.
The histogram may show that an image is not using the full tonal range available if some pixels aren’t available in the
shadows and highlights. You can fix an image with limited tonal range by stretching the tonal range using either the
Levels command or one of the Enhance
> Auto commands.
How to read a histogram
A. Overexposed photo with clipped highlights B. Properly exposed photo with full tonality C. Underexposed photo with clipped shadows
A B
C
D
E
A
B
C

115
USING PHOTOSHOP ELEMENTS 9
Color and tonal correction
Last updated 1/3/2012
More Help topics
“About camera raw image files” on page 80
“Using the histogram and RGB values in camera raw” on page 84
“The Adjust Levels Guided Edit” on page 51
View a histogram
1If the Histogram panel is not open in the Edit workspace or the Panel Bin, choose Window > Histogram.
2Choose the source of the histogram’s display from the Source menu:
Entire Image Displays a histogram of the entire image, including all layers in the multilayered document.
Selected Layer Displays a histogram of the selected layer in the Layers panel.
Adjustment Composite Displays a histogram of an adjustment layer selected in the Layers panel, including all the
layers below the adjustment layer.
3To view the histogram for a portion of your image, make a selection in your image, and choose an option from the
Channel menu:
RGB Displays a histogram that is a composite of individual color channels placed on top of each other.
Red, Green, and Blue Displays the histograms for the individual color channels.
Luminosity Displays a histogram representing the luminance or intensity values of the composite channel.
Colors Displays the composite RGB histogram individually by color. Red, green, and blue represent the pixels in those
channels. Cyan, magenta, and yellow represent where the histograms of two channels overlap. Gray represents areas
where all three color channel histograms overlap.
Grayscale images have a single channel option: Gray.
4To view the following statistical information about a range of values, drag in the histogram and hold down the
mouse button to highlight the range. To view information about a specific area of the histogram, place the pointer
over the area:
Mean Represents the average intensity value.
Standard Deviation (Std Dev) Represents how widely intensity values vary.
Median Shows the middle value in the range of intensity values.
Pixels Represents the total number of pixels used to calculate the histogram.
Level Displays the intensity level of the area underneath the pointer.
Count Shows the total number of pixels at the intensity level underneath the pointer.
Percentile Displays the percentage of pixels at and below the level underneath the pointer. This value is expressed as
a percentage of all the pixels in the image, from 0% at the far left to 100% at the far right.
Cache Level Shows the setting for the image cache. If Use Cache For Histograms is selected in the Preferences dialog
box, Photoshop
Elements displays histograms more quickly but less accurately. To display more accurate histograms,
deselect this option.
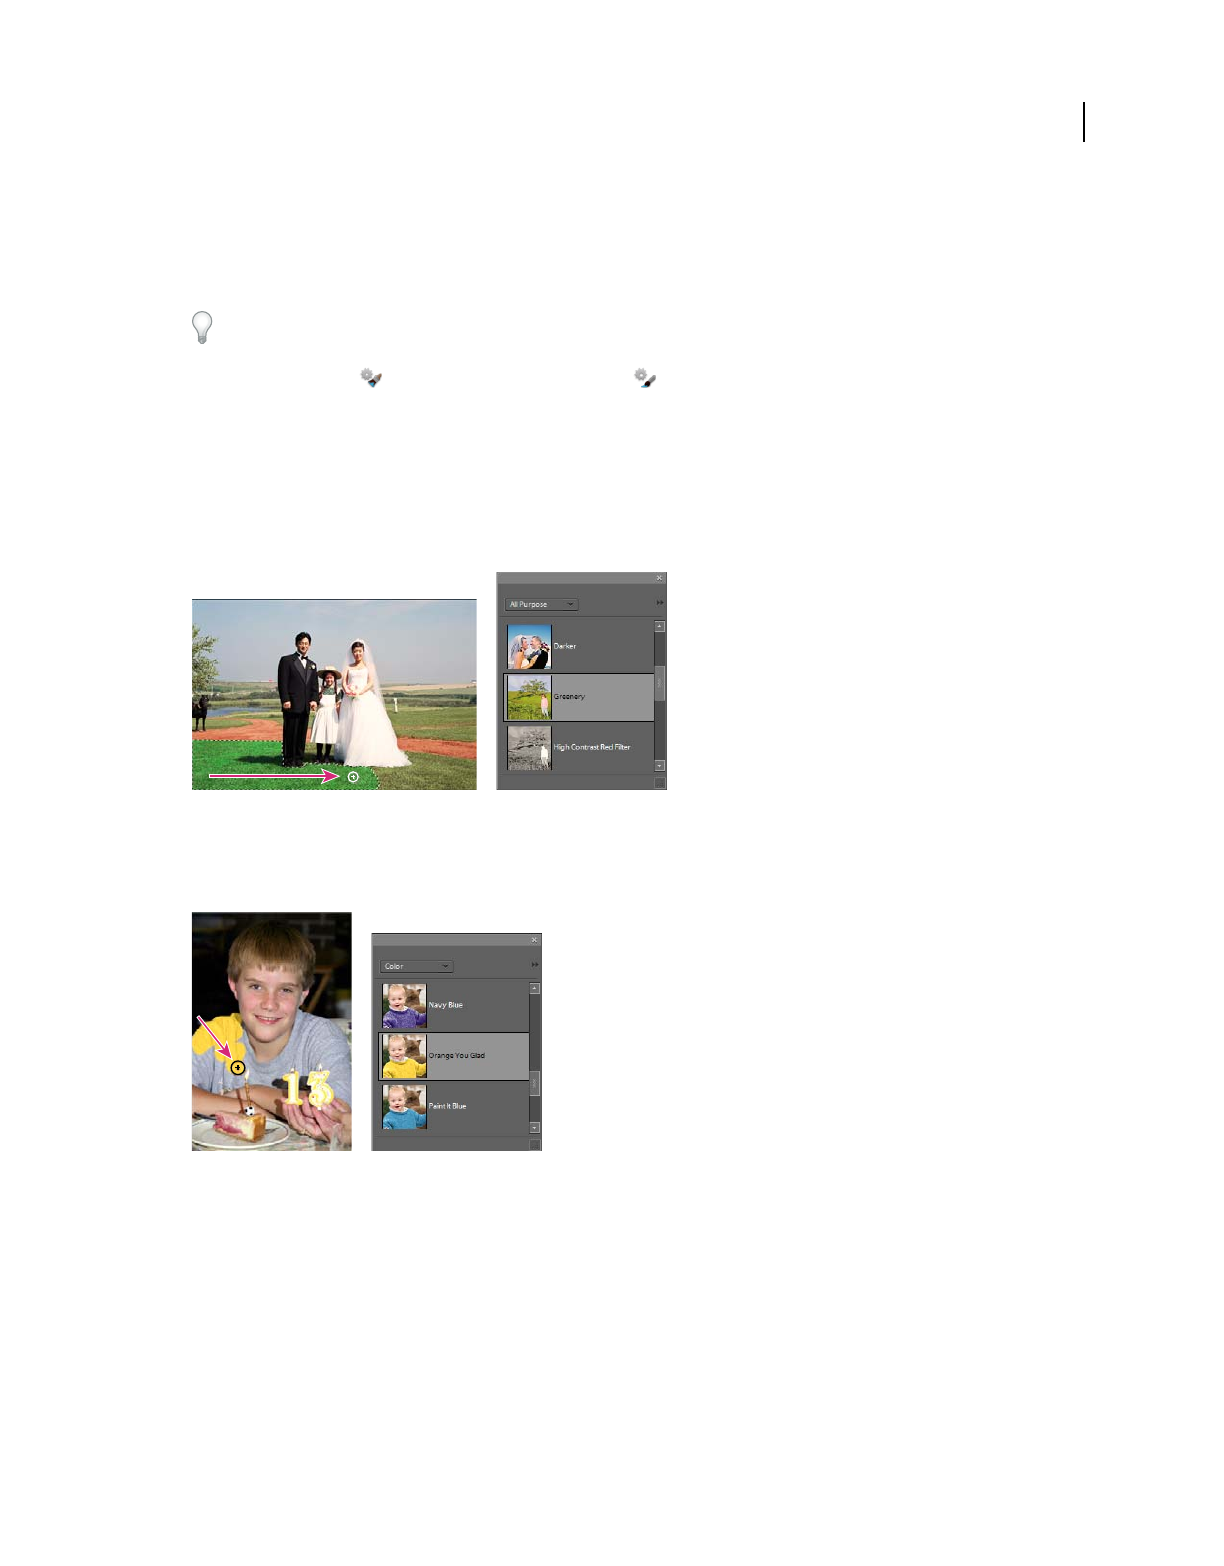
116
USING PHOTOSHOP ELEMENTS 9
Color and tonal correction
Last updated 1/3/2012
Adjusting shadows and light
Adjust color and tonality using the Smart Brush tools
For a video about this process, see www.adobe.com/go/lrvid2324_pse9_en.
The Smart Brush tool and the Detail Smart Brush tool apply tonal and color adjustments to specific areas of a
photo. Certain effects can also be applied using these tools. You simply pick a preset adjustment and apply the
correction. Both tools automatically create adjustment layers. This feature offers you flexibility in working with your
photos because the original image layer is not altered. You can go back and tweak the adjustments and no image
information is discarded.
When you apply the Smart Brush tool, it makes a selection based on color and texture similarly. The adjustment is
simultaneously applied to the selected area.
Smart Brush tool applying an adjustment selection
The Detail Smart Brush tool enables you to paint the adjustment to specific areas of the photo. Use this tool to adjust
finer details.
Detail Smart Brush tool applying an adjustment stroke
Both brush tools enable you to add to or subtract from the areas being adjusted. You can also have more than one
adjustment preset applied to a photo. Each preset adjustment is applied to its own adjustment layer. You can tweak the
settings for each correction separately.
When a correction is made, a pin appears where you first applied the adjustment. The pin provides a reference for the
specific adjustment. A new pin appears when a different adjustment preset is applied. This feature makes it easier to
modify a specific correction, especially if you apply different adjustments.
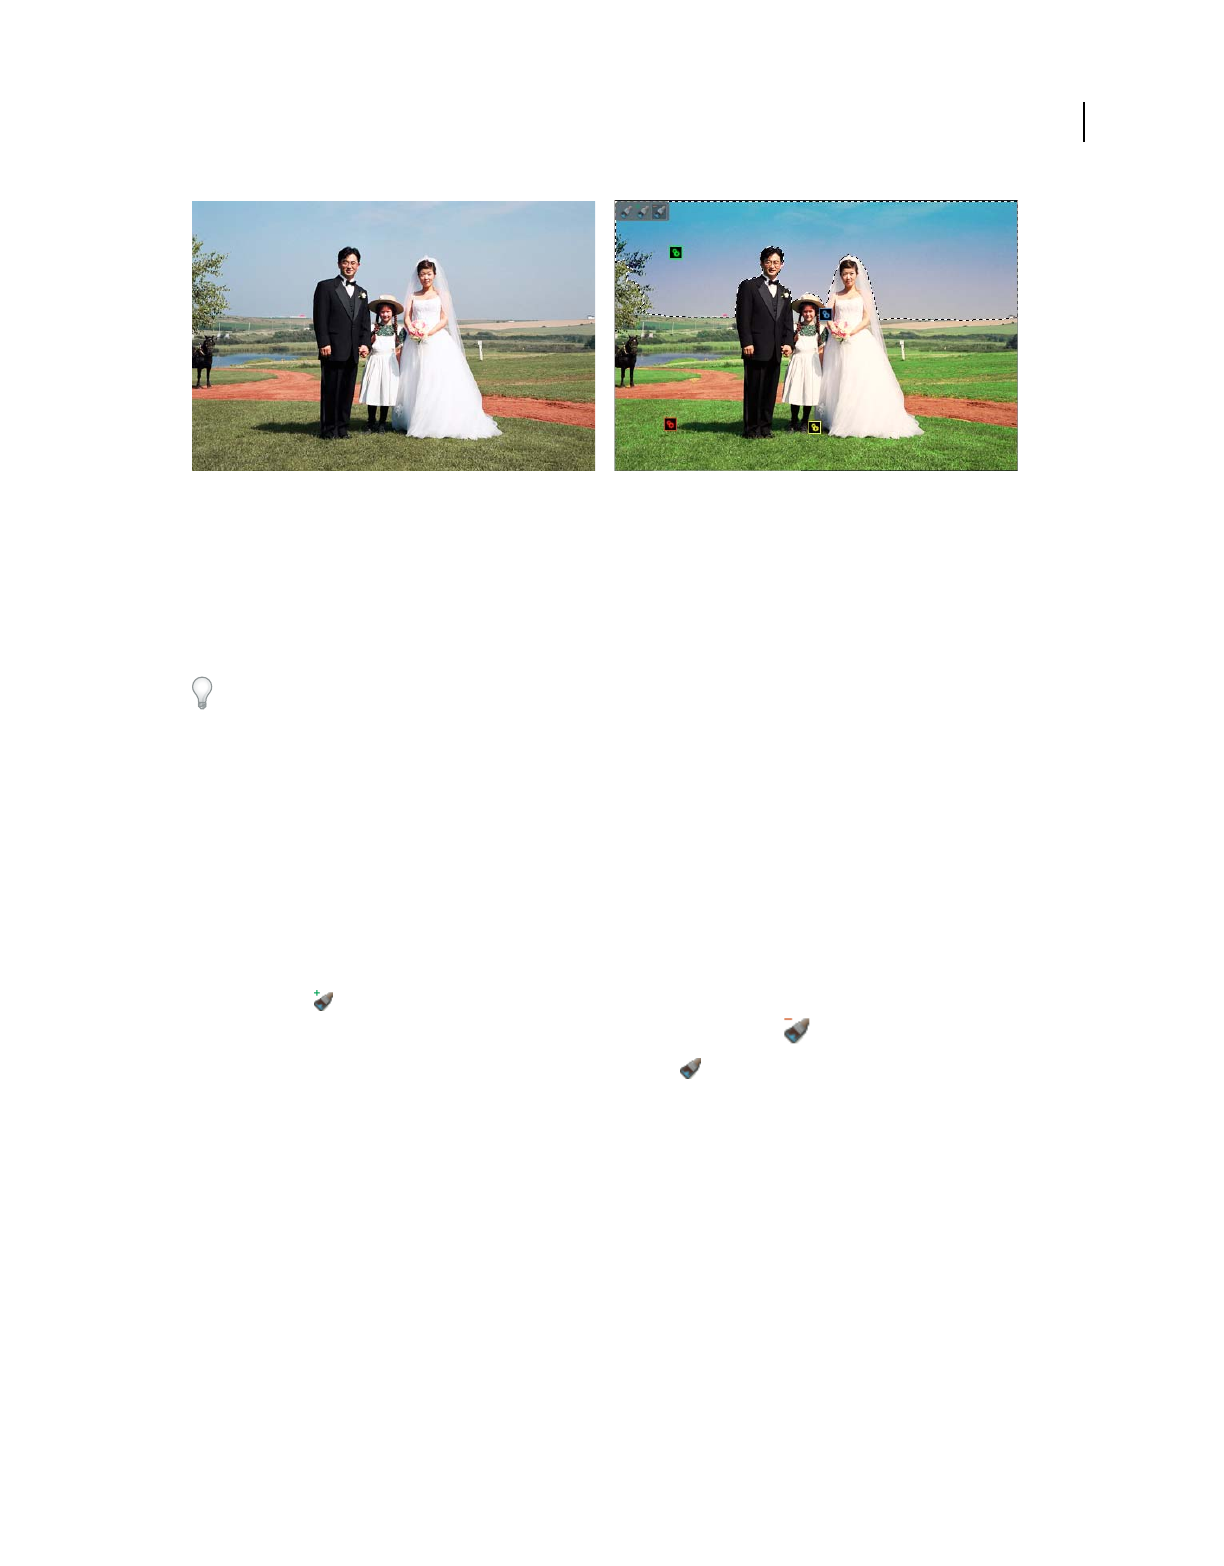
117
USING PHOTOSHOP ELEMENTS 9
Color and tonal correction
Last updated 1/3/2012
Pins showing different adjustments in a photo
Apply the Smart Brush tools
1In the Edit workspace, select the Smart Brush tool or the Detail Smart Brush tool from the toolbox.
A pop-up panel opens displaying adjustment presets.
2Choose an adjustment from the preset pop-up panel.
Choose an option from the pop-up panel menu to view different sets of adjustments. For more information on
configuring the pop-up panel, see “About presets” on page 239.
3(Optional) Adjust the size and quality of the brush tool by doing one of the following:
•If you selected the Smart Brush tool, open the Brush Picker in the options bar and adjust the settings.
•If you selected the Detail Smart Brush tool, select a preset brush tip from the Brush presets pop-up panel. Then
adjust the brush size setting in the options bar.
4Paint or drag the tool in the image.
The correction is applied on its own adjustment layer and a color pin appears where you first applied the brush tool.
5(Optional) Do any of the following:
•To add the current adjustment to more areas of the photo, paint or drag in the image. If necessary, make sure Add
To Selection
is selected.
•To remove parts of the current adjustment, select Subtract From Selection and paint in the image.
•To apply a different type of adjustment, select New Selection , select a preset from the pop-up panel, and then
paint in the image.
•To smooth the edges of the selection, click Refine Edges in the options bar, adjust the settings in the dialog box, and
then click OK. For more information, see “Smoothing selection edges with anti-aliasing and feathering” on
page 101.
Note: If you use a different tool from the toolbox and then return to the Smart Brush tool or Detail Smart Brush tool, the
last adjustment you applied is active.
6(Optional) If you have multiple adjustments, do one of the following to select the adjustment you want to add to,
subtract from, or modify:
•Click a pin.
•Right-click in the photo and choose the adjustment listed in the bottom portion of the menu.
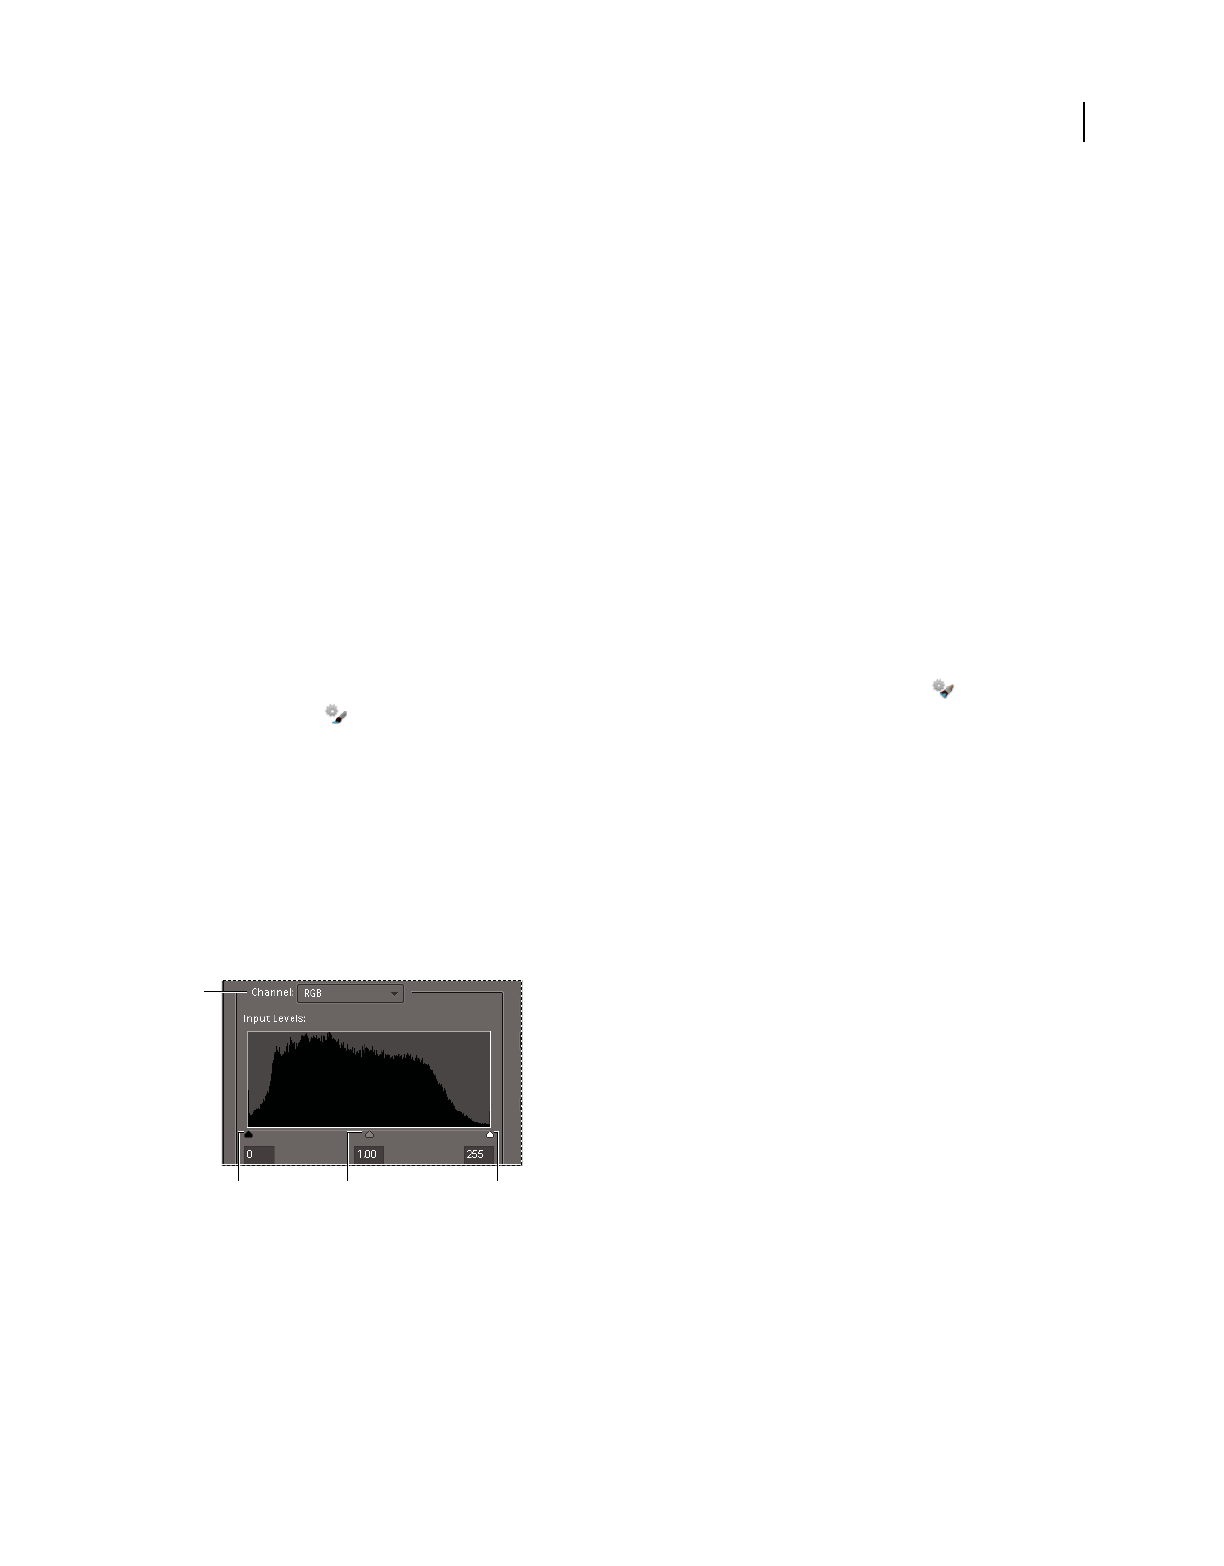
118
USING PHOTOSHOP ELEMENTS 9
Color and tonal correction
Last updated 1/3/2012
Modify Smart Brush tool correction settings
1Do any of the following:
•In the image, right-click a pin or an active selection and choose Change Adjustment Settings.
•In the Layers panel, double-click the layer thumbnail for the specific adjustment layer.
•Double-click a pin.
2Adjust the settings in the dialog box and then click OK.
Change the Smart Brush tool correction preset
1Click a pin or active selection and then open the preset pop-up panel in the options bar.
2Choose an adjustment preset from the pop-up panel.
Delete a Smart Brush tool correction
❖Right-click a pin or an active selection and choose Delete Adjustment.
Note: In the Layers panel, you can also delete a Smart Brush tool correction by deleting the specific adjustment layer.
Smart Brush pop-up panel
Photoshop Elements lets you apply many different preset adjustments using the Smart Brush tool and the Detail
Smart Brush tool . You pick an adjustment from the preset pop-up panel in the options bar. Like all pop-up panels,
the Smart Brush preset pop-up panel can be configured. Use the panel menu to display the adjustments as thumbnails
or in a list. You can also drag the picker out of the options bar so it floats where you want it in the workspace.
Specific sets of adjustments or all adjustments can be viewed by choosing from a menu near the upper-left area of the
panel. The adjustments range from tonal and corrections.
About Levels adjustments
The Levels dialog box is a powerful tonal and color-adjustment tool. You can make levels adjustments in the entire
image or a selected portion. (To access the dialog box, choose Enhance
> Adjust Lighting > Levels.)
Levels dialog box
A. Channels to adjust color B. Shadow values C. Middle tones D. Highlight values
You can do any of the following with the Levels dialog box:
•Set the shadow and highlight values to make sure that your image uses the full tonal range.
•Adjust the brightness of the image’s middle tones without affecting the shadow and highlight values.
•Fix a color cast by making grays neutral. You can also enhance an image by adding a slight color cast, for example,
by adding a warming effect on a sunset.
B C D
A

119
USING PHOTOSHOP ELEMENTS 9
Color and tonal correction
Last updated 1/3/2012
•Target shadow and highlight RGB values if you are preparing images for commercial printing.
When you work with Levels, you can work directly on the image pixels or through an adjustment layer. Adjustment
layers give you flexibility in the following ways:
•You can modify an adjustment at any time by double-clicking the adjustment layer to reopen the Levels dialog box.
•You can reduce the effect of an adjustment by lowering the adjustment layer’s opacity in the Layers panel.
•You can stack adjustment layers to make multiple adjustments without degrading the image because of too many
successive adjustments.
•You can use the adjustment layer’s layer mask to confine an adjustment to a portion of your image.
More Help topics
“About adjustment and fill layers” on page 70
“The Adjust Levels Guided Edit” on page 51
Improve shadow and highlight detail
1In the Edit workspace, choose Enhance > Adjust Lighting > Shadow/Highlights.
2Drag any of the adjustment sliders or enter values in the text boxes, then click OK.
Lighten Shadows Brightens the dark areas of your photo and reveals more of the shadow detail that was captured in
your image.
Darken Highlights Darkens the light areas of your photo and reveals more of the highlight detail that was captured in
your image. Pure white areas of your photo don’t have any detail and aren’t affected by this adjustment.
Midtone Contrast Adds or reduces the contrast of the middle tones. Use this slider if the image contrast doesn’t look
right after you’ve adjusted shadows and highlights.
To reset the image to how it looked when you opened the dialog box, hold down Alt (Option in Mac OS) and click the
Reset button.
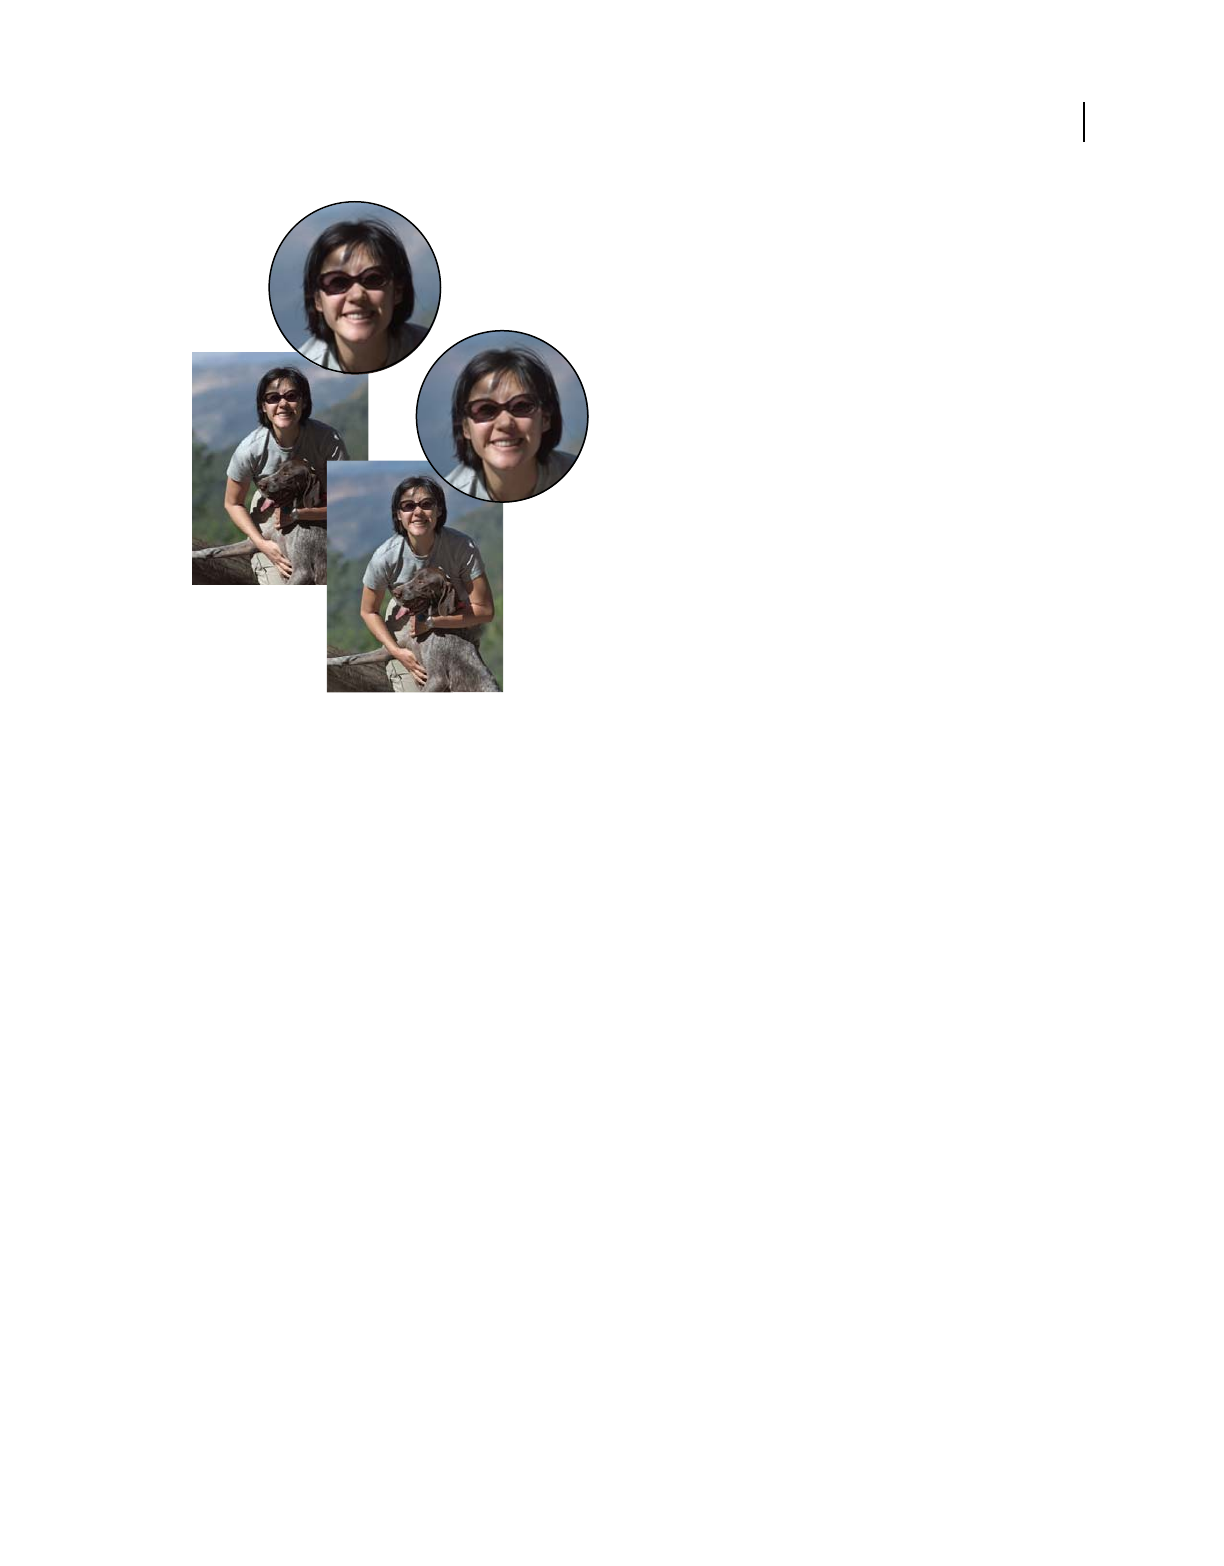
120
USING PHOTOSHOP ELEMENTS 9
Color and tonal correction
Last updated 1/3/2012
Before adjusting shadows and highlights (top) and after (bottom). Adjusting softens the face and reveals more detail behind sunglasses.
More Help topics
“Remove a color cast automatically” on page 125
Adjust shadows and brightness using Levels
1Do one of the following in the Edit workspace:
•Choose Enhance > Adjust Lighting > Levels.
•Choose Layer > New Adjustment Layer > Levels, or open an existing Levels adjustment layer.
2Choose RGB from the Channel menu. When set to RGB, your adjustment affects all three (red, green, and blue)
channels. If you are working on a grayscale image, it will only have the gray channel.
3Set the shadow and highlight values by dragging the black and white Input Levels sliders (the left and right sliders
directly under the histogram) to the edge of the first group of pixels on either end of the histogram. You can also
enter values directly into the first and third Input Levels text boxes.
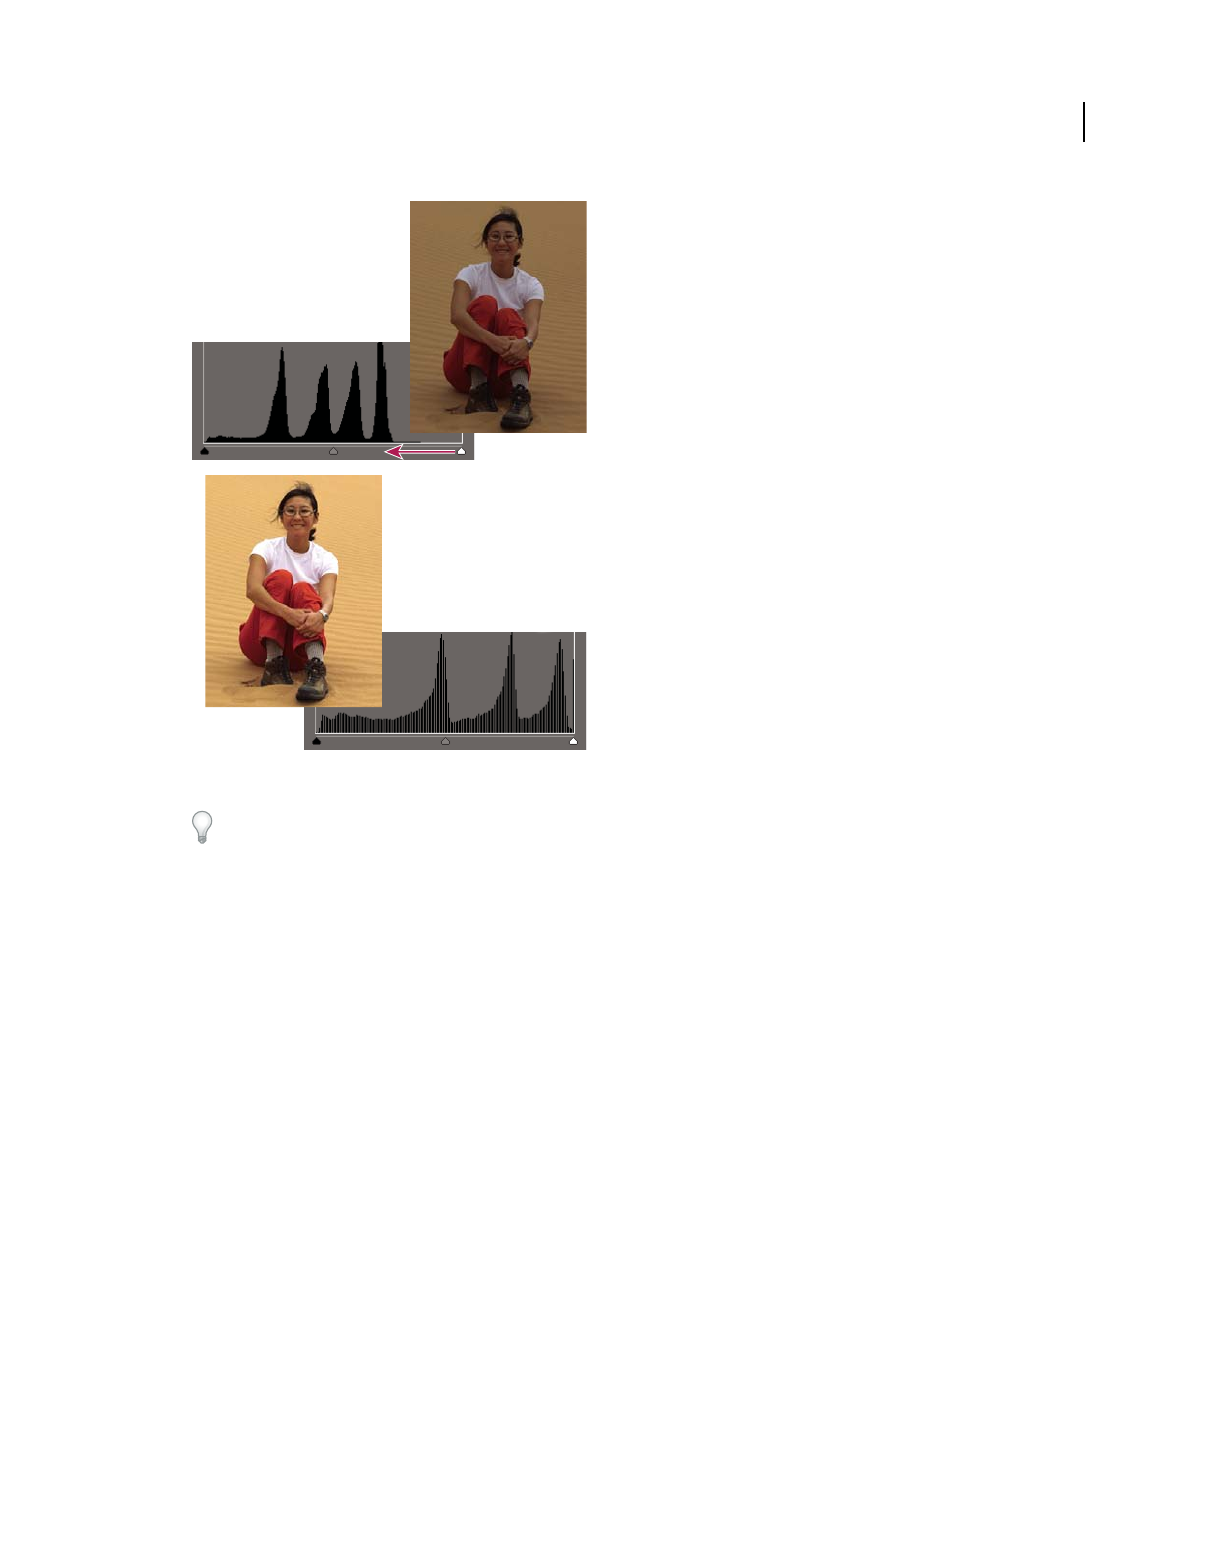
121
USING PHOTOSHOP ELEMENTS 9
Color and tonal correction
Last updated 1/3/2012
Dragging the highlight slider to the left lightens the photo.
Press Alt (Option in Mac OS) and drag the Shadow slider to see which areas will be clipped to black (level 0). Press
Alt (Option in Mac OS) and drag the Highlight slider to see which areas will be clipped to white (level 255). Colored
areas show clipping in individual channels.
4To adjust the brightness of the middle tones without affecting the shadow and highlight values, drag the gray Input
Levels (middle) slider. You can also enter values directly in the middle Input Levels text box. (A value of 1.0
represents the current unadjusted midtone value.) Click OK.
You can see the adjustment reflected in the Histogram panel.
Note: You can click Auto to move the Highlight and Shadow sliders automatically to the brightest and darkest points in
each channel. This is the same as using the Auto Levels command and may cause a color shift in your image.
More Help topics
“The Adjust Levels Guided Edit” on page 51
“Adjust saturation and hue” on page 127
“Automatically correct lighting and color” on page 112
Adjust brightness and contrast in selected areas
The Brightness/Contrast command is best used on selected portions of an image. Use this command to adjust the
brightness of an entire image or to reduce contrast results in an image that doesn’t use the entire available tonal range.
The Levels and Shadow/Highlight commands are better choices for making tonal adjustments.
1Do one of the following in the Edit workspace:
•Choose Enhance > Adjust Lighting > Brightness/Contrast to make adjustments directly to image pixels.
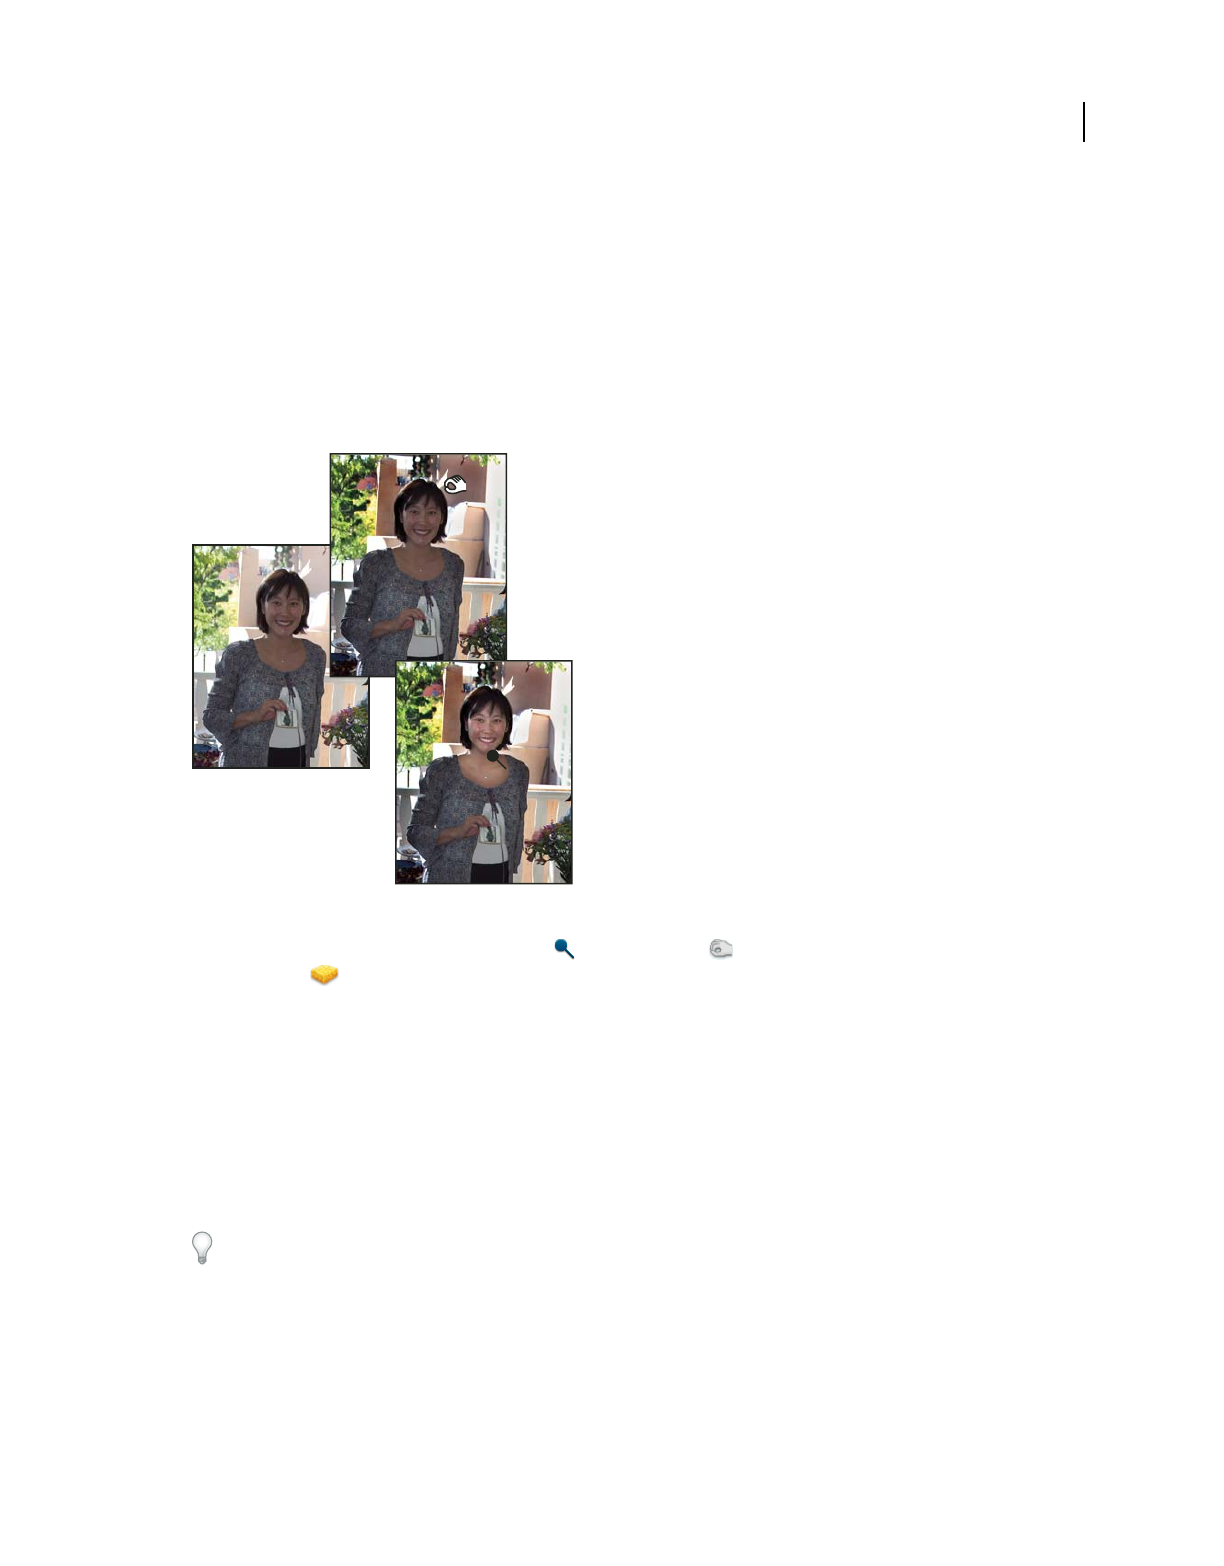
122
USING PHOTOSHOP ELEMENTS 9
Color and tonal correction
Last updated 1/3/2012
•Choose Layer > New Adjustment Layer > Brightness/Contrast to make adjustments to a layer.
2Drag the sliders to adjust the brightness and contrast, then click OK.
Dragging to the left decreases the level; dragging to the right increases it. The number at the right of each slider displays
the brightness or contrast value.
Quickly lighten or darken isolated areas
The Dodge tool and the Burn tool lighten or darken areas of the image. You can use the Dodge tool to bring out details
in shadows and the Burn tool to bring out details in highlights.
Original image (left), after using the Burn tool (top center), and after using the Dodge tool (bottom right)
1In the Edit workspace, select the Dodge tool or the Burn tool . If you do not see these tools, look for the
Sponge tool .
2Set tool options in the options bar:
Brushes pop-up menu Sets the brush tip. Click the arrow next to the brush sample, choose a brush category from the
Brushes pop-up menu, and then select a brush thumbnail.
Size Sets the size of the brush, in pixels. Drag the Size slider or enter a size in the text box.
Range Sets the image tonal range that the tool adjusts. Select Midtones to change the middle range of grays, Shadows
to change the dark areas, and Highlights to change the light areas.
Exposure Sets the effect of the tool with each stroke. A higher percentage increases the effect.
To dodge or burn an area gradually, set the tool to a low exposure value and drag several times over the area you want
to correct.
3Drag over the part of the image you want to modify.
More Help topics
“Adjust saturation and hue” on page 127

123
USING PHOTOSHOP ELEMENTS 9
Color and tonal correction
Last updated 1/3/2012
Quickly saturate or desaturate isolated areas
The Sponge tool saturates or desaturates areas of the image. You can use the Sponge tool to bring out or mute the color
on an object or area.
1In the Edit workspace, select the Sponge tool . If you do not see the Sponge tool, look for the Dodge or
Burn tool.
2Set the tool options in the options bar.
Brushes pop-up menu Sets the brush tip. Click the arrow next to the brush sample, choose a brush category from the
Brushes pop-up menu, and then select a brush thumbnail.
Size Sets the size of the brush, in pixels. Drag the Size slider or enter a size in the text box.
Mode Sets whether to saturate or desaturate.
Flow Sets the strength of the tool with each stroke. In Saturate mode, a higher percentage increases the saturation. In
Desaturate mode, a higher percentage increases the desaturation.
Correcting color casts
Correct color casts by comparing variations of an image
You can make color and tonal adjustments in the Color Variations dialog box by comparing and choosing different
thumbnail variations of the photo. Color Variations works best for average tone images that don’t require precise color
adjustments.
Note: You can’t use the Color Variations command with images in Indexed Color mode.
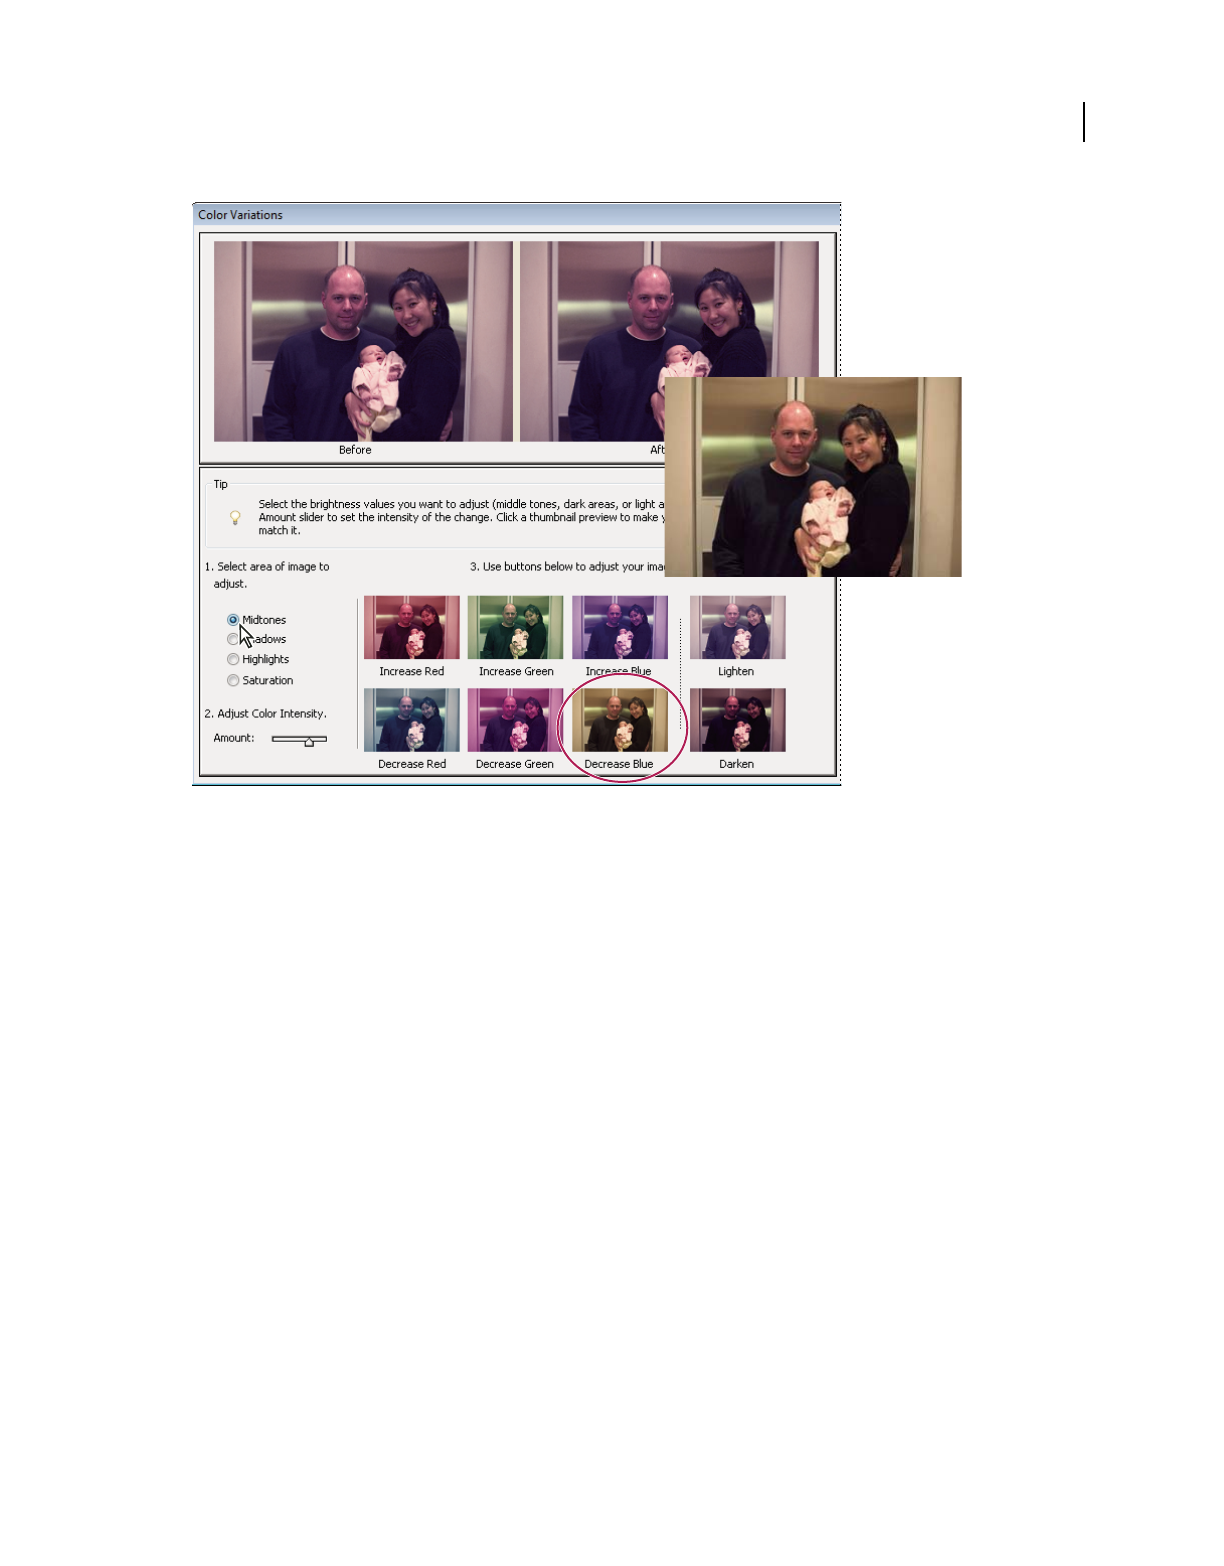
124
USING PHOTOSHOP ELEMENTS 9
Color and tonal correction
Last updated 1/3/2012
Comparing color adjustments in the Color Variations dialog box
1In the Edit workspace, choose Enhance > Adjust Color > Color Variations.
The two preview images show the original image (Before) and the adjusted image after you’ve made changes (After).
2Select an option to choose what you want to adjust in the image:
Midtones, Shadows, or Highlights Specify which part of the tonal range to adjust: dark, middle, or light areas.
Saturation Makes the image colors more vivid (more saturation) or muted (less saturation).
3Set the amount, or intensity, of each adjustment by using the Adjust Color slider. Dragging the slider to the left
decreases the amount, and dragging to the right increases it.
4If you are adjusting the color of midtones, shadows, or highlights, do either of the following:
•To add a color to the image, click the corresponding Increase color thumbnail.
•To subtract a color, click the corresponding Decrease color thumbnail.
Each time you click a thumbnail, all thumbnails are updated.
5If you are adjusting color saturation, click either the Less Saturation or More Saturation button.
6To undo or redo adjustments, do any of the following, then click OK to apply the adjustments to your image.
•Click Reset Image to start over and undo all adjustments.
•Click Undo once or multiple times for each successive adjustment you want to undo. You cannot undo the Reset
Image option.
•After undoing a new adjustment, click Redo once or multiple times for each adjustment you want to redo.
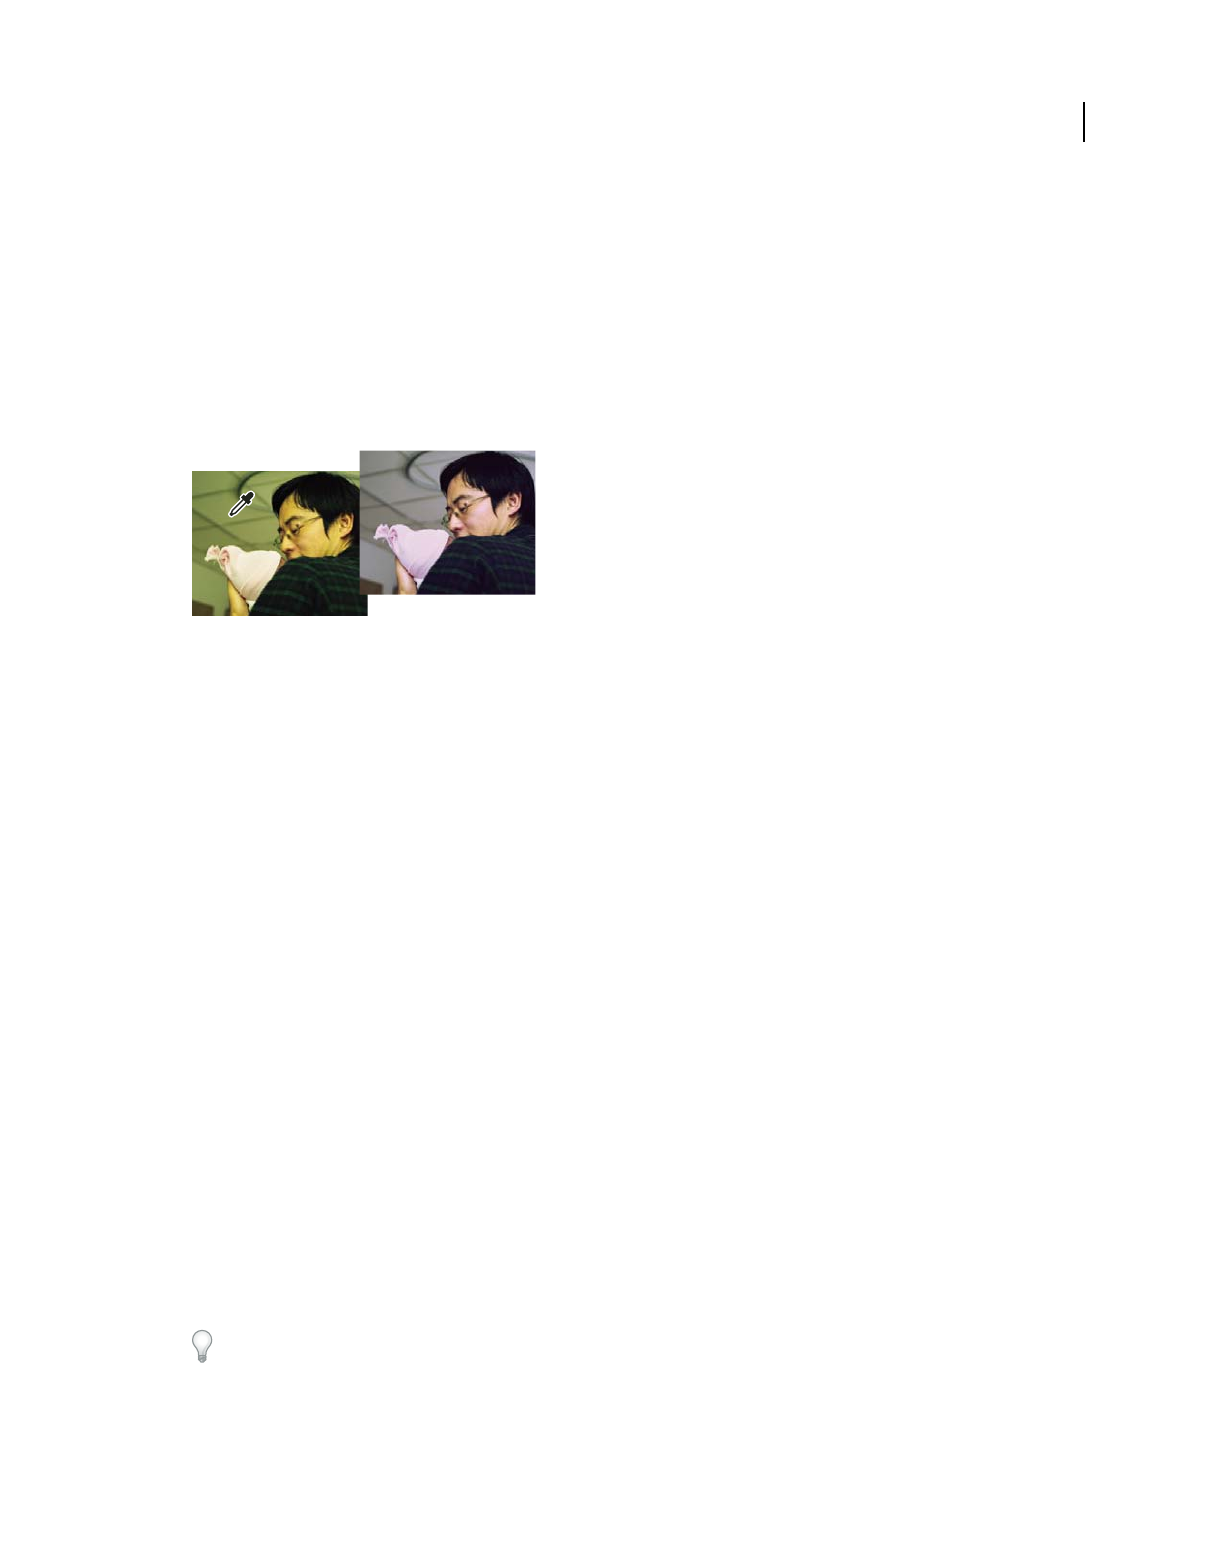
125
USING PHOTOSHOP ELEMENTS 9
Color and tonal correction
Last updated 1/3/2012
More Help topics
“Improve shadow and highlight detail” on page 119
“Adjust shadows and brightness using Levels” on page 120
Remove a color cast automatically
A color cast is an unpleasant color shift in a photo. For example, a photo taken indoors without a camera flash may
have too much yellow. The Remove Color Cast command changes the overall mixture of colors to remove color casts
from an image.
Original (left), and after removing the green color cast (right)
1In the Edit workspace, choose Enhance > Adjust Color > Remove Color Cast.
2In your image, click an area that should be white, black, or neutral gray. The image changes based on the color you
selected.
3To start over and undo the changes made to the image, click the Reset button.
4Click OK to accept the color change.
More Help topics
“Automatically correct lighting and color” on page 112
Remove a color cast using Levels
This technique requires color correction experience and some knowledge of the RGB color wheel.
1Do one of the following in the Edit workspace:
•Choose Enhance > Adjust Lighting > Levels.
•Choose Layer > New Adjustment Layer > Levels, or open an existing Levels adjustment layer.
2Choose a color channel to adjust from the Channel pop-up menu:
•Red to add red or cyan to the image.
•Green to add green or magenta to the image.
•Blue to add blue or yellow to the image.
3Drag the middle input slider left or right to add or subtract color.
4Click OK when you are satisfied with the overall color.
You can use the gray eyedropper in the Levels dialog box to quickly remove a color cast. Double-click the eyedropper
and make sure that the RGB values are equal. After you close the Color Picker, click an area in your image that should
be a neutral gray.
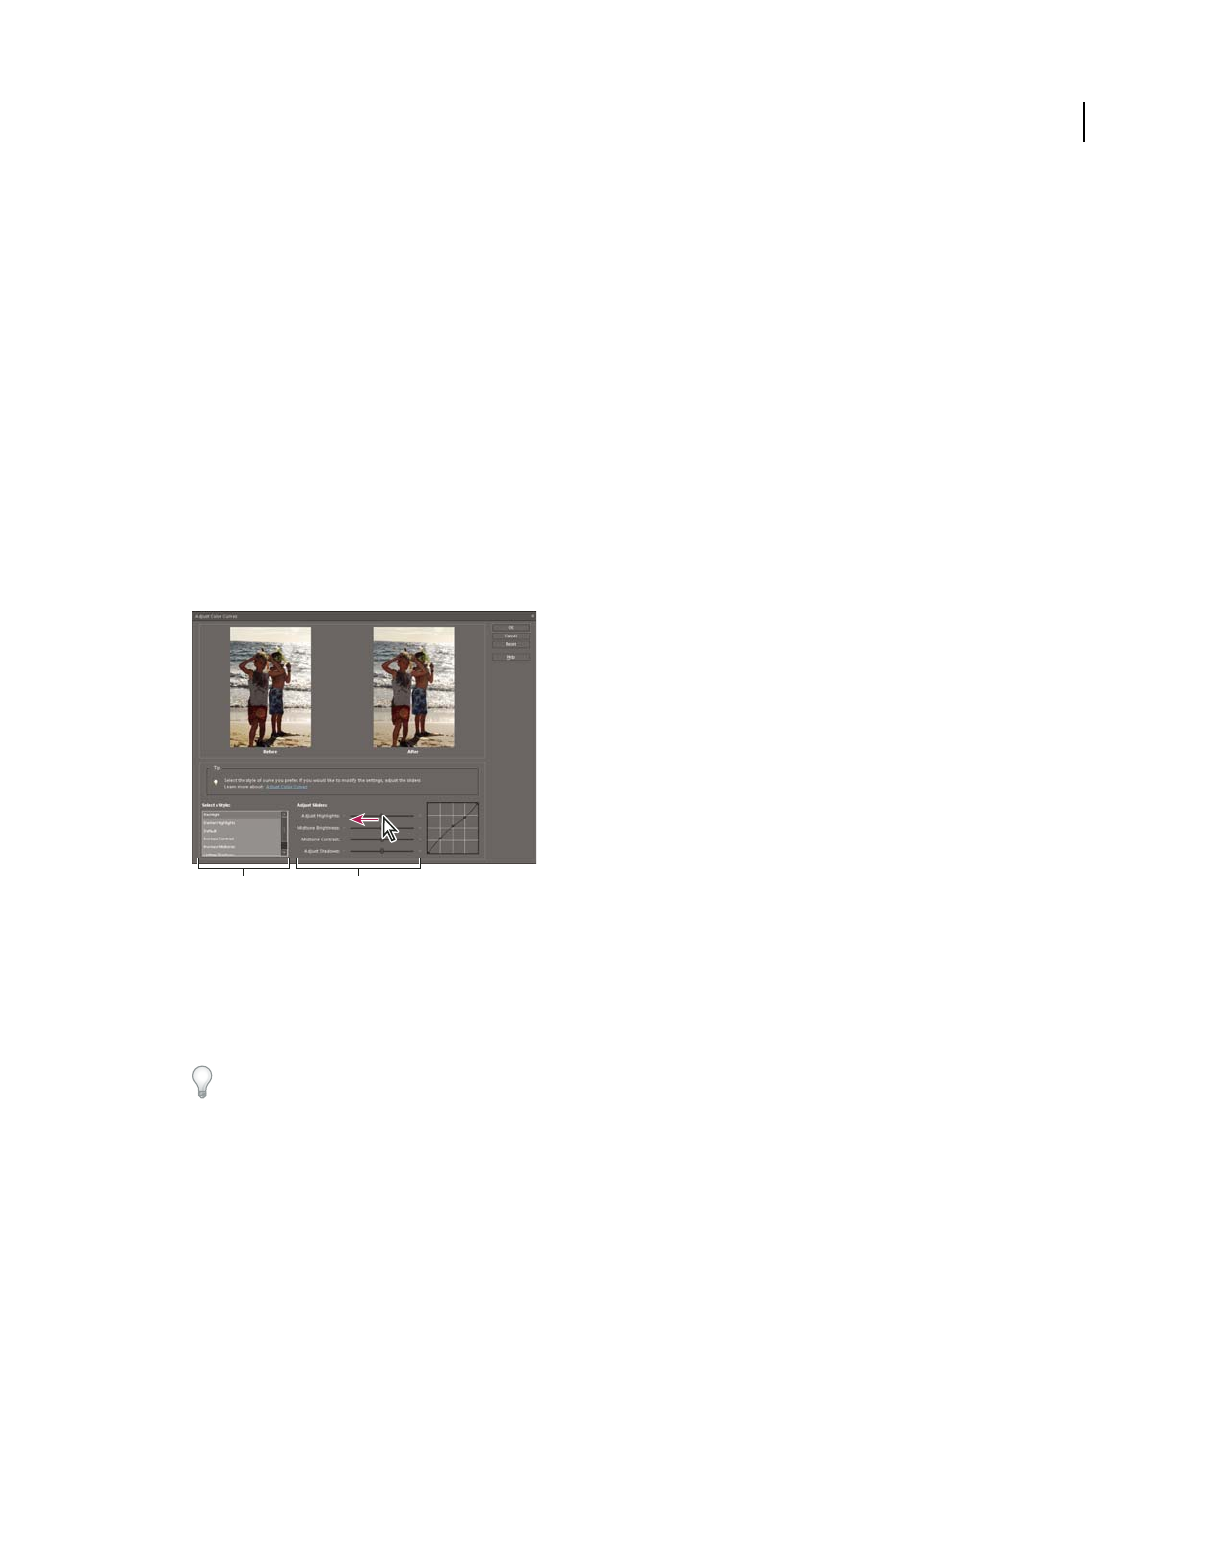
126
USING PHOTOSHOP ELEMENTS 9
Color and tonal correction
Last updated 1/3/2012
More Help topics
“Color wheel” on page 174
“Adjust shadows and brightness using Levels” on page 120
“The Adjust Levels Guided Edit” on page 51
“Remove a color cast automatically” on page 125
Adjust color curves
The Adjust Color Curves command improves color tones in a photo by adjusting highlights, midtones, and shadows
in each color channel. For example, this command can fix photos with silhouetted images resulting from strong
backlighting, or slightly washed-out objects that were too close to the camera’s flash.
In the Adjust Color Curves dialog box, you can compare and choose different tonal presets by selecting from the list
of styles in the Select A Style box. To fine-tune the adjustment, adjust the highlights, midtone brightness and contrast,
and shadows.
Adjusting color curves in an image
A. Select a Style (choose from presets) B. Adjust Sliders (custom options)
1In the Edit workspace, open an image.
2To adjust a specific image area or layer, select it with one of the selection tools. (If no selection is made, the
adjustment applies to the entire image.)
To preserve the original photo while experimenting with tonal adjustments, adjust the color curves in a duplicate
layer.
3Choose Enhance > Adjust Color > Adjust Color Curves.
4Select a style (for example, Backlight or Solarize).
5Adjust the sliders for Highlights, Midtone Brightness, Midtone Contrast, and Shadows.
6To apply the adjustment to your image, click OK. To cancel the adjustment and start over, click Reset. To close the
Adjust Color Curves dialog box, click Cancel.
More Help topics
“Understanding layers” on page 56
B
A
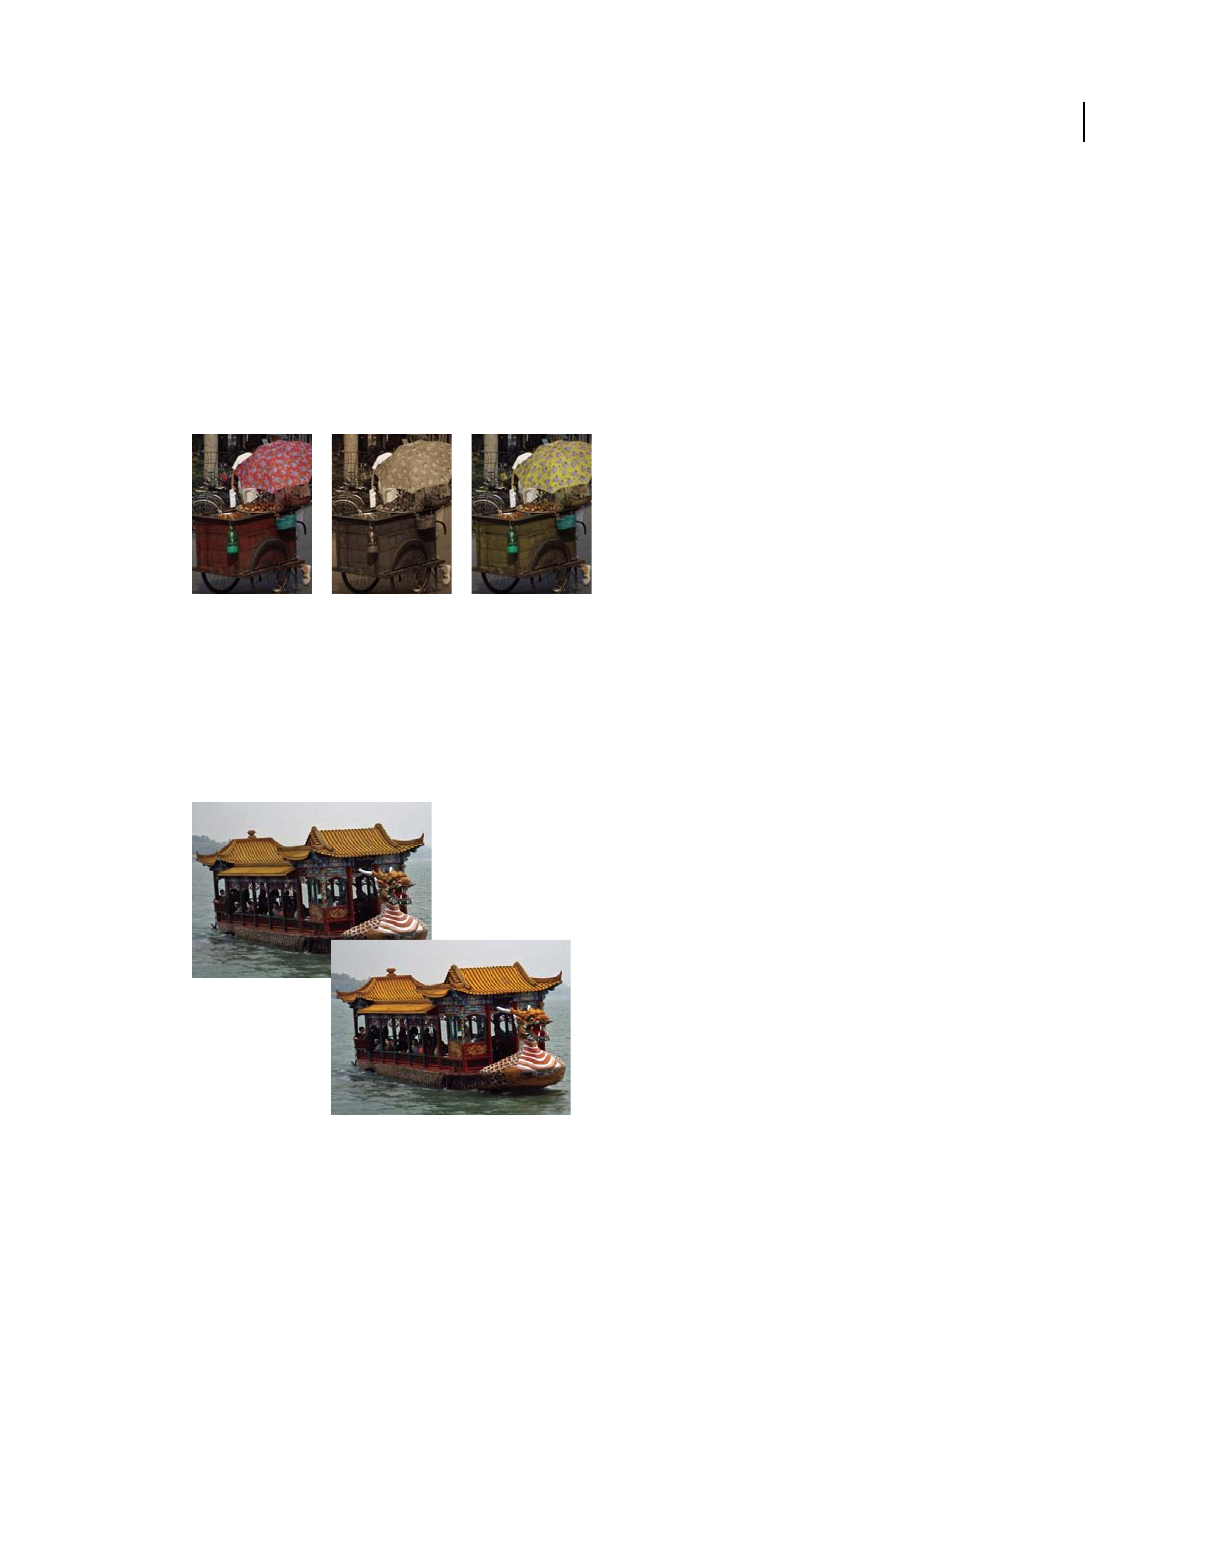
127
USING PHOTOSHOP ELEMENTS 9
Color and tonal correction
Last updated 1/3/2012
Adjusting color saturation and hue
Adjust saturation and hue
The Hue/Saturation command adjusts the hue (color), saturation (purity), and lightness of the entire image or of
individual color components in an image.
Use the Hue slider to add special effects, to color a black and white image (like a sepia effect), or to change the range
of colors in a portion of an image.
Changing colors in an image using the Hue/Saturation command
A. Original B. Entire image changed to sepia using the Colorize option C. Magenta colors targeted in the Edit menu and changed using the
Hue slider
Use the Saturation slider to make colors more vivid or more muted. A good use of this adjustment would be to add a
color punch to a landscape by adding saturation to all the colors, or to tone down a distracting color, like a vivid red
sweater in a portrait.
Before and after adjusting color saturation
Use the Lightness slider in conjunction with the other adjustments to lighten or darken a portion of an image. Take
care not to use it on an entire image—this adjustment reduces the overall tonal range.
More Help topics
“Color wheel” on page 174
Change color saturation or hue
1Do one of the following in the Edit workspace:
•Choose Enhance > Adjust Color > Adjust Hue/Saturation.
ABC

128
USING PHOTOSHOP ELEMENTS 9
Color and tonal correction
Last updated 1/3/2012
•Choose Layer > New Adjustment Layer > Hue/Saturation, or open an existing Hue/Saturation adjustment layer.
The two color bars in the dialog box represent the colors in their order on the color wheel. The upper bar shows the
color before the adjustment; the lower bar shows how the adjustment affects all hues at full saturation.
2In the Edit drop-down menu, choose which colors to adjust:
•Choose Master to adjust all colors at once.
•Choose one of the other preset color ranges listed for the color you want to adjust. An adjustment slider appears
between the color bars, which you can use to edit any range of hues.
3For Hue, enter a value or drag the slider until the colors appear as you want.
The values displayed in the text box reflect the number of degrees of rotation around the color wheel from the pixel’s
original color. A positive value indicates clockwise rotation, a negative value counterclockwise rotation. Values range
from -180 to +180.
4For Saturation, enter a value or drag the slider to the right to increase the saturation or to the left to decrease it.
Values range from -100 to +100.
5For Lightness, enter a value or drag the slider to the right to increase the lightness or to the left to decrease it. Values
range from -100 to +100. Be careful when using this slider on an entire image. It will reduce the tonal range of the
overall image.
6Click OK. Or, to cancel your changes and start over, hold down Alt (Option in Mac OS), and click Reset.
Modify the range of Hue/Saturation sliders
1Do one of the following in the Edit workspace:
•Choose Enhance > Adjust Color > Adjust Hue/Saturation.
•Choose Layer > New Adjustment Layer > Hue/Saturation, or open an existing Hue/Saturation adjustment layer.
2Choose an individual color from the Edit menu.
3Do any of the following to the adjustment slider:
•Drag one of the triangles to adjust the amount of color fall-off without affecting the range.
•Drag one of the gray bars to adjust the range without affecting the amount of color fall-off.
•Drag the gray center part to move the entire adjustment slider, selecting a different color area.
•Drag one of the vertical white bars next to the dark gray center part to adjust the range of the color component.
Increasing the range decreases the color fall-off, and vice versa.
To move the color bar and the adjustment slider bar together, Ctrl-drag (Command-drag in Mac OS) the color bar.
Adjustment slider
A. Adjusts color fall-off without affecting range B. Adjusts range without affecting color fall-off C. Adjusts the range of color component
D. Moves entire slider
ABC DCBA
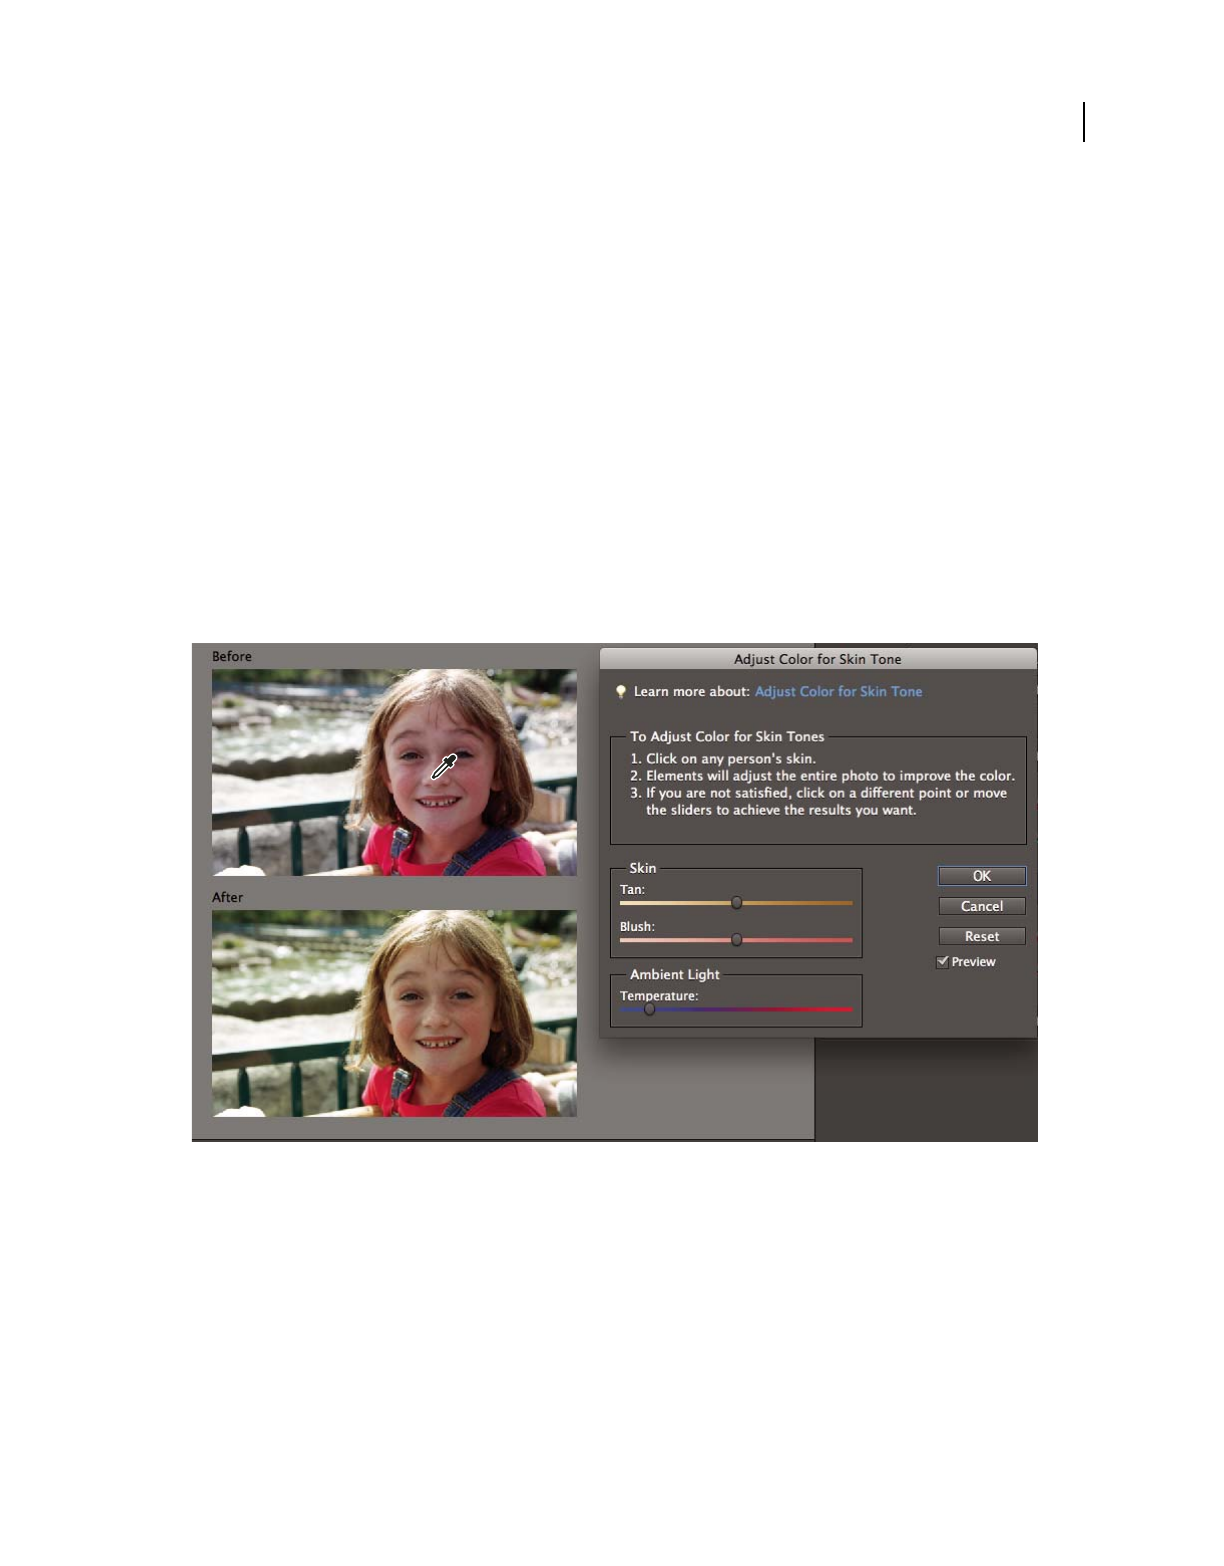
129
USING PHOTOSHOP ELEMENTS 9
Color and tonal correction
Last updated 1/3/2012
If you modify the adjustment slider so that it falls into a different color range, the name changes to reflect this. For
example, if you choose Yellow and alter its range so that it falls in the red part of the color bar, the name changes to
Red 2. You can convert up to six of the individual color ranges to varieties of the same color range (for example, Red
1 through Red 6).
Note: By default, the color range selected when you choose a color component is 30° wide, with 30° color fall-off on either
side. Setting the fall-off too low can produce banding in the image.
4To edit the range by choosing colors from the image, select the eyedropper, and click the image. Use the eyedropper
+ tool to add to the range; use the eyedropper - tool to subtract from the range.
While the eyedropper tool is selected, you can also press Shift to add to the range or press Alt (Option in Mac OS) to
subtract from it.
Adjust the color of skin tone
The Adjust Color For Skin Tone command adjusts the overall color in a photo to bring out more natural skin tones.
When you click an area of skin in the photo, Photoshop
Elements adjusts the skin tone—as well as all other colors in
the photo. You can manually adjust the brown and red colors separately to achieve the final color you want.
Original (top), and after adjusting skin tone (bottom)
1Open the photo in the Edit workspace, and select the layer that needs correction.
2Choose Enhance > Adjust Color > Adjust Color For Skin Tone.
3Click an area of skin.
Photoshop Elements automatically adjusts the colors in the image. Changes might be subtle.
Note: Make sure Preview is selected so that you can see the color changes as they occur.
4(Optional) Drag any of the following sliders to fine-tune the correction:
Tan Increases or decreases the level of brown in skin tones.
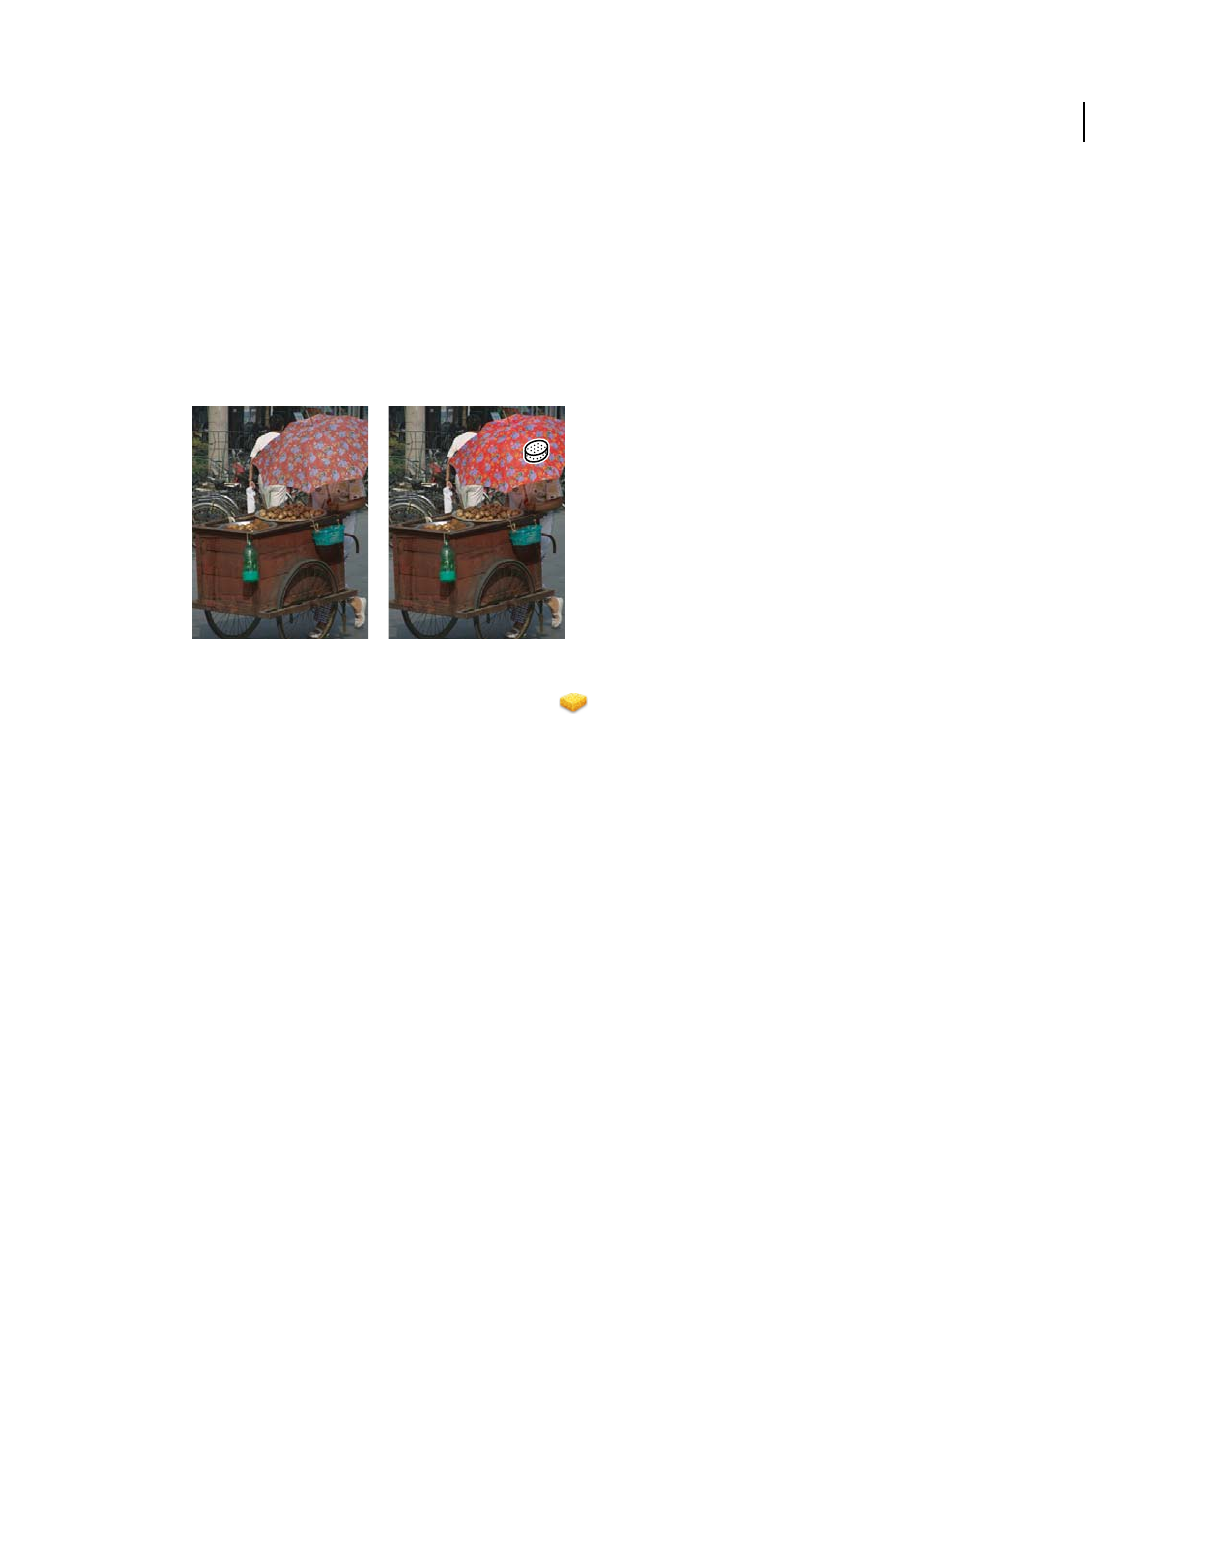
130
USING PHOTOSHOP ELEMENTS 9
Color and tonal correction
Last updated 1/3/2012
Blush Increases or decreases the level of red in skin tones.
Temperature Changes the overall color of skin tones.
5When you’re finished, click OK. Or, to cancel your changes and start over, click Reset.
Adjust saturation in isolated areas
The Sponge tool changes the color saturation or vividness of an area.
Increasing saturation by scrubbing with the Sponge tool
1In the Edit workspace, select the Sponge tool .
2Set tool options in the options bar:
Brushes pop-up menu Sets the brush tip. Click the arrow next to the brush sample, choose a brush category from the
Brushes pop-up menu, and then select a brush thumbnail.
Size Sets the size of the brush, in pixels. Drag the Size slider or enter a size in the text box.
Mode Increases or decreases color saturation. Choose Saturate to intensify the color’s saturation. In grayscale, Saturate
increases contrast. Choose Desaturate to dilute the color’s saturation. In grayscale, Desaturate decreases contrast.
Flow Sets the rate of saturation change. Drag the Flow pop-up slider or enter a value in the text box.
3Drag over the part of the image you want to modify.
Change the color of an object
The Replace Color command replaces a specific color in an image. You can set the hue, saturation, and lightness of the
color.
1In the Edit workspace, choose Enhance > Adjust Color > Replace Color.
2Select a display option under the image thumbnail:
Selection Displays the mask, which looks like a black and white version of the image, in the preview box.
Image Displays the image in the preview box. This option is useful when you are working with a magnified image or
have limited screen space.
3Click the Eyedropper button, and then click the color you want to change in the image or in the preview box. Use
the eyedropper + tool to add colors, or use the eyedropper - tool to remove colors to keep them from changing.
4Drag the Fuzziness slider to control the degree to which related colors are included in the selection.
5Do one of the following to specify a new color:
•Drag the Hue, Saturation, and Lightness sliders (or enter values in the text boxes).
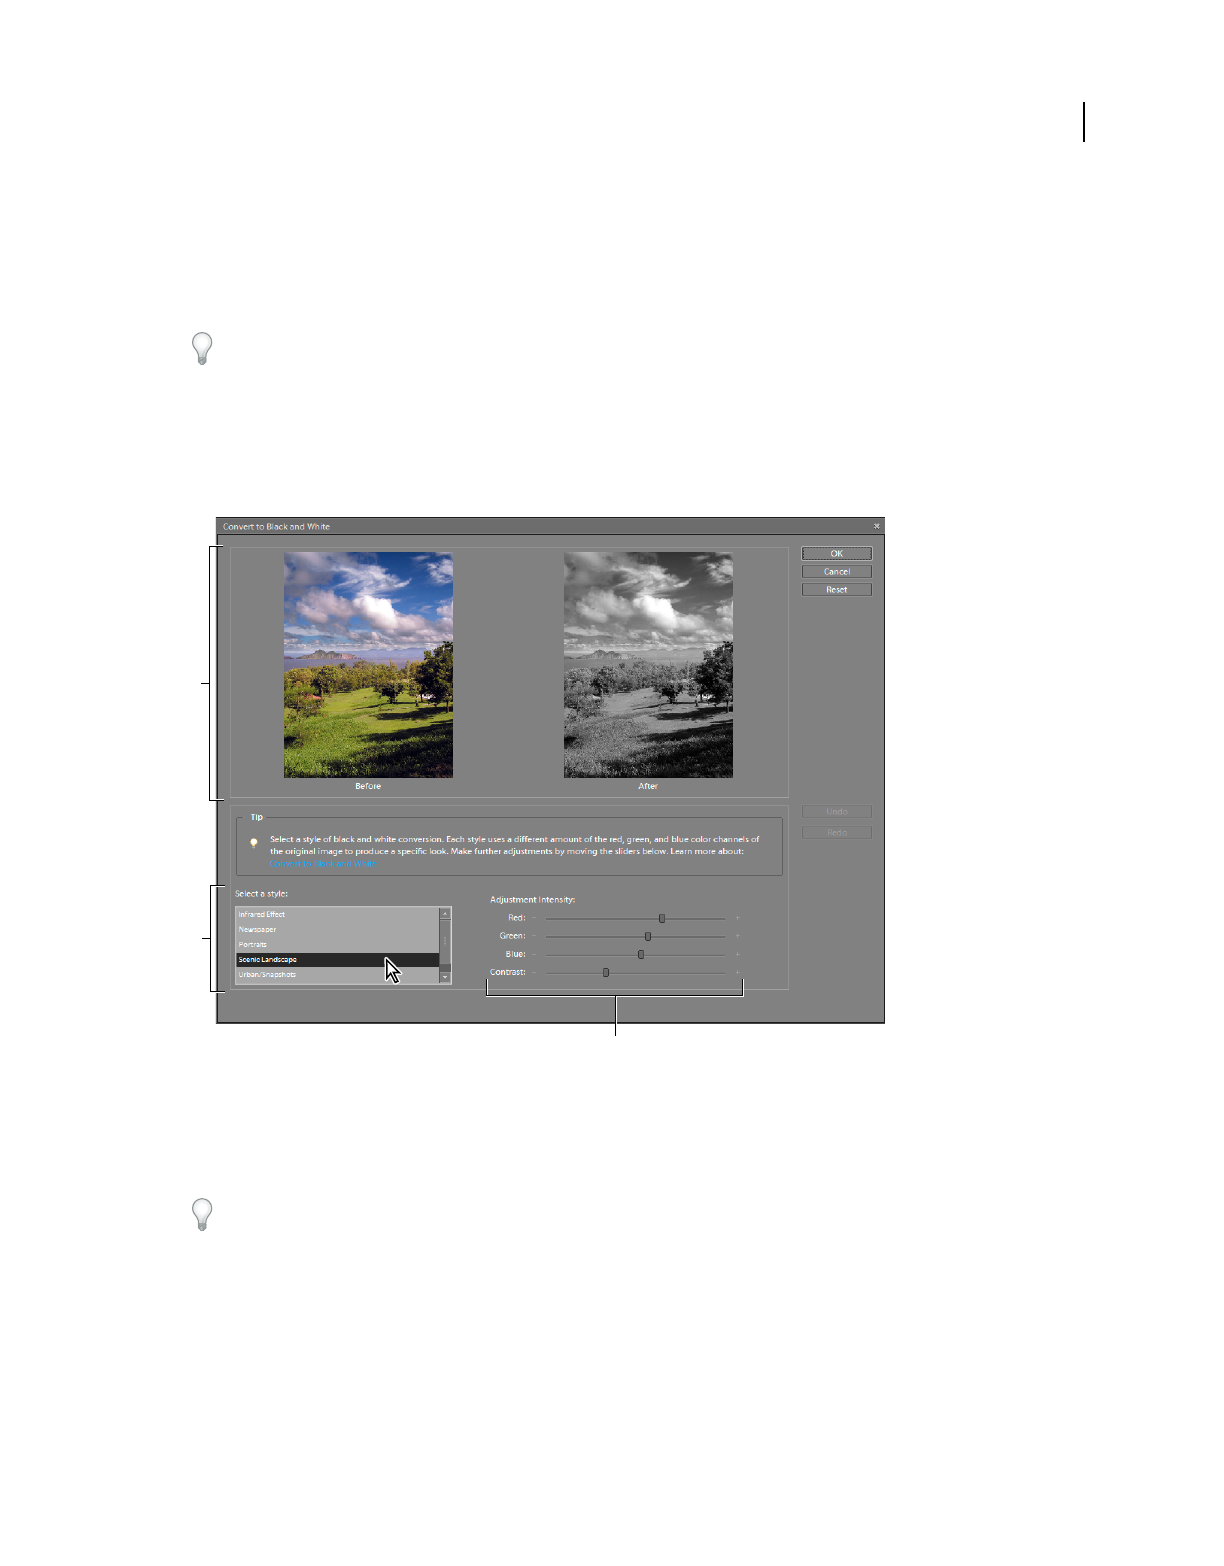
131
USING PHOTOSHOP ELEMENTS 9
Color and tonal correction
Last updated 1/3/2012
•Click the Results box and specify a new color in the Color Picker, then click OK.
6To cancel your changes and start over, hold down Alt (Option in Mac OS), and click Reset.
Precisely convert to black and white
For a video about this process, see www.adobe.com/go/lrvid2325_pse9_en.
The Convert To Black And White command lets you choose a specific conversion result, unlike the Remove Color
command, which automatically converts to black and white for you.
In the Convert To Black And White dialog box, you compare and choose different conversion presets represented by
image styles. Select a style and then use the available sliders to fine-tune the conversion.
Convert to black and white
A. Displays Before and After views B. Select a style C. Adjust intensity
1In the Edit workspace, open an image.
2Select an area or layer to convert. If you do not select an area or layer, the entire image is converted.
To experiment with black and white conversion while preserving the original photo, convert a duplicate layer.
3Choose Enhance > Convert To Black And White.
4Select a style option that reflects the content of your image (for example, Portraits or Scenic Landscape).
5Drag the Adjustment Intensity sliders to adjust red, green, blue, or contrast.
Note: The Adjustment Intensity sliders for red, green, and blue don’t colorize your image; they simply include more or
less data from the original color channels in the new black and white image.
A
B
C

132
USING PHOTOSHOP ELEMENTS 9
Color and tonal correction
Last updated 1/3/2012
6To convert your image, click OK. Or, to cancel your changes and start over, click Reset. To close the Convert To
Black And White dialog box, click Cancel.
More Help topics
“Understanding layers” on page 56
Automatically convert to black and white
The Remove Color command converts to black and white by assigning equal red, green, and blue values to each pixel
in an RGB image. The overall brightness of each pixel remains constant. This command has the same effect as setting
Saturation to -100 in the Hue/Saturation dialog box.
1To adjust a specific image area, select it with one of the selection tools. If no selection is made, the adjustment
applies to the entire image.
2Choose Enhance > Adjust Color > Remove Color.
Add custom presets for black and white conversion
You can manually add custom presets to the black and white converter by editing a specific text file.
Note: This is a task for advanced users.
1Close the Edit workspace.
2Navigate to the folder that contains the bwconvert.txt file.
•In Windows, \Program Files\Adobe\Photoshop Elements 9.0\Required
•In Mac OS, navigate to the folder /Applications/Photoshop Elements 9. Command-click Adobe Photoshop
Elements and select Show Package Contents. Navigate to the folder Contents/Required.
3Open the bwconvert.txt file in a plain text editor (such as Notepad).
4Following the same naming convention as the presets already in the file, add your new preset and give it a unique
name.
5Save the file (keeping the original filename).
6Start the Edit workspace and choose Enhance > Convert To Black And White to view the presets.
Add color to a grayscale image
You can colorize an entire grayscale image, or select areas to colorize with different colors. For example, you can select
a person’s hair and color it brown, and then add pink to the person’s cheeks after making another selection.
Note: If the image you are coloring is in grayscale mode, convert it into RGB by choosing Image > Mode > RGB Color in
the Edit workspace.
1In the Edit workspace, choose Enhance > Adjust Color > Adjust Hue/Saturation, or Layer > New Adjustment
Layer
> Hue/Saturation to work on an adjustment layer.
2Select Colorize. If the foreground color isn’t black or white, Photoshop Elements converts the image into the hue
of the current foreground color. The lightness value of each pixel does not change.
3Use the Hue slider to select a new color if desired. Use the Saturation slider to adjust the saturation. Then click OK.
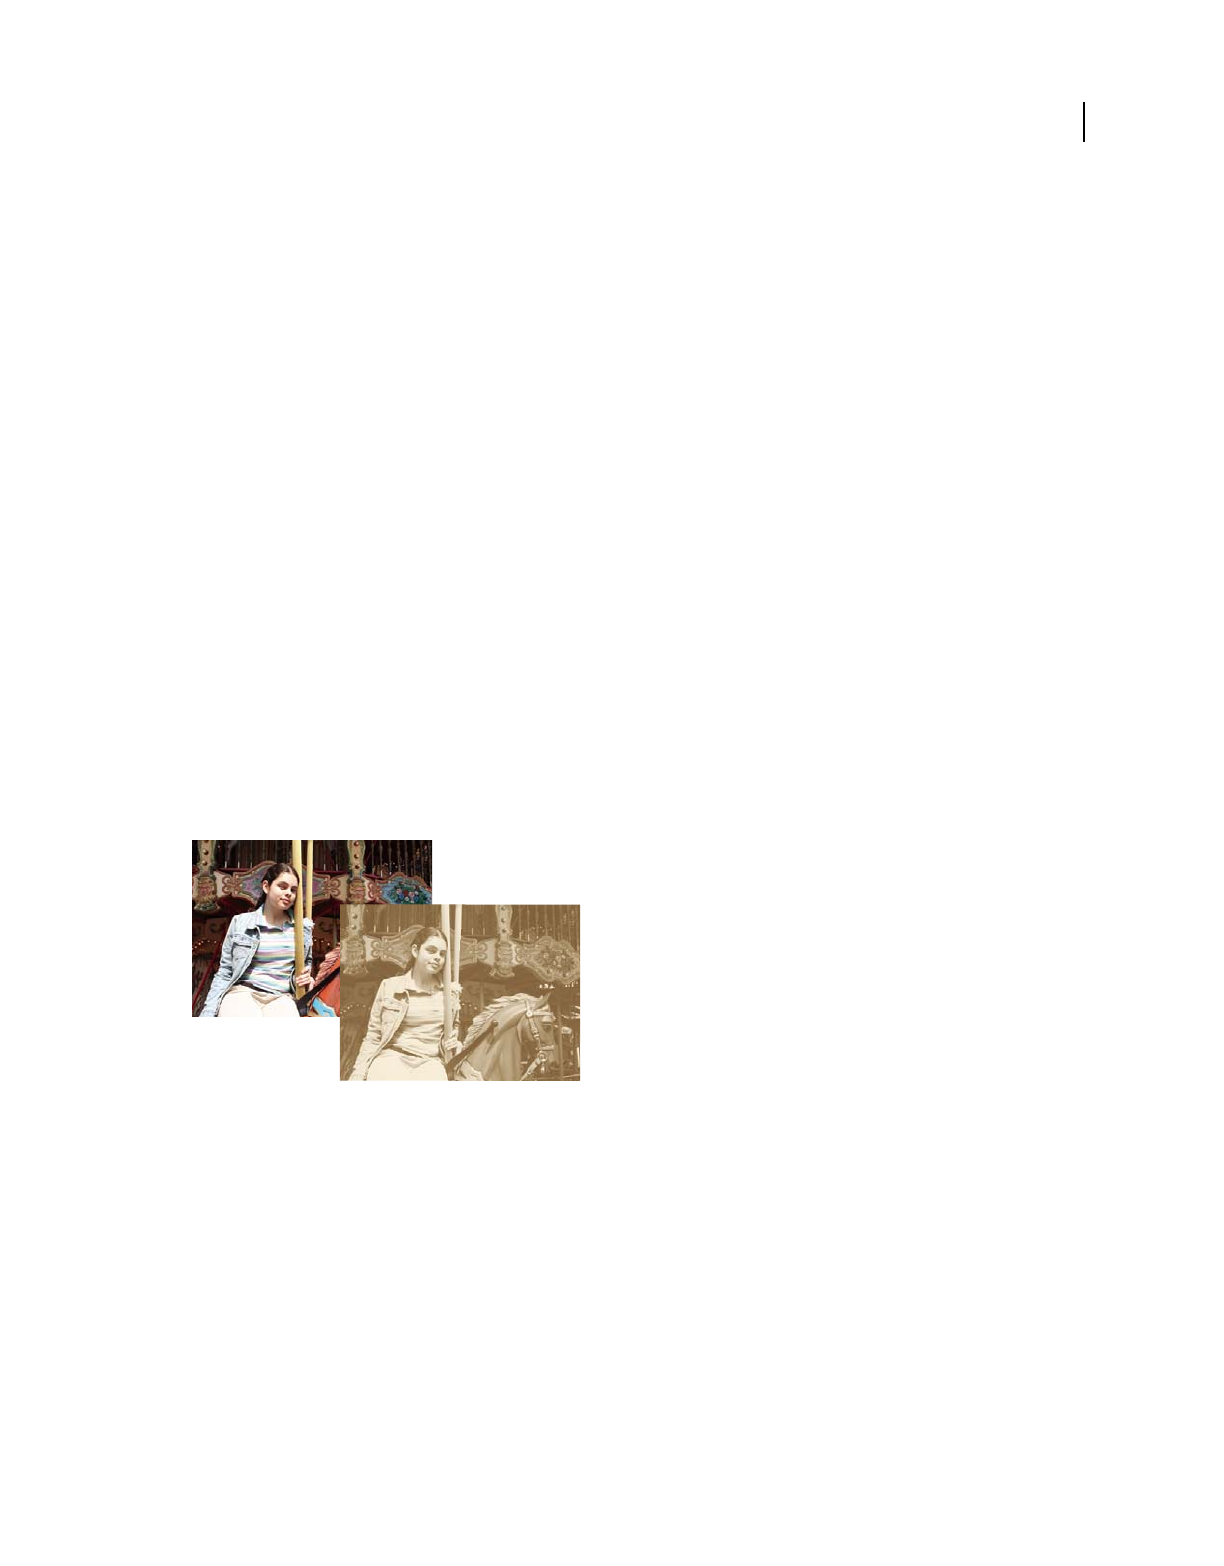
133
USING PHOTOSHOP ELEMENTS 9
Color and tonal correction
Last updated 1/3/2012
Adjustment filters
Apply the Equalize filter
The Equalize filter redistributes the brightness values of the pixels in an image so that they more evenly represent the
entire range of brightness levels. When you apply this command, Photoshop
Elements finds the brightest and darkest
values in the composite image and remaps them so that the brightest value represents white and the darkest value
represents black. Photoshop
Elements then equalizes the brightness—that is, distributes the intermediate pixel
values—evenly throughout the grayscale.
1In the Edit workspace, select an image, layer, or area.
2Choose Filter > Adjustments > Equalize.
3If you selected an area of the image, select what to equalize in the dialog box, and click OK:
•Equalize Selected Area Only to evenly distribute only the selection’s pixels.
•Equalize Entire Image Based On Selected Area to evenly distribute all image pixels based on those in the selection.
More Help topics
“About filters” on page 187
“Apply a filter” on page 189
Apply the Gradient Map filter
The Gradient Map filter maps the grayscale range of an image to the colors of a specified gradient fill.
Using the Gradient Map filter to simulate a sepia tone
1In the Edit workspace, select an image, layer, or area.
2Do one of the following:
•Choose Filter > Adjustments > Gradient Map.
•Using the Layers panel or Layer menu, create a new Gradient Map adjustment layer, or open an existing Gradient
Map adjustment layer.
3Specify the gradient fill you want to use:
•To choose from a list of gradient fills, click the triangle to the right of the gradient fill displayed in the Gradient Map
dialog box. Click to select the desired gradient fill, and then click in a blank area of the dialog box to dismiss the list.
•To edit the gradient fill currently displayed in the Gradient Map dialog box, click the gradient fill. Then modify the
existing gradient fill or create a new gradient fill.

134
USING PHOTOSHOP ELEMENTS 9
Color and tonal correction
Last updated 1/3/2012
By default, the shadows, midtones, and highlights of the image are mapped respectively to the starting (left) color,
midpoint, and ending (right) color of the gradient fill.
4Select neither, one, or both of the Gradient Options:
•Dither adds random noise to smooth the appearance of the gradient fill and reduce banding effects.
•Reverse switches the direction of the gradient fill, reversing the gradient map.
5Click OK.
More Help topics
“About filters” on page 187
“Apply a filter” on page 189
“About gradients” on page 235
“About adjustment and fill layers” on page 70
Apply the Invert filter
The Invert filter inverts the colors in an image. You might use this command to make a positive black-and-white image
negative or to make a positive from a scanned black-and-white negative.
Note: Because color print film contains an orange mask in its base, the Invert command cannot make accurate positive
images from scanned color negatives. Be sure to use the proper settings for color negatives when scanning film on slide
scanners.
When you invert an image, the brightness value of each pixel is converted into the inverse value on the 256-step color-
values scale. For example, a pixel in a positive image with a value of 255 is changed to 0.
1In the Edit workspace, select an image, layer, or area.
2Choose Filter > Adjustments > Invert.
More Help topics
“Apply a filter” on page 189
“About adjustment and fill layers” on page 70
Apply the Posterize filter
The Posterize filter lets you specify the number of tonal levels (or brightness values) for each channel in an image and
then maps pixels to the closest matching level. For example, choosing two tonal levels in an RGB image gives six colors,
two for red, two for green, and two for blue.
This command is useful for creating special effects, such as large, flat areas in a photograph. Its effects are most evident
when you reduce the number of gray levels in a grayscale image. But it also produces interesting effects in color images.
If you want a specific number of colors in your image, convert the image to grayscale and specify the number of levels
you want. Then convert the image back to the previous color mode, and replace the various gray tones with the colors
you want.
1In the Edit workspace, select an image, layer, or area.
2Do one of the following:
•Choose Filter > Adjustments > Posterize.

135
USING PHOTOSHOP ELEMENTS 9
Color and tonal correction
Last updated 1/3/2012
•From the Layers panel or Layer menu, create a new Posterize adjustment layer, or open an existing Posterize
adjustment layer.
3Enter the number of tonal levels you want, and click OK.
More Help topics
“About filters” on page 187
“Apply a filter” on page 189
“About adjustment and fill layers” on page 70
Apply the Threshold filter
The Threshold filter converts grayscale or color images into high-contrast, black-and-white images. You can specify a
certain level as a threshold. All pixels lighter than the threshold are converted to white; and all pixels darker are
converted to black. The Threshold command is useful for determining the lightest and darkest areas of an image.
1In the Edit workspace, select an image, layer, or area.
2Do one of the following:
•Choose Filter > Adjustments > Threshold.
•From the Layers panel or Layer menu, create a new Threshold adjustment layer, or open an existing Threshold
adjustment layer.
The Threshold dialog box displays a histogram of the luminance levels of the pixels in the current selection.
3Select Preview and do any of the following:
•To change the image to black and white, drag the slider below the histogram until the threshold level you want
appears at the top of the dialog box, and click OK. As you drag, the image changes to reflect the new threshold
setting.
•To identify a representative highlight, drag the slider to the right until the image is pure black. Then drag the slider
back until some solid white areas appear in the image.
•To identify a representative shadow, drag the slider to the left until the image is pure white. Then drag the slider
back until some solid black areas appear in the image.
4(Optional) To return to default settings, hold down Alt (Option in Mac OS) and click Reset.
5(Optional) Click Cancel to close the Threshold dialog box without applying changes to the image.
More Help topics
“About filters” on page 187
“Apply a filter” on page 189
“About adjustment and fill layers” on page 70
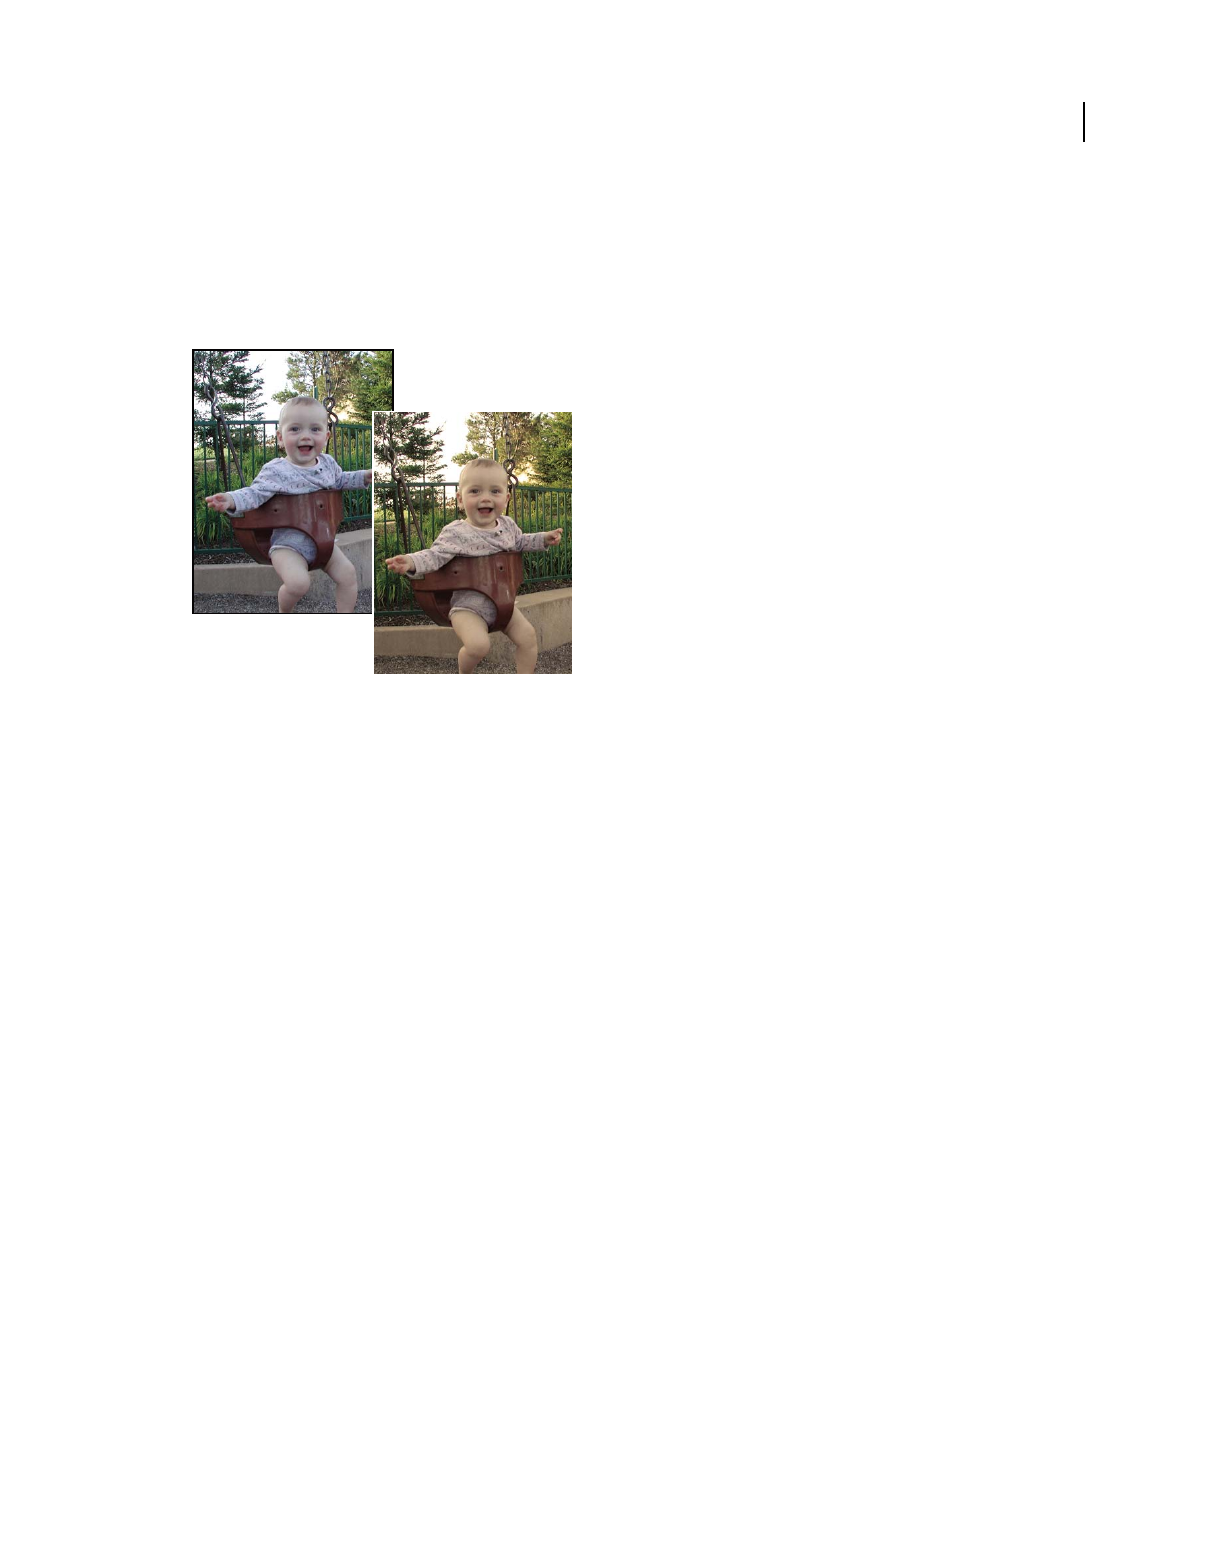
136
USING PHOTOSHOP ELEMENTS 9
Color and tonal correction
Last updated 1/3/2012
Apply the Photo filter
The Photo Filter command mimics the technique of putting a colored filter in front of the camera lens to adjust the
color balance and color temperature of the light transmitted through the lens and exposing the film. The Photo Filter
command also lets you choose a color preset to apply a hue adjustment to an image. If you want to apply a custom
color adjustment, the Photo Filter command lets you specify a color using the Adobe Color Picker.
Original image (left), and Warming Filter (81) with 60% Density applied (right)
1Do one of the following:
•Choose Filter > Adjustments > Photo Filter.
•Choose Layer > New Adjustment Layer > Photo Filter. Click OK in the New Layer dialog box.
2To choose the filter color, do one of the following in the Photo Filter dialog box:
Warming Filter (85) and Cooling Filter (80) Color conversion filters that tune the white balance in an image. If an
image was photographed at a lower color temperature of light (yellowish), the Cooling Filter (80) makes the image
colors bluer to compensate for the lower color temperature of the ambient light. Conversely, if the photo was taken at
a higher color temperature of light (bluish), the Warming Filter (85) makes the image colors warmer to compensate
for the higher color temperature of the ambient light.
Warming Filter (81) and Cooling Filter (82) Light balancing filters for minor adjustments in the color quality of an
image. The Warming Filter (81) makes the image warmer (yellower) and the Cooling Filter (82) makes the image
cooler (bluer).
Individual Colors Apply a hue adjustment to the image depending on the color preset you choose. Your choice of color
depends on how you're using the Photo Filter command. If your photo has a color cast, you can choose a complement
color to neutralize the color cast. You can also apply colors for special color effects or enhancements. For example, the
Underwater color simulates the greenish-blue color cast caused when photographing underwater.
•Select the Filter option, and choose a preset from the Filter menu.
•Select the Color option, click the color square, and use the Adobe Color Picker to specify the color of a custom color
filter.
Make sure Preview is selected to view the results of using a color filter.
If you don’t want the image darkened by adding the color filter, be sure that the Preserve Luminosity option is selected.

137
USING PHOTOSHOP ELEMENTS 9
Color and tonal correction
Last updated 1/3/2012
3To adjust the amount of color applied to the image, use the Density slider or enter a percentage in the Density text
box. A higher Density applies a stronger color adjustment.
4Click OK.
More Help topics
“About filters” on page 187
“Apply a filter” on page 189
“Adjust the color of skin tone” on page 129
“About adjustment and fill layers” on page 70
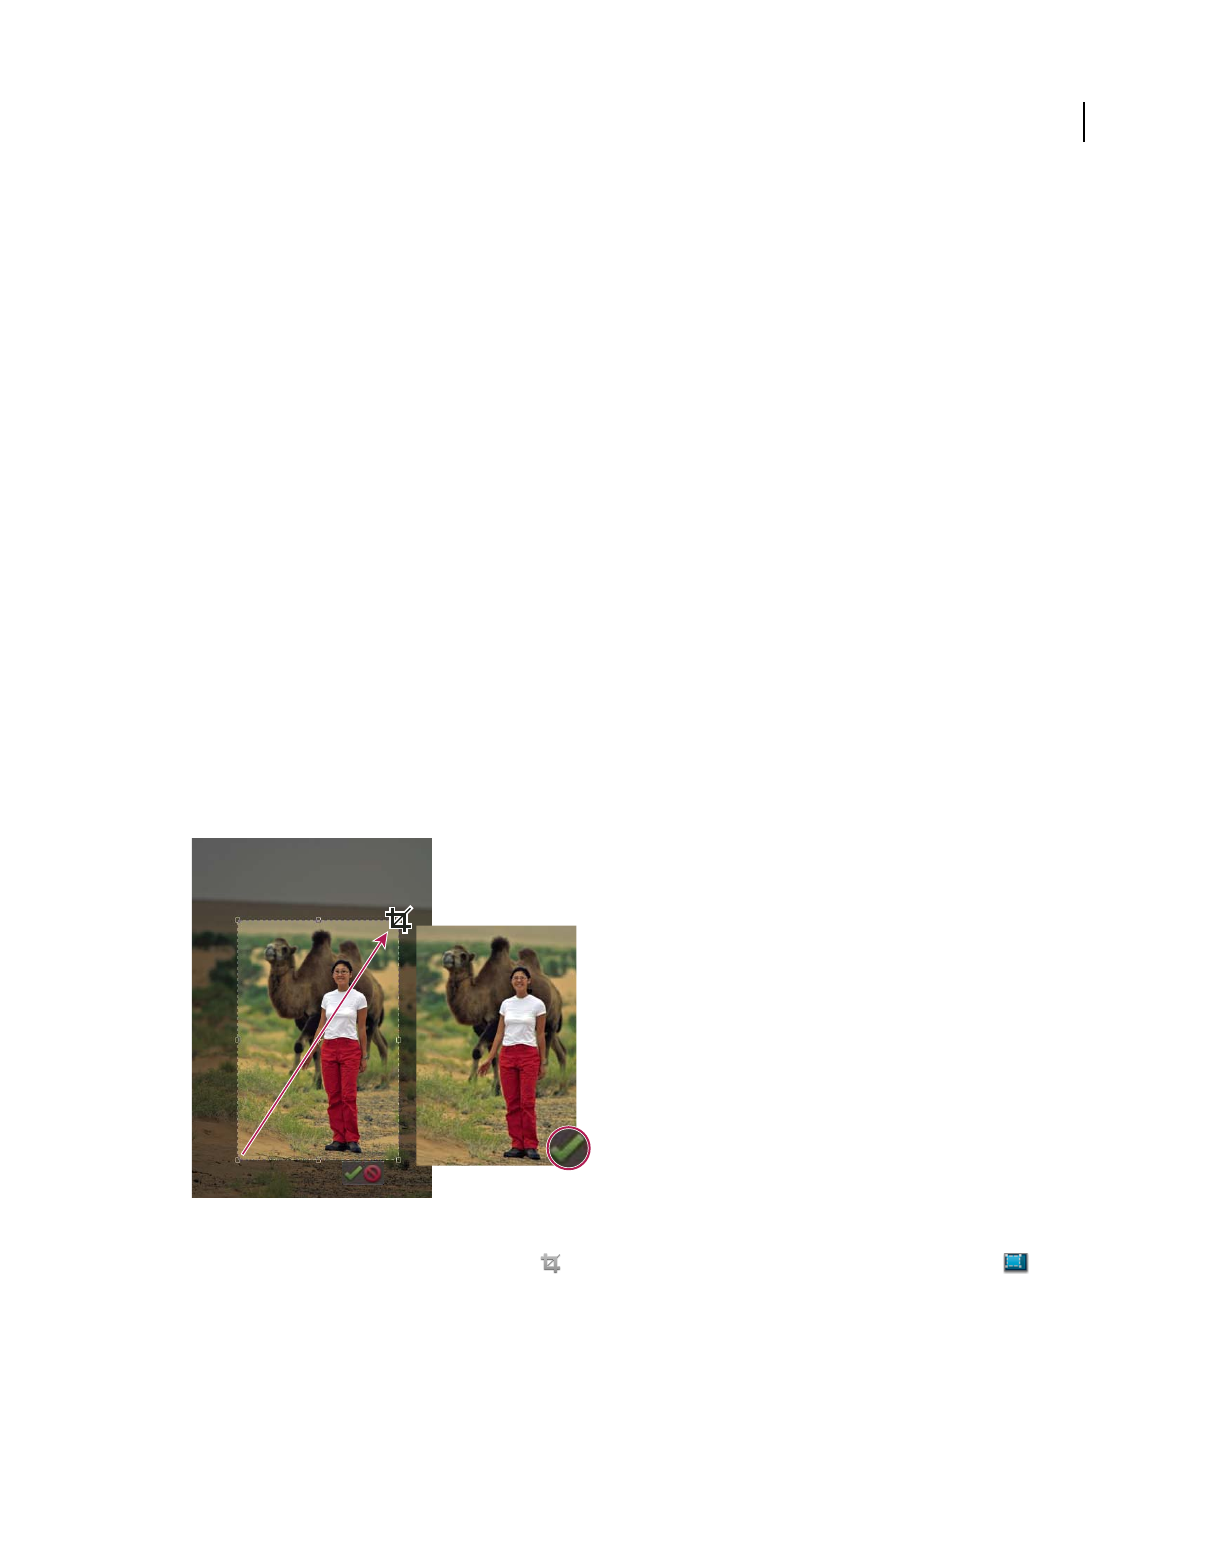
138
Last updated 1/3/2012
Chapter 8: Cropping, resizing, retouching,
and transforming photos
To create a customized image composition, you can crop and resize images. Cropping a photo can create a focal point
for a picture, or remove distracting background images. Resizing a photo lets you include more pictures on a page, or
fit photos better into a layout. You can retouch certain areas of a photo to fix red eye, replace colors, and soften, blur,
or sharpen an image. You can also rotate, resize, distort or apply perspective to a photo, layer, or selection, and even
manipulate a flat, two-dimensional image as if it were a solid, three-dimensional object.
Cropping
Cropping lets you remove unwanted portions of an image and helps bring focus on the areas of an image to which you
want to draw the viewer's attention.
Crop an image
The Crop tool removes the part of an image surrounding the crop marquee, or selection. Cropping is useful for
removing distracting background elements and creating a focus for your photo. By default, when you crop a photo,
the resolution remains the same as the original photo. Using the Photo Ratio option allows you to view and modify the
size and resolution when cropping a photo. If you use a preset size, the resolution changes to fit the preset.
Crop a photo to remove some of the distracting background.
1In the Edit workspace, select the Crop tool , or in the Elements Organizer, select the Fix tab and click Crop.
2If you want to use a resolution other than that of the original photo, select one of the following options from the
Aspect Ratio menu or specify new custom values in the Width and Height boxes in the options bar:
No Restriction Lets you resize the image to any dimension.
Use Photo Ratio Displays the original aspect ratio of the photo when you crop. The Width and Height boxes show the
values that are used for the cropped image. The Resolution box allows you to change the image resolution.
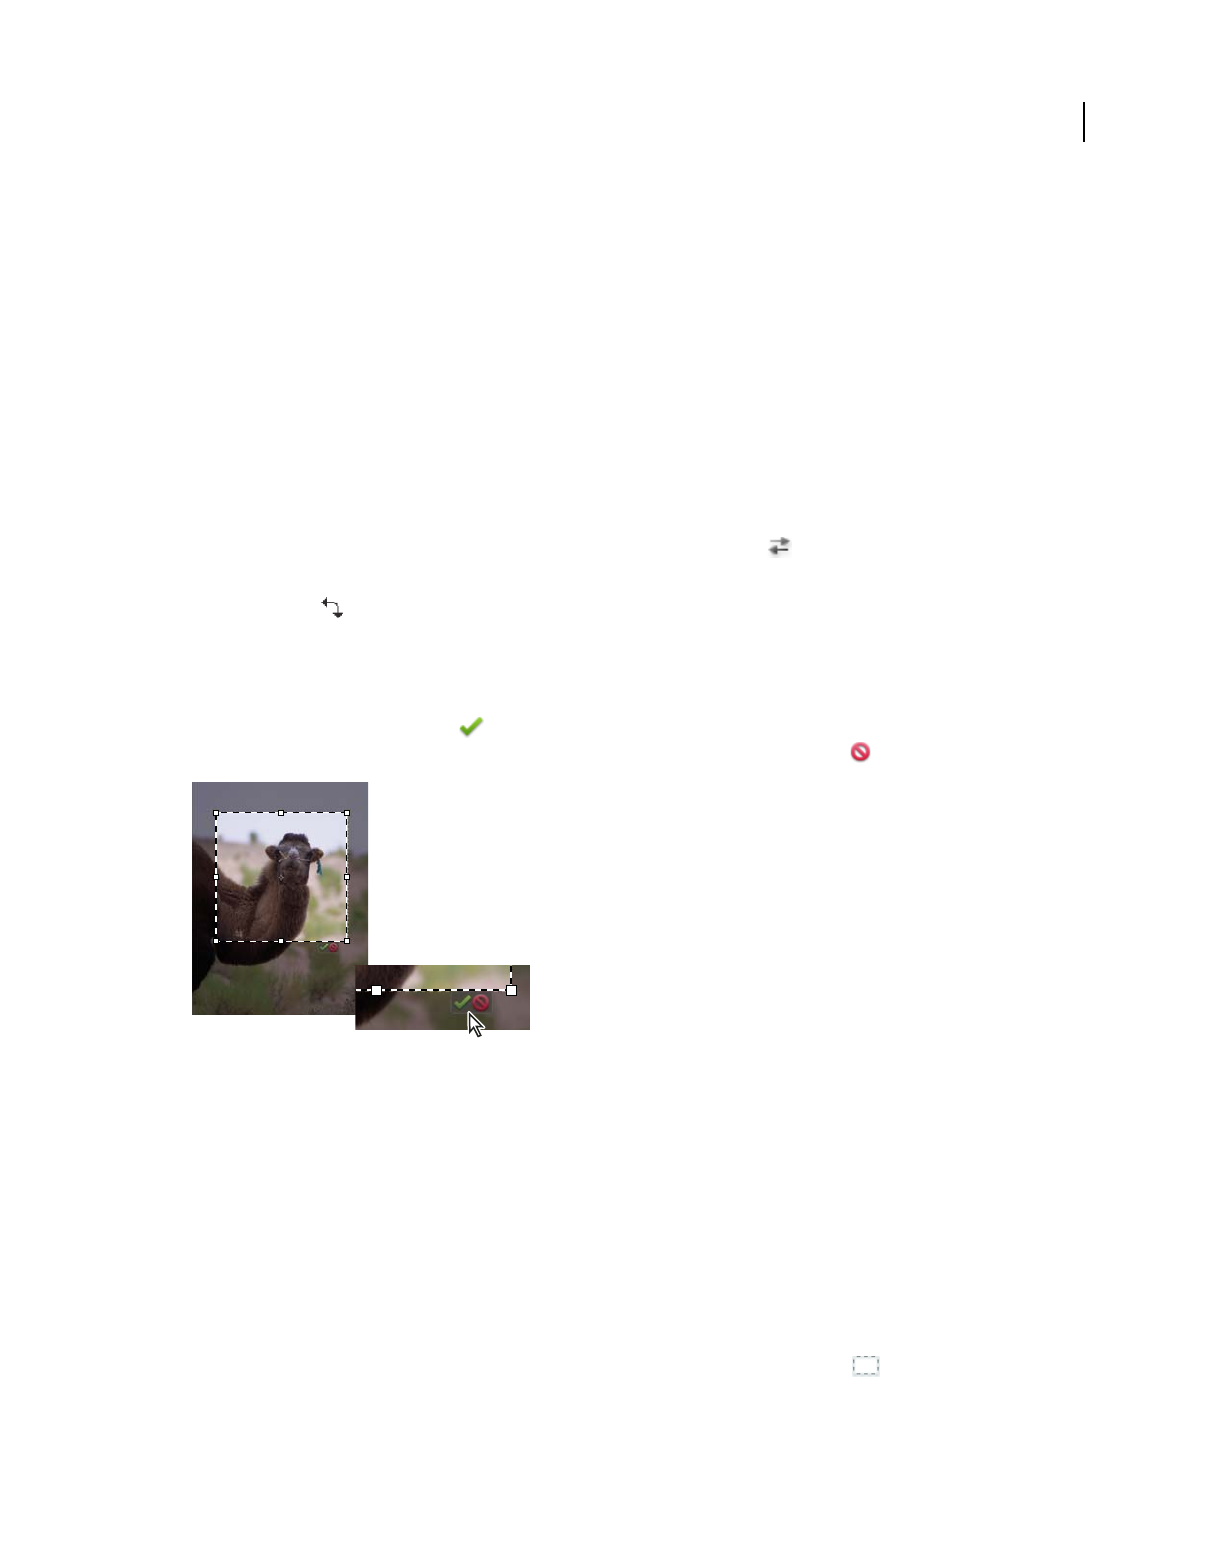
139
USING PHOTOSHOP ELEMENTS 9
Cropping, resizing, retouching, and transforming photos
Last updated 1/3/2012
Preset Size Specifies a preset size for the cropped photo. If you want your final output to be a specific size, such as 4 x
6 inches to fit a picture frame, choose that preset size.
Note: When you specify values for the Width and Height boxes, the Aspect Ratio menu changes to Custom.
3(Edit workspace) Drag over the part of the image you want to keep. When you release the mouse button, the crop
marquee appears as a bounding box with handles at the corners and sides.
4(Optional) Adjust the crop marquee by doing any of the following:
•To change the preset size or aspect ratio, choose new values from the Aspect Ratio menu in the options bar.
•To move the marquee to another position, place the pointer inside the bounding box and click-drag, or hold down
Alt (Option in Mac OS) and use the arrow keys to move the marquee.
•To resize the marquee, drag a handle. (If you choose No Restriction from the Aspect Ratio menu, you can constrain
the proportions while scaling by holding down Shift as you drag a corner handle.)
•(Edit workspace) To swap Width and Height values, click the Swap icon in the options bar.
•(Edit workspace) To rotate the marquee, position the pointer outside the bounding box (the pointer turns into a
curved arrow
), and drag. (You can’t rotate the crop marquee for an image in Bitmap mode.)
Note: You can change the color and opacity of the crop shield (the cropped area surrounding the image) by changing the
Crop tool preferences. Choose Edit
> Preferences > Display & Cursors and specify a new Color and Opacity value in the
Crop Tool area of the Preferences dialog box. If you don’t want to see a colored shield while cropping, deselect Use Shield.
5Click the green Commit button located in the lower-right corner of the marquee, or press Enter to finish the
cropping. If you want to cancel the cropping operation, click the red Cancel button or press Esc.
Click the Commit button to accept a crop.
More Help topics
“Resample an image” on page 146
Crop to a selection boundary
Using the Crop command, you can remove the areas that fall outside of the current selection. When you crop to a
selection boundary, Photoshop
Elements trims the image to the bounding box that contains the selection. (Irregularly
shaped selections, such as those made by using the Lasso tool, are cropped to a rectangular bounding box that contains
the selection.) If you use the Crop command without first making a selection, Photoshop
Elements trims the image by
50 pixels from each visible edge.
1In the Edit workspace, use any selection tool, such as the Rectangular Marquee tool , to select the part of the
image you want to keep.
2Choose Image > Crop.
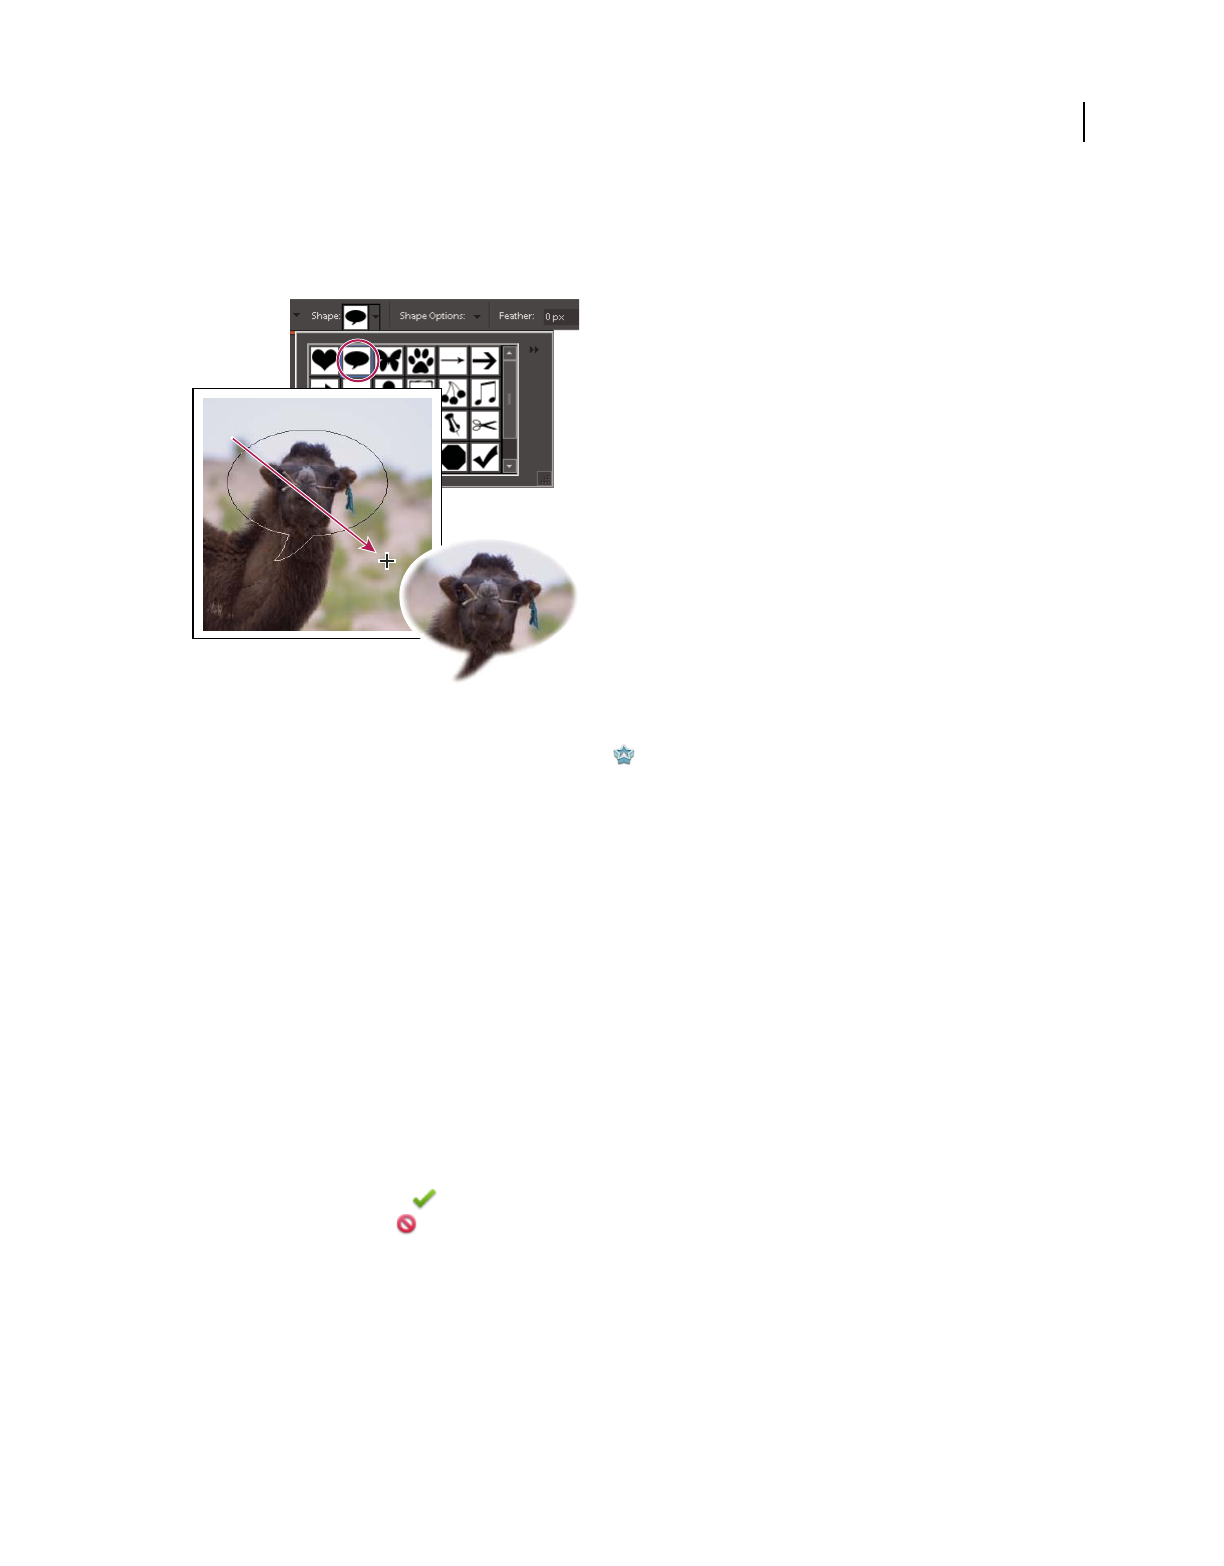
140
USING PHOTOSHOP ELEMENTS 9
Cropping, resizing, retouching, and transforming photos
Last updated 1/3/2012
Use the Cookie Cutter tool
The Cookie Cutter tool crops a photo into a shape that you choose. After you drag the shape in your photo, you can
move and resize the bounding box until you have just the area you want.
Use the Cookie Cutter tool to clip a photo into a fun shape.
1In the Edit workspace, select the Cookie Cutter tool .
2Click the Shapes menu in the options bar to view a library of shapes from which to choose. To view other libraries,
click the triangle on the right side of the currently open library and choose a new library from the list that appears.
3Double-click a shape to select it.
4Set Shape Options:
Unconstrained Draws the shape to any size or dimension.
Defined Proportions Keeps the height and width of the cropped shape in proportion.
Defined Size Crops the photo to the exact size of the shape you chose.
Fixed Size Specifies the exact measurements of the finished shape.
From Center Draws the shape from the center.
5Enter a value for Feather to soften the edges of the finished shape.
Note: Feathering softens the edges of the cropped image so that the edges fade out and blend into the background.
6Drag within the image to create the shape boundary and move it to the desired location in the image.
7Click the Commit button , or press Enter to finish the cropping. If you want to cancel the cropping operation,
click the Cancel button or press Esc.
Change the size of the canvas
You can add space to one or all sides of an image. Added canvas appears in the currently selected background color on
the Background layer; in other layers, the added canvas is transparent. In the new canvas space, you can add text or
resize your photo to fit the space.
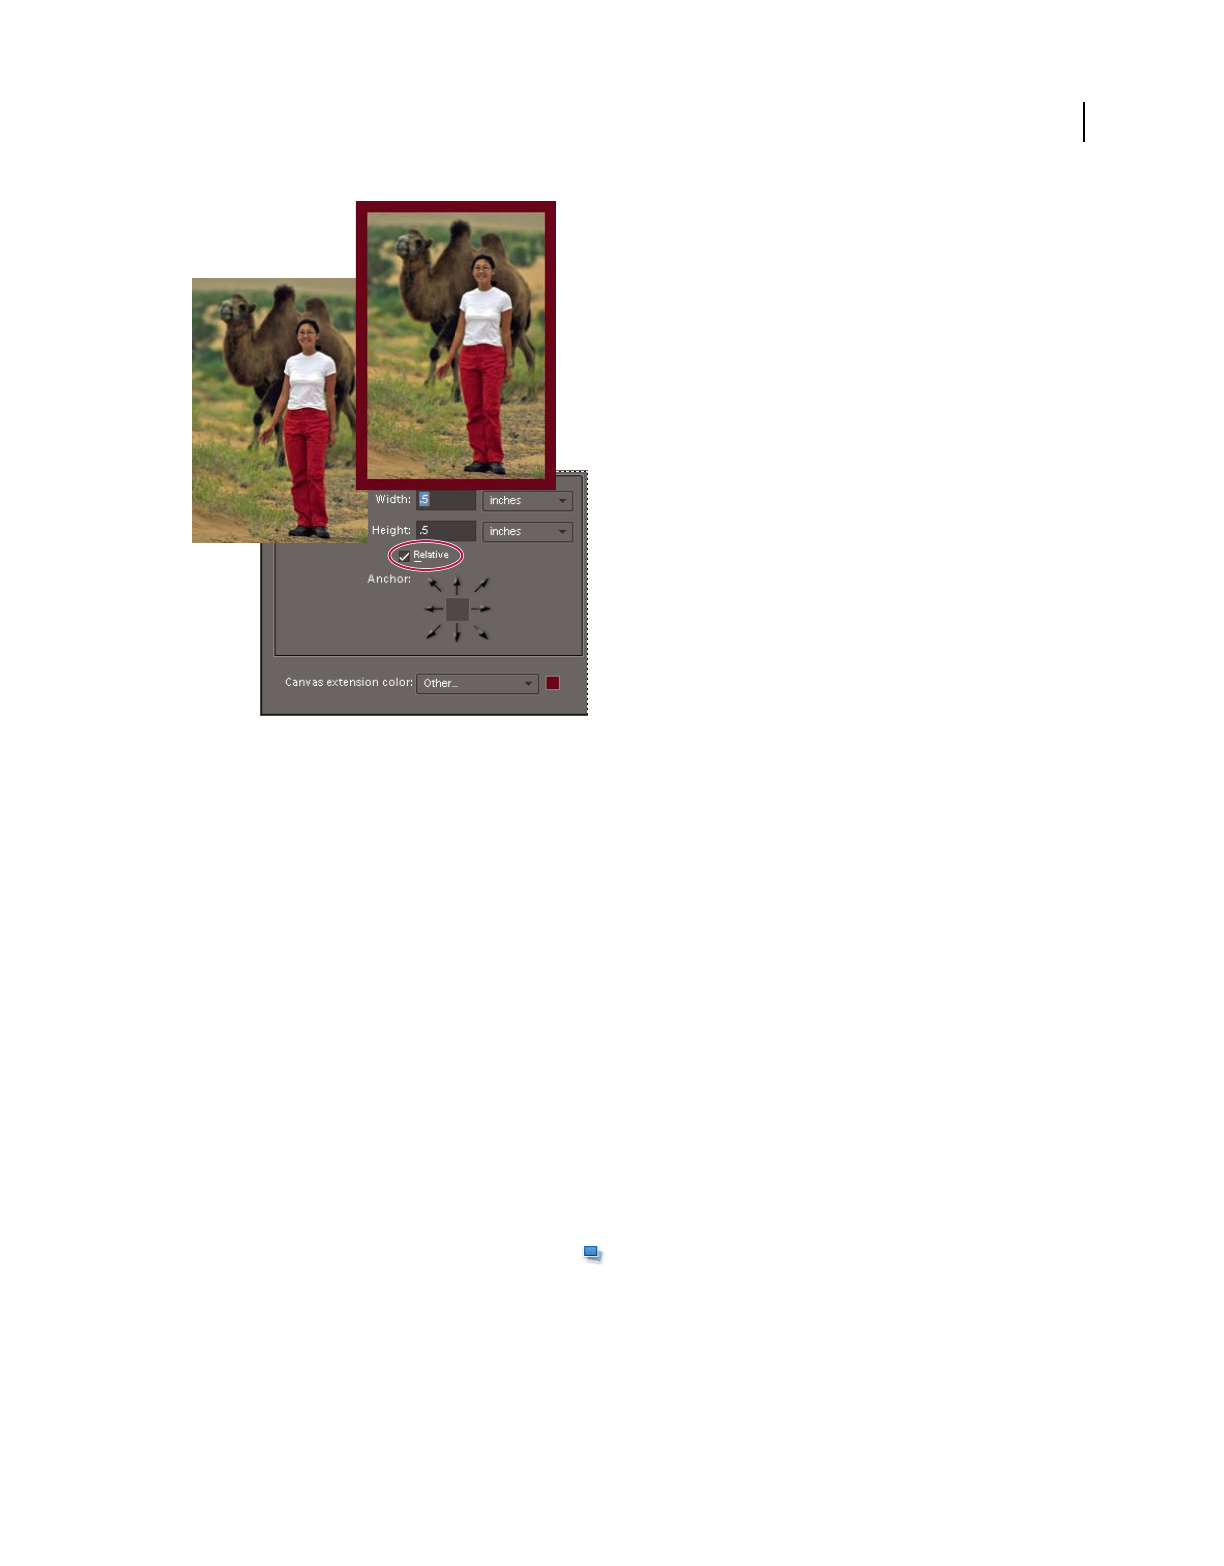
141
USING PHOTOSHOP ELEMENTS 9
Cropping, resizing, retouching, and transforming photos
Last updated 1/3/2012
Increasing the size of the canvas makes room for a colored border.
1In the Edit workspace, choose Image > Resize > Canvas Size.
2Do one of the following:
•In the Width and Height boxes, enter the full dimensions of the new canvas. Choose the units of measurement you
want from the adjacent menus. The Columns option measures width in terms of the columns specified in the Units
& Rulers preferences, and only applies to size reductions, not size increases.
•Select Relative, and enter the amount by which you want to increase or decrease the size of the canvas. Enter a
negative number to decrease the size of the canvas. Use this option if you want to increase the canvas by a specified
amount, such as 2 inches on each side.
3For Anchor, click an arrow to indicate where to position the existing image on the new canvas.
4To change the color of the added canvas, choose an option from the Canvas Extension Color menu and click OK.
Straighten an image
You can use the Straighten tool to realign an image vertically or horizontally. This tool also resizes or crops the canvas
to accommodate straightening the image.
Manually straighten an image
1In the Edit workspace, select the Straighten tool .
2To straighten all of the layers in the image, select Rotate All Layers, and then choose an option from the Canvas
Options menu (this menu is available only if you select Rotate All Layers):
Grow Or Shrink Canvas To Fit Resizes the canvas to fit the rotated image. Straightening causes corners of the image to
fall outside of the current canvas. The straightened image will contain areas of blank background, but no pixels are
clipped.
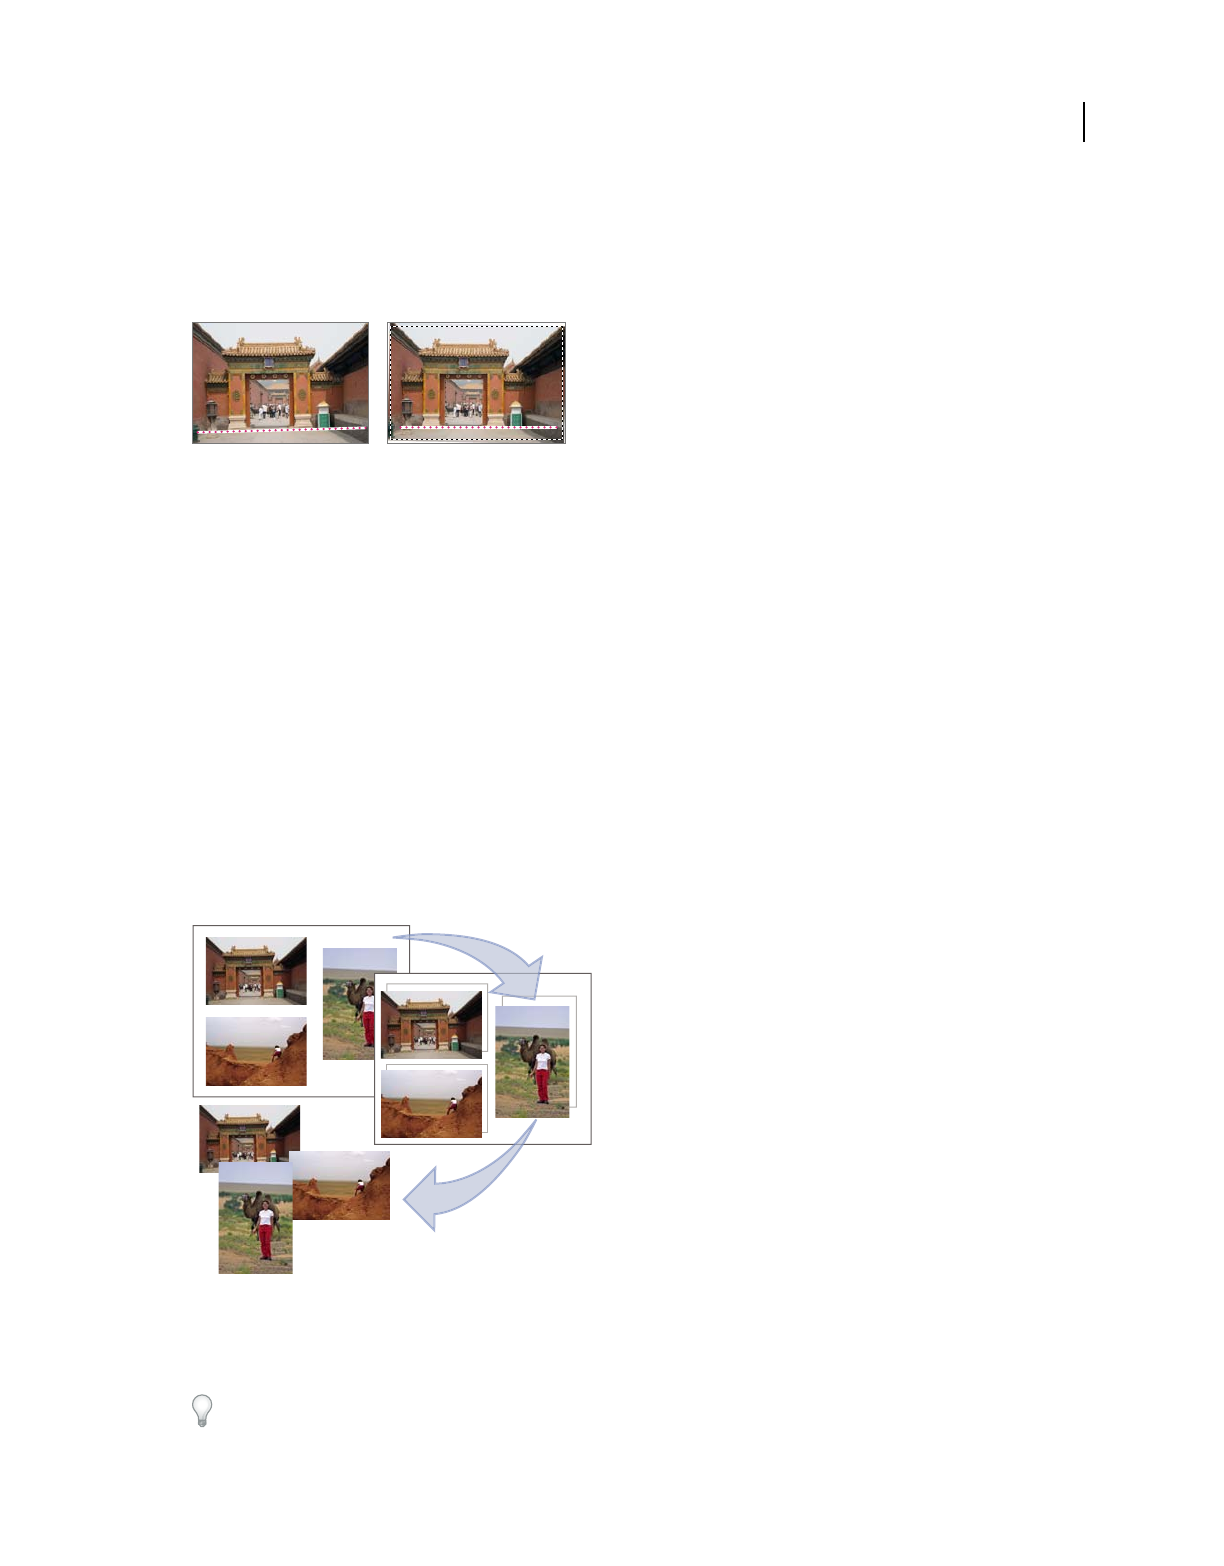
142
USING PHOTOSHOP ELEMENTS 9
Cropping, resizing, retouching, and transforming photos
Last updated 1/3/2012
Crop To Remove Background Crops the image to remove any blank background area that becomes visible after
straightening. Some pixels will be clipped.
Crop To Original Size Keeps the canvas the same size as the original image. The straightened image will include areas
of blank background and some pixels will be clipped.
Straightening and cropping to remove the background
3To straighten the image, do one of the following:
•To align horizontally, draw a line in the image to represent the new straight horizontal edge.
•To align vertically, click the starting point, hold down Ctrl (Command in Mac OS), and drag to represent the new
straight vertical line.
Automatically straighten an image
•To automatically straighten the image and leave the canvas around the image, choose Image > Rotate > Straighten
Image. The straightened image will contain areas of blank background, but no pixels are clipped.
•To automatically straighten and crop the image, choose Image > Rotate > Straighten And Crop Image. The
straightened image will not contain areas of blank background, but some pixels will be clipped.
Divide a scanned image containing multiple photos
If you scanned several pictures at once on a flatbed scanner, you can automatically divide and straighten the scanned
image into its component photos. The photos must have a clear separation between them.
Separating images scanned from one page into three separate images
❖In the Edit workspace, choose Image > Divide Scanned Photos. Photoshop Elements automatically divides the
image and places each photo in a separate file.
For images with white around the border (images of light skies, snow, and so on), this command works best if you
cover the image on the scanner with a piece of dark paper.
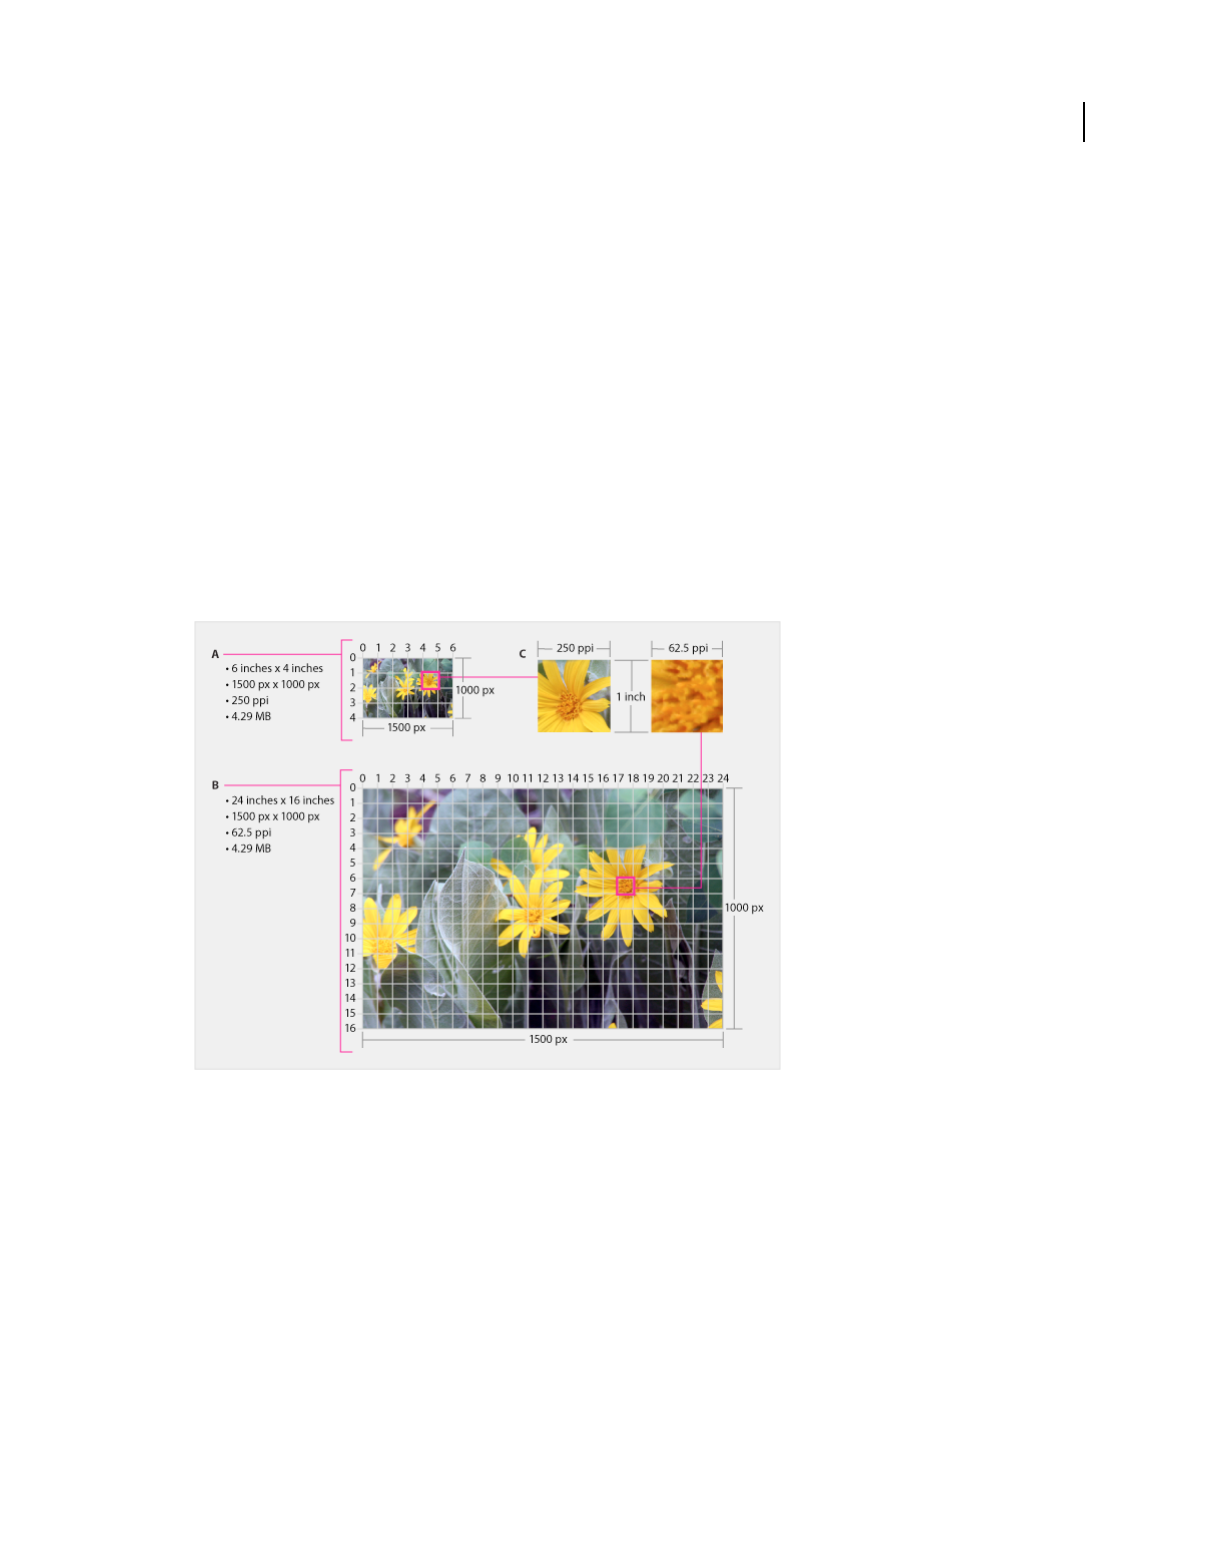
143
USING PHOTOSHOP ELEMENTS 9
Cropping, resizing, retouching, and transforming photos
Last updated 1/3/2012
Resizing
Increase or decrease the size of an image by changing its height and width.
About image size and resolution
The image size (or pixel dimensions) of an image is a measure of the number of pixels along an image’s width and
height. For example, your digital camera may take a photo that is 1500 pixels wide and 1000 pixels high. These two
measurements indicate the amount of image data in a photo and determine the file size.
Resolution is the amount of image data in a given space. It is measured in pixels per inch (ppi). The more pixels per
inch, the greater the resolution. Generally, the higher the resolution of your image, the better the printed image quality.
Resolution determines the fineness of detail you can see in an image.
Although a digital image contains a specific amount of image data, it doesn’t have a specific physical output size or
resolution. As you change the resolution of an image, its physical dimensions change, and as you change the width or
height of an image, its resolution changes.
Two images (A and B) with same image data and file size but different image size and resolution; C shows that a higher resolution means better
quality
You can see the relationship between image size and resolution in the Image Size dialog box (choose Image > Resize >
Image Size). As you change one value, the other two values change accordingly.
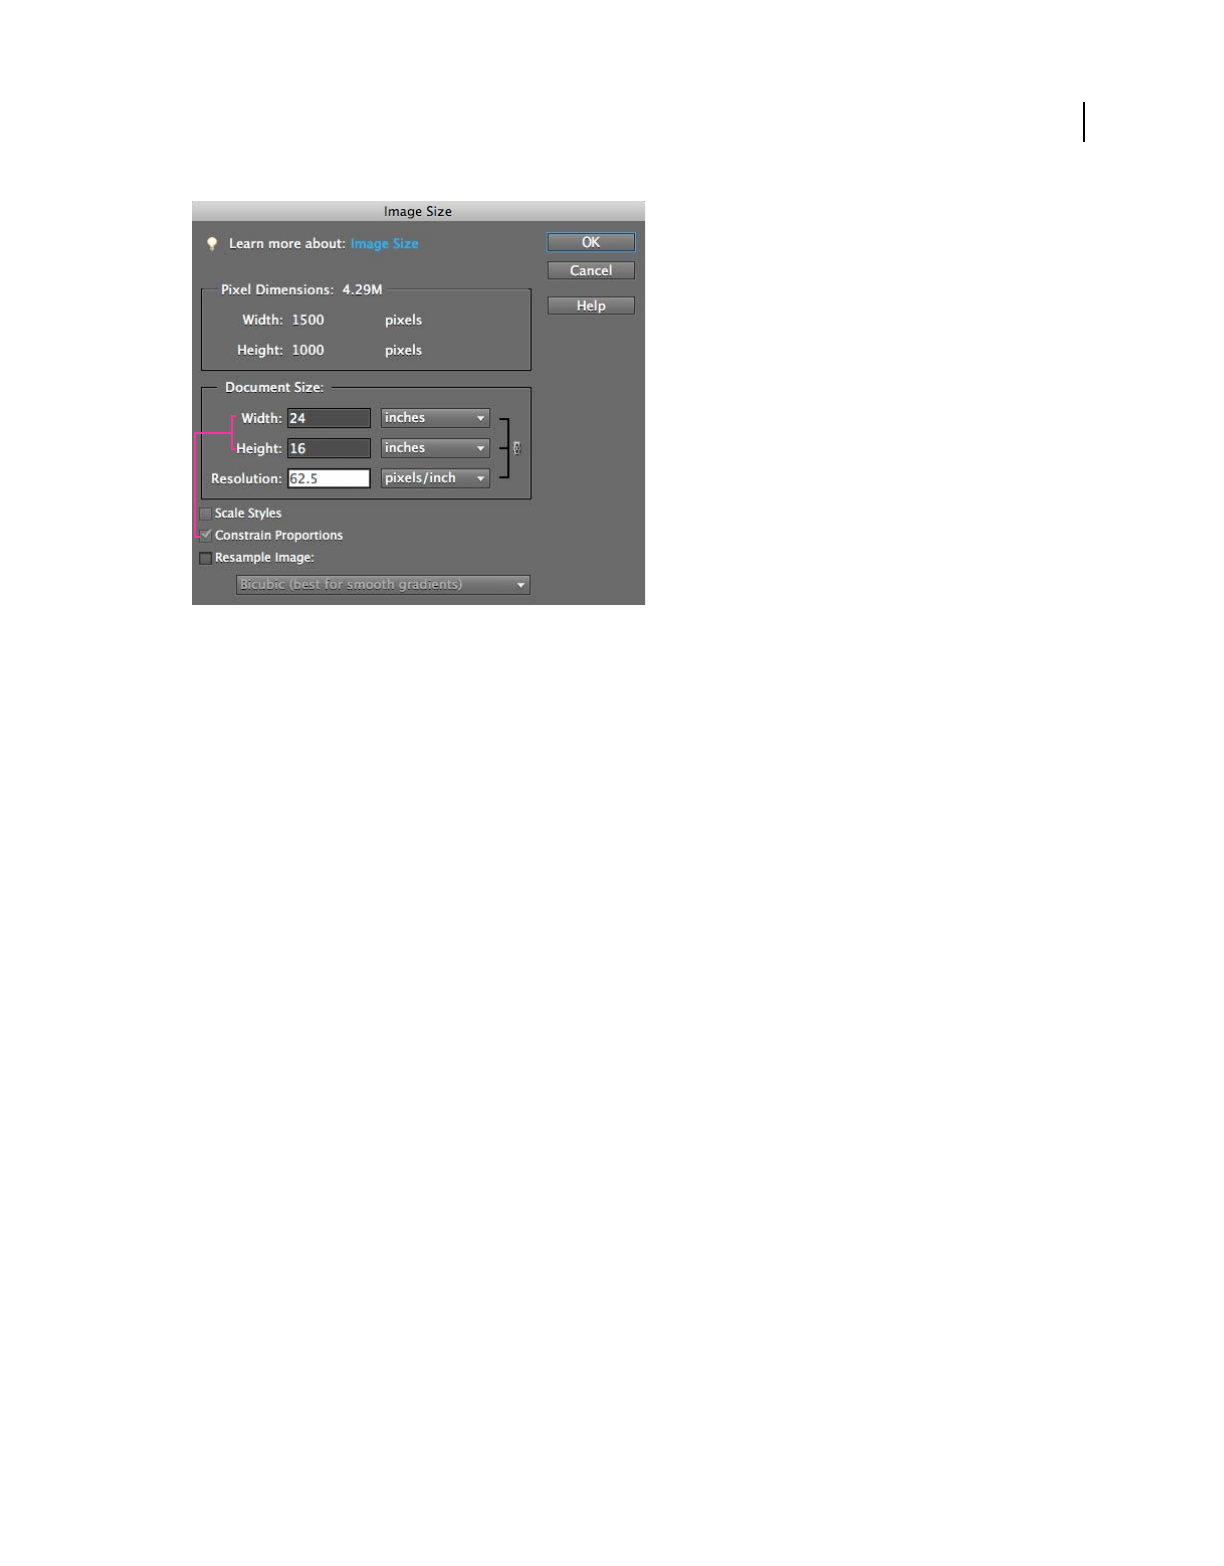
144
USING PHOTOSHOP ELEMENTS 9
Cropping, resizing, retouching, and transforming photos
Last updated 1/3/2012
Constrain Proportions lets you change image size without altering any image data
The Constrain Proportions option lets you maintain the aspect ratio (the ratio of image width to image height). If you
select this option and change the image size and resolution, the image does not stretch or shrink.
The Resample Image option lets you change the size of an image without changing the resolution. If you need to print
at a specific resolution, or if you want to print an image significantly smaller or larger than the image's pixel dimensions
allow, you can resample the image. However, resampling can degrade image quality.
More Help topics
“Change print dimensions and resolution without resampling” on page 145
“Resample an image” on page 146
About printer resolution
Printer resolution is measured in ink dots per inch (dpi). Generally, the more dots per inch, the finer the printed output
you’ll get. Most inkjet printers have a resolution of 720 to 5760 dpi, the latter being the smallest dot size a printer can use.
Printer resolution is different from, but related to, image resolution. To print a high-quality photo on an inkjet printer,
an image resolution of about 220 ppi should provide good results. Using a lower resolution, you can print a slightly
larger photo—if you are willing to accept some image degradation. You’ll see a warning if you chose a print size that
causes the photo to print at less than 220 ppi from the Edit workspace or 150 ppi from the Elements Organizer.
About monitor resolution
Your monitor’s resolution is described in pixel dimensions. For example, if your monitor resolution is set to 1600 x
1200 and your photo’s pixel dimensions are the same size, at 100%, the photo will fill the screen. The size an image
appears on-screen depends on a combination of factors: the pixel dimensions of the image, the monitor size, and the
monitor resolution setting. In Photoshop
Elements, you can change the image magnification on-screen, so you can
easily work with images of any pixel dimensions.
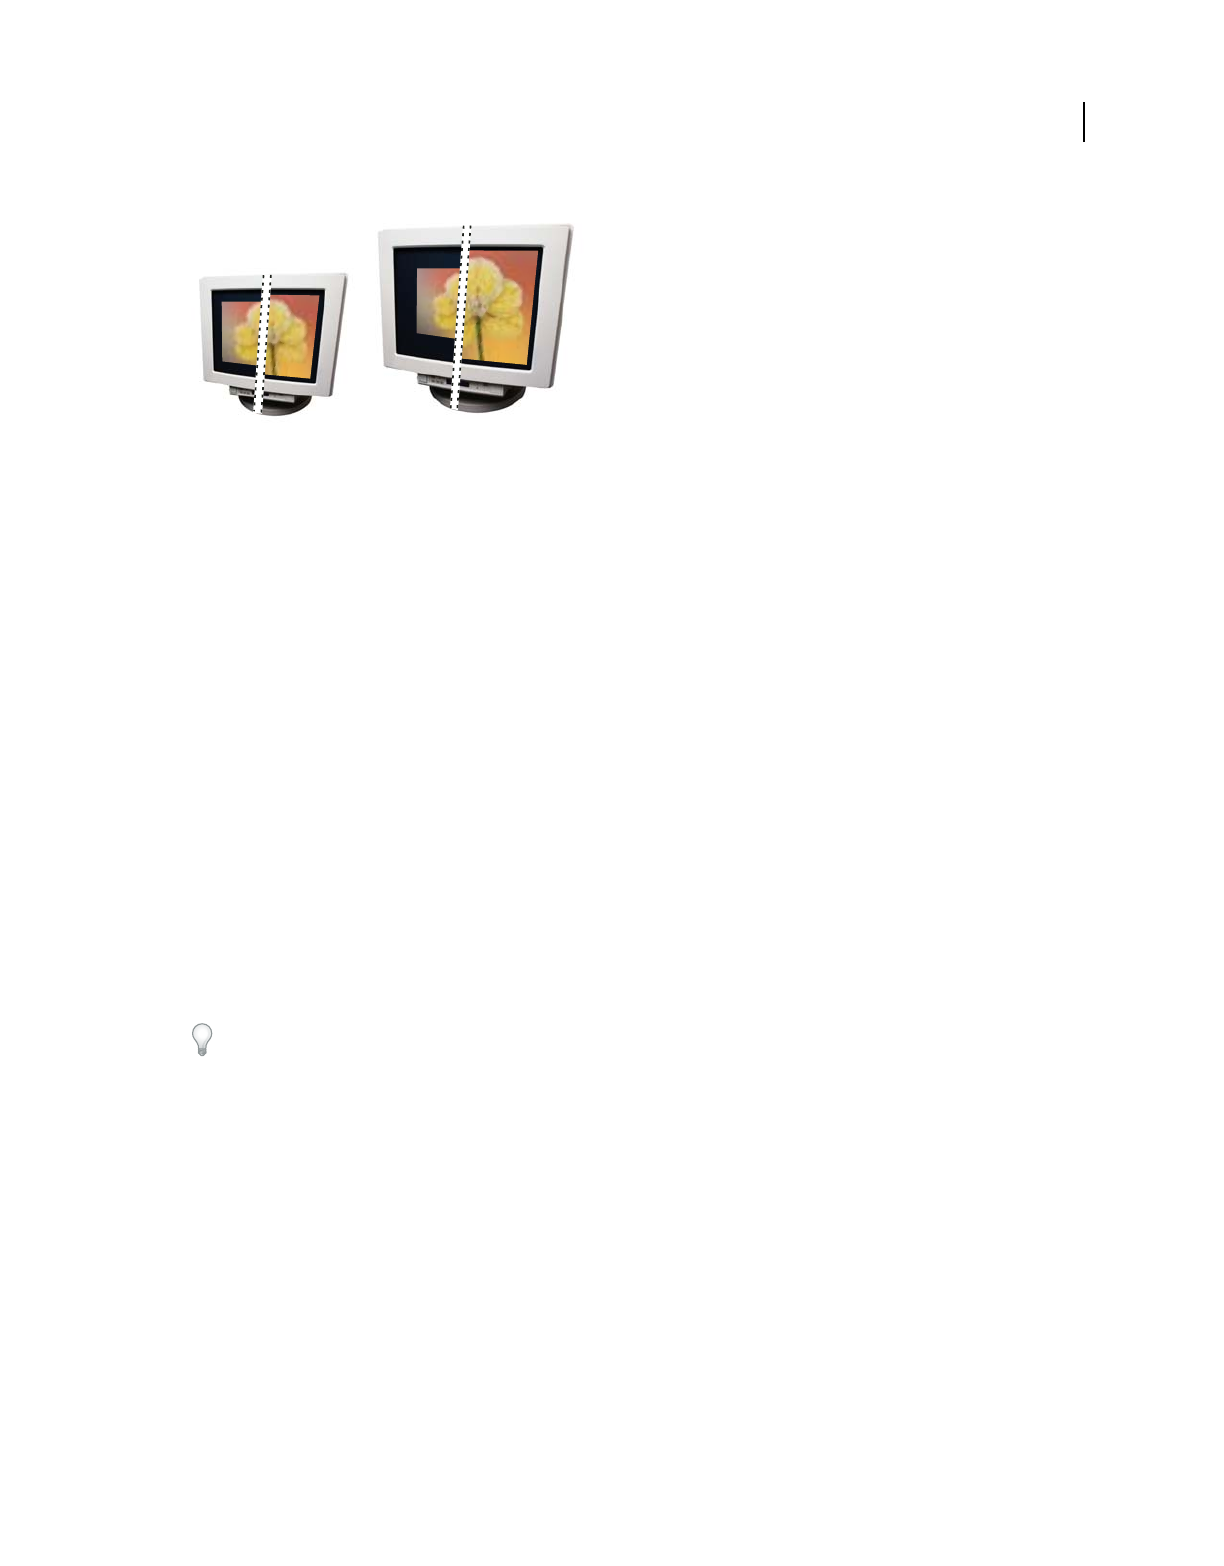
145
USING PHOTOSHOP ELEMENTS 9
Cropping, resizing, retouching, and transforming photos
Last updated 1/3/2012
A 620 x 400-pixel image displayed on monitors of different sizes and resolutions
When preparing images for on-screen viewing, you should consider the lowest monitor resolution that your photo is
likely to be viewed on.
Display the image size of an open file
❖In the Edit workspace, click-hold the file information box at the bottom of the document. The box displays the
width and height of the image (in the unit of measurement currently selected for the rulers), dimensions in total
image pixels, the
number of color channels, and the image resolution (ppi).
View the print size on-screen
❖In the Edit workspace, do one of the following:
•Choose View > Print Size.
•Select the Hand tool or Zoom tool, and click Print Size in the options bar.
The magnification of the image is adjusted to display its approximate printed size, as specified in the Document Size
section of the Image Size dialog box. Keep in mind that the size and resolution of your monitor affect the on-screen
print size.
Change print dimensions and resolution without resampling
Watch the video on this page to quickly learn how to resize an image.
You might need to change the print dimensions and resolution if you are sending the image to a print shop that
requires files to be at a specific resolution.
If you are printing directly from Photoshop Elements, you don’t have to perform this procedure. Instead, you can
choose a size in the Print dialog box and Photoshop
Elements applies the appropriate image resolution.
Note: To change only the print dimensions or the resolution, and adjust the total number of pixels in the image
proportionately, you must resample the image.
1In the Edit workspace, choose Image > Resize > Image Size.
2Make sure that Resample Image is deselected. If deselected, you can change the print dimensions and resolution
without changing the total number of pixels in the image, but the image may not keep its current proportions.
3To maintain the current aspect ratio, select Constrain Proportions. This option automatically updates the width as
you change the height, and vice versa. If this option is selected and you change the dimensions, the image does not
get distorted.
15"
20"
1024 x 768 / 640 x 480832 x 624 / 640 x 480
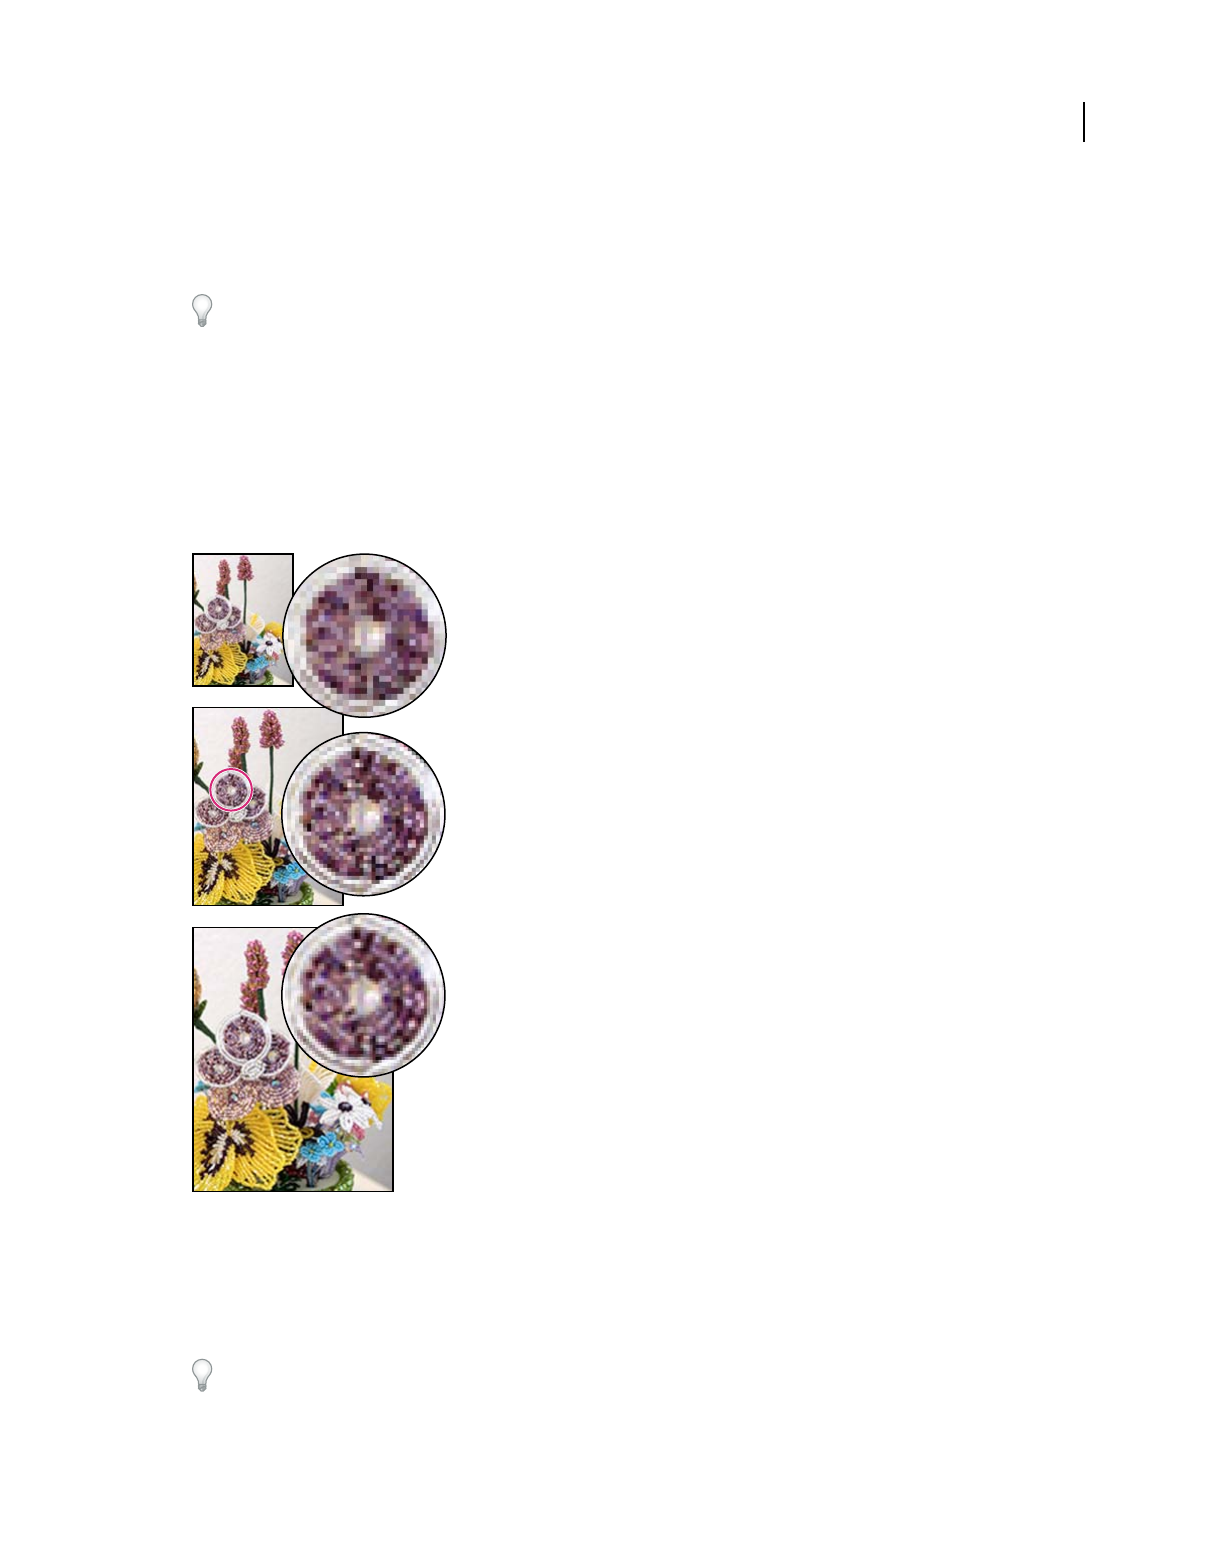
146
USING PHOTOSHOP ELEMENTS 9
Cropping, resizing, retouching, and transforming photos
Last updated 1/3/2012
4Under Document Size, enter new values for the height and width. If desired, choose a new unit of measurement.
For Width, the Columns option uses the width and gutter sizes specified in the Units & Rulers preferences.
5For Resolution, enter a new value. If desired, choose a new unit of measurement, and then click OK.
To return to the original values displayed in the Image Size dialog box, use Alt (Option in Mac OS) + click Reset.
Resample an image
Changing the pixel dimensions of an image is called resampling. Resampling affects not only the size of an image
on-screen, but also its image quality and its printed output—either its printed dimensions or its image resolution.
Resampling can degrade image quality. When you downsample, meaning that you decrease the number of pixels in
your image, information is removed from the image. When you upsample, or increase the number of pixels in your
image, new pixels are added based on the color values of existing pixels, and the image loses some detail and sharpness.
Resampling an image
A. Image downsampled B. Original image C. Image upsampled
To avoid the need for upsampling, scan or create the image at the resolution required for your printer or output device.
If you want to preview the effects of changing pixel dimensions on-screen or print proofs at different resolutions,
resample a duplicate of your file.
If you’re preparing images for the web, it’s useful to specify image size in terms of the pixel dimensions.
1In the Edit workspace, choose Image > Resize > Image Size.
A
B
C
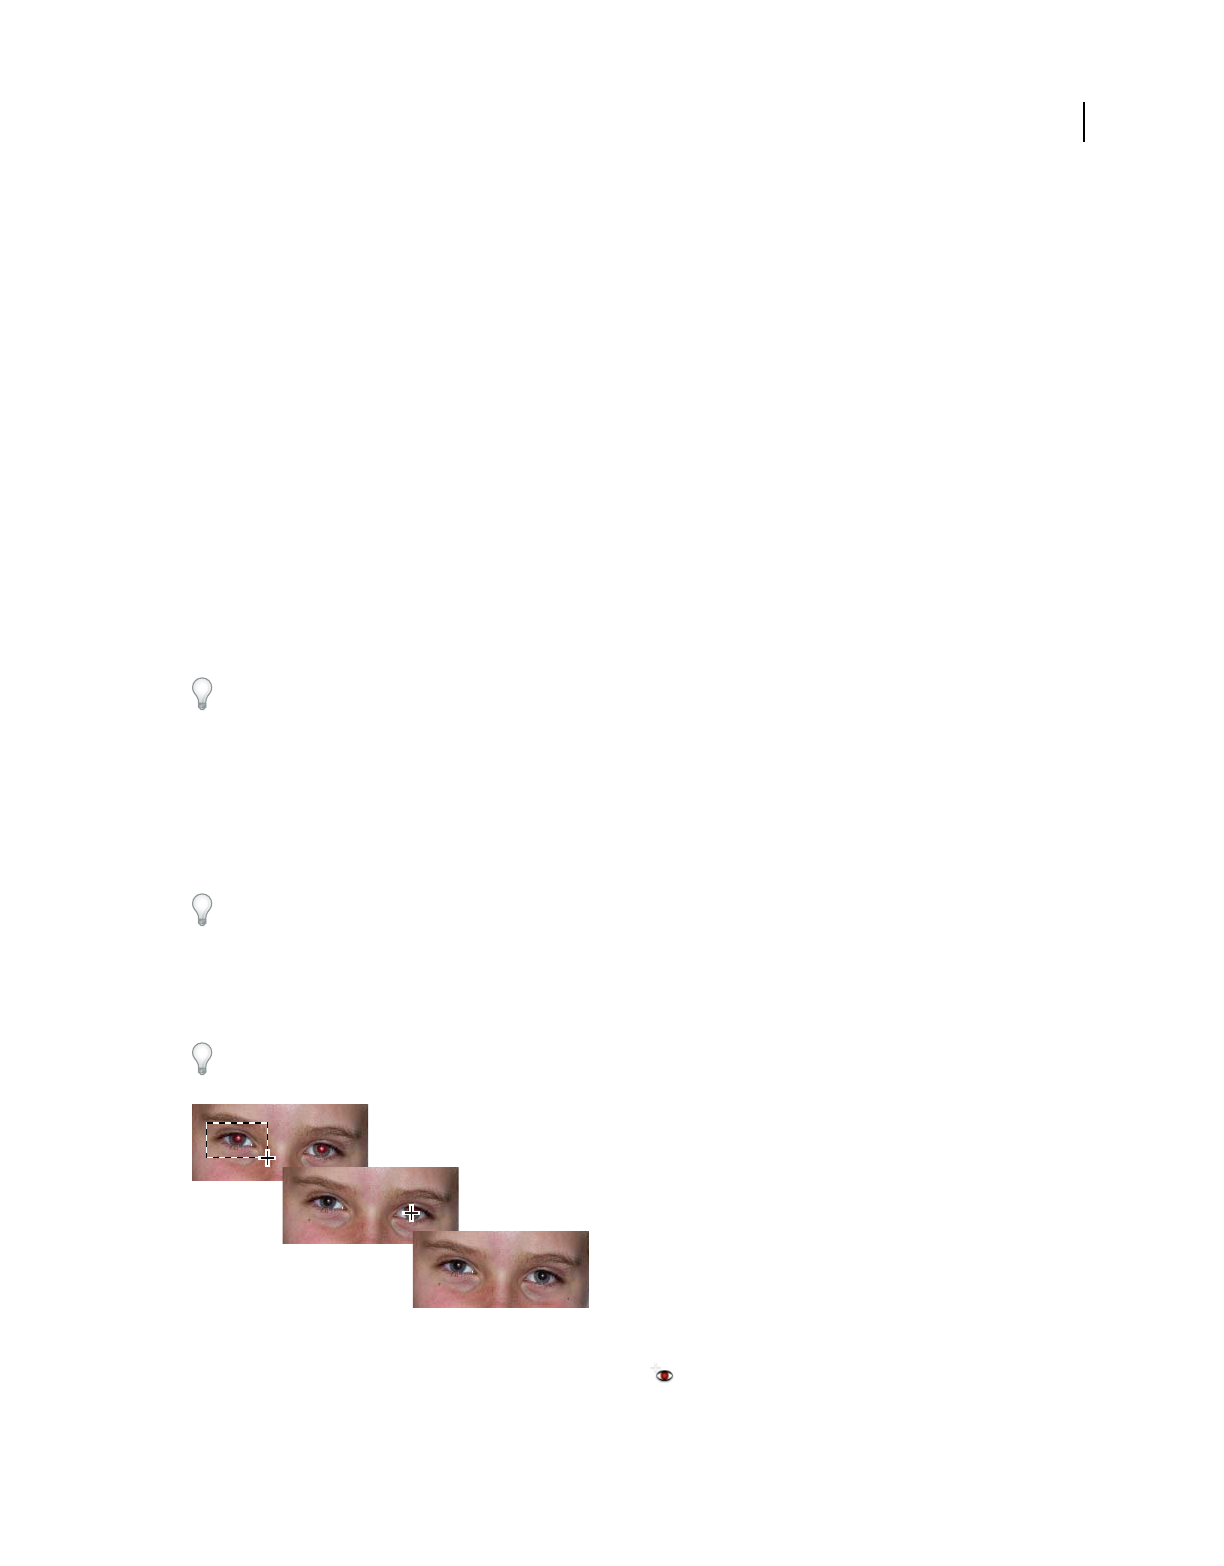
147
USING PHOTOSHOP ELEMENTS 9
Cropping, resizing, retouching, and transforming photos
Last updated 1/3/2012
2Select Resample Image, and choose an interpolation method:
Nearest Neighbor Fast, but less precise. This method is recommended for use with illustrations containing edges that
are not anti-aliased, to preserve hard edges and produce a smaller file. However, this method can create jagged edges,
which become apparent when distorting or scaling an image or performing multiple manipulations on a selection.
Bilinear Medium-quality.
Bicubic Slow, but more precise, resulting in the smoothest tonal gradations.
Bicubic Smoother Use when you're enlarging images.
Bicubic Sharper Use when you’re reducing the size of an image. This method maintains the detail in a resampled
image. It may, however, oversharpen some areas of an image. In this case, try using Bicubic.
3To maintain the current aspect ratio, select Constrain Proportions. This option automatically updates the width as
you change the height, and vice versa.
4In Pixel Dimensions, enter values for Width and Height. To enter values as percentages of the current dimensions,
choose Percent as the unit of measurement.
The new file size of the image appears next to Pixel Dimensions, with the old file size in parentheses.
5Click OK to change the pixel dimensions and resample the image.
For best results in producing a smaller image, downsample and apply the Unsharp Mask filter. To produce a larger
image, rescan the image at a higher resolution.
Retouching
Precisely remove red eye
For a video about this process, see www.adobe.com/go/lrvid906_pse_en
The Red Eye Removal tool removes red eye in flash photos of people. Red eye is caused by the illumination of the
subject’s retina by the camera’s flash. You’ll see it more often when taking pictures in a darkened room because the
subject’s iris is wide open. To avoid red eye, use the camera’s red-eye reduction feature, if available.
To automatically fix red eye when you import photos into the Elements Organizer, select Automatically Fix Red Eyes
in the Get Photos dialog box. You can also remove red eye from selected photos in the Photo Browser.
Correct red eye by selecting an eye (top) or clicking an eye (center).
1To manually fix red eye, select the Red Eye Removal tool in the Full Edit toolbox or in the Touchup panel of
Quick Fix.
2In the options bar, set the Pupil Size and Darken Amount.
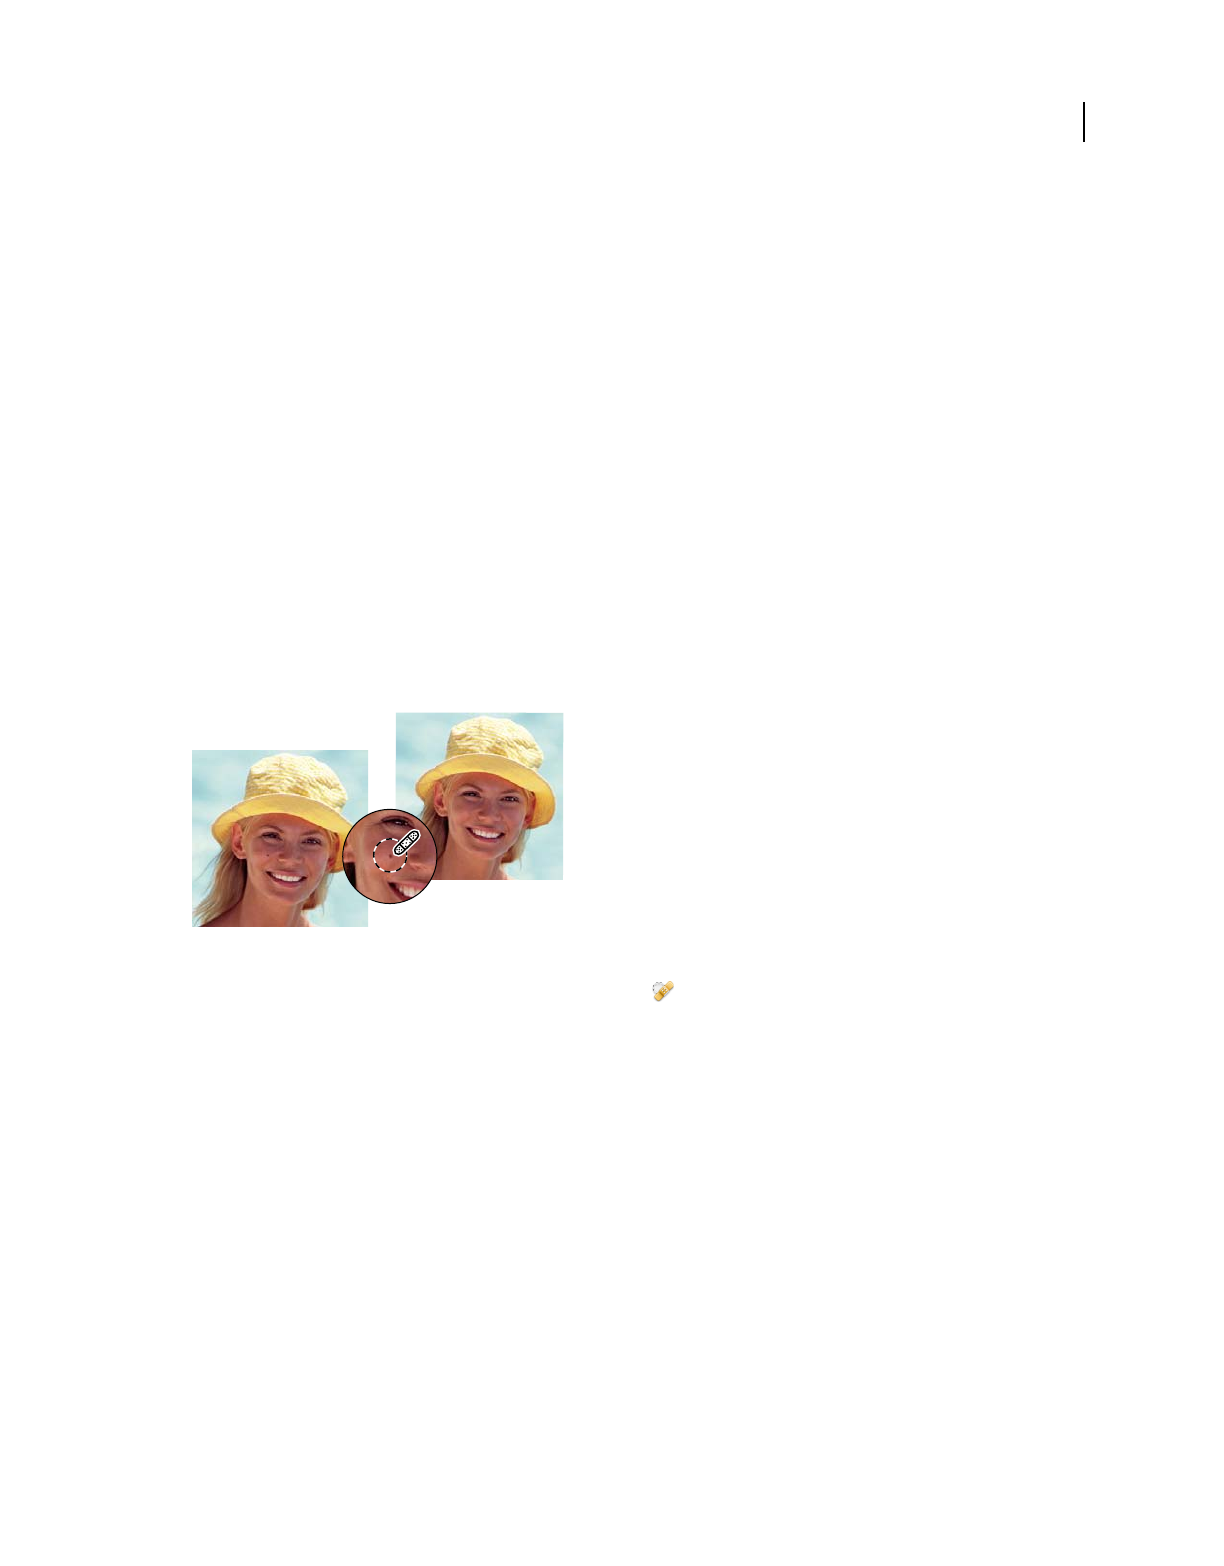
148
USING PHOTOSHOP ELEMENTS 9
Cropping, resizing, retouching, and transforming photos
Last updated 1/3/2012
3In the image, do one of the following:
•Click a red area of an eye.
•Draw a selection over the eye area.
When you release the mouse button, the red is removed from the eyes.
Note: You can also automatically fix red eye by clicking Auto in the Red Eye Removal tool options bar.
More Help topics
“Automatically correct lighting and color” on page 112
“Adjust the color of skin tone” on page 129
“Fix photos with Touch Up buttons in the Quick Fix Tools panel” on page 110
Remove spots and unwanted objects
Remove spots and small imperfections
The Spot Healing Brush quickly removes blemishes and other imperfections from your photos. You can either click
once on a blemish, or click and drag to smooth away imperfections in an area.
Easily remove spots or imperfections using the Spot Healing Brush tool.
1In the Edit workspace, select the Spot Healing Brush tool .
2Choose a brush size. A brush that is slightly larger than the area you want to fix works best so that you can cover
the entire area with one click.
3Choose one of the following Type options in the options bar.
Proximity Match Uses the pixels around the edge of the selection to find an image area to use as a patch for the selected
area. If this option doesn’t provide a satisfactory fix, choose Edit
> Undo, and try the Create Texture option.
Create Texture Uses all the pixels in the selection to create a texture with which to fix the area. If the texture doesn’t
work, try dragging through the area a second time.
Note: Click Sample All Layers to apply your change to all layers of the image.
4Click the area you want to fix in the image, or click and drag over a larger area.
More Help topics
“Adjust the color of skin tone” on page 129
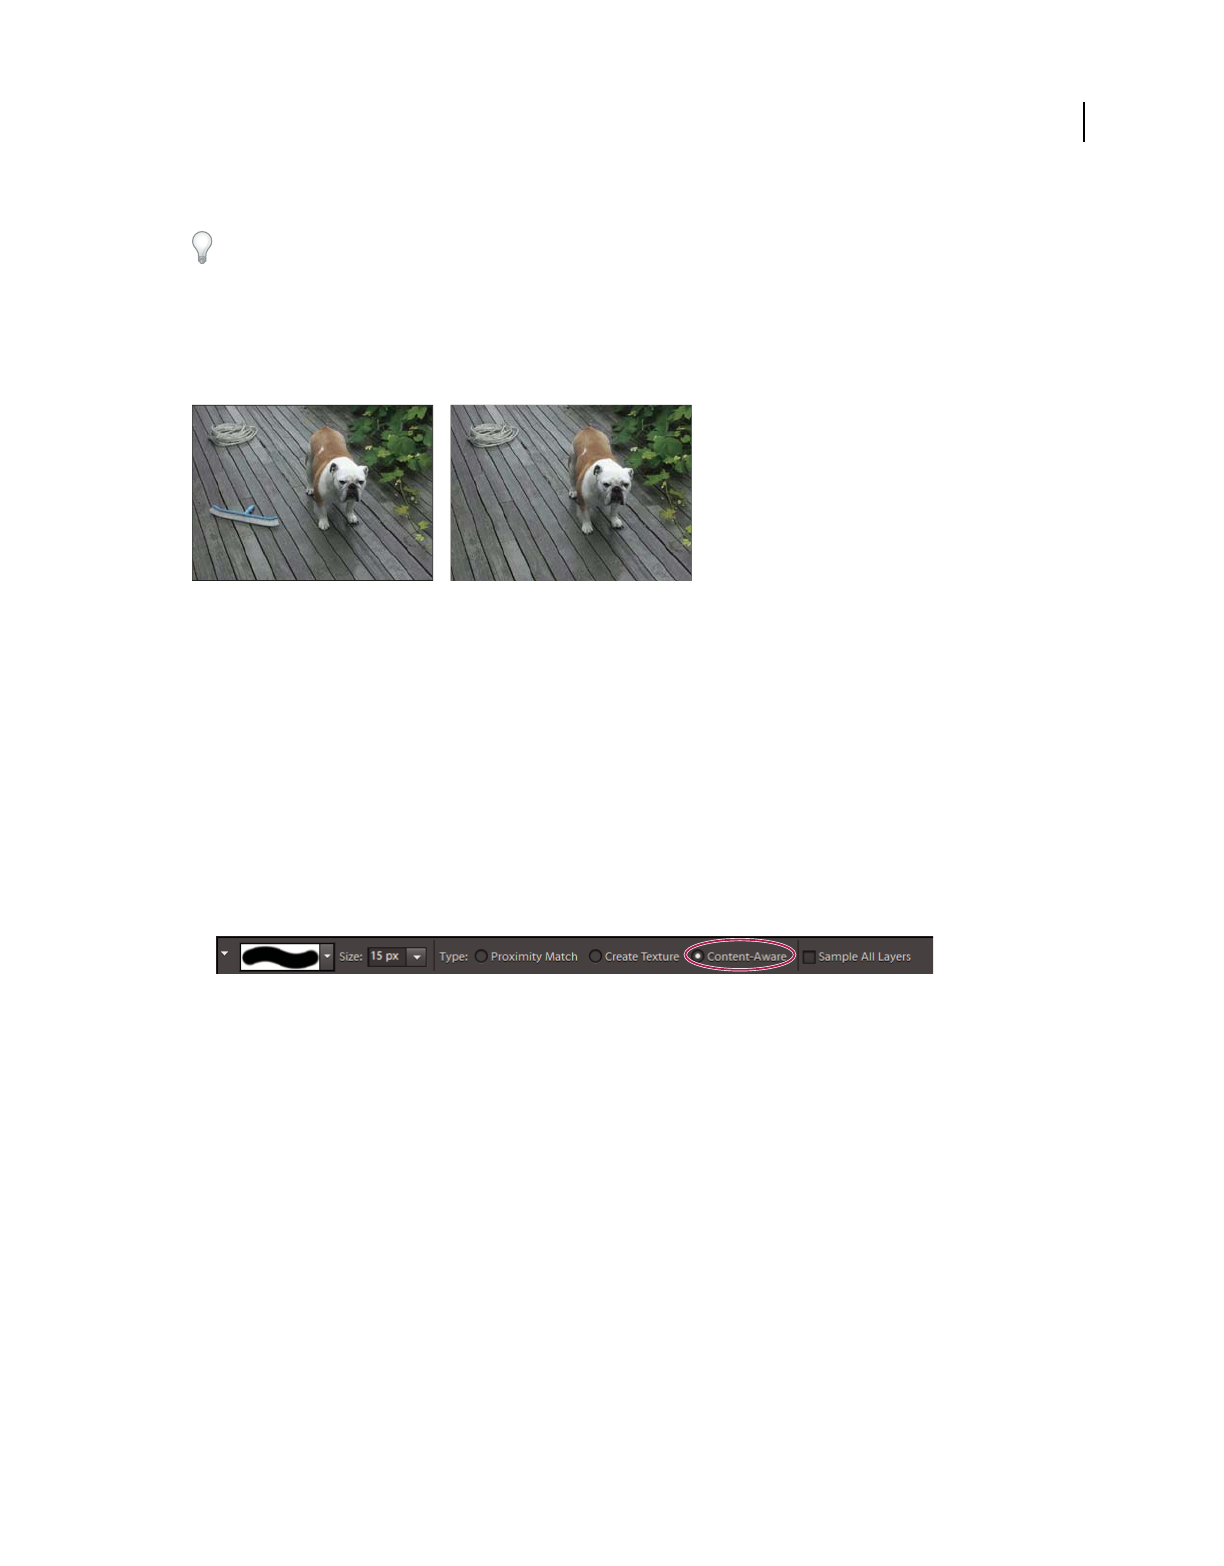
149
USING PHOTOSHOP ELEMENTS 9
Cropping, resizing, retouching, and transforming photos
Last updated 1/3/2012
Remove unwanted objects with content-aware healing
For a video about this process, see www.adobe.com/go/lrvid911_pse_en.
Many a time, you need to remove unwanted objects or figures from your photos without destroying the photos. Using
the Content-Aware option with the Spot Healing Brush tool, you can remove selected objects constructively from one
photo. Photoshop Elements compares nearby image content to seamlessly fill the selection, realistically maintaining
key details such as shadows and object edges.
Image before and after an unwanted object (the brush) is removed with content-aware fill
Spot healing works best on small objects. If the image you're working on is large and has a large unwanted object, make
surethat you work with high-end machine configuration. If you experience problems with large images, try the
following approaches:
•Make smaller selections to be filled at a time.
•Increase the RAM allocated and relaunch the application.
•Downsample the image.
To remove an unwanted object:
1Select the Spot Healing Brush tool.
2Select Content-Aware in the options bar.
Options bar for the Spot Healing Brush tool
3Paint over the object that you want to remove from the image.
Fix large imperfections
The Healing Brush fixes large areas of imperfections when you drag over them. You can remove objects from a
uniform background, such as an object in a field of grass.
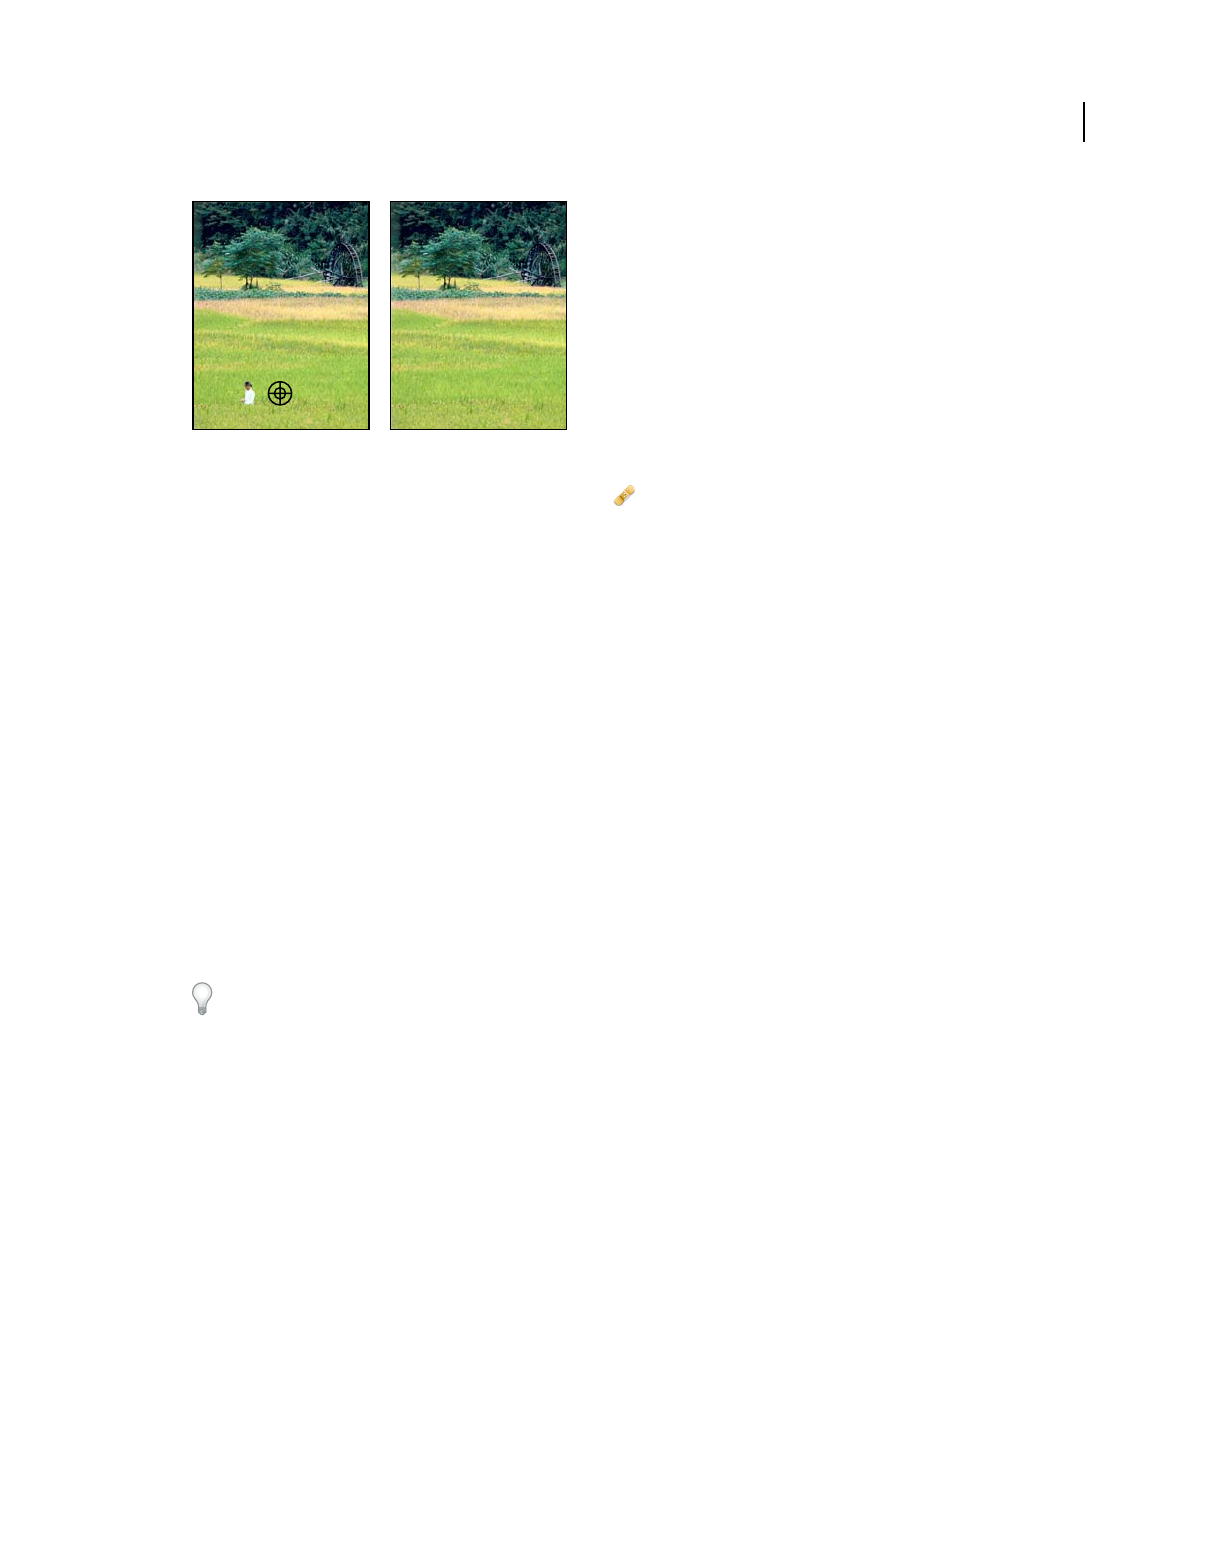
150
USING PHOTOSHOP ELEMENTS 9
Cropping, resizing, retouching, and transforming photos
Last updated 1/3/2012
Before and after using Healing Brush.
1In the Edit workspace, select the Healing Brush tool .
2Choose a brush size from the options bar and set healing brush options:
Mode Determines how the source or pattern blends with existing pixels. Normal mode lays new pixels over the
original pixels. Replace mode preserves film grain and texture at the edges of the brush stroke.
Source Sets the source to use for repairing pixels. Sampled uses pixels from the current image. Pattern uses pixels from
the pattern you specify in the Pattern panel.
Aligned Samples pixels continuously without losing the current sampling point, even if you release the mouse button.
Deselect Aligned to continue using the sampled pixels from the initial sampling point each time you stop and resume
painting.
Sample All Layers Choose Sample All Layers to sample data from the current layer, the current layer and below, or all
visible layers.
3Position the pointer in any open image and press Alt (Option in Mac OS) click to sample data.
Note: If you are sampling from one image and applying to another, both images must be in the same color mode unless
one of the images is in Grayscale mode.
4Drag the image over the flaw to meld existing data with sampled data. The sampled pixels meld with the existing
pixels each time you release the mouse button.
If there is a strong contrast at the edges of the area you want to heal, make a selection before you use the Healing Brush
tool. The selection should be bigger than the area you want to heal but should precisely follow the boundary of
contrasting pixels. When you paint with the Healing Brush tool, the selection prevents colors from bleeding in from the
outside.
More Help topics
“Adjust the color of skin tone” on page 129
“About blending modes” on page 214
“About patterns” on page 233
Clone images or areas in an image
The Clone Stamp tool paints with an image sample, which you can use to duplicate objects, remove image
imperfections, or paint over objects in your photo.
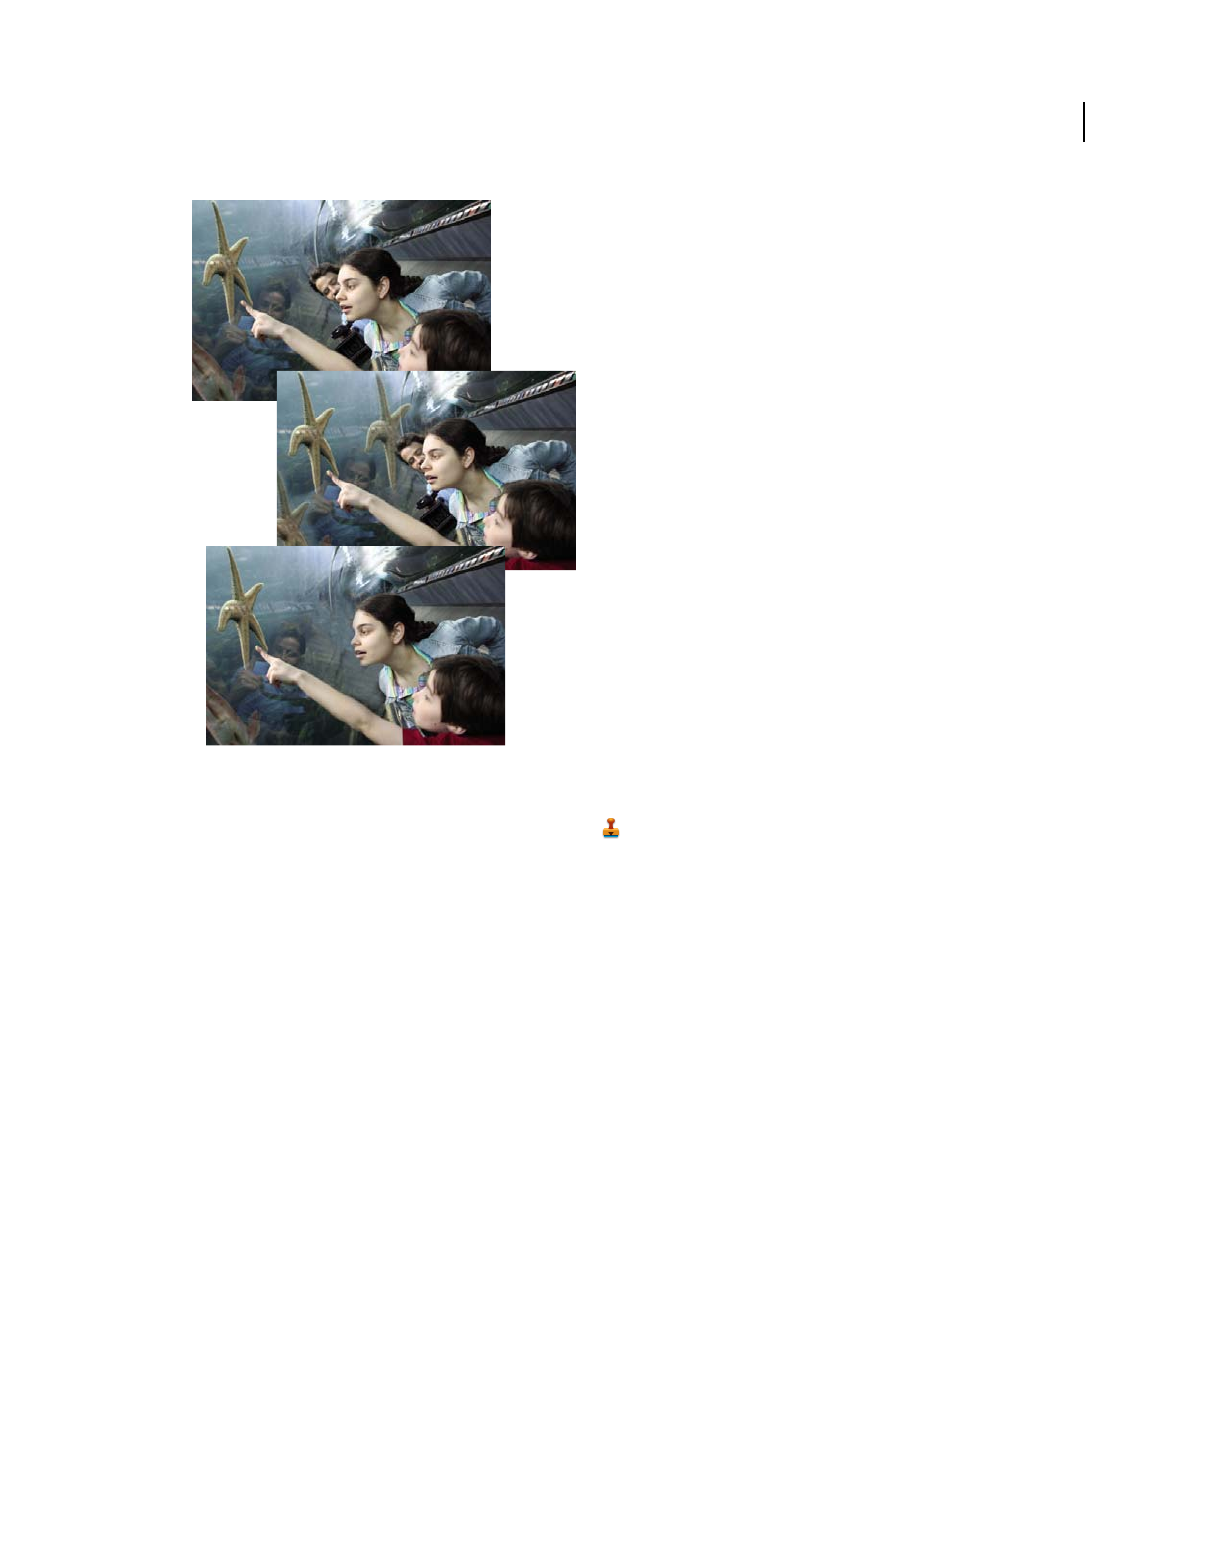
151
USING PHOTOSHOP ELEMENTS 9
Cropping, resizing, retouching, and transforming photos
Last updated 1/3/2012
Original photo (top), after adding two starfish with the Clone Stamp tool (center), and after removing a person with the Clone Stamp tool
(bottom).
1In the Edit workspace, select the Clone Stamp tool .
2(Optional) Set options in the options bar:
Brushes Sets the brush tip. Click the arrow next to the brush sample, choose a brush category from the Brushes pop-up
menu, and then select a brush thumbnail.
Size Sets the size of the brush in pixels. Drag the Size pop-up slider or enter a size in the text box.
Mode Determines how the source or pattern blends with existing pixels. Normal mode lays new pixels over the
original pixels.
Opacity Sets the opacity of the paint you apply. A low opacity setting allows pixels under a paint stroke to show
through. Drag the pop-up slider or enter an opacity value.
Aligned Moves the sampled area with the cursor as you begin to paint, regardless of how many times you stop and
resume painting. Selecting this option is useful when you want to eliminate unwanted areas, such as a telephone line
across the skyline or a rip in a scanned photo. If Aligned is deselected, the Clone Stamp tool applies the sampled area
from the initial sampling point each time you stop and resume painting. Deselecting this option is useful for applying
multiple copies of the same part of an image to different areas within the same image or to another image.
Sample All Layers To sample (copy) data from all visible layers, select Sample All Layers. To sample data from only the
active layer, deselect this option.
3Position the pointer on the part of any open image you want to sample, and press Alt (Option in Mac OS) and click.
The tool duplicates the pixels at this sample point in your image as you paint.
4Drag or click to paint with the tool.
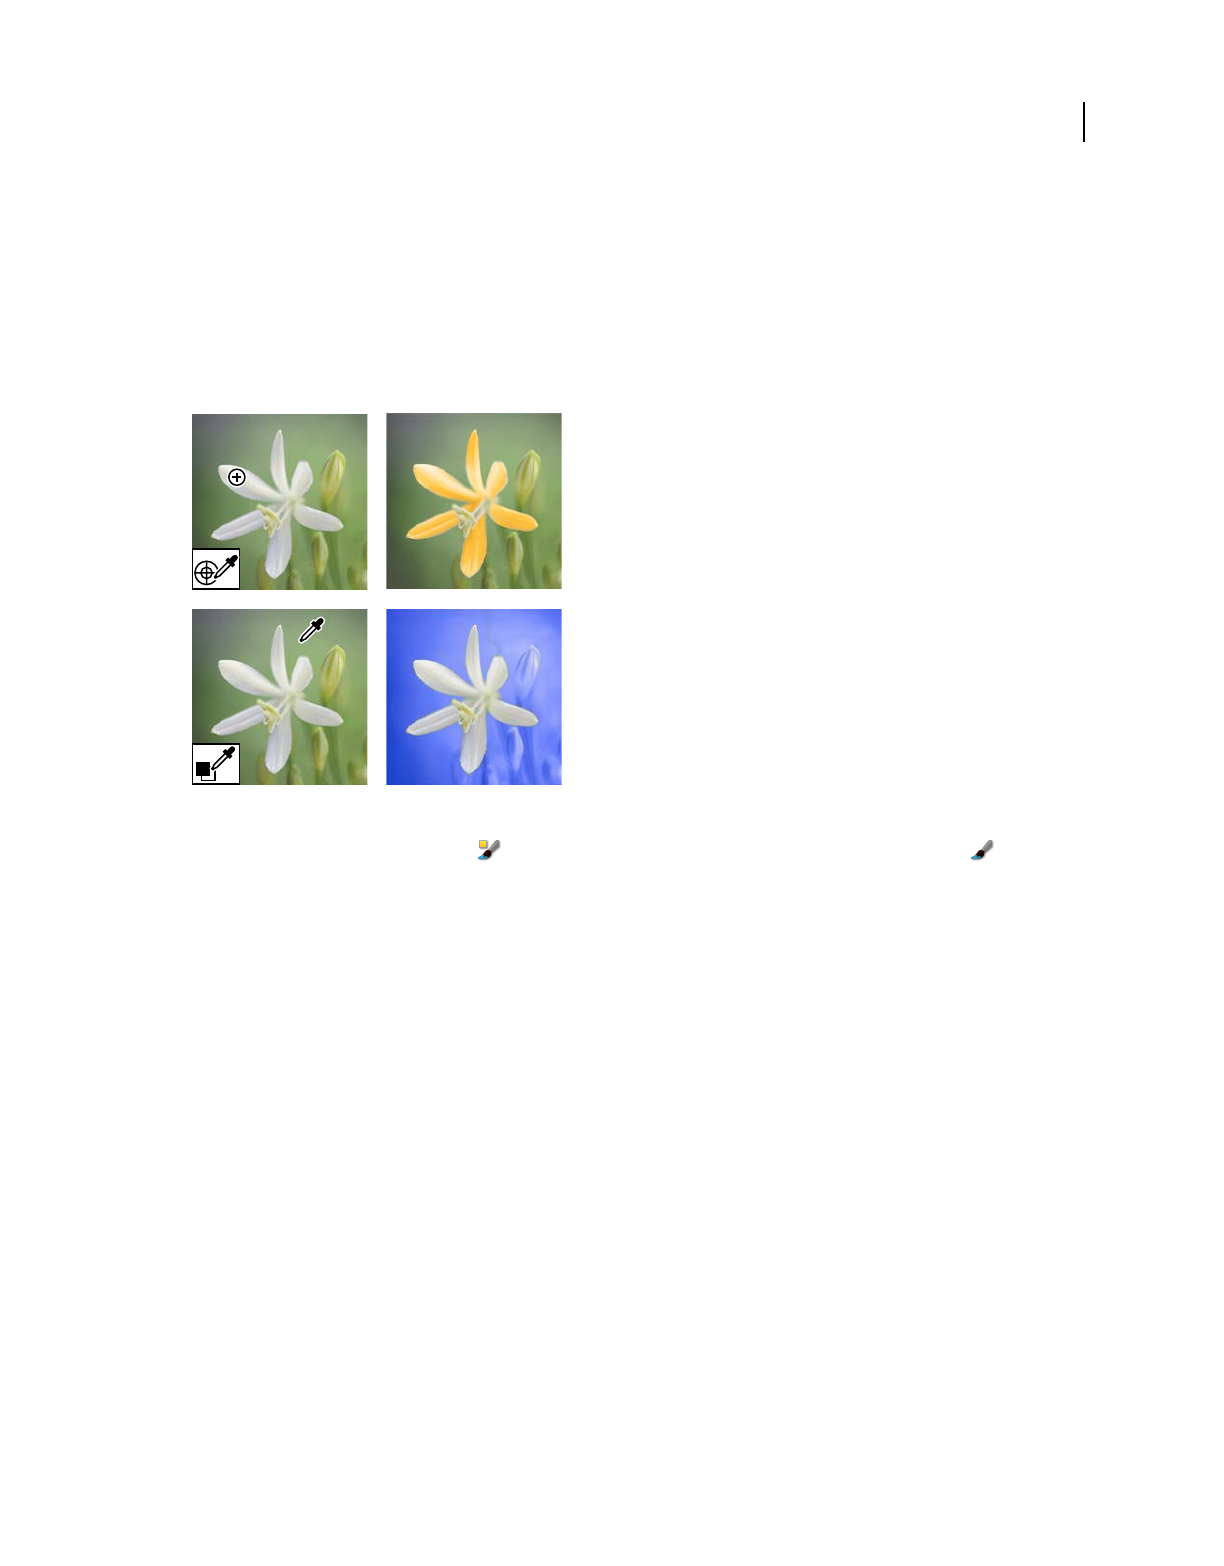
152
USING PHOTOSHOP ELEMENTS 9
Cropping, resizing, retouching, and transforming photos
Last updated 1/3/2012
More Help topics
“About blending modes” on page 214
Replace colors in an image
The Color Replacement tool simplifies replacing specific colors in your image. You can paint over a targeted color—
for example, a yellow flower in an image—with a different color, like red. You can also use the Color Replacement tool
to correct colors.
Replacing colors
1Select the Color Replacement tool . (The Color Replacement tool is nested under the Brush tool .)
2Choose a brush tip from the Brush menu in the options bar. For Mode, generally, you’ll want to keep the blending
mode set to Color.
3For Limits, choose one of the following:
Discontiguous Replaces the sampled color wherever it occurs under the pointer.
Contiguous Replaces colors that are contiguous with the color immediately under the pointer.
4For Tolerance, specify a low percentage to replace colors very similar to the pixel you click, or raise the percentage
to replace a broader range of colors.
5To give a smooth edge to the areas you correct, select Anti-alias.
6Choose a foreground color to use to replace the unwanted color.
7Click the color you want to replace in the image.
8Drag within the image to replace the targeted color.
More Help topics
“Adjust the color of skin tone” on page 129
Blur or soften edges
The Blur tool softens hard edges or areas in an image by reducing detail. Blurring a busy background can bring your
target images more into focus. You can also use Blur filters for this purpose.

153
USING PHOTOSHOP ELEMENTS 9
Cropping, resizing, retouching, and transforming photos
Last updated 1/3/2012
Original photo (left), and photo after blurring the background (right).
1Select the Blur tool .
2Set options in the options bar:
Brushes pop-up menu Sets the brush tip. Click the arrow next to the brush sample, choose a brush category from the
Brushes pop-up menu, and then select a brush thumbnail.
Size Sets the size of the brush, in pixels. Drag the Size pop-up slider or enter a size in the text box.
Mode Specifies how the pixels you blur blend into other pixels in the image.
Strength Specifies the amount of blur that occurs with each stroke.
Sample All Layers Blurs all visible layers. If this is deselected, the tool blurs only the active layer.
3Drag over the part of the image you want to blur.
More Help topics
“Blur and Blur More” on page 194
“Gaussian Blur” on page 195
“About blending modes” on page 214
Correct camera distortion
The Correct Camera Distortion dialog box enables you to fix common lens distortion problems, like darkened edges
caused by lens faults or improper lens shading. For example, in a picture of the sky taken in low light, the corners of
the image may be darker than the center. Changing the vignette amount and midtone settings fixes the distortion.
You can also use the perspective controls to rotate an image or fix image perspective caused by vertical or horizontal
camera tilt. The Correct Camera Distortion filter’s image grid allows you to make these adjustments easily and
accurately.
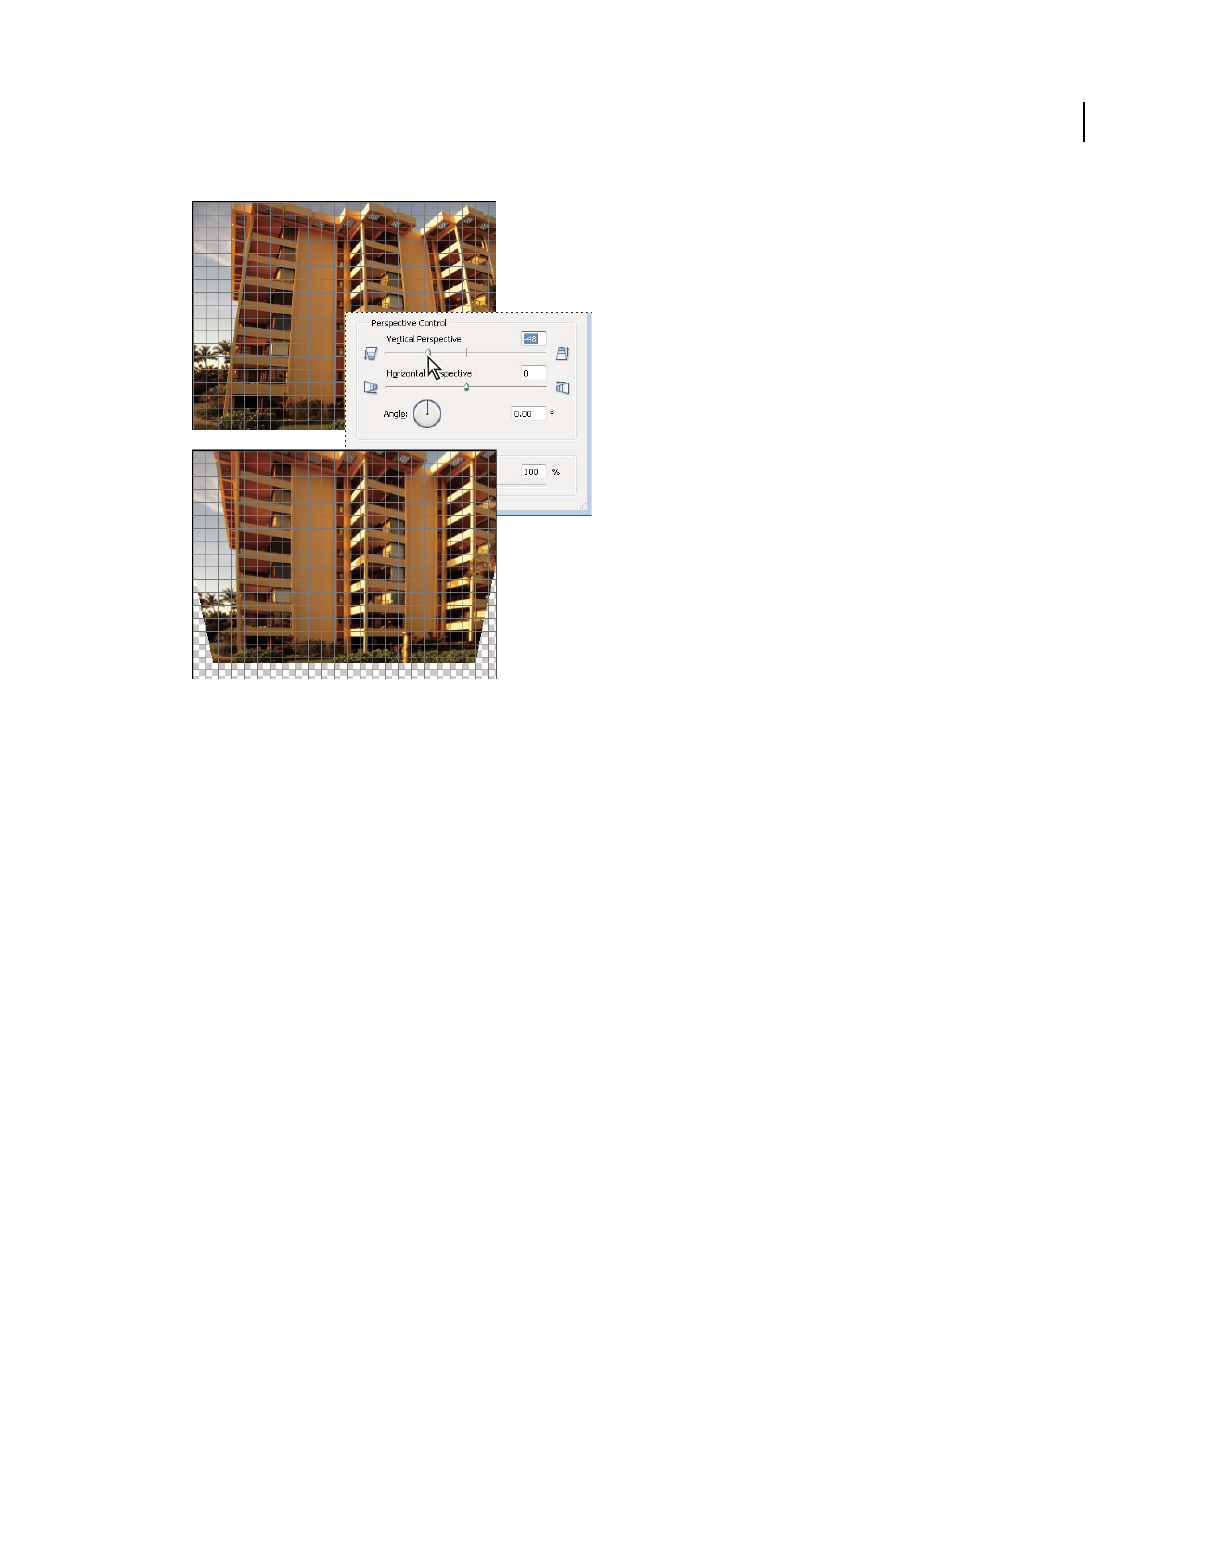
154
USING PHOTOSHOP ELEMENTS 9
Cropping, resizing, retouching, and transforming photos
Last updated 1/3/2012
Correct camera distortion
1Select Filter > Correct Camera Distortion.
2Select Preview check box.
3Set any of the following options to correct your image, and then click OK:
Remove Distortion Corrects lens barrel or pincushion distortion. Type a number in the box, or move the slider to
straighten horizontal and vertical lines that bend either away from or toward the center of the image.
Vignette Amount Sets the amount of lightening or darkening along the edges of an image. Type a number in the box,
or move the slider to gradually shade the image.
Vignette Midpoint Specifies the width of area affected by the Amount slider. Move the slider, or type a lower number
to affect more of the image. Type a higher number to restrict the effect to the edges of the image.
Vertical Perspective Corrects image perspective caused by tilting the camera up or down. Type a number in the box
or use the slider to make vertical lines in an image parallel.
Horizontal Perspective Detects the edges and detail in an image, provides finer detail, and reduces halos. Type a
number or use the slider to reduce the blur caused by camera or subject movement. Set the Angle control if you choose
Motion Blur.
Angle Rotates the image to correct for camera tilt or to make adjustments after correcting perspective. Type a number
in the box or drag the angle dial to rotate the image to the left (counterclockwise) or right (clockwise).
Scale Adjusts the image scale up or down. The image pixel dimensions aren’t changed. Type a number in the box or
use the slider to remove blank areas of the image caused by pincushion, rotation, or perspective corrections. Scaling
up effectively results in cropping the image and interpolating up to the original pixel dimensions.
Show Grid Shows the grid when selected. Hides the grid when deselected.
Zoom Shows a closer view when you zoom in, and shows a more distant view when you zoom out.
Color Specifies the grid color.

155
USING PHOTOSHOP ELEMENTS 9
Cropping, resizing, retouching, and transforming photos
Last updated 1/3/2012
More Help topics
“The Fix Keystone Distortion Guided Edit” on page 51
“Adjust color curves” on page 126
“Improve shadow and highlight detail” on page 119
Use Photomerge Group Shot
For a video about photomerge features, see www.adobe.com/go/lrvid2342_pse9_en.
Use Photomerge Group Shot to create the perfect group photo from multiple photos.
Note: For best results, pick the multiple images used to create a Photomerge Group Shot from the same photo session.
1
Do one of the following to select the group photos you want to use as source images for the Photomerge Group Shot:
•In Elements Organizer, select the photos.
•In the Edit workspace, open the photos.
2Choose File > New > Photomerge Group Shot.
3Select the best group photo, and drag it from the Project Bin to the Final window.
4Click other photos in the Project Bin (color coded to help you keep track). Use the Pencil tool to mark over the areas
that you want to merge into the final photo. To fine-tune the final image, use the Pencil tool to add additional
content, or the Eraser tool to remove content.
5Set any of the following:
Show Strokes Click this option to show the Pencil strokes you marked in the source image.
Show Regions Click this option to reveal the selected regions in the final image.
Advanced Options Expand or collapse this arrow for Advanced Options.
Alignment Tool To correct the alignment of multiple photos, click the Alignment Tool, place three markers in the
source image and three markers in the final image, then click Align Photos.
Note: Photomerge Group Shot uses auto alignment. Use the Alignment Tool only if the automatic alignment didn’t
produce the expected result.
Pixel Blending Click this option to blend pixels.
6Click Reset to start the process over, Done to complete the Photomerge Group Shot, or Cancel to close Photomerge
Group Shot.
Photomerge Group Shot window
Note: Photomerge Group Shot does not support the PSE file format. If you try to create a photomerge group shot with a
PSE file, you get an error message. This is a known issue.
Use Photomerge Faces
For a video about photomerge features, see www.adobe.com/go/lrvid2342_pse9_en.

156
USING PHOTOSHOP ELEMENTS 9
Cropping, resizing, retouching, and transforming photos
Last updated 1/3/2012
Use Photomerge Faces to combine multiple facial features to create one composite face.
1Do one of the following to select the face images you want to use as source images for Photomerge Faces:
•In Elements Organizer, select the face image photos.
•In the Edit workspace, open the face image photos.
2Choose File > New > Photomerge Faces.
3Pick a face photo as your base image, and drag it from the Project Bin to the Final window.
4Click another image in the Project Bin, and click the Alignment tool. Place the three alignment markers on the eyes
and mouth on the source image and the final image, and click Align Photos.
5Click other photos in the Project Bin (color coded to help you keep track). Use the Pencil tool to mark the areas that
you would like to merge into the final photo. To fine-tune the final image, use the Pencil tool to add additional
content, or the Eraser tool to remove content.
6Set the following:
Show Strokes Click this option to show the Pencil strokes you marked in the source image.
Show Regions Click this option to reveal the selected regions in the final image.
7Click Reset to start the process over, Done to complete the Photomerge Faces, or Cancel to close Photomerge Faces.
Photomerge Faces window
Use Photomerge Scene Cleaner
Use Photomerge Scene Cleaner to create the perfect scenic photo from multiple photos. You can eliminate unwanted
elements like tourists that inadvertently wandered into the scenery.
Note: For best results, the multiple images used with Photomerge Scene Cleaner should be of the same scene taken from
the same angle.
1Do one of the following to select 2 - 10 photos you want to use for the Photomerge Scene Cleaner:
•In the Elements Organizer, select the photos.
•In the Edit workspace, open the photos.
2Choose File > New > Photomerge Scene Cleaner.
Photoshop Elements is now in Guided Edit mode with the Photomerge Scene Cleaner Guided Edit panel containing
tools and directions.
3Select the best photo and then drag it from the Project Bin to the Final window.
This photo becomes the base image for the final photo.
4Click a photo in the Project Bin (color-coded to help you keep track).
It appears in the Source window.
5Do any of the following to add or remove areas from the Final window:
•To remove an area, use the Pencil tool to mark the area in the Final window.
•To add an area to the Final window, use the Pencil tool to mark the area in the Source window.
•To fine-tune the final image, use the Pencil tool to add additional content or the Eraser tool to remove content.
6(Optional) Select one of the following:
Show Strokes Shows your Pencil strokes in the source image.

157
USING PHOTOSHOP ELEMENTS 9
Cropping, resizing, retouching, and transforming photos
Last updated 1/3/2012
Show Regions Reveals the selected regions in the final image.
7(Optional) If there’s a problem with the photos aligning properly, click the Advanced Options arrow to access the
following:
Alignment Tool Corrects the alignment of the multiple photos. Click the Alignment Tool to place three markers in
the source image and three markers in the final image. Drag markers to similar areas in each photo and then click Align
Photos.
Note: Photomerge Scene Cleaner uses auto alignment. The Alignment Tool should only be used if the automatic
alignment didn’t produce the result you want.
Pixel Blending Blends pixels using different options. Experiment to see whether this option improves the photo or not.
8(Optional) Select other photos in the Project Bin for use in the Source window and repeat step 5.
9Click Reset to start the process over, Done to complete the Photomerge Scene Cleaner, or Cancel to close
Photomerge Scene Cleaner.
Photomerge Scene Cleaner
A. Dragging a photo to the Final window B. Using the Pencil tool to the mark area to be replaced in the Final window C. Result in the Final
window
Photomerge Exposure
For a video about photomerge features, see www.adobe.com/go/lrvid2342_pse9_en.
Use Photomerge Exposure to efficiently handle scenes in photos with exposure challenges. You can blend two photos
together to get a perfectly exposed photo. For example, if you have a photo with a window in the background and you
want a perfect photo with the following properties:
•A good exposure of the scenery outside the window.
•A good exposure of the darker objects inside the room.
In such a scenario, you often end up with either overexposed scenery outside the window or underexposed objects
inside the room.
To ensure that you get a perfect photo, do the following:
•Take two or more photos of the same scene with different exposures. For best results, take the photos at different
exposure value, with minimum shakes. For example:
•You can take two or more photos with the flash turned on to properly expose the subject (the objects inside the
room).
•You can then take one photo with the flash turned off to properly expose the background (the scenery outside
the window).
You can use Exposure Bracketing in your camera to capture the same subject with a number of shots with
different exposure settings.
•Blend the photos to create a perfectly exposed photo.
Photomerge Exposure facilitates blending the two photos together to get a perfectly exposed photo.
Photomerge Exposure can be done in the following modes:
•Automatic mode
•Manual mode

158
USING PHOTOSHOP ELEMENTS 9
Cropping, resizing, retouching, and transforming photos
Last updated 1/3/2012
To obtain best results while using the Automatic mode, use photos that are shot at different exposure values, using
Exposure Bracketing. To obtain best results while using the manual mode, use photos shot with flash turned on and
flash turned off.
Photomerge Exposure
Automatic Photomerge Exposure
You can select the required photos from Elements Organizer, and select and deselect the photos through the Project Bin.
1Do one of the following:
•In Elements Organizer, select a minimum of two and a maximum of ten photos, and select File > New >
Photomerge Exposure.
•In the Edit workspace, open the required files using File > Open.
aSelect Show Open Files In The Project Bin to view all the opened files.
bSelect a minimum of two and a maximum of ten photos from the Project Bin.
cSelect File > New > Photomerge Exposure.
Photoshop Elements displays the selected photos.
2In the Photomerge panel, select Automatic.
You can view the selected photos in the Edit workspace.
3Select one of the following options:
Simple Blending This option does not allow you to change the Photomerge Exposure settings. Selecting this option
displays the merged photo in the Edit workspace.
Smart Blending Selecting this option enables you to adjust the settings using the sliders. You can view the final photo
based on the settings you provide. You can adjust the following settings:
•Highlight Details Enables you to increase or decrease the details that are in the highlight.
•Shadows Enables you to lighten or darken the shadows.
•Saturation Enables you to change the intensity of the color.
4After you get the desired result, click Done to complete Photomerge Exposure.
Manual Photomerge Exposure
Note: For Photomerge Exposure, if you are using photos that have been taken with your flash on, then manual
Photomerge Exposure is the default mode.
1Do one of the following:
•In Elements Organizer, select a minimum of two and a maximum of ten photos and select File > New > Photomerge
Exposure.
•In the Edit workspace, open the required files using File > Open.
aSelect Show Open Files In The Project Bin to view all the opened files.
bSelect a minimum of two and a maximum of ten photos from the Project Bin.
cSelect File > New > Photomerge Exposure.
Photoshop Elements displays the selected photos.
2In the Photomerge panel, select Manual.

159
USING PHOTOSHOP ELEMENTS 9
Cropping, resizing, retouching, and transforming photos
Last updated 1/3/2012
The first image in the Project Bin is displayed as the source photo. You can select an image from the Project Bin as the
background photo.
3Set the following:
Show Strokes Click to show your Pencil strokes in the source image.
Show Regions Click to reveal the selected regions in the final image.
4Select exposed regions from the current source image by using the selection tool. Change the foreground photo,
and select regions from this photo if necessary.
You can now view a final image with different regions copied from different source photos above the initially selected
background photo.
5Change the transparency of these selected regions to blend them properly with the background by using the
Transparency Slider. Select Edge Blending to smoothen the blended edges.
Note: Transparency Slider affects only those regions that are selected from the currently displayed source image. Change
to a different source image if you want to change the transparency of the regions selected from the other images. It
remembers the value used for a particular image. If the slider is not changed, the default is set to 0.
6To correct the alignment of multiple photos, select Advanced Option, and click the Alignment tool. Place three
markers in the source image and three markers in the final image, then click Align Photos. Click Done.
Photomerge Style Match
If you like the style of an image, you can apply its style properties to another image. You can work with a set of images
that you like, apply styles one by one to the image, and then update the image with the style that produces the best
results.
Note: When you apply styles multiple times, the effect is not cumulative. Only the last applied style is saved.
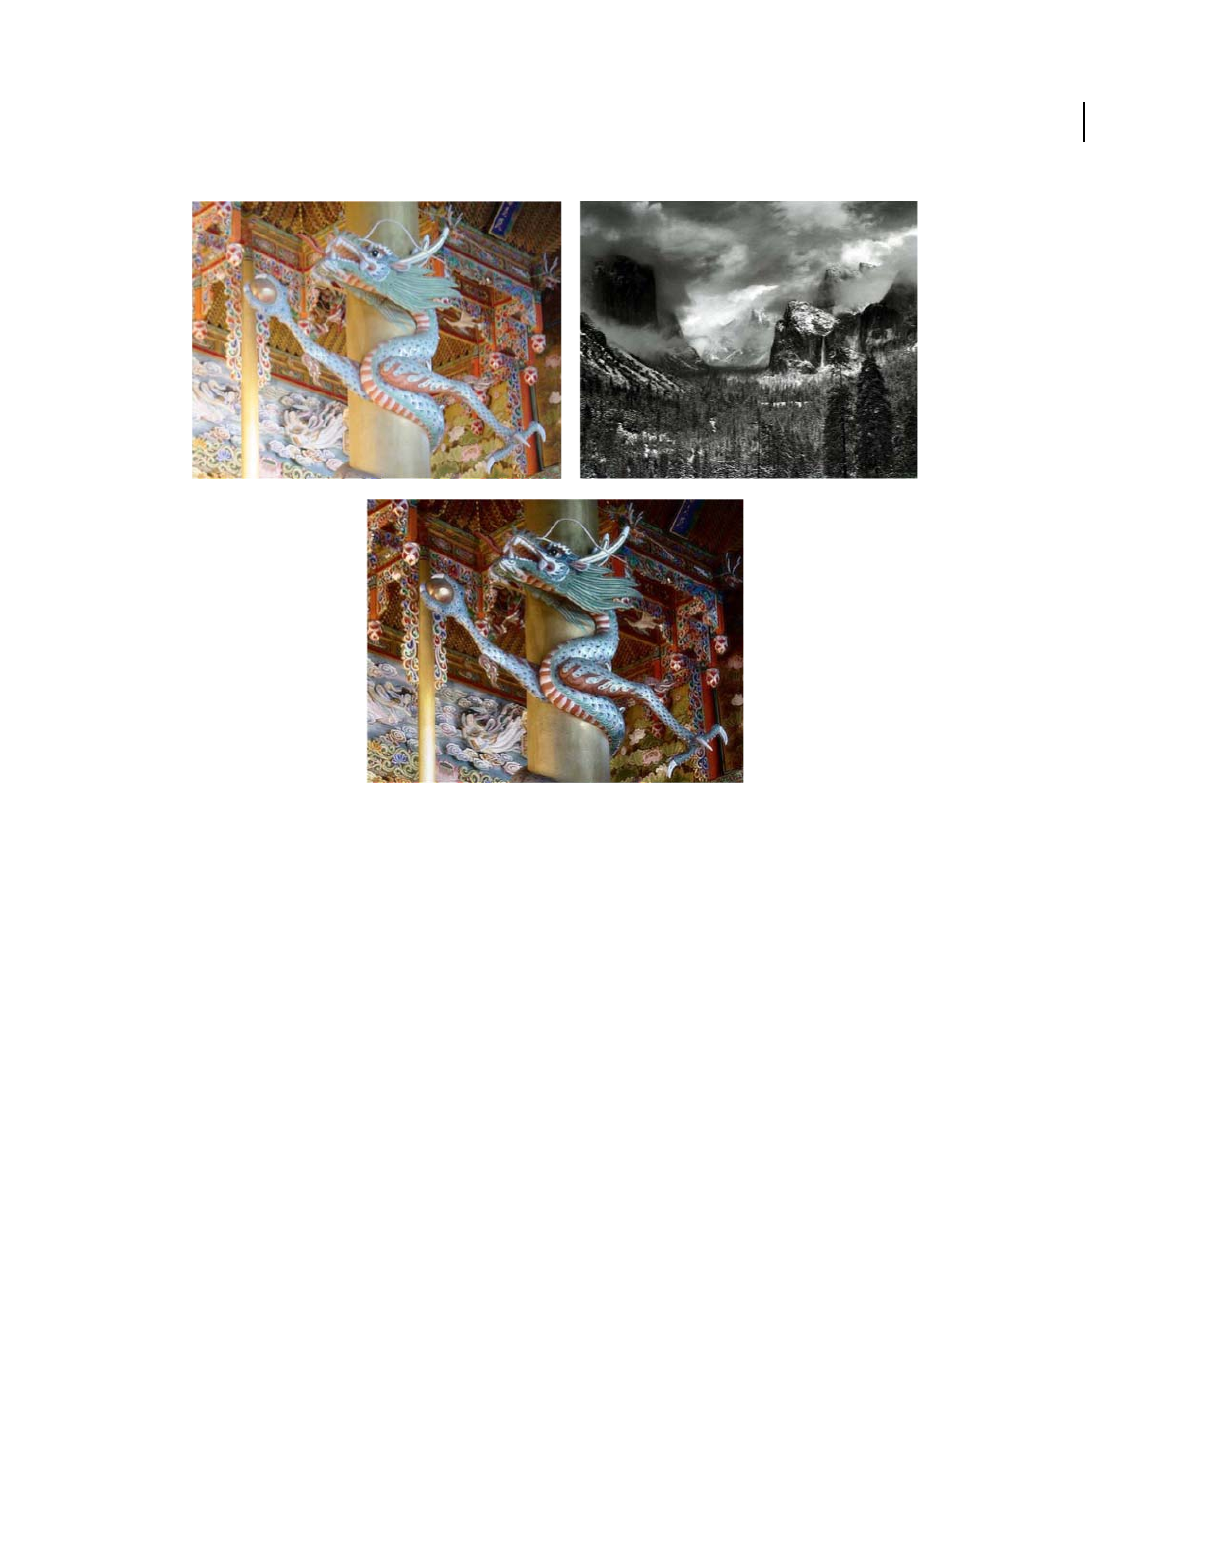
160
USING PHOTOSHOP ELEMENTS 9
Cropping, resizing, retouching, and transforming photos
Last updated 1/3/2012
Image after the style of the style image is applied
1Open the image, and do one of the following:
•Select File > New > Photomerge Style Match.
•In the Guided Edit workspace, select Photomerge > Style Match.
2In the Style bin, add the images from which you want to transfer the style. Choose images that have strong stylistic
properties and details.
Note: You can also choose an image from the default style images displayed in the Style bin.
3To apply the style of an image, double-click the style image in the Style bin or drag the image from the Style bin to
the image placeholder.
4To refine the image, use the options in the Edit panel.
Style Intensity Controls the amount or intensity of the style to transfer. The maximum value implies that you want
to transfer 100% style of the style image.
Style Clarity Improves the local contrast of a stylized image. The contrast of the slowly varying intensity regions are
enhanced, bringing out crisp details in darkened regions.
Enhance Details Improves the overall or global contrast of the image.
Style Eraser Removes the applied style from specific image areas.
Style Painter Adds the style back to areas from which you have removed the applied style.
Soften Stroke Edges Softens hard edges caused by to style erasing and painting.
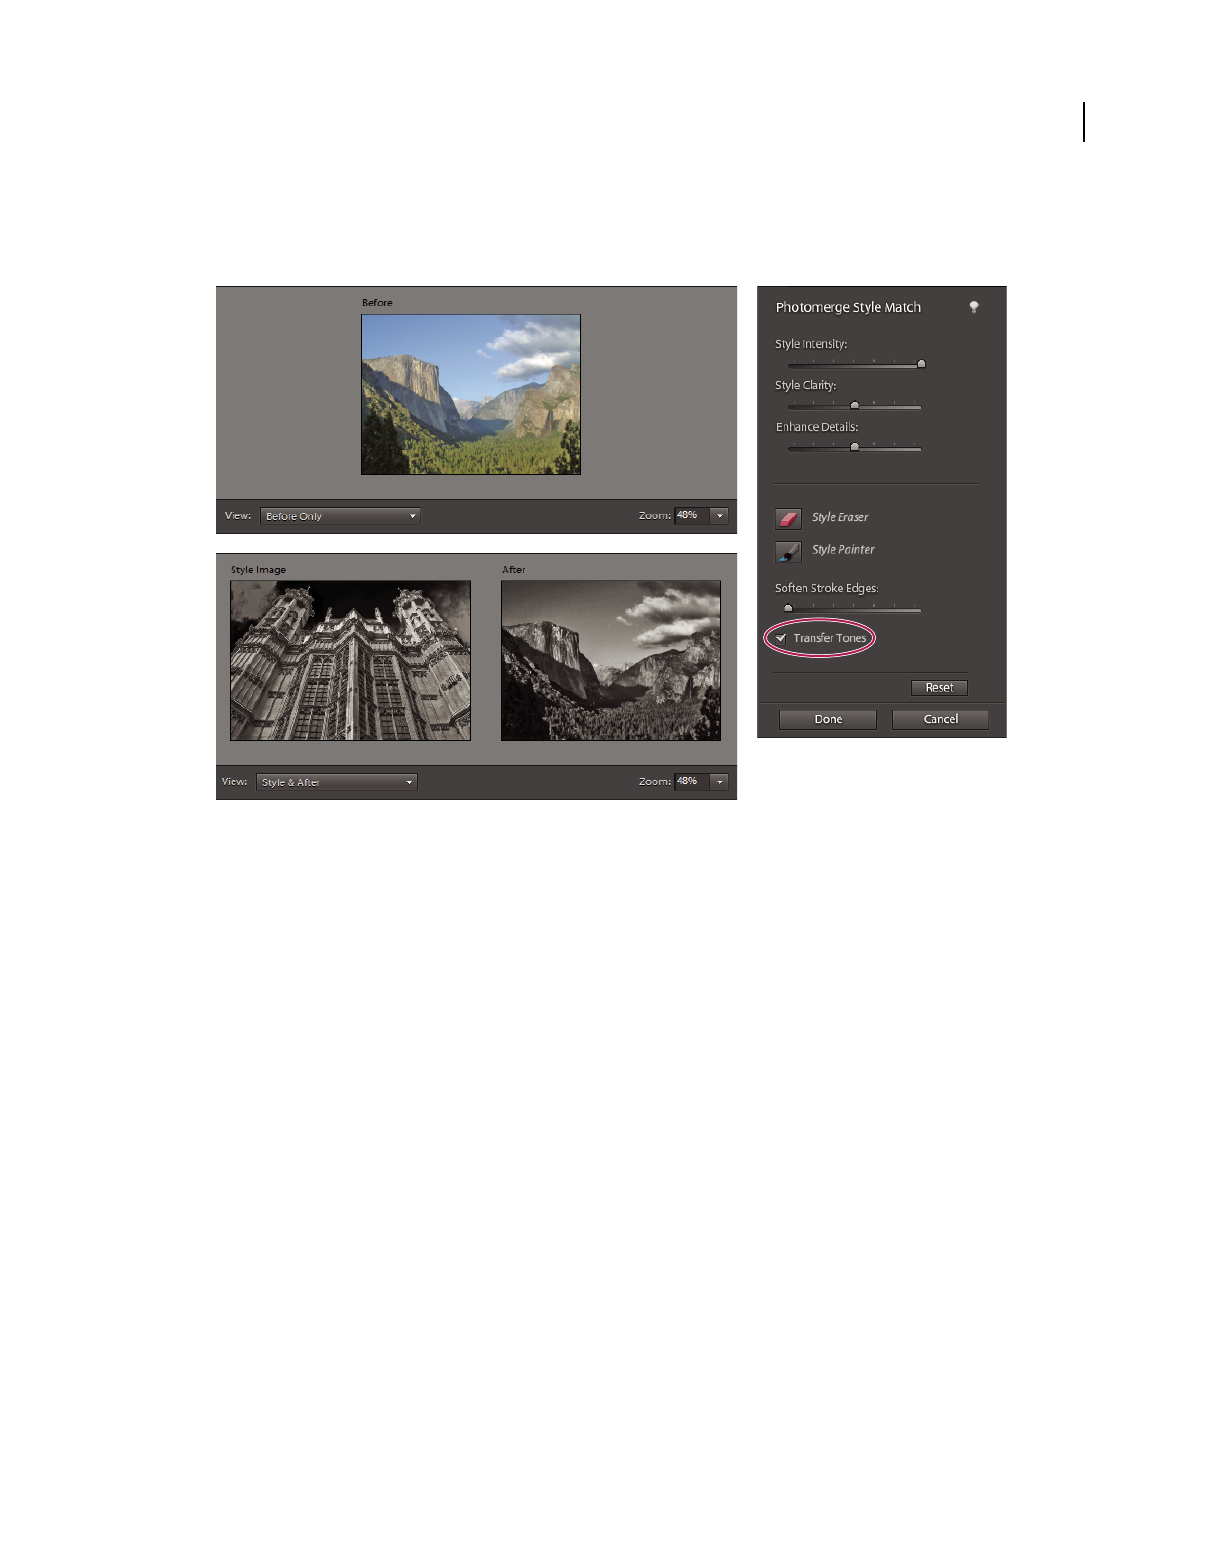
161
USING PHOTOSHOP ELEMENTS 9
Cropping, resizing, retouching, and transforming photos
Last updated 1/3/2012
Transfer Tones Transfers the tones of the style image. For example, if the style image is black and white or sepia,
and the image to which you want to apply Photomerge Style Transfer is colored, selecting Transfer Tones transfers
the style tone (black and white or sepia) to the colored image.
Original colored image changed to black and white through Transfer Tones
5Click Done to update the image with the applied style.
Sharpening
Sharpening overview
Sharpening enhances the definition of edges in an image. Whether your images come from a digital camera or a
scanner, most images can benefit from sharpening. When sharpening images, keep the following in mind:
•Sharpening cannot correct a severely blurred image.
•Sharpen your image on a separate layer so that you can resharpen it later if you need to change the adjustment. Set
the layer’s blending mode to Luminosity to avoid color shifts along edges. If you find that highlights or shadows are
lessened after you sharpen, use the layer blending controls to prevent sharpening in highlights and shadows.
•If you need to reduce image noise, do so before sharpening so that you don’t intensify the noise.
•Sharpen your image multiple times in small amounts. Sharpen the first time to correct blur captured by a scanner
or digital camera. After you’ve color corrected and resized your image, sharpen it again.
•If possible, judge your sharpening by outputting your image. The amount of sharpening needed varies depending
on whether the image is printed or displayed on a web page.

162
USING PHOTOSHOP ELEMENTS 9
Cropping, resizing, retouching, and transforming photos
Last updated 1/3/2012
Sharpen an image
The Auto Sharpen command increases clarity or focus without the risk of oversharpening an image.
The Sharpen tool focuses soft edges in a photo to increase clarity or focus. Oversharpening a photo gives it a grainy look.
You can avoid oversharpening by setting a lower Strength value in the options bar. It’s best to make the sharpening
subtle and increase it as necessary by dragging over the area several times, building up the sharpness each time.
The Adjust Sharpness dialog box has sharpening controls not available with the Sharpen tool or with Auto Sharpen.
You can set the sharpening algorithm or control the amount of sharpening that occurs in shadow and highlight areas.
Adjust sharpening
Automatically sharpen an image
❖Select Enhance > Auto Sharpen.
Sharpen areas of an image
Original image (top), two faces sharpened correctly (bottom left), and two faces oversharpened (bottom right)
1Select the Sharpen tool .
2Set options in the options bar:
Brushes menu Sets the brush tip. Click the arrow next to the brush sample, choose a brush category from the Brushes
menu, and then select a brush thumbnail.
Size Sets the size of the brush, in pixels. Drag the Size pop-up slider or enter a size in the text box.
Mode Determines how the paint that you apply blends with the existing pixels in the image.
Strength Specifies the amount of sharpening that occurs with each stroke.
Sample All Layers Sharpens all visible layers. If this is deselected, the tool sharpens only the active layer.
3Drag over the part of the image you want to sharpen.
Precisely sharpen an image
1Select Enhance > Adjust Sharpness.
2Select Preview check box.
3Set any of the following options to sharpen your image, and then click OK.
Amount Sets the amount of sharpening. Type a number in the box or drag the slider to increase or decrease the
contrast between edge pixels, giving the appearance of greater sharpness.
Radius Determines the number of pixels surrounding the edge pixels affected by the sharpening. Type a number in
the box or drag the slider to change the radius value. As you increase the radius, sharpening becomes more obvious.
Remove Sets the sharpening algorithm used to sharpen the image. Gaussian Blur is the method used by the Unsharp
Mask filter. Lens Blur detects the edges and detail in an image, and provides finer sharpening of detail and reduced
sharpening halos. Motion Blur attempts to reduce the effects of blur due to camera or subject movement. Select a blur
option from the pop-up menu.
Angle Sets the direction of motion for the Motion Blur option of the Remove control. Type a number in the box or
drag the angle dial to change the angle percentage to the left (counterclockwise) or right (clockwise).
More Refined Processes the file more slowly for more accurate blur removal.

163
USING PHOTOSHOP ELEMENTS 9
Cropping, resizing, retouching, and transforming photos
Last updated 1/3/2012
Use the Unsharp Mask filter
The Unsharp Mask filter reproduces a traditional film technique used to sharpen edges in an image. The Unsharp
Mask filter corrects blur introduced during photographing, scanning, resampling, or printing. It is useful for images
intended for both print and online viewing.
Unsharp Mask locates pixels that differ from surrounding pixels by the threshold you specify and increases the pixels’
contrast by the amount you specify. For neighboring pixels within the specified radius, the lighter pixels get lighter,
and the darker pixels get darker.
The effects of the Unsharp Mask filter are far more pronounced on-screen than in high-resolution printed output. If
your final destination is printed output, experiment to determine what settings work best for your image.
The Unsharp Mask filter adds contrast to reduce fuzziness.
1In the Edit workspace, select an image, layer, or area.
2Choose Enhance > Unsharp Mask.
3Select the Preview option.
4Set any of these options and click OK:
Amount Determines how much to increase the contrast of pixels. For high-resolution printed images, an amount
between 150% and 200% is usually best.
Radius Specifies the number of pixels to sharpen around edges. For high-resolution images, a radius between 1 and 2
is usually recommended. A lower value sharpens only the edge pixels, whereas a higher value sharpens a wider band
of pixels. This effect is much less noticeable in print than on-screen, because a 2-pixel radius represents a smaller area
in a high-resolution printed image.
Threshold Determines how far different pixels must be from the surrounding area before they are considered edge
pixels and sharpened. To avoid introducing noise (in images with flesh tones, for example), experiment with
Threshold values between 2 and 20. The default Threshold value (0) sharpens all pixels in the image.
Transforming
Rotate or flip an item
You can rotate or flip a selection, a layer, or an entire image. Make sure to choose the correction command depending
on the item you want to rotate or flip.
1In the Edit workspace, select the photo, layer, selection, or shape you want to rotate or flip.
2Choose Image > Rotate, and choose one of the following commands from the submenu:
90° Left, Layer 90° Left, or Selection 90° Left Rotates the photo, layer, or selection a quarter-turn counterclockwise.
(Rotate Selection is only available when you have an active selection in an image.)
90° Right, Layer 90° Right, or Selection 90° Right Rotates the photo, layer, or selection a quarter-turn clockwise.
180°, Layer 180°, or Selection 180° Rotates the photo, layer, or selection a half-turn.
Custom Rotates the item by the amount you specify. If you select this option, enter the number of degrees you want
to rotate the item by, and the direction in which you want to rotate the item.
Note: A positive number rotates the object clockwise, and a negative number rotates the object counterclockwise.
When you are finished, click OK.

164
USING PHOTOSHOP ELEMENTS 9
Cropping, resizing, retouching, and transforming photos
Last updated 1/3/2012
Flip Horizontal, Flip Layer Horizontal, or Flip Selection Horizontal Flips the photo, layer, or selection horizontally.
Flip Vertical, Flip Layer Vertical, or Flip Selection Vertical Flips the photo, layer, or selection vertically.
Rotating an image
A. Rotate 90° left B. Flip Horizontal C. Rotate 90° right D. Rotate 180° E. Original image F. Free rotate G. Flip Vertical
Freely rotate an item
With the Free Rotate Layer and Free Rotate Selection commands, you can rotate an item by any amount.
Use the Free Rotate Layer command to straighten the image, and click the Commit button to apply the rotation.
1In the Edit workspace, select the layer or selection you want to rotate.
2Choose Image > Rotate > Free Rotate Layer or Selection. A bounding box appears in the image.
Note: If you select an image that is a Background layer (such as a photo imported from a camera or scanner), you are
given the option of turning it into a regular layer so that you can transform it.
3(Optional) To change the point around which the item rotates, click a square on the reference point locator in the
options bar.
4Do one of the following to specify the rotation amount:
•Click and drag the rotate handle at the bottom of the bounding box. The cursor will change to concentric arrows
when it’s hovering over the handle. To constrain the rotation to 15° increments, hold down Shift as you drag.
•Type an angle of rotation between -180 (maximum counterclockwise rotation) and 180 (maximum clockwise
rotation) in the Set Rotation text box
of the options bar.
5Do one of the following:
•To apply the transformation, double-click inside the bounding box, click the Commit button , or press Enter.
•To cancel the transformation, click the Cancel button , or press Esc.
Scale an item
1In the Edit workspace, select the photo, layer, selection, or shape you want to scale.
2Choose Image > Resize > Scale.
Note: If you select a photo that is a Background layer (such as a photo imported from a camera or scanner), you are given
the option of turning it into a regular layer so that you can transform it.
3Do any of the following to specify the scale amount:
•To maintain the relative proportions (avoiding image distortion) as you scale, select Constrain Proportions, and
then drag a corner handle. Alternatively, press Alt (Option in Mac OS) as you drag a corner handle.
•To scale only the height or the width, drag a side handle.
•Enter a percentage for the Width, Height, or both in the options bar.
4Do one of the following:
•To apply the transformation, double-click inside the bounding box, click the Commit button or press Enter.
•To cancel the transformation, click the Cancel button or press Esc.
Scaling proportionally by dragging the corner with the scaling icon.

165
USING PHOTOSHOP ELEMENTS 9
Cropping, resizing, retouching, and transforming photos
Last updated 1/3/2012
Skew or distort an item
Skewing applies a vertical or horizontal slant to an item. Distorting stretches or squishes an item.
1In the Edit workspace, select the photo, layer, selection, or shape you want to transform.
2Choose Image > Transform > Skew or Image > Transform > Distort. If you are transforming a shape with the Shape
tool selected, choose Image
> Transform Shape > Skew or Image > Transform Shape > Distort.
Note: If you select a photo that is a Background layer (such as a photo imported from a camera or scanner), you are given
the option of turning it into a regular layer so that you can transform it.
3Drag a handle to skew or distort the bounding box.
4Do one of the following:
•To apply the transformation, double-click inside the bounding box, click the Commit button , or press Enter.
•To cancel the transformation, click the Cancel button , or press Esc.
Apply perspective to an item
Applying perspective creates the appearance of objects existing in three dimensions.
Original image (left) and image after perspective applied (right).
1In the Edit workspace, select the item you want to transform.
2Choose Image > Transform > Perspective. If you are transforming a shape with the Shape tool selected, choose
Image
> Transform Shape > Perspective.
Note: If you select a photo that is a background layer (such as a photo imported from a camera or scanner), you are given
the option of turning it into a regular layer so that you can transform it.
3Drag a corner handle on the bounding box to apply perspective.
4Do one of the following:
•To commit the transformation, double-click inside the bounding box, click the Commit button , or press Enter.
•To cancel the transformation, click the Cancel button , or press Esc.
Freely transform an item
The Free Transform command lets you apply transformations (rotating, scaling, skewing, distorting, and perspective)
in one step. Instead of choosing different commands, you simply hold down a key on your keyboard to switch between
transformation types.
1In the Edit workspace, select the item you want to transform.
2Choose Image > Transform > Free Transform. If you are transforming a shape, choose Image > Transform Shape >
Free Transform Shape.
Note: If you select a photo that is a Background layer (such as a photo imported from a camera or scanner), you are given
the option of turning it into a regular layer so that you can transform it.
3(Optional) To change the point around which the item rotates, click a square on the reference point locator in the
options bar.
4Do one or more of the following to transform the object:
•To scale, drag any handle of the bounding box. To scale the width and height proportionally, either press Shift as
you drag a corner handle, or select Constrain Proportions in the options bar, and then drag a corner handle.

166
USING PHOTOSHOP ELEMENTS 9
Cropping, resizing, retouching, and transforming photos
Last updated 1/3/2012
•To rotate, move the pointer outside of the bounding box and drag. When positioned outside the bounding box, the
pointer becomes a curved, two-sided arrow
. Press Shift and drag to constrain the rotation to 15° increments.
•To distort, press Ctrl (Command in Mac OS), and drag any handle. When positioned over a handle, the pointer
becomes a gray arrowhead
.
•To skew, press Ctrl+Shift (Command+Shift in Mac OS) and drag a handle in the middle of any side of the bounding
box. When positioned over a side handle, the pointer becomes a gray arrowhead with a small double arrow
.
•To apply perspective, press Ctrl+Alt+Shift (Command+Option+Shift), and drag a corner handle. When positioned
over a corner handle, the pointer becomes a gray arrowhead
.
5Do one of the following:
•To commit the transformation, double-click inside the bounding box, and then click the Commit button , or
press Enter.
•To cancel the transformation, click the Cancel button , or press Esc.
Apply a transformation to a Background layer
Before you can apply transformations to the Background layer, you need to convert it into a regular layer.
1In the Edit workspace, select the Background layer in the Layers panel.
2Convert the background.
3Apply the transformation.
More Help topics
“Convert the Background layer into a regular layer” on page 60
Recomposing
The Recompose tool facilitates intelligent resizing of photos without changing important visual content such as people,
building, animals, and so on. Normal scaling affects all pixels uniformly when resizing an image. Recompose affects
pixels in areas that don’t have important visual content. Recompose enables you to upscale or downscale images to
improve a composition, fit a layout, or change the orientation.
Note: Recompose can also be performed without using the protect areas option. For example, to recompose a photo
without marking any areas for protection or removal, drag the image handles .
Before Recompose (left) and after Recompose
If you want to preserve or remove specific areas when scaling an image, Recompose enables you to protect content
intelligently during resizing.
A. Photo selected for Recompose B. Areas marked for protection (green) and for removal (red) C. Photo after Recompose
Recompose a photo in Guided Edit
1Open a photo in the project bin that you want to resize, and select Edit Guided.
2In the Guided Edit panel, Expand Basic Photo Edits, and select Recompose Photo.

167
USING PHOTOSHOP ELEMENTS 9
Cropping, resizing, retouching, and transforming photos
Last updated 1/3/2012
3Mark the areas you want to protect using the Protect brush . Right-click the photo, and select one of the following
modes:
Use Normal Highlight This mode is similar to painting. Mark all the regions that require protection. For example,
protecting a circle using Normal Highlight requires marking or painting the entire circle.
Use Quick Highlight You can quickly highlight the required regions for protection. Encircle the subject to highlight
the required regions. For example, to highlight the area within a circle, trace the boundary of the circle. Quick
Highlight ensures that the area within the circle is marked for protection.
You can specify the size of the brush and the photo.
Green indicates the areas marked for protection.
4Do one of the following to erase portions of unwanted marked areas (green):
•Erase using the green Eraser tool .
•Right-click the photo, and select Clear Protect Highlights.
5Mark the areas you want to remove (areas that are unimportant) using the Remove brush tool .
Red indicates the areas marked for removal.
Right-click the photo, and select Clear All Highlights to erase protected and unprotected marked areas.
6Do one of the following to erase portions of unwanted marked areas (red):
•Erase using the red Eraser tool .
•Right-click the photo, and select Clear Remove Highlights.
7Drag the image handles to Recompose your photo.
Recompose a photo in Full Edit
1Open a photo in the project bin that you want to resize, and select Image > Recompose, or click the Recompose tool .
Note: To view the Recompose tool, press C, or right-click the Crop tool in the toolbar, and select the Recompose tool.
A dialog box with a brief overview of the Recompose tool opens. If you do not want to view this dialog again, select
Don’t Show Again. If you want to view this Help dialog again while working with the Recompose tool, right-click the
photo and select Show Recompose Help. Click View An Online Video Tutorial to view a demo on Recompose.
2Mark the areas you want to protect using the Protect brush . Right-click the photo, and select one of the following
modes:
•Use Normal Highlight
•Use Quick Highlight
You can specify the size of the brush and the photo.
Green indicates the areas marked for protection.
Note: Recompose can also be performed without using the protect areas option. For example, to recompose a photo
without marking any areas for protection or removal, drag the image handles .
3Do one of the following to erase portions of unwanted marked areas (green):
•Erase using the green Eraser tool .

168
USING PHOTOSHOP ELEMENTS 9
Cropping, resizing, retouching, and transforming photos
Last updated 1/3/2012
•Right-click the photo, and select Clear Protect Highlights.
4Mark the areas you want to remove (areas that are unimportant) using the Remove brush tool .
Red indicates the areas marked for removal.
Right-click the photo, and select Clear All Highlights to erase protected and unprotected marked areas.
5Do one of the following to erase portions of unwanted marked areas (red):
•Erase using the red Eraser tool .
•Right-click the photo, and select Clear Remove Highlights.
You can specify the size of the brush and the photo.
6Drag the handles of the image to Recompose your photo. On completion, click the Commit Current Operation
icon .
Recompose a photo in a photo project
You can use the Recompose tool to Recompose photos in the following photo projects:
•Photo Book
•Greeting Card
•Photo Collage
1Create a photo book, greeting card, or a photo collage.
2Right-click the photo in the photo project, and select Recompose Photo.
3(Optional) Mark the areas you want to protect using the Protect brush .
Green indicates the protected areas. You can use the green Eraser tool to erase portions of unwanted marked regions.
Note: Recompose can also be performed without using the Protect Areas option. For example, to recompose a photo
without marking any areas for protection or removal, drag the image handles .
4(Optional) Mark the areas you want to remove using the Remove brush tool .
Red indicates the areas marked for removal. You can use the red Eraser tool to erase portions of unwanted areas
marked for removal.
You can specify the size of the brush and the photo.
5Drag the image handles to Recompose your photo. On completion, click the Commit current operation icon .
More Help topics
“Creating projects in the Edit workspace” on page 256
Recompose options
You can use the following options while using the Recompose tool.
Size Enables you to define the brush size.

169
USING PHOTOSHOP ELEMENTS 9
Cropping, resizing, retouching, and transforming photos
Last updated 1/3/2012
Preset Used to specify the ratio that you want to use for resizing. Preset works on the photo ratio and not the
dimensions of the photo. For example, if you use a preset ratio 3x5, the image is resized using this ratio. If you want to
scale the photo using the same ratio, hold the Shift key and drag the corner handles.
Note: If you don’t hold down the Shift key, the image is resized in any ratio.
Amount Used to set the Recompose threshold. Setting the threshold to 100% indicates a 100% Recompose. If it is set
to 0%, then the behavior of Recompose tool is similar to the Transform tool.
Highlight Skin Tones Identifies and highlights skin tones for protection. You can preserve regions that contain skin
tones. Click the Highlight Skin Tones icon to view the suggested skin tones region. To erase the identified regions that
contain skin tones, use the Protect Eraser tool, or right-click the image and select Clear Protect Highlights.
Swap Width And Height Used to swap the values specified for height and width. For example, you have specified the
following values: H: 10 and W: 15. Click the Swap Height and Width icon to interchange these values. The new values
are: H: 15 and W: 10.
Stitching together panoramas
Creating photomerge panoramas
For a video about this process, see www.adobe.com/go/lrvid923_pse_en.
The Photomerge Panorama command combines several photographs into one continuous image. For example, you
can take five overlapping photographs of a city skyline, and assemble them into a panorama. The Photomerge
Panorama command can tile photos horizontally as well as vertically.
When you set up a Photomerge Panorama composition, you identify the files you want to merge (called your source
files), and then Photoshop
Elements automatically assembles them into a single panorama. After the panorama is
complete, you can still make changes to the placement of the individual photos, if necessary.
Creating a Photomerge Panorama
Your source photographs play a large role in panoramic compositions. To avoid problems, follow these guidelines
when taking pictures for use with Photomerge Panorama:
Overlap images sufficiently Images should overlap approximately 15% to 40%. If the overlap is less, Photomerge
Panorama may not be able to automatically assemble the panorama. If images overlap by 50% or more, it can be
difficult to work with them, and blending may not be as effective.
Use a consistent focal length Avoid using the zoom feature of your camera while taking your pictures.
Keep the camera level Although Photomerge Panorama can process slight rotations between pictures, a tilt of more
than a few degrees can result in errors when automatically assembling the panorama. Using a tripod with a rotating
head helps maintain camera alignment and viewpoint.
When photographing a panoramic scene from a high place, the natural inclination is to keep the horizon level in the
viewfinder. However, this actually produces a noticeable rotation between images. Try using a tripod to keep the
camera level when taking photographs in this situation.
Stay in the same position Try not to change your location as you take a series of photographs, so that the pictures are
from the same viewpoint. Using the optical viewfinder with the camera held close to the eye helps keep the viewpoint
consistent. Or
try using a tripod to keep the camera in the same place.

170
USING PHOTOSHOP ELEMENTS 9
Cropping, resizing, retouching, and transforming photos
Last updated 1/3/2012
Avoid using distortion lenses Lenses, such as fish-eye lenses, that noticeably distort the image can interfere with
Photomerge Panorama.
Maintain the same exposure Avoid using the flash in some pictures and not in others. The advanced blending feature
in Photomerge Panorama helps smooth out different exposures, but extreme differences make alignment difficult.
Some digital cameras change exposure settings automatically as you take pictures, so you may need to check your
camera settings to be sure that all the images have the same exposure.
Create a Photomerge panorama composition
1Do one of the following:
•In Full Edit mode in the Edit workspace, choose File > New > Photomerge Panorama.
•In the Elements Organizer, choose File > New > Photomerge Panorama.
2In the Photomerge dialog box, choose an option from the Use pop-up menu:
Files Generates the Photomerge composition using individual image files.
Folders Uses all the images stored in a folder to create the Photomerge composition. The files in the folder appear in
the dialog box.
Or, click Add Open Files to use the images you have open in the Edit workspace.
3Do one of the following to select photos you want to use:
•Click Add Open Files to use images you have open in the Edit workspace.
•Click the Browse button to navigate to the source files or folder.
You can add more files by clicking the Browse button again and navigating to the source files. You can always remove
a file from the Source Files list by selecting the file and clicking the Remove button.
4Choose a layout option:
Auto Analyzes the source images and applies either a Perspective or Cylindrical layout, depending on which produces
a better photomerge.
Perspective Creates a consistent composition by designating one of the source images (by default, the middle image)
as the reference image. The other images are then transformed (repositioned, stretched, or skewed as necessary) so that
overlapping content layer is matched.
Cylindrical Reduces the “bow-tie” distortion that can occur with the Perspective layout by displaying individual
images as on an unfolded cylinder. Overlapping content is still matched. The reference image is placed at the center.
This is best suited for creating wide panoramas.
Spherical Aligns and transforms the images as if they were for mapping the inside of a sphere. If you have taken a set
of images that cover 360 degrees, use this for 360 degree panoramas. You might also use Spherical to produce nice
panoramic results with other file sets.
Collage Aligns the layers and matches overlapping content and transforms (rotate or scale) any of the source layers.
Reposition Aligns the layers and matches overlapping content, but does not transform (stretch or skew) any of the
source images.
Interactive Layout Choose this option to open the source images in a dialog box and position them manually.

171
USING PHOTOSHOP ELEMENTS 9
Cropping, resizing, retouching, and transforming photos
Last updated 1/3/2012
5(Optional) Select any of the following options:
Blend Images Together Finds the optimal borders between the images and creates seams based on those borders, and
to color match the images. With Blend Images Together turned off, a simple rectangular blend is performed. This may
be preferable if you intend to retouch the blending masks by hand.
Vignette Removal Removes and performs exposure compensation in images that have darkened edges caused by lens
flaws or improper lens shading.
Geometric Distortion Correction Compensates for barrel, pincushion, or fisheye distortion.
6Click OK to generate the panorama as a new file.
A message asks whether you want to fill the panorama edges that are left transparent. If you click Yes,
Photoshop
Elements fills the edges with content-aware healing.
Create a Photomerge panorama interactively
Generally, the automatic options in the Photomerge dialog box create satisfactory panoramas. If these options don’t
produce the results you want, select the Interactive Layout option. The Photomerge dialog box for interactive layouts
lets you manually rearrange your source images.
1Choose the Interactive Layout option in the main Photomerge dialog box to open the Photomerge interactive
dialog box.
2Do any of the following:
•Select Reposition Only and Snap To Image to preserve the alignment at overlapping image areas.
Photoshop
Elements applies blending to even out differences of exposure between the source images.
•Select Perspective and Photoshop Elements selects one of the source images to supply a vanishing point. It also
stretches or skews the other images to create a wraparound effect. Use the Vanishing Point tool to change the
vanishing point and reorient the perspective.
3Drag the images to the work area and manually arrange them.
4After arrange the composition, click OK to generate the panorama as a new file. The composition then opens in
Photoshop
Elements.
The Photomerge dialog box for interactive layouts
The Photomerge dialog box contains tools for manipulating the composition, a lightbox for storing source images that
are not in
use, a work area for assembling the composition, and options for viewing and editing the composition. You
can also zoom in and out to better see the alignment of each file.
Photomerge interactive layout dialog box.
A. Lightbox B. Tools C. Work area D. Selected image E. Status bar
•To navigate, select the Move View tool and drag within the work area. Or, drag the view area (the red box) or the
scroll bar of the navigator.
•To zoom, click the Zoom In icon and Zoom Out icon , or use the Zoom tool . Hold down Alt (Option in Mac
OS) to zoom out with the Zoom tool.
•To rotate images, select the Select Image tool , click the image you want to rotate, select the Rotate tool , and then
drag in a circular motion around the image.
•To reorder images in the lightbox, select the Select Image tool and drag an image in the lightbox.
•To add an image to the composition, select the Select Image tool, and then drag the image from the lightbox to the
work area.

172
USING PHOTOSHOP ELEMENTS 9
Cropping, resizing, retouching, and transforming photos
Last updated 1/3/2012
•To remove an image from the composition, select the Select Image tool, and then drag the image from the work
area to the lightbox.
Make sure Snap To Image is selected to automatically snap overlapping images into place when a commonality is
detected.
Change the vanishing point in a Photomerge panorama
The Vanishing Point tool selects the vanishing point image, which changes the perspective of the Photomerge
panorama composition.
1Select Perspective in the Settings area of the Photomerge dialog box. The middle image is the default vanishing
point image (it has a blue border around it when selected).
2Select the Vanishing Point tool , and click on an image in the work area to make it the vanishing point image. There
can only be one vanishing point image in a composition.
Note: Hold down Alt (Option in Mac OS) when you move the pointer over an image to show the selection border of the
photo.
3If necessary, use the Select Image tool to adjust the position of the non-vanishing point images. A non-vanishing
point image has a red border around it when selected.
When you apply perspective correction to a composition, the non-vanishing point images are linked to the vanishing
point image. You can break this link by clicking the Reposition Only button, by separating the images in the work area,
or by dragging the vanishing point image back to the lightbox. After the link is broken, images return to their original
shapes.
The perspective correction only works up to an approximately 120° angle of view. If your composition has a wider
angle of view, deselect the Perspective option.
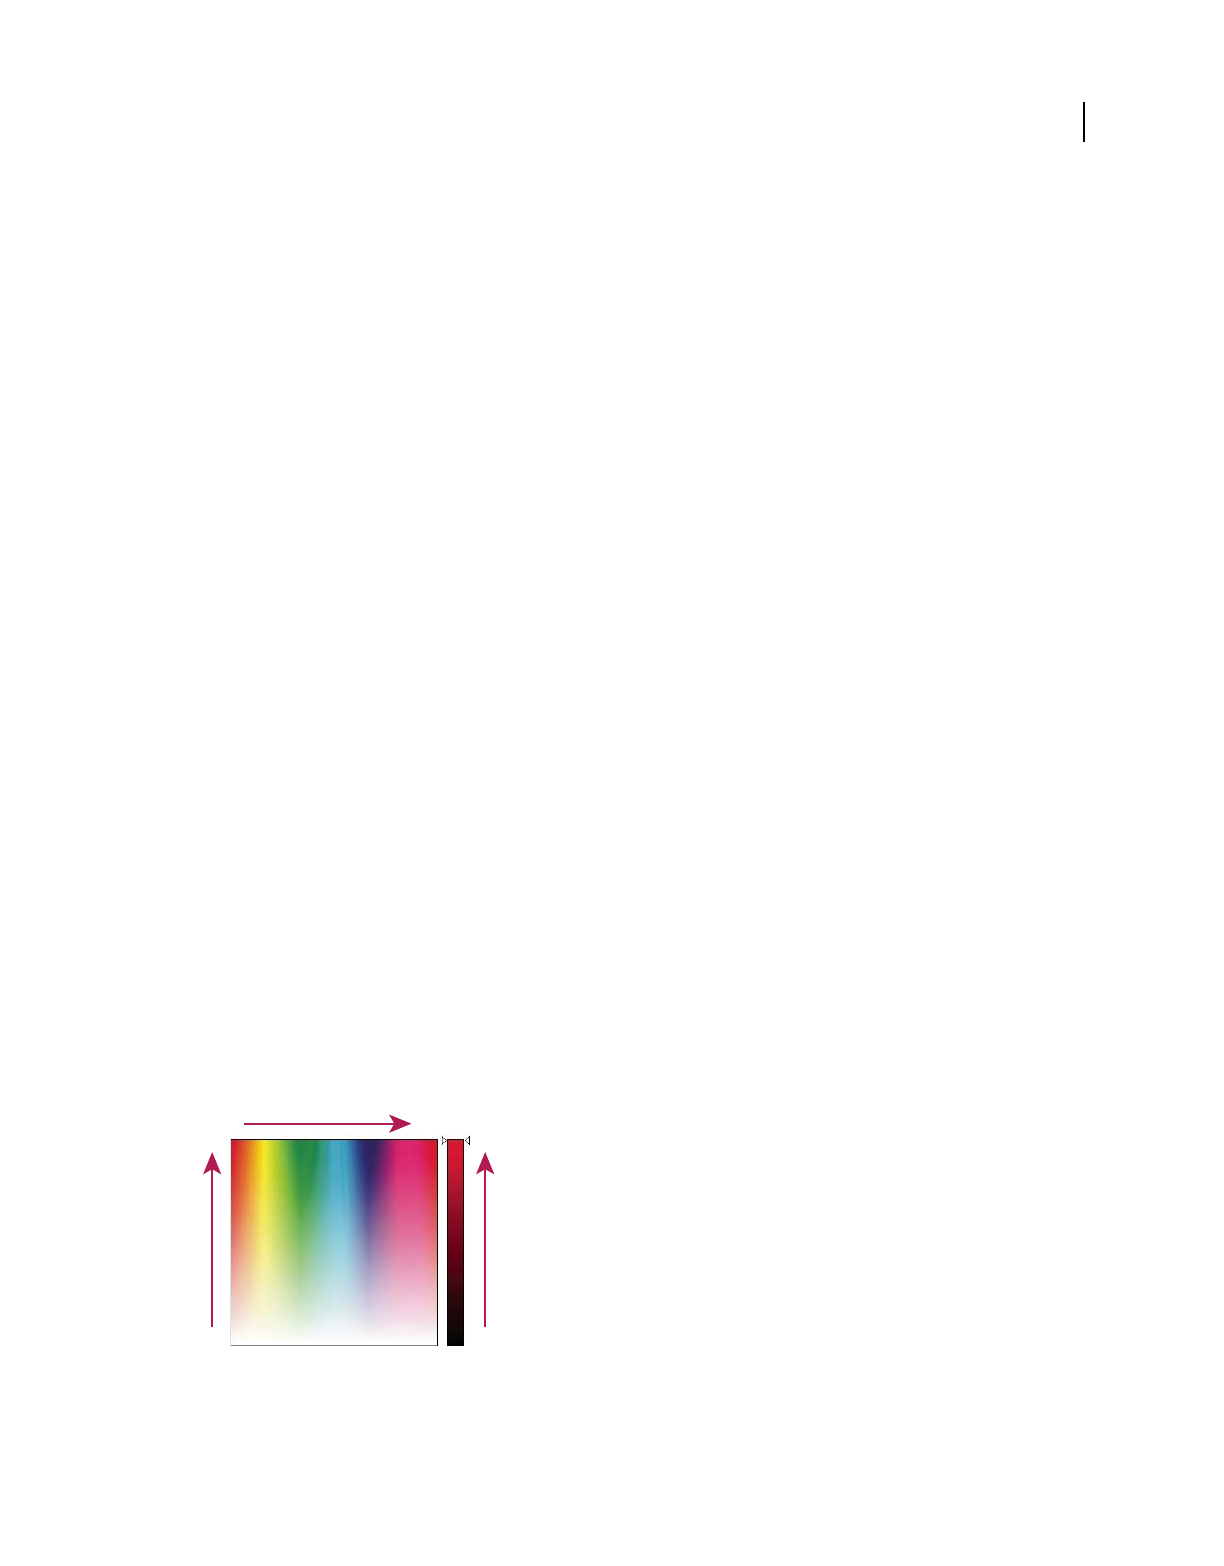
173
Last updated 1/3/2012
Chapter 9: Understanding color
In Adobe® Photoshop® Elements 9, you use two color models to manipulate color. One model is based on the way the
human eye sees color—hue, saturation, and brightness (HSB), while the other model is based on the way computer
monitors display color (in amounts of red, green, and blue or RGB). The color wheel is another tool that helps you
understand the relationships between colors. Photoshop
Elements provides four image modes that determine the
number of colors displayed in an image: RGB, bitmap, grayscale, and indexed color.
Understanding color
About color
The human eye perceives color in terms of three characteristics—hue, saturation, and brightness (HSB)—whereas
computer monitors display colors by generating varying amounts of red, green, and blue (RGB) light. In
Photoshop
Elements, you use the HSB and RGB color models to select and manipulate color. The color wheel can help
you understand the relationships between colors.
HSB model
Based on the human perception of color, the HSB model describes three fundamental characteristics of color:
Hue The color reflected from or transmitted through an object. It is measured as a location on the standard color
wheel, expressed as a degree between 0 and 360. In common use, hue is identified by the name of the color, such as
red, orange, or green.
Saturation The strength or purity of the color. Saturation, which is sometimes called chroma, represents the amount
of gray in proportion to the hue, measured as a percentage from 0 (gray) to 100 (fully saturated). On the standard color
wheel, saturation increases from the center to the edge.
Brightness The relative lightness or darkness of the color, usually measured as a percentage from 0 (black) to 100
(white).
Although you can use the HSB model in Photoshop Elements to define a color in the Color Picker dialog box, you
cannot use the HSB mode to create or edit images.
HSB view in the Adobe Color Picker
A. Saturation B. Hue C. Brightness
0
100
0 360
0
100
B
C
A
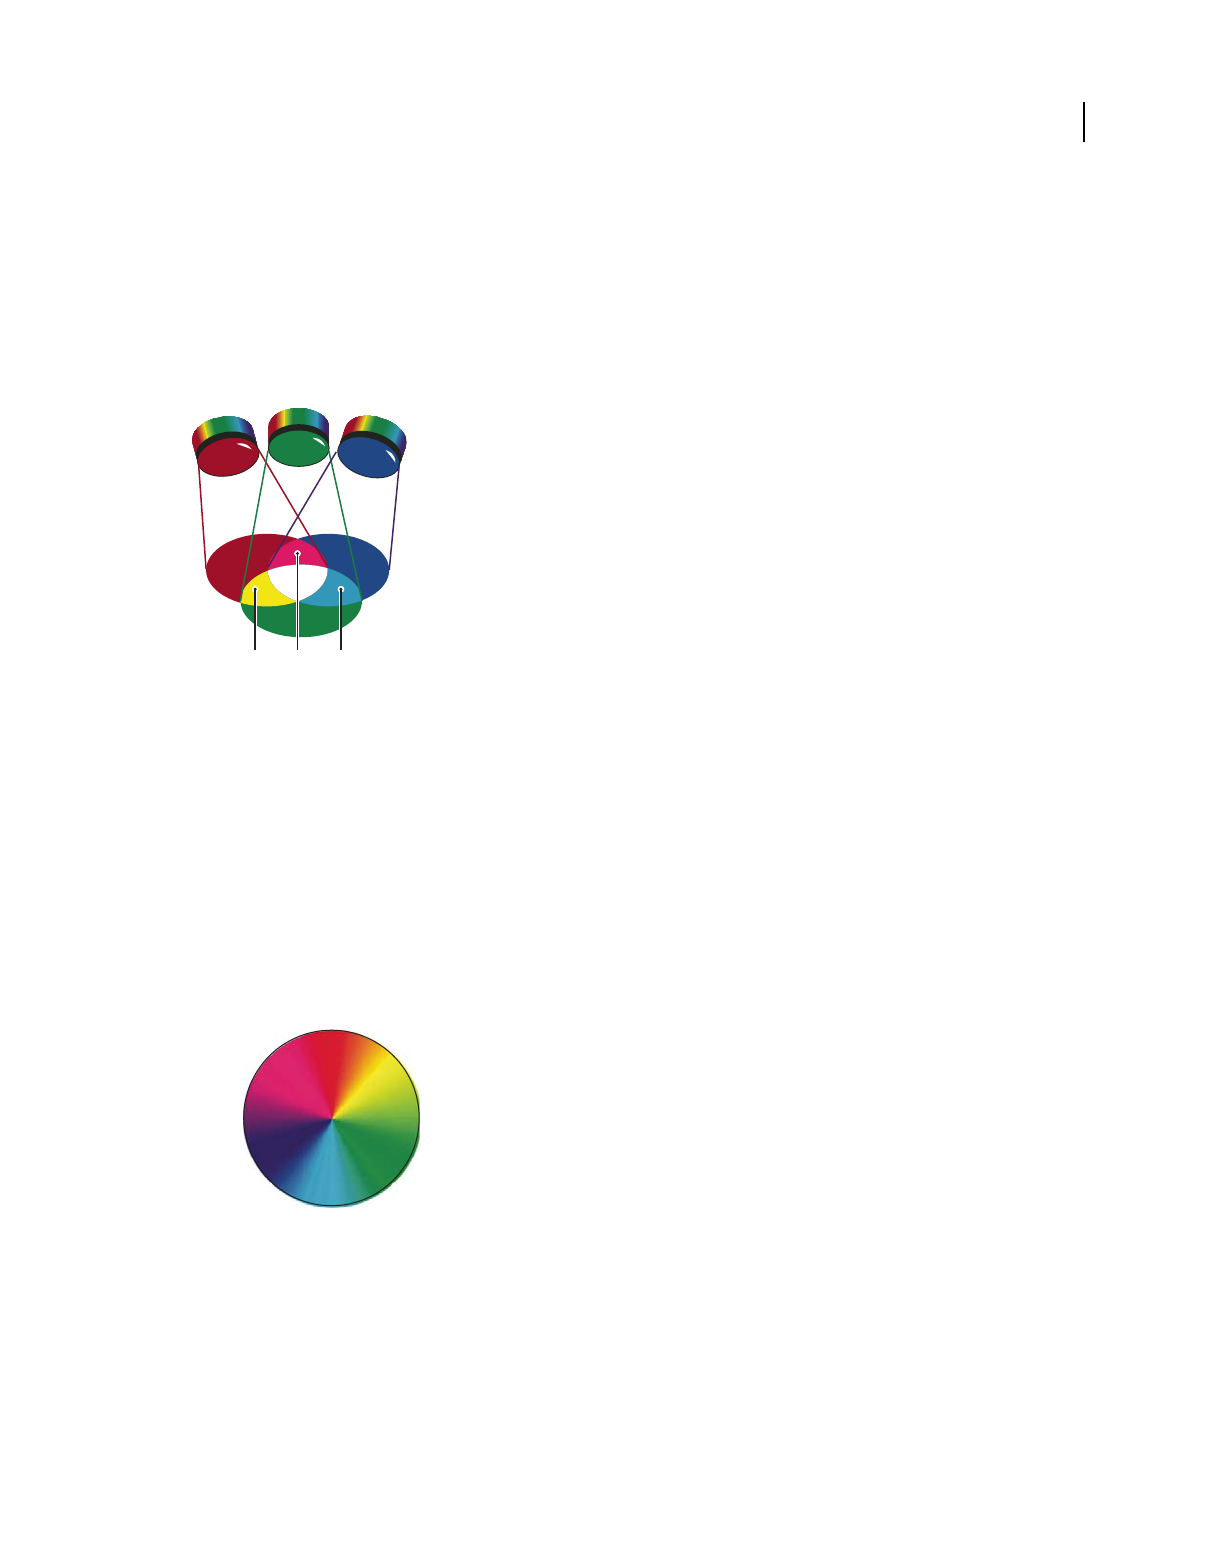
174
USING PHOTOSHOP ELEMENTS 9
Understanding color
Last updated 1/3/2012
RGB model
A large percentage of the visible spectrum can be represented by mixing red, green, and blue (RGB) light in various
proportions and intensities. These three colors are called the additive primaries. Added together, red, green, and blue
light make white light. Where two colors overlap, they create cyan, magenta, or yellow.
The additive primary colors are used for lighting, video, and monitors. Your monitor, for example, creates color by
emitting light through red, green, and blue phosphors.
Additive colors (RGB).
A. Red B. Green C. Blue D. Yellow E. Magenta F. Cyan
Color wheel
The color wheel is a convenient way to understand and remember the relationship between colors. Red, green, and
blue are the additive primaries. Cyan, magenta, and yellow are the subtractive primaries. Directly across from each
additive primary is its complement: red-cyan, green-magenta, and blue-yellow.
Each subtractive primary is made up of two additive primaries, but not its complement. So, if you increase the amount
of a primary color in your image, you reduce the amount of its complement. For example, yellow is composed of green
and red light, but there is no blue light in yellow. When adjusting yellow in Photoshop
Elements, you change the color
values in the blue color channel. By adding blue to your image, you subtract yellow from it.
Color wheel.
A. Magenta B. Red C. Yellow D. Green E. Cyan F. Blue
A
DE F
BC
F
B
0/360
1
80
90 270
C
D
E
A
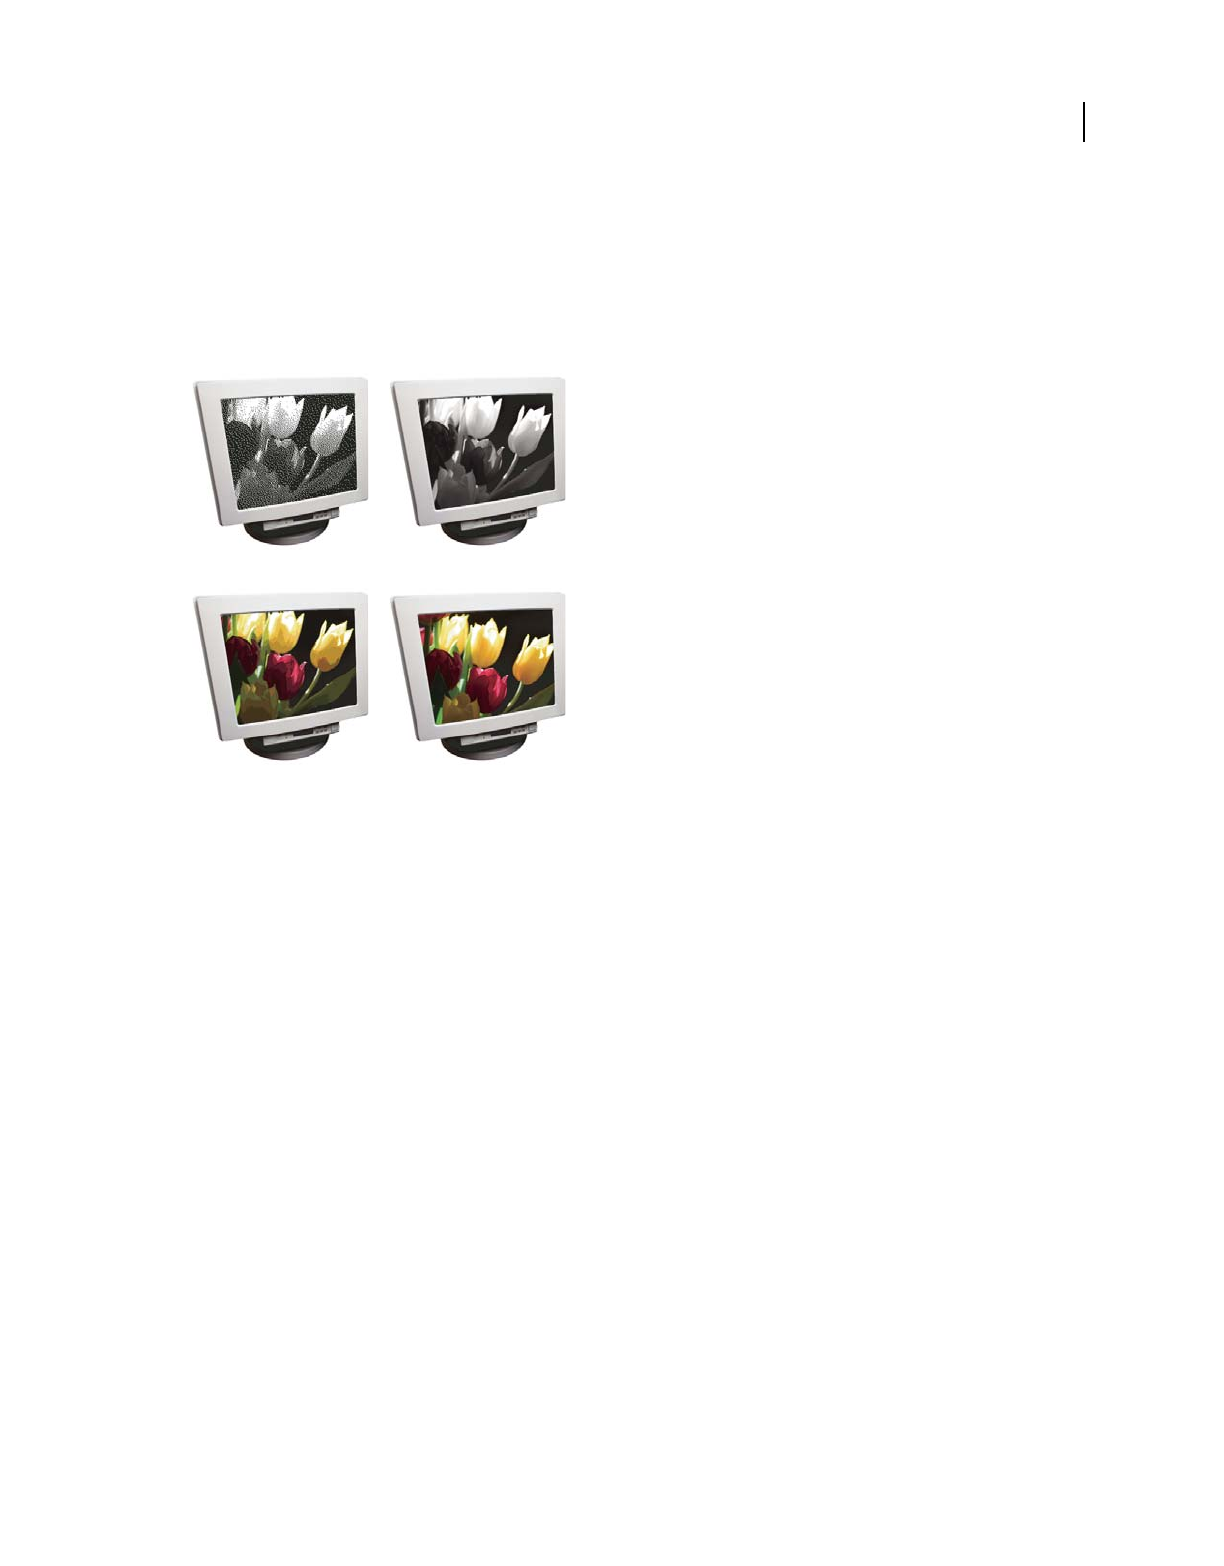
175
USING PHOTOSHOP ELEMENTS 9
Understanding color
Last updated 1/3/2012
Using image modes and color tables
About image modes
An image mode determines the number of colors that can be displayed in an image and can also affect the file size of
the image. Photoshop
Elements provides four image modes: RGB, bitmap, grayscale, and indexed color.
Image modes
A. Bitmap mode B. Grayscale mode C. Indexed-color mode D. RGB mode
Bitmap mode Uses one of two color values (black or white) to represent the pixels in an image. Images in bitmap mode
are called 1-bit images because they have a bit depth of 1.
Grayscale mode Uses up to 256 shades of gray. Grayscale images are 8-bit images. Every pixel in a grayscale image has
a brightness value ranging from 0 (black) to 255 (white). Grayscale values can also be measured as percentages of black
ink coverage (0% is equal to white, 100% to black).
Indexed Color mode Uses up to 256 colors. Indexed-color images are 8-bit images. When converting into indexed
color, Photoshop
Elements builds a color lookup table (CLUT), which stores and indexes the colors in the image. If a
color in the original image does not appear in the table, the program chooses the closest one or simulates the color
using available colors. By limiting the panel of colors, indexed color can reduce file size while maintaining visual
quality—for example, for a web page. Limited editing is available in this mode. For extensive editing, you should
convert temporarily into RGB mode.
When you choose a different color mode for an image in the Edit workspace (Image > Mode > [image mode]), you
permanently change the color values in the image. You might want to convert into a different mode for several reasons.
For example, you may have an old scanned photo in grayscale mode in which you want to add color, so you would
need to convert it into RGB mode. Before converting images, it’s best to do the following:
•Edit as much as possible in RGB mode.
•Save a backup copy before converting. Be sure to save a copy of your image that includes all layers in order to edit
the original version of the image after the conversion.
•Flatten the file before converting it. The interaction of colors between layer blending modes will change when the
mode changes.
AB
CD
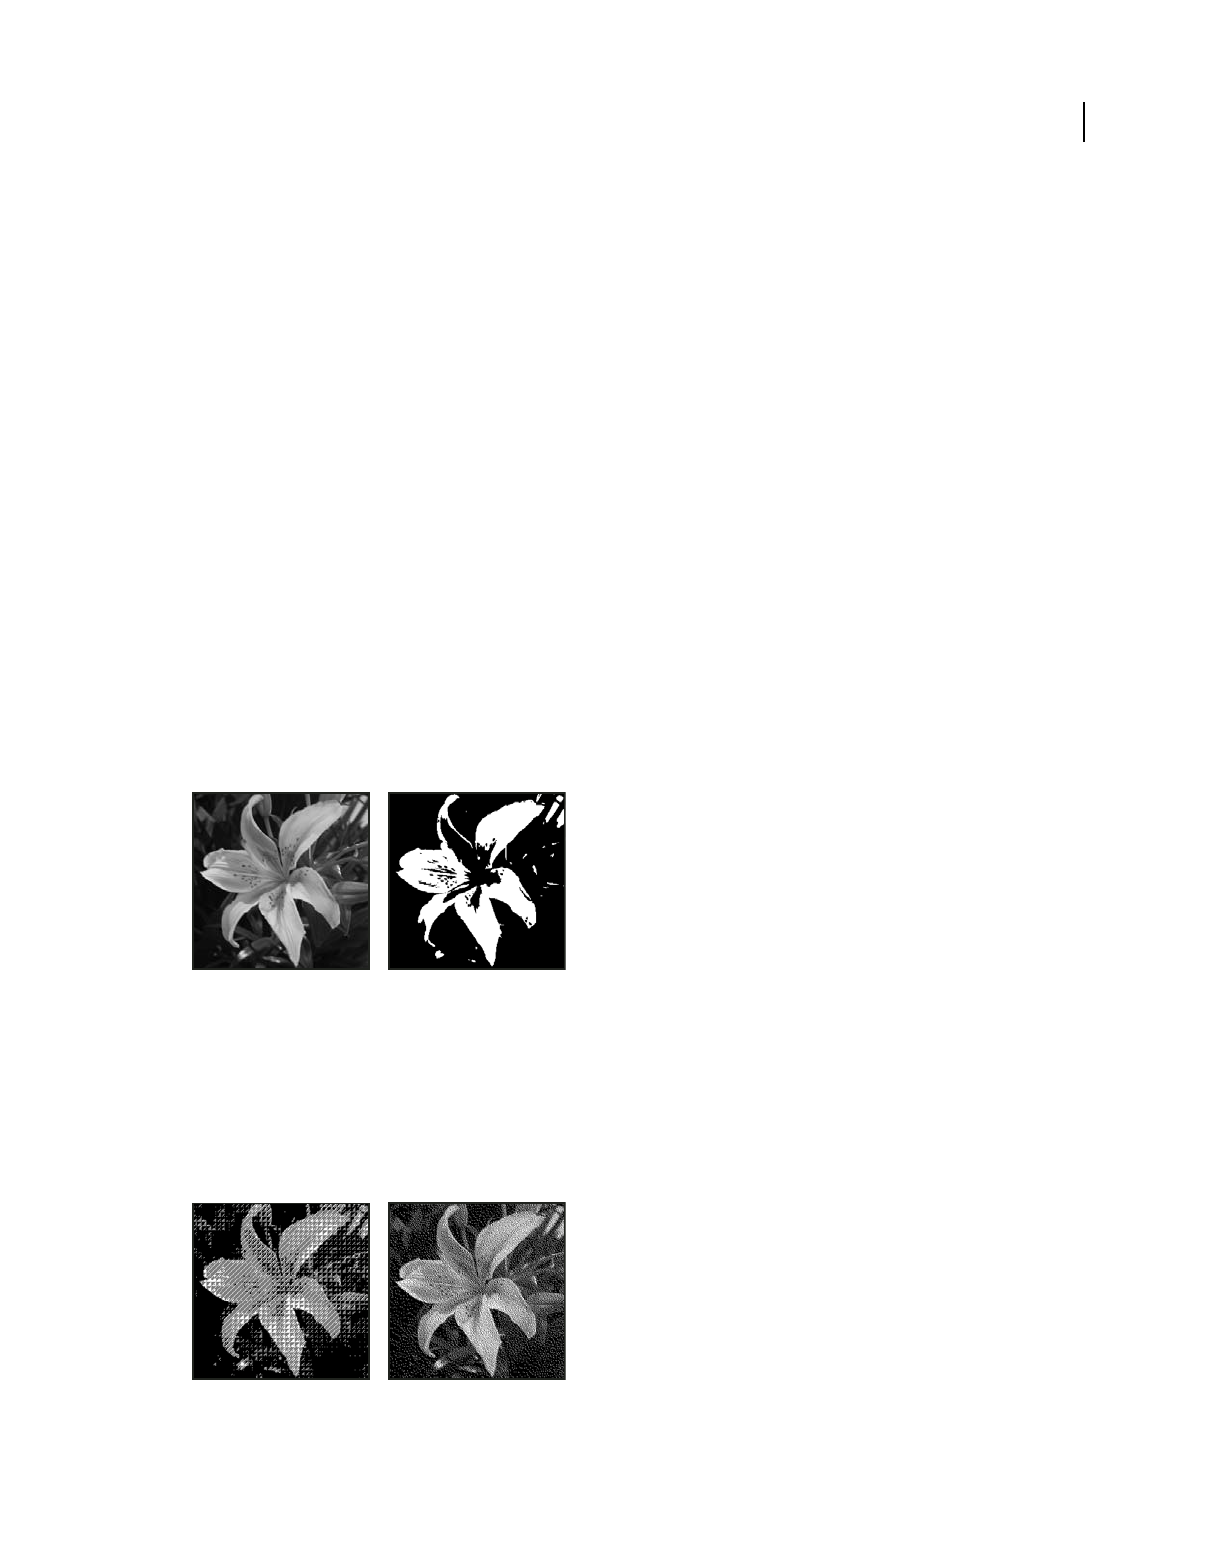
176
USING PHOTOSHOP ELEMENTS 9
Understanding color
Last updated 1/3/2012
Note: Hidden layers are discarded and images are flattened automatically when you convert them into bitmap or
indexed-color mode, because these modes do not support layers.
RGB Color mode The default mode of new Photoshop Elements images and images from your digital camera. In RGB
mode, the red, green, and blue components are each assigned an intensity value for every pixel—ranging from 0 (black)
to 255 (white). For example, a bright red color might have an R value of 246, a G value of 20, and a B value of 50. When
the values of all three components are equal, the result is a shade of neutral gray. When the value of all components is
255, the result is pure white; when the value is 0, the result is pure black.
Convert an image to bitmap mode
To convert an image to bitmap mode, you must first convert it to grayscale mode, simplifying the color information
in the image and reducing its file size. Converting to grayscale removes the hue and saturation information from the
pixels and leaves just the brightness values. However, because few editing options are available for bitmap-mode
images, it’s usually best to edit the image in grayscale mode and then convert it.
1Choose Image > Mode > Bitmap.
2If the image is RGB, click OK to convert it to grayscale.
3For Output, enter a value for the output resolution of the bitmap-mode image, and choose a unit of measurement.
By default, the current image resolution appears as both the input and the output resolutions.
4Select one of the following bitmap conversion methods, and click OK:
50% Threshold Converts pixels with gray values above the middle gray level (128) to white, and those below to black.
The result is a very high-contrast, black-and-white representation of the image.
Original grayscale image (left) and 50% Threshold conversion method applied (right).
Pattern Dither Converts an image by organizing the gray levels into geometric configurations of black and white dots.
Diffusion Dither Converts an image by using an error-diffusion process, starting at the pixel in the upper-left corner
of the image. If the pixel’s value is above middle gray (128), the pixel is changed to white—if it’s below middle gray, it’s
changed to black. Because the original pixel is rarely pure white or pure black, error is inevitably introduced. This error
is transferred to surrounding pixels and diffused throughout the image, resulting in a grainy, film-like texture. This
option is useful for viewing images on a black-and-white screen.
Pattern Dither and Diffusion Dither conversion methods

177
USING PHOTOSHOP ELEMENTS 9
Understanding color
Last updated 1/3/2012
Convert a bitmap-mode image to grayscale
Before converting, keep in mind that a bitmap-mode image edited in grayscale mode may not look the same when
converted back to bitmap mode. For example, consider a pixel that is black in bitmap mode and then edited to a shade
of gray in grayscale mode. If the gray value of the pixel is light enough, it will become white when converted back to
bitmap mode.
1In the Edit workspace, choose Image > Mode > Grayscale.
2Enter a value from 1 to 16 for the size ratio.
The size ratio is the factor for scaling down the image. For example, to reduce a grayscale image by 50%, enter 2 for the
size ratio. If you enter a number greater than 1, the program averages multiple pixels in the bitmap-mode image to
produce a single pixel in the grayscale image. This process lets you generate multiple shades of gray from an image
scanned on a 1-bit scanner.
Convert an image to indexed color
Converting to indexed color reduces the number of colors in the image to a maximum of 256—the standard number
of colors supported by the GIF and PNG-8 formats and many web browsers. This conversion reduces file size by
deleting color information from the image.
Note: To convert to indexed color, you must start with either a grayscale or an RGB image.
1In the Edit workspace, choose Image > Mode > Indexed Color.
2Click OK to flatten layers.
Note: This will flatten all visible layers and discard hidden layers.
For grayscale images, the conversion happens automatically. For RGB images, the Indexed Color dialog box appears.
3Select Preview in the Indexed Color dialog box to display a preview of the changes.
4Specify any of the following conversion options and click OK.
Palette Specifies the color palette to apply to the indexed-color image. There are 10 color palettes available:
•Exact Creates a panel using the exact colors that appear in the RGB image—an option available only if the image
uses 256 or fewer colors. Because the image’s panel contains all of the colors in the image, there is no dithering.
•System (Mac OS) Uses the Mac OS default 8-bit panel, which is based on a uniform sampling of RGB colors.
•System (Windows) Uses the Windows system’s default 8-bit panel, which is based on a uniform sampling of RGB
colors.
•Web Uses the 216 colors that web browsers, regardless of platform, use to display images on a monitor limited to
256 colors. Use this option to avoid browser dither when images are viewed on a monitor display limited to 256 colors.
•Uniform Creates a panel by uniformly sampling colors from the RGB color cube. For example, if
Photoshop
Elements takes 6 evenly spaced color levels, each of red, green, and blue, the combination produces a
uniform panel of 216 colors (6 cubed = 6 x 6 x 6 = 216). The total number of colors displayed in an image corresponds
to the nearest perfect cube (8, 27, 64, 125, or 216) that is less than the value in the Colors text box.
•Local or Master Perceptual Creates a custom panel by giving priority to colors to which the human eye has greater
sensitivity. Local Perceptual applies the panel to individual images; Master Perceptual applies the selected panel to
multiple images (for example, for multimedia production).
•Local or Master Selective Creates a color table similar to the Perceptual color table, but favoring broad areas of
color and the preservation of web colors. This option usually produces images with the greatest color integrity. Local

178
USING PHOTOSHOP ELEMENTS 9
Understanding color
Last updated 1/3/2012
Selective applies the panel to individual images; Master Selective applies the selected panel to multiple images (for
example, for multimedia production).
•Local or Master Adaptive Creates a panel by sampling the colors from the spectrum appearing most often in the
image. For example, an RGB image with only the colors green and blue produces a panel made primarily of greens and
blues. Most images concentrate colors in particular areas of the spectrum. To control a panel more precisely, first select
a part of the image that contains the colors you want to emphasize. Photoshop
Elements weights the conversion
toward these colors. Local Adaptive applies the panel to individual images; Master Adaptive applies the selected panel
to multiple images (for example, for multimedia production).
•Custom Creates a custom panel by using the Color Table dialog box. Either edit the color table and save it for later
use, or click Load to load a previously created color table. This option also displays the current Adaptive panel, which
is useful for previewing the colors most often used in the image.
•Previous Uses the custom panel from the previous conversion, making it easy to convert several images with the
same custom panel.
Colors Specifies the number of colors to include in the color table (up to 256) for Uniform, Perceptual, Selective, or
Adaptive panels.
Forced Provides options to force the inclusion of certain colors in the color table. Black And White adds a pure black
and a pure white to the color table; Primaries adds red, green, blue, cyan, magenta, yellow, black, and white; Web adds
the 216 web-safe colors; and Custom lets you define custom colors to add.
Transparency Specifies whether to preserve transparent areas of the image during conversion. Selecting this option
adds a special index entry in the color table for a transparent color. Deselecting this option fills transparent areas with
the matte color, or with white if no matte color is chosen.
Matte Specifies the background color used to fill anti-aliased edges that lie adjacent to transparent areas of the image.
With Transparency selected, the matte is applied to edge areas to help blend the edges into a web background of the
same color. With Transparency deselected, the matte is applied to transparent areas. Choosing None for the matte
creates hard-edged transparency, if Transparency is selected; otherwise, all transparent areas are filled with 100%
white.
Dither Specifies whether to use a dither pattern or not. Unless you’re using the Exact color table option, the color table
may not contain all the colors used in the image. To simulate colors not in the color table, you can dither the colors.
Dithering mixes the pixels of the available colors to simulate the missing colors.
•None Does not dither colors but, instead, uses the color closest to the missing color. This tends to result in sharp
transitions between shades of color in the image, creating a posterized effect.
•Diffusion Uses an error-diffusion method that produces a less structured dither than the Pattern option. To protect
colors in the image that contain entries in the color table from being dithered, select Preserve Exact Colors. This is
useful for preserving fine lines and text for web images.
•Pattern Uses a halftone-like square pattern to simulate any colors not in the color table.
•Noise Helps to reduce seam patterns along the edges.
Amount Specifies the percentage of image colors to dither. A higher amount dithers more colors, but may increase file
size.
Preserve Exact Colors Prevents colors in the image that are in the color table from being dithered.

179
USING PHOTOSHOP ELEMENTS 9
Understanding color
Last updated 1/3/2012
Edit colors in an indexed-color table
You can edit colors in the color table to produce special effects, or assign transparency in the image to a single color in
the table.
1Open the indexed-color image in the Edit workspace.
2Choose Image > Mode > Color Table.
3Click or drag within the table to choose the color or range of colors you want to change.
4Choose a color from the Color Picker or sample a color from the image.
If you are changing a range of colors, Photoshop Elements creates a gradient in the color table between the starting
and ending colors. The first color you choose in the Color Picker is the beginning color in the range. When you click
OK, the Color Picker reappears, so that you can choose the last color in the range.
The colors you selected in the Color Picker are placed in the range you selected in the Color Table dialog box.
5Click Preview to view the results of the changes you have made to the image.
6Click OK in the Color Table dialog box to apply the new colors to the indexed-color image.
Assign transparency to a single color in an indexed-color table
1In the Edit workspace, choose Image > Mode > Color Table.
2Select the eyedropper, and click the desired color in the table or in the image. The sampled color is replaced with
transparency in the image. Click OK.
Use a predefined indexed-color table
1In the Edit workspace, choose Image > Mode > Color Table.
2Select an option from the Table menu:
Black Body Displays a panel based on the different colors a black body radiator emits as it is heated—from black to
red, orange, yellow, and white.
Grayscale Displays a panel based on 256 levels of gray—from black to white.
Spectrum Displays a panel based on the colors produced as white light passes through a prism—from violet, blue, and
green to yellow, orange, and red.
System Displays the standard 256-color system panel for Mac OS or Windows.
Save or load an indexed-color table
•To save a table, click the Save button in the Color Table dialog box.
•To load a table, click the Load button in the Color Table dialog box. After you load a color table into an image, the
colors in the image change to reflect the color positions they reference in the new color table.
Note: You can also load saved color tables into the Color Swatches panel.
More Help topics
“Use the Color Swatches panel” on page 219
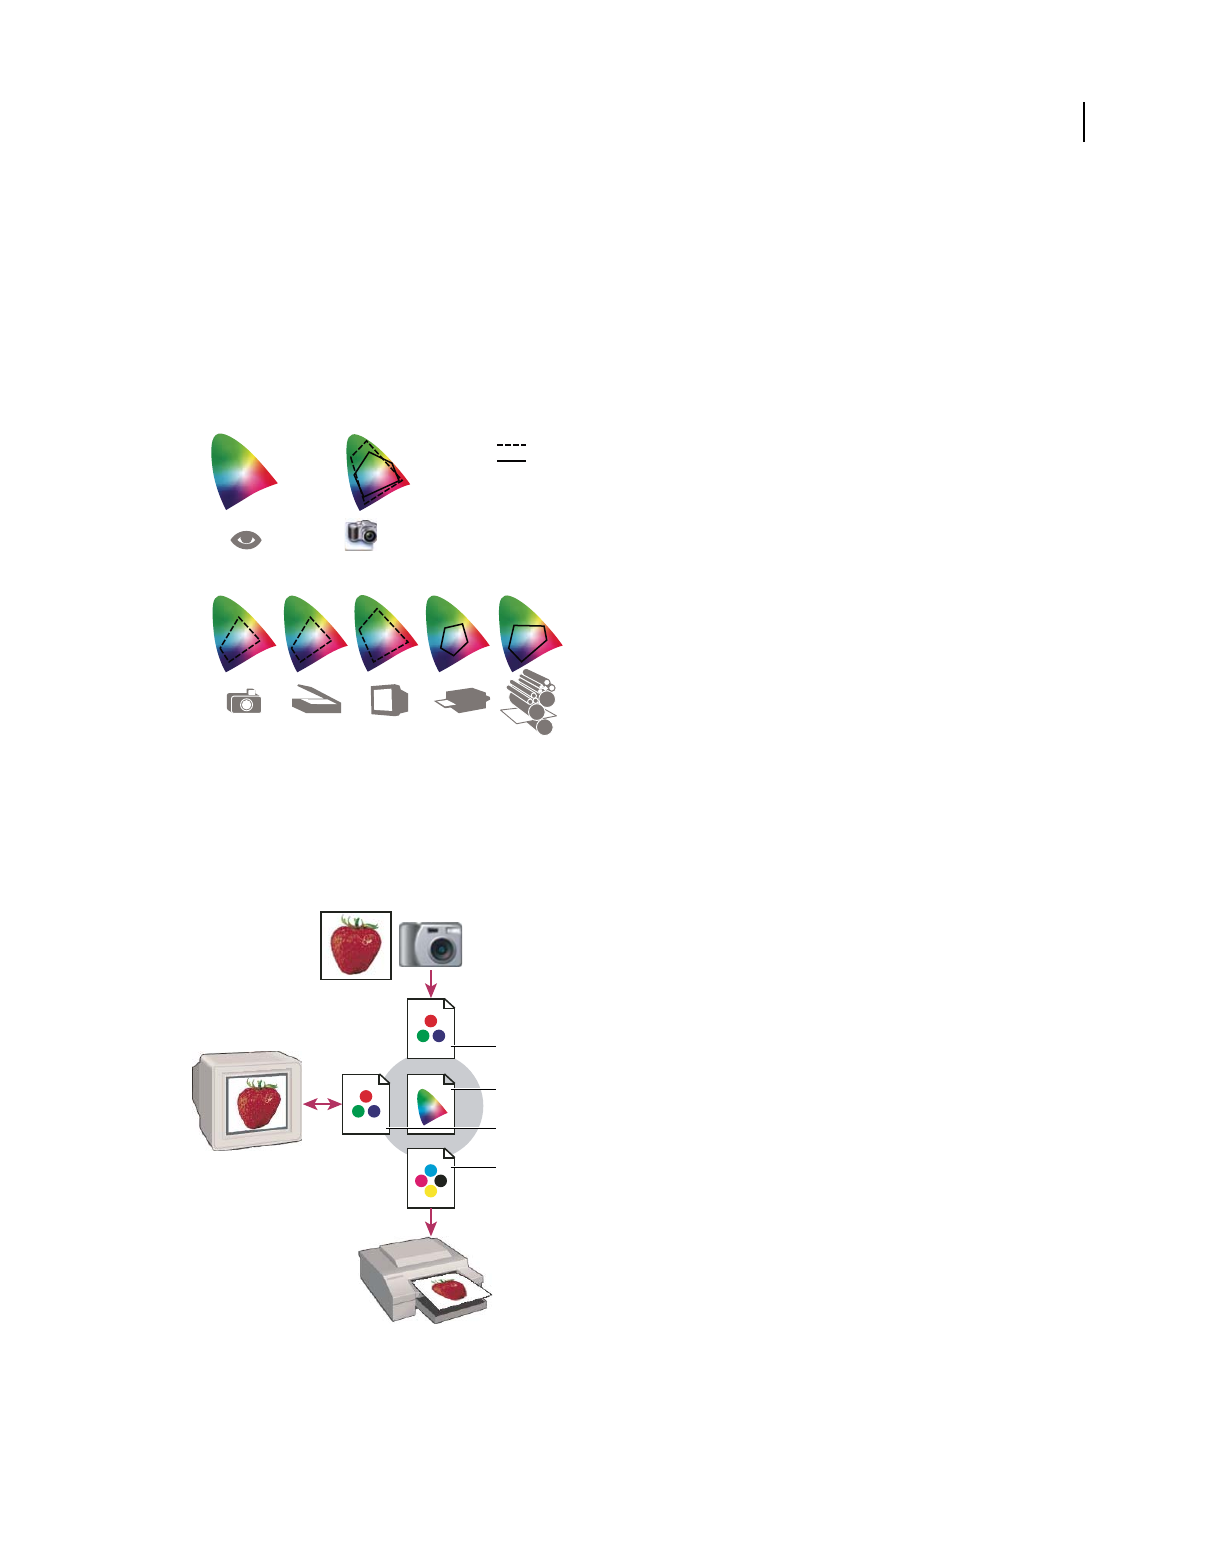
180
USING PHOTOSHOP ELEMENTS 9
Understanding color
Last updated 1/3/2012
Setting up color management
About color management
Color management helps you to achieve consistent color among digital cameras, scanners, computer monitors, and
printers. Each of these devices reproduces a different range of colors, called a color gamut. As you move an image from
your digital camera to your monitor, and finally to a printer, the image colors shift. This shift occurs because every
device has a different color gamut and thus reproduces the colors differently.
The color gamuts of different devices and documents
A. Lab color space (entire visible spectrum) B. Documents (working space) C. Devices
Color management translates the image colors so that each device can reproduce them in the same way and the colors
you see on your monitor will be close to the colors in your printed image. All colors may not match exactly because
the printer may not reproduce the same range of colors as the monitor.
Managing color with profiles
A. Profiles describe the color spaces of the input device and the document. B. Using the profiles’ descriptions, the color management system
identifies the document’s actual colors. C. The monitor’s profile tells the color management system how to translate the numeric values into the
monitor’s color space. D. Using the output device’s profile, the color management system translates the document’s numeric values into the color
values of the output device, so the actual colors are printed.
Photoshop Elements
CMYK
RGB
AB
C
A
B
C
D

181
USING PHOTOSHOP ELEMENTS 9
Understanding color
Last updated 1/3/2012
Profiling devices
For color management to work, you must profile your devices or use an ICC profile created by the device’s
manufacturer.
Capture devices Profiling is not critical for capture devices such as digital cameras or scanners. You may want to
profile a scanner, however, if you want to accurately reproduce the colors in scanned transparencies, and reduce your
color correction workload in Photoshop
Elements.
Monitors Calibrating and profiling your monitor is important. If you are using a laptop or other LCD monitor, you
can use the profile provided by the manufacturer. If you own a colorimeter and corresponding software to create
profiles, you can use those profiles in Photoshop
Elements.
Printers Profiling your inkjet printer will generally give you better results, though you can make excellent prints
without a printer profile by using the controls in your printer driver. Many printer manufacturers provide ICC printer
profiles on their websites. You need a separate profile for each printer, ink, and type of paper. You can also have
profiles made for your favorite combination of ink and paper.
When you work on a photo and save it, Photoshop Elements can embed (tag) an ICC profile that reflects the colors on
your computer monitor or the device that produced it. Embedding profiles with an image makes its color portable, so
that different devices can translate its color values. For example, if you send the photo to your inkjet printer, the color
management system reads the embedded profile and translates the color data using the printer’s profile. Your printer
can then use the translated color data to accurately translate its color into the selected media.
Color management tasks
If you want to use color management, you need to perform the following tasks:
•Set up color management by embedding a color profile and using device profiles when scanning or printing. (See
“Set up color management” on page 181.)
•Calibrate and profile your computer monitor. If you use an LCD monitor, use the profile that came with your
monitor. See your LCD monitor documentation for instructions.
•When you print an image from Photoshop Elements, make sure that the correct color profile is specified in the
Color Management area of the Print dialog box. Or, if you don’t have a printer profile, specify colors using the color
controls in the printer driver. In addition, choose a color setting that’s appropriate for your workflow, such as
Optimize For Printing.
Set up color management
1In the Edit workspace, choose Edit > Color Settings.
2Select one of the following color management options, then click OK.
No Color Management Leaves your image untagged. This option uses your monitor profile as the working space. It
removes any embedded profiles when opening images, and does not tag when saving.
Always Optimize Colors For Computer Screens Uses sRGB as the RGB working space; the Grayscale working space is
Gray Gamma 2.2. This option preserves embedded profiles, and assigns sRGB when opening untagged files.
Always Optimize For Printing Uses Adobe RGB as the RGB working space; the Grayscale working space is Dot Gain
20%. This option preserves embedded profiles and assigns Adobe RGB when opening untagged files.
Allow Me To Choose Lets you choose sRGB (the default) or Adobe RGB when opening untagged files.
3When you save a file, select ICC Profile in the Save As dialog box.

182
USING PHOTOSHOP ELEMENTS 9
Understanding color
Last updated 1/3/2012
Convert color profile
You don’t often change the color profile of a document. Photoshop Elements automatically assigns the color profile
based on the setting you select in the Color Settings dialog box. However, one reason to manually change a color profile
is when preparing a document for a different output destination. The other time to change a color profile is for
correcting a policy behavior that you no longer want implemented in the document. Changing the color profile is
recommended for advanced users only.
❖In the Edit workspace, choose Image > Convert Color Profile and then choose one of the following:
Remove Profile Removes the profile so that the document is no longer color-managed.
Convert To sRGB Profile Embeds an sRGB profile in the document.
Convert To Adobe RGB Profile Embeds an Adobe RGB profile in the document.
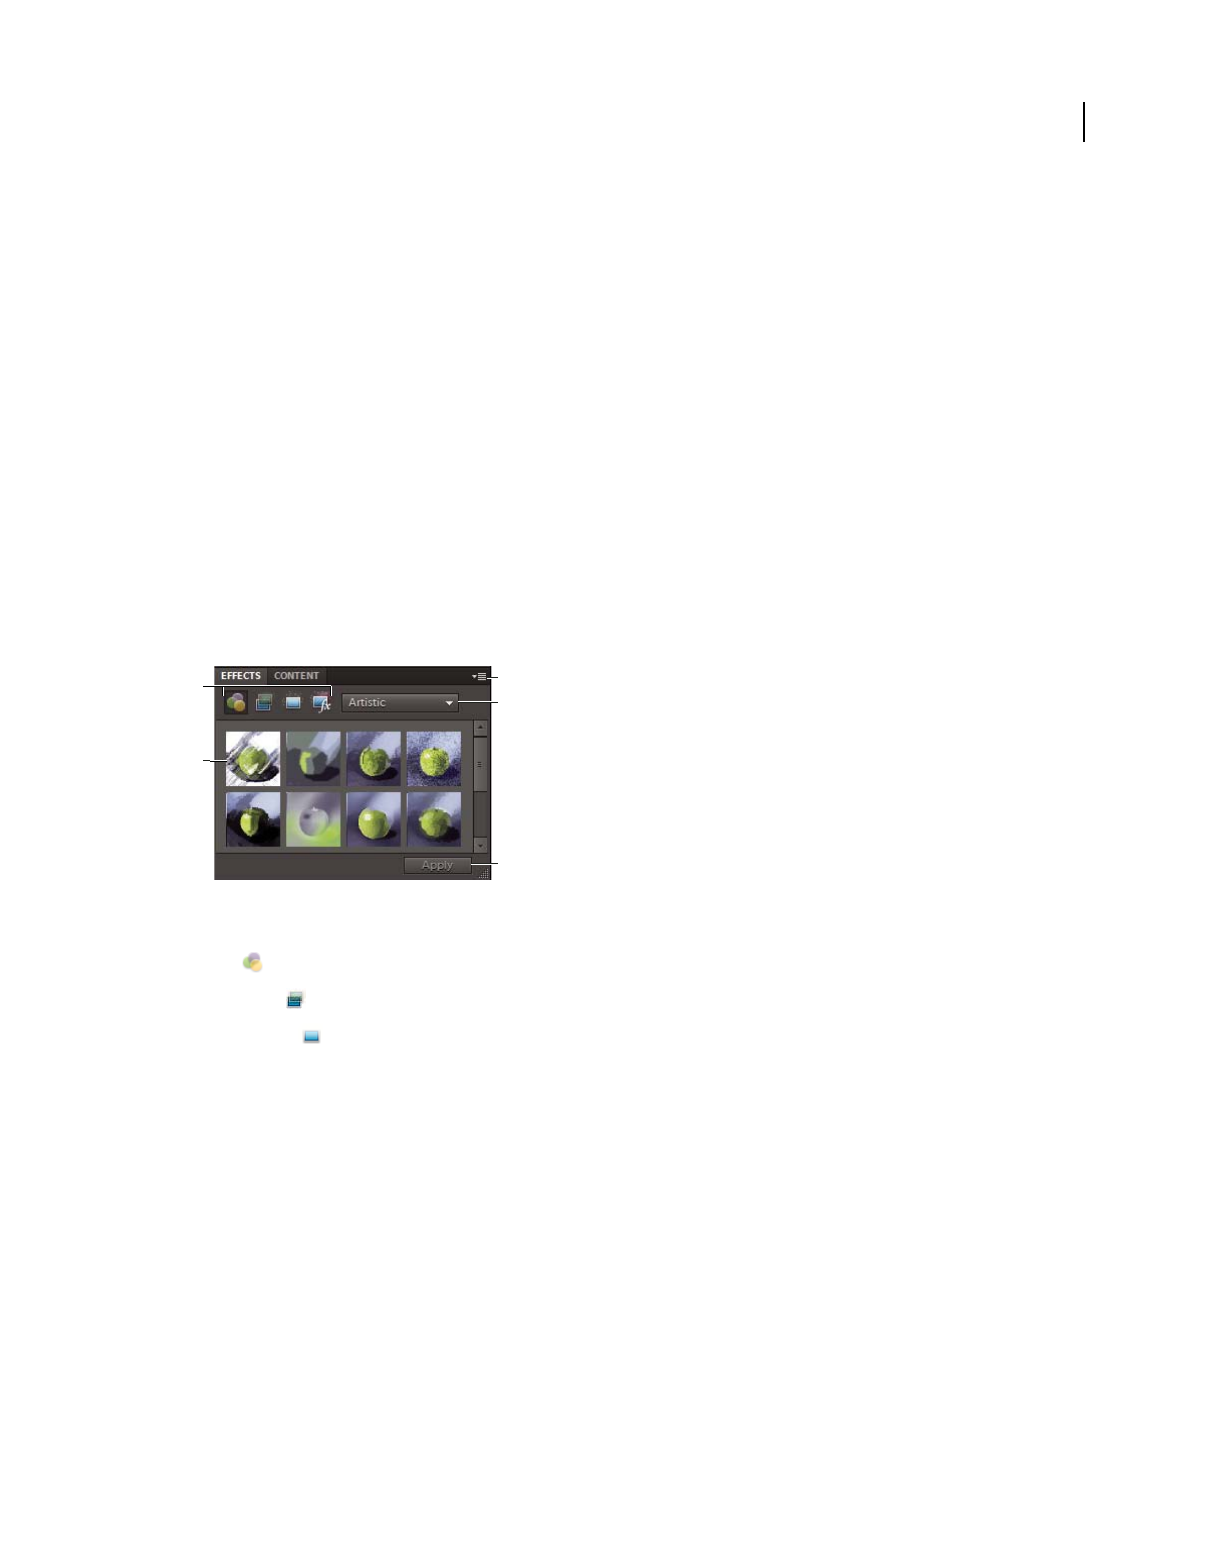
183
Last updated 1/3/2012
Chapter 10: Filters, effects, styles, and
artwork
You can enhance images by using a variety of filters, effects, styles, and artwork. Using the deinterlace and NTSC color
filters, you can smooth lines in a video or prepare it for television reproduction. You can also install and use third-party
plug-in filters or create custom filters.
Effects
Using the Effects panel
The Effects panel provides a single location from which you can apply effects. By default, the Effects panel is located
on the top of the Panel Bin.
Effects panel
A. Category B. Sample thumbnails C. More menu D. Subcategory E. Apply (save)
Filters Apply filters to your image.
Layer Styles Apply layer styles to your image.
Photo Effects Apply photo effects to your image.
Each section displays thumbnail examples of the artwork or effects that you can add or apply to an image. Most
sections offer a menu of category options and corresponding subcategories.
Using the Content panel
The Content panel provides a single location from which you can apply artwork, theme decorations, and text styles to
your images. To show the Content panel, choose Window > Content.
A
C
E
D
B
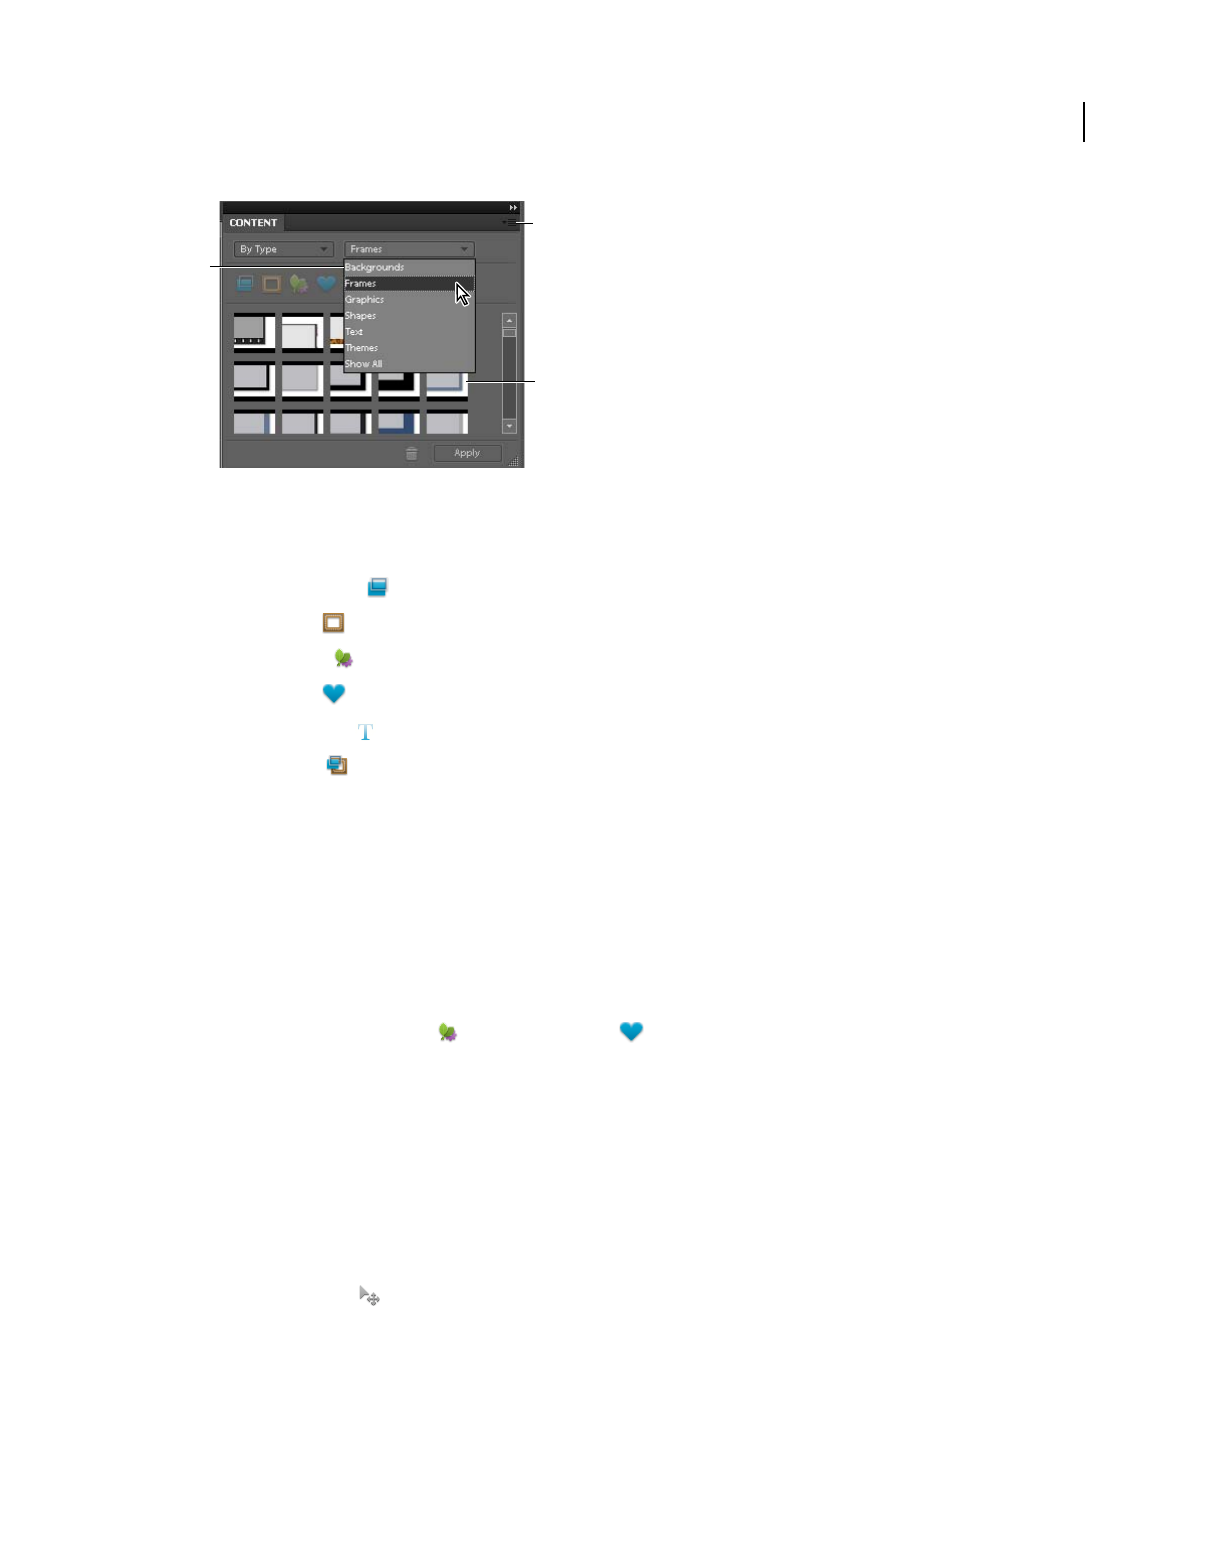
184
USING PHOTOSHOP ELEMENTS 9
Filters, effects, styles, and artwork
Last updated 1/3/2012
Content panel
A. Category B. More menu C. Sample thumbnails
In the Content panel, the following sections provide various items that can enhance your images:
Filter For Backgrounds Choose from a selection of decorative backgrounds.
Filter For Frames Choose from preset frames to enhance your image or project.
Filter For Graphics Apply graphics to your image or project.
Filter For Shapes Apply shapes to your image or project.
Filter For Text Effects Apply text to your image or project.
Filter For Themes Choose from a selection of themes to apply to your project.
Each section displays thumbnail examples of the artwork or effects that you can add or apply to an image. Most
sections offer a menu of category options and corresponding subcategories.
Note: Clicking these buttons activates or deactivates the display of the thumbnails related to these buttons.
Add stylized shapes or graphics to an image
When you add a shape or graphic to an image, the shape or graphic is a new layer and does not affect the original image.
1In the Content panel, do one of the following:
•Click the Filter For Graphics or Filter For Shapes icon.
•Choose from the category menu (for example, By Event or By Activity), and choose a subcategory (for example,
Baby or Cooking).
2Then, in the toolbox, choose a color for the shape.
3Do one of the following:
•Select a thumbnail and click Apply.
•Double-click a thumbnail.
•Drag the thumbnail to the image.
4Use the Move tool to relocate or resize the shape or graphic.
More Help topics
“About shapes” on page 250
“Select or move a shape” on page 254
A
B
C
185
USING PHOTOSHOP ELEMENTS 9
Filters, effects, styles, and artwork
Last updated 1/3/2012
Add an artistic background to an image
When you add an artistic background to an image, you replace the existing background layer. For example, you could
use the selection tools to create a layer separating your family members from a kitchen background, and then replace
the kitchen with a nature background.
1
If your image has only a background layer, select it, and choose Layer > Duplicate Layer. Name the layer and click OK.
2Select the Background layer in the Layers panel.
3In the Content panel, click the Background icon .
4Do one of the following:
•Select a thumbnail, and click Apply.
•Double-click a thumbnail.
•Drag the thumbnail to the image.
Add a frame or theme to an image
When you add a frame or theme to a photo project, frames appear with a blank (gray) area for the image. Click and
drag an image from the Project Bin to the blank area.
1In the Content panel, do one of the following:
•Click the Filter For Themes or Filter For Frames icon.
•Choose from the category menu (for example, By Event or By Activity, and choose a subcategory (for example,
Baby or Cooking).
2Do one of the following:
•Select a thumbnail and click Apply.
•Double-click a thumbnail.
•Drag the thumbnail to the blank background.
3Drag the desired image from the Project Bin to the frame.
4Use the slider to resize the image in the frame or theme border, then click the Commit icon to apply the change,
or click the Cancel icon .
5Use the Move tool to center the image, then click the Commit icon to apply the change, or click the Cancel
icon .
About photo effects
Photo effects let you quickly create different looks for your images. In the Effects panel, click Photo Effects and
choose one of the subcategories, such as Faded Photo, Frame, Misc. Effects, Monotone Color, Old Photo or Vintage
Photo.
Frame Apply a variety of effects to the edges of a selected layer, or to a portion of a layer. A frame also creates a drop
zone where you can add or change the contents easily.
Image Effects Apply effects to a copy of a selected layer. Adding the Blizzard effect to an image makes it look like it’s
snowing. The Neon Glow effect turns the image into a dramatic neon picture. You can use Image effects, such as Oil
Pastel or Soft Focus, to soften colors or blur an image. You can also combine Image effects, but you may be prompted
to flatten layers first.
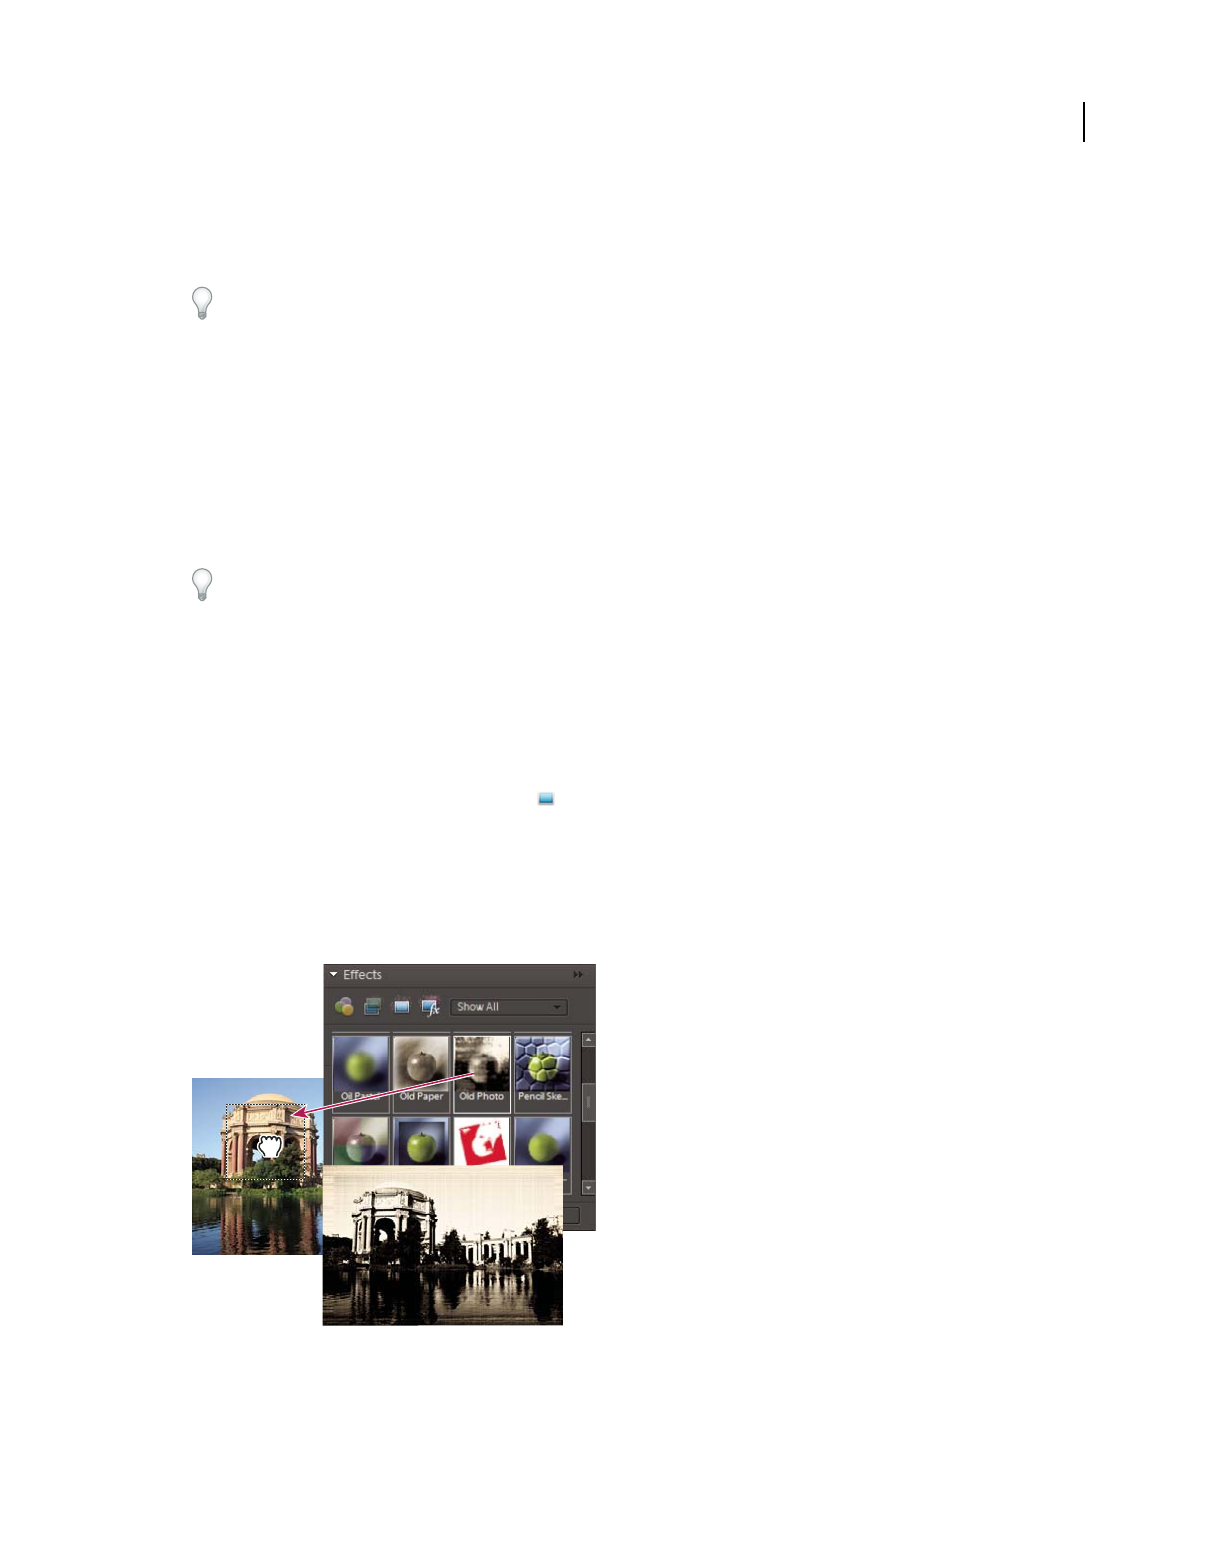
186
USING PHOTOSHOP ELEMENTS 9
Filters, effects, styles, and artwork
Last updated 1/3/2012
Textures Apply texture layers to an image. You can add texture to a new, blank image as a background, or add a texture
to an existing image. By arranging layers, and working with opacity and other layer tools, you can create interesting
and attractive images.
Many photo effects apply filters with modified values.
More Help topics
“Using the Effects panel” on page 183
“Improve performance with filters and effects” on page 192
“Flatten an image” on page 68
Apply an effect
If you want to experiment with an effect, modify a duplicate layer and preserve the original image.
1Do one of the following:
•To apply an effect to an entire layer, deselect any selected areas in the image, and then select the layer in the Layers
panel.
•To apply an effect to a portion of a layer, use any selection tool to select the area.
•To apply an effect to text, select or create text, and use any text effect from the Content panel.
2In the Effects panel, choose Photo Effects and do one of the following:
•Double-click an effect.
•Drag an effect to the image.
•Select an effect, and click Apply.
Note: In some cases, when applying an effect to an image with multiple layers, you are prompted to flatten the image first.
Dragging an image effect to a photo

187
USING PHOTOSHOP ELEMENTS 9
Filters, effects, styles, and artwork
Last updated 1/3/2012
More Help topics
“About photo effects” on page 185
“Improve performance with filters and effects” on page 192
“Understanding layers” on page 56
Add stylized text to an image
When you add text to an image, a text layer is added, so you can modify the text without affecting the original image.
1In the Content panel, click the Text icon , and then do one of the following:
•Select a thumbnail, and click Apply.
•Double-click a thumbnail.
•Drag a thumbnail to the image.
2A text frame appears over the image and the Text tool becomes active. Type in the new text.
3When you are finished changing the text, either click the Commit icon to apply the change, or click the Cancel
icon .
4Use the Move tool to relocate or resize the text frame.
5(Optional) Add color to the text using the pop-up Color panel in the options bar.
6When you finish adjusting the text, either click the Commit icon to apply the change, or click the Cancel
icon .
7(Optional) To experiment with different text effects, drag a different thumbnail over the text frame.
More Help topics
“About text” on page 243
“Edit type in a type layer” on page 245
“Change the orientation of a type layer” on page 248
Add artwork or effects to Favorites
When you see artwork or effects that you would like to quickly access in the future, add it to the Favorites section of
the Effects panel.
❖In the Effects or Content panel, right-click on the thumbnail and choose Add To Favorites.
Filters
About filters
You can use filters to clean up or retouch photos. You can also use filters to apply special art effects or create unique
transformations using distortion effects. In addition to the filters provided by Adobe, some filters provided by third-
party developers are available as plug-ins. Once installed, these plug-in filters appear at the bottom of the Filter lists.
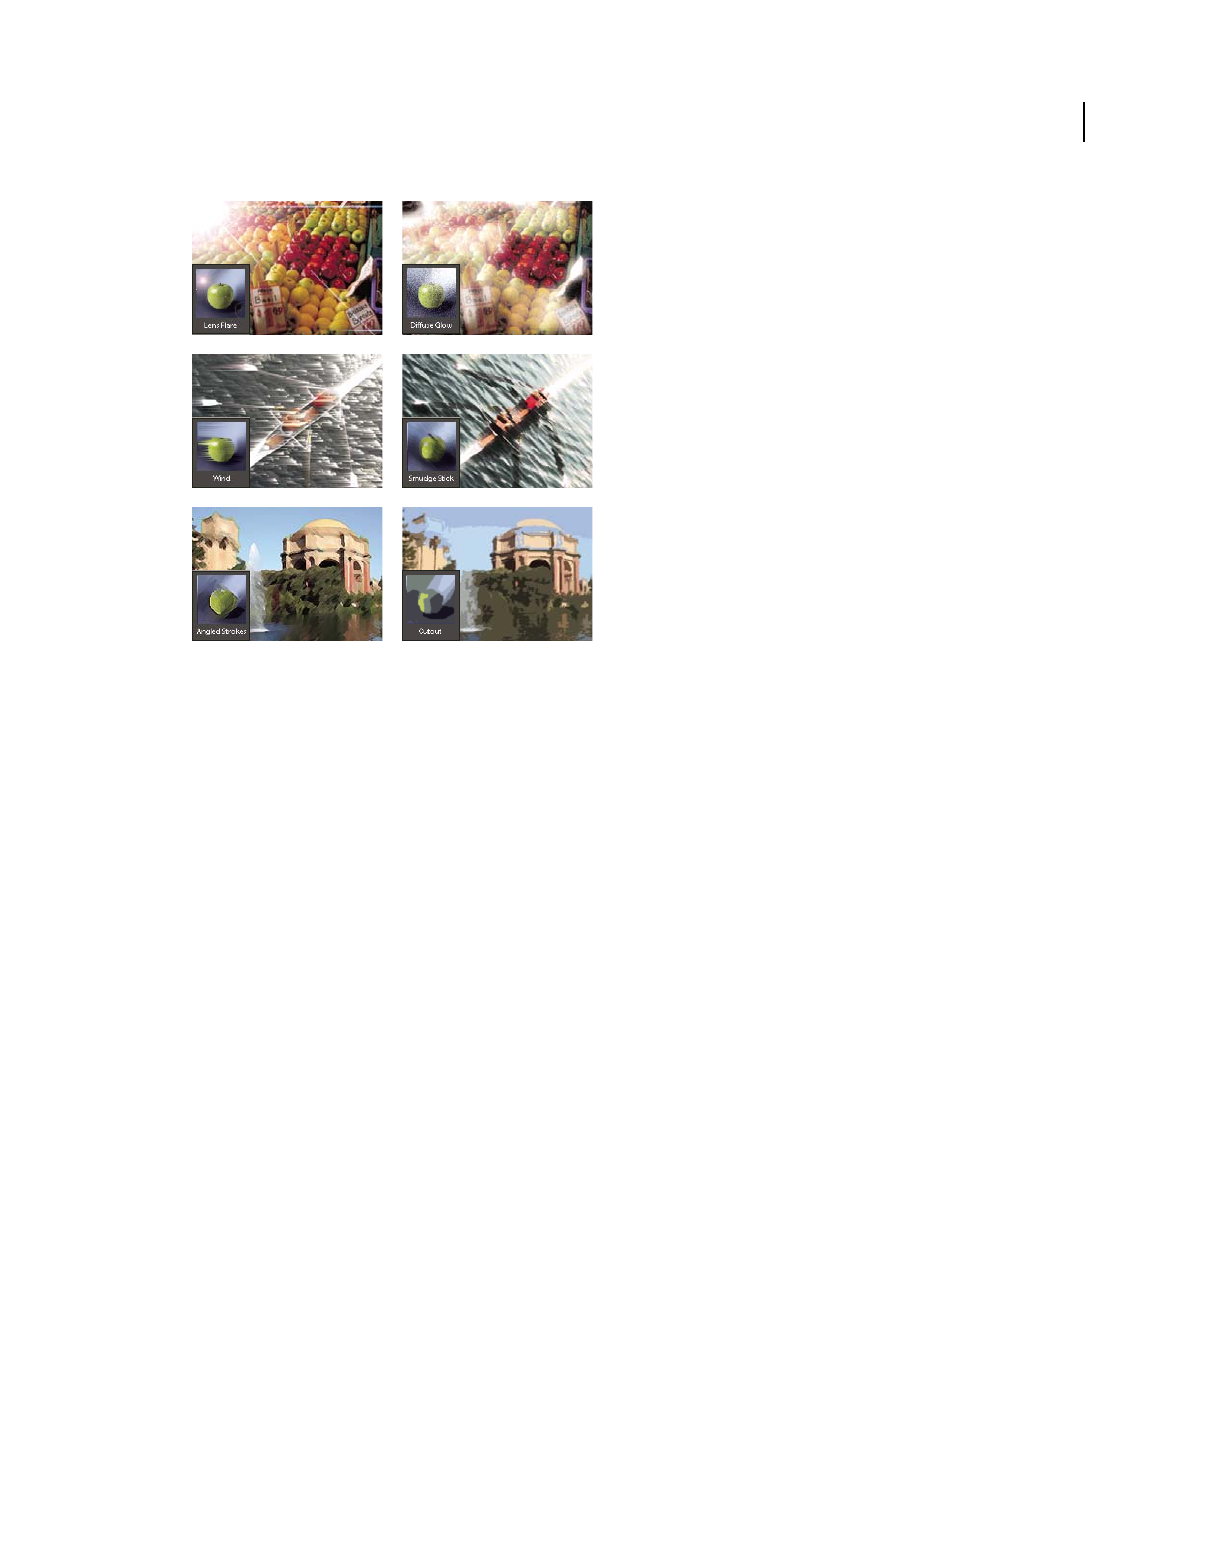
188
USING PHOTOSHOP ELEMENTS 9
Filters, effects, styles, and artwork
Last updated 1/3/2012
Filters can radically change the mood of a photo or image.
You can apply filters in any of three ways:
Filter menu Contains all of the available filters and lets you apply filters individually.
Filter Gallery Displays thumbnail examples of what each filter does, like the panel. The Filter Gallery lets you apply
filters cumulatively and apply individual filters more than once. You can also rearrange filters and change the settings
of each filter you’ve applied to achieve the effect you want. Because it is so flexible, the Filter Gallery is often the best
choice for applying filters. However, not all filters listed in the Filter menu are available in the Filter Gallery.
Effects panel Displays thumbnail examples of what each filter listed in the Filter menu does. However, you can also
use it to apply effects and layer styles.
Tips for applying filters
The following information can help you understand the process of applying filters to your images.
•Preview the filter’s result. Applying filters to a large image can be time-consuming. It’s quicker to preview what the
filter does in the Filter Gallery. Most filters also let you preview their result in the Filter Options dialog box and the
document window. You can then choose to apply the filter or cancel the operation without losing time.
•Filters apply only to the active part of an image. Filters affect only the active, visible layer or a selected area of the
layer.
•Filters don’t work on all images. You can’t use some filters on images in grayscale mode, or any filters on images in
bitmap or indexed-color mode. Many filters don’t work on 16-bit images.
•You can reapply the previous filter. The last filter you applied appears at the top of the Filter menu. You can reapply
it with the same settings you last used to further enhance the image.
Tips for creating visual effects with filters
Use the following techniques to achieve special visual results with filters:
•Feature the filter edges. If you’re applying a filter to a selected area, you can soften the edges of the filter effect by
feathering the selection before you apply the filter.

189
USING PHOTOSHOP ELEMENTS 9
Filters, effects, styles, and artwork
Last updated 1/3/2012
•Apply filters in succession to build up effects. You can apply filters to individual layers or to several layers in
succession to build up an effect. Choosing different blending modes in the Layers panel blends the effect. For a filter
to affect a layer, the layer must be visible and must contain pixels.
•Create textures and backgrounds. By applying filters to solid-color or grayscale images, you can generate a variety
of backgrounds and textures. You can then blur these textures. Although some filters (for example, the Glass filter)
have little or no visible effect when applied to solid colors, others produce interesting effects. For such colors, you
can use Add Noise, Chalk & Charcoal, Clouds, Conté Crayon, Difference Clouds, Glass, Graphic Pen, Halftone
Pattern, Mezzotint, Note Paper, Pointillize, Reticulation, Rough Pastels, Sponge, or Underpainting. You can also
use any of the filters in the Texture submenu.
•Improve image quality and consistency. You can disguise faults, alter or enhance images, or make a series of images
look similar by applying the same filter to each.
More Help topics
“Using the Effects panel” on page 183
“Improve performance with filters and effects” on page 192
Apply a filter
1Choose the area you want to apply the filter to:
•To apply a filter to an entire layer, deselect any selected areas, and then select the layer in the Layers panel.
•To apply a filter to a portion of a layer, use any selection tool to select an area.
2Choose how to apply the filter:
•To use the Filter gallery, choose Filter > Filter Gallery, select a category, and click the filter you want to apply.
•To use the Effects panel, choose Window > Effects, select a category, and double-click the filter you want to apply.
You can also drag a filter to the image.
•To use the Filter menu, choose Filter, then choose a submenu followed by the filter you want to apply. If a filter
name is followed by ellipses (…), a Filter Options dialog box appears.
3If a dialog box appears, enter values or select options.
4If available, select the Preview option to preview the filter in the document window. Depending on the filter and
how you are applying it, use one of the following methods to preview the filter:
•Use the + button or - button under the preview window to zoom in or zoom out.
•Click the zoom bar (where the zoom percentage appears) to choose a zoom percentage.
•Click-drag within the preview window to center a specific area of the image in the window.
•Click the Show/Hide button at the top of the dialog box to hide the filter thumbnails. Hiding the thumbnails
expands the preview area.
•Click the eye icon next to a filter to hide the effect in the preview image.
5If the dialog box contains sliders, hold down Alt (Option in Mac OS) while dragging a slider to see a real-time
preview (real-time rendering).
6Click in the image window to center a specific area of the image in the preview window. (This may not work with
all preview windows.)
Note: A blinking line beneath the preview size indicates that the preview is being rendered.

190
USING PHOTOSHOP ELEMENTS 9
Filters, effects, styles, and artwork
Last updated 1/3/2012
7If you are using the Filter Gallery, or the filter opens in the Filter Gallery, do any of the following and click OK:
•Click the New Effect Layer button at the bottom of the dialog box and choose an additional filter to apply. You
can add multiple effect layers to apply multiple filters.
•Rearrange applied filters by dragging a filter name to another position in the list of applied filters at the bottom of
the dialog box. Rearranging the order of filters can dramatically change the way your image looks.
•Remove applied filters by selecting the filter and clicking the Delete Effect Layer button .
8If you are using a Filter command or the Effects panel, do one of the following and click OK:
•Double-click the filter.
•Drag the filter onto the image.
More Help topics
“Using the Effects panel” on page 183
Filter categories
You can apply the following categories of filters:
Correct Camera Distortion Fixes common lens flaws such as barrel and pincushion distortion, and vignetting. The
filter also rotates an image and fixes image perspective caused by vertical or horizontal camera tilt.
Adjustment filters Change the brightness values, color, grayscale range, and tonal levels of pixels in an image. Convert
color pixels into black and white.
Artistic filters Simulate a painterly appearance on traditional media and create a unique look.
Blur filters Soften a selection or an image. Useful for retouching.
Brush Stroke filters Give a painterly or fine-arts look using different brush and ink stroke effects.
Distort filters Geometrically distort an image, creating three-dimensional and other reshaping effects.
Noise filters Blend a selection into the surrounding pixels and remove problem areas, such as dust and scratches.
Pixelate filters Sharply define an image or selection by clumping pixels of similar color values.
Render filters Create cloud patterns, lens flare, fibers, and lightning effects in an image.
Sketch filters Add texture for depth or to give a hand-drawn look.
Stylize filters Produce a painted or impressionistic effect by displacing pixels and heightening contrast.
Texture filters Give the appearance of depth or substance, or add an organic look.
Video filters Restrict the gamut of colors to those acceptable for television reproduction and smooth moving images
captured from video.
Other filters Let you create your own filter effects, modify masks, offset a selection within an image, and make quick
color adjustments.
Digimarc filter Lets you read a Digimarc watermark.
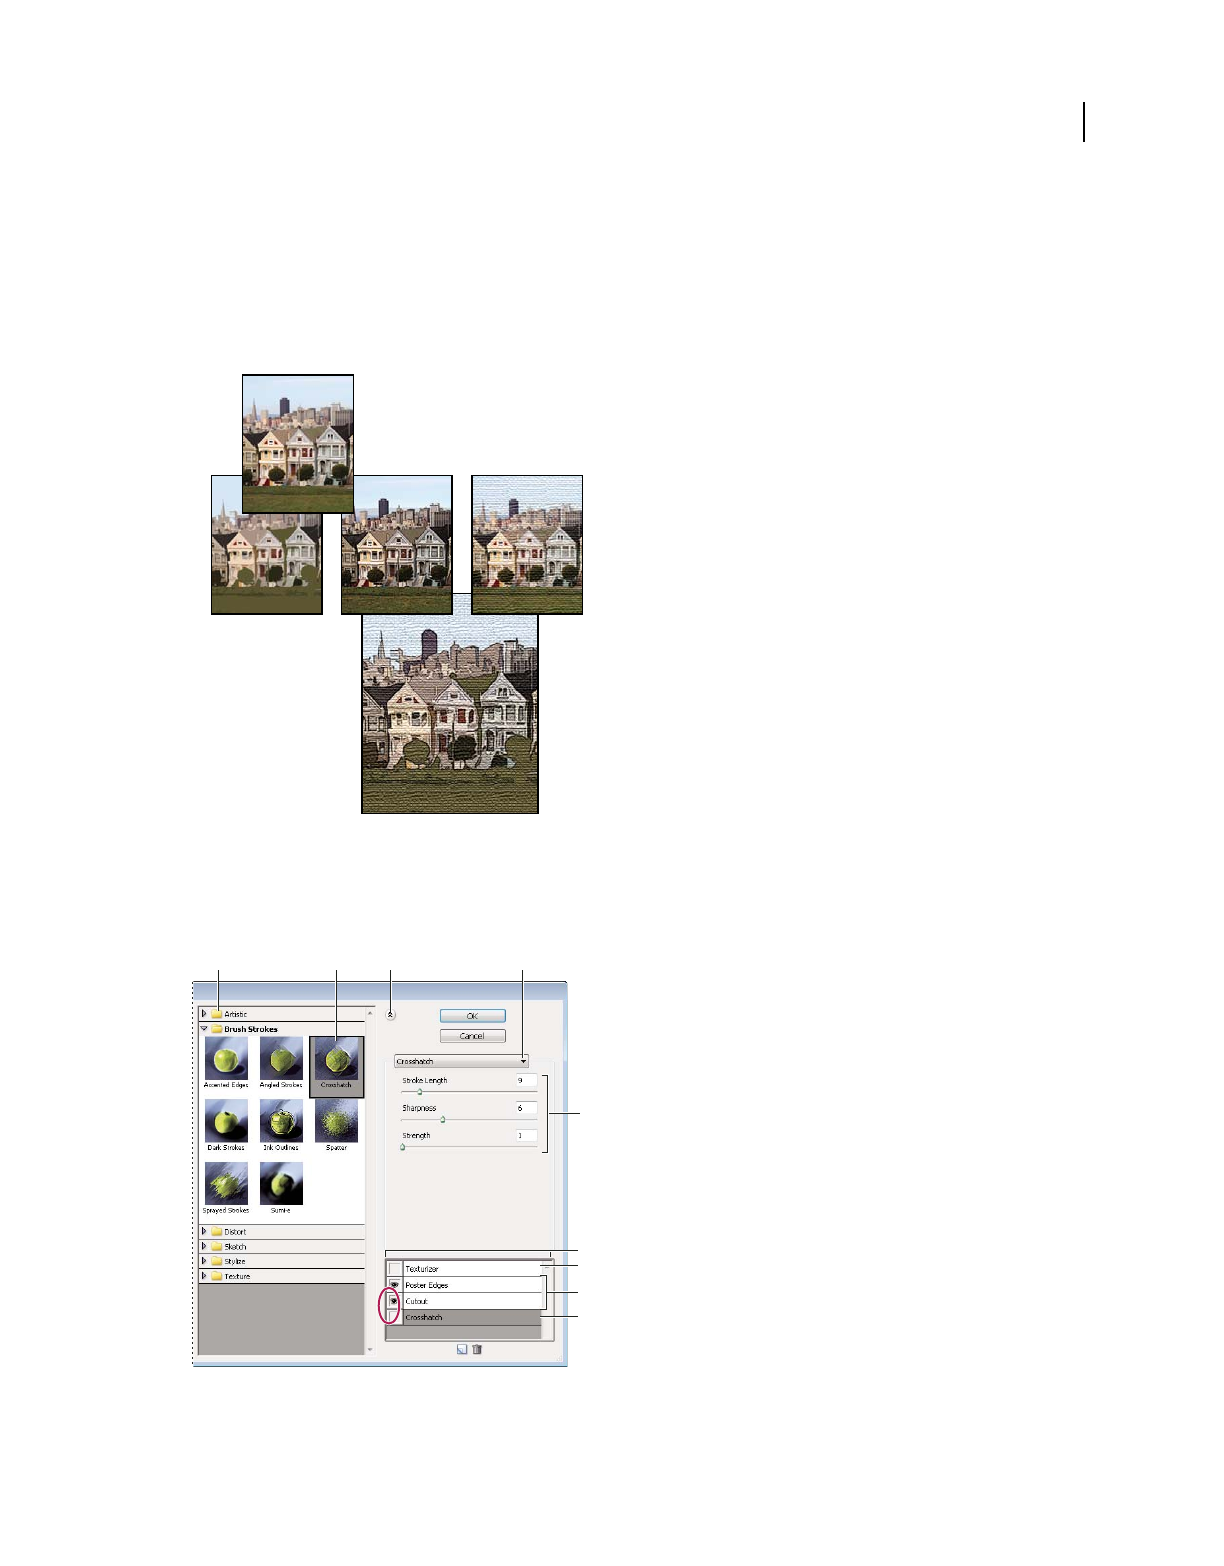
191
USING PHOTOSHOP ELEMENTS 9
Filters, effects, styles, and artwork
Last updated 1/3/2012
Filter Gallery
The Filter Gallery (Filter > Filter Gallery) lets you apply filters cumulatively, and apply individual filters more than
once. You can also rearrange filters and change the settings of each filter you’ve applied to achieve the effect you want.
Because you can apply more than one filter to an image when you use the Filter Gallery dialog box, you have a lot of
control over the way your image is affected by each filter. The Filter Gallery is often the best choice for applying filters
because it’s flexible and easy to use.
Applying filters through the Filter Gallery
A. Original photo B. Photos each with a single filter applied C. Three filters applied cumulatively
However, not all filters are available from the Filter Gallery. Some are available only as individual commands from the
Filter menu. Also, you cannot apply effects and layer styles from the Filter Gallery, as you can from the Effects panel.
Filter Gallery dialog box
A. Filter category B. Thumbnail of selected filter C. Show/Hide filter thumbnails D. Filter menu E. Options for selected filter F. List of filter
effects to apply or arrange G. Hidden filter H. Filters applied cumulatively but not selected I. Filter selected but not applied
C
B
A
ABC D
E
G
H
I
F

192
USING PHOTOSHOP ELEMENTS 9
Filters, effects, styles, and artwork
Last updated 1/3/2012
More Help topics
“Using the Effects panel” on page 183
Texture and glass surface options
The Conté Crayon, Glass, Rough Pastels, Texturizer, and Underpainting filters have texturizing options. These options
make images appear as if they were painted onto textures, such as canvas or brick, or viewed through glass blocks.
Texture Specifies the type of texture to apply. You can also click Load Texture to specify a Photoshop file.
Scaling Increases or decreases the effect on the image surface.
Relief (if available) Adjusts the depth of the texture’s surface.
Light (if available) Sets the direction of the light source on the image.
Invert Reverses the surface’s light and dark colors.
Improve performance with filters and effects
Some filters and effects are memory intensive, especially when applied to high-resolution images. You can use these
techniques to improve performance:
•Try filters and settings on a small selected area of the image.
•Try filters and settings on a smaller, resized copy of your image. When you’re satisfied with the results, apply the
filter with the same settings to your original image.
•Free up memory before running the filter or effect by clearing the clipboard, the undo history, or both. Choose
Edit
> Clear > [command].
•Exit from other applications to make more memory available.
•Adjust filter settings to make memory-intensive filters less complex. Memory-intensive filters include Lighting
Effects, Cutout, Stained Glass, Chrome, Ripple, Spatter, Sprayed Strokes, and Glass. (For example, to reduce the
complexity of the Stained Glass filter, increase cell size. To reduce the complexity of the Cutout filter, increase Edge
Simplicity, decrease Edge Fidelity, or both.)
More Help topics
“About photo effects” on page 185
Artistic filters
Colored Pencil
The Colored Pencil filter redraws an image using colored pencils on a solid background. This filter retains important
edges and gives them a rough crosshatch appearance; the solid background color shows through the smoother areas.
You can set the pencil width, stroke pressure, and paper brightness.
Note: For a parchment effect, change the background color before applying the Colored Pencil filter to a selected area.

193
USING PHOTOSHOP ELEMENTS 9
Filters, effects, styles, and artwork
Last updated 1/3/2012
Cutout
The Cutout filter portrays an image as though it were made from roughly cut-out pieces of colored paper. High-
contrast images appear as if in silhouette, while colored images are built up from several layers of colored paper. You
can set the number of levels, edge simplicity, and edge fidelity.
Dry Brush
The Dry Brush filter paints an image using a dry brush technique (between oil and watercolor). The filter simplifies an
image by reducing its range of colors to areas of common color. You can set the brush size, brush detail, and texture.
Film Grain
The Film Grain filter applies an even, grainy pattern to an image. It adds a smoother, more saturated pattern to the
image’s lighter areas. This filter is useful for eliminating banding in blends and visually unifying elements from various
sources. You can set the grain, highlight area, and intensity.
Fresco
The Fresco filter paints a layer in a coarse style using short, rounded, and hastily applied dabs. You can set the brush
size, brush detail, and texture.
Neon Glow
The Neon Glow filter uses the foreground color, background color, and glow color to colorize an image while softening
its look. You can set the glow size, glow brightness, and glow color. Lower glow size values restrict the glow color to
the shadow areas, and higher values move the glow color to the midtones and highlight areas of a layer. To select a glow
color, click the Glow Color box, and select a color in the Color Picker.
Paint Daubs
The Paint Daubs filter makes an image appear painted. You can set the brush size, sharpness, and brush types.
Palette Knife
The Palette Knife filter reduces detail in an image to give the effect of a thinly painted canvas that reveals the texture
underneath. You can set the stroke size, stroke detail, and softness.
Plastic Wrap
The Plastic Wrap filter renders a layer as if it were coated in shiny plastic, accentuating the surface detail. You can set
the highlight strength, detail, and smoothness.
Poster Edges
The Poster Edges filter reduces the number of colors in an image according to the posterization option you set, finds
the edges of the image, and draws black lines on them. Large broad areas of the image receive simple shading, while
fine dark details are distributed throughout the image. You can set the edge thickness, edge intensity, and
posterization.

194
USING PHOTOSHOP ELEMENTS 9
Filters, effects, styles, and artwork
Last updated 1/3/2012
Rough Pastels
The Rough Pastels filter makes an image appear as if it were made with rough strokes of pastel chalk on a textured
background. In areas of bright color, the chalk appears thick with little texture; in darker areas, the chalk appears
scraped off to reveal the texture. You can set the stroke length, stroke detail, and texture. Texture options make images
appear as if they were painted onto textures, such as canvas, brick, burlap, or sandstone.
Smudge Stick
The Smudge Stick filter softens an image using short diagonal strokes to smudge or smear the darker areas of the
images. Lighter areas become brighter and lose detail. You can set the stroke length, highlight area, and intensity.
Sponge
The Sponge filter paints a layer with highly textured areas of contrasting color. You can set the brush size, definition,
and smoothness.
Underpainting
The Underpainting filter paints a layer as if it were on a textured background. You can set the brush size, texture
coverage area, and texture options. Texture options make images appear as if they were painted onto textures, such as
canvas, brick, burlap, or standstone.
Watercolor
The Watercolor filter paints an image in a watercolor style, simplifying details in an image by using a medium brush
loaded with water and color. Where significant tonal changes occur at edges, the filter saturates colors. You can set the
brush detail, shadow intensity, and texture.
Blur filters
Average
The Average filter finds the average color of an image or selection, and then fills the image or selection with the color
to create a smooth look. For example, if you select an area of grass, the filter changes the area into a homogeneous patch
of green.
Blur and Blur More
The Blur filters soften a selection or an image and are useful for retouching. They smooth transitions by averaging the
color values of pixels next to the hard edges of defined lines and shaded areas.
Blur Eliminates noise where significant color transitions occur in an image. Blur filters smooth transitions by
averaging the color values of pixels next to the hard edges of defined lines and shaded areas.
Blur More Produces an effect several times stronger than that of the Blur filter.
Note: Before applying a Blur filter, deselect the Lock transparent pixels option in the Layers panel.

195
USING PHOTOSHOP ELEMENTS 9
Filters, effects, styles, and artwork
Last updated 1/3/2012
Blurring the background of a photo
Gaussian Blur
The Gaussian Blur filter quickly blurs a selection by an adjustable amount. Gaussian refers to the bell-shaped curve
that Photoshop
Elements generates when it applies a weighted average to the pixels. The Gaussian Blur filter adds low-
frequency detail and can produce a hazy effect. You can set the blur radius in the filter options to determine how far
the filter searches for dissimilar pixels to blur.
Motion Blur
The Motion Blur filter blurs in a particular direction (from -360º to +360º) and at a specific distance (from 1 to 999).
The filter’s effect is analogous to taking a picture of a moving object with a fixed exposure time. You can set the blur
angle and distance.
Radial Blur
The Radial Blur filter simulates the blur of a zooming or rotating camera to produce a soft blur. The Amount option
controls the blur amount. Spin blurs along concentric circular lines and lets you specify a degree of rotation. Zoom
blurs along radial lines, as if zooming in on or out of the image and lets you specify an amount from 1 to 100. Blur
quality ranges from Draft for fast but grainy, results to Good and Best for smoother results, which are indistinguishable
except on a large selection. You can specify the origin of the blur by dragging the pattern in the Blur Center box.
Smart Blur
The Smart Blur filter precisely blurs an image. You can specify a radius to determine how far the filter searches for
dissimilar pixels to blur, a threshold to determine how different the pixels’ values must be before they are eliminated,
and a blur quality. You can also set a mode for the entire selection (Normal) or for the edges of color transitions (Edge
Only and Overlay Edge). Where significant contrast occurs, Edge Only applies black-and-white edges and Overlay
Edge applies white.
Surface Blur
The Surface Blur filter blurs an image while preserving edges. This filter is useful for creating special effects and for
removing noise and graininess. The Radius option specifies the size of the area sampled for the blur. The Threshold
option controls how much the tonal values of neighboring pixels must diverge from the center pixel value before
becoming a part of the blur. Pixels with tonal value differences less than the Threshold value are excluded from the blur.

196
USING PHOTOSHOP ELEMENTS 9
Filters, effects, styles, and artwork
Last updated 1/3/2012
Brush Stroke filters
Accented Edges
The Accented Edges filter accentuates the edges of an image. When the edge brightness control is set to a high value,
the accents resemble white chalk; when set to a low value, the accents resemble black ink. You can set the edge width,
edge brightness, and smoothness.
Angled Strokes
The Angled Strokes filter repaints an image using diagonal strokes. The strokes in the lighter areas of the image go in
the opposite direction of the strokes in the darker areas. You can set the stroke direction balance, stroke length, and
sharpness.
Crosshatch
The Crosshatch filter preserves the details and features of the original image while adding texture and roughening the
edges of the colored areas in the image with simulated pencil hatching. You can set the stroke length, sharpness, and
strength (the number of hatching passes).
Dark Strokes
The Dark Strokes filter paints dark areas of an image closer to black with short, tight strokes, and paints lighter areas
of the layer with long, white strokes. You can set the stroke balance and black and white intensity levels.
Ink Outlines
The Ink Outlines filter redraws an image with fine narrow lines over the original details, in pen-and-ink style. You can
set the stroke length and dark and light intensity levels.
Spatter
The Spatter filter replicates the effect of a spatter airbrush. You can set the spray radius and smoothness.
Sprayed Strokes
The Sprayed Strokes filter repaints a layer using its dominant colors with angled, sprayed strokes of color. You can set
the stroke length, spray radius, and stroke direction.
Sumi-e
The Sumi-e filter redraws a layer in a Japanese style, as if with a wet brush full of black ink on rice paper. The effect is
soft blurry edges with rich blacks. You can set stroke width, stroke pressure, and contrast.

197
USING PHOTOSHOP ELEMENTS 9
Filters, effects, styles, and artwork
Last updated 1/3/2012
Distort filters
Diffuse Glow
The Diffuse Glow filter renders an image as though it were viewed through a soft diffusion filter. This filter adds see-
through white noise to an image, with the glow fading from the center of a selection.
Displace
The Displace filter uses an image, called a displacement map, to determine how to distort a selection. For example,
using a parabola-shaped displacement map, you can create an image that appears to be printed on a cloth held at its
corners.
This filter requires a displacement map file composed of either a flattened image saved in Photoshop format or an
image in bitmap mode. You can use your own files or the files included in the Photoshop Elements
8/Plug-Ins/Displacement Maps folder or the Photoshop Elements 8/Presets/Textures folder.
More Help topics
“About filters” on page 187
“Flatten an image” on page 68
Apply the Displace filter
1In the Edit or, select an image, layer, or area.
2Choose Distort > Displace from the Filter menu.
3To define the magnitude of the displacement, enter a value between -999 and 999 in the Horizontal and Vertical
Scale text boxes.
When the horizontal and vertical scales are 100%, the greatest displacement is 128 pixels (because middle gray
produces no displacement).
4If the displacement map is not the same size as the selection, select how you want the map to fit the image:
Stretch To Fit Resizes the map.
Tile Fills the selection by repeating the map in a pattern.
5Select how to fill voids that are created by the filter in the image, and click OK.
Wrap Around Fills voids with content from the opposite edge of the image.
Repeat Edge Pixels Extends the colors of pixels along the image’s edge in the direction you specify.
6Select and open the displacement map. Photoshop Elements applies the map to the image.
Glass
The Glass filter makes an image appear as if it were being viewed through different types of glass. You can choose a
glass effect or create your own glass surface as a Photoshop file and apply it. You can adjust scaling, distortion, and
smoothness settings. When using surface controls with a file, follow the instructions for the Displace filter.

198
USING PHOTOSHOP ELEMENTS 9
Filters, effects, styles, and artwork
Last updated 1/3/2012
Liquify
The Liquify filter makes it easy to manipulate areas of an image as if those areas had been melted. You work with a
preview image of the current layer, using special tools to warp, twirl, expand, contract, shift, or reflect areas of the
image. You can make subtle changes to retouch an image or drastic distortions to create an artistic effect.
More Help topics
“About filters” on page 187
Apply the Liquify filter
1In the Edit workspace, select an image, layer, or area.
2Choose Filter > Distort > Liquify.
3To zoom in on or out of the image preview, do one of the following:
•Choose a zoom level from the pop-up menu in the lower-left area of the dialog box.
•Select the Zoom tool from the toolbox in the dialog box, and click in the image to zoom in, or Alt-click (Option-
click in Mac OS) to zoom out. You can also use the Zoom tool to drag over an area of the preview you want to
magnify.
•Select a tool from the toolbox.
4Select one of the following tools from the toolbox:
Warp Pushes pixels forward as you drag.
Turbulence Smoothly scrambles pixels and creates fire, clouds, waves, and similar effects. To adjust the
smoothness, drag the Turbulent Jitter pop-up slider in the Tool Options section, or enter a value between 1 and 100 in
the text box. Higher values increase smoothness.
Twirl Clockwise Rotates pixels clockwise as you hold down the mouse button or drag.
Twirl Counter Clockwise Rotates pixels counterclockwise as you hold down the mouse button or drag.
Pucker Moves pixels toward the center of the brush area as you hold down the mouse button or drag.
Bloat Moves pixels away from the center of the brush area as you hold down the mouse button or drag.
Shift Pixels Moves pixels perpendicularly to the stroke direction. Drag to move pixels to the left, and Alt-drag
(Option-drag in Mac OS) to move pixels to the right.
Reflection Copies pixels to the brush area. Drag to reflect the area perpendicular to the direction of the stroke (to
the left of or below the stroke). Alt-drag (Option-drag in Mac OS) to reflect the area in the direction opposite the stroke
(for example, the area above a downward stroke). Use overlapping strokes to create an effect similar to a reflection in
water.
Reconstruct Fully or partially reverses the changes you’ve made.
5In the Tool Options section, adjust the brush size and pressure of the tool, as needed:
•To change the brush size, drag the pop-up slider, or enter a brush size value from 1 to 600 pixels.
•To change the brush pressure, drag the pop-up slider, or enter a brush pressure value from 1 to 100.
A low brush pressure makes more gradual changes.
•If you’re using a stylus tablet, select Stylus Pressure.

199
USING PHOTOSHOP ELEMENTS 9
Filters, effects, styles, and artwork
Last updated 1/3/2012
To create the effect of dragging in a straight line between the current point and the previous point that you clicked,
Shift-click with the Warp, Shift Pixels, or Reflection tool.
6To apply the changes in the preview image to the actual image, click OK.
7(Optional) To revert to a previous state, do one of the following:
•Select the Reconstruct tool , and hold down the mouse button or drag over the distorted areas. The restoration
occurs more quickly at the brush center. Shift-click to reconstruct in a straight line between the current point and
the previous point that you clicked.
•To restore the entire preview image to its state when you opened the dialog box, press Alt (Option in Mac OS) and
click Reset. Alternatively, click Revert to restore the original image and reset the tools to their previous settings.
Ocean Ripple
The Ocean Ripple filter adds randomly spaced ripples to the image's surface, making the image look as if it were under
water.
Pinch
The Pinch filter squeezes a selection or layer inward or outward.
Apply the Pinch filter
1In the Edit workspace, select an image, layer, or area.
2Choose Distort > Pinch from the Filter menu.
3Drag the slider to the right, into positive values, to pinch a selection inward toward its center; or to the left, into
negative values, to shift a selection outward. Then click OK.
More Help topics
“About filters” on page 187
Polar Coordinates
The Polar Coordinates filter converts a selection from its rectangular to polar coordinates, and vice versa, according
to a selected option. You can use this filter to create a cylinder anamorphosis—art popular in the 18th century—in
which the distorted image appears normal when viewed in a mirrored cylinder.
Ripple
The Ripple filter creates an undulating pattern on a selection, like ripples on the surface of a pond. For greater control,
use the Wave filter. Options include the amount and size of ripples.
Shear
The Shear filter distorts an image along a curve.
More Help topics
“About filters” on page 187

200
USING PHOTOSHOP ELEMENTS 9
Filters, effects, styles, and artwork
Last updated 1/3/2012
Apply the Shear filter
1In the Edit workspace, select an image, layer, or area.
2Choose Distort > Shear from the Filter menu.
3To define a distortion curve, do one of the following in the Shear dialog box:
•Click anywhere on either side of the vertical line.
•Click on the vertical line, and then drag the new curve point.
You can drag any point along the curve to adjust the distortion, and you can add additional curve points.
4Select one of the following in the Undefined Areas options and click OK:
Wrap Around Fills new voids in the image with content from the opposite side of the image.
Repeat Edge Pixels Extends the colors of pixels. Banding may result if the edge pixels are different colors.
You can click Defaults to start over and return the curve to a straight line.
Spherize
The Spherize filter gives objects a 3D effect by wrapping a selection around or inside a spherical shape, distorting and
stretching the image.
Apply the Spherize filter
1In the Edit workspace, select an image, layer, or area.
2Choose Distort > Spherize from the Filter menu.
3For Amount, enter a positive value to stretch the image outward as though it were wrapped around a sphere. Enter
a negative amount to compress the image inward as though it were wrapped inside a sphere.
4For Mode, choose normal, horizontal, or vertical, and then click OK.
More Help topics
“About filters” on page 187
Twirl
The Twirl filter rotates an image or selection more sharply in the center than at the edges. Specifying an angle produces
a twirl pattern. You can drag the slider to the right into positive values to twirl the image clockwise, drag the slider to
the left into negative values to twirl counterclockwise, or enter a value between -999 and 999.
Wave
The Wave filter creates an undulating pattern on a layer or selection.
Apply the Wave filter
1In the Edit workspace, select an image, layer, or area.
2Choose Distort > Wave from the Filter menu.
3Select a wave type in the Type section: Sine (creates a rolling wave pattern), Triangle, or Square.
4To set the number of wave generators, drag the slider or enter a number between 1 and 999.

201
USING PHOTOSHOP ELEMENTS 9
Filters, effects, styles, and artwork
Last updated 1/3/2012
5Drag the minimum and maximum Wavelength sliders to set the distance from one wave crest to the next. Set both
sliders to the same value to create a consistent pattern of wave crests.
6Drag the minimum and maximum Amplitude sliders to set the wave strength.
7Drag the horizontal and vertical Scale sliders to set the height and width of the wave effect.
8To apply random results based on the set of values in the dialog box, click Randomize. You can click Randomize
multiple times to get more results.
9Select one of the following and click OK:
Wrap Around Fills the voids in the image with content from the opposite edge of the image.
Repeat Edge Pixels Extends the colors of pixels along the image’s edge in the direction specified.
More Help topics
“About filters” on page 187
ZigZag
The ZigZag filter distorts a selection radially, depending on the radius of the pixels in your selection.
Apply the ZigZag filter
1In the Edit workspace, select an image, layer, or area.
2Choose Distort > ZigZag from the Filter menu.
3Drag the Amount slider to set the level and direction of distortion.
4Drag the Ridges slider to set the number of direction reversals for the zigzag from the center to the edge of the
selection.
5Choose a displacement option from the Style menu and click OK:
Around Center Rotates the pixels around the center of the selection.
Out From Center Produces a rippling effect toward or away from the center of the selection.
Pond Ripples Produces a rippling effect that distorts the selection to the upper left or lower right.
More Help topics
“About filters” on page 187
Noise filters
Add Noise
The Add Noise filter applies random pixels to an image, simulating the result of shooting pictures on high-speed film.
This filter can also be used to reduce banding in feathered selections or graduated fills, to give a more realistic look to
heavily retouched areas, or to create a textured layer. You can set the amount of noise, the type of noise distribution,
and color mode. The Uniform option creates a subtle distribution appearance and Gaussian creates a speckled
distribution look. Monochromatic applies the filter using the existing tones of the image without changing the colors.
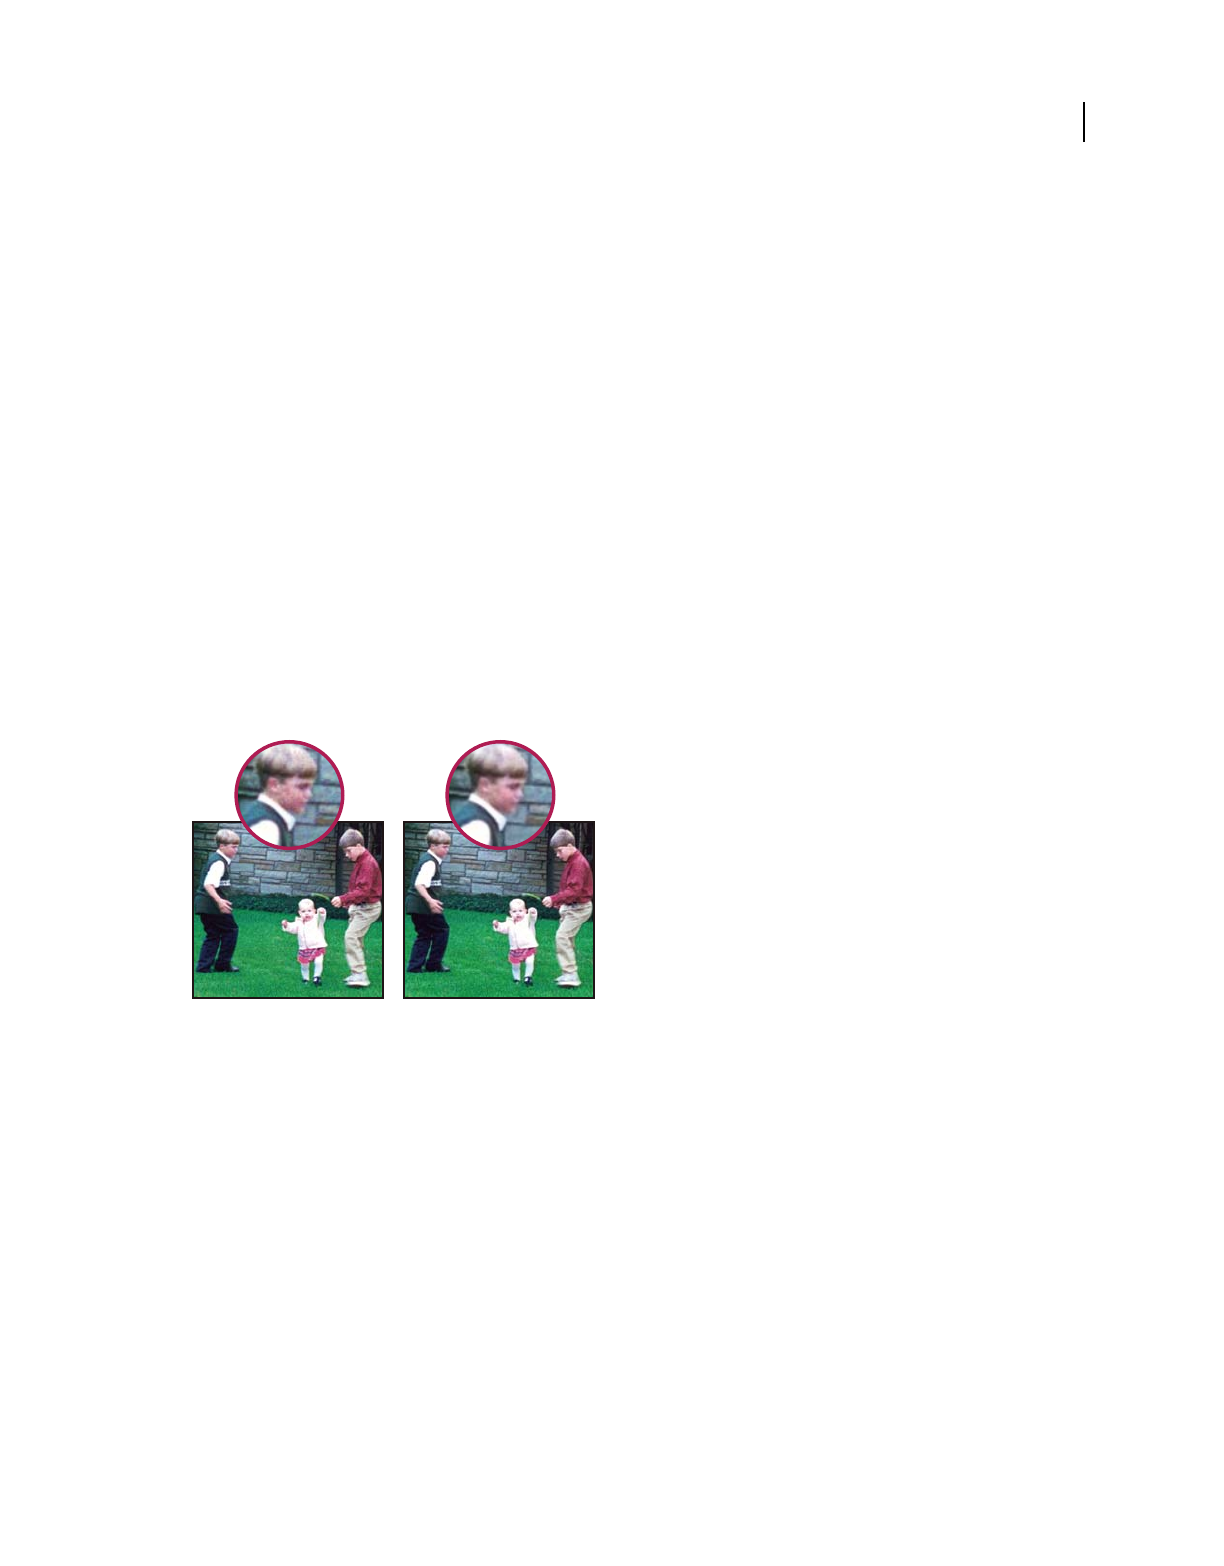
202
USING PHOTOSHOP ELEMENTS 9
Filters, effects, styles, and artwork
Last updated 1/3/2012
Despeckle
The Despeckle filter detects the edges in a layer (areas where significant color changes occur) and blurs all of the
selection except those edges. This blurring removes noise while preserving detail. You can use this filter to remove
banding or visual noise that often appears in scans of magazines or other printed materials.
Dust & Scratches
The Dust & Scratches filter reduces visual noise by changing dissimilar pixels.
Median
The Median filter reduces noise in a layer by blending the brightness of pixels within a selection. The filter searches for
pixels of similar brightness, discarding pixels that differ too much from adjacent pixels, and replaces the center pixel
with the median brightness value of the searched pixels. This filter is useful for eliminating or reducing the appearance
of motion in an image, or undesirable patterns that may appear in a scanned image.
Reduce Noise
The Reduce Noise filter reduces luminous noise and color noise, such as the noise introduced by photographing with
insufficient light. Select the Remove JPEG Artifacts option to remove the blocky artifacts and halos that are caused by
saving an image at a low JPEG quality setting.
In this photo, taken with a mobile phone, there’s noise in the boy’s face (left). The Reduce Noise filter smoothes away the stray pixels (right).
Pixelate filters
Color Halftone
The Color Halftone filter simulates the result of using an enlarged halftone screen on the layer. The filter divides the
image into rectangles and replaces each rectangle with a circle. The circle size is proportional to the brightness of the
rectangle.
Apply the Color Halftone filter
1In the Edit workspace, select an image, layer, or area.
2Choose Pixelate > Color Halftone from the Filter menu.
3Enter a value for the maximum radius of a halftone dot, from 4 to 127 pixels.

203
USING PHOTOSHOP ELEMENTS 9
Filters, effects, styles, and artwork
Last updated 1/3/2012
4Enter a screen-angle value between -360 and 360 (the angle of the dot from the true horizontal) for one or more
channels:
•For grayscale images, enter a value in channel 1. Values in the other channel text boxes do not affect the filter.
•For color images, use channels 1, 2, 3, and 4, which correspond to CMYK channels (cyan, magenta, yellow, and
black).
5Click Defaults to return all the screen angles to their default values, and then click OK.
More Help topics
“About filters” on page 187
Crystalize
The Crystalize filter redraws a layer as polygon-shaped clumps of color. You can set the cell size of the crystals.
Facet
The Facet filter redraws a layer as blocks of solid color. You can use this filter to make a scanned image look hand-
painted or to make a realistic image resemble an abstract painting.
Fragment
The Fragment filter redraws a layer so that it appears offset and blurred.
Mezzotint
The Mezzotint filter redraws a layer as a random pattern of black-and-white areas in a grayscale image, or fully
saturated colors in a color image. You can choose a dot, line, or stroke pattern.
Mosaic
The Mosaic filter redraws a layer as square blocks of color. You can set the mosaic cell size.
Pointillize
The Pointillize filter redraws a layer as randomly placed dots, as in a pointillist painting, and uses the background color
in the toolbox as a canvas area between the dots. You can set the cell size.
Render filters
Clouds
The Clouds filter generates a soft cloud pattern using random values that vary between the foreground and the
background color in the toolbar.
To generate a starker cloud pattern, hold down Alt (Option in Mac OS) as you choose Filter > Render > Clouds.

204
USING PHOTOSHOP ELEMENTS 9
Filters, effects, styles, and artwork
Last updated 1/3/2012
Difference Clouds
The Difference Clouds filter uses randomly generated values that vary between the foreground and background color
in the toolbox to produce a cloud pattern. The first time you choose this filter, portions of the image are inverted in a
cloud pattern. Applying the filter several times creates rib and vein patterns that resemble a marble texture.
Fibers
The Fibers filter creates the look of woven fibers using the foreground and background colors. You can control how
the colors vary with the Variance option (a low value creates longer streaks of color, while a high value makes very
short fibers with more varied distribution of color). The Strength option controls how each fiber looks. A low setting
creates spread out fibers, while a high setting produces short, stringy fibers. Randomize changes how the pattern looks;
you can select this option until you find a pattern you like. When you apply the Fibers filter, the image data on the
active layer is replaced with fibers.
Add a gradient map adjustment layer to colorize the fibers. (See “About adjustment and fill layers” on page 70.)
Lens Flare
The Lens Flare filter simulates the light refraction caused by shining a bright light into a camera lens. You can set the
flare brightness, flare location, and flare shape (the lens type). Click in the preview window in the dialog box to set the
flare location.
Lighting Effects
The Lighting Effects filter lets you produce sophisticated lighting effects in RGB images. You can create multiple lights,
set individual light properties, and easily drag lights around in the preview window to test different lighting setups.
You can also use textures from grayscale files called texture maps to produce 3D-like effects, and save your own styles
for use in other images.
Apply the Lighting Effects filter
1In the Edit workspace, select an image, layer, or area.
2Choose Render > Lighting Effects from the Filter menu.
3Specify options, as desired, and click OK.
Preview area Displays a preview of the lighting effect so you can adjust each light (see “Adjust a light” on page 206).
You can also create a new light by dragging the light icon into the preview area (you can create up to 16 lights). To
delete a light, select the light in the preview window and drag the light (by its center circle) to the Trash or press Delete.
To copy an existing light, select a light in the preview window, press Alt (Option in Mac OS), and drag to a new
location in the window.
Save Lets you name and save the style. Saved styles include all of the settings for each light and appear in the Style
menu whenever you open an image in Photoshop
Elements.
Delete Removes the selected style. You can’t delete default styles.
Style menu Lets you choose from the following default light styles, plus any custom styles you have saved:
Note: If you choose a style that has multiple lights, you must set options for each light individually.
•2 O’ Clock Spotlight Adds one yellow spotlight with medium intensity and wide focus.
•Blue Omni Adds a blue overhead omni light with full intensity and no focus.

205
USING PHOTOSHOP ELEMENTS 9
Filters, effects, styles, and artwork
Last updated 1/3/2012
•Circle Of Light Adds four spotlights. White has full intensity and a concentrated focus. Yellow has strong intensity
and a concentrated focus. Red has medium intensity and a concentrated focus. Blue has full intensity and medium
focus.
•Crossing Adds one white spotlight with medium intensity and a wide focus.
•Crossing Down Adds two white spotlights with medium intensity and a wide focus.
•Default Adds a white spotlight with a medium intensity and a wide focus.
•Five Lights Down/Five Lights Up Add five white spotlights down or up with full intensity and wide focus.
•Flashlight Adds an omni yellow light with medium intensity.
•Flood Light Produces a medium intensity and wide focus white spotlight.
•Parallel Directional Is a blue light with full intensity and no focus, or a white directional light with medium
intensity and no focus.
•RGB Lights Are red, green, and blue lights producing a light of medium intensity and wide focus.
•Soft Direct Lights Adds two unfocused white (soft intensity) and blue (medium intensity) directional lights.
•Soft Omni Is a soft omni light of medium intensity.
•Soft Spotlight Is a white spotlight with full intensity and wide (100) focus.
•Three Down Adds three white spotlights with medium intensity and wide focus.
•Triple Spotlight Adds three spotlights with medium intensity and wide focus.
Light Type Contains these options for each light in the selected style:
•On Turns the selected light on or off in the preview window. This is useful if your lighting effects style uses multiple
lights and you want to look at a particular light.
•Intensity Specifies the light’s brightness.
•Focus Specifies the width of the beam of light.
•Color box Displays the Color Picker so you can change the color of the light. Click this white box to use it.
Properties Contains these options for the image you’re shining the light on:
•Gloss Determines how much the surface reflects light, from Matte (low reflectance) to Shiny (high reflectance).
•Material Determines whether the light or the object on which the light is cast reflects more light. Plastic reflects the
light’s color; Metallic reflects the object’s color.
•Exposure Increases the light (positive values) or decreases the light (negative values). A value of 0 has no effect.
•Ambience Diffuses the light as if it were combined with other light in a room, such as sunlight or fluorescent light.
Choose a value of 100 to use only the light source, or a value of -100 to completely diffuse the light source.
•Color box Displays the Color Picker so you can change the color of the ambient light. Click this white box to use it.
Texture Channel Contains these options for creating a texture for the image you’re shining the light on:
•Texture Channel menu Lets you select the red, green, and blue color channels in your image so you can manipulate
how light reflects off of each channel, creating a texture effect. You can also choose to use the layer transparency of the
active layer to create a texture effect.
•White Is High Raises the light parts of the channel from the surface. Deselect this option to raise the dark parts.
•Height Varies the depth of the texture from Flat (0) to Mountainous (100).

206
USING PHOTOSHOP ELEMENTS 9
Filters, effects, styles, and artwork
Last updated 1/3/2012
Adjust a light
Do any of the following in the Lighting Effects preview, depending on the type of light:
•(Directional, Omni, and Spotlights) To move the light, drag the center circle.
•(Directional lights) To change the direction of the light, drag the handle at the end of the line at an angle from the
line. Ctrl-drag to keep the light’s height constant.
•(Directional lights) To change the height of the light, drag the handle at the end of the line in the direction of the
line. Shift-drag to keep the angle constant and change the light’s height (line length).
•(Omni lights) To increase or decrease the size of the light, drag one of the handles defining the edges of the light.
•(Spotlights) To change the light angle, drag the handle at the end of the line.
•(Spotlights) To stretch the ellipse or rotate the light, drag one of the handles. Shift-drag to keep the angle constant
and change only the size of the ellipse. Ctrl-drag to keep the size constant and change the angle or direction of the
spotlight.
More Help topics
“Apply the Lighting Effects filter” on page 204
“Lighting Effects” on page 204
Texture Fill
The Texture Fill filter uses a grayscale Photoshop image as a texture for an image.
Sketch filters
Bas Relief
The Bas Relief filter transforms an image to appear carved in low relief and lit to accent the surface variations. Dark
areas of the image take on the foreground color, light areas use the background color. You can set relief detail and
smoothness.
Chalk & Charcoal
The Chalk & Charcoal filter redraws an image’s highlights and midtones with a solid midtone gray background drawn
in coarse chalk. Shadow areas are replaced with black diagonal charcoal lines. The charcoal is drawn in the foreground
color, the chalk in the background color. You can set stroke pressure, and the charcoal and chalk areas.
Charcoal
The Charcoal filter redraws an image to create a smudged effect. Major edges are boldly drawn, and midtones are
sketched using a diagonal stroke. Charcoal is the foreground color, and the paper is the background color. You can set
the charcoal thickness, level of image detail, and light/dark balance.
Chrome
The Chrome filter gives the image a polished chrome surface using highlights as high points and shadows as low points
in the reflecting surface. You can set the level of chrome surface detail and smoothness.

207
USING PHOTOSHOP ELEMENTS 9
Filters, effects, styles, and artwork
Last updated 1/3/2012
After applying the Chrome filter, use the Levels dialog box to add more contrast to the image.
Conté Crayon
The Conté Crayon filter replicates the texture of dense dark and pure white Conté crayons on an image. The Conté
Crayon filter uses the foreground color for dark areas and the background color for light areas. You can set the level
of foreground and background emphasis, and texture options. Texture options make images appear as if they were
painted onto textures, such as canvas and brick, or viewed through glass blocks, for example.
For a more realistic effect, change the foreground color to one of the common Conté Crayon colors (black, sepia, or
sanguine) before applying this filter. For a muted effect, change the background color to white with some foreground
color added to it.
Graphic Pen
The Graphic Pen filter uses fine, linear ink strokes to capture the details in the original image and is especially striking
with scanned images. The filter replaces color in the original image, using the foreground color for ink and background
color for paper. You can set the stroke length and direction, and the light/dark balance.
Halftone Pattern
The Halftone Pattern filter simulates the effect of a halftone screen while maintaining the continuous range of tones.
You can set the halftone size, contrast, and pattern type.
Note Paper
The Note Paper filter simulates the texture of handmade paper by combining the effects of the Emboss and Grain
filters. Dark areas in the image appear as holes in the top layer of paper, revealing the background color. You can set
the image balance, graininess, and relief.
Photocopy
The Photocopy filter simulates the effect of photocopying an image. Large areas of darkness tend to copy only around
their edges, and midtones fall away to either solid black or white. You can set the level of detail and darkness.
Plaster
The Plaster filter molds the layer into a 3D plaster effect, and then colorizes the result using the foreground and
background color. Dark areas are raised, light areas are sunken. You can set the image balance, smoothness, and light
direction.
Reticulation
The Reticulation filter simulates the controlled shrinking and distorting of film emulsion to create an image that
appears clumped in the shadow areas and lightly grained in the highlights. You can set the density, foreground, and
background levels.

208
USING PHOTOSHOP ELEMENTS 9
Filters, effects, styles, and artwork
Last updated 1/3/2012
Stamp
The Stamp filter simplifies the image so that it seems made with a rubber or wood stamp. You can set the smoothness,
and the balance between light and dark. This filter works best with black-and-white images.
Torn Edges
The Torn Edges filter reconstructs the image as ragged, torn pieces of paper, and then colorizes the image using the
foreground and background color. You can set the image balance, smoothness, and contrast. This filter is particularly
useful for images consisting of text or high-contrast objects.
Water Paper
The Water Paper filter uses blotchy daubs that appear to be painted onto fibrous, damp paper, causing the colors to
flow and blend. You can set the paper’s fiber length, brightness, and contrast.
Stylize filters
Diffuse
The Diffuse filter shuffles pixels in a selection to make the selection look less focused according to the option you select:
Normal moves pixels randomly, ignoring color values; Darken Only replaces light pixels with darker pixels; Lighten
Only replaces dark pixels with lighter pixels; and Anisotropic softens all pixels.
Emboss
The Emboss filter makes a selection appear raised or stamped by converting its fill color to gray and tracing the edges
with the original fill color. You can set the embossing angle, height, and a percentage for the amount of color within
the selection.
Extrude
The Extrude filter gives a three-dimensional texture to a selection or layer.
Apply the Extrude filter
1In the Edit workspace, select an image, layer, or area.
2Choose Stylize > Extrude from the Filter menu.
3Set the following options and click OK:
Blocks Creates objects with a square front face and four side faces.
Pyramids Creates objects with four triangular sides that meet at a point.
Size Determines the length of the object’s base, from 2 to 255 pixels.
Depth Indicates how far the tallest object appears to protrude from the screen, from 1 to 255.
Random Gives each block or pyramid an arbitrary depth.
Level-based Makes each object’s depth correspond to its brightness—bright objects protrude more than dark.

209
USING PHOTOSHOP ELEMENTS 9
Filters, effects, styles, and artwork
Last updated 1/3/2012
Solid Front Faces Fills the front face of each block with an averaged color of the block. Deselect Solid Front Faces to
fill the front face of each block with the image. This option is not available for Pyramids.
Mask Incomplete Blocks Hides any object extending beyond the selection.
More Help topics
“About filters” on page 187
Find Edges
The Find Edges filter identifies areas of the image with significant transitions and emphasizes edges. Like the Trace
Contour filter, Find Edges outlines the edges of an image with dark lines against a white background and is useful for
creating a border around an image.
Note: After using filters like Find Edges and Trace Contour that highlight edges, you can apply the Invert filter to outline
the edges of a color image with colored lines or a grayscale image with white lines.
Glowing Edges
The Glowing Edges filter identifies the edges of color and adds a neon-like glow to them. You can set the edge width,
brightness, and smoothness.
Solarize
The Solarize filter blends a negative and a positive image, for a result similar to exposing a photographic print briefly
to light during development.
Tiles
The Tiles filter breaks up an image into a series of tiles, offsetting the selection from its original position. You can set
the number of tiles and the offset percentage. You can also choose one of the following to fill the empty area between
the tiles: Background Color, Foreground Color, Inverse Image, or Unaltered Image, which puts the tiled version on
top of the original and reveals part of the original image underneath the tiled edges.
Trace Contour
The Trace Contour filter finds the transitions between major areas of brightness and thinly outlines them for an effect
similar to the lines in a contour map. You can set the level for evaluating color values, and specify whether to outline
pixels that are below (Lower) or above (Upper) that level.
Use the Info panel in grayscale mode to identify a color value that you want traced. Then enter the value in the Level
text box.
Wind
The Wind filter creates tiny horizontal lines in the image to simulate a wind effect. You can set the wind strength and
direction.

210
USING PHOTOSHOP ELEMENTS 9
Filters, effects, styles, and artwork
Last updated 1/3/2012
Texture filters
Craquelure
The Craquelure filter paints an image onto a high-relief plaster surface, producing a fine network of cracks that follow
the contours of the image. Use this filter to create an embossing effect with images that contain a broad range of color
or grayscale values. You can set the crack spacing, depth, and brightness.
Grain
The Grain filter adds texture to an image by simulating different kinds of grain. The sprinkles and stippled grain types
use the background color. You can set the grain intensity, contrast, and type.
Mosaic Tiles
The Mosaic Tiles filter draws the image as if it were made up of small chips or tiles and adds grout between the tiles.
(In contrast, the Pixelate
> Mosaic filter breaks up an image into blocks of different-colored pixels.) You can set the
tile size, grout width, and lighten grout.
Patchwork
The Patchwork filter breaks up an image into squares filled with the predominant color in different areas of the image.
The filter randomly reduces or increases the tile depth to replicate the highlights and shadows. You can set the square
size and relief.
Stained Glass
The Stained Glass filter repaints an image as single-colored adjacent cells outlined in the foreground color. You can
set the cell size, border thickness, and light intensity.
Texturizer
The Texturizer filter allows you to simulate different texture types or select a file to use as a texture. Texture options
make images appear as if they were painted onto textures, such as canvas and brick, or viewed through glass blocks.
Video filters
De-Interlace
The De-Interlace filter smoothes moving images captured on video by removing either the odd or even interlaced lines
in a video image. You can choose to replace the discarded lines by duplication or interpolation.
NTSC Colors
The NTSC Colors filter restricts the gamut of colors to those acceptable for television reproduction to prevent
oversaturated colors from bleeding across television scan lines.

211
USING PHOTOSHOP ELEMENTS 9
Filters, effects, styles, and artwork
Last updated 1/3/2012
Other filters
Custom filters
Custom filters let you design your own filter effect. With the Custom filter, you can change the brightness values of
each pixel in the image according to a predefined mathematical operation known as convolution. Each pixel is
reassigned a value based on the values of surrounding pixels. You can save the custom filters you create and use them
with other Photoshop images.
Use the Save and Load buttons to save and reuse custom filters.
Apply a Custom filter
1In the Edit workspace, select an image, layer, or area.
2Choose Other > Custom from the Filter menu.
3Select the center text box, which represents the pixel being evaluated. Enter the value by which you want to multiply
that pixel’s brightness value, from -999 to +999.
4Select a text box representing an adjacent pixel. Enter the value by which you want the pixel in this position
multiplied.
For example, to multiply the brightness value of the pixel to the immediate right of the current pixel by 2, enter 2 in
the text box to the immediate right of the center text box.
Note: To avoid turning the image completely white or black, the sum of the values in the matrix should equal 1.
5Repeat steps 3 and 4 for all pixels you want to include in the operation. You don’t have to enter values in all the text
boxes.
6For Scale, enter the value by which to divide the sum of the brightness values of the pixels included in the
calculation.
7For Offset, enter the value to be added to the result of the scale calculation.
8Click OK. The custom filter is applied to each pixel in the image, one at a time.
More Help topics
“About filters” on page 187
High Pass
The High Pass filter retains edge details in the specified radius where sharp color transitions occur and suppresses the
rest of the image. (A radius of 0.1 pixel keeps only edge pixels.) The filter removes low-frequency detail in an image
and has an effect opposite to that of the Gaussian Blur filter.
You can use the High Pass filter to extract line art and large black-and-white areas from scanned images. To do so,
apply the filter before using the Filter > Adjustments > Threshold command or converting the image to bitmap mode.

212
USING PHOTOSHOP ELEMENTS 9
Filters, effects, styles, and artwork
Last updated 1/3/2012
Maximum and Minimum
The Maximum and Minimum filters look at individual pixels in a selection, like the Median filter. Within a specified
radius, the Maximum and Minimum filters replace the current pixel’s brightness value with the highest or lowest
brightness value of the surrounding pixels. The Maximum filter has the effect of applying a choke—spreading out
white areas and choking in black areas. The Minimum filter has the effect of applying a spread—spreading out black
areas and shrinking white areas.
Offset
The Offset filter moves a selection a specified amount to the right horizontally or down vertically, leaving an empty
space at the selection’s original location. Depending on the size of the selection, you can fill the empty area with a
transparent background, with the edge pixels, or with pixels from the right or bottom edges of an image.
Plug-in filters
You can install plug-in filters developed by non-Adobe software developers. Once installed, the plug-in filters appear
at the bottom of the Filter menu unless the developer has specified another location.
If you are interested in creating plug-in modules, contact Adobe Systems Developer Support.
Important: If you have problems or questions about a third-party plug-in, contact the plug-in’s manufacturer for support.
More Help topics
“About filters” on page 187
“Apply a filter” on page 189
“About plug-in modules” on page 28
Digimarc filter
Photoshop Elements automatically scans opened images for Digimarc® watermarks. If a watermark is detected, the
application displays a copyright symbol in the image window’s title bar and includes the information in the Copyright
Status, Copyright Notice, and Owner URL sections of the File Info dialog box.
More Help topics
“About filters” on page 187
“Filter categories” on page 190
“Apply a filter” on page 189
Detect the Digimarc filter
1Choose Filter > Digimarc > Read Watermark. If the filter finds a watermark, a dialog box displays the Digimarc ID,
copyright year (if present), and image attributes.
2Click OK. If you have a web browser installed, click Web Lookup to get more information about the owner of the
image. This option opens the browser and displays the Digimarc website, where contact details appear for the given
Digimarc ID.
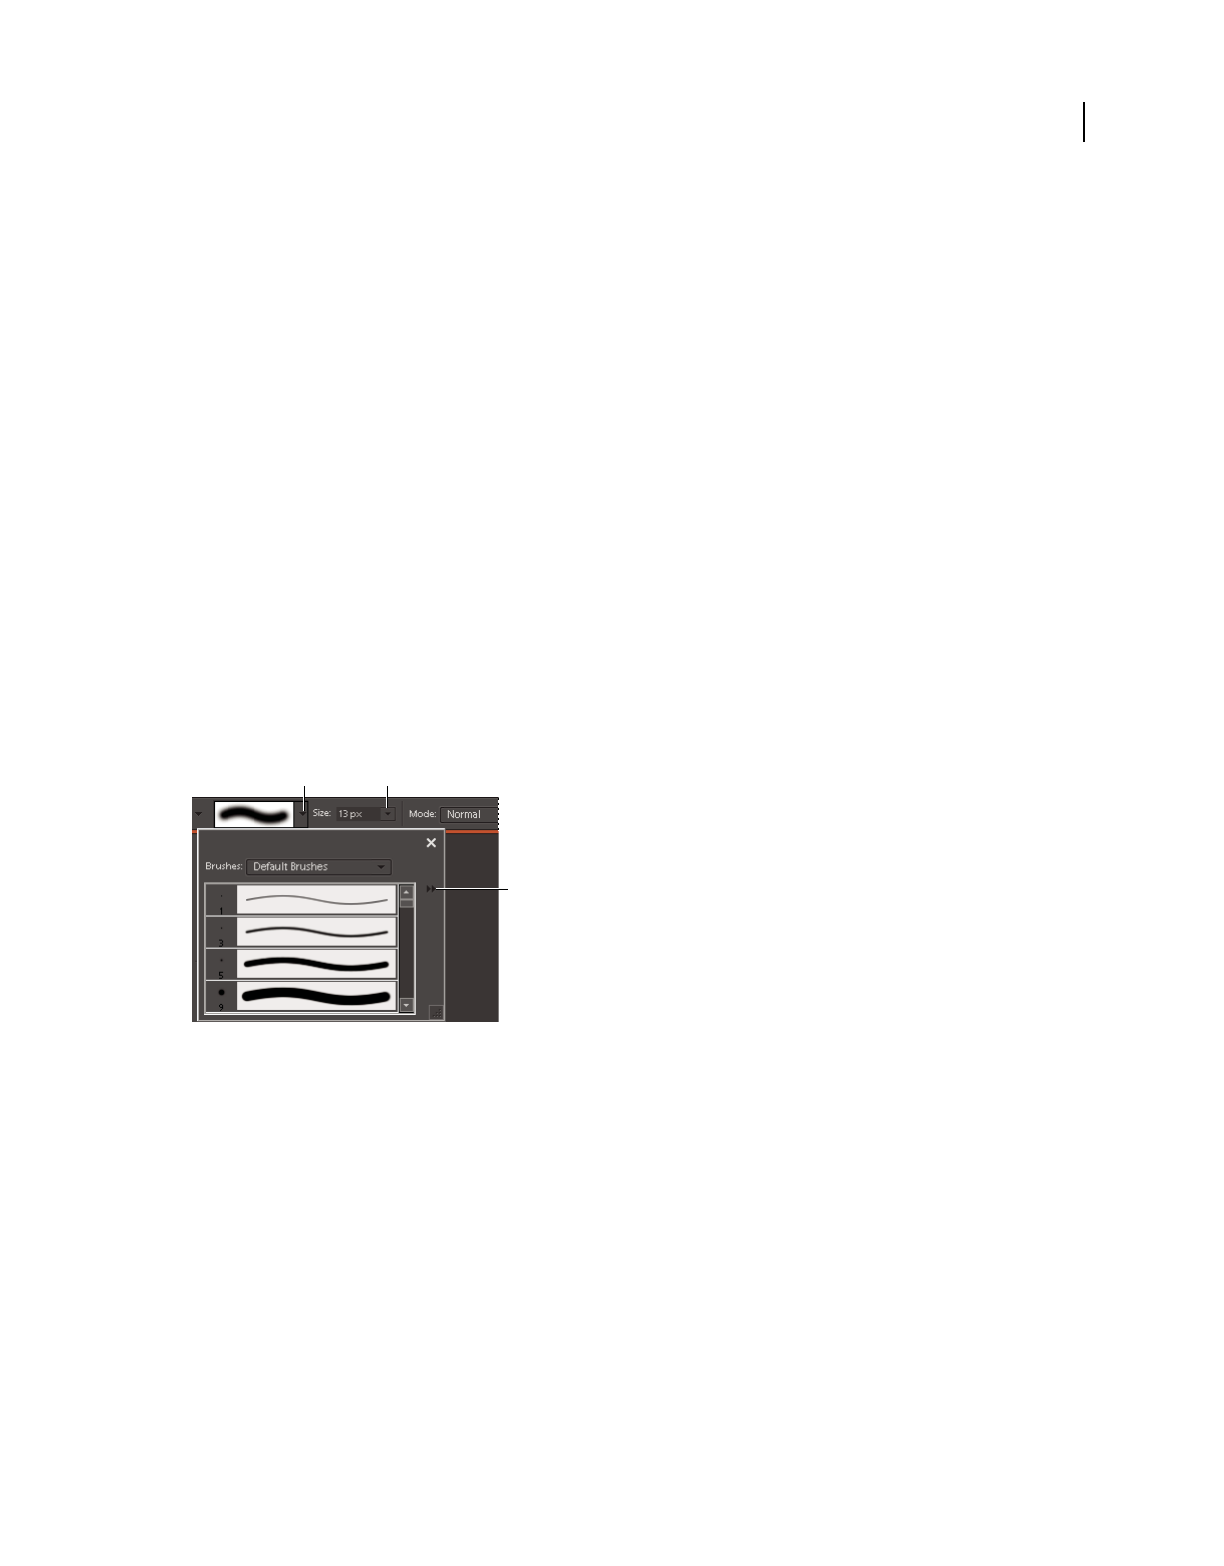
213
Last updated 1/3/2012
Chapter 11: Painting
The painting tools change the color of pixels in an image. The Brush tool and the Pencil tool work like traditional
drawing tools by applying color with brush strokes. The Gradient tool, Fill command, and Paint Bucket tool apply
color to large areas. Tools like the Eraser tool, Blur tool, and Smudge tool modify the existing colors in an image.
The power of painting in Adobe® Photoshop® Elements 9 is in the options that you can set to specify how a tool applies
or modifies color. You can apply color gradually, with soft edges, with large brush strokes, with various brush
dynamics, with different blending properties, and with brushes of different shapes. You can simulate spraying paint
with an airbrush.
Painting overview
About painting tools
The Edit workspace in Photoshop Elements provides a variety of tools for applying and editing color. When you select
a painting tool, the option bar displays a variety of preset brush tips and settings for brush size, paint blending, opacity,
and airbrush effects. You can create new brush presets and save them in brush libraries. You can customize the brush
and settings for any of the painting and editing tools and manage them using the Preset Manager.
Brush options in the options bar
A. Brush pop-up panel and brush thumbnail B. Brush size pop-up slider and text box C. More menu
The Brush tool paints smooth, anti-aliased lines. Other painting tools include the Pencil tool for making hard-edged
lines and the Eraser tool for erasing color pixels from layers. The Paint Bucket tool and Fill command fill areas of your
image with color or patterns. The pattern Stamp tool paints with one of the predefined patterns or a pattern that you
design.
The Impressionist Brush tool affects existing color by applying stylized brush strokes. The Smudge tool also affects
existing image colors by simulating the action of dragging a finger through wet paint.
The Detail Smart Brush tool automatically creates an adjustment layer as you paint. It doesn’t alter the original image
layer. You can paint and change the adjustments as many times as you want without degrading your original photo.
See “Adjust color and tonality using the Smart Brush tools” on page 116.
AB
C
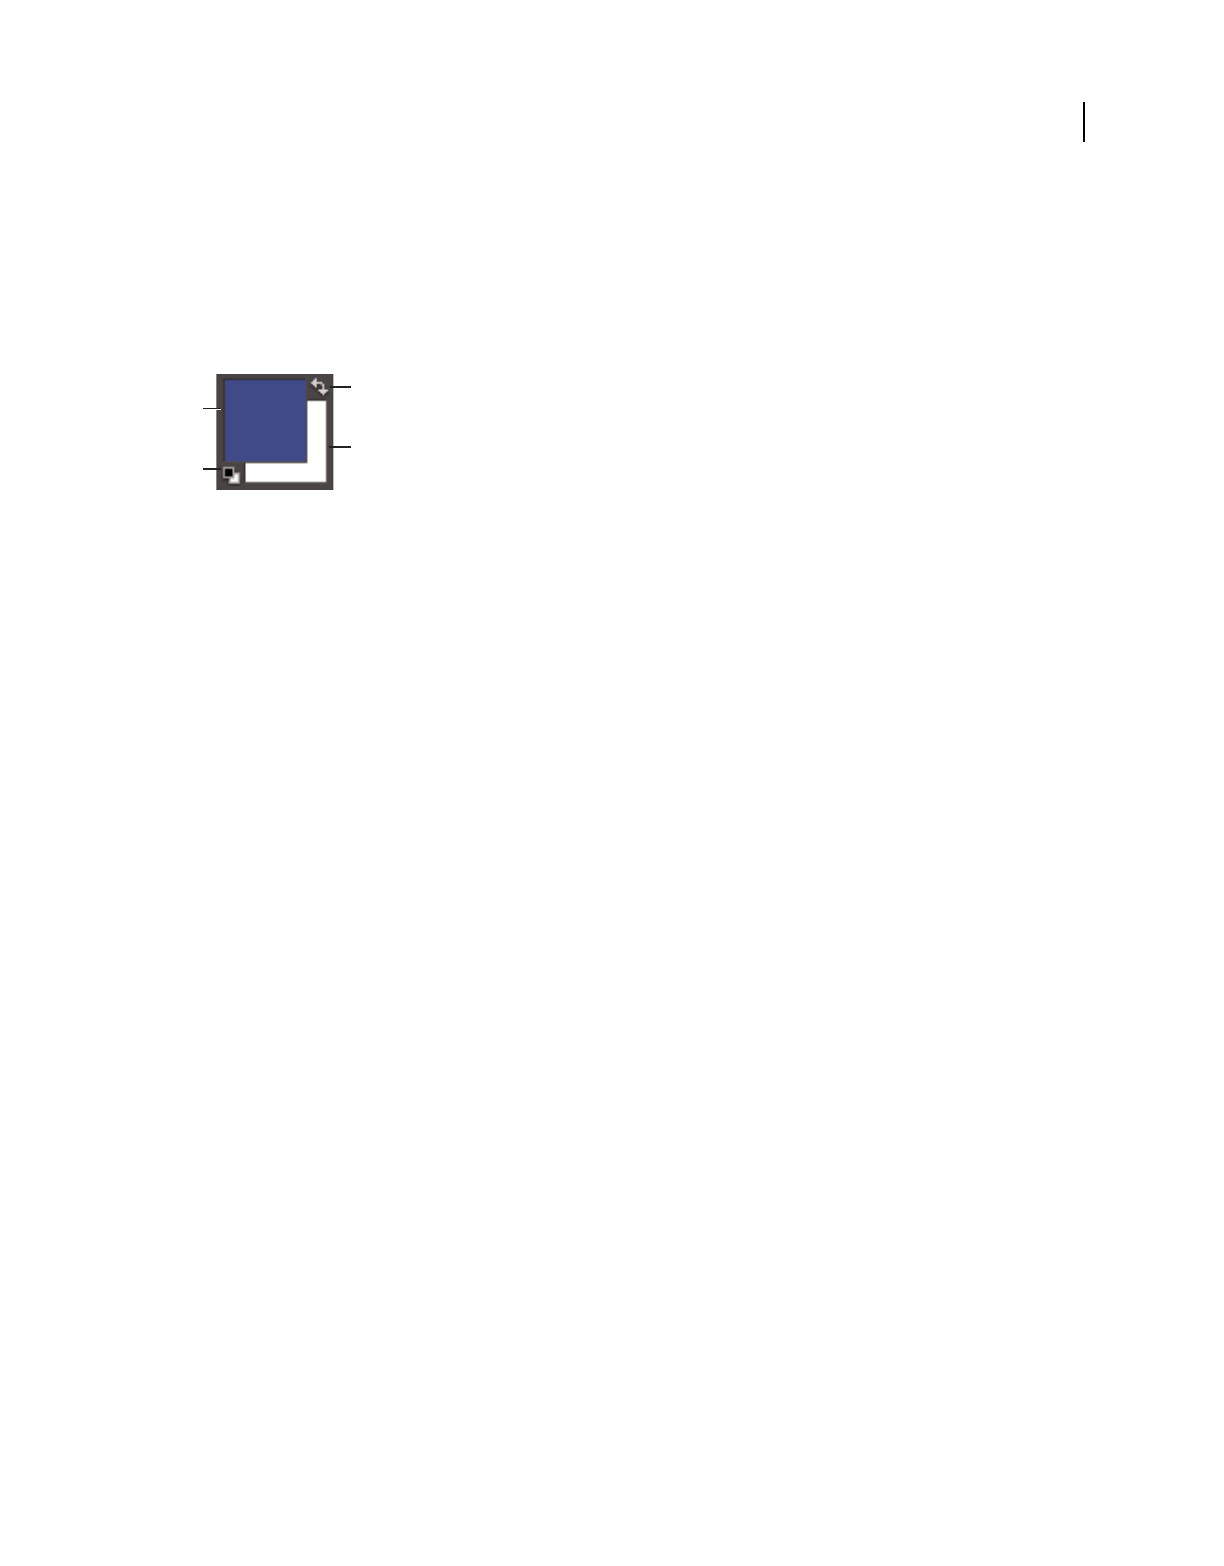
214
USING PHOTOSHOP ELEMENTS 9
Painting
Last updated 1/3/2012
About foreground and background colors
You apply the foreground color when you paint with the Brush or Pencil tools, and when you fill selections with the
Paint Bucket tool. The color you apply to the Background layer with the Eraser tool is called the background
color. You can see and change the foreground and background colors in the two overlapping boxes at the bottom of
the toolbox. The top box is the foreground color, and the bottom box is the background color. The foreground and
background colors are also used together by the Gradient tool and some special effects filters.
Foreground and background color boxes in toolbox
A. Foreground color box B. Click to use default colors (black and white) C. Click to switch the foreground and background colors
D. Background color box
You can change the foreground or background color in the toolbox by using the Eyedropper tool, the Color Swatches
panel, or the Color Picker.
More Help topics
“Choosing colors” on page 217
About blending modes
Blending modes control how pixels in an image are affected by a painting or editing tool. It’s helpful to think in terms
of the following colors when visualizing a blending mode’s effect:
•The base color is the original color in the image.
•The blend color is the color applied by the painting or editing tool.
•The result color is the color resulting from the blend.
A
B
D
C
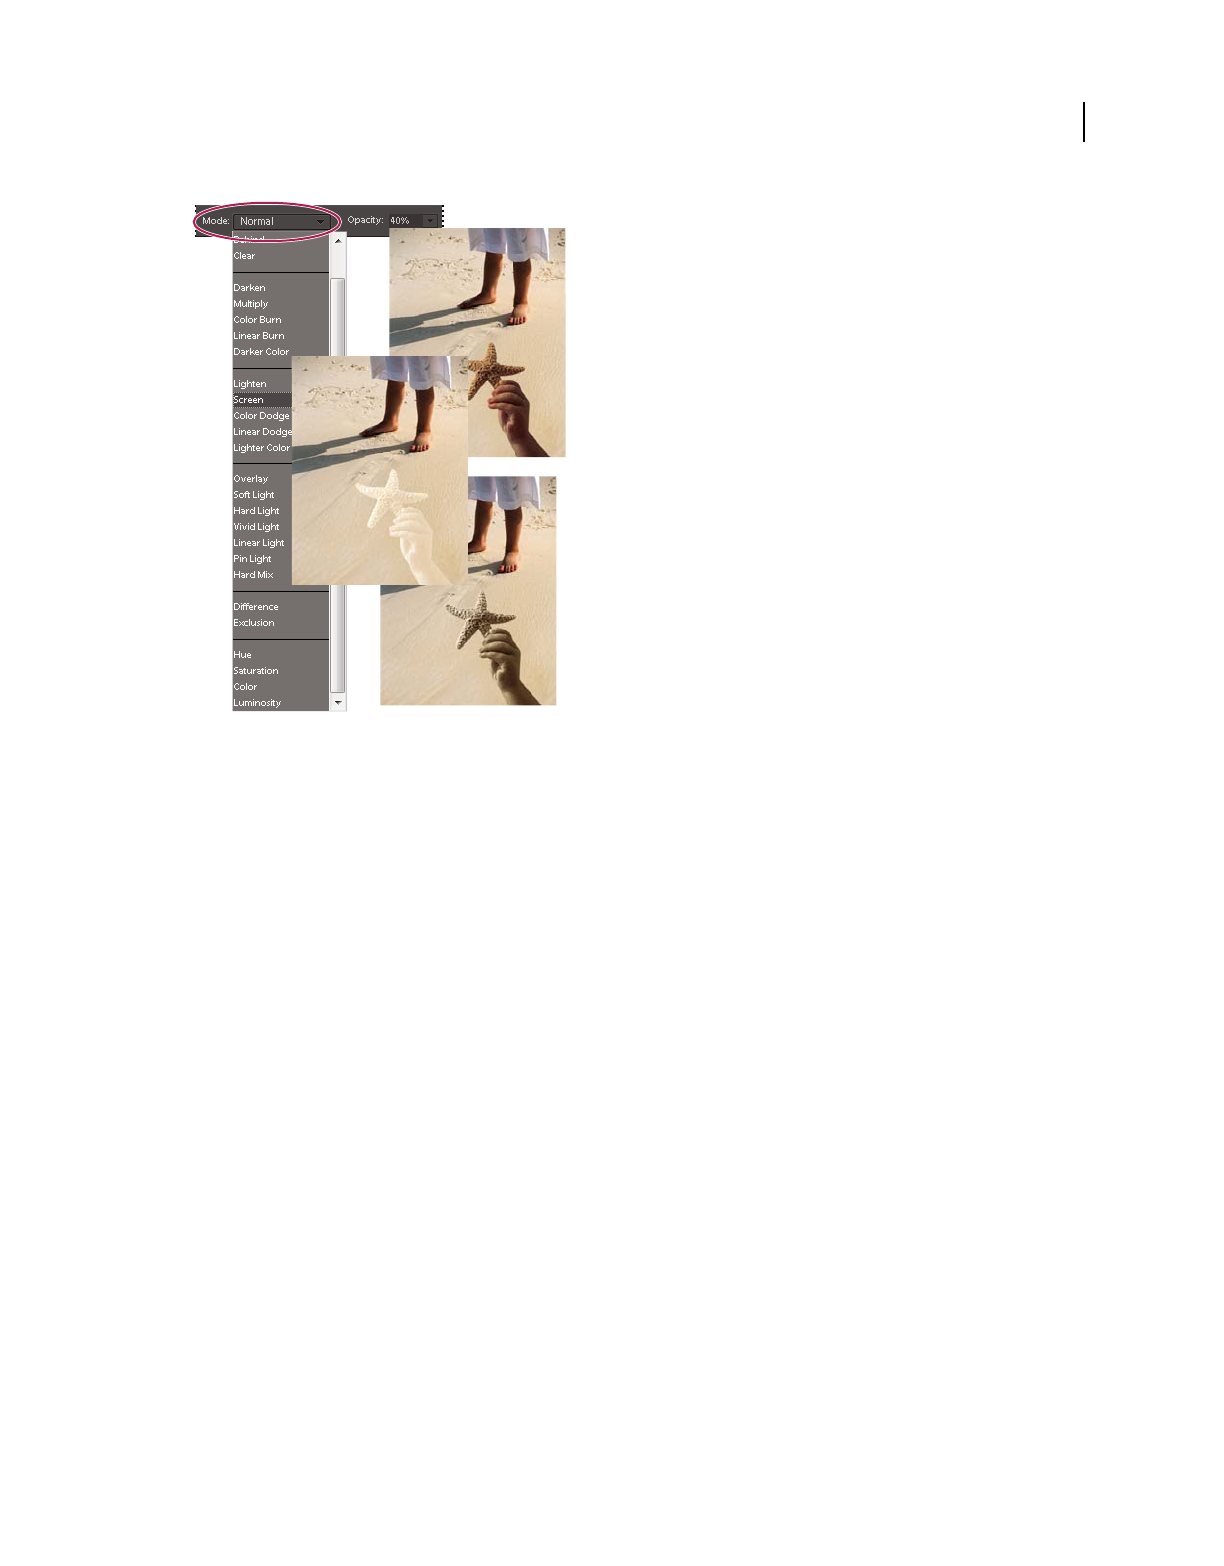
215
USING PHOTOSHOP ELEMENTS 9
Painting
Last updated 1/3/2012
The Multiply blending mode (top), Screen blending mode (center), and Luminosity blending mode (bottom) applied to the starfish layer.
You can choose any of the following blending modes from the Mode menu in the options bar:
Normal Edits or paints each pixel to make it the result color. This is the default mode. (Normal mode is called
Threshold when you’re working with an image in bitmap or indexed-color mode.)
Dissolve Edits or paints each pixel to make it the result color. However, the result color is a random replacement of
the pixels with the base color or the blend color, depending on the opacity at any pixel location. This mode works best
with the brush tool and a large brush.
Behind Edits or paints only on the transparent part of a layer. This mode works only on layers with Lock Transparency
deselected, and is analogous to painting on the back of transparent areas on a sheet of glass.
Clear Edits or paints each pixel and makes it transparent. You must be on a layer with Lock Transparency deselected
in the Layers panel to use this mode.
Darken Looks at the color information in each channel and selects the base or blend color-whichever is darker-as the
result color. Pixels lighter than the blend color are replaced, and pixels darker than the blend color do not change.
Darker Color Compares the total of all channel values for the blend and base color and displays the lower value color.
Darker Color does not produce a third color, which can result from the Darken blend, because it chooses the lowest
channel values from both the base and the blend color to create the result color.
Multiply Looks at the color information in each channel and multiplies the base color by the blend color. The result
color is always a darker color. Multiplying any color by black produces black. Multiplying any color by white leaves
the color unchanged. When you’re painting with a color other than black or white, successive strokes with a painting
tool produce progressively darker colors. The effect is similar to drawing on the image with multiple felt-tipped pens.
Color Burn Looks at the color information in each channel and darkens the base color to reflect the blend color.
Blending with white produces no change.
Linear Burn Looks at the color information in each channel and darkens the base color to reflect the blend color by
decreasing the brightness. Blending with white produces no change.

216
USING PHOTOSHOP ELEMENTS 9
Painting
Last updated 1/3/2012
Lighten Looks at the color information in each channel and selects the base or blend color-whichever is lighter-as the
result color. Pixels darker than the blend color are replaced, and pixels lighter than the blend color do not change.
Screen Looks at each channel’s color information and multiplies the inverse of the blend and base colors. The result
color is always a lighter color. Screening with black leaves the color unchanged. Screening with white produces white.
The effect is similar to projecting multiple photographic slides on top of each other.
Color Dodge Looks at the color information in each channel and brightens the base color to reflect the blend color.
Blending with black produces no change.
Linear Dodge (Add) Looks at the color information in each channel and brightens the base color to reflect the blend
color by increasing the brightness. Blending with black produces no change.
Lighter Color Compares the total of all channel values for the blend and base color and displays the higher value color.
Does not produce a third color, which can result from the Lighten blend, because it chooses the highest channel values
from both the base and blend color to create the result color.
Overlay Multiplies or screens the colors, depending on the base color. Patterns or colors overlay the existing pixels
while preserving the highlights and shadows of the base color. The base color is mixed with the blend color to reflect
the lightness or darkness of the original color.
Soft Light Darkens or lightens the colors, depending on the blend color. The effect is similar to shining a diffused
spotlight on the image. If the blend color is lighter than 50% gray, the image is lightened. If the blend color is darker
than 50% gray, the image is darkened. Painting with pure black or white produces a distinctly darker or lighter area
but does not result in pure black or white.
Hard Light Multiplies or screens the colors, depending on the blend color. The effect is similar to shining a harsh
spotlight on the image. If the blend color is lighter than 50% gray, the image is lightened. This is useful for adding
highlights to an image. If the blend color is darker than 50% gray, the image is darkened. This is useful for adding
shadows to an image. Painting with pure black or white results in pure black or white.
Vivid Light Burns or dodges the colors by increasing or decreasing the contrast, depending on the blend color. If the
blend color (light source) is lighter than 50% gray, the image is lightened by decreasing the contrast. If the blend color
is darker than 50% gray, the image is darkened by increasing the contrast.
Linear Light Burns or dodges the colors by decreasing or increasing the brightness, depending on the blend color. If
the blend color (light source) is lighter than 50% gray, the image is lightened by increasing the brightness. If the blend
color is darker than 50% gray, the image is darkened by decreasing the brightness.
Pin Light Replaces the colors, depending on the underblend color. If the blend color (light source) is lighter than 50%
gray, pixels darker than the blend color are replaced, and pixels lighter than the blend color do not change. If the blend
color is darker than 50% gray, pixels lighter than the blend color are replaced, and pixels darker than the blend color
do not change. This mode is useful for adding special effects to an image.
Hard Mix Reduces colors to white, black, red, green, blue, yellow, cyan, and magenta-depending on the base color and
the blend color.
Difference Looks at the color information in each channel and subtracts either the blend color from the base color or
the base color from the blend color, depending on which has the greater brightness value. Blending with white inverts
the base color values; blending with black produces no change.
Exclusion Creates an effect similar to, but lower in contrast, than the Difference mode. Blending with white inverts the
base color values. Blending with black produces no change.
Hue Creates a result color with the luminance and saturation of the base color and the hue of the blend color.
Saturation Creates a result color with the luminance and hue of the base color and the saturation of the blend color.
Painting with this mode in an area with zero saturation (a neutral gray area) causes no change.
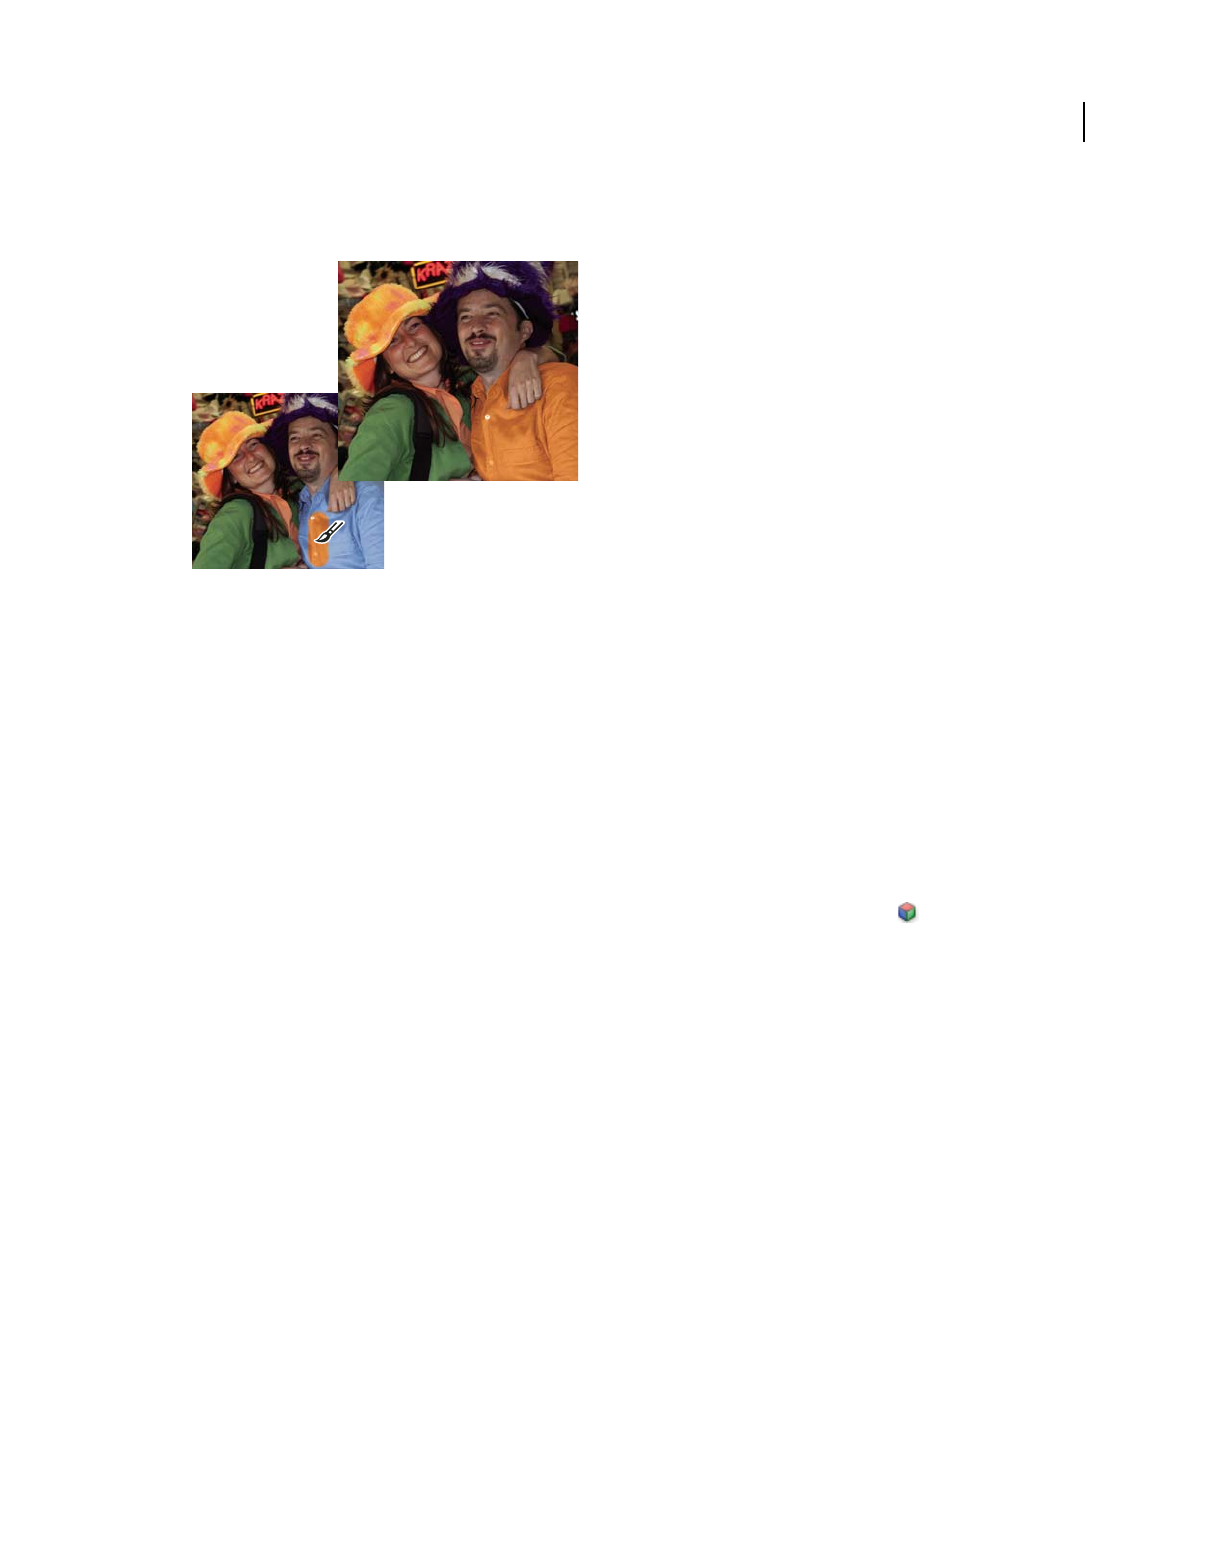
217
USING PHOTOSHOP ELEMENTS 9
Painting
Last updated 1/3/2012
Color Creates a result color with the luminance of the base color and the hue and saturation of the blend color. This
preserves the gray levels in the image and is useful for coloring monochrome images and for tinting color images.
Using the Color blending mode to change the color of a shirt
Luminosity Creates a result color with the hue and saturation of the base color and the luminance of the blend color.
This mode creates an inverse effect from that of the Color mode.
Web-safe colors
Web-safe colors are the 216 colors used by browsers on both the Windows and Mac OS platforms. By working only
with these colors, you ensure that colors in art you prepare for the web display accurately in a web browser.
You can identify web-safe colors in the Adobe Color Picker by using either of the following methods:
•Select Only Web Colors in the lower-left corner of the Color Picker, and then choose any color in the Color Picker.
When this option is selected, any color you pick is web-safe.
•Choose a color in the Color Picker. If you choose a color that isn’t web-safe, an alert cube appears next to the
color rectangle in the upper-right area of the Color Picker. Click the alert cube to select the closest web-safe color.
(If no alert cube appears, the color you chose is web-safe.)
More Help topics
“Use the Color Swatches panel” on page 219
“Use the Adobe Color Picker” on page 220
“About dithering” on page 280
Choosing colors
Choose a color with the Eyedropper tool
The Eyedropper tool makes it easy to copy a color without having to select a swatch. It copies, or samples, the color of
an area in your photo to set a new foreground or background color. You can sample from the active image, from
another open image, or from your computer’s desktop.
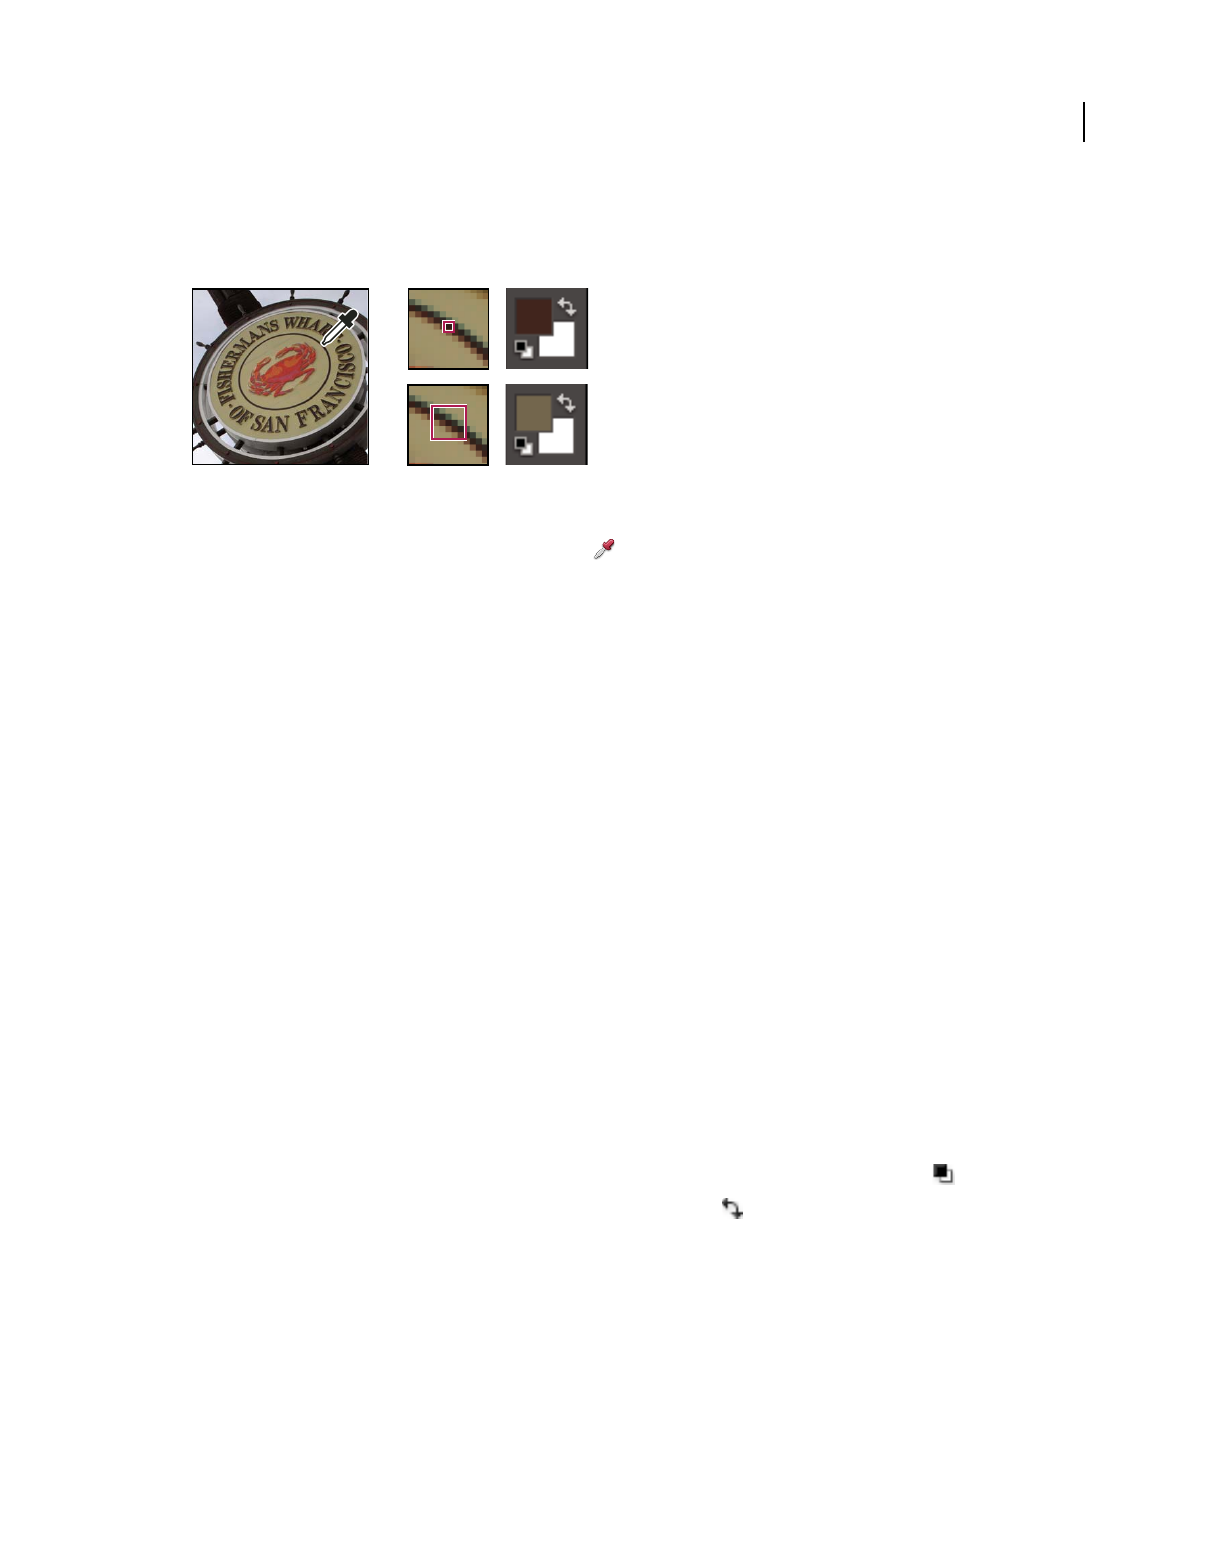
218
USING PHOTOSHOP ELEMENTS 9
Painting
Last updated 1/3/2012
If you want the color always to be available, you can add the sampled color to the Color Swatches panel. You can also
specify the size of the area that the Eyedropper tool samples. For example, you can set the eyedropper to sample the
average color values of a 5-by-5- or 3-by-3-pixel area under the pointer.
Selecting a foreground color with the eyedropper.
A. Point sample B. 5 by 5 Average sample
1In the Edit workspace, select the Eyedropper tool in the toolbox.
2(Optional) To change the sample size of the eyedropper, choose an option from the Sample Size menu in the
options bar:
•Point Sample to get the precise value of the pixel you click.
•3 By 3 Average or 5 By 5 Average to get the average value of the specified number of pixels within the area you click.
3Do one of the following to choose a color:
•To select a new foreground color from an image, click the desired color in your image. To select a color that appears
elsewhere on your computer screen, click inside your image and drag away from it.
•To select a new background color from an image, Alt-click (Option-click in Mac OS) the color you want.
As you click and drag the Eyedropper tool, the foreground color box changes.
4Release the mouse button to pick the new color.
Note: You can temporarily switch to the Eyedropper tool while using most painting tools, which allows you to change
colors quickly without selecting another tool. Simply hold down the Alt key (Option key in Mac OS). Once you’ve chosen
your color, release the Alt key (Option key in Mac OS).
More Help topics
“About foreground and background colors” on page 214
Choose a color from the toolbox
❖Do one of the following:
•To set the foreground and background boxes to black and white, click the Default Colors icon .
•To switch the colors in the two boxes, click the Switch Colors icon .
•To change the foreground color, click the topmost color box in the toolbox, and then choose a color from the Color
Picker.
•To change the background color, click the bottom color box in the toolbox, and then choose a color from the Color
Picker.
More Help topics
“About foreground and background colors” on page 214
A
B

219
USING PHOTOSHOP ELEMENTS 9
Painting
Last updated 1/3/2012
Use the Color Swatches panel
The Color Swatches panel (Window > Color Swatches) is a good place to store the colors that you use often in your
images. You can select a foreground or background color by clicking a color swatch in the Color Swatches panel. You
can add or delete colors to create a custom swatch library, save a library of swatches, and reload them for use in another
image. You can change the way thumbnails are displayed in the Color Swatches panel by choosing an option from the
More menu.
Although you can add many colors to the Color Swatches panel, you should manage its size and organization to
improve performance. Creating libraries can help you group related or special swatches and manage panel size.
The Photoshop Elements\9.0\Presets\Color Swatches folder contains the various swatch libraries. When you create
custom libraries, saving them to the Color Swatches folder makes them automatically appear in the panel libraries
pop-up menu.
More Help topics
“Use the Preset Manager” on page 241
Choose a color using the Color Swatches panel
1If the Color Swatches panel is not already open in the Edit workspace, choose Window > Color Swatches.
2(Optional) Choose a swatch library name from the Swatches menu in the upper-left corner of the panel.
3Do one of the following:
•To choose a foreground color, click a color in the panel.
•To choose a background color, Ctrl-click (Command-click in Mac OS) a color in the panel.
Add a color to the Color Swatches panel
If there is a color you’d like to use often, you can save the color as a swatch in the Color Swatches panel. Saved swatches
are added to the library of colors in the panel. To permanently save your custom swatches, you must save the entire
library.
1Set the foreground color in the toolbox to the color you want to add.
2Do one of the following in the Color Swatches panel:
•Click the New Swatch button at the bottom of the panel. The color swatch is added and automatically named
Color Swatch 1.
•Choose New Swatch from the More menu.
•Position the pointer over an empty space in the bottom row of the Color Swatches panel (the pointer turns into the
Paint Bucket tool), and click to add the color.
Selecting a color with the eyedropper and adding it as a new swatch
3Enter a name for the new color and click OK.

220
USING PHOTOSHOP ELEMENTS 9
Painting
Last updated 1/3/2012
4If prompted to save the swatch library, enter a new name in the Save dialog box and click Save.
Save and use custom swatch libraries
❖Do any of the following in the Color Swatches panel:
•To save a library of swatches, choose Save Swatches from the More menu. To make the set appear in the panel’s
swatch libraries pop-up menu, save the file to the Photoshop Elements\9.0\Presets\Color Swatches folder.
Note: To see the new swatch set in the menu, you must restart Photoshop Elements.
•To select and load a swatch library, choose Load Swatches from the More menu in the panel.
•To replace the current swatch library with a different library, choose Replace Swatches from the More menu in the
panel and select a library.
Reset a swatch library to its default color swatches
1In the Edit workspace, choose a swatch library from the pop-up menu in the Color Swatches panel.
2From the More menu in the Color Swatches panel, choose Preset Manager.
3In the Preset Manager dialog box, choose Swatches from the Preset Type menu.
4Choose Reset Swatches from the More menu, and click Done.
Delete a color from the Color Swatches panel
1Do one of the following:
•Drag the color swatch to the Trash button in the panel, and click OK to confirm the deletion.
•Press Alt (Option key in Mac OS) to change the pointer to a scissors icon, and click a color in the Color Swatches
panel.
2If prompted to save the library, enter a name in the Save dialog box and click Save.
Note: To permanently remove swatches you delete, you must resave the library that contained them.
Use the Adobe Color Picker
You can use the Adobe Color Picker to select the foreground or background color by choosing from a color spectrum
or by defining colors numerically. In addition, you can select colors based on HSB or RGB color models, or choose to
select only web-safe colors.
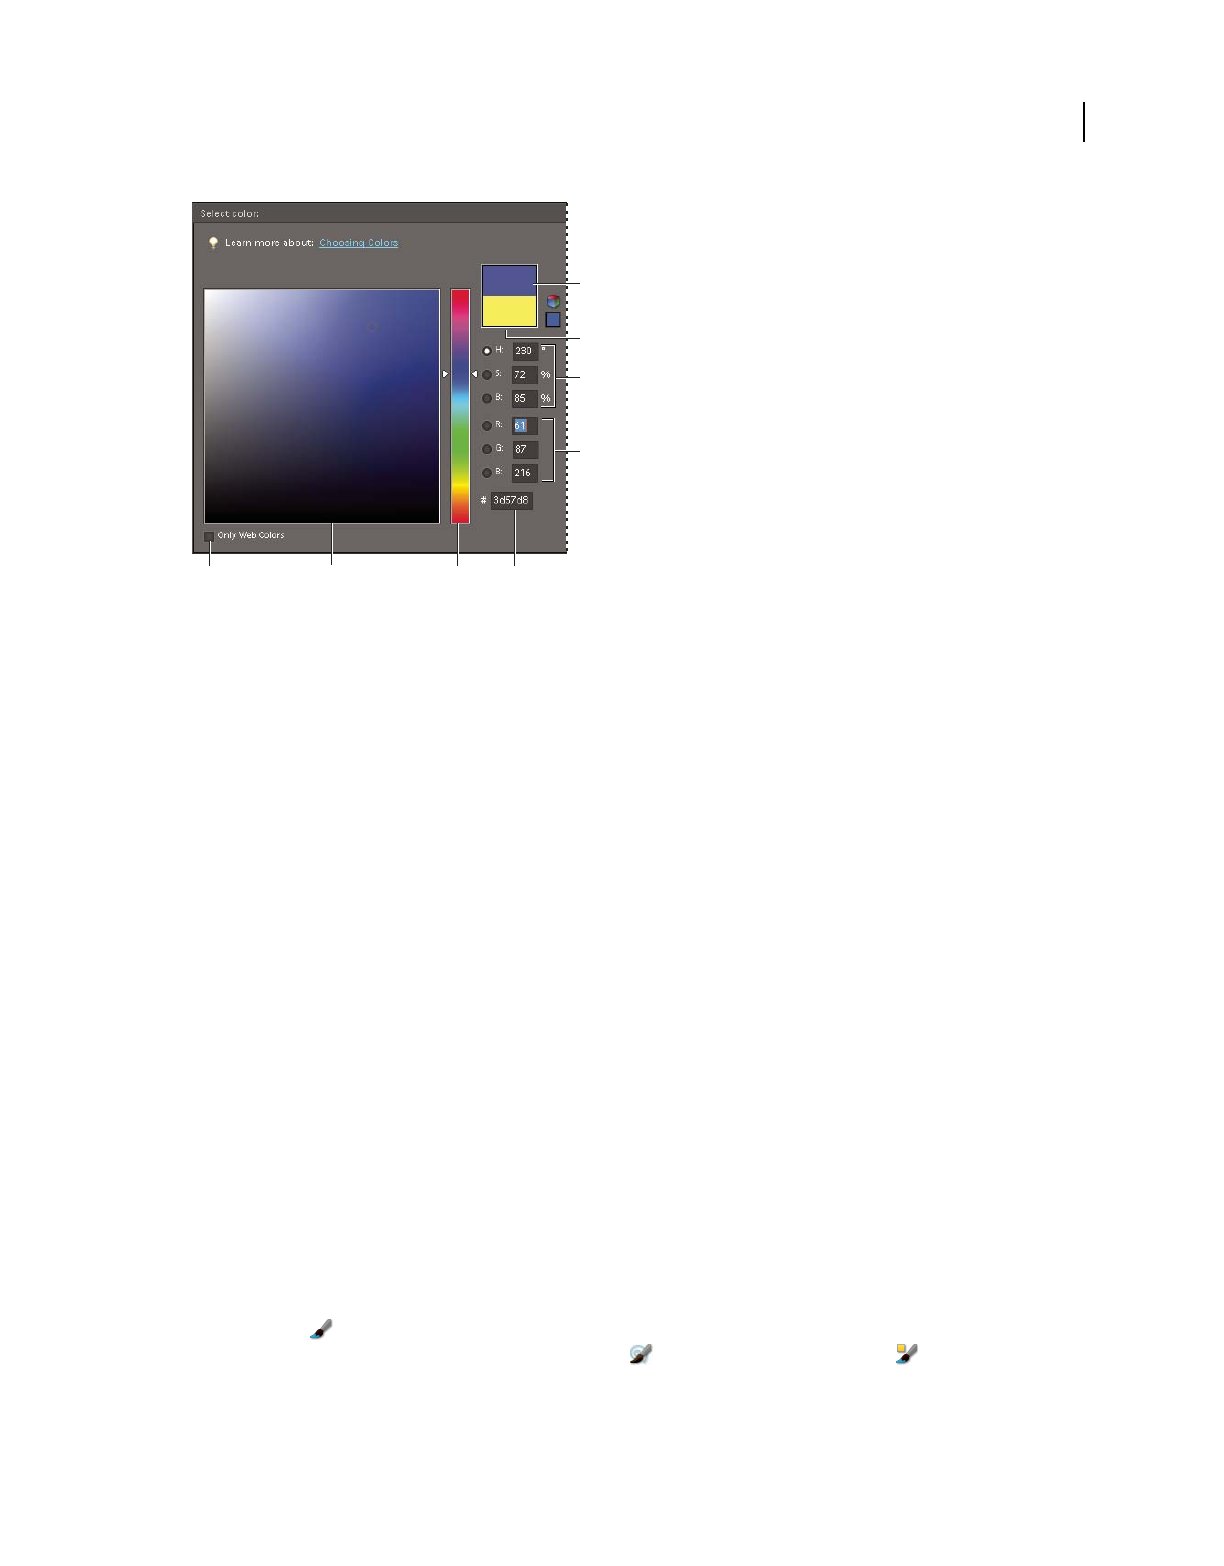
221
USING PHOTOSHOP ELEMENTS 9
Painting
Last updated 1/3/2012
Adobe Color Picker.
A. Adjusted color B. Original color C. HSB color values D. RGB color values E. Displays only web colors F. Color field G. Color slider
H. Hexadecimal color value
1Click the foreground or background color boxes in the toolbox to display the Color Picker.
2Click inside the color field. When you click in the color field, a circular marker indicates the color’s position in the
field, and the numerical values change to reflect the new color.
3Drag the white triangles along the slider to move to another color.
4Alternately, to specify a number visually, do any of the following:
•Enter the hexadecimal value for your color in the text box under the RGB values. (Hexadecimal color values are
often used by web designers.)
•For RGB color, select a radio button and specify component values from 0 to 255 (0 is no light and 255 is the
brightest light).
•For HSB color, select a radio button and specify saturation and brightness as percentages; specify hue as an angle
from 0° to 360° that corresponds to a location on the color wheel.
5The color rectangle to the right of the color slider displays the new color in the top section of the rectangle. The
original color appears at the bottom of the rectangle.
6Click OK to begin painting with the new color.
Note: You can select colors using your system’s built-in color picker or a plug-in color picker. Choose Edit > Preferences >
General and choose the color picker.
Painting tools
Use the Brush tool
The Brush tool creates soft or hard strokes of color. You can use it to simulate airbrush techniques. (If you don’t
see it in the toolbox, select either the Impressionist Brush or the Color Replacement tool , and then click the
Brush tool icon in the options bar.)
1In the Edit workspace, select a color to paint by setting the foreground color.
FEH
G
C
A
B
D

222
USING PHOTOSHOP ELEMENTS 9
Painting
Last updated 1/3/2012
2Select the Brush tool in the toolbox.
3Specify Brush tool options in the options bar as desired, and then drag within the image to paint.
To draw a straight line, click a starting point in the image. Then hold down Shift and click an ending point.
You can specify any of the following Brush tool options:
Brushes Sets the brush tip. Click the arrow next to the brush sample, choose a brush category from the Brushes pop-up
menu, and then select a brush thumbnail.
Size Sets the size of the brush in pixels. Drag the Size pop-up slider or enter a size in the text box.
Mode Specifies how the paint that you apply blends with the existing pixels in the image.
Opacity Sets the opacity of the paint you apply. A low opacity setting allows pixels under a paint stroke to show
through. Drag the pop-up slider or enter an opacity value.
Airbrush Enables airbrush capabilities. This option applies gradual tones to an image, simulating traditional
airbrush techniques.
Brush Tablet Options Sets the options to control with your stylus if you are using a pressure sensitive drawing
tablet instead of a mouse.
More Options Sets additional brush options.
More Help topics
“About blending modes” on page 214
“About foreground and background colors” on page 214
“About brush options” on page 228
“Add a new brush to the brush library” on page 230
“Set up pressure-sensitive tablet support” on page 231
Use the Pencil tool
The Pencil tool creates hard-edged freehand lines.
1In the Edit workspace, select a color to paint by setting the foreground color.
2Select the Pencil tool in the toolbox. (The Pencil tool is nested with the Brush tool .)
3Set Pencil tool options in the options bar, as desired, and then drag within the image to paint.
To draw a straight line, click a starting point in the image. Then hold down Shift and click an ending point.
You can specify any of the following Pencil tool options:
Brushes Sets the brush tip. Click the arrow next to the brush sample, choose a brush category from the Brushes pop-up
menu, and then select a brush thumbnail.
Size Sets the size of the brush in pixels. Drag the Size pop-up slider or enter a size in the text box.
Mode Specifies how the paint that you apply blends with the existing pixels in the image.
Opacity Sets the opacity of the paint you apply. A low opacity setting allows pixels under a paint stroke to show
through. Drag the pop-up slider or enter an opacity value.
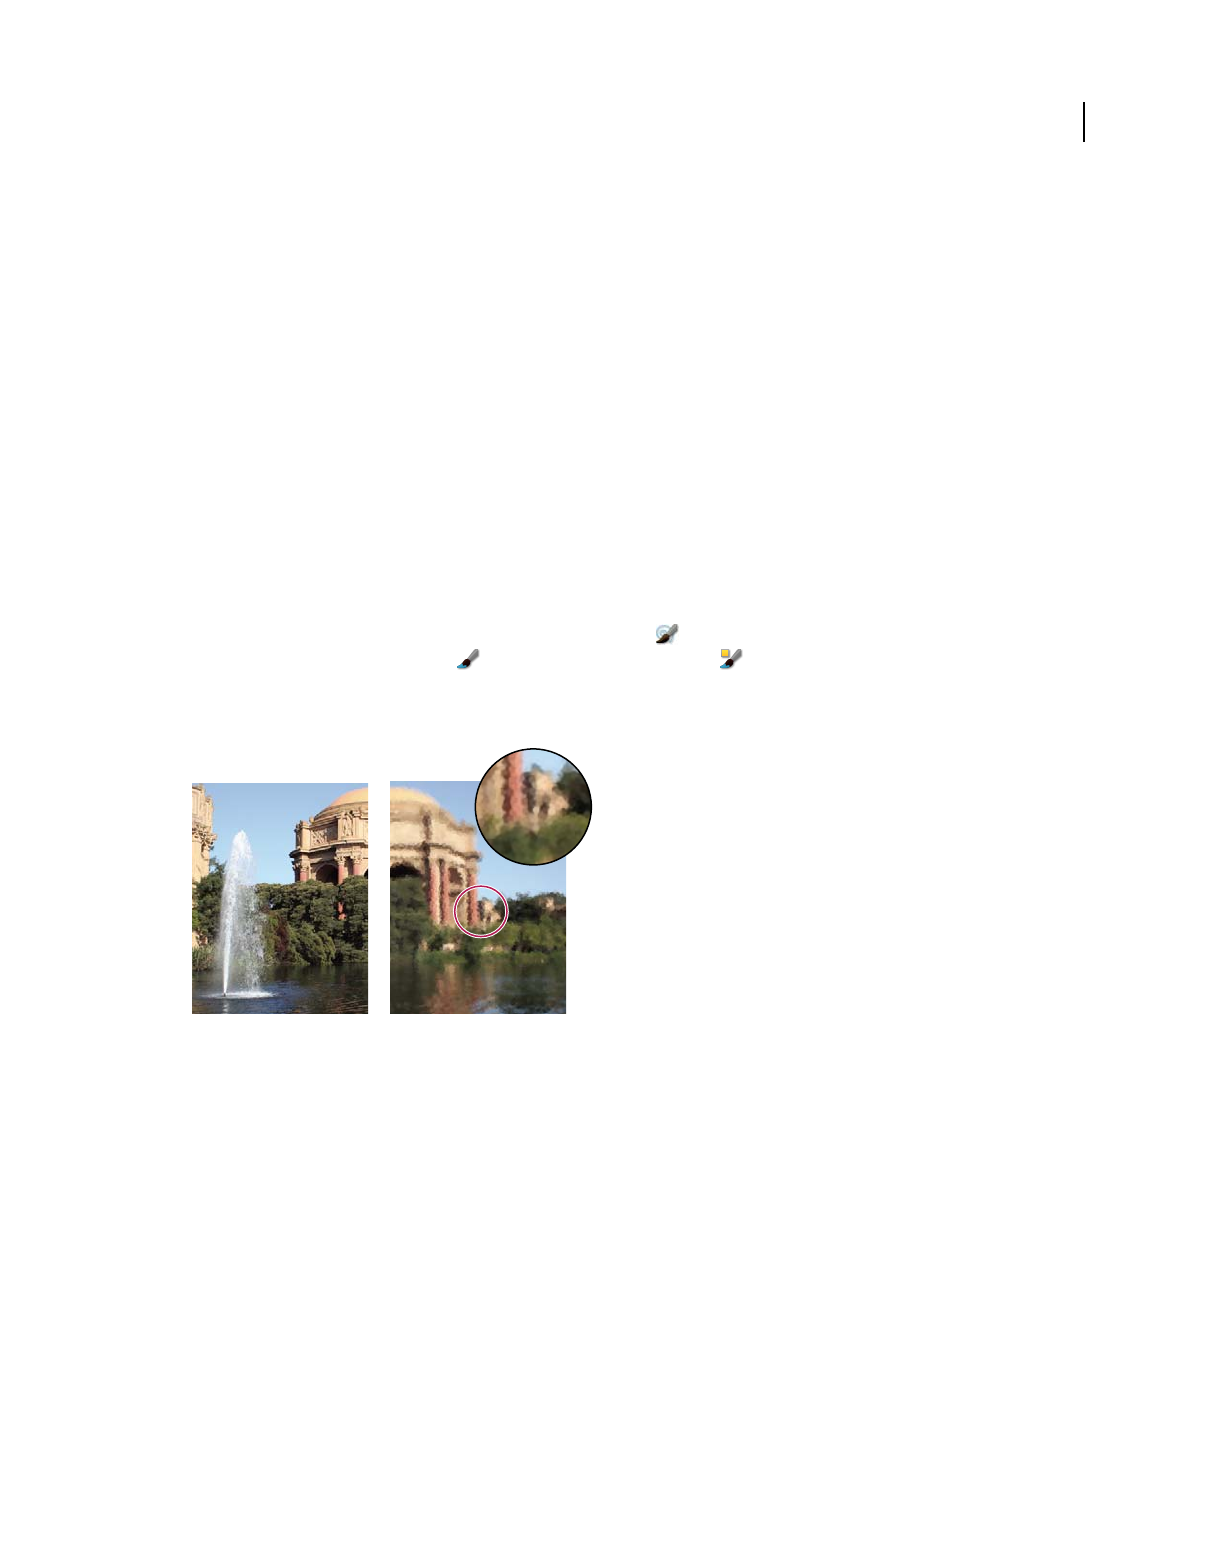
223
USING PHOTOSHOP ELEMENTS 9
Painting
Last updated 1/3/2012
Auto Erase If you begin drawing and drag over an area that doesn’t contain the foreground color, the tool paints with
the foreground color. That is, if we start with color other than foreground color, it paints the foreground color only.
Click and paint on the areas containing the foreground color, pencil paints with the Background color.
More Help topics
“About blending modes” on page 214
“About foreground and background colors” on page 214
“About painting tools” on page 213
“About brush options” on page 228
Use the Impressionist Brush tool
The Impressionist Brush tool changes the existing colors and details in your image so your photo looks like it was
painted using stylized brush strokes. By experimenting with different style, area size, and tolerance options, you can
simulate the textures associated with painting in different artistic styles.
1In the Edit workspace, select the Impressionist Brush tool from the toolbox. (If you don’t see it in the toolbox,
right-click either the Brush tool or the Color Replacement tool , and then select Impressionist Brush tool in
the toolbox.)
2Set options in the options bar as desired, and then drag within the image to paint.
Original photo (left), and after using the Impressionist Brush tool (right)
You can specify any of the following options:
Brushes Sets the brush tip. Click the arrow next to the brush sample, choose a brush category from the Brushes pop-up
menu, and then select a brush thumbnail.
Size Sets the size of the brush in pixels. Drag the Size pop-up slider or enter a size in the text box.
Mode Specifies how the paint that you apply blends with the existing pixels in the image. See “About blending modes”
on page 214 for more information.
Opacity Sets the opacity of the paint you apply. A low opacity setting allows pixels under a paint stroke to show
through. Drag the pop-up slider or enter an opacity value.
More Options Style affects the shape of the brush stroke. Area controls the size of the brush stroke. A larger area value
also increases the number of strokes. Tolerance controls how similar in color value adjacent pixels must be before they
are affected by the brush stroke.

224
USING PHOTOSHOP ELEMENTS 9
Painting
Last updated 1/3/2012
More Help topics
“About brush options” on page 228
Use the Smudge tool
The Smudge tool simulates the actions of dragging a finger through wet paint. The tool picks up color where the stroke
begins and pushes it in the direction you drag. You can smudge existing colors in your image, or smear foreground
color on the image.
Original image (left), and after smudging parts of the photo (right)
1In the Edit workspace, select the Smudge tool in the toolbox. (If you don’t see it in the toolbox, select either the
Blur tool or the Sharpen tool , and then click the Smudge tool icon in the options bar.)
2Set options in the options bar, and then drag within the image to smudge color.
To temporarily use the Finger Painting option as you drag with the smudge tool, press the Alt key (Option key in Mac
OS).
You can specify any of the following Smudge tool options:
Brushes Sets the brush tip. Click the arrow next to the brush sample, choose a brush category from the Brushes pop-up
menu, and then select a brush thumbnail.
Size Sets the size of the brush in pixels. Drag the Size pop-up slider or enter a size in the text box.
Mode Specifies how the paint that you apply blends with the existing pixels in the image. See “About blending modes”
on page 214 for more information.
Strength Sets the amount of the smudge effect.
Sample All Layers Smudges using color from all visible layers. If this option is deselected, the smudge tool uses colors
from only the active layer.
Finger Painting Smears the foreground color at the beginning of each stroke. If this option is deselected, the smudge
tool uses the color under the pointer at the beginning of each stroke.
More Help topics
“Understanding layers” on page 56
“About brush options” on page 228

225
USING PHOTOSHOP ELEMENTS 9
Painting
Last updated 1/3/2012
Use the Eraser tool
The Eraser tool changes pixels in the image as you drag through them. If you’re working in the Background layer or
in a layer with locked transparency, erased pixels change to the background color; otherwise, erased pixels become
transparent. Transparent pixels are indicated by the transparency grid.
1Select the Eraser tool from the toolbox. (If you don’t see it in the toolbox, select either the Background Eraser
tool or the Magic Eraser tool , and then click the Eraser tool icon in the options bar.)
2Set options in the options bar as desired, and then drag through the area you want to erase.
You can specify any of the following Eraser tool options:
Brushes Sets the brush tip. Click the arrow next to the brush sample, choose a brush category from the Brushes pop-up
menu, and then select a brush thumbnail.
Size Sets the size of the brush in pixels. Drag the Size pop-up slider or enter a size in the text box.
Mode Brush mode erases by using characteristics of the brush tool, so you can make soft-edged erasures. Pencil mode
makes hard-edge erasures like a pencil. Block mode uses a hard-edged 16-pixel square as an eraser.
Opacity Defines the strength of the erasure. An opacity of 100% erases pixels to complete transparency on a layer and
to the background color on the Background layer. A lower opacity erases pixels to partial transparency on a layer and
paints partially with the background color on the Background layer. (If Block mode is selected in the options bar, the
Opacity option isn’t available.)
More Help topics
“About blending modes” on page 214
“About brush options” on page 228
Use the Magic Eraser tool
The Magic Eraser tool changes all similar pixels when you drag within a photo. If you’re working in a layer with locked
transparency, the pixels change to the background color; otherwise, the pixels are erased to transparency. You can
choose to erase contiguous pixels only, or all similar pixels on the current layer.
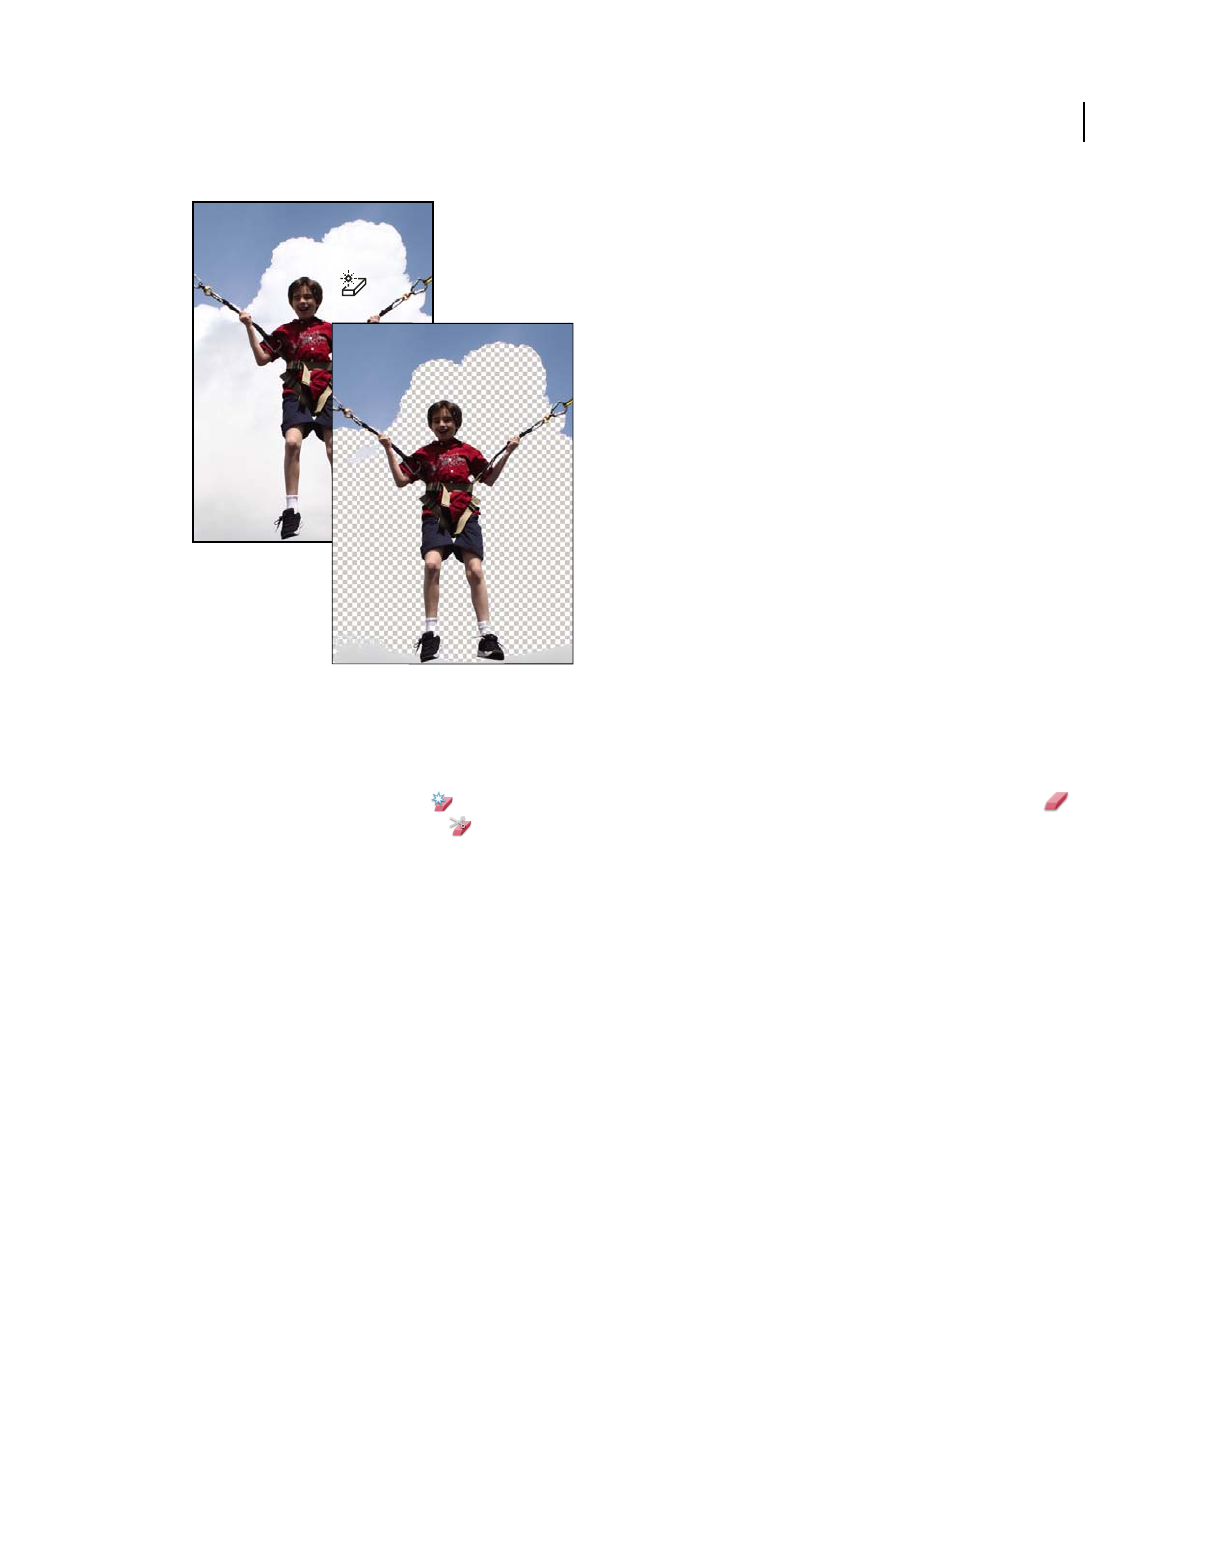
226
USING PHOTOSHOP ELEMENTS 9
Painting
Last updated 1/3/2012
Original image (left), and after erasing the clouds (right)
1In the Layers panel, select the layer containing the areas you want to erase.
Note: If you select the Background, it automatically becomes a layer when you use the Magic Eraser.
2Select the Magic Eraser tool in the toolbox. (If you don’t see it in the toolbox, select either the Eraser tool
or the Background Eraser tool , and then click the Magic Eraser tool icon in the options bar.)
3Set options in the options bar, as desired, and then click the area of the layer you want to erase.
You can set any of the following Magic Eraser tool options:
Tolerance Defines the range of colors that will be erased. A low tolerance erases pixels within a range of color values
very similar to the pixel you click. A high tolerance erases pixels within a broader range.
Anti-alias Smoothes the edges of the area you erase, making the edge look more natural.
Contiguous Erases only pixels that are adjacent to the one you click. Deselect this option to erase all similar pixels in
the image.
Sample All Layers Samples the erased color using combined data from all visible layers. Deselect the option if you want
to erase only the pixels on the active layer.
Opacity Defines the strength of the erasure. An opacity of 100% erases pixels to complete transparency on a layer and
to the background color on a locked layer. A lower opacity erases pixels to partial transparency on a layer and paints
partially with the background color on a locked layer.
More Help topics
“About blending modes” on page 214
“About brush options” on page 228
“About the Layers panel” on page 57
“Smooth the edges of a selection by anti-aliasing” on page 101
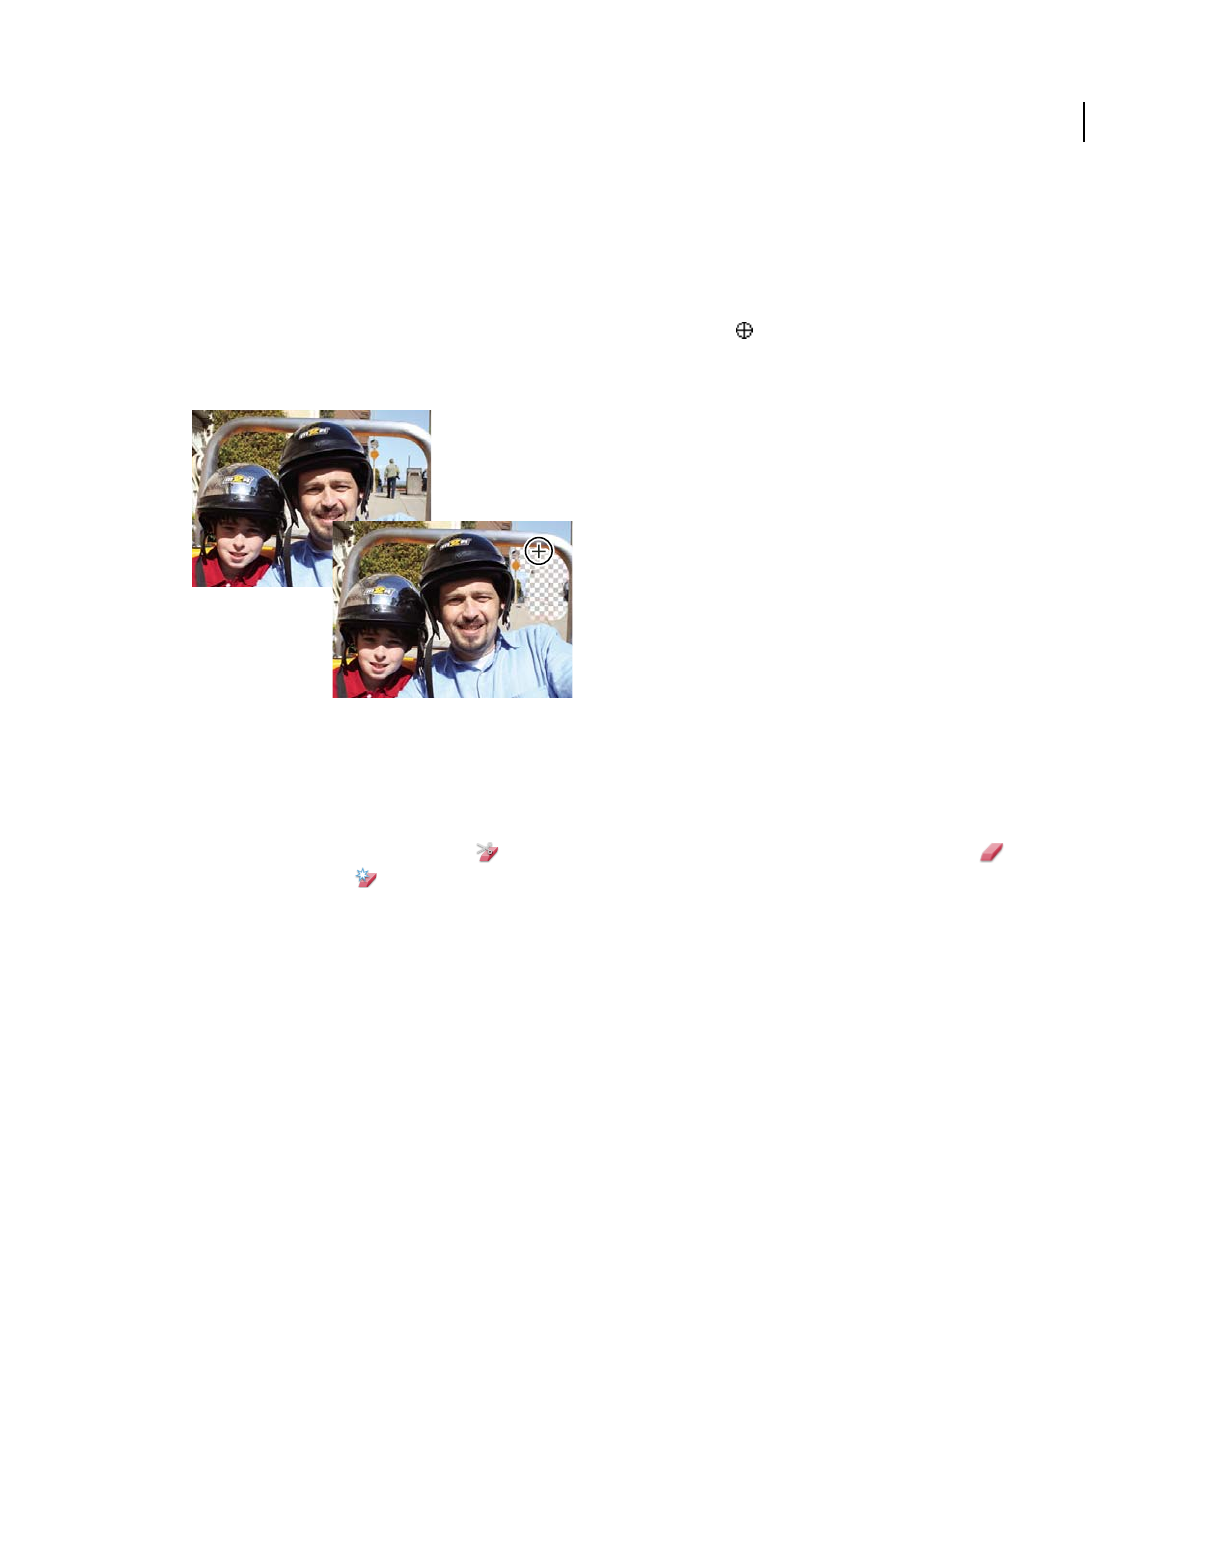
227
USING PHOTOSHOP ELEMENTS 9
Painting
Last updated 1/3/2012
Use the Background Eraser tool
The Background Eraser tool turns color pixels to transparent pixels so that you can easily remove an object from its
background. With careful use, you can maintain the edges of the foreground object while eliminating background
fringe pixels.
The tool pointer is a circle with a cross hair indicating the tool’s hotspot . As you drag the pointer, pixels within the
circle and of a similar color value as the pixel under the hotspot are erased. If the circle overlaps your foreground object,
and it doesn’t contain pixels similar to the hotspot pixel, the foreground object won’t be erased.
Erasing the distracting background. You can replace the background with another background by using the Clone Stamp tool or by adding
another layer.
1In the Layers panel, select the layer containing the areas you want to erase.
Note: If you select Background, it automatically becomes a layer when you use the Background Eraser.
2Select the Background Eraser tool . (If you don’t see it in the toolbox, select either the Eraser tool or the
Magic Eraser tool , and then click the Background Eraser tool icon in the options bar.)
3Set options in the options bar as desired, and then drag through the area you want to erase. Keep the tool’s hotspot
off of areas that you don’t want to erase.
You can specify any of the following Background Eraser tool options:
Brush Preset Picker Sets the presets of the brush, such as size, diameter, hardness, and spacing. Drag the Size pop-up
sliders or enter numbers in text boxes.
Limits Choose Contiguous to erase areas that contain the hotspot color and are connected to one another.
Discontiguous erases any pixels within the circle that are similar to the hotspot color.
Tolerance Defines how similar in color to the hotspot a pixel must be to be affected by the tool. A low tolerance limits
erasure to areas that are very similar to the hotspot color. A high tolerance erases a broader range of colors.
More Help topics
“About brush options” on page 228
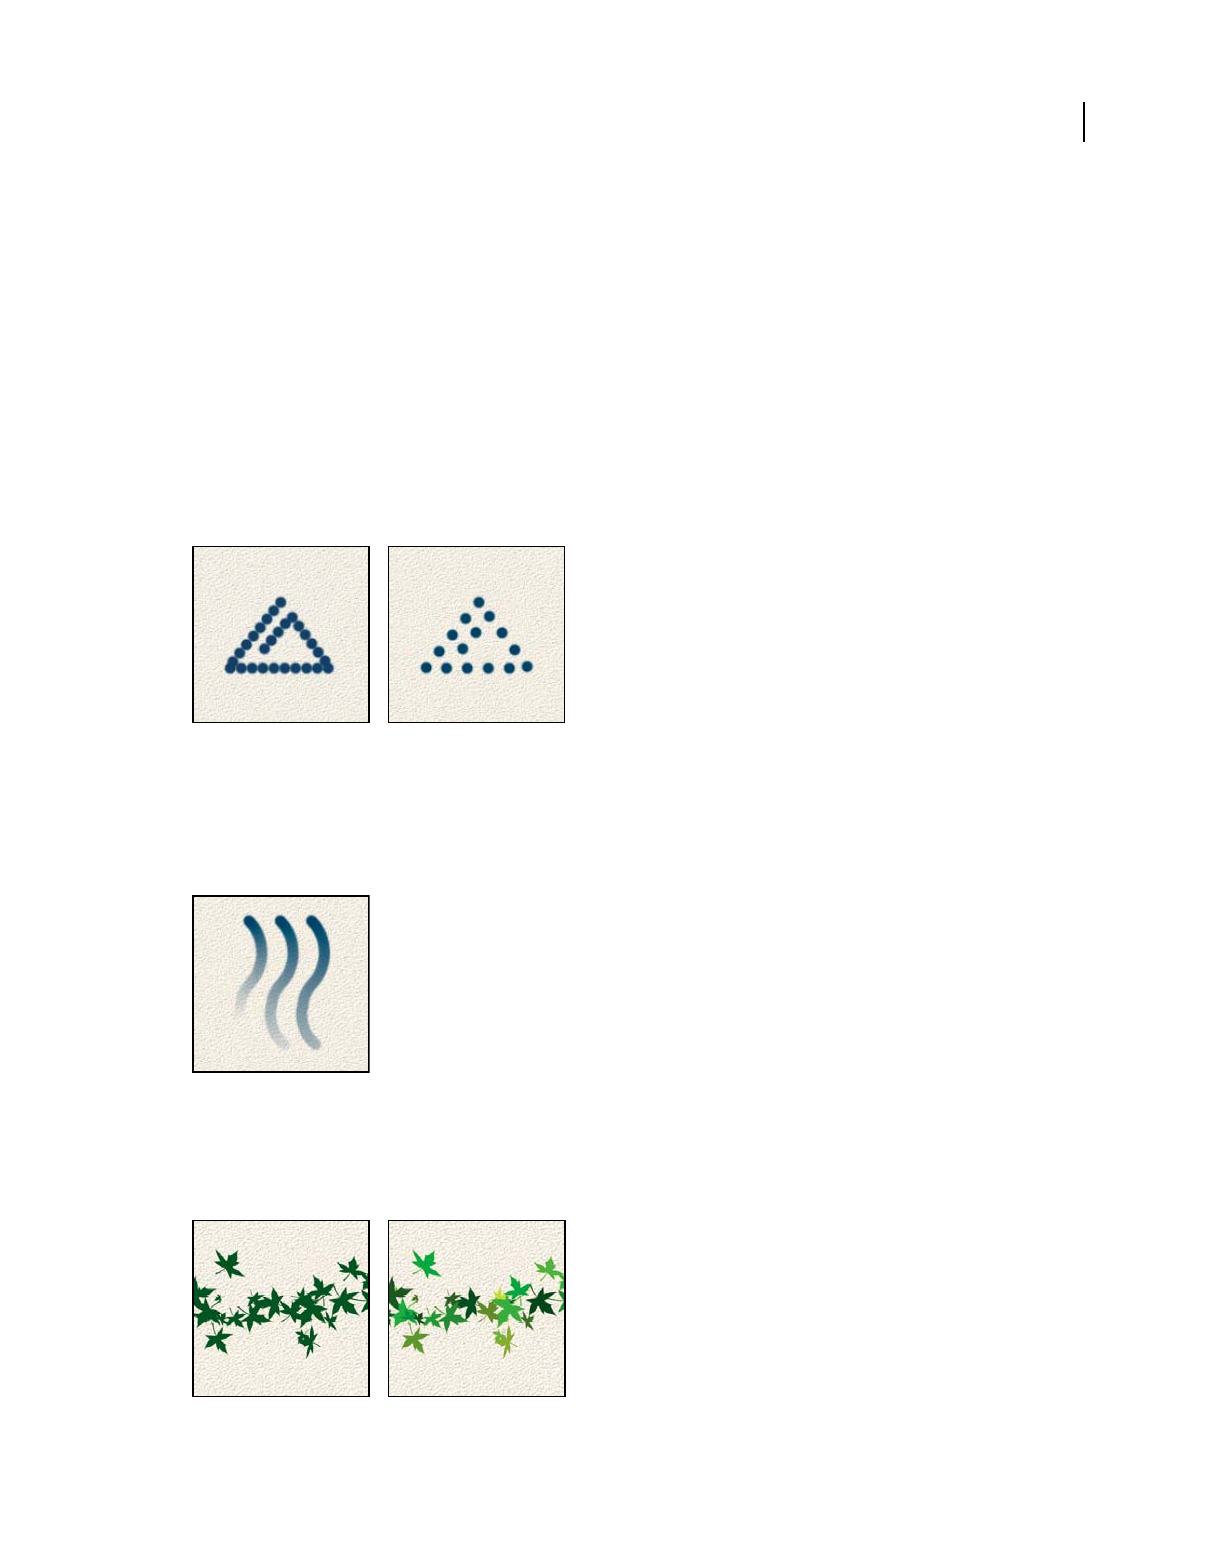
228
USING PHOTOSHOP ELEMENTS 9
Painting
Last updated 1/3/2012
Setting up brushes
About brush options
You can simulate actual brush strokes by setting the rates at which the brush tool strokes fade out. You can specify
which options dynamically change over the course of a brush stroke, including scattering, size, and color. The brush
thumbnail in the options bar reflects the brush changes as you adjust the brush dynamics options.
You set brush dynamics options by selecting the brush tool and then selecting from the following controls from the
More Options menu in the options bar.
Spacing Controls the distance between the brush marks in a stroke. To change the spacing, type a number, or use the
slider to enter a value that is a percentage of the brush diameter. (The brush thumbnail in the options bar dynamically
changes to reflect your spacing adjustments.)
Increasing the spacing makes the brush skip.
Fade Sets the number of steps until the paint flow fades to nothing. A low value makes the paint stroke fade away very
quickly, while a value of zero has no fading effect. Each step is equal to one mark of the brush tip. Possible values range
from 0 to 9999. For example, entering 10 for Fade produces a fade in 10 increments. For smaller brushes, you may want
to set a value of 25 or larger. If strokes fade too quickly, increase the values.
Fade showing setting of 40, 60, and 80 steps
Hue Jitter Sets the rate at which the stroke color switches between the foreground and background colors. Higher
values cause more frequent switches between the two colors than lower values. (To set the colors used by the color jitter
option, see “About foreground and background colors” on page 214.)
Paint stroke without and with color jitter
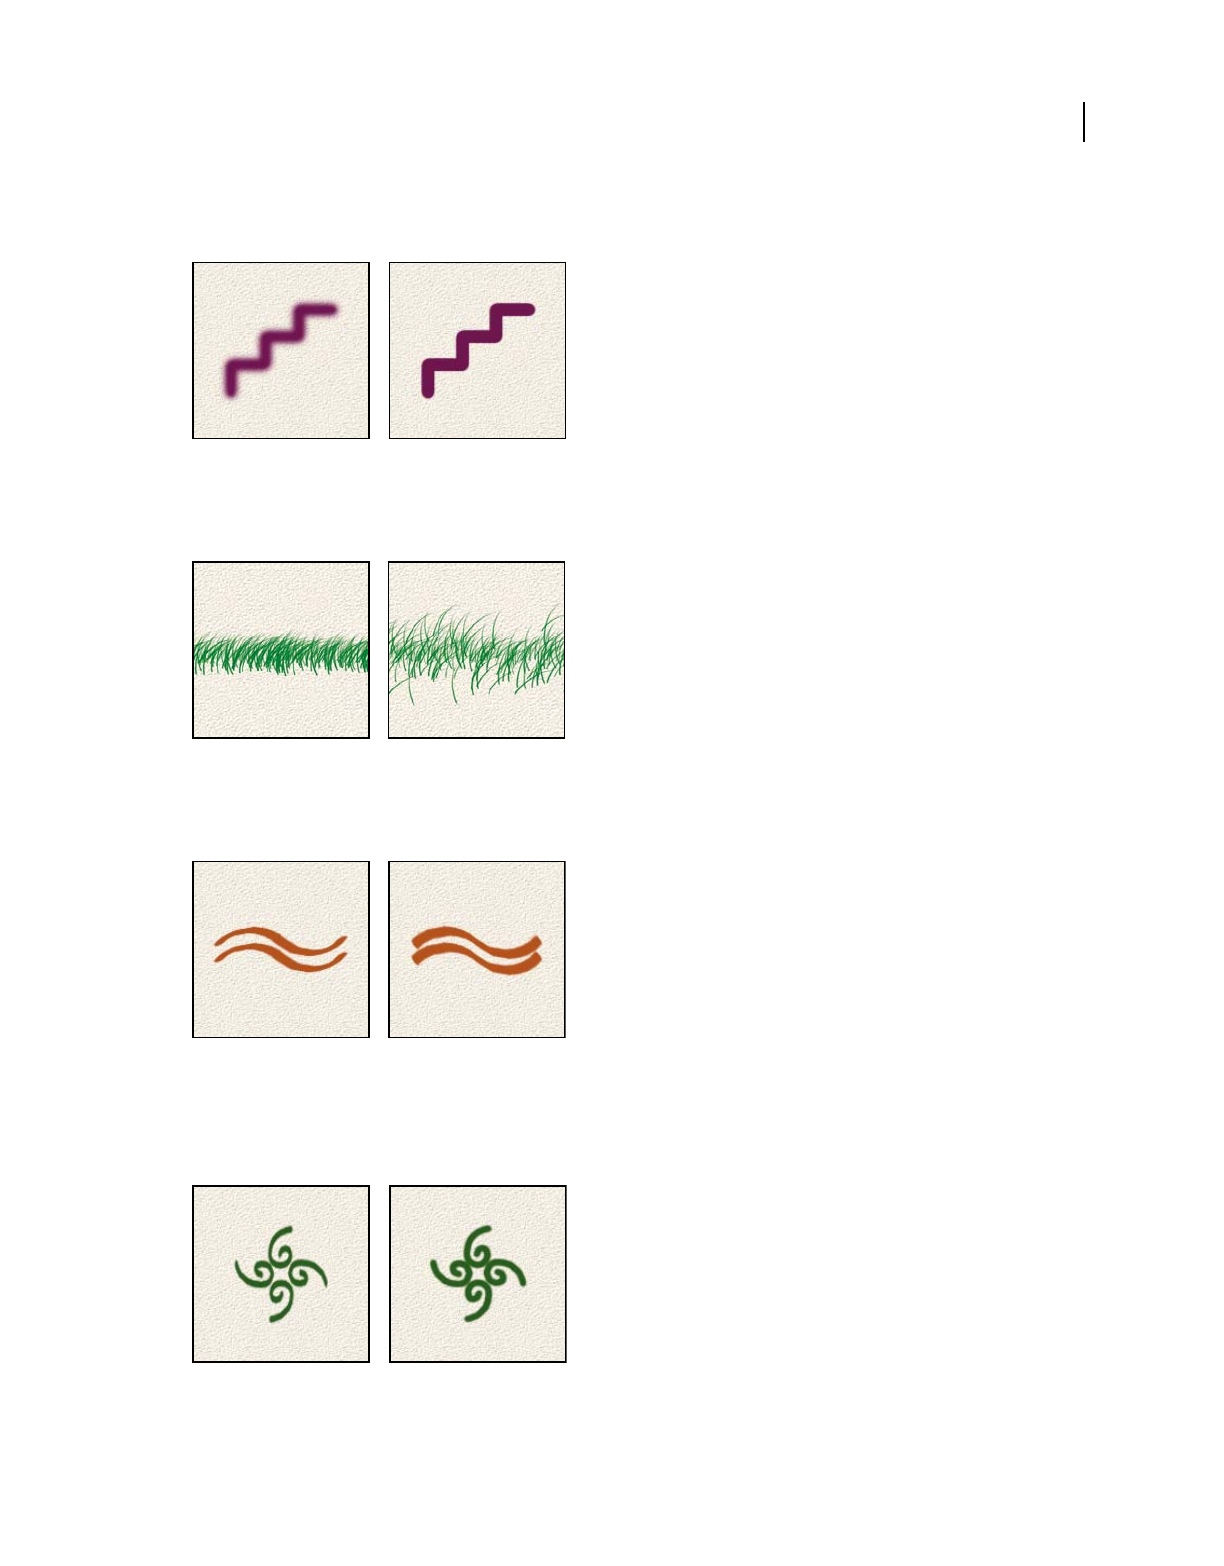
229
USING PHOTOSHOP ELEMENTS 9
Painting
Last updated 1/3/2012
Hardness Controls the size of the brush’s hard center. Type a number, or use the slider to enter a value that’s a
percentage of the brush diameter.
Brush strokes with different hardness values
Scatter Brush scattering determines how brush marks are distributed in a stroke. A low value produces a denser stroke
with less paint scattering, and higher values increase the scattering area.
Brush stroke with low and high scatter values
Angle Specifies the angle by which an elliptical brush’s long axis is offset from horizontal. Type a value in degrees, or
drag the arrowhead of the angle icon to mark the desired angle.
Angled brushes create a chiseled stroke
Roundness Specifies the ratio between the brush’s short and long axes. Enter a percentage value, or drag a dot in the
angle icon away from or toward the arrow. A value of 100% indicates a circular brush, a value of 0% indicates a linear
brush, and intermediate values indicate elliptical brushes.
Adjusting roundness affects the shape of a brush tip.

230
USING PHOTOSHOP ELEMENTS 9
Painting
Last updated 1/3/2012
More Help topics
“About blending modes” on page 214
Add a new brush to the brush library
1Select the Brush tool .
2Click the arrow next to the brush sample to display the pop-up panel in the options bar; choose a category from the
Brushes pop-up menu, and then select a brush to modify in the brush list.
3Use the options bar to modify the original brush.
4Click the arrow next to the brush sample to display the panel menu, and then choose Save Brush.
5Enter a name in the Brush Name dialog box and click OK.
The new brush is selected in the options bar, and is added to the bottom of the brushes pop-up panel.
Delete a brush
1Select the Brush tool .
2Click the arrow next to the brush sample to display the brushes pop-up panel in the options bar.
3Do one of the following:
•Press the Alt key (Option key in Mac OS) to change the pointer to scissors, and then click the brush you want to
delete.
•Select the brush in the pop-up panel, and choose Delete Brush from the panel menu.
•Choose Preset Manager from the panel menu, select Brushes from the Preset Type list, select the brush from the list
in the dialog box, and click Delete.
Create a custom brush shape from an image
You can create a custom brush by selecting an area in a photo. The brush uses a grayscale version of that selection to
apply the foreground color to your image. For example, you could select a leaf and then paint using a fall color. You
can also draw a new brush shape using the Brush tool. You can create a custom brush shape either from an entire layer
or from a selection. A custom brush shape can be up to 2500 pixels by 2500 pixels in size.
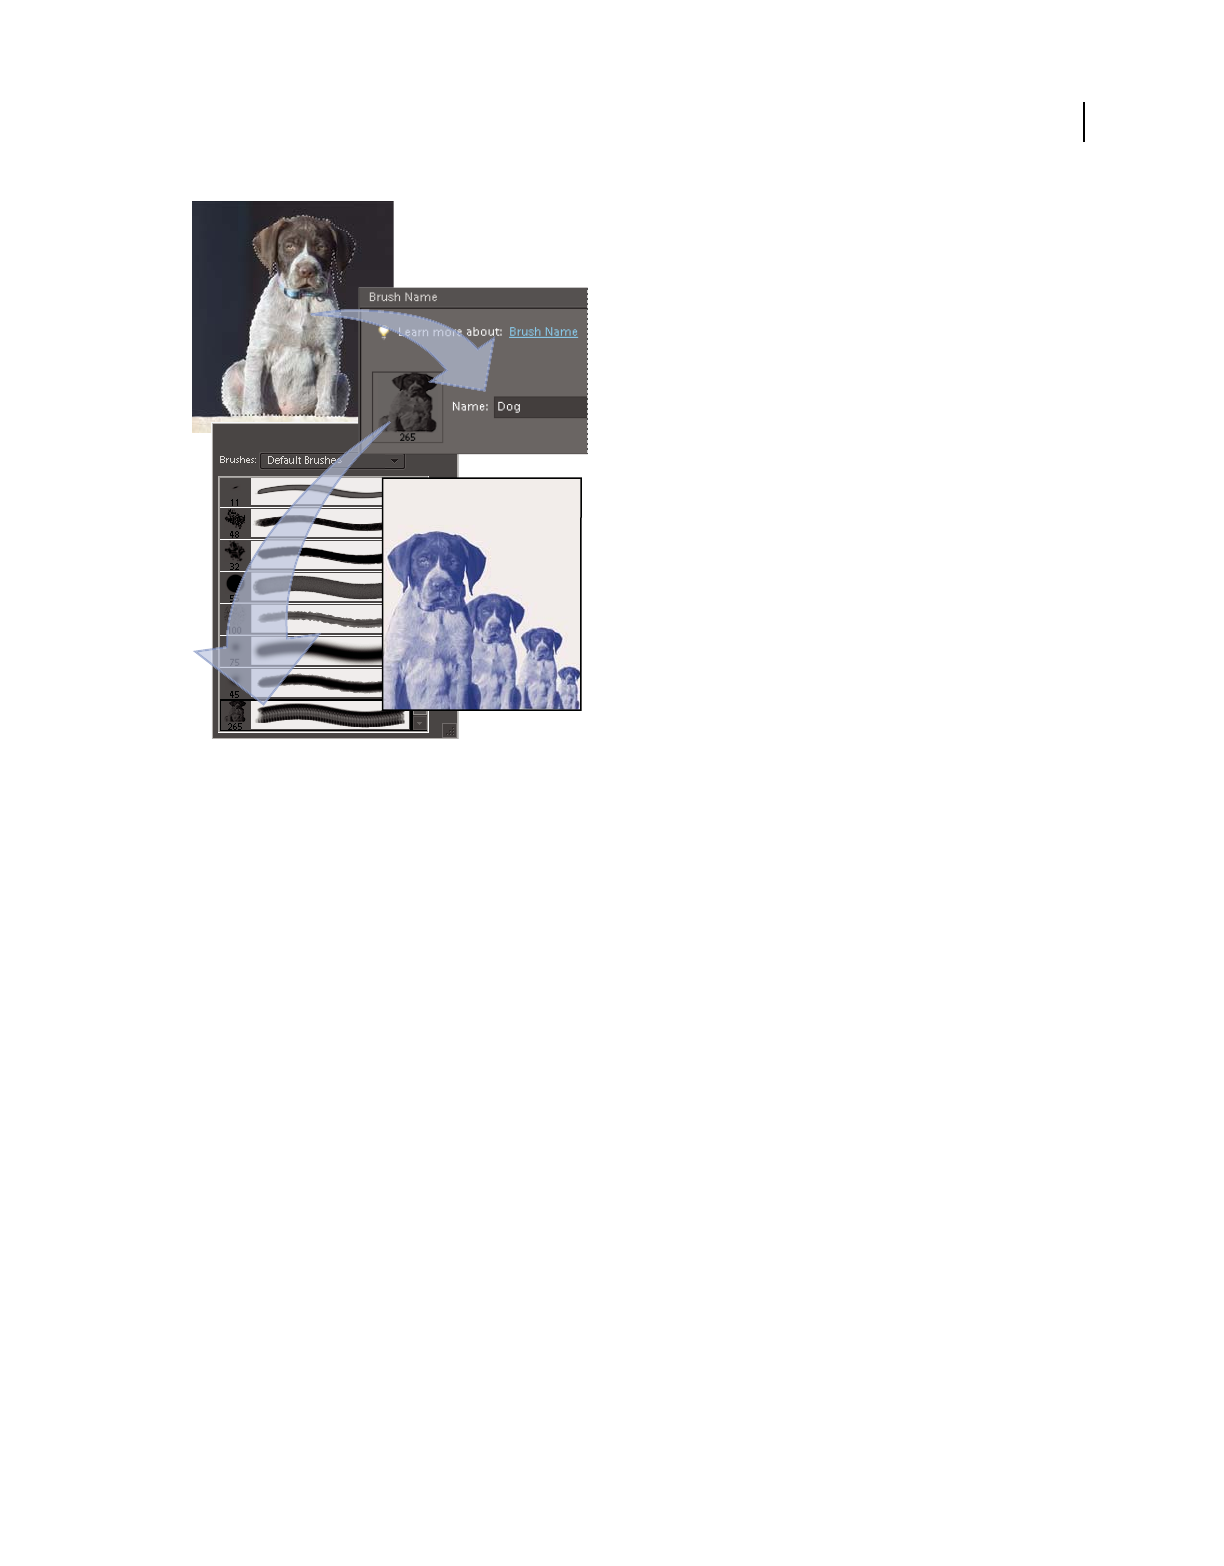
231
USING PHOTOSHOP ELEMENTS 9
Painting
Last updated 1/3/2012
Creating a custom brush of a dog. When you paint with this brush, you paint on dogs.
1Do one of the following:
•To use part of the image as a custom brush, select part of an image.
•To use the entire layer as a custom brush, deselect everything.
Use the painting tools to draw the brush shape and select it. You can use hard-edged or soft-edged strokes, or vary the
opacity of strokes to achieve soft-edge effects.
2Choose Edit > Define Brush or Edit > Define Brush From Selection.
3Name the brush and click OK.
More Help topics
“Use the Preset Manager” on page 241
Set up pressure-sensitive tablet support
Photoshop Elements is compatible with most pressure-sensitive digitizing tablets, such as Wacom® tablets. With the
software control panel for your tablet installed, you can vary brush tool properties based on the chosen tablet options
and the amount of pressure you apply with your stylus.
❖In the Edit workspace, select the Brush tool in the toolbox and then set the tablet options in the options bar that you
want to control with pen pressure.

232
USING PHOTOSHOP ELEMENTS 9
Painting
Last updated 1/3/2012
Fills and strokes
Use the Paint Bucket tool
The Paint Bucket tool fills an area that is similar in color value to the pixels you click. You can fill an area with the
foreground color or a pattern.
1In the Edit workspace, choose a foreground color.
2Select the Paint Bucket tool in the toolbox.
3Set options in the options bar, as desired, and then click the part of the image you want to fill.
If you don’t want to fill transparent areas in a layer, you can lock the layer’s transparency in the Layers panel.
You can specify any of the following Paint Bucket tool options:
Pattern Sets a pattern to use as the fill.
Mode Specifies how the paint that you apply blends with the existing pixels in the image.
Opacity Sets the opacity of the paint you apply. A low opacity setting allows pixels under a paint stroke to show
through. Drag the pop-up slider or enter an opacity value.
Tolerance Defines how similar in color filled pixels must be. A low tolerance fills pixels with color values very similar
to the pixel you click. A high tolerance fills pixels that have a broader range of colors.
Anti-alias Smoothes the edges of the filled selection.
Contiguous Fills similarly colored pixels that are next to each other. Deselect this option to fill all similar pixels in the
image, including those that aren’t touching. The Tolerance option defines how similar the colors must be.
All Layers Fills similar pixels on any visible layer that are within the levels set by the Tolerance and Contiguous
options.
More Help topics
“About foreground and background colors” on page 214
“About blending modes” on page 214
“Smooth the edges of a selection by anti-aliasing” on page 101
“Create fill layers” on page 72
Fill a layer with a color or pattern
You can use a Fill Layer to apply a fill or a pattern to your image, instead of using one of the brush tools. The fill layer
gives you the added flexibility of changing the fill and pattern properties and editing the fill layer’s mask to limit the
gradient to a portion of your image.
1In the Edit workspace, specify a foreground or background color.
2Select the area you want to fill. To fill an entire layer, select the layer in the Layers panel.
3Choose Edit > Fill Layer.
4Set options in the Fill dialog box, and then click OK.
Contents Choose a color from the Use menu. To select a different color, choose Color, and then select a color from
the Color Picker. Choose Pattern to fill with a pattern.

233
USING PHOTOSHOP ELEMENTS 9
Painting
Last updated 1/3/2012
Custom Pattern Specifies the pattern to use if you choose Pattern from the Use menu. You can use patterns from the
pattern libraries or create your own patterns.
Mode Specifies how the color pattern that you apply blends with the existing pixels in the image.
Opacity Sets the opacity of the color pattern to apply.
Preserve Transparency Fills only opaque pixels.
More Help topics
“About patterns” on page 233
“About blending modes” on page 214
“About foreground and background colors” on page 214
“Create fill layers” on page 72
Stroke (outline) objects on a layer
You can use the Stroke command to automatically trace a colored outline around a selection or the content of a layer.
Note: To add an outline to the background, you must first convert it to a regular layer. The background contains no
transparent pixels, so the entire layer is outlined.
1In the Edit workspace, select the area in the image or a layer in the Layers panel.
2Choose Edit > Stroke (Outline) Selection.
3In the Stroke dialog box, set any of the following options, and then click OK to add the outline:
Width Specifies the width of the hard-edged outline. Values can range from 1 to 250 pixels.
Color Sets the color of the outline. Click the color swatch to select a color in the Color Picker.
Location Specifies whether to place the outline inside, outside, or centered over the selection or layer boundaries.
Mode Specifies how the paint that you apply blends with the existing pixels in the image.
Opacity Sets the opacity of the paint you apply. Enter an opacity value or click on the arrow and drag the pop-up slider.
Preserve Transparency Strokes only areas containing opaque pixels on a layer. If your image has no transparency, this
option isn’t available.
More Help topics
“About blending modes” on page 214
Patterns
About patterns
You can paint a pattern with the Pattern stamp tool or fill a selection or layer with a pattern that you choose from the
pattern libraries. Photoshop
Elements has several patterns you can choose from.
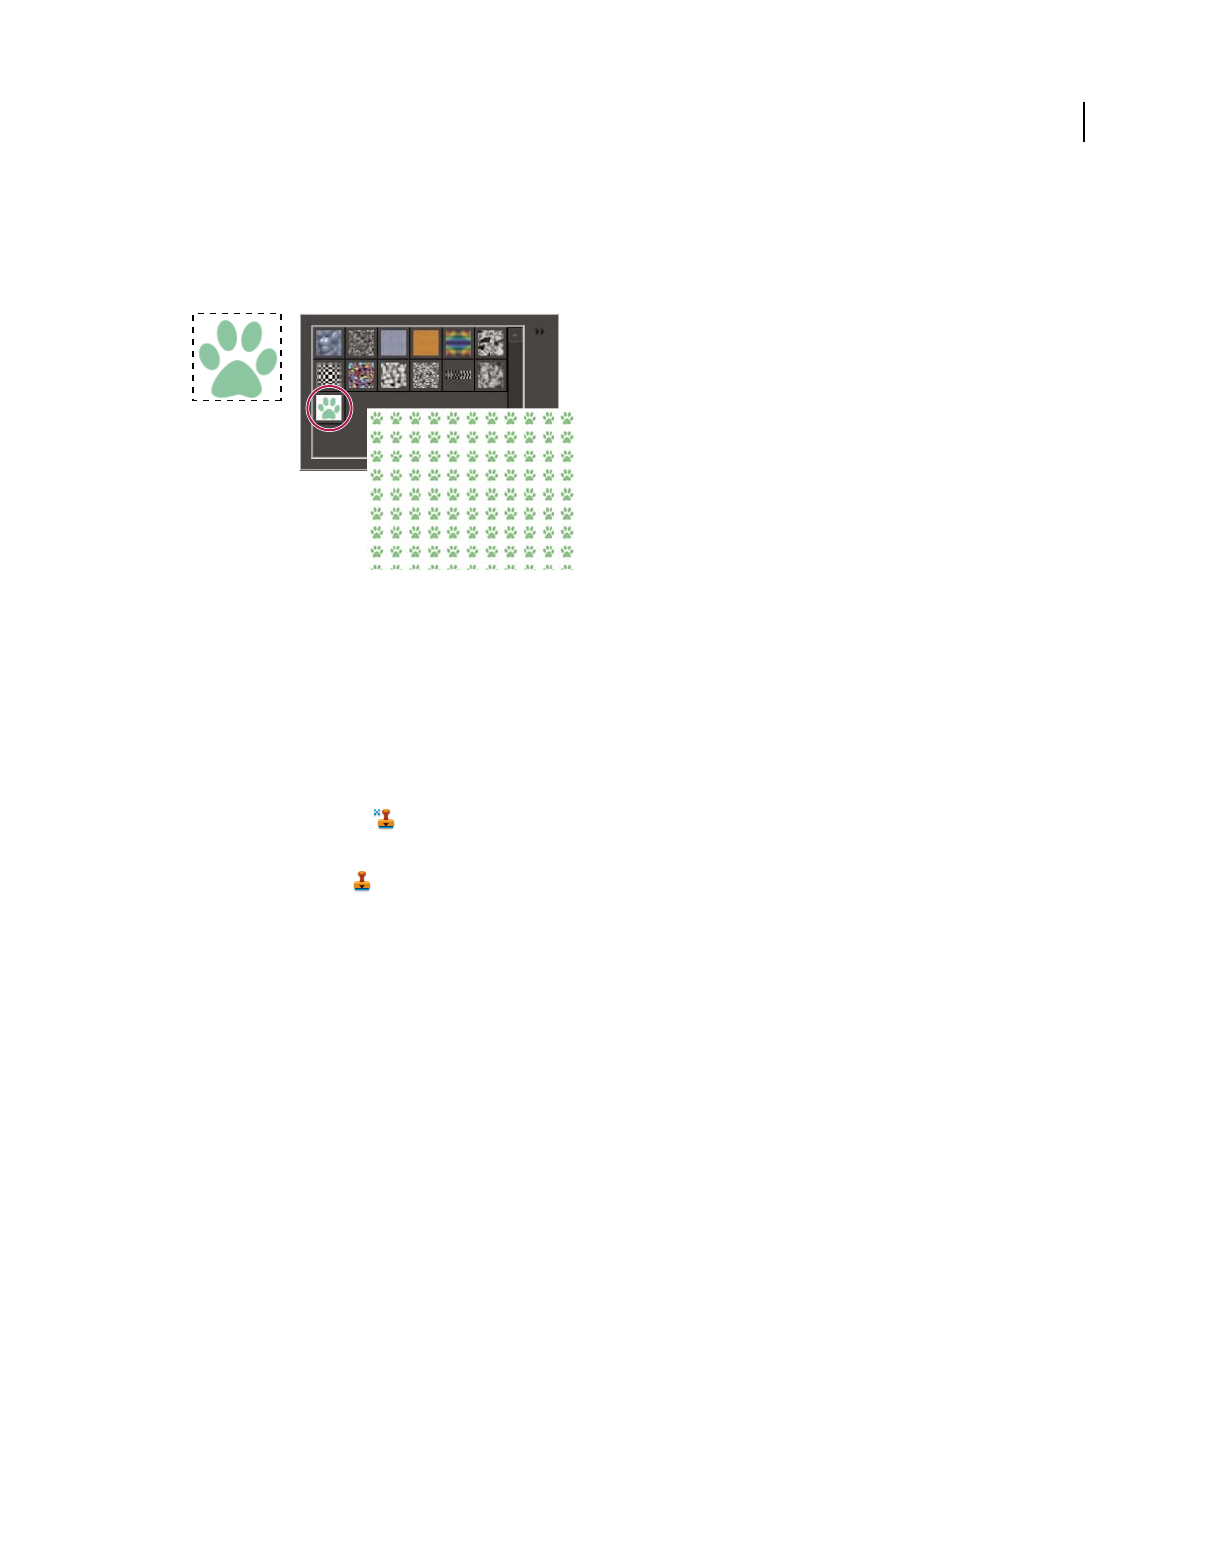
234
USING PHOTOSHOP ELEMENTS 9
Painting
Last updated 1/3/2012
To customize your images, or to make one-of-a-kind scrapbook pages, you can create your own patterns. You can save
patterns that you create in a library, and then load libraries of patterns using the Preset Manager or the Pattern pop-up
panel, which appears in the options bar of the Pattern Stamp tool and the Paint Bucket tool. Saving patterns allows you
to easily use a pattern in multiple images.
Creating a custom pattern
A. Rectangular selection used to define a pattern B. Custom pattern in pattern picker C. New image filled with custom pattern
More Help topics
“Fill a layer with a color or pattern” on page 232
“Use the Preset Manager” on page 241
Use the Pattern Stamp tool
The Pattern Stamp tool paints with a pattern defined from your image, another image, or a preset pattern.
1In the Edit workspace, select the Pattern Stamp tool from the toolbox. (If you don’t see it in the toolbox, select the
Clone Stamp tool
, and then click the Pattern Stamp tool icon in the options bar.)
2Choose a pattern from the Pattern pop-up panel in the options bar. To load additional pattern libraries, select a
library name from the panel menu, or choose Load Patterns and navigate to the folder where the library is stored.
You can also define your own pattern.
3Set Pattern Stamp tool options in the options bar, as desired, and then drag within the image to paint.
You can specify any of the following Pattern Stamp tool options:
Brushes Sets the brush tip. Click the arrow next to the brush sample, choose a brush category from the Brushes pop-up
menu, and then select a brush thumbnail.
Size Sets the size of the brush in pixels. Drag the Size pop-up slider or enter a size in the text box.
Mode Specifies how the paint that you apply blends with the existing pixels in the image. (See “About blending modes”
on page 214.)
Opacity Sets the opacity of the pattern you apply. A low opacity setting allows pixels under a pattern stroke to show
through. Drag the pop-up slider or enter an opacity value.
Aligned Repeats the pattern as a contiguous, uniform design. The pattern is aligned from one paint stroke to the next.
If Aligned is deselected, the pattern is centered on the pointer each time you stop and resume painting.
Impressionist Paints the pattern using paint daubs to create an impressionist effect.
More Help topics
“Fill a layer with a color or pattern” on page 232
A
B
C

235
USING PHOTOSHOP ELEMENTS 9
Painting
Last updated 1/3/2012
Add a custom pattern to the pattern picker
1Do one of the following:
•To create a pattern from part of the image, make a rectangular selection with Feather set to 0 pixels.
•To create a pattern from the entire image, deselect everything.
2Choose Edit > Define Pattern From Selection.
3Enter a name for the pattern in the Pattern Name dialog box.
4To deselect the original selection, choose Select > Deselect.
More Help topics
“About selections” on page 88
Use a preset pattern from the PostScript Patterns folder
Each preset file in the PostScript Patterns folder contains a single pattern in the Adobe Illustrator format. You can scale
these patterns at any resolution.
1Choose File > Open.
2Navigate to Photoshop Elements 9.0/Presets/Patterns/PostScript Patterns.
3Select the pattern file you want to use, and click Open.
4When the Rasterize Generic EPS Format dialog opens, click OK to proceed.
5
Choose Select > All, or make a rectangular selection around the pattern with Feather set to 0 pixels in the options bar.
6Choose Edit > Define Pattern From Selection. The pattern is defined as an Adobe Photoshop Elements pattern.
7Enter a name for the pattern in the Pattern Name dialog box, and click OK.
More Help topics
“Use the Preset Manager” on page 241
Gradients
About gradients
You fill an area with a gradient by dragging within the image or by selecting with the Gradient tool. The distance
between the starting point (where you first press the mouse button) and ending point (where you release the mouse
button) affects the gradient appearance, as does the gradient type.
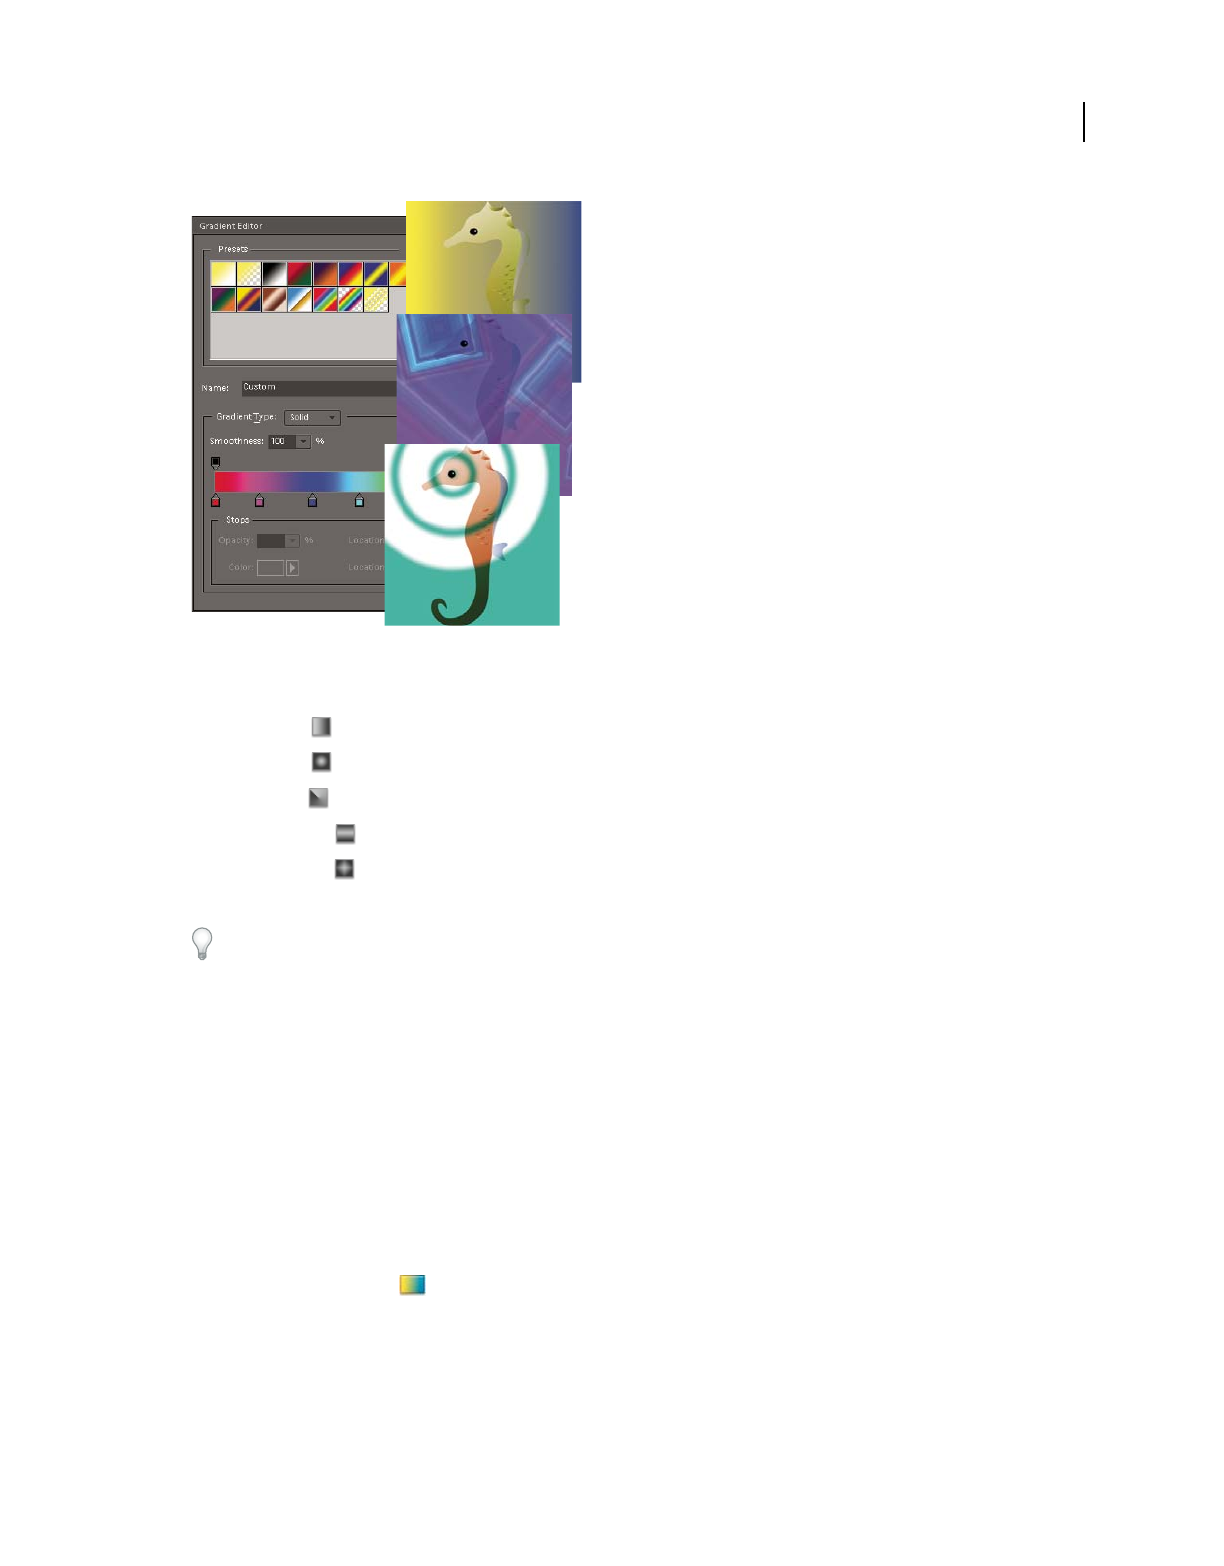
236
USING PHOTOSHOP ELEMENTS 9
Painting
Last updated 1/3/2012
Using the Gradient tool and Gradient Editor, you can create a custom mix of colors in your photos.
You can choose any of the following gradient types in the options bar.
Linear gradient Shades from the starting point to the ending point in a straight line.
Radial gradient Shades from the starting point to the ending point in a circular pattern.
Angle gradient Shades in a counterclockwise sweep around the starting point.
Reflected gradient Shades using symmetric linear gradients on either side of the starting point.
Diamond gradient Shades from the starting point outward in a diamond pattern. The ending point defines one
corner of the diamond.
You can also use a Fill Layer to apply a gradient to your image. The fill layer gives you the added flexibility of changing
the gradient properties and editing the fill layer’s mask to limit the gradient to a portion of your image.
Gradients are stored in libraries. You can choose a different library of gradients to display in the Gradient Picker menu
by clicking the small triangle in the menu and selecting a library at the bottom of the list. You can also save and load
your own libraries of gradients in this menu. You can also manage gradients by using the Preset Manager.
More Help topics
“Create fill layers” on page 72
Apply a gradient
1To fill part of the image, select the area with one of the selection tools. Otherwise, the gradient fill is applied to the
entire active layer.
2Select the Gradient tool .
3In the options bar, click the desired gradient type.
4Choose a gradient fill from the Gradient Picker panel in the options bar.
5(Optional) Set gradient options in the options bar.
Mode Specifies how the gradient blends with the existing pixels in the image.
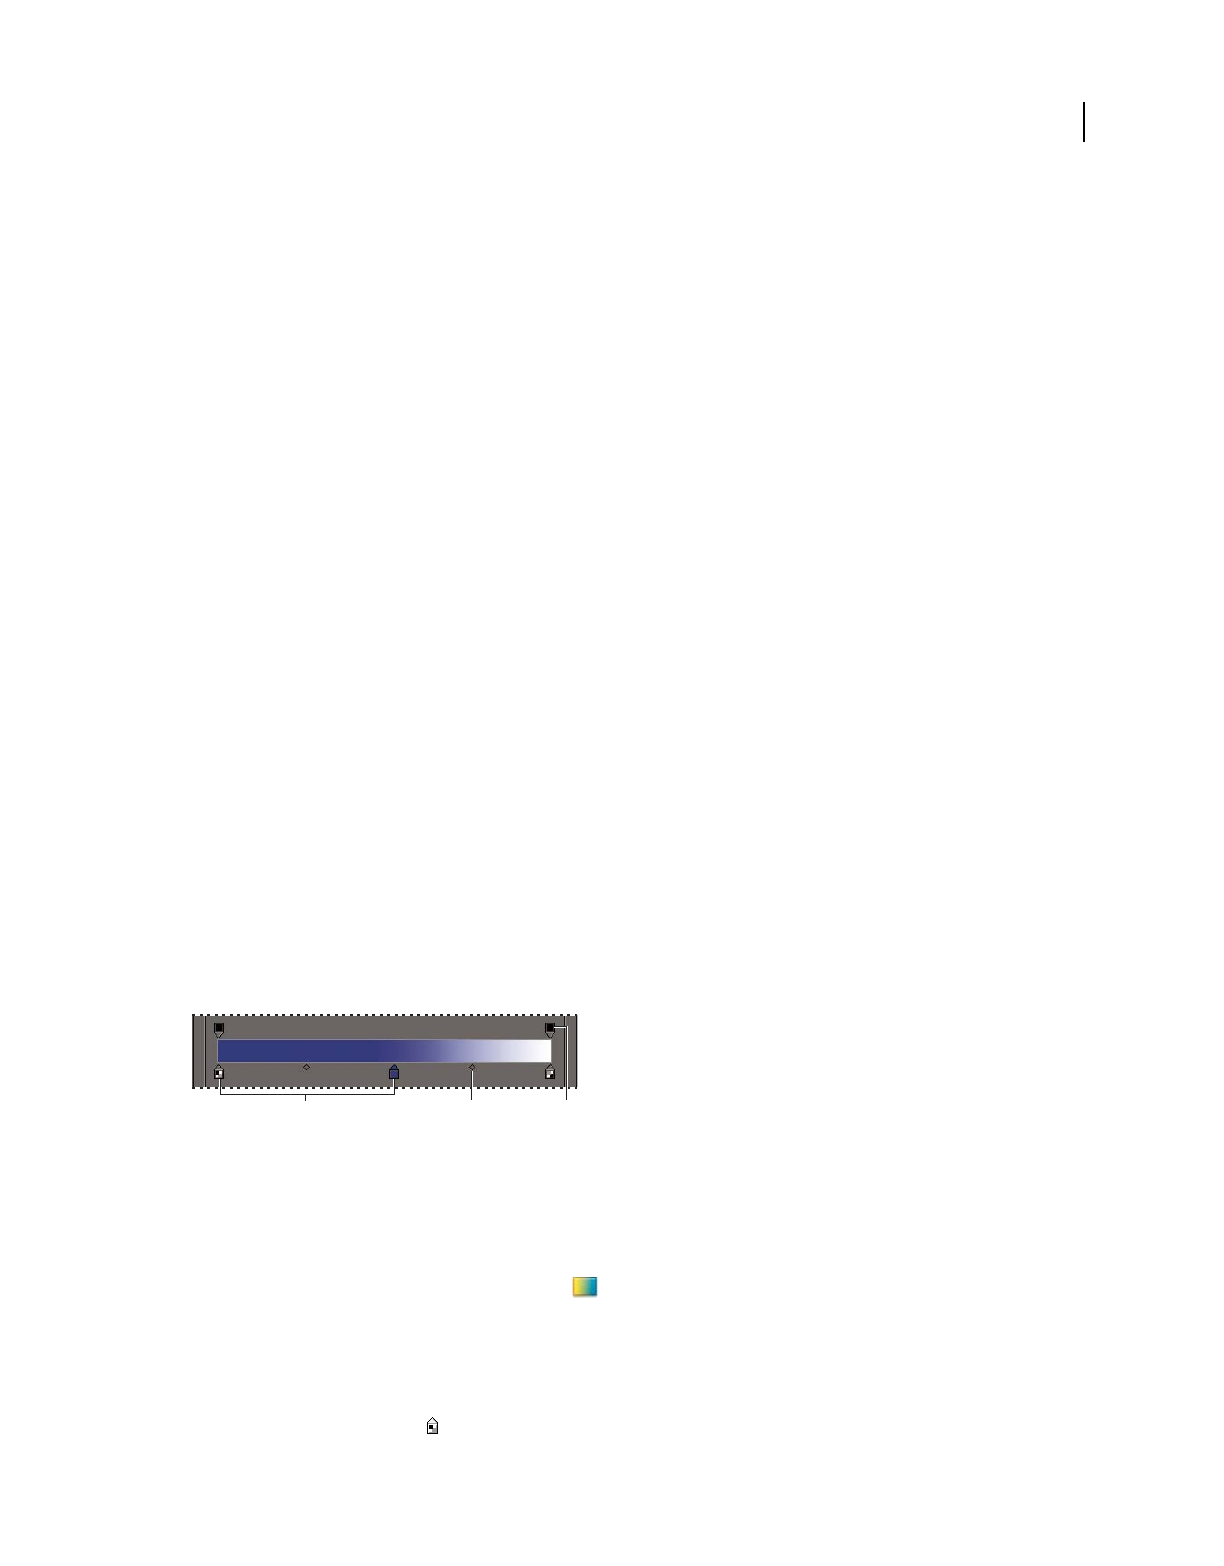
237
USING PHOTOSHOP ELEMENTS 9
Painting
Last updated 1/3/2012
Opacity Sets the opacity of the gradient. A low opacity setting allows pixels under the gradient to show through. Drag
the pop-up slider or enter an opacity value.
Reverse Switches the order of the colors in the gradient fill.
Dither Creates a smoother blend with less obvious bands of color.
Transparency Uses the gradient’s transparency (instead of any transparent areas in the image) if the gradient has
transparent areas.
6In the image, position the pointer where you want to set the starting point of the gradient, and drag to define the
ending point. To constrain the gradient angle to a multiple of 45°, hold down Shift as you drag.
Apply gradient fill to text
1Select the text you want to fill.
2Choose Layer > Simplify Layer to convert the vector text to a bitmap image. You won’t be able to edit the text after
you simplify the layer.
3Control-click (Command-click in Mac OS) the thumbnail for the text layer in the Layers panel to select the text.
4Select the Gradient tool.
5In the options bar, click the desired gradient type.
6Choose a gradient fill from the Gradient Picker panel.
7Position the pointer on the text where you want to set the starting point of the gradient, and drag to define the
ending point.
More Help topics
“Simplify a layer” on page 62
Define a gradient
You can define your own gradients in the Gradient Editor dialog box. A gradient can include two or more colors, or
one or more colors that fade to transparency.
Gradient Editor dialog box.
A. Color Stop B. Color Midpoint C. Opacity Stop
To define a gradient, you add a color stop to add a color to the gradient, drag the color stop and the midpoint icon to
define the range between two colors, and adjust the Opacity stops to specify the transparency that you want in the
gradient.
1In the Edit workspace, select the Gradient tool .
2To display the Gradient Editor dialog box, click the Edit button next to the gradient sample.
3In the Presets section of the Gradient Editor dialog box, select a gradient on which to base your new gradient.
4To choose colors for your gradient, do one of the following:
•Double-click the color stop , or click the Color swatch to display the Color Picker. Choose a color, and click OK.
C
B
A

238
USING PHOTOSHOP ELEMENTS 9
Painting
Last updated 1/3/2012
•Choose Foreground from the Color pop-up menu to use the current foreground color.
•Choose Background from the Color pop-up menu to use the current background color.
•Choose User Color from the Color pop-up menu to always use the color you chose for the gradient, other than the
current foreground or background.
5To adjust the color stop location of a color, drag the stop left or right.
6To add a color to the gradient, click below the gradient bar to define another color stop.
7To adjust the location of the transition midpoint between colors, drag the diamond below the gradient bar to the
left or right.
8To delete the color stop you are editing, click Delete.
9To set the color transition’s smoothness, enter a percentage in the Smoothness text box, or drag the pop-up slider.
10 If desired, set transparency values for the gradient by dragging the Opacity stops.
11 To save the gradient in the gradient presets, enter a name for the new gradient, and then click New.
12 Click OK. The newly created gradient is selected and ready to use.
More Help topics
“Use the Adobe Color Picker” on page 220
Specify gradient transparency
Each gradient fill contains settings (opacity stops) that control the opacity of the fill at different locations in the
gradient. The checkerboard pattern indicates the amount of transparency in the gradient preview. Gradients need at
least two opacity stops.
1Create a gradient.
2To adjust the starting opacity in the Gradient Editor, click the left opacity stop above the gradient bar. The triangle
below the stop turns black, indicating that you’re editing the starting transparency.
3Set the Opacity by doing one of the following:
•Enter a value between 0 (fully transparent) and 100% (fully opaque).
•Drag the arrow on the Opacity pop-up slider.
4To adjust the opacity of the endpoint, click the right transparency stop above the gradient bar. Then set the opacity
as described in step 3.
5To adjust the location of the starting or ending opacity, do one of the following:
•Drag the corresponding opacity stop to the left or right.
•Select the corresponding opacity stop, and enter a value for Location.
6To adjust the location of the midpoint opacity (the point midway between the starting and ending opacities), do
one of the following:
•Drag the diamond above the gradient bar to the left or right.
•Select the diamond, and enter a value for Location.
7To delete the opacity stop you are editing, click Delete, or drag the stop away from the gradient bar.
8To add an intermediate opacity, click above the gradient bar to define a new opacity stop. You can then adjust and
move this opacity as you would a starting or ending opacity.
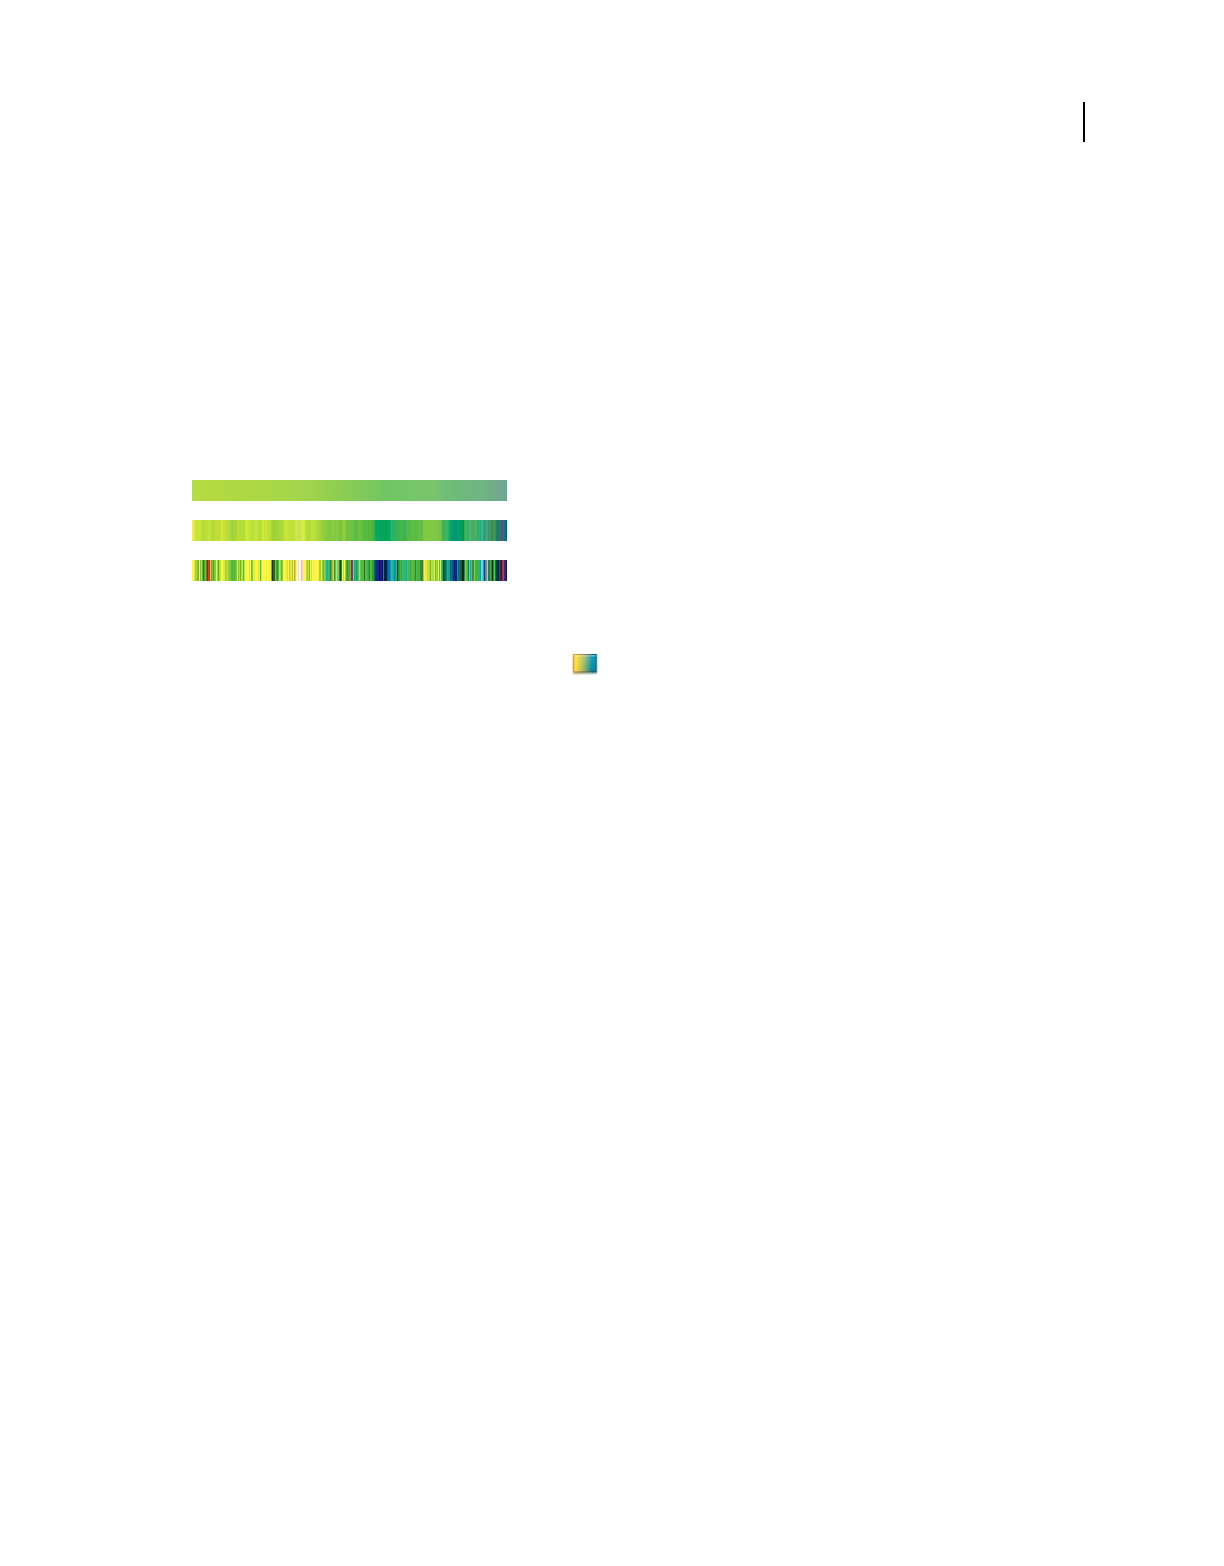
239
USING PHOTOSHOP ELEMENTS 9
Painting
Last updated 1/3/2012
To remove an intermediate opacity, drag its transparency stop up and off the gradient bar, or select the stop and click
the Delete button.
9To save the gradient to the gradient presets, enter a new name in the Name text box, and then click New. This
creates a new gradient preset with the transparency setting you specified.
10 Click OK to exit the dialog box and select the newly created gradient. Make sure that Transparency is selected in
the options bar.
Create a noise gradient
A noise gradient is a gradient that contains randomly distributed colors within a range of colors that you specify.
Noise gradients with different noise values.
A. 10% noise B. 50% noise C. 90% noise
1In the Edit workspace, select the Gradient tool .
2To display the Gradient Editor dialog box, click the Edit button in the options bar.
3Choose Noise from the Gradient Type menu.
4Set options for the gradient.
Roughness Sets the amount of softness in the transition between colors in the pattern.
Color Model Specifies the color model to use to set the color range to include in the gradient. To define the range of
colors, drag the sliders for each color component.
Restrict Colors Prevents oversaturated colors.
Add Transparency Adds transparency to random colors.
5To randomly mix the colors, click the Randomize button until you find a gradient you like.
6Enter a name for the new gradient.
7To add your gradient preset, click New.
8Click OK to exit the dialog box, and then select the newly created gradient.
Presets and libraries
About presets
In the Full Edit workspace, pop-up panels appear in the options bar and provide access to predefined libraries of
brushes, color swatches, gradients, patterns, layer styles, and custom shapes. The items in each library are called presets.
When closed, pop-up panels display a thumbnail image of the currently selected preset.
A
B
C
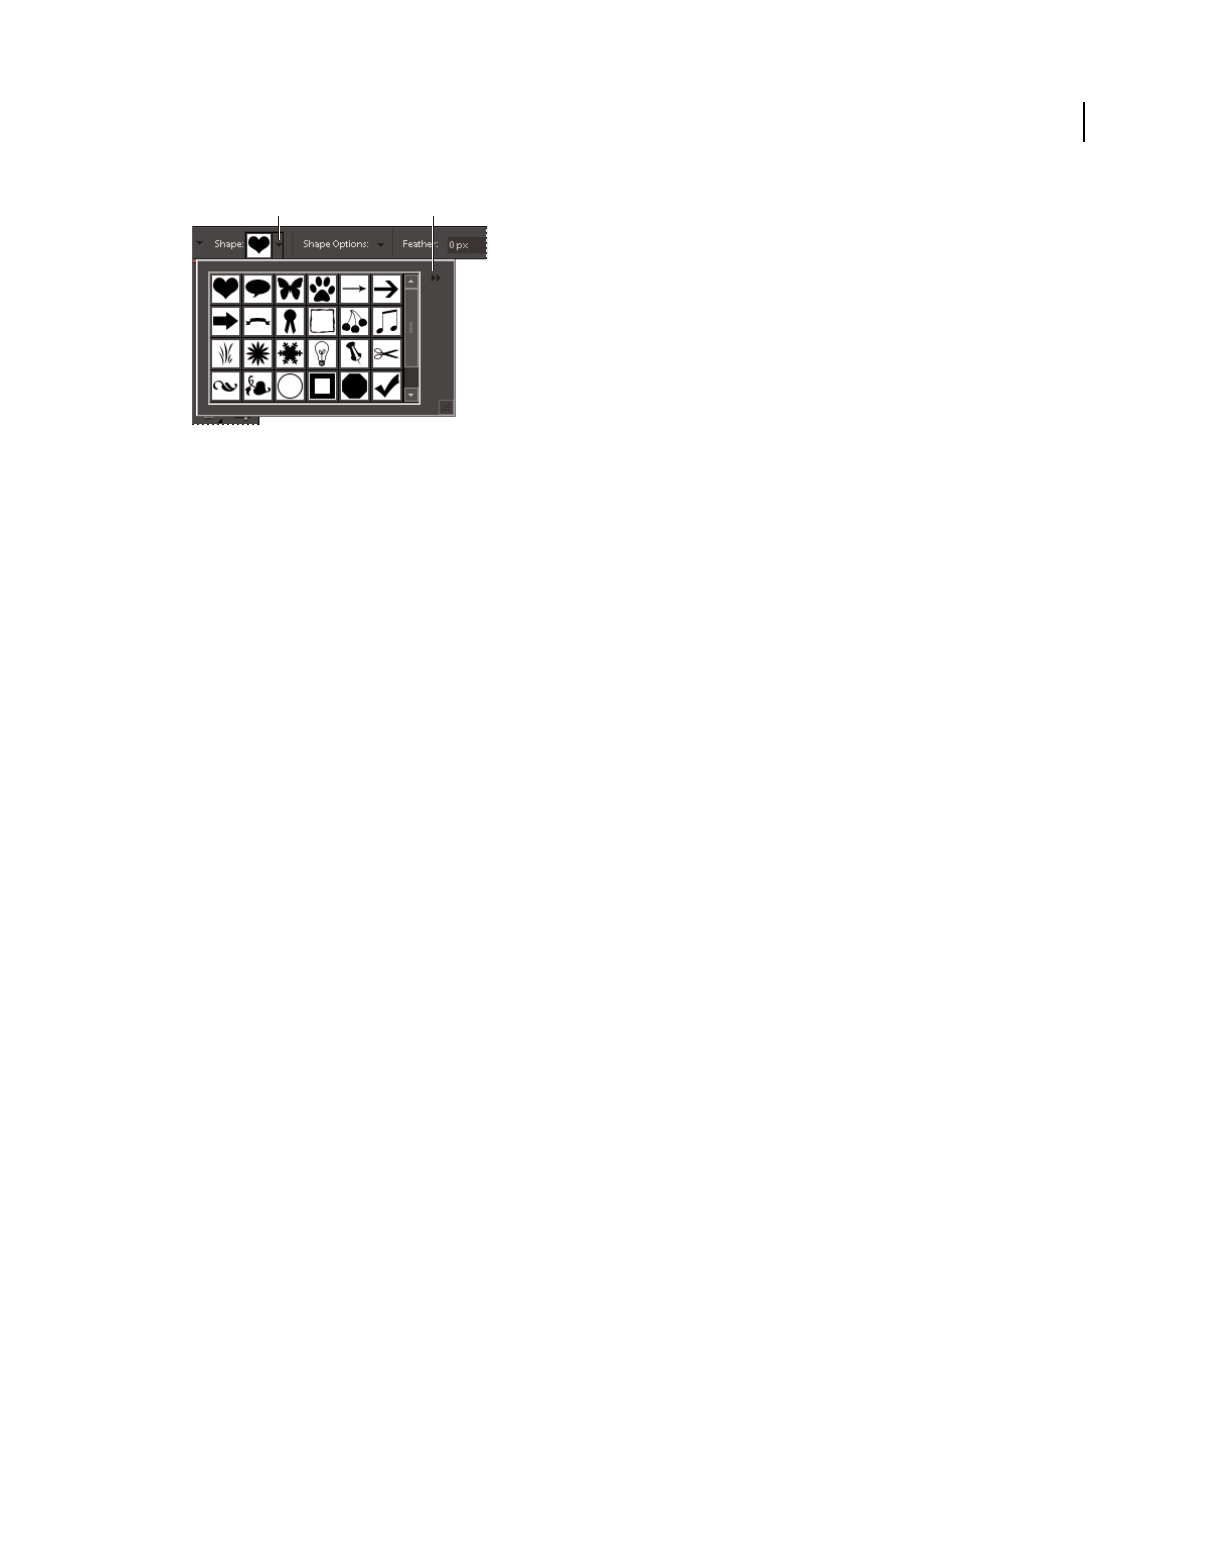
240
USING PHOTOSHOP ELEMENTS 9
Painting
Last updated 1/3/2012
Viewing the Cookie Cutter pop-up panel in the options bar
A. Click to show the pop-up panel. B. Click to view the pop-up panel menu, which contains preset libraries.
You can change the display of a pop-up panel to view presets by their names, as thumbnail icons, or with both names
and icons.
You can use the Presets Manager to load different preset libraries. Presets are stored in separate library files that can
be found in the Presets folder in the Photoshop
Elements application folder.
Use preset tool options
1Select the tool you want to use.
2In the options bar, open the pop-up panel. (Only certain tools have pop-up panels.)
3Do any of the following:
•To view and select currently loaded preset libraries, click the triangle in the upper-right corner of the pop-up panel.
•To select a preset, click an item in the library.
•To save a brush, open the pop-up panel menu, choose the Save Brush command, then enter a name in the dialog
box provided and click
OK.
•To save a gradient or pattern, open the panel menu, choose the New Gradient or New Pattern command, then enter
a name in the dialog box provided and click
OK.
•To rename a brush, gradient, or pattern in a panel, open the pop-up panel menu, choose the Rename command,
then enter a new name and click
OK.
•To delete a brush, gradient, or pattern from a panel, select an item, open the pop-up panel menu and choose the
Delete command. You can also hold down Alt (Option key in Mac OS) and click a brush or gradient.
•To save a library of brushes, gradients, or patterns, open the pop-up panel menu. From the menu, choose the Save
Brushes, Save Gradients, or Save Patterns command, then enter a name for the library file, and click Save.
•To load a library of brushes, gradients, or patterns, open the pop-up panel menu, choose the Load command, then
select the library file you want to add and click Load.
Note: Using the Load command adds the brush library to the brushes you have available. If you choose a preset library
of brushes, the preset library replaces your current set of brushes.
•To replace the current set of gradients in a panel, open the pop-up panel menu, choose a library file from the bottom
section of the menu, and click
OK. You can also choose the Replace command, browse to select a library file, and
click Load.
•To replace the current set of brushes or patterns in a panel, choose a library from the Brushes menu.
Note: To replace the current set of brushes, gradients, or patterns, you can also choose Preset Manager from the pop-up
panel menu and use the Preset Manager to load a different library of brushes, gradients, or patterns.
AB
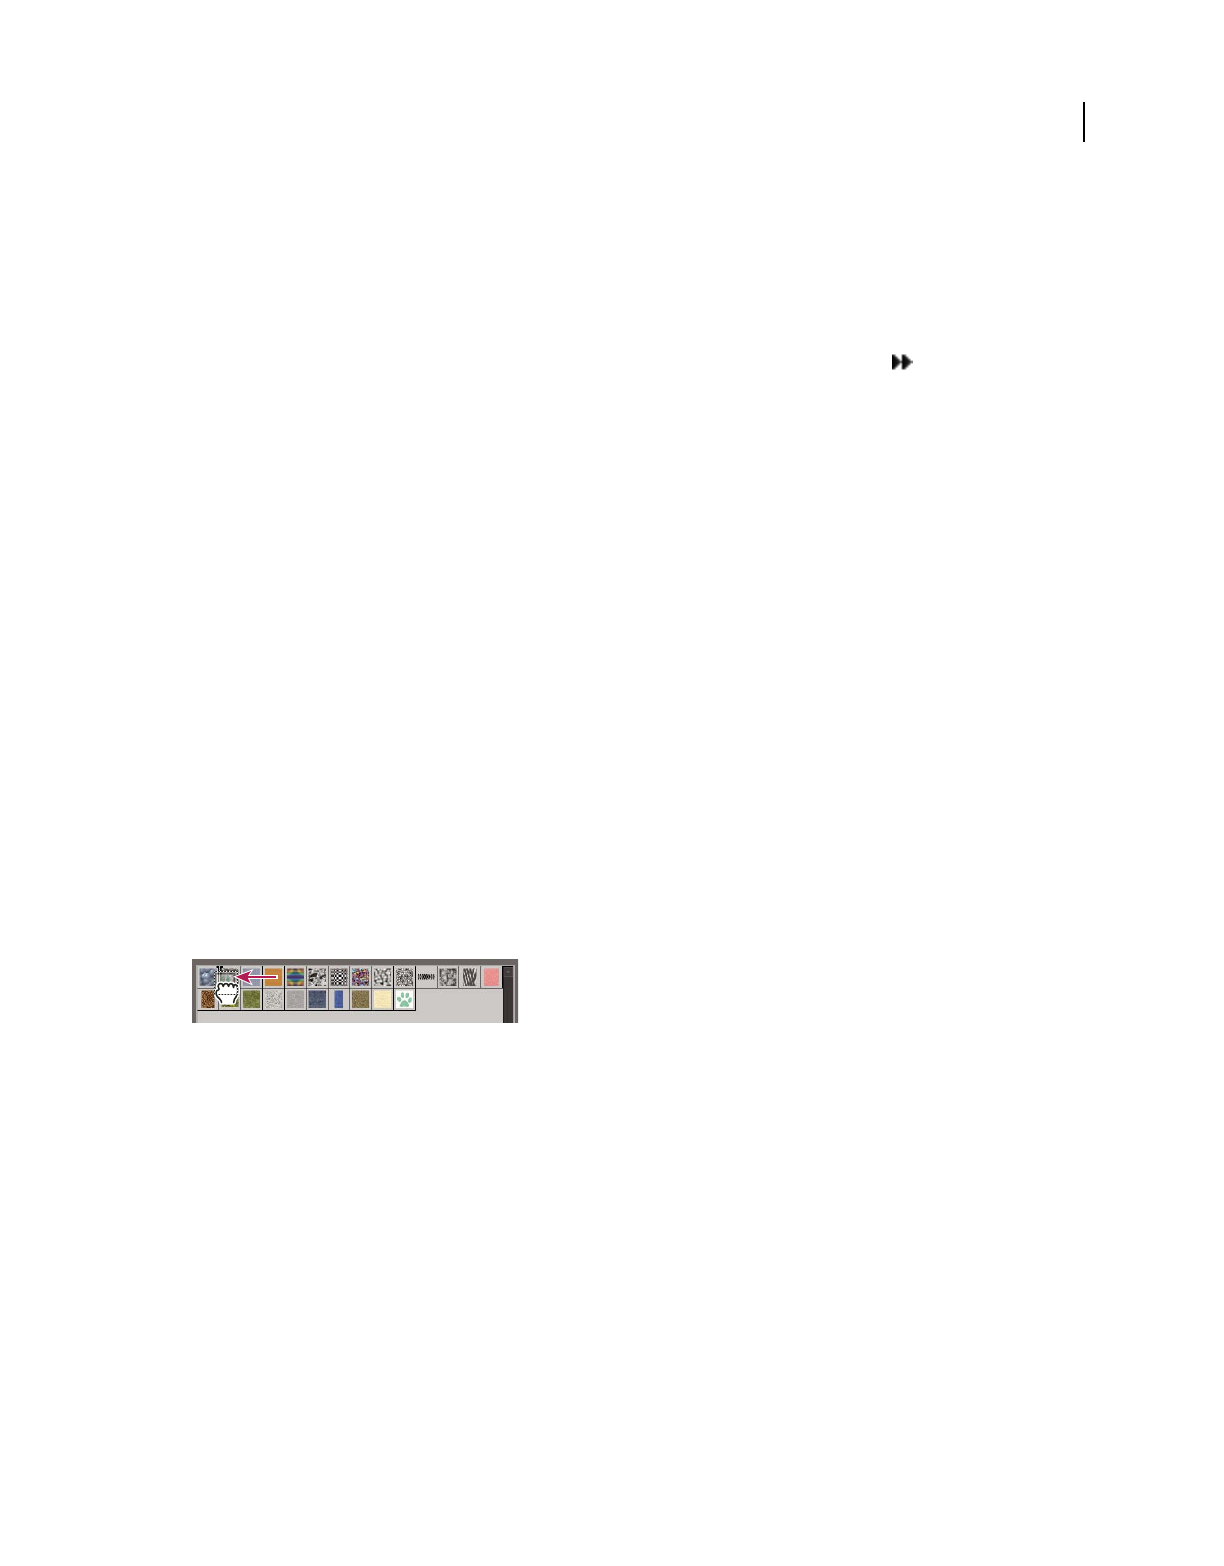
241
USING PHOTOSHOP ELEMENTS 9
Painting
Last updated 1/3/2012
•To load the default set of brushes, gradients, or patterns, open the pop-up panel menu and choose the Reset
command.
Change the display of items in a pop-up panel menu
1Do one of the following:
•To change the display of one panel, open the pop-up panel menu by clicking the triangle in the upper-right
corner of the pop-up panel.
•To change the display for all panels, choose Edit > Preset Manager to open the Preset Manager, and then click the
More button.
2Select a view option:
Text Only Displays the name of each item.
Small Thumbnail or Large Thumbnail Displays a thumbnail of each item.
Small List or Large List Displays the name and thumbnail of each item.
Stroke Thumbnail Displays a sample brush stroke and brush thumbnail. (This option is available for brushes only.)
Note: Not all of the above options are available for all pop-up panels.
Use the Preset Manager
In the Full Edit workspace, the Preset Manager (Edit > Preset Manager) lets you manage the libraries of preset brushes,
color swatches, gradients, and patterns included in Photoshop
Elements. For example, you can create a set of favorite
brushes, or you can restore the default presets.
Each type of library is a file with its own file extension and default folder. Preset files are installed on your computer
inside the Presets folder in the Photoshop
Elements program folder.
Note: You can delete a preset in the Preset Manager by selecting the preset and clicking Delete. You can always use the
Reset command to restore the default items to a library.
Dragging a preset to a new position in the Preset Manager
Load a library
1In the Preset Manager, choose Brushes, Color Swatches, Gradients, or Patterns from the Preset Type menu.
2Do one of the following:
•Click Load, select a library from the list, and then click Load. If you want to load a library located in another folder,
navigate to that folder, then select the library. By default, preset files are installed on your computer inside the
Presets folder in the Photoshop
Elements program folder.
•Click the More button and choose a library from the bottom section of the menu.
3Click the Done button when you’re finished.
Restore the default library or replace the currently displayed library
❖In the Preset Manager, click the More button and choose a command from the menu:
Reset Restores the default library for that type.

242
USING PHOTOSHOP ELEMENTS 9
Painting
Last updated 1/3/2012
Replace Replaces the current library with the contents of another library.
Save a subset of a library
1In the Preset Manager, Shift-click to select multiple contiguous presets or Ctrl-click (Command-click in Mac OS)
to select multiple noncontiguous presets. Only the selected presets are saved in the new library.
2Click Save Set, then enter a name for the library. If you want to save the library in a folder other than the default,
navigate to the new folder before saving.
Rename a preset
1In the Preset Manager, do one of the following:
•Select a preset in the list, and click Rename.
•Double-click a preset in the list.
2Enter a new name for the preset. If you selected multiple presets, you are prompted to enter multiple names.
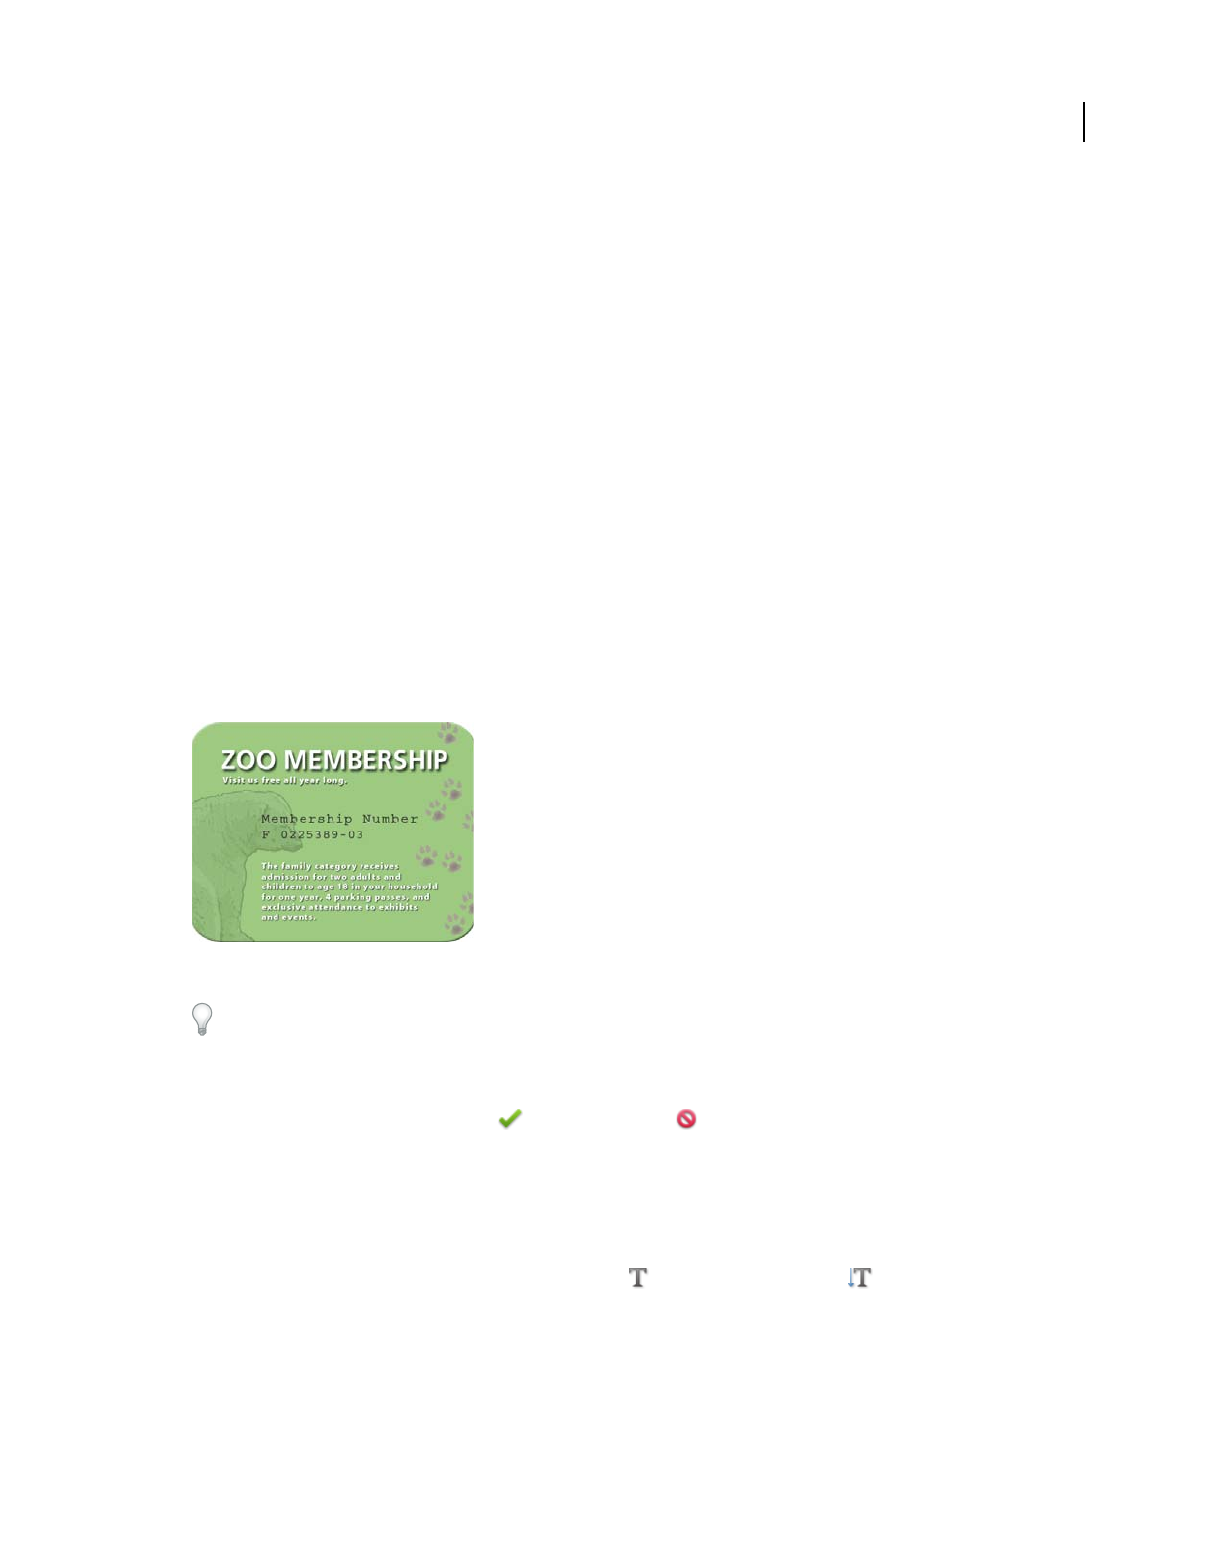
243
Last updated 1/3/2012
Chapter 12: Adding text and shapes
You can add text and shapes of different color, styles, and effects to an image. In the Edit workspace, use the Horizontal
Type and Vertical Type tools to create and edit text. You can create single-line text or paragraph text.
In Photoshop Elements, shapes are resolution-independent vector graphics (lines and curves defined by their
geometric characteristics instead of pixels) that can be moved, resized, or changed without losing detail, clarity, or
quality. Both text and shapes are created in separate layers.
Add and edit text
About text
In the Edit workspace, use the Horizontal Type and Vertical Type tools to create and edit text. The new text you type
is entered in a new text layer. You can create single-line text or paragraph text. Each line of single line text you enter is
independent—the length of a line grows or shrinks as you edit it, but it doesn’t wrap to the next line. To create a new
line of text, press Enter. Paragraph text wraps within the paragraph boundaries you specify.
Single-line text (top of image) and paragraph text (bottom of image).
You can use the type mask tools (Right-click the Type tool) to create a selection in the shape of text. You can then create
different effects and cutouts with the text.
Clicking in an image with a type tool puts the tool in edit mode so you can enter and edit text. You must commit
changes to the type before you can perform other operations, like selecting menu commands. The Type tool is in edit
mode when you see the Commit button
and Cancel button in the options bar.
Note: When you add text to an image that’s in indexed color mode, Photoshop Elements does not create a new text layer.
The text you type appears as masked text.
Add text
1In the Edit workspace, select the Horizontal Type tool or the Vertical Type tool .
2Do one of the following:
•To create a single line of text, click in the image to set an insertion point for the type.
•To create paragraph text, drag a rectangle to create a textbox for the type.
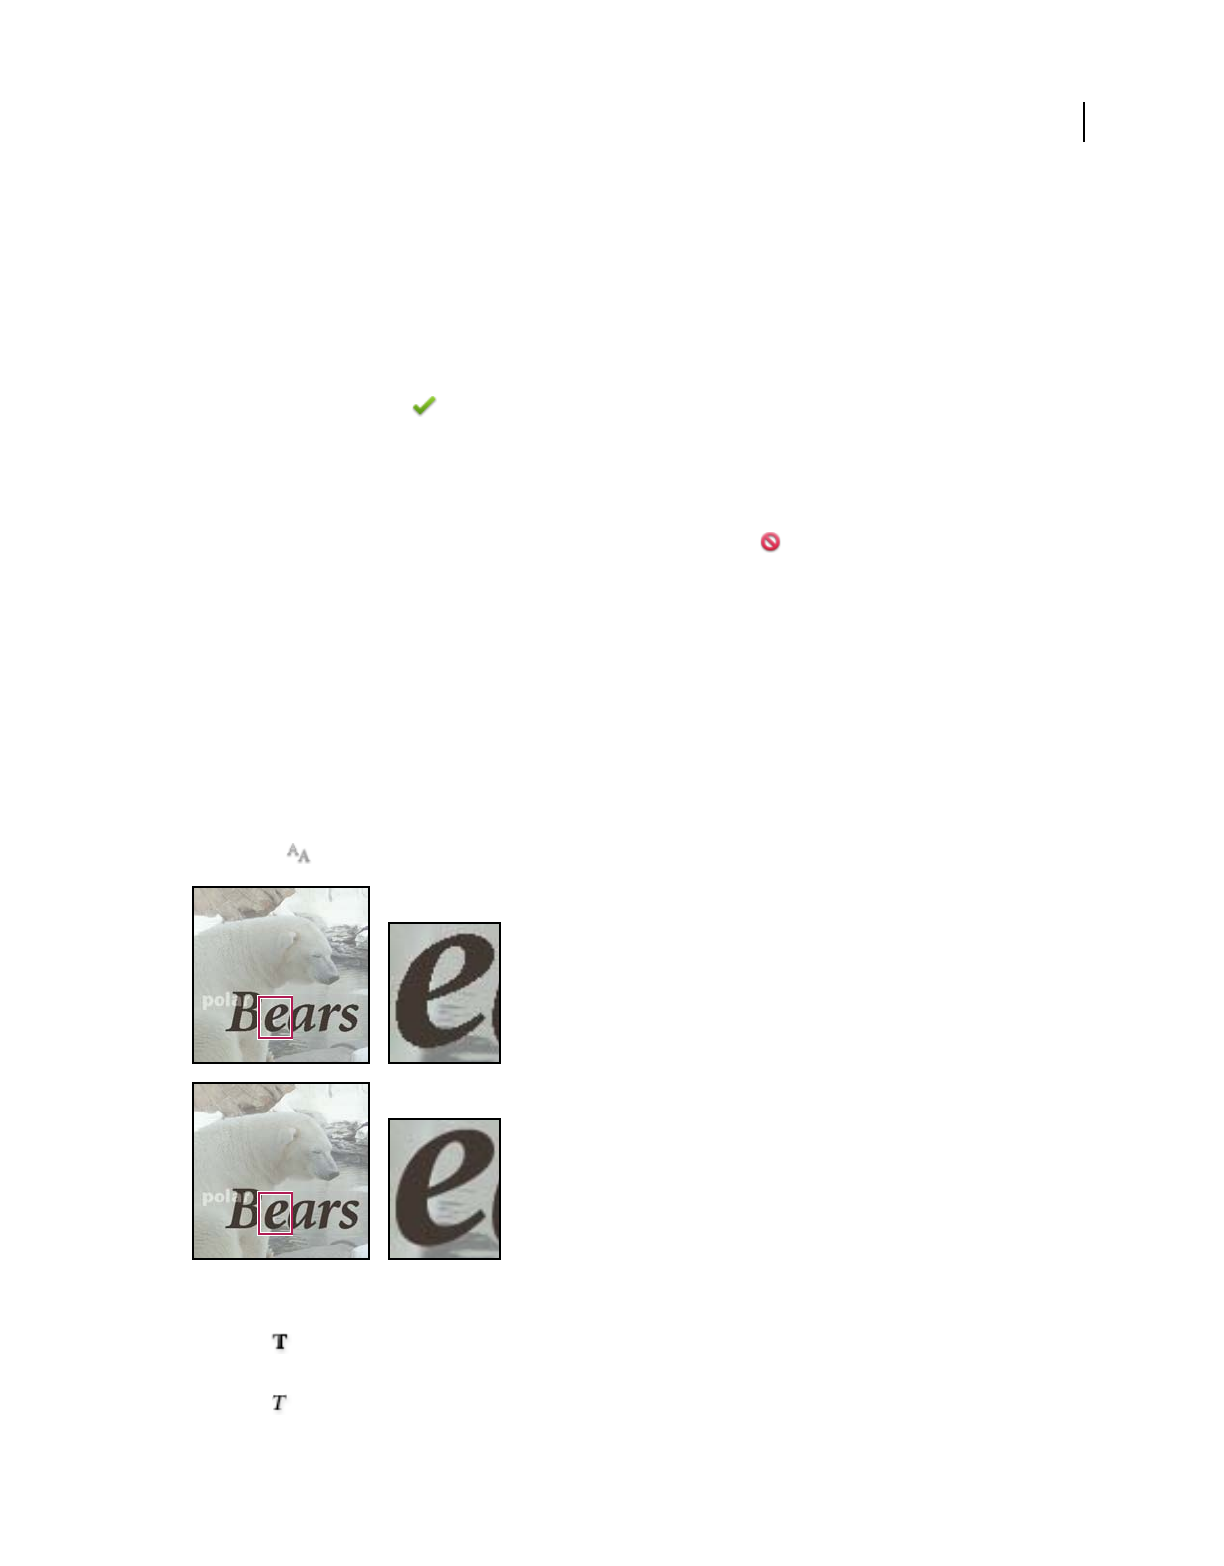
244
USING PHOTOSHOP ELEMENTS 9
Adding text and shapes
Last updated 1/3/2012
The small line through the I-beam marks the position of the type baseline. For horizontal type, the baseline marks the
line on which the type rests; for vertical type, the baseline marks the center axis of the type characters.
3(Optional) Select type options, such as font, style, size, and color, in the options bar.
4Type the characters you want. If you did not create a textbox, press Enter to create a new line.
The text appears in its own layer, which is called a text layer.
5Commit the text layer by doing one of the following:
•Click the Commit button in the options bar.
•Press the Enter key on the numeric keypad.
•Click in the image, outside the textbox.
•Select a different tool in the toolbox.
Note: To discard the text layer before you commit it, click the Cancel button .
More Help topics
“Add stylized text to an image” on page 187
Type tool options
In the options bar, set the following Type tool options:
Font Family Applies a font family to new or existing text.
Font Style Applies font styles, such as bold, to new or existing text.
Font Size Applies a font size to new or existing text.
Anti-aliased Applies anti-aliasing to make text appear smoother.
Applying anti-aliasing
A. Anti-aliasing off B. Anti-aliasing on
Faux Bold Applies a bold style to new or existing text. Use this option if your font doesn’t have a true bold style
that you can select from the Font Style menu.
Faux Italic Applies an italic style to new or existing text. Use this option if your font doesn’t have a true italic or
oblique style that you can select from the Font Style menu.
A
B

245
USING PHOTOSHOP ELEMENTS 9
Adding text and shapes
Last updated 1/3/2012
Underline Applies an underline to new text or selected existing text.
Strikethrough Applies a line through new text or selected existing text.
Leading menu Sets the space between lines of new or selected text.
Text Color menu Applies a color to new text or selected text.
Warp text Warps text on the selected layer.
Text Orientation Changes vertical text to horizontal and horizontal text to vertical.
Edit type in a type layer
After you create a text layer, you can edit the text and apply layer commands to it. You can insert new text, change
existing text, and delete text in text layers. If any styles are applied to a text layer, all text inherits the attributes of those
styles.
You can also change the orientation (either horizontal or vertical) of a text layer. When a text layer is vertical, the type
lines flow from top to bottom. When a text layer is horizontal, the type lines flow from left to right.
1Select the Horizontal Type tool or the Vertical Type tool (or select the Move tool and double-click the
text).
When you click in an existing text layer, the Type tool changes at the insertion point to match the orientation of the
layer.
2Select the text layer in the Layers panel, or click the text flow to automatically select a text layer.
3Position the insertion point in the text, and do one of the following:
•Click to set the insertion point.
•Select one or more characters you want to edit.
•Enter text as desired.
4Commit the text layer by doing one of the following:
•Click the Commit button in the options bar.
•Click in the image.
•Select a different tool in the toolbox.
Align text
❖Using a type tool, click the Align pop-up menu and select any of the following:
Left Align Aligns the left edge of each text line in the layer to the initial cursor position.
Center Aligns the center of each text line in the layer to the initial cursor position.
Right Align Aligns the right edge of each text line in the layer to the initial cursor position.
Select characters
1In the Edit workspace, select a type tool.
2Select the text layer in the Layers panel, or click in the text flow to automatically select a text layer.
3Position the insertion point in the text, and do one of the following:
•Drag to select one or more characters.

246
USING PHOTOSHOP ELEMENTS 9
Adding text and shapes
Last updated 1/3/2012
•Double-click to select a single word.
•Triple-click to select an entire line of text.
•Click a point in the text and then Shift-click to select a range of characters.
•Choose Select > All to select all the characters in the layer.
•To use the arrow keys to select characters, hold down Shift and press the Right Arrow or Left Arrow key.
Choose a font family and style
A font is a set of characters—letters, numbers, or symbols—that share a common weight, width, and style. When you
select a font, you can select the font family (for example, Arial) and its type style independently. A type style is a variant
version of an individual font in the font family (for example, regular, bold, or italic). The range of available type styles
varies with each font.
If a font doesn’t include the style you want, you can apply faux (fake) versions of bold and italic. A faux font is a
computer-generated version of a font that approximates an alternative typeface design, used only if there is no
corresponding style for a given font.
1If you’re changing the existing text, select one or more characters whose font you want to change. To change the
font of all characters in a layer, select the text layer in the Layers panel, and then use the buttons and menus in the
options bar to change the font type, style, size, alignment, and color.
2In the options bar, choose a font family from the Font Family pop-up menu.
3Do one of the following:
•Choose a font style from the Font Style pop-up menu in the options bar.
•If the font family you chose does not include a bold or italic style, click the Faux Bold button , Faux Italic
button , or both; then click OK.
Note: The type you enter gets its color from the current foreground color; however, you can change the type color before
or after you enter text. When editing existing text layers, you can change the color of individual characters or all type in
a layer.
Choose a font size
The type size determines how large the type appears in the image. The physical size of the font depends on the
resolution of the image. A capital letter in 72-point text is approximately 1-inch high in an image that is 72 ppi. Higher
resolutions reduce a given text point size because the pixels are packed more tightly in higher resolution images.
1If you’re changing existing text, select one or more characters whose size you want to change. To change the size of
all the characters in a layer, select the text layer in the Layers panel.
2Select the Horizontal Type tool or the Vertical Type tool .
3In the options bar, enter or select a new value for Size. You can enter a size larger than 72 points. The value you
enter is converted into the default unit of measurement. To use an alternate unit of measurement, enter the unit
(in, cm, pt, px, or pica) after the value in the Size text box.
The default unit of measurement for type is points. However, you can change the unit of measurement in the Units &
Rulers section of the Preferences dialog box. In the Edit workspace, choose Edit > Preferences > Units & Rulers, and
then select a unit of measurement for Type.
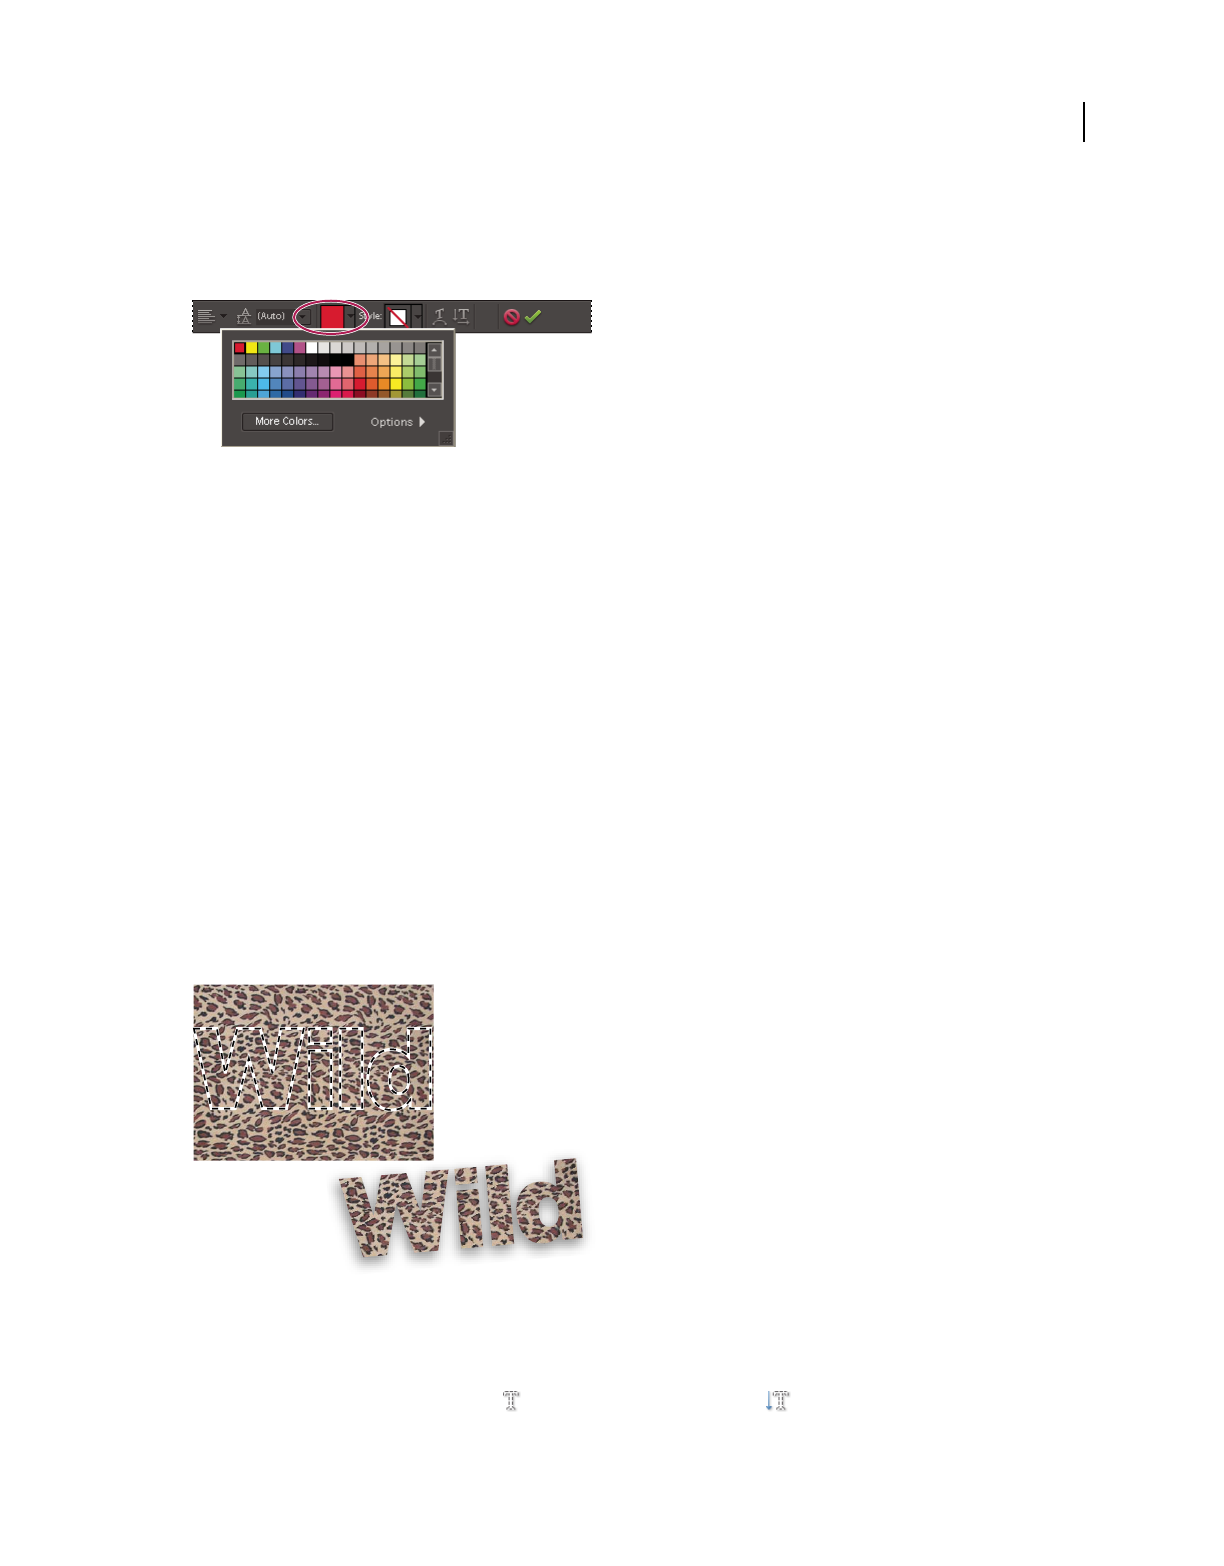
247
USING PHOTOSHOP ELEMENTS 9
Adding text and shapes
Last updated 1/3/2012
Change text color
You can change the type color before or after you enter text. When editing existing text layers, you can change the color
of individual characters or all type in a layer. You can also apply a gradient to text in a text layer.
The Color menu in the options bar displays many preset color swatches from which you can choose.
1Do one of the following:
•To change the color of text before you type it, select a type tool.
•To change the color of existing text, select a type tool and then drag to select the text.
2Do one of the following:
•To choose a color from the Color Picker, click the colored area of the Color menu in the options bar.
•To choose a color from a list of color swatches, click the triangle on the Color menu in the options bar.
More Help topics
“Use the Color Swatches panel” on page 219
“Use the Adobe Color Picker” on page 220
Create and use masked type
The Horizontal Type Mask tool and Vertical Type Mask tool create a selection in the shape of text. You can have fun
with text selection borders by cutting text out of an image to show the background, or pasting the selected text into a
new image. Experiment with different options to personalize your images and compositions.
Horizontal type mask used to create a filled selection.
1In the Edit workspace, select the layer on which you want the selection to appear. For best results, don’t create the
type selection border on a text layer.
2Select the Horizontal Type Mask tool or the Vertical Type Mask tool .
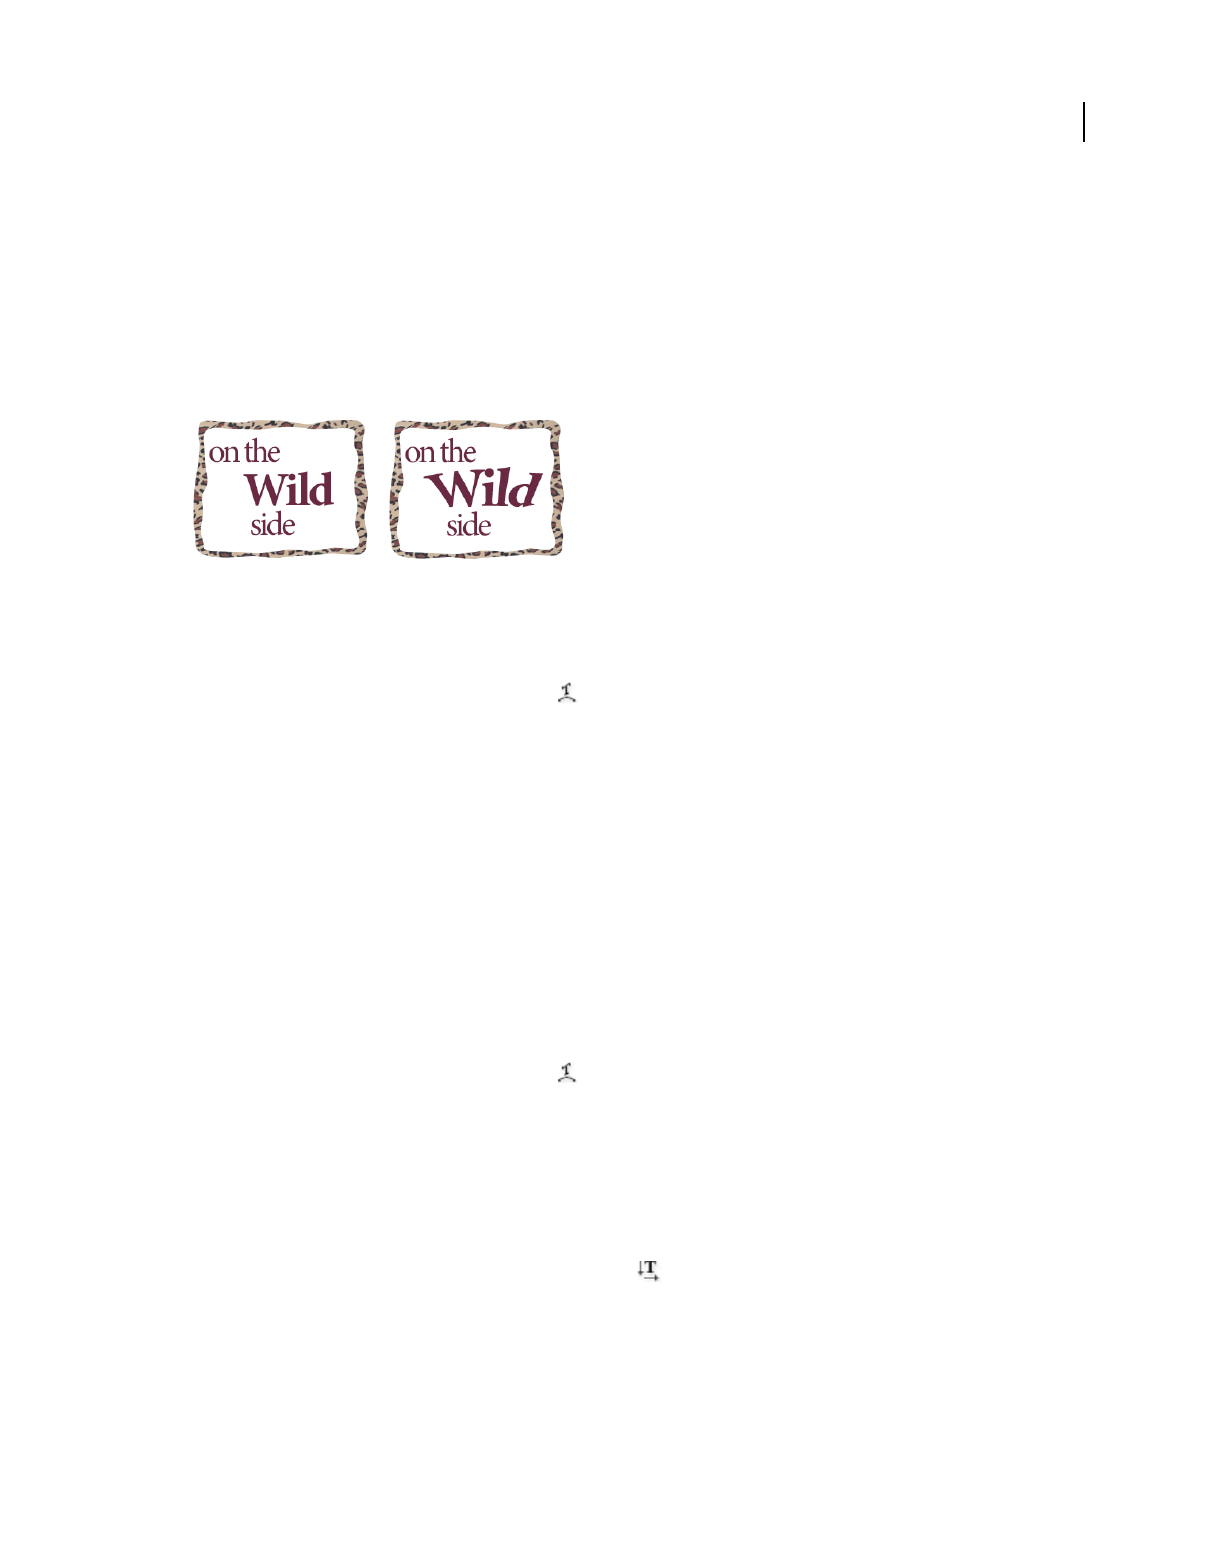
248
USING PHOTOSHOP ELEMENTS 9
Adding text and shapes
Last updated 1/3/2012
3Select additional type options (See “Type tool options” on page 244), and enter your text.
The type selection border appears in the image on the active layer.
Warp type
Warping allows you to distort type to conform to a variety of shapes; for example, you can warp type in the shape of
an arc or a wave. Warping applies to all characters in a text layer—you cannot warp individual characters. Also, you
can’t warp faux bold text.
Text layer with warp applied
1In the Edit workspace, select a text layer.
2Do one of the following:
•Select a type tool, and click the Warp button in the options bar.
•Choose Layer > Type > Warp Text.
3Choose a warp style from the Style pop-up menu. The style determines the basic shape of the warped text.
4Select an orientation for the warp effect—Horizontal or Vertical.
5(Optional) Specify values for additional warping options to control the orientation and perspective of the warp
effect:
•Bend to specify the amount of warp.
•Horizontal Distortion and Vertical Distortion to apply perspective to the warp.
6Click OK.
Unwarp type
1Select a text layer that has warping applied to it.
2Select a type tool, and click the Warp button in the options bar; or choose Layer > Type > Warp Text.
3Choose None from the Style pop-up menu, and click OK.
Change the orientation of a type layer
1In the Edit workspace, select the text layer in the Layers panel.
2Do one of the following:
•Select a type tool, and click the Flip Orientation button in the options bar.
•Choose Layer > Type > Horizontal, or choose Layer > Type > Vertical.
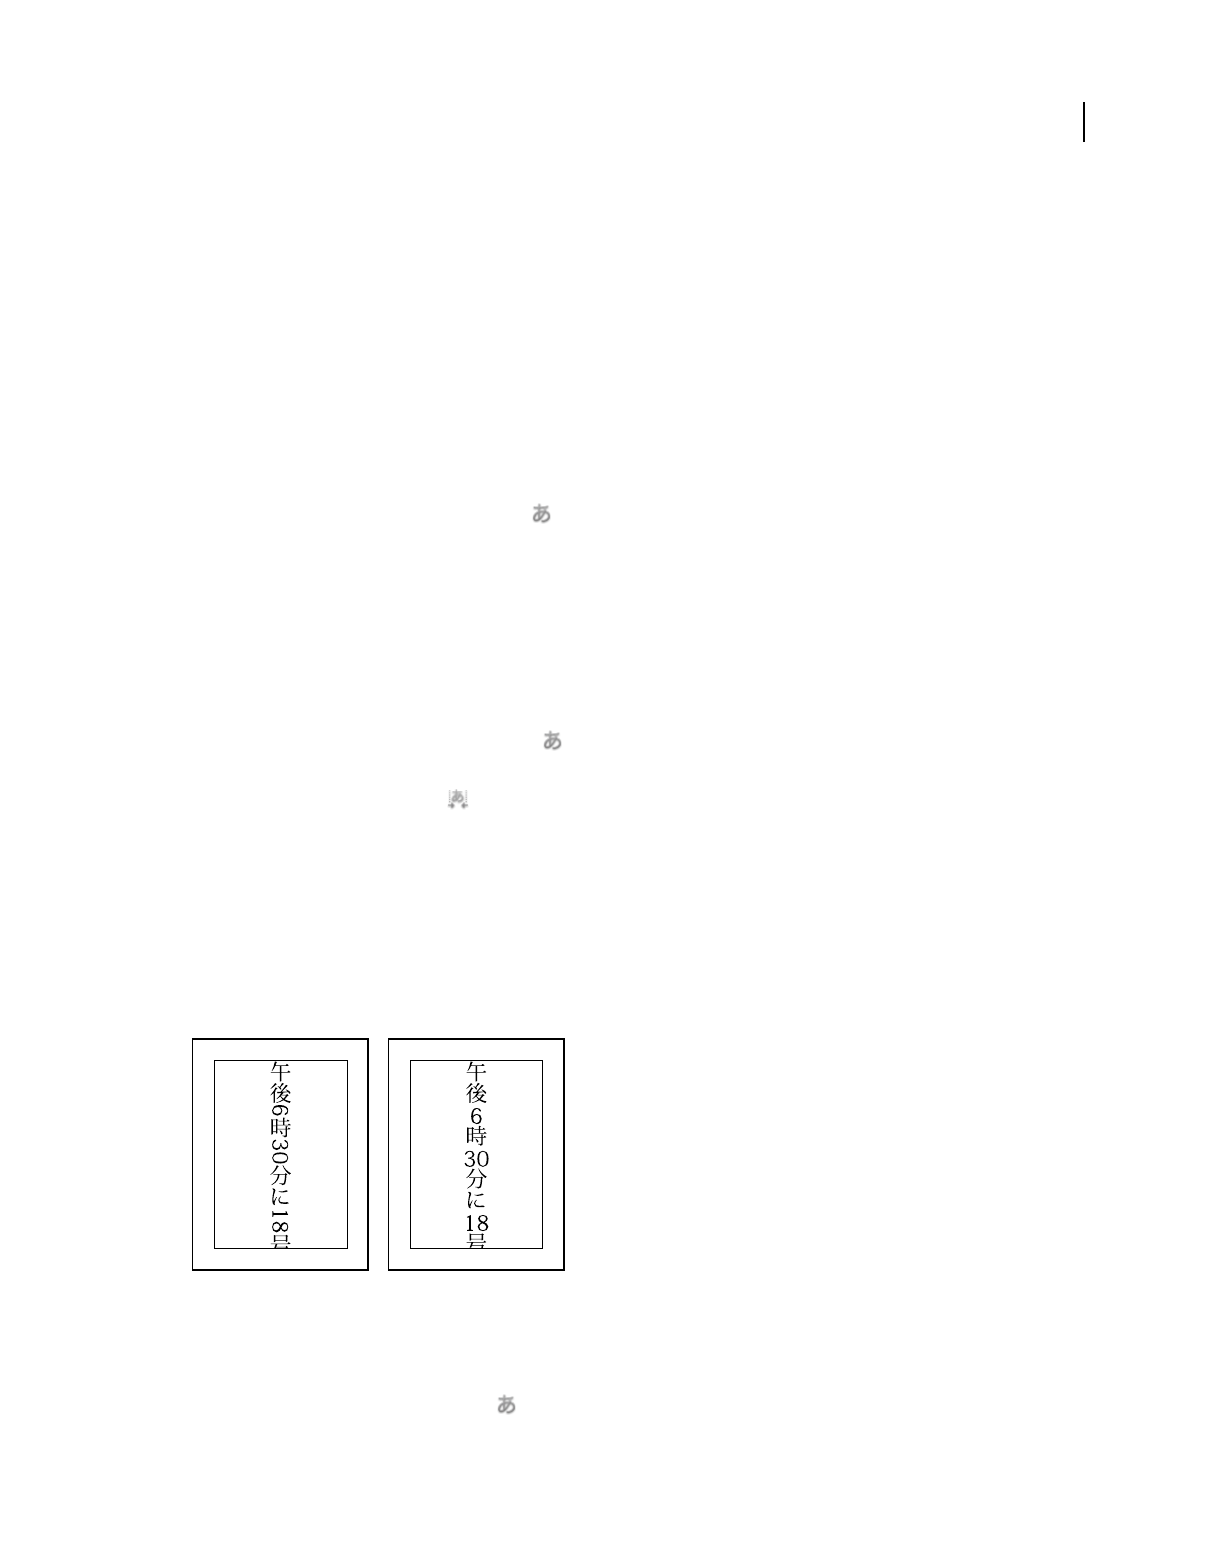
249
USING PHOTOSHOP ELEMENTS 9
Adding text and shapes
Last updated 1/3/2012
Work with Asian type
Display Asian type options
Photoshop Elements provides several options for working with Asian type. Asian fonts are often referred to as double-
byte fonts or CJK fonts, meaning Chinese, Japanese, and Korean fonts.
1In Windows, choose Edit > Preferences > Type. In Mac OS, choose Photoshop Elements > Preferences > Type.
2Set text options:
•Show Asian Text Options to display Asian type options.
•Show Font Names in English to display Asian font names in English.
3Click OK. The Asian type options button is added to the type tool options bar.
Reduce spacing between Asian characters
Tsume reduces the space around a character (but not the character itself) by a specified percentage value. When tsume
is added to a character, spacing around both sides of the character is reduced by an equal percentage.
1If you’re working with an existing layer, select the text layer in the Layers panel and then select a type tool.
2Select the characters you want to adjust.
3Click the Show Asian Text Options button in the options bar. If you don’t see the button, make sure that
preferences are set to show Asian type options.
4Select a percentage for Tsume from the pop-up menu, and press the Enter or Return key. The greater the
percentage, the tighter the compression between characters. At 100% (the maximum value), there is no space
between the character’s bounding box and its em box.
Note: An em box is a space whose height and width roughly correspond to the width of the letter “M” (also called a
mutton).
Turn on or turn off tate-chuu-yoko
Tate-chuu-yoko (also called kumimoji and renmoji) is a block of horizontal type laid out within a vertical type line.
Before and after tate-chuu-yoko is applied
1If you’re working with an existing layer, select the text layer in the Layers panel and then select a type tool.
2Select the characters that you want to rotate.
3Click the Asian Text Options button in the options bar.
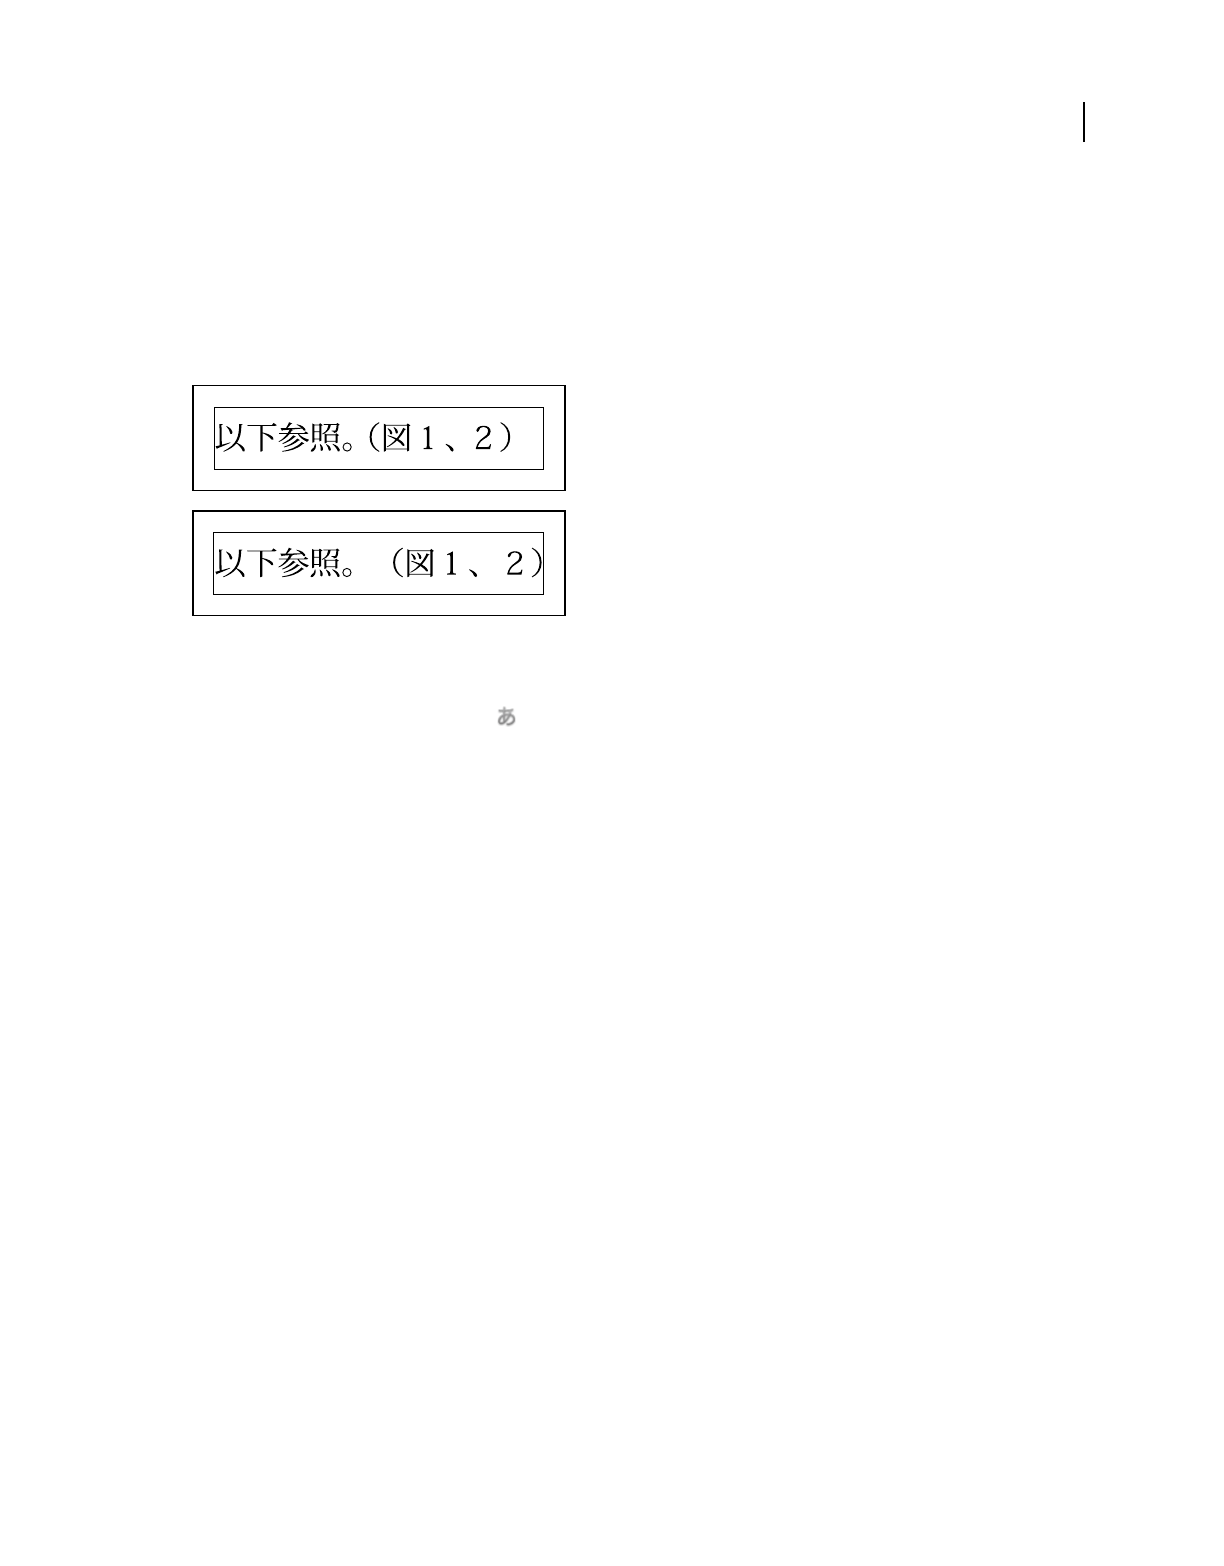
250
USING PHOTOSHOP ELEMENTS 9
Adding text and shapes
Last updated 1/3/2012
4Select Tate-Chuu-Yoko.
Turn on or turn off mojikumi
Mojikumi determines spacing between punctuation, symbols, numbers, and other character classes in Japanese type.
When mojikumi is turned off, full-width spacing is applied to these characters. When mojikumi is on, half-width
spacing is applied to these characters.
Mojikumi on (top), and mojikumi off (bottom)
1If you’re working with an existing layer, select the text layer in the Layers panel and then select a type tool.
2Click the Asian Text Options button in the options bar.
3Select Mojikumi.
Creating shapes
About shapes
In Photoshop Elements, shapes are vector graphics, which means they are made up of lines and curves defined by their
geometric characteristics instead of pixels. Vector graphics are resolution-independent—that is, they can be scaled to
any size and printed at any resolution without losing detail or clarity. You can move, resize, or change them without
losing the quality of the graphic. Because computer monitors display images on a pixel grid, vector data is displayed
on-screen as pixels.
Shapes are created in shape layers. A shape layer can contain a single shape or multiple shapes, depending on the shape
area option you select. You can choose to have more than one shape in a layer.
You can change the color of a shape by editing its fill layer and applying layer styles to it. Shape tools provide an easy
way to create buttons, navigation bars, and other items used on web pages.
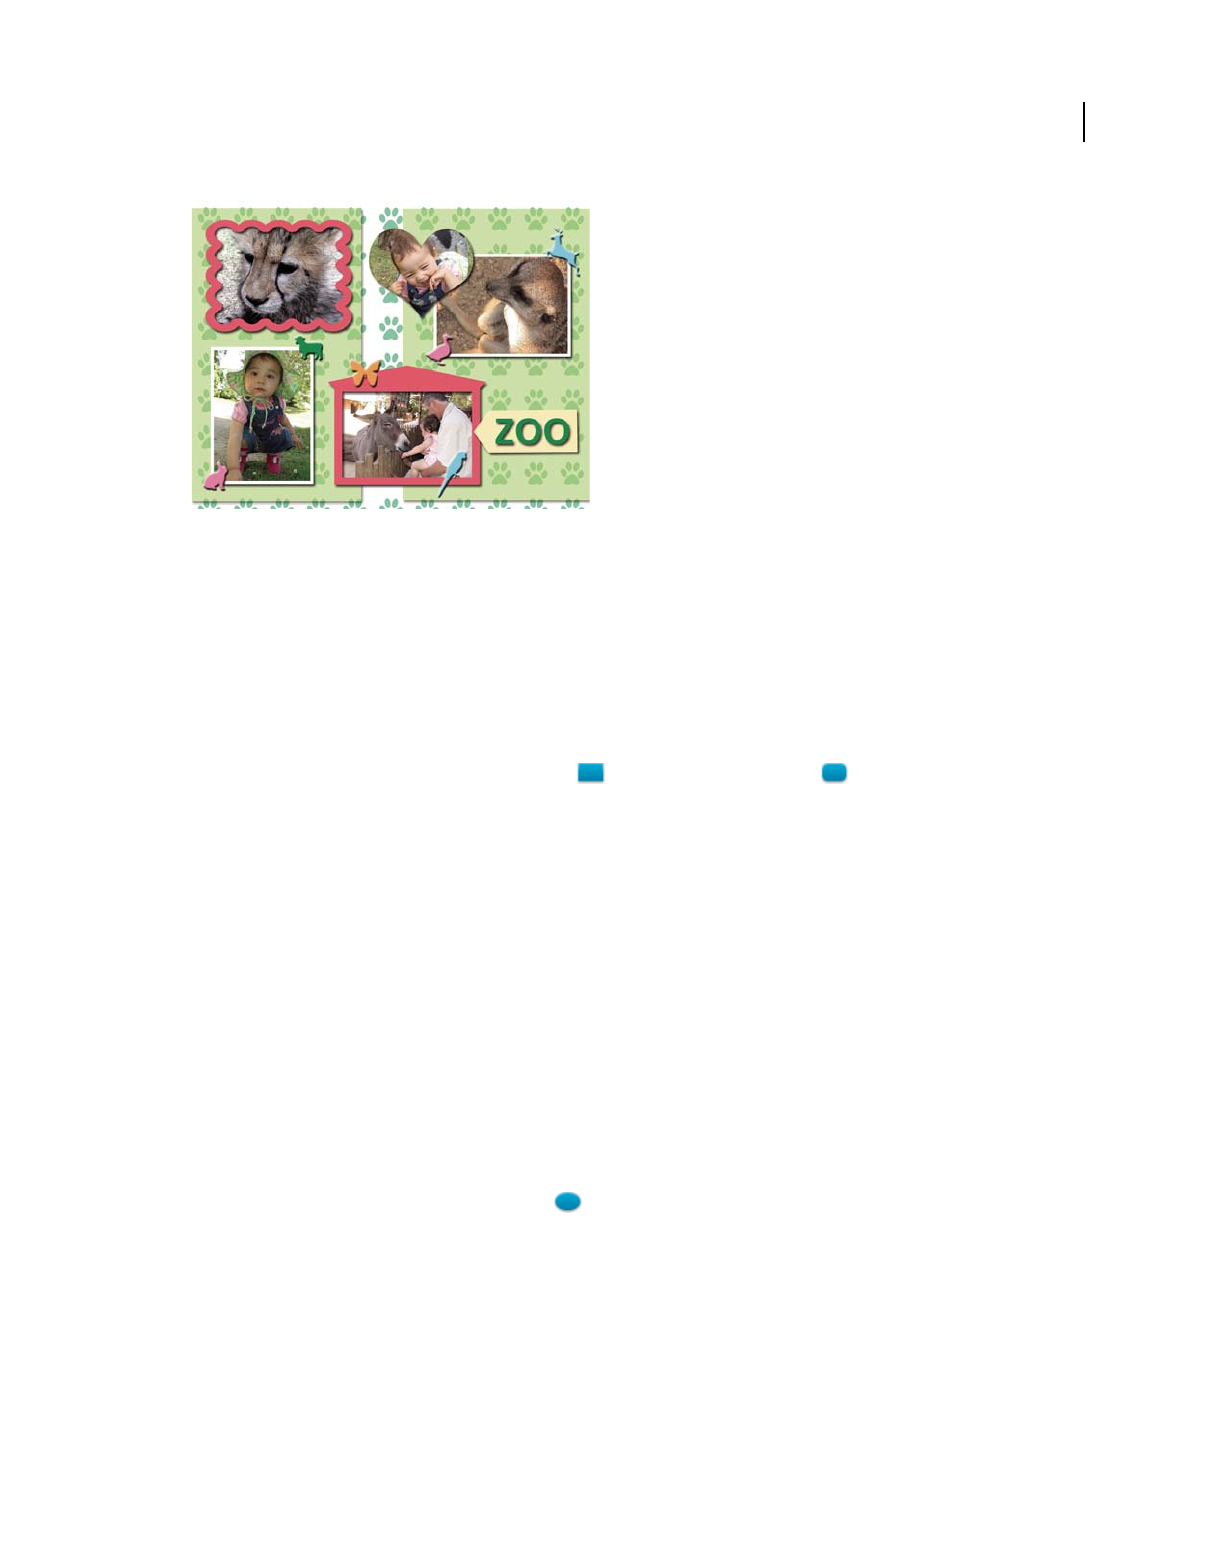
251
USING PHOTOSHOP ELEMENTS 9
Adding text and shapes
Last updated 1/3/2012
Vector objects created with the shape tools in Photoshop Elements
More Help topics
“Select or move a shape” on page 254
“Transform a shape” on page 254
“Apply a layer style to a shape” on page 254
Draw a rectangle, square, or rounded rectangle
1In the Edit workspace, select the Rectangle tool or Rounded Rectangle tool . If necessary, press and hold
another shape tool in the toolbox, and then choose a tool from the list that appears.
2(Optional) In the options bar, click the Geometry options triangle to access the following options:
Unconstrained Lets you set the width and height of a rectangle by dragging.
Square Constrains a rectangle to a square.
Fixed Size Draws a rectangle at the exact size you specified in the Width and Height text boxes.
Proportional Draws a rectangle based on the numbers you type in the Width and Height text boxes.
From Center Draws a rectangle from the center of where you begin drawing (usually a rectangle is drawn from the
upper-left corner).
Snap to Pixels Snaps edges of a rectangle to the pixel boundaries.
3Drag within your image to draw the shape.
Draw a circle or ellipse
1In the Edit workspace, select the Ellipse tool . If necessary, press and hold another shape tool in the toolbox,
and then choose this tool from the list that appears.
2(Optional) In the options bar, click the Geometry options triangle to use the following options:
Unconstrained Lets you set the width and height of an ellipse by dragging.
Circle Draws a perfect circle instead of an ellipse.
Fixed Size Draws an ellipse at the exact size you specified in the Width and Height text boxes.
Proportional Draws a proportional ellipse based on the numbers you type in the Width and Height text boxes.
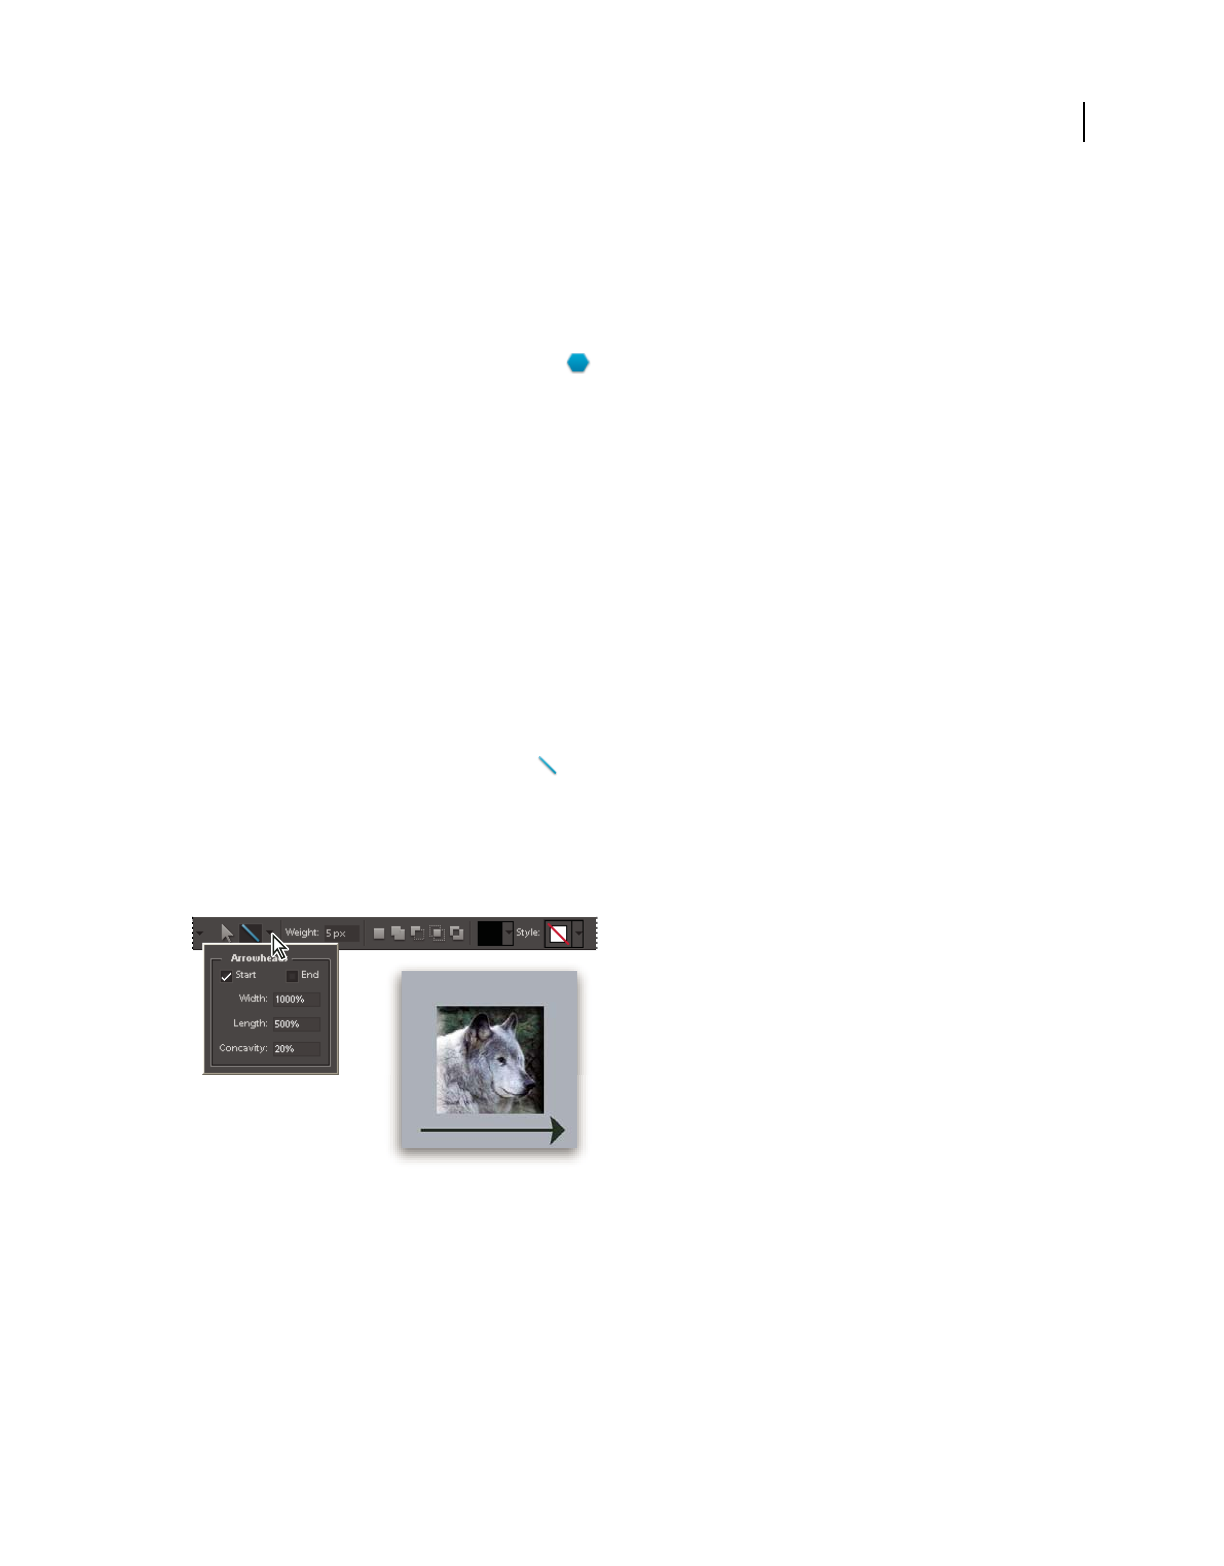
252
USING PHOTOSHOP ELEMENTS 9
Adding text and shapes
Last updated 1/3/2012
From Center Draws an ellipse from the center of where you begin drawing (usually an ellipse is drawn from the upper-
left corner).
3Drag in your image to draw the ellipse.
Draw a multisided shape
1In the Edit workspace, select the Polygon tool . If necessary, press and hold another shape tool in the toolbox,
and then choose this tool from the list that appears.
2(Optional) In the options bar, select the Geometry options triangle to use the following options:
Radius Specifies the distance from the center of a polygon to the outer points.
Smooth Corners Renders a polygon with smooth corners.
Star Turns a polygon into a star.
Indent Sides By Specifies the depth of the star’s indentations.
Smooth Indents Renders a star-shaped polygon with smooth indents.
3In the Sides box, specify the number of sides for the polygon.
4Drag within your image to draw the polygon.
Draw a line or arrow
1In the Edit workspace, select the Line tool . If necessary, press and hold another shape tool in the toolbox, and
then choose this tool from the list that appears.
2(Optional) In the options bar, select the Geometry options triangle to use the following options:
Arrowheads Start and End Renders a line with arrowheads. Select Start, End, or both to specify on which end of the
line arrows are rendered. The shape options appear in the pop-up dialog box.
Choosing options for an arrowhead
Arrowheads Width and Length Specify the proportions of the arrowhead as a percentage of the line width (10% to
1000% for Width, and 10% to 5000% for Length). Enter a value for the concavity of the arrowhead (from -50% to
+50%).
Concavity Defines the amount of curvature on the widest part of the arrowhead, where the arrowhead meets the line.
3In the Weight box, specify the width of the line in pixels.
4Drag within your image to draw the line.
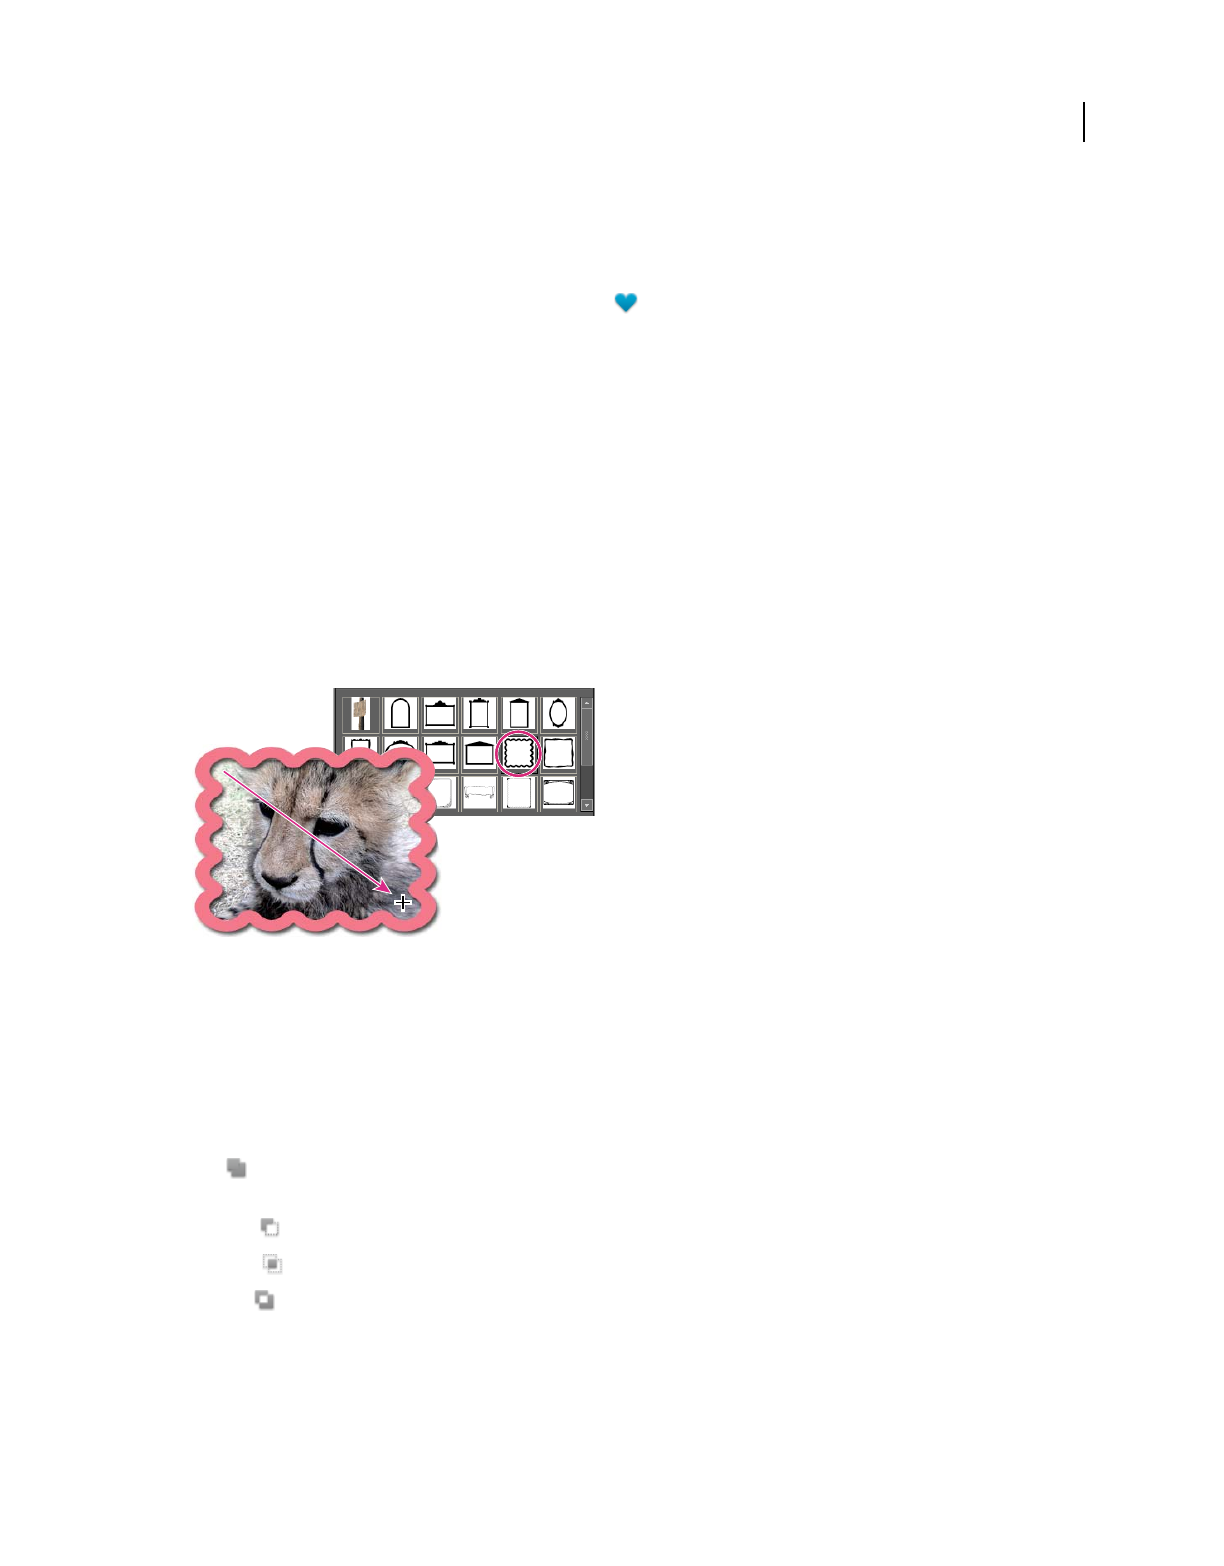
253
USING PHOTOSHOP ELEMENTS 9
Adding text and shapes
Last updated 1/3/2012
Draw a custom shape
The Custom Shape tool provides many different shape options for you to draw. When you select the custom shape
tool, you can access these shapes in the options bar.
1In the Edit workspace, select the Custom Shape tool . If necessary, press and hold another shape tool in the
toolbox, and then choose this tool from the list that appears.
2In the options bar, select a shape from the Shape pop-up panel. Click the arrow at the top right of the panel to list
the shapes you can choose from and how to display them.
3(Optional) In the options bar, select the Geometry options triangle to use the following options:
Unconstrained Lets you set the width and height of a rectangle, rounded rectangle, ellipse, or custom shape by
dragging.
Defined Proportions Draws a custom shape based on the proportions with which it was created.
Defined Size Draws a custom shape based on the size at which it was created.
Fixed Size Draws a custom shape as a fixed shape based on the values you enter in the Width and Height text boxes.
From Center Draws a custom shape from the center.
4Drag within your image to draw the shape.
The Custom Shape tool has ready-made frames that you can drag around a photo.
Create multiple shapes in the same layer
1In the Edit workspace, select a shape layer in the Layers panel or create a new shape layer.
2If you want to create a different type of shape, select a different shape tool.
3Select a shape area option to determine how shapes should overlap, and then drag within the image to draw new
shapes:
Add Adds an additional shape to the existing shape. The combined shape will cover the entire area of the shapes
you drew using the Add option.
Subtract Removes the area where shapes overlap. The rest of the shapes’ areas are preserved.
Intersect Shows only the area where shapes intersect. The other areas will be removed.
Exclude Removes the overlapping areas in the new and existing shapes.

254
USING PHOTOSHOP ELEMENTS 9
Adding text and shapes
Last updated 1/3/2012
Editing shapes
Select or move a shape
Use the Shape Selection tool to select shapes with one click. If you convert a shape into a bitmap element by
simplifying the shape layer, the Shape Selection tool will no longer select the shape (use the Move tool instead).
If a layer contains multiple shapes, you can reposition all the shapes together using the Move tool. However, if you
want to reposition a specific shape in a layer, you must use the Shape Selection tool.
1In the Edit workspace, do one of the following:
•Select the Shape Selection tool in the toolbox.
•If another shape tool is active, click the Shape Selection tool in the options bar.
2To select the shape, click it.
3To move the shape, drag it to a new location.
Transform a shape
1Select the Shape Selection tool .
2Do one of the following:
•Select the shape you want to transform, choose Image > Transform Shape, and then choose a transformation
command.
•Double-click the shape you want to transform, and then drag an anchor to transform the shape.
Change the color of all shapes in a layer
1In the Edit workspace, double-click the thumbnail of the shape layer in the Layers panel.
2Use the Color Picker tool to select a new color.
Note: If the color of a shape doesn’t change when you pick a new color, check to see if the layer has a layer style
(represented by a style icon in the Layers panel). Some layer styles override the base color of a shape.
More Help topics
“Use the Adobe Color Picker” on page 220
“Use the Paint Bucket tool” on page 232
Apply a layer style to a shape
You can apply effects—such as drop shadows and bevels—to shapes quickly and easily using layer styles. Keep in mind
that a layer style is applied to all shapes in a layer. For example, if you apply a drop shadow style to a layer that contains
multiple shapes, all of the shapes will display a drop shadow.
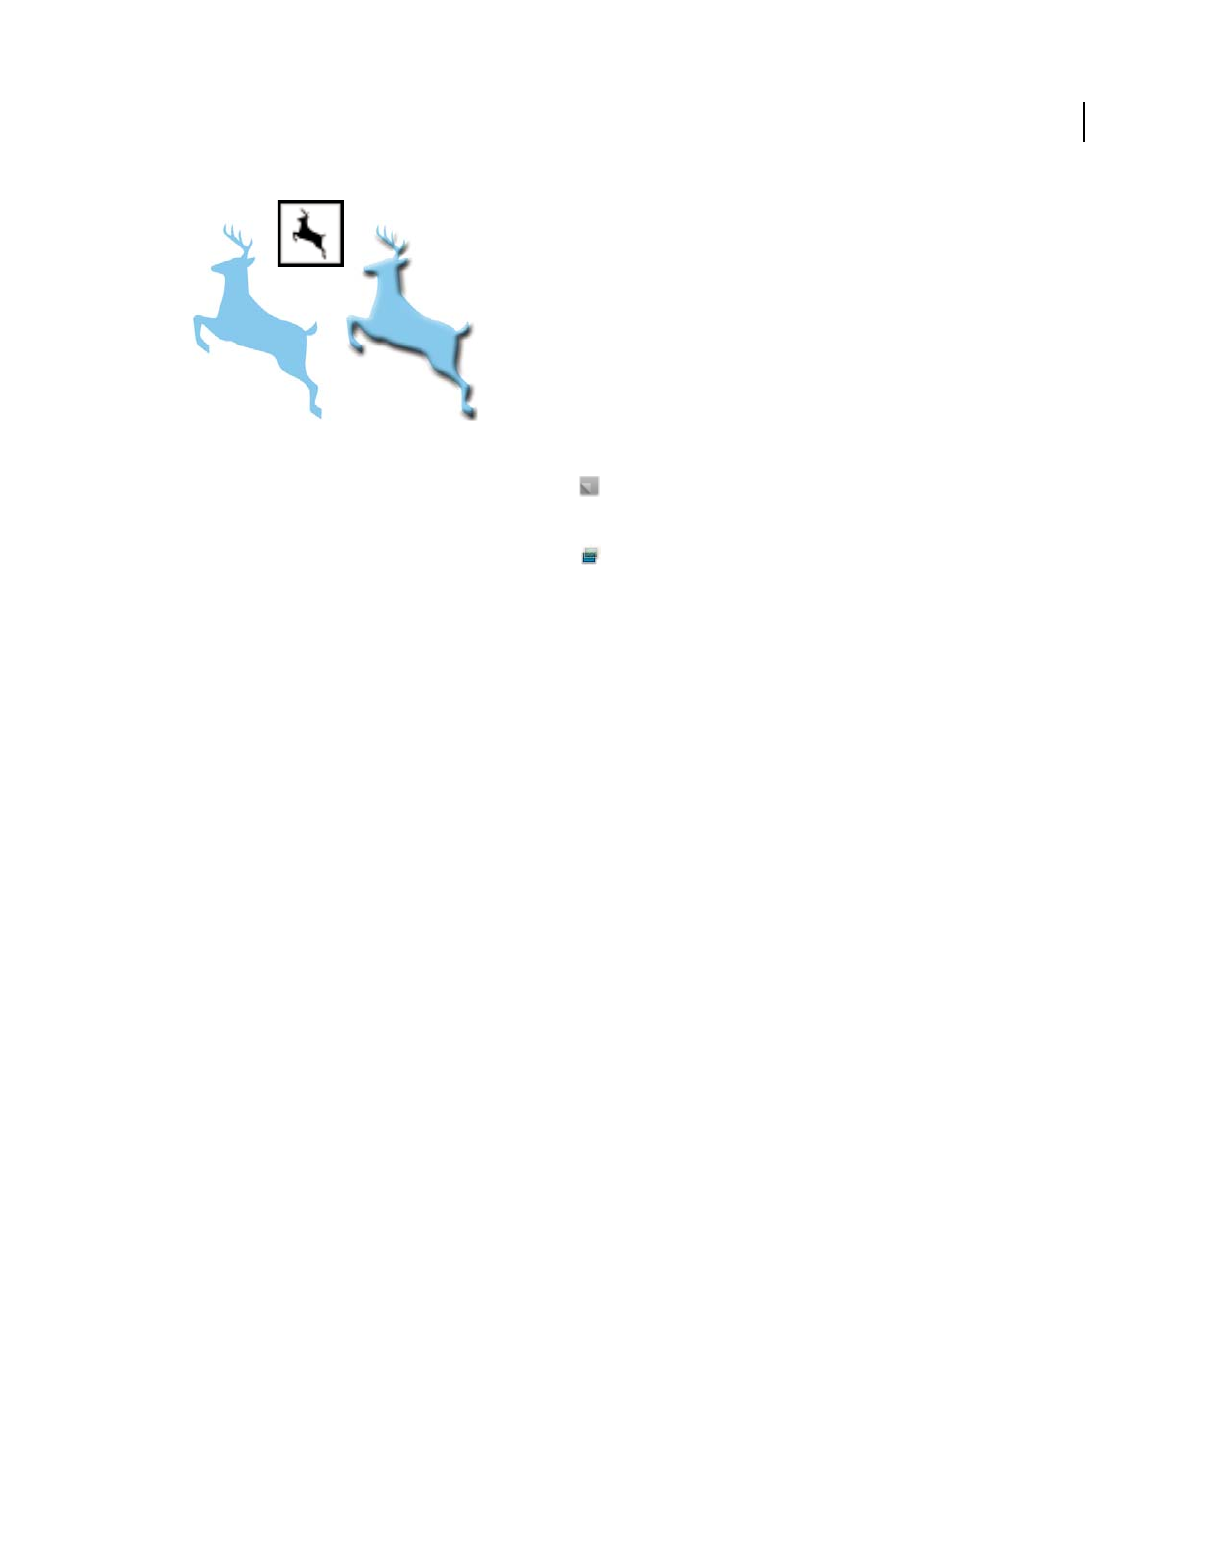
255
USING PHOTOSHOP ELEMENTS 9
Adding text and shapes
Last updated 1/3/2012
Before (left) and after (right) applying a layer style to a custom shape.
1In the Layers panel, click the New Layer button .
2In the Content panel, select a shape and insert it into the new layer.
3In the Effects panel, click the Layer Styles button and double-click the thumbnail you want to apply to the shape.

256
Last updated 1/3/2012
Chapter 13: Creating projects in the Edit
workspace
You can use your photos in creative projects, such as slide shows and photo books, and share them with family and
friends.
Note: Slide Show, VCD With Menu, and Flipbook options are not available in Mac OS.
Project basics
The Organize and Edit workspaces provide quick and easy ways to be creative with your photos. You can complete
some projects in the Organize workspace. For other projects, you select the photos you want to use in the Organize
workspace and then complete the project in the Edit workspace.
The projects under the Create tab guide you through the process of using professionally designed templates to create
your own unique project. When you complete a project, you can either share it online, or print it on your home
computer or through a professional printing service.
Your projects are displayed in the Organize workspace. The project file and related subfolders that contain the
document or web page files for each project are created on your local hard drive. To maintain the link between these
project files, subfolders, and page files, avoid moving them using Windows Explorer. Instead, use the Move command
in the Organize workspace.
You can share projects in a variety of ways. For example, you can burn a slide show onto a VCD. You can also have
your projects professionally printed through Adobe Photoshop Elements Online Services.
Note: Projects from previous versions of Photoshop Elements might not open in the current version. You may have to use
a previous version to open some projects.
Making photo projects
About photo projects
Photo projects include photo books, photo calendars, photo collages, greeting cards, and jackets and labels for CDs
and DVDs.
Note: Photo books are designed specifically for online printing. You can print them locally, but each side of a spread is
treated as a separate page.
If a project has a single page, it’s saved in Photoshop format (PSD) by default. If a project has multiple pages, however,
it’s saved in the more versatile Photo Projects Format (PSE). Unlike conventional image formats, which require you
to open and edit each image separately, PSE lets you create and print up to 30 pages at one time.
Note: Because multipage files can be quite large, a computer with at least one gigabyte of RAM is recommended for
optimum performance.

257
USING PHOTOSHOP ELEMENTS 9
Creating projects in the Edit workspace
Last updated 1/3/2012
When you start a photo project, you can specify a size, printing option (local or through a service provider, and theme
that’s unique or common to the project type. For example, the CD Jacket template has different size options than the
Photo Collage template, but both offer layout and theme options that are common to most projects. At this time, you
also specify whether to use the Autofill With Selected Images and Number Of Pages options (when applicable).
After you specify these primary options, the photo project opens in the Edit workspace. The Pages, Layouts, Artwork,
and Text tabs in the Create panel let you add or modify frames, backgrounds, and layer styles. For example, you can
apply a unique background to every page of a photo album using the Artwork tab instead of having all pages with the
default backgrounds for the selected theme.
After you finish a project, you can share it in various ways. For example, you can print or e-mail greeting cards or photo
collages. You can also have your projects professionally printed using Adobe Photoshop Elements Online Services.
Note: If a photo project has missing files, you can save the project but can’t print it.
Synchronize photo projects
When you create a photo book, greeting card, or calendar, Photoshop Elements displays the images you add in low
resolution and maintains links with the original images. The low-resolution images are replaced with the original
images when you print or order the project.
If you want to share photo books, greeting cards, or calendars by e-mail, make sure that you first synchronize them.
1In the Organize workspace, select Edit > Preferences (Adobe Elements 9 Organizer > Preferences in Mac OS). Click
Backup/Synchronization.
2In Synchronize File Types under Advanced Backup/Sync Options, select Creations.
3In the Edit workspace, resave the project.
Setting photo project options
The Create tab is the starting point for making new photo projects. When you select a photo project, say a photo book,
you can specify a size, printing option, and theme. Only a limited number of sizes are supported for each printing
option. You can also select Autofill With Selected Images to add all the images open in the Project Bin in one step,
instead of manually adding them later.
For example, if you click Photo Collage in the Create tab, the photo projects dialog box provides the following options:
Sizes Provides preset page sizes for each project. The size chosen becomes the default for all pages in the project. Each
project type offers different size options. For example, the greeting card template sizes are smaller than the photo book
template sizes.
Themes Provides various preset designs to complement your images with preset frames and backgrounds. The theme
and frame chosen becomes the default for all pages in the project, but they can be modified later in the Layouts,
Artwork, and Text tabs. For example, you may want to apply a different background to each page of a scrapbook.
Autofill With Selected Images Places selected images in the project automatically in the same order they are arranged
in the Project Bin. You can select open files, albums, or files selected in the Elements Organizer to autofill the project.
To arrange images in a particular order, rearrange them in the Project Bin before starting a project. You can also
rearrange the images later in the photo project by dragging them from the Project Bin or by adding them directly from
their folder location. You can also open the images in the Project Bin and autofill the project later through the Project
Bin context menu option.
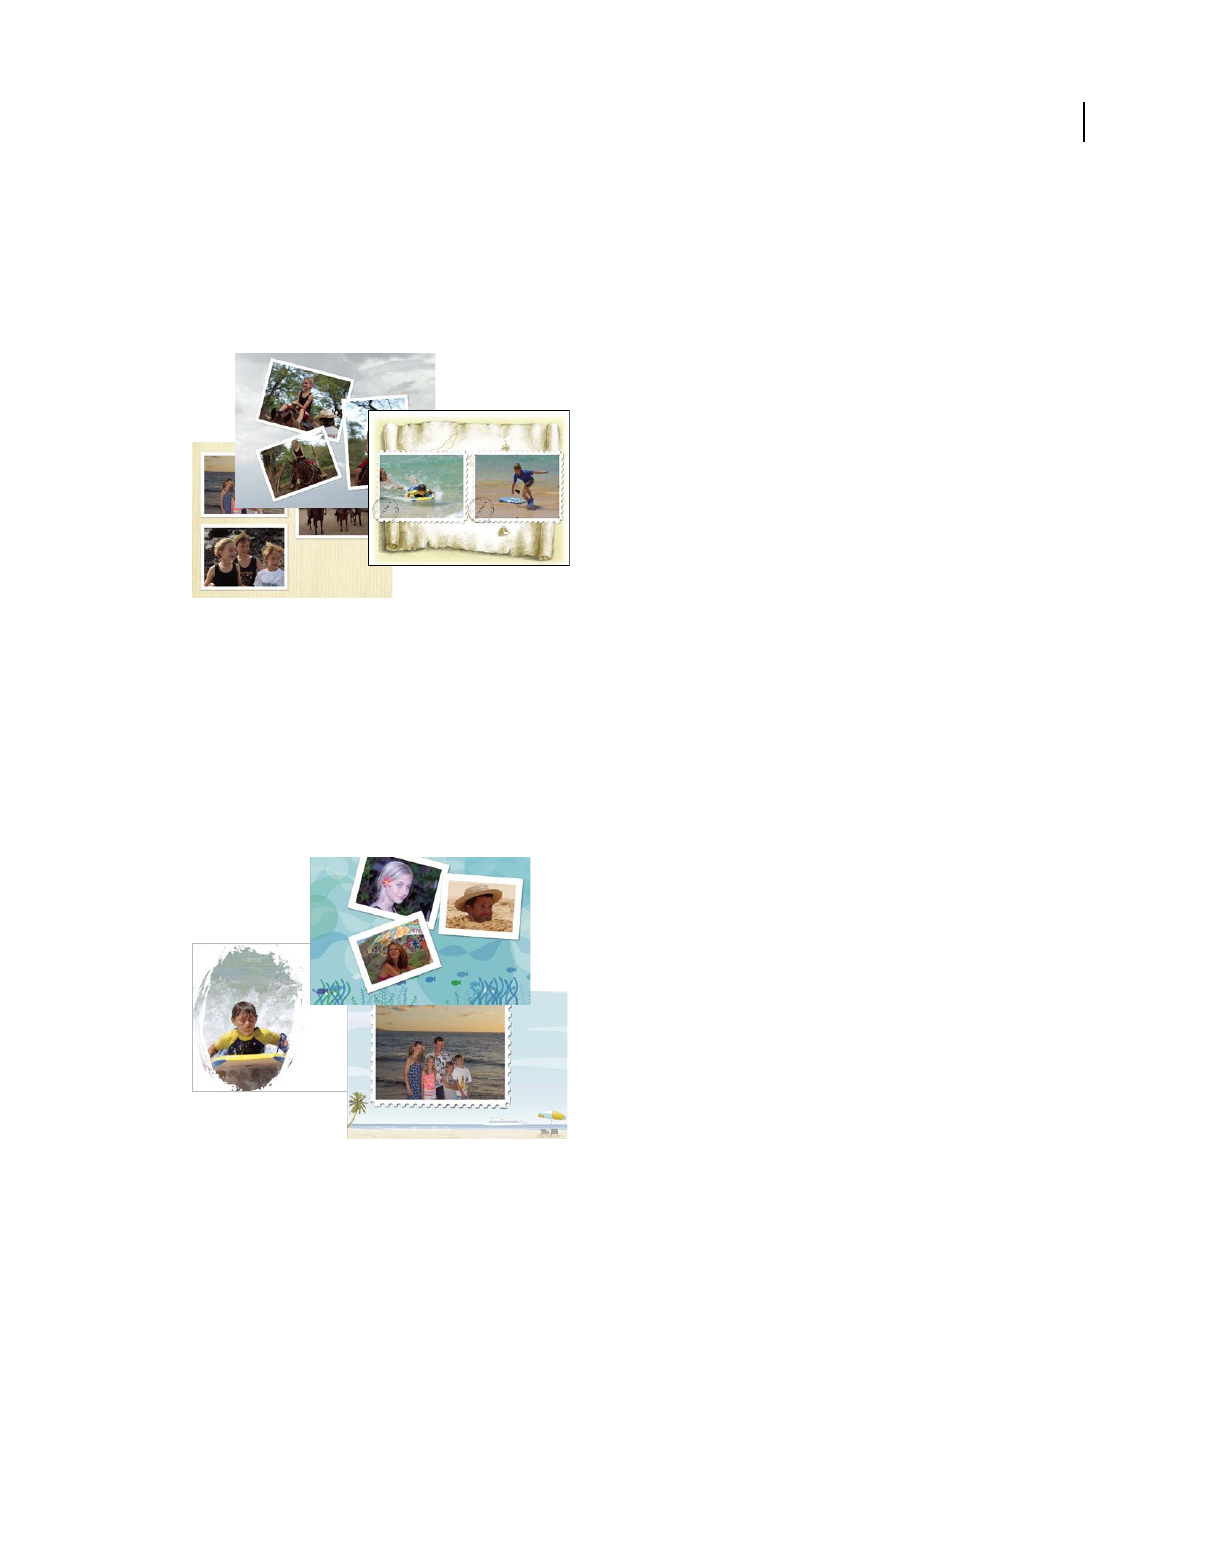
258
USING PHOTOSHOP ELEMENTS 9
Creating projects in the Edit workspace
Last updated 1/3/2012
Types of photo projects
About photo collages
Photo collages let you create large picture projects, such as photo collages or unique photo prints. Photo collages can
be printed with your home printer, ordered online, saved to your hard drive, and sent by e-mail.
Sample photo collages
More Help topics
“Make a photo collage, label, CD, and DVD Jacket” on page 260
About greeting cards
Greeting cards let you add various layouts and designs to your images, and allows adding up to 22 photos on a page.
Greeting cards can be printed with your home printer, saved to your hard drive, and sent by e-mail. Greetings cards
can be ordered online from Adobe Photoshop Elements Online Services for some locales.
Sample photo greeting cards
More Help topics
“Make a photo collage, label, CD, and DVD Jacket” on page 260
About CD and DVD jackets
Photoshop Elements lets you create disc jackets (covers) for a CD and DVD case. They can be printed with your home
printer, saved to your hard drive, and sent by e-mail as PDFs.
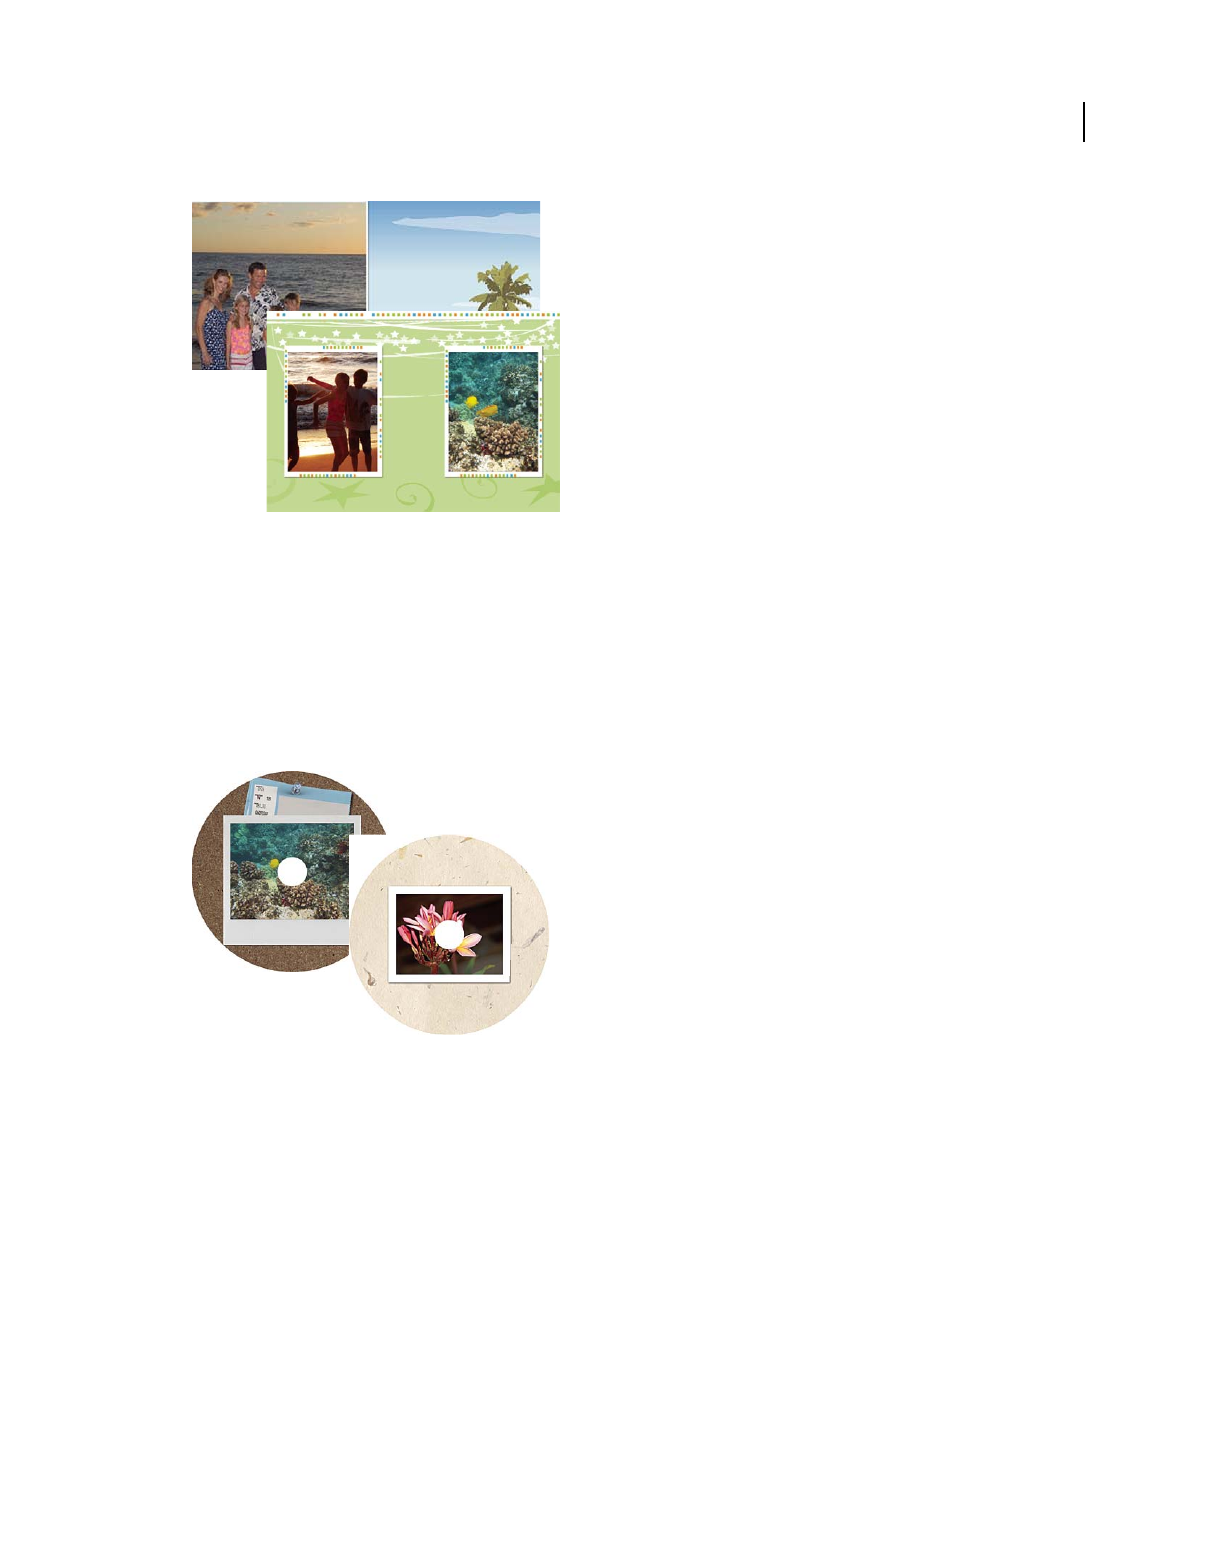
259
USING PHOTOSHOP ELEMENTS 9
Creating projects in the Edit workspace
Last updated 1/3/2012
Sample CD and DVD jackets
More Help topics
“Make a photo collage, label, CD, and DVD Jacket” on page 260
About CD and DVD labels
Photoshop Elements lets you create adhesive disc labels for CDs and DVDs, or labels for printable CDs and DVDs,
using an inkjet printer. Labels can be printed with your home printer, or saved to your hard drive and sent by e-mail
as PDFs.
Sample CD and DVD labels
More Help topics
“Make a photo collage, label, CD, and DVD Jacket” on page 260
About slide shows
Slide shows are a fun way to share media files. With Photoshop Elements, you can customize slide shows with music
clips, clip art, text, and even voice narration. Images in PDF do not display in slide shows.
After you complete a slide show, you can choose several ways to share it.
Note: Slide shows are not available in Mac OS.
Note: For a video about slide shows, see www.adobe.com/go/lrvid913_pse_en

260
USING PHOTOSHOP ELEMENTS 9
Creating projects in the Edit workspace
Last updated 1/3/2012
Make a photo collage, label, CD, and DVD Jacket
For a video about photo collages, see www.adobe.com/go/lrvid910_pse_en.
1In the Organize workspace, select the photos you want to use in your project. Or, if you want to add photos after
creating it, open the Edit workspace.
2Select the Create tab . You can see the project types. Do one of the following:
•Click Photo Collage
•Click More Options, and select CD Jacket.
•Click More Options, and select DVD Jacket.
•Click More Options, and select CD/DVD Label.
3Select a size and theme.
4Select Autofill With Selected Images.
5Click OK.
The project opens in the Edit workspace. You can modify the design using the Pages, Layouts, Artwork, and Text tabs
in the Create panel.
6Add photos (if you have not yet added) or new pages to the photo project.
7View and customize your photos by doing any of the following:
•Reposition or resize a photo.
•Rotate a photo.
•Add or edit text.
•Replace or remove a photo.
8Choose File > Save. By default, projects are saved in your My Pictures folder, although you can save projects to
another location.
9By default, Include In The Elements Organizer is selected, which places the project in Elements Organizer. Deselect
this option if you do not want the project placed in Elements Organizer.
10 Type a filename, and click Save.
More Help topics
“Editing photo projects” on page 266
Create a photo book
For a video about this process, see www.adobe.com/go/lrvid2328_pse9_en.
Photo Books let you add various layouts and designs to your images. Photo books can be printed on your home printer,
ordered online from Adobe® Photoshop® Services, saved to your hard drive, and sent by e-mail. Photo books are
designed to be ordered online using Adobe Photoshop Elements Online Services.

261
USING PHOTOSHOP ELEMENTS 9
Creating projects in the Edit workspace
Last updated 1/3/2012
Create a photo book
1Select the images that you want to add to the photo book in the Organize workspace or open them in the Edit
workspace. Click Create and select Photo Book.
2Select the appropriate size and theme.
Note: The Sizes panel displays options suitable for various online services.
3Select Autofill With Selected Images to add all the photos already open in the Project Bin.
4Specify the number of pages in the photo book.
Note: Photoshop Elements supports different ranges of pages depending upon the method of printing that you select. For
example, the range for the locally printed photo book is 2 – 78 pages. The minimum and maximum number of pages also
varies based on the locale.
5Click OK.
Photoshop Elements creates the photo book and displays Pages, Layouts, Artwork, and Text tabs in the Create panel.
6Use the following options to fine-tune and add creative designs to your photo book:
Pages Add or delete pages.
Layouts Double-click a layout to apply it.
Artwork Choose a background, frame, and graphics.
Text Add and edit text on the pages.
7Click Switch To Advanced Mode to access Full Edit options.
Note: In advanced mode, Photoshop Elements changes the resolution from 72 PPI to 220 PPI. You cannot resize a
creation in the advanced mode.
8Click Print.
Note: Photoshop Elements prints pages at a resolution of 220 PPI.
9Click Done.
Create photo books using Shutterfly
You can upload your photos, create photo books, and print using Shutterfly. You can also order a digital scrapbook
using Shutterfly.
1In the Edit workspace, click Create, and select Photo Book (or from the Elements Organizer, select the Create tab,
and select Photo Book).
2Select one of the available Shutterfly sizes.
3Select a theme.
4Select Autofill With Selected Images to add all the photos already open in the Project Bin.
5Specify the number of pages in the photo book.
Note: The minimum and maximum number of pages varies based on the locale.
6Click OK.
Photoshop Elements creates the photo book and displays Pages, Layouts, Artwork, and Text tabs in the Create panel.

262
USING PHOTOSHOP ELEMENTS 9
Creating projects in the Edit workspace
Last updated 1/3/2012
7Use the following options to fine-tune and add creative designs to your photo book:
Pages Add or delete pages.
Layouts Double-click a layout to apply it.
Artwork Choose a background, frame, and graphics.
Text Add and edit text on the pages.
8Click Switch To Advanced Mode to access Full Edit options.
Note: You cannot resize a creation in the advanced mode.
9Click Order.
10 Follow the onscreen instructions to create and order photo books.
Note: Sign up for Shutterfly membership to use their services.
Create photo books using Kodak Gallery
1In the Edit workspace, click Create, and select Photo Book (or from the Elements Organizer, select the Create tab,
and select Photo Book).
2Select a size that is suitable for Kodak Gallery.
3Select a theme.
4Select Autofill With Selected Images to add all the photos already open in the Project Bin.
5Specify the number of pages in the photo book.
Note: The minimum and maximum number of pages varies based on the locale.
6Click OK.
Photoshop Elements creates the photo book and displays Pages, Layouts, Artwork, and Text tabs in the Create panel.
7Use the following options to fine-tune and add creative designs to your photo book:
Pages Add or delete pages.
Layouts Double-click a layout to apply it.
Artwork Choose a background, frame, and graphics.
Text Add and edit text on the pages.
8Click Switch To Advanced Mode to access Full Edit options.
Note: You cannot resize a creation in the advanced mode.
9Click Order.
10 Follow the onscreen instructions to create and order photo books.
Note: Sign up for Kodak Gallery membership to use their services.
Create a greeting card
Greeting cards let you add various layouts and designs to your images, and enables you to add up to 22 photos on a
page. Greeting cards can be printed with your home printer, saved to your hard drive, and sent by e-mail.

263
USING PHOTOSHOP ELEMENTS 9
Creating projects in the Edit workspace
Last updated 1/3/2012
You can also upload photos and order greeting cards from Shutterfly and Kodak Gallery.
Greetings cards can be ordered online from Adobe Photoshop Elements Online Services from some locales.
Sample photo greeting cards
For a video about greeting cards, see www.adobe.com/go/lrvid912_pse_en.
Create a greeting card and print on a local printer
1From the Edit workspace, click Create, and select Greeting Card (or from the Elements Organizer, select the Create
tab, and select Greeting Card).
2Select the appropriate size and theme.
Note: The Sizes panel displays options suitable for various online services.
3Select Autofill With Selected Images to add all the photos already open in the Project Bin.
4Click OK.
Photoshop Elements creates the greeting card and displays Pages, Layouts, Artwork, and Text tabs in the Create panel.
5Use the following options to fine-tune and add creative designs to your greeting card:
Pages Add or delete pages.
Layouts Double-click a layout to apply it.
Artwork Choose a background, frame, and graphics.
Text Add and edit text on the pages.
6Click Switch To Advanced Mode to access Full Edit options.
Note: You cannot resize a creation in the advanced mode.
7Click Print.
8Click Done.
Order greeting cards using Shutterfly
You can upload your photos, create greeting cards, and order copies using Shutterfly.
1From the Edit workspace, click Create, and select Greeting Card (or from the Elements Organizer, select the Create
tab, and select Greeting Card).

264
USING PHOTOSHOP ELEMENTS 9
Creating projects in the Edit workspace
Last updated 1/3/2012
2Select one of the available Shutterfly sizes.
3Select a theme.
4Select Autofill With Selected Images to add all the photos already open in the Project Bin.
5Click OK.
Photoshop Elements creates the greeting card and displays Pages, Layouts, Artwork, and Text tabs in the Create panel.
6Use the following options to fine-tune and add creative designs to your greeting card:
Pages Add or delete pages.
Layouts Double-click a layout to apply it.
Artwork Choose a background, frame, and graphics.
Text Add and edit text on the pages.
7Click Switch To Advanced Mode to access Full Edit options.
Note: You cannot resize a creation in the advanced mode.
8Click Order.
9Follow the onscreen instructions to create and order greeting cards.
Note: Sign up for Shutterfly membership to use their services.
Order greeting cards using Kodak Gallery
You can upload your photos, create greeting cards, and order using Kodak Gallery.
1From the Edit workspace, click Create, and select Greeting Card (or from the Elements Organizer, select the Create
tab, and select Greeting Card).
2Select a size that is suitable for Kodak Gallery.
3Select a theme.
4Select Autofill With Selected Images to add all the photos already open in the Project Bin.
5Click OK.
Photoshop Elements creates the greeting card and displays Pages, Layouts, Artwork, and Text tabs in the Create panel.
6Use the following options to fine-tune and add creative designs to your greeting card:
Pages Add or delete pages.
Layouts Double-click a layout to apply it.
Artwork Choose a background, frame, and graphics.
Text Add and edit text on the pages.
7Click Switch To Advanced Mode to access Full Edit options.
Note: You cannot resize a creation in the advanced mode.
8Click Order.
9Follow the onscreen instructions to create and order greeting cards.
Note: Sign up for Kodak Gallery membership to use their services.

265
USING PHOTOSHOP ELEMENTS 9
Creating projects in the Edit workspace
Last updated 1/3/2012
Create photo calendars
Create photo calendars for local printing
You can upload your photos, create photo calendars, and order copies using Shutterfly.
1From the Edit workspace, click Create, and select Photo Calendar (or from Elements Organizer, select the Create
tab, and select Photo Calendar).
2Select the starting month and year.
3Select the appropriate size and theme.
Note: The Sizes panel displays options suitable for online services.
4Select Autofill With Selected Images to add all the photos already open in the Project Bin.
5Click OK.
Photoshop Elements creates the photo calendar and displays Pages, Layouts, Artwork, and Text tabs in the Create
panel.
6Use the following options to fine-tune and add creative designs to your photo calendar:
Pages Add or delete pages.
Layouts Double-click a layout to apply it.
Artwork Choose a background, frame, and graphics.
Text Add and edit text on the pages.
7Click Switch To Advanced Mode to access Full Edit options.
Note: You cannot resize a creation in the advanced mode.
8Click Print.
9Click Done.
Create photo calendars and order using Kodak Gallery
You can upload your photos, create photo calendars, and order using Kodak Gallery.
1From the Edit workspace, click Create, and select Photo Calendar (or from the Elements Organizer, select the
Create tab, and select Photo Calendar).
2Select the starting month and year.
3Select a size available for Kodak Gallery.
4Select a theme.
5Select Autofill With Selected Images to add all the photos already open in the Project Bin.
6Click OK.
Photoshop Elements creates the photo calendar and displays Pages, Layouts, Artwork, and Text tabs in the Create
panel.
7Use the following options to fine-tune and add creative designs to your photo calendar:
Pages Add or delete pages.
Layouts Double-click a layout to apply it.

266
USING PHOTOSHOP ELEMENTS 9
Creating projects in the Edit workspace
Last updated 1/3/2012
Artwork Choose a background, frame, and graphics.
Text Add and edit text on the pages.
8Click Switch To Advanced Mode to access Full Edit options.
Note: You cannot resize a creation in the advanced mode.
9Click Order.
10 Follow the onscreen instructions to create and order photo calendars.
Note: Sign up for Kodak Gallery membership to use their services.
Editing photo projects
About photo project edits
In the Edit workspace, you can modify photo collages, greeting cards, and CD/DVD disc jackets and labels. The Create
panel lets you add a variety of frames, textures, backgrounds, and graphics to your projects, as well as apply text effects.
You can also resize, rotate, and move images.
Add images to a photo project
You can add images to a photo project in the Edit workspace. After you add images, you can rearrange, modify, or
replace them.
Photoshop Elements adds all the images in a project to your default catalog.
When you save a photo project, Photoshop Elements saves any unsaved images added to the project. A single-layered
image is saved as a JPEG file, and a multilayered image is saved as a PSD file. Photoshop
Elements saves the image as
a copy of the original image in the same location.
Note: If the location is not writable, Photoshop Elements saves the image in %My Documents%Adobe\Photo Creations.
If you relocate the images used in a photo book, missing file icons appear in the photo book instead of the images. Re-
import the images by clicking the ? sign, or reconnect all the missing files in the Organize workspace. After
reconnecting the files, close the project and reopen it.
1If the photo project is not already open in the Edit workspace, select the photo project in the Elements Organizer
and click the triangle beside Fix
> Full Photo Edit, or drag the photo project to the Edit workspace. Images can only
be added to a photo project in the Edit workspace.
2Choose File > Open. Choose the photos you want to add. If you do not see the images, navigate to where they are
located, and then click Open, which places them in the Project Bin.
3Select a photo from the Project Bin, and drag it into a frame, which is the gray area inside a layout. To replace an
existing photo in a photo project, right-click the photo and select Replace Photo, and then select an image file and
click Place. You can also double-click an image in the photo project and click the Get New Photo button, or select
another photo from the Project Bin, and drag it into a frame.
Edit photos in the Quick Fix mode
1In the Edit workspace, right-click the photo and select Edit Quick.
2Use the various sliders to achieve the results you want.
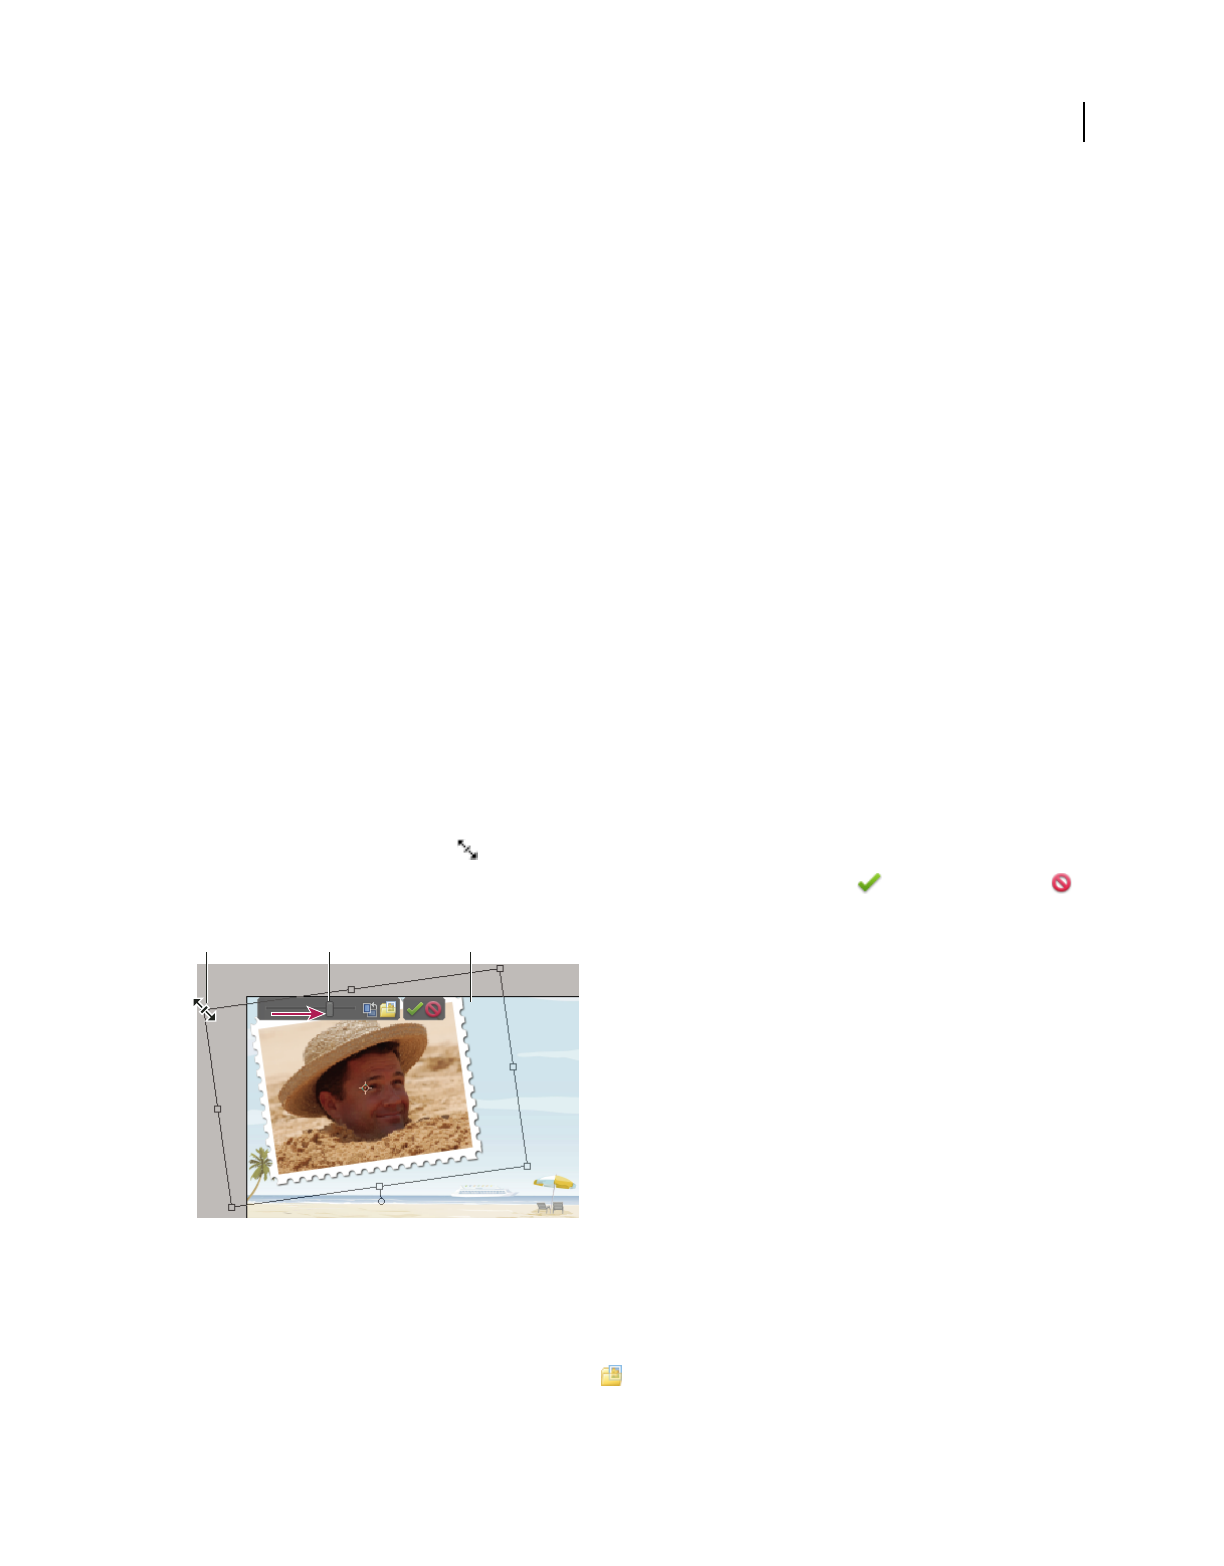
267
USING PHOTOSHOP ELEMENTS 9
Creating projects in the Edit workspace
Last updated 1/3/2012
3Click Back To Creation to return to the Create panel.
Add new pages to a photo project
1In the Project Bin, select the page that will precede the new page.
2Do any of the following:
•To add a blank page, choose Edit > Add Blank Page, or right-click a page in the Project Bin, and then select this
option from the context menu. You can also drag a blank page to a different location in the photo project. For
example, you might drag it to the beginning of your photo project if you want to use it as your title page.
•To add a new page that uses the current layout, click Edit > Add Page Using Current Layout, or right-click a page
in the Project Bin, and then select this option from the context menu. You can also drag a new page to a different
location in the project. For example, you might want to move the new page somewhere else in the project.
•To remove a page, click Edit > Delete Current Page, or right-click the page, and then select this option from the
context menu.
Reposition or resize photos in a photo project
1To adjust a photo and frame together, click the photo once. To adjust a photo within a frame, double-click the
photo.
A bounding box appears showing the edges of the photo, even if the edges are masked by the frame.
2Do any of the following:
•To reposition the photo, click anywhere within the bounding box and drag the photo.
•To resize the photo, drag the slider. Or, position the Move tool over a corner, top, bottom, or side; when the
diagonal double-headed arrow
appears, drag it.
3After repositioning or resizing the photo within the frame, click the Commit button or the Cancel button
when you’re finished.
Resizing a photo in the Edit workspace
A. Drag a corner of the photo to resize it B. Move the resize slider C. Areas outside the photo frame are hidden
Replace or remove photos in a photo project
❖Do any of the following:
•Double-click the photo, then click Get New Photo
•Drag a new photo from the Project Bin onto a photo.
BC
A
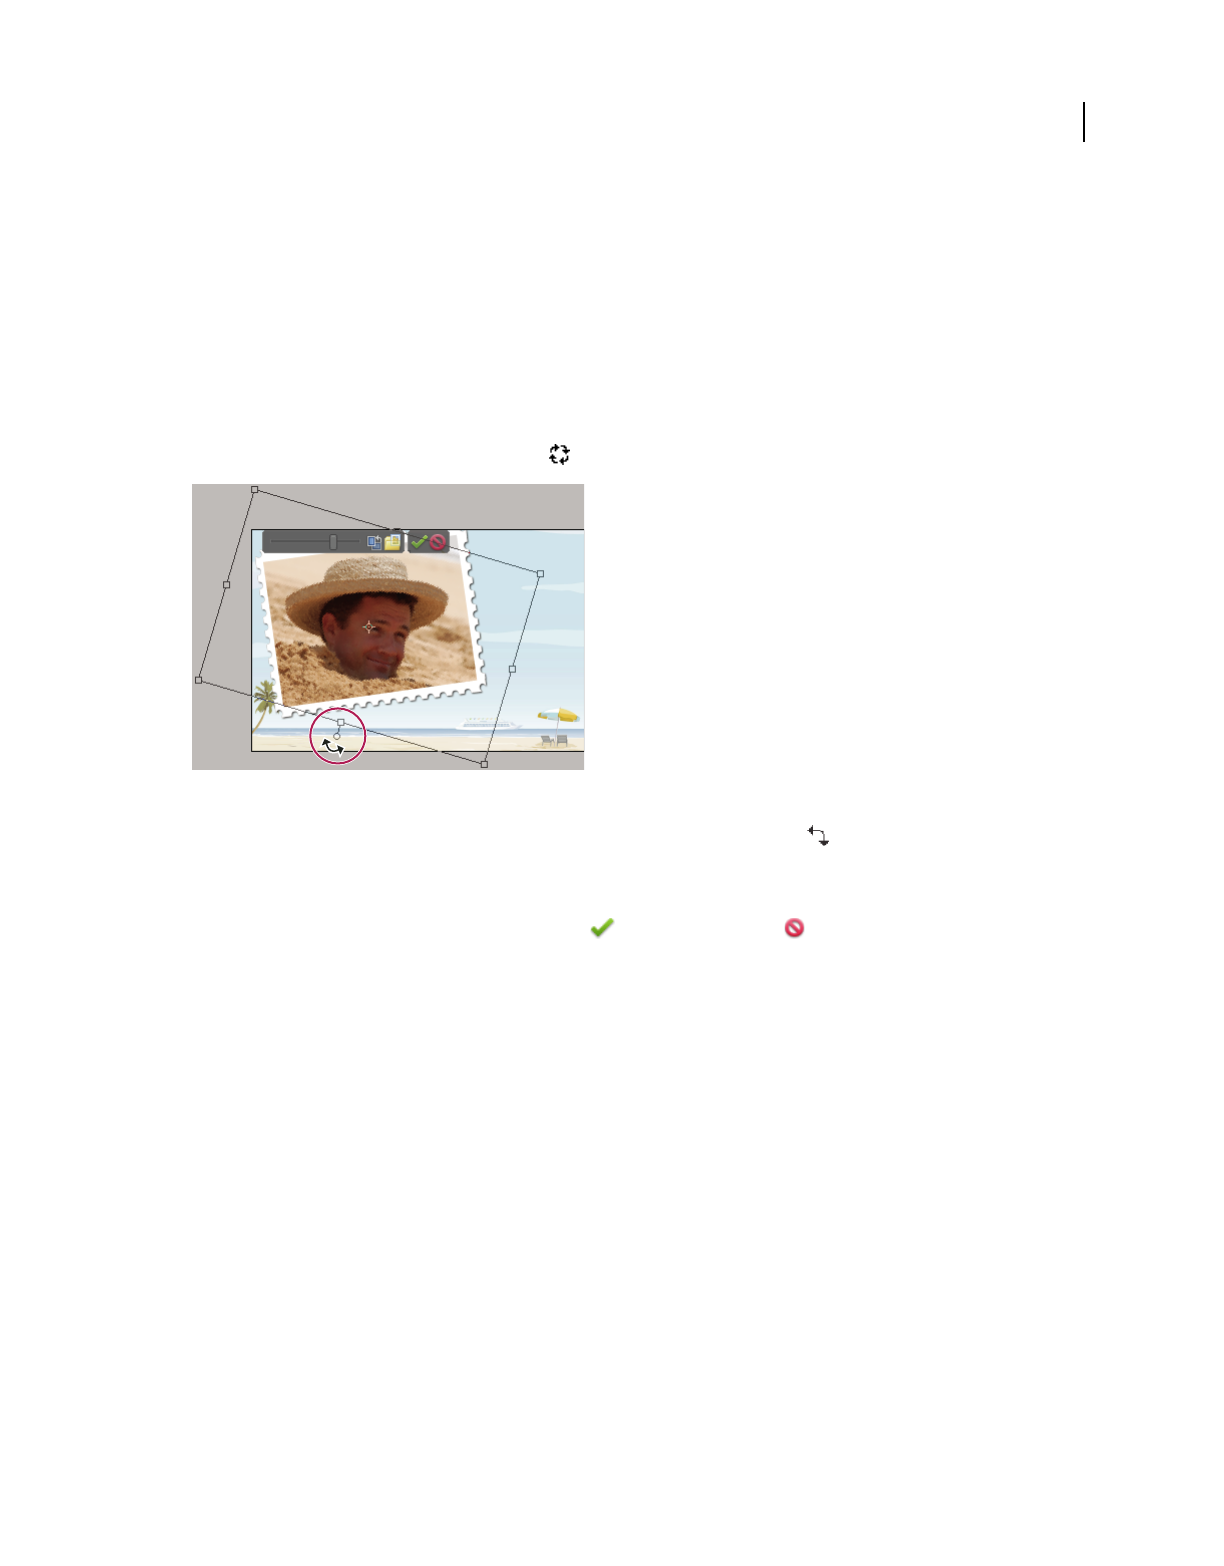
268
USING PHOTOSHOP ELEMENTS 9
Creating projects in the Edit workspace
Last updated 1/3/2012
•To replace a photo on a page, right-click and select Replace Photo.
•To remove (clear) a photo from a page, right-click and select Clear Photo.
Rotate photos in a photo project
1To rotate a photo and frame together, click the photo once. To rotate a photo within a frame, double-click the
photo.
2Do any of the following:
•Click anywhere within the bounding box and a circle appears below the selection. Position the cursor over the
circle. When the curved four-headed arrow
appears, drag the track ball handle to rotate the image.
Rotating an image in a photo project
•Position the Move tool over a corner. When the curved double-headed arrow appears, drag it to rotate the
photo. The further away the cursor is from the corner, the more control you have to make more accurate changes.
•Double-click the photo, and then click the rotate button next to the slider (only rotates in 90° increments).
3When you are finished, click the Commit button or the Cancel button .
Edit photo project pages in Photoshop CS5
If you have Adobe® Photoshop® CS5 and Photoshop Elements installed on the same computer, you can send JPEG, GIF,
and other single-page photo files to Photoshop by using the Edit >Edit with Photoshop command. Photoshop does not
support the multipage PSE file format, so it cannot edit entire photo projects. However, Photoshop can edit individual
pages of a photo project, which are in the single-page PSD format.
Photoshop offers direct control over many aspects of photo project pages, including direct editing of photo layers
(called Smart Objects in Photoshop) and frames. These features are limited in Photoshop
Elements to preserve its easy,
automatic image-editing workflow.
1In the Photo Browser, right-click the photo project.
2Select Show Properties.
3In the General page, click the folder icon next to the path of the project file, which displays the PSE file in Windows
Explorer.
4Locate and open the folder with the same name as the PSE file.
5Right-click the PSD file for the page you want to edit, and choose Open With > Adobe Photoshop CS5.

269
USING PHOTOSHOP ELEMENTS 9
Creating projects in the Edit workspace
Last updated 1/3/2012
6In Photoshop, make your changes, and then choose File > Save. When Photoshop asks if you want to replace the
existing file, click Yes.
Important: Do not reorder or rename layers in the PSD file. Doing so could prevent the automatic editing features in
Photoshop
Elements from working as expected.
Create a VCD with a menu of slide shows
You can burn a video CD (VCD) of your slide shows to share with friends and family. To create a VCD, you must have
a CD-RW drive or a DVD-RW drive and use only CD-R/RW discs.
You can start from the Edit workspace and complete the task of creating a VCD with a menu of slide shows in Elements
Organizer. Click Create > More Options > VCD With Menu to start the creation of a VCD with a menu of slide shows.
Flipbooks
Flipbook enables you to create a stop motion video of your photos. You can start from the Edit workspace and
complete the task of creating a flipbook in Elements Organizer. Click Create > More Options > Flipbook to start the
creation of a flip book.

270
Last updated 1/3/2012
Chapter 14: Optimizing for the web
Optimization for the web is the process of compressing images and setting display options for optimal use on the
Internet. When you put images on the Internet, file size becomes important; you want to achieve a file size that is small
enough to allow a reasonable download time, but large enough to preserve colors and details to your satisfaction. There
are three major graphic file formats that are used on the web: GIF, JPEG, and PNG.
Optimizing images
About optimizing
When you put images on the web, you need to think about file size. The goal is a file size that is small enough to allow
reasonable download times but that preserves colors and details to your satisfaction.
Three major graphic file formats are used on the web: GIF, JPEG, and PNG. You can optimize images in these formats
using one of the following methods:
•To precisely optimize an image for use in web authoring applications, such as Adobe® Dreamweaver®, you can use
the Save For Web command. The Save For Web dialog box lets you preview your image in different file formats and
with different optimization settings. You can also set transparency and animation settings.
•For basic optimization, you can use the Save As command. Depending on the file format, you can specify image
quality, background transparency or matting, color display, and downloading method.
Using the Save For Web dialog box
Use the Save For Web dialog box to preview the effects of different optimization options on a photo you want to share
on the web. The process is simple. Open a photo in the Edit workspace, and choose File
> Save For Web. Then choose
a format from the file format menu (GIF, JPEG, PNG-8, or PNG-24) and set options as desired. (The file format menu
is directly beneath the Preset menu.) This saves a copy of your file, without overwriting the original image.
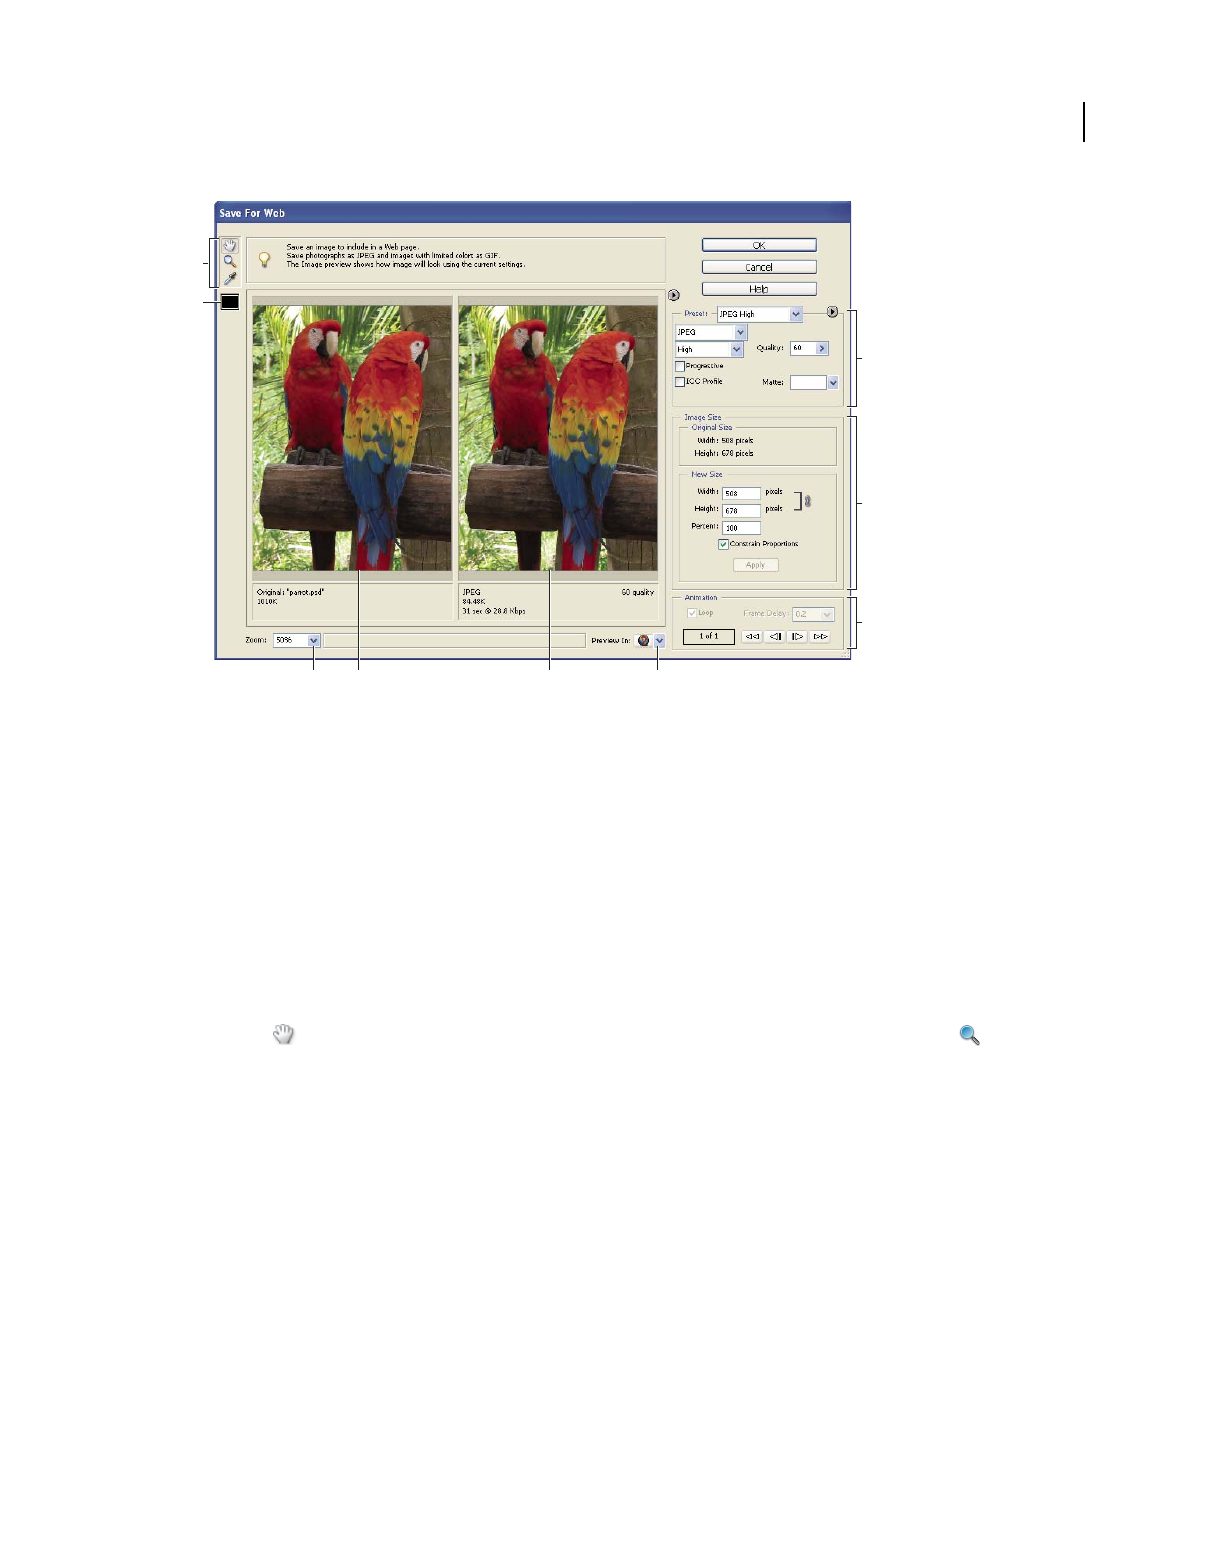
271
USING PHOTOSHOP ELEMENTS 9
Optimizing for the web
Last updated 1/3/2012
Save For Web dialog box
A. Toolbox B. Eyedropper color C. Optimization settings D. Image Size E. Animation options F. Zoom level menu G. Original image
H. Optimized image I. Browser preview menu
Optimization options appear on the right side of the Save For Web dialog box. In addition to selecting a web file
format, you can choose compression and color options, preserve background transparency or set background matting,
and change the size of the image. You can use predefined settings (by choosing a format from the Preset menu), or
select format-specific options to fine-tune the optimization.
The image windows show your original image (on the left) and a preview of the optimized image (on the right). Under
each window is optimization information—the current settings, the size of the optimized file, and the estimated
download time. As you make adjustments, the information under the optimized image changes to reflect your new
settings.
A small toolbox is located in the upper-left corner of the dialog box. To view different areas of an image, select the
Hand tool
and drag to bring those areas into view. To zoom in on an image, select the Zoom tool and click in
a view; then hold down Alt, and click again to zoom out. (Alternatively, you can use the Zoom box at the bottom of
the dialog box.) To create matte colors, use the Eyedropper Color tool.
More Help topics
“Preview an optimized image in a web browser” on page 282
“Preview variations in color display” on page 283
“View estimated download time” on page 282
Optimized file formats for the web
You can choose between four formats for the web. Use the following guidelines when choosing the format for your
web image:
JPEG In most cases, this is the best format in which to save photographs.
A
B
C
E
F
D
G H I
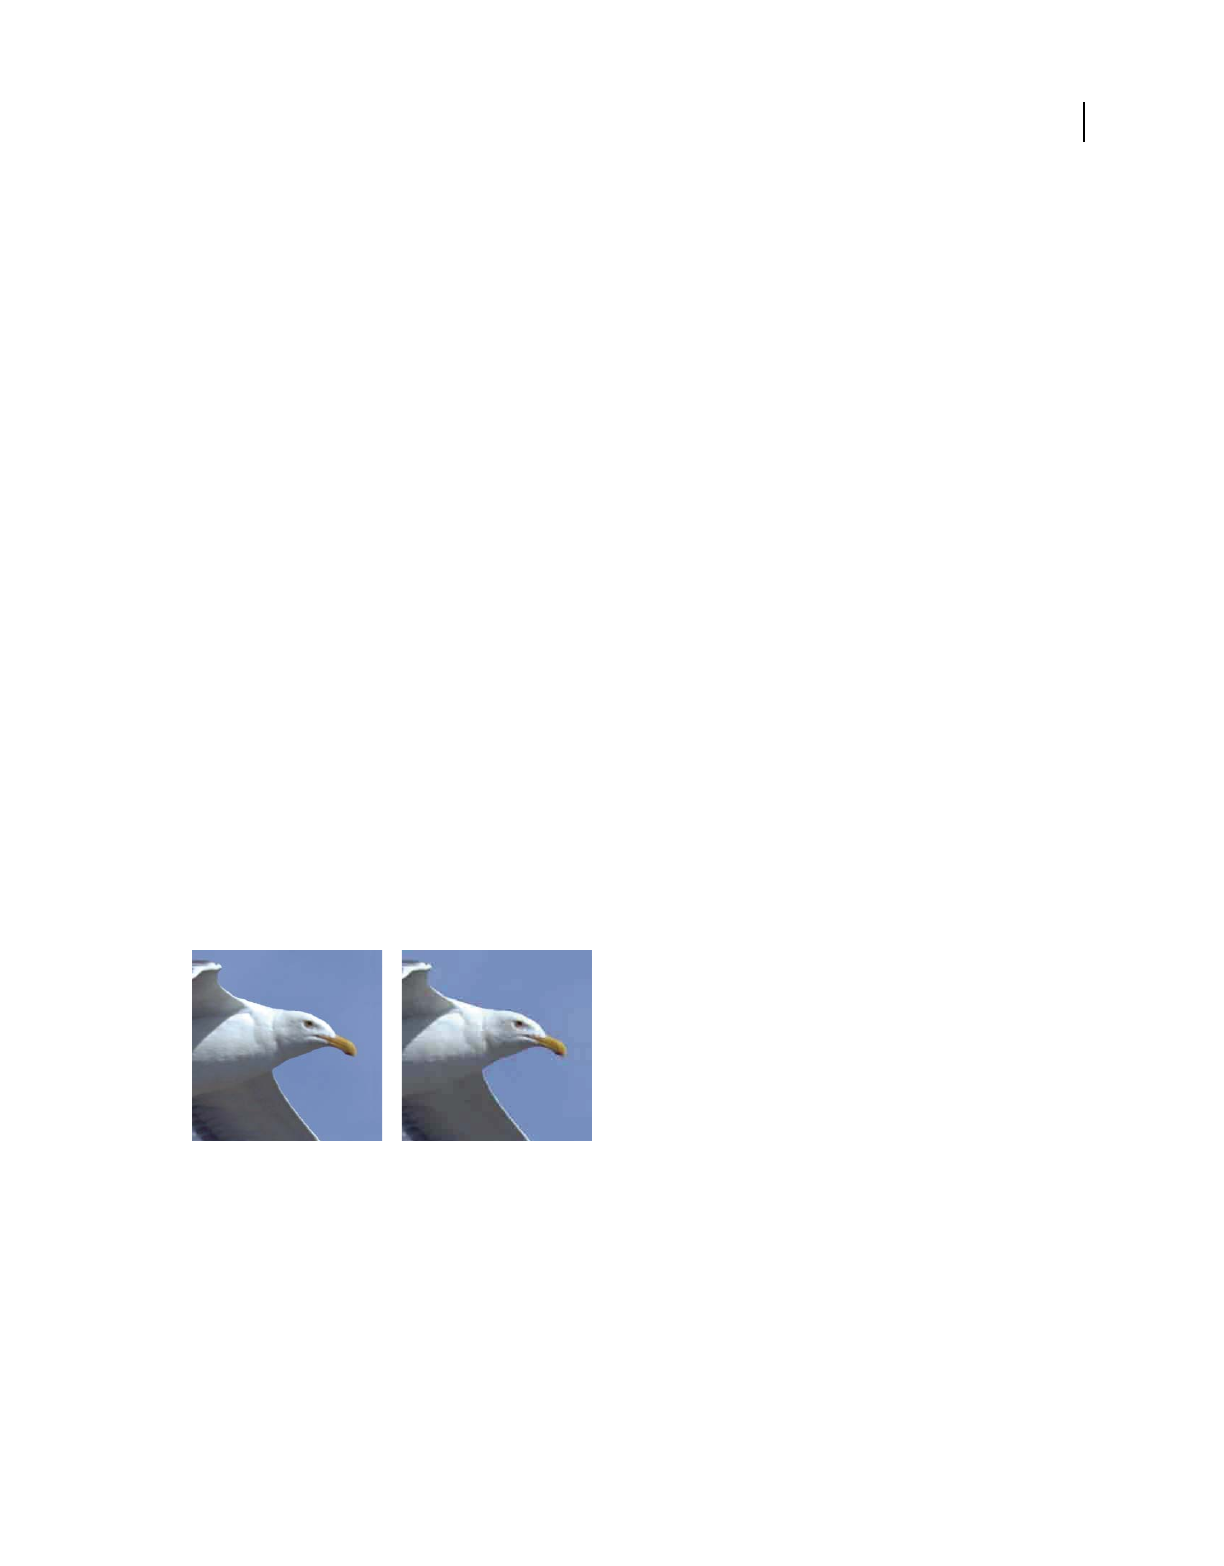
272
USING PHOTOSHOP ELEMENTS 9
Optimizing for the web
Last updated 1/3/2012
PNG-24 Like JPEG, this is a good format for photographs. Choose PNG-24 rather than JPEG only when your image
contains transparency. (JPEG does not support transparency; you must fill it with a matte color.) PNG-24 files are
often much larger than JPEG files of the same image.
GIF GIF is the format to use for line art, illustrations with large areas of solid color and crisp detail, and text. Also, if
you want to export an animated image, you must use GIF.
PNG-8 PNG-8 is a lesser-known alternative to GIF. Use it for the same purposes (except animation).
Images in GIF and PNG-8 formats, sometimes called indexed-color images, can display up to 256 colors. To convert
an image to indexed-color format, Photoshop Elements builds a color lookup table. If a color in the original image does
not appear in the color lookup table, the application either chooses the closest color in the table or simulates the color
using a combination of available colors.
JPEG and PNG-24 files support 24-bit color, so they can display up to 16 million colors. Depending on the format, you
can specify image quality, background transparency or matting, color display, and the method a browser should use
to display the image while downloading.
The appearance of an image on the web also depends on the colors displayed by the computer platform, operating
system, monitor, and browser. You may want to preview images in different browsers and on different platforms to
see how they will appear on the web.
About the JPEG format
The JPEG format supports 24-bit color, so it preserves the subtle variations in brightness and hue found in
photographs. A progressive JPEG file displays a low-resolution version of the image in the web browser while the full
image is downloading.
JPEG image compression is called lossy because it selectively discards image data. A higher quality setting results in
less data being discarded, but the JPEG compression method may still degrade sharp detail in an image, particularly
in images containing type or vector art.
Note: Artifacts, such as wavelike patterns or blocky areas of banding, are created each time you save an image in JPEG
format. Therefore, you should always save JPEG files from the original image, not from a previously saved JPEG.
Original image (left), and optimized JPEG with Low quality setting (right)
The JPEG format does not support transparency. When you save an image as a JPEG file, transparent pixels are filled
with the matte color specified in the Save For Web dialog box. To simulate the effect of background transparency, you
can match the matte color to the web page background color. If your image contains transparency and you do not
know the web page background color, or if the background is a pattern, you should use a format that supports
transparency (GIF, PNG-8, or PNG-24).
More Help topics
“Create a matted GIF or PNG image” on page 279
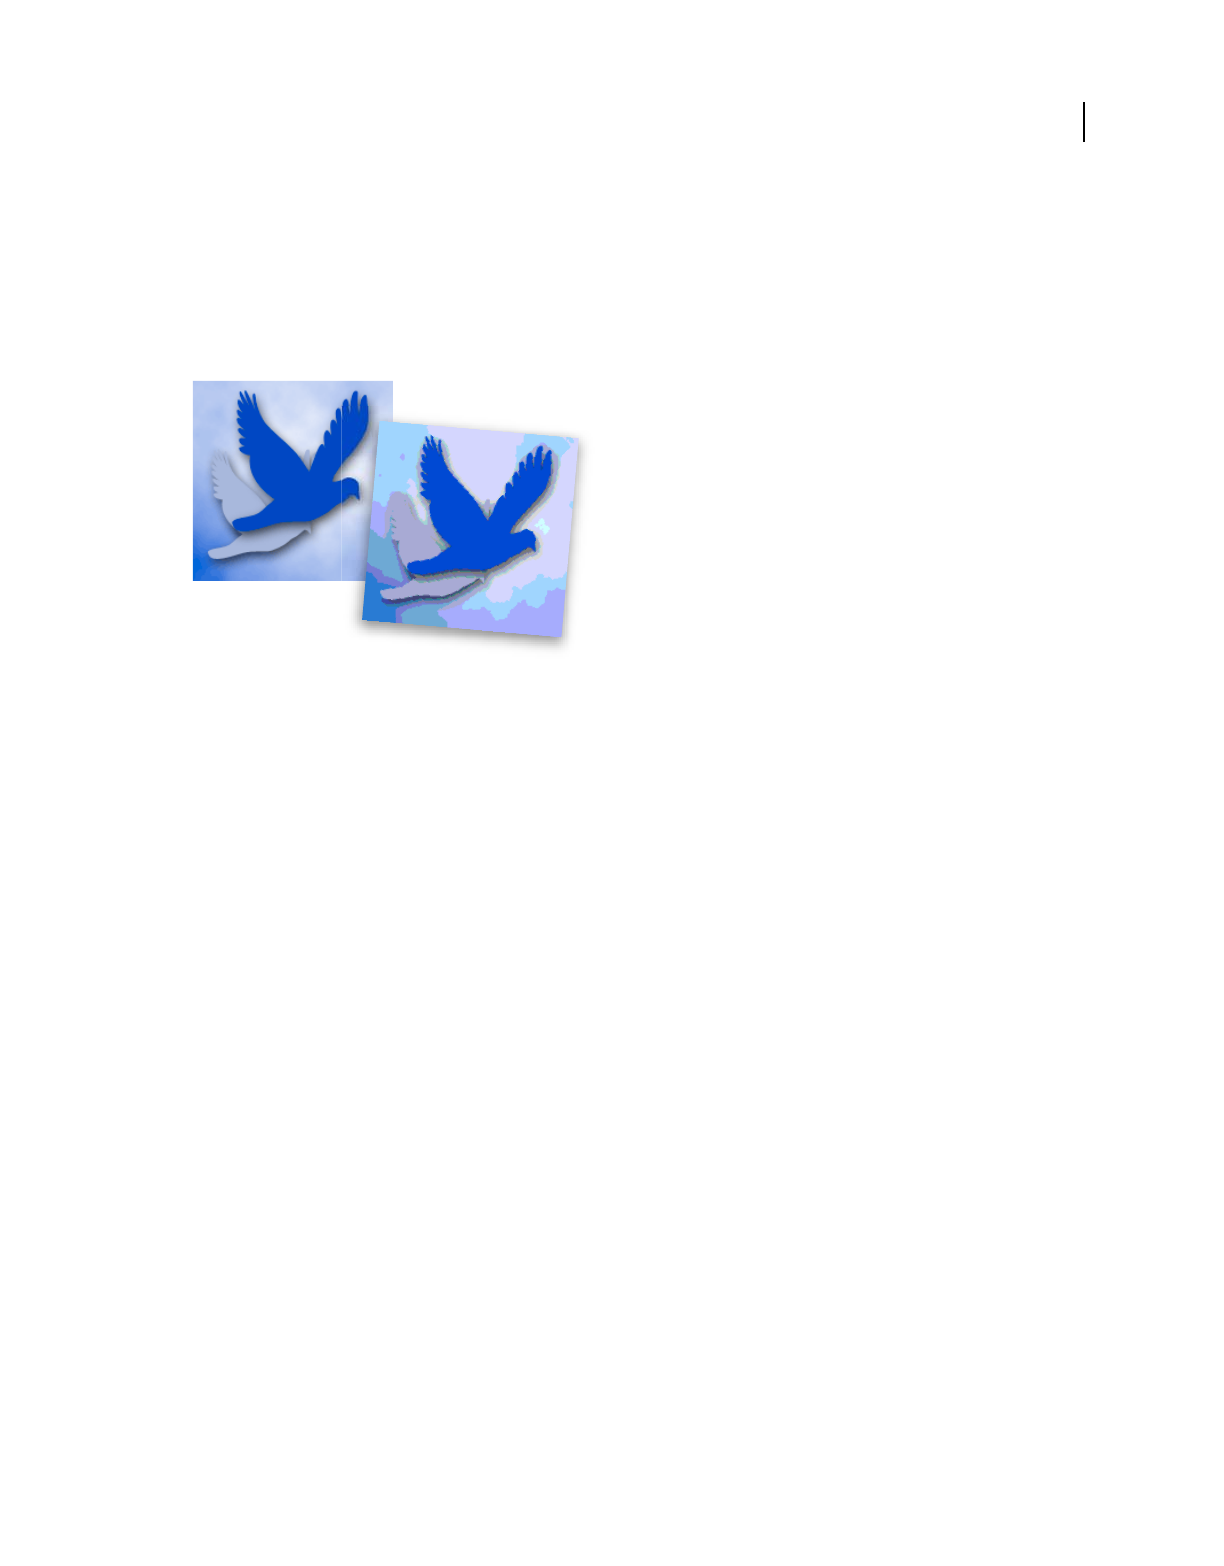
273
USING PHOTOSHOP ELEMENTS 9
Optimizing for the web
Last updated 1/3/2012
About the GIF format
The GIF format uses 8-bit color and efficiently compresses solid areas of color while preserving sharp details like those
in line art, logos, or type. You also use the GIF format to create an animated image and preserve transparency in an
image. GIF is supported by most browsers.
The GIF format uses LZW compression, which is a lossless compression method. However, because GIF files are
limited to 256 colors, optimizing an original 24-bit image as an 8-bit GIF can subtract colors from an image.
GIF image with selective color (left), and GIF image with web color (right)
You can choose the number of colors in a GIF image and control how colors dither in a browser. GIF supports
background transparency or background matting, by which you blend the edges of the image with a web page
background color.
More Help topics
“Preserve background transparency in a GIF or PNG image” on page 279
About the PNG-8 format
The PNG-8 format uses 8-bit color. Like the GIF format, PNG-8 efficiently compresses areas of solid color while
preserving sharp detail like those in line art, logos, or type.
Because PNG-8 is not supported by all browsers, you may want to avoid this format when you are distributing the
image to a wide audience.
The PNG-8 format uses more advanced compression schemes than GIF does, and a PNG-8 file can be 10% to 30%
smaller than a GIF file of the same image, depending on the image’s color patterns. Although PNG-8 compression is
lossless, optimizing an original 24-bit image as an 8-bit PNG file can subtract colors from the image.
Note: With certain images, especially those with simple patterns and few colors, GIF compression can create a smaller file
than PNG-8 compression. View optimized images in GIF and PNG-8 format to compare file size.
As with the GIF format, you can choose the number of colors in an image and control how colors dither in a browser.
The PNG-8 format supports background transparency and background matting, by which you blend the edges of the
image with a web page background color.
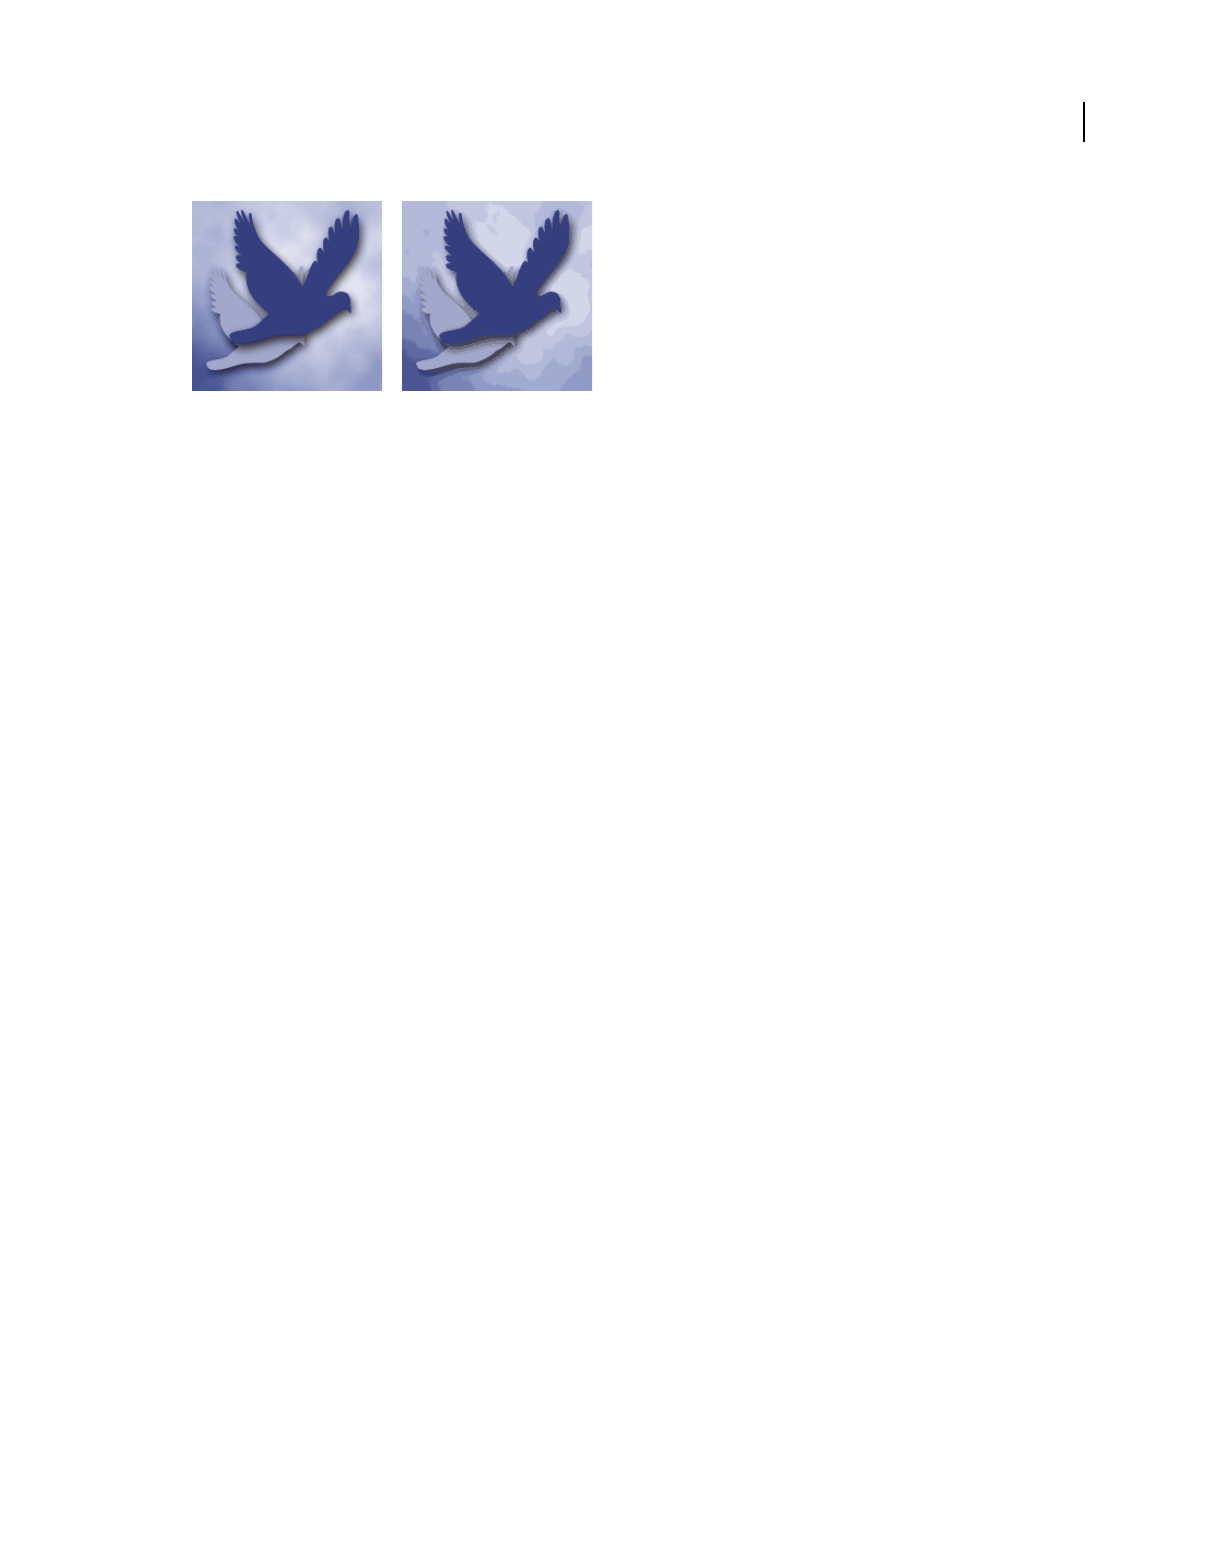
274
USING PHOTOSHOP ELEMENTS 9
Optimizing for the web
Last updated 1/3/2012
PNG-8 with 256 colors and no dither (left), and PNG-8 with 16 colors and dithering (right)
More Help topics
“Preserve background transparency in a GIF or PNG image” on page 279
About the PNG-24 format
The PNG-24 format supports 24-bit color. Like the JPEG format, PNG-24 preserves the subtle variations in brightness
and hue found in photographs. Like the GIF and PNG-8 formats, PNG-24 preserves sharp details like those in line art,
logos, or type.
The PNG-24 format uses the same lossless compression method as the PNG-8 format. For that reason, PNG-24 files
are usually larger than JPEG files of the same image. You may want to avoid PNG-24 format when you are distributing
your image to a wide audience.
In addition to supporting background transparency and background matting, the PNG-24 format supports multilevel
transparency. You can have up to 256 degrees of transparency from opaque to completely transparent, so you can
blend the edges of an image smoothly with any background color. However, not all browsers support multilevel
transparency.
More Help topics
“Preserve background transparency in a GIF or PNG image” on page 279
About animated GIFs
Animated GIFs create the illusion of movement by displaying a sequence of images, or frames, over time. Photoshop
Elements provides a powerful, easy way to create animated GIFs from a multiple-layer image.
To create an animated GIF file, you work with layers. Each layer becomes a frame when Photoshop Elements generates
an optimized animation. The animated GIFs are compiled into a RGB color document in the Edit workspace.
You can open an existing animated GIF file using the Open command from the Edit workspace. For each frame in the
file, Photoshop Elements creates a layer. To view a specific frame in the document window, make the layer for that
frame visible in the Layers panel, and hide other layers.

275
USING PHOTOSHOP ELEMENTS 9
Optimizing for the web
Last updated 1/3/2012
Images in separate layers can be sequenced together to create an animation.
More Help topics
“Understanding layers” on page 56
“Preview an animation” on page 283
Apply a preset optimization setting
You can quickly and easily optimize an image for the web by choosing a predefined optimization setting, called a preset,
from the Preset menu near the upper-right corner of the Save For Web dialog box. Presets are tailored to meet the
optimization needs of different types of images.
The name of each preset reflects its file format and quality level. For example, choose JPEG High to optimize an image
in JPEG format with high image quality and low compression. Choose GIF 32 Dithered to optimize an image in GIF
format, reduce the number of colors to 32, and apply dithering.
1In the Save For Web dialog box, choose a setting name from the Preset menu, and then click OK.
2In the Save Optimized As dialog box, type a filename and click Save.
Note: If you change the options in a preset, the Preset menu displays the word “Custom.” You cannot save a custom
setting; however, the current settings appear in the Save For Web dialog box the next time you display it.
Optimize as JPEG
JPEG is the standard format for compressing photographs.
1In the Edit workspace, open an image and choose File > Save For Web.
2Choose JPEG from the optimization format menu.
3To optimize to a specific file size, click the arrow to the right of the Preset menu, and then click Optimize To
File Size. Enter a number in the Desired File Size text box, and select either Current Settings, which optimizes for
the current settings, or Auto Select GIF/JPEG, which automatically determines whether JPEG or GIF is the better
format.
4Do one of the following to specify the compression level:
•
Choose a quality option (Low, Medium, High, and so on) from the pop-up menu under the optimization format menu.
•Click the arrow in the Quality menu and drag the Quality pop-up slider.
•Enter a value between 0 and 100 in the Quality box.
The higher the Quality setting, the more detail is preserved in the optimized image, but the larger the file size. View
the optimized image at several quality settings to determine the best balance between quality and file size.

276
USING PHOTOSHOP ELEMENTS 9
Optimizing for the web
Last updated 1/3/2012
5Select Progressive to display the image progressively in a web browser; that is, to display it first at a low resolution,
and then at progressively higher resolutions as downloading proceeds.
Note: Some browsers do not support progressive JPEGs.
6To preserve the ICC profile of the original image in the optimized file, select ICC Profile.
Some browsers use ICC profiles for color correction. The ICC profile of the image depends on your current color
setting.
7If the original image contains transparency, select a Matte color that matches the background of your web page.
Transparent areas in your original image are filled with the Matte color.
8To save your optimized image, click OK. In the Save Optimized As dialog box, type a filename, and click Save.
More Help topics
“About the JPEG format” on page 272
“About color management” on page 180
Optimize as GIF or PNG-8 format
GIF is the standard format for compressing images with large areas of solid colors and crisp details like those in line
art, logos, or type. Like the GIF format, PNG-8 supports transparency and efficiently compresses areas of solid color
while preserving sharp detail; however, not all web browsers can display PNG-8 files.
1In the Edit workspace, open an image and choose File > Save For Web.
2Choose GIF or PNG-8 from the optimization format menu.
3To display an image at low resolution while the full-resolution image is downloading, select Interlaced. Interlacing
can make downloading time seem shorter and gives viewers feedback that downloading is in progress.
4Under the optimization format menu, choose a color-reduction algorithm for generating the color lookup table:
Perceptual Creates a custom color table by giving priority to colors for which the human eye has greater sensitivity.
Selective Creates a color table similar to the Perceptual color table, but favoring broad areas of color and the
preservation of web colors. This color table usually produces images with the greatest color integrity. (Selective is the
default choice.)
Adaptive Creates a custom color table by sampling colors from the spectrum appearing most commonly in the image.
For example, an image with only shades of green and blue produces a color table made primarily of greens and blues.
Most images concentrate colors in particular areas of the spectrum.
Restrictive (Web) Uses the standard, 216-color, web-safe color table common to the 8-bit (256-color) panels of
Windows and Mac OS. This option ensures that no browser dither is applied to colors when the image is displayed
using 8-bit color. If your image has fewer than 216 colors, unused colors are removed from the table.
5To specify the maximum number of colors in the color panel, select a number from the Colors menu, enter a value
in the text box, or click the arrows to change the number of colors. If the image contains fewer colors than the panel,
the color table reflects the smaller number of colors in the image.
6If you chose Restrictive (Web) for the color-reduction algorithm, you can choose Auto from the Colors menu.
Choose Auto if you want Photoshop Elements to determine the optimal number of colors in the color table based
on the frequency of colors in the image.
7Choose a dithering percentage, either by entering a percentage in the Dither text box or by clicking the Dither menu
arrow and dragging the slider that appears.

277
USING PHOTOSHOP ELEMENTS 9
Optimizing for the web
Last updated 1/3/2012
8If the image contains transparency, select Transparency to preserve transparent pixels; deselect Transparency to fill
fully and partially transparent pixels with the matte color.
9To create an animated GIF, select Animate.
10 To save your optimized image, click OK. In the Save Optimized As dialog box, type a filename, and click Save.
More Help topics
“About dithering” on page 280
“About transparent and matted web images” on page 278
Optimize as PNG-24
PNG-24 format is suitable for compressing photographs. However, PNG-24 files are often much larger than JPEG files
of the same image. PNG-24 format is recommended only when you work with an image that includes multiple levels
of partial transparency.
1In the Edit workspace, open an image and choose File > Save For Web.
2Choose PNG-24 for the optimization format.
3Select Interlaced to create an image that is displayed at low-resolution in a browser while the full-resolution image
is downloading. Interlacing can make downloading time seem shorter and gives viewers feedback that downloading
is in progress.
4If the image contains transparency, select Transparency to preserve transparent pixels; deselect Transparency to fill
fully and partially transparent pixels with the Matte color.
5To save your optimized image, click OK. In the Save Optimized As dialog box, type a filename, and click Save.
More Help topics
“Preserve background transparency in a GIF or PNG image” on page 279
Create an animated GIF
1In the Edit workspace, place the images you want to appear in each frame of the animation on separate layers of the
Layers panel. For example, to create an animation of an eye blinking, you would place an image of the open eye on
one layer, and an image of the closed eye on another layer.
2Choose File > Save for Web.
Note: If your image has multiple layers, you can also open the Save For Web dialog box from the Save As dialog box by
choosing CompuServe GIF Format and selecting Layers As Frames.
3Optimize the image in GIF format.
4Select Animate.
5Set additional options in the Animation section of the dialog box:
Loop Continuously repeats the animation in a web browser.
Frame Delay Specifies the number of seconds that each frame is displayed in a web browser. Use a decimal value to
specify fractions of a second. For example, use .5 to specify half a second.
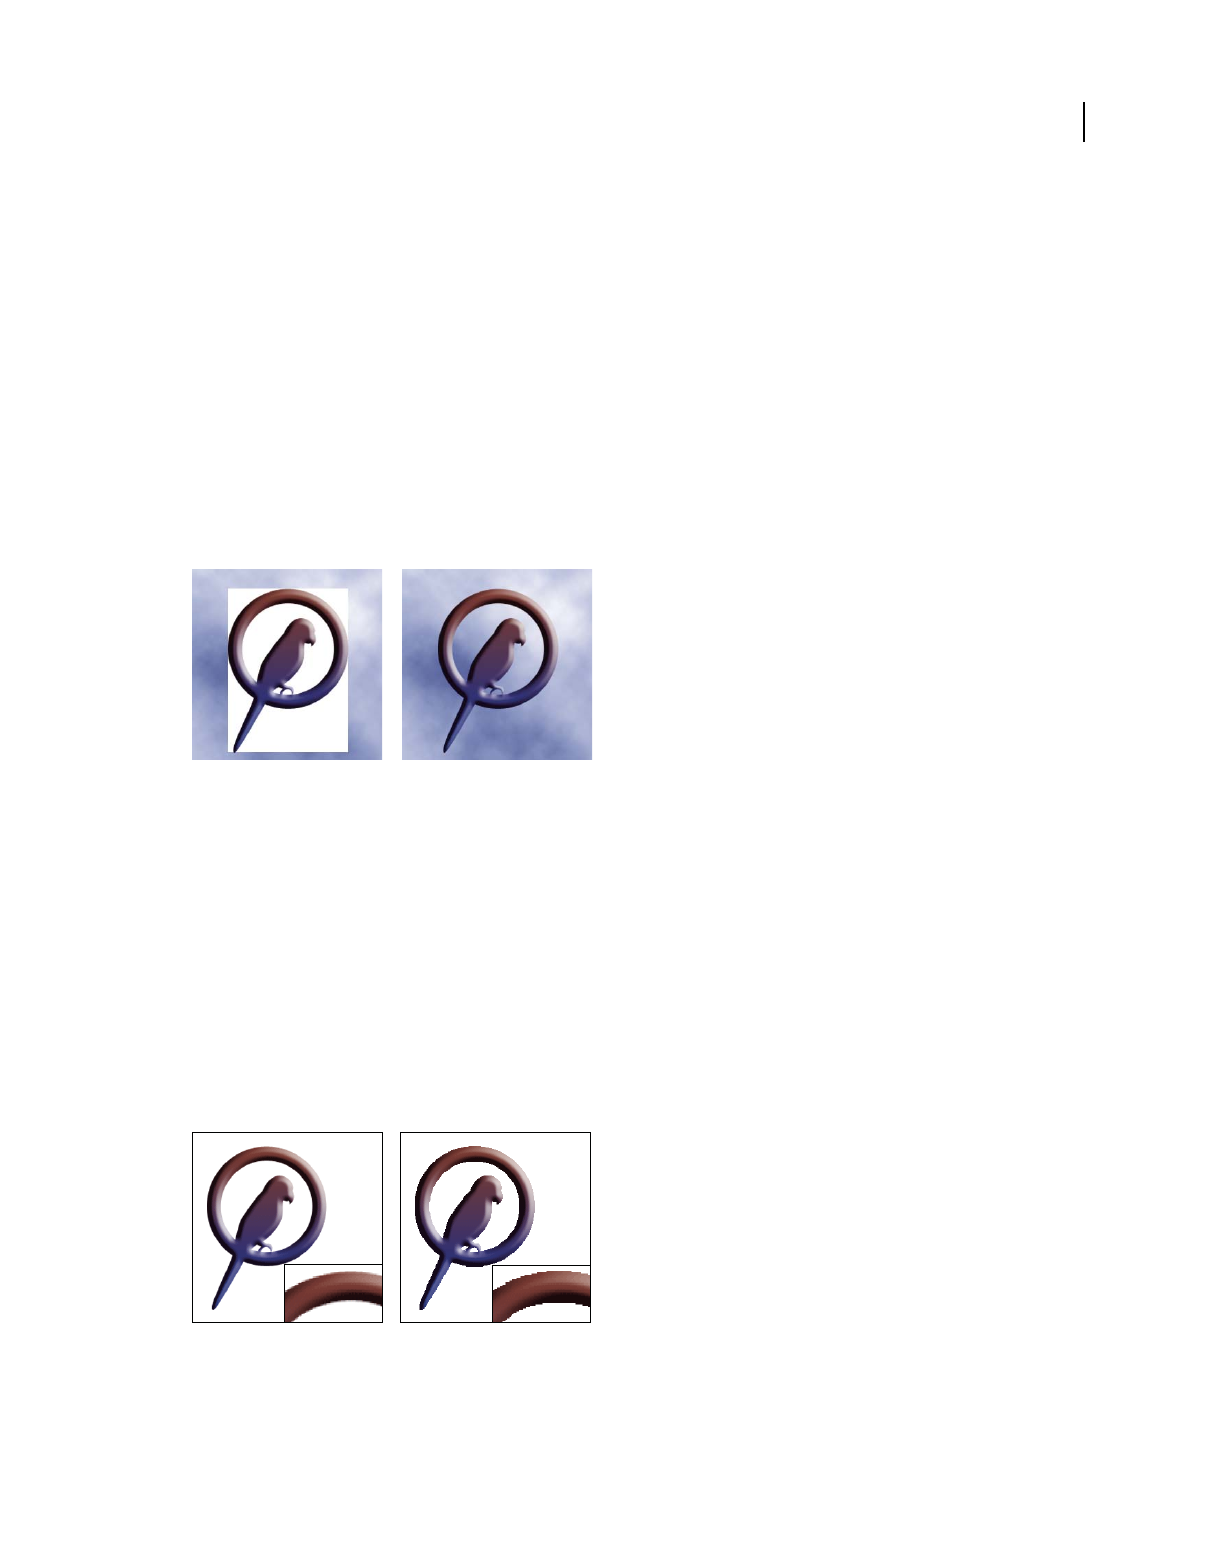
278
USING PHOTOSHOP ELEMENTS 9
Optimizing for the web
Last updated 1/3/2012
More Help topics
“Preview an animation” on page 283
“Understanding layers” on page 56
Using transparency and mattes
About transparent and matted web images
Transparency makes it possible to create nonrectangular images for the web. Background transparency, supported by
the GIF and PNG formats, preserves transparent pixels in the image and allows the background of the web page to
show through the transparent areas of your image. (Although the JPEG format does not support transparency, you can
specify a matte color to simulate the appearance of transparency in the original image.)
Web button without transparency (left), and with transparency (right)
Background matting, supported by the GIF, PNG, and JPEG formats, simulates transparency by filling or blending
transparent pixels with a matte color that matches the web page background. Background matting works best if the
web page background is a solid color and if you know what that color is.
To create background transparency or background matting in the optimized image, you must start with an image that
contains transparency. You can create transparency when you create a new layer or use the Background Eraser, Magic
Eraser, or Magic Extractor tools.
When working with GIF or PNG-8 files, you can create hard-edged transparency: all pixels that are more than 50%
transparent in the original image are fully transparent in the optimized image, and all pixels that are more than 50%
opaque in the original image are fully opaque in the optimized image. Use hard-edged transparency when you don’t
know the background color of a web page, or when the web page background contains a texture or pattern. However,
keep in mind that hard-edged transparency can cause jagged edges in the image.
GIF without hard-edges transparency (left), and with hard-edged transparency (right)

279
USING PHOTOSHOP ELEMENTS 9
Optimizing for the web
Last updated 1/3/2012
More Help topics
“Adding layers” on page 58
“Optimized file formats for the web” on page 271
Preserve background transparency in a GIF or PNG image
GIF and PNG-8 formats support one level of transparency—pixels can be fully transparent or fully opaque, but not
partially transparent. (By contrast, PNG-24 format supports multilevel transparency; that is, you can have up to 256
degrees of transparency in an image, ranging from opaque to completely transparent.)
1In the Edit workspace, open or create an image that contains transparency, and choose File > Save For Web.
2In the Save For Web dialog box, select GIF, PNG-8, or PNG-24 as the optimization format.
3Select Transparency.
4For the GIF and PNG-8 formats, specify how to treat partially transparent pixels in the original image. You can
blend these pixels with a matte color, or you can create hard-edged transparency.
More Help topics
“About the GIF format” on page 273
“About the PNG-8 format” on page 273
“About the PNG-24 format” on page 274
Create a matted GIF or PNG image
When you know the background color of the web page on which an image will be displayed, you can use the matting
feature to fill or blend transparent pixels with a matte color that matches the web page background.
1In the Edit workspace, open or create an image that contains transparency, and choose File > Save For Web.
2In the Save For Web dialog box, select GIF, PNG-8, or PNG-24 as the optimization format.
3For GIF and PNG-8 format, do one of the following:
•To keep fully transparent pixels transparent, and blend partially transparent pixels with the matte color, select
Transparency. This option prevents the halo effect you see when you place an anti-aliased image on a web page
background that differs from the image background. This option also prevents the jagged edges of hard-edged
transparency.
•To fill transparent pixels with the matte color and blend partially transparent pixels with the matte color, deselect
Transparency.
4Select a color from the Matte menu:
•Eyedropper Color (to use the color in the eyedropper sample box)
•White, Black, or Other (to select a color using the Color Picker)
More Help topics
“About the GIF format” on page 273
“About the PNG-8 format” on page 273
“About the PNG-24 format” on page 274

280
USING PHOTOSHOP ELEMENTS 9
Optimizing for the web
Last updated 1/3/2012
Create hard-edged transparency in a GIF or PNG-8 file
Use hard-edged transparency when you don’t know the background color of a web page, or when the web page
background contains a texture or pattern. However, keep in mind that hard-edged transparency can cause jagged
edges in the image.
1In the Edit workspace, open or create an image that contains transparency, and choose File > Save For Web.
2In the Save For Web dialog box, select GIF or PNG-8 as the optimization format.
3Select Transparency.
4Select None from the Matte menu.
More Help topics
“About the GIF format” on page 273
“About the PNG-8 format” on page 273
Create a matted JPEG image
Although the JPEG format does not support transparency, you can specify a matte color to simulate the appearance of
transparency in the original image. The matte color fills fully transparent pixels and blends with partially transparent
pixels. When you place the JPEG on a web page with a background that matches the matte color, the image appears to
blend with the background.
1In the Edit workspace, open or create an image that contains transparency, and choose File > Save For Web.
2In the Save For Web dialog box, select JPEG as the optimization format.
3Select a color from the Matte menu: None, Eyedropper Color (to use the color in the eyedropper sample box),
White, Black, or Other (to select a color using the Color Picker).
When you select None, white is used as the matte color.
More Help topics
“About the JPEG format” on page 272
Dithering in web images
About dithering
Most web images are created by designers using 24-bit color displays (which display over 16 million colors), although
some users view web pages on computers with 8-bit color displays (which display only 256 colors). As a result, web
images often contain colors not available on some computers. Computers use a technique called dithering to simulate
colors they can’t display. Dithering uses adjacent pixels of different colors to give the appearance of a third color. For
example, a red color and a yellow color may dither in a mosaic pattern to produce the illusion of an orange color that
the 8-bit color panel doesn’t contain.
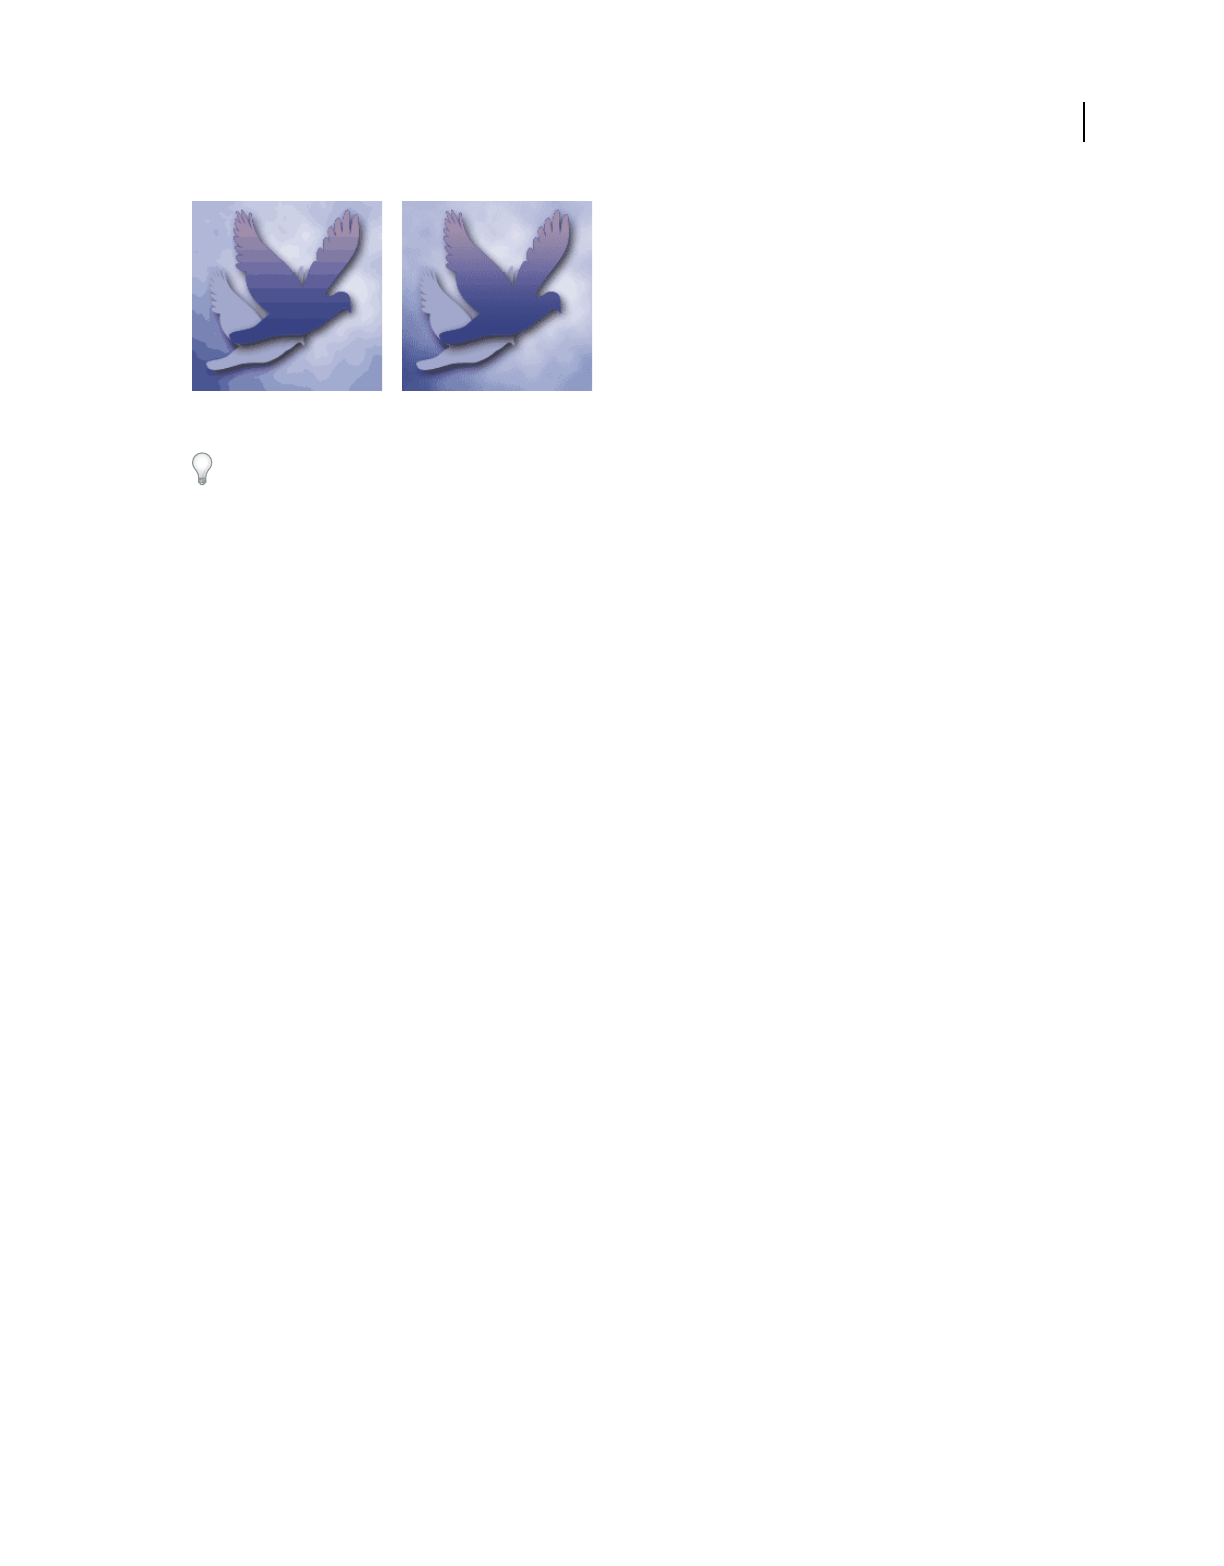
281
USING PHOTOSHOP ELEMENTS 9
Optimizing for the web
Last updated 1/3/2012
Dithering simulates continuous tones
Use colors in the Web panel to ensure that colors won’t dither when displayed in Windows or Mac OS systems capable
of displaying 256 colors. When creating an original image, you can use the Color Picker to choose web-safe colors.
When optimizing images, keep in mind that two kinds of dithering can occur:
Application dither Occurs in GIF and PNG-8 images when Photoshop Elements attempts to simulate colors that
aren’t in the current color table. You can control application dither by choosing a dithering pattern, or you can try to
avoid application dither by adding more colors to the table.
Browser dither Occurs when a web browser using an 8-bit color display (256-color mode) attempts to simulate colors
that aren’t in the 8-bit color panel. Browser dither can occur with GIF, PNG, or JPEG images. In Photoshop Elements,
you can control the amount of browser dither by shifting selected colors in the image to web-safe colors. You can also
specify web-safe colors when choosing a color in the Color Picker.
You can preview application dither in GIF and PNG-8 images. Images with primarily solid colors may work well
without dithering. Conversely, images with continuous-tone color (especially color gradients) may require dithering
to prevent color banding.
More Help topics
“Optimized file formats for the web” on page 271
“Use the Adobe Color Picker” on page 220
“Optimize as GIF or PNG-8 format” on page 276
Control dither in web images
1In the Edit workspace, open an image and choose File > Save For Web.
2Choose your optimization settings.
3Enter a value in the Dither text box, or click the Dither menu arrow and drag the slider that appears.
4The Dither percentage controls the amount of dithering that is applied to the image. A higher dithering percentage
creates the appearance of more colors and more detail in an image but can also increase the file size. For optimal
compression and display quality, use the lowest percentage of application dither that provides the color detail you
require.
Preview dither
You can preview browser dither directly in Photoshop Elements or in a browser that uses an 8-bit color display
(256-color mode).
1In the Edit workspace, open an image and choose File > Save For Web.
2Choose your optimization settings.

282
USING PHOTOSHOP ELEMENTS 9
Optimizing for the web
Last updated 1/3/2012
3To preview dither in Photoshop Elements, choose Browser Dither from the document panel menu in the Save For
Web dialog box. (To view the menu, click the triangle
in the upper-right corner of the optimized image.)
4To preview dither in a browser, follow these steps:
•Set your computer’s color display to 8-bit color (256 colors). See your operating system’s documentation for
information on changing the color display.
•Select a browser from the Preview In menu in the Save For Web dialog box.
More Help topics
“Add a browser to the Preview In menu” on page 282
Previewing web images
Preview an optimized image in a web browser
You can preview an optimized image in any web browser installed on your system. The browser preview displays the
image with a caption listing the image’s file type, pixel dimensions, file size, compression specifications, and other
HTML information.
1In the Edit workspace, open the image you want to preview.
2Select File > Save For Web, and apply your optimization settings.
3Choose a browser from the Preview In menu in the lower-right corner of the optimized image, or click the browser
icon
to launch your default web browser.
More Help topics
“Using the Save For Web dialog box” on page 270
Add a browser to the Preview In menu
1In the Edit workspace, choose File > Save For Web.
2Click the down arrow in the Preview In menu, and choose Edit List.
3In the Browsers dialog box, click Find All. The dialog box displays all installed browsers.
4Select a browser, click Add, and then click OK.
View estimated download time
1In the Edit workspace, open an image and choose File > Save For Web.
2Choose your optimization settings.
3Click the triangle to the upper right of the optimized image to view the document panel menu.
4Choose an Internet access speed, including modem, ISDN, cable, or DSL Internet access.
5When you change the Internet access speed, the estimated download time displayed under the optimized image is
updated. If the download time seems too long, try different optimization settings, or change the image size in the
Save For Web dialog box.

283
USING PHOTOSHOP ELEMENTS 9
Optimizing for the web
Last updated 1/3/2012
More Help topics
“About optimizing” on page 270
Preview variations in color display
When optimizing an image for the web, consider how the image will appear on different monitors. In general, an image
appears darker in Windows systems than on Mac OS systems. You can simulate cross-platform display differences in
the Save For Web dialog box.
1In the Edit workspace, open an image and choose File > Save For Web.
2Choose your optimization settings.
3Click the triangle to the right of the optimized image to view the document panel menu.
4Choose a display option:
Uncompensated Color Shows the image with no color adjustment (the default option).
Standard Windows Color Adjusts the color to simulate a standard Windows monitor.
Standard Macintosh Color Adjusts the color to simulate a standard Macintosh® monitor.
Use Document Color Profile Shows image with its color profile, if one exists.
Note: These preview options adjust color only in the Save For Web dialog box; they don’t change colors in the original or
optimized image.
More Help topics
“About optimizing” on page 270
Preview an animation
You can preview an animation in the Save For Web dialog box or in a web browser. The Save For Web dialog box
shows the animation as still frames. You must preview the animation in a browser to view the frames in timed
sequence.
1In the Edit workspace, set up an animated image and choose File > Save For Web.
2To preview an animation from the Save For Web dialog box, do one of the following:
•To view the next frame in the animation, click the Next Frame button .
•To view the previous frame in the animation, click the Previous Frame button .
•To view the last frame in the animation, click the Last Frame button .
•To view the first frame in the animation, click the First Frame button .
3To preview an animation in a web browser, do the following:
•Choose a browser from the Preview In menu below the lower-right corner of the optimized image, or click the
browser icon
to launch your default web browser.
•Use your browser’s Stop, Refresh, or Reload commands to stop or replay the animation.

284
Last updated 1/3/2012
Chapter 15: Printing and sharing photos
Adobe® Photoshop® Elements 9 provides several options for printing and sharing your photos. You can have photos
professionally printed by online providers through Adobe Photoshop Services, or you can print your photos with your
home printer. You can print individual photos, contact sheets (thumbnails of each selected photo), picture packages
(a page of one or more photos printed at various sizes), and even T-shirt transfers. Photoshop
Elements also lets you
share images and order prints over the Internet.
Important: U.S. Photoshop Elements users can back up and share photos with their Elements Membership account.
Photoshop Elements free online benefits and Photoshop Elements Plus are available in the United States only. Internet
access required. See “Sign up with your Adobe ID” on page 2.
Printing photos
Printing overview
For a video overview, see www.adobe.com/go/lrvid2333_pse9_en.
Photoshop Elements provides several options for printing your photos. You can have photos professionally printed by
online providers through Adobe Photoshop Services, or you can print your photos with your home printer. (In the
Organize workspace, you can also select a video clip for printing, but only the first frame is printed.) You can print
individual photos, contact sheets (thumbnails of each selected photo), and picture packages (a page of one or more
photos printed at various sizes). You can even horizontally flip the image to print T-shirt transfers.
Note: To print a PDF file, you must have Adobe Acrobat installed on your computer.
Finally, you can print projects you’ve made in Photoshop Elements, such as photo albums, cards, and calendars. Some
projects can be ordered from online print services.

285
USING PHOTOSHOP ELEMENTS 9
Printing and sharing photos
Last updated 1/3/2012
Different printing options
A. Individual photos B. Contact sheet C. Picture package
Before you print your photos, ensure that you provide Photoshop Elements some basic information about your print
job, such as the paper size you are using and the page orientation. Set these options in the Page Setup dialog box. You
might also need to specify measurement units in the Preferences dialog box.
More Help topics
“Set page and printer options” on page 289
Print photos from the Edit workspace
1Do one of the following:
•Open the photos in the Edit workspace.
•Select photos in the Project Bin and use Ctrl+click (Command + click in Mac OS) to select multiple photos from
the Project Bin.
Note: You can select the photos in the Organize workspace, and select the option Show Files Selected In Organizer. The
photos are displayed in the Project Bin.
2Select File > Print.
Note: You can add photos to a print job from within the Print dialog box.
3Click Add to select photos from the Organize workspace. You can select photos from different sets, such as catalogs
and albums. You can also specify a criterion, such as a particular keyword tag or photos with rating.
4Select a printer from the Select Printer menu. You can also click the Page Setup button to specify page printing
options.
A B
C

286
USING PHOTOSHOP ELEMENTS 9
Printing and sharing photos
Last updated 1/3/2012
5(Windows only) Click the Change Settings button to modify the printer settings. You can change the following
settings in the Change Settings dialog box:
•Printer
•Paper Type
•Paper Tray
•Paper Size
•Print Quality
6Select the size of the paper from the Paper Size menu.
7Select one of the options from the Select Type Of Print menu.
8Select a print size from the Select Print Size menu.
9Select or enter a number in the Print copies of each page text box.
10 To fit the individual image to the specified print layout, select Crop To Fit. The image is scaled and, if necessary,
cropped to match the aspect ratio of the print layout. Deselect this option if you don’t want your photos cropped.
11 To place the image at a specific location, deselect the Center Image check box and specify Top and Left values. Leave
the option selected if you want the image to appear at the center.
If you pan the image inside the photo holder or drag the photo holder, the Center Image check box gets deselected
automatically.
Note: The default unit for Top and Left values is inches. You can choose any other unit from the predefined list of units.
12 (Optional) Click More Options to change additional settings.
13 Click Print.
If your photos are not printing at a particular size, try resizing the photo to the specific dimensions you want before
you print.
More Help topics
“Set page and printer options” on page 289
“Change print dimensions and resolution without resampling” on page 145
Add photos using the Print dialog box
1In the Print dialog box, click the Add button.
2In the Add Photos dialog box, select one of the following:
Photos Currently In Browser Displays photos currently visible in the Media Browser.
Entire Catalog Displays all photos in your catalog.
Album Displays photos from a specific album. Use the menu to select an album.
Keyword Tag Displays photos with a specific tag. Use the menu to select a tag.
Only Show Photos with Ratings Displays only photos marked with the Favorites tag.
Also Show Hidden Photos Displays photos marked as hidden.
3Click one or more thumbnails, or click Select All, and then click Add Selected Photos.
4Click Done.

287
USING PHOTOSHOP ELEMENTS 9
Printing and sharing photos
Last updated 1/3/2012
More options for printing from the Edit workspace
When you click More Options in the Print dialog box, the following options are displayed:
•Printing Choices
•Custom Print Size
•Color Management
Printing Choices Enables you to specify the following settings:
•Photo Details You can print the date, caption, and filename by selecting the following options:
•Show Date
•Show Caption
•Show File Name
•Border You can specify the following details for the border:
•Thickness in inches, mm, or points.
•Color of the border
•Background color
•Iron-on Transfer Select Flip Image to use image for T-shirt transfers.
Note: Some printers have the inverting images option. If so, ensure that you use either your printer driver settings or the
Invert image option to invert images. Selecting both the options horizontally flips the image twice.
•Trim Guidelines Select Print Crop Marks (guide lines on all four edges of the photo) to make it easier to trim a
photo.
Custom print Size Enables you to specify the following settings:
•Print Size You can specify the width and height in inches, centimeters, and millimeters. Select Scale To Fit Media
to scale the image to fit on the page.
Color Management Displays the color profile of the image. Image Space shows the color space embedded in your
photo file. (The print preview in the Print dialog box is not color managed and doesn’t update as you choose a profile.)
You can change the profile for printing from the following options:
•Color Handling You can choose to have either your printer or Photoshop Elements manage colors, or you can
choose no color management.
•Printer Profile Sets a custom printer profile to convert image colors to the printer’s color space, or turns off color
conversion. If you have an ICC profile for your printer and paper combination, choose it from the menu. Make sure
that you turn off the printer driver’s color management.
•Rendering Intent Specifies how colors are translated from the image’s source color space when certain colors are
not available in the print space.
Scale an image in the Print dialog box
Scaling an image in the Print dialog box changes the size and resolution of the printed image (the file size of the image
doesn’t change).
❖In the Edit workspace, select File > Print. Click More Options in the Print dialog box. Select Custom Print Size
option and do one of the following:
•Select Scale To Fit Media to scale the image to fit on the page.

288
USING PHOTOSHOP ELEMENTS 9
Printing and sharing photos
Last updated 1/3/2012
•Specify the units of measurement from the Units menu and enter values for Height and Width to rescale the image
numerically. The dimensions are constrained, meaning that changing one dimension proportionately changes the
other dimension.
Print multilayer images from the Edit workspace
If your image (PSD or TIFF) is multi-layered, use the Layers panel to temporarily hide the layers from view and prevent
them from printing.
1In Full Edit, open a multilayer image.
2In the Layers panel, click the Eye icon to make a layer invisible.
3When only the layers you want to print are visible, select File > Print. The Print dialog box opens with only the
visible layers showing in the thumbnail preview.
4Set your printing options and click Print.
More Help topics
“Understanding layers” on page 56
Use Photo Prints
You can print photos using the Photo Prints option.
1Do one of the following:
•Open the photos in the Edit workspace.
•Use Ctrl+Click to select multiple photos from the Project Bin.
Note: You can select the photos in the Organize workspace and select the option Show Files From Organizer. The photos
are displayed in the Project Bin.
2Select Create > Photo Prints.
3Do one of the following:
•Select Print With Local Printer to print the photos using a printer that is configured on your machine. The Print
dialog box launches. For more information, see “Print photos from the Edit workspace” on page 285.
•Select Print Picture Package.
Note: In Windows, selecting this option launches the Print dialog box in the Organize workspace. For more information,
see Print a picture package
•Select Upload Your Pictures And Order Prints Shutterfly.
Note: Sign up for Shutterfly membership to use their services.
•Select Order Prints Kodak Gallery.
Note: Sign up to Kodak Gallery to use their services.
4Follow the onscreen instructions to print your photos.
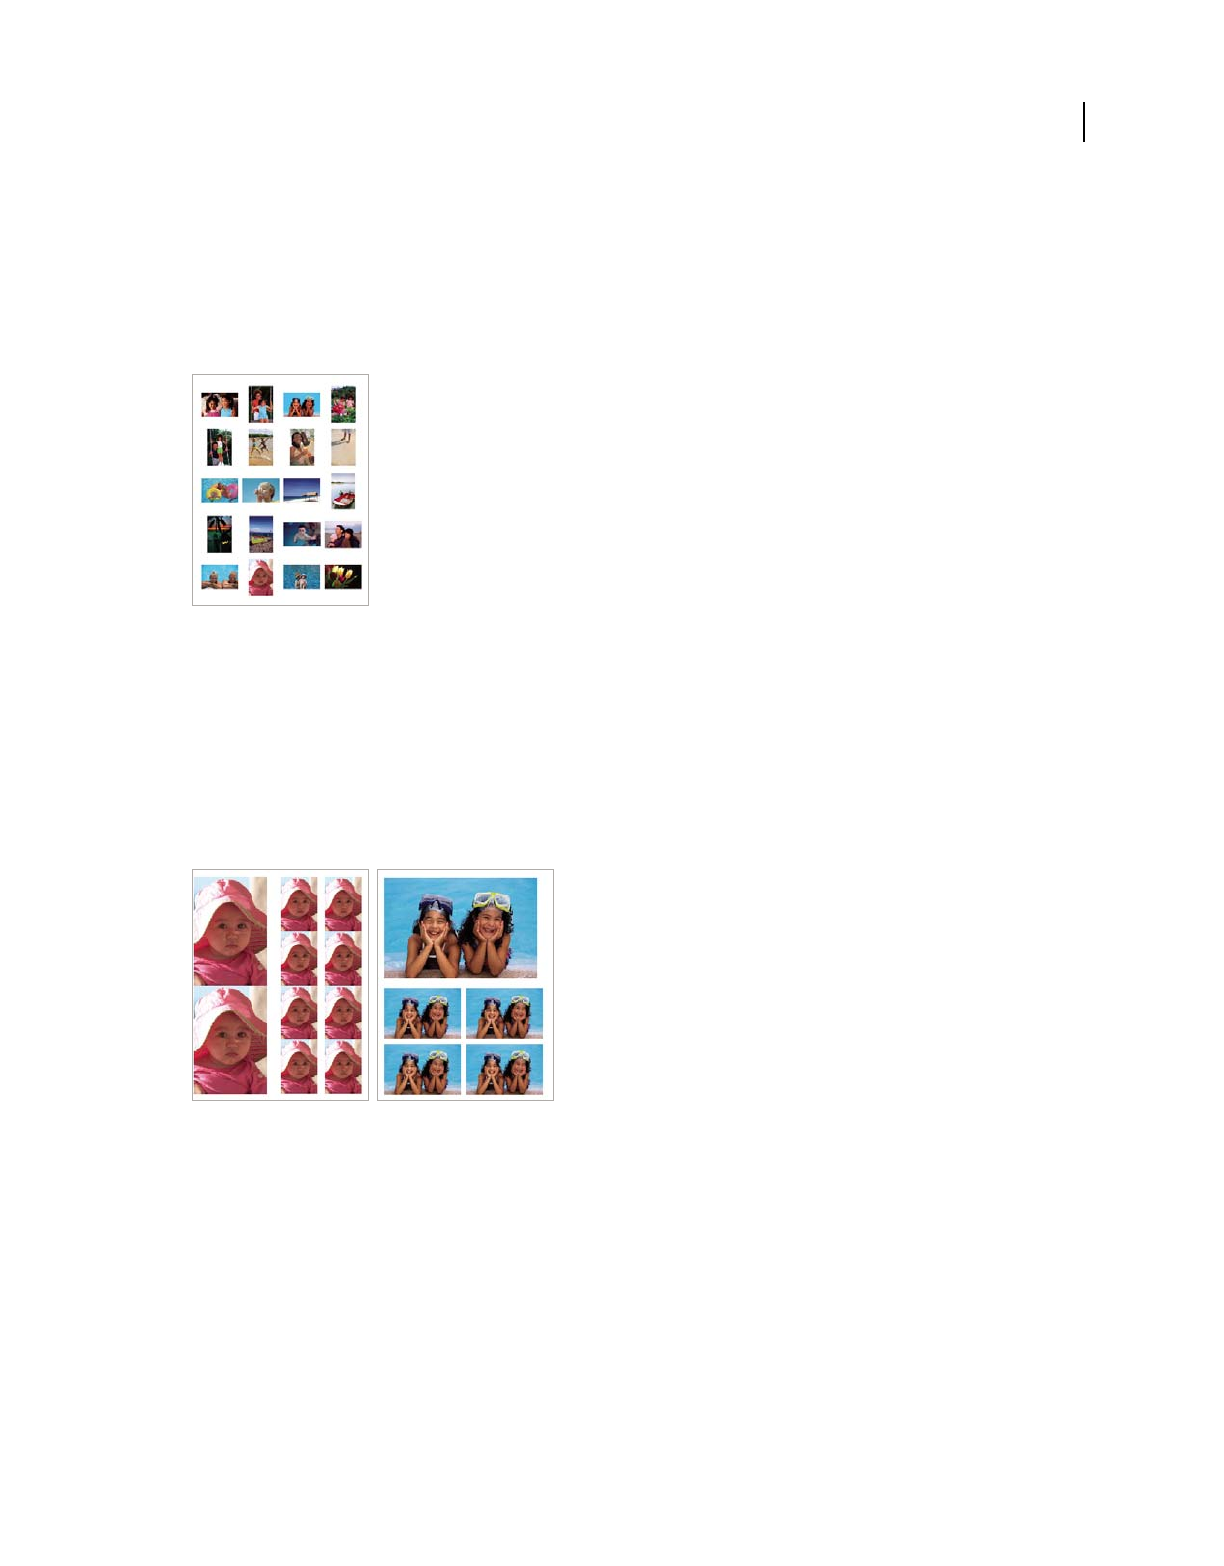
289
USING PHOTOSHOP ELEMENTS 9
Printing and sharing photos
Last updated 1/3/2012
Print a contact sheet
Contact sheets enable you to easily preview groups of images by displaying a series of thumbnail images on a single
page. You can print a contact sheet from the Organize workspace. However, you can initiate the process from the Edit
workspace. Select contact sheet from the Print dialog box. Elements Organizer opens and enables you to print the
required contact sheet. For more information about printing a contact sheet from Elements Organizer, see Print a
contact sheet in the Elements Organizer guide.
Sample contact sheet
Print a picture package
Picture Package enables you to place multiple copies of one or more photos on a single page, much as traditional
portrait studios do. You can select from various size and placement options to customize your package layout. You can
print picture packages from the Organize workspace. However, you can initiate the process from the Edit workspace.
Select Picture Package from the Print dialog box. Elements Organizer opens and enables you to print the required
picture package. For more information about printing a picture package from Elements Organizer, see Print a picture
package in the Elements Organizer guide.
Picture packages come in various sizes
Print options
Set page and printer options
1Choose File > Print and then select Page Setup in the Print dialog box. In Full Edit, Quick Fix, or Guided Edit, a
photo must be open for the Print command to be available.

290
USING PHOTOSHOP ELEMENTS 9
Printing and sharing photos
Last updated 1/3/2012
2In the Page Setup dialog box, click the Printer button and choose a printer from the Name menu. If necessary, click
the Properties button to specify layout and paper options. You can click the Advanced button in the printer driver
dialog box (if it’s available) to set other printer options. The availability of the Advanced button and printer options
depends on your printer, print drivers, and Windows. Click OK to close the dialog boxes.
Note: If you plan to scale the printed image, use the scaling options in the Print Preview dialog box rather than the
printer’s advanced options. The Print dialog box is more helpful because it shows you a preview of the scaled image. Also,
you don’t want to set the scaling options in both the printer’s advanced options and the Print Preview dialog box. This
setting applies scaling twice, and the resulting image may not be the size you intended.
3In the Page Setup dialog box, specify options, such as paper size and orientation, and then click OK.
Send photos to online sharing services
1In the Edit workspace, click the Share tab .
2Click More Options, and choose one of the photo sharing services from the pop-up menu.
3Follow the onscreen directions to share your photos online.
Sharing photos
Photoshop Elements enables you to share photos by e-mail. You can either attach photos to an e-mail or embed a
photo in an e-mail using Photo Mail. You can also share online albums and share photos by burning them to a
CD/DVD. Since Elements Organizer enables efficient organization and management of media files, you can start the
share operation in Photoshop
Elements and complete it in Elements Organizer. Elements Organizer enables you to
select the required media files for sharing. The Share tab in the Photoshop
Elements provides the following options to
share photos:
Online Album Enables you to share the albums.
E-mail Attachments Enables you to share photos as e-mail attachments.
Photo Mail Enables you to use a wizard to embed your photos in the body of an e-mail message, with colorful custom
layouts (stationery).
Note: Photo Mail is not supported in Mac OS.
Share To Flickr Enables you to upload photos on Flickr.
Share To Facebook Enables you to upload photos on Facebook.
Send To SmugMug Gallery Enables you to upload photos on SmugMug Gallery.
You can also share images using online services.
Note: For a video about sharing files by e-mail, see www.adobe.com/go/lrvid914_pse_en
291
Last updated 1/3/2012
Chapter 16: Photoshop Elements keyboard
shortcuts
You can use keyboard shortcuts to navigate through Elements Organizer, and to find, view, and edit photos in the
Organize workspace. In the Edit workspace, shortcuts help you view, select, edit, and use many of the other tools that
are available in Full Edit mode.
Windows 7 keyboard shortcuts
Photoshop Elements supports the following Windows 7 keyboard shortcuts:
Keys for viewing images (Full Edit)
This partial list includes the most helpful shortcuts. You'll find additional shortcuts in menu commands and tool tips.
Result Shortcut
Activate Aero Peek Windows + Spacebar
Activate Aero Shake Windows + Home
Maximize Windows + Up Arrow
Restore or minimize Windows + Down Arrow
Maximize the current window vertically Windows + Shift + Up Arrow
Snap the current window to the left or right half of the display
Note: In a multi-monitor configuration, repeat the command to
move the window to other monitors.
Windows + Left Arrow
Windows + Right Arrow
Move the current window to the left or right display Windows + Shift + Left Arrow
Windows + Shift + Right Arrow
Zoom in on the desktop Windows ++
Zoom out of the desktop Windows +- (minus)
Navigate the windows (or tabs) within a grouped icon on the
taskbar
Control + click
Result Windows Mac OS
Cycle forward through open documents Control + Tab
Cycle backward through open documents Control + Shift + Tab
Fit image in window Ctrl + 0 (or double-click Hand tool) Command + 0
Magnify 100% Ctrl + Alt + 0 (or double-click Zoom tool) Command + Option + 0
Switch to Hand tool (when not in text-edit mode) Spacebar Spacebar
292
USING PHOTOSHOP ELEMENTS 9
Photoshop Elements keyboard shortcuts
Last updated 1/3/2012
Keys for selecting tools
This partial list includes the most helpful shortcuts. You'll find additional shortcuts in menu commands and tool tips.
Switch to Zoom In tool Control + Spacebar Spacebar + Command
Switch to Zoom Out tool Spacebar + Alt Spacebar + Option
Reposition zoom marquee while dragging Spacebar-drag Spacebar-drag
Zoom in on specified area of an image Control-drag over preview in Navigator
panel
Command-drag over preview in Navigator
panel
Scroll image with Hand tool Drag, or drag view area box in Navigator
panel
Drag, or drag view area box in Navigator
panel
Scroll up or down 1 screen Page Up or Page Down Page Up or Page Down
Scroll up or down 10 units Shift + Page Up or Page Down Shift + Page Up or Page Down
Scroll left or right 1 screen Ctrl + Page Up or Page Down Command + Page Up or Page Down
Scroll left or right 10 units Ctrl + Shift + Page Up or Page Down Command + Shift + Page Up or Page Down
Move view to upper-left corner or lower-right
corner
Home or End Home or End
Result Windows Mac OS
Cycle through tools that have the same keyboard
shortcut
Shift-press keyboard shortcut (preference
setting, Use Shift Key for Tool Switch, must
be enabled)
Shift-press keyboard shortcut (preference
setting, Use Shift Key for Tool Switch, must
be enabled)
Cycle through nested tools Alt-click tool Option-click tool
Move tool V V
Zoom tool Z Z
Hand tool H H
Eyedropper tool I I
Rectangular Marquee tool
Elliptical Marquee tool
M M
Lasso tool
Magnetic Lasso tool
Polygonal Lasso tool
L L
Magic Wand tool W W
Selection Brush tool (or Quick Selection tool) A A
Horizontal Type tool
Vertical Type tool
Horizontal Type Mask tool
Vertical Type Mask tool
T T
Result Windows Mac OS
293
USING PHOTOSHOP ELEMENTS 9
Photoshop Elements keyboard shortcuts
Last updated 1/3/2012
Crop tool
Recompose tool
C C
C
Cookie Cutter tool Q Q
Straighten tool P P
Red Eye Removal tool Y Y
Spot Healing Brush tool
Healing Brush tool
J J
Clone Stamp tool
Pattern Stamp tool
S S
Eraser tool
Background Eraser tool
Magic Eraser tool
E E
Pencil tool N N
Brush tool
Impressionist Brush
Color Replacement tool
B B
Smart Brush tool
Detail Smart Brush tool
F F
Paint Bucket tool K K
Gradient tool G G
Rectangle tool
Rounded Rectangle tool
Ellipse tool
Polygon tool
Line tool
Custom Shape tool
Shape Selection tool
U U
Blur tool
Sharpen tool
Smudge tool
R R
Sponge tool
Dodge tool
Burn tool
O O
Show/Hide all panels (not including Content and
Layers panel)
Tab Tab
Default foreground and background colors D D
Switch foreground and background colors X X
Result Windows Mac OS

294
USING PHOTOSHOP ELEMENTS 9
Photoshop Elements keyboard shortcuts
Last updated 1/3/2012
Keys for selecting and moving objects
This partial list includes the most helpful shortcuts. You'll find additional shortcuts in menu commands and tool tips.
Keys for the Magic Extractor dialog box
This partial list includes the most helpful shortcuts. You'll find additional shortcuts in menu commands and tool tips.
Result Windows Mac OS
Deselect a selection Control + D Command + D
Reposition marquee while selecting Spacebar-drag Spacebar-drag
Add to or subtract from a selection Any selection tool + Shift or Alt-drag Any selection tool + Shift or Option-drag
Intersect a selection Any selection tool (except quick selection
and selection brush tool) + Shift + Alt-drag
Any selection tool (except quick selection
and selection brush tool) + Shift + Option-
drag
Constrain marquee to square or circle (if no other
selections are active)
Shift-drag Shift-drag
Draw marquee from center (if no other selections
are active)
Alt-drag Option-drag
Constrain shape and draw marquee from center Shift + Alt-drag Shift + Option-drag
Switch to Move tool Control (except when Hand or any shape
tool is selected)
Command (except when Hand or any shape
tool is selected)
Switch from Magnetic Lasso tool to Polygonal
Lasso tool
Alt-click and drag Option-click and drag
Delete last anchor point for Magnetic or
Polygonal Lasso tool
Delete Delete
Apply/cancel an operation of the Magnetic Lasso
tool
Enter/Esc Enter/Esc
Move copy of selection Move tool + Alt-drag selection Move tool + Option-drag selection
Move selection area 1 pixel Any selection + Right Arrow, Left Arrow, Up
Arrow, or Down Arrow
Any selection + Right Arrow, Left Arrow, Up
Arrow, or Down Arrow
Move selection 1 pixel Move tool + Right Arrow, Left Arrow, Up
Arrow, or Down Arrow
Move tool + Right Arrow, Left Arrow, Up
Arrow, or Down Arrow
Move layer 1 pixel when nothing selected on layer Control + Right Arrow, Left Arrow, Up
Arrow, or Down Arrow
Command + Right Arrow, Left Arrow, Up
Arrow, or Down Arrow
Increase/decrease detection width Magnetic Lasso tool + [ or ] Magnetic Lasso tool + [ or ]
Accept cropping or exit cropping Crop tool + Enter or Esc Crop tool + Enter or Esc
Toggle crop shield off and on / (forward slash) / (forward slash)
295
USING PHOTOSHOP ELEMENTS 9
Photoshop Elements keyboard shortcuts
Last updated 1/3/2012
Keys for transforming selections
This partial list includes the most helpful shortcuts. You'll find additional shortcuts in menu commands and tool tips.
Keys for painting and brushes
This partial list includes the most helpful shortcuts. You'll find additional shortcuts in menu commands and tool tips.
Result Shortcut (both Windows and Mac OS)
Foreground brush B
Straighten tool P
Point Eraser E
Add To Selection tool A
Remove From Selection tool D
Healing Brush tool J
Zoom tool Z
Hand tool H
Result Windows Mac OS
Transform from center or reflect Alt Option
Constrain Shift Shift
Distort Control Command
Skew Control + Shift Command + Shift
Change perspective Control + Shift + Alt Command + Shift + Option
Apply Enter Enter
Cancel Esc or Control + . (period) Esc or Command + . (period)
Result Windows Mac OS
Switch to Eyedropper tool Any painting tool or shape tool + Alt
(except Impressionist Brush)
Any painting tool or shape tool + Option (except
Impressionist Brush)
Select background color Eyedropper tool + Alt-click Eyedropper tool + Option-click
Set opacity, tolerance, or exposure for
painting
Any painting or editing tool + number
keys (for example, 0 = 100%, 1 = 10%, 4
and 5 in quick succession = 45%).
Any painting or editing tool + number keys (for
example, 0 = 100%, 1 = 10%, 4 and 5 in quick
succession = 45%).
Cycle through blending modes Shift + + (plus) or - (minus) Shift + + (plus) or - (minus)
Fill selection/layer with foreground or
background color
Alt + Backspace, or Control +
Backspace
Option + Delete (Backspace), or Command + Delete
(Backspace)
Display Fill dialog box Shift + Backspace Shift + Delete (Backspace)
296
USING PHOTOSHOP ELEMENTS 9
Photoshop Elements keyboard shortcuts
Last updated 1/3/2012
Keys for using text
This partial list includes the most helpful shortcuts. You'll find additional shortcuts in menu commands and tool tips.
Lock transparent pixels on/off / (forward slash) / (forward slash)
Connect points with a straight line (draw a
straight line)
Any painting tool + Shift-click Any painting tool + Shift-click
Delete brush Alt-click brush Option-click brush
Decrease/increase brush size [ or ] [ or ]
Decrease/increase brush softness/hardness
in 25% increments
Shift + [ or ] Shift + [ or ]
Select previous/next brush size , (comma) or . (period) , (comma) or . (period)
Select first/last brush Shift + , (comma) or . (period) Shift + , (comma) or . (period)
Display precise cross hair for brushes Caps Lock Caps Lock
Result Windows Mac OS
Move type in image Control-drag type when Type layer is
selected
Command-drag type when Type layer is selected
Select 1 character left/right or 1 line
down/up, or 1 word left/right
Shift + Left Arrow/Right Arrow or Down
Arrow/Up Arrow, or Control + Shift +
Left Arrow/Right Arrow
Shift + Left Arrow/Right Arrow or Down Arrow/Up
Arrow, or Command + Shift + Left Arrow/Right Arrow
Select characters from insertion point to
mouse click point
Shift-click Shift-click
Move 1 character left/right, 1 line down/up,
or 1 word left/right
Left Arrow/Right Arrow, Down
Arrow/Up Arrow, or Control + Left
Arrow/Right Arrow
Left Arrow/Right Arrow, Down Arrow/Up Arrow, or
Command + Left Arrow/Right Arrow
Select word, line, or paragraph Double-click, triple-click, or quadruple-
click
Double-click, triple-click, or quadruple-click
Scale and skew text within a bounding box
when resizing the bounding box
Control-drag a bounding box handle Command-drag a bounding box handle
Align left, center, or right Horizontal Type tool or Horizontal Type
Mask tool + Control + Shift + L, C, or R
Horizontal Type tool or Horizontal Type Mask tool +
Command + Shift + L, C, or R
Align top, center, or bottom Vertical Type tool or Vertical Type Mask
tool + Control + Shift + L, C, or R
Vertical Type tool or Vertical Type Mask tool +
Command + Shift + L, C, or R
Return to default font style Control + Shift + Y Command + Shift + Y
Turn Underlining on/off Control + Shift + U Command + Shift + U
Turn Strikethrough on/off Control + Shift + / (forward slash) Command + Shift + / (forward slash)
Decrease or increase type size of selected
text 2 pts/px
Control + Shift + < or > Command + Shift + < or >
Result Windows Mac OS

297
USING PHOTOSHOP ELEMENTS 9
Photoshop Elements keyboard shortcuts
Last updated 1/3/2012
Keys for the Layers panel
This partial list includes the most helpful shortcuts. You'll find additional shortcuts in menu commands and tool tips.
Keys for using blending modes
This partial list includes the most helpful shortcuts. You'll find additional shortcuts in menu commands and tool tips.
Result Windows Mac OS
Set layer options Alt-click New button Option-click New button
Delete without confirmation Alt-click Trash button Option-click Trash button
Apply value and keep text box active Shift + Enter Shift + Enter
Load layer transparency as a selection Control-click layer thumbnail Command-click layer thumbnail
Add to current selection Control + Shift-click layer Command + Shift-click layer thumbnail
Subtract from current selection Control + Alt-click layer thumbnail Command + Option-click layer thumbnail
Intersect with current selection Control + Shift + Alt-click layer thumbnail Command + Shift + Option-click layer
thumbnail
Merge visible layers Control + Shift + E Command + Shift + E
Create new empty layer with dialog Alt-click New Layer button Option-click New Layer button
Create new layer below target layer Control-click New Layer button Command-click New Layer button
Activate bottom/top layer Shift + Alt + [ or ] Shift + Option + [ or ]
Select next layer down/up Alt + [ or ] Option + [ or ]
Move target layer down/up Control + [ or ] Command + [ or ]
Merge a copy of all visible layers into target layer Control + Shift + Alt + E Command + Shift + Option + E
Merge down Control + E Command + E
Copy current layer to layer below Alt + Merge Down command from the panel
pop-up menu
Option + Merge Down command from the
panel pop-up menu
Copy all visible layers to active layer Alt + Merge Visible command from the
panel pop-up menu
Option + Merge Visible command from the
panel pop-up menu
Show/hide all other currently visible layers Alt-click the eye icon Option-click the eye icon
Toggle lock transparency for target layer, or last
applied lock
/ (forward slash) / (forward slash)
Edit layer properties Double-click layer thumbnail Double-click layer thumbnail
Select all text; temporarily select Type tool Double-click text layer thumbnail Double-click text layer thumbnail
Create a clipping mask Alt-click the line dividing two layers Option-click the line dividing two layers
Rename layer Double-click the layer name Double-click the layer name
298
USING PHOTOSHOP ELEMENTS 9
Photoshop Elements keyboard shortcuts
Last updated 1/3/2012
Keys for the Info panel
This partial list includes the most helpful shortcuts. You'll find additional shortcuts in menu commands and tool tips.
Result Windows Mac OS
Cycle through blending modes Shift + + (plus) or - (minus) Shift + + (plus) or - (minus)
Normal Shift + Alt + N Shift + Option + N
Dissolve Shift + Alt + I Shift + Option + I
Behind Shift + Alt + Q Shift + Option + O
Clear Shift + Alt + R Shift + Option + R
Darken Shift + Alt + K Shift + Option + K
Multiply Shift + Alt + M Shift + Option + M
Color Burn Shift + Alt + B Shift + Option + B
Linear Burn Shift + Alt + A Shift + Option + A
Lighten Shift + Alt + G Shift + Option + G
Screen Shift + Alt + S Shift + Option + S
Color Dodge Shift + Alt + D Shift + Option + D
Linear Dodge Shift + Alt + W Shift + Option + W
Overlay Shift + Alt + O Shift + Option + O
Soft Light Shift + Alt + F Shift + Option + F
Hard Light Shift + Alt + H Shift + Option + H
Vivid Light Shift + Alt + V Shift + Option + V
Linear Light Shift + Alt + J Shift + Option + J
Pin Light Shift + Alt + Z Shift + Option + Z
Hard Mix Shift + Alt + L Shift + Option + L
Difference Shift + Alt + E Shift + Option + E
Exclusion Shift + Alt + X Shift + Option + X
Hue Shift + Alt + U Shift + Option + U
Saturation Shift + Alt + T Shift + Option + T
Color Shift + Alt + C Shift + Option + C
Luminosity Shift + Alt + Y Shift + Option + Y
Result Shortcut (both Windows and Mac OS)
Change color readout modes Click eyedropper icon
Change measurement units Click cross-hair icon
299
USING PHOTOSHOP ELEMENTS 9
Photoshop Elements keyboard shortcuts
Last updated 1/3/2012
Keys for the Color Swatches panel
This partial list includes the most helpful shortcuts. You'll find additional shortcuts in menu commands and tool tips.
Keys for showing or hiding panels (Full Edit)
This partial list includes the most helpful shortcuts. You'll find additional shortcuts in menu commands and tool tips.
Keys for the Filter Gallery
This partial list includes the most helpful shortcuts. You'll find additional shortcuts in menu commands and tool tips.
Result Windows Mac OS
Create new swatch from foreground color Click in empty area of panel Click in empty area of panel
Select background color Control-click swatch Command-click swatch
Delete color Alt-click swatch Option-click swatch
Result Shortcut
Open Help F1
Show/Hide Content panel F7
Show/Hide Info panel F8
Show/Hide Histogram panel F9
Show/Hide Undo History panel F10
Show/Hide Layers panel F11
Show/Hide Navigator panel F12
Result Windows Mac OS
Apply a new filter on top of selected Alt-click on a filter Option-click on a filter
Open/close all disclosure triangles Alt-click on a disclosure triangle Option-click on a disclosure triangle
Change Cancel button to Default Control Command
Change Cancel button to Reset Alt Option
Undo/redo Control + Z Command + Z
Step forward Control + Shift + Z Command + Shift + Z
Step backward Control + Alt + Z Command + Option + Z
300
USING PHOTOSHOP ELEMENTS 9
Photoshop Elements keyboard shortcuts
Last updated 1/3/2012
Keys for the Liquify filter
This partial list includes the most helpful shortcuts. You'll find additional shortcuts in menu commands and tool tips.
Keys for using Photomerge Panorama
This partial list includes the most helpful shortcuts. You'll find additional shortcuts in menu commands and tool tips.
Result Windows Mac OS
Warp tool W W
Turbulence tool A T
Twirl Clockwise tool R C
Twirl Counter Clockwise tool L L
Pucker tool P P
Bloat tool B B
Shift Pixels tool S S
Reflection tool M M
Reconstruct tool E E
Zoom tool Z Z
Hand tool H H
Result Windows Mac OS
Select Image tool A A
Rotate Image tool R R
Set Vanishing Point tool (Perspective option
selected)
V V
Zoom tool Z Z
Hand tool H H
Switch to Hand tool Spacebar Spacebar
Step backward Control + Z Command + Z
Step forward Control + Shift + Z Command + Shift + Z
Move selected image 1 pixel Right Arrow, Left Arrow, Up Arrow, or Down
Arrow
Right Arrow, Left Arrow, Up Arrow, or Down
Arrow
Change Cancel button to Reset Alt Option
Show individual image border Alt-move pointer over image Option-move pointer over image
301
USING PHOTOSHOP ELEMENTS 9
Photoshop Elements keyboard shortcuts
Last updated 1/3/2012
Keys for the Camera Raw dialog box
This partial list includes the most helpful shortcuts. You'll find additional shortcuts in menu commands and tool tips.
Result Windows Mac OS
Display highlights that will be clipped in Preview Alt-drag Exposure or Blacks sliders Option-drag Exposure or Blacks sliders
Enable Open Copy button in the Camera Raw
dialog box
Alt Option

302
Last updated 1/3/2012
Chapter 17: Glossary
The glossary is your guide to unfamiliar terms in Adobe® Photoshop® Elements 9 and digital imaging terms. If you
don’t find a term here, search for it in Help to find a feature-specific definition.
Find definitions for terms
❖In the Contents tab of Help, expand the letters below “Digital imaging terms.” If you don’t find a term there, enter
it in the Search box to find it elsewhere in Help.
Digital imaging terms
A
acquisition module interface A plug-in that allows you to import photos from a digital camera or scanner.
active layer The layer currently selected in the Layers panel.
additive primaries Red, green, and blue. The human eye perceives all other colors as combinations of these three. To
create colors besides the additive primaries, computer monitors combine these three colors of light. For instance, to
create yellow, a monitor emits a combination of red and green light. When combined with each other at maximum
intensity, the additive primaries create white. (See also “subtractive primaries” on page 314.)
adjustment layer A layer that lets you apply color and tonal adjustments to your image without permanently changing
pixel values. Use adjustment layers to experiment with color and color tones. You can think of an adjustment layer as
a veil through which the underlying layers are seen. (See also “layer” on page 309.)
ADM Adobe Dialog Manager. A file required for many plug-ins in Photoshop Elements.
Adobe Color Engine Manages colors you view on-screen and in print. It is used to map the gamut of one color space
to the gamut of another.
Adobe Color Picker A built-in utility for specifying a foreground or background color in an Adobe application.
Adobe Photo Downloader A feature of Photoshop Elements that automatically searches for and downloads photos
from attached card readers, cameras, or mobile phones. You can disable the automatic detection in the camera and
card reader preferences. When disabled, you can still manually access the downloader by clicking the Get Photos icon
in the Photo Browser and choosing From Camera, Mobile Phone, or Card Reader.
Adobe RGB The RGB color space profile created by Adobe Systems, Incorporated. It provides a large gamut of colors.
(See also “RGB” on page 313.)
AGMLib An Adobe Graphics Manager library file, which Photoshop Elements installs with and requires.
airbrush A brush option that lets you apply gradual tones to an image, simulating traditional airbrush techniques.
Paint builds up as you apply more pressure. Using this option simulates the effect of spray-painting an image.
album A group of photos that you want to view together. Photos in albums can have different tags. Each photo in a
collection is numbered, so you can order them by rank. Albums are useful for organizing the photos in photo albums
and slide shows.

303
USING PHOTOSHOP ELEMENTS 9
Glossary
Last updated 1/3/2012
aliasing The jagged edges seen at the edges of diagonal lines, arcs, and so on, caused by pixels lining up in a saw-tooth
pattern.
alpha channels Masks, which let you manipulate, isolate, and protect specific parts of an image. In Photoshop
Elements, alpha channels are called saved selections. To save an alpha channel, choose Select
> Save Selection. To load
an alpha channel, choose Select
> Load Selection.
ambient light The existing lighting conditions under which a photo is taken, without enhancement from a camera
flash.
animated GIF A series of images in GIF format that create the illusion of movement when they are displayed in
sequence over time.
anti-aliasing The smoothing of jagged edges in digital images by averaging the colors of the pixels at a boundary.
arithmetic coded JPEG A type of file compression used to compress JPEG files.
artifact Any unexpected and undesired change to a digital image caused by incorrect settings or faulty processing.
Examples include blooming, moire, sharpening, and noise.
aspect ratio The ratio of an image’s width to its height. It is used to determine how an image fits on a page or monitor.
associated Related to an application (also, file association). Each file type has an associated application. For example,
PSD files are associated with Adobe Photoshop and Photoshop Elements. You receive an alert if you try to open a file
that lacks an associated application.
audio caption Voice narration of a photo.
Auto Levels An automatic color-correction command.
B
Background layer The bottom-most layer in an image, usually containing the image data. The Background layer is
always locked. If you want to change its stacking order, blending mode, or opacity, you must first convert it to a regular
layer.
backlight Light coming from a source behind the photographed subject.
bas relief In digital photography, the illusion that an image is slightly raised from its background surface.
baseline JPEG The standard compression scheme for JPEG files. Baseline JPEG files display in line-by-line passes
when viewed on the web.
batch processing Performing one or more tasks to a group of files at the same time.
bevel A raised or depressed effect around all or part of an image or text. Bevels are created by applying highlight and
shadow to the inside and outside edges of its border to simulate three-dimensional depth.
bit depth The number of colors used to represent a pixel in an image. A 1-bit image is black and white; an 8-bit image
can have 256 colors or shades of gray; a 16-bit image can have 65,536 colors.
bitmap image An image consisting of rows and columns of pixels in computer memory. Also called a raster image.
Bitmap file formats include BMP, GIF, JPEG, PSD, PICT, and TIFF. (See also “vector graphics” on page 315.)
bits/channel Bits per channel. This measurement determines how many tones each color channel can contain.
black body A theoretical material that is black when completely cold and that begins to glow in various colors as it is
heated. As its temperature (measured in degrees Kelvin) rises, it begins glowing in colors ranging from red (coolest)
to white (hottest). (See also “color temperature” on page 305.)

304
USING PHOTOSHOP ELEMENTS 9
Glossary
Last updated 1/3/2012
blending mode A feature that controls how pixels in an image are affected by a painting or editing tool. The blend
color is applied to the base (original) color to produce a new color, the result color. When applied to layers, a blending
mode determines how the pixels in a layer blend with pixels in layers beneath it.
blooming An artifact caused by overflow of color information from one sensor in a camera (corresponding to a pixel)
to adjacent ones. Blooming can cause streaks, halos, and loss of detail. (See also “artifact” on page 303.)
blur The softening of the detail in an image or parts of an image.
BMP A standard file format for saving bitmap files in Windows. Windows can display BMP files on any type of display
device.
bounding box A rectangular border around an image, shape, or text that you can drag to rotate or resize.
brightness The relative lightness or darkness of an image, which determines the intensity of colors. Also, the relative
lightness or darkness of any color. (See also “luminance” on page 310.)
brightness value The brightness of an image or selection, usually measured as a percentage from 0% (black) to 100%
(white).
brush preset A brush with preset settings for size, thickness and so on. Photoshop Elements includes several brush
presets for you to choose from, and you can create your own as well. The maximum number of brush presets that you
can create in Photoshop Elements: 8000.
brush type One of the following brush tool styles: brush, impressionist brush, or airbrush.
burning The selective darkening of a part of an image.
C
cache file A file used for virtual memory. The cache file speeds the performance of Photoshop Elements.
camera raw format A format describing data exactly as it is captured by a camera sensor, with no in-camera processing
applied. Also called raw format. (This format differs from “Photoshop raw format” on page 311.)
canvas The workspace around an existing image, within the image window. Layer data may lie outside of the canvas,
but it will be clipped to the canvas when the image is flattened. You can change the size and color of the canvas by
choosing Image
> Resize > Canvas Size.
caption Either a text or audio note attached to a photo. You can add audio captions in the Photo Browser by using
your computer microphone or by importing an audio file. You can add text captions by typing text in the caption field
of the Properties panel in the Photo Browser or the File Info dialog box in Full Edit.
card reader Portable hardware on which you can store, upload, or download photos, audio, video, and other data. You
can download data from a card reader into Photoshop Elements.
CCITT Comité Consultatif International Téléphonique et Télégraphique. A group that defines communications
standards. Now known as the ITU-T (International Telecommunications Union-Telecommunication Standardization
sector). The CCITT has developed a family of lossless compression techniques for black-and-white images.
channel A construct for describing the color data in an image. A black-and-white grayscale image has one channel, an
RGB image has three, and a CMYK image has four. Ordinarily, a channel describes either red, green, or blue, which
are blended to create all colors.
chroma See “saturation” on page 313.
CIE Commission Internationale de l’Éclairage. A group that defined universal color standards in the early 1930s. The
Lab color model was developed by CIE.
clipboard The temporary holding area for data stored with the Cut or Copy commands.

305
USING PHOTOSHOP ELEMENTS 9
Glossary
Last updated 1/3/2012
clipboard path data Data for vector paths stored on the clipboard. Vector paths are used with vector data such as text
layers or shape layers.
clone To paint with the Clone Stamp tool. You must set a sampling point on the active layer before you paint with the
Clone Stamp tool.
CMap files Files used to access character sets in double-byte fonts such as Japanese fonts.
CMYK Cyan, magenta, yellow, and black—the inks most printers use to produce color images. Though Photoshop
Elements does not support CMYK color mode, most desktop printers automatically convert to it.
color cast An unwanted or unexpected color shift in a photo. For example, a photo taken indoors without a camera
flash may have too much yellow.
color channels The component colors from which all colors in an image are created. Usually refers to red, green, and
blue (RGB).
color depth Measures how much color information is available to display or print each pixel in an image. Greater color
depth means more available colors and more accurate color representation in the digital image.
color gamut The range of colors that a device can reproduce in any given color space.
color lookup table (CLUT) A system used to index or reference colors when the bit depth is insufficient to represent all
colors.
color management A system used to achieve consistent color as an image travels from one device to another (for
example, from camera to computer, and computer to printer).
color mode Determines how the components of a color are combined, based on the number of color channels in the
color model. Color modes include grayscale (1 channel), RGB (3 channels), and CMYK (4 channels), among others.
Photoshop Elements supports bitmap, grayscale, indexed, and RGB color modes.
color model Any system for specifying the components of color. The main color models are RGB, CMYK, and HSB.
color separation The conversion of RGB color data into CMYK data for printing.
color space A color mode designed for a particular device or purpose. For instance, Adobe RGB is the color space used
by Adobe applications, and sRGB is the color space used by most monitors. Color spaces are important in color
management, where the color profile of an image is reconciled with the color space of the application or device on
which it is viewed. The color space used by Adobe applications is sometimes called the working space.
color table See “color lookup table (CLUT)” on page 305.
color temperature (1) The position of a color along a continuum from warm (red) to cool (blue). (2) The degree of
heat (in degrees Kelvin) that an object would have to absorb before it glowed in a certain color. Each color is associated
with a color temperature, as are various kinds of light.
color value A mathematical description of the color of a pixel determined from its color components.
color wheel A representation of the colors in the visible spectrum arranged in a circle so that complementary colors
are directly opposite each other.
ColorSync Color management software provided by Apple.
command Refers to any menu item you choose to perform a desired operation.
complementary colors Two colors of light that, when combined, create white light, or two colors of ink that, when
combined, create black. Complementary colors are opposing colors on a color wheel.
compression A technique that reduces the file size of bitmap images.
content layers Any layer in Photoshop Elements that contains an image, text, or object.

306
USING PHOTOSHOP ELEMENTS 9
Glossary
Last updated 1/3/2012
content-aware An option with Spot Healing Brush Tool. Select this option to remove unwanted objects without
creating a hole in the background.
contrast The difference in brightness between light and dark areas of an image. Contrast determines the number of
shades in the image.
cool colors The colors at the blue end of the spectrum.
CoolType A font technology from Adobe that improves on-screen text resolution.
Cos object An internal part of an Adobe PDF file.
craquelure Hairline surface cracking seen in old paintings, and the effect used to simulate surface cracking in
photographic images.
cropping Trimming a portion of an image to improve its composition or to create a frame around it.
custom shape A shape listed in the Custom Shape menu in the options bar. The Custom Shape menu is available when
you select the Custom Shape tool.
D
definition Sharpness or clarity of detail in an image.
differential JPEG files A type of coding method used with certain JPEG files. Differential JPEG files are not supported
in Photoshop Elements.
digital camera A camera that records image data in pixels, which consist of bits of information that a computer can
process.
dithering The approximation of an unavailable color through the use of two or more available colors. The color of
adjacent pixels is changed in an attempt to reproduce the unavailable color.
dodging The selective lightening of any part of an image.
dots per inch (dpi) A measure of printer resolution. High dpi settings produce prints with fine detail. (See also “pixels
per inch (ppi)” on page 311.)
double-byte fonts A term used to describe Asian fonts, often called CJK (Chinese, Japanese, Korean) fonts. Two bytes,
rather than one, are needed to represent each character.
droplet A small application that batch processes images that you drag onto the droplet icon. Photoshop Elements does
not support droplets.
Duotone A two-color grayscale file that uses two custom inks. Photoshop Elements does not support duotone files.
E
embedded profile An ICC (color) profile resident in an image file. This profile ensures that image colors are correctly
interpreted. (See also “color management” on page 305.)
end-of-file The last line of readable code in a file. The error “Unexpected end-of-file” indicates that the file you are
trying to work with is damaged.
EPS Encapsulated PostScript. A file format used to save images that will be used in illustration and page-layout
programs
EPS file An Encapsulated PostScript file. A graphic file format that can represent both vector and bitmap data and is
supported by virtually all graphic, illustration, and page-layout programs.
EPS PICT preview A low-resolution screen preview saved with a Macintosh EPS file.

307
USING PHOTOSHOP ELEMENTS 9
Glossary
Last updated 1/3/2012
EPS TIFF preview A low-resolution screen preview saved with an EPS file.
error log A text file generated when an error occurs while running the Batch Processing command or the Process
Multiple Files command.
errors A system or application message that alerts you to a failed command or operation.
EXIF Exchangeable Image File Format. A standard for simplifying the exchange of data between cameras and software.
The data may include camera model, date and time the photo was taken, camera settings, shutter speed, and so on.
export module A plug-in that enables you to export images in different file formats from Photoshop Elements.
exposure A measure of the amount of light in which a photo was taken. Underexposed digital photos are too dark;
overexposed ones, too light.
extension module A plug-in for Photoshop Elements that enhances performance or adds features.
F
fade When used with painting tools, fade controls the number of steps until the paint flow fades to nothing.
fall-off Decrease in light as it travels from its source. Also the length of the transition between related colors in the
Hue/Saturation dialog box.
faux bold style A type style that allows you to apply a bold effect to a font family that does not include a bold style.
faux font A computer-generated version of a font that simulates the appearance of an unavailable font.
FDF File containing comments from an Adobe Acrobat PDF file. Photoshop Elements cannot open FDF files.
feathering The softening of an edge of a selection.
File Associator An internal engine in Photoshop Elements that allows the application to recognize, change, and open
different file types.
file-format module A plug-in that allows Photoshop Elements to open different file types.
fill layer A type of layer that contains a solid color, a pattern, or a gradient as an interchangeable attribute.
filter module A filter plug-in installed with Photoshop Elements and listed in the Filter menu.
filters Presupplied ways to alter the look of an image, for instance, to make it look like a mosaic, add unique lighting,
apply distortions, and so on.
flattening Merging all visible layers into the Background layer to reduce file size.
font A set of letters, numbers, punctuation marks, and symbols that share a common weight, width, and style. An
example is Times Italic.
font family A collection of fonts with the same name but different styles. For instance, Times Italic, Times Bold, and
Times Bold Italic all belong to the same font family.
font server An internal engine in Photoshop Elements that allows the application to use and display fonts.
font style A variant version of an individual font in a family. Italic, regular, and bold are font styles.
48-bit RGB color A high-bit image mode that can contain thousands of colors per channel. Photoshop Elements
supports 8-bit or 16-bits per color channel, so an RGB image can be a total of 24-bit or 48-bit, depending on the bit
depth per channel.
frame layer A layer masking an image in a photo creation. A frame layer borders an image and can be resized, rotated,
or repositioned using the same methods used for images.

308
USING PHOTOSHOP ELEMENTS 9
Glossary
Last updated 1/3/2012
fuzziness A tolerance setting for the Magic Wand tool and the Replace Color command. It controls the degree to
which related colors are included in the selection. See Tolerance.
G
gamma adjustment The contrast resulting from darkening or lightening the midtones of an image. When you adjust
the gamma, you change the brightness of the midtones without substantially affecting the highlights and shadows.
gamut The range of color that a device can reproduce. (See also “color space” on page 305.)
Gaussian blur A softening effect applied through a bell-shaped distribution of tones and colors.
GIF Graphic image file format. A file format suitable for images that contain line art, large areas of a single color, and
text. Web animations are done with images in GIF format.
gradient Any of several methods for achieving a smooth transition between two adjacent colors, including black and
white.
Gray working space profile A predefined profile that determines how best to display and print grayscale images for a
given color setting.
grayscale A single-channel image that includes only black, white, and shades of gray. Depending on the bit depth,
grayscale images can reproduce various shades of gray.
H
halftone A monochrome image made up of variably sized dots simulating the shades of gray in a photograph. It is used
for reproducing photographs on PostScript printers and printing presses.
highlight and shadow The lightest and darkest colors in an image.
highlights The brightest elements in an image. (See also “shadows” on page 313.)
histogram A bar chart showing the distribution of the pixel values in a digital image. The horizontal axis represents
levels from 0 (darkest) to lightest (255), and the vertical axis represents the numbers of pixels at each level.
history state An image state listed in the Undo History panel.
hotspot An area in which light is concentrated to such a degree that all detail is lost; that is, an area that is blown out
to white.
HSB A color mode that is based on the human perception of color and describes it according to hue, saturation, and
brightness.
hue The color reflected from or transmitted through an object. In common use, hue is the property that allows a color
to be distinguished as red, blue, yellow, and so on; the “color of a color.”
hue jitter Sets the rate at which the stroke color switches between the foreground and background colors. Higher
values cause more frequent switches between the two colors than lower values.
I
ICC International Color Consortium. ICC device profiles are the industry standard for reproducing colors accurately
across devices such as scanners, monitors, and printers. (See also “profile” on page 312.)
ICM Image Color Management, is Windows’s built-in color management system that uses color profiles for images
and devices such as scanners or printers. Similar to Apple’s ColorSync on Mac OS.
illuminance A measure of the light falling upon a subject in a photograph.

309
USING PHOTOSHOP ELEMENTS 9
Glossary
Last updated 1/3/2012
image cache A section of hard disk space used as virtual memory. The image cache speeds the on-screen redraw of
high-resolution images.
image mode The color mode of an image, such as Grayscale or RGB.
indexed color A color that is rendered by using a pixel value as an index to a panel of 256 or fewer colors for
interpretation.
interlaced video Video generated by a system developed for early television and still in use in standard television
displays. Video is displayed on-screen at 30 frames per second (NTSC) or 25 frames per second (PAL). Each frame is
divided into two interlaced fields, each displayed for 1/60 of a second. The odd field contains all the odd-numbered
scan lines, and the even field contains all the even-numbered scan lines of a video frame. The human eye perceives the
information in two sequential interlaced fields as one unified frame. (See also “progressive scan” on page 312.)
interlacing The display of a series of low-resolution versions of an image in a browser while the full image file is
downloaded.
J
jitter Specifies the randomness of a brush stroke.
JPEG Joint Photographic Experts Group. A committee of experts that develops algorithms for compressing computer
image files. Also, any graphic file to which a JPEG algorithm is applied. JPEG is the format generally used to share
photographs over the web.
JPEG compression A lossy compression technique that reduces image data and file size. (See also “lossy compression”
on page 309.)
K
kumimoji See “tate-chuu-yoko” on page 314.
L
layer A mechanism for overlaying and combining multiple images. Layers are like transparent sheets of acetate (clear
plastic) that you can stack and rearrange. In addition to ordinary image layers, there are special kinds of layers. (See
“fill layer” on page 307 and “adjustment layer” on page 302.)
layer group A collection of layers saved with a Photoshop image. When you open a file with a layer group in
Photoshop Elements, individual layers in the set are hidden in a read-only folder. To edit a layer group in Photoshop
Elements, you must first simplify the layer.
layer mask A protected area in an adjustment layer. Areas below the mask cannot be edited.
Levels Functionality for adjusting color and tone. With a Levels adjustment, you can set shadow and highlight values
to use a full tonal range, adjust middle tones only, correct color casts, and so on.
locked A file that is set as Read Only. In the Photo Browser, locked files display with a lock icon.
locked layer A layer in the Layers panel that has the lock icon applied. No changes can be made to a locked layer. A
Background layer is always locked.
lossless compression An image-compression technique that prevents image degradation caused by data loss. Lossless
techniques usually use lower compression ratios than lossy techniques.
lossy compression An image-compression technique using compression ratios that result in the loss of some image
data.

310
USING PHOTOSHOP ELEMENTS 9
Glossary
Last updated 1/3/2012
luminance Lightness. Technically, the highest plus lowest RGB values divided by two.
LZW (Lemple-Zif-Welch) A lossless technique especially suited for compressing images that contain large areas of a
single color.
M
matting A method for simulating transparency in images displayed on web pages. When transparency is not
supported, you can specify a matte color that matches the background to simulate transparency.
mezzotint An effect that simulates the pattern of light and shade seen in engravings made from a roughened plate.
Microsoft Panel file A color table attached to an image file.
midtone An area that falls between the brightest highlight and the darkest shadow.
moire A wavy striped pattern in an image, resembling the pattern of watered silk. Moire can be an artifact caused by
a camera’s inability to capture the detail in an image.
mojikumi A system for determining spacing between punctuation, symbols, and numbers in Japanese type.
monitor resolution The resolution of a monitor, described in pixel dimensions. The size of an image displayed
on-screen depends on the pixel dimensions of the image, the size of the monitor, and the monitor resolution. (See also
“resolution” on page 312 and “printer resolution” on page 312.)
multiple master Customizable Type 1 fonts with typeface characteristics that have variable features such as weight,
width, style, and optical size.
N
noise An artifact caused by interference or camera error. Noise is often seen as stray pixels of unexpected color or a
generally “grainy” appearance. Certain compression techniques can amplify noise.
noise gradient A gradient that contains randomly distributed colors within a range of specified colors.
non-fringe pixels Pixels that are more than 50 percent selected in an anti-aliased selection.
notes A note added to a Photoshop file. In Photoshop Elements you can view and delete notes, but you can't add them.
O
online service Any service to which you can connect to and order from over the Internet. You can access online
services directly from Photoshop Elements to order prints, photo books, cards, and such. In addition, you can share
your photos online through online sharing services.
opacity The extent to which something blocks light. You can change the opacity of layers, filters, and effects so that
more (or less) of the underlying image shows through.
opaque The opposite of transparent. When text, shapes, or layers are opaque you cannot see through them.
outline data Outline data for PostScript fonts that is used when printing. This data is stored in the font outline file,
also known as the printer font.

311
USING PHOTOSHOP ELEMENTS 9
Glossary
Last updated 1/3/2012
P
panning Changing the focus of a photo from one subject or area to another over a period of time. For example, in a
Photoshop Elements slide show, you can set the start of a pan on one face in a photo and end the pan on another face,
creating, in effect, a video from the photo. You can also zoom into or out of a photo over a period of time. For example,
you can begin with a close up of one face in a photo and zoom out to view the entire photo.
panorama A broad view of a subject, usually a landscape, made by overlapping individual shots as they are taken and
then merging them to form one image.
parser module A plug-in that converts vector data into bitmap data.
pattern A predefined pattern included with Photoshop Elements, or a pattern you create. You can use patterns with
fill layers, the Fill command, the Pattern Stamp tool, or the Paint Bucket tool.
PDF (PDP) Portable Document Format. An Adobe file format that captures the elements of a printed document,
including graphics and photos, as an electronic image. You can search, navigate through, print, and e-mail PDF
documents. PDF and PDP files are identical, except that PDF files are opened in Adobe Acrobat and PDP files are
opened in Adobe Photoshop Elements.
perspective The angle or level from which a photograph is taken; the camera-eye view.
phosphor The substance that coats the interior surface of a CRT monitor. It emits light in response to electrical
stimulation and affects how colors appear on the screen. Over time, changes in the phosphor make it necessary to
recalibrate or reprofile the monitor.
Photoshop raw format A format designed to accommodate images saved in undocumented formats, such as those
used in scientific applications. (This format differs from “camera raw format” on page 304.)
PICT A file format for storing digital images in Mac OS.
pixel The basic, rectangular unit of data that a digital image consists of. The edges of pixels can produce a saw-tooth
pattern unless anti-aliasing is used. (See also “bitmap image” on page 303.)
pixel dimensions The number of pixels along the width and height of an image. This is a measure of the amount of
image data in the photo, not its physical size when printed or displayed on a monitor.
pixels per inch (ppi) A measure of image resolution stored in a camera or computer file. High ppi settings produce
photographs with fine detail and large file size. (See also “dots per inch (dpi)” on page 306.)
PixMap A bitmap image stored in your computer’s memory.
plug-in module A small software program developed by Adobe or third parties to add functionality to Adobe
products.
PNG-24 Portable Network Graphics. An image format that supports 24-bit color. Like the JPEG format, PNG-24
preserves photographic detail. Unlike JPEG, it supports 256 levels of transparency.
PNG-8 Portable Network Graphics. A bitmap image format that uses 8-bit color. Like the GIF format, PNG-8
efficiently compresses areas of solid color while preserving sharp detail in line art, logos, or type.
point The default unit of measurement for type, for instance Times Roman Regular, 12 points.
pointillism A style of painting in which paint is applied in very small dots that cannot be discerned individually at a
distance. The eye merges the dots into the perceived color.
posterize To reduce the number of continuous tones in an image. Posterization results in a flat, cartoon-like image.
The effect can be deliberately applied but sometimes results from overcompression.
PostScript A programming language developed by Adobe that describes the appearance of text, graphic shapes, and
sampled images on printed or displayed pages.

312
USING PHOTOSHOP ELEMENTS 9
Glossary
Last updated 1/3/2012
printable character A text object that can be printed.
printer profiles Profiles that describe how printers reproduce colors.
printer resolution The fineness of detail that a printer can render in an image. It is measured in ink dots per inch (dpi).
Generally a resolution of 240 dpi provides good results when you print high-quality photos on an inkjet printer. (See
also “resolution” on page 312 and “monitor resolution” on page 310.)
profile Information about the color space of a device, application, or photo file. An ICC device color profile allows an
image’s color data to be converted so that color is reproduced faithfully on that specific device. (See also “color
management” on page 305.)
progressive scan A process of displaying images on-screen that draws 60 complete frames of video from left to right
every second. Progressive scan creates a cleaner, clearer picture than interlaced video.
project A product that you make using your photos in Photoshop Elements. You can create slide shows, album pages,
greeting cards, calendars, and more.
PSD The native file format of Adobe Photoshop and Adobe Photoshop Elements.
Q
Quick Mask A mask channel created in Quick Mask mode in Photoshop. Photoshop Elements has no Quick Mask
mode and flattens all channels in Photoshop images.
QuickTime Software from Apple that allows you to view movies and other multi-media files on your computer.
R
RAID Redundant Array of Independent Disks, a category of disk drives that use two or more drives at the same time
to improve performance and ensure a graceful response in the event of a hardware or software failure.
raster image See “bitmap image” on page 303.
rasterizer The engine in Photoshop Elements that converts vector data, such as text, to bitmap data.
red eye The reflection of the camera flash from the retina of a photographed subject, resulting in a red dot in the
subject’s eye. You can eliminate it automatically when you import images or by using the Red Eye Removal tool.
Rename Multiple Files Allows you to automatically rename several files at once. Available with the Process Multiple
Files command.
rendering Converting a vector layer such as a shape layer or a text layer into a normal layer. To convert a vector layer
into a normal layer, choose Layer
> Simplify Layer.
renmoji See “tate-chuu-yoko” on page 314.
resample To change the resolution of an image by changing its pixel dimensions. Downsampling is decreasing the
number of pixels, and resampling up (or upsampling) is increasing the number.
resolution A measure of the clarity and sharpness of an image. In digital images, it is measured in pixels per inch. (See
also “monitor resolution” on page 310 and “printer resolution” on page 312.)
resolution independence Lets an image be resized without changing its resolution. In a typical bitmap image, pixel
resolution is fixed, so if you enlarge the image, quality is reduced. With resolution independence, however, an image
isn't rendered into pixels until it is simplified or printed.
reticulation A traditional photographic effect caused by the rapid changing of the film emulsion from hot to cold (hot
developer to cold fixer). It produces a random pattern of lines in a photographic image, less fine than craquelure.

313
USING PHOTOSHOP ELEMENTS 9
Glossary
Last updated 1/3/2012
revert The command that reverts the image to the last saved version.
RGB A model for representing colors on a computer display. Red, green, and blue (RGB) are combined in different
proportions to represent any color. The RGB model can represent 256 x 256 x 256 colors.
RGB working space profile A color profile that defines an RGB working space, such as that for a digital camera or
scanner.
RLE (run length encoding) A lossless technique for compressing the transparent portions of each layer in images. (See
also “lossless compression” on page 309.)
S
sample To select a color with the eyedropper in order to use it with a drawing or painting tool.
saturation The purity, or strength, of a color. A fully saturated color contains no gray. Saturation controls make colors
more vivid (less black or white added) or more muted (more black or white added).
scanning The process of converting a tangible image, such as a slide or print, into a digital image by using light shining
onto sensors such as Charged Couple Devices (CCDs).
scatter Determines how brush marks are distributed in a stroke.
scatter spacing Determines the spacing between elements in a brush stroke.
Scitex file A high-resolution file for use with proprietary Scitex systems. Photoshop Elements can open Scitex files that
are in RGB color mode.
scratch disk Photoshop Elements’ own virtual memory system, which uses any disk drive or drive partition with free
space. You can designate scratch disks to be used whenever there is not enough RAM to perform an operation.
screen resolution The dimensions of the pixel grid used by a monitor.
selection A part of an image selected for manipulation of any kind—duplication in a layer, color correction, deletion,
rotation, and so on. The selection consists of all the pixels—fully or partially selected—contained within the selection
boundary.
selection module A plug-in that enables you to make a selection in Photoshop Elements, such as the TextureSelect
plug-in that is used by the Magic Selection Brush tool and the Magic Extractor.
sepia print A photograph in tones of brown. Photo-editing programs simulate this antique look by applying special
effects.
shadows The darkest elements in an image, and the degree of detail that is discernible in those the dark portions. (See
also “highlights” on page 308.)
shape layer A layer that contains vector-based shapes. (See also “layer” on page 309.)
sharpening In photo-editing programs, any functionality that enhances the details at the edges of photographed
objects and people. Sharpening is often applied as part of in-camera processing as well, although no sharpening is
applied to camera raw file images. (See also “Unsharp Mask” on page 315.)
sharpening halo An artifact, seen as a bright ring or line around edges, caused by too much sharpening. (See also
“artifact” on page 303.)
silhouette A dark mass outlined against a light background.
simplifying Converting a text layer, shape layer, solid color layer, gradient layer, or pattern fill layer to a regular image
layer. You must simplify these layer types before applying filters or using the painting tools.
single channel images An image that contains one channel such as a bitmap-mode, grayscale, or indexed-color image.

314
USING PHOTOSHOP ELEMENTS 9
Glossary
Last updated 1/3/2012
16-bit grayscale A high-bit image mode that can contain thousands of shades of gray. Photoshop Elements supports
flattened 16-bit images (it does not support layers in 16-bit images).
skewing Deviation of the content of an image from a vertical or horizontal axis. Skewing can be a camera artifact or
an intentionally applied effect.
slices Portions of an image in Photoshop that divide the image into functional areas. Slices are not supported in
Photoshop Elements.
smoothing A technique for averaging the values of neighboring pixels to reduce contrast and create a soft, blurry
effect.
spot channels A Photoshop channel that contains a spot color such as a Pantone color. Photoshop Elements does not
support spot channels.
sRGB An RGB color space that’s now a standard on the web. Most computer monitors can display only the colors in
the sRGB color space. (See also “color space” on page 305.)
stack Photos that you group together under one photo. You can create stacks when you have multiple photos of the
same subject and you don’t want them all to clutter up the Photo Browser.
stroke (1) An outline around an image or part of an image created with the Stroke command or with a drawing,
painting, or selection tool. (2) The characteristics of the lines created with one of the painting or drawing tools,
especially brushes.
subtractive primaries Cyan, magenta, and yellow. In theory, when pigments of these three colors are combined in
equal quantities, the result is black. Printers combine these colors in various proportions to represent all printable
colors. The additive primaries are used to combine colors of light, whereas the subtractive primaries are used to
combine colors of ink. (See also “additive primaries” on page 302.)
swatches Preset colors that you can choose from in the Color Swatches panel. The maximum number of color
swatches that you can load in Photoshop Elements: 8190.
T
tag A label that you attach to photos to organize them. You create your own tags according to the people, places, and
events that they represent. You can attach multiple tags to a photo. Once tagged, you can easily find photos by
searching on the tags.
Targa (TGA) format A file format that is compatible with systems using the Truevision video board.
target channels Selected channels in the Channels panel of Photoshop. Photoshop Elements doesn’t have a Channels
panel.
target colors Colors you specify for highlights, neutral grays, and shadows when you correct a photo.
target layer The selected layer in the Layers panel.
target path The selected path in the Paths panel of Photoshop. Photoshop Elements doesn’t have a Paths panel.
tate-chuu-yoko A block of horizontal type that is laid out in a vertical line.
temperature In regard to color, the degree of heat (in degrees Kelvin) that an object would have to absorb before it
glowed in a certain color. Each color is associated with a color temperature, as are various kinds of light. (See also
“black body” on page 303.)
text layer A layer that contains vector-based text. (See also “layer” on page 309.)
thumbnail A small, low-resolution representation of an image. The program displays thumbnails of the photos you
are working on to help you find them and edit them.

315
USING PHOTOSHOP ELEMENTS 9
Glossary
Last updated 1/3/2012
TIFF Tagged Image File Format. A digital image format widely used for images that are to be printed or published.
TIFF images can be compressed losslessly.
tint A variation of a color produced by adding white, thus decreasing saturation and increasing lightness.
tolerance A measure of the precision with which certain tools work. The tolerance describes the difference in value
between adjacent pixels affected by a tool. If the tolerance is high, many more pixels are affected or selected than if the
tolerance is low.
tonal correction An adjustment made in the tones of an image: shadows, highlights, or midtones. You can adjust
highlight and shadow values to increase the tonal range, adjust the brightness of the midtones without affecting
shadow and highlight values, and so on.
transform To scale, shrink, enlarge, skew, distort, rotate, or change the perspective of a layer, selection, or shape.
transform bounding box The box that surrounds the portion of an image you are changing with a transform
command.
transition An effect added between two photos, for instance in a slide show, that affects the visual presentation of how
one photo changes to the other. For example, you can add a Fade transition between photos to make one photo fade
out of view as the next photo fades into view.
transparency In digital photography, the functionality that supports transparent areas in an image or image layer.
Certain image formats do not support transparency.
trim To remove pixels from an image by using the Trim command in Photoshop. Photoshop Elements doesn’t have
a Trim command.
TWAIN A protocol by which applications and devices, such as scanners and cameras, exchange information.
type mask A selection outline in the shape of text.
type style See “font style” on page 307.
U
underexposed image An image that is overly dark because it was taken in low-light conditions or with incorrect
camera settings.
Unicode character Part of the Worldwide Character coding system for text.
Unsharp Mask A technique that sharpens details in an image by increasing the contrast between light and dark areas.
(The name originates from traditional photography, where contrast is increased by adding a slightly blurred negative
over the original.)
V
VCD Video Compact Disc. A CD that includes MPEG-formatted audio and video. You can play a VCD in a DVD
player or CD player. You can include menus in VCDs that you create in Photoshop Elements.
vector graphics Lines, shapes, and other graphic image components stored in a format that incorporates geometric
formulas for rendering the image elements. For this reason, the graphics scale without degradation of image quality,
and there are no jagged lines in the output. Adobe Illustrator is a vector graphics program.
version set
Edited versions of photos that are automatically grouped together when you save edits in the Editor. By
default, when you edit a photo in the Editor, Photoshop Elements saves the edited version as the top photo and groups
the original and previously edited versions underneath it. You can reveal or ungroup photos in a version set at any time.

316
USING PHOTOSHOP ELEMENTS 9
Glossary
Last updated 1/3/2012
video monitor Video monitors use a progressive scanning method to display images (as compared to televisions,
which use interlaced fields).
vignetting An effect in which the edges of an image gradually fade out.
W
wallpaper The background image or images on your Windows desktop. You can create your own custom wallpaper
by using the Creations wizard in Photoshop Elements.
warm colors Colors at the red end of the spectrum, including yellow and orange, associated with heat.
warping A distortion of an image, often text, to conform to a variety of shapes. For instance, a line of text can be
warped in the shape of an arc or wave.
web-safe color Any of the 216 colors that are displayed consistently on the web, regardless of browser and computer
platform.
white balance A function that compensates for the different rendering of identical colors under different sources of
light: incandescent, fluorescent, sunlight, and so on.
white point A reference point used to represent white. This reference point is used to calculate all other colors in the
image.
wizard A Photoshop Elements tool that steps you through a creation process from start to finish. The wizard informs
you of all the features you can use at each phase of the creation process; you decide which ones you want, and then you
move to the next step.
Z
zero length images Images without specified dimensions.
zero width images Images without specified dimensions.
ZIP encoding A lossless compression technique best used for images that contain large areas of a single color.