Apple Aperture 3.4 User Guide 34
User Manual: apple Aperture - 3.4 - User Guide Free User Guide for Apple Aperture Software, Manual
Open the PDF directly: View PDF ![]() .
.
Page Count: 632 [warning: Documents this large are best viewed by clicking the View PDF Link!]
- Aperture 3.4 User Guide
- Contents
- Chapter 1: Aperture Basics
- Chapter 2: Working with the Aperture Library
- Organizing Items in the Library Inspector
- Working with the Aperture Trash
- Working with Library Files
- Working in Projects View
- Switching to Projects View
- Previewing the Photos in a Project in Projects View
- Creating and Deleting Projects in Projects View
- Importing Files into a Project in Projects View
- Merging Projects and Libraries into Projects in Projects View
- Setting the Key Photo for a Project
- Emptying the Aperture Trash in Projects View
- Playing a Slideshow of a Project’s Photos
- Organizing Projects in Projects View
- Working with the Info HUD in Projects View
- Chapter 3: Importing Photos
- An Overview of Importing Photos
- File Formats You Can Import into the Library
- Planning Your Import Strategy
- Importing from Your Digital Camera or Card Reader
- Importing Files Stored on Your Computer or Connected Servers
- Adding Import Options
- An Overview of Import Options
- Viewing File Information
- Automatically Naming Your Imported Photos
- Applying Valid Filenames
- Creating Custom Name Formats
- Automatically Backing Up Your Imported Files
- Adjusting the Image File’s Time When Importing
- Adding Metadata to Photos During Import
- Applying Effects to Photos During Import
- Filtering Files by Type During Import
- Importing RAW + JPEG Image Pairs
- Using AppleScript Actions Immediately After Import
- Resetting Your Import Settings
- Importing Files from the Finder via Drag and Drop
- Capturing Photos as You Work
- Importing Folders of Files from the Finder
- Importing Originals for Referenced Images into Folders
- Where Aperture Stores Your Managed Files in the Library
- Adding Audio Attachments to Image Files
- Reprocessing Photos from Previous Versions of Aperture
- Chapter 4: Working with Photos in the Browser
- An Overview of the Browser
- Navigating Through and Selecting Photos
- Working with Browser Views
- Viewing Photos with the Loupe
- Searching for Photos in the Browser
- Rearranging and Sorting Photos in the Browser
- Rotating Photos
- Creating Versions of a Photo
- Deleting Photos from the Browser
- Dragging Photos into Different Projects and Albums
- Renaming Original Image Files
- Working with Referenced Images
- An Overview of Referenced Images
- Identifying Referenced Images
- Displaying a List of Referenced Images
- Locating a Referenced Image’s Original on a Hard Disk
- Reconnecting Missing or Offline Referenced Images
- Relocating Referenced Originals
- Moving Referenced Originals to the Aperture Library
- Searching for Referenced Images Using the Filter HUD
- Working with Stacks in the Browser
- Displaying Specific Metadata with Your Photos
- Chapter 5: Displaying Photos in the Viewer
- An Overview of the Viewer
- Customizing the Viewer Display
- Comparing Photos
- Viewing Stacks
- Viewing Photos at Full Resolution
- Viewing Original Photos
- Working with Audio and Video in the Viewer
- Displaying Metadata Associated with Photos
- Viewing Photos on Multiple Displays
- Showing Hot and Cold Areas in Your Photos
- Setting Up the Viewer for Onscreen Proofing
- Working with Preview Images
- An Overview of Preview Images
- Setting Preview Preferences
- Controlling Previews with the Library Action Pop-Up Menu
- Controlling Previews with Shortcut Menus
- Rescheduling JPEG Preview Maintenance
- Rendering Preview Images
- Determining Which Versions Have Previews
- Integration with iLife and iWork
- Displaying Offline Referenced Images
- Suppressing Preview Generation
- Sample Workflows for Using Previews Effectively
- Chapter 6: Viewing Photos in Full Screen View
- Chapter 7: Stacking Photos and Making Picks
- Chapter 8: Rating Photos
- Chapter 9: Applying Keywords to Photos
- An Overview of Keywords
- Displaying Keywords in the Viewer and Browser
- Viewing a Photo’s Keywords Using the Info Inspector
- Viewing Keywords in the Browser in List View
- Applying Keywords Using the Keywords HUD
- Applying Keywords Using Keyword Controls and Keyword Presets
- Applying Keywords Using the Lift & Stamp HUD
- Applying Keywords Using the Info Inspector
- Applying Keywords to Photos in the Light Table
- Removing Keywords from a Photo
- Exporting and Importing Keyword Lists
- Chapter 10: Working with Metadata
- An Overview of Working with Metadata
- Showing the Info Inspector
- Displaying Metadata with Your Photos
- Viewing and Changing Metadata in the Info Inspector and Inspector HUD
- Working with the AutoFill Editor
- Working with Metadata Views
- Working with Metadata Presets
- Batch Changing Metadata
- About IPTC Metadata
- Understanding Badge Overlays
- Adjusting the Photo Date and Time
- Chapter 11: Organizing Photos with Faces
- Chapter 12: Locating and Organizing Photos with Places
- An Overview of Places
- Viewing Photo Locations
- Changing the Map View
- Adding Locations to Photos
- Changing Photo Locations
- Searching for Locations
- Removing Locations
- Importing and Working with GPS Track File Data
- Assigning Location Information to Projects
- Working with Location Information Using the Info Inspector
- Chapter 13: Searching for and Displaying Photos
- An Overview of Searching
- Performing Quick Searches Using the Search Field Pop-Up Menu
- About the Filter HUD
- Searching by Rating
- Searching for Flagged Photos
- Searching by Color Label
- Searching by Photo Name, Caption, or Other Text
- Searching by Keyword
- Searching by Adjustments
- Searching by Aperture Metadata
- Searching by Attachment
- Searching by Calendar
- Searching by Date
- Searching by EXIF Information
- Searching by Face
- Searching by File Status
- Searching by File Type
- Searching by Import Session
- Searching by IPTC Information
- Searching by Photo Usage
- Searching by Place
- Searching by a Combination of Criteria
- Searching Across the Entire Library
- Saving Your Search Results
- Chapter 14: Grouping Photos with Smart Albums
- Chapter 15: An Overview of Image Adjustments
- Adjustments in Aperture
- Using the Adjustment Controls
- Performing Adjustments in Full Screen View
- Applying Adjustments to a Group of Images
- Applying the Same Adjustment to an Image Multiple Times
- Working with Effects
- Working with Adjustments Applied in iOS Devices
- Removing Adjustments
- Using Modifier Keys to Identify Color Clipping
- Using the Color Meter and Displaying Camera Information
- Using an External Editor
- Working with the RAW Fine Tuning Controls
- Working with iPhoto Effects
- Understanding How to Read Histograms
- About Making Adjustments Onscreen
- Chapter 16: Making Image Adjustments
- Working with the Auto Enhance Button
- Working with the Retouch Controls
- Working with the Red Eye Correction Controls
- Working with the Spot & Patch Controls
- An Overview of the Spot & Patch Adjustment
- Spotting Your Images
- Patching Your Images
- Adjusting the Size of Spot & Patch Target Overlays
- Adjusting the Softness Within Spot & Patch Target Overlays
- Adjusting the Opacity Within Spot & Patch Target Overlays
- Adjusting the Detail Within Spot & Patch Target Overlays
- Viewing the Corrected Image Without Spot & Patch Target Overlays
- Moving Spot & Patch Target Overlays
- Deleting Spot & Patch Target Overlays
- Working with the Straighten Controls
- Working with the Crop Controls
- Working with the Flip Controls
- Working with the Chromatic Aberration Controls
- Working with the Devignette Controls
- Working with the Noise Reduction Controls
- Working with the White Balance Controls
- Working with the Exposure Controls
- Working with the Enhance Controls
- An Overview of the Enhance Adjustment
- Adjusting Contrast in the Image
- Adjusting Definition in the Image
- Adjusting Saturation in the Image
- Adjusting Vibrancy in the Image
- Setting the Tint of Black, Gray, and White Values in the Image
- Using the Eyedroppers to Set the Tint in an Image
- Manually Setting the Tint in an Image
- Working with the Curves Controls
- An Overview of the Curves Adjustment
- Curves Adjustment Controls
- Working with the Auto Curves Buttons
- Adjusting the Tonal Curve of an Image Using the Curves Controls
- Using Eyedropper Tools to Set Black, Gray, and White Points
- Using the Curves Controls for Color Correction
- Adjusting the Tonal Curve of the Red Color Channel
- Adjusting the Tonal Curve of the Green Color Channel
- Adjusting the Tonal Curve of the Blue Color Channel
- Working with the Highlights & Shadows Controls
- Working with the Levels Controls
- An Overview of the Levels Adjustment
- Automatically Adjusting Luminance
- Automatically Adjusting RGB Channels
- Setting the Auto Levels Options
- Adjusting the Luminance Levels in an Image
- Showing Quarter-Tone Levels Controls
- Adjusting the Brightness of an Image
- Using Levels for Color Correction
- Adjusting the Levels of the Red Color Channel
- Adjusting the Levels of the Green Color Channel
- Adjusting the Levels of the Blue Color Channel
- Working with the Color Controls
- Working with the Black & White Controls
- Working with the Color Monochrome Controls
- Working with the Sepia Tone Controls
- Working with the Sharpen and Edge Sharpen Controls
- Working with the Vignette Controls
- Chapter 17: Making Brushed Adjustments
- An Overview of Brushed Adjustments
- Using Brushed Adjustment Controls
- Working with the Skin Smoothing Quick Brush Controls
- Working with the Dodge Quick Brush Controls
- Working with the Burn Quick Brush Controls
- Working with the Polarize Quick Brush Controls
- Working with the Intensify Contrast Quick Brush Controls
- Working with the Tint Quick Brush Controls
- Working with the Contrast Quick Brush Controls
- Working with the Saturation Quick Brush Controls
- Working with the Definition Quick Brush Controls
- Working with the Vibrancy Quick Brush Controls
- Working with the Blur Quick Brush Controls
- Working with the Sharpen Quick Brush Controls
- Working with the Halo Reduction Quick Brush Controls
- Working with the Noise Reduction Quick Brush Controls
- Chapter 18: Printing Your Photos
- Chapter 19: Exporting Your Photos
- An Overview of Exporting Photos
- Exporting Copies of Originals
- Exporting Photo Versions
- Exporting Audio and Video Versions
- Exporting Projects, Folders, and Albums
- Working with Export Presets
- Exporting Photos into Folders in the Finder
- Renaming Photos at Export
- Exporting Metadata in a Separate File
- Exporting Using Plug-ins
- Exporting by Dragging
- Chapter 20: Creating Slideshow Presentations
- An Overview of Slideshows
- Playing Slideshows Using Slideshow Presets
- Workflow for Creating a Multimedia Slideshow Presentation
- Creating Slideshow Albums
- Changing a Slideshow’s Theme
- About Editing Slideshow Transitions and Applying Effects
- Modifying Settings Applied to the Entire Slideshow
- An Overview of Modifying the Entire Slideshow
- Setting the Aspect Ratio for the Slideshow
- Looping the Slideshow and the Main Audio Track
- Applying a Title to the Slideshow
- Setting the Length of Time Slides Play
- Choosing a Background Color for the Slideshow
- Adding Borders Uniformly to Slides
- Fitting the Slides to the Aspect Ratio
- Adding Transitions Uniformly Between Slides
- Adding Text to Slides
- Modifying Individual Slides and Transitions
- An Overview of Modifying Individual Slides and Transitions
- Working with Video Slides
- Applying a Photo Effect to Individual Slides
- Modifying the Display Time for Individual Slides
- Changing the Background Color for Individual Slides
- Adding Image Borders to Individual Slides
- Setting the Crop for Individual Slides
- Applying a Ken Burns Effect to Individual Slides
- Modifying Individual Transitions Between Slides
- Adding Text to an Individual Slide
- Adding Music and Audio to Slideshows
- An Overview of Adding Music and Audio to Slideshows
- Adding Audio Clips to Your Slideshow
- Working with Audio Clips in the Secondary Audio Track
- Adjusting the Volume Between the Main Audio Track and Secondary Audio Track
- Syncing the Main Audio Track to the Slides in the Slideshow
- Removing Audio Clips from Your Slideshow
- Viewing Your Slideshows in Aperture
- Sharing Your Slideshow Movies
- Chapter 21: Creating Webpages
- Chapter 22: Using the Light Table
- Chapter 23: Creating Books
- An Overview of Creating Books
- Planning Your Book
- Creating a Book Album
- Choosing a Theme
- Viewing Pages
- Placing Photos in a Book
- Adding and Removing Pages
- Working with Pages
- Working with Photos
- Adding Photo Boxes to a Book Page
- Changing How a Photo Fills a Photo Box
- Changing the Aspect Ratio of a Photo Box
- Arranging Photos on the Page
- Copying, Pasting, Cutting, and Removing Photos from Photo Boxes
- Stacking Photo Boxes in a Specific Order
- Removing Photo Boxes
- Changing the Look of Photos with Filters
- Adding Map Boxes to a Book Page
- Working with Text
- Working with the Layout Options Inspector
- Working with Master Pages
- Creating and Sharing Custom Themes
- Copying a Book Album
- Ordering Books from Third-Party Print Vendors Using Plug-ins
- Chapter 24: Sharing Your Photos Online
- An Overview of Sharing Your Photos Online
- Using My Photo Stream
- An Overview of My Photo Stream
- Setting Up Your iCloud Account
- Turning On My Photo Stream for an Aperture Library
- Automatically Transferring Photos Between Aperture and Your Photo Stream
- Manually Transferring Photos Between Aperture and Your Photo Stream
- About Turning On My Photo Stream on More Than One Mac
- About Uploading RAW Files to Your Photo Stream
- Sharing Photo Streams
- Emailing Photos
- Publishing Photos to Flickr and Facebook
- An Overview of Sharing Photos with Flickr and Facebook
- Signing In to Flickr and Facebook
- Creating Flickr and Facebook Albums
- Viewing Flickr and Facebook Albums
- Updating Your Flickr and Facebook Albums
- Deleting Flickr and Facebook Albums
- Changing Your Facebook Settings
- Working with Multiple Flickr and Facebook Accounts
- Disabling and Enabling Flickr and Facebook Accounts
- Chapter 25: Backing Up Your Photos
- An Overview of the Backup Workflow
- Planning Your Backup System
- Showing the Vault Pane
- Creating Vaults
- Updating Vaults
- Disconnecting a Vault’s Hard Disk Drive from Your System Temporarily
- Reconnecting a Vault’s Hard Disk Drive to Your System
- Deleting a Vault Permanently
- Restoring Your Aperture System
- Repairing and Rebuilding Your Aperture Library
- Chapter 26: Customizing the Aperture Workspace
- Glossary

Aperture 3.4
User Guide
KApple Inc.
© 2012 Apple Inc. All rights reserved.
Your rights to the software are governed by the accompanying
software license agreement. The owner or authorized user of a
valid copy of Aperture software may reproduce this publication
for the purpose of learning to use such software. No part
of this publication may be reproduced or transmitted for
commercial purposes, such as selling copies of this publication
or for providing paid for support services.
The Apple logo is a trademark of Apple Inc., registered in
the U.S. and other countries. Use of the “keyboard” Apple
logo (Shift-Option-K) for commercial purposes without the
prior written consent of Apple may constitute trademark
infringement and unfair competition in violation of federal and
state laws.
Every eort has been made to ensure that the information in
this manual is accurate. Apple is not responsible for printing
and clerical errors.
Apple
1 Innite Loop
Cupertino, CA 95014
408-996-1010
www.apple.com
Apple, the Apple logo, Aperture, AppleScript, Apple TV,
ColorSync, Finder, FireWire, GarageBand, iLife, iPad, iPhone,
iPhoto, iPod, iTunes, iWork, Keychain, Mac, Mac OS, OS X,
QuickTime, and Safari are trademarks of Apple Inc., registered
in the U.S. and other countries.
Multi-Touch is a trademark of Apple Inc.
iCloud is a service mark of Apple Inc., registered in the U.S. and
other countries.
Adobe and Photoshop are trademarks or registered
trademarks of Adobe Systems Incorporated in the U.S. and/or
other countries.
IOS is a trademark or registered trademark of Cisco in the U.S.
and other countries and is used under license.
UNIX is a registered trademark of The Open Group.
The YouTube logo is a trademark of Google Inc.
Other company and product names mentioned herein
are trademarks of their respective companies. Mention of
third-party products is for informational purposes only and
constitutes neither an endorsement nor a recommendation.
Apple assumes no responsibility with regard to the
performance or use of these products.
019-2507
Contents
17 Chapter 1: Aperture Basics
17 What Is Aperture?
18 Aperture Workow Overview
20 Aperture Interface Overview
24 Basic Components of Aperture
24 An Overview of the Basic Components of Aperture
24 What Are Originals?
24 What Are Versions?
25 What Are Projects?
26 What Are Albums?
27 What Are Folders?
27 What Is the Library?
28 What Are Managed Images and Referenced Images?
29 What Is the Aperture Trash?
29 What Is a Vault?
29 Opening Aperture for the First Time
31 Chapter 2: Working with the Aperture Library
31 Organizing Items in the Library Inspector
31 An Overview of the Library Inspector
33 Using More Than One Album in a Project
33 Creating and Naming Projects
34 Opening and Closing Items in the Library Inspector
36 Arranging Items in the Library Inspector
37 Creating and Showing Favorite Items
37 Duplicating a Project Structure
38 Merging Projects
38 Working with the Aperture Trash
39 Working with Library Files
39 An Overview of Library Files
39 Creating New Libraries
40 Viewing Other Libraries
41 Merging Libraries
43 Opening Your Library in iPhoto
43 Working in Projects View
43 Switching to Projects View
43 Previewing the Photos in a Project in Projects View
43 Creating and Deleting Projects in Projects View
44 Importing Files into a Project in Projects View
44 Merging Projects and Libraries into Projects in Projects View
44 Setting the Key Photo for a Project
45 Emptying the Aperture Trash in Projects View
3
45 Playing a Slideshow of a Project’s Photos
45 Organizing Projects in Projects View
48 Working with the Info HUD in Projects View
50 Chapter 3: Importing Photos
50 An Overview of Importing Photos
51 File Formats You Can Import into the Library
52 Planning Your Import Strategy
53 Importing from Your Digital Camera or Card Reader
57 Importing Files Stored on Your Computer or Connected Servers
60 Adding Import Options
60 An Overview of Import Options
60 Viewing File Information
60 Automatically Naming Your Imported Photos
62 Applying Valid Filenames
62 Creating Custom Name Formats
64 Automatically Backing Up Your Imported Files
64 Adjusting the Image File’s Time When Importing
65 Adding Metadata to Photos During Import
66 Applying Eects to Photos During Import
66 Filtering Files by Type During Import
67 Importing RAW + JPEG Image Pairs
68 Using AppleScript Actions Immediately After Import
68 Resetting Your Import Settings
69 Importing Files from the Finder via Drag and Drop
69 Capturing Photos as You Work
70 Importing Folders of Files from the Finder
72 Importing Originals for Referenced Images into Folders
74 Where Aperture Stores Your Managed Files in the Library
74 Adding Audio Attachments to Image Files
76 Reprocessing Photos from Previous Versions of Aperture
76 An Overview of Reprocessing Photos
76 Strategies for Reprocessing Photos
76 Reprocessing a Photo Selection
78 Reprocessing Photos Individually
79 Chapter 4: Working with Photos in the Browser
79 An Overview of the Browser
81 Navigating Through and Selecting Photos
81 Navigating Through Photos in the Browser
82 Selecting Photos
83 Navigating Through Photos in Quick Preview Mode
84 Working with Browser Views
84 Working with Photos in Filmstrip View
85 Working with Photos in Grid View
86 Working with Photos in List View
88 Choosing a Workspace View
89 Working with Two or More Browsers Open
89 Viewing Photos with the Loupe
89 An Overview of the Loupe
90 Moving the Loupe
Contents 4
90 Using the Pointer to Magnify Parts of a Photo
91 Changing the Size and Magnication of the Loupe
92 Displaying a Pixel Grid and Color Values
93 Using the Alternate Loupe
94 Searching for Photos in the Browser
95 Rearranging and Sorting Photos in the Browser
96 Rotating Photos
97 Creating Versions of a Photo
97 Deleting Photos from the Browser
98 Dragging Photos into Dierent Projects and Albums
99 Renaming Original Image Files
99 Working with Referenced Images
99 An Overview of Referenced Images
100 Identifying Referenced Images
100 Displaying a List of Referenced Images
101 Locating a Referenced Image’s Original on a Hard Disk
102 Reconnecting Missing or Oine Referenced Images
103 Relocating Referenced Originals
103 Moving Referenced Originals to the Aperture Library
103 Searching for Referenced Images Using the Filter HUD
104 Working with Stacks in the Browser
105 Displaying Specic Metadata with Your Photos
107 Chapter 5: Displaying Photos in the Viewer
107 An Overview of the Viewer
109 Customizing the Viewer Display
110 Comparing Photos
111 Viewing Stacks
111 Viewing Photos at Full Resolution
112 Viewing Original Photos
112 Working with Audio and Video in the Viewer
115 Displaying Metadata Associated with Photos
116 Viewing Photos on Multiple Displays
116 Showing Hot and Cold Areas in Your Photos
117 Setting Up the Viewer for Onscreen Proong
118 Working with Preview Images
118 An Overview of Preview Images
119 Setting Preview Preferences
119 Controlling Previews with the Library Action Pop-Up Menu
119 Controlling Previews with Shortcut Menus
120 Rescheduling JPEG Preview Maintenance
120 Rendering Preview Images
121 Determining Which Versions Have Previews
121 Integration with iLife and iWork
122 Displaying Oine Referenced Images
122 Suppressing Preview Generation
123 Sample Workows for Using Previews Eectively
125 Chapter 6: Viewing Photos in Full Screen View
125 An Overview of Full Screen View
127 Entering and Exiting Full Screen View
Contents 5
127 Working in Viewer Mode in Full Screen View
130 Working in Browser Mode in Full Screen View
131 Working in Projects Mode in Full Screen View
132 Using HUDs in Full Screen View
134 Changing the Display of Metadata in Full Screen View
135 Chapter 7: Stacking Photos and Making Picks
135 An Overview of Stacking Photos
136 Creating Stacks
138 Working with Stacks
138 Opening and Closing Stacks
138 Designating a Pick Photo for a Stack
139 Designating an Album Pick for a Stack
139 Arranging Photos in a Stack
139 Adding Photos to and Removing Photos from Stacks
140 Splitting Stacks
141 Dragging Stacks
141 Comparing Photos in Stacks
142 Working with Stacks in List View
143 Chapter 8: Rating Photos
143 An Overview of the Aperture Rating System
145 Rating Individual Photos
146 Rating Multiple Photos
146 Sorting Photos by Rating
148 Including Photo Rating in Your Workow
149 Comparing and Rating Photos
152 Chapter 9: Applying Keywords to Photos
152 An Overview of Keywords
154 Displaying Keywords in the Viewer and Browser
155 Viewing a Photo’s Keywords Using the Info Inspector
156 Viewing Keywords in the Browser in List View
157 Applying Keywords Using the Keywords HUD
157 An Overview of the Keywords HUD
157 Using the Keywords HUD to Apply Keywords
159 Browsing and Searching for Keywords
159 Adding Keywords to the Keywords HUD
161 Removing Keywords from the Keywords HUD
162 Modifying Existing Keywords in the Keywords HUD
162 Applying Keywords Using Keyword Controls and Keyword Presets
162 An Overview of the Keyword Controls in the Control Bar
163 Choosing a Keyword Preset Group
163 Adding Preset Keywords to Photos Using Keyword Controls
165 Creating a Keyword Preset Group
167 Applying Keywords Using the Lift & Stamp HUD
169 Applying Keywords Using the Info Inspector
170 Applying Keywords to Photos in the Light Table
171 Removing Keywords from a Photo
171 Exporting and Importing Keyword Lists
Contents 6
172 Chapter 10: Working with Metadata
172 An Overview of Working with Metadata
175 Showing the Info Inspector
176 Displaying Metadata with Your Photos
176 An Overview of Metadata Overlays
178 Turning the Display of Metadata On or O
179 Specifying the Type of Metadata to Display in the Viewer and Browser
183 Viewing and Changing Metadata in the Info Inspector and Inspector HUD
187 Working with the AutoFill Editor
187 Working with Metadata Views
187 An Overview of Metadata Views
189 Creating New Metadata Views
190 Modifying Existing Metadata Views
190 Managing Metadata Views
191 Working with Metadata Presets
191 Creating Metadata Presets
192 Applying Combinations of Metadata Using Metadata Presets
193 Managing Metadata Presets
194 Batch Changing Metadata
195 About IPTC Metadata
196 Understanding Badge Overlays
196 Working with Badge Overlays
197 Displaying Photos with Badge Overlays
198 Adjusting the Photo Date and Time
199 Chapter 11: Organizing Photos with Faces
199 An Overview of Faces
201 Adding Names to Faces in Your Photos
203 Viewing Photos in Faces View
206 Searching for Photos by Face
207 Creating Smart Albums with Photos of People
208 Chapter 12: Locating and Organizing Photos with Places
208 An Overview of Places
211 Viewing Photo Locations
216 Changing the Map View
217 Adding Locations to Photos
220 Changing Photo Locations
221 Searching for Locations
222 Removing Locations
222 Importing and Working with GPS Track File Data
223 Assigning Location Information to Projects
225 Working with Location Information Using the Info Inspector
229 Chapter 13: Searching for and Displaying Photos
229 An Overview of Searching
229 Performing Quick Searches Using the Search Field Pop-Up Menu
231 About the Filter HUD
235 Searching by Rating
236 Searching for Flagged Photos
236 Searching by Color Label
Contents 7
237 Searching by Photo Name, Caption, or Other Text
239 Searching by Keyword
240 Searching by Adjustments
241 Searching by Aperture Metadata
242 Searching by Attachment
242 Searching by Calendar
243 Searching by Date
244 Searching by EXIF Information
245 Searching by Face
246 Searching by File Status
247 Searching by File Type
248 Searching by Import Session
249 Searching by IPTC Information
250 Searching by Photo Usage
251 Searching by Place
252 Searching by a Combination of Criteria
253 Searching Across the Entire Library
253 Saving Your Search Results
255 Chapter 14: Grouping Photos with Smart Albums
255 An Overview of Smart Albums
257 Collecting Photos in a New Smart Album
259 Searching Within a Smart Album
259 Revising the Contents of a Smart Album
260 Transferring Smart Album Photos to Another Project or Album
260 Deleting a Smart Album
261 Working with Library Albums
262 Chapter 15: An Overview of Image Adjustments
262 Adjustments in Aperture
265 Using the Adjustment Controls
265 Using the Adjustments inspector and Inspector HUD
268 Using Sliders
269 Working with Adjustment Tools in the Tool Strip
269 Using the Brush Controls
270 Resetting and Turning O Adjustments
271 Accessing Adjustment Controls from Aperture Editors
271 Performing Adjustments in Full Screen View
272 Applying Adjustments to a Group of Images
274 Applying the Same Adjustment to an Image Multiple Times
274 Working with Eects
274 An Overview of Eects
275 Creating Eects
276 Applying Eects
277 Removing Adjustments from an Eect
278 Renaming Eects
279 Organizing Eects
281 Deleting Eects
281 Sharing Eects
282 Restoring the Default Eects
282 Working with Adjustments Applied in iOS Devices
Contents 8
282 Removing Adjustments
283 Using Modier Keys to Identify Color Clipping
283 Identifying Color Channel Clipping
284 Setting Color Channel Clipping Overlay Colors
284 Color Overlay Descriptions
285 Monochrome Overlay Descriptions
286 Using the Color Meter and Displaying Camera Information
288 Using an External Editor
289 Working with the RAW Fine Tuning Controls
289 An Overview of the RAW Fine Tuning Controls
290 Using the Boost Controls
291 Using the Sharpening Controls
292 Using the Moire Controls
293 Working with DNG Files
294 Setting the Camera Default
295 Working with iPhoto Eects
295 Understanding How to Read Histograms
295 An Overview of Histograms
296 Evaluating Exposure
297 Evaluating Tonality and Contrast
298 About Making Adjustments Onscreen
299 Chapter 16: Making Image Adjustments
299 Working with the Auto Enhance Button
300 Working with the Retouch Controls
300 An Overview of the Retouch Adjustment Controls
301 Repairing Your Images
302 Cloning Your Images
303 Deleting Retouch Brush Strokes
304 Working with the Red Eye Correction Controls
304 An Overview of the Red Eye Adjustment
304 Reducing Red-Eye Using the Red Eye Tool
305 Adjusting the Size of Red Eye Target Overlays
307 Adjusting the Sensitivity of Red Eye Target Overlays
308 Viewing the Corrected Image Without Red Eye Target Overlays
308 Moving Red Eye Target Overlays
309 Deleting Red Eye Target Overlays
309 Working with the Spot & Patch Controls
309 An Overview of the Spot & Patch Adjustment
310 Spotting Your Images
311 Patching Your Images
314 Adjusting the Size of Spot & Patch Target Overlays
315 Adjusting the Softness Within Spot & Patch Target Overlays
316 Adjusting the Opacity Within Spot & Patch Target Overlays
317 Adjusting the Detail Within Spot & Patch Target Overlays
317 Viewing the Corrected Image Without Spot & Patch Target Overlays
318 Moving Spot & Patch Target Overlays
318 Deleting Spot & Patch Target Overlays
319 Working with the Straighten Controls
319 An Overview of the Straighten Adjustment
319 Rotating Images with the Straighten Tool
Contents 9
320 Rotating Images with the Straighten Controls
321 Working with the Crop Controls
321 An Overview of the Crop Adjustment
321 Cropping Images with the Crop Tool
324 Cropping Images with the Crop Controls
325 Working with the Flip Controls
326 Working with the Chromatic Aberration Controls
327 Working with the Devignette Controls
329 Working with the Noise Reduction Controls
330 Working with the White Balance Controls
330 An Overview of the White Balance Adjustment
331 Adjusting White Balance Automatically
333 Adjusting White Balance Manually
335 Working with the Exposure Controls
335 An Overview of the Exposure Adjustment
335 Using the Auto Exposure Button
336 Correcting Exposure in the Image
337 Recovering Highlight Details in the Image
338 Setting the Image’s Blacks
339 Adjusting Brightness in the Image
340 Working with the Enhance Controls
340 An Overview of the Enhance Adjustment
340 Adjusting Contrast in the Image
341 Adjusting Denition in the Image
342 Adjusting Saturation in the Image
343 Adjusting Vibrancy in the Image
344 Setting the Tint of Black, Gray, and White Values in the Image
344 Using the Eyedroppers to Set the Tint in an Image
349 Manually Setting the Tint in an Image
350 Working with the Curves Controls
350 An Overview of the Curves Adjustment
350 Curves Adjustment Controls
351 Working with the Auto Curves Buttons
353 Adjusting the Tonal Curve of an Image Using the Curves Controls
357 Using Eyedropper Tools to Set Black, Gray, and White Points
361 Using the Curves Controls for Color Correction
362 Adjusting the Tonal Curve of the Red Color Channel
362 Adjusting the Tonal Curve of the Green Color Channel
363 Adjusting the Tonal Curve of the Blue Color Channel
363 Working with the Highlights & Shadows Controls
363 An Overview of the Highlights & Shadows Adjustment
364 Adjusting Highlights, Shadows, and Midtone Contrast
365 Upgrading Images Previously Adjusted with Highlights & Shadows Adjustment Controls
366 Working with the Original Highlights & Shadows Adjustment Controls
367 Working with the Levels Controls
367 An Overview of the Levels Adjustment
368 Automatically Adjusting Luminance
369 Automatically Adjusting RGB Channels
370 Setting the Auto Levels Options
372 Adjusting the Luminance Levels in an Image
374 Showing Quarter-Tone Levels Controls
Contents 10
374 Adjusting the Brightness of an Image
375 Using Levels for Color Correction
375 Adjusting the Levels of the Red Color Channel
376 Adjusting the Levels of the Green Color Channel
376 Adjusting the Levels of the Blue Color Channel
377 Working with the Color Controls
377 An Overview of the Color Adjustment
377 About Hue, Saturation, and Luminance
378 Adjusting the Color of the Image with the Color Controls
381 Adjusting Custom Colors Using the Color Eyedropper
382 Working with the Black & White Controls
383 Working with the Color Monochrome Controls
384 Working with the Sepia Tone Controls
385 Working with the Sharpen and Edge Sharpen Controls
385 An Overview of the Sharpen and Edge Sharpen Adjustments
385 Working with the Edge Sharpen Controls
387 Understanding the Edge Sharpen Workow
388 Working with the Sharpen Controls
389 Working with the Vignette Controls
392 Chapter 17: Making Brushed Adjustments
392 An Overview of Brushed Adjustments
395 Using Brushed Adjustment Controls
395 Working with Controls in the Brush HUD
396 Applying Brushed Adjustments
399 Applying Quick Brush Adjustments
401 Working with Brush Strokes
404 Working with Brushed Adjustment Overlays
407 Limiting the Tonal Range of Brushed Adjustments
408 Working with the Skin Smoothing Quick Brush Controls
409 Working with the Dodge Quick Brush Controls
410 Working with the Burn Quick Brush Controls
411 Working with the Polarize Quick Brush Controls
412 Working with the Intensify Contrast Quick Brush Controls
413 Working with the Tint Quick Brush Controls
414 Working with the Contrast Quick Brush Controls
415 Working with the Saturation Quick Brush Controls
416 Working with the Denition Quick Brush Controls
418 Working with the Vibrancy Quick Brush Controls
419 Working with the Blur Quick Brush Controls
420 Working with the Sharpen Quick Brush Controls
421 Working with the Halo Reduction Quick Brush Controls
422 Working with the Noise Reduction Quick Brush Controls
423 Chapter 18: Printing Your Photos
423 An Overview of Printing
424 Working with the Print Controls
426 Printing Photos and Contact Sheets in Aperture
426 Printing a Single Photo
428 Printing Multiple Copies of a Photo on a Page
429 Printing a Series of Photos
Contents 11
429 Printing a Contact Sheet or Series of Contact Sheets
430 Manually Adjusting Photo Layout in the Preview Area
432 Printing a Book
433 Printing a Light Table Arrangement
434 Creating and Modifying Print Presets
435 Proong Your Images Onscreen
435 Turning O Color Management in Your Printer
436 Chapter 19: Exporting Your Photos
436 An Overview of Exporting Photos
437 Exporting Copies of Originals
438 Exporting Photo Versions
439 Exporting Audio and Video Versions
441 Exporting Projects, Folders, and Albums
442 Working with Export Presets
442 Viewing the Settings for an Export Preset
442 Creating an Export Preset
443 Modifying an Export Preset
443 Deleting an Export Preset
444 Setting Image Resolution When Exporting
446 Adjusting Images at Export
447 Adding a Watermark at Export
448 Applying IPTC Metadata and Keywords to Your Photos
448 Exporting Photos into Folders in the Finder
450 Renaming Photos at Export
454 Exporting Metadata in a Separate File
454 Exporting Using Plug-ins
455 Exporting by Dragging
456 Chapter 20: Creating Slideshow Presentations
456 An Overview of Slideshows
457 Playing Slideshows Using Slideshow Presets
457 An Overview of Slideshow Presets
458 Playing a Slideshow Using a Preset
459 Controlling a Slideshow
459 Arranging the Order of a Slideshow’s Photos
460 Controls in the Slideshow Dialog
461 Creating Slideshow Presets
462 Modifying Slideshow Presets
463 Using Slideshow Presets to Play Slideshows with Music
464 Workow for Creating a Multimedia Slideshow Presentation
465 Creating Slideshow Albums
467 Changing a Slideshow’s Theme
468 About Editing Slideshow Transitions and Applying Eects
469 Modifying Settings Applied to the Entire Slideshow
469 An Overview of Modifying the Entire Slideshow
469 Setting the Aspect Ratio for the Slideshow
469 Looping the Slideshow and the Main Audio Track
470 Applying a Title to the Slideshow
471 Setting the Length of Time Slides Play
471 Choosing a Background Color for the Slideshow
Contents 12
471 Adding Borders Uniformly to Slides
472 Fitting the Slides to the Aspect Ratio
473 Adding Transitions Uniformly Between Slides
474 Adding Text to Slides
475 Modifying Individual Slides and Transitions
475 An Overview of Modifying Individual Slides and Transitions
475 Working with Video Slides
476 Applying a Photo Eect to Individual Slides
477 Modifying the Display Time for Individual Slides
478 Changing the Background Color for Individual Slides
478 Adding Image Borders to Individual Slides
479 Setting the Crop for Individual Slides
480 Applying a Ken Burns Eect to Individual Slides
481 Modifying Individual Transitions Between Slides
482 Adding Text to an Individual Slide
483 Adding Music and Audio to Slideshows
483 An Overview of Adding Music and Audio to Slideshows
485 Adding Audio Clips to Your Slideshow
487 Working with Audio Clips in the Secondary Audio Track
488 Adjusting the Volume Between the Main Audio Track and Secondary
Audio Track
490 Syncing the Main Audio Track to the Slides in the Slideshow
490 Removing Audio Clips from Your Slideshow
491 Viewing Your Slideshows in Aperture
492 Sharing Your Slideshow Movies
493 Chapter 21: Creating Webpages
493 An Overview of Creating Webpages
494 Creating Web Galleries and Web Journals
494 Creating Webpage Albums
495 Creating Smart Web Page Albums
496 Creating Web Journal Albums
497 Viewing and Navigating Through Webpages
498 Choosing and Modifying Themes
499 Working with Web Gallery Pages
499 Arranging, Adding, and Deleting Photos in a Web Gallery
499 Changing Text on Web Gallery Pages
499 Hiding or Showing Photo Plate Numbers in Web Galleries
500 Working with Web Journal Pages
500 Adding, Arranging, and Deleting Web Journal Photos and Text
501 Adding Web Journal Pages
501 Choosing a Header Style for a Web Journal Page
501 Deleting Pages from a Web Journal
502 Reordering Pages in a Web Journal
502 Exporting Webpages as HTML Files
503 Working with Web Export Presets
503 Viewing the Settings for a Web Export Preset
504 Creating Web Export Presets
505 Modifying Web Export Presets
505 Deleting Web Export Presets
506 Adding Watermarks to Webpage Photos
Contents 13
507 Chapter 22: Using the Light Table
507 An Overview of the Light Table
508 Creating a Light Table Album
510 Placing and Viewing Photos in the Light Table
511 Moving and Resizing Photos in the Light Table
512 Aligning and Arranging Photos in the Light Table
514 Adjusting the Light Table View
515 Printing Light Table Arrangements
515 Deleting a Light Table Album
516 Chapter 23: Creating Books
516 An Overview of Creating Books
518 Planning Your Book
519 Creating a Book Album
521 Choosing a Theme
522 Viewing Pages
522 Navigating to Book Pages
522 Displaying Single Pages or Spreads
523 Resizing the Page View
523 Placing Photos in a Book
523 Placing Photos Manually
523 Placing Photos Automatically
524 Viewing Photos to Be Placed in a Book
525 Adding and Removing Pages
525 Adding Individual Pages to a Book
526 Automatically Creating New Pages
527 Adding New Pages to Hold a Selection of Photos
528 Adding New Pages Based on a Master Page
529 Adding a Photo Index to a Book
530 Removing Pages from a Book
530 Working with Pages
530 Creating a Cover for Your Book
531 Choosing a Master Page Layout
531 Copying Pages
531 Reordering Pages in a Book
532 Choosing a Background Image
532 Using Page Numbers in a Book
533 Rebuilding a Book
533 Working with Photos
533 Adding Photo Boxes to a Book Page
533 Changing How a Photo Fills a Photo Box
534 Changing the Aspect Ratio of a Photo Box
535 Arranging Photos on the Page
535 Copying, Pasting, Cutting, and Removing Photos from Photo Boxes
536 Stacking Photo Boxes in a Specic Order
536 Removing Photo Boxes
537 Changing the Look of Photos with Filters
537 Adding Map Boxes to a Book Page
541 Working with Text
541 Placing Text on the Page
542 Adding Text Boxes to a Page
Contents 14
542 Adding Metadata Boxes to a Page
543 Hiding or Showing Photo Plate Numbers in Books
543 Choosing a Text Style
543 Making Font Changes in Books
544 Arranging Text on the Page
544 Changing the Number of Text Columns
544 Removing Text Boxes from a Page
544 Working with the Layout Options Inspector
546 Working with Master Pages
546 An Overview of Master Pages
546 Viewing Master Pages
547 Creating and Modifying Master Pages
548 Unifying and Splitting Master Pages
548 Updating Book Pages with Master Page Changes
549 Creating and Sharing Custom Themes
550 Copying a Book Album
551 Ordering Books from Third-Party Print Vendors Using Plug-ins
552 Chapter 24: Sharing Your Photos Online
552 An Overview of Sharing Your Photos Online
552 Using My Photo Stream
552 An Overview of My Photo Stream
554 Setting Up Your iCloud Account
555 Turning On My Photo Stream for an Aperture Library
556 Automatically Transferring Photos Between Aperture and Your Photo Stream
557 Manually Transferring Photos Between Aperture and Your Photo Stream
557 About Turning On My Photo Stream on More Than One Mac
558 About Uploading RAW Files to Your Photo Stream
559 Sharing Photo Streams
559 An Overview of Shared Photo Streams
559 Turning On Shared Photo Streams in Aperture
560 Creating a Shared Photo Stream
562 Adding, Removing, and Editing Photos in a Shared Photo Stream
563 Managing Subscribers to Your Shared Photo Streams
564 Subscribing to Shared Photo Streams
567 Emailing Photos
568 Publishing Photos to Flickr and Facebook
568 An Overview of Sharing Photos with Flickr and Facebook
569 Signing In to Flickr and Facebook
574 Creating Flickr and Facebook Albums
575 Viewing Flickr and Facebook Albums
576 Updating Your Flickr and Facebook Albums
578 Deleting Flickr and Facebook Albums
578 Changing Your Facebook Settings
579 Working with Multiple Flickr and Facebook Accounts
579 Disabling and Enabling Flickr and Facebook Accounts
581 Chapter 25: Backing Up Your Photos
581 An Overview of the Backup Workow
582 Planning Your Backup System
583 Showing the Vault Pane
Contents 15
583 Creating Vaults
584 Updating Vaults
585 Disconnecting a Vault’s Hard Disk Drive from Your System Temporarily
585 Reconnecting a Vault’s Hard Disk Drive to Your System
586 Deleting a Vault Permanently
586 Restoring Your Aperture System
587 Repairing and Rebuilding Your Aperture Library
588 Chapter 26: Customizing the Aperture Workspace
588 Changing Main Window Layouts
590 Setting Aperture Preferences
590 An Overview of Aperture Preferences
591 Opening Aperture Preferences
591 General Preferences
592 Appearance Preferences
593 Import Preferences
594 Export Preferences
595 Labels Preferences
595 Previews Preferences
596 Photo Stream Preferences
596 Web Preferences
597 Advanced Preferences
598 Customizing the Toolbar
598 Hiding and Showing the Toolbar
598 Customizing Items in the Toolbar
599 Using Gestures with Aperture
601 Customizing Keyboard Shortcuts
601 An Overview of Customizing Keyboard Shortcuts
602 Choosing a Command Set
603 Viewing Keyboard Shortcuts by Group
603 Searching for Commands
604 Filtering the View by Modier Keys
604 Viewing Key and Command Details
605 Assigning Keyboard Shortcuts
606 Importing and Exporting Command Sets
607 Glossary
Contents 16
17
What Is Aperture?
Aperture is a powerful, easy-to-use digital photo management system for organizing, adjusting,
archiving, and presenting high-quality photographic images.
In Aperture, you can:
•Work directly with your iPhoto library without having to import your iPhoto photos.
•Import digital photos, audio les, and HD video les from cameras, card readers, and hard disk
drives in high-quality formats such as JPEG, TIFF, and RAW.
•Edit and adjust digital photos using intuitive image-processing tools for retouching, skin
smoothing, red-eye removal, color balance, exposure correction, and more.
•Work with your photos in RAW format, from capture through adjustment to nal output,
preserving the highest-quality images throughout your workow.
•Store photos, audio les, and video les wherever you want—in the Aperture library, on
multiple hard disks, or on other storage media.
•Work with multiple Aperture libraries, with the ability to switch from library to library without
closing Aperture.
•Catalog and manage thousands of photos and video les using exible organizational tools,
comprehensive metadata support, and powerful search tools that let you nd les instantly in
multiple locations, including hard disks, oine volumes, CDs, and DVDs.
•Export any part of your library, make changes to it on a second Aperture system, and then
merge it back into the library of your primary Aperture system.
•Process your photos nondestructively. Aperture protects your original image les and uses
built-in safeguards to help ensure that you don’t accidentally overwrite or modify originals.
Aperture Basics 1
Chapter 1 Aperture Basics 18
•Automatically back up copies of your image les to designated storage areas, called vaults,
located on external hard disks.
•Print or publish your photos and albums in any of numerous formats and to multiple locations.
Working directly with RAW photos, you can create color-accurate prints, custom contact
sheets, and unique bound books.
•Share your photos electronically, publishing them to Facebook, Flickr, and iCloud Photo
Stream. You can also create slideshow presentations for clients and friends, attach photos to
email, and create webpages to display your photos.
Aperture Workow Overview
The basic process of managing photos in Aperture is described below. You don’t have to do
every step, and you might do other tasks that aren’t listed here.
Using Your iPhoto Library with Aperture
The rst time you open Aperture, the Welcome to Aperture screen invites you to open your
iPhoto library. Aperture opens your iPhoto library, and you can begin working with your
photos instantly. It’s that simple. You can also switch to your iPhoto library by choosing File >
Switch to Library.
Important: Aperture can only open iPhoto libraries upgraded to iPhoto 9.3 or later. To upgrade
your iPhoto library, open it in iPhoto 9.3 or later.
For more information about switching libraries in Aperture, see Viewing Other Libraries on
page 40.
Importing Photos into Aperture
To use Aperture, you rst import your photos. You can import digital photos directly from your
camera or a card reader and from hard disks or other storage devices where you’ve archived
digital les.
Aperture automatically imports any audio attachments associated with your image les,
provided that the image les and and their audio attachments have the same lename. In
addition to importing photos into Aperture, you can also import QuickTime-compatible audio
and video les.
Creating Projects
As you work with Aperture, you create projects to hold your photos. Projects are simliar to events
in iPhoto. A project can hold dozens, hundreds, or even thousands of photos. When you need
to further subdivide and organize photos in a project, you can create albums. As your portfolio
increases and you create more and more projects, you can organize your work into hierarchies of
folders, projects, and albums.
Viewing and Organizing Your Photos
To work with your photos, you select a project in the Library inspector, and the project’s photos
appear in the Browser. You use the Browser to review, organize, and select photos. When you
select a thumbnail image in the Browser, the photo appears in the Viewer. If you want to work
with your photos in detail, you can view them in Full Screen view.
Aperture also provides several tools to help you organize a large portfolio of photos. You can
compare high-resolution photos side by side, group similar photos in stacks, rate photos, identify
people in your photos using Faces, and apply location information to your photos using Places.
You can also apply keywords and other metadata to your photos to make them easier to nd.
Chapter 1 Aperture Basics 19
Adjusting Your Images
You can enhance your photos using a set of powerful, nondestructive adjustments such as Crop,
Straighten, Exposure, White Balance, Levels, Curves, Highlights & Shadows, Vignette, and more. In
addition, you can use brushes to apply or remove adjustments selectively, aecting only certain
parts of an image.
To streamline your workow, you can save adjustment settings as presets (collections of saved
settings) and apply a combination of image adjustments to one or more photos in a single step.
Sharing Your Photos
When it’s time to show your work to others, Aperture provides many options for distributing and
sharing your photos:
•Send your photos to Flickr and Facebook.
•Present your photos in multimedia slideshows.
•Create premium-quality photo books.
•Print high-resolution photos.
•Export your photos in a variety of le formats.
•Email your photos directly from Aperture.
•Publish your photos in web galleries and web journals as HTML that you can upload to a
web server.
•Use Photo Stream to make your photos available on all your devices—including iOS devices,
Mac computers, PCs, and Apple TV—as well as share photos with friends and family members
who have iCloud accounts.
Backing Up Your Work
After you import photos from your camera and erase memory cards in preparation for the next
shoot, Aperture stores a single copy of each photo on your hard disk. It's important to make
backup copies of these photos to safeguard your portfolio. You can set Aperture to back up your
managed images (images that are stored in the Aperture library) and all information associated
with them, such as keywords and image adjustment settings, on vaults located on hard disk
drives. You can also set Aperture to automatically back up your photos during import.
Chapter 1 Aperture Basics 20
Aperture Interface Overview
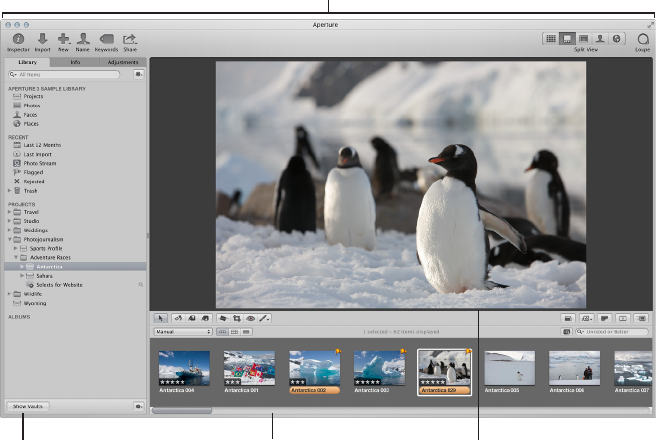
Here are the main areas of the Aperture window:
Toolbar: Perform common tasks
and select a workspace view.
Inspectors: Access the library,
view photo information, and
adjust photos.
Browser: View thumbnails
of photos in the item selected
in the Library inspector.
Viewer: View the photo
or photos selected in
the Browser.
Chapter 1 Aperture Basics 21
Organizing Photos Using the Library Inspector
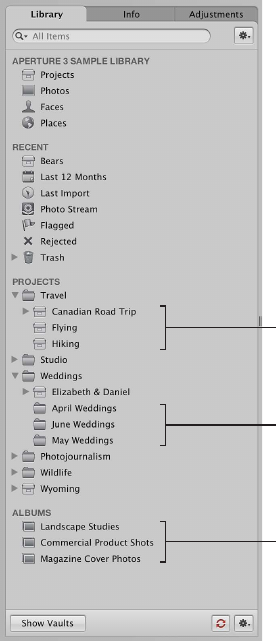
All your imported photos are available in the Library inspector, one of three inspectors in the
Inspector pane on the left side of the Aperture main window. The Library inspector holds
containers—projects, folders, and albums—you can use to organize your photos.
Albums
Folders
Projects
The Library inspector also provides a number of ways to view items in the library. For example,
you can select Projects at the top of the Library inspector to view your photos organized by
project, or Places to view the locations of all the photos in the library. For more information, see
An Overview of the Library Inspector on page 31.
When you select a folder, a project, or an album in the Library inspector, the images appear in
the Browser and Viewer to the right.
Displaying Photos in the Browser and Viewer
You can arrange the Browser and Viewer to suit your work style, showing either one by itself
or both at once. To change the main window layout, click a layout button at the right side of
the toolbar.
Chapter 1 Aperture Basics 22
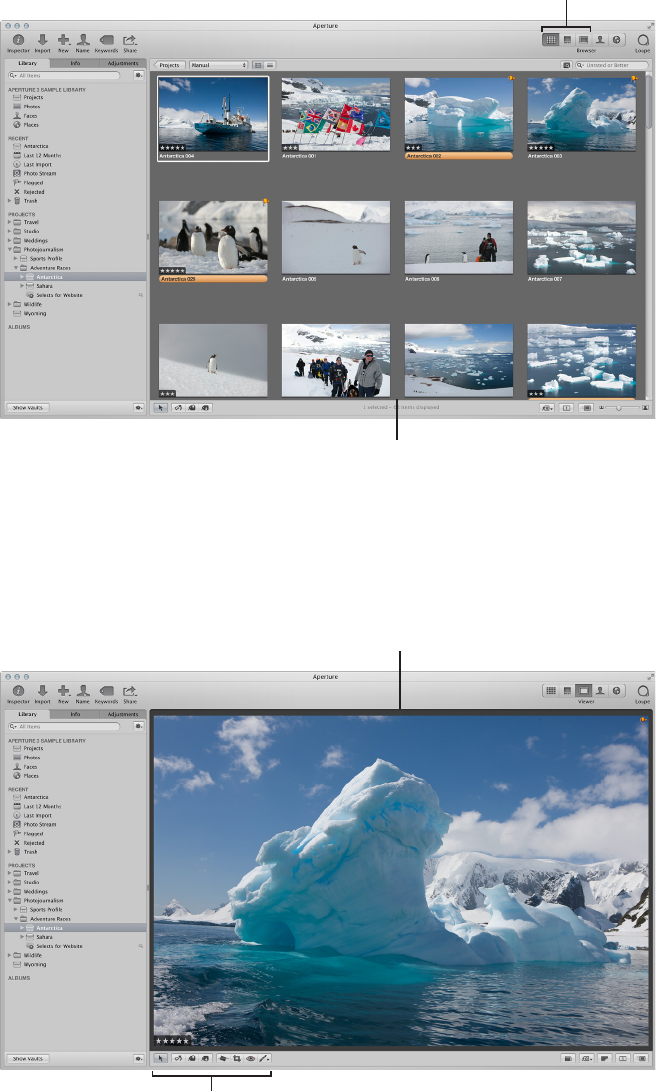
The Browser layout displays a grid of thumbnail images.
Browser layout: The Browser
fills the workspace and displays
a grid of thumbnail images.
Layout buttons: Click
a button to select a
main window layout.
When you double-click a thumbnail image in the Browser (or click the Viewer button in the
toolbar), Aperture switches to the Viewer layout, displaying the selected photo in a larger format.
You can use the Viewer to examine a photo at full size or compare multiple photos side by side.
Viewer layout: The Viewer
fills the workspace and
displays your photo selection.
Tool strip: Use these
tools to adjust and work
with your photos.
You can use the tools in the tool strip below the Viewer to adjust and manipulate your photos.
For more information, see Working with Adjustment Tools in the Tool Strip on page 269.
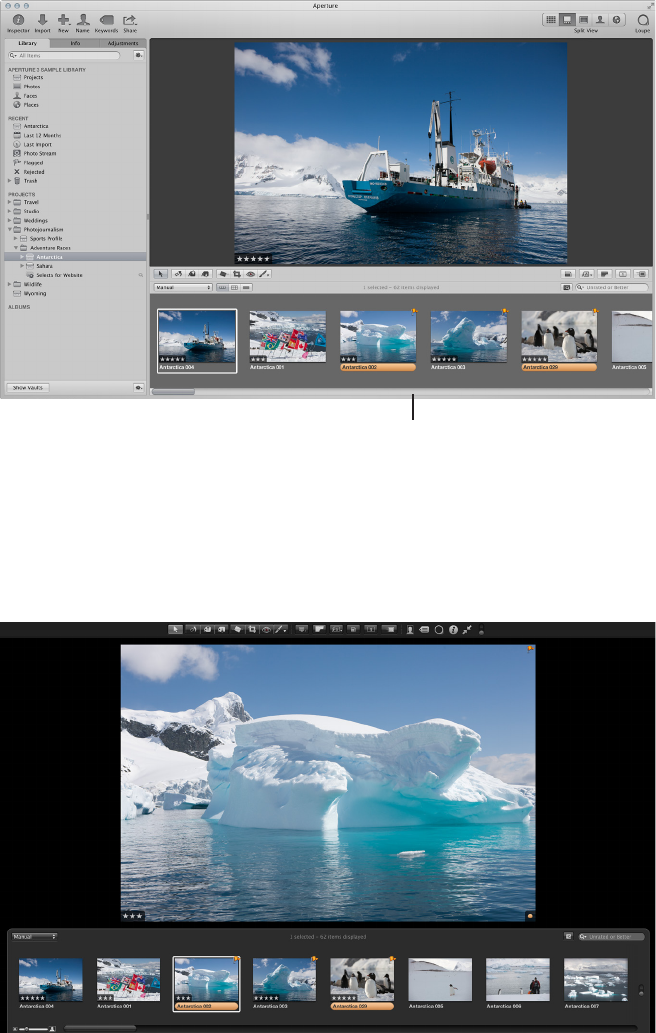
Chapter 1 Aperture Basics 23
To display the Viewer and Browser at the same time, click the Split View button at the right side
of the toolbar.
Split View layout: The Viewer
and Browser appear together.
Displaying Photos in Full Screen View
You can also view your photos in Full Screen view, dramatically projecting them onto a solid
background for detailed adjustments and comparisons. Full Screen view oers dierent display
layouts that let you view large-format versions of selected photos, view thumbnails, or view
photos by project. For more information see An Overview of Full Screen View on page 125.
Chapter 1 Aperture Basics 24
Basic Components of Aperture
An Overview of the Basic Components of Aperture
Aperture uses the following basic components in your photo management system:
•Originals: The original image, video, and audio les imported from your digital camera,
memory card, computer, or external storage media.
•Versions: Files derived from the originals and used to display your photos with any changes
you’ve made, including image adjustments or changes to metadata.
•Projects: The basic containers used in Aperture to organize photos. Projects can hold versions,
folders, and albums.
•Albums: Containers that hold versions. You can create albums to organize photos within
projects or outside of them.
•Folders: Containers used to organize projects and albums.
•Library: The Aperture database that records and tracks your original image, video, and audio
les and all of their corresponding versions. You can also create multiple Aperture library les
in dierent locations. The library tracks all the information about the projects, folders, and
albums you create to organize your media.
•Managed and referenced images: Originals stored in the Aperture library are called managed
images because Aperture manages the location of the image les in its database. Managed
image les are physically located in the Aperture Library le. You can also import photos into
Aperture without storing the original image les in the library. Image les that are not stored
in the library are called referenced images. Aperture links to referenced image les in their
current locations on your hard disk, without placing them in the Aperture Library le.
•Aperture Trash: Container that holds items you delete in Aperture. You can retrieve items from
the Aperture Trash until it is emptied.
•Vaults: Containers that each hold a backup of the library and all its photos and information.
The next sections describe each of these elements and how you work with them in Aperture.
What Are Originals?
Originals are the original digital RAW, GIF, JPEG, TIFF, DNG, PNG, audio, or video les that are
imported into Aperture from digital cameras, memory cards, computers, CDs, DVDs, or storage
devices such as external hard disk drives. Aperture never changes the original, so you always
have originals to work from.
Important: Originals—especially RAW les—tend to be quite large. Projects consisting of several
thousand originals require high-capacity hard disks.
For information about importing originals, see An Overview of Importing Photos on page 50.
What Are Versions?
Once you have originals on your hard disk, you can review and make adjustments to your
images. For example, you can change the exposure, contrast, or saturation, or add information to
an image, such as the photographer’s name, the project, and the location. To work with photos,
Aperture creates a version of each original that includes your adjustments and embedded
information, leaving the original unchanged. A version refers to the original on your hard
disk, but it is not the original itself. Versions store only the thumbnail image, adjustments, and
embedded information. A full image le is not created until you are ready to print or export,
saving valuable hard disk storage.
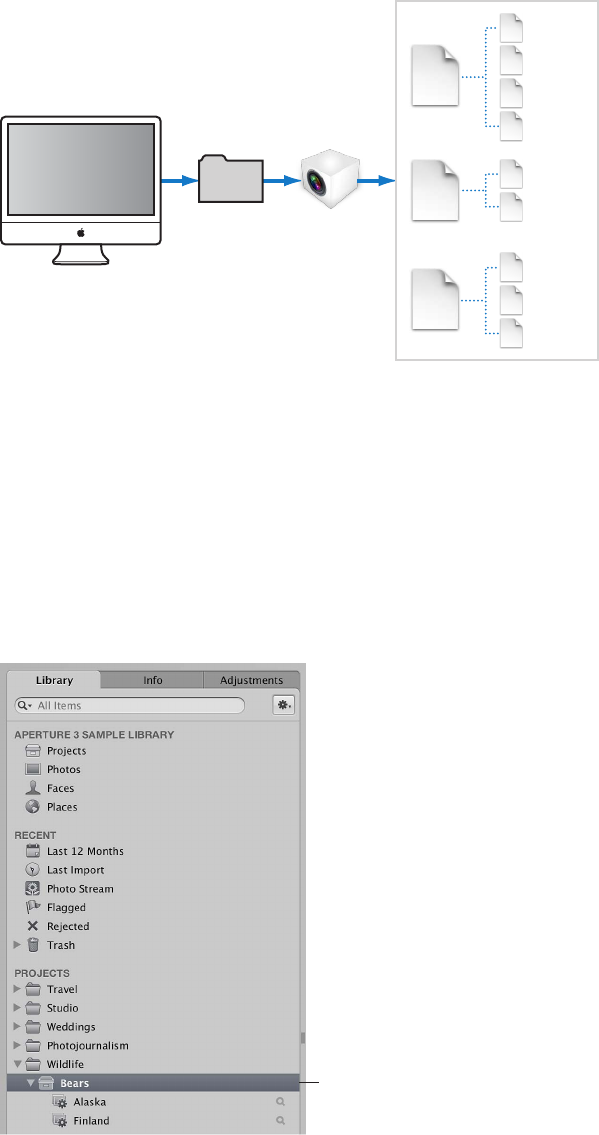
Chapter 1 Aperture Basics 25
In many cases, your workow may call for dierent renderings of the same photo. For example,
a client may request a color as well as a black-and-white version of the same head shot. You can
create multiple versions of the same photo in Aperture.
Versions
from
Original 1
Original
Versions
from
Original 2
Original
Versions
from
Original 3
Original
1A
1B
1C
1D
Aperture
Library file
Pictures
folder
Computer 3A
3C
3B
1
2
3
2A
2B
When you create a version, Aperture reads the original image le on disk and displays it on the
screen. As you make adjustments or add information to the image, Aperture displays the version
with your changes, but the original image le is never changed.
What Are Projects?
You organize your originals and versions using projects which are similar to events in iPhoto.
When you import photos into Aperture, you assign them to a project. You can create as many
projects as you like, up to the limitations of your disk space. For example, you can create a new
project for each of your shoots. Or, if you do several shoots of the same subject, you can create a
project that encompasses all of the shoots.
Project opened
to show its contents
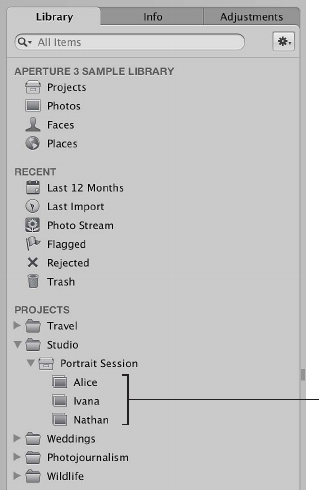
Chapter 1 Aperture Basics 26
You can have multiple projects open at the same time, each represented by its own icon in the
Library inspector and tab in the Browser. For more information, see Working with Two or More
Browsers Open on page 89.
What Are Albums?
An album is a container in the Aperture library used to group photo versions. You use albums
to organize photos in the library, making your selections of versions easier to manage. You can
create albums at the library level or within a project.
You use albums created at the library level to organize versions from multiple projects. For
example, you can create an album to consolidate your favorite photos, or selects, from multiple
projects. You can then publish this collection of selects on your website or export the album’s
contents for review by a prospective client.
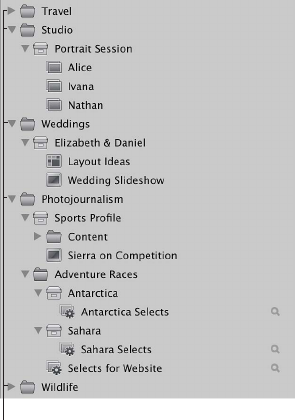
You can also create albums within projects to help you organize your photos into relevant
groups. For example, photos in your Soccer project can be divided into three albums: Game 1,
Game 2, and Game 3.
Three albums created
within one project
You can also place versions from other projects into an album that resides within a project.
In addition to a standard album that you drag photos into, you can create Smart Albums whose
contents are controlled by criteria you specify. When you change a Smart Album’s search criteria,
the contents of the Smart Album change automatically. For more information, see An Overview
of Smart Albums on page 255.
Chapter 1 Aperture Basics 27
What Are Folders?
In Aperture, you use folders to organize projects and albums. For example, you can import
photos into projects and then place the projects in folders based on photo type or location.
If you shoot multiple projects for the same client, you can create a folder that holds the
client’s projects.
These folders organize
projects based on type.
Folders contain only albums, projects, and other folders. They don’t contain originals or versions.
What Is the Library?
The Aperture library tracks every project, album, folder, original, and version, no matter whether
the photos, video les, and audio les are stored in the Aperture Library le or in other hard disk
locations. Aperture automatically creates a library le in the Pictures folder the rst time you
open Aperture. You can import media into the library or have Aperture access the les in other
locations. The library tracks all your image, video, and audio les and the information recorded
about them, as well as information about where backup les are stored.
You can move the library le to a dierent folder or hard disk. You specify where the library is
located using the Preferences window. For information about working with multiple library les
in Aperture, see An Overview of Library Files on page 39.
You can also transfer libraries from other Aperture systems and merge them with the library
on your local Aperture system. All links between versions and their originals are maintained
when projects are transferred. This is particularly useful if you use a portable computer when on
location or away from your studio, and a workstation at your studio. For more information about
merging libraries, see Merging Libraries on page 41.
When you back up your originals to vaults on external hard disks, those actions are tracked
by the Aperture library as well. For more information about backing up your library, see An
Overview of the Backup Workow on page 581.
Chapter 1 Aperture Basics 28
What Are Managed Images and Referenced Images?
Aperture lets you choose how you organize your photos on disk. You can store your photos
in the Aperture library, or you can import photos by simply linking to the image les in their
current locations, without placing them in the library.
Images whose originals are stored in the Aperture library are called managed images. Managed
images are always accessible and are easily backed up to vaults, to name just two benets.
Imported photos whose originals haven’t been placed in the library are called referenced images.
Using referenced images provides a number of substantial benets to your photography
workow. For example, you can incorporate your existing portfolio of photos into Aperture
without changing the current location of the les. Importing images by reference does not result
in a duplication of your image les in the Aperture library, thus saving hard disk space. You can
also connect and disconnect hard disks holding your referenced images’ originals as you need
them. This allows you to keep originals for less-used photos oine or to make specic types of
photos available for editing or adjustments as needed. Using referenced images lets you build a
exible image management system customized to your work style.
You specify whether a photo will be a managed image or a referenced image when you import
it. When importing photos, you can:
•Specify that originals be stored in the Aperture library.
•Import photos as referenced images, so that their originals remain in their current locations.
•Move or copy image les to a new location. For example, you might decide to have a certain
group of referenced image les, such as photos from 2011, placed in one hard disk location,
and another group, such as photos from 2012, placed in a dierent hard disk location.
You can work with referenced images—creating versions, making adjustments, cropping, and
adding metadata—just as you can with managed images. Versions that you create from a
referenced image are stored in the library. In order for you to make adjustments to a version from
a referenced image, the referenced image’s original must be available on your hard disk or other
storage device. For example, if you delete a referenced image’s original in the Finder, Aperture no
longer has access to the original and so no longer allows you to change your versions or create
new ones.
To help you identify referenced images, Aperture marks them with a badge overlay that you
can display or hide. When a referenced image’s original is missing or oine, its badge changes
to show that the image is not accessible. For example, if you disconnect a hard disk that holds
originals for many referenced images, Aperture automatically marks the referenced images
in the Browser and Viewer as oine. If you reconnect the hard disk or other storage device
later, Aperture accesses the originals automatically and you can work with and change their
versions again.
You can also relocate originals, moving them out of the library or moving referenced originals to
dierent hard disk locations. If needed, you can also move referenced originals into the Aperture
library by choosing the Consolidate Originals command in the File menu.
You can search for photos based on whether they are managed images, referenced images, or
online or oine images. Aperture also provides robust le management tools that let you quickly
determine which images are oine and easily reconnect images that have been moved to
dierent volumes.
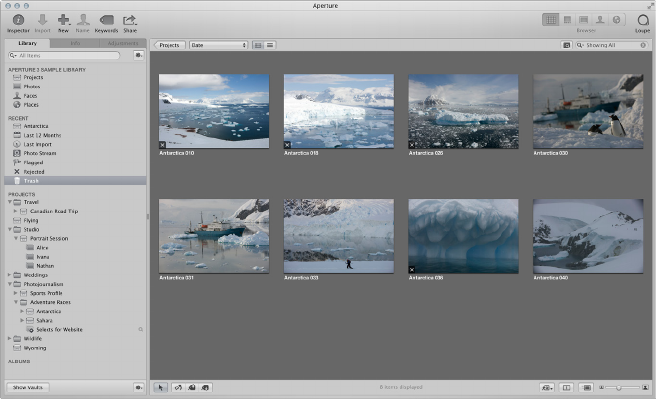
Chapter 1 Aperture Basics 29
What Is the Aperture Trash?
All items deleted in Aperture, including projects, albums, folders, versions, and originals, are
placed in the Aperture Trash in the Library inspector. You can retrieve any item from the Aperture
Trash until you empty it. For more information, see Working with the Aperture Trash on page 38.
What Is a Vault?
To ensure that you have backup copies of your photos, you create a vault to hold the backup
les. A vault is a container that holds an exact copy of the library. This includes projects, originals,
and any versions you’ve created. You can easily create and update a vault to back up the library.
It’s a good idea to create multiple vaults on multiple external hard disk drives to safeguard
copies of the library.
You can have as many vaults as you deem necessary. Creating more than one vault is useful if
you work at dierent locations; you can always keep one vault on an external drive onsite and
another one osite. All vaults and backup les are tracked by the library so that even if you
disconnect the external hard drive that contains a vault, Aperture can access it the next time you
reconnect the drive and update the vault.
All the originals and versions for managed images are backed up, as well as all metadata,
previews, and adjustment information associated with managed images. The versions, previews,
metadata, and adjustment information associated with referenced originals are also backed up in
the vault. Referenced originals are not backed up in the vault with the library.
Important: Because the originals for referenced images are stored outside of the library, you
must manage the backup and archiving of them yourself.
Opening Aperture for the First Time
The rst time you open Aperture, a Welcome to Aperture screen presents you with two options,
provided you have an iPhoto library:
•Update and begin using your existing iPhoto library.
•Start with a new, empty Aperture library and begin importing photos.
Important: Aperture can only open iPhoto libraries upgraded to iPhoto 9.3 or later. To upgrade
your iPhoto library, open it in iPhoto 9.3 or later.
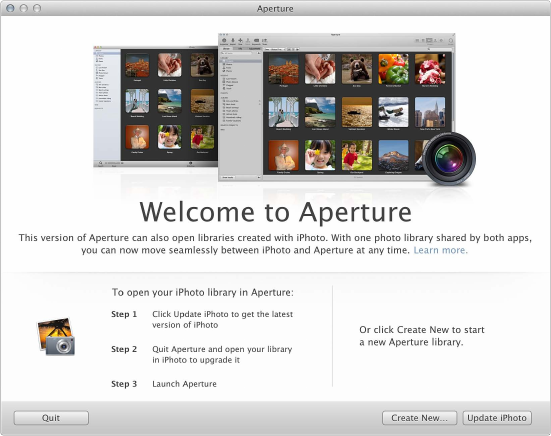
Chapter 1 Aperture Basics 30
To open Aperture for the rst time
1 In the Applications folder in the Finder, double-click the Aperture icon.
The Welcome to Aperture screen appears.
2 Do one of the following:
•To update your iPhoto library and begin working with it in Aperture: Click the Update
iPhoto button.
After iPhoto is updated to version 9.3, open your iPhoto library so that it is upgraded
to version 9.3 as well. When the upgrade is complete, close iPhoto and open Aperture.
The contents of your iPhoto library appear in the Library inspector in Aperture. For more
information, see An Overview of the Library Inspector on page 31.
•To open a new, empty Aperture library: Click the Create New button.
Aperture opens a new, empty Aperture library, and you can begin importing photos
immediately. For more information, see An Overview of Importing Photos on page 50.
Tip: To set Aperture to use the keyboard shortcuts you're familiar with using in iPhoto, choose
Aperture > Commands > iPhoto. For more information, see An Overview of Customizing
Keyboard Shortcuts on page 601.
31
Organizing Items in the Library Inspector
An Overview of the Library Inspector
The Library inspector provides access to items tracked by the Aperture library, such as projects
and albums, and dierent views of the contents of the library. For example, you can select Faces
in the Library inspector to view your photos grouped by the people in them, or Places to view
your photos grouped by where they were taken.
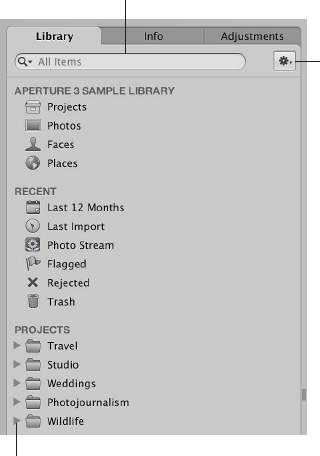
There are several controls you use to work with items in the Library inspector.
Disclosure triangle
Library Action
pop-up menu
Library search field
•Library search eld: Enter text to search for items located in the Library inspector.
•Disclosure triangle: Click to see all items within a project, a folder, or the Trash.
•Library Action pop-up menu: Add the selected item to a list of favorites or remove it from the
favorites list. You can also choose to export items selected in the Library inspector or maintain
previews. For more information about previews, see An Overview of Preview Images on
page 118 .
Working with the Aperture Library 2

Chapter 2 Working with the Aperture Library 32
You can select items at the top of the Library inspector to view the contents of your library
organized in dierent ways.
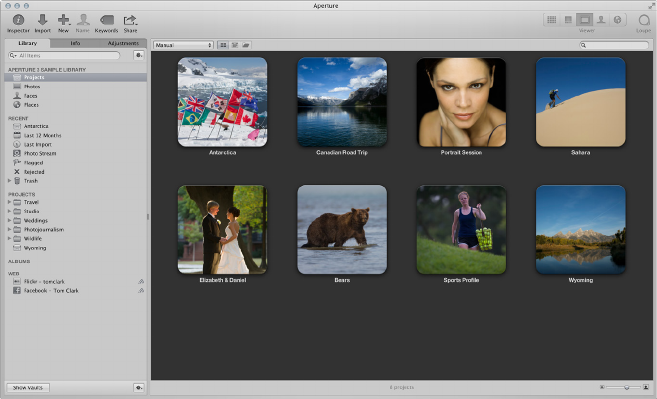
•Projects: Select this item to have all the projects in the library appear in Projects view in place
of the Browser and Viewer. Each project is represented by a single thumbnail. You can position
the pointer over a project thumbnail and drag to quickly skim the photos in the project. When
you hold down the Control key and click a project’s thumbnail, a shortcut menu appears
that allows you to create a new project, display information about the project, delete the
project, import les into the project, export the project as a library, set the currently displayed
image as the key photo that represents the project, empty the Aperture Trash, or play each
photo in the project in a slideshow. Double-click the project’s thumbnail to see the photos in
the Browser.
For more information about Projects view, see Switching to Projects View on page 43.
•Photos: Select this item to see all photos, video clips, and audio clips in the library. All media in
the library is displayed in the Browser as thumbnails. Select a thumbnail in the Browser to view
it or listen to it in the Viewer.
•Faces: Select this item to view people identied in photos and tracked by Aperture in the
library. Click the Info button on a snapshot to show the Info HUD. The Info HUD provides the
name of the person, how many photos in the library contain the person, when the photos
were shot, and the person’s full name and email address (if you entered them). Click the View
Photos button in the HUD to view all the photos the person appears in and any photos the
person might appear in.
For more information about working with Faces, see An Overview of Faces on page 199.
•Places: Select this item to view a map that shows the locations assigned to photos in
the library.
For more information about working with Places, see An Overview of Places on page 208.
You can select items in the Recent area of the Library inspector to view photos you've imported
recently, photos in your iCloud Photo Stream, agged photos, rejected photos, or photos you've
placed in the Aperture Trash.
•Last 12 Months: Select this item to see all photos, video clips, and audio clips imported into
Aperture during the last 12 months. Select a thumbnail in the Browser to view it or listen to it
in the Viewer.
•Last Import: Select this item to see all photos, video clips, and audio clips imported into
Aperture during the last import session. Select a thumbnail in the Browser to view it or listen
to it in the Viewer.
Chapter 2 Working with the Aperture Library 33
•Flagged: Select this item to see all the photos, video clips, and audio clips in the library that
have been agged. The thumbnails for all agged media appear in the Browser. Select a
thumbnail in the Browser to view it or listen to it in the Viewer.
•Photo Stream: Select this item to see all the photos that have been uploaded to Photo Stream
from your iOS 5 devices and your Aperture library. The thumbnails for all Photo Stream images
appear in the Browser. Select a thumbnail in the Browser to view it in the Viewer.
For more information about working with Photo Stream, see An Overview of My Photo
Stream on page 552.
•Trash: Select this item to see all the photos, video clips, and audio clips in the library that have
been deleted. The thumbnails for all deleted media appear in the Browser. Select a thumbnail
in the Browser to view it or listen to it in the Viewer. Click the disclosure triangle next to the
Trash to view any items that have been deleted in the Library inspector. Select an item in the
Trash to view its contents.
Note: If there is no disclosure triangle next to the Aperture Trash, no items in the Library
inspector have been deleted since the last time the Trash was emptied.
For more information about the Trash, see Working with the Aperture Trash on page 38.
Using More Than One Album in a Project
For some projects, it makes sense to use several albums within the project. You can use albums
in several ways, including:
•Albums as occasions: Break a project into a series of albums according to specic occasions. For
example, a wedding project can be divided into albums for each of the following occasions:
Preparation, Ceremony, and Reception.
•Albums as days: Break a project that spans multiple days into albums for individual days. For
example, a project consisting of a two-week trip to Japan can be divided into 14 individual
albums corresponding to each day.
•Albums for specic subjects: Break a project consisting of multiple photographed subjects into
individual albums dedicated to each subject. For example, a studio photographer may shoot
three models for a single project. The photographer can create an album for each model. Or
you might create albums to hold specic photo types, such as candid shots or close-ups.
Creating and Naming Projects
You can create projects at any time, although typically you create them when you import
photos. When you import photos into the Aperture library and no project is selected, you are
asked to create a new one. For more information about importing les and creating projects
automatically, see An Overview of Importing Photos on page 50.
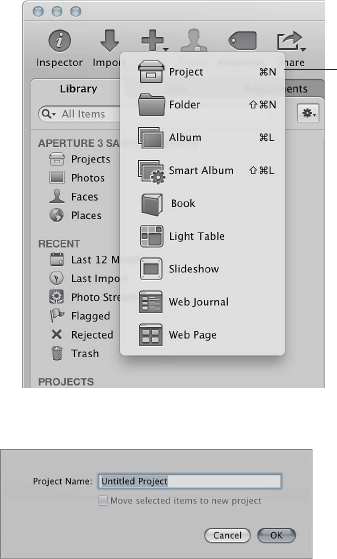
Chapter 2 Working with the Aperture Library 34
To create a new project
1 Do one of the following:
•Choose File > New > Project (or press Command-N).
•Choose Project from the New pop-up menu in the toolbar.
Choose Project from
the New pop-up menu.
2 In the dialog that appears, enter a name for the project in the Project Name eld.
3 Do either of the following:
•To move the photo selection into a new project: Select the “Move selected items to new project”
checkbox.
•To create a new, empty project: Do not select the “Move selected items to new project”
checkbox.
4 Click OK.
The new project appears in the Library inspector. If the “Move selected items to new project”
checkbox is selected, the selected photos appear in the Browser and Viewer.
Opening and Closing Items in the Library Inspector
To work with photos in Aperture, you rst select an item in the Library inspector to open it in
the Browser. You can open and work on more than one item at a time. When you open multiple
items from the Library inspector, you can have each item appear in the Browser with its own tab
or have the contents of all items appear in a single Browser. You can click an item’s Browser tab
to bring it to the front. You can also open an item in its own pane to view the contents of two
items in the Browser side by side. When you quit and reopen Aperture, all items that were open
at the end of your last session open automatically.
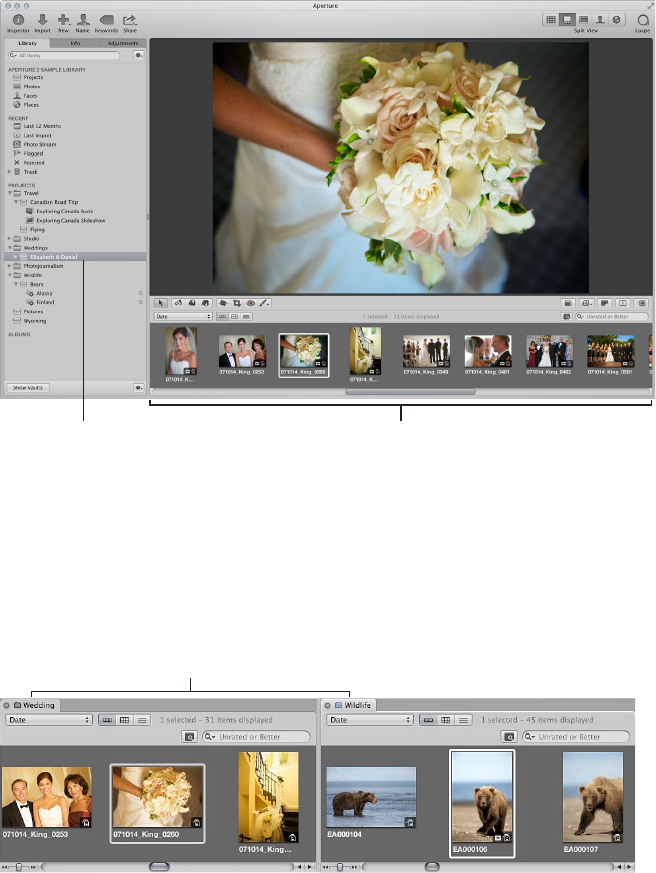
Chapter 2 Working with the Aperture Library 35
To open an item in the Library inspector
mSelect the item in the Library inspector.
All photos in the project
appear in the Browser.
Select a project to view
its photos in the Browser.
To open additional items in the Browser, each with its own tab
mCommand-Option-click an item in the Library inspector.
The newly opened item appears in the Browser with its own tab, in front of any other open items.
To open another item in its own pane
mOption-click an item in the Library inspector.
Library items are
identified by their tabs.
The newly opened item appears in the Browser with its own tab and in its own pane.
To switch among several open items
mIn the Browser, click a project’s tab.
To open multiple items in the same Browser
mCommand-click multiple items in the Library inspector.
The contents of each item selected in the Library inspector appear in the same Browser.
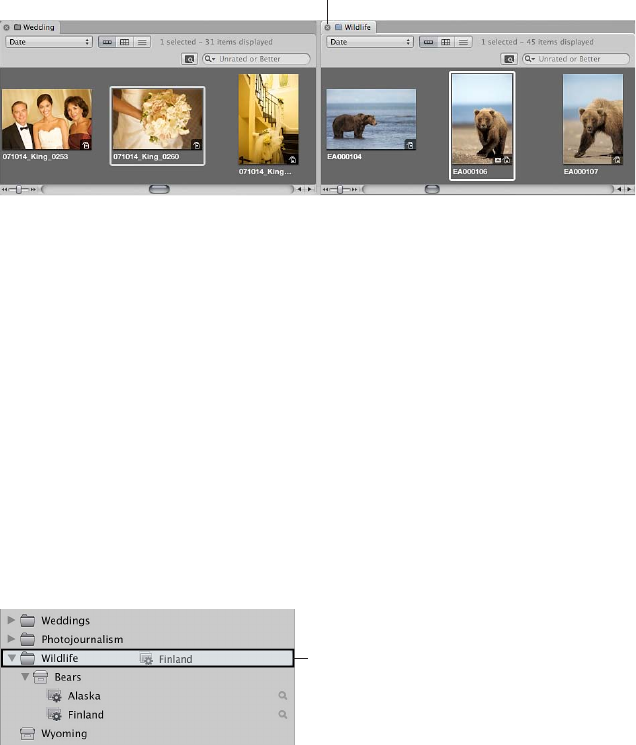
Chapter 2 Working with the Aperture Library 36
To close an item in the Browser
1 Click the item’s tab to bring it to the front.
2 Click the tab’s close button.
Close button in a tab
Arranging Items in the Library Inspector
Typically, you create a new Aperture project for each photography project or job that you work
on, regardless of its duration. For example, if you’re working on a documentary in Thailand, you
would create a project for it. If you’re also shooting the temples in the interior of the country, that
could be a second, separate project. Both projects could conceivably refer to some of the same
photos, but they are completely independent structures, each with its own versions and albums.
Very large photography projects, such as documentaries and sporting events, often consist of
large numbers of photos. You can always break one project into several should the need arise.
As your library grows, you’ll need to reorganize your library’s structure to t your
particular workow.
To move an item in the Library inspector
mSelect an item in the Library inspector, then drag it to a new location.
The black box indicates
where the item will
be placed.
A black bar indicates where the item will be placed.
To move multiple items in the Library inspector
Do one of the following:
mShift-click adjacent items, then drag them to a new location.
mCommand-click nonadjacent items, then drag them to a new location.
To automatically arrange items in the Library inspector
Do one of the following:
mControl-click in the Library inspector, then choose Keep Arranged By > Kind from the shortcut
menu to group similar items together.
mControl-click in the Library inspector, then choose Keep Arranged By > Name from the shortcut
menu to sort items alphabetically.
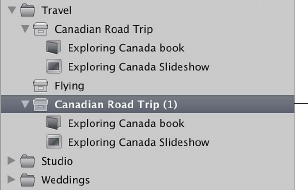
Chapter 2 Working with the Aperture Library 37
Creating and Showing Favorite Items
If you have certain projects that you work on most often or projects that you work on at the
same time, you can make them favorites to quickly view them all simultaneously.
To make a project, a folder, or an album a favorite
mIn the Library inspector, select a project, folder, or album, then choose Add to Favorites from the
Library Action pop-up menu (with a gear icon).
To view a favorite project, folder, or album
mIn the Library inspector, choose Favorite Items from the search eld pop-up menu at the
top-left corner.
Only the items in the library that have been chosen as favorites are shown. All other items in the
Library inspector are removed from view.
To remove a project, a folder, or an album as a favorite
mIn the Library inspector, select a project, folder, or album, then choose Remove From Favorites
from the Library Action pop-up menu (with a gear icon).
To view recently selected items in the Library inspector
mIn the Library inspector, choose Recent Items from the search eld pop-up menu at the
top-left corner.
To view all items in the Library inspector again
mIn the Library inspector, choose All Items from the search eld pop-up menu.
Duplicating a Project Structure
If you routinely use the same project structure populated with the same types of albums and
folders, you can duplicate the structure of an existing project and create a new, empty project
with the same arrangement of albums and folders. If the project you’re duplicating has Smart
Albums, the settings for those Smart Albums are duplicated as well.
For more information, see An Overview of Smart Albums on page 255.
To duplicate a project structure
1 In the Library inspector, select the project whose structure you want to copy.
2 Choose File > Duplicate Project Structure.
Double-click the item’s
name to rename it.
The project and all of its subordinate items, such as albums, folders, and Smart Albums, are
duplicated along with their names. However, the duplicated project contains no photos, audio
clips, or video clips.
3 Double-click the name of each duplicated item in the new project to give it a new name.
Chapter 2 Working with the Aperture Library 38
Merging Projects
If you created multiple projects and then later decide that the content spread among the
projects would be better suited to a single project, you can select the projects in the Library
inspector and merge them into a single project. When you merge projects, the projects are
consolidated into the topmost selected project in the Library inspector.
To merge projects
1 In the Library inspector, select the projects you want to merge by Shift-clicking adjacent projects
or Command-clicking nonadjacent projects.
2 Choose File > Merge Projects.
A dialog appears, indicating which project the selected projects will be merged into.
3 Click Merge.
The content in the selected projects is merged into the topmost selected project in the
Library inspector.
Working with the Aperture Trash
All items deleted in Aperture, including projects, albums, folders, versions, and originals, are
placed in the Aperture Trash in the Library inspector. You can retrieve any item from the Trash
until you empty it.
To delete an original and all its versions from a project
mSelect a photo, a video clip, or an audio clip, then choose File > Delete Original Image and
All Versions.
The original and all versions are moved to the Trash.
To delete only a version from an album
mSelect a photo, a video clip, or an audio clip, then choose Photos > Remove From Album (or
press Delete).
The version is deleted. The original and its other versions are not deleted.
To delete projects and folders
When you delete an item from the Library inspector, the contents of the item are deleted with it.
Note: If you delete a project, the originals contained in the project are also deleted.
1 Select a project or folder.
2 Do one of the following:
•Choose File > Delete [item] (or press Command-Delete).
•Drag the item to the Aperture Trash.
The selected item is moved to the Trash in the Library inspector.
To move an item out of the Aperture Trash
If you delete an item in the Library inspector by mistake, it’s easy to x.
Do one of the following:
mDrag the item out of the Aperture Trash.
mControl-click the item in the Aperture Trash, then choose Put Back from the shortcut menu.
The selected item is moved back to its original position in the Library inspector.

Chapter 2 Working with the Aperture Library 39
To empty the Aperture Trash
After you’ve reviewed the contents of the Aperture Trash and are condent that you no longer
need the items within it, you can empty the Trash. When you empty the Aperture Trash, all of its
contents are placed in the Finder Trash.
1 Do one of the following:
•Choose Aperture > Empty Aperture Trash (or press Command-Shift-Delete).
•Control-click the Aperture Trash, then choose Empty Aperture Trash from the shortcut menu.
A dialog appears, warning you that the items will be removed from the Aperture
Trash permanently.
2 Click Delete.
WARNING: This action cannot be undone, but you can retrieve the originals from the Finder
Trash until you empty it.
Working with Library Files
An Overview of Library Files
Aperture exports projects, albums, and folders as a library le. You can transfer the library le
from one Aperture system to another and then merge the transferred library le into the library
le on that system. All links between versions and their originals are maintained when library
items are transferred. This is particularly useful if you use a portable computer when on location
or away from your studio, and a desktop computer at your studio. Any work done in the eld can
be exported from your portable computer as a library le and then merged with the library le
on the desktop computer at your studio.
You can work with as many libraries as necessary—including iPhoto libraries—and switch
between them without having to quit and reopen Aperture. If your workow calls for several
unique libraries, you can switch between them on the y. You can also check the contents of a
library prior to importing it into the library that’s currently open.
When the library le becomes large and requires more disk space than is available in its current
location, you can move it to a hard disk with greater storage capacity. To change the location
of the library, you move the library le to a new location and then double-click it to open it
in Aperture.
Tip: To maximize performance, place the library le on an internal hard disk.
Important: Aperture can only open and view iPhoto libraries upgraded to iPhoto 9.3 or later.
To upgrade your iPhoto library, open it in iPhoto 9.3 or later. iPhoto upgrades the library
automatically. All cards, books, calendars, and Smart Albums in your iPhoto library can be viewed
but not edited in Aperture. To work with your iPhoto cards, books, calendars, and Smart Albums,
close Aperture and open your iPhoto library in iPhoto.
Creating New Libraries
If the Aperture library becomes large, you can create additional, separate library les to hold
more photos. You can create additional library les in dierent locations on your internal hard
disk or on dierent hard disks. You can also rename library les as needed. Thus, you might have
multiple library les with dierent names in the same location, with Aperture set to access the
library le you want.
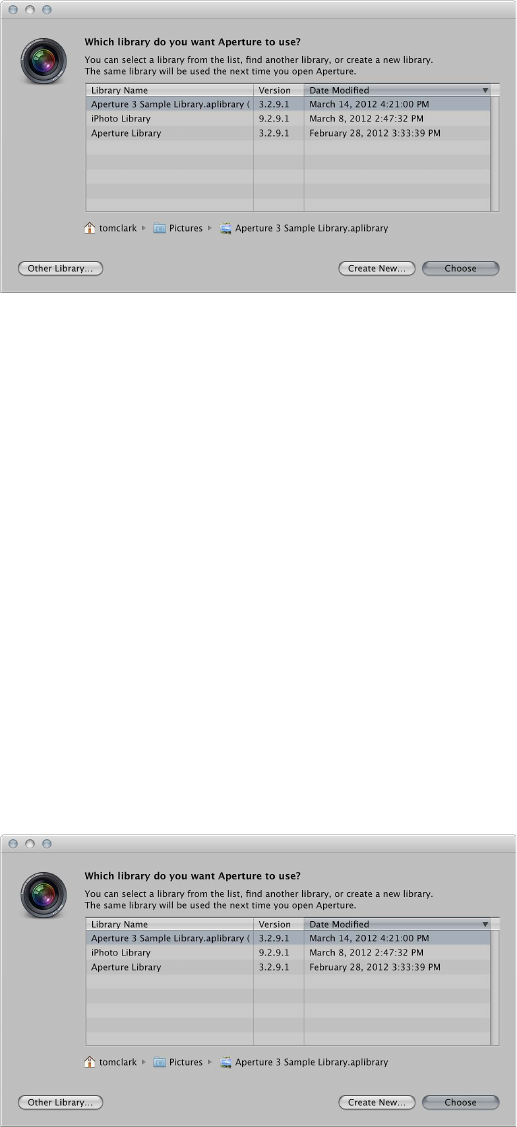
Chapter 2 Working with the Aperture Library 40
To create a new, empty library le in a new location
1 Choose File > Switch to Library > Other/New.
2 In the dialog that appears, click Create New.
3 In the next dialog, enter a name for the library in the Save As eld, choose a location, then click Create.
Aperture creates the new library in the location you chose. To open the new library, see Viewing
Other Libraries on page 40.
Viewing Other Libraries
When you have multiple Aperture and iPhoto library les accessible to your Aperture system, you
can switch between them and view their contents. You can also choose which library le to use
when you open Aperture.
Important: Aperture can only open and view iPhoto libraries upgraded to iPhoto 9.3 or later.
To upgrade your iPhoto library, open it in iPhoto 9.3 or later. iPhoto upgrades the library
automatically. All cards, books, calendars, and Smart Albums in your iPhoto library can be viewed
but not edited in Aperture. To work with your iPhoto cards, books, calendars, and Smart Albums,
close Aperture and open your iPhoto library in iPhoto.
To access a dierent Aperture or iPhoto library
1 Choose File > Switch to Library > [library lename].
2 If the library you are looking for doesn’t appear in the Switch to Library submenu, choose Other/New.
3 In the dialog that appears, select the library you want to open from the list, then click Choose.
Note: You must close iPhoto before opening your iPhoto library in Aperture.
Aperture opens the library you selected.
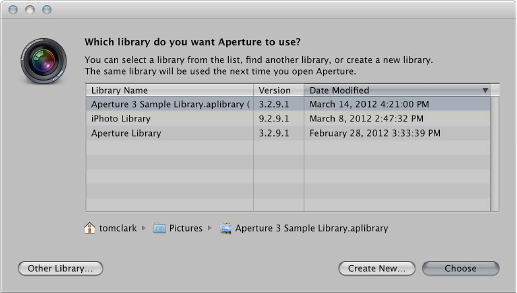
Chapter 2 Working with the Aperture Library 41
To choose which library to use while opening Aperture
1 Hold down the Option key while opening Aperture.
A dialog appears, with options for selecting an existing library or creating a new one.
2 Do one of the following:
•To open an Aperture library le shown in the dialog: Select the library le, then click Choose.
•To open an Aperture library le not shown in the dialog: Click the Other Library button, locate the
library le in the dialog that appears, then click Select.
•To open a new, empty library: Click the Create New button, give the library a name in the Save
As eld, select a location for the library, then click Create.
Aperture creates a new, empty library le and opens it.
Merging Libraries
If you work with several computers, or work on projects with other people, you may nd it
necessary to transfer projects and albums from one Aperture system to another. Transferring
folders, projects, and albums is a simple export and import process. The items you export are
consolidated into a library le. When you import the library into the second Aperture system, you
can add les, delete les, modify metadata, and make adjustments. When you’re ready to return
the contents of the modied library to the original computer, Aperture merges the two libraries
together.
To transfer folders, projects, and albums from one computer to another
1 In the Library inspector, select the items you want to transfer, then choose File > Export > Items
as New Library.
Note: Items in the Export menu change depending on what is selected. If you have a single item,
such as an album, selected in the Library inspector, choose File > Export > Album as New Library.
2 Enter a name and choose a location for the exported library.
3 Do any of the following:
•If your project contains referenced images and you want the original les to be available to the new
Aperture system: Select the “Consolidate originals into exported library” checkbox to copy the
original image les into the new library le.
•If you want to copy the previews into the new library so that you don’t have to rebuild them on the
new Aperture system: Select the “Include Previews in exported library” checkbox.
•If you want Aperture to alert you when it nishes building the new library: Select the “Show alert
when nished” checkbox.
Chapter 2 Working with the Aperture Library 42
4 Click Export Library.
Aperture consolidates the selected items into a library, and the library le is exported to the
location you chose.
5 Connect or network the two computers together, and copy the exported library le to the
second computer.
For more information, see the documentation that came with the computers.
6 Open Aperture on the second computer, then choose File > Switch to Library > [library lename].
You can now work with the exported library from the rst computer on the second computer.
To merge the modied library from the second computer into the library of the rst computer
When you’re ready to merge the modied library on the second computer into the library on the
rst computer, import it into the open library on the rst computer.
1 Follow the steps in the previous task to transfer the modied library on the second computer to
the rst computer.
2 On the rst computer, choose File > Import > Library/Project, locate the modied library le from
the second computer, then click Import.
A dialog appears, giving you the option to merge the imported library with the current library or
add the contents of the imported library to the current library.
3 Click Merge.
A dialog appears, asking you to choose which library to use to resolve potential conicts caused
by the dierences between the libraries.
4 To import the changes in the modied library, choose the library from the second computer.
Aperture imports the modied library from the second computer, merging the changes made
to the projects and albums on the second computer into the same projects and albums on the
rst computer. Any les that were deleted on the second computer, or for some other reason no
longer exist in the library le of the second computer, are moved to the Aperture Trash in the
library of the rst computer.
To add the contents of the library from the second computer without overwriting the
contents of the library on the rst computer
If you don’t want to overwrite the original projects and albums you exported from the rst
computer to the second computer with the projects and albums you modied on the second
computer, you can add the modied projects and albums to the library on the rst computer as
unique items.
1 Transfer the modied library from the second computer to the rst computer.
2 On the rst computer, choose File > Import > Library/Project, locate the modied library le from
the second computer, then click Import.
A dialog appears, asking you to choose which library to use to resolve potential conicts caused
by the dierences between the libraries.
3 Click Add.
Aperture imports the contents of the modied library from the second computer into the library
of the rst computer. Instead of overwriting the les that changed, Aperture adds the changed
les as additional items. If imported items have the same names as existing items in the Library
inspector, the names of the imported items are appended with "(1)."

Chapter 2 Working with the Aperture Library 43
Opening Your Library in iPhoto
You can open your library in iPhoto from within Aperture.
To open your library in iPhoto
mChoose File > Open Library in iPhoto.
Aperture closes and iPhoto opens the library you were working with in Aperture.
Working in Projects View
Switching to Projects View
Projects view provides a convenient space for organizing and quickly viewing your projects.
To switch to Projects view
mIn the Library inspector, select Projects.
Previewing the Photos in a Project in Projects View
If you’re looking for a specic group of photos, you can quickly skim the photos within a project.
To quickly preview the photos in a project
Do one of the following:
mSlowly drag the pointer horizontally across the project’s thumbnail.
mSelect the project’s thumbnail, then use the Left Arrow and Right Arrow keys to navigate through
the photos in the project.
Creating and Deleting Projects in Projects View
You can create new projects in Projects view, as well as delete them at any time.
To create new projects
1 Do one of the following:
•Choose File > New > Project (or press Command-N).
•Control-click a project, then choose New > Project from the shortcut menu.
2 In the dialog that appears, enter a name for the project in the Project Name eld.
3 Click OK.
Chapter 2 Working with the Aperture Library 44
The new, empty project opens in the Browser.
To delete a project
Do one of the following:
mSelect a project’s thumbnail, then choose File > Delete Project (or press Command-Delete).
mControl-click a project, then choose Delete Project from the shortcut menu.
The selected project is moved to the Aperture Trash. For more information about the Aperture
Trash, see Working with the Aperture Trash on page 38.
Importing Files into a Project in Projects View
You can import les into a project selected in Projects view.
To import les into a project
Do one of the following:
mSelect a project’s thumbnail, then choose File > Import > Files (or press Command-I).
mControl-click a project, then choose Import > Files from the shortcut menu.
The Import browser appears with the project selected in the Destination pop-up menu. For more
information about importing les, see An Overview of Importing Photos on page 50.
Merging Projects and Libraries into Projects in Projects View
You can merge projects from earlier versions of Aperture and whole Aperture libraries into a
selected project.
To merge a project or an Aperture library into a project
1 Control-click a project, then choose Import > Library/Project from the shortcut menu.
2 In the dialog that appears, select the project or library that you want to merge into the project
selected in Projects view, then click Import.
The project or library is merged into the project selected in Projects view. For more information
about merging libraries, see Merging Libraries on page 41.
Setting the Key Photo for a Project
You can set any photo within a project as the key photo, which represents the project in
Projects view.
To set a photo as the key photo to represent a project
1 Do one of the following:
•Slowly skim through the photos in the project by dragging the pointer over the project’s
thumbnail image to navigate to the photo you want to set as the key photo.
•Select the project’s thumbnail, then use the Left Arrow and Right Arrow keys to navigate to
the photo you want to set as the key photo.
2 When you have located the photo you’re looking for, press the Space bar.
The selected photo is set as the key photo to represent the project.
Chapter 2 Working with the Aperture Library 45
Emptying the Aperture Trash in Projects View
After you’ve performed a lot of housecleaning tasks in Projects view—removing unnecessary or
obsolete projects, for example—you can empty the Aperture Trash.
To empty the Aperture Trash
Do one of the following:
mChoose Aperture > Empty Aperture Trash (or press Command-Shift-Delete).
mControl-click a project, then choose Empty Trash from the shortcut menu.
The Aperture Trash is emptied and its contents are moved to the Finder Trash. For more
information about the Aperture Trash, see Working with the Aperture Trash on page 38.
Playing a Slideshow of a Project’s Photos
You can select a project and play a slideshow to review the photos within it.
To play a slideshow of a project’s photos
1 Do one of the following:
•Select a project’s thumbnail, then choose File > Play Slideshow (or press Shift-S).
•Control-click a project, then choose Play Slideshow from the shortcut menu.
2 In the Play Slideshow dialog, choose a preset from the Slideshow Preset pop-up menu, then
click Start.
A slideshow of the photos in the selected project plays. Press the Space bar to pause and play
the slideshow, and the Escape key to stop the slideshow. For more information about slideshows,
see An Overview of Slideshows on page 456.
Organizing Projects in Projects View
You can organize your projects by the year the photos were created. If you organize your
projects in folders in the Library inspector, you can group your projects by the folders they reside
in. You can sort projects by name, in ascending and descending order, and in the order in which
the projects appear from top to bottom in the Library inspector. If you have a large number of
projects in your library, you can search for a specic project, removing the others from view.
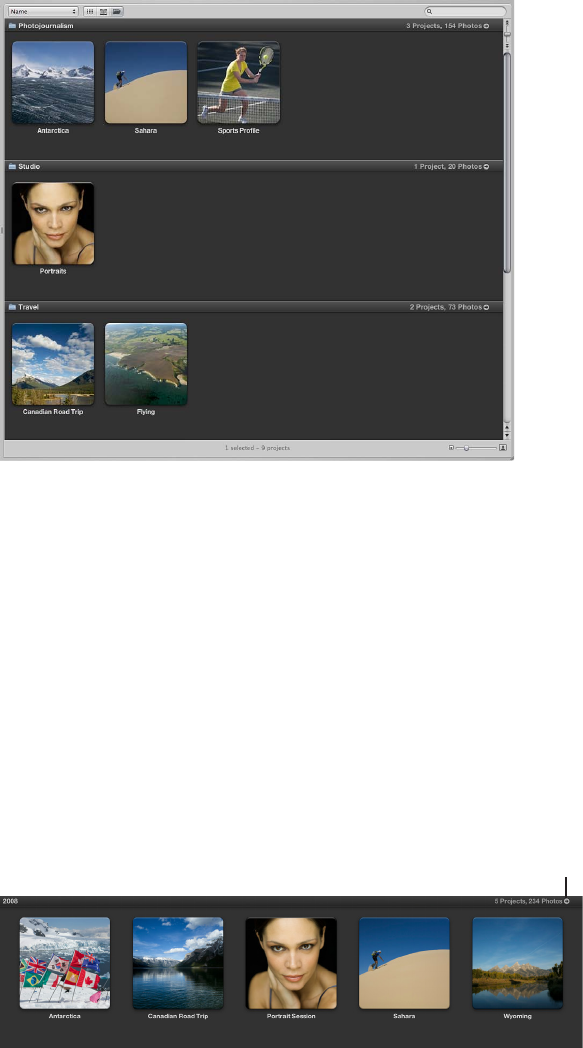
Chapter 2 Working with the Aperture Library 46
If you have more than one project documenting the same subject and you want to consolidate
the projects into a single project, you can merge the projects.
To group projects by year or by folder
mTo group projects by year: Click the Group by Year button (with a calendar icon) at the top of
Projects view.
mTo group projects by folder: Click the Group by Folder button (with a folder icon) at the top of
Projects view.
To set Projects view to show a single year or a single folder of projects
When projects are grouped by year or by folder, you can set Projects view to show the projects
for a single year or folder only.
1 In Projects view, group the projects by year or by folder.
For example, if you group projects by year, the number of projects and photos created in that
year are displayed in the top-right corner of that year’s row.
2 Click the arrow button to lter Projects view to display only that year’s or folder’s projects.
Arrow button

Chapter 2 Working with the Aperture Library 47
Projects view displays the projects for the selected year or folder only. Click the Projects button at
the top of the main window in Projects view to display the projects for all years or folders.
Projects button
To sort projects in Projects view
mTo sort projects by name: Choose Name from the Sorting pop-up menu.
mTo sort projects in ascending order by the date the photos were captured: Choose Date – Newest First
from the Sorting pop-up menu.
mTo sort projects in descending order by the date the photos were captured: Choose Date – Oldest First
from the Sorting pop-up menu.
mTo sort projects by the order in which they appear in the Library inspector: Choose Library from the
Sorting pop-up menu.
To search for projects by name
mIn Projects view, enter the name of the project you want to locate in the search eld.
All projects are removed from view except for the project or projects matching the name in
the search eld. Click the Cancel button in the search eld to set Projects view to display all
projects again.
To view a project’s photos in the Browser
When you’ve located the project you want to work with, you can view the project’s photos in
the Browser.
mDouble-click the project.
The Browser replaces Projects view and displays the selected project’s thumbnail images.
To merge projects in Projects view
1 In Projects view, select the project or group of projects that you want to merge with
another project.
2 Drag the selected project or projects into the project that you want to contain the other project
or projects.
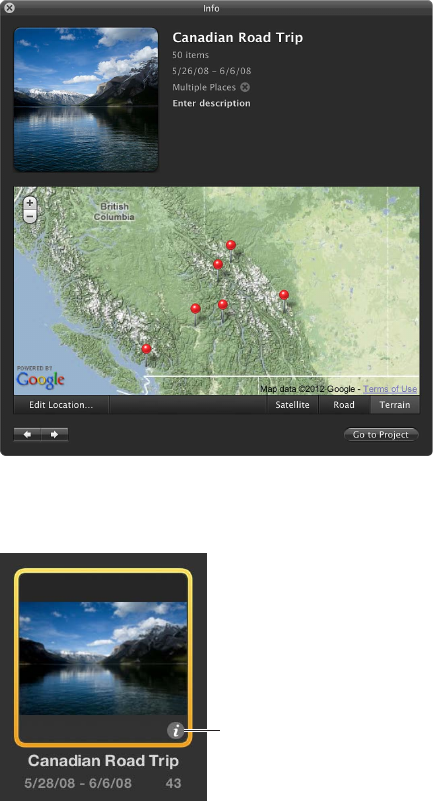
Chapter 2 Working with the Aperture Library 48
Working with the Info HUD in Projects View
In Projects view, you use the Info HUD to navigate through the projects in the library, set the key
photo for a project, and assign location information to photos within a project.
For more information about assigning location information using the Info HUD, see Assigning
Location Information to Projects on page 223.
To open the Info HUD in Projects view
mClick the Info button on a project’s thumbnail.
Info button
The Info HUD appears, displaying information about the selected project.
To navigate through your projects using the Info HUD
mClick the navigation buttons at the bottom-left corner of the HUD.
To set the key photo for a project
1 Select the project whose key photo you want to change.
2 In the Info HUD, slowly skim through the photos in the project by dragging the pointer over the
project’s thumbnail image.
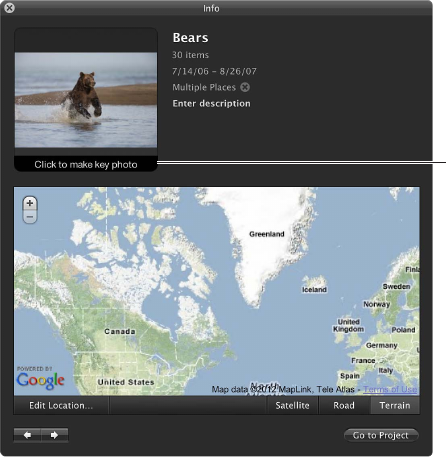
Chapter 2 Working with the Aperture Library 49
3 When you locate the photo you’re looking for, click the “Click to make key photo” button at the
bottom of the thumbnail.
Click to set this photo
as the key photo.
The selected photo is set as the key photo to represent the project.
To enter descriptive information about a project
1 Select the project for which you want to add or change descriptive information.
2 In the Info HUD, enter descriptive information about the project in the description eld.
To open a project using the Info HUD
1 Select the project you want to open using the navigation controls in the Info HUD.
2 Click the Go to Project button.
The selected project opens in the Viewer and Browser.
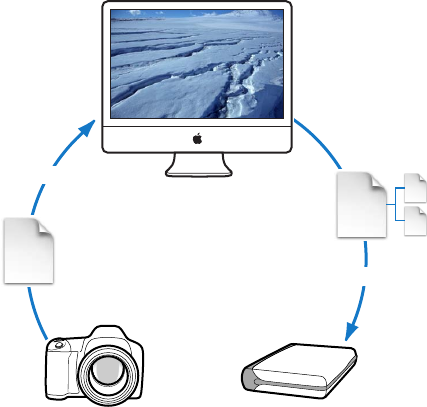
50
An Overview of Importing Photos
Aperture provides tools and workow options that make it easy to import your photos. You can
import photos directly from your digital camera or card reader, and import photos stored on
your computer hard disk or other storage devices. You can also import audio and video les.
You no longer have to import photos individually from your iPhoto library into Aperture.
Aperture can open, view, and work with iPhoto libraries the same way it works with multiple
Aperture library les. For more information about opening your iPhoto library in Aperture, see An
Overview of Library Files on page 39.
When you import from a digital camera or card reader, Aperture places the photos in a project. If
you don’t select an existing project, a new one is created automatically.
As Aperture imports photos, video les, and audio les, it generates a version le, preview, and
thumbnail corresponding to each original.
Aperture library
(system disk)
Importing
to Aperture
Camera
Import
Back up
Originals
Versions
Project
Vault
(external drive)
RAW
& JPEG
You can import originals directly from a digital camera or card reader and from your hard
disk drives.
When you import photos, you can choose whether to have the originals stored in the Aperture
library or on a hard disk outside of the library, where they can be accessed as referenced images.
For more information about referenced images, see What Are Managed Images and Referenced
Images? on page 28.
Importing Photos 3
Chapter 3 Importing Photos 51
As you import photos, you can set Aperture to automatically name and record information about
them. Aperture can assign lenames using custom naming conventions; record metadata such
as captions, keywords, dates, copyright and credit information, and IPTC information; and adjust
the time when the photo was shot to the correct time zone. If the photo has an XMP sidecar
le, Aperture imports it as well and adds the metadata to the image version. You can even set
Aperture to automatically back up your photos as they are imported. For more information, see
An Overview of the Backup Workow on page 581.
Important: Audio les, audio attachments, and PDFs imported into your Aperture library are not
visible when you open your Aperture library in iPhoto. To view and work with these items, open
your Aperture library in Aperture.
File Formats You Can Import into the Library
Aperture supports most image, audio, and video le formats captured by digital cameras. File
types and formats that can be imported into your Aperture library include:
•GIF
•JPEG
•JPEG2000
•PDF
•PNG
•PSD (8- and 16-bit)
•TIFF (8- and 16-bit)
•BMP
•DNG
•RAW les from a variety of supported digital cameras
•AIF
•WAV
•MOV
•AVCHD
Important: Aperture does not support 1080p AVCHD footage recorded at 60 frames per
second (fps) or 50 fps.
Note: For a list of supported digital cameras, go to http://www.apple.com/aperture/specs.
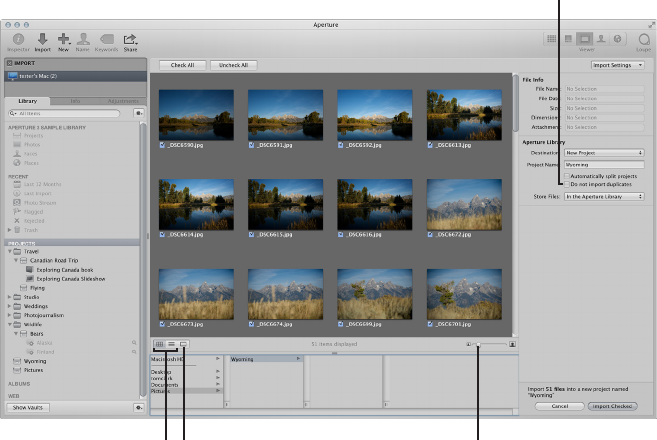
Chapter 3 Importing Photos 52
Planning Your Import Strategy
Before you import photos into Aperture, it’s a good idea to plan the organization of your photos.
Eventually your photo library may contain many thousands of photos that you’ll want organized
in a exible and easy-to-manage system. It’s important to take a long-term view of what
makes for an eective and ecient organization of your projects based on your specic type of
photography.
You may already have a large digital portfolio that you eventually want to import into the
Aperture library. As an import strategy, it’s best to try out importing photos in a series of steps:
•If you have an iPhoto library, you can open your iPhoto library and work with its contents
directly in Aperture. For more information about opening iPhoto libraries in Aperture, see An
Overview of Library Files on page 39.
•Make trial imports of a small group of photos directly from your digital camera or card reader.
Learn about import features, such as automatic lenaming and the application of metadata
presets. For information about importing from your digital camera or card reader, see
Importing from Your Digital Camera or Card Reader on page 53.
•Plan how you want to import your legacy digital photos. Because you may have many tens of
thousands of image les already stored on disk, you need to decide whether you’ll store newly
imported photos in the Aperture library or store them as referenced images, leaving them
in their current hard disk locations. You can also copy or move image les to a dierent hard
disk location when importing them. Also, plan the project organization you’ll need to hold
the photos. For more information about importing les, see Importing Files Stored on Your
Computer or Connected Servers on page 57.
•Try out the dierent methods for importing individual les into your system. You can import
individual les, import les stored in folders, and drag les or folders from the Finder into
Aperture. For more information, see Importing Files from the Finder via Drag and Drop on
page 69 and Importing Folders of Files from the Finder on page 70.
After you’re familiar with Aperture, you can begin to create and organize your personal photo
management system.
When you connect a digital camera or select an item in the Import pane, the Import
browser appears.
Thumbnail Resize slider
Viewer button
Grid View and
List View buttons
“Do not import
duplicates” checkbox
Chapter 3 Importing Photos 53
You use the options in the Import browser to specify how and where photos are imported. The
Import browser shows thumbnails of your photos that you can enlarge or reduce in size using
the Thumbnail Resize slider. You can select individual photos to import or import all the photos
at once. You can also set the Import browser to display photos in a list by clicking the List View
button. In list view, you can click a column heading to sort photos by category. If you are unsure
whether or not a specic photo should be imported, you can click the Viewer button to inspect a
high-resolution version of the photo.
When you import photos, Aperture automatically checks to see if any of the photos are
duplicates of previously imported photos. Aperture checks the lename of the original to
determine if a photo is a duplicate of one in the library. Select the “Do not import duplicates”
checkbox to prevent Aperture from importing duplicates. If this checkbox is unselected, Aperture
imports all photos, even if they are duplicates, and creates a new original with a dierent
name for each duplicate. Aperture never overwrites or replaces an original that has already
been imported.
Importing from Your Digital Camera or Card Reader
Using the Import browser, you can import photos from a digital camera or card reader into
Aperture in two ways. You can import all photos on the camera or card reader at once, or you
can import a selection of photos from the camera or card reader.
You can also:
•Store imported photos in the Aperture library or select a dierent location on your hard disk
and import the photos as referenced images
•Have Aperture automatically delete the image les on your memory card after the photos are
imported
•Have Aperture automatically split the photos into multiple projects based on the length of
time between shots
•Have Aperture automatically back up photos as they are imported
•Display photos in the Import browser as a grid of thumbnails or as a list that you can sort
•Apply a naming convention to standardize the names of the image les in the library
•Apply metadata to the image les, such as keywords, captions, copyright information, and the
photographer’s name. You can also keep or replace existing metadata associated with a photo
when you import the image.
•Adjust the shoot time of photos that were shot in a dierent time zone
Note: When connecting your camera directly to the computer, make sure that you turn the
camera on and set it to the mode for transferring photos (PC, PTP, Normal, or another mode,
depending on the type of camera). Some cameras automatically select the correct transfer mode
when connected to a computer. See your camera’s manual for specic instructions. If you have a
card reader, it’s preferable to transfer photos using the card reader rather than the camera. Using
a card reader saves you time and doesn’t require the use of your camera’s battery.
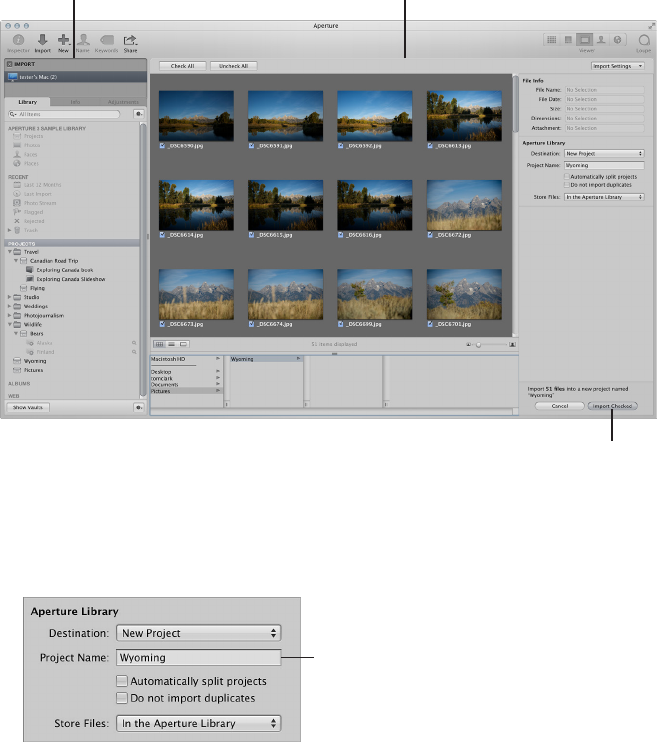
Chapter 3 Importing Photos 54
To import photos from a camera or card reader into Aperture
1 Connect your camera or card reader to your computer.
The Import browser appears, showing the photos on the camera or card.
Note: If iPhoto opens when you connect your camera or card reader, quit iPhoto. Then, in
Aperture, choose Aperture > Preferences and click Import. Choose Aperture from the “When
a camera is connected, open” pop-up menu. Disconnect and reconnect your camera to have
Aperture open the Import browser.
Import Checked button
Import pane Import browser
2 Do one of the following:
•If you want to import the photos into a new, empty project: Choose New Project from the
Destination pop-up menu to create a new project, and enter a name for the project in the
Project Name eld.
Project Name field
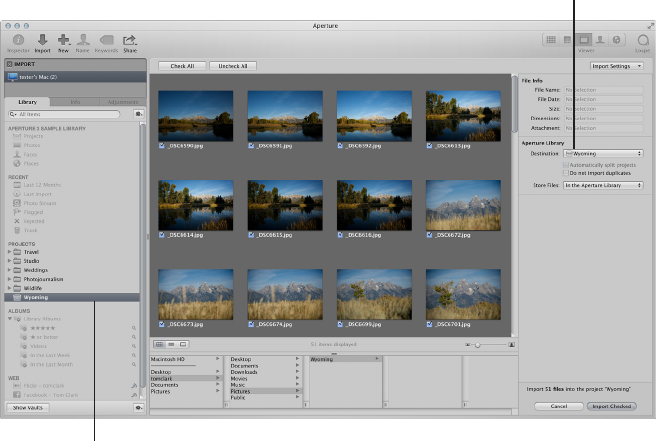
Chapter 3 Importing Photos 55
•If you want to import the photos into an existing project: Select the project in the
Library inspector.
The project selected in
the Library inspector
appears here.
Selected project in
the Library inspector
The selected project appears in the Destination pop-up menu.
3 Choose a location to store the original image les by doing one of the following:
•To store imported originals in the Aperture library: Choose “In the Aperture Library” from the
Store Files pop-up menu.
•To store imported originals as referenced images in the Pictures folder on your hard disk: Choose
Pictures from the Store Files pop-up menu, then choose whether you want the image les
moved or copied to the Pictures folder by clicking the “Move les” or “Copy les” button.
•To store imported originals as referenced images in a location other than the Pictures folder:
Choose “Choose” from the Store Files pop-up menu and select a folder. In the dialog that
appears, choose a location to store the imported originals, then click Open. Choose Project
Name from the Subfolders pop-up menu to specify that the les be stored in a folder with the
same name as the project. Choose whether you want the image les moved or copied to the
new location by clicking the “Move les” or “Copy les” button.
4 To add controls for additional import settings, choose an option from the Import Settings
pop-up menu.
For more information about Import Settings, see An Overview of Import Options on page 60.
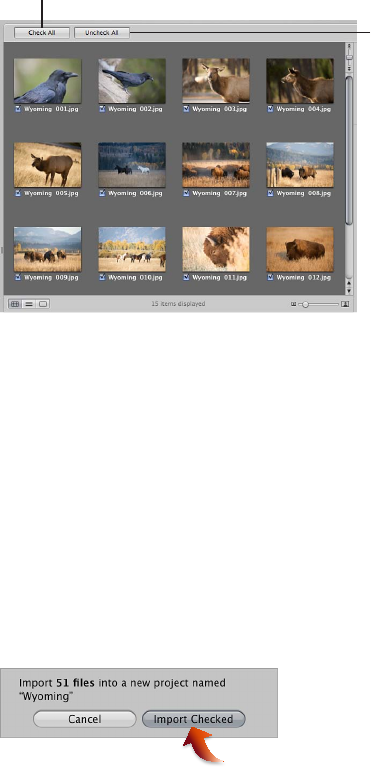
Chapter 3 Importing Photos 56
5 Do one of the following:
Uncheck All button
Check All button
•To import all photos from the camera or card reader: Click the Check All button.
The checkboxes for all the photos in the Import browser are selected.
•To import a subset of photos from the camera or card reader: Click the Uncheck All button to
clear the checkboxes for all photos, then select the checkboxes for the photos you want
to import.
You can also Shift-click adjacent photos and Command-click nonadjacent photos, and then
select the checkbox for one of the photos. Selecting a single checkbox selects the checkboxes
for all of the selected photos.
Note: You can double-click a thumbnail image to see a larger version of the photo, if you want
to verify its contents before importing it.
6 Click the Import Checked button.
The import process begins and an indicator appears next to the project’s name, showing the
progress of the import. When the photos are imported, a dialog appears.
7 Click Eject Card, Erase Imported Items and Eject Card, or Done.
Note: The options oered in this dialog depend on the way your camera is made available when
it is connected. Some cameras connect as mass storage devices. When you import from these
cameras, the Erase and Eject options appear. Other cameras simply connect as cameras, and you
will not see either Erase or Eject after the import is completed. In that case, you can erase the
photos directly in the camera.
As the photos appear in the Browser, you can begin working with them. Photos may temporarily
appear as gray boxes until the loading process is complete.
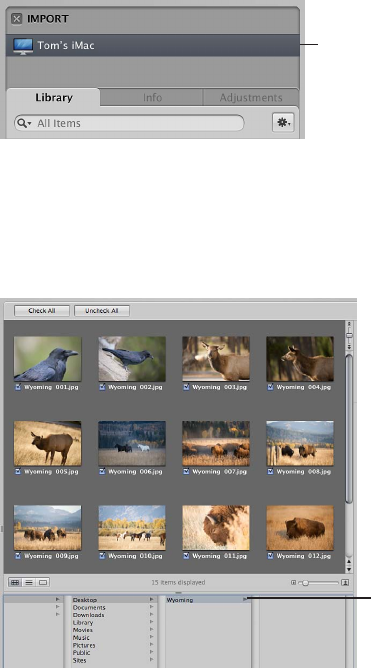
Chapter 3 Importing Photos 57
Importing Files Stored on Your Computer or Connected Servers
You can import image, audio, and video les stored on your computer and other storage devices.
You have a choice of storing the imported les in the Aperture library, or importing the les as
referenced image, audio, and video les and then moving or copying them to a dierent location.
Note: If you have folders of photos to import, you can import them using the Import Folders as
Projects command in the File menu. For more information, see Importing Folders of Files from
the Finder on page 70.
You can import image les in many common image formats, including images scanned from
nondigital sources such as lm and photographic prints. You can also import any QuickTime-
compatible audio or video le. Adding these les to your Aperture database is as simple as
navigating to the folder where they reside on your hard disk using the Import browser.
When you import les from a folder on your computer system, you can import the les into a
new project or an existing one.
To import les stored on your computer’s hard disk or another storage device
1 Click the Import button in the toolbar (or press Command-I).
The Import browser appears.
2 Select your computer.
Select the source where
the photos you want
to import are located.
3 At the bottom of the browser, navigate to the folder containing the les you want to import.
Your computer, connected servers, and connected storage devices are listed in the column on
the left.
Tip: To quickly select the desktop, press Command-D.
Select the folder
of photos you
want to import.
When you select the folder containing the les you want to import, thumbnail images appear in
the Import browser representing the image, audio, and video les within it.
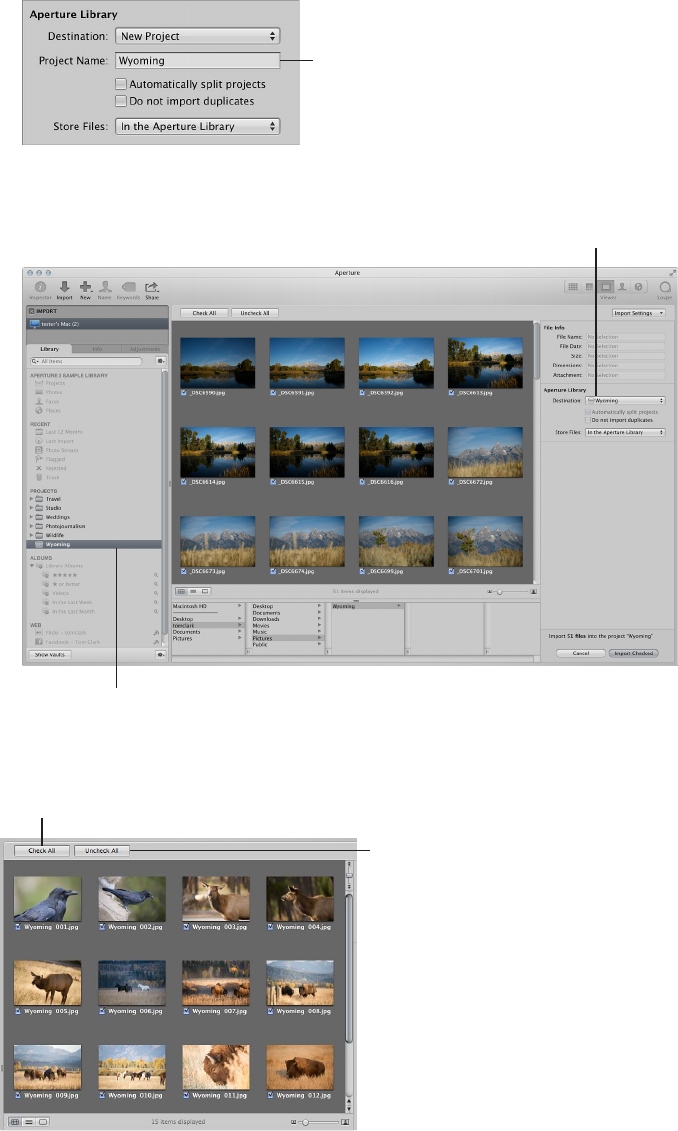
Chapter 3 Importing Photos 58
4 Do one of the following:
•If you want to import the les into a new, empty project: Choose New Project from the
Destination pop-up menu to create a new project, then enter a name for the project in the
Project Name eld.
Project Name field
•If you want to import les into an existing project: Select the project in the Library inspector.
The project selected in
the Library inspector
appears here.
Selected project in
the Library inspector
The selected project appears in the Destination pop-up menu.
5 Do one of the following:
Uncheck All button
Check All button
Chapter 3 Importing Photos 59
•To import all the les in the selected folder: Click the Check All button.
The checkboxes for all the les in the Import browser are selected.
•To import a subset of les from the selected folder: Click the Uncheck All button to clear the
checkboxes for all photos, then select the checkboxes for the photos you want to import.
Note: You can double-click a thumbnail image to see a larger version of the photo if you want
to verify its contents before importing it.
6 Choose a location for the imported les by doing one of the following:
•To store imported originals in the Aperture library: Choose “In the Aperture Library” from the
Store Files pop-up menu.
•To store imported originals as referenced image les, audio les, or video les in their current
location: Choose “In their current location” from the Store Files pop-up menu.
•To store imported originals as referenced image les, audio les, or video les in the Pictures folder
on your hard disk: Choose Pictures from the Store Files pop-up menu, then choose whether
you want the les moved or copied to the Pictures folder by clicking the “Move les” or “Copy
les” button.
•To store imported originals as referenced image les, audio les, or video les in a location other
than the Pictures folder: Choose “Choose” from the Store Files pop-up menu and select a folder.
In the dialog that appears, choose a location to store the imported originals, then click Open.
Choose Project Name from the Subfolders pop-up menu to specify that the les be stored in a
folder with the same name as the project. Choose whether you want the image les moved or
copied to the new location by clicking the “Move les” or “Copy les” button.
7 To add controls for additional import settings, choose an option from the Import Settings
pop-up menu.
For more information about Import Settings, see An Overview of Import Options on page 60.
8 Click the Import Checked button in the lower-right corner of the Import browser.
The import process begins and an indicator appears next to the project’s name, showing the
progress of the import. When the import process is complete, a dialog appears.
Tip: If you want to immediately import additional image, audio, or video les, Option-click the
Import Checked button. The Import browser remains open, and you can immediately start
importing additional items.
As the les appear in the Browser, you can begin working with them.
Important: You can import and export XMP sidecar les in Aperture. However, Aperture displays
only metadata that adheres to the XMP 1.0 specication. Ratings, label values, and custom
metadata created by third-party applications are not supported.
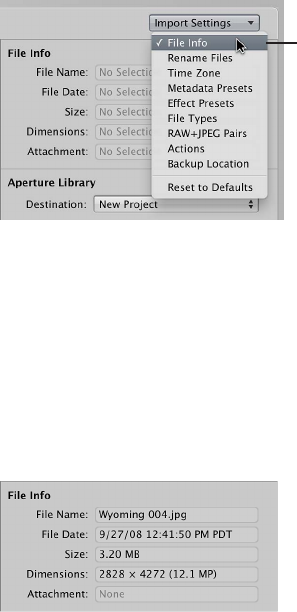
Chapter 3 Importing Photos 60
Adding Import Options
An Overview of Import Options
In the Import browser, you can add additional import options to rene how les are brought into
Aperture. You add controls for additional import settings by choosing an option from the Import
Settings pop-up menu. After you modify the import settings, you can remove them from view by
deselecting the option in the Import Settings pop-up menu.
File Info option
Viewing File Information
By default, basic le information about the photos you are about to import into Aperture is not
shown in the Import browser. However, you can set Aperture to show this information.
To show basic le information about the les displayed in the Import browser
mIn the Import browser, choose File Info from the Import Settings pop-up menu.
Basic metadata about the le selection appears above the Aperture Library controls in the
Import browser.
Note: When a photo with an attachment is selected, the duration of that attachment is displayed.
If the selection is a movie or audio le, the duration is shown as well.
Automatically Naming Your Imported Photos
The lenames given to photos by the camera are often dicult to distinguish. When you import
photos, you can have Aperture use the original name assigned by the camera or use a lenaming
convention that you choose or create. For example, you can use a name format that includes
a name that you specify, plus the date, the time, and an index number. Aperture provides a
number of preset name formats, and you can also create your own naming conventions to suit
the dierent types of shoots you do. You can choose a preset name format when you import
new photos.
You can apply names to your image les when you import them and when you export them. You
can specify names to apply to the versions and to the originals. For example, when you import
photos from your camera, you can specify that a name format be applied to each image version
that Aperture creates. You can also specify that Aperture apply names to the originals as they
are stored in the library or on a hard disk. When importing image les, you select the Rename
Original File checkbox to apply a name format to the originals. Then both the versions and the
originals share the same name format. When you export originals, you can also rename them.
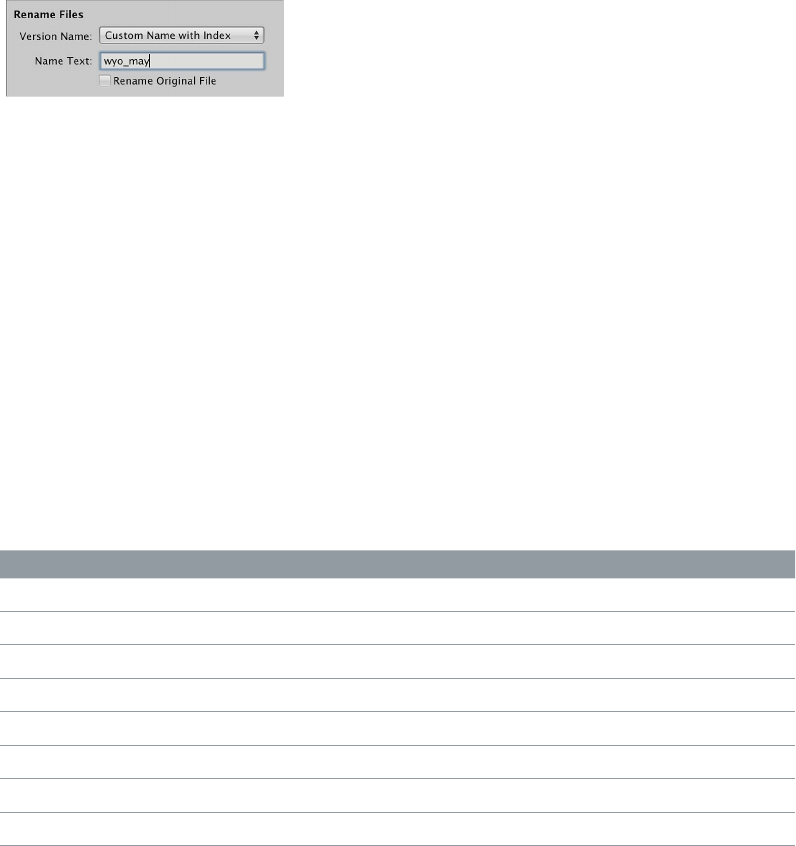
Chapter 3 Importing Photos 61
When you import originals as referenced images, you can’t rename the originals if you leave
them in their original locations. However, when you import originals as referenced images and
move them to a new hard disk location, you can rename them at that time.
Note: If you back up your les on import, the copied les are also renamed. For more information
about backing up your les on import, see Automatically Backing Up Your Imported Files on
page 64.
To automatically name your les during import
1 In the Import browser, choose Rename Files from the Import Settings pop-up menu.
The Rename Files controls appear in the Import browser.
2 Do one of the following:
•To apply a preset name format to your les as they are imported: Choose a preset name format
from the Version Name pop-up menu.
•To use the existing lenames: Choose None from the Version Name pop-up menu.
•To create a new name format: Choose Edit from the Version Name pop-up menu, and create a
custom name format in the File Naming dialog.
For more information about creating new name formats, see Creating Custom Name
Formats on page 62.
3 If you choose a name format with a custom name, the Name Text eld appears below the Version
Name pop-up menu. Enter a name for the photos in the Name Text eld.
4 Select the Rename Original File checkbox if you want to change the lenames of the originals on
disk to match the version names.
Aperture provides the following preset name formats in the Version Name pop-up menu
by default.
Preset name format Example
Custom Name with Index Thailand 1, Thailand 2, and so on
Custom Name with Index (no spaces) Thailand1, Thailand2, and so on
Version Name IMG001
Version Name and Date/Time IMG001 - 2008-10-14 09.03.25 PM
Version Name with Sequence IMG001 (1 of 2), IMG002 (2 of 2), and so on
Version Name with Index IMG001 1, IMG002 2, and so on
Image Date/Time 2008-10-14 09.03.25 PM
Custom Name with Counter Thailand 001, Thailand 002, and so on

Chapter 3 Importing Photos 62
Applying Valid Filenames
Proper lenaming is one of the most critical aspects of media and project management. When
you capture your originals, consider how and where your les may be used in the future. Naming
your les simply and consistently makes it easier to share media among multiple photographers,
transfer projects to other Aperture systems, move les across a network, and properly restore
archived projects.
The most conservative lenaming conventions provide the most cross-platform compatibility.
This means that your lenames will work in dierent operating systems, such as OS X and other
UNIX-based operating systems, and Windows. You also need to consider lenaming when you
transfer les over the Internet, where you can never be certain what computer platform your les
may be stored on, even if temporarily.
Avoid Example characters Reasons
File separators / (slash)
\ (backslash)
Some applications may not allow
you to use slashes in the names
of items. These characters are
directory separators for OS X and
DOS (Windows), respectively.
Special characters not included in
your native alphabet
¢™ These characters may not be
supported or may be dicult
to work with when exported to
other applications.
Punctuation marks, parentheses,
quotation marks, brackets, and
operators
. , [ ] { } ( ) ! ; “ ` * ? < > | These characters are often used
in scripting and programming
languages.
White space characters such
as spaces, tabs, new lines, and
carriage returns (the last two are
uncommon)
White space is handled dierently
in dierent programming
languages and operating systems,
so certain processing scripts and
applications may treat your les
dierently than expected. The
most conservative lenames avoid
all use of white space characters
and use the underscore (_)
character instead.
Creating Custom Name Formats
In addition to the preset name formats, you can create custom name formats. To create a name
format, you select the name elements you want in the File Naming dialog. You can compose a
name format that combines the following name elements:
•Version Name
•Original File Name
•Sequence Number (1 of 5, 2 of 5, 3 of 5, and so on)
•Image Year
•Image Month
•Image Day
•Image Date
•Image Time
•Index Number (1, 2, 3, and so on)
•Custom Name
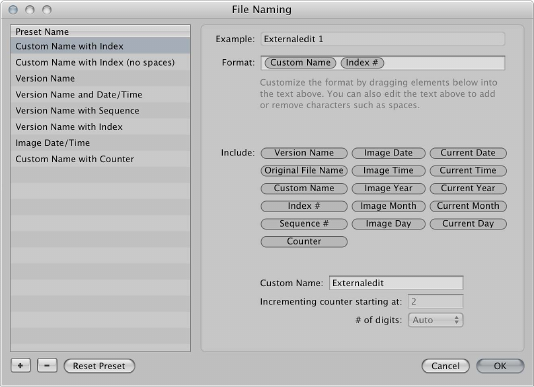
Chapter 3 Importing Photos 63
•Counter (001, 002, 003, and so on)
•Current Date
•Current Time
•Current Year
•Current Month
•Current Day
To create a custom name format
1 In the Import browser, choose Rename Files from the Import Settings pop-up menu, then choose
Edit from the Version Name pop-up menu.
The File Naming dialog appears.
2 Click the Add (+) button to create a new name format, or select the preset name format you
want to change.
3 Drag the name elements you want into the Format eld in the order you want them. You can
also add valid characters or spaces between the name elements. For more information about
valid lenaming characters, see Applying Valid Filenames on page 62.
4 Enter a custom name in the Custom Name eld, if you like.
5 Click OK.
Your new name format now appears in the Version Name pop-up menu.
To reset the starting number of a counter in a name format
When using a counter in your name format, you can specify the starting number and the
number of digits, from one to six, that appear in the counter. When you use a preset name format
with a counter, make sure to reset the initial starting number, if necessary. Otherwise, on the next
import, Aperture will continue numbering the imported les starting from the last number of the
previous import.
Do one of the following:
mIn the File Naming dialog, type “0” (zero) in the “Incrementing counter starting at” eld.
mIn the File Naming dialog, select the preset whose counter you want to reset to zero, then click
the Reset Preset button.
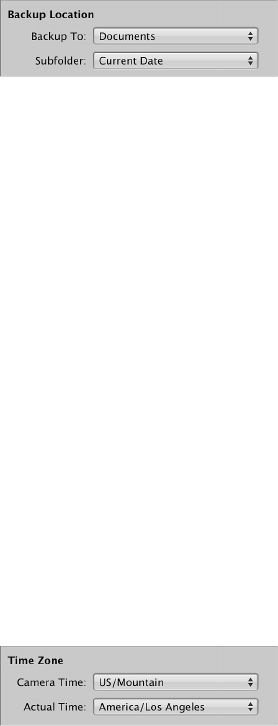
Chapter 3 Importing Photos 64
Automatically Backing Up Your Imported Files
Creating copies of your photos from the moment you take them is essential to the preservation
of your work. In Aperture, you can back up your original les as they are imported, using the Back
Up Files import option. Backing up your image, video, and audio les at import ensures that if
something catastrophic happens to your computer system, copies of your original les are stored
somewhere safe. If you back up your les during import, Aperture makes a copy of each le and
places the copied les in the location you specify.
To back up your original les during import
1 In the Import browser, choose Backup Location from the Import Settings pop-up menu.
The Backup Location controls appear in the Import browser.
2 Do one of the following:
•To back up your les to the Documents folder: Choose Documents from the Backup To
pop-up menu.
•To back up your les to a new location: Choose “Choose” from the Backup To pop-up menu, then
select a location from the dialog that appears.
Note: It’s a good idea to back up your original les to a location other than your computer. This
is the only way to ensure that your original les are safe if something catastrophic happens to
your computer.
To turn o automatic backup during import
mChoose None from the Backup To pop-up menu.
Adjusting the Image File’s Time When Importing
On a trip, it’s easy to forget to update your camera’s clock to match the local time zone. If you
didn’t synchronize your camera time to the new location, Aperture lets you correct the time
assigned to the image le by whole hours when importing.
To adjust image le capture time when importing
1 In the Import browser, choose Time Zone from the Import Settings pop-up menu.
The Time Zone controls appear in the Import browser.
2 Choose the time zone that matches the camera’s time setting from the Camera Time
pop-up menu.
3 Choose the time zone of the shoot location from the Actual Time pop-up menu.
Aperture updates the capture time of your image les according to the Time Zone settings.
After you’ve imported photos, you can adjust the date and time of any versions you’ve created
by choosing Metadata > Adjust Date and Time. For more information, see Adjusting the Photo
Date and Time on page 198.
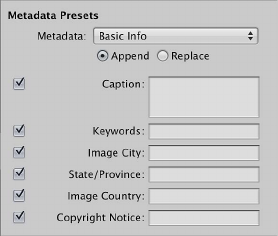
Chapter 3 Importing Photos 65
Adding Metadata to Photos During Import
You can add metadata to your photos as they are imported into Aperture. Adding metadata
during the import process helps you keep track of your photos and quickly locate them using
the Smart Settings HUD and Filter HUD. For example, you can add IPTC keywords and other
metadata to the photos.
To add metadata to photos as they’re imported
1 In the Import browser, choose Metadata Presets from the Import Settings pop-up menu.
The Metadata Presets controls appear in the Import browser.
2 Do one of the following:
•To show the metadata elds for a metadata preset: Choose a metadata preset from the Metadata
pop-up menu.
•If you don’t want to modify the metadata of the les during import: Choose None from the
Metadata pop-up menu.
•To create a new metadata preset: Choose Edit from the Metadata pop-up menu, then create a
new metadata preset using the Metadata dialog.
For more information, see Creating Metadata Presets on page 191.
When you choose a metadata preset, Aperture displays the metadata elds for that preset. You
can enter the metadata you want in the elds.
3 Do one of the following:
•To add metadata to the photo while maintaining any associated metadata: Click Append.
•To add metadata and overwrite any associated metadata: Click Replace.
When you choose a metadata preset, Aperture displays the list of metadata elds and metadata
for that preset. You can edit the metadata preset to store any metadata that you want to apply
frequently to your photos using the Info inspector. For more information, see Creating Metadata
Presets on page 191.
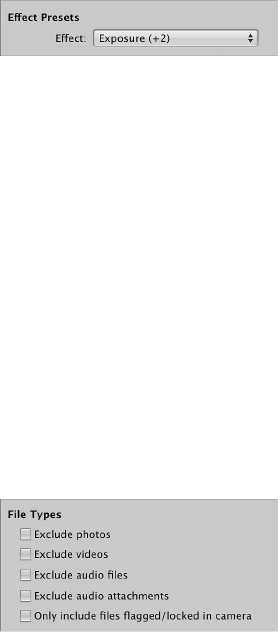
Chapter 3 Importing Photos 66
Applying Eects to Photos During Import
You can apply image eects and basic image adjustments, such as an exposure adjustment,
to your photos as they are imported. You apply eects and image adjustments by choosing
an eect preset from the Eects pop-up menu. The eect preset is applied uniformly to every
imported photo until it is turned o.
You can edit eect presets that you want to apply frequently to your photos. For more
information, see An Overview of Eects on page 274.
To apply eects to photos as they are imported
1 In the Import browser, choose Eect Presets from the Import Settings pop-up menu.
The Eect Presets controls appear in the Import browser.
2 Choose an eect preset option to apply to the imported photos from the Preset pop-up menu.
To turn o eects during import
mIn the Eect Presets controls, choose None from the Eect pop-up menu.
Filtering Files by Type During Import
Some digital cameras allow you to add audio attachments to your photos. For example, some
cameras allow you to record audio annotations for a photo after you shoot it. The camera
attaches the audio le to the image le so that you can review the audio when you download
the photo. When you connect a digital camera or card reader or point to a folder with photos
on your computer, Aperture recognizes any photo that has an audio attachment. You can also
import standalone QuickTime-compatible audio and video les.
To lter les by type during import
1 In the Import browser, choose File Types from the Import Settings pop-up menu.
The File Types controls appear in the Import browser.
2 Do any of the following:
•To exclude image les, leaving only audio and video les available for import: Select the “Exclude
photos” checkbox.
•To exclude video les during import: Select the “Exclude videos” checkbox.
•To exclude audio les during import: Select the “Exclude audio les” checkbox.
•To exclude all audio les attached to the photos: Select the “Exclude audio attachments”
checkbox.
•To include only les that were agged or locked using the camera: Select the “Only include les
agged/locked in camera” checkbox.
All photos matching the selected criteria appear in the Import browser. To make all the photos
reappear, deselect the checkboxes above.

Chapter 3 Importing Photos 67
Important: An audio le is imported into Aperture as an attachment when the audio le’s name
matches the image le’s name. For example, when you import “le.nef” and “le.wav,” Aperture
imports the .wav le attached to the .nef raw image le. Audio les are automatically attached
during all types of import: from a connected camera or card reader, from internal and external
hard disk drives, as well as via drag and drop. If the audio lename is not the same as the image
lename, it will not be attached to the photo even if imported directly from a camera or a card
reader. However, there is one exception: some Canon cameras, including the G9 and G10, prex
the audio lename with “SND” and the image lename with “IMG”; these audio les are imported
as attachments.
Importing RAW + JPEG Image Pairs
Many digital cameras have a setting for creating a RAW le plus a JPEG le for each photo as you
shoot. Many photographers use the RAW + JPEG workow for the convenience of publishing
the JPEG images quickly while saving the RAW les for high-resolution prints. Aperture provides
several options for importing the RAW + JPEG image pairs. However, if you decide to import the
JPEG image les only, you can go back and import the corresponding RAW les later.
Note: The RAW + JPEG Pairs import setting remains in eect from one import session to the next.
To lter RAW + JPEG pairs during import
1 In the Import browser, choose RAW + JPEG Pairs from the Import Settings pop-up menu.
The RAW + JPEG Pairs controls appear in the Import browser.
2 Choose an option from the Import pop-up menu:
•To import both the RAW and the JPEG image les and set the JPEG le in each pair as the original:
Choose “Both (JPEG as Original).”
•To import both the RAW and the JPEG image les and set the RAW le in each pair as the original:
Choose “Both (RAW as Original).”
•To import the RAW and JPEG image les as separate originals: Choose “Both (Separate Originals).”
•To import the JPEG les only: Choose “JPEG les only.”
•To import the RAW les only: Choose “RAW les only.”
To import the RAW les that match the JPEG les in your Aperture library
1 Choose “Matching RAW les” from the Import pop-up menu.
The Include pop-up menu appears below the Import pop-up menu.
2 Choose an option from the Include pop-up menu:
•To import all matching RAW les regardless of rating: Choose “All matching les.”
•To import all RAW les matching JPEG les that are unrated or better: Choose “Unrated or better.”
•To import all RAW les that match the current rating: Choose “Current lter.”

Chapter 3 Importing Photos 68
Using AppleScript Actions Immediately After Import
The Aperture community provides many AppleScript actions online to automate repetitive tasks
in Aperture, and you can create your own AppleScript actions to help automate your workow.
You can use AppleScript actions from within Aperture immediately after an import operation
is complete.
For more information about AppleScript actions for use with Aperture, go to
http://www.apple.com/aperture/resources.
Important: All scripts must use the import event handler: on importActionForVersions(input).
To use AppleScript actions immediately after import
1 Choose Actions from the Import Settings pop-up menu.
The Actions controls appear in the Import browser.
2 If no AppleScript action is selected, click the Choose button and locate a script from the dialog
that appears.
The selected AppleScript action appears in the AppleScript eld and is set to begin as soon as
the import operation is complete.
Note: The AppleScript action is applied only to the current import operation.
To stop AppleScript actions from automatically starting after import
mClick the Clear button.
Resetting Your Import Settings
The import settings you set in the Import browser remain in eect from import session to import
session, regardless of whether or not they are shown. However, you can quickly reset the import
settings to their defaults.
To reset the import settings to their defaults
mIn the Import browser, choose Reset to Defaults from the Import Settings pop-up menu.
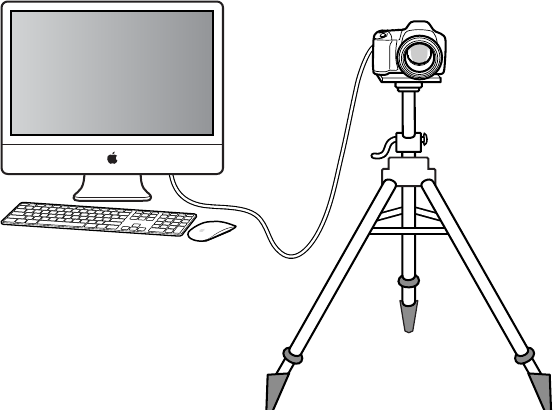
Chapter 3 Importing Photos 69
Importing Files from the Finder via Drag and Drop
You can drag image, video, and audio les from the Finder or desktop directly into the Library
inspector, Viewer, and Browser. This is useful if you receive image les from a source other than
your camera and you want to use them in Aperture. You can also use this technique if you have
image, audio, and video les scattered on your desktop or throughout folders on your computer
and you want to consolidate them in one place in the library.
To quickly import les from the Finder
1 Select an item in the Library inspector, such as a project or an album, in which to import
the photos.
2 Locate the image, audio, or video les in the Finder.
3 Drag the les to either the selected item in the Library inspector or anywhere in the Browser
or Viewer.
The import process begins and an indicator appears next to the project’s name, showing the
progress of the import.
Capturing Photos as You Work
For certain kinds of shoots, such as product shoots done within your oce studio, you may want
to immediately see test shots on your computer to check on lighting and other production
factors. You can connect your camera directly to your computer and have each shot immediately
appear in an Aperture project as you shoot. You can review a photo in detail, make production
changes, and then shoot and immediately see the results again. This process is called tethered
shooting, and it’s ideal for checking the details of a shot while setting up the nal shot.
Note: For a list of cameras that Aperture supports for tethered shooting, go to
http://support.apple.com/kb/HT4176. See your camera’s manual for information about setting up
your camera for tethered shooting.
Chapter 3 Importing Photos 70
To use tethered shooting, you rst connect your camera to the computer using a USB or FireWire
cable. You then select a project for the photos to be stored in. Aperture provides a Tether
Settings dialog for specifying your tethered shooting settings, and you can also use this dialog
to specify any other import settings (just as you would normally specify import settings in the
Import browser).
After starting a session, you can use Aperture to view and capture photos. You use the Aperture
Tether HUD to control your camera and take photos as you work.
To set up Aperture for tethered shooting
1 Connect your camera to your computer.
2 In the Library Inspector, select the project you want the photos captured to.
3 Choose File > Tether > Start Session.
4 Specify import settings.
For information, see Importing from Your Digital Camera or Card Reader on page 53.
5 Click Start Session.
The Tether HUD appears.
6 Do one of the following:
•To begin the capture session: Click Capture.
•To stop capturing photos: Click Stop Session.
Importing Folders of Files from the Finder
If you’ve spent time organizing your image, video, and audio les into a meaningful hierarchy
on your computer and you want to keep that organization, you can import a folder of les as
a project or drag it directly into the Library inspector. When you import a folder of les or drag
it into the Library inspector, the top folder becomes a folder in the Library inspector and any
subfolders become projects within the folder.
To import a folder of les from the Finder using the Import command
1 Choose File > Import > Folders as Projects.
2 Select the folder of photos that you want to import. You can select multiple folders to import by
Shift-clicking them.
3 Do one of the following:
•To import the top-level folder as a folder in the Aperture library and all of its subfolders as individual
projects: Choose Folders and Projects from the Import Folders As pop-up menu.
•To import the top-level folder as a project and all its subfolders as albums: Choose Projects and
Albums from the Import Folders As pop-up menu.
Chapter 3 Importing Photos 71
4 Choose a location for the imported photos by doing one of the following:
•To store imported originals in the Aperture library: Choose “In the Aperture Library” from the
Store Files pop-up menu.
•To import the les as referenced images stored in their current location on your hard disk: Choose
“In their current location” from the Store Files pop-up menu.
•To store imported originals as referenced images in the Pictures folder on your hard disk: Choose
Pictures from the Store Files pop-up menu, then choose whether you want the les moved or
copied to the Pictures folder by clicking the “Move les” or “Copy les” button.
•To store imported originals as referenced images in a location other than the Pictures folder:
Choose “Choose” from the Store Files pop-up menu and select a folder. Choose “No folder”
from the Subfolders pop-up menu to specify that the les be stored as separate, individual
les in the selected folder. You can also specify that Aperture create a hierarchy of subfolders
with specic folder names to hold your les. For more information about creating folders to
hold your imported photos, see Importing Originals for Referenced Images into Folders on
page 72. Choose whether you want the image les moved or copied to the new location by
clicking the “Move les” or “Copy les” button.
5 Choose a naming convention from the Version Name pop-up menu to specify how you want the
photos named.
For example, choose Original File Name from the Version Name pop-up menu to have your les
stored using the original lenames from your camera or card. Choose a name format from the
Version Name pop-up menu to have your photos stored using a specied name. If you choose a
custom name format, enter a name in the Name Text eld. Choose Edit from the Version Name
pop-up menu to dene a new naming scheme. For more information about naming les, see
Automatically Naming Your Imported Photos on page 60.
Click the “Apply to Original lenames” checkbox to rename the original les as well.
6 Choose how you want Aperture to import RAW + JPEG pairs from the RAW + JPEG pop-up menu.
For more information about importing RAW + JPEG pairs, see Importing RAW + JPEG Image
Pairs on page 67.
7 Click Import.
The top-level folder in the selection either appears as a folder or is converted to a project based
on the option you chose from the Import Folders As pop-up menu. If the folder you imported
contains a hierarchy of subfolders and photos, the subfolders appear as albums.
To drag folders into Aperture
When you drag folders into the Library inspector, Aperture uses the last import settings you
specied to determine how the folders are imported and where they are stored.
1 In the Finder, locate the folder containing the containing the folders, video les, and audio les
you want to import.
2 Drag the folder to the Library inspector.
Chapter 3 Importing Photos 72
Importing Originals for Referenced Images into Folders
When you import photos as referenced images, you can have Aperture place their originals
individually into a selected folder or create subfolders to hold the les. For example, you might
have the imported image les placed in subfolders identied by date. You can create folder name
format presets that you can quickly choose to select the folder name format you prefer.
To create a folder name format, you select the name elements in the Folder Naming Presets
dialog. You can specify a combination of name elements to create custom folder names. You can
compose folder name formats that combine the following name elements:
•Version Name
•Original File Name
•Sequence Number (1 of 5, 2 of 5, 3 of 5, and so on)
•Image Year
•Image Month
•Image Day
•Image Date
•Image Time
•Index Number (1, 2, 3, and so on)
•Custom Name
•Counter (001, 002, 003, and so on)
•Current Date
•Current Time
•Current Year
•Current Month
•Current Day
•Folder Name
•Project Name
You can also create a hierarchy of folders within folders. For example, you can specify that
Aperture place your referenced images in a subfolder named Date, and within that folder you
can create subfolders identied by the time the photo was taken.
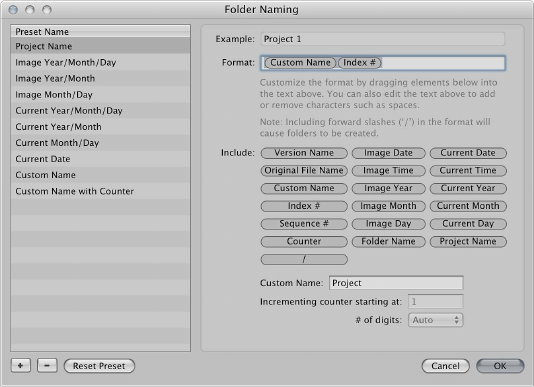
Chapter 3 Importing Photos 73
To create a custom folder name format
1 In the Import browser, choose Pictures or another folder from the Store Files pop-up menu, then
choose Edit from the Subfolder pop-up menu that appears.
The Folder Naming dialog appears.
2 Click the Add (+) button to create a new name format, or select the preset name format you
want to change.
3 Drag name elements into the Format eld in the order you want them to appear.
4 Drag a slash between the elements where you want subfolders created.
5 Enter a custom name in the Custom Name eld, if you like.
6 Click OK.
Your new folder name format now appears in the Subfolders pop-up menu.
To reset the starting number of a counter in a folder name format
When using a counter in your folder name format, you can specify the starting number and the
number of digits, from one to six, that appear in the counter. When you use a folder name format
with a counter, reset the initial starting number. Otherwise, on the next import, Aperture will
continue numbering the image folders starting from the last number of the previous import.
mIn the Folder Naming Presets dialog, type “0” (zero) in the “Incrementing counter starting at” eld.

Chapter 3 Importing Photos 74
Where Aperture Stores Your Managed Files in the Library
You can always view and work with your photos within the Aperture application. However, you
may wonder where your managed image les physically reside in the Aperture library on the
computer’s hard disk. By default, your photos are stored in the Aperture Library le within the
Pictures folder. For more information about managed image les, see What Are Managed Images
and Referenced Images? on page 28.
You can open and see the contents of the Aperture Library le in the Finder by Control-
clicking the le and choosing Show Package Contents from the shortcut menu. However, it’s
not recommended that you access or work with your originals in this way because you risk
interfering with the Aperture library.
WARNING: You should always back up and work with your managed images and projects
from within the Aperture application. If you move or accidentally change the les stored in
the Aperture Library le, Aperture may not be able to locate your projects and the media they
contain. Making a change to a managed le in the Finder, such as renaming it, creates changes
that Aperture cannot track.
Adding Audio Attachments to Image Files
Although the audio les of photos with audio attachments are automatically imported into
Aperture when the lenames match, you can also manually attach an audio le to a photo after
it has been imported into Aperture. There are two ways to attach an audio le to a photo. If the
project selected in the Library inspector contains an original audio le, you can attach the audio
le to a photo in the project using the Info inspector. If the audio le is outside of the Aperture
library, you can drag the audio le from the Finder to the photo in the Viewer.
Note: For a list of le formats that can be used for audio attachments in Aperture, go to
http://www.apple.com/aperture/specs.
To add an audio attachment using the Info inspector
1 In the Library inspector, select a project containing the audio le you want to attach.
2 In the Browser, select the photo you want to attach the audio le to.
3 In the Info inspector, choose Attach Audio File from the Metadata Action pop-up menu.
4 In the dialog that appears, select the audio le you want to attach, then click Attach.
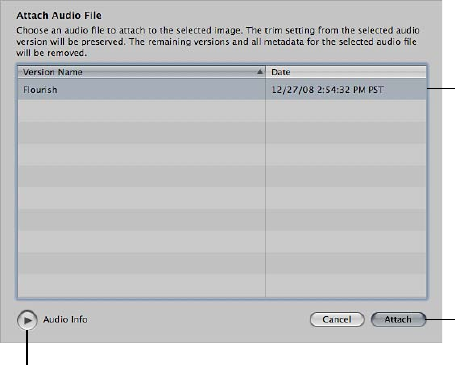
Chapter 3 Importing Photos 75
You can preview the selected audio le by clicking the Play button.
Audio file
Attach button
Play button
The audio attachment is added to the photo, and the audio le’s thumbnail disappears from the
Browser. A badge appears on the lower-right portion of the photo, indicating that an audio le
is attached. For more information about playing audio attachments, see Viewing and Changing
Metadata in the Info Inspector and Inspector HUD on page 183.
To add an audio attachment to a photo via drag and drop
1 If necessary, click the Split View button in the toolbar, and then select the photo you want to
attach the audio le to in the Browser.
2 In the Finder, select the audio le you want to attach.
3 Drag the audio le to the photo you want to attach it to in the Viewer.
The photo is surrounded with a green outline, indicating that the le is about to be attached.
The audio attachment is added to the photo in Aperture. A badge appears on the lower-right
portion of the photo, indicating that an audio le is attached. For more information about
playing audio attachments, see Viewing and Changing Metadata in the Info Inspector and
Inspector HUD on page 183.
To remove an attachment from a photo
1 In the Browser, select the photo whose attachment you want to remove.
2 In the Info inspector, choose Detach Audio File from the Metadata Action pop-up menu.
The audio le is detached and placed in the same project as the photo it was attached to.
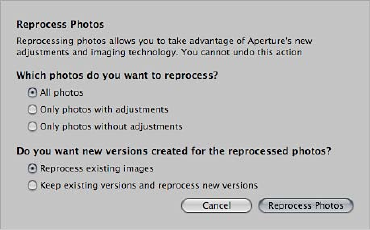
Chapter 3 Importing Photos 76
Reprocessing Photos from Previous Versions of Aperture
An Overview of Reprocessing Photos
Aperture provides image processing algorithms that deliver improved image quality. With
improved default rendering of RAW images from supported cameras, Aperture 3 provides
signicantly enhanced image quality with improvements in noise reduction, sharpening, and
highlights recovery.
To maintain the image integrity of the existing photos in your Aperture library, Aperture
allows you to retain the original processing of your photos from previous versions, selectively
process images using the most current RAW image processing, or create duplicate versions of
each original image le with the most current RAW image processing applied. However, some
adjustments and brushed adjustments are not available unless the selected photo uses the most
current RAW image processing.
Strategies for Reprocessing Photos
When you start using Aperture 3.4, all of your existing photos continue to use the previous
version’s image processing, in order to preserve their appearance. Any of these photos can
be individually reprocessed to use the most current image processing. You can also use the
Reprocess Originals command in the Photos menu to reprocess selected photos, projects, books,
slideshows, webpages, web journals, Light Table albums, albums, and Smart Albums.
Reprocessing a large number of photos can be a time-consuming process. Therefore, you may
nd it easier to reprocess photos on an as-needed basis. For example, if you have ve-star
selects, you may decide to initially reprocess only those photos. Photos are not aected by being
reprocessed more than once; if a photo already uses the most image processing, reprocessing it
has no eect.
Reprocessing a Photo Selection
You can reprocess all photos, reprocess only photos with adjustments, or reprocess only photos
without adjustments. You can also reprocess photos one at a time using the RAW Fine Tuning
controls in the Adjustments inspector or the Adjustments pane of the Inspector HUD. For more
information, see Reprocessing Photos Individually on page 78.
To reprocess a selection of photos
1 Select a photo or a group of photos.
2 Choose Photos > Reprocess Originals.
3 In the dialog that appears, select the appropriate reprocessing criteria, then click the Reprocess
Photos button.
The image les are reprocessed from the earlier image process to the most current image
processing, according to the criteria you specied.
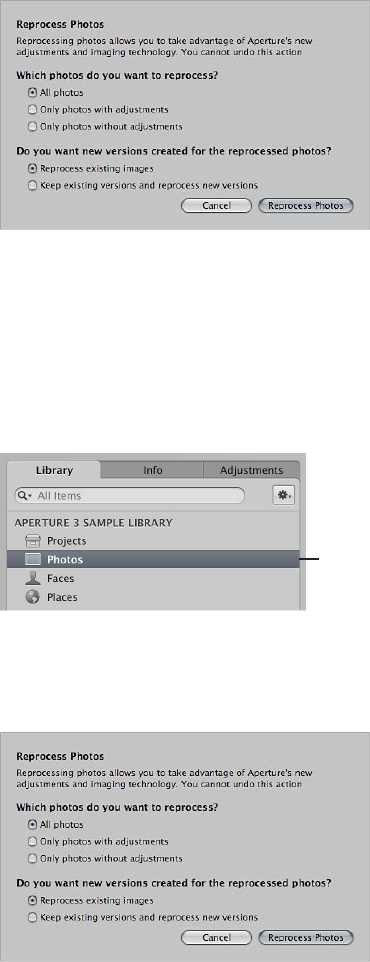
Chapter 3 Importing Photos 77
To reprocess a project or an album
You can reprocess all the photos in a selected project, book, slideshow, webpage, web journal,
Light Table album, album, or Smart Album.
1 In the Library inspector, select a project or album.
2 Choose Photos > Reprocess Originals.
3 In the dialog that appears, select the appropriate reprocessing criteria, then click the Reprocess
Photos button.
All photos in the selected project or album are reprocessed using the most current
image processing.
To reprocess every photo in the library
If you like, you can reprocess all the photos in the library at once. However, this process may take
a long time for large libraries.
1 In the Library inspector, select the Photos item.
Photos item
2 Choose Photos > Reprocess Originals.
3 In the dialog that appears, select the appropriate reprocessing criteria, then click the Reprocess
Photos button.
Every photo in the library is reprocessed using the most current image processing.
Chapter 3 Importing Photos 78
Important: Reprocessing thousands of image les can be a lengthy operation. Make sure to set
aside a signicant amount of time for Aperture to process the image les—preferably when you
don’t need to use your Aperture system.
Reprocessing Photos Individually
You can reprocess photos one at a time using the Adjustments inspector or the Adjustments
pane of the Inspector HUD.
To reprocess an individual photo
1 Select a photo.
2 In the Adjustments inspector or the Adjustments pane of the Inspector HUD, choose RAW Fine
Tuning from the Add Adjustment pop-up menu.
3 In the RAW Fine Tuning controls, click the Reprocess button.
Note: If the Reprocess button does not appear in the Adjustments inspector or the Adjustments
pane of the Inspector HUD, the photo has already been reprocessed using Aperture 3
image processing.
The photo is reprocessed using the most current image processing.
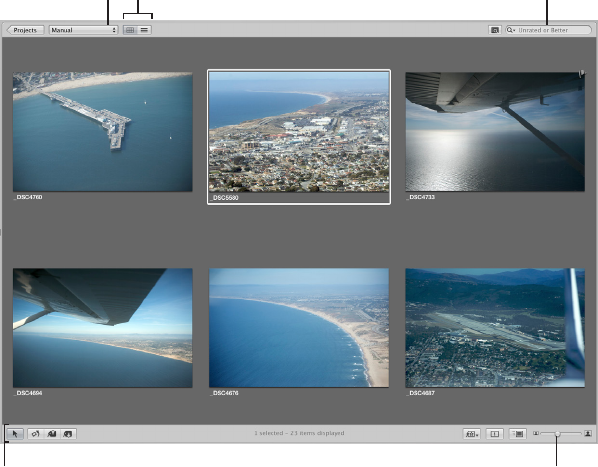
79
An Overview of the Browser
After a shoot, you may need to sort through hundreds or even thousands of photos in a project.
Aperture provides ecient methods for increasing your productivity when working with large
numbers of photos.
The Browser provides the principal environment for viewing, selecting, and working with photos.
You can quickly search for a photo in a project, reorder and sort photos, rotate photos to portrait
or landscape orientation, create new versions, and delete photos.
When you select a project, folder, or album in the Library inspector, thumbnails of its photos
appear in the Browser. You select photos in the Browser to work with them. You can move and
rearrange photos, rotate photos, make new versions, and delete photos from a project.
Sorting
pop-up menu Search field
Thumbnail Resize slider
Grid View and
List View buttons
Tool strip
Aperture provides fast and ecient ways of selecting photos. You can use the arrow keys to
quickly select a photo or multiple photos to work on. You can also select photos by clicking,
dragging a selection rectangle, and using keyboard shortcuts. If using Aperture with a trackpad,
you can use the swipe gesture to select photos. For more information about using gestures with
Aperture, see Using Gestures with Aperture on page 599.
You can display photos in the Browser in lmstrip view, grid view, and list view.
Working with Photos in
the Browser 4
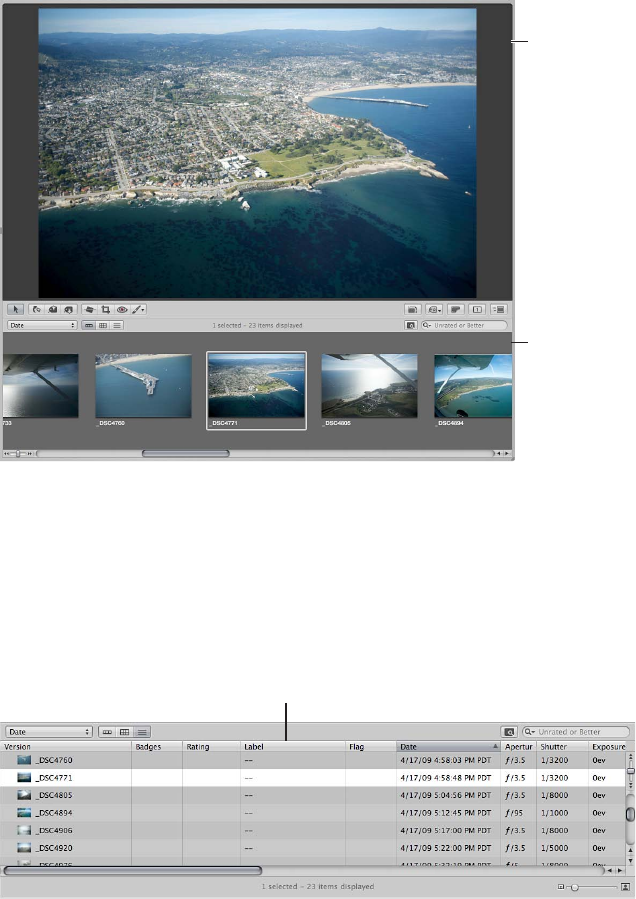
Chapter 4 Working with Photos in the Browser 80
When you select lmstrip view, the Browser changes to a single row of photos that you can
select and navigate through, and selected photos appear in the Viewer.
Viewer
Browser in
filmstrip view
Grid view organizes thumbnails of your photos in a grid pattern. Use grid view when it’s easiest
to identify your photos by sight and work with thumbnails as you organize, stack, or assign
keywords to photos.
List view displays a list of your photos with associated le information. Use list view when you
need to see or sort your photos by corresponding le properties such as image date, le size,
or rating.
Photos displayed in list
view in the Browser
List view is a great way to quickly see information about your les. You can also use list view to
sort your photos by any of the column categories. Click a column heading to sort your photos by
that category.
You can also customize the information that appears with your photos. For example, you can set
your photos to appear with the lename as well as the IPTC data and EXIF data. You can change
what information appears in the Browser in grid view, list view, and lmstrip view by customizing
the Metadata options in the Preferences window. For more information, see Displaying Specic
Metadata with Your Photos on page 105.
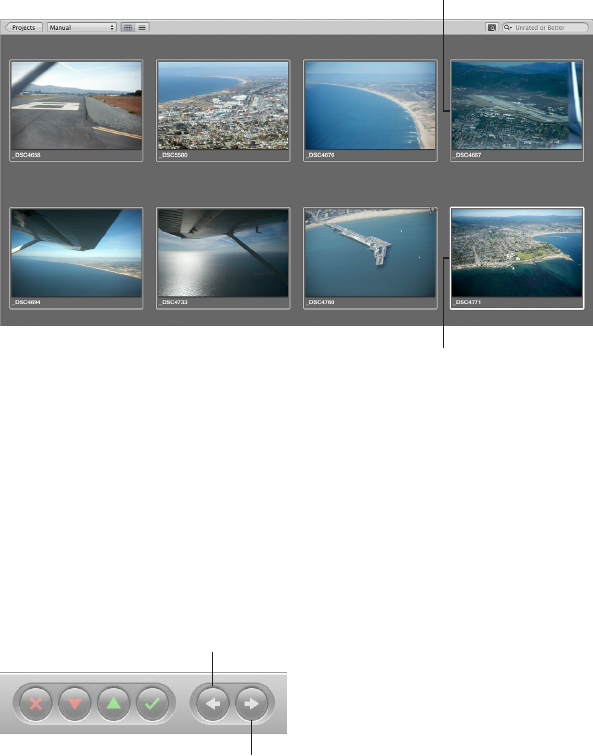
Chapter 4 Working with Photos in the Browser 81
If you make a mistake while editing, in most cases you can choose the Undo command to
immediately cancel your last action. In fact, you can choose the Undo command multiple times
to undo your last series of actions. Aperture places deleted originals in the Aperture Trash. If you
discover a deletion you did not intend to make, and the Undo command cannot recover the
deletion, you can still recover the original from the Aperture Trash until the Trash is emptied.
Navigating Through and Selecting Photos
Navigating Through Photos in the Browser
You can select one or several of the photos in the Browser to work with them or to view them
in the Viewer. Aperture identies the photos you’ve selected by displaying them with a white
border. When you select a group of photos, the actively selected photo, called the primary
selection, appears with a thick white border and the rest of the selected photos appear with thin
white borders.
All selected photos
display a white border.
A thick white border
surrounds the
primary selection.
To navigate through photos
Do one of the following:
mPress an arrow key to move left, right, up, or down.
mUse the scroll bar to scroll through the photos in the Browser, then click the photo you want
to view.
mChoose Window > Show Control Bar to display the control bar. In the control bar, click the Move
Selection Left or Move Selection Right button.
Move Selection Left
Move Selection Right

Chapter 4 Working with Photos in the Browser 82
Selecting Photos
Selecting photos is a fundamental task in Aperture. Knowing the many ways you can select
photos can help increase your productivity and satisfaction while working with your photos.
You can select photos in the following ways.
Task Action
Select a single photo •Click the photo.
•Press the arrow keys to navigate to the photo.
Select a range of photos •Select the rst photo, then choose Edit > Select to
End (or press Shift-End) to extend the selection to
the last photo in the Browser.
•Select the last photo in a range, then choose Edit >
Select to Beginning (or press Shift-Home) to extend
the selection to the rst photo in the Browser.
•Click the rst photo in a range, then Shift-click the
last photo.
•Press the arrow keys to select the rst photo, then
press Shift and an arrow key to select the last
photo in the range.
•Drag a selection rectangle to select all the photos
that fall within the rectangle.
Select a photo among selected photos •Press Semicolon (;) or press Command–Option–
Left Arrow to select the previous photo in the
selection. Press Apostrophe (’) or press Command–
Option–Right Arrow to select the next photo in
the selection.
Select a photo in a stack •Press the Right Arrow or Left Arrow key.
Select nonadjacent photos •Command-click the photos you want to select.
Command-click the photos again to deselect them.
Slide a selection •Press Command–Left Arrow or Command–Right
Arrow to slide the current selection over by one
photo. For example, you can move a three-photo
selection left or right by one photo at a time.
Select the next stack •With a stack selected, press Option–Page Up or
Option–Page Down.
Select or set a compare photo •Select the photo, then press Option-O.
Deselect the compare photo •Press Command-Return.
Select a dierent compare photo •Select the photo you want as a compare photo,
then press Return.
Select all photos in the Browser •Choose Edit > Select All (or press Command-A).
Select only the primary photo, deselecting all others •Choose Edit > Reduce Selection (or press Shift-E).
Deselect all photos in the Browser •Choose Edit > Deselect All (or press
Command-Shift-A).
•Click the gray background of the Browser.

Chapter 4 Working with Photos in the Browser 83
Navigating Through Photos in Quick Preview Mode
As you work with photos in the Browser and Viewer, you can set Aperture to display JPEG
representations of the photos called previews. Because the preview’s le size is smaller than that
of the original photo, Aperture can display the photo more quickly. For example, the thumbnails
in the Browser are preview representations of the originals, reduced to thumbnail size.
Likewise, when you select a photo in the Viewer, Aperture rst displays a preview photo as it
reads the larger original on disk. It then displays the full original once the image is decoded.
This process of displaying the previews and then the originals can be nearly instantaneous, or,
depending on the size of your originals, there can be a short delay in the nal display.
For more information about creating and working with previews, see An Overview of Preview
Images on page 118 .
To speed up the access and display of photos, you can turn on Quick Preview mode. In Quick
Preview mode, Aperture displays preview photos only, without reading the larger originals. You
can use Quick Preview mode to rapidly move to and select dierent photos. For example, you
might use Quick Preview mode to quickly select and stack photos, add keywords, or change
other metadata. When using Quick Preview mode, however, there are some things you can’t do,
such as make adjustments to photos. In Quick Preview mode, tools and functions that aren’t
available appear dimmed. Depending on your task, you may nd switching to Quick Preview
mode a great way to gain speedy access to photos.
To turn on Quick Preview mode
Do one of the following:
mChoose View > Quick Preview (or press P).
mClick the Quick Preview button in the tool strip.
The Quick Preview button in the tool strip turns yellow, and the border around the photo
selection in the Browser changes from white to yellow.
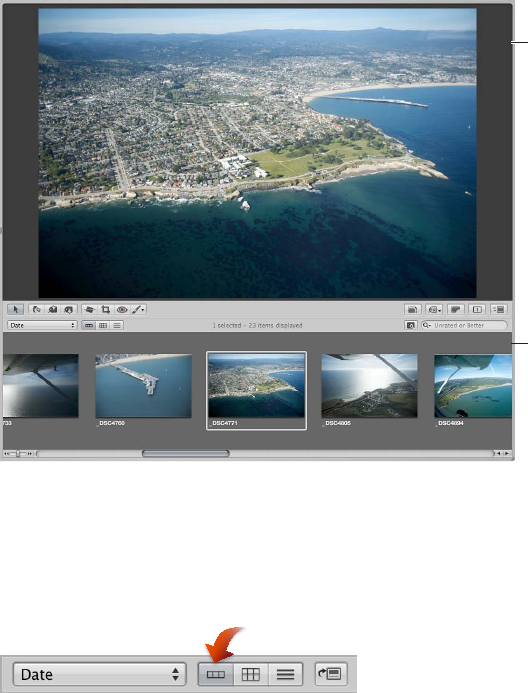
Chapter 4 Working with Photos in the Browser 84
Working with Browser Views
Working with Photos in Filmstrip View
Filmstrip view is the default view for the Browser. You can use lmstrip view in combination
with the Viewer to quickly scroll from photo to photo, making changes and comparing photos.
For example, you can select several photos in a row, group them in a stack, apply ratings, and
compare them side by side in the Viewer. You can use the Right Arrow and Left Arrow keys to
quickly move from photo to photo, and you can use the scroll bar and the Shuttle control to
scroll through photos. You can resize the thumbnails in the lmstrip by dragging the top of the
lmstrip to enlarge its area.
Viewer
Browser in
filmstrip view
To switch to lmstrip view
Do one of the following:
mChoose View > Browser > Filmstrip (or press Control-F).
mClick the Filmstrip View button in the Browser.
Note: The main window must be set to the Split View layout in order to access the lmstrip in
the Browser. When the main window is set to Browser, the Filmstrip View button disappears.
To shuttle continuously through the photos in lmstrip view
mPress J to shuttle left, press K to stop shuttling, or press L to shuttle right.
Note: Pressing J or L multiple times increases the shuttle speed.
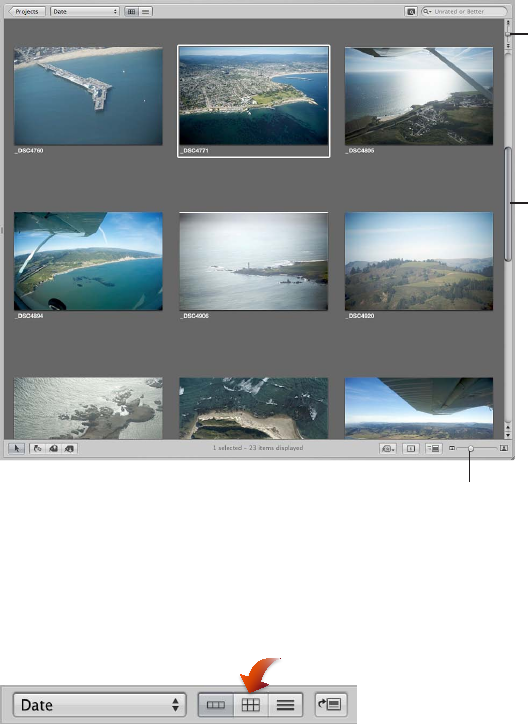
Chapter 4 Working with Photos in the Browser 85
Working with Photos in Grid View
Grid view displays the photos in your selection in the Library inspector as a grid of thumbnails
in the Browser. You can use grid view when you want to review large thumbnail photos quickly.
Setting the Aperture main window to show the Browser by itself provides the maximum amount
of space to dedicate to viewing thumbnails. You may want to adjust the size of the thumbnails to
a size convenient for selecting and working with them. If your selection in the Library inspector
has many photos, you can also use the Shuttle control or the scroll bar to scroll through
the photos.
For more information about setting the Aperture main window to show the Browser by itself, see
Choosing a Workspace View on page 88.
Shuttle control
Scroll bar
Thumbnail Resize slider
To switch to grid view
Do one of the following:
mChoose View > Browser > Grid (or press Control-G).
mClick the Grid View button in the Browser.
To adjust the thumbnail size
mDrag the Thumbnail Resize slider to increase or decrease the size of the thumbnails.
To shuttle continuously through the photos in grid view
mPress J to shuttle left, press K to stop shuttling, or press L to shuttle right.
Note: Pressing J or L multiple times increases the shuttle speed.
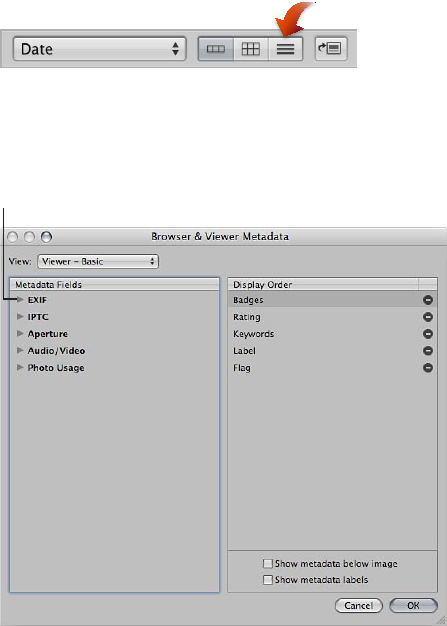
Chapter 4 Working with Photos in the Browser 86
To lighten or darken the background of the Browser
Depending on your work preferences, you may want to lighten or darken the background that
your thumbnails appear against in the Browser. The darker the background, the less it interferes
with the colors in your photo. It’s a good idea to set the background to a dark color when
performing color adjustments to your photo. You can darken the background from shades of
gray all the way to black, or lighten it from gray to white.
1 Choose Aperture > Preferences, or press Command-Comma (,).
2 In the Preferences window, click Appearance and drag the Browser Background Brightness slider
to lighten or darken the background, then close the window.
Working with Photos in List View
Instead of displaying thumbnails, list view displays photos by name and icon with accompanying
information such as rating, image dimensions, le size, and date.
To switch to list view
Do one of the following:
mChoose View > Browser > List (or press Control-L).
mClick the List View button in the Browser.
To choose what type of information is displayed in list view
1 Choose View > Metadata Display > Customize (or press Command-J).
2 In the Browser & Viewer Metadata dialog, choose a list view option from the View pop-up menu.
Disclosure triangle
3 In the Metadata Fields column, click the disclosure triangles next to the main groups of metadata
to reveal the options within them.
4 Specify the type of metadata that appears in list view by selecting the checkboxes
corresponding to each type. Deselect the checkboxes for metadata items you want to remove.
Each metadata item selected in the Metadata Fields column in the Browser & Viewer Metadata
dialog appears as a column in list view.
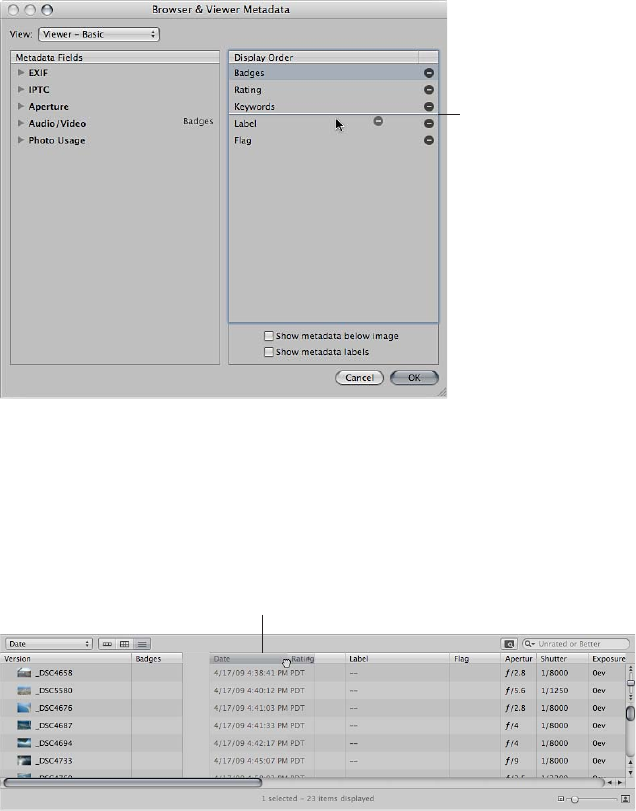
Chapter 4 Working with Photos in the Browser 87
5 If necessary, rearrange the order in which the metadata columns are displayed by dragging the
metadata items up or down in the Display Order column.
The order of metadata selections in the Display Order column from top to bottom corresponds
to the order of columns in the Browser in list view from left to right. Moving an item up in the
Display Order column moves the metadata column to the left in list view.
“Badges” is moved
and will appear
after “Keywords.”
6 When you are satised with your metadata selections and the order in which they will be
displayed in list view, click OK.
To rearrange the metadata columns in list view
You can rearrange the metadata columns to keep the most important information in view.
mSelect the column’s header and drag the column to a new position.
The Date column
is being dragged.
To sort photos in list view by a category
One of the main advantages of list view is that you can quickly sort photos based on a category
of information. When you click a column heading in list view, Aperture reorders the photos,
sorting them by that category. For example, you might sort your photos by date.

Chapter 4 Working with Photos in the Browser 88
mClick the category column heading in the Browser.
Photos in list view
sorted by date
To enlarge the thumbnail icons in list view
When you work in list view, it may sometimes be dicult to determine the content of a photo
based on the le information. You can enlarge the thumbnail icons that appear in list view to
give you a better look at the photos.
mDrag the Thumbnail Resize slider to increase or decrease the size of the icons.
To rename a photo version in list view
You can easily rename les after importing them. When you rename a le, you are renaming the
photo version, not the original. The lename of the original does not change.
mSelect a photo, then double-click the photo’s version name and enter a new name.
Choosing a Workspace View
You can easily change the layout of the Aperture main window to match your workspace
preferences and workow. You can work with the Browser lling the main window, with the
Browser in combination with the Viewer, or with only the Viewer open.
When you work with the Browser and Viewer together, you can reposition the Browser on the
screen. For example, you can rotate the Browser to the side. You can also swap the position of
the Viewer and Browser.
To work with the Browser lling the main window
Do one of the following:
mChoose View > Browser.
mClick the Browser button in the toolbar.
To work with the Browser and Viewer together in the main window
Do one of the following:
mChoose View > Split View.
mClick the Split View button in the toolbar.
To work with the Viewer only
Do one of the following:
mChoose View > Viewer.
mClick the Viewer button in the toolbar.
Tip: To quickly change workspace views, press the V key repeatedly until you see the view you
want to work in.
To rotate the position of the Browser
m Choose View > Browser > Rotate Position (or press Shift-W).

Chapter 4 Working with Photos in the Browser 89
To swap the position of the Browser and the Viewer
m Choose View > Browser > Swap Position (or press Option-W).
Working with Two or More Browsers Open
You can work with two items in the Library inspector open at once, splitting the Browser into a
separate pane for each item.
Project tab
When you select an item in the Library inspector and then Option-click a second item, Aperture
splits the Browser into two panes and shows thumbnails for both items. You can select photos
in either pane and see the selections in the Viewer. You can also set dierent display options for
each pane. For example, one pane may show photos in grid view and the other in list view. You
may nd that working with multiple Browser panes open allows you to easily copy or transfer
the contents of one item in the Library inspector to another. You can also open multiple items
in the Library inspector and display their contents in a single Browser. For more information
about opening and closing multiple projects, see Opening and Closing Items in the Library
Inspector on page 34.
Viewing Photos with the Loupe
An Overview of the Loupe
Aperture has a Loupe tool (also called the Centered Loupe) that is primarily designed to check
the focus and details of image thumbnails in the Browser. Using the Loupe can save you time
by preventing you from having to open the photo in the Viewer, zoom in to the photo to check
details, and then switch back to scanning through image thumbnails in the Browser.
For more information about using the Viewer to zoom in to images, see Viewing Photos at Full
Resolution on page 111.
You can position the Loupe over a portion of the photo you want to magnify. You can also
position the Loupe o to the side of the photo and have the Loupe magnify the portion of the
photo at the position of the pointer. Then, as you move the pointer, you see specic parts of the
photo magnied. In addition to checking a photo’s focus, the Loupe is useful for making quick
checks for sensor dust, aws, ngerprints on lm scans, and other issues. You can use the Loupe
on any photo or thumbnail in the Aperture library.
Aperture also provides a second version of the Loupe for your convenience. For more
information about using this alternate Loupe, see Using the Alternate Loupe on page 93.
To show the Loupe
Do one of the following:
mChoose View > Show Loupe, or press the Grave Accent (`) key.
mClick the Loupe button in the toolbar.

Chapter 4 Working with Photos in the Browser 90
The Loupe appears.
Loupe pop-up menu
Loupe
To hide the Loupe
Do one of the following:
mChoose View > Hide Loupe, or press the Grave Accent (`) key.
mClick the Loupe button in the toolbar.
Moving the Loupe
You can move the Loupe by dragging it to dierent locations over a photo.
To move the Loupe
Do one of the following:
mDrag the Loupe’s handle.
mDrag within the Loupe.
A circle appears that targets the area to be magnied.
mHold down the Grave Accent key (`) while clicking a specic place on a photo.
The Loupe moves to the part of the photo you clicked.
Using the Pointer to Magnify Parts of a Photo
You can leave the Loupe stationary and set it to magnify the portion of the photo at the position
of the pointer. Using the pointer to magnify the photo is useful when you don’t want the Loupe
to cover up the area of the photo you want to magnify.
Pointer position
Loupe pop-up menu
The Loupe shows
a magnified view
of the portion of the
photo at the position
of the pointer.

Chapter 4 Working with Photos in the Browser 91
To use the pointer to magnify parts of a photo
mChoose Focus on Cursor from the Loupe pop-up menu.
Choose Focus on Cursor
from the pop-up menu.
To turn o this feature, choose Focus on Loupe from the Loupe pop-up menu.
Changing the Size and Magnication of the Loupe
You can change the size of the Loupe and increase or decrease its magnication level.
To increase the size of the Loupe
Do one of the following:
mChoose View > Loupe Options > Increase Diameter, or press Shift–Option–Plus Sign (+).
mPull the grip on the Loupe’s handle out.
To decrease the size of the Loupe
Do one of the following:
mChoose View > Loupe Options > Decrease Diameter, or press Shift-Option-Underscore (_).
mPush the grip on the Loupe’s handle in.
To change the Loupe’s magnication by dened amounts
mChoose a magnication level from the Loupe pop-up menu.
Choose a magnification
level here.
To change the Loupe’s magnication incrementally
mTo increase the Loupe’s magnication: Choose View > Loupe Options > Increase Zoom, or press
Command–Shift–Plus Sign (+).
Press these keys repeatedly to continue increasing the magnication.
mTo decrease the Loupe’s magnication: Choose View > Loupe Options > Decrease Zoom, or press
Command-Shift-Underscore (_).
Press these keys repeatedly to continue decreasing the magnication.
mTo create smooth changes in magnication: Use the scroll gesture.
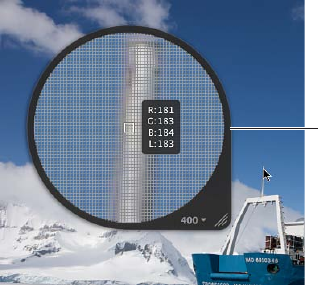
Chapter 4 Working with Photos in the Browser 92
Displaying a Pixel Grid and Color Values
You can have the Loupe display a photo as a grid that shows the actual pixel composition of
the photo, allowing you to see the individual pixel values at high magnication (400 percent or
higher). You can also set the Loupe to display readings of the color values of the photo, showing
the RGB (%), RGB (8-bit), Lab, CMYK, HSB, or HSL values chosen for the Color meter.
Loupe set to display
a pixel grid and
color values
To set the Loupe to show a pixel grid
1 Set the Loupe’s magnication to 400 percent or higher.
For more information about setting the Loupe’s magnication, see Changing the Size and
Magnication of the Loupe on page 91.
2 Do one of the following:
•Choose View > Loupe Options > Show Pixel Grid in Loupe.
•Choose Pixel Grid from the Loupe pop-up menu.
To turn o this feature, choose the menu item again.
To turn on the display of color values in the Loupe
Do one of the following:
mChoose View > Loupe Options > Show Color Value in Loupe, or press Shift-Option-Tilde (~).
mChoose Color Value from the Loupe pop-up menu.
To turn o this feature, choose the menu item again.
To change the color value option
mIn the Adjustments inspector or the Adjustments pane of the Inspector HUD, choose a color
value option from the Adjustment Action pop-up menu (with a gear icon).
For more information about color values, see Using the Color Meter and Displaying Camera
Information on page 286.
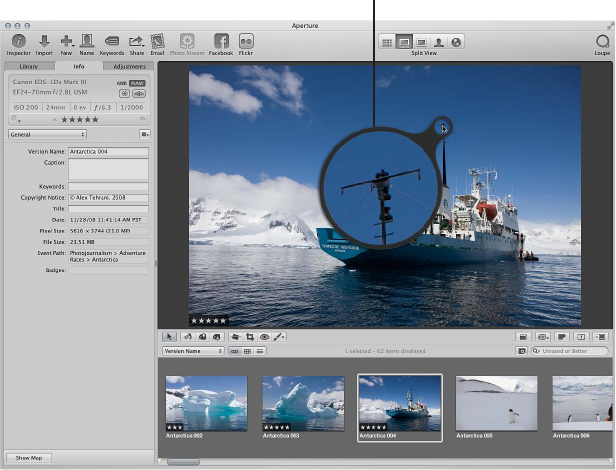
Chapter 4 Working with Photos in the Browser 93
Using the Alternate Loupe
You can also use an alternate Loupe to examine parts of a photo. You position the small ring of
the alternate Loupe over the portion of the photo you want to see, and the large ring shows a
magnied view. Depending on the details in the photo, you can change the size of the alternate
Loupe and increase or decrease its magnication level. It’s useful for making quick checks for
dust specks, aws, ngerprints, or other issues. You can use the alternate Loupe on any photo or
thumbnail in the Aperture library.
The alternate Loupe
shows a magnified view
of whatever is beneath it.
To show the alternate Loupe
1 Do one of the following:
•Choose View > Show Loupe, or press the Grave Accent (`) key.
•Click the Loupe button in the toolbar.
2 Choose View > Loupe Options > Use Centered Loupe to turn o the display of the regular Loupe.
The checkmark next to the Use Centered Loupe menu item disappears.
To reduce the size of the alternate Loupe
mChoose View > Loupe Options > Decrease Diameter, or press Shift-Option-Underscore (_).
To increase the size of the alternate Loupe
mChoose View > Loupe Options > Increase Diameter, or press Shift–Option–Plus Sign (+).
To increase the magnication of the alternate Loupe
mPress Command–Shift–Plus Sign (+).
Press these keys repeatedly to continue increasing the magnication.
To decrease the magnication of the alternate Loupe
mPress Command-Shift-Underscore (_).
Press these keys repeatedly to continue decreasing the magnication.
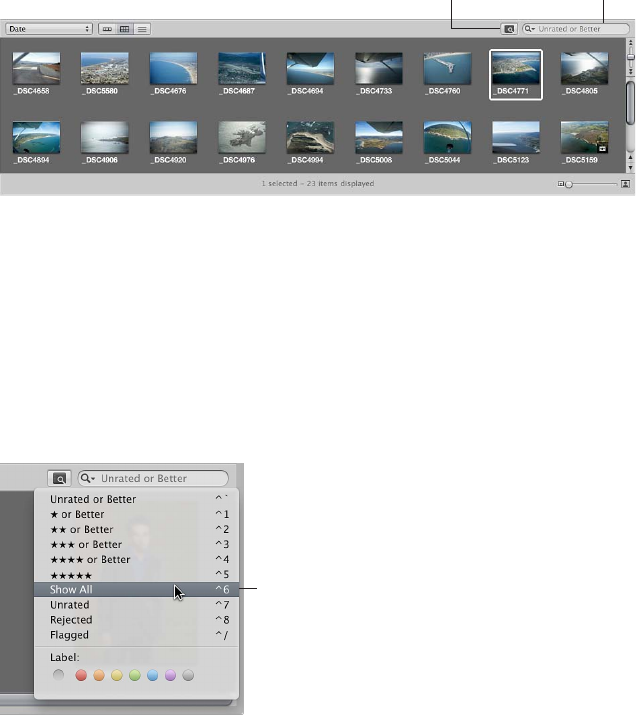
Chapter 4 Working with Photos in the Browser 94
Searching for Photos in the Browser
When you have more photos than the Browser can display at one time, you can use the search
eld to locate photos. Enter the search criteria in the search eld, and Aperture nds the photo
or photos for you, removing all others from view.
Filter HUD button Search field
When you search for photos in the Browser, the search is conned to the selection in the Library
inspector. For example, if you shot several hundred photos for a wedding event but want to view
only those that have the keyword Bride, you select the wedding project in the Library inspector
and then enter Bride in the Browser’s search eld to display only the photos of the bride, hiding
the remainder from view.
When viewing the contents of albums (including Smart Albums) in the Browser, you may not
be able to see photos with a rating of Reject. This is because the Browser is set to show unrated
photos or better. To view rejected photos, you must set the Browser to show all photos.
Items in the search
field pop-up menu
You can also lter the photos shown in the Browser by criteria other than ratings. For example,
you can lter photos by whether they’ve been agged or assigned a color label.
Important: Search criteria set in the Aperture Browser lters photos only within Aperture. If you
open your Aperture library in iPhoto, all photos are shown.
To search for a photo in the Browser
mEnter text associated with that photo in the Browser’s search eld.
To see all your photos again
mClick the search eld’s Reset button (with an X) or delete the text in the search eld.
Important: You can use keyboard shortcuts to quickly implement a search that displays
photos with specic ratings or photos that have a specic keyword. It’s possible, while working
with photos, to accidentally press such a keyboard shortcut and see photos on your screen
unexpectedly change or even disappear. If this happens, you can quickly display your photos by
clicking the Reset button in the search eld to reset the search criteria in the Filter HUD.
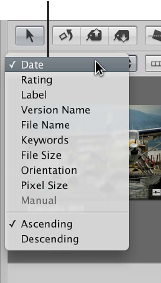
Chapter 4 Working with Photos in the Browser 95
To set the Browser to show all photos
1 In the Library inspector, select an item.
2 In the Browser, choose Show All from the search eld pop-up menu.
All photos, including rejects, appear in the Browser, and Showing All appears in the Browser’s
search eld.
To set the Browser to show rejected photos only
1 In the Library inspector, select an item.
2 In the Browser, choose Rejected from the search eld pop-up menu.
Only photos with the Reject rating appear in the Browser, and X appears in the Browser’s
search eld.
To set the Browser to show agged photos only
1 In the Library inspector, select an item.
2 In the Browser, choose Flagged from the search eld pop-up menu.
To set the Browser to show photos assigned a specic color label
1 In the Library inspector, select an item.
2 In the Browser, choose a color label from the search eld pop-up menu.
Rearranging and Sorting Photos in the Browser
As you work with photos in the Browser, you can move and rearrange them into any order or
grouping you like. For example, you might want to keep all related photos of a wedding project,
such as the cake cutting, in close proximity to allow you to easily sort through the best ones and
then adjust them.
You can drag photos to new locations in the Browser. When you drag photos to new locations,
you create a custom arrangement of your photos, and the Sorting pop-up menu changes to
show the Manual option. Aperture records the order of your photos, and whenever you choose
Manual from the Sorting pop-up menu, your photos reappear in that order.
You can also change the order of photos in the Browser based on photo properties such as
lename, le size, date, color label, rating, and more. For example, when displaying photos by
lename, Aperture places the photos in alphabetical order. You might also order the photos by
date or time. You choose the sort property from the Sorting pop-up menu in grid view, list view,
and lmstrip view.
Choose the sort property
and direction from the
Sorting pop-up menu.
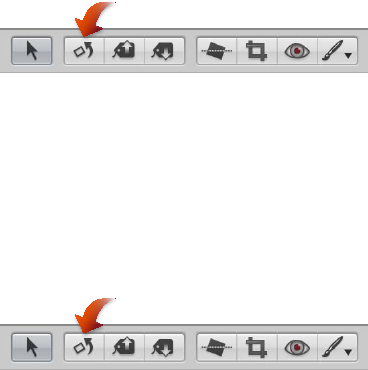
Chapter 4 Working with Photos in the Browser 96
To rearrange photos in the Browser
m Drag the photos you want to rearrange to a new location; when the green bar appears, release
the mouse button.
To restore a manual arrangement of your photos in the Browser
mChoose Manual from the Sorting pop-up menu.
Aperture remembers the last time you moved photos and restores that arrangement.
To change the displayed order of photos in the Browser
mChoose a sort property from the Sorting pop-up menu. Choose Ascending or Descending to
specify an ascending or descending sort order.
Rotating Photos
When photos are imported into a project, some may be displayed in an incorrect orientation,
requiring you to rotate them. The tool strip provides a Rotate tool for rotating selected photos
counterclockwise. You can rotate photos individually or select a group and rotate them all at
once. You can also select photos and quickly rotate them using keyboard shortcuts.
To rotate photos individually
Do one of the following:
mSelect the photo you want to rotate, then choose Photos > Rotate Counterclockwise (or press
Command-[), or choose Photos > Rotate Clockwise (or press Command-]).
mSelect the Rotate tool in the tool strip, then click a photo to rotate it counterclockwise.
mSelect the Rotate tool in the tool strip, then Option-click the photo to rotate it clockwise.
To rotate a group of selected photos
Do one of the following:
mSelect a group of photos, then choose Photos > Rotate Counterclockwise (or press Command-[),
or choose Photos > Rotate Clockwise (or press Command-]).
mSelect a group of photos, then click the Rotate tool in the tool strip.
Tip: To rotate the photos clockwise, hold down the Option key while clicking photos with the
Rotate tool.
Chapter 4 Working with Photos in the Browser 97
Creating Versions of a Photo
Occasionally, you may want to make a second version of a photo. For example, you might want
to create another version of a photo and apply dierent exposure settings or other adjustments,
or change it for a specic use, such as for placement in a webpage or book.
When you create a new photo version, you can duplicate either the original image or the
currently selected version with any changes you’ve made. For example, if you’ve made a series of
adjustments to a photo and now you want to start from the original photo and make dierent
adjustments, you can duplicate the original and start with a fresh, unchanged photo. In contrast,
if you plan to use the same adjustments in multiple versions, you can make those adjustments
rst and then duplicate the version with the adjustments applied.
To create a new version from an original
1 Select the photo you want to duplicate.
2 Choose Photos > New Version From Original (or press Option-G).
To duplicate the selected photo version
1 Select the photo you want to duplicate.
2 Choose Photos > Duplicate Version (or press Option-V).
Deleting Photos from the Browser
If necessary, you can delete versions and even originals.
When deleting photos, you can:
•Remove a version of the photo from an album, leaving any other versions in their original
locations in the library
•Delete versions from within a stack
•Delete originals
To remove a version from an album
mSelect the version and choose Photos > Remove From Album (or press Delete).
To delete a version from a version stack (a stack of versions from the same original)
1 Open the stack and select the version you want to delete.
2 Choose File > Delete Version (or press Command-Delete).
The deleted version is moved to the Aperture Trash. For more information, see Working with the
Aperture Trash on page 38.
To delete an original
When a photo is represented in the Browser by a single version, you can select the version and
delete it, and the corresponding original is deleted as well.
1 Select a version.
2 Choose File > Delete Version (or press Command-Delete).
The original and its version are moved to the Aperture Trash. For more information, see Working
with the Aperture Trash on page 38.
Chapter 4 Working with Photos in the Browser 98
To delete a version stack and its original
You can select a stack containing versions of the same image and delete all the image versions in
the stack as well as the original.
1 Select the stack you want to delete.
2 Choose File > Delete Original Image and All Versions.
The original and all its versions are moved to the Aperture Trash. For more information, see
Working with the Aperture Trash on page 38.
To recover a deleted photo
If you accidentally delete a photo you meant to keep, and you can't recover it by choosing Undo,
you may be able to recover it from the Aperture Trash.
1 In the Library inspector, select Trash.
All photos currently in the Aperture Trash are displayed in the Browser.
2 Do one of the following:
•Drag the photo you accidentally deleted back to its original project.
•Control-click the accidentally deleted photo and choose Put Back from the submenu.
If you've already emptied the Aperture Trash, you may be able to recover the photo from the
Finder Trash. If you've already emptied the Finder Trash, but you backed up your library before
deleting the photo, you may be able to restore the project containing the deleted photo from
the vault. If you updated your vault after emptying the Aperture Trash, the vault won't contain
the deleted photo.
Dragging Photos into Dierent Projects and Albums
You can drag photos into dierent projects and albums. Depending on where you drag a photo,
Aperture either moves or copies the photo to the new location.
As a general rule, when you drag a photo into a dierent project, Aperture moves the photo into
the new project.
When you drag a photo into a dierent album, Aperture creates a duplicate version of the photo
and places it in the album. A photo can be copied into any album in the same project or into
albums in dierent projects. The destination album can be an album, book album, Light Table
album, slideshow, or web journal or webpage album.
To copy a photo into a dierent album
mDrag the photo into another album in the Library inspector.
To move a photo into a dierent project
mDrag the photo into another project in the Library inspector.
To copy a photo into a dierent project
mOption-drag the photo into another project in the Library inspector.
You can also drag photos out of Smart Albums. If you drag a photo from a Smart Album into
another album, the version is copied to the new location. If you drag a photo into a project
dierent from the project that contains the Smart Album, Aperture moves the photo to the
destination project. All links to versions in other albums are maintained. For more information,
see An Overview of Smart Albums on page 255.
Chapter 4 Working with Photos in the Browser 99
Renaming Original Image Files
At times, you may want to rename original image les to match the names you’ve assigned to
the photo versions in Aperture. Although Aperture keeps track of your originals regardless of
what they are named, it’s often useful for your image lenames to match inside and outside of
Aperture—especially when the originals are referenced images. For more information about
working with referenced images, see An Overview of Referenced Images on page 99.
To rename originals
1 In the Browser, select a photo or group of photos.
2 Choose Metadata > Batch Change (or press Command-Shift-B).
3 In the Batch Change dialog, choose a naming convention from the Version Name Format pop-up
menu to specify how you want the originals named.
For example, choose Version Name from the Version Name Format pop-up menu to have your
original lenames changed to match the names of the corresponding versions in Aperture. If
you choose a custom name format, enter the name you want in the Custom Name text eld.
For more information about naming les, see Automatically Naming Your Imported Photos on
page 60.
4 Select the Apply to Original Files checkbox, then click OK.
The original les corresponding to the selected photos are renamed. For more information about
working with the Batch Change dialog, see Batch Changing Metadata on page 194.
Working with Referenced Images
An Overview of Referenced Images
Originals for photos that you import as referenced images may reside in many dierent locations
on your hard disk storage devices instead of in the single location of your main Aperture Library
le. At times, you may need to determine which photos are referenced images in order to
readily locate them in the Finder. Aperture provides many ways to identify, search for, and move
referenced images.
You can copy, move, and delete referenced images in your Aperture projects using the same
procedures you use for other Aperture versions and originals.
When you copy a version of a referenced image in Aperture, a new version is created and
tracked in the Aperture library. No new les are recorded on the hard disk in the location of the
referenced image’s original.
When you move a referenced image between projects on your Aperture system, the referenced
original remains in its original location on your hard disk.
When you delete a referenced original from Aperture, you can specify whether the photo’s
version is placed in the Aperture Trash. When you empty the Aperture Trash, the link to the
original image le is deleted, and the original image le remains in its current location in
the Finder.
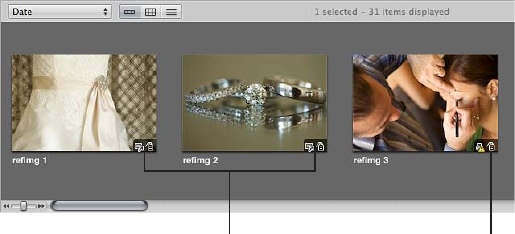
Chapter 4 Working with Photos in the Browser 100
Identifying Referenced Images
After you import referenced images, you can identify them in the Browser by turning on
referenced image badge overlays. Referenced images appear with badges that show whether
their originals are currently available (online) or not found (oine).
These badge overlays
indicate the photos are
referenced images.
This badge overlay
indicates the photo is an
offline referenced image.
To turn on referenced image badge overlays
1 Choose Aperture > Preferences, or press Command-Comma (,).
2 In the Preferences window, click Appearance, then select the “Badge referenced items” checkbox.
You can select and work with online referenced images using the same procedures you use with
photos whose originals reside in the Aperture library.
Aperture keeps track of referenced images’ originals when you move or rename the les in the
Finder, keeping them on the same hard disk or volume. A referenced image appears as an oine
image if the hard disk holding the referenced image’s original has been disconnected from your
computer system. A referenced image is listed as “not found” when its original has been deleted,
moved to the Finder Trash, or moved from its original hard disk location to another hard disk and
Aperture can’t nd it.
Displaying a List of Referenced Images
When working with numerous photos in the Browser, you may need to determine which photos
have originals that reside in the Aperture library and which are referenced images whose
originals are located elsewhere on your hard disks.
You can select a group of photos in the Browser and Aperture can show a list of the referenced
images within the selection, including information about where the originals are located.
To see a list of referenced images in a selection
1 In the Browser, select a group of photos.
2 Choose File > Locate Referenced Files.
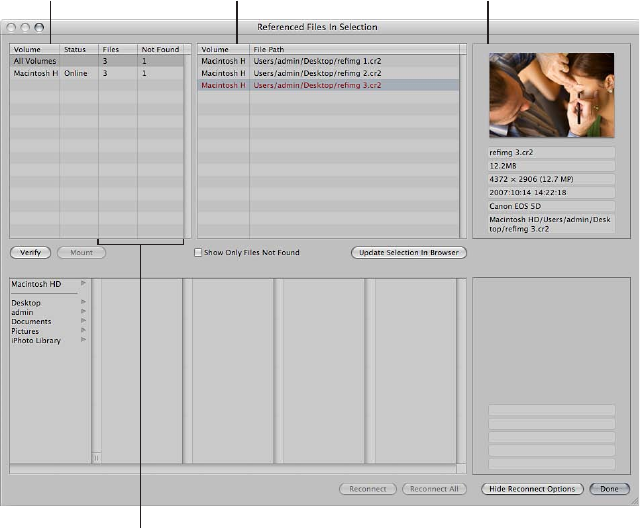
Chapter 4 Working with Photos in the Browser 101
The Referenced Files In Selection dialog appears.
This column shows
the names of hard
disks where referenced
originals are located.
This column
identifies the hard
disk location of the
referenced originals.
The specific photo
and metadata to help
you identify the file
are displayed here.
These columns identify how
many originals for referenced
images are on the hard disk,
and how many are not found.
Locating a Referenced Image’s Original on a Hard Disk
At times, you may need to quickly nd a referenced image’s original on your hard disk to copy
or move it, attach it to an email, or otherwise work with it outside of Aperture. You can select a
photo in the Browser and Aperture will display the location of the photo’s original in the Finder.
To locate a referenced image’s original in the Finder
1 Select a referenced image in the Browser.
2 Choose File > Show in Finder.
A Finder window appears, displaying the selected referenced image’s original.
Note: If you open a referenced image’s original from the Finder in another application, you won’t
see the changes or adjustments you’ve made to the image in Aperture. Your changes appear
in versions stored in the Aperture library, and the referenced image’s original is always left
unchanged. To see the adjusted photo, you need to export a version of it.
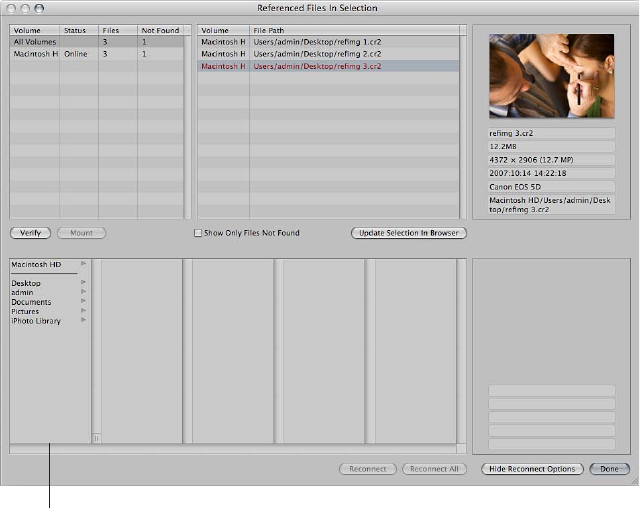
Chapter 4 Working with Photos in the Browser 102
Reconnecting Missing or Oine Referenced Images
When a referenced image’s original is oine, you can’t make adjustments to the photo until you
reconnect the original to your Aperture system. If you have disconnected a hard disk drive that
holds a referenced image’s original, you can reconnect the drive to your computer system and
Aperture automatically locates the hard disk and reconnects the original.
If a photo is oine or modied in some way that makes it unrecognizable as the original referenced
image, you can still select it and Aperture can reconnect the original for the specic photo.
To reconnect an oine referenced image
1 Reconnect the hard disk holding the referenced image’s original, or otherwise locate or make the
le available to Aperture for reconnecting.
2 Select the project that contains the oine photo you want to reconnect, or select the oine
photo in the Browser.
3 Choose File > Locate Referenced Files.
4 If necessary, click the Show Reconnect Options button.
Select the volume you want here,
and navigate to the location of the
file on the hard disk.
5 At the top of the dialog, select the le path for the original that you want to reconnect.
A thumbnail of the photo and some identifying metadata appear.
6 In the bottom half of the dialog, navigate to the location of the referenced image’s original on
the hard disk and select the original.
You can follow the le path listed for a selected photo in the top of the dialog.
When you select the le, a thumbnail of the photo and metadata appear, allowing you to
compare them to the thumbnail and metadata in the upper part of the dialog to make sure
you’ve selected the correct le.
7 Click Reconnect to reconnect a specic photo, or click Reconnect All to reconnect all
selected photos.
Chapter 4 Working with Photos in the Browser 103
Relocating Referenced Originals
You can easily move originals for referenced images (referenced originals) to new locations on the
same hard disk or a dierent hard disk. For example, if you use several hard disks, you might want
to move the originals they contain to a convenient location on a dierent hard disk.
To move originals for referenced images to a new location
1 In the Browser, select the referenced images whose originals you want to move.
2 Choose File > Relocate Originals.
3 Choose a folder location in the dialog that appears.
4 Choose None from the Subfolders pop-up menu to specify that the les be stored as separate,
individual les in the selected folder. You can also specify that Aperture create a hierarchy of
subfolders with specic folder names to store your les. For more information about creating
folders to hold your imported image les, see Importing Originals for Referenced Images into
Folders on page 72.
5 Choose a naming convention from the Name Format pop-up menu to specify how you want the
originals named.
For example, choose Original File Name from the Version Name pop-up menu to have your les
stored using the current original lenames from your camera or card. Choose a name format
from the Version Name pop-up menu to have your originals stored using a specied name. If
you choose a custom name format, enter the name you want in the Name Text eld. For more
information about naming les, see Automatically Naming Your Imported Photos on page 60.
6 Click Relocate Originals.
Moving Referenced Originals to the Aperture Library
You can move referenced images’ originals (referenced originals) to the Aperture library. For
example, if you have a variety of originals stored in dierent hard disk locations but it would
be more convenient to work with them all stored in the Aperture library, you can select the
referenced images in the Browser and Aperture can move their originals to the library. With
the originals stored in the library, Aperture manages all aspects of them, keeping them always
available and allowing you to back them up in your vaults.
To move referenced originals to the Aperture library
1 In the Browser, select the referenced images whose originals you want to move to the library.
2 Choose File > Consolidate Originals.
3 Choose whether or not you want the image les moved or copied into the Aperture library by
clicking the “Move les” or “Copy les” button.
4 Click Continue to conrm that you want the referenced originals moved to the Aperture library.
Searching for Referenced Images Using the Filter HUD
You can search for photos using their le status. For example, you can search for photos that are
referenced images, managed images, and online or oine images.
To search for photos by le status, you use the File Status search options.
To search for photos by le status
1 In the Library inspector, select an item you want to search.
2 Show the Filter HUD by doing one of the following:
•Choose Edit > Find (or press Command-F).
•Click the Filter HUD button beside the search eld in the Browser.
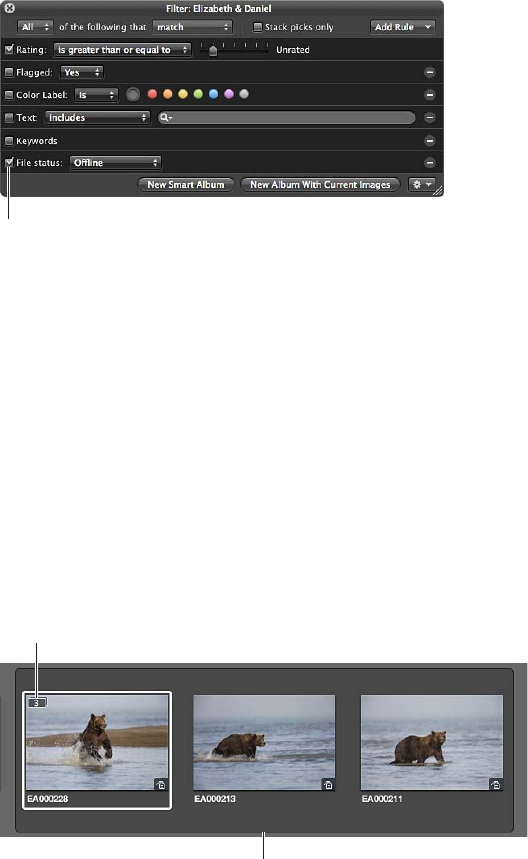
Chapter 4 Working with Photos in the Browser 104
3 In the Filter HUD, choose File Status from the Add Rule pop-up menu, and select the “File status”
checkbox.
4 Deselect any checkboxes that aren’t part of your query, and choose the search criteria from the
“File status” pop-up menu.
Select the “File status” checkbox
and choose the file status you
want to search for.
5 Choose Any from the Any/All pop-up menu, if it’s not already chosen.
The photos that match the search criteria are displayed in the Browser.
Working with Stacks in the Browser
The primary place you work with stacks is in the Browser. A stack appears in the Browser as a
group of photos. The photo that represents the stack, called the pick, is selected and displayed on
the left. You can select any photo in the stack as the pick, and it moves to the leftmost position
in the stack. You can rearrange the order of photos in a stack. For example, you might choose an
alternate photo and position it next to the pick. A Stack button appears in the upper-left corner
of the pick photo in the stack, indicating the number of photos in the stack.
The Stack button
indicates the number
of photos in the stack.
A stack with three photos
is shown expanded.
For more information about working with stacks, such as keyboard commands for creating
stacks, selecting a stack pick, and promoting and demoting photos, see An Overview of Stacking
Photos on page 135.
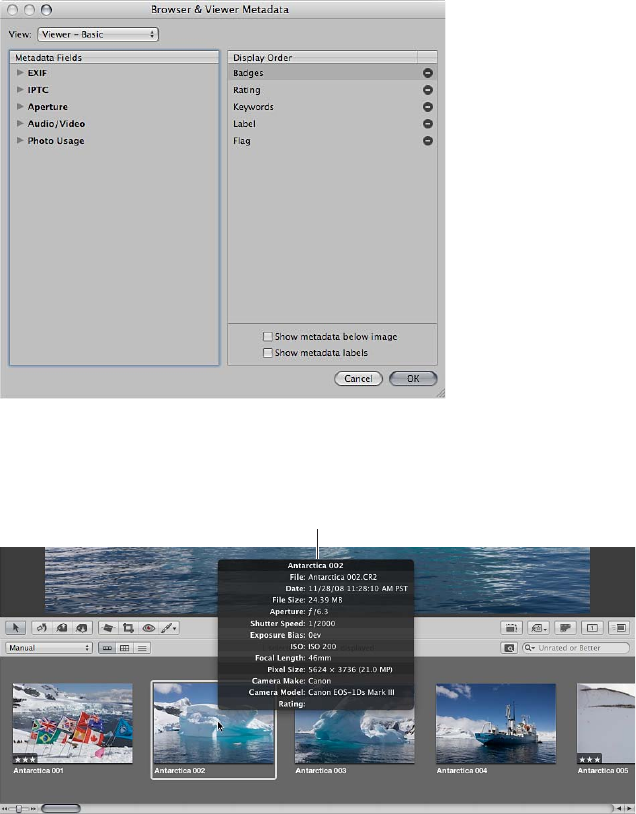
Chapter 4 Working with Photos in the Browser 105
Displaying Specic Metadata with Your Photos
To help identify photos as you work, you can set Aperture to display the metadata associated
with photos. You do this by specifying metadata settings in the Browser & Viewer Metadata
dialog. For example, you can set Aperture to display keywords, IPTC information, or EXIF
information with photos in grid view. You can also congure two views of information to be
displayed with photos and quickly switch between views. For example, the rst view might show
ratings for use while photo editing, while another could display IPTC and EXIF information as
you manage les for export. You can then switch between views to change the information that
appears with your photos depending on the task at hand.
You use the Browser & Viewer Metadata dialog to customize the display of information shown
with photos in the Browser.
If you prefer to display thumbnail images in the Browser without metadata overlays but would
still like to quickly view a photo's metadata, you can turn on metadata tooltips. When metadata
tooltips are turned on, you can move the pointer over a photo to view information about it.
Metadata tooltip
For more information about changing the type of metadata that appears in overlays in the
Browser, see Specifying the Type of Metadata to Display in the Viewer and Browser on page 179.
To turn the display of metadata in the Browser on or o
Do one of the following:
Chapter 4 Working with Photos in the Browser 106
mChoose View > Metadata Display, then choose Show Metadata from the Browser section of the
submenu (or press U).
mChoose Show Metadata from the Browser section of the Browser & Viewer Metadata Overlays
pop-up menu in the tool strip.
To switch between views of metadata information in the Browser
Do one of the following:
mChoose View > Metadata Display, > then choose Switch to [view name] from the Browser section
of the submenu (or press Shift-U).
mChoose Switch to [view name] from the Browser section of the Browser & Viewer Metadata
Overlays pop-up menu in the tool strip.
If you prefer to display the thumbnail images in the Browser without metadata overlays but
would still like a way to quickly view a photo’s metadata, you can use metadata tooltips. The
Metadata Tooltips HUD displays the metadata about the photo beneath the pointer. Move the
pointer over another photo, and the metadata in the Metadata Tooltips HUD updates to show
the information about that photo.
To turn on metadata tooltips
mChoose View > Metadata Display > Image Tooltips (or press Control-T).
Press Control-T again to turn metadata tooltips o.
For more information about displaying metadata with your photos, see An Overview of Working
with Metadata on page 172.
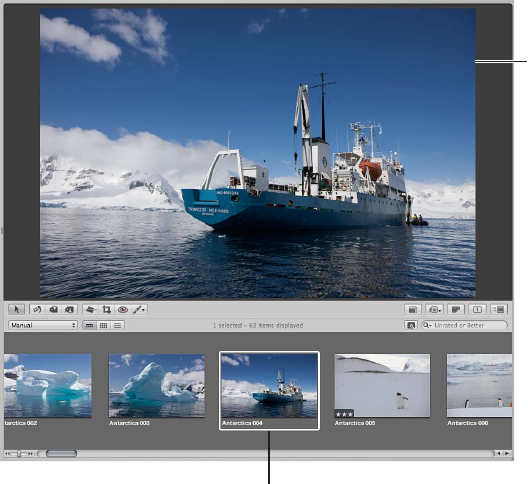
107
An Overview of the Viewer
The Viewer displays a detailed view of the photo or photos selected in the Browser. You can view
one photo in incredible detail or view several photos at a time.
You use the Viewer to make adjustments, closely compare similar photos, and inspect photos at
full resolution. If you use a dual-display system, you can set the Viewer to show your photos on
both screens to provide stunning, full-detail views. You can also use the Viewer to preview and
edit audio attachments and video clips.
When you select photos in the Browser, the Viewer immediately displays a detailed view of
your selection. You can display one photo at a time, three photos at a time, or any selection of
multiple photos.
Selected photo
in the Browser
A detailed view
of the selected
photo appears
in the Viewer.
Displaying Photos in the Viewer 5
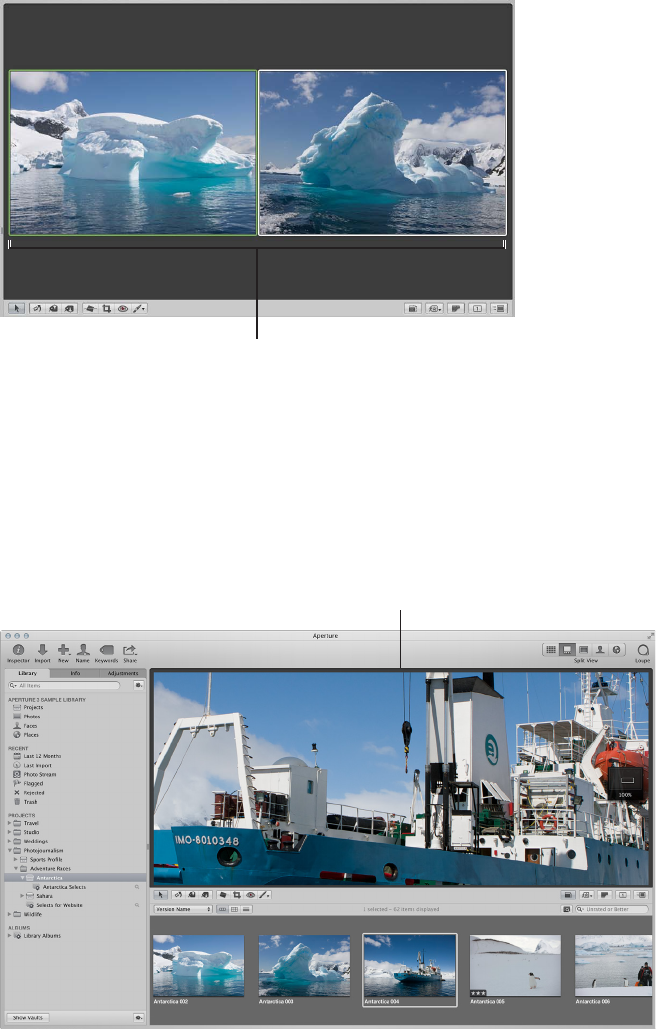
Chapter 5 Displaying Photos in the Viewer 108
When rating or adjusting photos, you can set the Viewer to compare two photos at once. You
select a photo to compare against and then display other similar or related photos next to it
for inspection. You might use the Aperture comparison feature to select photos from a series or
compare versions of adjusted images to see which is best.
You can use the Viewer
to compare two photos.
Depending on the size of your display and Viewer, photos may be displayed at a reduced size
to t in the Viewer. Aperture can display your photos at full resolution, pixel for pixel, which can
create photos larger than can t on your display’s screen. Displaying a photo at full resolution
allows you to examine the photo exactly as it was recorded and see the precise eects of your
adjustments and changes. In addition, you can zoom in to and out of the Viewer incrementally to
check details in the photo, such as sharpness.
Full-resolution view of
a photo that is larger than
the Viewer’s screen size
Using two displays with your Aperture system is an excellent way to view your photos. Aperture
can show your photos on both displays, allowing you to dedicate one display to enlarged views.
When your system uses two or more displays, Aperture provides two Viewers, called the Main
Viewer and Secondary Viewer. Just as you can with a single Viewer, you can set the Secondary
Viewer to show one, three, or multiple photos at a time.
Chapter 5 Displaying Photos in the Viewer 109
You can also set metadata options that determine the amount of information that appears with
each photo. For example, you can display photos in the Viewer with their keywords and other
information, such as IPTC or EXIF metadata.
Customizing the Viewer Display
You can hide the Browser when necessary and work only in the Viewer. You can also quickly hide
the Viewer to provide more room for the Browser, and show the Viewer again when needed.
Depending on your work preferences, you might want to lighten or darken the background that
your photos appear against in the Viewer. You can darken the background from shades of gray
all the way to black, or lighten it from gray to white.
You can also specify whether the Viewer displays one photo, three photos, or multiple photos at
a time. If your system uses multiple displays, you can congure your main and secondary displays
to show single photos, three photos, or multiple photos simultaneously. The display settings you
choose also control the display of photos in Full Screen view.
To work with the Viewer only
Do one of the following:
mChoose View > Viewer.
mClick the Viewer button in the toolbar.
To hide the Viewer
Do one of the following:
mChoose View > Browser.
mClick the Browser button in the toolbar.
To switch between views
mPress V.
To change the background of the Viewer
1 Choose Aperture > Preferences, or press Command-Comma (,).
2 In the Preferences window, click Appearance, then drag the Viewer Brightness slider to lighten or
darken the background.
To change the number of photos displayed in the Viewer
mTo display multiple photos: Choose View > Main Viewer > Show Multiple (or press Option-U).
This is the default setting. When Show Multiple is chosen, the Viewer displays anywhere from one
photo up to twelve at a time, depending on the number of photos selected in the Browser.
mTo display a single photo: Choose View > Main Viewer > Show One (or press Option-R).
When the Viewer is set to Show One, the Viewer displays one photo at a time regardless of the
number of photos selected in the Browser. This setting allows you to make a multiple photo
selection in the Browser and then view each photo by itself within the selection.
mTo display three photos: Choose View > Main Viewer > Three Up (or press Option-H).
When the Viewer is set to show three photos at a time, Aperture displays the selected photo in
the center of the three photos that appear in the Viewer.
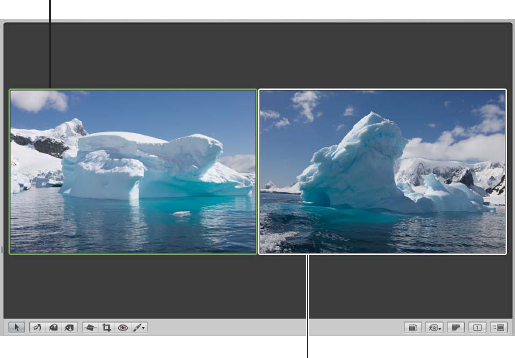
Chapter 5 Displaying Photos in the Viewer 110
Comparing Photos
You can select a photo against which to compare other photos in your project or in the library.
The selected photo remains on the screen as you select and display other photos to compare
against it. The comparison feature is useful for making nal selections of the best photos in a
series or comparing two versions of a photo for correct exposure or highlights. When comparing
photos, you can apply ratings and keywords and make adjustments to selected photos.
Comparing photos involves setting a “compare” photo and then viewing other photos against
the compare photo.
To set the Viewer to compare photos
1 Select a photo.
2 Choose View > Main Viewer > Compare (or press Option-O).
The compare photo is displayed
with a green border, visible in the
Viewer and Browser.
The photo you want to
examine against the compare
photo is shown to the right.
To view a photo against a compare photo
Do one of the following:
mIn the Browser, select another photo.
mNavigate through the photos in the Browser with the Up Arrow, Down Arrow, Left Arrow, and
Right Arrow keys.
To set the alternate photo as the compare photo and navigate to the next photo
mPress Return.
To turn o the comparison feature and select the compare photo
mChoose Edit > Select Compare Item (or press Option-Return).
To turn o the comparison feature and select the photo you’re viewing against the
compare photo
mChoose Edit > Clear Compare Item (or press Command-Return).
You can also use these procedures to compare photos in Full Screen view. For more information
about Full Screen view, see An Overview of Full Screen View on page 125.
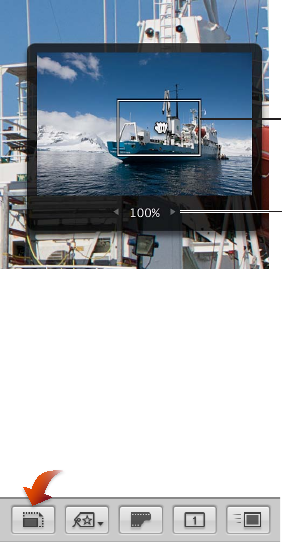
Chapter 5 Displaying Photos in the Viewer 111
Viewing Stacks
To work eciently with photos in stacks, you can set the Viewer to automatically open a selected
stack and set up the stacked photos for comparison. The pick of the stack is set as the compare
photo. This stack-viewing feature also works in Full Screen view.
To set the Viewer to automatically open and compare the photos in stacks
mChoose View > Main Viewer > Stack (or press Option-T).
For more information about using stacks, see An Overview of Stacking Photos on page 135.
Viewing Photos at Full Resolution
A full-resolution view of a photo shows every pixel in the photo. You can set Aperture to display
a photo at full resolution even though the photo may not t within the Viewer. Viewing photos
at full resolution allows you to inspect your photo using the nest level of detail possible.
When a photo doesn’t t within the area of the Viewer, a small gray navigation box appears on
the right side of the photo. This box contains a small version of the entire photo, and a white
rectangle within indicates which part of the photo is currently visible in the Viewer. You can drag
the white rectangle over the miniature photo to see other parts of the photo, also known as
panning. You can also incrementally zoom in to and out of the photo at values from 25 to 1000
percent using the Zoom value slider at the bottom of the navigation box.
Drag the rectangle
to change your
view of the photo.
Zoom value slider
To display a selected photo at full resolution
Do one of the following:
mChoose View > Zoom to Actual Size (or press Z).
mClick the Zoom Viewer button in the tool strip.
Click the button again to turn o the full-resolution display.
mUse the double-tap with one nger gesture.
Double-tap with one nger again to turn o the full-resolution display.
Note: Smart zoom must be turned on in System Preferences. For more information about turning
on smart zoom, see Help Center.

Chapter 5 Displaying Photos in the Viewer 112
To pan a full-resolution photo in the Viewer
Do one of the following:
mDrag the white rectangle that appears on the photo.
mHold down the Space bar and drag the photo.
To incrementally zoom in to and out of a photo
Do one of the following:
mClick the left and right arrows in the Zoom value slider below the white rectangle to zoom in to
and out of the photo by single percentage increments.
mDrag in the Zoom value slider below the white rectangle to quickly zoom in to and out of
the photo.
mPress Command–Minus Sign (–) to zoom out of the photo and Command–Plus Sign (+) to zoom
in to the photo.
Viewing Original Photos
When working with adjusted images, or versions, you may at times want to check what the
original photo looks like. Aperture can quickly display the original photo on which a selected
version is based.
To display the original photo for a selected version
Do one of the following:
mChoose View > Show Original Image (or press M).
mClick the Show Original button in the tool strip.
Working with Audio and Video in the Viewer
If you have imported audio and video les into Aperture, you can use the Viewer to review and
edit them. You can edit the length of video and audio clips using the video and audio controls in
the Viewer. You can also set the poster frame for a video clip (the frame that visually represents
the clip in the video's thumbnail in the Browser), as well as create a JPEG image from any frame
in the video clip.
Note: If you have a camera that can record audio annotations or if you have manually attached
an audio le to a photo, you use the Info inspector to listen to and edit audio attachments. For
more information about listening to audio attachments, see Viewing and Changing Metadata in
the Info Inspector and Inspector HUD on page 183.
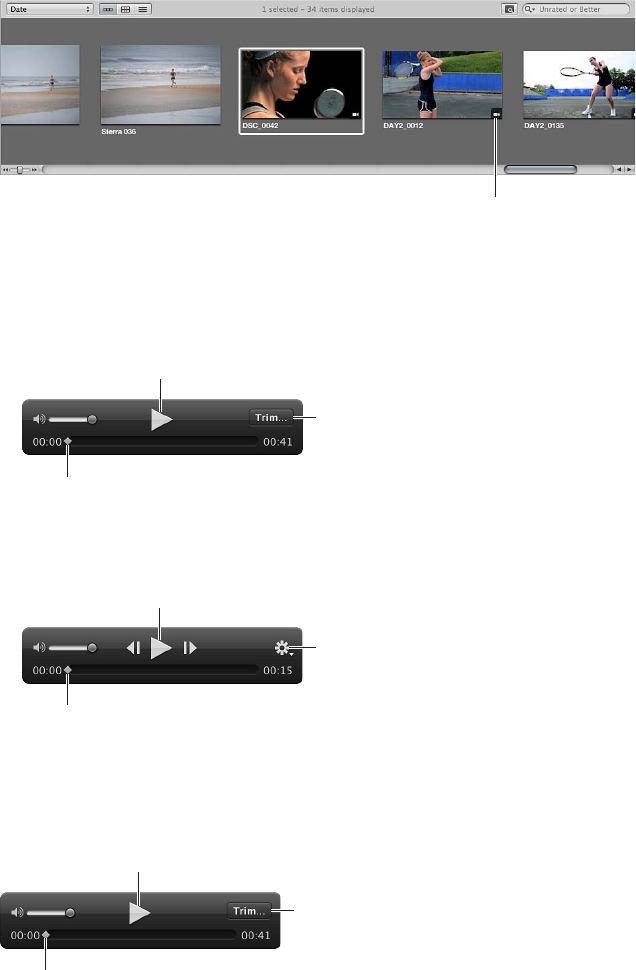
Chapter 5 Displaying Photos in the Viewer 113
To listen to audio clips or view video clips imported into Aperture
1 In the Library inspector, select an item that contains audio or video clips.
The audio and video clips appear in the Browser as thumbnails.
2 In the Browser, select either an audio or a video clip.
This icon indicates
a video clip.
3 In the Viewer, do one of the following:
•If you selected an audio clip: Audio controls with the audio clip’s lename appear in the Viewer.
Click the Play button to listen to the audio clip, and use the playhead to navigate forward
and backward.
Play button
Trim button
Playhead
•If you selected a video clip: The video clip appears in the Viewer. Move the pointer over the
Viewer, and the video controls appear. Click the Play button to view the video clip, and use the
playhead to navigate forward and backward.
Play button
Action pop-up menu
Playhead
To edit the length of an audio clip
You adjust the length of an audio clip by clicking the Trim button, dragging the Start and End
points to the positions where you want the audio to begin and end, and then clicking the Trim
button again to apply the edit.
Play button
Trim button
Playhead
1 Select the audio clip in the Browser.
The audio controls appear in the Viewer with the selected audio clip’s lename displayed at
the top.
2 In the Viewer, click the Trim button.
The Trim controls appear.
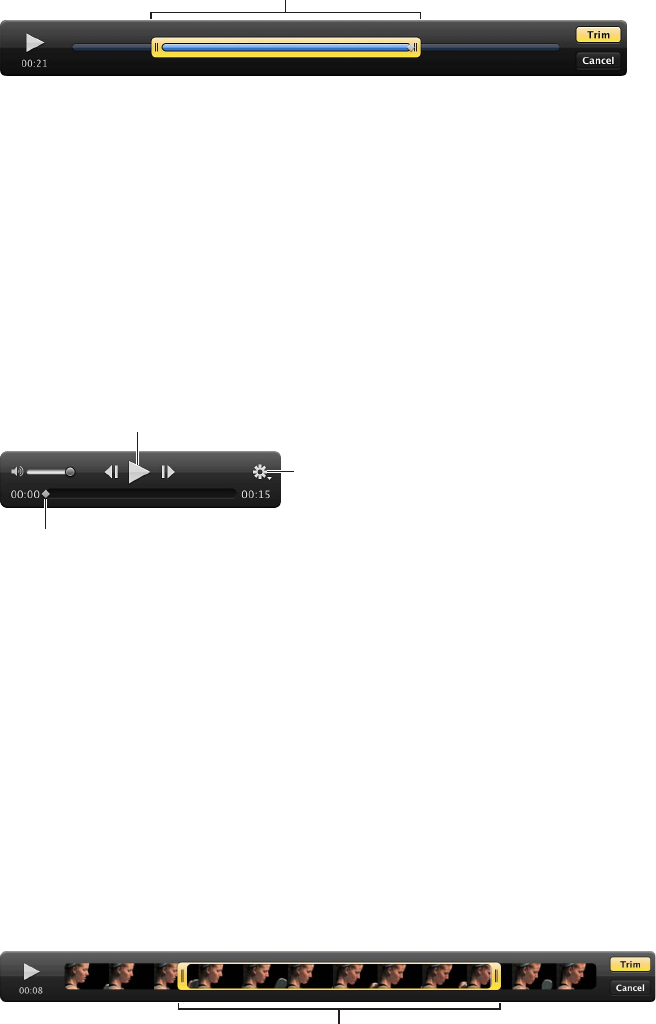
Chapter 5 Displaying Photos in the Viewer 114
3 Click the Play button to listen to the audio clip and determine which parts of the audio you want
to keep.
4 Drag the Start point to the beginning of the audio you plan to use, and drag the End point to the
position where you want the audio to end.
Drag the Start and End
points to trim the audio.
The Trim button turns yellow, indicating that the length of the audio clip has changed.
5 When you are satised with the length of the audio clip, click the Trim button.
The audio clip is trimmed.
Tip: If you want to use more than one part of the audio clip, choose Photos > New Version from
Original (or press Option-G) for each additional part of the clip you plan to use, and repeat the
steps above.
To edit the length of a video clip
You adjust the length of a video clip by choosing Trim from the Action pop-up menu for the
video controls, dragging the Start and End points to the positions where you want the video clip
to begin and end, and then clicking the Trim button to apply the edit.
Play button
Action pop-up menu
Playhead
1 Select the video clip in the Browser.
The video appears in the Viewer.
2 Move the pointer over the lower portion of the video in the Viewer.
The video controls appear.
3 Choose Trim from the Action pop-up menu for the video controls.
The Trim controls appear.
4 Click the Play button to view the video clip and determine which parts of the video you want
to keep.
Note: If you move the pointer away from the Trim controls, they disappear. Move the pointer
over the lower portion of the Viewer to show them again.
5 Drag the Start point to the beginning of the video you plan to use, and drag the End point to the
position where you want the video to end.
Drag the Start and End
points to trim the video.
The Trim button turns yellow, indicating that the length of the video clip has changed.
6 When you are satised with the length of the video clip, click the Trim button.
The video clip is trimmed.
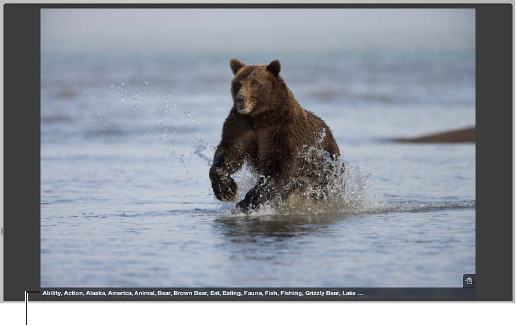
Chapter 5 Displaying Photos in the Viewer 115
Tip: If you want to use more than one part of the video clip, choose Photos > New Version from
Original (or press Option-G) for each additional part of the clip you plan to use, and repeat the
steps above.
To set the poster frame for the video clip’s thumbnail in the Browser
1 Select the video clip in the Browser.
2 Move the pointer over the lower portion of the video in the Viewer to show the video controls,
then drag the playhead to the frame of video you want to set as the poster frame.
3 Choose “Set as poster frame” from the Action pop-up menu for the video controls.
The video frame at the position of the playhead is set as the video clip’s poster frame, and the
video clip’s thumbnail image in the Browser is updated.
To create a JPEG image from a video frame
1 Select the video clip in the Browser.
2 Move the pointer over the lower portion of the video in the Viewer to show the video controls,
and then drag the playhead to the video frame from which you want to create a JPEG image.
3 Choose “New JPEG from frame” from the Action pop-up menu for the video controls.
A JPEG image of the video frame is created, and the thumbnail image appears in a stack with the
video clip in the Browser. For more information about working with stacks, see An Overview of
Stacking Photos on page 135.
Displaying Metadata Associated with Photos
To help identify your photos as you work with them, you can set Aperture to display the
metadata associated with photos in the Viewer. You can display keywords, ratings, EXIF
information, IPTC information, and more. You can specify whether the information appears below
the photos or across the bottom of the photo.
You can also specify up to two views of information to be displayed with photos in the Viewer.
For example, one view might be congured to show ratings only, and another view to show all
the IPTC information associated with a photo. You can then switch between views to change the
information that appears with your photos.
The caption and keywords
are displayed here.
For more information about working with metadata views in the Viewer, see An Overview of
Metadata Overlays on page 176 .
Chapter 5 Displaying Photos in the Viewer 116
Viewing Photos on Multiple Displays
Using the additional screen space of a second display provides an excellent platform for viewing
and performing image adjustments, playing slideshows, and presenting your full-color, full-size
photos to clients. When your system uses two displays, Aperture provides two Viewers in which
you can view multiple photos. These Viewers are called the Main Viewer and the Secondary
Viewer. The Main Viewer is used for displaying the Aperture application, and the Secondary
Viewer for viewing photos. The Secondary Viewer has the following settings:
•Mirror: Displays the same photos in the Main Viewer and the Secondary Viewer. For example, if
you have the Main Viewer set to display three photos, the Secondary Viewer displays the same
three photos.
•Alternate: Displays the currently selected photo in the Secondary Viewer. The Secondary Viewer
shows only one photo, even when you have the Main Viewer set to display multiple photos.
•Span: Splits the display of the currently selected photos between the Main Viewer and the
Secondary Viewer. For example, if you select seven photos to view, the Main Viewer shows as
many as t its screen size, and the remaining photos appear in the Secondary Viewer. Thus,
one Viewer might show four photos, and the other Viewer might show the remaining three of
the seven. Span is also used if you want to compare photos and show one photo per display.
•Black: Sets the Secondary Viewer to be a blank screen.
•O: Turns o the dual-display function.
To display the same photos in both the Main Viewer and the Secondary Viewer
mChoose View > Secondary Viewer > Mirror (or press Option-M).
To display the currently selected photo in the Secondary Viewer
mChoose View > Secondary Viewer > Alternate (or press Option-A).
To display a selection of photos across both the Main Viewer and the Secondary Viewer
mChoose View > Secondary Viewer > Span (or press Option-S).
To turn o the display of photos in the Secondary Viewer, making the screen black
mChoose View > Secondary Viewer > Black (or press Option-B).
To turn o the Secondary Viewer function
mChoose View > Secondary Viewer > O (or press Option-X).
Showing Hot and Cold Areas in Your Photos
Photos may occasionally have overly bright areas where color information is beyond the
standard limits of the Aperture working color space. For example, white areas in a photo brightly
lit with direct sunlight, or bright ashes o a water surface, may be so bright that their color is
outside the working color space. Similarly, photos may occasionally have black areas where color
information is below the standard limits of the working color space. Aperture can display these
“hot” and “cold” areas of an image with tints on the photo to help you identify where they’re
located. You may be able to adjust the areas identied by the hot and cold area overlays and
recover highlight and shadow detail by changing the exposure, the recovery, the black point, or
the gamma setting of the image.
To show the hot and cold areas in your photos
mChoose View > Highlight Hot & Cold Areas (or press Shift-Option-H).
You can also monitor color clipping per color channel when performing specic adjustments
using modier keys. For more information, see Identifying Color Channel Clipping on page 283.
Chapter 5 Displaying Photos in the Viewer 117
To change the clipping overlays display color
You can choose to view the hot and cold overlays in color or monochrome.
1 Choose Aperture > Preferences, or press Command-Comma (,).
2 In the Preferences window, click Advanced.
3 Choose either Color or Monochrome from the “Clipping overlay” pop-up menu.
To adjust the hot area display threshold
You can adjust the threshold or sensitivity of the hot area overlays. By default, the threshold is
set to 100%. You can set Aperture to ag pixels that are near the 100% mark by lowering the
threshold in the Preferences window.
1 Choose Aperture > Preferences, or press Command-Comma (,).
2 In the Preferences window, click Advanced.
3 Drag the “Hot Area threshold” slider to the left to increase the sensitivity to highlight pixels, and
to the right to decrease it.
To adjust the cold area display threshold
You can adjust the threshold or sensitivity of the cold area overlays. By default, the threshold
is set to 0%. You can set Aperture to ag pixels that are near the 0% mark by increasing the
threshold in the Preferences window.
1 Choose Aperture > Preferences, or press Command-Comma (,).
2 In the Preferences window, click Advanced.
3 Drag the “Cold Area threshold” slider to the right to increase the sensitivity to shadow pixels, and
to the left to decrease it.
Setting Up the Viewer for Onscreen Proong
Photos displayed on your computer screen may look dierent when displayed on computer
screens that use dierent color technologies. Your photos may also reproduce dierently in print
depending on the type of printer, the paper used, and the color prole of the printing device.
To see what a photo will look like when you print it or view it on a dierent display, you can
have Aperture adjust your display so that your photos resemble the nal results. To adjust
your computer display, you choose a proong prole that matches, as closely as possible, the
characteristics of the nal output device. For example, if your photo will be printed on sheet-
fed coated paper, you can choose a proong prole for sheet-fed coated paper to see a close
approximation of what the printed photo might look like. Aperture provides several dozen
proles that match the characteristics of many printers, display devices, and color spaces.
After choosing a proong prole that matches the nal output of the photo, you turn on the
onscreen proong feature, and the photo changes to show the expected results.
Onscreen proong alters the look of photos in the Viewer and in Full Screen view.
To choose a proong prole
mChoose View > Proong Prole, then choose the prole you want from the submenu.
To turn onscreen proong on or o
mChoose View > Onscreen Proong (or press Shift-Option-P).
Chapter 5 Displaying Photos in the Viewer 118
Working with Preview Images
An Overview of Preview Images
Aperture allows you to create and use JPEG previews of versions in the library. Preview images
improve the display of photos in Aperture and allow you to easily use your photos in other
applications. These preview images are used to speed up the display of photos in the Viewer,
in the Browser, and in Full Screen view. Previews are JPEG images generated by Aperture that
represent the original photo with any applied adjustments.
You can set Aperture to create and maintain previews automatically as you add or modify
versions, or you can create previews manually whenever you need them. To maintain an ecient
use of disk space and adequate display speed, you can control the size of previews, from a
preview image that has the full-size dimensions of the original down to a preview image that is
1280 pixels in the longest dimension. You can also control the JPEG compression quality of the
previews. If your workows do not benet from previews, you can congure Aperture not to
create them at all.
Previews are shared with applications in iLife and iWork, and Aperture uses JPEG previews to
display photos in slideshows. The result is smoother, more responsive slideshows. However, if
the previews are absent or not up to date, Aperture must render the preview images before the
slideshow begins.
You can control the creation and maintenance of preview images for an entire library, as well as
on a project-by-project or photo-by-photo basis.
Aperture is preset to create previews for photos in the library. Previews are built as a background
activity after photos are imported. If you import a large number of photos, it may take an
extended time to build these previews. In that case, you may want to temporarily stop the
building of previews using the Activity window and then resume building the previews later.
Or, you can deselect the “Create previews for existing images” checkbox and build previews on
a project-by-project basis, as described in Sample Workows for Using Previews Eectively on
page 123.
For more information about the Activity window, see Suppressing Preview Generation on
page 122 .
How Aperture Displays Photos in the Viewer
When a version needs to be displayed in the Viewer, Aperture does the following:
•Aperture draws the thumbnail image (a JPEG image that is 1280 pixels in the longest dimension).
•Aperture draws the JPEG preview, if present.
•Aperture decodes the original and applies any adjustments to it.
Once the last step is completed, the adjustment controls become available. Because the JPEG
preview is created with all the adjustments for that version, it appears onscreen faster than the
adjusted original would. The result is a sharp preview image that appears quickly in the Viewer.
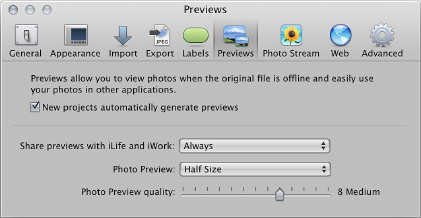
Chapter 5 Displaying Photos in the Viewer 119
Setting Preview Preferences
Aperture provides four preference settings for controlling previews. These settings apply to
all libraries.
To open Aperture preferences
mChoose Aperture > Preferences, then click Previews.
The Previews pane appears.
For more information about the Previews pane, see Previews Preferences on page 595.
Controlling Previews with the Library Action Pop-Up Menu
You turn automatic preview maintenance on or o on a project-by-project basis.
To have Aperture automatically update previews in a single project only
1 In the Library inspector, select the projects whose photos you want to maintain previews for.
2 Choose Maintain Previews For Project from the Library Action pop-up menu (with a gear icon).
A checkmark appears next to the Maintain Previews For Project menu command. Aperture will
now automatically update previews when photos are imported into the projects, as well as when
versions are created or adjusted.
Note: Turning on automatic preview maintenance does not generate the previews. It only tells
Aperture what to do the next time a photo is imported or a version is created or adjusted. To
generate previews, you can use the shortcut menus described in Controlling Previews with
Shortcut Menus on page 119 .
Controlling Previews with Shortcut Menus
You can control previews in projects by Control-clicking a project in the Library inspector and
choosing an item from the shortcut menu that appears. In addition, you can control previews for
single photos or for a selection of photos by Control-clicking photos in the Browser.
In the Library inspector, you can delete all the previews for a project or update all the previews
for a project.
To delete all the JPEG previews for a project
mIn the Library inspector, select the project whose JPEG previews you want to delete, then choose
Photos > Delete Previews for Project.
To update all the JPEG previews in a project
mIn the Library inspector, select the project whose JPEG previews you want to update, then
choose Photos > Update Previews for Project.
If previews are already up to date and you choose Update Previews, Aperture alerts you that no
work is required. However, you can force the rebuilding of previews (see the following steps).
Chapter 5 Displaying Photos in the Viewer 12 0
To force the rebuilding of JPEG previews in a project
mIn the Library inspector, select the project whose JPEG previews you want to force Aperture to
update, hold down the Option key, then choose Photos > Generate Previews for Project.
To delete JPEG previews for a photo selection
In the Browser, you can select one or more photos and either delete or update the
JPEG previews.
1 In the Browser, select a photo or group of photos whose JPEG previews you want to delete.
2 Choose Photos > Delete Previews.
To update JPEG previews for a photo selection
1 In the Browser, select a photo or group of photos whose JPEG previews you want to update.
2 Choose Photos > Update Previews from the shortcut menu.
To force the rebuilding of JPEG previews for a photo selection
1 In the Browser, select a photo or group of photos whose JPEG previews you want to force
Aperture to update.
2 Hold down the Option key, then choose Photos > Generate Previews from the shortcut menu.
Rescheduling JPEG Preview Maintenance
Preview maintenance can be rescheduled for projects in which automatic preview maintenance
is turned o.
To reschedule JPEG preview maintenance
mIn the Library inspector, select the project whose JPEG previews you want to start updating
again, then choose Photos > Update Previews.
Note: Each time you open Aperture, it checks for out-of-date previews in those projects whose
automatic preview maintenance option is turned on and then schedules the previews for
regeneration. If you don’t want previews updated automatically, turn o automatic preview
maintenance for your projects. For more information, see Controlling Previews with the Library
Action Pop-Up Menu on page 119 .
Rendering Preview Images
Aperture renders preview images in four situations:
•When a library is upgraded—provided that the “Create previews for existing images” checkbox
is selected in the Welcome to Aperture dialog
•When a photo is imported, or a version is created, rotated, or adjusted—provided that the
Maintain Previews item is selected in the Library Action pop-up menu (with a gear icon)
•When you select the library, a project, or a photo selection and choose Photos > Update Previews
•Immediately before a slideshow, if the previews are not up to date, and the slideshow preset
uses the Best quality setting
When rendering a group of preview images, Aperture uses the current application preference
settings for compression quality and picture size, not the settings that were specied when
preview rendering began. For example, if you have the quality set to 6, and then halfway through
rendering you change the setting to 8, the previews that have not yet been rendered will be
compressed at setting 8. Previously rendered previews are unaected.
Chapter 5 Displaying Photos in the Viewer 121
To update previews to use new size and compression settings
1 In the Browser, select the photos you want to update.
2 Hold down the Option key, then choose Photos > Generate Previews from the shortcut menu.
If you encounter performance issues, you can check the Activity window to see if Aperture is
doing work in the background (choose Window > Show Activity). If you think that preview
processing may be degrading performance, you can turn o automatic preview maintenance
for that project and cancel the preview processing task underway. You can then generate the
previews at a more convenient time.
Determining Which Versions Have Previews
There isn’t a badge indicating if a version has a preview. You can choose Photos > Update
Preview from the shortcut menu to learn if a version’s preview is up to date. (If the version’s
preview is not present or needs updating, Aperture will build it or update it.) You can also
drag a single version out of the Aperture Browser and a plus sign (+) appears over the pointer,
indicating that there is a preview to drag out. If a plus sign does not appear, no preview exists for
the selected version.
When a version has a preview built for it, you can drag the photos directly from the Browser to
any application that accepts JPEG les, including the Finder, Mail, and most other applications. If
the version doesn’t have a preview, dragging and dropping is disabled for that version (except
within Aperture). If you are dragging multiple photos, but only some of them have previews, only
the versions with previews are dragged out.
Integration with iLife and iWork
You can use previews to distribute your Aperture photos in movies, on the web, on DVDs, in
slideshows, and in podcasts. You can also download your Aperture photos to devices such as
iPod, import your Aperture photos into iPhoto, or use them to create Pages documents. The
Media Browsers in the iLife and iWork applications support browsing Aperture libraries. For each
version in the library, Aperture provides two JPEG les to iLife and iWork: a 240-pixel (longest
dimension) JPEG thumbnail that is shown in the Media Browser, and the JPEG preview image (at
whatever size you specied for it). If a version has no preview, the photo is not made available to
the Media Browser.
Note: When photos are within stacks, only stack picks and album picks are shared. If you want
iLife to have access to a photo in a stack and it’s not the pick, you need to extract it from the
stack or make it the pick.
Like photos in iPhoto libraries, photos in Aperture libraries can be used for your screen saver,
desktop picture, and Mail, through the same mechanism the Media Browser uses.
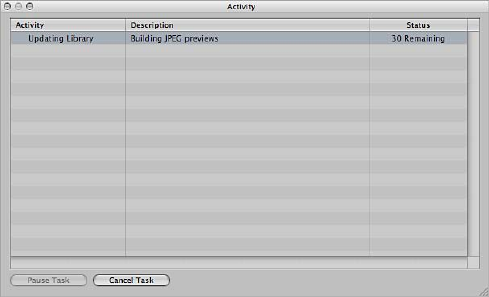
Chapter 5 Displaying Photos in the Viewer 122
Displaying Oine Referenced Images
When an original is oine or cannot be found, Aperture draws the thumbnail image rst, and
then the preview if it is present. Because the preview is high quality, you can zoom and even use
the Loupe.
Suppressing Preview Generation
When Aperture opens, it begins updating previews for those projects whose Maintain Previews
For Project setting is turned on. (For more information about maintaining previews, see
Controlling Previews with the Library Action Pop-Up Menu on page 119 .) This can cause problems
if a project contains damaged les or images in unsupported le formats. You can suppress
preview generation when opening Aperture, allowing you to more easily identify the damaged
image les. To do this, press the Shift key while opening Aperture. You can also cancel the current
preview maintenance operation using the Activity window.
Note: If you have canceled a preview maintenance operation, the previews are not updated
until another change is made to the photo. To force Aperture to update the preview for a photo,
see Controlling Previews with Shortcut Menus on page 119 . The next time you open Aperture,
automatic preview maintenance resumes.
While Aperture is open it renders preview images in the background; however, there may be
times when you want to stop this operation. You can view the progress of the preview render
operation, as well as cancel the operation, in the Activity window.
To stop the building of previews
1 Choose Window > Show Activity.
2 In the Activity window, select the “Building JPEG previews” task, then click the Cancel Task button.
3 Close the Activity window.
Note: Because slideshows that use the Best quality setting cannot begin until all preview images
are up to date, preview generation is done in the foreground with a Cancel button to stop the
operation. In all other cases, previews are created in the background.
To turn o previews
If your workow does not benet from previews, you can turn them o completely.
1 Choose Aperture > Preferences, then click Previews.
2 Deselect the “New projects automatically generate previews” checkbox.
This turns o automatic preview maintenance for any new projects that you create.
Chapter 5 Displaying Photos in the Viewer 123
3 In the Library inspector, select all the projects, then choose Maintain Previews For Projects from
the Library Action pop-up menu (with a gear icon), so there is no checkmark next to it.
This turns o automatic preview maintenance for your existing projects.
Note: You need to perform steps 1 through 3 for each of your libraries.
4 If you have already generated previews for some projects and do not want them, select all the
projects in the Library inspector, then choose Photos > Delete Previews for Items.
This deletes all previews that have been generated previously. You need to do this for each
library in which you have already generated previews.
Sample Workows for Using Previews Eectively
There are several methods for using preview images eciently and eectively:
•Generate previews for projects you intend to keep oine: A JPEG preview is displayed when a
referenced image’s original is oine or cannot be found. This makes previews a great way of
maintaining high picture quality while conserving the disk space that originals (especially RAW
les) require.
•Generate previews for photos based on rating: Another way to use previews is to create a search
that displays only low-rated photos. You can then build previews just for those photos and
take their originals oine (for example, burn them to a DVD). That way you still have good-
quality images for all of your photos, without using a lot of disk space.
You can also create a search that displays only highly rated photos and then build previews
for those photos only. This is a useful alternative for workows in which the default thumbnail
resolution is sucient for low-rated photos. For more information about searching for photos,
see An Overview of Searching on page 229.
•Generate previews for new or active projects: Because previews are used by the iLife and
iWork Media Browsers as well as by the OS X screen saver, you can use previews as a way
to distribute your Aperture photos in movies, on the web, on DVDs, in slideshows, and in
podcasts using the applications in iLife. You can also download your Aperture photos to
devices such as iPad, iPhone, and iPod touch; import your Aperture photos into iPhoto; or use
them to create Pages documents.
•Generate previews for Smart Albums: You can create previews for photos collected in Smart
Albums. For example, you can create previews for highly rated photos only. For more
information about working with Smart Albums, see An Overview of Smart Albums on
page 255.
To use previews for oine referenced images
1 Make sure the external hard disk containing the referenced originals you want to keep oine is
connected to your computer.
If the originals you want to keep oine are currently stored on your computer, you must convert
the images to referenced images and move the originals to an external hard disk. You can do
this by selecting the project containing the photos whose originals you want to keep oine,
choosing File > Relocate Originals, selecting an external hard disk location for the originals, and
then clicking Relocate Originals.
2 Select the project containing the photos whose originals you want to keep oine, then choose
Photos > Update Previews.
3 When the previews are built (you can check the status by choosing Window > Show Activity),
you can disconnect the hard disk containing the originals.
Chapter 5 Displaying Photos in the Viewer 12 4
Even though the originals are oine, you can browse, search, and assign metadata to preview
images. You can even use the Loupe to zoom in on preview images, because they are high-
quality JPEG les.
To share previews with other applications
1 Select the project whose photos you want to share with other applications, then choose
Maintain Previews For Project from the Library Action pop-up menu (with a gear icon).
2 Make sure that Always is chosen in the “Share previews with iLife and iWork” pop-up menu in
Aperture preferences (choose Aperture > Preferences, then click Previews).
3 In the Library inspector, select the project and choose Photos > Update Previews for Project.
When the previews are built, you can open any of the iLife and iWork applications and use your
Aperture photos.
To generate previews for Smart Albums
1 Create a Smart Album and specify criteria for it using the Smart Album’s Smart Settings HUD.
2 Click in the Browser, then press Command-A to select all the photos.
3 Choose Photos > Update Previews.
Note: Previews for Smart Albums are not automatically maintained—automatic preview
maintenance is a project-level setting only. In this workow, you need to update the previews
yourself periodically, by following the steps in Controlling Previews with Shortcut Menus on
page 119 . Aperture builds previews only for the versions that have changed, so you don’t need to
determine which ones to update.
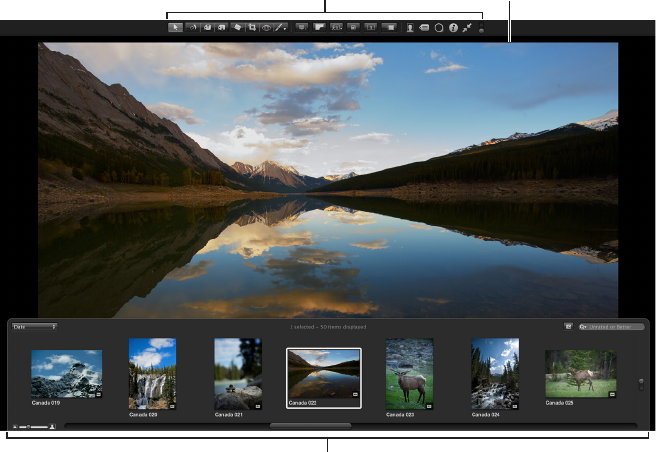
12 5
An Overview of Full Screen View
Full Screen view shows your photos against a black background for detailed viewing using every
inch of the display. Using a dual-display system in Full Screen view gives you an enlarged space
in which to compare and adjust images.
You can view, compare, and stack your photos in Full Screen view. You can also apply
adjustments and keywords. When you’ve nished working with your photos, you can use this
view to preview and proof your photos.
You can use any of the Aperture HUDs in Full Screen view. You can open the Inspector HUD or
Keywords HUD by pressing its keyboard shortcut. In fact, you’ll nd it convenient to use keyboard
shortcuts for most features you use in Full Screen view. For more information about keyboard
shortcuts you can use, see the Aperture 3 Keyboard Shortcuts PDF available in the Help menu.
Full Screen view has three modes that you can access by pressing the V key:
•Viewer mode is similar to the Split View layout in the Aperture main window. Use the lmstrip
to navigate through, organize, and rate your photos. Photos selected in the lmstrip appear
above the lmstrip in high resolution, lling the screen.
Toolbar available
in Full Screen view
Filmstrip available
in Full Screen view
The displayed photo
fills the screen.
You can dock the lmstrip on the left, right, or bottom of the screen—wherever it best suits
your work habits. You can also hide or show the lmstrip whenever you like.
Use the toolbar buttons and tools to modify your photos. The toolbar includes buttons for
creating versions and working with stacks, as well as a full set of image adjustment tools.
Viewing Photos in Full Screen View 6
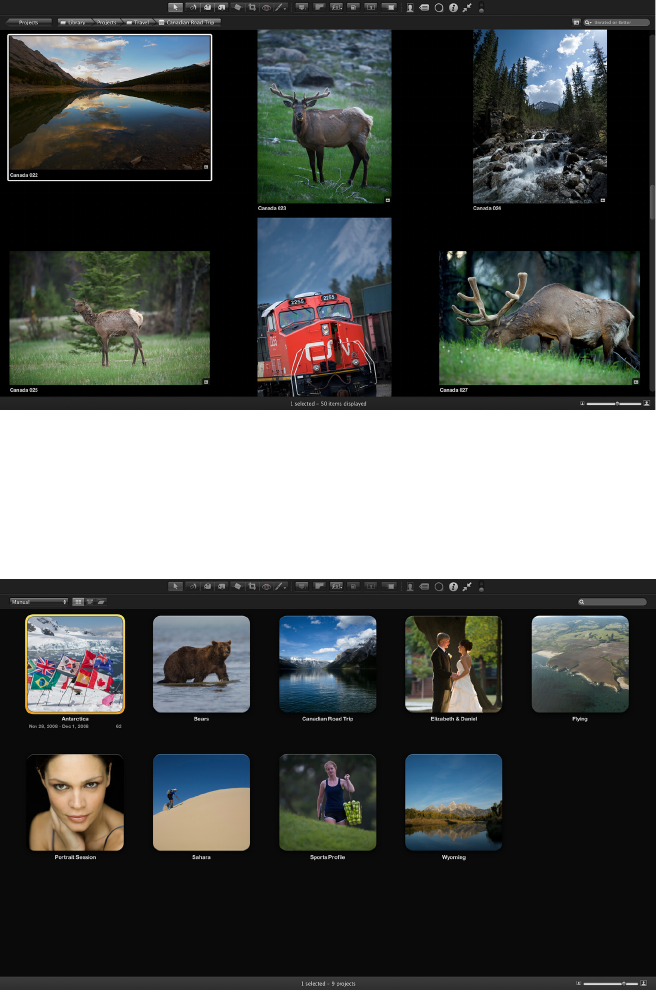
Chapter 6 Viewing Photos in Full Screen View 126
For more information about Viewer mode, see Working in Viewer Mode in Full Screen View on
page 127.
•Browser mode is similar to the working layout you see when the Browser is set to grid view
in the Aperture main window. The search eld and Filter HUD are accessible for ltering
photos, and the Library Path Navigator pop-up menus provide access to all the items in the
Library inspector.
For more information about Browser mode, see Working in Browser Mode in Full Screen
View on page 130 .
•Projects mode is similar to the Projects view in the Aperture main window. Each project is
displayed as a thumbnail image. You can group projects by the year the photos were created
or by the folders in which they reside in the Library inspector.
For more information about Projects mode, see Working in Projects Mode in Full Screen
View on page 131.
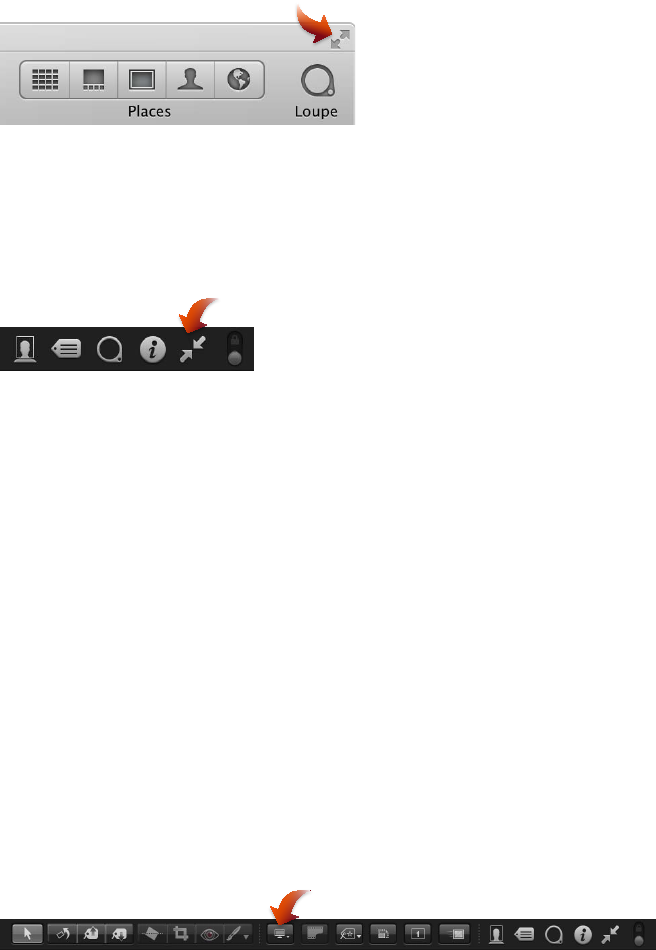
Chapter 6 Viewing Photos in Full Screen View 127
Entering and Exiting Full Screen View
You can quickly switch between Full Screen view and your workspace layout in the Aperture
main window.
To enter Full Screen view
mClick the Full Screen button at the top-right corner of the Aperture main window (or press F).
The Aperture main window disappears, and your photos appear in Full Screen view.
To exit Full Screen view
Do one of the following:
mClick the Exit Full Screen button in the Full Screen view toolbar (or press F).
mPress Esc (Escape).
The workspace view you were working in before entering Full Screen view reappears.
Note: When you quit Aperture while working in Full Screen view, Aperture returns to Full Screen
view the next time you open the application. You can bypass Full Screen view and return to the
main Aperture workspace by pressing Shift-Option while opening Aperture.
Working in Viewer Mode in Full Screen View
When you rst enter Full Screen view, Viewer mode is shown. Viewer mode is similar to the Split
View layout in the Aperture main window; however, the photos are displayed in high resolution
against a solid background. You navigate through your photos using the lmstrip.
To view a photo in the lmstrip
mSelect a photo displayed in the lmstrip by pressing the arrow keys or clicking the photo you
want to see.
To view more than one photo at the same time
1 Choose Show Multiple from the Viewer Mode pop-up menu in the toolbar.
2 In the lmstrip, do one of the following:
•Command-click nonadjacent photos to select them.
•Shift-click images to select a range of photos.
Chapter 6 Viewing Photos in Full Screen View 128
To show and move the lmstrip
The lmstrip includes a control that lets you dene when the lmstrip appears. You can choose
to always show the lmstrip, so that Aperture automatically ts the photos and lmstrip on
your screen without overlapping, or you can hide it, so that it appears only when you place the
pointer over the area where it is docked.
You can also move the lmstrip to the left, bottom, or right side of your main display.
mTo always show the lmstrip: Move the Always Show Filmstrip control to the locked position.
Always Show
Filmstrip control
The lmstrip is set to always appear, and Aperture automatically ts the photo and the lmstrip
on the screen, without overlapping.
mTo show the lmstrip only when you move the pointer over its docked position: Move the Always
Show Filmstrip control to the unlocked position.
The photo lls the screen, and the lmstrip appears over the photo when you move the pointer
over the area where the lmstrip is docked.
mTo move the lmstrip to a dierent location: Drag the lmstrip to the left, right, or bottom of the
Aperture window.
To search for a photo in the lmstrip
When you have more photos than the lmstrip can display at once, you can use the search eld
in the lmstrip to quickly locate photos. The search is conned to the selection in the Library
pane of the Inspector HUD.
mEnter text associated with that photo in the lmstrip’s search eld.
Aperture nds the relevant photo or photos for you, removing others from view. To see all your
photos again, click the search eld’s Reset button (with an X) or delete the text in the search eld.
Important: You can use keyboard shortcuts to quickly implement a search that displays
photos with specic ratings or photos that have a specic keyword. It’s possible, while working
with photos, to accidentally press such a keyboard shortcut and see photos on your screen
unexpectedly change or even disappear. If this happens, you can display your photos by clicking
the Reset button in the search eld to reset the search criteria in the Filter HUD.
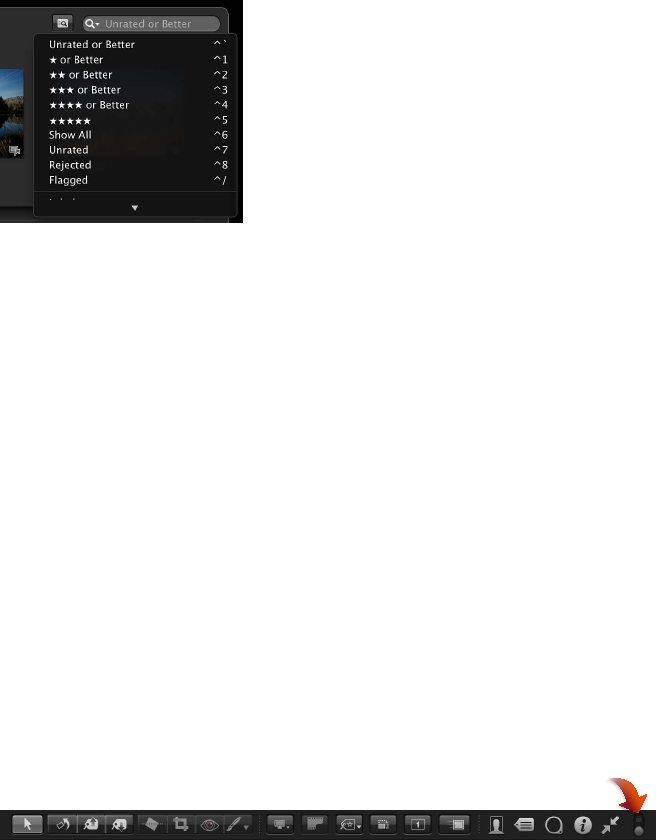
Chapter 6 Viewing Photos in Full Screen View 129
To set the lmstrip to lter photos
By default, the lmstrip is set to show photos that are unrated or better. Any photos that have
been assigned the Reject rating are automatically removed from view. To view rejected photos,
you must set the lmstrip to show all photos.
You can also lter the photos shown in the lmstrip by criteria other than ratings. For example,
you can lter photos by whether they’ve been agged or assigned a color label.
mTo set the lmstrip to show all photos: In the lmstrip, choose Show All from the search eld
pop-up menu.
All photos, including rejects, appear in the lmstrip, and Showing All appears in the lmstrip’s
search eld.
mTo set the lmstrip to show only rejected photos: In the lmstrip, choose Rejected from the search
eld pop-up menu.
Only photos with the Reject rating appear in the lmstrip, and X appears in the lmstrip’s
search eld.
mTo set the lmstrip to show only agged photos: In the lmstrip, choose Flagged from the search
eld pop-up menu.
mTo set the lmstrip to show only photos assigned a specic color label: In the lmstrip, choose a color
label from the search eld pop-up menu.
To view the Full Screen view toolbar
The toolbar displayed in Full Screen view is similar to the toolbar in the Aperture main window.
You use the toolbar’s buttons and tools to make image adjustments and to control your displays.
mIn Full Screen view, move the pointer to the top of the screen on the main display.
You can have the toolbar always appear on the screen by clicking the Always Show Toolbar
control in the toolbar.
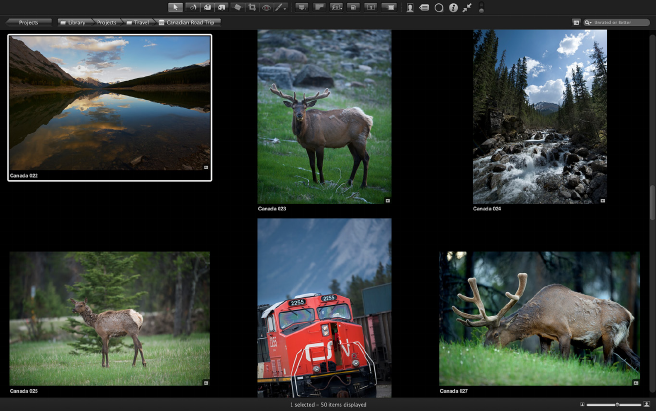
Chapter 6 Viewing Photos in Full Screen View 130
Working in Browser Mode in Full Screen View
You can set Full Screen view to switch between Viewer mode and Browser mode. Browser mode
displays thumbnail images in a grid over a black background with minimal color interference. As
in the Browser in the main Aperture workspace, the search eld and Filter HUD are accessible for
ltering photos. When Full Screen view is set to Browser mode, the toolbar remains accessible at
the top of the screen but the lmstrip disappears.
To set Full Screen view to Browser mode
1 If Aperture is not already in Full Screen view, enter it by pressing F.
2 Press V to switch from Viewer mode to Browser mode.
Full Screen view switches from Viewer mode to Browser mode.
To set Full Screen view back to Viewer mode
Do one of the following:
mPress V again.
mDouble-click a thumbnail image.
Full Screen view switches back to Viewer mode.
To navigate through photos
Do one of the following:
mPress an arrow key to move left, right, up, or down.
mUse the scroll swipe gesture to scroll through the photos, then click the photo you want to
work with.
You select and search for photos in Browser mode in the same way you select and search for
them when the Browser is set to grid view in the main Aperture window. For more information,
see Selecting Photos on page 82 and Searching for Photos in the Browser on page 94.
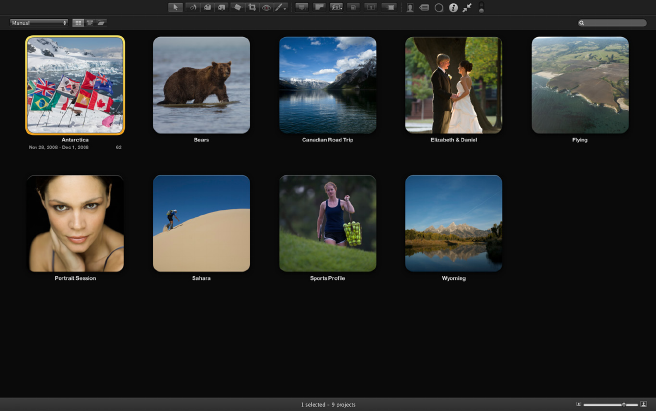
Chapter 6 Viewing Photos in Full Screen View 131
Working in Projects Mode in Full Screen View
When you want to view your projects using as much screen space as possible and with a
minimum of color interference, you can set Full Screen view to Projects mode.
To set Full Screen view to Projects mode
1 If Aperture is not already in Full Screen view, enter it by pressing F.
2 Press V to set Full Screen view to Browser mode.
3 Click the Projects button in the top-left corner of the screen.
Full Screen view switches from Browser mode to Projects mode. The controls in Projects mode
are the same as the controls in the Projects view in the Aperture main window. For more
information about Projects view, see Switching to Projects View on page 43.
To switch Full Screen view from Projects mode to Browser mode
mDouble-click a project’s thumbnail.
Full Screen view switches to Browser mode.
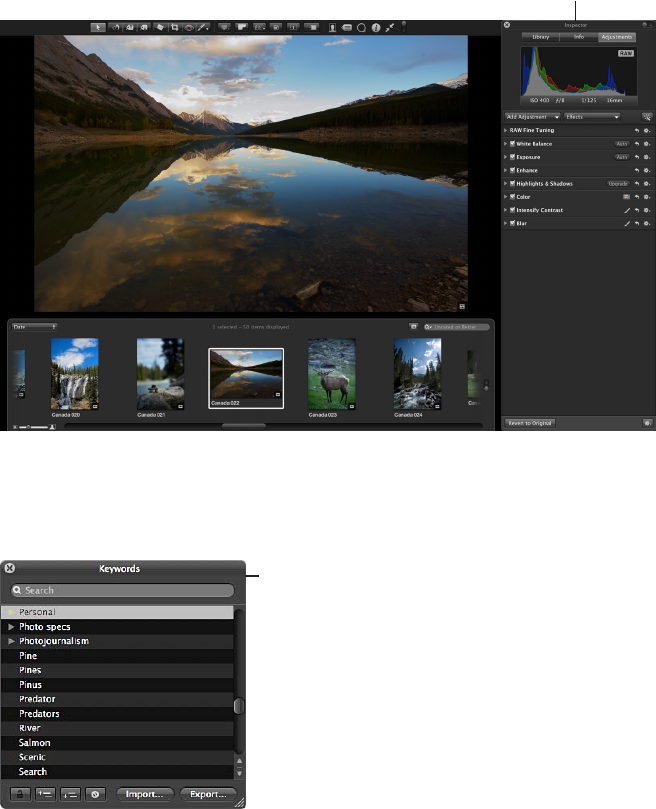
Chapter 6 Viewing Photos in Full Screen View 132
Using HUDs in Full Screen View
You can use these HUDs to work with your photos in Full Screen view:
•Keywords HUD: Use the Keywords HUD to create and organize keywords and to add keywords
to your photos.
•Inspector HUD: Use the Inspector HUD to navigate through the library, modify metadata in your
photos, and perform adjustments.
•Tool HUDS: Use any of the adjustment tools that work in conjunction with HUDs.
HUDs are available for use
in Full Screen view and can
make adjusting photos easier.
To show or hide the Keywords HUD
Do one of the following:
mClick the Keywords HUD button in the toolbar.
Use the Keywords HUD
in Full Screen view to
quickly add keywords
to your photos.
mPress Shift-H.
For more information about using the Keywords HUD, see An Overview of Keywords on
page 152.
To show or hide the Inspector HUD
Do one of the following:

Chapter 6 Viewing Photos in Full Screen View 133
mClick the Inspector HUD button in the toolbar.
Use the Inspector HUD in
Full Screen view to open
the Library pane, Info pane,
or Adjustments pane when
working with photos.
mPress H.
To temporarily hide the Inspector HUD while making an adjustment
You can temporarily hide the Inspector HUD while performing an image adjustment, so that you
have an unobstructed view of your photo.
mHold down the Shift key while dragging a slider in the Adjustments pane of the Inspector HUD.
When you release the Shift key, the Inspector HUD reappears.
To open any of the adjustment tool HUDs
1 Show the Full Screen view toolbar by moving your pointer to the top of the screen on your
main display.
2 Select an adjustment tool in the toolbar, or choose a Quick Brush adjustment from the Quick
Brush pop-up menu.
If the tool you selected has a HUD, that HUD appears.
Crop tool
The Crop HUD appears
when you select the
Crop tool in the toolbar.
To hide the adjustment tool HUDs
mSelect the Selection tool in the toolbar.
Chapter 6 Viewing Photos in Full Screen View 134
Changing the Display of Metadata in Full Screen View
The metadata display settings you choose for the Viewer and Browser also apply to photos
displayed in Full Screen view and in its lmstrip. The settings for the Viewer control the display of
metadata for full-screen photos, and the settings for the Browser control the display of metadata
for thumbnails in the lmstrip. For more information about setting the display of metadata, see
An Overview of Working with Metadata on page 172.
Although the menus are not available in Full Screen view, you can change the display of
metadata using the same keyboard shortcuts used to change the display of metadata in the
Browser and Viewer.
To turn the display of metadata in Full Screen view on or o
mPress Y.
To switch between metadata views for photos in Full Screen view
mPress Shift-Y.
To hide or show metadata in the lmstrip and the Full Screen view Browser mode
mPress U.
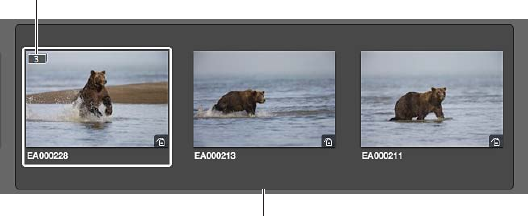
135
An Overview of Stacking Photos
To capture a specic moment in time, such as a bride and groom kissing or a student soccer
player kicking the winning goal, a photographer may shoot multiple photos, using both
bracketing and continuous shooting, to increase the odds of capturing a usable photo. After
shooting the series, the photographer reviews the images and picks the best photo of the group.
Reviewing and making picks from many related photos can be time-consuming and
dicult. Aperture makes it simple to choose the best photo out of a series by allowing you to
group related photos into sets, called stacks, that are easy to review, work with, and select nal
picks from.
Aperture can automatically create stacks by grouping photos that were shot in quick succession,
or by grouping multiple versions of the same photo. You can also select photos and create
stacks manually.
A stack appears in the Browser as a group of thumbnail images. The photo that represents the
stack, called the pick, is selected and displayed on the left. You can select any photo in the stack
as the pick, and it moves to the leftmost position in the stack. You can rearrange the order of
photos in a stack. For example, you might choose an alternate photo and position it next to the
pick. A Stack button appears in the upper-left corner of the pick photo in the stack, indicating
the number of photos in the stack.
The Stack button
indicates the number
of photos in the stack.
A stack with three photos
is shown expanded.
Stacking Photos and Making Picks 7
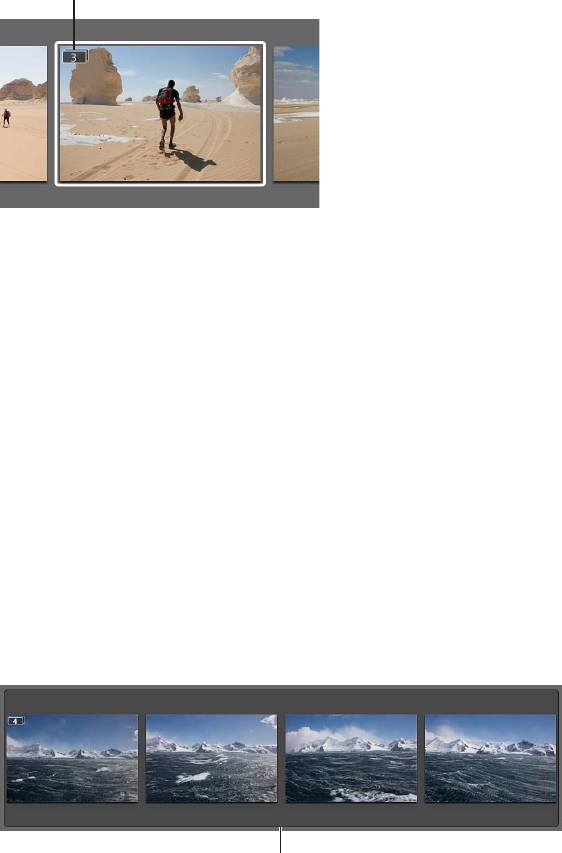
Chapter 7 Stacking Photos and Making Picks 136
After creating a stack and selecting the pick, you can close the stack by clicking the Stack button
on the pick photo. When a stack is closed, only the stack’s pick photo appears in the Browser.
Clicking the Stack button again expands the stack.
Only the pick photo is
shown when the stack
is closed.
By closing stacks, you quickly reduce the number of photos you have to visually sort through
when selecting photos in the nal photo edit.
After creating stacks, you can organize and change them as needed. You can add photos to
a stack and remove those that don’t belong. You can also split a stack into multiple stacks
if necessary.
Important: When you open an Aperture library in iPhoto, only stack picks are shown. The photos
within stacks are not shown or accessible, but they are not discarded. To work with your photos
within stacks, open the Aperture library in Aperture.
Creating Stacks
You can create stacks in two ways: specify that Aperture create stacks automatically, or you can
create stacks manually. For example, if you shoot a series of photos in quick succession (such as
at a sports event) or if you bracket photos to allow for dierences in lighting or exposure, you
most likely will want to view those photos together. Aperture can stack those photos based on
metadata recorded by the camera as the series of pictures is taken.
A series of photos taken
in quick succession.
•Photo series: With a series of photos shot in quick succession, Aperture can determine the
photos in a sequence and group them in a single stack. For example, sports photographers
shoot rapid bursts of photos to capture action. Based on timeline metadata—when a series of
shots was taken and the interval between shots—Aperture can determine which photos fall
into a sequence and group them in stacks.
•Bracketed shots: These typically represent a series of three pictures with slightly dierent
exposure settings. Advanced digital cameras often have options for shooting bracketed shots
automatically. When Aperture detects a series of bracketed photos, it includes the neutral
photo and the over- and underexposed photos in the stack.
•Version stacks: You can also have Aperture automatically group new versions of the same
photo as you create them.
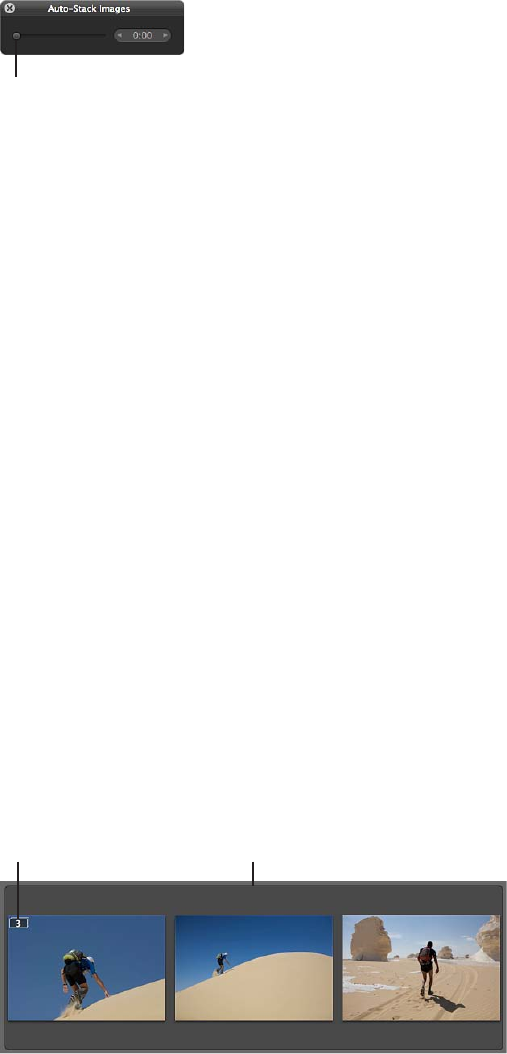
Chapter 7 Stacking Photos and Making Picks 137
To automatically stack photos
1 In the Library inspector, select a project or an album that contains the photos you want to stack.
2 Choose Stacks > Auto-Stack (or press Command-Option-A).
3 In the Auto-Stack Images HUD, drag the slider to specify the maximum interval for successive
shots in a stack.
Move the slider to indicate
the maximum interval for
successive shots.
As you drag the slider, the photos in the Browser are stacked according to the interval of time
specied. For example, if you typically shoot a series of related photos in 15-second intervals, set
the slider to 15 seconds.
4 Inspect the stacks to determine if the time interval should be shortened or lengthened.
Note: You can also manually select photos in the Import browser and stack and unstack them
using the same commands and procedures you use to stack photos in the Browser.
To automatically create new version stacks
1 Choose Aperture > Preferences, or press Command-Comma (,).
The Aperture Preferences window appears.
2 Click the General button, then select the “Automatically stack new versions” checkbox.
To create a stack manually
After importing photos, you may want to quickly review them and delete those that you
immediately see have technical or content aws. You may then want to group the remaining
photos into stacks before rating them. Stacking photos manually can help provide an initial
organization and an overview of your shots, which you can then put through a more rened or
discriminating rating pass later.
1 In the Browser, select the photos you want to stack.
You can Shift-click adjacent photos and Command-click nonadjacent photos to select them.
Tip: To quickly select a series of photos, select a photo at one end of the series, hold down the
Shift key and press the Right Arrow or Left Arrow key to select additional photos.
2 Choose Stacks > Stack (or press Command-K).
The selected photos are
now stacked and have a
dark gray box around them.
The Stack button
appears on the
current pick photo.
The selected photos are now stacked and appear linked in gray. The Stack button appears as an
overlay on the top-left portion of the current pick photo in the Browser. You can change the pick
photo and rearrange the order of the photos in the stack as you wish.
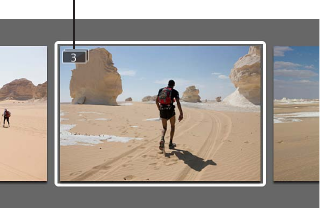
Chapter 7 Stacking Photos and Making Picks 138
To unstack a selection of photos
mAfter creating a stack, choose Edit > Undo, or select a photo in the stack and choose Stacks >
Unstack (or press Command-Shift-K).
Working with Stacks
Opening and Closing Stacks
You can close a stack and open it again whenever you wish. You may want to do this to free up
space in the Browser. You can also close stacks to quickly reduce the number of photos you must
sort through visually when selecting photos for a nal photo edit. When a stack is closed, only
the stack’s pick photo appears in the Browser.
To close a stack
Do one of the following:
mSelect an open stack, then choose Stacks > Close Stack (or press Shift-K).
mClick the Stack button on the pick photo.
Only the pick photo is
shown when the stack
is closed.
To close all stacks
mChoose Stacks > Close All Stacks, or press Option-Semicolon (;).
To open a stack
Do one of the following:
mSelect a closed stack, then choose Stacks > Open Stack (or press Shift-K).
mClick the Stack button on the pick photo.
To open all stacks
mChoose Stacks > Open All Stacks, or press Option-Apostrophe (’).
Designating a Pick Photo for a Stack
The pick photo represents the stack. You can set the photo you like best as the pick, or Aperture
can set the pick automatically. When you select and stack photos manually in the Browser, the
leftmost photo becomes the pick. You can change the pick whenever you wish.
To set a photo as the pick
Do one of the following:
mSelect a photo in the stack, then choose Stacks > Pick, or press Command-Backslash (\).
mDrag the photo you want into the pick (or leftmost) position in the stack. When you see a green
bar appear, release the mouse button.

Chapter 7 Stacking Photos and Making Picks 139
Designating an Album Pick for a Stack
The same stack may appear in several albums. Depending on the purpose of the album, you may
want a dierent pick photo for each album. For example, a stack in a webpage album may have
one pick photo, and the same stack in a book album may have a dierent pick photo adjusted
for printing. You can designate a specic photo in a stack to be an “album pick”—the pick for the
stack within a specic album. Each album can have a dierent album pick for the stack.
An album pick appears with the Album Pick badge at the top of the image’s thumbnail in
the Browser.
To select an album pick for a stack that appears in multiple albums
mSelect a photo in the stack, then choose Stacks > Set Album Pick, or press Command-Shift-
Backslash (\).
To clear an album pick for a stack
mChoose Stacks > Clear Album Pick, or press Command-Shift-Backslash (\) again.
Arranging Photos in a Stack
It can sometimes be dicult to decide which photo in the stack should be the pick. In many
cases, photos are so similar that more than one merits the pick position. For this reason, you may
want to have alternate photos available when presenting photos to clients.
You can change the order of photos within a stack to help you choose the pick and alternates.
Moving a photo to the left promotes it; moving it to the right demotes it.
To promote a photo in a stack
Do one of the following:
mSelect a photo, then choose Stacks > Promote, or press Command–Left Bracket ([).
mDrag the photo over the photo location you want until you see a green bar appear, then release
the mouse button.
To demote a photo in a stack
Do one of the following:
mSelect a photo, then choose Stacks > Demote, or press Command–Right Bracket (]).
mDrag the photo over the photo location you want until you see a green bar appear, then release
the mouse button.
Adding Photos to and Removing Photos from Stacks
You can add photos to and remove photos from stacks at any time. You can drag photos into or
out of a stack, and you can also drag photos from one stack to another.
To add a photo to a stack
Do one of the following:
mSelect the photos in a stack and the photo you want to add to the stack, then choose Stacks >
Stack (or press Command-K).
mDrag the photo into an expanded stack.
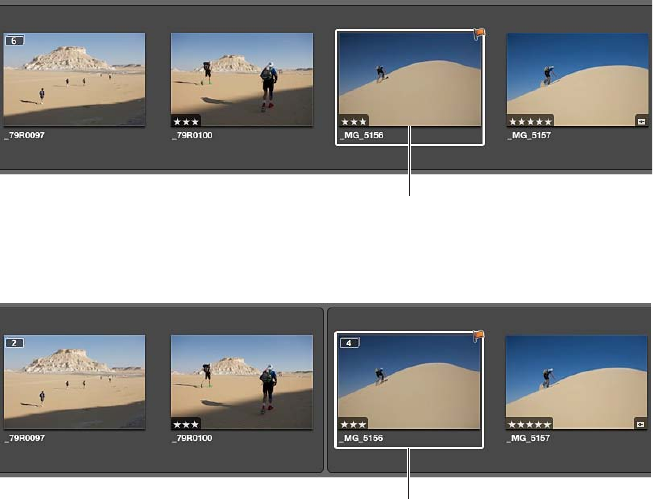
Chapter 7 Stacking Photos and Making Picks 140
To remove a photo from a stack
Do one of the following:
mSelect the photo, then choose Stacks > Extract Item (or press Shift-Option-K).
mDrag the photo out of an expanded stack.
Splitting Stacks
You can split a stack into multiple stacks to rene the organization of your photos. All photos
remain stacked, but they are now part of new stacks. The photo selected as the splitting point
becomes the pick for the new stack.
To split a stack
1 In an expanded stack, select the photo that you want as the rst photo in a new stack.
Select the photo you
want as the first image
in the new stack.
2 Choose Stacks > Split Stack (or press Option-K).
The selected image becomes
the pick in the new stack, which
is marked with a white outline.
The selected photo becomes the pick of the new stack.
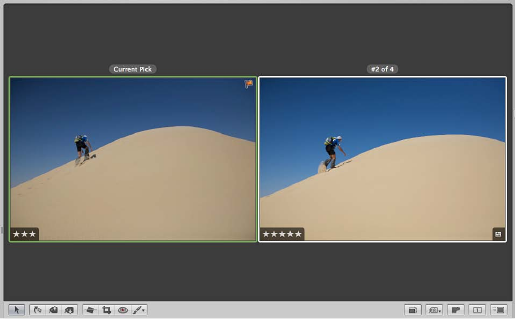
Chapter 7 Stacking Photos and Making Picks 141
Dragging Stacks
You can drag an entire stack to a new location, and you can drag specic photos within a stack
to a new location. When a stack is closed, dragging the stack moves the entire stack. When a
stack is open, you can drag individual photos to new locations in the Browser. You can also drag
photos into a stack. If you drag a photo within a stack into a dierent project, however, the entire
stack moves to the new location.
When you drag a stack into a webpage album, web journal album, book album, or slideshow
album, the entire stack appears in the Browser, but only the stack picks can be used for
publication in webpages, web journals, books, and slideshows.
Comparing Photos in Stacks
To help with the photo editing process, you can set the Viewer and Browser to automatically
open a selected stack and set up the stacked photos for comparison. The pick of the stack is set
as the “compare” photo. This stack-viewing feature also works in Full Screen view.
To set the Viewer to automatically open and compare the photos in stacks
mChoose View > Main Viewer > Stack (or press Option-T).
The compare photo is surrounded by a green border, and the alternate photo is surrounded by a
white border.
Tip: When the Viewer is in Stack mode, you can press the Up Arrow and Down Arrow keys to
move from stack to stack.
To select another alternate photo
mPress the Left Arrow and Right Arrow keys.
To select another stack
mPress the Up Arrow and Down Arrow keys.
To promote the alternate photo in the stack
mPress Command–Left Bracket ([).
To demote the alternate photo in the stack
mPress Command–Right Bracket (]).
To set the alternate photo as the stack pick photo
mPress Command–Backslash (\).

Chapter 7 Stacking Photos and Making Picks 142
Working with Stacks in List View
If you prefer, you can create and work with stacks in list view. You can select photos to stack,
select a pick, add and remove photos, and split stacks, just as you can in lmstrip view and
grid view.
Click the disclosure triangle to
the left of the pick photo to view
the photos within the stack.
In list view, a stack is identied by a disclosure triangle beside the name of the pick photo.
To open and close stacks in list view
mClick the disclosure triangle beside the name of the pick photo.
You can work with the photos in a stack in list view by dragging, pressing keyboard shortcuts, or
choosing commands from the Stacks menu.
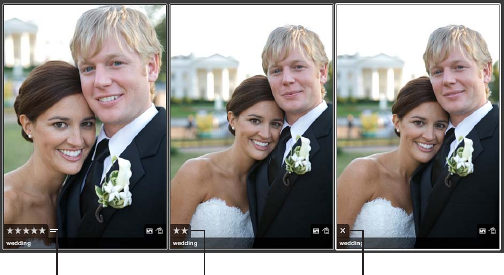
143
An Overview of the Aperture Rating System
Rating photos is a quick and easy way to narrow down the number of photos you intend to work
with. It can also help you locate your best photos later.
After nishing a shoot, photographers typically review their photos and determine which
ones are worth working with. Although a “yes or no” appraisal of a photo can work with a
small selection of photos, with a larger collection of similar photos that show small variations,
photographers need an organized method of noting which photos are superior shots, which
deserve further review, and which are poor quality or rejects. A simple and eective rating
system can help you narrow the number of photos to focus on during the selection process.
Rating is a simple process with powerful results. If you can easily identify 100 out of 500 photos
that aren’t going to work, removing these photos reduces your workload by 20 percent. Rating
and thereby reducing your workload can save you a considerable amount of time.
Aperture provides a system for rating photos from Select to Reject. The easily decipherable
photo ratings appear on the photos themselves as overlays. Positive ratings appear as stars; you
can rate photos from one to ve stars, with ve being the highest, or Select, rating. A negative, or
Reject, rating appears as an X.
An X indicates a
negative rating (Reject).
Stars indicate
a positive rating.
Five stars indicate
the highest rating
(Select).
Rating Photos 8
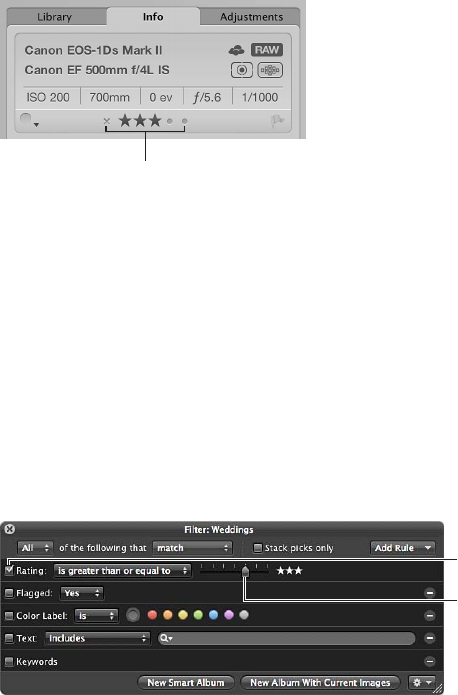
Chapter 8 Rating Photos 144
The process of rating a photo can be as easy as selecting a photo and clicking a rating button in
the Info inspector.
Click a rating button
to assign and change
photo ratings.
You can also use keyboard shortcuts to quickly assign or change ratings.
You can select and rate multiple photos at once. You can review and rate photos in the Viewer,
Browser, and Light Table, as well as in Full Screen view. When you’ve nished rating photos,
Aperture allows you to sort photos according to their ratings.
You can use the Filter HUD to hide or show photos of a certain rating. For example, after an initial
rating pass, you can set the Filter HUD to show only those photos that are rated one star. You can
then closely inspect and further rene your selection or begin an adjustment pass. Aperture is
preset to hide photos that are rated Reject, so you may need to change the Filter HUD settings to
see rejected photos.
Make sure this checkbox
is selected, then choose an
option from the pop-up menu.
Set the slider to a
rating.
Aperture provides a set of seven possible photo ratings:
•Five stars, or Select
•Four stars
•Three stars
•Two stars
•One star
•Unrated, or neutral
•Reject
Rejected photos appear with a white X overlay. Positive ratings appear with white star overlays.
If no overlays are displayed on the photo, the photo is considered neutral or is not rated. You can
rate a single photo or apply a rating to several photos at once.
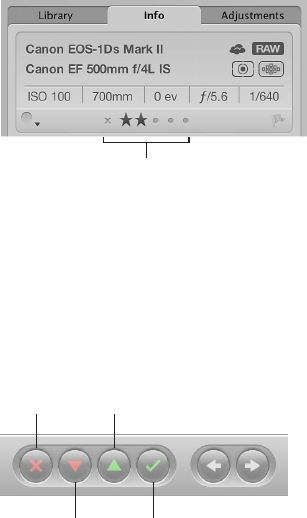
Chapter 8 Rating Photos 145
Rating Individual Photos
You can quickly rate a selected photo using the rating buttons in the Info inspector or in the
control bar.
To rate an individual photo using the rating buttons in the Info inspector
1 Select a photo.
2 In the Info inspector or the Info pane of the Inspector HUD, click a rating button.
Click a rating button
to assign and change
photo ratings.
Note: As long as the photo is selected, you can change its rating.
To rate an individual photo using the rating buttons in the control bar
1 Select a photo.
2 To show the control bar, choose Window > Show Control Bar (or press D).
3 Click the rating buttons in the control bar to assign a rating.
Reject
Decrease
Rating
Select
Increase Rating
•To assign the highest rating to the photo: Click the Select button.
•To assign a rating of Reject: Click the Reject button.
•To increase or decrease the photo rating: Click the Increase Rating or Decrease Rating button.
Note: As long as the photo is selected, you can change its rating.
4 To select the next photo, press the Right Arrow or Left Arrow key, or click the Move Selection Left
or Move Selection Right button in the control bar.
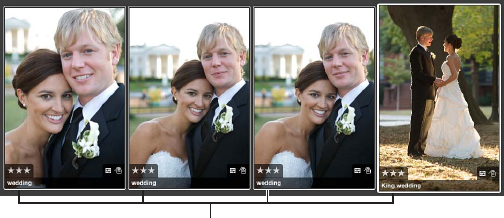
Chapter 8 Rating Photos 146
Rating Multiple Photos
For quick and ecient rating, you use the arrow keys to select photos and then use the
appropriate keyboard shortcuts to apply ratings. For more information about keyboard shortcuts
used to apply ratings to photos, choose Help > Keyboard Shortcuts.
You can apply a rating to several photos at once. If the photos are already assigned various
ratings, you can increase and decrease their ratings by equivalent amounts, such as one star.
To apply the same rating to multiple photos at once
1 Select the photos you want to rate.
For more information, see Navigating Through Photos in the Browser on page 81.
2 Click a rating button in the control bar, or press the keyboard shortcut for a rating.
The rating you assign
is displayed on all the
selected photos.
Sorting Photos by Rating
After you’ve rated your photos, you can sort photos according to a specic rating. For example,
after an initial rating pass, you can choose to show only those photos rated Select, with ve
stars. You can then closely inspect and further rene your selection or begin making image
adjustments. You can sort photos by rating using either the pop-up menu in the Browser’s search
eld or the Rating controls in the Filter HUD.
Note: Original image les are not deleted when sorted by rating. They are only temporarily
removed from view.
For more information on using the Browser’s search eld to sort photos by rating, see Searching
for Photos in the Browser on page 94.
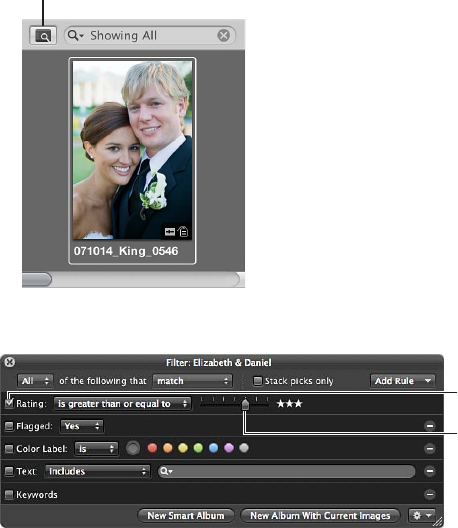
Chapter 8 Rating Photos 147
To sort photos by rating using the Filter HUD
1 Show the Filter HUD by doing one of the following:
•Choose Edit > Find (or press Command-F).
•In the Browser, click the Filter HUD button next to the search eld.
Filter HUD button
in the Browser
2 Select the Rating checkbox.
Set the slider to a
rating.
Make sure this checkbox
is selected, then choose an
option from the pop-up menu.
3 Choose an option from the Rating pop-up menu.
•To show photos with a specic rating only: Choose “is.”
•To show photos with a specic rating or better: Choose “is greater than or equal to.”
•To show photos with a specic rating or worse: Choose “is less than or equal to.”
4 Drag the Rating slider to specify a rating.
The Browser instantly displays only photos that meet the specied rating criteria.
To view all photos again
Do one of the following:
mDeselect the Rating checkbox in the Filter HUD.
mPress Control-6.
To view all photos that are unrated or better
mPress Control–Grave Accent (`).
To view rejected photos only
mPress Control-8.
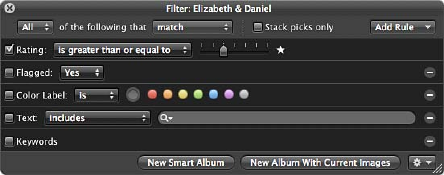
Chapter 8 Rating Photos 148
Including Photo Rating in Your Workow
You can use photo rating as part of your workow to help reduce a large group of photos to a
smaller group of preferred photos. Sometimes you can accomplish the selection process in one
pass, especially if the group of photos is small. If the group is large, additional rating and culling
passes may be necessary.
Rating photos with multiple passes can allow you to take a measured approach to the photo
editing process. You can systematically rate photos and then remove levels of rated photos from
view to work with your best photos.
Here is a suggested workow for rating photos in multiple passes.
To rate photos in multiple passes
1 Begin by assigning a Reject rating to all photos that are clearly unacceptable.
If the Filter HUD is set to show unrated photos or better (the default setting), the rejected photos
immediately disappear.
2 In the next rating pass, assign positive ratings to any photos that deserve a rating of one star or
better. Leave photos you’re uncertain about unrated.
3 To hide all unrated photos, show the Filter HUD and specify a rating that is greater than or equal
to one star as search criteria.
Only photos with a rating of one star or better remain visible in the Browser.
4 In the next rating pass, assign a rating of two stars to any photos that are better than one star.
5 Change the search criteria in the Filter HUD to show only those photos that are rated two stars
or better.
6 In the next rating pass, assign a rating of three stars to your photos that are better than two stars.
7 Change the search criteria in the Filter HUD to show only those photos that are rated three
stars or better.
8 In the next rating pass, assign a rating of four stars to your photos that are better than
three stars.
9 Change the search criteria in the Filter HUD to show only those photos that are rated four stars
or better.
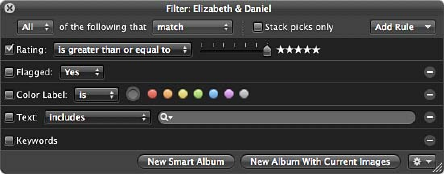
Chapter 8 Rating Photos 149
10 In the next pass, assign a rating of ve stars, or Select, to your best photos.
11 Specify a rating that is equal to ve stars in the Filter HUD.
Only the photos rated Select remain visible in the Browser. Now you can focus on those photos
that deserve your attention.
You can also set up a series of Smart Albums in a project, where each Smart Album represents
a rating from Reject to Select. As you rate your photos in the project, the Smart Albums gather
the photos with matching ratings. You can then review the photos in each Smart Album to verify
they belong in the Smart Album’s rating category. As you progressively change the ratings on
your photos, the contents within the Smart Albums you set up change dynamically to gather the
photos that correspond to their rating setting.
For more information about working with Smart Albums, see An Overview of Smart Albums on
page 255.
Comparing and Rating Photos
For those really tough decisions, Aperture allows you to compare and rate a Select photo against
close alternates. This is particularly useful when you are trying to choose a photo from a small
group of similarly composed photos.
For example, choosing the best photo from a series of head shots can be dicult. Even in head
shots captured within a short time span, the facial expressions of the subject can change ever so
slightly. By comparing photos side by side and rating them, you can more easily choose among
like photos.
To compare and rate photos
1 Make sure the Browser and Viewer are showing by clicking the Split View button in the toolbar.
2 In the Browser, select the photo that appears to be the best.
3 To set this photo as the “compare” photo, choose View > Main Viewer > Compare (or press
Option-O).
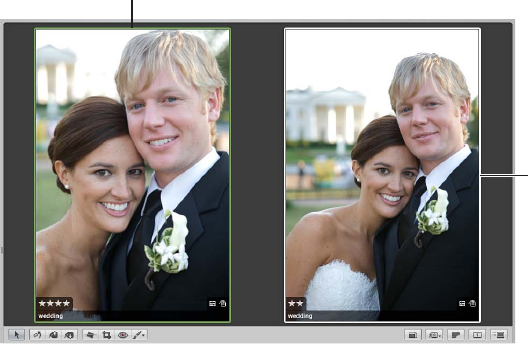
Chapter 8 Rating Photos 150
The compare photo appears in the Viewer and the Browser with a green border. The next
selected photo appears with a white border immediately to the right of the compare photo. If
you want to view another photo against the compare photo, simply select it. The alternate photo
you selected appears to the right of the compare photo in the Viewer.
The compare photo
has a green border.
The alternate
photo has a
white border.
If you have a second display and want to view each photo on a dierent display, choose View >
Secondary Viewer > Span (or press Option-S).
4 Rate your compare photo by doing one of the following:
•To assign the Select rating: Press Option-Backslash (\).
•To increase the compare photo’s rating: Press Option–Equal Sign (=).
•To decrease the compare photo’s rating: Press Option-Hyphen (-).
The rating appears as an overlay on the compare photo.
5 Rate the alternate photo by doing one of the following:
•To assign the Select rating: Press Backslash (\).
•To increase the photo’s rating: Press Equal Sign (=).
•To decrease the photo’s rating: Press Hyphen (-).
•To assign the Reject rating: Press 9.
The rating appears as an overlay on the alternate photo.
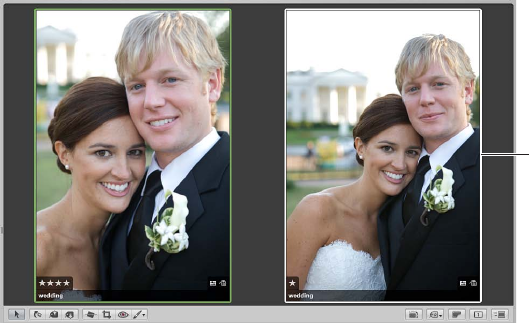
Chapter 8 Rating Photos 151
6 Navigate to the next alternate by pressing the Left Arrow or Right Arrow key or by clicking the
Move Selection Left or Move Selection Right button in the control bar.
The new alternate
appears in the
Browser with
a white border.
If you discover that the new selection is a better choice or has the best rating, you can make
it the compare photo by pressing Return or choosing Edit > Set Compare Item. You can then
review and compare your alternates against this photo to conrm it as the best photo.
Tip: To quickly turn o the comparison feature, press Command-Return.
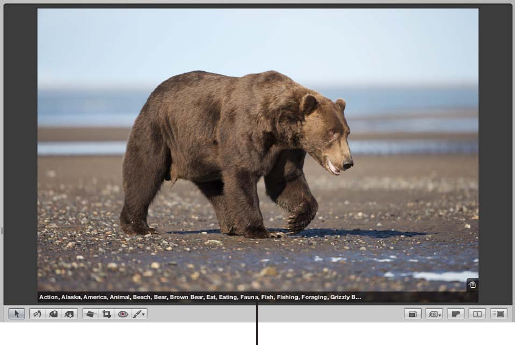
152
An Overview of Keywords
Keywords are descriptive words assigned to photo versions and saved as metadata. For example,
a family portrait may include such keywords as Portrait, Family, Father, Mother, Daughter, Husband,
Wife, Park, Client, Select, Purchased, and more.
Adding keywords to your photos helps you organize your photos and quickly locate
specic photos.
After you have applied keywords to your photos, you can have Aperture display a photo’s
keywords in the Viewer and Browser. You can also view keywords for selected photos in the
Info inspector.
Keywords assigned
to a photo
You can use the Smart Settings HUD to quickly locate photos by their keywords, and you can use
Smart Albums to automatically group photos that have specic keywords assigned. For example,
you can create a Smart Album at the library level named Purchased, which automatically groups
all photos with the keyword Purchased. If you want to quickly review the photos your clients
bought over time, all you have to do is open the Smart Album named Purchased.
You can also apply keywords to photos based on your future intentions. For example, you can
create a Smart Web Page Album that gathers photos that have a For Web keyword applied. As
you’re reviewing your photos, apply the keyword For Web to any photo you think is worthy of
being published on your website. All photos with the keyword For Web are now collected in
the Smart Web Page Album. If you later change your mind about publishing a photo on your
website, you can always remove the keyword. As soon as you remove the keyword, the photo is
removed from the Smart Web Page Album.
Applying Keywords to Photos 9
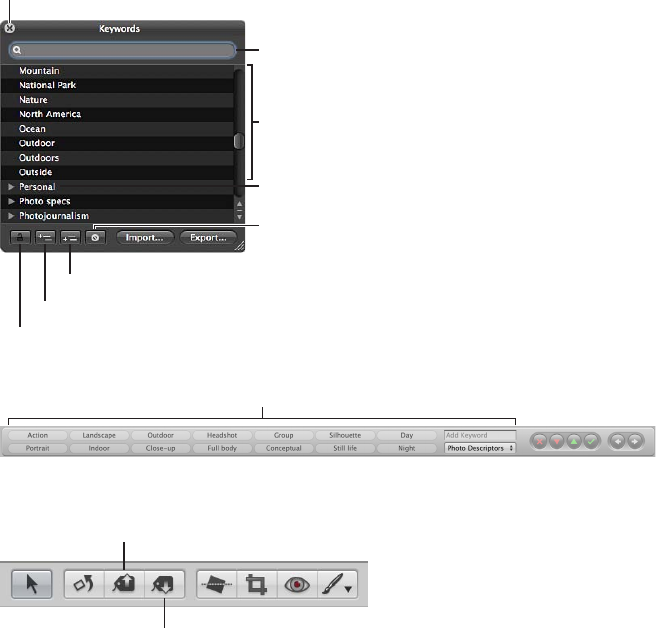
Chapter 9 Applying Keywords to Photos 153
If you sell your photos to image libraries, you can export the keywords assigned to your photos
as IPTC data. During export, Aperture embeds your keywords individually in the image le as
IPTC-compliant keyword elds. The more keywords you apply to your photos, the more likely it is
that your photos will be located by potential customers. For more information, see An Overview
of Exporting Photos on page 436.
Important: If you are planning to export your keywords as IPTC data, make sure your keyword
phrases are no more than 64 characters in length. Longer keyword phrases may not be displayed
properly in other IPTC editors or operating systems.
There are several ways to apply keywords:
•Using the Keywords HUD
Close button
Search field
Keyword group
Keyword list
Remove Keyword button
Lock button
Add Keyword button
Add Subordinate Keyword button
•Using keyword controls, presets, and the keyword eld in the control bar
Keyword controls
•Using the Lift and Stamp tools via the Lift & Stamp HUD
Lift tool
in the tool strip
Stamp tool
in the tool strip
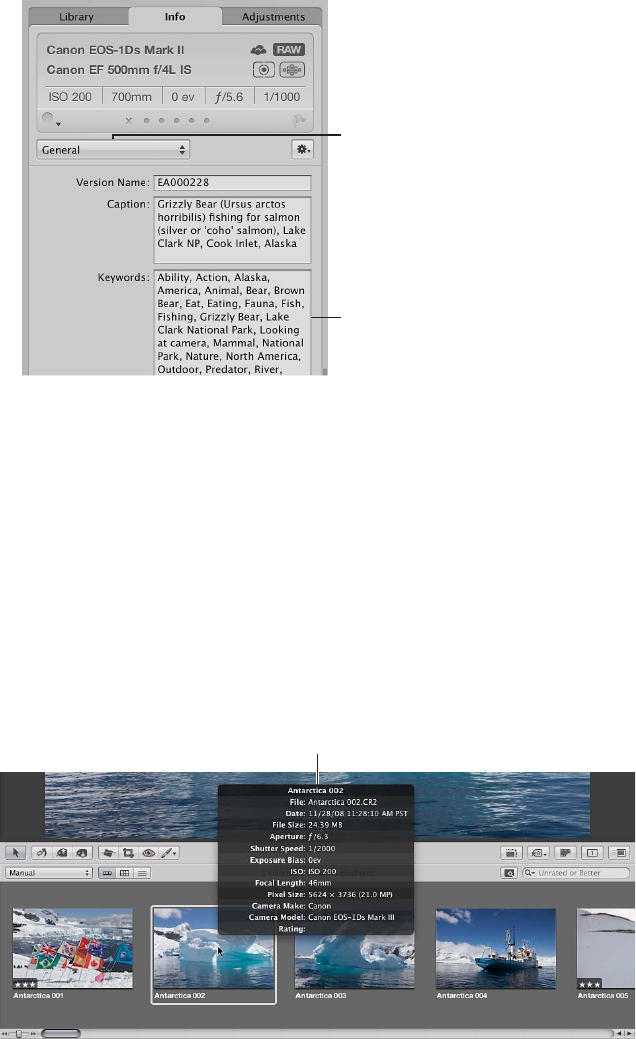
Chapter 9 Applying Keywords to Photos 154
•Using the Info inspector
Add keywords here.
Metadata View pop-up menu
Displaying Keywords in the Viewer and Browser
You can turn on the display of photo keywords in the Viewer and Browser using metadata
overlay views. Your keywords are displayed in overlays that appear across the bottom of the
photo or below the photo. However, you must choose a metadata view that includes keywords,
such as General or Caption & Keywords.
For more information about turning on metadata overlays in the Viewer and Browser, see An
Overview of Metadata Overlays on page 176 .
You can also view a photo’s keywords using metadata tooltips. When you turn metadata tooltips
on, basic metadata, including keywords, is displayed over the photo when you place the pointer
over it. You turn metadata tooltips on and o by pressing Control-T.
Metadata tooltip
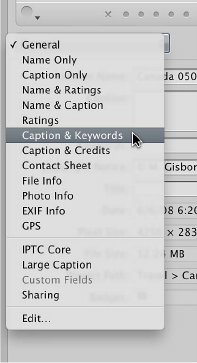
Chapter 9 Applying Keywords to Photos 155
Viewing a Photo’s Keywords Using the Info Inspector
The Info inspector and the Info pane of the Inspector HUD provide views of the metadata
associated with a selected photo. When you show the Info inspector or the Info pane of the
Inspector HUD and then select a photo, you can see the keywords assigned to your photo,
including IPTC keywords.
To view a photo’s keywords using the Info inspector
1 Show the Info inspector by doing one of the following:
•Choose Window > Show Inspector (or press I), then click the Info tab.
•Click the Inspector button in the toolbar, then click the Info tab.
2 Choose a metadata view that includes keywords, such as General or Caption & Keywords, from
the Metadata View pop-up menu.
3 In the Browser, select a photo to see its keywords.
Any keywords applied to the selected photo appear in the Keywords eld of the Info inspector.
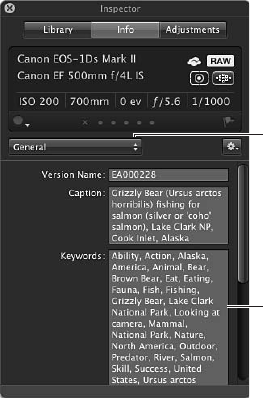
Chapter 9 Applying Keywords to Photos 156
To view a photo’s keywords using the Info pane of the Inspector HUD
1 Show the Info pane of the Inspector HUD by choosing Window > Show Inspector HUD (or
pressing H), then click the Info button.
2 Choose a metadata view that includes keywords, such as General or Caption & Keywords, from
the Metadata View pop-up menu.
Choose a metadata
view from the Metadata
View pop-up menu.
Keywords field
3 Select a photo to see its keywords.
Any keywords applied to the selected photo appear in the Keywords eld of the Info pane of the
Inspector HUD.
Viewing Keywords in the Browser in List View
When the Browser is set to list view, Aperture can display a column that shows the keywords
assigned to photos.
To view keywords in the Keywords column of the Browser
1 To set the Browser to list view, click the List View button (or press Control-L).
The Browser switches to list view.
2 Choose View > Metadata Display > Customize (or press Command-J).
The Browser & Viewer Metadata dialog appears.
3 Select a list view option from the View pop-up menu.
4 Make sure the Keywords checkbox is selected in the Metadata Fields column by clicking the IPTC
and Content disclosure triangles.
The Keywords checkbox can be found in the Content category.
5 Click OK.
6 In the Browser, you can resize the Keywords column by dragging the edge of the column
heading to view all the keywords assigned to the photo.
The keywords for each photo appear in the Keywords column.
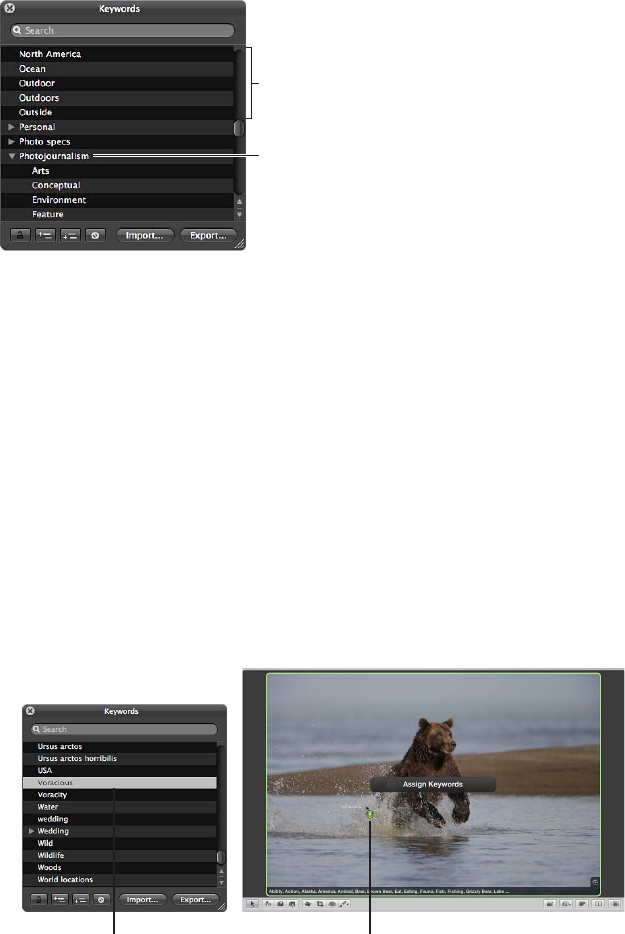
Chapter 9 Applying Keywords to Photos 157
Applying Keywords Using the Keywords HUD
An Overview of the Keywords HUD
The Keywords HUD provides an ecient way to apply keywords to photos. The Keywords HUD
contains a library of predened keywords that you can browse and search. You can also add
your own keywords or remove keywords. The Keywords HUD is automatically updated with
any keywords you add. For example, when you enter a new keyword in the Info inspector, that
keyword also appears in the Keywords HUD. When you change a keyword—by changing its
spelling or capitalization, for example—the keyword is updated on all photos that have that
keyword assigned.
Keyword group
Keyword list
Using the Keywords HUD to Apply Keywords
You can use the Keywords HUD to quickly apply keywords to one or more photos. You simply
drag keywords to any photo or selection of photos in the Viewer or Browser. When you select a
group of photos, you can assign keywords to all the selected photos at once.
To assign a keyword using the Keywords HUD
1 To show the Keywords HUD, do one of the following:
•Choose Window > Show Keywords HUD (or press Shift-H).
•Click the Keywords button in the toolbar.
The Keywords HUD appears.
2 Do one of the following:
•If the Browser is in lmstrip view or grid view: Drag a keyword from the Keywords HUD to a
photo or selected photos in the Viewer or Browser.
...to a photo.Drag a keyword from
the Keywords HUD...
•If the Browser is in list view: Drag a keyword from the Keywords HUD to a photo selection in the
Browser list. The keyword appears in the Keywords column for the photo or photos.
Chapter 9 Applying Keywords to Photos 158
Note: Depending on the metadata options you have set, the Keywords column may not
appear. For more information, see Viewing Keywords in the Browser in List View on page 15 6.
•If Aperture is set to Full Screen view: Drag a keyword or keyword group from the Keywords HUD
to a photo or selected photos displayed onscreen or in the lmstrip.
The keyword is applied to the photo or selection of photos to which you dragged it. To view
keywords applied to photos, see Displaying Keywords in the Viewer and Browser on page 15 4 .
To apply multiple keywords using the Keywords HUD
1 To show the Keywords HUD, do one of the following:
•Choose Window > Show Keywords HUD (or press Shift-H).
•Click the Keywords button in the toolbar.
The Keywords HUD appears.
2 To select the keywords you want to apply, do one of the following:
•Hold down the Shift key while pressing the Up Arrow or Down Arrow key to select
several keywords.
•Shift-click a group of adjacent keywords.
•Command-click nonadjacent keywords.
The selected keywords are highlighted in the keyword list.
3 Drag the keywords from the Keywords HUD to a photo or selection of photos in the Browser, in
the Viewer, or in Full Screen view.
The keywords are assigned to the photo or selection of photos to which you dragged them.
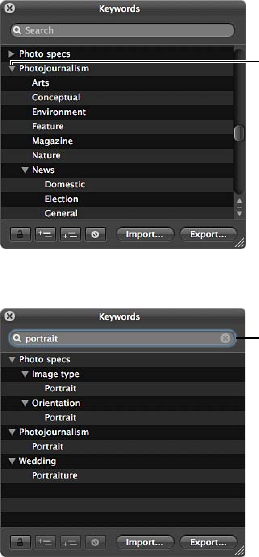
Chapter 9 Applying Keywords to Photos 159
Browsing and Searching for Keywords
You can browse and search for specic keywords in the Keywords HUD.
To locate a keyword using the Keywords HUD
1 To show the Keywords HUD, do one of the following:
•Choose Window > Show Keywords HUD (or press Shift-H).
•Click the Keywords button in the toolbar.
The Keywords HUD appears.
2 Do one of the following:
•To browse for a keyword: Scroll up and down to review the keywords, and click the disclosure
triangles to reveal the keywords in each keyword group.
Click the disclosure triangle
next to a keyword group to
display all the keywords in it.
•To search for a keyword: Type the keyword you’re looking for in the Keywords HUD search eld.
Enter a keyword
in the search field.
The keyword list updates to reveal all instances of the keyword you entered.
Adding Keywords to the Keywords HUD
You can add new keywords to the keyword library of the Keywords HUD. You can also create new
keyword groups. For example, if you added the keyword Fish to your list, you might want to add
Angelsh, Dolphin, Tuna, and Shark under the Fish keyword to further dene your photos.
To add new keywords to the keyword library
1 To show the Keywords HUD, do one of the following:
•Choose Window > Show Keywords HUD (or press Shift-H).
•Click the Keywords button in the toolbar.
The Keywords HUD appears.
2 Click the Add Keyword button.

Chapter 9 Applying Keywords to Photos 160
A new, untitled keyword appears in the keyword list.
Click the Add
Keyword button to
add a new keyword.
A new, untitled
keyword appears
in the keyword list.
3 Type a name for the new keyword, then press Return.
The new keyword is added to the keyword library.
The new keyword is
added to the keyword
library and is sorted
alphabetically.
To add keywords to a keyword group
1 In the Keywords HUD, select the keyword group to which you want to add a keyword.
2 Do one of the following:
•Click the Add Subordinate Keyword button, type the new keyword, then press Return.
A new, untitled keyword
appears in this list within
the keyword group.
Click the Add Subordinate Keyword
button to add a keyword within
a keyword group.
•Drag an existing keyword into the keyword group.
The new keyword appears in the keyword group you selected, sorted alphabetically within
the group.
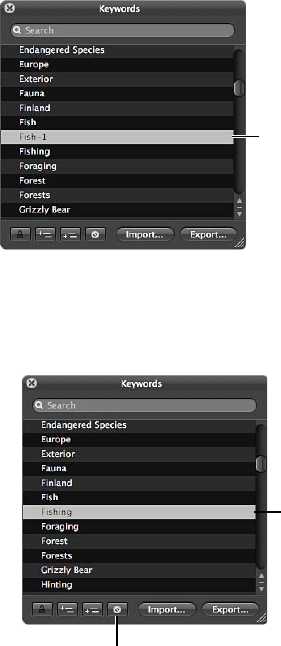
Chapter 9 Applying Keywords to Photos 161
To create a new keyword group with keywords in it
1 In the Keywords HUD, click the Add Keyword button, then type a name for the new
keyword group.
2 With the new keyword group name selected, click the Add Subordinate Keyword button, type a
keyword, then press Return.
The keyword you just added becomes the rst keyword in the new group.
3 To add another keyword to the new group, click the Add Subordinate Keyword button, type a
keyword, then press Return.
Removing Keywords from the Keywords HUD
After adding keywords to the keyword library of the Keywords HUD, you may decide not to use
certain keywords. If so, you can easily remove them.
To remove a keyword or keyword group from the keyword library
1 In the Keywords HUD, select the keyword or keyword group you want to remove.
The selected keyword
is highlighted.
2 Do one of the following:
•Click the Remove Keyword button.
•Press the Delete key.
The selected keyword
is removed. The next
keyword in the list is
automatically selected.
Click the Remove
Keyword button to
remove a keyword.
3 If the keyword you are attempting to remove is assigned to any photo in your library, a dialog
appears, indicating the number of times it’s being used. If you still want to remove the keyword,
click “Remove from all versions.”
Important: Removing a keyword from the keyword library removes it from any photos to which
it’s already assigned.
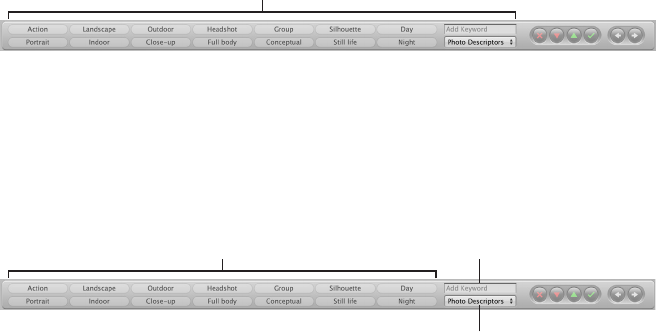
Chapter 9 Applying Keywords to Photos 162
Modifying Existing Keywords in the Keywords HUD
When entering a large group of keywords in the Keywords HUD, it’s not uncommon to make
spelling mistakes. It’s easy to modify existing keywords to x the mistakes.
To modify an existing keyword in the Keywords HUD
1 In the Keywords HUD, double-click the keyword you want to change.
The selected keyword is highlighted, and you can edit it.
2 Enter the correction, then press Return.
3 If the keyword you are attempting to modify is assigned to any photo in your library, a dialog
appears, indicating the number of times it’s being used. If you still want to change the keyword,
click “Rename in all versions.”
Note: If you’re planning to enter a large group of keywords, it may be easier to enter them in
a tab-delimited text (.txt) le, using an application such as TextEdit, and then import the list of
keywords into Aperture. For more information, see Exporting and Importing Keyword Lists on
page 171.
Applying Keywords Using Keyword Controls and Keyword Presets
An Overview of the Keyword Controls in the Control Bar
One way to apply and remove keywords is to use the keyword controls located in the control bar.
You can add new keywords to photos or apply preset keywords that are part of a keyword group.
Keyword controls
The keyword controls are located at the left side of the control bar, but they are not shown
by default.
To show the keyword controls in the control bar
mChoose Window > Show Keyword Controls (or press Shift-D).
Keyword Preset Group
pop-up menu
Add Keyword field
Keyword buttons showing
individual keywords assigned
to the number keys 1–8
The following keyword controls appear:
•Keyword buttons: These buttons display the preset keywords in the selected keyword preset
group. The rst eight keywords are assigned to the keyboard shortcut key combination of
Option and a number key (1 through 8) on the keyboard. Press Option and a number key on
the keyboard (not the numeric keypad) to add the preset keyword to a selected photo, or click
a keyword button. The control bar can hold up to 20 keyword buttons. To remove a keyword
applied by clicking a button, press Shift-Option and the button’s corresponding number key.
To remove all keywords, press Shift-Option-9.
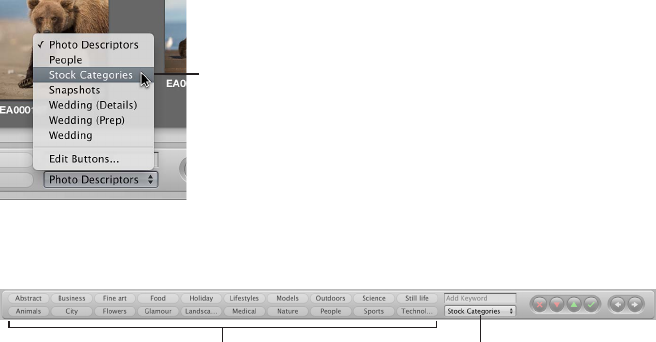
Chapter 9 Applying Keywords to Photos 163
•Add Keyword eld: Type a new keyword in this eld and press Return to add it to a selected
photo. If the keyword has been used before, Aperture automatically completes the word as
you type it. If the Keywords HUD is locked, you are asked whether you want to unlock the
Keywords HUD and add the keyword to the keyword library, or not add the keyword to the
photo. To remove a keyword you’ve just applied, type the keyword again and press Shift-
Return. Keywords removed using the keyword eld are not removed from the Keywords HUD.
•Keyword Preset Group pop-up menu: Use this pop-up menu to choose the keyword preset
group you want displayed. You can also use the Comma (,) key and Period (.) key to quickly
cycle forward and backward through the keyword preset groups. The rst eight keywords in
the group are assigned to the keyboard shortcut key combination of Option and a number
key from 1 through 8.
Choosing a Keyword Preset Group
Aperture provides groups of related keywords in sets that you can easily select and use. A
group of related keywords is called a keyword preset group. You can select a keyword preset
group whenever you need it, and you can create your own keyword preset groups that include
keywords you frequently use.
When you choose a keyword preset group, Aperture assigns the specic keywords to
keyword buttons in the control bar. This allows you to set the control bar to show the most
useful keywords.
To choose a keyword preset group and apply keywords to photos
1 Select a photo or group of photos in the Browser.
2 In the control bar, choose a keyword preset group from the Keyword Preset Group pop-up menu.
Choose the keyword
preset group you want
to use.
The keyword buttons in the control bar update according to the keyword preset group
you chose.
The Keyword Preset
Group pop-up menu
displays your choice.
The keyword buttons now
appear with keywords from
the group you chose.
Adding Preset Keywords to Photos Using Keyword Controls
You can easily add a preset keyword to a photo.
To add a preset keyword to a photo
1 Select the photo to which you want to assign a keyword.
2 In the control bar, choose a keyword preset group from the Keyword Preset Group pop-up menu.
3 Do one of the following:
•Choose Metadata > Add Keyword, then choose the keyword you want from the submenu.
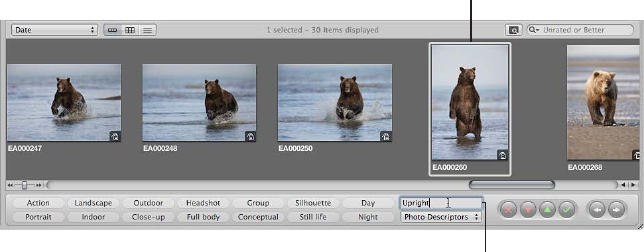
Chapter 9 Applying Keywords to Photos 164
•Press Option and a number key from 1 to 8 to assign one of the rst eight keywords.
•Click a keyword button in the control bar.
To remove a preset keyword from a photo
1 Select the photo with the preset keyword you want to remove.
2 In the control bar, select a keyword preset group from the Keyword Preset Group pop-up menu.
3 Do one of the following:
•Choose Metadata > Remove Keyword, then choose the keyword you want to remove from
the submenu.
•Press Shift-Option and a number key from 1 to 8 to remove one of the rst eight keywords.
•Shift-click the keyword button in the control bar.
To apply a new keyword using the keyword controls
1 In the Browser, select a photo or group of photos.
2 In the control bar, type the new keyword in the Add Keyword eld, then press Return.
Enter your keyword
in this field, then
press Return.
Select the photo
to which you want
to apply a new keyword.
The keyword you entered is now applied to the photo or group of photos.
For information about viewing keywords applied to photos, see Displaying Keywords in the
Viewer and Browser on page 154 .
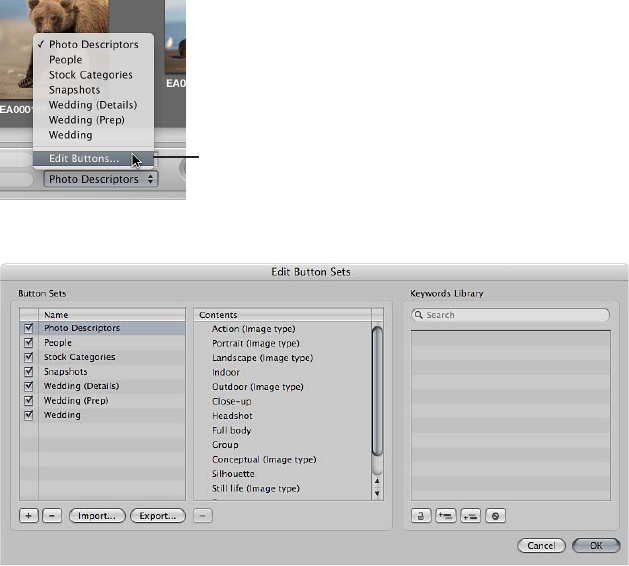
Chapter 9 Applying Keywords to Photos 165
Creating a Keyword Preset Group
You can create new keyword preset groups when you need them.
To create a keyword preset group and assign keywords to it
1 In the control bar, choose Edit Buttons from the Keyword Preset Group pop-up menu.
Choose Edit Buttons
to add a new keyword
preset group.
The Edit Button Sets dialog appears.
The Name column on the left lists the keyword preset groups that already exist. When you select
a keyword preset group in this column, the keywords included in the group appear in the center
Contents column. You add or remove keywords by adding them to or removing them from the
Contents column. The Keywords Library column provides a list of the existing keywords in your
keyword library. You can drag keywords from this list into the Contents column. You can also add
keywords and keyword groups to your keyword library using the controls below the Keywords
Library column.
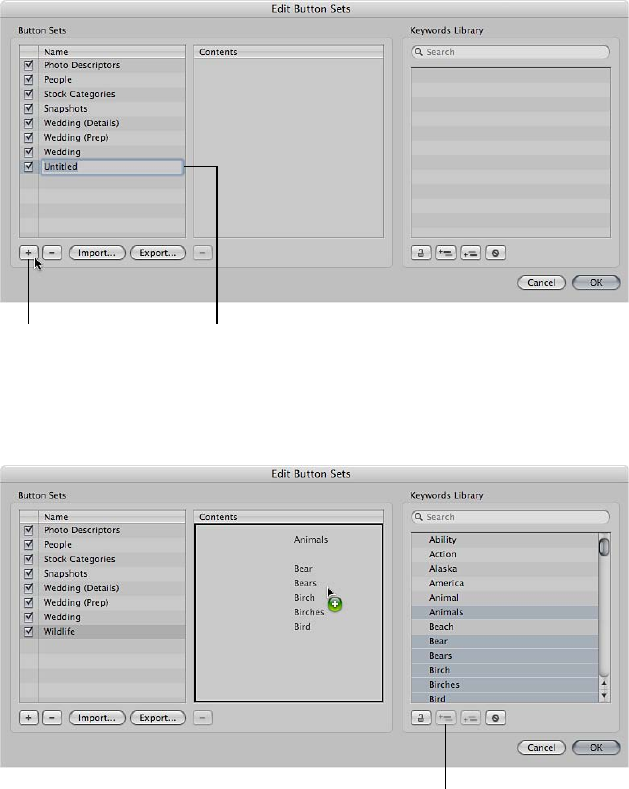
Chapter 9 Applying Keywords to Photos 166
2 To create a new keyword preset group, click the Add (+) button.
An untitled keyword preset group appears in the Name column.
Click the Add button
to add a keyword
preset group.
A new, untitled preset
group appears in this list.
3 Type a name for the new keyword preset group, then press Return.
4 Drag keywords from the Keywords Library column to the Contents column.
Add Keyword button
If you wish, you can select multiple keywords and drag them to the Contents column at the same
time. Hold down the Shift key while pressing the Up Arrow or Down Arrow key to select several
keywords, Shift-click to select adjacent keywords, or Command-click to select nonadjacent keywords.
If you have a large list of keywords, you can quickly locate the one you’re looking for by typing the
keyword in the search eld. You can also add new keywords to the Keywords Library column by
clicking the Add Keyword button. You can then drag the new keywords into the Contents column.
5 If you want to rearrange the order of the keywords in the Contents column, drag them into the
order you prefer.
The rst eight keywords are assigned to the keyboard shortcut key combination of Option and a
number key (1 through 8) on the keyboard. To remove a keyword from the column, select it and
press Delete, or click the Remove (–) button below the column.
6 After arranging the keywords in order, click OK.
The new keyword preset group appears in the Keyword Preset Group pop-up menu.
If the keyword preset group has fewer than eight keywords, the unassigned keys are inactive.
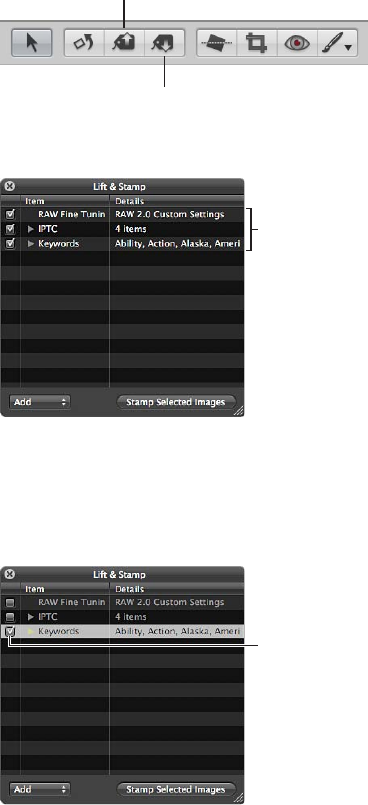
Chapter 9 Applying Keywords to Photos 167
Applying Keywords Using the Lift & Stamp HUD
You can use the Lift and Stamp tools to quickly apply all or some of the keywords from one
photo to other photos. Using the Lift and Stamp tools is an ecient way to apply keywords and
other types of metadata, such as ratings, to large numbers of photos. The Lift and Stamp tools
can also apply adjustments made to photos, such as cropping, straightening, exposure changes,
and other adjustments. For more information about using the Lift and Stamp tools to apply
adjustments, see Applying Adjustments to a Group of Images on page 272.
The Lift and Stamp tools have a corresponding HUD you can use to view and remove items
you’ve lifted (copied) from one photo before you stamp (paste) them onto another photo.
To lift all the keywords from a photo and stamp them onto another photo or group of photos
1 Select a photo.
2 Select the Lift tool (or press O).
Lift tool
in the tool strip
Stamp tool
in the tool strip
The Lift & Stamp HUD appears.
All information for
the selected image
appears here.
All the photo’s metadata, such as applied adjustments, rating, and keywords, appears in the Lift &
Stamp HUD.
3 Deselect all checkboxes except for Keywords, or select items in the HUD and press Delete to
remove them.
Make sure the Keywords
checkbox is the only
one selected.
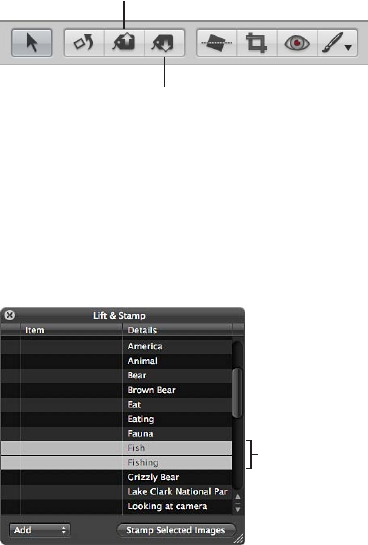
Chapter 9 Applying Keywords to Photos 168
4 To apply the keywords from the Lift & Stamp HUD, do one of the following:
•Use the Stamp tool to select the photos to which you want to assign the keywords.
•Use the Selection tool to select a group of photos in the Browser, then click the Stamp
Selected Images button in the Lift & Stamp HUD.
The keywords from the rst photo are applied to all of the photos you stamped them on.
To stamp a reduced selection of keywords onto a photo
In many cases, you do not want to copy all keywords from one photo and paste them onto
another. For this reason, you can select specic keywords that apply to the photo you want to
stamp them on.
1 Select a photo.
2 Select the Lift tool (or press O).
Lift tool
in the tool strip
Stamp tool
in the tool strip
The Lift & Stamp HUD appears.
3 In the Lift & Stamp HUD, deselect all image information checkboxes except for Keywords.
4 Click the Keywords disclosure triangle to reveal the keywords from the selected photo.
5 Remove any keywords you don’t want to stamp onto a photo or group of photos by selecting
each unwanted keyword in the list and pressing the Delete key.
Select the keywords
you don’t want to stamp,
then press Delete.
6 To apply the keywords from the Lift & Stamp HUD, do one of the following:
•Use the Stamp tool to select the photos to which you want to assign the keywords.
•Use the Selection tool to select a group of photos in the Browser, and then click the Stamp
Selected Images button in the Lift & Stamp HUD.
The reduced selection of keywords is applied to the selected photo.
To quickly lift and stamp photo metadata and adjustments
You can quickly lift and stamp the keywords and all other metadata and adjustments from one
photo to another using keyboard shortcuts.
1 Select a photo, then press Command-Shift-C to lift the metadata from the photo.
2 Select a photo or group of photos, then press Command-Shift-V to stamp the metadata onto the
selected photos.
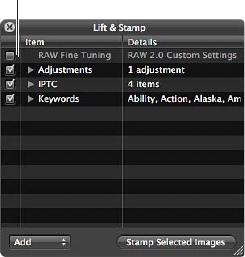
Chapter 9 Applying Keywords to Photos 169
You can also lift RAW Fine Tuning parameter values from one RAW image and stamp them onto
another. RAW Fine Tuning adjustments are included in lift and stamp operations by default. If
you don’t want to lift and stamp RAW Fine Tuning adjustments, you must deselect them in the
Lift & Stamp HUD. For more information about lifting and stamping adjustments, see Applying
Adjustments to a Group of Images on page 272. For more information about the RAW Fine
Tuning adjustments, see An Overview of the RAW Fine Tuning Controls on page 289.
Deselect the RAW
Fine Tuning checkbox.
To exclude everything but metadata from lift and stamp operations
You can use the Lift & Stamp HUD to lift and stamp metadata only.
1 Select the photo with the metadata or keywords you want to copy.
2 Choose Metadata > Lift Metadata.
The Lift & Stamp HUD appears, showing the metadata and keyword information only.
3 Select a photo or group of photos, then click the Stamp Selected Images button.
Only the selected metadata and keywords are applied to the photo selection.
Applying Keywords Using the Info Inspector
When you select a photo, you can use the Info inspector to see the photo’s keywords and add
new keywords, if needed.
To apply keywords using the Info inspector
1 Select a photo.
2 Choose Window > Show Inspector (or press I), then click Info.
3 Choose Caption & Keywords from the Metadata View pop-up menu.
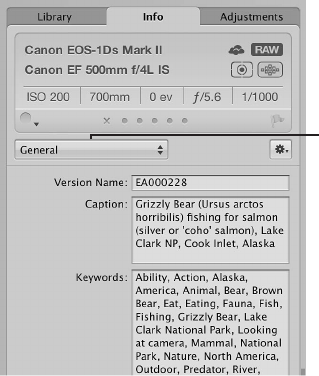
Chapter 9 Applying Keywords to Photos 170
All keywords assigned to the photo appear in the Keywords eld.
Metadata View pop-up menu
4 To add a keyword, type a keyword in the Keywords eld.
Note: All keywords must be separated by commas (,).
Applying Keywords to Photos in the Light Table
You can use the Light Table to arrange your photo selection in a freeform manner. After
arranging your photos into groups, you can apply keywords to a group of photos at once. For
example, if you make a Light Table album consisting of the selects from your wedding shoot,
you can group the photos according to the part of the wedding event they show. After you’ve
arranged them, you can apply keywords, such as Getting Ready, Wedding, Ceremony, Formal
Shots, and Reception, as appropriate.
To apply keywords to groups of photos in the Light Table
1 Select a Light Table album in the Library inspector.
2 Click the Keywords button in the toolbar (or press Shift-H).
3 In the Light Table or the Browser, select a group of photos to which you want to assign keywords.
4 Drag the appropriate keywords from the Keywords HUD to the selected photos.
The keywords are immediately applied to the selected photos.
For more information about using the Light Table, see An Overview of the Light Table on
page 507.
Chapter 9 Applying Keywords to Photos 171
Removing Keywords from a Photo
You can remove keywords that you've applied to a photo.
To remove all keywords from a photo
1 Select the photo.
2 Choose Metadata > Remove Keyword > Remove All Keywords (or press Shift-Option-9).
To remove specic keywords using the Info inspector
1 If the Info inspector isn’t shown, click the Inspector button in the toolbar, then click Info.
2 Choose Caption & Keywords from the Metadata View pop-up menu.
3 In the Keywords eld, select and delete any keywords you want removed from the photo.
To remove an individual keyword from a group of photos using keyword controls in the
control bar
1 Select the group of photos.
2 Do one of the following:
•In the control bar, type the keyword you want to remove in the Add Keyword eld, then press
Shift-Return.
•If the keyword is a keyword preset, Shift-click the keyword button in the control bar.
The keyword is removed from the selected photos.
For more information about using the control bar, see An Overview of the Keyword Controls in
the Control Bar on page 162.
Exporting and Importing Keyword Lists
You can export and import keyword lists to share with other Aperture users and transfer to
other Aperture systems. You can also create keyword lists for specic projects and then import
them as needed. When you export a keyword list, all your keywords are placed in a simple tab-
delimited text (.txt) le. The tab-delimited list is set up in a hierarchical structure that matches
the hierarchical structure of the Keywords HUD.
To export a keyword list
1 Do one of the following:
•In the Keywords HUD, click the Export button.
•In the Edit Buttons Sets dialog, click the Export button.
2 In the dialog that appears, give the keyword list a name, choose a location, and click Save.
The keyword list is saved as a text (.txt) le to the location you chose.
To import a keyword list
After you have exported a keyword list, you can transfer the le to another Aperture system and
import it. You can also manually create or edit keyword lists using other applications such as
TextEdit, and you can import the lists into Aperture as long as they follow a tab-delimited text
le structure.
1 Do one of the following:
•In the Keywords HUD, click the Import button.
•In the Edit Buttons Sets dialog, click the Import button.
2 In the dialog that appears, navigate to the keyword list le and click Open.
The Keywords HUD is updated to include all the new keywords from the imported keyword list.
172
An Overview of Working with Metadata
Information about your photos, including the types of adjustments applied, information recorded
by the camera, and descriptive information about the photos, is called metadata. In Aperture, you
work with three types of metadata.
The rst type of metadata is called Exchangeable Image File (EXIF) data. EXIF metadata is
information recorded by the camera and stored in the image le at the time it was shot, such
as shutter speed, f-stop, the time the photo was captured, the camera model, and GPS data (for
cameras that support it).
The second type of metadata is data you apply to identify and track photos within Aperture,
such as a version name, color labels, ags, keywords, when the photo was imported, the types of
adjustments applied to it, and how and where it was published.
The third type of metadata is called International Press Telecommunications Council (IPTC) data.
IPTC metadata is standardized data used by photographers and media organizations to embed
keywords, captions, copyright notices, and other information in the image les themselves. You
can view and modify IPTC metadata in Aperture.
Note: For more information about working with GPS data in Aperture, see An Overview of
Places on page 208.
Working with Metadata 10
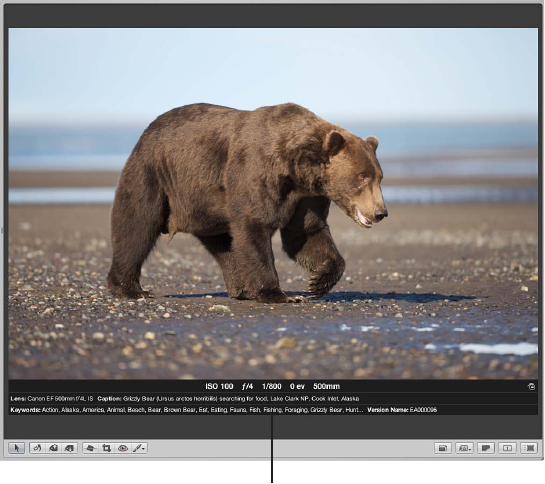
Chapter 10 Working with Metadata 173
You can display dierent combinations of metadata with your photos in the Viewer and the
Browser, as well as in Full Screen view. Aperture provides metadata overlay views, which
represent specic combinations of information that you can display as overlays on or just below
each photo. For example, you can choose a basic view that shows a photo’s version name and
caption. Or, you can choose an expanded view that displays a photo’s rating, badges, aperture
setting, shutter speed, exposure bias, focal length, caption, keywords, version name, ISO speed
rating, and le size, as well as the original’s location. You can also create your own metadata
overlay views.
A photo in the Viewer
with metadata shown in
the expanded metadata
overlay view
You can choose dierent metadata overlay views for the Viewer, the Browser in grid view and
lmstrip view, and the Browser in list view. You can also display metadata with labels that help
identify the types of metadata being displayed.
Note: Choosing a metadata view for the Viewer also denes the metadata that appears with
photos in Full Screen view. Choosing a metadata view for the Browser in grid view denes the
metadata that appears with thumbnail images in the Full Screen view lmstrip, as well as the
thumbnail images in Full Screen view Browser mode.
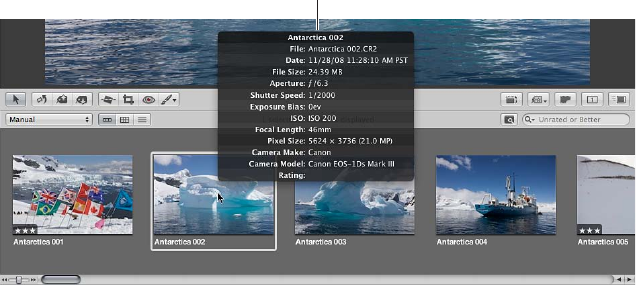
Chapter 10 Working with Metadata 174
When you position the pointer over a photo, Aperture can display information about it in a text
box called a metadata tooltip. You can turn the display of metadata tooltips on or o using the
Metadata Overlays pop-up menu in the tool strip. You can choose a metadata view to specify
the combination of metadata that appears in metadata tooltips using the Browser & Viewer
Metadata dialog.
Metadata tooltip
You can change the combination of metadata that appears in the Info inspector by choosing a
metadata view from the Metadata View pop-up menu. For more information about metadata
views, see An Overview of Metadata Views on page 187.
You can also add the actual metadata you want applied to your photos to the elds of a
metadata view and save it as a metadata preset using the Metadata dialog accessed via the
Metadata Action pop-up menu in the Info inspector. For more information about metadata
presets, see Creating Metadata Presets on page 191.
You can then use that metadata preset to apply combinations of metadata to photos as you
import them or apply a combination of metadata to a group of photos using the Batch Change
dialog. For more information about applying combinations of metadata to a group of photos, see
Batch Changing Metadata on page 194.
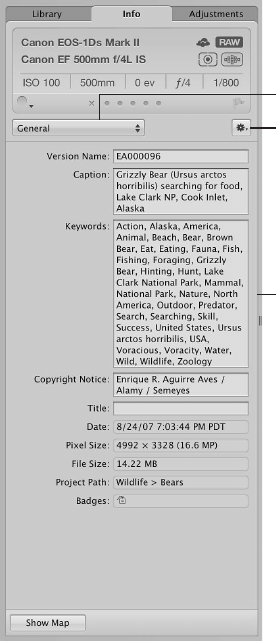
Chapter 10 Working with Metadata 175
Showing the Info Inspector
You can view the metadata for a selected photo in the Info inspector and the Info pane of the
Inspector HUD.
To show the Info inspector
Do one of the following:
mChoose Window > Show Inspector (or press I), then click the Info tab.
mClick the Inspector button in the toolbar, then click the Info tab.
Choose a metadata view from
the Metadata View pop-up menu.
Info inspector
Apply and edit metadata presets,
manage custom fields, and attach
audio files to images using the
Metadata Action pop-up menu.

Chapter 10 Working with Metadata 176
To show the Info pane of the Inspector HUD
mChoose Window > Show Inspector HUD (or press H), then click Info.
Choose a metadata
view from the Metadata
View pop-up menu.
Apply and edit metadata
presets, manage custom
fields, and attach audio
files to images using
the Metadata Action
pop-up menu.
Info pane of the
Inspector HUD
Displaying Metadata with Your Photos
An Overview of Metadata Overlays
You use the Metadata Overlays pop-up menu in the tool strip to turn on and turn o the
display of metadata overlays that appear with photos in the Viewer and Browser. You can also
use this pop-up menu to turn on and turn o the display of metadata tooltips. You can switch
between the “basic” and “expanded” metadata overlay views independently for both the Viewer
and Browser. In addition, you access the Browser & Viewer Metadata dialog for the Viewer and
Browser using the Metadata Overlays pop-up menu.
Metadata Overlays
pop-up menu
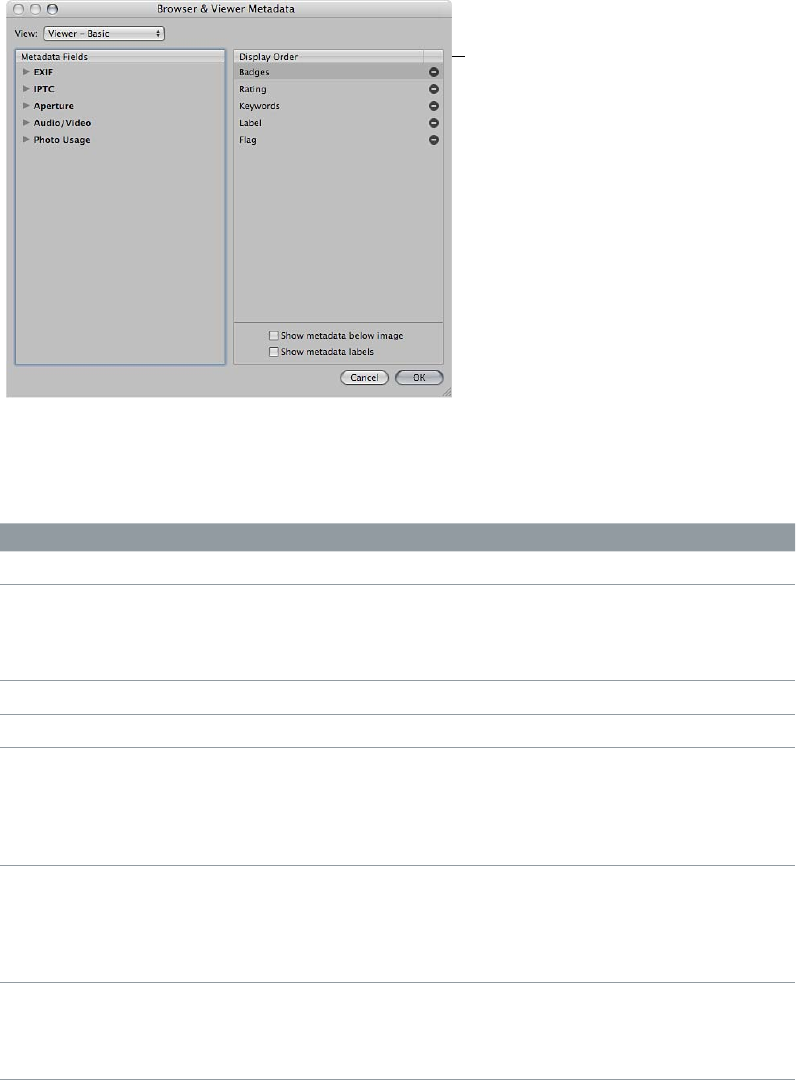
Chapter 10 Working with Metadata 177
You use the Browser & Viewer Metadata dialog to specify the metadata elds to display in the
basic and expanded metadata overlay views for both the Viewer and Browser, as well as the
metadata that appears in metadata tooltips. You can choose to display a wide variety of EXIF
and IPTC metadata elds. In addition, you can add Aperture-specic metadata elds, such as
rating and version name, as well as photo usage information, such as whether a photo has
been emailed or ordered via Apple’s print service. You can also specify whether to display the
photo’s metadata over the lower portion of the photo or below it, and you can choose to display
metadata with labels to make it easier to identify the types of metadata being displayed.
Choose the metadata
to display with photos
in the Browser & Viewer
Metadata dialog.
Some metadata overlay views are specically designed for displaying information in the Viewer,
in the Browser in grid view or list view, or in metadata tooltips. The following table lists the
metadata overlay views that you can choose and the information that each view displays.
Metadata overlay view Information displayed
Viewer - Basic Badges, rating, keywords, labels, and ag
Viewer - Expanded Rating, badges, label, aperture (f-stop), shutter speed,
exposure bias, focal length (35mm), focal length, lens,
caption, keywords, version name, date, ISO, le size,
and project path
Grid View – Basic Badges, rating, label, and ag
Grid View – Expanded Badges, rating, version name, label, and ag
List - Basic Version name, badges, rating, label, ag, date, aperture
(f-stop), shutter speed, exposure bias, ISO, focal length
(35mm), focal length, lens, pixel size, orientation,
aspect ratio, lename, le size, camera model, import
session, and project path
List - Expanded Version name, badges, rating, label, ag, date, caption,
keywords, provider, copyright notice, title, lename,
le size, camera model, import session, project path,
aperture (f-stop), shutter speed, exposure bias, ISO,
focal length (35mm), focal length, lens, and pixel size
Metadata Tooltips Version name, lename, date, le size, caption,
keywords, aperture (f-stop), shutter speed, exposure
bias, ISO, focal length (35mm), focal length, pixel size,
camera make, camera model, and rating
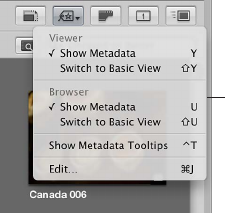
Chapter 10 Working with Metadata 178
Turning the Display of Metadata On or O
You can turn the display of metadata on and o and switch between metadata overlay views in
the Viewer and Browser independently using menu commands or the Metadata Overlays pop-up
menu in the tool strip.
Metadata Overlays
pop-up menu
To hide or show metadata in the Viewer
Do one of the following:
mChoose View > Metadata Display, then choose Show Metadata from the Viewer section of the
submenu (or press Y).
mIn the tool strip, choose Show Metadata from the Viewer section of the Metadata Overlays
pop-up menu.
To switch to the expanded metadata overlay view in the Viewer
Do one of the following:
mChoose View > Metadata Display, then choose Switch to Expanded View from the Viewer section
of the submenu (or press Shift-Y).
mIn the tool strip, choose Switch to Expanded View from the Viewer section of the Metadata
Overlays pop-up menu.
To switch to the basic metadata overlay view in the Viewer
Do one of the following:
mChoose View > Metadata Display, then choose Switch to Basic View from the Viewer section of
the submenu (or press Shift-Y).
mIn the tool strip, choose Switch to Basic View from the Viewer section of the Metadata Overlays
pop-up menu.
To hide or show metadata in the Browser in lmstrip view and grid view
Do one of the following:
mChoose View > Metadata Display, then choose Show Metadata from the Browser section of the
submenu (or press U).
mIn the tool strip, choose Show Metadata from the Browser section of the Metadata Overlays
pop-up menu.
To switch to the expanded metadata overlay view in the Browser in lmstrip view, grid view,
and list view
Do one of the following:
mChoose View > Metadata Display, then choose Switch to Expanded View from the Browser
section of the submenu (or press Shift-U).
mIn the tool strip, choose Switch to Expanded View from the Browser section of the Metadata
Overlays pop-up menu.
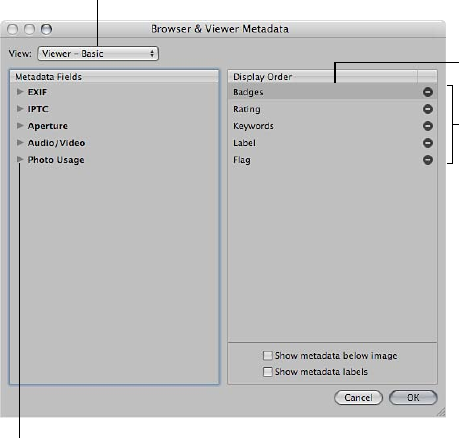
Chapter 10 Working with Metadata 179
Note: Switching to the expanded view increases the number of columns displayed in list view.
To switch to the basic metadata overlay view in the Browser in lmstrip view, grid view, and
list view
Do one of the following:
mChoose View > Metadata Display, then choose Switch to Basic View from the Browser section of
the submenu (or press Shift-U).
mIn the tool strip, choose Switch to Basic View from the Browser section of the Metadata Overlays
pop-up menu.
Note: Switching to the basic view decreases the number of columns displayed in list view.
To turn metadata tooltips on or o
Do one of the following:
mChoose View > Metadata Display > Image Tooltips (or press Control-T).
mIn the tool strip, choose Show Metadata Tooltips from the Metadata Overlays pop-up menu.
A checkmark appears next to the menu item when metadata tooltips are turned on.
Specifying the Type of Metadata to Display in the Viewer and Browser
You use the Browser & Viewer Metadata dialog to specify the types of metadata that are shown
in the basic and expanded views for the Viewer, the Browser in grid view and lmstrip view, and
the Browser in list view. You can also specify the types of metadata shown in metadata tooltips.
Note: When you choose a metadata overlay view for the Browser in list view, the metadata
overlay view determines the number of columns that appear. Each metadata item in the
metadata overlay view corresponds to a list view column.
Choose the metadata
overlay view you want
from this pop-up menu.
The item at the top
appears on the left
side of the overlay.
Drag metadata fields
up or down to change
their display order.
Click a disclosure triangle to
change the metadata you want
displayed in a particular group.
Chapter 10 Working with Metadata 180
To set the metadata elds that are displayed in a specic metadata overlay view
1 Do one of the following:
•Choose View > Metadata Display > Customize (or press Command-J).
•In the tool strip, choose Edit from the Metadata Overlays pop-up menu.
The Browser & Viewer Metadata dialog appears.
2 Choose the metadata overlay view you want to modify from the View pop-up menu.
3 In the Metadata Fields column, do any of the following:
•To add EXIF information, such as exposure and aperture settings: Click the EXIF disclosure triangle,
then select the checkboxes next to the metadata elds you want to add to the metadata
overlay view.
•To add IPTC information, such as copyright information and keywords: Click the IPTC disclosure
triangle, then select the checkboxes next to the metadata elds you want to add to the
metadata overlay view.
•To add Aperture information, such as version name and color labels: Click the Aperture disclosure
triangle, then select the checkboxes next to the metadata elds you want to add to the
metadata overlay view.
•To add audio and video clip information, such as duration, data rate, and frames per second (fps):
Click the Audio/Video disclosure triangle, then select the checkboxes next to the metadata
elds you want to add to the metadata overlay view.
•To add information about photo usage, such as whether or not a photo has been printed or
emailed: Click the Photo Usage disclosure triangle, then select the checkboxes next to the
metadata elds you want to add to the metadata overlay view.
The selected metadata elds are added to the Display Order column.
4 If you want to change the order in which the metadata elds are displayed in the overlay, from
left to right, drag the metadata elds in the Display Order column into a new arrangement.
The topmost metadata item in the Display Order column appears on the left side of the overlay.
5 When you are satised with the metadata elds assigned to the selected metadata overlay view
and the arrangement of the metadata elds in that view, click OK.
To remove a metadata eld from a metadata overlay view
1 Do one of the following:
•Choose View > Metadata Display > Customize (or press Command-J).
•In the tool strip, choose Edit from the Metadata Overlays pop-up menu.
The Browser & Viewer Metadata dialog appears.
2 Choose the metadata overlay view you want to modify from the View pop-up menu.
3 In the Display Order column, click the Remove (–) button next to the metadata eld you want
to remove.
4 When you are satised with the metadata elds assigned to the selected metadata overlay view
and the arrangement of the metadata elds in that view, click OK.
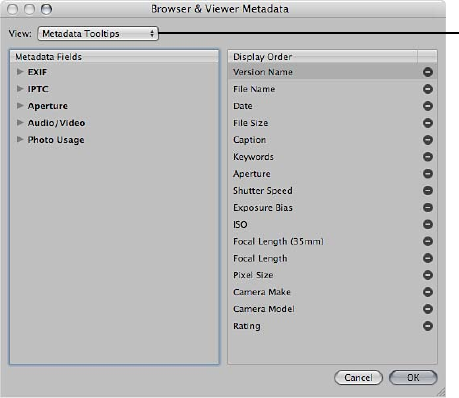
Chapter 10 Working with Metadata 181
To set the display of metadata in metadata tooltips
1 Do one of the following:
•Choose View > Metadata Display > Customize (or press Command-J).
•In the tool strip, choose Edit from the Metadata Overlays pop-up menu.
The Browser & Viewer Metadata dialog appears.
2 Choose Metadata Tooltips from the View pop-up menu.
Choose Metadata
Tooltips from the
View pop-up menu.
3 In the Metadata Fields column, do any of the following:
•To add EXIF information, such as exposure and aperture settings: Click the EXIF disclosure
triangle, then select the checkboxes next to the metadata elds you want to add to the
metadata tooltip.
•To add IPTC information, such as copyright information and keywords: Click the IPTC disclosure
triangle, then select the checkboxes next to the metadata elds you want to add to the
metadata tooltip.
•To add Aperture information, such as version name and color label: Click the Aperture disclosure
triangle, then select the checkboxes next to the metadata elds you want to add to the
metadata tooltip.
•To add audio and video clip information, such as duration, data rate, and frames per second (fps):
Click the Audio/Video disclosure triangle, then select the checkboxes next to the metadata
elds you want to add to the metadata tooltip.
•To add information about photo usage, such as whether or not a photo has been printed or
emailed: Click the Photo Usage disclosure triangle, then select the checkboxes next to the
metadata elds you want to add to the metadata tooltip.
The selected metadata elds are added to the Display Order column.
4 If you want to change the order in which the metadata elds are displayed in the tooltip, drag
the metadata elds in the Display Order column into a new arrangement.
5 When you are satised with the metadata elds assigned to Metadata Tooltips view and the
arrangement of the metadata elds in that view, click OK.
Chapter 10 Working with Metadata 182
To set the position of metadata overlays
You can use the Browser & Viewer Metadata dialog to specify whether metadata overlays
displayed with photos in the Viewer or in the Browser in grid view or list view appear over the
lower portion of the photo or directly beneath it.
mTo display the metadata overlay over the lower portion of the photo: In the area below the Display
Order column of the Browser & Viewer Metadata dialog, deselect the “Show metadata below
image” checkbox.
mTo display the metadata overlay directly beneath the photo: In the area below the Display Order
column of the Browser & Viewer Metadata dialog, select the “Show metadata below image”
checkbox.
To turn the display of metadata labels on or o
You can use the Browser & Viewer Metadata dialog to specify that a metadata overlay view show
metadata with labels. Labels provide the names of the metadata elds and help identify the
types of metadata being displayed. In some views, metadata labels are shown by default, but you
can turn them o in the Browser & Viewer Metadata dialog. Turning o metadata labels can help
save visual space in the selected metadata overlay view, allowing you to add more metadata
elds to it.
mIn the area below the Display Order column of the Browser & Viewer Metadata dialog, select or
deselect the “Show metadata labels” checkbox.
Metadata labels are turned on or o for the selected metadata overlay view. When metadata
labels are turned on, they are displayed with the metadata elds they identify.
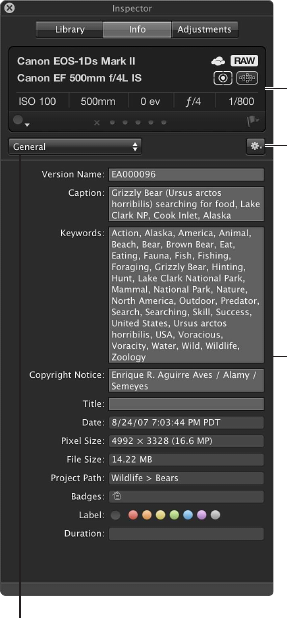
Chapter 10 Working with Metadata 183
Viewing and Changing Metadata in the Info Inspector and
Inspector HUD
You can view or change the metadata for a selected photo in the Info inspector and the Info
pane of the Inspector HUD. The selected photo’s metadata appears in text elds. You can change
the metadata elds shown in the Info inspector and the Info pane of the Inspector HUD by
choosing a dierent metadata view from the Metadata View pop-up menu. You can also modify
metadata views by adding EXIF elds, IPTC elds, and other miscellaneous metadata that
you specify using the Metadata Views dialog. In addition, you can use controls in the Camera
Info pane to add color labels, ratings, and ags to an image selection. If a photo has an audio
attachment, you use the controls in the Camera Info pane to listen to the audio as well.
Camera Info pane
Info pane of the
Inspector HUD
Metadata Action
pop-up menu
Choose a metadata view
from the Metadata View
pop-up menu.
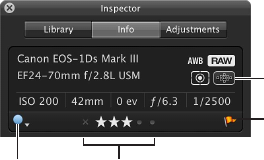
Chapter 10 Working with Metadata 184
The top portion of the Info inspector and the Info pane of the Inspector HUD displays basic
camera information about a photo, if it’s available. This area is called the Camera Info pane. If
a video clip is selected, the Camera Info pane displays the length of the video clip, frame size,
and number of frames per second. If an audio clip is selected, the Camera Info pane displays
the length of the audio clip, the bit rate, and the type of audio le. In addition to displaying
basic camera information, the Camera Info pane also contains controls for applying color labels,
ratings, and ags to photos, and for displaying autofocus point overlays indicating which part
of the image the camera focused on.
Rating buttons
Autofocus Points button
Color Label
pop-up menu
Flag button
To add a color label, rating, or ag to a photo
1 In the Info Inspector or the Info pane of the Inspector HUD, choose Show Camera Info from the
Metadata Action pop-up menu.
2 In the Camera Info pane, do any of the following:
•To add a color label to a photo: Choose a color label from the Color Label pop-up menu.
•To assign a rating to a photo: Click the rating button corresponding to the rating you want to
apply to the photo.
The leftmost button assigns a Reject rating, and the rightmost button assigns a rating of ve
stars (or Select).
•To ag a photo: Click the Flag button, or press Slash (/).
Click the Flag button again to remove the ag from the photo.
To show autofocus point overlays
If your camera saves autofocus EXIF metadata that’s compatible with Aperture, you can have
Aperture display the autofocus points over the image. The autofocus points used to focus the
image appear in red.
mIn the Camera Info pane, click the Autofocus Points button (or press Option-F).
Tip: You can temporarily display the autofocus point overlays on an image by placing the
pointer over the Autofocus Points button in the Camera Info pane. The autofocus points overlays
disappear when you move the pointer away from the Autofocus Points button.
To switch metadata views in the Info inspector and the Info pane of the Inspector HUD
You can change the metadata elds shown in the Info inspector and the Info pane of the
Inspector HUD by choosing a dierent metadata view from the Metadata View pop-up menu.
1 Do one of the following:
•To show the Info inspector: Click the Inspector button in the toolbar (or press I), then click the
Info tab.
•To show the Info pane of the Inspector HUD: Choose Window > Show Inspector HUD (or press H),
then click Info.
2 Choose a metadata view from the Metadata View pop-up menu.
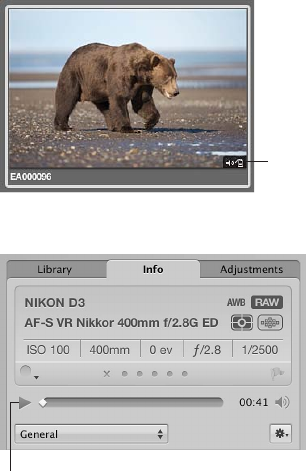
Chapter 10 Working with Metadata 185
3 To change the metadata in a text eld that can be edited, click in the text eld to make it active,
then enter the text you want.
To change the metadata for a photo
1 Select a photo.
2 In the Metadata View pop-up menu, choose a metadata view that contains the metadata elds
you want to change.
3 Click in a text eld to make it active, then enter the text you want.
Note: Not all metadata elds can be edited. Most EXIF metadata elds cannot be changed.
To rearrange the metadata elds in a metadata view
mDrag the metadata labels into the arrangement you want.
To show and hide the Large Caption eld
To quickly add caption text to all of your photos, you can set the Info inspector and the Info pane
of the Inspector HUD to show an enlarged version of the Caption eld by itself. Then you apply
the caption text to each selected photo by entering it in this space.
mIn the Info inspector or the Info pane of the Inspector HUD, choose Large Caption from the
Metadata View pop-up menu.
To listen to an audio attachment
If the photo selected in the Browser has an audio attachment, you can use the Info inspector or
the Info pane of the Inspector HUD to listen to it.
1 In the Browser, select a photo with an audio attachment.
The audio badge
indicates this photo has
an audio attachment.
2 In the Info inspector or the Info pane of the Inspector HUD, click the Play button.
Play button
Aperture plays the audio attachment. For more information about adding attachments to
photos, see Adding Audio Attachments to Image Files on page 74.
Chapter 10 Working with Metadata 186
To view the sharing status of a photo
If you’ve shared photos with your Flickr and Facebook accounts, you can view the status of a
photo using the Info inspector. If you downloaded the photo from one of your Flickr or Facebook
accounts, the Info inspector displays which account the photo was downloaded from. If you
published the photo from Aperture to one of your accounts online, the Info inspector displays
the specic Facebook album or Flickr set the photo was published to and when it was published.
1 In the Browser, select a photo.
2 In the Info inspector or the Info pane of the Inspector HUD, choose Sharing from the Metadata
View pop-up menu.
If the photo is shared online, the Info inspector displays either the account it was downloaded
from or the specic account and album or set it was published to, along with when it was
published. The Info inspector also indicates if the photo has not been shared.
To view and reply to comments that friends post about your Facebook photos
If you’ve created Facebook albums in Aperture and shared photos from your Aperture library
with your Facebook account, you can use the Info inspector to view comments posted about
the photos by your friends. Aperture makes it easy to reply to comments that appear in the Info
inspector or add your own by opening the appropriate page in your web browser.
1 In the Browser, select a photo shared with Facebook.
2 In the Info inspector or the Info pane of the Inspector HUD, choose Sharing from the Metadata
View pop-up menu.
Comments posted about the selected photo by your friends on Facebook appear in the
Info inspector.
3 To reply to a comment, click it.
Your Internet browser opens to the Facebook page the photo is posted on. You can post your
reply directly in your Facebook account.
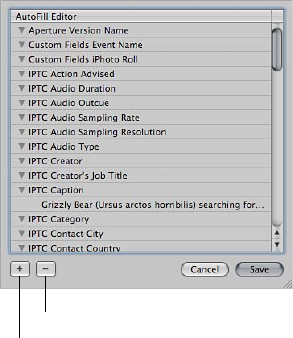
Chapter 10 Working with Metadata 187
Working with the AutoFill Editor
As you enter metadata in the Info inspector’s elds, Aperture checks for previous entries, and if it
locates a match, it completes the entry for you. For example, if you used the keyword Landscape
previously, and you type the rst few letters of Landscape again, Aperture automatically
enters Landscape in the eld. You can set up and change the list of metadata that Aperture
automatically enters using the AutoFill Editor. You can enter up to 20 entries for a eld type. If
you’ve made a spelling mistake when typing an entry, you can also use the AutoFill Editor to
correct the mistake so that Aperture suggests the correct spelling.
To set up autoll entries in the AutoFill Editor
1 Choose Metadata > Edit AutoFill List.
Remove button
Add button
2 To edit the list, do one of the following:
•To add an entry: Select the metadata type you want to add, click the Add (+) button, and enter
the text you want.
•To change an entry: Click the disclosure triangle for a metadata type to display its entries, then
double-click the entry you want to change and type the new text.
•To delete an entry: Click the disclosure triangle for a metadata type to display its entries, then
select the entry you want to delete and click the Remove (–) button.
3 Click Save.
Working with Metadata Views
An Overview of Metadata Views
You can create your own combinations of metadata to display with your photos, called metadata
views. Using controls in the Info inspector and the Metadata Views dialog, you can either create
new metadata views or modify the ones that come with Aperture.
You can also apply combinations of metadata to your photos by recording metadata in a
metadata view and saving it as a metadata preset. For more information about creating and
using metadata presets, see Creating Metadata Presets on page 191.

Chapter 10 Working with Metadata 188
The following table lists the metadata views that you can choose and the information that each
view displays.
Metadata view Information displayed
General Version name, caption, keywords, copyright notice,
title, date, pixel size, le size, project path, and badges
Name Only Version name
Caption Only Caption
Name & Ratings Version name, rating, and badges
Name & Caption Version name and caption
Ratings Rating and badges
Caption & Keywords Version name, caption, and keywords
Caption & Credits Version name, creator, provider, caption, and copyright
notice
Contact Sheet Version name, caption, label, ISO, focal length,
exposure bias, aperture, and shutter speed
File Info Version name, lename, le size, pixel size, color
model, date, and badges
Photo Info Version name, date, camera model, lens, ISO, focal
length, focal length (35mm), exposure bias, aperture,
shutter speed, ash, white balance, exposure program,
metering mode, exposure mode, focus mode, prole
name, and pixel size
EXIF Info Version name, date, camera make, camera model,
serial number, lens, ISO, focal length, focal length
(35mm), exposure bias, aperture, shutter speed,
ash, ash exposure compensation, white balance,
exposure program, shooting mode, metering mode,
exposure mode, focus mode, focus distance, le size,
pixel size, original pixel size, prole name, aspect ratio,
orientation, and depth
GPS Latitude, longitude, altitude, and compass direction (if
available)
IPTC Core Contact: Creator, job title, address, city, state/province,
postal code, country, phone, email, and website
Content: Headline, caption, keywords, IPTC subject
code, and caption writer
Image: Date created, intellectual genre, IPTC scene,
location, city, state/province, country, and ISO country
code
Status: Title, job identier, instructions, provider,
source, copyright, and usage terms
Large Caption Caption eld with large text
Custom Fields Custom metadata elds created using the Manage
Custom Metadata elds dialog. Custom elds are for
use only in Aperture.
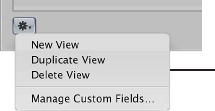
Chapter 10 Working with Metadata 189
Creating New Metadata Views
You can create new metadata views that display dierent combinations of metadata.
To create a new metadata view
1 Do one of the following:
•To show the Info inspector: Click the Inspector button in the toolbar (or press I), then click the
Info tab.
•To show the Info pane of the Inspector HUD: Choose Window > Show Inspector HUD (or press H),
then click Info.
2 Choose Edit from the Metadata View pop-up menu.
The Metadata Views dialog appears.
3 In the Metadata Views dialog, choose New View from the Metadata Views Action pop-up menu.
Metadata Views
Action pop-up menu
A new, untitled metadata view appears in the Metadata Views column of the Metadata
Views dialog.
4 Enter a name for the new metadata view, then press Return.
5 In the Metadata Fields column, do any of the following:
•To add EXIF information, such as exposure and aperture settings: Click the EXIF disclosure triangle,
then select the checkboxes next to the metadata elds you want to add to the metadata view.
•To add IPTC information, such as copyright information and keywords: Click the IPTC disclosure
triangle, then select the checkboxes next to the metadata elds you want to add to the
metadata view.
•To add Aperture information, such as version name and color label: Click the Aperture disclosure
triangle, then select the checkboxes next to the metadata elds you want to add to the
metadata view.
•To add audio and video clip information, such as duration, data rate, and frames per second (fps):
Click the Audio/Video disclosure triangle, then select the checkboxes next to the metadata
elds you want to add to the metadata view.
•To add information about photo usage, such as whether or not a photo has been printed or
emailed: Click the Photo Usage disclosure triangle, then select the checkboxes next to the
metadata elds you want to add to the metadata view.
•To remove unwanted metadata elds: Deselect the checkboxes next to the metadata elds you
want removed.
6 When you are satised with the metadata elds assigned to metadata view, click OK.
The new metadata view is added to the Metadata View pop-up menu in the Info inspector and
the Info pane of the Inspector HUD. For more information about switching metadata views, see
Viewing and Changing Metadata in the Info Inspector and Inspector HUD on page 183.
Chapter 10 Working with Metadata 190
Modifying Existing Metadata Views
You can change the combination of metadata that appears in a metadata view. You can add or
remove metadata elds, create new ones, and rearrange the order in which the metadata elds
are displayed.
Note: You cannot modify the IPTC Core, Large Caption, and Custom Fields metadata views.
To change the metadata elds that appear in an existing metadata view
1 Choose Edit from the Metadata View pop-up menu in the Info inspector or the Info pane of the
Inspector HUD.
The Metadata Views dialog appears.
2 Select the metadata view you want to change in the Metadata Views column.
3 In the Metadata Fields column, do any of the following:
•To add EXIF information, such as exposure and aperture settings: Click the EXIF disclosure triangle,
then select the checkboxes next to the metadata elds you want to add to the metadata view.
•To add IPTC information, such as copyright information and keywords: Click the IPTC disclosure
triangle, then select the checkboxes next to the metadata elds you want to add to the
metadata view.
•To add Aperture information, such as version name and color label: Click the Aperture disclosure
triangle, then select the checkboxes next to the metadata elds you want to add to the
metadata view.
•To add audio and video clip information, such as duration, data rate, and frames per second (fps):
Click the Audio/Video disclosure triangle, then select the checkboxes next to the metadata
elds you want to add to the metadata view.
•To add information about photo usage, such as whether or not a photo has been printed or
emailed: Click the Photo Usage disclosure triangle, then select the checkboxes next to the
metadata elds you want to add to the metadata view.
•To remove unwanted metadata elds: Deselect the checkboxes next to metadata elds you
want removed.
4 When you are satised with the metadata elds assigned to the selected metadata view, click OK.
Managing Metadata Views
You can rename, add, or delete metadata views in the Metadata Views dialog.
To rename a metadata view
1 Choose Edit from the Metadata View pop-up menu in the Info inspector or the Info pane of the
Inspector HUD.
The Metadata Views dialog appears.
2 Double-click a metadata view name in the Metadata Views column, then enter a new name and
press Return.
To duplicate a metadata view
1 Choose Edit from the Metadata View pop-up menu in the Info inspector or the Info pane of the
Inspector HUD.
The Metadata Views dialog appears.
2 Select the metadata view you want to duplicate in the Metadata Views column, then choose
Duplicate View from the Metadata Views Action pop-up menu.
Chapter 10 Working with Metadata 191
The duplicated metadata view appears in the Metadata Views column immediately below the
original metadata view.
To delete a metadata view
1 Choose Edit from the Metadata View pop-up menu in the Info inspector or the Info pane of the
Inspector HUD.
The Metadata Views dialog appears.
2 Select the metadata view you want to delete in the Metadata Views column, then choose Delete
View from the Metadata Views Action pop-up menu.
The metadata view is removed from the Metadata Views column of the Metadata Views dialog
and from the Metadata View pop-up menu in the Info inspector and the Info pane of the
Inspector HUD.
Working with Metadata Presets
Creating Metadata Presets
You can create your own preset combinations of metadata that you can save and then apply to
your photos as needed. You create a preset by selecting a version that has metadata applied to
it and saving the metadata as a preset. You can also select a version with no metadata applied
to it, add the metadata you want to apply to the version, and then save the information as a
metadata preset. Your metadata preset is then available to be chosen when you import photos,
batch change photos, or modify a photo’s metadata in the Info inspector or the Info pane of the
Inspector HUD. Aperture also provides easy methods of managing your presets.
To create a new metadata preset
1 In the Info inspector or the Info pane of the Inspector HUD, enter the metadata you want applied
to your photos in the metadata elds.
You can add metadata to multiple metadata views by choosing dierent views from the
Metadata View pop-up menu.
2 Choose New Preset from Version from the Metadata Action pop-up menu (with a gear icon).
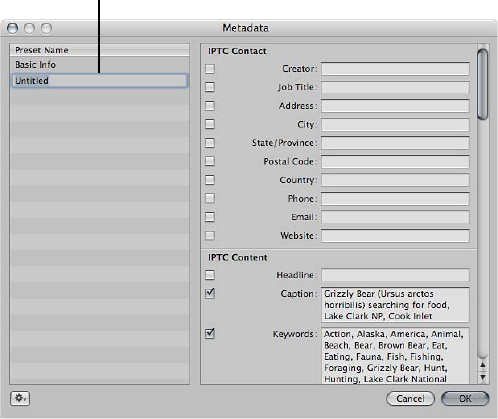
Chapter 10 Working with Metadata 192
3 In the Metadata dialog, enter a name for the new metadata preset, then click OK.
Enter a name for the
new metadata preset.
The new metadata preset now appears in the Append with Preset and Replace with Preset
submenus of the Metadata Action pop-up menu.
To modify an existing metadata preset
1 In the Info inspector or the Info pane of the Inspector HUD, choose Manage Presets from the
Metadata Action pop-up menu (with a gear icon).
2 In the Metadata dialog, select the preset you want to modify.
3 Enter the changes you want to make in the metadata elds on the right side of the Metadata dialog.
4 Click OK.
The changes to the metadata preset are saved. If you want, you can rearrange the order of
metadata presets in the Append with Preset and Replace with Preset submenus of the Metadata
Action pop-up menu. You can also rename and delete metadata presets. For more information,
see Managing Metadata Presets on page 193.
Applying Combinations of Metadata Using Metadata Presets
You can apply metadata presets to selected photos using the Info inspector, the Info pane of
the Inspector HUD, or the Batch Change command. You can also apply metadata presets when
importing photos using the Import browser. For more information about the Batch Change
command, see Batch Changing Metadata on page 194. For more information about applying
metadata presets during import, see Adding Metadata to Photos During Import on page 65.
To apply a metadata preset when modifying photos with the Info inspector or the Info pane
of the Inspector HUD
1 Select the photos you want to change.
2 In the Info inspector or the Info pane of the Inspector HUD, do one of the following:
•To add metadata to the photos, maintaining any currently associated metadata: Choose Append
with Preset from the Metadata Action pop-up menu (with a gear icon), then choose the
metadata preset you want.
Chapter 10 Working with Metadata 193
•To remove all previously applied metadata to the photos and replace it with a metadata preset:
Choose Replace with Preset from the Metadata Action pop-up menu, then choose the preset
you want to use.
The photo selection is updated with metadata from the metadata preset.
Managing Metadata Presets
You can make changes to the list of metadata presets that appears in pop-up menus.
When you work with other Aperture users or Aperture systems, you can share your metadata
presets to ensure a consistent application of metadata to all the photos. You can export
metadata presets for others to use and import presets when you need them.
To arrange the metadata preset list
1 In the Info inspector or the Info pane of the Inspector HUD, choose Manage Presets from the
Metadata Action pop-up menu (with a gear icon).
2 In the Metadata dialog, rearrange the order of metadata presets by dragging them to new
locations in the Preset Name column.
To rename a metadata preset
1 In the Info inspector or the Info pane of the Inspector HUD, choose Manage Presets from the
Metadata Action pop-up menu (with a gear icon).
2 In the Metadata dialog, double-click the metadata preset name, then type a new name in the
eld that appears.
To delete a metadata preset
1 In the Info inspector or the Info pane of the Inspector HUD, choose Manage Presets from the
Metadata Action pop-up menu (with a gear icon).
2 In the Metadata dialog, select a metadata preset, then press the Delete key.
To export a metadata preset
1 In the Info inspector or the Info pane of the Inspector HUD, choose Manage Presets from the
Metadata Action pop-up menu (with a gear icon).
2 In the Metadata dialog, select the metadata preset that you want to export, then choose Export
from the Action pop-up menu (with a gear icon) in the bottom-left corner of the dialog.
3 Choose a location to store the metadata preset information, then click Export.
The metadata preset is exported to the location you chose and saved as [lename].apmetadata.
To import a metadata preset
1 In the Info inspector or the Info pane of the Inspector HUD, choose Manage Presets from the
Metadata Action pop-up menu (with a gear icon).
2 In the Metadata dialog, choose Import from the Action pop-up menu (with a gear icon) in the
bottom-left corner of the dialog.
3 In the dialog that appears, select the metadata preset le that you want to import, then
click Import.
The metadata preset is imported into Aperture and placed at the bottom of the Preset Name
column in the Metadata dialog.
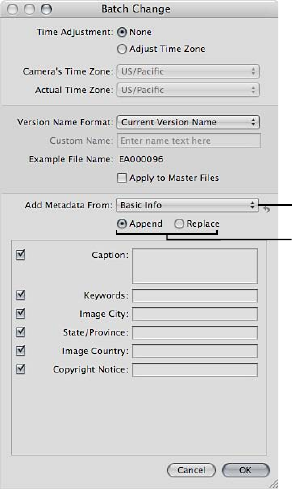
Chapter 10 Working with Metadata 194
Batch Changing Metadata
You can select a group of photos and make metadata changes to all the photos at once. For
example, if you need to add the same set of keywords to a selection of photos, or change
the version name format, you can select the photos and use the Batch Change dialog to
change them.
To change the metadata associated with a selection of photos
1 Do one of the following:
•Choose Metadata > Batch Change (or press Command-Shift-B).
•In the Info inspector or the Info pane of the Inspector HUD, choose Batch Change from the
Metadata Action pop-up menu (with a gear icon).
2 In the Batch Change dialog, choose the metadata preset you want from the Add Metadata From
pop-up menu.
Choose the metadata
preset you want from
this pop-up menu.
Click Append or Replace.
3 Click Append to add the preset’s metadata to the photos, maintaining any currently associated
metadata, or click Replace to add the preset’s metadata to the photos and remove any other
associated metadata.
4 Enter any additional metadata you want applied in the metadata elds.
5 Specify any other metadata options you want to change, then click OK.

Chapter 10 Working with Metadata 195
About IPTC Metadata
In Aperture, you can import and export IPTC metadata for a photo in an XMP sidecar le. XMP
sidecar les are XML les that accompany each photo containing IPTC and other metadata
associated with the photo. Any eld containing information in the IPTC Core metadata view for
a selected photo version can be exported to the XMP sidecar le for that version. The IPTC Core
metadata view is compliant with the IPTC Core specication version 1.0. For more information
about choosing the IPTC Core metadata view, see Viewing and Changing Metadata in the Info
Inspector and Inspector HUD on page 183. For more information about exporting XMP sidecar
les, see An Overview of Exporting Photos on page 436. For more information about the IPTC
Core specication version 1.0, go to http://www.iptc.org.
If you intend to export your keywords as IPTC metadata, make sure each keyword entry is no
more than 64 characters long. Keyword entries longer than 64 characters may not be displayed
properly in other IPTC editors or operating systems.
Here are some examples of common character limits for IPTC elds.
IPTC eld and character limit Description and example
Caption (2000 characters) A long-form description of the subject and related
information in a natural-language caption
Example: Mayor Alvarado addresses a crowd at the
rst soccer match of the season.
Keywords (64 characters) A list of words describing the subject in discrete
words or phrases
Example: Politician, Mayor, Futbol, Soccer, News, Game,
Team, San Jose
Provider (32 characters) Photographer’s name and/or agency name
Example: Matthew Birdsell/Sun Times News
Copyright (128 characters) Copyright date, photographer’s name, agency name,
and rights
Example: © 2009 Matthew Birdsell/Sun Times News.
All rights reserved.
Title (64 characters) A unique identier, used by an agency or organization
to catalog images
Example: mt52642j
Date Created (16 characters) Date the photo was created
Example: 05/16/2009
Image City (32 characters) City where the photo was captured
Example: San Jose
Image State/Province (32 characters) Province or state where the photo was captured
Example: California
Image Country (64 characters) Country where the photo was captured
Example: USA
Instructions (256 characters) Applicable restrictions, rights, or embargo information
Example: MAGS OUT, INTERNET OUT, NO THIRD-PARTY
SALES
Creator (64 characters) The photo byline text
Example: © Matthew Birdsell/Sun Times News
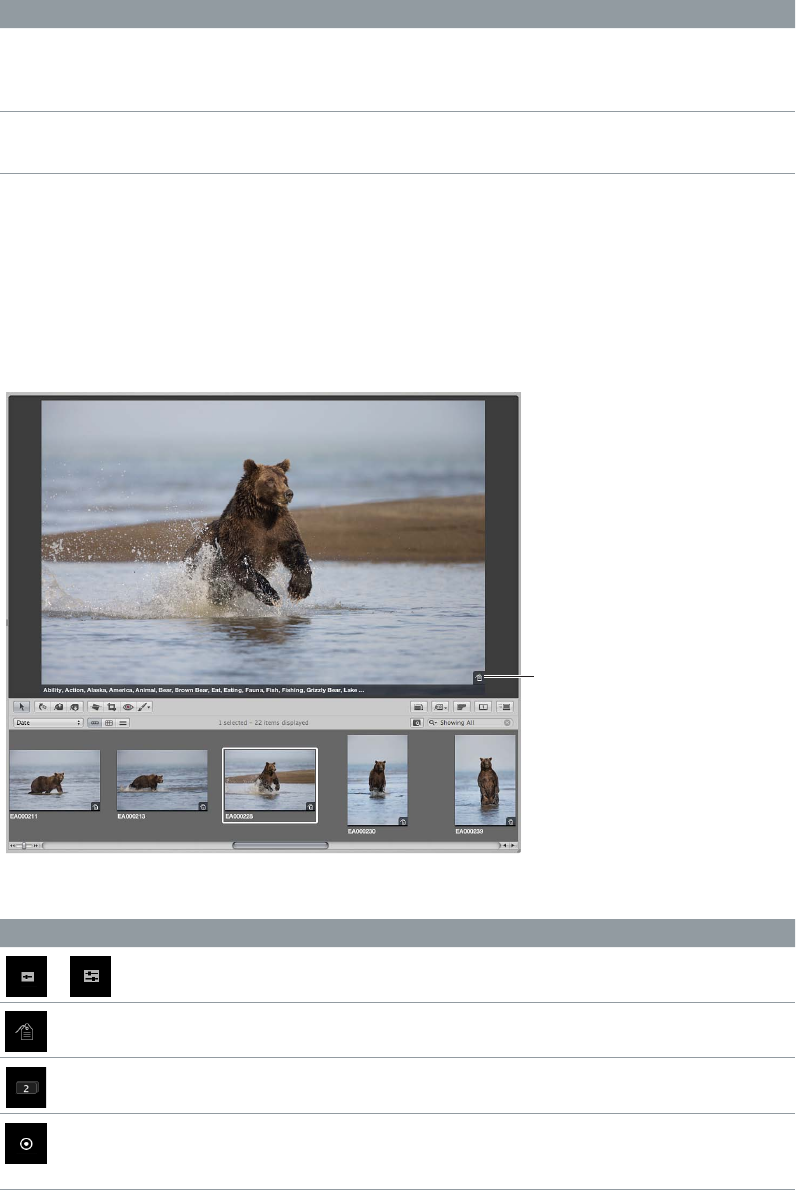
Chapter 10 Working with Metadata 196
IPTC eld and character limit Description and example
Headline (256 characters) The headline published with the photo
Example: Mayor Alvarado Opens New Soccer Season
in San Jose
Source (32 characters) The source that provided the photo
Example: Mercury News
Understanding Badge Overlays
Working with Badge Overlays
When you apply adjustments, keywords, or other changes to a photo, Aperture marks the photo
with a badge overlay. Badges can appear on photos in the Viewer, the Browser, and the Light
Table, in book pages and webpages, and in Full Screen view.
Keywords have
been applied
to this photo.
The following table shows badges that appear on photos in Aperture.
Badge Denition
or One or more adjustments have been applied to the photo.
One or more keywords have been applied to the photo.
Photos are contained in a stack. The number indicates the number of
photos in the stack.
The photo has been edited with an external editor, and is therefore
represented by the original created when the le was exported to the
external editor.
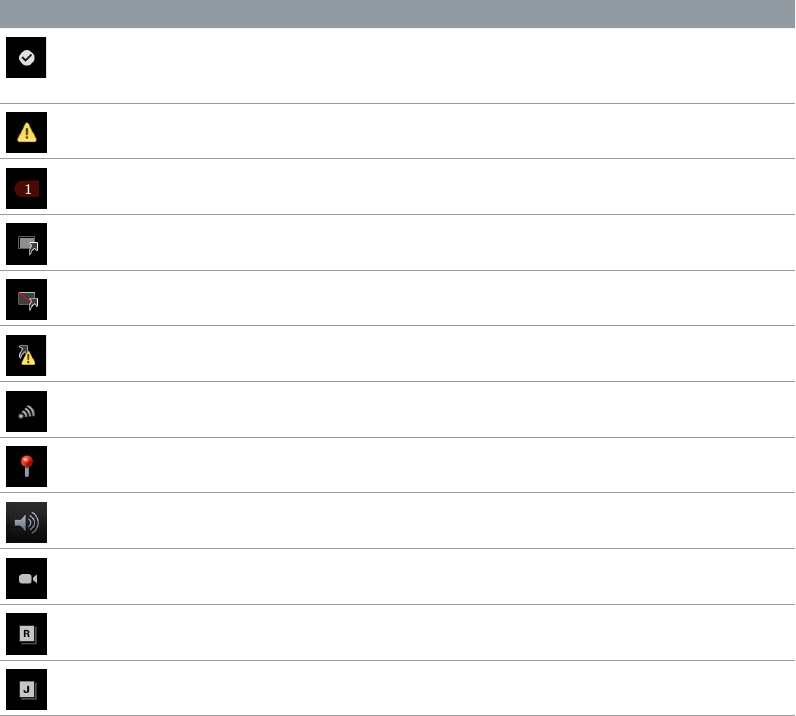
Chapter 10 Working with Metadata 197
Badge Denition
The photo is an album’s pick photo, the identifying photo for that album,
webpage album, web journal album, Light Table album, slideshow album,
or book album.
Because of low image resolution, the photo’s print quality may be aected.
This badge appears on photos placed in book pages and webpages.
The number indicates the number of times the photo has been used in a
given book, web journal, or Light Table arrangement.
The photo is a referenced image.
The referenced image’s original is oine.
The referenced image’s original has not been found.
The photo was downloaded from Photo Stream or imported from a
Facebook album or Flickr set online.
A location has been assigned to the photo.
The photo has an audio le attached.
The thumbnail image represents a video clip.
The photo is part of a RAW + JPEG image pair, and this photo’s original is
the RAW le.
The photo is part of a RAW + JPEG image pair, and this photo’s original is
the JPEG le.
Displaying Photos with Badge Overlays
Badge visibility is determined by the metadata overlay view that is displayed. You can control
whether badges are visible by choosing a metadata overlay view that includes badge overlays;
you can also control whether badge overlays are visible by turning metadata overlays on or o.
Important: Badge overlays appear only in the Aperture application; they do not appear on
photos exported or printed from Aperture.
To display badge overlays on photos in the Viewer
1 Do one of the following:
•Choose View > Metadata Display > Customize (or press Command-J).
•In the tool strip, choose Edit from the Metadata Overlays pop-up menu.
The Browser & Viewer Metadata dialog appears.
2 Choose a Viewer metadata overlay view from the View pop-up menu.
3 In the Metadata Fields column, click the Aperture disclosure triangle to reveal the metadata elds
below it, then select the Badges checkbox.
4 Click OK.
5 Make sure both Show Metadata and the metadata overlay view you just modied are selected
for the Viewer in the Metadata Overlays pop-up menu in the tool strip.
Badges are now visible in the Viewer.
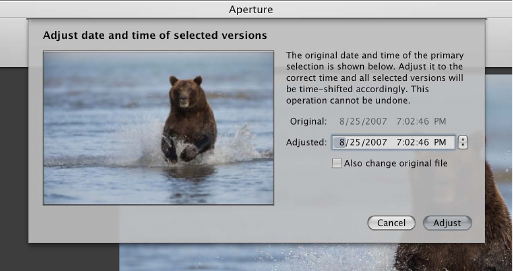
Chapter 10 Working with Metadata 198
To display badge overlays on photos in the Browser in grid view
1 Do one of the following:
•Choose View > Metadata Display > Customize (or press Command-J).
•In the tool strip, choose Edit from the Metadata Overlays pop-up menu.
The Browser & Viewer Metadata dialog appears.
2 Choose a Browser Grid View metadata overlay view from the View pop-up menu.
3 In the Metadata Fields column, click the Aperture disclosure triangle to reveal the metadata elds
below it, then select the Badges checkbox.
4 Click OK.
5 Make sure both Show Metadata and the metadata overlay view you just modied are selected
for the Browser in the Metadata Overlays pop-up menu in the tool strip.
Badge overlays are now visible in the Browser.
You can turn o the display of badge overlays in the Viewer or in the Browser by turning o the
display of metadata. For more information, see Turning the Display of Metadata On or O on
page 178.
Adjusting the Photo Date and Time
You can adjust the date and time a photo was taken at any time. Aperture gives you the option
of adjusting the date and time of a photo’s version or the photo’s version and original.
To change the creation date of a photo or group of photos
1 Select a photo or group of photos.
2 Choose Metadata > Adjust Date and Time.
3 Enter a new date and time in the Adjusted eld.
4 If you want to modify the creation date of the original or originals, select the “Also change
original le” checkbox.
5 Click the Adjust button.
The creation date and time of the version or versions changes. If you selected the “Also change
original le” checkbox, the date and time adjustment is applied to the original as well.
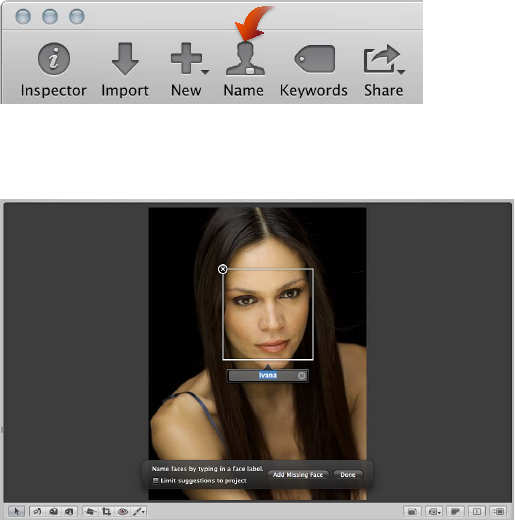
199
An Overview of Faces
As image libraries grow, it can be dicult to locate every photo with a specic person in it. Rather
than painstakingly comb through your entire image library, adding keywords to each photo in
order to identify all the people in it, you can use the Aperture face detection and face recognition
technology, called Faces, to help automate this process.
When you upgraded to Aperture 3, Aperture identied all the photos in your library containing
faces. This process also occurs when you import photos into Aperture 3. To begin the process of
having Aperture identify the people in your photos, you select a photo with a face in it and click
the Name button to assign a name to the subject in the photo.
An “unnamed” face label appears below the subject’s face, and you enter the person’s name in
the face label.
Organizing Photos with Faces 11
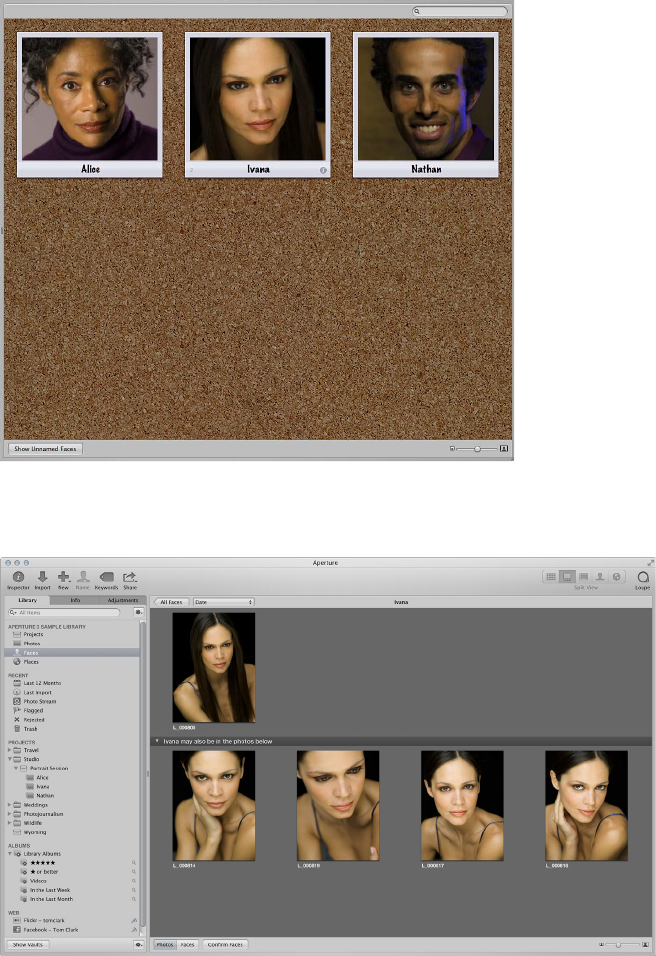
Chapter 11 Organizing Photos with Faces 200
Now that you’ve identied a person in one of your photos, Aperture presents any photo in your
entire image library or within the item selected in the Library inspector that might contain the
person you named. You view matching photos by selecting Faces in the Library inspector or by
clicking the Faces button in the toolbar. The Aperture main window switches to Faces view, with
the snapshot of the person you named appearing at the top. You can slowly move the pointer
over the snapshot to skim other conrmed photos of that person.
If you double-click a person’s snapshot in Faces view, Aperture presents suggested photos of the
person at the bottom of the Faces browser.
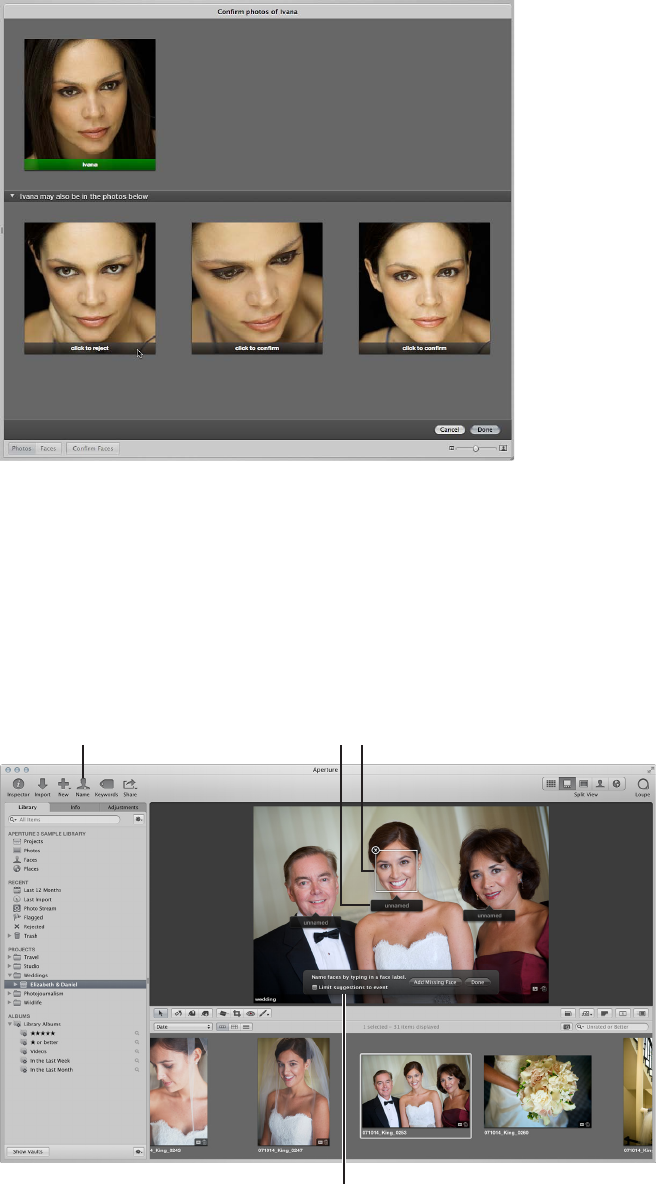
Chapter 11 Organizing Photos with Faces 201
You can click a suggested photo to accept it or reject it as a match.
When you have named all the people in your photos, you can create Smart Albums based on
specic people. Whenever you conrm a face that matches the person the Smart Album was
created for, the photo is automatically added to the Smart Album. You can also assign Facebook
IDs and have Aperture automatically publish the identied photos to your Facebook account.
Adding Names to Faces in Your Photos
To begin using Faces in Aperture, you must rst identify the people in your photos by assigning
names to their faces.
Positioning box
Face labelName button
Name Faces HUD
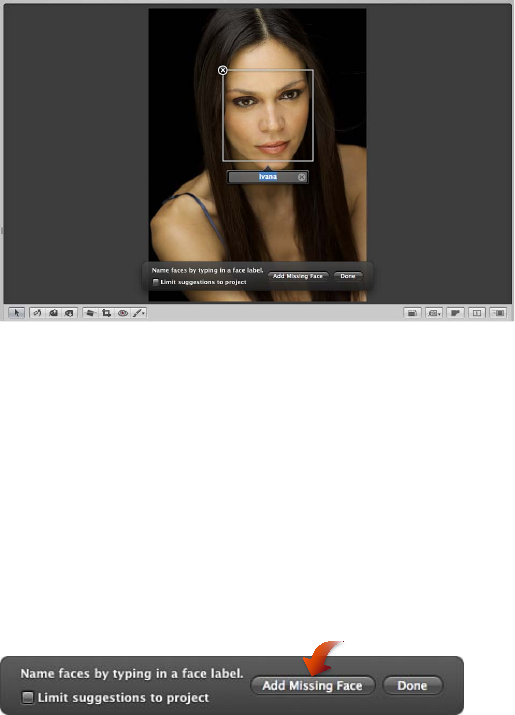
Chapter 11 Organizing Photos with Faces 202
To assign names to faces in your photos
1 In the Browser, select a photo with people in it.
2 Click the Name button in the toolbar.
Face labels appear below the faces of the people in the photo in the Viewer.
3 Click the face label below a person’s face and enter the person’s name in the text eld.
As you enter the person’s name, names that have already been assigned to faces, as well as
names in your Contacts, are suggested in the face label.
Note: If you want to limit the suggestions to faces you’ve already named in the project, select
the “Limit suggestions to project” checkbox.
4 When you are satised with the person’s name in the face label, press Return.
The person’s name appears in the face label.
5 Enter a name in the face label for each person in the photo, then click Done.
Aperture presents the photos in the library that are suggested matches for the people you
just named. For more information about reviewing suggested photos of a person, see Viewing
Photos in Faces View on page 203.
To add missing faces
If there are faces in a photo that Aperture doesn’t detect, you can still add face labels to the faces
and assign them names.
1 If necessary, click the Name button in the toolbar.
2 In the Name Faces HUD, click the Add Missing Face button.
A positioning box appears with a face label below it.
3 Drag the positioning box over the face you want to name, and resize the box so that it contains
just the face.
4 Enter a name in the face label and press Return.
5 Repeat steps 2 through 4 until all faces lacking face labels in the photo have been named.
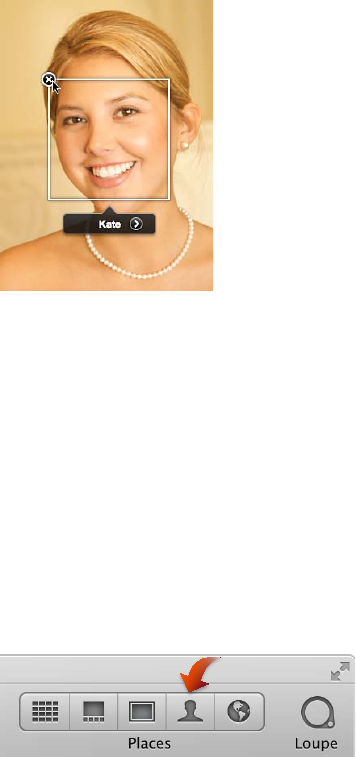
Chapter 11 Organizing Photos with Faces 203
To rename a person in a photo
1 Select a photo containing the face of a person you want to rename.
2 Click the Name button in the toolbar.
3 Select the face label for the person whose name you want to change, and enter a new name in
the text eld.
To delete a face label
1 Select a photo containing a face label you want to remove.
2 Click the Name button in the toolbar.
3 Position the pointer over the person’s face, then click the Remove button at the top-left corner of
the positioning box.
The positioning box and face label are removed.
Viewing Photos in Faces View
After you’ve assigned names to the people in a few of your photos, you can review suggested
photos of the same people.
To enter Faces view
Do one of the following:
mIn the Library inspector, select Faces.
Selecting Faces in the Library inspector shows the faces identied across the entire library.
mIn the Library inspector, select an item, then click the Faces button in the toolbar.
Only faces identied in the selected item in the Library inspector appear in Faces view.
To set a photo as the key photo for a snapshot
When you enter Faces view, a snapshot of each person you named in the Aperture library
appears. You can quickly view the conrmed photos of a person by skimming over the snapshot
with the pointer. You can also choose your favorite photo of the person to represent the
snapshot, also known as the key photo.
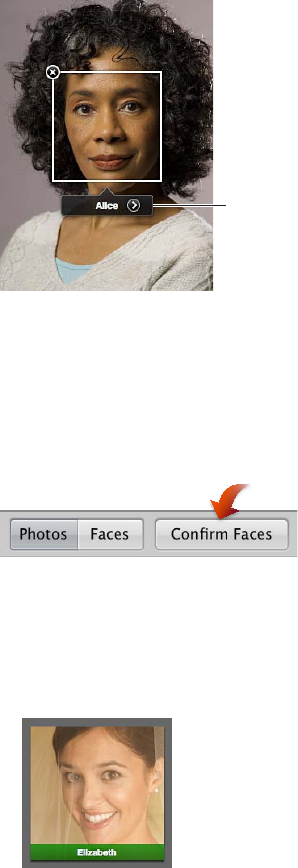
Chapter 11 Organizing Photos with Faces 204
1 Skim over the snapshot with the pointer.
2 When you nd your favorite photo of that person, do one of the following:
•Press the Space bar.
•Control-click the photo, then choose Make Key Photo from the shortcut menu.
To view all the photos of a specic person
Do one of the following:
mIn Faces view, double-click the person’s snapshot.
mClick the Name button in the toolbar, then click the Show Faces View button in the face label
below the person’s face in the Viewer.
Show Faces
View button
The Faces browser appears, showing all the conrmed photos of the person.
To conrm photos of a person
When you rst open the Faces browser after assigning a name to a new face, Aperture displays
all the suggested photos for that person in the bottom half of the Faces browser.
1 At the bottom of the Faces browser, click the Conrm Faces button.
A “click to conrm” overlay appears at the bottom of each suggested photo.
2 To conrm a face as a match, do one of the following:
•To conrm the face in a single photo: Click the photo.
The person’s name appears below the photo.
•To conrm the face in multiple suggested photos: Shift-click the photos.
The person’s name appears below each photo.
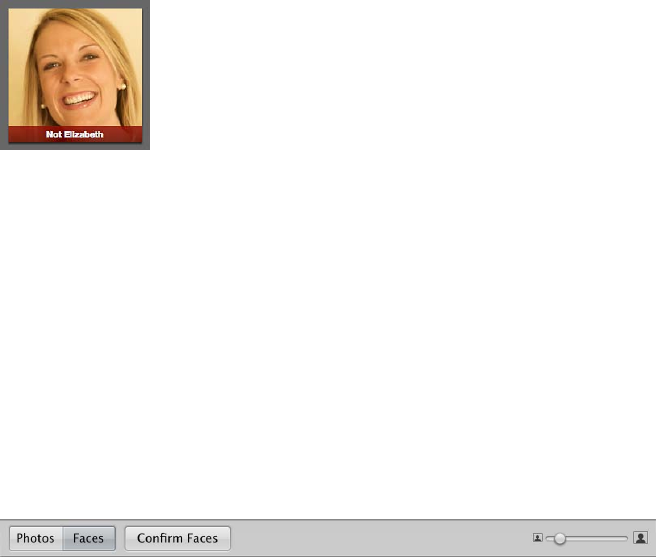
Chapter 11 Organizing Photos with Faces 205
3 To reject a photo as a match, do one of the following:
•Click the photo, then click it again to reject it.
•Option-click the photo.
“Not [name of face]” appears below the photo.
4 When you have nished conrming photos, click Done.
Conrmed photos move to the top of the Faces browser.
Note: As you conrm or reject the face of the person appearing in each photo, you can have
Aperture suggest additional photos by pressing the Option key and clicking the Update button.
When you press the Option key, the Done button changes to the Update button. Clicking the
Update button also saves any conrm and reject decisions you’ve already made.
To customize the Faces browser
As the number of conrmed photos of a person grows, it can be dicult to identify a person’s
face in a small thumbnail image. To make it easier to identify a person’s face in a photo, you can
either make the thumbnail images larger or switch from showing whole photos to showing
only faces.
mTo show whole photos: In the Faces browser, click the Photos button.
The thumbnail images in the Faces browser return to displaying whole photos.
mTo show faces only: In the Faces browser, click the Faces button.
Each thumbnail image in the Faces browser is cropped to show only the person’s face.
mTo make the thumbnail images larger: In the Faces browser, drag the Thumbnail Resize slider to
the right.
mTo return to Faces view: Click the All Faces button at the top of the Faces browser.
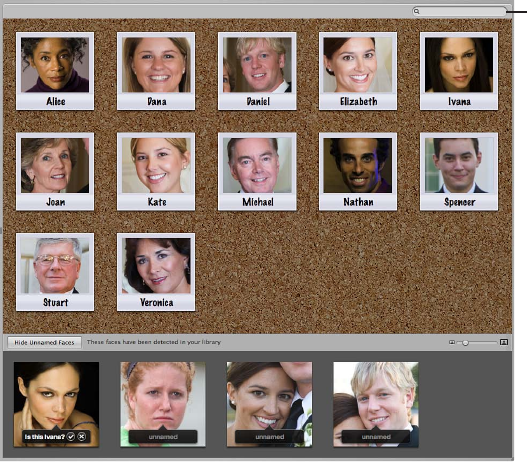
Chapter 11 Organizing Photos with Faces 206
Searching for Photos by Face
As you name the people that appear in the photos in the library, the number of named faces
quickly grows. Locating photos of a particular person is a simple process.
To search for photos by face
1 In the Library inspector, select Faces.
2 In Faces view, enter the name of the person you are looking for in the search eld.
Faces view
search field
Aperture displays the snapshot of the person whose name you entered in the search eld,
removing all others from view.
To show all faces again
mIn Faces view, click the Reset button (with an X) on the right side of the search eld.
Snapshots for all the people identied in the library reappear in Faces view.
You can use the Filter HUD in the Browser to perform more complex searches for people in your
photos. For more information, see Searching by Face on page 245.
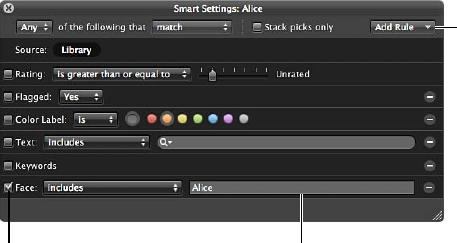
Chapter 11 Organizing Photos with Faces 207
Creating Smart Albums with Photos of People
You can create a Smart Album and specify a person or a group of people as search criteria. For
example, you can create a Smart Album that is set to collect photos of your family members. First
you create the Smart Album, and then you use the Smart Album’s Smart Settings HUD to specify
that it collect photos of each individual in your family.
To congure a Smart Album to collect photos of particular people
1 In the Library inspector, select Projects.
2 Choose File > New > Smart Album (or press Command-Shift-L).
A new, untitled Smart Album appears in the Albums section of the Library inspector.
3 Give the Smart Album a name.
4 In the Smart Album’s Smart Settings HUD, choose Face from the Add Rule pop-up menu.
5 Select the Face checkbox, choose “includes” from the Face pop-up menu, then enter the name
of the person you want to include in the Smart Album in the text eld to the right of the
pop-up menu.
Add Rule pop-up menu
Face checkbox Face text field
6 Repeat steps 3 and 4 for each additional person you want added to the Smart Album.
7 When you have nished, close the Smart Settings HUD.
To quickly create a Smart Album congured to collect photos of a person
A quick way to create a Smart Album congured to collect photos of a specic person is to drag
the snapshot of the person in Faces view to the Library inspector.
mIn Faces view, drag the snapshot of the person to the Library inspector.
A Smart Album congured to collect photos of the person appears in the Library inspector,
named after the person’s snapshot in Faces view.
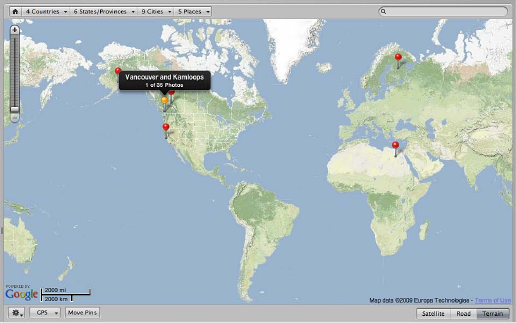
208
An Overview of Places
In Aperture, you can organize and explore your photos by location using the Places feature.
If you have a GPS-enabled camera or iOS device, Aperture categorizes your photos by location
and converts the GPS location tags to place names such as Vancouver, Canada. Aperture can
also convert photo location information from GPS trackers (including those generated by iPhone
apps) and from iPhoto photos. You can explore where your photos were shot using Places view.
Locating and Organizing Photos
with Places 12
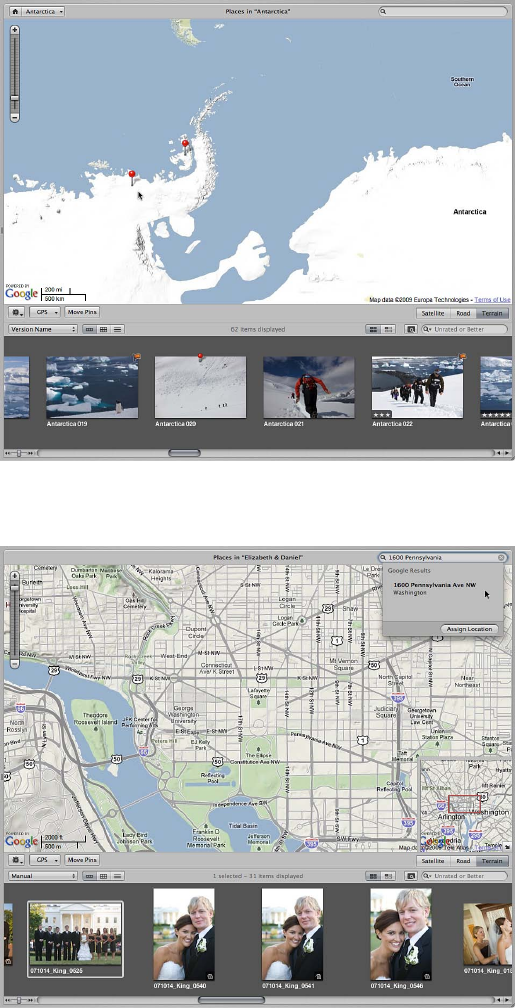
Chapter 12 Locating and Organizing Photos with Places 209
If you don’t have a GPS-enabled camera or iOS device, you can still make the most of Places. You
can assign locations to your photos by:
•Dragging photos from the Browser to the appropriate spot on the map in Places view
•Typing the name of a place or entering an address in the Places view search eld, and then
clicking the Assign Location button
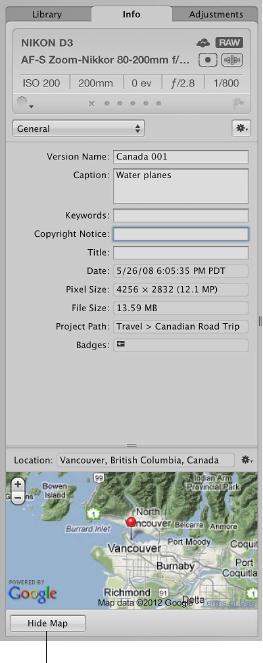
Chapter 12 Locating and Organizing Photos with Places 210
•Entering the name of a place or an address in the Location eld in the Map pane of the
Info inspector
Show/Hide Map button
Aperture saves every location that has been assigned to a photo. When you want to quickly nd
photos you shot in New York City or the Grand Canyon, just choose the location from the My
Places list in the search eld pop-up menu in Places view.
Important: To use Places, you must be connected to the Internet.
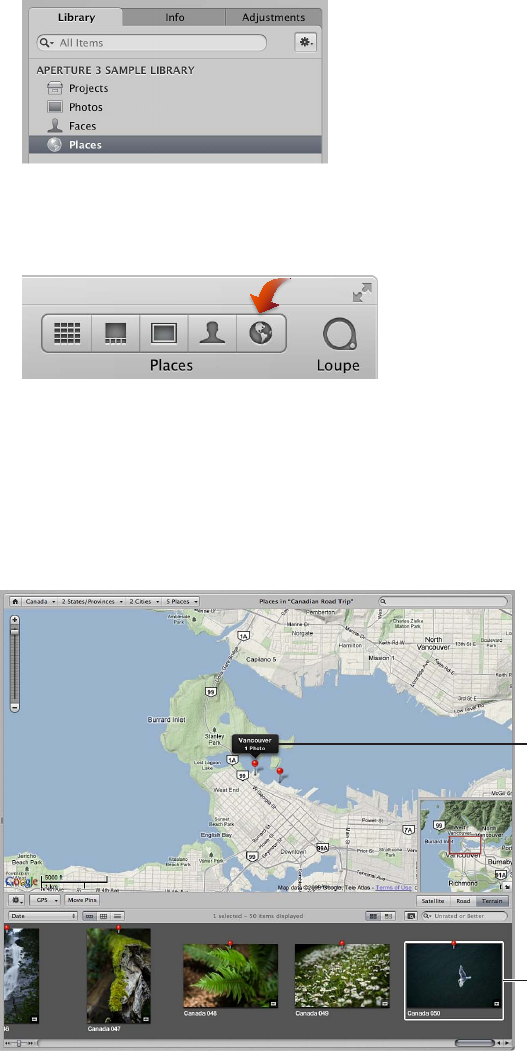
Chapter 12 Locating and Organizing Photos with Places 211
Viewing Photo Locations
If you shot your photos with a GPS-enabled camera or iOS device, Aperture automatically plots
the location of each photo on the map in Places view. There are many ways to view a photo’s
location and the photos associated with a location using Places view.
To view the location information for a photo or group of photos
1 Do one of the following:
•To view the photo locations for photos throughout the library: In the Library inspector,
select Places.
•To view the photo locations for photos in an item selected in the Library inspector: Select an item
in the Library inspector containing photos that already have location information assigned to
them, then click the Places button in the toolbar.
The Aperture main window switches to Places view. Red location pins mark the locations where
photos or groups of photos were shot.
2 In the Browser, select a photo.
A location label appears above a pin in Places view, indicating the location where the photo was
shot. The location label indicates the name of the location and the number of photos that were
captured there.
Location label
Selected photo
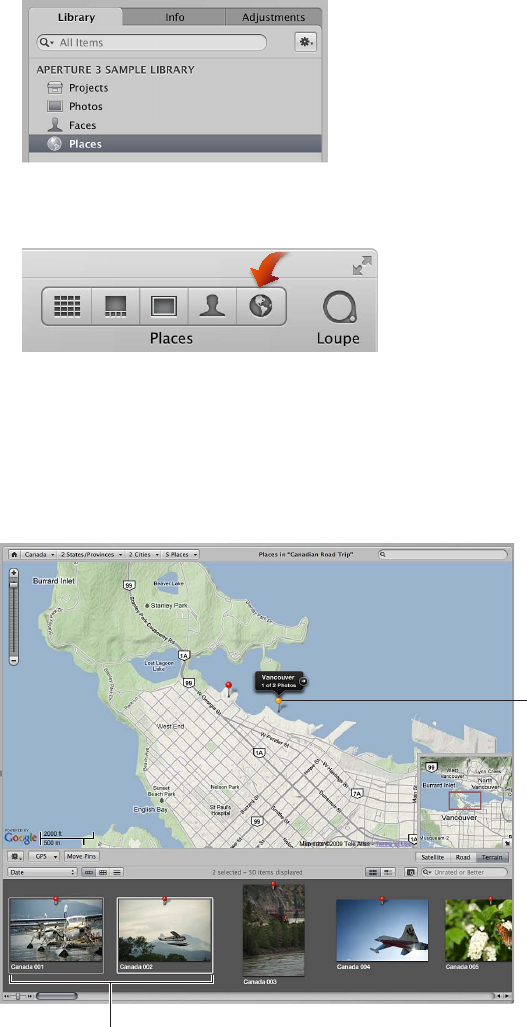
Chapter 12 Locating and Organizing Photos with Places 212
To view the photos associated with a location
1 Do one of the following:
•In the Library inspector, select Places.
•Select an item in the Library inspector containing photos that already have location
information assigned to them, then click the Places button in the toolbar.
The Aperture main window switches to Places view. Red location pins mark the locations where
photos or groups of photos were shot.
2 Select a red pin.
The selected pin turns orange, and the photo or photos associated with the location marked by
the orange pin are selected in the Browser.
Location pin
Photos shot in the
selected location
To view the precise location of photos represented by the same location pin
Depending on the zoom setting in Places view, Aperture might use a single pin to represent a
group of photos shot in close proximity. However, you can view the precise location where each
photo in the group was shot.

Chapter 12 Locating and Organizing Photos with Places 213
Do one of the following:
mIn Places view, click the location arrow on the location label.
Click the location arrow
to view the precise
locations of photos
represented by this pin.
Places view zooms in to the location of the photo group, marking the location of each photo
with a pin. Some photos may remain grouped together in a single location pin if shot in close
proximity. Click the location arrow on the location label to zoom in further.
mIn Places view, use the Zoom slider and buttons to zoom in to the location of the photo group.
Zoom out
Zoom in
As you zoom in to the map, locations grouped together in a single pin begin to be marked by
their own pins.
mUse the scroll gesture to zoom in and out.
Scroll gesture zoom box
As you zoom in to the map, locations grouped together in a single pin begin to be marked by
their own pins.
mCommand-drag a specic area of the map.

Chapter 12 Locating and Organizing Photos with Places 214
The map zooms in to the area indicated by the selection rectangle.
Command-drag a
rectangle over the map
to zoom in to that area.
To reposition the map in Places view
As you zoom in to the map, you may need to reposition it.
Do one of the following:
mMove the map by dragging it.
mDrag the box in the Overview Map pane, which appears in the bottom-right corner of
Places view.
Drag the red box
to reposition the map.
To open and close the Overview Map pane
mClick the Overview Map Pane button.
Click this button to
open and close the
Overview Map pane.
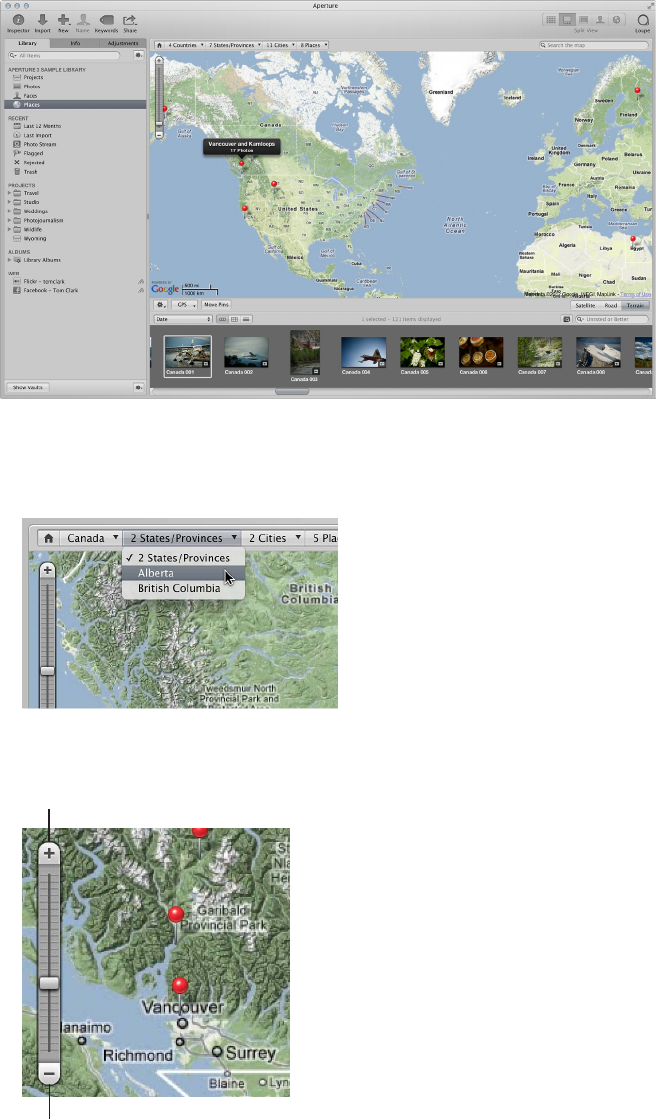
Chapter 12 Locating and Organizing Photos with Places 215
To view all photos in the Aperture library that have location assignments
1 In the Library inspector, select Places.
Places view appears, with red pins representing photos that have location assignments.
2 Zoom in to a specic location by doing one of the following:
•Choose a location from one of the Places Path Navigator pop-up menus at the top of
Places view.
Aperture repositions the map to display the selected location.
•In Places view, use the Zoom slider and buttons to zoom in to the location of a photo group.
Zoom out
Zoom in
As you zoom in to the map, photo locations grouped together in a single pin begin to be
marked by their own pins.

Chapter 12 Locating and Organizing Photos with Places 216
•Position the pointer over a pin that represents the location of a group of photos, then use the
scroll gesture to zoom in to the map.
Scroll gesture zoom box
As you zoom in to the map, photo locations grouped together in a single pin begin to be
marked by their own pins. As you zoom out of the map, photo locations marked by individual
pins are consolidated into fewer pins as they get closer together.
Changing the Map View
There are three dierent map views you can use within Places view:
•Satellite view: This view shows the map as satellite imagery.
•Road view: This view shows the map with a traditional depiction of roads, parks, borders,
bodies of water, and more.
•Terrain view: This view displays a topographical map with physical elevations as shaded relief
along with elevation lines.
Map view buttons
To switch to the Satellite view within Places view
mClick the Satellite button.
Select the Show Labels checkbox, which appears when the Satellite button is clicked, to view
street names and other information.
To switch to the Road view within Places view
mClick the Road button.
To switch to the Terrain view within Places view
mClick the Terrain button.
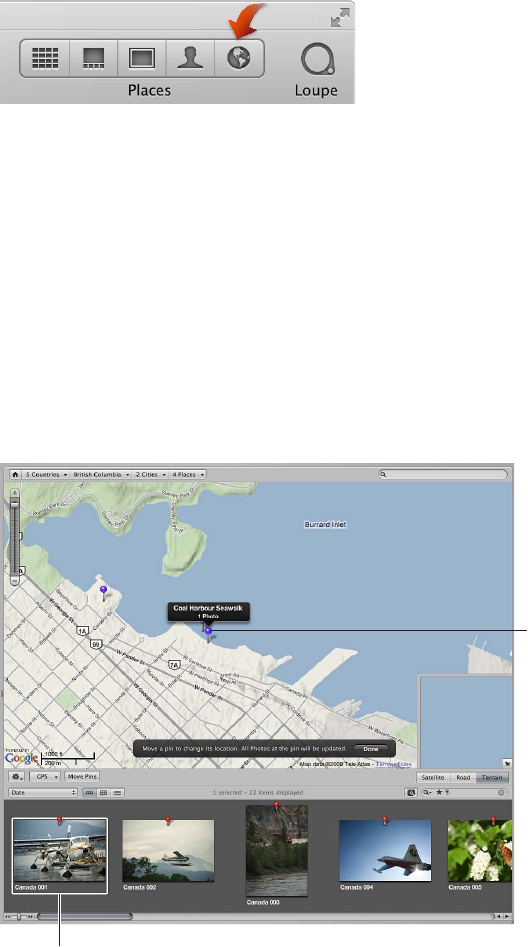
Chapter 12 Locating and Organizing Photos with Places 217
Adding Locations to Photos
You don’t need a GPS-enabled camera or iOS device to use Places. Adding location information in
Places view is as simple as dragging photos from the Browser to the area on the Places view map
where they were shot. Another option is to enter a specic location in the search eld in Places
view, select a location from the Google Results list that appears below the search eld, and then
click the Assign Location button. You can also designate a large geographical area, such as a city
or national park, as a location and assign this general location to photos.
To manually assign locations to photos in the Browser
1 Select an item in the Library inspector containing photos to which you want to assign
location information.
2 Click the Places button in the toolbar.
The Aperture main window switches to Places view. Red pins mark the locations where photos
that already have location information were shot.
3 Position the map in Places view to display the location you want to assign to the photos by
dragging and zooming in to the map.
4 In the Browser, select a photo or group of photos, then drag the photo selection to the
appropriate location on the map in Places view.
A purple pin with a location label appears, marking the location where the photo or photo group
was shot. The location label indicates the name of the location and the number of photos that
were captured there.
A dialog also appears at the bottom of Places view, informing you that you can move the pin to
change the location assigned to all photos associated with the pin.
A purple pin with
a location label
marks the location
where the photo
selection was shot.
Selected photo
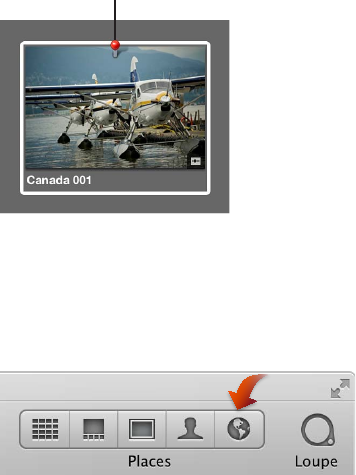
Chapter 12 Locating and Organizing Photos with Places 218
5 Click Done.
The purple pin turns red, indicating that the location you specied has been assigned to
the selected photos, and a location badge (a red pin) appears over the thumbnail images in
the Browser.
Location badge
To search for a location and assign it to a photo selection
1 Select an item in the Library inspector containing photos to which you want to assign
location information.
2 If the main window is not in Places view, click the Places button in the toolbar.
The Aperture main window switches to Places view. Red pins mark the locations where photos
that already have location information were shot.
3 In the Browser, select the photos to which you want to assign a location.
4 Choose Metadata > Assign Location.
5 In the dialog that appears, enter the location you want to search for in the search eld. For
example, you can enter a city name or an address.
Locations whose names match the text you entered are listed below the search eld.
6 Select the appropriate location in the search results list.
A location is plotted on the map with a purple circle surrounding it. The purple circle is used to
determine the geographical area encompassed by the location.
7 If you wish, enter a custom name for the location, such as “Our backyard,” in the Place Name eld.
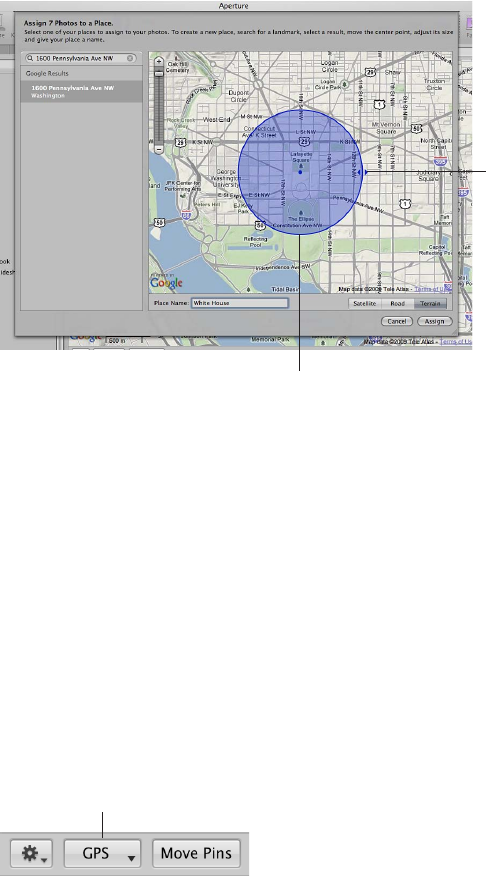
Chapter 12 Locating and Organizing Photos with Places 219
8 Drag the resize handles on the right side of the purple circle to change the area assigned to
the location.
Resize handles
Purple circle indicating the
area assigned to the location
9 When you are satised with the area assigned to the location, click the Assign button.
A red pin appears on the map in Places view, with a location label indicating the name of the
location and the number of photos it’s assigned to. A purple circle indicates the area the location
covers. A red location badge appears over the selected thumbnail images in the Browser,
indicating that a location has been assigned.
To assign location information to photos shot with a GPS-enabled iOS device
If you have photos imported from a GPS-enabled iOS device, you can use the GPS data from the
photos to automatically assign location information to them.
1 In the Library inspector, select a project containing photos captured with a GPS-enabled
iOS device.
2 In Places view, choose “Import GPS from iPhone Photos” from the GPS pop-up menu.
Choose “Import GPS from
iPhone Photos” from the
GPS pop-up menu.
3 In the dialog that appears, select the photos to which you want to assign location information,
then click OK.
Aperture displays waypoints for the photos in Places view.
4 In the Browser, drag a photo to a waypoint in Places view to assign location information to it.
Chapter 12 Locating and Organizing Photos with Places 220
Changing Photo Locations
If you’ve assigned incorrect locations to photos, it’s easy to change their location information.
There are three methods for reassigning photo locations:
•To change the location assignment for all photos associated with a location: You can move the
location pin in Places view.
•To change the location assignment for a subset of photos associated with a location: You can
reassign the location for the photo subset using the Assign Location dialog.
•To change the location assignment for a single photo: You can reassign the location for the
photo using the Map pane of the Info inspector. For more information, see Working with
Location Information Using the Info Inspector on page 225.
To move a pin, changing the location for all photos with that location assignment
1 Do one of the following:
•In the Library inspector, select Places.
•Select the item in the Library inspector containing the photos whose location you want to
change, then click the Places button in the toolbar.
2 In Places view, click the Move Pins button.
The location pins on the Places view map turn purple, indicating that they can be moved.
3 Drag the incorrectly placed pin to the correct location, then click Done in the dialog that appears
at the bottom of Places view.
The location pin is moved to its new location, and the location information is changed for all
photos associated with the original location.
To change the location assignment for a photo selection
1 In the Browser, select the photos whose location information you want to change.
2 Choose Metadata > Assign Location.
3 In the dialog that appears, enter the new location you want to assign in the search eld.
Locations whose names match the text you entered are listed below the search eld.
4 Select the appropriate location in the search results list.
A location is plotted on the map with a purple circle surrounding it. The purple circle is used to
determine the geographical area encompassed by the location.
5 Adjust the area covered by the location as necessary by dragging the resize handles on the right
side of the purple circle.
6 When you are satised with the location and the area assigned to it, click the Assign button.
The location assignment for the selected photos changes to the new location. A red pin appears
on the map in Places view, with a location label indicating the location name and the number of
photos it’s assigned to. A purple circle indicates the area the location covers.
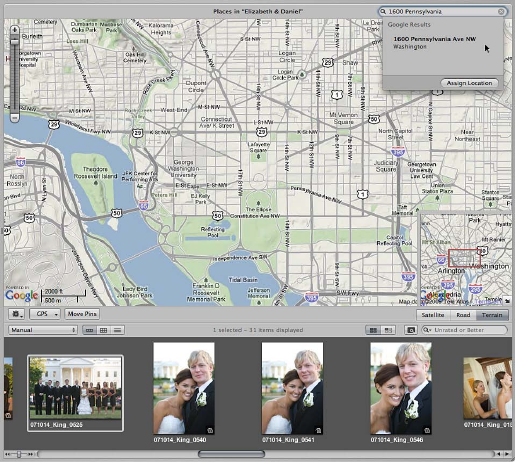
Chapter 12 Locating and Organizing Photos with Places 221
Searching for Locations
As you assign locations to the photos in the Aperture library, the list of locations quickly grows.
Although you may have shot photos all over the world, you can quickly nd the locations where
photos were shot using the search eld in Places view.
To quickly nd locations
1 In the Library inspector, select Places.
The Aperture main window switches to Places view.
2 Enter the location you want to nd in the Places view search eld.
Locations you’ve assigned whose names match the text entered in the search eld appear at the
top of the search results list. Additional results located by Google appear in the Google Results
section at the bottom of the list.
3 Select the correct location in the list that appears below the search eld.
The location pin for the location you selected appears in Places view.
Note: You can also remove location information from photos using the Map pane of the
Info inspector. For more information, see Working with Location Information Using the Info
Inspector on page 225.
Chapter 12 Locating and Organizing Photos with Places 222
Removing Locations
If you have assigned a location to a photo or group of photos by mistake, you can remove it.
To remove location information from a photo or group of photos
1 Do one of the following:
•To remove a location assignment from all photos associated with a location: In Places view, select
the location pin.
•To remove a location assignment from a subset of photos associated with a location: In the
Browser, select the photos whose location information you want to remove.
2 In Places view, choose Remove Locations from the Places Action pop-up menu (with a gear icon).
If you selected a location pin, the location is removed from all photos associated with the
pin. If you selected photos in the Browser, the location information is removed from the
selected photos.
You can also remove location information from photos using the Map pane of the Info inspector.
For more information, see Working with Location Information Using the Info Inspector on
page 225.
Importing and Working with GPS Track File Data
To begin working with a GPS track le in Places view, you must rst import the GPS track le
into Aperture.
GPS track points are digital bread crumbs that are used to dene a path or route (“track”) using
precise coordinates saved by a GPS device or GPS tracking iPhone app. If you have a GPS-
enabled camera or iOS device or another GPS device that you use to create track les and save
waypoints, you can import the track les into Aperture and work with them in Places view.
Each leg and waypoint is displayed in Places view, and you can assign the legs and waypoints
to photos. Photos taken with a GPS-enabled camera or iOS device are automatically assigned
locations corresponding to waypoints in the track le.
To import a GPS track le
1 In the Library inspector, select the project into which you want to import the track le, then click
the Places button in the toolbar.
2 In Places view, choose Import GPS Track from the GPS pop-up menu.
3 In the dialog that appears, navigate to the location of the GPS track le, select it, then click
Choose Track File.
The track le is imported into the selected project. The track le appears as a purple line on the
map in Places view.
To create a new location based on a waypoint in a GPS track le
Once you have imported the GPS track le into your Aperture project, you can begin working
with the GPS track data to create new locations, assign locations to photos, and move
location pins.
1 In the Library inspector, select a project with an imported GPS track le.
2 In the Browser, select a photo and drag it to a waypoint in Places view.
A small dialog appears at the bottom of Places view asking if you would like to assign location
information to other photos in the project based on time.
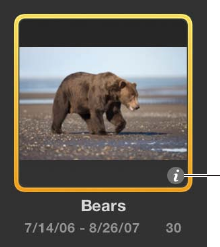
Chapter 12 Locating and Organizing Photos with Places 223
3 Do one of the following:
•To assign photo location information to other photos in the project based on time in the GPS track
le: Click Assign Locations.
•If you don’t want to assign photo location information to other photos in the project: Click Done.
To assign location information from a GPS waypoint to a photo selection
1 In the Browser, select the photo or photos to which you want to assign location information.
2 In Places view, Control-click the waypoint whose location information you want to assign to the
selected photos, then choose Assign Photos from the shortcut menu.
The waypoint’s location information is assigned to the photo selection, and a location badge (a
red pin) appears at the top of each selected photo in the Browser.
Moving location pins that correspond to waypoints in a GPS track le works the same way as
moving other location pins. For more information about moving location pins, see Changing
Photo Locations on page 220.
To delete a GPS track le
You can delete a GPS track le at any time. For example, if you have several GPS track les
on your computer and you aren’t sure which locations they track, you can import the les
individually to see if the track data corresponds to locations in your project. If a GPS track le
contains track data that doesn’t match locations in your project, you can delete it.
mIn Places view, choose Delete Selected Track from the GPS pop-up menu.
Assigning Location Information to Projects
If all the photos in a project were shot in the same location, you can save time by assigning
location information to the project in Projects view. Rather than selecting photos in the Browser
and assigning them a location, you can assign the location to the project. Assigning a location to
a project assigns the location to all versions in the project.
To quickly assign a location to all versions in a project
1 In the Library inspector, select Projects.
The Aperture main window switches to Projects view.
2 Click the Info button for the project to which you want to assign the location.
Info button
The Info HUD appears.
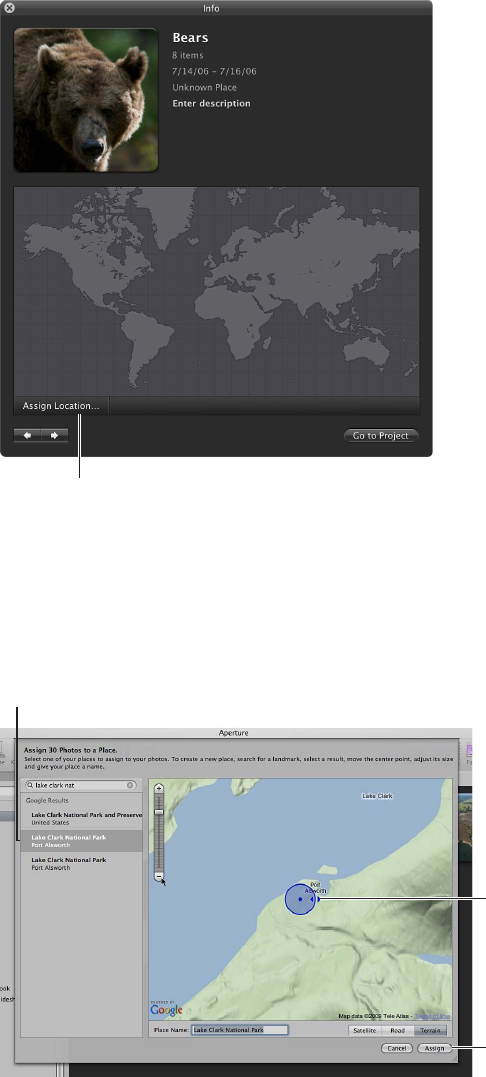
Chapter 12 Locating and Organizing Photos with Places 224
3 In the Info HUD, click Assign Location.
Assign Location button
4 In the dialog that appears, enter a specic address or the name of a place, a city or town, or a
signicant geographical location such as a national park in the search eld.
Google searches for the location you entered in the search eld and displays a list of search
results. Place names that match the text you entered are displayed at the top of the search
results list, and Google search matches are displayed under Google Results.
5 Select the search result that matches the location you are looking for.
Search result
Location of the selected
search result on the map
Assign button
6 If you would like to give the location a custom name, enter a name in the Place Name eld.
7 Click Assign.
The selected location is assigned to every photo in the project.

Chapter 12 Locating and Organizing Photos with Places 225
Working with Location Information Using the Info Inspector
In addition to working with location information in Places view and Projects view, you can also
work with location information in the Map pane of the Info inspector. The Map pane of the Info
inspector provides a convenient means of modifying a photo’s location information without
having to switch to Places view.
There are four map views you can use within the Map pane of the Info inspector:
•Satellite: This view shows the map as satellite imagery.
•Satellite with Labels: This view shows the map as satellite imagery with street names and
other information.
•Road view: This view shows the map with a traditional depiction of roads, parks, borders,
bodies of water, and more.
•Terrain view: This view displays a topographical map with physical elevations as shaded relief
along with elevation lines.
To view a photo’s location information using the Map pane of the Info inspector
1 In the Browser, select a photo whose location information you want to view.
2 In the Info inspector, click the Show Map button.
The Map pane appears, with a red pin in the center of the map indicating where the photo
was shot.
Show/Hide Map button
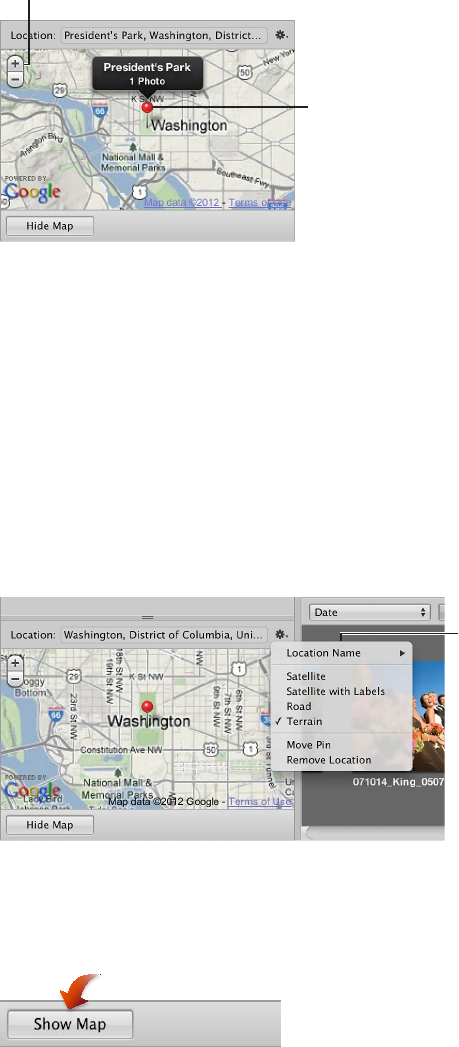
Chapter 12 Locating and Organizing Photos with Places 226
The controls for zooming in to and out of the map are similar to the zoom controls in
Places view.
Zoom button
Double-click the
location pin to zoom
in to the map.
To zoom in to and out of the map in the Map pane of the Info inspector
Do one of the following:
mIn the Map pane of the Info inspector, use the Zoom buttons to zoom in to or out of the location
where the photo was captured.
mUse the scroll gesture to zoom in and out.
mIn the Map pane of the Info inspector, double-click the location pin.
The map zooms in to the area where the photo was captured. Double-click the location pin
again to zoom in further.
To switch views within the Map pane of the Info inspector
mChoose a map view from the Map Pane Action pop-up menu.
Map Pane Action
pop-up menu
To assign location information using the Map pane of the Info inspector
1 In the Browser, select a photo to which you want to assign a location.
2 In the Info inspector, click the Show Map button to open the Map pane.
The Map pane appears.
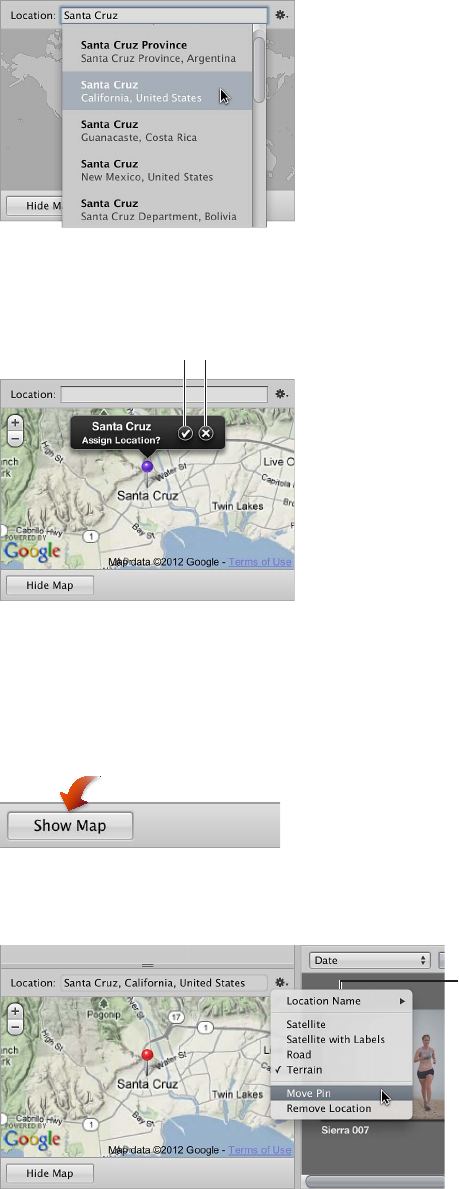
Chapter 12 Locating and Organizing Photos with Places 227
3 Enter the name of the location you want to assign to the photo in the Location eld, then select
the location in the search results list that appears.
The map view changes to show the new location, with a purple location pin and a location label
at its center.
4 Click the Assign Location button in the location label.
Cancel button
Assign Location button
The location information is assigned to the photo.
To change a photo’s location information using the Map pane of the Info inspector
1 In the Browser, select a photo whose location information you want to change.
2 In the Info inspector, click the Show Map button to open the Map pane.
The Map pane appears, with a red pin in the center of the map indicating where the photo was shot.
3 Choose Move Pin from the Map Pane Action pop-up menu.
Map Pane Action
pop-up menu
The red pin turns purple.
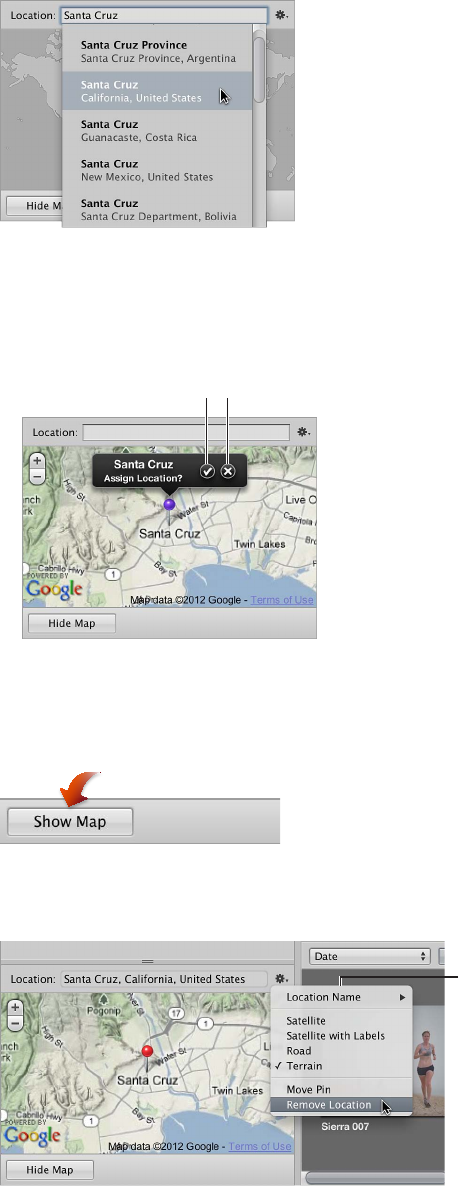
Chapter 12 Locating and Organizing Photos with Places 228
4 Enter the name of a new location to assign to the photo in the Location eld, then select the
location in the search results list that appears.
The map view changes to show the new location.
5 Do one of the following:
•To assign the location to the photo: Click the Assign Location button in the location label.
•To cancel the location change: Click the Cancel button in the location label.
Cancel button
Assign Location button
To remove location information using the Map pane of the Info inspector
1 In the Browser, select a photo whose location information you want to remove.
2 In the Info inspector, click the Show Map button to open the Map pane.
The Map pane appears.
3 Choose Remove Location from the Map Pane Action pop-up menu.
Map Pane Action
pop-up menu
The location information is removed from the photo.
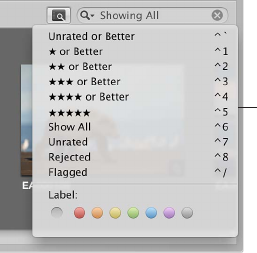
229
An Overview of Searching
Aperture allows you to easily search for and gather photos in a variety of locations. In Aperture,
you can search for photos in multiple ways. You can use the search eld and pop-up menu in the
Browser to quickly locate photos by name or display photos by rating, ag status, and color label.
You can also use the Filter HUD to perform complex searches for photos using a wide variety of
criteria, including photo name, subject, keyword, photographer, caption or text, date, location,
EXIF and IPTC information, applied adjustments, color labels, agged photos, usage statistics,
and more.
In addition to searching for photos in the Browser, you can search for photos within items in the
Library inspector. You can quickly locate faces using the search eld in Faces view. You can also
quickly nd locations assigned to photos using the search eld in Places view.
For more information about searching for items in the Library inspector, see An Overview of the
Library Inspector on page 31.
For more information about searching for items in Faces view, see Searching by Face on
page 245.
For more information about searching for items in Places view, see Searching by Place on
page 251.
Performing Quick Searches Using the Search Field Pop-Up Menu
The search eld pop-up menu in the Browser provides a set of options that let you quickly
remove photos from view in the Browser so that you can focus on the photos with which you
want to work. You can either enter the name of a photo in the search eld or choose a rating,
ag status, or color label from the search eld pop-up menu to lter photos in the Browser.
Although photos that don’t match your search string or search eld pop-up menu choice are
removed from view, they are not deleted. To view all photos in the Browser again, you simply
click the Reset button in the search eld.
Search field
pop-up menu
Searching for and
Displaying Photos 13
Chapter 13 Searching for and Displaying Photos 230
To show photos based on a text string or numerical value, such as a keyword or pixel size
mIn the Browser, enter the search string in the search eld, then press Return.
To show only photos that have been assigned a specic rating or better
Do one of the following:
mIn the Browser, choose Unrated or Better from the search eld pop-up menu to show photos that
are unrated or better, or press Control–Grave Accent (`).
Note: This is the default view.
mIn the Browser, choose One Star or Better from the search eld pop-up menu to show photos
that are rated one star or better (or press Control-1).
mIn the Browser, choose Two Stars or Better from the search eld pop-up menu to show photos
that are rated two stars or better (or press Control-2).
mIn the Browser, choose Three Stars or Better from the search eld pop-up menu to show photos
that are rated three stars or better (or press Control-3).
mIn the Browser, choose Four Stars or Better from the search eld pop-up menu to show photos
that are rated four stars or better (or press Control-4).
mIn the Browser, choose Five Stars from the search eld pop-up menu to show photos that are
rated ve stars, also known as selects (or press Control-5).
To show all photos regardless of rating, including rejects
mIn the Browser, choose Show All from the search eld pop-up menu (or press Control-6).
To show unrated photos only
mIn the Browser, choose Unrated from the search eld pop-up menu (or press Control-7).
To show rejected photos only
mIn the Browser, choose Rejected from the search eld pop-up menu (or press Control-8).
To show agged photos only
mIn the Browser, choose Flagged from the search eld pop-up menu, or press Control-Slash (/).
To show photos based on the color labels assigned to them
Do one of the following:
mIn the Browser, choose No Label from the search eld pop-up menu to show only photos that
have no color label assigned to them (or press Command-Control-0).
mIn the Browser, choose Red from the search eld pop-up menu to show only photos that have
the red color label assigned to them (or press Command-Control-1).
mIn the Browser, choose Orange from the search eld pop-up menu to show only photos that
have the orange color label assigned to them (or press Command-Control-2).
mIn the Browser, choose Yellow from the search eld pop-up menu to show only photos that have
the yellow color label assigned to them (or press Command-Control-3).
mIn the Browser, choose Green from the search eld pop-up menu to show only photos that have
the green color label assigned to them (or press Command-Control-4).
mIn the Browser, choose Blue from the search eld pop-up menu to show only photos that have
the blue color label assigned to them (or press Command-Control-5).
mIn the Browser, choose Purple from the search eld pop-up menu to show only photos that have
the purple color label assigned to them (or press Command-Control-6).
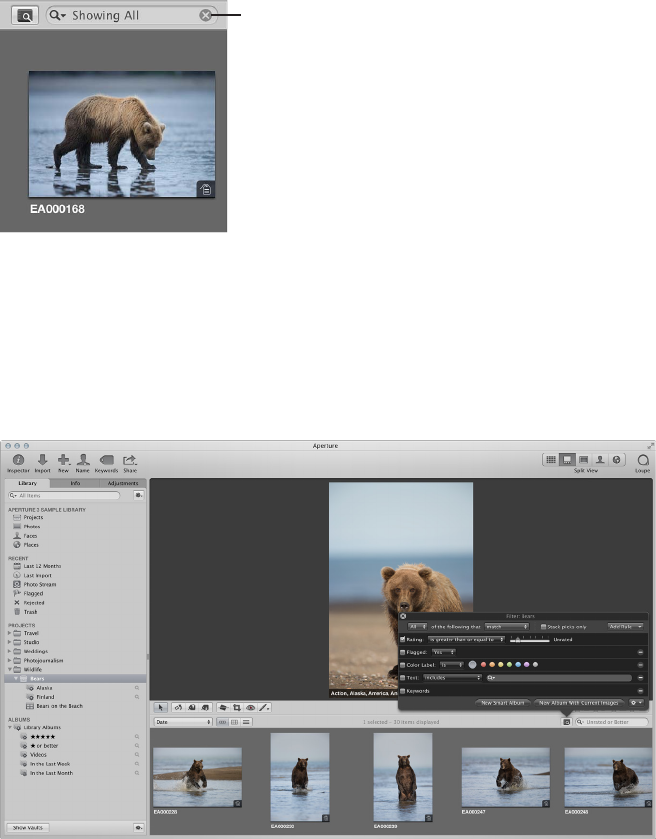
Chapter 13 Searching for and Displaying Photos 231
mIn the Browser, choose Gray from the search eld pop-up menu to show only photos that have
the gray color label assigned to them (or press Command-Control-7).
To reset the search eld pop-up menu back to the default setting of Unrated or Better
mClick the Reset button on the right side of the search eld.
Reset button
About the Filter HUD
The Filter HUD is an easy-to-use window with options for specifying search criteria. For example,
you can enter the text “action” in the Filter HUD, and Aperture locates les that include that text
in their metadata. To show the Filter HUD for a selected project, you click the Filter HUD button
(with a magnifying glass icon) next to the search eld in the Browser.
You can use the Filter HUD to display particular photos within a project, album, or folder, which
are automatically gathered based on search criteria. You specify where you want to search by
selecting the project, album, or folder that contains the photos you want to see.
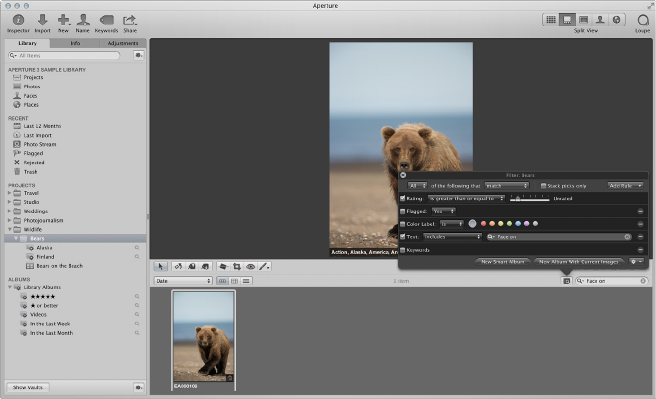
Chapter 13 Searching for and Displaying Photos 232
The most common reason to perform a search is to display a selection of photos within a project.
By selecting a project and using the Filter HUD, you can quickly display specic photos, hiding
the rest from view. For example, you might isolate and display only those photos of a certain
subject, pose, rating, or location. Your search doesn’t change the contents of the project; it only
temporarily changes the photos you view in the Browser. If you cancel the search criteria in
the Filter HUD, all of your photos appear in the Browser again. The Filter HUD is preset to show
photos that are unrated or better, hiding rejected photos, but you can change the Filter HUD
criteria to show rejected photos if you wish.
You can also create special albums, called Smart Albums, whose contents are gathered
automatically, solely by search criteria. For example, you might create a Smart Album that
searches for and displays all portrait photos from the entire library. When you create a Smart
Album, you use the Smart Settings HUD—whose controls are similar to the controls in the Filter
HUD—to dene criteria for the photos that should appear in the Smart Album. In this case, you
can set the Smart Album to locate and capture photos with the keyword Portrait assigned to
them. As you add portrait photos to your library over time, they automatically appear in the
Smart Album you created to track them. For more information about creating and using Smart
Albums, see An Overview of Smart Albums on page 255.
Aperture can locate photos based on many types of information associated with the photos.
When you import photos into Aperture, certain information is automatically assigned to
each photo, including EXIF metadata such as image date, photographer, camera technical
data, lename, and much more. You can also assign your own metadata to photos, including
keywords, summaries, captions, and information used by IPTC elds, and then locate your photos
by searching for the metadata. In addition, you can search for photos based on the type of
adjustment applied to them as well as the version of the RAW decoding process used to decode
the RAW original.
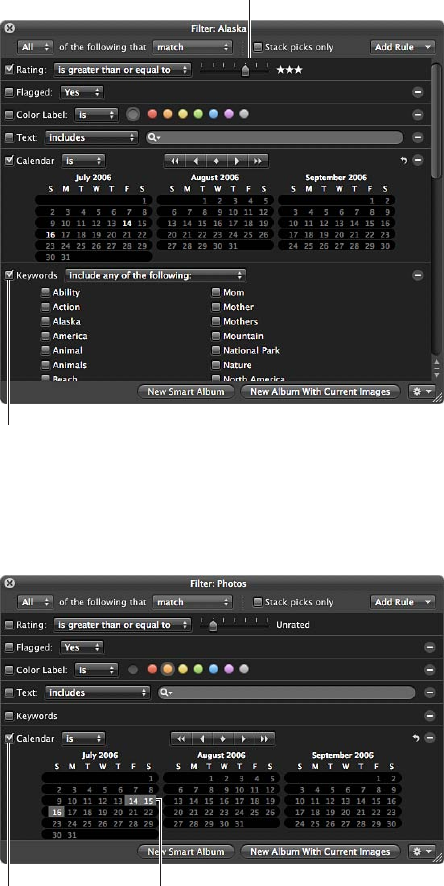
Chapter 13 Searching for and Displaying Photos 233
The search criteria that you use can be simple or complex. The following illustration shows some
of the search criteria you can specify using the Filter HUD.
Specify your search criteria.
Select the checkboxes for the
items you want to search by.
To search using a particular type of search criteria, you select the checkbox to turn on the search
option and then specify the criteria that Aperture should look for. For example, to nd photos
taken on a specic date, you select the Calendar checkbox and select a date or range of dates.
Select the Calendar
checkbox.
Select the dates you
want to search by.
The photos taken on the dates you specied are displayed in the Browser, where you can review
and work with them.

Chapter 13 Searching for and Displaying Photos 234
The following search options are available in the Filter HUD and Smart Settings HUD.
Rule Function
Adjustments Search for photos based on the type of adjustment
that has been applied to them in Aperture, as well
as which RAW decoding version was used to render
the image.
Aperture Metadata Search for photos with Aperture-specic metadata
applied to them, such as version name and
project name.
Attachment Search for photos based on whether they have
audio attachments.
Calendar Search for photos by the date they were taken as
registered in the EXIF data.
Color Label Search for photos that have color labels assigned
to them.
Date Search for photos based on their creation date.
EXIF Search for photos using any EXIF information
recorded by the camera.
Face Search for photos based on the faces that have been
assigned names.
File Status Search for photos based on whether they are
managed images, referenced images, or online or
oine images.
File Type Search for les of a specic type, such as RAW
or video.
Flagged Search for photos that you have agged in Aperture.
Import Session Search for photos that were imported at a specic
time or on a specic date.
IPTC Search for photos based on any IPTC information
assigned to them.
Keywords Search for photos by any of the keywords that you’ve
assigned to them.
Photo Usage Search for photos that have been employed for a
specic purpose in Aperture, such as photos currently
used in a book, emailed photos, and prints ordered via
the Apple print service.
Place Search for photos by the location information
assigned to them.
Rating Search for photos based on the ratings assigned to
them in Aperture.
Text Search for photos based on any text associated with
a photo.
To show the Filter HUD
Do one of the following:
mChoose Edit > Find (or press Command-F).
mClick the Filter HUD button (with a magnifying glass icon) beside the search eld in the Browser.
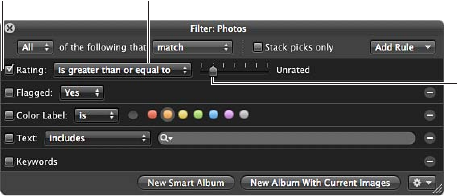
Chapter 13 Searching for and Displaying Photos 235
To show the Smart Settings HUD
mIn the Library inspector, click the Smart Settings HUD button to the right of the Smart Album
whose search criteria you want to modify.
For more information about working with Smart Albums, see An Overview of Smart Albums on
page 255.
Searching by Rating
You can use the Filter HUD to see all photos with a certain rating. For example, you can search
for all the photos in a project that have a rating of ve stars. You can show photos with a specic
rating, photos rated at or below a specic rating, or photos rated at or above a rating. Aperture is
preset to hide photos rated as rejected, showing only those that are unrated or better.
To search for photos by rating
1 In the Library inspector, select the item you want to search.
2 Click the Filter HUD button (with a magnifying glass icon) beside the search eld in the Browser
(or press Command-F).
3 In the Filter HUD, select the Rating checkbox.
Select the
Rating checkbox.
Choose an option from
the Rating pop-up menu.
Specify the rating level
you want using this slider.
4 From the Rating pop-up menu, choose whether you want to search for photos with a rating that
is equal to, greater than or equal to, or less than or equal to the specied rating.
5 Specify the rating level by dragging the slider.
The photos that match the search criteria are displayed in the Browser. To save your search
results, see Saving Your Search Results on page 253.
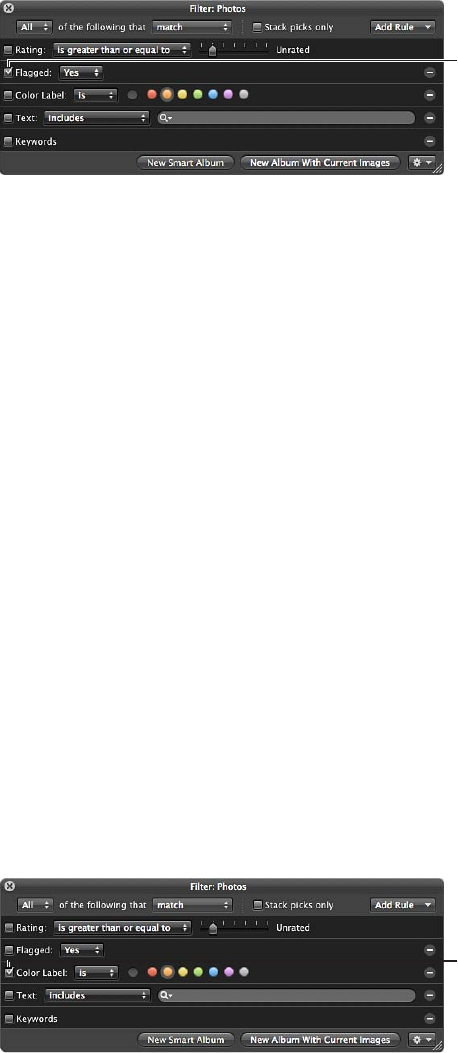
Chapter 13 Searching for and Displaying Photos 236
Searching for Flagged Photos
You can use the Filter HUD to locate photos that you have agged in Aperture. You can also
locate photos that have not been agged.
To search for agged photos
1 In the Library inspector, select the item you want to search.
2 Click the Filter HUD button (with a magnifying glass icon) beside the search eld in the Browser
(or press Command-F).
3 In the Filter HUD, select the Flagged checkbox.
Select the Flagged checkbox.
4 Choose an option from the Flagged pop-up menu:
•To locate agged photos: Choose Yes.
•To located photos without ags: Choose No.
5 Choose Any from the Any/All pop-up menu in the top-left corner of the Filter HUD, if it’s not
already chosen.
The photos that match the search criteria are displayed in the Browser. To save your search
results, see Saving Your Search Results on page 253.
To quickly review all agged photos in the library
mIn the Recent section of the Library inspector, click Flagged.
All agged photos in the library appear in the Browser.
Searching by Color Label
You can search for and locate photos that have color labels assigned to them. To search for
photos with a specic color label, you use the Color Label search options. You can search for
more than one color label at a time. You can also search for photos that do not have a specic
color label assigned to them.
To search for photos by color label
1 In the Library inspector, select the item you want to search.
2 Click the Filter HUD button (with a magnifying glass icon) beside the search eld in the Browser
(or press Command-F).
3 In the Filter HUD, select the Color Label checkbox.
Select the Color
Label checkbox.
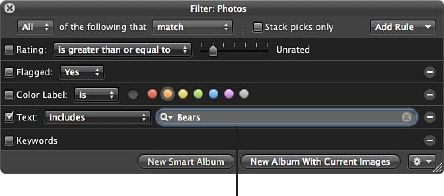
Chapter 13 Searching for and Displaying Photos 237
4 Choose an option from the Color Label pop-up menu:
•To display photos that have the specied color labels assigned to them: Choose “is.”
•To display photos that do not have the specied color labels assigned to them: Choose “is not.”
5 Select the colors you want to search by.
You can select more than one color at a time to broaden your search.
6 Choose Any from the Any/All pop-up menu in the top-left corner of the Filter HUD, if it’s not
already chosen.
The photos that match the search criteria are immediately displayed in the Browser. To save your
search results, see Saving Your Search Results on page 253.
Searching by Photo Name, Caption, or Other Text
You can search for photos using any text that you’ve associated with a photo. For example, you
might search for photos based on text in a photo’s caption or keywords, or in any other text
entry. You can also search by multiple text entries.
To search for photos by text
1 In the Library inspector, select the item you want to search.
2 Click the Filter HUD button (with a magnifying glass icon) beside the search eld in the Browser
(or press Command-F).
3 Select the Text checkbox, then enter the text you want to search for in the search eld.
Enter the text you want
to search for in this field.
You can enter multiple text items, separated by commas. Aperture locates any photos that have a
match for all the text items.
4 Choose an option from the Text pop-up menu to qualify your search.
•To specify characters that the text associated with the photo should contain somewhere within the
eld: Choose “includes.”
•To specify characters that the text associated with the photo should not contain: Choose “does
not include.”
•To specify the exact characters that the text associated with the photo should contain: Choose “is.”
•To specify the exact characters that the text associated with the photo should not contain: Choose
“is not.”
•To specify the characters that the text associated with the photo should begin with: Choose
“starts with.”
•To specify the characters that the text associated with the photo should end with: Choose “ends with.”
5 Choose All from the Any/All pop-up menu in the top-left corner of the Filter HUD, if it’s not
already chosen.
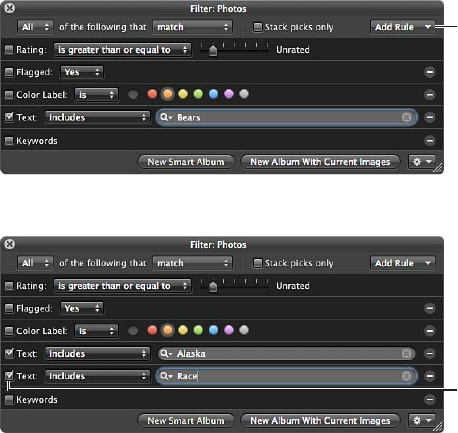
Chapter 13 Searching for and Displaying Photos 238
The photos that match the search criteria are displayed in the Browser. To save your search
results, see Saving Your Search Results on page 253.
To search for photos by multiple text entries
1 In the Library inspector, select the item you want to search.
2 Click the Filter HUD button (with a magnifying glass icon) beside the search eld in the Browser
(or press Command-F).
3 In the Filter HUD, add as many text elds as you need by choosing Text from the Add Rule
pop-up menu multiple times.
Choose Text from the
Add Rule pop-up menu.
4 Select the Text checkboxes and enter text in each eld to locate the photos you want.
Select the Text checkboxes
and enter text in each text
field you added.
5 Choose an option from the Text pop-up menu to qualify your search.
•To specify characters that the text associated with the photo should contain somewhere within the
eld: Choose “includes.”
•To specify characters that the text associated with the photo should not contain: Choose “does
not include.”
•To specify the exact characters that the text associated with the photo should contain: Choose “is.”
•To specify the exact characters that the text associated with the photo should not contain: Choose
“is not.”
•To specify the characters that the text associated with the photo should begin with: Choose
“starts with.”
•To specify the characters that the text associated with the photo should end with: Choose
“ends with.”
6 Choose Any from the Any/All pop-up menu in the top-left corner of the Filter HUD to locate
photos that have matches for any of the text entries, or choose All to locate photos that have
matches for all of the text entries.
The photos that match the search criteria are immediately displayed in the Browser. To save your
search results, see Saving Your Search Results on page 253.
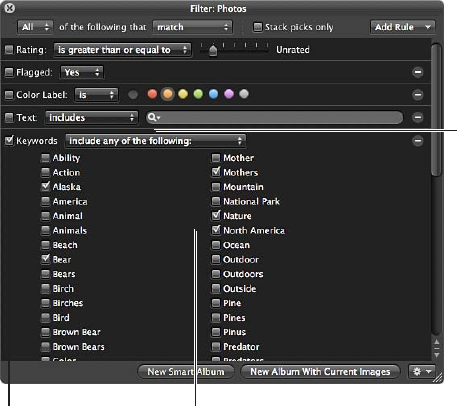
Chapter 13 Searching for and Displaying Photos 239
Searching by Keyword
You can search for and locate photos by any of the keywords that you’ve assigned to them. You
can select one or more keywords to search for. You can also specify which keywords a photo
must have to qualify as a match. For example, you can choose to search for photos that have
both Silhouette and Landscape as keywords, or photos that have either Silhouette or Landscape
as keywords. In addition, you can search for photos that do not have specic keywords applied
to them.
To search for photos by keyword
1 In the Library inspector, select the item you want to search.
2 Click the Filter HUD button (with a magnifying glass icon) beside the search eld in the Browser
(or press Command-F).
3 In the Filter HUD, select the Keywords checkbox.
Note: The Keywords checkbox is dimmed if no keywords have been applied to the photos in the
selected item in the Library inspector.
Select the Keywords
checkbox.
Select the checkbox
next to each keyword
you want to search for.
Choose an option
from the Keywords
pop-up menu.
4 Choose an option from the Keywords pop-up menu:
•To display photos that have the selected keywords: Choose “are applied.”
•To display photos that do not have the selected keywords: Choose “are not applied.”
•To display photos that have any of the selected keywords: Choose “include any of the following.”
•To display only those photos that have all the keywords you selected: Choose “include all of the
following.”
•To display photos that have only the selected keywords: Choose “include only the following.”
•To display photos that do not have any of the selected keywords: Choose “do not include any of
the following.”
•To display photos that do not have all of the selected keywords: Choose “do not include all of the
following.”
5 Select the checkboxes next to the keywords you want to search for.
6 Choose Any from the Any/All pop-up menu in the top-left corner of the Filter HUD, if it’s not
already chosen.
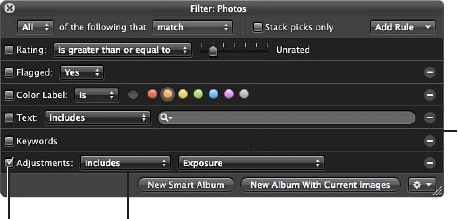
Chapter 13 Searching for and Displaying Photos 240
You can also search for IPTC keywords using the IPTC search options. These options allow you
to specify searches for specic IPTC elds in a variety of ways. For example, you can search for
any photos that don’t have keywords assigned. For more information, see Searching by IPTC
Information on page 249.
The photos that match the search criteria are immediately displayed in the Browser. To save your
search results, see Saving Your Search Results on page 253.
Searching by Adjustments
You can search for and identify photos based on the type of adjustment that has been applied
to them, as well as which RAW decoding version was used to render the image. To search for
photos based on a specic adjustment, you use the Adjustments search options. You can also
search for photos that do not have a specic type of adjustment applied to them.
To search for photos by adjustment type
1 In the Library inspector, select the item you want to search.
2 Click the Filter HUD button (with a magnifying glass icon) beside the search eld in the Browser
(or press Command-F).
3 In the Filter HUD, choose Adjustments from the Add Rule pop-up menu, and select the
Adjustments checkbox.
Select the
Adjustments
checkbox.
Choose how you want to
qualify your search from
this pop-up menu.
Choose an adjustment
to search by.
4 Choose an option from the Adjustments pop-up menu:
•To display any photo that has had an adjustment applied to it: Choose “are applied.”
•To display photos with no adjustments: Choose “are not applied.”
•To display photos with a specic adjustment applied to them: Choose “includes,” then choose an
adjustment from the pop-up menu to the right.
•To display photos that do not have a specic adjustment applied to them: Choose “do not include,”
then choose an adjustment from the pop-up menu to the right.
5 Choose Any from the Any/All pop-up menu in the top-left corner of the Filter HUD, if it’s not
already chosen.
The photos that match the search criteria are displayed in the Browser. To save your search
results, see Saving Your Search Results on page 253.
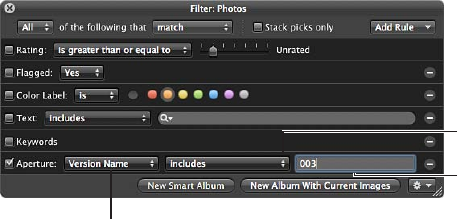
Chapter 13 Searching for and Displaying Photos 241
Searching by Aperture Metadata
To search for photos by metadata other than IPTC or EXIF information, you use the Aperture
Metadata search options. You can search for photos using the following kinds of metadata
tracked by Aperture:
•Album name
•Aspect ratio
•Project name
•Project path
•Filename
•File size
•Original pixel size
•Orientation
•Pixel size
•Version name
To search for photos by metadata other than IPTC or EXIF information
1 In the Library inspector, select the item you want to search.
2 Click the Filter HUD button (with a magnifying glass icon) beside the search eld in the Browser
(or press Command-F).
3 In the Filter HUD, choose Aperture Metadata from the Add Rule pop-up menu.
4 Select the Aperture checkbox, then choose the type of metadata you want to search for using
the Aperture pop-up menu.
Choose the type of metadata
you want to search for.
Choose how you want
to qualify your search
from this pop-up menu.
Enter a metadata
value here.
5 Choose an option from the middle pop-up menu to qualify your search.
6 Enter the metadata value, such as "Antarctica” or “Sierra Slideshow,” in the Aperture metadata
text eld.
7 Choose Any from the Any/All pop-up menu in the top-left corner of the Filter HUD, if it’s not
already chosen.
The photos that match the search criteria are displayed in the Browser. To save your search
results, see Saving Your Search Results on page 253.
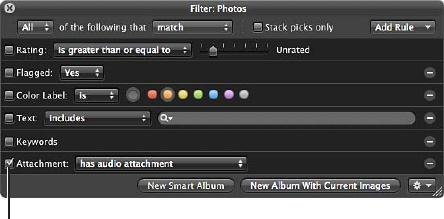
Chapter 13 Searching for and Displaying Photos 242
Searching by Attachment
Using the Filter HUD, you can search for photos that have audio attachments and photos that do
not have audio attachments.
To search for photos with attachments
1 In the Library inspector, select the item you want to search.
2 Click the Filter HUD button (with a magnifying glass icon) beside the search eld in the Browser
(or press Command-F).
3 In the Filter HUD, choose Attachment from the Add Rule pop-up menu, then select the
Attachment checkbox.
Select the Attachment checkbox.
4 Do one of the following:
•To search for photos with attachments: Choose “has audio attachment” from the Attachment
pop-up menu.
•To search for photos with no attachments: Choose “does not have audio attachment” from the
Attachment pop-up menu.
5 Choose Any from the Any/All pop-up menu in the top-left corner of the Filter HUD, if it’s not
already chosen.
The photos that match the search criteria are displayed in the Browser. To save your search
results, see Saving Your Search Results on page 253.
Searching by Calendar
You can search for and locate photos by the date they were taken. For example, you might locate
any photos taken during a trip between May 16, 2011 and May 20, 2011. To search for photos by
date, you use the Calendar search options. When the calendar appears, any dates that appear in
bold represent dates on which new photos were taken as registered in the EXIF data. You can
select a date or several dates in the calendar to search for photos taken on those dates, as well as
specify a range of dates. In addition, you can search for photos taken outside of a range of dates.
Note: Images that you import from sources other than digital cameras and card readers, such as
JPEG or TIFF les, may not have EXIF information associated with them. However, you can search
for them based on each le’s creation date. For more information, see Searching by Date on
page 243.
To search for photos by date
1 In the Library inspector, select the item you want to search.
2 Click the Filter HUD button (with a magnifying glass icon) beside the search eld in the Browser
(or press Command-F).
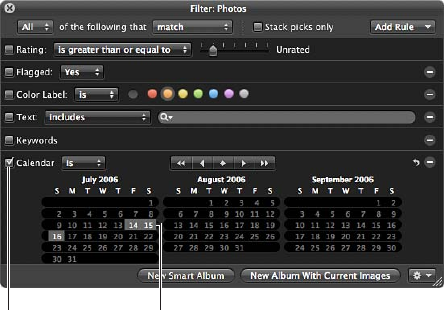
Chapter 13 Searching for and Displaying Photos 243
3 In the Filter HUD, choose Calendar from the Add Rule pop-up menu, then select the
Calendar checkbox.
Select the Calendar
checkbox.
Select the dates you
want to search by.
4 Choose an option from the Calendar pop-up menu:
•To display photos shot on the selected dates: Choose “is.”
•To display photos not shot on the selected dates: Choose “is not empty and is not.”
5 Select the date or dates you want to search by.
Use the Calendar navigation buttons to navigate through the monthly calendars. Shift-click to
select a range of continuous dates; Command-click to select multiple noncontinuous dates.
6 Choose Any from the Any/All pop-up menu in the top-left corner of the Filter HUD, if it’s not
already chosen.
The photos that match the search criteria are immediately displayed in the Browser. To save your
search results, see Saving Your Search Results on page 253.
Searching by Date
Images that you import from sources other than digital cameras and card readers, such as JPEG
or TIFF les, may not have EXIF information associated with them. However, they typically have a
creation date assigned to the le. You can use this creation date to locate images using the Date
search options.
To search for images by creation date
1 In the Library inspector, select the item you want to search.
2 Click the Filter HUD button (with a magnifying glass icon) beside the search eld in the Browser
(or press Command-F).
3 In the Filter HUD, choose Date from the Add Rule pop-up menu.
4 Select the Date checkbox, then choose a date option from the Date pop-up menu.
5 Choose an option from the middle pop-up menu to qualify your search.
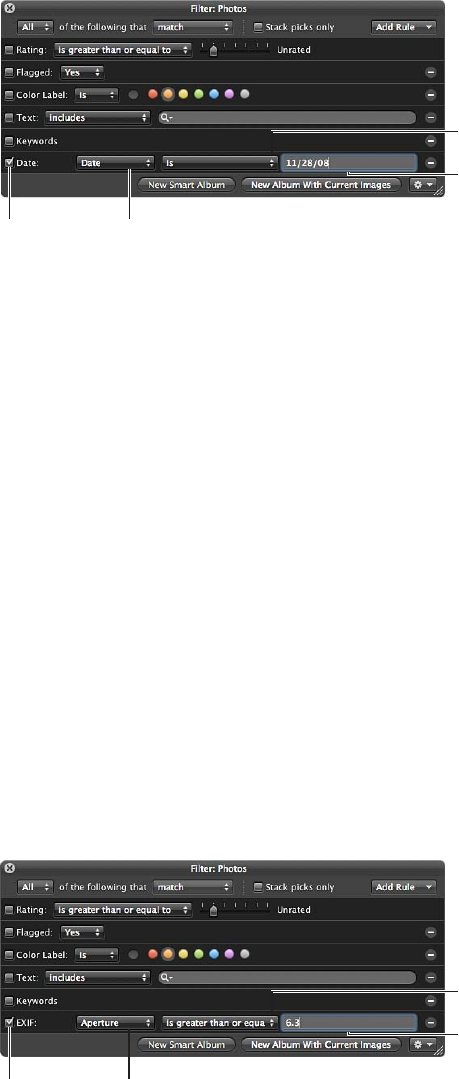
Chapter 13 Searching for and Displaying Photos 244
6 In the text eld, enter the date you want the search based upon.
Select the
Date checkbox.
Choose a date
option from the
Date pop-up menu.
Choose how you want
to qualify your search
from this pop-up menu.
Enter a date here.
If needed, you can add multiple Date options to specify the capture year, capture month, capture
day, and so on.
7 Choose Any from the Any/All pop-up menu in the top-left corner of the Filter HUD, if it’s not
already chosen.
The photos that match the search criteria are immediately displayed in the Browser. To save your
search results, see Saving Your Search Results on page 253.
Searching by EXIF Information
You can search for and locate photos using any EXIF information recorded by your camera. For
example, you might locate any photos that were created with a certain camera or at a specic
exposure. To search for photos by EXIF information, you use the EXIF search options.
To search for photos by EXIF information
1 In the Library inspector, select the item you want to search.
2 Click the Filter HUD button (with a magnifying glass icon) beside the search eld in the Browser
(or press Command-F).
3 In the Filter HUD, choose EXIF from the Add Rule pop-up menu.
4 Select the EXIF checkbox, then choose an EXIF eld you want to search by from the EXIF
pop-up menu.
Select the
EXIF checkbox.
Choose an EXIF
field to search by.
Choose how you want
to qualify your search
from this pop-up menu.
Enter an EXIF value here.
5 Choose an option from the middle pop-up menu to qualify your search.
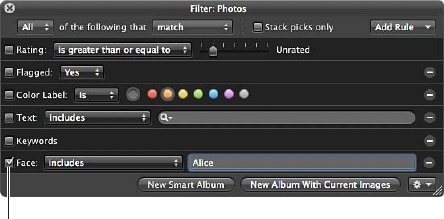
Chapter 13 Searching for and Displaying Photos 245
6 Enter the EXIF value you want to search by in the EXIF text eld.
7 Choose Any from the Any/All pop-up menu in the top-left corner of the Filter HUD, if it’s not
already chosen.
The photos that match the search criteria are immediately displayed in the Browser. To save your
search results, see Saving Your Search Results on page 253.
Searching by Face
You can search for and locate photos based on the faces that have been assigned names. You
can search for photos that only contain a single named face, as well as photos that have multiple
people in them, including the face you’re looking for.
For more information about working with Faces, see An Overview of Faces on page 199.
To search for photos by Faces information
1 In the Library inspector, select the item you want to search.
2 Click the Filter HUD button (with a magnifying glass icon) beside the search eld in the Browser
(or press Command-F).
3 In the Filter HUD, choose Face from the Add Rule pop-up menu.
4 Select the Face checkbox, then choose an option from the Face pop-up menu:
Select the Face checkbox.
•To display photos that include a face: Choose “includes.”
•To display only photos that contain the face: Choose “is.”
•To display only photos that do not contain the face: Choose “is not.”
•To display photos with faces that have not been named: Choose “has unnamed.”
•To display any photo with a face whose name has the following letters: Choose “is detected.”
•To display any photo with a face whose name has none of the following letters: Choose “is not
detected.”
•To display any photo with a face whose name begins with the following letters: Choose
“starts with.”
•To display any photo with a face whose name ends with the following letters: Choose “ends with.”
5 Enter the face name you want to search by in the Face text eld.
6 Choose Any from the Any/All pop-up menu in the top-left corner of the Filter HUD, if it’s not
already chosen.
The photos that match the search criteria are immediately displayed in the Browser. To save your
search results, see Saving Your Search Results on page 253.
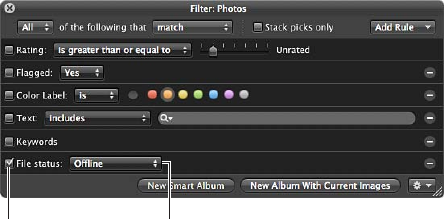
Chapter 13 Searching for and Displaying Photos 246
Searching by File Status
You can search for photos based on whether they are managed images, referenced images, or
online or oine images. In addition, you can use the File Status search category to show the
photos whose originals Aperture considers missing. For more information about locating and
reconnecting missing image les, see Reconnecting Missing or Oine Referenced Images on
page 102.
To search for photos by le status
1 In the Library inspector, select the item you want to search.
2 Click the Filter HUD button (with a magnifying glass icon) beside the search eld in the Browser
(or press Command-F).
3 In the Filter HUD, choose File Status from the Add Rule pop-up menu, then select the “File status”
checkbox.
4 Deselect any checkboxes that aren’t part of your query, then choose the search criteria from the
“File status” pop-up menu.
Select the “File
status” checkbox.
Choose the file status
you want to search for.
•To display photos whose originals are located in the Aperture library: Choose Managed.
•To display photos whose originals are located outside of the Aperture library: Choose Referenced.
•To display photos whose originals are visible to Aperture: Choose Online.
•To display photos whose originals are not visible to Aperture because the external disk drive they
reside on is not connected to your computer: Choose Oine.
•To display photos that Aperture cannot locate: Choose Missing.
5 Choose Any from the Any/All pop-up menu in the top-left corner of the Filter HUD, if it’s not
already chosen.
The photos that match the search criteria are displayed in the Browser. To save your search
results, see Saving Your Search Results on page 253.
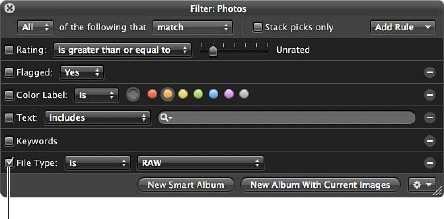
Chapter 13 Searching for and Displaying Photos 247
Searching by File Type
You use the File Type search options in the Filter HUD to locate images of a specic le type.
You can also search for RAW + JPEG image pairs, movie and audio le attachments, and images
edited with external applications.
To search for les by type
1 In the Library inspector, select the item you want to search.
2 Click the Filter HUD button (with a magnifying glass icon) beside the search eld in the Browser
(or press Command-F).
3 In the Filter HUD, choose File Type from the Add Rule pop-up menu, then select the File
Type checkbox.
Select the File Type checkbox.
4 Choose an option from the File Type pop-up menu:
•To display les of a specic le type: Choose “is,” then choose a le type from the pop-up menu
to the right.
•To display les that are not of a specic le type: Choose “is not,” then choose a le type from the
pop-up menu to the right.
5 Choose Any from the Any/All pop-up menu in the top-left corner of the Filter HUD, if it’s not
already chosen.
The photos that match the search criteria are displayed in the Browser. To save your search
results, see Saving Your Search Results on page 253.
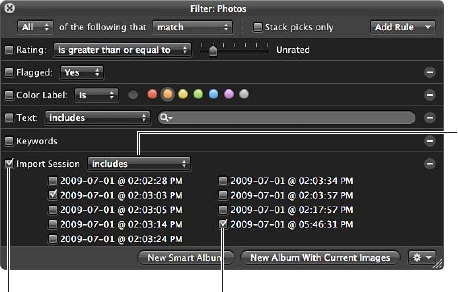
Chapter 13 Searching for and Displaying Photos 248
Searching by Import Session
You can locate photos that were imported at a specic time or on a specic date. Aperture keeps
track of your import sessions and can identify photos that were imported at the same time. To
search for photos based on their import session, you use the Import Session search options. You
can also search for photos that were not imported during a specic import session or range
of sessions.
To search for photos by import session
1 In the Library inspector, select the item you want to search.
2 Click the Filter HUD button (with a magnifying glass icon) beside the search eld in the Browser
(or press Command-F).
3 In the Filter HUD, choose Import Session from the Add Rule pop-up menu, then select the Import
Session checkbox.
Choose “includes” or
“does not include” to
search for photos that
are or are not part of the
selected import sessions.
Select the Import
Session checkbox.
Select an import group.
4 Select the checkbox for the import group you want to search by.
5 Choose an option from the Import Session pop-up menu:
•To display photos imported during the selected import sessions: Choose “includes.”
•To display photos not imported during the selected import sessions: Choose “does not include.”
6 Choose Any from the Any/All pop-up menu in the top-left corner of the Filter HUD, if it’s not
already chosen.
The photos that match the search criteria are displayed in the Browser. To save your search
results, see Saving Your Search Results on page 253.
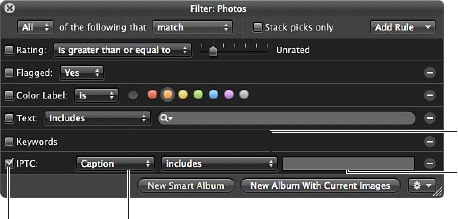
Chapter 13 Searching for and Displaying Photos 249
Searching by IPTC Information
You can search for and locate photos using any IPTC information that you’ve assigned to your
photos. To search for photos by IPTC information, you use the IPTC search options. For example,
you can search for any photo that doesn’t have a copyright notice applied to it by specifying a
search that uses the Copyright Notice eld and an “is empty” search qualier.
To search for photos by IPTC information
1 In the Library inspector, select the item you want to search.
2 Click the Filter HUD button (with a magnifying glass icon) beside the search eld in the Browser
(or press Command-F).
3 In the Filter HUD, choose IPTC from the Add Rule pop-up menu.
4 Select the IPTC checkbox, then choose the IPTC eld you want to search by from the IPTC
pop-up menu.
Select the
IPTC checkbox.
Choose an IPTC
field to search by.
Choose how you want
to qualify your search
from this pop-up menu.
Enter an IPTC value here.
5 Choose an option from the middle pop-up menu to qualify your search.
•To specify characters that the IPTC eld should contain somewhere within the eld: Choose
“includes.”
•To specify characters that the IPTC eld should not contain: Choose “is not empty and does not
include.”
•To specify the exact characters that the IPTC eld should contain: Choose “is.”
•To specify the exact characters that the IPTC eld should not contain: Choose “is not empty and is
not.”
•To specify the characters that the IPTC eld should begin with: Choose “starts with.”
•To specify the characters that the IPTC eld should end with: Choose “ends with.”
•To specify that the IPTC eld should hold no entry: Choose “is empty.”
•To specify that the IPTC eld can be any entry as long as the eld is not empty: Choose “is not
empty.”
6 Enter the IPTC value you want to search by in the IPTC text eld.
7 Choose Any from the Any/All pop-up menu in the top-left corner of the Filter HUD, if it’s not
already chosen.
The photos that match the search criteria are immediately displayed in the Browser. To save your
search results, see Saving Your Search Results on page 253.
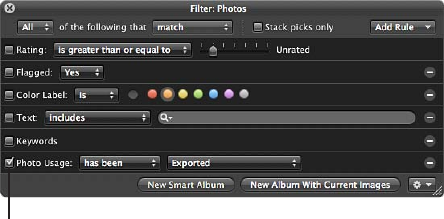
Chapter 13 Searching for and Displaying Photos 250
Searching by Photo Usage
You use the Photo Usage search options in the Filter HUD to locate photos that have been
employed for a specic purpose. You can search for photos that are currently used in a book,
photos currently placed in a Light Table arrangement, emailed photos, exported photos, prints or
books ordered via the Apple print service, locally printed photos, photos that have been viewed,
and photos used in an album, a book album, a Light Table album, or a web gallery album.
To search for photos by usage information
1 In the Library inspector, select the item you want to search.
2 Click the Filter HUD button (with a magnifying glass icon) beside the search eld in the Browser
(or press Command-F).
3 In the Filter HUD, choose Photo Usage from the Add Rule pop-up menu.
4 Select the Photo Usage checkbox, then choose an option from the Photo Usage pop-up menu.
Select the Photo
Usage checkbox.
•To specify that Aperture display photos that have been used in the chosen operation: Choose
“has been.”
•To specify that Aperture display photos that have not been used in the chosen operation: Choose
“has not been.”
5 Choose an operation option from the rightmost pop-up menu to qualify your search.
6 Choose Any from the Any/All pop-up menu in the top-left corner of the Filter HUD, if it’s not
already chosen.
The photos that match the search criteria are immediately displayed in the Browser. To save your
search results, see Saving Your Search Results on page 253.
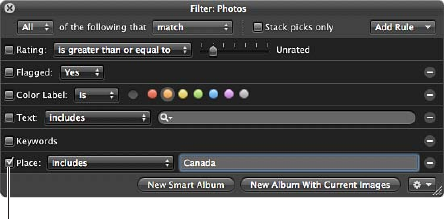
Chapter 13 Searching for and Displaying Photos 251
Searching by Place
If you have photos that were shot with a GPS-enabled digital camera or if you’ve identied
where photos were shot using Places, you can search for photos by location using the Place
search options in the Filter HUD.
To search for photos by location
1 In the Library inspector, select the item you want to search.
2 Click the Filter HUD button (with a magnifying glass icon) beside the search eld in the Browser
(or press Command-F).
3 In the Filter HUD, choose Place from the Add Rule pop-up menu, then select the Place checkbox.
Select the Place checkbox.
4 Choose an option from the Place pop-up menu to qualify your search.
•To specify characters that the place name should contain somewhere within the eld:
Choose “includes.”
•To specify characters that the place name should not contain: Choose “does not include.”
•To specify the exact characters that the place name should contain: Choose “is.”
•To specify the exact characters that the place name should not contain: Choose “is not.”
•To specify the characters that the place name should begin with: Choose “starts with.”
•To specify the characters that the place name should end with: Choose “ends with.”
•To specify that the place name should hold no entry: Choose “is empty.”
•To specify that the place name can be any entry as long as the eld is not empty: Choose “is
not empty.”
5 Enter the value you want to search by in the Place text eld.
6 Choose Any from the Any/All pop-up menu in the top-left corner of the Filter HUD, if it’s not
already chosen.
The photos that match the search criteria are displayed in the Browser. To save your search
results, see Saving Your Search Results on page 253.
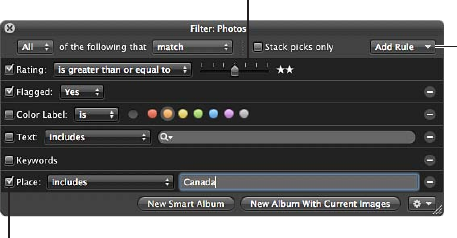
Chapter 13 Searching for and Displaying Photos 252
Searching by a Combination of Criteria
You can specify complex combinations of search criteria in the Filter HUD. For example, you can
search for photos that have certain keywords and that were taken on a specic date. To create
complex searches, you add multiple search options using the Add Rule pop-up menu.
To search for photos by a combination of search criteria
1 In the Library inspector, select the item you want to search.
2 Click the Filter HUD button (with a magnifying glass icon) beside the search eld in the Browser
(or press Command-F).
3 In the Filter HUD, choose the search options you want to add from the Add Rule pop-up menu.
4 Select the checkboxes beside the criteria you want to use, and specify the search criteria.
Specify your search criteria.
To add additional search
options, choose them
from this pop-up menu.
Select the checkboxes for the
items you want to search by.
5 Do one of the following:
•To specify that a photo must match at least one of the criteria or keywords: Choose Any from the
Any/All pop-up menu and “match” from the Match pop-up menu.
•To specify that a photo must match all the criteria and keywords: Choose All from the Any/All
pop-up menu and “match” from the Match pop-up menu.
•To specify that a photo must not match any of the criteria and keywords: Choose Any from the
Any/All pop-up menu and “do not match” from the Match pop-up menu.
•To specify that a photo must not match all of the criteria and keywords: Choose All from the Any/
All pop-up menu and “do not match” from the Match pop-up menu.
The photos that match the search criteria are immediately displayed in the Browser. To save your
search results, see Saving Your Search Results on page 253.
Chapter 13 Searching for and Displaying Photos 253
Searching Across the Entire Library
At times, you may want to search for photos that reside in many dierent projects. For example,
you might want to locate all your select photos for an entire year or for a particular month. To
search for photos across the library, you use Photos view. Photos view displays all the photos in
your library regardless of which project, folder, or album they reside in.
To search for photos across the entire library
1 In the Library inspector, select Photos.
The main window switches to Photos view, displaying all of the photos in the Aperture library. In
Photos view, you can use the Browser and Viewer to locate, sort, and adjust photos as necessary.
2 Make sure the Browser is showing by doing one of the following:
•To show the Browser by itself: Choose View > Browser.
•To show the Browser and Viewer together: Choose View > Split View.
3 Click the Filter HUD button (with a magnifying glass icon) beside the search eld in the Browser
(or press Command-F).
4 In the Filter HUD, choose the search options you want to add from the Add Rule pop-up menu.
5 Select the checkboxes beside the criteria you want to use, then specify the search criteria.
The photos in the library that match the search criteria set in the Filter HUD appear in
the Browser.
Saving Your Search Results
When you perform a search using the Filter HUD, you can save your results in several ways. You
can create a new Smart Album that locates photos that match the search criteria. You can also
save the search results themselves in a new album, book album, Light Table album, slideshow
album, Flickr album, Facebook album, Smart Web Page Album, webpage album, or web
journal album.
To create a Smart Album based on the search criteria
1 Use the Filter HUD to search for photos based on specied criteria.
2 In the Filter HUD, click the New Smart Album button.
A new, untitled Smart Album appears in the Library inspector.
3 Enter a name for the Smart Album, then press Return.
When you add photos to a project or the library that match the search criteria, they are
automatically added to the Smart Album.
For more information, see An Overview of Smart Albums on page 255.
To save your search results in an album
1 Use the Filter HUD to search for photos based on specied criteria.
2 In the Filter HUD, do one of the following:
•To create a new album: Click the New Album With Current Images button, enter a name for the
album that appears in the Library inspector, then press Return.
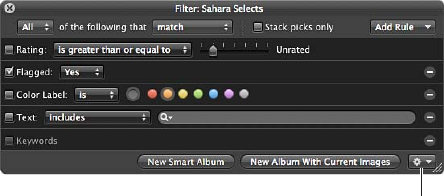
Chapter 13 Searching for and Displaying Photos 254
•To create a new book album, Light Table album, slideshow album, Flickr album, Facebook album,
Smart Web Page Album, webpage album, or web journal album: Choose the appropriate item
from the Filter HUD Action pop-up menu (with a gear icon), enter a name for the album, then
press Return.
Filter HUD Action
pop-up menu
All photos that match the search criteria are placed in the new album you created.
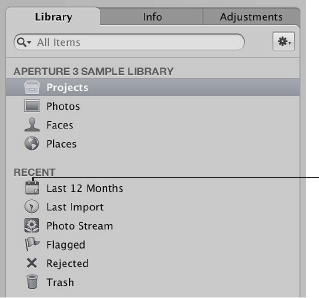
255
An Overview of Smart Albums
When you need to group certain types of photos, either temporarily or permanently, you can use
a Smart Album to gather the photos. Aperture comes with a number of preset Smart Albums.
You can also create your own Smart Album and specify search criteria that identify the photos
you want to be included; Aperture automatically searches for and displays the photos in the
new album. Whenever a photo meets the search criteria later, it’s automatically added to the
Smart Album.
Unlike a standard album that you drag photos into, a Smart Album’s contents are controlled by
the criteria you specify in the Smart Album’s Smart Settings HUD. When you change a Smart
Album’s search criteria, the contents of the Smart Album change.
Aperture comes with a Smart Album set up in the library for you that contains all photos
imported into Aperture over the last 12 months. Select a Smart Album to see its contents in
the Browser.
A Smart Album
has this icon.
You can also create your own Smart Albums. For example, suppose you want to create a Smart
Album that includes the best photos you took of a particular sports event. You select the project
containing shots of the sports event, create a Smart Album, show the Smart Settings HUD, and
search for photos rated Select (ve stars). All photos with that rating immediately appear in the
Smart Album.
You can also choose where to search for photos—across the entire library or within a specic
project or folder. For example, when you select the Projects item in the Library inspector and
create a Smart Album, the Smart Album searches across the entire library. When you select
a project and create a Smart Album, the Smart Album searches within that project. When
you select a folder and create a Smart Album, the Smart Album searches the projects within
that folder.
By instituting specic keyword schemes, you can create Smart Albums that are automatically
updated with specic kinds of photos.
Grouping Photos with
Smart Albums 14
Chapter 14 Grouping Photos with Smart Albums 256
For example, you might create Smart Albums that:
•Collect photos of certain poses or subjects, such as head shots, photos of particular models, or
photos of sports scenes
•Collect photos suitable for a specic purpose, such as distribution on the web or submission to
stock photography houses
•Gather the best photos of your collection into a portfolio of poster photos that you use to
present or introduce your work
•Automatically gather a project’s select photos
•Automatically gather specic types of media, such as audio and video clips
As you complete photography projects throughout the year, Smart Albums are automatically
updated with photos that match their search criteria.
You might also use Smart Albums to explore dierent aspects of your photography portfolio. For
example, you can create temporary collections of photos based on technical data such as camera
model, exposure, or lens type as you investigate technical inuences on your photos.
You can use Smart Albums to track photos on which you’ve performed specic types of
adjustments. For example, you can use the Smart Album’s Smart Settings HUD to specify that a
Smart Album collect any photo that has had a vignette applied to it.
You can quickly create a Smart Album to review photos and then delete it. Or, you can create
Smart Albums that hold permanent and expanding collections of photos. Using Smart Albums
can become an ecient way to relieve yourself of slow reviews of photos that you are required
to track periodically.
Important: Aperture Smart Albums cannot be edited in iPhoto. To modify the search criteria
of an Aperture Smart Album, you must open the Aperture Library in Aperture and then revise
the Smart Album’s search criteria. For more information, see Revising the Contents of a Smart
Album on page 259.
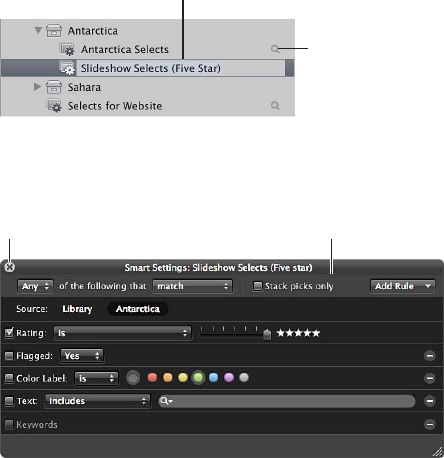
Chapter 14 Grouping Photos with Smart Albums 257
Collecting Photos in a New Smart Album
You can collect photos based on any of the information you can search for using the Smart
Settings HUD. For example, you can create a Smart Album that gathers photos based on a
specic keyword or a combination of keywords, ratings, dates, or other metadata. You can narrow
or broaden the Smart Album search criteria in the Smart Settings HUD at any time.
To create a Smart Album that searches only within one project
1 Select a project in the Library inspector.
2 Do one of the following:
•Choose File > New > Smart Album (or press Command-Shift-L).
•In the Library inspector, Control-click the project, then choose New > Smart Album from the
shortcut menu.
•Choose Smart Album from the New pop-up menu in the toolbar.
A new, untitled Smart Album appears within the project, and the Smart Settings HUD appears to
its right.
3 Rename the Smart Album by entering a new name.
Enter a new name
for the Smart Album.
Smart Settings
HUD button
4 In the Smart Settings HUD that appears, specify search criteria.
Close button
Specify the search
criteria for photos
you want in the
Smart Album.
The controls in the Smart Settings HUD are nearly identical to those in the Filter HUD. For more
information about using the Filter HUD and specifying search criteria, see An Overview of
Searching on page 229.
5 Click the Smart Settings HUD’s close button.
Aperture nds the photos within the project that match the specied search criteria and displays
them in the Browser. You can now work with these versions of your photos in the same way you
work with photos in any project or album.

Chapter 14 Grouping Photos with Smart Albums 258
To create a Smart Album that searches across the entire library
1 In the Library inspector, select Projects.
2 Do one of the following:
•Choose File > New > Smart Album (or press Command-Shift-L).
•Choose Smart Album from the New pop-up menu in the toolbar.
A new, untitled Smart Album appears in the Albums section of the Library inspector.
3 Rename the Smart Album by entering a new name.
4 In the Smart Settings HUD, specify search criteria.
For more information about using the Smart Settings HUD and specifying search criteria, see An
Overview of Searching on page 229.
5 Click the Smart Settings HUD’s close button.
Aperture nds the photos in the library that match the specied search criteria and displays
them in the Browser. You can now work with these versions of your photos in the same way you
work with photos in any project or album.
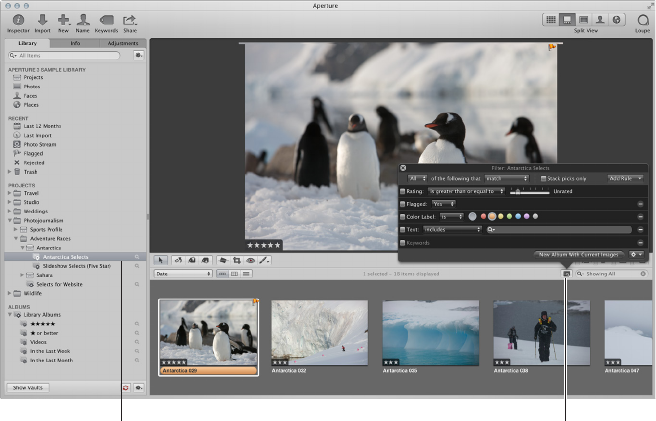
Chapter 14 Grouping Photos with Smart Albums 259
Searching Within a Smart Album
After creating a Smart Album, you can search for specic photos within the contents of the
Smart Album.
To search within the contents of a Smart Album
1 In the Library inspector, select the Smart Album whose contents you want to search, then click
the Filter HUD button in the Browser.
Select the Smart Album
you want to search within.
Show the Browser’s Filter HUD
and specify search criteria.
2 When the Filter HUD appears, specify secondary search criteria to show specic photos within
the Smart Album.
To see the entire contents of the Smart Album again, delete the search criteria in the Filter HUD.
Revising the Contents of a Smart Album
To change the contents of a Smart Album, you change the search criteria for the Smart Album.
You can manually select individual photos and delete them, but the deletion removes both the
version and the original wherever it exists in the original project. Similarly, you cannot simply
drag photos into a Smart Album to add them.
If you decide that certain photos should not be in a Smart Album, you can narrow the search
criteria to exclude photos. Aperture performs a new search and revises the Smart Album’s
contents. To remove a photo from a Smart Album, you can also change the photo so that it no
longer matches the Smart Album’s search criteria. For example, if a Smart Album gathers photos
rated ve stars, changing a photo’s rating to four stars removes it from the Smart Album.
To change the contents of a Smart Album by changing the search criteria
1 In the Library inspector, click the Smart Settings HUD button to the right of the Smart Album to
show the Smart Settings HUD.
2 Revise the search criteria in the Smart Settings HUD to eliminate or add the photos you want, or
change the keyword or rating for the photo itself.
3 Click the Smart Settings HUD’s close button.
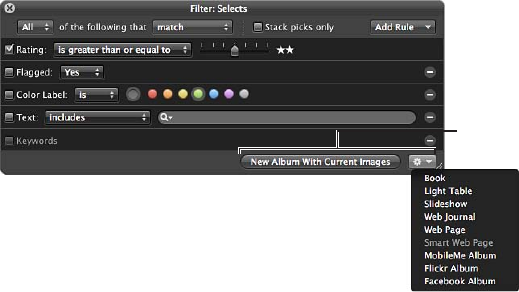
Chapter 14 Grouping Photos with Smart Albums 260
Transferring Smart Album Photos to Another Project or Album
You can transfer photos from a Smart Album to another project or album, such as a slideshow
album or a book album. You transfer photos by selecting the photos in the Smart Album and
dragging or copying them into another project or album. You can also select the photos in the
Smart Album and have Aperture create a new album to hold them.
To transfer photos from a Smart Album to another project or album
1 Create a new project or album, if necessary.
2 Select the Smart Album, then select the photos you want.
3 Drag or copy the photos into the project or album you want to transfer the photos to.
To transfer photos from a Smart Album to a new album that Aperture creates
1 In the Library inspector, select the Smart Album containing the photos you want to transfer, then
click the Filter HUD button in the Browser.
2 In the Filter HUD, specify search criteria for the photos you want to transfer.
3 Click the New Album With Current Images button to create an album, or choose the type of
album you want from the Filter HUD Action pop-up menu in the bottom-right corner of the
Filter HUD.
Click the New Album
With Current Images
button, or choose a
type of album from
the Filter HUD Action
pop-up menu.
A new album is created, containing the photos you selected using the search criteria.
Deleting a Smart Album
You can delete a Smart Album at any time, and none of the photos gathered from the library are
deleted. If you’ve transferred photos from a Smart Album to another album, the photos in the
other album are also not deleted when you delete the Smart Album.
To delete a Smart Album
1 Select the Smart Album in the Library inspector.
2 Choose File > Delete Smart Album (or press Command-Delete).
Chapter 14 Grouping Photos with Smart Albums 261
Working with Library Albums
If you created a library in a previous version of Aperture, a selection of Smart Albums was set
up in the Library inspector for you automatically. When you click the disclosure triangle beside
Library Albums in the Library inspector, you see the following Smart Albums:
•Five Stars: Select this Smart Album to see all photos in the library that are rated ve stars.
•One Star or Better: Select this Smart Album to see all photos that are rated one star or better.
•Rejected: Select this Smart Album to see all photos that are rated Reject.
•Videos: Select this Smart Album to see all video clips in the library.
•In the Last Week: Select this Smart Album to see all photos taken in the last week.
•In the Last Month: Select this Smart Album to see all photos taken in the last month.
Important: Library albums appear in the Library inspector only if your Aperture library was
created in Aperture 3.2 or earlier.
To work with library albums
mOpen an Aperture library created in a previous version of Aperture.
The library albums appear in the Albums section of the Library inspector. For information about
switching libraries, see An Overview of Library Files on page 39.
To remove the library albums from the Library inspector
If you’re working with an Aperture library created in a previous version of Aperture and you no
longer want to see the library albums, you can remove them.
mIn the Library inspector, select Library Albums, then choose File > Delete Folder (or press
Command-Delete).

262
Adjustments in Aperture
Adjustment controls are found in the Adjustments inspector and the Adjustments pane of the
Inspector HUD. The controls are the same in each. The Adjustments inspector is a tab in the
Inspector pane on the left side of the Aperture main window. The Inspector HUD is a oating
version of the inspectors that can be placed anywhere onscreen, allowing you the most exibility
in how you use your screen workspace.
In Aperture, you can apply adjustments to images in two ways. The rst method involves using
the controls in the Adjustments inspector and the Adjustments pane of the Inspector HUD to
identify, or target, the pixels that the specic adjustment is designed to x or enhance, no matter
where in the image they occur. The second method involves brushing adjustments on the areas
of an image you want to change.
There are two methods you can use to brush adjustments on images in Aperture. Many
adjustments can be brushed on images. When you brush an adjustment on an image, you
specify the adjustment’s parameter settings prior to applying the adjustment. You can also
use the Quick Brush adjustments, which are designed to be brushed on the image and then
modied using the adjustment controls.
Standard Adjustments
You can make the following standard adjustments to images in Aperture.
Adjustment Function
Retouch Retouches all types of imperfections in an image,
such as skin blemishes, using either the Repair or
Clone brush.
Red Eye Correction Reduces red-eye in the eyes of the subjects in your
images. Used in conjunction with the Red Eye tool.
Spot & Patch Designed to x imperfections in an image caused by
sensor dust, in previous versions of Aperture.
In Aperture 3, it is recommended to use the Retouch
adjustment to x any imperfections in an image.
Straighten Levels the image’s horizon. Used in conjunction with
the Straighten tool.
Crop Trims the image. Used in conjunction with the
Crop tool.
Flip Inverts the composition of the image horizontally,
vertically, or both.
Chromatic Aberration Corrects chromatic aberration, produced by certain
lenses during shooting.
Devignette Corrects a vignette applied to the image when it
was shot.
An Overview of
Image Adjustments 15

Chapter 15 An Overview of Image Adjustments 263
Adjustment Function
Noise Reduction Reduces digital noise in an image.
White Balance Sets an image’s white balance by evaluating the
image for natural gray or skin tone in identied faces,
as well as by adjusting the color temperature and tint.
Exposure Adjusts exposure, recovery, black point,
and brightness.
Enhance Adjusts contrast, denition, saturation, and vibrancy,
as well as black, gray, and white tints.
Curves Selectively remaps the tonal range of the image by
applying a curve from input to output.
Highlights & Shadows Selectively adjusts the exposure in the shadows and
highlights of an image.
Levels Selectively adjusts the tonal range of an image.
Color Adjusts hue, saturation, and luminance on a color-by-
color basis, as well as chromatic range.
Black & White Selectively controls the source red, green, and blue
color channels when a color image is converted
to grayscale.
Color Monochrome Desaturates the image and applies a color tint of your
choosing to the midtones.
Sepia Tone Changes a color image to sepia. Allows you to
desaturate the color image to the level of sepia
coloring you want.
Sharpen Sharpens the image.
In Aperture 3, it is recommended to use the Edge
Sharpen adjustment to sharpen images.
Edge Sharpen Sharpens the image based on luminance using
multiple sharpening passes.
Vignette Applies a vignette eect to the image.
Note: You can also modify how OS X decodes RAW les using the RAW Fine Tuning controls, and
you can modify iPhoto eects for images you’re working with in iPhoto. For more information
about decoding RAW les, see An Overview of the RAW Fine Tuning Controls on page 289. For
more information about working with iPhoto, see Working with iPhoto Eects on page 295.

Chapter 15 An Overview of Image Adjustments 264
Quick Brush Adjustments
You can make the following adjustments to images in Aperture using Quick Brushes. For more
information, see An Overview of Brushed Adjustments on page 392.
Quick Brush Function
Skin Smoothing Smoothes people’s skin by subtly blurring wrinkles
and skin pores in the area of the image the
adjustment is brushed on.
Dodge (Lighten) Dodges (lightens) the area of the image the
adjustment is brushed on.
Burn (Darken) Burns (darkens) the area of the image the adjustment
is brushed on.
Polarize (Multiply) Deepens the colors in the image by specically
darkening the shadows and midtones while
preserving the highlights in the area of the image the
adjustment is brushed on.
Intensify Contrast (Overlay) Corrects the shadow areas of the image that appear
washed out by intensifying the contrast between
pure black and 50% gray in the area of the image the
adjustment is brushed on.
Tint Shifts the tint in the area of the image the adjustment
is brushed on.
Contrast Applies additional contrast to the area of the image
the adjustment is brushed on.
Saturation Saturates the colors in the area of the image the
adjustment is brushed on.
Denition Adds clarity and reduces haze without adding
too much contrast to the area of the image the
adjustment is brushed on.
Vibrancy Adds saturation to desaturated colors only in the area
of the image the adjustment is brushed on. Skin tones
are not aected.
Blur Blurs (softens) the area of the image the adjustment is
brushed on.
Sharpen Sharpens the area of the image the adjustment is
brushed on.
Halo Reduction Removes blue and purple fringes in the image the
adjustment is brushed on. Fringing is occasionally
produced by certain lenses when the image
is overexposed.
Noise Reduction Removes digital noise in the area of the image the
adjustment is brushed on.
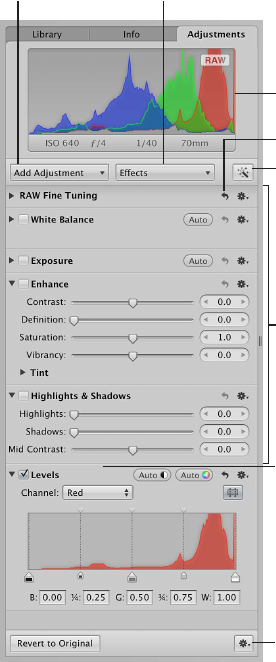
Chapter 15 An Overview of Image Adjustments 265
Using the Adjustment Controls
Using the Adjustments inspector and Inspector HUD
You can use menu commands, keyboard shortcuts, or the Inspector button on the left side of the
toolbar to show and hide the Inspector pane containing the adjustment controls. The adjustment
controls in the Adjustments inspector are also found in the Adjustments pane of the Inspector
HUD. You can use menu commands and buttons in the Full Screen view toolbar to show or hide
the Inspector HUD.
To show the Adjustments inspector
Do one of the following:
mChoose Window > Show Inspector (or press I), then click the Adjustments tab.
mClick the Inspector button in the toolbar, then click the Adjustments tab.
Add Adjustment
pop-up menu
Histogram
Double-click
the top of an
adjustment to
show and hide
the adjustment’s
controls.
Reset button
Effects
pop-up menu
Adjustments
Auto Enhance
button
Adjustment Action
pop-up menu
Each adjustment contains individual properties, called parameters, for which you can specify
a range of values. You click an adjustment’s disclosure triangle, or double-click the top of the
adjustment, to view the parameters for the adjustment and the controls you use to change
parameter values. For more information about using the adjustment controls to change
parameter values, see Using Sliders on page 268.
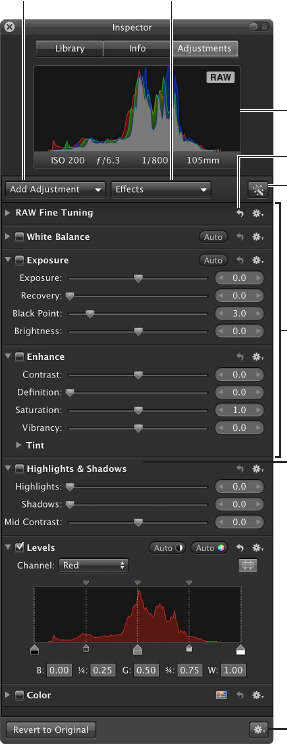
Chapter 15 An Overview of Image Adjustments 266
To show the Adjustments pane of the Inspector HUD
Do one of the following:
mChoose Window > Show Inspector HUD (or press H), then click the Adjustments button.
mClick the Inspector HUD button in the Full Screen view toolbar, then click the
Adjustments button.
For more information about Full Screen view, see Performing Adjustments in Full Screen View on
page 271.
Histogram
Double-click
the top of an
adjustment to
show and hide
the adjustment’s
controls.
Reset button
Add Adjustment
pop-up menu
Effects
pop-up menu
Adjustments
Auto Enhance
button
Adjustment Action
pop-up menu
Note: The adjustment controls in the Adjustments inspector and the Adjustments pane of the
Inspector HUD appear dimmed when an audio or video clip is selected.
To choose a histogram view
When you show the Adjustments inspector or the Adjustments pane of the Inspector HUD, a
histogram of the selected image’s luminance or color channels appears. The histogram displays a
graph of the brightness values in the image, from the blackest point to the whitest point. You can
adjust the histogram to show luminance; red, green, and blue (RGB) channels displayed together;
or separate red, green, and blue channels.
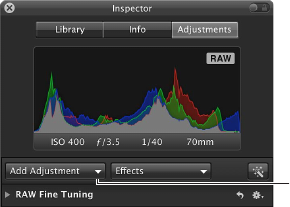
Chapter 15 An Overview of Image Adjustments 267
mChoose a view option from the Histogram Options section of the Adjustment Action pop-up
menu (with a gear icon).
Note: The histogram updates in real time for images displayed in the Viewer and in Full Screen
view, but it is slightly delayed in the Book Layout Editor, the Webpage Editor, and the Light Table.
For more information about how to interpret a histogram, see An Overview of Histograms on
page 295.
To add additional adjustments
The rst time you show either the Adjustments inspector or the Adjustments pane of the
Inspector HUD, only the White Balance, Exposure, Enhance, Highlights & Shadows, Levels, and
Color adjustments are available.
Note: A photo must be selected in the Browser in order for adjustment controls to appear in the
Adjustments inspector or the Adjustments pane of the Inspector HUD.
m Choose an adjustment from the Add Adjustment pop-up menu at the top of either the
Adjustments inspector or the Adjustments pane of the Inspector HUD.
Add Adjustment
pop-up menu
The new adjustment appears highlighted in both the Adjustments inspector and the
Adjustments pane of the Inspector HUD, if both are shown. For more information about
adjustment controls, see Using Sliders on page 268.
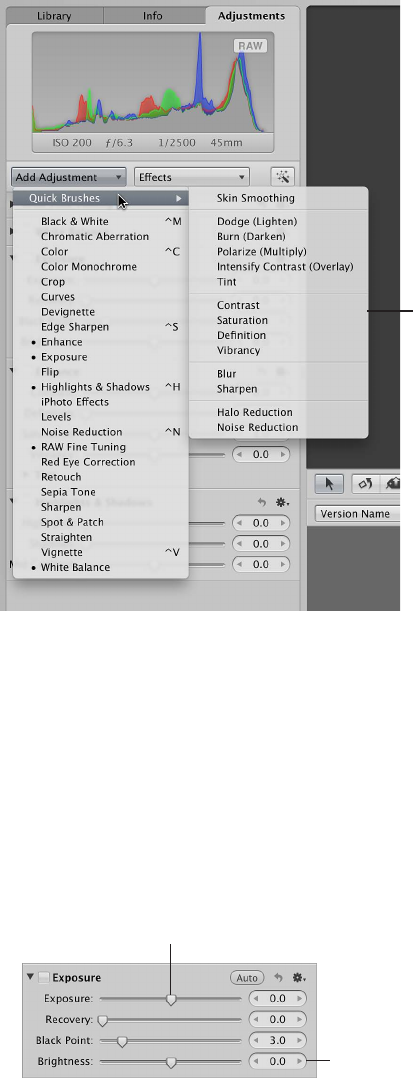
Chapter 15 An Overview of Image Adjustments 268
To add Quick Brushes
mChoose a Quick Brush adjustment from the Add Adjustment pop-up menu at the top of either
the Adjustments inspector or the Adjustments pane of the Inspector HUD.
Quick Brush adjustments
The adjustment controls for the Quick Brush appear in both the Adjustments inspector and the
Adjustments pane of the Inspector HUD, if both are shown. Also, a HUD containing the Quick
Brush controls appears, and the pointer changes to a brush. For more information about Quick
Brush adjustments, see Using the Brush Controls on page 269.
Using Sliders
There are two types of slider controls for changing parameter values—sliders and value sliders.
Slider controls have varying value ranges depending on the parameter.
•Sliders: Drag the slider left or right to set a value, or click anywhere along the slider’s range to
jump directly to that value.
Slider for the
Exposure parameter
Value slider for the
Brightness parameter
•Value sliders: Double-click the value and type a number in the value eld, click the left or right
arrow, or drag inside the value eld to set a value. Often, you can type a much larger number
in the value eld than can be achieved by dragging the standard sliders. When using value
sliders, you can use a modier key to make value adjustments in small or large increments.
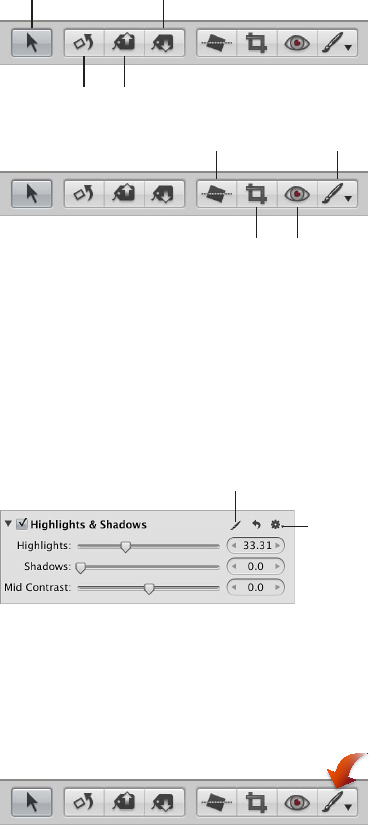
Chapter 15 An Overview of Image Adjustments 269
To change values in small increments
mOption-drag in the value eld.
To change values in large increments
mShift-drag in the value eld.
Working with Adjustment Tools in the Tool Strip
When the Viewer is shown, the tool strip contains tools for working with your images
in the Viewer and Browser. Many of the adjustment tools also work in conjunction with
adjustment controls.
Lift toolRotate tool
Selection tool Stamp tool
Quick Brush
pop-up menu
Red Eye tool
Crop tool
Straighten tool
Using the Brush Controls
Whenever a photo is selected and displayed in the Viewer or in Full Screen view, you can retouch
it using a brushed adjustment, which allows you to manually target a specic part of the image
using brush controls. Most adjustments can be brushed on images. You choose a brush for an
adjustment from the adjustment’s Action pop-up menu.
Choose to brush an
adjustment “in” or “away”
from the adjustment’s
Action pop-up menu.
A Brush button appears when
the adjustment is brushed on the
photo. Click the button to open
the Brush HUD for the adjustment.
In addition to brushing standard adjustments, you can also use Quick Brush adjustments that are
specically designed for brushing on images. Quick Brush adjustments are accessible from the
Add Adjustment pop-up menu in the Adjustments inspector and the Adjustments pane of the
Inspector HUD, as well as from the Quick Brush pop-up menu in the tool strip.

Chapter 15 An Overview of Image Adjustments 270
When you choose to brush an adjustment, its Brush HUD appears. You specify settings using the
controls in the HUD and then brush the adjustment on the image.
When you choose a Quick Brush adjustment, its adjustment controls appear highlighted in the
Adjustments inspector and the Adjustments pane of the Inspector HUD, if both are shown. As
with the standard adjustment controls, you use the checkbox to turn Quick Brush adjustments
on and o. For more information, see Resetting and Turning O Adjustments on page 270.
Some Quick Brush adjustments also have sliders for changing parameter values after the Quick
Brush adjustment has been applied. For more information about adjustment controls, see Using
Sliders on page 268.
For more information about the individual Quick Brush adjustments and how to apply them to
an image, see An Overview of Brushed Adjustments on page 392.
Resetting and Turning O Adjustments
You can reset all of the parameters for an adjustment to their default values. You can also use
the checkboxes to turn adjustments on and o. Turning adjustments on and o is a good way to
verify the cumulative eect of adjustments on your image.
To reset all parameter values for an adjustment
mClick the Reset button to the right of the adjustment name.
Reset button
To turn an adjustment on and o
mSelect the checkbox next to the adjustment’s name to turn it on, and deselect the checkbox to
turn it o.
Turn an adjustment on
and off by selecting and
deselecting the checkbox.

Chapter 15 An Overview of Image Adjustments 271
Accessing Adjustment Controls from Aperture Editors
Whenever a photo is selected and displayed in the Viewer or in Full Screen view, you can adjust
it using the adjustment controls in the Adjustments inspector or the Adjustments pane of the
Inspector HUD. You can also adjust images in the Book Layout Editor, Webpage Editor, Slideshow
Editor, and Light Table.
Note: Some of the adjustment controls are not available for use in the Book Layout Editor,
Webpage Editor, Slideshow Editor, and Light Table, but you can easily switch to the Viewer to
make your changes.
To switch to the Viewer from the Book Layout Editor, Webpage Editor, Slideshow Editor, or
Light Table
Do one of the following:
mClick the Show Viewer button at the top of the Browser.
When you have nished making the adjustment, click the Show Viewer button again to return to
the previous view.
mIf you have a system that has more than one display, choose View > Secondary Viewer >
Alternate, then perform the adjustments on the second display.
For more information about using Aperture with multiple displays, see Viewing Photos on
Multiple Displays on page 116 .
Performing Adjustments in Full Screen View
Full Screen view, which displays photos against a solid background and contains only a
few interface elements, provides the best onscreen work environment for performing color
adjustments. It is highly recommended that you perform adjustments in Full Screen view to
achieve the best results possible. For more information about Full Screen view, see An Overview
of Full Screen View on page 125.
To switch to Full Screen view
Do one of the following:
mChoose View > Full Screen (or press F).
mClick the Full Screen button in the toolbar.
To switch back to the Aperture main window
Do one of the following:
mClick the Exit Full Screen button in the Full Screen view toolbar.
mPress F or the Esc (Escape) key.
To show the Inspector HUD while in Full Screen view
mPress H.
To lock the Inspector HUD to the side of the screen so that it doesn’t overlap the image
mClick the Always Show Inspector HUD control in the top-right corner of the HUD.
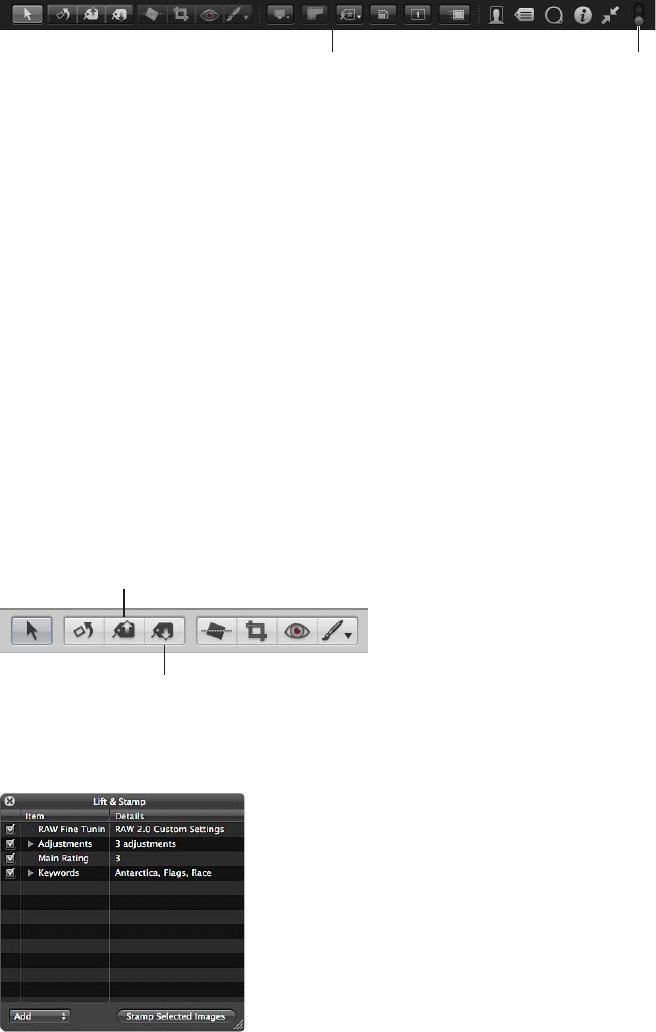
Chapter 15 An Overview of Image Adjustments 272
To access a tool in Full Screen view
mMove your pointer to the top of the screen until the Full Screen view toolbar appears, then select
a tool.
Toolbar shown at
the top of the screen
in Full Screen view
Always Show
Toolbar control
To keep the Full Screen view toolbar on the screen
By default, the toolbar is not shown in Full Screen view until the pointer is moved to the top of
the screen. You can set the toolbar to remain on the screen.
mMove the pointer to the top of the screen in Full Screen view, then click the Always Show Toolbar
control in the toolbar.
Applying Adjustments to a Group of Images
You can apply an adjustment or group of adjustments to a range of images by rst applying
the adjustments to one image and then lifting the adjustments from the rst image and
stamping them on the other images. You do this by using the Lift and Stamp tools and the Lift &
Stamp HUD.
To lift adjustments from one image and stamp them on a group of images
1 In the Browser, select the photo that has the adjustments you want to copy.
2 In the tool strip, select the Lift tool (or press O).
Lift tool
in the tool strip
Stamp tool
in the tool strip
The Lift & Stamp HUD appears, showing the adjustments, IPTC metadata, and keywords applied
to the image.

Chapter 15 An Overview of Image Adjustments 273
3 Deselect all metadata-related checkboxes to prevent Aperture from copying the metadata from
the selected photo.
Deselect a checkbox to prevent
Aperture from copying the item
from the selected photo.
4 If necessary, remove any unwanted adjustments by clicking the Adjustments disclosure triangle
in the Lift & Stamp HUD, selecting the unwanted adjustments, and then pressing Delete.
Select an adjustment
and press Delete to
remove it.
5 In the tool strip, select the Selection tool (or press A), then do one of the following:
•Drag a selection rectangle around the photos to which you want to apply the adjustments.
•Select the photos to which you want to apply the adjustments by Shift-clicking to select a
range of adjacent photos and Command-clicking to select nonadjacent photos.
Note: The adjustments aren’t applied to photos within closed stacks. If you want to stamp the
adjustments on photos within a stack, you must open it rst by choosing Stacks > Open Stack
(or pressing Shift-K).
6 Do one of the following:
•In the tool strip, select the Stamp tool.
•In the Lift & Stamp HUD, click the Stamp Selected Images button.
Click the Stamp
Selected Images button
to apply the adjustments
to the selected images.
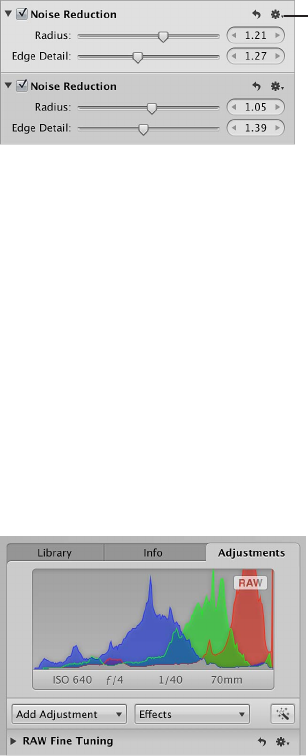
Chapter 15 An Overview of Image Adjustments 274
The adjustments copied from the rst photo are applied to the selected photos. For more
information about using the Lift & Stamp HUD, see Applying Keywords Using the Lift & Stamp
HUD on page 167.
Applying the Same Adjustment to an Image Multiple Times
Some images can be dicult to perfect. Images shot in mixed lighting and low-light conditions
often require the same adjustment applied multiple times in small increments in order to
achieve the appearance you’re looking for. For example, an image shot in low-light conditions
may require multiple incremental Noise Reduction adjustments so that the image is not
muddied by a single strong Noise Reduction adjustment. In Aperture, adjustments are applied
from top to bottom. In this situation, you can add the Noise Reduction controls with a slight
Radius adjustment coupled with a slight Edge Detail adjustment, and then add the same Noise
Reduction controls to the Adjustments inspector again, with the same incremental settings.
In some situations, incremental adjustments can produce a superior overall adjustment to the
image.
To add the same adjustment multiple times
mChoose Add New [adjustment] from the Action pop-up menu for the adjustment.
Choose to add a new
adjustment from the
Action pop-up menu.
Another set of adjustment controls for the same adjustment appears in the Adjustments
inspector and the Adjustments pane of the Inspector HUD, if both are shown.
Working with Eects
An Overview of Eects
If you frequently use the same adjustment parameter settings, you can save these settings as an
eect. You can create new eects, rename and rearrange eects, and delete eects you no longer
use. When you create an eect, it appears in the Eects pop-up menu. You can create eects for
individual adjustments or for a set of multiple adjustments. For example, you can create an eect
for creating black-and-white images. When your workow calls for creating a set of black-and-
white images, you simply choose your saved eect from the Eects pop-up menu at the top of
the Adjustments inspector or the Adjustments pane of the Inspector HUD.
When you delete an eect, adjustments already applied to your images are unaected.
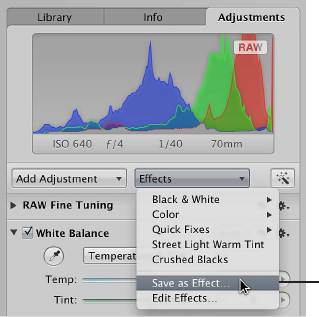
Chapter 15 An Overview of Image Adjustments 275
Important: In previous versions of Aperture, eects (formerly known as adjustment presets) for
single adjustments were accessible via the Preset Action pop-up menu for each adjustment.
Presets were created and stored in the preset dialog for that adjustment. If you created and
saved adjustment presets in a previous version of Aperture, the adjustment presets now appear
as eects in the Eects pop-up menu at the top of the Adjustments inspector or the Adjustments
pane of the Inspector HUD. If you want to remove adjustment presets created in previous
versions of Aperture, see Deleting Eects on page 281.
Creating Eects
Creating an eect is as simple as saving the adjustment parameter settings and naming the
eect using the Eects pop-up menu and the Eect Presets dialog.
To create an eect
1 Select a photo with the adjustment parameter settings you want to save.
2 At the top of the Adjustments inspector or the Adjustments pane of the Inspector HUD, choose
Save as Eect from the Eects pop-up menu.
Choose Save as Effect from
the Effects pop-up menu.
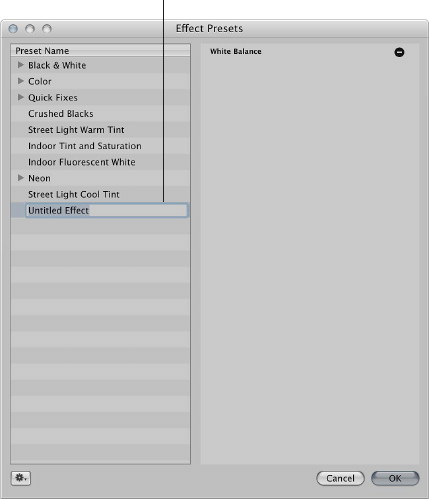
Chapter 15 An Overview of Image Adjustments 276
3 In the Eect Presets dialog, enter a name for the new eect, then click OK.
Enter a name
for the effect here.
The adjustment parameter settings are saved as an eect, and the new eect is now available
for use in the Eects pop-up menu in the Adjustments inspector or the Adjustments pane of the
Inspector HUD.
Applying Eects
Applying an eect to an image is as simple as selecting the photo and choosing the eect from
the Eects pop-up menu. When you apply an eect to an image, the adjustment controls and
parameter values update to reect the settings saved in the eect. If you prefer, you can use an
eect as a starting point in your image adjustment workow and then ne-tune the eect after
it’s applied to the image.
To apply an eect to an image
1 Select a photo.
2 In the Adjustments inspector or the Adjustments pane of the Inspector HUD, choose the eect
you want to apply to the image from the Eects pop-up menu.
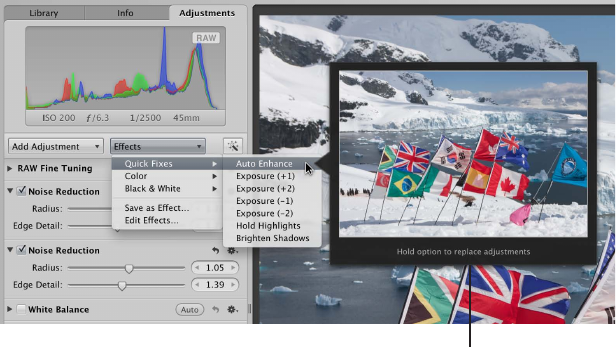
Chapter 15 An Overview of Image Adjustments 277
Note: When you place the pointer over an eect in the Eects pop-up menu, a preview of the
adjustment applied to the image is shown to the right of the highlighted eect.
Place the pointer over
an effect to preview its
effect on the photo.
The eect is applied to the image. If the image already had some adjustments applied to it, the
eect is applied in addition to the previous adjustment settings.
To replace the adjustments previously applied to an image with an eect
If an image already has adjustments applied to it, you can replace the previously applied
adjustments with the adjustment parameter values saved in the eect.
mHold down the Option key while choosing the eect from the Eects pop-up menu at the top of
the Adjustments inspector or the Adjustments pane of the Inspector HUD.
Removing Adjustments from an Eect
You can pare down the adjustment parameter settings in an eect by removing adjustments
from the eect in the Eect Presets dialog.
To remove an adjustment from an eect
1 In the Adjustments inspector or the Adjustments pane of the Inspector HUD, choose Edit Eects
from the Eects pop-up menu.
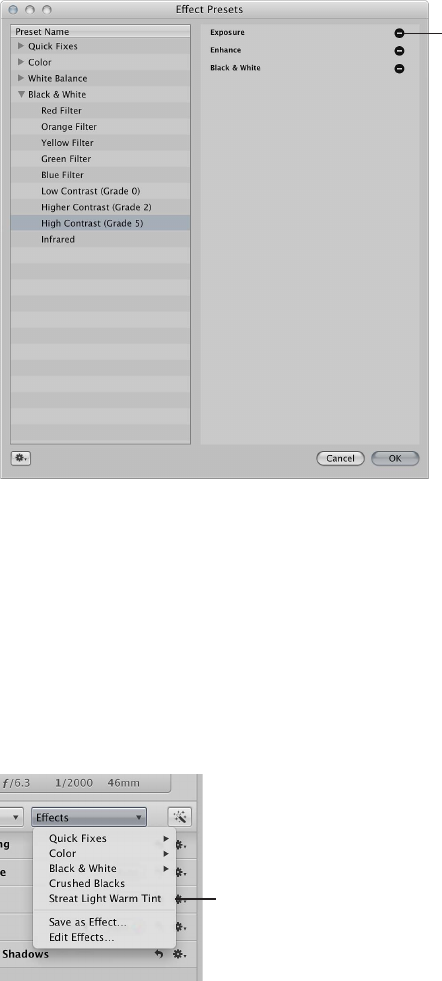
Chapter 15 An Overview of Image Adjustments 278
2 In the Eect Presets dialog, select the eect you want to modify, then click the Remove (–) button
beside the adjustment you want removed from the selected eect.
Click the Remove button
to remove an adjustment
from the selected effect.
The adjustment and its parameter values are removed from the eect.
3 Repeat step 2 until all of the adjustments you want removed from the selected eect have been
removed, then click OK.
Renaming Eects
You can rename an eect at any time.
To rename an eect
1 In the Adjustments inspector or the Adjustments pane of the Inspector HUD, choose Edit Eects
from the Eects pop-up menu.
You can rename an
effect (for example,
to fix a spelling error).
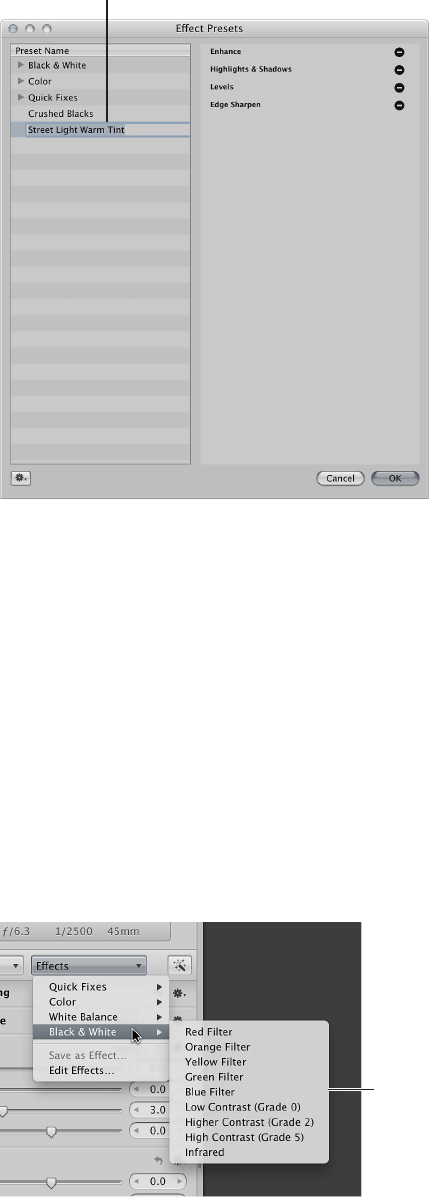
Chapter 15 An Overview of Image Adjustments 279
2 In the Eect Presets dialog, double-click the name of the eect you want to change.
The eect’s name is highlighted.
Double-click an effect’s
name to rename it.
3 Enter a new name, then press Return.
The eect is renamed.
Organizing Eects
Each time you create an eect, it is added to the bottom of the list of eects in the Eect Presets
dialog and the Eects pop-up menu. As this list grows, it can become dicult to locate a specic
eect in a long list of eects. You can rearrange the order of the eects in the Eect Presets
dialog to make eects easier to nd.
You can also organize eects of like type by grouping them together into eect groups. Creating
eect groups helps reduce the list of eects that are initially displayed in the Eects pop-up
menu. For example, if you have several types of Color adjustment settings saved as individual
eects, you can create an eect group for Color eects, named Color. When you choose Color
from the Eects pop-up menu, the individual Color eects are displayed in a submenu to
the right.
Effect group
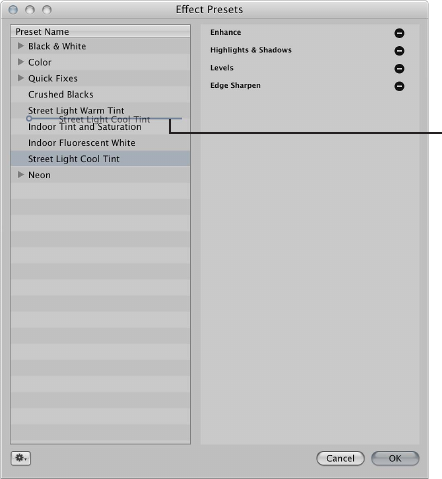
Chapter 15 An Overview of Image Adjustments 280
To rearrange the order of eects
1 In the Adjustments inspector or the Adjustments pane of the Inspector HUD, choose Edit Eects
from the Eects pop-up menu.
2 In the Eect Presets dialog, drag an eect to a new position.
A black bar indicates where the eect will be placed.
Drag an effect to its
new position. A black
bar indicates where
it will be placed.
3 Repeat step 2 until your eects list is organized, then click OK.
The eects list in the Eects pop-up menu is updated to match the order of eects in the Eect
Presets dialog.
To create an eect group
1 In the Adjustments inspector or the Adjustments pane of the Inspector HUD, choose Edit Eects
from the Eects pop-up menu.
2 In the Eect Presets dialog, choose New Preset Group from the Eect Action pop-up menu (with
a gear icon).
3 Give the new eect group a name and press Return.
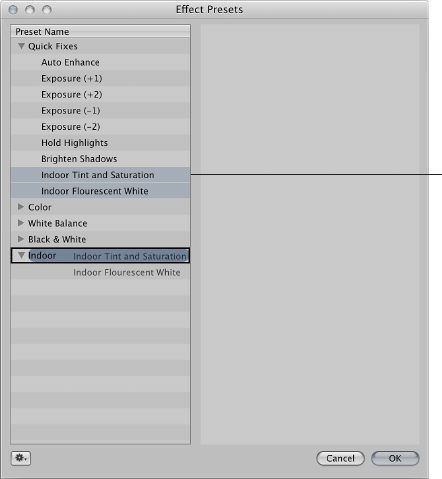
Chapter 15 An Overview of Image Adjustments 281
4 Drag eects into the eect group.
Drag effects into
an effect group.
The eects are consolidated into the eect group and can be accessed by clicking the disclosure
triangle to the left of the eect group’s name.
5 Click OK.
Deleting Eects
You can delete an eect at any time. Any adjustments that were previously applied to images
using the eect remain applied.
To delete an eect
1 In the Adjustments inspector or the Adjustments pane of the Inspector HUD, choose Edit Eects
from the Eects pop-up menu.
2 In the Eect Presets dialog, select the eect you want to delete, then do one of the following:
•Press the Delete key.
•Choose Delete Preset from the Eect Action pop-up menu (with a gear icon), then click Delete
in the dialog that appears.
The eect is deleted.
Sharing Eects
You can share your saved eects with another Aperture system.
To share your eects with another Aperture system
1 On the rst Aperture system, choose Edit Eects from the Eects pop-up menu at the top of the
Adjustments inspector or the Adjustments pane of the Inspector HUD.
2 In the Eect Presets dialog, select the eect you want to share.
Note: To share more than one eect, you have to create an eect group and then select the
group. For more information about creating eect groups, see Organizing Eects on page 279.
3 Choose Export from the Eect Action pop-up menu (with a gear icon).
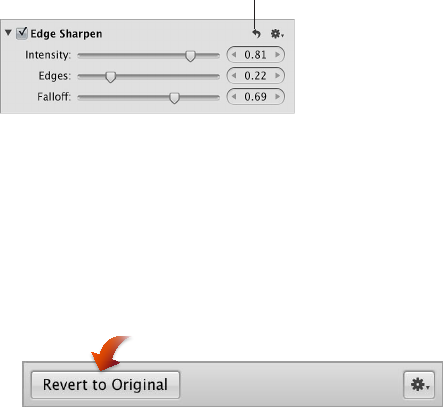
Chapter 15 An Overview of Image Adjustments 282
4 In the dialog that appears, enter an eect name in the Save As eld, choose a location to export
the eect to, then click Save.
The eect is exported to the location you selected as [name].AdjustmentPresets. It’s a good idea
to export the eect to a location the other Aperture system can access. Eect les are small and
can be easily sent to another Aperture system via email.
5 On the second Aperture system, navigate to the location of the eect le and double-click it.
The eect is transferred to the second Aperture system and accessed via the Eects pop-up menu.
Restoring the Default Eects
If you’ve created and modied so many eects that they have become too dicult to manage,
you can restore the default eects that came with Aperture.
To restore the default eects
1 In the Adjustments inspector or the Adjustments pane of the Inspector HUD, choose Edit Eects
from the Eects pop-up menu.
2 In the Eect Presets dialog, choose Reset All to Factory Settings from the Eect Action pop-up
menu (with a gear icon).
Working with Adjustments Applied in iOS Devices
When you take a photo using an iPad, iPhone, or iPod touch with iOS 5 and then apply
adjustments to the image using the iOS device, the image adjustments are retained and
automatically applied when the image is imported into Aperture. However, you can modify the
adjustments in Aperture at any time.
Removing Adjustments
In Aperture, there are two ways to remove adjustments from an image. You can remove specic
adjustments, or you can remove all adjustments from a photo selection at once.
To remove a single adjustment from an image
mSelect a photo, then click the Reset button for the adjustment you want to remove.
Reset button
To remove all adjustments from an image
1 Select a photo.
2 Do one of the following:
•Choose Photos > Revert to Original.
•In the bottom-left corner of the Adjustments inspector or the Adjustments pane of the
Inspector HUD, click the Revert to Original button.
All adjustments applied to the image are removed.
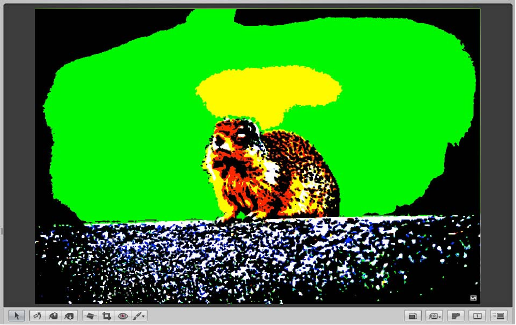
Chapter 15 An Overview of Image Adjustments 283
Using Modier Keys to Identify Color Clipping
Identifying Color Channel Clipping
When performing adjustments, it’s useful to know if you’re clipping one or more color channels
and thereby losing important image details. In Aperture, you can use modier keys to get instant
feedback on channel clipping when using controls in the Exposure and Levels adjustments. Color
overlays appear on the image when you press the Command key and drag the sliders to indicate
that any, all, or a combination of color channels have been clipped.
To identify color channel clipping
mPress Command while dragging the following sliders:
•Exposure slider (Exposure controls): Shows highlight clipping.
•Recovery slider (Exposure controls): Shows highlight clipping.
•Black Point slider (Exposure controls): Shows shadow clipping.
•Black Levels slider (Levels controls): Shows shadow clipping.
•White Levels slider (Levels controls): Shows highlight clipping.
If one or more color channels are clipped as a result of adjusting one of the above parameters,
colored overlays appear over the areas of the image where clipping is occurring. Release the
Command key, and the color overlays disappear.
The color of the overlay indicates which color channel is clipped. For more information, Setting
Color Channel Clipping Overlay Colors on page 284.
Note: The color channel clipping overlays appear regardless of whether Highlight Hot & Cold
Areas is turned on. For more information about the Highlight Hot & Cold Areas feature, see
Showing Hot and Cold Areas in Your Photos on page 116 .
Chapter 15 An Overview of Image Adjustments 284
Setting Color Channel Clipping Overlay Colors
The color of the color channel clipping overlay indicates which color channel or combination
of color channels is clipped. In addition, Aperture gives you the option of choosing color or
monochromatic overlays to indicate clipping.
To set the color channel clipping overlay color
1 Choose Aperture > Preferences, then click Advanced.
2 Choose one of the following options from the Clipping Overlay pop-up menu:
•To display the clipping overlays in shades of color: Choose Color.
For more information about how the color overlays correspond to individual adjustment
parameter settings, see Color Overlay Descriptions on page 284.
•To display the clipping overlays in black, shades of gray, and white: Choose Monochrome.
For more information about how the monochrome overlays correspond to individual
adjustment parameter settings, see Monochrome Overlay Descriptions on page 285.
Color Overlay Descriptions
The following sections list the color overlays and the corresponding color channels that have
been clipped by the adjustment parameter setting.
Exposure parameter (Exposure adjustment)
•Red: Indicates highlight clipping in the red color channel.
•Green: Indicates highlight clipping in the green color channel.
•Blue: Indicates highlight clipping in the blue color channel.
•Yellow: Indicates highlight clipping in the red and green color channels.
•Pink: Indicates highlight clipping in the red and blue color channels.
•Cyan: Indicates highlight clipping in the blue and green color channels.
•White: Indicates highlight clipping in all three color channels.
•Black: Indicates no highlight clipping in any color channel.
Recovery parameter (Exposure adjustment)
•Red: Indicates highlight clipping in the red color channel.
•Green: Indicates highlight clipping in the green color channel.
•Blue: Indicates highlight clipping in the blue color channel.
•Yellow: Indicates highlight clipping in the red and green color channels.
•Pink: Indicates highlight clipping in the red and blue color channels.
•Cyan: Indicates highlight clipping in the blue and green color channels.
•White: Indicates highlight clipping in all three color channels.
•Black: Indicates no highlight clipping in any color channel.
Black Point parameter (Exposure adjustment)
•Red: Indicates shadow clipping in the red color channel.
•Green: Indicates shadow clipping in the green color channel.
•Blue: Indicates shadow clipping in the blue color channel.
•Yellow: Indicates shadow clipping in the red and green color channels.
•Pink: Indicates shadow clipping in the red and blue color channels.
•Cyan: Indicates shadow clipping in the blue and green color channels.
Chapter 15 An Overview of Image Adjustments 285
•White: Indicates no shadow clipping in any color channel.
•Black: Indicates shadow clipping in all three color channels.
Black Levels parameter (Levels adjustment)
•Red: Indicates shadow clipping in the red color channel.
•Green: Indicates shadow clipping in the green color channel.
•Blue: Indicates shadow clipping in the blue color channel.
•Yellow: Indicates shadow clipping in the red and green color channels.
•Pink: Indicates shadow clipping in the red and blue color channels.
•Cyan: Indicates shadow clipping in the blue and green color channels.
•White: Indicates no shadow clipping in any color channel.
•Black: Indicates shadow clipping in all three color channels.
White Levels parameter (Levels adjustment)
•Red: Indicates highlight clipping in the red color channel.
•Green: Indicates highlight clipping in the green color channel.
•Blue: Indicates highlight clipping in the blue color channel.
•Yellow: Indicates highlight clipping in the red and green color channels.
•Pink: Indicates highlight clipping in the red and blue color channels.
•Cyan: Indicates highlight clipping in the blue and green color channels.
•White: Indicates highlight clipping in all three color channels.
•Black: Indicates no highlight clipping in any color channel.
Monochrome Overlay Descriptions
The following sections list the monochrome overlays and the corresponding color channels that
have been clipped by the adjustment parameter setting.
Exposure parameter (Exposure adjustment)
•White: Indicates highlight clipping in all color channels.
•66% gray: Indicates highlight clipping in two color channels.
•33% gray: Indicates highlight clipping in one color channel.
•Black: Indicates no highlight clipping in any color channel.
Recovery parameter (Exposure adjustment)
•White: Indicates highlight clipping in all color channels.
•66% gray: Indicates highlight clipping in two color channels.
•33% gray: Indicates highlight clipping in one color channel.
•Black: Indicates no highlight clipping in any color channel.
Black Point parameter (Exposure adjustment)
•White: Indicates no shadow clipping in any color channel.
•66% gray: Indicates shadow clipping in one color channel.
•33% gray: Indicates shadow clipping in two color channels.
•Black: Indicates shadow clipping in all three color channels.
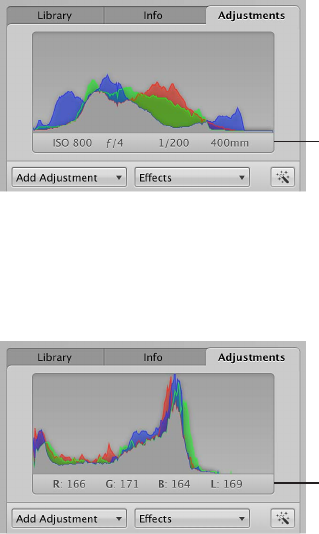
Chapter 15 An Overview of Image Adjustments 286
Black Levels parameter (Levels adjustment)
•White: Indicates no shadow clipping in any color channel.
•66% gray: Indicates shadow clipping in one color channel.
•33% gray: Indicates shadow clipping in two color channels.
•Black: Indicates shadow clipping in all three color channels.
White Levels parameter (Levels adjustment)
•White: Indicates highlight clipping in all color channels.
•66% gray: Indicates highlight clipping in two color channels.
•33% gray: Indicates highlight clipping in one color channel.
•Black: Indicates no highlight clipping in any color channel.
Using the Color Meter and Displaying Camera Information
Aperture provides a built-in Color meter you can use to sample the color values in an image and
display them as RGB, Lab, CMYK, HSL, or HSB values. When you place the pointer over a photo or
thumbnail, the color values are displayed in the Adjustments inspector or the Adjustments pane
of the Inspector HUD. You can also use the Loupe for a more accurate pixel selection and see the
color values displayed within the magnied area of the Loupe. When the pointer is moved away
from the photo, the color values are replaced by basic EXIF metadata values for the image, such
as ISO setting, f-stop, shutter speed, and focal length.
To display camera and color information
mIn the Adjustments inspector or the Adjustments pane of the Inspector HUD, choose Show
Camera/Color Info from the Adjustment Action pop-up menu (with a gear icon).
Camera information
To use the pointer to sample the color values in an image
mPlace the pointer over the area of the image where you want to sample the color values,
and view the values at the top of the Adjustments inspector or the Adjustments pane of the
Inspector HUD.
Color meter
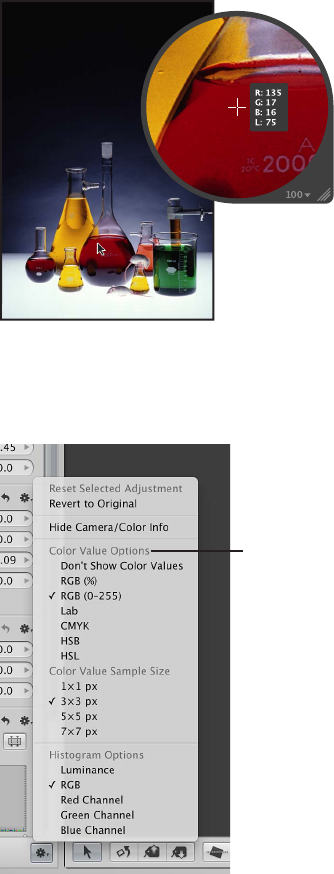
Chapter 15 An Overview of Image Adjustments 287
To use the Loupe to sample color values in an image
1 Click the Loupe button in the toolbar, or press the Grave Accent (`) key.
2 Choose View > Loupe Options > Show Color Value in Loupe, or press Shift-Option-Tilde (~).
3 Place the target area of the Loupe over the area of the image where you want to sample the
color values.
The color values appear in the magnied area of the Loupe.
To choose a color value option for the Color meter
mIn the Adjustments inspector or the Adjustments pane of the Inspector HUD, choose a color
value option from the Adjustment Action pop-up menu (with a gear icon).
Choose a color
value option here.
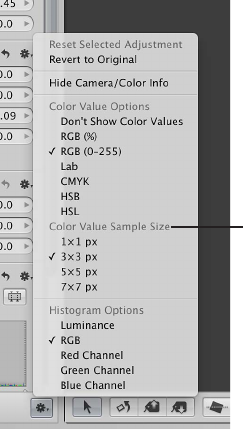
Chapter 15 An Overview of Image Adjustments 288
To choose a color value sample size (pixel area) for the Color meter
mIn the Adjustments inspector or the Adjustments pane of the Inspector HUD, choose an
appropriate color value sample size from the Adjustment Action pop-up menu (with a gear icon).
Choose a color value
sample size here.
Using an External Editor
If you need to perform more advanced image operations, such as compositing, you can set an
external editor for use within Aperture. First you have to specify which application Aperture
should use and the le format (TIFF or PSD). You only have to do this once. Then you select a
photo and choose a menu command to have the photo open in the application designated as
the external editor. You can also set an external editor for audio and video les.
To set an external editor for photos in Aperture
1 Choose Aperture > Preferences, then click Export.
2 Click the Choose button to the right of the External Photo Editor eld, navigate to an application
in the Select Application dialog, then click Select.
The application’s name appears in the External Photo Editor eld.
3 Choose the appropriate le format (TIFF or PSD) from the External Editor File Format pop-up
menu, then enter a resolution in the dpi eld.
This is the le format Aperture uses when opening les in external editors.
Tip: It’s a good idea to choose the 16-bit option for the External Editor le format because the
larger bit depth provides an exponentially higher number of colors each pixel can express, and
the higher bit depth option helps reduce color clipping and banding.
To set an external editor for audio and video les in Aperture
1 Choose Aperture > Preferences, then click Export.
2 Do one or both of the following:
•To set an external editor for audio les: Click the Choose button to the right of the External
Audio Editor eld, navigate to an application in the Select Audio Application dialog, then
click Select.
The application’s name appears in the External Audio Editor eld.
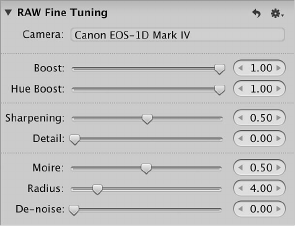
Chapter 15 An Overview of Image Adjustments 289
•To set an external editor for video les: Click the Choose button to the right of the External Video
Editor eld, navigate to an application in the Select Video Application dialog, then click Select.
The application’s name appears in the External Video Editor eld.
To use an external editor in Aperture
1 Select an item in the Browser.
2 Choose Photos > Edit with > External Editor (or press Command-Shift-O).
Aperture creates a new original (leaving the original unchanged), converts it to the chosen le
format, and then opens the le in the external editor. The le is tracked as a new original stacked
with the previous original.
3 When you’ve nished modifying the image, audio, or video le in the external application, save
the le.
The saved le is automatically updated in Aperture.
Working with the RAW Fine Tuning Controls
An Overview of the RAW Fine Tuning Controls
You can modify how OS X decodes RAW les using the adjustment controls in the RAW Fine
Tuning area of the Adjustments inspector or the Adjustments pane of the Inspector HUD. OS X
characterizes the RAW le format for each digital camera supported by Aperture. This calibration
data usually results in the optimal decoding of the RAW image les for a particular camera.
However, certain types of images may require adjustments to how OS X decodes the RAW
image le.
The RAW Fine Tuning controls include the following parameters:
•Boost: Use the Boost and Hue Boost sliders and value sliders to control image contrast.
For more information, see Using the Boost Controls on page 290.
•Sharpening: Use the Sharpening and Detail sliders and value sliders to ne-tune the amount of
sharpening you want applied to images during the RAW decoding process.
For more information, see Using the Sharpening Controls on page 291.
•Moire: Use the Moire and Radius sliders and value sliders to correct color fringing in high-
contrast edges and the moire pattern eect found in images with subjects whose linear
patterns introduce the eect, such as a brick wall or a picket fence.
For more information, see Using the Moire Controls on page 292.
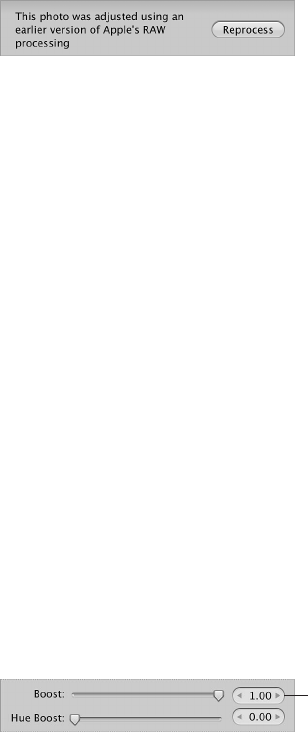
Chapter 15 An Overview of Image Adjustments 290
Note: Some controls in the RAW Fine Tuning area of the Adjustments inspector and the
Adjustments pane of the Inspector HUD appear dimmed if these settings are not available for
use with images derived from a particular RAW le format. Some camera models can create
multiple types of RAW le formats, and dierent controls may be available for each of these RAW
le formats.
Using these controls, you can ne-tune your RAW decoding settings on an image-by-image basis.
Aperture also enables you to save your customized RAW decoding settings as eects or as the
default settings always used with a specic camera, so they are easily applied to newly imported
images. For more information about saving your custom RAW Fine Tuning settings as the default
for a specic camera, see Setting the Camera Default on page 294.
If the RAW Fine Tuning controls do not appear, the selected photo is from a previous version of
Aperture. You must rst reprocess the image using the most current RAW image processing. For
more information, see An Overview of Reprocessing Photos on page 76.
Using the Boost Controls
OS X characterizes each digital camera’s RAW le format to determine an optimal contrast
setting. The Boost controls allow you to set the strength of the contrast when the RAW le is
decoded. The Hue Boost controls are used to maintain the hues in the image as the contrast is
increased using the Boost controls. When the Hue Boost parameter is set to 1.00 and the Boost
parameter is set to 1.00, the hues of the primary and secondary colors are pinned to their pure
color values, resulting in a shift of all the hues in the image.
For images that consist of saturated primary and secondary colors, such as an image of owers
in a lush garden, shifting the hues to their true values has a desirable visual eect. However, this
is not visually desirable for images containing skin tones. Shifting the hues most often causes the
skin to appear yellow. Setting the Hue Boost parameter to 0.00 increases the color contrast in the
image while preserving the original hues in the image.
To adjust the strength of the contrast applied during the RAW decoding process
1 Select a RAW image.
Note: If the RAW Fine Tuning controls do not appear in the Adjustments inspector or the
Adjustments pane of the Inspector HUD, the selected image is from a previous version of
Aperture. You must rst reprocess the image using the most current RAW image processing. For
more information, see An Overview of Reprocessing Photos on page 76.
2 In the Adjustments inspector or the Adjustments pane of the Inspector HUD, adjust the Boost
parameter using the Boost slider and value slider.
Use the Boost slider and value
slider to adjust the amount of
contrast applied during the
RAW decoding process.
A value of 0.00 applies no contrast adjustment to the image during the RAW decoding process.
A value greater than 0.00 increases the contrast adjustment to the image. A value of 1.00 applies
the full Apple-recommended contrast adjustment for the specic camera model.

Chapter 15 An Overview of Image Adjustments 291
3 Adjust the Hue Boost parameter using the Hue Boost slider and value slider.
Use the Hue Boost slider and
value slider to protect hue fidelity
during the RAW decoding process.
A value of 0.00 preserves the original hues in the image in relation to the Boost adjustment
(color contrast) during the RAW decoding process. A value greater than 0.00 increases the hue
adjustment to the image. A value of 1.00 applies the full Apple-recommended hue adjustment
for the specic camera model.
Using the Sharpening Controls
You can adjust sharpening during the RAW decoding process by using the RAW Fine Tuning
Sharpening controls in the Adjustments inspector or the Adjustments pane of the Inspector HUD.
Note: The eect of sharpening an image or group of images using the RAW Fine Tuning
adjustment is very subtle. More sharpening eects can be obtained using the Edge Sharpen
adjustment. For more information about the Edge Sharpen adjustment, see Working with the
Edge Sharpen Controls on page 385.
To adjust the amount of sharpening applied during the RAW decoding process
1 Select a RAW image.
Note: If the RAW Fine Tuning controls do not appear in the Adjustments inspector or the
Adjustments pane of the Inspector HUD, the selected image is from a previous version of
Aperture. You must rst reprocess the image using the most current RAW image processing. For
more information, see An Overview of Reprocessing Photos on page 76.
2 Adjust the strength of the sharpening eect using the Sharpening slider and value slider.
Use the Sharpening slider and
value slider to adjust the strength
of the sharpening effect applied
during the RAW decoding process.
A value of 0.00 applies no sharpening eect to the image during the RAW decoding process. A
value greater than 0.00 increases the sharpening eect to the image.
3 Adjust how the sharpening eect is applied to edges using the Detail slider and value slider.
Use the Detail slider and value
slider to adjust how the sharpening
effect is applied to the edges
during the RAW decoding process.
A value greater than 0.00 intensies the sharpening eect on hard edges.
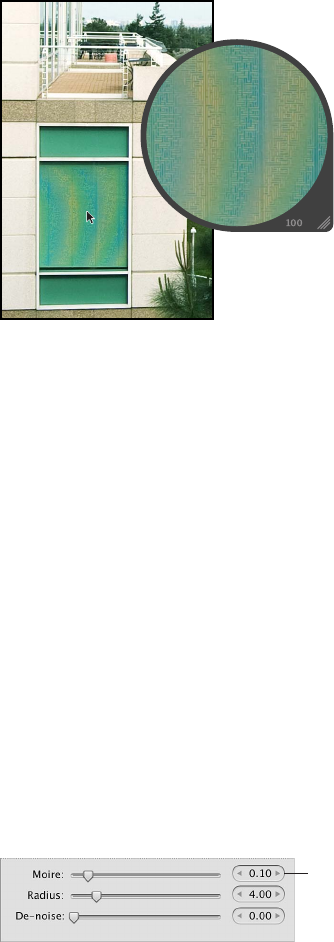
Chapter 15 An Overview of Image Adjustments 292
Using the Moire Controls
Digital images often have color artifacts that appear around edges and lines because of
noise created by digital image sensors. Images whose subjects have linear patterns often
introduce a moire pattern that gives the subject a wrinkled or rainbow-colored appearance.
In addition, cameras with image sensors employing Bayer patterns often introduce noise into
monochromatic images. The Moire adjustment controls in the RAW Fine Tuning area of the
Adjustments inspector or the Adjustments pane of the Inspector HUD identify these patterns
and correct these artifacts.
Because many digital cameras have weak anti-aliasing lters, the Moire and Radius parameters
are specically used to correct aliasing in an image caused by edges with high color contrast.
Weak anti-aliasing lters tend to curve edges, skewing the colors in the process. During the RAW
decoding process, OS X scans for high-frequency information in the RAW le, looking for blended
colors, and then replaces the blended colors with the edge colors that originally existed in the
scene. The Moire parameter adjusts the amount of signal to apply the adjustment to. The Radius
parameter adjusts the pixel area (visual threshold) the adjustment is applied to.
Note: The Moire controls replace the Chroma Blur controls found in previous versions
of Aperture.
To adjust the amount of moire reduction applied during the RAW decoding process
1 Select a RAW image.
Note: If the RAW Fine Tuning controls do not appear in the Adjustments inspector or the
Adjustments pane of the Inspector HUD, the selected image is from a previous version of
Aperture. You must rst reprocess the image using the most current RAW image processing. For
more information, see An Overview of Reprocessing Photos on page 76.
2 Adjust the amount of signal to apply the Moire adjustment to using the Moire slider and
value slider.
Use the Moire slider and value
slider to adjust the amount of
signal the Moire adjustment
is applied to during the RAW
decoding process.
A value of 0.00 applies no moire correction during the RAW decoding process. A value greater
than 0.00 applies moire correction during the RAW decoding process.

Chapter 15 An Overview of Image Adjustments 293
3 Adjust the pixel area (visual threshold) the Moire adjustment is applied to using the Radius slider
and value slider.
Use the Radius slider and value
slider to adjust the visual threshold
of the Moire adjustment during the
RAW decoding process.
A value of 0.10 is the most limited area over which the moire correction can be applied during
the RAW decoding process. A value greater than 0.10 increases the area over which the moire
correction is applied during the RAW decoding process.
4 If supported by the camera, reduce digital noise in the image using the De-noise slider and
value slider.
A value greater than 0.00 reduces noise in the image.
Working with DNG Files
In Aperture, you can adjust how OS X decodes RAW images in the DNG format. If the digital
camera that captured a photo is supported by Aperture, the calibration data for that camera is
used to decode the RAW le in the same manner as if it were decoded from the RAW le format
itself. If the DNG le is from an unsupported camera, Aperture uses the camera information
stored in the DNG le to decode the image.
To adjust the RAW Fine Tuning parameters of a DNG le
1 Select a DNG le imported with or reprocessed using Aperture 3 image processing.
Note: If the RAW Fine Tuning controls do not appear in the Adjustments inspector or the
Adjustments pane of the Inspector HUD, the selected image is from a previous version of
Aperture. You must rst reprocess the image using Aperture 3 image processing. For more
information, see An Overview of Reprocessing Photos on page 76.
2 Adjust the RAW Fine Tuning parameters as necessary for the image.
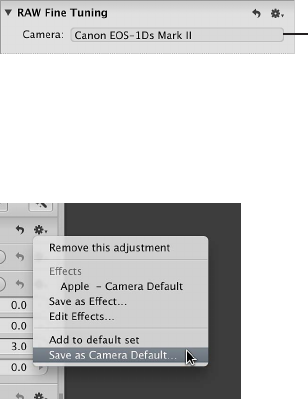
Chapter 15 An Overview of Image Adjustments 294
Setting the Camera Default
When you’ve modied the RAW decoding settings using the controls in the RAW Fine Tuning
area of the Adjustments inspector or the Adjustments pane of the Inspector HUD, you can save
these settings as the default parameter values for the camera model. All RAW image les from
this camera model that are imported into Aperture are decoded using these saved settings.
The camera model is displayed
in the Camera field.
To set the camera default
1 In the RAW Fine Tuning area of the Adjustments inspector or the Adjustments pane of the
Inspector HUD, choose Save as Camera Default from the Action pop-up menu (with a gear icon)
for the RAW Fine Tuning adjustment.
The RAW Fine Tuning Adjustment Presets dialog appears.
2 Enter a name for the preset and click OK.
The Action pop-up menu for the RAW Fine Tuning adjustment displays the preset’s name with a
checkmark next to it.
To clear the camera default settings
You can always clear the saved camera default settings. To remove a RAW Fine Tuning
adjustment preset from the list of camera default settings, you have to delete it.
1 In the RAW Fine Tuning area of the Adjustments inspector or the Adjustments pane of the
Inspector HUD, choose Apple from the Action pop-up menu (with a gear icon) to make it the
camera default setting, then choose Edit Eects from the Action pop-up menu.
The RAW Fine Tuning Adjustment Presets dialog appears.
2 Select the RAW Fine Tuning preset you want to remove, then press the Delete key.
3 In the dialog that appears, click the Delete Adjustment Presets button.
The adjustment preset is removed from the RAW Fine Tuning Adjustment Presets dialog, and the
adjustment preset no longer appears in the RAW Fine Tuning Action pop-up menu.
To use the Apple-recommended camera default settings
mIn the RAW Fine Tuning area of the Adjustments inspector or the Adjustments pane of the
Inspector HUD, choose Apple from the Action pop-up menu (with a gear icon).
A checkmark appears next to Apple in the Action pop-up menu.
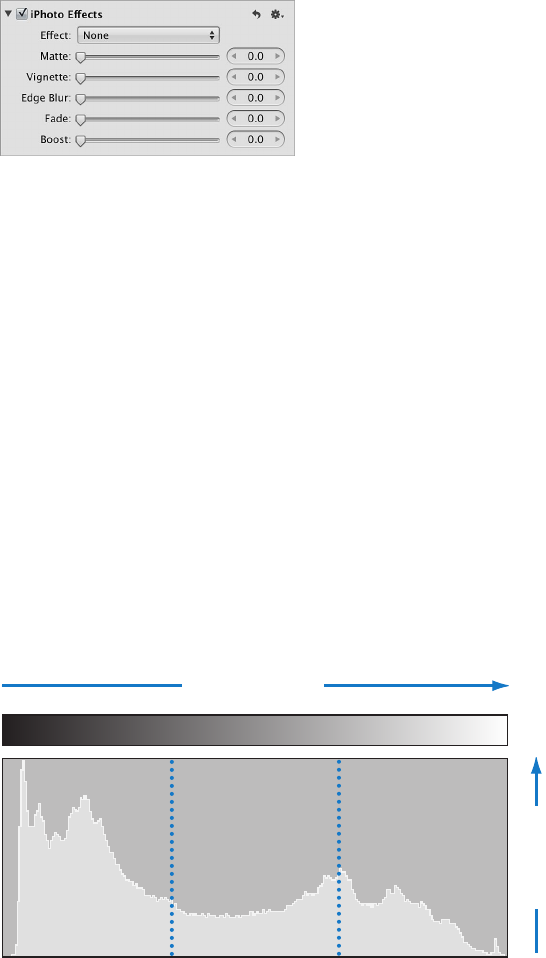
Chapter 15 An Overview of Image Adjustments 295
Working with iPhoto Eects
If you prefer working with iPhoto eects, you can apply them to your images directly in Aperture.
If you’ve applied an eect in iPhoto, such as a Matte eect or an Antique eect, you can adjust
the eect’s parameters in Aperture as well.
To apply an iPhoto eect to an image
1 Select an image.
2 Choose iPhoto Eects from the Add Adjustment pop-up menu in the Adjustments inspector or
the Adjustments pane of the Inspector HUD.
3 Do either or both of the following:
•To apply the Black & White, Sepia, or Antique eect to the image: Choose an option from the
Eect pop-up menu.
The Amount slider and value slider appear when you choose Antique from the Eect pop-up
menu. Use the Amount controls to adjust the intensity of the Antique eect.
Note: The None option removes the Black & White, Sepia, or Antique eect.
•To apply the Matte, Vignette, Edge Blur, or Fade eect: Drag the slider or use the value slider for
the eect.
Understanding How to Read Histograms
An Overview of Histograms
The histogram is a graph that displays relative brightness in an image, from pure black to pure
white. The area under the graph represents all the pixels in the image. From left to right, the
histogram describes the range of dark pixels (shadows), gray pixels (midtones), and bright pixels
(highlights) in the image. The shape of the histogram graph depends on the tonality of the scene
and the exposure.
Pixels increase
Shadows HighlightsMidtones
Brightness increases
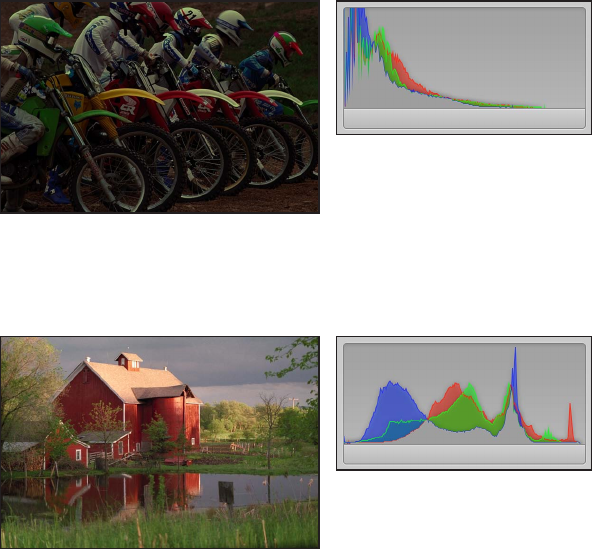
Chapter 15 An Overview of Image Adjustments 296
A histogram can also be used as a tool to evaluate whether or not there is enough shadow,
midtone, and highlight information in the image. Aperture provides three histograms in the
Adjustments inspector and the Adjustments pane of the Inspector HUD. The histogram above
the adjustment controls indicates the current state of the image. The Levels histogram included
with the Levels adjustment controls provides a way to adjust the brightness values in the
image in relation to the displayed histogram. You use the Levels controls to adjust the shadow,
dark quarter-tone, midtone, light quarter-tone, and highlight values independently of each
other without aecting the other areas of the image. The Curves histogram included with the
Curves adjustment controls provides a way to adjust the tonal values in the image in relation
to the displayed histogram. You use the Curves controls to adjust the full range of tonal values
independently of each other without aecting the other areas of the image.
For more information about performing a Levels adjustment, see An Overview of the Levels
Adjustment on page 367. For more information about performing a Curves adjustment, see An
Overview of the Curves Adjustment on page 350.
Evaluating Exposure
Histograms are good tools for evaluating exposure. For example, a series of peaks in the darker
side of the histogram often indicates an underexposed image that consists mainly of dark pixels.
A series of peaks in the center of the histogram often indicates a balanced exposure because a
majority of the pixels are concentrated within the midtones of the histogram. They’re not too
dark or too bright.
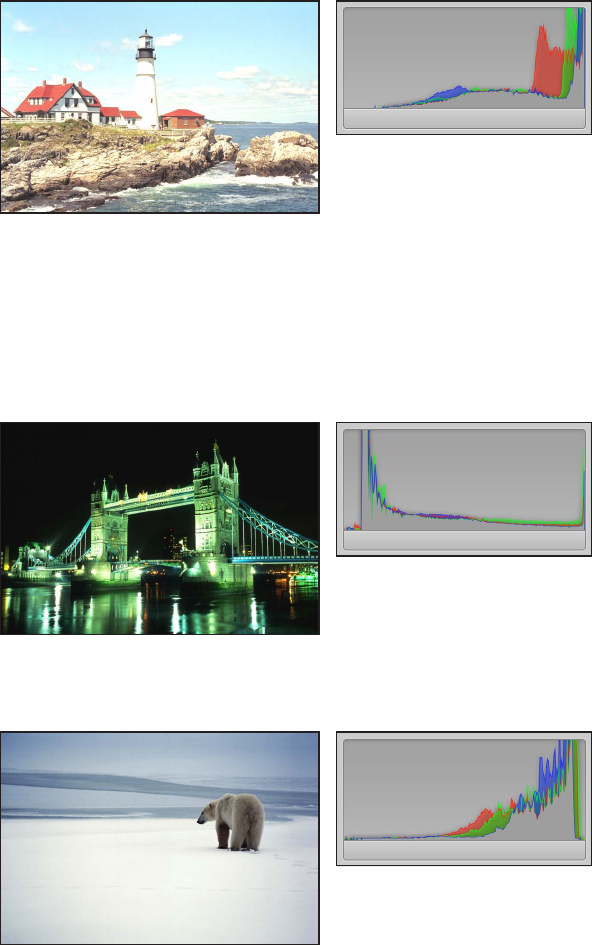
Chapter 15 An Overview of Image Adjustments 297
However, a series of peaks in the brighter side of the histogram often indicates an overexposed
image because most of the pixels in the image are too bright.
Evaluating Tonality and Contrast
Although histogram graphs are good tools for evaluating an image’s exposure, you shouldn’t
interpret histograms for exposure information only, because the shape of the histogram is also
inuenced by the tonality in the scene. You need to take the subject of the image into account
when evaluating its histogram. For example, images shot at night are naturally going to have a
majority of peaks in the darker side of the histogram.
Likewise, images of bright scenes, such as snow or light reecting o the ocean, have a majority
of their peaks in the brighter side of the histogram.
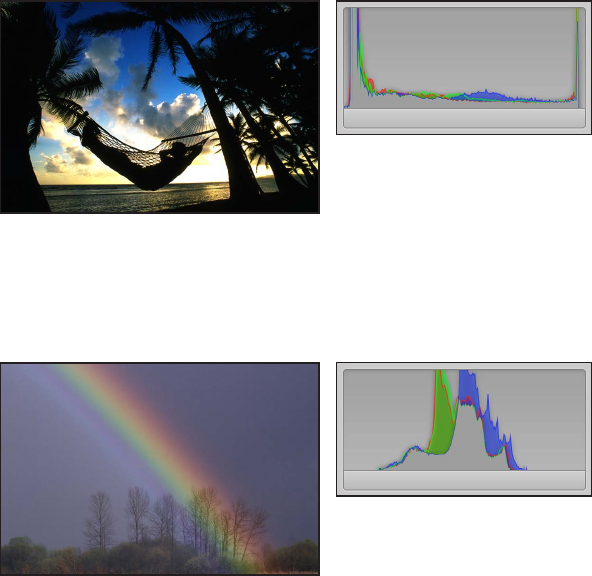
Chapter 15 An Overview of Image Adjustments 298
Histograms can also depict contrast in an image. For example, this silhouette of the man in the
hammock in front of the sunset consists of a relatively even assortment of extreme bright and
dark tonal values with few midtones. In this case, the histogram is shaped like a valley with peaks
in both the dark and bright sides.
Likewise, histograms can also depict a lack of contrast in an image. For example, an image of
a rainbow in the fog lacks contrast. Without directional lighting, there aren’t any highlights or
shadows in the image. In this case, the peaks of the histogram are concentrated in the center
and do not come close to either the dark or bright sides.
About Making Adjustments Onscreen
Human eyes perceive color subjectively. It’s dicult to make objective changes to the colors in
an image because the brain is so advanced that it skews the perception of colors to make them
appear as natural as possible. For this reason, it is essential that you create the best possible work
environment for performing color adjustments. Such an environment excludes extraneous colors
that have the potential to throw o your eye.
Before you begin making color adjustments to your images, it’s important to pay attention to the
following:
•Set your display to its highest-resolution setting. This will give you the best view of your image.
•Make sure you are employing good color management. This means that your displays and
printers are calibrated and their proles are up to date.
•Reduce the ambient light in the room you are working in to prevent the light from skewing
your perception of the colors on your screens, and make sure your displays are set to their
brightest levels.
•If possible, paint the walls in the room in which you perform detailed image adjustments a
neutral gray. Keep bright-colored objects to a minimum to ensure that the colors on your
screens are not altered by the color in the rest of the room.
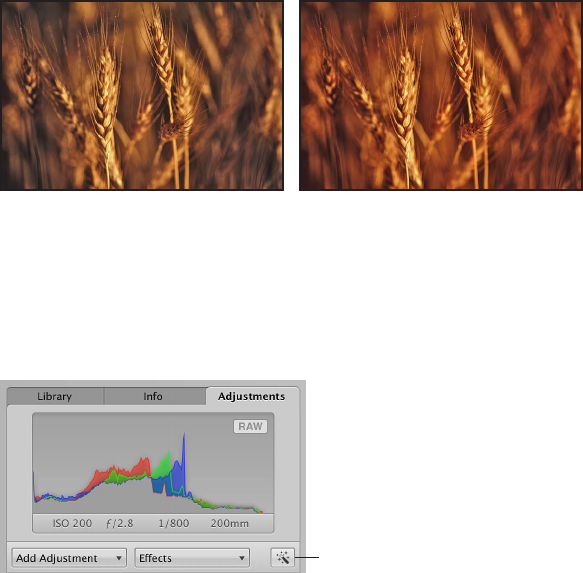
299
Working with the Auto Enhance Button
You use the Auto Enhance button when you want to quickly improve your image or preview
what the image will look like when adjusted. When you click the Auto Enhance button, Aperture
evaluates the image and then applies the White Balance, Enhance, Curves, and Highlights &
Shadows adjustment settings in a manner that suits the selected photo. Using Auto Enhance is a
good starting point when adjusting an image because you can always ne-tune the parameter
settings for each adjustment.
Before Auto Enhance adjustment After Auto Enhance adjustment
To automatically enhance an image
1 Select a photo.
2 At the top of the Adjustments inspector or the Adjustments pane of the Inspector HUD, click the
Auto Enhance button.
Auto Enhance button
To ne-tune the White Balance, Enhance, Curves, and Highlights & Shadows parameter settings
applied by the Auto Enhance adjustment, see the following sections:
•An Overview of the White Balance Adjustment on page 330
•An Overview of the Enhance Adjustment on page 340
•An Overview of the Curves Adjustment on page 350
•An Overview of the Highlights & Shadows Adjustment on page 363
Making Image Adjustments 16
Chapter 16 Making Image Adjustments 300
Working with the Retouch Controls
An Overview of the Retouch Adjustment Controls
You use the Retouch brushes to touch up imperfections in the image caused by sensor dust,
image artifacts, and other environmental conditions. You can also copy an element of an image
and paste it in another area for purely aesthetic reasons. Aperture provides two methods for
retouching your images. The method you use depends on whether you are trying to copy
texture from the source while preserving hard edges at the destination (where the blemish is) or
simply copy pixels from one area of the image and replace them over another.
If the area you need to repair has a hard edge near the problem area, you use the “repair”
method. You also use the repair method when you want to copy high-frequency texture from
one area of the image (the source) and brush the texture over the destination area while
maintaining the underlying color and shading of the destination area.
The second method, “cloning,” is used when you simply want to copy pixels from one area and
paste them on another area. Cloning is useful when you want to copy an element of an image as
is (a cloud, for example) and paste it in another area.
Which Retouching Adjustment Should You Use?
Aperture provides two sets of controls that you can use to retouch your image: Retouch and
Spot & Patch.
In the vast majority of cases, Retouch provides the controls that will best serve your image-repair
needs. The Spot & Patch controls have been included in Aperture 3 in order to retain the integrity
of images that were adjusted with earlier versions of Aperture. In many cases, image repairs
might even be improved by removing an existing Spot & Patch repair and replacing it with a
Repair or Clone adjustment performed with the Retouch tool.
There are certain situations in which Spot & Patch is the adjustment of choice. For example, an
artifact on or very near a curved edge in an image may be more eectively removed using the
Angle parameter. For more information about the Spot & Patch adjustment controls, see Spotting
Your Images on page 310 .
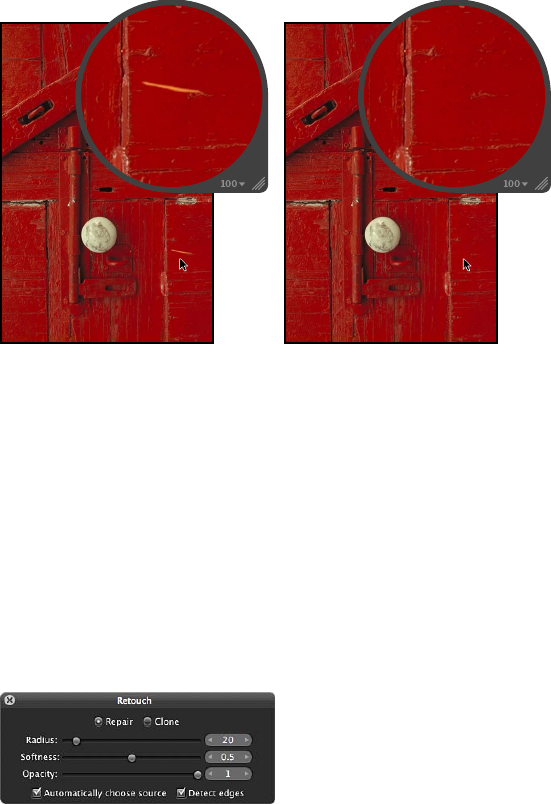
Chapter 16 Making Image Adjustments 301
Repairing Your Images
You use the Repair brush of the Retouch adjustment when the area surrounding the blemish has
elements of high contrast, such as an edge, or when you need to copy texture from the source
area and maintain the color and shading in the destination area.
Before Repair adjustment After Repair adjustment
To retouch an image using the Repair brush
1 Select a photo.
2 To display the photo at full size, click the Zoom Viewer button in the tool strip or the Full Screen
view toolbar (or press Z).
Setting the photo to appear at full size (100 percent) prevents image scaling from
obscuring details.
3 Choose Retouch from the Quick Brush pop-up menu (with a brush icon) in the tool strip or the
Full Screen view toolbar.
The pointer changes to a brush, and the Retouch HUD appears.
4 In the Retouch HUD, do the following:
a Click the Repair button.
b Set the radius of the brush by dragging the Radius slider, entering a value in the Radius value
slider, or using the scroll gesture.
Note: You cannot use the scroll gesture when the pointer is placed over the Retouch HUD.
c Set the softness of the brush by dragging the Softness slider or entering a value in the
Softness value slider.
d Set the opacity of the brush by dragging the Opacity slider or entering a value in the Opacity
value slider.
5 If you want the Retouch adjustment to preserve edge details in the image, select the “Detect
edges” checkbox.
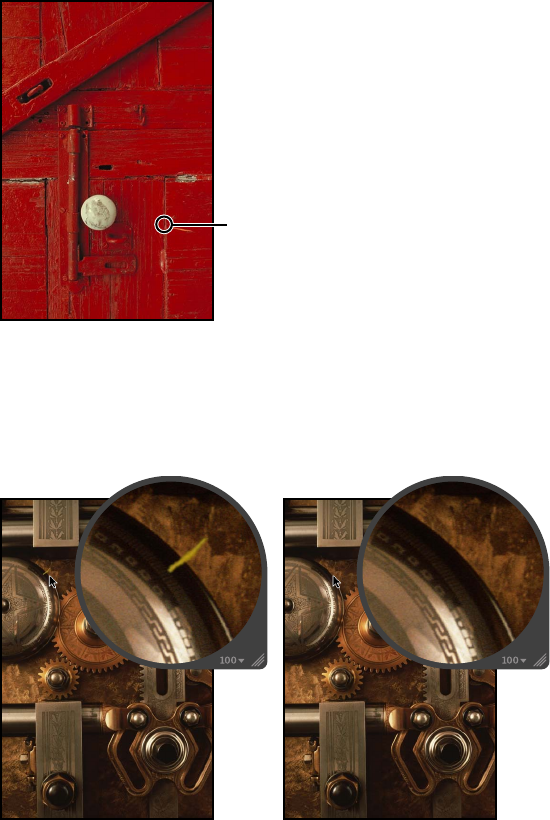
Chapter 16 Making Image Adjustments 302
6 If you need to copy pixels from another area of the image, deselect the “Automatically choose
source” checkbox, and Option-click the source area.
7 Brush over the area with the imperfection.
Brush over the blemish
with the Repair brush.
Cloning Your Images
You use the Clone brush of the Retouch adjustment to copy pixels from an area of the image
with similar visual elements and paste the pixels over the area with the imperfection. No pixels
are blended from the area surrounding the brush stroke.
Before Clone adjustment After Clone adjustment
To retouch an image using the Clone brush
1 Select a photo.
2 To display the photo at full size, click the Zoom Viewer button in the tool strip or the Full Screen
view toolbar (or press Z).
Setting the photo to appear at full size (100 percent) prevents image scaling from
obscuring details.
3 Choose Retouch from the Quick Brush pop-up menu (with a brush icon) in the tool strip or the
Full Screen view toolbar.

Chapter 16 Making Image Adjustments 303
The pointer changes to a brush, and the Retouch HUD appears.
4 In the Retouch HUD, do the following:
a Click the Clone button.
b Set the radius of the brush by dragging the Radius slider or entering a value in the Radius
value slider.
c Set the softness of the brush by dragging the Softness slider or entering a value in the
Softness value slider.
d Set the opacity of the brush by dragging the Opacity slider or entering a value in the Opacity
value slider.
5 Option-click the source area (the area where you want to copy the pixels).
6 Brush over the area with the imperfection.
Brush over the blemish
with the Clone brush.
Deleting Retouch Brush Strokes
You can delete a Retouch brush stroke at any time. Because pixels in brush strokes are sampled
sequentially, brush strokes can be deleted only in reverse order.
To delete a brush stroke
1 Click the Delete button in the Retouch area of the Adjustments inspector or the Adjustments
pane of the Inspector HUD.
Click the Delete button to
remove a brush stroke.
2 Repeat step 1 until the brush stroke you want to remove is deleted.
To delete all brush strokes at one time
mClick the Reset button (a curved arrow) in the Retouch area of the Adjustments inspector or the
Adjustments pane of the Inspector HUD.
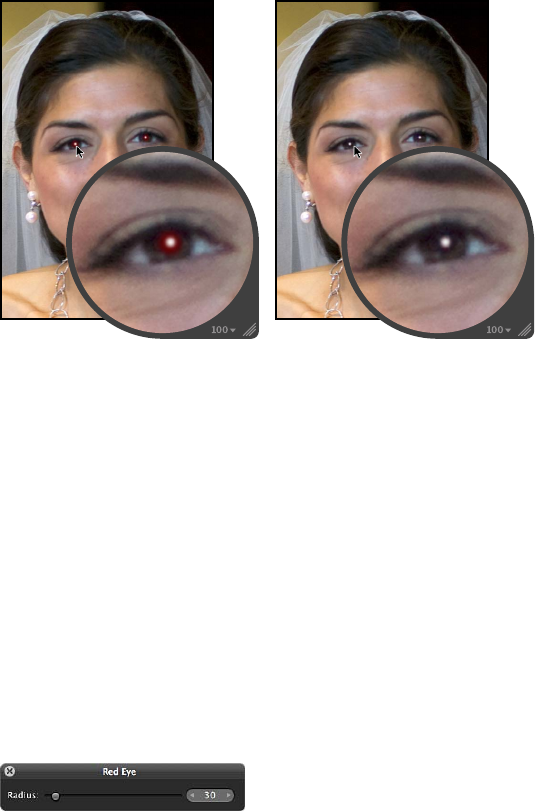
Chapter 16 Making Image Adjustments 304
Working with the Red Eye Correction Controls
An Overview of the Red Eye Adjustment
You use the Red Eye tool and the Red Eye Correction adjustment controls to reduce the red-eye
eect in the eyes of the subjects in your image. You use the Red Eye tool to place targets on the
red eyes of the subjects in the image, and then you can adjust the radius and sensitivity of the
target overlays using the Red Eye Correction controls. Aperture desaturates the red pixels within
the target overlay area, reducing the eect.
After Red Eye adjustment
Before Red Eye adjustment
Reducing Red-Eye Using the Red Eye Tool
Reducing red-eye in the eyes of the subjects in your image is as simple as targeting the red eyes
with the Red Eye tool.
To remove red-eye with the Red Eye tool
1 Select a photo.
2 To display the photo at full size, click the Zoom Viewer button in the tool strip or the Full Screen
view toolbar (or press Z).
Setting the photo to appear at full size (100 percent) prevents image scaling from
obscuring details.
3 Select the Red Eye tool in the tool strip or the Full Screen view toolbar (or press E).
The pointer changes to a target, and the Red Eye HUD appears.
4 Click a red eye in the image to place a Red Eye target overlay on it.

Chapter 16 Making Image Adjustments 305
The Red Eye target overlay is placed over the red eye, and the red pixels within the Red Eye
target overlay are desaturated.
5 Repeat step 4 until all of the red eyes in your image are corrected.
Adjusting the Size of Red Eye Target Overlays
Aperture xes red-eye in your images by desaturating the red pixels within the Red Eye target
overlay area. It’s a good idea to t each Red Eye target overlay to the size of the eye it covers.
This prevents any red pixels in the skin around your subject’s eyes or in clothing, such as a scarf
or hat, from being aected by the red-eye adjustment. You may also need to increase the size
of a Red Eye target overlay to completely encompass the eye you are targeting if the image is
a close-up. You can adjust the size of a Red Eye target overlay before and after it’s placed on
the image.
To change the size of the Red Eye tool’s target
Do one of the following:
mDrag the Radius slider in the Red Eye HUD.
mUse the scroll gesture.
The size of the Red Eye tool’s target changes.
To change the size of an existing Red Eye target overlay
1 Display the image at full size (100 percent) by clicking the Zoom Viewer button in the tool strip
or the Full Screen view toolbar (or pressing Z).
2 Click the Red Eye target overlay to select it.
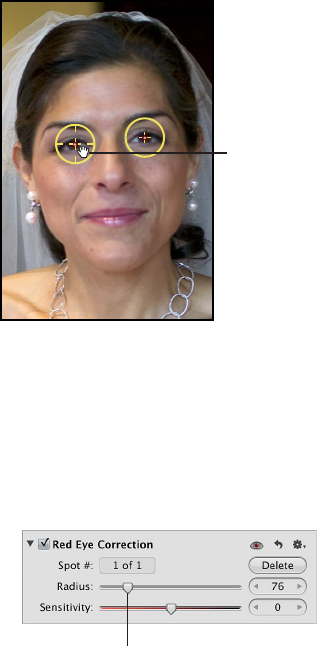
Chapter 16 Making Image Adjustments 306
A hand icon appears to indicate that you can select the Red Eye target overlay.
The Red Eye tool changes
to a hand icon to indicate
that you can select the
Red Eye target overlay.
3 In the Red Eye Correction area of the Adjustments inspector or the Adjustments pane of the
Inspector HUD, adjust the Radius parameter by doing one of the following:
•Drag the Radius slider.
•Click the left or right arrow in the Radius value slider to change the size of the Red Eye target
overlay by single increments, or drag in the value eld.
•Double-click the number in the Radius value slider, then enter a value from 3.00 to 400.00.
Drag the Radius slider to adjust
the size of the selected Red Eye
target overlay.
The size of the Red Eye target overlay increases as the parameter value increases.
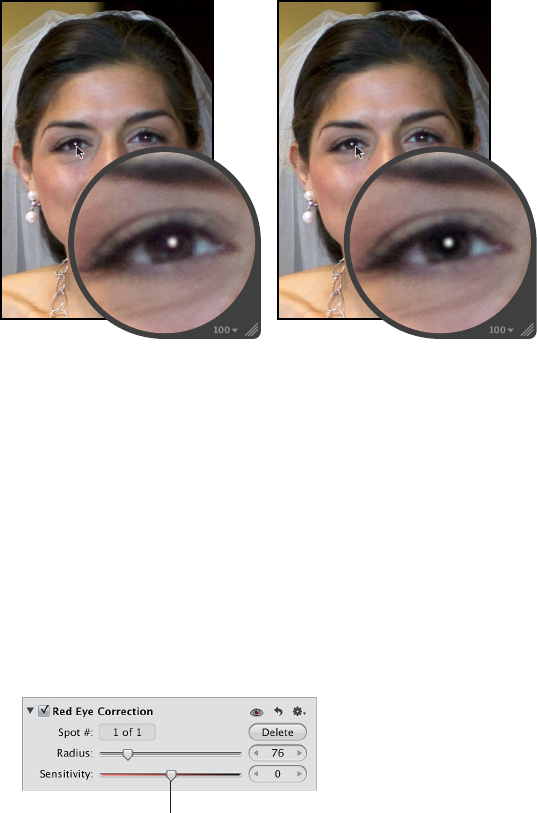
Chapter 16 Making Image Adjustments 307
Adjusting the Sensitivity of Red Eye Target Overlays
When you target a red eye in a picture, Aperture automatically chooses the area within the target
overlay circle where the desaturation is applied. In a few cases, the area chosen by Aperture
might be either slightly too large or slightly too small (typically including a few pixels in the
eyelid skin, or missing a few red pixels inside the pupil). For these dicult cases, you can adjust
the Sensitivity parameter to change the area where desaturation occurs. For example, dragging
the Sensitivity slider to the left by one notch decreases the radius of the active area within the
Red Eye target overlay by one pixel, and dragging the Sensitivity slider one notch to the right
enlarges it by one pixel.
After Sensitivity adjustment
Before Sensitivity adjustment
(the eyelids are desaturated)
To adjust the sensitivity of a Red Eye target overlay
1 Click the Red Eye target overlay to select it.
2 In the Red Eye Correction area of the Adjustments inspector or the Adjustments pane of the
Inspector HUD, adjust the Sensitivity parameter by doing one of the following:
•Drag the Sensitivity slider.
•Click the left or right arrow in the Sensitivity value slider to change the sensitivity of the Red
Eye target overlay by single-pixel increments, or drag in the value eld.
•Double-click the number in the Sensitivity value slider, then enter a value from –10.00 to 10.00
and press Return.
Use the Sensitivity slider and
value slider to fine-tune the area
within the Red Eye target overlay
where desaturation occurs.
The area within the Red Eye target overlay where desaturation occurs increases as the parameter
value increases.
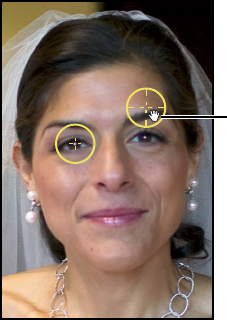
Chapter 16 Making Image Adjustments 308
Viewing the Corrected Image Without Red Eye Target Overlays
After correcting the red eyes in your image, you can view the corrected image with the Red Eye
target overlays turned o.
To view the corrected image with the Red Eye target overlays turned o
mSelect the Selection tool in the tool strip or the Full Screen view toolbar (or press A).
The Red Eye target overlays disappear, but the eect of the Red Eye adjustment remains visible.
Note: You can still make adjustments to the targeted red eyes with the overlays turned o, and
the image is updated to show the changes.
To turn the Red Eye target overlays on again
Do one of the following:
mSelect the Red Eye tool in the tool strip or the Full Screen view toolbar (or press E).
mIn the Red Eye Correction area of the Adjustments inspector or the Adjustments pane of the
Inspector HUD, click the Red Eye Tool button (with an icon of a red eye).
The Red Eye target overlays reappear.
Moving Red Eye Target Overlays
Once placed, a Red Eye target overlay can always be moved.
To move a Red Eye target overlay
1 Make sure the Red Eye tool is selected, then place the Red Eye tool’s target over the Red Eye
target overlay you want to move until the target changes to a hand icon.
The hand icon indicates that you can drag the target overlay rather than place a new one.
Drag the Red Eye target
overlay over the red eye
in the image.
2 Drag the Red Eye target overlay to the appropriate position over the subject’s eye.
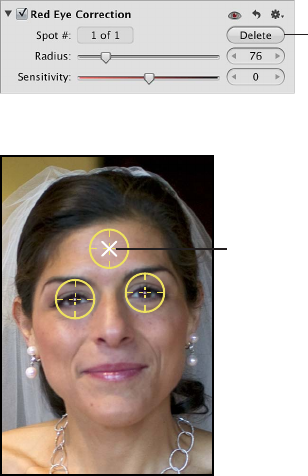
Chapter 16 Making Image Adjustments 309
Deleting Red Eye Target Overlays
You can always delete a Red Eye target overlay.
To delete a Red Eye target overlay
Do one of the following:
mSelect a Red Eye target overlay in the image, then click the Delete button in the Red Eye
Correction area of the Adjustments inspector or the Adjustments pane of the Inspector HUD.
Click the Delete button
to delete a Red Eye
target overlay.
mCommand-click a Red Eye target overlay.
Command-click a Red Eye
target overlay to delete it.
The Red Eye target overlay disappears.
Working with the Spot & Patch Controls
An Overview of the Spot & Patch Adjustment
You use the Spot & Patch adjustment controls when you need to modify Spot & Patch parameter
settings that were applied using previous versions of Aperture. When using the Spot & Patch
adjustment to spot or patch your images, you can modify the appearance of the pixels within the
target overlays. You can also adjust the size of Spot & Patch target overlays.
Which Retouching Adjustment Should You Use?
Aperture provides two sets of controls that you can use to retouch your image: Retouch and
Spot & Patch.
In the vast majority of cases, Retouch provides the controls that will best serve your image-repair
needs. The Spot & Patch controls have been included in Aperture 3 in order to retain the integrity
of images that were adjusted with earlier versions of Aperture. In many cases, image repairs
might even be improved by removing an existing Spot & Patch repair and replacing it with a
Repair or Clone adjustment performed with the Retouch tool. For more information about the
Retouch tool, see An Overview of the Retouch Adjustment Controls on page 300.
There are certain situations in which Spot & Patch is the adjustment of choice. For example, an
artifact on or very near a curved edge in an image may be more eectively removed using the
Angle parameter.
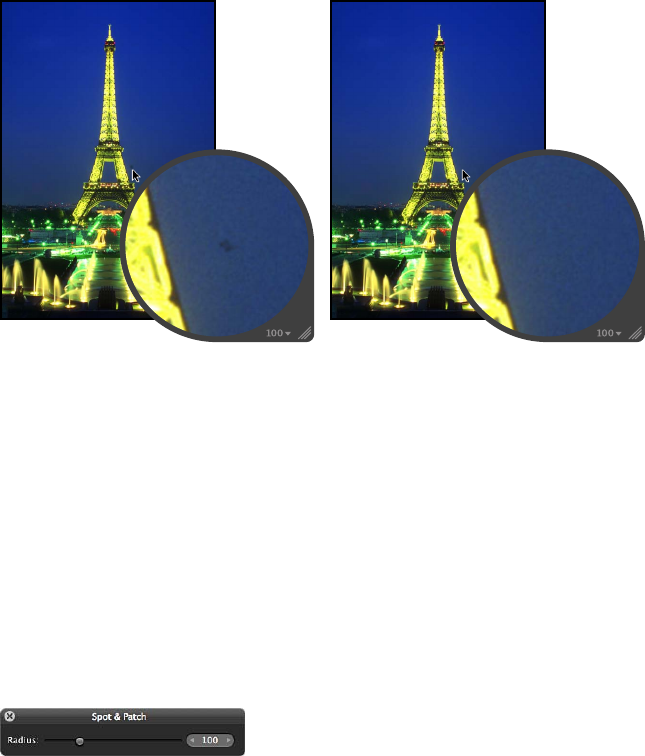
Chapter 16 Making Image Adjustments 310
Spotting Your Images
When the area around the blemish is continuous (such as a solid color) and doesn’t contain a
distinct texture, you can use the spotting method to obscure the blemish by integrating the
pixels that surround it. You x a blemish by placing the Spot & Patch target overlay over the
blemish in the image and then adjusting the size of the target overlay so that it just barely covers
the blemish. By keeping the target overlay small, you minimize the chance of a visual aberration
in the nal image. Aperture provides additional parameter controls to allow you to adjust the
softness, opacity, and amount of detail in the cloned pixels, so that the corrected area looks as
natural as possible.
Before Spot & Patch adjustment
(spotting)
After Spot & Patch adjustment
(spotting)
To spot an image
1 Select a photo.
2 To display the photo at full size, click the Zoom Viewer button in the tool strip or the Full Screen
view toolbar (or press Z).
Setting the photo to appear at full size (100 percent) prevents image scaling from
obscuring details.
3 Choose Spot & Patch from the Add Adjustment pop-up menu in the Adjustments inspector or
the Adjustments pane of the Inspector HUD.
The pointer changes to a target, and the Spot & Patch HUD appears.
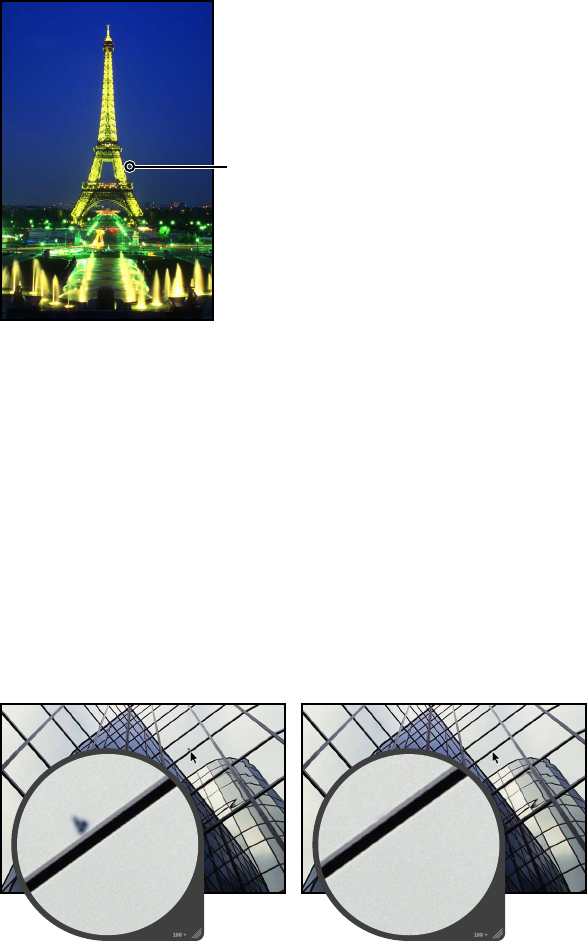
Chapter 16 Making Image Adjustments 311
4 Click the blemish area to place the Spot & Patch target overlay on it.
The yellow Spot & Patch target overlay is placed over the blemish, and the blemish disappears.
Click a blemish to place
a Spot & Patch target
overlay on it.
Note: You can always adjust the size of the target overlay and other parameters. For more
information, see Adjusting the Size of Spot & Patch Target Overlays on page 314.
5 Repeat step 4 until all of the blemishes in your image are removed.
Patching Your Images
When you need to clone pixels from a dierent area of an image to x the area where the
blemish is, you use the “patching” method. Patching is similar to spotting, except that there are
some additional steps. You rst place a Spot & Patch target overlay (yellow) over the blemish,
and then you place a source target overlay (white) over the area you want to clone. The pixels in
the Spot & Patch target overlay are replaced by the pixels copied from the source target overlay.
Aperture provides additional parameter controls to allow you to adjust the size of target overlays
and the softness, opacity, and amount of detail in cloned pixels, so that the patched area looks as
natural as possible.
Before Spot & Patch adjustment
(patching)
After Spot & Patch adjustment
(patching)
To patch a blemish in an image
1 Select a photo.
2 To display the photo at full size, click the Zoom Viewer button in the tool strip or the Full Screen
view toolbar (or press Z).
Setting the photo to appear at full size (100 percent) prevents image scaling from
obscuring details.
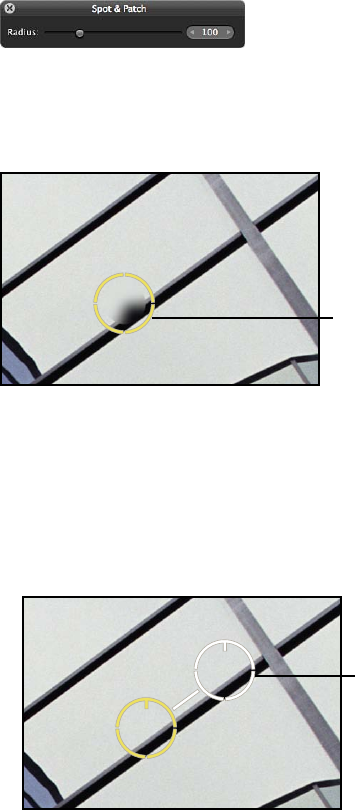
Chapter 16 Making Image Adjustments 312
3 Choose Spot & Patch from the Add Adjustment pop-up menu in the Adjustments inspector or
the Adjustments pane of the Inspector HUD.
The pointer changes to a target, and the Spot & Patch HUD appears.
4 Click the blemish area to place a Spot & Patch target overlay on it.
A yellow target overlay is placed over the blemish, and the blemish is replaced by the pixels that
surround it. This yellow target overlay is the destination target overlay.
Click a blemish to place
a Spot & Patch target
overlay on it.
5 Do one of the following:
•Select the Patch checkbox in the Spot & Patch area of the Adjustments inspector or the
Adjustments pane of the Inspector HUD, then drag the white source target overlay to the area
you want to clone (the source area).
•Option-click the area you want to clone.
A white source target overlay appears and is placed over the source area.
Option-click the area
you want to clone to
place a source target
overlay on it.
The pixels within the source target overlay are copied and replace the pixels within the
destination target overlay. The blemish is patched.
Note: You can always adjust the size of the target overlay and other parameters. For more
information, see Adjusting the Size of Spot & Patch Target Overlays on page 314.
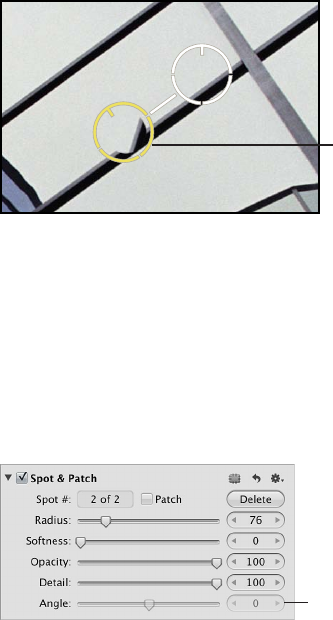
Chapter 16 Making Image Adjustments 313
6 Repeat steps 4 and 5 until all blemishes are removed from your image.
To adjust the angle of the cloned pixels within a destination target overlay
Adjusting the angle of the cloned pixels within the destination target overlay rotates the
cloned pixels over the destination area. This is particularly useful if you’re cloning an area that
has a visual element, such as a pattern or line, that is at a dierent angle from elements in
the destination area. The Angle controls allow you to match the angle of the pixels within the
destination target overlay.
You can adjust the angle
of the cloned pixels.
In the Spot & Patch area of the Adjustments inspector or the Adjustments pane of the Inspector
HUD, adjust the Angle parameter by doing one of the following:
mDrag the Angle slider to the left to rotate the cloned pixels counterclockwise, or drag the Angle
slider to the right to rotate the cloned pixels clockwise.
mClick the left or right arrow in the Angle value slider, or drag in the value eld.
mDouble-click the number in the Angle value slider, then enter a value from –180.00 to 180.00 and
press Return.
Use the Angle slider and
value slider to adjust the
angle of the pixels in the
destination target overlay.
A negative value rotates the cloned pixels counterclockwise, and a positive value rotates the
cloned pixels clockwise.
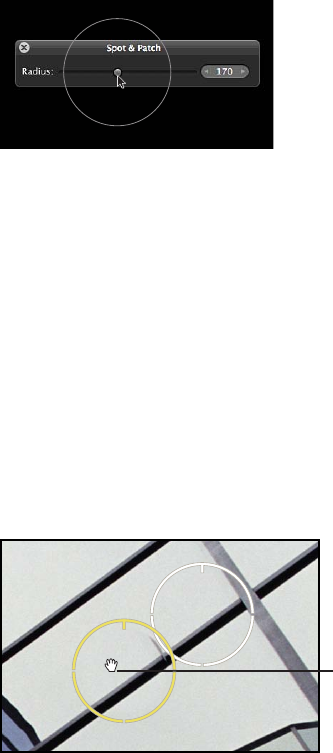
Chapter 16 Making Image Adjustments 314
Adjusting the Size of Spot & Patch Target Overlays
You can change the size of a Spot & Patch target overlay before and after it’s placed on an image.
It’s best to adjust the size of the target overlay so it ts the area around the blemish as tightly as
possible. A tight t ensures that any visual aberrations are minimal.
To change the size of the Spot & Patch target before placing it on the image
Do one of the following:
mDrag the Radius slider in the Spot & Patch HUD.
mClick the left or right arrow in the Radius value slider, or drag in the value eld.
mDouble-click the number in the Radius value slider, then enter a value from 3 to 400 and
press Return.
mUse the scroll gesture.
The size of the Spot & Patch target changes.
To change the size of an existing Spot & Patch target overlay
1 Display the image at full size (100 percent) by clicking the Zoom Viewer button in the tool strip
or the Full Screen view toolbar (or pressing Z).
2 Click a Spot & Patch target overlay to select it.
A hand icon appears to indicate that you can select the Spot & Patch target overlay rather than
place a new one.
A hand icon appears
to indicate that you can
move the target overlay.

Chapter 16 Making Image Adjustments 315
3 In the Spot & Patch area of the Adjustments inspector or the Adjustments pane of the Inspector
HUD, adjust the Radius parameter by doing one of the following:
•Drag the Radius slider.
•Click the left or right arrow in the Radius value slider to change the radius of the Spot & Patch
target overlay by single-pixel increments, or drag in the value eld.
•Double-click the number in the Radius value slider, then enter a value from 3 to 400 and
press Return.
Use the Radius slider and
value slider to adjust the
size of previously placed
Spot & Patch target overlays.
The size of the Spot & Patch target overlay increases as the parameter value increases.
Adjusting the Softness Within Spot & Patch Target Overlays
You can also change the “softness” of cloned pixels within Spot & Patch target overlays. Softness
describes how well the area within the target overlay blends in with the surrounding image area.
The Softness parameter controls the blending of pixels between the center of the Spot & Patch
target overlay and the circumference. The higher the Softness parameter value, the closer to the
center the pixel blending occurs. The lower the parameter value, the less pixel blending occurs,
resulting in a “hard edge.”
You can adjust
the softness of
the cloned pixels.
To adjust the softness of pixels within a Spot & Patch target overlay
In the Spot & Patch area of the Adjustments inspector or the Adjustments pane of the Inspector
HUD, adjust the Softness parameter by doing one of the following:
mDrag the Softness slider.
mClick the left or right arrow in the Softness value slider, or drag in the value eld.
mDouble-click the number in the Softness value slider, then enter a value from 3 to 400 and
press Return.
Use the Softness slider and
value slider to make the
edges of the Spot & Patch
overlay blend better with the
surrounding image area.
A low value decreases the softness of pixels within the Spot & Patch target overlay, and a high
value increases the softness.
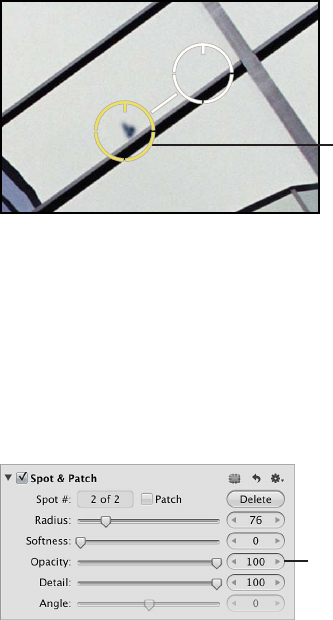
Chapter 16 Making Image Adjustments 316
Adjusting the Opacity Within Spot & Patch Target Overlays
Another method of modifying Spot & Patch target overlays to make cloned pixels blend in better
with surrounding pixels is to adjust the opacity of pixels in the target overlay. The higher the
Opacity parameter value, the more the cloned pixels obscure the original pixels they cover.
You can adjust
the opacity of the
cloned pixels.
To adjust the opacity of cloned pixels in a Spot & Patch target overlay
In the Spot & Patch area of the Adjustments inspector or the Adjustments pane of the Inspector
HUD, adjust the Opacity parameter by doing one of the following:
mDrag the Opacity slider.
mClick the left or right arrow in the Opacity value slider, or drag in the value eld.
mDouble-click the number in the Opacity value slider, then enter a value from 0 to 100 and
press Return.
Use the Opacity slider and
value slider to adjust the
opacity of the cloned pixels
in the target overlay.
A low value decreases the opacity of the cloned pixels in the Spot & Patch target overlay, and a
high value increases the opacity.
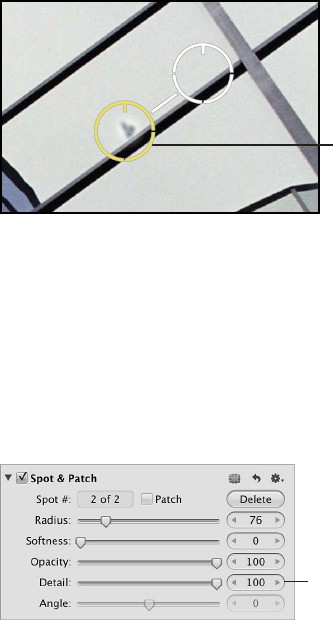
Chapter 16 Making Image Adjustments 317
Adjusting the Detail Within Spot & Patch Target Overlays
In addition to adjusting softness and opacity in Spot & Patch target overlays, you can adjust the
amount of detail, such as texture or grain, that is preserved in the cloned pixels.
You can adjust the
amount of detail
in the cloned pixels.
To adjust the amount of detail in cloned pixels in a Spot & Patch target overlay
In the Spot & Patch area of the Adjustments inspector or the Adjustments pane of the Inspector
HUD, adjust the Detail parameter by doing one of the following:
mDrag the Detail slider.
mClick the left or right arrow in the Detail value slider, or drag in the value eld.
mDouble-click the number in the Detail value slider, then enter a value from 0 to 100 and
press Return.
Use the Detail slider and value
slider to adjust the amount
of detail in the cloned pixels
in the target overlay.
A low value decreases the amount of detail, such as texture or grain, preserved in the cloned
pixels, and a high value increases the amount of detail.
Viewing the Corrected Image Without Spot & Patch Target Overlays
After retouching the blemishes in your image, you can view the corrected image with the Spot &
Patch target overlays turned o.
To view the corrected image with the Spot & Patch target overlays turned o
mSelect the Selection tool in the tool strip or the Full Screen view toolbar (or press A).
The Spot & Patch target overlays disappear, but the eects of the Spot & Patch adjustment
remain visible.
To turn the Spot & Patch target overlays on again
mClick the Spot & Patch Tool button (with a patch icon) in the Spot & Patch area of the
Adjustments inspector or the Adjustments pane of the Inspector HUD.
The Spot & Patch target overlays reappear.
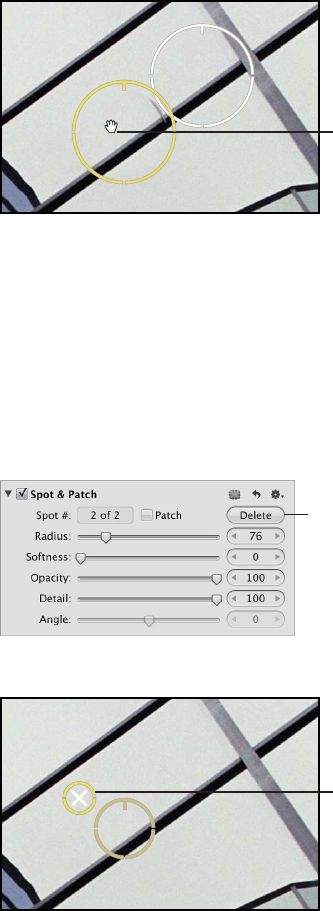
Chapter 16 Making Image Adjustments 318
Moving Spot & Patch Target Overlays
Once placed, a Spot & Patch target overlay can always be moved.
To move a Spot & Patch target overlay
1 Make sure the Spot & Patch HUD is shown, then place the Spot & Patch target over the Spot &
Patch target overlay you want to move until a hand icon appears.
The hand icon indicates that you can drag the target overlay rather than place a new one.
A hand icon appears
to indicate that you can
select the Spot & Patch
target overlay.
2 Drag the Spot & Patch target overlay to the appropriate position on the image.
Deleting Spot & Patch Target Overlays
You can delete a Spot & Patch target overlay at any time.
To delete a Spot & Patch target overlay
Do one of the following:
mSelect a Spot & Patch target overlay in the image, then click the Delete button in the Spot &
Patch area of the Adjustments inspector or the Adjustments pane of the Inspector HUD.
Click the Delete button
to delete a Spot &
Patch target overlay.
mCommand-click the Spot & Patch target overlay.
Command-click
a Spot & Patch target
overlay to delete it.
The Spot & Patch target overlay disappears.
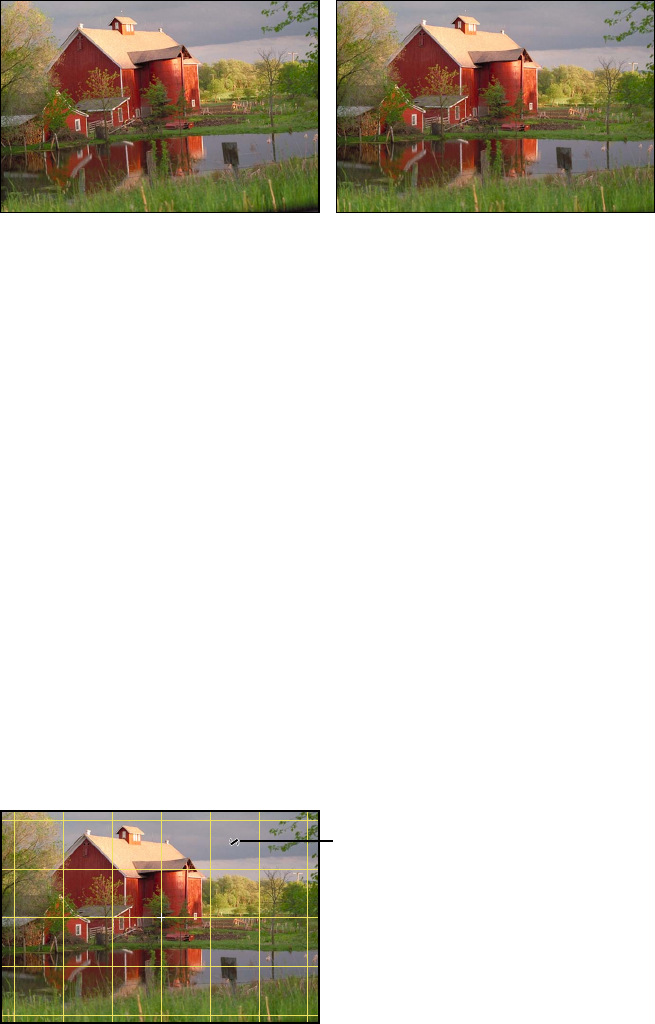
Chapter 16 Making Image Adjustments 319
Working with the Straighten Controls
An Overview of the Straighten Adjustment
When you shoot photos, environmental conditions often make it dicult to frame an image that
is level in relation to the horizon—either real or virtual. In Aperture, you can straighten an image
so that the horizon in the image is parallel to the bottom and top edges.
Before Straighten adjustment After Straighten adjustment
You can use two dierent methods to straighten your images. You can use either the Straighten
tool or the Straighten adjustment controls. However, you may nd it most ecient to use the
Straighten tool to quickly level the image so that it’s roughly straight and then use the Straighten
controls for more precision.
Rotating Images with the Straighten Tool
Rotating an image with the Straighten tool is as simple as selecting the tool and dragging within
the image to make it straight. However, it’s important to understand that although the image
appears to enlarge as you rotate it, Aperture actually crops the image so that it ts within its
rectangular border without blank edges appearing on the sides.
To straighten your image using the Straighten tool
1 Select a photo.
2 Select the Straighten tool in the tool strip or the Full Screen view toolbar (or press G).
The Selection tool changes to the Straighten tool.
3 With the Straighten tool selected, drag within the image to rotate it either clockwise
or counterclockwise.
As you rotate the image, a yellow grid overlay appears to help you make the horizon perfectly
straight, and the image is cropped to prevent gaps from appearing in the corners of the image.
Drag within the image
to rotate it.
Note: It’s a good idea to turn zooming o when straightening an image, so that the full image ts
within the Viewer. If an image is zoomed in to its actual size, you can turn o zooming by clicking
the Zoom Viewer button in the tool strip or the Full Screen view toolbar (or by pressing Z).

Chapter 16 Making Image Adjustments 320
Rotating Images with the Straighten Controls
You can also straighten an image using the Straighten adjustment controls. Using these controls
provides more precision.
To straighten an image using the Straighten controls
1 Select the image.
2 If the Straighten controls are not shown in the Adjustments inspector or the Adjustments pane
of the Inspector HUD, choose Straighten from the Add Adjustment pop-up menu.
3 Change the value for the Angle parameter by doing one of the following:
•Drag the Angle slider.
•Click the left or right arrow in the Angle value slider, or drag in the value eld.
•Double-click the number in the Angle value slider, then enter a value from –20.0 to 20.0
degrees and press Return.
Use the Angle slider and value
slider to straighten the photo.
Decreasing the value rotates the image clockwise, and increasing the value rotates the
image counterclockwise.
As you rotate the image, a yellow grid overlay appears to help you make the horizon perfectly
straight, and the image is cropped to prevent gaps from appearing in the corners of the image.
Note: It’s a good idea to turn zooming o when straightening an image, so that the full image ts
within the Viewer. If an image is zoomed in to its actual size, you can turn o zooming by clicking
the Zoom Viewer button in the tool strip or the Full Screen view toolbar (or by pressing Z).
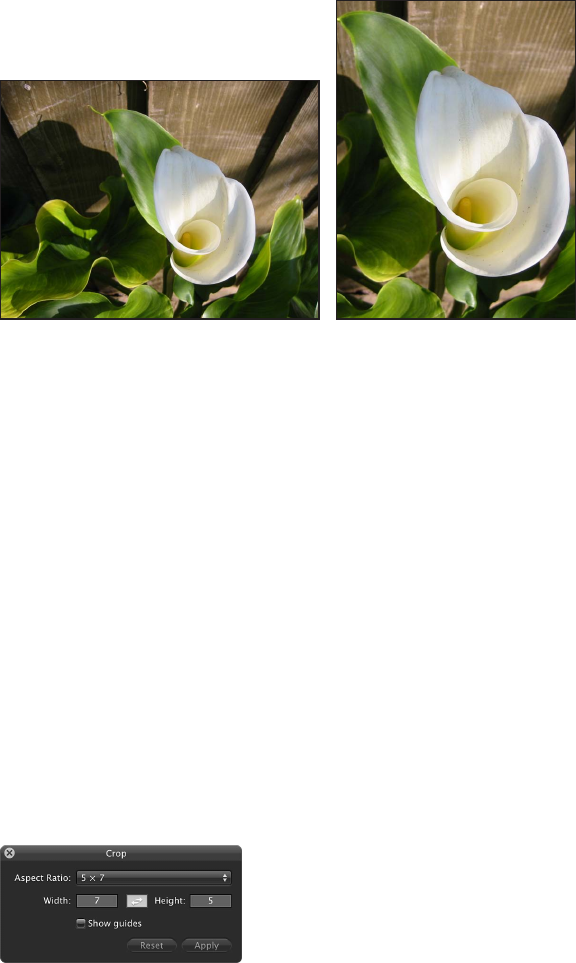
Chapter 16 Making Image Adjustments 321
Working with the Crop Controls
An Overview of the Crop Adjustment
You use the Crop tool and the Crop adjustment controls when you want to improve the
composition of your image by trimming the edges, or when you want to change the aspect ratio
of the image. For example, you can change an image’s aspect ratio from 4 x 6 to 3 x 5.
Before Crop adjustment After Crop adjustment
There are two methods for cropping an image: you can use the Crop tool to manually crop the
image, or you can use the Crop adjustment controls. The method you choose is determined by
the level of precision you require. The Crop tool provides a fast freehand method and works in
conjunction with a Crop HUD that contains controls for setting the aspect ratio of the crop. The
extra precision provided by the Crop adjustment controls is useful when you want to specify
exact dimensions for the cropped image.
Cropping Images with the Crop Tool
Cropping an image with the Crop tool is the easiest method. You simply select the Crop tool
and drag a rectangle over your image to exclude the unwanted areas. The Crop HUD appears,
providing additional controls for setting the aspect ratio of the image and displaying cropping
guides to help you visually align the composition of the image according to the rule of thirds.
To crop an image using the Crop tool
1 Select a photo.
2 Select the Crop tool in the tool strip or the Full Screen view toolbar (or press C).
The Selection tool changes to the Crop tool, and the Crop HUD appears.

Chapter 16 Making Image Adjustments 322
3 With the Crop tool selected, drag a rectangle over the image to exclude the areas that you want
to trim.
A Crop overlay appears on the image with resize handles, and the trimmed edges are dimmed.
Drag across the photo
with the Crop tool.
A dark overlay is placed
over the trimmed areas.
4 Do any of the following:
•To change the size and shape of a Crop overlay: Drag a resize handle on the Crop overlay.
Drag a resize handle to
resize the Crop overlay.
•To adjust the placement of the crop on the image: Drag the Crop overlay to the
appropriate position.
Drag the Crop overlay
to adjust its position.
•To set the aspect ratio of the Crop overlay: Choose an aspect ratio from the Aspect Ratio pop-up
menu, or enter a custom aspect ratio by entering values in the Width and Height elds.
Choose a standard
aspect ratio for the crop
from the Aspect Ratio
pop-up menu.
Note: Aperture interprets small (single- and double-digit) numbers as inches and larger
numbers as pixels.
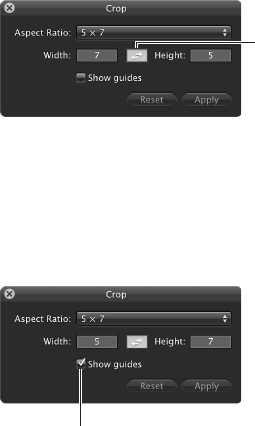
Chapter 16 Making Image Adjustments 323
•To change the orientation of the crop: Click the Switch Aspect Ratio button.
Click the Switch Aspect
Ratio button to change
the orientation to portrait
or landscape.
The values in the Width and Height elds are reversed, and the Crop overlay is updated to
show the new orientation. (Entering a number in the Width eld that is smaller than the
number in the Height eld sets a portrait orientation. Entering a larger number in the Width
eld sets a landscape orientation.)
•To show cropping guides within the Crop overlay: Select the “Show guides” checkbox.
Select the “Show guides”
checkbox to display cropping
guides over the photo.
5 When you are satised with the composition of the crop, do one of the following:
•Click the Apply button in the Crop HUD.
•Click the close button (with an X) at the top-left corner of the Crop HUD.
•Select another tool in the tool strip or the Full Screen view toolbar. For example, select the
Selection tool (or press A).
The cropped image appears in the Viewer. Select the Crop tool again (or press C) to make the
trimmed edges visible in the Viewer again.
To remove the crop from an image
If you’re unhappy with how an image is cropped, you can remove the Crop and start over.
1 Select the photo with the crop you want to reset.
2 In the tool strip, select the Crop tool.
3 Click the Reset button in the Crop HUD.

Chapter 16 Making Image Adjustments 324
Cropping Images with the Crop Controls
You use the Crop adjustment controls when an extra level of precision is required. For example,
if a client wants an image cropped to a precise dimension that is dierent from the standard
aspect ratios, you use the Crop controls.
Aperture uses a simple coordinate system to position the Crop overlay on the image. You
simply set x and y coordinates to specify the position of the bottom-left corner of the crop. The
x-coordinate moves the bottom-left corner of the crop horizontally, and the y-coordinate moves
the bottom-left corner of the crop vertically. Then you set the width and height to determine the
area within the crop.
To set crop dimensions using the Crop adjustment controls
1 Select a photo.
2 If you wish, use the Crop tool to place a rough crop on the image.
3 If the Crop controls are not shown in the Adjustments inspector or the Adjustments pane of the
Inspector HUD, choose Crop from the Add Adjustment pop-up menu.
4 In the Crop area of the Adjustments inspector or the Adjustments pane of the Inspector HUD,
click the X value slider’s left or right arrow, or double-click the number and enter a new number,
to set the horizontal position of the bottom-left corner of the Crop overlay.
Use the Width and Height
value sliders to adjust the size
of the area within the crop.
The X and Y value sliders
control the position of the
bottom-left corner of the
crop on the original photo.
The X value is measured in pixels, and as the value increases, the Crop overlay moves to the right.
5 Specify the vertical position of the bottom-left corner of the crop using the Y value slider.
The Y value is measured in pixels, and as the value increases, the Crop overlay moves up.
6 Specify the width of the crop using the Width value slider.
The width is measured in pixels, and the measurement starts at the bottom-left corner,
increasing from left to right.
7 Specify the height of the crop using the Height value slider.
The height is measured in pixels, and the measurement starts at the bottom-left corner,
increasing from bottom to top.
8 To apply the crop to the image, press Return.
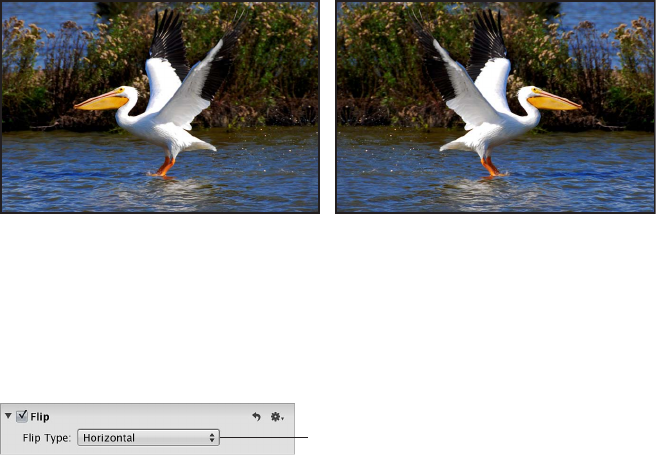
Chapter 16 Making Image Adjustments 325
Working with the Flip Controls
You use the Flip adjustment controls when you want to ip the composition of the image
vertically, horizontally, or both.
Before Flip adjustment After Flip adjustment
To ip the composition of an image
1 Select a photo.
2 If the Flip controls are not shown in the Adjustments inspector or the Adjustments pane of the
Inspector HUD, choose Flip from the Add Adjustment pop-up menu.
Choose how you want to flip
the photo from the Flip Type
pop-up menu.
3 In the Flip area of the Adjustments inspector or the Adjustments pane of the Inspector HUD, do
any of the following:
•To ip the image horizontally: Choose Horizontal from the Flip Type pop-up menu.
•To ip the image vertically: Choose Vertical from the Flip Type pop-up menu.
•To ip the image both horizontally and vertically: Choose Horizontal and Vertical from the Flip
Type pop-up menu.
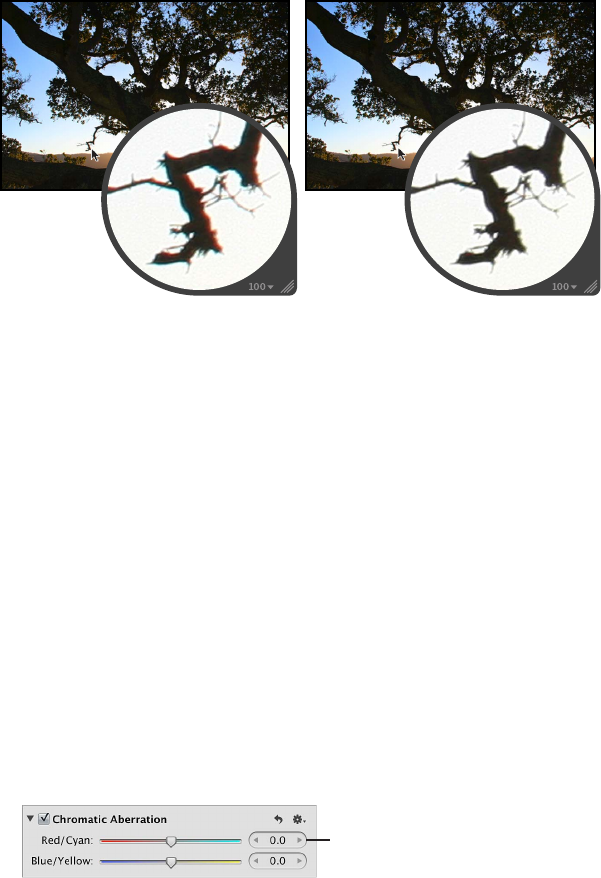
Chapter 16 Making Image Adjustments 326
Working with the Chromatic Aberration Controls
When you want to x chromatic aberration, also known as purple fringing, you use the Chromatic
Aberration adjustment controls. For example, if your image has a ghost image in high-contrast
boundary areas, you use the Chromatic Aberration adjustment controls to neutralize the color
fringing. Chromatic aberration can be caused by a poorly designed lens that fails to focus light at
the correct point on the focal plane when the lens is set at dierent focal lengths. Certain types
of light sources can also cause chromatic aberration.
Before Chromatic Aberration adjustment After Chromatic Aberration adjustment
(increased cyan)
Important: The Chromatic Aberration adjustment controls are available only for images using
Aperture 3 image processing. For more information about reprocessing your images, see An
Overview of Reprocessing Photos on page 76.
To remove chromatic aberration from an image
1 Select a photo.
2 If the Chromatic Aberration controls are not shown in the Adjustments inspector or the
Adjustments pane of the Inspector HUD, choose Chromatic Aberration from the Add Adjustment
pop-up menu.
3 If your image exhibits red or cyan fringing, neutralize it by doing one of the following:
•Drag the Red/Cyan slider to the right to add cyan, neutralizing the red fringing, or drag the
slider to the left to add red, neutralizing the cyan fringing.
•Click the left or right arrow in the Red/Cyan value slider, or drag in the value eld.
•Double-click the number in the Red/Cyan value slider, then enter a value from –5.0 to 5.0 and
press Return.
Use the Red/Cyan slider
and value slider to neutralize
red and cyan fringing.
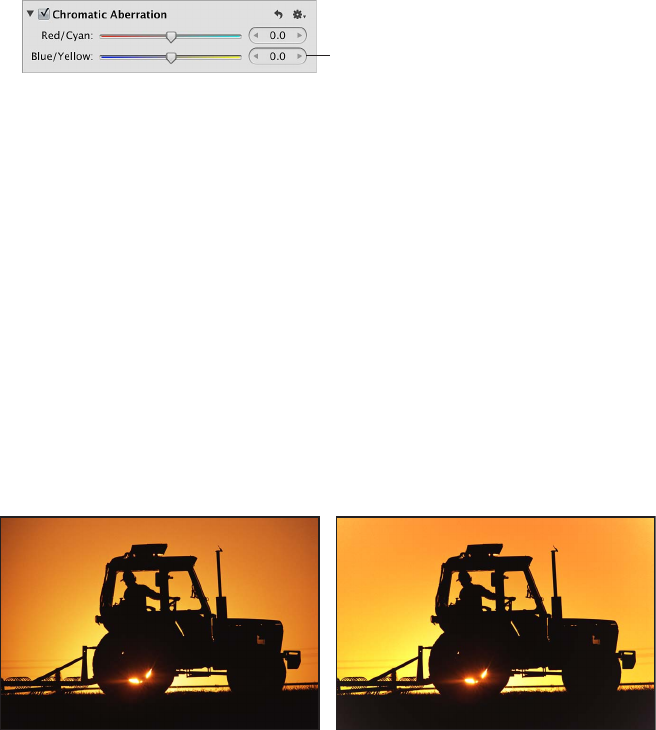
Chapter 16 Making Image Adjustments 327
4 If your image exhibits blue and yellow fringing, neutralize it by doing one of the following:
•Drag the Blue/Yellow slider to the right to add yellow, neutralizing the blue fringing, or drag
the slider to the left to add blue, neutralizing the yellow fringing.
•Click the left or right arrow in the Blue/Yellow value slider, or drag in the value eld.
•Double-click the number in the Blue/Yellow value slider, then enter a value from –5.0 to 5.0
and press Return.
Use the Blue/Yellow slider
and value slider to neutralize
blue and yellow fringing.
The chromatic aberration is removed from the image.
You can also brush the Chromatic Aberration adjustment on selected parts of an image. For
more information, see An Overview of Brushed Adjustments on page 392.
Working with the Devignette Controls
You use the Devignette adjustment controls to correct a vignette that was applied to an image
as it was shot. The term vignette describes an image whose brightness fades to its periphery from
its center. Vignettes are usually caused by poor lens design, stacked lters, lens hoods, and wide-
angle zoom lenses. Aperture corrects the image by increasing the brightness on the edges of the
image where vignettes typically occur.
Note: When you apply a Devignette and Crop adjustment to the same image, Aperture applies
the Devignette adjustment prior to the crop in order to correct lens artifacts. Applying the
Devignette adjustment before the crop prevents any distortion that would otherwise appear in
the cropped image.
Before Devignette adjustment After Devignette adjustment
To remove the vignette from your image
1 Select a photo.
2 If the Devignette controls are not shown in the Adjustments inspector or the Adjustments pane
of the Inspector HUD, choose Devignette from the Add Adjustment pop-up menu.
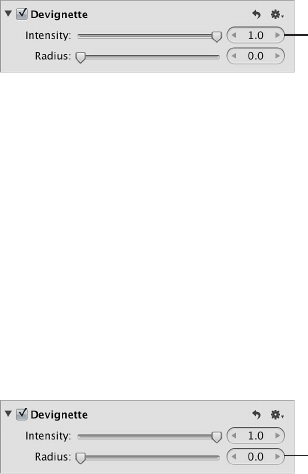
Chapter 16 Making Image Adjustments 328
3 By default, the Intensity parameter is set to 1.0. Adjust the Intensity parameter by doing one of
the following:
•Drag the Intensity slider to the left to decrease the amount of brightness applied to the edges
of the image, or drag it to the right to increase the brightness.
•Click the left or right arrow in the Intensity value slider to change the brightness applied to
the edges of the image, or drag in the value eld.
The left arrow decreases the amount of brightness applied to the edges of the image, and the
right arrow increases the brightness.
•Double-click the number in the Intensity value slider, then enter a value from 0.0 to 1.0 and
press Return.
Use the Intensity slider and
value slider to adjust the
amount of brightness applied
to the edges of the photo.
4 To adjust the distance Aperture goes from the edge of the image, in pixels, to apply the
Devignette adjustment, do one of the following:
•Drag the Radius slider to the right to increase the number of pixels Aperture goes toward
the center of the image to apply the Devignette adjustment, or drag it to the left to limit the
vignette to the edges of the image.
•Click the left or right arrow in the Radius value slider, or drag in the value eld.
The left arrow limits the Devignette adjustment to the edges of the image, and the right arrow
moves the Devignette adjustment toward the center point of the image.
•Double-click the number in the Radius value slider, then enter a value from 0.0 to 2.0 and
press Return.
Use the Radius slider and value
slider to adjust the size of the
area over which the Devignette
adjustment is applied.
The vignette is removed from the image.
For more information about applying a vignette to an image, see Working with the Vignette
Controls on page 389.
You can also brush the Devignette adjustment on selected parts of an image. For more
information, see An Overview of Brushed Adjustments on page 392.
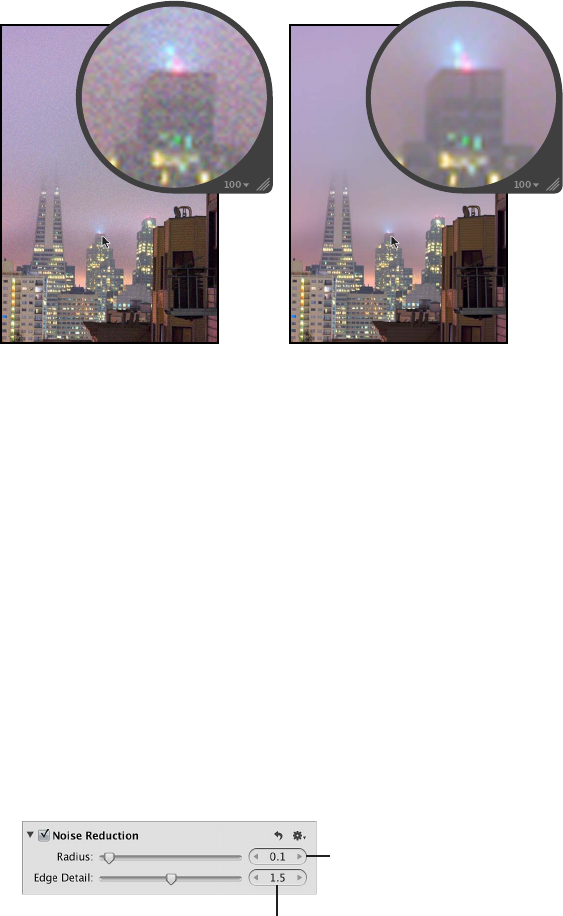
Chapter 16 Making Image Adjustments 329
Working with the Noise Reduction Controls
You use the Noise Reduction adjustment controls when you need to reduce digital noise in an
image. Digital noise is often caused by shooting at high ISO settings in low-light conditions.
When you reduce noise in an image, you often have to sharpen the image to prevent blurry
edges or loss of detail. For more information about sharpening an image, see Working with the
Edge Sharpen Controls on page 385.
Before Noise Reduction adjustment After Noise Reduction adjustment
To reduce digital noise in an image
1 Select a photo.
2 If the Noise Reduction controls are not shown in the Adjustments inspector or the Adjustments
pane of the Inspector HUD, choose Noise Reduction from the Add Adjustment pop-up menu (or
press Control-N).
3 Reduce digital noise in the image by doing one of the following:
•By default, the Radius slider is set to the left side of the slider control. Drag the Radius slider
to the right to decrease digital noise in the image, or drag the slider back to the left to reduce
the eect of the noise reduction.
•Click the left or right arrow in the Radius value slider to adjust noise in the image by 5 percent
increments, or drag in the value eld.
The left arrow increases noise in the image, and the right arrow decreases it.
•Double-click the number in the Radius value slider, then enter a value from 0.0 to 2.0 and
press Return.
Use the Radius slider and
value slider to decrease the
digital noise in the photo.
Use the Edge Detail slider
and value slider to maintain
details in areas of contrast.
A value of 0.0 applies no digital noise adjustment to the image. A value greater than 0.0 reduces
digital noise in the image.
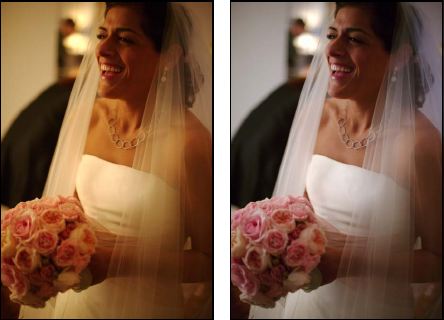
Chapter 16 Making Image Adjustments 330
4 Maintain edge detail in areas of high contrast in the image by doing one of the following:
•Drag the Edge Detail slider to the right to increase sharpness in areas of the image with high
contrast, or drag the slider back to the left to reduce the sharpening eect.
•Click the left or right arrow in the Edge Detail value slider to adjust edge detail by 5 percent
increments, or drag in the value eld.
The left arrow decreases edge detail sharpening in the image, and the right arrow increases it.
•Double-click the number in the Edge Detail value slider, then enter a value from 0.0 to 3.0 and
press Return.
As you change the parameter value, the image is updated to display the amount of edge detail
sharpening applied to it.
You can also brush the Noise Reduction adjustment on selected parts of an image. For more
information, see An Overview of Brushed Adjustments on page 392.
Working with the White Balance Controls
An Overview of the White Balance Adjustment
If an image has unnatural skin tones or pixels that should be pure white, you can use the White
Balance adjustment controls to remove the color cast from the image. Aperture provides three
methods for adjusting an image’s white balance:
•Balance the warmth of the image based on natural gray.
•Balance the warmth of the image based on skin tones.
•Balance the image based on traditional color temperature (in degrees kelvin) and tint.
You can adjust an image's white balance automatically or manually. In most cases, the automatic
adjustment succeeds in removing the color cast from the image. You can also use the White
Balance eyedropper to choose the natural gray or skin tone pixels that Aperture uses to balance
the image. If either the Auto White Balance button or the White Balance eyedropper does not
completely remove the color cast from the image, you can use the White Balance controls to
ne-tune the adjustment.
Although Aperture can set the white balance of the image with great accuracy, sometimes you
have to use a combination of these methods to have the image appear with the warm or cool
tonality you intended.
Before White Balance adjustment After White Balance adjustment
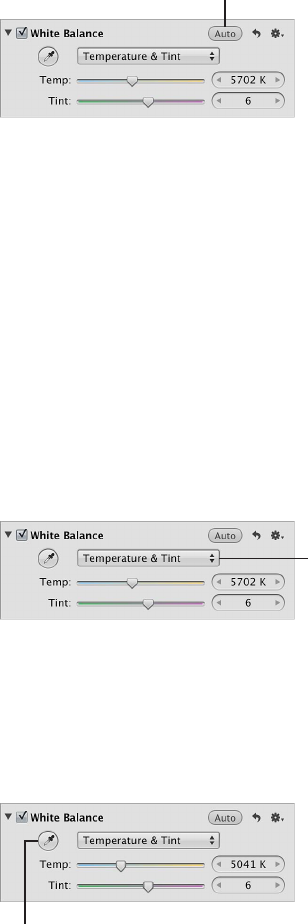
Chapter 16 Making Image Adjustments 331
Adjusting White Balance Automatically
Correcting white balance in an image is as simple as clicking a button.
To automatically adjust an image’s white balance
1 Select a photo.
2 In the White Balance area of the Adjustments inspector or the Adjustments pane of the Inspector
HUD, click the Auto button.
Click the Auto button to
automatically adjust the
image’s white balance.
Aperture evaluates the image. If faces are detected in the image, the image is adjusted to
preserve skin tones. If no faces are detected, Aperture identies a natural gray value in the image
and adjusts the image's white balance based on that value.
To ne-tune the image’s white balance settings after the automatic adjustment has been applied,
see Adjusting White Balance Manually on page 333.
To automatically adjust an image’s white balance using the White Balance eyedropper
When you have pixels in your image that should be pure white, you can use the White Balance
eyedropper tool to automatically set the color temperature and tint of the image.
1 Select a photo.
2 In the White Balance area of the Adjustments inspector or the Adjustments pane of the Inspector
HUD, choose the method Aperture uses to adjust the image’s white balance from the White
Balance pop-up menu.
Choose how you want to adjust
the image’s white balance from
this pop-up menu.
•To adjust the image’s white balance based on natural gray: Choose Natural Gray.
•To adjust the image’s white balance based on a skin tone: Choose Skin Tone.
•To adjust the image’s white balance based on color temperature (in degrees kelvin) and tint:
Choose Temperature & Tint.
3 Select the White Balance eyedropper tool to activate the Loupe.
Click the White Balance
eyedropper tool to
activate the Loupe.
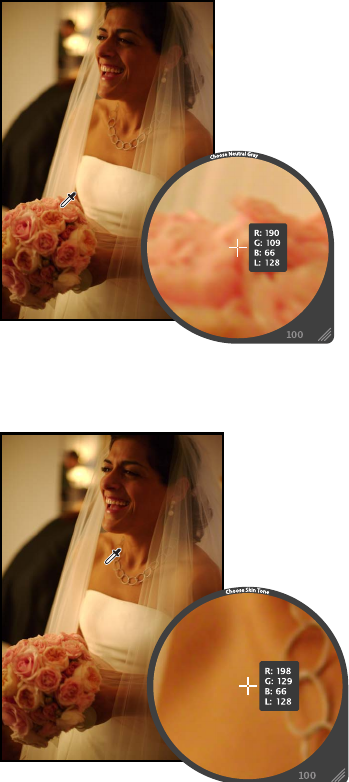
Chapter 16 Making Image Adjustments 332
The pointer changes to the Loupe, showing a magnied view of the target area. By default, the
Loupe is set to magnify the image to 100 percent (full size). If necessary, you can increase the
magnication of the Loupe by pressing Command–Shift–Plus Sign (+). For more information
about the Loupe, see An Overview of the Loupe on page 89.
4 Do one of the following:
•If you chose either Natural Gray or Temperature & Tint from the White Balance pop-up
menu: Position the target area of the Loupe over the pixels in the image that are a natural
gray, then click.
•If you chose Skin Tone from the White Balance pop-up menu: Position the target area of the
Loupe over a skin tone in the image, then click.
The white balance of the image is adjusted. The color tonality of the image is shifted either
cooler or warmer, depending on the tonality of the original image.
Important: Make sure that there is as little digital noise in the target area of the Loupe as
possible. Digital noise can skew the white-balance calculation results, introducing a color cast
that wasn’t previously there. A simple way to avoid errant pixels is to increase the magnication
of the Loupe by pressing Command–Shift–Plus Sign (+).

Chapter 16 Making Image Adjustments 333
Adjusting White Balance Manually
You can manually adjust an image’s white balance using the Warmth, Temp, and Tint
parameter controls.
You use the Warmth and Temp parameter controls to adjust the image’s color temperature. Color
temperature is a term used to describe the color of light when the image was shot. However,
it refers to the color value of the light rather than its heat value. Light’s color temperature is
measured in units called kelvin (K). Adjusting the color temperature of the image changes how
Aperture interprets the colors in the image in relation to the assigned temperature of light.
The purpose of adjusting the color temperature of an image is to make colors look as natural
as possible.
You can also manually adjust the tint of an image using the Tint parameter controls. You use
the Tint parameter controls when you need to ne-tune the white balance adjustment by
neutralizing the remaining green or magenta tint.
Note: The Warmth and Temp parameter controls adjust the image’s color temperature in the
same way except that Aperture does not display the Warmth values in kelvin (K) units.
To manually adjust the color temperature of an image
1 Select a photo.
2 In the White Balance area of the Adjustments inspector or the Adjustments pane of the Inspector
HUD, choose the method Aperture uses to adjust the image’s white balance from the White
Balance pop-up menu.
Choose how you want to adjust
the image’s white balance from
this pop-up menu.
•To adjust the image’s white balance based on natural gray: Choose Natural Gray.
•To adjust the image’s white balance based on a skin tone: Choose Skin Tone.
•To adjust the image’s white balance based on color temperature (in degrees kelvin) and tint:
Choose Temperature & Tint.
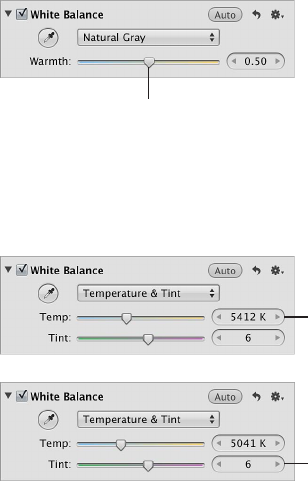
Chapter 16 Making Image Adjustments 334
3 Do one of the following:
•If you chose either Natural Gray or Skin Tone from the White Balance pop-up menu: Use the
Warmth parameter controls to warm or cool the the image’s tonality.
Use the Warmth slider
and value slider to adjust
the image’s tonality.
•If you chose Temperature & Tint from the White Balance pop-up menu: Use the Temp parameter
controls to adjust the image’s color temperature (in degrees kelvin) and the Tint parameter
controls to neutralize unwanted green or magenta tints.
Use the Temp slider and
value slider to adjust the color
temperature of the photo.
Use the Tint slider and
value slider to adjust
the tint of the photo.
Tip: You can brush Natural Gray and Skin Tone White Balance adjustments on an image. For
more information about working with brushed adjustments, see An Overview of Brushed
Adjustments on page 392.
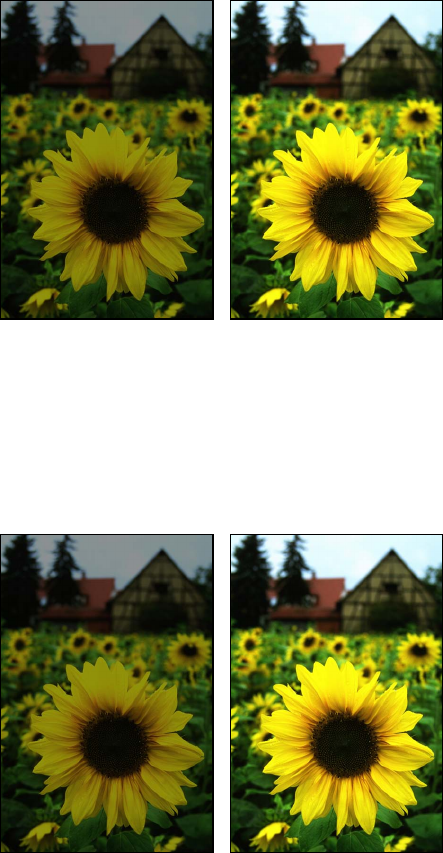
Chapter 16 Making Image Adjustments 335
Working with the Exposure Controls
An Overview of the Exposure Adjustment
You use the Exposure adjustment controls to set the exposure, recovery, black point, and
brightness values.
Before Exposure adjustment After Exposure adjustment
Using the Auto Exposure Button
When you want to quickly adjust the exposure of a RAW image, you can use the Auto Exposure
button. Depending on the exposure Aperture sets for the image, you can always ne-tune the
image’s exposure setting using the Exposure adjustment controls. For more information about
manually adjusting the exposure of an image, see Correcting Exposure in the Image on page 336.
Before Auto Exposure
adjustment
After Auto Exposure
adjustment
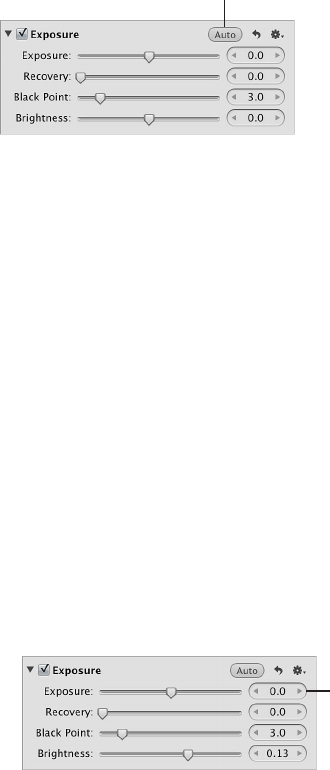
Chapter 16 Making Image Adjustments 336
To automatically correct the exposure of a RAW image
1 Select a photo.
2 In the Exposure area of the Adjustments inspector or the Adjustments pane of the Inspector
HUD, click the Auto Exposure button.
Click the Auto Exposure
button to automatically set
the exposure for the photo.
The exposure of the image is automatically corrected. If you need to ne-tune the image’s
exposure setting, see Correcting Exposure in the Image on page 336.
Correcting Exposure in the Image
If you’ve overexposed or underexposed an image, you can correct it by adjusting the Exposure
parameter. The amount of latitude you have—the visually acceptable range of f-stops—depends
on the le type, the bit depth, and the amount of compression applied to the image during
capture. Typically, a RAW le is capable of a slightly wider latitude than a JPEG le.
To correct the exposure of an image
1 Select a photo.
2 In the Exposure area of the Adjustments inspector or the Adjustments pane of the Inspector
HUD, adjust the Exposure parameter by doing one of the following:
•Drag the Exposure slider.
•Click the left or right arrow in the Exposure value slider to change the exposure of the image
by 5 percent increments, or drag in the value eld.
•Double-click the number in the Exposure value slider, then enter a value from –9.99 to 9.99
stops and press Return.
Use the Exposure slider
and value slider to correct
the photo’s exposure.
A negative value decreases the exposure (darkening the image), and a positive value increases
the exposure (lightening the image).
The exposure of the image is updated as you change the parameter value.
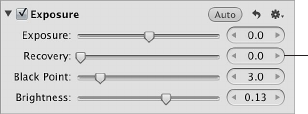
Chapter 16 Making Image Adjustments 337
Recovering Highlight Details in the Image
Many images, especially RAW image les, have additional highlight detail that isn’t displayed by
default. Aperture provides the Recovery parameter controls to give you access to that additional
headroom. Because digital image sensors dier from camera model to camera model, the
highlight headroom varies. In some cases, you can recover signicant detail that appears lost or
blown out in the most extreme highlight areas of the image.
Note: The Recovery controls are not available for RAW decoding versions 1.0 and 1.1. To make the
Recovery controls available, reprocess the image. For more information, see An Overview of the
RAW Fine Tuning Controls on page 289.
To recover highlight details in the image
1 Select a photo.
2 In the Exposure area of the Adjustments inspector or the Adjustments pane of the Inspector
HUD, adjust the Recovery parameter by doing one of the following:
•Drag the Recovery slider.
•Click the left or right arrow in the Recovery value slider to change the amount of highlight
detail to recover in the image by 5 percent increments, or drag in the value eld.
•Double-click the number in the Recovery value slider, then enter a value from 0.0 to 1.5 and
press Return.
Use the Recovery slider
and value slider to
recover highlight detail.
The higher the value, the more highlight information is made available, and the more
highlight detail is recovered.
The image’s highlights are updated as you change the parameter value.
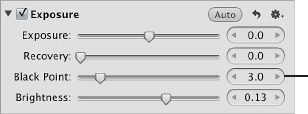
Chapter 16 Making Image Adjustments 338
Setting the Image’s Blacks
Shadow detail and the importance of visual elements in shadow vary from image to image.
In addition, some cameras are more capable of capturing shadow details than others. In some
photos, such as an image of a person’s face in the shadow of an alley, the shadow is the most
important visual element in the image. In other images, the details in the shadows have nothing
to do with the main subject of the image. For example, the shadow area of the image may
obscure trash that would otherwise ruin a pristine image. In Aperture, you use the Black Point
parameter controls to increase the threshold of shadow details in the image as well as crush the
blacks when necessary.
Note: The Black Point controls are not available for RAW decoding versions 1.0 and 1.1. To make
the Black Point controls available, reprocess the image. For more information, see An Overview of
the RAW Fine Tuning Controls on page 289.
To set the black point of the image
1 Select a photo.
2 In the Exposure area of the Adjustments inspector or the Adjustments pane of the Inspector
HUD, adjust the Black Point parameter by doing one of the following:
•Drag the Black Point slider.
•Click the left or right arrow in the Black Point value slider to change the shadow detail to
recover in the image by 5 percent increments, or drag in the value eld.
•Double-click the number in the Black Point value slider, then enter a value from –5.0 to 50.0
and press Return.
Use the Black Point slider
and value slider to set
pure black in the photo.
Decreasing the value increases the amount of detail in the shadow areas by moving pure black
below the current black point. Increasing the value decreases the amount of detail in the shadow
areas of the image, eectively crushing the blacks by moving pure black above the current
black point.
The image’s black point is updated as you change the parameter value.
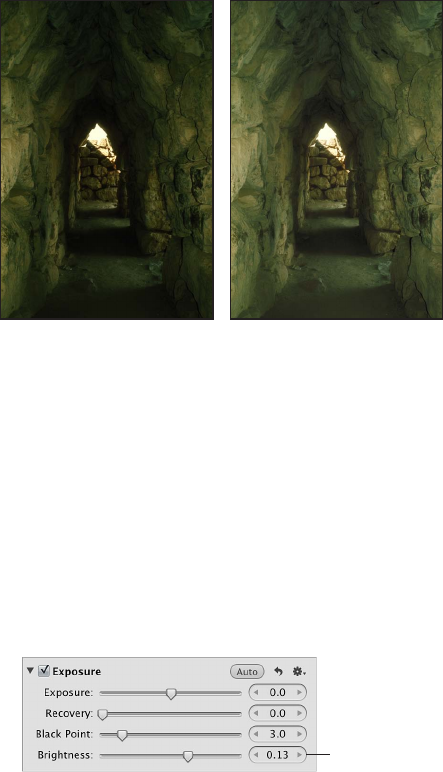
Chapter 16 Making Image Adjustments 339
Adjusting Brightness in the Image
You can adjust the Brightness parameter when you want to lighten or darken your image. When
you adjust brightness, the brightness values of the midtone pixels in the image change the most.
You can change the brightness of the image temporarily to see how the adjustment aects
details in the shadows, midtones, and highlights. For more precise control over the range of
tonality in the image, consider using the Levels adjustment controls. For more information about
adjusting levels, see An Overview of the Levels Adjustment on page 367.
Before Brightness adjustment After Brightness adjustment
To adjust brightness in an image
1 Select a photo.
2 In the Exposure area of the Adjustments inspector or the Adjustments pane of the Inspector
HUD, adjust the Brightness parameter by doing one of the following:
•Drag the Brightness slider.
•Click the left or right arrow in the Brightness value slider to change the brightness of the
image by 5 percent increments, or drag in the value eld.
•Double-click the number in the Brightness value slider, then enter a value from –2.0 to 2.0 and
press Return.
Use the Brightness slider
and value slider to lighten
and darken the photo.
A value below 0.0 decreases the brightness of the image. A value greater than 0.0 increases
the brightness of the image. The brightness of the image is updated as you change the
parameter value.
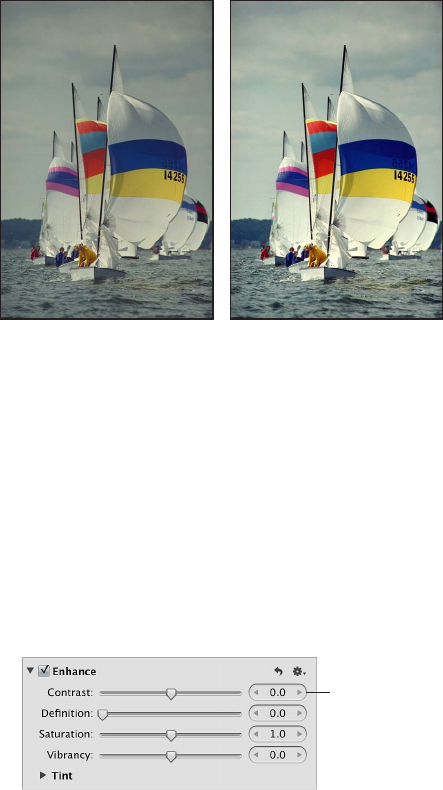
Chapter 16 Making Image Adjustments 340
Working with the Enhance Controls
An Overview of the Enhance Adjustment
You use the Enhance adjustment controls to set the contrast, denition, saturation, and vibrancy,
as well as the black, gray, and white tint values.
You can also brush the Enhance adjustment on selected parts of an image. For more information,
see An Overview of Brushed Adjustments on page 392.
Adjusting Contrast in the Image
If you want to adjust the dierence between the dark and bright areas of the image, you can
modify the Contrast parameter. An image with very little midtone tonality is considered to have
a lot of contrast, whereas an image with considerable midtone tonality is considered to have
minimal contrast. Often, an image with too much midtone tonality looks at. Adding contrast to
the image can add depth to it. However, you add contrast to the image at the expense of detail
in the midtones, so a little contrast goes a long way.
Before Contrast adjustment After Contrast adjustment
To adjust the contrast in an image
1 Select a photo.
2 In the Enhance area of the Adjustments inspector or the Adjustments pane of the Inspector HUD,
adjust the Contrast parameter by doing one of the following:
•Drag the Contrast slider.
•Click the left or right arrow in the Contrast value slider to change the contrast of the image by
5 percent increments, or drag in the value eld.
•Double-click the number in the Contrast value slider, then enter a value from –1.0 to 1.0 and
press Return.
Use the Contrast slider and
value slider to modify the
contrast between light and
dark colors in the photo.
A value below 0.0 decreases the contrast in the image. A value greater than 0.0 increases the
contrast in the image. The contrast in the image is updated as you change the parameter value.
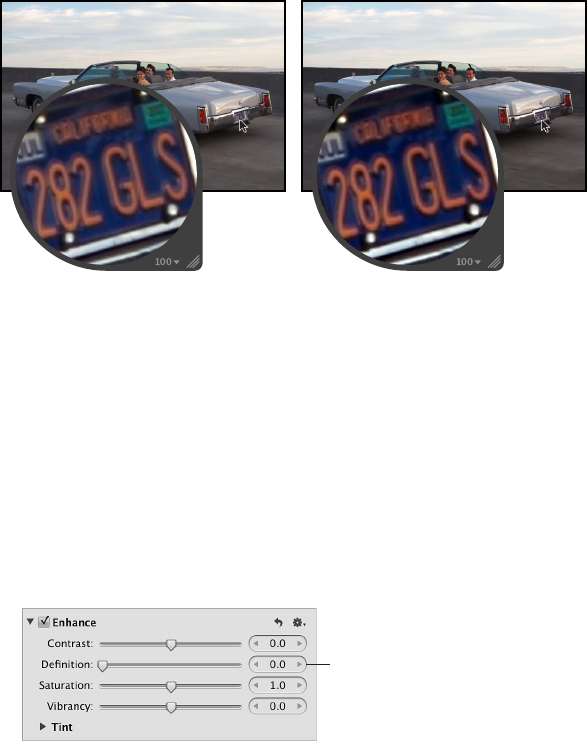
Chapter 16 Making Image Adjustments 341
Note: If you’re trying to retrieve detail in a high-contrast image, you should use the Highlights
& Shadows controls. For more information, see Adjusting Highlights, Shadows, and Midtone
Contrast on page 364.
Adjusting Denition in the Image
When you want to add a little clarity and denition to an image without adding too much
contrast, you use the Denition parameter controls. The Denition parameter is useful for adding
local contrast (adding contrast to areas of the image that are improved by a contrast adjustment
without aecting the image’s global contrast) as well as reducing haze.
Before Definition adjustment After Definition adjustment
To adjust denition in an image
1 Select a photo.
2 In the Enhance area of the Adjustments inspector or the Adjustments pane of the Inspector HUD,
adjust the Denition parameter by doing one of the following:
•Drag the Denition slider.
•Click the left or right arrow in the Denition value slider to change the clarity of the image by
5 percent increments, or drag in the value eld.
•Double-click the number in the Denition value slider, then enter a value from 0.0 to 1.0 and
press Return.
Use the Definition slider
and value slider to add
local contrast to the photo.
A value greater than 0.0 increases the clarity in the image. The denition in the image is updated
as you change the parameter value.
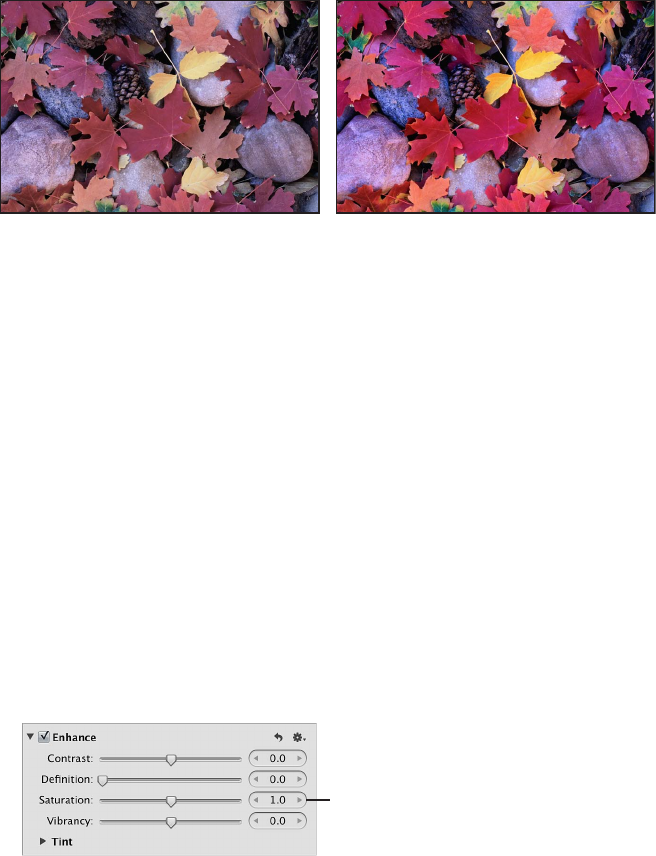
Chapter 16 Making Image Adjustments 342
Adjusting Saturation in the Image
You can change the value for the Saturation parameter to either give your image an extra burst
of color or tone down the color palette by desaturating the image.
Before Saturation adjustment After Saturation adjustment
Important: Increasing the saturation of an image can make the colors appear more pure, and
many people like the eect of an image whose colors are more saturated than they would
appear naturally. However, you can easily oversaturate an image. In the process of making the
colors more pure, subtleties in shades of colors disappear, often resulting in reduced detail in
the image. To ensure that visual elements aren’t unnecessarily lost, pay attention to the details in
your image as you increase saturation.
To change the saturation of an image
1 Select a photo.
2 In the Enhance area of the Adjustments inspector or the Adjustments pane of the Inspector HUD,
adjust the Saturation parameter by doing one of the following:
•Drag the Saturation slider.
•Click the left or right arrow in the Saturation value slider to change the saturation of the image
by 5 percent increments, or drag in the value eld.
•Double-click the number in the Saturation value slider, then enter a value from 0.0 to 4.0 and
press Return.
Use the Saturation slider
and value slider to adjust
the saturation of colors
in the photo.
A value below 1.0 decreases the color saturation in the image, and a value above 1.0 increases
the saturation. A value of 0.0 removes all color from the image, making it grayscale. A value of 4.0
increases the saturation by 400 percent.
The saturation of the image is updated as you change the parameter value.
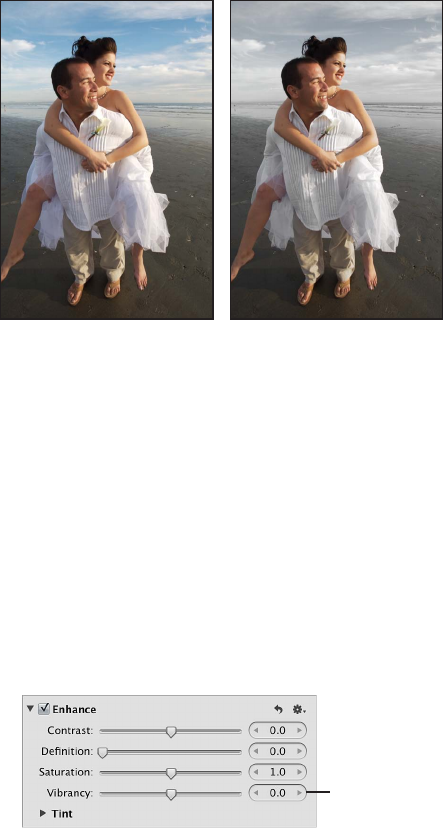
Chapter 16 Making Image Adjustments 343
Adjusting Vibrancy in the Image
You use the Vibrancy parameter controls when you want to add a bit of punch to the image
without aecting skin tones. The Vibrancy parameter applies saturation to the image in a
nonlinear manner. Colors that are already saturated are left alone, while saturation is added to
all other colors. In addition, the Vibrancy parameter takes skin tones into account, leaving them
untouched. This allows you to take a portrait and desaturate the image except for the skin tones.
Before Vibrancy adjustment After Vibrancy adjustment
(reduced saturation except
for the skin tones)
To adjust vibrancy in an image
1 Select a photo.
2 In the Enhance area of the Adjustments inspector or the Adjustments pane of the Inspector HUD,
adjust the Vibrancy parameter by doing one of the following:
•Drag the Vibrancy slider.
•Click the left or right arrow in the Vibrancy value slider to change the saturation of the image
by 5 percent increments, or drag in the value eld.
•Double-click the number in the Vibrancy value slider, then enter a value from –1.0 to 1.0 and
press Return.
Use the Vibrancy slider and
value slider to add smart
saturation to the photo.
A value below 0.0 decreases the color saturation in the image, and a value above 0.0 increases
the saturation of the nonsaturated colors. A value of –1.0 removes all color from the image,
making it grayscale except for any skin tones.

Chapter 16 Making Image Adjustments 344
Setting the Tint of Black, Gray, and White Values in the Image
You use the Black Tint, Gray Tint, and White Tint color wheels when you want to selectively
remove color casts from the shadows, midtones, and highlights in the image. Color casts
are often caused by shooting in mixed lighting and unnatural lighting situations, where the
dierence in the color from the mixture of multiple types of source lights can produce a color
variance in a specic tonal range in an image. For example, when shooting indoors, interior
incandescent (tungsten) lighting can often produce a yellow color cast through the white colors
in the image. Using the White Tint eyedropper, you can have Aperture isolate the highlights and
add blue to the white values, thereby reducing the yellow color cast and returning the whites to
neutral white.
There are two methods for selectively adjusting the tint values in an image: you can use the
Black Tint, Gray Tint, and White Tint eyedroppers to have Aperture automatically adjust the tint
to neutral color values, or you can use the Black Tint, Gray Tint, and White Tint color wheels to
manually adjust the tint values. The method you choose is determined by the level of precision
you require. The eyedroppers provide an accurate means of identifying the color cast within the
tonal range of each eyedropper and returning the color values to neutral. However, depending
on the subject, you may not want to completely remove the color cast found in a specic
tonal range. Therefore, you can manually adjust the tint values in the shadows, midtones, and
highlights using the Black Tint, Gray Tint, and White Tint color wheels.
For more information about using the eyedroppers to adjust the black, gray, and white tints in
the image, see Using the Eyedroppers to Set the Tint in an Image on page 344.
For more information about manually adjusting the black, gray, and white tints in the image, see
Manually Setting the Tint in an Image on page 349.
Using the Eyedroppers to Set the Tint in an Image
You use the Black Tint, Gray Tint, and White Tint eyedropper tools when you want to have
Aperture selectively modify the tints of the shadows, midtones, and highlights in an image
automatically.
You use the Black Tint eyedropper to remove color casts from the shadows in your images.
Before Black Tint adjustment After Black Tint adjustment
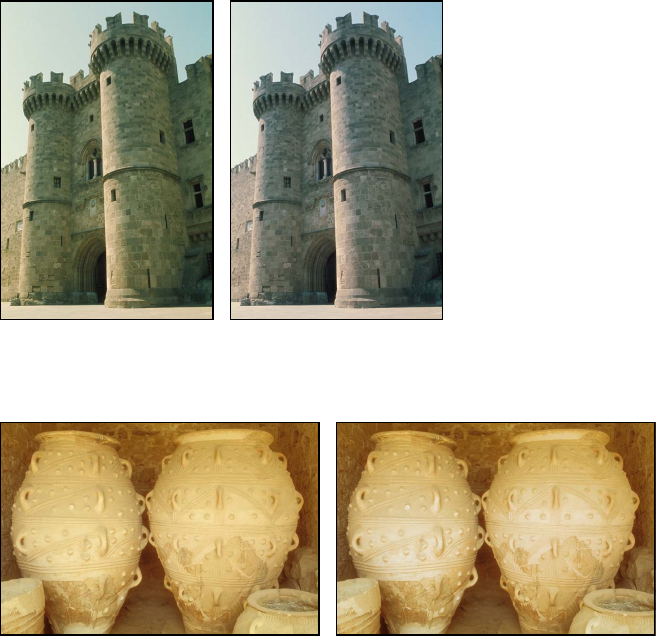
Chapter 16 Making Image Adjustments 345
You use the Gray Tint eyedropper to remove color casts from the midtones in your images.
Before Gray Tint adjustment After Gray Tint adjustment
You use the White Tint eyedropper to remove color casts from the highlights in your images.
Before White Tint adjustment After White Tint adjustment
Whereas using the White Balance controls adjusts the tints of all tonal values in the image
uniformly, the Black Tint, Gray Tint, and White Tint eyedropper tools allow you to selectively
neutralize color casts that aect only the shadows, midtones, or highlights. In some dicult
cases, you can use the Black Tint, Gray Tint, and White Tint eyedropper tools in combination with
the White Balance controls to rst neutralize a tint in a specic tonal range and then uniformly
remove the tint from the rest of the image. For more information about adjusting white balance,
see An Overview of the White Balance Adjustment on page 330.
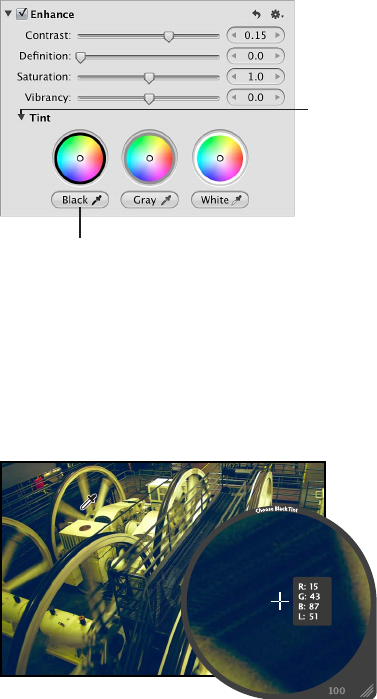
Chapter 16 Making Image Adjustments 346
To set the tint of the shadows in an image
1 Select a photo.
2 If necessary, click the Tint disclosure triangle in the Enhance area of the Adjustments inspector or
the Adjustments pane of the Inspector HUD to reveal the Tint color wheels, then select the Black
Tint eyedropper.
Click the disclosure
triangle to reveal
the Tint color wheels.
Select the Black Tint
eyedropper to activate
the Loupe.
The pointer changes to the Loupe, showing a magnied view of the target area. By default, the
Loupe is set to magnify the image to 100 percent (full size). If necessary, you can increase the
magnication of the Loupe by pressing Command–Shift–Plus Sign (+). For more information
about the Loupe, see An Overview of the Loupe on page 89.
3 Position the target area of the Loupe over the darkest pixels in the image, then click.
The tint (hue and saturation) of the black values in the image is set to remove the color cast in
the shadows.
Important: Make sure that there are no bright pixels in the target area of the Loupe. Bright pixels
in the target area can skew the Black Tint calculation, making the image look dierent than
intended. A simple way to avoid errant bright pixels is to increase the magnication of the Loupe
by pressing Command–Shift–Plus Sign (+).
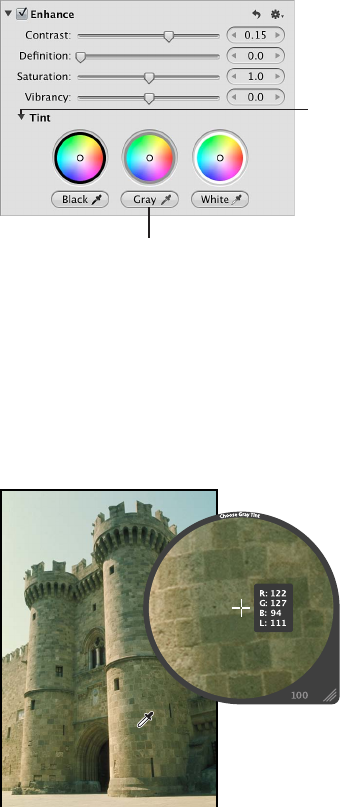
Chapter 16 Making Image Adjustments 347
To set the tint of the midtone values in an image
1 Select a photo.
2 If necessary, click the Tint disclosure triangle in the Enhance area of the Adjustments inspector or
the Adjustments pane of the Inspector HUD to reveal the Tint color wheels, then select the Gray
Tint eyedropper.
Click the disclosure
triangle to reveal
the Tint color wheels.
Select the Gray Tint
eyedropper to activate
the Loupe.
The pointer changes to the Loupe, showing a magnied view of the target area. By default, the
Loupe is set to magnify the image to 100 percent (full size). If necessary, you can increase the
magnication of the Loupe by pressing Command–Shift–Plus Sign (+). For more information
about the Loupe, see An Overview of the Loupe on page 89.
3 Position the target area of the Loupe over a midrange color that is as close as possible to
medium gray, then click.
The tint (hue and saturation) of the gray values in the image is set to remove the color cast in
the midtones.
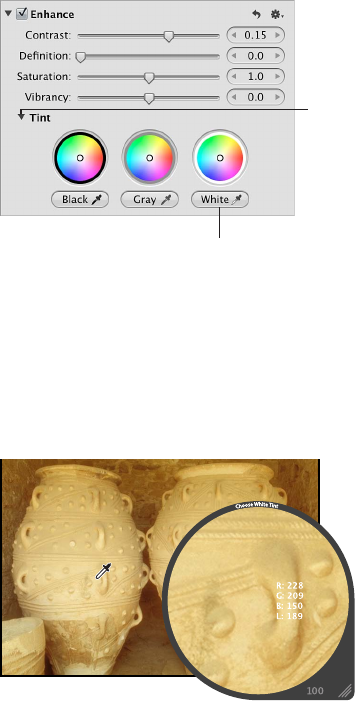
Chapter 16 Making Image Adjustments 348
To set the tint of the highlight values in an image
1 Select a photo.
2 If necessary, click the Tint disclosure triangle in the Enhance area of the Adjustments inspector or
the Adjustments pane of the Inspector HUD to reveal the Tint color wheels, then select the White
Tint eyedropper.
Click the disclosure
triangle to reveal
the Tint color wheels.
Select the White Tint
eyedropper to activate
the Loupe.
The pointer changes to the Loupe, showing a magnied view of the target area. By default, the
Loupe is set to magnify the image to 100 percent (full size). If necessary, you can increase the
magnication of the Loupe by pressing Command–Shift–Plus Sign (+). For more information
about the Loupe, see An Overview of the Loupe on page 89.
3 Position the target area of the Loupe over the lightest (white) pixels in the image, then click.
The tint (hue and saturation) of the white values in the image is set to remove the color cast in
the highlights.
Important: Make sure that there are no dark pixels in the target area of the Loupe. Dark pixels
in the target area can skew the White Tint calculation, making the image look dierent than
intended. A simple way to avoid errant dark pixels is to increase the magnication of the Loupe
by pressing Command–Shift–Plus Sign (+).
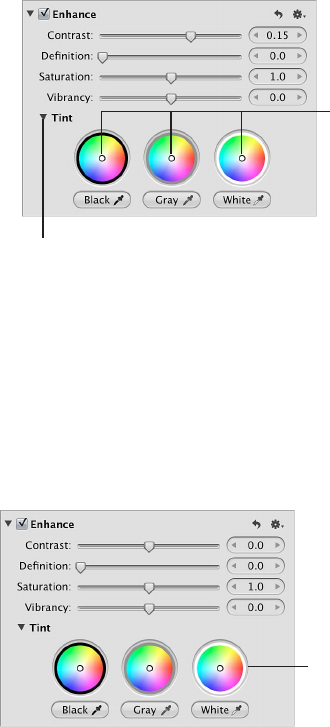
Chapter 16 Making Image Adjustments 349
Manually Setting the Tint in an Image
You can also manually adjust the tint of the shadow, midtone, and highlight values in an image
using the Black Tint, Gray Tint, and White Tint color wheels.
To manually adjust the tint of the shadow, midtone, and highlight values in an image
1 Select a photo.
2 If necessary, click the Tint disclosure triangle in the Enhance area of the Adjustments inspector or
the Adjustments pane of the Inspector HUD, then do the following:
•To adjust the tint of the shadows: Drag the Black point in the Black Tint color wheel.
•To adjust the tint of the midtones: Drag the Gray point in the Gray Tint color wheel.
•To adjust the tint of the highlights: Drag the White point in the White Tint color wheel.
Drag the Black, Gray, and
White points (white circles)
to selectively adjust the
tint of the photo.
Click the disclosure triangle to
reveal the Tint color wheels.
You remove a color cast in a tonal range by dragging the point in the color wheel toward the
opposite color. For example, to remove a blue cast, you drag the point in the color wheel toward
yellow until the color cast is neutralized.
To reset a Tint color wheel
You can individually reset the Tint color wheels without aecting the other parameters in the
Enhance area of the Adjustments inspector or the Adjustments pane of the Inspector HUD.
mDouble-click the color wheel.
Double-click a color
wheel to reset it to
its default value.
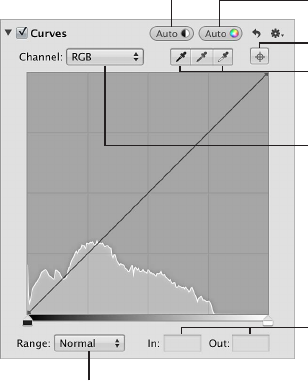
Chapter 16 Making Image Adjustments 350
Working with the Curves Controls
An Overview of the Curves Adjustment
You use the Curves adjustment controls when you want to manually set the tonal values of
the shadows, midtones, and highlights in an image using a tonal curve. Unlike the Levels
adjustment controls, the Curves controls do not reapportion the luminance values in the image
by constraining the white and black points. Instead, you use the Curves controls to precisely
remap the position of the midtones relative to the white and black points. Because the human
eye’s perception of light is logarithmic rather than incremental, a curve is necessary to distribute
the luminance values across all tonal ranges in an image in a way that matches how the eye
perceives light in nature.
In addition to adjusting the tonal values of an image for overall luminance, you can also color
correct an image by applying the Curves adjustment to the red, green, and blue channels
independently. Applying a Curves adjustment to each color channel allows you to control the
color tonality in an image.
You can also have Aperture automatically identify tonal ranges in an image using the Black Point,
Gray Point, and White Point eyedropper tools in the Curves adjustment controls. When you select
a tonal range using one of the eyedropper tools, Aperture plots the corresponding curve over
the Curves histogram.
You can also brush the Curves adjustment on selected parts of an image. For more information,
see An Overview of Brushed Adjustments on page 392.
Important: The Curves adjustment controls are only available for images using Aperture 3
image processing. For more information about reprocessing your images, see An Overview of
Reprocessing Photos on page 76.
Curves Adjustment Controls
Before applying a Curves adjustment, it’s a good idea to get acquainted with the Curves
adjustment controls.
Add Point button
Channel pop-up menu
Auto Curves
Combined button
Auto Curves
Separate button
Black Point, Gray Point,
and White Point
eyedropper buttons
Range pop-up menu
In and Out fields

Chapter 16 Making Image Adjustments 351
•Channel pop-up menu: Choose a color channel to apply a tonal curve to from this pop-up
menu. You can also apply the tonal curve to all color channels combined, as well as show
separate color channel overlays when tonal curve adjustments are applied to individual
color channels.
•Auto Curves Combined button: Click this button to apply a tonal curve adjustment when
you want to correct contrast based on total luminance, without aecting the color cast of
the image.
•Auto Curves Separate button: Click this button to apply a tonal curve adjustment when you
want to correct contrast as well as remove color casts in the image.
•Black Point eyedropper tool: Use this eyedropper to set the black point in the image.
•Gray Point eyedropper tool: Use this eyedropper to set the gray point in the image.
•White Point eyedropper tool: Use this eyedropper to set the white point in the image.
•Add Point button: Click this button to use the Loupe to sample pixels in the image and then
add a point to the tonal curve for each color channel as well as the RGB tonal curve.
•In and Out elds: Enter the In and Out point values for a selected point on the tonal curve. The In
point represents the horizontal axis (x-axis), and the Out point represents the vertical axis (y-axis).
•Range pop-up menu: Choose a viewing range option from this pop-up menu. Choosing
Shadows restricts the view of the histogram and tonal curve from pure black to 50 percent
gray. Choosing Normal presents the view of the histogram and tonal curve from pure black
to pure white. Choosing Extended enlarges the view of the histogram from pure black to two
times pure white. Because some cameras are capable of capturing image information beyond
pure white, using the Extended range option provides controls for bringing that information
into the viewable image.
Working with the Auto Curves Buttons
You use the Auto Curves buttons to analyze the image and apply a tonal curve adjustment to the
image based on that analysis. This is a good way to make a quick correction to an image before
ne-tuning the Curves adjustment with the manual adjustment controls.
To automatically adjust the tonal curve of an image based on total luminance
When you want to quickly adjust the tonal curve of an image based on total luminance values—
red, green, and blue channels combined—you click the Auto Curves Combined button. Red,
green, and blue channels are adjusted by the same amount based on the total luminance. You
use the Auto Curves Combined button for luminance when you want to correct the contrast of
the image without modifying the color cast of the image.
Before Auto Curves Combined adjustment After Auto Curves Combined adjustment
1 Select a photo.
2 If the Curves controls are not shown in the Adjustments inspector or the Adjustments pane of
the Inspector HUD, choose Curves from the Add Adjustment pop-up menu.
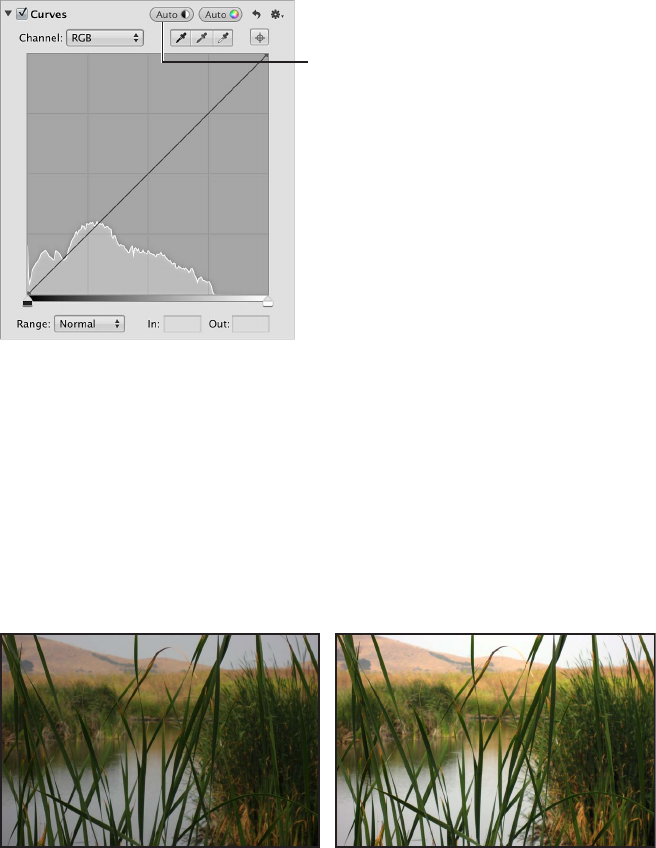
Chapter 16 Making Image Adjustments 352
3 In the Curves area of the Adjustments inspector or the Adjustments pane of the Inspector HUD,
click the Auto Curves Combined button.
Click the Auto Curves
Combined button to
automatically set the
tonal curve for the
photo based on all
three color channels.
The tonal curve of the image is adjusted. To ne-tune the tonal curve adjustment, see Adjusting
the Tonal Curve of an Image Using the Curves Controls on page 353.
To automatically adjust the tonal curve of an image based on an evaluation of each
color channel
When you want to automatically adjust the tonal curve of an image based on individual
evaluations of the red, green, and blue channels, you use the Auto Curves Separate button. Red,
green, and blue channels are adjusted based on the evaluation of each channel. You use the
Auto Curves Separate button when you want to correct the color cast in the image in addition to
correcting the contrast.
Before Auto Curves Separate adjustment After Auto Curves Separate adjustment
1 Select a photo.
2 If the Curves controls are not shown in the Adjustments inspector or the Adjustments pane of
the Inspector HUD, choose Curves from the Add Adjustment pop-up menu.
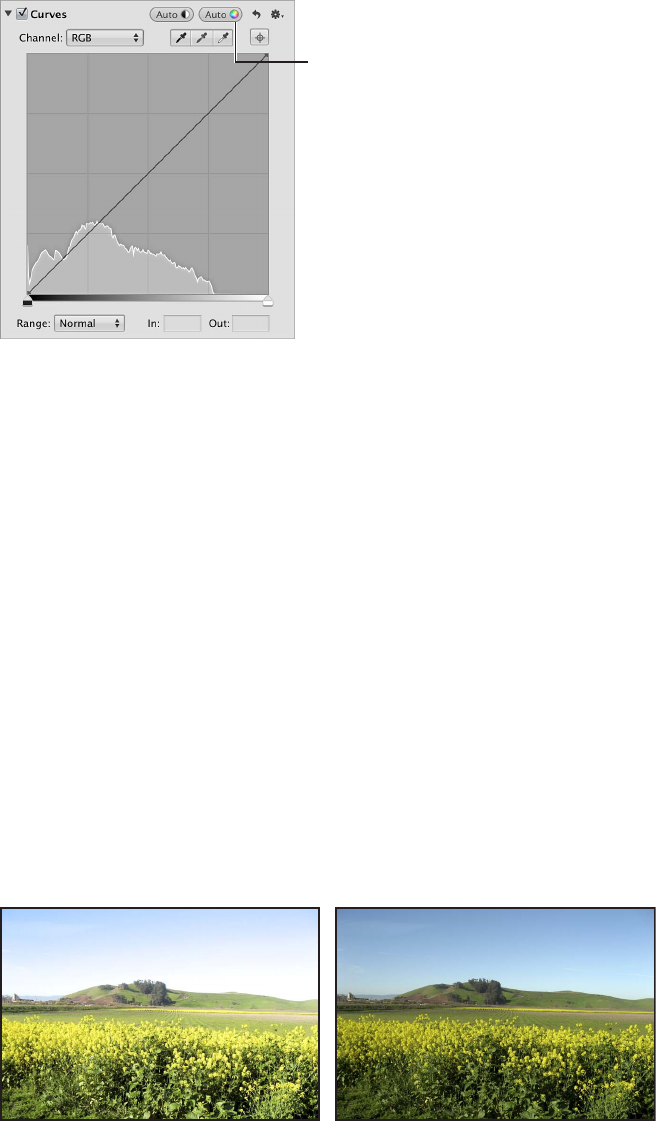
Chapter 16 Making Image Adjustments 353
3 In the Curves area of the Adjustments inspector or the Adjustments pane of the Inspector HUD,
click the Auto Curves Separate button.
Click the Auto Curves
Separate button to
automatically set
the tonal curve for
the photo based
on an evaluation of
each color channel’s
luminance values.
The tonal curve of the image is automatically adjusted for each color channel. To ne-tune the
tonal curve adjustment, see Adjusting the Tonal Curve of an Image Using the Curves Controls on
page 353.
Adjusting the Tonal Curve of an Image Using the Curves Controls
You use the tonal curve in the Curves adjustment controls to adjust the overall tonality of an
image. There are two types of tonal curve adjustments: RGB and Luminance. When you want
to specify a tonal curve adjustment that modies both the contrast and the tint in the image,
you use the RGB tonal curve. When you want to adjust the overall tonality of an image without
aecting its color cast, you use the luminance tonal curve.
As you perform a tonal curve adjustment, a histogram is displayed behind the tonal curve and
is updated as you manipulate the tonal curve. You can specify the tonal range of the histogram
to focus the graph on the part of the tonal curve you plan to work with. For example, if you plan
to manipulate the contrast in the shadow areas of the image, you can limit the tonal range of
the tonal curve and histogram to display pure black to 50 percent gray only. You can also extend
the range of the histogram and tonal curve beyond pure white to capture highlight detail that
would be clipped otherwise.
You can also adjust the tonal curve of each color channel independently. For more information,
see Using the Curves Controls for Color Correction on page 361.
Before Curves adjustment After Curves adjustment
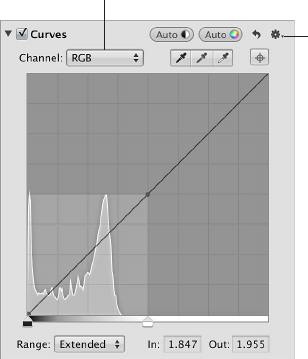
Chapter 16 Making Image Adjustments 354
To adjust the tonal curve of an image based on luminance
1 Select a photo.
2 If the Curves controls are not shown in the Adjustments inspector or the Adjustments pane of
the Inspector HUD, choose Curves from the Add Adjustment pop-up menu.
Channel pop-up menu
Curves Action
pop-up menu
3 Do one of the following:
•Choose RGB from the Channel pop-up menu.
Choosing the RGB tonal curve allows you to manipulate the tonal curve of the red, green, and
blue color channels combined. This is the proper choice when you want to modify the tint of
the image in addition to the contrast.
•Choose Luminance from the Grayscale section of the Curves Action pop-up menu, then
choose Luminance from the Channel pop-up menu.
Choosing the luminance tonal curve allows you to manipulate the luminance of the combined
red, green, and blue color channels without aecting the image’s tint.
4 Choose the tonal range to display from the Range pop-up menu.
For more information about the options in the Range pop-up menu, see Curves Adjustment
Controls on page 350.
5 Choose the type of tonal curve adjustment to apply to the image from the Type section of the
Curves Action pop-up menu.
Choosing Linear—the default option—applies the Curves adjustment to the image evenly
from pure black to pure white and beyond. Choosing Gamma-Corrected applies the Curves
adjustment logarithmically to match the way the human eye perceives light, adding additional
weight to the shadows.
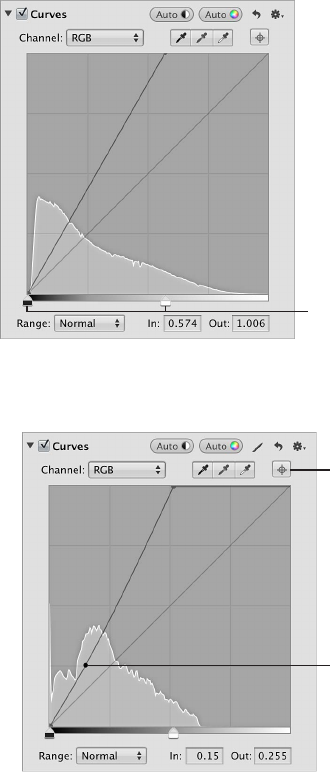
Chapter 16 Making Image Adjustments 355
6 Drag the Black Point and White Point sliders to where they touch the outside of the histogram
graph, constraining the image to its new black and white points.
Drag the Black Point and
White Point sliders to where
they touch the outside of
the histogram graph.
7 Set a point along the curve by doing one of the following:
•Click a place on the curve where you want to add a point.
Click the Add Point
button to use the
eyedropper tool to
sample a portion of
the photo and add a
point to the tonal curve.
Click the tonal curve
to add a new point, and
drag the new point to
set the tonal value.
•Click the Add Point button and use the eyedropper tool to sample a portion of the image.
Note: You can change the Loupe’s color value sample size by choosing an option from the
Adjustment Action pop-up menu. For more information, see Using the Color Meter and
Displaying Camera Information on page 286.
Aperture places a point on the curve in the exact tonal range of the sampled area of
the image.
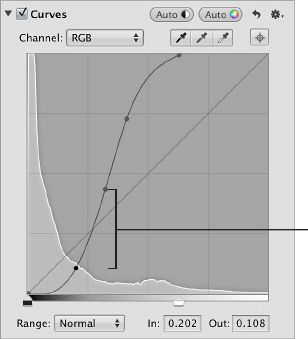
Chapter 16 Making Image Adjustments 356
8 Adjust the shape of the curve by doing one of the following:
•Drag the point on the curve until that tonal area of the image looks correct.
For example, dragging a point down in the shadow area of the curve darkens the shadows in
the image, and dragging a point up in the shadow area lightens the shadows in the image.
•Click a point on the curve and enter new In point and Out point values in the In and Out elds.
The In point values represent the horizontal axis of the graph, and the Out point values
represent the vertical axis of the graph.
Points on the curve that are not selected remain anchored, allowing you to independently adjust
each tonal area.
Darkening the shadows
and lightening the
highlights creates an
S-curve, indicating that
the photo’s contrast
is increased.
9 Repeat steps 7 and 8 for each tonal area in the image that you want to correct.
The tonal values in the image are adjusted, giving the image the appropriate amount of contrast.
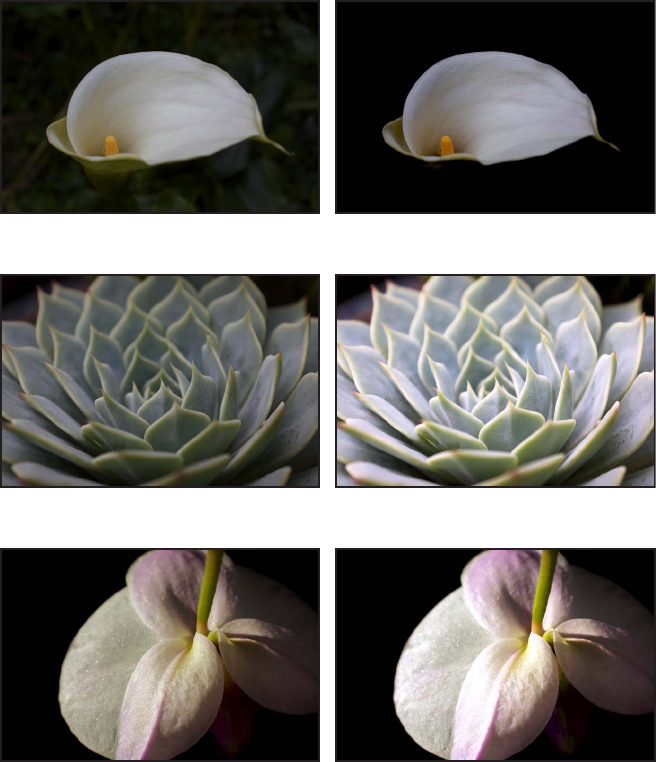
Chapter 16 Making Image Adjustments 357
Using Eyedropper Tools to Set Black, Gray, and White Points
You use the Black Point, Gray Point, and White Point eyedropper tools in the Curves adjustment
controls when you want to have Aperture selectively modify the tonal values of the shadows,
midtones, and highlights in an image automatically. Using an eyedropper tool, you sample the
pixels of the tonal value in the image you intend to correct, and Aperture places a point on the
tonal curve and automatically adjusts the image so that the pixels that fall in the same tonal
range as the sampled pixels are set to either black, gray, or white. For example, you use the Black
Point eyedropper tool to select the specic area of the image that should be black. Aperture
samples the pixels within the selection, places a point on the curve, and then adjusts the curve
to make the selected pixels—and all other pixels in the image of the same tonal value or
darker—black.
Before Black Point Curves adjustment After Black Point Curves adjustment
Before Gray Point Curves adjustment After Gray Point Curves adjustment
Before White Point Curves adjustment After White Point Curves adjustment
In some dicult cases, you can use the Black Point, Gray Point, and White Point eyedropper
tools in combination with points that you manually place on the tonal curve to neutralize
a tint or create the specic contrast you want in the image. For more information about
manually adjusting the tonal curve, see Adjusting the Tonal Curve of an Image Using the Curves
Controls on page 353.
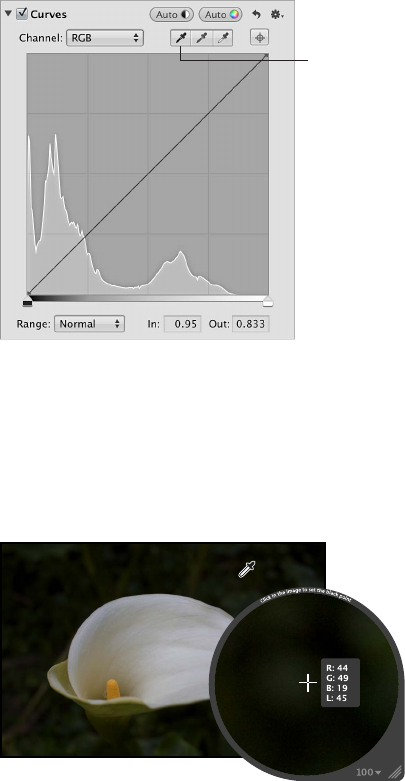
Chapter 16 Making Image Adjustments 358
To set the black point in an image
1 Select a photo.
2 If the Curves controls are not shown in the Adjustments inspector or the Adjustments pane of
the Inspector HUD, choose Curves from the Add Adjustment pop-up menu.
3 Select the Black Point eyedropper tool to activate the Loupe.
Click the Black Point
eyedropper button
to activate the Loupe.
The pointer changes to an eyedropper, and the Loupe appears, showing a magnied view of
the target area. By default, the Loupe is set to magnify the image to 100 percent (full size). If
necessary, you can increase the magnication of the Loupe by choosing a larger magnication
value from the Loupe pop-up menu. For more information, see An Overview of the Loupe on
page 89.
4 Position the eyedropper over the darkest pixels in the image, then click.
The sampled pixels are used to set the black point in the image.
To set the gray point in an image
1 Select a photo.
2 If the Curves controls are not shown in the Adjustments inspector or the Adjustments pane of
the Inspector HUD, choose Curves from the Add Adjustment pop-up menu.
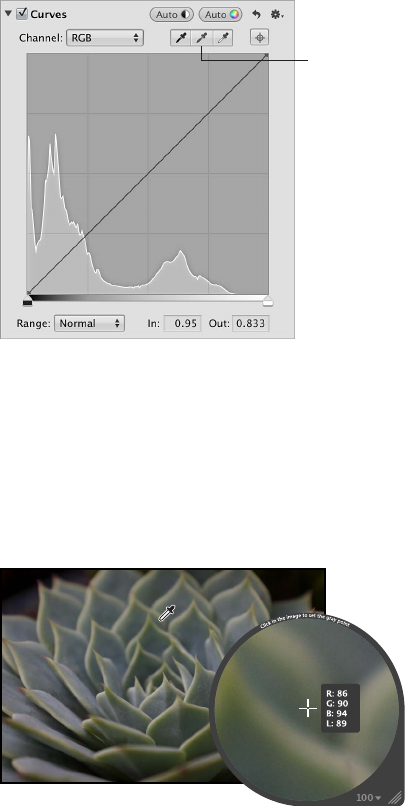
Chapter 16 Making Image Adjustments 359
3 Select the Gray Point eyedropper tool to activate the Loupe.
Click the Gray Point
eyedropper button
to activate the Loupe.
The pointer changes to an eyedropper, and the Loupe appears, showing a magnied view of
the target area. By default, the Loupe is set to magnify the image to 100 percent (full size). If
necessary, you can increase the magnication of the Loupe by choosing a larger magnication
value from the Loupe pop-up menu. For more information, see An Overview of the Loupe on
page 89.
4 Position the eyedropper over a midrange color that is as close as possible to medium gray,
then click.
The sampled pixels are used to set the gray point in the image.
To set the white point in an image
1 Select a photo.
2 If the Curves controls are not shown in the Adjustments inspector or the Adjustments pane of
the Inspector HUD, choose Curves from the Add Adjustment pop-up menu.
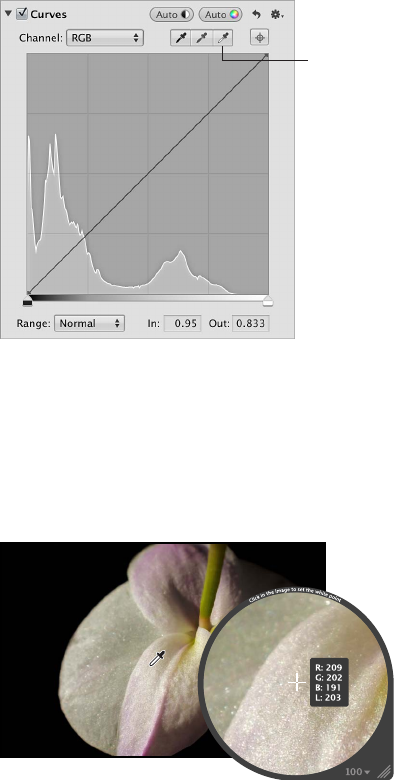
Chapter 16 Making Image Adjustments 360
3 Select the White Point eyedropper tool to activate the Loupe.
Click the White Point
eyedropper button
to activate the Loupe.
The pointer changes to an eyedropper, and the Loupe appears, showing a magnied view of
the target area. By default, the Loupe is set to magnify the image to 100 percent (full size). If
necessary, you can increase the magnication of the Loupe by choosing a larger magnication
value from the Loupe pop-up menu. For more information, see An Overview of the Loupe on
page 89.
4 Position the eyedropper over the lightest pixels in the image, then click.
The sampled pixels are used to set the white point in the image.
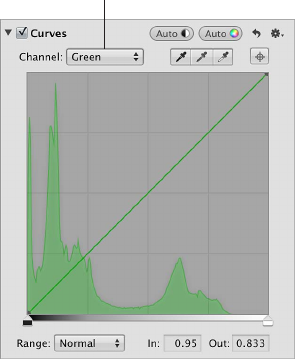
Chapter 16 Making Image Adjustments 361
Using the Curves Controls for Color Correction
One of the most powerful ways to remove a color cast from an image or accentuate a desirable
color cast is to adjust the tonal curves of the red, green, and blue color channels independently.
It’s important to understand that you’re adjusting the colors of the image within the RGB
spectrum; therefore, you reduce yellow when you increase blue, you reduce magenta when you
increase green, and so on.
To adjust the tonal curve of a single color channel in an image
1 In the Curves area of the Adjustments inspector or the Adjustments pane of the Inspector HUD,
choose a single color channel from the Channel pop-up menu.
Choose a color channel from
the Channel pop-up menu.
2 Place points on the curve, and adjust them as necessary, to remove or accentuate a color cast in
the image.
For more information about placing points on the tonal curve, see Adjusting the Tonal Curve of
an Image Using the Curves Controls on page 353.
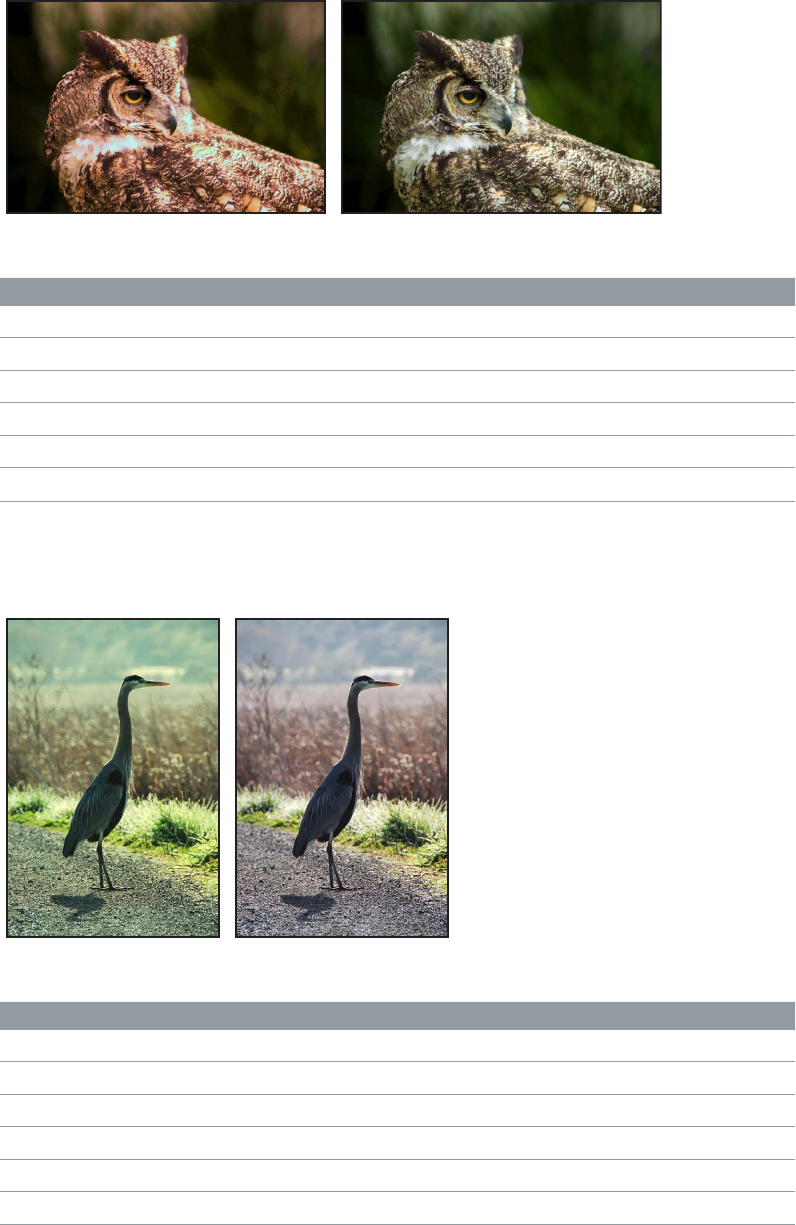
Chapter 16 Making Image Adjustments 362
Adjusting the Tonal Curve of the Red Color Channel
You adjust the tonal curve of the red color channel when you want to remove red and cyan
color casts in the image.
Before Red Curves adjustment After Red Curves adjustment
Red adjustment Eect
Move tonal curve down in the shadows. Adds cyan to the shadows, removing red.
Move tonal curve up in the shadows. Adds red to the shadows, removing cyan.
Move tonal curve down in the midtones. Adds cyan to the midtones, removing red.
Move tonal curve up in the midtones. Adds red to the midtones, removing cyan.
Move tonal curve down in the highlights. Adds cyan to the highlights, removing red.
Move tonal curve up in the highlights. Adds red to the highlights, removing cyan.
Adjusting the Tonal Curve of the Green Color Channel
You adjust the tonal curve of the green color channel when you want to remove green and
magenta color casts in the image.
Before Green Curves adjustment After Green Curves adjustment
Green adjustment Eect
Move tonal curve down in the shadows. Adds magenta to the shadows, removing green.
Move tonal curve up in the shadows. Adds green to the shadows, removing magenta.
Move tonal curve down in the midtones. Adds magenta to the midtones, removing green.
Move tonal curve up in the midtones. Adds green to the midtones, removing magenta.
Move tonal curve down in the highlights. Adds magenta to the highlights, removing green.
Move tonal curve up in the highlights. Adds green to the highlights, removing magenta.
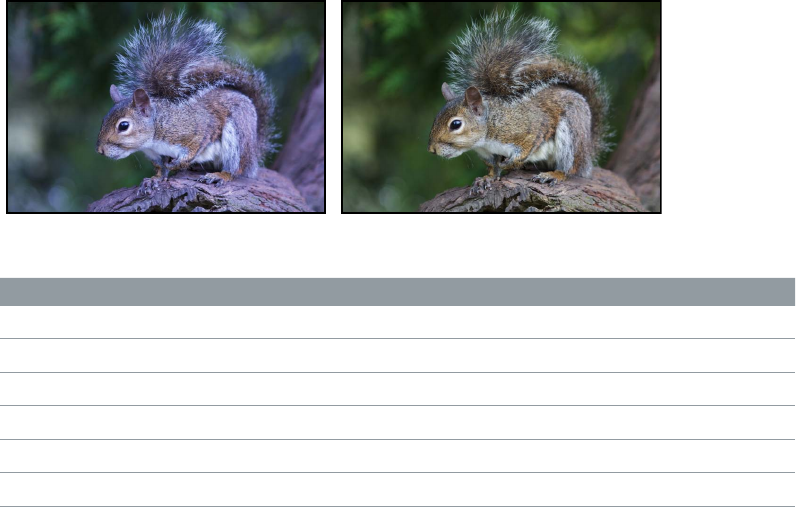
Chapter 16 Making Image Adjustments 363
Adjusting the Tonal Curve of the Blue Color Channel
You adjust the tonal curve of the blue color channel when you want to remove blue and yellow
color casts in the image.
Before Blue Curves adjustment After Blue Curves adjustment
Blue adjustment Eect
Move tonal curve down in the shadows. Adds yellow to the shadows, removing blue.
Move tonal curve up in the shadows. Adds blue to the shadows, removing yellow.
Move tonal curve down in the midtones. Adds yellow to the midtones, removing blue.
Move tonal curve up in the midtones. Adds blue to the midtones, removing yellow.
Move tonal curve down in the highlights. Adds yellow to the highlights, removing blue.
Move tonal curve up in the highlights. Adds blue to the highlights, removing yellow.
Working with the Highlights & Shadows Controls
An Overview of the Highlights & Shadows Adjustment
You use the Highlights & Shadows adjustment controls to correct the exposure in images shot
in complex lighting conditions. For example, you can use the Highlights & Shadows controls to
correct the exposure of the darker areas (shadows) of an image that was otherwise correctly
exposed for silhouette. You can also use the Highlights & Shadows controls to retrieve detail in
extremely bright areas of an image. This is particularly useful when adjusting images of clouds
or snow, or images correctly exposed for the shadow areas. Using the Highlights & Shadows
controls is the best way to optimize your image’s exposure in the highlights, midtones, or
shadows without compromising detail in the other areas of tonality.
You can also brush the Highlights & Shadows adjustment on selected parts of an image. For
more information, see An Overview of Brushed Adjustments on page 392.
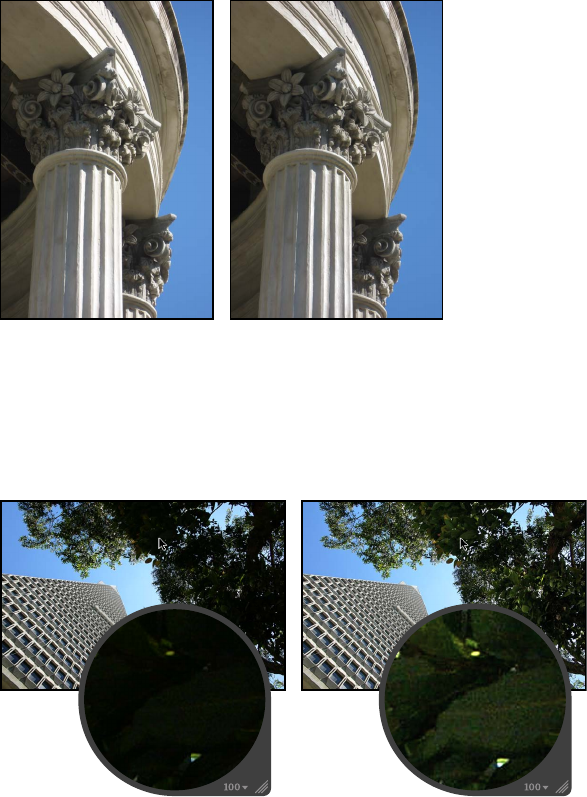
Chapter 16 Making Image Adjustments 364
Adjusting Highlights, Shadows, and Midtone Contrast
When you want to adjust the brightness values in the highlight areas of the image without
aecting the midtones and shadows, you can adjust the Highlights parameter. Although the
human eye is more sensitive to details in shadow areas than in highlight areas, such as snow,
there is usually a fair amount of visual information that you can retrieve in the highlights using
the Highlights parameter controls. Another example of when to use the Highlights controls is
when the background of your image is correctly exposed, and the foreground of the image
is slightly overexposed. In this case, you use the Highlights controls to make the overexposed
foreground match the exposure of the correctly exposed background.
Before Highlights adjustment After Highlights adjustment
Adjusting the shadow areas is necessary when the shadow areas in an image are underexposed.
A good example is an image shot in a doorway, where the background is correctly exposed but
the foreground is a little underexposed. Adjusting the shadows lightens the pixels in the shadow
areas only, bringing out detail that would normally have been shades of black or dark gray.
Before Shadows adjustment After Shadows adjustment
You can also adjust the amount of contrast in the midtones of the image using the Mid Contrast
parameter controls.
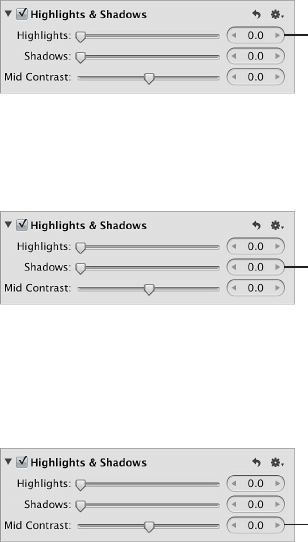
Chapter 16 Making Image Adjustments 365
To adjust the highlights, shadows, and midtone contrast in an image
1 Select a photo.
2 In the Highlights & Shadows area of the Adjustments inspector or the Adjustments pane of the
Inspector HUD, do any of the following:
•To recover details in the highlight areas of the image: Use the Highlights parameter controls.
Use the Highlights slider and value
slider to adjust the brightness
values in the photo’s highlights.
Aperture isolates the areas of the image with highlights and updates them as you change the
parameter value.
•To recover details in the shadow areas of the image: Use the Shadows parameter controls.
Use the Shadows slider and value
slider to adjust the brightness
values in the photo’s shadows.
Aperture isolates the shadow areas of the image and updates them as you change the
parameter value.
•To adjust the amount of contrast in the midtones of the image: Use the Mid Contrast
parameter controls.
Use the Mid Contrast slider and
value slider to adjust the contrast
in the photo’s midtones.
Aperture modies the contrast in the image’s midtones as you change the parameter value.
Upgrading Images Previously Adjusted with Highlights & Shadows
Adjustment Controls
The Highlights & Shadows adjustment controls have been updated in Aperture 3.3 for ease of
use, reduced halo eect with shadow adjustments, improved highlight detail recovery, and better
overall performance. Images that were adjusted using the original Highlights & Shadows controls
are not upgraded by default. The original image processing is preserved, and you can continue
to use the original Highlights & Shadows parameter controls. When you upgrade your image to
use the new Highlights & Shadows adjustment controls, Aperture removes the old Highlights
& Shadows adjustment and reprocesses the image using the new Highlights & Shadows
adjustment. The image’s appearance will change.
Note: For information about using the legacy Highlights & Shadows adjustment controls, see
Working with the Original Highlights & Shadows Adjustment Controls on page 366.
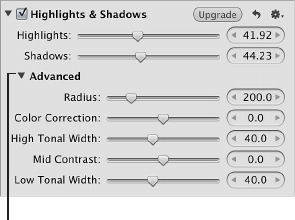
Chapter 16 Making Image Adjustments 366
To upgrade an image to use the new Highlights & Shadows adjustment controls
1 Select a photo that has a Highlights & Shadows adjustment applied to it using a previous version
of Aperture.
An Upgrade button appears at the top of the Highlights & Shadows adjustment controls in the
Adjustments inspector and the Adjustments pane of the Inspector HUD.
2 Click the Upgrade button.
The image is upgraded to use the new Highlights & Shadows adjustment, and the new controls
appear. The highlight and shadow details in the image may change.
Working with the Original Highlights & Shadows Adjustment Controls
If you don’t want to upgrade an image to use the new Highlights & Shadows adjustment
controls, you can still ne-tune a Highlights & Shadows adjustment that was applied to the
image using a previous version of Aperture.
Note: When Highlights & Shadows adjustments are applied to an image for the rst time in
Aperture 3.3 or later, only the new Highlights & Shadows controls appear.
To adjust an image using the legacy Highlights & Shadows adjustment controls
1 Select a photo that has a Highlights & Shadows adjustment applied to it using a previous version
of Aperture.
An Upgrade button appears at the top of the Highlights & Shadows adjustment controls
indicating that the Highlights & Shadows adjustment was applied to the image using a previous
version of Aperture.
2 In the Highlights & Shadows area of the Adjustments inspector or the Adjustments pane of the
Inspector HUD, do one of the following:
•To recover details in the highlight areas of the image: Use the Highlight parameter controls.
Aperture isolates the areas of the image with highlights and updates them as you change the
parameter value.
•To recover details in the shadow areas of the image: Use the Shadow parameter controls.
Aperture isolates the shadow areas of the image and updates them as you change the
parameter value.
3 If you want to adjust the Highlights & Shadows advanced settings, click the Advanced disclosure
triangle to show the advanced Highlights & Shadows controls, then do the any of the following:
Click the disclosure triangle to
reveal the advanced Highlights
& Shadows controls.
•To set the area Aperture uses to determine each pixel’s tonality: Use the Radius parameter controls.
•To set the amount of saturation applied during a Highlights or Shadows adjustment: Use the Color
Correction parameter controls.
Chapter 16 Making Image Adjustments 367
•To set the range of tones that are modied in the highlights: Use the High Tonal Width
parameter controls.
•To set the amount of contrast in the midtones: Use the Mid Contrast parameter controls.
•To set the range of tones that are modied in the shadows: Use the Low Tonal Width
parameter controls.
Working with the Levels Controls
An Overview of the Levels Adjustment
You use the Levels adjustment controls when you want to manually set the tonal values of the
shadows, midtones, and highlights in an image. By default, Aperture sets 0 as pure black and 1
as pure white. Constraining the white and black point values evenly redistributes the tonal range
of the pixels between black and white. Reapportioning the luminance values increases the tonal
range and contrast in the image. However, if you clip too far into either the black or white tonal
values, tonal values that were originally near pure black and pure white are now changed to pure
black and pure white, resulting in lost image detail.
To simply your workow, you can use the Auto Levels buttons in the Levels adjustment to
analyze the image and adjust the levels based on that analysis. This is a good way to make
a quick correction to an image before ne-tuning the Levels adjustment with the manual
adjustment controls.
There are two ways to perform an Auto Levels adjustment. For more information, see the
following sections:
•Automatically Adjusting Luminance on page 368
•Automatically Adjusting RGB Channels on page 369
You can also adjust the tolerance of the white and black clipping points of the Auto Levels
adjustment. For more information, see Setting the Auto Levels Options on page 370.
In addition to adjusting the tonal values of an image for overall shadows, midtones, and
highlights, you can also color correct an image by adjusting the levels of the red, green, and
blue channels independently. Aperture provides a way to adjust levels for each color channel,
allowing you to control the color tonality in an image.
You can also brush the Levels adjustment on selected parts of an image. For more information,
see An Overview of Brushed Adjustments on page 392.
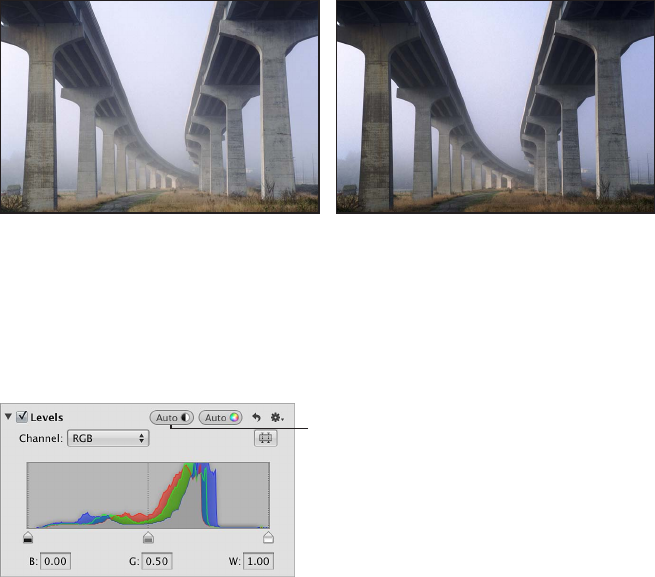
Chapter 16 Making Image Adjustments 368
Automatically Adjusting Luminance
When you want to quickly adjust the levels of an image based on total luminance values—red,
green, and blue channels combined—you choose Luminance from the Channel pop-up menu
in the Levels adjustment and then click the Auto Levels Combined button. Red, green, and blue
channels are adjusted by the same amount based on the total luminance. You use the Auto
Levels Combined button for luminance when you want to correct the contrast of the image
without modifying the color cast of the image.
Before Auto Levels Combined adjustment After Auto Levels Combined adjustment
To automatically adjust the levels of an image based on total luminance
1 Select a photo.
2 In the Levels area of the Adjustments inspector or the Adjustments pane of the Inspector HUD,
choose Luminance from the Channel pop-up menu, then click the Auto Levels Combined button.
Click the Auto Levels Combined
button to automatically set the
levels for the photo based on
the combined luminance of all
three color channels.
The levels of the image are automatically adjusted. To ne-tune the Levels adjustment, see
Adjusting the Luminance Levels in an Image on page 372.
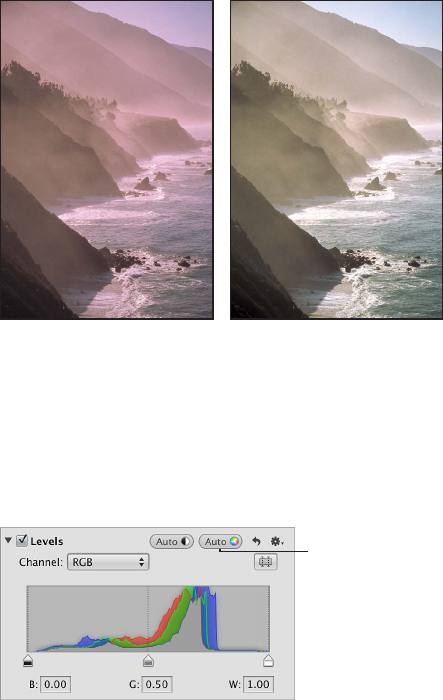
Chapter 16 Making Image Adjustments 369
Automatically Adjusting RGB Channels
When you want to automatically adjust the levels of an image based on individual evaluations
of the red, green, and blue channels, you use the Auto Levels Separate button in the Levels
adjustment. Red, green, and blue channels are adjusted based on the evaluation of each channel.
You use the Auto Levels Separate button when you want to correct the color cast in the image in
addition to correcting the contrast.
Before Auto Levels Separate
adjustment
After Auto Levels Separate
adjustment
To automatically adjust the levels based on an evaluation of each color channel
1 Select a photo.
2 In the Levels area of the Adjustments inspector or the Adjustments pane of the Inspector HUD,
choose RGB from the Channel pop-up menu, then click the Auto Levels Separate button.
Click the Auto Levels Separate
button to automatically set the
levels for the photo based on
an evaluation of each color
channel’s luminance values.
The levels of the image are automatically adjusted for each color channel. To ne-tune the levels
adjustment, see Adjusting the Luminance Levels in an Image on page 372.
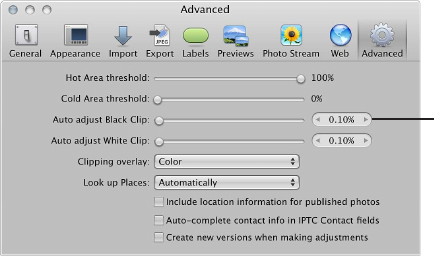
Chapter 16 Making Image Adjustments 370
Setting the Auto Levels Options
Aperture provides the option to set both the black and white clipping point parameters for the
Auto Levels adjustments. Modifying the black and white clipping points from their default value
of 0% expands the tonal range of the image. One reason for expanding the tonal range of an
image is to preserve shadow and highlight detail when the image is printed.
Note: You may have to perform a few print tests to determine the output characteristics of your
printer before settling on nal values for black and white clipping points.
To adjust the black clipping point
1 Choose Aperture > Preferences, then click Advanced.
Use the Auto Adjust Black
Clip slider and value slider to
add tolerance to Auto Levels
adjustments when evaluating
colors beyond black.
2 In the Advanced pane, do one of the following:
•By default, the Auto Adjust Black Clip slider is set to the left side of the slider control. Drag the
slider to the right to increase the tolerance of Auto Levels adjustments to colors beyond the
analyzed black point in the image, and drag the slider back to the left to reduce the tolerance.
•By default, the Auto Adjust Black Clip value slider is set to 0.10%. Double-click the number in
the value slider, then enter a value from 0% to 10% and press Return.
•Click the left or right arrow in the value slider to change the tolerance of Auto Levels
adjustments to colors beyond the analyzed black point in the image, or drag in the value eld.
Clicking the left arrow reduces the tolerance, and clicking the right arrow increases it.
3 Once the black clipping point is adjusted, click either the Auto Levels Combined or the Auto
Levels Separate button in the Levels area of the Adjustments inspector or the Adjustments pane
of the Inspector HUD to view the eect on the image.

Chapter 16 Making Image Adjustments 371
To adjust the white clipping point
1 Choose Aperture > Preferences, then click Advanced.
Use the Auto Adjust White
Clip slider and value slider to
add tolerance to Auto Levels
adjustments when evaluating
colors beyond white.
2 In the Advanced pane, do one of the following:
•By default, the Auto Adjust White Clip slider is set to the left side of the slider control. Drag the
slider to the right to increase the tolerance of Auto Levels adjustments to colors beyond the
analyzed white point in the image, and drag the slider back to the left to reduce the tolerance.
•By default, the Auto Adjust White Clip value slider is set to 0.10%. Double-click the number in
the value slider, then enter a value from 0% to 10% and press Return.
•Click the left or right arrow in the value slider to change the tolerance of Auto Levels
adjustments to colors beyond the analyzed white point in the image, or drag in the value eld.
The left arrow reduces the tolerance, and the right arrow increases it.
3 Once the white clipping point is adjusted, click either the Auto Levels Combined or the Auto
Levels Separate button in the Levels area of the Adjustments inspector or the Adjustments pane
of the Inspector HUD to view the eect on the image.
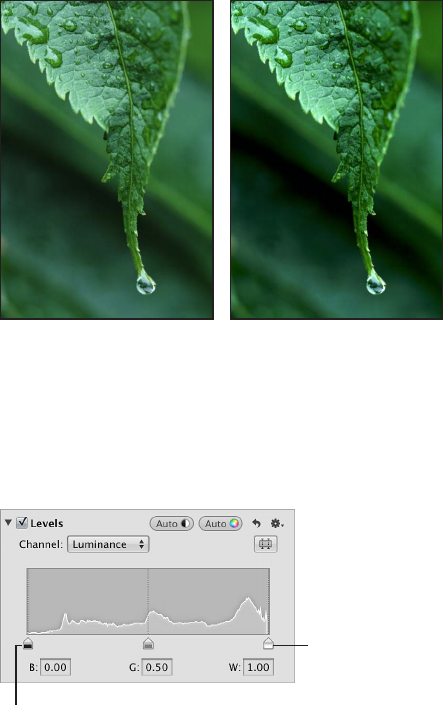
Chapter 16 Making Image Adjustments 372
Adjusting the Luminance Levels in an Image
When you want to adjust the overall tonality of an image, you use the Levels adjustment controls
based on a histogram that shows luminance. When the histogram is set to show luminance, it
displays the cumulative brightness values for all three color channels for each pixel.
To adjust levels in an image based on luminance
You use the histogram’s luminance view when you want to adjust an image’s tonal values
without aecting the color cast.
Before Levels adjustment After Levels adjustment
1 Select a photo.
2 To turn on the Levels histogram, select the Levels checkbox in the Levels area of the Adjustments
inspector or the Adjustments pane of the Inspector HUD.
The Levels histogram appears.
White Levels slider
Black Levels slider
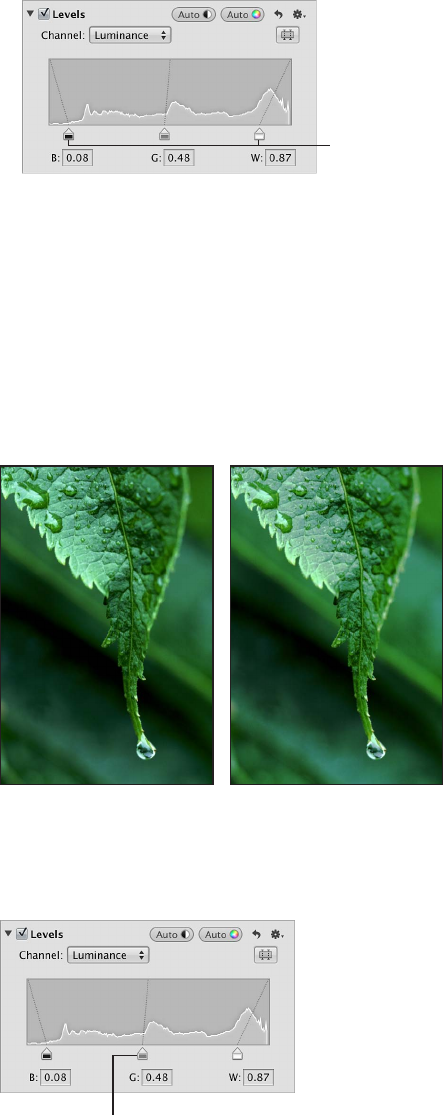
Chapter 16 Making Image Adjustments 373
3 Choose Luminance from the Channel pop-up menu.
4 Do one of the following:
•Drag the Black Levels and White Levels sliders to where they touch the outside of the
histogram graph, constraining the image to its new black and white points.
Drag the Black Levels and
White Levels sliders to
where they touch the outside
of the histogram graph.
•Select the numbers in the Black (B) and White (W) elds, then enter a value from 0.00 to 1.00.
By default, the black point is set to 0.00, and the white point is set to 1.00.
The tonal values for shadows and highlights in the image are updated, resulting in more dened
blacks and highlight values as well as increased overall contrast.
To adjust the midtone levels in an image
You can also use the Gray Levels slider if you need to adjust the brightness values of the
midtones while limiting the brightening eect in the black and white points. The brighter areas
of shadows and the darker areas of highlights are aected, but the eect tapers o as it nears the
dark blacks and bright whites.
Before Gray Levels adjustment After Gray Levels adjustment
Do one of the following:
mDrag the Gray Levels slider until the brightness values in the image’s midtones are correct.
Gray Levels slider
mBy default, the gray point is set to 0.50. Select the number in the Gray (G) eld, then enter a value
from 0.02 to 0.98 to correct the brightness values in the image’s midtones.

Chapter 16 Making Image Adjustments 374
Showing Quarter-Tone Levels Controls
When you need additional control over tonal values between the midtones and shadows as well
as the midtones and highlights, you use the Quarter-Tone Levels controls in the Levels area of
the Adjustments inspector or the Adjustments pane of the Inspector HUD. For example, if you
need to add contrast to the midtone values independently of the black and white point settings,
you use the Quarter-Tone Levels sliders. Unlike the Black Levels and White Levels sliders, Quarter-
Tone Levels sliders are independent and aect only the tonal range of the pixels they represent:
either shadows to midtones or midtones to highlights.
To show the Quarter-Tone Levels controls
mClick the Quarter-Tone Controls button.
Click the Quarter-Tone
Controls button to
show the Quarter-Tone
Levels sliders.
Adjusting the Brightness of an Image
You can also use the Levels adjustment controls to adjust the brightness of an image. When you
adjust the brightness of the image, you can then use the Black Levels, Gray Levels, and White
Levels sliders modify the tonality of the image based on the new brightness value.
For more information about adjusting the tonality of the image, see Adjusting the Luminance
Levels in an Image on page 372.
To uniformly adjust the brightness of the image
mIn the Levels area of the Adjustments inspector or the Adjustments pane of the Inspector HUD,
drag the Brightness Levels slider until the brightness of the entire image is correct.
Drag the Brightness Levels
slider to uniformly adjust
the brightness of a photo.
To selectively adjust the brightness of the shadows and highlights in an image
mDrag the Shadow Brightness Levels and Highlight Brightness Levels sliders until the brightness
values of the shadows and highlights in the image are correct.
Drag the Shadow Brightness
Levels (on the left) and
Highlight Brightness Levels
sliders to selectively adjust
the brightness of a photo.
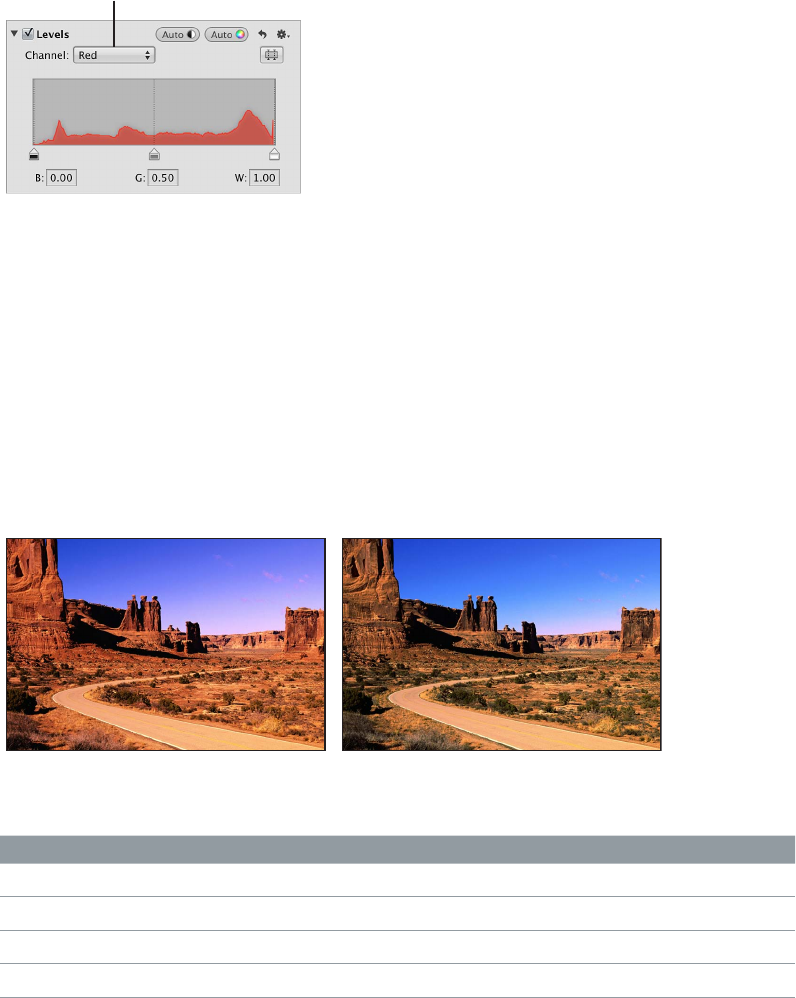
Chapter 16 Making Image Adjustments 375
Using Levels for Color Correction
A powerful way to color correct an image is to adjust the levels of each color channel in the
image. Adjusting the levels of each color channel is useful for removing color casts in an image.
It’s important to understand that you’re adjusting the colors of the image within the RGB
spectrum; therefore, you reduce yellow when you increase blue, you reduce magenta when you
increase green, and so on.
To adjust the levels of a single color channel in an image
1 In the Levels area of the Adjustments inspector or the Adjustments pane of the Inspector HUD,
choose a color channel from the Channel pop-up menu.
Choose a color channel from
the Channel pop-up menu.
2 Drag the Black Levels, Gray Levels, and White Levels sliders (or enter values in the corresponding
elds) to create the eect you want.
For a description of how adjusting the levels of the red, green, and blue color channels eects
the image, see:
•Adjusting the Levels of the Red Color Channel on page 375
•Adjusting the Levels of the Green Color Channel on page 376
•Adjusting the Levels of the Blue Color Channel on page 376
Adjusting the Levels of the Red Color Channel
You adjust the levels of the red color channel when you want to remove red and cyan color casts
in the image.
Before Red Levels adjustment After Red Levels adjustment
(moved Gray Levels slider right)
Red adjustment Eect
Move Black Levels slider right. Adds cyan to the shadows, removing red.
Move Gray Levels slider left. Adds red to the midtones, removing cyan.
Move Gray Levels slider right. Adds cyan to the midtones, removing red.
Move White Levels slider left. Adds red to the highlights, removing cyan.
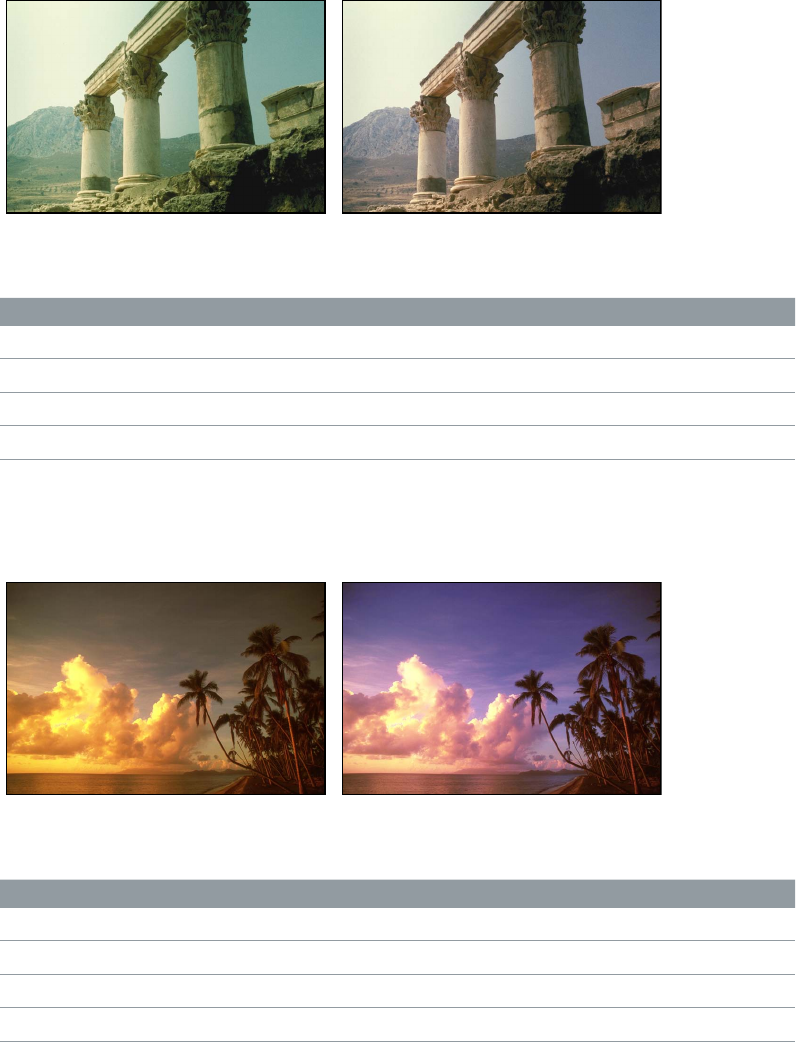
Chapter 16 Making Image Adjustments 376
Adjusting the Levels of the Green Color Channel
You adjust the levels of the green color channel when you want to remove green and magenta
color casts in the image.
Before Green Levels adjustment After Green Levels adjustment
(moved Gray Levels slider right)
Green adjustment Eect
Move Black Levels slider right. Adds magenta to the shadows, removing green.
Move Gray Levels slider left. Adds green to the midtones, removing magenta.
Move Gray Levels slider right. Adds magenta to the midtones, removing green.
Move White Levels slider left. Adds green to the highlights, removing magenta.
Adjusting the Levels of the Blue Color Channel
You adjust the levels of the blue color channel when you want to remove blue and yellow color
casts in the image.
Before Blue Levels adjustment
After Blue Levels adjustment
(moved White Levels and Gray Levels sliders left)
Blue adjustment Eect
Move Black Levels slider right. Adds yellow to the shadows, removing blue.
Move Gray Levels slider left. Adds blue to the midtones, removing yellow.
Move Gray Levels slider right. Adds yellow to the midtones, removing blue.
Move White Levels slider left. Adds blue to the highlights, removing yellow.
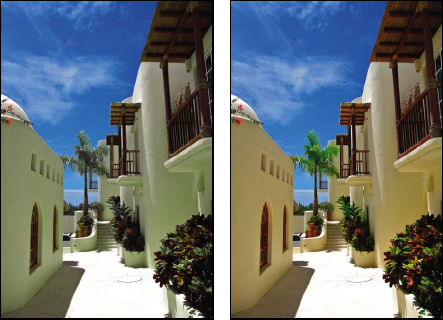
Chapter 16 Making Image Adjustments 377
Working with the Color Controls
An Overview of the Color Adjustment
You use the Color adjustment controls to selectively adjust the red, green, blue, cyan, magenta,
and yellow colors in an image. Each color has individual Hue, Saturation, and Luminance controls. If
you need to adjust the hue, saturation, and luminance of a color that does not appear in the Color
controls, you can use the Color eyedropper to identify a hue in the image that needs adjusting.
Although segmenting control of hue, saturation, and luminance on a per-color basis may seem
complicated at rst, restricting these adjustments to specic colors helps correct and enhance
targeted colors without aecting others. In addition, Aperture provides Range controls used to
set the extent of colors aected by the Hue, Saturation, and Luminance adjustments. The extent
of colors aected by these adjustments is also known as chromatic spread. You use the Range
controls to ne-tune your color adjustments.
Before Color adjustment After Color adjustment
(adjusted the hue and
saturation of blue)
You can also brush the Color adjustment on selected parts of an image. For more information,
see An Overview of Brushed Adjustments on page 392.
About Hue, Saturation, and Luminance
Hue (H) describes the actual color itself. Hue is measured as an angle on a color wheel. Moving a
Hue slider in Aperture remaps the color from its original position on the color wheel to the new
position indicated by the slider. Hue adjustments are often made to match the color of the same
subject in dierent images. Adjusting the hue of an image is particularly useful when the subject
you shot moved between various lighting conditions. Another advantage of adjusting the hue of
an image is that camera models of dierent types or from dierent manufacturers rarely capture
and render color exactly the same way. You can use the Hue controls to match the color of a
subject shot by two dierent cameras, so that when the images are placed side by side, they match.
Saturation (S) denes the intensity of a specic hue. A saturated hue gives the color a vivid and
pure appearance. A less saturated hue appears atter and more gray. A completely desaturated
hue becomes a shade of gray.
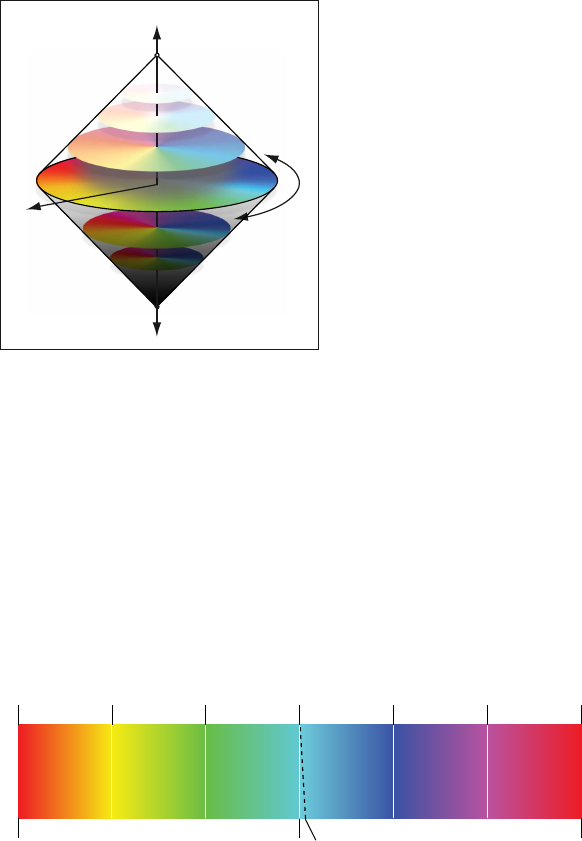
Chapter 16 Making Image Adjustments 378
Luminance (L) describes the brightness of the selected color. An increase in luminance brightens
the selected color value. A maximum Luminance adjustment results in pure white. Conversely, a
decrease in luminance darkens the selected color. A minimum Luminance adjustment results in
pure black.
L
S
H
Adjusting the Color of the Image with the Color Controls
When you want to adjust the color values in an image, you must rst identify the colors that have
the most inuence on the colors you want to change. It’s important to understand that you’re
adjusting the colors of the image within the RGB spectrum; therefore, you reduce yellow when
you increase blue, you reduce magenta when you increase green, and so on. When you want to
isolate a color and adjust its hue, it’s important to identify the color’s location on the color wheel.
For example, if the color value is closer to cyan than blue, you may decide to adjust the cyan Hue
value without adjusting the blue Hue value. Depending on the image, you may decide to adjust
both the cyan and blue Hue values to achieve the color values you’re looking for. There’s not just
one correct way of perfecting the colors in an image. Your approach should be based on the
image’s subject and the overall aesthetic you want to achieve.
Yellows
–180˚ 180˚
Reds Cyans
Cyan remapped 4˚
Blues Magentas Reds
Greens
0˚
To adjust a color value in an image
1 Select a photo.
2 In the Color area of the Adjustments inspector or the Adjustments pane of the Inspector
HUD, click the color button that corresponds to the color you want to adjust to view its Hue,
Saturation, Luminance, and Range controls.
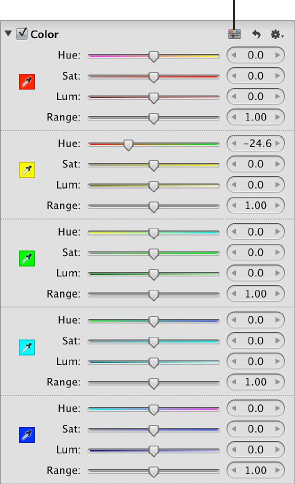
Chapter 16 Making Image Adjustments 379
Note: You can also click the Expanded View button to expand the Color area to show the
controls for all colors at the same time.
Click the Expanded View
button to view the controls for
all colors at the same time.
3 If a Hue adjustment is necessary, adjust the Hue parameter by doing one of the following:
•By default, the Hue slider is set to the center of the slider control. Drag the Hue slider to the
left or right to change the hue of the selected color.
•Click the left or right arrow in the Hue value slider to change the hue of the selected color in
the image by single increments, or drag in the value eld.
The left arrow remaps the hue in the following ways:
•Red Hue value moves toward magenta.
•Yellow Hue value moves toward red.
•Green Hue value moves toward yellow.
•Cyan Hue value moves toward green.
•Blue Hue value moves toward cyan.
•Magenta Hue value moves toward blue.
The right arrow remaps the hue in the following ways:
•Red Hue value moves toward yellow.
•Yellow Hue value moves toward green.
•Green Hue value moves toward cyan.
•Cyan Hue value moves toward blue.
•Blue Hue value moves toward magenta.
•Magenta Hue value moves toward red.

Chapter 16 Making Image Adjustments 380
•By default, the Hue value slider is set to 0.0. Double-click the number in the value slider, then
enter a value from –180.0 to 180.0 and press Return.
Use the Hue slider and
value slider to remap the
hue of the selected color.
4 If a Saturation adjustment is necessary, adjust the Saturation parameter by doing one of
the following:
•By default, the Saturation slider is set to the center of the slider control. Drag the slider to the
left to desaturate the selected color, or drag the slider to the right to increase the saturation of
the selected color.
•Click the left or right arrow in the Saturation value slider to change the saturation of the
selected color in the image by single increments, or drag in the value eld.
•By default, the Saturation value slider is set to 0.0. Double-click the number in the value slider,
then enter a value from –100.0 to 100.0 and press Return.
Use the Saturation slider
and value slider to correct
the intensity of the hue
of the selected color.
5 If a Luminance adjustment is necessary, adjust the Luminance parameter by doing one of
the following:
•By default, the Luminance slider is set to the center of the slider control. Drag the slider to the
left to decrease the brightness of the selected color, or drag the slider to the right to increase
the brightness.
•Click the left or right arrow in the Luminance value slider to change the brightness of the
selected color in the image by single increments, or drag in the value eld.
•By default, the Luminance value slider is set to 0.0. Double-click the number in the value slider,
then enter a value from –100.0 to 100.0 and press Return.
Use the Luminance slider
and value slider to correct
the brightness of the hue
of the selected color.
6 The Range parameter limits or expands the chromatic range of the adjustment. Adjust the Range
parameter by doing one of the following:
•By default, the Range slider is set to the center of the slider control. Drag the slider to the
left to decrease the range of the selected color, or drag the slider to the right to increase
the range.
•Click the left or right arrow in the Range value slider to change the chromatic range of the
selected color by 10 percent increments, or drag in the value eld.
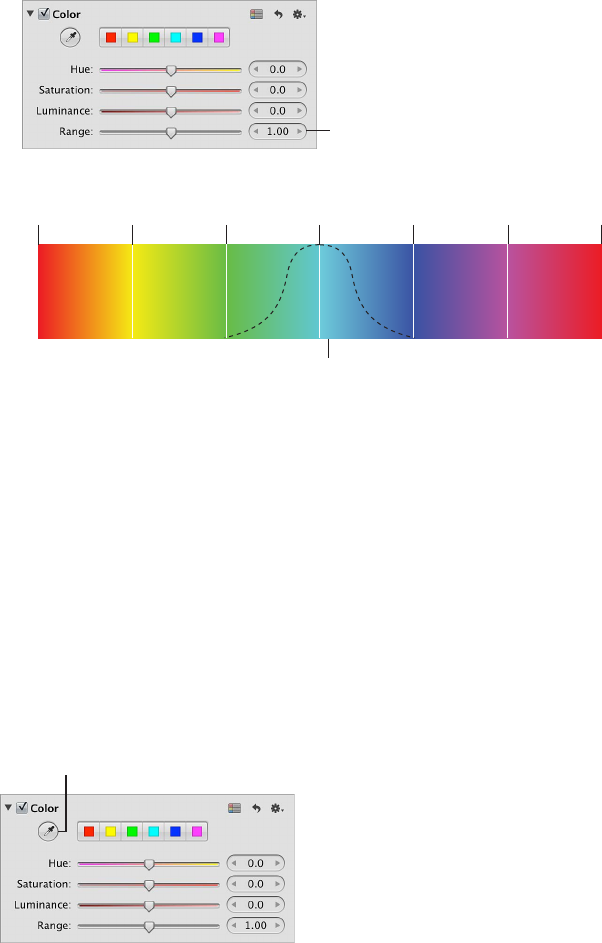
Chapter 16 Making Image Adjustments 381
•Double-click the number in the value slider, then enter a value from 0.00 to 20.00 and
press Return.
Use the Range slider
and value slider to adjust
the chromatic range of
the color adjustment.
By default, the Range value slider is set to 1.00.
Yellows
Reds Cyans
10
10
You can adjust the chromatic range up to 20. The default spread is 1.
Blues Magentas Reds
Greens
1
7 Repeat steps 2 through 6 until you are satised with the appearance of the colors in your image.
Adjusting Custom Colors Using the Color Eyedropper
If you require a specic hue as a starting point for your color adjustment, you can use the Color
eyedropper to identify a hue in the image.
To adjust a custom color value in an image
1 Select a photo.
2 In the Color area of the Adjustments inspector or the Adjustments pane of the Inspector HUD,
click the color button with the hue closest to the one you plan to adjust, then select the Color
eyedropper tool.
Click the Color eyedropper
and select the color in the
photo you want to adjust.
The pointer changes to an eyedropper, and the Loupe appears, showing a magnied view of
the target area. By default, the Loupe is set to magnify the image to 100 percent (full size). If
necessary, you can increase the magnication of the Loupe by pressing Command–Shift–Plus
Sign (+). For more information about the Loupe, see An Overview of the Loupe on page 89.
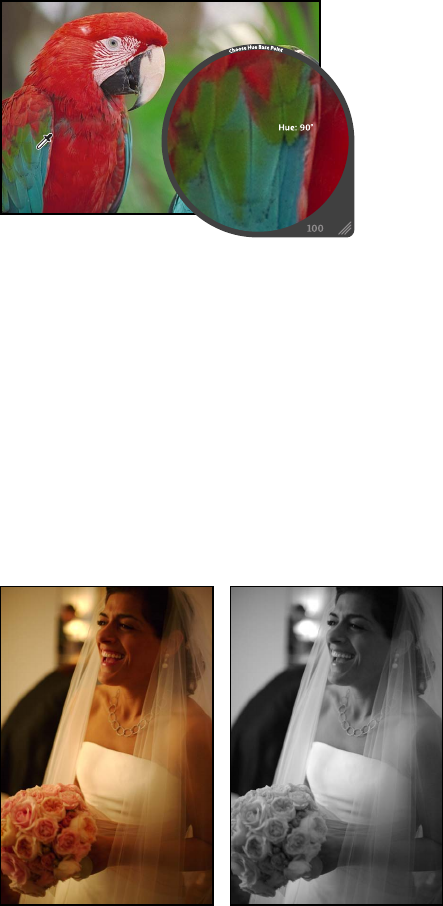
Chapter 16 Making Image Adjustments 382
3 Position the eyedropper over the color in the image that you want to adjust, then click.
The new hue is selected and becomes the starting point for color adjustments of that hue. For
more information about Color adjustments, see Adjusting the Color of the Image with the Color
Controls on page 378.
Working with the Black & White Controls
You use the Black & White adjustment controls when you want more control over converting
your image from color to black and white than simply desaturating it gives you. The Black &
White adjustment controls allow you to adjust tonal relationships and contrast in an image
by adjusting the red, green, and blue channels independently. The eects of a Black & White
adjustment are similar to the eects of attaching a color lter to a camera lens and shooting
black-and-white lm.
Before Black & White adjustment After Black & White adjustment
The key to the successful use of the Black & White adjustment controls is to experiment with
changing values for the Red, Green, and Blue parameters until you are satised with the eect on
the image.
Note: A good rule of thumb is to keep the total percentage of the red, green, and blue channels
at or below 100 percent to prevent you from blowing out the highlights in your image.
To convert a color image to black and white using the Black & White controls
1 Select a photo.
2 If the Black & White controls are not shown in the Adjustments inspector or the Adjustments
pane of the Inspector HUD, choose Black & White from the Add Adjustment pop-up menu (or
press Control-M).
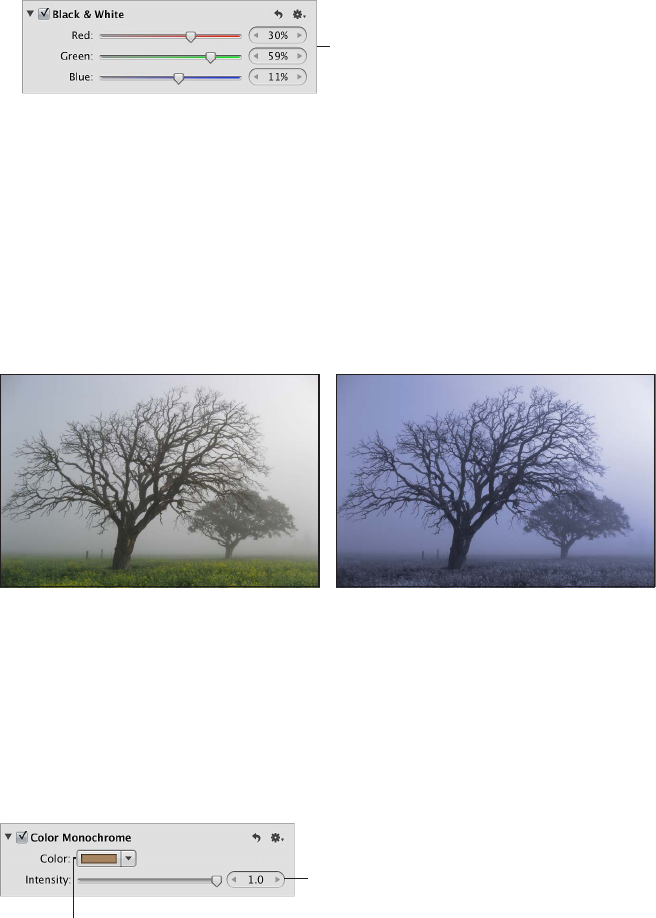
Chapter 16 Making Image Adjustments 383
3 Adjust the mixture of red, green, and blue channels by doing one of the following:
•Drag a color slider to the left to decrease the color’s percentage in the color mix, or drag the
slider to the right to increase the percentage.
•Click the left or right arrows in the value sliders to modify the percentages by single
increments, or drag in the value elds.
The left arrows decrease the percentage, and the right arrows increase it.
•Double-click the number in a value slider, then enter a value from –100% to 200% and
press Return.
Use the Red, Green,
and Blue sliders and value
sliders to manually adjust
the mix of color channels.
The tonal and contrast values in your black-and-white image are set.
You can also brush the Black & White adjustment on selected parts of an image. For more
information, see An Overview of Brushed Adjustments on page 392.
Working with the Color Monochrome Controls
The Color Monochrome adjustment controls are useful when you want to perform a basic
conversion from color to black and white while simultaneously applying a color tint to the
image’s midtones.
Before Color Monochrome adjustment
After Color Monochrome adjustment
(applied blue tint)
To convert a color image to black and white with a color tint
1 Select a photo.
2 If the Color Monochrome controls are not shown in the Adjustments inspector or the
Adjustments pane of the Inspector HUD, choose Color Monochrome from the Add Adjustment
pop-up menu.
Use the Intensity slider and
value slider to adjust the
strength of the color tint
applied to the photo.
Click in the Color well
to select a color from
the Colors window.
3 Click the Color well and then choose a new tint color from the Colors window, or click the disclosure
button (to the right of the color well) and choose a new tint color from the pop-up color palette.
The selected color appears in the Color well and tints the midtones in the image.
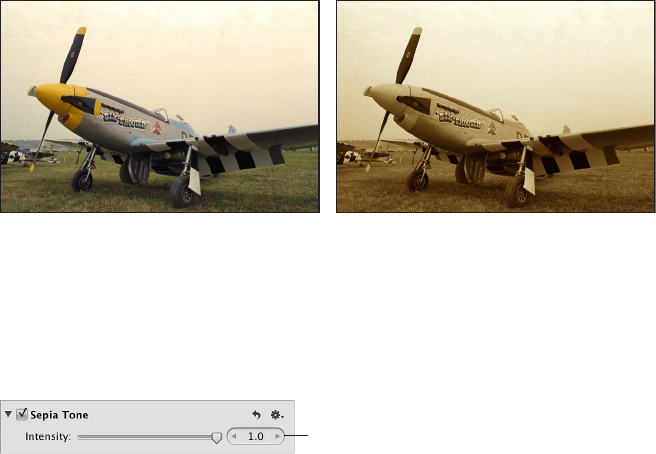
Chapter 16 Making Image Adjustments 384
4 By default, the color intensity is set to the maximum value of 1.0. Adjust the intensity of the color
tint by doing one of the following:
•Drag the Intensity slider to the left to decrease the intensity of the color in the image’s
midtones, or drag the slider back to the right to increase the intensity.
•Click the left or right arrow in the Intensity value slider to modify the intensity by 5 percent
increments, or drag in the value eld.
The left arrow decreases the intensity, and the right arrow increases it.
•Double-click the number in the Intensity value slider, then enter a value from 0.0 to 1.0 and
press Return.
The image is converted to black and white, with the selected color tint applied to the midtones.
You can also brush the Color Monochrome adjustment on selected parts of an image. For more
information, see An Overview of Brushed Adjustments on page 392.
Working with the Sepia Tone Controls
The Sepia Tone adjustment controls behave similarly to the Color Monochrome controls, except
that the sepia color is already selected.
Before Sepia Tone adjustment After Sepia Tone adjustment
To apply a sepia tint to an image
1 Select a photo.
2 If the Sepia Tone controls are not shown in the Adjustments inspector or the Adjustments pane
of the Inspector HUD, choose Sepia Tone from the Add Adjustment pop-up menu.
Use the Intensity slider and value
slider to adjust the strength of the
sepia tint applied to the photo.
3 By default, the intensity of the sepia color is set to the maximum value of 1.0. Adjust the intensity
of the sepia color by doing one of the following:
•Drag the Intensity slider to the left to decrease the intensity of the sepia color in the image’s
midtones, or drag the slider back to the right to increase the intensity.
•Click the left or right arrow in the Intensity value slider to modify the intensity by 5 percent
increments, or drag in the value slider.
The left arrow decreases the intensity, and the right arrow increases it.
•Double-click the number in the Intensity value slider, then enter a value from 0.0 to 1.0 and
press Return.
The image is converted to black and white, with the sepia color tint applied to the midtones.
You can also brush the Sepia Tone adjustment on selected parts of an image. For more
information, see An Overview of Brushed Adjustments on page 392.
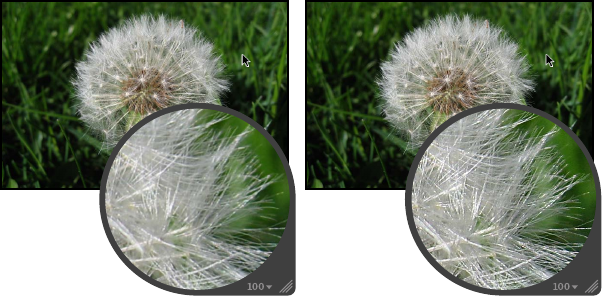
Chapter 16 Making Image Adjustments 385
Working with the Sharpen and Edge Sharpen Controls
An Overview of the Sharpen and Edge Sharpen Adjustments
Aperture provides two sharpening adjustments that you can use to sharpen the detail in your
image: Sharpen and Edge Sharpen.
If you’ve already applied sharpening in a previous version of Aperture using the Sharpen
adjustment controls, the Sharpen adjustment controls are still there so that your adjustments
remain intact and unchanged. However, to do further sharpening on other images, it is
recommended that you use the Edge Sharpen adjustment controls, which generally oer more
precise control over how sharpening is applied. For more information, see Working with the Edge
Sharpen Controls on page 385.
Working with the Edge Sharpen Controls
You use the Edge Sharpen controls when you want to sharpen the detail in your image. Images
shot with digital image sensors are often a bit soft in focus because of the demosaic lter
applied by the camera’s processor. The Edge Sharpen controls adjust the luminance values in
the image, increasing the contrast between light and dark pixels that touch, creating an “edge.”
Increasing the contrast between these neighboring light and dark pixels gives the image a
crisper, or sharper, appearance. You also use the Edge Sharpen controls when you make noise-
reduction adjustments, so that the image retains detail and crisp edges that might otherwise be
obscured by the eect of the noise-reduction adjustment.
Before Edge Sharpen adjustment After Edge Sharpen adjustment
Important: The Edge Sharpen controls are not designed to correct images that were shot out of
focus. They are designed to help mitigate the eects of the camera’s demosaic lter, as well as
maintain image detail when noise-reduction adjustments are applied. Edge Sharpen adjustments
can also compensate for the softening that occurs with some printing processes.
To sharpen an image using the Edge Sharpen controls
1 Select a photo.
2 If the Edge Sharpen controls are not shown in the Adjustments inspector or the Adjustments
pane of the Inspector HUD, choose Edge Sharpen from the Add Adjustment pop-up menu (or
press Control-S).
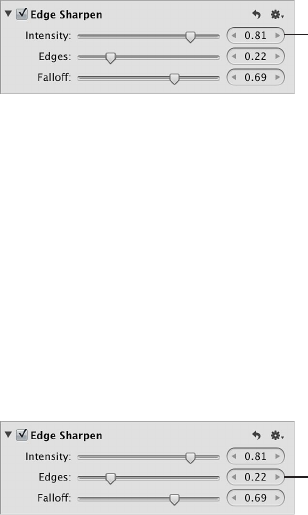
Chapter 16 Making Image Adjustments 386
3 Sharpen the image by doing one of the following:
•Drag the Intensity slider to the right to increase the amount of sharpening applied to the
image, and drag the slider back to the left to reduce the amount of sharpening.
•Click the left or right arrow in the Intensity value slider to adjust the sharpening by 5 percent
increments, or drag in the value eld. The left arrow decreases the sharpening eect on the
image, and the right arrow increases it.
•Double-click the number in the Intensity value slider, then enter a value from 0.0 to 1.0 and
press Return.
Use the Intensity slider
and value slider to
adjust the strength of the
sharpening adjustment.
A value of 0.0 applies no sharpening adjustment to the image. A value greater than 0.0 increases
the sharpening adjustment applied to the image.
4 Adjust the threshold for determining which pixels are edges and which ones are not by doing
one of the following:
•Drag the Edges slider to the right to increase the area over which the sharpening eect is
applied, and drag the Edges slider back to the left to reduce it.
•Click the left or right arrow in the Edges value slider to adjust the area over which the
sharpening eect is applied by 5 percent increments, or drag in the value eld.
•Double-click the number in the Edges value slider, then enter a value from 0.0 to 1.0 and
press Return.
Use the Edges slider
and value slider to adjust
the threshold of the
sharpening adjustment.
A value of 0.0 applies no sharpening adjustment to the image. A value greater than 0.0 increases
the number of pixels that qualify as edges.
Note: If you observe digital noise beginning to increase in at areas of the image (areas with
little or no contrast), decrease the Edges parameter setting.
5 For maximum accuracy, the Edge Sharpen adjustment sharpens the image in three passes that
appear to occur simultaneously—an initial sharpening pass, where a majority of the sharpening
occurs, followed by two subsequent sharpening passes. These subsequent passes are called
fallo. Adjust the amount of sharpening applied in the subsequent sharpening passes by doing
one of the following:
•Drag the Fallo slider to the right to increase the percentage of the original sharpening that’s
applied during the subsequent sharpening passes, and drag the slider back to the left to
reduce it.
•Click the left or right arrow in the Fallo value slider to adjust the fallo percentage by 5
percent increments, or drag in the value eld.

Chapter 16 Making Image Adjustments 387
•Double-click the number in the Fallo value slider, then enter a value from 0.0 to 1.0 and
press Return.
Use the Falloff slider and
value slider to adjust the
strength of the subsequent
sharpening adjustment.
The fallo percentage is applied proportionally to the second and third sharpening passes.
For example, if 0.69 (69 percent) is set as the Fallo parameter value, 69 percent of the original
amount of sharpening is applied during the second sharpening pass, and 69 percent of the
amount of sharpening from the second sharpening pass is applied during the third sharpening
pass. In other words, only 47.6 percent of the amount of the original sharpening is applied during
the third sharpening pass.
You can also brush the Edge Sharpen adjustment on selected parts of an image. For more
information, see An Overview of Brushed Adjustments on page 392.
Understanding the Edge Sharpen Workow
The Edge Sharpen adjustment in Aperture is a professional tool that’s used to sharpen photos.
Using the Edge Sharpen adjustment controls in conjunction with the following workow makes
it easy to achieve professional results.
To sharpen an image
1 In the Edge Sharpen area of the Adjustments inspector or the Adjustments pane of the Inspector
HUD, set the Intensity slider to the maximum value to see the eect of the operation.
2 Adjust the Edges slider so you can see which parts of the image are being sharpened.
If possible, adjust the Edges slider so that edges are sharpened, but noise and texture in the
image are not aected.
3 Adjust the Fallo slider so that the edge sizes you want sharpened the most are accentuated.
4 Decrease the Intensity parameter value until the sharpening eect is appropriately subtle.
Values below 0.5 usually work best.

Chapter 16 Making Image Adjustments 388
Working with the Sharpen Controls
You use the Sharpen adjustment controls when you need to modify Sharpen adjustment
parameter settings that were applied to an image in a previous version of Aperture.
To sharpen an image using the Sharpen controls
1 Select a photo.
2 If the Sharpen controls are not shown in the Adjustments inspector or the Adjustments pane of
the Inspector HUD, choose Sharpen from the Add Adjustment pop-up menu.
3 Sharpen the image by doing one of the following:
•By default, the Intensity slider is set to 0.5. Drag the Intensity slider to the right to increase the
amount of sharpening applied to the image, and drag the slider back to the left to reduce the
amount of sharpening.
•Click the left or right arrow in the Intensity value slider to adjust the sharpening by 5 percent
increments, or drag in the value eld.
The left arrow decreases the sharpening eect on the image, and the right arrow increases it.
•Double-click the number in the Intensity value slider, then enter a value from 0.0 to 1.0 and
press Return.
Use the Intensity slider and
value slider to adjust the strength
of the sharpening adjustment.
Use the Radius slider and
value slider to adjust the area
over which the sharpening
adjustment is applied.
A value of 0.0 applies no sharpening adjustment to the image. A value greater than 0.0 increases
the sharpening adjustment to the image.
4 Adjust the area over which the sharpening adjustment is applied (the distance, in pixels, that
Aperture goes from each pixel to evaluate sharpness) by doing one of the following:
•By default, the Radius slider is set to 1.0 pixels. Drag the Radius slider to the right to increase
the area over which the sharpening eect is applied, and drag the Radius slider back to the left
to reduce it.
•Click the left or right arrow in the Radius value slider to adjust the Radius pixel distance by 5
percent increments, or drag in the value eld.
•Double-click the number in the Radius value slider, then enter a value from 0.0 to 20.0 and
press Return.
A value of 0.0 applies no sharpening adjustment to the image. A value greater than 0.0 increases
the area over which the sharpening adjustment is applied.
As you change the parameter values, the image is updated to display the sharpening eect.
You can also brush the Sharpen adjustment on selected parts of an image. For more information,
see An Overview of Brushed Adjustments on page 392.
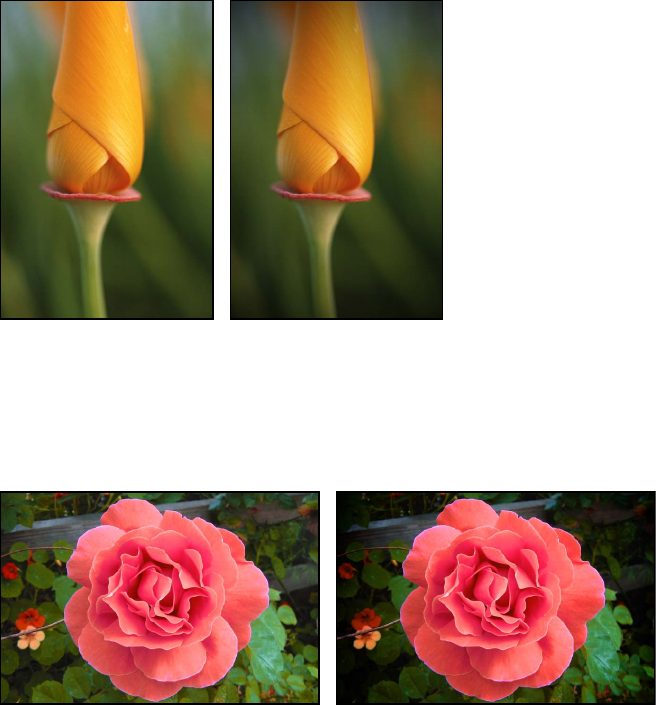
Chapter 16 Making Image Adjustments 389
Working with the Vignette Controls
You use the Vignette adjustment controls to apply a vignette to an image. The term vignette
describes an image whose brightness fades to its periphery from its center. Vignettes are usually
applied to an image after it is shot, for artistic eect. Aperture provides two types of vignettes:
Exposure and Gamma.
The Exposure vignette is designed to simulate a lens-created vignette.
Before Exposure Vignette
adjustment
After Exposure Vignette
adjustment
The Gamma vignette is designed for artistic eect and applies a gamma adjustment to the
aected pixels within the vignette. Because the Gamma vignette intensies colors in the aected
pixels, it creates a more pronounced vignette eect than the Exposure vignette.
Before Gamma Vignette adjustment After Gamma Vignette adjustment
Note: You can add a vignette to any image cropped in Aperture. The adjustment is applied after
the image is cropped.
To apply an Exposure vignette to an image
1 Select a photo.
2 If the Vignette controls are not shown in the Adjustments inspector or the Adjustments pane of
the Inspector HUD, choose Vignette from the Add Adjustment pop-up menu (or press Control-V).
3 Choose Exposure from the Type pop-up menu.

Chapter 16 Making Image Adjustments 390
4 Adjust the amount of vignette to apply to the image by doing one of the following:
•Drag the Intensity slider to the left to decrease the amount of dark shading applied to the
edges of the image, or drag the slider to the right to increase the dark shading.
•Click the left or right arrow in the Intensity value slider to change the amount of dark shading
applied to the edges of the image, or drag in the value eld.
The left arrow decreases the amount of dark shading applied to the edges of the image, and
the right arrow increases the dark shading.
•Double-click the number in the Intensity value slider, then enter a value from 0.0 to 1.0 and
press Return.
Use the Intensity slider and
value slider to adjust the
amount of brightness removed
from the edges of the photo.
5 To adjust the radius of the vignette, in pixels, do one of the following:
•Drag the Radius slider to the right to increase the dark shading from the edges of the image
inward, or drag the slider to the left to limit the dark shading to the edges of the image.
•Click the right or left arrow in the Radius value slider, or drag in the value eld.
The right arrow moves the Vignette adjustment toward the center point of the image, and the
left arrow limits the Vignette adjustment to the edges of the image.
•Double-click the number in the Radius value slider, then enter a value from 0.0 to 2.0 and
press Return.
Use the Radius slider and
value slider to adjust the size
of the area over which the
Vignette adjustment is applied.
The Exposure vignette is applied to the image.
You can also brush the Exposure Vignette adjustment on selected parts of an image. For more
information, see An Overview of Brushed Adjustments on page 392.
To apply a Gamma vignette to an image
1 Select a photo.
2 If the Vignette controls are not shown in the Adjustments inspector or the Adjustments pane of
the Inspector HUD, choose Vignette from the Add Adjustment pop-up menu (or press Control-V).
3 Choose Gamma from the Type pop-up menu.
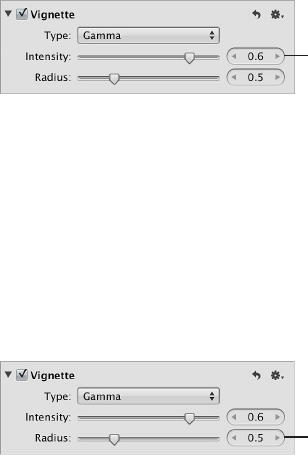
Chapter 16 Making Image Adjustments 391
4 Adjust the amount of vignette to apply to the image by doing one of the following:
•Drag the Intensity slider to the left to decrease the amount of dark shading applied to the
edges of the image, or drag the slider to the right to increase the dark shading.
•Click the left or right arrow in the Intensity value slider to change the amount of dark shading
applied to the edges of the image, or drag in the value eld.
The left arrow decreases the amount of dark shading applied to the edges of the image, and
the right arrow increases the dark shading.
•Double-click the number in the Intensity value slider, then enter a value from 0.0 to 1.0 and
press Return.
Use the Intensity slider and
value slider to adjust the
amount of brightness removed
from the edges of the photo.
5 To adjust the radius of the vignette, in pixels, do one of the following:
•Drag the Radius slider to the right to increase the dark shading from the edges of the image
inward, or drag the slider to the left to limit the dark shading to the edges of the image.
•Click the right or left arrow in the Radius value slider, or drag in the value eld.
The right arrow moves the Vignette adjustment toward the center point of the image, and the
left arrow limits the Vignette adjustment to the edges of the image.
•Double-click the number in the Radius value slider, then enter a value from 0.0 to 2.0 and
press Return.
Use the Radius slider and value
slider to adjust the size of the
area over which the Vignette
adjustment is applied.
The Gamma vignette is applied to the image.
You can also brush the Gamma Vignette adjustment on selected parts of an image. For more
information, see An Overview of Brushed Adjustments on page 392.
For information about removing a vignette that was applied to an image when it was shot, see
Working with the Devignette Controls on page 327.
To switch vignette types
You can switch the type of vignette that’s applied to an image and maintain the Intensity and
Radius parameter values you set using the previous vignette type.
mChoose the other vignette type from the Type pop-up menu.
The new vignette is applied to the image, but the Intensity and Radius parameters maintain
their settings.

392
An Overview of Brushed Adjustments
In Aperture, you can make adjustments to specic portions of your images with brushes to
selectively correct and enhance your photos. Most adjustments in Aperture can be brushed on
images. You simply specify the parameter settings for an adjustment, previewing the eect of the
adjustment on the entire image, and then choose to either brush the adjustment “in” or brush
the adjustment “away” using the adjustment’s Action pop-up menu.
You brush an adjustment in when you want to apply the adjustment to a specic portion of
the image rather than the whole image. When you choose to brush an adjustment in, the
adjustment is applied to specic portions of the image as you brush it on.
A plus sign (+) indicates
that you’re brushing
the adjustment in.
You brush an adjustment away when the area you want to apply the adjustment to is larger than
the area you don’t want the adjustment applied to. When you choose to brush an adjustment
away, Aperture applies the adjustment to the entire image, and you use the eraser brush to
remove the adjustment from the areas of the image that don’t need the adjustment.
A minus sign (–) indicates that
you’re brushing the adjustment
away (erasing).
Making Brushed Adjustments 17
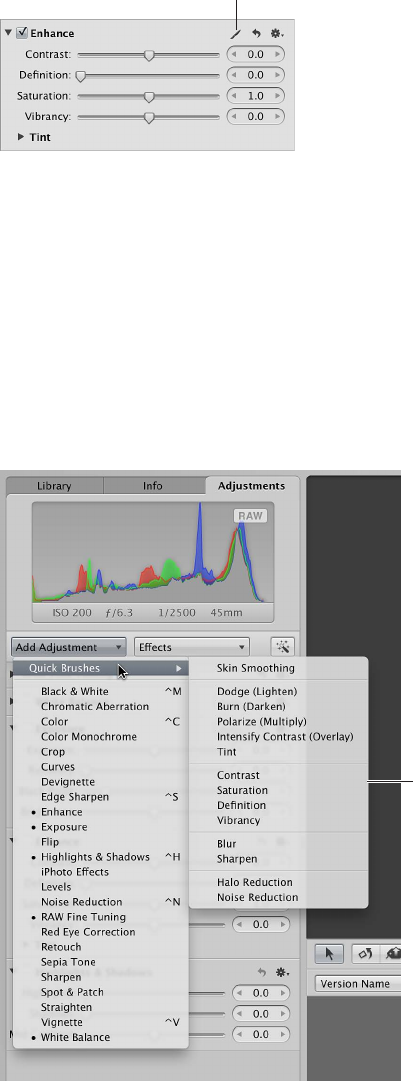
Chapter 17 Making Brushed Adjustments 393
When you brush an adjustment on an image, a Brush button appears at the top of the
adjustment controls for that adjustment.
A Brush button appears after
the adjustment has been
brushed on the photo.
Aperture also provides Quick Brush adjustments that have been specically designed for
brushing on images. Using Quick Brush adjustments, you brush an adjustment on the image and
then modify the adjustment’s parameter settings. Several of the adjustments and adjustment
parameters in Aperture have Quick Brush equivalents: Noise Reduction, Saturation, Sharpen,
Contrast, and Vibrancy.
However, a few Quick Brush adjustments are uniquely designed to x imperfections best
remedied with selective brushing. Examples are Halo Reduction and Skin Smoothing. When you
identify the area of an image that is ideally suited for a Quick Brush adjustment, you choose
the appropriate Quick Brush from the Add Adjustment pop-up menu in either the Adjustments
inspector or the Adjustments pane of the Inspector HUD.
Quick Brush adjustments

Chapter 17 Making Brushed Adjustments 394
You can also choose a Quick Brush adjustment from the Quick Brush pop-up menu in the tool
strip of the Aperture main window or in the Full Screen view toolbar.
Quick Brush pop-up menu
Each time you choose a Quick Brush adjustment from the Add Adjustment pop-up menu or the
Quick Brush pop-up menu, the adjustment controls for the Quick Brush adjustment appear in
the Adjustments inspector (and the Adjustments pane of the Inspector HUD, if both are shown).
Some Quick Brush adjustments, such as Retouch, have just a checkbox and a Delete button for
removing brush strokes. Other Quick Brush adjustments, such as Denition, have additional
parameter controls that allow you to modify the radius and intensity of the adjustment after it
has been brushed on the image.
When you choose to brush either a standard adjustment or a Quick Brush adjustment, a Brush
HUD for that adjustment appears, and the pointer turns into a brush. You use the controls in the
Brush HUD to dene the size of the brush, the softness of the brush’s edges, and the strength
of the brush stroke. In addition to brush controls, the Brush HUD also contains controls for
erasing brush strokes, feathering the edges of brush strokes, working with overlays, limiting
the adjustment to specic tonal ranges, and detecting edges. When you are satised with the
settings in the Brush HUD, you can begin brushing the adjustment on the image.
All brushed adjustments are available for use in the Viewer and in Full Screen view, and you
can apply a brushed adjustment at any magnication setting. If you prefer to make brushed
adjustments with a pen and tablet rather than a mouse, the brushed adjustments are
pressure-sensitive.
Important: Brushed adjustments are available only for images using Aperture 3 image
processing. For more information about reprocessing your images, see An Overview of
Reprocessing Photos on page 76.
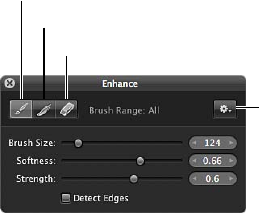
Chapter 17 Making Brushed Adjustments 395
Using Brushed Adjustment Controls
Working with Controls in the Brush HUD
The controls in the Brush HUD are the same for all brushed adjustments except for Retouch.
For more information about the Retouch adjustment, see An Overview of the Retouch
Adjustment Controls on page 300.
To show the Brush HUD for an adjustment
Do one of the following:
mIn the Adjustments inspector or the Adjustments pane of the Inspector HUD, choose either
“Brush [adjustment] in” or “Brush [adjustment] away” from the Action pop-up menu for
the adjustment.
mIn the Adjustments inspector or the Adjustments pane of the Inspector HUD, choose Quick
Brushes from the Add Adjustment pop-up menu, then choose a Quick Brush adjustment from
the submenu.
mChoose a Quick Brush adjustment from the Quick Brush pop-up menu (with a brush icon) in the
tool strip.
mIn Full Screen view, choose a Quick Brush adjustment from the Quick Brush pop-up menu in
the toolbar.
The Brush HUD appears.
Brush button
Feather button
Eraser button
Brush Action
pop-up menu
•Brush button: Click this button to activate the brush.
•Feather button: Click this button to feather the edges of previously applied brush strokes.
•Eraser button: Click this button to activate the eraser used to remove portions of previously
applied brush strokes for the currently selected adjustment.
•Brush Action pop-up menu: Choose to apply the brushed adjustment to the entire image, invert
the brush strokes, remove all brush strokes, display brush strokes as color overlays, show a
white mask with the brush strokes revealing the image underneath, show a black mask with
the brush strokes revealing the image underneath, or limit the brushed adjustment to the
shadows, midtones, or highlights of the image.
•Brush Size slider and value slider: Enter the diameter of the brush using the slider or value slider.
•Softness slider and value slider: Enter the softness of the brush’s edge using the slider or
value slider.
•Strength slider and value slider: Enter the intensity of the brush stroke using the slider or
value slider.
•Detect Edges checkbox: Select this checkbox to detect edges in the image that the adjustment
is brushed over, thereby preserving detail.
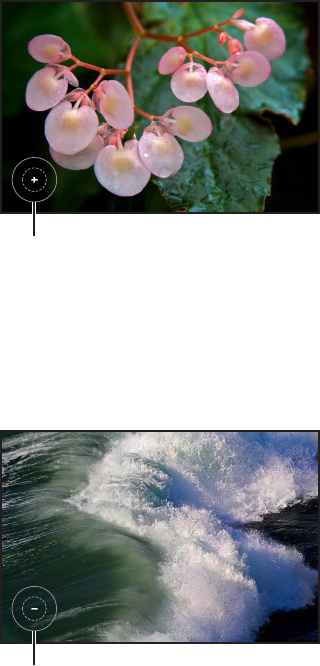
Chapter 17 Making Brushed Adjustments 396
Applying Brushed Adjustments
When you want to apply an adjustment to a small portion of an image, you can specify the
adjustment parameter settings and then brush the adjustment in.
A plus sign (+) indicates
that you’re brushing
the adjustment in.
When you want to apply an adjustment to most of an image except for a specic portion, you
can specify the parameter settings for the adjustment and then brush the adjustment away from
the areas of the image you want to exclude. Brushing an adjustment away from an image is the
same operation as using the eraser brush.
A minus sign (–) indicates that
you’re brushing the adjustment
away (erasing).
After applying a brushed adjustment to an image, you can still modify the eect of the
adjustment on the image. Whether you brushed a standard adjustment or a Quick Brush
adjustment, you can modify the adjustment using the controls for that adjustment in the
Adjustments inspector or the Adjustments pane of the Inspector HUD.
To brush an adjustment in
1 Select a photo.
2 If the adjustment you want to apply to the image is not shown in the Adjustments inspector or
the Adjustments pane of the Inspector HUD, choose the adjustment from the Add Adjustment
pop-up menu.
Note: The Red Eye Correction, Spot & Patch, Straighten, Crop, Flip, White Balance, and Exposure
adjustments cannot be brushed on images.
3 Specify parameter settings for the adjustment while viewing the eect on the image.
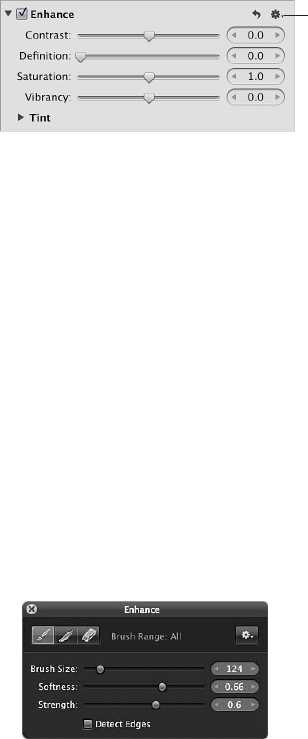
Chapter 17 Making Brushed Adjustments 397
4 When the area of the image you want to adjust has the correct appearance, choose “Brush
[adjustment] in” from the adjustment’s Action pop-up menu (with a gear icon).
Action pop-up menu for
the Enhance adjustment
The pointer turns into a brush, and the Brush HUD for the adjustment appears. The adjustment is
also removed from the image.
5 In the Brush HUD, specify the following settings:
•To adjust the size of the brush: Drag the Brush Size slider to the left to decrease the diameter of
the brush, or drag the slider to the right to increase the diameter. You can also enter a value in
the Brush Size value slider.
Tip: Use the scroll gesture to quickly resize the brush as you work.
•To adjust the softness of the brush: Drag the Softness slider to the left to decrease the softness
of the brush, or drag the slider to the right to increase the softness. You can also enter a value
in the Softness value slider.
•To adjust the intensity of the brush: Drag the Strength slider to the left to decrease the strength
of the brush stroke, or drag the slider to the right to increase the strength. You can also enter a
value in the Strength value slider.
•To specify that the adjustment detect edges in order to preserve detail: Select the Detect
Edges checkbox.
Note: For additional options, see Working with Brush Strokes on page 401.
6 Brush the adjustment over the areas of the image you want to apply it to.
Tip: It’s a good idea to regularly zoom in to the image to ensure the brush strokes cover the
areas of the image you intended the adjustment to cover.
The adjustment is applied to the portion of the image it was brushed on.
For information about how you can modify the eect of the adjustment after it has been
brushed on the image, see Working with Brush Strokes on page 401.
To brush an adjustment away
1 Select a photo.
2 If the adjustment you want to apply to the image is not shown in the Adjustments inspector or
the Adjustments pane of the Inspector HUD, choose the adjustment from the Add Adjustment
pop-up menu.
Note: The Red Eye Correction, Spot & Patch, Straighten, Crop, Flip, White Balance, and Exposure
adjustments cannot be brushed on images.
3 Specify parameter settings for the adjustment while viewing the eect on the image.
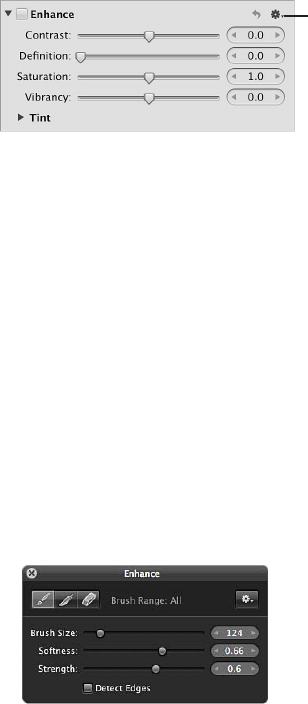
Chapter 17 Making Brushed Adjustments 398
4 When the area of the image you want to adjust has the correct appearance, choose “Brush
[adjustment] away” from the adjustment’s Action pop-up menu (with a gear icon).
Action pop-up menu for
the Enhance adjustment
The pointer turns into a brush, and the Brush HUD for the adjustment appears. The adjustment
remains applied to the entire image.
5 In the Brush HUD, specify the following settings:
•To adjust the size of the brush: Drag the Brush Size slider to the left to decrease the diameter of
the brush, or drag the slider to the right to increase the diameter. You can also enter a value in
the Brush Size value slider.
•To adjust the softness of the brush: Drag the Softness slider to the left to decrease the softness
of the brush, or drag the slider to the right to increase the softness. You can also enter a value
in the Softness value slider.
•To adjust the intensity of the brush: Drag the Strength slider to the left to decrease the strength
of the brush stroke, or drag the slider to the right to increase the strength. You can also enter a
value in the Strength value slider.
•To specify that the adjustment detect edges in order to preserve detail: Select the Detect
Edges checkbox.
Note: For additional options, see Working with Brush Strokes on page 401.
6 Brush over the areas of the image you want to exclude the adjustment from.
Tip: It’s a good idea to regularly zoom in to the image to ensure that the brush strokes exclude
the areas of the image you don’t want the adjustment to cover.
The adjustment is excluded from the portion of the image it was brushed on.
For information about how you can modify the eect of the adjustment after it has been
brushed on the image, see Working with Brush Strokes on page 401.
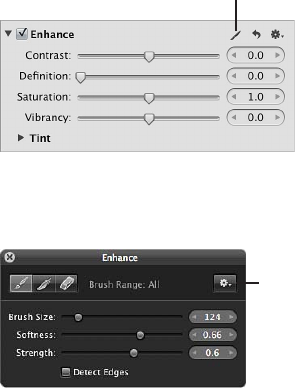
Chapter 17 Making Brushed Adjustments 399
To apply a brushed adjustment to the entire image
You can extend a brushed adjustment to the entire image if you decide that the adjustment
should be applied to the entire image rather than just the area you brushed over.
1 Select the photo with the brushed adjustment you want applied to the entire image.
2 If necessary, select the brushed adjustment in the Adjustments inspector or the Adjustments
pane of the Inspector HUD, then click the Brush button in the adjustment controls.
Click the Brush button.
The Brush HUD for the adjustment appears.
3 In the Brush HUD, choose “Apply to entire photo” from the Brush Action pop-up menu.
Choose “Apply to entire
photo” from the Brush
Action pop-up menu.
The brushed adjustment’s brush strokes are removed, and the adjustment is applied to the
entire image.
To modify a brushed adjustment after it has been applied to an image
mSpecify new parameter settings using the controls for that adjustment in the Adjustments
inspector or the Adjustments pane of the Inspector HUD.
Note: The parameter settings for the Retouch and Halo Reduction brushed adjustments cannot
be modied after the adjustments have been applied.
Applying Quick Brush Adjustments
Aperture provides Quick Brush adjustments, such as Dodge, Burn, Halo Reduction, and Skin
Smoothing, that have been specically designed for brushing on images. Using Quick Brush
adjustments, you brush the adjustment on the image and then modify the adjustment’s
parameter settings.
To apply a Quick Brush adjustment
1 Select a photo.
2 Do one of the following:
•In the Adjustments inspector or the Adjustments pane of the Inspector HUD, choose Quick
Brushes from the Add Adjustment pop-up menu, then choose a Quick Brush adjustment from
the submenu.
•Choose a Quick Brush adjustment from the Quick Brush pop-up menu (with a brush icon) in
the tool strip.
•In Full Screen view, choose a Quick Brush adjustment from the Quick Brush pop-up menu in
the toolbar.
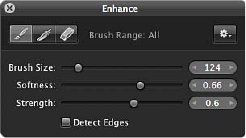
Chapter 17 Making Brushed Adjustments 400
The pointer turns into a brush, the Brush HUD for the adjustment appears, and adjustment
controls for the adjustment appear in the Adjustments inspector and the Adjustments pane of
the Inspector HUD, if both are shown.
Note: The controls in the Retouch HUD are dierent from those that appear in the Brush HUD
for other brushed adjustments. For more information about the controls in the Retouch HUD, see
Repairing Your Images on page 301.
3 In the Brush HUD, specify the following settings:
•To adjust the size of the brush: Drag the Brush Size slider to the left to decrease the diameter of
the brush, or drag the slider to the right to increase the diameter. You can also enter a value in
the Brush Size value slider.
•To adjust the softness of the brush: Drag the Softness slider to the left to decrease the softness
of the brush, or drag the slider to the right to increase the softness. You can also enter a value
in the Softness value slider.
•To adjust the intensity of the brush: Drag the Strength slider to the left to decrease the strength
of the brush stroke, or drag the slider to the right to increase the strength. You can also enter a
value in the Strength value slider.
•To specify that the adjustment detect edges in order to preserve detail: Select the Detect
Edges checkbox.
Note: For additional options, see Working with Brush Strokes on page 401.
4 Brush the adjustment over the areas of the image you want to apply it to.
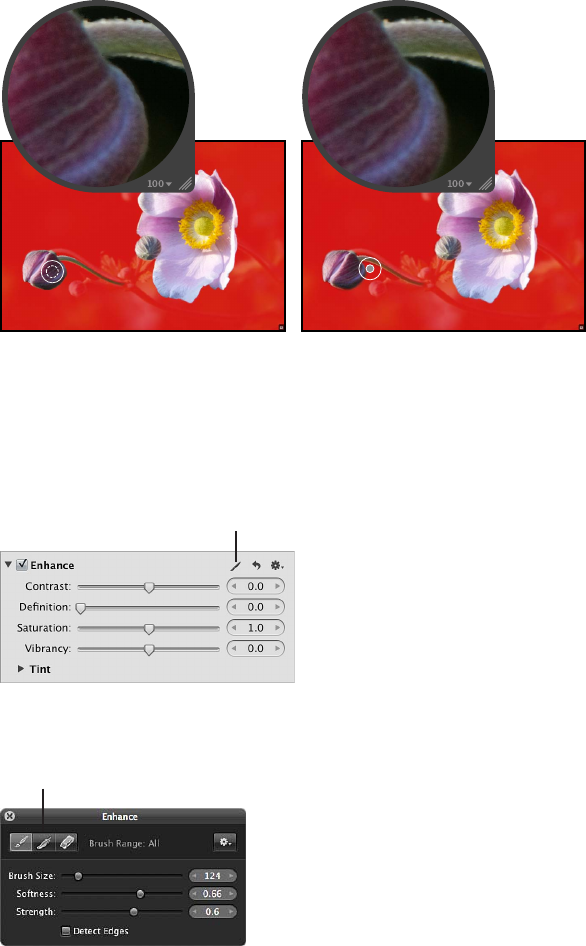
Chapter 17 Making Brushed Adjustments 401
Working with Brush Strokes
There are many controls in the Brush HUD that you can use to apply, remove, and feather
brush strokes.
To feather brush strokes
In many situations, it’s best to avoid brush strokes that have hard, noticeable edges. The Brush
HUD has a feathering brush that you can use to smooth the edges of previously applied brush
strokes so that they blend seamlessly into the image. The feathering brush is applied to the
selected brushed adjustment only.
Before feathering After feathering
(used the feathering brush to smooth the edge
of a previously applied brush stroke)
1 Select the photo with the brushed adjustment whose brush strokes you want to feather.
2 If necessary, select the brushed adjustment in the Adjustments inspector or the Adjustments
pane of the Inspector HUD, then click the Brush button in the adjustment controls.
Click the Brush button.
The Brush HUD for the adjustment appears.
3 In the Brush HUD, click the Feather button.
Click the Feather button.
4 Specify the diameter of the brush and its intensity using the Brush Size and Strength sliders and
value sliders.
5 Drag the brush over the edges of the previously applied brush strokes.
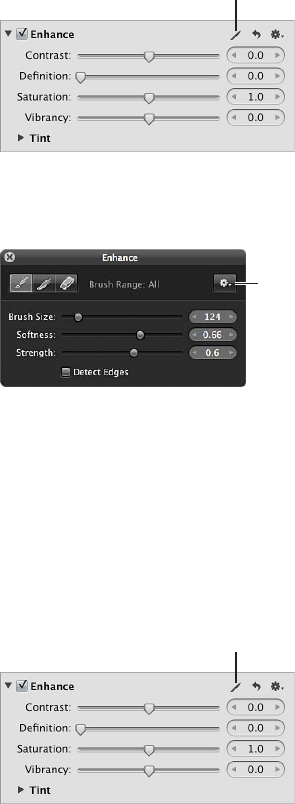
Chapter 17 Making Brushed Adjustments 402
Tip: When feathering brush stokes, it’s a good idea to display the brush strokes as color
overlays to help identify the boundaries of each brush stroke. Then turn the color overlays o at
regular intervals and visually inspect the image to ensure that the brush strokes are feathered
appropriately. For more information about working with overlays, see Working with Brushed
Adjustment Overlays on page 404.
The adjustment’s brush strokes are feathered, blending them into the image.
To invert an adjustment’s brush strokes
If you brush an adjustment over a specic area of an image and then decide that the adjustment
should be removed from the area you just brushed over and applied to the rest of the image,
you can invert the brush strokes.
1 Select the photo with the brushed adjustment whose brush strokes you want to invert.
2 If necessary, select the brushed adjustment in the Adjustments inspector or the Adjustments
pane of the Inspector HUD, then click the Brush button in the adjustment controls.
Click the Brush button.
The Brush HUD for the adjustment appears.
3 In the Brush HUD, choose Invert from the Brush Action pop-up menu.
Choose Invert from
the Brush Action
pop-up menu.
The adjustment’s brush strokes in the image are inverted.
To modify an adjustment’s brush strokes
You can modify the brush strokes of a previously applied adjustment by selecting the
adjustment in the Adjustments inspector or the Adjustments pane of the Inspector HUD, clicking
the Brush button, and then erasing or feathering the previously applied brush strokes as needed.
1 Select the photo whose brush strokes you want to change.
2 Click the Brush button at the top of the adjustment.
Click the Brush button.
The Brush HUD for the adjustment appears.
3 Use the controls in the Brush HUD to add new brush strokes, feather existing brush strokes, and
erase portions of brush strokes on the image.
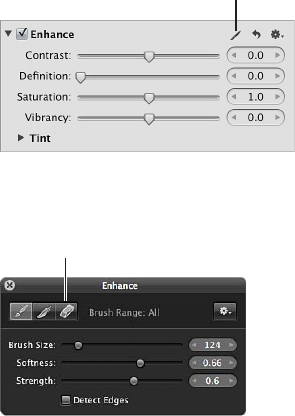
Chapter 17 Making Brushed Adjustments 403
To erase brush strokes
You can erase the brush strokes for any brushed adjustment applied to an image using the
Eraser button in the Brush HUD. The eraser brush erases the brush strokes of the selected
brushed adjustment only. The eraser brush uses the same parameters as the standard brush
(Brush Size, Softness, and Strength).
Tip: You can quickly switch from the brush to the eraser by holding down the Option key.
Release the Option key to switch back to the brush.
1 Select the photo with the brushed adjustment whose brush strokes you want to erase.
2 If necessary, select the brushed adjustment in the Adjustments inspector or the Adjustments
pane of the Inspector HUD, then click the Brush button in the adjustment controls.
Click the Brush button.
The Brush HUD for the adjustment appears.
3 In the Brush HUD, click the Eraser button.
Click the Eraser button.
4 Specify the diameter of the brush, its softness, and its intensity using the Brush Size, Softness,
and Strength sliders and value sliders.
5 Drag the brush over the parts of the previously applied brush strokes that you want to remove.
Tip: Some brushed adjustments are so subtle that it’s dicult to identify the boundaries of the
brush strokes or even the brush strokes themselves. In some cases, one brushed adjustment can
obscure another when brushed over the same area. To help identify brush strokes, it’s a good
idea to use overlays. For more information, see Working with Brushed Adjustment Overlays on
page 404.
The brush strokes selected with the eraser brush are erased.

Chapter 17 Making Brushed Adjustments 404
To remove all brush strokes for a specic adjustment from an image
If you want to remove all brush strokes for a specic adjustment that are applied to an image,
you can remove them all at once using the Brush Action pop-up menu in the Brush HUD for
that adjustment.
1 Select the photo with the brushed adjustment whose brush strokes you want to remove.
2 If necessary, select the brushed adjustment in the Adjustments inspector or the Adjustments
pane of the Inspector HUD, then click the Brush button in the adjustment controls.
Click the Brush button.
The Brush HUD for the adjustment appears.
3 In the Brush HUD, choose “Clear from entire photo” from the Brush Action pop-up menu.
Choose “Clear
from entire photo”
from the Brush
Action pop-up
menu.
All brush strokes for the selected adjustment are removed from the image.
Working with Brushed Adjustment Overlays
Overlays are useful tools for identifying where brush strokes for the selected brushed adjustment
have been applied to the image. When you’ve brushed an adjustment with a subtle softness
and strength over the image, it can be dicult to discern the boundaries of the brush strokes.
Aperture provides several types of overlays to help you visually identify the selected brushed
adjustment’s cumulative brush strokes. When you accurately identify the boundaries of a brush
stroke, you can use the eraser brush to remove any parts of the brush stroke that don’t belong,
and you can use the feathering brush to smooth out the edges. For more information, see
Applying Brushed Adjustments on page 396 and Working with Brush Strokes on page 401.
The Brush Action pop-up menu in the Brush HUD provides the following overlay options to help
you with detailed brushing:
•Color Overlay: This option displays a pink overlay over the brush strokes for the
selected adjustment.
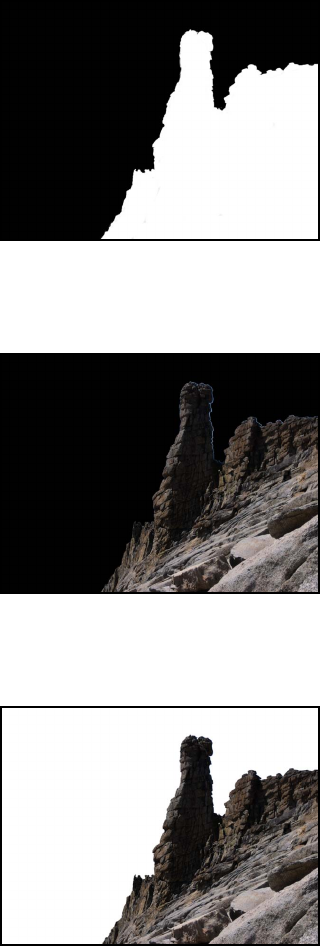
Chapter 17 Making Brushed Adjustments 405
•Brush Strokes: This option displays the brush strokes for the selected adjustment as pure white
over a pure black background. This option provides the easiest method for identifying brush
strokes that have been applied to an image. It’s a good idea to use this overlay option if you
suspect that you missed a tiny part of the image when brushing. The missed portions of the
image appear as black dots or lines.
•On Black: This option displays a pure black mask over the image, with the brush strokes
revealing the image beneath. This option is useful for showing detailed brush strokes over a
bright area in the image.
•On White: This option displays a pure white mask over the image, with brush strokes revealing
the image beneath. This option is useful for detailed brush strokes over dark areas in
the image.
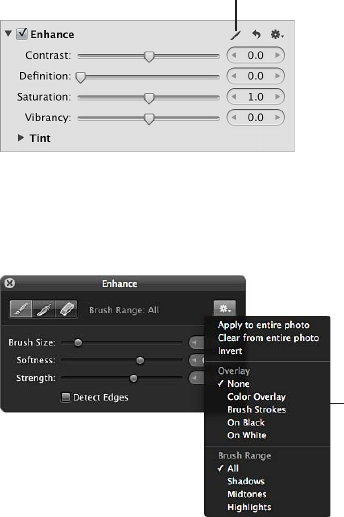
Chapter 17 Making Brushed Adjustments 406
To apply an overlay for a brushed adjustment to an image
1 Select the photo with the brushed adjustment whose brush strokes you want to view as
an overlay.
2 If necessary, select the brushed adjustment in the Adjustments inspector or the Adjustments
pane of the Inspector HUD, then click the Brush button in the adjustment controls.
Click the Brush button.
The Brush HUD for the adjustment appears.
3 In the Brush HUD, choose an overlay option from the Overlay section of the Brush Action
pop-up menu.
Choose an overlay from
the Overlay section
of the Brush Action
pop-up menu.
The chosen overlay appears on the image, displaying the brush strokes for the selected
brushed adjustment.
To turn an overlay o
mIn the Brush HUD, choose None from the Overlay section of the Brush Action pop-up menu.
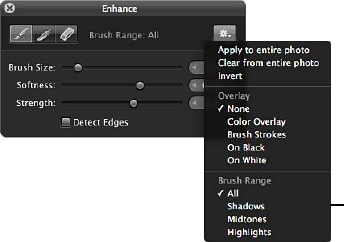
Chapter 17 Making Brushed Adjustments 407
Limiting the Tonal Range of Brushed Adjustments
You can limit the adjustment you’re about to brush on an image to a specic tonal range
using the Brush Action pop-up menu in the Brush HUD. For example, if you want to brush an
adjustment on an image and have the adjustment limited to the shadows, you choose Shadows
from the Brush Action pop-up menu and then brush the adjustment on the image. If the brush
touches a midtone or highlight, that part of the image is not changed.
Tip: This feature is particularly useful when burning and dodging, because you can limit the
exposure adjustment to the tonal range you want to modify without having to worry about
adversely aecting details in the tonal ranges that are appropriately exposed.
To limit a brushed adjustment to a specic tonal range
1 Select a photo.
2 Do one of the following:
•In the Adjustments inspector or the Adjustments pane of the Inspector HUD, choose either
“Brush [adjustment] in” or “Brush [adjustment] away” from the Action pop-up menu (with a gear
icon) for the adjustment you want to apply to the image.
•Choose a Quick Brush adjustment from the Quick Brush pop-up menu (with a brush icon) in
the tool strip.
•In the Adjustments inspector or the Adjustments pane of the Inspector HUD, choose Quick
Brushes from the Add Adjustment pop-up menu, then choose a Quick Brush adjustment from
the submenu.
•In Full Screen view, choose a Quick Brush adjustment from the Quick Brush pop-up menu in
the toolbar.
The Brush HUD for the adjustment appears.
3 In the Brush HUD, choose a tonal range for the adjustment from the Brush Range section of the
Brush Action pop-up menu.
Note: If you don’t want the brushed adjustment limited to a specic tonal range, choose All.
Choose a tonal
range option from
the Brush Range
section of the Brush
Action pop-up menu.
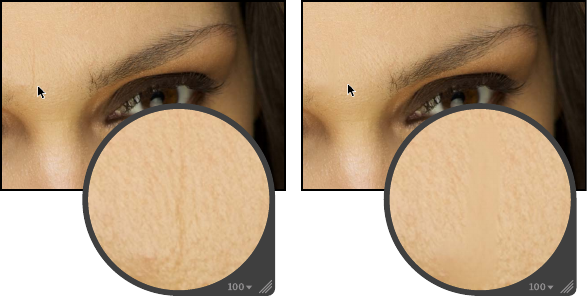
Chapter 17 Making Brushed Adjustments 408
Working with the Skin Smoothing Quick Brush Controls
You use the Skin Smoothing Quick Brush adjustment to smooth a person’s skin by subtly blurring
wrinkles and skin pores.
Before Skin Smoothing
Quick Brush adjustment
After Skin Smoothing
Quick Brush adjustment
To brush the Skin Smoothing adjustment on an image
1 Select a photo.
2 Do one of the following:
•In the Adjustments inspector or the Adjustments pane of the Inspector HUD, choose Quick
Brushes > Skin Smoothing from the Add Adjustment pop-up menu.
•In the tool strip, choose Skin Smoothing from the Quick Brush pop-up menu (with a brush icon).
The Skin Smoothing Brush HUD appears, and the Skin Smoothing adjustment controls appear in
the Adjustments inspector and the Adjustments pane of the Inspector HUD, if both are shown.
3 Specify the brush stroke settings using the controls in the Skin Smoothing Brush HUD.
For more information about the controls in the Brush HUD, see Working with Controls in the
Brush HUD on page 395. For more information about applying brush strokes to an image, see
Working with Brush Strokes on page 401.
4 Brush the adjustment on the area of the image that contains the person whose skin you want
to smooth.
The person’s skin in the image appears smoother where the Skin Smoothing Quick Brush
adjustment is applied.
To modify the Skin Smoothing adjustment after it has been applied to an image
1 Select a photo with the Skin Smoothing adjustment applied to it.
2 In the Skin Smoothing area of the Adjustments inspector or the Adjustments pane of the
Inspector HUD, modify the Skin Smoothing adjustment by specifying the following settings:
•Specify the area over which the Skin Smoothing adjustment is applied using the Radius slider
and value slider.
•Specify the amount of detail to preserve in the area of the image where the Skin Smoothing
adjustment is applied using the Detail slider and value slider.
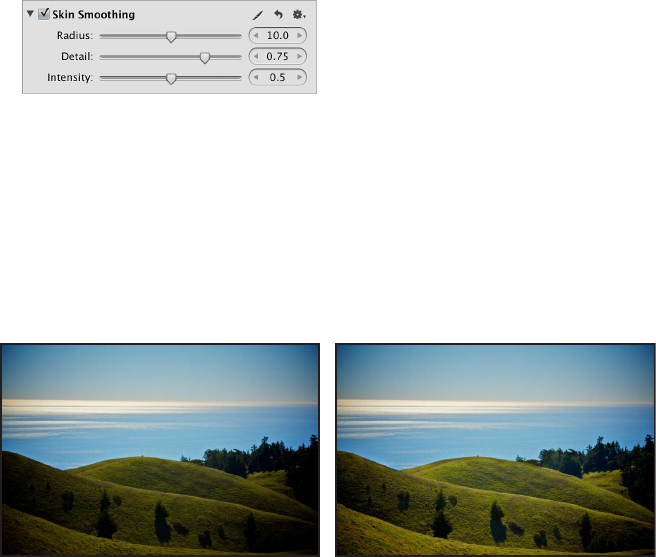
Chapter 17 Making Brushed Adjustments 409
•Specify the amount of the Skin Smoothing adjustment you want to apply to the image using
the Intensity slider and value slider.
The previously applied Skin Smoothing adjustment is modied.
Working with the Dodge Quick Brush Controls
You use the Dodge Quick Brush adjustment to lighten the area of the image the adjustment is
brushed on. For example, if you have a subject in the foreground of the image that you want
to emphasize by making it slightly lighter than the background, you use the Dodge Quick
Brush adjustment.
Before Dodge adjustment After Dodge adjustment
(lightened the hills in the foreground)
To brush the Dodge adjustment on an image
1 Select a photo.
2 Do one of the following:
•In the Adjustments inspector or the Adjustments pane of the Inspector HUD, choose Quick
Brushes > Dodge (Lighten) from the Add Adjustment pop-up menu.
•In the tool strip, choose Dodge (Lighten) from the Quick Brush pop-up menu (with a
brush icon).
The Dodge Brush HUD appears, and the Dodge adjustment controls appear in the Adjustments
inspector and the Adjustments pane of the Inspector HUD, if both are shown.
3 Specify the brush stroke settings using the controls in the Dodge Brush HUD.
For more information about the controls in the Brush HUD, see Working with Controls in the
Brush HUD on page 395. For more information about applying brush strokes to an image, see
Working with Brush Strokes on page 401.
4 Brush the adjustment on the area of the image you want to lighten.
The image appears lighter where the Dodge Quick Brush adjustment is applied.
To modify the Dodge adjustment after it has been applied to an image
1 Select a photo with the Dodge adjustment applied to it.
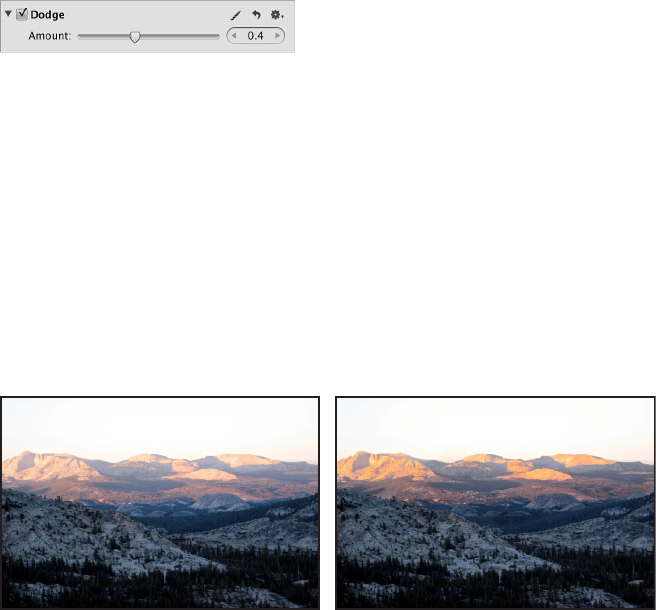
Chapter 17 Making Brushed Adjustments 410
2 In the Dodge area of the Adjustments inspector or the Adjustments pane of the Inspector HUD,
modify the Dodge adjustment by specifying the amount of the adjustment you want to apply to
the image using the Amount slider and value slider.
The previously applied Dodge adjustment is modied.
Working with the Burn Quick Brush Controls
You use the Burn Quick Brush adjustment to darken the area of the image the adjustment is
brushed on. For example, if you want to obscure a visual element in the shadows of the image
without using the Levels or Curves adjustment to crush the blacks (changing the tonality of all
shadows in the image), you use the Burn Quick Brush adjustment.
For more information about Curves adjustments, see An Overview of the Curves Adjustment on
page 350. For more information about Levels adjustments, see An Overview of the Levels
Adjustment on page 367.
Before Burn adjustment After Burn adjustment
(darkened the mountains in the background)
To brush the Burn adjustment on an image
1 Select a photo.
2 Do one of the following:
•In the Adjustments inspector or the Adjustments pane of the Inspector HUD, choose Quick
Brushes > Burn (Darken) from the Add Adjustment pop-up menu.
•In the tool strip, choose Burn (Darken) from the Quick Brush pop-up menu (with a brush icon).
The Burn Brush HUD appears, and the Burn adjustment controls appear in the Adjustments
inspector and the Adjustments pane of the Inspector HUD, if both are shown.
3 Specify the brush stroke settings using the controls in the Burn Brush HUD.
For more information about the controls in the Brush HUD, see Working with Controls in the
Brush HUD on page 395. For more information about applying brush strokes to an image, see
Working with Brush Strokes on page 401.
4 Brush the adjustment on the area of the image you want to darken.
The image appears darker where the Burn Quick Brush adjustment is applied.
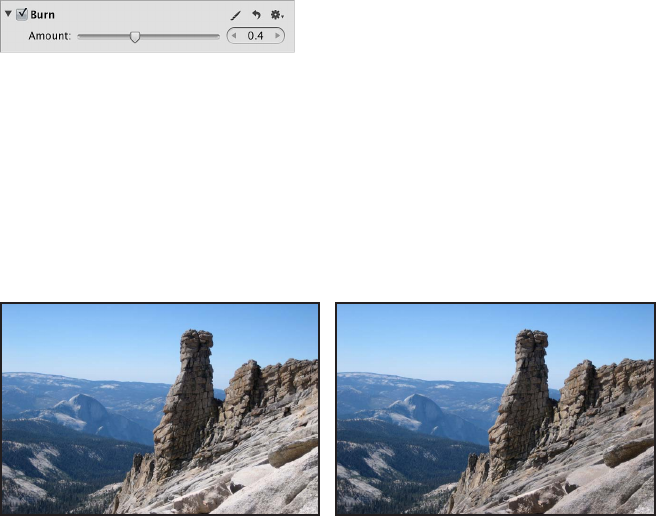
Chapter 17 Making Brushed Adjustments 411
To modify the Burn adjustment after it has been applied to an image
1 Select a photo with the Burn adjustment applied to it.
2 In the Burn area of the Adjustments inspector or the Adjustments pane of the Inspector HUD,
modify the Burn adjustment by specifying the amount of the adjustment you want to apply to
the image using the Amount slider and value slider.
The previously applied Burn adjustment is modied.
Working with the Polarize Quick Brush Controls
You use the Polarize Quick Brush adjustment to deepen colors in the image by specically
darkening the shadows and midtones without aecting the black and white points in the area of
the image the adjustment is brushed on. The Polarize Quick Brush adjustment creates an eect
similar to a polarizing lter by using a Multiply blend.
Before Polarize adjustment After Polarize adjustment
(added contrast to the shadows and midtones
of the granite rocks in the foreground)
To brush the Polarize adjustment on an image
1 Select a photo.
2 Do one of the following:
•In the Adjustments inspector or the Adjustments pane of the Inspector HUD, choose Quick
Brushes > Polarize (Multiply) from the Add Adjustment pop-up menu.
•In the tool strip, choose Polarize (Multiply) from the Quick Brush pop-up menu (with a brush icon).
The Polarize Brush HUD appears, and the Polarize adjustment controls appear in the Adjustments
inspector and the Adjustments pane of the Inspector HUD, if both are shown.
3 Specify the brush stroke settings using the controls in the Polarize Brush HUD.
For more information about the controls in the Brush HUD, see Working with Controls in the
Brush HUD on page 395. For more information about applying brush strokes to an image, see
Working with Brush Strokes on page 401.
4 Brush the adjustment on the area of the image that contains shadows and midtones you want to
add contrast to.
Additional contrast appears in the shadows and midtones of the image in the areas where the
Polarize Quick Brush adjustment is applied.
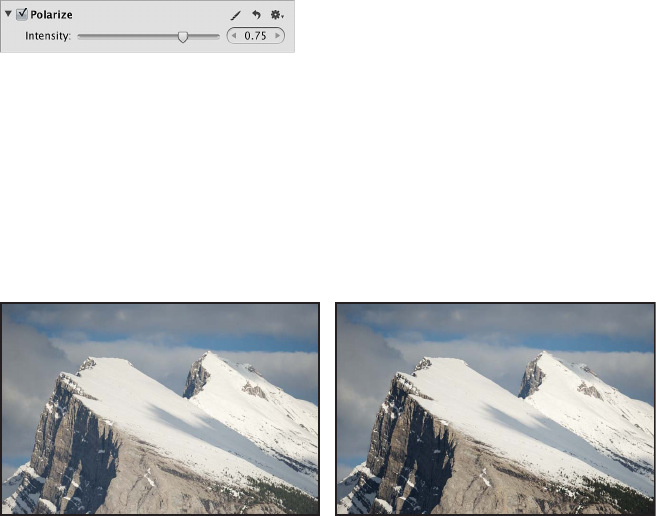
Chapter 17 Making Brushed Adjustments 412
To modify the Polarize adjustment after it has been applied to an image
1 Select a photo with the Polarize adjustment applied to it.
2 In the Polarize area of the Adjustments inspector or the Adjustments pane of the Inspector HUD,
modify the Polarize adjustment by specifying the amount of the adjustment you want to apply
to the image using the Intensity slider and value slider.
The previously applied Polarize adjustment is modied.
Working with the Intensify Contrast Quick Brush Controls
You use the Intensify Contrast Quick Brush adjustment to correct shadow areas of the image that
appear washed out by intensifying the contrast between pure black and 50 percent gray in the
area of the image the adjustment is brushed on. The Intensify Contrast Quick Brush adjustment is
equivalent to applying an Overlay blend.
Before Intensify Contrast adjustment After Intensify Contrast adjustment
(added contrast to the exposed mountainside and
trees in the foreground)
To brush the Intensify Contrast adjustment on an image
1 Select a photo.
2 Do one of the following:
•In the Adjustments inspector or the Adjustments pane of the Inspector HUD, choose Quick
Brushes > Intensify Contrast (Overlay) from the Add Adjustment pop-up menu.
•In the tool strip, choose Intensify Contrast (Overlay) from the Quick Brush pop-up menu (with
a brush icon).
The Intensify Contrast Brush HUD appears, and the Intensify Contrast adjustment controls appear
in the Adjustments inspector and the Adjustments pane of the Inspector HUD, if both are shown.
3 Specify the brush stroke settings using the controls in the Intensify Contrast Brush HUD.
For more information about the controls in the Brush HUD, see Working with Controls in the
Brush HUD on page 395. For more information about applying brush strokes to an image, see
Working with Brush Strokes on page 401.
4 Brush the adjustment on the area of the image where you want to intensify contrast in shadows.
Additional contrast appears between pure black and 50 percent gray in the area of the image
where the Intensify Contrast Quick Brush adjustment is applied.
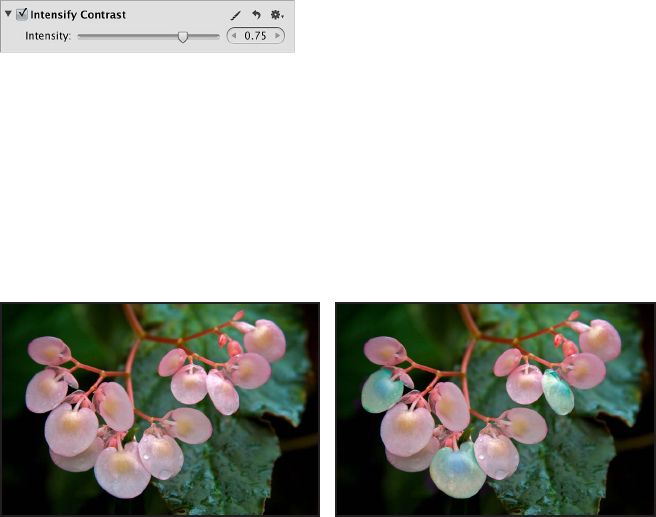
Chapter 17 Making Brushed Adjustments 413
To modify the Intensify Contrast adjustment after it has been applied to an image
1 Select a photo with the Intensify Contrast adjustment applied to it.
2 In the Intensify Contrast area of the Adjustments inspector or the Adjustments pane of the
Inspector HUD, modify the Intensify Contrast adjustment by specifying the amount of the
adjustment you want to apply to the image using the Intensity slider and value slider.
The previously applied Intensify Contrast adjustment is modied.
Working with the Tint Quick Brush Controls
You use the Tint Quick Brush adjustment to shift the tint in the area of the image the adjustment
is brushed on. For example, if an object in your image has a cyan tint that you want to neutralize
without changing the overall tint of the image, you use the Tint Quick Brush adjustment and
then add magenta to the brush stroke using the Angle slider and value slider.
Before Tint adjustment After Tint adjustment
(changed the color of three flower petals)
Note: You can also apply a Tint adjustment by brushing the entire Enhance adjustment's
parameter settings in to or out of an image. However, brushing the Enhance adjustment on an
image applies the Contrast, Denition, Saturation, Vibrancy, and Tint parameter settings. You
use the Quick Brush equivalents when you need to apply each of these adjustments in dierent
ways to dierent parts of the photo. For more information about the Enhance adjustment, see An
Overview of the Enhance Adjustment on page 340.
To brush the Tint adjustment on an image
1 Select a photo.
2 Do one of the following:
•In the Adjustments inspector or the Adjustments pane of the Inspector HUD, choose Quick
Brushes > Tint from the Add Adjustment pop-up menu.
•In the tool strip, choose Tint from the Quick Brush pop-up menu (with a brush icon).
The Tint Brush HUD appears, and the Tint adjustment controls appear in the Adjustments
inspector and the Adjustments pane of the Inspector HUD, if both are shown.
3 Specify the brush stroke settings using the controls in the Tint Brush HUD.
For more information about the controls in the Brush HUD, see Working with Controls in the
Brush HUD on page 395. For more information about applying brush strokes to an image, see
Working with Brush Strokes on page 401.
4 Brush the adjustment on the area of the image where you want to change the tint.
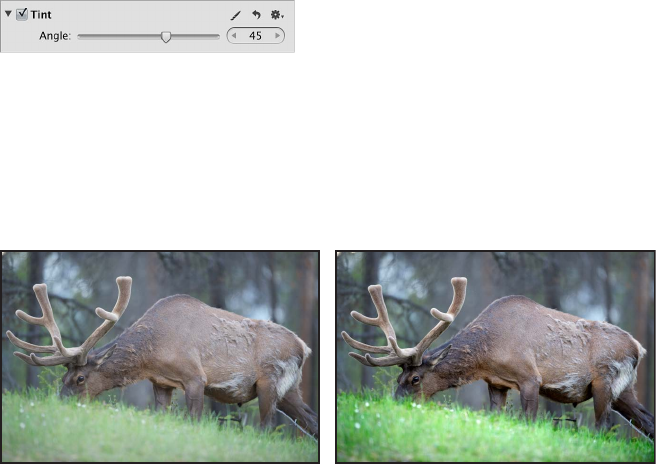
Chapter 17 Making Brushed Adjustments 414
The tint is shifted in the area of the image where the Tint Quick Brush adjustment is applied.
To modify the Tint adjustment after it has been applied to an image
1 Select a photo with the Tint adjustment applied to it.
2 In the Tint area of the Adjustments inspector or the Adjustments pane of the Inspector HUD,
modify the Tint adjustment by specifying which way you want to shift the color’s tint using the
Angle slider and value slider.
The previously applied Tint adjustment is modied.
Working with the Contrast Quick Brush Controls
You use the Contrast Quick Brush adjustment to modify the contrast in the area of the image the
adjustment is brushed on.
Before Contrast adjustment After Contrast adjustment
(added contrast to elk and grass)
Note: You can also apply a Contrast adjustment by brushing the entire Enhance adjustment's
parameter settings in to or out of an image. However, brushing the Enhance adjustment on an
image applies the Contrast, Denition, Saturation, Vibrancy, and Tint parameter settings. You
use the Quick Brush equivalents when you need to apply each of these adjustments in dierent
ways to dierent parts of the photo. For more information about the Enhance adjustment, see An
Overview of the Enhance Adjustment on page 340.
To brush the Contrast adjustment on an image
1 Select a photo.
2 Do one of the following:
•In the Adjustments inspector or the Adjustments pane of the Inspector HUD, choose Quick
Brushes > Contrast from the Add Adjustment pop-up menu.
•In the tool strip, choose Contrast from the Quick Brush pop-up menu (with a brush icon).
The Contrast Brush HUD appears, and the Contrast adjustment controls appear in the
Adjustments inspector and the Adjustments pane of the Inspector HUD, if both are shown.
3 Specify the brush stroke settings using the controls in the Contrast Brush HUD.
For more information about the controls in the Brush HUD, see Working with Controls in the
Brush HUD on page 395. For more information about applying brush strokes to an image, see
Working with Brush Strokes on page 401.
4 Brush the adjustment on the area of the image where you want to change the contrast.
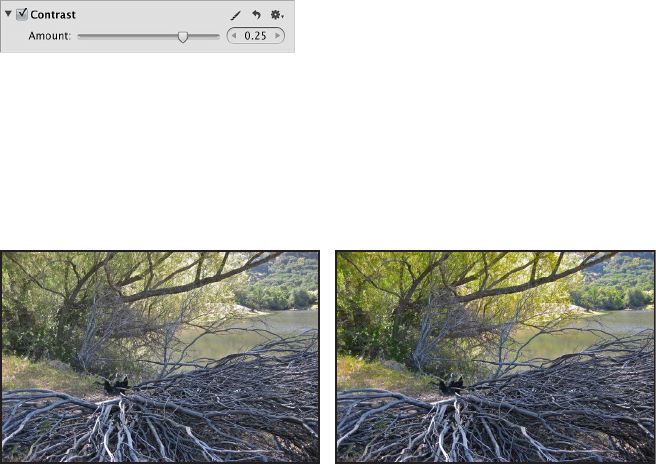
Chapter 17 Making Brushed Adjustments 415
The contrast is changed in the area of the image where the Contrast Quick Brush adjustment
is applied.
To modify the Contrast adjustment after it has been applied to an image
1 Select a photo with the Contrast adjustment applied to it.
2 In the Contrast area of the Adjustments inspector or the Adjustments pane of the Inspector HUD,
modify the Contrast adjustment by specifying the amount of the adjustment you want to apply
to the image using the Amount slider and value slider.
The previously applied Contrast adjustment is modied.
Working with the Saturation Quick Brush Controls
You use the Saturation Quick Brush adjustment to modify the saturation of the colors in the area
of the image the adjustment is brushed on.
Before Saturation adjustment After Saturation adjustment
(added saturation to the green trees
in the background)
Note: You can also apply a Saturation adjustment by brushing the entire Enhance adjustment's
parameter settings in to or out of an image. However, brushing the Enhance adjustment on an
image applies the Contrast, Denition, Saturation, Vibrancy, and Tint parameter settings. You
use the Quick Brush equivalents when you need to apply each of these adjustments in dierent
ways to dierent parts of the photo. For more information about the Enhance adjustment, see An
Overview of the Enhance Adjustment on page 340.
To brush the Saturation adjustment on an image
1 Select a photo.
2 Do one of the following:
•In the Adjustments inspector or the Adjustments pane of the Inspector HUD, choose Quick
Brushes > Saturation from the Add Adjustment pop-up menu.
•In the tool strip, choose Saturation from the Quick Brush pop-up menu (with a brush icon).
The Saturation Brush HUD appears, and the Saturation adjustment controls appear in the
Adjustments inspector and the Adjustments pane of the Inspector HUD, if both are shown.
3 Specify the brush stroke settings using the controls in the Saturation Brush HUD.
For more information about the controls in the Brush HUD, see Working with Controls in the
Brush HUD on page 395. For more information about applying brush strokes to an image, see
Working with Brush Strokes on page 401.
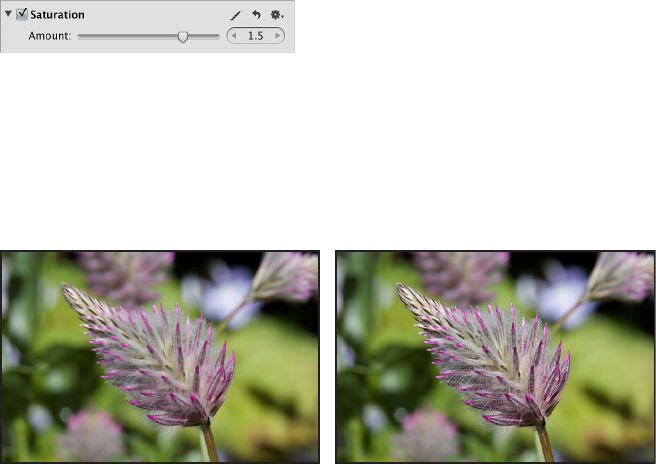
Chapter 17 Making Brushed Adjustments 416
4 Brush the adjustment on the area of the image where you want to change the saturation.
The saturation is changed in the area of the image where the Saturation Quick Brush adjustment
is applied.
To modify the Saturation adjustment after it has been applied to an image
1 Select a photo with the Saturation adjustment applied to it.
2 In the Saturation area of the Adjustments inspector or the Adjustments pane of the Inspector
HUD, modify the Saturation adjustment by specifying the amount of the adjustment you want to
apply to the image using the Amount slider and value slider.
The previously applied Saturation adjustment is modied.
Working with the Denition Quick Brush Controls
You use the Denition Quick Brush adjustment to add clarity and reduce haze without adding
too much contrast to the area of the image the adjustment is brushed on.
Before Definition adjustment After Definition adjustment
(added definition to the flower in the foreground)
Note: You can also apply a Denition adjustment by brushing the entire Enhance adjustment's
parameter settings in to or out of an image. However, brushing the Enhance adjustment on an
image applies the Contrast, Denition, Saturation, Vibrancy, and Tint parameter settings. You
use the Quick Brush equivalents when you need to apply each of these adjustments in dierent
ways to dierent parts of the photo. For more information about the Enhance adjustment, see An
Overview of the Enhance Adjustment on page 340.

Chapter 17 Making Brushed Adjustments 417
To brush the Denition adjustment on an image
1 Select a photo.
2 Do one of the following:
•In the Adjustments inspector or the Adjustments pane of the Inspector HUD, choose Quick
Brushes > Denition from the Add Adjustment pop-up menu.
•In the tool strip, choose Denition from the Quick Brush pop-up menu (with a brush icon).
The Denition Brush HUD appears, and the Denition adjustment controls appear in the
Adjustments inspector and the Adjustments pane of the Inspector HUD, if both are shown.
3 Specify the brush stroke settings using the controls in the Denition Brush HUD.
For more information about the controls in the Brush HUD, see Working with Controls in the
Brush HUD on page 395. For more information about applying brush strokes to an image, see
Working with Brush Strokes on page 401.
4 Brush the adjustment on the area of the image where you want to add denition.
Clarity is added and haze is reduced in the area of the image where the Denition Quick Brush
adjustment is applied.
To modify the Denition adjustment after it has been applied to an image
1 Select a photo with the Denition adjustment applied to it.
2 In the Denition area of the Adjustments inspector or the Adjustments pane of the Inspector
HUD, modify the Denition adjustment by specifying the following settings:
•Specify the area over which the Denition adjustment is applied using the Radius slider and
value slider.
•Specify the amount of the Denition adjustment you want to apply to the image using the
Intensity slider and value slider.
The previously applied Denition adjustment is modied.
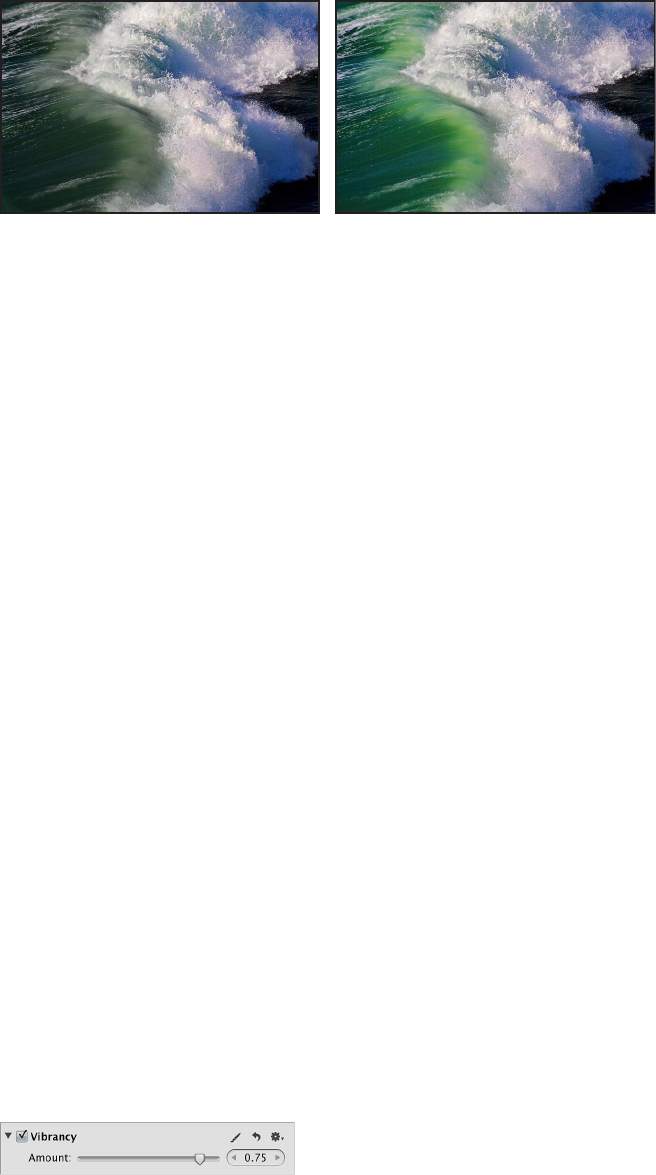
Chapter 17 Making Brushed Adjustments 418
Working with the Vibrancy Quick Brush Controls
You use the Vibrancy Quick Brush adjustment to add saturation to desaturated colors only in the
area of the image the adjustment is brushed on. Skin tones are not aected.
Before Vibrancy adjustment After Vibrancy adjustment
(added saturation to desaturated colors
in the green wave)
Note: You can also apply a Vibrancy adjustment by brushing the entire Enhance adjustment's
parameter settings in to or out of an image. However, brushing the Enhance adjustment on an
image applies the Contrast, Denition, Saturation, Vibrancy, and Tint parameter settings. You
use the Quick Brush equivalents when you need to apply each of these adjustments in dierent
ways to dierent parts of the photo. For more information about the Enhance adjustment, see An
Overview of the Enhance Adjustment on page 340.
To brush the Vibrancy adjustment on an image
1 Select a photo.
2 Do one of the following:
•In the Adjustments inspector or the Adjustments pane of the Inspector HUD, choose Quick
Brushes > Vibrancy from the Add Adjustment pop-up menu.
•In the tool strip, choose Vibrancy from the Quick Brush pop-up menu (with a brush icon).
The Vibrancy Brush HUD appears, and the Vibrancy adjustment controls appear in the
Adjustments inspector and the Adjustments pane of the Inspector HUD, if both are shown.
3 Specify the brush stroke settings using the controls in the Vibrancy Brush HUD.
For more information about the controls in the Brush HUD, see Working with Controls in the
Brush HUD on page 395. For more information about applying brush strokes to an image, see
Working with Brush Strokes on page 401.
4 Brush the adjustment on the area of the image where you want to add saturation to desaturated
colors only.
The saturation of the desaturated colors is changed in the area of the image where the Vibrancy
Quick Brush adjustment is applied.
To modify the Vibrancy adjustment after it has been applied to an image
1 Select a photo with the Vibrancy adjustment applied to it.
2 In the Vibrancy area of the Adjustments inspector or the Adjustments pane of the Inspector HUD,
modify the Vibrancy adjustment by specifying the amount of the adjustment you want to apply
to the image using the Amount slider and value slider.
The previously applied Vibrancy adjustment is modied.
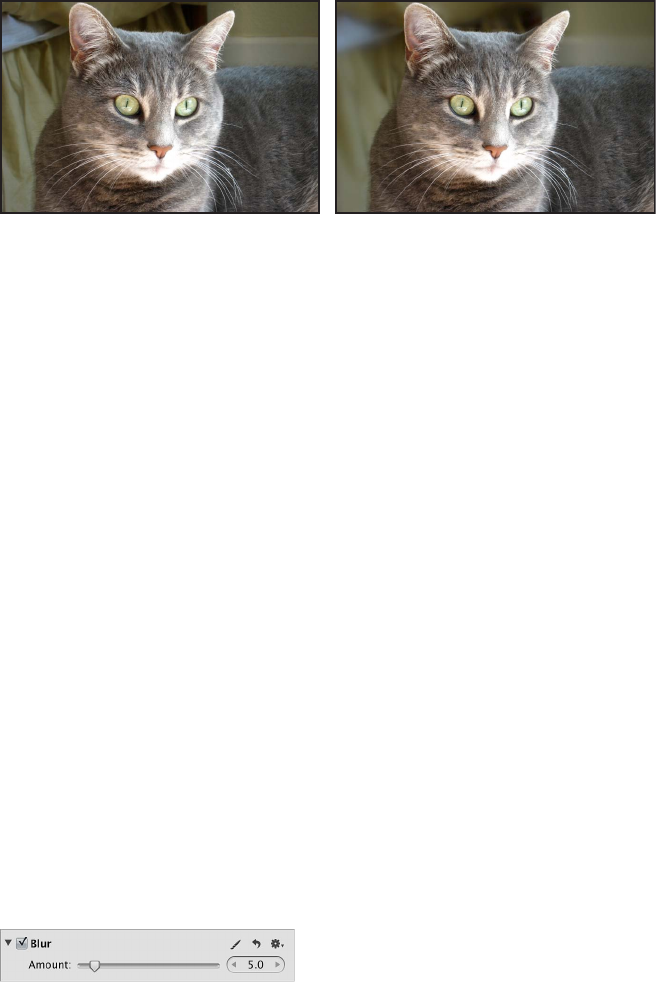
Chapter 17 Making Brushed Adjustments 419
Working with the Blur Quick Brush Controls
You use the Blur Quick Brush adjustment to soften the area of the image the adjustment is
brushed on.
Before Blur adjustment After Blur adjustment
(blurred the background)
To brush the Blur adjustment on an image
1 Select a photo.
2 Do one of the following:
•In the Adjustments inspector or the Adjustments pane of the Inspector HUD, choose Quick
Brushes > Blur from the Add Adjustment pop-up menu.
•In the tool strip, choose Blur from the Quick Brush pop-up menu (with a brush icon).
The Blur Brush HUD appears, and the Blur adjustment controls appear in the Adjustments
inspector and the Adjustments pane of the Inspector HUD, if both are shown.
3 Specify the brush stroke settings using the controls in the Blur Brush HUD.
For more information about the controls in the Brush HUD, see Working with Controls in the
Brush HUD on page 395. For more information about applying brush strokes to an image, see
Working with Brush Strokes on page 401.
4 Brush the adjustment on the area of the image where you want to soften or obscure detail.
The visual details are softened in the area of the image where the Blur Quick Brush adjustment
is applied.
To modify the Blur adjustment after it has been applied to an image
1 Select a photo with the Blur adjustment applied to it.
2 In the Blur area of the Adjustments inspector or the Adjustments pane of the Inspector HUD,
modify the Blur adjustment by specifying the amount of the adjustment you want to apply to
the image using the Amount slider and value slider.
The previously applied Blur adjustment is modied.
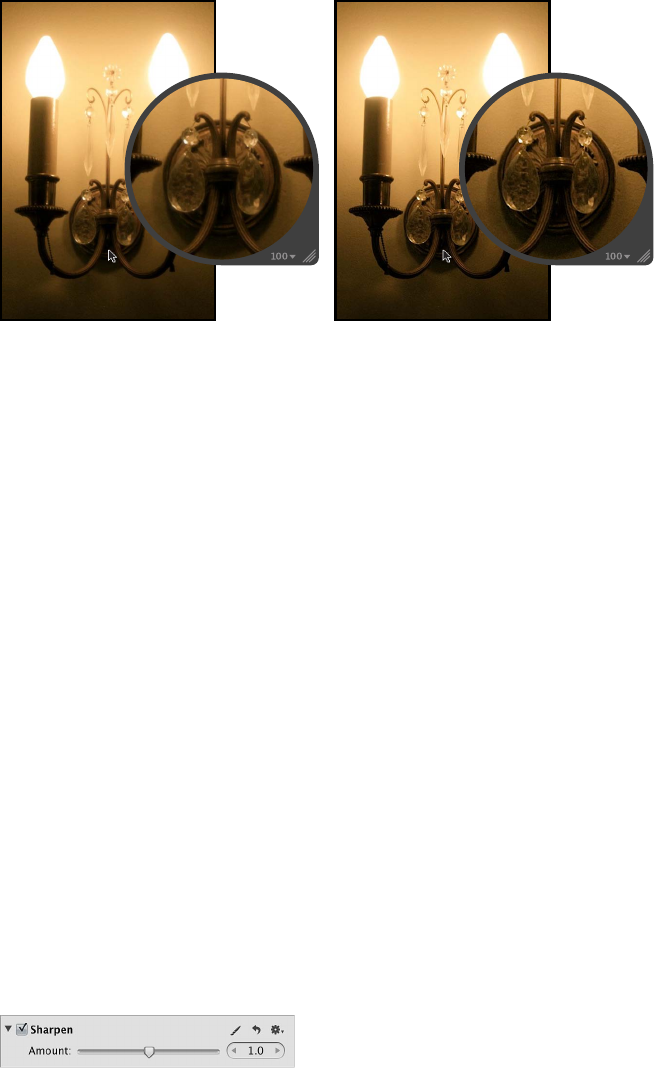
Chapter 17 Making Brushed Adjustments 420
Working with the Sharpen Quick Brush Controls
You use the Sharpen Quick Brush adjustment to ne-tune the details in the area of the image the
adjustment is brushed on.
Before Sharpen adjustment After Sharpen adjustment
To brush the Sharpen adjustment on an image
1 Select a photo.
2 Do one of the following:
•In the Adjustments inspector or the Adjustments pane of the Inspector HUD, choose Quick
Brushes > Sharpen from the Add Adjustment pop-up menu.
•In the tool strip, choose Sharpen from the Quick Brush pop-up menu (with a brush icon).
The Sharpen Brush HUD appears, and the Sharpen adjustment controls appear in the
Adjustments inspector and the Adjustments pane of the Inspector HUD, if both are shown.
3 Specify the brush stroke settings using the controls in the Sharpen Brush HUD.
For more information about the controls in the Brush HUD, see Working with Controls in the
Brush HUD on page 395. For more information about applying brush strokes to an image, see
Working with Brush Strokes on page 401.
4 Brush the adjustment on the area of the image that you want to sharpen.
The visual details are sharpened in the area of the image where the Sharpen Quick Brush
adjustment is applied.
To modify the Sharpen adjustment after it has been applied to an image
1 Select a photo with the Sharpen adjustment applied to it.
2 In the Sharpen area of the Adjustments inspector or the Adjustments pane of the Inspector HUD,
modify the Sharpen adjustment by specifying the amount of the adjustment you want to apply
to the image using the Amount slider and value slider.
The previously applied Sharpen adjustment is modied.
Chapter 17 Making Brushed Adjustments 421
Working with the Halo Reduction Quick Brush Controls
You use the Halo Reduction Quick Brush adjustment to remove the blue and purple fringes that
are occasionally produced with certain lenses when the image is overexposed.
To brush the Halo Reduction adjustment on an image
1 Select a photo.
2 Do one of the following:
•In the Adjustments inspector or the Adjustments pane of the Inspector HUD, choose Quick
Brushes > Halo Reduction from the Add Adjustment pop-up menu.
•In the tool strip, choose Halo Reduction from the Quick Brush pop-up menu (with a
brush icon).
The Halo Reduction Brush HUD appears, and the Halo Reduction adjustment controls appear in
the Adjustments inspector and the Adjustments pane of the Inspector HUD, if both are shown.
3 Specify the brush stroke settings using the controls in the Halo Reduction Brush HUD.
For more information about the controls in the Brush HUD, see Working with Controls in the
Brush HUD on page 395. For more information about applying brush strokes to an image, see
Working with Brush Strokes on page 401.
4 Brush the adjustment on the area of the image where you want to remove the halo eect.
The halo eect is removed in the area of the image where the Halo Reduction Quick Brush
adjustment is applied.
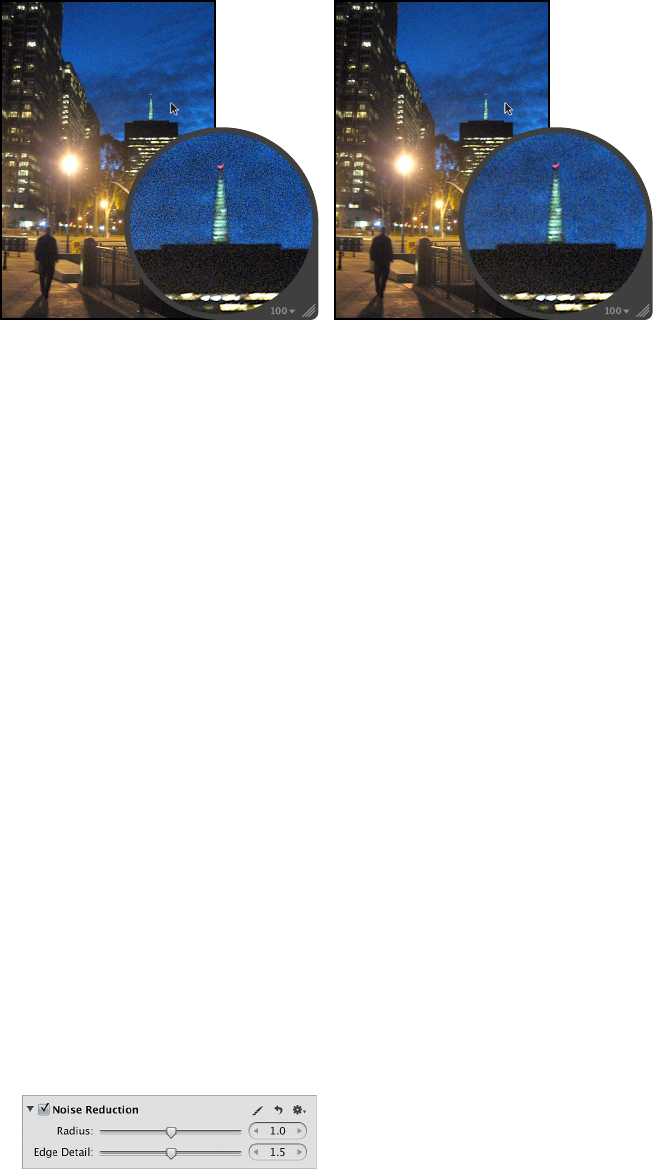
Chapter 17 Making Brushed Adjustments 422
Working with the Noise Reduction Quick Brush Controls
You use the Noise Reduction Quick Brush adjustment to remove digital noise in the area of the
image the adjustment is brushed on.
After Noise Reduction adjustment
Before Noise Reduction adjustment
To brush the Noise Reduction adjustment on an image
1 Select a photo.
2 Do one of the following:
•In the Adjustments inspector or the Adjustments pane of the Inspector HUD, choose Quick
Brushes > Noise Reduction from the Add Adjustment pop-up menu.
•In the tool strip, choose Noise Reduction from the Quick Brush pop-up menu (with a brush icon).
The Noise Reduction Brush HUD appears, and the Noise Reduction adjustment controls appear in
the Adjustments inspector and the Adjustments pane of the Inspector HUD, if both are shown.
3 Specify the brush stroke settings using the controls in the Noise Reduction Brush HUD.
For more information about the controls in the Brush HUD, see Working with Controls in the
Brush HUD on page 395. For more information about applying brush strokes to an image, see
Working with Brush Strokes on page 401.
4 Brush the adjustment on the area of the image where you want to reduce the digital noise.
The digital noise is removed from the area of the image where the Noise Reduction Quick Brush
adjustment is applied.
To modify the Noise Reduction adjustment after it has been applied to an image
1 Select a photo with the Noise Reduction adjustment applied to it.
2 In the Noise Reduction area of the Adjustments inspector or the Adjustments pane of the
Inspector HUD, modify the Noise Reduction adjustment by specifying the following settings:
•Specify the area over which the Noise Reduction adjustment is applied using the Radius slider
and value slider.
•Specify the amount of edge detail you want to preserve in areas of high contrast using the
Edge Detail slider and value slider.
The previously applied Noise Reduction adjustment is modied.
423
An Overview of Printing
Aperture makes it easy to print high-resolution photos. You can print single photos, contact
sheets, webpages, and books. You can print photos selected in the Light Table, as well as create
PDF les that you can easily transfer to clients for review.
Aperture allows you to print your photos as high-resolution images and multi-image contact
sheets. Aperture also oers a variety of printing options, including using a standard, roll, or
custom paper size and assigning a specic ColorSync prole.
The easiest way to print photos is to use one of the Aperture print presets. Print presets, or
groups of print settings, allow you to print your photos without having to repeatedly change
your settings or remember settings used in specic situations. If the precongured presets don’t
meet your needs, you can create your own.
For example, if you regularly print both 8-by-10-inch and 11-by-14-inch photographs, you can
create a print preset for each of those paper sizes. For photographers with multiple printers, such
as a standard and wide-format inkjet printer, you can create print presets for each printer. Give
each preset a name you’ll remember, and the next time you need to print, simply select the print
preset that corresponds to your paper size or printer type.
You can create new print presets, modify existing print presets, and delete print presets you
no longer use. When changing your print presets, remember that modifying an existing preset
changes its original settings; creating a new preset, on the other hand, allows you to preserve
the settings in the existing preset. For more information about working with print presets, see
Creating and Modifying Print Presets on page 434.
Before you print your photos, you can soft proof them onscreen using the onscreen proong
feature. Proles used for onscreen proong are also applied to the photo when printed. For
more information about onscreen proong, see Setting Up the Viewer for Onscreen Proong on
page 117.
Here are a few suggestions to help you with the printing process:
•Use the highest-resolution image possible: It’s preferable to work with photos imported directly
from your digital camera. However, even photos imported directly from your camera or card
reader can be low-resolution, low-quality images. This is why it’s important to shoot with the
highest-resolution settings available on your camera. Compression settings applied during
image capture may be apparent when you print. Consider shooting RAW les if the setting is
available, and shoot at the highest bit depth possible.
If you’ve imported a photo that was reduced or compressed in another application, Aperture
cannot increase the resolution of the le. In other words, Aperture cannot replace image
information that was previously removed during the compression process. If possible, locate
the original full-resolution image le, use the Lift and Stamp tools to apply the adjustments
you’ve made to the low-resolution le, and print the higher-resolution image le.
Printing Your Photos 18
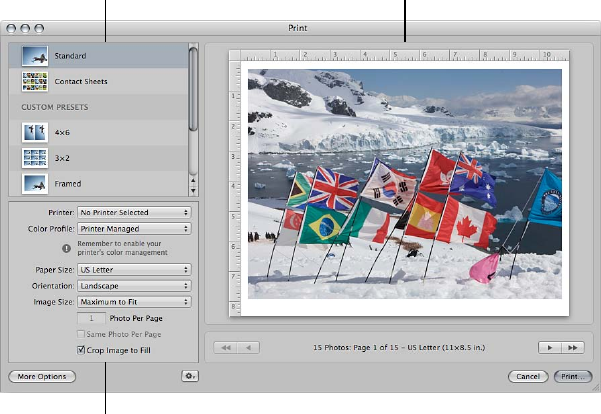
Chapter 18 Printing Your Photos 424
•Use a printer that supports 16-bit printing: If the photo you’re printing is a high-resolution 16-bit
le, using a printer that supports 16-bit printing results in smoother gradations.
•Color calibrate your Aperture system: It’s important to calibrate your display and printer so that
your printed photos look as much as possible like the photos you see on the computer screen.
Working with the Print Controls
Whether you’re printing a high-resolution print or a single image multiple times on the same
page, you use the Standard print controls in the Print dialog to print your work. If you want to
print multiple image contact sheets, you use the Contact Sheets controls in the Print dialog. For
each option, you can reveal additional controls such as layout, margin, image border, metadata,
and image adjustment settings, and additional options such as page numbers and crop marks.
These additional controls are often only set once, but you can access them at any time.
To open the Print dialog
mSelect a photo or series of photos in the Browser, then choose File > Print Images (or press
Command-P).
Presets list
Print options area
Preview area
To access the print controls for standard print presets
There are a default set of printer and layout controls for standard print presets. You can also
access additional print options, such as additional layout, margin, render, image adjustment,
image border, and metadata controls. For example, you can use these controls to include your
studio’s name and logo on each print and then save the settings as a preset. The next time you
print images, select the print preset you just saved and print your image selection using the
default print controls for standard prints.
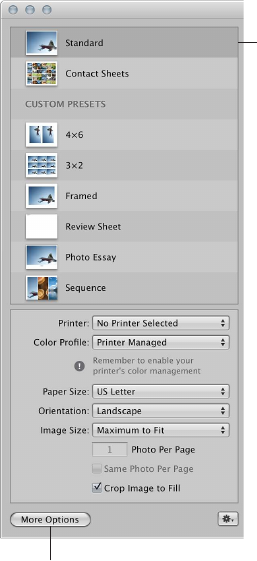
Chapter 18 Printing Your Photos 425
1 Select either the Standard print preset or a custom preset in the Presets list of the Print dialog.
Select the Standard preset
to see the print controls for
printing individual photos.
The More Options button
indicates that the default
print controls are shown.
The basic controls for standard print presets are shown.
2 To show additional print controls, click the More Options button.
The Print dialog expands to show additional print controls for standard prints. After adjusting the
additional print settings, click the Fewer Options button at the bottom-left corner of the Print
dialog to return to the default print controls.
To access the print controls for contact sheet presets
There is a default set of printer and layout controls for contact sheet presets. You can also access
additional print options, such as additional layout, margin, image border, metadata, and image
adjustment controls. For example, you can use these controls to include your studio’s name and
logo on each print along with a limited amount of metadata printed below each image and
then save the settings as a contact sheet preset. The next time you want to print a contact sheet,
select the contact sheet preset you just saved, and print a contact sheet of your image selections
using the default print controls for contact sheets.
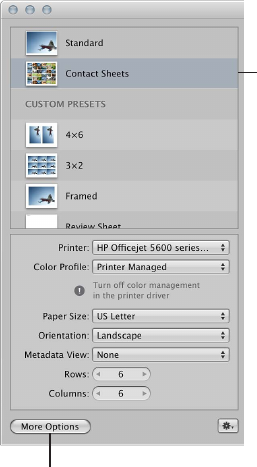
Chapter 18 Printing Your Photos 426
1 Select either the Contact Sheets preset or a contact sheet preset saved in the Custom Presets
area of the Print dialog.
Select the Contact
Sheets preset to see
the print controls for
printing contact sheets.
The More Options button
indicates that the default
print controls are shown.
The Printer and Layout controls for contact sheet presets are shown.
2 To show additional print controls, click the More Options button.
The Print dialog expands to show additional print controls for contact sheets. After adjusting the
additional print settings, click the Fewer Options button at the bottom-left corner of the Print
dialog to return to the default print controls.
Printing Photos and Contact Sheets in Aperture
Printing a Single Photo
When you want to print a single, high-resolution photo on a single sheet of paper, you use the
Standard preset or one of the presets in the Custom Presets area of the Print dialog.
Use the Copies eld in the OS X Print dialog to print multiple copies of your
high-resolution photo.
To print a single photo
1 In the Browser, select a photo.
2 Choose File > Print Image (or press Command-P).
3 In the Print dialog, select either the Standard preset or a preset in the Custom Presets area.
4 In the default print options area, specify the following settings:
•Choose a printer from the Printer pop-up menu.
•If necessary, choose a print prole from the Color Prole pop-up menu.
Note: Printer Managed, the default setting, is the appropriate choice in most cases. If you are
outputting to a specic device prole or if you have color calibrated your printer, you should
choose an appropriate prole from this pop-up menu.
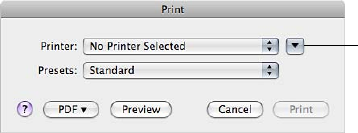
Chapter 18 Printing Your Photos 427
•Choose a paper size from the available items in the Paper Size pop-up menu.
•In the Orientation pop-up menu, choose whether you want the image printed in Landscape
mode or Portrait mode.
•Choose the size of the printed photo from the Image Size pop-up menu, by doing one of the
following:
•To print the photo so that the entire image ts on the page: Choose Maximum to Fit. If you’ve
chosen a borderless printing option, Aperture ts the entire photo on the page; margins
appear on two sides of the photo where the dimensions don’t match.
•To print the photo so that it lls in the entire page: Choose Maximum to Fit, and select the Crop
Image to Fill checkbox below the Image Size pop-up menu. If you’ve chosen a borderless
printing option, the photo covers the entire page; parts of the photo are cropped if the
dimensions don’t match.
•To print the photo at a standard size: Choose a standard dimension, such as 5 x 7, from the
pop-up menu.
•To print the photo in a custom size: Choose Custom from the pop-up menu, then enter the
dimensions in the Height and Width elds that appear below.
5 After you’ve veried that the settings in the Print dialog are correct, click Print.
The OS X Print dialog appears.
6 Conrm that the settings in the OS X Print dialog are correct.
Important: Make sure the paper type matches the color prole selected in the Aperture Print
dialog. If you chose Printer Managed, make sure to enable your printer’s color management. For
more information about enabling color management on your printer, see the documentation
that came with your printer.
7 Click Print.
The high-resolution photo is printed on a single sheet of paper.
To print multiple copies of a photo
1 Follow steps 1 through 5 in the previous task.
2 In the OS X Print dialog, click the disclosure button to reveal additional print controls.
Click the disclosure
button to reveal
additional print controls.
3 In the Copies eld, enter the number of copies to print, then click Print.
Chapter 18 Printing Your Photos 428
Printing Multiple Copies of a Photo on a Page
You can print the same photo multiple times on the same sheet of paper. This option is useful for
saving paper when the image size is small.
To print the same photo multiple times on a single sheet of paper
1 In the Browser, select the photo you want to print.
2 Choose File > Print Image (or press Command-P).
3 In the Print dialog, select either the Standard preset or a preset in Custom Presets.
4 In the default print options area, specify the following settings:
•Choose a printer from the Printer pop-up menu.
•If necessary, choose a print prole from the Color Prole pop-up menu.
Note: Printer Managed, the default setting, is the appropriate choice in most cases. If you are
outputting to a specic device prole or if you have color calibrated your printer, you should
choose an appropriate prole from this pop-up menu.
•Choose a paper size from the available items in the Paper Size pop-up menu.
•In the Orientation pop-up menu, choose whether you want the photo printed in Landscape
mode or Portrait mode.
•Choose a standardized size, such as 2 x 3, for the printed photo from the Image Size pop-up
menu. Pick a size that’s small enough to t multiple photos on the paper size chosen in the
Paper Size pop-up menu.
The Photo Per Page and Same Photo Per Page controls below the Image Size pop-up menu
become available.
•Enter the number of times you want the photo printed on the page in the Photos Per Page
eld, then select the Same Photo Per Page checkbox.
The Preview area updates to show multiple photos on the page.
5 If you want each photo to ll its allotted printable space, select the Crop Image to Fill checkbox.
6 If you want to modify the arrangement of the photos on the page, click the More Options button
at the bottom of the Print dialog, then use the Layout and Margins controls to adjust the image
spacing and page margins.
7 After you’ve veried that the settings in the Print dialog are correct, click Print.
The OS X Print dialog appears.
8 Conrm that the settings in the OS X Print dialog are correct.
Important: Make sure the paper type matches the color prole selected in the Aperture Print
dialog. If you chose Printer Managed, make sure to enable your printer’s color management. For
more information about enabling color management on your printer, see the documentation
that came with your printer.
9 Click Print.
Chapter 18 Printing Your Photos 429
Printing a Series of Photos
You can print multiple photos at once, each on its own sheet of paper.
To print a series of photos
1 In the Browser, select the photos you want to print.
2 Choose File > Print Images (or press Command-P).
3 In the Print dialog, select either the Standard preset or a preset in Custom Presets.
4 Conrm that the settings in the Print dialog are correct.
For more information about print settings, see Printing a Single Photo on page 426.
5 If necessary, use the navigation buttons in the Preview area to verify that the photos in the job
you are about to print are correct.
6 Click Print.
The OS X Print dialog appears.
7 Conrm that the settings in the OS X Print dialog are correct.
Important: Make sure the paper type matches the color prole selected in the Aperture Print
dialog. If you chose Printer Managed, make sure to enable your printer’s color management. For
more information about enabling color management on your printer, see the documentation
that came with your printer.
8 Click Print.
Your photos are printed, one photo per page.
Printing a Contact Sheet or Series of Contact Sheets
You can print contact sheets of your photos, and Aperture does all the layout work for you.
All you have to do is specify the number of pages or columns; Aperture adjusts the size of the
photos based on your layout and margin settings.
To print contact sheets
1 In the Browser, select the photos you want to print.
2 Choose File > Print Images (or press Command-P).
3 In the Print dialog, select either the Contact Sheets preset or the Review Sheet preset in the
Custom Presets section.
4 In the default print options area, specify the following settings:
•Choose a printer from the Printer pop-up menu.
•If necessary, choose a color prole from the Color Prole pop-up menu.
Note: Printer Managed, the default setting, is the appropriate choice in most cases. If you are
outputting to a specic device prole or if you have color calibrated your printer, you should
choose an appropriate prole from this pop-up menu.
•Choose a paper size from the available items in the Paper Size pop-up menu.
•In the Orientation pop-up menu, choose whether you want the contact sheet printed in
Landscape mode or Portrait mode.
•Choose a metadata view to display underneath each photo on the contact sheet.
•Specify the number of rows and columns to set how many photos are printed on the page.
The Preview area updates to show the new print dimensions for each photo in the contact
sheet. You can double-click a photo to adjust its scale within the image frame. You use the
Image Scale HUD to zoom in to and out of the photo.
Chapter 18 Printing Your Photos 430
5 If you want to modify the arrangement of the photos on the page, click the More Options button
at the bottom of the Print dialog, then use the Layout and Margins controls to adjust image
spacing between the photos and add margins.
6 If you want to manually adjust the spacing margins, drag the row and column lines in the
Preview area.
7 After you’ve veried that the settings in the Print dialog are correct, click Print.
The OS X Print dialog appears.
8 Conrm that the settings in the OS X Print dialog are correct.
Important: Make sure the paper type matches the color prole selected in the Aperture Print
dialog. If you chose Printer Managed, make sure to enable your printer’s color management. For
more information about enabling color management on your printer, see the documentation
that came with your printer.
9 Click Print.
Your contact sheet is printed.
Manually Adjusting Photo Layout in the Preview Area
In addition to using the Layout and Margins controls in the Print dialog, you can manually
adjust the margins and spacing in the Preview area of the Print dialog. When printing a single
photo with a border or dimensions smaller than the paper size, you can adjust the placement
of the photo on the page by dragging the margin lines in the Preview area. Similarly, when
you are printing multiple photos on the same sheet of paper, you can adjust both the margins
surrounding the photos and the spacing between the photos. If you selected the Crop Marks
checkbox in the Metadata & Page Options section of the Print dialog, you can also adjust the
crop lines to modify the margins and spacing of the photos on the page.
Note: The margin lines are not visible unless you place the pointer over the Preview area of the
Print dialog.
To manually adjust the placement of a single photo on a page
1 In the Browser, select the photo you want to print.
2 Choose File > Print Images (or press Command-P).
3 In the Print dialog, choose a single photo print preset and a photo size that is smaller than the
chosen paper size.
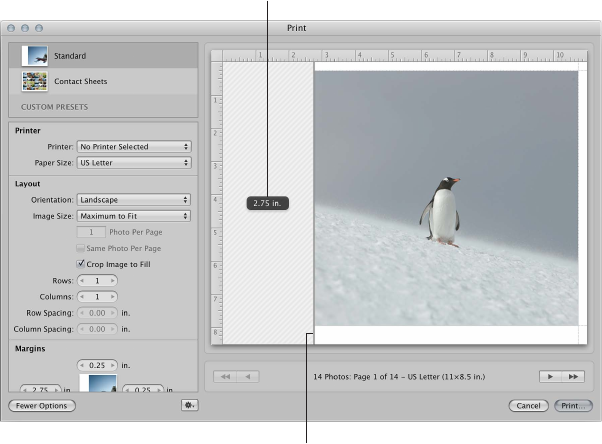
Chapter 18 Printing Your Photos 431
4 In the Preview area, drag the margin lines to adjust the placement of the photo on the page.
The overlay displays the
distance between the
edge of the paper and
the edge of the photo.
Drag the margin lines to
adjust the placement of the
photo on the page.
The distance between the edge of the paper and the edge of the photo is displayed in an
overlay as you drag the margin line.
To manually adjust the placement of multiple photos on a page
1 In the Browser, select the photo or photos you want to print.
2 Choose File > Print Images (or press Command-P).
3 In the Print dialog, do one of the following:
•Select a print preset that prints the same photo multiple times on the same sheet of paper.
•Select a print preset for a contact sheet.
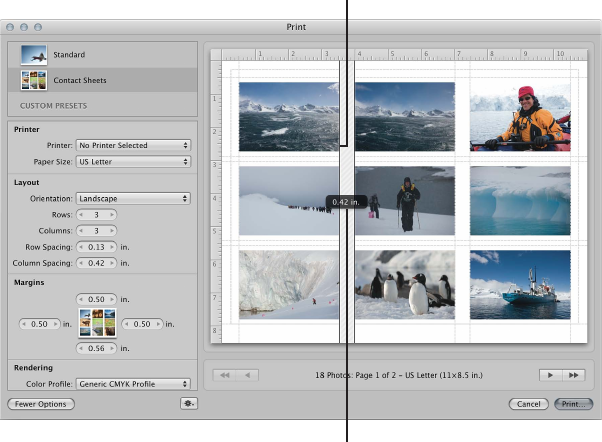
Chapter 18 Printing Your Photos 432
4 In the Preview area, do either or both of the following:
•Drag the margin lines between the outer edges of the photos and the paper’s edge.
•Drag the lines between the photos to adjust the spacing between them.
The overlay displays the
distance between the photos.
Drag the lines between
the photos to adjust the
spacing between them.
Dragging one vertical line adjusts the vertical spacing between all photos on the page equally;
similarly, dragging one horizontal line adjusts the horizontal spacing between the photos in
equal amounts.
Printing a Book
You can print a book to check its nal format and appearance before handing it o to a
professional printer, ordering a printed copy online, or distributing copies to others. You can
also create a PDF le of a book to store an electronic copy for use at another time or to send
to others.
For more information about creating and working with books, see An Overview of Creating
Books on page 516 .
To print a book
1 Select a book album in the Library inspector.
The book appears in the Book Layout Editor.
2 Choose File > Print Book (or press Command-P).
The OS X Print dialog appears.
3 Verify that the settings in the OS X Print dialog are correct, then click Print.
Your book is printed.
Chapter 18 Printing Your Photos 433
To create a PDF le of a book
1 In the Library inspector, select a book album.
2 Choose File > Print Book (or press Command-P).
3 In the Print dialog, choose Save as PDF from the PDF pop-up menu.
The Save dialog appears.
4 Enter a name for the PDF le and choose a location to save the le, then click Save.
Printing a Light Table Arrangement
You can print an arrangement of images in the Light Table. You can also create a PDF of your
Light Table arrangement using the OS X Print dialog.
To print a Light Table arrangement
1 Select a Light Table album in the Library inspector.
The Light Table appears above the Browser.
2 Do one of the following:
•To print selected photos: Select the photos you want to print in the Light Table.
•To print the entire Light Table arrangement: Deselect all photos in the Light Table by clicking
the background.
3 Choose File > Print Light Table (or press Command-P).
The OS X Print dialog appears.
4 Verify that the settings in the OS X Print dialog are correct, then click Print.
Your Light Table arrangement is printed.
To create a PDF le of a Light Table arrangement
1 Select a Light Table album in the Library inspector.
The Light Table appears above the Browser.
2 Do one of the following:
•To print selected photos: Select the photos you want to print in the Light Table.
•To print the entire Light Table arrangement: Deselect all photos in the Light Table by clicking
the background.
3 Choose File > Print Light Table (or press Command-P).
The OS X Print dialog appears.
4 Choose Save as PDF from the PDF pop-up menu in the bottom-left corner of the dialog.
The Save dialog appears.
5 Enter a name for the PDF le in the Save As eld, and choose a location to save the PDF le to
from the Where pop-up menu.
6 Verify that the settings in the Save dialog are correct, then click Save.
A PDF le of your Light Table arrangement is saved to the location you chose in the Save dialog.
Chapter 18 Printing Your Photos 434
Creating and Modifying Print Presets
After examining a selected preset’s print settings, you may want to change certain settings. You
can do this by modifying an existing print preset and then saving it, or by duplicating an existing
print preset and making changes to it. You use the presets stored in the Custom Presets area of
the Print dialog to create and save your customized print presets.
Note: The settings modied in the Standard and Contact Sheets presets are reset to their default
values each time the Print dialog is closed.
To create a new print preset using the Duplicate Preset command
You create new print presets by duplicating existing print presets and then making modications
to them.
1 Select a photo, then choose File > Print Images (or press Command-P).
The Print dialog appears.
2 In the Print dialog, select a print preset under Custom Presets that you want to duplicate, then
choose Duplicate Preset from the Print Action pop-up menu (with a gear icon).
3 Enter a new name for the preset.
4 Modify the settings as appropriate, then choose Save Preset from the Print Action pop-up menu.
You can now select this preset whenever you need to use these print settings.
To modify an existing print preset
Any preset you created can be changed, either temporarily or permanently. If you change a
preset’s settings without saving it, the preset will revert to its original settings after the print job
is processed. If you save the modied settings, the preset will retain the setting changes.
1 Select a photo, then choose File > Print Image (or press Command-P).
The Print dialog appears.
2 In the Print dialog, select the print preset that you created and want to modify under Custom
Presets, then click the More Options button.
3 Modify the settings as appropriate.
4 When you’re ready to save the preset, choose Save Preset from the Print Action pop-up menu
(with a gear icon).
The print preset is saved with its new settings.
To delete a print preset
You can delete a print preset that you no longer use.
1 In the Custom Presets section of the Print dialog, select the preset you want to delete.
2 Choose Delete Preset from the Print Action pop-up menu (with a gear icon).
3 Conrm the deletion in the dialog that appears.
The preset is deleted from the Custom Presets list.
Chapter 18 Printing Your Photos 435
Proong Your Images Onscreen
The printer, paper type, and color prole settings all aect the way your photos are printed.
Onscreen proong allows you to check the color in your photos, before you print them.
To use onscreen proong, choose the proong prole that most closely matches the
characteristics of the nal output device, and then turn on onscreen proong. When onscreen
proong is turned on, the photo is converted using the selected prole before it is sent to
the printer.
To choose a proong prole
mChoose View > Proong Prole, then choose the prole you want from the submenu.
To turn onscreen proong on or o
mChoose View > Onscreen Proong (or press Shift-Option-P).
When onscreen proong is on, a checkmark appears beside the item in the View menu.
For more information about using the Aperture onscreen proong feature, see Setting Up the
Viewer for Onscreen Proong on page 117.
Turning O Color Management in Your Printer
For best results, you should turn o color management in your printer when printing a photo
using Aperture. By default, most printers are set to convert the photo to the printer’s color space.
However, Aperture is designed to perform this conversion internally. Each printer manufacturer
creates its own Print dialog. This means the setting for turning o color management in your
printer varies depending upon the manufacturer of your printer and the printer model.
Note: If you have multiple printers connected to your computer, you should create a print preset
and turn o color management for each printer.
To turn o color management for your printer
mRefer to the owner’s manual that came with your printer.
436
An Overview of Exporting Photos
Using Aperture, you can export copies of originals, as well as versions that you’ve created. When
you export photo versions, you can export them in JPEG, TIFF, PNG, and PSD le formats.
At export, you can rename les, resize and adjust images, and include metadata such as
EXIF information, IPTC information, and keywords. You can also apply ColorSync proles and
watermarks to the versions you’re exporting. You can export separate lists of metadata for
selected photos as a le. You can also export originals with IPTC data stored in XMP sidecar les
that can be used in other applications, such as Adobe Photoshop.
If you worked with audio and video clips in Aperture, you can export both the versions and
the original les. If you trimmed the duration of the audio or video clips in Aperture, the edited
duration is preserved in the exported versions.
Before exporting your photos to another application, a printing service, a client, or a website,
you need to know what le types the recipient can use. You should also check with the recipient
about other important information, including le size limitations, required image dimensions,
and naming conventions. The key to a successful le transfer is anticipating—and avoiding—
anything that can prevent the recipient from opening your les.
Aperture allows you to perform multiple export operations concurrently. However, to prevent
unintended behavior, it’s extremely important that you avoid making changes to the photos you
are exporting until the operation is complete.
The easiest way to export photos is to use one of the Aperture export presets. Presets, or groups
of export settings, allow you to eciently export your photos. If the presets included with
Aperture don’t meet your needs, you can create your own. For example, if you regularly send
groups of photos to a stock photography house and a printer, you can create an export preset
for each destination. Give the presets a name you’ll remember, and the next time you need to
send photos to either destination, simply select the correct export preset.
You can also modify existing export presets and delete export presets you no longer use.
Aperture provides an easy way to transfer photos to another application for changes and then
bring the revised photos back into Aperture. You can specify an application as an external editor
in the Export pane of the Preferences window. For example, if your image editing sometimes
requires one or more of the specialized tools available in Adobe Photoshop, you can select
Photoshop as your external editor. You can then select a photo and choose Photos > Edit with
External Editor. Aperture makes a new original and version of your photo and opens it in Adobe
Photoshop. After you make your changes and save the image, the revised version automatically
reappears in Aperture. The external editor doesn’t change the previous original. For more
information, see Using an External Editor on page 288.
Exporting Your Photos 19
Chapter 19 Exporting Your Photos 437
You can also export projects, folders, and albums, as well as a combination of all three. Aperture
consolidates the originals and versions of the items you selected in the Library inspector and
exports them as a library, maintaining their organizational structure. Then you can merge the
exported library into the Aperture library on another computer. For more information about
merging libraries, see Merging Libraries on page 41.
Exporting Copies of Originals
When you export originals, duplicates of the les that were imported from your camera or other
source are created; no adjustments, le modications, or any other changes are exported with
the le.
To export copies of originals
1 Select a photo or photos in the Browser.
2 Choose File > Export > Originals (or press Command-Shift-S).
3 In the dialog that appears, navigate to the location where you want the exported les placed.
4 Do one of the following:
•Choose None from the Subfolder Format pop-up menu to specify that the originals be stored
as separate les in the selected folder.
•Choose a folder name preset from the Subfolder Format pop-up menu to specify that
Aperture create a hierarchy of subfolders with specic folder names to hold your les. For
more information about creating folders to hold your exported photos, see Exporting Photos
into Folders in the Finder on page 448.
•Choose Custom Name or Custom Name with Counter from the Subfolder Format pop-up
menu, then enter a custom folder name in the Custom Subfolder Name eld.
5 Choose a name format for your originals from the Name Format pop-up menu.
For more information about selecting and setting up lenaming formats, see Renaming Photos
at Export on page 450. Aperture shows an example of the selected name format in the dialog.
6 To export the originals with IPTC metadata, do one of the following:
•To write IPTC metadata into the original: Choose Include IPTC from the Metadata pop-up menu.
•To create an XMP sidecar le that contains the photo’s IPTC metadata: Choose Create IPTC4XMP
Sidecar File from the Metadata pop-up menu.
7 If you want to include audio attachments with your exported original les, select the Include
Audio Attachments checkbox.
8 If you want to be notied when the export process is complete, select the “Show alert when
nished” checkbox.
9 When you’re ready to export your les, click Export Originals.
Copies of the originals for the selected photos are exported to the location you specied. If you
selected the “Show alert when nished” checkbox, a dialog appears displaying the number of
originals exported and the le path. If you want Aperture to open the Finder to the location
where you exported your originals, click the Reveal in Finder button. Otherwise, click OK to close
the dialog.
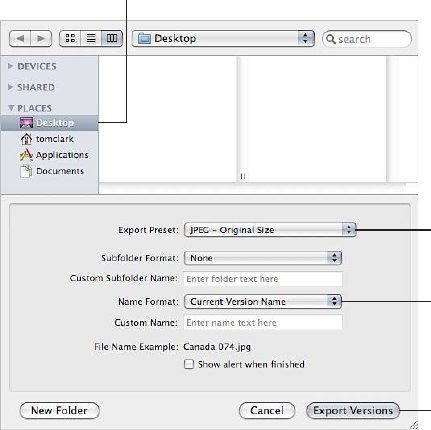
Chapter 19 Exporting Your Photos 438
Exporting Photo Versions
You can export photo versions that you’ve created in Aperture. For example, you might
make adjustments to images for a specic purpose and then export them for use in another
application. You can also rename photos when exporting them, make minor adjustments on
export, add watermarks, and export photos with metadata. You can also quickly export photos to
your email application to send them to others.
When you export photo versions, you can specify settings for the exported les, such as format,
size, and lename.
Note: You can set Aperture to always include location information and names assigned to faces
when exporting your photos. For more information about including Places and Faces information
with your photos, see Export Preferences on page 594.
To export versions of photos
1 Select a photo or photos in the Browser.
2 Choose File > Export > Versions (or press Command-Shift-E).
3 In the dialog that appears, navigate to the location where you want the exported photos placed.
Choose a location
for the exported files.
Choose an export preset
for the exported files.
Choose a name format
for the exported files.
Click this button
to export the files.
4 Choose an export preset from the Export Preset pop-up menu.
For more information on export presets, see Viewing the Settings for an Export Preset on
page 442.
5 Do one of the following:
•Choose None from the Subfolder Format pop-up menu to specify that the versions be stored
as separate les in the selected folder.
•Choose a folder name preset from the Subfolder Format pop-up menu to specify that
Aperture create a hierarchy of subfolders with specic folder names to hold your les. For
more information about creating folders to hold your exported photos, see Exporting Photos
into Folders in the Finder on page 448.
•Choose Custom Name or Custom Name with Counter from the Subfolder Format pop-up
menu, then enter a custom folder name in the Custom Subfolder Name eld.
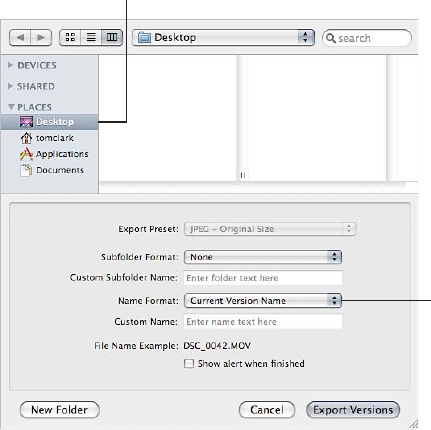
Chapter 19 Exporting Your Photos 439
6 Choose a name format for your les from the Name Format pop-up menu.
If you choose a Custom Name format, enter a name in the Custom Name eld. For more
information on renaming photos at export, see Renaming Photos at Export on page 450.
7 If you want to be notied when the export process is complete, select the “Show alert when
nished” checkbox.
8 When you’re ready to export les, click Export Versions.
The photos you selected are exported to the location you specied. If you selected the “Show
alert when nished” checkbox, a dialog appears displaying the number of versions exported and
the le path. If you want Aperture to open the Finder to the location where you exported your
versions, click the Reveal in Finder button. Otherwise, click OK to close the dialog.
Note: If you want to check on the progress of an export operation, choose Window > Show
Activity. The Activity window displays the progress of each export operation. You can also use
this window to pause and cancel an export operation.
Exporting Audio and Video Versions
You can export edited versions of audio and video clips brought into Aperture. If you trimmed
the length of the audio or video clip, the new edited length is exported along with any metadata
you applied in Aperture.
To export versions of audio and video clips
1 Select audio or video clips in the Browser.
2 Choose File > Export > Version (or press Command-Shift-E).
3 In the dialog that appears, navigate to the location where you want the exported audio or video
les placed.
Choose a location
for the exported files.
Choose a name format
for the exported files.
Chapter 19 Exporting Your Photos 440
4 Do one of the following:
•Choose None from the Subfolder Format pop-up menu to specify that the clips be stored as
separate les in the selected folder.
•Choose a folder name preset from the Subfolder Format pop-up menu to specify that
Aperture create a hierarchy of subfolders with specic folder names to hold your les. For
more information about creating folders to hold your exported audio and video les, see
Exporting Photos into Folders in the Finder on page 448.
•Choose Custom Name or Custom Name with Counter from the Subfolder Format pop-up
menu, then enter a custom folder name in the Custom Subfolder Name eld.
5 Choose a name format for your les from the Name Format pop-up menu.
If you choose a Custom Name format, enter your custom name in the Custom Name eld.
For more information on renaming audio and video les at export, see Renaming Photos at
Export on page 450.
6 If you want to be notied when the export process is complete, select the “Show alert when
nished” checkbox.
7 When you’re ready to export les, click Export Versions.
The audio or video clips you selected are exported to the location you specied. If you selected
the “Show alert when nished” checkbox, a dialog appears displaying the number of versions
exported and the le path. If you want Aperture to open the Finder to the location where you
exported your clips, click the Reveal in Finder button. Otherwise, click OK to close the dialog.
Note: If you want to check on the progress of an export operation, choose Window > Show
Activity. The Activity window displays the progress of each export operation. You can also use
this window to pause and cancel an export operation.
Chapter 19 Exporting Your Photos 441
Exporting Projects, Folders, and Albums
You can select and export any combination of projects, folders, and albums in the Library
inspector. Aperture consolidates the selected items into an Aperture library and places it in the
location of your choosing. After exporting the item selection as an Aperture library, you can
either open the new library and work within it, or you can merge the library into the library of
another Aperture system.
For more information about opening Aperture libraries, see Viewing Other Libraries on page 40.
For more information about merging Aperture libraries, see Merging Libraries on page 41.
To export projects, folders, and albums
1 In the Library inspector, select the items you want to export, then choose File > Export > Items as
New Library.
Aperture consolidates the selected items into a library.
2 Enter a name and choose a location for the exported library.
3 Do any of the following:
•If your project contains referenced images and you want the original les available to the new
Aperture system: Select the “Consolidate originals into exported library” checkbox to copy the
original image les into the new library le.
•If you want to copy the previews into the new library so that you don’t have to rebuild them on the
new Aperture system: Select the “Include Previews in exported library” checkbox.
•If you want Aperture to alert you when it has nished building the new library: Select the “Show
alert when nished” checkbox.
4 Click Export Library.
Aperture consolidates the selected items into a library and exports the library le to the location
you chose.
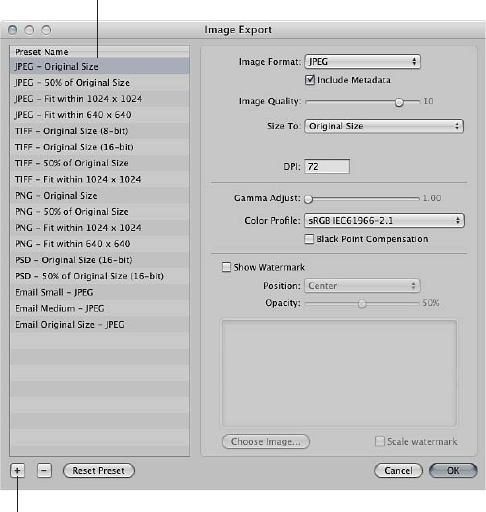
Chapter 19 Exporting Your Photos 442
Working with Export Presets
Viewing the Settings for an Export Preset
Export presets are groups of saved export settings that help you quickly and easily export your
photos. Aperture comes with numerous export presets, and you can also create your own.
Before using an export preset, whether it’s one that comes with Aperture or one that you
created, you can view its settings to make sure they are exactly what you want.
To view the settings for an export preset
Do one of the following:
mChoose Aperture > Presets > Image Export.
mWith a photo selected, choose File > Export > Version (or press Command-Shift-E) and in the
dialog that appears, choose Edit from the Export Preset pop-up menu.
The Image Export dialog appears, listing the presets available and the congurable
export settings.
Creating an Export Preset
If none of the predened export presets suits your needs, you can create your own export preset.
An easy way to create a new export preset is to copy an existing preset and then modify the
copy.
To create a new export preset
1 Choose Aperture > Presets > Image Export.
The Image Export dialog appears.
Click the Add button
to add a new preset.
Select a preset on which
to base your new preset.
2 Select an export preset on which to base your new preset, then click the Add (+) button.
A new preset appears highlighted in the Preset Name list.
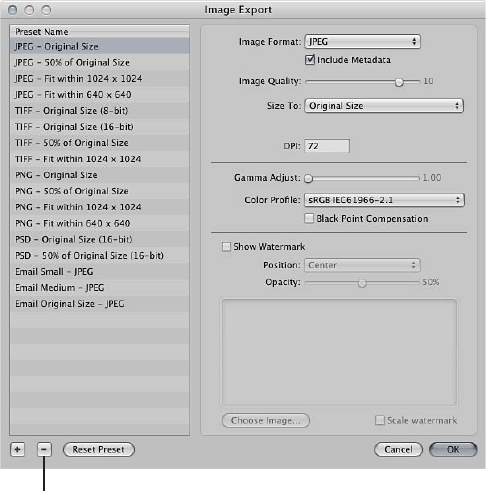
Chapter 19 Exporting Your Photos 443
3 Enter a name for the new preset, then press Return.
4 Change the export settings as required, then click OK.
Modifying an Export Preset
You can modify existing presets when you need to. The next time you export using that preset,
Aperture remembers your modied settings and exports your photos accordingly.
To modify an existing preset
1 Choose Aperture > Presets > Image Export.
The Image Export dialog appears.
2 Select the preset you want to modify and change its settings as required, then click OK.
Deleting an Export Preset
You can delete an export preset when you no longer need it.
To delete an export preset in the Image Export dialog
1 Select the preset, then click the Remove (–) button.
Click the Remove button
to delete the selected preset.
2 In the dialog that appears, click Delete.
The preset disappears from the Preset Name list.
3 Click OK.
The preset is permanently deleted.
Note: If you click the Delete button and then click Cancel, the preset reappears the next time
you open the Image Export dialog.
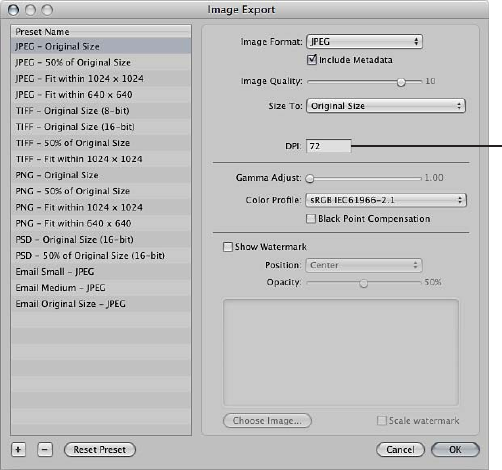
Chapter 19 Exporting Your Photos 444
Setting Image Resolution When Exporting
You can set the image resolution you want for exported photos in the Image Export dialog
in several ways: by specifying a dpi setting, by specifying a percentage of the original, or by
specifying photo dimensions in inches, centimeters, or pixels. First you select an export preset,
and then you specify a resolution for that preset.
To specify the dpi setting for exported photos in an export preset
1 Do one of the following:
•Choose Aperture > Presets > Image Export.
•Choose File > Export > Versions (or press Command-Shift-E), then choose Edit from the Export
Preset pop-up menu.
The Image Export dialog appears.
Enter a DPI setting for
exported photos here.
2 Select an export preset or create a new one, then enter a dpi setting.
For more information on creating export presets, see Creating an Export Preset on page 442.
3 Specify additional settings as necessary, then click OK.
Use this export preset when you need to export versions at the resolution specied in the DPI
eld. Create a new preset when a new dpi setting is required.
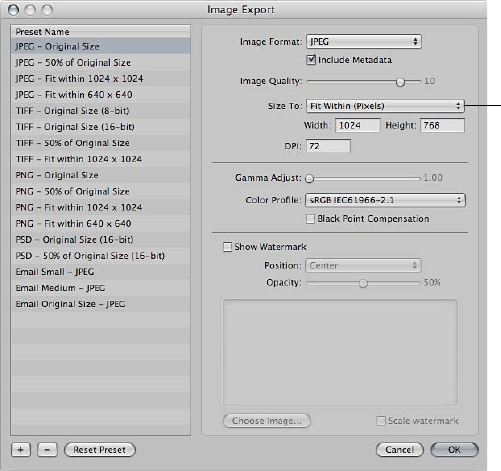
Chapter 19 Exporting Your Photos 445
To create an export preset constraining photos to a specic size at export
1 Do one of the following:
•Choose Aperture > Presets > Image Export.
•Choose File > Export > Versions (or press Command-Shift-E), then choose Edit from the Export
Preset pop-up menu.
The Image Export dialog appears.
Choose a Size To
option and enter
the corresponding
values here.
2 Select an export preset or create a new one.
For more information on creating export presets, see Creating an Export Preset on page 442.
3 Choose an item from the Size To pop-up menu, then specify the size of the photo by entering
values in the elds that appear below it.
4 Specify additional settings as necessary, then click OK.
Use this export preset when you need to export photos at a specic size. Create a new preset
when new dimensions are required.
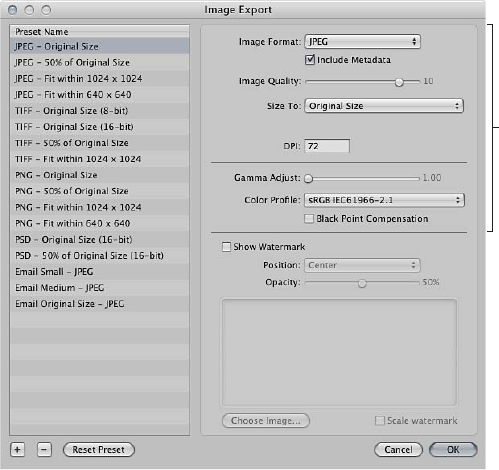
Chapter 19 Exporting Your Photos 446
Adjusting Images at Export
You can apply nal adjustments to images at export by choosing ColorSync proles, setting
gamma adjustments, and applying black point compensation. Because these adjustments are
applied at export, the photo versions and originals in the Aperture library are not changed. Only
exported les receive image adjustments applied with an export preset.
To adjust images at export, you create a new export preset in the Image Export dialog and then
modify the Image Quality, Gamma Adjust, ColorSync Prole, and Black Point Compensation
settings as appropriate.
Use these options to
adjust photos when
they are exported.
Gamma adjustments applied at export are applied on top of gamma adjustments previously
applied to photo versions. Before exporting, verify that you are not doubling any gamma
adjustments previously applied to your photos.
When you export, select the preset that includes the adjustments you want to make.
To create an image export preset to adjust images at export
1 Do one of the following:
•Choose Aperture > Presets > Image Export.
•Choose File > Export > Versions (or press Command-Shift-E), then choose Edit from the Export
Presets pop-up menu.
The Image Export dialog appears.
2 Select an export preset, or create a new one.
For information about creating export presets, see Creating an Export Preset on page 442.
Chapter 19 Exporting Your Photos 447
3 Specify adjustment options:
•To add a gamma adjustment to the exported photos: Drag the Gamma Adjust slider to the right.
•To change the ColorSync prole applied to the exported photos: Choose a prole from the Color
Prole pop-up menu.
•To apply black point compensation to the exported photos: Select the Black Point
Compensation checkbox.
4 Specify additional settings as necessary, then click OK.
Use this export preset when you want to export photos with the adjustments you specied.
Adding a Watermark at Export
A watermark is a visible graphic overlay that is applied to a photo. Photographers often use
watermarks to indicate that the photos are protected by a copyright and to discourage others
from inappropriately using their photos.
You can import a graphics le and add it to your photos as a watermark.
Use the following guidelines to create high-quality watermarks for your photos:
•Save your watermark as a PSD (Photoshop) le with a transparent background.
•Create multiple sizes of your watermark so that you can select the one that is the best match
for the output size of the exported photo.
Note: If a watermark le is larger than the photo you want to export, Aperture automatically
scales the watermark down to t the photo. (Aperture does not scale watermarks up.)
•After you create a watermark, save it as part of an export preset so you can reuse it as often as
you need.
To add a watermark image to your exported photos
1 Select the photos you want to export.
2 Choose File > Export > Versions (or press Command-Shift-E).
3 In the dialog that appears, choose Edit from the Export Preset pop-up menu.
4 In the Image Export dialog, select the export preset you want to use to export your photos.
5 Select the Show Watermark checkbox.
6 Click the Choose Image button.
7 Select the image you want to use as a watermark, then click Choose.
8 Specify where you want the watermark to appear on the photo using the Position pop-up menu.
9 To adjust the opacity of the watermark, drag the Opacity slider to a new position.
10 If you want the watermark to be scaled in proportion to the photo’s output size, select the “Scale
watermark” checkbox.
11 When you’re satised with how your watermark appears in the watermark preview area, click OK.
12 Navigate to the location where you want the exported photos placed.
13 Choose a name format for your exported les from the Name Format pop-up menu.
14 Click Export Versions.
Your les are exported with the watermark you created.
Chapter 19 Exporting Your Photos 448
Applying IPTC Metadata and Keywords to Your Photos
Many publications use a standard set of image keywords; the American Newspaper Publishers
Association (ANPA) wire codes, developed by the Newspaper Association of America, are one
example. You can apply these keywords to your photos when exporting to JPEG, TIFF, and PSD
le formats.
Remember that applying metadata at export applies all the metadata attached to your photo. If
your photo version has metadata that you don’t want exported, create a new photo version that
only includes the metadata you intend to export.
Note: The PNG le format does not support the inclusion of metadata.
To create an image export preset that includes metadata with exported photos
1 Do one of the following:
•Choose Aperture > Presets > Image Export.
•Choose File > Export > Versions (or press Command-Shift-E), then choose Edit from the Export
Presets pop-up menu.
The Image Export dialog appears.
2 In the Image Export dialog, select the export preset you want to use to export your photos, or
create a new one.
For more information about creating export presets, see Creating an Export Preset on page 442.
3 Select the Include Metadata checkbox.
Note: This checkbox is dimmed when PNG is chosen in the Image Format pop-up menu.
4 Click OK.
The version metadata is included in your exported photos when this export preset is chosen.
Exporting Photos into Folders in the Finder
When you export versions and originals, you can have Aperture place the les individually into a
selected folder or create subfolders to hold the les. For example, you might have the exported
les placed in subfolders identied by date. You can create folder name formats that you can
quickly choose to select the folder structure you want.
To create a folder name preset, you select the name elements you want in the Folder Naming
dialog. You can compose subfolder name formats that combine the following name elements:
•Version Name
•Original File Name
•Sequence Number (1 of 3, 2 of 3, 3 of 3, and so on)
•Image Year
•Image Month
•Image Day
•Image Date
•Image Time
•Index Number (1, 2, 3, and so on)
•Custom Name
•Counter (001, 002, 003, and so on)

Chapter 19 Exporting Your Photos 449
•Folder Name
•Current Date
•Current Time
•Current Year
•Current Month
•Current Day
•Project Name
•/ (slash)
You can specify a combination of name elements to create custom folder names.
You can also create a hierarchy of folders within folders. For example, you can specify that
Aperture place your photos in a subfolder named Date, and within that folder you can create
subfolders identied by the time the photo was taken. To create the folder name format, you
drag the elements you want into the Format eld and drag the slash element between the
elements where a subfolder should be created.
To create a folder name preset
1 Do one of the following:
•Choose Aperture > Presets > Folder Naming.
•In the Export dialog, choose Edit from the Subfolder Format pop-up menu.
The Folder Naming dialog appears.
2 Click the Add (+) button to create a new folder name format, or select the preset folder name
format you want to change.
3 Drag the name elements you want into the Format eld in the order you want them.
4 Drag a slash between the elements where you want subfolders created.
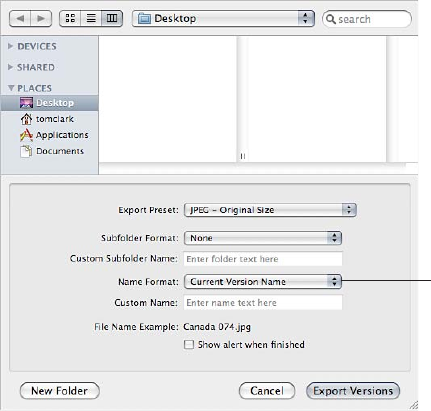
Chapter 19 Exporting Your Photos 450
5 Enter a custom name in the Custom Name eld, if you wish.
Note: The Custom Name eld is dimmed unless “Custom Name” is one of the elements in the
Format eld.
6 Click OK.
Your new folder name format now appears in the Subfolder Format pop-up menu.
To reset the starting number of a counter in a folder name preset
When using a counter in your folder name format, you can specify the starting number and the
number of digits, from 1 to 6, that appear in the counter. When you use a folder name format
with a counter, make sure to reset the initial starting number, if necessary. Otherwise, on the next
export Aperture will continue numbering the folders containing the exported photos starting
from the last number of the previous export.
mIn the Folder Naming dialog, type 0 (zero) in the “Incrementing counter starting at” eld.
Renaming Photos at Export
When you export a large group of photos, the exported les often have nonsequential names.
You can rename your photos at export, giving them more meaningful names.
For example, suppose you want to export photos LA 031, LA 441, LA 686, and LA 894 from photo
group LA 001 to LA 1061. You can use the Custom Name with Index name format to rename your
photos LA 1, LA 2, and so on.
To rename photos at export
1 Select the photo or photos you want to export.
2 Do one of the following:
•To export originals and rename them: Choose File > Export > Originals (or press
Command-Shift-S).
•To export versions and rename them: Choose File > Export > Versions (or press
Command-Shift-E).
3 In the Export dialog, navigate to the location where you want the exported photos placed.
4 Choose a name format from the Name Format pop-up menu.
Choose a name format
here; if you choose a
Custom Name format,
enter the name in the
field below.
If you choose a Custom Name format, enter your custom name in the Custom Name eld.
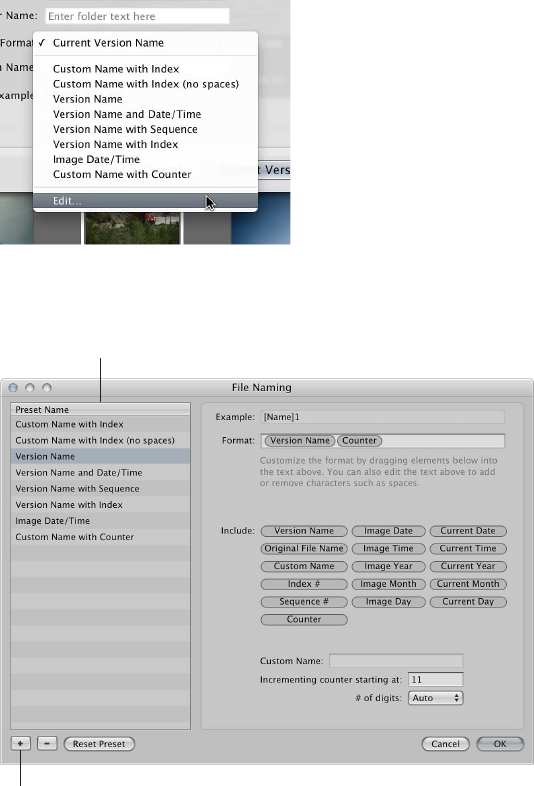
Chapter 19 Exporting Your Photos 451
5 When you’re ready to export les, click either Export Originals or Export Versions.
The les are exported with the name format you specied.
To create a new name format
If none of the preset name formats meets your needs, you can create a new name format. For
example, you could create a name format that uses a custom name, the index number, and the
date.
1 Do one of the following:
•Choose Aperture > Presets > File Naming.
•Choose File > Export > Versions (or press Command-Shift-E), then choose Edit from the Name
Format pop-up menu.
The File Naming dialog appears.
2 In the Preset Name list, select an existing name format on which to base the new name format,
then click the Add (+) button.
Select an existing name
format in this list.
Click the Add button.
A copy of the selected name format is created.
3 Enter a name for the new preset, then press Return.
4 Add name elements by dragging the elements from the Include area to the Format eld.
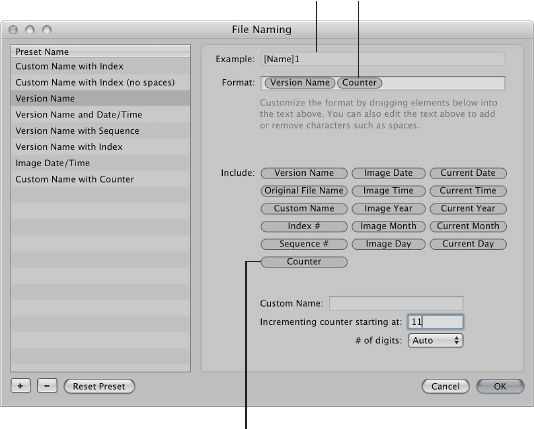
Chapter 19 Exporting Your Photos 452
If necessary, enter relevant naming information in the elds provided. Remove name elements
from the Format eld by selecting them and pressing Delete. You can also type characters
directly in the Format eld.
Name elements appear
here. Remove a name
element by selecting it
and pressing Delete.
The name format
example automatically
updates as you change
the name elements.
After dragging in this callout
Symbol, click the Break Link to
Symbol icon. Then edit this callout.
As you add or delete name elements, the Example eld automatically updates.
5 When you’re satised with the new name format, click OK.
The new name format appears in the Name Format pop-up menu.
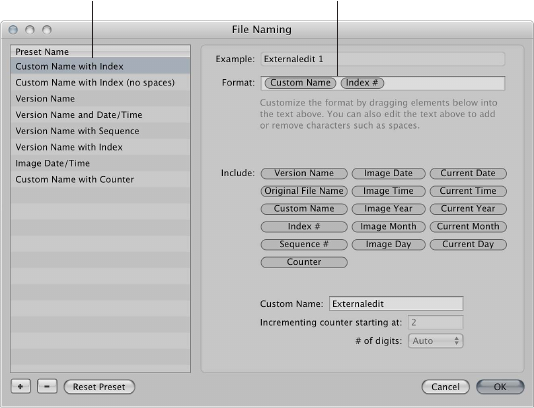
Chapter 19 Exporting Your Photos 453
To modify a name format to remove spaces
When exporting photos for specic uses, such as for use on websites, you may need to use
lenames without spaces so that the lenames are compatible with the intended application
or website. Aperture adds spaces to lenames depending on the name format you use. You can
easily modify name formats to remove spaces from lenames.
1 Choose Aperture > Presets > File Naming.
2 In the File Naming dialog, select the preset name format you want to modify.
Select the name format
you want to modify.
Select the space between
name elements and delete it.
3 In the Format eld, select and delete the spaces or characters between the name elements.
If you wish, you can also add spaces or characters between name elements.
4 Click OK.
Chapter 19 Exporting Your Photos 454
Exporting Metadata in a Separate File
You can select photos and export the IPTC metadata assigned to them in a tab-delimited text
le. The text le also lists the version names, ratings, keywords, and color labels assigned to the
photos in Aperture.
For more information about IPTC metadata, see About IPTC Metadata on page 195.
To export photo metadata in a text le
1 Select the photos whose metadata you want to export.
2 Choose File > Export > Metadata.
3 Enter a name for the text le in the Save As eld, select the location where you want the le
stored, then click Export Metadata.
Aperture exports the metadata information as a standard Unicode text le that you can open
and use with any application that uses text les.
Exporting Using Plug-ins
Some applications, social networking sites, and photography services supply plug-ins that allow
Aperture to export les automatically with the format and settings the application or service
requires. For example, a stock photography service or print lab may require that photos be
transferred at a specic size, in a specic le format, or with particular types of metadata. Such
a service can create its own plug-in that automatically sets up Aperture to export les with
precisely the characteristics the service needs.
To use an export plug-in, you must rst obtain the plug-in software from the service or
application vendor and install it. You can nd a list of available plug-ins by connecting to the
Internet and choosing Aperture > Aperture Plug-ins. Third-party plug-ins for Aperture are stored
in the following location: /Library/Application Support/Aperture/Plug-ins/Export/.
To export photos using a third-party plug-in
1 Select the photos you want to transfer.
2 Choose File > Export, then select the plug-in that you want to use.

Chapter 19 Exporting Your Photos 455
Exporting by Dragging
You can export photo, audio, and video versions by dragging them from the Browser or Library
inspector to the desktop or any location in the Finder. You can also do the same with projects,
albums, and folders in the Library inspector. However, Flickr and Facebook albums cannot be
exported by dragging.
Note: A photo version without a JPEG preview cannot be exported via the drag-and-drop
method. If the version doesn’t have a preview, dragging and dropping is disabled for that
version (except within Aperture). If you are dragging multiple photos, but only some of them
have previews, only the versions with previews are dragged out. The quality of the JPEG image
is determined by the Previews settings in Aperture preferences. For more information, see An
Overview of Preview Images on page 118 .
To export versions from Aperture by dragging
1 In the Browser, select the photo, audio, and video versions you want to export.
2 Drag the versions to the desktop or any location in the Finder.
To export items in the Library inspector by dragging
1 In the Library inspector, select the items you want to export by Shift-clicking adjacent items and
Command-clicking nonadjacent items.
2 Drag the items to the desktop or any location in the Finder.
The exported items are consolidated into a single Aperture library. The library is named after the
item that appears at the highest point (from top to bottom) in the Library inspector. If an album
is selected for export, the album and the project to which it is subordinate are exported, but
only the versions within the album are exported. Any other photos in the project are left out of
the export.
If you want to rename the exported library, double-click the library le’s name and enter a
new name.
WARNING: In rare instances, color shifts between exported photos may occur when the
Camera Previews option is selected in the Import pane of the Aperture Preferences window.
This color shift happens because some RAW photos have fully rendered previews, and others
still use the camera’s RAW thumbnail. To prevent this from happening, view all photos you want
to export in the Viewer, and Aperture generates a fully rendered preview for each photo. For
more information, see An Overview of Preview Images on page 118 and Import Preferences on
page 593.
456
An Overview of Slideshows
With Aperture, you can easily create and present slideshows of your photos. You can use two
main methods to create slideshows in Aperture. You can quickly create a slideshow from a
selection of photos, or you can create an advanced multimedia presentation complete with
video clips, a layered soundtrack, and customized titles, borders, transitions, and eects.
To create an impromptu slideshow based on a photo selection and play it on your computer,
you use slideshow presets. Slideshow presets are collections of predened slideshow settings
that determine the overall look of your slideshow and how your photos appear on the screen.
Aperture provides a number of slideshow presets, and you can also create your own custom
presets. Slideshow presets are convenient when you’re sitting with a client or friend and you
want to give a basic presentation of your photos, but you don’t need to save the slideshow.
For more information about playing slideshows using slideshow presets, see An Overview of
Slideshow Presets on page 457.
When you want to create a more elaborate multimedia presentation or when you want to
export your slideshow as a movie for others to view, you create a slideshow album and use the
Slideshow Editor to edit the slideshow. Aperture provides themes that you can apply to your
slideshow to give it a professional look, and you can also include video clips, create a layered
soundtrack, and customize elements such as titles, borders, transitions, and eects. You can play
the slideshow on your computer, or you can export the slideshow as a movie to share with
others via email or the web. You can also send your slideshow directly to iTunes for syncing with
iPhone, iPod, iPod touch, iPad, or Apple TV.
Note: Aperture slideshow themes automatically scale to t panoramic photos.
Important: Aperture slideshows cannot be edited in iPhoto. To modify an Aperture slideshow,
you must open your Aperture library in Aperture and then edit the slideshow.
For more information about creating slideshow presentations using the Slideshow Editor, see the
following sections:
•Workow for Creating a Multimedia Slideshow Presentation on page 464
•Creating Slideshow Albums on page 465
•Changing a Slideshow’s Theme on page 467
•About Editing Slideshow Transitions and Applying Eects on page 468
•An Overview of Modifying the Entire Slideshow on page 469
•An Overview of Modifying Individual Slides and Transitions on page 475
•An Overview of Adding Music and Audio to Slideshows on page 483
•Viewing Your Slideshows in Aperture on page 491
•Sharing Your Slideshow Movies on page 492
Creating Slideshow Presentations 20
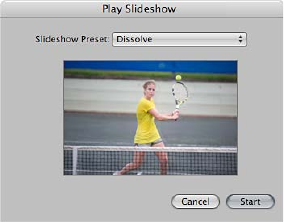
Chapter 20 Creating Slideshow Presentations 457
Playing Slideshows Using Slideshow Presets
An Overview of Slideshow Presets
To play a slideshow using a slideshow preset, you select an item in the Library inspector or
individual photos in the Browser and then choose File > Play Slideshow (or press Shift-S).
When the Play Slideshow dialog appears, you can specify how you want photos displayed by
choosing a slideshow preset.
Slideshow presets are groups of predened settings for playing a slideshow. For example, you
can choose a slideshow preset to change the theme or apply transitions and timing to your
onscreen presentation.
Aperture provides several slideshow presets from which to choose. When you choose a preset
from the Slideshow Preset pop-up menu, a preview of the slideshow preset plays below the
pop-up menu.
You can also create your own custom presets. For example, to prepare for a presentation, you
could create two new slideshow presets: one for your presentation and the other for your
question-and-answer period. The presentation slideshow can be manually controlled, allowing
you to move through the photos at your own pace. Your second slideshow preset, to be used
during the question-and-answer period of your presentation, can display the same photos using
the Sliding Panels theme set to show each photo for 15 seconds, with music and looping applied.
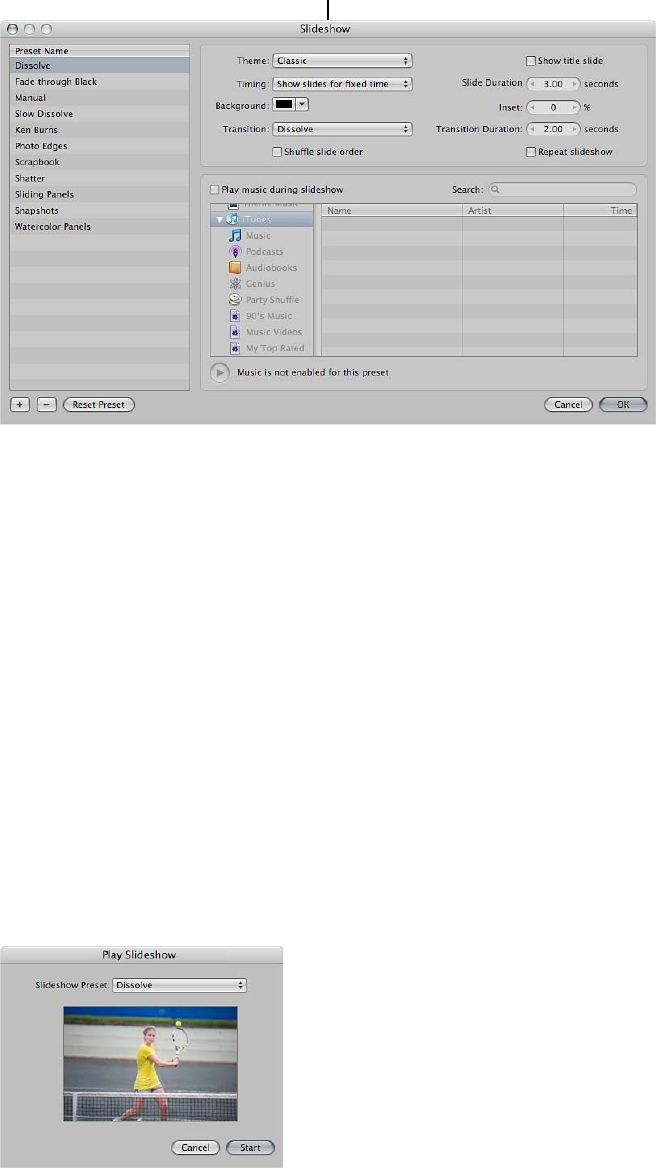
Chapter 20 Creating Slideshow Presentations 458
To create or modify a slideshow preset, you choose Aperture > Presets > Slideshow (or choose
Edit from the Slideshow Preset pop-up menu in the Play Slideshow dialog), and the Slideshow
dialog appears.
The Slideshow dialog
lets you create or modify
slideshow presets.
You can then select a slideshow preset or create a new one, specifying the settings you want.
Playing a Slideshow Using a Preset
You can easily set up a slideshow by selecting the photos you want and then choosing a
slideshow preset.
Important: To display slideshows at the best quality, you should set Aperture to create high-
resolution previews. In addition to setting previews to their highest resolution, you should also
use full-size previews to prevent upscaling with large displays. If previews are not available,
photos in the slideshow may not be as sharp as they would be otherwise. For more information
about creating high-resolution previews, see An Overview of Preview Images on page 118 .
To create and play a slideshow
1 Select a set of photos by doing one of the following:
•Select an item in the Library inspector.
•Select individual photos or photo stacks in the Browser.
2 Choose File > Play Slideshow (or press Shift-S).
The Play Slideshow dialog appears.
Chapter 20 Creating Slideshow Presentations 459
3 Choose a preset from the Slideshow Preset pop-up menu.
Note: Additional slideshow presets appear in the Slideshow Preset pop-up menu for use in
Aperture when iPhoto ’11 is installed.
When you choose a preset from the Slideshow Preset pop-up menu, a preview of the slideshow
preset plays below the pop-up menu.
4 Click Start.
If either no photo or a single photo is selected, the slideshow displays all photos in the current
album or project.
Important: You can save slideshows and share them by creating a slideshow album and then
placing the photo versions for your slideshow in it. For more information, see Creating Slideshow
Albums on page 465.
Controlling a Slideshow
Once you start playing a slideshow, you can use keyboard shortcuts to control the slideshow.
To pause the slideshow
mPress the Space bar.
To continue playing the slideshow
mPress the Space bar again.
To move forward through the slideshow
mPress the Right Arrow key.
To move backward through the slideshow
mPress the Left Arrow key.
To stop the slideshow
mPress Esc (Escape).
The slideshow stops playing, and the Aperture workspace reappears.
Arranging the Order of a Slideshow’s Photos
You can arrange the order in which the photos in a slideshow are presented.
To arrange the order of a slideshow’s photos
mBefore creating the slideshow, arrange the thumbnail images in the Browser in the order in
which you want them to appear in the slideshow.
You can then play the slideshow by following the instructions in Playing a Slideshow Using a
Preset on page 458.
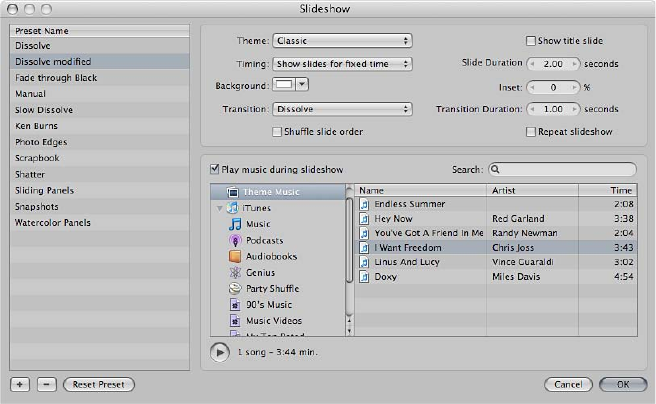
Chapter 20 Creating Slideshow Presentations 460
Controls in the Slideshow Dialog
The Slideshow dialog contains options for creating and modifying slideshow presets. In it, you
can choose how many photos to display at a time, how those photos are arranged, and how long
each photo is displayed in your slideshow. You can also choose to play slideshows on one or two
displays, with custom background colors and music.
To open the Slideshow dialog
Do one of the following:
mChoose Aperture > Presets > Slideshow.
mChoose File > Play Slideshow (or press Shift-S), then choose Edit from the Slideshow Preset
pop-up menu in the Play Slideshow dialog.
The Slideshow dialog appears.
•Preset Name list: Displays the list of current slideshow presets.
•Theme pop-up menu: Choose a theme for your slideshow preset from this pop-up menu.
•“Show title slide” checkbox: Select this checkbox to display a title slide at the beginning of the
slideshow. Aperture automatically generates the title using the name of the item selected in
the Library inspector.
•Timing pop-up menu: Choose how the slideshow duration is determined. There are three
options: tting the slideshow to the duration of the music, showing each photo for a xed
time, or advancing photos manually.
•Slide Duration value slider: Use this value slider to determine the minimum amount of time
each photo is shown.
•Background color well: Change the background color of your slideshow by clicking the
Background color well and then selecting a new background color from the Colors window, or
click the disclosure button (to the right of the color well) and select a new background color
from the pop-up color palette.
•Inset value slider: Use this value slider to adjust the space between the edges of the screen and
the photos.
•Transition pop-up menu: Choose the type of transition that occurs between the slides.
•Transition Duration value slider: Use this value slider to adjust the length of applied transitions.
The duration setting is applied uniformly to each transition.
Chapter 20 Creating Slideshow Presentations 461
•“Shue slide order” checkbox: Select this checkbox to have Aperture shue the order of the
photos presented in the slideshow.
•“Repeat slideshow” checkbox: Select this checkbox to loop, or continuously play, your slideshow.
If you select this option, you must stop your slideshow manually by pressing Esc.
•“Play music during slideshow” checkbox: Select this checkbox to play your slideshow with an
accompanying song or iTunes playlist.
•Audio browser area: Displays sample music and slideshow theme music selections, as well as
music from GarageBand, your iTunes library, and any audio imported into the Aperture library.
Navigate to a song to accompany your slideshow, or search for a song name, artist, or song
time by entering information in the search eld. You can also preview DRM-free music by
clicking the Play button.
•OK button: Click this button to apply any changes made to the selected slideshow preset.
•Cancel button: Click this button to cancel the changes made to the selected slideshow preset.
•Reset Preset button: Click this button to reset the selected slideshow preset to its
original settings.
•Remove (–) button: Click this button to remove an unwanted slideshow preset from the Preset
Name list.
•Add (+) button: Click this button to create a new slideshow preset based on the preset selected
in the Preset Name list.
Creating Slideshow Presets
You create a new slideshow preset by duplicating an existing preset and then modifying it.
First, identify which existing preset you want to model your new preset on. After duplicating
the preset and renaming the duplicate, you can easily customize your new slideshow
preset’s settings.
To create a new slideshow preset
1 Choose Aperture > Presets > Slideshow.
The Slideshow dialog appears.
2 Select a preset in the Preset Name list on which to model your new preset.
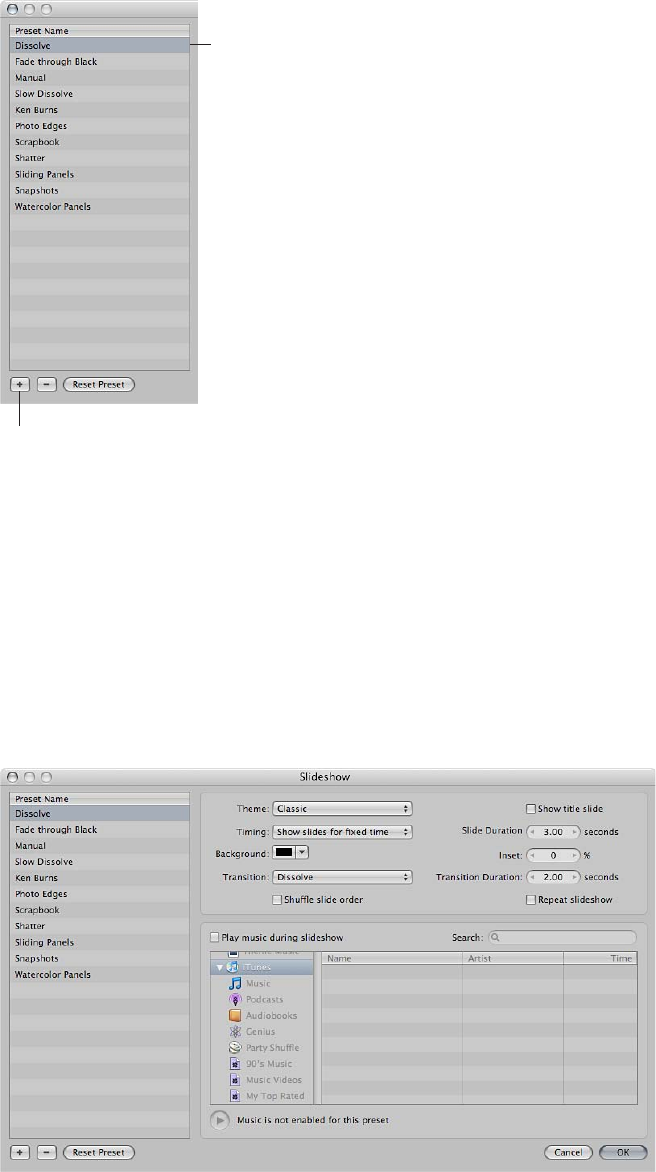
Chapter 20 Creating Slideshow Presentations 462
3 In the bottom-left corner of the dialog, click the Add (+) button.
Select a preset
in the list.
Click this button
to add a new preset.
A copy of the slideshow preset appears highlighted in the Preset Name list.
4 Enter a new name for the copied slideshow preset, then press Return.
5 When you’ve nished specifying the slideshow settings you want, click OK.
Modifying Slideshow Presets
You can modify slideshow presets to create custom slideshow presentations.
To modify an existing preset
1 Choose Aperture > Presets > Slideshow.
The Slideshow dialog appears.
2 Select the preset you want to modify in the Preset Name list.
3 Modify the slideshow preset’s settings as appropriate.
4 When you’ve nished modifying settings for the slideshow preset, click OK.
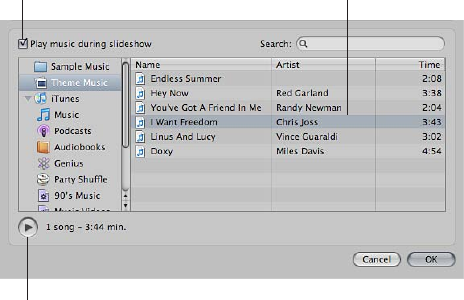
Chapter 20 Creating Slideshow Presentations 463
To revert to the preset’s original settings
1 In the Slideshow dialog, select the preset whose settings you want to revert.
2 Click the Reset Preset button.
Using Slideshow Presets to Play Slideshows with Music
Adding music to your slideshow can increase your audience’s enthusiasm and participation. You
can easily add DRM-free music from your iTunes music library to accompany your slideshow.
To add music to your slideshow presentation
1 Select a set of photos to be displayed in your slideshow.
2 Choose File > Play Slideshow (or press Shift-S).
The Play Slideshow dialog appears.
3 Choose Edit from the Slideshow Preset pop-up menu.
The Slideshow dialog appears.
4 Do one of the following:
•Select a slideshow preset to modify.
For more information about modifying existing slideshow presets, see Modifying Slideshow
Presets on page 462.
•Create a new slideshow preset.
For more information about creating new slideshow presets, see Creating Slideshow
Presets on page 461.
5 In the Slideshow dialog, select the “Play music during slideshow” checkbox.
Select this checkbox if you
want to play music or an audio
clip during your slideshow.
Click the Play button
to preview your choice.
Select a song
or an audio clip.
6 Navigate to a song or an audio track in the audio browser.
You can search for a specic song, artist, or song time by entering information in the search eld.
7 If you want to preview your song choice, click the Play button.
8 If you are satised with your music selection, click OK.
The Play Slideshow dialog appears.
9 Click Start to begin playing the slideshow presentation.
Chapter 20 Creating Slideshow Presentations 464
Workow for Creating a Multimedia Slideshow Presentation
Creating, editing, and sharing slideshows containing your photos is a fairly simple process. Here
are some of the typical steps in the slideshow creation and sharing process.
Stage 1: Selecting Photos, Audio Clips, and Video Clips
Gather your initial selection of photos and video clips in the Browser. Locate any audio clips you
plan to use in your slideshow presentation.
Stage 2: Creating a Slideshow Album
Create a slideshow album in the Library inspector from the selection of photos and video clips in
the Browser and choose a theme for the slideshow. Drag additional photos and video clips into
the slideshow album as necessary.
Note: The Classic and Ken Burns slideshow themes are the most customizable. Use the dialog
that appears when you create a new slideshow album to preview the slideshow themes that
come with Aperture. If you want to signicantly modify a slideshow theme, choose Classic or
Ken Burns.
Stage 3: Arranging the Slideshow Presentation
Arrange the photos and video clips in the Browser, below the Slideshow Editor, from left to right
to tell the story you want. Each photo and video clip functions as an individual slide.
Stage 4: Previewing the Slideshow in the Slideshow Editor
Preview the slideshow in the Slideshow Editor to verify that photos and video clips play in the
correct sequence.
Stage 5: Selecting Music
Choose the music or audio clip that will play during the slideshow. You can apply a looped
song to the main audio track and then add voiceover audio clips and other audio clips to the
secondary audio track.
Stage 6: Adjusting Transitions
Adjust transitions to emphasize the most important photos in the slideshow or give a particular
treatment to photos with similar subject matter. Make sure that the sequence of photos and the
duration of the transitions match the cadence and tempo of the music or audio clip you selected
for the slideshow.
Stage 7: Titling and Adding Text to the Slideshow
Add a title to your slideshow using the titling controls. Insert a blank slide at the beginning of
the movie to display your title. You can also use blank slides to act as chapter dividers. Add text
to individual slides where appropriate.
Stage 8: Previewing the Slideshow Again
Preview the slideshow once again in full-screen mode to make sure the photos and video clips
are playing in the correct sequence. Ensure that the music or audio clip matches the theme of
the slideshow and the cadence of the photos and video clips, that the eects and transitions are
to your liking, and that the title text is correct.
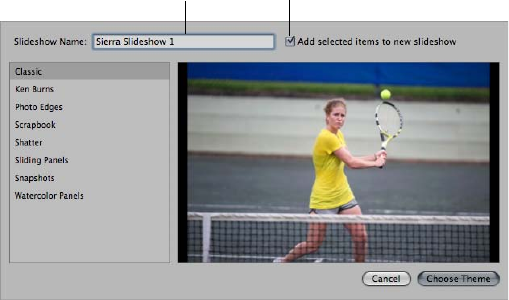
Chapter 20 Creating Slideshow Presentations 465
Stage 9: Exporting the Slideshow
Export the slideshow as a movie in the format that best ts the platform by which you mean to
share it. You can choose a format that is optimized for iPhone, iPod, iPod touch, iPad, YouTube,
Apple TV, 720p HD, or 1080p HD. You can also create a custom movie in a wide range of frame
rates and frame sizes.
Stage 10: Sharing Your Slideshow
After exporting your slideshow movie, tell your clients and friends. If you’ve posted your
slideshow on your website or YouTube, send an email announcement.
Creating Slideshow Albums
To create a slideshow using the Slideshow Editor, you must rst create an album that holds the
slideshow’s photos. The easiest way to do this is to select photos you want to appear in the
slideshow and then create an album. Aperture places the photos in the order in which they were
selected in the Browser, but you can rearrange the order at any time.
To create a slideshow album from selected photos
1 Do one of the following:
•In the Browser, select the photos you want to place in your slideshow.
•Select an item in the Library inspector.
2 Do one of the following:
•Choose File > New > Slideshow.
•Control-click an item in the Library inspector, then choose New > Slideshow from the
shortcut menu.
•Choose Slideshow from the New pop-up menu in the toolbar.
3 In the dialog that appears, give the slideshow a name, select a theme, and make sure the “Add
selected items to new slideshow” checkbox is selected.
Make sure this
checkbox is selected.
Enter a name for your
slideshow in this field.
You can preview slideshow themes by selecting themes in the left column.
Note: Aperture slideshow themes automatically scale to t panoramic photos.
4 Click Choose Theme.
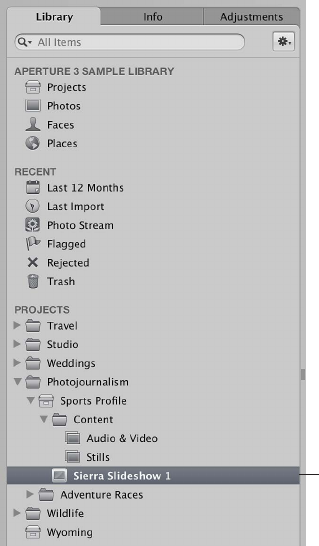
Chapter 20 Creating Slideshow Presentations 466
The new slideshow album containing the selected photos appears in the Library inspector, and
the Slideshow Editor appears above the Browser. If you want to rename the slideshow album,
double-click the slideshow album’s name in the Library inspector and enter a new name.
The new slideshow
album appears in the
Library inspector.
To create a new, empty slideshow album
1 Do one of the following:
•Choose File > New > Slideshow.
•Control-click an item in the Library inspector, then choose New > Slideshow from the
shortcut menu.
•Choose Slideshow from the New pop-up menu in the toolbar.
2 In the dialog that appears, give the slideshow a name, then select a theme.
You can preview slideshow themes by selecting themes in the left column.
Note: Aperture slideshow themes automatically scale to t panoramic photos.
3 Make sure the “Add selected items to new slideshow” checkbox is not selected.
4 Click Choose Theme.
The new, empty slideshow album appears in the Library inspector, and the Slideshow Editor
appears above the Browser. Drag the photos you want from the Browser into the new slideshow
album in the Library inspector.
To make changes to the slideshow, you use the controls in the Slideshow Editor. For more
information about making changes to the slideshow, see About Editing Slideshow Transitions
and Applying Eects on page 468.

Chapter 20 Creating Slideshow Presentations 467
Changing a Slideshow’s Theme
The rst step in creating a slideshow is to choose its theme. Aperture provides a set of
professionally designed themes that present your photos with background images, graphic
elements, and animation.
Aperture asks you to choose a theme when you rst create a slideshow album, and it’s a good
idea to explore the slideshow themes before you get started. Some themes may lend themselves
better to the subject matter of your photos than others. However, you can change the theme of
a slideshow at any time.
Note: Additional slideshow themes appear in the Slideshow Themes dialog for use in
Aperture when iPhoto ’11 is installed. Aperture slideshow themes automatically scale to t
panoramic photos.
For more information about creating slideshow albums, see Creating Slideshow Albums on
page 465.
To change the theme for a slideshow
1 In the Slideshow Editor, click the Theme button.
Click the Theme
button to change
a slideshow’s theme.
2 In the dialog that appears, select a theme from the list, then click Choose Theme.
Aperture applies the selected theme to the slideshow.
Important: Aperture provides a set of professionally designed themes you can use to present
slideshows of your photos. However, the Classic and Ken Burns slideshow themes are the most
customizable. Use the dialog that appears when you create a new slideshow album or when you
click the Theme button in the Slideshow Editor to preview the slideshow themes that come with
Aperture. If you want to signicantly modify a slideshow theme, choose Classic or Ken Burns.
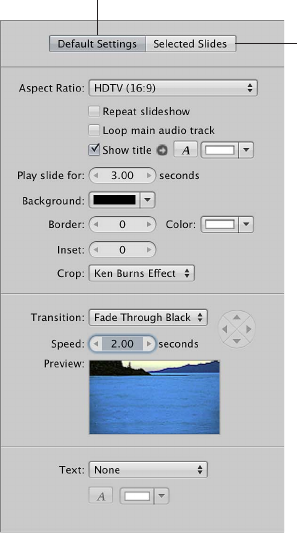
Chapter 20 Creating Slideshow Presentations 468
About Editing Slideshow Transitions and Applying Eects
Aperture provides two methods for applying transitions and eects to the slides in your
slideshow. The rst method applies the changes uniformly to every slide and transition in the
slideshow using the Default Settings controls. The second method applies changes to individual
slides and transitions using the Selected Slides controls. You use the second method when you
want to emphasize a specic photo, change the length or type of a particular transition, or
apply text to an individual slide. The settings made for selected photos using the Selected Slides
controls override the settings made to the entire slideshow using the Default Settings controls.
When you make changes to the entire slideshow using the Default Settings controls, the settings
made using the Selected Slides controls are unchanged.
Although the Default Settings and Selected Slides controls are not visible by default, you can
access them by clicking the Slideshow Settings button in the Slideshow Editor.
For more information about working with the Default Settings controls, see An Overview of
Modifying the Entire Slideshow on page 469. For more information about working with the
Selected Slides controls, see An Overview of Modifying Individual Slides and Transitions on
page 475.
To show the Default Settings and Selected Slides controls
mClick the Slideshow Settings button (with a slide icon) in the lower-right corner of the Slideshow
Editor, then click either the Default Settings or Selected Slides button.
Click here to change
settings for all slides.
Click here to change
settings for the selected
slides only.
The slideshow controls in either the Default Settings or Selected Slides pane appear, depending
on which button you clicked.
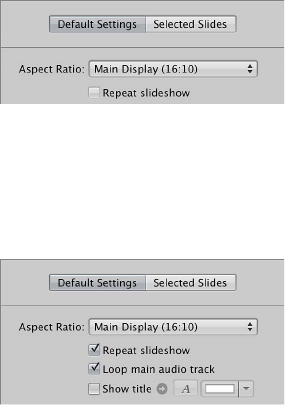
Chapter 20 Creating Slideshow Presentations 469
Modifying Settings Applied to the Entire Slideshow
An Overview of Modifying the Entire Slideshow
The onscreen duration of each slide, the type of transition between slides, and the length of the
transitions are initially set by the theme you choose for the slideshow. However, you can change
these settings at any time, along with the aspect ratio, background color, image borders, Ken
Burns eect settings, and titles. For more information about working with slideshow themes, see
Changing a Slideshow’s Theme on page 467.
Setting the Aspect Ratio for the Slideshow
Determining the aspect ratio of the slideshow is the rst setting you need to address. Aperture
slideshows can be output at aspect ratios that match either the main or secondary display, the
dimensions of a standard 4:3 or 16:9 widescreen TV, or the 3:2 aspect ratio of iPhone.
To set the aspect ratio for the slideshow
mIf the Default Settings pane of the Slideshow Editor is not shown, click the Default Settings
button, then choose an aspect ratio from the Aspect Ratio pop-up menu.
Looping the Slideshow and the Main Audio Track
You can set the slideshow to play repeatedly in full-screen mode until you stop playback by
pressing Esc. You can set playback of the audio clip in the slideshow’s main audio track to loop
until the end of the slideshow.
To set the slideshow to loop in full-screen mode until stopped
mIn the Default Settings pane of the Slideshow Editor, select the “Repeat slideshow” checkbox.
To loop playback of the slideshow’s main audio track
mIn the Default Settings pane of the Slideshow Editor, select the “Loop main audio track” checkbox.
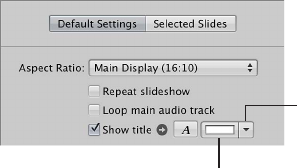
Chapter 20 Creating Slideshow Presentations 470
Applying a Title to the Slideshow
You can apply a title to the beginning of your slideshow. You can also display your title over a
solid background by inserting a blank slide.
Note: The title controls in the Selected Slides pane of the Slideshow Editor and the title options
in the Slideshow Action pop-up menu (with a gear icon) are available for use only with the
Classic and Ken Burns slideshow themes. If iPhoto ’11 is installed, a new Text control appears,
allowing you to add text to any slideshow theme.
To apply a title to the beginning of the slideshow
1 In the Default Settings pane of the Slideshow Editor, select the “Show title” checkbox.
Disclosure button for the
pop-up color palette
“Show title” color well
The slideshow album’s name appears in a text box over the rst slide in the slideshow.
2 If you wish, double-click the title and enter new title text.
3 If you would like to choose a specic font and font size for the slideshow text, click the “Show”
Fonts button and select a font and font size from the Fonts window.
4 If you would like to change the font color for the slideshow title, do one of the following:
•Click the “Show title” color well, then select a color from the Colors window.
•Click the disclosure button to the right of the color well, then select a color from the pop-up
color palette.
To insert a blank slide for the title
1 In the Browser, move the playhead to the beginning of the slideshow.
2 Choose Insert Blank Slide With Text from the Slideshow Action pop-up menu (with a gear icon).
3 If necessary, drag the blank slide to the beginning of the slideshow.
A blank slide appears at the beginning of the slideshow with the title.
4 In the Slideshow Editor, double-click the text in the slide and enter a title for the slideshow.
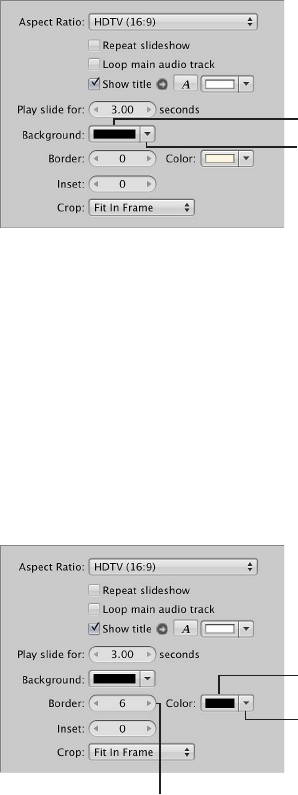
Chapter 20 Creating Slideshow Presentations 471
Setting the Length of Time Slides Play
Next, you need to set the length of time the slides play.
To set the length of time the slides play
mIn the Default Settings pane of the Slideshow Editor, specify the number of seconds that each
slide should appear onscreen using the “Play slide for” value slider.
Note: Depending on which theme is applied to the slideshow, additional controls may appear
for tting the slideshow to the soundtrack and aligning the slideshow to beats. For more
information about adding a soundtrack to a slideshow, see An Overview of Adding Music and
Audio to Slideshows on page 483.
Choosing a Background Color for the Slideshow
You can change the color of the background over which the slides play.
Background color well
Disclosure button for
the pop-up color palette
To change the slideshow’s background color
Do one of the following:
mClick the disclosure button to the right of the color well, then select a color from the pop-up
color palette.
mIn the Default Settings pane of the Slideshow Editor, click the Background color well, then select
a color from the Colors window.
Adding Borders Uniformly to Slides
You can add a uniform border to the slides in your slideshow to help distinguish them from
the background.
Border color well
Disclosure button for
the pop-up color palette
Border value slider

Chapter 20 Creating Slideshow Presentations 472
To add image borders
1 In the Default Settings pane of the Slideshow Editor, specify the width of the border using the
Border value slider.
2 To specify a border color, do one of the following:
•Click the Border color well, then select a color from the Colors window.
•Click the disclosure button to the right of the color well, then select a color from the pop-up
color palette.
The border is applied to every photo in the slideshow.
To add space between a photo and its border
mIn the Default Settings pane of the Slideshow Editor, specify the width of the inset (as measured
in pixels) using the Inset value slider.
Fitting the Slides to the Aspect Ratio
After you have chosen an aspect ratio for your slideshow, you need to decide how you want
your photos to appear within the aspect ratio. Use the Crop pop-up menu in the Default Settings
pane of the Slideshow Editor to choose to have the photos t within the frame of the slideshow
aspect ratio, have the photos ll the frame of the slideshow aspect ratio, or apply a Ken Burns
eect to each photo in the slideshow. A Ken Burns eect either zooms in to or out of the photo
while simultaneously panning along the widest dimension of the photo.
You can have Aperture scale the photos so that they ll the screen, with no part of the
background showing. Keep in mind that Aperture must zoom in to most of the photos to make
them t the aspect ratio of the slideshow. This means that parts of the photos will be cropped.
To set the crop characteristics for your photos
mTo t every photo in the slideshow within the chosen aspect ratio without cropping the photos:
Choose Fit in Frame from the Crop pop-up menu.
mTo have every photo in the slideshow ll the frame of the chosen aspect ratio: Choose Fill Frame from
the Crop pop-up menu.
Cropping will occur along the longest dimension of each photo unless the photo’s aspect ratio
matches the aspect ratio chosen in the Aspect Ratio pop-up menu. Drag within the images to set
the portions of the photos that are visible.
mTo apply a Ken Burns eect to the photos in the slideshow: Choose Ken Burns Eect from the Crop
pop-up menu.
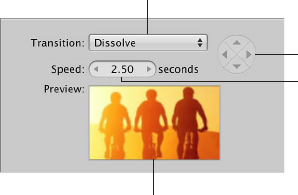
Chapter 20 Creating Slideshow Presentations 473
Adding Transitions Uniformly Between Slides
You can add uniform transitions between the slides in your slideshow as well as set the duration
of the transitions.
Speed value slider
Transition
pop-up menu
Preview area
Transition direction buttons
To apply a transition uniformly between slides in the slideshow
1 In the Default Settings pane of the Slideshow Editor, choose a transition from the Transition
pop-up menu.
A preview of the selected transition plays below the Speed value slider. You can use the
Transition direction buttons to preview the angle at which animated transitions enter and exit
the frame.
2 If you chose a transition that can be applied in more than one direction, click a Transition
direction button to set the direction of the transition.
The Preview area shows the angle at which animated transitions enter and exit the frame.
Note: The Transition direction buttons appear dimmed if you choose a transition that can be
applied in only one direction.
3 Set the duration of the transitions between slides by specifying the time, in seconds, using the
Speed value slider.
The chosen transition is applied uniformly between slides in the slideshow, with the direction
and duration you specied.
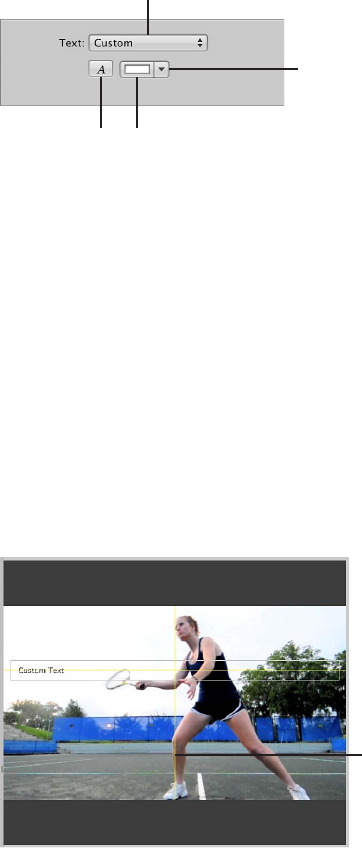
Chapter 20 Creating Slideshow Presentations 474
Adding Text to Slides
You can display basic information about each photo in your slideshow, such as each version’s
name or caption.
To add slide text
1 In the Default Settings pane of the Slideshow Editor, choose the type of information to display
with each photo from the Text pop-up menu.
Text Fonts
button
Text color well
Text pop-up menu
Disclosure button for
the pop-up color palette
2 If you would like to choose a specic font and font size for the slideshow text, click the Text Fonts
button and select a font and font size from the Fonts window.
3 If you would like to change the color of the slideshow text, do one of the following:
•Click the Text color well, then select a color from the Colors window.
•Click the disclosure button to the right of the color well, then select a color from the pop-up
color palette.
To move the slide text
By default, the slide text is displayed on the lower-left side of the photo. However, you can
choose where you want the slide text to appear onscreen.
mIn the Slideshow Editor, select the slide text, then drag it to a new position on the screen.
Yellow alignment guides appear to help you center the text horizontally and vertically or align
the text in the upper third or lower third of the photo.
Yellow lines appear
to help you position
the text.
The slide text is moved to the new position, appearing in the same position over each slide.
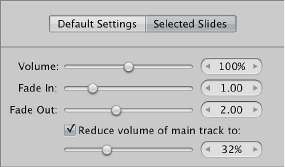
Chapter 20 Creating Slideshow Presentations 475
Modifying Individual Slides and Transitions
An Overview of Modifying Individual Slides and Transitions
After specifying the basic settings for a slideshow, you use the Selected Slides controls to modify
or accentuate specic slides and transitions. You can set the length of time a specic photo
appears onscreen, change the background color for any slide, modify the border width and color
for individual slides, modify the space between a photo and its border, and set how a specic
photo is cropped when it is set to ll the screen. You can also apply a Ken Burns eect to a
specic slide and set where the panning begins and ends within the photo, apply or change an
existing transition and its duration, and apply titles to individual slides.
Note: The availability of controls in the Selected Slides pane of the Slideshow Editor depends on
the theme applied to the slideshow.
For more information about working with the default settings for a slideshow, see An Overview
of Modifying the Entire Slideshow on page 469.
Working with Video Slides
In Aperture, you can add video clips as individual slides in your slideshow. You work with video
clips in the Slideshow Editor and Browser in the same way that you work with photos. However,
there are additional controls in the Selected Slides pane of the Slideshow Editor for specifying
the volume settings of the video clip. For example, you can mute the audio clip in the main audio
track so that it doesn’t drown out the audio in the video clip while it is playing in the slideshow.
You can also set duration of the fade-in and fade-out of the video clip’s audio to smooth out
abrupt transitions between the video clip and the audio clip in the slideshow’s main audio track.
Note: To trim a video clip or duplicate a video clip so that you can use multiple portions of it in
the same slideshow, see Working with Audio and Video in the Viewer on page 112 .
To set the volume for a video slide
1 Select a video clip in the Browser.
2 If the Selected Slides pane of the Slideshow Editor is not shown, click the Selected Slides button.
Note: The video controls appear in the Selected Slides pane only when a video clip is selected in
the Browser.
3 Specify the volume of the video clip as it plays in the slideshow using the Volume slider and
value slider.
To add a fade-in to a video clip
You can set the volume of a video clip to smoothly increase over time by applying a fade-in.
Adding a fade-in to a video clip helps prevent an abrupt transition from the audio clip in the
slideshow’s main audio track to the audio in the video clip.
mIn the Selected Slides pane of the Slideshow Editor, specify the duration of the fade-in, in
seconds, using the Fade In slider and value slider.
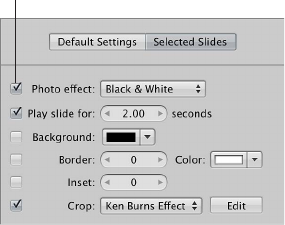
Chapter 20 Creating Slideshow Presentations 476
To add a fade-out to a video clip
You can set the volume of a video clip to smoothly decrease over time by applying a fade-out.
Adding a fade-out to a video clip helps prevent an abrupt transition from the audio in the video
clip to the audio clip in the slideshow’s main audio track.
mIn the Selected Slides pane of the Slideshow Editor, specify the duration of the fade-out, in
seconds, using the Fade Out slider and value slider.
To adjust the volume of the audio clip in the main audio track while a video clip is playing
You can specify the volume of the audio clip in the main audio track or turn it o completely
when a video clip is playing.
mIn the Selected Slides pane of the Slideshow Editor, make sure the “Reduce volume of main track
to” checkbox is selected, then drag the slider to the left to decrease the volume, or to the right to
increase it. You can also click the left or right arrow in the value slider to change the volume, or
drag in the value eld.
To mute the volume of the audio clip in the main audio track while a video clip is playing
mIn the Selected Slides pane of the Slideshow Editor, make sure the “Reduce volume of main track
to” checkbox is selected, then set the slider to 0%.
Applying a Photo Eect to Individual Slides
You can apply an eect, such as a sepia tint, to a selection of slides in your slideshow.
To apply a photo eect to a specic slide or group of slides
1 Select a photo or group of photos in the Browser.
2 If the Selected Slides pane is not shown in the Slideshow Editor, click the Selected Slides button,
then choose an eect from the “Photo eect” pop-up menu.
Make sure this
checkbox is selected.
The eect is applied to the selected slides. Deselect the “Photo eect” checkbox to turn the
eect o.
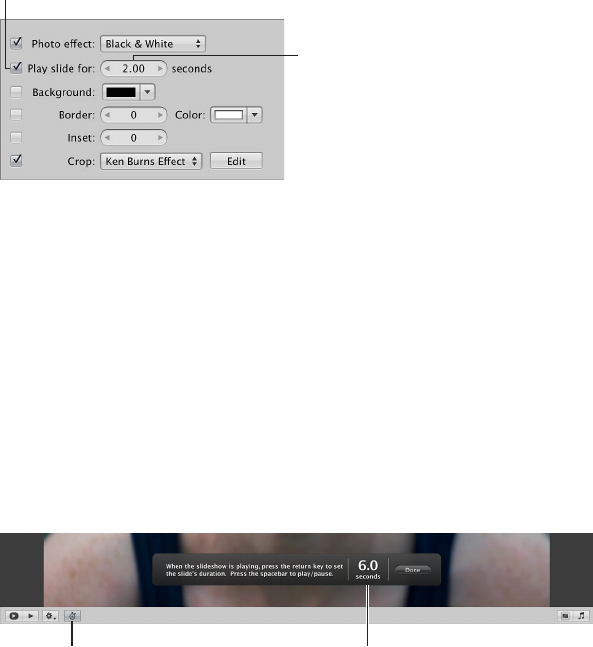
Chapter 20 Creating Slideshow Presentations 477
Modifying the Display Time for Individual Slides
You can modify the length of time any photo in your slideshow appears onscreen.
To set the display time for a specic slide or group of slides
1 Select a photo or group of photos in the Browser.
2 In the Selected Slides pane of the Slideshow Editor, select the “Play slide for” checkbox.
Make sure this checkbox
is selected.
Specify a duration
using this value slider.
3 Specify the length of time you want the slide or group of slides to appear using the “Play slide
for” value slider.
The display time for the selected slide or slides changes to the duration you specied.
To set a slide’s duration on the y
You can use the Slide Duration button to change the durations of slides while the slideshow
is playing. When you click the Slide Duration button, controls appear that allow you to set the
length of time each slide plays on the y while playing the slideshow.
1 In the Browser, move the playhead to the beginning of the slideshow.
2 In the Slideshow Editor, click the Slide Duration button.
An overlay displays the length of time the slide is set to play.
Controls appear over the photo in
the Slideshow Editor that allow you
to change the duration of each slide.
Click the Slide
Duration button.
3 Press the Space bar to play the slideshow.
As the playhead moves over the selected slide in the Browser, the duration counter in the overlay
counts the number of seconds. The playhead stops when it reaches the end of the slide, but the
duration counter continues to count.
4 Press Return to stop the counter and set the current slide’s display duration.
The playhead moves to the next slide in the Browser.
5 Repeat step 4 until the duration of each slide is set.
6 When you have nished, click Done.

Chapter 20 Creating Slideshow Presentations 478
Changing the Background Color for Individual Slides
You can change the background color for any slide in your slideshow.
To change the background color of a specic slide or group of slides
1 Select a photo or group of photos in the Browser.
2 In the Selected Slides pane of the Slideshow Editor, select the Background checkbox.
Make sure this checkbox
is selected.
Click here to select
a color from the
Colors window.
Pop-up color palette
Click here to select
a color from the
pop-up color palette.
3 Do one of the following:
•Click the Background color well, then select a color from the Colors window.
•Click the disclosure button to the right of the color well, then choose a color from the pop-up
color palette.
The new background color is applied to the selected slide or group of slides.
Adding Image Borders to Individual Slides
You can apply a border to any photo or group of photos in a slideshow.
To add image borders to a selected slide or group of slides
1 Select a photo or group of photos in the Browser.
2 In the Selected Slides pane of the Slideshow Editor, select the Border checkbox.
Click here to select
a color from the
Colors window.
Click here to select
a color from the
pop-up color palette.
Make sure this checkbox
is selected.
Specify the width
of the border using
this value slider.
3 Specify the width of the border using the Border value slider.
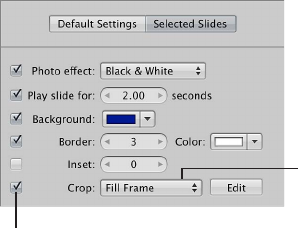
Chapter 20 Creating Slideshow Presentations 479
4 If you want to change the color of the border, do one of the following:
•Click the Border color well, then select a color from the Colors window.
•Click the disclosure button to the right of the color well, then select a color from the pop-up
color palette.
The new image border is applied to the selected slide or group of slides in the slideshow.
Setting the Crop for Individual Slides
You can make a photo or a group of photos in your slideshow ll the screen.
Choose how you want
the photo cropped from
this pop-up menu.
Make sure this checkbox
is selected.
To make the photo or group of photos in the slideshow ll the screen
1 Select a photo or group of photos in the Browser.
2 In the Selected Slides pane of the Slideshow Editor, select the Crop checkbox.
3 Choose Fill Frame from the Crop pop-up menu.
The selected photo or photos ll the screen. To set which part of the photo is cropped when you
choose the Fill Frame item from the Crop pop-up menu, follow the steps below.
To set the crop for photos that ll the screen
1 In the Selected Slides pane of the Slideshow Editor, click the Edit button to the right of the Crop
pop-up menu.
A crop overlay appears over the selected photo.
2 Drag the crop overlay over the part of the photo that you want to appear in the slideshow.
3 Click Done.
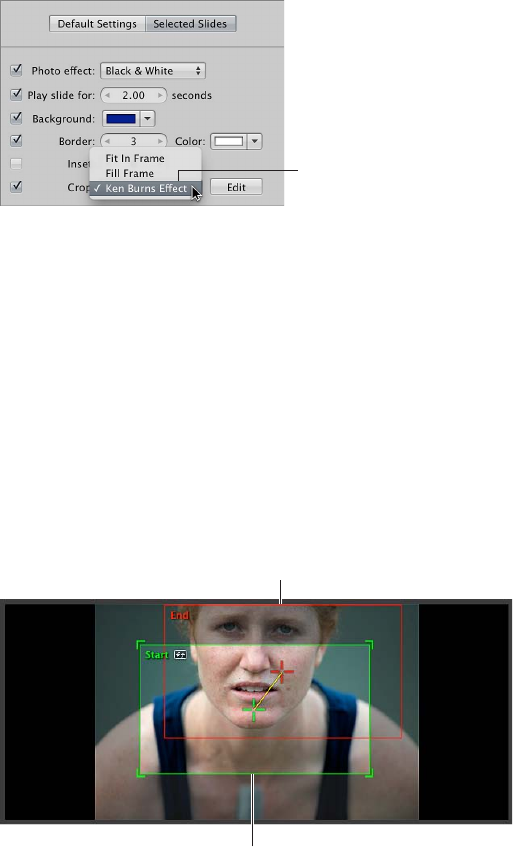
Chapter 20 Creating Slideshow Presentations 480
Applying a Ken Burns Eect to Individual Slides
You can select specic photos in your slideshow that warrant additional emphasis and apply a
Ken Burns eect to them. You can also choose where the Ken Burns eect panning begins and
ends within a photo.
Note: If the faces in the photos have names assigned to them, the Ken Burns eect takes this
information into account when cropping and positioning the faces in the slideshow.
To apply a Ken Burns eect to an individual slide in the slideshow
1 Select a photo in the Browser.
2 In the Selected Slides pane of the Slideshow Editor, select the Crop checkbox.
Choose Ken Burns
Effect from the Crop
pop-up menu.
3 Choose Ken Burns Eect from the Crop pop-up menu.
A Ken Burns eect is applied to the photo.
To set the start and end frames for the Ken Burns eect
1 Follow the steps above for applying a Ken Burns eect to an individual slide.
2 Click the Edit button to the right of the Crop pop-up menu.
The Start and End overlays appear in the Slideshow Editor.
3 Drag the Start (green) and End (red) overlays over the parts of the photo where you want the
panning to begin and end.
The yellow line between the center marks of the Start and End overlays indicates the panning
path of the Ken Burns eect.
The End overlay is red.
The Start overlay
is green.
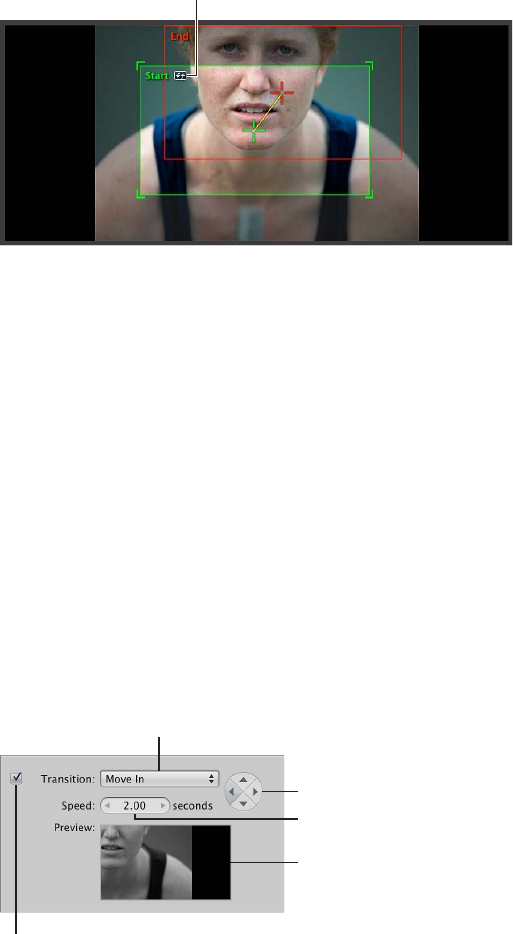
Chapter 20 Creating Slideshow Presentations 481
4 If you wish, you can reverse the panning motion by clicking the Reverse button.
Reverse button
5 When you are satised with the panning path of the Ken Burns eect, click Done.
The customized Ken Burns eect is applied to the photo.
Tip: Click the Preview Slideshow button or press the Space bar to review the customized Ken
Burns eect you applied to the photo.
Modifying Individual Transitions Between Slides
You can add a unique transition in your slideshow or change an existing one using the Transition
controls.
To add a unique transition between slides
1 Select two photos in the Browser that appear side by side.
2 In the Selected Slides pane of the Slideshow Editor, select the Transition checkbox and choose a
transition from the pop-up menu.
A preview of the transition applied between the photos appears in the Preview area below the
Speed value slider.
Make sure this
checkbox is selected.
Transition direction buttons
Speed value slider
Preview area
Transition
pop-up menu
3 Set the duration of the transition in seconds using the Speed value slider.
4 If the transition eect can be applied in more than one direction (the Move In transition,
for example), you can set the direction of the transition by clicking one of the Transition
direction buttons.
The chosen transition is applied between the photos selected in the Browser with the duration
and direction you specied.
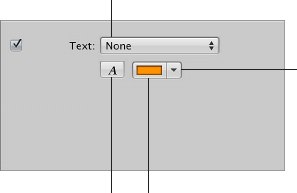
Chapter 20 Creating Slideshow Presentations 482
Adding Text to an Individual Slide
You can add text to individual photos in your slideshow using the Text controls. The text for the
individual slides overrides any text applied to the entire slideshow using the Default Settings
controls. Text that can be edited appears over the selected photo or group of photos in the
slideshow. You can also automatically add text based on metadata such as the version name
or caption.
To add text to an individual photo in the slideshow
1 In the Browser, select a photo or group of photos.
2 In the Selected Slides pane of the Slideshow Editor, select the Text checkbox, then do one of the
following:
•To add custom text: Choose Custom from the Text pop-up menu.
Text that can be edited appears over the selected photo in the slideshow. Enter the text for
the photo here.
•To add text based on the photo’s metadata: Choose a type of metadata from the Text
pop-up menu.
Text pop-up menu
Text color well
Text Fonts button
Disclosure button
for the pop-up color
palette
3 If you would like to change the color of the text, do one of the following:
•Click the Text color well, then select a color from the Colors window.
•Click the disclosure button to the right of the color well, then select a color from the pop-up
color palette.
4 If you would like to choose a specic font and font size for the slideshow text, click the Text Fonts
button and select a font and font size from the Fonts window.
5 If you would like to choose where the text appears on the screen, drag the text to a
new position.
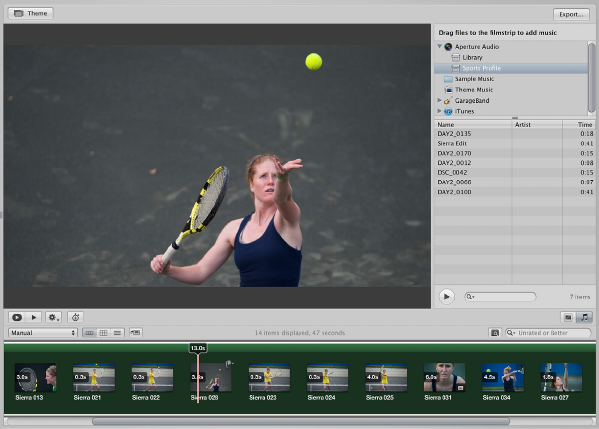
Chapter 20 Creating Slideshow Presentations 483
Adding Music and Audio to Slideshows
An Overview of Adding Music and Audio to Slideshows
You can add music and audio to your slideshow using the Audio browser controls in the
Slideshow Editor. In the Slideshow Editor, you can add audio to slideshows in two ways.
The rst method of adding audio to a slideshow involves dragging a song or an audio clip from
the Audio browser to the background of the timeline in the Browser. Audio added in this way
is called the main audio track. The main audio track is used to play audio, such as a song, in the
background. Clips in the main audio track cannot be edited, but you can append additional
audio (such as another song) to the end of the track if the slideshow is longer than the audio
le. When an audio clip is added to the main audio track, the background of the timeline in the
Browser appears green.
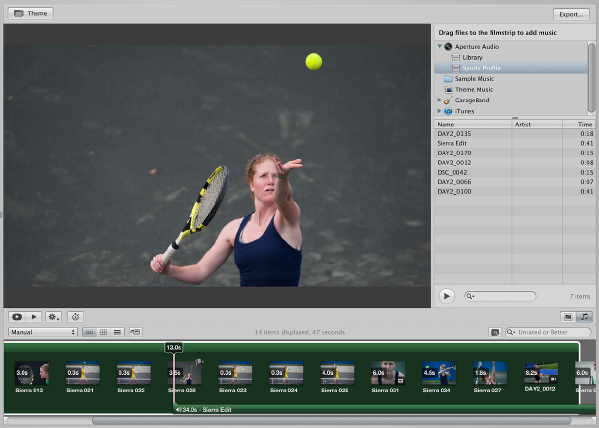
Chapter 20 Creating Slideshow Presentations 484
The second method of adding audio to a slideshow involves dragging a song or an audio clip,
such as voiceover recorded using GarageBand, from the Audio browser to a specic slide in the
Browser. Dragging an audio clip to a slide creates a secondary audio track, which appears as a
green bar below the slides in the Browser. You can trim the length of audio clips in the secondary
audio track, as well as control fade-in and fade-out eects.
You can use the Audio browser controls to access DRM-free audio les from a variety of sources,
including the Sample Music folder, the Theme Music folder, GarageBand, or your iTunes music
library. You can also use any audio le imported into the Aperture library.
You can t the slideshow to match the length of the main audio track, and you can align the
slides to match the beat of the music.
To show the Audio browser controls
mClick the Audio Browser button (with an icon of a musical note) in the lower-right corner of the
Slideshow Editor.
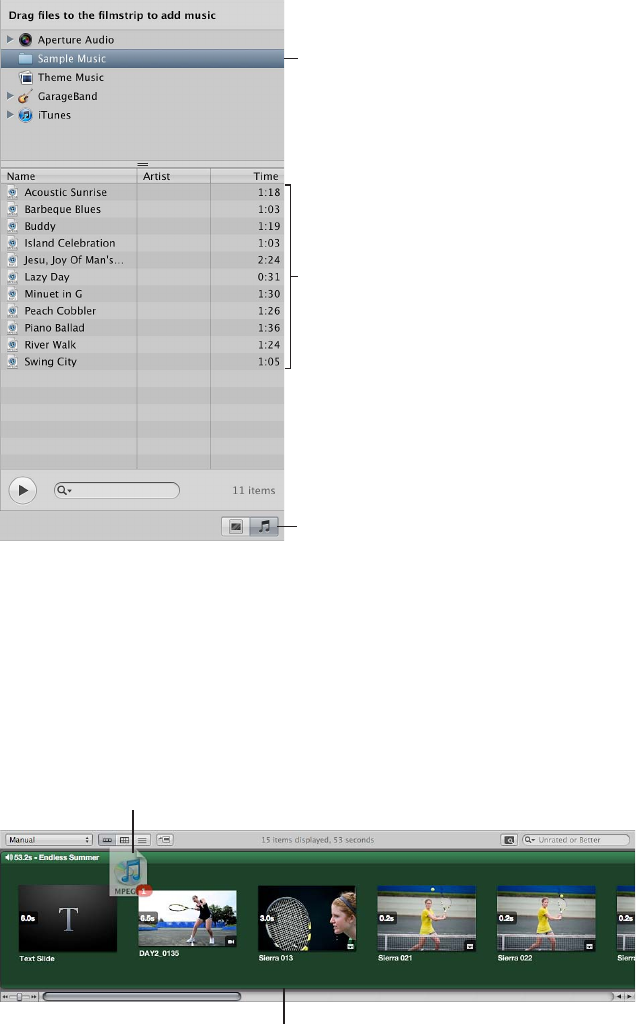
Chapter 20 Creating Slideshow Presentations 485
Adding Audio Clips to Your Slideshow
You can add audio to your slideshow by dragging an audio clip to the background of the
Browser to create the main audio track, or you can drag an audio clip to a specic slide in the
Browser to create the secondary audio track.
To add an audio clip to the main audio track in your slideshow
1 If the Audio browser controls are not shown in the Slideshow Editor, click the Audio
Browser button.
2 Choose the source for your audio from the Source list pop-up menu.
Choose the source
audio for your audio
from this pop-up menu.
Select a song or audio
clip in this area.
Audio Browser button
3 Select a song or audio clip from the Audio browser.
4 If you wish, preview the audio by clicking the Play button.
5 Drag the selected song or audio clip to the Browser’s background.
The background of the Browser appears green, indicating that the selected song or audio clip is
applied to the main audio track of the slideshow. The main audio track clip always starts at the
beginning of the slideshow. When there is more than one clip in the main audio track, the audio
clips are placed back to back, with no gaps.
Drag the song or audio clip
to the Browser’s background.
The background of the
Browser becomes green.
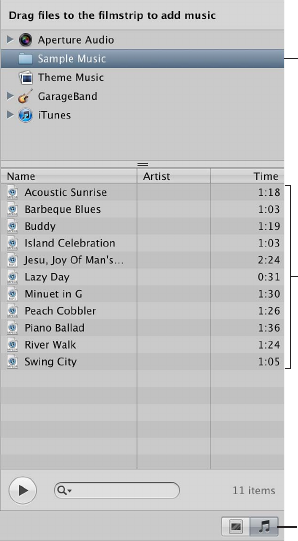
Chapter 20 Creating Slideshow Presentations 486
6 If the audio clip in the main audio track is not long enough, drag another audio clip from the
Audio browser to the point in the Browser where the previous audio clip ended.
The main audio track is extended by the duration of the second audio clip.
To add an audio clip to the secondary audio track in your slideshow
1 If the Audio browser controls are not shown in the Slideshow Editor, click the Audio
Browser button.
2 Choose the source for your audio from the Source list pop-up menu.
Choose the source
audio for your audio
from this pop-up menu.
Select a song or audio
clip in this area.
Audio Browser button
3 Select a song or audio clip from the Audio browser.
4 If you wish, preview the audio by clicking the Play button.
5 Drag the selected song or audio clip to the specic slide in the Browser where you want the
audio to begin.
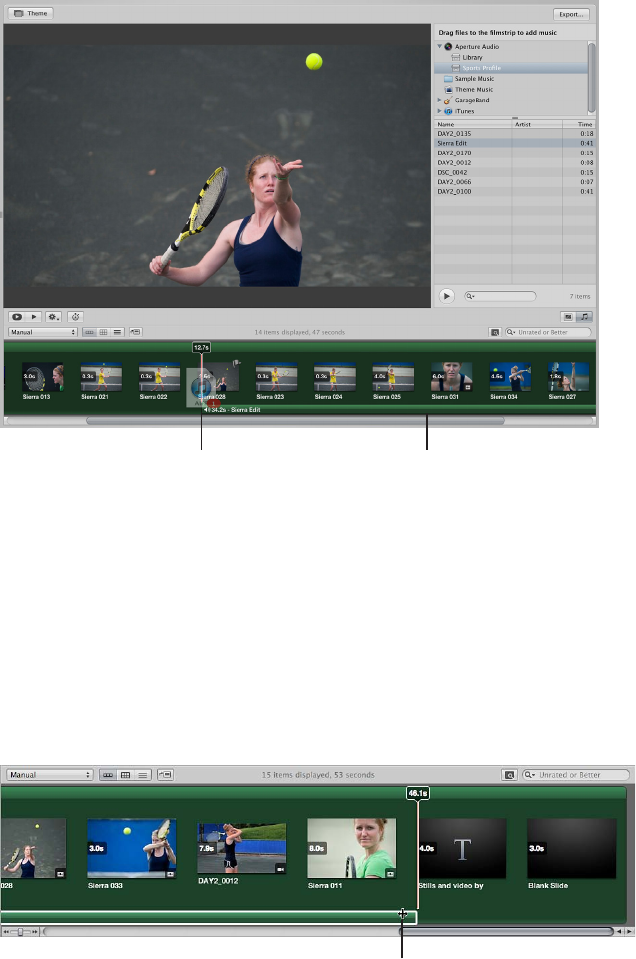
Chapter 20 Creating Slideshow Presentations 487
A green bar appears at the bottom of the Browser to indicate that the audio clip has been added
to the secondary audio track. When the playhead reaches the secondary audio track, the audio
clip in that track plays over any audio clip in the main audio track.
Drag the song or audio
clip to where you want the
secondary audio to begin.
The green bar
indicates a clip in the
secondary audio track.
6 Repeat steps 2 through 5 to add additional audio clips to the secondary audio track.
Working with Audio Clips in the Secondary Audio Track
You can adjust the duration and placement of audio clips in the secondary audio track.
To trim an audio clip in the secondary audio track
mIn the Browser, click the right edge of the audio clip, then drag to the left to shorten the audio
clip or drag to the right to lengthen it.
The pointer changes to a Resize pointer, indicating that you can change the clip duration.
Use the Resize pointer
to shorten or lengthen
the audio clip.
To adjust the placement of an audio clip in the secondary audio track
mDrag the audio clip to a new position in the Browser timeline.
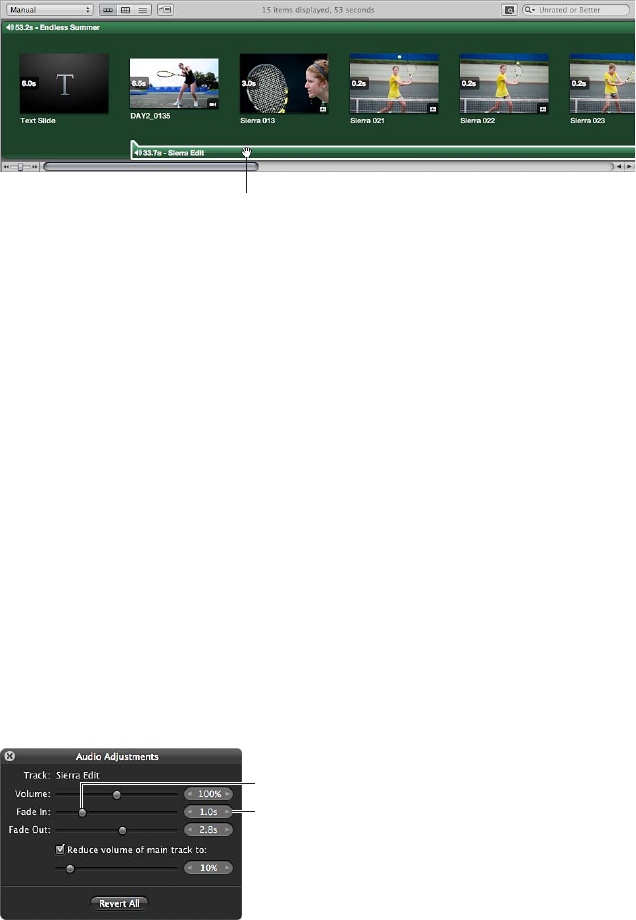
Chapter 20 Creating Slideshow Presentations 488
The pointer changes to a hand, indicating that you can drag the audio clip to a new position.
The hand icon appears
when you drag the audio
clip to a new position.
Adjusting the Volume Between the Main Audio Track and Secondary
Audio Track
As the slideshow plays, the clips in the secondary audio track always play on top of audio clips
in the main audio track. However, you can apply fade-ins and fade-outs to the clips in the
secondary audio track, and you can adjust the volume of clips in the main audio track when a
clip in the secondary audio track is playing.
To add a fade-in to an audio clip in the secondary audio track
1 In the Browser, select the clip in the secondary audio track to which you want to apply a fade-in.
2 Do one of the following:
•Choose Adjust Audio from the Slideshow Action pop-up menu (with a gear icon).
•In the Browser, double-click the audio clip.
The Audio Adjustments HUD appears.
3 In the Audio Adjustments HUD, drag the Fade In slider to the right to increase the duration of the
fade-in, or to the left to decrease the duration.
You can also click the left or right arrow in the Fade In value slider, or drag in the value eld.
Fade In slider
Fade In value slider
A setting of 0.0s turns the fade-in o.
The volume at the beginning of the audio clip in the secondary audio track will slowly increase
according to the setting you specied in the Audio Adjustments HUD.

Chapter 20 Creating Slideshow Presentations 489
To add a fade-out to an audio clip in the secondary audio track
1 In the Browser, select the clip in the secondary audio track to which you want to apply a fade-out.
2 Do one of the following:
•Choose Adjust Audio from the Slideshow Action pop-up menu (with a gear icon).
•In the Browser, double-click the audio clip.
The Audio Adjustments HUD appears.
3 In the Audio Adjustments HUD, drag the Fade Out slider to the right to increase the duration of
the fade-out, or to the left to decrease the duration.
You can also click the left or right arrow in the Fade Out value slider, or drag in the value eld.
Fade Out value slider
Fade Out slider
A setting of 0.0s turns the fade-out o.
The volume at the end of the audio clip in the secondary audio track will slowly decrease
according to the setting you specied in the Audio Adjustments HUD.
To adjust the volume of clips in the main audio track while a clip in the secondary audio track
is playing
1 In the Browser, select a clip in the secondary audio track.
2 Do one of the following:
•Choose Adjust Audio from the Slideshow Action pop-up menu (with a gear icon).
•In the Browser, double-click the audio clip.
The Audio Adjustments HUD appears.
3 In the Audio Adjustments HUD, do one of the following:
•To change the volume of clips in the main audio track: Make sure the “Reduce volume of main
track to” checkbox is selected, then drag the slider to the left to decrease the volume, or to the
right to increase it. You can also click the left or right arrow in the value slider to change the
volume, or drag in the value eld.
•To mute the main audio track: Make sure the “Reduce volume of main track to” checkbox is
selected, then set the slider to 0%.
Use this checkbox and the
controls below to change
or mute the volume of clips
in the main audio track.
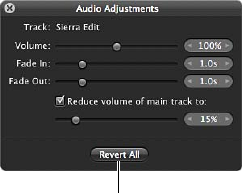
Chapter 20 Creating Slideshow Presentations 490
Syncing the Main Audio Track to the Slides in the Slideshow
You can set the slideshow to t the duration of the main audio track. However, you need to make
sure that the audio clips you apply to the main audio track are long enough to play each slide.
To t the slideshow to the duration of the main audio track
mIn the Slideshow Editor, choose Fit Slides to Main Audio Track from the Slideshow Action pop-up
menu (with a gear icon).
To align the slides to the beat of the music
mIn the Slideshow Editor, choose Align Slides to Beats from the Slideshow Action pop-up menu
(with a gear icon).
To reset audio adjustments
You can always reset any audio adjustments you’ve made to an audio clip applied to a slideshow.
1 Open the Audio Adjustments HUD by choosing Adjust Audio from the Slideshow Action pop-up
menu (with a gear icon).
2 In the Audio Adjustments HUD, click the Revert All button.
Click this button to reset
all audio adjustments.
Removing Audio Clips from Your Slideshow
You can remove audio clips from both the main and secondary audio tracks.
To remove an audio clip from the main audio track
1 In the Browser, select the audio clip in the main audio track.
2 Press the Delete key.
The audio clip is removed from the main audio track, and the green background in the
Browser disappears.
To remove an audio clip from the secondary audio track
1 In the Browser, select the audio clip you want to remove from the secondary audio track.
2 Press the Delete key.
The audio clip is removed from the secondary audio track.
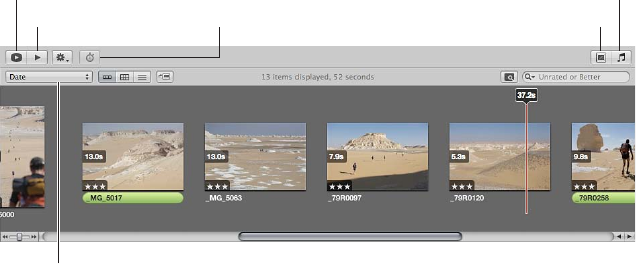
Chapter 20 Creating Slideshow Presentations 491
Viewing Your Slideshows in Aperture
You can view your slideshow at any time in one of two ways in Aperture: in full-screen mode or
in the Slideshow Editor.
Slideshow Action
pop-up menu
Play Slideshow button
Preview Slideshow button Slide Duration button Slideshow Settings button
Audio Browser button
To preview your slideshow in the Slideshow Editor
1 In the Slideshow Editor, click the Preview Slideshow button.
2 Click the Space bar to begin playing the slideshow, and click it again to pause playback.
The slideshow plays in the Slideshow Editor, and a playhead in the Browser moves across the
photos as they appear in the slideshow.
To play your slideshow in full-screen mode
mIn the Slideshow Editor, click the Play Slideshow button.
The computer screen turns blank, and then the slideshow begins playing. Press the Esc key at
any time to exit the slideshow.
Note: If you have a dual-display system, you can choose which display the slideshow appears
on when you click the Play Slideshow button. Choose Aperture > Preferences, then click
Appearance. Choose which display you want the slideshow to appear on from the “View
Slideshows on” pop-up menu.
Chapter 20 Creating Slideshow Presentations 492
Sharing Your Slideshow Movies
Once you have completed your slideshow, you are ready to share it with clients and friends.
Aperture provides a few simple controls for exporting your slideshow as a movie, in the size and
format most suitable for your intended audience. When you’re ready to share your slideshow,
the rst thing you need to decide is how it will be viewed. By default, the Export dialog provides
options for exporting your slideshow as a movie suitable for playback on iPhone, iPod, iPod
touch, or iPad; as a movie for the web to be posted on YouTube; or as a high-resolution movie
compatible with HD 720p or HD 1080p televisions. If necessary, you can also output your
slideshow movie in a custom size.
To share your slideshow as a movie
1 In the top-right corner of the Slideshow Editor, click the Export button.
2 In the dialog that appears, give the slideshow movie a name in the Save As eld, then select a
location to save it to.
3 Choose the viewing platform for your movie from the “Export for” pop-up menu.
4 If you want to export a slideshow movie in a custom size, choose Custom from the “Export for”
pop-up menu, choose a codec from the Codec pop-up menu, enter the number of frames per
second in the Frame Rate eld, enter the width and height, in pixels, in the Width and Height
elds, then choose a compression setting from the Quality pop-up menu.
5 If you want Aperture to automatically send a copy of the slideshow movie to iTunes, select the
“Automatically send slideshow to iTunes” checkbox.
6 If you want to be notied when the export process is complete, select the “Show alert when
nished” checkbox.
7 Click Export.
493
An Overview of Creating Webpages
In Aperture, you can easily create webpages of your photos that you can post to your own
website. Then clients can conveniently review your work via the Internet.
You can use built-in Aperture webpage themes and designs to create two types of webpages:
•Web galleries show your photos in eye-catching settings and are designed to display photos
without your having to lay out pages by hand. Aperture automatically creates the appropriate
number of webpages and populates them with the selected photos. You can then adjust
the pages to make the photos appear as you want them. You can also choose the metadata
information, such as captions, names, and ratings, that appears next to each photo.
•Web journals allow you to mix photos and text manually on the page and are ideal for projects
in which you show photos with narrative to support them. For example, you might create web
journal pages that show and tell the story of an overseas shoot or a journalistic project. When
working with web journals, you manually add pages, photos, and text to your web journal. You
can choose a theme to apply to all your pages, and you can change the layout of photos and
text on your web journal pages.
To create a web gallery or web journal, you create a webpage or web journal album. When you
select the album in the Library inspector, the Webpage Editor appears. The Webpage Editor
is where you design your webpages, including changing the theme, positioning photos, and
adding text.
After you’ve laid out your web gallery or web journal pages in the Webpage Editor, you can save
them as HTML pages that you can post to your webpage server. Once the photos are posted
online, you can give clients the URL of the pages, and clients can view them remotely.
Important: Web galleries and web journals created in Aperture are not visible when working
with your Aperture library in iPhoto. However, your web galleries and web journals are not
discarded. To view and work with your web galleries and web journals, open the Aperture library
in Aperture.
Creating Webpages 21
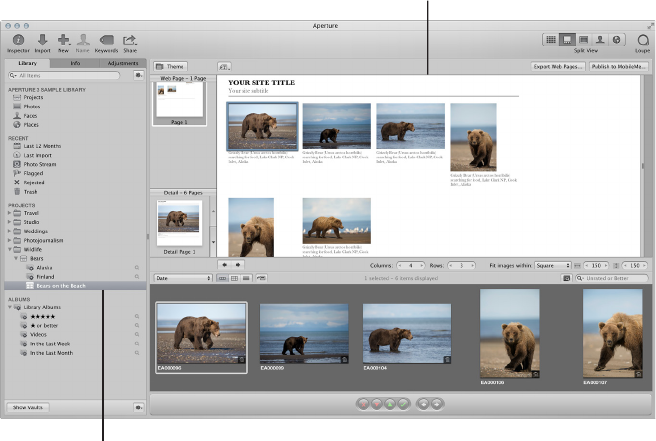
Chapter 21 Creating Webpages 494
Creating Web Galleries and Web Journals
Creating Webpage Albums
Aperture web galleries oer a way to showcase your photos on the web. You have a number of
options for designing these pages. You can choose the type of information to accompany each
photo, such as name and rating. You can also specify the number of columns and rows you want
on each page.
To create a web gallery, you must rst create a webpage album that holds your web gallery
photos. The easiest way to do this is to select photos you want to appear in the web gallery,
create a webpage album, and have Aperture automatically place the photos on the web gallery
pages. Aperture creates as many webpages as necessary to hold all of the selected photos. You
can also create an empty webpage album and then drag photos into the album.
To create a new webpage album from selected photos
1 Do one of the following:
•In the Browser, select the photos you want to place on your web gallery pages.
•Select an item in the Library inspector.
2 Do one of the following:
•Choose File > New > Web Page.
•Control-click in the Library inspector, then choose New > Web Page from the shortcut menu.
•Choose Web Page from the New pop-up menu in the toolbar.
3 In the dialog that appears, give your webpage album a name, select a theme, then click
Choose Theme.
Note: Make sure the “Add selected items to new web page” checkbox is selected.
The new webpage album appears in the Library inspector, with the selected photos.
The Webpage Editor appears
with the selected photos.
The new album you created
appears in the Library Inspector.
Chapter 21 Creating Webpages 495
To create a new, empty webpage album
1 Do one of the following:
•Choose File > New > Web Page.
•Control-click in the Library inspector, then choose New > Web Page from the shortcut menu.
•Choose Web Page from the New pop-up menu in the toolbar.
2 In the dialog that appears, give your webpage album a name, select a theme, and make sure to
deselect the “Add selected items to new web page” checkbox.
3 Click Choose Theme.
A new, empty webpage album is added to the Library inspector. You can drag the photos
you want into the new webpage album from the Browser or from other items selected in the
Library inspector.
Creating Smart Web Page Albums
You can use the Aperture Smart Album feature to gather photos from the library or from
projects and place them on web gallery pages automatically. Smart Albums gather photos
based on search criteria that you specify. For example, you can create a Smart Web Page Album
that gathers your select photos from across the entire Aperture library. Then each time you rate
a photo Select, Aperture automatically adds it to your Smart Web Page Album and to its web
gallery. You can then update your website with pages of your most up-to-date select photos.
Note: The Smart Album feature is not available for web journals.
To create a Smart Web Page Album of your photos
1 Do one of the following:
•Choose File > New > Smart Web Page.
•Control-click in the Library inspector, then choose New > Smart Web Site from the
shortcut menu.
2 Enter a name for the new Smart Web Page Album in the Library inspector.
3 If necessary, click the Smart Settings HUD button (with a magnifying glass icon) to the right of
the Smart Web Page Album name to show the Smart Settings HUD.
4 In the Smart Settings HUD, specify the search criteria for the Smart Web Page Album.
The Smart Web Page Album is created and lled with the photos that meet the search criteria.
You can change the search criteria, thus changing the contents of the Smart Web Page Album,
at any time. For more information about working with Smart Albums, see An Overview of Smart
Albums on page 255.
Chapter 21 Creating Webpages 496
Creating Web Journal Albums
Web journals provide a great way to mix photos and text to chronicle trips and explain photos
on the web. You can manually add and arrange photos and text in your web journal.
To create a web journal, you must rst create an album that holds your web journal’s photos.
The easiest way to do this is to select photos you want to appear in the web journal and create
an album. Aperture creates a web journal album that contains the photos you selected, and
the Webpage Editor appears. The Browser contains the selected photos, which you can then
manually place on the webpages.
To create a web journal album from selected photos
1 Do one of the following:
•In the Browser, select the photos you want to place on your web journal pages.
•Select an item in the Library inspector.
2 Do one of the following:
•Choose File > New > Web Journal.
•Control-click in the Library inspector, then choose New > Web Journal from the shortcut menu.
•Choose Web Journal from the New pop-up menu in the toolbar.
3 In the dialog that appears, give your web journal album a name, select a theme, then click
Choose Theme.
Note: Make sure the “Add selected items to new web journal” checkbox is selected.
The selected photos appear in the Browser. You can then manually add photos to your web
journal pages from the Browser or from other items selected in the Library inspector.
To create a new, empty web journal album
1 Do one of the following:
•Choose File > New > Web Journal.
•Control-click in the Library inspector, then choose New > Web Journal from the shortcut menu.
•Choose Web Journal from the New pop-up menu in the toolbar.
2 In the dialog that appears, give your web journal album a name, select a theme, and make sure
to deselect the “Add selected items to new web journal” checkbox.
3 Click Choose Theme.
A new, empty web journal album is added to the Library inspector. You can drag the photos
you want into the new web journal album from the Browser or from other items selected in
the Library inspector. To make changes to the web journal pages, you use the controls in the
Webpage Editor.
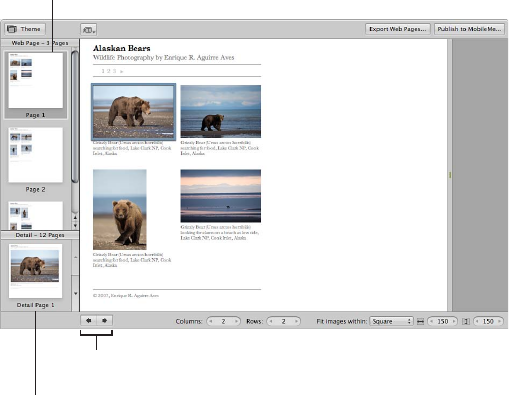
Chapter 21 Creating Webpages 497
Viewing and Navigating Through Webpages
As you modify your web galleries and web journals, there are some easy ways to view and
navigate through your pages.
Select a thumbnail in the
Detail Images pane to see an
enlarged version of the photo.
Select the page you want to
work on in the Pages pane.
Previous Page and
Next Page buttons
To view a particular webpage
Do one of the following:
mClick the Previous Page or Next Page button to display a dierent page.
mUse the scroll gesture in the Pages pane of the Webpage Editor to locate the page, then click
the page.
When someone clicks a photo on a page in your website, a page showing an enlarged view of
the photo appears. You can view these enlarged photos in the Webpage Editor.
To see an enlarged photo from a webpage
Do one of the following:
mIn the Webpage Editor, position the pointer over the photo, then click the Detail button (with a
curved arrow).
mClick the up arrow and down arrow buttons on the side of the Detail Images pane to navigate
through detail pages for the photos in a web gallery or web journal.
To return to the page view after viewing an enlarged photo
Do one of the following:
mIn the Webpage Editor, click the Index link above the photo.
mClick a page in the Pages pane.
Chapter 21 Creating Webpages 498
Choosing and Modifying Themes
Aperture provides a variety of themes that you can choose for your web gallery or web journal.
The theme you choose for your pages determines the basic template design of the page. Make
sure to explore the themes to see which best suits your work.
You choose a theme type and a theme when you create a new web gallery or web journal
album, but you can change the theme at any time. After a theme is applied to your pages, you
can modify it by changing the number and size of photos on the page.
You can also display photos with metadata and have copyright information appear on
your pages.
To change the theme for your web gallery or web journal
1 Click the Theme button at the top-left corner of the Webpage Editor.
2 In the dialog that appears, select the theme you want to use, then click Choose.
To change the number of columns and rows of photos on the page
After you’ve chosen a theme, you can change how many photos appear on each page.
Note: When a web journal is open in the Webpage Editor, only the Columns value slider is
available. You can manually add as many rows of photos to a page as you need by dragging a
photo from the Browser below the current row of photos in the Webpage Editor.
mIn the Webpage Editor, double-click in the number eld of the Columns or Rows value slider and
enter a new number, or click the left or right arrow.
When you change the number of columns or rows, Aperture automatically updates all the pages
in the web gallery or web journal to reect the new settings.
To change the size of photos on a page
1 In the “Fit images within” pop-up menu in the Webpage Editor, choose whether you want the
photos to be spaced according to their longest edge or both edges.
2 To increase or decrease the photo size, double-click in the number eld of the Width and Height
value sliders and enter new numbers, or click the left or right arrow.
To specify the types of metadata that appear with your photos
You can specify that your photos appear with metadata in your web gallery or web journal.
You can choose dierent combinations of metadata to appear on your pages. For example, you
might display your photos with a simple set of metadata that includes the lename, caption, and
photo date.
mChoose an option from the Metadata View pop-up menu at the top of the Webpage Editor.
To change the copyright information that appears in web galleries and web journals
Web galleries and web journals also appear with copyright information on the page. You
can select the copyright text on the page and change it. You can also specify the copyright
information you want for all your pages in the Preferences window.
1 Choose Aperture > Preferences, then click Export.
2 Type the text you want in the Web Copyright eld.
Chapter 21 Creating Webpages 499
Working with Web Gallery Pages
Arranging, Adding, and Deleting Photos in a Web Gallery
When you create a web gallery, the photos in it are placed automatically. You can then adjust the
placement of photos on web gallery pages and add and delete photos in the Webpage Editor.
Note: You can’t select and use the Lift, Stamp, Straighten, Crop, or Red Eye tool or any Quick
Brush adjustments when using the Webpage Editor. To use these tools to make a change to
a photo in a web gallery or web journal, select the photo in the Browser, then click the Show
Viewer button at the top of the Browser (to the right of the List View button). The selected photo
appears in the Viewer, and you can make changes. Click the Show Viewer button again to return
to the Webpage Editor.
To change the viewing order of your photos in a web gallery
mDrag the photos to dierent locations, either in the Webpage Editor or the Browser.
You can add photos to a web gallery after you’ve created it.
To add a photo to a web gallery
mDrag a photo from a project, folder, album, or the library into the webpage album for the
web gallery.
To delete a photo from a web gallery
mSelect the photo in the Browser, then choose Photos > Remove from Album (or press the
Delete key).
Changing Text on Web Gallery Pages
Depending on the theme you choose for your web gallery, pages may appear with titles,
subtitles, or headings. You can change the sample text to text appropriate for your web
gallery pages.
To change titles and subtitles on web gallery pages
mIn the Webpage Editor, click the title, subtitle, or heading you want to change, then type the text
you want.
Hiding or Showing Photo Plate Numbers in Web Galleries
You can turn on or turn o the display of plate numbers for photos in your web galleries. By
default, Aperture does not display plate numbers for photos.
To turn on the display of photo plate numbers in a web gallery
mChoose Enable Plate Metadata from the Metadata View pop-up menu at the top of the
Webpage Editor.
Plate numbers appear below each photo in the web gallery. Choose Disable Plate Metadata from
the Metadata View pop-up menu to turn o the display of plate numbers.
Chapter 21 Creating Webpages 500
Working with Web Journal Pages
Adding, Arranging, and Deleting Web Journal Photos and Text
As you work with a web journal, you can add photos and text to pages, add pages, choose
header types, delete pages, and change the page order.
You must manually place your photos and add text on web journal pages.
To add photos to a web journal page
mDrag photos from the Browser to the page in the Webpage Editor.
You can also drag several photos into place at once by selecting and dragging groups of photos.
For example, if your web journal page is set to display four photos per row, you can arrange four
photos in the order you want them and then drag all four to the page at once.
To move photos on a web journal page
1 In the Webpage Editor, click a photo to select it.
2 Drag the grid mark at the top of the photo box to move the photo to the new location. Release
the mouse button when a green bar appears where you want to place the photo.
Aperture places your photos in the photo boxes designed for the page.
To remove a photo from a web journal page
1 In the Webpage Editor, click the photo to select it.
2 Click the Remove (–) button to remove the selected photo box.
To add text to a web journal page
You can add text boxes to web journal pages as you need them. Text boxes are added to the
page one after another. New text boxes are always added to the bottom of the page, but you can
drag text boxes to new locations when you need to rearrange them.
1 In the Pages pane of the Webpage Editor, select the thumbnail of the page to which you want to
add text.
2 Click the Add Text Block button at the top of the Webpage Editor.
3 Enter the text you want.
To move a text box
1 In the Webpage Editor, click the text box to select it.
2 Position the pointer on the grid mark at the top of the text box and drag the text box until you
see a green bar appear where you want to place the text box, then release the mouse button.
To remove a text box from a web journal page
1 In the Webpage Editor, click the text box to select it.
2 Click the Remove (–) button at the top-right corner of the selected text box to remove it.
Chapter 21 Creating Webpages 501
Adding Web Journal Pages
You can add pages to your web journal as you need them. You can also have Aperture create
pages in your web journal to hold photos that have a type of metadata, such as a specic
rating, keyword, or photo date. For example, you can have Aperture create a page for each
keyword assigned to the album’s photos and place photos that have certain keywords on the
correct pages automatically. Or, if your album holds photos with four- and ve-star ratings, you
can create a page that automatically holds the ve-star photos and another that holds the
four-star photos.
You can have Aperture add pages for photos based on:
•Day
•Keyword
•Rating
•Byline
•City
•Category
To add a page to a web journal
1 In the Webpage Editor, select a thumbnail page in the Pages pane where you want the new page
to appear.
The new page will appear after the selected page.
2 Click the Add Page (+) button to add a new page.
To add a new page based on a metadata category
1 In the Webpage Editor, select a thumbnail page in the Pages pane where you want the new page
to appear.
The new page will appear after the selected page.
2 Choose an option for the type of page you want to add from the Page Action pop-up menu
(with a gear icon).
Choosing a Header Style for a Web Journal Page
Depending on the theme you choose, you can change the look of web journal pages by
choosing a style that displays either a heading followed by text or a heading followed by
a photo.
To choose the header style for a web journal page
1 In the Webpage Editor, select a page in the Pages pane.
2 Choose either Header with Text or Header with Image from the Page Template pop-up menu.
Note: The theme applied to the web journal must support photos in the header.
Deleting Pages from a Web Journal
When you no longer need a page, you can delete it from the web journal.
To delete a page from a web journal
1 In the Webpage Editor, select the thumbnail of the page you want to delete in the Pages pane.
2 Click the Remove Page (–) button to delete the page, then click the Delete button
when prompted.
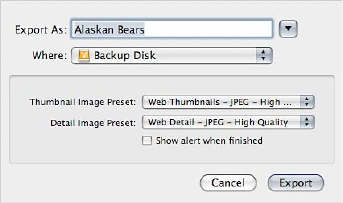
Chapter 21 Creating Webpages 502
Reordering Pages in a Web Journal
You can change the order of web journal pages when necessary.
To move a page up or down in the page order of a web journal
1 In the Webpage Editor, select the thumbnail of the page you want to move in the Pages pane.
2 Choose either Move Current Page Up or Move Current Page Down from the Page Action pop-up
menu (with a gear icon).
Exporting Webpages as HTML Files
Integrating your Aperture webpages into your business’s website requires you to thoroughly
understand your website structure and web server. With some planning, you can modify your
homepage or access pages to provide links to your Aperture webpages.
You can also open your webpages in a standard HTML editor and make the changes required for
them to work in your site. You can add and revise the HTML code that creates the page structure.
You can plan how the pages link to the structure of your website and provide additional items
such as navigation buttons or links that normally appear on your webpages. If you use a web
design service to create and maintain your site, you can supply your Aperture les to your design
service in a folder and allow the design service to integrate your Aperture webpages. If you are
your own webmaster, you can transfer your Aperture web les to your web server or Internet
service provider using a copying method such as FTP, or using the transfer features of your
webpage service.
You can export webpages that you create in Aperture. When you export your Aperture
webpages, you can export them to a folder on your computer to keep them organized in one
place. You can name the folder and choose the image quality and le types that are created.
Aperture has web export presets you can choose that automatically set up the export of
webpages. You can choose an existing export preset or create your own.
To export webpages
1 In the Webpage Editor, click the Export Web Pages button.
2 In the dialog that appears, type a name for the folder that will hold the webpage les in the
Export As eld.
3 Choose a location for the webpage folder from the Where pop-up menu.
4 Choose a web export preset for your thumbnail images from the Thumbnail Image Preset
pop-up menu.
5 Choose a web export preset for your detail image pages from the Detail Image Preset
pop-up menu.
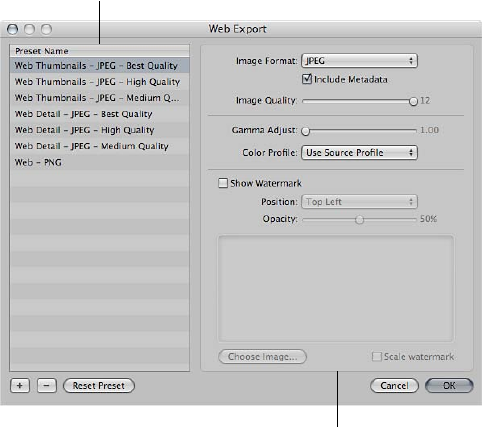
Chapter 21 Creating Webpages 503
6 If you would like to be notied when the export process is complete, select the “Show alert when
nished” checkbox.
7 When you’re ready to export your webpages, click Export.
The webpage is exported to the location you specied.
Note: If you would like to check on the progress of an export operation, choose Window > Show
Activity. The Activity window displays the progress of each export operation. You can also use
this window to pause and cancel an export operation.
Working with Web Export Presets
Viewing the Settings for a Web Export Preset
Web export presets are groups of saved export settings that are congured to produce dierent
types of web images. You use them to help you quickly and easily export your photos for use on
the web. Aperture comes with a number of web export presets, and you can create your own.
Before using a web export preset, whether it’s one that comes with Aperture or one that you
created, you can view its settings to make sure they are exactly what you want.
To view the settings for an export preset
mChoose Aperture > Presets > Web Export.
The Web Export dialog appears, listing the presets available and their export settings.
Available presets
are shown in this area.
The right side of the dialog
shows the settings for the
selected preset.
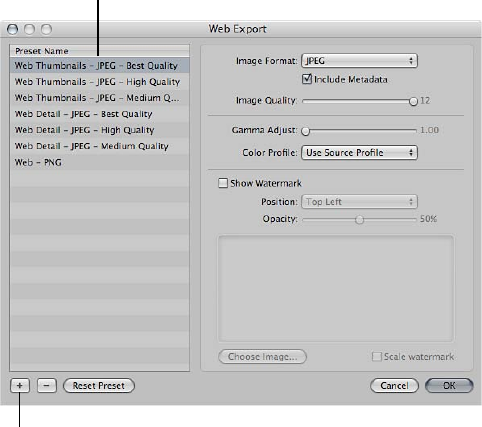
Chapter 21 Creating Webpages 504
Creating Web Export Presets
If none of the existing web export presets suit your needs, you can create your own. An easy way
to create a new export preset is to copy an existing preset and then modify the copy.
To create a new web export preset
1 Do one of the following:
•Choose Aperture > Presets > Web Export.
•In the Webpage Editor, click the Export Web Pages button, then choose Edit from the
Thumbnail Image Preset or Detail Image Preset pop-up menu.
The Web Export dialog appears.
Select a preset.
Then click the Add button.
2 Select a web export preset on which to base your new preset, then click the Add (+) button.
A new preset, based on the export preset you selected, appears highlighted in the Preset
Name list.
3 Enter a new name for the preset.
4 Make your changes to the export settings, then click OK.
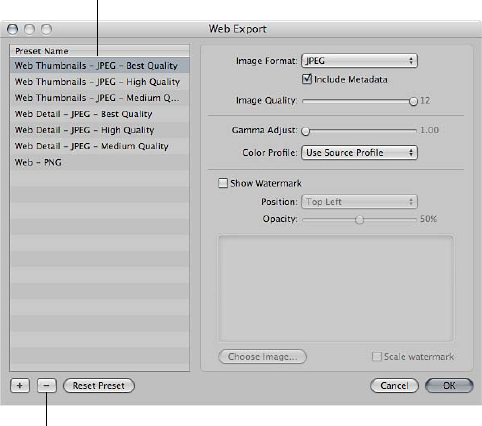
Chapter 21 Creating Webpages 505
Modifying Web Export Presets
After examining a selected preset’s settings, you may want to change something about the
preset. To modify a selected preset, you can simply change the necessary settings and click OK.
The next time you export using that preset, Aperture remembers your modied settings and
exports your web images accordingly.
When you modify an existing preset, you lose its original settings.
To change a web export preset
1 Do one of the following:
•Choose Aperture > Presets > Web Export.
•In the Webpage Editor, click the Export Web Pages button, then choose Edit from the
Thumbnail Image Preset or Detail Image Preset pop-up menu.
The Web Export dialog appears.
2 Select the export preset you want to change, modify its settings, then click OK.
Deleting Web Export Presets
You can delete web export presets when you no longer need them.
To delete a web export preset
mIn the Web Export dialog, select the preset, then click the Remove (–) button.
Select a preset.
Then click the Remove button.
The preset is permanently deleted.
Chapter 21 Creating Webpages 506
Adding Watermarks to Webpage Photos
You can add a graphics le to your photos as a watermark to discourage others from using
your photos without your permission. Watermarks are especially useful when applied to photos
posted on the web.
Use the following guidelines to create high-quality watermarks for your photos:
•Save your watermark as a Photoshop (.psd) le with a transparent background.
•Create multiple sizes of your watermark so that you can select the one that is the best match
for the output size of the exported photo.
Note: If a watermark le is larger than the photo you wish to export, Aperture automatically
scales the watermark down to t the photo. (Aperture does not scale watermarks up.)
•After you create a watermark, save it as part of a web export preset, so you can reuse it
whenever you need.
Note: Export presets and web export presets are independent of one another. Make sure to
save your watermark as part of the appropriate preset.
To create a preset that adds a watermark to your exported web photos
1 Choose Aperture > Presets > Web Export.
2 In the Web Export dialog, select the web export preset you want to modify, or click the Add (+)
button to create a new preset.
3 Select the Show Watermark checkbox.
4 Click the Choose Image button.
5 Select the image you want as a watermark, then click Choose.
6 Choose where you want the watermark to appear on the photo from the Position pop-up menu.
7 To adjust the opacity of the watermark, drag the Opacity slider to a new position.
8 When you’re satised with how your watermark appears in the watermark preview area, click OK.
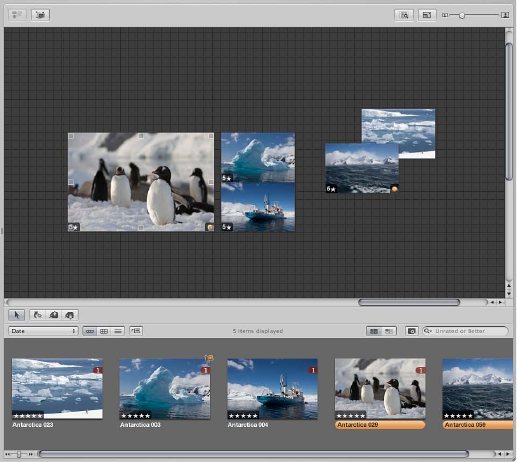
507
An Overview of the Light Table
The Light Table provides a large, open space where you can freely resize, group, and rearrange
photos. You can also easily arrange related photos together to compare them, as you might
during color correction.
The Light Table is used to arrange and view photos. You can work with photos in the Light Table
just as you would work with slides on a physical light table. You can place a selection of photos
in the Light Table for review and drag them to new positions, arranging, grouping, and resizing
them in dierent combinations to see how they might look on webpages or book pages. The
Light Table automatically displays yellow guidelines that show you how the item you’re working
with aligns with other items already on the page. You never run out of space in the Light Table—
it grows as you add photos to it, and it’s easy to adjust the view by zooming in or changing the
area of the Light Table that’s shown.
You can use the Light Table when color correcting many related photos. You can arrange related
photos together and carefully compare the color values between photos.
You can also use the Light Table to sort photos into related piles. After sorting, you can select
groups of photos and assign keywords to all the photos in a group at once.
You can use the Light Table to create editorial layouts as well, arranging photos onscreen to tell
a story. You can put the selects from a given project in the Light Table and arrange them so that
they progress visually, eliminating repetitive photos. As you group and pair photos of the same
subject, you’ll nd the Light Table ideal for examining the relationships between photos.
Using the Light Table 22
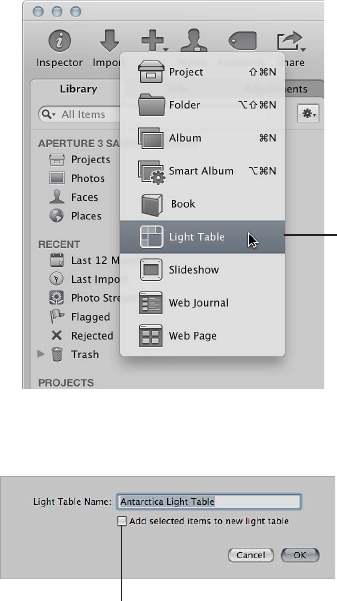
Chapter 22 Using the Light Table 508
Creating a Light Table Album
To view photos in the Light Table, you rst create a Light Table album. You can create a new,
empty album and drag photos into it, or you can select photos in a project and create a Light
Table album to hold them.
To create a new, empty Light Table album
1 In the Library inspector, select the project or folder where you want the new Light Table album
to appear. If you want the Light Table to appear in the Light Tables section of the Library
inspector, select Projects.
2 Do one of the following:
•Choose File > New > Light Table.
•Control-click the item in the Library inspector, then choose New > Light Table from the
shortcut menu.
•Choose Light Table from the New pop-up menu in the toolbar.
Choose Light Table
from the New pop-up
menu in the toolbar.
3 In the dialog that appears, enter a name for the Light Table, and make sure to deselect the “Add
selected items to new light table” checkbox.
Make sure this checkbox
is not selected.
4 Click OK.
The new empty Light Table album appears in the Library inspector. Now you can drag photos
into the new Light Table album from any item in the Library inspector.

Chapter 22 Using the Light Table 509
To create a Light Table album that holds a selection of photos
1 In the Browser, select the photos you want in the Light Table album.
2 Do one of the following:
•Choose File > New > Light Table.
•Control-click the selected item in the Library inspector, then choose New > Light Table from
the shortcut menu.
•Choose Light Table from the New pop-up menu in the toolbar.
Choose Light Table
from the New pop-up
menu in the toolbar.
3 In the dialog that appears, enter a name for the Light Table, and make sure the “Add selected
items to new light table” checkbox is selected.
Make sure this checkbox
is selected.
4 Click OK.
The new Light Table album containing your photo selection appears in the Library inspector.
If necessary, you can drag additional photos from the Browser to the Light Table album in the
Library inspector.
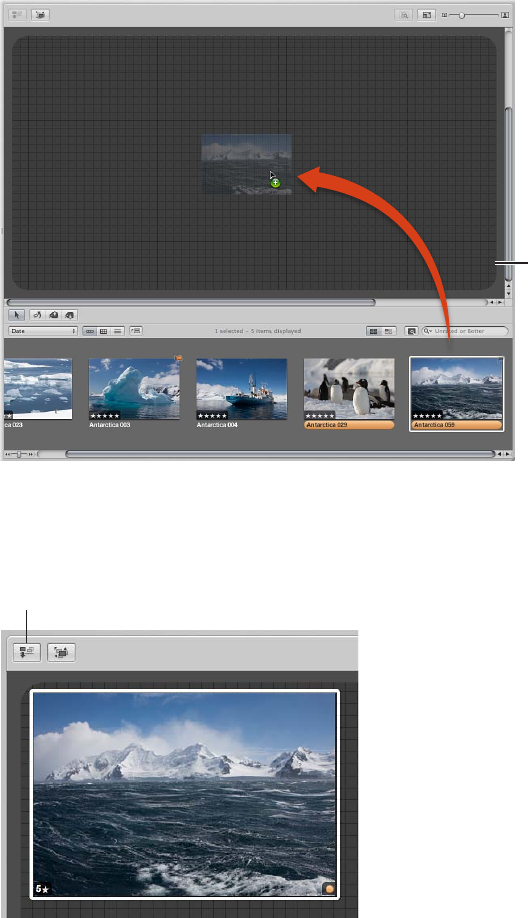
Chapter 22 Using the Light Table 510
Placing and Viewing Photos in the Light Table
After adding photos to the Light Table album, you can select the ones you want to work with
and place them in the Light Table for viewing.
To add photos to the Light Table
mSelect a Light Table album in the Library inspector, then drag photos from the Browser to the
Light Table.
Simply drag images
from the Browser
to the Light Table.
To remove a photo from the Light Table
mSelect the photo in the Browser, then click the Put Back Selected button at the top-left corner of
the Light Table.
Click the Put Back Selected button
to remove a selected photo.
The photo disappears from the Light Table but remains available in the Browser.
To see only photos in the Browser that remain unplaced
If you have many photos in a Light Table album, it may be dicult to remember which photos
you haven’t yet placed in the Light Table. You can set the Browser to show only those photos that
haven’t been placed in the Light Table.
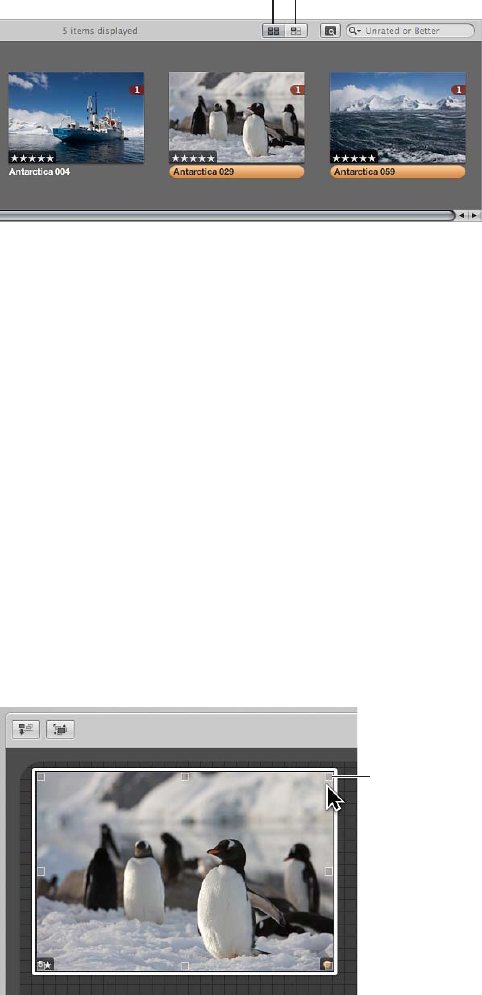
Chapter 22 Using the Light Table 511
mClick the Show Unplaced Images button.
Show Unplaced
Images button
Show All
Images button
To see the entire contents of the Light Table album in the Browser again, click the Show All
Images button.
Moving and Resizing Photos in the Light Table
You can drag photos to dierent locations in the Light Table, trying out dierent combinations
and orientations. For example, you might take a group of related photos and arrange them to
see how they’d appear on a print page. You can also enlarge or reduce photos. After resizing a
photo, you can quickly reset the photo back to its original size.
To move photos in the Light Table
mIn the Light Table, select the photos you want to move and drag them to a new location.
To drag a photo to a location oscreen
mDrag the photo to the border of the Light Table until the screen begins to scroll.
To change the size of a photo
mPosition the pointer over the photo, then drag a resize handle.
Move the pointer over the
photo to show the resize
handles, then drag to
change the photo’s size.
To reset a photo to its previous size
mControl-click the photo, then choose Reset Selected Size from the shortcut menu.
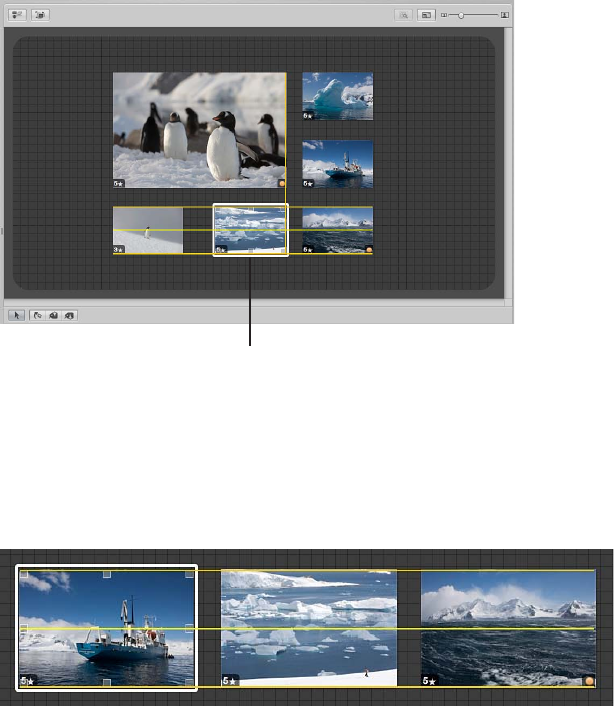
Chapter 22 Using the Light Table 512
Aligning and Arranging Photos in the Light Table
As you drag photos in the Light Table, you’ll see yellow guidelines appear that mark the vertical,
horizontal, and center points of the stationary, unselected photos in relation to the photos you
are dragging. Using the guidelines, you can make sure that your selected photos visually align
with other photos in the Light Table.
You can also select a group of photos in the Light Table and automatically align them according
to their top, bottom, or side edges, or by their centers. In addition, you can have Aperture arrange
a selected group with equal space between each photo.
When you drag a photo,
guidelines appear, helping you
align it with the other photos.
To manually align photos
1 In the Light Table, select the photos you want to align, making sure that the photo or group of
photos you want to align with remain unselected.
2 Drag the selected photo or group of photos.
As you drag the selected photo or group of photos, yellow guidelines appear as a visual cue
to help you align the selected photos with the unselected ones. When you quit dragging, the
yellow guidelines disappear.
To automatically arrange photos in the Light Table
mIn the Light Table, Control-click beside the photos, then choose Arrange All Items from the
shortcut menu.
To reveal photos in the Light Table that are covered by other photos
If some photos in a group are hidden behind other photos, you can also reveal, or uncover, all
photos in the group.
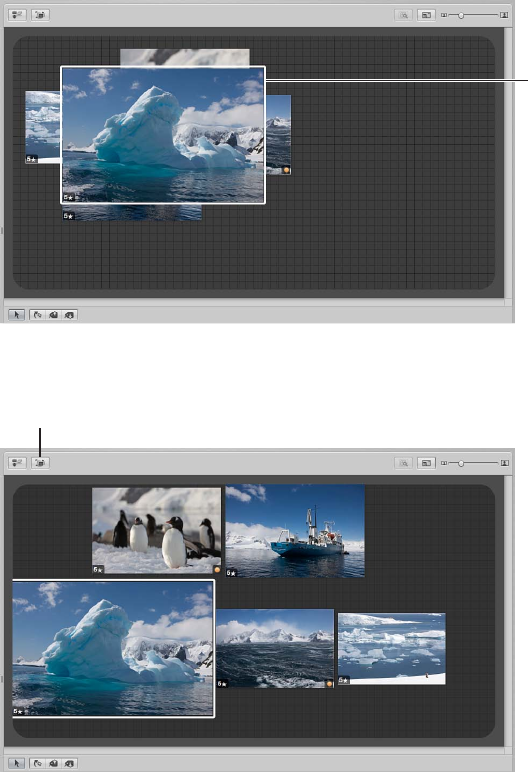
Chapter 22 Using the Light Table 513
1 Select the top photo in the group.
The top photo
is selected.
2 Click the Uncover button (or press Shift-X).
Click the Uncover button
to reveal all photos under
the selected photo.
3 Select an uncovered photo.
The photos are regrouped, with the selected photo on top.
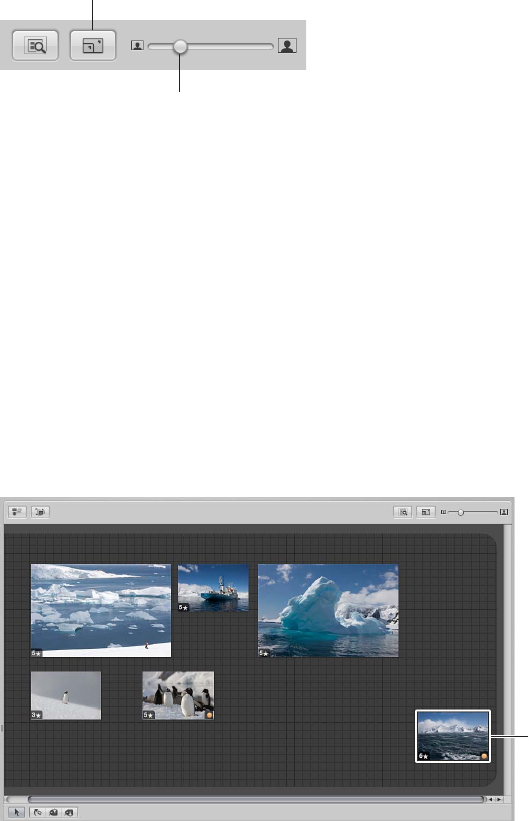
Chapter 22 Using the Light Table 514
Adjusting the Light Table View
You can adjust the Light Table view to better view and work with photos. This is particularly
useful when the Light Table is larger than your screen size. You can also increase the area of the
Light Table.
Scale to Fit button
Drag the Light Table
Zoom slider to zoom
in or out.
To zoom in to or out of the Light Table
mDrag the Zoom slider to change the view.
To t the Light Table to your screen size
mClick the Scale to Fit button.
To change the Light Table view to 100 percent
mControl-click in a blank area of the Light Table, then choose Zoom to 100% from the
shortcut menu.
To increase the area of the Light Table
mDrag a photo to the border of the grid background so that the area of the Light Table
automatically expands.
Drag a photo to
a border of the
Light Table to
expand the Light
Table area.
Chapter 22 Using the Light Table 515
Printing Light Table Arrangements
After arranging photos in the Light Table, you can print the photo arrangement for
further review.
For more information about printing Light Table arrangements, see Printing a Light Table
Arrangement on page 433.
Deleting a Light Table Album
You can quickly delete an entire Light Table album. If you’ve transferred photos from the Light
Table album to other projects or albums, the photos in the other projects and albums remain
unchanged, even though the Light Table versions are gone.
To delete a Light Table album
1 Select the Light Table album in the Library inspector.
2 Choose File > Delete Light Table (or press Command-Delete).
The deleted Light Table album is placed in the Aperture Trash. For more information about the
Aperture Trash, see Working with the Aperture Trash on page 38.
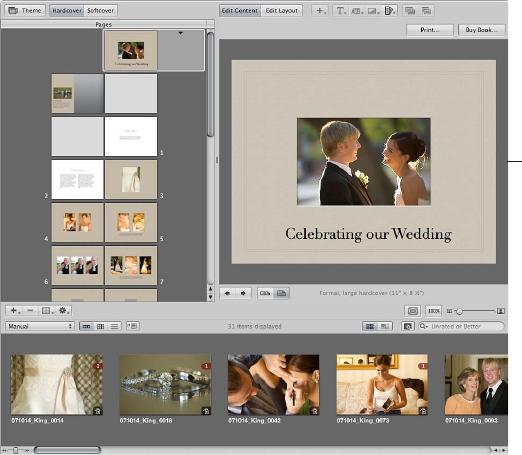
516
An Overview of Creating Books
Using the book designs and page layouts included in Aperture, you can print outstanding
portfolios of your work that show your photos in their best light. You can order printed books
of your photos using the Apple print vendor service, which provides excellent printed results
and direct delivery to you or your clients. You can also print your own custom books on a color
printer or create les that you can hand o to a print vendor.
When you select or create a book album in the Library inspector, the Book Layout Editor appears
along with the Browser. You use the Book Layout Editor to set up the page structure of your book
and place photos and text on the pages.
The Book Layout
Editor is where you
design your book.
The Pages pane on the left shows thumbnails of your book pages. You scroll through the
thumbnails and click to select a page of your book to work on. A larger view of the selected page
appears on the right.
When you rst create a book album in the Library inspector, Aperture automatically creates
a default set of pages for you. You then use the Book Layout Editor to format your pages and
create any additional pages you need.
Books are based on a theme, or design, and master page layouts that present your photos in a
standardized way. Click the Theme button to see the themes you can choose.
Creating Books 23
Chapter 23 Creating Books 517
When you choose a theme, the Book Layout Editor provides a professionally designed set of
master pages that determine how you mix text and photos on the page. For example, you can
choose among master pages that create a cover page, pages of text in columns of various sizes,
pages of photos in dierent arrangements, and pages with dierent combinations of photos and
text. You’ll nd master pages provide a fast and convenient method for quickly laying out a book.
You can apply a master page design to any selected page to dene where your text and photos
appear. Pages appear with gray photo boxes to hold photos and text boxes to hold text. To add
photos, you drag them into the photo boxes from the Browser. To add text, you select a text box
and type or paste text into it. If you wish, you can also place metadata boxes next to photos to
display a photo’s version name, caption, keywords, and other metadata. You can also add a map
showing the places where the photos in your book were shot.
If you prefer, you can build a book page by page. You can add a new page to your book, choose
a master page design, ll in photos and text, and then create the next page, repeating the
procedure for each page you add.
You can also select a group of photos in the Browser and have Aperture automatically place
them in pages in your book. Aperture creates as many pages as you need and lls them with
your photos. You can change the page design of individual pages later by applying dierent
master page designs.
As you work on a book, you may need to adjust the layout of individual pages. For example,
you may discover that one photo in a group should appear slightly larger. You can move and
resize the boxes that hold photos on individual pages, making minor layout adjustments when a
master page design doesn’t quite suce.
To change the design of a page, click the Edit Layout button. You can then work with the photo
boxes and text boxes that appear on the page, resizing and rearranging them as necessary. The
Book Layout Editor automatically displays yellow guidelines that show you how the item you’re
working with aligns with other items already on the page.
To add text and photos to your pages without changing the page layout, click the Edit Content
button. You can then add photos and text to the page, but you can’t move or resize the boxes on
the page, which helps prevent unintended formatting changes.
You can also add photo, text, map, or metadata boxes to a page when you need them.
Click the Edit Layout button and then choose a text, metadata, map, or photo box option from
the Add Box pop-up menu. When a box appears, you can resize and reposition it.
The Book Layout Editor also allows you to create covers, indexes, and blank pages, use automatic
page numbers, and create or modify master page designs.
When your book is complete, you can purchase printed copies from the Apple print vendor for a fee.
Note: Although you can create books larger than 99 pages, there is a 99-page limit for books
ordered through the Apple print vendor. When you try to order a book larger than 99 pages, a
dialog warns you that there are too many pages. If you plan to print a book using the Apple print
vendor, make sure to keep the number of pages at or below the 99-page limit.
If you prefer to print your books yourself, you can print your book using your own oce printer
or export your book as a PDF le that you can send to a print shop for printing.
Chapter 23 Creating Books 518
Important: Books created in Aperture are not visible when working with your Aperture library
in iPhoto. However, your Aperture books are not discarded. To view and work with your Aperture
books, open the Aperture library in Aperture.
Planning Your Book
The amount of planning and work involved in creating a book varies with the type of project
you’re undertaking. If you’re creating wedding photo albums, you may be primarily concerned
with creating a reusable book design into which you can quickly place photos that tell the
wedding story. The end result may be one or several printed copies per project.
On the other hand, producing a large book, such as a coee table book, may require a good
deal of planning, writing, design, page composition, proong, and production work. In addition,
you’ll want to look ahead and decide how the manuscript should be printed and bound, the
number of copies for the print run, and what copyright and permissions information your book
should include.
For relatively simple books, here are some of the typical steps in the publishing process.
Stage 1: Planning Your Book’s Cover
Choose a cover photo and decide what text should appear on the cover.
Stage 2: Creating Copyright Notices
Create any copyright or permissions notices you need.
Stage 3: Creating a Book Album
Create a book album and choose a theme for your book.
Stage 4: Choosing the Book’s Photos
Place the book’s photos in the book album and arrange them in the Browser in the order in
which they should appear in the book. Don’t place the photos on your pages yet.
Stage 5: Specifying the Book’s Settings
Specify any overall settings for the book, such as size, hardcover or softcover binding, page
numbering, and so on.
Stage 6: Creating the Book’s Pages
Create the number of pages you need and apply master page designs to them.
Stage 7: Placing Photos in the Book
Have Aperture automatically place your photos, or drag the photos onto your pages.
Stage 8: Repositioning and Resizing Photos
Reposition and resize photos, adjusting individual page layouts if necessary.
Stage 9: Adding Text to Your Book
Add text to your pages and cover.
Stage 10: Proong Your Book
Print a proof and carefully review the text and layout of the book.
Chapter 23 Creating Books 519
Stage 11: Distributing Your Book
Send the book to the Apple print vendor, or create a PDF le that you can print or send to a
print vendor. If you create a PDF le, make sure to include all the fonts you used in your book
in the PDF le. If you’re creating a larger, more complex book, contact your print vendor early
in the process to make sure you consider printing issues such as the choice of paper stock, the
use of inks and varnishes, and the review of bluelines, as well as other issues such as binding,
packaging, shipping, and pricing.
If you routinely produce printed albums, you can create a book album that you can copy and
reuse with each new project. After setting up master pages and individual page layouts, you can
copy the book album to another project and then substitute the new photos, increasing your
publishing productivity greatly. You can then customize certain pages, such as your cover, to
provide any unique touches you like.
Creating a Book Album
You can create a book album in two ways:
•Select the photos you want to include in the book and then create a new book album
containing the selected photos.
•Create a new book album and then drag the photos into it.
To create a book album from a selection of photos
1 Select the photos you want to use in the book, then do one of the following:
•Choose File > New > Book.
•Control-click a project, folder, or album in the Library inspector, then choose New > Book from
the shortcut menu.
•Choose Book from the New pop-up menu in the toolbar.
2 In the dialog that appears, enter a name for the book album in the Book Name eld, and specify
the following:
•Theme list: Select a theme in the list to see a preview of its design on the right.
•Book Type pop-up menu: Choose the physical size of the book.
3 Select the “Add selected items to new book” checkbox.
4 If you plan to use the Apple print service to print your book and you want to check the pricing
for your book type and theme combinations, click the Options & Prices button.
Pricing options for ordering printed books through the Apple print service appear in your
web browser.
5 When you’re ready, click Choose Theme.
A new book album appears in the Library inspector, containing the selected photos.
Chapter 23 Creating Books 520
To create a new, empty book album
1 In the Library inspector, select the project or folder where you want the new book album
to appear.
If you want the book album to appear in the Books section of the Library inspector,
select Projects.
2 Do one of the following:
•Choose File > New > Book.
•Control-click a project or folder in the Library inspector, then choose New > Book from the
shortcut menu.
•Choose Book from the New pop-up menu in the toolbar.
3 In the dialog that appears, enter a name for the book album in the Book Name eld, and specify
the following:
•Theme list: Select a theme in the list to see a preview of its design on the right.
•Book Type pop-up menu: Choose the physical size of the book.
4 Make sure the “Add selected items to new book” checkbox is not selected.
5 If you plan to use the Apple print service to print your book and you want to check the pricing
for your book type and theme combinations, click the Options & Prices button.
Pricing options for ordering printed books through the Apple print service appear in your
web browser.
6 When you’re ready, click Choose Theme.
A new book album with no photos appears in the Library inspector.
To add photos to any book album
1 In the Library inspector, select the project, folder, or album that holds the photos you want to
add to the book album.
The project, folder, or album’s photos appear in the Browser.
2 Drag the photos from the Browser to the book album in the Library inspector.
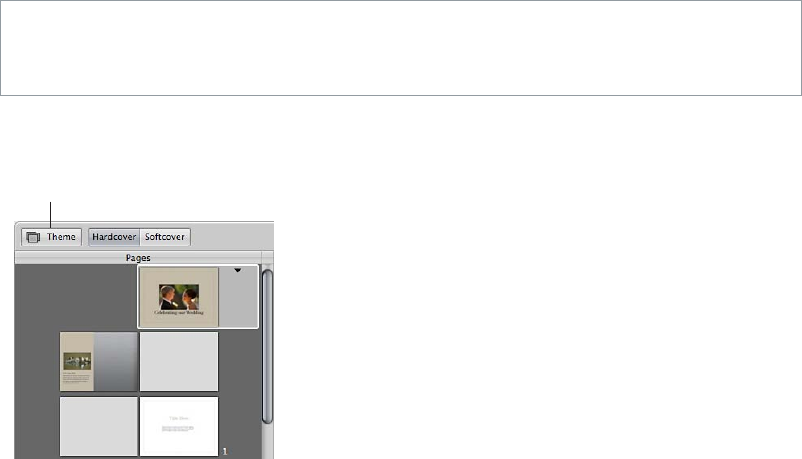
Chapter 23 Creating Books 521
Choosing a Theme
You choose a theme for your book when you create your book album. However, you can change
the book’s theme at any time. A theme provides a professionally designed set of master pages
that determine how text and photos are placed on the page.
It’s a good idea to explore the page styles and designs of Aperture themes. Some theme
designs lend themselves better to presenting many pictures without much text; others to
more traditional mixes of text and photos, such as you might nd in coee table books. Once
you know the characteristics of the dierent themes, you can choose the theme best suited to
a project.
You can also create your own custom theme with the dimensions of your choosing. However,
you can’t order books from Apple created with custom themes. For more information about
creating custom themes, see Creating and Sharing Custom Themes on page 549.
It’s important to choose the theme you want at the beginning of a project. Each theme presents
dierent combinations of master pages. Although you can change themes after you start a
project and Aperture will attempt to convert your book structure to the new theme’s master
pages, you may need to redo some of your work to make up for dierences between themes.
It’s not recommended that you complete a book and then change themes to see it with
dierent layouts.
WARNING: It’s possible to lose text when you change themes. If you change book themes,
make sure to rst copy the text you’ve entered into another document so that you have a
backup copy.
To choose a new theme for your book
1 In the Book Layout Editor, click the Theme button.
Theme button
A dialog appears, alerting you that you may lose text when you change themes and that any
custom layouts you created will not be preserved.
2 Click OK.
3 Choose a book size from the Book Type pop-up menu.
4 In the theme list, select a theme.
5 Click Choose Theme.
After you change the theme, Aperture updates all of your pages to use the new theme.
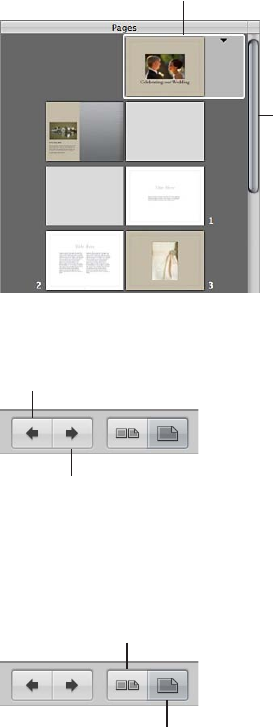
Chapter 23 Creating Books 522
Viewing Pages
Navigating to Book Pages
As you work on a book, you can select and view particular pages, and you can change your view
of the pages. You can display your pages laid out singly or side by side, and you can enlarge or
reduce your view of book pages.
You can navigate to pages in your book by clicking a page in the Pages pane or by clicking the
navigation buttons.
To view a particular page in a book
mUse the scroll gesture in the Pages pane of the Book Layout Editor to scroll to a specic page,
then click the page to select it.
Click to select the
page you want in
the Pages pane.
Use the scroll gesture
to scroll through the
pages in your book.
You can also quickly navigate through your pages by clicking the Previous Page and Next
Page buttons.
Previous Page button
Next Page button
Displaying Single Pages or Spreads
You can set the Book Layout Editor to display your pages singly or side by side. For example, you
can display pages side by side to see how photos work beside each other in two-page spreads.
Show Full
Spreads button
Show Single
Pages button
To display pages singly or side by side
mClick the Show Single Pages or Show Full Spreads button.
Note: Printing single- or double-sided pages is a function of your printer and the options
available in the printer’s Print dialog. If you’re purchasing printed books from the Apple print
vendor, your book is automatically printed double-sided.

Chapter 23 Creating Books 523
Resizing the Page View
You can reduce or enlarge the view of your book pages in the Book Layout Editor. For example,
you might enlarge the display of your pages to closely inspect details, or reduce the view to get
an overview of the general page composition.
Scale to Fit button
Display Size slider
Actual Size button
To reduce or enlarge the display of your pages
mDrag the Display Size slider left or right to change your view.
To return your page view to a size that ts within the Book Layout Editor
mClick the Scale to Fit button.
To change the page view to show the actual size of the page
mClick the Actual Size button.
Placing Photos in a Book
Placing Photos Manually
After you have created a book album with photos and chosen a theme, it’s time to place photos
on the book’s pages.
You can place photos in a book manually by dragging them into the Book Layout Editor one at
a time.
To add photos to the book manually
mDrag a photo from the Browser to a photo box on the page.
Placing Photos Automatically
Using the Autoow feature, you can have Aperture automatically place your photos in a book. It’s
a good idea to set up the page structure of your document rst by creating the number of pages
needed and assigning master page layouts. Then arrange your photos in the Browser in the order
in which they should appear in the book and let Aperture place the photos into the structure
you created.
You can place all of the unplaced photos in your book at once, or you can select specic photos
and have Aperture distribute them into any empty pages. For example, you might select several
photos and have Aperture place them into the rst several pages of your book, and then select
several more photos and have Aperture place them on the following pages.
If you prefer, you can have Aperture create as many pages as necessary to hold all of your photos
and place them on the pages. Aperture creates new pages using master page designs from the
selected theme and lls those pages with your photos. You can then change the master page
assignments if you wish.
To have Aperture “autoow” unplaced photos
When you create a structure of pages to hold your photos, Aperture can distribute unplaced
photos into the pages of the book. If more pages are required to hold your photos, Aperture
creates additional pages. If you’ve already placed some photos on pages in the book, Aperture
distributes photos beginning with the rst empty photo box.
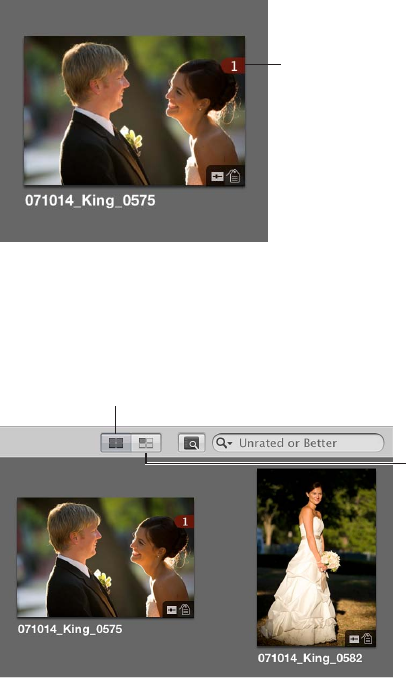
Chapter 23 Creating Books 524
mChoose Autoow Unplaced Images from the Book Action pop-up menu (with a gear icon) in the
Book Layout Editor.
To have Aperture “autoow” selected photos
You can select photos in the Browser and have Aperture distribute them into the current page
structure of the book, starting with the rst empty photo box. For example, you can select two
photos in the Browser and have Aperture place them into the rst two empty photo boxes of
your book. You can thus place photos into a document’s page structure little by little as you go. If
you select more photos than your current page structure can hold, Aperture creates new pages
as necessary.
1 In the Browser, select the photos you want to place in the book.
2 Choose Autoow Selected Images from the Book Action pop-up menu (with a gear icon) in the
Book Layout Editor.
Viewing Photos to Be Placed in a Book
After a photo is placed in the book, its Browser thumbnail is marked with a number to show how
many times the photo appears on the pages of the book.
The number indicates
the number of times a
photo has been placed
in a book.
In a long book with many photos, it can at times be dicult to know which photos have been
placed in a book. To help you work eciently, you can click the Show Unplaced Images button to
see only the photos that remain unplaced.
Click the Show
Unplaced Images button
to see only unplaced
images.
Click the Show All Images
button to see all the
images in the book album.
To display only unplaced photos in the Browser
mClick the Show Unplaced Images button.
To display all of an album’s photos in the Browser
mClick the Show All Images button.

Chapter 23 Creating Books 525
To display a selection of photos in a book album in a standard Viewer
To inspect selected photos in detail, you can display them in the Viewer. When the Book Layout
Editor is open, the Browser provides a button for quickly switching to a standard Viewer.
1 Select the photos in the Browser.
2 Click the Show Viewer button.
The Book Layout Editor is replaced by the Viewer, allowing you to view the photos in detail
and perform image adjustments. To return to the Book Layout Editor, click the Show Viewer
button again.
Note: You can’t select and use the Lift, Stamp, Rotate, and adjustment tools in the tool strip
when using the Book Layout Editor. To use these tools to make a change to a photo in your book,
select the photo in the Browser, then click the Show Viewer button. The selected photo appears
in the Viewer where you can make image adjustments. Click the Show Viewer button again to
return to the Book Layout Editor.
Adding and Removing Pages
Adding Individual Pages to a Book
When you create a book album, Aperture automatically sets up default pages laid out in the
Book Layout Editor. You can select and change these pages to suit your book’s requirements, and
you can add and remove pages as needed. You can insert new blank pages wherever you like.
After adding pages, you can drag them in the Pages pane to new locations in the book.
The most basic way to build a book is to create new pages one by one, adding them to the book
as you go.
Add Pages pop-up menu
Set Master Page pop-up menu

Chapter 23 Creating Books 526
To add a single page to a book
1 In the Book Layout Editor, select a page in the Pages pane.
The new page you are about to create will appear just after the selected page.
2 Choose Add New Page from the Add Pages pop-up menu.
The new page appears in the Pages pane just after the selected page.
3 With the page selected in the Pages pane, choose a master page from the Set Master Page
pop-up menu.
The layout is applied to the new page.
To duplicate a single page in a book
Do one of the following:
mSelect a page in the Pages pane where the new page should appear, then choose Edit > Duplicate.
mSelect a page in the Pages pane, then choose Duplicate Page from the Add Pages pop-up menu.
A new page appears in the Pages pane with the same page layout as the one you selected.
Automatically Creating New Pages
Aperture can automatically add pages to a book to accommodate the unplaced photos in the
Browser. Aperture creates the number of pages needed to hold the remaining unplaced photos.
Add Pages pop-up menu
Remove Pages button
Set Master Page pop-up menu
Book Action pop-up menu
To distribute unplaced photos in pages created automatically by Aperture
1 Arrange the book album’s photos in the Browser in the order in which you want them to appear
in the book.
2 In the Book Layout Editor, select a page in the Pages pane.
The new pages will appear just after the selected page.
3 Choose Add New Pages > With Unplaced Images from the Add Pages pop-up menu.
All of the unplaced photos in the album are added to new pages in the book.
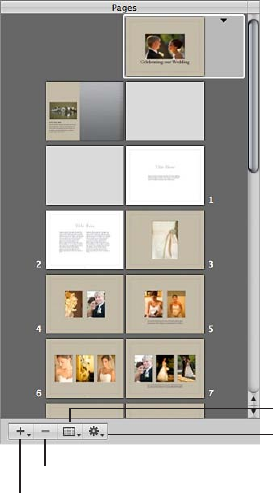
Chapter 23 Creating Books 527
Adding New Pages to Hold a Selection of Photos
You can also select a group of photos and Aperture can automatically place them on new pages
in a book. Aperture creates the number of pages needed to hold the selected photos.
Add Pages pop-up menu
Remove Pages button
Set Master Page pop-up menu
Book Action pop-up menu
To add a selection of photos to new pages in a book
1 In the Browser, select the photos in the book album that you want add to the book.
2 In the Book Layout Editor, select a page in the Pages pane.
The new pages will appear just after the selected page.
3 Choose Add New Pages > With Selected Images from the Add Pages pop-up menu.
The selected photos are added to a book.

Chapter 23 Creating Books 528
Adding New Pages Based on a Master Page
You can add pages that are based on a specic master page.
Add Pages pop-up menu
Remove Pages button
Set Master Page pop-up menu
Book Action pop-up menu
To add a new page that is based on a master page
1 To show master pages, choose Show Master Pages from the Book Action pop-up menu (with a
gear icon) in the Book Layout Editor.
2 Select a page in the Pages pane.
The new page will appear just after the selected page.
3 Select a master page in the Master Pages pane.
4 Choose Add New Page From Master from the Add Pages pop-up menu.
To add pages based on a master page and have Aperture ll them with unplaced photos
1 To show master pages, choose Show Master Pages from the Book Action pop-up menu (with a
gear icon) in the Book Layout Editor.
2 Select a master page in the Master Pages pane.
3 Choose Add New Pages From Master > With Unplaced Images from the Add Pages
pop-up menu.
Aperture adds the unplaced photos to new pages and places them at the end of your book.
All the new pages are based on the selected master page. If you do not want the new pages
to appear at the end of the book, drag them to the position in the book that you prefer in the
Pages pane. For more information, see Reordering Pages in a Book on page 531.
To add pages based on a master page and have Aperture ll them with a selection of photos
1 To show master pages, choose Show Master Pages from the Book Action pop-up menu (with a
gear icon) in the Book Layout Editor.
2 Select a master page in the Master Pages pane.
3 Select the photos you want in the Browser.

Chapter 23 Creating Books 529
4 Choose Add New Pages From Master > With Selected Images from the Add Pages pop-up menu.
Aperture adds the selected photos to new pages and places them at the end of your book.
All the new pages are based on the selected master page. If you do not want the new pages
to appear at the end of the book, drag them to the position in the book that you prefer in the
Pages pane. For more information, see Reordering Pages in a Book on page 531.
Tip: If you no longer need to see the Master Pages pane, choose Hide Master Pages from the
Book Action pop-up menu (with a gear icon).
Adding a Photo Index to a Book
You can add index pages to a book that show thumbnails of all the book’s photos. Depending on
the theme you choose, Aperture provides dierent looks and layouts for photo indexes. You can
also add an index of photo metadata to your book. Typically, the photo index appears at the end
of a book or at its beginning.
Note: Not all themes support photo indexes. For more information about switching themes, see
Choosing a Theme on page 521.
To add an index page to the end of your book
1 To show master pages, choose Show Master Pages from the Book Action pop-up menu (with a
gear icon).
2 Select an index master page in the Master Pages pane.
Note: The selected theme must support index pages.
3 Choose Add New Page From Master from the Add Pages pop-up menu.
Add as many index pages as your book needs to hold all the photos.
4 Drag photos to the photo boxes to ll the index pages at the end of your book.
If you want the index pages to appear in a dierent position in your book, drag them in the
Pages pane.
To add a metadata index to your book
mChoose Create Index from the Book Action pop-up menu (with a gear icon) in the Book
Layout Editor.
Aperture adds metadata index pages to the end of your book and updates the index with the
metadata information from your photos. You can change the metadata that appears in the index
by selecting metadata boxes and changing the metadata format using the Set Metadata Format
pop-up menu.
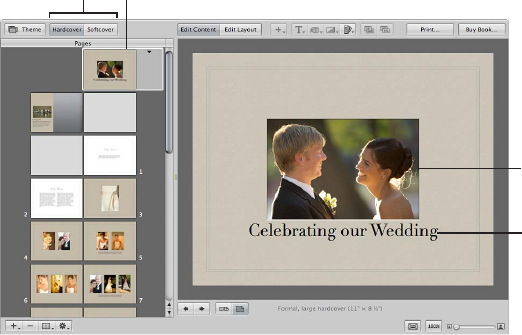
Chapter 23 Creating Books 530
Removing Pages from a Book
You can remove pages from a book. Removing pages removes the contents of the page, and
remaining pages simply reow to ll the deletion. You cannot remove the cover page of a book.
To remove pages from a book
1 Select the page or pages you want to remove in the Pages pane of the Book Layout Editor.
You can Shift-click pages to select multiple pages.
2 Click the Remove Pages button (or press the Delete key), then conrm that you want to delete
the page or pages.
Working with Pages
Creating a Cover for Your Book
When you create a new book album, Aperture automatically creates a front cover page for the
book. You can select the page and add a title, cover photo or design, and other text or photos
that you like.
You can also choose between a softcover or hardcover design. Softcover designs have a white
background; if you select a hardcover design and purchase printed copies of the book from the
Apple print vendor, you can choose from a selection of hardcover colors. Note that you can only
add photos and text to the front cover of your book; you can’t specify photos or text on the spine
or back cover when purchasing books from the Apple print vendor.
Book cover
buttons Book cover page
To add or change
the cover photo,
drag a photo from
the Browser into
the photo box.
Cover title
To choose whether your book has a softcover or hardcover design, you click one of the book
cover buttons.
To select a hardcover or softcover design for your book
mClick the Hardcover or Softcover button in the Book Layout Editor.
If you don’t plan to purchase printed books from the Apple print vendor, you may want to
employ a graphic designer to create the front and back cover for you, or you can design the
cover yourself using a graphics application.
Chapter 23 Creating Books 531
Choosing a Master Page Layout
You select a design for your page by applying a master page layout. Aperture provides dierent
master page layouts depending on the theme you choose. You choose a page design from the
Set Master Page pop-up menu. For example, you might create a single-photo page and then
later decide to change that page to hold two photos.
You can apply dierent master page designs to a page to nd the design that works best for
your project.
To apply a master page design to a page
1 Select the page in the Pages pane of the Book Layout Editor.
2 Do one of the following:
•Choose a master page from the Set Master Page pop-up menu.
•Click the disclosure triangle on the page, then choose a master page from the pop-up menu.
To reapply a master page design to a page
If you change a page’s design by repositioning or resizing boxes and you want to start over with
the original design, you can reapply the original master page design.
1 Select the page you want to change in the Pages pane of the Book Layout Editor.
2 Choose Reapply Master from the Book Action pop-up menu (with a gear icon).
Copying Pages
If you’ve made changes to a page and you want to use that page again in your book, you can
duplicate it. Or, you might duplicate a page and then make small modications to it, keeping
both the new page design and the original for later use.
To copy pages
1 In the Pages pane of the Book Layout Editor, select the page or pages you want to duplicate.
You can Shift-click pages in the Pages pane to select multiple pages.
2 Do one of the following:
•Choose Edit > Duplicate.
•Choose Duplicate Page from the Add Pages pop-up menu.
Reordering Pages in a Book
You can move pages within a book. If you need to move a particular page forward or backward
in the page order, you can drag it to a new location in the book structure.
To move a page in your book
1 Select the page in the Pages pane of the Book Layout Editor.
2 Drag the page to a new location.

Chapter 23 Creating Books 532
Choosing a Background Image
You can choose a background image to appear behind the other photos on a page. For example,
you might create a page that shows a bride and groom in the foreground and a church setting
in the background. Or, you might choose a background image that complements the colors of
the photo in the foreground.
To choose a background image for a page
1 Select the page in the Pages pane of the Book Layout Editor.
2 Drag a photo from the Browser over the page in the Book Layout Editor until the background
becomes highlighted, then release the mouse button.
To apply a background image to a two-page spread
1 Make sure the Show Full Spreads button is selected in the Book Layout Editor.
2 In the Pages pane, select one of the pages to which you want to apply the background.
3 Drag the photo you want over the spine (center) of the page spread in the Book Layout Editor
until the background becomes highlighted on both pages.
To remove a background image
1 Select the page in the Pages pane of the Book Layout Editor.
2 Do one of the following:
•Click the page background to select the image, then press the Delete key to remove
the image.
•Choose No Background from the Set Background pop-up menu.
Note: The Set Background pop-up menu is not available for all themes.
Using Page Numbers in a Book
Aperture provides automatic page numbering in your books. Each theme oers page numbers in
preset positions on the page. You can turn o page numbering if you wish. You cannot reposition
page numbers on the page or change the format of the page numbers.
To turn on page numbering
mChoose Page Numbers > Always from the Book Action pop-up menu (with a gear icon) in the
Book Layout Editor.
You can also choose the Automatic option to turn on page numbering. When chosen, the
Automatic option displays page numbers on pages when no photos appear behind them.
To turn o page numbering
mChoose Page Numbers > O from the Book Action pop-up menu (with a gear icon) in the Book
Layout Editor.
Chapter 23 Creating Books 533
Rebuilding a Book
If you’ve made modications to the design of a book and you want to start over with an
unmodied design, Aperture can rebuild your book. Aperture rebuilds the book structure using
the default series of master page designs and adds your photos to the revised pages. You lose
any changes that you previously made to your pages. Aperture can place all the photos in the
Browser into the book, or only selected photos.
To rebuild a book with all of the photos in the Browser
mChoose Rebuild Book With All Images from the Book Action pop-up menu (with a gear icon) in
the Book Layout Editor.
To rebuild a book with a selection of photos
1 In the Browser, select the photos you want to place in the book.
2 Choose Rebuild Book With Selected Images from the Book Action pop-up menu (with a gear
icon) in the Book Layout Editor.
Working with Photos
Adding Photo Boxes to a Book Page
After creating a page and applying a master page design, you may need to add more photo
boxes to hold photos on the page. You can select a dierent master page design that has more
photo boxes, or you can add photo boxes where you need them.
To add a photo box to a page
1 In the Book Layout Editor, click the Edit Layout button, if it’s not already selected.
2 Select a page in the Pages pane.
3 Choose Add Photo Box from the Add Box pop-up menu.
When the photo box appears, you can drag it to a new position and resize it.
Changing How a Photo Fills a Photo Box
Aperture is preset to scale photos to ll a photo box on a book page. You can change the
position of a photo within a photo box, making it appear centered or aligned on the right or
left edge. You can also adjust the scaling of a photo within a box. If a photo is scaled so that
only part of the photo is visible within the photo box, you can change the portion of the photo
that’s visible.
To change the position of a photo in a photo box
1 In the Book Layout Editor, click the Edit Layout button, if it’s not already selected.
2 Select the photo box you want to change.
3 Choose Photo Box Alignment from the Book Action pop-up menu (with a gear icon), then
choose an alignment option from the submenu.
•To scale the photo to t the size of the box on the page: Choose Scale to Fill.
•To center the photo in the box: Choose Scale to Fit Centered.
•To align the photo on the left edge of the box: Choose Scale to Fit Left-Aligned.
•To align the photo on the right edge of the box: Choose Scale to Fit Right-Aligned.
To change the scale of a photo in a photo box
1 Double-click the photo.
Chapter 23 Creating Books 534
The Image Scale HUD appears.
2 Drag the slider to adjust the size of the photo within the photo box.
Click outside the photo box to hide the Image Scale HUD.
To change the part of the photo that appears in a photo box
1 Double-click the photo.
The Image Scale HUD appears.
2 Drag the photo to change the part that’s visible within the box.
Changing the Aspect Ratio of a Photo Box
Book pages hold photo boxes with specic sizes and aspect ratios. You can select a photo box
and change the aspect ratio to t the photo. For example, you can change a photo box with a
landscape orientation to one with a portrait orientation.
Aperture provides commands for creating photo boxes with the following aspect ratios:
•4:3 landscape
•3:2 landscape
•2:3 portrait
•3:4 portrait
•Square
•The aspect ratio of the current photo
To change the aspect ratio of a photo box
1 In the Book Layout Editor, click the Edit Layout button, if it’s not already selected.
2 Select the photo box you want to change.
3 Choose Photo Box Aspect Ratio from the Book Action pop-up menu (with a gear icon), then
choose an aspect ratio from the submenu.
•To change a photo box to a 4:3 landscape aspect ratio: Choose Landscape 4:3.
•To change a photo box to a 3:2 landscape aspect ratio: Choose Landscape 3:2.
•To change a photo box to a 2:3 portrait aspect ratio: Choose Portrait 2:3.
•To change a photo box to a 3:4 portrait aspect ratio: Choose Portrait 3:4.
•To change a photo box to a square aspect ratio: Choose Square.
•To create a photo box that ts the cropping of the current photo in the box: Choose Photo
Aspect Ratio.
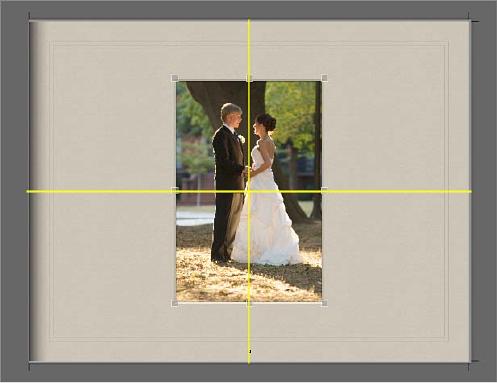
Chapter 23 Creating Books 535
Arranging Photos on the Page
You can resize and reposition photo boxes on a book page. First click the Edit Layout button; you
can then click photo boxes to select them. Once selected, photo boxes show handles that you
can drag to resize the box. You can also drag the content of the box to move the photo box to a
new position.
As you drag a photo box, yellow guidelines appear that mark the important margins and image
borders on your page. Using the guidelines, you can make sure that your photo boxes correctly
align with other boxes on your pages.
To arrange photo boxes on the page
1 In the Book Layout Editor, click the Edit Layout button, if it’s not already selected.
2 Select the photo box you want to move or resize.
3 Drag the photo box to a new location, or drag a handle on the selected box to change the
photo’s size.
Copying, Pasting, Cutting, and Removing Photos from Photo Boxes
After you place photos in photo boxes on your book pages, you can select a box or group of
boxes and copy and paste the contents, or cut or remove the photos from photo boxes.
To copy and paste the contents of selected photo boxes
1 In the Book Layout Editor, click the Edit Content button, if it’s not already selected.
2 Select the photo box or boxes whose contents you want to copy.
3 Choose Edit > Copy Content.
4 Select the photo box or boxes where you want the copied contents to appear.
5 Choose Edit > Paste Content.
To copy selected photo boxes
1 In the Book Layout Editor, click the Edit Layout button, if it’s not already selected.
2 Select the box or boxes you want to copy.
3 Choose Edit > Copy.
4 Select the page where you want the copied photo box or boxes to appear.
5 Choose Edit > Paste.

Chapter 23 Creating Books 536
To cut the contents of selected photo boxes, placing the contents in the Clipboard
1 In the Book Layout Editor, click the Edit Content button, if it’s not already selected.
2 Select the photo box or boxes whose contents you want to cut.
3 Choose Edit > Cut Content.
To remove the contents of selected photo boxes without saving them in the Clipboard
1 In the Book Layout Editor, click the Edit Content button, if it’s not already selected.
2 Select the photo box or boxes whose contents you want to remove.
3 Press the Delete key.
Stacking Photo Boxes in a Specic Order
As you arrange photo boxes on a book page, perhaps overlapping them to create a certain look,
you may want to change their stacking order. For example, you might want to place three photos
on top of one another in a specic order. To change the stacking order of photo boxes, you select
a photo box and then click the Bring Forward or Send Backward button.
Send Backward button
Bring Forward button
To change the order of a stack of photo boxes
1 In the Book Layout Editor, click the Edit Layout button, if it’s not already selected.
2 Select the photo box whose stacking order you want to change.
3 Do one of the following:
•Click the Bring Forward or Send Backward button.
•Choose Arrange from the Book Action pop-up menu (with a gear icon), then choose an option
from the submenu.
Removing Photo Boxes
After creating a book page and applying a master page design, you may want to remove one or
more photo boxes from the page. You can choose a dierent master page design that has fewer
photo boxes, or you can manually remove photo boxes from the page.
To remove photo boxes from a page
mClick the Edit Layout button, select a photo box or boxes, then choose Edit > Cut (or press Delete).
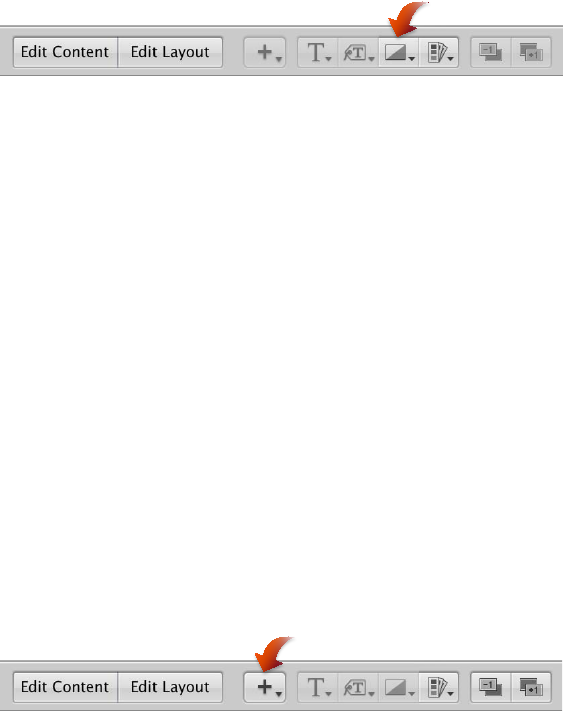
Chapter 23 Creating Books 537
Changing the Look of Photos with Filters
Aperture allows you to change the look of photos in books by applying lters. For example,
you might apply a lter that fades a photo so that you can position text over it to create an
interesting cover. You can also apply lters that change a photo to black and white or sepia.
To apply a lter to a photo box
1 Select the photo box that contains the photo you want to change.
2 Choose the lter style you want from the Set Photo Filter pop-up menu.
Note: When you apply a lter to a photo in a book and then examine the photo with the Loupe,
the photo appears without the lter eect. The lter is applied only to the photo in the book, not
to the photo version. The Loupe displays the photo version.
Adding Map Boxes to a Book Page
If you’ve added location information to your photos using Places, you can add a map to a book
page showing the locations where the surrounding photos were shot. In addition, you can dene
a route between locations to illustrate the journey between destinations.
Note: The Map box feature is available only in certain book themes. For more information about
book themes, see Choosing a Theme on page 521.
To add a map box to a page
1 In the Book Layout Editor, click the Edit Layout button, if it’s not already selected.
2 Select a page in the Pages pane.
3 Choose Add Map Box from the Add Box pop-up menu.
When the map box appears on the selected page in the Book Layout Editor, you can drag it to
a new position and resize it. Locations assigned to photos in photo boxes surrounding the map
box are automatically plotted on the map.
To give the map a title
You can give the map a title that appears over the bottom-left portion of the map.
1 In the Book Layout Editor, double-click the map.
The Map Options HUD appears.

Chapter 23 Creating Books 538
2 In the Map Options HUD, enter a title for the map in the Title eld at the top of the HUD.
Enter a title for
the map here.
A title appears over the bottom-left portion of the map in the Book Layout Editor.
To add a location to the map
By default, the map automatically displays the locations where the photos that surround it were
captured, provided they have location information assigned to them. However, you can also add
and remove locations that appear on the map using the Map Options HUD.
1 If necessary, double-click the map in the Book Layout Editor.
2 In the Map Options HUD, click the Add (+) button.
A new, untitled location appears.
An Untitled
location appears.
Click the Add (+) button.

Chapter 23 Creating Books 539
3 Click the Untitled location and enter a location that you would like to appear on the map.
A list of locations appears below.
Enter the first few letters
of a new location and
choose the location from
the list that appears.
4 Choose the location from the list.
The new location appears on the map in the Book Layout Editor.
To remove a location from the map
1 If necessary, double-click the map in the Book Layout Editor.
2 In the Map Options HUD, do one of the following:
•To temporarily remove a location from the map: Deselect the checkbox next to the
location’s name.
•To permanently remove a location from the map: Select the location’s name, then click the
Remove (–) button.
...click the Remove (–)
button to permanently
remove it.
Deselect the location’s
checkbox to temporarily
remove it, or...
The location is removed from the map.
To show direction lines between locations on the map
You can show direction lines between locations on the map to illustrate the progression of your
journey from place to place in your photo essay.
1 If necessary, double-click the map in the Book Layout Editor.
2 In the Map Options HUD, choose one of the following options from the Action pop-up menu
(with a gear icon):
•To show a simple set of lines connecting the locations on the map: Choose Show Straight Lines.

Chapter 23 Creating Books 540
•To show curved lines with arrowheads indicating the direction of movement from one place to
another: Choose Show Lines with Arrowheads.
Choose to show direction
lines on the map from the
Action pop-up menu.
The direction lines appear on the map.
To set the path of the direction lines in the map
When you show direction lines on the map, they may not initially connect locations in a way that
matches the route you intended. You set the path of the direction lines by rearranging the order
of the locations in the Map Options HUD.
1 If necessary, double-click the map in the Book Layout Editor.
2 In the Map Options HUD, drag the locations into the order in which you want the direction lines
to appear on the map, from top to bottom.
Drag the locations into
the order in which you
want the direction lines
to appear on the map.
3 If you want the last location on the map connected to the rst location on the map, choose
Return to Starting Place from the Map Options HUD Action pop-up menu (with a gear icon).
The direction lines on the map are updated to match the order of locations in the Map
Options HUD.
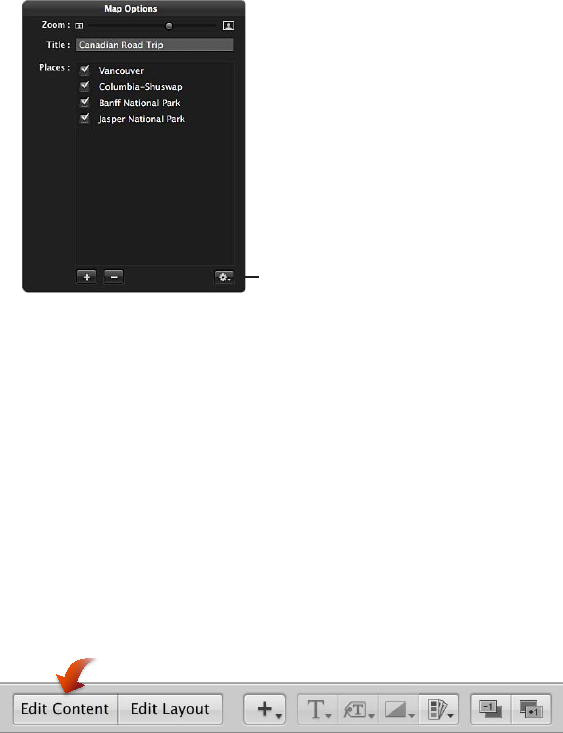
Chapter 23 Creating Books 541
To choose the area shown in the map
You can specify which part of the map is visible on the page by zooming in to and out of
the map and repositioning the map. If you’ve repositioned the map and the photo locations
are o-center or no longer appear, you can return the map to a position centered on the
photo locations.
1 If necessary, double-click the map in the Book Layout Editor.
2 In the Map Options HUD, do any of the following:
•To zoom in to and out of the map: Drag the Zoom slider (at the top of the HUD) to the right to
zoom in and to the left to zoom out.
•To reposition the map to show other locations: Drag the map to reposition it.
•To center the map on the photo locations: Choose Center Map on Places from the Map Options
HUD Action pop-up menu (with a gear icon).
Choose to center the
map direction lines using
the Action pop-up menu.
Working with Text
Placing Text on the Page
As you work with your book layout, you can add text and position it on the page. You can
make text changes to individual pages in your book, or you can change master pages to create
template pages with custom text styles and layouts.
Master page designs provide text boxes that you can select and enter text in. You can also copy
text and paste it into text boxes on your book pages.
To add text to a text box
1 In the Book Layout Editor, click the Edit Content button, if it’s not already selected.
2 In the Pages pane, select the page you want to work on.
3 Select the text box you want to change.
4 Select any existing text and type or paste the new text.
Chapter 23 Creating Books 542
Adding Text Boxes to a Page
When you want to add text to a book page and need another text box, you can add one and
position it anywhere on the page.
To add a text box to a page
1 In the Pages pane of the Book Layout Editor, select the page to which you want to add text.
2 Click the Edit Layout button.
3 Choose Add Text Box from the Add Box pop-up menu.
A new text box appears on the page.
4 Drag the text box to the location where you want it to appear.
You can resize a text box by dragging its resize handles.
Adding Metadata Boxes to a Page
You can display photos on a book page along with any metadata associated with them. To
display a photo’s metadata, you add a metadata box to the page and link it to the photo. You can
also unlink a metadata box from its selected photo and relink it when necessary.
To add a metadata box to a page
1 In the Pages pane of the Book Layout Editor, select the page to which you want to add the
metadata box.
2 Click the Edit Layout button.
3 Select the photo box to which you want to add a metadata box.
4 Choose Add Metadata Box from the Add Box pop-up menu.
A new metadata box appears on the page.
5 Drag the metadata box to the location where you want it to appear.
You can resize a metadata box by dragging its resize handles.
6 Choose the type of metadata you want displayed in the box from the Set Metadata Format
pop-up menu.

Chapter 23 Creating Books 543
To unlink a metadata box
1 In the Pages pane of the Book Layout Editor, select the page that has a metadata box you want
to unlink.
2 Select the metadata box.
3 Choose Unlink Metadata Box from the Book Action pop-up menu (with a gear icon).
To relink a metadata box
1 In the Pages pane of the Book Layout Editor, select the page that has the metadata box you want
to link.
2 Command-click the metadata box and the photo box you want to link to select them both.
3 Choose Link Metadata Box from the Book Action pop-up menu (with a gear icon).
Hiding or Showing Photo Plate Numbers in Books
You can turn the display of plate numbers in your books and web galleries on or o. Aperture is
preset not to display plate numbers for photos.
To turn on the display of plate numbers in a book
mIn the Book Layout Editor, choose Enable Plate Metadata from the Book Action pop-up menu
(with a gear icon).
Choosing a Text Style
You can assign text styles to text and metadata boxes to change the look of text in your book.
Aperture master pages come with preset text styles that include designs for important text
elements such as cover text, subtitles, headings, and paragraph text. You can easily apply these
styles to text and metadata boxes as you work.
To change the text style of a text or metadata box
1 Select the text or metadata box you want to change.
2 Choose a text style for your text from the Set Text Style pop-up menu.
Making Font Changes in Books
Aperture provides a Fonts window that you can use to change fonts in your books. You select
text in a text box on a page to change the font, font size, font color, and more.
Important: Aperture follows the text-smoothing preferences set in the Appearance pane of
System Preferences. The OS X default setting doesn’t smooth fonts that are 8 points in size or
smaller. This setting only aects the appearance of fonts onscreen; the fonts appear smoothed
when printed.
To show the Fonts window
Do one of the following:
mSelect a text box, then choose Edit > Show Fonts (or press Command-T).
mControl-click the text box, then choose Font > Show Fonts from the shortcut menu.
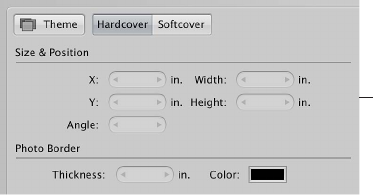
Chapter 23 Creating Books 544
Arranging Text on the Page
You can resize and reposition text and metadata boxes on a book page. First click the Edit Layout
button; then click boxes to select them. Selected boxes display handles that you drag to resize
the boxes. You can also drag the contents of a box to move the box to a new position.
To arrange text on a page
1 In the Book Layout Editor, click the Edit Layout button, if it’s not already selected.
2 In the Pages pane, select the page you want to work on.
3 Select the text box on the page that you want to move or resize.
4 Drag the box to a new location, or drag a handle on the selected box to change the box’s size.
Changing the Number of Text Columns
You can change a text box on a book page so that it’s formatted to hold from one to four
columns of text.
To change the number of text columns in a text box
1 In the Book Layout Editor, click the Edit Layout button, if it’s not already selected.
2 Select the text box.
3 Choose Text Box Columns from the Book Action pop-up menu (with a gear icon), then choose
the number of columns from the submenu.
4 If necessary, resize the text box to better accommodate the changed column layout of the box.
Removing Text Boxes from a Page
After creating a book page and applying a master page design, you may want to remove one or
more text boxes from the page. You can choose a dierent master page design that has fewer
text boxes, or you can manually select and remove text boxes.
To remove text or metadata boxes from a page
1 In the Book Layout Editor, click the Edit Layout button.
2 Select the text or metadata box that you want to remove, then choose Edit > Cut Content (or
press Delete).
Working with the Layout Options Inspector
You can select an item on a book page and view its geometry using the Layout Options
inspector. Some printers require precise layout dimensions; you can use the Layout Options
inspector to accurately place all items on the page by specifying new dimensions using the value
sliders. In addition, you can change the angle of text and photo boxes, as well as apply a color
border to a photo box.
Layout Options inspector
Chapter 23 Creating Books 545
To open the Layout Options inspector
mChoose Show Layout Options from the Book Action pop-up menu (with a gear icon) in the Book
Layout Editor.
The Layout Options inspector appears at the top-left area of the Book Layout Editor.
To change the dimensions of a text or photo box
1 Select a text box or photo box on a book page displayed in the Book Layout Editor.
2 Do any of the following:
•To move the selected item left or right: Specify a new value using the X value slider.
•To move the selected item up or down: Specify a new value using the Y value slider.
•To change the width of the selected item: Specify a new value using the Width value slider.
•To change the height of the selected item: Specify a new value using the Height value slider.
To change the angle of a text or photo box
1 Select a text box or photo box on a book page displayed in the Book Layout Editor.
2 Specify an angle value using the Angle value slider.
The photo rotates counterclockwise as the value increases. Decrease the value to rotate the
photo clockwise.
To add a border to a photo box
1 Select a photo box on a book page displayed in the Book Layout Editor.
2 Set the width of the border by specifying a value using the Thickness value slider.
3 Set the color of the border by clicking in the Color well and then choosing a color in the
Colors window.
The border is applied to the photo.
To close the Layout Options inspector
mChoose Hide Layout Options from the Book Action pop-up menu (with a gear icon) in the Book
Layout Editor.
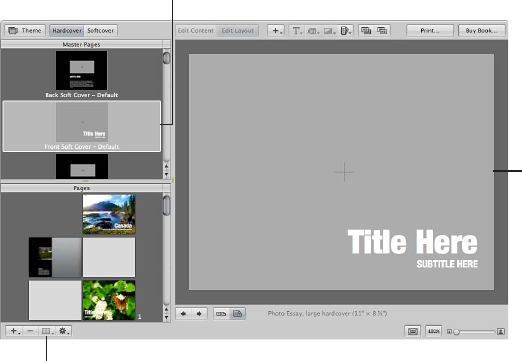
Chapter 23 Creating Books 546
Working with Master Pages
An Overview of Master Pages
Master pages supply the initial design of your book pages. You apply master page designs
repeatedly throughout a book.
If you plan to make reusable book albums, you can customize the page designs of a selected
theme before creating your books. You can select a master page and modify it, changing the
photo, text, and metadata boxes that appear on the page. You can also create new master pages
to suit specic layout needs. To modify pages, you use the procedures for working with photo,
text, and metadata boxes presented earlier in this chapter.
To modify a master page, you show master pages in the Master Pages pane and then add a new
page or select the page you want to work on. When you select a master page in the Master
Pages pane, the Book Layout Editor displays an enlarged view of the page.
Make layout
changes to your
master page here.
Choose Show Master Pages
from this pop-up menu to show
the Master Pages pane.
Choose the master page
you want to work on here.
Viewing Master Pages
To view and work on a book theme’s master pages, you must show the master pages in the
Master Pages pane.
To show master pages
mChoose Show Master Pages from the Book Action pop-up menu (with a gear icon) in the Book
Layout Editor.
The Master Pages pane appears above the Pages pane, showing thumbnails of the master pages
for the selected theme. You can select master pages in the Master Pages pane to display and
work on them. You can drag the border between the Master Pages pane and the Pages pane to
resize the pane display.
To hide master pages
mChoose Hide Master Pages from the Book Action pop-up menu (with a gear icon) in the Book
Layout Editor.
Chapter 23 Creating Books 547
Creating and Modifying Master Pages
You can create new master pages, or you can duplicate existing master pages and modify them.
For example, if you decide to customize a two-photo layout from an original master page design,
you can save the customized version and have multiple two-photo layouts from which you can
choose. Once you create a new master page, the master page name appears in the Set Master
Page pop-up menu, where you can choose it to apply the design to pages in your book.
Note: You cannot modify the master pages for cover pages.
To create a new master page design
1 Choose Show Master Pages from the Book Action pop-up menu (with a gear icon) in the Book
Layout Editor.
2 Select a master page in the Master Pages pane.
3 Choose Add New Page from the Add Pages pop-up menu.
The new master page appears in the Master Pages pane underneath the page you selected in
step 2.
4 If you want to rename the page, double-click its title and type a new name.
5 Select the new master page and make your changes.
To duplicate and modify a master page design
1 Choose Show Master Pages from the Book Action pop-up menu (with a gear icon) in the Book
Layout Editor.
2 Select the master page you want to duplicate in the Master Pages pane.
3 Choose Duplicate Page from the Add Pages pop-up menu.
The new duplicate page appears in the Master Pages pane underneath the original page.
4 If you want to rename the page, double-click its title and type a new name.
5 Select the new master page and make your changes.
To create a new master page design from a page in your book
You can change the design of a page in your book and save the changes to create a new
master page.
1 In the Pages pane of the Book Layout Editor, select the page whose modications you want to
save as a master page.
2 Choose Save Page > As New Document Master from the Book Action pop-up menu (with a
gear icon).
3 Choose Show Master Pages from the Book Action pop-up menu, if necessary, to show the Master
Pages pane.
4 Select the new master page in the Master Pages pane and rename it.
To save changes in a book page to the original master page design
After updating the design of a page in your book, you can update the original master page with
those changes.
1 In the Pages pane of the Book Layout Editor, select the page whose design you modied.
2 Choose Save Page > To Document Master from the Book Action pop-up menu (with a gear icon).
Aperture updates the original master page with your design changes.
Chapter 23 Creating Books 548
Unifying and Splitting Master Pages
Some master pages have left and right versions to match the book margins on the left and right
facing pages. You can select a left or right master page and consolidate the two versions into
one page.
To unify left and right versions of a master page
1 Select a left or right master page in the Master Pages pane of the Book Layout Editor.
2 Choose Unify Master Page from the Book Action pop-up menu (with a gear icon).
You can also select a master page that has only one version and split it into left and
right versions.
To split a master page that doesn’t have left or right versions into left and right versions
1 Select a master page in the Master Pages pane of the Book Layout Editor.
2 Choose Split Master Page from the Book Action pop-up menu (with a gear icon).
You can now adjust the position of items on the new pages to match the margins on the left and
right pages.
Updating Book Pages with Master Page Changes
After you change a master page, the modied design can be applied to pages in your book.
Aperture does not automatically update the design of pages whose master pages are modied.
However, you can choose to update the pages in a book with revised master page designs.
To update a page with a changed master page design
1 In the Pages pane of the Book Layout Editor, select the page whose master page design you
want to update.
2 Choose Reapply Master from the Book Action pop-up menu (with a gear icon).
Aperture applies the current master page design to the selected page.
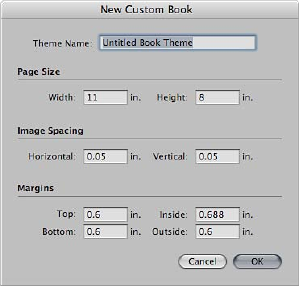
Chapter 23 Creating Books 549
Creating and Sharing Custom Themes
If you need a book with dimensions dierent from those of the Small, Medium, and Large format
books, you can create a custom theme with the precise dimensions you require. The ability to set
the dimensions in a custom theme provides the precision demanded by professional printers.
To create a custom theme
1 In the Book Layout Editor, click the Theme button.
A dialog appears, alerting you that you may lose text when you change themes.
2 Click OK.
3 In the dialog that appears, choose Custom from the Book Type pop-up menu.
4 Click the New Theme button at the bottom of the dialog.
The New Custom Book dialog appears.
5 In the Theme Name eld, enter a name for the custom theme.
6 Enter the book’s dimensions in the Page Size, Image Spacing, and Margins areas, then click OK.
The new custom theme appears in the theme list.
To share custom themes with another Aperture system
You can share custom book themes with other Aperture systems. By default, Aperture saves
custom themes in the following location in the Finder:
/Users/username/Library/Application Support/Aperture3/Book Themes/
mCopy the themes you want to share from the Book Themes folder on the rst Aperture system to
the same location on the other Aperture system.
The custom themes appear in the Book Themes dialog when you choose Custom from the Book
Type pop-up menu.
Chapter 23 Creating Books 550
Copying a Book Album
After you’ve set up a book structure that you like, you can reuse it for other book publication
projects. For example, you might create a wedding album book structure that you
reuse frequently.
You can select and duplicate a book album. You can then remove the photos from the album
and replace them with others to ll the new book. Aperture can automatically ow the new
photos into the duplicated book structure.
To copy a book album and place new photos in it
1 Select the book album in the Library inspector.
2 Choose File > Duplicate Book.
The duplicate book appears in the Library inspector.
3 Drag the duplicate book album to a new project, if you wish.
4 With the duplicate book album selected in the Library inspector, select a photo in the Browser
and choose Edit > Select All (or press Command-A).
5 To remove the photos from the album, choose Photos > Remove From Album (or press Delete).
All the photos are removed from the Browser and the book pages.
6 Select the project, folder, or album that has the photos you want to place in the book.
7 In the Browser, select the photos and drag them to the duplicate book album in the
Library inspector.
8 Select the duplicate book album in the Library inspector.
9 Arrange the photos in the Browser in the order you want them to appear in your book.
10 Choose Autoow Unplaced Images from the Book Action pop-up menu (with a gear icon) in the
Book Layout Editor.
The photos are automatically placed in the book pages.
Chapter 23 Creating Books 551
Ordering Books from Third-Party Print Vendors Using Plug-ins
Some third-party print vendors supply plug-ins that allow Aperture to submit your book les
with the format and settings the print vendor requires. All third-party book plug-ins provide
custom themes, book dimensions, and binding options.
To use a third-party book plug-in, you must rst obtain the plug-in software
from the print vendor and install it. For a list of book plug-ins, go to
http://www.apple.com/aperture/resources/third-party-books.html.
To create a book using a third-party book plug-in
1 Go to http://www.apple.com/aperture/resources/third-party-books.html, download a third-party
book plug-in, and install it.
2 Create a book album.
For more information, see Creating a Book Album on page 519.
3 When entering a name for the book album and choosing a theme in the dialog that appears,
choose a third-party book plug-in from the Non-Apple Books section of the Book Type
pop-up menu.
Custom themes designed specically for the third-party book plug-in appear in the theme list.
4 Select a theme, then click Choose Theme.
5 After you have nished laying out the book, click the Send Book button at the top-right corner of
the Book Layout Editor.
An order pane for the third-party print vendor appears with options and pricing details.
552
An Overview of Sharing Your Photos Online
My Photo Stream is the iCloud service that lets you view all your recent photos on your devices
without having to sync—all you have to do is turn it on. You can also create shared photo
streams to share photos and comments about them with your friends. For more information, see
An Overview of My Photo Stream on page 552 and An Overview of Shared Photo Streams on
page 559.
Important: My Photo Stream and Shared Photo Streams can be associated with only one library
at a time. When you switch libraries, Aperture prompts you to set My Photo Stream to share
photos with the new library exclusively. Photos from your photo stream and shared photo
streams are pushed to the new library from that point on.
You can email photos directly from Aperture. For more information, see Emailing Photos on
page 567.
You can also share your photos with your Flickr and Facebook accounts from within Aperture by
creating Flickr and Facebook albums. Photos placed in Flickr and Facebook albums in Aperture
are automatically exported to and published in your Flickr and Facebook accounts. For more
information, see An Overview of Sharing Photos with Flickr and Facebook on page 568.
Using My Photo Stream
An Overview of My Photo Stream
My Photo Stream is the iCloud service that uploads and stores the last 30 days of your photos
and automatically pushes them to your iOS devices and computers.
Note: You must have an iCloud account to use My Photo Stream. iCloud requires OS X v10.7.2 or
later. For more information, see Setting Up Your iCloud Account on page 554.
Here’s how your photo stream works:
•First, set up My Photo Stream on any device that you want to be part of your photo stream.
•Then, take a photo with your iOS device, or import some photos from your digital camera to
your Mac, iPad, or Windows computer.
•iCloud automatically uploads the photos to your photo stream, and then downloads them to
your other devices (via a Wi-Fi network or Ethernet).
Sharing Your Photos Online 24

Chapter 24 Sharing Your Photos Online 553
•The photos appear in your photo stream on each device: in the Photos app on your iOS
devices, in iPhoto or Aperture on a Mac, or in the Pictures folder on a Windows computer.
Take a photo
Take a photo with your
iOS device. Or import
a photo from your
digital camera to
your Mac or PC.
iCloud stores it
New photos
are automatically
sent to iCloud after
you take them or
import them.
And pushes it
to your devices
Your photos
automatically
appear on
your devices.
My Photo Stream is totally automatic, but if you have a Mac, you can choose to turn o
automatic uploading when you set up My Photo Stream in iPhoto or Aperture. This can be useful
if you regularly import very large numbers of photos.
iCloud stores your new photos for 30 days so that your devices have plenty of time to connect
and download the photos. Your iOS devices keep a rolling collection of your last 1000 photos,
and you can save your favorite shots to your Camera Roll or any other album to keep them on
your device permanently. Because your computers have more storage, they can keep all your
photo stream photos.
Note: Automatic Import must be turned on in Photo Stream preferences in iPhoto or Aperture
for your Mac to keep all photos (this option is turned on by default). Your Windows PC keeps all
photos no matter what.
In addition to using My Photo Stream to keep your photos up to date between your devices,
you can create photo streams to share photos with other people. For more information, see An
Overview of Shared Photo Streams on page 559.
To get started, set up My Photo Stream on your devices.
For more information about setting up My Photo Stream on your iOS devices, see
Set up Photo Stream in iCloud Help.
Note: My Photo Stream is compatible with TIFF les up to 100 MB, JPEG les up to 50 MB, RAW
les (in supported formats) up to 100 MB, and PNG les up to 50 MB.

Chapter 24 Sharing Your Photos Online 554
Setting Up Your iCloud Account
In order to use My Photo Stream, you must set up a free iCloud account. With an active iCloud
account, you can set your Aperture library as the main repository for all your photo stream
photos. You can also choose which photos you want to download from your photo stream into
Aperture, as well as the specic photos in your Aperture library that you want to upload to your
photo stream.
Note: You must have an Internet connection to set up an iCloud account.
To set up an iCloud account
1 In the Library inspector in Aperture, select Photo Stream.
2 Click the Turn On Photo Stream button, then click Continue in the dialog that appears.
3 In the iCloud pane of the System Preferences window, do one of the following:
•Enter your Apple ID and password, then click Sign In.
Note: If you can’t remember your Apple ID and password, click the “Forgot password?” link,
then follow the onscreen instructions.
•Click Create an Apple ID, then follow the onscreen instructions.
Note: For more instructions on setting up an iCloud account, see Help Center.
You can now return to Aperture to begin working with My Photo Stream.
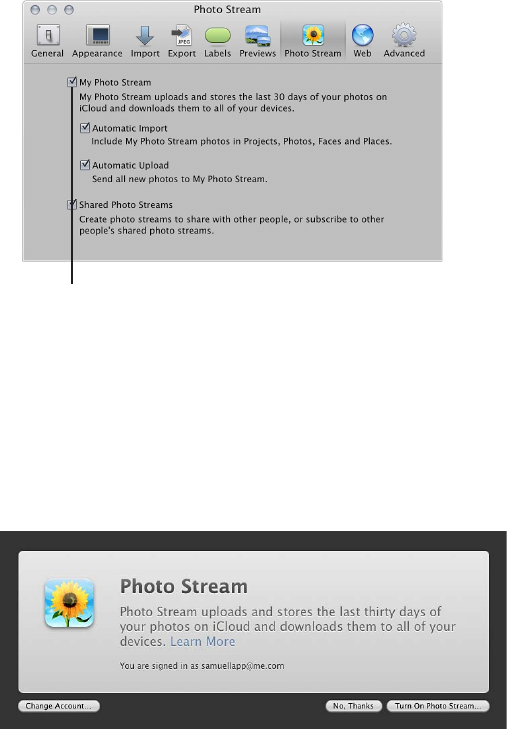
Chapter 24 Sharing Your Photos Online 555
Turning On My Photo Stream for an Aperture Library
My Photo Stream is designed to work with one Aperture or iPhoto library at a time. However, it’s
easy to switch the library iCloud uses to upload and download photos.
Important: If you have My Photo Stream turned on in iPhoto, turning on My Photo Stream in
Aperture turns o My Photo Stream for your iPhoto library. Photos from your photo stream are
no longer pushed to your iPhoto library.
To turn My Photo Stream on or o
1 Choose Aperture > Preferences, then click Photo Stream.
2 Do one of the following:
•To turn on My Photo Stream: Select the My Photo Stream checkbox.
•To turn o My Photo Stream: Deselect the My Photo Stream checkbox, then click Turn O in the
dialog that appears.
Select or deselect this checkbox
to turn My Photo Stream on or off
for this library.
To switch My Photo Stream to another Aperture library
1 Open the Aperture library you want to use with My Photo Stream.
Note: For instructions for switching Aperture libraries, see Viewing Other Libraries on page 40.
2 In the Web section of the Library inspector, select Photo Stream.
3 Click the Turn On Photo Stream button, then click Switch in the dialog that appears.
My Photo Stream is turned on for the Aperture library you switched to and is turned o for
the library you switched from. New photos downloaded from your photo stream appear in the
library with My Photo Stream turned on, and only photos from that library are automatically
uploaded to your photo stream.
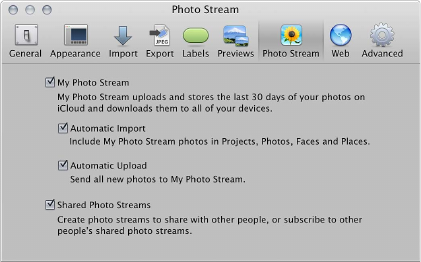
Chapter 24 Sharing Your Photos Online 556
For more information about setting a library to automatically upload photos to your photo
stream, see Automatically Transferring Photos Between Aperture and Your Photo Stream on
page 556.
Automatically Transferring Photos Between Aperture and Your Photo Stream
When you turn on My Photo Stream for an Aperture library, Aperture is set to automatically
upload photos to and download photos from your photo stream. However, you can turn these
settings on and o. When Aperture is set to automatically download photos from your photo
stream, new photos are imported into a project named “[Month] [Year] Photo Stream.” When
Aperture is set to automatically upload photos to your photo stream, photos are uploaded as
they are imported into Aperture.
Note: To transfer photos between Aperture and your photo stream, you must have an
Internet connection.
To set Aperture to automatically upload photos to and download photos from your
photo stream
1 Choose Aperture > Preferences, then click the Photo Stream button.
2 Select the My Photo Stream checkbox.
3 Do either or both of the following:
•To set Aperture to automatically download photos from your photo stream: Select the Automatic
Import checkbox.
Note: If you recently switched libraries or have the Automatic Import feature turned o, only
new photos added to your photo stream are automatically downloaded to your Aperture
library. If you want to import the existing photos in your photo stream, you must manually
download them. For more information, see Manually Transferring Photos Between Aperture
and Your Photo Stream on page 557.
•To set Aperture to automatically upload photos to your photo stream as they are imported into
your Aperture library: Select the Automatic Upload checkbox.
Photos remain in your photo stream for 30 days and are then removed automatically—unless
you delete them rst.
Chapter 24 Sharing Your Photos Online 557
Manually Transferring Photos Between Aperture and Your Photo Stream
You can choose which photos in your Aperture library you want to upload to your photo stream.
You can also manually download from your photo stream only those photos that you want to
store in your Aperture library.
Note: To transfer photos between Aperture and your photo stream, you must have an
Internet connection.
To manually upload photos to your photo stream
1 In the Library inspector, select the item containing the photos you want to upload to your
photo stream.
2 In the Browser, select the photos you want to upload to your photo stream, then do one of
the following:
•Choose File > Share > Photo Stream.
•Click the Photo Stream button in the toolbar.
•Drag the photos to the Photo Stream item in the Library inspector.
The Photo Stream dialog appears.
3 Choose My Photo Stream from the Photo Stream pop-up menu, then click OK.
The photos are uploaded to your photo stream and immediately pushed to the iOS devices
connected to your iCloud account. Photos remain in your photo stream for 30 days and are then
removed automatically—unless you delete them rst.
To manually download photos from your photo stream
1 In the Library inspector, select Photo Stream, then double-click My Photo Stream.
2 Select the photos you want to download from your photo stream, then drag them to a project or
an album in the Library inspector.
The photos from your photo stream are downloaded to the specied project in Aperture and
are permanently stored on your Mac—unless you manually delete them. For more information
about deleting images in Aperture, see Working with the Aperture Trash on page 38.
About Turning On My Photo Stream on More Than One Mac
You can turn on My Photo Stream for the same iCloud account on more than one Mac. When you
have My Photo Stream turned on for more than one Mac and you upload a photo to your photo
stream, the event information from iPhoto or the project information and hierarchy from Aperture
are included. If the receiving application has Automatic Import turned on in Photo Stream
preferences, the event or project information is passed along in one of the following ways:
•Photo uploaded from iPhoto on one Mac and pushed to iPhoto on another Mac: If the iPhoto
library the photo is pushed to contains a duplicate of the event in which the photo originated,
the photo is placed in that event—even if the event has been renamed. If the same event
does not appear in the iPhoto library the photo is pushed to, a new event is created and
named after the photo’s original event.
•Photo uploaded from iPhoto on one Mac and pushed to Aperture on another Mac: A new
project is created in the Aperture library and named after the iPhoto event in which the
photo originated.

Chapter 24 Sharing Your Photos Online 558
•Photo uploaded from Aperture on one Mac and pushed to iPhoto on another Mac: A new event
is created in the iPhoto library and named after the photo’s immediate parent item in the
Aperture library. For example, if the photo originated at the top level of a project named
“Travel,” a new Travel event is created in iPhoto. If the photo originated in an album named
“Christmas 2011” that is inside another album or a project, the new iPhoto event is named after
the Christmas 2011 album.
•Photo uploaded from Aperture on one Mac and pushed to Aperture on another Mac: If the
Aperture library the photo is pushed to contains a duplicate of the project or album in which
the photo originated, the photo is placed in that project or album—even if the project and
any subordinate folders and albums have been renamed or restructured. If the project or
its albums don’t exist in the Aperture library the photo is pushed to, the project hierarchy is
replicated and the photo is placed in its original position.
Note: When pushing photos to iPhoto or Aperture, iCloud downloads photos to iPhoto events
and Aperture projects that have universally unique identiers (UUIDs) matching those of the
photos’ original events or projects. If you manually create iPhoto events or Aperture projects
with the same names as events or projects in other libraries, those events or projects are not
recognized as matches. To create matching events or projects, you must copy them from one
library and merge them with the other.
About Uploading RAW Files to Your Photo Stream
RAW les imported into Aperture can be uploaded to your photo stream and viewed on your
iOS devices. The way the RAW le’s image is uploaded to your photo stream depends on how the
RAW le was imported into Aperture and whether any adjustments have been applied.
Note: When you share a RAW photo via a shared photo stream, an optimized JPEG copy is
created and added to the shared photo stream. For more information, see An Overview of
Shared Photo Streams on page 559.
RAW image state How the RAW image is uploaded to your photo
stream
RAW image with no adjustments applied The RAW le is uploaded to your photo stream.
RAW image with adjustments applied The JPEG le for the preview image is uploaded to
your photo stream.
For more information about preview images, see An
Overview of Preview Images on page 118 .
RAW + JPEG image pair The le that is uploaded is determined by the
frontmost le in the RAW + JPEG pair.
For more information about RAW + JPEG pair import
settings, see Importing RAW + JPEG Image Pairs on
page 67.
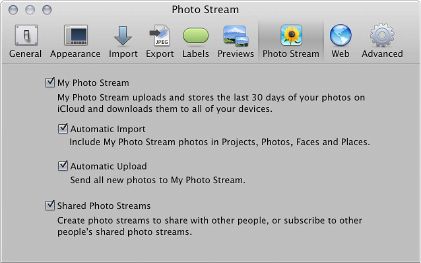
Chapter 24 Sharing Your Photos Online 559
Sharing Photo Streams
An Overview of Shared Photo Streams
Sharing a photo stream is an easy way to keep the important people in your life up to date with
your latest photos. Invitees, who must have an iCloud account to join the photo stream, can view,
“like,” and comment on your photos from any device set up with Photo Stream. Those invitees
without an iCloud account are sent a link to a webpage to view the shared photos; however, they
cannot comment on the photos.
Here’s how shared photos streams work:
•First, set up Photo Stream on any Apple device that you want to be part of your photo stream.
•Then, select a photo on your iOS device or select a photo in your Aperture or iPhoto library.
•Create a shared photo stream to share your photo with your friends.
Your friends initially receive an email inviting them to subscribe to your shared photo stream.
When they accept, the stream appears on their iOS devices or within Aperture and iPhoto.
All subsequent photos shared in that photo stream automatically appear on the subscribers’
Apple devices.
•You and your friends can comment on and like shared photos, as well as reply to
the comments.
Your friends are alerted to new comments and photos by notications on their iOS devices and
in OS X. You are alerted to new comments from your friends, but only you can add photos to and
remove photos from the streams you create.
Note: Photo stream sharing requires OS X Mountain Lion v10.8.2 or later.
Turning On Shared Photo Streams in Aperture
You can turn Shared Photo Streams on and o independently of My Photo Stream.
To turn Shared Photo Streams on and o in Aperture
1 Choose Aperture > Preferences, then click Photo Stream.
2 Do one of the following:
•To turn on Shared Photo Streams: Select the Shared Photo Stream checkbox.
•To turn o Shared Photo Streams: Deselect the Shared Photo Stream checkbox.
After you turn o Shared Photo Streams in Aperture, you can continue to add photos to and
remove photos from your shared photo streams using your other Apple devices.
Chapter 24 Sharing Your Photos Online 560
Creating a Shared Photo Stream
It’s easy to create a photo stream to share your photos.
To create a shared photo stream
1 Select the photos you want to share, then do one of the following:
•Choose File > Share > Photo Stream.
•Choose Photo Stream from the Share pop-up menu in the toolbar.
2 In the Photo Stream dialog, choose New Photo Stream from the Photo Stream pop-up menu.
3 In the “Shared with” eld, type the email addresses for your invitees.
To enable your invitees to access the shared photo stream from an iOS device, you must provide
the email addresses associated with their iCloud accounts.
4 In the Name eld, type a name for the photo stream.
5 If you want to share your photo stream with someone who doesn’t have an Apple device, select
the Public Website checkbox.
Note: People who view your shared photo stream on the web cannot comment on the photos.
They also cannot view the comments posted by you or by others who subscribe to your shared
photo stream with an Apple device. If you would like someone who doesn’t have an Apple
device to see the rst comment added to a photo, you must post the comment rst, before
inviting the person to view the shared stream.
6 Click OK.
Your invitees are sent an email and a notication asking them to subscribe to your shared
photo stream.
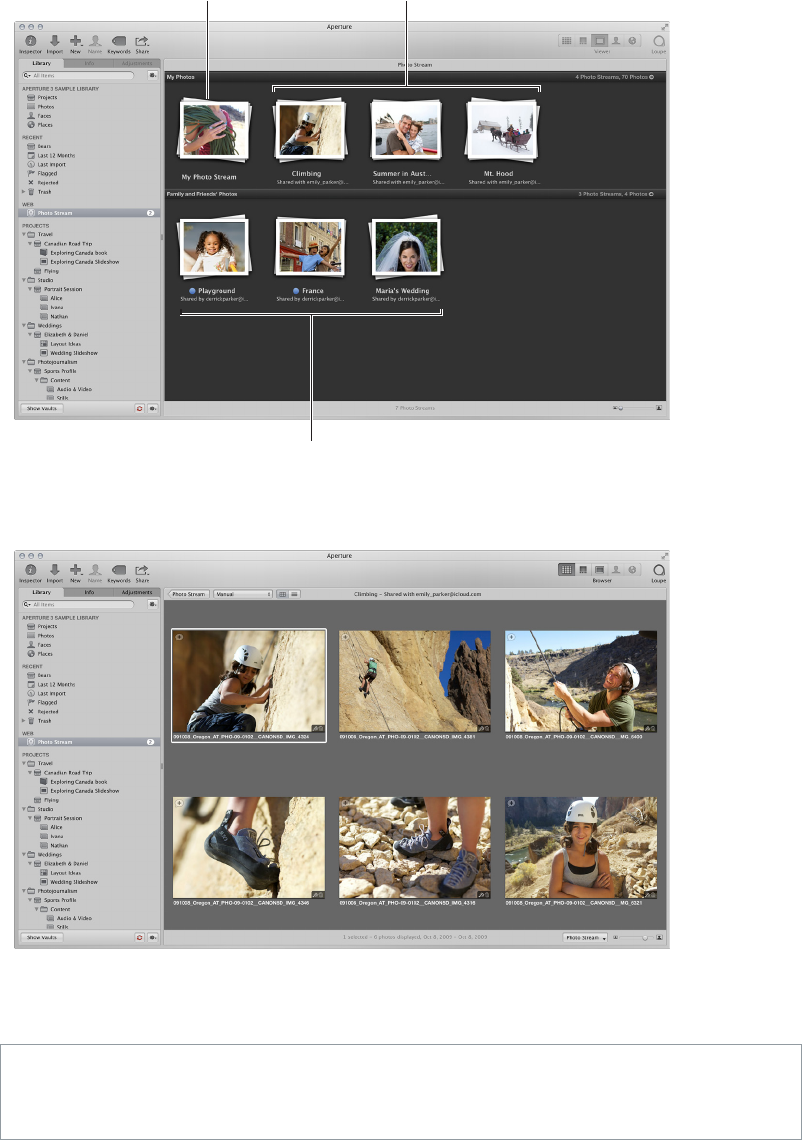
Chapter 24 Sharing Your Photos Online 561
To view photos in a shared photo stream
1 In the Web section of the Library inspector, select Photo Stream.
My Photo Stream
Photo streams you’ve
created and shared
Streams you’ve subscribed to
Your photo stream and shared photo streams appear.
2 To view the contents of a photo stream, double-click its thumbnail.
To stop sharing a photo stream
If you want to stop sharing a photo stream, all you have to do is delete it.
WARNING: When you delete a shared photo stream, it’s immediately removed from your
subscribers’ devices. If you think your subscribers might want to keep some of the photos, you
should alert them to save the photos before you delete the shared photo stream.
1 In the Web section of the Library inspector, select Photo Stream.
2 Select the photo stream you want to stop sharing, then press Command-Delete.
Chapter 24 Sharing Your Photos Online 562
Adding, Removing, and Editing Photos in a Shared Photo Stream
You can add and remove photos in a shared photo stream that you created. You can also update
photos in a shared stream.
Note: You can add photos only to photo streams you create. You cannot add photos to shared
photo streams you subscribe to.
To add photos to a shared photo stream
1 Select the photos you want to add to an existing photo stream, then do one of the following:
•Choose File > Share > Photo Stream.
•Choose Photo Stream from the Share pop-up menu in the toolbar.
2 In the Photo Stream dialog, choose a shared photo stream from the Photo Stream pop-up menu,
then click OK.
To remove photos from a shared photo stream
1 In the Web section of the Library inspector, select Photo Stream.
2 Double-click the shared photo stream containing the photos you want to remove.
3 Select the photos you want to remove, then press Delete.
To replace a photo in a shared photo stream
If you share a photo in a shared photo stream and then apply image adjustments to it, the newly
adjusted photo doesn’t automatically appear in the shared photo stream. You can either add it to
the existing photo stream along with the older version, or you can delete the older version and
replace it with the updated photo.
1 In the Web section of the Library inspector, select Photo Stream.
2 Double-click the shared photo stream containing the photo you want to replace.
3 Select the photo you want to replace, then press Delete.
4 In the Library inspector, select the project containing the updated photo, then select the photo.
5 Choose Photo Stream from the Share pop-up menu in the toolbar.
6 In the Photo Stream dialog, choose the shared photo stream that contained the photo you want
to replace from the Photo Stream pop-up menu, then click OK.
The updated photo with the new adjustments replaces the photo you just removed.
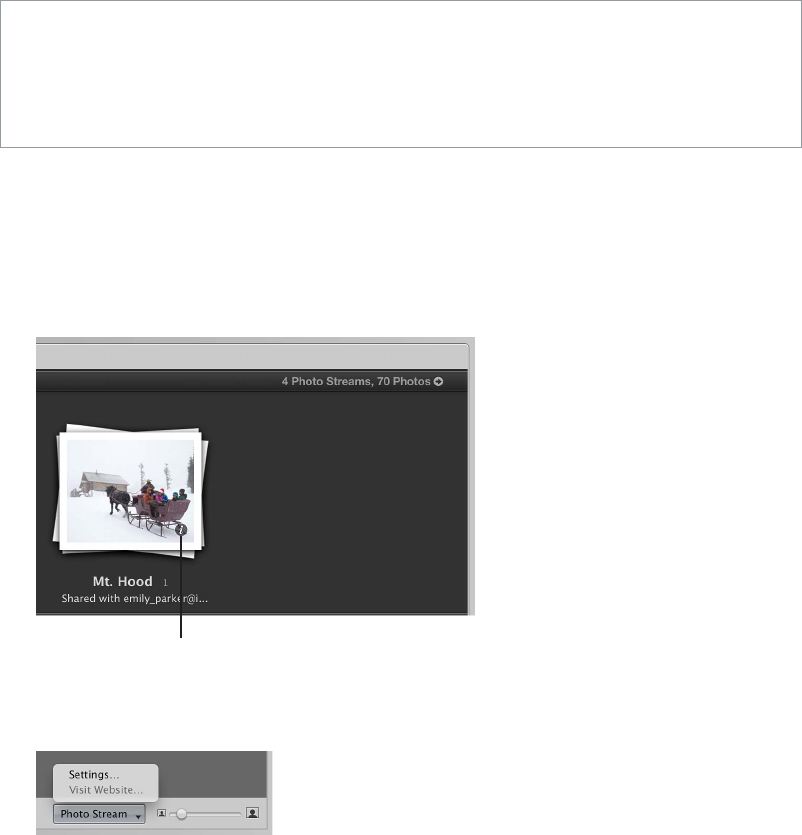
Chapter 24 Sharing Your Photos Online 563
Managing Subscribers to Your Shared Photo Streams
You can add and remove subscribers to your shared photo streams at any time.
WARNING: If you plan to remove a subscriber from a shared photo stream and you think that
person might like to keep some photos in the shared stream, you need to alert the person to
save the photos before you remove him or her from the subscription list. When you remove the
subscriber, your shared stream along with all of its photos is immediately removed from the
subscriber’s Apple devices.
To add and remove subscribers to a shared photo stream
1 In the Web section of the Library inspector, select Photo Stream.
2 Do one of the following:
•Move the pointer over the shared photo stream’s thumbnail, then click the Info button (with
an “i”).
Click the Info button to open
the Photo Stream dialog.
•Double-click the shared photo stream’s thumbnail, then choose Settings from the Photo
Stream pop-up menu in the tool strip.
3 In the Photo Stream dialog, do one of the following:
•To invite a new subscriber: Type the invitee’s email address in the “Shared with” eld.
If the person you’re inviting doesn’t have an iCloud account, select the Public
Website checkbox.
•To remove a subscriber: Select the subscriber’s email address, then press Delete.
If the subscriber doesn’t have an iCloud account and you invited him or her to view a public
website, deselect the Public Website checkbox.
4 Click OK.
If you invited a new person to view your shared photo stream, an email and a notication are
sent, asking that person to subscribe to your shared photo stream. If you removed an existing
subscriber from your shared photo stream, the shared stream is immediately removed from the
subscriber’s Apple devices. If you want to reinvite a subscriber to view your shared photo stream,
delete the person’s email address from the “Shared with” eld, then add the email address again.
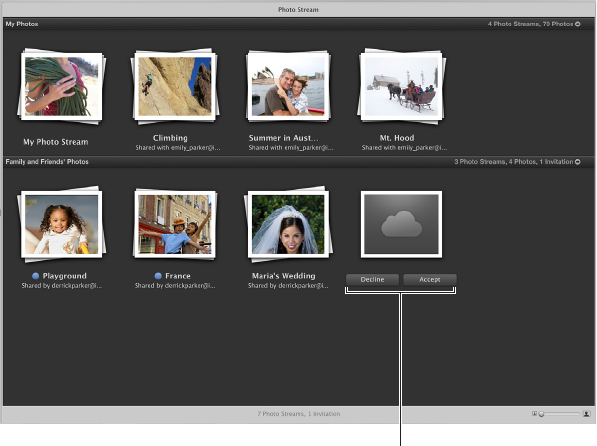
Chapter 24 Sharing Your Photos Online 564
Subscribing to Shared Photo Streams
If you have an iCloud account, you can subscribe to shared photo streams that your family
and friends invite you to. After you accept, you can view the photos on all your Apple devices,
including your Mac. You can also mark the photos you like and comment on photos. You can
unsubscribe from a shared photo stream at any time. If you want to use a photo in a shared
photo stream that you subscribe to, you can import the photo into your Aperture library and
then make adjustments to the photo as needed.
To subscribe to a shared photo stream
To subscribe to a shared photo stream, all you have to do is accept the invitation. Invitations to a
shared photo stream are sent by email and notications.
1 In the Web section of the Library inspector, select Photo Stream.
2 In the lower portion of Photo Stream view, move the pointer over the shared photo stream’s
thumbnail, then click the Accept button.
If you don’t want to subscribe to the shared photo stream, click the Decline button.
Click to accept or decline an
invitation to a shared photo stream.
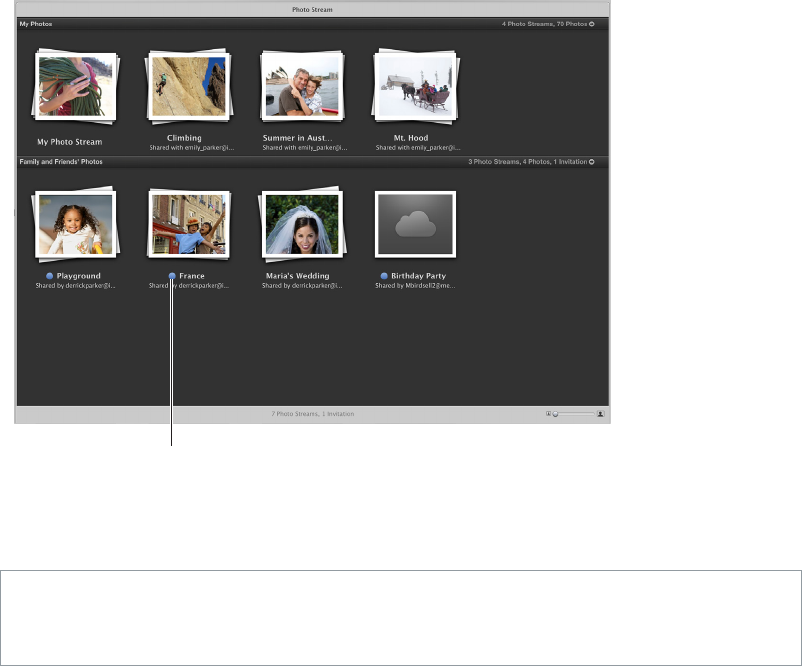
Chapter 24 Sharing Your Photos Online 565
Shared photo streams that you subscribe to appear in the lower portion of Photo Stream view. A
blue dot next to the shared photo stream’s name indicates that new photos have been added to
the photo stream or new comments have been added to one of its photos. In addition, a number
appears above the Aperture icon in the Dock to indicate that new photos and comments have
been shared with you.
A blue dot indicates that new photos
or comments have been added.
To unsubscribe from a shared photo stream
If you want to unsubscribe from a photo stream, all you have to do is delete it.
WARNING: When you unsubscribe from a shared photo stream, the photos contained in the
shared stream are immediately deleted from all your devices. If you want to keep some of the
photos, you should import them into your Aperture library rst.
1 In the Web section of the Library inspector, select Photo Stream.
2 Select the photo stream you want to unsubscribe from, then press Command-Delete.
To comment on or “like” a photo in a shared photo stream
When someone shares a photo with you in a shared photo stream, you can like the photo or add
comments to it.
1 In the Web section of the Library inspector, select Photo Stream.
2 Double-click the shared photo stream containing the photo you want to like or comment on.
3 Select the photo.
4 In the Info inspector, choose Comments from the Metadata View pop-up menu, then do either of
the following:
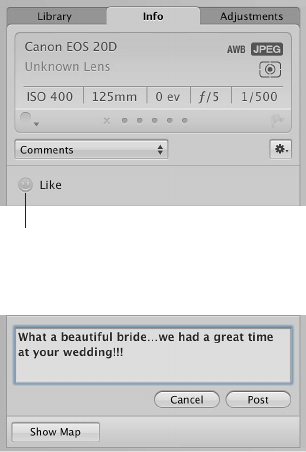
Chapter 24 Sharing Your Photos Online 566
•To like the photo: Click the Like button (with a smiley face).
Click the Like button
to “like” a photo.
•To add a comment to the photo: Type the comment in the text eld, then click Post.
When you like or comment on a photo in a shared stream, a notication is sent to all the Apple
devices of the photo stream’s creator and subscribers. You can delete comments you added to a
photo by placing the pointer over the comment and clicking the Delete button that appears.
To save photos from shared photo streams you subscribe to
Photos in shared photo streams are view-only. However, you can import the photos into your
Aperture library, apply image adjustments, share the updated photos, and add them to your
slideshows and books.
1 In the Web section of the Library inspector, select Photo Stream.
2 Double-click the shared stream containing the photos you want to save.
3 Select the photos.
4 Import the photos by doing one of the following:
•Drag the photos into a project in the Library inspector.
•In the histogram area of the Adjustments inspector, click the Import Photo button.
Chapter 24 Sharing Your Photos Online 567
Emailing Photos
While it’s not the best method for delivering uncompressed or large image les, email provides
a quick and easy way to deliver photos. Aperture contains three export presets (Email Small,
Email Medium, and Email Original Size) that create compressed JPEG les that are easy to send
via email. If these export presets don’t meet your needs, you can create your own custom email
export preset.
You can also have Aperture transfer a photo directly to your email application. To specify that
Aperture use a specic email application to send your photos, choose the email application you
want to use in the Export pane of the Preferences window. You can also specify the email export
preset used to prepare the photos.
To specify an email application and email export preset for Aperture to use
1 Choose Aperture > Preferences, or press Command-Comma (,), then click Export.
2 In the Export pane of the Preferences window, choose the email application you want to use
from the “Email using” pop-up menu.
3 To specify an export preset for Aperture to use when preparing photos for email transfer, choose
a preset from the “Email Photo Export preset” pop-up menu.
If none of the presets meets your needs, choose Edit from the “Email Photo Export preset”
pop-up menu and create a new export preset.
For more information about creating export presets, see Creating an Export Preset on page 442.
To send a photo directly to your email application
1 Select the photo you want to send.
2 Do one of the following:
•Choose File > Share > Email (or press Option-E).
•Choose Email from the Share pop-up menu in the toolbar.
The photo is exported directly to your email application.
Note: Before you attempt to email a photos, nd out the maximum le size your email client
supports. If your exported photos exceed this maximum le size, consider using FTP software or
another le-sharing technique to deliver your photos.
To export a photo or photos to attach to an email message later
1 Select the photo or photos you want to export.
2 Choose File > Export > Versions (or press Command-Shift-E).
3 Navigate to the location where you want the exported photos placed.
4 Choose an image le format from the Export Preset pop-up menu.
5 Choose a name format for your les from the Name Format pop-up menu.
6 When you’re ready to export les, click Export Versions.
You can now open your email application and attach the exported les.
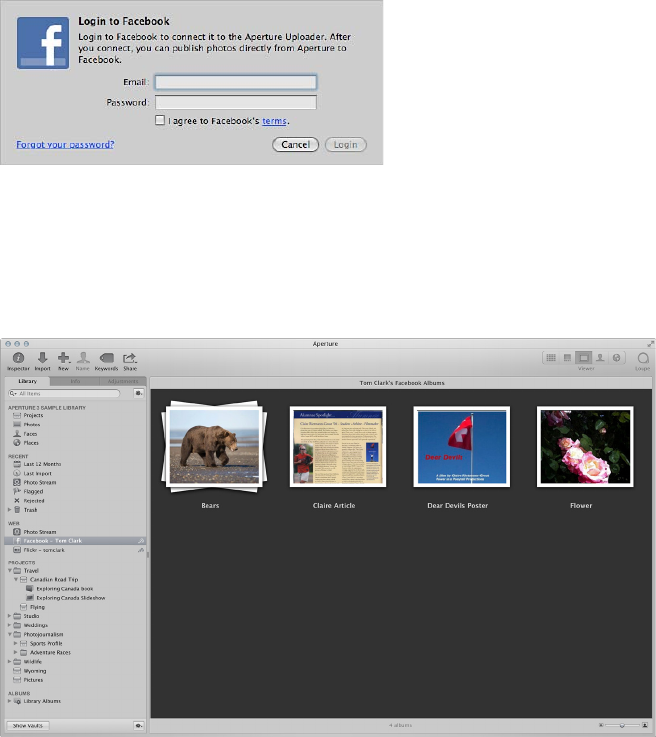
Chapter 24 Sharing Your Photos Online 568
Publishing Photos to Flickr and Facebook
An Overview of Sharing Photos with Flickr and Facebook
Aperture lets you create Flickr and Facebook albums to collect photos for publication on
http://www.ickr.com and http://www.facebook.com. Photos placed in Flickr and Facebook
albums in Aperture are automatically exported to and published in your Flickr and
Facebook accounts.
Any comments your friends post about a photo in one of your Facebook accounts appear in the
Info inspector in Aperture. For more information about reviewing comments your friends post
about your photos, see Viewing and Changing Metadata in the Info Inspector and Inspector
HUD on page 183.
The rst time you create a Flickr or Facebook album, Aperture prompts you to enter your account
information. If you don’t have an account with Flickr or Facebook, you can create one. Aperture
stores your account information for each website in the OS X secure keychain.
You can also post photos to multiple Flickr and Facebook accounts from within Aperture. With
your account settings in place, Aperture immediately creates a Flickr or Facebook album and
then publishes the album to the corresponding account’s website. Your Flickr and Facebook
accounts appear in the Web section of the Library inspector. Select an account to view its albums
in Web Albums view.
Once you have an existing Flickr or Facebook album in place, you can continue to publish photos
to the web album. Any photos posted to your Flickr and Facebook accounts from other software
applications, your web browser, or a mobile device automatically appear in their respective
albums in Web Albums view.
Chapter 24 Sharing Your Photos Online 569
You can have Aperture check to see if any new albums appear in your Facebook accounts or if
any new sets appear in your Flickr accounts. If Aperture detects the presence of a new album
in your Facebook account, it downloads the album’s conguration. The new Facebook album
appears in the Web Albums view for the account. If Aperture detects a new set in your Flickr
account, the new set appears as a Flickr album in the Web Albums view for the account. To view
the contents of a new album, double-click the new album in the account’s Web Albums view.
Note: A Flickr album is not created for photos and video clips published to your Flickr
photostream. For more information about publishing Flickr sets and uploading photos and video
clips to your Flickr photostream, see Signing In to Flickr and Facebook on page 569.
Signing In to Flickr and Facebook
In order to share photos from your Aperture library with Flickr and Facebook, you create Flickr
and Facebook albums. The rst step in creating Flickr and Facebook albums is entering your
Flickr and Facebook account details. You only have to do this once. After you enter your account
details, Aperture securely stores the information in the OS X user account’s secure keychain. Then
you can create as many Flickr and Facebook albums as you wish and publish the photos in the
albums whenever you have an Internet connection. You can also publish to multiple Flickr and
Facebook accounts.
Important: You must have an Internet connection to share photos from your Aperture library
with Flickr and Facebook.
The rst time you create a Flickr or Facebook album, Aperture asks you to sign in to your Flickr or
Facebook account.
To sign in to Flickr and create a new Flickr album
1 In Aperture, select a group of photos or a video.
Note: If you have a basic Flickr account, you can upload only one video le at a time to your
Flickr set.
2 Do one of the following:
•Choose File > Share > Flickr.
•Choose Flickr from the Share pop-up menu in the toolbar.
3 In the dialog that appears, click Set Up.
The Flickr account sign-in page opens in your web browser.
4 In the Flickr account sign-in page, do the following:
•Enter your Yahoo! ID.
•Enter your password.
•Select the “Keep me signed in” checkbox.
Selecting this checkbox keeps you signed in for two weeks and prevents you from having
to sign in to Flickr every time you want to publish photos to your Flickr account within a
two-week period.
5 Click Sign In.
A new page opens in Flickr asking if you arrived at this page via Aperture Uploader.
6 Click Next.
A new page opens in Flickr asking if you want Aperture Uploader to link to your Flickr account.
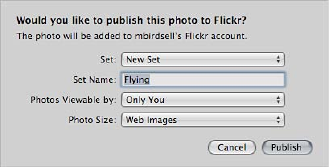
Chapter 24 Sharing Your Photos Online 570
7 Click the “OK, I’ll Authorize It” button, then switch back to Aperture.
A new dialog appears in Aperture with controls for creating a new Flickr set as well as setting
access restrictions for your Flickr page.
8 Do the following:
•If necessary, choose the Flickr account you want to publish to from the Flickr Account
pop-up menu.
•Choose New Set from the Set pop-up menu.
•Give your Flickr set a name in the Set Name eld.
•In the “Photos Viewable by” pop-up menu, choose an access level to set who can view your
Flickr set.
•In the Photo Size pop-up menu, choose whether or not you want the photos resized and
optimized for publication.
9 Click Publish.
Aperture securely saves your Flickr account information to your OS X user account’s keychain
and then publishes your album to Flickr. The new Flickr album representing the online Flickr
set appears in Web Albums view, which is accessed by selecting the Flickr account in the Web
section of the Library inspector. For more information about publishing additional photos to
your Flickr set, see Updating Your Flickr and Facebook Albums on page 576.
You can also use the Info inspector to view the specic Flickr account and the set the photos
were published to, along with when the photos were published. For more information, see
Viewing and Changing Metadata in the Info Inspector and Inspector HUD on page 183.
To sign in to Flickr and upload a photo or video to your photostream
1 In Aperture, select a photo or a video.
Note: If you have a basic Flickr account, you can upload only one video le at a time to your
Flickr photostream.
2 Do one of the following:
•Choose File > Share > Flickr.
•Choose Flickr from the Share pop-up menu in the toolbar.
3 In the dialog that appears, click Set Up.
The Flickr account sign-in page opens in your web browser.
Chapter 24 Sharing Your Photos Online 571
4 In the Flickr account sign-in page, do the following:
•Enter your Yahoo! ID.
•Enter your password.
•Select the “Keep me signed in” checkbox.
Selecting this checkbox keeps you signed in for two weeks and prevents you from having
to sign in to Flickr every time you want to publish photos to your Flickr account within a
two-week period.
5 Click Sign In.
A new page opens in Flickr asking if you arrived at this page via Aperture Uploader.
6 Click Next.
A new page opens in Flickr asking if you want Aperture Uploader to link to your Flickr account.
7 Click the “OK, I’ll Authorize It” button, then switch back to Aperture.
A new dialog appears in Aperture with controls for creating a new Flickr set as well as setting
access restrictions for your Flickr page.
8 Do the following:
•If necessary, choose the Flickr account you want to publish to from the Flickr Account
pop-up menu.
•Choose Photostream from the Set pop-up menu.
• In the “Photos Viewable by” pop-up menu, choose an access level to set who can view your
Flickr set.
•In the Photo Size pop-up menu, choose whether or not you want the photos resized and
optimized for publication.
9 Click Publish.
Aperture securely saves your Flickr account information to your OS X user account’s keychain and
then publishes your photo or video to your Flickr photostream.
You can also use the Info inspector to view the specic Flickr account, along with when the
photo or video was published. For more information, see Viewing and Changing Metadata in the
Info Inspector and Inspector HUD on page 183.

Chapter 24 Sharing Your Photos Online 572
To sign in to Facebook and create a new Facebook album
1 In Aperture, select a photo or a group of photos.
2 Do one of the following:
•Choose File > Share > Facebook.
•Choose Facebook from the Share pop-up menu in the toolbar.
3 In the dialog that appears, do the following:
•Enter your email address.
•Enter your password.
•Select the “I agree to Facebook’s terms” checkbox.
•Click Login.
4 In the dialog that appears, do the following:
•If you have multiple Facebook accounts, choose the Facebook account you want to publish to
from the Facebook Account pop-up menu.
•Choose New Album from the Albums pop-up menu.
•Give your Facebook album a name in the Album Name eld.
•In the Photos Viewable By pop-up menu, choose an access level to set who can view your
Facebook album.
•Click Publish.
Aperture securely saves your Facebook account information to your OS X user account’s
keychain and then publishes your album to Facebook. The new Facebook album appears in Web
Albums view, which is accessed by selecting the Facebook account in the Web section of the
Library inspector.
Note: You will no longer have to log in to your Facebook account if there is a change to this
Facebook album or when you create new Facebook albums. For more information about
publishing your Facebook album, see Updating Your Flickr and Facebook Albums on page 576.
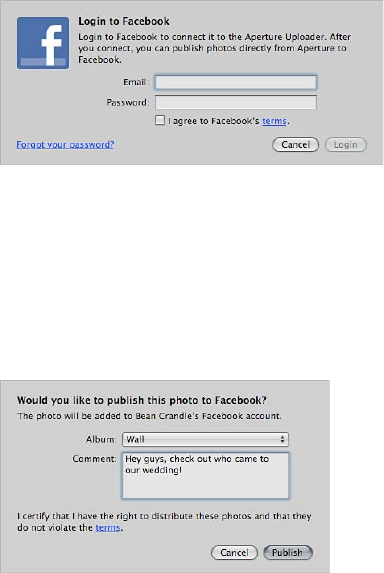
Chapter 24 Sharing Your Photos Online 573
To sign in to Facebook and upload a photo or video to your Facebook Wall
1 In Aperture, select a photo or a video.
Note: You can upload only one photo or video le at a time to your Facebook Wall.
2 Do one of the following:
•Choose File > Share > Facebook.
•Choose Facebook from the Share pop-up menu in the toolbar.
3 In the dialog that appears, do the following:
•Enter your email address.
•Enter your password.
•Select the “I agree to Facebook’s terms” checkbox.
•Click Login.
4 In the dialog that appears, do the following:
•If you have multiple Facebook accounts, choose the Facebook account you want to publish to
from the Facebook Account pop-up menu.
•Choose Wall from the Album pop-up menu.
•In the Comment eld, enter a comment to appear with your photo or video in Facebook.
•Click Publish.
Aperture securely saves your Facebook account information to your OS X user account’s keychain
and then publishes your photo or video, along with your comment, to your Facebook account’s
Wall. Any comments your friends post to your photo on Facebook appear in the Metadata
inspector when the photo is selected in Aperture. For more information, see Viewing and
Changing Metadata in the Info Inspector and Inspector HUD on page 183.
Chapter 24 Sharing Your Photos Online 574
Creating Flickr and Facebook Albums
Once you set up your account information and create your rst Flickr or Facebook album,
creating new Flickr and Facebook albums is a simple process.
To create a new Flickr album to publish as a Flickr set
1 Do one of the following:
•In the Library inspector, select an item.
•In the Browser, select a group of photos.
2 Do one of the following:
•Choose File > Share > Flickr.
•Choose Flickr from the Share pop-up menu in the toolbar.
3 In the dialog that appears, do the following:
•If you have multiple Flickr accounts, choose the Flickr account you want to publish to from the
Flickr Account pop-up menu.
•Choose New Set from the Set pop-up menu.
•In the Set Name eld, give your Flickr set a name.
•In the “Photos Viewable by” pop-up menu, choose an access level to set who can view your
Flickr set.
•In the Photo Size pop-up menu, choose an image size option.
4 Click Publish.
Aperture publishes your album to Flickr as a Flickr set, and the new Flickr album appears in Web
Albums view, which is accessed by selecting the Flickr account in the Web section of the Library
inspector. For more information about viewing Flickr albums, see Viewing Flickr and Facebook
Albums on page 575.
To create a new Facebook album
1 Do one of the following:
•In the Library inspector, select an item.
•In the Browser, select a group of photos.
2 Do one of the following:
•Choose File > Share > Facebook.
•Click the Facebook button in the toolbar.
3 In the dialog that appears, do the following:
•If you have multiple Facebook accounts, choose the Facebook account you want to publish to
from the Facebook Account pop-up menu.
•Choose New Album from the Albums pop-up menu.
•In the Album Name eld, give your Facebook album a name.
•In the Photos Viewable By pop-up menu, choose an access level to set who can view your
Facebook album.
4 Click Publish.
Aperture publishes your album to Facebook, and the new Facebook album appears in Web
Albums view, which is accessed by selecting the Facebook account in the Web section of the
Library inspector. For more information about viewing Facebook albums, see Viewing Flickr and
Facebook Albums on page 575.
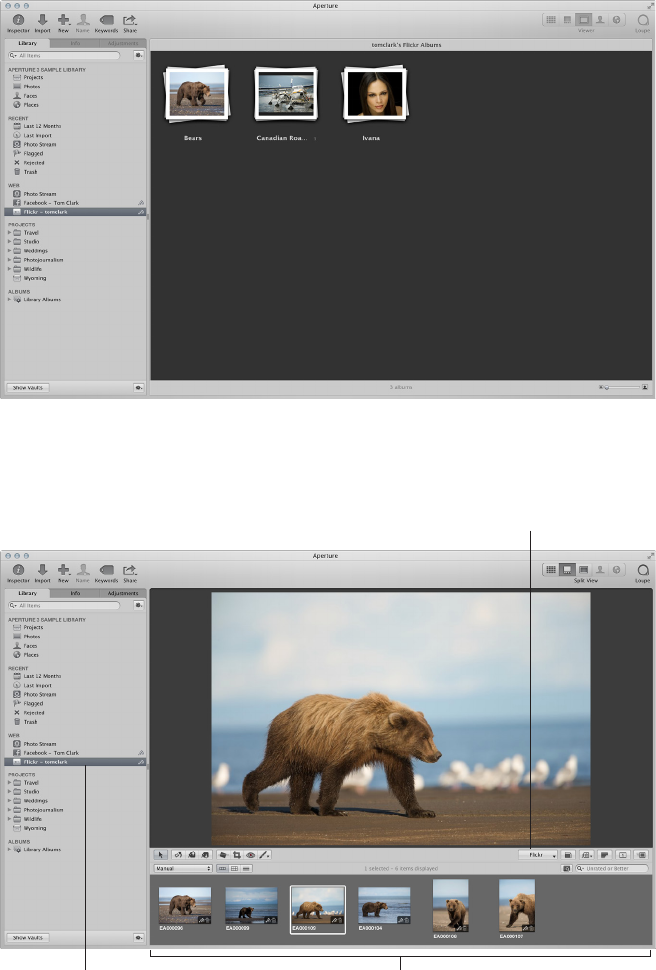
Chapter 24 Sharing Your Photos Online 575
Viewing Flickr and Facebook Albums
You can view the contents of your Flickr and Facebook albums in Aperture at any time.
To view a Flickr or Facebook album in Aperture
1 In the Web section of the Library inspector, select the Flickr or Facebook account containing the
albums you want to view.
The albums for the selected Flickr or Facebook account appear in Web Albums view to the right
of the Library inspector.
2 In Web Albums view, double-click an album’s thumbnail to view its contents.
Flickr account
Flickr pop-up menu
Photos in the
Flickr album
Chapter 24 Sharing Your Photos Online 576
Updating Your Flickr and Facebook Albums
As your Flickr and Facebook albums grow, you can publish them at any time. Aperture checks
to see which photo versions have already been published in the album and then uploads any
version that has changed and any new versions. If you’re not sure if a Flickr or Facebook album is
up to date or you just want to check your Flickr or Facebook page, you can visit your published
Facebook album or Flickr set from within Aperture.
To publish new photos to an existing Flickr set
1 Select the photos you want to publish to your Flickr album.
2 Do one of the following:
•Choose File > Share > Flickr.
•Choose Flickr from the Share pop-up menu in the toolbar.
•Drag the photos to the Flickr account in the Web section of the Library inspector.
The Flickr publication dialog appears.
3 Do the following:
a If necessary, choose the Flickr account you want to publish to from the Flickr Account
pop-up menu.
b Choose the album’s name from the Set pop-up menu.
c In the “Photos Viewable by” pop-up menu, choose an access level to set who can view your
Flickr set.
d In the Photo Size pop-up menu, choose whether or not you want the photos resized and
optimized for publication.
4 Click Publish.
Any changed or new versions in the selected Flickr album are uploaded to the Flickr set.
To publish new photos to an existing Facebook album
1 Select the photos you want to publish to your Facebook album.
2 Do one of the following:
•Choose File > Share > Facebook.
•Choose Facebook from the Share pop-up menu in the toolbar.
•Drag the photos to the Facebook account in the Web section of the Library inspector.
The Facebook publication dialog appears.
3 Do the following:
a If you have multiple Facebook accounts, choose the Facebook account you want to publish to
from the Facebook Account pop-up menu.
b Choose the album’s name from the Albums pop-up menu.
4 Click Publish.
Any changed or new versions are uploaded to the selected Facebook album.
To have Aperture immediately check for new Flickr sets or Facebook albums online
You can have Aperture immediately check to see if any of your friends have published new Flickr
sets or Facebook albums to your accounts online.
mIn the Library inspector, click the Sync button (with a broadcast icon) to the right of the Flickr or
Facebook account’s name.
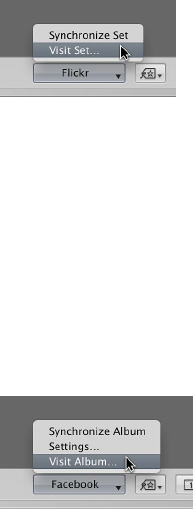
Chapter 24 Sharing Your Photos Online 577
Any new Flickr sets or Facebook albums created outside of Aperture are downloaded to the Web
Albums view for the account selected in the Library inspector.
To have Aperture check an individual Flickr or Facebook album for new content online
mIn Web Albums view, Control-click the Flickr or Facebook album you want to update, then choose
Synchronize Album from the shortcut menu.
Any new photos or videos posted to your Flickr set or Facebook album online appear in the
selected album in Web Albums view. Double-click the album to view its contents.
To visit your published Flickr set
1 In the Library inspector, select the Flickr account containing the album you want to visit.
The Web Albums view for the selected Flickr account appears.
2 In Web Albums view, do one of the following:
•Double-click the Flickr album you want to visit, then choose Visit Set from the Flickr pop-up
menu in the tool strip.
•Control-click the Flickr album you want to visit, then choose Visit Set from the shortcut menu.
Your web browser opens your Flickr page and displays your published Flickr set.
To visit your published Facebook album
1 In the Library inspector, select the Facebook account containing the album you want to visit.
The Web Albums view for the selected Facebook account appears.
2 In Web Albums view, do one of the following:
•Double-click the Facebook album you want to visit, then choose Visit Album from the
Facebook pop-up menu in the tool strip.
•Control-click the Facebook album you want to visit, then choose Visit Album from the
shortcut menu.
Your web browser opens your Facebook page and displays your published album.

Chapter 24 Sharing Your Photos Online 578
Deleting Flickr and Facebook Albums
You can delete Flickr and Facebook albums in Aperture at any time.
WARNING: Deleting Flickr and Facebook albums in Aperture permanently deletes the
corresponding Flickr sets and Facebook albums online, along with their contents. If you want to
temporarily remove a Flickr or Facebook account in Aperture, but keep the albums and photos
as they are in your Flickr or Facebook account online, you can always disable your Flickr or
Facebook account in Aperture. For more information about disabling and enabling accounts in
Aperture, see Disabling and Enabling Flickr and Facebook Accounts on page 579.
To delete a Flickr or Facebook album
1 In the Library inspector, select the Flickr or Facebook account containing the album you want
to delete.
2 In Web Albums view, select the Flickr or Facebook album you want to delete.
3 Choose File > Delete Album (or press Command-Delete).
4 In the dialog that appears, select the “Import photos to your library before deleting” checkbox if
you want to save the photos before deleting the album in your library and online.
5 Click Delete.
The Flickr or Facebook album you selected in the Library inspector is deleted from the Aperture
library, as well as from your Flickr or Facebook account online.
Changing Your Facebook Settings
After publishing an album to Facebook, you can change its name as well as the restrictions for
who can view it. For example, if you recently published photos of your latest family vacation on
Facebook and made the album viewable by everyone, you can use the Facebook pop-up menu
in the tool strip to make the album viewable only by friends.
To change the settings for a published Facebook album
1 In the Library inspector, select the Facebook account containing the album whose settings you
want to change.
2 In Web Albums view, select the album whose settings you want to change.
3 In the tool strip, choose Settings from the Facebook pop-up menu, then specify new settings in
the dialog that appears.
4 Click Change Settings.
Chapter 24 Sharing Your Photos Online 579
Working with Multiple Flickr and Facebook Accounts
In Aperture, you can share photos with multiple Flickr and Facebook accounts.
To add multiple Flickr and Facebook accounts to Aperture
1 Choose Aperture > Preferences, or press Command-Comma (,).
The Preferences window appears.
2 In the Preferences window, click Web, then click the Add (+) button to add an account.
3 In the dialog that appears, choose a type of account, then click Add.
4 Do one of the following:
•To log in to a Flickr account: Click Set Up.
Your browser opens. Follow the onscreen instructions to sign in to Flickr using your Yahoo! ID
and password, then authorize the Aperture Uploader to post photos to your Flickr account on
the following page.
•To log in to a Facebook account: Enter your email address and password, select the “I agree to
Facebook’s terms” checkbox, then click Login.
You can now share photos with the new Flickr or Facebook account. Flickr sets and Facebook
albums created outside of Aperture can be downloaded to the Library inspector. For more
information, see Updating Your Flickr and Facebook Albums on page 576.
Disabling and Enabling Flickr and Facebook Accounts
You can disable access to your Flickr or Facebook accounts and then enable access to them again
from within Aperture at any time. When a Flickr or Facebook account is disabled in Aperture, all
of the disabled account’s albums are removed from Aperture. However, the albums and their
photos are retained and still appear in the Flickr or Facebook account.
When you choose to disable an account in Aperture, a dialog appears asking if you want to
import the photos in the account’s albums into your Aperture library. If you choose to import
the photos, Aperture places the photos in a new project in the Library inspector. If you choose
not to import the photos, Aperture places the contents of the albums in the Aperture Trash. Any
sharing history that appears in the Info inspector for the disabled account is deleted.
If you regularly enable and disable your Flickr and Facebook accounts in Aperture, and you want
to permanently import content posted to these accounts outside of Aperture, drag the content
you want to import from the Flickr or Facebook album to a new or existing project in the Library
inspector. Aperture generates new copies of the media and places them in the selected project.
Chapter 24 Sharing Your Photos Online 580
To disable all of your online accounts in Aperture
mChoose File > Web Accounts > Disable All Accounts.
All of your online Flickr and Facebook accounts and their associated albums are disabled and
removed from Aperture. However, the album congurations are saved in case you want to
reenable the accounts later. The albums, sets, and their contents still appear in the Flickr or
Facebook accounts online.
To disable a single Flickr or Facebook account in Aperture
mChoose File > Web Accounts > Disable [account].
The selected Flickr or Facebook account and all its albums are disabled and removed from
Aperture. However, the album congurations are saved in case you want to reenable the
account later. The albums, sets, and their contents still appear in the disabled Flickr or Facebook
account online.
To enable all of your Flickr and Facebook accounts in Aperture
After disabling your Flickr or Facebook accounts in Aperture, you can always reenable them.
mChoose File > Web Accounts > Enable All Accounts.
The published albums for the web accounts appear in the Library inspector.
To enable a single Flickr or Facebook account in Aperture
mChoose File > Web Accounts > Enable [account].
The published albums for the selected web account appear in the Library inspector.
581
An Overview of the Backup Workow
To safeguard your photography portfolio, it’s important to establish a reliable backup system and
back up regularly. You can use the Aperture backup system to back up the entire Aperture library
on a regular basis. Aperture clearly indicates how up to date your most recent backup is, and
you can update your backups immediately whenever you wish. In the event of a rare equipment
failure or unforeseen catastrophe such as a re or weather-related damage, you can easily restore
the entire Aperture library onto your computer or a new computer.
Making backup copies of the library aords you the reassurance that should an unforeseen
incident cause the loss of your les, you can easily restore them from your backup vaults later. If
you back up the library regularly and store backups osite, you run little risk of losing your work.
When you back up your photos, Aperture makes a complete copy of the library in its current
state. If you remove items from the library, those items are removed from the backup when it is
next updated.
You can make and store as many complete backups of the library as you wish. If you want to
keep a historical archive of the library, you’ll need to devise a system of storing separate backups
in some regular chronological order.
You set Aperture to back up a copy of the library to a designated storage area called a vault.
For safety and redundancy, use external hard disks to hold your vaults. Aperture lets you create
as many vaults as you deem necessary. For example, you may want to create one vault on an
external hard disk for daily backups and a second vault on another external hard disk that you
keep osite.
All originals for managed images, all versions, and all metadata, previews, and adjustment
information associated with your photos are backed up. The versions, previews, and metadata
associated with referenced images are also backed up in the vault.
Important: Referenced images’ originals are not backed up in the vault with the library. Because
the originals for referenced images are stored outside of the library, you must manage the
backup and archiving of them yourself.
Although rare, mechanical failures and unexpected damage to your computer system can occur.
And from time to time you may upgrade your equipment and need to move your portfolio to a
new system. Aperture allows you to easily restore the entire Aperture library from your backup
disks onto your computer or a new system. For more information about restoring images and
projects, see Restoring Your Aperture System on page 586.
Backing Up Your Photos 25
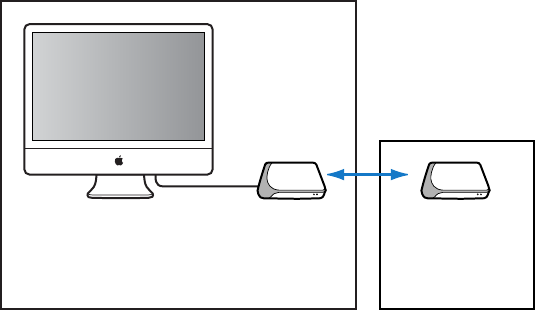
Chapter 25 Backing Up Your Photos 582
As you add to your photo library, Aperture automatically tracks which les have been backed
up to each vault. When there are image les in the library that are not backed up in a vault, the
Vault Status button appears red. When your vault is up to date, the Vault Status button for the
vault appears black. When you have made image modications (such as image adjustments or
metadata or keyword changes) that have not yet been backed up in a vault, the button appears
yellow. Aperture does not automatically update your vaults, but you can update your vaults at
any time.
Important: Aperture does not back up your library automatically. You must tell Aperture to back
up your library by either clicking the Update All Vaults button, which creates a mirror copy of
your library on all connected vaults, or clicking the Vault status button for a vault, which creates a
mirror copy of your library on that vault.
Planning Your Backup System
As you begin working with Aperture, it’s important to perform regular backups of your photos.
When you import new photos from your camera, you should immediately create a backup so
that you have copies safely stored. As you routinely work with Aperture, creating new photo
versions and making adjustments, you’ll want to make sure your work is copied to disk and your
backup vaults are up to date.
A typical backup system used with Aperture might look like the following:
Office Remote location
Aperture library
(internal disk)
Vault
(external disk)
Vault
(kept offsite and
updated regularly)
This system backs up the Aperture library to two vaults stored on external hard disks. You
routinely back up the library on one external hard disk. You use the second hard disk as a backup
that you keep osite. You can then alternately back up the library on your onsite external hard
disk and rotate it with the osite hard disk to keep all your vaults updated.
To set up your Aperture backup system, you need to do the following:
•Determine the number of vaults you need. For example, do you need one for routine backups,
one for weekly backups, and one for osite storage?
•Determine the number of hard disks you need for routine backups.
•Determine the number of hard disks you’ll use for storing backups osite.
•Connect your hard disk drives to your computer.
•Open Aperture and create the vaults you need, assigning a hard disk to each vault.
•Update the new empty vaults with copies of the Aperture library.
•Disconnect one of the vault hard disks and take it to an osite location for safekeeping.
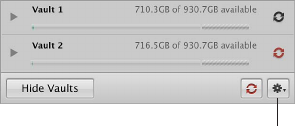
Chapter 25 Backing Up Your Photos 583
When planning the amount of storage space you’ll need, estimate the amount of disk space
needed to hold your existing digital images (photos you plan to import into Aperture) and the
amount of space you might need for new projects. For example, RAW images typically require 8
to 25 or more megabytes (MB) of disk space per le. Estimating the number of photos in a typical
project and the number of projects you usually create in a year, you can make a rough estimate
of what might represent a year’s storage space.
Showing the Vault Pane
You use the Vault pane below the Library inspector to set the location of your vaults and check
their status.
To show the Vault pane
Do one of the following:
mChoose Window > Show Vaults (or press Shift-R).
mClick the Show Vaults button.
Creating Vaults
Before you can back up your les, you must create a vault and assign a hard disk to it. After
you assign a disk to the vault, Aperture uses the vault to back up the entire library. You can
create additional vaults and assign hard disks to them, and each additional vault also records a
complete backup of the library.
To create a new vault
1 Do one of the following:
•Choose File > Vault > Add Vault.
•Choose Add Vault from the Vault Action pop-up menu.
Vault Action pop-up menu
2 A dialog appears, listing the number of managed les that will be backed up to the vault and the
number of referenced les that will not be included. Click Continue to proceed.
3 In the Add Vault dialog, specify the following options:
•Type a vault name in the Save As eld.
•Choose where you want the vault stored from the Where pop-up menu.
4 Click Add.
The new empty vault appears in the Vault pane.
Important: To ensure preservation of your image assets, make sure to assign a separate external
hard disk drive to each vault.
To update a vault
When you create a new vault, it is empty. Therefore, as soon as you create a new vault, you
should update it.
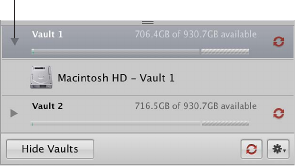
Chapter 25 Backing Up Your Photos 584
mIn the Vault pane, click the Vault Status button to the right of the vault’s name.
For more information about updating vaults, see Updating Vaults on page 584.
To see the hard disk assigned to a vault
mIn the Vault pane, click the disclosure triangle beside the vault name.
Disclosure triangle
You can easily see the amount of free space your vault has available next to the vault name.
Make sure to assign enough disk space to the vault to ensure a complete backup of the library
and to allow the library to grow as you import new photos over time.
Updating Vaults
You can have Aperture update your vaults at any time. You can determine which vaults need to
be updated by the color of the Vault Status button next to each vault. You can have Aperture
update a particular vault or all of your vaults at once.
After you import new photos into Aperture, you should make an immediate backup to ensure
that the digital les exist in more than one place. You can make an immediate backup of your
imported photos by updating an existing vault.
To update all connected vaults
1 Do one of the following:
•Choose File > Vault > Update All Vaults.
•In the Vault pane, click the Update All Vaults button.
2 In the dialog that appears, click Update.
To update an existing vault
1 Do one of the following:
•Choose Window > Show Vaults (or press Shift-R).
•Click the Show Vaults button.
2 Select the vault you want to update.
3 Do one of the following:
•In the Vault pane, choose Update Vault from the Vault Action pop-up menu (with a gear icon).
•Click the Vault Status button beside the vault name.
4 In the dialog that appears, click the Update button.
Chapter 25 Backing Up Your Photos 585
Disconnecting a Vault’s Hard Disk Drive from Your System
Temporarily
You may routinely disconnect a backup hard disk drive from your Aperture system and take it to
a safe osite location. When you disconnect a backup hard disk from your computer, Aperture
takes the associated vault oine. When you reconnect the hard disk, Aperture automatically
detects the hard disk and connects it to the corresponding vault.
To disconnect a vault’s hard disk drive from your Aperture system
1 In the Finder, drag the icon for the hard disk drive to the Trash, or select the disk in the sidebar of
a Finder window and click the Eject button.
2 Disconnect the hard disk drive from your computer.
Reconnecting a Vault’s Hard Disk Drive to Your System
If you keep a backup of the Aperture library on an osite hard disk drive, you’ll occasionally need
to bring it in for updating. Aperture keeps track of the hard disks that have been disconnected
from their vaults. When you reconnect a hard disk drive, Aperture automatically detects the hard
disk, determines which vault it’s assigned to, and reconnects the vault.
At times, you may rename a backup hard disk drive or add a new one and copy a vault to the
new disk. In this case, you need to specify the location, or path, of the new or changed backup
hard disk drive.
To specify a vault’s new location or path
1 Connect the hard disk drive to your computer.
2 To show the Vault pane, do one of the following:
•Choose Window > Show Vaults (or press Shift-R).
•Click the Show Vaults button.
3 Select the vault to be updated to a new path.
4 Choose Update Vault Path from the Vault Action pop-up menu (with a gear icon).
5 Navigate to the location of the vault on the hard disk drive, select it, then click Update Path.

Chapter 25 Backing Up Your Photos 586
Deleting a Vault Permanently
You can delete an entire vault and all the photos on it when you need to recongure your
backup system. This is useful when you have moved your backup vault to a larger-capacity hard
disk and you want to delete the vault information from the current hard disk drive to use it for
other purposes.
To permanently remove a vault and delete its information
1 Do one of the following:
•Choose Window > Show Vaults (or press Shift-R).
•Click the Show Vaults button.
2 In the Vault pane, select the vault you want to remove.
3 Do one of the following:
•Choose File > Vault > Remove Vault.
•Choose Remove Vault from the Vault Action pop-up menu (with a gear icon).
A dialog appears, asking if you want to remove the vault.
4 Click one of the following buttons:
•Remove and Delete: When you click this button, Aperture no longer tracks the vault, and the
vault’s les are deleted from your hard disk.
•Remove: When you click this button, Aperture no longer tracks the vault, but the vault’s les
remain on the hard disk.
Restoring Your Aperture System
If you buy a new computer or use another system at a dierent location and want access to the
Aperture library, you can install Aperture and then transfer the library from your vault (on your
backup disk) to the other computer. If you experience equipment failure or other unexpected
events, such as re or weather-related damage to your equipment, you can easily restore the
entire library to your new computer from a backup disk.
To restore the entire library from an external backup disk
1 Connect the hard disk drive that contains the most up-to-date vault to your computer and
open Aperture.
2 Choose File > Vault > Restore Library.
The Restore Library dialog appears.
3 Choose the vault you want to use to restore your library from the Source Vault pop-up menu.
If the vault doesn’t appear in the Source Vault pop-up menu, choose Select Source Vault from the
Source Vault pop-up menu, navigate to the vaults location in the Select Source Vault dialog, then
click Select.
4 Click Restore, then click Restore again.
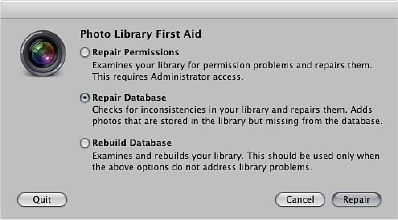
Chapter 25 Backing Up Your Photos 587
Repairing and Rebuilding Your Aperture Library
In the rare event that your Aperture database becomes corrupted or the les within it have
permissions issues, Aperture provides a few methods for reconstituting your Aperture library and
the le relationships within it.
To repair or rebuild your Aperture library
1 Close Aperture, if it’s open.
2 Locate the Aperture library you want to x, then hold down the Command and Option keys
while double-clicking the Aperture library.
The Photo Library First Aid dialog appears.
3 Do one of the following:
•To repair the permissions of the les within your Aperture library: Select Repair Permissions.
This option should be used when Aperture can’t access some of the image les within the
database or Aperture is unable to open the library itself. The Repair Permissions option
reviews each le in your Aperture library and sets the read and write access of each le where
appropriate, allowing Aperture to access the les again.
Note: This option does not relocate referenced images whose original image les are oine.
For more information about reconnecting oine images, see Reconnecting Missing or Oine
Referenced Images on page 102.
•To repair your Aperture library le: Select Repair Database.
This is the rst option you should use if you believe there is something wrong with the
Aperture library other than image le access issues.
•To rebuild your database from scratch: Select Rebuild Database.
This option should be used as your last measure as it can be time-consuming for large photo
libraries. If you have tried repairing your database, and the issues you are encountering with
your Aperture library still persist, you should use the Rebuild Database option. Aperture
examines the library’s entire database and rebuilds each component until it reconstitutes your
original Aperture library.
4 Depending on your selection, click Repair or Rebuild.
Aperture either xes le permissions within the library or repairs or rebuilds the library, and then
opens the application workspace.
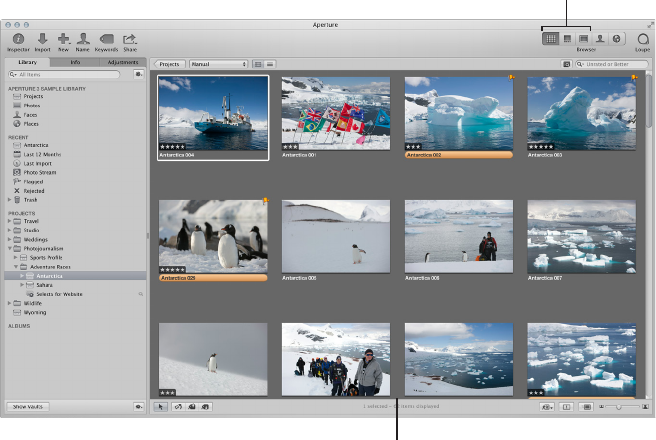
588
Changing Main Window Layouts
When a project, album, or folder is selected in the Library inspector, Aperture oers three basic
layouts for the main window:
•Browser: Use this layout to display image thumbnails in an enlarged Browser so you can review
photos, perform initial rating passes, and create and work with stacks of photos.
Browser layout: The Browser
fills the workspace and displays
a grid of thumbnail images.
Layout buttons: Click
a button to select a
main window layout.
Customizing the
Aperture Workspace 26
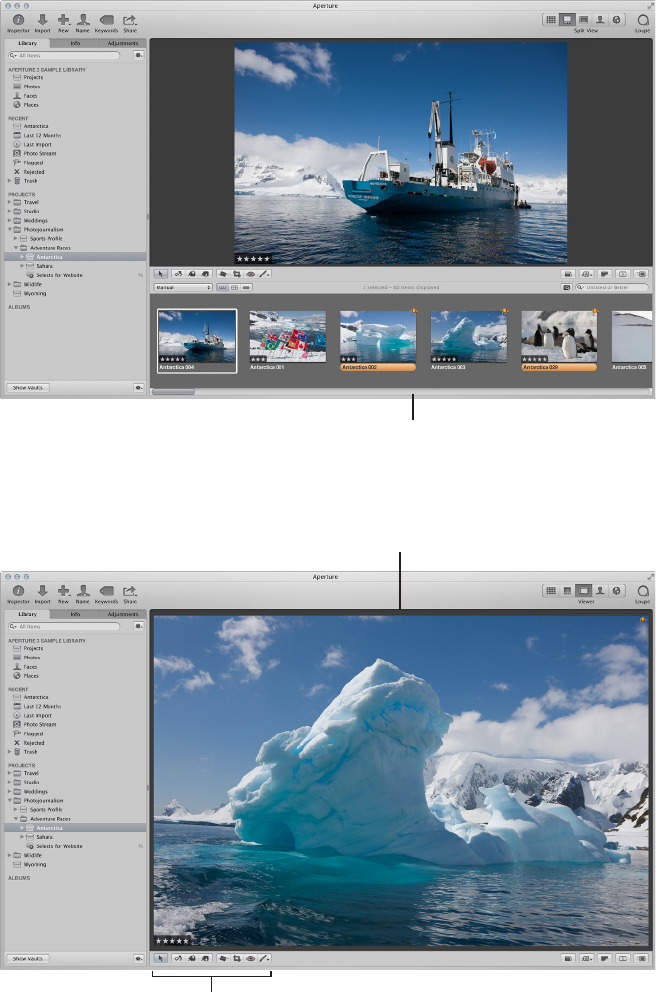
Chapter 26 Customizing the Aperture Workspace 589
•Split View: Use this layout to display both the Browser and Viewer together and use them in
combination to review and work with photos.
Split View layout: The Viewer
and Browser appear together.
•Viewer: Use this layout to display photos in an enlarged Viewer and work with them in detail.
Viewer layout: The Viewer
fills the workspace and
displays your photo selection.
Tool strip: Use these
tools to adjust and work
with your photos.
You can switch between layouts by pressing V, choosing commands from the View menu, or
clicking buttons in the toolbar.
To change the main window layout
Do one of the following:
mChoose Browser, Split View, Viewer, or Cycle View Mode from the View menu (or press V).
mClick the Browser, Split View, or Viewer button in the toolbar.
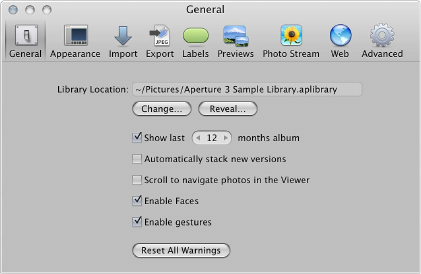
Chapter 26 Customizing the Aperture Workspace 590
Setting Aperture Preferences
An Overview of Aperture Preferences
Aperture provides a Preferences window for specifying settings that control the location of the
Aperture library, the appearance of the Aperture window, the application used to import photos
onto your computer, how photos are exported out of Aperture, how color labels are dened, how
preview images are generated, as well as additional advanced settings. By taking time to specify
your preference settings, you can speed up your workow.
The Aperture Preferences window contains the following controls:
•General button: Click this button to display options for setting the location of the library,
setting the length of time to keep track of recently imported photos, automatically stacking
new versions of the same photo together, enabling scrolling with the mouse to navigate
through photos in the Viewer, enabling face detection, and enabling gestures when using
a Multi-Touch trackpad or Magic Mouse. For more information, see General Preferences on
page 591.
•Appearance button: Click this button to display options for customizing the Aperture interface,
including setting the background brightness level for the Browser, the Viewer, and Full Screen
view, choosing which display to view slideshows on, and displaying tooltips and badges. For
more information, see Appearance Preferences on page 592.
•Import button: Click this button to specify what Aperture should do when a camera is
connected to your computer, whether photos should be imported into a new project or into
the item selected in the Library inspector, and the length of time used to determine when to
automatically split projects. For more information, see Import Preferences on page 593.
•Export button: Click this button to display options for selecting an external editor for changing
your photos, audio, and video outside of Aperture, as well as specifying the email application
and settings you want used when emailing photos. You can also create a copyright statement
that will be included in webpages that you create, as well as specify that photos exported
from Aperture contain location information and Faces metadata (names you have assigned to
people in your photos using Faces). For more information see Export Preferences on page 594.
•Labels button: Click this button to display options for assigning text to color labels. For more
information, see Labels Preferences on page 595.
•Previews button: Click this button to display options for how Aperture creates and displays
preview images. For more information, see Previews Preferences on page 595.
•Photo Stream button: Click this button to display options for turning on Photo Stream in
Aperture, as well as setting Aperture to immediately upload photos to and download photos
from Photo Stream. For more information, see Photo Stream Preferences on page 596.
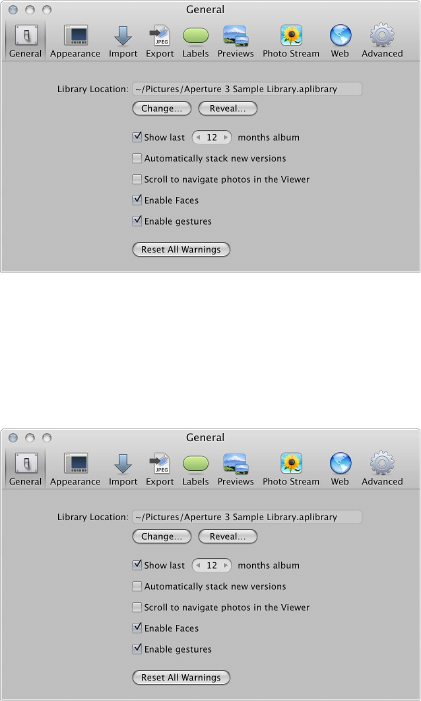
Chapter 26 Customizing the Aperture Workspace 591
•Web button: Click this button to display options for reviewing and updating albums that
you’ve published to your Flickr and Facebook accounts online. For more information, see Web
Preferences on page 596.
•Advanced button: Click this button to display options for specifying hot and cold area
thresholds, adding tolerance to Auto Levels adjustments, choosing color or monochrome
clipping overlays, and choosing to have Aperture look up photo location information
automatically. For more information, see Advanced Preferences on page 597.
Opening Aperture Preferences
You can open the Aperture Preferences window at any time.
To open the Preferences window
mChoose Aperture > Preferences, or press Command-Comma (,).
The Preferences window appears. For more information about the Aperture Preferences window,
see An Overview of Aperture Preferences on page 590.
General Preferences
Use the controls in the General preference pane to set the location of the library, set the length
of time to keep track of recently imported photos, enable face detection, automatically stack
new versions of the same photo, and congure other photo management options.
The General preference pane contains the following controls:
•Library Location eld: Displays the default location of the library. To specify a custom location
for the Aperture library, click Change and navigate to a location to store the library. Quit and
reopen Aperture to complete the location change. Click Reveal to display the Aperture library
le in the Finder.
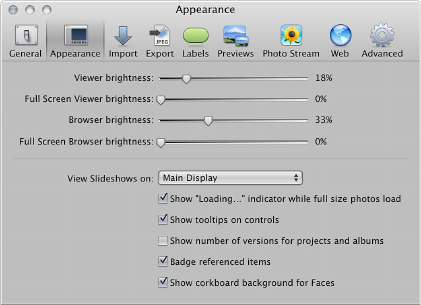
Chapter 26 Customizing the Aperture Workspace 592
•“Show last [number] months album” checkbox: Select this checkbox to add an item to the
Recent section of the Library inspector that tracks recently imported photos. Use the value
slider to set the number of months to keep track of the imported photos.
•“Automatically stack new versions” checkbox: Select this checkbox to automatically stack
versions of the same photo as you create them.
•“Scroll to navigate photos in the Viewer” checkbox: Select this checkbox to enable scrolling with
the mouse when the pointer is placed over the photo in the Viewer (or in the Viewer mode in
Full Screen view).
•Enable Faces checkbox: Select this checkbox to enable face detection when importing photos
into the Aperture library.
•“Enable gestures” checkbox: Select this checkbox to enable gesture functions in Aperture
when using a Multi-Touch trackpad or Magic Mouse. For more information about the gesture
functions supported in Aperture, see Using Gestures with Aperture on page 599.
•Reset All Warnings button: Click this button to display warning messages. If you have set
Aperture to not display certain warnings, this button resets Aperture to display them again.
Appearance Preferences
Use the controls in the Appearance preference pane to customize the Aperture interface.
The Appearance preference pane contains the following controls:
•“Viewer brightness” slider: Adjust the Viewer background brightness using this slider.
•“Full Screen Viewer brightness” slider: Adjust the Full Screen view Viewer mode background
brightness using this slider.
•“Browser brightness” slider: Adjust the Browser background brightness using this slider.
•"Full Screen Browser brightness” slider: Adjust the Full Screen view Browser mode background
brightness using this slider.
•“View Slideshows on” pop-up menu: Choose to display slideshows in full-screen mode on your
main display or secondary display. For more information about playing slideshows in full-
screen mode, see Viewing Your Slideshows in Aperture on page 491.
•“Show ‘Loading...’ indicator while full size photos load” checkbox: Select this checkbox to have
Aperture display an initial proxy image if there is any delay when loading a full-size photo.
•“Show tooltips on controls” checkbox: Select this checkbox to have Aperture display the names
of interface items when you place the pointer over them.
•“Show number of versions for projects and albums” checkbox: Select this checkbox to have
Aperture display the number of versions in a project or album in the Library inspector.
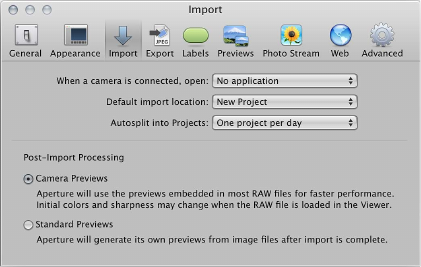
Chapter 26 Customizing the Aperture Workspace 593
•“Badge referenced items” checkbox: Select this checkbox to have Aperture display badges that
identify referenced images, audio clips, and video clips.
•“Show corkboard background for Faces” checkbox: Select this checkbox to display a corkboard in
the background of Faces view.
Import Preferences
Use the controls in the Import preference pane to specify what Aperture should do when a
camera is connected, whether to import photos into a new project or into the item selected
in the Library inspector, and the length of time used to determine when to automatically
split projects.
The Import preference pane contains the following controls:
•“When a camera is connected, open” pop-up menu: Specify which application should open when
a camera is connected to your computer.
•“Default import location” pop-up menu: Specify whether Aperture imports photos into a new
project or into the item selected in the Library inspector.
•“Autosplit into Projects” pop-up menu: Choose an option for automatically grouping imported
photos in projects according to the time the photos were captured.
•Camera Previews button: Click this button to set Aperture to use the JPEG version of the RAW
image le produced by the camera, if available. The advantage of this setting is that a sharp,
high-resolution preview is available immediately upon import, even before the RAW image
le is done being copied from the memory card to the computer. A color shift may occur after
the RAW le’s preview is processed within Aperture. However, the rst time the RAW image
is shown in the Viewer, Aperture generates its own fully rendered preview and there is no
further shifting.
Tip: Use this Camera Previews setting in conjunction with the Quick Preview mode to review
your newly imported images instantly, with sharp previews and no processing. For more
information, see Navigating Through Photos in Quick Preview Mode on page 83.
•Standard Previews button: Click this button to have Aperture generate a preview image for
every image le immediately after import, using the settings in Previews preferences. When
you select this option, Aperture uses its RAW decoding technology to create a fully rendered
preview for every le in the import group, rather than waiting until the RAW image is selected
and displayed in the Viewer. However, it may take a signicant period of time to process the
previews after importing a large group of RAW image les.
For more information, see Previews Preferences on page 595.
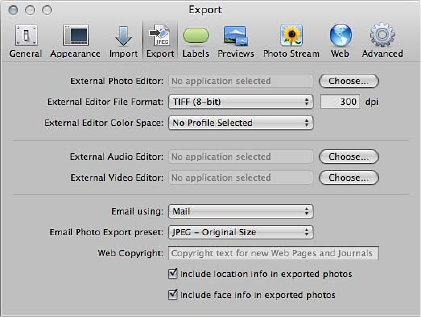
Chapter 26 Customizing the Aperture Workspace 594
Important: The Camera Previews and Standard Previews settings apply only when
Maintain Previews is turned on in the Library Action pop-up menu (with a gear icon) in the
Library inspector.
Export Preferences
Use the controls in the Export preference pane to set the external editor, choose the email
application used to email photos from within Aperture, and assign a copyright statement to
webpages you create.
The Export preference pane contains the following controls:
•External Photo Editor eld: You can use an external image editing application to make
adjustments to your images. To identify an external editor, click Choose and select an
application. To open a photo in the external editor, select the photo, then choose Photos >
Edit with External Editor.
•External Editor File Format pop-up menu: Choose the le format in which to export a photo to
an external editor. You can also specify the dot-per-inch (dpi) resolution of the photo in the
dpi eld.
•External Editor Color Space pop-up menu: Choose a color space in which to work with your
photos in the external photo editor.
•External Audio Editor eld: You can use an external audio editor to make adjustments to your
audio clips. To identify an external editor, click Choose and select an application. To open
an audio clip in the external editor, select the audio clip, then choose Photos > Edit with
External Editor.
•External Video Editor eld: You can use an external video editor to make adjustments to your
video clips. To identify an external editor, click Choose and select an application. To open
a video clip in the external editor, select the video clip, then choose Photos > Edit with
External Editor.
•“Email using” pop-up menu: If you want to export items to an email client, choose the email
application from this pop-up menu.
•“Email Photo Export preset” pop-up menu: Choose an export preset to use when exporting
photos to your email client. If you want to create a custom export preset, choose Edit and
create a new preset in the Image Export dialog.
•Web Copyright eld: Enter copyright text for webpages and web journals here.
•“Include location info in exported photos” checkbox: Select this checkbox to include location
metadata in exported photos.
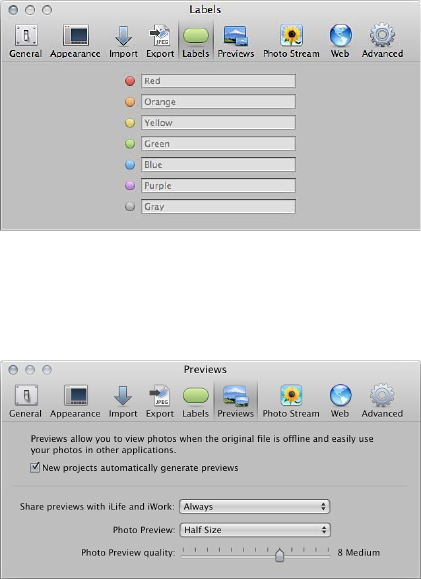
Chapter 26 Customizing the Aperture Workspace 595
•“Include face info in exported photos” checkbox: Select this checkbox to include Faces metadata
(names you have assigned to people in your photos using Faces) in exported photos.
Labels Preferences
Use the text elds in the Labels preference pane to customize labels for each color.
Previews Preferences
Use the controls in the Previews preference pane to set how Aperture creates and displays
preview images.
The Previews preference pane contains the following controls:
•“New projects automatically generate previews” checkbox: To set Aperture to create previews for
the photos in all new projects and new libraries, select this checkbox. Deselect this checkbox if
you don’t want previews created for photos in new projects.
•“Share previews with iLife and iWork” pop-up menu: Choose whether to enable sharing of JPEG
preview images with iLife and iWork applications.
•Photo Preview pop-up menu: To set a maximum pixel size for your previews, choose a size from
this pop-up menu.
•“Photo Preview quality” slider: To change the image quality of the previews, drag the slider. The
higher the quality setting, the more disk space the previews require.
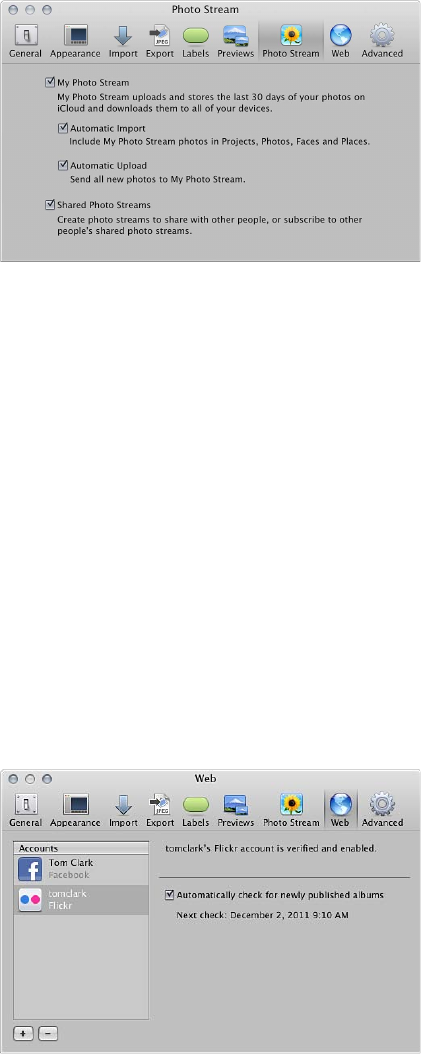
Chapter 26 Customizing the Aperture Workspace 596
Photo Stream Preferences
Use the controls in the Photo Stream preference pane to turn My Photo Stream on or o
for an Aperture library, as well as set options for automatically uploading and downloading
photos between your photo stream and your Aperture library. You can also turn on photo
stream sharing.
The Photo Stream preference pane contains the following controls:
•My Photo Stream checkbox: Select or deselect this checkbox to turn your photo stream on or o
in the currently open Aperture library.
•Automatic Import checkbox: Select this checkbox to have photos from your photo stream
automatically imported into your Aperture library so that they appear in Projects view,
Photos view, Faces view, and Places view. If you do not select this checkbox, you have to
manually drag photos from your photo stream to projects in your Aperture library.
•Automatic Upload checkbox: Select this checkbox to have all new photos that are imported
into your Aperture library uploaded to your photo stream.
•Shared Photo Streams: Select this checkbox to share photo streams and view photo streams
shared by others. Photos added to a shared stream are automatically pushed to the devices of
people who subscribe to the shared stream.
Web Preferences
Use the controls in the Web preference pane to set options for reviewing and updating albums
that you’ve published to your Flickr and Facebook accounts, as well as add or remove Flickr and
Facebook accounts within Aperture.
The Web preference pane contains the following controls:
•Accounts column: Select the account you want to modify in this column.
•Add (+) button: Click this button to add one or more Flickr and Facebook accounts.
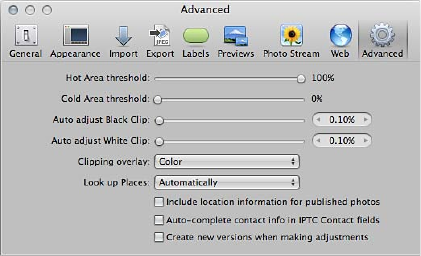
Chapter 26 Customizing the Aperture Workspace 597
•Remove (–) button: Click this button to delete the selected account from Aperture.
Important: All albums associated with the deleted Flickr or Facebook account are removed
from Aperture. However, the albums or sets and their photos still appear in the Flickr or
Facebook account.
•“Automatically check for newly published albums” checkbox: Choose whether you want Aperture
to check regularly for new albums published outside of Aperture to your Flickr or Facebook
accounts or whether you want to update the accounts manually.
Advanced Preferences
Use the controls in the Advanced preference pane to specify the display threshold for hot
and cold areas of images, add tolerance to Auto Levels adjustments, choose whether clipping
overlays are displayed in color or monochrome, specify that Aperture look up photo location
information when photos are imported, and specify that Aperture create a new version when
you adjust an image.
The Advanced preference pane contains the following controls:
•“Hot Area threshold” slider: You can view an image’s hot areas (where highlight data in any
color channel has been clipped) by choosing View > Highlight Hot & Cold Areas. To adjust the
threshold used to determine an image’s hot areas, drag the slider.
•“Cold Area threshold” slider: You can view an image’s cold areas (where black data in any color
channel has been clipped) by choosing View > Highlight Hot & Cold Areas. To adjust the
threshold used to determine an image’s cold areas, drag the slider.
•“Auto adjust Black Clip” slider: Use the “Auto adjust Black Clip” slider and value slider to add
tolerance to Auto Levels adjustments when evaluating colors beyond black.
•“Auto adjust White Clip” slider: Use the “Auto adjust White Clip” slider and value slider to add
tolerance to Auto Levels adjustments when evaluating colors beyond white.
•“Clipping overlay” pop-up menu: Choose color or monochrome for the display of your
clipping overlays.
•“Look up Places” pop-up menu: Specify that Aperture look up photo location information as the
photos are imported.
•“Include location information for published photos” checkbox: Select this checkbox to have
Aperture include any location information with the photos you share online.
•“Auto-complete contact info in IPTC Contact elds” checkbox: Select this checkbox to have
Aperture automatically enter contact information in the IPTC Contact elds after you have
entered the information the rst time.
•“Create new versions when making adjustments” checkbox: Select this checkbox to have Aperture
automatically create a new version when you adjust a selected photo. The adjustment is
applied to the original version and the new one is left untouched.
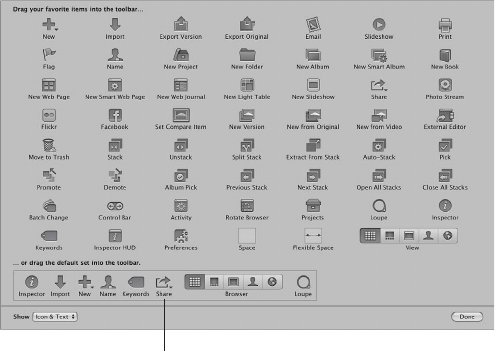
Chapter 26 Customizing the Aperture Workspace 598
Customizing the Toolbar
Hiding and Showing the Toolbar
The toolbar is shown by default, but you can choose to hide it.
To hide the toolbar
mChoose View > Hide Toolbar (or press Shift-T).
To show a toolbar that has been hidden
mChoose View > Show Toolbar (or press Shift-T).
Tip: You can also quickly hide or show the toolbar by clicking the Toolbar button (a gray, oblong
button in the top-right corner of the Aperture main window).
Customizing Items in the Toolbar
Aperture provides a simple drag-and-drop interface for adding, deleting, and rearranging the
toolbar buttons and controls. You can also choose whether items in the toolbar appear as icons,
as text, or as both.
To customize the toolbar
1 Do one of the following:
•Choose View > Customize Toolbar.
•Control-click the toolbar, then choose Customize Toolbar from the shortcut menu.
A dialog appears, showing icons for toolbar buttons and controls.
Default toolbar items are
shown in the bottom section.
Note: Because you can customize the toolbar by adding and removing buttons and controls,
your toolbar may look dierent from the one shown above.
2 Congure the toolbar by doing any of the following:
•To add items to the toolbar: Drag their icons from the dialog to the location where you want
them to appear in the toolbar.
•To remove items from the toolbar: Drag items out of the toolbar, or Control-click the item you
want to remove and choose Remove Item from the shortcut menu.
•To change the order of the items in the toolbar: Drag each item to its new position.

Chapter 26 Customizing the Aperture Workspace 599
•To control whether each item’s icon and text appear in the toolbar: Choose Text Only, Icon Only, or
Icon & Text from the Show pop-up menu in the lower-left corner of the dialog, or Control-click
the toolbar and choose Text Only, Icon Only, or Icon & Text from the shortcut menu.
3 When you nish conguring the toolbar, click Done.
To reset the toolbar to its default state
mDrag the default toolbar up from the bottom of the dialog into the toolbar area.
Using Gestures with Aperture
If your computer has a Multi-Touch trackpad or a Magic Mouse, you can use gestures when
working with Aperture. For example, when working with photos in the Browser, you can use the
rotate gesture to rotate images and the swipe gesture to select a dierent photo. In addition to
the standard Multi-Touch trackpad gestures used with Mac portable computers, you can use
Multi-Touch gestures with the following Aperture features.
Note: To use the following gestures, you must have Aperture 3.3.2 or later and OS X Mountain
Lion v10.8 or later.
Feature Multi-Touch trackpad gestures
Browser in grid view •Use the pinch gesture to change the size of
thumbnails in the Browser.
•Use the rotate gesture to rotate the photo beneath
the pointer.
•Use the three-nger swipe gesture to select
another photo when “Swipe with three ngers”
is selected in the “Swipe between pages”
pop-up menu in the More Gestures pane of
Trackpad preferences.
For more information about the swipe gesture, see
Help Center.
Browser in list view •Use the pinch gesture to change the size of
thumbnails in the Browser.
•Use the three-nger swipe gesture to select
another photo when “Swipe with three ngers”
is selected in the “Swipe between pages”
pop-up menu in the More Gestures pane of
Trackpad preferences.
For more information about the swipe gesture, see
Help Center.
Browser in lmstrip view (Split View layout) and
lmstrip in Full Screen view (Viewer mode)
•Use the pinch gesture to change the size of
thumbnails in the Browser or the lmstrip.
•Use the rotate gesture to rotate the image beneath
the pointer.
•Use the three-nger swipe gesture to select
another photo when “Swipe with three ngers”
is selected in the “Swipe between pages”
pop-up menu in the More Gestures pane of
Trackpad preferences.
For more information about the swipe gesture, see
Help Center.

Chapter 26 Customizing the Aperture Workspace 600
Feature Multi-Touch trackpad gestures
Viewer and Full Screen view (Viewer mode) •Use the pinch gesture to zoom in to or out of the
photo, or double-tap with two ngers to zoom in to
a specic part of the photo.
•Use the rotate gesture to rotate the photo beneath
the pointer.
•Use the swipe gesture to select a dierent
photo when “Scroll to navigate photos in the
Viewer” is selected in the General pane of the
Preferences window.
For more information about the General
pane of the Preferences window, see General
Preferences on page 591. For more information
about the swipe gesture, see Help Center.
Faces •Use the pinch gesture to change the size of
the snapshots.
Places •Use two-nger scrolling to zoom in to or out of
the map.
Light Table •Use the pinch gesture to zoom in to or out of the
Light Table or to change the size of the photo
beneath the pointer.
Book Layout Editor •Use the pinch gesture to zoom in to or out of the
selected page or resize the object beneath the
pointer on the page. (The Edit Layout button must
be selected to resize objects on the page.)
•Use the rotate gesture to rotate objects. You can
also hold down the Shift key as you use the rotate
gesture to restrict rotation to 15-degree increments.
•Use the swipe gesture to change pages.
Slideshows •Use the swipe gesture to display the next or
previous slide during a slideshow.
Loupe tool •Use the pinch gesture to change the Loupe size.
(As with previous versions of Aperture, you can
also use the scroll gesture to change the Loupe
magnication.)
Crop tool •Use the pinch gesture to modify an existing crop
selection and change its size.
Straighten tool •Use the rotate gesture to change the amount of
image rotation.
Print dialog (Preview area) •Use the pinch gesture to zoom in to or out of
the photo displayed in the Preview area of the
Print dialog.
For more information about working with gestures, see Help Center.
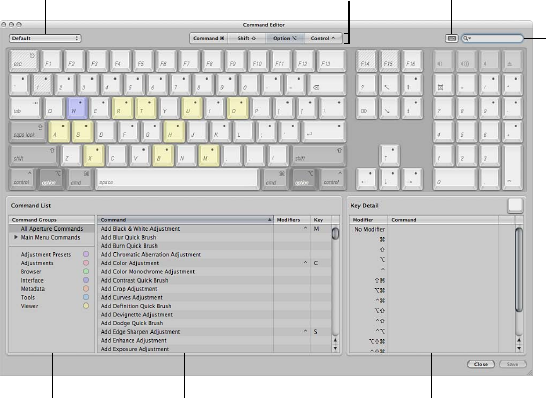
Chapter 26 Customizing the Aperture Workspace 601
Customizing Keyboard Shortcuts
An Overview of Customizing Keyboard Shortcuts
Aperture provides a wide variety of menu commands and keyboard shortcuts that let you
control almost every aspect of your workow. The Command Editor lets you search or browse
the various commands and keyboard shortcuts in Aperture. In addition, the Command Editor lets
you customize keyboard shortcuts so you can streamline the way you work.
Use the Command Editor’s search tools to nd commands, view their descriptions and keyboard
shortcuts, and preview highlighted key combinations in a visual representation of the keyboard.
You can modify existing shortcuts, create new shortcuts, and save multiple sets of keyboard
shortcuts, called command sets, that can be imported and exported for use by others. If you’re
more familiar with keyboard shortcuts from other applications, you can use the Command Editor
to substitute keyboard shortcuts for the default set of Aperture keyboard shortcuts.
Command
groups
Command list Detail area
Command
set options
Keyboard
Highlight button
Modifier
key buttons
Search field
The upper half of the Command Editor displays a virtual keyboard. The lower half contains
a command list that sorts menu commands by group and oers a brief description of each
command, along with its associated keyboard shortcut, if one exists.
The virtual keyboard is color-coded to help you identify the type of command each key
performs. The Command Groups column on the left side of the Command List area includes a
clickable color key for reference.
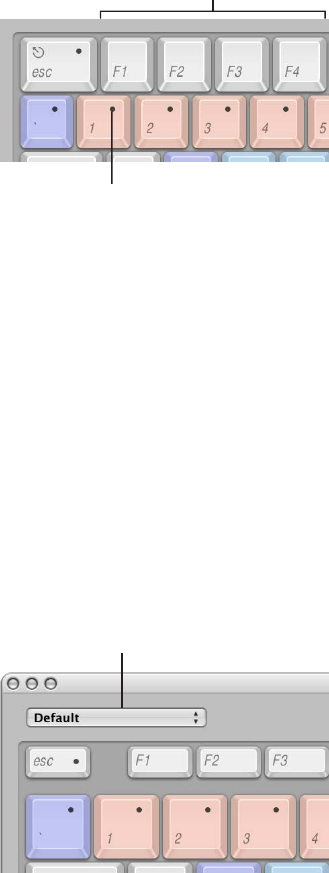
Chapter 26 Customizing the Aperture Workspace 602
Keys that are assigned to shortcuts are marked with a dark gray dot, whereas unassigned keys
have no additional markings. Several keys are shaded with diagonal lines, indicating that they are
reserved for OS X operating system use.
No markings indicate
unassigned keys.
A dark gray dot
indicates keys with
assigned shortcuts.
Choosing a Command Set
By default, Aperture uses a standard set of commands, with the language choice that you
specied when you set up your computer.
To display the Command Editor in Aperture
mChoose Aperture > Commands > Customize.
The Command Editor appears.
To choose a command set
Do one of the following:
mChoose Aperture > Commands, then choose a command set from the submenu.
mIf the Command Editor is already open, choose a command set from the pop-up menu in the
upper-left corner.
Choose a command set
from the pop-up menu.
Once you choose a command set, the keyboard shortcuts in the set become active in Aperture.
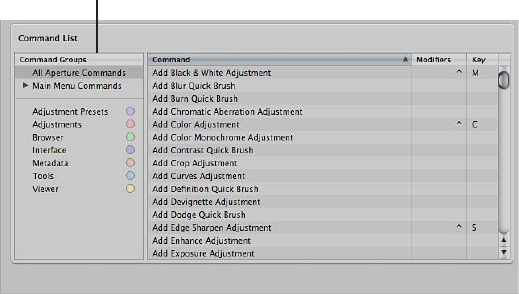
Chapter 26 Customizing the Aperture Workspace 603
Viewing Keyboard Shortcuts by Group
The Command List area of the Command Editor displays several groupings of commands,
organized by Aperture menus as well as by type of command. Click a group to have the
Command list display only the commands and keyboard shortcuts in that group.
Command groups are
displayed in this area.
Searching for Commands
Use the search eld in the upper-right corner of the Command Editor to quickly locate
a command or its keyboard shortcut. You can search by command name, description, or
keyboard shortcut.
To search for a keyboard shortcut
mIn the Command Editor, click in the search eld and type a word that describes the keyboard
shortcut you need, or type the key combination.
The Command list immediately displays the search results, listing all commands and keyboard
shortcuts related to the search term.
You can further narrow your search by choosing a category from the search eld pop-up menu.
The menu options include All, Command, Description, and Key Equivalent.
Note: Do not use the Shift key to capitalize letters when typing in the search eld. The search
eld recognizes the Shift key as a modier key in a keyboard shortcut.
To search for and highlight a keyboard shortcut on the virtual keyboard
You can use the search eld in combination with the virtual keyboard to highlight
keyboard shortcuts.
1 Click the Keyboard Highlight button to the left of the search eld.
The keyboard is dimmed.
2 Click in the search eld and begin typing.
The Command list changes as you type, highlighting the keys related to your search term.
Note: When you click the Keyboard Highlight button to turn on keyboard highlighting, modier
keys that may be part of the keyboard shortcut (Command, Shift, Option, and Control) are
not highlighted.
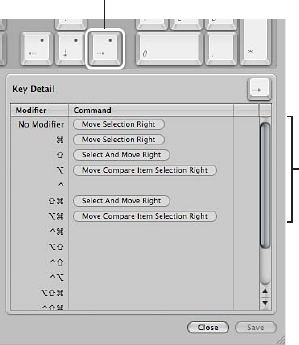
Chapter 26 Customizing the Aperture Workspace 604
Filtering the View by Modier Keys
You can use the modier key buttons (Command, Shift, Option, and Control) at the top of the
Command Editor to quickly see which keys work in combination with the various modier keys.
To lter by modier keys
1 Click one of the four modier key buttons at the top of the Command Editor (or click one of the
modier keys on the virtual keyboard).
Keys assigned to work in combination with the selected modier key appear marked with a dark
gray dot.
2 If necessary, click another modier key button (or a modier key on the virtual keyboard) to
create a combination.
The virtual keyboard updates to show which keys are assigned to shortcuts that use the
combined modier keys.
Viewing Key and Command Details
The Detail area to the right of the Command List area provides additional information about
a selected key in the virtual keyboard or a selected command in the Command list. When you
select a key on the virtual keyboard, this area displays a list of all keyboard shortcuts associated
with that key.
All available shortcuts
that include the selected
key are displayed here.
Selected key
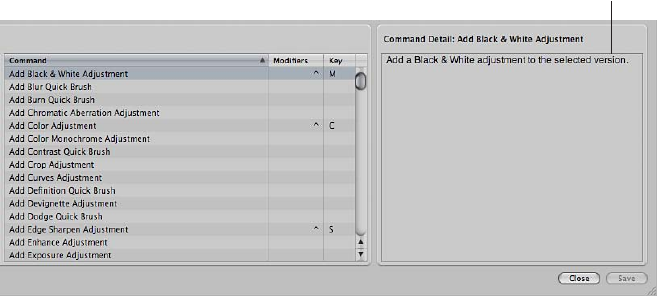
Chapter 26 Customizing the Aperture Workspace 605
When you select a command in the Command list, the Detail area displays a brief description of
the command.
A brief description of
the selected command is
shown in the Detail area.
Assigning Keyboard Shortcuts
Customizing keyboard shortcuts in the Command Editor is fast and easy. Because the default
command set includes commands for which no shortcut is dened, you may want to apply a
new shortcut to a command. Because you cannot modify the default command set, you must
rst duplicate that command set and then customize the new duplicate command set. After you
make changes to the duplicate command set, you can save the changes.
To duplicate the currently active command set
1 Choose Duplicate from the pop-up menu at the top of the Command Editor.
A dialog appears and prompts you to name the new command set.
2 Type a name in the dialog, then click OK.
The new duplicate command set is saved and appears as an item in both the pop-up menu in
the Command Editor and the Commands submenu of the Aperture menu.
To modify individual key assignments in the duplicate set of keyboard shortcuts, see the
following steps.
To add or modify a keyboard shortcut
1 Using the search eld (or browsing the Command list) of the Command Editor, select the
command to which you want to assign a new keyboard shortcut.
2 Using your physical keyboard, press the combination of keys you want to use as a shortcut for
the command (for example, Shift-Option-T).
Note: When you assign a key combination to a command, the Delete key becomes an assignable
key when one of the modier keys (Command, Shift, Option, or Control) is held down. See how
to delete a command set below.
If the key combination is not already assigned to a command, the virtual keyboard updates to
show the new key assignment. A gray dot appears on the newly assigned key or keys, and a
color is applied if the command belongs to a color-coded command group.
If the key combination is already assigned to a command, Aperture displays the current
assignment and prompts you to conrm the change.
Chapter 26 Customizing the Aperture Workspace 606
To save a command set
m Click the Save button in the lower-right corner of the Command Editor.
If you close the Command Editor with unsaved changes, Aperture prompts you to save the
command set.
To delete a command set
1 Make sure the command set you want to delete is the active command set, then choose Delete
from the pop-up menu at the top of the Command Editor.
A dialog appears.
2 Click Delete.
The command set is removed, and the default command set becomes the active set of
commands.
Importing and Exporting Command Sets
After you save a command set, you may want to export it to create a backup or to share the new
command set with others. Exported command sets are saved in a le that you can import back
into Aperture at a later time.
To export a command set
1 Make the command set you want to export the active set by choosing it from the pop-up menu
in the top-left corner of the Command Editor.
2 Do one of the following:
•Choose Aperture > Commands > Export.
•In the Command Editor, choose Export from the pop-up menu.
3 In the dialog that appears, navigate to the location where you want to save the exported
command set, then type a name in the Save As eld.
4 Click Save.
The le is saved in the location you chose, with a .commandset le extension.
To import a command set
1 Do one of the following:
•Choose Aperture > Commands > Import.
•In the Command Editor, choose Import from the pop-up menu.
2 In the dialog that appears, navigate to the location where you have stored a command set le,
select it, then click Open.
The imported command set is added to the Commands submenu of the Aperture menu and to
the pop-up menu in the Command Editor.
If you are already using a command set with the same name, a dialog appears and prompts you
to rename the imported command set.
607
additive color Images with color elements derived from the light source itself. RGB is a common
form of additive color. See also RGB.
adjustment Any change to the appearance of an image. See also brushed adjustment.
Adobe RGB (1998) A color prole commonly used for printing. See also color space.
album A type of container in the Aperture library that holds only versions. You can create
albums at either the project level or within a project. There are specialized types of albums,
including book, Light Table, webpage, web journal, and slideshow albums. See also folder, library,
project, Smart Album, version.
alternate The photo immediately next to the pick in a stack. Alternate photos are useful when
more than one photo in a stack merits the pick position. See also image, pick, stack.
Alternate setting A secondary Viewer setting that presents the currently selected photo on the
secondary Viewer display. See also display, image, main Viewer, primary selection, secondary Viewer.
ambient light The lighting characteristics that already exist in the scene (indoor or outdoor)
without any additional light supplied by the photographer.
analog-to-digital conversion The process of transforming light energy voltage values captured
by the camera’s digital image sensor into binary (digital numbers) for processing and storage.
See also digitization, quantization.
angle of view The area of the scene displayed within the frame. Determined by the focal length
of the lens.
aperture An adjustable iris or diaphragm in the lens through which light passes. Measured in
f-stops. See also f-stop.
aperture priority A setting on certain cameras that automatically sets the shutter speed for a
correct exposure based on the aperture setting provided by the photographer. See also exposure,
shutter priority.
archive The process of storing image data on a permanent medium, such as optical media (CD
or DVD).
aspect ratio The ratio of height to width of the dimensions of a photograph. Common North
American aspect ratios are 3.5 x 5, 4 x 6, 5 x 7, 11 x 14, and 16 x 20 inches.
audio attachment An audio le that has been attached to a photo, either in the camera that
captured the photo or within Aperture. Audio attachments are often audio notations recorded
by the photographer while shooting a photo.
audio clip An instance of a segment of audio in Aperture; an audio le’s version. See also audio
le, version.
Glossary
Glossary 608
audio le The source media le on disk to which an audio clip in Aperture refers; the audio clip’s
original. See also audio clip, original.
autofocus The system within the camera that automatically focuses the lens on a specic
portion of the subject or scene. See also autofocus point overlays.
autofocus point overlays Overlays displayed over photos in the Viewer that show which
autofocus mode was used by the camera and which focal point was used to focus the photo
when it was captured. You turn on autofocus point overlays by clicking the Autofocus Points
button in the Camera Info pane of the Info inspector. You can also temporarily view autofocus
point overlays by placing the pointer over the Autofocus Points button. See also autofocus.
automatic bracketing A setting on many professional cameras that automatically brackets the
exposure of the photo. See also bracketing.
background The area in the rear of the image that appears behind the subject. See also depth of
eld, foreground.
backlighting A light source that faces toward the lens of the camera, emanating from behind
the subject. Backlighting makes the outline of the subject stand out from the background, often
resulting in a silhouette. See also frontlighting, sidelighting, silhouette.
badge overlay A small icon Aperture places on a photo to indicate that an adjustment, keyword,
or other change has been applied to it. See also adjustment, keywords, oine.
Bayer pattern color lter array A specic arrangement of red, green, and blue lenses attached to
the surface of a digital image sensor. There are roughly twice as many green lenses as blue and
red to accommodate how the human eye perceives color. See also charge-coupled device (CCD),
complementary metal oxide semiconductor (CMOS), digital image sensor.
bit depth The number of tonal values or shades of a color each channel in a pixel is capable of
displaying. Increasing the bit depth of color channels in an image’s pixels exponentially increases
the number of colors each pixel can express. See also color channels, color depth.
Black & White adjustment An adjustment in Aperture that allows you to selectively control the
source red, green, and blue color channels when a color image is converted to grayscale. See also
adjustment, grayscale, image, monochrome.
black point compensation Black point compensation ensures that black and white luminance
values are appropriately scaled to t within the range or gamut of the destination device (printer,
paper, and ink). Using black point compensation helps prevent clipping in shadows because the
blacks are scaled to t within the gamut of the printer, paper, and ink.
Black Point parameter An Exposure adjustment parameter in Aperture used to set the blacks in
the image. See also Exposure adjustment.
Black setting A secondary Viewer setting that sets the secondary Viewer display to be a blank
screen. See also display, secondary Viewer.
Blur Quick Brush A type of Quick Brush adjustment that softens the area of the image the
adjustment is brushed on. See also adjustment, Brush HUD, Quick Brushes.
bounce lighting Natural and unnatural light sources (ash and tungsten) redirected toward the
subject using a reective surface to give the eect of natural light as well as ll-in shadows. See
also color temperature, ll-in lighting, White Balance adjustment.
Glossary 609
bracketing The process of taking three shots of the same photo based on the aperture and
shutter values recommended by the light meter: a shot one stop under the recommended
exposure, a shot at the recommended exposure, and a shot one stop over the recommended
exposure. You can also narrow the bracketing range to fractions of a stop. Bracketing is used in
dicult lighting situations to ensure that the scene is captured with the correct exposure. See
also automatic bracketing.
Brightness parameter An Exposure adjustment parameter in Aperture used to lighten or darken
an image. The adjustment aects the brightness values of the image’s midtones the most. See
also adjustment, Exposure adjustment, midtones.
Browser The part of the Aperture interface that displays the contents of the library, folders,
projects, or albums. The Browser displays photos as a row of thumbnails (lmstrip view), a grid
of thumbnails (grid view), or by le information (list view). See also lmstrip view, grid view, list
view, Viewer.
Browser layout A main window layout in Aperture in which the Viewer is hidden. See also
Browser, Full Screen view, Split View layout, Viewer, Viewer layout.
Browser mode (Full Screen view) A view mode in Full Screen view, similar to the Browser in the
Aperture main window. When Full Screen view is set to Browser mode, photos are presented as
thumbnails against a black background. Aperture provides controls for searching for and sorting
the thumbnails in this mode. See also Browser, Full Screen view, Library Path Navigator pop-up
menus, Projects mode (Full Screen view), Viewer mode (Full Screen view).
brushed adjustment A type of adjustment in Aperture that is brushed on the image rather than
applied to it all at once. Most adjustments can be brushed on an image. See also adjustment,
brushed adjustment overlay, Quick Brushes.
brushed adjustment overlay A masking tool in Aperture used to identify brush strokes that
have already been applied to an image. See also Brush HUD, Quick Brushes.
Brush HUD A oating window used to set the size of the brush, the softness of the brush’s
edges, and the strength of the brush stroke for the selected adjustment. The Brush HUD also
contains controls for deleting brush strokes, working with overlays, limiting the adjustment to
specic tonal ranges, and edge detection. See also brushed adjustment overlay, Detect Edges,
Quick Brushes.
Bulb (B) A manual shutter speed setting on many cameras used for timed exposures. When
the shutter is set to B, the shutter stays open until the photographer presses the shutter release
button. See also shutter, shutter speed.
Burn Quick Brush A type of Quick Brush adjustment that darkens the area of the image the
adjustment is brushed on. See also adjustment, Brush HUD, Dodge Quick Brush, Quick Brushes.
calibration The process of creating an accurate color prole for a device. Calibrating a device
ensures accurate color translation from device to device. See also device characterization.
camera A photographic device usually consisting of a lightproof box with a lens at one end and
either light-sensitive lm or a digital image sensor at the other. See also digital point-and-shoot
camera, digital single-lens reex (DSLR) camera.
camera shake Blurring of the image caused by the combination of a slow shutter speed, a small
aperture, and a long focal length. See also aperture, shutter speed, tripod, unipod.
Glossary 610
candid shot Refers to a photograph of a person that appears to have been taken informally and
unposed, without the subject’s knowledge. See also composition.
capture a. The process of taking the image received by the digital image sensor and camera
processor and storing that information on the memory card in the camera. b. The process of
recording a photo in Aperture at the moment it is shot via a tethered camera. See also camera,
digital image sensor, image, memory card, tethered shooting.
center-weighted metering A type of metering that measures the light in the entire viewnder
but gives extra emphasis to the center of the frame. Center-weighted metering is the most
common type of metering in consumer cameras. See also evaluative metering, light meter,
spot metering.
charge-coupled device (CCD) A type of digital image sensor that records the pixel information
row by row. See also complementary metal oxide semiconductor (CMOS), digital image sensor.
Chromatic Aberration adjustment An adjustment in Aperture that corrects chromatic
aberration, produced by certain lenses when the photo was shot. Some lenses refract light at
specic focal lengths, resulting in a rainbow eect in the image. See also adjustment, image, light.
chromatic spread The extent of colors aected by the Hue, Saturation, and Luminance
parameters in the Color adjustment. See also adjustment, Color adjustment.
Clone brush A type of Retouch brush in Aperture used to correct and obscure imperfections
in an image by copying pixels from a similar-looking area of an image and pasting them
over the area with the pixels you want to replace. See also image, pixel, Repair brush, Retouch
adjustment, retouching.
close-up A photo in which the subject usually appears within 3 feet of the camera. For example,
head shots are often referred to as close-ups. A shot of an ant on a ower’s petal, where the ant
lls a majority of the frame, is also a close-up.
CMYK A working space used for print pieces combining cyan, magenta, and yellow inks in
dierent combinations to create a color that reects the proper color of light. Black ink (K)
is added to the photo last to generate pure black on the page. See also subtractive color,
working space.
codec Short for compressor/decompressor or encode/decode. A software component used to
translate video or audio from its analog uncompressed form to the digital compressed form in
which it is stored on a computer’s hard disk. Also referred to as a compressor. See also audio le,
video le.
Color adjustment An adjustment in Aperture used to adjust hue, saturation, and luminance
on a color-by-color basis, as well as chromatic range. See also adjustment, chromatic spread, hue,
luminance, saturation.
color cast An unnatural tint in an image due to a lack of color balance. Color casts are often
caused by articial light sources such as interior lighting. Color casts in images are commonly
removed by adjusting levels, tint, or white balance. See also White Balance adjustment.
color channels The individual channels into which color information for digital images is
divided. Each individual color channel represents one of the three individual primary colors that
combine to represent the nal image. Each channel has a bit depth; most digital image les have
8 bits per channel, meaning that there are 256 levels of color for each channel. See also bit depth,
color depth.
Glossary 611
color depth The possible range of colors that can be used in an image. There are generally three
choices with digital images: grayscale, 8-bit, and 16-bit. Higher color depths provide a wider
range of colors but require more storage space. See also bit depth, color channels, grayscale.
colorimeter An instrument capable of measuring the color value of a sample, using color lters.
A colorimeter is used to determine if two colors are the same. However, it does not take into
account the light under which a sample is measured. Colorimeters are often used to calibrate
displays and printers. See also calibration.
colorimetry The science of measuring color both objectively and perceptively.
color interpolation The process of calculating additional color values from light captured via the
red, green, and blue elements on the digital image sensor.
color label A type of metadata that can be assigned in Aperture to help organize and lter
photos. You can assign one of ve color labels to a photo, as well as assign a specic meaning to
each type of color label. See also metadata.
color management system (CMS) An application that controls and interprets the reproduction
of color between devices and imaging software for accuracy. See also ColorSync.
color matching method (CMM) A software algorithm designed to translate color information
from one device prole to another, such as from your display to your printer. ColorSync is a
thoroughly integrated CMM used by OS X. See also ColorSync.
Color Monochrome adjustment An adjustment in Aperture that desaturates the image and
applies a color tint of your choosing to the midtones. See also adjustment, desaturate, image,
midtones, monochrome, Tint adjustment.
color space A mathematical model used to describe part of the visible spectrum. Color from one
device is mapped from the device-dependent value to a device-independent value in a color
space. Once in an independent space, the color can be mapped to another device-dependent
space. See also device dependent, device independent.
ColorSync A color management system that is part of the Mac operating system. In OS X,
ColorSync is thoroughly integrated with the entire operating system and is available to all native
OS X applications. See also color management system (CMS), color matching method (CMM),
ColorSync Utility.
ColorSync Utility A centralized application for setting preferences, viewing installed proles,
assigning proles to devices, and repairing proles that do not conform to the current ICC
specication. See also ColorSync, International Color Consortium (ICC), prole.
color temperature Describes the color quality of light. Color temperature is measured in units
called kelvins (K). See also kelvin (K), White Balance adjustment.
Commission Internationale de l’Eclairage (CIE) An organization established in 1931 to create
standards for a series of color spaces representing the visible spectrum of light. See also color
space, device dependent, device independent, lab plot.
compare photo In Aperture, a photo set to remain onscreen while other photos are viewed
against it. The compare photo is indicated by a green border. See also image.
Glossary 612
complementary metal oxide semiconductor (CMOS) A type of digital image sensor that
is capable of recording the entire image provided by the light-sensitive elements in parallel
(essentially all at once), resulting in a higher rate of data transfer to the storage device. Tiny
colored microlenses are tted on each light-sensitive element in a CMOS sensor to increase its
ability to interpret light. See also charge-coupled device (CCD), digital image sensor.
compositing A process in which two or more digital images are combined into one. See
also eects.
composition The arrangement of visual elements in a scene.
compression The process by which digital image les are reduced in size. Lossy compression
is the process of reducing digital image le sizes through the removal of redundant or less
important image data. Lossless compression reduces le sizes by mathematically consolidating
redundant image data without discarding it. See also decompression, LZW compression.
cones A type of receptor in the eye capable of perceiving color. There are three types of cone
cells, each sensitive to a particular frequency range in the visible spectrum. Cone cells are
capable of seeing either red, green, or blue colors. See also rods.
contact sheet Based on a print preset in Aperture, a printed selection of thumbnail-sized photos
with or without associated metadata. Contact sheets in Aperture are similar in appearance to
contact prints made by exposing negatives or transparencies against photographic paper.
contrast The dierence between the brightness and color values in an image that allows the
viewer to distinguish between objects in an image. High-contrast images have a large range
of values, from the darkest shadow to the lightest highlight. Low-contrast images have a more
narrow range of values, resulting in a “atter” look. See also Contrast parameter, Curves adjustment,
density, at.
Contrast parameter An Enhance adjustment parameter in Aperture used to adjust the contrast
in an image. See also adjustment, contrast, Exposure adjustment.
Contrast Quick Brush A type of Quick Brush adjustment that applies additional contrast to
the area of the image the adjustment is brushed on. See also adjustment, Brush HUD, contrast,
Quick Brushes.
control bar The control bar contains buttons and controls you can use to rate and navigate
through images, as well as apply keywords to them. See also keywords, rating.
copyright The legal right to exclusive publication, production, sale, or distribution of a literary,
musical, or artistic work. Typically, these rights are in eect for a specic period of time.
crop The process of printing or distributing only part of the original image. The general purpose
of cropping an image is to create a more eective composition. Another reason for cropping an
image is to make it t a particular aspect ratio, such as 4 x 6. See also adjustment, aspect ratio,
composition, Crop adjustment, eects.
Crop adjustment An adjustment in Aperture that trims the image for the purpose of changing
the composition or modifying the aspect ratio. The Crop adjustment is used in conjunction with
the Crop tool. See also adjustment, aspect ratio, composition, crop.
Curves adjustment An adjustment in Aperture that selectively remaps the tonal range of the
image by applying a curve from input to output. Manipulating the curve modies the tonal
values in the image. See also adjustment, contrast.
Glossary 613
decompression The process of creating a viewable image from a compressed digital image le.
See also compression.
denition The clarity of details in an image. See also resolution.
Denition parameter An Enhance adjustment parameter in Aperture used to adjust the clarity
of details in an image. See also Enhance adjustment.
Denition Quick Brush A type of Quick Brush adjustment that adds clarity and reduces haze
without adding too much contrast to the area of the image the adjustment is brushed on. See
also adjustment, Brush HUD, denition, Quick Brushes.
demote In Aperture, the process of moving a photo in a stack away from the pick position. See
also Full Screen view toolbar, image, pick, promote, stack.
densitometer An instrument designed to measure the optical density of photographs. See also
device characterization.
density The ability of an image to reproduce distinct dark colors. An image with high denition
in the darker colors is referred to as dense. See also contrast, at.
depth of eld The area of the photo that appears in focus from the foreground to the
background. Depth of eld is determined by a combination of the opening of the aperture and
the focal length of the lens. See also aperture, background, focal length, foreground.
desaturate To remove color from an image. Complete desaturation results in a grayscale image.
See also Black & White adjustment, grayscale, saturation.
destination prole The working-space prole that denes the results of a color conversion from
a source prole. See also prole.
Detect Edges A Brush HUD setting in Aperture that examines dierences in pixel values to
determine possible hard edges and then restricts the brush from aecting pixels beyond those
edges, making it easier to paint adjustments into specic areas of the photo. See also Brush HUD.
device characterization The process of creating a unique, custom prole for a device such as a
display or printer. Characterizing a device involves specialized dedicated hardware and software
to determine the exact gamut of the device. See also calibration, gamut.
device dependent Describes color values that are contingent upon the ability of a device to
reproduce those colors. For example, some colors produced by displays cannot be reproduced
on paper by a printer. The colors produced by the display are outside the gamut of the printer.
Therefore, those colors are considered to be device dependent. See also gamut.
device independent Describes standard color spaces, such as CIE Lab and XYZ, where the
interpretation of a color is not dependent on a specic device. See also color space, Commission
Internationale de l’Eclairage (CIE).
Devignette adjustment An adjustment in Aperture used to correct unwanted vignetting
applied to the image at the time it was captured. See also Vignette adjustment, vignetting.
diused lighting A type of light that is scattered across the subject or scene. Diused lighting
results in a photo with low contrast and detail, as seen in photos shot outdoors on an overcast
day. See also contrast, at.
Glossary 614
digital A description of data that is stored or transmitted as a sequence of ones and zeros. Most
commonly, refers to binary data represented using electronic or electromagnetic signals. JPEG,
PNG, RAW, and TIFF les are all digital. See also digitization.
digital image sensor The computer chip located at the image plane inside the camera that
consists of millions of individual light-sensitive elements capable of capturing light. See also
camera, charge-coupled device (CCD), complementary metal oxide semiconductor (CMOS), megapixel.
digital noise Misinterpreted pixels occurring as the result of high ISO settings; also known as
chrominance signal-to-noise ratio. Random bright pixels, especially in solid colors, are the result of
digital noise. See also ISO speed, noise reduction.
digital original le See original.
digital point-and-shoot camera A lightweight digital camera with a built-in autofocus feature,
aptly named for the two steps required of the photographer to shoot a photo. The lens, aperture,
and shutter are one assembly that is usually irremovable from the camera. See also camera,
digital single-lens reex (DSLR) camera.
digital single-lens reex (DSLR) camera An interchangeable-lens camera where the image
created by the lens is transmitted via a reexing mirror through a prism to the viewnder, and
the viewnder image corresponds to the actual image area. The mirror reexes, or moves up, so
as not to block the digital image sensor when the shutter is open. See also camera, digital point-
and-shoot camera.
digitization The process of converting an analog voltage value to a digital value.
digitize A term often used by photographers for converting photos captured on lm to a digital
format, such as TIFF, using a lm scanner.
disclosure triangle A small triangle you click to show or hide details in the Aperture interface.
display The computer’s monitor.
distort Performing an adjustment that changes the shape or composition of an image. See
also eects.
DNG A royalty-free RAW image format designed by Adobe Systems Incorporated. See also
format, RAW.
Dodge Quick Brush A type of Quick Brush adjustment that lightens the area of the image the
adjustment is brushed on. See also adjustment, Brush HUD, Burn Quick Brush, Quick Brushes.
dot gain A printing term used to describe the enlargement of halftone dots as ink is absorbed
into paper. Dot gain can aect the quality of an image’s appearance by reducing the amount of
white reected o the paper.
dots per inch (dpi) A printer resolution measurement that refers to the maximum number of
dots within a square inch. See also print, resolution.
drift Changes in the way a device reproduces color over time. For example, the age of
inks and the type of paper can cause a printer’s color output to drift. See also device
characterization, gamut.
drop shadow An eect that creates an articial shadow behind an image. Typically used on
websites and in photo albums to create the illusion of three dimensions.
Glossary 615
Duplicate Version command A command in the Photos menu that duplicates the selected
photo version with all applied metadata and adjustments. See also adjustment, image,
metadata, version.
dust and scratch removal The process of digitally removing the blemishes caused by dust and
scratches on lm scans. See also Retouch adjustment.
dye sublimation A type of printer that creates images by heating colored ribbon to a gaseous
state, bonding the ink to the paper. See also inkjet printer, photo printer, print, RA-4.
Edge Sharpen adjustment An adjustment in Aperture that sharpens the image based on
luminance using multiple sharpening passes. See also adjustment, image, Sharpen adjustment.
editing The process of arranging and eliminating photos. See also photo edit.
eect preset A set of saved adjustment parameter settings. You can create new eect presets
and rename, rearrange the order of, and delete existing eect presets. Eect presets appear in the
Eects pop-up menu in the Adjustments inspector and the Adjustments pane of the Inspector
HUD, and you can also access them by choosing Photos > Add Eect. See also adjustment, eects.
eects A general term used to describe the introduction of unnatural visual elements to
enhance an image. See also compositing, eect preset, lters.
electromagnetic radiation A type of energy ranging from gamma rays to radio waves that also
includes visible light. See also light.
embedded prole The source prole saved in the digital image le. JPEG, TIFF, PNG, and PDF le
formats support embedded proles. See also device characterization, prole.
emulsion The tiny layers of gelatin, consisting of light-sensitive elements, found in lm. When
the emulsion is exposed to light, a chemical reaction occurs. After the lm is developed, an
image appears. See also dust and scratch removal, lm.
Enhance adjustment An adjustment in Aperture that adjusts contrast, denition, saturation, and
vibrancy, as well as black, gray, and white tints in an image. See also adjustment, contrast, Contrast
parameter, denition, Denition parameter, saturation, Saturation parameter, tint, Tint adjustment,
Vibrancy parameter.
evaluative metering A type of metering that operates by dividing the frame into several small
segments, taking a reading from each individual segment, and processing the average of the
total segments to recommend the best exposure value for the overall photo. See also center-
weighted metering, light meter, spot metering.
EXIF Short for Exchangeable Image File. The standard format for storing information—such as
shutter speed, aperture, white balance, exposure compensation, metering setting, ISO setting,
date, and time—about how a photo was shot. See also IPTC, metadata.
export The process of formatting data in such a way that it can be understood by other
applications. In Aperture, photos can be exported in their native RAW format, as well as in
JPEG, TIFF, PNG, and PSD formats. The EXIF and IPTC metadata associated with a photo can be
exported as well.
Glossary 616
exposure The amount of light in a photo. Exposure is controlled by limiting the intensity of light
(controlled by the aperture) and the length of time light comes into contact with the digital
image sensor (controlled by the shutter). Exposure aects the overall brightness of the photo
as well as its perceived contrast. See also adjustment, aperture, contrast, digital image sensor,
Exposure adjustment, shutter.
Exposure adjustment An adjustment in Aperture that adjusts exposure, recovery, black point,
and brightness. See also adjustment, Black Point parameter, Brightness parameter, exposure,
Recovery parameter.
exposure meter See light meter.
extended desktop mode A setting in System Preferences that allows the OS X desktop to span
multiple displays. See also display, mirroring.
external editor An application used in tandem with Aperture to perform advanced adjustments,
such as compositing. Aperture creates a new original when an image is sent to an external editor
and automatically retrieves the original when the image is saved. See also compositing, original.
external ash A type of ash connected to the camera via the hot-shoe bracket or PC terminal.
Using an external ash is the best technique for avoiding the red-eye eect in your subject’s
eyes. See also ash, red-eye.
face detection The process Aperture uses to determine if a face appears in a photo. See also
Faces view.
face recognition The process Aperture uses to keep track of faces you have identied in
your photos and suggest other possible matching faces in the same Aperture library. See also
Faces view.
Faces view An Aperture view that displays snapshots of people in photos in the library or in an
item selected in the Library inspector that have been assigned names. See also face detection,
face recognition, Flagged view, Photos view, Places view, Projects view, skimming.
ll-in lighting The use of an articial light source, such as daylight lamps or ash, to soften a
subject or ll in shadows. See also bounce lighting, color temperature, White Balance adjustment.
lm A exible transparent base coated with a light-sensitive emulsion capable of recording
photos. See also dust and scratch removal, emulsion.
lmstrip An interface element in Full Screen view that allows you to scroll through and search
for photos. See also Full Screen view.
lmstrip view A Browser view that allows you to quickly scroll through thumbnail images
horizontally. See also Browser.
Filter HUD A oating window used to quickly locate photos in the Browser based on a
combination of criteria, such as adjustments, keywords, ratings, and EXIF metadata. See also EXIF,
image, keywords, rating.
lters a. Modiable search criteria used in the Filter HUD to return a specic selection of
photos. b. Eects applied in Photoshop that aect the visual quality of the image to which
they’re applied. c. A colored piece of glass or plastic designed to be placed in front of a camera
lens to change, emphasize, or eliminate density, reections, or areas within the scene. See also
compositing, density, eects.
Glossary 617
Finder The part of the Mac operating system software that keeps track of les, applications, and
folders and displays the desktop.
nishing The process of applying the nal adjustments to a digital image just before
presentation. Finishing may involve applying an additional gamma adjustment upon export, or
using an external editor to either burn or dodge a portion of the image before sending it to the
printer. See also export, external editor.
FireWire The trademarked Apple name for the IEEE 1394 standard, a fast and versatile interface
used to connect external devices to computers. FireWire is well suited to transferring large
amounts of data, and FireWire devices such as hard drives are often used to provide additional
storage space. Aperture vaults are commonly stored on external FireWire hard drives. See also
tethered shooting, USB, vault.
xed lens See prime lens.
ag A type of metadata assigned in Aperture used to help lter photos. You can ag photos and
then search for and display photos in Aperture based on whether they are agged or not. See
also Flagged view, metadata.
Flagged view An Aperture view that displays all photos, audio clips, and video clips in the library
that have been agged. See also Faces view, ag, Photos view, Places view, Projects view.
ash A device either on or attached to the camera that emits a brief, intense burst of light when
the shutter release button is pressed. Flashes, synchronized with the shutter, are used to obtain
a correctly exposed photo in low-light situations. See also exposure, external ash, ll-in lighting,
hot shoe.
at The lack of density in a photo when the contrast is too low. See also contrast, density.
Flip adjustment An adjustment in Aperture that inverts the composition of the image
horizontally, vertically, or both. See also adjustment.
focal length The distance from the rear nodal point of the lens to the point where the light rays
passing through the lens are focused onto the image plane—the digital image sensor. Focal
lengths are measured in millimeters (mm).
focus point overlays See autofocus point overlays.
folder A type of container in the Aperture library used to organize projects and albums within
projects. Folders do not contain photos, video clips, or audio clips. See also album, library, project.
foreground The area of the image between the subject and the camera. See also background,
depth of eld.
format a. File format: A specic method of encoding information. Most well-known le formats,
such as TIFF and PNG, have published specications. b. Disk formatting: The preparation of a hard
disk or other storage medium for use with a le system. See also JPEG, PNG, PSD, TIFF, vault.
frame The border of an image. Frame can also be used as a verb to describe the process of
constructing a composition within a specic image area. See also crop.
frontlighting A light source, emanating from the direction of the camera, that faces toward the
subject. See also backlighting, sidelighting.
f-stop The ratio of the focal length of the lens to the diameter of the opening of the aperture.
See also aperture.
Glossary 618
Full Screen view A workspace view in Aperture with minimal user interface, used to view full-
screen photos in high resolution with the least amount of light and color interference. See also
Browser layout, lmstrip, HUD, Split View layout, Viewer layout.
Full Screen view toolbar A collection of buttons and tools, grouped by function, located at the
top of the screen in Full Screen view. See also toolbar.
gamma A curve that describes how the middle tones of an image appear. Gamma is a nonlinear
function often confused with brightness or contrast. Changing the value of the gamma aects
middle tones while leaving the whites and blacks of the image unaltered. Gamma adjustment is
often used to compensate for dierences between Mac and Windows video cards and displays.
The Mac Standard gamma is 1.8; the PC Standard is 2.2.
gamut The range of colors an individual color device is capable of reproducing. Each device
capable of reproducing color has a unique gamut determined by age, frequency of use, and
other elements such as inks and paper. See also device characterization, device dependent, gamut
mapping, ICC prole.
gamut mapping The process of identifying colors outside a device’s gamut and then calculating
the nearest color within its gamut. Gamut mapping is used when receiving color information
from another color space. See also color space, gamut.
Global Positioning System (GPS) A U.S. space-based navigation system that provides reliable
positioning, navigation, and timing services for civilian users on a continuous, worldwide basis.
Aperture uses photo location information provided by GPS-enabled cameras to plot where each
image was shot on a map in Places view. See also GPS track log, Places view.
GPS track log A le consisting of digital bread crumbs that are used to dene a path or route
(“track”) using precise coordinates saved by a GPS device or GPS tracking iOS application. If you
have a GPS-enabled camera or iOS device or another GPS device that you use to create track les
and save waypoints, you can import the track les into Aperture and work with them in Places
view. See also Global Positioning System (GPS), Places view, waypoint.
grayscale Describes an image whose only colors are shades of gray. Usually grayscale images
have smaller le sizes because less information is required to display a gray pixel, in which the
red, green, and blue pixel elements all emit an equal intensity. See also Black & White adjustment,
monochrome, pixel.
grid view A Browser view that displays photos as a grid of thumbnails. Grid view is the Browser’s
default view. See also Browser, lmstrip view, list view.
Halo Reduction Quick Brush A type of Quick Brush adjustment used to remove the blue
and purple fringes that are occasionally produced with certain lenses when the image is
overexposed. See also adjustment, Brush HUD, Quick Brushes.
high-denition video Generally refers to video that is 720 progressive scan lines or better, also
known as HD video.
highlights The brightest areas of the subject or scene. See also contrast, density, shadows.
Highlights & Shadows adjustment An adjustment in Aperture used to selectively adjust the
highlights and shadows in an image. See also adjustment, highlights, shadows.
hot shoe An apparatus at the top of a camera designed to hold a portable ash. When the
shutter release button is pressed, an electric signal is transmitted through a connection in the
hot shoe to activate the portable ash. See also external ash, ash.
Glossary 619
HUD Short for heads-up display. In Aperture, HUDs are oating windows that allow you to work
on your image. You can open and then move a HUD wherever you wish, based on your display
setup. See also Full Screen view.
hue An attribute of color perception; also known as color phase. For example, red and blue are
dierent hues. See also Color adjustment.
ICC prole Created as a result of device characterization, the ICC prole contains the data
about the device’s exact gamut. See also device characterization, gamut, International Color
Consortium (ICC).
image An artifact that reproduces the likeness of some subject, usually a physical object or
person, also known as a picture. See also photograph, photo selection, picture, subject.
importing The process of bringing digital image les, audio les, and video les of various types
into a project in Aperture. Imported les can be created in another application, downloaded
from a camera or card reader, or brought in from another Aperture project. See also project.
inkjet printer A type of printer that creates images by spraying little ink droplets onto the paper.
See also dye sublimation, photo printer, print, RA-4.
Inspector HUD A oating window that contains the Library, Metadata, and Adjustments panes.
See also Inspector pane.
Inspector pane An element of the Aperture main window that contains the Library, Info, and
Adjustments inspectors. See also Inspector HUD.
Intensify Contrast Quick Brush A type of Quick Brush adjustment that corrects the shadow
areas of the image that appear washed out by intensifying the contrast between pure black and
50 percent gray in the area of the image the adjustment is brushed on. The Intensify Contrast
Quick Brush adjustment is equivalent to applying an Overlay blend. See also adjustment, Brush
HUD, contrast, Polarize Quick Brush, Quick Brushes, shadows.
International Color Consortium (ICC) An organization established to create the color
management standard known as the ICC prole. ICC proles are universally accepted by hardware
and software vendors because they’re based on an open standard. See also ICC prole.
IPTC Short for International Press Telecommunications Council. IPTC metadata is used
by photographers and media organizations to embed keywords (words describing the
characteristics of the image, including the photographer’s name) in the image les themselves.
Large publishers typically use image management systems to quickly identify photos based on
the IPTC information embedded in the image le. See also EXIF, metadata.
IPTC Core A dened set of metadata elds, primarily used by photographers and news media,
built on Adobe’s XMP technology. See also IPTC, metadata, XMP sidecar le.
iris See pupil.
ISO speed The relative sensitivity of lm provided as a benchmark by the International
Standards Organization (ISO). In digital cameras, the minimum ISO rating is dened by the
sensitivity of the digital image sensor. When the ISO setting on the camera is increased, allowing
the photographer to shoot in low-light situations, the camera amplies the voltage received
from the light-sensitive elements on the digital image sensor prior to converting the voltage
signals to digital values. See also digital image sensor, digital noise.
Glossary 620
JPEG Short for Joint Photographic Experts Group, JPEG is a popular image le format that lets
you create highly compressed graphics les. The amount of compression used varies. Less
compression results in a higher-quality image. JPEG les usually have a .jpg extension. See also
format, RAW + JPEG image pair.
kelvin (K) A unit of measurement used to describe color values of light sources, based
on a temperature scale that begins at absolute zero. See also color temperature, White
Balance adjustment.
keywords Descriptive words about the subject in the photo that are added to photo versions
and saved as metadata. See also control bar, Keywords HUD, metadata, version.
Keywords HUD A oating window containing a library of keywords that can be applied to a
photo selection. See also keywords, metadata, photo selection.
lab plot A visual three-dimensional representation of the CIE Lab color space. See also color
space, ColorSync.
lens A series of sophisticated elements—usually glass—constructed to refract and focus the
reective light from a scene at a specic point: the digital image sensor in a camera. See also
camera, digital image sensor, macro lens, prime lens, telephoto lens, wide-angle lens, zoom lens.
Levels adjustment An adjustment in Aperture that provides controls to selectively adjust the
tonal range of an image. See also adjustment, image.
library In Aperture, a container le that holds projects, folders, albums, originals, and versions.
You organize items in the library, rename items, sort items, and so on using the Library inspector.
By default, the Aperture Library le is located in your Pictures folder. See also album, folder,
merging libraries, original, project, version.
Library Path Navigator pop-up menus A set of pop-up menus at the top-left corner of the
screen in the Full Screen view Browser mode that are used to provide access to all the items in
the Library inspector. See also Browser mode (Full Screen view), Full Screen view, library.
Lift & Stamp HUD A oating window that displays the attributes lifted from a photo. You can
choose which attributes are stamped on a photo selection by deselecting the attributes you
don’t want to apply. See also HUD, Lift and Stamp tools, photo selection.
Lift and Stamp tools A pair of tools used in conjunction with the Lift & Stamp HUD to copy (lift)
attributes, such as metadata and adjustments, from one photo and paste (stamp) them on a
photo selection. See also adjustment, Lift & Stamp HUD, metadata, photo selection.
light Visible energy in the electromagnetic spectrum with wavelengths ranging between 400
and 720 nanometers. See also electromagnetic radiation.
light meter A device capable of measuring the intensity of reective light. Light meters are used
as an aid for selecting the correct exposure settings on the camera. Most cameras have internal
light meters. See also center-weighted metering, evaluative metering, meter, spot metering.
Light Table An area in the Aperture main window that appears when you select a Light Table
album. The Light Table provides a large open space where you can place a selection of photos for
review and drag them to new positions, group them in dierent combinations, and resize them
as needed. See also album, Navigator button.
Glossary 621
list view A Browser view that displays photos in a list by name, icon, and accompanying
metadata, such as rating, image dimensions, le size, and date, rather than as a row or grid of
thumbnails. See also Browser, lmstrip view, grid view, metadata, rating.
Loupe A tool in Aperture used to magnify the area of the photo you place it over.
luminance A value describing the brightness of all color channels combined in a pixel.
LZW compression A lossless data-compression algorithm developed by Abraham Lempel, Jakob
Ziv, and Terry Welch in 1984. LZW compression algorithms are typically used with JPEG and TIFF
graphics les to reduce the le size for archiving and transmission at a ratio of 2.8:1. See also
compression, JPEG, TIFF.
macro lens A type of lens used for extreme close-up photography. See also camera, lens, prime
lens, telephoto lens, wide-angle lens, zoom lens.
main Viewer For systems with multiple displays, the main Viewer is used for displaying the
Aperture application. See also display, secondary Viewer.
managed images Images whose originals are stored in the Aperture library. The locations of the
originals are managed by the Aperture database. Managed image les are always online. See also
library, oine, online, original, referenced images.
megapixel One million pixels. For example, 1,500,000 pixels equals 1.5 megapixels. See also
digital image sensor, pixel.
memory card The device in the camera where digital image les are stored. See also camera,
capture.
merging libraries The process of importing an Aperture library le and merging its contents
into the library that is currently open in Aperture. See also library.
metadata Data about data; metadata describes how data was collected and formatted.
Databases use metadata to track specic forms of data. Aperture supports both EXIF and IPTC
metadata. See also EXIF, IPTC.
meter The process of using a light meter to calculate the appropriate exposure. See also
light meter.
midtones The color values in an image between the highlights and shadows. See also contrast,
highlights, Highlights & Shadows adjustment, Levels adjustment, shadows.
mirroring The process of showing the same photo on two or more displays. See also extended
desktop mode.
Mirror setting A secondary Viewer setting that sets Aperture to present the same photo
selection on the main and secondary Viewer displays. See also display, mirroring, main Viewer,
photo selection, secondary Viewer.
moire pattern Refers to the type of visual pattern that is created by the interference of two grids
overlaid on top of one another. Moire patterns can occur in photos taken with digital cameras
when the linear pattern in the photo interferes with the linear pattern of the digital image sensor
pixel array. The moire pattern often results from a weak anti-aliasing lter employed by the
camera’s image processor. See also digital image sensor, RAW Fine Tuning adjustment.
monitor See display.
Glossary 622
monochrome An image presented in shades of a single color, such as the shades of gray in a
black-and-white photograph. See also Black & White adjustment, Color Monochrome adjustment,
grayscale, image, photograph.
Navigator button A button in the Light Table used to reposition the view when the contents of
the Light Table are larger than your screen. See also Light Table.
negative Developed lm with a reverse-tone image of the subject or scene. See also dust and
scratch removal, emulsion, lm, positive.
New Version From Original command A command in the Photos menu that creates a new
version from the original corresponding to a selected photo, audio clip, or video clip. See also
original, version.
noise See digital noise.
noise reduction The process of removing digital noise in a photo. See also adjustment, digital
noise, image, Noise Reduction adjustment, Noise Reduction Quick Brush.
Noise Reduction adjustment An adjustment in Aperture that reduces digital noise in an image.
See also adjustment, digital noise, image, noise reduction.
Noise Reduction Quick Brush A type of Quick Brush adjustment that removes digital noise in
the area of the image the adjustment is brushed on. See also adjustment, Brush HUD, digital noise,
noise reduction, Quick Brushes.
N-up printing The process of consolidating a multiple-page document on a single sheet of
paper. See also print.
oine Describes photos whose originals are currently unavailable to Aperture. Oine photos
appear in the Viewer and Browser with badge overlays displaying a red slash through them.
Photos may be oine because the device containing the originals, such as a CD, DVD, FireWire
drive, or server, is not connected to your computer or the original lenames have been modied
in some way. To bring the photos online, you must reconnect them to their corresponding
originals. See also Browser, FireWire, online, original, preview images, Viewer.
oset press A type of professional printer used for high-volume printing for items such as
magazines and brochures. Oset printing presses deposit ink in lines of halftone dots to produce
images on the page. See also photo printer.
O setting A secondary Viewer setting that turns o the dual-display function. See also display,
secondary Viewer.
online Describes photos whose originals are currently available to Aperture. See also oine.
opacity The level of an image’s transparency.
optical zoom lens See zoom lens.
original The source media le that was copied from either your computer’s le system or your
camera’s memory card. In Aperture, the original is never modied. Whenever a change is made
to a photo, a video clip, or an audio clip, that change is applied to the version. Formerly known as
the master. See also memory card, project, version.
overexposure The result of exposing a scene too long. Overexposed scenes appear too bright
and lack adequate details in the shadows. See also exposure, underexposed.
Glossary 623
panning a. Moving the camera along with a moving subject in order to keep the subject in
the frame. Panning a fast-moving subject with a slow shutter speed usually causes the subject
to remain relatively in focus, while the remaining areas of the scene are blurred or stretched
in the direction of the camera movement. b. In Aperture, pressing the Space bar and dragging
within an image to see other parts of the image when it is displayed at 100 percent size. See also
camera, image, Viewer.
panorama Usually refers to a scenic landscape photo with a wide aspect ratio. Photographers
often digitally combine, or “stitch,” multiple photos of the same scene to create a continuous
panoramic photo. See also aspect ratio.
perceptual A type of render intent that compresses the total gamut from one device’s color
space into the gamut of another device’s color space when one or more colors in the original
image are out of the gamut of the destination color space. This preserves the visual relationship
between colors by shrinking the entire color space and shifting all colors. However, colors that
were in gamut also shift. See also gamut, relative colorimetric, rendering intent.
phase An attribute of color perception; also known as hue. See also hue.
photo edit The process of choosing selects from a group of photos, as well as rejecting photos
that you don't plan to use or publish. The more aggressively you cull undesirable photos from
your working group of photos, the more time you save when you process the photos for display.
See also rating, Reject rating, Select rating.
photograph An image created using a camera as a result of light interacting with a light-
sensitive surface, usually lm or a digital image sensor. See also camera, digital image sensor, lm,
image, picture.
photo printer A type of printer capable of producing photo-quality images. See also dye
sublimation, gamut, inkjet printer, oset press, print, RA-4.
photo selection Refers to a photo or group of photos selected in the Browser or the Full Screen
view lmstrip. A white rectangle surrounding a photo indicates it is selected. See also Browser,
Full Screen view, photograph.
Photo Stream An iCloud service that uploads and stores the last 30 days of your photos and
automatically pushes them to all your iOS devices and computers. Also a view in Aperture that
displays all the photos that have been uploaded to Photo Stream from your iOS 5 devices and
the Aperture library. See also Faces view, Flagged view, Photos view, Places view, Projects view.
Photos view An Aperture view that displays all the photos, audio clips, and video clips in the
library. See also Faces view, Flagged view, Photo Stream, Places view, Projects view.
pick The photo that represents a stack. The pick is usually the best photo in the stack. See also
alternate, stack.
picture A visual representation rendered on a at surface or screen, such as a photograph. See
also image, photograph.
Pictures folder Located in the Home folder, the Pictures folder is the default location for
Aperture and iPhoto libraries. See also library.
pixel The smallest discernible visual element of a digital image. See also megapixel.
Places Path Navigator pop-up menus A set of pop-up menus located at the top-left corner of
the screen in Places view that are used to navigate to locations on the map. See also Places view.
Glossary 624
Places view A view in Aperture that allows you to apply location information to a photo
selection and track the location of each shot using Google Maps. Photos captured with GPS-
enabled cameras provide their location information automatically. See also Faces view, Flagged
view, Global Positioning System (GPS), photo selection, Photos view, Places Path Navigator pop-up
menus, Projects view, waypoint.
PNG Short for Portable Network Graphics. PNG is a bitmapped graphics le format that has been
approved by the World Wide Web Consortium to replace patented GIF les. PNG les are patent
and royalty free. See also format.
Polarize Quick Brush A type of Quick Brush adjustment that deepens the colors in the image by
darkening the shadows and midtones while preserving the highlights in the area of the image
the adjustment is brushed on. The Polarize Quick Brush adjustment is equivalent to applying a
Multiply blend. See also adjustment, Brush HUD, contrast, highlights, Intensify Contrast Quick Brush,
midtones, Quick Brushes, shadows.
polarizing lter A lter placed on the front of the camera lens that selectively transmits light
traveling on one plane while absorbing light traveling on other planes. Polarizing lters are
capable of reducing unwanted reections on windows and shiny surfaces. Polarizing lters are
also used to darken the sky. See also lters.
positive Developed lm, where the tonal relationship of the subject or scene is the same
on lm as when viewed by the eye; also known as a slide. See also dust and scratch removal,
emulsion, negative.
presets A saved group of settings, such as export, naming, print, and web export settings.
Presets determine properties such as le format, le compression, lename construction, paper
size, and ColorSync prole. Presets are usually dened for particular workows and can be
tailored to client specications. See also ColorSync.
pressure-sensitive tablet An input device used in place of a mouse that consists of two parts: a
at surface for drawing (the interface that is connected to the computer) and a pen or stylus. The
harder you press the stylus against the surface of the tablet, the thicker the line or brush stroke
is. See also Brush HUD, Quick Brushes.
preview images JPEG images generated by Aperture that represent the original with any
applied adjustments and associated metadata. Preview images are designed to be shared with
other applications, such as iWork and iLife applications, and used in place of the high-resolution
originals when they are oine. See also adjustment, JPEG, metadata, oine, original.
primary selection The most important photo in a photo selection. Adjustments are applied
only to the primary selection in a photo selection. The primary selection is identied by a thicker
white border. There can be only one primary selection in a photo selection. See also adjustment,
photo selection, Primary setting.
Primary setting A Viewer setting in Aperture that limits metadata changes to only the
primary selection in a multiple-photo selection. See also lmstrip, metadata, photo selection,
primary selection.
prime lens A lens with a xed focal length that cannot be changed.
print An image, such as a photograph, printed on paper. See also dye sublimation, inkjet printer,
N-up printing, photograph, RA-4.
Glossary 625
prole A compilation of data on a specic device’s color information, including its gamut, color
space, and modes of operation. A prole represents a device’s color-reproduction capabilities and
is essential to eective color management. See also device characterization, gamut.
program exposure An exposure mode on many automatic cameras in which the camera
automatically sets the aperture and shutter values for a correct exposure. See also exposure.
project In Aperture, the top-level container that holds all the originals, versions, and metadata
associated with your shoot. In the case of referenced images, the originals are stored in their
current location rather than in the project within the library le. See also album, folder, library,
original, Projects mode (Full Screen view), Projects view, referenced images, version.
Projects mode (Full Screen view) A view mode in Full Screen view, similar to the Projects view
in the Aperture main window. All projects are displayed, and each project is represented by
one large thumbnail of a photo within the project. You can position the pointer over a project
thumbnail and drag to quickly skim the photos in the project. See also Browser mode (Full Screen
view), Full Screen view, project, Projects view, Viewer mode (Full Screen view).
Projects view An Aperture view that displays all the projects in the library. Each project is
represented by one large thumbnail of a photo within the project. You can position the pointer
over a project thumbnail and drag to quickly skim the photos in the project. See also Faces view,
Flagged view, Photos view, Places view, project, Projects mode (Full Screen view), skimming.
promote The process of moving a photo in a stack closer to the pick position. See also demote,
pick, stack.
PSD Short for Photoshop Document. PSD les are proprietary graphics les for Adobe Systems
Incorporated. See also format.
pupil The part of the eye that contracts and expands depending on the amount of light; also
known as the iris.
quantization The process of converting a value derived from an analog source to a discrete
digital value. See also digitization.
Quick Brushes Used to apply selective adjustments to an image by brushing the adjustment
over a portion of the image. See also adjustment, brushed adjustment, brushed adjustment overlay,
Brush HUD.
QuickTime A cross-platform multimedia technology developed by Apple. Widely used for
editing, compositing, web video, and more.
RA-4 A type of professional printer capable of printing digital les on traditional photographic
paper. RA-4 printers use a series of colored lights to expose the paper; the colors blend together
to produce continuous-tone prints. See also dye sublimation, inkjet printer, photo printer, print.
RAID Short for Redundant Array of Independent Disks. A method of providing photographers who
have large photo libraries many gigabytes of high-performance data storage by formatting a
group of hard disks to act as a single volume. The performance of a group of hard disks striped
together as a RAID can be much higher than that of the individual disks.
RAM Short for random-access memory. A computer’s memory capacity, measured in megabytes
(MB) or gigabytes (GB), which determines the amount of data the computer can process and
temporarily store at any moment.
Glossary 626
rangender An apparatus found on many cameras that is used to help focus the image. See also
camera, viewnder.
raster image processor (RIP) A specialized printer driver that replaces the driver that comes with
your printer. The RIP takes input from applications and converts, or rasterizes, the information to
data that the printer understands so that it can put dots on a page. Software RIPs typically oer
features not found in standard printer drivers.
rating In Aperture, the process of adding a value to a photo to indicate its quality in relation to
other photos in a selection. See also photo edit, Reject rating, Select rating.
RAW The original bit-for-bit digital image le captured by the camera. See also RAW + JPEG
image pair.
RAW Fine Tuning adjustment A set of adjustment parameters in Aperture used to control how
Aperture decodes RAW image les. See also moire pattern.
RAW + JPEG image pair A photo captured by a professional digital camera and saved as both
an individual RAW le and an individual JPEG le. You can set Aperture to import one le type or
both le types in the pair. See also JPEG, RAW.
reciprocity The relationship between the aperture and the shutter that allows for correct
exposures as a result of multiple shutter speed and aperture setting combinations. An increase
in aperture and a decrease in shutter speed creates the same exposure as the previous aperture
and shutter combination, and vice versa. See also aperture, shutter.
Recovery parameter An Exposure adjustment parameter in Aperture used to recover highlight
detail. See also Exposure adjustment.
red-eye The phenomenon that gives people glowing red eyes in photographs. Red-eye is
caused by the close proximity of the ash to the lens (especially built-in ash). See also external
ash, Red Eye Correction adjustment.
Red Eye Correction adjustment An adjustment in Aperture that replaces red pixels with black,
eliminating the red-eye eect. Used in conjunction with the Red Eye tool. See also adjustment,
pixel, red-eye.
referenced images Images whose originals are stored outside of the Aperture library. See also
library, managed images, oine, online, original.
Reject rating In Aperture, a negative rating applied to a photo as part of the photo editing
process. See also photo edit, rating, Select rating.
relative colorimetric A rendering intent suitable for printing photographic images. It compares
the highlight values of the source color space to that of the destination color space and shifts
out-of-gamut colors to the closest reproducible color in the destination color space. This
rendering intent can cause two colors, which appear dierent in the source color space, to
be the same in the target color space, which is known as clipping. See also gamut, perceptual,
rendering intent.
rendering intent The method by which colors that are out of gamut for a selected output
device are mapped to that device’s reproducible gamut. See also gamut, perceptual,
relative colorimetric.
Glossary 627
Repair brush A type of Retouch brush in Aperture used to correct and obscure imperfections
in an image by copying pixels from a similar-looking area of an image and pasting them over
the area with the pixels you want to replace. In addition to overwriting the pixels, the Repair
brush resamples the pasted pixels to match the color, texture, and luminance of the pixels you
replaced. See also Clone brush, Retouch adjustment, retouching.
resolution The amount of information a digital image is capable of conveying. Resolution is
determined by the combination of le size (number of pixels), bit depth (pixel depth), and dots
per inch (dpi). See also bit depth, dots per inch (dpi), pixel.
Retouch adjustment In Aperture, an adjustment used to correct or obscure imperfections in an
image. Used in conjunction with the Retouch HUD, which provides a Clone brush and a Repair
brush. See also adjustment, Clone brush, Repair brush.
retouching The process of altering an image to add or remove details. See also Clone brush,
compositing, eects, lters, Repair brush, Retouch adjustment.
RGB Short for Red, Green, Blue. A color space commonly used on computers, in which each color
is described by the strength of its red, green, and blue components. This color space directly
translates to the red, green, and blue elements used in computer displays. The RGB color space
has a very large gamut, meaning it can reproduce a wide range of colors. This range is typically
larger than the range that printers can reproduce. See also additive color.
rods A type of receptor in the eye capable of perceiving luminance. Rods do not perceive color,
but only levels of brightness. See also cones.
saturation The intensity of color in an image. Saturated colors are perceived to have a “purer”
look, resulting from the absence of the color gray. See also adjustment, desaturate.
Saturation parameter An Enhance adjustment parameter in Aperture used to adjust saturation
in an image. See also adjustment, desaturate, Enhance adjustment, saturation.
Saturation Quick Brush A type of Quick Brush adjustment that adds saturation to or removes it
from the area of the image the adjustment is brushed on. See also adjustment, Brush HUD, Quick
Brushes, saturation.
secondary Viewer The secondary Viewer is used to present photos on a second display, separate
from the application workspace. The secondary Viewer has ve settings: Mirror, Alternate, Span,
Black, and O. See also Alternate setting, Black setting, display, main Viewer, Mirror setting, O
setting, Span setting.
selective focus The process of isolating a subject by using an f-stop that produces a shallow
depth of eld. See also depth of eld.
Select rating In Aperture, the highest rating that can be applied to a photo as part of the photo
editing process. A Select rating is applied when you intend to display or distribute the photo. See
also photo edit, rating, Reject rating.
sepia Describes a photograph with a brown tint. See also photograph, Sepia Tone adjustment,
Tint adjustment.
Sepia Tone adjustment An adjustment in Aperture that changes a color image to sepia—
allowing you to desaturate the color image to the level of sepia coloring you want. See also
adjustment, desaturate, image, sepia, Tint adjustment.
shadows The darkest areas of a subject or scene. See also contrast, density, highlights.
Glossary 628
Sharpen adjustment An adjustment in Aperture used to sharpen images. See also adjustment,
Edge Sharpen adjustment, image.
Sharpen Quick Brush A type of Quick Brush adjustment that sharpens the area of the image the
adjustment is brushed on. See also adjustment, Brush HUD, Quick Brushes.
shortcut menu A menu you access by holding down the Control key and clicking an area of the
interface, or by pressing the right mouse button.
shutter A complicated mechanism, usually consisting of a blade or a curtain, that precisely
controls the duration of time light passing through the lens remains in contact with the digital
image sensor. See also shutter speed.
shutter priority A setting on certain cameras that automatically sets the aperture for a correct
exposure based on the shutter speed set by the photographer. See also aperture priority, exposure.
shutter speed The length of time the shutter is open or the digital image sensor is activated or
charged. Shutter speeds appear as fractions of a second, such as 1/8 or 1/250. See also shutter.
sidelighting Light that hits the subject from the side, perpendicular to the angle of the camera.
See also backlighting, frontlighting.
silhouette A photo in which the subject is a solid dark shape against a bright background.
Extreme backlighting, such as a sunset, can cause the silhouette eect when your subject is
placed in the foreground. See also backlighting, foreground.
skimming The act of quickly navigating through photos of a person in Faces view or photos
within a project in Projects view by slowly dragging over the thumbnail representing the person
in Faces view or the project in Projects view. See also Faces view, Projects view.
Skin Smoothing Quick Brush A type of Quick Brush adjustment used to smooth a person’s skin
by subtly blurring wrinkles and skin pores in the area of the image the adjustment is brushed on.
See also adjustment, Brush HUD, Quick Brushes.
slide See positive.
slider In Aperture, a control that can be dragged forward or backward to make an adjustment.
Sliders can be found in the Adjustments inspector and the Adjustments pane of the Inspector
HUD. See also adjustment, HUD, Inspector HUD.
slideshow An animated presentation of a series of photos. In Aperture, you can combine photos
with music and video to create multimedia slideshows that you can play on your computer
(using one or two displays) or export as slideshow movies.
Smart Album Dynamic albums in Aperture used to organize photos, audio clips, and video clips
by gathering versions based on search criteria. See also album, Smart Settings HUD, version.
Smart Settings HUD A oating window used to specify search criteria, such as adjustments,
keywords, ratings, and EXIF metadata, for the purpose of gathering photos that match into a
Smart Album. See also EXIF, keywords, rating, Smart Album.
soft lighting See diused lighting.
soft proof The onscreen simulation by a display of the expected output from a printer or press.
Sorting pop-up menu Used to arrange photos in the Browser based on a variety of sort
properties or custom sort criteria. See also Browser.
Glossary 629
source image le See original.
source prole The prole of an image le before it undergoes color conversion.
Span setting A secondary Viewer setting that splits the presentation of the current photo
selection between the main and secondary Viewer displays. See also main Viewer, photo selection,
secondary Viewer.
spectrophotometer An instrument that measures the wavelength of color across an
entire spectrum of colors. Because it can be used to prole both displays and printers, the
spectrophotometer is preferred for device proling.
Split View layout A main window layout in Aperture that displays the Viewer and Browser at the
same time. See also Browser, Browser layout, Viewer, Viewer layout.
Spot & Patch adjustment An adjustment in Aperture used to retouch imperfections in an image,
such as sensor dust. See also adjustment.
spot metering A type of metering that operates by metering within a small target that is usually
in the center of the frame. See also center-weighted metering, evaluative metering, light meter.
sRGB A common working space designed to represent the average PC monitor. Because of its
small gamut, it is suitable for web graphics but not for print production. See also working space.
stack In Aperture, a set of similar photos, of which only one photo is intended for use. See also
alternate, pick.
stopping down The process of changing the aperture, or f-stop, to a smaller opening. See also
aperture, f-stop.
Straighten adjustment An adjustment in Aperture that levels the image’s horizon. Used in
conjunction with the Straighten tool. See also adjustment.
subject The main object, person, scene, or incident chosen by the photographer to be
represented in a photo. See also candid shot, photograph.
subtractive color Images with color elements derived from the light reected o the surface of
an object. CMYK is a common form of subtractive color. See also CMYK.
SWOP Short for Specications for Web Oset Publications, a standard printing-press prole. Web
here refers to a web press, not to the Internet.
tabs In Aperture, elements that delineate projects, folders, or albums in the Browser when more
than one is selected in the Library inspector. You click a tab to view the contents of a currently
open project, folder, or album. See also album, folder, project.
target A reference le used to prole a device such as a scanner or digital camera. It often
contains patches whose color values have been measured. The output from a device is then
compared with the target. See also device characterization.
telephoto lens A lens with a long focal length that magnies the subject. See also lens.
tethered shooting Refers to the process of connecting a digital camera to your Mac via a
FireWire or USB cable, shooting photographs, and having Aperture capture and store the image
les at the moment they are shot. See also camera, FireWire.
Glossary 630
theme Professionally designed layouts in Aperture used for books, webpages, and slideshows.
See also slideshow.
TIFF Short for Tagged Image File Format. TIFF is a widely used bitmapped graphics le format,
developed by Aldus and Microsoft, that handles monochrome, grayscale images. See also format,
grayscale, monochrome.
tint The shade of a color. See also color cast.
Tint adjustment An adjustment parameter in Aperture used to selectively remove color casts in
the shadows, midtones, and highlights in an image. See also adjustment, color cast, exposure.
Tint Quick Brush A type of Quick Brush adjustment that shifts the tint in the area of the image
the adjustment is brushed on. See also adjustment, Brush HUD, Quick Brushes, tint.
toolbar A collection of buttons and controls, grouped by function, located at the top of the
Aperture main window. See also Full Screen view toolbar.
transition A visual eect applied between photos in a slideshow. In Aperture, you can choose
the type and duration of the transition between photos. See also slideshow.
travel maps You can create travel maps using the Book Layout Editor if you select a book theme
that includes travel maps. See also Places view.
tripod A stand with three legs used to keep a camera steady. The use of a tripod is especially
necessary when shooting long exposures. See also camera shake, exposure.
tungsten light A type of light with a low color temperature. Tungsten light sources usually
include household lamps but should not be confused with uorescent lights. See also color
temperature, White Balance adjustment.
underexposed The result of not exposing a scene long enough. Underexposed scenes appear
dark. See also exposure, overexposure.
unipod Similar to a tripod; a stand with one leg used as an aid in keeping a camera steady. See
also camera shake, exposure.
untagged A document or an image that lacks an embedded prole.
USB Short for Universal Serial Bus. A versatile interface used to connect external devices to
computers. USB cables are often used to connect computers to computer peripherals, such
as keyboards and digital cameras, as well as transfer large amounts of data. See also camera,
FireWire, tethered shooting.
vault A designated storage space that contains an exact copy of the Aperture library (from the
last time you backed up), usually saved on an external FireWire drive. See also FireWire, library.
version The le containing all the metadata and adjustment information for an image, a video
clip, or an audio clip. In Aperture, only versions are changed. Aperture never changes originals.
See also original.
Vibrancy parameter An Enhance adjustment parameter in Aperture used to add saturation
in an image in a nonlinear manner. Saturated colors are left alone while saturation is added to
all other colors. However, skin tones are not modied. See also adjustment, desaturate, Enhance
adjustment, saturation.
Glossary 631
Vibrancy Quick Brush A type of Quick Brush adjustment that adds saturation to or removes
it from just the desaturated colors in the area of the image the adjustment is brushed on. Skin
tones are not aected. See also adjustment, Brush HUD, Quick Brushes, saturation.
video clip An instance of a segment of video in Aperture; a video le’s version. See also version,
video le.
video le The source media le on disk to which a video clip in Aperture refers; the video clip’s
original. See also original, video clip.
Viewer An area in Aperture that displays the photos currently selected in the Browser. You can
use the Viewer to perform adjustments on images as well as compare them with each other. See
also Browser.
Viewer layout A main window layout in Aperture in which the Browser is hidden. See also
Browser, Browser layout, Full Screen view, Split View layout, Viewer.
Viewer mode (Full Screen view) A view mode in Full Screen view, similar to the Viewer in the
Aperture main window. When Full Screen view is set to Viewer mode, photos are presented
at high resolution over a solid-color background. Viewer mode is ideal for performing image
adjustments. See also Browser mode (Full Screen view), Full Screen view, Projects mode (Full Screen
view), Viewer.
viewnder The part of the camera designed to preview the area of the scene that will be
captured by the digital image sensor. See also camera, digital image sensor.
Vignette adjustment An adjustment in Aperture designed to add a vignette eect to an image.
See also Devignette adjustment, vignetting.
vignetting a. Darkening, also known as fallo, at the corners of an image as a result of too
many lters attached to the lens, a large lens hood, or poor lens design. b. The process of
applying a vignette to an image for artistic eect. See also Devignette adjustment, lters, lens,
Vignette adjustment.
watermark A visible graphic or text overlay applied to a photo to indicate that the photo is
protected by a copyright. Watermarks are applied to discourage the use of photos without the
copyright holder’s explicit permission.
waypoint A coordinate saved in a GPS track log representing a specic geographic location. In
Aperture, waypoints can be assigned to photos in Places view. See also GPS track log, Places view.
White Balance adjustment An adjustment in Aperture that changes the color temperature
and tint of a digital image. The goal of adjusting an image’s white balance is to neutralize color
casts in the image. For example, if the white in an image is too yellow because of incandescent
lighting, white balancing adds enough blue to make the white appear neutral. The White Balance
adjustment can also be used to neutralize color casts by identifying skin tones in the image. See
also color cast, color temperature, kelvin (K).
white point The color temperature of a display, measured in kelvins. The higher the white point,
the bluer the white is; the lower the white point, the redder the white. The native white point for
a Mac computer is D50 (5000 kelvins); for a Windows PC, it is D65 (6500 kelvins). See also color
temperature, kelvin (K).
wide-angle lens A lens with a short focal length that takes in a wide view. The focal length of
a wide-angle lens is smaller than the lm plane or digital image sensor. See also digital image
sensor, lens.
Glossary 632
working space The color space in which you edit a le. Working spaces are based either on color
space proles such as Apple RGB or on device proles.
XMP sidecar le An extensible markup language designed by Adobe Systems Incorporated that
is used for dening metadata sets for photo editing applications. Resources, such as adjustment
parameters, can be saved in this le and passed on to other applications. See also adjustment,
IPTC, IPTC Core, metadata.
zoom lens A lens that has the mechanical capacity to change its focal length; also known as an
optical zoom lens. See also lens.
Zoom Viewer button A button in the Viewer and the Full Screen view toolbar that alternates the
display of the photo selection between tting the photos within the Viewer and presenting the
photos at 100 percent size. See also control bar, lmstrip, photo selection, Viewer.