Avid CaptureManager Installation Administration Guide Capture Manager 4.0 & Configuration Install
User Manual: avid Avid CaptureManager - 4.0 - Installation & Configuration Guide Free User Guide for Avid CaptureManager Software, Manual
Open the PDF directly: View PDF ![]() .
.
Page Count: 68
- Title Page
- Contents
- Using This Manual
- Chapter 1 - System Overview
- Chapter 2 - Server Software
- Pre-Installation Assumptions
- Server Installation
- Install Summary
- Install Details
- Step 1: Start the Installation Program
- Step 2: Select Components to Install
- Step 3: Configure Video Services
- Step 4: Enter the Media Browse License Server Key
- Step 5: Configure the TMClient.ini File
- Step 6: Select the Video Standard and Type of Timecode
- Step 7: Name the System Service Computer
- Step 8: Answer Questions about Databases
- Step 9: Configure Software Distribution
- Step 10: Restart the Computer
- Split System/Data Server Configuration
- Chapter 3 - Client Software
- Chapter 4 - CaptureManager Monitor
- Index

make manage move | media™
Avid ®
Avid® CaptureManager™
Installation & Configuration Guide
2
Copyright and Disclaimer
Product specifications are subject to change without notice and do not represent a commitment on the part of Avid Technology,
Inc.
The software described in this document is furnished under a license agreement. You can obtain a copy of that license by
visiting Avid's Web site at www.avid.com. The terms of that license are also available in the product in the same directory as
the software. The software may not be reverse assembled and may be used or copied only in accordance with the terms of the
license agreement. It is against the law to copy the software on any medium except as specifically allowed in the license
agreement.
Avid products or portions thereof are protected by one or more of the following United States Patents: 4,746,994; 4,970,663;
5,045,940; 5,267,351; 5,309,528; 5,355,450; 5,396,594; 5,440,348; 5,452,378; 5,467,288; 5,513,375; 5,528,310; 5,557,423;
5,577,190; 5,583,496; 5,584,006; 5,627,765; 5,640,601; 5,644,364; 5,654,737; 5,715,018; 5,719,570; 5,724,605; 5,726,717;
5,729,673; 5,745,637; 5,752,029; 5,754,851; 5,799,150; 5,812,216; 5,828,678; 5,842,014; 5,852,435; 5,999,406; 6,038,573;
6,061,758; 6,141,007; 6,211,869; 6,532,043; 6,546,190; 6,596,031; 6,636,869; 6,747,705; 6,763,523; 6,766,357; 6,813,622;
6,847,373; D352,278; D372,478; D373,778; D392,267; D392,268; D392,269; D395,291; D396,853; D398,912.
Other patents are pending.
This document is protected under copyright law. An authorized licensee of CaptureManager may reproduce this publication
for the licensee’s own use in learning how to use the software. This document may not be reproduced or distributed, in whole
or in part, for commercial purposes, such as selling copies of this document or providing support or educational services to
others. This document is supplied as a guide for CaptureManager. Reasonable care has been taken in preparing the
information it contains. However, this document may contain omissions, technical inaccuracies, or typographical errors. Avid
Technology, Inc. does not accept responsibility of any kind for customers’ losses due to the use of this document. Product
specifications are subject to change without notice.
Copyright © 2007 Avid Technology, Inc. and its licensors. All rights reserved.
The following disclaimer is required by Sam Leffler and Silicon Graphics, Inc. for the use of their TIFF library:
Copyright © 1988–1997 Sam Leffler
Copyright © 1991–1997 Silicon Graphics, Inc.
Permission to use, copy, modify, distribute, and sell this software [i.e., the TIFF library] and its documentation for any purpose
is hereby granted without fee, provided that (i) the above copyright notices and this permission notice appear in all copies of
the software and related documentation, and (ii) the names of Sam Leffler and Silicon Graphics may not be used in any
advertising or publicity relating to the software without the specific, prior written permission of Sam Leffler and Silicon
Graphics.
THE SOFTWARE IS PROVIDED “AS-IS” AND WITHOUT WARRANTY OF ANY KIND, EXPRESS, IMPLIED OR
OTHERWISE, INCLUDING WITHOUT LIMITATION, ANY WARRANTY OF MERCHANTABILITY OR FITNESS FOR A
PARTICULAR PURPOSE.
IN NO EVENT SHALL SAM LEFFLER OR SILICON GRAPHICS BE LIABLE FOR ANY SPECIAL, INCIDENTAL, INDIRECT
OR CONSEQUENTIAL DAMAGES OF ANY KIND, OR ANY DAMAGES WHATSOEVER RESULTING FROM LOSS OF USE,
DATA OR PROFITS, WHETHER OR NOT ADVISED OF THE POSSIBILITY OF DAMAGE, AND ON ANY THEORY OF
LIABILITY, ARISING OUT OF OR IN CONNECTION WITH THE USE OR PERFORMANCE OF THIS SOFTWARE.
The following disclaimer is required by the Independent JPEG Group:
Portions of this software are based on the work of the Independent JPEG Group.
This Software may contain components licensed under the following conditions:
Copyright © 1989 The Regents of the University of California. All rights reserved.
Redistribution and use in source and binary forms are permitted provided that the above copyright notice and this paragraph
are duplicated in all such forms and that any documentation, advertising materials, and other materials related to such
distribution and use acknowledge that the software was developed by the University of California, Berkeley. The name of the
University may not be used to endorse or promote products derived from this software without specific prior written
permission. THIS SOFTWARE IS PROVIDED ``AS IS'' AND WITHOUT ANY EXPRESS OR IMPLIED WARRANTIES,
INCLUDING, WITHOUT LIMITATION, THE IMPLIED WARRANTIES OF MERCHANTABILITY AND FITNESS FOR A
PARTICULAR PURPOSE.
Copyright © 1989, 1991 by Jef Poskanzer.
Permission to use, copy, modify, and distribute this software and its documentation for any purpose and without fee is hereby
granted, provided that the above copyright notice appear in all copies and that both that copyright notice and this permission
notice appear in supporting documentation. This software is provided "as is" without express or implied warranty.

3
Copyright 1995, Trinity College Computing Center. Written by David Chappell.
Permission to use, copy, modify, and distribute this software and its documentation for any purpose and without fee is hereby
granted, provided that the above copyright notice appear in all copies and that both that copyright notice and this permission
notice appear in supporting documentation. This software is provided "as is" without express or implied warranty.
Copyright 1996 Daniel Dardailler.
Permission to use, copy, modify, distribute, and sell this software for any purpose is hereby granted without fee, provided that
the above copyright notice appear in all copies and that both that copyright notice and this permission notice appear in
supporting documentation, and that the name of Daniel Dardailler not be used in advertising or publicity pertaining to
distribution of the software without specific, written prior permission. Daniel Dardailler makes no representations about the
suitability of this software for any purpose. It is provided "as is" without express or implied warranty.
Modifications Copyright 1999 Matt Koss, under the same license as above.
Copyright © 1991 by AT&T.
Permission to use, copy, modify, and distribute this software for any purpose without fee is hereby granted, provided that this
entire notice is included in all copies of any software which is or includes a copy or modification of this software and in all
copies of the supporting documentation for such software.
THIS SOFTWARE IS BEING PROVIDED "AS IS", WITHOUT ANY EXPRESS OR IMPLIED WARRANTY. IN PARTICULAR,
NEITHER THE AUTHOR NOR AT&T MAKES ANY REPRESENTATION OR WARRANTY OF ANY KIND CONCERNING THE
MERCHANTABILITY OF THIS SOFTWARE OR ITS FITNESS FOR ANY PARTICULAR PURPOSE.
This product includes software developed by the University of California, Berkeley and its contributors.
The following disclaimer is required by Paradigm Matrix:
Portions of this software licensed from Paradigm Matrix.
The following disclaimer is required by Ray Sauers Associates, Inc.:
“Install-It” is licensed from Ray Sauers Associates, Inc. End-User is prohibited from taking any action to derive a source code
equivalent of “Install-It,” including by reverse assembly or reverse compilation, Ray Sauers Associates, Inc. shall in no event be
liable for any damages resulting from reseller’s failure to perform reseller’s obligation; or any damages arising from use or
operation of reseller’s products or the software; or any other damages, including but not limited to, incidental, direct, indirect,
special or consequential Damages including lost profits, or damages resulting from loss of use or inability to use reseller’s
products or the software for any reason including copyright or patent infringement, or lost data, even if Ray Sauers Associates
has been advised, knew or should have known of the possibility of such damages.
The following disclaimer is required by Videomedia, Inc.:
“Videomedia, Inc. makes no warranties whatsoever, either express or implied, regarding this product, including warranties with
respect to its merchantability or its fitness for any particular purpose.”
“This software contains V-LAN ver. 3.0 Command Protocols which communicate with V-LAN ver. 3.0 products developed by
Videomedia, Inc. and V-LAN ver. 3.0 compatible products developed by third parties under license from Videomedia, Inc. Use
of this software will allow “frame accurate” editing control of applicable videotape recorder decks, videodisc recorders/players
and the like.”
The following disclaimer is required by Altura Software, Inc. for the use of its Mac2Win software and Sample
Source Code:
©1993–1998 Altura Software, Inc.
The following disclaimer is required by 3Prong.com Inc.:
Certain waveform and vector monitoring capabilities are provided under a license from 3Prong.com Inc.
The following disclaimer is required by Interplay Entertainment Corp.:
The “Interplay” name is used with the permission of Interplay Entertainment Corp., which bears no responsibility for Avid
products.
This product includes portions of the Alloy Look & Feel software from Incors GmbH.
This product includes software developed by the Apache Software Foundation (http://www.apache.org/).
© DevelopMentor

4
This product may include the JCifs library, for which the following notice applies:
JCifs © Copyright 2004, The JCIFS Project, is licensed under LGPL (http://jcifs.samba.org/). See the LGPL.txt file in the Third
Party Software directory on the installation CD.
Avid Interplay contains components licensed from LavanTech. These components may only be used as part of and in
connection with Avid Interplay.Attn. Government User(s). Restricted Rights Legend
U.S. GOVERNMENT RESTRICTED RIGHTS. This Software and its documentation are “commercial computer software” or
“commercial computer software documentation.” In the event that such Software or documentation is acquired by or on behalf
of a unit or agency of the U.S. Government, all rights with respect to this Software and documentation are subject to the terms
of the License Agreement, pursuant to FAR §12.212(a) and/or DFARS §227.7202-1(a), as applicable.
Trademarks
888 I/O, Adrenaline, AirPlay, AirSPACE, AirSPACE HD, AirSpeed, AniMatte, AudioSuite, AudioVision, AutoSync, Avid,
Avid DNA, Avid DNxcel, Avid DNxHD, AVIDdrive, AVIDdrive Towers, Avid DS Assist Station, Avid ISIS,
Avid Learning Excellerator, Avid Liquid, Avid Mojo, AvidNet, AvidNetwork, Avid Remote Response, AVIDstripe, Avid Unity,
Avid Unity ISIS, Avid Xpress, AVoption, AVX, CamCutter, ChromaCurve, ChromaWheel, DAE, Dazzle, Deko, DekoCast, D-Fi,
D-fx, DigiDelivery, Digidesign, Digidesign Audio Engine, Digidesign Intelligent Noise Reduction, DigiDrive,
Digital Nonlinear Accelerator, DigiTranslator, DINR, DNxchange, do more, D-Verb, Equinox, ExpertRender, Face Robot,
FieldPak, Film Composer, FilmScribe, FluidMotion, HIIP, HyperSPACE, HyperSPACE HDCAM, IllusionFX,
Image Independence, iNEWS, iNEWS ControlAir, Instinct, Interplay, Intraframe, iS9, iS18, iS23, iS36, LaunchPad, Lightning,
Lo-Fi, Magic Mask, make manage move | media, Marquee, Matador, Maxim, MCXpress, Media Browse, Media Composer,
MediaDock, MediaDock Shuttle, Media Fusion, Media Illusion, MediaLog, Media Reader, Media Recorder, MEDIArray,
MediaShare, MediaStream, Meridien, MetaSync, MissionControl, NaturalMatch, Nearchive, NetReview, NewsCutter, Nitris,
OMF, OMF Interchange, OMM, Open Media Framework, Open Media Management, PCTV, Pinnacle MediaSuite,
Pinnacle Studio, Pinnacle Systems, ProEncode, Pro Tools, QuietDrive, Recti-Fi, RetroLoop, rS9, rS18, Sci-Fi, ScriptSync,
SecureProductionEnvironment, Show Center, Softimage, Sound Designer II, SPACE, SPACEShift, SpectraGraph,
SpectraMatte, SteadyGlide, Symphony, TARGA, Thunder, Trilligent, UnityRAID, Vari-Fi, Video RAID, Video Slave Driver,
VideoSPACE, and Xdeck are either registered trademarks or trademarks of Avid Technology, Inc. in the United States and/or
other countries.
Adobe and Photoshop are either registered trademarks or trademarks of Adobe Systems Incorporated in the United States
and/or other countries. Windows is either a registered trademark or trademark of Microsoft Corporation in the United States
and/or other countries. All other trademarks contained herein are the property of their respective owners.
Footage
Windhorse — Courtesy of Paul Wagner Productions.
Arizona Images — KNTV Production — Courtesy of Granite Broadcasting, Inc.,
Editor/Producer Bryan Foote.
Canyonlands — Courtesy of the National Park Service/Department of the Interior.
News material provided by WFTV Television Inc.
Tornados + Belle Isle footage — Courtesy of KWTV News 9.
WCAU Fire Story — Courtesy of NBC-10, Philadelphia, PA.
Women in Sports – Paragliding — Courtesy of Legendary Entertainment, Inc.
GOT FOOTAGE?
Editors — Filmmakers — Special Effects Artists — Game Developers — Animators — Educators — Broadcasters — Content
creators of every genre — Just finished an incredible project and want to share it with the world?
Send us your reels and we may use your footage in our show reel or demo!*
For a copy of our release and Avid’s mailing address, go to www.avid.com/footage.
*Note: Avid cannot guarantee the use of materials submitted.
Avid CaptureManager Installation & Configuration Guide • 0130-07637-02 Rev. B • November 2007
5
Contents
Using This Manual. . . . . . . . . . . . . . . . . . . . . . . . . . . . . . . . . . . . . . . 7
Who Should Use This Manual. . . . . . . . . . . . . . . . . . . . . . . . . . . . . . . . . . . . . 7
About This Manual . . . . . . . . . . . . . . . . . . . . . . . . . . . . . . . . . . . . . . . . . . . . . 7
If You Need Help. . . . . . . . . . . . . . . . . . . . . . . . . . . . . . . . . . . . . . . . . . . . . . . 8
Related Documentation . . . . . . . . . . . . . . . . . . . . . . . . . . . . . . . . . . . . . . 9
How to Order Documentation. . . . . . . . . . . . . . . . . . . . . . . . . . . . . . . . . . 9
Avid Educational Services . . . . . . . . . . . . . . . . . . . . . . . . . . . . . . . . . . . . 9
Symbols and Conventions . . . . . . . . . . . . . . . . . . . . . . . . . . . . . . . . . . . . . . . 9
Chapter 1 System Overview. . . . . . . . . . . . . . . . . . . . . . . . . . . . . . . . . . . . . . . 11
Workflow . . . . . . . . . . . . . . . . . . . . . . . . . . . . . . . . . . . . . . . . . . . . . . . . . . . . 12
Workspace . . . . . . . . . . . . . . . . . . . . . . . . . . . . . . . . . . . . . . . . . . . . . . . . . . 14
Chapter 2 Server Software . . . . . . . . . . . . . . . . . . . . . . . . . . . . . . . . . . . . . . . . 15
Pre-Installation Assumptions. . . . . . . . . . . . . . . . . . . . . . . . . . . . . . . . . . . . . 16
CaptureManager with Avid Unity ISIS . . . . . . . . . . . . . . . . . . . . . . . . . . 17
VTR Ingest Criteria for Video Servers . . . . . . . . . . . . . . . . . . . . . . . . . . 18
Server Installation . . . . . . . . . . . . . . . . . . . . . . . . . . . . . . . . . . . . . . . . . . . . . 18
Install Summary . . . . . . . . . . . . . . . . . . . . . . . . . . . . . . . . . . . . . . . . . . . 19
Install Details . . . . . . . . . . . . . . . . . . . . . . . . . . . . . . . . . . . . . . . . . . . . . 19
Problems Detected During Installation . . . . . . . . . . . . . . . . . . . . . . 23
Questions Regarding Capture Service . . . . . . . . . . . . . . . . . . . . . . 24
AirSPACE Video Service. . . . . . . . . . . . . . . . . . . . . . . . . . . . . . . . . 25
AirSpeed Video Service. . . . . . . . . . . . . . . . . . . . . . . . . . . . . . . . . . 25
Unity Video Service . . . . . . . . . . . . . . . . . . . . . . . . . . . . . . . . . . . . . 26
Profile Video Service . . . . . . . . . . . . . . . . . . . . . . . . . . . . . . . . . . . . 28
Split System/Data Server Configuration . . . . . . . . . . . . . . . . . . . . . . . . . . . . 38
6
Multiple Data Server Configuration . . . . . . . . . . . . . . . . . . . . . . . . . . . . 39
Chapter 3 Client Software . . . . . . . . . . . . . . . . . . . . . . . . . . . . . . . . . . . . . . . . 41
Installation . . . . . . . . . . . . . . . . . . . . . . . . . . . . . . . . . . . . . . . . . . . . . . . . . . 42
Logging In. . . . . . . . . . . . . . . . . . . . . . . . . . . . . . . . . . . . . . . . . . . . . . . . . . . 46
Chapter 4 CaptureManager Monitor . . . . . . . . . . . . . . . . . . . . . . . . . . . . . . . . 49
Overview . . . . . . . . . . . . . . . . . . . . . . . . . . . . . . . . . . . . . . . . . . . . . . . . . . . 50
System Monitor . . . . . . . . . . . . . . . . . . . . . . . . . . . . . . . . . . . . . . . . . . . . . . 52
System Status Information . . . . . . . . . . . . . . . . . . . . . . . . . . . . . . . . . . 52
Status Icons . . . . . . . . . . . . . . . . . . . . . . . . . . . . . . . . . . . . . . . . . . 53
Status Text Box . . . . . . . . . . . . . . . . . . . . . . . . . . . . . . . . . . . . . . . 53
System Tab’s Sub-tabs . . . . . . . . . . . . . . . . . . . . . . . . . . . . . . . . . . . . . 56
Services Tab. . . . . . . . . . . . . . . . . . . . . . . . . . . . . . . . . . . . . . . . . . 56
Monitors and Tools Tab . . . . . . . . . . . . . . . . . . . . . . . . . . . . . . . . . 56
Clients Tab . . . . . . . . . . . . . . . . . . . . . . . . . . . . . . . . . . . . . . . . . . . 57
Capture Monitor . . . . . . . . . . . . . . . . . . . . . . . . . . . . . . . . . . . . . . . . . . . . . . 58
Transfer Monitor . . . . . . . . . . . . . . . . . . . . . . . . . . . . . . . . . . . . . . . . . . . . . . 59
Route Monitor. . . . . . . . . . . . . . . . . . . . . . . . . . . . . . . . . . . . . . . . . . . . . . . . 61
VTR Monitor . . . . . . . . . . . . . . . . . . . . . . . . . . . . . . . . . . . . . . . . . . . . . . . . . 62
Archive Monitor . . . . . . . . . . . . . . . . . . . . . . . . . . . . . . . . . . . . . . . . . . . . . . 63
Index . . . . . . . . . . . . . . . . . . . . . . . . . . . . . . . . . . . . . . . . . . . . . . . . . 65
Using This Manual
Congratulations on your purchase of your Avid CaptureManager system.
Avid CaptureManager offers a considerable amount of additional functionality for the state-
of-the-art newsroom, including feed management, newsroom system integration, and asset
management. With CaptureManager, newsroom personnel can easily coordinate all video
feeds, schedule feed captures in advance, or record late breaking events instantly—even
control the router. CaptureManager provides a consolidated interface for all low and high-
resolution material coming in to multiple feed room devices, reducing the chance for human
error.
This publication provides information on how to use the CaptureManager system.
nThe documentation describes the standard features of a basic system configuration.
Therefore, your system might contain certain features and hardware that are not covered in
the documentation.
Who Should Use This Manual
This manual is written for journalists, producers, directors, writers, and various technical
personnel responsible for using the CaptureManager system in a broadcast newsroom. This
manual is intended for all users, from beginning to advanced.
It is strongly recommended that system users have prior experience in or classroom
knowledge of Windows-based operating systems.
About This Manual
This manual will lead you through even the most complex procedures with task-oriented
instructions, illustrated for a more realistic presentation of the actual icons and images you
will encounter. The information provides basic user procedures, while adding a complete
explanation of all the tools and techniques required to create, apply, and adjust various
settings, including useful tips, shortcuts, and custom options.
Using This Manual
8
The Table of Contents that precedes this preface lists all topics included in the book. They
are presented with the following overall structure:The Contents lists all topics included in
the book. They are presented with the following overall structure:
• The Introduction helps you get oriented with beginning concepts and general workflow
and provides valuable pointers to keep in the back of your mind as you proceed.
• The main body of the manual follows the natural flow of your work, with clear and
comprehensive step-by-step procedures.
• Finally, a detailed Index helps you quickly locate specific topics.
This manual provides instruction for your system in the following areas:
• An overview of system architecture & workflow
• The CaptureManager Workspace
• Various procedures and uses for CaptureManager
Use this manual for help in using your system after you have installed all components
according to requirements and specifications. Before installing any equipment, the site must
already have a configured network.
If You Need Help
If you are having trouble using the Avid CaptureManager system:
1. Retry the action, carefully following the instructions given for that task in this guide. It
is especially important to check each step of your workflow.
2. Check for the latest information in one of two locations:
- If release notes are available, they ship with your application.
- If ReadMe files are available, they are supplied in your Avid application folder.
nRelease notes and ReadMe files are also available on the Avid Knowledge Base.
3. Check any printed documentation that came with your Avid application or your
hardware for maintenance or hardware-related issues.
4. Visit the online Knowledge Base at www.avid.com/onlinesupport. Online services are
available 24 hours per day, 7 days per week. Search this online Knowledge Base to find
answers, to view error messages, to access troubleshooting tips, to download updates,
and to read/join online message-board discussions.
5. For Technical Support, call 800-800-AVID (800-800-2843).
For Broadcast On-Air Sites and Call Letter Stations, call
800-NEWSDNG (800-639-7364).

Symbols and Conventions
9
Related Documentation
The following documents provide more information about CaptureManager:
• Avid CaptureManager Installation and Administration Guide
• Avid CaptureManager ReadMe files (located on the installation CD)
The Online Library that ships with most Avid editing applications includes a Master
Glossary of all specialized terminology used in the documentation for Avid products.
nFor the latest product information, see the Avid Knowledge Center:
www.avid.com/support
How to Order Documentation
To order additional copies of any Avid documentation from within the United States, call
Avid Sales at 800-949-AVID (800-949-2843). If you are placing an order from outside the
United States, contact your local Avid representative.
Avid Educational Services
For information on courses/schedules, training centers, certifications, courseware, and
books, visit www.avid.com/training or call Avid Sales at 800-949-AVID (800-949-2843).
Symbols and Conventions
Avid documentation uses the following symbols and conventions:
Symbol or Convention Meaning or Action
nA note provides important related information,
reminders, recommendations, and strong suggestions.
cA caution means that a specific action you take could
cause harm to your computer or cause you to lose data.
wA warning describes an action that could cause you
physical harm. Follow the guidelines in this document
or on the unit itself when handling electrical
equipment.

Using This Manual
10
> This symbol indicates menu commands (and
subcommands) in the order you select them. For
example, File > Import means to open the File menu
and then select the Import command.
tThis symbol indicates a single-step procedure.
Multiple arrows in a list indicate that you perform one
of the actions listed.
Italic font Italic font is used to emphasize certain words and to
indicate variables.
Courier Bold font
Courier Bold font identifies text that you type.
Ctrl+key or mouse action Press and hold the first key while you press the last
key or perform the mouse action. For example,
Ctrl+drag or Ctrl+S. This also applies to Alt and Shift
keys.
Symbol or Convention Meaning or Action
Chapter 1 System Overview
12
Workflow
The Avid nonlinear broadcast news workflow starts with the ability to control the capture of
feeds from any source, such as satellite downlinks, microwave relays, field tapes, and studio
input. CaptureManager interfaces with a wide range of industry standard components,
allowing for easy simultaneous control of routers, VTRs, ingest devices, and video servers.
CaptureManager’s feed-scheduling ability enables users to create recording schedules in
advance, based on a variety of criteria. Users can also perform instant frame-accurate
recordings—by ensuring the synchronous start of multiple ingest devices—for late-breaking
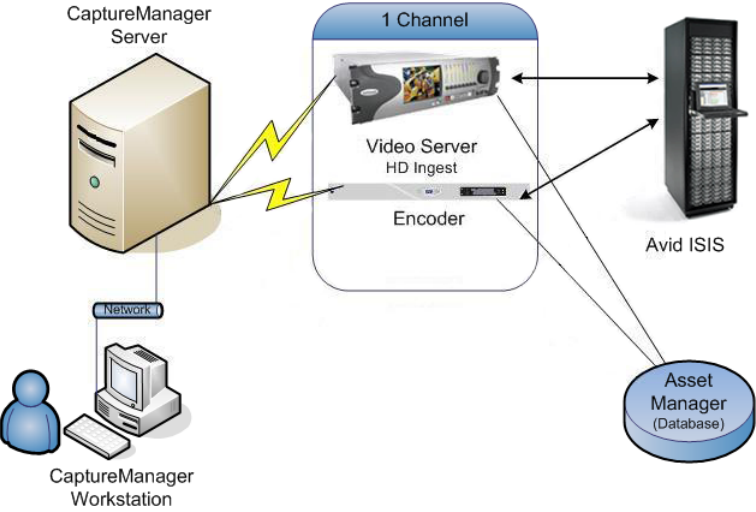
news events. For example, in an Interplay environment, each CaptureManager Server can
control up to ten simultaneous encoding streams—that is, ten channels, with each channel
controlling multiple devices, such as a low resolution encoder and a high-definition video
server as shown in the following graphic:
The unique ID associated with a recording is shared among the devices and stored in the
asset management database for immediate access throughout the newsroom. Since
CaptureManager users can monitor feeds and even enter descriptive metadata during the
recording process, which is instantly available over the network, searching for media and
feeds becomes a lot easier.
Workflow
13
The CaptureManager system is comprised of:
• A Windows-based workstation running the CaptureManager client software
• A Windows NT-based server running the CaptureManager utility programs, known as
services. In a basic configuration, all of the following services run on the same
computer; however, some are optional and may not be used at your site at all:
- System service
- Mapper service
- License service
- Data service
- Capture service
- Software Distribution service (optional)
- User Profile service
- VTR Control service (optional)
- Route service (optional)
- <hi-res> service (optional—for high-resolution video)
nThe <hi-res> option in the above service name may be one of several product names for
high-resolution video servers, such as AirSpeed, Unity, or AirSPACE.
Chapter 1 System Overview
14
Workspace
CaptureManager’s simple tabbed workspace is both informative and easy to navigate.
At the top is a menu with the following options: File and Help. The File menu allows users
to print asset information, log off, and exit the program. The Help menu is a user’s link to the
system’s comprehensive task-oriented reference tool known as the Avid Help system.
For more information on the primary tabs, located across the top, see the CaptureManager
User’s Guide.
For more information on logging in to CaptureManager, see “Logging In” on page 46.
Chapter 2
Server Software
The CaptureManager product was developed from another Avid product, known as Media
Browse. As a result, the CaptureManager Server utilizes pre-existing services, which when
installed retain the original names. The server installation program included on your
CaptureManager CD installs these required services under the name Media Browse Server.
This chapter contains the following main sections:
•Pre-Installation Assumptions
•Server Installation
•Split System/Data Server Configuration

Chapter 2 Server Software
16
Pre-Installation Assumptions
This chapter assumes:
• The person responsible for conducting the installation is familiar with current
specifications for the version being installed, as provided online at:
http://www.avid.com
nAlso refer to the CaptureManager ReadMe file for the version being installed, which is
available on Avid’s online Knowledge Base at:
http://www.avid.com/onlinesupport
• The site has a fully functioning switched 100 Mb/s (or higher) Ethernet network with at
least 100 Mb/s to servers and workstations connected to the network. Do not use hubs in
place of switches.
• All servers have TCP/IP network protocol installed with static IP addresses assigned to
them.
• All high-resolution video servers, if any, are connected to the network and have valid,
static IP addresses assigned to them. Also, ensure they adhere to compatible software
requirements according to current specifications.
• Establish a meaningful name for each server, which helps identify each one as part of
the system.
• The appropriate versions of the following software are installed on all servers:
- Windows-based operating system and service pack
- Microsoft DirectX
- Microsoft Media Player
- W32Time (Windows Time Service) installed & configured or other time
synchronization method
- Microsoft Java Virtual Machine (VM)
- Internet Explorer
Depending on what services are to be used with a site’s system, installation of other Avid
and third-party software may be required prior to installing the server software on specific
computers. The following table provides a guide of prerequisite software:
If Installing... Required Software Prior to Installation
Unity Video service Avid Unity ISIS Client Manager
Pre-Installation Assumptions
17
nAs components (services and databases) are selected for inclusion during the server
installation, the setup program issues warnings whenever prerequisite software is not
detected or if the appropriate version is incorrect.
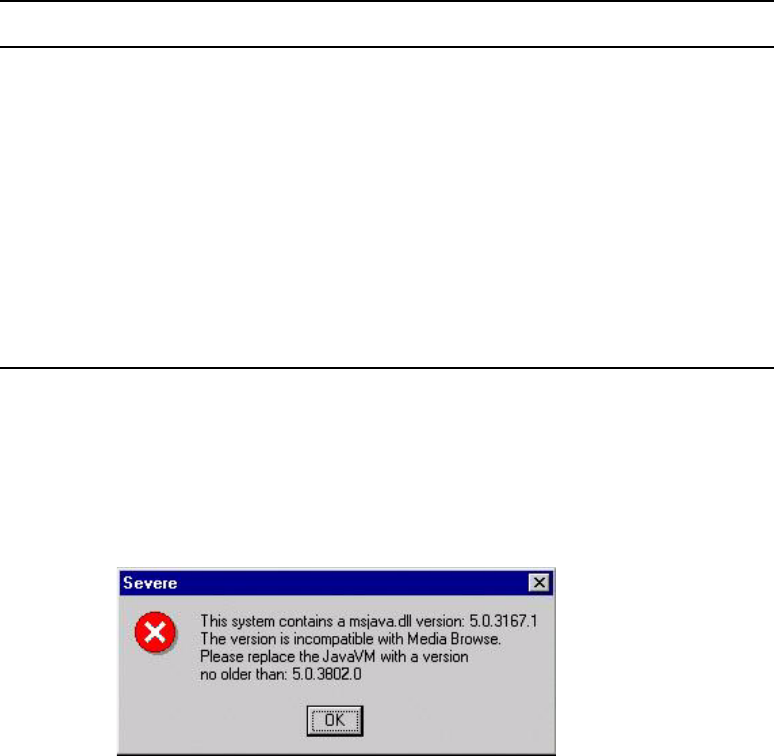
For instance, if an incompatible Java VM is installed on the computer, a warning message
similar to the following graphic appears during the server installation process:
CaptureManager with Avid Unity ISIS
Regarding CaptureManager in an Avid Unity ISIS environment, the computer running the
Media Browse Unity Video service must be in the ISIS VLAN. It must also have an Avid
Unity ISIS client installed and configured, although the Avid Unity ISIS client manager does
not need to have workspaces mounted or be running.
The following are guidelines for CaptureManager in an ISIS environment:
• Given the above requirements, all servers may be placed in the ISIS VLAN.
Capture service and the AirSPACE
Video service
AirSPACE SPACEnet Applications: LaunchPad and Mission
Control
Capture service and the AirSpeed
Video service
AirSpeed Application known as the Avid AirSpeed I/O
Peripherals
nDuring installation, ensure that Pilot, Flight Plan, and
Editor Ingest and Playback Support are selected.
Also, ensure installation of the TransferManager client software
that is bundled with the I/O Peripherals.
The databases: MediaBrowse
database, resolver database, and
MBUserProfile database
SQL Server (with recommended service pack)
If Installing... Required Software Prior to Installation
Chapter 2 Server Software
18
• The Media Browse System service inside the ISIS VLAN is unable to "discover"
workstations or services running outside the ISIS VLAN; therefore, a restart of the
System service or a reboot of the System service computer will require restarts of those
services and workstations running the client software outside the ISIS VLAN after the
System service is running.
• Any installation dialogs that ask for a PortServer name can be answered instead with the
ISIS System Director name.
VTR Ingest Criteria for Video Servers
When an Avid CaptureManager system uses a video server for VTR ingest, the following
criteria must be observed:
• The VTR timecode (LTC or VITC) from the tape must be routed to the AirSpeed or
Profile and an encoder
• The Timecode must be set up to record the same type of time code (LTC or VITC) in
both high and low-resolution to ensure the media matches up correctly
• The timecode on the tape must ascending. For instance,
09:00:00:00
to
10:00:00:00
to
11:00:00:00
• A timecode must not repeat
• The timecode may only cross midnight once
Avid recommends that field cameras are set up to record time-of-day timecode to
accommodate the above criteria.
Server Installation
As explained in Chapter 1of this guide, CaptureManager uses a group of utility programs,
known as Media Browse services, that might or might not run on a single computer.
In some cases, a site may have more than one server, with the services distributed among
them. When both the System service and Data service are on the same computer, it is called
the System/Data server. However, some sites may have a “split” system, which means
services are distributed to multiple computers on the network. When separated, the server
might bear the name of the service it’s running, such as System server and Data server. Or
for instance, the PC running the optional VTR Control service is known as the VTR server.
Collectively, the computers running these services are known as CaptureManager Servers.
Larger sites may have one System server and multiple Data servers to meet demands. See
“Multiple Data Server Configuration” on page 39 for more information.
Server Installation
19
For the purposes of this guide, the procedure assumes installation of services on a single
server. However, not all components may apply to your site. The sequence of dialog boxes
that appear will vary depending on which components are selected during installation.
When selecting components, it is important to consider the basic architecture of the site. For
instance, consider whether the site uses a single or split System/Data server or a multiple
Data server configuration. For more information on how services may be distributed, see
“Split System/Data Server Configuration” on page 38.
Install Summary
This section contains a summarized version of the installation procedure. Each step listed is
explained further in “Install Details” on page 19.
nThis chapter does not cover installation of client software. For information pertaining to
those procedures, see Chapter 3.
To install the server software on the System/Data server:
1. Start the Installation Program (Page 20)
2. Select Components to Install (Page 21)
3. Configure Video Services (Page 24)
4. Enter the Media Browse License Server Key (Page 29)
5. Configure the TMClient.ini File (Page 30)
6. Select the Video Standard and Type of Timecode (Page 32)
7. Name the System Service Computer (Page 33)
8. Answer Questions about Databases (Page 33)
9. Configure Software Distribution (Page 35)
10. Restart the Computer (Page 36)
Install Details
The installation procedure for a site comprises the following steps:
nThe dialog boxes shown in this guide may vary slightly from those seen during your
installation. Read all dialogs presented carefully before continuing with your installation.
Chapter 2 Server Software
20
Step 1: Start the Installation Program
1. Insert the CaptureManager installation CD into the computer or access it from a shared
network drive.
nIf installing from an Interplay Installer DVD, click Servers on the Main Menu window, then
select the CaptureManager Server option.
2. Select the folder containing the server software version for installation.
3. Double-click the
Setup.exe
file. The InstallShield Wizard appears with a progress bar,
showing the status of preparation.
4. When the Welcome dialog box appears, click Next.
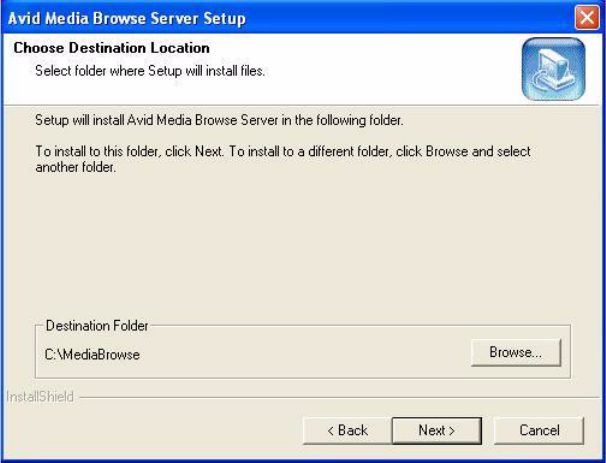
The Choose Destination Location dialog box appears:
5. Do the following:
tAccept the default, C:\MediaBrowse, for the Destination Folder.
tUse the Browse button to select another location.
6. Click the Next button.
The Select Components dialog box appears, as shown:
Server Installation
21
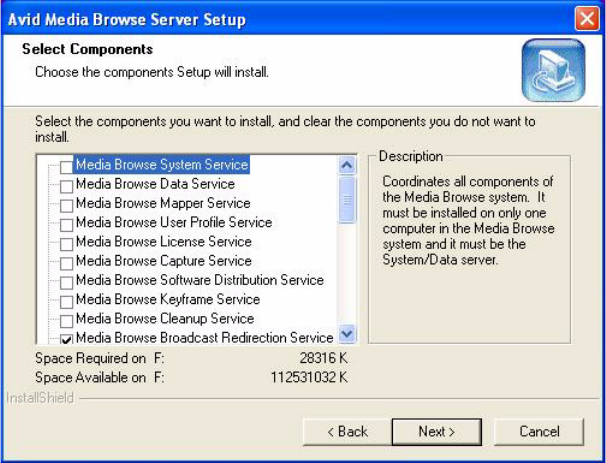
Step 2: Select Components to Install
There are numerous components to choose from during the installation. The only component
selected by default in the Select Components dialog box is the Media Browse Broadcast
Redirection service, which must be installed on every server at a site.
Which components are selected depends on a site’s architecture, and on which computer you
are conducting the installation.
nSingle-clicking on the service or database listed in the Select Components dialog box will
display a description of the component on the right side. Read each description carefully as
you determine which components are necessary on the computer. The choices made will
have a significant impact on the functionality of the CaptureManager system.
Some components, such as the System service, must be installed on only one computer at a
site. Some, such as the Data service, may be installed on multiple computers, and some must
be installed together, while others are optional and might not be used at a site at all.

Chapter 2 Server Software
22
The following table shows which components must be installed together on any given
computer.
To select components:
tEnsure the check box for each component you want to install is selected in the Select
Components dialog box, then click Next.
nUse the scroll bar to view all of the components available in the dialog box.
When certain components are chosen, additional dialog boxes appear during the installation
process. The following table provides what steps in this documented procedure best covers
the alternatives related to specific services:
If Selected... Then Also Select to Install...
Media Browse Data Service Media Browse Capture Service and the MediaBrowse
database
Media Browse Mapper Service resolver database
Media Browse User Profile Service MBUserProfile database
Media Browse Component Step
System Service Step 7 “Name the System Service Computer” on page 33
License Service Step 4 “Enter the Media Browse License Server Key” on page 29
Capture Service See single step in “Questions Regarding Capture Service” on
page 24
Software Distribution Service Step 9 “Configure Software Distribution” on page 35
AirSPACE Video Service Step 3 “Configure Video Services” on page 24
AirSpeed Video Service Step 3 “Configure Video Services” on page 24
Unity Video Service Step 3 “Configure Video Services” on page 24
Profile Video Service Step 3 “Configure Video Services” on page 24
MediaBrowse database Step 8 “Answer Questions about Databases” on page 33
resolver database Step 8 “Answer Questions about Databases” on page 33
MBUserProfile database Step 8 “Answer Questions about Databases” on page 33

Server Installation
23
Problems Detected During Installation
During the installation, the InstallShield Wizard verifies numerous settings, from the
operating system on the computer to versions of software required in associated with Media
Browse components selected for installation. The Problems Detected On This Computer
dialog box is encountered only when problems are detected. It provides a list of the
problems that need correcting.
The following are examples of possible problems, their causes and solutions.
Problem Message Cause Solution
“This computer has <amount of RAM>
megabytes of RAM. Avid Media Browse may not run
properly.”
RAM is less than 120MB. Add RAM according to Avid
Media Browse Specifications.
“This computer is not running Windows 2003. Avid
Media Browse is only supported on Windows 2003.”
Operating system is not
2003.
Install Windows 2003
operating system.
“The Windows service pack installed on this
machine is not supported...”
When operating system is
Windows but the service
pack is incorrect.
For Windows operating
system install correct service
pack, according to Media
Browse specifications.
“The user account currently logged into this system
does not have administrator privileges. Please use an
account with administrator privileges to install Avid
Media Browse.”
The installer must have
administrator privileges.
Log on to this server with
administrator privileges.
“The version of Microsoft Internet explorer installed
on this system may not be supported. Please install
the correct version.”
When the Microsoft
Internet Explorer version
is incorrect.
Install the correct version
Microsoft Internet Explorer,
according to Media Browse
specifications.
“This system contains a msjava.dll version that
is incompatible with Avid Media Browse. For Avid
Media Browse to function properly, you must replace
the Java VM with the recommended version.
The Java VM version is
not the required version.
Install the correct Java VM
according to Media Browse
specifications.
Chapter 2 Server Software
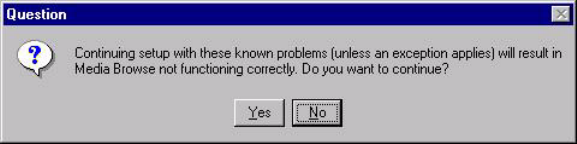
24
After problems are detected, the following Question dialog box may appear:
Should problems be detected, Avid recommends you discontinue the installation, correct the
problems indicated in the dialog boxes to ensure proper functionality and restart the
installation afterwards for best results.
Questions Regarding Capture Service
If the Capture service is selected and prerequisite software, pertaining to high resolution
video servers, has not already been installed on the computer, the InstallShield Wizard will
prompt the person doing the install to answer the following questions at some point during
the installation process:
• Will the selected Media Browse Capture service control an Avid AirSPACE video
server?
• Will the selected Media Browse Capture service control an Avid AirSpeed video server?
Do the following:
tAnswer Yes or No depending on the type of high-resolution video server controlled by
the Capture service.
nTo avoid warnings and other such prompts that may occur during installation, see “Pre-
Installation Assumptions” on page 16 for more information about software that must be
installed prior to installing Media Browse Server software.
Step 3: Configure Video Services
CaptureManager system configurations include a high-resolution video server. There are
different types of high-resolution video servers, such as Avid Unity, Avid AirSpeed, Avid
AirSPACE, or Grass Valley Group Profiles that could be used with the CaptureManager
system. None of the Avid video servers require any Media Browse services be installed on
them. However, installation of some Unity, AirSpeed, or AirSPACE software is required on
the server running Media Browse services. When a Profile is used, the Media Browse
executables,
profile.exe
or
profileXP.exe
are installed on the Profile video server.
Server Installation
25
nIf Avid iNEWS ControlAir is used to control Profile channels on a system with
CaptureManager, the profile and profileXP executables must be installed on the Profile
video server from the ControlAir installation CD, not the CaptureManager installation CD.
Regardless of which video service is selected in step 2 on page 21, subsequent dialog boxes
will appear; however, they will vary depending on which video service is being installed.
This guide provides details on each variation in the following sections:
•“AirSPACE Video Service” on page 25
•“AirSpeed Video Service” on page 25
•“Unity Video Service” on page 26
•“Profile Video Service” on page 28
AirSPACE Video Service
This service coordinates with the Media Browse Capture service to capture high-resolution
media to an AirSPACE video server within the CaptureManager system. It is necessary
when capture of video into the system includes an AirSPACE video server for ingest.
A series of Media Browse AirSPACE Video Service Configuration dialog boxes—each one
numbered, beginning at #1—will appear to enable you to configure the system for use with
AirSPACE high-resolution video servers.
nThe dialog boxes might vary slightly from those described in this guide. Read all dialogs
carefully before continuing with the installation.
a. Dialog 1 – Enter the name(s) of any AirSPACE video servers, separating each with
a comma. Click Next.
b. Dialog 2 – Answer Yes or No to whether video files will be deleted after transfer to
the Avid Unity system. Click Next.
c. Dialog 3 – Specify the temporary directory used by the AirSPACE Video service.
To accept the default, click Next. By default, the destination folder is
c:\temp
;
however, you may use the Browse button to select another location. Click Next.
Installing the AirSPACE Video service requires configuration of the TransferManager client
file, called
TMClient.ini
. For more information, see step 5 on page 30.
AirSpeed Video Service
This service coordinates with the Capture service to capture high-resolution media to an
AirSpeed video server within the CaptureManager system. It is necessary when capture of
video into the system includes an AirSpeed video server for ingest.
Chapter 2 Server Software
26
A series of Media Browse AirSpeed Video Service Configuration dialog boxes—each one
numbered, beginning at #1—will appear to enable you to configure the system for use with
AirSpeed video servers.
nThe dialog boxes may vary slightly from those described in this guide. Read all dialogs
carefully before continuing with the installation.
a. Dialog 1 – Answer Yes or No to whether the AirSpeed Video service should
automatically add ingest AirSpeed video servers that appear in CaptureManager
channel configurations to the list of video servers being monitored. If Yes, go to b.
If No, you must specify (in the next dialog box) the names of the ingest AirSpeed
video server(s) that should be monitored. Click Next.
nIf the “No” option in Dialog 1 is chosen, the “next dialog box”, which allows you to specify
the video server(s), is numbered 2 and subsequent dialog boxes appear renumbered
accordingly. For the purpose of this procedure, the renumbering is not applied.
b. Dialog 2 – Specify whether media files on the AirSpeed be deleted by
CaptureManager, following transfer to the Unity system. Click Next.
c. Dialog 3 – Specify the temporary directory used by the AirSpeed Video service. To
accept the default, click Next. By default, the destination folder is
c:\temp
;
however, you may use the Browse button to select another location. Click Next.
Installing the AirSpeed Video service may or may not require configuration of the
TransferManager client file, called
TMClient.ini
. For more information, see step 5 on
page 30.
Unity Video Service
This service coordinates the movement of high-resolution media in and out of a Unity
system. It uses the Interplay Adapter to check assets into the Interplay database. Starting
with CaptureManager v4.0.4 and later, a Unity Video service can be installed for each
Interplay Adapter in your Interplay environment. This provides redundancy within the
system. For instance, if one CaptureManager Server stops working, others can continue to
check files into the Interplay database.
nIf you perform a lot of AirSpeed captures and intend to use CaptureManager to control your
AirSpeed systems, Avid recommends installing the Interplay Adapter on the
CaptureManager Server.
If the Interplay Adapter is installed on the same computer as the Unity Video service, all of
the following settings use the same computer name:
• The Asset Manager value defined in the Setup view on the AirSpeed video server.
Server Installation
27
• The name of Avid Interplay Server supplied during the configuration of the Unity Video
service when installing CaptureManager. Post-installation, this value can also be
adjusted in the registry at the following location:
[HKEY_LOCAL_MACHINE\SOFTWARE\iNEWS\Media Browse\Media Browse Unity
Video Service]
“Media Manager Host Name”=””
• The Media Manager Host Name setting defined for all AirSpeeds in the Device
Information dialog box in CaptureManager. For more information about this setting, see
“Adding a Channel on the Grid” in the Avid CaptureManager User’s Guide.
If the Interplay Adapter is installed on a computer other than the Interplay Engine, then the
mmserver.ini
file must be edited to point at the Interplay Engine by adjusting this value:
env.ABServer=
. For more information about the Interplay Adapter, see “Configuring Avid
AirSpeed in Avid Interplay Adapter” in the Avid Interplay Software Installation and
Configuration Guide.
A series of Media Browse Unity Video Service Configuration dialog boxes—each one
numbered, beginning at #1—will appear to enable you to configure the system.
nNo defaults are provided for these configuration settings, so the dialog boxes require
knowledge of several names of host computers on the system, such as the MediaManager
host computer, and so forth. If this data is not known, you may cancel the installation and
rerun the setup program after the information is obtained.
a. Dialog 1 – Enter the name of the Avid Interplay Server with which the Unity Video
service will interact. Click Next.
b. Dialog 2 – Specify the temporary directory used by the Unity Video service. To
accept the default, click Next. By default, the destination folder is
c:\temp
;
however, you may use the Browse button to select another location. Click Next.
Installing the Unity Video service requires configuration of the TransferManager client file,
called
TMClient.ini
. For more information, see step 5 on page 30.
Unity Video Service has Configurable Interplay Access Polling Interval
The Unity Video service checks in metadata, such as comments, PreventAutoArchive
setting, Project location, etc. that are associated with a particular Interplay Access asset for
which CaptureManager is controlling the capture. That asset must exist in Interplay Access
prior to the metadata being updated. The Unity Video service will check Media Interplay
Access for the asset to ensure its existence in Interplay Access prior to attempting any
metadata updates. The frequency at which the Unity Video service will perform checks for
Chapter 2 Server Software
28
the appearance in Interplay Access of assets CaptureManager is creating through its capture
process can be adjusted by making changes to the following entry in the Windows registry
for the Unity Video service:
[HKEY_LOCAL_MACHINE\SOFTWARE\iNEWS\Media Browse\Media Browse Unity Video
Service]
"First Checkin Check Interval (seconds)"="60"
cGenerally, it is best to avoid making changes to the registry. Only edit the registry
when it is absolutely necessary. Incorrectly editing the registry might severely damage
your system. Before making any changes to the registry, Avid recommends backing up
any valued data.
The value of First Checkin Check Interval is the number of seconds between Unity Video
service checks for CaptureManager captured material in Interplay Access after an initial
series of checks. The default value is 60.
The value of this entry along with the value of the Short Chunking Period, configured
directly on an AirSpeed video server, will determine how quickly CaptureManager created
metadata will be reflected in Interplay Access after the beginning of a CaptureManager
initiated AirSpeed recording. (For more information on configuring the Short Chunking
Period, see “Chunking” in the Avid AirSpeed Installation and User’s Guide.)
If users want to have CaptureManager recordings to be checked into Interplay Access in the
CaptureManager designated folder (project in Interplay Access) with other CaptureManager
generated metadata very soon after the recording begins, the First Checkin Check Interval
should be made small, such as 5 seconds, along with a small Short Chunking Period on the
AirSpeed, such as 15 seconds.
If users want to minimize impact to Interplay Access Engine and Interplay Adapter, the First
Checkin Check Interval (seconds) value should not be significantly shorter than the Short
Chunking Period and may even be made longer than the Short Chuncking Period to ensure
minimal non-existent asset errors are dealt with by Interplay Access Engine and Interplay
Adapter.
Profile Video Service
A series of Media Browse Profile Video Service Configuration dialog boxes—each one
numbered, beginning at #1—will appear to enable you to configure the system for use with
Profile video servers.
nThe dialog boxes might vary slightly from those described in this guide. Read all dialogs
carefully before continuing with the installation.
Server Installation
29
a. Dialog 1 – Answer Yes or No to whether the service being installed is for a GVG
Media Area Network (MAN) Profile. Click Next. If Yes, go to step b. If No, go to
step c.
b. Dialog 2 – Enter the name(s) of the GVG MAN Profiles, separating each with a
comma. Click Next and go to step d.
c. Dialog 2 – Enter the name of the Profile associated with the service. Click Next.
d. Dialog 3 – Answer Yes or No to whether the service will be used in conjunction
with an Avid Unity system. Click Next. If Yes, go to step e. If No, Dialog 4 will not
appear.
e. Dialog 4 – Use the Browse button to specify the temporary directory for the Profile
Video service, such as
c:\temp
. Click Next.
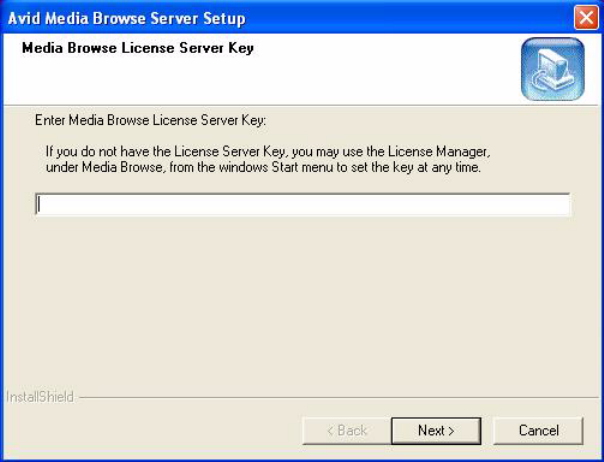
Step 4: Enter the Media Browse License Server Key
The License Server key is an alphanumeric security code that may be obtained from Avid
Customer Support. The software will not function without it.
During installation of the Media Browse services, when the License service is selected as a
component for install, the following dialog box will appear at some point in the procedure:
Chapter 2 Server Software
30
When the Media Browse License Server Key dialog box appears, do one of the
following:
tEnter the required key and click Next.
tLeave the text field blank and click Next.
nTo use CaptureManager, you must set the License key; however, doing so during installation
is not necessary. You may choose to enter the data—post installation—using the License
Manager, accessed from the Windows Start menu. See Chapter 2 in the Avid Media Browse
Administration Guide for more information about that administrative tool.
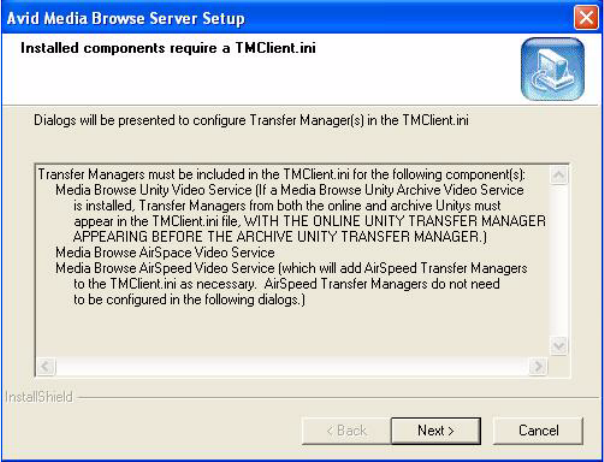
Step 5: Configure the TMClient.ini File
Further configuration of a CaptureManager specific TransferManager client INI file is
required whenever certain Media Browse services are chosen for installation, such as Unity,
AirSPACE, and AirSpeed Video services.
nThe
TMClient.ini
file is located in the installation directory and may be manually edited
from that directory if necessary.
1. If no INI file is detected on the computer, the following dialog box will appear at some
point during the installation process:
Server Installation
31
tClick Next to continue with the TransferManager configuration process. Go to step
2 on page 31.
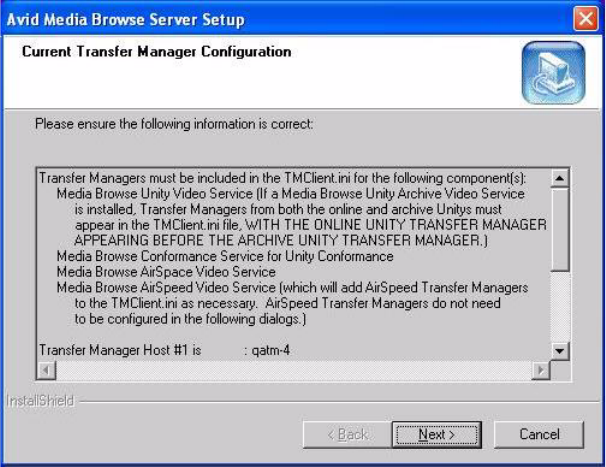
However, if the INI file, called
TMClient.ini
, already exists with some configuration
settings for TransferManagers in place on the computer, that information will appear in
the Current Transfer Manager Configuration dialog box, as shown:
a. Scroll through the information provided to ensure that all of it is correct, then click
Next.
b. Answer Yes or No to confirm whether the configuration information provided is
accurate. If No, additional dialog boxes will be provided to allow you to edit
existing or add TransferManagers to the INI file. Go to step 2.
2. Enter the host name and workgroup for a TransferManager on the Unity system.
nIf no stand-alone TransferManager is deployed, leave the default values as is and click Next.
3. A Question dialog box appears asking whether any additional TransferManagers need to
be added to the configuration. Do one of the following:
tAnswer Yes to add the host name and workgroup for another TransferManager.
When you click Next, the Question dialog box will reappear to allow for the
addition of more TransferManagers.
tAnswer No if there are no more TransferManager to add.
Chapter 2 Server Software
32
nIf a Unity Archive Video service is installed, ensure that the host name and
workgroup for the archive’s TransferManager is listed after the other Unity
TransferManagers.
You do not need to manually add AirSpeed TransferManagers to the INI file during this
configuration procedure if the AirSpeed Video service is configured to add ingest video
servers automatically. See “AirSpeed Video Service” on page 25 for more information.
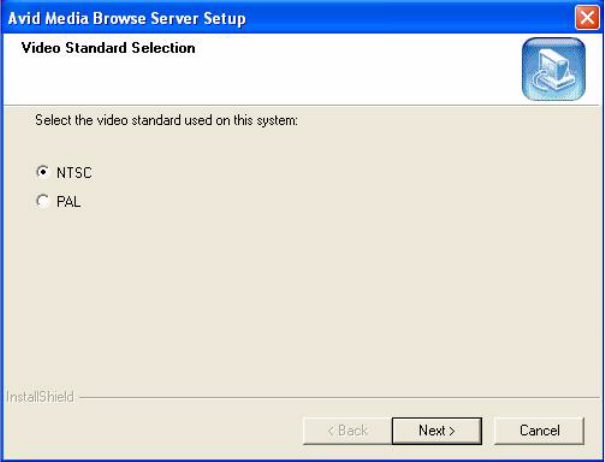
Step 6: Select the Video Standard and Type of Timecode
Avid CaptureManager supports two video standards, but cannot support both of them
simultaneously.
1. When the Video Standard Selection dialog box appears during the installation process,
select the standard best suited for you geographic location. By default, NTSC is
selected, which is the standard used in the United States.
for mo
2. If NTSC is selected in step 1, then the Timecode Selection dialog box appears. Choose
either Drop Frame or Non Drop Frame and click Next.
For NTSC both Drop Frame and Non Drop Frame timecode formats are supported.
CaptureManager functions with either of these video standards and timecode formats;
however they must be uniform across the entire system. The intermixing of different
video standards (or timecode formats for NTSC) within the same CaptureManager
system is not supported. The timecode signal however can be a mixture of LTC and
Server Installation
33
VITC; this will be dependent on the specific capability and purpose for the peripheral
equipment attached to the CaptureManager system. The timecode type and format that
is used is determined on a site-by-site basis and set for the system during the installation
process.
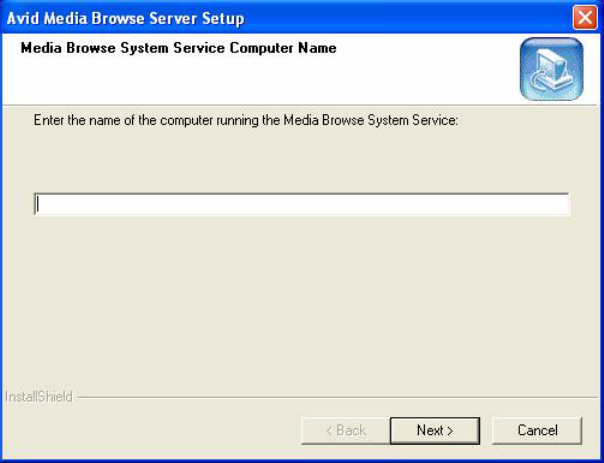
Step 7: Name the System Service Computer
Since all Media Browse services report to the System service, the following dialog box will
appear at some point during the installation:
To continue with installation:
1. Enter the name of the computer running the System service.
2. Click Next.
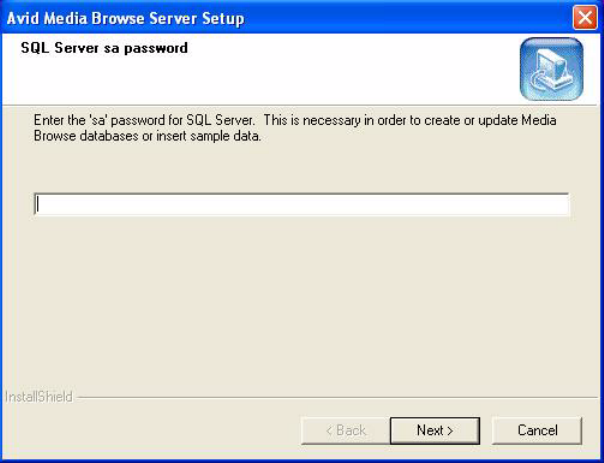
Step 8: Answer Questions about Databases
If any of the three Media Browse databases were selected for installation—as needed for the
Data, Mapper, and/or User Profile services—the InstallShield Wizard will request further
information pertaining to the SQL Server, as shown in the following dialog box:
Chapter 2 Server Software
34
nBefore installing the Media Browse databases—the resolver database,
MBUserProfile database, and the MediaBrowse database—SQL Server
software must be installed on the computer. See “Pre-Installation
Assumptions” on page 16 for more information on prerequisite software. Also,
see step 2 on page 21 for a comparison of what services must be installed on
the same computer as each Media Browse database.
To continue with installation:
1. When the SQL Server sa password dialog box appears, enter the password in the field
provided
2. Click Next.
Server Installation
35
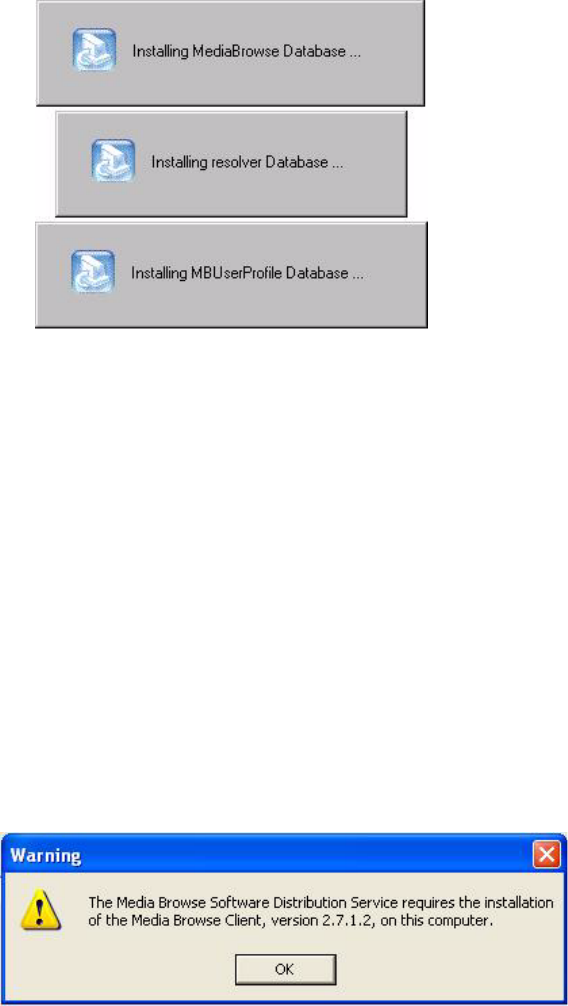
The following message boxes will appear to indicate installation of the databases.
After each database installation, a dialog box will appear to indicate whether the
installation was a success or failure. If the install attempt failed, the dialog box will also
include information indicating possible reasons, such as incorrect sa password. In the
case of a failed installation attempt, corrective measures should be taken and the
databases reinstalled.
nInstallation of the databases will result in a update of the schema, so a dialog box will also
appear to indicate whether that update was successful.
Step 9: Configure Software Distribution
The Media Browse Software Distribution service is used to provide notification of available
upgrades whenever a user logs into a computer running the CaptureManager client software.
The service requires that CaptureManager client software reside on the same computer as
the service, so if the client software is not already on the computer, a warning similar to the
one shown below may appear whenever the service is selected as a component (step 2 on
page 21) during the installation process:
Chapter 2 Server Software
36
To continue with the installation:
1. Click OK.
2. Software Distribution Service Configuration dialog boxes—each one numbered,
beginning at #1—will appear during the installation to enable you to configure the
system.
a. Dialog 1 – Specify under which user the installation of a CaptureManager client
software upgrade should be run. Options include:
• The user logged onto the PC when the available CaptureManager client
software upgrade is detected. Click Next.
• The user you specify in the next dialog box. Click Next. If this option is
selected, go to step b.
b. Dialog 2 – This dialog appears only if you choose to specify a user for upgrades.
Provide the user name, password, and domain (if applicable) that the Media Browse
Software Distribution service will use to conduct upgrades. The specified user
account must have administration privileges to any computer running
CaptureManager client software on which an upgrade may be conducted. Click
Next.
nAdministrative rights on the computer are required to do an install of client software.
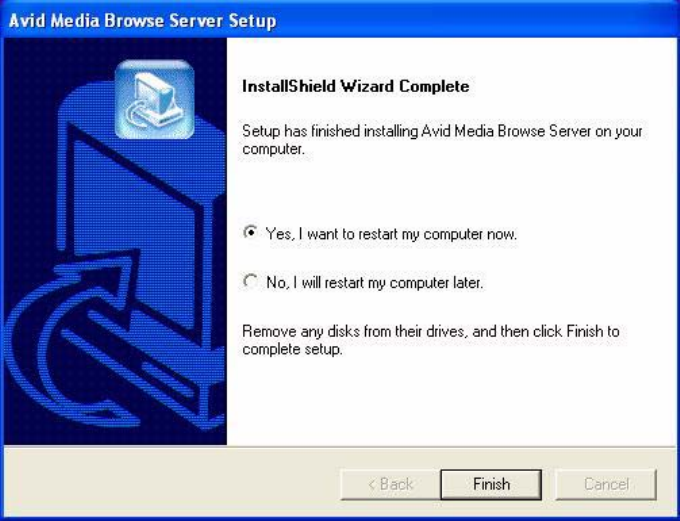
Step 10: Restart the Computer
If the installation program detects that a reboot is not required, all installed services will be
automatically started.
When the InstallShield Wizard completes the installation process, a dialog box similar to the
following graphic will appear:
Server Installation
37
nAvid recommends that the computer be restarted after all first-time server software
installations, regardless of whether the install program recommends a restart or not.
1. Select Yes, I want to restart my computer now.
2. Remove the CaptureManager installation CD and any other disks from their drives.
3. Click Finish.

Chapter 2 Server Software
38
Split System/Data Server Configuration
The following table provides one example of which components should be installed together
for optimal performance based on a Split System/Data Server configuration.
Service or Component
On Data
Server
On
System
Server
On Either
Server
On Both
Servers
On
Another
PC/Server
System Service X
Data Service X
Mapper Service X
User Profile Service X
License Service X
Capture Service X
Software Distribution Service X
Broadcast Redirection Service X X
AirSPACE Video Service X
AirSpeed Video Service X
Unity Video Service X
Profile Video Service (not on a MAN Profile) X
Files for GVG Media Area Network Profile X
Route Service X
VTR Control Service
(on the VTR server or PC)
X
MedaBrowse database X
resolver database X
MBUserProfile database X
Split System/Data Server Configuration
39
Multiple Data Server Configuration
A Data server is a server running the Media Browse Data service. For an architecture of
multiple Data servers, special consideration must be given to the components and services
selected for installation on each server running the Data service.
Because of the number of possible configuration scenarios in a multiple Data server
architecture, the services and components installed on each of the Data servers are
determined on a site-by-site basis.
The following guidelines must be considered:
• For each Capture service installed there must also be a Data service installed. Capture
service requires a unique Data service and a Data service may have only one Capture
service.
• The User Profile service must be installed on the same computer with the
MBUserProfile database. The Mapper service must be installed on the same computer
with the resolver database. The Data service must be installed on the same computer
with the MediaBrowse database. All of those computers, whether they are the same
server or not, must also run SQL Server.
Chapter 2 Server Software
40
Chapter 3 Client Software
42
Installation
This section outlines the steps required to install the CaptureManager client software on a
workstation.
To install the CaptureManager client software:
1. Insert the CaptureManager CD into the workstation or access a shared network drive
and navigate to the folder containing the software version for this installation.
nIf installing from an Interplay Installer DVD, click Clients on the Main Menu window, then
select the CaptureManager Client option.
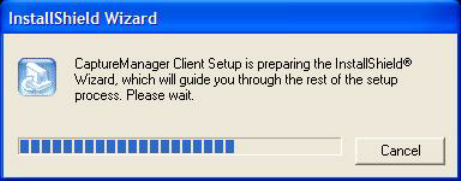
2. Double-click
setup.exe
.
3. InstallShield Wizard prepares for the installation, during which time you will see a
progress bar, as shown:
4. When the Welcome dialog box opens, click Next.
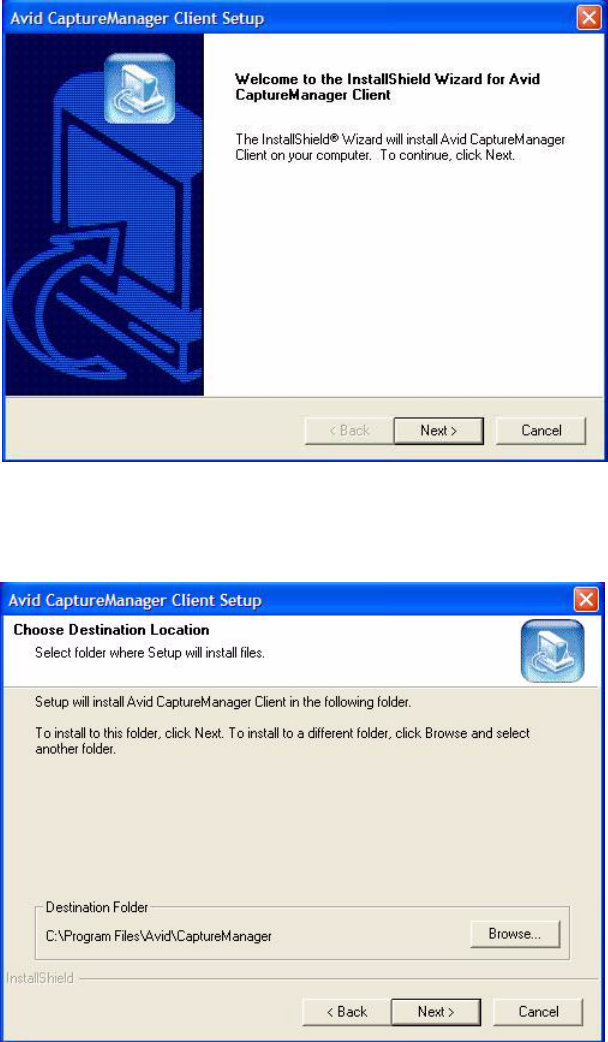
Installation
43
5. The Choose Destination Location displays the default location:
C:\Program Files\Avid\CaptureManager
Chapter 3 Client Software
44
Do one of the following:
tClick Next to accept the default location.
tClick Browse to select an alternative location, then click Next.
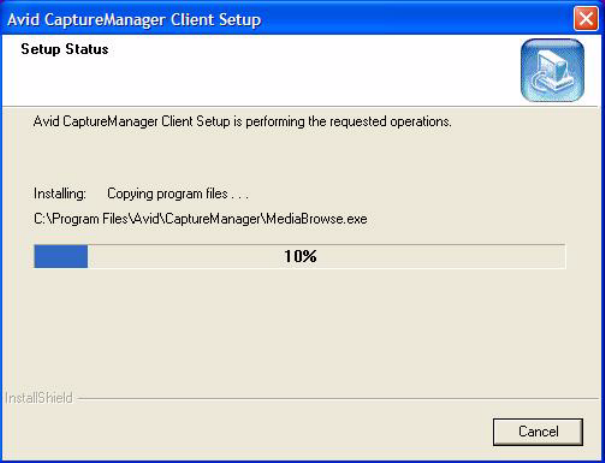
While the InstallShield Wizard installs the necessary files displays, a Setup Status
dialog box shows the percentage of progress.
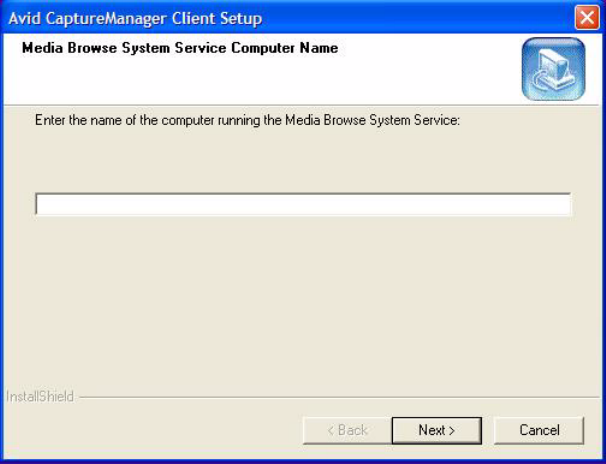
6. When the Setup Status reaches 100%, the following dialog box appears:
Installation
45
7. Type the name of the computer running the Media Browse System service.
nFor more information on this service and others installed with the CaptureManager Server
software, see Chapter 2.
8. Click Next.
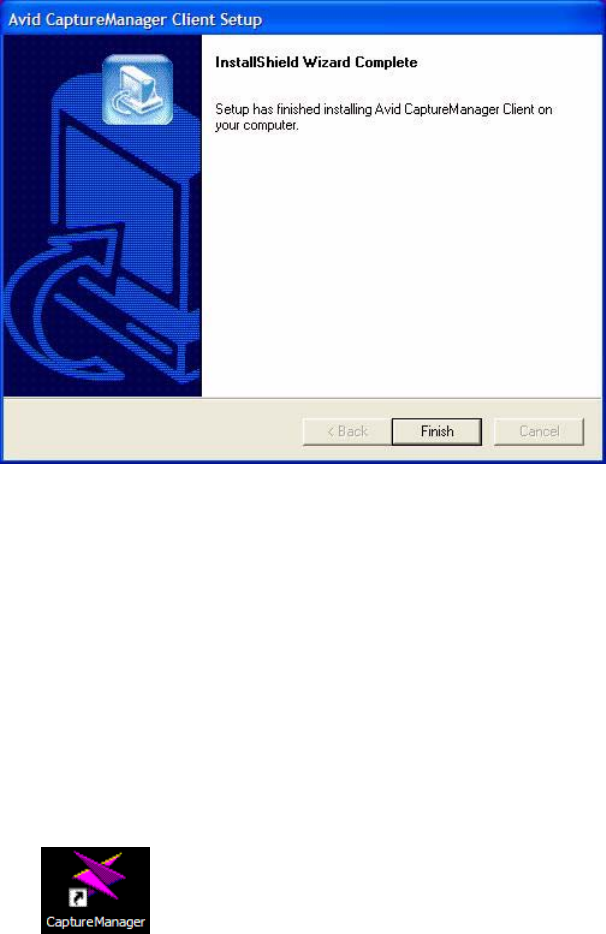
The InstallShield Wizard Complete dialog box appears when the installation is finished.
Chapter 3 Client Software
46
9. Click Finish.
Logging In
After the CaptureManager client software is installed on a Windows-based computer, a
shortcut icon will appear on the desktop, allowing users at that workstation to log in.
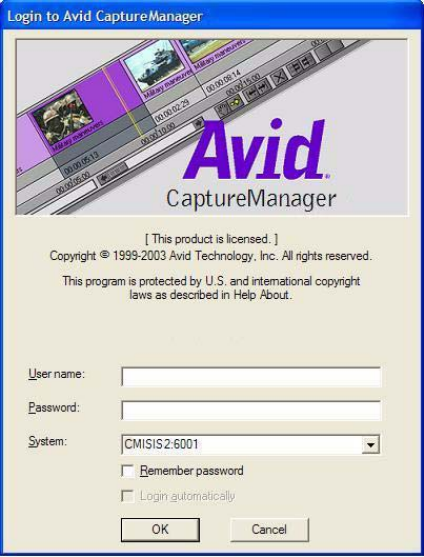
To log in to CaptureManager:
1. Do one of the following:
tSelect Start > Programs > CaptureManager > CaptureManager.
tDouble click the CaptureManager shortcut on the desktop, as shown below:
2. Enter your user name and password in the Login to Avid CaptureManager dialog box.
Logging In
47
3. Select the appropriate server from the System drop-down list (if necessary).
4. (Optional) Select whether you want the computer to remember your password and log
you in without prompting you for a user name and password.
5. Click OK. The Avid CaptureManager window will appear, displaying the program’s
workspace.
For more information, see “Workspace” on page 14 and the CaptureManager User’s Guide.
Chapter 3 Client Software
48
Chapter 4
CaptureManager Monitor
A monitor is a utility program that observes a computer. For instance, some programs
monitor how often another program accesses a disk drive or how much CPU time it uses.
This chapter contains the following main sections:
•Overview
•System Monitor
•Capture Monitor
•Transfer Monitor
•Route Monitor
•VTR Monitor
•Archive Monitor
Chapter 4 CaptureManager Monitor
50
Overview
The CaptureManager Monitor provides real-time information about all of the Media Browse
services or devices that interact with those services. Individual monitors are available for
viewing information separately. However, in the CaptureManager Monitor window all
individual monitors appear in a convenient tabular format.
The individual monitors that appear as tabs are:
•System Monitor
•Capture Monitor
•Transfer Monitor
•Route Monitor
•VTR Monitor
•Archive Monitor
The CaptureManager Monitor displays monitor tabs which provide real-time information
about all of the Media Browse services or devices which interact with those services.
To start the CaptureManager Monitor:
1. Select Diagnostics > CaptureManager Monitor.
The CaptureManager Monitor window opens.
Overview
51
The CaptureManager Monitor opens to the System tab by default.
2. From here the user may view any of the specific monitors by clicking the appropriate
monitor tab. Each tab is described in the following sections of this chapter.
3. Click the X button to close the window.

Chapter 4 CaptureManager Monitor
52
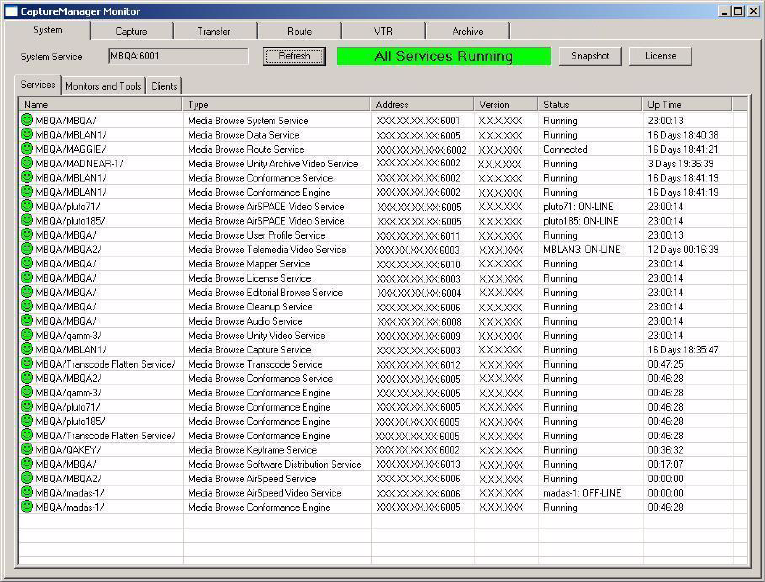
System Monitor
The System Monitor provides real-time information about the services running throughout
the CaptureManager system. The System Monitor window contains three function buttons
and three tabs which display information about the Services, Monitors and Tools, and
Clients running throughout the system.
In addition to the function buttons, the other parts of the System tab are:
•Status Text Box
•Status Icons
•Services Tab
•Monitors and Tools Tab
•Clients Tab
System Status Information
When the System Monitor opens, some of the first things you may notice on the System tab
are the round Status icons that appear next to the name of each service in the list and a
colored Service Status text box. The icons let you know at a glance the current status of each
service in your system while the System Status text box displays the results of a comparison
between the configuration snapshot saved in the System Service registry and the current,
real-time status of each service displayed in the list.
Button Function Description
The Refresh button updates the information on the Services, Monitors and
Tools, and Clients tabs.
The Snapshot button is only active on the Services tab. When clicked, the
system saves the current configuration to the System service’s Windows
registry. For more information, see “System Service Registry” on
page 54.
The License button opens a dialog box containing the client license
information for the system.
System Monitor
53
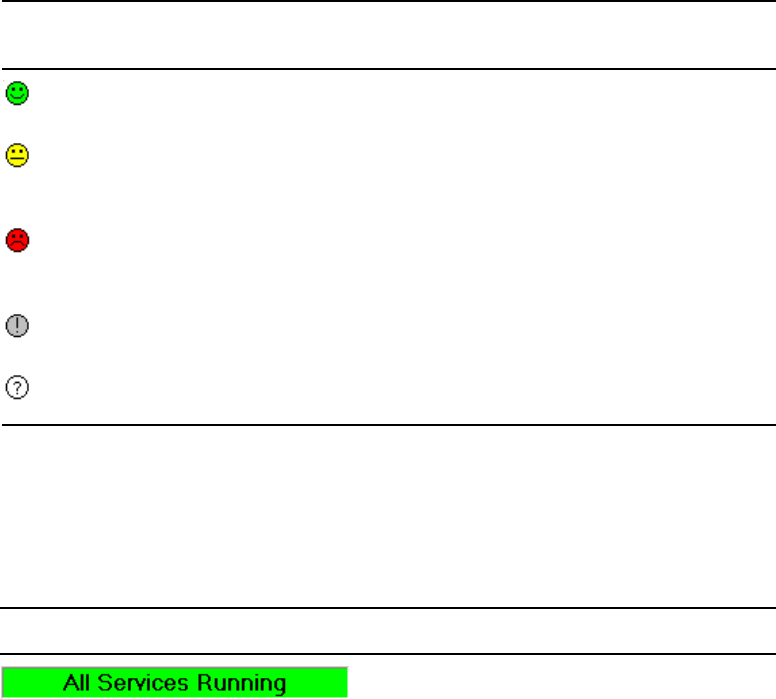
Status Icons
The System Monitor has five different status icons.
Status Text Box
The system’s Status text box is located at the top of the System tab. It is easily identified by
its bright background color and status text message. The possible text messages and their
descriptions are:
Status
Icon
Icon
Color Description
Green This status icon is displayed when a service process or device communicates
with the System service properly.
Yellow This status icon is displayed after one unsuccessful communication attempt
between the System service and the service process or device that is registered
with the System service.
Red This status icon is displayed after five minutes of unsuccessful communication
attempts between the System service and the service process or device that is
registered with the System service.
Gray This status icon is displayed when an extra service process or device is
registered with the System service after the snapshot was configured.
White This status icon is displayed when a service process or device is no longer
registered with the System service as expected, based on the snapshot.
System Status Message Description
When the System Monitor makes a comparison
between the System Service snapshot in the registry
and the real-time status, the results show the two
configurations match. All expected services are
running.
Chapter 4 CaptureManager Monitor
54
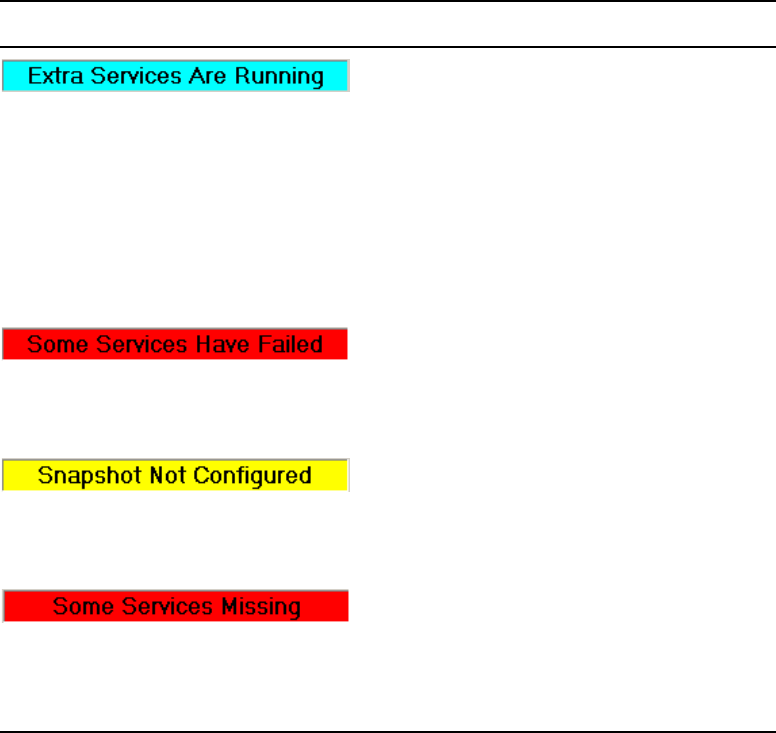
System Service Registry
After all of the services or devices, which interact with those services, are installed and
running, a snapshot of the configuration of the services may be saved to the the Windows
registry for the System service. If not saved, the System Status text box at the top of the
System tab of the CaptureManager Monitor window appears yellow and the message reads,
Snapshot Not Configured. See “Status Text Box” on page 53 for more information.
When the System Monitor makes a comparison
between the System Service snapshot in the registry
and the real-time status, the results show the two
configurations do not match. Extra services are
running. If the extra services are intentionally
installed, save a new configuration to the System
Service registry with the Snapshot button. See
“System Service Registry” on page 54 for more
information. If the service is running in error, you may
stop the service and remove it using the Windows
Control Panel.
When the System Monitor makes a comparison
between the System Service snapshot in the registry
and the real-time status, the results show the two
configurations do not match. One or more services do
not have the status expected by the System Monitor.
No comparison between the System Service registry
and the real-time status can take place because the
system services configuration was not saved to the
System Service registry. See “System Service
Registry” on page 54 for more information.
When the System Monitor makes a comparison
between the System Service registry and the real-time
status, the results show the two configurations do not
match. One or more services do not have the status
expected by the System Monitor. A missing service
may be restarted using the Windows Control Panel.
System Status Message Description
System Monitor
55
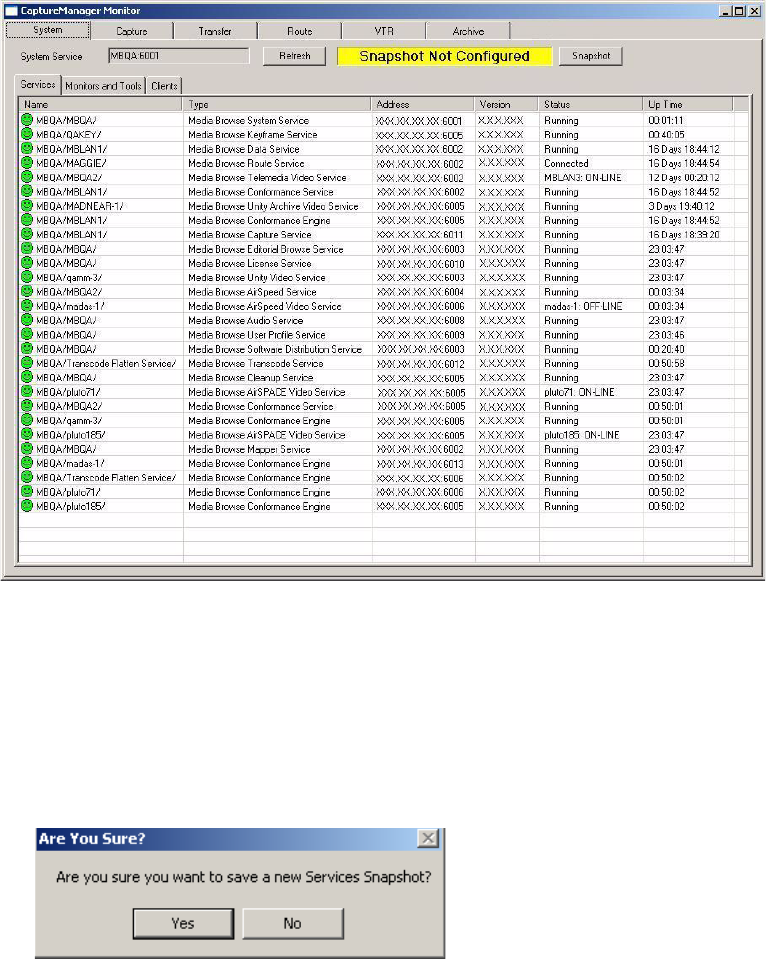
To save the snapshot:
1. Select Diagnostics > CaptureManager Monitor.
2. On the System tab and its Services sub-tab, verify all services are running properly. All
status icons must be green. See “Status Icons” on page 53 and “Services Tab” on
page 56 for more information.
3. When all services are running properly, click the Snapshot button. A dialog box opens.
4. Press the Yes button to save the new services snapshot.

Chapter 4 CaptureManager Monitor
56
The new snapshot configuration is saved to the Windows registry of the System service. The
System service may now compare the real-time configuration shown on the System Monitor
to the one saved in the registry. The results of this comparison are displayed in the System
Status box at the top of the Services tab. See “System Status Information” on page 52 for
more information.
System Tab’s Sub-tabs
The System tab has three sub-tabs—Services, Monitors and Tools, and Clients—which are
explained in this section.
Services Tab
When the System Monitor starts, the Services tab displays by default. For more information,
see “System Monitor” on page 52.
The Services tab displays a spreadsheet showing the current status of each service process or
device, which interacts with a service, in your CaptureManager system.
Other information, such as the type of service, its network address, the version number, and
up time is also displayed in the various columns on the spreadsheet. For an example of the
information contained in the spreadsheet, see page 54.
The icons located to the left of each service’s name offer a quick reference to the status of
each individual service. See “Status Icons” on page 53 for more information.
Monitors and Tools Tab
The Monitors and Tools tab displays a spreadsheet showing the current status of each
monitor and configuration tool in your CaptureManager system.
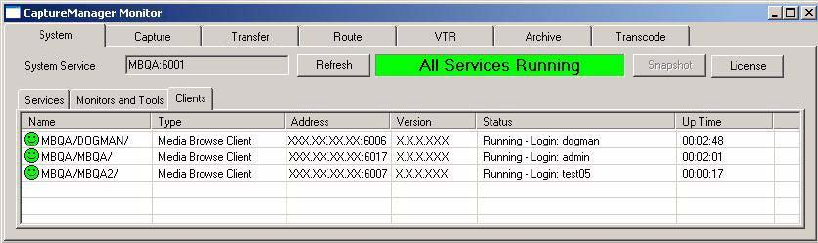
System Monitor
57
The Refresh and License buttons are both active on this tab. See “System Monitor” on
page 52 for more information.
Failed or missing services may be removed from the monitor by right-clicking the service
and clicking the Remove From System button. This action does not uninstall the service, and
the service reappears when the monitor is restarted.
Clients Tab
The Clients tab displays a spreadsheet list showing the current status of each licensed
workstation in your CaptureManager system.
The Refresh and License buttons are both active on this tab. See “System Monitor” on
page 52 for more information.
Failed or missing services may be removed from the monitor by right-clicking the service
and clicking the Remove From System button. This action does not uninstall the service, and
the service reappears when the monitor is restarted.
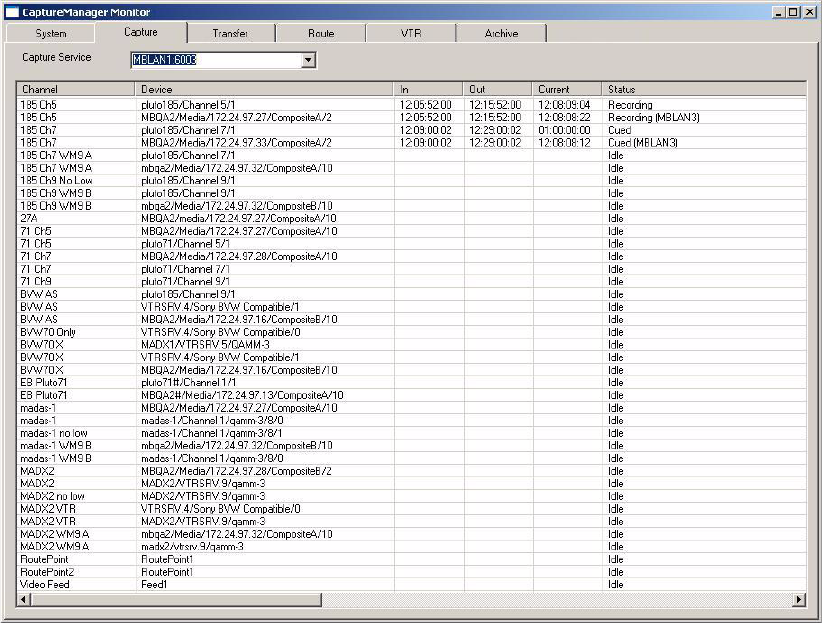
Chapter 4 CaptureManager Monitor
58
Capture Monitor
The Capture Monitor gives real-time feedback on the status of capture events on a particular
device on a specific channel. The Capture tab in the CaptureManager Monitor window
shows what channels are set up, any current errors from connected devices.
To start the Capture Monitor:
1. Select Diagnostics > CaptureManager Monitor.
2. Select the Capture tab.
The Capture tab displays a spreadsheet showing the current status of the following:
• Channel—Name of the channel
• Device—Name of device
• In—timecode that defines the beginning of the capture event
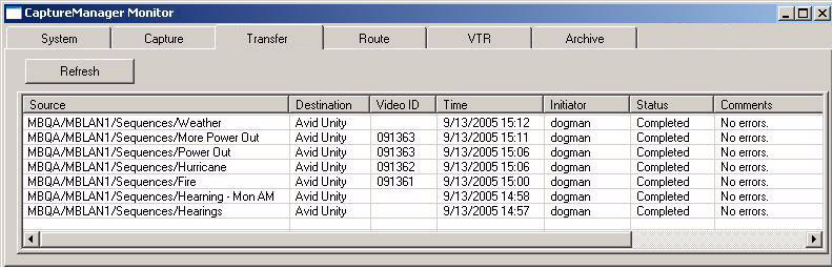
Transfer Monitor
59
• Out—timecode that defines the end of the capture event
• Current—the real-time timecode from the device
• Status—state of the device or event
If your site has multiple Capture services you may view the information for the other
Capture services by using the drop-down list located at the top of the tab to select another
Capture service.
Transfer Monitor
The Transfer Monitor is a diagnostic tool that provides real-time status information on
transfers for the following devices: AirSpeed and AirSPACE video servers.
To start the Transfer Monitor:
1. Select Diagnostics > CaptureManager Monitor.
2. Select the Transfer tab .
The Transfer tab has a refresh button and shows information about any transfer initiated
by the capture process that is in progress or completed for AirSpeed and AirSPACE
video servers, as shown in the following example:
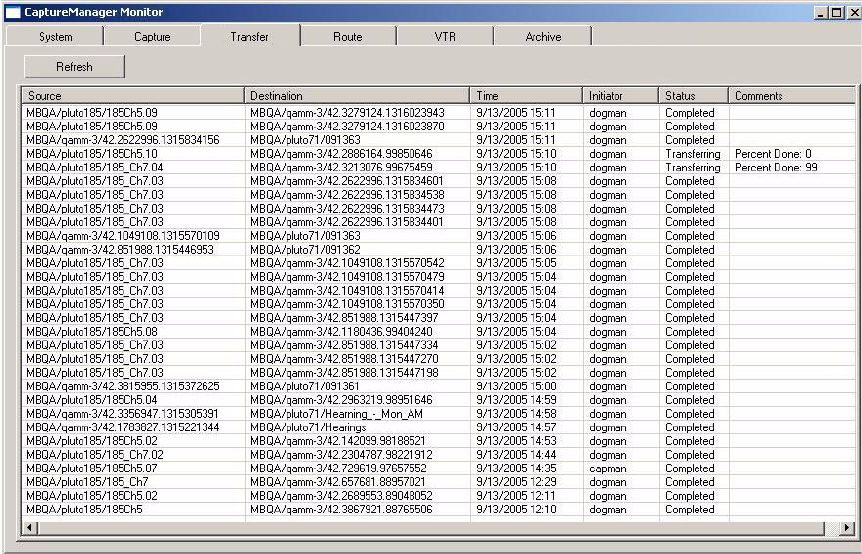
Chapter 4 CaptureManager Monitor
60
3. Click the Refresh button, if necessary, to update the information displayed by the
monitor.
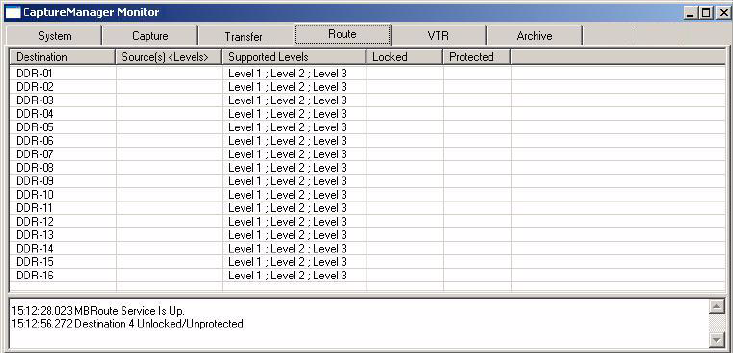
Route Monitor
61
Route Monitor
The Route Monitor is a diagnostics tool which provides real-time information about source
and destination route paths. A CaptureManager system administrator may use Route
Monitor to lock or unlock a route. For instance, a user may have locked a route during a
recording so that other users may not access it. If something goes wrong while recording, the
system administrator can unlock the source video using the Route Monitor.
To start the Route Monitor:
1. Select Diagnostics > CaptureManager Monitor
2. Select the Route tab.
This window displays information in two panels. The upper Information panel shows real
time information about the route(s) and the lower Message panel shows messages about the
actions of the Route service. The information and messages are continually refreshed while
the session is open.
To unlock a route:
1. In the upper Information panel of the Route tab, right-click on a row displaying a locked
route. An Unlock button appears.
2. Click the Unlock button. The route is unlocked.
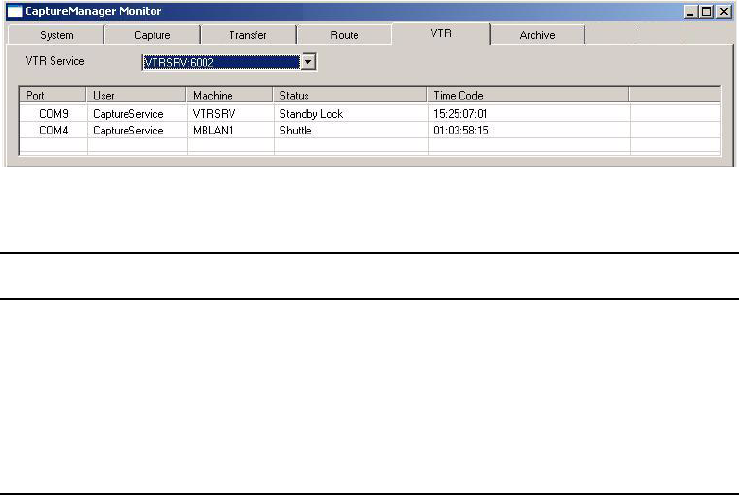
Chapter 4 CaptureManager Monitor
62
VTR Monitor
The VTR Monitor shows real-time information about any connected Xdecks or VTRs on the
VTR tab in the CaptureManager Monitor window. If an Xdeck or VTR is connected but idle
no information is displayed. This tab shows real- time activity only. When the activity
ceases, the information no longer appears.
To start the VTR Monitor:
1. Select Diagnostics > CaptureManager Monitor
2. Select the VTR tab.
Details about information displayed on the VTR tab are described in the following table:
Column Heading Description
Port The COM port the Media Browse VTR service is using.
User The CaptureManager user who initiated the activity.
Machine The computer from which the activity was initiated.
Status Displays the status of the VTR.
Time Code Shows the event’s timecode on the VTR.
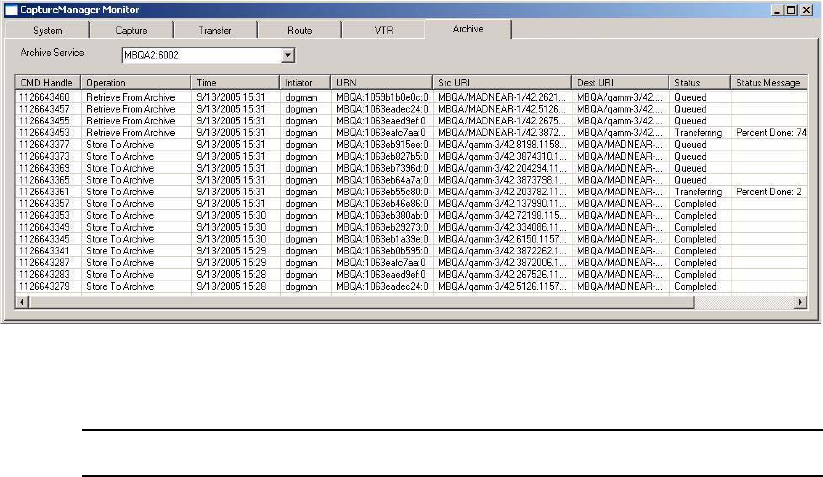
Archive Monitor
63
Archive Monitor
The Archive Monitor provides real-time information for monitoring the status of archive
operations on the Archive tab in the CaptureManager Monitor window.
To start the Archive Monitor:
1. Select Diagnostics > CaptureManager Monitor.
2. Select the Archive tab.
Details about information displayed on the Archive tab are described in the following
table:
Column Heading Description
CMD Handle The Command handle for the operation.
Operation The type of operation (Store To Archive, Delete From
Archive, Retrieve From Archive).
Time The time at which the operation was last updated.
Initiator The user who initiated the operation.
URN The uniform resource name of the clip associated with the
operation.
Src URI The source’s uniform resource identifier is the source of the
operation (when applicable).

Chapter 4 CaptureManager Monitor
64
Dest URI The destination’s uniform resource identifier is the
destination of the operation (when applicable).
Status This refers to the status of the operation (Queued, Failed,
Completed).
Status Message A Status Message is shown in this column containing
further information about the operation.
Column Heading Description
Index
65
Index
A
AirSPACE
Capture service 24
configuring video services 24
monitoring transfers 59
SPACEnet applications 17
AirSPACE Video service 17
configuring 25
AirSpeed
Asset Manager 26
Capture service 24
configuring video services 24
I/O peripherals 17
monitoring transfers 59
Short Chunking Period 28
AirSpeed TransferManagers 32
AirSpeed Video service 17, 25
configuring 26
Archive monitor 63
Asset Manager 26
Avid
educational services 9
Knowledge Base 16
Avid Interplay Server 27
Avid Unity
configuring video services 24
ISIS environment 17
C
Capture monitor 58
Capture service 17, 24
CaptureManager
components of 13
ISIS environment 17
overview 12
CaptureManager monitor 50
Components
distribution guidelines 38
selecting for installation 21
D
Databases 22
MBUserProfile 17
MediaBrowse 17
resolver 17
Diagnostic tools
archive monitor 63
capture monitor 58
CaptureManager monitor 50
overview of monitors 50
route monitor 61
system monitor 52
transfer monitor 59
VTR monitor 62
Drop frame 32
DV50 12
E
Encoding streams 12
F
First Checkin Check Interval 28
H
HD 12
I
iNEWS
documentation 9
training 9
Ingest criteria, VTR 18
Index
66
INI file 30
AirSpeed TransferManagers 32
mmserver 27
Installing, prerequisites 16
Internet Explorer 16
Interplay 26
Interplay Access
Engine 28
polling interval 27
Interplay Adapter 26, 28
ISIS environment 17
ISIS VLAN 17
J
Java VM 17
L
LaunchPad 17
License server key 29
LTC 32
M
MBUserProfile database 17
Media Browse
installing components 21
server install overview 18
server installation 20
Media Browse Broadcast Redirection service 21
Media Manager Host Name 27
MediaBrowse database 17
Messages, installation JavaVM 17
Microsoft DirectX 16
Microsoft Java Virtual Machine 16
Microsoft Media Player 16
Mission Control 17
mmserver.ini 27
Monitor, defined 49
Multiple data servers See split server system
N
Non drop frame 32
NTSC 32
O
Online support 8
P
Polling interval for Interplay Access 27
PortServer in ISIS environment 18
Pre-install requirements 16
Prerequisite software 16
Procedures
high-resolution video server setup 24
install the client software 42
install the server software 19
log in to CaptureManager 46
save the snapshot 55
selecting components/services 21
start the archive monitor 63
start the capture monitor 58
start the CaptureManager monitor 50
start the route monitor 61
start the VTR monitor 62
start transfer monitor 59
Profile Video service, configuring 24, 28
R
Resolver database 17
Route monitor 61
S
Server install 15–39
pre-installation assumptions 16
problems detected 23
program 20
summary 19
services
AirSPACE Video 25
AirSpeed Video 25
Broadcast Redirection 21
Capture 24
configuring video 24
Index
67
defined 18
installing together 22
ISIS environment 17
list of 13
monitoring 50
Profile Video 28
System 18
VTR Control 18
Short Chunking Period 28
Software Distribution service
installation 35
SPACEnet applications 17
Split server system, guidelines 39
SQL Server 17
sa password required 34
System monitor 52
status icons explained 53
System service 54
System service, ISIS environment 18
System status 53
System/Data server
multiple Data servers 39
split System/Data server configuration 38
T
Timecode 18
formats 32
TMClient.ini 31
Training, ordering courses 9
Transfer monitor 59
TransferManager, configuring 30
Troubleshooting 8
U
Unity Archive Video service 32
Unity Conformance service 16
Unity Video service 16, 26
configuring 27
configuring the polling interval 27
ISIS environment 17
Utility programs 18
V
Video standards 32
VITC 33
VLAN 17
VTR ingest criteria 18
VTR monitor 62
VTR timecode 18
W
W32Time 16
Workflow 12
Workspace 14
Index
68
