Avid Interplay V3.4 Best Practices Guide Production 3.4 V3 4 En
User Manual: avid Interplay Production - 3.4 - Best Practices Guide Free User Guide for Avid Interplay Software, Manual
Open the PDF directly: View PDF ![]() .
.
Page Count: 314 [warning: Documents this large are best viewed by clicking the View PDF Link!]
- Title Page
- Contents
- Chapter 1 Interplay | Production Components 11
- Chapter 2 Setting Up a Folder Structure and a User Database 27
- Chapter 3 Developing an Interplay Delete Strategy 40
- Chapter 4 Refining Your Search in Interplay | Production 83
- Chapter 5 Using AMA Material in Interplay | Production 97
- Chapter 6 Sony XDCAM HD and XDCAM EX End-to-End Workflow 127
- Chapter 7 720p MultiRez Workflow 139
- Chapter 8 Determining Interplay Database Scalability 163
- Chapter 9 H.264 End-to-End MultiRez Workflow 175
- Chapter 10 HD 23.976p and HD 24p Support 196
- Chapter 11 Apple ProRes Resolutions Supported in Interplay | Production 202
- Chapter 12 JPEG 2000 Resolutions Supported in Interplay | Production 205
- Chapter 13 Support for Stereoscopic 3D Workflows 206
- Chapter 14 DNxHD Resolutions Supported in Interplay | Production 216
- Chapter 15 XAVC-Intra HD Resolutions Supported in Interplay | Production 219
- Chapter 16 DNxHR Resolutions Supported in Interplay | Production 220
- Chapter 17 Using Frame Chase Editing 222
- Chapter 18 Additional Interplay | Production Topics 229
- Chapter 19 Working with Interplay | Media Indexers 236
- Appendix A Interplay | Production Maintenance Recommendations 295
- Appendix B Archive Migration (Workgroup 4) 301
- Interplay Documentation
- Interplay | Production Components
- Using MultiRez and Dynamic Relink
- Interplay | Engine
- Interplay | Access
- Interplay | Administrator
- Interplay Window
- Interplay | Transfer
- Interplay | Production Services Providers
- Interplay | Assist
- iNews
- Archive and Restore Services
- MediaManager to Interplay Migration Tool
- Interplay | Media Indexer
- Service Framework Services
- Interplay | Capture
- Access Control and Media Deletion Model
- Interplay Application Icons
- Setting Up a Folder Structure and a User Database
- Developing an Interplay Delete Strategy
- Introduction to Interplay Deletion
- Interplay Database Folder Structure
- Creating Avid Editing Projects in an Interplay Environment
- Project Workflow Samples
- Example: Deletion for Day-of-the-Week Workflow
- Sample Delete Workflow
- Project Folders – Editor Projects (Daily)
- Projects Folder – Ingest or AirSpeed Folders (Daily)
- Incoming Media (Daily)
- Sent to Playback (Daily)
- Avid Instinct Assets (Daily)
- Orphan Clips (Weekly)
- Un-Checked In Avid Assets (Weekly)
- Deleted Items (Weekly)
- Avid Editing Application Maintenance
- Example: Orphan Clips Deletion
- Deletion Guidelines
- Determining How Much Space a Delete Operation Will Free Up
- Searching for Media
- Refining Your Search in Interplay | Production
- Using AMA Material in Interplay | Production
- Overview of Working with AMA Material
- AMA on Interplay | Production Workflow
- How Interplay | Media Indexer Works with AMA Material
- Configuring Interplay | Administrator and Interplay | Media Indexer to Manage AMA Media
- Using Third-Party Storage for AMA Media
- Viewing AMA Clips in Interplay | Access
- Deleting AMA Clips Using Interplay | Access
- Resyncing AMA Media Files
- Sony XDCAM HD and XDCAM EX End-to-End Workflow
- 720p MultiRez Workflow
- Determining Interplay Database Scalability
- H.264 End-to-End MultiRez Workflow
- HD 23.976p and HD 24p Support
- Apple ProRes Resolutions Supported in Interplay | Production
- JPEG 2000 Resolutions Supported in Interplay | Production
- Support for Stereoscopic 3D Workflows
- DNxHD Resolutions Supported in Interplay | Production
- XAVC-Intra HD Resolutions Supported in Interplay | Production
- DNxHR Resolutions Supported in Interplay | Production
- Using Frame Chase Editing
- Additional Interplay | Production Topics
- Working with Interplay | Media Indexers
- New Features for Interplay | Media Indexer V3.2
- New Features for Media | Indexer V3.0 and V3.1
- Interplay | Media Indexer Overview
- Web-Based User Interface
- Managing Interplay | Media Indexers in an Interplay Environment
- Troubleshooting Interplay | Media Indexer
- Remote Mode Button
- Interplay | Media Indexer Diagnostics
- Resolving Memory Threshold Problems
- Interplay | Media Indexer Logging Capability
- Additional Logging Capabilities
- Interplay | Media Indexer, Interplay | Assist, and Avid Instinct
- Checking Interplay | Media Indexer Status
- If the Interplay | Media Indexer Service Does Not Appear on the Client
- Shutting Down the Interplay | Media Indexer
- Interplay | Media Indexer Health Monitor Options
- Interplay | Media Indexing Workers Thread Pool
- Storage Activity, Storage Resync Status, and Storage Root
- Media Table Statistics
- Media Table Operations and Media Table Queries Performance
- Checking Interplay | Media Indexer Memory Usage
- Suppressing Alerts in the Health Monitor
- Interplay | Media Indexer Health Monitor Changes
- Interplay | Production Maintenance Recommendations
- Archive Migration (Workgroup 4)
- Index

Interplay®| Production
Best Practices Guide
Version 3.4
2
Legal Notices
Product specifications are subject to change without notice and do not represent a commitment on the part of Avid Technology, Inc.
This product is subject to the terms and conditions of a software license agreement provided with the software. The product may
only be used in accordance with the license agreement.
This product may be protected by one or more U.S. and non-U.S patents. Details are available at www.avid.com/patents.
This document is protected under copyright law. An authorized licensee of Avid Interplay may reproduce this publication for the
licensee’s own use in learning how to use the software. This document may not be reproduced or distributed, in whole or in part, for
commercial purposes, such as selling copies of this document or providing support or educational services to others. This document
is supplied as a guide for Avid Interplay. Reasonable care has been taken in preparing the information it contains. However, this
document may contain omissions, technical inaccuracies, or typographical errors. Avid Technology, Inc. does not accept
responsibility of any kind for customers’ losses due to the use of this document. Product specifications are subject to change without
notice.
Copyright © 2015 Avid Technology, Inc. and its licensors. All rights reserved. Printed in USA.
The following disclaimer is required by Apple Computer, Inc.:
APPLE COMPUTER, INC. MAKES NO WARRANTIES WHATSOEVER, EITHER EXPRESS OR IMPLIED, REGARDING THIS
PRODUCT, INCLUDING WARRANTIES WITH RESPECT TO ITS MERCHANTABILITY OR ITS FITNESS FOR ANY PARTICULAR
PURPOSE. THE EXCLUSION OF IMPLIED WARRANTIES IS NOT PERMITTED BY SOME STATES. THE ABOVE EXCLUSION
MAY NOT APPLY TO YOU. THIS WARRANTY PROVIDES YOU WITH SPECIFIC LEGAL RIGHTS. THERE MAY BE OTHER
RIGHTS THAT YOU MAY HAVE WHICH VARY FROM STATE TO STATE.
The following disclaimer is required by Sam Leffler and Silicon Graphics, Inc. for the use of their TIFF library:
Copyright © 1988–1997 Sam Leffler
Copyright © 1991–1997 Silicon Graphics, Inc.
Permission to use, copy, modify, distribute, and sell this software [i.e., the TIFF library] and its documentation for any purpose is
hereby granted without fee, provided that (i) the above copyright notices and this permission notice appear in all copies of the
software and related documentation, and (ii) the names of Sam Leffler and Silicon Graphics may not be used in any advertising or
publicity relating to the software without the specific, prior written permission of Sam Leffler and Silicon Graphics.
THE SOFTWARE IS PROVIDED “AS-IS” AND WITHOUT WARRANTY OF ANY KIND, EXPRESS, IMPLIED OR OTHERWISE,
INCLUDING WITHOUT LIMITATION, ANY WARRANTY OF MERCHANTABILITY OR FITNESS FOR A PARTICULAR PURPOSE.
IN NO EVENT SHALL SAM LEFFLER OR SILICON GRAPHICS BE LIABLE FOR ANY SPECIAL, INCIDENTAL, INDIRECT OR
CONSEQUENTIAL DAMAGES OF ANY KIND, OR ANY DAMAGES WHATSOEVER RESULTING FROM LOSS OF USE, DATA OR
PROFITS, WHETHER OR NOT ADVISED OF THE POSSIBILITY OF DAMAGE, AND ON ANY THEORY OF LIABILITY, ARISING
OUT OF OR IN CONNECTION WITH THE USE OR PERFORMANCE OF THIS SOFTWARE.
The following disclaimer is required by the Independent JPEG Group:
This software is based in part on the work of the Independent JPEG Group.
This Software may contain components licensed under the following conditions:
Copyright (c) 1989 The Regents of the University of California. All rights reserved.
Redistribution and use in source and binary forms are permitted provided that the above copyright notice and this paragraph are
duplicated in all such forms and that any documentation, advertising materials, and other materials related to such distribution and
use acknowledge that the software was developed by the University of California, Berkeley. The name of the University may not be
used to endorse or promote products derived from this software without specific prior written permission. THIS SOFTWARE IS
PROVIDED ``AS IS'' AND WITHOUT ANY EXPRESS OR IMPLIED WARRANTIES, INCLUDING, WITHOUT LIMITATION, THE
IMPLIED WARRANTIES OF MERCHANTABILITY AND FITNESS FOR A PARTICULAR PURPOSE.
Copyright (C) 1989, 1991 by Jef Poskanzer.
Permission to use, copy, modify, and distribute this software and its documentation for any purpose and without fee is hereby
granted, provided that the above copyright notice appear in all copies and that both that copyright notice and this permission notice
appear in supporting documentation. This software is provided "as is" without express or implied warranty.
Copyright 1995, Trinity College Computing Center. Written by David Chappell.
Permission to use, copy, modify, and distribute this software and its documentation for any purpose and without fee is hereby
granted, provided that the above copyright notice appear in all copies and that both that copyright notice and this permission notice
appear in supporting documentation. This software is provided "as is" without express or implied warranty.
3
Copyright 1996 Daniel Dardailler.
Permission to use, copy, modify, distribute, and sell this software for any purpose is hereby granted without fee, provided that the
above copyright notice appear in all copies and that both that copyright notice and this permission notice appear in supporting
documentation, and that the name of Daniel Dardailler not be used in advertising or publicity pertaining to distribution of the software
without specific, written prior permission. Daniel Dardailler makes no representations about the suitability of this software for any
purpose. It is provided "as is" without express or implied warranty.
Modifications Copyright 1999 Matt Koss, under the same license as above.
Copyright (c) 1991 by AT&T.
Permission to use, copy, modify, and distribute this software for any purpose without fee is hereby granted, provided that this entire
notice is included in all copies of any software which is or includes a copy or modification of this software and in all copies of the
supporting documentation for such software.
THIS SOFTWARE IS BEING PROVIDED "AS IS", WITHOUT ANY EXPRESS OR IMPLIED WARRANTY. IN PARTICULAR,
NEITHER THE AUTHOR NOR AT&T MAKES ANY REPRESENTATION OR WARRANTY OF ANY KIND CONCERNING THE
MERCHANTABILITY OF THIS SOFTWARE OR ITS FITNESS FOR ANY PARTICULAR PURPOSE.
This product includes software developed by the University of California, Berkeley and its contributors.
The following disclaimer is required by Nexidia Inc.:
© 2010 Nexidia Inc. All rights reserved, worldwide. Nexidia and the Nexidia logo are trademarks of Nexidia Inc. All other
trademarks are the property of their respective owners. All Nexidia materials regardless of form, including without limitation,
software applications, documentation and any other information relating to Nexidia Inc., and its products and services are the
exclusive property of Nexidia Inc. or its licensors. The Nexidia products and services described in these materials may be covered
by Nexidia's United States patents: 7,231,351; 7,263,484; 7,313,521; 7,324,939; 7,406,415, 7,475,065; 7,487,086 and/or other
patents pending and may be manufactured under license from the Georgia Tech Research Corporation USA.
The following disclaimer is required by Paradigm Matrix:
Portions of this software licensed from Paradigm Matrix.
The following disclaimer is required by Ray Sauers Associates, Inc.:
“Install-It” is licensed from Ray Sauers Associates, Inc. End-User is prohibited from taking any action to derive a source code
equivalent of “Install-It,” including by reverse assembly or reverse compilation, Ray Sauers Associates, Inc. shall in no event be liable
for any damages resulting from reseller’s failure to perform reseller’s obligation; or any damages arising from use or operation of
reseller’s products or the software; or any other damages, including but not limited to, incidental, direct, indirect, special or
consequential Damages including lost profits, or damages resulting from loss of use or inability to use reseller’s products or the
software for any reason including copyright or patent infringement, or lost data, even if Ray Sauers Associates has been advised,
knew or should have known of the possibility of such damages.
The following disclaimer is required by Videomedia, Inc.:
“Videomedia, Inc. makes no warranties whatsoever, either express or implied, regarding this product, including warranties with
respect to its merchantability or its fitness for any particular purpose.”
“This software contains V-LAN ver. 3.0 Command Protocols which communicate with V-LAN ver. 3.0 products developed by
Videomedia, Inc. and V-LAN ver. 3.0 compatible products developed by third parties under license from Videomedia, Inc. Use of this
software will allow “frame accurate” editing control of applicable videotape recorder decks, videodisc recorders/players and the like.”
The following disclaimer is required by Altura Software, Inc. for the use of its Mac2Win software and Sample Source
Code:
©1993–1998 Altura Software, Inc.
The following disclaimer is required by Ultimatte Corporation:
Certain real-time compositing capabilities are provided under a license of such technology from Ultimatte Corporation and are
subject to copyright protection.
The following disclaimer is required by 3Prong.com Inc.:
Certain waveform and vector monitoring capabilities are provided under a license from 3Prong.com Inc.
The following disclaimer is required by Interplay Entertainment Corp.:
The “Interplay” name is used with the permission of Interplay Entertainment Corp., which bears no responsibility for Avid products.
This product includes portions of the Alloy Look & Feel software from Incors GmbH.
4
This product includes software developed by the Apache Software Foundation (http://www.apache.org/).
© DevelopMentor
This product may include the JCifs library, for which the following notice applies:
JCifs © Copyright 2004, The JCIFS Project, is licensed under LGPL (http://jcifs.samba.org/). See the LGPL.txt file in the Third Party
Software directory on the installation CD.
Avid Interplay contains components licensed from LavanTech. These components may only be used as part of and in connection
with Avid Interplay.
Attn. Government User(s). Restricted Rights Legend
U.S. GOVERNMENT RESTRICTED RIGHTS. This Software and its documentation are “commercial computer software” or
“commercial computer software documentation.” In the event that such Software or documentation is acquired by or on behalf of a
unit or agency of the U.S. Government, all rights with respect to this Software and documentation are subject to the terms of the
License Agreement, pursuant to FAR §12.212(a) and/or DFARS §227.7202-1(a), as applicable.
Trademarks
003, 192 Digital I/O, 192 I/O, 96 I/O, 96i I/O, Adrenaline, AirSpeed, ALEX, Alienbrain, AME, AniMatte, Archive, Archive II, Assistant
Station, AudioPages, AudioStation, AutoLoop, AutoSync, Avid, Avid Active, Avid Advanced Response, Avid DNA, Avid DNxcel, Avid
DNxHD, Avid DS Assist Station, Avid Ignite, Avid Liquid, Avid Media Engine, Avid Media Processor, Avid MEDIArray, Avid Mojo, Avid
Remote Response, Avid Unity, Avid Unity ISIS, Avid VideoRAID, AvidRAID, AvidShare, AVIDstripe, AVX, Beat Detective, Beauty
Without The Bandwidth, Beyond Reality, BF Essentials, Bomb Factory, Bruno, C|24, CaptureManager, ChromaCurve,
ChromaWheel, Cineractive Engine, Cineractive Player, Cineractive Viewer, Color Conductor, Command|24, Command|8,
Control|24, Cosmonaut Voice, CountDown, d2, d3, DAE, D-Command, D-Control, Deko, DekoCast, D-Fi, D-fx, Digi 002, Digi 003,
DigiBase, Digidesign, Digidesign Audio Engine, Digidesign Development Partners, Digidesign Intelligent Noise Reduction,
Digidesign TDM Bus, DigiLink, DigiMeter, DigiPanner, DigiProNet, DigiRack, DigiSerial, DigiSnake, DigiSystem, Digital
Choreography, Digital Nonlinear Accelerator, DigiTest, DigiTranslator, DigiWear, DINR, DNxchange, Do More, DPP-1, D-Show, DSP
Manager, DS-StorageCalc, DV Toolkit, DVD Complete, D-Verb, Eleven, EM, Euphonix, EUCON, EveryPhase, Expander,
ExpertRender, Fader Pack, Fairchild, FastBreak, Fast Track, Film Cutter, FilmScribe, Flexevent, FluidMotion, Frame Chase, FXDeko,
HD Core, HD Process, HDpack, Home-to-Hollywood, HYBRID, HyperSPACE, HyperSPACE HDCAM, iKnowledge, Image
Independence, Impact, Improv, iNEWS, iNEWS Assign, iNEWS ControlAir, InGame, Instantwrite, Instinct, Intelligent Content
Management, Intelligent Digital Actor Technology, IntelliRender, Intelli-Sat, Intelli-sat Broadcasting Recording Manager, InterFX,
Interplay, inTONE, Intraframe, iS Expander, iS9, iS18, iS23, iS36, ISIS, IsoSync, LaunchPad, LeaderPlus, LFX, Lightning, Link &
Sync, ListSync, LKT-200, Lo-Fi, MachineControl, Magic Mask, Make Anything Hollywood, make manage move | media, Marquee,
MassivePack, Massive Pack Pro, Maxim, Mbox, Media Composer, MediaFlow, MediaLog, MediaMix, Media Reader, Media
Recorder, MEDIArray, MediaServer, MediaShare, MetaFuze, MetaSync, MIDI I/O, Mix Rack, Moviestar, MultiShell, NaturalMatch,
NewsCutter, NewsView, NewsVision, Nitris, NL3D, NLP, NSDOS, NSWIN, OMF, OMF Interchange, OMM, OnDVD, Open Media
Framework, Open Media Management, Painterly Effects, Palladium, Personal Q, PET, Podcast Factory, PowerSwap, PRE,
ProControl, ProEncode, Profiler, Pro Tools, Pro Tools|HD, Pro Tools LE, Pro Tools M-Powered, Pro Transfer, QuickPunch,
QuietDrive, Realtime Motion Synthesis, Recti-Fi, Reel Tape Delay, Reel Tape Flanger, Reel Tape Saturation, Reprise, Res Rocket
Surfer, Reso, RetroLoop, Reverb One, ReVibe, Revolution, rS9, rS18, RTAS, Salesview, Sci-Fi, Scorch, ScriptSync,
SecureProductionEnvironment, Serv|GT, Serv|LT, Shape-to-Shape, ShuttleCase, Sibelius, SimulPlay, SimulRecord, Slightly Rude
Compressor, Smack!, Soft SampleCell, Soft-Clip Limiter, SoundReplacer, SPACE, SPACEShift, SpectraGraph, SpectraMatte,
SteadyGlide, Streamfactory, Streamgenie, StreamRAID, SubCap, Sundance, Sundance Digital, SurroundScope, Symphony, SYNC
HD, SYNC I/O, Synchronic, SynchroScope, Syntax, TDM FlexCable, TechFlix, Tel-Ray, Thunder, TimeLiner, Titansync, Titan, TL
Aggro, TL AutoPan, TL Drum Rehab, TL Everyphase, TL Fauxlder, TL In Tune, TL MasterMeter, TL Metro, TL Space, TL Utilities,
tools for storytellers, Transit, TransJammer, Trillium Lane Labs, TruTouch, UnityRAID, Vari-Fi, Video the Web Way, VideoRAID,
VideoSPACE, VTEM, Work-N-Play, Xdeck, X-Form, Xmon and XPAND! are either registered trademarks or trademarks of Avid
Technology, Inc. in the United States and/or other countries.
Adobe and Photoshop are either registered trademarks or trademarks of Adobe Systems Incorporated in the United States and/or
other countries. Apple and Macintosh are trademarks of Apple Computer, Inc., registered in the U.S. and other countries. Windows
is either a registered trademark or trademark of Microsoft Corporation in the United States and/or other countries. All other
trademarks contained herein are the property of their respective owners.
Footage
Eco Challenge Morocco — Courtesy of Discovery Communications, Inc.
News material provided by WFTV Television Inc.
Ice Island — Courtesy of Kurtis Productions, Ltd.
Interplay | Production Best Practices • Created 9/28/15 • This document is distributed by Avid in online (electronic)
form only, and is not available for purchase in printed form.
5
Contents
Using This Guide. . . . . . . . . . . . . . . . . . . . . . . . . . . . . . . . . . . . . . . . . . . . . . . . 9
Interplay Documentation . . . . . . . . . . . . . . . . . . . . . . . . . . . . . . . . . . . . . . . . . . . . . . . . . . 9
Chapter 1 Interplay | Production Components . . . . . . . . . . . . . . . . . . . . . . . . . . . . . . . 11
Using MultiRez and Dynamic Relink . . . . . . . . . . . . . . . . . . . . . . . . . . . . . . . . . . . . . . . . 11
Interplay | Engine . . . . . . . . . . . . . . . . . . . . . . . . . . . . . . . . . . . . . . . . . . . . . . . . . . . . . . 12
Interplay | Access . . . . . . . . . . . . . . . . . . . . . . . . . . . . . . . . . . . . . . . . . . . . . . . . . . . . . . 13
Interplay | Administrator . . . . . . . . . . . . . . . . . . . . . . . . . . . . . . . . . . . . . . . . . . . . . . . . . 14
Interplay Window. . . . . . . . . . . . . . . . . . . . . . . . . . . . . . . . . . . . . . . . . . . . . . . . . . . . . . . 16
Interplay | Transfer . . . . . . . . . . . . . . . . . . . . . . . . . . . . . . . . . . . . . . . . . . . . . . . . . . . . . 17
Interplay | Production Services Providers . . . . . . . . . . . . . . . . . . . . . . . . . . . . . . . . . . . . 19
Interplay | Assist . . . . . . . . . . . . . . . . . . . . . . . . . . . . . . . . . . . . . . . . . . . . . . . . . . . . . . . 19
iNews . . . . . . . . . . . . . . . . . . . . . . . . . . . . . . . . . . . . . . . . . . . . . . . . . . . . . . . . . . . . . . . 21
Archive and Restore Services. . . . . . . . . . . . . . . . . . . . . . . . . . . . . . . . . . . . . . . . . . . . . 21
MediaManager to Interplay Migration Tool . . . . . . . . . . . . . . . . . . . . . . . . . . . . . . . . . . . 23
Interplay | Media Indexer. . . . . . . . . . . . . . . . . . . . . . . . . . . . . . . . . . . . . . . . . . . . . . . . . 23
Service Framework Services . . . . . . . . . . . . . . . . . . . . . . . . . . . . . . . . . . . . . . . . . . . . . 23
Interplay | Capture. . . . . . . . . . . . . . . . . . . . . . . . . . . . . . . . . . . . . . . . . . . . . . . . . . . . . . 24
Access Control and Media Deletion Model . . . . . . . . . . . . . . . . . . . . . . . . . . . . . . . . . . . 24
Interplay Application Icons . . . . . . . . . . . . . . . . . . . . . . . . . . . . . . . . . . . . . . . . . . . . . . . 24
Chapter 2 Setting Up a Folder Structure and a User Database . . . . . . . . . . . . . . . . . . 27
Permissions and Folder Structures . . . . . . . . . . . . . . . . . . . . . . . . . . . . . . . . . . . . . . . . . 27
Setting Up a Folder Structure in Interplay | Access . . . . . . . . . . . . . . . . . . . . . . . . . . . . 28
Basic Setup: Assigning Access to User Groups . . . . . . . . . . . . . . . . . . . . . . . . . . . . . . . 29
Assigning Database Access on a Project Basis . . . . . . . . . . . . . . . . . . . . . . . . . . . . . . . 32
Defining the Editor Database Settings . . . . . . . . . . . . . . . . . . . . . . . . . . . . . . . . . . . . . . 36
Managing the Assist User Settings . . . . . . . . . . . . . . . . . . . . . . . . . . . . . . . . . . . . . . . . . 38
Creating Folders for Capturing Media . . . . . . . . . . . . . . . . . . . . . . . . . . . . . . . . . . . . . . . 38
6
Chapter 3 Developing an Interplay Delete Strategy. . . . . . . . . . . . . . . . . . . . . . . . . . . . 40
Introduction to Interplay Deletion . . . . . . . . . . . . . . . . . . . . . . . . . . . . . . . . . . . . . . . . . . 40
Interplay Database Folder Structure . . . . . . . . . . . . . . . . . . . . . . . . . . . . . . . . . . . . . . . . 41
Creating Avid Editing Projects in an Interplay Environment . . . . . . . . . . . . . . . . . . . . . . 47
Project Workflow Samples . . . . . . . . . . . . . . . . . . . . . . . . . . . . . . . . . . . . . . . . . . . . . . . 53
Example: Deletion for Day-of-the-Week Workflow . . . . . . . . . . . . . . . . . . . . . . . . . . . . . 56
Example: Orphan Clips Deletion . . . . . . . . . . . . . . . . . . . . . . . . . . . . . . . . . . . . . . . . . . . 64
Deletion Guidelines . . . . . . . . . . . . . . . . . . . . . . . . . . . . . . . . . . . . . . . . . . . . . . . . . . . . . 70
Determining How Much Space a Delete Operation Will Free Up . . . . . . . . . . . . . . . . . . 73
Searching for Media . . . . . . . . . . . . . . . . . . . . . . . . . . . . . . . . . . . . . . . . . . . . . . . . . . . . 75
Chapter 4 Refining Your Search in Interplay | Production . . . . . . . . . . . . . . . . . . . . . . 83
Using the Search Root and Attributes to Speed Up Interplay | Production Search . . . . 84
Basic Interplay | Production Search Attributes . . . . . . . . . . . . . . . . . . . . . . . . . . . . . . . . 85
Searching in Interplay | Assist, Avid Instinct, and the Interplay Window. . . . . . . . . . . . . 86
Searching in Interplay | Access. . . . . . . . . . . . . . . . . . . . . . . . . . . . . . . . . . . . . . . . . . . . 88
Example: Finding Assets By Using a Unique Identifier . . . . . . . . . . . . . . . . . . . . . . . . . . 91
Chapter 5 Using AMA Material in Interplay | Production . . . . . . . . . . . . . . . . . . . . . . . 97
Overview of Working with AMA Material . . . . . . . . . . . . . . . . . . . . . . . . . . . . . . . . . . . . . 97
AMA on Interplay | Production Workflow. . . . . . . . . . . . . . . . . . . . . . . . . . . . . . . . . . . . . 98
How Interplay | Media Indexer Works with AMA Material . . . . . . . . . . . . . . . . . . . . . . . 101
Configuring Interplay | Administrator and Interplay | Media Indexer to Manage
AMA Media . . . . . . . . . . . . . . . . . . . . . . . . . . . . . . . . . . . . . . . . . . . . . . . . . . . . . . . . 104
Using Third-Party Storage for AMA Media . . . . . . . . . . . . . . . . . . . . . . . . . . . . . . . . . . 110
Viewing AMA Clips in Interplay | Access. . . . . . . . . . . . . . . . . . . . . . . . . . . . . . . . . . . . 116
Deleting AMA Clips Using Interplay | Access . . . . . . . . . . . . . . . . . . . . . . . . . . . . . . . . 121
Resyncing AMA Media Files . . . . . . . . . . . . . . . . . . . . . . . . . . . . . . . . . . . . . . . . . . . . . 123
Chapter 6 Sony XDCAM HD and XDCAM EX End-to-End Workflow . . . . . . . . . . . . . 127
MPEG-2 Long GOP Overview . . . . . . . . . . . . . . . . . . . . . . . . . . . . . . . . . . . . . . . . . . . 127
Supported File Formats for XDCAM HD and XDCAM EX Media . . . . . . . . . . . . . . . . . 129
Long GOP Workflows . . . . . . . . . . . . . . . . . . . . . . . . . . . . . . . . . . . . . . . . . . . . . . . . . . 129
Chapter 7 720p MultiRez Workflow . . . . . . . . . . . . . . . . . . . . . . . . . . . . . . . . . . . . . . . . 139
Overview of the 720p MultiRez Workflow . . . . . . . . . . . . . . . . . . . . . . . . . . . . . . . . . . . 139
Editor MultiRez Workflow for 720p . . . . . . . . . . . . . . . . . . . . . . . . . . . . . . . . . . . . . . . . 140
7
720p MultiRez Workflow Components . . . . . . . . . . . . . . . . . . . . . . . . . . . . . . . . . . . . . 145
Setting Up the Production Services Profiles for a 720p MultiRez Workflow . . . . . . . . . 158
Chapter 8 Determining Interplay Database Scalability . . . . . . . . . . . . . . . . . . . . . . . . 163
Definition of Terms . . . . . . . . . . . . . . . . . . . . . . . . . . . . . . . . . . . . . . . . . . . . . . . . . . . . 163
Total Used Database Pages and Estimated Database Page Limit. . . . . . . . . . . . . . . . 164
Comparing Database Page Count and Cache Size . . . . . . . . . . . . . . . . . . . . . . . . . . . 166
Tips for Improving Database Performance . . . . . . . . . . . . . . . . . . . . . . . . . . . . . . . . . . 169
Establish a Stable Ratio Between Database Objects and Database Pages. . . . . . . . . 170
Chapter 9 H.264 End-to-End MultiRez Workflow . . . . . . . . . . . . . . . . . . . . . . . . . . . . . 175
H.264 Resolutions Supported by Interplay | Production . . . . . . . . . . . . . . . . . . . . . . . . 175
Installation and Configuration for an H.264 Workflow . . . . . . . . . . . . . . . . . . . . . . . . . . 177
Acquiring Media for an H.264 Workflow . . . . . . . . . . . . . . . . . . . . . . . . . . . . . . . . . . . . 190
Editing with H.264 and High-Res . . . . . . . . . . . . . . . . . . . . . . . . . . . . . . . . . . . . . . . . . 194
Archiving, Restoring, and Deleting H.264 and High-Res Media . . . . . . . . . . . . . . . . . . 195
Chapter 10 HD 23.976p and HD 24p Support . . . . . . . . . . . . . . . . . . . . . . . . . . . . . . . . . 196
Interplay Production Support for Native HD 23.976p and HD 24p Formats . . . . . . . . . 196
Interplay Production Support for HD 23.976p and HD 24p Proxy Resolutions . . . . . . . 200
Chapter 11 Apple ProRes Resolutions Supported in Interplay | Production . . . . . . . 202
Chapter 12 JPEG 2000 Resolutions Supported in Interplay | Production . . . . . . . . . . 205
Chapter 13 Support for Stereoscopic 3D Workflows . . . . . . . . . . . . . . . . . . . . . . . . . . 206
Overview of Stereoscopic Support . . . . . . . . . . . . . . . . . . . . . . . . . . . . . . . . . . . . . . . . 206
Stereoscopic Media and Stereoscopic Clips. . . . . . . . . . . . . . . . . . . . . . . . . . . . . . . . . 207
Stereoscopic 3D Support in Interplay | Access . . . . . . . . . . . . . . . . . . . . . . . . . . . . . . . 209
Stereoscopic 3D Support in Interplay | Transcode . . . . . . . . . . . . . . . . . . . . . . . . . . . . 211
Stereoscopic 3D Support in the Interplay Window, and Interplay | Assist . . . . . . . . . . 213
Properties for Stereoscopic Clips . . . . . . . . . . . . . . . . . . . . . . . . . . . . . . . . . . . . . . . . . 213
Chapter 14 DNxHD Resolutions Supported in Interplay | Production . . . . . . . . . . . . . 216
Chapter 15 XAVC-Intra HD Resolutions Supported in Interplay | Production . . . . . . 219
Chapter 16 DNxHR Resolutions Supported in Interplay | Production . . . . . . . . . . . . . 220
Chapter 17 Using Frame Chase Editing. . . . . . . . . . . . . . . . . . . . . . . . . . . . . . . . . . . . . 222
Frame Chase Editing and Frame Chase Capture. . . . . . . . . . . . . . . . . . . . . . . . . . . . . 222
Understanding Frame Chase Editing . . . . . . . . . . . . . . . . . . . . . . . . . . . . . . . . . . . . . . 222
8
Workflow for Frame Chase Editing . . . . . . . . . . . . . . . . . . . . . . . . . . . . . . . . . . . . . . . . 224
Limitations When Working With In-Progress Clips . . . . . . . . . . . . . . . . . . . . . . . . . . . . 227
Chapter 18 Additional Interplay | Production Topics . . . . . . . . . . . . . . . . . . . . . . . . . . 229
Changing Source Information for a Clip in Interplay | Production . . . . . . . . . . . . . . . . . 229
Ingest and Playout of Ancillary Data . . . . . . . . . . . . . . . . . . . . . . . . . . . . . . . . . . . . . . . 230
Support for AFD Ancillary Data . . . . . . . . . . . . . . . . . . . . . . . . . . . . . . . . . . . . . . . . . . . 231
Dynamic Relink: Working with a Single Resolution. . . . . . . . . . . . . . . . . . . . . . . . . . . . 233
Disconnecting an Avid Editing Application from the Interplay Environment . . . . . . . . . 235
Chapter 19 Working with Interplay | Media Indexers. . . . . . . . . . . . . . . . . . . . . . . . . . . 236
New Features for Interplay | Media Indexer V3.2 . . . . . . . . . . . . . . . . . . . . . . . . . . . . . 236
New Features for Media | Indexer V3.0 and V3.1 . . . . . . . . . . . . . . . . . . . . . . . . . . . . . 245
Interplay | Media Indexer Overview. . . . . . . . . . . . . . . . . . . . . . . . . . . . . . . . . . . . . . . . 255
Web-Based User Interface . . . . . . . . . . . . . . . . . . . . . . . . . . . . . . . . . . . . . . . . . . . . . . 256
Managing Interplay | Media Indexers in an Interplay Environment . . . . . . . . . . . . . . . . 265
Troubleshooting Interplay | Media Indexer . . . . . . . . . . . . . . . . . . . . . . . . . . . . . . . . . . 272
Interplay | Media Indexer Health Monitor Options. . . . . . . . . . . . . . . . . . . . . . . . . . . . . 279
Appendix A Interplay | Production Maintenance Recommendations . . . . . . . . . . . . . . 295
Interplay Daily Maintenance Check List . . . . . . . . . . . . . . . . . . . . . . . . . . . . . . . . . . . . 295
Interplay Weekly Maintenance Check List . . . . . . . . . . . . . . . . . . . . . . . . . . . . . . . . . . 296
Interplay Monthly Maintenance Check List . . . . . . . . . . . . . . . . . . . . . . . . . . . . . . . . . . 297
Avid ISIS Recommended Maintenance . . . . . . . . . . . . . . . . . . . . . . . . . . . . . . . . . . . . 299
Complete Server Room Shutdown . . . . . . . . . . . . . . . . . . . . . . . . . . . . . . . . . . . . . . . . 300
Appendix B Archive Migration (Workgroup 4) . . . . . . . . . . . . . . . . . . . . . . . . . . . . . . . . 301
Searching for Migrated Workgroup 4 Archive Items . . . . . . . . . . . . . . . . . . . . . . . . . . . 301
Restoring Migrated Assets . . . . . . . . . . . . . . . . . . . . . . . . . . . . . . . . . . . . . . . . . . . . . . 302
Restoring Different Versions of a MediaManager Archive Clip . . . . . . . . . . . . . . . . . . . 303
Working with OMF Media Files After an Archive Migration. . . . . . . . . . . . . . . . . . . . . . 308
Retained Workgroup 4 Clip Attributes. . . . . . . . . . . . . . . . . . . . . . . . . . . . . . . . . . . . . . 310
Using This Guide
Congratulations on your purchase of Interplay® Production, a powerful system for managing
media in a shared storage environment. This guide contains an overview of Avid Interplay and
also contains task-oriented instructions, conceptual information, and reference material you need
to use your Avid Interplay system. This guide is intended for all Interplay users, from beginning
to advanced
Interplay Documentation
The following documents describe how to use Avid Interplay:
•Avid Interplay Best Practices — provides an overview of the major Interplay components,
shows sample configuration diagrams, and describes several of the key features, such as
setting up a user database and using the Avid Interplay Archive Engine.
•Avid Interplay Software Installation and Configuration Guide — describes how to use the
Avid Interplay installation programs to install and configure software on the various systems
that make up a Interplay environment.
•Avid Interplay Engine Failover Guide — describes how to set up a cluster configuration for
the Avid Interplay Engine and the Avid Interplay Archive engine. There are two versions of
this guide: one for SR2500 systems and one for AS3000 systems.
•Avid Interplay Engine and Avid Interplay Archive Engine Administration Guide — describes
how to administer your Avid Interplay Engine or Avid Interplay Archive Engine and Avid
Interplay database.
•Avid Interplay Access User’s Guide — describes how to use Interplay Access to browse,
search, and work with assets in the Avid Interplay database.
•Avid Interplay Assist User’s Guide — describes how to use Interplay Assist for logging,
archiving, and sending to Playback material in an Interplay environment.
•Avid Instinct User’s Guide — describes how to use the Avid Instinct application to write
iNEWS stories and put together simple audio and video sequences.
•Avid Interplay Production Services Setup and User’s Guide — Avid Interplay Production
Services lets you control and automate Transcode, Archive, and other Interplay Production
Services.
Interplay Documentation
10
•Avid Interplay Transfer Setup and User’s Guide — describes how to use Interplay Transfer
to transfer media to and from another workgroup, send finished sequences to a configured
playback device, ingest media from a configured ingest device, and perform standalone
transfers between workstations.
•Avid Service Framework User’s Guide — describes how to use the logging, monitoring, and
management features of the Avid Service Framework applications.
•Avid Interplay Capture User’s Guide — describes how to use Interplay Capture, a newsroom
ingest tool that enables automated recordings.
•Avid Interplay Capture Administrator’s Guide — describes administrative concepts, tasks,
and reference material for Avid Interplay Capture.
All documents are available in PDF form on the Avid Knowledge Base at
www.avid.com/onlinesupport.

1Interplay | Production Components
This chapter provides a brief overview of the main components that make up an
Interplay Production environment.
•Using MultiRez and Dynamic Relink
•Interplay | Engine
•Interplay | Access
•Interplay | Administrator
•Interplay Window
•Interplay | Transfer
•Interplay | Production Services Providers
•Interplay | Assist
•iNews
•Archive and Restore Services
•MediaManager to Interplay Migration Tool
•Interplay | Media Indexer
•Service Framework Services
•Interplay | Capture
•Access Control and Media Deletion Model
•Interplay Application Icons
Using MultiRez and Dynamic Relink
MultiRez (a term derived from “multiple resolutions”) allows you to associate a single master
clip with multiple media files of different resolutions. For example, you can associate the same
master clip with low-resolution MPEG-2, JFIF 15:1s, and uncompressed media files. MultiRez
also works with audio files: you can associate an audio clip with more than one sample rate.
In an Interplay Production environment, you can capture a master clip in multiple resolutions or
transcode a clip to another resolution, and you can easily switch between the different
resolutions. This switching is referred to as dynamic relink. Dynamic relink is useful when you
Interplay | Engine
12
want to work with low-resolution media and create your final master in high-resolution media.
For more information, see “Using MultiRez and Dynamic Relink” in the Avid Media Composer
Editing Guide.
This information is also included in the Help for these products or the Interplay Production
Help.For additional information, see “Dynamic Relink: Working with a Single Resolution” on
page 233.
Interplay | Engine
The Interplay Engine forms the backbone of the Interplay environment. The Interplay Engine is a
server that combines an asset database with workflow management software, both of which are
integrated with Avid shared storage and Avid archive solutions. This topic provides basic
information about the functions and components of the Interplay Engine.
The Interplay Engine provides the following features:
• Management of Avid assets (for example, master clips and sequences) as well as file assets
(for example, Adobe Photoshop® and Microsoft® Office files)
• Version control for sequences and file assets
• Integration with Avid ISIS™
• Support for MultiRez (multiple resolution) workflows
• Access control through groups as follows:
- Five fixed user roles: Administrator, Read/Write/Delete, Read/Write, Read, and No
Access
- A user can be part of several groups
- Permissions can be modified at the folder level
• Import on the desktop level to Interplay Access
• Use the Interplay Window to check in and check out to the database from the Avid editing
application
• Support for MXF media files and AAF metadata. Interplay v3.0 adds support for AMA
media.
• Failover capability (using Windows® 2003 Enterprise Server), including Auto-Failover to
hot spare (Interplay Engine and Interplay Archive Engine only)
Interplay | Access
13
• Simplified workgroup delete rules including the following:
- The administrator can specify the delete permissions that users and groups have on
particular folders. You use Reservations to protect the media files related to Avid assets.
- Media can be protected by reservations that have time and date expirations
- Reservations protect assets and media placed in a protected folder
- You can use the Interplay Access software to place personal reservations on folders
For information on the Interplay Engine, see Interplay Engine and Interplay Archive Engine
Administration Guide and the Interplay Access User’s Guide.
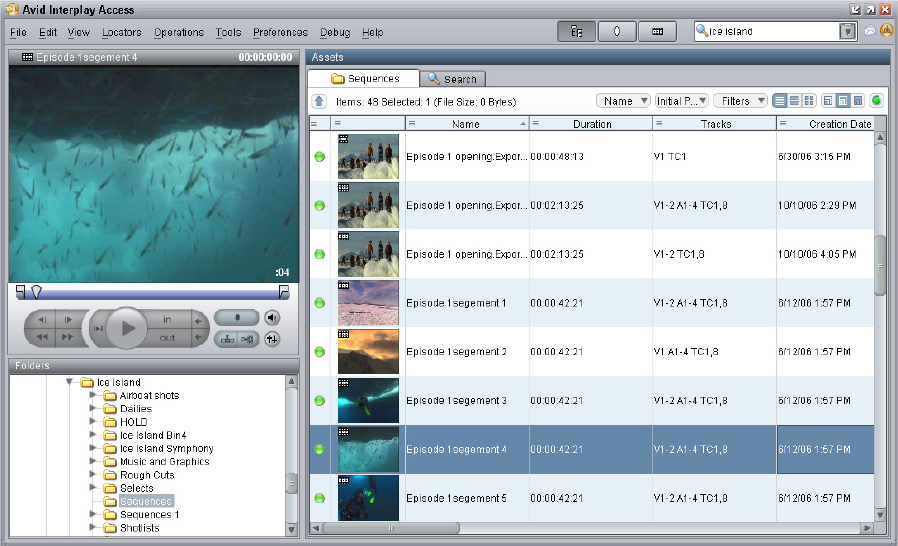
Interplay | Access
The Interplay Access software is a dedicated application that can be used by system
administrators and other designated users such as editors, assistants, and producers to interact
with the Interplay Engine.
The Interplay Access user interface allows you to quickly search or browse its contents for assets
of interest. Drag-and-drop support allows you to obtain Avid assets by dragging them to the Avid
editing applications Interplay Window.
Interplay Access provides search tools and an Object Inspector that allow anyone from artists to
editors to easily find shots, clips, sequences, or other elements defined for the project without
even knowing file names, and to quickly see the dependencies and relatives involved. You can
also use Interplay Access to manage sequences and other Avid assets whose media is no longer
online. You can then search for these assets, view information about them such as the source tape
name, obtain the source footage, and recapture it.
The following illustration shows Interplay Access.
Interplay | Administrator
14
You can play Avid video and audio clips in the Interplay Access Monitor if the clips are
associated with MPEG-4/H.263 or H.264 video media, MPEG1 Layer 2 audio media, or both.
For more information about Interplay Access, see the Interplay Access User’s Guide.
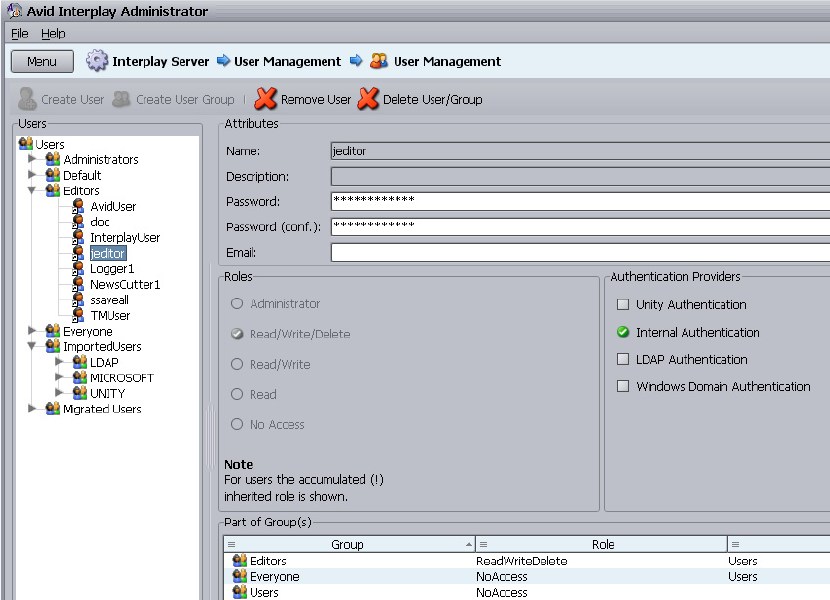
Interplay | Administrator
The Interplay Administrator is a cross-platform application used for basic administration of the
Interplay Engine and the Interplay Archive Engine. Supported capabilities include the following:
• Database activation, creation, and security
• Scheduling backups
• Server licensing configuration
• Central configuration server setup of users
The following illustration shows the User Management window of the Interplay Administrator
application.
Interplay Window
16
Interplay Window
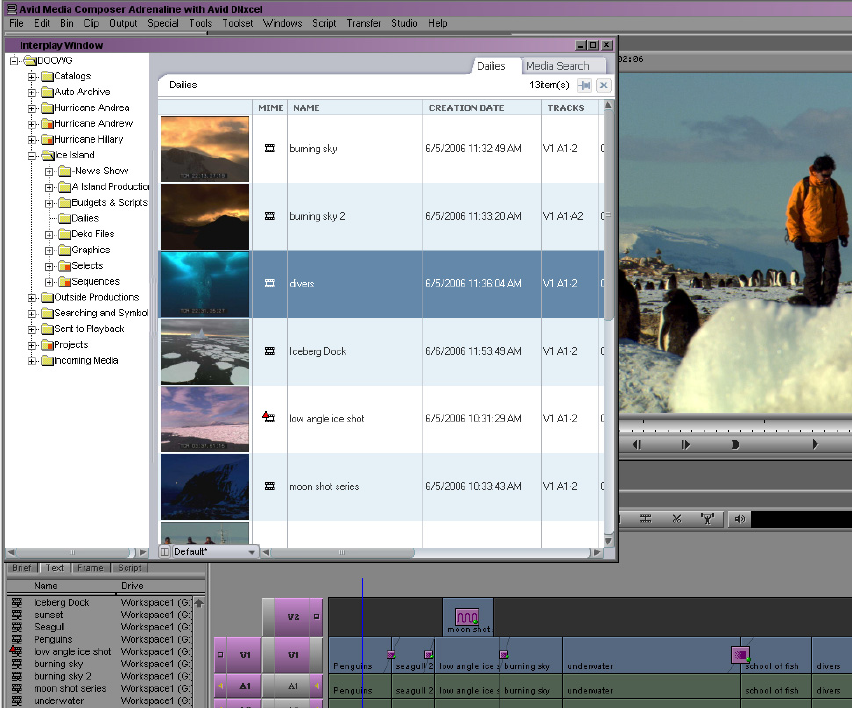
The Interplay window allow you to share Avid assets with other users in the Interplay Production
environment. The Interplay window provide the following capabilities:
• Avid editing applications such as Avid Media Composer® can work with Avid assets through
the Interplay window. The Interplay window displays the same folder structure you see in
the Interplay Access interface. You can capture material to an Interplay window and edit
those clips into a sequence in a bin. You can also check sequences into the Interplay window
for asset management and for sharing with other editors.
Key features of the Interplay Window include the following:
• Capture (digitize) directly into the Interplay Window
• Save current state and restore on relaunch
• Drag from editing application bins to the Interplay window and vice versa
• Edit remote clips directly into a sequence
• Search the Interplay Production database
• Create shortcuts
Avid editors must edit sequences, render, and consolidate in bins.
The following illustration shows the Interplay Window within an Avid editing application.
Interplay | Transfer
17
For more information, see “Working with Interplay Production from an Avid Editing System” in
the Interplay Production Help, the Help for your Avid editing application or the Avid Media
Composer Editing Guide.
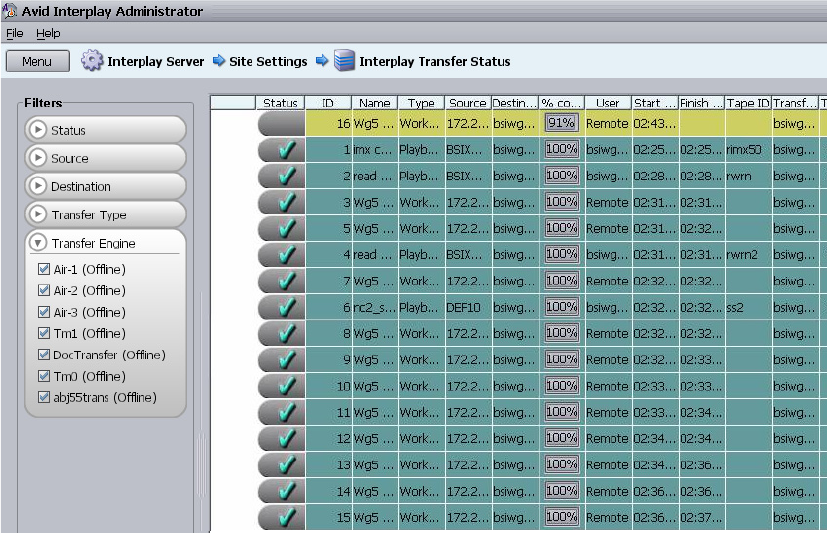
Interplay | Transfer
Interplay Transfer lets you transfer Avid assets to and from another workgroup, send finished
sequences to a configured playback device, and capture media from a configured ingest device.
You can also use Interplay Transfer in a standalone environment (an environment other than Avid
shared storage) to move Avid assets between workstations.
Interplay | Transfer
18
The Interplay Transfer Engine and client software operates as TransferManager does in a
MediaManager environment. In addition, it supports the following features:
• You can perform MediaManager-to-Interplay Production transfers from a MediaManager
browser to a an Interplay Transfer Status window or to a bin in an Avid editing application
within your Interplay Production environment.
• Standalone Interplay Transfer support is provided in the Avid editing applications.
• Support for a Transfer Cache Engine that can monitor transfers for a large number of users.
This removes the task of reporting transfer status from the Interplay Transfer Engine.
The following illustration shows the Interplay Transfer Status window viewed from the Interplay
Administrator.
For information on Interplay Transfer, see the Interplay Transfer Setup and User’s Guide.
nInterplay-to-OMF transfers are not supported.
Interplay | Production Services Providers
19
Interplay | Production Services Providers
The Interplay Production Services application supports the following services:
• Interplay Transcode allows you to transcode clips from one Avid-supported resolution to
another. For example, you can create a low-resolution version of a sequence or master clip.
You can perform transcode operations from within the Avid editing application or from
within Interplay Access.
• The Copy service allows you to copy media and metadata between different Interplay
Workgroups.
• The Move service allows you to move media and metadata between different workspaces on
the same Avid ISIS system.
• The STP Encode service allows you off load time-consuming processing involved in
exporting and transferring of Long GOP OP1a media, during a send-to-playback request
from the Avid editing application or Avid Interplay Assist. See “Workflow for Background
Processing of Long GOP Splicing and Transferring of Long GOP OP1a Media” on
page 136.
• The Delivery service lets you perform workgroup-to-workgroup transfers of shotlists,
subclips, master clips, cuts-only sequences, and their media files. Interplay Delivery
Receiver is also a service that is part of Interplay Production Services. However, it runs as a
Windows service.
• The Interplay Archive service and the Interplay Restore service. See “Archive and Restore
Services” on page 21.
For more information, see the Interplay Production Services Setup and User’s Guide. For
hardware configuration information, see the Interplay Software Installation and Configuration
Guide.
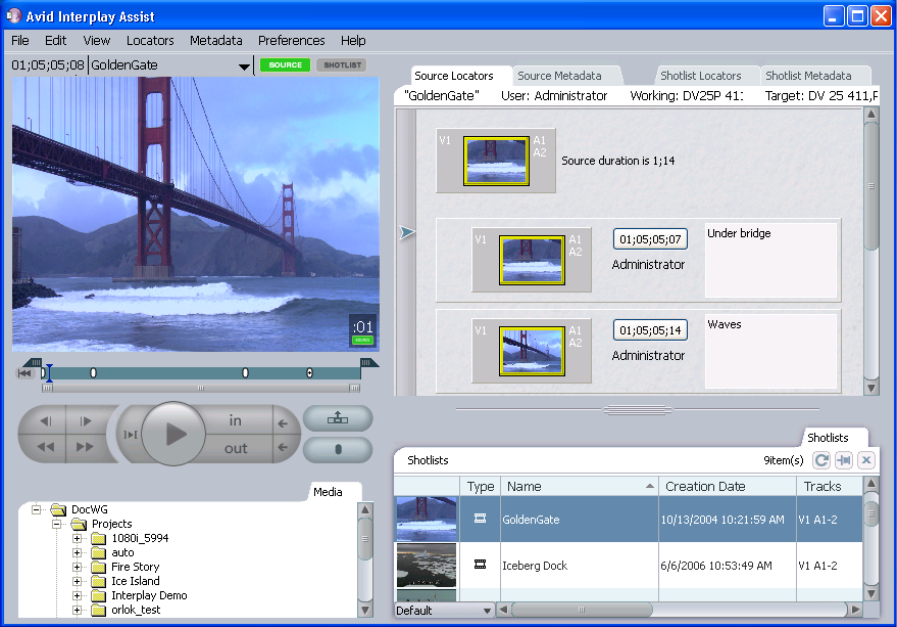
Interplay | Assist
Interplay Assist allows you to perform the following tasks:
• Search the Interplay Engine database
• Play media
• Add locators and locator information
• Select, view, and create shotlists
• Send to playback
•Archive
Interplay|Assist
20
The following illustration shows Interplay Assist.
You can also use Interplay Assist to quickly preview clips. All resolutions supported by the Avid
editing applications are supported.
Interplay Assist also provides the following additional features:
• Restrictions — Support for a restriction marker indicating that a range of media being used
is somehow restricted for use. These markers do not prevent usage, but alert the user that a
restriction is in place. This feature is also referred to as Digital Rights Management (DRM).
• Annotations — labels you can attach to locators. Annotations support special markers such
as the following:
- Restricted flag
- Best Picture
-Best Sound
iNews
21
- User-created custom annotation markers
• Metadata — textual data you can use to identify and describe the creation, contents, and
disposition of a clip or shotlist
• Searching across multiple logs
• Log filtering
For more information, see the Interplay Assist User’s Guide.
iNews
The Avid iNEWS newsroom computer system (NRCS) is a powerful tool for developing news,
rundowns, and stories.
Archive and Restore Services
An Interplay Production environment supports a separate asset manager known as the Interplay
Archive Engine to track archived assets. The basic features and functionality that are used to
track assets in the online storage system, including MultiRez support, are also available for the
archived assets. The Interplay Archive Engine also supports partial file restore of Avid MXF
media in the archive. A partial restore refers to a situation where there might be a large master
clip in the archive but your sequence only uses a small portion of the master clip. A partial
restore restores only the portion of the file that you need.
The following illustration shows an archive database displayed in Interplay Access.
Archive and Restore Services
22
The Interplay Production Services application supports Archive and Restore services that
manage the process of moving data. You can access the Archive and Restore operations from
within the Avid editing applications and from within Interplay Access.
You can send high-resolution media to archive and keep a low-resolution version of the asset in
the online storage system. This allows you to edit with the low-res asset and conform a “partial”
file of the high-res asset from the archive.
The Auto Archive feature includes the following:
• An auto-archive folder that triggers an archive of any material placed in the folder
• Duplication of archive items automatically prevented (default option)
• Ability to append metadata and logging information to archived material
For additional information, see the Interplay Production Services Setup and User’s Guide.
MediaManager Archive Solutions
Starting at Interplay v1.1.4, you can migrate MediaManager v4.5.x (also known as Workgroup 4)
archived assets to an Interplay Archive environment. See your Avid representative for details on
performing the migration. See “Archive Migration (Workgroup 4)” on page 301.
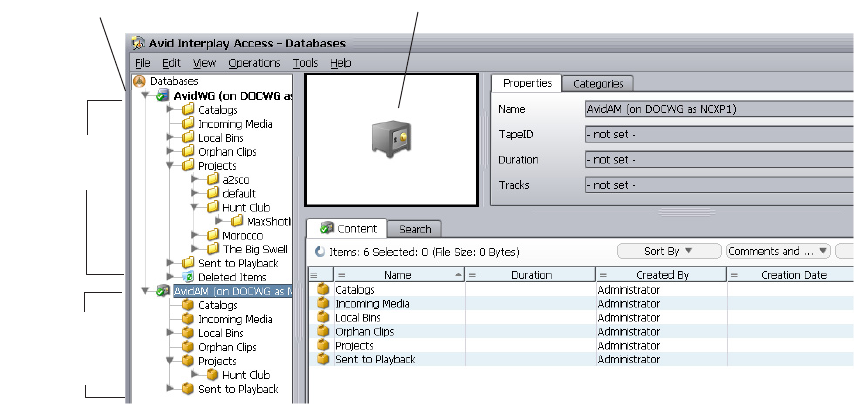
Safe image identifies the archive database
Avid Interplay
online
database
Avid Interplay
Archive
database
Tree view
MediaManager to Interplay Migration Tool
23
MediaManager to Interplay Migration Tool
You can migrate much of your MediaManager environment metadata to an Interplay Production
workgroup with the Migration tool. You can migrate clips, sequences, and effects from projects,
catalogs, workspaces, and users. You can also migrate MediaManager Archive metadata to an
Interplay Archive system. For more information, see your Avid representative.
Interplay | Media Indexer
The Interplay Media Indexer is a background service that keeps track of the media files in
storage locations that you identify. In an Interplay Production environment, each Avid editing
application has its own local Interplay Media Indexer that manages the local storage areas on that
system. Each Interplay Production environment also has at least one Interplay Media Indexer
that manages media on shared storage. When the Avid editing application needs to access media
on shared storage, it communicates with its local Interplay Media Indexer, which then
communicates with the shared storage Interplay Media Indexer. For more information, see
“Working with Interplay | Media Indexers” on page 236.
Service Framework Services
Avid Service Framework is a common service distribution framework, which enables the
configuration and monitoring of Avid services and applications in an Interplay environment.
Avid Service Framework consists of applications and services that provide dynamic discovery
and lookup mechanisms, a scalable notification system, a centralized configuration tool,
diagnostic logging for workgroup-enabled applications and services, system health monitoring,
and so on. Some of the services are known collectively as Support services. The Support services
are viewed, monitored, and configured using the Service Framework applications.
The Avid Service Framework provides the following tools for Interplay Production:
• Scalable notification mechanism
• Configuration tool for centralizing configuration tasks
• Diagnostic Logging application for consistent logging across all Interplay applications
• Health and Monitoring application
Interplay | Capture
24
Interplay | Capture
Interplay Capture is intended for customers who require a management system for video capture.
This application is a key part of the MultiRez workflow. Interplay Capture stores its schedule and
other metadata in the Interplay database, which allows for easy access to the captured material
within the Interplay work environment.
For information on Interplay Capture, see the Interplay Capture Administration Guide, the
Interplay Capture User’s Guide, and the Interplay Capture Install Guide.
Access Control and Media Deletion Model
One of the most essential aspects of asset management is developing a system by which assets
and their associated media files (for example, video and audio files) can be automatically and
accurately protected from normal deletion. The administrator can specify the delete permissions
that users and groups have on particular folders. Administrators and users can also use folder
reservations to protect media files.
• A reserved folder protects any media files referred to by the assets in that folder.
• Folder reservations can have an expiration date so they don’t needlessly protect media files
after they are inactive.
• Administrators and file owners can override folder reservations.
For more information, see the Interplay Access User’s Guide and “Developing an Interplay
Delete Strategy” on page 40.
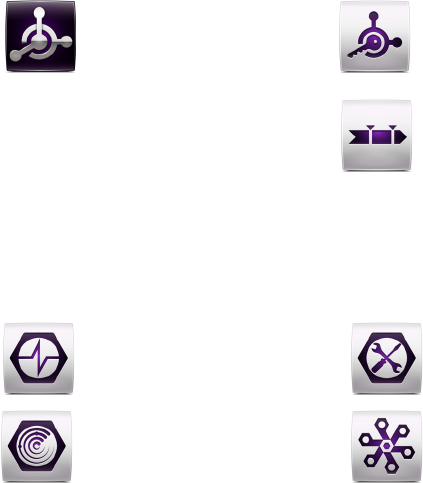
Interplay Application Icons
This section describes the Interplay Production icons.
Interplay | Access, Administrator, and Assist
The Interplay Access icon has a purple background to signify that it is the main entry point that
most people will use to work with the Interplay Production database. The Interplay
Administrator has a similar look but with a key to denote the administrator. The Assist icon
represents adding metadata to a locator track in Assist.
Interplay Application Icons
25
Avid Service Framework
The Avid Service Framework icons use a tools-based hex nut design in all four icons.
Interplay | Production Services
The Interplay Production Services Engine icon represents a controller or Broker controlling the
Production Services jobs. The image of the curved line and connecting dots is repeated in several
of the icons. In the Stream Publish icon the image represents the fact that the service continually
watches for files to publish. Delivery represents the files being delivered across the world to
different Interplay environments. The Copy and Move icons also use the curved line to represent
the fact that Copy works on one ISIS system (between workspaces) while Move works between
two ISIS systems.
The Interplay Transcode and STP Encode icons use broken lines and arrows to indicate that the
application processes the media. Interplay Archive and Restore use the metaphor of moving
media to and from an archive.
Interplay Access Interplay Administrator
Interplay Assist
Avid Health Monitor
Avid Diagnostics
Service Configuration
Workgroup Properties

Interplay Application Icons
26
Interplay | Transfer
The Interplay Transfer icons share a double arrow that represents transfers. In the case of FTP
Clips List and FTP Media Browse, the arrows show that the application only transfers in one
direction.
Interplay Delivery
Interplay Move
Interplay Restore
Interplay Production Services
Engine
Interplay Transcode
Interplay Copy
Interplay STP Encode
Interplay Archive
Interplay FTP Clip List
Interplay FTP Media Browse
Interplay Production Services and
Transfer Status
Interplay Transfer Configuration
Interplay Transfer

2Setting Up a Folder Structure and a User
Database
This chapter describes the process of setting up a user database for your Interplay Production
environment. This chapter includes the following topics:
•Permissions and Folder Structures
•Setting Up a Folder Structure in Interplay | Access
•Basic Setup: Assigning Access to User Groups
•Assigning Database Access on a Project Basis
•Defining the Editor Database Settings
•Managing the Assist User Settings
•Creating Folders for Capturing Media
Permissions and Folder Structures
The permissions that you assign to users in your workgroup define which folders users have
access to. For example:
• At a small site, you might have a small group of editors and graphic artists that should
always have Read/Write/Delete privileges on all files. You might also have a group of
assistants that should have Read/Write privileges. In this case you can set up two user groups
that have different sets of privileges. The access privileges you assign to those groups apply
across the entire database. You can also change access for particular folders when necessary.
• At a larger site, you might have editors and graphic artists that work on different projects.
Depending on the workload, they might be assigned to different projects at different times.
In this case you might want to avoid confusion and not allow editors on one project to have
Write/Delete privileges on projects they are not working on. This is easy to accomplish by
creating project groups that have privileges that are inherited by any user that is added to the
group. In this scenario, an editor can work on more than one project at the same time and
they inherit permissions from both projects.
This chapter describes how to set up both scenarios.
Setting Up a Folder Structure in Interplay | Access
28
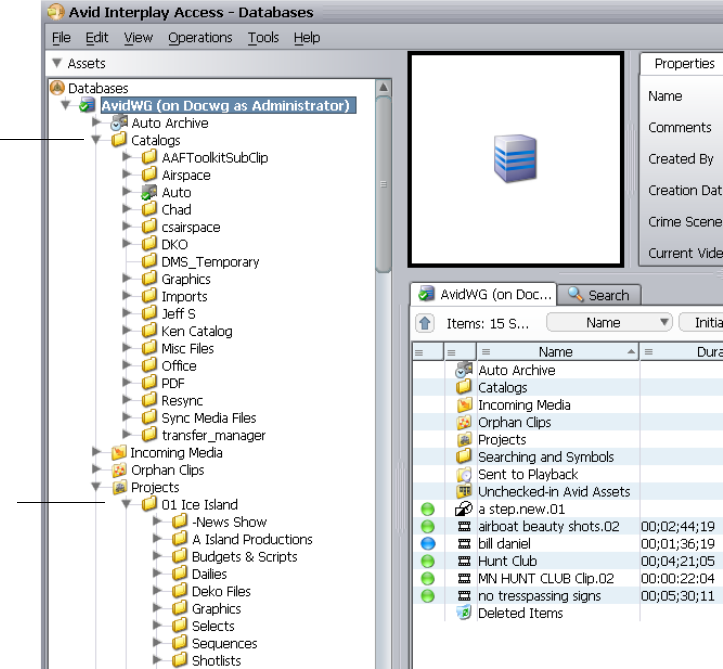
Setting Up a Folder Structure in Interplay | Access
Every project that you work on must have a folder structure. You can create folders within the
default folders or create new ones. You can set up a folder structure that complements your
workflow and allows people in your Interplay workgroup to easily navigate to their working
folders. The following illustration shows folders used by the DocWG database. The
administrator uses the default Catalogs folder for common elements that might be used by
different projects. A new folder was created in the Projects folder for a documentary named 01
Ice Island. For additional information, see “Creating Avid Editing Projects in an Interplay
Environment” on page 47.
Catalogs folder
used for common
elements
Projects created
within the Projects
folder
Basic Setup: Assigning Access to User Groups
29
Maximum Number of Characters for Clip Names, Folders, and Files
Avid recommends adhering to a best practice of a 255 character limit for clip names. While it is
technically possible for clip names to be longer, folders and files are hard set at this 255
maximum and using it as a guideline may be easier to enforce over time across staff or teams.
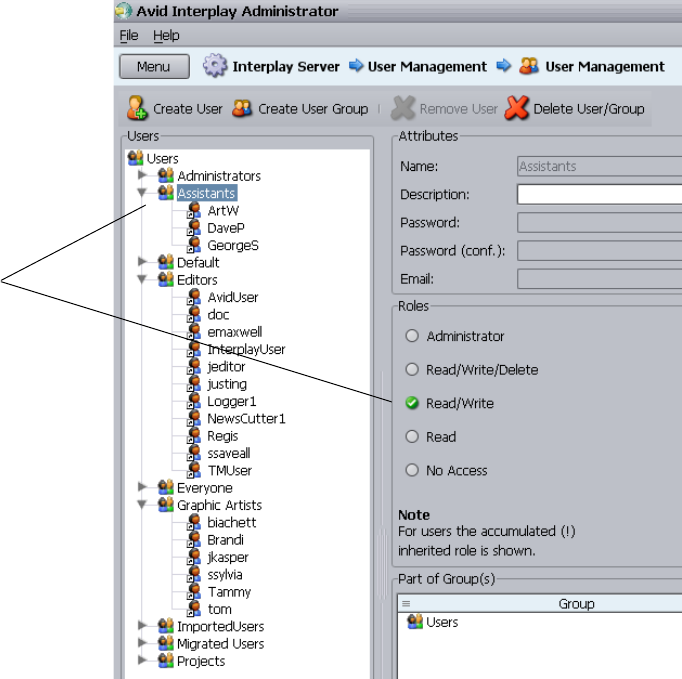
Basic Setup: Assigning Access to User Groups
If you work at a relatively small site where all of the editors have access to all of the current
projects, then you can set user permissions by user groups. For example, in the following
illustration, the Editors group and the Graphics Artists groups have Read/Write/Delete privileges
for the entire database. The Assistants group has Read/Write access to the database. You set up
the permissions for each group in the User Management View of the Interplay Administrator
window.
Assistants group
has Read/Write
permission on the
entire database
Basic Setup: Assigning Access to User Groups
30
For more information, see the Interplay Engine and Interplay Archive Engine Administration
Guide.
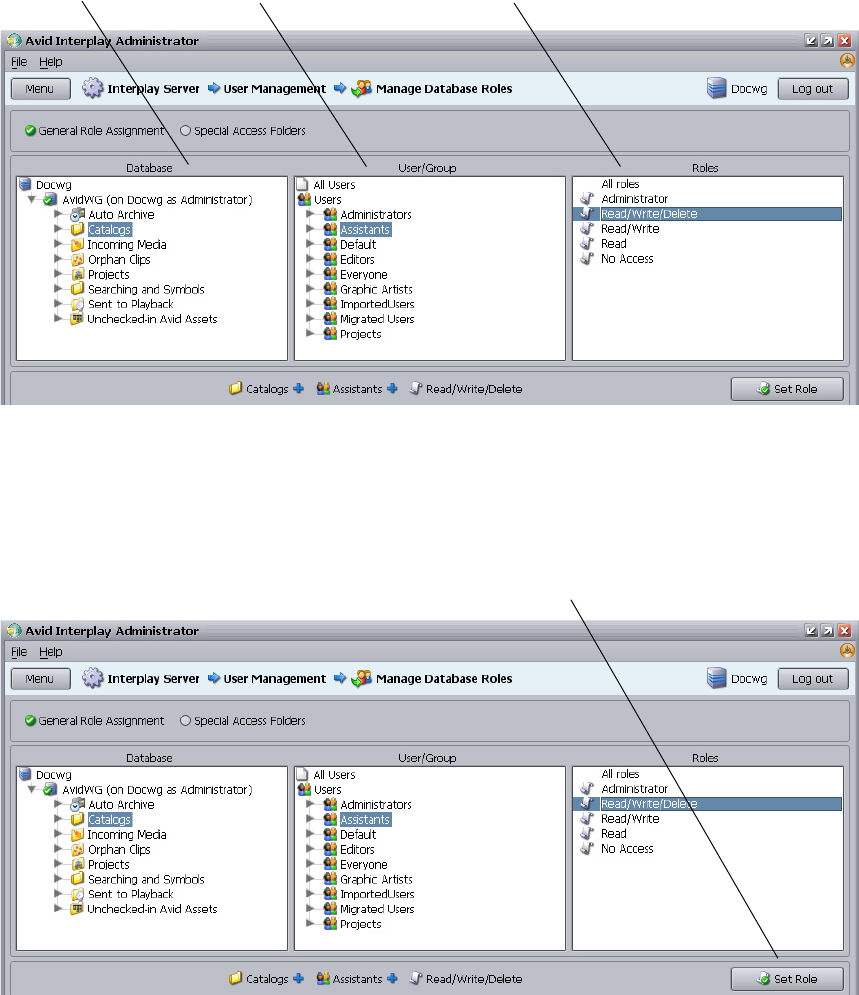
Assigning Access Rights to User Groups on a Folder Basis
You can use the Manage Database Roles view of the Interplay Administrator window to set
permissions on specific folders for user groups. In this example, the Assistants group has
Read/Write access to the entire database but you would like to give them Read/Write/Delete
permission to the Catalogs folder.
To use the Manage Database Roles window to assign permissions for a group:
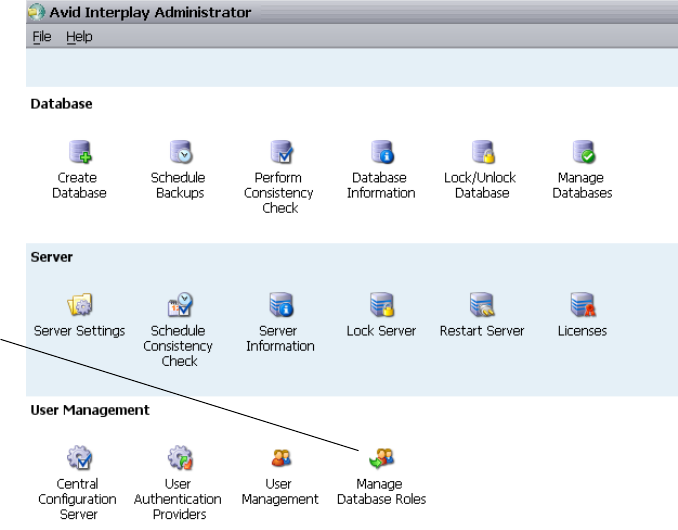
1. Click Manage Database Roles in the Interplay Administrator tool.
The Manage Database Roles window opens.
Manage
Database
Roles
Basic Setup: Assigning Access to User Groups
31
2. Select the folder that you want to assign permission to in the Database panel.
3. Select the folder containing the group in the User/Group panel and select the permissions in
the Roles panel.
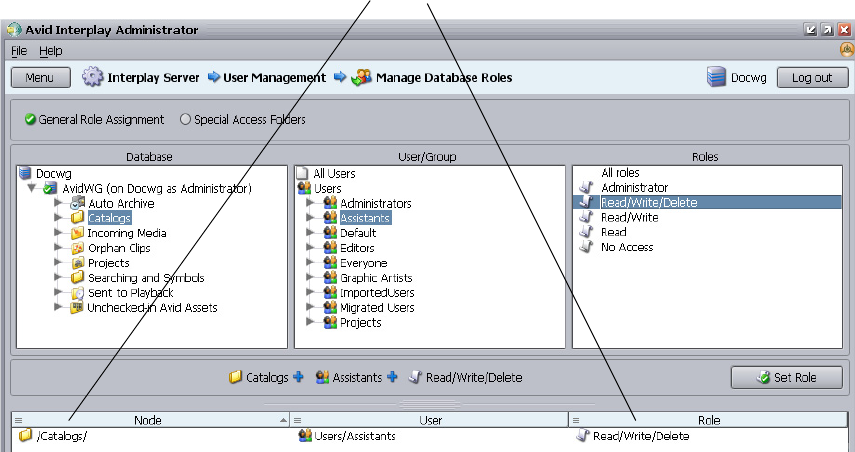
4. Click the Set Roles button.
The permissions for that user group appear in the bottom panel as shown in the following
illustration.
Database panel User/Group panel Roles panel
Set Roles button
Assigning Database Access on a Project Basis
32
Assigning Database Access on a Project Basis
It is often useful to prevent users on one project from modifying or deleting material used by
other projects. There are several ways to achieve this type of structure and the following
guidelines show one way to accomplish this:
• Create user groups (for example, Editors, Graphic Artists, and Assistants) and give each user
group “No Access” (or perhaps just Read-only access) to the database. Then add your users
to the groups.
• Create another user group for Projects and assign either No Access or Read only access to
that group. Then create folders within that group for each project.
• Assign permissions to the folders within the Projects folder.
• Copy your users into the folders in the Projects folder. A single user can be copied to more
than one Project folder.
This section covers each of these topics.
Assistants group has Read/Write/Delete access to the Catalogs folder
Assigning Database Access on a Project Basis
33
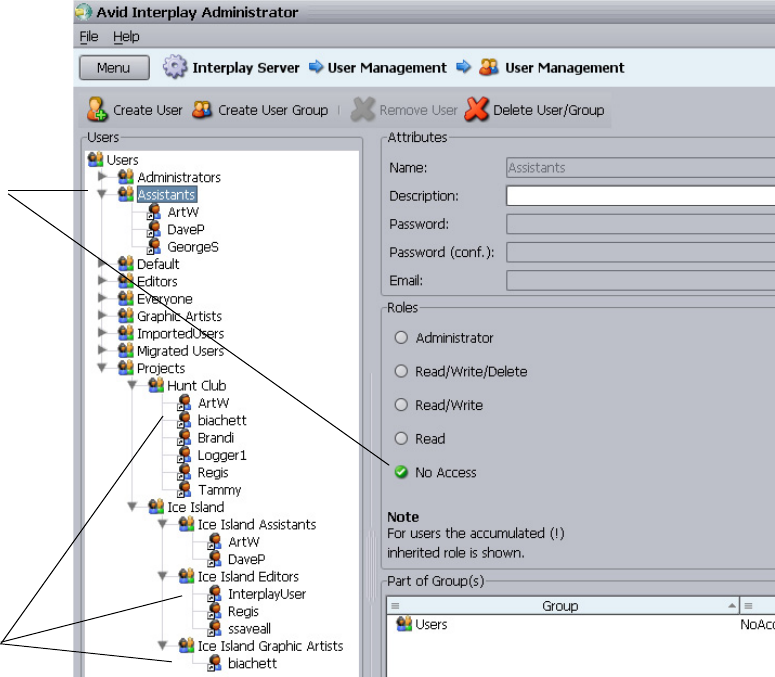
The following illustration shows the user structure for two sample projects:
• The Hunt Club project group uses a one-level hierarchy. All users in the Hunt Club group
will be given Read/Write/Delete access to all the files in the Hunt Club folder.
• The Ice Island project group shows a more complex structure where users are copied to
different folders within the Project Folder. In this model you can assign different
permissions to the different user groups within the Ice Island project.
Users can belong to multiple groups. The user inherits the privileges from both groups. In this
example we initially give no access to Project groups. Use the Manage Database Roles window
to assign the permissions for each group.
User groups
start with
No Access to
database
Copy users into
the Project
groups
Assigning Database Access on a Project Basis
34
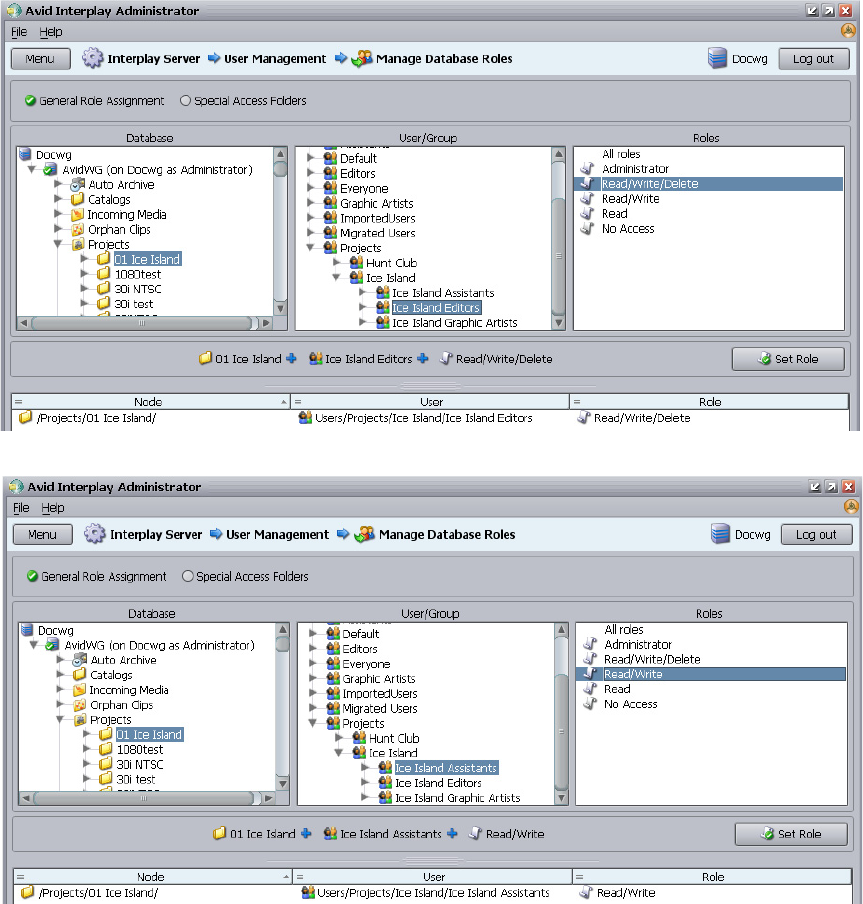
Managing Database Roles
In this example, users and groups initially inherit their Read/Write/Delete permissions from the
folder they are working in. You use the Manage Database Roles window to assign these
permissions. The following illustration shows the Manage Database Roles button in the Interplay
Administrator window.
The following illustrations shows the permissions for the Ice Island Editors and Ice Island
Assistants groups. Any user copied to these folders inherits these permissions when he or she is
working in the 01 Ice Island folder.
Editor
Database
Settings
Defining the Editor Database Settings
36
Defining the Editor Database Settings
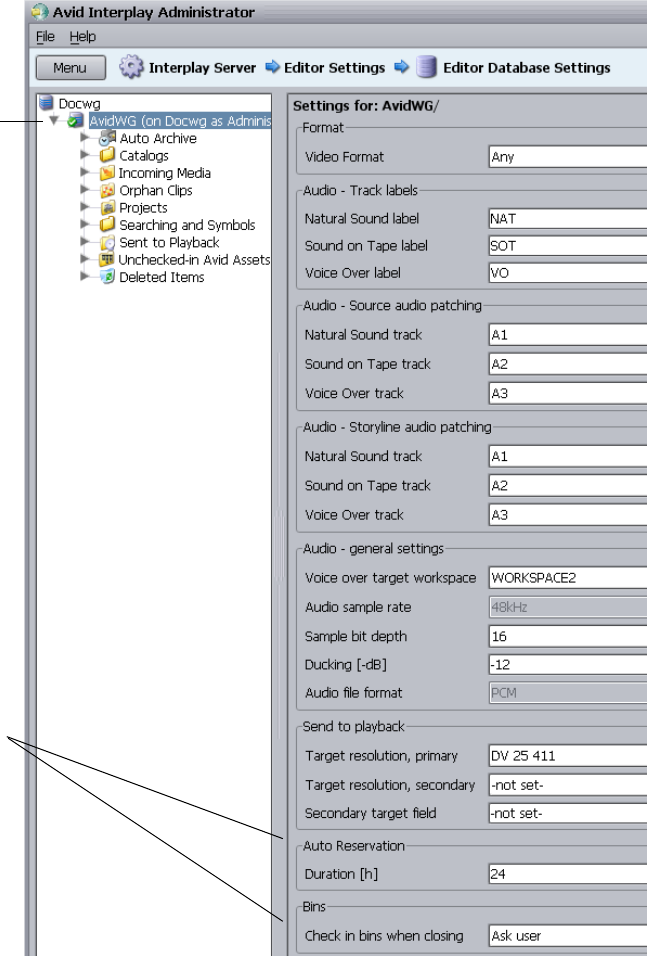
After you set up your folder and user structure, you use the Editor Database Settings window to
define the following settings:
• Automatic Checkin and Auto Reservation settings. These settings apply to all editing
applications, including Media Composer, Symphony, and NewsCutter Adrenaline, and
NewsCutter XP.
• Project-related settings for Interplay Assist such as target resolution and audio settings.
For additional information on the Editor Database Settings, see the Interplay Engine and
Interplay Archive Engine Administration Guide.
To set the Editor Database settings:
1. Double-click Editor Database Settings in the Interplay Administrator window.
The Editor Database Settings window opens.
2. Click the root node for the database and define the default settings for the entire database.
Editor database
settings
Defining the Editor Database Settings
37
3. Click the Apply button in the lower right of the window. The settings apply to all folders in
the hierarchy.
4. (Option) Select a folder and define the settings for the folder.
Auto reservations and
Automatic Checkin
settings apply to all Avid
editing applications
Settings for the
entire database
Managing the Assist User Settings
38
Managing the Assist User Settings
If you have Interplay Assist users in your Interplay environment, an administrator must select
options in the Interplay Administrator window:
• Set the following in the Assist User Settings window:
- The working resolution for each Assist user. For this release, this value must be for each
user individually.
- Access settings that allow users to perform operations such as adding locators and
restrictions, creating shotlists, and sending to playback. These can be set on a user basis
or on a group basis.
• Set the project-related settings, such as such as target resolution, and audio settings, in the
Editor Database Settings window. See “Defining the Editor Database Settings” on page 36.
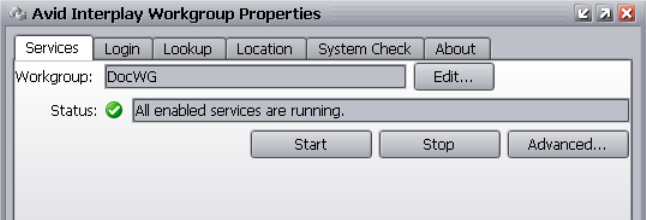
• Set the workgroup name in the Server Hostname Settings window. The Interplay Assist
clients use this setting to locate the Interplay Media Indexer that monitors shared storage.
cThe workgroup name you enter in the Server Hostname Settings window must match the
Workgroup name used by the Service Framework. The name must match exactly and it is
case sensitive. You can locate and set the name in the Interplay Workgroup Properties
window. The following illustration shows the Interplay Workgroup Properties window.
For more information, see the Interplay Engine and Interplay Archive Engine Administration
Guide.
Creating Folders for Capturing Media
When you are setting up your folder structure, you can determine how you want to set up the
folders that you will use for temporary storage of captured material. For additional information,
see “Interplay Database Folder Structure” on page 41.
Creating Folders for Capturing Media
39
To ensure the best performance with the Interplay Engine, you should not store more than 20,000
files in a single folder. For example, if you are going to use the Incoming Media folder for
captures, perform periodic deletions of files you no longer need in that folder. If you know that
you will have recurring captures, you can set up folders for those captures. For example, you
could name folders for the days of the week or for specific types of captures.

3Developing an Interplay Delete Strategy
This document describes how to develop a workflow for deleting material from your Interplay
system and covers the following topics:
•Introduction to Interplay Deletion
•Interplay Database Folder Structure
•Creating Avid Editing Projects in an Interplay Environment
•Project Workflow Samples
•Example: Deletion for Day-of-the-Week Workflow
•Example: Orphan Clips Deletion
•Deletion Guidelines
•Determining How Much Space a Delete Operation Will Free Up
•Searching for Media
The strategies proposed in this document are guidelines and may not be suitable for all
workflows. Each site needs to develop its own deletion strategy, according to its own workflows,
media throughput, storage capacity, archiving, and media protection policies.
Introduction to Interplay Deletion
Developing a successful strategy for deletion involves the following:
• Become familiar with the default folder structure of the Interplay database.
• Develop a consistent folder structure that complements your site’s workflow.
• Develop a consistent way to create (and subsequently delete) projects among the Avid
editing applications and among the users that capture, transcode, or otherwise create media
on the Interplay database.
• Determine a regular schedule for deleting material from the following locations:
- Interplay database folders. You can use Interplay Access to delete assets from the
database as well as associated media files from shared storage.
- Delete old projects from the editing application systems

Interplay Database Folder Structure
41
- Delete out-of-date files from AirSpeed and Interplay Capture systems
• Become familiar with the Interplay Access Extended Search feature to let you easily locate
material that should be deleted.
nThe deletion process changed in Interplay v2.4 so that Interplay administrators can schedule the
most load-demanding part of deletion operations during times of low activity. For more
information, see “Setting Options for Deletion” in the Interplay Engine and Interplay Archive
Engine Administration Guide.
Use Interplay Access when deleting assets from the Interplay database and deleting the
associated files from shared storage. Avid strongly recommends that you do not delete files
directly from the file system because the relationships between the clip metadata and the specific
files that make up the clip are not obvious from the file system. Those relationships are managed
by the Avid editing applications and the Interplay Engine. Interplay Access is the best tool for
managing the files in the Interplay database.
nFor information on deleting the material associated with AMA media, see “Deleting AMA Clips
Using Interplay | Access” on page 121.
Interplay Database Folder Structure
Once you become familiar with how Interplay uses the various Interplay folders, you can
organize and maintain your media more efficiently and start developing your own delete strategy.
The following table lists the default folders.
Folder Function
Catalogs The following information can be stored in this folder:
• You can create folders here that complement your overall workflow. For
example, you can create folders with site-specific names such as Highlight
Reels, and create folders for Auto-archive or Auto-transcode operations.
• When ingesting media via AirSpeed, you have the option to specify that all
created clips created be placed in a Catalogs folder. See “Folders Used by
AirSpeed” on page 43. AirSpeed Multi Stream does this by default.
• When you perform a Resync, the system automatically places a Resync folder
in the Catalogs folder. Any assets checked in while the system is performing a
Resync are placed in this folder. You can move them to an appropriate location
after the Resync is completed. For more information, see “Resyncing Media
Files with Avid Shared Storage Workspaces” in the Interplay Access User’s
Guide or Help.

Interplay Database Folder Structure
42
Incoming Media This is the destination for incoming clips from AirSpeed, AirSpeed Multi Stream
or Interplay Transfer. The folder structure is organized by workspace name. See
“Folders Used by AirSpeed” on page 43 and “Folders Used by Interplay | Transfer
Checkins” on page 46.
Orphan Clips Contains master clip and rendered effects that have been deleted from the Interplay
folders but still point to media files on shared storage.
The Orphan Clips folder provides a mechanism for protecting media files when
you delete an Interplay asset and do not delete the associated media. For example,
if you check the same master clip into two different Interplay folders, there are two
copies of the asset in the Interplay database. If you delete both clips but do not
delete the associated media, the system automatically moves the last clip to the
Orphan Clips folder.
One of the benefits of the Orphan Clips folder is that it allows you to retrieve
deleted master clips if they are still associated with a sequence. For example, even
though the last master clip associated with a media file is deleted from the
Interplay folders, the associated media might still be included in a sequence. If you
find that the media is in a sequence that you want to keep, you can retrieve the
master clip from the Orphan Clips folder. You can use the “In Use” and “Not in
Use” search criteria to determine whether assets in the Orphan Clips folder are
used by any sequences. See “Example: Orphan Clips Deletion” on page 64.
nIn order to delete all instances of a master clip, including those referenced
by a sequence, you must enable viewing of Referenced Assets in Interplay
Access. See “Determining How Much Space a Delete Operation Will Free
Up” on page 73.
By default, only administrators can view this folder. An Administrator can assign
read/write/delete permissions for this folder to users or groups using the Managing
Database Roles view in the Interplay Administration tool.
nBeginning with Interplay Access v2.4, the Orphan Clips folder also contains
links for assets deleted from Interplay folders whose media files were
deleted. This change enables an Interplay administrator to schedule the
most load-demanding part of deletion operations during times of low
activity. For more information, see “Setting Options for Deletion” in the
Interplay Engine and Interplay Archive Engine Administration Guide.
Folder Function

Interplay Database Folder Structure
43
The following section describes how the various Interplay applications use the folder structure.
Folders Used by AirSpeed
This section describes the assets that are created when you use AirSpeed to capture material to
your Interplay Production system.
nFor an example of using AirSpeed MultiStream with Interplay Capture, see “Folders and
Shared-Storage Workspaces for an H.264 Workflow” on page 180.
Project The following information is stored in this folder:
• This is the default folder for Avid editing application projects. See “Project and
Bin Folders Created by the Avid Editing Applications” on page 47.
• Capture Manager creates folders here. See “Folders Used by AirSpeed” on
page 43.
• AirSpeeds create folders here and/or under the Catalogs folder. See “Folders
Used by AirSpeed” on page 43.
• Instinct creates folders here named after the iNEWS directory path and server
name. See “Avid Instinct Assets (Daily)” on page 61.
Sent to Playback This folder contains the sequences created when you perform a Send to Playback
operation. See “Folders Used by Send to Playback Operations” on page 46.
Un-Checked-In Avid
Assets
This folder serves as a temporary folder for assets associated with newly created
media. Avid editing applications automatically check newly created media into this
folder. When you check in the bin or drag the assets to the Interplay Window, the
Interplay Engine moves the assets to the corresponding folders. For additional
information, see “Un-Checked In Avid Assets (Weekly)” on page 62.
Deleted Items Serves as a recycle bin for non-Avid assets such as graphics files and Microsoft
Word files. You can restore deleted items from this folder. The folder is created the
first time you delete non-Avid assets from the Interplay database. Users only see
what they deleted. An administrator sees all items deleted by all users. When an
administrator deletes material from this folder, the files are permanently deleted.
Folder Function
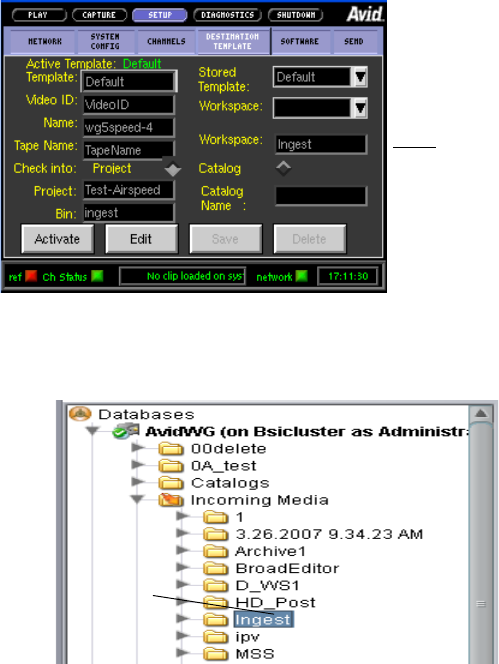
Interplay Database Folder Structure
44
Assets Created During an AirSpeed Capture
Each AirSpeed capture automatically creates either two or three Interplay assets as follows:
• One asset is checked into the Incoming Media folder. The system places the asset in a folder
named after the workspace that AirSpeed uses for the capture. You specify the workspace in
the Airspeed Destination template as shown in the following illustration.
The following illustration shows the corresponding folder (named Ingest) in the Incoming
Media folder. AirSpeed creates the folder if it does not already exist.
nThe associated media files are captured to the workspace specified by the workspace name in the
AirSpeed Destination window.
• One asset is checked into either the Projects folder or the Catalogs folder, depending on how
you configure the Destination template in the AirSpeed application interface.
Workspace name
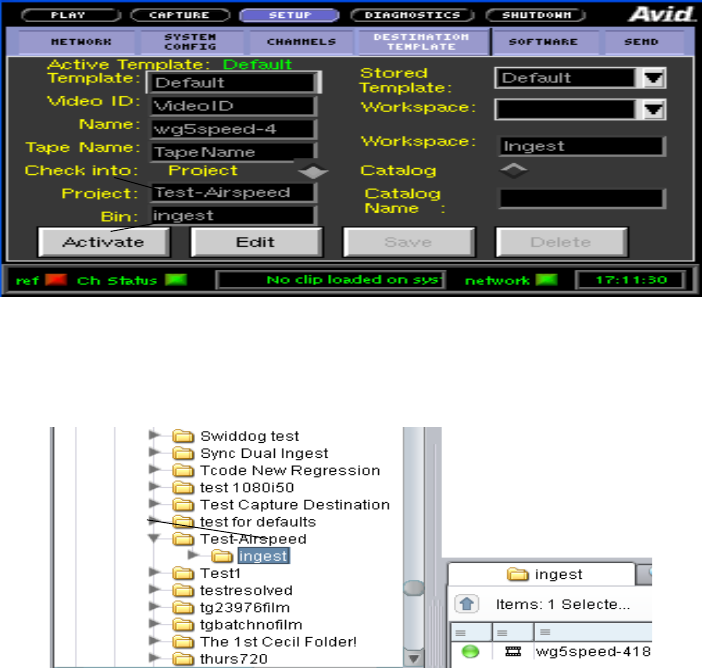
Interplay Database Folder Structure
45
In this example the Projects folder is specified and names for the folder and sub folder are
entered. The following illustration shows the corresponding folders that AirSpeed creates
under the Projects folder when it checks in the asset.
If you use the Catalog option, the system creates a folder with the name you specify and
places it at the top level of the Catalogs folder. If you use the Project option, you can specify
two folder levels: a project folder and a bin name.
Summary for AirSpeed Checkins
Depending on the type of capture, you can have multiple assets checked in for one capture
operation:
• For an AirSpeed capture without Interplay Capture, the system checks in two assets for each
captured media file. Assets are checked into the following folders:
- Incoming Media
- Catalogs or Projects folder (defined by AirSpeed)
Catalog name
Project name
Bin name
Folder created
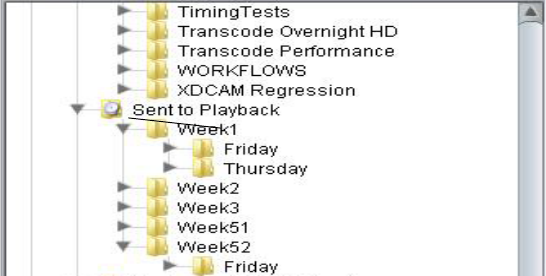
Interplay Database Folder Structure
46
• For an AirSpeed capture scheduled by Interplay Capture, the system checks in three assets
for each captured media file. Assets are checked into the following folders
- Incoming Media
- Catalogs or Projects folder (defined by AirSpeed)
- Projects folder (defined by Interplay Capture)
• For a dual-ingest capture using Interplay Capture, AirSpeed, and Avid Low Res Encode, the
system may create additional assets in the folder created by Interplay Capture depending on
whether the Scene change option is enabled. In this case there is an asset for each additional
low res subclip.
Folders Used by Interplay | Transfer Checkins
Assets checked in by a Workgroup to Workgroup Transfer or other Interplay Transfer operations
are placed in the Incoming Media folder. Assets are organized by the name of the workspace that
the media is transferred to. For additional information on files checked into the Incoming Media
folder, see “Assets Created During an AirSpeed Capture” on page 44.
Folders Used by Send to Playback Operations
When you use Interplay Transfer to send a sequence to playback, the system automatically
checks the sequence into the Sent to Playback folder. The default organization is by “week of the
year” and “day of the week” as shown in the following illustration.
You can also instruct the system to create an additional folder in the Catalogs folder. The
following illustration shows a Sent to MSS002 folder created in the Catalogs folder. In this case
an asset is also checked in to the Sent to Playback folder.
Default Sent to
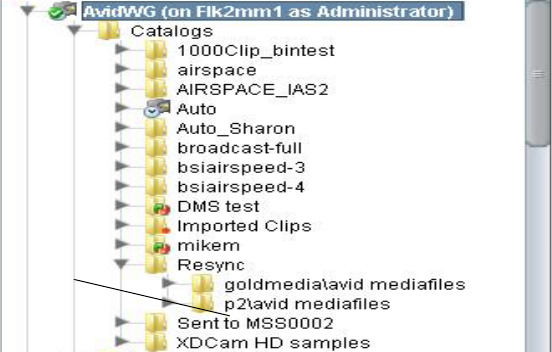
Creating Avid Editing Projects in an Interplay Environment
47
For more information on creating an additional folder, see “Configuring an Ingest Device
Catalog” in the Interplay Transfer Setup and User’s Guide.
Project and Bin Folders Created by the Avid Editing Applications
Editors, after login, select a project that they will work in. This project and its associated bins are
checked in to the Interplay database when the editor uses the Check in Bin to Interplay
command. You can also instruct the system to automatically check in bins when the editor closes
the Avid editing application.
For additional information, see “Defining the Interplay Folder Setting” on page 51 .
Creating Avid Editing Projects in an Interplay
Environment
One of the biggest decisions you will make regarding your workflow is the location of the
projects and bins created by the editing applications. A predictable folder structure allows for the
following:
• Creates an easily maintained folder structure in the Interplay database
• Makes it easy for editors and other users in the organization to locate assets that are used by
different projects
• Makes it easier for the Administrator to delete older projects on the Avid editing systems
This section covers the basics of creating a project structure that is easy to maintain in an
Interplay environment.
Custom Sent to
Creating Avid Editing Projects in an Interplay Environment
48
Creating Projects
In a large Interplay environment it is important to locate Avid editing projects in areas that are
easily accessible by the Administrator that has to delete the projects. This section describes the
options for choosing a location for newly created projects.
When you start the editing application, the system displays the project log in window. From this
window, you can create a project that is either Private, Shared, or External.
The best choices for a shared structure are either Shared or External. These types of projects are
created in a common location, making it easier for the Administrator to locate and delete old
projects.
nAny user can create or delete a project via the editor. Keep your project structure consistent to
make the Interplay database easy to maintain.
If you are working with projects created on local drives, then note the following:
• A local project resides on the C: drive of the Avid editing system.
• If the connection between the Avid editing system and shared storage is lost, the project and
its contents are unlikely to become corrupt as a by-product.
• You cannot login to the project from another workstation. You (or other users) must go to the
Interplay Projects folder to locate the contents created in this project.
• From an administration standpoint, you must clean these projects up or archive them from
each editing system. At a large site this can become time consuming and needs to become
part of the Administrator’s workflow.
Private
A Private Project is stored locally. It can be accessed only by the user currently logged on to the
editing machine. On a Windows system, a Private Project is always stored under the user’s
Documents directory. An administrator may be able to access this project if they have read/write
permission to the user’s directory.
Creating Avid Editing Projects in an Interplay Environment
49
Shared
A Shared Project is stored locally. It can be accessed by any user that can log on the editing
machine. On a Windows system, a Shared Project is always stored in the machine’s Shared
Documents directory.
Private Project - under the My Documents/Avid Projects folder
Shared Project - under the Shared Avid Projects folder
Creating Avid Editing Projects in an Interplay Environment
50
External
An External Project can be saved to any directory, either local or remote. Depending on the
file-system permissions set on the selected folder, other users or an administrator may or may not
be able to access the project. The external option is particularly useful when you want to save the
project on shared network drive to make project maintenance easier.
nAvid does not support sharing bins in an Interplay environment. If you create projects on shared
storage, do not allow editors to work in the same bin at the same time. This can result in data
loss or media corruption. Instead of sharing bins, editors should use the Interplay Window to
collaborate and share material.
Interplay | Production Settings in the Editing Application
The Interplay Folder setting defines where the Avid editing application checks files into the
Interplay database. After you open a project you can specify several Interplay Production
settings, including the Interplay Folder. To access the settings, open the Settings scroll list in the
in the Project window. The following table lists the Interplay-related settings.
External Project - the editor can specify the location
Option Description
Interplay Server (Site Setting) Specify the name of the Interplay Engine for the environment. If the
site has an Interplay Engine Cluster, this is a virtual name that will log
in to the active node.

Creating Avid Editing Projects in an Interplay Environment
51
Defining the Interplay Folder Setting
The Interplay Folder setting defines where assets will be checked into the Interplay Production
database. You need to define the location for each project. The examples in this chapter assume
that you are using the Projects folder in the Interplay Production database. The following
illustration shows the setting defined for the Projects folder. Use the Set button to define the
location.
Interplay User (User Setting) Specify the name of the default Interplay user (if applicable) and
check the Automatic Login at Project Selection checkbox. This does
not auto-login to Interplay, but prompts the user to do so after logging
in to their project.
Interplay Folder (Project Setting) Interplay Production organizes assets and media by folders. The
default checkin folder must be set on each Avid editing application.
By default, the folder path is empty. The Interplay database Projects
folder is a good location to use. This will check the assets into a folder
with the name of the bin inside the folder for the project. Click the Set
button to navigate to the directory you want to use. After you select the
Projects folder, the Interplay Folder Settings dialog box will display
the following:
Projects/<project>
Dynamic Relink This setting is utilized in MultiRez environments, to specify the
working and target resolutions for the Avid editing applications. The
term MultiRez refers to having a single master clip associated with
multiple resolutions. For additional information, see the Help for your
Avid editing application or the Interplay Production Help.
Production Services This setting specifies the Production Services Engine information.
This allows the editor to submit Transcode, Pro Encode, or Archive
jobs to the Media Service broker to hand off to the provider. When
logged in to Production Services the client can submit the jobs using
the File menu options or by right-clicking assets in a bin. You need to
specify that Production Services are available, the Host name of your
Production Services Engine, and a valid Interplay Production login
account.
Option Description
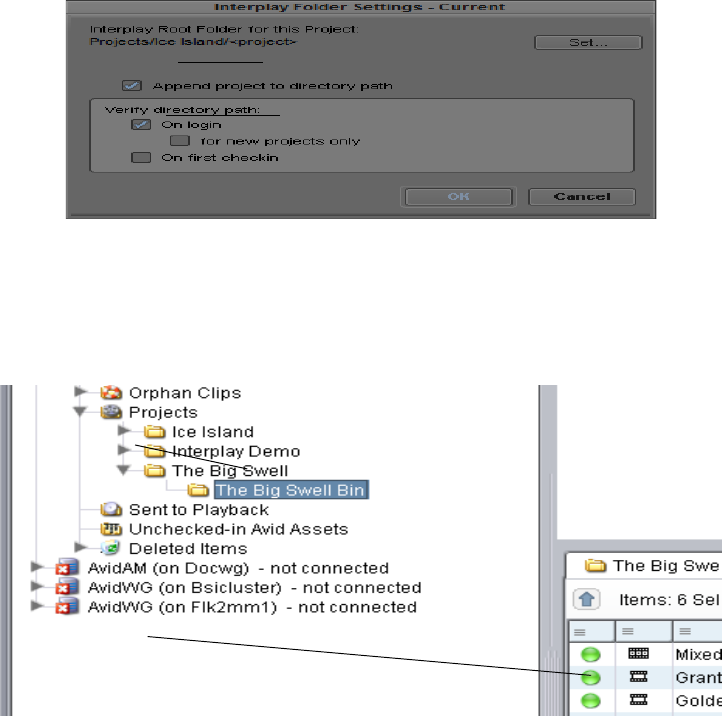
Creating Avid Editing Projects in an Interplay Environment
52
The following illustration shows a folder for a project named “The Big Swell” created in the
Projects folder. The folder was created automatically when the editor checked the first bin into
Interplay Production using the Check in Bin to Interplay command. The system automatically
created both folders and checked in the assets into the folder.
For a Day-of-the-Week workflow, use the Projects\<project> setting in the Interplay Folder
Setting window. Then, when multiple editors work in the 01Monday project, there will be one
01Monday folder populated by the bins from each system. This keeps the organization easier to
maintain.
To instruct the system to automatically check in bins when the editor closes the application,
select the Bins option in the Editor Database Settings window in the Interplay Administration
tool. The default is to ask the editor before checking in the bin.
Projects folder
selected
Click the
Append project
checkbox.
Folders created by
Checked in assets
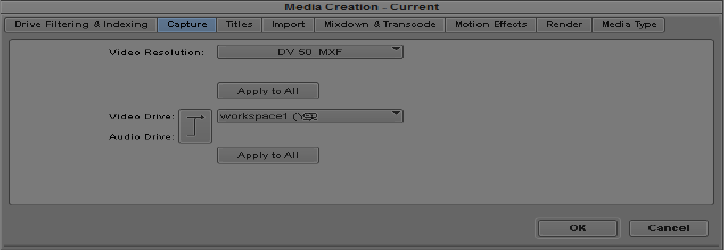
Project Workflow Samples
53
Defining the Media Creation Settings
Use the Media Creation dialog box to define where you want the Avid editing application to
store newly created media.This is usually a workspace on shared storage that is monitored by the
Interplay Media Indexer High Availability Group.
To define the Media Creation settings:
1. Click the Settings tab in the Project window of the Avid editing application.
2. Double-click Media Creation.
3. (Option) On the Drive Filtering and Indexing tab, click Auto-index local drives as they come
online.
4. Click the Capture tab.
5. Select the video resolution and shared storage workspace for capturing new material.
6. Select the options for the other tabs (Import, Render, etc.).
Project Workflow Samples
This section describes sample folder structures for Broadcast and Post environments.
Whatever the structure, the more simplified the Project and the Interplay Folder structure, the
easier it is to maintain the Interplay environment.
Local Projects
This document assumes that you are using Local projects (projects created on local drives of the
Avid editing applications). For more information, see “Project and Bin Folders Created by the
Avid Editing Applications” on page 47.

Project Workflow Samples
54
Local projects guarantee that only one user will be in a project at any given time. Other editors
must access the material through the Interplay folder structure.
Broadcast Project Examples
Many broadcast sites use a Day-of-the-Week structure for organization and ease of
administration. Broadcast projects are time-sensitive and items are often removed from the
system within days. This convention makes it easy for users to locate material, and it makes it
easy for administrators to maintain the system.
For example, if a site decides to use a 1Monday through 7Sunday project structure, this allows
them to regularly delete the daily projects. This reduces the likelihood of the project becoming
corrupted over never-ending use and also cleans out old tape names.
The following table shows some sample project names.
In these examples the day of the week is the project and the story is the bin. The Hold folder is
for continuing stories and the Permanent folder is used for items such as frequently used
graphics, music, bumps, and show openers.
The day of the month monthly structure provides the ability to work further than a week ahead
but requires more work creating projects. When using this model you have to create 28-31 days
of the month projects manually. To simplify the operation you can copy from a template and
rename the project and the .avs and .avp files within the project.
Weekly Structure Monthly Structure (September)
1Monday 0903 Monday
2Tuesday 0904 Tuesday
3Wednesday 0905 Wednesday
4Thursday 0906 Thursday
5Friday 0907 Friday
6Saturday 0908 Saturday
7Sunday 0909 Sunday
Hold Hold
Permanent Permanent
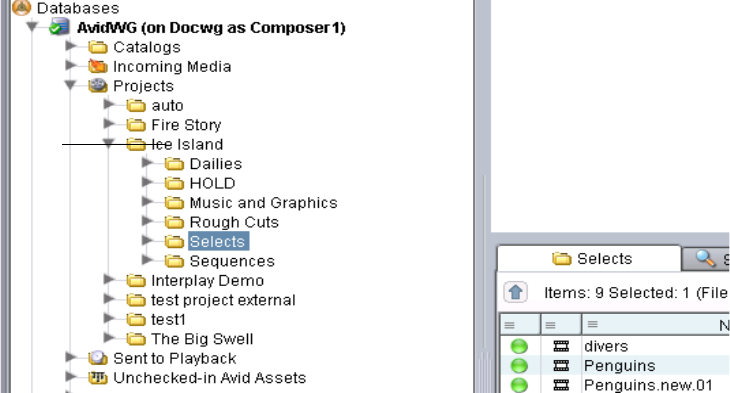
Project Workflow Samples
55
Post Environment Project Example
The Day-of-the-Week structure is usually not appropriate for Post environments because a Post
site may work on projects for several weeks or months at a time. You should develop your own
structure based on your particular workflow. Keep in mind that when projects and bins are
clearly named (for example by program name) it is much easier to maintain the folder structure.
The following illustration shows a sample Post structure for a project named Ice Island. Most of
the subfolders were created when bins were checked in by the editors. The HOLD folder is
created by the Media Manager in Interplay Access and is used for master clips, frequently used
graphics, and other elements that should not be deleted. In this example when editors want to
make sure certain assets are not deleted, they either copy the assets to the HOLD folder
themselves or request that the assets be copied to the folder.
In this example the HOLD folder is on a per-project level because there may be some elements
that you do not want to share between different shows.
Using this model, the Administrator could delete the entire project folder after production has
finished. Before deleting the folder, check whether editors want to archive finished sequences or
some of the dailies. The following are some archiving methods:
• Move the assets to a reserved HOLD folder elsewhere in the Interplay folder structure
• Perform a digital cut to tape
• Perform a Send to Archive operation
Post
project
Example: Deletion for Day-of-the-Week Workflow
56
Using Project Templates
Typically, a site creates a folder called Project Templates (either locally or on a shared storage
workspace). This example uses the Day-of-the-Week structure. In the example the Administrator
deletes the current “1Monday” project from the editor’s local machine and copies and pastes the
template to provide a new starting point.
To copy a project template to a local system:
1. Navigate to the location of the Project Templates.
2. Right-click on the 1Monday folder and select Copy.
3. Navigate to the current 1Monday folder on the local machine and delete the folder.
4. Paste the template 1Monday folder into the same location.
Example: Deletion for Day-of-the-Week Workflow
You should use Interplay Access to perform the majority of the administration of the Interplay
Production assets on the Avid shared storage system. You should always use Interplay Access to
delete media files from shared storage. Keep in mind that media and metadata also has to be
deleted from other places in the system (in particular, from Avid editing applications and from
AirSpeed and Interplay Capture systems).
nThe deletion process changed in Interplay v2.4 so that Interplay administrators can schedule the
most load-demanding part of deletion operations during times of low activity. For more
information, see “Setting Options for Deletion” in the Interplay Engine and Interplay Archive
Engine Administration Guide.
Sample Delete Workflow
The following table lists deletion activities based on the Day-of-the-Week Project workflow and
points to the sections that explain the operations.

Example: Deletion for Day-of-the-Week Workflow
57
Project Folders – Editor Projects (Daily)
The fastest way to clean up space on the system is to delete entire folders from the Interplay
database. You can delete an entire folder and all the media that is referenced by the assets in that
folder. For information on how the Avid editing applications create folders in Interplay
Production, see “Project and Bin Folders Created by the Avid Editing Applications” on page 47.
After using the system for a few weeks, determine how long it takes to reach the maximum
storage capacity of your shared storage workspaces. Then you can determine how often you will
need to delete material.
Interplay Production
Component Activity
Interplay Access Delete daily project and those other projects ready for deletion.
See “Project Folders – Editor Projects (Daily)” on page 57.
Delete material from the AirSpeed project or catalog. Sift the
results by creation date and delete.“Projects Folder – Ingest or
AirSpeed Folders (Daily)” on page 59.
Delete material created by Interplay Capture under the Projects
folder. See “Incoming Media (Daily)” on page 60.
Delete story folders and sequences created by Avid Instinct. Search
or navigate to each Instinct project under the Projects folder
(iNEWS Server Name-Show-5PM-Rundown for example) and
delete story folders and sequences. See “Avid Instinct Assets
(Daily)” on page 61.
Delete Sent to Playback for the day of the week that you deleted
above-located under the week number. See “Folders Used by Send
to Playback Operations” on page 46.
Delete items in the Orphan Clips folder. See “Orphan Clips
(Weekly)” on page 62.
Delete material from the Un-Checked in Avid Assets folder. See
“Un-Checked In Avid Assets (Weekly)” on page 62.
Delete from the Deleted Items folder. See “Deleted Items
(Weekly)” on page 63.
Avid editing applications Delete daily project and those other projects ready for deletion.
This must be done from all editors. “Avid Editing Application
Maintenance” on page 63.
Delete the project or projects deleted in the step above out of the
Attic. You must do this on each editing system.

Example: Deletion for Day-of-the-Week Workflow
58
On Avid ISIS, attempt to keep the used space under 80% of the capacity of the Storage Group for
each Storage Group on the ISIS. Use the ISIS Administration Tool/Storage Groups tab to view
this information.
For the Day-of-the-Week model, after you determine how long it takes to reach your maximum
capacity, set up a schedule to delete the day of the week project a specific number of days after
the project day. For example, always delete the 1Monday project on Friday. Note that you will
also have to delete the corresponding local projects on the Avid editing systems as well.
To delete Project Folders and associated media:
1. Open the Projects folder in Interplay Access.
2. Locate the project to delete.
3. Right-click the folder and select Delete. The Delete window opens and displays the clips in
the folder.
4. Click Select All to select all the assets, files, and resolutions. The center portion of the dialog
box shows how much free space you will gain from the Delete operation.
The amount
of disk space
that will be
freed by the
deletion
Example: Deletion for Day-of-the-Week Workflow
59
nThe number of media files and the amount of data that will be deleted are only affected by the
option “Delete only media created with the selected clip or clips.” This information is not
affected by your selections in the Media Resolutions or Media Workspace sections of the dialog
box.
5. Click OK.
The system displays the Delete in Progress window and indicates whether any files were
reserved. The system does not delete any media files associated with reserved items and
does not delete the folder containing the reserved assets. You may wish to move reserved
items to a Hold folder and then delete the folder that contained the reserved assets.
6. After the folder is emptied, the system deletes the folder. If there are any non-Avid assets in
the folder (for example, graphics files or text files) the system asks if you want to delete the
files and the folder from the Interplay database.
Using Reservations to Protect Media
All users (for example, editors, producers, and journalists) must know how to use Reservations
to protect assets if they want to keep media on the system any longer than this number of days. If
an editor wants to keep material on this system, the assets must be in a folder with a reservation
on it. The media files will be protected as long as there is a reservation on the folder containing
the asset. Reservations are either permanent or on a timed basis. For additional information, see
“Using Reservations” on page 70.
Besides using Reservations, the editors can also request that the assets be moved or copied to a
Hold or Permanent folder. Its is useful to develop a method of easily communicating this kind of
information. For example, editors could use the Messenger feature in Interplay Access to
identify assets or folders that they need protected.
Projects Folder – Ingest or AirSpeed Folders (Daily)
The Projects folder contains assets that point to media created by AirSpeeds. See “Folders Used
by AirSpeed” on page 43.
In this case, do not delete an entire folder (for example, Week1) because it contains material
from all seven days of the week. This section describes how to delete selected assets.
To delete assets from the Ingest or Airspeed folders:
1. In Interplay Access, click on the Projects Folder (or Catalog folder depending on where
Airspeed created the folders).
2. Open up the folder called Ingest or AirSpeed.
3. Select Creation Date from the Sort By list. This will show the oldest material.
Example: Deletion for Day-of-the-Week Workflow
60
4. Ctrl-click on all the clips from the day that was deleted in the previous section.
5. Right-click on one of the clips and select Delete.
6. Select the metadata and media that you want to delete.
7. Click OK.
Incoming Media (Daily)
Media that is transferred from an Interplay Transfer server or captured by an AirSpeed creates an
asset under the Incoming Media Files. The folder is sub-divided by the name of the workspace
that the media was transferred to or captured to. See “Folders Used by AirSpeed” on page 43 and
“Folders Used by Interplay | Transfer Checkins” on page 46.
This area should be maintained and entries should be cleaned out. Filter each workspace and
delete the material for the day that was deleted in the previous procedures.
Sent to Playback (Daily)
The Sent to Playback folder is the area where sequences get created when you push to playback
devices (AirSpeeds). It is structured by weeks and then by the days within the week. See
“Folders Used by Send to Playback Operations” on page 46.
Delete the day corresponding to the 1Monday project deleted in the previous examples.
You can also use a Search to identify the files for deletion. The following procedure searches the
Send to Playback folder for assets whose media status is offline and that were created before a
particular date. In this case the files are offline because we deleted the media when we deleted
the assets in the Projects folder.
To delete using search results:
1. Open a search and select the Send to Playback folder.
2. Perform an extended search for Media Status is offline and Creation date is before a
specified date.
Sort By list
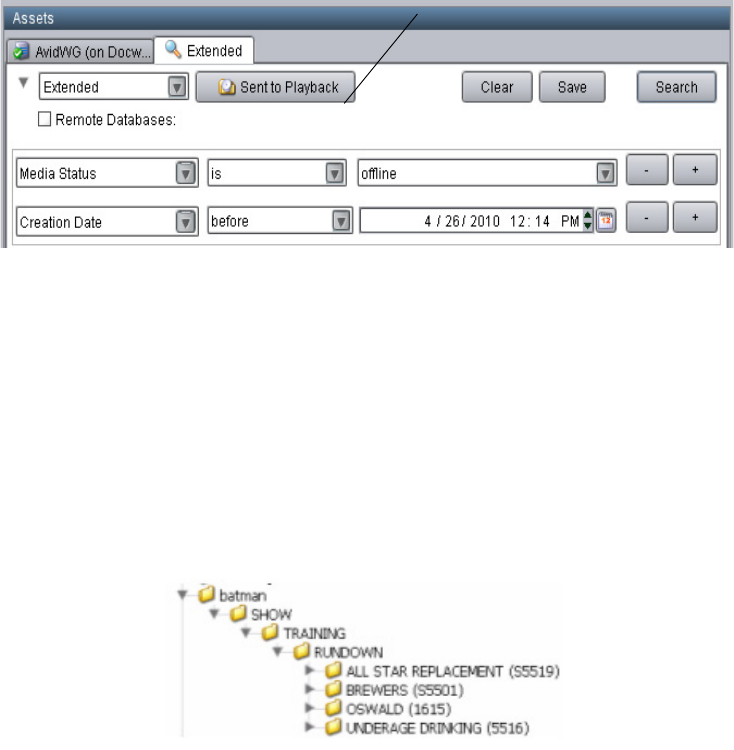
Example: Deletion for Day-of-the-Week Workflow
61
3. Delete the search results.
The following illustration shows the Interplay Access search dialog.
Avid Instinct Assets (Daily)
Search or navigate to each Instinct project under the Projects folder and delete story folders and
sequences.
When you save a story in Instinct, the story sequence gets checked in to Interplay Production in a
path that mimics the location of the story in iNEWS.
nAvid Instinct cannot adhere to a Day-of-the-Week structure.
The following illustration shows a typical Instinct structure under the Projects folder.
Elements in the graphic are explained as follows:
• Server Name - Named after the iNEWS servers (in this Example-Batman)
• Show - iNEWS Show folder
• Rundown - NEWS queue - story name
• The story name contains the sequence which is also named after the story
Sent to Playback folder
Example: Deletion for Day-of-the-Week Workflow
62
Orphan Clips (Weekly)
If you delete a master clip from all of the Interplay Production folders and do not delete the
associated media, the system automatically moves the last copy of the asset to the Orphan Clips
folder. To delete these objects and their associated media and free up the disk space, you must
delete them from the Orphan Clips folder.
nBeginning with Interplay Access v2.4, the Orphan Clips folder also contains links for assets
deleted from Interplay folders whose media files were deleted. This change enables an Interplay
administrator to schedule the most load-demanding part of deletion operations during times of
low activity. For more information, see the Interplay Engine and Interplay Archive Engine
Administration Guide.
Even though all of the master clips associated with a media file are deleted from the Interplay
folders, the Interplay folders can still contain sequences that use the media. You can use the “In
Use” or “Not in Use” search criteria to determine whether the clips in the Orphan Clips folder
are used by any sequences. Then you can decide whether you want to delete the master clips and
media or move the associated clips out of the Orphan Clips folder to the folders that contain the
sequences. See “Example: Orphan Clips Deletion” on page 64.
Some workflows may involve deleting master clips when they are no longer needed and later
deleting the media from the Orphan Clips folder. In order to delete all instances of a master clip,
including those referenced by sequences, you must turn on the view of Referenced Assets in
Interplay Access. See “Example: Orphan Clips Deletion” on page 64.
nStarting with Interplay v2.3, you cannot delete a referenced asset unless you also delete the asset
that references it. For more information, see the “Deleting Assets” chapter of the Interplay
Access User’s Guide.
Un-Checked In Avid Assets (Weekly)
This folder serves as a temporary folder for assets associated with newly created media.
Applications such as the editing applications or Interplay Capture automatically check newly
created media into this folder. For example, when you capture video, consolidate, transcode, or
render effects in your bin, the Avid editing application automatically checks the asset into the
Un-Checked In Avid Assets folder. When you check in the bin or drag the assets to the Interplay
Window, the Interplay Engine moves the assets to the corresponding folders.
Administrators see a folder for each user; users see only their own folder. If editors always check
in bins when they close them, this folder should be easy to maintain. Be careful of deleting assets
and associated media from this folder because if an editor forgot to check in a bin, you might
delete media such as rendered effects that the editor recently created.
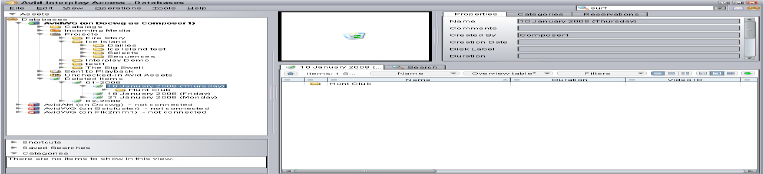
Example: Deletion for Day-of-the-Week Workflow
63
To delete using search results:
1. Open a search and select the Unchecked in Avid Assets folder.
2. Perform an extended search for “Creation date is” before a specified date.
3. Delete the search results.
For additional information on extended searches, see “Searching for Media” on page 75.
Deleted Items (Weekly)
The Deleted Items folder serves as a recycle bin for non-Avid assets such as graphics files and
Microsoft word documents. You can restore deleted items from this folder. When an
administrator deletes files from this folder, the files are permanently deleted. The folder is
created the first time you delete non-Avid assets from the Interplay Production database.
The Deleted Items folder for a non-Administrator shows only the items deleted by the user who
is logged in, while the Administrator sees all items deleted by all users. The following
illustration shows the Deleted items folder.
Avid Editing Application Maintenance
After you clean up the Interplay Production folder structure, you should also delete the
corresponding projects and bins used by the Avid editing applications. These projects and bins
reside locally on the Avid editing systems and you have to clean them up on each editor. The files
exist independently of the Interplay Production database.
This procedure ensures the following:
• Prevents the editor from opening projects and bins that contain clips and sequences that have
been deleted from Interplay Production. If they are re-opened, and the metadata gets
checked in again, you will have to repeat the deletion procedures through Interplay
Production.
• Prevents projects from becoming corrupted by regularly replacing the project folders with
fresh folders.
• Clears out the old tape names that build up in the project every time a tape is put in to a deck
on the editing system.
Example: Orphan Clips Deletion
64
nDepending on your workflow you may find it more convenient to delete the projects on the editor
systems before you delete the corresponding assets and media from Interplay Access. This avoids
the possibility of editors re-opening the projects and checking in material after it has been
deleted from Interplay Production.
Deleting the Project Files
This section describes how to replace a project file folder with a clean template. If you aren’t
using templates, you can just delete the project file and create a new project in the Avid editing
application.
To delete projects when using the 01Monday – 07Sunday workflow:
1. Open My Computer on the Avid editing system.
2. In the Network Drives section, locate the workspace that contains the Project Templates
folder and open the folder.
3. Locate the day of the week you are going to delete and replace, right-click the folder and
select Copy.
4. Navigate to the Project folder that you want to replace.
5. Select the folder that you want to delete and press the Delete key
6. Perform a right click-Paste and paste in the new project template.
Cleaning Up the Attic
This section describes how to delete files from the Avid Attic on the local Avid editing system.
To clean up the Attic:
1. Navigate to the following location on the Avid editing application system:
C:\Program Files\Avid\<application name>\Avid Attic
2. Sort by creation date.
3. Delete projects no longer needed.
Example: Orphan Clips Deletion
This deletion strategy involves deleting only metadata from the various Interplay Access folders
(such as Projects, Incoming Media, and Catalog folders) and then regularly deleting metadata
and media from the Orphan Clips folder. It is most useful at sites where users regularly copy
assets between Interplay folders. It avoids the problems of deleting the media associated with a
Example: Orphan Clips Deletion
65
clip that someone else might be using. Using reservations can also avoid this problem but
depending on your site’s workflow, you might find that this provides an additional security step
before media is fully deleted.
You can have several copies of an asset that all reference the same media file. If you delete the
last reference to the asset and do not also delete the associated media files, the system moves the
last reference to the Orphan Clips folder.
The following examples show the deletion of two clips. The underwater clip is used in a
sequence and the burning sky 2 clip is not used in any sequence.
nStarting with Interplay v2.3, you cannot delete a referenced asset unless you also delete the asset
the references it. For more information, see the “Deleting Assets” chapter of the Interplay
Access User’s Guide.
nBeginning with Interplay Access v2.4, the Orphan Clips folder contains links for assets deleted
from Interplay folders whose media files were also deleted. This change enables an Interplay
administrator to schedule the most load-demanding part of deletion operations during times of
low activity. For more information, see the Interplay Engine and Interplay Archive Engine
Administration Guide.
To delete metadata only:
1. Make sure that Referenced Assets are displayed in Interplay Access. This is necessary so
that you can see all of the master clips that are referenced by sequences in your Interplay
folders. If you don’t have Referenced Assets displayed you will only see master clips that
you explicitly check in or copy to Interplay folders. Do the following to turn on Referenced
Assets:
a. Select Preferences > Options. The Options dialog box opens.
b. Click the Filter Settings tab.
c. Make sure that the Referenced Assets check box is selected. Then click OK.
2. When you delete assets from the various Interplay database folders, delete the metadata but
do not delete media.
The following illustration shows two assets in the Dailies folder. Both of these assets are the
last assets associated with the media. One asset (underwater) is used in several sequences.
The other is not used in any sequence.
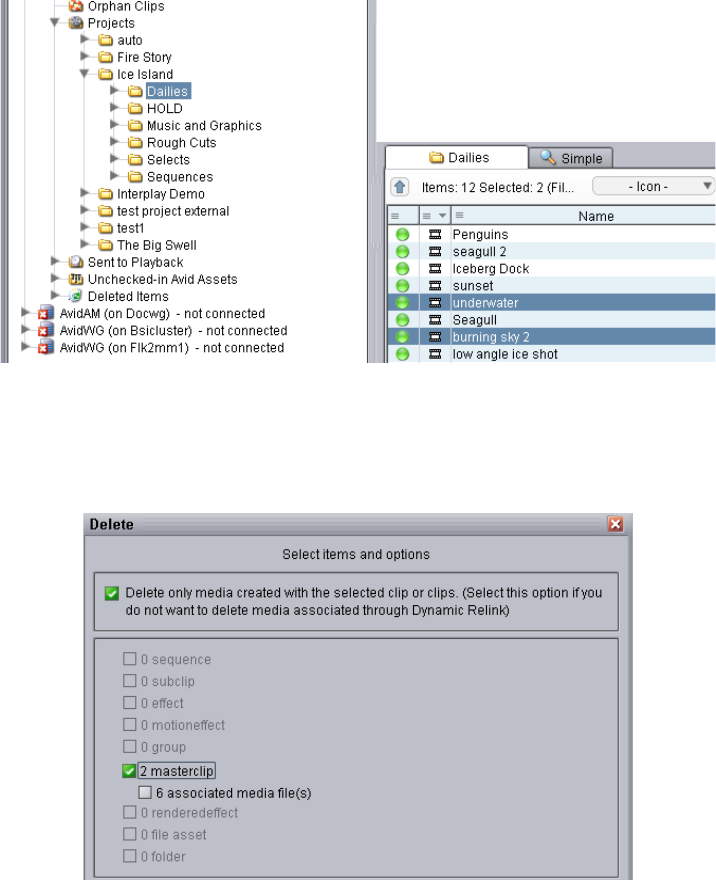
Example: Orphan Clips Deletion
66
3. Right-click the assets and select Delete.
4. In the Delete dialog box, select the metadata but do not select the media.
The following illustration shows the Delete dialog box for this operation.
5. Perform additional metadata deletions as your workflow requires. For example, delete from
the folders as described in “Example: Deletion for Day-of-the-Week Workflow” on page 56.
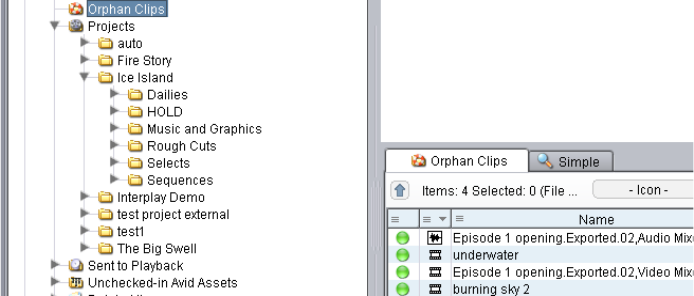
Example: Orphan Clips Deletion
67
To delete metadata and media from the Orphan Clips folder:
1. When you are ready to delete the media files, open the Orphan Clips folder.
By default, only administrators can view this folder. An Administrator can assign
read/write/delete permissions for this folder to users or groups using the Managing Database
Roles view in the Interplay Administration tool.
The two assets deleted earlier are now in the Orphan Clips folder. Since the two assets were
the last copies associated with their media files, they were both moved to the Orphan Clips
folder.
2. (Option) Place reservations on any folders that you know you do not want media to be
deleted from. For example, place a reservation on the Unchecked-in Avid Assets to protect
any media files that editors have created but have not yet checked in.
nThe system protects the media associated with sequences and subclips that are in reserved
folders. The protection remains in effect even if you move the master clips to an unreserved
folder. See “Using Reservations” on page 70.
3. To make sure that you display all referenced assets in the Orphan Clips folder, do the
following:
a. Select Preferences > Options. The Options dialog box opens.
b. Click the Filter Settings tab.
c. Make sure that the Referenced Assets check box is selected. Then click OK.
4. Select all the clips in the Orphan Clips folder, right click one of the clips and select Update
Status from Media Indexer.
The following illustration shows the Update Status from Interplay Media Indexer command.

Example: Orphan Clips Deletion
68
c Updating the status is a critical step for Interplay v1.2.3 and earlier releases. This
guarantees that Interplay Access has the latest information on the files before you perform
the deletion.
5. Create an Extended search that searches the Orphan Clips folder for files that are “not in
use.” The following illustration shows the Search and the results.
The burning sky 2 asset appears in the search results but the underwater clip is not in the list.
The underwater clip is part of a sequence and so it is “in use.”
6. Select all of the assets in the search results window and delete them. Delete the metadata and
the media as shown in the following illustration.
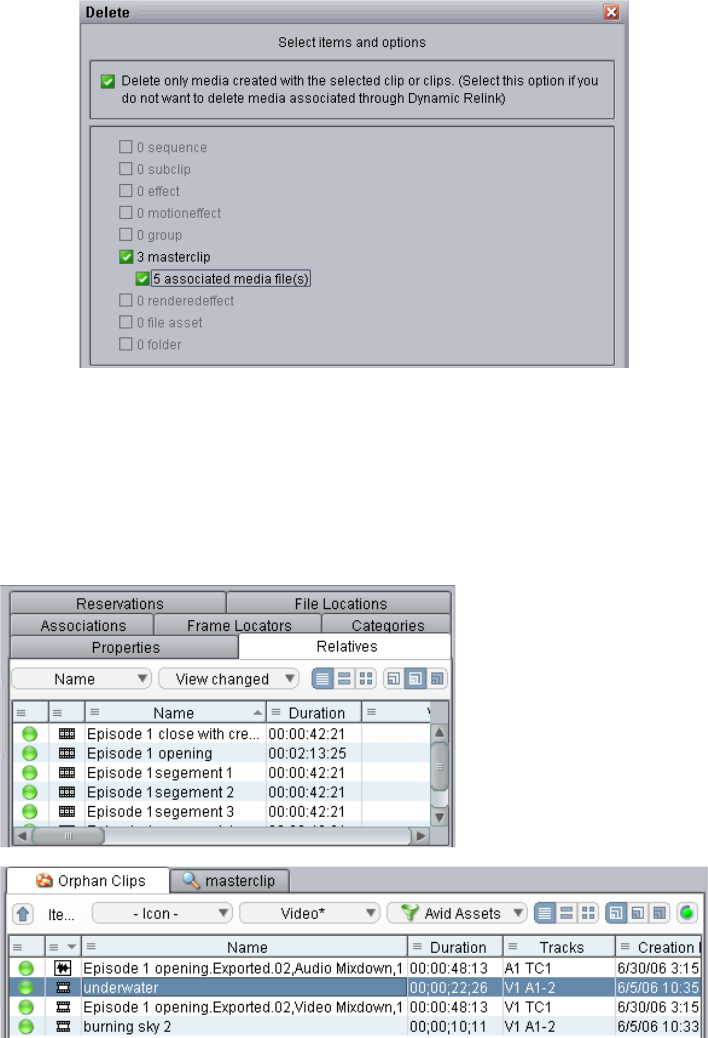
Example: Orphan Clips Deletion
69
To check for relatives of clips in the Orphan Clips folder:
1. Open the Orphan Clips folder.
2. Select the clip and click the Relatives tab in the Object Inspector.
The following illustration shows that the underwater clip is referenced by several sequences.
That is why it did not appear in the search results for the “not in use” search.
Deletion Guidelines
70
Deletion Guidelines
In general, avoid the following:
• Deleting material from the Avid MediaFiles folders on the workspace itself.
• Using the Media Tool on Avid shared storage workspaces for searching or deleting.
• Deleting workspaces without first deleting Interplay Production assets and media files from
the workspace. Avid ISIS will not let you delete a workspace with any files on it (whether
the files are media or any other type of file, even hidden files). Use the following procedure
to delete a workspace:
- Perform an extended search in Interplay Access, using the workspace name as a search
criteria. For search examples, see “Examples: Using Search with Delete” on page 76.
- Use Interplay Access to delete the files on the workspace.
- Use the ISIS Administration tool to delete the workspace.
The following sections provide additional information:
•Using Reservations
•Do Not Perform Large Deletions During Prime Time
•Do Not Delete More Than 2,000 Assets at a Time
•Folder Limitations
•Deleting By Workspace
•Perform Deletions from One Interplay | Access Client
•Guideline for Number of Deletions Per Hour
•Priorities with Deletion
•Delete Sequences When Possible
•Amount of Space Freed Up by Deletion
Using Reservations
Reservations are an excellent method for protecting media and metadata from deletion.
Reservations work on folders, not on individual assets. So, to protect an asset from deletion it
must be in a reserved folder.
A special case is that sequences and subclips in reserved folders protect the media files of
referenced master clips, even if the master clips are in a non-reserved folder. For example,
Sequence A uses Clip 1, and both are in a reserved folder. If you move Clip 1 to a non-reserved
Deletion Guidelines
71
folder, and try to delete the master clip and media associated with Clip 1, you can delete the
master clip, but the media remains protected. If the master clip is the last link to the media, the
link is moved to the Orphan Clips folder and the master clip and media remain protected.
Use the following guidelines when using reservations:
• Do not reserve the top level folders with an expiration date of “never.” This protects all of the
assets in the top level folder and all subfolders. This effectively prevents you from deleting
any assets in those folders.
• Reserve special items such as templates, frequently used graphics, and station logos that are
used on a daily basis with “never.”
• Reserve only folders that need to be reserved, especially when auto-reservation is on. By
default, auto-reservation extends the reservation for an additional 24 hours from the time
that a new or modified Avid asset is checked in from an Avid editing application.
For details on deleting files as well as information on using reservations to protect media from
deletion, see the Interplay Access User’s Guide.
Do Not Perform Large Deletions During Prime Time
Perform deletions during times when the system is not heavily used. A large delete operation can
slow down the response time on the Interplay Engine. This also slows down the response times
on Avid editing applications that are working with the Interplay Window.
Deletion consists of three parts: deletion of links, deletion of media, and deletion of database
assets.
• In Interplay v2.3 and earlier, deletion was synchronous: links, media, and database assets
were all deleted at approximately the same time. Disadvantages to synchronous deletion
were the impact on the engine (particularly the database assets) and the length of time
required for the deletion to take place. Starting with Interplay Engine v2.4, deletion is
asynchronous: the deletion of database assets is disassociated from deletion of links and
media and can be scheduled for off hours. This reduces the performance impact of the initial
deletion. For more information, see “Setting Options for Deletion” in the Interplay Engine
and Interplay Archive Engine Administration Guide.
• Deletion of media impacts Interplay Media Indexer performance. For each file that the
Interplay Engine deletes on the share storage system, a notification is sent to
Interplay Media Indexer. These notifications cause Interplay Media Indexer to update its
internal tables.
You can set an option to prevent Interplay Media Indexer from sending these notifications,
but this option (“ignore delete notifications”) should only be used temporarily. Using this
option causes a delay in updating of the media status of assets, which can cause workflow
problem, particularly for archive and restore. For more information, see “Configuring
Interplay Media Indexers” in the Interplay Production Best Practices Guide.
Deletion Guidelines
72
Do Not Delete More Than 2,000 Assets at a Time
Earlier versions of Interplay Production documentation recommended deleting up to 2,000 assets
at a time. With the introduction of scheduled deletion, this recommendation is less critical unless
you are deleting media. If you delete media (with or without its corresponding assets), wait at
least 5 minutes in between deletions to give the Interplay Media Indexer time to update its
structure.
Folder Limitations
It is important that you do not store more than 20,000 assets in Interplay database folders. In
general, you can keep up to 5,000 assets in a folder without affecting system performance. One
of the problems with storing many assets in a folder is the amount of time it takes to list the items
in the folder when you open the folder for browsing.
Periodically check that folders do not contain more than 5,000 assets. Delete or move assets to
other folders. If a folder must contain a large number of assets it is more efficient to add multiple
subfolders for storing the assets.
This limitation also applies to capture folders. If you know that you will have recurring captures,
you could set up folders for those captures. For example, you could name folders for the days of
the week or for specific types of capture.
Deleting By Workspace
Starting at Interplay v1.5, the Delete dialog box includes an option to select which workspace
you want to delete media from. If you select media files and resolutions for deletion, all
workspaces that contain the selected media are listed and are selected by default.
Perform Deletions from One Interplay | Access Client
Media management and large deletions should only be executed from one Interplay Access
client. If you start several clients on different machines and perform large deletions on each, it is
actually much slower compared with doing all the deletions on one client in a serialized order.
Guideline for Number of Deletions Per Hour
A scheduled deletion on the Interplay Engine can delete at least 25,000 objects per hour and
possibly more. This guideline can be useful when determining the length of a scheduled deletion
window.
Determining How Much Space a Delete Operation Will Free Up
73
Priorities with Deletion
• By default, a scheduled deletion stops when an Interplay Production backup begins, and
resumes when the backup ends or at the next scheduled deletion. You can select an option in
the Delete Behavior dialog box to allow both processes to operate at the same time.
• Ingest operations are not impacted by scheduled deletions because scheduled deletion has a
lower priority.
Delete Sequences When Possible
If possible workflows should include deletion of sequences and their referenced assets. By
default you cannot delete referenced assets unless you delete the asset that references them.
However, you can overwrite this behavior. See “Activating the Option to Delete Referenced
Assets” in the Interplay Engine and Interplay Archive Engine Administration Guide.
Amount of Space Freed Up by Deletion
The Delete dialog in Interplay Access provides the most reliable measurement of the space that
will be freed up by a Delete operation. Performing a search in Interplay Access is not a reliable
measurement. For more information, see the next topic.For more information, see “Determining
How Much Space a Delete Operation Will Free Up” on page 73.
Determining How Much Space a Delete Operation
Will Free Up
The Delete dialog in Interplay Access provides the most reliable measurement of the space that
will be freed up by a Delete operation.
To determine how much space will be freed up by a deletion:
1. Make sure that Referenced Assets are displayed in Interplay Access. This is necessary so
that you can see all of the master clips that are referenced by sequences in your Interplay
folders. If you don’t have Referenced Assets displayed you will only see master clips that
you explicitly check in or copy to Interplay folders. Do the following to turn on Referenced
Assets:
a. Select Preferences > Options. The Options dialog box opens.
b. Click the Filter Settings tab.
c. Make sure that the Referenced Assets check box is selected. Then click OK.
2. Right-click the folder you want to delete and select Delete.
The Delete dialog box opens and shows how many assets and media files will be deleted.
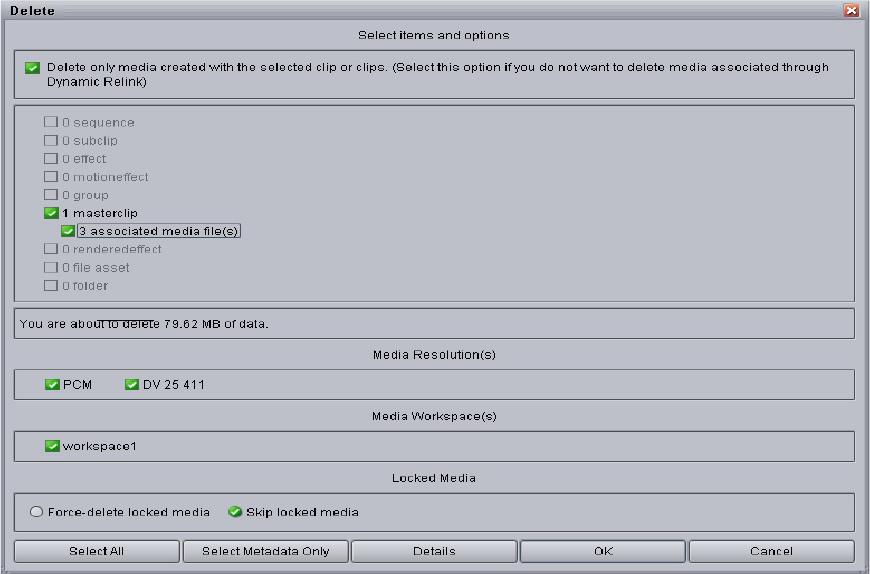
Determining How Much Space a Delete Operation Will Free Up
74
3. The value in the center of the dialog box shows the disk space that will be freed up if you
perform the deletion.
The number of media files and the amount of disk space that will be freed up are only
affected by the option “Delete only media created with the selected clip or clips.” This
information is not affected by your selections in the Media Resolutions or Media Workspace
sections of the dialog box.
4. Click Select All to select all the assets, files, and resolutions. The center portion of the dialog
box shows how much free space you will gain from the Delete operation.
5. Click OK or Cancel, depending on whether you want to perform the deletion or whether you
were just checking on the disk space.
The amount
of disk space
that will be
freed by the
deletion
Searching for Media
75
Searching for Media
Interplay Access can search across all projects and bins in the Interplay environment. This makes
it much faster to search in Interplay Access than to open multiple Projects and Bins in the editing
application. There are two types of searches:
• A simple text-based search allows you to filter media by name, project, bin, time, and media
type
• An extended attribute-based search allows you to search by more detailed attributes and
provides operator based searching using “and” and “or” type searches
Saved Searches
Searches can be saved and made public (available to all users) or private by clicking on the Save
button.
Depending on the site, the entire deletion strategy can be based on searching. Below are some
common examples of saved searches used in such environments.
• An Offline Material search returns anything that has been deleted from ISIS, but not
Interplay Production
• An Orphaned Precomputes search returns any effects that are not part of a sequence
• An Unused AirSpeed Clips search returns any master clips from the Incoming Media folder
that are not cut into sequences or subclips
• A DRM Clips search returns all master clips/subclips/sequences that contain restrictions.
For examples of searches that could be saved, see “Examples: Using Search with Delete” on
page 76.
Improving Search Response Time
Interplay Production includes powerful, customizable search capabilities. If you are working in a
facility with a large database, you can speed up the search process by specifying a particular
folder as the search root and by using attributes. For example, by using the Time attribute, you
can limit your search to clips modified within the last 24 hours, the last 7 days, and other time
periods.
Even if you only change the search root, or search by a single attribute, you can dramatically
improve the response time. For additional information, see “Using the Search Root and
Attributes to Speed Up Interplay | Production Search” on page 84.
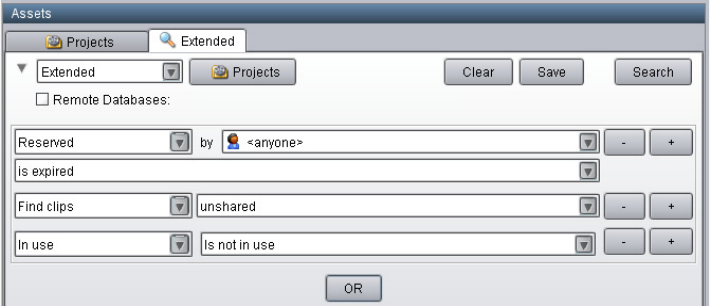
Searching for Media
76
Examples: Using Search with Delete
You can use an Extended search to create a list of assets that match your criteria for deleting.
This topic provides several examples.
Example 1
This first example uses the following criteria:
• Find clips without an active reservation. The Search syntax is:
Reserved : by anyone : is expired
• Find clips that are not shared (only one instance, no links in other folders). The Search
syntax is:
Find clips : unshared
• Find clips that have no relatives. The Search syntax is:
In use : Is not in use
The following illustration shows these criteria in the Extended search tab.
After you run this search, you can delete the results from the Search Results list.
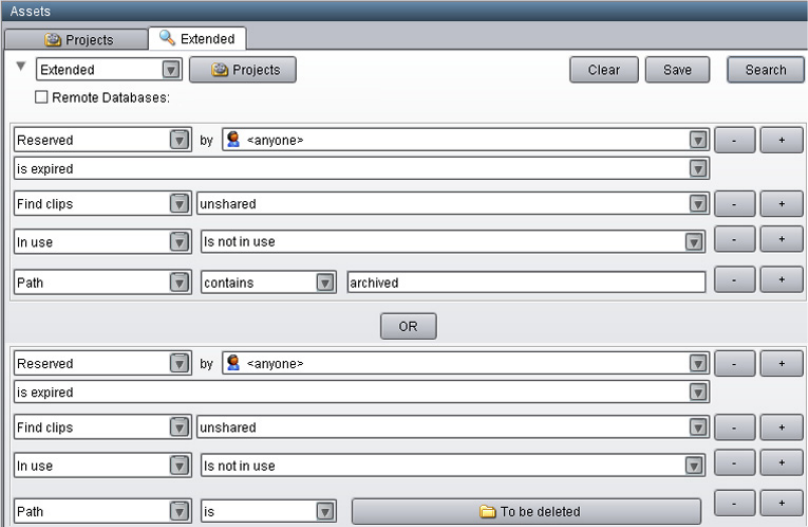
Searching for Media
77
Example 2
You can associate the criteria used in Example 1 with specific folders to include or exclude
specific locations in the search. This example adds the following criteria:
• Find clips that are located in a folder whose name contains the word “archived.” The Search
syntax is:
Path : contains : archived
• Or find clips that are located in the folder named “To be deleted.” The Search syntax is:
Path : is : To be deleted
You need to create two different groups in the Extended tab: one that combines the criteria in
Example 1 with the first path and one that combines the criteria in Example 1 with the second
path. These groups are separated by OR, as in the following illustration.
The results of this search are clips that are stored either in one of the Archived folders or in the
“To be deleted” folder. You see the contents of both folders in the Search Results list.
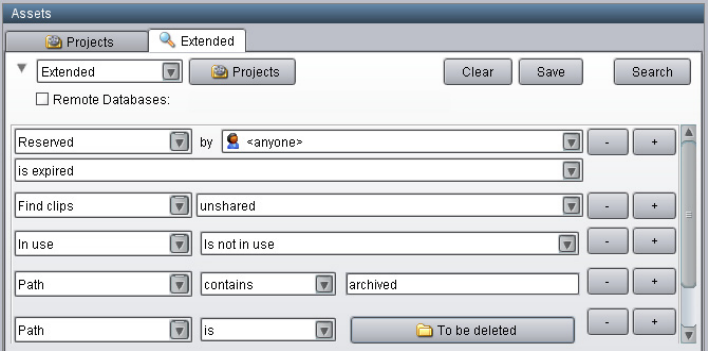
Searching for Media
78
Example 3
This example is similar to Example 2. However, instead of searching for clips stored either in
one of the Archived folder or in the “To be deleted” folder, these criteria search for clips stored
both in an Archived folder and in the “To be deleted” folder. The following illustration shows
these criteria in the Extended tab.
Example 4
Another search might include the following criteria:
•
Creation date : Not within : Last week
•
Path : contains : archived
•
Path : is : To be deleted
•
In use: Is not in use
•
OR
•
Creation Date: Not within : last 72 hours
•
Path : is : Aired stories
•
Path : is : Incoming feed from Washington
The first group of criteria searches for all clips older than a week located in the Archived and “To
be deleted” folders that have no relatives. The second group searches for clips older than 72
hours located in the “Aired stories” folder and in the “Incoming feed from Washington” folder.
The results are a combination of these searches.
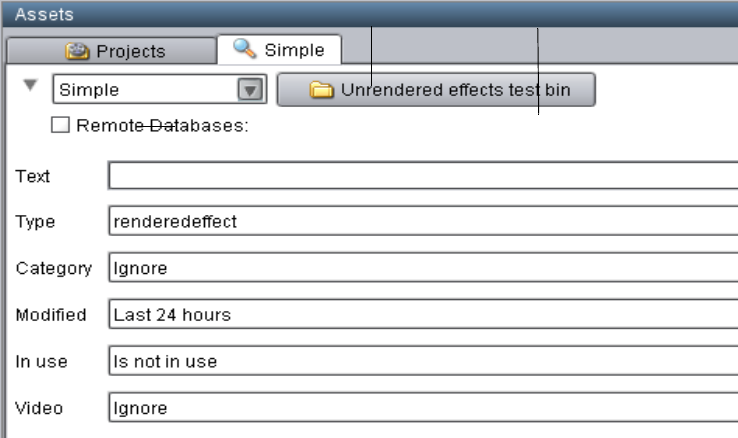
Searching for Media
79
Example: Searching for Unused Rendered Effects
When you design a deletion strategy, usually the precomputes (rendered effects) are deleted
along with the usual deletion searches because they are based on creation date and project.
Anything inside a project that is older than a certain number of days is deleted, and that usually
takes care of the rendered effects as well.
The Unchecked in Avid Assets folders may contain a large number of precomputes, particularly
for sequences that have been rendered several times. These rendered effects might not be found
by simply searching by project and date. Note that editors can see their own Interplay assets but
only administrators can view all of assets inside the Unchecked in Avid Assets folders.
This section describes a search that is not based on projects. The example deletes unrendered
effects in a particular folder that are not in use by any sequence. For more information, see
nStarting with Interplay version 2.3, links for rendered effects are no longer included in the
Interplay database. These links are still displayed in Interplay Access and other client
applications, and to the end user they appear like other referenced assets. For more information,
see “Emulated Rendered Effects” in the Interplay Access User’s Guide.
This example searches for rendered effects created within the last 24 hours in a particular folder
named “Unrendered effects test bin.” The following illustration shows the Search window in
Interplay Access.
Search tab
Search root button
Search Conditions
Searching for Media
80
nOnly use the “in use” flag example for Interplay v1.2.3 and later. Older Interplay versions did
not set the in use flag correctly.
To search for unrendered effects in a particular folder:
1. In the Assets pane, click a Search tab.
2. Select Simple from the Search Type list. If necessary, click the Search Conditions arrow to
show the search criteria.
3. Click the Search Root button and navigate to the folder.
The Search root button displays the folder you selected to search. Selecting a particular
folder will make the search faster.
4. In the Type field, click the down arrow and select “rendered effect.”
5. In the Modified field, click the down arrow and select the time period.
6. In the “In use” field, click the down arrow and select “Is not in use.”
7. Do one of the following:
tPress Enter.
tClick the Search button.
The Search button changes to a Stop button, which you can click if you want to stop the
search. The Interplay search engine limits the database to rendered effects that have
been modified in the time period you selected, and then searches within that subset for
rendered effects that are not in use. The results are displayed in the Search Results pane.
They are visible until you close Interplay Access or until you perform a new search.
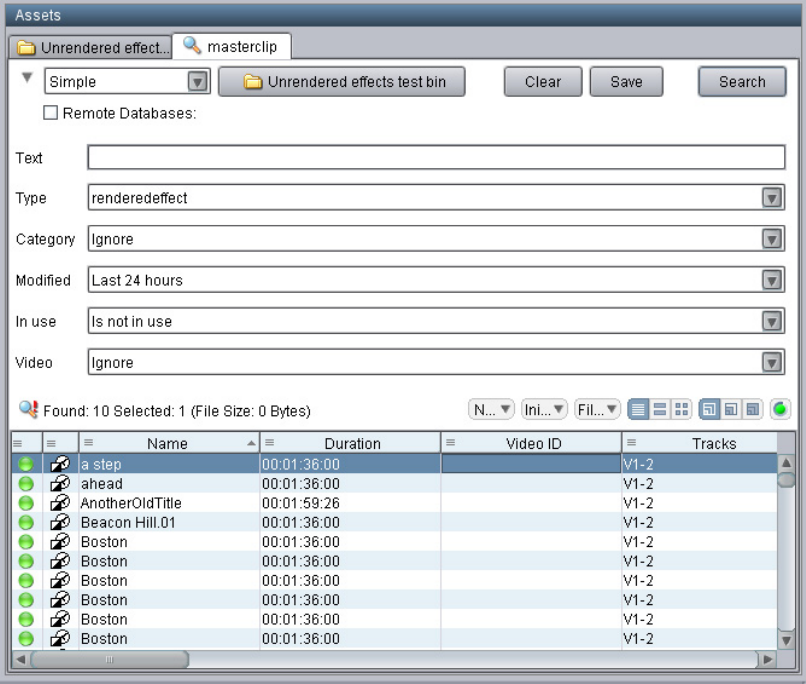
Searching for Media
81
To delete the unused rendered effects:
1. Click in the Results pane and use CTRL-A to select all of the rendered effects.
2. Press the Delete key.
The system displays the Delete dialog box and allows you to delete the metadata, the media,
or both. The following illustration shows the Delete dialog box for this example.
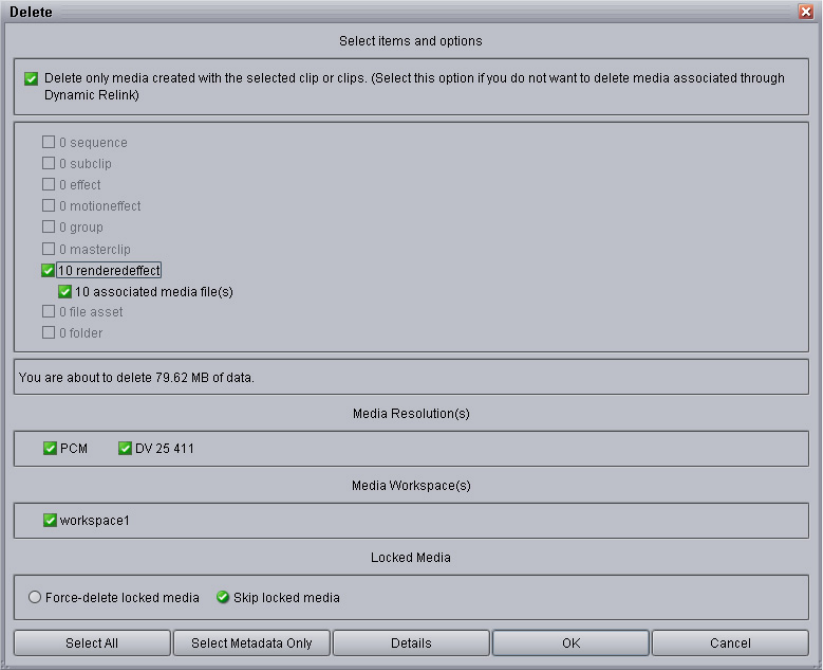
Searching for Media
82
3. Select the rendered effects (metadata) and the Media Resolutions (media files).
4. Click OK.

4Refining Your Search in
Interplay | Production
Interplay Production includes a powerful, customizable search. If you are working in a facility
with a large database, you can speed up the search process by specifying a particular folder as the
search root and by using attributes. For example, by using the Time attribute, you can limit your
search to clips modified within the last 24 hours, the last 7 days, and other time periods.
You can search the Interplay Production database from the following applications:
• Interplay Assist
• Avid Instinct
• Interplay Window (in Avid editing systems)
• Interplay Access
All applications use the same search engine, which runs on the Interplay Engine server, and all
applications share a core set of attributes. Interplay Assist, Instinct, and the Interplay Window
share the same user interface (the Media Search tab) and the same set of attributes. Interplay
Access includes these core attributes, but also offers additional options for an extended search.
All applications search for Avid assets (clips, subclips, and other media), but only Interplay
Access searches for file assets (such as Adobe Photoshop files).
The following topics provide information about Interplay Production search in general as well as
specific information for Interplay applications:
•Using the Search Root and Attributes to Speed Up Interplay | Production Search
•Basic Interplay | Production Search Attributes
•Searching in Interplay | Assist, Avid Instinct, and the Interplay Window
•Searching in Interplay | Access
•Example: Finding Assets By Using a Unique Identifier
nSpecifying attributes for a search is also one approach to a deletion strategy. For more
information and examples, see “Examples: Using Search with Delete” in the Interplay Access
User’s Guide.
Using the Search Root and Attributes to Speed Up Interplay | Production Search
84
Using the Search Root and Attributes to Speed Up
Interplay | Production Search
To speed up your search, make your search as specific as possible. The more specific you can
make your search, the faster you can get the results you want. Two ways to make your search
more specific are:
• Specifying a search root
• Using attributes
Keep in mind that even if you only change the search root, or search by a single attribute, you can
dramatically improve the response time.
Specifying a Search Root
By specifying a particular folder as the search root, you are instructing the search engine to limit
the set of assets that it searches to that particular folder and any folders included in that folder’s
subtree. By default, the search root is the entire database. If you know the folder subtree in which
the asset you are searching for is stored, you can select that folder to speed your search. For
example, in Interplay Access, you can select the Project folder, or a particular project within that
folder.
Using Attributes
By specifying one or more attributes, you are also instructing the search engine to limit the set of
assets that it searches. Simply searching for text, without restricting the search root, is the most
time-consuming search, because the search engine searches the entire database. However, if you
specify a particular attribute (such as the Time attribute), the search engine can quickly limit the
database to a small subset and search for text within that subset.
For example, if you wanted to find a clip about the Nobel Peace Prize acceptance speech, you
could search for the text “Nobel Peace Prize.” In this case, the search engine will search through
the entire database of clips, which could take twenty-five seconds for a large database. However,
if you know that the speech took place within the past week, you can select the Time attribute
and then the option “Last week.” The search engine creates a subset of clips that were modified
in the past seven days, and searches for the text within that set. Setting this attribute can reduce
the time for a search from twenty-five seconds to one second.

Basic Interplay | Production Search Attributes
85
Basic Interplay | Production Search Attributes
The following table lists the basic Interplay search attributes. These are available in the Media
Search tab in Interplay Assist, Avid Instinct, and the Interplay Window. They are available in a
slightly different format in the Simple Search tab of Interplay Access.
Attribute Options Description
Text User-supplied text Allows you to search all text-based attributes:
•Name
•Tape
•VideoID
• Comments
• Locator and restriction annotations
• User-created fields
If you specify more than one word in the Text attribute, the
search engine searches for an exact match. For example, if you
specify “President speech” the search engine looks for assets
with that exact phrase. To search for clips that contain
“President” and “speech” anywhere in the text, use the Extended
Search in Interplay Access.
Text Fields • Any system
property or
custom
metadata
containing a
text field
• Select All
• Clear All
Allows you to search in any text field you select; Name is
selected by default.
Search In Allows you to search in any folder managed by the asset
manager
Types Master Clip
Subclip
Sequence
Allows you to specify the type of media object for your search
(you must select at least one type for each search)

Searching in Interplay | Assist, Avid Instinct, and the Interplay Window
86
Interplay Access includes additional attributes and options that you can use to search for Avid
assets or file assets.
Searching in Interplay | Assist, Avid Instinct, and the
Interplay Window
Interplay Assist, Avid Instinct, and the Interplay Window share the same set of attributes and the
same user interface: the Media Search tab. They also provide a way to define a folder as a search
root. This topic describes how to perform a search in any of these applications.
nInterplay Assist includes a Find function that you use to search within clips and shotlists for text
in locators and annotations. It is different from the Media Search function, which searches the
media database (see Interplay Assist Search Options).
nAvid Instinct includes an iNEWS Search function that you use to search for information in the
iNEWS database. It is different from the Media Search function that you use to search the media
database.
The following example shows how to search for clips that have been logged to reference a fire
that took place last night.
To search for clips in Interplay Assist, Instinct, or the Interplay Window:
1. Open a Media Search tab.
tIn the Interplay Window, a Media Search tab is always displayed.
tIn Interplay Assist or Instinct, right-click an Interplay folder and select Search.
A Media Search tab opens in the Research panel.
Category Site-specific list
of categories
Allows you to specify which category to search. The specific
categories listed for this attribute are defined by the system
administrator.
Time Whenever
Last 10 minutes
Last hour
Last 24 hours
Last week
Last month
Last year
Allows you to set a time parameter for your search (time
parameters refer to the date the media object was last modified)
Attribute Options Description
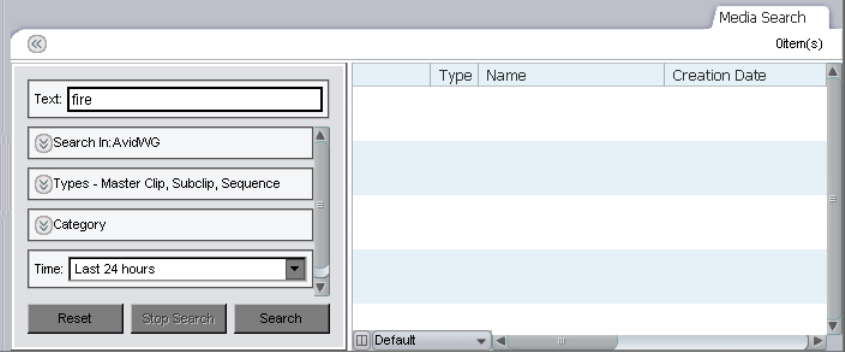
Searching in Interplay | Assist, Avid Instinct, and the Interplay Window
87
2. In the Text field, type a search term. In this case, type the word “fire.”
You can specify words or characters for your search. Search terms are not case-sensitive and
apply to all text attributes of the media objects in your search. If you specify more than one
word, the search engine searches for the exact phrase.
3. Click the Text Fields menu, and select the kinds of text fields to search in.
4. (Option) If you know which folder subtree might contain the clips, expand the “Search in”
field and navigate to the folder. You can also expand the Types or Category field and select
the appropriate option for the search.
5. Click the Time menu, and select a time parameter for your search. In this case you know that
the fire took place last night, so you can select “Last 24 hours.”
6. Click Search.
The Interplay search engine limits the database to clips that have been modified (captured or
edited) in the last 24 hours, and then searches within that subset for text that contains the
word “fire.” Any clips that meet these criteria are displayed in the Research panel.
7. (Option) To start a new search, click Reset and then repeat steps 1 through 5.
For complete information on searching media, see the documentation for your application
(Interplay Assist, Instinct, or Avid editing application).
Searching in Interplay | Access
88
Searching in Interplay | Access
Interplay Access provides more options for refining your search than other Interplay
applications. There are two ways to search for assets in Interplay Access:
• Running a text-based search on the database (through the text box on the Interplay Access
menu bar)
• Running an attributes-based search on the database or a selected folder subtree (through a
Search tab)
Running a text-based search is more convenient, but depending on the size of your database,
could take more time than you want. An attributes-based search provides you with more options
for refining your search criteria and results in a faster search.
The following examples shows how to search for clips that have been logged to reference a fire
that took place last night.
• The first example illustrates how to search for a clip if you know that the word “fire” appears
in any text attribute, such as clip name, comment, and frame locators. This example also uses
the Modified attribute to limit the search to clips modified in the last 24 hours.
• The second example illustrates how to make the same search more efficient if you know that
the word “fire” is used in the clip’s name, because the scope of the search is limited to clip
names only. This example also uses the Modified Date attribute to limit the search to clips
created after a certain time.
For complete information on searching in Interplay Access, see the Interplay Access User’s
Guide or the Interplay Access Help.
To search for clips in Interplay Access (Simple search):
1. Do one of the following:
tClick the Search tab. Simple search is selected by default.
tSelect Edit > Search to open a new search tab. You can also press F3 or Ctrl+F
(Windows) or Command+F (Macintosh).
tSelect Simple from the Search Type list.
2. If necessary, click the Search Conditions arrow to show the search criteria.

Searching in Interplay | Access
89
3. (Option) If you know which folder might contain the clips, click the Search Root button and
navigate to the folder.
The Search root button displays the database or folder you selected to search. Selecting a
particular database or folder will make the search faster.
You can also select a folder to search before you open a Search tab.
4. Type the text for the search. In this case, type the word “fire.”
5. In the Modified field, click the down arrow and select the time period. In this case you know
that the fire took place last night, so you can select “Last 24 hours.”
6. (Option) Select a value for the other search attributes by clicking the down arrow and
selecting an option.
7. Do one of the following:
tPress Enter.
tClick the Search button.
The Search button changes to a Stop button, which you can click if you want to stop the
search. The Interplay search engine limits the database to clips that have been modified
(captured or edited) in the last 24 hours, and then searches within that subset for text that
contains the word “fire.” The results are displayed in the Search Results pane. They are
visible until you close Interplay Access or until you perform a new search.
8. (Option) To start a new search, click Clear and repeat steps 1 through 7.
To search for clips in Interplay Access (Extended search):
1. Do one of the following:
tSelect Extended from the Search Type list.
Search Root button
Search
Conditions
arrow
Search Type list
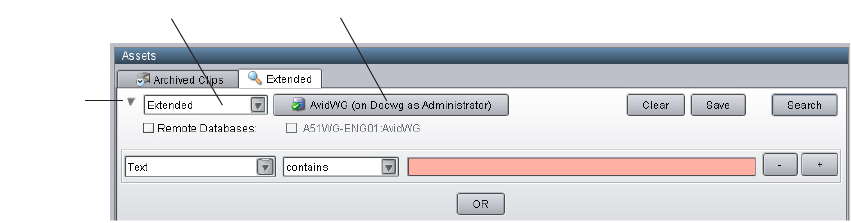
Searching in Interplay | Access
90
tSelect Edit > Search to open a new Search tab. You can also press F3 or Ctrl+F
(Windows) or Command+F (Macintosh). Then select Extended from the Search Type
list.
2. If necessary, click the Search Conditions arrow to show the search criteria.
The Extended search uses a set of statements to construct a search. In this example, you can
limit the search to the Name field. Even if you are not sure about using other attributes for
the search, you can speed your search considerably by limiting the search to just the name of
the clip.
3. (Option) If you know which folder might contain the clips, click the Search Root button and
navigate to the folder.
The Search root button displays the database or folder you selected to search. Selecting a
particular database or folder will make the search faster.
You can also select a folder to search before you open a Search tab.
4. Specify an attribute, in this case, “Name.”
5. Specify an operator, in this case, “contains.”
6. Type the words you want to search for, in this case, “fire.”
7. Add another search statement by clicking the + button and specifying the following:
- Select “Modified Date” as the attribute. The attribute selections include any attribute
defined and enabled in the Property Layout view of the Interplay Administrator.
- Select “after” as the operator.
- Specify a date and time. You can edit the default date and time in the field. You can also
use the calendar button to select a date.
Search Root button
Search
Conditions
arrow
Search Type list
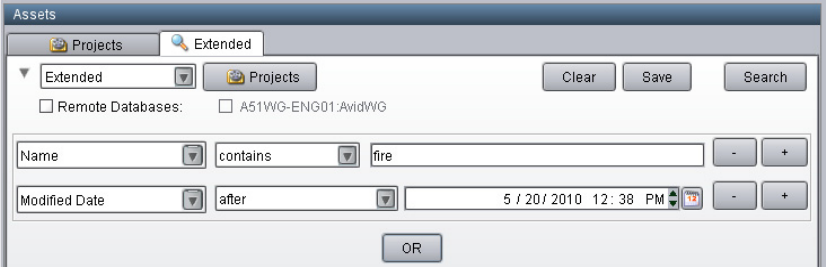
Example: Finding Assets By Using a Unique Identifier
91
8. Do one of the following:
tPress Enter.
tClick the Search button.
The Search button changes to a Stop button, which you can click if you want to stop the
search. The Interplay search engine searches only the names of clips for those that contain
the word “fire” that were created after April 22, 2010. The results are displayed in the Search
Results pane.
9. (Option) To start a new search, click Clear and repeat steps 2 through 8.
Example: Finding Assets By Using a Unique
Identifier
This topic illustrates a workflow in which you assign a unique identifier (numbers, letters, or a
combination) to an asset and use that identifier to find and display the asset. For example, you
could choose to associate a unique number with each sequence in an Interplay database so that
you can quickly find a particular sequence later using that number, even if someone has changed
the name of the sequence. This workflow uses a custom property and a custom search for the
most efficient and reliable way of finding the asset.
There are alternative methods for associating a unique identifier to the one described in this
topic. However, they do not make optimal use of the Interplay search engine. For example, one
workflow might be to append an identifier to the end of an asset name so that it can be tracked
with the asset. A disadvantage to this approach is that you need to use the full-text search
mechanism to find the asset. Another disadvantage is that renaming the asset will remove the
identifier unless you add it to the new name.
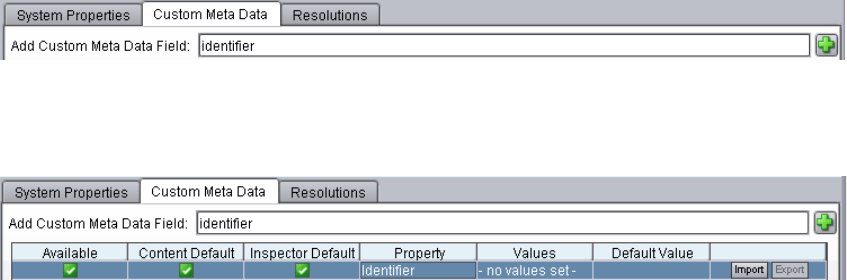
Example: Finding Assets By Using a Unique Identifier
92
A more efficient approach is to create a custom property (or metadata field) that is used
exclusively to hold the identifier. You can then search for the asset by using an exact match rather
than a full-text search, and you can rename the asset without needing to add the identifier. You
use the Interplay Administrator to create a custom property, and then use Interplay Access to set
and search for the identifier.
nAdding an identifier to the name of an asset and using full-text search to locate the asset by name
causes unnecessary extra load on the Interplay Server, because it searches through much more
data than it would if searching on a single custom property. You should always define a custom
property if your workflow uses a unique identifier.
The following procedures describe
• How to add and display a custom property
• How to add the identifier
• How to search for the identifier
Prerequisite: A user must have write permission on an asset to add an identifier to an asset.
To add a custom property:
1. In the Site Settings section of the Interplay Administrator window, click the Property Layout
icon.
2. In the Property Layout view, select the database for which you want to set properties.
3. Click the Custom Meta Data tab.
4. In the Add Custom Meta Data Field text box, type a name for the custom property. In this
case, type the name “Identifier.”
5. Click the green plus sign (+).
The custom property appears in the list.
6. Select the Available option, which makes the custom property available for users to add into
Interplay Access displays and to use in an Extended search.
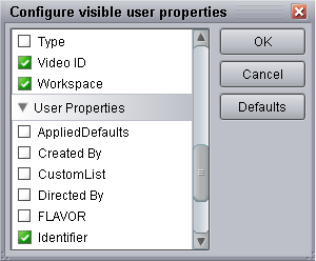
Example: Finding Assets By Using a Unique Identifier
93
7. Select the options to include the property in the Content tab and the Object Inspector’s
Properties tab. Users can then add or edit a value for Identifier in Interplay Access.
8. Click Apply to save the added custom property and new layout.
The next time a user logs in to Interplay Access, the Identifier property will be displayed.
nDeselect the property in the Available column to turn off custom properties that you do not want
displayed in the Interplay Access properties lists. You cannot delete custom properties for this
release but you can turn off their display. For more information about working with custom
properties, see “Creating Custom Properties” in the Interplay Engine and Interplay Archive
Engine Administration Guide.
To set an identifier for an asset:
1. In Interplay Access, select the asset for which you want to set the identifier. In this case,
select a sequence.
2. The first time you want to set an identifier, do the following:
a. Click the Properties tab, scroll down and click the Configure button.
The “Configure visible user properties” dialog box opens.
b. In the User Properties section, select “Identifier” to display the property in the Object
Inspector, and click OK.
3. In the Object Inspector, scroll down until you see the new custom property Identifier.
4. Click the text box and type the identifier.
You need write permissions on the asset to add the identifier. An orange box highlights the
controls for adding a property value.
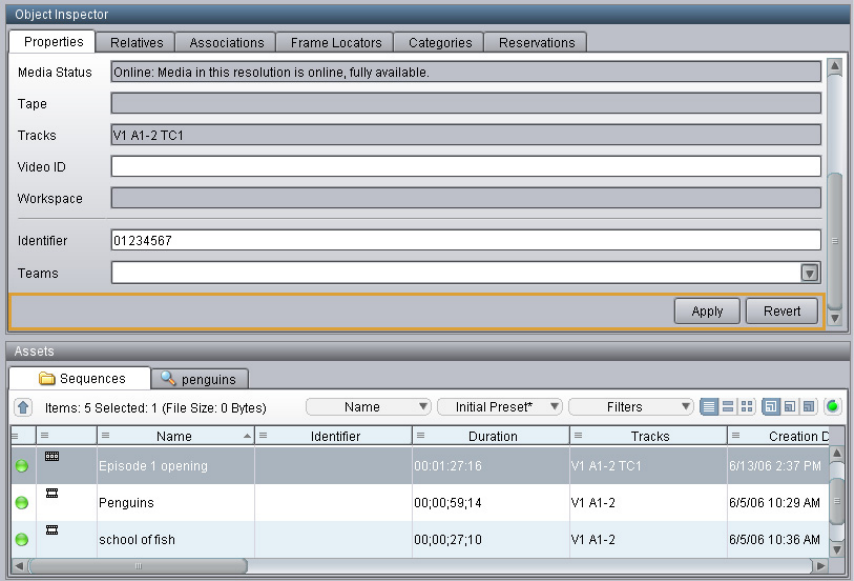
Example: Finding Assets By Using a Unique Identifier
94
5. Click Apply.
The identifier is displayed in the Identifier column in the Contents tab.
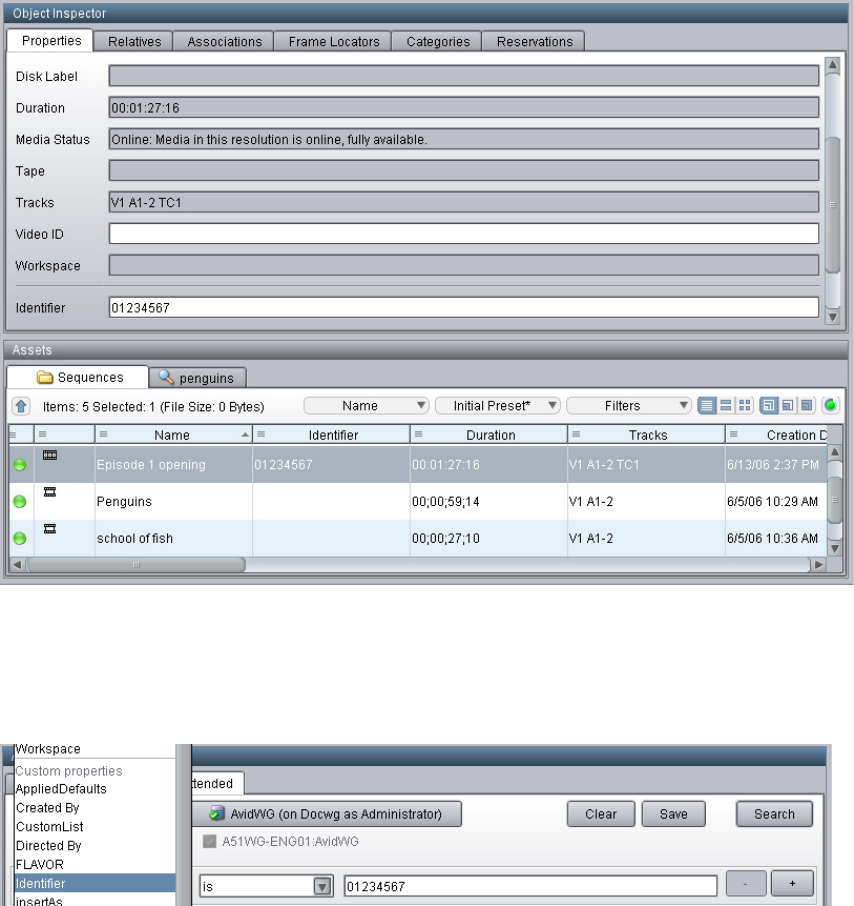
Example: Finding Assets By Using a Unique Identifier
95
To search for an asset using the unique identifier:
1. In Interplay Access, click the Search tab, then select Extended from the Search type list.
2. Click the Attribute Name field, scroll down the list, and select Identifier.
3. In the Operator field, select “is.”
4. In the Value field, type the identifier, and click Search.
The asset is displayed in the Search results list.
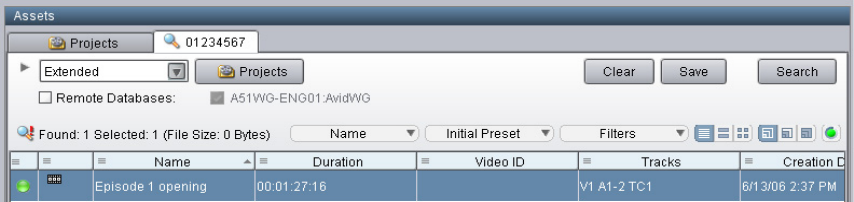
Example: Finding Assets By Using a Unique Identifier
96
If you know only part of an identifier, select “contains” from Operator field and type part of
the identifier. This is less efficient than an exact match, but is much more efficient than a
full-text search on the name.

5Using AMA Material in
Interplay | Production
This chapter contains the following topics:
•Overview of Working with AMA Material
•AMA on Interplay | Production Workflow
•How Interplay | Media Indexer Works with AMA Material
•Configuring Interplay | Administrator and Interplay | Media Indexer to Manage AMA Media
•Using Third-Party Storage for AMA Media
•Viewing AMA Clips in Interplay | Access
•Deleting AMA Clips Using Interplay | Access
•Resyncing AMA Media Files
Overview of Working with AMA Material
Interplay v3.0 and later supports checkin and dynamic relink of AMA (Avid Media Access)
material. The following are two goals for this feature:
• Improve the Interplay workgroup aspects of the Avid file-based workflow
• Provide better support for workflows that make use of a large ratio of raw footage compared
to the size of the final show
For example, some post-production shoot scenarios, such as reality TV, use multiple,
heterogeneous cameras, with shoot ratios (unused/used) can that range from 30/1 to 100/1 or
more. This means that every hour of programming can involve perhaps 100 hours of raw media
to process. Processing includes copying the media from camera storage (Optical disk or SSD) to
something more usable by the production system, such as ISIS shared storage.
One way to handle this in the past was to consolidate the recorded AMA media to native MXF
files on the ISIS system associated with the Interplay Production environment (such as an ISIS
5000 or ISIS 7000). However, the potentially high shoot ratios mean that a lot of capacity was
used to hold media that might be discarded later in the process. To solve this, the AMA workflow
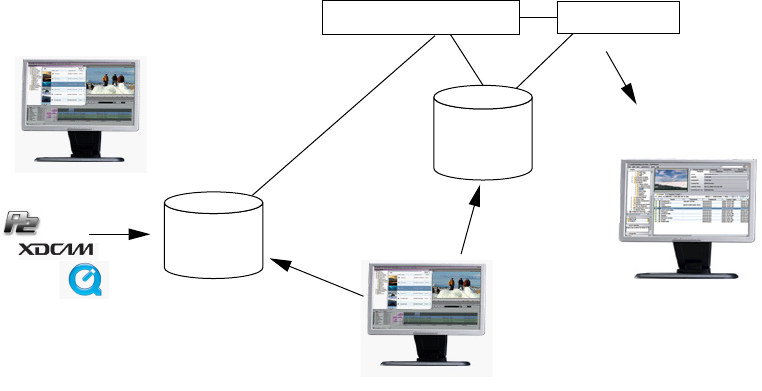
AMA on Interplay | Production Workflow
98
introduced in Interplay v3.0 uses a second, low bandwidth ISIS 2000 as a parking storage area
for the AMA media. Later, when the material that should be saved is identified, it can be
consolidated from the AMA source to the ISIS production system at full resolution.
AMA on Interplay | Production Workflow
The following illustration shows a basic AMA workflow for Interplay Production.
The following sections describes these numbered portions of the AMA workflow for Interplay
Production. You can perform the operations individually or you can use the Dynamic Media
Folder (DMF) feature in the Avid editing application to automate the process.
nSee the chapter “Acquisition of File-Based Media (AMA)” in the Avid Media Composer |
Software Editing Guide or the Media Composer Help for information on working with AMA
media in an Avid editing application.
nInterplay v3.1 and later supports Media | Director, which can automate much of this process. For
details, see the Media | Director User’s Guide on the Avid Knowledge Base.
Before You Begin
Before you can perform the third step in the workflow (Check in to Interplay), you must
configure the Interplay Administrator and the Media Indexer to recognize the new material. Avid
recommends that you dedicate a specific workspace for the .spaaf files. See “Configuring
Interplay | Administrator and Interplay | Media Indexer to Manage AMA Media” on page 104.
Media Composer
Copy
Check in
to Interplay | Production
Hi-Res
Consolidate
Transcode
QuickTime
Interplay Engine
Avid ISIS
5000/7000
Access to AMA
qq
ww
ee
rr
tt
Media Composer
MediaCentral | UX
Link to AMA
MCS Server
Playback
Transcoded
Material
ISIS 2000
Parking
Storage
y
AMA on Interplay | Production Workflow
99
1. Copy the AMA Material to Shared Storage
This step involves copying files from the camera media card or disk to shared storage and does
not have to be performed on an editing workstation.
nIn order to be able to perform a dynamic relink to AMA material, the AMA material must reside
on shared storage at the time of checkin.
This workflow uses a shared storage system such as an ISIS 2000 as a parking area for the AMA
media. This allows you to store all of the original AMA media on shared storage without taking
up space on your high bandwidth ISIS 5500 or ISIS 7500. This is particularly useful if you have
a high ratio of shooting versus footage used in the final production. In this scenario you would
have a multiple ISIS setup; one for the original AMA material and one for your production
material.
nInterplay v3.1 and later supports third-party storage as parking storage. For details see “Using
Third-Party Storage for AMA Media” on page 110.
Create a folder structure in the parking area that organizes the material by project and use a
unique name for each new folder. For example, if you have a series of interviews associated with
Project A you could create a folder structure such as Project A/interviews/interview1 and store
the media for interview1 in that folder.
Drag and drop all of the material from the media card or disk into the appropriate folder.
2. Create a New Bin and Create a Link to the AMA Media on Shared Storage
Create a new bin on the Avid editing application. From the new bin, use the Link to AMA
command in the Avid editing application to link to the AMA material on shared storage. For
information on the Link to AMA process, search for “Linking Media with AMA” in the editing
guide or Help for your Avid editing system.
After you successfully link to the AMA material, the Avid editing system creates clips in the bin
for the media and you can start working with the material in the editor. If you want other editors
to be able to access the media, you need to check the AMA clips into Interplay Production.
3. Check the AMA Clips into Interplay Production
You can use the following methods to check the AMA clips into Interplay Production:
• Use menu commands or automatic checkin
• Drag assets to the Interplay Window
• Check the files in automatically as part of the profile associated with a DMF folder
AMA on Interplay | Production Workflow
100
For information on checking assets into Interplay Production, see “Checking Avid Assets into
the Interplay Database.” For information on using DMFs, see “Creating Dynamic Media
Folders.” Both topics are in the Avid Media Composer | Software Editing Guide and the Media
Composer Help.
When you check the AMA clips into Interplay Production, the Interplay client library creates
files that the Interplay Media Indexer can index. There are two types of files:
• .spaaf (sparse AAF) files. These files are similar to .mxf files that are used for native Avid
media. The main difference is that .mxf files contain media but .spaaf files contain pointers
to the media.
• AAF files. These files are similar to .aaf files for native Avid media but refer to AMA media.
For information on the files that are created, see “How Interplay | Media Indexer Works with
AMA Material” on page 101.
nThe SPAAF workspace on ISIS must be mounted and accessible by the editing user on the editing
machine. On a Mac OS X system, the workspace must be mounted using the same name as the
workspace. The checkin will fail if this condition is not met.
4. Access to AMA
After the Interplay Media Indexer indexes the new files, other Avid editing applications can
check out the clips and work with them. Interplay Access can also search for the files and display
information about the files in the Object Inspector. See “Viewing AMA Clips in
Interplay | Access” on page 116. Note that MediaCentral UX, Interplay Assist, and Avid Instinct
cannot play the material until you transcode it to an Avid resolution.
5. Transcode the AMA Material
Depending on the bandwidth requirements of the AMA material, you can improve playback and
editing performance on the Avid editing systems if you transcode the AMA material you want to
work with to an Avid resolution. Then use Dynamic Relink to work with the transcoded material.
Another benefit of transcoding the AMA material is that MediaCentral UX, Interplay Assist, and
Instinct users can now work with the clips.
nYou cannot create an H.264 proxy from the AMA material using the Transcode feature on an Avid
editing application. However, you can use Interplay Transcode to create a proxy.
How Interplay | Media Indexer Works with AMA Material
101
6. High Res Consolidate
If you are working with a transcoded resolution, you can dynamically relink back to the high
resolution AMA material when you want to consolidate a high res version of your final sequence
to your production ISIS system. This allows you to finish the sequence using the original AMA
resolution. In this case only the portions of the AMA material that are used for the final sequence
need to be stored on the production ISIS system.
In a broadcast facility, you can transcode this final AMA sequence to the format that you need
for a send to playback operation. This allows you to create a final version from the original AMA
media. In a post facility, a colorist may use the high resolution AMA material for a final color
correction. Then it can be transcoded for the final output.
How Interplay | Media Indexer Works with AMA
Material
In releases prior to Interplay v3.0, the Interplay Media Indexer was not able to index AMA
material. This limitation is related to the difference between AMA material (OP-1A format) and
the OP-ATOM format associated with .mxf material. The following illustration compares OP-1A
and OP-ATOM material.
How Interplay | Media Indexer Works with AMA Material
102
The following sections compare the checkin process for OP-ATOM material with the checkin
process for OP-1A material.
MI
C
CCC CCC
S
SSS
A1
A1 A1
A2
A2 A2
V1
V1 V1
Media
Media Media Media
SSS
Avid AAF (OP-ATOM)
Interplay checkin
Create .spaaf files
One file ID
containing
three descriptors.
One descriptor per channel.
Three file IDs.
One per channel.
a.mxf b.mxf c.mxf
MyAMA.mov
ID-1 ID-2 ID-3
ID-4 ID-5 ID-6
d.spaaf e.spaaf f.spaaf
ID-1 V1 a.mxf
ID-2 A1 b.mxf
ID-3 A2 c.mxf
ID-4 V1 d.spaaf MyAMA.mov
ID-5 A1 e.spaaf MyAMA.mov
ID-6 A2 f.spaaf MyAMA.mov
Media Indexer data
MI = Media Indexer
C = Clip ID
S = Source ID (reference to source tape or file)
V1, A1, A2 = Video/Audio file IDs
D.V1, D.A1, D.A2 = Video/Audio descriptors
Legend
Reference to the media
AMA AAF (OP-1A)
C
S
D.A1
D.A2
D.V1
How Interplay | Media Indexer Works with AMA Material
103
Avid AAF (OP-ATOM) Format
The example in the previous illustration uses a clip with one video channel and two audio
channels. The top portion of the Avid AAF section is a representation of what you can see in an
Avid editing system bin for digitized MXF material. The metadata contains the following:
•A clip ID
• Three file IDS, one for each video and audio track.
• A source ID (for example, a reference to the source file or source tape)
The three file IDs relate directly to the associated .mxf files on shared storage. The .mxf files
contain the related media and each contains a File ID that identifies the file as video or audio. In
the “Media Indexer data section” of the illustration, the Interplay Media Indexer lists the three
files starting with ID-1, ID-2, and ID-3.
AMA AAF (OP-1A) Format
The format for the OP-1A material above the dashed line in the illustration is obviously different.
Instead of separate file IDs for video and audio, the information is stored as separate descriptors
within one file ID. And the media is store separately without the metadata elements associated
with OP-ATOM material.
AMA Checkin to Interplay | Production
The area below the dashed line in the illustration shows the new files created when you check
AMA material into Interplay v3.0. The Interplay client library (also known as the JXDK) creates
a new file for each channel or track of the AMA material. These new files have a .spaaf extension
and are in a format that the Interplay Media Indexer can index. Each file contains a file ID for the
associated audio or video channel as well as a pointer to the related portion of the media. The
“Media Indexer data” portion of the illustration shows these files as ID-4, ID-5, and ID-6. Each
entry in the Interplay Media Indexer database references the .spaaf file and the AMA Media file.
As you check the AMA files into Interplay Production, the system maintains a hierarchy of
folders within that folder. You store the AMA media files in a separate location such as an ISIS
2000 parking storage. The Interplay Media Indexer needs to be aware of the location of both sets
of files. It does not index the AMA media files but it does index the .spaaf files. This allows you
to use dynamic relink to an AMA resolution. See “AMA on Interplay | Production Workflow” on
page 98.
For Interplay v3.1, the checkin process copies the OP-ATOM AAF file to the same location that
you specified to hold the .spaaf files.
Configuring Interplay | Administrator and Interplay | Media Indexer to Manage AMA Media
104
Configuring Interplay | Administrator and
Interplay | Media Indexer to Manage AMA Media
The Interplay Administrator and Interplay Media Indexer work together to index and manage
AMA media. Starting with Interplay v3.2, the AMA metadata location you specify in the
Interplay Administrator is automatically set in the Media Indexer.
See the following topics:
•“Configuring the AMA Metadata Location” on page 104
•“Specifying the AMA Media Files Location” on page 106
Special configuration is required for third-party storage. See “Using Third-Party Storage for
AMA Media” on page 110.
Configuring the AMA Metadata Location
You need to determine a workspace on ISIS shared storage to hold the .spaaf files and AAF files
for AMA media. The following requirements apply to this workspace:
• All of the .spaaf and AAF files will be located under one top-level directory. Avid
recommends setting up a specific shared-storage workspace for the spaaf files. Do not add
.mxf files to this workspace.
• The workspace containing the .spaaf and AAF files must be accessible to the ISIS client on
the editing client. On Macintosh systems, the workspace must be mounted. Checkins will
fail if the workspace is not mounted. The workspace does not need to be mounted on
Windows systems.
• The editor using Media Composer must have write permission to this workspace.
This workspace is labeled “AMA Metadata Location (SPAAF)” in both the Interplay
Administrator and the Media Indexer. Starting with Interplay Administrator v3.2, if you set this
location in the Interplay Administrator, it is automatically set in Media Indexer.
To configure the AMA metadata location in the Interplay Administrator:
1. Log in to the Interplay Administrator tool and open the Server Hostname Settings view.
The following illustration shows the Server Hostname Settings view.

Configuring Interplay | Administrator and Interplay | Media Indexer to Manage AMA Media
105
2. In the “AMA Metadata Location (SPAAF)” text box, enter the location for the .spaaf and
AAF files. Enter the value as a full UNC path (on both Windows and Macintosh systems). In
the above example, the name of the ISIS System Director system is a51-wg1-sd1. A specific
workspace is set aside for the .spaaf files named spaaf. This location is automatically
provided to the Media Indexer and is displayed in the Interplay Media Indexer Web interface
(see “Specifying the AMA Media Files Location” on page 106.
3. Click Apply Changes.
To check the Interplay Media Indexer Web interface for the AMA metadata location:
1. Open the Interplay Media Indexer Web interface by typing the following in a browser
window:
http://<MI system name>:8888/mi/
where <MI system name> can either be the name of the system running the Interplay Media
Indexer or its IP address. The string “:8888” identifies the port that the Interplay Media
Indexer system uses for web communication.
2. Click the Configuration tab and then click the AMA Metadata Configuration tab.
The path displayed is the top level of the storage location for the .spaaf files and AAF files
created when you check an AMA clip into Interplay Production.
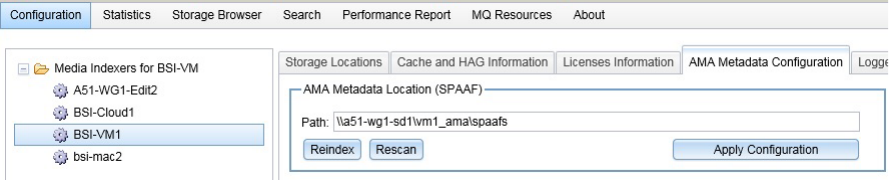
Configuring Interplay | Administrator and Interplay | Media Indexer to Manage AMA Media
106
The path that is displayed must match the path that you entered in the Interplay
Administrator. If it does not match, enter the UNC path as shown in the previous illustration
and click Apply Configuration.
Specifying the AMA Media Files Location
You need to specify the storage folder that holds the AMA media files so that Media Indexer can
identify the media files. How you specify the folder depends on the type of storage you use:
• For media stored on ISIS shared storage, use the following procedure.
• For media stored on third-party storage, see “Using Third-Party Storage for AMA Media”
on page 110.
nThe Interplay Media Indexer needs to know the location of the AMA media files but it does not
index those files. The Interplay Media Indexer indexes the related .spaaf files at the location
identified in “Configuring the AMA Metadata Location” on page 104.
To specify the location of the AMA media files for ISIS shared storage:
1. Open the Interplay Media Indexer Web interface by typing the following in a browser
window:
http://<MI system name>:8888/mi/
where <MI system name> can either be the name of the system running the Interplay Media
Indexer or its IP address. The string “:8888” identifies the port that the Interplay Media
Indexer system uses for web communication.
2. Click the Storage Locations tab.
The system displays the locations of .mxf media on shared storage as well as any previously
defined AMA storage locations. The following illustration shows three locations for Avid
media files and two locations for AMA media files (circled).
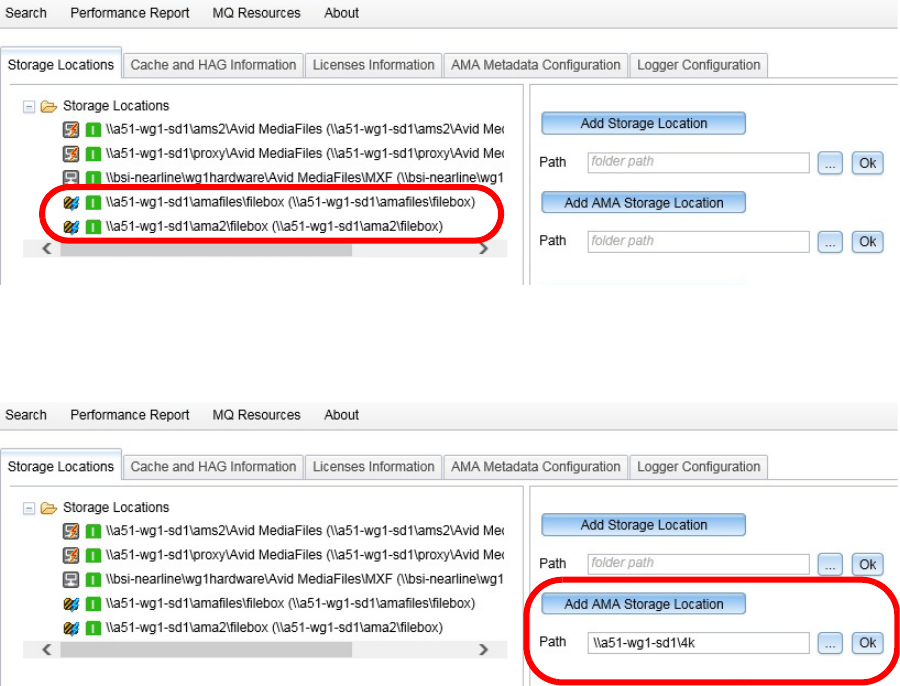
Configuring Interplay | Administrator and Interplay | Media Indexer to Manage AMA Media
107
3. Click the Add AMA Storage Location button.
The system displays a path dialog, a browse button, and an OK button.
4. Click the Browse button to navigate to the location of a folder containing AMA media on
shared storage. You can have multiple AMA media folders in different locations.
5. Click OK.
The AMA storage location appears in the list of storage locations.

Configuring Interplay | Administrator and Interplay | Media Indexer to Manage AMA Media
108
nDo not mix .mxf media files and AMA media files in the same storage location. Also, do not mix
.spaaf files and AMA media files in the same location.
Viewing Statistics about AMA Media
You can view information about AMA files using the Interplay Media Indexer Statistics page and
Storage Browser. Note that this information is not available until you check the AMA media into
the Interplay Production database.
To view storage statistics about AMA files:
1. Click the Statistics tab.
2. For comparison, open and (optionally) rearrange the following panes:
- Storage Statistics
- AMA Storage Statistics
- Storage Workspaces
- AMA Storage Workspaces
Interplay Media Indexer displays separate panes for .mxf files and AMA media files.

Configuring Interplay | Administrator and Interplay | Media Indexer to Manage AMA Media
109
Note that the Total size entries provided in the AMA Storage Workspaces window relates to
the total size of the .spaaf files associated with the AMA media files.
To obtain the total file count for the Interplay Media Indexer:
tAdd the Files value from the Storage Statistics section (top window in the example above)
and add the number of .spaaf files on the ISIS file system. Since the .spaaf files are all in one
workspace, you can use Windows OS tools to determine the number of .spaaf files that the
Interplay Media Indexer is monitoring.
Note that the Files count listed in the AMA Storage Statistics window shows the number of
AMA media files. It does not show the number of .spaaf files.
nA separate .spaaf file is created for every channel (track) in an AMA media file. This means that
if you check an AMA file with one video track and four audio tracks into Interplay Production,
you add five files to the Interplay Media Indexer file count.
Using the Storage Browser
Starting at Interplay v3.0, the Storage Browser window contains separate sections for MXF
media and AMA media.
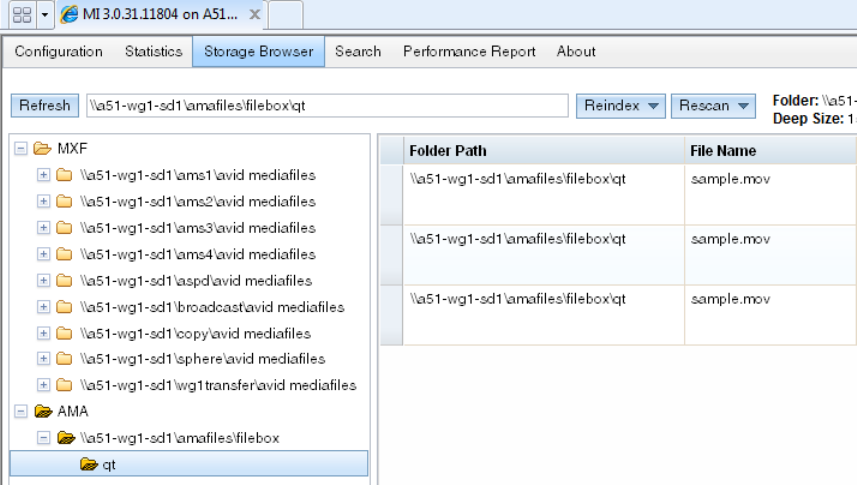
Using Third-Party Storage for AMA Media
110
To view information about AMA media in the Storage Browser:
1. Click the Storage Browser tab.
The Storage Browser window opens to show separate folders for MXF and AMA media.
You can use the storage browser to see how the AMA media files are organized. In this
example, the AMA files were copied to a subfolder on a workspace named amafiles.
To view the location of the associated .spaaf files, scroll over to the right in the window.
Using Third-Party Storage for AMA Media
Interplay v3.1 and later supports third-party (3rd party) storage for “parking storage” of AMA
material. Parking storage is often used to store AMA sources or other material where real-time
playback is not required. For example, parking storage is used as part of a Media | Director
workflow where real-time playback is not required and/or where high-density storage offers a
better value for large files that may need to be stored for an extended period.
A license is required to use third-party storage. A procedure in this section provides more details.
Note that in Interplay Access the network locator (file path) for an asset that is stored on
unlicensed third-party storage is shown by a path that uses the following format:

Using Third-Party Storage for AMA Media
111
//UNAVAILABLE/nnnn/filename
where nnnn is a variable four-digit number. The following illustration shows an example of how
this path is displayed in the Object Inspector.
A full path is shown if the system is properly licensed.
The third-party storage must be defined as a network share that is publicly accessible. It must
appear on the network as a UNC path. How a third-party storage and its UNC share path are
created on a network depends on the storage product and technology. The following procedure
describes how to configure a Windows storage device as a Windows share.
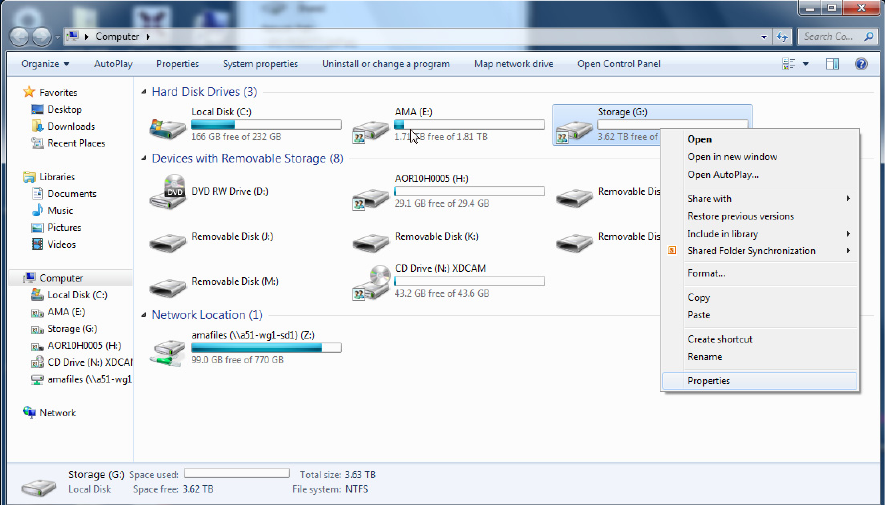
Using Third-Party Storage for AMA Media
112
To define a third-party storage share as a Windows share:
1. On the Windows desktop, right-click the storage location you want to use as third-party
storage and select Properties.
The Storage Properties dialog opens.
2. Select the Sharing tab.
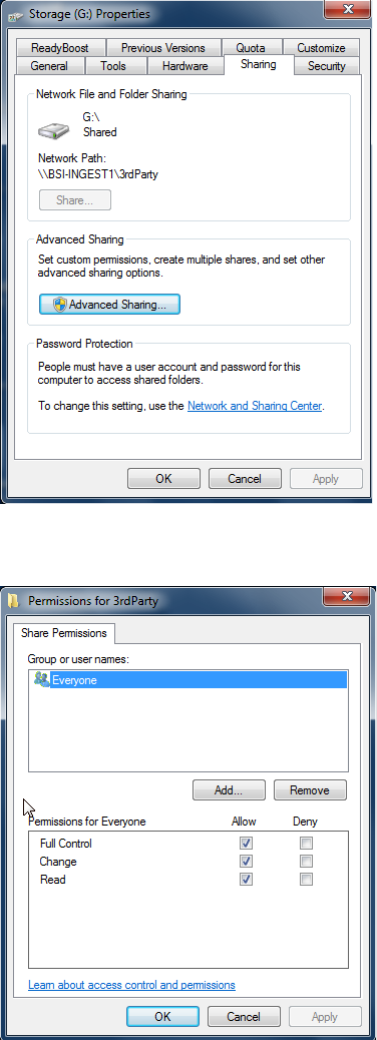
Using Third-Party Storage for AMA Media
113
3. Click Advanced Sharing. The Share Permissions dialog opens.
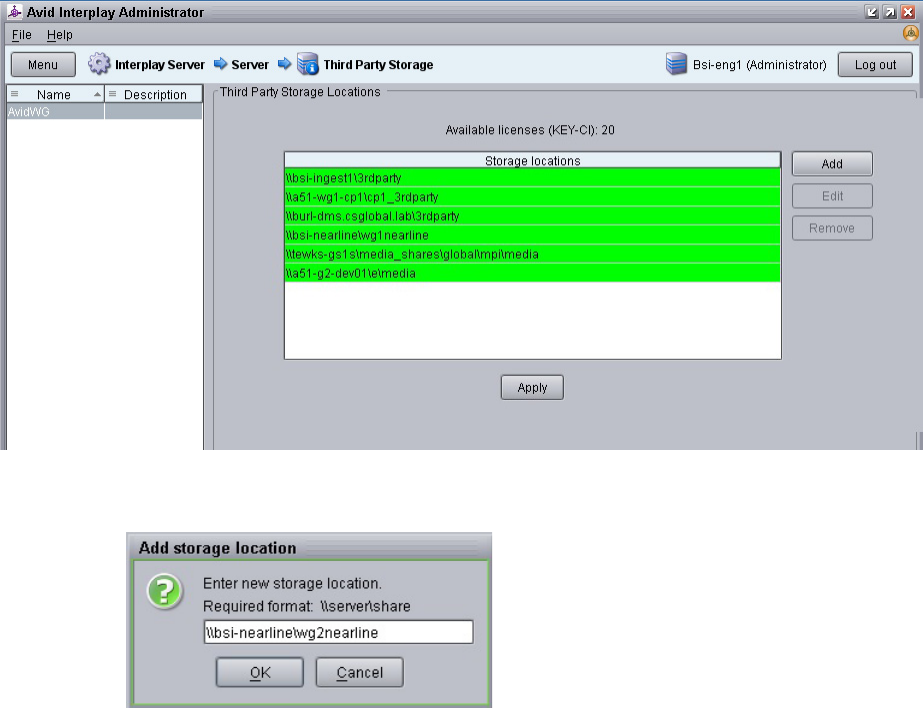
Using Third-Party Storage for AMA Media
114
4. Give Everyone full access to the share and click Apply and OK.
The share is ready to be added to the Interplay environment.
To configure the third-party storage share in the Interplay Administrator:
1. Purchase one or more Key-CI licenses from your Avid representative and add the licenses to
your Interplay system using the Licenses view in the Interplay Administration tool. You
need a license for each third-party location that you configure. See the Interplay System
Administration Guide for details on obtaining and installing a license.
2. Make sure the network share for the third-party license is properly configured. The previous
procedure describes how to create a Windows share.
3. Open the Third Party Storage view in the Server section of the Interplay Administrator tool.
4. Click Add, type the network share as a UNC path, and click OK.
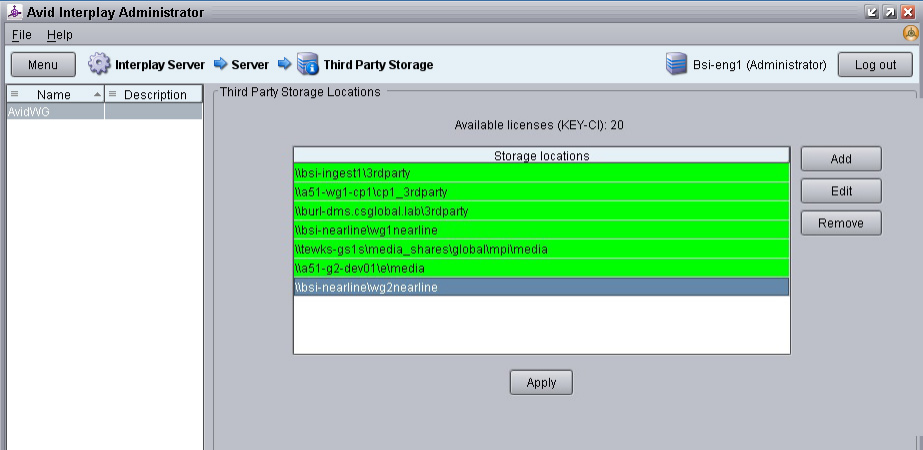
Using Third-Party Storage for AMA Media
115
The storage location is added to the list.
5. Click Apply.
The Interplay Administrator sends both the licenses and the storage information to the
Media Indexer. The following procedure describes how to check the storage location.
To check the third-party storage share in the Media Indexer:
1. Open the Media Indexer web interface in a browser as follows:
http://<MI system name>:8888/mi/
where <MI system name> can either be the name of the system running the Media Indexer or
its IP address. The string “:8888” identifies the port that the Media Indexer system uses for
web communication.
2. Click the Configuration button at the top of the window and click Storage Locations.
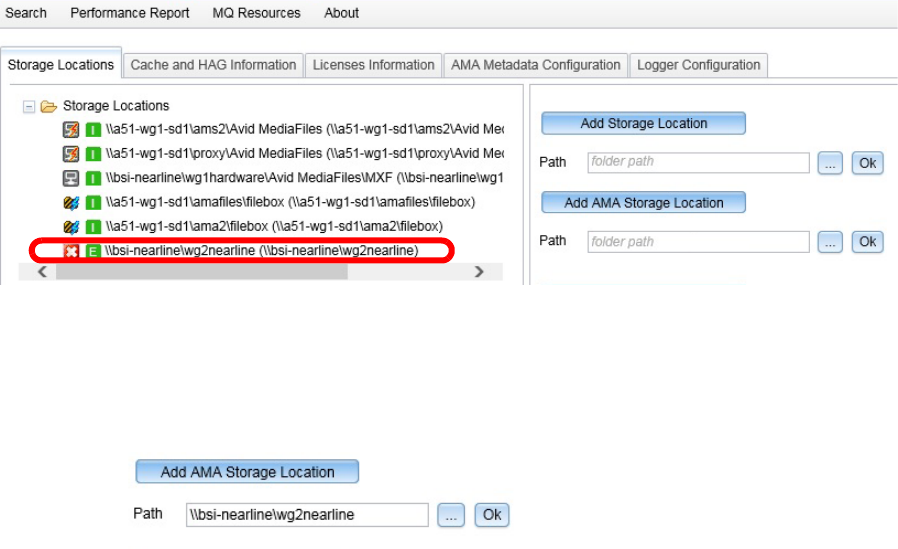
Viewing AMA Clips in Interplay | Access
116
The third-party storage location should be listed. If it is not, add it manually, as described in
the following step.
3. Click Add AMA Storage Location and add the network share as a UNC path. Then click
OK.
The third-party storage location is added to the list of storage locations.
Note that storage locations with a third-party license associated with them are designated
with a green E (stands for explicit license) icon. Other storage locations have an I
designation (implicit license).
You can also check information in the Licenses Information tab.
Viewing AMA Clips in Interplay | Access
After you check an AMA clip into Interplay Production you can search for or navigate to the clip
in Interplay Access. The following illustration shows an AMA clip in the Interplay Access
Object Inspector. Assets that only have AMA media are shown with a purple circle.
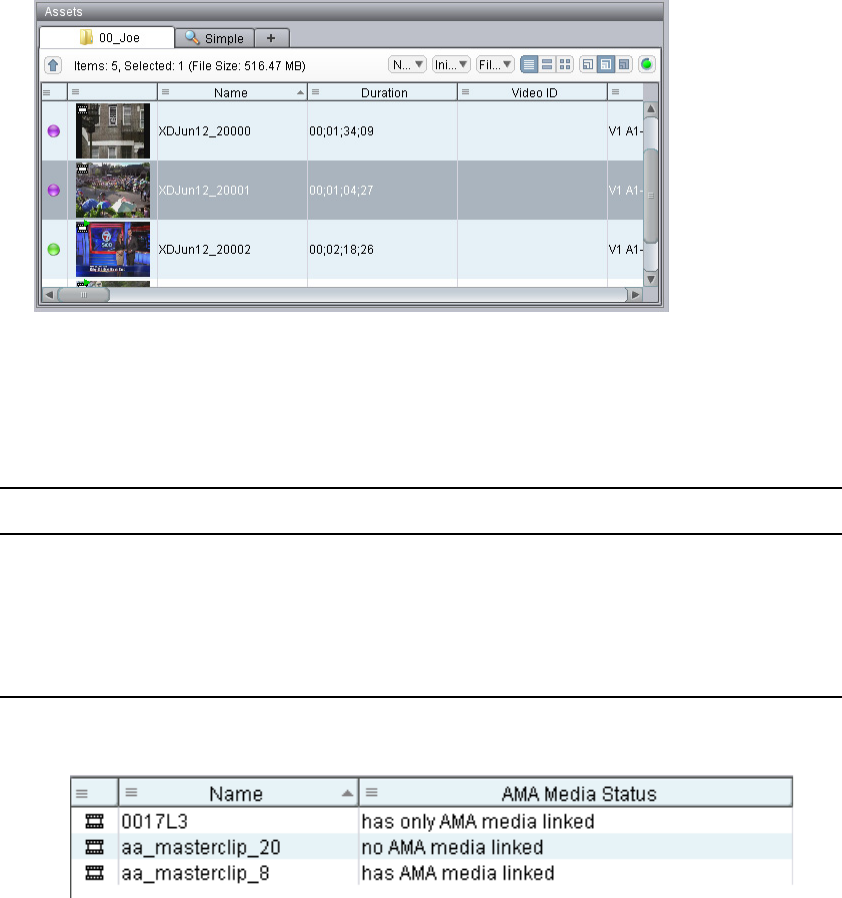
Viewing AMA Clips in Interplay | Access
117
The following information is specific to using Interplay Access with AMA material.
• The AMA Media Status column in the Assets view allows you to determine whether the
object you are looking at contains AMA material. The column displays one of the values
described in the following table.
The following illustration shows an example of each value.
• There are several new search criteria for an Interplay Access extended search, as described
in the following table.
Value Dot color Description
has AMA media linked Green The clip is linked to both AMA media and native
Avid media
has only AMA media linked Purple The clip is linked to AMA media, but is not linked to
native Avid media.
no AMA media linked Green The clip is not linked to AMA media.
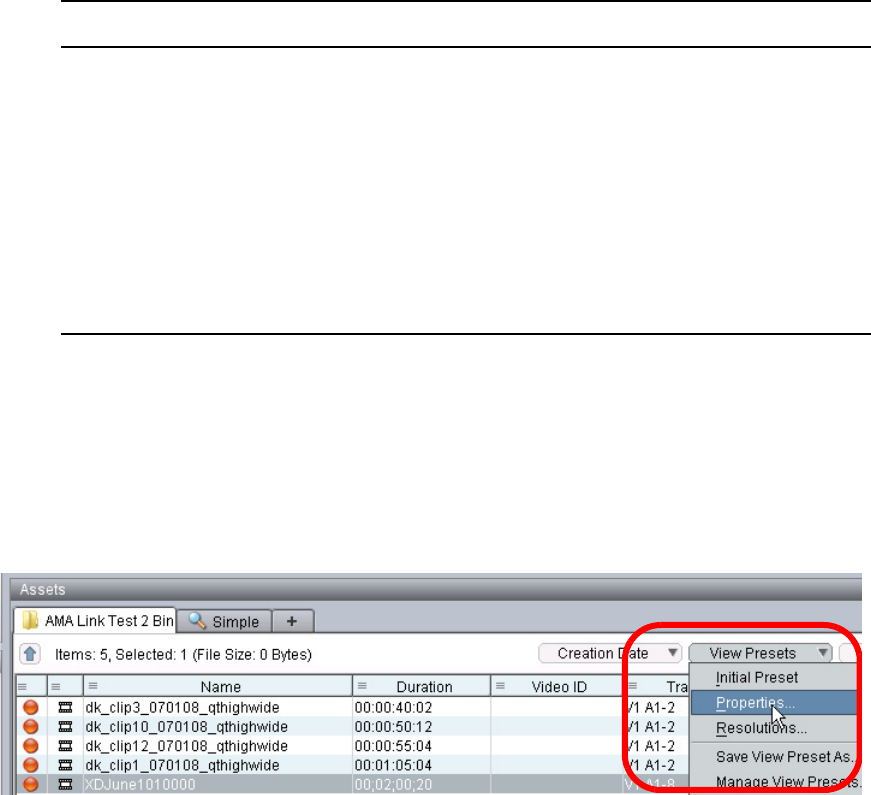
Viewing AMA Clips in Interplay | Access
118
To turn on the display of the AMA Media Status column and search fields in
Interplay Access:
1. Open the Interplay Administrator tool.
2. Open the Property Layout view in the Site Settings area.
3. Select the check box in all three columns for AMA Media Status and click Apply.
4. In Interplay Access, select Properties from the View Presets menu in the Assets view.
5. Select AMA Media Status and click Apply.
Criterion Description
has AMA media linked Search for clips linked to AMA media. These clips can include only
AMA media or both AMA media and native Avid media.
has native media linked Search for clips linked to native Avid media or both native Avid
media and AMA media.
has only AMA media linked Search for clips that are linked to AMA media but not to native Avid
media.
has native and AMA media linked Search for clips that are linked to both AMA media and native Avid
media.
does not have AMA media linked Search for clips that are not linked to AMA media.
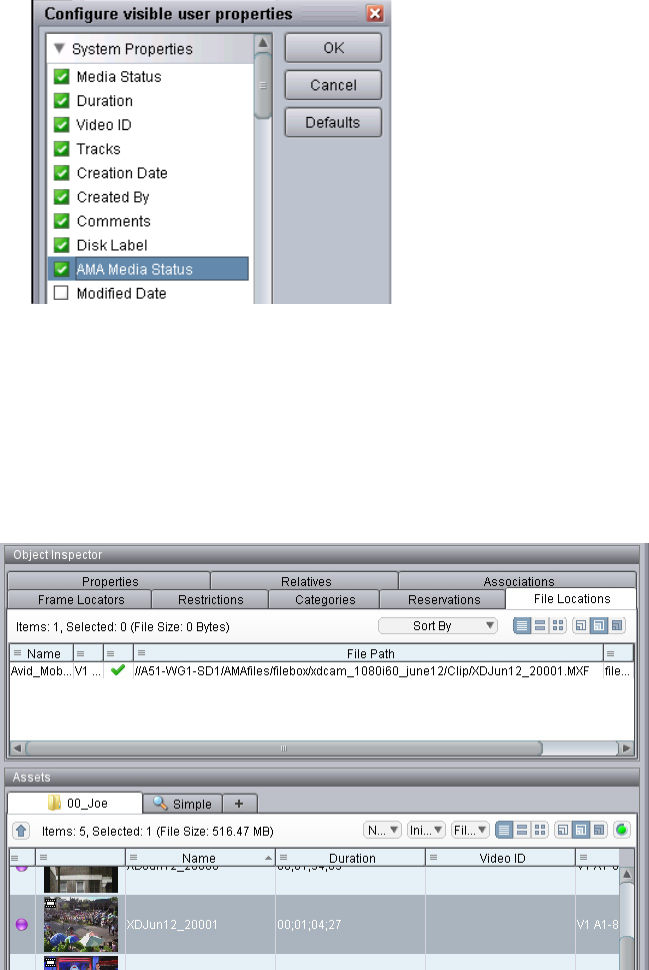
Viewing AMA Clips in Interplay | Access
119
The AMA Media Status column appears in the Assets view and now you can perform an
extended search for AMA Media Status values.
AMA Source File Locations in Access
The Interplay Object Inspector shows the location of the associated AMA source file in the File
Path column of the File Locations tab. The following illustration shows a clip that only has AMA
media associated with it.
The extension of the AMA source file depends on the AMA plugin used to create the file. For
example, QuickTime files have a .mov extension. Note that when you delete the AMA clip in
Access you delete only the reference to this source file.
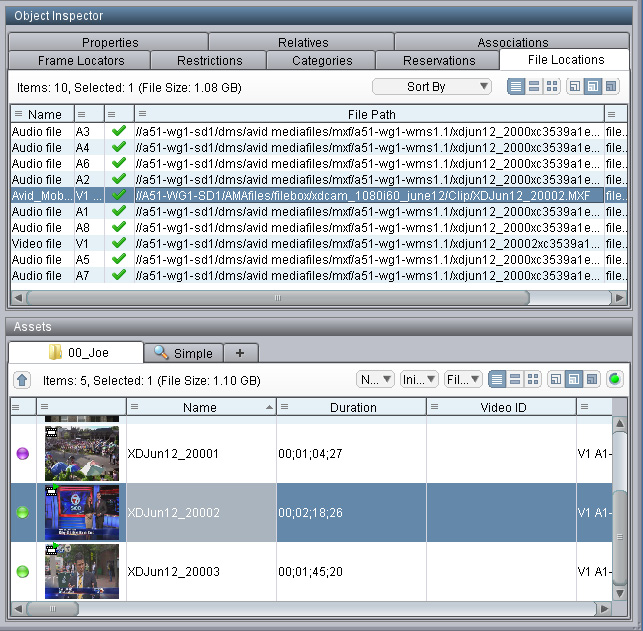
Viewing AMA Clips in Interplay | Access
120
The following illustration shows the file locations for a clip that has both AMA media and proxy
media. The AMA source file is highlighted. Note that the AMA media is stored in a separate
workspace (named AMAfiles in this example). Following this best practice helps you to organize
your AMA material.
Beginning with Interplay v3.1, there is an additional column in the File Locations tab named
Essence Type, which shows if the media file is AMA or not.
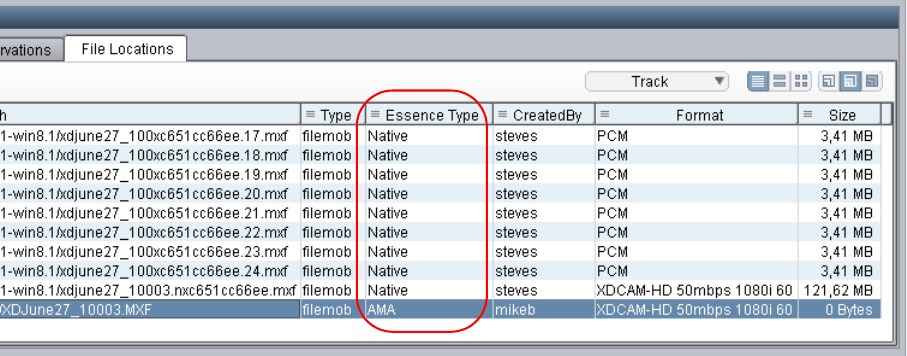
Deleting AMA Clips Using Interplay | Access
121
Deleting AMA Clips Using Interplay | Access
When you delete an AMA clip from the Interplay database, you delete the reference to the AMA
source file. This reference includes a number of .spaaf files, one for each track in the AMA
source file, and since v3.1 an AMA AAF file. For additional information on .spaaf files, see
“How Interplay | Media Indexer Works with AMA Material” on page 101.
The following illustration shows two clips selected for deletion. Both clips have green dots
meaning they are online. In this case the clips have associated AMA and native proxy media.
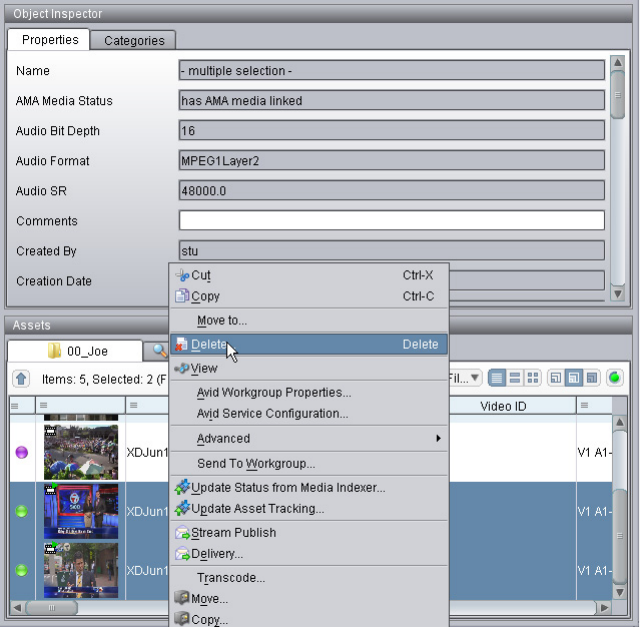
Deleting AMA Clips Using Interplay | Access
122
The following illustration shows the Delete dialog box for this example. It shows that three types
of objects will be deleted:
• Two master clips (database objects)
• 18 media files (native proxy media, not native AMA media)
• Two associated AMA references (.spaaf files)
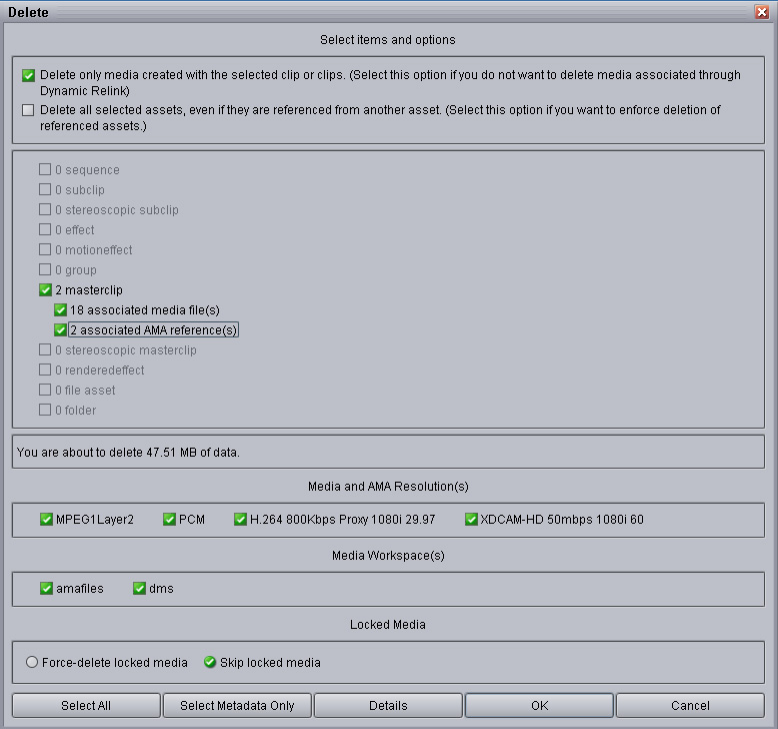
Resyncing AMA Media Files
123
nWhen you delete an AMA clip from the Interplay database the system does not delete the AMA
source files. It deletes only the database object and the associated .spaaf files.
Resyncing AMA Media Files
The Resync process, which you initiate from Interplay Access, synchronizes metadata contained
in Media Indexer with metadata contained in the Interplay Production database.
For Interplay Production v3.2, the Resync process has been extended to include resync of AMA
(Avid Media Access) media files. Resync works with Media Indexer and checks if the AMA
media files indexed in the MI (through their associated .spaaf files) are managed in the Interplay
database.
Resyncing AMA Media Files
124
nMedia Indexer v3.2 is required when using Resync from Interplay Access v3.2. This requirement
applies to resyncing both AMA media files and Avid media files.
You should run Resync for AMA media in the following cases:
• After restoring the database from backup. (This is also a case in which you should run
Resync for Avid media.)
• When upgrading from Interplay v3.0.x to Interplay v3.2. In this case, Resync adds file
locations to AMA assets created in v3.0.x.
nStarting with Interplay Production v3.1, a copy of the AAF file created by the AMA linking
process is copied to the same location as the spaaf files.
Less frequent reasons to run Resync for AMA media are:
• If the complete asset or AMA reference was deleted from the database, but for some reason
the .spaaf and AAF files could not be deleted (for example, because of a network issue).
• If the .spaaf and AAF files were manually copied to or deleted from the AMA metadata
location.
The Resync process for AMA media works as follows:
• If .spaaf files and an AAF file exist for AMA media, but a corresponding asset does not exist
in the database, Resync creates an new asset. This asset is checked into the Resync catalog
and can be moved to another folder.
• If only .spaaf files exist for AMA media (without an AAF file), but there is an asset in the
database (as is the case with assets checked in prior to Interplay Production v3.1), the media
file locations are added to the asset. The location of the media files is shown in the File
Locations tab.
• If only .spaaf files exist for AMA media (without an AAF file), and there is no asset in the
Interplay database, the .spaaf files are selected for deletion and the user is asked to confirm
the deletion.
nIf no .spaaf files exist, Media Indexer does not index the AMA media, and the Resync process has
no effect on the Interplay Production database.
To resync the Interplay database with Avid shared-storage workspaces that contain AMA
media:
1. Log in to Interplay Access with an Administrator account.
2. In the Asset tree, right-click the database and select Resync.
The Resynchronize Media dialog box opens.
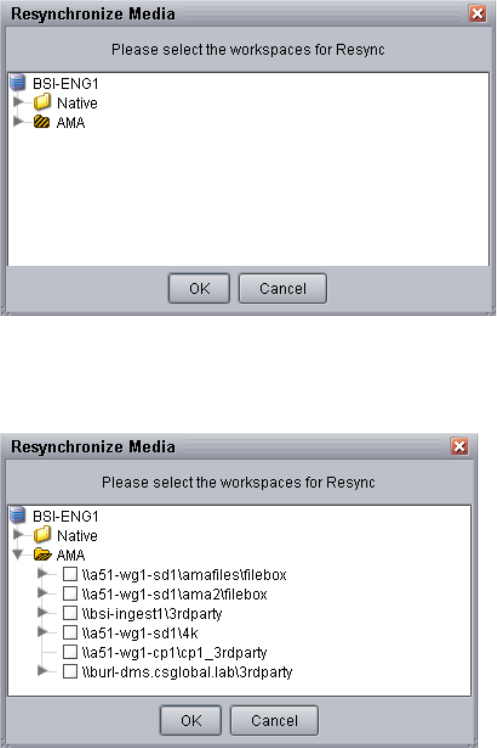
Resyncing AMA Media Files
125
3. Click the triangle next to the AMA folder.
All workspaces indexed by the Media Indexer are displayed.
4. Select the workspace or workspaces with which you want to resync. Click the triangle next
to the workspace name to view folders in the workspace. You can select one or more
individual folders or sub-folders.
Resyncing AMA Media Files
126
5. Click OK.
A dialog box displays the progress. If Resync discovers .spaaf files to be deleted for an
AMA media file, a message is displayed.
Click Yes to delete .spaaf files for this AMA media file, click “No” to preserve them, or click
“Cancel” to end the Resync process.
Select “Apply to all items” if you want to apply the action to any additional AMA media
files, then click Yes or No. If you do not select this option, a dialog box is displayed for each
set of .spaaf files.
nThe Resync process does not delete media.
6. When the Resync process is complete, click OK.
Any assets created during Resync are checked in and added to the Resync catalog.

6Sony XDCAM HD and XDCAM EX
End-to-End Workflow
Interplay v1.6 and greater supports an end-to-end Long GOP workflow for several of the Sony®
XDCAM™ HD and XDCAM EX formats and modes that are used at many broadcast sites. This
section describes the overall workflow and lists the limitations particular to the release. For a list
of supported formats (also known as operating points), see the Interplay Production ReadMe.
This chapter includes the following topics:
•MPEG-2 Long GOP Overview
•Supported File Formats for XDCAM HD and XDCAM EX Media
•Long GOP Workflows
MPEG-2 Long GOP Overview
MPEG (Motion Pictures Expert Group) is an ISO/IEC standards group that has defined a number
of standards for digital compression of audio and video signals. MPEG-2 is one of the standards
defined by the group. MPEG-2 defines a set of generic video and audio compression and
decompression technologies (codecs) that supports a wide range of SD and HD video
applications.
MPEG-2 codecs can employ either intra-frame compression (“I-frame only” as with IMX) or
inter-frame compression (“Long GOP” as with XDCAM HD and XDCAM EX). GOP stands for
the “Group of Pictures” that are compared during compression and decompression of the images.
A GOP contains several different types of compressed frames:
• I frames, which are compressed frames that do not depend on any frames around them. I
frames anchor the beginning of the GOP.
• P (predictive) frames and B (bidirectional) frames, which depend on the frames around
them.
You cannot decompress an isolated P or B frame because of their dependency on other frames.
This leads to some of the limitations associated with Long GOP as described in the following
section.
MPEG-2 Long GOP Overview
128
For an overview of MPEG-2 and other compression standards, see Symes, Peter. Digital Video
Compression. McGraw-Hill, 2003.
Long GOP Benefits and Limitations
Long GOP native workflows provide the following benefits in a broadcast environment:
• Efficiency: Lower data rates mean faster network transfer times and lower storage
(bandwidth and capacity) requirements.
• Compatibility: Many common ingest and playout devices employ Long GOP compression.
In a broadcast environment it is important to keep the Long GOP data stream intact as much
as possible throughout the workflows to reduce the number of time-consuming decode and
encode cycles.
Long GOP native workflows have the following limitations:
• Processing Times: Processing Long GOP image sequences takes more computational power
than I-frame-only image sequences, making some aspects of the workflow slower. For
example, often during the creation of a program for air, new frames must be created (for
example, visual effects), requiring decompression and recompression of the GOPs. It is
often impossible to avoid the time-consuming decompressing and re-compressing of the
Long GOP data stream. Scrubbing performance can also be affected because the frame that
you want to display may have to be generated from a number of surrounding frames.
• Image Degradation: In many cases, especially at lower data rates, Long GOP images might
degrade in visual quality very quickly as the stream is decompressed and then recompressed.
Many operations, such as visual effects rendering, can affect image quality. Rendering the
same media several times can increase the degradation. Even cuts-only editing of Long GOP
content can affect image quality around the edit points. For this reason, many content
creators prefer to use I-frame-only formats during program creation even if Long GOP
formats are used for distribution.
For example, if you perform a large amount of compositing or rendering, you should use
DNxHD resolutions for rendering. This creates I-frame only media and minimizes
degradation of the rendered media. In this way you will benefit from the storage and
bandwidth savings for your captured Long GOP material and only use the more
bandwidth-dependent resolutions for rendered media.
Many broadcasters feel the benefits of Long GOP compression outweigh the limitations,
especially for news production and on-air applications. When considered purely as a
transmission format, Long GOP requires considerably less bandwidth than an I frame format
with comparable picture quality.
Supported File Formats for XDCAM HD and XDCAM EX Media
129
Supported File Formats for XDCAM HD and XDCAM
EX Media
The following formats are associated with XDCAM HD and XDCAM EX media:
• MXF OP-ATOM: This is the Avid editing application native media format for XDCAM HD
and XDCAM EX material. This format stores each audio and video tracks as a separate file.
• MXF OP-1A: XDCAM HD devices store media in MXF OP-1A format. OP-1A files
include multiple tracks of audio and video sources that are interleaved into a single file. In
this document, XDCAM HD material is sometimes referred to as disk-based to differentiate
it from XDCAM EX (card-based) material.
• MP4: XDCAM EX devices store media in MP4 format. This is basically MPEG-2 material
with an MPEG-4 wrapper. This format also includes multiple tracks of audio and video
sources that are interleaved into a single file.
You can either work on the OP1-A and MP4 files directly on the Sony disk or card and then
consolidate to MXF OP-ATOM or use a variety of methods to convert the files to OP-ATOM
during the import or capture process. For details on working with these formats, see “Long GOP
Workflows” on page 129.
nSome XDCAM HD devices support a “Direct Access” mode in which the video and audio tracks
are presented as separate files in the interface rather than interleaved into a single file. These
separate files are not supported directly by Avid applications, although some third party utilities
do support them.
For a list of supported formats (also known as operating points), see the Interplay Production
ReadMe.
Long GOP Workflows
This section describes the basics of an end-to-end Long GOP workflow and lists the Avid
applications that are used in the process.
Capture Workflow
The capture workflow moves the Long-GOP material into the collaborative production
environment, including shared and local storage and Interplay Production asset management. All
incoming media is rewrapped as MXF OP-ATOM media files. Audio is uncompressed PCM.
When using AirSpeed Multi Stream together with Interplay Low Res Encode to create a dual
ingest, the Low Res Encode device creates compressed MPEG-1 Layer 2 audio proxies.
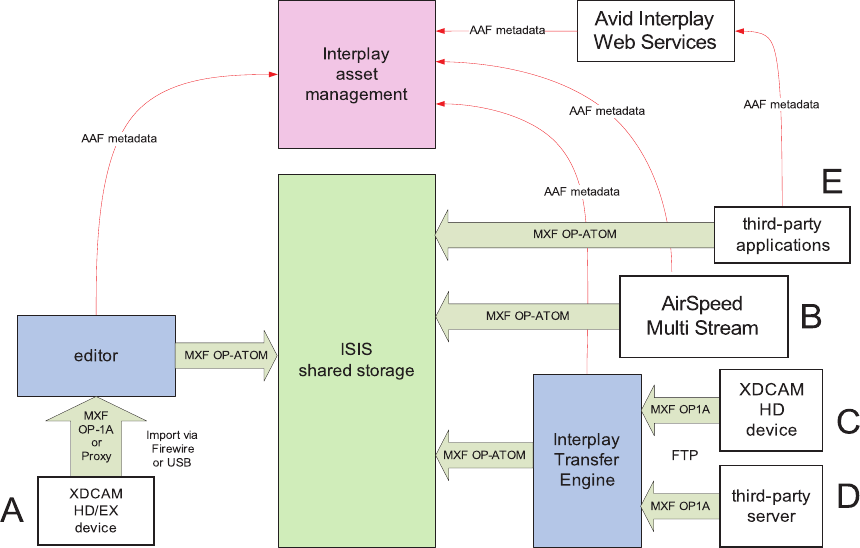
Long GOP Workflows
130
The following illustration shows four Long GOP ingest paths.
The ingest paths in the illustration are marked with the letters A through E. The following
sections describe the ingest paths:
Path A. Editor Import Directly from Sony XDCAM HD or EX Device
This path uses the following connections:
• XDCAM HD (disk based) Firewire or USB
• XDCAM EX (card based) USB only
XDCAM HD devices store media as MXF OP-1A interleaved files and XDCAM EX devices
store media as MP4, also with interleaved files. You have two choices for capturing XDCAM
HD and XDCAM EX media:
• Use the Avid Media Access (AMA) Workflow. This method allows you to work directly
with the native files on the XDCAM HD disk or XDCAM EX card. The files open in a bin
on your Avid editing application. You can create sequences with the media or select the clips
you want to capture. When you are ready to bring the files into the Interplay environment,
Long GOP Workflows
131
select the sequence or clips and use the Consolidate command to create new OP-ATOM
media files. The Consolidate command copies the new files to shared storage and performs a
check-in to Interplay Production.
You can also copy the native files from the disk or card directly to a folder on shared storage
and work with them there before you edit the files and perform the consolidation. This frees
up the editor from the process of copying the XDCAM data from the cards. For example, a
cameraman can copy the contents of several XDCAM cards or disks to shared storage and
then the editor can edit and consolidate the material at a later time. In this workflow, copy the
files to a workspace or folder that is not monitored by the Interplay Media Indexer that
monitors shared storage. The Interplay Media Indexer only supports the OP-ATOM files
that are created when you perform a consolidation.
• Import the files using the “Import and Export Workflow” method as described in the Avid
editing application Help.
- For XDCAM HD (disk-based) files, import the MXF OP-1A files into the Avid editing
application. During the import process the editing application converts the files to MXF
OP-ATOM.
- For XDCAM EX (card-based) files, use a Sony application named ClipBrowser to
convert the MP4 files to OP-1A. Then import the OP-1A files into the Avid editing
application or drag the clip to a bin. During the import process the editing application
converts the files to MXF OP-ATOM.
- You can also use the ClipBrowser application to convert XDCAM EX files directly to
MXF OP-ATOM files and AAF metadata files. In this case, copy the OP-ATOM files to
the Avid MediaFiles folder on a shared storage workspace and drag the AAF file to a
bin.
In AMA and “Import and Export” methods, the import or consolidate operation writes the files
to shared storage and performs a check-in to Interplay via AAF metadata. Both of these
workflow methods are described in the Help for your Avid editing application. See “File Based
Media” in the Help.
nThe Import and Export method allows you to import the proxy media and high resolution media.
The AMA method only allows you to work with high resolution.
For some Import and Export workflows, you might want to import the proxy media first so you
can start editing. Once you create your sequence, you can use the batch import function to import
only those portions of the high-resolution clips needed for your sequence.
For other Import and Export workflows, you might want to import the proxy media to an editing
workstation, and then separately import the high-resolution media to Avid shared storage using
Interplay Transfer. This process also checks the associated AAF metadata into the Interplay
Long GOP Workflows
132
database. Your Avid editing application maintains the connection between the proxy media and
the high-resolution media, so you can relink the edited clips at any time to the high-resolution
master clips in an Interplay environment.
Path B. Ingest Through AirSpeed Multi Stream
The AirSpeed Multi Stream server performs the following operations:
• Encodes the incoming video to MXF OP-ATOM files
• Writes the new media files to shared storage
• Performs a check-in to Interplay Production through AAF metadata
The Airspeed Multi Stream also supports the following Interplay Production features:
• Dual ingest with Avid Low Res Encode
• Frame Chase Editing via Interplay Transfer.
For additional information, see the Avid AirSpeed Multi Stream Installation and User’s Guide.
For information on Frame Chase Editing, see Using Frame Chase Editing.
Paths C. and D. Interplay Transfer Ingest from XDCAM Device or Third-party Servers
that Support FTP
The Interplay Transfer Engine performs the following operations:
• Pulls the media from the device through Generic FTP and splits it into separate MXF
OP-ATOM media files
• Writes the files to shared storage
• Performs a check-in to Interplay Production through AAF metadata
Paths C and D have the following limitations:
• In the case of a third-party server, the server must support MXF OP-1A at the required rates
and formats. As of this writing, Omneon devices have been qualified for this operation. See
the Interplay Production ReadMe for the latest list of qualified devices.
• XDCAM EX devices do not have FTP capability, therefore EX is not supported through this
path
For additional information, see the Interplay Transfer Setup and User’s Guide.
Long GOP Workflows
133
Path E. Third-party Applications that Support the Interplay Web Services API
This path applies to third party applications that take advantage of the Interplay Web Services
application programmer interface (API). The third party application performs the following
tasks:
• Create separate MXF OP-ATOM media files and AAF metadata files.
• Write the media files to shared storage
• Use the Interplay Web Services to perform a check-in to Interplay Production through AAF
metadata
For additional information, see the documentation for your third party application.
Editing Workflow
No new or modified editing features are required for an end-to-end workflow. However, Avid
editing applications now allow full media creation and playback support for all of the specified
formats, rates, and modes. This includes the following support:
•Video mixdown
• Consolidation
•Render
•Transcode
• Graphic and Title creation
For information on editing with XDCAM and XDCAM EX material, see “File Based Media” in
the Help for your Avid editing application.
If you use a lot of compositing or rendering in your workflow, consider rendering to one of the
DNxHD formats. For more information, see “Long GOP Benefits and Limitations” on page 128.
Output Workflow
The output workflow sends the finished product of the edit back to a broadcast recording device
or to a playback server. In this workflow, the editing application creates a single MXF OP-1A
media file that is a flattened representation of the edited sequence. This requires the editing
application to perform all necessary Long GOP editing, rendering, and multiplexing of streams.
The playback device is handed a single integrated stream in the desired MPEG-2 format. The
audio is uncompressed PCM.
The following illustration shows three Long GOP output paths.
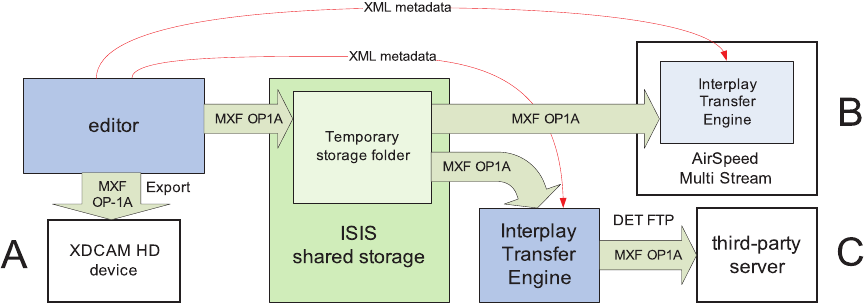
Long GOP Workflows
134
nThe FTP transfer to the third party device does not use Generic FTP.
The output devices in the illustration are marked with the letters A through C. The following
sections describe the output paths:
Path A. Editor Export to XDCAM HD Device
The XDCAM HD device mounts on the system using Sony provided drivers, and appears to the
Avid editing application as a standard volume. The editing application writes the MXF OP-1A
file directly to the device.
nThis release does not support export to XDCAM EX devices.
nYou cannot export Long GOP media as QuickTime Same as Source or QuickTime Reference. If
you want to use Long GOP material in an application such as Adobe After Effects, first
transcode the media to a DNxHD format.
Paths B. and C. Playout Through AirSpeed Multi Stream or Third-party Server
The following steps describe the workflow for Paths B and C:
• The editor selects a sequence in a bin and chooses the Send To Playback command.
• The editing application performs the following operations:
- If necessary, perform an audio mixdown
- If the sequence contains any mixed resolutions, perform a transcode operation.
- Generate a temporary MXF OP-1A clip and writes it to a Temp folder on shared storage.
The application automatically selects a Temp folder on the top level of the workspace
with the most free space.
Long GOP Workflows
135
- Send an XML file describing the clip to an Interplay Transfer Engine. The XML file
contains the shared storage location and the target location.
• The Interplay Transfer Engine performs the following operations:
- Initiate an FTP transfer of the temporary MXF OP-1A clip file to the target location.
nThis step does not use Generic FTP. This Interplay Transfer step is simply a file move operation.
The frames are not published to the DHM interface.
- Delete the temporary clip from the shared storage system after the transfer is complete.
For AirSpeed Multi Stream transfers, the Transfer Engine runs as a separate process on the
AirSpeed Multi Stream server. For third-party servers, a separate Transfer Engine server is
required.
The editing application writes the temporary file to a Temp folder at the top level of the
workspace with the most free storage space. Since the Interplay Administrator typically
configures Interplay Media Indexers to monitor only the Avid MediaFiles folder on a
workspace, the Interplay Media Indexer will not be aware of the files in the Temp folder.
Once the Transfer Engine has finished the transfer, it deletes the clip from the Temp folder
on shared storage. In an AirSpeed Multi Stream Studio configuration, several servers might
need to transfer the same clip. In this context, the deletion of clips from the temporary folder
is coordinated between the servers in the configuration.
If the export operation fails, the applications delete the file from the Temp folder as follows:
- If the operation fails during the export from the Avid editing application, the editing
application deletes the file from the Temp folder.
- If the operation fails during the FTP transfer, the Interplay Transfer application deletes
the file from the Temp folder and displays the status in the Interplay Transfer Status
window.
For additional information, see the Interplay Transfer Setup and User’s Guide.
Performance Considerations
When the editing application performs the Send to Playback operation, it performs a mixdown
and transcode if necessary. The mixdown and transcode are typically performed in real time or
less depending on the complexity of the sequence. See the Interplay Production ReadMe for
details on any limitations associated with the release.
Long GOP Workflows
136
Long GOP Sequences Not Saved in Sent to Playback Folder
Long GOP OP1a sequences that are sent to playback are not copied to the Interplay Access Sent
to Playback folder. Interplay Transfer, which performs the send to playback, requires AAF
metadata to perform checkins to Interplay Access. In an OP1a transfer, Interplay Transfer does
not receive AAF metadata. Instead, it receives the path to an OP1a media file.
Workflow for Background Processing of Long GOP Splicing and
Transferring of Long GOP OP1a Media
This section explains the portion of the Long GOP workflow that can be handled by the Interplay
STP Encode service instead of the Avid editing application.
The STP Encode service provides background processing that off loads the time-consuming
processes involved in Long GOP OP1a exporting and transferring from an Avid editing
application. Before you can use the STP Encode service, the workgroup needs an FTP Server
profile and the STP Encode provider must be registered with the Interplay Production Services
Engine.
nIf an STP Encode service is not available, a send to playback request is handled in the
foreground by the Avid editing application.
Best practices for when to use the STP Encode service:
• Use foreground send to playback processing (no STP Encode service)—when sending short
or urgent sequences to a playback device
• Use STP Encode service for background processing—when sending long or non-urgent
sequences to a playback device
nPerforming the Long GOP splicing in the background might not improve on the time it takes to
run the process in the foreground. However, by using the background process, you can continue
to work with the Avid editing application for other tasks.
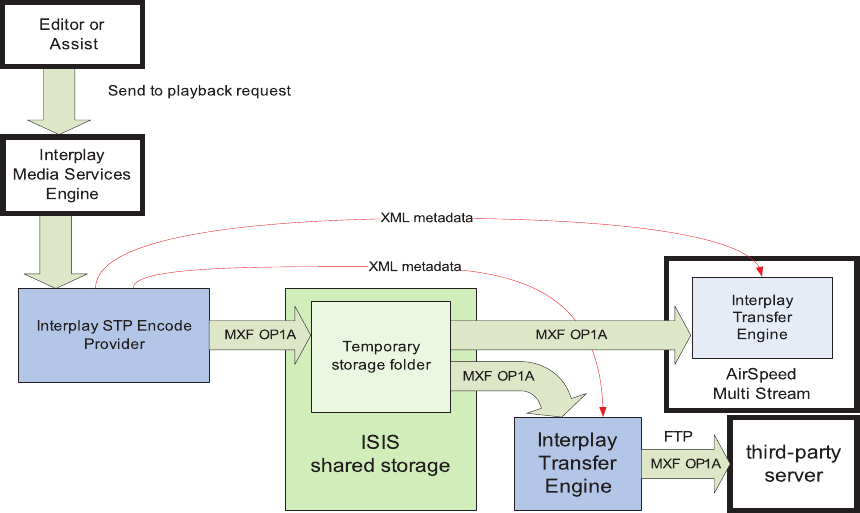
Long GOP Workflows
137
The following steps describe the workflow for playout through AirSpeed Multi Stream or a
supported third-party server:
• The editor selects a sequence in a bin and chooses the Send To Playback command.
• The editing application performs the following operations:
- If necessary, performs an audio mixdown.
- If the sequence contains any mixed resolutions, performs a transcode operation.
- Exports the metadata for the sequence composition as AAF file to shared storage in a
Temp folder.
- Submits an STP Encode service job for the sequence composition. The STP Encode
service exports the MXF OP1a media and sends the appropriate system request to
transfer it to the target playback device.
- All audio effects are pre-rendered by the Avid editing application before the sequence is
exported and transferred using the STP Encode service. The Interplay STP Encode
service can render real-time video effects. However, you have to pre-render any static
video effects before exporting the sequence as an STP Encode job.
Long GOP Workflows
138
• The Interplay STP Encode provider performs the following operations:
- Generates a temporary MXF OP1A clip and writes it to a Temp folder on shared
storage. The application automatically selects a Temp folder on the top level of the
workspace with the most free space.
- Sends an XML file describing the clip to an Interplay Transfer Engine. The XML file
contains the shared storage location and the target location.
• The Interplay Transfer Engine performs the following operations:
- Initiates an FTP transfer of the clip to the target location.
- Deletes the temporary clip from the shared storage system after the transfer is complete.
For AirSpeed Multi Stream transfers, the Transfer Engine runs as a separate process on the
AirSpeed Multi Stream server. For third-party servers, a separate Transfer Engine server is
required.
The STP Encode provider writes the temporary file to a Temp folder at the top level of the
workspace with the most free storage space. Since the Interplay Administrator typically
configures Interplay Media Indexers to monitor only the Avid MediaFiles folder on a
workspace, the Interplay Media Indexer is not aware of the files in the Temp folder.
nIn general, you should make sure that your Interplay Media Indexers do not monitor entire
workspaces. They should point to the specific Avid MediaFiles folders that you want to monitor.
After the Transfer Engine has finished the transfer, it deletes the clip from the Temp folder
on shared storage. In an AirSpeed Multi Stream Studio configuration, several servers might
need to transfer the same clip. In this case, the deletion of clips from the temporary folder is
coordinated between the servers in the configuration.
If the export operation fails, the applications delete the file from the Temp folder as follows:
- If the operation fails during the export from the STP Encode provider, the STP Encode
provider deletes the file from the Temp folder.
- If the operation fails during the FTP transfer, the Interplay Transfer application deletes
the file from the Temp folder and displays the status in the Interplay Transfer Status
window.
For additional information on STP Encode, see the Interplay Production Services Setup and
User’s Guide. For additional information, see the Interplay Transfer Setup and User’s
Guide.
nLong GOP OP1a sequences that are sent to playback are not copied to the Interplay Access Sent
to Playback folder. Interplay Transfer, which performs the send to playback, requires AAF
metadata to perform checkins to Interplay Access. In an OP1a transfer, Interplay Transfer does
not receive AAF metadata. Instead, it receives the path to an OP1a media file.

7720p MultiRez Workflow
This chapter describes a 720p MultiRez workflow. It is similar to other MultiRez workflows
except that it always requires a transcode operation to create the low-res proxy.
This document covers the following topics:
•Overview of the 720p MultiRez Workflow
•Editor MultiRez Workflow for 720p
•720p MultiRez Workflow Components
•Setting Up the Production Services Profiles for a 720p MultiRez Workflow
Overview of the 720p MultiRez Workflow
Interplay v2.0 supports low-res proxy media for 720p high-res media. The supported resolutions
are as follow. AVCI stands for AVC intra-frame.
In a MultiRez workflow a media manager or Interplay administrator archives most of the
high-res material to a robotic tape library and maintains a low-res version online. For example, a
sports station may capture high res media for entire sporting events with a duration of three or
four hours each. After archiving, the media manager deletes the online high-res material and
maintains the low-res material online. The low-res material is stored on line partly to allow
editors to work with it and partly as a reference for the material in the archive.
The following illustration shows the main stages of the workflow.
Format Resolution Avid Editor Interface Name
NTSC 720p/59.94 (H.264) AVCIBP-BLL3.0 60
PAL 720p/50 (H.264) AVCIBP-BLL3.0 50
Editor MultiRez Workflow for 720p
140
The above illustration shows two methods for restoring the high-res material. For example, if the
media manager gets a request for the entire game played on 6/12/09, he or she can use Interplay
Access to search for it and restore the entire clip from the archive. An editor can also search for
the clip in the online database and begin working directly with the low-res version. After the
editor finishes the sequence, he can perform a partial restore and restore only the portions of the
game that are in the sequence, rather than restoring the entire sporting event from archive.
Editor MultiRez Workflow for 720p
The editor can begin working with the media as soon as it is transcoded to the low-res proxy. In
fact, the archiving and deleting of the high-res material can go on in the background while the
editor is working. This section describes the editor’s portion of the workflow. The details of
transcoding, archiving, and restoring are covered later in the chapter. See “Working with a
MultiRez Clip in the Editor and Performing a Partial Restore” on page 140.
Working with a MultiRez Clip in the Editor and Performing a Partial
Restore
This section describes the following topics:
• Opening a 720p project and checking out the clip
• Setting Dynamic Relink to work with the low-res proxy
• Performing a partial restore to restore the portions of the clip used in the sequence.
• Using Dynamic Relink to start working with the high-res material.
Capture 720p HD media
Transcode to 720p proxy
Editor or
Interplay Capture
Editor or Interplay Access
Interplay Access
Archive the high-res
media and delete
high-res from online
shared storage
Search for clips in order
to restore from archive
Work with low-res proxy
in the editing application
Editor
Interplay Access Restore clips from the
archive and make
available to editors
Perform a partial restore
to restore only the
portions used in the
sequence
Editor or Interplay Access
Interplay Access
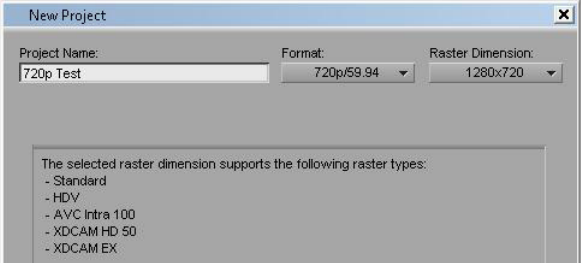
Editor MultiRez Workflow for 720p
141
To set up a 720p project:
1. When you create the project, make sure it supports the resolution you want to use. For
example, the following illustration shows the Project selection dialog box used in this
example.
To check out the clip and set Dynamic Relink:
1. Select Tools > Interplay Window.
2. Locate the clip in the Interplay Window and drag it to the bin.
The following illustration shows the clip in the Interplay window and the bin. Notice that the
clip has been transcoded and both the high-res and low-res are online.
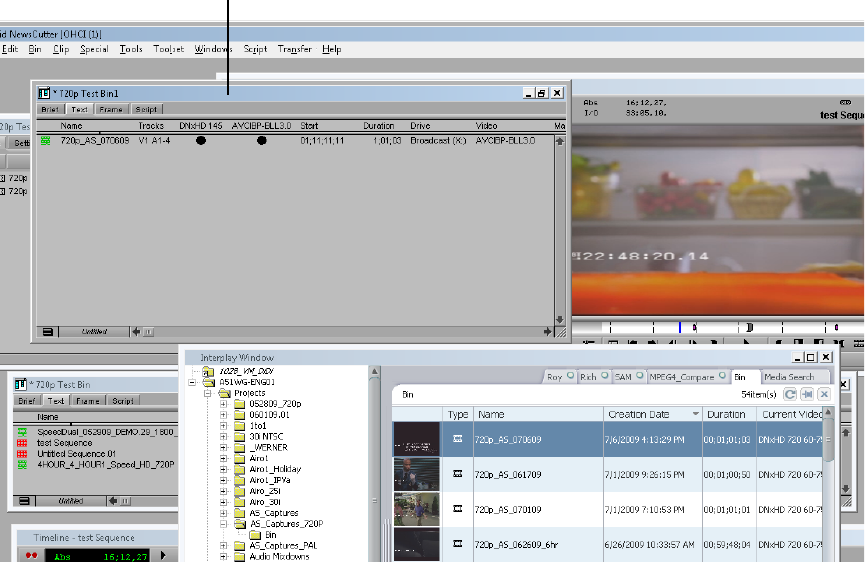
Editor MultiRez Workflow for 720p
142
3. Open the Dynamic Relink dialog box and set the working resolution to the low-res proxy.
The following illustration shows the Dynamic Relink values used in this example to link to
the low-res media.
high-res and low-res media is online
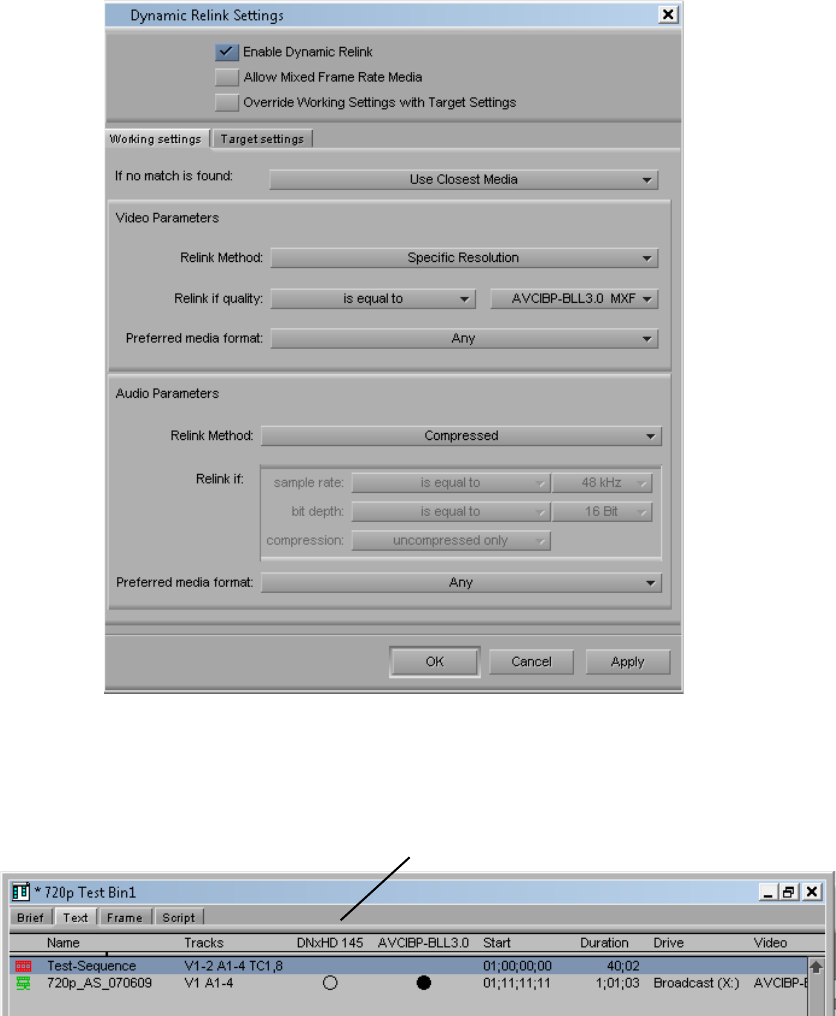
Editor MultiRez Workflow for 720p
143
4. Edit the low-res media into a sequence.
The following illustration shows the bin after the sequence is created. Notice that at this
point the high-res material has been deleted and is showing completely offline.
high-res has been deleted and is completely offline
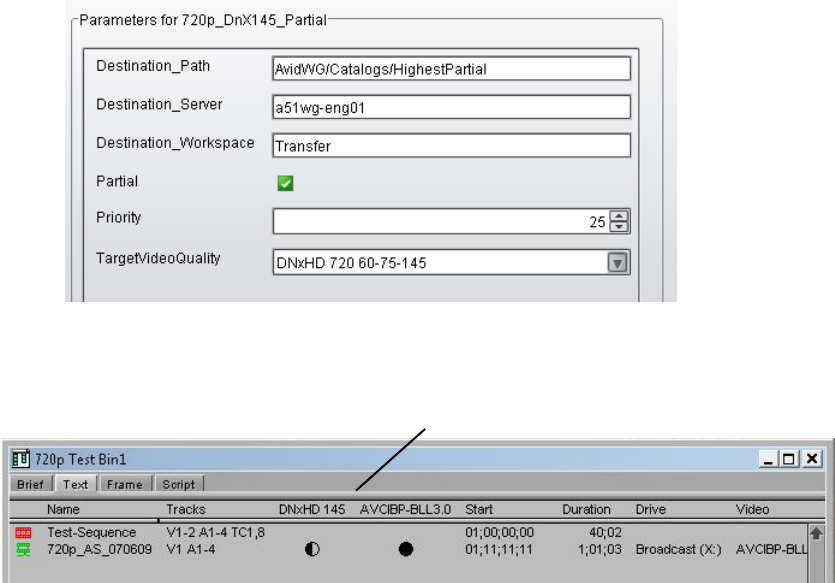
Editor MultiRez Workflow for 720p
144
5. When you are finished editing the sequence, right-click the sequence in the bin and select
Restore. Select a profile that is set up to perform partial restore. The following illustration
shows the Restore profile used in this example.
If the profile that you choose is set up to perform partial restores, the application restores
only the portion of the clip that is in the sequence.
The following illustration shows the bin after the partial restore operation is completed. The
high-res media is now partly online.
6. Open the Dynamic Relink dialog box and set the working resolution to the high-res version.
The following illustration shows the Dynamic Relink values used to link to the high-res
video and audio in this example. This is linking to a specific resolution. You could also link
to the highest available resolution.
After partial restore, high-res is partly online
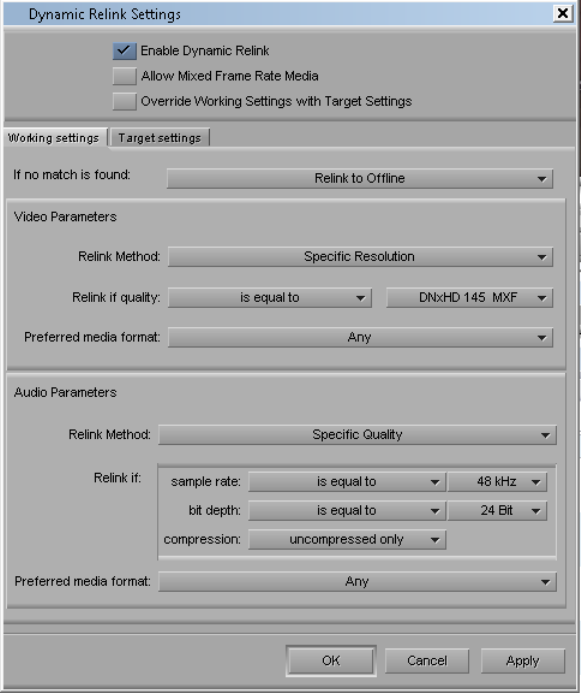
720p MultiRez Workflow Components
145
7. Now you can work with the restored high-res material.
720p MultiRez Workflow Components
The following topics describes the different aspects of the 720p proxy workflow:
•Capturing High Res 720p Material
•Transcoding to 720p Proxy
•Archiving the High Res 720p Material
•Deleting the High Res Media
•Searching for and Restoring High Res Master Clips
•Performing a Partial Restore
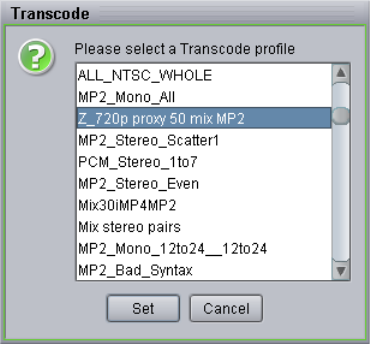
720p MultiRez Workflow Components
146
Capturing High Res 720p Material
You can capture 720p high-res material directly from the editing application or using
Interplay Capture. This example assumes that you are capturing DNx145 720p/59.94 media. For
additional information, see the following:
• For information on capturing from within the Avid editing application, see the editing
application Help or the Basics Guide for your editing application.
• For information on using Interplay Capture, see the Interplay | Capture User’s Guide.
Transcoding to 720p Proxy
Transcoding is the only way to obtain 720p proxy material. You have the following choices for
transcoding:
• Right-click the clip within the Avid editing application, select Avid Interplay Production
Services > Interplay Transcode Service and choose a profile.
nThe editor Consolidate/Transcode operation does not create the 720p proxy for this release.
• Right-click the clip within Interplay Access and select Transcode.
• Set up an Auto Transcode folder in Interplay Access and drag and drop clips to the folder.
For additional information, see the Interplay Production Help or the Interplay Production
Services Setup and User’s Guide.
To transcode a clip from within Interplay Access:
1. Right-click the clip in Interplay Access and select Transcode.
The Transcode profile dialog box opens.
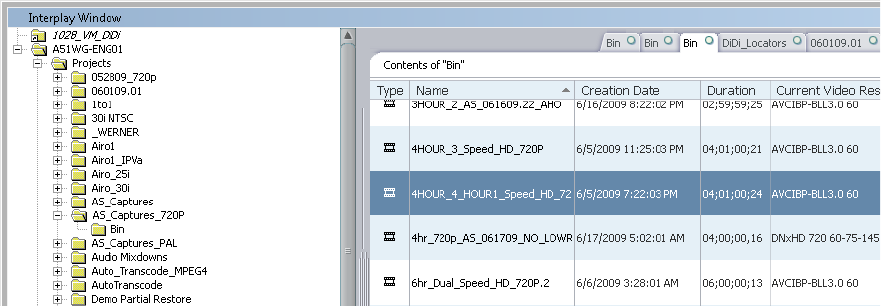
720p MultiRez Workflow Components
147
2. Select the profile and click Set.
The Transcode service transcodes the clip and stores the media according to the instructions
in the profile. The new media is associated with the original clip metadata. The following
illustration shows the low-res proxy in the Interplay Window. You can see that the current
resolution for the clip is AVCIBP-BLL3.0.60. This is the Avid editing application
representation for 720p/59.94 proxy media.
To begin working with the media, drag it to an Avid editing application bin and modify your
Dynamic Relink settings to use the low-res proxy as your working resolution. See “Editor
MultiRez Workflow for 720p” on page 140.
Archiving the High Res 720p Material
You can use Interplay Access or the Avid editing application to archive the high-res material:
Both techniques use a Production Services profile as described in “Archive Profile” on page 160.
nYou can also set up an Auto Archive folder and use Interplay Access to drag and drop files to
archive into the folder. For additional information, see the Interplay Production Services Setup
and User’s Guide.
To archive the high-res material:
1. Start Avid Interplay Access.
2. Select the asset that you want to archive from the online database.
3. Select Tools > Archive or right-click the asset and select Archive.
The Archive dialog box opens.
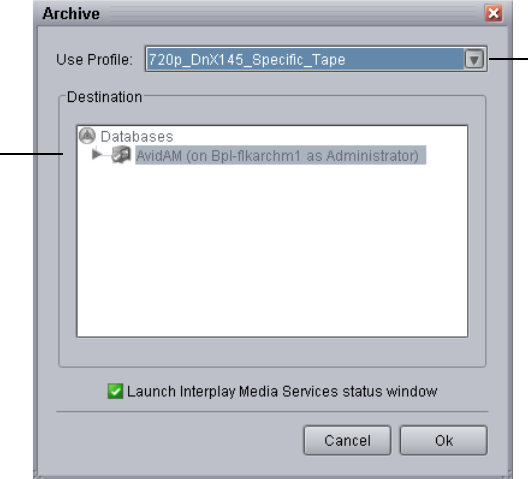
720p MultiRez Workflow Components
148
4. Select a profile from the Use Profile menu. See “Archive Profile” on page 160.
nAvid recommends that you use profiles for archiving, because profiles define many key settings
such as target folders and archive partitions. For example, if you do not use a profile with an
SGL archive implementation, the system uses the default SGL archive volume name. If this
volume is not defined on the SGL system, the archive operation will fail.
5. (Option) Select “Launch Interplay Media Services Status window.”
6. Click OK.
The system starts the Archive operation. The following illustration shows the Media
Services and Transfer Status tool with the archive operation in progress.
Select a Profile
Select a
database
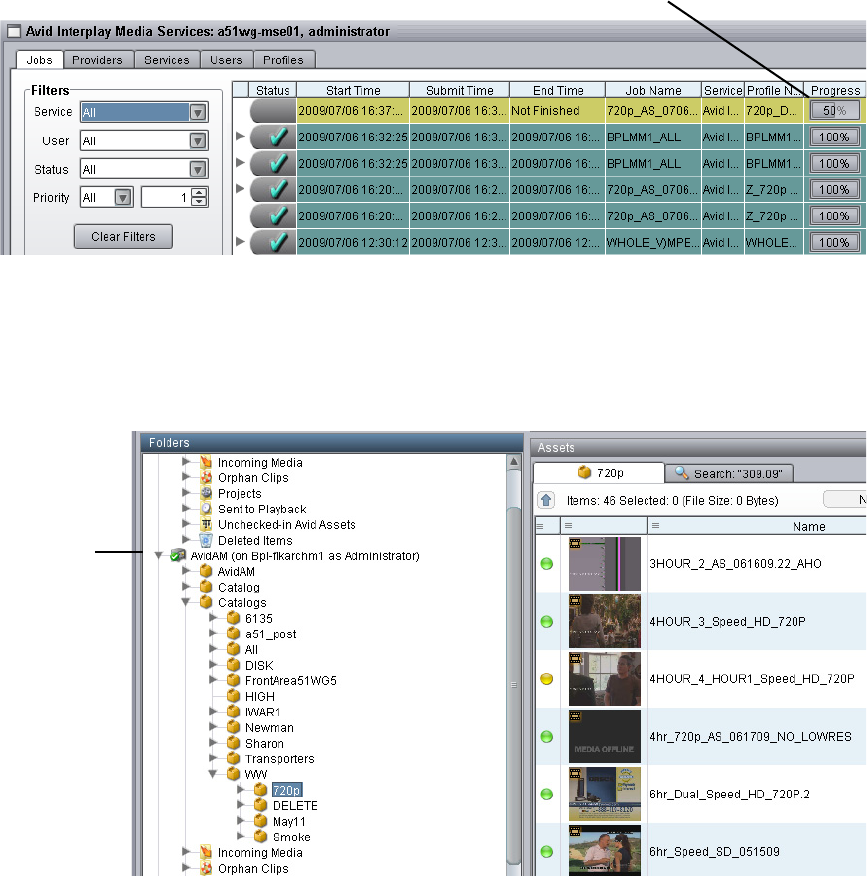
720p MultiRez Workflow Components
149
7. (Option) For details about the job, select the job and click the Details button.:
8. (Option) Navigate to the destination folder in the archive database and verify that your file
has been archived.
The following illustration shows the clip in the Archive database.
Deleting the High Res Media
After the high-res material is archived, you can delete the online version. Use the Delete dialog
box in Interplay Access to select Avid assets for deletion. You have the option of deleting the
assets only, the media only, or both assets and media. Delete only the high-res media associated
Archive in progress
Archive
database
720p MultiRez Workflow Components
150
with the master clips; do not delete the master clips or the low-res proxy. For additional
information on deleting assets and media, see the Interplay Access User’s Guide and the
Interplay Production Best Practices Guide.
To delete the high-res media:
1. In the Interplay Access Content tab, select the assets you want to delete.
You can select multiple folders or clips for deletion. You can also delete folders by selecting
them in the tree structure in the Folders pane.
2. Do one of the following:
tRight-click and select Delete.
tPress the Delete key.
The Delete dialog box opens, displaying information about the items you selected. It also
displays the amount of disk space that would be freed if you delete the media files. No items
are selected for deletion until you select them in the Delete dialog box.
The following illustration shows the results of selecting a master clip for deletion. The
master clip is associated with both high-res and low-res media files but you are only deleting
the high res material. Leave the master clip and low res material online.
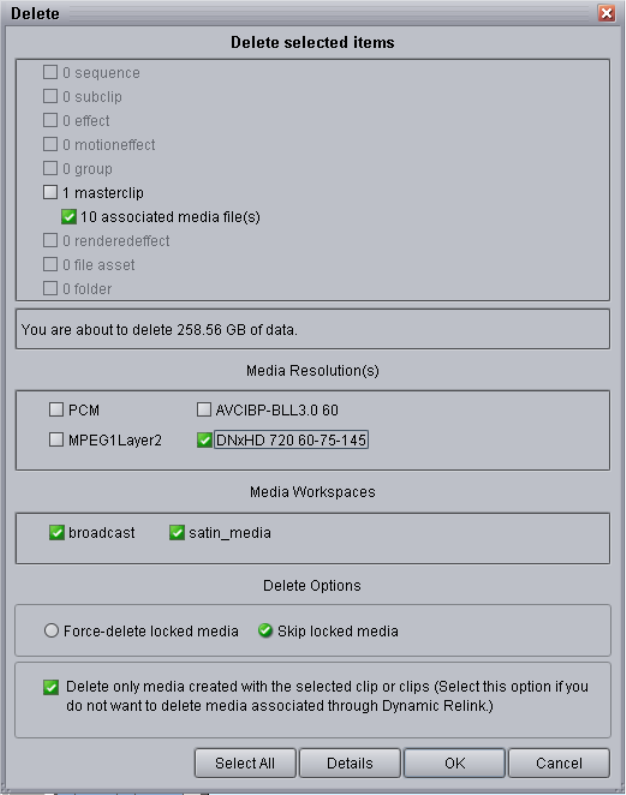
720p MultiRez Workflow Components
151
3. In the “Delete selected items” area, deselect the master clip as shown in the above
illustration. Keep the associated media files box checked.
4. Specify the media that you want to delete.
a. Select the resolutions you want to delete.
The Media Resolutions section of the dialog box lists all video resolutions and audio
formats for the clips you selected, including media associated through the Dynamic
Relink feature. All resolutions are selected by default. Deselect the resolutions you want
to keep. In this example, deselect the low-res media and keep the high-res DNxHD
media selected for deletion.
720p MultiRez Workflow Components
152
b. Select which workspaces you want to delete media from.
All workspaces that contain the selected media are listed and are selected by default.
c. Select whether to force the deletion of media files locked by an editor or to skip deletion
of locked files.
These options are available only if the user has administrative rights or if they are
enabled by an administrator. “Skip locked media” is the default.
d. Select “Delete only media created with the selected clip or clips.” This ensures that you
only delete the media that was originally created with the clip.
nBeginning with Interplay v2.0, the “Deselect only media...” option is selected by default.
5. (Option) Click Details to determine if any clips are reserved.
The Clips Reserved dialog box opens. Any clips with reservations are listed, along with
information about the clips. If you have the proper privileges, you can override the
reservations. Otherwise, click Cancel.
6. When you are ready to delete the files, click OK in the Delete dialog box.
The Delete in Progress dialog box displays the status of the deletion.
7. When the delete operation is completed, click Done.
Searching for and Restoring High Res Master Clips
You can select a sequence or master clip for restoring from the archive. This example assumes
the following:
• high-res media is in the archive and the corresponding low-res proxy media is online.
• You can search the online database for clips meeting specific criteria, view the low-res
proxy, and then decide which clips to restore them from the archive.
• You can also search the archive database for clips to restore.
To search the online database for clips:
1. In the Assets view, click the Search tab.
2. Click the Simple tab. If necessary, click the Search Conditions arrow to show the search
criteria.
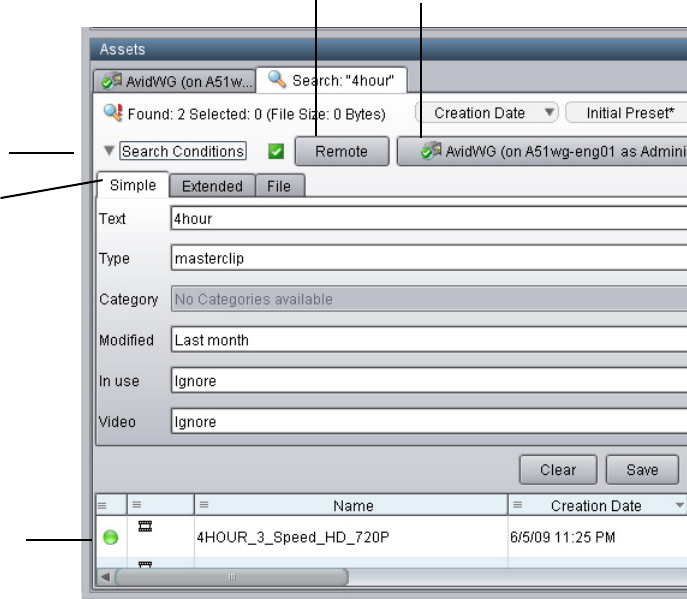
720p MultiRez Workflow Components
153
3. Select a search root folder by doing one of the following:
tUse the Search Root button to select the archive database.
tClick a folder in the Tree view and drag it onto the Search Root button.
The Search root button displays the database or folder you selected to search.
4. Type the text or select the attributes and values you want to use for the search. In this
example, the desired clip name contains the text “4hour”, it is a master clip, and it was
created within the last month.
nIf you do not select any criteria, the search returns all the records in the database.
5. Click the Search button.
The Search button changes to a Stop button, which you can click if you want to stop the
search. The results are displayed in the Search Results pane. They are visible until you close
Interplay Access or until you perform a new search.
Search tab Search Root button
Search Conditions arrow
Simple tab
Search results
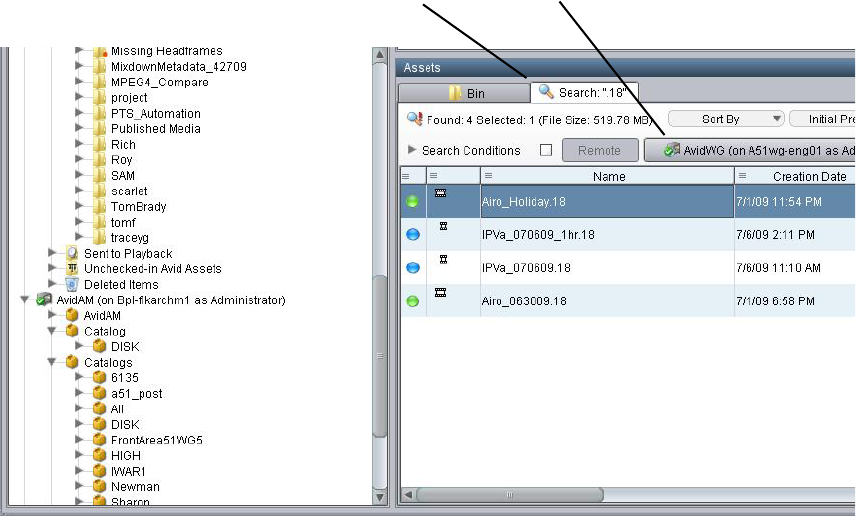
720p MultiRez Workflow Components
154
For additional information on searching and search criteria, see the Interplay Access Users
Guide.
To search for a clip in the archive database:
1. Connect to the archive database.
2. Click the Search tab in the Avid Interplay Access window.
3. Click the Search Root button
The Choose Search Root dialog box opens.
Search Root
Search Tab
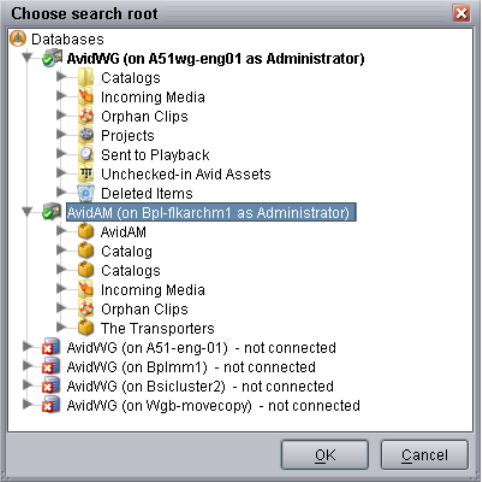
720p MultiRez Workflow Components
155
4. Select the Archive database (AvidAM) and click OK.
nIf necessary, expand the bottom of the window to display the Search Results area.
5. Type the name (or a portion of the name) of the clip you want to search for and select the
appropriate search criteria.
6. Click the Search button.
The system displays the search results. In this example, one master clip in the archive
database has the text “4HOUR” in its name.
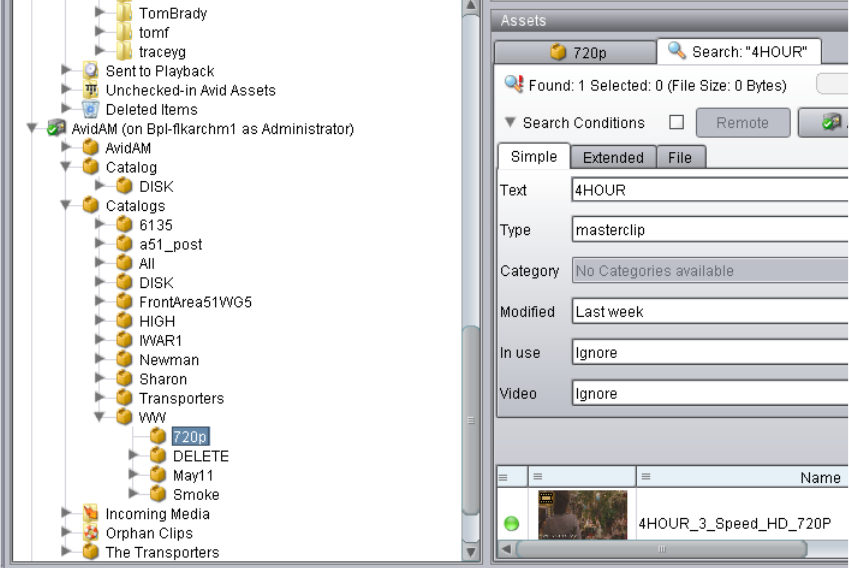
720p MultiRez Workflow Components
156
Restoring a Full Clip from the Archive
This example uses the results of a search to select a clip to restore. You can also use the Tree
view to locate the clip you want to restore.
To restore a clip located in the Search Results area of the Avid Interplay Access:
1. Make sure the Media Services Engine application and Interplay Archive service are
connected. See “Verifying a Service Provider Is Connected” in the Interplay Production
Help or the Interplay Production Services Setup and User’s Guide.
2. Right-click the clip in the Search Results area and choose Restore.
720p MultiRez Workflow Components
157
The Restore dialog box opens.
3. Select a profile from the Use Profile menu. For information about profiles, see “Creating
Profiles” on page 158.
4. Click OK.
The system performs the restore operation. You can use the Production Services Status
window to view the progress and results of the restore operation.
5. (Option) Navigate to the destination folder in the Avid Interplay Access window and verify
that the clip was restored.
6. Make sure Enable Dynamic Relink is selected to view the restored media.
Performing a Partial Restore
For a description of how to perform a partial restore, see “Working with a MultiRez Clip in the
Editor and Performing a Partial Restore” on page 140.
Tree view Search results
Archive
database
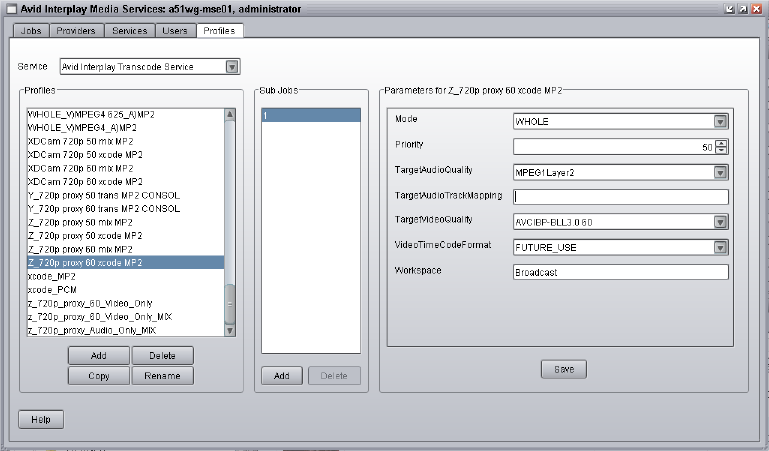
Setting Up the Production Services Profiles for a 720p MultiRez Workflow
158
Setting Up the Production Services Profiles for a
720p MultiRez Workflow
This workflow requires a number of Media Service profiles for the transcode, archive, and
restore operations. This section describes the profiles. For details on creating a profile see the
Interplay Production Help or the Interplay Production Services Setup and User Guide.
Creating Profiles
This example uses the following profiles:
• Transcode high-res DNxHD 720p material to 720p proxy
• Archive the high-res material
• Restore high-res clips from the archive
• Perform a partial restore of clips or subclips that are part of a sequence.
To use the Production Services application to create a profile:
1. In Interplay Access, select View > Production Services Status.
2. Click the Profiles tab and select the Provider from the Service menu in the top left-hand
window.
The following illustration shows the Interplay Transcode Service provider selected.
Setting Up the Production Services Profiles for a 720p MultiRez Workflow
159
3. Click Add and type in a name for the new profile.
4. Add the appropriate values and click Save.
For more information on creating profiles, see the Interplay Production Help or the Interplay
Production Services User and Setup Guide.For examples of the profiles used in this
workflow, see “Interplay | Production Service Profile Examples” on page 159.
Interplay | Production Service Profile Examples
This section shows examples of the profiles used in this workflow.For information on parameter
values, see the Interplay Production Help or the Interplay Production Services User and Setup
Guide.
Transcode Profile
The following illustration shows a typical 720p Transcode profile. This profile creates low-res
proxy video and compressed audio.
Parameter Value
Mode Whole
Priority 50
TargetAudioQuality MPEG1LAYER2
TargetAudioTrackMapping blank
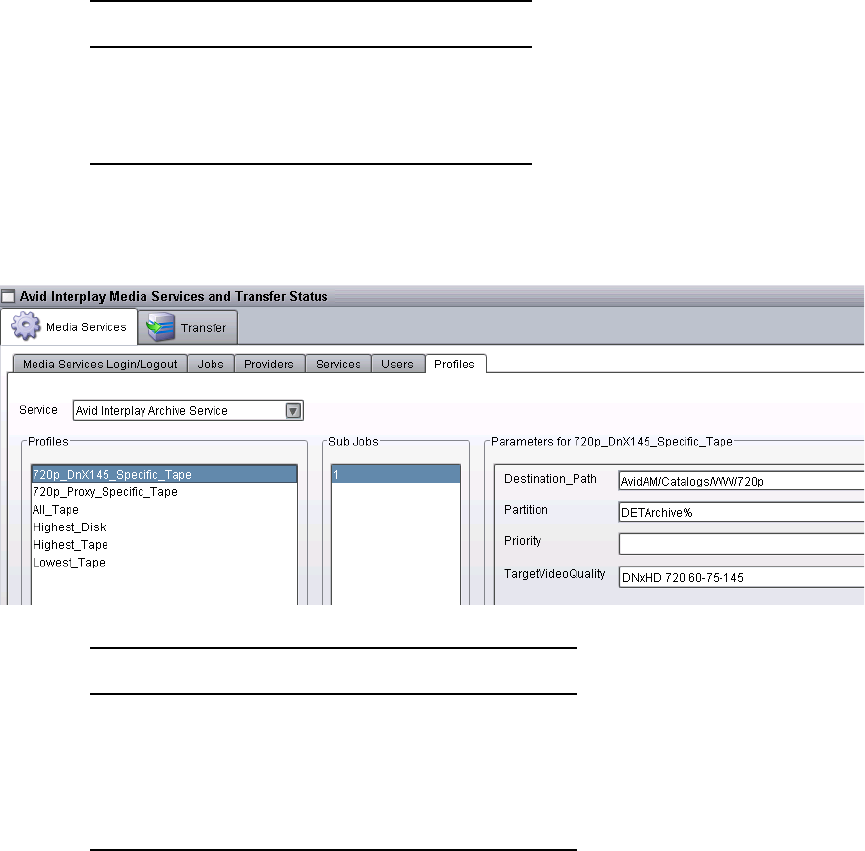
Setting Up the Production Services Profiles for a 720p MultiRez Workflow
160
Archive Profile
The following illustration shows an archive profile.
Full Restore Profile
The following illustration shows a profile used for restoring full clips from the archive. Note that
Partial is not checked.
TargetVideoQuality AVCIBP-BLL3.0 60
VideoTimeCodeFormat FUTURE_USE
Workspace Broadcast
Parameter Value
Parameter Value
Destination_Path AvidAM/Catalogs/WW/720p
Partition DETArchive%
Priority 50
TargetVideoQuality DNxHD 720 60-75-145
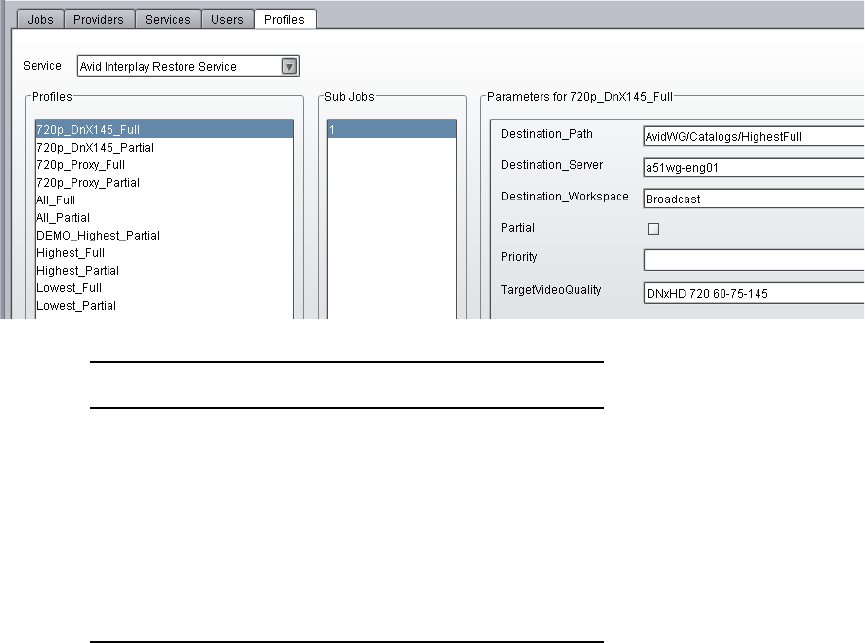
Setting Up the Production Services Profiles for a 720p MultiRez Workflow
161
Partial Restore Profile
The following illustration shows a profile used to perform a partial restore of 720p high-res
material. This profile only restores a specific resolution: DNxHD 720 60-75-145. You could also
select “Highest” and restore the highest available resolution.
Parameter Value
Destination_Path AvidWG/Catalogs/HighestFull
Destination_Server a51wg-eng01
Destination_Workspace Transfer
Partial Not checked
Priority 50
TargetVideoQuality DNxHD 720 60-75-145
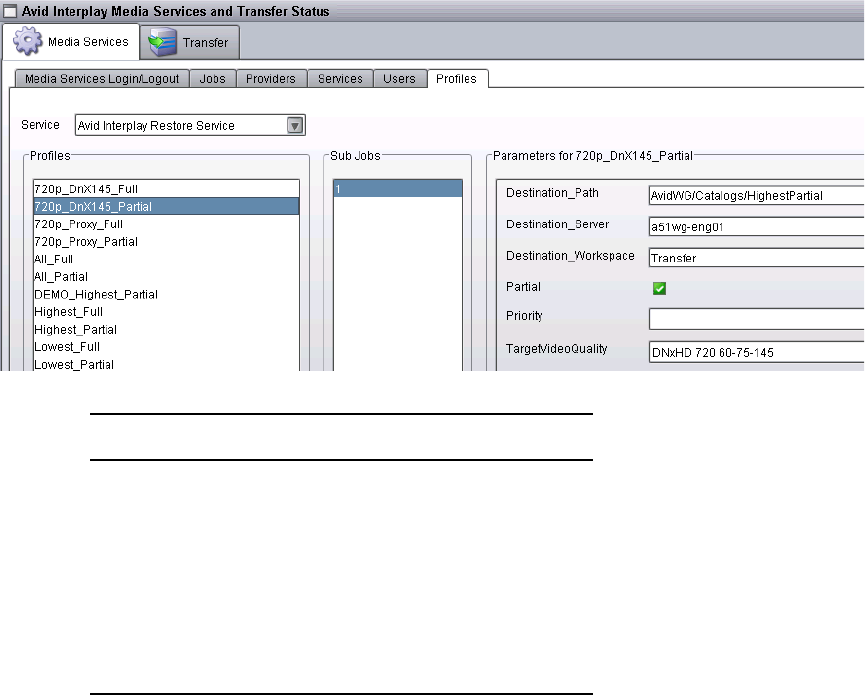
Setting Up the Production Services Profiles for a 720p MultiRez Workflow
162
Parameter Value
Destination_Path AvidWG/Catalogs/HighestPartial
Destination_Server a51wg-eng01
Destination_Workspace Transfer
Partial Checked
Priority 50
TargetVideoQuality DNxHD 720 60-75-145

8Determining Interplay Database
Scalability
This document describes how to use the size of the Interplay Engine database and the amount of
available RAM to make decisions about how much larger your database can grow while
maintaining your current workflow and hardware. This document contains the following topics:
•Definition of Terms
•Total Used Database Pages and Estimated Database Page Limit
•Comparing Database Page Count and Cache Size
•Tips for Improving Database Performance
Definition of Terms
Database Page
A database page is a fixed size, contiguous block of data that contains persisted database
content. The metric of total used database pages provides a consistent way to determine whether
you are operating within the scalability limits of your system. For additional information, see
“Total Used Database Pages and Estimated Database Page Limit” on page 164.
Maximum Cache Size
The maximum cache size refers to the maximum number of database pages the Interplay Engine
can keep cached in RAM. This value is dependent on the amount of RAM available on the
Interplay Engine system or by manual configuration (in the case of the Interplay Bundle).
If the database size exceeds the maximum cache size, the Interplay Engine may need to swap out
pages whenever it needs to load new database pages into RAM. The probability of swapping
pages increases as you continue to exceed the maximum cache size. Slow downs can occur when
you perform large searches, deletions, or add a large number of new assets to the database.
Total Used Database Pages and Estimated Database Page Limit
164
Database Object
A database object contains the metadata that defines an asset in the Interplay Production
database. One database object can reference many other objects. For example, a sequence is
represented as a database object and each sequence references other database objects such as
master clips and audio tracks.
The number of database objects that an Interplay environment can support is highly dependent
on the workflow at a particular site. The following areas can be affected by the workflow:
•Highly linked objects: For example, if your workflow involves adding one short introductory
clip to the beginning of every sequence, that clip might be associated with hundreds of
database objects. See “Tips for Improving Database Performance” on page 169.
•Dependency complexity: For example, if you have a complex sequence with many rendered
effects, master clips, subclips, and locators, the database object representing the sequence
can be complex. Different versions of the sequence and multiple resolutions associated with
master clips also adds complexity.
•Object size: Depends on the type of object and the number of (custom) properties associated
with the object. For example, if you store a large amount of text within locators this can
contribute to the size of the object.
For additional information, see “Establish a Stable Ratio Between Database Objects and
Database Pages” on page 170.
File Count Limit
The file count limit is the maximum number of media files that the Interplay Media Indexer can
index on ISIS shared storage. See the Interplay Production ReadMe for the current file count
limit.
The Interplay Engine uses the filemob object to keep track of the media files that are checked
into the Interplay database. However, the Interplay Media Indexer may be monitoring a much
larger number of media files than the ones that are checked in. For example, there may be five
different resolutions for a master clip but possibly only two are checked in.
Total Used Database Pages and Estimated Database
Page Limit
The metric of total used database pages provides a consistent way to determine whether you are
operating within the scalability limits of your system. A database page is a fixed size,
contiguous block of data that contains persisted database content. To maintain an acceptable
Total Used Database Pages and Estimated Database Page Limit
165
level of performance, the total number of used database pages should not exceed the
recommended database page limit for your system. Recommended values are listed in the
“Interplay | Engine Database Page Limits” on page 165.
For Interplay v2.6 and higher, you can view the total number of database pages in use in the
Database Information view of the Interplay Administration tool. See “Comparing Database Page
Count and Cache Size” on page 166. The same information is available (for all releases) in the
log file named NXNServer_<date>.log in the following directory:
C:\Program Files\Avid\Interplay Engine\Logs\Machines\<machine name>
In the NXN log file, search for the text string “AvidWG pages total” for Interplay Engines and
search for “AvidAM pages total” for Archive Engines.
The estimated database page limit is the maximum amount of pages the Interplay Engine can
keep cached in RAM (maximum cache size) plus an estimated permissible percentage of
overusage.
This “overusage” is possible because all databases contain data that is never or very seldom
accessed and because a low frequency of swapping cached pages does not have a perceptible
performance impact. The permissible overusage value is typically 20% of the size of the cache.
The values for different hardware configurations are estimated by extracting cache usage data
from customer databases and by performing internal testing with databases that are slightly
larger than recommended.
nThe permissible overusage depends on the customer's workflows and might exceed or be lower
than the estimated 20%. Therefore it is important that you closely monitor the performance of
the Interplay Engine once the total used database pages exceed the Maximum Cache size.
If the total used pages exceeds the recommended limit for your system, performance may
degrade and slow downs may occur. In this case, do one of the following:
• Delete assets in the Interplay Production database to bring the total number of pages down
below the recommended limit for your system.
• Increase the amount of RAM or move to a more powerful system as shown in the table under
“Interplay | Engine Database Page Limits” on page 165.
Interplay | Engine Database Page Limits
This section lists the maximum cache size and the estimated database page limits supported by
an Interplay Engine running on an Intel SR2500 or AS3000 server for Interplay v2.4 or higher.
Values are the same for standalone engines and cluster systems.

Comparing Database Page Count and Cache Size
166
The table also shows values for the Interplay Bundle. An Interplay Bundle consists of an
Interplay Engine, Interplay Media Indexer, and Lookup Service running on the same system. A
configurator script is run on the system to limit the memory requirements of the Interplay Engine
and the Interplay Media Indexer.
Note that for Interplay v2.3 and earlier, the database page limit numbers are lower.
Comparing Database Page Count and Cache Size
The following illustration shows an example of the Database Information view for Interplay
v2.6.
System RAM Operating System
Maximum
Cache Size
Estimated Database
Page Limita
a. The estimated database page limit is the maximum cache size plus a 20% overusage value.
Standalone Interplay Engine and Interplay Engine Cluster
SR2500 4 GB W2K3 R2 500,000 600,000
12 GB W2K3 R2 Enterprise 1.8 million 2.2 million
AS3000 12 GB W2K8 R2
W2K3 R2 Enterprise
1.8 million 2.2 million
36 GBb
b. Purchasable option.
W2K8 R2 Enterprise 7.0 million 8.4 million
Interplay Bundle Configurations
SR2500 4 GB W2K3 R2 (32-bit) 200,000 240,000
9 GBc
c. Not a standard configuration.
W2K3 R2 (64-bit) 1 million 1.2 million
AS3000 12 GB W2K8 R2 (64-bit) 1.4 million 1.7 million
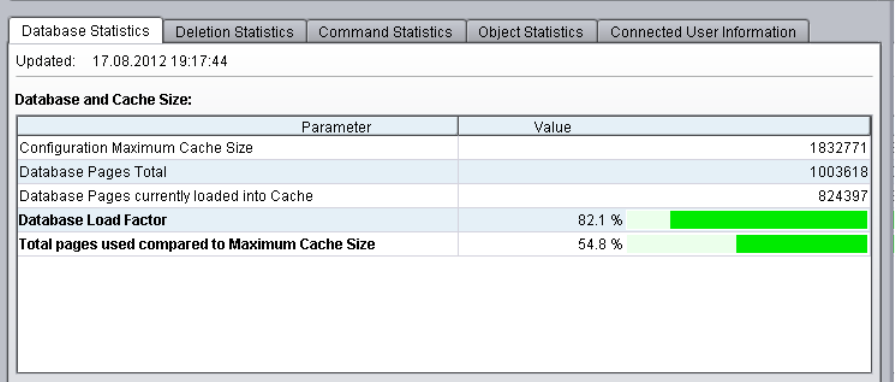
Comparing Database Page Count and Cache Size
167
The Database and Cache Size parameters are described as follows:
• Configuration Maximum Cache Size: The number of database pages that can be loaded into
RAM for this system. This value corresponds directly to the “Maximum Cache Size”
column in the tables listed in “Interplay | Engine Database Page Limits” on page 165. In this
example, the RAM cache can hold 1.8 million pages. This corresponds to an SR2500 or
AS3000 with 12 GB of RAM.
• Database Pages Total: The number of pages in this Interplay database. This is the current
size of the database.
• Database Pages currently loaded into Cache: The number of database pages currently loaded
into RAM. In this example, the database contains 1,003,618 pages and 824,397 of those
pages are loaded into RAM.
• The fourth entry in the display differs depending on whether you are using Interplay v2.6 or
v2.7 and higher:
- Interplay v2.7: Database Load Factor. Shows the percentage of the database that is
currently loaded into RAM. On a completely loaded database the ratio would be 100%,
but since some pages of a database are never loaded, it will always stay below 100%. If
the operations/workflows executed against this database do not require the whole
database to be loaded into cache, this ratio will stay farther below 100%.
This number can be used to judge the "warmness" of a database (whether the database is
fully operational). For example, the value may steadily increase after starting up the
Interplay Engine after a maintenance window.

Comparing Database Page Count and Cache Size
168
Note that if the “Total pages used compared to Maximum Cache Size” of the database
exceeds 100%, then the load factor can never reach 100%. The bigger the database
grows over the maximum cache size, the less database pages can be loaded into the
cache.
- Interplay v2.6: Cache Utilization. Shows a graphical representation of how much RAM
you are currently using. As the number of cached pages gets very close to the maximum
cache size, performance degrades during times when large database activities occur. The
slow downs occur because the Interplay Engine must swap pages in and out of RAM in
order to make room for the new information
This value cannot be larger than 100% because the amount of RAM is fixed. Note that
when you get close to 100% the Interplay Engine automatically starts releasing pages to
allow for new requests. If you reach 100%, the Interplay Engine runs out of memory and
you will see a corresponding error in the NXNserver.log file.
• Total pages used compared to Maximum Cache Size: Shows a graphical representation of
how close the current database size (total pages used) is to the maximum cache size. This
graphs shows whether the entire database can fit into RAM.
This value can be larger than 100% because it is possible for your database to be larger than
the number of pages that can be loaded into RAM. If that occurs, the excess portion of the
graph turns red as shown in the following illustration.
The value can be up to 120% without causing performance problems. Recall that the
recommended database page limit is the maximum cache size plus 20%. See “Interplay | Engine
Database Page Limits” on page 165. If the total number of database pages exceeds 120%,
performance slowdown can be dramatic (exponential). In this case you should either delete
assets to reduce the size of your database or increase the cache size by adding RAM or moving to
a more powerful system.
As mentioned earlier, the permissible overusage depends on the customer's workflows and might
exceed or be lower than the estimated 20%. Therefore it is important that you closely monitor the
performance of the Interplay Engine once the total used database pages exceed the Maximum
Cache size.
Database Activity Information
The following illustration shows the Database Activity parameters at the bottom of the Database
Statistics tab.

Tips for Improving Database Performance
169
The page activity counters are accumulated for two different intervals:
• The time interval since the last time the Interplay Engine was started
• The three minute interval that ended at the time displayed at the bottom of the screen. The
Interplay Engine collects the information every three minutes and displays the results at the
bottom of the screen.
The Database Activity parameters are described as follows:
• Pages created: Gives an indication of how much new information has been added to the
database.
• Pages Written: An indication of how much has changed in the database.
• Pages Read: An indication of the requests that have been made of the database. This shows
how many pages have been read from disk. After pages are loaded into RAM, this number
usually decreases.
At the bottom of the screen the system shows the date and time of the last data collection. Time
is measured by the system time of the Interplay Engine.
Tips for Improving Database Performance
The following list provides some tips for improving performance:
• Determine the ratio between the number of objects in your Interplay database and the
number of total pages used in the database to understand how the number of objects stored in
the database relate to the size of your database. See “Establish a Stable Ratio Between
Database Objects and Database Pages” on page 170.
• Reduce the number of highly linked objects.
For example, a broadcast site may have one high level Projects folder that contains an
Intro_clip that is used by all groups at the site. You could consolidate that clip to create
several copies and then move the copies into separate folders, one for each group. For
Establish a Stable Ratio Between Database Objects and Database Pages
170
example, you could create a Promo_Intro_clip and a News_Intro_Clip, and put those clips in
folders that would be accessed by the different groups. Delete the old Intro_clip asset and
have the groups start using the new versions. This can dramatically reduce the number of
highly linked objects.
• Develop an efficient deletion workflow and only perform large deletions using a custom
deletion schedule. For additional information, see the Interplay Production Best Practices
Guide.
• Use search criteria to avoid searching the entire database.
If you only use the simple “Contains” text search option, the Interplay Engine searches the
entire database for the asset. To improve search performance, limit the search to a particular
folder or use an attribute such as a particular time frame to narrow down the search. Note
that for simple text searches the search time increases linearly as your database grows. For
example, if the database is twice as large, it can take twice as much time to perform the same
simple text search. For additional information, see “Refining Your Search in
Interplay | Production” on page 83.
• Keep the number of files per folder on ISIS under 5000. As the number of files in a folder
grows, it takes the Interplay Media Indexer a longer time to traverse the folder. Traversing a
folder with more than 5000 files can result in a performance degradation. Note that this does
not affect the Interplay database performance directly but it does affect the performance of
the system as a whole.
Apply this same limitation to the number of assets in a folder in the Interplay database.
Establish a Stable Ratio Between Database Objects
and Database Pages
The number of database objects that an Interplay environment can support is dependent on the
workflow at a particular site. For additional information, see “Database Object” on page 164.
For a given workflow, the ratio of database objects per total number of database pages remains
fairly constant. Stable ratios are often in the range of 0.4 to 1.5 but this can vary depending on
your workflow. Calculate the ratio when you feel you have an established workflow. Keep track
of the following values:
• Total number of objects in the database
• Total number of database pages in use
• Ratio of objects per total number of pages (total objects / total database pages)
If you do this periodically while you maintain a constant workflow, you will start to see a pattern.
Once you determine a stable ratio for your current workflow you can start to make predictions
about how much you can increase the database size while maintaining the same workflow.
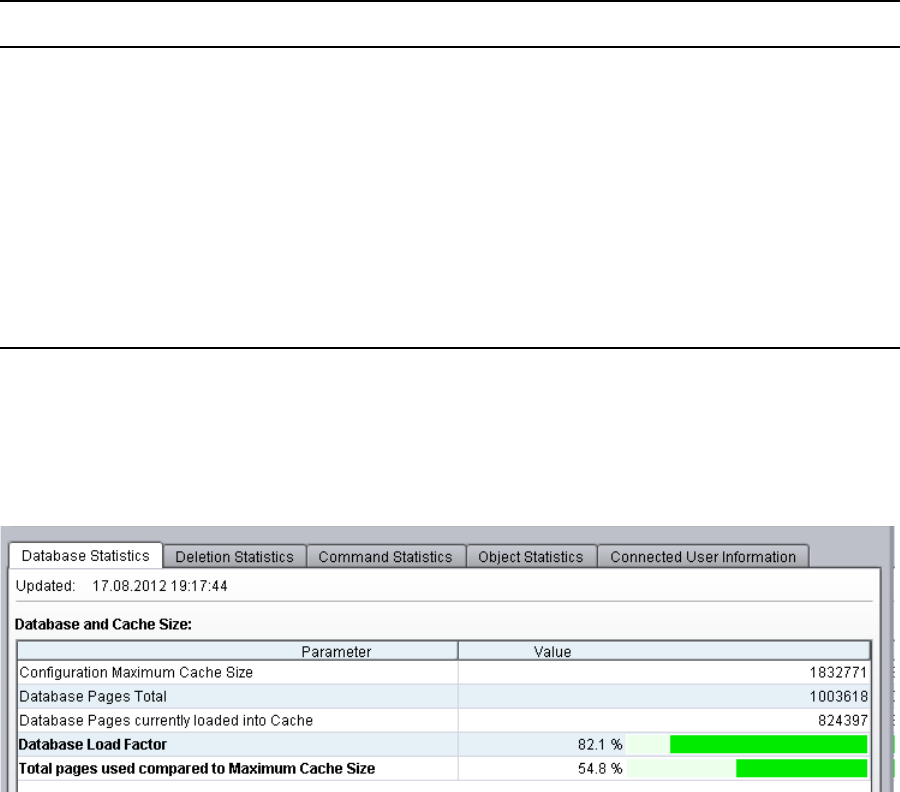
Establish a Stable Ratio Between Database Objects and Database Pages
171
Calculating the Ratio Between Pages and Objects
The method for determining the ratio differs depending on your Interplay Production version.
The following table shows where to locate the data for each version.
The following section presents an example of how to use the ratio.
Example: Using the Ratio to Plan for Database Growth
The following illustration shows an example database.
Interplay Production version Total Objects Total Database Pages Ratio
v2.7 and higher Objects Statistics tab Database Statistics tab Automatically
calculated and
displayed on the
Objects Statistics tab
v2.6 Objects Statistics tab Database Statistics tab calculate:
total objects/total
database pages
v2.5 and earlier Objects Statistics tab NXNServer_<date>.log file
See “Total Used Database
Pages and Estimated Database
Page Limit” on page 164
calculate:
total objects/total
database pages
Establish a Stable Ratio Between Database Objects and Database Pages
172
The following statistics apply to this database:
• Maximum cache size: For this hardware configuration, the maximum number of database
pages that can fit into RAM is 1.8 million. For additional information, see
“Interplay | Engine Database Page Limits” on page 165.
• Database Pages: The total number of database pages is currently 1,003,618.
• The number of database pages currently loaded into cache (RAM) is 824,397.
• The fourth entry in the list differs depending on whether you are using Interplay v2.6 or v2.7
and higher:
- Interplay v2.7: Database Load Factor. Shows the percentage of the database that is
currently loaded into RAM.
- Interplay v2.6: Cache Utilization. Shows how much of the cache is currently being used.
• Total pages used compared to Maximum Cache Size: If the complete database (1,003,618
pages) was loaded into cache, it would consume 54.8% of the cache.
According to the final list item, the database can grow by almost 45% and still be within the
cache limits. Calculate the number of pages that can be added as follows:
maximum cache size - total database pages = 1,832,771 - 1,003,618 = 829,153
This means that you can add 829,153 database pages and the database should still load into
RAM.
Growing the database by a specific number of pages is a relatively abstract concept. The
following sections describe how to correlate this information to the more concrete terms of
database objects such as master clips and sequences.
nYou can add an additional 20% of pages to the database once the number of pages reaches the
maximum cache size. This is the “overusage” value described in “Total Used Database Pages
and Estimated Database Page Limit” on page 164. The extra 20% is not included in these
calculations and you can consider it as an additional buffer.
Calculating the Objects per Page Ratio
Interplay v2.7 automatically calculates and displays the objects per database page ratio on the
Objects Statistics tab. For earlier releases, you can calculate the ratio of database objects to
database pages. For information on where to obtain the data, see “Calculating the Ratio Between
Pages and Objects” on page 171.
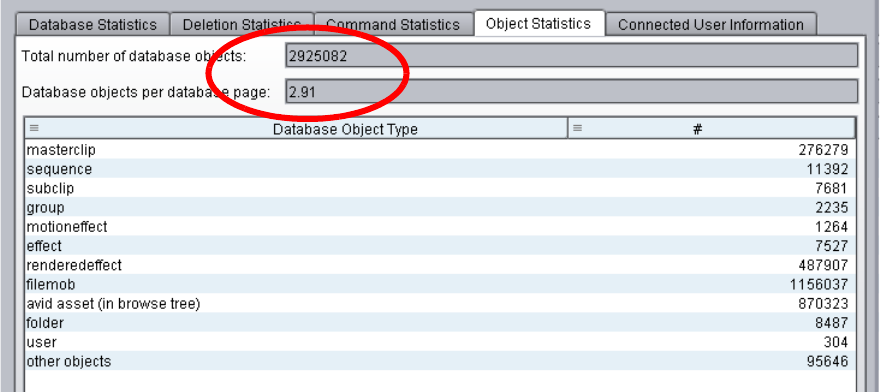
Establish a Stable Ratio Between Database Objects and Database Pages
173
The objects per pate ratio can help determine how much you can grow your database while
maintaining the same workflow. When your workflow is stable, the ratio tends to be constant
over time. If you change your workflow then you need to calculate a new ratio. The objects per
page ratio is calculated as follows:
total number of database objects / total number of database pages
The following illustration shows the Object Statistics tab for this example. The total number of
database objects is 2,925,082.
The objects per page ratio in this example is 2,925,082/1003618 = 2.91.
The ratio is 1:2.91. This means that there are approximately 2.91 database objects per database
page.
In this example, the database can grow by 45% or roughly 829K database pages. Using a ratio of
1:2.91, that means you can add 2.4 million objects and the database should still be able to load
into RAM. (829K x 2.91= 2,412,390)
Using the Ratio with Masterclip Objects
This example takes the calculation one step farther to predict how many additional masterclips
can be added to the Interplay database and still keep the database within the cache limits. First
calculate the percentage of database objects that includes masterclips:
Masterclip count / total database objects = 276,279/2,925,082 = 0.9 = 9%
Establish a Stable Ratio Between Database Objects and Database Pages
174
In this example, masterclips make up approximately 10% of the total number of database
objects.
Since the database can grow by 2.4 million objects, this means that you can add approximately
240K masterclips (10% of 2.4 million).
In summary, you can increase the size of the database by adding 240K masterclips and the
database should still be able to load into RAM. If you change the workflow you will need to
calculate a new ratio and recalculate the number of masterclips you can add.

9H.264 End-to-End MultiRez Workflow
The following topics describe stages in a MultiRez workflow that uses H.264 low-res proxy
media for editing and high-res media for output, both ingested through an AirSpeed
Multi Stream server. They also describe a workflow that uses Interplay Transcode to create the
low-res proxy media.
•H.264 Resolutions Supported by Interplay | Production
•Installation and Configuration for an H.264 Workflow
•Acquiring Media for an H.264 Workflow
•Editing with H.264 and High-Res
•Archiving, Restoring, and Deleting H.264 and High-Res Media
There are specific settings for ingest of H.264 proxy media through an AirSpeed Multi Stream
server. Otherwise, this dual-ingest workflow is similar to a dual-ingest workflow with two
devices and MPEG-4 proxy media.
H.264 Resolutions Supported by
Interplay | Production
H.264 is a low-res proxy format intended for low bit-rate applications. The proxy is a Baseline
profile, Level 3.0 H.264 bit stream, which limits the raster size and bit rate of the compressed
data. Interplay Production supports both 800 Kbps and 2.0 Mbps versions of H.264 media.
H.264 800 Kbps Proxy Resolutions
Interplay version 2.3 and later supports an end-to-end workflow for H.264 800 Kbps proxy
resolutions. You can ingest H.264 800 Kbps material (through AirSpeed Multi Stream only),
work with it in an Avid editing application, check it in and out of the Interplay database, and
process it through Interplay Production Services and Interplay Transfer. You can use Interplay
Transcode to transcode from another resolution to H.264 800 Kbps.
nAvid editing applications cannot capture H.264 proxy resolutions. They can be created only
through dual ingest from AirSpeed Multi Stream or Interplay Capture, or by transcoding or
mixing down a clip or sequence to one of the Avid H.264 proxy resolutions.

H.264 Resolutions Supported by Interplay | Production
176
Note the following limitation:
• Partial delivery and partial restore are not supported for H.264 proxy resolutions.
The following table lists the supported H.264 800 Kbps resolutions.
Support includes eight channels of compressed MPEG1 Layer 2 audio media (96k per channel).
nSee the Interplay Production ReadMe for limitations on 24p proxy resolutions.
nIf you perform a partial restore operation on a sequence that includes H.264 media, H.264
media is fully restored. Other resolutions are partially restored.
H.264 2.0 Mbps Proxy Resolutions
Interplay version 2.7 and later supports workflows for H.264 2.0 Mbps (HD) and 1500 Kbps
(SD) proxy resolutions. These resolutions are created by a Media Composer Cloud editing
system or by an Interplay Transcode provider. You can work with H.264 2.0 Mbps material in an
Avid editing application, check it in and out of the Interplay database, and process it through
Interplay Production Services and Interplay Transfer.
Editor
Project Type
Edit Rate
(frames/sec)
Resolution Name in Interplay
Access and Interplay Transcode KBit/Sec
Aspect
Ratio
Proxy
Raster
Size
25i PAL 25 H.264 800Kbps Proxy 625 800 Kbps 4:3 352x288
30i NTSC 29.97 H.264 800Kbps Proxy 525 800 Kbps 4:3 352x240
720p 23.976 23.976 H.264 800Kbps Proxy 720p 23.976 800 Kbps 16:9 320x180
720p 50 50 H.264 800Kbps Proxy 720p 50 800 Kbps 16:9 320x180
720p 59.94 59.94 H.264 800Kbps Proxy 720p 59.94 800 Kbps 16:9 320x180
1080i 50 25 H.264 800Kbps Proxy 1080i 25 800 Kbps 16:9 480x270
1080i 59.94 29.97 H.264 800Kbps Proxy 1080i 29.97 800 Kbps 16:9 480x270
1080p 23.976 23.976 H.264 800 Kbps Proxy 1080p 23.976 800 Kbps 16:9 480x270
1080p 24 24 H.264 800Kbps Proxy 1080p 24 800 Kbps 16:9 480x270
1080p 25 25 H.264 800Kbps Proxy 1080p 25 800 Kbps 16:9 480x270
1080p 29.97 29.97 H.264 800Kbps Proxy 1080p 29.97 800 Kbps 16:9 480x270

Installation and Configuration for an H.264 Workflow
177
Note the following limitations:
• Partial archive and partial restore are not supported for H.264 proxy resolutions.
The following table lists the supported H.264 2.0 Mbps resolutions.
Support includes eight channels of compressed MPEG1 Layer 2 audio media (96k per channel).
nIf a clip has both 800 Kbps and 2Mbps proxies, Interplay Access plays the 800 Kbps version.
Installation and Configuration for an H.264 Workflow
The following topics describe installation and configuration that is specific to an H.264
workflow:
•H.264 Workflow Overview
•H.264 Card for AirSpeed Multi Stream
•Folders and Shared-Storage Workspaces for an H.264 Workflow
•Interplay | Production Services Profiles for an H.264 Workflow
•Configuring Interplay | Production Clients for an H.264 MultiRez Workflow
Editor
Project Type
Edit Rate
(frames/sec)
Resolution Name in Interplay
Access and Interplay Transcode Bit/Sec
Aspect
Ratio
Proxy
Raster
Size
25i PAL 25 H.264 1500Kbps Proxy 625 1500 Kbps 4:3 352x288
30i NTSC 29.97 H.264 1500Kbps Proxy 525 1500 Kbps 4:3 352x240
720p 50 50 H.264 2.0Mbps Proxy 720p 50 2.0 Mbps 16:9 320x180
720p 59.94 59.94 H.264 2.0Mbps Proxy 720p 59.94 2.0 Mbps 16:9 320x180
1080i 50 25 H.264 2.0Mbps Proxy 1080i 25 2.0 Mbps 16:9 480x270
1080i 59.94 29.97 H.264 2.0Mbps Proxy 1080i 29.97 2.0 Mbps 16:9 480x270
1080p 50 50 H.264 2.0Mbps Proxy 720p 50 2.0 Mbps 16:9 320x180
1080p 59.94 59.94 H.264 2.0Mbps Proxy 720p 59.94 2.0 Mbps 16:9 320x180
Installation and Configuration for an H.264 Workflow
178
H.264 Workflow Overview
Interplay version 2.3 and later supports an end-to-end workflow that includes H.264 resolutions.
This topic describes two workflows:
• AirSpeed MultiStream server to ingest both high-res and H.264 proxy media (H.264 800
Kbps only)
• Interplay Transcode to create H.264 media (either H.264 800 Kbps or H.264 2.0 Mbps)
nThis topic describes two possible workflows. For help in defining a workflow for your facility,
consult an Avid workflow specialist.
Dual-Ingest Using AirSpeed MultiStream
The following illustration shows the main stages of a workflow that uses an AirSpeed Multi
Stream system for ingest of both high-res media and H.264 800 Kbps proxy media.
1. Ingest: Interplay Capture manages dual ingest from the AirSpeed Multi Stream (high-res
media and H.264 proxy media) and checks the metadata into the Interplay database on the
Interplay Engine.
2. Editing: A user on an Avid editing system edits with H.264 proxy media (working
resolution).
3. Output: When the sequence is complete, the user dynamically relinks to the high-res media
(target resolution) and sends the sequence to playback.
Playout Server
Avid AirSpeed
Multi Stream
Interplay Engine
Media Indexer
Interplay Capture
High-res
ISIS Shared
Storage Avid Editing System
Interplay
Archive Engine
H.264 proxy H.264
High-res
Archive
Storage
Solution
Interplay Production
Services Engine
Interplay
Archive
Provider
High-res
Metadata
Ingest
Editing Output
Archive
Interplay Transfer
Engine
Installation and Configuration for an H.264 Workflow
179
For information about input and output workflows for XDCAM HD media, see “Sony
XDCAM HD and XDCAM EX End-to-End Workflow” on page 127.
4. Archive: From an Avid editing system, a user consolidates the sequence and uses the
Interplay Archive Provider to send metadata to the Interplay Archive Engine and send media
to a third-party storage solution. A user can also use the Interplay Transcode provider (from
an Avid editing system or from Interplay Access) to create a mixdown and then archive the
metadata and media.
nYou can stream H.264 media over a wide area network from the Interplay Streaming Server and
play the media in Interplay Access.
Transcoding Through Interplay Transcode
You can also use the Interplay Transcode service to create H.264 proxy media. The following
illustration shows the main stages of a multi-resolution workflow that uses Interplay Transcode
to create H.264 proxy media from high-res media ingested through an AirSpeed server.
1. Ingest: Interplay Capture manages ingest of high-res media from the AirSpeed server and
checks the metadata into the Interplay database on the Interplay Engine. (You can also
transcode media captured through an Avid editing system.)
2. Transcode: From Interplay Access or an Avid editing system, a user uses Interplay
Transcode to create H.264 proxy media. Interplay Transcode stores media on the Avid
shared-storage system and associate the high-res clips with the H.264 proxy media in the
Interplay database.
Avid AirSpeed
Interplay Engine
Interplay
Media Indexer
Interplay Capture
High-res
ISIS Shared
Storage
Interplay Production
Services Engine
Interplay
Transcode
Provider
Metadata
Ingest
Transcode
High-res H.264
Playout Server
Avid Editing System
H.264
High-res High-res
Editing Output
Interplay Transfer
Engine
Installation and Configuration for an H.264 Workflow
180
3. Editing: A user on an Avid editing system edits with H.264 proxy media (working
resolution).
4. Output: When the sequence is complete, the user dynamically relinks to the high-res media
(target resolution) and sends the sequence to playback.
For information about input and output workflows for XDCAM HD media, see “Sony
XDCAM HD and XDCAM EX End-to-End Workflow” on page 127.
5. Archive: From an Avid editing system, a user consolidates the sequence and uses the
Interplay Archive Provider to send metadata to the Interplay Archive Engine and send media
to a third-party storage solution. (See “Dual-Ingest Using AirSpeed MultiStream” on
page 178 for an illustration.) A user can also use the Interplay Transcode provider (from an
Avid editing system or from Interplay Access) to create a mixdown and then archive the
metadata and media.
nYou can stream H.264 media over a wide area network from the Interplay Streaming Server and
play the media in Interplay Access.
Dynamic Relink and MPEG1 Layer 2 Audio
MPEG1 Layer 2 audio is a compressed audio format that is used as proxy media in a
multi-resolution environment. MPEG1 Layer 2 uses a sample rate of 48 kHz with 16-bit depth.
Interplay Production supports eight channels of MPEG1 Layer 2 audio at 96k per channel.
To explicitly link to proxy audio, select “Compressed” as the audio relink method in the
Dynamic Relink settings. If you select “Compressed,” the sample rate and bit depth are inactive.
This setting is valid only for Working settings. Compressed audio is not supported in Target
settings, to avoid sending compressed audio to a playback device.
H.264 Card for AirSpeed Multi Stream
An AirSpeed Multi Stream system uses an encoder card to ingest H.264 800 Kbps media. This
card is shipped with new systems or can be installed in the field. For information about how to
install the H.264 card, see the Avid AirSpeed Multi Stream H.264 Option Kit Installation Guide.
Folders and Shared-Storage Workspaces for an H.264 Workflow
As part of the configuration for acquiring media through Air Speed Multi Stream and an ingest
automation server — for example, Interplay Capture — you need to specify the folders in which
you want to store the clip metadata, the shared-storage workspace in which you want to store the
media, and other information. The following topics describe the necessary settings:
•Configuring AirSpeed Multi Stream for an H.264 800Kbps Workflow
•Specifying the Folder Location in Interplay Capture for H.264 Multi-Res Clips
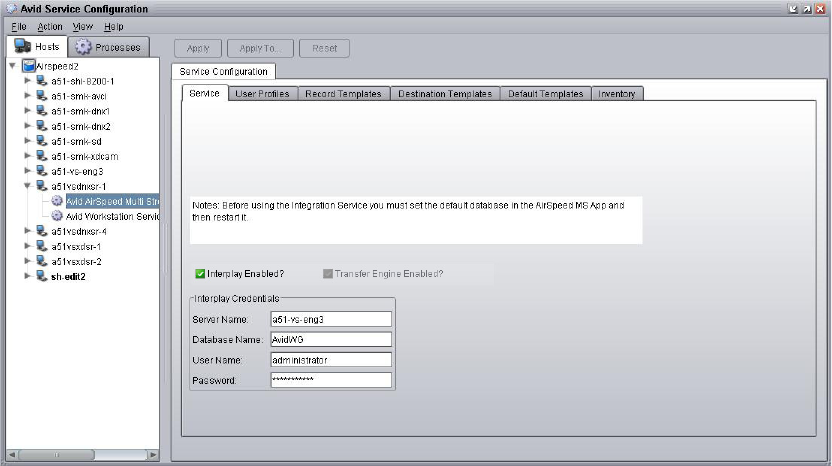
Installation and Configuration for an H.264 Workflow
181
Configuring AirSpeed Multi Stream for an H.264 800Kbps Workflow
To configure AirSpeed Multi Stream to ingest H.264 800 Kbps clips and media, you need to
specify settings on four tabs in the Avid Service Configuration application:
• Record Templates
• Destination Templates
• Default Templates
•Inventory
You can open the Avid Service Configuration on any workstation in the workgroup that includes
your AirSpeed Multi Stream server, if the Avid Service Framework is installed on the
workstation.
To open the Avid Service Configuration dialog box:
1. Select Start > Programs > Avid > Avid Framework > Avid Service Configuration.
2. Click your AirSpeed Multi Stream server name and select AirSpeed Multi Stream
Integration Service.
The Avid Service Configuration dialog box opens.
nFor complete information on configuring AirSpeed Multi Stream in a workgroup environment,
see the Avid AirSpeed Multi Stream Installation and User’s Guide.
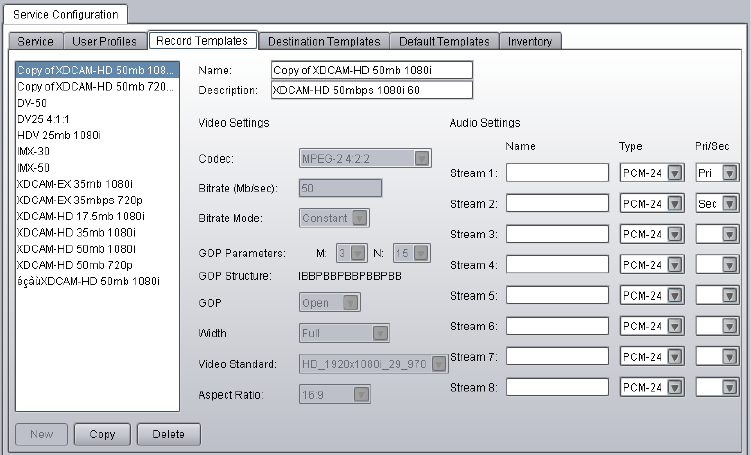
Installation and Configuration for an H.264 Workflow
182
For an H.264 workflow, use the settings described in the following sections.
Record Templates Tab
Use the Record Templates tab to specify the audio settings for each template that you use to
record a high-res resolution and H.264 proxy resolution. In the Type column, select an audio
format for each high-resolution stream you are recording. In the Pri/Sec (Primary/Secondary)
column, select one stream as Pri to record H.264 proxy audio. You must have at least one stream
selected as Pri. You can select a second stream as Sec (secondary).
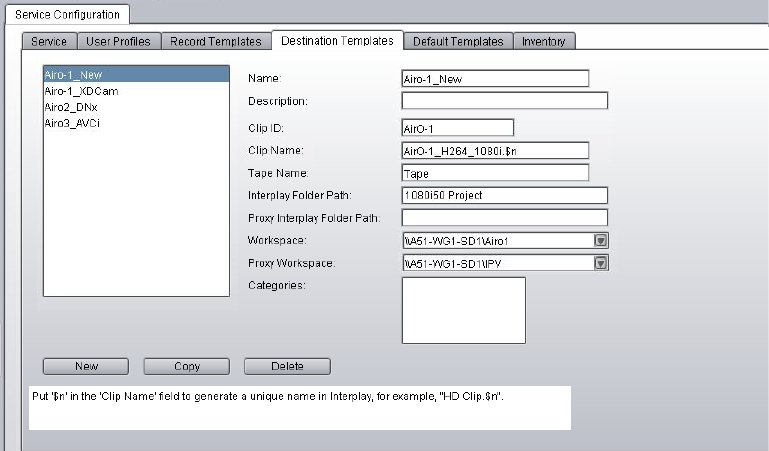
Installation and Configuration for an H.264 Workflow
183
Destination Templates Tab
Use the Destination Templates tab to specify the folder in which AirSpeed Multi Stream should
store ingested clips and the workspace in which it should store the ingested media.
•Interplay Folder Path: Type the name of a subfolder in the Interplay database Projects
folder in which to store the ingested clips. This is optional and is not necessary if you
manage ingest through Interplay Capture (Interplay Capture overwrites this setting).
If you specify a folder in the Interplay Folder Path field, the clip that is created in that folder
is associated with both the low-res and high-res media and can be used for dynamic relink.
In most cases, do not specify a folder in the Proxy Interplay Folder Path field.
•Workspace: Specify the workspace or workspaces in which AirSpeed Multi Stream should
store the ingested media. You must specify a workspace in the Workspace field. You have
the option of specifying a Proxy Workspace if you want to store the high-res media and the
H.264 proxy media in different Avid ISIS workspaces.

Installation and Configuration for an H.264 Workflow
184
Default Templates Tab
Use the Default Templates tab to select the Record template, proxy resolution, and Destination
template for each channel you are going to record. In the Record column, select the Record
template for the high-res resolution. In the Proxy column, select an H.264 proxy resolution. (The
correct corresponding proxy is displayed in the list automatically.) In the Destination column,
select the Destination template for the clips and media.
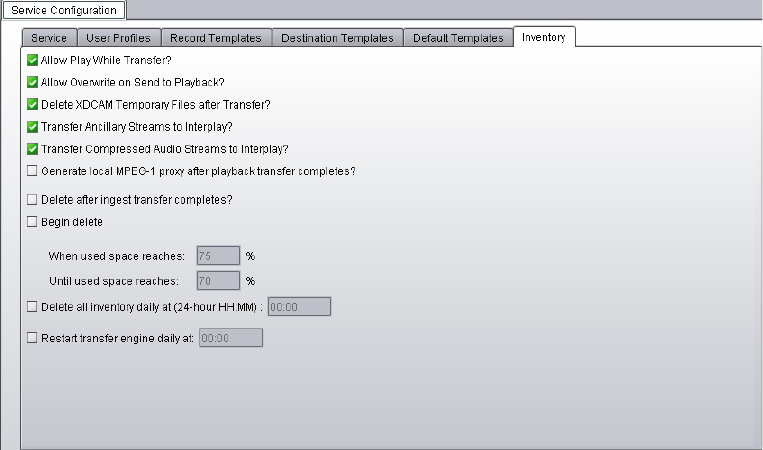
Installation and Configuration for an H.264 Workflow
185
Inventory Tab
Use the Inventory tab to specify if you want to capture the audio for the H.264 proxy video.
Select the option “Transfer Compressed Audio Streams to Interplay?”
nThe setting “Generate local MPEG-1 proxy after playback transfer completes?” applies only to
local playback on the AirSpeed Multi Stream. It is not related to H.264 proxy media.
Specifying the Folder Location in Interplay Capture for H.264 Multi-Res Clips
If you are using Interplay Capture, you set the folder for storing ingested clips in the General tab
of the Schedule Item Detail panel. Select a folder location from the Interplay Production
directory tree. You can access a list of recently used folders by clicking the down-arrow icon next
to the Folder field.
nFor complete information on configuring Interplay Capture, see the Interplay Capture User’s
Guide.
The following figure shows Interplay Capture set to store clips in the Interplay folder
/Projects/Workflows/1080iXDCAM50.
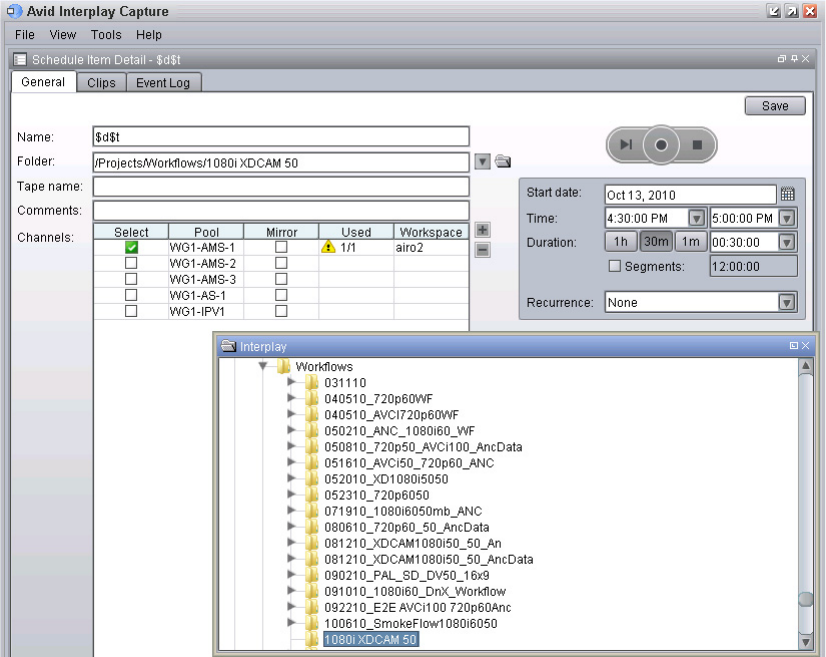
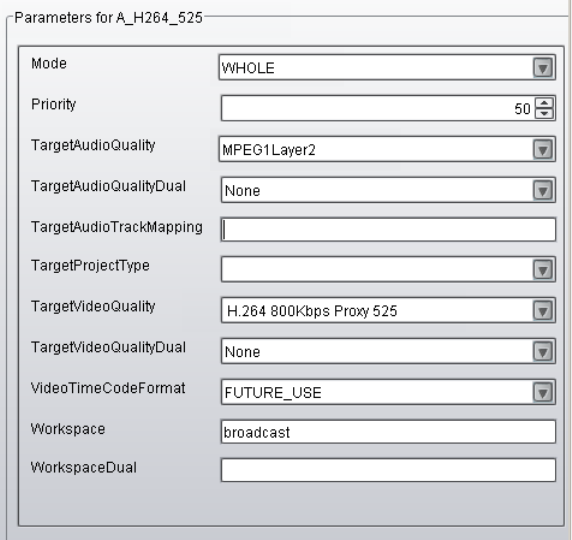
Installation and Configuration for an H.264 Workflow
187
Interplay | Production Services Profiles for an H.264 Workflow
Depending on your workflow, you may need to create profiles for the following Interplay
Production Services. You set these profiles in the Profiles tab of the Interplay Production
Services and Transfer Status tool. For information about supported H.264 resolutions, see
“H.264 Resolutions Supported by Interplay | Production” on page 175. For more information
about creating profiles, see the Interplay Production Services Setup and User’s Guide.
• Interplay Transcode Service: If you are transcoding high-res media to H.264 media, select
your desired H.264 resolution from the TargetVideoQuality list. You can select any mode
(WHOLE, CONSOLIDATE, MIXDOWN, DUALMIXDOWN, CROSSRATE).
• Interplay Archive Service: If you plan to archive H.264 media, select your desired resolution
from the TargetVideoQuality list. For H.264 media, you can select All, Lowest, or a specific
resolution.
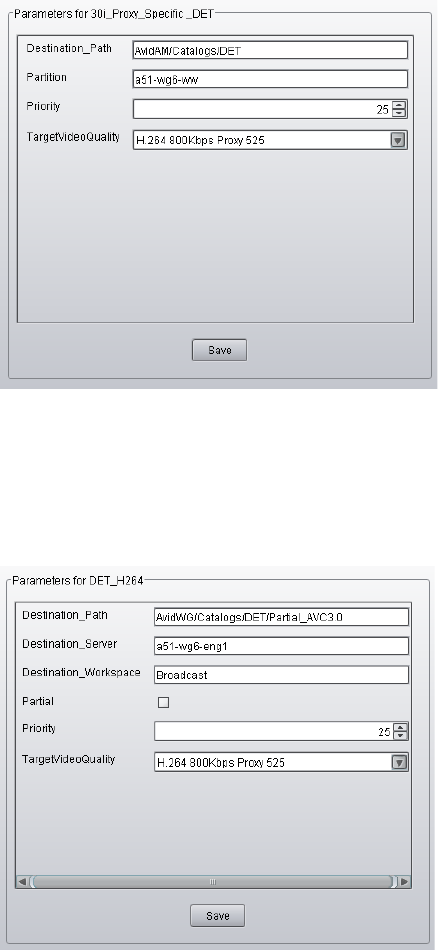
Installation and Configuration for an H.264 Workflow
188
• Interplay Restore Service. If you plan to restore H.264 media from archive, select your
desired resolution from the TargetVideoQuality list. For H.264 media, you can select All,
Lowest, or a specific resolution.
nIf you use a profile in which Partial is selected, H.264 media is fully restored.
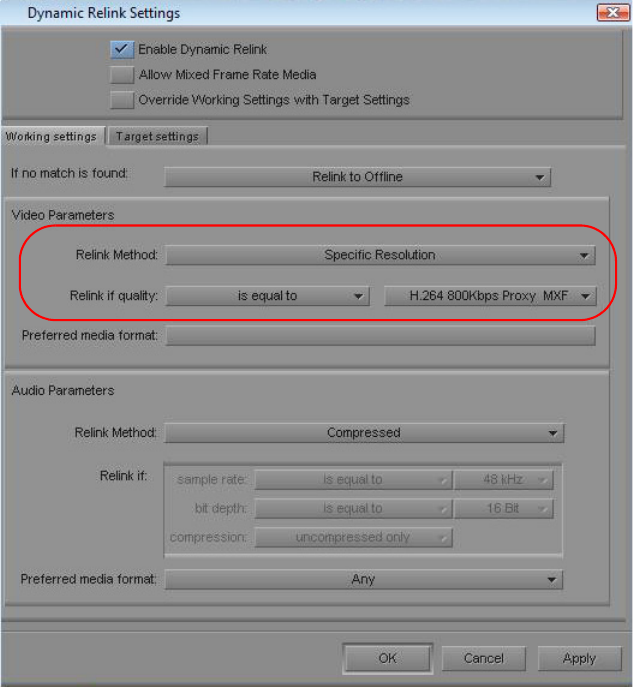
Installation and Configuration for an H.264 Workflow
189
Configuring Interplay | Production Clients for an H.264 MultiRez
Workflow
To prepare for editing with H.264 proxy media, specify your desired working and target settings
in the Dynamic Relink Settings dialog box in your Avid editing application. The following are
typical settings for a multirez workflow with H.264 proxy media:
• Working Settings: Relink to the specific resolution H.264 800Kbps
• Target Settings: Relink to the specific resolution XDCAM HD 50 Mbit
Other settings are possible, depending on your specific workflow.
The following illustration shows the Working Settings tab for relinking to an H.264 resolution.
Working Settings: H.264
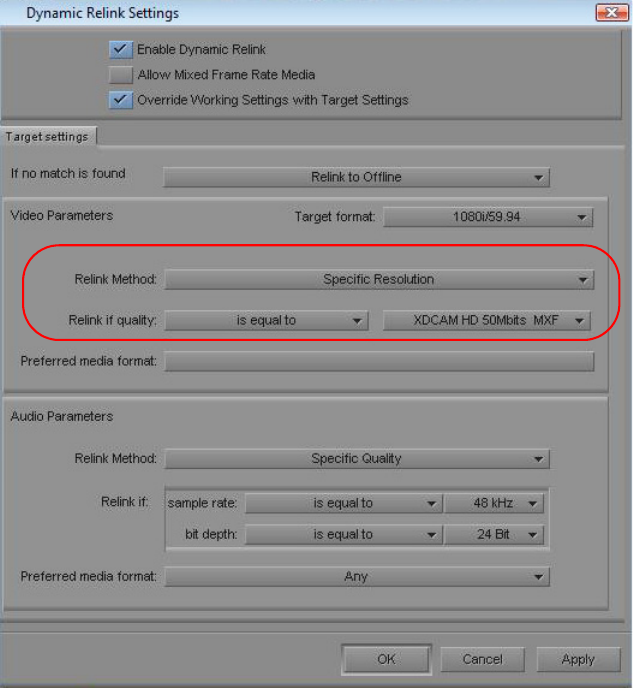
Acquiring Media for an H.264 Workflow
190
The following illustration shows the Target Settings tab for relinking to an XDCAM HD
resolution.
For more information on MultiRez, see “Using MultiRez and Dynamic Relink” in the Interplay
Production Help or the Help for your Avid editing application.
Acquiring Media for an H.264 Workflow
The following topics describe two methods for acquiring H.264 media:
•Dual-Ingest for High-Res Media and H.264 Proxy Media
•Transcoding to Create H.264 Media
Target Settings: 1080i/59.94 XDCAM HD 50
Acquiring Media for an H.264 Workflow
191
nYou can stream H.264 media over a wide area network from the Interplay Streaming Server and
play the media in Interplay Access.
Dual-Ingest for High-Res Media and H.264 Proxy Media
An AirSpeed Multi Stream server with an H.264 encoder card can simultaneously ingest both
high-res media and low-res H.264 800 Kbps media. You can use Interplay Capture to manage the
ingesting process. For specific H.264 settings, see “Folders and Shared-Storage Workspaces for
an H.264 Workflow” on page 180.
Interplay Capture works with AirSpeed MultiStream to create a clip in a Projects folder that you
specify. This clip is associated with both the high-res media and the low-res media, and you
should use this clip for editing and streaming.
However, Interplay Capture creates additional clips and links, as described in the following
section.
Interplay Capture and AirSpeed MultiStream
Interplay Capture and AirSpeed MultiStream create three different but related clips in the
following locations:
• Capture master clip: This clip is checked into the folder Projects\folder_name, where
folder_name refers to the path you set in Interplay Capture (in the General tab of the
Schedule Item Detail panel). This folder contains a clip that is associated with both high-res
and low-res media. You should use this clip for editing and streaming.
• Device clips: When working with an AirSpeed Multistream server, Capture creates two
additional clips: one associated with high-res media and one associated with low-res media.
These clips are checked into the following folders:
- Incoming Media\workspace_name, where workspace_name refers to the shared-storage
workspace you set in the AirSpeed Multi Stream Destination template. You must
specify a workspace in this template to perform an ingest operation, and this workspace
name is used to create this folder.
-Catalogs\server_name, where server_name is the network name of the AirSpeed Multi
Stream server. No setting is required.
-Projects\name, where name is the folder name you set in the General tab of the Capture
Settings plugin in the Interplay Administrator. Make sure to distinguish this folder from
the folder you set for the Capture master clip.
Avid recommends that these three folders be hidden from all users except administrators,
because the multi-res associations are managed only on the Capture master clip. For more
information, see Interplay Capture Best Practices.
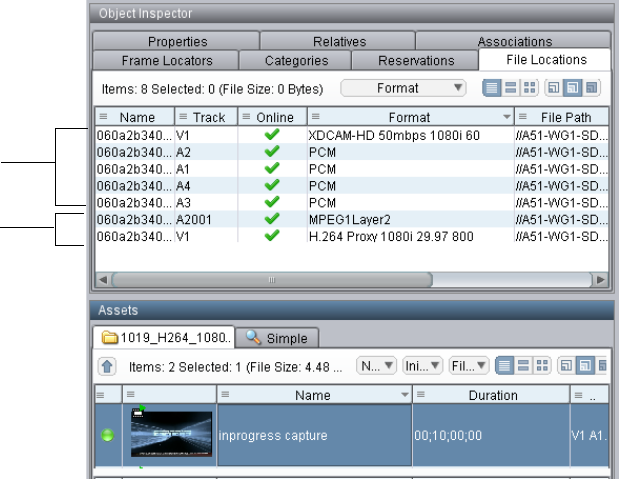
Acquiring Media for an H.264 Workflow
192
The following illustration shows the high-res media and the low-res media associated with the
Interplay Capture master clip, as displayed in Interplay Access.
The following illustration shows the associations for the Interplay Capture master clip. Because
it is a multi-res clip, it is associated with both the low-res and the high-res device clips. Interplay
Capture appends a .1 to the low-res and the high-res device clips.
High-res media
Low-res media
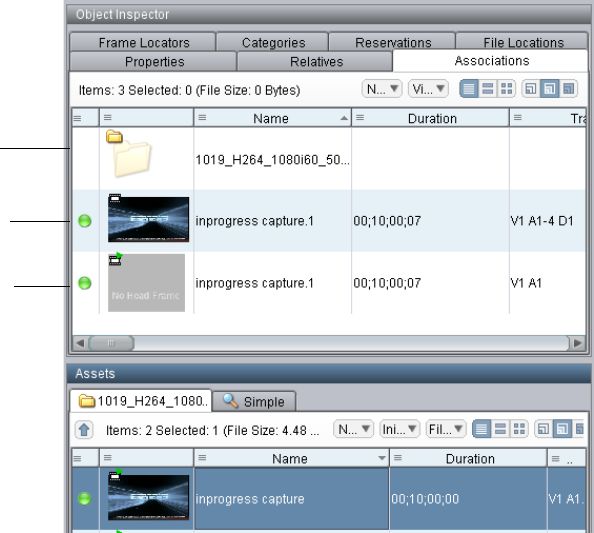
Acquiring Media for an H.264 Workflow
193
The following illustration shows the associations for the high-res device clip: three folders and
the Interplay Capture master clip. Both high-res and low-res device clips are located in these
three folders.
High-res device clip
Low-res device clip
Projects folder that
holds the Capture
master clip
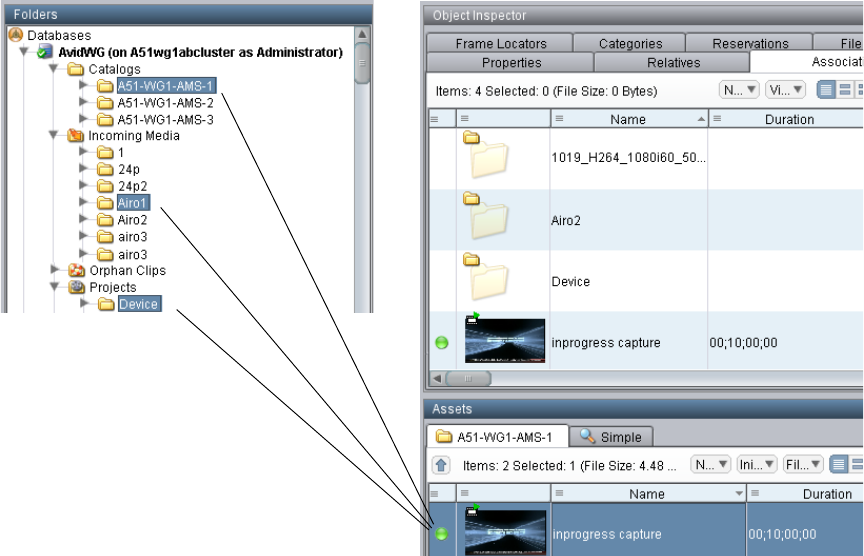
Editing with H.264 and High-Res
194
Transcoding to Create H.264 Media
If you do not use a dual-ingest configuration, you can use the Interplay Transcode service to
create H.264 media for proxy editing or streaming over the web. Transcoding to create H.264
media requires a Transcode profile (see “Interplay | Production Services Profiles for an H.264
Workflow” on page 186 and “H.264 Resolutions Supported by Interplay | Production” on
page 175). You can use the Auto-Transcode service to set up folders for automatic transcoding to
H.264.
For information about using the Interplay Transcode and the Interplay Auto-Transcode services,
see the Interplay Production Services Setup and User’s Guide or the Interplay Production Help.
Editing with H.264 and High-Res
After the H.264 media is acquired, you can use the MultiRez and Dynamic Relink features to
edit with H.264 low-res proxy media and output high-res media.

Archiving, Restoring, and Deleting H.264 and High-Res Media
195
When editing with H.264 media in an Avid editing system, for the best performance during
playback, right-click the Video Quality menu button below the Timeline and select Best
Performance (yellow/yellow).
For more information, see the documentation for your Avid editing system.
Archiving, Restoring, and Deleting H.264 and
High-Res Media
Procedures for archiving, restoring, and deleting H.264 and high-res media are similar to
procedures you use for other multirez workflows. However, If you perform a partial restore
operation on a sequence that includes H.264 media, H.264 media is fully restored. Other
resolutions are partially restored.
Two possible workflows are:
• Archiving high-res media after it is ingested:
- Use the Interplay Archive service to archive the high-res media to archive storage, while
keeping the low-res media online on shared storage. Alternatively, you can archive the
low-res media also.
- Delete the high-res online media.
- Create a sequence using low-res H.264 media.
- Use the Interplay Production Restore service to perform a partial restore to bring the
necessary portions of the high-res media online.
- Use Dynamic Relink to create the final output.
• Archiving the final sequence and its media.
- Create a sequence using H.264 media.
- Use Dynamic Relink to create the final output.
- Consolidate the sequence to create only the media used in the sequence.
- Use Interplay Archive to archive the sequence and the consolidated media.
For information about delete workflows, see “Developing an Interplay Delete Strategy” on
page 40.
Video Quality Menu Button

10 HD 23.976p and HD 24p Support
The following topics describe Interplay Production support for HD 23.976p and HD 24p formats
and their associated proxy resolutions:
•Interplay Production Support for Native HD 23.976p and HD 24p Formats
•Interplay Production Support for HD 23.976p and HD 24p Proxy Resolutions
Interplay Production Support for Native HD 23.976p
and HD 24p Formats
Interplay version 2.3 and later supports management of assets acquired in the native frame rate
for the following HD formats:
In an Avid editing project, Interplay Production support requires the following:
• The media must be acquired directly in one of the supported formats, such as through a
camera that is recording HD 1080p/23.976 without pulldown. In this case, HD 1080p/23.976
is referred to as the “native frame rate.”
• The native frame rate of the media must match the project frame rate.
This is especially important for dynamic relink. For example, if you are working in a
1080p/23.976 project, your media must be captured directly as 1080p/23.976. You can then use
dynamic relink between DNxHD 1080 36 and 1:1 MXF or with any other resolutions that are
supported for the 1080p/23.976 format. See the table below for the supported resolutions for
each project type.
Format Type of Acquisition (in Avid editing systems)
1080p/23.976 Camera, deck, file-based clips through AMA, import
1080p/24 Camera, deck, file-based clips through AMA, import
720p/23.976 File-based clips through AMA, import

Interplay Production Support for Native HD 23.976p and HD 24p Formats
197
nInterplay Production does not support dynamic relink between sources that use different edit
rates. For example, you cannot dynamically relink a 1080p/23.976 master clip to 720p/23.976
media. Interplay Production also does not support dynamic relink between NTSC sources from
which pulldown has been removed (23.976p or 24p projects) and their HD 23.976p and 24p
equivalents.
nYou cannot use Dynamic Relink with clips that are captured in a 720p 23.976 project from a
deck set to 720p 59.94 or 720p 60. This configuration creates media from which pulldown has
been removed, which is not supported for Dynamic Relink in Interplay Production.
Interplay Production support for native HD 23.976p and 24p formats includes the following:
• Checkin to and checkout from the Interplay database
• Dynamic relink (only as described above)
• Logging clips in Interplay Assist
• Archive and restore through Production Services
• Transcode through Interplay Production Services (with the exceptions noted in the table
below)
• Transfer to another workgroup (Send to Workgroup)
• Output directly to a 24p or 23.976p device (camera or file-based media player). Other
file-based output, such as Send to Playback, requires modifying the sequence in the Avid
editing application to the desired format. For example, in a 1080p/23.976p project, modify a
1080p/23.976p sequence to 1080i/59.94, then open it in a 1080i/59.94 project.
• Output to tape can be supported through Avid hardware, through the tape device, or by
transcoding the sequence in the Avid editing application.
The following table lists supported resolutions:
Project Type and
Raster Size Resolution Notes
1080p/23.976
1920x1080
1:1 MXF Not a supported target for Interplay Transcode
1:1p 10b MXF Not a supported target for Interplay Transcode
AVC-Intra 50 1080p 23.976
AVC-Intra 100 1080p 23.976
DNxHD 1080 36
DNxHD 1080 115-120-145

Interplay Production Support for Native HD 23.976p and HD 24p Formats
198
DNxHD 1080 175-185-220
DNxHD 1080 175X-185X-220X
DNxHD 444 1080 350X-365X-440X RGB color space
DNxHD 1080p 100
XDCAM-EX 35mbps 1080p 23.976
XDCAM-HD 50mbps 1080p 23.976
Apple ProRes Proxy 1080p 23.976
Apple ProRes LT 1080p 23.976
Apple ProRes 1080p 23.976
Apple ProRes HQ 1080p 23.976
Apple ProRes 4444 1080p 23.976
JPEG 2000 1080p 23.976
1080p/24
1920x1080
1:1 MXF Not a supported target for Interplay Transcode
1:1p 10b MXF Not a supported target for Interplay Transcode
DNxHD 1080 36
DNxHD 1080 115-120-145
DNxHD 1080 175-185-220
DNxHD 1080 175X-185X-220X
DNxHD 444 1080 350X-365X-440X RGB color space
DNxHD 1080p 100
Apple ProRes Proxy 1080p 24
Apple ProRes LT 1080p 24
Apple ProRes 1080p 24
Apple ProRes HQ 1080p 24
Apple ProRes 4444 1080p 24
Project Type and
Raster Size Resolution Notes

Interplay Production Support for Native HD 23.976p and HD 24p Formats
199
Support for HD RGB Media
Interplay Production supports two HD RGB resolutions for native HD 23.976p and HD 24p:
• 1:1 10-bit HD RGB. This resolution is supported for check in, check out, and deletion. It is
not supported for Production Services operations.
• DNxHD 444 RGB. This resolution is supported for all Interplay Production operations.
JPEG 2000 1080p 24
720p/23.976
1280x720
1:1 MXF Not a supported target for Interplay Transcode
1:1p 10b MXF Not a supported target for Interplay Transcode
AVC-Intra 50 720p 23.976
AVC-Intra 100 720p 29.97
DNxHD 720 60-75-145
DNxHD 720 90-110-220
DNxHD 720 90X-110X-220X
DNxHD 720p 100
XDCAM-EX 35mbps 720p 23.976
DVCPRO HD
Apple ProRes Proxy 720p 23.976
Apple ProRes LT 720p 23.976
Apple ProRes 720p 23.976
Apple ProRes HQ 720p 23.976
JPEG 2000 720p 23.976
Project Type and
Raster Size Resolution Notes

Interplay Production Support for HD 23.976p and HD 24p Proxy Resolutions
200
Film Option When Creating a New Project
If you want to use Dynamic Relink in any of the following project types:
• 1080p 23.976
• 1080p 24
• 720p 23.976
do not select the Film option in the Create New Project dialog box. Selecting the Film option
disables Dynamic Relink.
Interplay Production Support for HD 23.976p and HD
24p Proxy Resolutions
Interplay version 2.5 and later includes support for HD 23.976p and HD 24p low-res proxy
media. You can work with this proxy media in an Avid editing application, check it in and out of
the Interplay database, and process it through Interplay Production Services and Interplay
Transfer.
nThis proxy media is supported only in workgroups that use Interplay Engine v2.5 or later.
The following table describes the HD formats supported by Interplay Production and the
corresponding proxy formats, as they are labeled in the Production Services Profiles tab in the
Production Services and Transfer Status tool. Use the Profiles tab to create a Transcode profile
that specifies the required proxy format.
nAvid editing applications cannot create HD 23.976p or HD 24p H.264 proxy media.This media
can be created only by using the Interplay Production Services to transcode or mix down a clip
or sequence to one of the Avid H.264 proxy resolutions.
Because these proxy resolutions use the H.264 format, you can play clips and sequences through
Interplay Access over a WAN.
In an Avid editing system, you can use the low-res proxy media to edit a sequence, and then use
dynamic relink to link to the high-res media for conforming and finishing.
HD Format Type of Acquisition (in Avid editing systems) Proxy Format
1080p/23.976 Camera, deck, file-based clips through AMA, import H.264 800Kbps Proxy 1080p 23.976
1080p/24 Camera, deck, file-based clips through AMA, import H.264 800Kbps Proxy 1080p 24
720p/23.976 File-based clips through AMA, import H.264 800Kbps Proxy 720p 23.976

11 Apple ProRes Resolutions Supported in
Interplay | Production
Interplay v2.6 supports workflows for clips and sequences that use Apple ProRes resolutions,
with some limitations. You can work with Apple ProRes clips in an Avid editing application,
check them in and out of the Interplay database, process them through Interplay Production
Services, and use Interplay Transfer for workgroup-to-workgroup transfers.
Note the following limitations:
• Apple ProRes 4444 is not supported for 720p projects.
• SD progressive resolutions are not supported in Interplay Production.
• Partial archive and partial restore are not supported for Apple ProRes resolutions.
• Sequences composed of Apple ProRes clips are not supported for Send to Playback.
The following table lists the supported resolutions. These resolutions are supported as sources
and targets for Interplay Transcode.
Project Edit Rate
Resolution Name in Interplay Access
and Interplay Transcode Mbit/sec Raster Size
720p 23.976 Apple ProRes Proxy 720p 18 1280 x 720
Apple ProRes LT 720p 41 1280 x 720
Apple ProRes 720p 59 1280 x 720
Apple ProRes HQ 720p 88 1280 x 720
720p 50 Apple ProRes Proxy 720p 38 1280 x 720
Apple ProRes LT 720p 84 1280 x 720
Apple ProRes 720p 122 1280 x 720
Apple ProRes HQ 720p 184 1280 x 720

203
720p 59.94 Apple ProRes Proxy 720p 45 1280 x 720
Apple ProRes LT 720p 101 1280 x 720
Apple ProRes 720p 147 1280 x 720
Apple ProRes HQ 720p 220 1280 x 720
1080p 23.976 Apple ProRes Proxy 1080p 36 1920 x 1080
Apple ProRes LT 1080p 82 1920 x 1080
Apple ProRes 1080p 117 1920 x 1080
Apple ProRes HQ 1080p 176 1920 x 1080
Apple ProRes 4444 1080p 264 1920 x 1080
1080p 24 Apple ProRes Proxy 1080p 36 1920 x 1080
Apple ProRes LT 1080p 82 1920 x 1080
Apple ProRes 1080p 117 1920 x 1080
Apple ProRes HQ 1080p 176 1920 x 1080
Apple ProRes 4444 1080p 264 1920 x 1080
1080i 50 Apple ProRes Proxy 1080i 38 1920 x 1080
Apple ProRes LT 1080i 85 1920 x 1080
Apple ProRes 1080i 122 1920 x 1080
Apple ProRes HQ 1080i 184 1920 x 1080
Apple ProRes 4444 1080i 275 1920 x 1080
Project Edit Rate
Resolution Name in Interplay Access
and Interplay Transcode Mbit/sec Raster Size

204
1080i 59.94 Apple ProRes Proxy 1080i 45 1920 x 1080
Apple ProRes LT 1080i 102 1920 x 1080
Apple ProRes 1080i 147 1920 x 1080
Apple ProRes HQ 1080i 220 1920 x 1080
Apple ProRes 4444 1080i 330 1920 x 1080
25i PAL 25 Apple ProRes Proxy 25i 12 720 x 576
Apple ProRes LT 25i 28 720 x 576
Apple ProRes 25i 41 720 x 576
Apple ProRes HQ 25i 61 720 x 576
Apple ProRes 4444 25i 92 720 x 576
30i NTSC 29.97 Apple ProRes Proxy 30i 12 720 x 486
Apple ProRes LT 30i 29 720 x 486
Apple ProRes 30i 42 720 x 486
Apple ProRes HQ 30i 63 720 x 486
Apple ProRes 4444 30i 94? 720 x 486
Project Edit Rate
Resolution Name in Interplay Access
and Interplay Transcode Mbit/sec Raster Size

12 JPEG 2000 Resolutions Supported in
Interplay | Production
Interplay v2.6 supports workflows for clips and sequences that use JPEG 2000 (J2K) resolutions,
with some limitations. You can work with JPEG 2000 material in an Avid editing application,
check it in and out of the Interplay Production database, and process it using Interplay
Production Services and use Interplay Transfer for workgroup-to-workgroup transfers.
JPEG 2000 resolutions are supported in Media Composer v6.1 and later.
Note the following limitation:
• Sequences composed of JPEG 2000 clips are not currently supported for Send to Playback.
The following table lists the supported resolutions. These resolutions are supported as sources
and targets for Interplay Transcode.
Project Edit Rate
Resolution Name in
Interplay Access and
Interplay Transcode
Average
Video Bit
Rate
(Mbit/Sec)
Maximum
Video Bit
Rate
(Mbit/Sec) Raster Size
30i 29.97 J2K NTSCi 50 Mbit 120 Mbit 720x486
25i 25 J2K PALi 50 Mbit 120 Mbit 720x592
720p 23.976 J2K 720p 60 Mbit 150 Mbit 1280x720
50 J2K 720p 125 Mbit 250 Mbit 1280x720
59.94 J2K 720p 150 Mbit 250 Mbit 1280x720
1080i 50 J2K1080i 125 Mbit 250 Mbit 1920x1080
59.94 J2K1080i 150 Mbit 250 Mbit 1920x1080
1080p 23.976 J2K1080p 120 Mbit 250 Mbit 1920x1080
24 J2K1080p 120 Mbit 250 Mbit 1920x1080

13 Support for Stereoscopic 3D Workflows
The following topics describe support for stereoscopic 3D workflows in Interplay Production:
•Overview of Stereoscopic Support
•Stereoscopic Media and Stereoscopic Clips
•Stereoscopic 3D Support in Interplay | Access
•Stereoscopic 3D Support in Interplay | Transcode
•Stereoscopic 3D Support in the Interplay Window, and Interplay | Assist
•Properties for Stereoscopic Clips
Overview of Stereoscopic Support
Interplay v2.6 and later supports workflows for clips and sequences that use stereoscopic 3D
formats, with some limitations. Stereoscopic metadata is preserved when you check stereoscopic
objects in and out of the Interplay database, process them through Interplay Production Services,
and use Interplay Transfer for workgroup-to-workgroup transfers. Interplay Transcode supports
transcoding of stereoscopic media from one format to another.
Note the following limitations:
• Stereoscopic clips are supported in Transcode WHOLE and CONSOLIDATE mode but are
not supported in DUALMIXDOWN or CROSSRATE mode. MIXDOWN mode is supported
with limitations. See “Stereoscopic 3D Support in Interplay | Transcode” on page 211.
• Stereoscopic clips are not supported for streaming play in Interplay Access. You cannot
transcode to H.263 or H.264 target resolutions.
• Sequences composed of stereoscopic clips are not supported for Send to Playback.
• Stereoscopic clips are not supported for partial delivery or partial restore.
• Stereoscopic clips created from a simultaneous left/right capture do not load in an editing
system if dynamic relink is enabled. An error message is displayed. As a workaround,
disable dynamic relink. Note: Clips created manually or from QuickTime movies load and
play correctly.
Stereoscopic Media and Stereoscopic Clips
207
The following project types and resolutions are supported:
• 1080p 23.976
- DNxHD 36, 115, 175, 175x, 444
- AVC-Intra 50 and 100
- 8-bit HD Uncompressed (1:1 MXF in Avid editing systems)
• 1080i 60
- DNxHD 145. 220, 220x
- AVC-Intra 50 and 100
- 8-bit HD Uncompressed (1:1 MXF in Avid editing systems)
• 1080i 50
- DNxHD 120, 185, 185x
- AVC-Intra 50 and 100
- 8-bit HD Uncompressed (1:1 MXF in Avid editing systems)
Stereoscopic Media and Stereoscopic Clips
Stereoscopic 3D editing requires two synchronized images, representing the left and right human
eyes. When these left and right images are captured into an Avid editing application, they can be
combined to produce a special type of clip called a stereoscopic clip, which allows you to more
easily edit stereoscopic material.
In an Avid editing application, stereoscopic media can be edited in one of two formats: full frame
or frame compatible.
• Full frame describes a format that represents each eye of the stereoscopic pair at full
resolution. During the capture process, one master clip is created for the left eye and one
master clip is created for the right eye. A stereoscopic clip is created to reference these
master clips.
• Frame compatible describes a format where the images from both the eyes are squeezed into
a single video image, either side by side or over/under. During the capture process, only one
master clip is created. A stereoscopic clip is created to reference this master clip.
The following illustration shows the four different types of 3D master clips. It also shows how all
3D master clips and a monoscopic clip can be associated with the same stereoscopic clip.
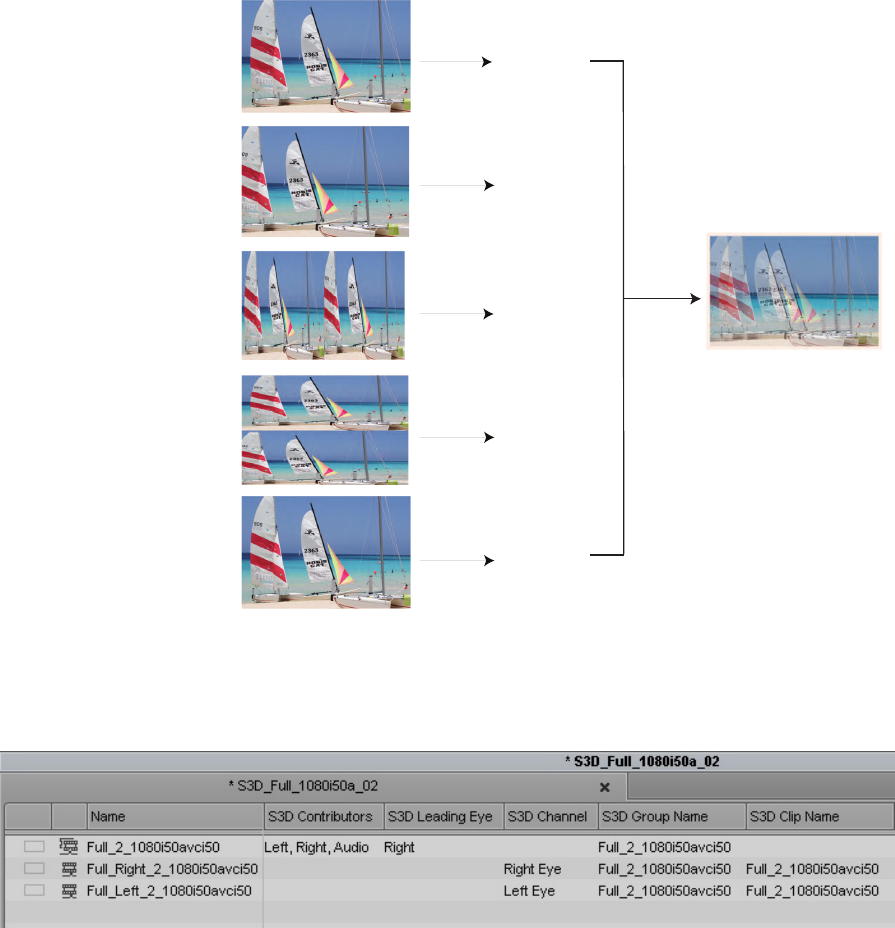
Stereoscopic Media and Stereoscopic Clips
208
The following illustration shows a stereoscopic clip and two full-frame master clips in a
Media Composer bin. The stereoscopic clip is represented by a unique icon. The illustration also
shows some of the bin columns that are specifically used for stereoscopic objects.
Frame Compatible
OVER_UNDER
Frame Compatible
SIDE_BY_SIDE
MASTER CLIPS
CREATED IN BIN
STEREOSCOPIC
CLIP
GENERATE D
IN BIN
Full Frame
LEFT
Full Frame
RIGHT
Full-Res
Stereo Media
Half-Res
Stereo Media
Half-Res
Stereo Media
AVAILABLE
MEDIA VERSIONS
ON DISK STORAGE
A single Stereo Clip is generated
for all captures done for the same
timeframe.
Full-Res
Stereo Media
CAPTURE/IMPORT
FORMAT
Monoscopic Standard
Full-Res Media
Stereoscopic 3D Support in Interplay | Access
209
nFor more information about working with stereoscopic clips on an Avid editing system, see the
Avid Stereoscopic 3D Editing Workflow Guide, which is available on the Customer Support
Knowledge Base.
Stereoscopic 3D Support in Interplay | Access
Interplay Access v2.6 and later includes the following features that support workflows for
stereoscopic media and clips:
• Stereoscopic icons
• Stereoscopic properties
• Stereoscopic search criteria
Stereoscopic Icons and Properties
Interplay Access uses the same icons for stereoscopic clips as Avid editing systems, as described
in the following table.
The following illustration shows a stereoscopic clip in the Assets window and the related master
clips (full left and full right) in the Master Clip Relative tab of the Object Inspector. The Assets
window shows some of the stereoscopic property columns.
Icon Description
Stereoscopic clip
Stereoscopic subclip
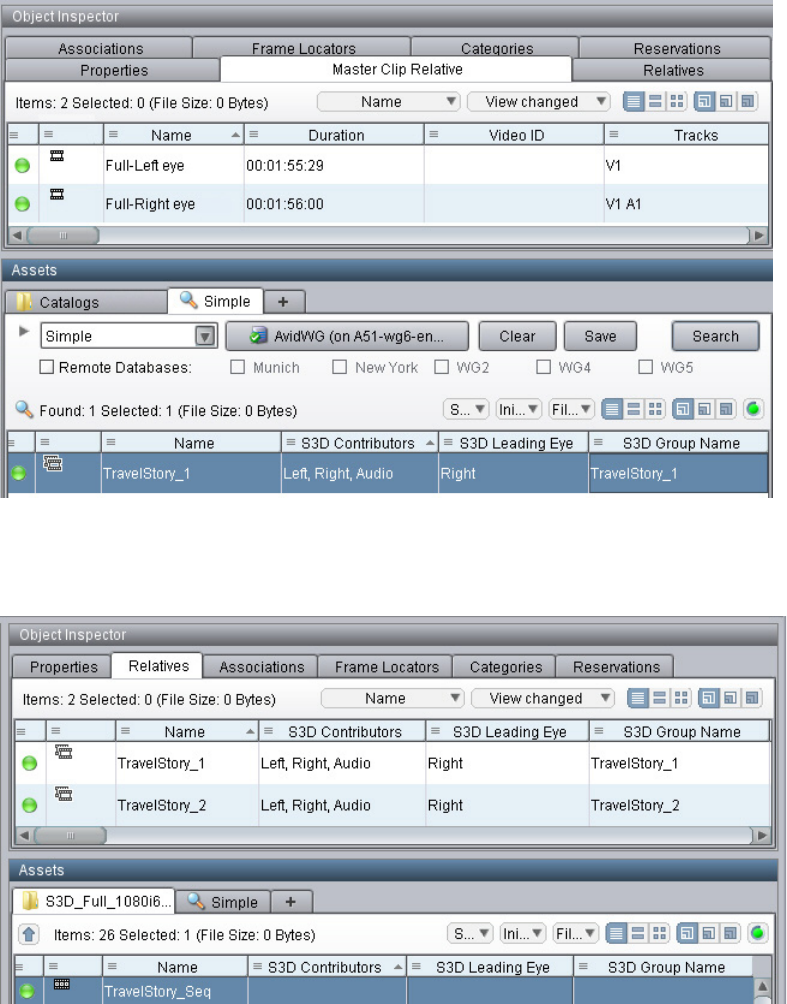
Stereoscopic 3D Support in Interplay | Access
210
The following illustration shows a sequence in the Assets window and its referenced
stereoscopic clip in the Relatives tab of the Object Inspector.

Stereoscopic 3D Support in Interplay | Transcode
211
For a list of all stereoscopic properties available for display, see “Properties for Stereoscopic
Clips” on page 213.
Stereoscopic Search Criteria
Interplay Access Search now includes the following criteria. To display the extended criteria,
you need to enable them for display in the Property Layout view in the Interplay Administrator.
Stereoscopic 3D Support in Interplay | Transcode
Interplay Transcode v2.6 includes the following stereoscopic 3D support:
• Transcoding of stereoscopic clips, stereoscopic subclips, and sequences containing
stereoscopic clips and subclips, in WHOLE and CONSOLIDATE modes.
• Mixdown of sequences containing only stereoscopic clips, stereoscopic subclips, or both.
Metadata properties (column data) and DRM (restrictions) are preserved.
You can use MIXDOWN mode to change the stereoscopic project type of the sequence when
creating a mixed-down clip. Options for creating a MIXDOWN profile now include an option
labeled TargetStereoScopicProjectType.
Type of Search Criteria
Simple (Type field) All stereoscopic clips
Stereoscopic master clips
Stereoscopic subclips
Extended S3D Alignment
S3D Channel
S3D Clip Name
S3D Contributors
S3D Eye Ordering
S3D Group Name
S3D Inversion
S3D InversionR
S3D Leading Eye

Stereoscopic 3D Support in Interplay | Transcode
212
The following table lists the stereoscopic project types you can select and the resulting
mixed-down clips.
Note the following limitations:
• DUALMIXDOWN mode is not supported for sequences containing stereoscopic clips,
stereoscopic subclips, or both.
• CROSSRATE mode is not supported for stereoscopic clips or subclips.
• Frame locators (markers) are not preserved during mixdowns.
• H.263 and H.264 resolutions are not supported as target resolutions for transcoding.
• Source resolutions and target resolutions for mixdowns are limited to the following:
- 8-bit HD Uncompressed (1:1 MXF in Avid editing systems)
- DNxHD (all resolutions, including DNxHD 1080p 444)
- AVC-Intra 50 and AVC-Intra100
See “Overview of Stereoscopic Support” on page 206 for specific project types and
resolutions.
nFor information about working with stereoscopic project types on an Avid editing system, see the
Avid Stereoscopic 3D Editing Workflow Guide, which is available on the Customer Support
Knowledge Base.
nFor information about creating a Transcode profile, see the Interplay Production Services Setup
and Users Guide or the Interplay Production Help.
Stereoscopic
Project Type Master Clips Created
Stereoscopic
Clip Created?
Monoscopic One master clip No
Leading Eye One master clip for the Leading Eye footage only No
Left eye only One master clip for the Left Eye footage only No
Right Eye only One master clip for the Right Eye footage only No
Side by side One master clip with Left and Right images side by side Yes
Over / Under One master clip with the Left image above the Right image Yes
Full One master clip for the Left eye, one master clip for the Right eye Yes

Stereoscopic 3D Support in the Interplay Window, and Interplay | Assist
213
Stereoscopic 3D Support in the Interplay Window,
and Interplay | Assist
Stereoscopic 3D clips are supported in the Interplay Window, and Interplay Assist in the same
way as other master clips are supported. Playback of full S3D clips in Interplay Assist uses the
leading eye only, as set in the Avid editing application.
Properties for Stereoscopic Clips
The following properties are available for display in Interplay Access. To select properties for
display, open the Property Layout view in the Interplay Administrator.
Bin column Description
S3D Alignment Displays whether or not the media has already been aligned by a third-party
application. Presently, this is just an indicator for the editor. There are no
software functions associated with this field.
• None (Default)
• Full: Indicates that media has been pre-aligned by an external application.
S3D Channel Displays which channel this master clip will deliver into the stereoscopic clip.
(Left eye, right eye and monoscopic are full frame channels, while Side by
Side and Over/Under are frame compatible channels.)
Left Eye: Indicates that the contents of this clip are to be used as the Left eye.
Right Eye: Indicates that the contents of this clip are to be used as the Right
eye.
Over/Under: Indicates that this is frame compatible media in an over/under
format.
Side by side: Indicates that this is frame compatible media in a side by side
format.
Monoscopic: Indicates that this is a standard 2D clip (not stereoscopic).
S3D Clip name Displays the name that was used to name the stereoscopic clip when it is
created. The name only needs to be set for one of the contributing master clips.
If no name is entered for any of the contributing clips, then the S3D Group
name will be used instead.
S3D Contributors
(master clip only)
Lists the S3D Channels (master clips) that feed into the stereoscopic clip.

Properties for Stereoscopic Clips
214
S3D Eye Ordering Only available if the media is in a frame compatible format with the S3D
Channel set to either Over/Under or Side by Side.
Specifies which half of the image the eye is displayed.
Left-Right:
• For Side by Side format, the Left eye is on the left, the Right eye is on the
right.
• For Over/Under format, the Left eye is in the top half of the image, Right
eye is in the bottom.
Right-Left:
• For Side by Side format, the Right eye is on the left, Left eye is on the
right.
• For Over/Under format, the Right eye is in the top half of the image, Left
eye is in the bottom.
S3D Group name A common name used to identify all master clips originating from the same
stereoscopic footage. The group name is used by the application to create a
single stereoscopic clip that references these master clips. Therefore, this
name must be exactly the same for all clips that need to be grouped into a
stereoscopic clip.
When material is captured from tape, this field is automatically populated for
all the left and right eye master clips.
When material is imported/linked from file, this data may not be present. If so,
you can select the clips in the bin and request for auto-population of the group
name.
If an S3D Clip name is not specified, then the group name is used to name the
stereoscopic clip when it is created.
S3D Inversion Displays if and how the contents of this clip should be inverted before being
used.
This is useful when beam-splitter rigs are used during filming, and a mirror is
used to create the image for one of the eyes. In this case, one of the eyes will
be inverted so it needs to be corrected
None: Leaves the image as is.
Horizontal: Inverts the image horizontally.
Vertical: Inverts the image vertically.
Horizontal/Vertical: Inverts the image horizontally and vertically.
Bin column Description

Properties for Stereoscopic Clips
215
S3D InversionR Only available if the media is in a frame compatible format with the S3D
Channel set to either Over/Under or Side by Side.
Displays how the part of the image that provides the right eye should be
inverted before being used.
None: Leaves the image as is.
Horizontal: Inverts the right eye image horizontally.
Vertical: Inverts the right eye image vertically.
Horizontal/Vertical: Inverts the right eye image horizontally and vertically.
S3D Leading Eye
(master clip only)
Displays which eye image should be used when editing with the leading eye.
This is useful in scenarios where a beam-splitter rig was used during filming.
In such a case, the leading eye is typically the non-reflected image.
Left: (Default) Indicates that the left eye image is the leading eye.
Right: Indicates that the right eye image is the leading eye.
Bin column Description

14 DNxHD Resolutions Supported in
Interplay | Production
Interplay v3.2 and later supports workflows for clips and sequences that use many of the
DNxHD resolutions. Supported workflows include the following:
• Capture media on an AirSpeed system or an Avid editing application
• Work with media in an Avid editing application
• Check assets in to and out from the Interplay database
• Process assets using Interplay Production Services (including partial restore and partial
delivery)
• Transfer assets from workgroup-to-workgroup with Interplay Transfer
• Send a sequence composed of DNxHD clips to a playback device (STP). Progressive
resolutions are not supported.
The following tables list the supported resolutions..
720p Projects
Project
Edit Rate
(frames/
sec)
Resolution
Name in Avid
Editing
Application
Resolution Name in Interplay
Access and Interplay Transcode
Approx.
Video Bit
Rate
(Mbit/Sec)
Raster
Size
720p/23.976 23.976 DNxHD 40 DNxHD 720p 100 40 Mbit 960x720
DNxHD 90x
DNxHD 90
DNxHD 60
DNxHD 720 90X-110X-220X 1 Field
DNxHD 720 90-110-220 1 Field
DNxHD 720 60-75-145 1 Field
88 Mbit
88 Mbit
60 Mbit
1280x720
720p/50 50 DNxHD 85 DNxHD 720p 100 85 Mbit 960x720
DNxHD 185x
DNxHD 185
DNxHD 120
DNxHD 720 90X-110X-220X 1 Field
DNxHD 720 90-110-220 1 Field
DNxHD 720 60-75-145 1 Field
184 Mbit
184 Mbit
121 Mbit
1280x720
720p/59.94 59.94 DNxHD 100 DNxHD 720p 100 100Mbit 960x720
217
1080p Projects
DNxHD 220x
DNxHD 220
DNxHD 145
DNxHD 720 90X-110X-220X 1 Field
DNxHD 720 90-110-220 1 Field
DNxHD 720 60-75-145 1 Field
220 Mbit
220 Mbit
145 Mbit
1280x720
Project
Edit Rate
(frames/
sec)
Resolution
Name in Avid
Editing
Application
Resolution Name in Interplay
Access and Interplay Transcode
Approx.
Video Bit
Rate
(Mbit/Sec)
Raster
Size
Project
Edit Rate
(frames/
sec)
Resolution
Name in Avid
Editing
Application
Resolution Name in Interplay
Access and Interplay Transcode
Approx.
Video Bit
Rate
(Mbit/Sec)
Raster
Size
1080p/23.97 23.976 DNxHD 80 DNxHD 1080p 100 80 Mbit 1440x1080
DNxHD 444 350x
DNxHD 175x
DNxHD 175
DNxHD 115
DNxHD 36
DNxHD 1080p 444
DNxHD 1080 175X-185X-220X 1 Field
DNxHD 1080 175-185-220 1 Field
DNxHD 1080 115-120-145 1 Field
DNxHD 1080 36
352 Mbit
176 Mbit
176 Mbit
116 Mbit
36 Mbit
1920x1080
1080p/24 24 DNxHD 80 DNxHD 1080p 100 80 Mbit 1440x1080
DNxHD 444 350x
DNxHD 175x
DNxHD 175
DNxHD 115
DNxHD 36
DNxHD 1080p 444
DNxHD 1080 175X-185X-220X 1 Field
DNxHD 1080 175-185-220 1 Field
DNxHD 1080 115-120-145 1 Field
DNxHD 1080 36
352 Mbit
176 Mbit
176 Mbit
116 Mbit
36 Mbit
1920x1080
1080p/25 25 DNxHD 444 365x
DNxHD 185x
DNxHD 185
DNxHD 120
DNxHD 36
DNxHD 1080p 444
DNxHD 1080 175X-185X-220X 1 Field
DNxHD 1080 175-185-220 1 Field
DNxHD 1080 115-120-145 1 Field
DNxHD 1080 36
367 Mbit
184 Mbit
184 Mbit
121Mbit
38 Mbit
1920x1080
1080p/29.97 29.97 DNxHD 444 440x
DNxHD 220x
DNxHD 220
DNxHD 145
DNxHD 45
DNxHD 1080p 444
DNxHD 1080 175X-185X-220X 1 Field
DNxHD 1080 175-185-220 1 Field
DNxHD 1080 115-120-145 1 Field
DNxHD 1080 36
440 Mbit
220 Mbit
220 Mbit
145 Mbit
45 Mbit
1920x1080

218
1080i Projects
1080p/50 50 DNxHD 444 735x
DNxHD 365x
DNxHD 365
DNxHD 240
DNxHD 75
DNxHD 1080p 444
DNxHD 1080 175X-185X-220X 1 Field
DNxHD 1080 175-185-220 1 Field
DNxHD 1080 115-120-145 1 Field
DNxHD 1080 36
734 Mbit
367 Mbit
367 Mbit
242 Mbit
75 Mbit
1920x1080
1080p/59.94 59.94 DNxHD 444 880x
DNxHD 440x
DNxHD 440
DNxHD 290
DNxHD 90
DNxHD 1080p 444
DNxHD 1080 175X-185X-220X 1 Field
DNxHD 1080 175-185-220 1 Field
DNxHD 1080 115-120-145 1 Field
DNxHD 1080 36
880 Mbit
440 Mbit
440Mbit
291Mbit
90 Mbit
1920x1080
Project
Edit Rate
(frames/
sec)
Resolution
Name in Avid
Editing
Application
Resolution Name in Interplay
Access and Interplay Transcode
Approx.
Video Bit
Rate
(Mbit/Sec)
Raster
Size
Project
Edit Rate
(frames/
sec)
Resolution
Name in Avid
Editing
Application
Resolution Name in Interplay
Access and Interplay Transcode
Approx.
Video Bit
Rate
(Mbit/Sec)
Raster
Size
1080i/50 25 DNxHD 85 DNxHD 1080i 100 85 Mbit 1440x1080
DNxHD 185x
DNxHD 185
DNxHD 120
DNxHD 1080 175X-185X-220X
DNxHD 1080 175-185-220
DNxHD 1080 115-120-145
184 Mbit
184 Mbit
121 Mbit
1920x1080
1080i/59.94 29.97 DNxHD 100 DNxHD 1080i 100 100 Mbit 1440x1080
DNxHD 220x
DNxHD 220
DNxHD 145
DNxHD 1080 175X-185X-220X
DNxHD 1080 175-185-220
DNxHD 1080 115-120-145
220 Mbit
220 Mbit
145 Mbit
1920x1080

15 XAVC-Intra HD Resolutions Supported in
Interplay | Production
Interplay v3.2 and later supports workflows for clips and sequences that use XAVC-Intra HD
resolutions. Supported workflows include the following:
• Capture media on an AirSpeed system or an Avid editing application
• Work with media in an Avid editing application
• Check assets in to and out from the Interplay database
• Process assets using Interplay Production Services (including partial restore and partial
delivery)
• Transfer assets from workgroup-to-workgroup with Interplay Transfer
• Send a sequence composed of XAVC-Intra HD clips to a playback device (STP). Support is
limited to:
- XAVC Intra 100 1080i 50
- XAVC Intra 100 1080i 60
The following table lists the supported resolutions.
Project Edit Rate
Resolution Name in Interplay
Access
Video Bit
Rate
(Mbit/Sec) Raster Size
1080i 50 XAVC Intra 50 1080i 50
XAVC Intra 100 1080i 50
50 Mbit
100 Mbit
1440x1080
1920x1080
59.94 XAVC Intra 50 1080i 60
XAVC Intra 100 1080i 60
50 Mbit
100 Mbit
1440x1080
1920x1080
1080p 23.976 XAVC Intra 50 1080p 23.976
XAVC Intra 100 1080p 23.976
50 Mbit
100 Mbit
1440x1080
1920x1080

16 DNxHR Resolutions Supported in
Interplay | Production
Interplay v3.3 and later supports workflows for clips and sequences that use the following
DNxHR resolutions for UHDTV1 (Ultra HD) formats:
• DNxHR LB (low bandwidth)
• DNxHR SQ (standard quality)
• DNxHR HQ (high quality)
• DNxHR HQX (high quality 12-bit)
• DNxHR 444 (cinema quality 12-bit)
nDNxHR HQX 10 bit and DNxHR 444 10-bit are not supported.
Supported workflows include the following:
• Capture media on an Avid editing application
• Work with media in an Avid editing application
• Check assets in to and out from the Interplay database
• Process assets using Interplay Production Services (including partial restore and partial
delivery)
Interplay Transcode can use DNxHR resolutions as sources only.
• Transfer assets from workgroup-to-workgroup with Interplay Transfer
• Send a sequence composed of DNxHR clips to a playback device (STP).
Note the following are unsupported:
• DNxHR LB 1/16 and 1/4
• DNxHR media with alpha channels
• DNxHR in Interplay Assist (Assist v3.3 has a clear error message; earlier versions do not)
The following table lists the supported resolutions.

221
Media
Composer
Project Edit Rate
Resolution
Name in
Interplay
Access
Video Bit Rate
(Mbit/Sec) Raster Size
Ultra HD 59.94p DNxHR LB
DNxHR SQ
DNxHR HQ
DNxHR HQX
DNxHR 444
359
1154
1747
1747
3494
3840 x 2160
Ultra HD 50p DNxHR LB
DNxHR SQ
DNxHR HQ
DNxHR HQX
DNxHR 444
299
963
1457
1457
2914
3840 x 2160
Ultra HD 29.97p DNxHR LB
DNxHR SQ
DNxHR HQ
DNxHR HQX
DNxHR 444
179
577
873
873
1747
3840 x 2160
Ultra HD 25p DNxHR LB
DNxHR SQ
DNxHR HQ
DNxHR HQX
DNxHR 444
150
481
729
729
1457
3840 x 2160
Ultra HD 24p DNxHR LB
DNxHR SQ
DNxHR HQ
DNxHR HQX
DNxHR 444
144
462
699
699
1399
3840 x 2160
Ultra HD 23.976p DNxHR LB
DNxHR SQ
DNxHR HQ
DNxHR HQX
DNxHR 444
143
462
699
699
1398
3840 x 2160

17 Using Frame Chase Editing
This chapter describes how to use Frame Chase™ editing. Frame Chase editing (sometimes
called “edit while capture”) lets an Avid editing application that is part of an Interplay
workgroup view and edit clips while they are being captured. Frame Chase editing is supported
only when media is captured from a supported external device through Interplay Transfer.
•Frame Chase Editing and Frame Chase Capture
•Understanding Frame Chase Editing
•Workflow for Frame Chase Editing
•Limitations When Working With In-Progress Clips
Frame Chase Editing and Frame Chase Capture
Frame Chase editing as described in this chapter always involves Interplay Transfer. You can
also use the Capture tool on an Avid editing application to capture to shared storage. This
technique is referred to as Frame Chase Capture. Frame Chase Capture also creates in-progress
clips that are available for viewing and editing as soon as the initial check-in to Interplay
Production takes place. For more information, search for “Frame Chase Capture” in your Avid
editing application Help.
Understanding Frame Chase Editing
Frame Chase editing is a time-saving feature that lets an editor view and edit media while it is
being captured from a line feed or ingest device. After the capture starts, the editor can use the
captured media to create a sequence, view the media as it is captured, and complete a sequence
even before the capture has finished.
Clips that are in the process of being captured are referred to as in-progress clips. In-progress
clips are indicated by the following icons:
In-progress master
clips
In-progress audio clips
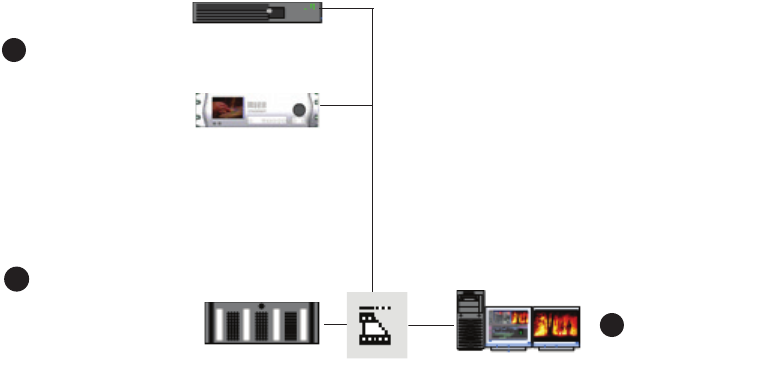
Understanding Frame Chase Editing
223
When the capture is complete, the icon is replaced by the standard master clip or audio clip icon.
To view the updated icon in the Interplay Window, press F5. To view the updated icon in a bin,
select Bin > Update from Interplay.
Frame Chase editing is available only in an Interplay Production workgroup that includes
Interplay Transfer and a supported external device. Media must be in the MXF format. The
process consists of three basic parts:
• A capture is started on a line feed or ingest device (for example, an Avid AirSpeed video
server). This capture is controlled by an application such as Interplay Capture. Depending on
the device, you can also “hot record” a clip by using controls on the device itself.
• After the capture begins, the Interplay Transfer software on the AirSpeed checks the
in-progress clip into the Interplay database. Interplay Transfer also manages the transfer of
media to Avid shared storage.
• The editor or journalist loads the in-progress clip. You can work with in-progress clips on an
Avid editing system, Avid Instinct, or Interplay Assist. On an Avid editing system, you can
work directly from the Interplay window, or you can check out a clip to a bin.
The following diagram illustrates these basic parts of the process.
The length of an in-progress clip is based on the expected duration of the capture. For on-the-fly
or open-ended captures, the length of the clip is based on the maximum capture time set by the
capture application. The Frame Chase process creates one media file for each track of the
captured media. As a capture continues, the size of the associated media file increases. After the
capture is complete, the clip is updated to reflect the actual duration of the capture and the
in-progress icon is replaced by the standard icon.
The capture
application star ts
the capture .
Interpla y T ransf er
chec ks in the c lip.
CaptureManager
AirSpeed with
Interplay Transfer
Unity shared storage Avid editing system
The editor loads
the in-pr ogress
clip.
33
1
2
Workflow for Frame Chase Editing
224
nThe default duration on an AirSpeed server is one hour (01:00:00:00). When the capture is
complete, the duration is updated. If a clip goes beyond one hour, the default duration is two
hours (02:00:00:00).
Frame Chase editing is supported in a dual-ingest configuration, in which both a low-res and a
high-res version of a clip is created. When an editor loads an in-process clip, the version that is
displayed is determined by one of the following:
• If dynamic relink is enabled, the dynamic relink settings determine which version is
displayed.
• If dynamic relink is not enabled, the latest version checked in to the Interplay database is
displayed.
For more information about dual-ingest configurations, see the Interplay Capture Installation
and Configuration Guide. For more information about dynamic relink, see “Using MultiRez and
Dynamic Relink” in the Help for your Avid editing system..
Workflow for Frame Chase Editing
The following workflow is one example of how to use Frame Chase editing. This workflow
includes the following components:
• An Avid editing system that is an Interplay Production client. This workflow uses Avid
Media Composer. It also uses the Interplay Window to access the Interplay Production
database.
• A supported line-feed or ingest device. This workflow uses an Avid AirSpeed server.
• A capture application. This workflow uses Interplay Capture software, which schedules the
ingest on the AirSpeed server.
• Interplay Transfer software. In this workflow, the AirSpeed server contains its own version
of Interplay Transfer.
You can adapt this workflow to suit the requirements of your working environment.
In this example workflow, an editor uses Media Composer to create a news story from a timed
feed. Interplay Capture has been set up to work with an AirSpeed server to automatically create
clips of a set duration from the feed, as shown in the following illustration.

Workflow for Frame Chase Editing
225
To use Frame Chase editing:
1. Make sure that the ingest device is properly connected and set up for recording and transfer.
2. On the Avid editing system, make sure an Avid shared storage workspace is mounted.
3. Open Media Composer, open a project, and open the Interplay Window.
4. In the Interplay Window, navigate to the folder that holds the clip that you want to use for
editing. If you know some information about the clip, you can use the Search feature.
A clip that is being captured displays an in-progress icon.
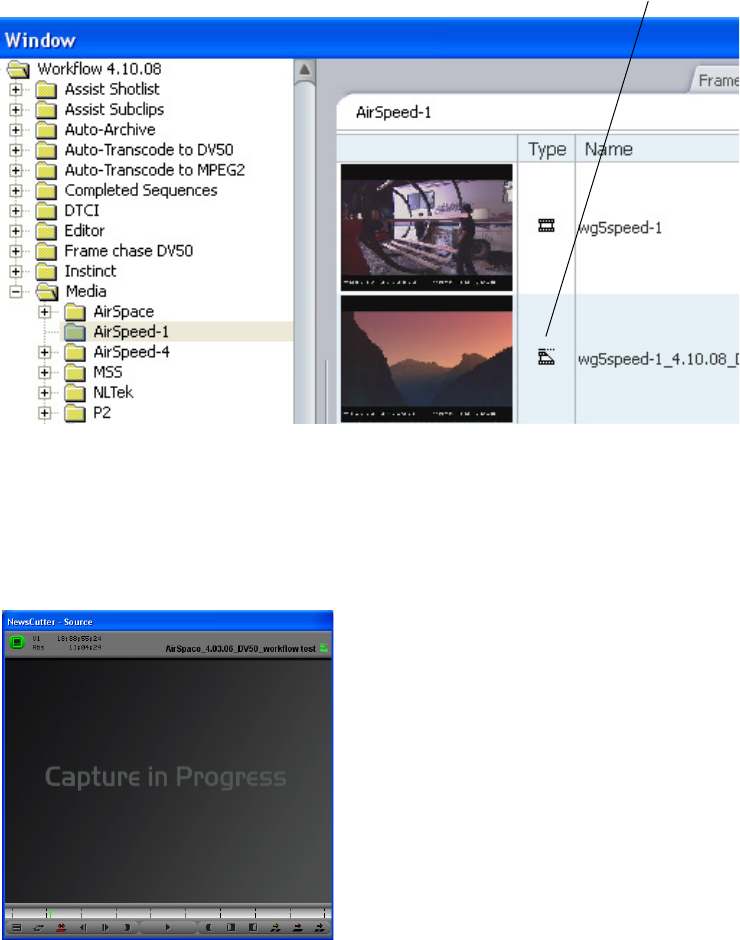
Workflow for Frame Chase Editing
226
5. Load the clip into the Source monitor and play the clip.
The clip plays in the Source monitor at the same time the media is being captured.
nPortions of a clip that are not currently available display a “Capture in Progress” slide until the
sections are captured.
nIn Avid Instinct or Interplay Assist, press Alt+F5 to update the media displayed in the monitor.
6. Create a sequence in a bin on Media Composer.
In-progress icon
Limitations When Working With In-Progress Clips
227
7. Use standard editing techniques to build a sequence from the in-progress clip.
8. When the clip is completely captured, select Bin > Update from Interplay.
This command ensures that the latest version of the clip is used in your sequence. For more
information, see “Updating Remote Assets in a Bin” in the Help for your Avid editing
system.
9. Save the sequence and prepare it for playback.
Limitations When Working With In-Progress Clips
During the capture process the final length of the clip is unknown until the capture is complete
and the clip information is updated. Because of this, there are some limitations when you work
with in-progress clips.
The following editing functions are limited to working with the available captured media of an
in-progress clip:
• Editing in-progress clips into a sequence — You can edit the captured portions of
in-progress clips into a sequence.
• Subclips — When creating a subclip from an in-progress clip you must place the IN and
OUT points where media has already been captured and is available.
• Trimming — The right-side trim limit of an in-progress clip is determined by the currently
available media. When you trim an in-progress clip to the end of available media the trim
functions as if it had reached the end of the clip. As more media is captured the trim limit
increases. Performing the trim at a later time might allow more trimming as more media
might become available.
The following editing functions are not available when working with in-progress clips:
• Clip duplication — Duplication of an in-progress clip is not allowed because the duplicated
clip loses its relationship with the original in-progress master clip.
• Group clips — You cannot use an in-progress clip in a group clip, because the length of an
in-progress clip is unknown until the capture is complete. Group clips are based on the
length of the contributing clips. This limitation applies to all of the related grouping
operations, such as AutoSync, Group Clips, and MultiGroup.
• Consolidate, Transcode, and Audio Conversion — You cannot use consolidate, transcode, or
audio conversion with an in-progress clip. All the media must be available and the length of
the clip known before you can perform these functions. However, you can use consolidate
and transcode on subclips and sequences that reference or contain in-progress clips. In these
cases, any right-side handles are restricted by the known media duration of the in-progress
clip at the time of the operation.
Limitations When Working With In-Progress Clips
228
For example, if you set 2 second handles but there is only 1 second of media available for a
handle at the time the consolidate or transcode operation is executed, then the right-side
handle is restricted to 1 second.
• Decompose — The restrictions for decompose are the same as consolidate and transcode.
The right-side handles cannot exceed the known media duration of the clip.
• Non-Check-in export — You cannot export an in-progress clip or a sequence that contains
in-progress clips because the final clip length might be different than the clip length at the
time of the export.
• Variable-bit-rate media — The only variable-bit-rate (variable-frame-size) media supported
for Frame Chase editing is low-res long-GOP MPEG-2 media captured by the Interplay
Production low-res encoder. Only media captured by supported ingest devices is supported
for Frame Chase editing.
• Using the Capture tool—Frame Chase editing is not available on an Avid editing system that
is using the Capture tool to capture media.

18 Additional Interplay | Production Topics
This chapter covers the following topics:
•Changing Source Information for a Clip in Interplay | Production
•Ingest and Playout of Ancillary Data
•Dynamic Relink: Working with a Single Resolution
•Disconnecting an Avid Editing Application from the Interplay Environment
Changing Source Information for a Clip in
Interplay | Production
There are two types of source information that usually should not be changed for a master clip in
an Interplay environment:
• Source tape name
• Timecode format (changing between drop frame and non-drop frame)
The tape name and timecode format are part of the source information for a clip and changing
them may cause the clip to become offline whenever Dynamic Relink is activated. Once this
happens, the relation of the clip to its media can be permanently lost.
If it is necessary to change the tape name or timecode format for a master clip in an Interplay
environment, use the procedure described in this section.
You only need to perform this procedure if both of the following statements apply:
• If your site uses Dynamic Relink. If your site does not use Dynamic Relink there is no need
to perform the procedure.
• If you are associating a master clip with a different tape name or timecode format. If you are
simply changing the name of an existing tape you don’t have to perform the procedure.
To change the tape name or timecode format for a clip in an Interplay environment:
1. Disable Dynamic Relink. See the Avid editing application Help or the Interplay Production
Help for information on Dynamic Relink.
2. Right-click the master clip in the bin and select Modify > Set Source.
Ingest and Playout of Ancillary Data
230
3. To change the tape name, do the following:
a. Select Set Source from the Modify dialog box popup menu. The Select Tape dialog box
opens.
b. Change the source tape name. Use an existing tape name or create a new one.
4. To change the timecode format to drop or non-drop frame, do the following:
a. Select ”Set Timecode Drop/Non-drop” from the Modify dialog box popup menu.
b. Select the format and click OK.
nThe media will remain online at this point because Dynamic Relink is turned off.
5. Consolidate the clip to generate new media that will be associated with the newly selected
tape name. Use the following options:
- Uncheck “Skip media files already on the target drive”
- (Option) check “Delete original media files when done”
- Use the default settings for all other conversion parameters
The system generates new media files that will reference the correct tape name or timecode
format. See the Avid editing application Help for additional information on the Consolidate
command.
6. Re-enable Dynamic Relink.
7. Double-click the clip in the bin to trigger the relink. The media will be online and linked
correctly to the adjusted tape name.
Ingest and Playout of Ancillary Data
Interplay v2.2.1 and later provides limited support for ancillary data. (Closed Captioning
conforming to SMPTE 436-M is a common form of ancillary data.) The following limitations
apply:
• Ancillary data is only supported with HD material
• Interplay Production supports one track of ancillary data
• VBI-based ancillary data is not supported
• For successful playback, sequences must be made up of clips captured by the same vendor’s
hardware. See “Playback Limitations” below.
The following table lists editor and AirSpeed Multi Stream ingest and playout capabilities for
HD resolutions that support ancillary data in an Interplay environment.

Support for AFD Ancillary Data
231
Playback Limitations
Since there are variations in how ancillary data is encoded and decoded with different vendor’s
hardware, composition sequences created for a Send To Playback destination must use ancillary
data captured or ingested using the SAME vendor's hardware and tools. Sequences with
mixed-vendor ancillary data are not supported since mixed-vendor ancillary data is not
guaranteed to decode and play correctly.
Support for AFD Ancillary Data
Active Format Description (AFD) is a standard set of codes through which the preferred display
format for media can be embedded in video signals. Media Composer v6.1 and later allows the
creation of AFD values for sequences in an ancillary data track (D1).
nFor more information, see the Media Composer documentation.
Interplay v2.7 and later supports workflows for sequences that include modified AFD values.
AFD values are preserved when you check sequences in and out of the Interplay database,
process them through Interplay Production Services, and use Interplay Transfer for
workgroup-to-workgroup transfers and send-to-playback operations. AFD values are displayed
in the metadata property labeled AFD, which can be displayed in an Avid editing application bin
and in Interplay Access.
Resolution with
Ancillary Data
Editor
Capturea
a. Captured with DX hardware and a device that supports ancillary data. For details, see “Ancillary Data
and Avid Editing Functions” in the Avid editing application Help.
AirSpeed Multi Stream
Ingest/STP
Supported with Ancillary
Data for Interplay v2.2.1b
b. Support includes check in and check out to Interplay database, Interplay Media Indexer support, and
send to playback.
XDCAM HD Yes Yes Yes
AVC-Intra Yes Yes Yes
DNxHD Yes Yes Yes
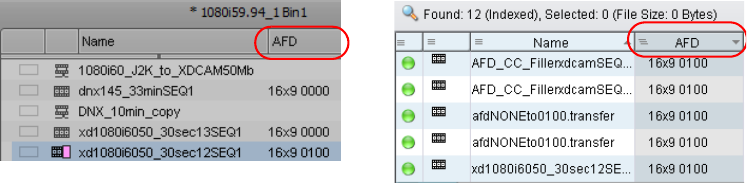
Support for AFD Ancillary Data
232
Working with AFD Values on Avid Editing Systems
When you add an AFD value to a Media Composer sequence, you add the value to the entire
sequence. If there is not already a D1 track in the sequence Timeline, Media Composer creates
one.
The D1 track must be present and monitored during playback to display the AFD value when the
sequence is played back through an ancillary data decoder. Deleting the D1 track prevents
display of the AFD value, but it does not remove the assigned AFD value from the sequence.
When you add an AFD value to a sequence, the Timeline display depends on whether there is
already a D1 track in the Timeline.
Sequences that do not have a D1 track: When an AFD value is assigned to a sequence without
a D1 track, an empty D1 track is created in the sequence to store the AFD value. The D1 track in
the Timeline does not display essence for the AFD value.
Sequences that already have AFD values in a D1 track: When you assign an AFD value to a
sequence whose master clips already have AFD values in a D1 track, the sequence in the
Timeline does not display essence for the new AFD value. However, during playback, the new
AFD value supersedes the AFD values for the master clips.
The following illustration shows a Timeline in which an AFD value has been applied to the
sequence. The D1 track for the first master clip is empty: it does not include essence. The D1
track for the second master clip includes essence with an AFD value. This value is superseded by
the AFD value applied to the sequence.
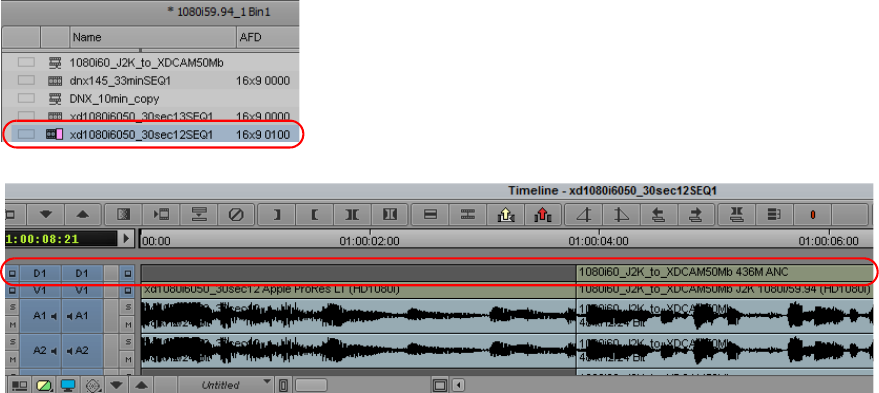
Dynamic Relink: Working with a Single Resolution
233
AFD Values and Send to Playback
The modified AFD value is preserved through a send-to-playback operation, resulting in an asset
on the destination playback server that holds the AFD value of the sequence in a D1 track with
data essence. If the user on an Avid editing system assigns an AFD value, then deletes a
sequence's D1 track before sending it to the playback server, the AFD value will be written on a
newly created D1 data track.
Dynamic Relink: Working with a Single Resolution
The term MultiRez refers to having a single master clip associated with multiple resolutions. You
use Dynamic Relink to allow the system to automatically switch between the different
resolutions depending on whether you are working with your working resolution or target
(output) resolution. If you are not using MultiRez in your Interplay environment, you can either
specify a single resolution for the Avid editing application or turn the feature off altogether. For
Interplay Assist and Avid Instinct you can turn the feature off in the Interplay Administration
tool.
Restricting Clips to a Single Resolution
This section describes how to set values in the Dynamic Relink dialog box if you know that you
will only be working with one resolution.

Dynamic Relink: Working with a Single Resolution
234
For Sites that Use Only One Resolution
If your site never creates multiple resolutions of the same master clip, you can disable Dynamic
Relink in the editing applications.
To turn off Dynamic Relink:
1. In the Avid editing application, open the Project window and click Settings.
2. Open the Dynamic Relink dialog box and deselect the Enable Dynamic Relink checkbox.
For Sites that Use Multiple Resolutions of the Same Master Clip
If your site uses multiple resolutions of the same master clip but you always want to use the same
resolution in your Avid editing application, you should enable Dynamic Relink and use the
“Override Working and Target Setting” option.
To use just one resolution in an Avid editing application:
1. Open the Dynamic Relink dialog box and click “Override Working Settings with Target
Settings”. This makes the working and target resolutions the same.
2. Set the target resolution to the resolution you want to use.
The problem with disabling Dynamic Relink in this case is that if there are different resolutions
of the same clip used at your site, you always get the “currently checked in resolution” when you
check a clip out of the Interplay Window. For example, if another user had transcoded your clip
to a different resolution and checked it in, you would get that resolution the next time you
checked it out. When you use the Override option you are assured that you will be working with
the resolution that you want.
Turning Off Dynamic Relink for Interplay | Assist and Avid Instinct
Interplay Assist supports the ability to disable dynamic relink. Dynamic relink allows you to link
your working media to a target resolution for send-to-playback operations. If your workflow
doesn’t require dynamic relinking, you can disable this feature.
You set dynamic relink options in the Interplay Administrator in the Editor Database settings and
in the Instinct/Assist User settings. If you enable dynamic relink, you must also change the
following relink options from the default value (“not set”) before the functionality is applied to a
site or a user.
Option Setting Description
Send to playback (Editor
Database Settings)
Target resolution, primary Sets a resolution for output to a playback device. The
default is DV 25 411.

Disconnecting an Avid Editing Application from the Interplay Environment
235
Disconnecting an Avid Editing Application from the
Interplay Environment
Starting at Interplay v1.1.1, Interplay Production supports a Disconnected Client mode that
allows you to work while disconnected from the Interplay Production environment.
There are two basic cases when you might want to voluntarily disconnect an Avid editing
application from the Interplay environment:
• If you have a laptop that you want to disconnect from the network and then use it to work
with media on your local drives.
• If the Service Framework is not available and you want to continue working on your local
drives.
Your system administrator might also perform a forced disconnect on your system in case of
software installation or system update.
For details on the capabilities and limitations of disconnected mode, see the Interplay Production
Help and the ReadMe for your Avid editing application.
Audio Target Resolution Sets an audio resolution for output to a playback
device. The default is PCM.
Also sets the Sample Rate and Bit Depth of the audio
for playback.
Video Settings
(Instinct/Assist User
Settings)
Working Resolution Sets the user’s working video resolution.
Audio Settings
(Instinct/Assist User
Settings)
Working Resolution Sets the user’s working audio resolution. If the working
resolution is set to PCM, you can select a sample rate
and a bit depth for audio clips.
Format Video Format (Avid Instinct only) Sets the default video format for
your sequences Select a format or select Any. If you
select Any, Avid Instinct allows you to select a video
format for your sequence when you create a new story.
Option Setting Description

19 Working with Interplay | Media Indexers
This chapter covers the following topics:
•New Features for Interplay | Media Indexer V3.2
•New Features for Media | Indexer V3.0 and V3.1
•Interplay | Media Indexer Overview
•Web-Based User Interface
•Managing Interplay | Media Indexers in an Interplay Environment
•Troubleshooting Interplay | Media Indexer
•Interplay | Media Indexer Health Monitor Options
New Features for Interplay | Media Indexer V3.2
The Media Indexer Web UI includes the following new features:
•Media Indexer HTTPS Support
•Media Indexer Configuration Import/Export
•Media Indexer Web UI Tool Tips
•Media Indexer Statistics
•Media Indexer AMA Configuration Enhancements
•Media Indexer MQ Resource View
•Media Indexer Web UI Security
•Media Indexer Web UI Shutdown
Features are described in the following topics.
Media Indexer HTTPS Support
You now connect to the Web UI through a secure HTTPS port 8443 using the following URL:
https://<MI system name>:8443/mi
New Features for Interplay | Media Indexer V3.2
237
Note the following:
• The previous URL http:\\<MI system name>:8888/mi redirects to the new URL.
• Access through the secure port uses the Secure Sockets Layer (SSL), which requires the
server to have a digital certificate. Media Indexer uses a self-signed certificate.
• With a self-signed certificate, the user is presented with a warning message. The exact
message depends on the browser, but in all cases the user will be able to access Media
Indexer.
The following illustration shows the warning page in the Chrome Browser when you
connect to Media Indexer on the machine that hosts the Web UI. Although the message
seems serious, the https connection is secure and there is little security risk for a properly
configured Media Indexer system. You can click on “Proceed to localhost (unsafe)” and
view the Media Indexer Web UI.
New Features for Interplay | Media Indexer V3.2
238
Media Indexer Configuration Import/Export
You can export and import a Media Indexer configuration, which can save time and effort when
setting up another instance of Media Indexer. The following information is included in the
exported .cfg file:
• MXF Index Locations
• AMA Media Location
• AMA Metadata (SPAAF) Location
• MI Server Connection
When importing a configuration file, you have options for which configuration information to
import and whether to replace or merge the configuration.
nNew configuration files are incompatible with files previously created by ASF.
Media Indexer Web UI Tool Tips
Tool tips have been added for icons, buttons, and input fields. Explanation text is displayed while
hovering over certain elements. For example, the following illustration shows the tool tip for the
icon that indicates an MXF real-time storage location.
New Features for Interplay | Media Indexer V3.2
239
Media Indexer Storage Location Icons (Introduced in V3.1)
The icons used for MI storage locations depend on the storage type (ISIS or licensed 3rd party)
and whether the storage location is used for AMA or for non-AMA media. ISIS Storage types
are further delineated by the ISIS family. For example, ISIS 7500 is defined as Realtime and ISIS
2500 is defined as Nearline.
The following table shows the Media Indexer web interface icons for Interplay v3.1 and later.
MI Web Interface Icon Description Comments
AMA Realtime Storage This includes AMA media stored on ISIS
7500, 7000, 5500, and 5000.
AMA Nearline Storage This includes AMA media stored on ISIS
2500, ISIS 2000, and licensed 3rd party
storage.
MXF Realtime Storage This includes MXF media stored on ISIS
7500, 7000, 5500, and 5000. These locations
are actively indexed by Media Indexer.
MXF Nearline This includes MXF material stored on ISIS
2500, ISIS 2000, and licensed 3rd party
storage. These locations are actively indexed
by Media Indexer.
MI Cannot Access this
Folder
Media Indexer cannot access the storage
location.
• For AMA storage locations, this might not
be a serious problem because Media
Indexer does not index the AMA media
directly. It indexes the related .spaaf files.
• For MXF storage locations, this indicates
a serious problem.
The X symbol can also indicate that the folder
was mistyped or that the storage location is
not available. In this case, Media Indexer
might have access to the storage when it is
available.
New Features for Interplay | Media Indexer V3.2
240
Media Indexer Statistics
The Statistics page includes new and expanded information for the following sections:
• Quarantined files in Storage Statistics and AMA Storage Statistics. Now use subfolders
labeled by month and year.
- Quarantined file count is displayed for MXF and AMA storage locations. Only files in
subfolders labeled yyyymm are listed.
- Removed split-off file count and size are shown for the AMA metadata (SPAAF)
workspace.
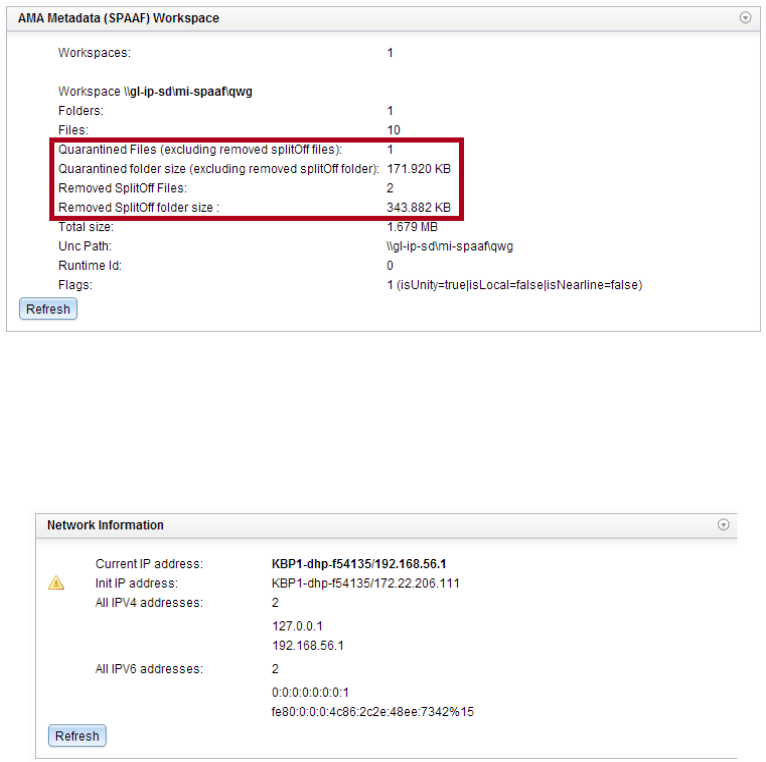
New Features for Interplay | Media Indexer V3.2
241
• Network Information (new)
A green check mark is displayed when the current and initial IP addresses are the same. A
warning triangle is displayed when current and initial IP addresses are different, as in the
following illustration.
• AMQ Server Adapters Information (new).
AMQ server connection is displayed in AMQ Server Adapters section
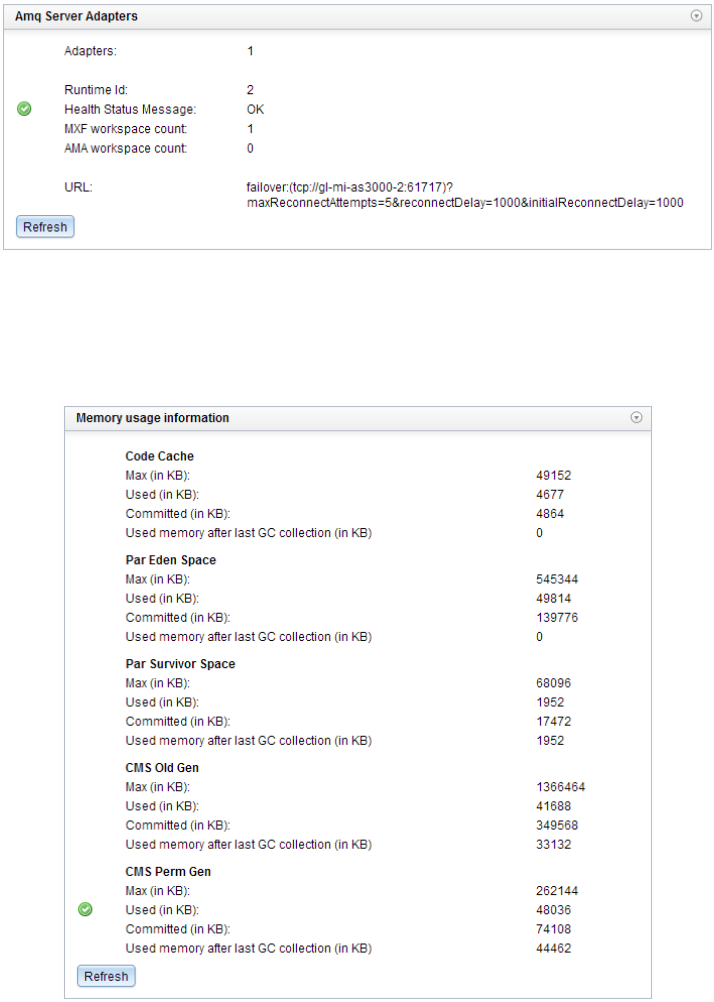
New Features for Interplay | Media Indexer V3.2
242
The Server Adapters section for the ASF server connection has been removed.
• Memory Usage Information (new)
Memory usage for different Java memory pools is displayed.
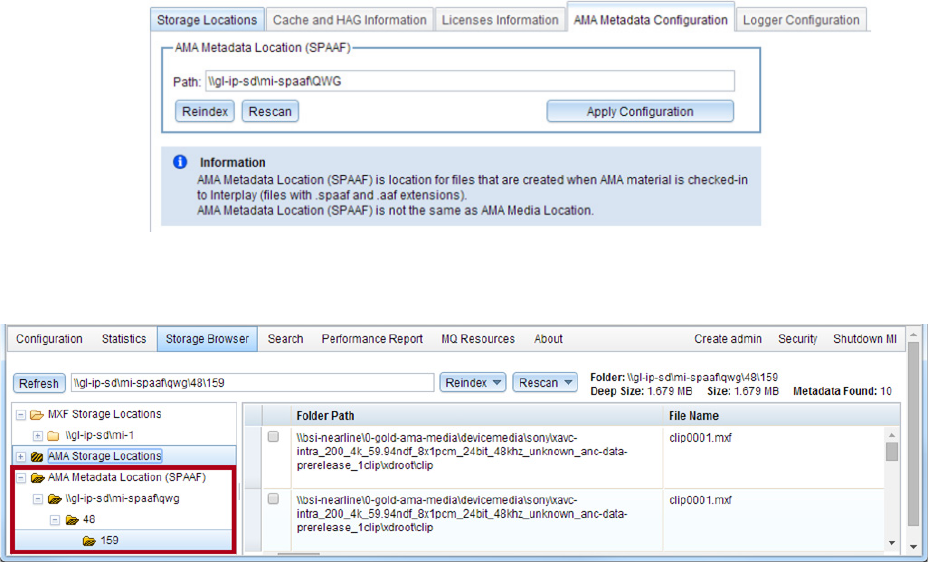
New Features for Interplay | Media Indexer V3.2
243
Media Indexer AMA Configuration Enhancements
In the Storage Locations tab, wording has been improved and explanatory text added.
In the Storage Browser, you can browse AMA files by the AMA Metadata Location.
Media Indexer MQ Resource View
There is a new page for MQ Resources, which provides technical details about the embedded
messaging infrastructure.
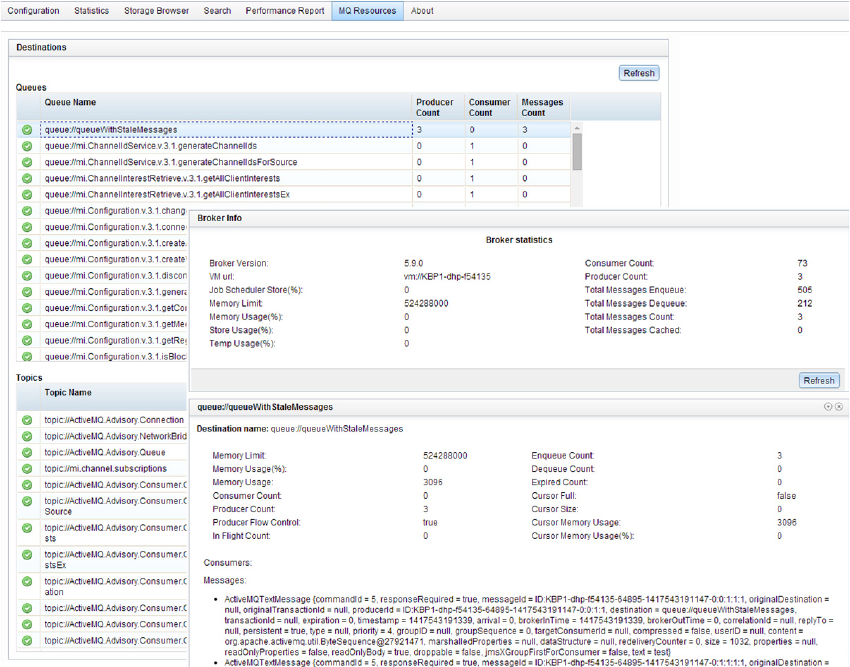
New Features for Interplay | Media Indexer V3.2
244
Media Indexer Web UI Security
You can add security to a session through the Security page:
• Click the Enable button to enable security. Security is disabled by default.
• Create an Administrator account for secure access. This is the only account available. The
password is stored in userCache.cache. The security status and password can be reset when
the Media Indexer Web UI is opened on the machine on which it was installed.
• Logging in as administrator is required to make changes to the UI if Security is enabled.
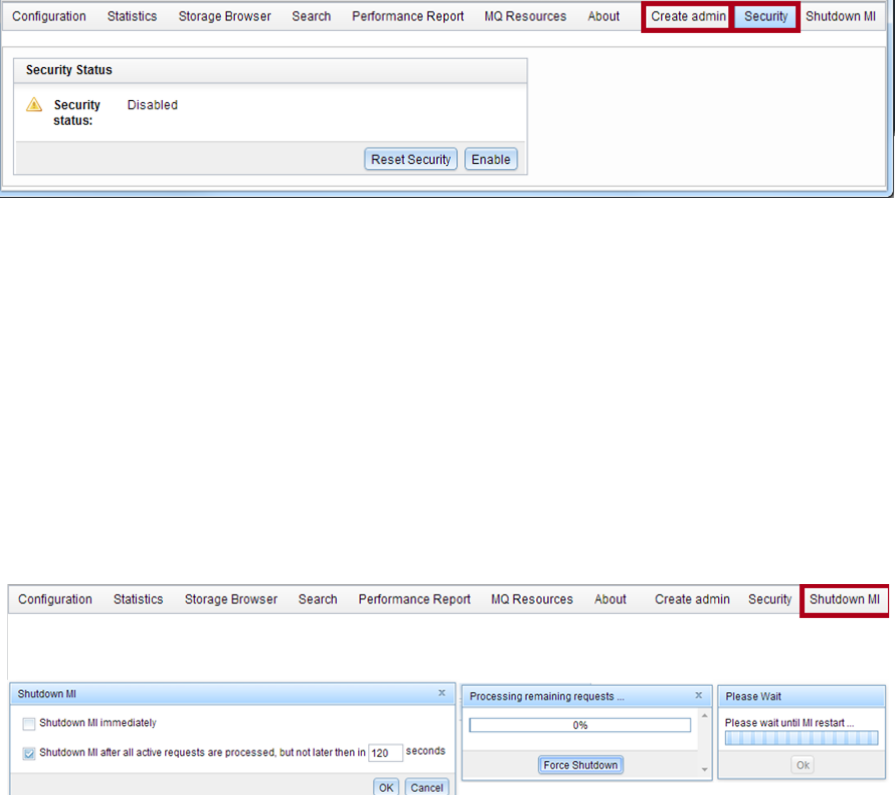
New Features for Media | Indexer V3.0 and V3.1
245
Media Indexer Web UI Shutdown
You can shut down Media Indexer from the Web UI. Shutdown is available only when logged on
to the system displaying the Web UI, and admin permissions are granted to the logged-in Media
Indexer Web UI user.
There are two options for shutdown:
• Shutdown immediately
• Shutdown after all requests are processed.
After a shutdown, the browser page will be automatically loaded when Media Indexer starts up
again.
New Features for Media | Indexer V3.0 and V3.1
The following new features are added for Media Indexer v3.x:
• Starting in Interplay v3.0, there is a new method for connecting Avid editing clients to the
HAG. See “Configuring Media Indexer Servers and Clients” in the Interplay Production
Software Installation and Configuration Guide.
• Media Indexer v3.x can index and relink to AMA material. See “How Interplay | Media
Indexer Works with AMA Material” on page 101.
New Features for Media | Indexer V3.0 and V3.1
246
• Starting in Interplay v3.1, you can configure third party (3rd party) storage for AMA
material. See “Using Third-Party Storage for AMA Media” on page 110.
• Starting in Interplay v3.1, you can delete the .spaaf files associated with AMA material. See
“Deleting AMA Clips Using Interplay | Access” on page 121.
The following information was added at Interplay v2.6 and v2.7:
•“Multiple ISIS Support” on page 246
•“Changes for Log Files and Cache Files” on page 247
•“Improved File Scanning” on page 251
•“Managing the Order of Storage Locations” on page 252
•“Viewing the Size of Indexed Workspaces and Folders” on page 253
At Interplay v2.4 there were several new features added to the Health Monitor for Media Indexer.
See “Interplay | Media Indexer Health Monitor Changes” on page 289.
Multiple ISIS Support
One Interplay Media Indexer can index two or more ISIS systems in the same Interplay
workgroup. The following limitations apply:
• The Interplay Media Indexer must be running on an AS3000 with at least 12 GB of RAM.
The Intel SR2500 is not supported for Multi ISIS indexing.
• Each Interplay Media Indexer in the HAG must have access to all of the available ISIS
workspaces. For information on setting up and configuring ISIS systems, see the Avid
Products and Network Site Preparation Guide and the Setup Guide for your ISIS product.
• Configure the ISIS client on the Interplay Media Indexer to recognize all available ISIS
systems. Use the Remote Host Settings button to connect to additional ISIS systems as
shown in the following illustration.
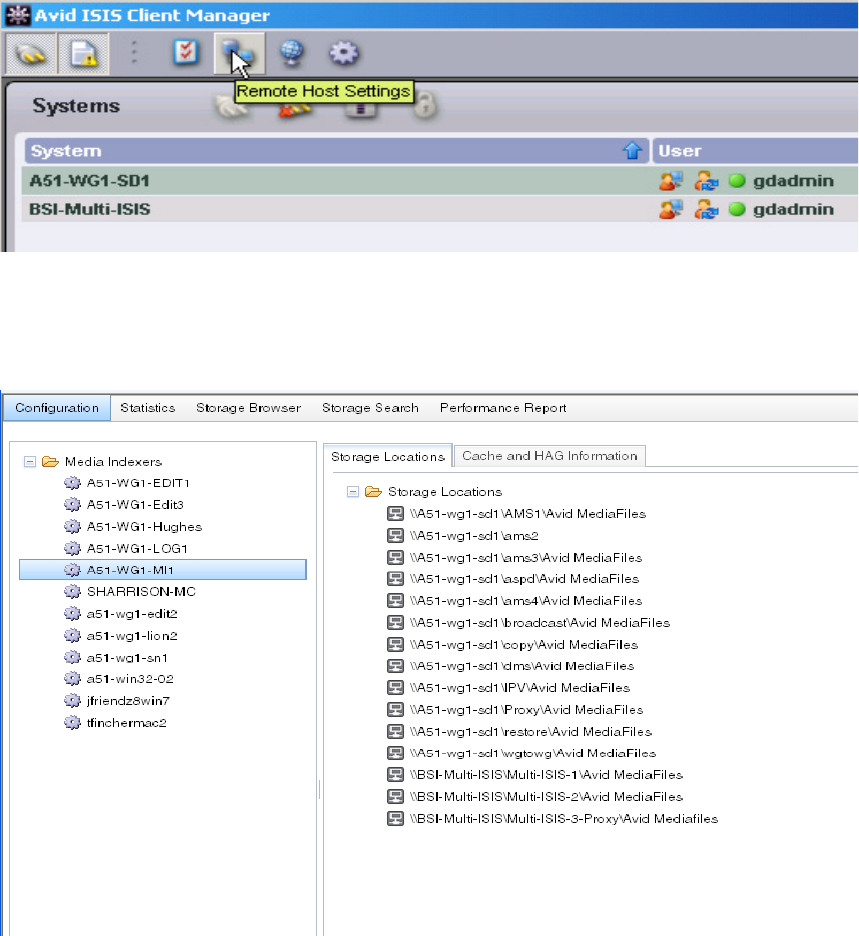
New Features for Media | Indexer V3.0 and V3.1
247
• Configure the leader of the HAG to see all of the storage locations that you want to access on
both ISIS systems. For example, the following illustration shows connections to the
workspaces on two ISIS systems. The two System Directors are named A51-wg1-sd1 and
BSI-Multi-ISIS.
Changes for Log Files and Cache Files
Starting with Media Indexer 2.6, the log and cache files are located in the following folder on
Windows 7, Windows Server2003, and Windows Server 2008:
New Features for Media | Indexer V3.0 and V3.1
248
%ALLUSERSPROFILE%\Avid\AvidMI
This usually translates to the following location:
C:\Program Data\Avid\AvidMI
On a Macintosh editor, the log and cache files are in the following location:
• log files: /Applications/Avid Media Indexer/state/log
• cache files: /Applications/Avid Media Indexer/state
Archived Log Files
Log files are now automatically archived in the following folder:
%ProgramData%\Avid\AvidMI\log\archive
This usually translates to the following location:
C:\Program Data\Avid\AvidMI\log\archive
One zip file per day is stored in the folder with the following limitations:
• If there is less than 10 GB free space on the drive that stores the log and cache files, the
Interplay Media Indexer starts removing zip files, oldest first, until more than 10 GB is free.
Note that the current day’s archive is not removed.
• Zipped log archives are removed automatically by size and age restrictions. The details of
the restrictions are configurable in the jini.config file at the following location on a Windows
system:
%PROGRAM FILES%\Avid\AvidMI\state\config\jini
On a Macintosh editor, the log archives and jini config files are in the following locations:
log archive files: /Applications/Avid Media Indexer/state/log/archive
jini config file: /Applications/Avid Media Indexer/state/config/jini
Default jini config file values
The default values for configuring the saving and purging of archive files are as follows:
// Period for scheduling task which purges log archives (in milliseconds).
static archivesPurgerPeriod = new Long( 300000 );
// Retained archives count for task which purges log archives.
static archivesCount = new Integer( 60 );
New Features for Media | Indexer V3.0 and V3.1
249
// Retained archives size for task which purges log archives (in bytes).
static archivesSize = new Long( 104857600 );
Different Format of Interplay | Media Indexer Cache Files
Starting with Media Indexer 2.6, the cache files have different names and format. Note that cache
files are binary files and are not intended to be human-readable.
adapters.cache
The adapters.cache file contains information about which workspaces or file locations are
configured for indexing. In the case of a local Interplay Media Indexer, it also identifies the
Interplay Media Indexer server in the HAG that the local Interplay Media Indexer is connected
to. For those familiar with the Interplay Media Indexer cache files, the information that used to
be contained in the ummds.cache files is now in adapters.cache.
quality.cache
The quality.cache file contains information about the quality or resolution of indexed files. For
those familiar with Interplay Media Indexer cache files, this information used to be in the
ummds.cache file.
metadata_xx_y.cache
The metadata cache files are the persistent storage for the actual essence metadata that the
Interplay Media Indexer is monitoring. While the adapters.cache file has the information about
which locations on the file system to index, the metadata_xx_y.cache file contains the result of
indexing those locations. On a local Interplay Media Indexer, the results will only contain data
that is indexed locally, while on a server Interplay Media Indexer, the results will usually contain
results from indexing shared storage.
For those familiar with Interplay Media Indexer cache files, the information that used to be
contained in the channelxxx.cache is now in the metadata_xx_yy.cache files. For Interplay v2.6,
the xx is always 20 for Media Indexer 2.6, and y will be numbered from 1 to 20. Data will be
spread across these files.
adapters.txt
Adapters.txt is a readable file that contains the configured workspaces. Interplay Media Indexer
keeps that in sync with the caches but does not need this for loading data from the cache. The file
is informational only and is overwritten each time the cache is flushed or the storage locations
are changed. The file is basically a readable version of adapters.cache. Interplay Media Indexer
does not read any information from the file.
New Features for Media | Indexer V3.0 and V3.1
250
Changes in Behavior for Local Interplay | Media Indexers
The local Interplay Media Indexer no longer caches data that is available on the Interplay Media
Indexer server. Refer to the server cache files for that information.
Using the UTest Diagnostic Utility
For troubleshooting issues, you can consult the Web interface for the individual Interplay Media
Indexer or use the UTest diagnostics tool.
This section provides tips on using UTest. This tool is typically used by Customer Support.
nDo not use the UTest diagnostic utility to connect to a running Interplay Media Indexer because
it will impact the ability to properly report online/offline status of media.
nBecause of the format and name changes for cache files, older versions of UTest will not work
with Media Indexer v2.6 or later. You must use the v2.6 version or later. Also note that the cache
files from Media Indexer v2.6 or later will not work with older versions of UTest.
Using the Graphviz Tool to View a Generated Report
When using the UTest Dump feature, you must use the Graphviz tool to view the generated
report. For information about Graphviz, see the following Web page:
http://www.graphviz.org/
Install the Graphviz tool at one of the following locations depending on whether the system has a
32-bit or 64-bit architecture:
• %ProgramFiles%\ATT\Graphviz\bin\dot.exe
• %ProgramFiles(x86)%\ATT\Grraphviz\bin\dot.exe
The generated report can be converted into an image on a system that has the Graphviz tool
installed. Enter the following command line (assuming dot is in the path).
dot \-o . \-Tpng \-Kdot <your-dot-file>
When you enter the above command, the dump feature converts the dot file to an image. The
operation will fail if graphviz is not installed.
Compare Option Removed
The compare option for UTest is no longer available starting at Media Indexer v2.6.
In order to compare two reports, simply compare them using a diff tool, such as kdiff3.
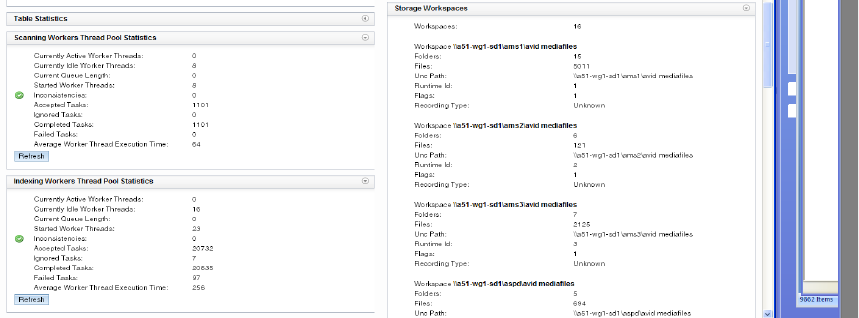
New Features for Media | Indexer V3.0 and V3.1
251
Commit Cache Files Before Creating Tabledump Report
The UTest tabledump report creates text file reports from the cache files at a location that you
specify. When you are ready to generate a tabledump report, it is useful to flush the cache files to
disk so that the files on disk represent the actual status.
Open the Service Framework Service Configuration tool and navigate to the Interplay Media
Indexer of interest. Then click the “Commit Immediately” button. As soon as the cache files are
written to disk, the tabledump report can be generated from the freshly created files to reflect
current data in the reports.
nYou can perform this same operation in the Configuration window of the Interplay Media
Indexer web-based user interface. If there is more than one Interplay Media Indexer in the HAG
you need to perform the operation on each Interplay Media Indexer that you are interested in.
Improved File Scanning
Before Media Indexer v2.6, Interplay Media Indexer performed file scanning on a per workspace
basis. There was a single scanning process for each workspace.
Starting at Media Indexer v2.6, scanning is done on a per folder basis. Interplay Media Indexer
maintains a pool of active workers and the workers select from a queue of folders that must be
scanned. When a worker finishes scanning a folder it selects another folder from the queue.
You can use the Interplay Media Indexer Web-based user interface to view the progress of the
file scanning. This value (Current Queue Length) is displayed in the Statistics window as shown
in the following illustration:
New Features for Media | Indexer V3.0 and V3.1
252
The Current Queue Length value shows the number of folders that must still be scanned. Note
that the display is not dynamic. Click the Refresh button to update the value. For additional
information, see “Web-Based User Interface” on page 256.
Files Per Folder Limitations
Avid strongly recommends that you keep no more than 5,000 files in an ISIS folder that is being
indexed by an Interplay Media Indexer. The number of files per folder affects the speed at which
the Interplay Media Indexer can traverse the folder. Interplay Media Indexer must traverse a
folder when one of the following occurs:
• When the Interplay Media Indexer starts up and must rescan the folders
• When the Interplay Media Indexer starts up with an empty cache
• During a daily resync
• When you delete, move, or rename a file or folder
Note that the limit of 5,000 items per folder also applies to the number of assets in an Interplay
database folder.
Managing the Order of Storage Locations
Media Indexer v2.7 added support for changing the order of storage locations. This feature is
already available in the Service Configuration tool. The following illustration shows the new
buttons.

New Features for Media | Indexer V3.0 and V3.1
253
• Move up and Move down buttons: Allow you to move the storage locations within the list.
When Sorting by Priority is enabled, you can manage the priority by moving the storage
locations up and down in the list. The highest priority storage location is at the top of the list.
• Sort by buttons: Allow you to switch between the default priority order and alphabetical
order.
nIn the case of a local Interplay Media Indexer, the local results are always returned before the
results from the HAG.
Viewing the Size of Indexed Workspaces and Folders
You can view the total size of the files indexed by a storage location and by a particular folder.
The following illustration shows the total size of each storage location in the Statistics tab.
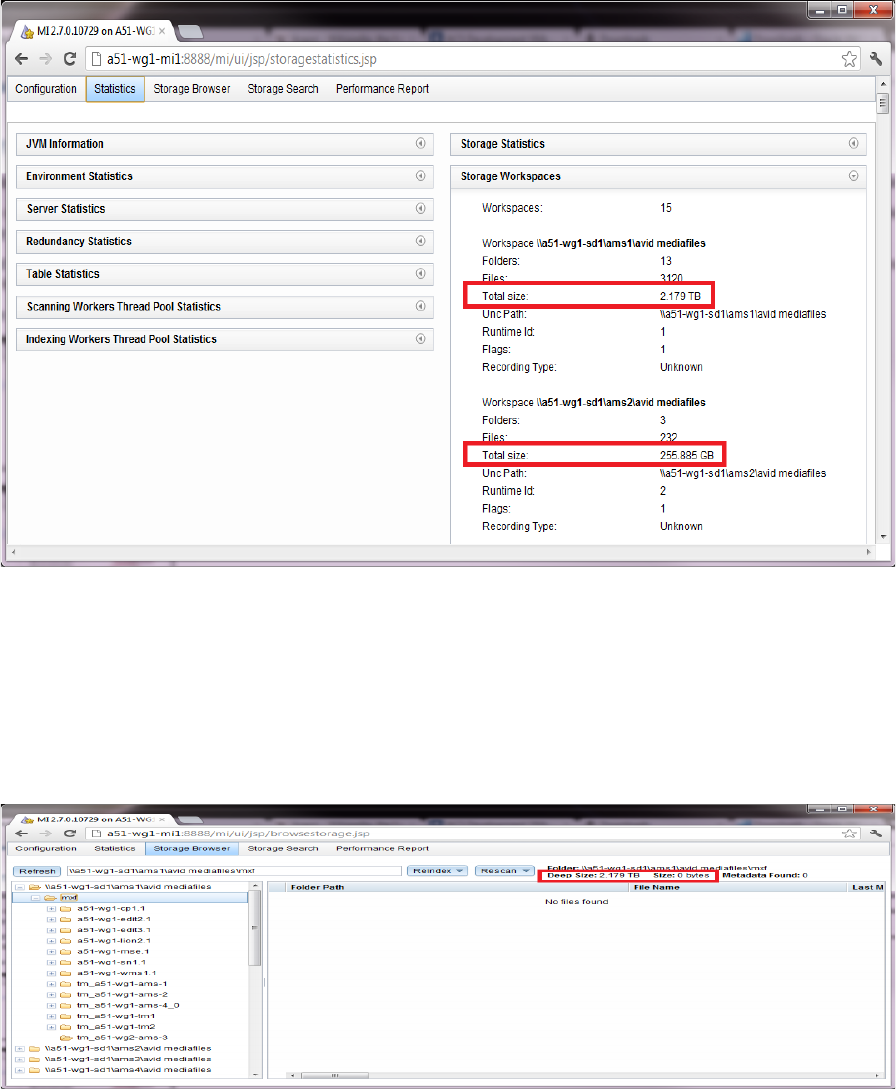
New Features for Media | Indexer V3.0 and V3.1
254
nThe Interplay Media Indexer only calculates the size of files that are indexed. If there are
non-indexed files in the folder they are not reported in this value.
The following illustration shows the size of folders in the Storage Browser tab. The Deep value is
the size of the currently selected folder and all subfolders under this folder. The value on the
right is the size of the currently selected folder. In this example the top folder is empty but the
subfolders contain indexed media.
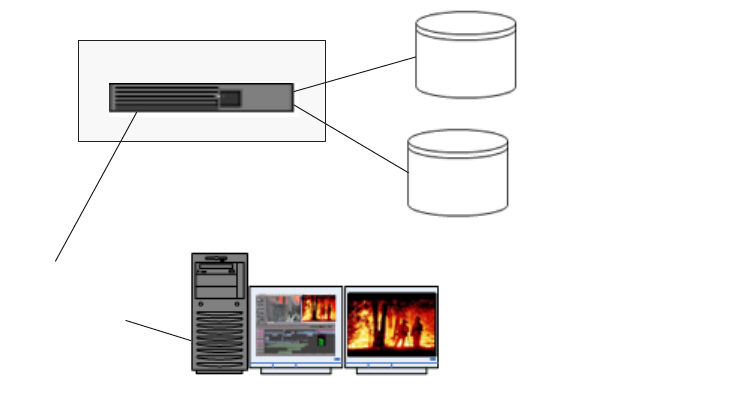
Interplay | Media Indexer Overview
255
Interplay | Media Indexer Overview
The Interplay Media Indexer is a background service that keeps track of media files in storage
locations that you identify.
In an Interplay Production environment, each Avid editing system has its own local Media
Indexer that manages the local storage areas on that system. Each Interplay Production
environment also has at least one Interplay Media Indexer that manages media on shared storage.
When the Avid editing system needs to access media on shared storage, it communicates with its
local Interplay Media Indexer, which then communicates with the shared storage Interplay
Media Indexer.
This chapter provides an overview of the procedures required to configure Interplay Media
Indexers. For configuration details, see the Interplay Production Software Installation and
Configuration Guide.
Configuring Interplay | Media Indexers
At a small site, configure one Interplay Media Indexer as a High Availability Group (in this case,
a group with one member) and configure it to index your Avid shared storage workspaces as
shown in the following illustration.
nOn a small system you might have the Interplay Media Indexer that monitors shared storage
running on the same system as the Interplay Engine.
Workspaces 1 through 3
Media Indexer 1
HIgh Availability Group (HAG)
Avid editing application
Local Media Indexer
connects to High
Availability Group
Workspaces 4 through 6
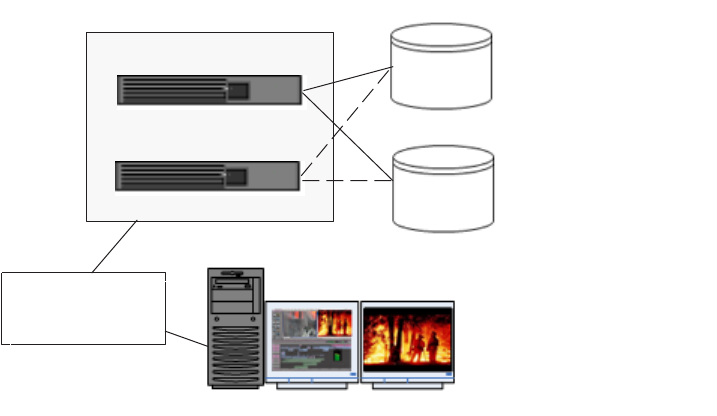
Web-Based User Interface
256
You can add additional Interplay Media Indexers to a High Availability Group for the following
reasons:
• Load balancing: The Avid editing applications randomly connect to the different members
of the group. This helps spread the load over the Interplay Media Indexers.
• Adding redundancy to the High Availability Group: If the leader of the group goes offline,
the Interplay Media Indexer with the highest weight automatically takes over as leader.
The following illustration shows a second Interplay Media Indexer added to the High
Availability Group. You configure the leader of the group to monitor shared storage. Interplay
Media Indexers that you add to the group automatically monitor the same storage locations as the
leader.
When you configure a Interplay Media Indexer to join a High Availability Group, you specify
the name of the group and assign a weight value to the Interplay Media Indexer that is joining the
group. The Interplay Media Indexer with the highest weight value is the leader.
Web-Based User Interface
Media Indexer v2.6 introduced a Web-based user interface for configuring and gathering
information about Interplay Media Indexers. You can use a browser to access the user interface
on port 8888 as follows:
http://<MI system name>:8888/mi
Workspaces 1 through 3
Media Indexer 1 (leader)
HIgh Availability Group
Avid editing application
Local Media Indexer
connects to High
Availability Group
Workspaces 4 through 6
Media Indexer 2
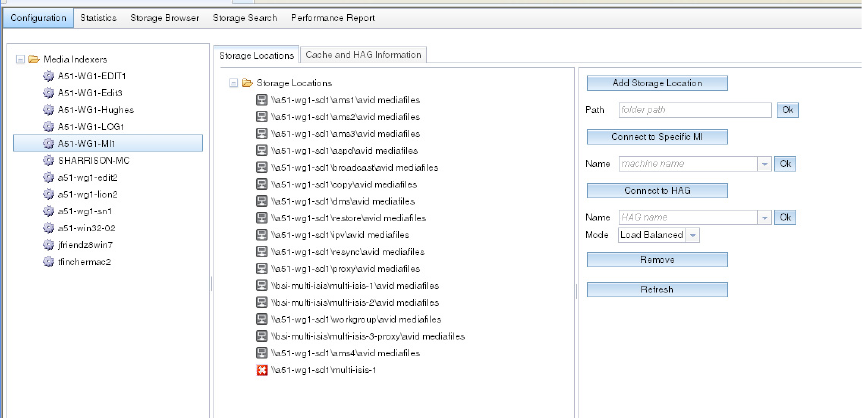
Web-Based User Interface
257
For example:
http://a51-wg1-mi1:8888/mi
Note that the Interplay Media Indexer uses the first available port from 8888 through 8892.
When setting up a Interplay Media Indexer, make sure that these ports are available. For
additional information, see the Port Usage chapter in the Interplay Production Software
Installation and Configuration Guide.
Each Interplay Media Indexer running v2.6 or higher hosts its own web-based user interface.
This includes MIs on editor systems. The Web-based user interface is only available while the
Interplay Media Indexer application is running.
Configuration Section
Click the Configuration tab to open a window that works similarly to the Service Framework
Service Configuration tool. This allows you to configure a Interplay Media Indexer from any
Windows system even if the Service Framework is not installed on your local system. The
following illustration shows the Configuration window.
In the case of local storage on an editor, the Interplay Media Indexer displays the full UNC path
to the storage location as well as the local path to the media files. The following illustration
shows the configuration for an editor named a51-wg1-sn1. It is connected to the HAG (via the
Interplay Media Indexer named A51-WG1-MI1) and has local storage on the C: drive.
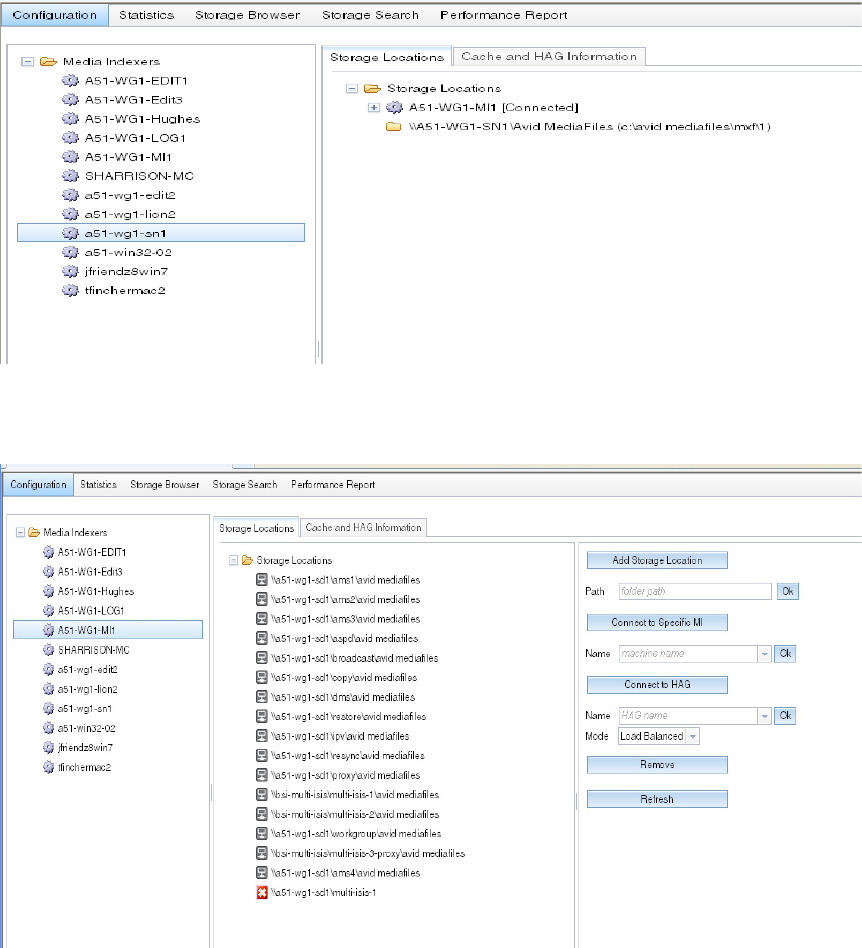
Web-Based User Interface
258
You can configure storage locations in the same way that you do for the Service Configuration
tool. The following illustration shows the configuration buttons and text fields.
Note that you can add a storage location before it is available online. Interplay Media Indexer
will check whether its available at the next resync. Or once the storage location is available you
can select the folder in the Storage Browser and select Rescan or Reindex.
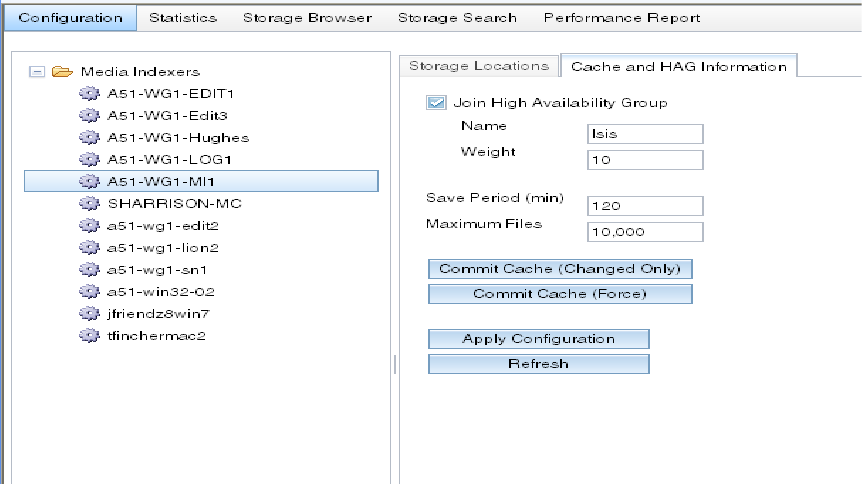
Web-Based User Interface
259
Updating the Interplay | Media Indexer Cache and Configuring the HAG
Use the “Cache and HAG Information” tab to update the Interplay Media Indexer cache and
configure the Interplay Media Indexer HAG (High Availability Group). This works the same as
the Service Configuration tool.
Statistics Section
The Statistics section presents the information that is sent to the Service Framework Health
Monitor. You can leave sections open and move sections around on the window. Your browser
retains the arrangement the next time you open the window. The following illustration shows a
portion of the Statistics section.

Web-Based User Interface
260
Storage Browser and Storage Search
The Storage Browser allows you to browse the storage locations and examine the media files that
are being indexed. Click on a folder to view details about the media files. The following
illustration shows the contents of a selected folder in the Storage Browser.
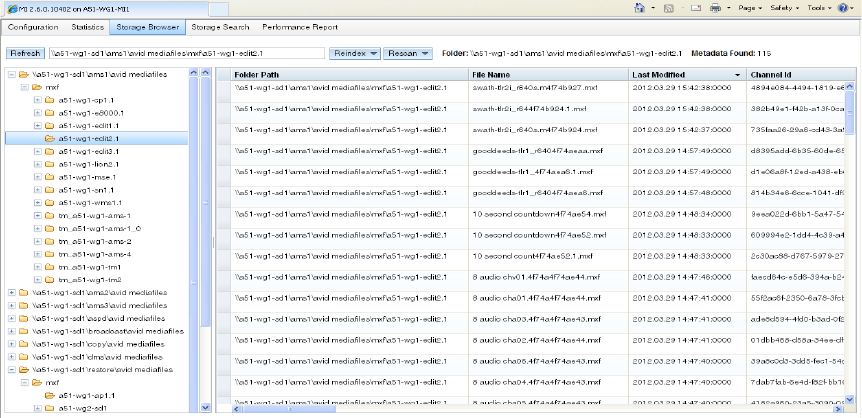
Web-Based User Interface
261
The Storage Browser does not update dynamically. Do one of the following to update the
display:
• If a storage location is added after you open the page, press the Refresh button to show the
new information.
• To see changes within an existing folder, select the folder again.
The Storage Browser displays a variety of information about a media file including the
following:
• Full path to the file (Folder Path)
• Channel ID
• FilemobID, original FilemobID, and MasterMobID
• Clip size (in bytes)
• Creation time, start time, duration, and time last modified
You can right-click an item in the list to view detailed information about the object including
codec, quality information, VCID, and timecode information.
Web-Based User Interface
262
Possible uses of the Storage Browser for troubleshooting include the following:
• When investigating dynamic relink and media offline issues, check for problems with the
start time, duration, offset, and channel ID.
• When investigating media offline issues in the editor, perform a Reveal File in the editor
application to determine the path to the MXF file, then check the Interplay Media Indexer
Storage Browser to determine whether the Interplay Media Indexer can locate the file.
Reindex and Rescan Buttons
The Reindex and Rescan buttons at the top of the Storage Browser window allow you to perform
a reindex or rescan of a particular workspace or folder. You can perform the operation on the top
level folder (shallow) or all folders underneath (deep).
The following explains the difference between reindexing and rescanning a folder:
•ReIndex: Interplay Media Indexer deletes all indexing information for the files in that folder
and then starts indexing the files again. This can create a time period in which no indexing
information is available for files in that folder.
•Rescan: Interplay Media Indexer reindexes all of the files that have been changed or added
since the last time Interplay Media Indexer indexed the folder. It also removes all files that
are no longer available on the file system.
A rescan is usually not needed because the Interplay Media Indexer will catch up with
changes on the file system by notifications sent form ISIS. However, there are situations,
such as network problems, where those notifications might get lost. In that case, a rescan
will pick up missed changes.
If a file shows as media offline and it reappears in the web interface after you perform a
rescan, it is often a good indication that there may be problems with either your network
connection or your connection to ISIS.
nThese are CPU intensive operations. Interplay Media Indexer responsiveness will decrease for
the duration of the operation. The operation will run in the background (not visible from the web
user interface).
The following illustration shows an example with multiple workspaces. To rescan the entire
workspace named ams3, select the workspace and choose Rescan > Deep. Note that you can also
right-click the workspace and select Rescan > Deep.
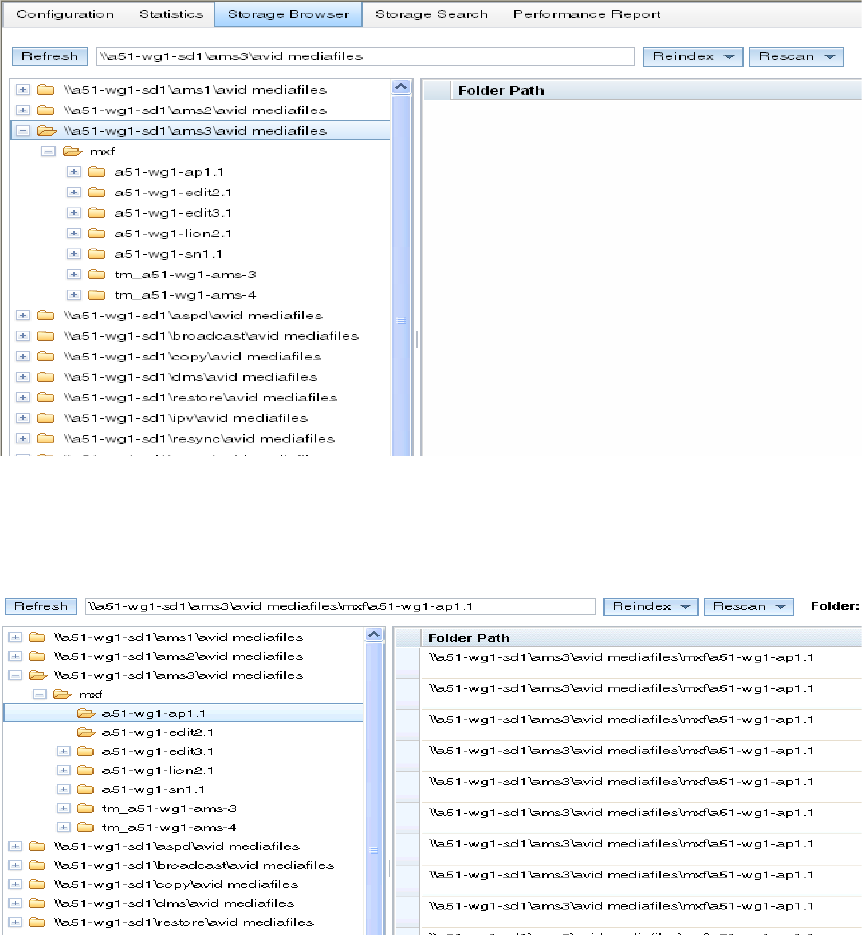
Web-Based User Interface
263
In the above example, Shallow would have no use since there are no individual files at the top
level of the workspace. In the following example, to rescan the folder named a51-wg1-ap1.1,
select the folder and choose either Shallow or Deep.
Since editor applications usually structure folders on ISIS without extra files at the top level, the
Shallow option is rarely needed. It is provided in case an application uses a different folder
layout.
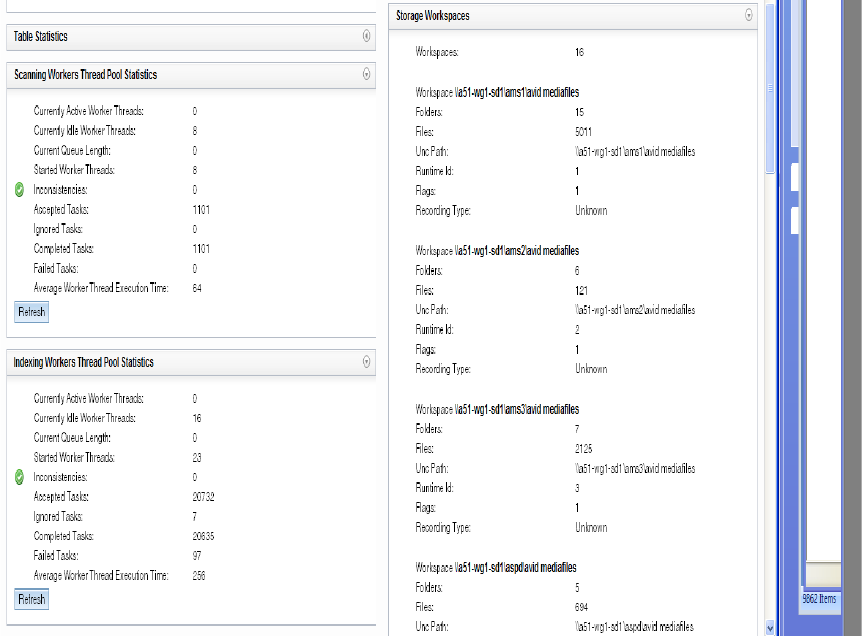
Web-Based User Interface
264
Viewing the Scan or Reindex Progress
When performing a reindex or rescan you can view the progress on the Statistics window under
Scanning Workers Thread Pool Statistics and Indexing Workers Thread Pool Statistics. The
Current Queue Length value shows the number of folders or files that still need to be processed.
Use the Refresh button to update the display. The following illustration shows the Scanning and
Indexing sections of the Statistics window.
Storage Search Section
The Storage Search window allows you to search for the following:
• folder path
• file path (supply the full path to a file)
•File mob ID
• Channel ID
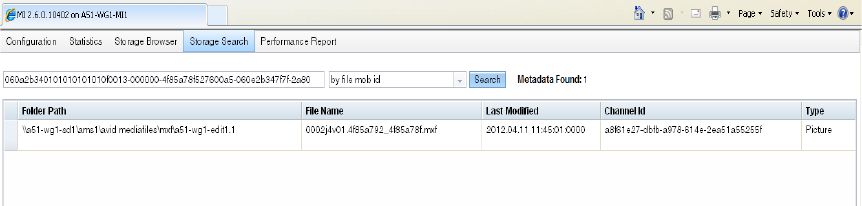
Managing Interplay | Media Indexers in an Interplay Environment
265
The following illustration shows the results of a search for a File mob ID.
Performance Monitor Section
The Performance Monitor tab provides access to Interplay Media Indexer specific performance
reports based on JAMon. JAMon stands for Java Application Monitor. It allows developers to
monitor applications such as Interplay Media Indexer. This page is intended for Customer
Support to help investigate problems occurring on a Interplay Media Indexer system.
JAMon allows you to view data on the web page and to export the data using various formats.
For additional information on JAMon, see the following web page:
http://jamonapi.sourceforge.net/
Note that the JAMon monitoring is on by default, The performance effect is very low because the
application only collects statistical data.
Managing Interplay | Media Indexers in an Interplay
Environment
This section covers the following topics:
•“Improving Interplay | Media Indexer Performance by Limiting the File Count in Media File
Folders” on page 266
•“Interplay | Media Indexer Restart Behavior” on page 267
•“Ignoring Global Delete Notifications” on page 268
•“Changing the Resync Interval for an Interplay | Media Indexer” on page 271
•“Import and Export Configuration Files” on page 272
Managing Interplay | Media Indexers in an Interplay Environment
266
Improving Interplay | Media Indexer Performance by Limiting the File
Count in Media File Folders
Avid strongly recommends that you keep no more than 5,000 files in an ISIS folder that is being
indexed by a Interplay Media Indexer. The number of files per folder affects the speed at which
the Interplay Media Indexer can traverse the folder. Interplay Media Indexer must traverse a
folder when one of the following occurs:
• When the Interplay Media Indexer starts up and must rescan the folders
• When the Interplay Media Indexer starts up with an empty cache
• During a daily resync
• When you delete, move, or rename a file or folder
If you have more than 5,000 files in a folder you can use one of the following techniques to
redistribute the files:
• Use the Production Services Move Provider to move the media files associated with master
clips
• Move the files manually as described in the following procedure
To manually move media files to a different media files folder:
1. Identify the folder that contains too many files and determine which shared storage
workspace it resides on.
2. Open the Avid Service Framework Service Configuration tool and remove the workspace
from the Interplay Media Indexer storage configuration.
3. Create a new folder on the same shared storage workspace and move enough media files to
get the file count down below 5,000 files. For example, sort by creation date and move all the
files created after a certain date to the new folder.
4. Open the Service Configuration tool and add the workspace back into the Interplay Media
Indexer storage configuration.
The files will still be online in the Avid editing application but they will be offline in
Interplay Access.
To bring the files back online in Interplay Access, do one of the following:
tIn Interplay Access, select all the files that you moved, right-click the selection, and choose
Update Status from Interplay Media Indexer. For example, search by creation date, select all
the files, and then perform the Update Status from Interplay Media Indexer.
tLoad the files into the Avid editing application monitor and then check the files back into the
Interplay database.
Managing Interplay | Media Indexers in an Interplay Environment
267
Limiting the Number of Files Captured by the Editor or by Interplay | Production
Starting at Media Composer v5.0.3 (and NewsCutter v9.0.3 and Symphony v5.0.3), The Avid
editing applications keep track of the number of media files in a folder and automatically create a
new folder when the total exceeds 5,000 files. This includes files created via the editor’s Capture
command as well as files created from other methods in the editing application such as rendering
and consolidating. The new folder has a .x extension such as FolderName.2. For earlier versions
of the editing applications you need to keep track of the number of media files in a folder. For
performance reasons you should split up the files in the folders after they reach 5,000 files as
described in this section.
In general, you should create a workflow that avoids capturing too many files to a single folder.
If you know that you will have recurring ingests, you should manage the folders for those
ingests. For example, you could name folders for the days of the week or for specific types of
ingest. Then you could regularly empty those folders as part of your delete workflow. For
additional information, see the chapter on Delete Guidelines in the Interplay Production Best
Practices Guide.
Interplay | Media Indexer Restart Behavior
Starting with Media Indexer v2.2.3, you have the following options when you restart a Interplay
Media Indexer that has existing cache files:
• REINDEX_CHANGED: This is the default option. The Interplay Media Indexer indexes
media files that have been added or changed within the last two hours since the cache was
last saved. The amount of time is configurable. The Interplay Media Indexer does not
reindex all known files to validate the cache.
• REINDEX_ALWAYS: This is identical to the default behavior of previous releases as
follow:
- Index any media files added to the storage locations since the cache was last saved.
- Reindex all known files to validate the cache information.
• REINDEX_CHANGED_LOCAL: Reindex new or changed files on local storages and
reindex all known files on shared storage locations.
• REINDEX_CHANGED_SHARED - Reindex new or changed media files on shared storage
locations and reindex all media files on local storage locations
• REINDEX_NEVER: Do not check if any media files have been added or changed since the
cache was written and do not validate the cache. This gives the fastest performance at startup
but should only be used temporarily on the recommendation of Avid support.
You can set these options in the jini.config file located at the following location:
\Program Files\Avid\AvidMI\state\config\jini\jini.config
Managing Interplay | Media Indexers in an Interplay Environment
268
The following shows the relevant portion of the file:
// Tolerance on reindexing of known files
// Media files modified up to this specified time, before the last time
// the MI cache was saved will NOT need to be re-validated.
// (depends on reindexingMode)
static timeStampOptimizationErrorMargin = new Long( 7200000 ); //2 hours
// Used to set reindexing mode for known files
// Reindexing of changed files adjusted by
// timeStampOptimizationErrorMargin parameter
// Possible values:
// REINDEX_ALWAYS - Always reindex known files
// REINDEX_NEVER - Never reindex known files
// REINDEX_CHANGED - Reindex known files on all storages if they were
// changed
// REINDEX_CHANGED_LOCAL - Reindex known files on local storages
// if they were changed and all known files on shared storages
// REINDEX_CHANGED_SHARED - Reindex known files on shared storages if
// they were changed and all known files on local storages
// Default value: REINDEX_CHANGED
static reindexingMode = ReindexingMode.REINDEX_CHANGED;
The time range value is in milliseconds and is set to 2 hours by default. After you edit and save
the file, use the Workgroup Properties tool to restart the Interplay Media Indexer service.
Ignoring Global Delete Notifications
This feature allows you to defer discovery of deleted files until the daily Resync. You can set the
option on a global basis or on a workspace-only basis.
nThis option should only be used as a temporary solution as described below.
This feature can be useful if you find it necessary to perform a large deletion of media files
during production time. For example, if there is an immediate need to free up disk space. Avid
recommends that you perform large deletions during off hours because it can slow down the
Interplay Engine and Interplay Media Indexer. However, if you find it necessary you can use this
option. See also “Scheduling Large File Deletions” on page 270.
Ignoring delete notifications will NOT affect how the files are actually removed from shared
storage. The only thing that is affected is how Interplay Media Indexer will update its internal
cache according to that delete. Normally the Interplay Media Indexer receives notifications of
each deletion and must resync the information with it’s internal cache. This can affect
performance during a busy production time. The full resync will rescan the file system to reflect
any changes found in the Interplay Media Indexer cache. The default full resync time is at 1:00
AM. See “Changing the Interplay | Media Indexer Full Resync Time” on page 270.
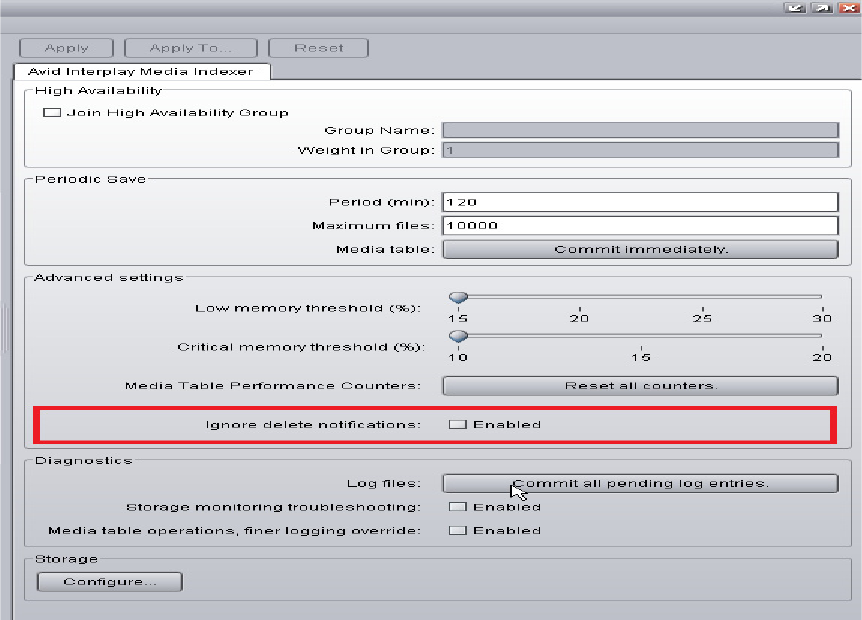
Managing Interplay | Media Indexers in an Interplay Environment
269
nThe global setting is persistent (remembered after a restart), the workspace specific one not
persistent.
To ignore delete notifications on a global basis:
1. Open the Service Configuration Window and select the Interplay Media Indexer monitoring
shared storage.
2. Click the Ignore delete notifications check box and click Apply.
The following illustration shows the global option.
To ignore delete notifications for a specific workspace:
1. Open the Service Configuration Window and select the Interplay Media Indexer monitoring
shared storage.
2. Click Configure to open the Configure Storage window.
3. Select a configured workspace and click the Change button.
4. Click the "Ignore delete notifications" check box.
Managing Interplay | Media Indexers in an Interplay Environment
270
5. Click OK to confirm your changes.
Scheduling Large File Deletions
The “ignore delete notifications” feature should only be used after careful discussion of how this
will affect your workflow. While it is true that the option will improve Interplay Media Indexer
performance during a large delete operation, there are other problems with performing a large
delete during production time:
• A large delete will slow down the Interplay Engine and can affect check-in and check-out
performance.
• If you delete media files and do not delete the associated clips from the editing applications
the Interplay Media Indexer will incorrectly show the files as online until it performs its Full
Resync operation.
Try to schedule the deletion of large numbers of files (for example, over 300 GB) during off
hours. A large delete operation can slow down the response time on the Interplay Engine. This
also slows down the response times on Avid editing applications that are working with the
Interplay Window.
When you delete a media file from within Interplay Access, the operation initiates a number of
communications between Interplay Access, the Interplay Media Indexer, and the Avid Unity
System Director. The communications occur for each media file that you delete. This is one of
the reasons why Avid recommends that you schedule large deletions for a time when the
Interplay environment is not being heavily used.
For best performance, try not to delete more than 2,000 assets at the same time. If you have more
than 2,000 assets to delete, perform the deletion in increments of 2,000 or less.
Changing the Interplay | Media Indexer Full Resync Time
The full Resync time is configurable. By default it is once a day at 1:00 AM.
To change the full resync time:
1. Edit the following file:
\Program Files\Avid\AvidMI\state\config\jini\jini.config
2. Change the resync time. The following shows the relevant portion of the file:
// Default time for workspaces with scheduled time resync policy
static scheduledResyncTime = "01:00:00 AM";
3. Save your changes and restart the Interplay Media Indexer service in the Workgroup
Properties tool.

Managing Interplay | Media Indexers in an Interplay Environment
271
Changing the Resync Interval for an Interplay | Media Indexer
Depending on your version of Interplay Production and ISIS, you may be able to improve
Interplay Media Indexer performance by increasing the resync interval. This is referred to as a
relaxed scan interval. The default resync intervals are referred to as aggressive scan intervals.
Use the following guidelines to determine whether you should change the resync interval.
• Any Interplay Media Indexer version that is connected to ISIS version lower than 1.7
requires aggressive rescan, so no change is required.
• Interplay Media Indexer 2.x running on ISIS v2.0.3 and higher does not require aggressive
rescan. Interplay Media Indexer v2.x automatically adjust its interval in this case, so no
change is required.
• The following Interplay Production versions require manual intervention to REMOVE
aggressive rescan and set the values to the relaxed values:
- Interplay Media Indexer 1.x or Interplay Media Indexer 2.x connected to ISIS version
1.7 up to and including 1.9.
- Interplay Media Indexer 1.x connected to ISIS version 2.0.3 and later.
cIf you increase the resync intervals when connected to an ISIS version lower than 1.7 and
2.0.3, there is an increased risk of encountering Media Offline issues.
To change the resync interval for a Interplay Media Indexer
1. Navigate to the following folder on the Interplay Media Indexer system:
\Program Files\Avid\AvidMI\state\config\jini\
2. Make a copy of the jini.config so you have preserved the original state.
3. Open file jini.config with an application such as Notepad.
4. Scroll through the file and locate the section called “com.avid.ummd.monitor.”
5. Change the values to the desired scan type as shown in the following table:
The following list shows the completed values for a relaxed scan:
Value Name
Aggressive Scan
(Default) Relaxed Scan Values
partialResyncDelay 10000 (10sec) 60000(1min)
fullResyncMinDelay 300000 (5min) 10800000 (3h)
fullResyncMaxDelay 900000 (15min) 18000000 (5h)
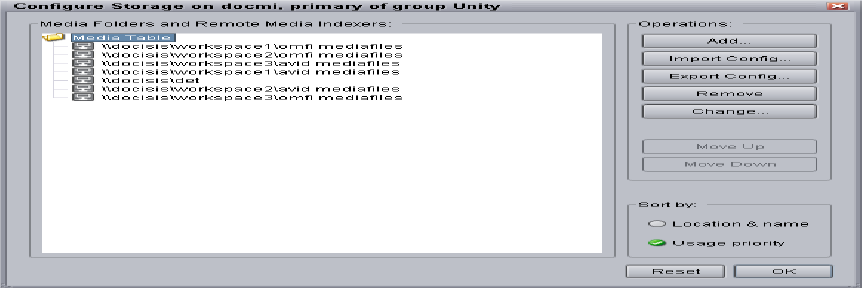
Troubleshooting Interplay | Media Indexer
272
static partialResyncDelay = new Long( 60000 );
static fullResyncMinDelay = new Long(10800000);
static fullResyncMaxDelay = new Long(18000000);
6. Save the file.
Import and Export Configuration Files
The Configuration Storage dialog box has Import Config and Export Config buttons that allow
you to import and export the configuration of a Interplay Media Indexer as a simple text file. For
example, if you are replacing a Interplay Media Indexer system, you can export the configuration
and then import it to the new system. This also allows you to backup your configurations.
The following illustration shows the Import and Export buttons.
When you click Export Config button, the system opens a dialog box that allows you to specify
the location for the configuration file. The default storage location is the Documents and Settings
folder for the Windows user that is currently logged in.
Troubleshooting Interplay | Media Indexer
This section describes what to do if you have captured new media and it is not coming online. It
usually means that the Interplay Media Indexer does not see the media; there are several things to
check.
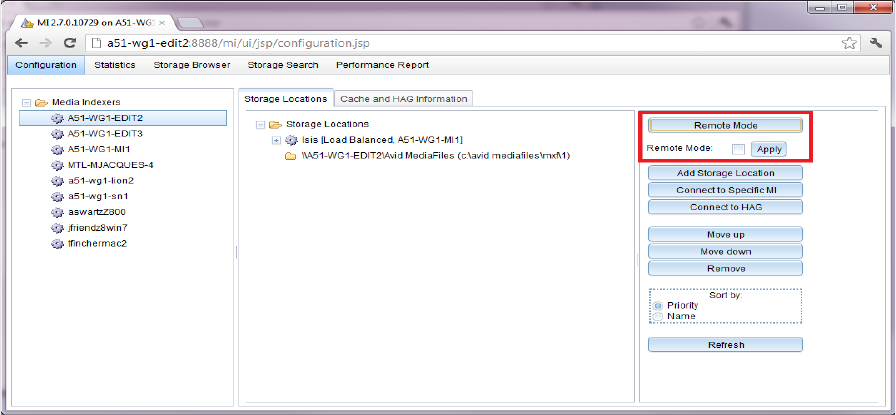
Troubleshooting Interplay | Media Indexer
273
Before you begin troubleshooting, verify the following:
• Shared storage volumes (ISIS workspaces) are mounted and the user that mounted the
workspace has Read/Write privileges.
• On Avid ISIS, Interplay Media Indexers that monitor shared storage must use letterless drive
mapping. In general other Interplay clients, such as Avid editing applications, must use
Lettered drive mappings. Interplay Media Indexers in the High Availability Group. For more
information on mounting drives, see the Avid ISIS Client Manager Help.
• The editing application is logged in to the Interplay Engine with a user that has sufficient
privileges.
• The Windows firewall is disabled.
• It is possible to ping the machine that runs the shared storage Interplay Media Indexer by IP
address and by name from the editing system and vice versa.
• The Service Framework is up and running so you can see the Interplay Media Indexer
service in the Interplay Service Configuration tool for all machines that have the service
installed.
Remote Mode Button
Local Interplay Media Indexers have a Remote Mode button that allows you to disconnect from
the HAG. On the Service Configuration tool, the Remote Mode button is in the Configure
Storages window. On the Web user interface the button is on the Configuration tab. When you
click the Remote Mode button it expands as shown in the following illustration.
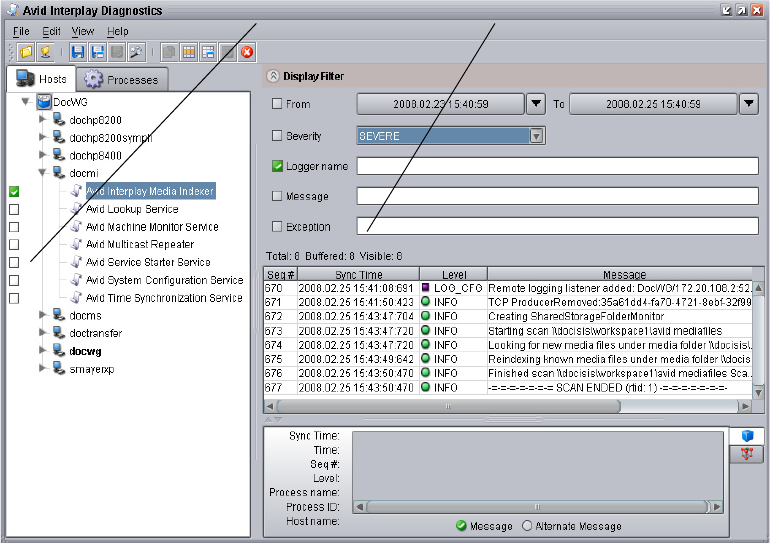
Troubleshooting Interplay | Media Indexer
274
cDo not use the Remote Mode button. It is intended for a future release and has not been
qualified.
Interplay | Media Indexer Diagnostics
The Interplay Media Indexer supplies additional information to the Service Framework
Diagnostics tool.
The following illustration shows the Diagnostics window showing Logger name information for
the Interplay Media Indexer process on the system named DocMI.
You can filter on the following values to obtain diagnostics information.
• Filter on the logger name “com.avid.ummd” to filter all messages issued by the Interplay
Media Indexer. For example, this can provide additional information about quarantined files.
• Filter on logger name “com.avid.workgroup” to filter messages issued by the Service
Framework. For example, this can provide information regarding Interplay Media Indexer
election issues.
• Filter on logger name “UMMDTableCacheLoader” to determine problems with loading the
cache file.
Logger name
Process to examine
Troubleshooting Interplay | Media Indexer
275
• Filter on “INDEXING ERROR” to view indexing errors as they happen.
• Filter on “Quarantined file” to view information on bad media files as they are quarantined.
Note that if you see a lot of Quarantined file messages about OMFI media files, it can be a
sign of the presence of legacy OMF files, or still unsupported OMF precompute media files.
• Filter on the Message “Commit” to see when the Interplay Media Indexer saved the cache.
Resolving Memory Threshold Problems
If your Interplay Media Indexer reaches the critical memory threshold, an Interplay system
administrator can use the following techniques to resolve the problem:
• Delete unnecessary files from the folders monitored by that Interplay Media Indexer.
• Archive files and delete online versions of media files.
• Use the Interplay Service Configuration tool to remove workspaces or folders from the
Interplay Media Indexer’s Media table.
• If practical, index specific folders within a workspace.
• Replace 32-Bit Interplay Media Indexers with more powerful 64-bit Interplay Media
Indexers.
Interplay | Media Indexer Logging Capability
A new audit trail was added in Media Indexer v2.1.2 for troubleshooting file system operations.
This logging mechanism allows you to collect all Interplay Media Indexer events that could
affect file count. It uses a different logger name than the default Java logger so that it can be
configured separately.
To enable and configure the new logging capability:
1. Open the following file in an application such as Notepad:
.\ AvidMI\state\config\logging.properties
2. Locate the following line:
#com.avid.workgroup.diagnostics.logging.AvidFileHandler.count = 100
3. Remove the # sign to uncomment the line, and change the value to 500 as follows:
com.avid.workgroup.diagnostics.logging.AvidFileHandler.count = 500
4. Add the following line after the modified line:
com.avid.ummd.util.AuditTrail.level = FINE
5. Save the file and restart the Interplay Media Indexer.
This enables the new audit trail mechanism to track file system operations. This level of
logging can be increased to FINER or FINEST if more detailed information is required.
Troubleshooting Interplay | Media Indexer
276
cOnly use the audit trail for troubleshooting. The feature uses Interplay Media Indexer
resources and can affect system performance. After you finish troubleshooting, comment
out the modified lines and restart the Interplay Media Indexer. For example:
#com.avid.workgroup.diagnostics.logging.AvidFileHandler.count = 500
#com.avid.ummd.util.AuditTrail.level = FINE
Additional Logging Capabilities
Media Indexer v2.2.3 introduced an improved logging capability that collects information on
notifications from shared storage. The information is stored in the following log file:
\AvidMI\state\config\storage-notifications-x.alf
where x is the index of the file.
By default, the Interplay Media Indexer logs warnings in the file when folders are found with
more than 5,500 (warning) and 10,000 (severe warning) files.
In addition, the number of log files saved and the file size limit for each log file are configurable.
To modify the number of saved log files and the size of saved log files:
1. Open the following file in an application such as Notepad:
.\ AvidMI\state\config\logging.properties
2. Locate the following lines:
# the size limit for each log file in bytes.
# Default value is 2 * 1024 * 1024 = 2097152 = 2 MB
com.avid.ummd.util.StorageNotificationsHandler.limit = 2097152
# the log files count. Default value is 10
com.avid.ummd.util.StorageNotificationsHandler.count = 10
3. Modify either the limit (file size) or count (number of log files) value as necessary.
4. Save the file and restart the Interplay Media Indexer.
For additional information on using the logging properties file, see the Interplay Production
Best Practices Guide.
Interplay | Media Indexer, Interplay | Assist, and Avid Instinct
When Interplay Media Indexers in the HAG are not running or are not communicating with
clients, Assist and Instinct clients report all media offline. This happens because the Assist and
Instinct do not have local Interplay Media Indexers and rely on the Interplay Media Indexer
defined in Interplay Administrator Server Hostname view.
Troubleshooting Interplay | Media Indexer
277
In contrast, Avid editing applications such as Avid Media Composer use local Interplay Media
Indexers. They only rely on the shared storage Interplay Media Indexer to locate media. Once the
media is located, the local Interplay Media Indexer can find the media even if the shared storage
Interplay Media Indexer stops running. In this case the editing applications can continue to work
with already-located media but they will not be able to find new media on shared storage until
the Interplay Media Indexer in the HAG is responding.
Checking Interplay | Media Indexer Status
This section lists different things to check to determine the status of the Interplay Media Indexer
application.
• Verify that Interplay Media Indexer is running.
• Check whether the Interplay Media Indexer has recently restarted. If the Interplay Media
Indexer recently restarted and there are many media files, it might take time for all of them
to come online.
• Verify that the Interplay Media Indexer is monitoring the correct shared storage.
• Check the Quarantined folder. If Interplay Media Indexer has trouble reading a file, it
attempts to move the file into a Quarantined Files folder.
To verify that the Interplay Media Indexer is running:
1. Click the Start button, and then select Programs > Avid > Workgroup Framework >
Avid Workgroup Properties.
2. Check to see if the Interplay Media Indexer service is running on the Interplay Media
Indexer system that monitors shared storage.
To verify that the Interplay Media Indexer monitoring shared storage has the correct
mapping:
1. Start the Interplay Service Configuration utility.
2. Open the client that has this Interplay Media Indexer running on it.
3. Select the Interplay Media Indexer.
4. Verify that “Join High Availability Group” is selected.
nInterplay Media Indexers on Avid editing systems should not should have this option selected.
5. Click the Configure button.
6. Verify the UNC paths for the workspaces are displayed. Add them if they are not displayed.
Troubleshooting Interplay | Media Indexer
278
To check whether the files you are looking for are in a Quarantined folder:
1. Determine who (client, hostname) created the media and which workspace it resides on.
2. Using Windows Explorer, open the Avid MediaFiles\MXF directory that has the hostname
of the client who created the media.
3. Look in the Quarantined folder to see if the media files were moved there.
If the Interplay | Media Indexer Service Does Not Appear on the Client
If you cannot see the client’s Interplay Media Indexer in the Interplay Service Configuration
utility:
tTo determine if there is a network problem, go to the client system and try pinging the
system that has the Interplay Media Indexer monitoring shared storage.
tOpen the Avid Workgroup Properties utility and verify that the Workgroup name is correct.
The workgroup name is case sensitive. If necessary, change the name in the Workgroup
Properties window.
tDetermine if the client is within the same subnet as the Interplay Media Indexer monitoring
shared storage. If it is not, you must configure a Multicast Repeater.
For information on Multicast repeaters, see Interplay Production Production Software
Installation and Configuration.
nAfter installing and configuring a multi-cast repeater, stop all Avid services (Workgroup
framework and Interplay Media Indexer) before you configure the lookup-service tab in the Avid
Properties Management utility.
Shutting Down the Interplay | Media Indexer
Do not shut down the Interplay Media Indexer while it is scanning files. If you do, the Interplay
Media Indexer might have to rebuild its cache when it starts up again. This can take a long time
on a large system.
To use the Health Monitor to determine whether the Interplay Media Indexer is scanning
files:
1. Launch the Health Monitor and navigate to the system that is running the Interplay Media
Indexer that you want to shut down.
2. Click Interplay Media Indexer.
3. Open the Interplay Media Indexer pane.
4. Check the value of the “Pending Files (scan)” field.
If the Interplay Media Indexer is not scanning files, it is safe to shut it down. To shut down
the service, use the Avid Workgroup Properties tool.
Interplay | Media Indexer Health Monitor Options
279
Interplay | Media Indexer Health Monitor Options
This section describes the options available in the Health Monitor. These options are added for
Interplay v1.2.3.
Terminology
The following terms are used in this section:
• ummdworker - An Interplay Media Indexer process (ummdworker.exe). Two processes run
per CPU on each system running an Interplay Media Indexer, so each machine running the
Interplay Media Indexer software has two ummdworkers processes. If the system has two
CPUs, there are four ummdworker processes.
• HAG - The High Availability Group (HAG) makes up the group of Interplay Media Indexers
monitoring shared storage. The primary Interplay Media Indexer is the leader of the group.
You configure this Interplay Media Indexer to monitor the shared storage locations. Other
Interplay Media Indexers in the HAG join the group and mirror the storage locations. When
an Interplay Media Indexer on an Avid editing system requests information on a media file,
the request is automatically routed to one of the HAG members. Adding more HAG
members increases the number of clients that can work with the HAG. For details on the
number of clients that are supported, see the Interplay Production ReadMe for your release.
• Cache files - There are two types of Interplay Media Indexer cache files. The channel*.cache
files contain the media clip metadata. The ummds.cache files contain the connections to
other Interplay Media Indexers and to shared and local storage locations.The cache files are
stored in the following directory:
C:\Program Files\Avid\AvidMI\state
See the following topics:
•“Interplay | Media Indexing Workers Thread Pool” on page 279
•“Storage Activity, Storage Resync Status, and Storage Root” on page 280
•“Media Table Statistics” on page 282
•“Media Table Operations and Media Table Queries Performance” on page 284
Interplay | Media Indexing Workers Thread Pool
The following illustration shows the Media Indexing Workers Thread Pool window.
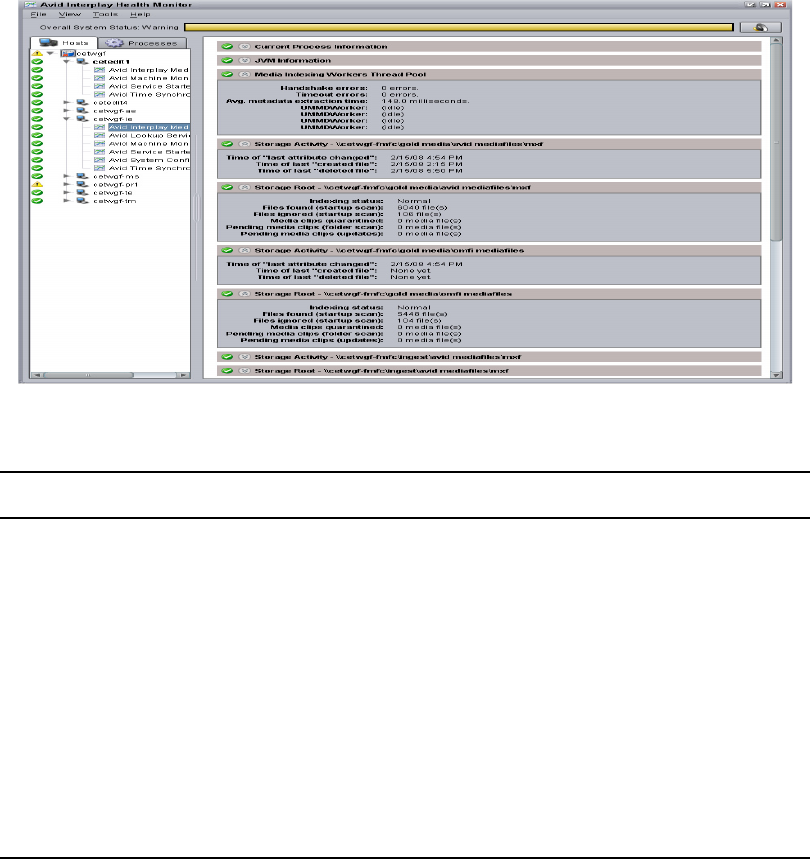
Interplay | Media Indexer Health Monitor Options
280
The following table describes the values.
Storage Activity, Storage Resync Status, and Storage Root
There is a Storage Activity, Storage Resync Status, and a Storage Root window for each shared
storage location that the Interplay Media Indexer is monitoring. Storage locations can be folders
on shared storage for Interplay Media Indexers in the HAG, or local storage areas for an
Interplay Media Indexer running on an Avid editing application. The following illustration shows
the three windows for one storage location.
Option Description
Handshake errors Counts number of handshaking errors between the Interplay Media Indexer
process and the ummdworkers.
Timeout errors Number of times a ummdworker process failed to return the metadata
information to the Interplay Media Indexer. This value can be a good
indication of corrupted media files. If the number is rising over time, check
the log files over the last 24 hours for Quarantine or Indexing error
messages.
Avg. metadata extraction
time
Average time it takes the Interplay Media Indexer to retrieve metadata from
the file.
ummdworker One-to-one relation with a ummdworker process (ummdworker.exe). Each
entry indicates a media file being indexed and the time the indexing request
was received.
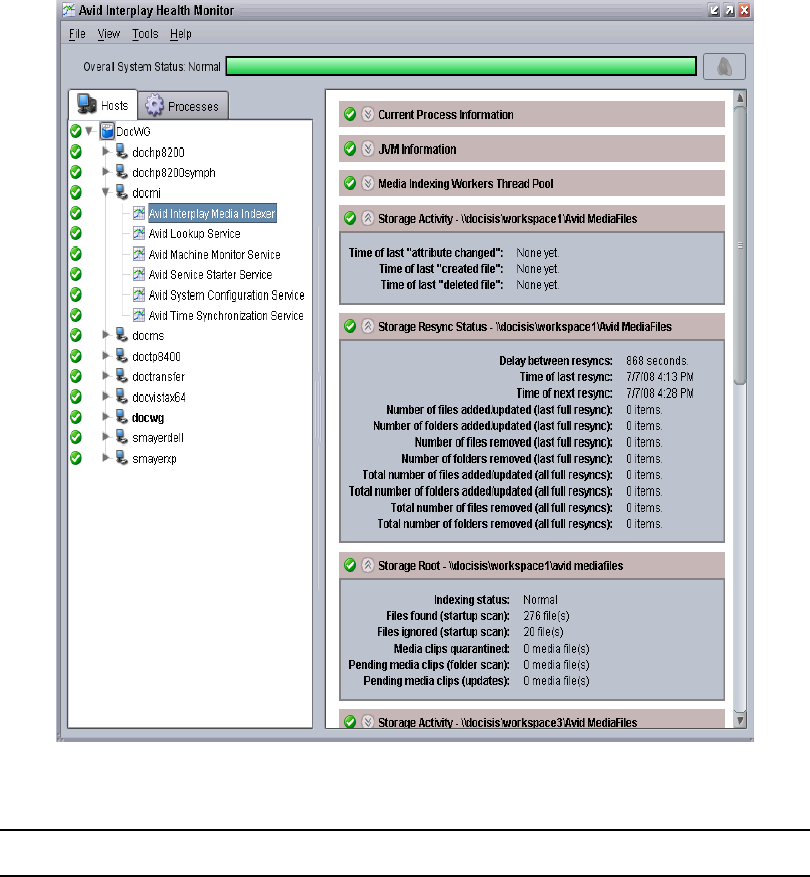
Interplay | Media Indexer Health Monitor Options
281
The following table describes the values.
Option Description
Storage Activity Shows the time when the last “file created” or “file deleted” notifications from the file
system were received by the Interplay Media Indexer. This information is useful for
debugging media offline problems. It lets you know whether the Interplay Media
Indexer received the notification. For example, when a file is ingested or deleted, the
corresponding entry should show the time. If it does not, there might be a problem with
file notifications between the Interplay Media Indexer and Avid shared storage file
system.

Interplay | Media Indexer Health Monitor Options
282
Media Table Statistics
The following illustration shows the Media Table Statistics window.
Storage Resync
Status
Shows the resync status of this particular shared storage folder or workspace. Displays
the following information:
• Delay time between resyncs.
• Time of last resync and time of next resync.
• The number of files and folders added, updated, or removed since the last full
resync.
• The number of files and folders added, updated, or removed for all resyncs since
the Interplay Media Indexer was last started.
There are two kinds of resync operations that Interplay Media Indexer performs:
• A full resync to check the location and online status of all media files in the
Interplay Media Indexer database. The Storage Resync Status shows this
information.
• Partial resyncs to check for new files or files that have changed or have been
deleted. These resyncs occur automatically and allow the Interplay Media Indexer
to stay up to date with the file system in between full resyncs.
nThe Storage Resync windows are only available on Interplay Media Indexers
that are monitoring shared storage.
Storage Root Shows indexing information for a given storage location. This allows you to examine
the Interplay Media Indexer performance on a specific workspace.The following
values are displayed:
• Indexing status
• Files found (startup scan)
• Files ignored (startup scan)
• Media Clips quarantined - represents the number of media files quarantined since
the Interplay Media Indexer process last restarted.
• Pending media clips (folder scan)
• Pending media clips (updates)
Option Description
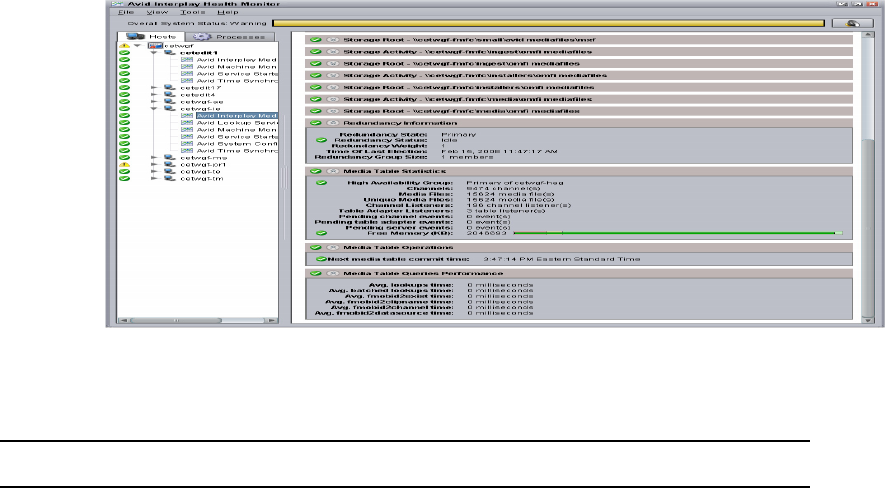
Interplay | Media Indexer Health Monitor Options
283
This window has not changed from versions prior to v1.2.3. The following table describes the
values.
Value Description
High
Availability
Group
Specifies whether the Interplay Media Indexer is a member of a High Availability Group
and if so, identifies the Interplay Media Indexer’s position in the group. The member
with the highest priority value is the leader of the group. You set the priority in the
Service Configuration tool.
Channels The number of sources that the media files are related to. This refers to items like source
tapes, file reels, and imported files.
Media files The total number of media files monitored by the Interplay Media Indexer. This number
includes any copies of media files. For a breakdown by storage locations, see the
Storage Root windows.
Unique Media
files
The number of unique media files monitored by the Interplay Media Indexer. This
number might be smaller than the actual number of media files because any copies of
media files are not counted in this total.
Channel
Listeners
The number of channels on which the Interplay Media Indexer could be sending
notifications. There is one channel listener per source ID (source media track) used by
each editor. For example, if an editor is working with a video track in the timeline that
contains three clips from different sources, there are three corresponding channel
listeners.
Table Adapter
Listeners
The number of Interplay Media Indexer services that are connected to this Interplay
Media Indexer This number should be close to the actual number of machines connected
to the Interplay Media Indexer. If this number keeps growing and becomes greater than
the number of clients by an order of magnitude, call Avid Technical Support and
schedule a restart for the Interplay Media Indexer.
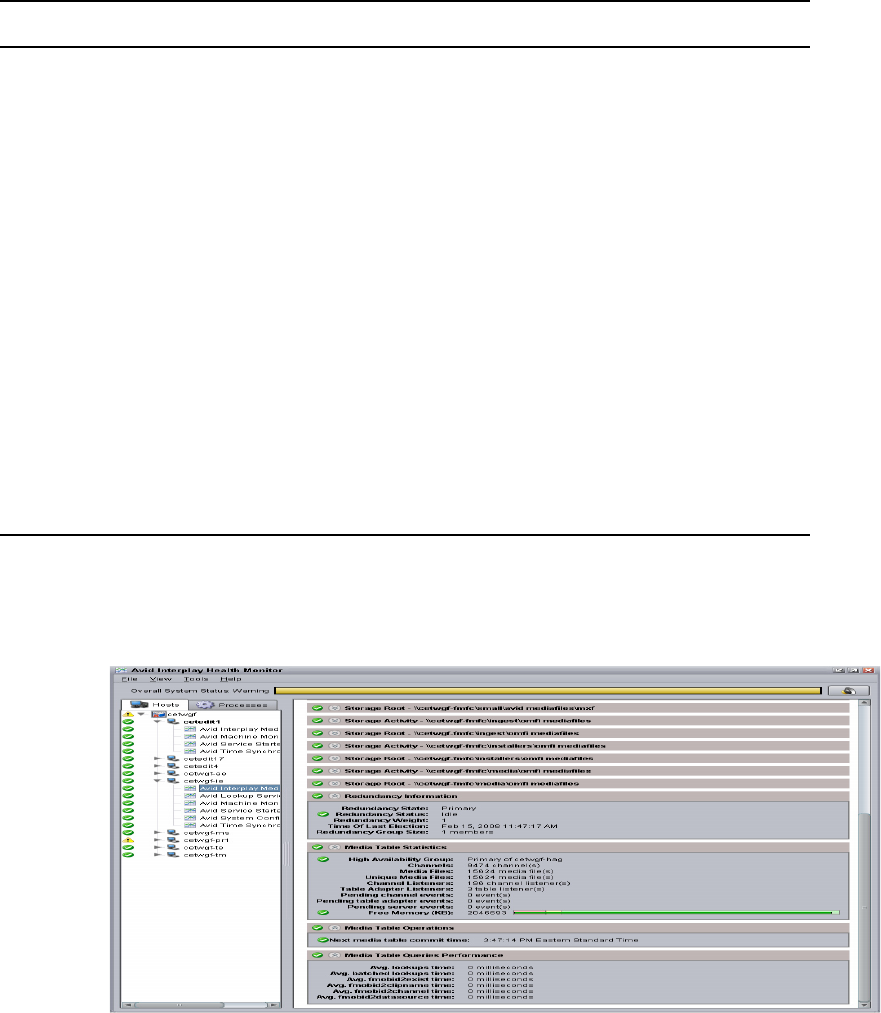
Interplay | Media Indexer Health Monitor Options
284
Media Table Operations and Media Table Queries Performance
The following illustration shows these two windows.
The following table describes the values.
Pending
channel events
Pending notification messages for new, removed, or updated media.
Pending table
adapter events
Pending notifications between HAG members for media table configuration changes.
These communications are sent from the primary Interplay Media Indexers to the
backup Interplay Media Indexers in the HAG.
Pending server
events
This option is reserved for future use.
Free memory The amount of free memory available to this Interplay Media Indexer. Each Interplay
Media Indexer has a certain amount of allocated memory. When the amount of free
memory available for the Interplay Media Indexer goes below 10% of that amount, the
Interplay Media Indexer stops indexing files. The Interplay Media Indexer still attempts
to answer requests from the Avid editing applications, but it does not index any new
files.
By default, the color bar at the top of the Health Monitor window turns yellow when the
free memory available to the Interplay Media Indexer goes below 15%. It turns red
when the free memory goes below 10%. If you check the Interplay Diagnostics tool at
this point, you might see “Memory usage too high” messages. For information on
adjusting the value, see Interplay Production Best Practices.
Value Description

Interplay | Media Indexer Health Monitor Options
285
Checking Interplay | Media Indexer Memory Usage
An individual Interplay Media Indexer is capable of indexing a specific number of files. The
actual number of files depends on the memory used by the Interplay Media Indexer monitoring
that particular portion of shared storage. You can use the Avid Health Monitor to track the
amount of memory used by the Interplay Media Indexer and, if necessary, take steps to reduce
the number of files that are being indexed or add additional Interplay Media Indexers.
nSee the Interplay Production ReadMe for the current Interplay Media Indexer file count
limitations.
To check the Interplay Media Indexer memory usage:
1. Click the Start button, and then select Programs > Avid > Workgroup Framework >
Avid Health Monitor.
The Health Monitor login window appears.
2. Log in and select the Interplay Media Indexer service on the system running the
Media Indexer.
Option Description
Media Table
Operations
Next media table commit time - The next time that the system will save the Interplay
Media Indexer cache file. You set the frequency of cache saves in the Service
Configuration window. A Commit Immediately button in the Service Configuration
window also allows you to save the cache file immediately.
Setting the periodic save value too low can affect performance in a large Interplay
environment. Set the save frequency in relation to the frequency with which you create
new media. For example, if you are not frequently capturing, consolidating, or
otherwise creating new media, you don’t need to set a low value for periodic saves.
During a save operations there is less CPU power available to handle client requests.
nThe Save time is based on the Windows Setup time on the local computer.
Media Table
Queries
Performance
The average values are calculated over time and should generally be under one second.
This is the average value since the Interplay Media Indexer was last restarted. The
value is most relevant if the Interplay Media Indexer was recently restarted.
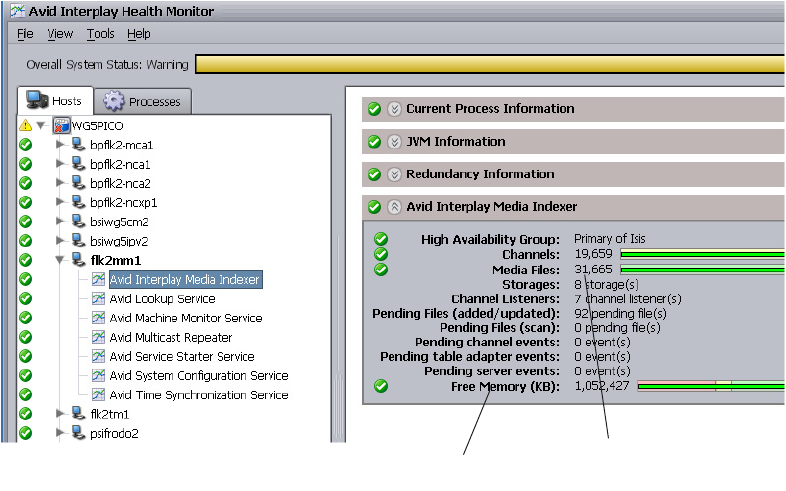
Interplay | Media Indexer Health Monitor Options
286
3. Check the memory usage for the Interplay Media Indexer. (Also check the number of files
that this Interplay Media Indexer is currently indexing. For the maximum supported number,
see the Interplay Production Production ReadMe.)
Each Interplay Media Indexer has a certain amount of allocated memory. When the amount
of free memory available for the Interplay Media Indexer goes below 10% of that amount,
the Interplay Media Indexer stops indexing files. The Interplay Media Indexer still attempts
to answer requests from the Avid editing applications, but it does not index any new files.
By default, the color bar at the top of the Health Monitor window turns yellow when the free
memory available to the Interplay Media Indexer goes below 15%. It turns red when the free
memory goes below 10%. If you check the Interplay Diagnostics tool at this point, you
might see “Memory usage too high” messages.
To adjust when the color bar changes
1. Open the Interplay Service Configuration tool and locate the system running the Interplay
Media Indexer service.
2. Click the Interplay Media Indexer service.
3. Use the sliders on the Interplay Media Indexer panel to control when the bars change color.
nThe default settings are appropriate for most installations.
The following illustration shows the sliders in the Interplay Service Configuration dialog
box.
Media Indexer
Memory Usage
The number of files currently
monitored by this Media Indexer.

Interplay | Media Indexer Health Monitor Options
287
Adjust the sliders as follows:
- Low memory threshold — controls when the color bar in the Health Monitor turns
yellow
- Critical memory threshold — controls when the color bar turns red
For example, if you want the bars to warn you before the free memory is 20%, you can
change the Low memory threshold to 20%.
Suppressing Alerts in the Health Monitor
The Health Monitor is useful for monitoring the health of systems that are connected to the
Service Framework. However, there can be times when a health alert for a relatively unimportant
process obscures the general health of the Interplay environment. This can happen when you use
the Disk Health Information feature to monitor the amount of free space for drives in the
environment. For example, if one media drive is filling up, the “Overall system state warning” at
the top of the Health Monitor window turns yellow. This can sometimes obscure other more
important issues that are occurring in the Interplay environment.
Low memory threshold
Critical memory
threshold
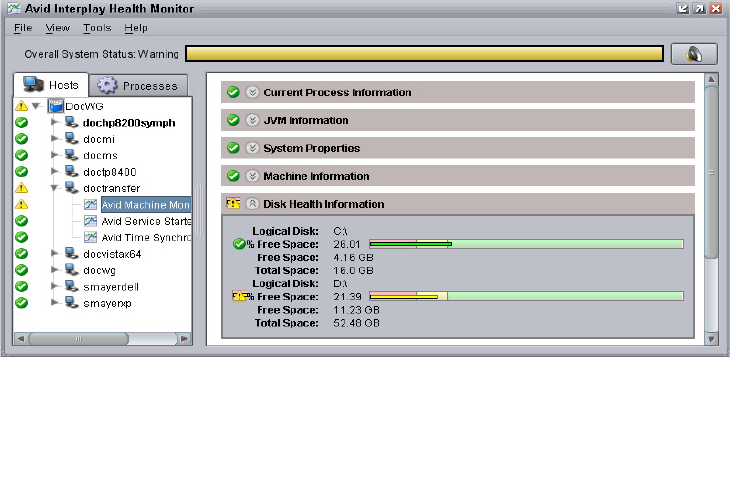
Interplay | Media Indexer Health Monitor Options
288
The problem arises because you cannot adjust the threshold values for individual drives on a
system. If you change the threshold values for one drive, the value applies to all drives physically
connected to the system. This can be a problem because while you want to know if any system
drives are running out of free space, you might be less concerned about whether media drives are
filling up. The workaround is to turn off the alert for individual drives.
To turn off Health Monitor alerts for a particular drive:
1. Open the Health Monitor, select the system, and select the Avid Machine Monitor service.
2. Open the Disk Health Information window. The following illustration shows a system with
two drives. One drive is filling up and it is causing the yellow warning bar to appear at the
top of the Health Monitor.
3. Right-click the % Free Space text on the drive that you don’t want the alerts coming from
and choose Suppress Health Alerts.
The following illustration shows the same system with the alert suppressed for the Disk
Health Information for one drive. The drive displays as yellow in the Disk Health
Information window but the overall system health shows as green.
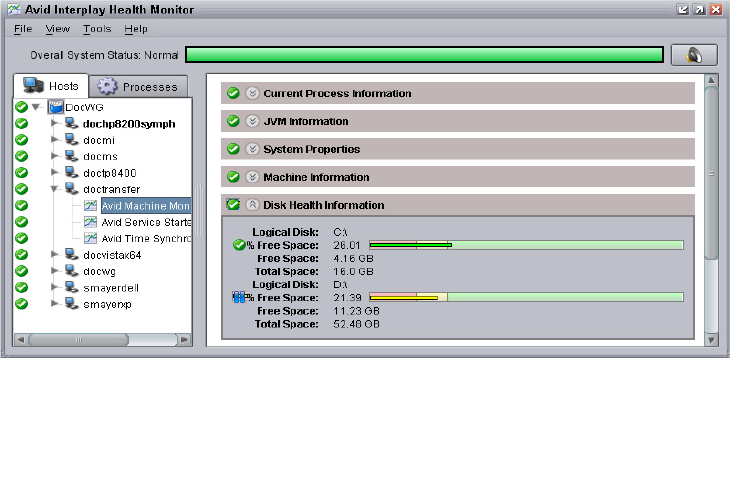
Interplay | Media Indexer Health Monitor Options
289
nThe alert suppression of the individual drive will not persist when the Machine Monitor is
restarted or if the machine is rebooted.
Interplay | Media Indexer Health Monitor Changes
Media Indexer v2.4 introduced the following changes to the information displayed in the
Interplay Media Indexer portion of the Avid Service Framework Health Monitor:
• A new window named Storages contains information on all the mounted workspaces so you
can view information on all monitored workspaces in one window. See “New Storages
Window” on page 290.
• Media Table information is now above the Storage Root sections in the Health Monitor. See
“New Information for Monitored Workspaces” on page 291.
• Additional information about the workspaces have been added to the Storage Roots
windows.
• A new Heartbeat monitor feature in the Storage Roots area allows you to monitor the
network connectivity of the Interplay Media Indexer to each shared storage workspace. See
“Heartbeat Information” on page 292.
• The Storage Roots windows are now listed in alphabetical order. The following illustration
shows the new organization.
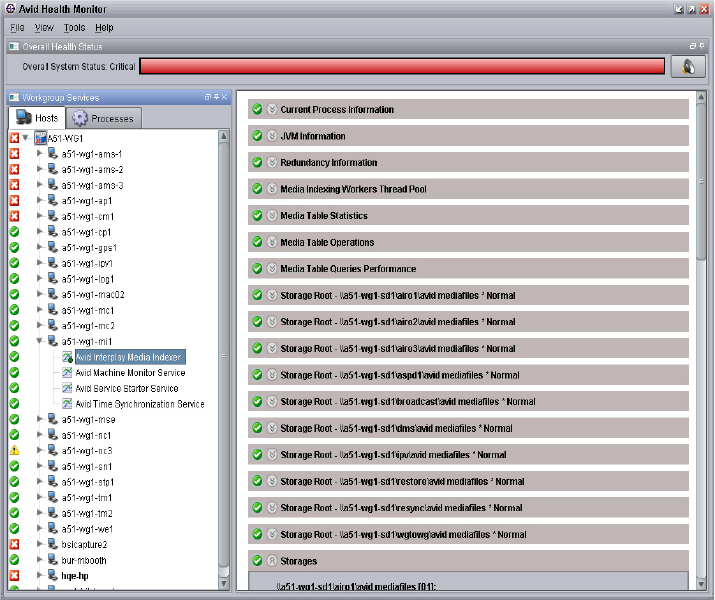
Interplay | Media Indexer Health Monitor Options
290
New Storages Window
Starting in Interplay v2.4, a new Storages window displays information from all the Storage
Roots windows in one location. The following illustration shows an example of the Storages
window.
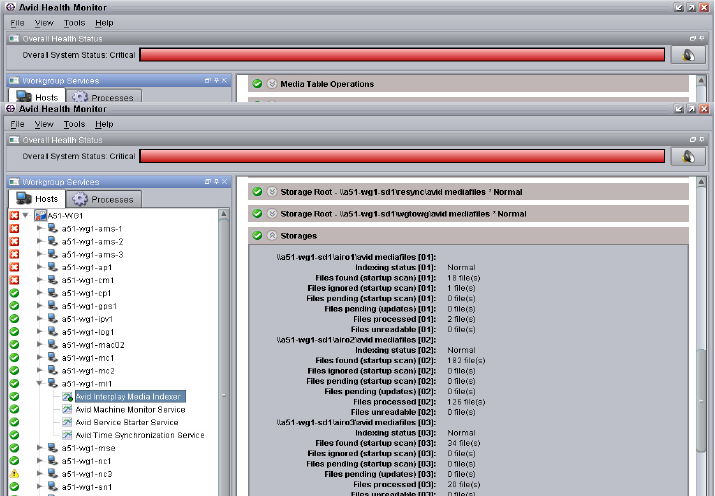
Interplay | Media Indexer Health Monitor Options
291
All items in each workspace list are suffixed with the integer value that is associated with that
particular workspace. This is the RTID (real time ID) value displayed in the Storage Root
window associated with that workspace.
New Information for Monitored Workspaces
Starting with Interplay v2.4, the Storage Roots windows displays additional information about
each workspace as shown in the following illustration.

Interplay | Media Indexer Health Monitor Options
292
In addition to the new information about modified files and folders, the window also shows the
“Startup reindexing mode” for the Interplay Media Indexer. The startup reindexing mode options
allow you to postpone the complete reindexing of all the files when an Interplay Media Indexer
starts up. This can help get an Interplay Media Indexer up and running faster during production
times. This feature was added in Interplay v2.3. For additional information see the Interplay
Production Best Practices Guide.
The RTID (real time ID) value in the Storage Roots window allows the system to identify each
monitored workspace with an integer value. This can help with trouble shooting and is also used
in the new Storages window to identify values associated with each workspace.
Heartbeat Information
Starting in Interplay v2.4, you can view heartbeat information for each workspace being
monitored by the Interplay Media Indexer. Heartbeat refers to the network connectivity between
the Interplay Media Indexer and the shared storage workspace.
The system displays the Heartbeat information at the bottom of each Storage Root window as
shown in the following illustration.
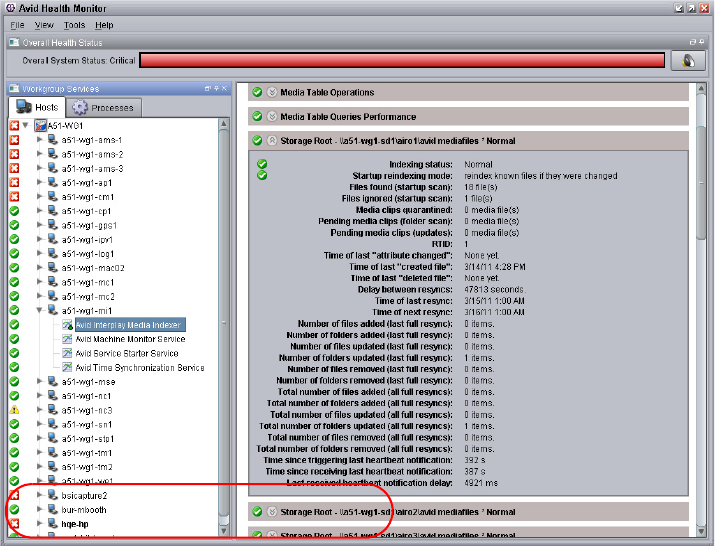
Interplay | Media Indexer Health Monitor Options
293
The “Last received heartbeat notification delay” is the value of interest. Check the value
periodically and record the value. Over time you will get an idea of the normal delay value for
that workspace. If you notice a spike in the value it may indicate that there is a problem with the
connectivity to shared storage. Check the System Director Administrator user interface to see if
there are any problems or additional loads being placed on the shared storage system.
In most cases a delay of up to 30 seconds is usually acceptable. If it takes several minutes, it is a
sign that there may be a problem with the connection between Interplay Media Indexer and ISIS
shared storage.
Each received heartbeat notification is also logged to the storage-notification log in the following
directory:
\Program Files\Avid\AvidMI\state\log
If a problem occurs you can check the log to determine when the problem started and correlate it
with any other occurrences in your Interplay environment that happened around the same time.
For example, it can be useful to check the heartbeat values if there is a problem with new media
Interplay | Media Indexer Health Monitor Options
294
not coming online fast enough. In that case, compare the values on the other Interplay Media
Indexers in the HAG to see if there is a problem with one of them or to rule them out as part of
the problem.
The default for the heartbeat is 600 seconds (10 minutes). You can change the heartbeat interval
value by editing the following line in the jini.config file:
static notifiactionsHeartbeatInterval = new Integer( 600 );
The jini.config file is located in the following directory on the Interplay Media Indexer server:
\Program Files\Avid\AvidMI\state\config

AInterplay | Production Maintenance
Recommendations
This chapter provides a list of maintenance activities that should be performed regularly in an
Interplay Production environment.
•Interplay Daily Maintenance Check List
•Interplay Weekly Maintenance Check List
•Interplay Monthly Maintenance Check List
•Avid ISIS Recommended Maintenance
•Complete Server Room Shutdown
The Interplay Administrator includes a set of maintenance tools for specific problems. You can
also run these regularly, depending on your workflow.
Interplay Daily Maintenance Check List
Interplay Daily Maintenance Check List
Task For more information
Avi d ISI S
See “Avid ISIS Recommended Maintenance” on page 299.
AirSpeed Multi Stream Playout Servers
Check Dashboard for “Warnings” or “Alerts.” Clear and protect
inventory of materials as required for daily operation.
Avid AirSpeed Multi Stream
Installation and User's Guide
Infortrend RAID disk set (for Interplay Engine Cluster)
No reboot maintenance is required for the Infortrend RAID disk set.
RAID disk sets such as the Infortrend are designed for 100% uptime
and generally do not benefit from being power cycled.
See the Interplay Engine
Failover Guide.
Interplay Media Indexer

Interplay Weekly Maintenance Check List
296
Interplay Weekly Maintenance Check List
Use the Avid Service Framework Health Monitor to check memory and
CPU usage. If the available memory falls below 10% (red zone in
Health Monitor), the Interplay Media Indexer stops indexing new files.
Interplay Production Best
Practices
Check the Health Monitor to make sure the number of “Table adapter
listeners” is consistent with the number of actual clients connected to
the Interplay Media Indexer. This number should be close to the actual
number of machines connected to the Interplay Media Indexer. If this
number keeps growing and becomes greater than the number of clients
by an order of magnitude, call Avid Technical Support and schedule a
restart for the Interplay Media Indexer.
Avid Editing Applications
Restart all Avid editing client systems including Media Composer,
NewsCutter, Symphony, Interplay Assist, and Avid Instinct.
Avid recommends that you reboot the editing systems at the start or end
of an editing shift/session. This allow the units to perform power on
self-checks to verify low level hardware health.
Interplay Weekly Maintenance Check List
Task For more information
Avid I S IS
See “Avid ISIS Recommended Maintenance” on page 299
Interplay Engine and Interplay Archive Engine
Ensure that individual ingest folders do not contain more than 5,000 objects
each.
See “Folder Limitations”
on page 72 and “Files Per
Folder Limitations” on
page 252.
Delete older AvDeletes log files from the following folder:
\\InterplayEngineName\C$\Program Files\Avid\Avid Interplay
Engine\Logs\Machines\InterplayEngineName
Interplay Transfer Server
Interplay Daily Maintenance Check List (Continued)
Task For more information

Interplay Monthly Maintenance Check List
297
Interplay Monthly Maintenance Check List
Inspect the Transfer Engine internal disc drive for minimal normal free
space. If the discs are reporting higher than normal use, inspect for the
presence of large logging or other error reporting files with recent creation
dates, Report any unusual findings to the site management for follow on
activities.
nStarting in Interplay v3.0, Interplay Transfer no longer requires a
weekly reboot. A monthly reboot is sufficient. This is because
Interplay Transfer v3.x creates a separate process for each playback,
ingest, or DET job. If there is a problem with one job it only affects
that particular job and does not affect the Interplay Transfer Engine.
Interplay Transfer Setup
and User’s Guide
Interplay Production Services
Purge all jobs. To purge jobs, use the Interplay Production Services and
Transfer Status window.
nAvid recommends that you turn on Auto Purge so you don’t have to
manually purge jobs.
nStarting in Interplay v3.x you do not need to restart the Interplay
Production servers every week. Once a month is sufficient.
Interplay Production
Services Setup and User’s
Guide
Interplay Media Indexer
Rebalance the Interplay Media Indexer configuration and/or storages to
make sure sufficient indexing memory is available for the Interplay Media
Indexer.
Use the Interplay Media Indexer Web interface or Avid Service Framework
Service Configuration tool to check and modify the Interplay Media Indexer
configuration.
Interplay Production
Software Installation and
Configuration Guide
Interplay Monthly Maintenance Check List
Task For more information
Interplay Engine
Interplay Weekly Maintenance Check List (Continued)
Task For more information

Interplay Monthly Maintenance Check List
298
Check the ratio between the number of database pages and the number of
objects in the database. This value is automatically calculated and displayed
in the Interplay Administrator tool.
Note that the Interplay Engine does not need to be restarted except for the
following reasons:
• To verify system health before an upgrade. See the section “Best
Practices for Performing an Engine Upgrade” in the Interplay
Production Readme.
• Testing the failover capability on a cluster system during regular
company maintenance windows (for example, twice a year).
See “Determining
Interplay Database
Scalability” on page 163.
Interplay Transfer Server
Delete the following Interplay Transfer temp files from the C: drive:
• My Computer>Local Disk C:\temp
• My Computer>Local Disk C:\tmp
The reason for files left in the Transfer Engine temporary directories may be
due to failed transfer sessions.
Interplay Transfer Setup
and User’s Guide
Delete the following Interplay Transfer server log files from the C: drive:
My Computer>Local Disk C:\ProgramData\Avid\Temp\TMServerLog
Reboot Interplay Transfer server CPUs. To do this, stop the Interplay
Transfer Engine application and then reboot the CPU.
Restart Interplay Transfer Engine application from the desktop shortcut.
Interplay Production Services
Restart the Production Services server and Provider systems, including
Transcode Provider, and Archive Provider.
nDo not shut down the Production Services server while jobs are in
progress. It is fine to shut down the server while jobs are pending.
They will restart after the server is restarted.
Interplay Production
Services Setup and User’s
Guide
Interplay Monthly Maintenance Check List (Continued)
Task For more information

Avid ISIS Recommended Maintenance
299
Avid ISIS Recommended Maintenance
Typically, the Avid ISIS does not need to be power cycled. All components of the Avid ISIS
stack can be individually replaced or restarted without interfering with the production of Avid
ISIS stack.
cPower cycling the entire stack (all the components at the same time) could risk the stability
of the Avid ISIS stack.
For a detailed description of the maintenance procedures for Avid ISIS, see the Avid ISIS 7000
Setup Guide ,Avid ISIS 5000 Setup Guide, or the Avid ISIS 2000 Setup Guide.
Interplay Streaming Server
Reboot the server. and clean up the log files.
In the log folder, keep the following files (these are the current ones)
C:\Program Files\Darwin Streaming Server\Logs
• StreamingServer.log
• Error.log
• server_status
and delete the following categories of log files:
• Error.xxyyzzaaaa.log
• mp3_access.xxyyzzaaa.log
• StreamingServer.xxyyzzaaa.log
Avid I S IS
See “Avid ISIS Recommended Maintenance” on page 299
Avid Service Framework
Use the Health Monitor to check memory and CPU usage of server-side
Framework services (Lookup, System Configuration, Time Sync Master,
Email). Check to make sure that none have memory that is increasing at an
unusual rate and that none have persistently high CPU usage.
Avid Service Framework
User’s Guide
Interplay Monthly Maintenance Check List (Continued)
Task For more information
Complete Server Room Shutdown
300
Complete Server Room Shutdown
There is no requirement to power cycle the entire Avid infrastructure but, if the need arises to
turn off all the equipment (such as a relocating the server room), turn off the components in the
following order. When turning on the components, use the reverse order.
To shut down the entire Interplay Production workgroup (server room):
1. Shut down all Avid editing systems and attached media I/O equipment.
2. Shut down all capture and playout servers such as AirSpeed Multi Streams.
3. Shut down Interplay Capture servers.
4. Shut down Interplay Transfer Server.
5. Shut down Interplay Production Services and Providers
6. Shut down Interplay Engine and Interplay Archive Engine.
7. Shut down Interplay Media Indexers — Don’t stop Interplay Media Indexer while it is
indexing storage, see “Shutting Down the Interplay | Media Indexer” on page 278.
8. Shut down systems running the Service Framework Lookup Service.
9. Shut down Backup Avid ISIS System Director.
10. Shut down Primary Avid ISIS System Director.
11. Shut down Avid ISIS Drive Chassis.
12. Shut down network switches.
nTurn on the entire rack of equipment in reverse order as above and verify that all clients have
mounted the necessary Avid ISIS Workspaces.

BArchive Migration (Workgroup 4)
Starting at Interplay v1.1.4, you can migrate MediaManager v4.5.x (also known as Workgroup 4)
archived assets to an Interplay Archive environment. See your Avid representative for details on
migrating.
nConversion of OMF to AAF metadata does not happen during the migration process. The OMF
to AAF conversion occurs when the metadata is checked in and out of an Interplay Window using
a separate Interplay API. Media files remain as OMF files until you create new media, for
example, using transcode or render to create AAF media files.
Searching for Migrated Workgroup 4 Archive Items
After importing the Workgroup 4 assets into an Interplay Archive system database, you can use
Interplay Access to filter the assets you want to restore from the imported Workgroup 4 assets.
There are two special attributes “WG4 Archived Date” and “WG4 Tape Group” that apply only
to Workgroup 4 clips. These two items are available as Interplay Archive search values.
The following illustration shows the Workgroup 4 attributes and the icons used to identify
Workgroup 4 assets before the restore process. The Workgroup 4 icons are similar to the
masterclip, subclip, and sequence icons used with Interplay assets, except they include a 4. After
the restore process the 4 is removed from the Workgroup 4 icons to display the type of asset,
such as clip, subclip, sequence, and so on.
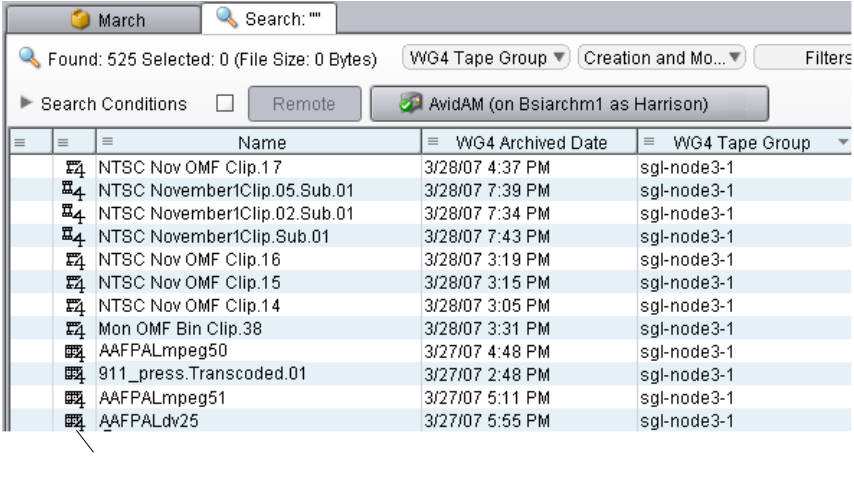
Restoring Migrated Assets
302
To search for Workgroup 4 assets in Interplay Access:
tPerform a normal search using the type of asset you want to restore.
The values allowed are masterclip, subclip, and sequence.
Restoring Migrated Assets
After you migrate the Workgroup 4 archive metadata, you can restore the migrated clips at your
convenience. However, to take advantage of some Interplay Production restore features, such as
partial restore and MultiRez, it is also necessary re-archive your Workgroup 4 media into
Interplay Archive. For more information, see “Working with OMF Media Files After an Archive
Migration” on page 308.
For information on restoring different versions of MediaManager clips, see “Restoring Different
Versions of a MediaManager Archive Clip” on page 303.
Workgroup 4 asset icon after import process
but before restore process.
Restoring Different Versions of a MediaManager Archive Clip
303
Be aware of the following when restoring migrated clips:
• Avid recommends that you schedule time to restore all of your archived Workgroup 4 media
and then re-archive it in Interplay Archive. See “Working with OMF Media Files After an
Archive Migration” on page 308.
• Avid recommends that restored Workgroup 4 clips be rearchived to a separate partition to
keep the restored Workgroup 4 assets separate from the Workgroup 4 tapes. This makes it
easier for deletions; see “Working with OMF Media Files After an Archive Migration” on
page 308.
• After the Workgroup 4 assets are restored in Interplay Archive database, Avid recommends
that you change the OMF metadata to AAF metadata. From an Avid editing application,
check in and then check out the assets to change the OMF metadata to AAF metadata.
• You don’t need to manually convert the AAF/MXF media track length information because
the Media Duration Update tool is automatically run when performing a restore.
• Partial Restore is not supported with migrated OMF media files. If you want to use Partial
Restore with these media files, you can transcode the assets to create MXF media files and
rearchive, and then subclip or Mark IN/OUT into a sequence to partial restore.
To restore the migrated clips:
tPerform the operation as a normal Restore. See Interplay Production Services Setup and
User’s Guide.
In Interplay Access, the media status shows the media as online. However, an Avid editing
application might show the media as offline until you update the status.
You might need to click in the Interplay Access window and then click the File Locations tab
to see the updated file path.
Restoring Different Versions of a MediaManager
Archive Clip
The Migration tool imports the latest version of MediaManager (WG4) clips into Interplay
Production. If the latest version is not the version you want, follow the steps in “Locating the
Correct Version to Restore” on page 304 to locate and restore the correct version.
After performing the archive migration, the FlashNet server database contains entries for
different versions of the metadata for Avid assets such as sequences and master clips. These
entries are stored in an SQL table named “avid.” You can perform a search in the SQL database
to locate the version that you want to restore. After determining the correct clip versions, you can
use Interplay Access to restore the desired version.
nBefore you begin, make sure you have a recent backup version of your Interplay database.
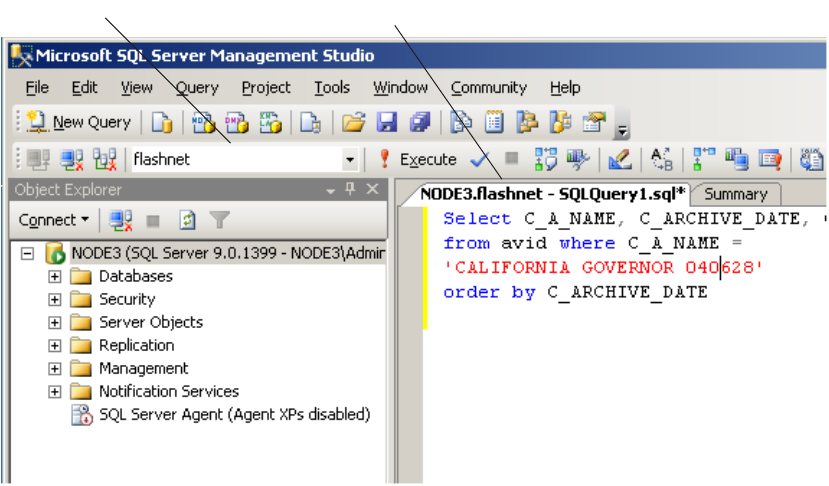
Restoring Different Versions of a MediaManager Archive Clip
304
Locating the Correct Version to Restore
To use SQL Management Studio to locate the correct version:
1. On the FlashNet server, select Start > Programs > Microsoft SQL Server 2005 > SQL Server
Management Studio.
2. Select the appropriate database and select New Query.
3. Type the following into the Query window:
Select C_A_NAME, C_ARCHIVE_DATE, C_A_TOTAL_SIZE, C_ARCHIVE, C_VOLUME
from avid where C_A_NAME =
’clip name’
order by C_ARCHIVE_DATE
where clip name is the name of the clip you want to search for. The following illustration
shows an example using a clip named CALIFORNIA GOVERNOR 040628.
The following illustration shows the Query window in more detail.
Available Databases pop-up menu Query window
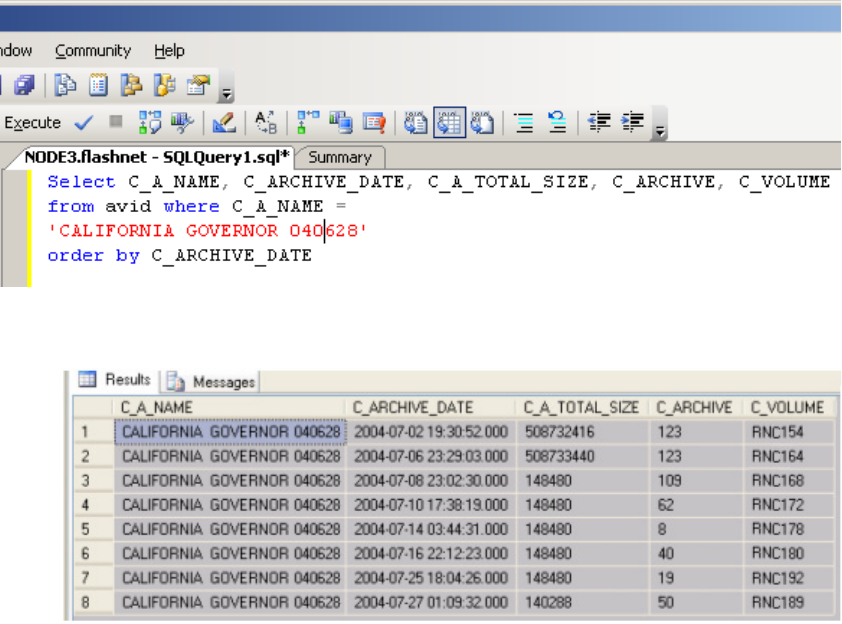
Restoring Different Versions of a MediaManager Archive Clip
305
The following illustration shows the result panel for this search.
The migration tool imports only the latest archived asset. In the preceding illustration, this is
the version archived at 2004-07-27. In this example, the version archived at 2004-07-06 is a
more desired version. The clip archive number is 123 and the Volume name is RNC164. The
file size is also larger than the 2004-07-27 version.
Setting the Correct Version Information for the Clip in Interplay | Access
You use Interplay Access to change the clip’s archive number and volume name in the Interplay
database.
To use Interplay Access to change the version to restore:
1. Log in to Interplay Access as an Administrator and search for the clip.
2. Right-click the clip and select Advanced.
3. Click Get/Set Property and click the All properties tab.
4. Scroll down the Name list and locate WGArchive ID and WGArchiveTapeID.
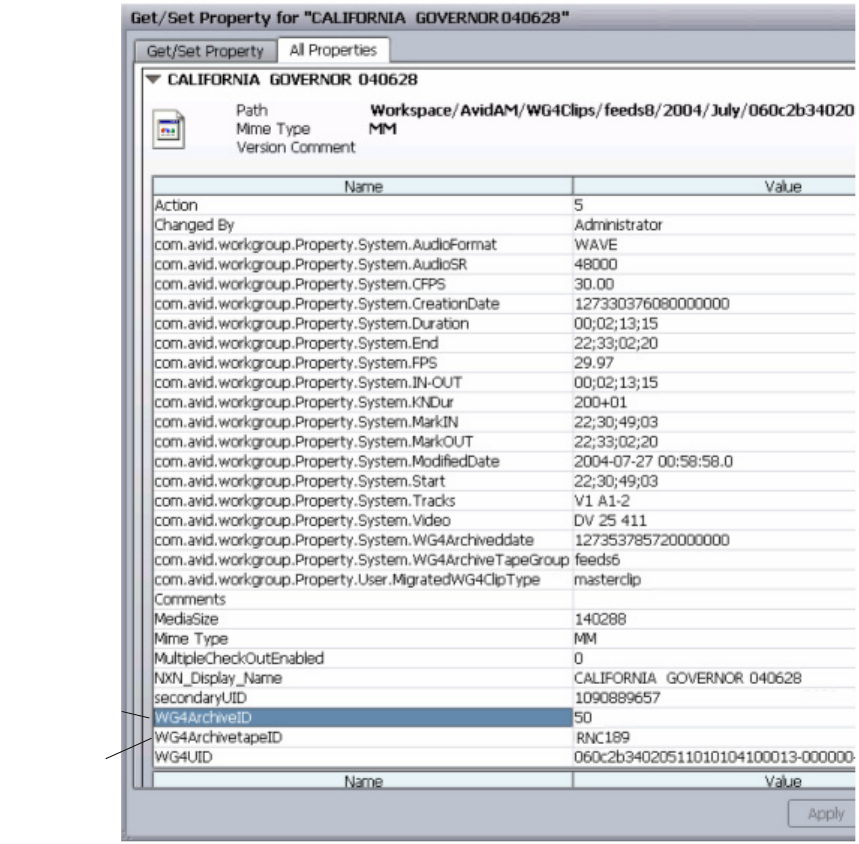
Restoring Different Versions of a MediaManager Archive Clip
306
The following illustration shows the selections for this example.
The All Properties tab shows the current WG4Archive ID and Archive Tape ID values. In
this example, we want to change the WGArchive ID to 123 and change the
WG4ArchiveTapeID to RNC164.
5. Click the Get/Set Property tab and select WG4ArchiveID from the Name list.
6. Click the Get button. The system displays the current value in the Value window.
Tape ID
(Volume name)
Archive ID.
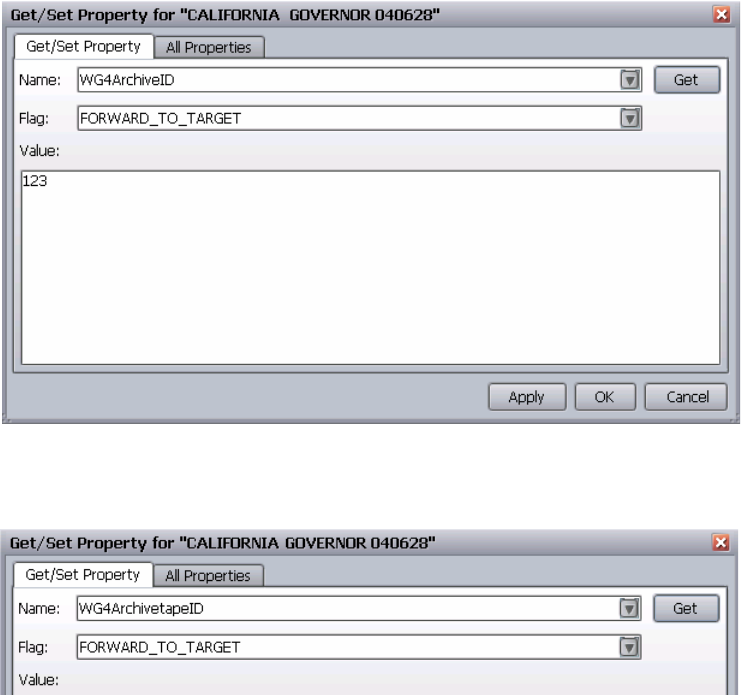
Restoring Different Versions of a MediaManager Archive Clip
307
7. Type the new value in the Value window and click the Apply button.
The following illustration shows the new value for this example.
8. Select the WG4ArchivetapeID from the Name menu and click Get. The system displays the
current value in the Value window.
9. Change the value, and click the Apply button. In this example we change the value to
RNC164.
10. Click the All Properties tab and verify that the new values are correct.
11. Click OK to close the dialog box.
Working with OMF Media Files After an Archive Migration
308
Restoring the Clip from the MediaManager Database
To restore the correct version of the clip:
1. Locate the clip that you want to restore in Interplay Access.
2. Delete the media for the clip.
cIf you have already restored the clip and want to restore a different version, delete the
Interplay Production version of the media before you perform the restore.
3. Right-click the clip in Interplay Access and select Restore.
Working with OMF Media Files After an Archive
Migration
You can troubleshoot problems that might occur with OMF media that is restored after an
archive migration. The conversion of OMF to AAF metadata does not happen during the restore
process. Media files remain as OMF files until you create new media. For example, using
transcode or render to create MXF media files. For specific steps on performing the archive
migration, see your Avid representative.
To create MXF media files after migrating a Workgroup 4 archive:
1. After you migrate the Workgroup 4 archive database to Interplay Production, restore the
media to a specific workspace, for example, one named WG4.
2. If you check out a reference clip from the sequence and notice that some of the media is
offline, use the Avid editing application’s Reveal File command to verify whether the online
media comes from the “WG4” workspace. If it does, you are working with OMF media. For
example, if you have an OMF sequence containing alpha, the video fill is online but the
alpha media is offline.
3. Do the following in the Avid editing application:
a. Change the Dynamic Relink settings by doing one of the following:
- Select If no match is found > Keep Existing Media.
- Turn off Dynamic Relink.
b. Check out the sequence again.
At this point the media should be online.
4. Transcode the sequence to an MXF resolution by doing the following:
a. Open the Consolidate/Transcode dialog box.
b. Select Transcode.
Working with OMF Media Files After an Archive Migration
309
c. Select Convert Video.
d. (Option) Select Create New Sequence, if you want to create a new sequence for the
MXF media that is separate from the OMF media.
e. Click Transcode.
New MXF media is created for the entire sequence. Turn on Dynamic Relink to link the
sequence to the new MXF media.
5. (Option) Rename the OMF sequence so you can identify it as being linked to OMF media.
This makes it easier to delete the OMF version later. See “Deleting the Online OMF Media”
on page 309.
6. (Option) Rearchive the sequence that is linked to the MXF media. This lets you take
advantage of partial restore the next time you restore the sequence.
Deleting the Online OMF Media
Use the following methods to delete the online OMF media files:
• If you used Create New Sequence to create the MXF media, you have two sequences: one
linking to OMF media and another linking to MXF media. After you perform the transcode,
rename the OMF version so you can identify it for deletion. Then you can use Interplay
Access to search for sequences with that text in the name. Delete the sequence and the
media.
• If you did not select Create New Sequence in the Consolidate/Transcode dialog box before
you transcoded the sequence, the sequence’s clips link to both the OMF media and the new
MXF media. In this case there is no way to delete just the OMF media from Interplay
Access. If you want to free up disk space, you must manually remove the OMF media files
from your Interplay environment.
To manually delete online OMF media files:
1. Use one of the following methods to identify the media files:
tSelect a clip from the sequence in Interplay Access and select the File Locations tab in
the Object Inspector, then identify the .omf file in the File Path column.
tUse Reveal File in the Avid editing application to identify the OMF files associated
withe the clip.
2. Use Windows Explorer to delete the associated .omf files.
cThis procedure should only be performed by an Administrator to avoid deleting the wrong
media files. In general, you should only use the Interplay Production applications to delete
media files.

Retained Workgroup 4 Clip Attributes
310
Retained Workgroup 4 Clip Attributes
The following table list the Workgroup 4 attributes that carry over to the Interplay Archive
database.
nThese attributes are not available in Interplay Access until after you perform a restore of the
Workgroup 4 assets.
Workgroup 4 Clip Attributes Retained in Interplay Environment
Attribute Master clip Subclip Sequence
Archive date X X X
Tape group X X X
File location X X
Start X X X
Duration X X X
End X X X
Mark_In X X X
Mark_Out X X X
In_Out X X X
FPS X X X
KN_dur X X X
Video X X X
Tracks X X X
Audio_Format X X X
Audio_SR X X X
CFPS X X X
Created_by X X X
Tape_ID X X X
Creation_Date X X X

Retained Workgroup 4 Clip Attributes
311
Modified_Date X X X
Media_Size X X X
Comment X X X
Workgroup 4 Clip Attributes Retained in Interplay Environment (Continued)
Attribute Master clip Subclip Sequence
Symbols
.spaaf files
described 101
Numerics
1080p/23.976 proxy support 200
1080p/23.976 support 196
1080p/24 support 196
1080p/24 support proxy 200
720p/23.976 proxy support 200
720p/23.976 support 196
A
Access control 24, 27, 36
Instinct and Interplay Assist User settings 38
AFD (Active Format Description)
support for 231
AirSpeed Multi Stream
configuring for H.264 workflow 181
AirSpeed server
Frame Chase editing with 224
AMA (Avid Media Access) material
.spaaf files 101
browsing in Access 116
configuring media files location 106
configuring metadata location 104
deleting in Access 121
license for third-party storage 110
Media Indexer 101
resyncing 123
support for 97
workflow 98
Ancillary data
ingest and playout 230
support for AFD 231
Apple ProRes support 202
Archive
restoring a clip 156
Archive migration 301
Asset manager
Admininstrator client 14
description 12
Assets 12
Avid assets 12
deleting 149
Avid Instinct
support for stereoscopic 3D 213
Avid Logging application 19
Avid Service Framework 23
C
Capture
creating folders 38
editing during 222
Frame Chase Capture 222
Frame Chase editing 222
Critical memory threshold 287
Custom properties
example of search 91
D
Deleting
Avid assets and media 149
best practices guidelines 70
determining how much space will be freed up 73
examples with search 76
introduction 40
media 24
media and metadata 41
Index
Index
313
Digital Rights Management 19
DNxHD 100 support 216
DNxHR support 220
Dual-ingest configuration
Frame Chase editing 224
Dynamic Relink
described 11
Dynamic relink
working with a single resolution 233
E
Edit while capture
See Frame Chase editing
Editing
during capture 222
Editor Database settings 36
F
File assets 12
Film option 196
Folders
defining a database 27
for capturing media 38
Frame Chase editing
described 222
dual-ingest configuration 224
limitations 227
overview 222
workflow 224
H
H.264 media
AirSpeed Multi Stream encoder card 180
archiving, restoring, deleting 195
editing 194
supported resolutions 175
H.264 workflow 175
acquiring media 190
archiving, restoring, deleting 195
configuring AirSpeed Multi Stream 181
configuring Interplay Capture 185
dual-ingest 191
folders and shared-storage workspaces 180
installation and configuration 177
Production Services profiles 186
transcoding 194
with AirSpeed Multistream 178
with Interplay Transcode 178
I
Icons
new for Interplay 2.3 24
Incoming Media folder
and performance 38
In-progress clips
editing during capture 222
limitations 227
Instinct and Interplay Assist User Settings 38
Interplay Administrator 14
Interplay Assist 19
support for stereoscopic 3D 213
Interplay Capture 24
configuring for H.264 185
Interplay Engine 12
Interplay Media Indexer 23
AMA material 101
Critical memory threshold 287
description 255
low memory threshold 287
Interplay Production Services 19
Interplay Transfer 18
Interplay Window
support for Stereoscopic 3D 213
J
JPEG 2000 support 205
L
Logging application 19
Long GOP 127
Capture workflow 129
editing workflow 133
Output workflow 133
Low memory threshold 287
M
Manage Database Roles 30, 34
Index
314
Media deletion 24
Media files
deleting 149
Media Indexer 23
see Avid Interplay Media Indexer 255
Migration from MediaManager 23
MPEG-2 127
MultiRez
described 11
partially online clips, restoring from an archive 140
MXF OP-1A 129
MXF OP-ATOM 129
O
OMF files
working with 308
OP-1A file format 129
OP-ATOM file format 129
Operating points for Long GOP workflow 127, 129
P
Partially online clips
restoring from an archive 140
Permissions
assigning 27
Profiles
Production Services for H.264 workflow 186
Projects
assigning permission to users 32
Properties
stereoscopic 3D 213
ProRes
support 202
R
Restoring a clip 156
Restricted flag 19
S
Searches
custom properties,example 91
examples with deletion 76
text media attribute 87
Server Hostname Settings 38
Stereoscopic 3D support
in Interplay Access 209
in Interplay Transcode 211
in Interplay Window, Interplay Assist, Avid Instinct
213
media and clips 207
overview 206
properties 213
STP Encode service
workflow 136
System maintenance 295
T
TransferManager 18
U
UHDTV1 support 220
Unique identifier
custom property for 91
User database
defining 27
W
Workflow
configuring Interplay Media Indexer 255
delete workflows 53
frame chase editing 222
H.264 MultiRez 175
setting up user database 27
system maintenance 295
Workgroups
migration from MediaManager 23
X
XAVC-Intra support 219
XDCAM HD and XDCAM EX 127
XDCAM HD and XDCAM EX file formats 129
