Avid Interplay Production Services Setup And User’s Guide 3.4 User's SUG V3 4 En
User Manual: avid Interplay Production Services - 3.4 - Setup and User's Guide Free User Guide for Avid Interplay Software, Manual
Open the PDF directly: View PDF ![]() .
.
Page Count: 352 [warning: Documents this large are best viewed by clicking the View PDF Link!]
- Title Page
- Contents
- Using This Guide
- Working with the Interplay | Production Services System
- Understanding the Production Services System
- Production Services Engine Components
- Understanding the Various Production Services
- Production Services Used By MediaCentral | UX
- Check Lists for Setting Up and Using Service Providers
- Licenses and Production Services
- Support for Restrictions
- Support for Group Clips
- Mounting Workspaces for Interplay Transcode and Other Production Services
- Changing the Hostname for the Interplay Auto Production Service
- Production Services Engine Installation and Configuration
- Using the Production Services and Transfer Status Tool
- Installing Services and Registering Providers
- Working with Production Services Profiles
- Working with the Transcode Service
- Understanding the Transcode Service
- Check List for Transcoding Assets
- Registering the Transcode Service with the Production Services Engine
- Connecting the Transcode Provider to the Production Services Engine
- Starting the Transcode Provider
- Creating an Interplay Transcode Service Profile
- Understanding the Transcode Services Modes
- Transcoding an Asset from Interplay | Access
- Transcoding an Asset from an Avid Editing Application
- Transcoding OMF Clips
- Working with an Auto Transcode Folder
- Stereoscopic 3D Support in Interplay Transcode
- Working with the Archive and Restore Services
- Understanding Archive and Restore Services
- Check List for Archiving and Restoring Assets
- Archive Configuration and Setup
- Registering the Archive or Restore Service with the Production Services Engine
- Configuring an Archive Provider or Restore Provider for the Production Services Engine
- Configuring the Archive Service
- Connecting to the Archive Database and Creating Folders in Interplay Access
- Working with Interplay Archive and Interplay Restore Profiles
- Archiving Assets from an Avid Editing Application
- Archiving Assets Using Interplay Access
- Working with an Auto Archive Folder
- Searching the Archive Database
- Restoring Assets from the Archive Database
- Working with Partial Restore
- Configuring a Workgroup to Use Multiple Archive Engines
- Working with the Copy Service
- Understanding the Copy Service
- Workflow for Copying Metadata and Media Files
- Check List for Copying Assets to Another Workgroup
- Registering the Copy Service with the Production Services Engine
- Configuring a Copy Provider for the Production Services Engine
- Using an Interplay Copy Service Profile
- Copying Assets and Media to Another Workgroup Using Interplay Access
- Copying Assets and Media to Another Workgroup Using an Avid Editing Application
- Copying Assets During Ingest
- Defining the Maximum Number of Simultaneous Jobs for Copy
- Automatically Copying Assets to Another Workgroup
- Working with the Move Service
- Understanding the Move Service
- Workflow for Moving Media to Another Workspace
- Check List for Moving Assets to Another Workspace
- Registering the Move Service with the Production Services Engine
- Configuring a Move Provider for the Production Services Engine
- Creating a Interplay Move Service Profile
- Moving Media to Another Workspace Using Interplay Access
- Defining the Maximum Number of Simultaneous Jobs for Move
- Working with the Delivery Service
- Understanding the Delivery Service and Delivery Receiver Service
- Check List for the Delivery Service
- Registering the Delivery Receiver in an Interplay Production Workgroup
- Registering the Delivery Service with the Production Services Engine
- Configuring a Delivery Provider for the Production Services Engine
- Creating an Interplay | Delivery Profile
- Transferring Assets Through Interplay Access
- Transferring Assets through an Avid Editing System
- Viewing the Transfer Status
- Relinking Partially Delivered Assets
- Verifying the Delivery Receiver Service is Running Using Avid Service Framework
- Monitoring the Health of the Interplay Delivery Receiver Service
- Overriding Delivery of Already Existing Media Files
- Allowing Third-Party Providers to Directly Connect to the Interplay Delivery Service
- Defining the Maximum Number of Simultaneous Jobs for Delivery
- Working with the STP Encode Service
- Understanding Long GOP OP1a and STP Encode
- Workflow for Background Processing of Long GOP Splicing and Transferring of Long GOP OP1a Media
- Check List for Transferring Long GOP OP1a Media in the Background
- Registering the STP Encode Service with the Production Services Engine
- Connecting the STP Encode Provider to the Production Services Engine
- Starting the STP Encode Provider
- Connecting to the Production Services Engine From Interplay Assist or an Avid Editing Application
- Performing Send-to-Playback as a Background Process from Interplay Assist
- Performing Send-to-Playback as a Background Process from an Avid Editing Application
- Installing and Configuring Production Services for MediaCentral Delivery
- Understanding Production Services for MediaCentral Delivery
- Check List for Installing and Configuring Automation and Consolidate Services
- Prerequisites for Installing and Configuring Automation and Consolidate Services
- Installing the Automation and Consolidate Services
- Registering the Automation and Consolidate Services
- Registering a Provider with the Production Services Engine
- Creating a Consolidate Profile
- Troubleshooting Interplay | Production Services
- General Troubleshooting for Production Services
- Checking Production Services Log Files
- Troubleshooting Using Avid Diagnostics
- Archive and Restore Troubleshooting
- Finding Solutions to Specific Archive and Restore Problems
- Compatibility of Archive and Restore Services and Third-Party Software
- Getting Information About an Archive or Restore Job from the Jobs Page
- Getting Information About an Archive or Restore Job from a Log File
- How the Production Services Status Tool Reports Archive and Restore Operations
- Archive and Restore Error Messages
- Manually Updating the Status of Media Files
- Using a HOSTS File for Production Services
- Media Supported by Partial Restore and Partial Delivery, Version 3.4
- AVC-Intra Resolutions Supported by Interplay | Production Services
- Target Resolutions for Interplay | Transcode, Version 3.4
- Maximum Number of Simultaneous Jobs
- Index

Interplay®| Production Services
Setup and User’s Guide
Version 3.4
2
Legal Notices
Product specifications are subject to change without notice and do not represent a commitment on the part of Avid Technology, Inc.
This product is subject to the terms and conditions of a software license agreement provided with the software. The product may
only be used in accordance with the license agreement.
This product may be protected by one or more U.S. and non-U.S patents. Details are available at www.avid.com/patents.
This document is protected under copyright law. An authorized licensee of Interplay Production Services may reproduce this
publication for the licensee’s own use in learning how to use the software. This document may not be reproduced or distributed, in
whole or in part, for commercial purposes, such as selling copies of this document or providing support or educational services to
others. This document is supplied as a guide for Interplay Production Services. Reasonable care has been taken in preparing the
information it contains. However, this document may contain omissions, technical inaccuracies, or typographical errors. Avid
Technology, Inc. does not accept responsibility of any kind for customers’ losses due to the use of this document. Product
specifications are subject to change without notice.
Copyright © 2015 Avid Technology, Inc. and its licensors. All rights reserved.
The following disclaimer is required by Sam Leffler and Silicon Graphics, Inc. for the use of their TIFF library:
Copyright © 1988–1997 Sam Leffler
Copyright © 1991–1997 Silicon Graphics, Inc.
Permission to use, copy, modify, distribute, and sell this software [i.e., the TIFF library] and its documentation for any purpose is
hereby granted without fee, provided that (i) the above copyright notices and this permission notice appear in all copies of the
software and related documentation, and (ii) the names of Sam Leffler and Silicon Graphics may not be used in any advertising or
publicity relating to the software without the specific, prior written permission of Sam Leffler and Silicon Graphics.
THE SOFTWARE IS PROVIDED “AS-IS” AND WITHOUT WARRANTY OF ANY KIND, EXPRESS, IMPLIED OR OTHERWISE,
INCLUDING WITHOUT LIMITATION, ANY WARRANTY OF MERCHANTABILITY OR FITNESS FOR A PARTICULAR PURPOSE.
IN NO EVENT SHALL SAM LEFFLER OR SILICON GRAPHICS BE LIABLE FOR ANY SPECIAL, INCIDENTAL, INDIRECT OR
CONSEQUENTIAL DAMAGES OF ANY KIND, OR ANY DAMAGES WHATSOEVER RESULTING FROM LOSS OF USE, DATA OR
PROFITS, WHETHER OR NOT ADVISED OF THE POSSIBILITY OF DAMAGE, AND ON ANY THEORY OF LIABILITY, ARISING
OUT OF OR IN CONNECTION WITH THE USE OR PERFORMANCE OF THIS SOFTWARE.
The following disclaimer is required by the Independent JPEG Group:
This software is based in part on the work of the Independent JPEG Group.
This Software may contain components licensed under the following conditions:
Copyright (c) 1989 The Regents of the University of California. All rights reserved.
Redistribution and use in source and binary forms are permitted provided that the above copyright notice and this paragraph are
duplicated in all such forms and that any documentation, advertising materials, and other materials related to such distribution and
use acknowledge that the software was developed by the University of California, Berkeley. The name of the University may not be
used to endorse or promote products derived from this software without specific prior written permission. THIS SOFTWARE IS
PROVIDED ``AS IS'' AND WITHOUT ANY EXPRESS OR IMPLIED WARRANTIES, INCLUDING, WITHOUT LIMITATION, THE
IMPLIED WARRANTIES OF MERCHANTABILITY AND FITNESS FOR A PARTICULAR PURPOSE.
Copyright (C) 1989, 1991 by Jef Poskanzer.
Permission to use, copy, modify, and distribute this software and its documentation for any purpose and without fee is hereby
granted, provided that the above copyright notice appear in all copies and that both that copyright notice and this permission notice
appear in supporting documentation. This software is provided "as is" without express or implied warranty.
Copyright 1995, Trinity College Computing Center. Written by David Chappell.
Permission to use, copy, modify, and distribute this software and its documentation for any purpose and without fee is hereby
granted, provided that the above copyright notice appear in all copies and that both that copyright notice and this permission notice
appear in supporting documentation. This software is provided "as is" without express or implied warranty.
Copyright 1996 Daniel Dardailler.
Permission to use, copy, modify, distribute, and sell this software for any purpose is hereby granted without fee, provided that the
above copyright notice appear in all copies and that both that copyright notice and this permission notice appear in supporting
documentation, and that the name of Daniel Dardailler not be used in advertising or publicity pertaining to distribution of the software
without specific, written prior permission. Daniel Dardailler makes no representations about the suitability of this software for any
purpose. It is provided "as is" without express or implied warranty.
3
Modifications Copyright 1999 Matt Koss, under the same license as above.
Copyright (c) 1991 by AT&T.
Permission to use, copy, modify, and distribute this software for any purpose without fee is hereby granted, provided that this entire
notice is included in all copies of any software which is or includes a copy or modification of this software and in all copies of the
supporting documentation for such software.
THIS SOFTWARE IS BEING PROVIDED "AS IS", WITHOUT ANY EXPRESS OR IMPLIED WARRANTY. IN PARTICULAR,
NEITHER THE AUTHOR NOR AT&T MAKES ANY REPRESENTATION OR WARRANTY OF ANY KIND CONCERNING THE
MERCHANTABILITY OF THIS SOFTWARE OR ITS FITNESS FOR ANY PARTICULAR PURPOSE.
This product includes software developed by the University of California, Berkeley and its contributors.
The following disclaimer is required by Nexidia Inc.:
© 2010 Nexidia Inc. All rights reserved, worldwide. Nexidia and the Nexidia logo are trademarks of Nexidia Inc. All other
trademarks are the property of their respective owners. All Nexidia materials regardless of form, including without limitation,
software applications, documentation and any other information relating to Nexidia Inc., and its products and services are the
exclusive property of Nexidia Inc. or its licensors. The Nexidia products and services described in these materials may be covered
by Nexidia's United States patents: 7,231,351; 7,263,484; 7,313,521; 7,324,939; 7,406,415, 7,475,065; 7,487,086 and/or other
patents pending and may be manufactured under license from the Georgia Tech Research Corporation USA.
The following disclaimer is required by Paradigm Matrix:
Portions of this software licensed from Paradigm Matrix.
The following disclaimer is required by Ray Sauers Associates, Inc.:
“Install-It” is licensed from Ray Sauers Associates, Inc. End-User is prohibited from taking any action to derive a source code
equivalent of “Install-It,” including by reverse assembly or reverse compilation, Ray Sauers Associates, Inc. shall in no event be liable
for any damages resulting from reseller’s failure to perform reseller’s obligation; or any damages arising from use or operation of
reseller’s products or the software; or any other damages, including but not limited to, incidental, direct, indirect, special or
consequential Damages including lost profits, or damages resulting from loss of use or inability to use reseller’s products or the
software for any reason including copyright or patent infringement, or lost data, even if Ray Sauers Associates has been advised,
knew or should have known of the possibility of such damages.
The following disclaimer is required by Videomedia, Inc.:
“Videomedia, Inc. makes no warranties whatsoever, either express or implied, regarding this product, including warranties with
respect to its merchantability or its fitness for any particular purpose.”
“This software contains V-LAN ver. 3.0 Command Protocols which communicate with V-LAN ver. 3.0 products developed by
Videomedia, Inc. and V-LAN ver. 3.0 compatible products developed by third parties under license from Videomedia, Inc. Use of this
software will allow “frame accurate” editing control of applicable videotape recorder decks, videodisc recorders/players and the like.”
The following disclaimer is required by Altura Software, Inc. for the use of its Mac2Win software and Sample Source
Code:
©1993–1998 Altura Software, Inc.
The following disclaimer is required by Ultimatte Corporation:
Certain real-time compositing capabilities are provided under a license of such technology from Ultimatte Corporation and are
subject to copyright protection.
The following disclaimer is required by 3Prong.com Inc.:
Certain waveform and vector monitoring capabilities are provided under a license from 3Prong.com Inc.
The following disclaimer is required by Interplay Entertainment Corp.:
The “Interplay” name is used with the permission of Interplay Entertainment Corp., which bears no responsibility for Avid products.
This product includes portions of the Alloy Look & Feel software from Incors GmbH.
This product includes software developed by the Apache Software Foundation (http://www.apache.org/).
© DevelopMentor
4
This product may include the JCifs library, for which the following notice applies:
JCifs © Copyright 2004, The JCIFS Project, is licensed under LGPL (http://jcifs.samba.org/). See the LGPL.txt file in the Third Party
Software directory on the installation CD.
Avid Interplay contains components licensed from LavanTech. These components may only be used as part of and in connection
with Avid Interplay.
Portions © Copyright 2003-2007 of MOG Solutions.
Attn. Government User(s). Restricted Rights Legend
U.S. GOVERNMENT RESTRICTED RIGHTS. This Software and its documentation are “commercial computer software” or
“commercial computer software documentation.” In the event that such Software or documentation is acquired by or on behalf of a
unit or agency of the U.S. Government, all rights with respect to this Software and documentation are subject to the terms of the
License Agreement, pursuant to FAR §12.212(a) and/or DFARS §227.7202-1(a), as applicable.
Trademarks
003, 192 Digital I/O, 192 I/O, 96 I/O, 96i I/O, Adrenaline, AirSpeed, ALEX, Alienbrain, AME, AniMatte, Archive, Archive II, Assistant
Station, AudioPages, AudioStation, AutoLoop, AutoSync, Avid, Avid Active, Avid Advanced Response, Avid DNA, Avid DNxcel, Avid
DNxHD, Avid DS Assist Station, Avid Ignite, Avid Liquid, Avid Media Engine, Avid Media Processor, Avid MEDIArray, Avid Mojo, Avid
Remote Response, Avid Unity, Avid Unity ISIS, Avid VideoRAID, AvidRAID, AvidShare, AVIDstripe, AVX, Beat Detective, Beauty
Without The Bandwidth, Beyond Reality, BF Essentials, Bomb Factory, Bruno, C|24, CaptureManager, ChromaCurve,
ChromaWheel, Cineractive Engine, Cineractive Player, Cineractive Viewer, Color Conductor, Command|24, Command|8,
Control|24, Cosmonaut Voice, CountDown, d2, d3, DAE, D-Command, D-Control, Deko, DekoCast, D-Fi, D-fx, Digi 002, Digi 003,
DigiBase, Digidesign, Digidesign Audio Engine, Digidesign Development Partners, Digidesign Intelligent Noise Reduction,
Digidesign TDM Bus, DigiLink, DigiMeter, DigiPanner, DigiProNet, DigiRack, DigiSerial, DigiSnake, DigiSystem, Digital
Choreography, Digital Nonlinear Accelerator, DigiTest, DigiTranslator, DigiWear, DINR, DNxchange, Do More, DPP-1, D-Show, DSP
Manager, DS-StorageCalc, DV Toolkit, DVD Complete, D-Verb, Eleven, EM, Euphonix, EUCON, EveryPhase, Expander,
ExpertRender, Fader Pack, Fairchild, FastBreak, Fast Track, Film Cutter, FilmScribe, Flexevent, FluidMotion, Frame Chase, FXDeko,
HD Core, HD Process, HDpack, Home-to-Hollywood, HYBRID, HyperSPACE, HyperSPACE HDCAM, iKnowledge, Image
Independence, Impact, Improv, iNEWS, iNEWS Assign, iNEWS ControlAir, InGame, Instantwrite, Instinct, Intelligent Content
Management, Intelligent Digital Actor Technology, IntelliRender, Intelli-Sat, Intelli-sat Broadcasting Recording Manager, InterFX,
Interplay, inTONE, Intraframe, iS Expander, iS9, iS18, iS23, iS36, ISIS, IsoSync, LaunchPad, LeaderPlus, LFX, Lightning, Link &
Sync, ListSync, LKT-200, Lo-Fi, MachineControl, Magic Mask, Make Anything Hollywood, make manage move | media, Marquee,
MassivePack, Massive Pack Pro, Maxim, Mbox, Media Composer, MediaFlow, MediaLog, MediaMix, Media Reader, Media
Recorder, MEDIArray, MediaServer, MediaShare, MetaFuze, MetaSync, MIDI I/O, Mix Rack, Moviestar, MultiShell, NaturalMatch,
NewsCutter, NewsView, NewsVision, Nitris, NL3D, NLP, NSDOS, NSWIN, OMF, OMF Interchange, OMM, OnDVD, Open Media
Framework, Open Media Management, Painterly Effects, Palladium, Personal Q, PET, Podcast Factory, PowerSwap, PRE,
ProControl, ProEncode, Profiler, Pro Tools, Pro Tools|HD, Pro Tools LE, Pro Tools M-Powered, Pro Transfer, QuickPunch,
QuietDrive, Realtime Motion Synthesis, Recti-Fi, Reel Tape Delay, Reel Tape Flanger, Reel Tape Saturation, Reprise, Res Rocket
Surfer, Reso, RetroLoop, Reverb One, ReVibe, Revolution, rS9, rS18, RTAS, Salesview, Sci-Fi, Scorch, ScriptSync,
SecureProductionEnvironment, Serv|GT, Serv|LT, Shape-to-Shape, ShuttleCase, Sibelius, SimulPlay, SimulRecord, Slightly Rude
Compressor, Smack!, Soft SampleCell, Soft-Clip Limiter, SoundReplacer, SPACE, SPACEShift, SpectraGraph, SpectraMatte,
SteadyGlide, Streamfactory, Streamgenie, StreamRAID, SubCap, Sundance, Sundance Digital, SurroundScope, Symphony, SYNC
HD, SYNC I/O, Synchronic, SynchroScope, Syntax, TDM FlexCable, TechFlix, Tel-Ray, Thunder, TimeLiner, Titansync, Titan, TL
Aggro, TL AutoPan, TL Drum Rehab, TL Everyphase, TL Fauxlder, TL In Tune, TL MasterMeter, TL Metro, TL Space, TL Utilities,
tools for storytellers, Transit, TransJammer, Trillium Lane Labs, TruTouch, UnityRAID, Vari-Fi, Video the Web Way, VideoRAID,
VideoSPACE, VTEM, Work-N-Play, Xdeck, X-Form, Xmon and XPAND! are either registered trademarks or trademarks of Avid
Technology, Inc. in the United States and/or other countries.
Adobe and Photoshop are either registered trademarks or trademarks of Adobe Systems Incorporated in the United States and/or
other countries. Apple and Macintosh are trademarks of Apple Computer, Inc., registered in the U.S. and other countries. Windows
is either a registered trademark or trademark of Microsoft Corporation in the United States and/or other countries. All other
trademarks contained herein are the property of their respective owners.
Interplay Production Services Setup and User’s Guide • Created September 22, 2015 • This document is distributed by Avid in
online (electronic) form only, and is not available for purchase in printed form.
Contents
Using This Guide. . . . . . . . . . . . . . . . . . . . . . . . . . . . . . . . . . . . . . . . . . . . . . . 13
Symbols and Conventions. . . . . . . . . . . . . . . . . . . . . . . . . . . . . . . . . . . . . . . . . . . . . . . . 14
If You Need Help . . . . . . . . . . . . . . . . . . . . . . . . . . . . . . . . . . . . . . . . . . . . . . . . . . . . . . . 15
Viewing Help and Documentation on the Interplay Production Portal. . . . . . . . . . . . . . . 15
Avid Training Services. . . . . . . . . . . . . . . . . . . . . . . . . . . . . . . . . . . . . . . . . . . . . . . . . . . 16
Chapter 1 Working with the Interplay | Production Services System 17
Understanding the Production Services System . . . . . . . . . . . . . . . . . . . . . . . . . . . . . . . 17
Production Services Engine Components. . . . . . . . . . . . . . . . . . . . . . . . . . . . . . . . . . . . 18
Understanding the Production Services Engine . . . . . . . . . . . . . . . . . . . . . . . . . . . . 18
Understanding the Interplay Production Services and Transfer Status Tool . . . . . . 19
Understanding the Various Production Services. . . . . . . . . . . . . . . . . . . . . . . . . . . . . . . 21
Production Services Used By MediaCentral | UX . . . . . . . . . . . . . . . . . . . . . . . . . . . . . . 23
Check Lists for Setting Up and Using Service Providers . . . . . . . . . . . . . . . . . . . . . . . . 23
Licenses and Production Services . . . . . . . . . . . . . . . . . . . . . . . . . . . . . . . . . . . . . . . . . 24
Support for Restrictions. . . . . . . . . . . . . . . . . . . . . . . . . . . . . . . . . . . . . . . . . . . . . . . . . . 24
Support for Group Clips. . . . . . . . . . . . . . . . . . . . . . . . . . . . . . . . . . . . . . . . . . . . . . . . . . 25
Mounting Workspaces for Interplay Transcode and Other Production Services. . . . . . . 26
Changing the Hostname for the Interplay Auto Production Service . . . . . . . . . . . . . . . . 27
Chapter 2 Production Services Engine Installation and Configuration 28
Check List for Setting Up the Production Services Engine . . . . . . . . . . . . . . . . . . . . . . . 28
Registering the Production Services Engine in an Interplay Workgroup. . . . . . . . . . . . . 29
Configuring the Production Services Engine. . . . . . . . . . . . . . . . . . . . . . . . . . . . . . . . . . 31
Starting the Production Services Engine. . . . . . . . . . . . . . . . . . . . . . . . . . . . . . . . . . . . . 35
Setting Up a Workgroup for Production Services Backup. . . . . . . . . . . . . . . . . . . . . . . . 36
Automatically Connecting to a Backup Production Services Engine . . . . . . . . . . . . 36
Configuring and Connecting a Spare Production Services Engine . . . . . . . . . . . . . 42
6
Backing Up the Production Services Database . . . . . . . . . . . . . . . . . . . . . . . . . . . . 43
Restoring the Production Services Database. . . . . . . . . . . . . . . . . . . . . . . . . . . . . . 49
Chapter 3 Using the Production Services and Transfer Status Tool. . . . . . . . . . . . . . 56
Opening the Production Services and Transfer Status Tool . . . . . . . . . . . . . . . . . . . . . . 56
Production Services and Transfer Status Tool User Interface . . . . . . . . . . . . . . . . . . . . 58
Using the Jobs Page . . . . . . . . . . . . . . . . . . . . . . . . . . . . . . . . . . . . . . . . . . . . . . . . . . . . 58
Job Information and Status . . . . . . . . . . . . . . . . . . . . . . . . . . . . . . . . . . . . . . . . . . . 60
Customizing the Reporting of Service Job Status . . . . . . . . . . . . . . . . . . . . . . . . . . 62
Customizing the Jobs Page Columns . . . . . . . . . . . . . . . . . . . . . . . . . . . . . . . . . . . 64
Filtering the Jobs List . . . . . . . . . . . . . . . . . . . . . . . . . . . . . . . . . . . . . . . . . . . . . . . . 64
Viewing Details About a Job. . . . . . . . . . . . . . . . . . . . . . . . . . . . . . . . . . . . . . . . . . . 65
Job Details Window . . . . . . . . . . . . . . . . . . . . . . . . . . . . . . . . . . . . . . . . . . . . . . . . . 66
Purging the Jobs List . . . . . . . . . . . . . . . . . . . . . . . . . . . . . . . . . . . . . . . . . . . . . . . . 68
Prioritizing a Job. . . . . . . . . . . . . . . . . . . . . . . . . . . . . . . . . . . . . . . . . . . . . . . . . . . . 69
Canceling a Job . . . . . . . . . . . . . . . . . . . . . . . . . . . . . . . . . . . . . . . . . . . . . . . . . . . . 69
Deleting a Job . . . . . . . . . . . . . . . . . . . . . . . . . . . . . . . . . . . . . . . . . . . . . . . . . . . . . 70
Retrying a Job . . . . . . . . . . . . . . . . . . . . . . . . . . . . . . . . . . . . . . . . . . . . . . . . . . . . . 70
Exporting the Jobs List . . . . . . . . . . . . . . . . . . . . . . . . . . . . . . . . . . . . . . . . . . . . . . . 70
Using the Providers Page . . . . . . . . . . . . . . . . . . . . . . . . . . . . . . . . . . . . . . . . . . . . . . . . 71
Opening the Providers Page . . . . . . . . . . . . . . . . . . . . . . . . . . . . . . . . . . . . . . . . . . 71
Customizing the Providers Display. . . . . . . . . . . . . . . . . . . . . . . . . . . . . . . . . . . . . . 72
Viewing Details About a Provider . . . . . . . . . . . . . . . . . . . . . . . . . . . . . . . . . . . . . . . 73
Deleting Providers . . . . . . . . . . . . . . . . . . . . . . . . . . . . . . . . . . . . . . . . . . . . . . . . . . 74
Using the Services Page. . . . . . . . . . . . . . . . . . . . . . . . . . . . . . . . . . . . . . . . . . . . . . . . . 74
Opening the Services Page . . . . . . . . . . . . . . . . . . . . . . . . . . . . . . . . . . . . . . . . . . . 74
Displaying Details About a Service . . . . . . . . . . . . . . . . . . . . . . . . . . . . . . . . . . . . . 75
Deleting a Production Services Service . . . . . . . . . . . . . . . . . . . . . . . . . . . . . . . . . . 76
Using the Users Page . . . . . . . . . . . . . . . . . . . . . . . . . . . . . . . . . . . . . . . . . . . . . . . . . . . 77
Opening the Users Page . . . . . . . . . . . . . . . . . . . . . . . . . . . . . . . . . . . . . . . . . . . . . 78
Setting Up User Accounts . . . . . . . . . . . . . . . . . . . . . . . . . . . . . . . . . . . . . . . . . . . . 79
Reassigning Passwords . . . . . . . . . . . . . . . . . . . . . . . . . . . . . . . . . . . . . . . . . . . . . . 79
Deleting User Accounts . . . . . . . . . . . . . . . . . . . . . . . . . . . . . . . . . . . . . . . . . . . . . . 80
7
Chapter 4 Installing Services and Registering Providers . . . . . . . . . . . . . . . . . . . . . . . 81
Managing Services . . . . . . . . . . . . . . . . . . . . . . . . . . . . . . . . . . . . . . . . . . . . . . . . . . . . . 81
Registering Services . . . . . . . . . . . . . . . . . . . . . . . . . . . . . . . . . . . . . . . . . . . . . . . . . . . . 82
Registering a Service Manually. . . . . . . . . . . . . . . . . . . . . . . . . . . . . . . . . . . . . . . . . . . . 83
Configuring a Provider for the Production Services Engine . . . . . . . . . . . . . . . . . . . . . . 87
Verifying That a Service Provider Is Connected . . . . . . . . . . . . . . . . . . . . . . . . . . . . . . . 89
Rules for Upgrading a Service and Preserving Profiles . . . . . . . . . . . . . . . . . . . . . . . . . 90
Chapter 5 Working with Production Services Profiles . . . . . . . . . . . . . . . . . . . . . . . . . 92
Understanding Production Services Profiles. . . . . . . . . . . . . . . . . . . . . . . . . . . . . . . . . . 92
Creating a Service Provider Profile . . . . . . . . . . . . . . . . . . . . . . . . . . . . . . . . . . . . . . . . . 93
Selecting Audio Formats for Copy, Move, and Deliver . . . . . . . . . . . . . . . . . . . . . . . . . . 95
Modifying Multiple Profiles . . . . . . . . . . . . . . . . . . . . . . . . . . . . . . . . . . . . . . . . . . . . . . . 96
Modifying Changed or New Options in a Profile . . . . . . . . . . . . . . . . . . . . . . . . . . . . . . . 98
Exporting and Importing Profiles . . . . . . . . . . . . . . . . . . . . . . . . . . . . . . . . . . . . . . . . . . . 98
Chapter 6 Working with the Transcode Service . . . . . . . . . . . . . . . . . . . . . . . . . . . . . 102
Understanding the Transcode Service . . . . . . . . . . . . . . . . . . . . . . . . . . . . . . . . . . . . . 102
Check List for Transcoding Assets . . . . . . . . . . . . . . . . . . . . . . . . . . . . . . . . . . . . . . . . 103
Registering the Transcode Service with the Production Services Engine . . . . . . . . . . 105
Connecting the Transcode Provider to the Production Services Engine . . . . . . . . . . . 106
Starting the Transcode Provider . . . . . . . . . . . . . . . . . . . . . . . . . . . . . . . . . . . . . . . . . . 109
Creating an Interplay Transcode Service Profile. . . . . . . . . . . . . . . . . . . . . . . . . . . . . . 110
Transcode Profile Parameters . . . . . . . . . . . . . . . . . . . . . . . . . . . . . . . . . . . . . . . . 112
Mapping Audio Tracks in MIXDOWN, DUALMIXDOWN, and CROSSRATE Modes . .
116
Mapping Multichannel Audio Tracks in MIXDOWN, DUALMIXDOWN, and CROSS-
RATE Modes. . . . . . . . . . . . . . . . . . . . . . . . . . . . . . . . . . . . . . . . . . . . . . . . . . . . 119
Support for Surround Sound Audio Tracks . . . . . . . . . . . . . . . . . . . . . . . . . . . . . . 120
Understanding the Transcode Services Modes . . . . . . . . . . . . . . . . . . . . . . . . . . . . . . 122
Understanding MIXDOWN Mode . . . . . . . . . . . . . . . . . . . . . . . . . . . . . . . . . . . . . . 123
Understanding DUALMIXDOWN Mode . . . . . . . . . . . . . . . . . . . . . . . . . . . . . . . . . 125
Understanding DUALMIXDOWN Mode with Two Workspaces . . . . . . . . . . . . . . . 126
Understanding CROSSRATE Mode. . . . . . . . . . . . . . . . . . . . . . . . . . . . . . . . . . . . 127
Understanding DATAEXTRACT Mode. . . . . . . . . . . . . . . . . . . . . . . . . . . . . . . . . . 129
8
Transcoding an Asset from Interplay | Access . . . . . . . . . . . . . . . . . . . . . . . . . . . . . . . 132
Transcoding an Asset from an Avid Editing Application . . . . . . . . . . . . . . . . . . . . . . . . 133
Transcoding OMF Clips . . . . . . . . . . . . . . . . . . . . . . . . . . . . . . . . . . . . . . . . . . . . . . . . 135
Working with an Auto Transcode Folder . . . . . . . . . . . . . . . . . . . . . . . . . . . . . . . . . . . . 137
Preparing the Workgroup for Auto Transcode . . . . . . . . . . . . . . . . . . . . . . . . . . . . 137
Identifying an Auto Transcode Folder . . . . . . . . . . . . . . . . . . . . . . . . . . . . . . . . . . 141
Transcoding Avid Assets Using an Auto Transcode Folder . . . . . . . . . . . . . . . . . . 142
Location of Automatically Transcoded Files. . . . . . . . . . . . . . . . . . . . . . . . . . . . . . 142
Stereoscopic 3D Support in Interplay Transcode . . . . . . . . . . . . . . . . . . . . . . . . . . . . . 143
Chapter 7 Working with the Archive and Restore Services . . . . . . . . . . . . . . . . . . . . 145
Understanding Archive and Restore Services . . . . . . . . . . . . . . . . . . . . . . . . . . . . . . . 145
Check List for Archiving and Restoring Assets . . . . . . . . . . . . . . . . . . . . . . . . . . . . . . . 147
Archive Configuration and Setup . . . . . . . . . . . . . . . . . . . . . . . . . . . . . . . . . . . . . . . . . 149
Registering the Archive or Restore Service with the Production Services Engine . . . . 150
Configuring an Archive Provider or Restore Provider for the Production Services Engine. .
151
Configuring the Archive Service . . . . . . . . . . . . . . . . . . . . . . . . . . . . . . . . . . . . . . . . . . 153
Specifying the Archive Server, Segment Size, and Restore Process . . . . . . . . . . 153
Archiving Duplicate Versions of Media. . . . . . . . . . . . . . . . . . . . . . . . . . . . . . . . . . 154
Adding AAF Metadata to an Archive . . . . . . . . . . . . . . . . . . . . . . . . . . . . . . . . . . . 156
Defining the Maximum Number of Simultaneous Jobs for Archive and Restore . . 156
Overriding Metadata When You Archive an Asset. . . . . . . . . . . . . . . . . . . . . . . . . 157
Connecting to the Archive Database and Creating Folders in Interplay Access. . . . . . 157
Working with Interplay Archive and Interplay Restore Profiles . . . . . . . . . . . . . . . . . . . 160
Creating an Interplay Archive or Interplay Restore Profile . . . . . . . . . . . . . . . . . . . 161
Interplay Archive Profile and Interplay Restore Profile Options . . . . . . . . . . . . . . . 162
Locating the Partition Value for an Archive Profile . . . . . . . . . . . . . . . . . . . . . . . . . 164
Archiving Assets from an Avid Editing Application . . . . . . . . . . . . . . . . . . . . . . . . . . . . 166
Consolidating Clips and Sequences Before an Archive Operation . . . . . . . . . . . . 168
Deleting Online Media After an Archive Operation. . . . . . . . . . . . . . . . . . . . . . . . . 170
Archiving Assets Using Interplay Access . . . . . . . . . . . . . . . . . . . . . . . . . . . . . . . . . . . 170
9
Working with an Auto Archive Folder . . . . . . . . . . . . . . . . . . . . . . . . . . . . . . . . . . . . . . 174
Preparing the Workgroup for Auto Archive. . . . . . . . . . . . . . . . . . . . . . . . . . . . . . . 175
Configuring Auto Archive Using Avid Service Configuration . . . . . . . . . . . . . . . . . 175
Verifying That the Auto Archive Service is Running . . . . . . . . . . . . . . . . . . . . . . . 178
Setting Up an Auto Archive Folder. . . . . . . . . . . . . . . . . . . . . . . . . . . . . . . . . . . . . 180
Archiving Assets Using an Auto Archive Folder . . . . . . . . . . . . . . . . . . . . . . . . . . . 181
Location of Automatically Archived Files . . . . . . . . . . . . . . . . . . . . . . . . . . . . . . . . 182
Searching the Archive Database. . . . . . . . . . . . . . . . . . . . . . . . . . . . . . . . . . . . . . . . . . 183
Restoring Assets from the Archive Database . . . . . . . . . . . . . . . . . . . . . . . . . . . . . . . . 185
Working with Partial Restore. . . . . . . . . . . . . . . . . . . . . . . . . . . . . . . . . . . . . . . . . . . . . 188
Performing a Partial Restore . . . . . . . . . . . . . . . . . . . . . . . . . . . . . . . . . . . . . . . . . 189
Relinking Partially Restored Assets . . . . . . . . . . . . . . . . . . . . . . . . . . . . . . . . . . . . 190
Viewing Partially Restored Reference Tracks in Interplay Access. . . . . . . . . . . . . 191
How the System Defines the Size of a Partially Restored File. . . . . . . . . . . . . . . . 192
Configuring a Workgroup to Use Multiple Archive Engines . . . . . . . . . . . . . . . . . . . . . 193
Check List for Configuring and Using Multiple Archive Engines . . . . . . . . . . . . . . 193
Required Software for Multiple Archive Engines . . . . . . . . . . . . . . . . . . . . . . . . . . 194
Terminology for Multiple Archive Engines . . . . . . . . . . . . . . . . . . . . . . . . . . . . . . . 194
Creating Profiles for Multiple Archive Engines . . . . . . . . . . . . . . . . . . . . . . . . . . . . 195
Configuring Asset Tracking for Multiple Archive Engines. . . . . . . . . . . . . . . . . . . . 198
Chapter 8 Working with the Copy Service . . . . . . . . . . . . . . . . . . . . . . . . . . . . . . . . . . 204
Understanding the Copy Service . . . . . . . . . . . . . . . . . . . . . . . . . . . . . . . . . . . . . . . . . 204
Workflow for Copying Metadata and Media Files . . . . . . . . . . . . . . . . . . . . . . . . . . . . . 205
Check List for Copying Assets to Another Workgroup . . . . . . . . . . . . . . . . . . . . . . . . . 209
Registering the Copy Service with the Production Services Engine . . . . . . . . . . . . . . . 211
Configuring a Copy Provider for the Production Services Engine. . . . . . . . . . . . . . . . . 211
Using an Interplay Copy Service Profile . . . . . . . . . . . . . . . . . . . . . . . . . . . . . . . . . . . . 213
Creating an Interplay Copy Service Profile . . . . . . . . . . . . . . . . . . . . . . . . . . . . . . 214
Interplay Copy Service Profile Definitions . . . . . . . . . . . . . . . . . . . . . . . . . . . . . . . 215
Copying Assets and Media to Another Workgroup Using Interplay Access . . . . . . . . . 218
Copying Assets and Media to Another Workgroup Using an Avid Editing Application . 221
10
Copying Assets During Ingest. . . . . . . . . . . . . . . . . . . . . . . . . . . . . . . . . . . . . . . . . . . . 222
Setting Registry Keys for Copying During Ingest . . . . . . . . . . . . . . . . . . . . . . . . . . 226
Defining the Maximum Number of Simultaneous Jobs for Copy. . . . . . . . . . . . . . . . . . 227
Chapter 9 Automatically Copying Assets to Another Workgroup . . . . . . . . . . . . . . . 228
Understanding the Auto-Copy Service . . . . . . . . . . . . . . . . . . . . . . . . . . . . . . . . . . . . . 228
Check List for the Auto-Copy Process . . . . . . . . . . . . . . . . . . . . . . . . . . . . . . . . . . . . . 230
Installing the Interplay Auto-Copy Service . . . . . . . . . . . . . . . . . . . . . . . . . . . . . . . . . . 231
Configuring the Auto-Copy Service . . . . . . . . . . . . . . . . . . . . . . . . . . . . . . . . . . . . 231
Verifying the Auto-Copy Service is Running . . . . . . . . . . . . . . . . . . . . . . . . . . . . . 234
Understanding the Auto-Copy Folder Process . . . . . . . . . . . . . . . . . . . . . . . . . . . . . . . 235
Rules of Auto-Copy Service . . . . . . . . . . . . . . . . . . . . . . . . . . . . . . . . . . . . . . . . . . 235
Identifying an Auto-Copy Folder. . . . . . . . . . . . . . . . . . . . . . . . . . . . . . . . . . . . . . . 236
Auto-Copying of Subfolders . . . . . . . . . . . . . . . . . . . . . . . . . . . . . . . . . . . . . . . . . . 237
Automatically Copying Assets To Another Workgroup Using an Auto-Copy Folder . . . 239
Automatically Backing Up the Complete Database and Media. . . . . . . . . . . . . . . . . . . 240
Changing the Number of Auto-Copy Replication Jobs Submitted . . . . . . . . . . . . . 241
Resetting the Auto-Copy Replication Scan . . . . . . . . . . . . . . . . . . . . . . . . . . . . . . 242
Chapter 10 Working with the Move Service . . . . . . . . . . . . . . . . . . . . . . . . . . . . . . . . . . 244
Understanding the Move Service . . . . . . . . . . . . . . . . . . . . . . . . . . . . . . . . . . . . . . . . . 244
Workflow for Moving Media to Another Workspace . . . . . . . . . . . . . . . . . . . . . . . . . . . 246
Check List for Moving Assets to Another Workspace . . . . . . . . . . . . . . . . . . . . . . . . . . 248
Registering the Move Service with the Production Services Engine. . . . . . . . . . . . . . . 250
Configuring a Move Provider for the Production Services Engine . . . . . . . . . . . . . . . . 250
Creating a Interplay Move Service Profile. . . . . . . . . . . . . . . . . . . . . . . . . . . . . . . . . . . 252
Moving Media to Another Workspace Using Interplay Access . . . . . . . . . . . . . . . . . . . 255
Defining the Maximum Number of Simultaneous Jobs for Move . . . . . . . . . . . . . . . . . 260
Chapter 11 Working with the Delivery Service. . . . . . . . . . . . . . . . . . . . . . . . . . . . . . . . 261
Understanding the Delivery Service and Delivery Receiver Service. . . . . . . . . . . . . . . 261
Check List for the Delivery Service . . . . . . . . . . . . . . . . . . . . . . . . . . . . . . . . . . . . . . . . 263
Registering the Delivery Receiver in an Interplay Production Workgroup . . . . . . . . . . 264
Registering the Delivery Service with the Production Services Engine . . . . . . . . . . . . 266
Configuring a Delivery Provider for the Production Services Engine . . . . . . . . . . . . . . 266
11
Creating an Interplay | Delivery Profile . . . . . . . . . . . . . . . . . . . . . . . . . . . . . . . . . . . . . 268
Creating Profiles for Specific Delivery Providers and Specific Delivery Receivers 272
Specifying User Credentials in a Delivery Profile . . . . . . . . . . . . . . . . . . . . . . . . . . 274
Transferring Assets Through Interplay Access . . . . . . . . . . . . . . . . . . . . . . . . . . . . . . . 275
Transferring Assets through an Avid Editing System . . . . . . . . . . . . . . . . . . . . . . . . . . 276
Viewing the Transfer Status . . . . . . . . . . . . . . . . . . . . . . . . . . . . . . . . . . . . . . . . . . . . . 276
Relinking Partially Delivered Assets . . . . . . . . . . . . . . . . . . . . . . . . . . . . . . . . . . . . . . . 279
Verifying the Delivery Receiver Service is Running Using Avid Service Framework . . 279
Monitoring the Health of the Interplay Delivery Receiver Service . . . . . . . . . . . . . . . . . 281
Overriding Delivery of Already Existing Media Files . . . . . . . . . . . . . . . . . . . . . . . . . . . 282
Allowing Third-Party Providers to Directly Connect to the Interplay Delivery Service. . 283
Defining the Maximum Number of Simultaneous Jobs for Delivery . . . . . . . . . . . . . . . 283
Chapter 12 Working with the STP Encode Service . . . . . . . . . . . . . . . . . . . . . . . . . . . . 284
Understanding Long GOP OP1a and STP Encode . . . . . . . . . . . . . . . . . . . . . . . . . . . 284
Workflow for Background Processing of Long GOP Splicing and Transferring of Long GOP
OP1a Media. . . . . . . . . . . . . . . . . . . . . . . . . . . . . . . . . . . . . . . . . . . . . . . . . . . . . . . . 286
Check List for Transferring Long GOP OP1a Media in the Background. . . . . . . . . . . . 289
Registering the STP Encode Service with the Production Services Engine . . . . . . . . . 290
Connecting the STP Encode Provider to the Production Services Engine . . . . . . . . . . 291
Starting the STP Encode Provider . . . . . . . . . . . . . . . . . . . . . . . . . . . . . . . . . . . . . . . . 294
Connecting to the Production Services Engine From Interplay Assist or an Avid Editing Ap-
plication . . . . . . . . . . . . . . . . . . . . . . . . . . . . . . . . . . . . . . . . . . . . . . . . . . . . . . . . . . . 295
Connecting to the Production Services Engine from Interplay Assist . . . . . . . . . . 295
Connecting to the Production Services Engine from an Avid Editing Application . 296
Performing Send-to-Playback as a Background Process from Interplay Assist . . . . . . 297
Performing Send-to-Playback as a Background Process from an Avid Editing Application .
299
Chapter 13 Installing and Configuring Production Services for MediaCentral Delivery . .
301
Understanding Production Services for MediaCentral Delivery . . . . . . . . . . . . . . . . . . 301
Check List for Installing and Configuring Automation and Consolidate Services . . . . . 302
Prerequisites for Installing and Configuring Automation and Consolidate Services . . . 303
Installing the Automation and Consolidate Services . . . . . . . . . . . . . . . . . . . . . . . . . . . 304
Registering the Automation and Consolidate Services . . . . . . . . . . . . . . . . . . . . . . . . . 305
12
Registering a Provider with the Production Services Engine . . . . . . . . . . . . . . . . . . . . 307
Registering a Production Services Automation Provider . . . . . . . . . . . . . . . . . . . . 308
Registering and Connecting a Consolidate Provider . . . . . . . . . . . . . . . . . . . . . . . 310
Creating a Consolidate Profile . . . . . . . . . . . . . . . . . . . . . . . . . . . . . . . . . . . . . . . . . . . 313
Chapter 14 Troubleshooting Interplay | Production Services . . . . . . . . . . . . . . . . . . . 317
General Troubleshooting for Production Services . . . . . . . . . . . . . . . . . . . . . . . . . . . . 317
Checking Production Services Log Files. . . . . . . . . . . . . . . . . . . . . . . . . . . . . . . . . . . . 319
Troubleshooting Using Avid Diagnostics. . . . . . . . . . . . . . . . . . . . . . . . . . . . . . . . . . . . 321
Archive and Restore Troubleshooting. . . . . . . . . . . . . . . . . . . . . . . . . . . . . . . . . . . . . . 323
Finding Solutions to Specific Archive and Restore Problems . . . . . . . . . . . . . . . . 323
Compatibility of Archive and Restore Services and Third-Party Software . . . . . . . 324
Getting Information About an Archive or Restore Job from the Jobs Page . . . . . . 325
Getting Information About an Archive or Restore Job from a Log File. . . . . . . . . . 325
How the Production Services Status Tool Reports Archive and Restore Operations . .
325
Archive and Restore Error Messages . . . . . . . . . . . . . . . . . . . . . . . . . . . . . . . . . . 326
Manually Updating the Status of Media Files. . . . . . . . . . . . . . . . . . . . . . . . . . . . . 329
Using a HOSTS File for Production Services . . . . . . . . . . . . . . . . . . . . . . . . . . . . . . . . 331
Understanding the HOSTS File (Windows) . . . . . . . . . . . . . . . . . . . . . . . . . . . . . . 331
Updating the HOSTS File (Windows). . . . . . . . . . . . . . . . . . . . . . . . . . . . . . . . . . . 332
Appendix A Media Supported by Partial Restore and Partial Delivery, Version 3.4 . . 334
Appendix B AVC-Intra Resolutions Supported by Interplay | Production Services . . 336
Appendix C Target Resolutions for Interplay | Transcode, Version 3.4 . . . . . . . . . . . . 338
Appendix D Maximum Number of Simultaneous Jobs. . . . . . . . . . . . . . . . . . . . . . . . . . 343
Index . . . . . . . . . . . . . . . . . . . . . . . . . . . . . . . . . . . . . . . . . . . . . . . . . . . . . . . . 344
Using This Guide
Congratulations on your purchase of the Interplay®| Production Services system, consisting of
the Production Services Engine, the Production Services, and the Production Services and
Transfer Status tool.
nIn Interplay Production v3.1, the product name Interplay Media Services was changed to
Interplay |Production Services. The product name in the user interface and documentation was
changed in Interplay Production v3.3.
. The Production Services Engine lets you take advantage of a network environment and pass
compute-intensive tasks to other workstations on your network. This allows video editors to stay
focused on their editing tasks.
For example, today’s production houses face a rising demand for translating media into formats
suitable for distribution through many channels — often at the same time. By moving or
distributing this operation to lower cost, dedicated workstations, editing workstations are free to
perform other tasks, allowing you to generate two streams of revenue-producing work in parallel.
The Production Services Engine and its Production Services and Transfer Status tool are the keys
to managing these resource-intensive processes. This software infrastructure manages all of the
Production Services. As Avid develops new Production Services, the Production Services Engine
manages those services as well.
This guide is intended for all Production Services users, from beginning to advanced.
nThe documentation describes the features and hardware of all models. Therefore, your system
might not contain certain features and hardware that are covered in the documentation.

Symbols and Conventions
14
Symbols and Conventions
Avid documentation uses the following symbols and conventions:
Symbol or Convention Meaning or Action
nA note provides important related information, reminders,
recommendations, and strong suggestions.
cA caution means that a specific action you take could cause harm to
your computer or cause you to lose data.
wA warning describes an action that could cause you physical harm.
Follow the guidelines in this document or on the unit itself when
handling electrical equipment.
> This symbol indicates menu commands (and subcommands) in the
order you select them. For example, File > Import means to open the
File menu and then select the Import command.
This symbol indicates a single-step procedure. Multiple arrows in a list
indicate that you perform one of the actions listed.
(Windows), (Windows
only), (Macintosh), or
(Macintosh only)
This text indicates that the information applies only to the specified
operating system, either Windows or Macintosh OS X.
Bold font Bold font is primarily used in task instructions to identify user interface
items and keyboard sequences.
Italic font Italic font is used to emphasize certain words and to indicate variables.
Courier Bold font
Courier Bold font identifies text that you type.
Ctrl+key or mouse action Press and hold the first key while you press the last key or perform the
mouse action. For example, Command+Option+C or Ctrl+drag.
| (pipe character) The pipe character is used in some Avid product names, such as
Interplay | Production. In this document, the pipe is used in product
names when they are in headings or at their first use in text.
If You Need Help
15
If You Need Help
If you are having trouble using your Avid product:
1. Retry the action, carefully following the instructions given for that task in this guide. It is
especially important to check each step of your workflow.
2. Check the latest information that might have become available after the documentation was
published. You should always check online for the most up-to-date release notes or ReadMe
because the online version is updated whenever new information becomes available. To view
these online versions, select ReadMe from the Help menu, or visit the Knowledge Base at
www.avid.com/support.
3. Check the documentation that came with your Avid application or your hardware for
maintenance or hardware-related issues.
4. Visit the online Knowledge Base at www.avid.com/support. Online services are available 24
hours per day, 7 days per week. Search this online Knowledge Base to find answers, to view
error messages, to access troubleshooting tips, to download updates, and to read or join
online message-board discussions.
Viewing Help and Documentation on the
Interplay Production Portal
You can quickly access the Interplay Production Help, links to the PDF versions of the
Interplay Production guides, and other useful links by viewing the Interplay Production User
Information Center on the Interplay Production Portal. The Interplay Production Portal is a Web
site that runs on the Interplay Production Engine.
You can access the Interplay Production User Information Center through a browser from any
system in the Interplay Production environment. You can also access it through the Help menu in
Interplay | Access and the Interplay | Administrator.
The Interplay Production Help combines information from all Interplay Production guides in one
Help system. It includes a combined index and a full-featured search. From the Interplay
Production Portal, you can run the Help in a browser or download a compiled (.chm) version for
use on other systems, such as a laptop.
To open the Interplay Production User Information Center through a browser:
1. Type the following line in a Web browser:
http://Interplay_Production_Engine_name
Avid Training Services
16
For Interplay_Production_Engine_name substitute the name of the computer running the
Interplay Production Engine software. For example, the following line opens the portal Web
page on a system named docwg:
http://docwg
2. Click the “Interplay Production User Information Center” link to access the Interplay
Production User Information Center Web page.
To open the Interplay Production User Information Center from Interplay Access or the
Interplay Administrator:
tSelect Help > Documentation Website on Server.
Avid Training Services
Avid makes lifelong learning, career advancement, and personal development easy and
convenient. Avid understands that the knowledge you need to differentiate yourself is always
changing, and Avid continually updates course content and offers new training delivery methods
that accommodate your pressured and competitive work environment.
For information on courses/schedules, training centers, certifications, courseware, and books,
please visit www.avid.com/support and follow the Training links, or call Avid Sales at
800-949-AVID (800-949-2843).

1Working with the Interplay | Production
Services System
The following topics provide an overview of the Interplay Production Services system:
•Understanding the Production Services System
•Production Services Engine Components
•Understanding the Various Production Services
•Production Services Used By MediaCentral | UX
•Check Lists for Setting Up and Using Service Providers
•Support for Restrictions
•Support for Group Clips
•Mounting Workspaces for Interplay Transcode and Other Production Services
•Changing the Hostname for the Interplay Auto Production Service
Understanding the Production Services System
The Production Services system is a software infrastructure on which various services are
layered. Production Services uses the concept of service providers. A service provider (or
provider) is a software service that can perform a particular job, such as transcoding media or
archiving assets. The Production Services Engine serves as a broker for services in an Interplay
workgroup.
nAvid editing applications allow you to work with clips of any frame rate or field motion type
(interlaced or progressive) in a project. Clips that do not match the frame rate or field motion
type of the project are known as mixed-rate clips. Interplay supports working with mixed-rate
clips and sequences with mixed-rate clips.
Production Services Engine Components
18
Production Services Engine Components
The software used to manage service providers is composed of two major components: the
Production Services Engine and the Production Services and Transfer Status tool.
The following topics describe these components:
•Understanding the Production Services Engine
•Understanding the Interplay Production Services and Transfer Status Tool
Understanding the Production Services Engine
The Production Services Engine acts as a broker to match jobs and their corresponding settings
with suitable providers. The Production Services Engine is a repository of job and provider
information. Individual providers select jobs that they are able to process according to the service
they provide.
For example, a Media Composer system (a client) needs a clip transcoded. It sends a request to
the Production Services Engine (the server) with information about the job. The Production
Services Engine places the information in a queue. When a Transcode provider is available to do
the transcoding, it selects the job, gets the information from the Production Services Engine, and
transcodes the media. The Production Services Engine provides status on the job through the
Production Services and Transfer Status tool.
The Production Services Engine should not reside on the same computer as an Avid editing
application. A provider can be installed on the same computer as the Production Services
Engine, depending on the individual provider and the workload and memory usage of the
particular computer.For specific information on configuration requirements, see the
Interplay | Production Software Installation and Configuration Guide.
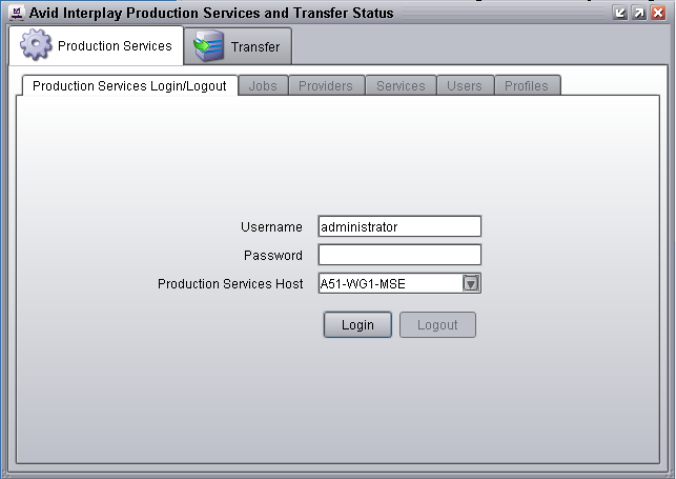
The Avid Interplay Production Services window opens when you start the Production Services
Engine. The window displays current information about the status of the Production Services
Engine, including the host name for the system on which the Production Services Engine resides.
The Production Services Engine uses the host name to identify itself on the network.

Production Services Engine Components
19
The following illustration of the Avid Interplay Production Services window shows the host
name A51-WG1-MSE, which is the host name of the computer on which the Production
Services Engine is installed.
The Avid Interplay Production Services window provides access to the Production Services and
Transfer Status tool through the Admin Tool button. See “Understanding the Interplay
Production Services and Transfer Status Tool” on page 19.
The Avid Interplay Production Services window also provides access to Production Services
settings through the Settings button. See “Configuring the Production Services Engine” on
page 31.
For information on starting the Production Services Engine, see “Starting the Production
Services Engine” on page 35.
Understanding the Interplay Production Services and Transfer
Status Tool
The Interplay Production Services and Transfer Status tool communicates with the Production
Services Engine to let you manage Production Services. The Production Services and Transfer
Status tool is installed with the Production Services Engine software.
The Production Services and Transfer Status tool also includes a tab for monitoring transfers that
use Interplay Transfer. For more information, see the Interplay | Transfer Setup and User’s
Guide.
The following illustration shows the Production Services and Transfer Status tool opened to the
login/logout tab.
Production Services Engine Components
20
The Production Services and Transfer Status tool is installed with the Production Services
Engine. You can install it on another computer from the Individual Optional Installers page of
the Interplay Server Installer or the Interplay Client Installer, so that you can manage Production
Services from that computer. The tool is also installed with Interplay Access, but you need to
open the Production Services Status tab and the Transfer Status tab as separate windows.
The Production Services and Transfer Status tool performs three types of functions:
• Provides detailed information about Production Services, based on lists of jobs, encoders,
profiles, and users.
• Provides controls for managing services and registering providers.
• Provides controls for managing Production Services such as canceling jobs, deleting
provider software, creating or deleting profiles, and creating or deleting users.
The functions you can perform depends on your user rights (see “Using the Users Page” on
page 77). Administrators can perform the following tasks:
• Register and delete providers
• View details on any job
• Delete jobs submitted by any user
• Purge the jobs list

Understanding the Various Production Services
21
Regular users can perform administrative tasks only on their own jobs.
For more information, see “Using the Production Services and Transfer Status Tool” on page 56.
Understanding the Various Production Services
Production Services can be distributed to dedicated workstations in a networked environment,
thereby freeing computer resources to perform other tasks.
When you install a Production Service on a computer, the installation program installs provider
software for that service. You can install the same service on more than one computer in an
Interplay workgroup, and as a result have multiple providers for the same service.
After you install a service, you use the Production Services and Transfer Status tool to register
the provider of the service. In a workgroup with multiple providers, you need to register each
provider.
The following table lists the services managed by the Production Services Engine.
Production Service Providers
Service Description
Interplay Transcode service Lets you transcode Avid assets from one Avid-supported
resolution to another. For example, you can use the Interplay
Transcode service to create a low-resolution version of a
sequence or master clip. For more information, see “Working
with the Transcode Service” on page 102.
Interplay Archive service
Avid Interplay Restore service
Provides access to archive and restore features. The Interplay
Archive and Restore services manage the process of moving data,
instead of using the Interplay Transfer Engine. For more
information, see “Working with the Archive and Restore
Services” on page 145.
Interplay Copy service Lets you copy assets (metadata) and their media files from one
workgroup to another. For more information, see “Working with
the Copy Service” on page 204.
Interplay Move service Lets you move media files from one Avid ISIS workspace to
another. For more information, see “Working with the Move
Service” on page 244.

Understanding the Various Production Services
22
Interplay Delivery service Lets you transfer a clip and its media files or only the portion that
is used in a subclip or a sequence. For more information, see
“Working with the Delivery Service” on page 261 and
“Production Services Used By MediaCentral | UX” on page 23.
Interplay Auto Production Services
• Auto Archive
• Auto Transcode
• Auto Transfer
• Auto Copy
Lets you configure folders and subfolders to perform tasks
automatically. You can use the Avid Service Configuration
settings to configure the various Auto Production Services.
nAn auto archive and auto transcode operation includes
subfolders. An auto transfer operation does not include
subfolders. An auto copy operation maintains the same
folder structure as the source workgroup.
For installation instructions, see the Interplay | Production
Software Installation and Configuration Guide.
For more information, see the following:
•“Working with an Auto Archive Folder” on page 174
•“Working with an Auto Transcode Folder” on page 137
• “Automatically Transferring Assets to Another Workgroup”
in the Interplay | Transfer Setup and User’s Guide.
•“Automatically Copying Assets to Another Workgroup” on
page 228
Interplay STP Encode service Lets you offload time-consuming processing involved in
exporting and transferring of Long GOP OP1a media, during a
send-to-playback request from the Avid editing application,
Interplay Assist, or MediaCentral UX. For more information, see
“Working with the STP Encode Service” on page 284 and
“Production Services Used By MediaCentral | UX” on page 23.
Interplay Production Services
Automation
(MediaCentral only) Handles the logic of chaining a Consolidate
job and a Delivery job. It triggers a Consolidate job and monitors
its status. If the Consolidate job is successful, it triggers a
Delivery job. For more information, see “Production Services
Used By MediaCentral | UX” on page 23 and “Installing and
Configuring Production Services for MediaCentral Delivery” on
page 301.
Production Service Providers (Continued)
Service Description

Production Services Used By MediaCentral | UX
23
nThe MediaCentral Distribution Service, which is used for MediaCentral send-to-playback
operations, is not managed by the Production Services Engine.
Production Services Used By MediaCentral | UX
Avid MediaCentral UX delivers workflow tools for media professionals through both Web and
mobile applications. It uses Interplay Production Services in the following workflows:
• Send to Playback (STP): STP from MediaCentral UX requires a Production Services Engine
and the following services:
- Interplay Transcode
- Interplay STP Encode
• Delivery: Delivery from MediaCentral UX requires a Production Services Engine and the
following services:
- Interplay Delivery
- Production Services Automation (for delivering Mark In to Mark Out)
- Interplay Consolidate (for delivering Mark In to Mark Out)
For more information, see the MediaCentral UX documentation and this guide.
nThe MediaCentral Distribution Service, which is used for MediaCentral send-to-playback
operations, is not managed by the Production Services Engine.
Check Lists for Setting Up and Using Service
Providers
The following table provides a list of the various Production Services providers with a reference
to the specific check list for each service. These check lists provide a list of the steps to set up
and use the various services.
Interplay Consolidate (MediaCentral only) Uses the In and Out marks specified for a
loaded clip or subclip to create a new media and asset.For more
information, see “Production Services Used By
MediaCentral | UX” on page 23 and “Installing and Configuring
Production Services for MediaCentral Delivery” on page 301.
Production Service Providers (Continued)
Service Description

Licenses and Production Services
24
For a check list for setting up the Production Services Engine, see “Check List for Setting Up the
Production Services Engine” on page 28.
Licenses and Production Services
A license is required for the Production Services Engine and most Production Services
providers. The license is activated in one of two ways:
• Through a hardware application key (dongle)
• Through software licensing (beginning with Interplay Production v3.3.
For more information, see the Interplay | Production Software Installation and Configuration
Guide.
Support for Restrictions
A restriction is a type of locator that Interplay Assist and Interplay Central users can add to a clip
to indicate that use of the clip is restricted in some way, such as a requirement to pay for its use.
Previous versions of Interplay preserved restrictions when you used an Avid editing application
to check out and check in a clip before sending it to a Production Service. For Interplay v3.0 and
later, checkout and checkin is no longer required, and you can send clips to Production Services
from Interplay Access, Interplay Assist, or an Avid editing application.
Production Service Provider Documentation
Interplay Transcode service “Check List for Transcoding Assets” on page 103
Interplay Archive service
Interplay Restore service
“Check List for Archiving and Restoring Assets” on page 147
Interplay Copy service “Check List for Copying Assets to Another Workgroup” on
page 209
Interplay Move service “Check List for Moving Assets to Another Workspace” on page 248
Interplay Delivery service “Check List for the Delivery Service” on page 263
Interplay STP Encode service “Check List for Transferring Long GOP OP1a Media in the
Background” on page 289
Interplay Consolidate “Check List for Installing and Configuring Automation and
Consolidate Services” on page 302
Interplay Production Services
Automation
“Check List for Installing and Configuring Automation and
Consolidate Services” on page 302
Support for Group Clips
25
Interplay v3.0 and later supports preservation of restrictions for clips processed through all
Production Services, including:
• Interplay Access
• Interplay Archive
• Interplay Restore
• Interplay Transcode
• Interplay Copy
• Interplay Move
• Interplay Delivery
• Interplay Transfer
Workgroup-to-workgroup transfers processed through Interplay Access v3.0 require
Interplay Access v3.0 on the receiving Transfer Engine.
Note the following limitations:
• A restriction includes a color value (used for its markers) and the username of the creator.
These values are supported in the local workgroup. However, after a clip is transferred to
another workgroup or restored from archive, the values default to color = white and
username = the login name of the user requesting the job.
• A sequence that includes a master clip with restrictions uses a copy of the master clip. If a
user later changes the restriction on the master clip, the copy used in the sequence is not
updated.
Support for Group Clips
Group clips are created in Media Composer and other Avid editing applications by using
MultiCam features to sync a group of clips based on common source timecode, auxiliary
timecode, or marks placed in the footage. A user working in an Avid editing application can
check group clips in to and out from an Interplay Production database. Interplay Access users
can view information about group clips, including master clip relatives.
Starting with Interplay v3.0, group clips and sequences that contain group clips are supported by
Interplay Transfer and by the following Production Services:
• Interplay Archive v3.0
• Interplay Restore v3.0, including Partial Restore
• Interplay Copy v3.0
• Interplay Move v3.0
Mounting Workspaces for Interplay Transcode and Other Production Services
26
• Interplay Delivery v3.0, including Partial Delivery
• STP Encode v3.0
• Interplay Transcode v3.0, with the following limitations:
- You cannot use CROSSRATE mode to transcode group clips.
- You can use MIXDOWN mode to transcode a sequence with group clips, but only the
camera angle selected in the Avid editing application timeline is included in the
mixed-down master clip.
nSubclips created from group clips, group clips composed of subclips, and multigroup clips are
not currently supported by Interplay Transfer or Production Services.
Mounting Workspaces for Interplay Transcode and
Other Production Services
To use Interplay Transcode and other Production Services, you must mount at least one
workspace for each shared-storage system that you use for reading and writing on the provider
system. You can mount the workspace as a UNC drive or a lettered drive.In most cases, you do
not need to mount each workspace that you use, but there is no harm in doing so. For Interplay
Transcode, if you use lettered drives, you must mount the target workspace.
Note the following:
• Starting with version 2.6, the Interplay Transcode service and the STP Encode service
require you to choose during installation how ISIS workspaces are mounted: by drive letter
or by UNC path. For multiple ISIS workgroups, select UNC paths if the number of
workspaces required for the client exceeds the available drive letters. Mount the workspaces
before you start the service.
You use the ISIS Client Manager Connection Manager to mount drives. For more information on
mounting workspaces, see the Avid ISIS Client Manager Help.
Changing the Hostname for the Interplay Auto Production Service
27
Changing the Hostname for the Interplay Auto
Production Service
The following procedure describes how to change the hostname of the Interplay Auto Production
Service (for example, if you entered the name incorrectly the first time). You use the Avid
Service Configuration Tool. The Interplay Auto Production Service is named Avid Automatic
Archive, Copy, Transcode, and Transfer Service in the Avid Service Configuration tool.
To change the hostname for the Automatic Archive, Copy, Transcode, and Transfer
service:
1. Open the Avid Service Configuration tool.
2. Open the display for the system running the Automatic Archive, Copy, Transcode, and
Transfer service.
3. Click the Avid Automatic Archive, Copy, Transcode, and Transfer service.
4. Change the name and click Apply.
5. Use the Computer Management tool to restart the service as follows:
a. Right-click the My Computer icon on your desktop.
b. Select Manage and select Services and Applications.
c. Restart the Avid Automatic Archive, Copy, Transcode, and Transfer service.

2Production Services Engine Installation
and Configuration
The following topics describe installation and configuration of the Production Services Engine:
•Check List for Setting Up the Production Services Engine
•Registering the Production Services Engine in an Interplay Workgroup‘
•Configuring the Production Services Engine
•Starting the Production Services Engine
•Setting Up a Workgroup for Production Services Backup
Check List for Setting Up the Production Services
Engine
The following table provides a list of steps to perform when setting up the Production Services
Engine in an Interplay workgroup.
Setting up the Production Services Engine Check List
Task Section Reference
Make sure the workstation is configured as a
server for an Interplay workgroup.
See your hardware configuration documentation.
Make sure the Production Services application
key is connected to the server.
Install the Production Services Engine
software and the supporting software.
• Avid Service Framework for Client
• Interplay Access
• Production Services Engine
See the Interplay | Production Software
Installation and Configuration Guide.

Registering the Production Services Engine in an Interplay Workgroup
29
After you set up the Production Services Engine, install and configure the Production Services
providers. See “Check Lists for Setting Up and Using Service Providers” on page 23.
Registering the Production Services Engine in an
Interplay Workgroup
Before you can use any Production Services Engine services, you must register the Production
Services Engine in an Interplay workgroup by opening the Interplay Administrator and
identifying the system that runs the Production Services Engine. After you register the
Production Services Engine, the Production Services and Transfer Status tool automatically
connects to the Production Services Engine.
nIf you are performing an upgrade, you do not have to register existing Production Services
Engines.
Activate the Production Services Engine
license by connecting the application key
(dongle) to a USB port or by installing a
software license.
See Interplay | Production Software Installation
and Configuration Guide.
Register the Production Services Engine in the
Interplay workgroup.
See “Registering the Production Services Engine
in an Interplay Workgroup” on page 29.
Configure the Production Services Engine.
• Identify the workgroup’s Interplay Engine
system
• Setup auto-purging of jobs
• (Optional) Setup e-mail notifications
See “Configuring the Production Services
Engine” on page 31.
Start the Production Services Engine software. See “Starting the Production Services Engine” on
page 35.
(Optional) Set up a workgroup for Production
Services backup
“Setting Up a Workgroup for Production Services
Backup” on page 36
Setting up the Production Services Engine Check List (Continued)
Task Section Reference
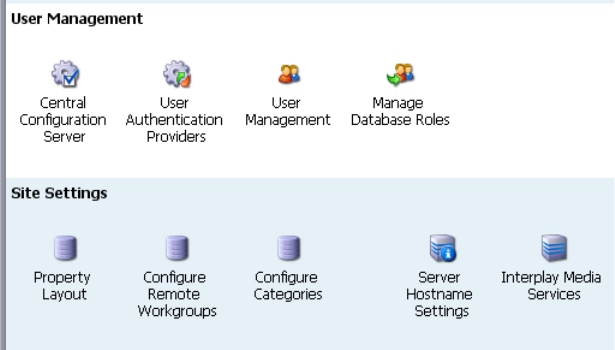
Registering the Production Services Engine in an Interplay Workgroup
30
To register the Production Services Engine in an Interplay workgroup:
1. Click Start and select Programs > Avid > Avid Interplay Access Utilities > Avid Interplay
Administrator.
The Avid Interplay Administrator opens.
2. Log in to the server for the workgroup in which you want to register the Production Services
Engine.
3. Click Server Hostname Settings in the Site Settings area.
The following illustration shows the Site Settings area of the Interplay Administrator.
The Server Hostname Settings window opens.
4. In the Interplay Production Services Settings area, type the name of the system that runs the
Production Services Engine and click Apply Changes.
nIf your Interplay environment includes the Interplay Delivery workflow, to receive transfers you
must add the hostname and the port number of the system where the Delivery Receiving service
is installed. For more information, see “Registering the Delivery Receiver in an
Interplay Production Workgroup” on page 264.
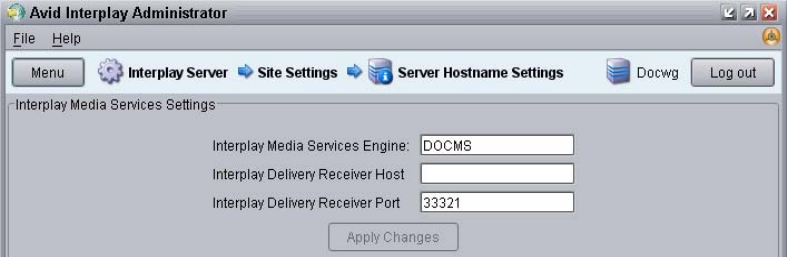
Configuring the Production Services Engine
31
5. (Option) While you have the Server Hostname Settings window open, it is a good time to
check whether you have entered the name of the workgroup in the Workgroup and
MediaIndexer Settings area of the window. The Avid Instinct and Interplay Assist
applications use this setting to locate the Media Indexer that is used to monitor shared
storage.
a. Near the center of the Server Hostname Settings window, make sure your Workgroup
name is in the Workgroup Name field. Type the workgroup name if necessary. This field
is case sensitive.
b. Click Check MediaIndexer to check whether the Media Indexer that monitors shared
storage is running.
If the Media Indexer is running, the system displays the message “Connected to Media
Indexer successfully.”
6. Click Log out and close the Interplay Administrator.
Configuring the Production Services Engine
After installing the Production Services Engine software, you can configure the Production
Services Engine for the following optional settings:
• Send e-mail notifications about the status of jobs. With this configuration, the Production
Services Engine sends a notice for successful job completion when a Media Composer user
selects “Notify me of job completion by email” in the Production Services Settings dialog
box and supplies an e-mail address. See “Archiving Assets from an Avid Editing
Application” on page 166 and “Transcoding an Asset from an Avid Editing Application” on
page 133.
nThe Users Tab of the Production Services and Transfer Status Tool includes a field for an e-mail
address. This field is for information only and is not used for Production Services e-mail
notification.
Configuring the Production Services Engine
32
• Identify the workgroup’s Interplay Engine system.
By identifying the Interplay Engine system, when you log in to the Production Services
Engine, the Production Services user information is updated with the user information in the
Interplay Administrator. As a result, you do not need to manage a separate user database for
Production Services. See “Using the Users Page” on page 77.
•Automatically purge Production Services jobs to improve the performance of the Production
Services and Transfer Status tool. There are two different types of auto-purge processes you
can set:
- An auto-purge process that runs once a day based on the start time and types of jobs that
you select. You can set a start time for the auto-purge to begin within 15 minute
intervals.
- An auto-purge process that starts at an interval that you select, checks the number of
jobs, and purges the jobs based on the job count and types of jobs that you select.
You can select either process or both processes. The auto-purge settings take effect
immediately; you do not have to restart the Production Services Engine. If you want to
cancel a scheduled auto-purge process, you must cancel the process before it starts. After an
auto-purge process begins you cannot cancel the process.
cWhen scheduling the auto-purge process, you should choose a low activity time. The
auto-purge process might impact the server’s performance and the ability to connect.
nThe History area on the Interplay Production Services Engine window provides information
about the auto-purge settings, such as any changes made to the settings.
To configure the Production Services Engine settings:
1. Click Start and select Programs > Avid > Interplay Production Services Engine.
The Avid Interplay Production Services window opens.
2. Click the Settings button.
The Interplay Production Services Engine Settings dialog box opens.

Configuring the Production Services Engine
33
3. Type the computer name of the local host in the Database Computer Name text box.
4. In the SMTP (Simple Mail Transfer Protocol) Server text box, type the name of your local
mail server (for example, mail.mycompany.com). If you don’t know the name of your local
mail server, ask your network administrator.
5. In the From Address text box, type an e-mail address for the Production Services Engine.
For example, broker@mycompany.com.
6. (Option) You can configure an SMTP Username and SMTP Password if your network
supports secure e-mail. These settings give the Production Services Engine a name and
password so that is can successfully send e-mail notification. If a network does not use
secure e-mail, the settings do not apply and are disregarded.
nThe Clean Start option is reserved for future use. Make sure it is set to No.
Configuring the Production Services Engine
34
7. In the Interplay Engine Hostname text box, type the host name of the Interplay Engine
system.
If this text box is left blank, the Production Services user information in the Interplay
Administrator is not used for authentication during login.
8. (Option) If you want to use the once-a-day auto-purge, select On from the auto-purge
Enabled list, then select the following settings:
- Purge Start Time—Select a time to start the auto-purge (15 minute intervals).
- Purge PENDING Jobs?—Yes, purges all pending jobs for all service providers.
- Purge CANCELLED Jobs?—Yes, purges all cancelled jobs for all service providers.
- Purge COMPLETED Jobs?—Yes, purges all completed jobs including jobs with the
Warning status (question mark icon) for all service providers.
- Purge ERROR Jobs?—Yes, purges all error jobs for all service providers.
nFor the chosen job type, all jobs for all service providers, and for all users are purged. Therefore,
you cannot purge jobs for a specific service provider, such as Interplay Transcode.
9. (Option) If you want to schedule an interval auto-purge, select On from the Interval Auto
Purge list, then select the following settings.
- Purge PENDING Jobs?—Does not apply to interval auto-purge.
- Purge CANCELLED Jobs?—Yes, purges all cancelled jobs for all service providers.
- Purge COMPLETED Jobs?—Yes, purges all completed jobs including jobs with the
Warning status (question mark icon) for all service providers.
- Purge ERROR Jobs?—Yes, purges all error jobs for all service providers.
- Purge Interval Time: Enter the number of minutes between runs of the auto-purge
interval timer. The auto-purge interval timer checks if there are a sufficient number of
jobs to purge (see the next option). For example, if you enter 50, the auto-purge interval
timer starts every fifty minutes. The default value is 60. The minimum value is 15 and
the maximum value is 1,440 minutes (24 hours).
- Purge Job Count: Enter the number of jobs that cause an auto-purge process to run. If
the number of jobs in the Production Services queue is greater than or equal to this
number when the interval timer runs, Production Services will purge the jobs you have
selected for purging (cancelled jobs, completed jobs, or error jobs - pending jobs are not
included). The default value is 5000. The minimum value is 100 and the maximum
value is 15,000.
For both these options, if you enter a number below the minimum value, the Production
Services Engine will use the minimum value. If you enter a number above the maximum
value, the engine will use the maximum value. If you enter nothing or enter an invalid
value in the field, the engine will use the default value.
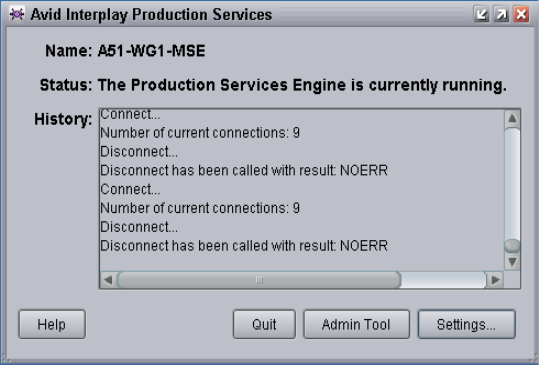
Starting the Production Services Engine
35
nFor the chosen job type, all jobs for all service providers, and for all users are purged. Therefore,
you cannot purge jobs for a specific service provider, such as Interplay Transcode.
10. Click OK.
The Interplay Production Services Engine Settings dialog box closes.
Starting the Production Services Engine
Starting with Interplay Production v3.4, the Production Services Engine automatically starts
when you start the server that hosts the engine. Use this procedure if you need to start the
Production Services Engine manually.
To start the Production Services Engine:
tClick Start and select Programs > Avid > Avid Interplay Production Services Engine.
The Avid Interplay Production Services window opens.
Setting Up a Workgroup for Production Services Backup
36
Setting Up a Workgroup for Production Services
Backup
A facility can set up a backup configuration for the Production Services Engine in case there is
system crash or the engine goes offline for some other reason. There are two approaches a
facility can use:
• Prepare one or two backup Production Services Engines and configure providers to
automatically connect to the backup engines. See “Automatically Connecting to a Backup
Production Services Engine” on page 36.
•Prepare spare engines (warm spare, cold spare, or both). See “Configuring and Connecting a
Spare Production Services Engine” on page 42.
A facility can use one or both approaches. In the second case, it is critical to regularly back up
the Production Services database. See “Backing Up the Production Services Database” on
page 43. Profiles are backed up as part of the database, but you can also export and import
Production Services profiles. See “Exporting and Importing Profiles” on page 98.
Automatically Connecting to a Backup Production Services Engine
Starting with Interplay Production 3.4, a Production Services provider can automatically connect
to a backup Production Services Engine in case the connection between the provider and the
primary engine is lost.
nThe Production Services Engine is sometimes referred to as the Media Services Broker or the
DMS Broker.
The following topics describe automatically connecting to a backup Production Services Engine:
•“How Auto-Connection to a Production Services Engine Works” on page 37
•“Preparing a Workgroup for Auto-Connection to a Backup Production Services Engine” on
page 38
•“Configuring Providers for Auto-Connection to a Backup Production Services Engine” on
page 39
•“Manual Requirements to Connect to a Backup Production Services Engine” on page 40

Setting Up a Workgroup for Production Services Backup
37
How Auto-Connection to a Production Services Engine Works
Interplay Production providers can automatically connect (auto-connect) to the Production
Services Engine when the provider starts.
• Production Services that run as Windows applications (Interplay Transcode, STP Encode,
and Interplay Consolidate) have an option to automatically connect in the Settings dialog
box.
• Other Production Services, which run as Windows services, always automatically connect.
If a provider fails to connect to a Production Services Engine (during operations such as status
reporting or job listing), the auto-connect is repeated every 30 seconds so long as the provider
remains unconnected to the engine.
Starting with Interplay Production 3.4, a provider’s initialization file can contain hostnames for
one backup engine (referred to as the secondary engine) or two backup engines (the secondary
engine and the tertiary engine). As a result, if the provider cannot connect to the primary engine,
the provider tries to connect to the secondary engine and then to the tertiary engine. If the
provider cannot connect to any of the engines, the provider waits for 30 seconds and tries to
connect to the engines again, beginning with the primary engine.
See “Configuring Providers for Auto-Connection to a Backup Production Services Engine” on
page 39
If the primary engine goes down, all currently running state information is lost. All other job
information remains with the primary engine and can resume when the engine comes back up.
Switching from one engine to another does not carry existing jobs to the other engine or
re-submit currently running or pending jobs. All current running and pending jobs must be
re-submitted manually to the new engine.
q
Primary Production
Services Engine
Secondary Production
Services Engine
Tertiary Production
Services Engine
Production Services
Provider

Setting Up a Workgroup for Production Services Backup
38
Manual Requirements After a Failover
If a failover to a backup Production Services Engine occurs, manual tasks are required for the
following components:
• Interplay Access and Interplay Administrator
• Interplay Auto Production services (Auto Archive, Auto Transcode, Auto Transfer, and Auto
Copy)
• Media Composer clients
See “Manual Requirements to Connect to a Backup Production Services Engine” on page 40.
Preparing a Workgroup for Auto-Connection to a Backup Production Services Engine
Use the following check list to help you prepare the workgroup for auto-connection.
Preparing a Workgroup for Auto-Connection to a Backup Production Services Engine
Task Section Reference
Install and configure one backup engine
(referred to as the secondary engine) or two
backup engines (the secondary engine and the
tertiary engine).
• Make sure all engines and providers are
running Interplay Production v3.4 or later.
• Make sure the engines are configured in
the same Interplay workgroup as the
primary engine, with the same users and
profiles. You can use a database backup to
configure the backup engines.
• The hostnames must be network
addressable through DNS or IP address.
“Check List for Setting Up the Production
Services Engine” on page 28
“Backing Up the Production Services Database”
on page 43
Configure providers to connect to the backup
engines.
“Configuring Providers for Auto-Connection to a
Backup Production Services Engine” on page 39
After the initial installation and configuration,
make sure all Production Services Engines
have the same profiles. If additional profiles
are added to the primary engine, you can
export them to the backup engines.
“Exporting and Importing Profiles” on page 98

Setting Up a Workgroup for Production Services Backup
39
Configuring Providers for Auto-Connection to a Backup Production Services Engine
Before configuring providers for auto-connection, see “Setting Up a Workgroup for Production
Services Backup” on page 36.
To configure a provider to automatically connect to one or two backup engines:
1. Locate the .ini file, using the following table.
2. Open the .ini file in a text editor and add the backup engines. Use the following syntax.
Substitute the appropriate backup engine hostnames for
secondary engine name
and
tertiary engine name
.
@6%tSecondary_Media_Services_Engine_Hostname=<secondary engine name>
@7%tTertiary_Media_Services_Engine_Hostname=<tertiary engine name>
3. Save the file.
4. Restart the provider.
Service Path for .ini File and Log Files
Interplay | Archive C:\ProgramData\Avid\Archive Service\DMSArchive.ini
Interplay | Consolidate C:\ProgramData\Avid\Consolidate Service\DMSConsolidate.ini
Interplay | Copy C:\ProgramData\Avid\Copy Service\DMSCopyMedia.ini
Interplay | Delivery C:\ProgramData\Avid\Delivery Service\DMSIDService.ini
Interplay | Production Services
Automation
C:\ProgramData\Avid\Media Services Automation\DMSCMService.ini
Interplay | Move C:\ProgramData\Avid\Move Service\DMSMoveMedia.ini
Interplay | Restore C:\ProgramData\Avid\Restore Service\DMSRestore.ini
Interplay | STP Encode C:\ProgramData\Avid\Avid Interplay STP Encode\STPEncode.ini
Interplay | Transcode C:\ProgramData\Avid\Transcode Service\DMSTranscode.ini
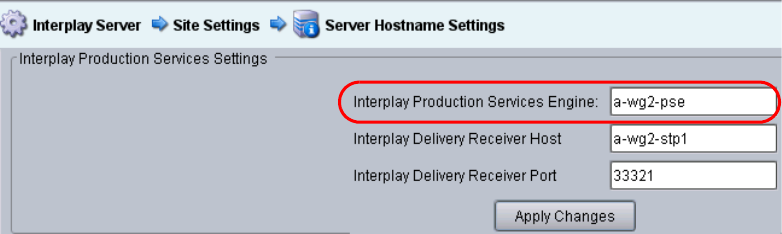
Setting Up a Workgroup for Production Services Backup
40
Manual Requirements to Connect to a Backup Production Services Engine
If a failover to a backup Production Services Engine occurs, an administrator must perform the
following tasks:
• Interplay Access and Interplay Administrator: You must change the Production Services
Engine name in the Interplay Administrator to the name of the currently connected engine.
Changing this value allows Interplay Access clients and Interplay Auto Production Services
to switch to the currently connected engine.
• Interplay Auto Production Services (Auto Archive, Auto Transcode, Auto Transfer, and
Auto Copy): You must manually restart the Interplay Auto Production Services service in
the Services tab of the Computer Management window to connect to the Production
Services Engine specified in the Interplay Administrator.
• Media Composer: A user or administrator must change the Hostname in the Production
Services Settings dialog box to the name of the currently connected engine. This must be
done for each Media Composer client.
This manual reconfiguring must also be done for Media Composer Cloud clients.
To change the Production Services Engine name:
1. Open the Interplay Administrator and log in to the Interplay Production workgroup for
which you want to change the Production Services Engine name.
2. In the Site Settings section of the Interplay Administrator window, click the Server
Hostname Settings icon.
3. In the Interplay Production Services Engine text box, type the name of the currently
connected engine.
4. Click Apply Changes.
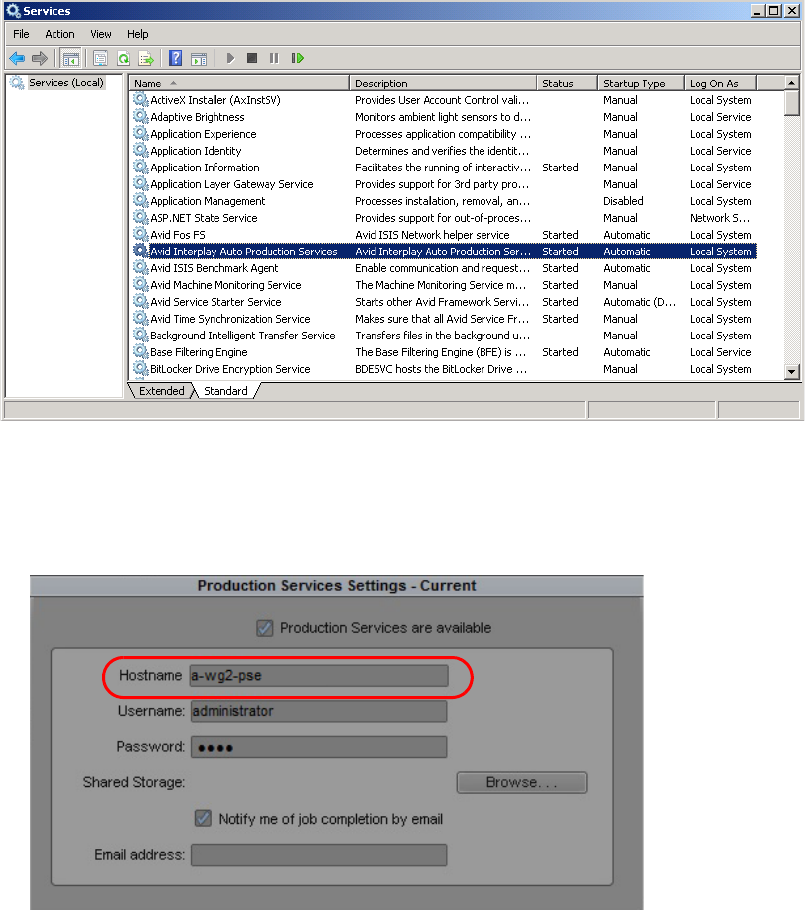
Setting Up a Workgroup for Production Services Backup
41
To restart Interplay Auto Production Services:
1. On the system running Auto Production Services, right-click the My Computer icon and
select Manage.
2. Double-click the Services and Applications icon, then double-click Services.
3. Right-click Avid Interplay Auto Production Services and select Start.
To change the Production Services Engine name for a Media Composer client:
1. In the Settings window, double-click Production Services Settings.

Setting Up a Workgroup for Production Services Backup
42
2. In the Hostname text box, type the name of the currently connected engine.
3. Click OK.
Configuring and Connecting a Spare Production Services Engine
To prepare for the online Production Services Engine going off line, an administrator can prepare
a spare Production Services Engine. This spare can be a cold spare or a warm spare.
•A cold spare has the same machine name and IP address as the primary Production Services
Engine. It is turned off until needed. It requires approximately 90 minutes to bring the
system up.
•A warm spare also has the same machine name and IP address as the primary Production
Services Engine. It is turned on but not connected to the network until needed. It requires
approximately 30 minutes to bring the system up.
nA spare engine is different from a backup engine because it uses the same machine name and IP
address as the primary engine. See “Automatically Connecting to a Backup Production Services
Engine” on page 36.
Use the following check list to prepare a cold or warm spare.
Preparing a Spare Production Services Engine
Task Section Reference
Configure the server to use the same machine
name and IP address as the primary Production
Services Engine.
Windows system documentation.
Install and set up the spare Production Services
Engine.
“Check List for Setting Up the Production
Services Engine” on page 28
Configure Interplay Transcode, STP Encode,
and Interplay Consolidate to automatically
connect to the Production Services Engine.
nOther Production Services run as
Windows services and are set to
automatically connect.
•“Connecting the Transcode Provider to the
Production Services Engine” on page 106
•“Connecting the STP Encode Provider to the
Production Services Engine” on page 291
•“Registering and Connecting a Consolidate
Provider” on page 310
Back up the Production Services database on
the primary Production Services Engine.
“Backing Up the Production Services Database”
on page 43
For a cold spare, turn off the server.

Setting Up a Workgroup for Production Services Backup
43
If the primary Production Services Engine goes offline, use one of the following procedures.
To bring a cold spare on line:
1. Remove the offline engine from the network.
2. Start the cold spare and connect it to the network.
3. Restore the most recent Production Services database backup.
4. Restart the Production Services Engine.
To bring a warm spare on line:
1. Remove the offline engine from the network.
2. Connect the warm spare to the network.
3. Restore the most recent Production Services database backup.
4. Restart the Production Services Engine.
Backing Up the Production Services Database
The Interplay Production Services system uses a Microsoft SQL Server®2012 database (named
“dmsdb”) to hold user names, profiles, and job information. If a facility is using warm spare/cold
spare Production Services Engine backup configuration, it is critical to create a database backup.
An administrator can then restore the database if necessary.
The following steps describe how to do a manual backup of the database. For information on
how to schedule an automated backup, see the Microsoft SQL 2012 Server Management Studio
documentation.
Prerequisite: Obtain SQL Server Management Studio 2012 (SSMS) and install it on all
Production Services Engines (primary and backup). You can download the application from
https://msdn.microsoft.com/en-us/library/mt238488.aspx. Select “SQL Server Management
Studio 2012 SP2.”
For a warm spare, keep the server on. Do not
connect it to the network.
Preparing a Spare Production Services Engine (Continued)
Task Section Reference
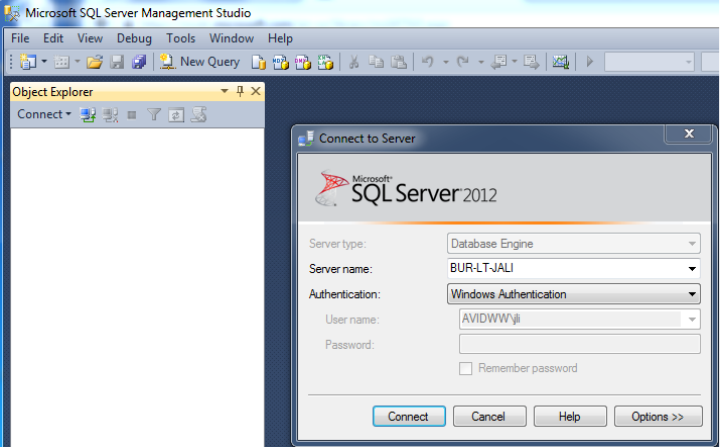
Setting Up a Workgroup for Production Services Backup
44
To manually back up the Production Services database:
1. On the server running the Production Services database you want to back up, start SQL
Server Management Studio and connect to the local host. In most cases, use Windows
Authentication (the user logged into Windows). The user needs Windows Administrator
permissions to connect to the SQL database.
In the following example, the server name of the local host is BURL-LT-JALI.
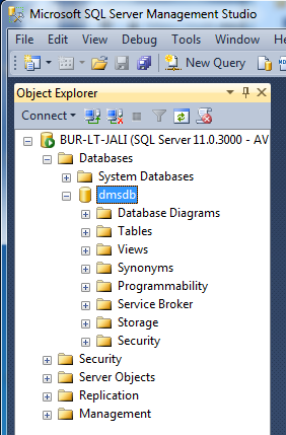
Setting Up a Workgroup for Production Services Backup
45
2. In the Object Explorer, expand Databases, and select dmsdb.
3. Right-click dmsdb and select Tasks > Back Up.
The Backup Database dialog box opens to the General page.
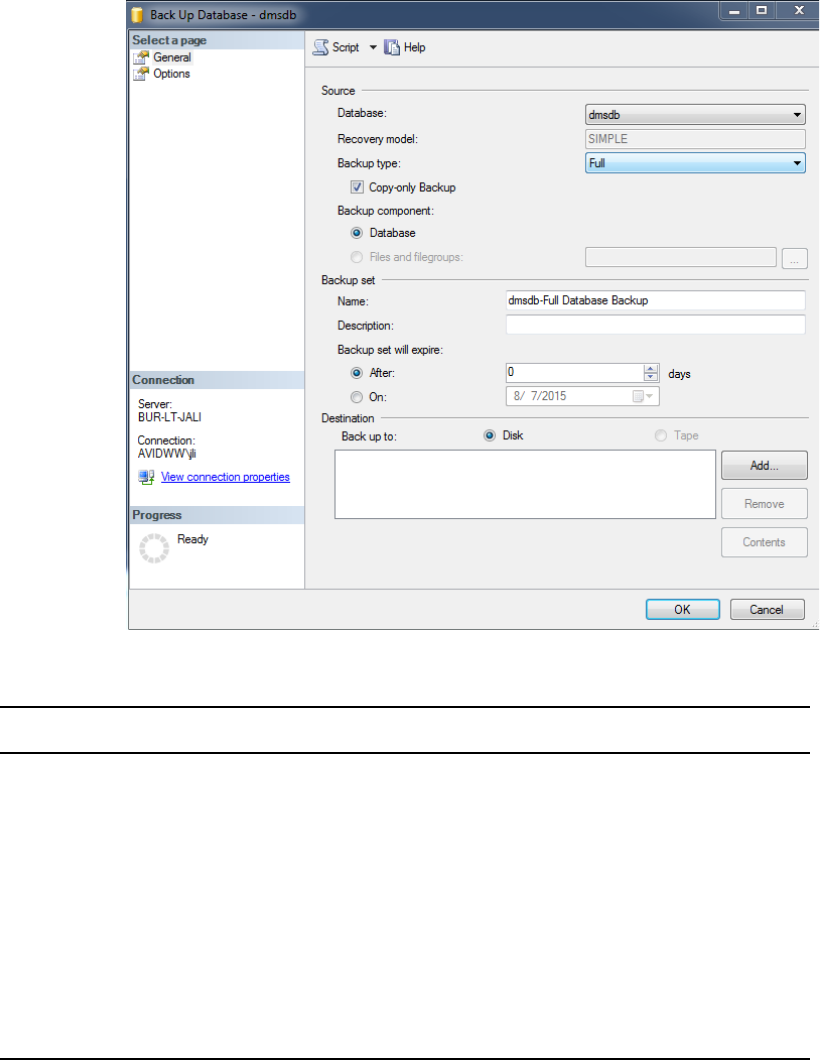
Setting Up a Workgroup for Production Services Backup
46
4. Select the Source and Backup Set options as shown in the following table.
Section Option Selection
Source Database dmsdb
Recovery model SIMPLE
Backup type Full
Copy only Backup
Backup component Database
Backup Set Name dmsdb-Full Database Backup
Description Optional
Backup set will expire After 0 days
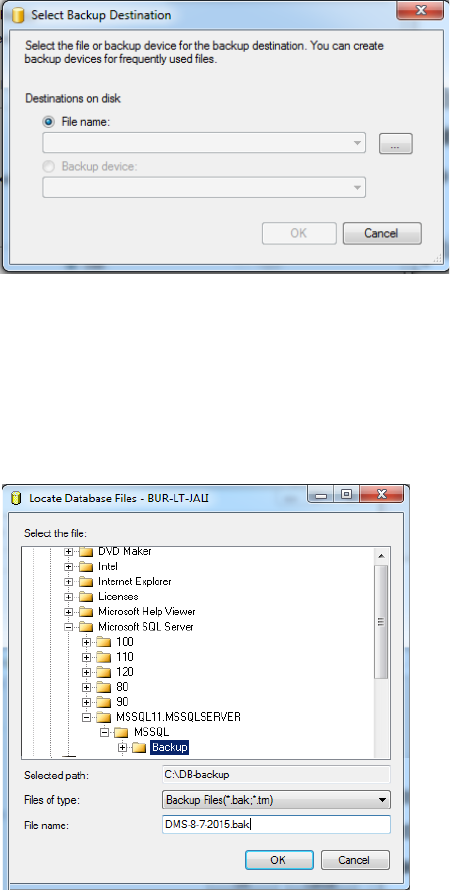
Setting Up a Workgroup for Production Services Backup
47
5. Set the destination folder (the location for the backup file) and backup file name.
cIf a destination already exists in the Destination list, it will be overwritten. Select the
existing destination or destinations and click Remove.
a. In the Destination section, click Add.
The Select Backup Destination dialog box opens.
b. Click the … (Browse) button.
The Locate Database Files dialog box opens.
c. Select the folder path and enter a name for the backup file.
Consider using a folder named Backup in the Microsoft SQL Server folder, and the date
of the manual backup in the file name, as shown in the following illustration.
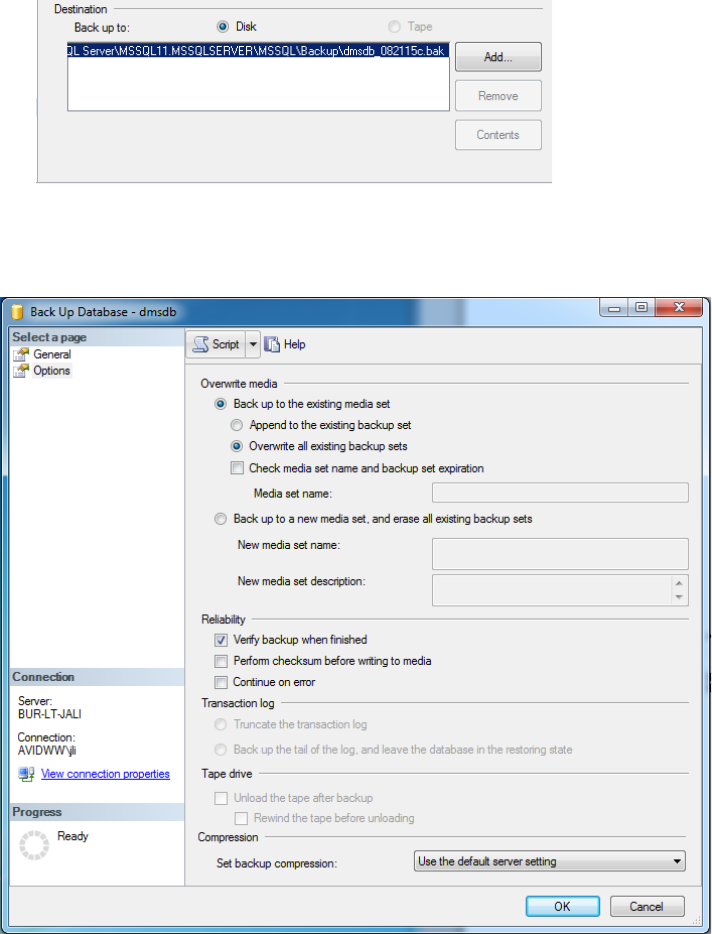
Setting Up a Workgroup for Production Services Backup
48
d. Click OK.
The path and file name are displayed in the Destination list.
6. On the left side of the Back Up Database dialog box, select Options.
The Options page is displayed.
Setting Up a Workgroup for Production Services Backup
49
7. Select the following options:
- Back up to the existing media set
- Overwrite all existing backup sets
- Verify backup when finished
- Set backup compression: Use the default server setting
Other settings are not needed.
8. Click OK to start the backup operation.
9. After the backup operation is complete, copy the database backup file to another machine in
case the primary Production Services Engine goes off line.
Restoring the Production Services Database
The following steps describe how to restore a Production Services database. Restoring the
database is necessary in case the primary Production Services Engine goes off line and an
administrator needs to bring a backup engine on line.
Prerequisite: Make at least one Production Services database backup. See “Backing Up the
Production Services Database” on page 43.
To restore the Production Services database:
1. On the server running the Production Services database you need to update, start SQL Server
Management Studio and connect to the local host. In most cases, use Windows
Authentication (the user logged into Windows). The user needs Windows Administrator
permissions to connect to the SQL database.
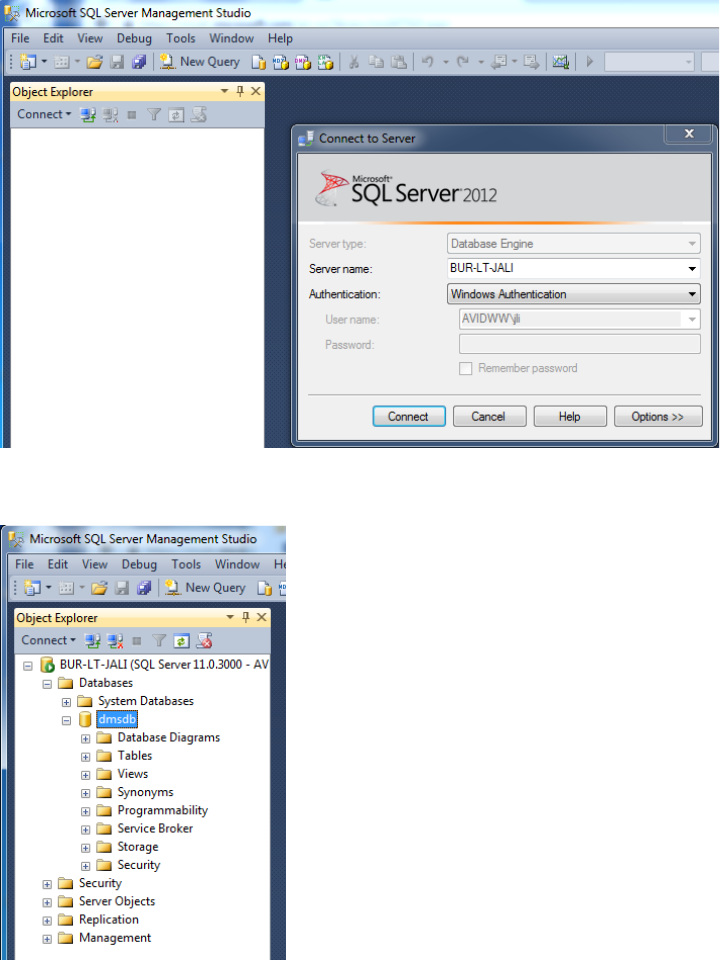
Setting Up a Workgroup for Production Services Backup
50
In the following example, the hostname of the Production Services Engine is
BURL-LT-JALI.
2. In the Object Explorer, expand the Databases folder and select dmsdb.
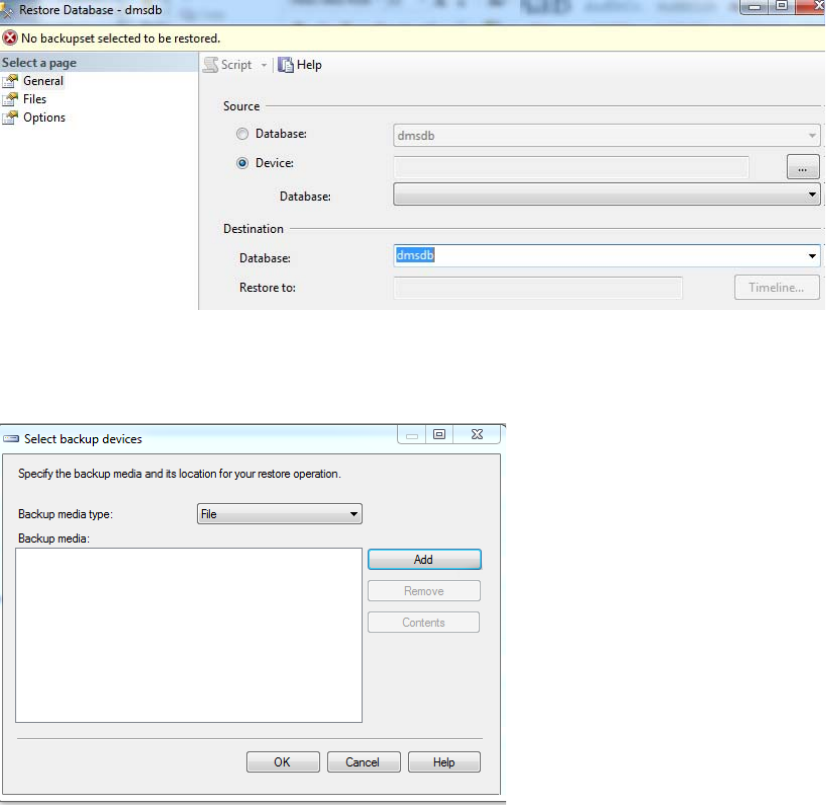
Setting Up a Workgroup for Production Services Backup
51
3. Right-click dmsdb and select Tasks > Restore > Database.
The Restore Database dialog box opens.
4. Select Device and click the ... (Browse) button.
The Select Backup Devices dialog box opens.
5. Click the Add button.
The Locate Backup File dialog box opens.
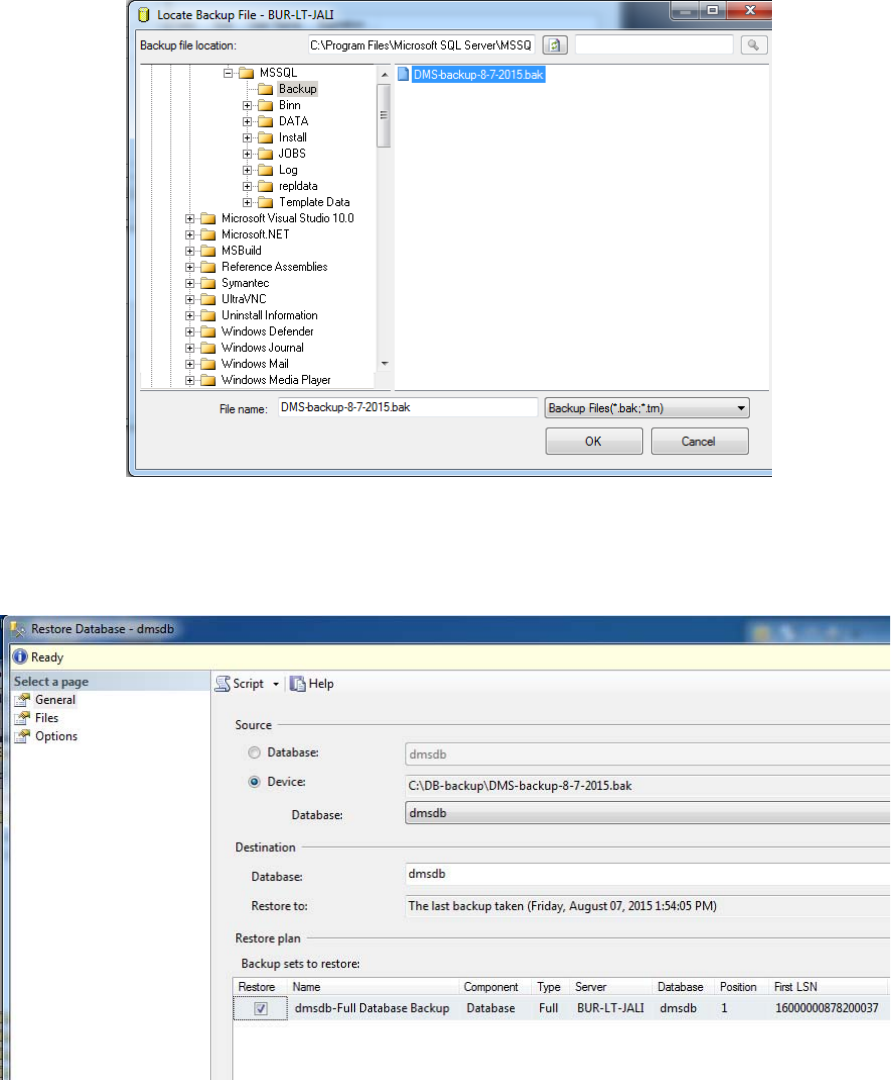
Setting Up a Workgroup for Production Services Backup
52
6. Navigate to the database backup file, select it, and click OK.
In the Restore Database dialog box, the “Backup sets to restore” field is populated with
information about the selected backup.
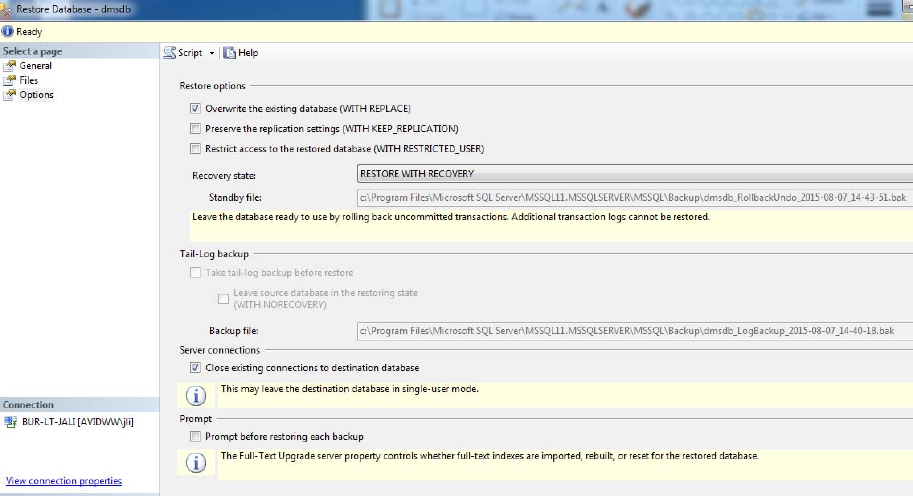
Setting Up a Workgroup for Production Services Backup
53
7. On the left side of the dialog box, click Options.
The Options page is displayed.
8. Select the following options:
- Overwrite the existing database
- Recovery state: RESTORE WITH RECOVERY
- Close existing connections to destination database
Other settings are not needed.
9. Click OK to start the restore operation.
10. After the restore is completed, you need to rename the user “dms” in the dmsdb database.
This user is carried over from the database of the original server, but should not be used on
the backup server. You need to create a new dms user in the dmsdb.
a. In Object Explorer, expand dmsdb > Security > Users.
b. Right-click the user “dms” and select Rename.
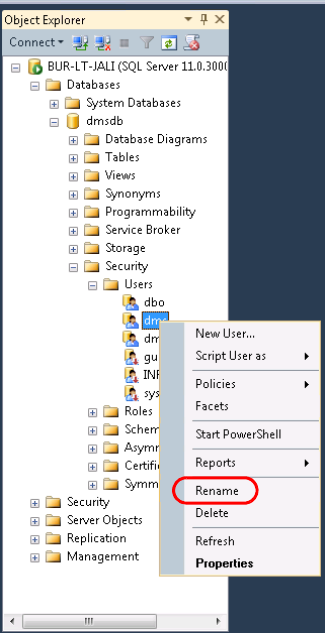
Setting Up a Workgroup for Production Services Backup
54
c. Rename “dms” to a meaningful name, such as “dms-orig.”
d. Right-click Users and select New User.
e. Create a user named “dms” with the login name “dms,” as shown in the following
illustration.
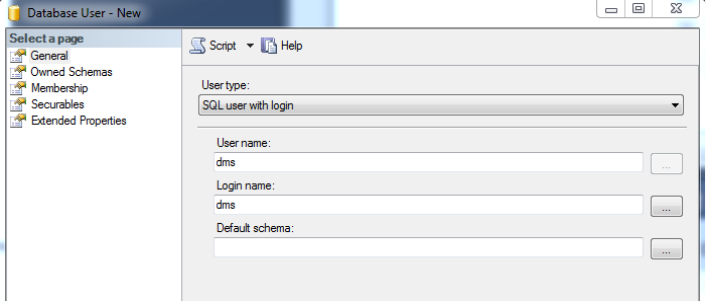
Setting Up a Workgroup for Production Services Backup
55
f. In the “Select a page” section, select Membership and select “db_owner.”
g. Click OK.

3Using the Production Services and
Transfer Status Tool
The following topics explain how to use the Production Services and Transfer Status tool:
•Opening the Production Services and Transfer Status Tool
•Production Services and Transfer Status Tool User Interface
•Using the Jobs Page
•Using the Providers Page
•Using the Services Page
•Using the Users Page
For an overview of the Production Services and Transfer Status tool, see “Understanding the
Interplay Production Services and Transfer Status Tool” on page 19.
Opening the Production Services and Transfer
Status Tool
The Production Services and Transfer Status tool (also referred to as the Admin Tool) can be
used on any computer that has a network connection to a computer running the Production
Services Engine.
To open the Production Services and Transfer Status tool:
1. Do one of the following:
tFrom the Avid Interplay Production Services window, click Admin Tool.
tFor a standalone application, click Start and select Programs > Avid > Avid Production
Services and Transfer Status.
tFrom Interplay Access, select View > Interplay Production Services Status.
tFrom the Interplay Administrator, in the Site Settings area, click the Interplay
Production Services icon.
2. Type your username and password. See “Using the Users Page” on page 77.

Opening the Production Services and Transfer Status Tool
57
If you opened Production Services Status from Interplay Access or the Interplay
Administrator, access is controlled by the information you used when you logged into
Interplay Access or the Interplay Administrator.
3. Type the host name of the system on which the Production Services Engine resides in the
Production Services Host text box.
The Production Services host name is the name of the computer that the Production Services
Engine runs on. You can find the host name in the Name field of the Production Services
window. Previously typed host names are available from the Production Services Host
menu.
4. Click the Login button.
If the username and password are accepted, the Jobs page opens. For information about the
Jobs page, see “Using the Jobs Page” on page 58.

Production Services and Transfer Status Tool User Interface
58
Production Services and Transfer Status Tool User
Interface
The Production Services and Transfer Status tool user interface is made up of five pages (in
addition to the Login/Logout page). These pages are described in the following table:
Using the Jobs Page
The Jobs page displays information about Production Services jobs and lets you cancel, delete,
and retry jobs. The Jobs page opens by default after you log in to the Production Services and
Transfer Status tool.
The following illustration shows a list of jobs filtered to show only jobs for the Interplay Copy
service.
Production Services Status Administration Tool Pages
Page Description Section Reference
Jobs Displays the status and other information about jobs
submitted to the Production Services Engine. Lets you
cancel or retry jobs, depending on your level of
privilege.
See “Using the Jobs Page” on
page 58.
Providers Displays information about systems that are running
Production Services provider software. Lets you
register and delete providers, depending on your level
of privilege.
See “Using the Providers Page”
on page 71.
Services Displays a list of services and service information.
Lets you install and delete services.
See “Using the Services Page” on
page 74.
Users Displays a list of user accounts. Lets you create and
delete accounts, depending on your level of privilege.
See “Using the Users Page” on
page 77.
Profiles Lets you create templates to use when performing an
operation.
See “Working with Production
Services Profiles” on page 92.
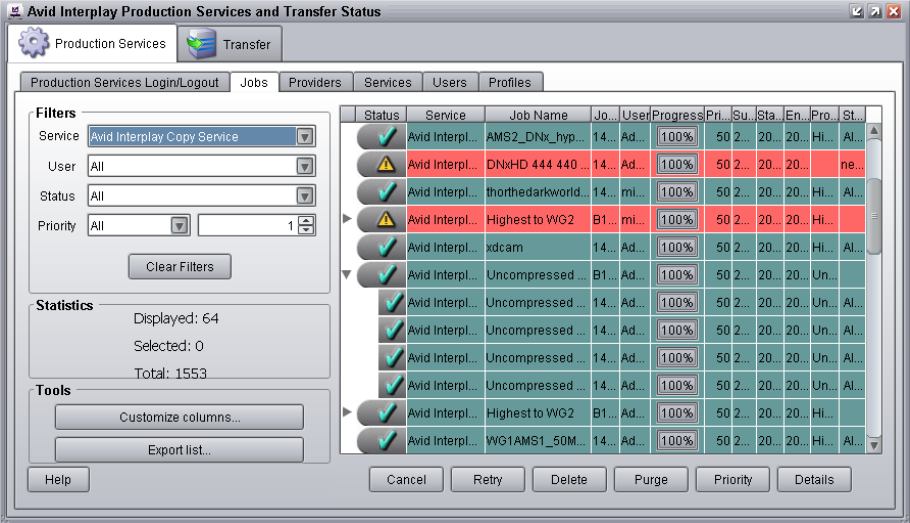
Using the Jobs Page
59
The following topics describe the options available from the Jobs page and how you can
customize the display:
•Job Information and Status
•Customizing the Reporting of Service Job Status
•Customizing the Jobs Page Columns
•Filtering the Jobs List
•Viewing Details About a Job
•Purging the Jobs List
•Prioritizing a Job
•Canceling a Job
•Deleting a Job
•Retrying a Job
•Exporting the Jobs List
For information about the Auto-Purge feature, see “Configuring the Production Services Engine”
on page 31.
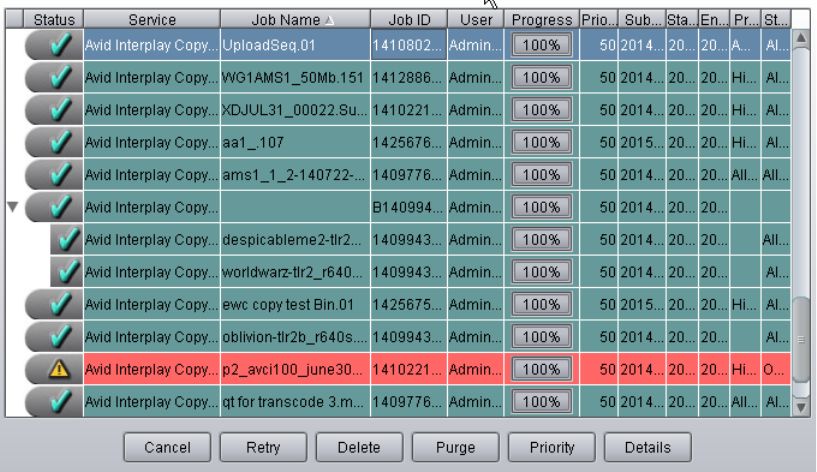
Using the Jobs Page
60
Job Information and Status
The Jobs page displays information about jobs submitted to the Production Services Engine. You
can specify how the status of the various service jobs are reported. See “Customizing the
Reporting of Service Job Status” on page 62.
When a job is submitted, the transaction is displayed at the top of the Jobs list by default. You
can reorder the list by any column by clicking in the column heading.
The following illustration shows jobs that have successfully processed (check mark and green
bar) and one that failed with an error (caution icon and red bar). A turn down arrow displays a
job that includes multiple assets.

Using the Jobs Page
61
The following table describes the information displayed for processed jobs.
Jobs Page
Column Description
Status The colors and icons in the display indicate the status of the job:
• Yellow bar with no icon = Job is processing.
• Green bar with check mark icon = Job is completed.
• Light green bar with question mark = Job is completed with a warning.
• Gray bar with stop icon = Job has been canceled.
• Red bar with caution icon = Job has failed with an error.
• Gray bar with no icon = Job is pending or is in a queue.
Service The name of the service to which the job was sent.
Job Name The file name submitted by the client to the Production Services Engine. This might
have a suffix — determined by the particular service — appended to it.
nAdministrators can view information about all jobs. Users without
administrator privileges can view all jobs, but can see only the user name and
job name of their own jobs.
Job ID A number automatically generated by the Production Services Engine.
User The name of the user who submitted the job.
nAdministrators can view information about all jobs. Users without
administrator privileges can view all jobs, but can see only the user name and
job name of their own jobs.
Progress (%) The percentage of the job completed.
Priority The priority of the job, as submitted by the client.
Submit Time The date and time the job was submitted by the client to the Production Services
Engine.
Start Time The date and time that the provider started the job.
End Time The date and time that the provider reports the job is complete.
Profile Name Indicates if a profile was used and displays the profile’s name.

Using the Jobs Page
62
Customizing the Reporting of Service Job Status
You can customize the status reporting for the following Production Services:
• Archive service
•Restore service
• Copy service
• Move service
•Delivery service
For example, during an archive operation, if one of the media files cannot be found, you can set
the reporting to the Jobs tab of the Production Services and Transfer Status tool to display one of
the following status indicators:
This section describes how to use the Avid Service Configuration tool to set which reporting
status displays with the various conditions of service jobs.
Avid Service Configuration is an application that is included with the Avid Service Framework
services. It lets you set and change parameters for each of the different Avid services and
applications in your workgroup environment. For more information about Avid Service
Framework, see the Avid Service Framework User’s Guide.
To customize the job status displays for various Production Services:
1. On any system running the Avid Service Framework services, click Start and select
Programs > Avid > Avid Service Framework > Avid Service Configuration.
The Select Workgroup dialog box opens.
nThe Select Workgroup dialog box does not open if the check box specifying to always select and
use this workgroup option was previously selected. When you select this option, the Select
Workgroup dialog box no longer opens when you start the application. The default workgroup is
selected, and the Avid Service Configuration window opens. To change this option and display
the Select Workgroup dialog box, click the Login tab of the Avid Framework Workgroup
Properties application and clear the check box for the option.
Job Status Display Description
Green with check mark icon Job completed
Green with question mark icon Job completed with a warning
Caution icon Job failed with an error
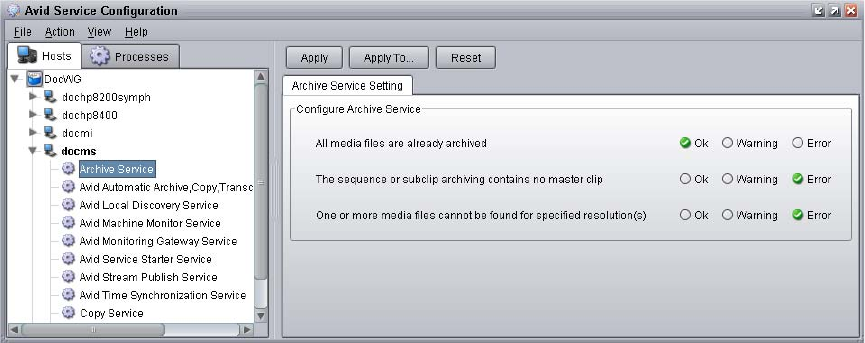
Using the Jobs Page
63
2. (Option) If the Select Workgroup dialog box opens, select the workgroup you want to
connect to and click Select.
The Avid Service Configuration window opens.
3. In the Directory pane, click the Processes tab and verify that the service is running.
nIf the service does not appear in the Avid Service Configuration window, the service is not
running or the system it runs on is not properly connected to the workgroup. Click the Hosts tab
and make sure that the Avid Service Framework services displays the name of the system that the
service is running on.
4. On the Processes tab, expand the service entry, such as Archive Service.
The system displays the name of the computer running the service.
5. Click the computer name.
The Administrator Password Needed dialog box opens.
6. Type the Avid Service Framework Administrator password and click OK.
nBy default, Avid Service Framework does not require a password. When a password is used, it is
set through the System Configuration Service. Check with your system administrator for the
correct password.
The system displays the setting tab for the service.
nDepending on the service you selected, different conditions are available for you to customize.
The following example shows the Archive Service settings.

Using the Jobs Page
64
7. Select the type of status you want to display for each job condition.
8. Click Apply.
Customizing the Jobs Page Columns
The Production Services and Transfer Status tool provides options to customize the columns
displayed on the Jobs page.
To customize which columns display on the Jobs page:
1. Open the Production Services and Transfer Status tool. For more information, see “Opening
the Production Services and Transfer Status Tool” on page 56.
The Jobs page opens by default after you log in to the Production Services and Transfer
Status tool.
2. In the Tools area, click Customize columns.
The Choose Columns dialog box opens.
3. Select the name of the columns you want to display.
4. Click OK.
The columns change to show the selections.
5. (Option) Click a column heading and drag it to a new location.
6. (Option) Click a column heading to reorder the jobs list by the selected column. The
ordering of the column depends on the contents of the column. For example, job IDs are
ordered numerically, either in ascending order or descending order.
Filtering the Jobs List
By default, the Jobs list displays all jobs that the Production Services Engine is currently
monitoring. You can customize your view to show only your jobs, to show jobs for a specific
service, or to show only jobs in a selected state.
nUsers with Administrator privileges are allowed to cancel or delete any job. Users without
administrator privileges can only cancel or delete jobs submitted by that user.
Option Job Status Display / Description
OK Green with check mark icon / Job completed
Warning Green with question mark icon / Job completed with a warning
Error Caution icon / Job failed with an error
Using the Jobs Page
65
To customize the Jobs list:
1. Open the Production Services and Transfer Status tool. For more information, see “Opening
the Production Services and Transfer Status Tool” on page 56.
The Jobs page opens by default after you log in to the Production Services and Transfer
Status tool.
2. In the Filters area, click the Service menu, and select a service.
3. In the Filters area, click the User menu, and select All Users or a specific user name.
4. In the Filters area, click the Status menu, and select one of the following:
- All — Displays all jobs with their current status.
- Processing — Displays only jobs that are currently being processed.
- Completed — Displays only jobs that have been successfully processed.
- Canceled — Displays only jobs that have been canceled by a user with administrator
privileges.
- Error — Displays only jobs that have stopped with an error.
- Pending — Displays only jobs that are waiting to be processed.
5. In the Filters area, click the Priority and select one of the following:
- ALL — Displays all priority jobs.
- > — Displays all priority jobs greater than the number indicated.
- < — Displays all priority jobs fewer than the number indicated.
- = — Displays all priority jobs equal to the number indicated.
The Jobs page displays jobs that meet the criteria you selected.
Viewing Details About a Job
You must be logged in as the job owner or as an administrator to view a job’s details.
To view details about a job:
1. Open the Production Services and Transfer Status tool. For more information, see “Opening
the Production Services and Transfer Status Tool” on page 56.
2. On the Jobs page, select the job that you want details about.
3. Click the Details button or right-click the job and select Details.
The Job Details window opens.

Using the Jobs Page
66
Job Details Window
The following table provides descriptions of the type of job information displayed in the Job
Details window.
Entry Description
Job Information
Name The name of the file submitted by a client to Production Services Engine. It
might include information appended to the file name, depending on the service
requirements.

Using the Jobs Page
67
Service The Production Services service for which the job was submitted; for example,
Interplay Archive Service.
State The current state of the job.
Submitted By: The user name associated with the job, as submitted by the client.
Priority The priority of the job, as submitted by the client.
Provider The name of the provider, as registered with the Production Services Engine.
Requested Provider The name of the provider requested
Job ID A number automatically generated by the Production Services Engine.
Batch ID The number of the batch containing the job.
Profile Name The name of the profile used for the job, if a profile is used.
Submit Time The date and time the job was submitted by the client to the Production
Services Engine.
Start Time The date and time the provider picked up the job.
End Time The date and time the job was reported as complete by the provider.
Error (if applicable) A message describing the error. Some errors and possible solutions are listed in
“Troubleshooting Interplay | Production Services” on page 317.
Severity (if applicable) The severity of the error (for example, fatal, non-fatal).
Progress The percentage of the job that has been processed.
Notification Displays whether notification of job completed or job error is enabled or
disabled.
Input Parameters The list of Input parameters varies for each service.
Output Parameters Shows the result of the operation.
Entry Description
Job Information
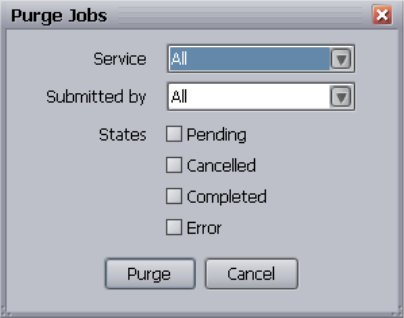
Using the Jobs Page
68
Purging the Jobs List
The purge function is available only to users with administrator privileges.
nYou can set the Production Services settings to allow for auto-purging of jobs. See “Configuring
the Production Services Engine” on page 31.
To purge the Jobs list:
1. Open the Production Services and Transfer Status tool and log in as a user with
administrator privileges. For more information, see “Opening the Production Services and
Transfer Status Tool” on page 56.
2. On the Jobs page, click the Purge button or right-click the job and select Purge.
The Purge Jobs dialog box opens.
3. Click the Service menu, and select the applicable service.
4. Click the Submitted By menu, and select a particular user or All, depending on the jobs you
want to purge.
5. Select which states of jobs you want to purge.
6. Click the Purge button.
The Jobs list no longer contains the jobs you selected. If a purge fails, a dialog box opens
with a list of the jobs that failed to delete and a reason for the failure.
Using the Jobs Page
69
Prioritizing a Job
You can prioritize the order of the pending jobs. The priority number assigned to a job indicates
the job’s position in the queue for a specific provider. This setting lets you order jobs in a desired
sequence and also move a job to the top of the queue. Priority numbers range from 1 (highest
priority) through 100 (lowest priority). The default priority number assigned to each job is 50.
When you assign a priority number to a job, the actual order in the queue depends on the
following:
• Priority numbers are relative only to jobs within a given service. For example, a transcode
job set with priority 1 might not execute before an archive job with priority 100.
• If the same priority number is assigned to several jobs of a specific provider, then all these
jobs have an equal chance of executing.
To prioritize a job:
1. Open the Production Services and Transfer Status tool as described in “Opening the
Production Services and Transfer Status Tool” on page 56.
2. On the Jobs page, select the job you want to prioritize.
3. Click the Priority button or right-click the job and select Priority.
The Set Job Priority dialog box opens.
4. Click the arrow button to select a priority number.
The default is 50. The priority range is 1 (highest priority) through 100 (lowest priority).
5. Click OK.
The Priority column displays the new priority for the job.
Canceling a Job
Jobs can be canceled during the Pending or the Processing state. A user can cancel only jobs that
have been submitted under his or her Production Services user name. An administrator can
cancel any job.
Providers periodically check the Production Services Engine for jobs that might need to be
canceled. When a job is canceled, it might take a short time for the job to actually stop and the
status change to be reflected. It is also possible that a job might finish before it can be canceled.
In this case, a dialog box might open stating that the Production Services Engine was unable to
cancel the job.
Using the Jobs Page
70
To cancel a job:
1. Open the Production Services and Transfer Status tool as described in “Opening the
Production Services and Transfer Status Tool” on page 56.
2. On the Jobs page, select the job that you want to cancel.
3. Click the Cancel button or right-click the job and select Cancel.
A dialog box opens and asks if you are sure you want to cancel the job.
4. Click OK to cancel the job.
The job remains in the Jobs list, but the state changes to canceled.
Deleting a Job
To delete a specific job or all jobs on the Jobs page:
1. Open the Production Services and Transfer Status tool as described in “Opening the
Production Services and Transfer Status Tool” on page 56.
2. On the Jobs page, select the specific job you want to delete.
3. Click the Delete button or right-click the job and select Delete.
A dialog box opens and asks if you are sure you want to delete the job.
4. Click OK to delete the job.
Retrying a Job
You can retry a job that is in the canceled state or error state.
To retry a job:
1. Open the Production Services and Transfer Status tool as described in “Opening the
Production Services and Transfer Status Tool” on page 56.
2. On the Jobs page, select the job you want to retry.
3. Click the Retry button or right-click the job and select Delete.
The Production Services Engine changes the state to Pending and places the job in the queue
for the next available provider.
Exporting the Jobs List
You can export the current Jobs list from the Production Services and Transfer Status tool.
Using the Providers Page
71
To export the Jobs list:
1. Open the Production Services and Transfer Status tool. For more information, see “Opening
the Production Services and Transfer Status Tool” on page 56.
The Jobs page opens by default after you log in to the Production Services and Transfer
Status tool.
2. In the Tools area, click Export list.
A Save dialog box opens.
3. Select a location for the Jobs list file.
4. Type a name for the Jobs list file.
5. Click Save.
Using the Providers Page
The Providers page displays information about computers that are running provider software and
are registered with the Production Services Engine. You can also view specific provider details
and capabilities.
The following topics provide information about using the Providers page:
•Opening the Providers Page
•Customizing the Providers Display
•Viewing Details About a Provider
•Deleting Providers
A provider is automatically registered the first time it connects to the Production Services
Engine.
Opening the Providers Page
To open the Providers page:
1. Open the Production Services and Transfer Status tool as described in “Opening the
Production Services and Transfer Status Tool” on page 56.
2. Click the Providers tab.
The Providers page opens.
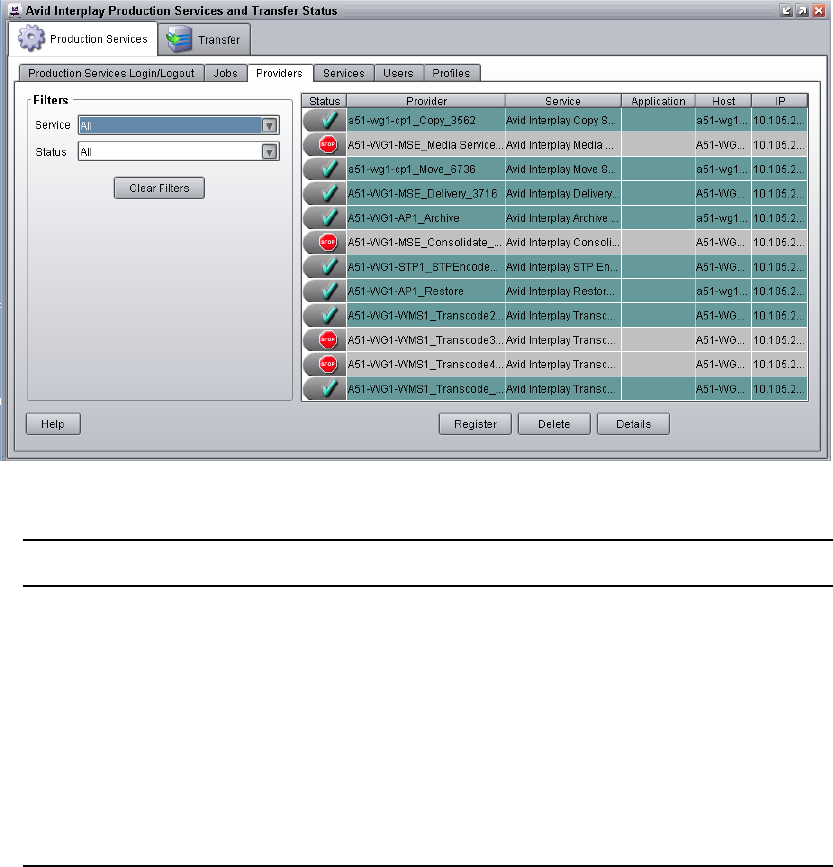
Using the Providers Page
72
The following table describes the information displayed in the Providers display.
Customizing the Providers Display
By default, the Providers page displays all providers that are registered with the Production
Services Engine. You can customize your view to show only the connected providers or
providers of a particular service.
Providers Page Description
Status Indicates whether or not the provider is connected to the Production Services
Engine.
Provider The name of the service provider, as registered with the Production Services
Engine.
Service The Production Services service for which the provider has been registered.
Application The name of the service provider application.
Host The computer name of the provider.
IP The IP address of the computer of the provider.

Using the Providers Page
73
To customize the Providers display:
1. Open the Production Services and Transfer Status tool as described in “Opening the
Production Services and Transfer Status Tool” on page 56.
2. Click the Providers tab. The Providers page opens.
3. In the Filters area, click the Service menu, and select the applicable service.
4. In the Filters area, click the Status menu, and select the applicable condition.
The Providers page displays providers that match your selections.
Viewing Details About a Provider
To view details about a provider:
1. Open the Production Services and Transfer Status tool as described in “Opening the
Production Services and Transfer Status Tool” on page 56.
2. On the Providers page, select the provider that you want details about.
3. Click the Details button or right-click the provider and select Details.
The Provider Details window opens.
The following table provides descriptions of the type of provider information displayed in
the Provider Details window.
Providers Page Description
Name The name of the service provider, as registered with the Production Services
Engine.
Service The Production Services service for which the provider has been registered.
Host Name The computer name of the provider.
Application The name of the service provider application.
IP Address The IP address of the computer of the provider.
Connected Indicates whether or not the provider is connected to the Production Services
Engine.
Using the Services Page
74
Deleting Providers
If a provider is connected to the Production Services Engine, the provider cannot be deleted until
it has been disconnected and all processing jobs are stopped. You must be logged in as an
administrator to delete any providers.
To delete the provider software, use the Add/Remove Programs in the Windows Control Panel on
the provider system.
To delete a service, see “Deleting a Production Services Service” on page 76.
To delete a provider from the Production Services Engine:
1. Open the Production Services and Transfer Status tool as described in “Opening the
Production Services and Transfer Status Tool” on page 56.
2. On the Providers page, select the provider that you want to delete.
3. Click the Delete button or right-click the provider and select Delete.
A dialog box opens and asks if you are sure you want to delete the provider.
4. Click OK.
The provider is no longer registered with the Production Services Engine. To register it
again, see “Configuring a Provider for the Production Services Engine” on page 87.
Using the Services Page
The Services page displays information about the services that are installed and lets the user
install new services, upgrade existing services, or delete services that were previously installed.
For information about installing a service, see “Registering Services” on page 82.
The following topics provide information about the Servers page:
•Opening the Services Page
•Displaying Details About a Service
•Deleting a Production Services Service
Opening the Services Page
To open the Services page:
1. Open the Production Services and Transfer Status tool as described in “Opening the
Production Services and Transfer Status Tool” on page 56.
2. Click the Services tab.
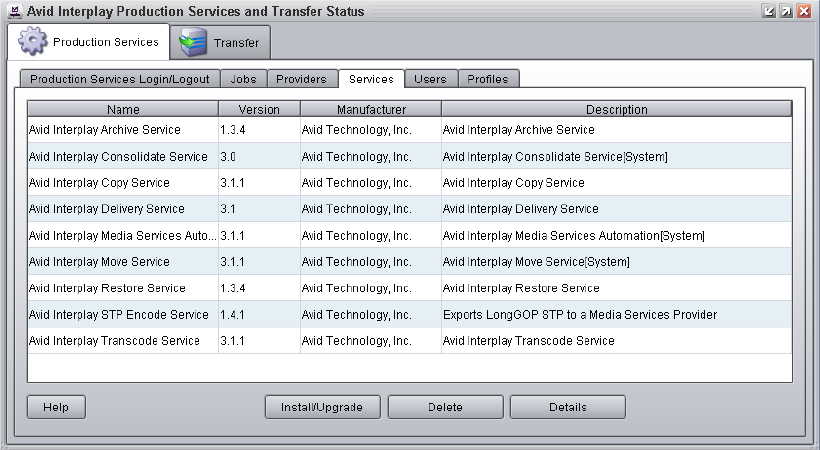
Using the Services Page
75
The Services page opens.
Displaying Details About a Service
To display information about a specific service:
1. Open the Production Services and Transfer Status tool as described in “Opening the
Production Services and Transfer Status Tool” on page 56.
2. On the Services page, select the service about which you want information.
3. Click the Details button or right-click the service and select Details.
The Service Details page opens.
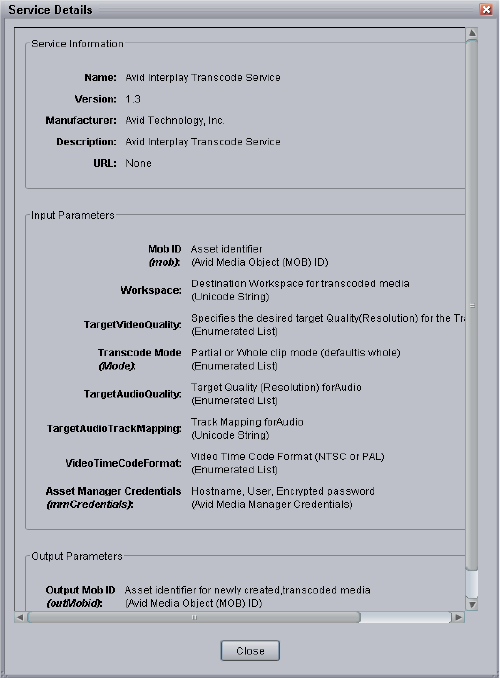
Using the Services Page
76
The specific information displayed on the Service Details page differs for each
installed service.
Deleting a Production Services Service
Deleting a Production Services service from the Services page deletes the information required
for the service to operate. If one or more providers have been registered for the service on the
Providers page, you must first delete the providers for the service. For more information, see
“Deleting Providers” on page 74.
Using the Users Page
77
To delete a service:
1. Open the Production Services and Transfer Status tool and log in as a user with
administrator privileges. For more information, see “Opening the Production Services and
Transfer Status Tool” on page 56.
2. Make sure all providers for the services that you are deleting have been deleted prior to
deleting the services themselves. See “Deleting Providers” on page 74.
3. Click the Services tab.
The Services page opens.
4. Select the service you want to delete.
5. Click the Delete button or right-click the service and select Delete.
The service is removed. To add the service again, see “Registering a Service Manually” on
page 83.
Using the Users Page
The Users page lets you create and manage user accounts. The default login for the Production
Services and Transfer Status tool is the user name Administrator, without a password. Avid
recommends assigning a password to this account after installing the Production Services
Engine. For more information, see “Reassigning Passwords” on page 79.
The Users page displays information based on the user’s login profile. A user logged in as an
Administrator can view information about all jobs, whereas users without administrator
privileges can view all jobs, but can only see the username and clip names of their own jobs.
There are two methods for managing Production Services users:
• Using Interplay authentication
If you set a host name in the Interplay Production Services Engine Settings dialog box, the
Production Services Engine authenticates user names and passwords with the Interplay
Engine (see “Configuring the Production Services Engine” on page 31). As a result, you do
not need to manage a separate user database for Production Services. If a host name is set,
when you attempt to log in to the Production Services Engine, and the login is successful,
the user name and password are added to or updated in the Production Services database
user’s table. The user name and password appear on the Users page.
Adding or changing users on the Users page has no effect if a host name is set in the
Interplay Engine Hostname setting in the Interplay Production Services Engine Settings
dialog box.
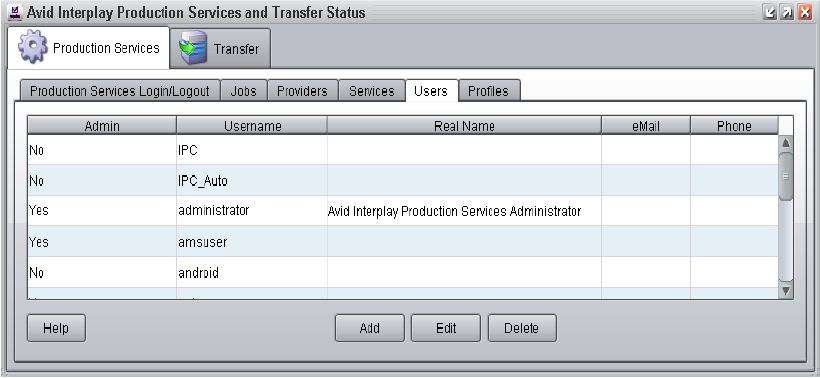
Using the Users Page
78
• Managing a separate user database
Managing Production Services users through a separate database can be useful if you want
to give administrator privileges to users who do not have administrator privileges in the
Interplay database. However, if you do not use Interplay authentication, make sure any user
name and password exactly matches a user name and password in the Interplay database,
because Production Services operations usually require login by a valid Interplay user.
The following topics describe the Users page:
•Opening the Users Page
•Setting Up User Accounts
•Reassigning Passwords
•Deleting User Accounts
Opening the Users Page
To open the Production Services Users page:
1. Open the Production Services and Transfer Status tool as described in “Opening the
Production Services and Transfer Status Tool” on page 56.
2. Click the Users tab.
The Users page opens with user accounts listed in the User name column.
Using the Users Page
79
Setting Up User Accounts
To set up a user account:
1. Open the Production Services and Transfer Status tool as described in “Opening the
Production Services and Transfer Status Tool” on page 56.
2. On the Users page, click the Add button.
A dialog box opens.
3. Type a user name in the Username text box.
User names and passwords are case sensitive and can contain only letters, numbers, and
underscores. They can be up to 255 characters.
4. (Option) You can assign a password by typing a password in the Password text box, then
typing it again in the Retype Password text box. Passwords are not required.
5. Type the applicable information about the user in the other text boxes.
nThe eMail address field is for information only and is not used for Production Services e-mail
notification. For more information, see “Configuring the Production Services Engine” on
page 31.
6. (Option) If this user is an administrator, select the “is Administrator” option.
7. Click Save.
Reassigning Passwords
If a user forgets his or her password, a new one must be assigned. If you forget the
Administration password, it must be reset. Contact Avid Customer Support.
To reassign a user password:
1. Open the Production Services and Transfer Status tool and log in as a user with
administrator privileges. For more information, see “Opening the Production Services and
Transfer Status Tool” on page 56.
2. On the Users page, select the user whose password you want to change.
3. Click the Edit button or right-click the user and select Edit.
A dialog box opens.
4. Type a new password in the Password text box, then type it again in the Retype Password
text box.
5. Click Save.
Using the Users Page
80
Deleting User Accounts
You must be logged in as an administrator to delete user accounts.
nThe user “Administrator” cannot be deleted. If you try to delete Administrator, you receive an
error message.
To delete a user account:
1. Open the Production Services and Transfer Status tool and log in as a user with
administrator privileges. For more information, see “Opening the Production Services and
Transfer Status Tool” on page 56.
2. On the Users page, select the user for each account you want to delete.
3. Click the Delete button or right-click the user and select Delete.
A dialog box opens and asks if you are sure you want to delete the user account.
4. Click OK.
The user account is deleted.
To re-create user accounts, see “Setting Up User Accounts” on page 79.

4Installing Services and Registering
Providers
This chapter provides general procedures for installing services, registering a provider, and
connecting it to the Production Services Engine. For specific information about each service, see
“Understanding the Various Production Services” on page 21 and the chapter that provides
information about the service.
The following topics provide information about the required tasks:
•Managing Services
•Registering Services
•Registering a Service Manually
•Configuring a Provider for the Production Services Engine
•Verifying That a Service Provider Is Connected
•Rules for Upgrading a Service and Preserving Profiles
Managing Services
Starting with Production Services v3.1, most Production Services operate as Windows services,
and can be managed like other Windows services.
cInterplay Transcode, STP Encode, and Interplay Consolidate operate as Windows
applications, not as Windows services.
Production Services as Windows services are started automatically and restart automatically
after a system reboot or crash. They are listed with other Windows services in the Services tab of
the Computer Management window. The following illustration shows the Interplay Delivery
service installed and running.

Registering Services
82
nThe Archive and Restore services require a third-party vendor dll. By default the services run
under the Local System account. If the third-party vendor dll needs more privileges than Local
System, the vendor must change the services to use the appropriate credentials.
Prior to Production Services v3.1, services operated as Windows applications, and needed to be
started manually. An advantage to this new feature is that all services are started automatically
and restart automatically after a system reboot or crash.
Because service providers are no longer applications, they are no longer listed in the Start menu
and no longer have a user interface window. Information that was displayed in the dialog box is
included in the service .ini file or in log files.You also edit the .ini file to register the provider
with the Production Services Engine. For more information, see “Configuring a Provider for the
Production Services Engine” on page 87.
Registering Services
The Production Services Engine requires configuration files for each service. These files are
called service description files and are contained in a .zip file (called a service package). For
example, Interplay Copy requires the service package CopyMedia.zip.
In earlier versions of Production Services, you needed to open the Production Services and
Transfer Status tool, click the Install/Upgrade button, then locate and open the correct .zip file on
the provider system. In Production Services v3.0 and later, the .zip files are installed on the
Production Services Engine system when you install the Production Services software. The first
time the Production Services Engine runs after a new installation, it checks which services and
versions were installed. It then automatically upgrades registered services or registers new
services.
nThe Interplay Consolidate service and the Production Services Automation service must be
registered manually. See “Registering the Automation and Consolidate Services” on page 305.
You only need to install service descriptions once, even if you configure multiple providers.
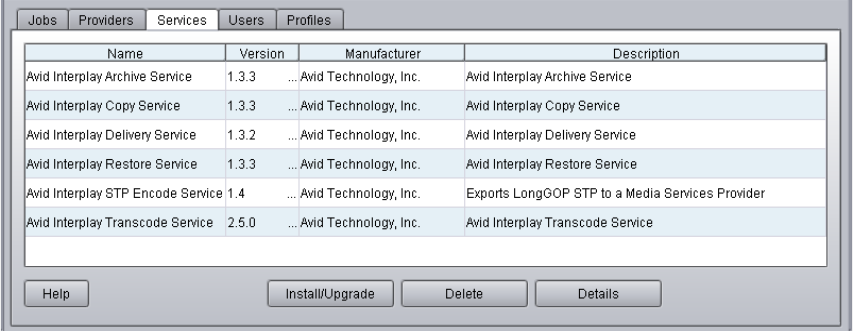
Registering a Service Manually
83
If necessary, you can use the manual procedure as documented in “Registering a Service
Manually” on page 83.
nIf you try to connect from a provider to the Production Services Engine before the latest service
is registered, the Status line in the Transcode Service dialog box reads:
Error From Broker! UNKNOWN_SERVICE.
To register services:
1. Install the Production Services Engine software from the Interplay Production Servers
installer.
2. Restart the Production Services Engine.
The services are listed in the Services tab of the Production Services and Transfer Status
tool.
Registering a Service Manually
Prior to Interplay v3.0, you needed to open the Production Services and Transfer Status tool and
install the service description. This procedure is now automatic (see “Registering Services” on
page 82). If necessary you can use the following procedure.
nThe Interplay Consolidate service and the Production Services Automation service must be
registered manually.
You only need to install a service description once, even if you configure multiple providers.

Registering a Service Manually
84
The following table provides a list of Production Services and the name of each service package.
nYou do not use the Production Services Engine to configure the Auto Archive, Auto Transcode,
and Auto Copy services. Instead, use the Interplay Administrator and the Avid Service
Framework services. For more information, see “Configuring Auto Archive Using Avid Service
Configuration” on page 175.
To install a Production Services service description:
1. Open the Production Services and Transfer Status tool and log in as administrator, as
described in “Opening the Production Services and Transfer Status Tool” on page 56.
2. Click the Services tab.
The Services page displays the currently configured services.
Service
File Name of Service Package
C:\Program Files\Avid\
Interplay Archive Interplay Archive Provider\ArchiveService\Archive.zip
Interplay Copy Interplay Copy\CopyService\CopyMedia.zip
Interplay Consolidate Interplay Consolidate\TranscodeService\ConsolidateService.zip
Interplay Delivery Interplay Delivery\PTFService.zip
Interplay Production Services
Automation
Interplay Production Services
Automation\MediaServicesAutomation.zip
Interplay Move Interplay Move\MoveService\MoveMedia.zip
Interplay Restore Interplay Archive Provider\RestoreService\Restore.zip
Interplay STP Encode Interplay STP Encode\LongGOPExport.zip
Interplay Transcode Interplay Transcode\TranscodeService\TranscodeService.zip
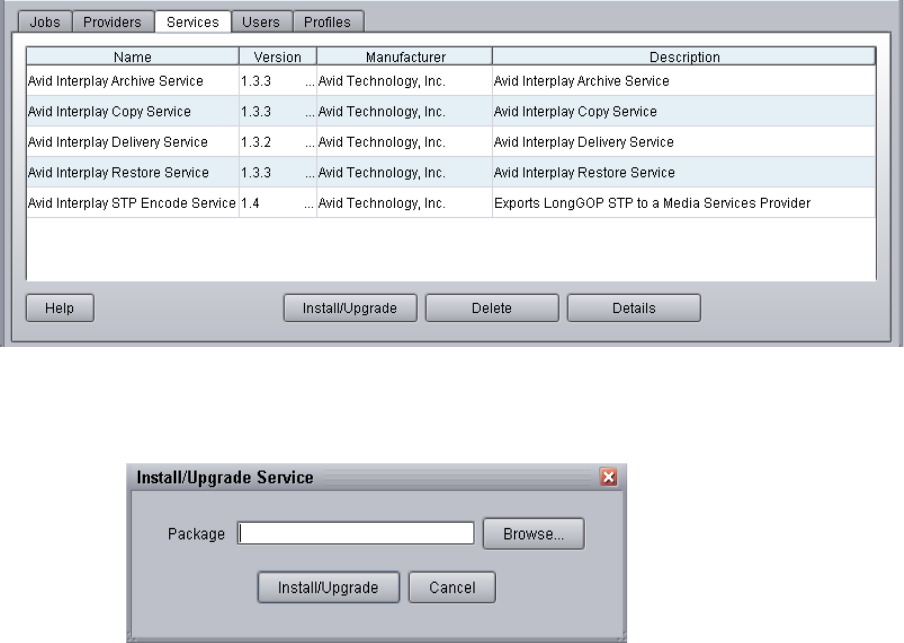
Registering a Service Manually
85
3. Click Install/Upgrade.
The Install/Upgrade Service dialog box opens.
4. Click the Browse button and navigate to the folder containing the service package (.zip file).
Make sure you have access to the folder.
The following is an example of the location of a service package. In this case, the service
package is for the Transcode service.
- C:\Program Files\Avid\Interplay Transcode\TranscodeService
You can use the Microsoft Windows Search tool to help you locate the folder that contains
the service package. For a list of package file names, see “Registering a Service Manually”
on page 83.
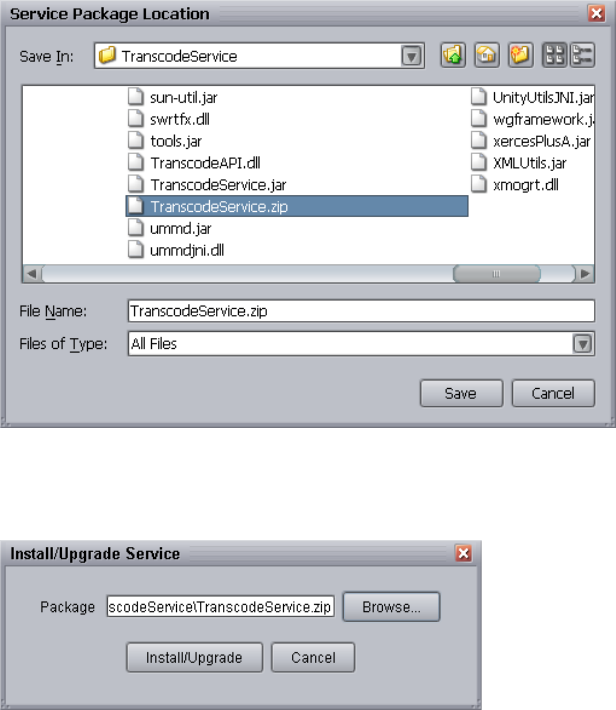
Registering a Service Manually
86
5. In the folder, select the service.zip file.
The following illustration shows the TranscodeService.zip file selected.
6. Click Save.
The path to the file appears in the Install/Upgrade Service dialog box.
7. Click Install/Upgrade.
The service and its description appear on the Services page.

Configuring a Provider for the Production Services Engine
87
Configuring a Provider for the Production Services
Engine
After the service descriptions are registered (see “Registering Services” on page 82), you need to
configure a provider for the Production Services Engine.
Prior to Production Services v3.1, you used a dialog box to connect a provider to the Production
Services Engine. Starting with Production Services v3.1, you edit an .ini file.
cInterplay Transcode, STP Encode, and Interplay Consolidate require you to use a dialog
box to connect a provider. See “Connecting the Transcode Provider to the Production
Services Engine” on page 106, “Connecting the STP Encode Provider to the Production
Services Engine” on page 291, and “Registering and Connecting a Consolidate Provider”
on page 310.

Configuring a Provider for the Production Services Engine
88
Note the following:
• If you are upgrading from a previous version, the existing .ini file is copied to the
appropriate new folder. If the associated Production Services Engine remains the same, no
further configuration is needed.
• If you are performing a new installation, the installed .ini file uses “localhost” as the name of
the associated Production Services Engine. This is appropriate if you are installing the
service on the same system as the Production Services Engine. If you are installing the
service on a different system, you need to change the default hostname by editing the .ini
file.
• The .ini file includes an automatically generated provider name. You can change the
provider name if you want.
The following procedure can be used for any service. For specific information for a service, see
the chapter for that service.
nThe Production Services and Transfer Status tool includes a Register button, which opens the
Register Provider dialog box. This dialog box is no longer needed because a provider is
automatically registered the first time it connects to the Production Services Engine.
To configure a provider for the Production Services Engine:
1. Locate the .ini file for the service and open it in a text editor, such as Windows Notepad.
The following table lists the Production Services with the path for the .ini file and the log
files.
Service Path for .ini File and Log Files
Interplay | Archive C:\ProgramData\Avid\Archive Service\DMSArchive.ini
C:\ProgramData\Avid\Archive Service\log
Interplay | Copy C:\ProgramData\Avid\Copy Service\DMSCopyMedia.ini
C:\ProgramData\Avid\Copy Service\log
Interplay | Delivery C:\ProgramData\Avid\Delivery Service\DMSIDService.ini
C:\ProgramData\Avid\Delivery Service\log
Interplay | Production
Services Automation
C:\ProgramData\Avid\Media Services
Automation\DMSCMService.ini
C:\ProgramData\Avid\Media Services Automation\log
Interplay | Move C:\ProgramData\Avid\Move Service\DMSMoveMedia.ini
C:\ProgramData\Avid\Move Service\log
Interplay | Restore C:\ProgramData\Avid\Restore Service\DMSRestore.ini
C:\ProgramData\Avid\Restore Service\log
Verifying That a Service Provider Is Connected
89
2. Substitute the hostname of the Production Services Engine.
Following is an example of a Copy service .ini file with the default hostname “localhost”:
#Mon May 05 11:34:54 EDT 2014
@5%?MaxJobs=1
@2%tMedia_Services_Engine_Hostname=localhost
@1%tProvider_Name=a51-dev_Copy_4080
Following is the same .ini file, edited to use the hostname “a51-ms_engine.”
#Mon May 05 11:34:54 EDT 2014
@5%?MaxJobs=1
@2%tMedia_Services_Engine_Hostname=a51-ms_engine
@1%tProvider_Name=a51-dev_Copy_4080
nExisting .ini files include the line @3%yAutomatically_Connect=TRUE. This line is no longer
applicable, because all services are now automatically connected.
3. A default name for the provider is automatically created by the provider software using the
following syntax:
<hostname>_<servicename>_<unique#>
The provider name in the previous example is a51-dev_Copy_4080.
Accept the default name or type a new name. This name appears in the Production Services
and Transfer Status tool. The provider name in the previous example
4. Save and close the .ini file.
The service automatically reads the .ini file and tries to connect to the Production Services
Engine. If the service fails to connect, it continues to try to connect. The re-connect interval
grows from 5 seconds to 10 minutes, depending on the amount of time that the service tries
to connect.
Verifying That a Service Provider Is Connected
To verify that a service provider is running and connected:
1. Open the Production Services and Transfer Status tool. See “Opening the Production
Services and Transfer Status Tool” on page 56.
2. Click the Providers tab.
The system displays the status of the Production Services providers. In the following
illustration, connected providers are indicated by a check mark in the Status column.
Providers not connected are indicated by a Stop sign.
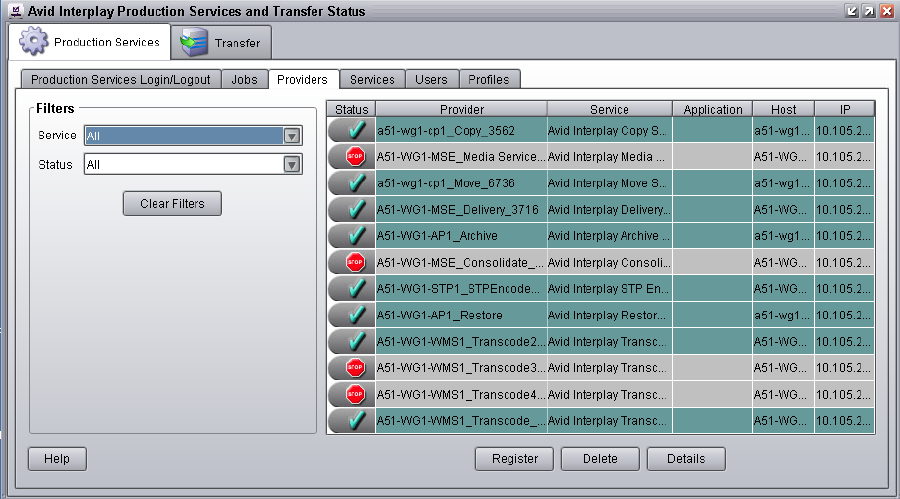
Rules for Upgrading a Service and Preserving Profiles
90
nAuto services, such as Auto Archive, do not appear in this list. Use the Avid Service Framework
Configuration window to verify that an Auto service is running. See “Verifying That the Auto
Archive Service is Running” on page 178.
Rules for Upgrading a Service and Preserving
Profiles
When you are upgrading a Production Service you need to perform the same procedures as a new
installation, such as installing the service description, registering the service provider and
connecting the provider to the Production Services Engine. However, before and after you
upgrade a service you need to follow a few rules:
• You need to log in with a user account that has administrator privileges.
• You should perform the upgrade of the service during a low usage time or when the
Production Services Engine is offline.
• You can only install a newer version of an existing service.
• The Production Services Engine only supports one version of a service at a time.
• Make sure the service providers are disconnected, by verifying that the Production Services
and Transfer Status tool’s Providers page shows Stop in the Status column.

Rules for Upgrading a Service and Preserving Profiles
91
nYou do not need to delete the service profiles or unregister the service before performing the
upgrade, as was required in versions prior to v2.0. However, if you want to delete a service
completely, you need to first delete all the profiles and providers, and then delete the service.
• During the service upgrade, you cannot cancel the upgrade, however you can continue to
work.
• When upgrading any of the Production Services, all existing profiles are saved. However,
because the new version of the service might contain new or modified profile settings, you
must review your profiles after the upgrade. New and modified settings are marked with a
caution icon (yellow triangle) in the Parameters area of the profile. These marked settings
require you to either set a valid value or leave the text box blank, depending on the
requirements for the new or modified profile setting.
For information about the various profile settings, see “Working with Production Services
Profiles” on page 92.
nYou can modify multiple profile setting values using the Profiles page. For information, see
“Modifying Multiple Profiles” on page 96.
• On the Profiles page, after the service is upgraded, a caution icon displays next to any profile
settings that were removed in the new version of the service. You need to check each
existing profile to make sure it meets your needs. The existing profile retains the older
profile settings to provide backward compatibility, however these older settings are not used
with the new version of the service.
• On the Profiles page, after the service is upgraded, a caution icon displays next to any profile
settings that the values were modified by the new version of the service. You need to check
each existing profile to make sure it meets your needs. The existing profile retains the older
profile setting values to provide backward compatibility, however these older setting values
are not used with the new version of the service.

5Working with Production Services
Profiles
The following topics provide information about working with Production Services profiles:
•Understanding Production Services Profiles
•Creating a Service Provider Profile
•Modifying Multiple Profiles
•Modifying Changed or New Options in a Profile
•Exporting and Importing Profiles
Understanding Production Services Profiles
Profiles let you set up templates to use when performing an operation. For example, you can
create a profile to use with the Interplay Transcode service. When you select the profile, the
Transcode service automatically performs the transcode operation using the specified target
resolution, stores the new media on the specified workspace, and stores the new asset in the
designated target folder, as defined in the profile.
Profiles are required if you request a service from an Avid editing application. If you request a
service from Interplay Access, some services require a profile, and others provide the option of
using a profile or setting the parameters for the current operation.
You can update the values set in multiple profiles at the same time by using the Multiple Profile
Select mode. To use this mode, the profiles must be of the same type. For example, you can
select multiple Transcode service profiles and then change the Workspace value to update the
values in all the selected Transcode service profiles. For more information, see “Modifying
Multiple Profiles” on page 96.
Before you upgrade a service you can preserve existing profiles by following the rules listed in
“Rules for Upgrading a Service and Preserving Profiles” on page 90.
This chapter provides an example of how to create a profile. For specific procedures to create
profiles for the various services, see the references in the following table.

Creating a Service Provider Profile
93
nYou do not need to create a Production Services profile for the STP Encode service. The service
requests profile information directly from the Transfer Engine during the STP Encode workflow.
nA profile is not needed for the Interplay Production Services Automation service.
If a profile includes a target workspace on an ISIS system that is configured in a multiple ISIS
workgroup, and the workspace is on a remote ISIS system, the workspace path must include the
hostname of the ISIS System Director and the name of the workspace, in the standard UNC
format:
\\hostname\workspace_name
For more information, see “Workgroups with Multiple ISIS Systems” in the
Interplay | Production Software Installation and Configuration Guide.
Creating a Service Provider Profile
This section gives an example of how to create a service provider profile. It uses the Transcode
service as an example.
To create a profile:
1. Open the Production Services and Transfer Status tool. For more information, see “Opening
the Production Services and Transfer Status Tool” on page 56.
2. Click the Profiles tab.
3. In the Service menu, select a service, for example, Avid Interplay Transcode Service.
Service name Documentation
Interplay Transcode Service “Creating an Interplay Transcode Service Profile” on page 110
Interplay Archive Service
Interplay Restore Service
“Creating an Interplay Archive or Interplay Restore Profile” on
page 161
Interplay Copy Service “Using an Interplay Copy Service Profile” on page 213
Interplay Move Service “Creating a Interplay Move Service Profile” on page 252
Interplay Delivery Provider “Creating an Interplay | Delivery Profile” on page 268
Interplay Consolidate “Creating a Consolidate Profile” on page 313
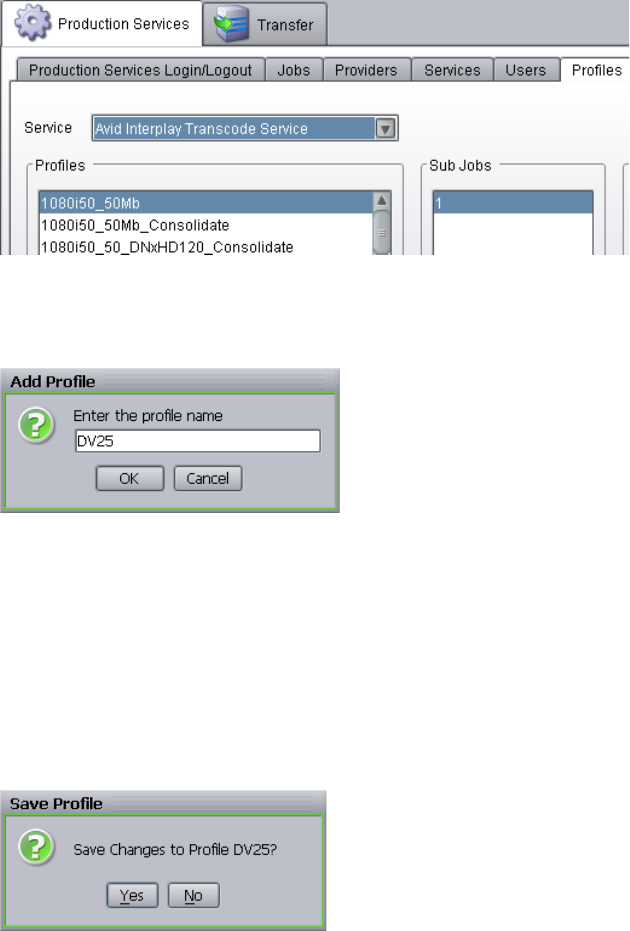
Creating a Service Provider Profile
94
4. Click Add in the Profiles area.
The Add Profile dialog box opens.
5. Type a descriptive name for the new profile in the Add Profile dialog box. This is the name
that users see when they right-click an asset and select a service, for example Transcode.
6. Click OK.
The name appears in the Profiles list and an empty template appears in the Parameters area.
7. In the Parameters area, set a value for each option as needed.
8. Click Save in the Parameters area.
The Save Profile dialog box opens.
9. Click Yes to save your changes.
You can define several operations under one main profile name. For example, you can add
subjobs to transcode several resolutions using one profile. The system processes each subjob
in turn.
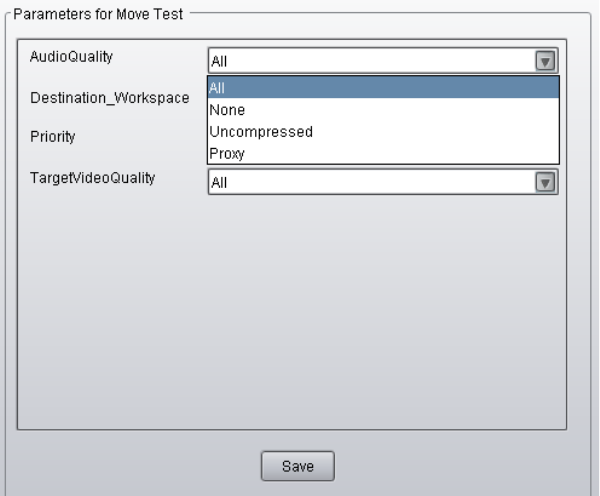
Selecting Audio Formats for Copy, Move, and Deliver
95
To add subjobs:
tClick Add in the Sub Jobs area.
Selecting Audio Formats for Copy, Move, and Deliver
In earlier versions of Interplay Copy, Interplay Move, and Interplay Delivery, transfer of audio
files depended on whether the Include Audio option was selected in the profile. With the option
selected, all audio associated a video clip was transferred with the clip. If the option was not
selected, no audio was transferred with the clip.
Starting with version 3.1, you have the option of selecting which audio formats you want to
include in the operation.
nIf you are performing a Copy or Move operation from Interplay Access, and you do not use a
profile, the behavior is not changed. Transfer of audio files depends on whether you select the
Include Audio option. A Delivery operation requires a profile.
The following illustration shows the Move profile settings, with a new setting named
AudioQuality. The default option is All.

Modifying Multiple Profiles
96
Note the following:
• For audio-only clips, the TargetVideoQuality setting is not applicable. The selection is
ignored.
• For sequences that contain an audio-only segment, you must select All or None as the
TargetVideoQuality.
• The AudioQuality setting is supported when the Production Services provider is connected
to a Production Services Engine v3.1 or later. The setting is also supported in the Production
Services Status tool in Interplay Access v3.1 when Access is connected to a Production
Services Engine v3.1 or later.
• If a pre-v3.1 version of Interplay Access is connected to a Production Services Engine v3.1,
Service Description files are already installed on the Production Services Engine, but the
AudioQuality setting is only displayed if you upgrade to v3.1 of Interplay Access.
• After the components are upgraded to v3.1, the AudioQuality setting will be displayed in
any existing Copy, Move, or Delivery profiles. It will be marked by a caution icon (yellow
triangle with exclamation point) until you make a selection from the menu and save the
profile.
• Data tracks (D tracks) are always included in a Copy, Move, or Delivery job.
Modifying Multiple Profiles
From the Profiles page of the Production Services and Transfer Status tool, you can select
multiple profiles to batch modify option values at the same time. When you select more than one
profile in the Profiles list, the Parameters area changes to multi-select mode with the title
“Parameters for All Selected Profiles.”
For example, you can select several Transcode profiles, and then change the Workspace value
once in the parameters area for all the selected profiles.
Option Audio Formats Included
All All audio formats associated with the selected asset or assets.
None No audio included with the selected asset or assets.
Uncompressed Only high-quality audio formats associated with the selected asset or assets,
for example, PCM or WAVE.
Proxy Only proxy-quality audio formats associated with the selected asset or assets,
for example, MPEG1 Layer 2.
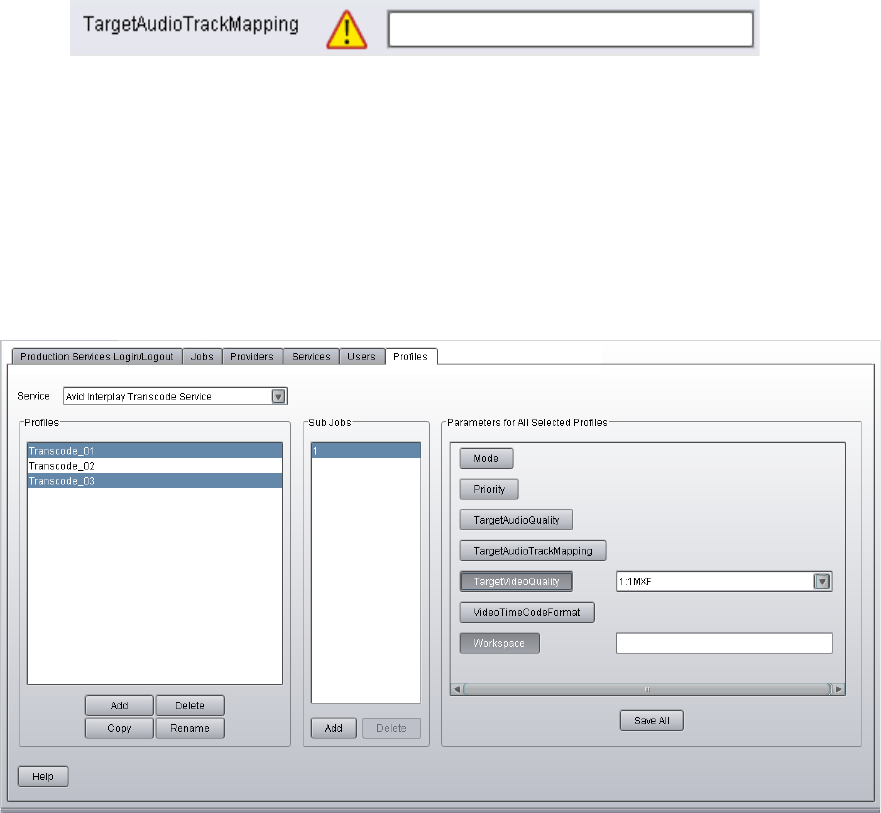
Modifying Multiple Profiles
97
This feature is useful after you upgrade a service provider and you need to modify your existing
profiles to correct any values that are not supported with the new version of the service provider.
In the Parameters area of the profile, a caution icon (yellow triangle) indicates which profile
settings require attention. This feature is also useful for setting the parameters of multiple
profiles after installing a new Production Services service.
To modify multiple profiles at the same time:
1. Open the Production Services and Transfer Status tool. For more information, see “Opening
the Production Services and Transfer Status Tool” on page 56.
2. Click the Profiles tab.
3. In the Service menu, select a service. For example, Avid Interplay Transcode Service.
4. In the Profiles list, select all the profiles you want to batch modify the setting values.
The Parameters for All Selected Profiles displays in the parameters area.
5. In the Parameters for All Selected Profiles area, click the option with the value you want to
change.
The option’s value field displays.

Modifying Changed or New Options in a Profile
98
6. Type or select a new value for the option.
7. Click Save All.
Only the options displaying their value field are updated for all of the selected profiles.
Modifying Changed or New Options in a Profile
If you upgrade a service provider, you might need to modify your existing profiles to correct any
values that are not supported with the new version of the service provider, or to add a value for a
new option. In the Parameters area of the profile, a caution icon (yellow triangle) indicates which
profile settings require attention.
To remove the Caution icon for a new profile value:
tMake any change to the option value.
In some cases, you might need to enable and then disable an option to remove the icon.
Exporting and Importing Profiles
You can export all Production Services profiles from one Production Services database to
another. This feature can be useful if your facility has more than one workgroup and you want to
share the same set of profiles. It can also be useful if you are setting up a backup Production
Services Engine. For more information, see “Setting Up a Workgroup for Production Services
Backup” on page 36.
nYou cannot export or import selected profiles. All profiles in a Production Services database are
exported or imported.
If you export profiles to a Production Services Engine that does not have the appropriate service
installed and registered, the profiles are not imported. For example, if a Production Services
Engine server does not have the Interplay Delivery service installed and registered, Interplay
Delivery profiles are not imported. After you install and register the service, import the profiles
again.
To export all profiles from a Production Services Engine:
1. On the Production Services Engine system, start the Production Services Engine.
2. In the Production Services window, click the Profiles button.
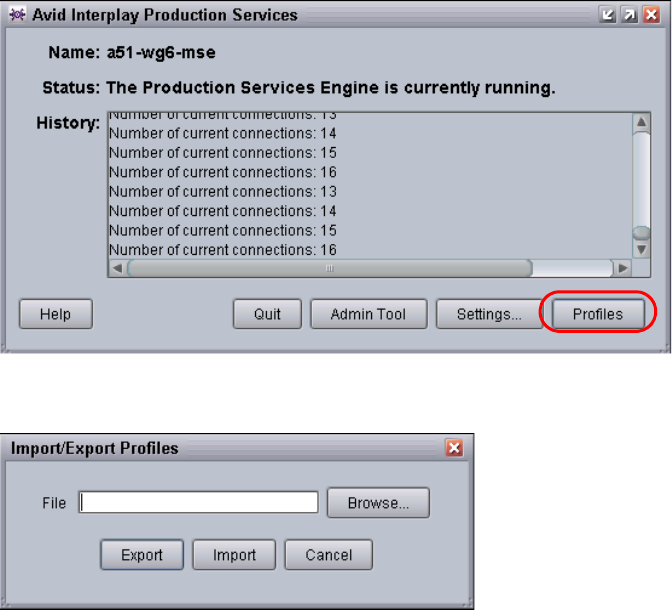
Exporting and Importing Profiles
99
The Import/Export Profiles dialog box opens.
3. To specify a location and file name, click the Browse button.
The Select File Location dialog box opens.
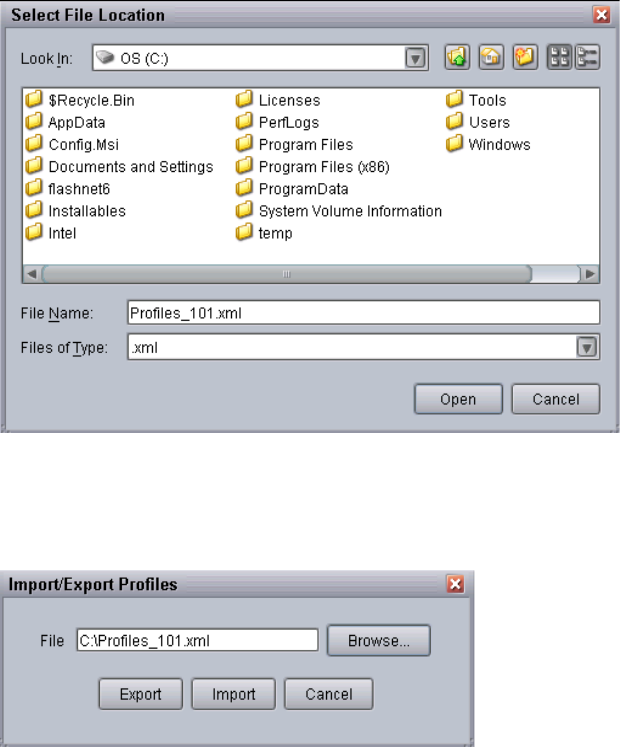
Exporting and Importing Profiles
100
4. Navigate to the folder in which you want to store the file that contains the profiles, type a file
name with the extension .xml, and click Open.
The path and file name are displayed in the Import/Export Profiles dialog box.
5. Check the path and file name, then click Export.
nAlternatively, you can type the full path and file name in the File field of the Import/Export
Profiles dialog box and click Export, If you type a file name only, the file is exported to the folder
that holds the Production Services Engine executable (for example, C:\Program
Files\Avid\Interplay Production Services\Broker).
nIf you do not use the extension .xml in the file name, a message is displayed, telling you that you
need to add the .xml extension.
A status window shows the progress of the Export process. If the operation succeeds, a
confirmation message is displayed.
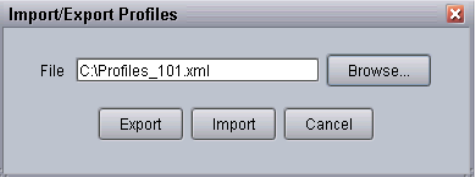
Exporting and Importing Profiles
101
To import profiles:
1. On the Production Services Engine system, start the Production Services Engine.
2. In the Production Services window, click the Profiles button.
The Import/Export Profiles dialog box opens.
3. To locate the profiles file, click the Browse button.
The Select File Location dialog box opens.
4. Navigate to the folder that holds the profiles file, select the file, and click Open.
The path and file name are displayed in the Import/Export Profiles dialog box.
The file must use the .xml extension.
5. Click Import.
nAlternatively, you can type the full path and file name in the File field of the Import/Export
Profiles dialog box and click Import.
A dialog box asks if you want to overwrite existing profiles. Click Yes.
A status window shows the progress of the Import process. If the operation succeeds, a
confirmation message is displayed.

6Working with the Transcode Service
The following topics provide information about working with the Transcode service:
•Understanding the Transcode Service
•Check List for Transcoding Assets
•Registering the Transcode Service with the Production Services Engine
•Connecting the Transcode Provider to the Production Services Engine
•Starting the Transcode Provider
•Creating an Interplay Transcode Service Profile
•Understanding the Transcode Services Modes
•Transcoding an Asset from Interplay | Access
•Understanding CROSSRATE Mode
•Understanding DATAEXTRACT Mode
•Transcoding an Asset from an Avid Editing Application
•Transcoding OMF Clips
•Working with an Auto Transcode Folder
•Stereoscopic 3D Support in Interplay Transcode
Understanding the Transcode Service
Transcoding Avid assets from one resolution to another resolution is available with the Interplay
Transcode service and Interplay Auto Transcode service. For example, you can use the Interplay
Transcode service to create a low-resolution version of a sequence or master clip. You can also
use the Interplay Transcode process to mix down the video and audio tracks during the
transcode.
If you are using the Transcode service to transcode a clip with multiple resolutions, the
Transcode service relinks to the Highest Quality resolution and then performs the transcode. The
Highest Quality resolution is determined by the Dynamic Relink feature of the Avid editing
system. For more information, see “Using MultiRez and Dynamic Relink” in the Interplay Help
or in the documentation for your Avid editing application.
Check List for Transcoding Assets
103
Before you can use the Transcode service, you need to check that the Transcode service is
installed and connected. For a list of the steps to prepare for transcoding, see “Check List for
Transcoding Assets” on page 103.
Interplay Transcode v3.0 and later is qualified to run as multiple instances on the same server.
Up to four providers are supported, depending on the total amount of CPU used. For more
information, see “Installing Multiple Transcode Providers on the Same Server” in the
Interplay | Production Software Installation and Configuration Guide.
nWhen accessing an Interplay Transcode system remotely, you should use the Microsoft Windows
Remote Desktop Connect command instead of VNC. The Remote Desktop Connect feature
requires setup on the Interplay Transcode system. For information, see the Microsoft Windows
documentation.
Interplay Transcode is used during a send-to-playback operation from MediaCentral UX. For
more information, see “Production Services Used By MediaCentral | UX” on page 23.
Check List for Transcoding Assets
For the transcode process, the following table provides a check list of steps for installing and
configuring the Production Services system in an Avid shared-storage environment, and
configuring an Avid editing system. The check list also provides references where to find more
information about each step.

Check List for Transcoding Assets
104
Transcoding Assets Check List
Task Section Reference
Make sure the Production Services Engine software
and the supporting software are installed and
configured in the workgroup.
• Avid Service Framework for Client
• Interplay Access
• Production Services Engine
• Interplay Transcode service (install this on each
server used as a provider)
nStarting with version 2.6, the Interplay
Transcode service and the STP Encode
service require you to choose during
installation how ISIS workspaces are
mounted: by drive letter or by UNC path.
For multiple ISIS workgroups, select UNC
paths if the number of workspaces required
for the client exceeds the available drive
letters. Mount the workspaces before you
start the service.
See Interplay | Production Software
Installation and Configuration Guide and
“Production Services Engine Installation and
Configuration” on page 28.
(Option) Install the Interplay Auto Production
Services service, which includes the Interplay Auto
Transcode software.
See “Preparing the Workgroup for Auto
Transcode” on page 137.
Activate the Interplay Transcode license by
connecting the application key (dongle) to a USB
port or by installing a software license.
A license can be configured for up to four
Transcode providers.
See Interplay | Production Software
Installation and Configuration Guide.
Make sure the Interplay Transcode service is
registered.
See “Registering the Transcode Service with
the Production Services Engine” on
page 105.
Connect the Interplay Transcode service provider to
the Production Services Engine.
See “Connecting the Transcode Provider to
the Production Services Engine” on
page 106.
Mount workspaces by drive letter or UNC path,
depending on how you installed Interplay
Transcode.
See “Mounting Workspaces for Interplay
Transcode and Other Production Services”
on page 26.

Registering the Transcode Service with the Production Services Engine
105
nYou do not use the Production Services Engine to configure the Auto Archive, Auto Transcode,
and Auto Copy services. Instead, use the Interplay Administrator and the Avid Service
Framework services. For more information, see “Configuring the Auto Transcode Service” on
page 138.
Registering the Transcode Service with the
Production Services Engine
After installing the Transcode provider software, you need to make sure that the current
Transcode service is registered with the Production Services Engine. The service should be listed
on the Services tab of the Production Services and Transfer Status tool. Registration is automatic
but takes place only after you restart the Production Services Engine. See “Registering Services”
on page 82.
Start the Interplay Transcode service provider. See “Starting the Transcode Provider” on
page 109.
Verify the Interplay Transcode service is connected. See “Verifying That a Service Provider Is
Connected” on page 89.
(Option) Create a Interplay Transcode profile. See “Creating an Interplay Transcode
Service Profile” on page 110.
Perform a transcode using Interplay Access. See “Transcoding an Asset from
Interplay | Access” on page 132.
Perform a transcode using an Avid editing system. See “Transcoding an Asset from an Avid
Editing Application” on page 133.
Transcoding Assets Check List (Continued)
Task Section Reference

Connecting the Transcode Provider to the Production Services Engine
106
Connecting the Transcode Provider to the
Production Services Engine
After making sure the service is registered, register the provider by connecting to the Production
Services Engine.
nIf you try to connect to the Production Services Engine before the latest service is registered, the
Status line in the Transcode Service dialog box reads:
Error From Broker! UNKNOWN_SERVICE.
If necessary, you can manually register the provider. See “Registering a Service Manually” on
page 83.
To connect the Transcode provider to the Production Services Engine:
1. Click Start and select Programs > Avid > Avid Interplay Transcode.
The Transcode Service dialog box opens.
2. Click Settings.
The Provider Settings dialog box opens.

Connecting the Transcode Provider to the Production Services Engine
107
3. Do the following:
a. Provider Name — A default name for the provider is automatically supplied. Accept the
default name or type a new name. In this example, the name is Transcode_01.
b. Production Services Engine Host Name — Type the name of the system running the
Production Services Engine application.
c. Automatically Connect — Select Yes to automatically connect the provider to the
Production Services Engine when the application starts. To prevent automatic
connection, select No.
The following illustration shows the Provider Settings dialog box with the values filled in for
the Transcode provider.
4. Click OK.
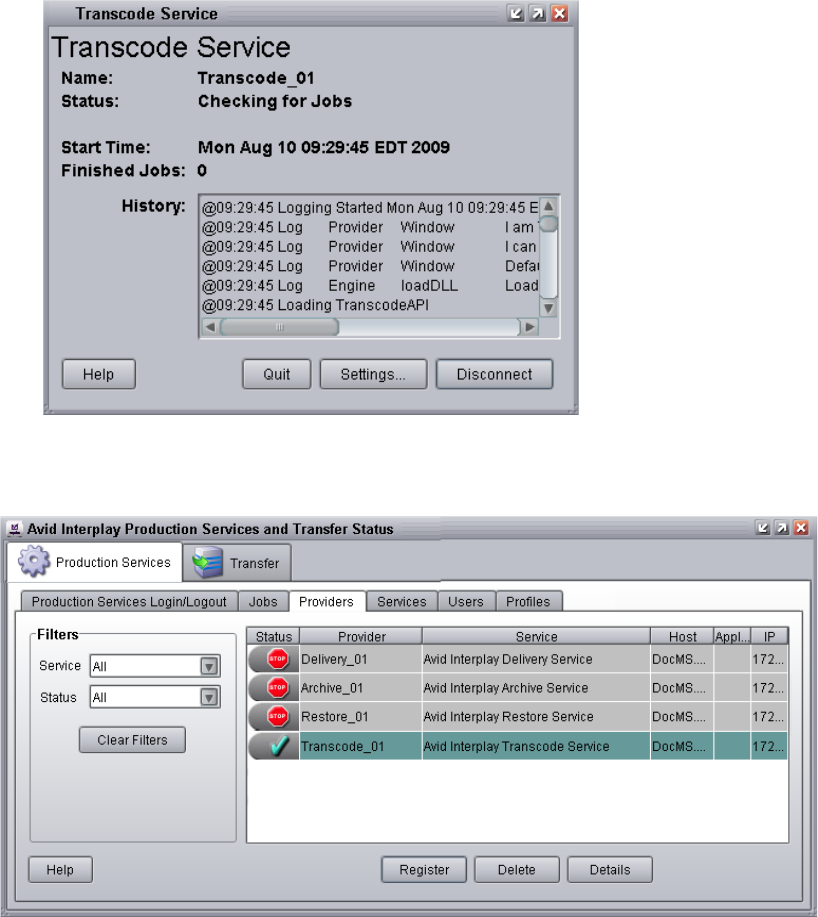
Connecting the Transcode Provider to the Production Services Engine
108
5. Click Connect in the Service window.
The Transcode Service dialog box now shows that the service is connected and shows the
name of the provider you connected.
The Provider page in the Production Services and Transfer Status tool now shows that the
service is connected, indicated by a check mark in the Status column.
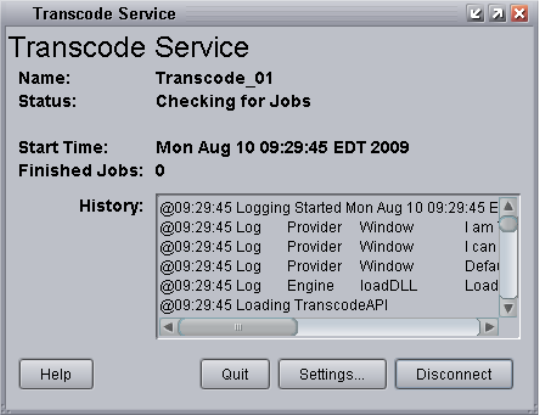
Starting the Transcode Provider
109
Starting the Transcode Provider
Make sure you have mounted at least one drive before you start the provider. See “Mounting
Workspaces for Interplay Transcode and Other Production Services” on page 26.
To start the Transcode provider:
1. Click Start and select Programs > Avid > Avid Interplay Transcode.
Depending on the service settings, one of the following happens:
- Automatically Connect—Yes, the service dialog box opens for the service you selected
and is connected to the service.
- Automatically Connect—No, the service dialog box opens for the service you selected
and displays Idle. Click the Connect button to connect to the service.
nThe service provider dialog box displays the start date and start time of the providers based on
the Microsoft Windows time.
After the connection is made, the Status line in the service dialog box reads “Checking for
Jobs,” and the History window displays the message “Connection Established.” The Connect
button changes to a Disconnect button.
The following example shows the Transcode Service dialog box as connected.
Creating an Interplay Transcode Service Profile
110
nIf the provider cannot connect to the Production Services Engine, the Status line reads
“Connection Error.” Ensure the Production Services Engine is running, the service is registered,
the provider is registered, and then click Connect again.
nStarting with Interplay 3.0.5, all Production Services (Transcode, Copy, and so on) are displayed
as two processes in the Processes tab of the Windows Task Manager of the provider system. This
is as designed. The tool that creates the services automatically creates a second process for each
service to ensure that the service shuts down smoothly. This change is visible only in Task
Manager.
Each service is listed only once in the Services tab.
Creating an Interplay Transcode Service Profile
You must create a profile to use when performing a Transcode or an Auto Transcode operation.
You select a Transcode profile after selecting an asset in Interplay Access or in an Avid editing
application.
Transcode profiles let you define the following:
• The portion of the Avid asset that is transcoded
• Job priority
• Resolution and format
• Workspace for the media files
To create a transcode profile:
1. Open and log in to the Production Services and Transfer Status tool as described in
“Opening the Production Services and Transfer Status Tool” on page 56.
2. Click the Profiles tab.
3. In the Service menu, select Avid Interplay Transcode Service.
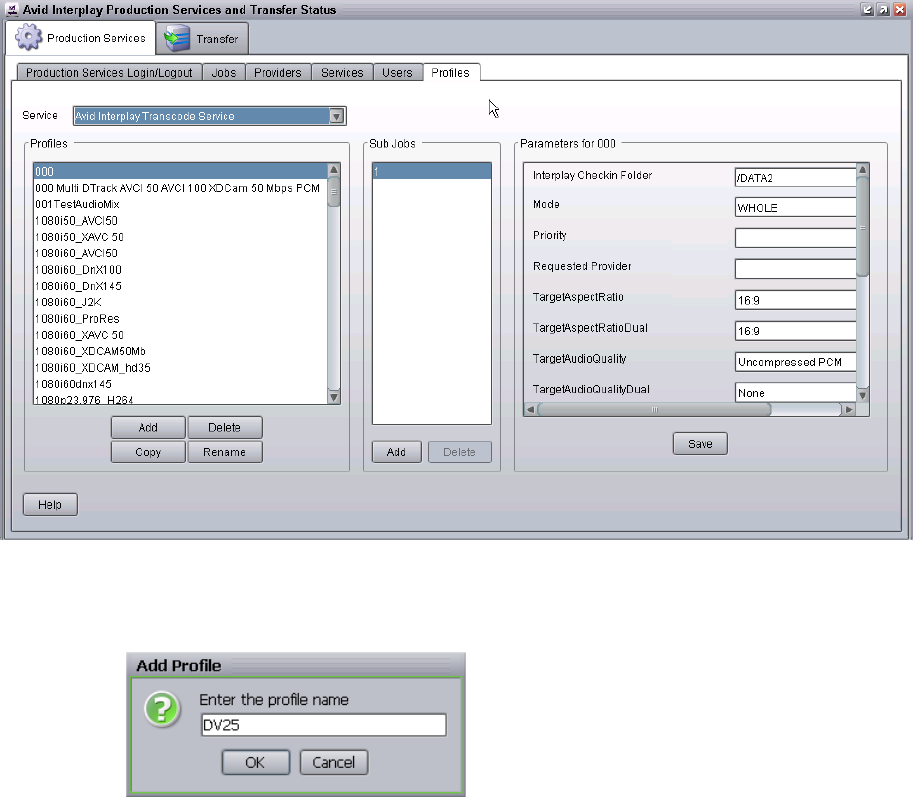
Creating an Interplay Transcode Service Profile
111
4. Click Add in the Profiles area.
The Add Profile dialog box opens.
5. Type a descriptive name for the new profile in the Add Profile dialog box. This is the name
that users see when they right-click an asset and select Transcode.
6. Click OK.
The name appears in the Profiles list and an empty template appears in the Parameters area.
7. In the Parameters area, select a Mode as follows:
- WHOLE: Transcodes the entire clip.
- CONSOLIDATE: Transcodes only the portion of a clip used to create a subclip or
portions of clips used to create a sequence.

Creating an Interplay Transcode Service Profile
112
- MIXDOWN: Transcodes and mixes down the video and audio to create one master clip.
- DUALMIXDOWN — Transcodes the selected asset twice to create a single master clip
with two resolutions associated with it.
- CROSSRATE — Creates a master clip in a project format different from the project
format of the original clip.
- DATAEXTRACT — Extracts the D1 track as a separate MXF file when you transcode
DNxHD media that contains embedded ancillary data.
For more information, see “Understanding the Transcode Services Modes” on page 122.
8. In the Parameters area, define the other values you want in the profile for the selected mode.
See “Transcode Profile Parameters” on page 112.
9. Click Save in the Parameters area.
The Save Profile dialog box opens.
10. Click Yes to save your changes.
You can define several transcode operations under one main profile name. For example, you
can add subjobs to transcode several resolutions using one profile. The system processes
each subjob in turn.
To add subjobs:
tClick Add in the Sub Jobs area.
Transcode Profile Parameters
All transcode profile parameters are displayed for any mode that you select, but some parameters
are applicable only to particular modes. The following table describes all parameters with notes
about specific modes.

Creating an Interplay Transcode Service Profile
113
Transcode Profile Settings
Parameter Description
Interplay Checkin Folder (MIXDOWN, DUALMIXDOWN, CROSSRATE,
DATAEXTRACT only) Specify the folder where the
transcoded assets are stored in the Interplay database. Use a
forward slash. For example,
/Catalogs/CheckinFolder/Test
nDo not set the Interplay Checkin Folder as a top-level
folder under AvidWG. Instead, create the check-in
folder at least one level down from the top-level folder.
This checkin folder is limited to the Interplay database in the
local workgroup
Mode • WHOLE: Transcodes the entire clip. See “Understanding
the Transcode Services Modes” on page 122.
•CONSOLIDATE: Transcodes only the portion of a clip
used to create a subclip or portions of clips used to create
a sequence. See “Understanding the Transcode Services
Modes” on page 122.
•MIXDOWN: Transcodes and mixes down the video and
audio of a sequence to create one master clip. See
“Understanding MIXDOWN Mode” on page 123.
•DUALMIXDOWN: Transcodes and mixes down the
video and audio of a sequence to create a one master clip
with two resolutions associated with it. See
“Understanding DUALMIXDOWN Mode” on page 125.
•CROSSRATE: Creates a master clip in a project format
different from the project format of the original clip. See
“Understanding CROSSRATE Mode” on page 127.
•DATAEXTRACT: Extracts the D1 track as a separate
MXF file when you transcode DNxHD media that
contains embedded ancillary data. See “Understanding
DATAEXTRACT Mode” on page 129.
Priority Select a priority. This value allows you to assign job priorities
to different profiles. Priority numbers range from 1 (highest
priority) through 100 (lowest priority). The default priority
number assigned to each job is 50.

Creating an Interplay Transcode Service Profile
114
Requested Provider The name of the Transcode provider that you want to use to
send an Transcode job. This must be the name of the
Transcode provider as it is registered with the Production
Services Engine, not the host name. Supply this name only if
you have more then one Transcode provider and want to use
this profile for a particular Transcode provider.
TargetAspectRatio Select the desired aspect ratio.
TargetAspectRatio Dual (DUALMIXDOWN mode only) Select the aspect ratio for the
second transcode
TargetAudioQuality Select an audio resolution for the transcode or select None.
• None
(MIXDOWN or DUALMIXDOWN mode only) The
mixed-down clip does not include the audio tracks.For
example, if you select None from the TargetAudioQuality
menu, then the audio tracks are not mixed down during
the Interplay Transcode operation.
• MPEG1 Layer 2: Digital audio compressed to the
MPEG1 Layer 2 specification at 96 Kb/s.
• Uncompressed PCM: 16-bit 48-kHz digital audio
• Uncompressed PCM 24-bit: 24-bit 48-kHz digital audio
TargetAudioQualityDual (DUALMIXDOWN mode only) Select an audio resolution
for the second transcode.
• None
The mixed-down clip does not include the audio tracks.
For example, if you select None from the
TargetAudioQualityDual menu, then the audio tracks are
not mixed down during the Interplay Transcode operation.
• MPEG1 Layer 2 - digital audio compressed to the
MPEG1 Layer 2 specification at 96 Kb/s.
• Uncompressed PCM: 16-bit 48-kHz digital audio
• Uncompressed PCM 24-bit: 24-bit 48-kHz digital audio
nIf you select a dual target, you should also select a
primary target.
This parameter is ignored for other Transcode modes.
Transcode Profile Settings (Continued)
Parameter Description

Creating an Interplay Transcode Service Profile
115
TargetAudioTrackMapping (MIXDOWN or DUALMIXDOWN mode only) Lets you
identify the mapping of source audio tracks to the output
(target) audio tracks. See “Mapping Audio Tracks in
MIXDOWN, DUALMIXDOWN, and CROSSRATE Modes”
on page 116. This parameter is ignored for other Transcode
modes.
TargetProjectType (CROSSRATE mode only) Select the project type to which
you want to transcode. See “Understanding CROSSRATE
Mode” on page 127. Select None if you do not want to
transcode to a different project type. This parameter is
ignored for other Transcode modes.
TargetVideoQuality Select a video resolution for the transcode. Select None if you
do not want the transcoded clip to include a video track.
TargetVideoQualityDual (DUALMIXDOWN mode only) Select a video resolution for
the second transcode. Select None if you do not want the
transcoded clip to include a video track.
This parameter is ignored for other Transcode modes.
nIf you select a dual target, you should also select a
primary target.
VideoTimeCodeFormat Not used - for future use.
Workspace Type the name of the Avid shared-storage workspace that will
hold the new media files.
If the workspace is part of a multiple-ISIS workgroup:
Existing profiles will work correctly with the workspaces as
currently defined, but new or edited profiles that specify a
workspace on a remote ISIS system must include the
hostname of the ISIS System Director.
\\hostname\workspace_name
WorkspaceDual (DUALMIXDOWN mode only) Type the name of a second
Avid shared-storage workspace that will hold the new media
files. See “Understanding DUALMIXDOWN Mode with
Two Workspaces” on page 126.
This parameter is ignored for other Transcode modes.
Transcode Profile Settings (Continued)
Parameter Description

Creating an Interplay Transcode Service Profile
116
Mapping Audio Tracks in MIXDOWN, DUALMIXDOWN, and CROSSRATE
Modes
When you create a Interplay Transcode profile for mixing down the source audio (in
MIXDOWN, DUALMIXDOWN, and CROSSRATE modes), you can also specify how the
source audio tracks map to the target audio tracks. The TargetAudioTrackMapping text box lets
you identify the source audio tracks and how you want them mapped to the target audio tracks.
Use the following rules in the TargetAudioTrackMapping text box:
AudioMode[S or A]TargetAudioTrack=SourceAudioTrack+SourceAudioTrack;
For example, S1=1+2; performs a stereo mapping of the source audio track 1 to the target audio
track 1 and the source audio track 2 to the target audio track 2.
If you leave the TargetAudioTrackMapping text box blank, then the default audio track mapping
is used: S1=0; which is stereo mode with all source audio tracks mapping to target audio tracks 1
and 2.
You can enter a series of output (target) track mapping specifications. The following table
explains the specifications:
TargetAudioTrackMapping
Text Box Rule
AudioMode Type S for stereo mode that uses two target audio tracks and applies
balancing.
Type A for mono mode that uses one target audio track and does not
include balancing.
Type O to specify surround sound 5.1
Type Q to specify surround sound 7.1. For more information, see
“Support for Surround Sound Audio Tracks” on page 120.
nThe letters S, A, O, and Q are not case sensitive.
TargetAudioTrack Type the target audio track number.
• For stereo mode the target audio track must be an odd number.
The second stereo target audio track is automatically set using
the number you type +1. For example, if you type S1 then the
target audio tracks are audio track 1 and audio track 2.
=You must type an equal sign after the Target Audio Track before
specifying the source audio tracks.

Creating an Interplay Transcode Service Profile
117
The following table provides some common uses of the audio track mapping process.
SourceAudioTrack Type a source audio track number.
• Type a specific source audio track number or a series of track
numbers separated by a + (plus sign).
•Type 0 to include all available source audio tracks.
•Type -1 to include all odd numbered source audio tracks.
•Type -2 to include all even numbered source audio tracks.
;You must type a ; (semicolon) as a terminator after the source audio
track numbers.
TargetAudioTrackMapping
Text Box Rule
TargetAudioTrackMapping
Text Box Explanation
A0=0; Mono mode, all available source audio tracks are mapped to equal
number of target audio tracks, such as source audio track 1 maps to
target audio track 1, source audio track 2 maps to target audio track
2, and so on.
A1=0; Mono mode, all available source audio tracks are mapped to target
audio track 1.
A1=-1; Mono mode, all available odd numbered source audio tracks are
mapped to target audio track 1.
A2=-2; Mono mode, all available even numbered source audio tracks are
mapped to target audio track 2.
S1=0; Stereo mode, all available source audio tracks are mapped to target
audio track 1 and target audio track 2. This is the default result if the
text box is left blank.

Creating an Interplay Transcode Service Profile
118
The following table provides an example of using audio track mapping with multi-language
source clips.
Override for default panning in Transcode mixdowns: The default audio panning behavior
for stereo mixdowns is center pan. This has been the behavior since Interplay v2.5 and matches
the behavior of Avid editing applications. (Previously the default panning was odd tracks left and
even tracks right.)
You can override this default to pan all odd tracks left and all even tracks right. To use this
override, enter P0=0; in a profile's TargetAudioTrackMapping text box, followed by the desired
track mapping. For example, to pan all odd tracks stereo left and all even tracks stereo right,
enter P0=0;S1=0;
nIf you enter only P0=0; the following error message is displayed: “No output track descriptors
found.”
Source Audio
Tracks
TargetAudioTrackMapping
text box Results
Track 1 and 2 - music
Track 3 and 4 - English
voice over
Track 5 and 6 - French
voice over
S1=1+2+3+4; Stereo mode
• source audio track 1 is mapped to target
audio tracks 1 (music odd track)
• source audio track 2 is mapped to target
audio tracks 2 (music even track)
• source audio track 3 is mapped to target
audio target track 1 (English odd track)
• source audio track 4 is mapped to target
audio track 2 (English even track)
S3=1+2+5+6; Stereo mode
• source audio track 1 is mapped to target
audio track 3 (music odd track)
• source audio track 2 is mapped to target
audio track 4 (music even track)
• source audio track 5 is mapped to target
audio track 3 (French odd track)
• source audio track 6 is mapped to target
audio track 4 (French even track)
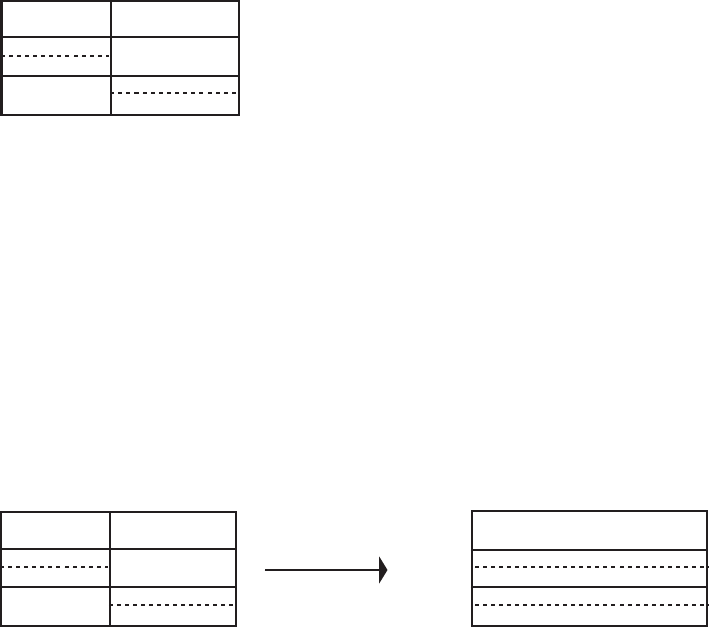
Creating an Interplay Transcode Service Profile
119
Mapping Multichannel Audio Tracks in MIXDOWN, DUALMIXDOWN, and
CROSSRATE Modes
Avid editing applications let users create and work with multichannel audio tracks. For example,
for a clip, you can combine audio tracks A1 and A2 into a single stereo track.The Interplay
Transcode Mixdown option (in MIXDOWN, DUALMIXDOWN, and CROSSRATE modes) lets
you specify how stereo tracks map to target audio tracks.
For example, you might want to transcode and mixdown a sequence that includes two tracks (A1
and A2), each of which is a stereo pair.
If you are using the Transcode Mixdown option, and you want to preserve the two tracks as
stereo pairs, use the following mapping:
S1 = 1;S3 = 2;
This mapping specifies that:
• For stereo output track 1 (S1), use source track 1
• For stereo output track 3 (S3), use source track 2
For stereo mode, the target track must be an odd number, because it represents two stereo tracks.
The transcoded, mixed-down sequence preserves the two tracks as stereo pairs, as shown in the
following illustration:
V1
A1
A2
Clip 1 Clip 2
V1
A1
A2
A1 & A2
A3 & A4
V1Clip 1 Clip 2 Clip 1.new
Transcode
Mixdown
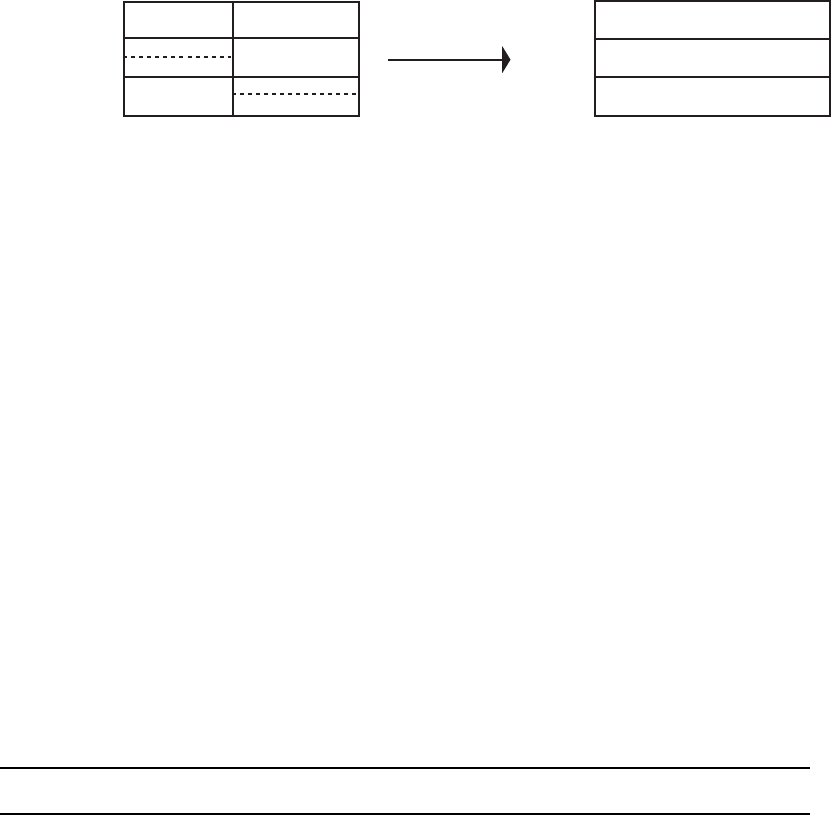
Creating an Interplay Transcode Service Profile
120
Other mappings will combine the stereo pair to a single track. For example, A0 = 0 will create
two mono tracks, as shown in the following illustration.
cIf you are using the Transcode Mixdown option with stereo tracks, make sure that your
audio track mapping is correct for the output that you want. The Transcode Mixdown
service uses the track information as labeled in the sequence, not as labeled in the original
master clips.
Support for Surround Sound Audio Tracks
Interplay v2.5 and later supports an end-to-end workflow for clips and sequences that include
surround sound audio tracks. Track groups are preserved when you check objects in and out of
the Interplay database and process them through Production Services and Interplay Transfer.
If you want to use the Transcode MIXDOWN, DUAL-MIXDOWN, or CROSSRATE mode with
surround sound audio, you need to create a profile that includes mapping information in the
TargetAudioTrackMapping text box. For information about creating a Transcode profile, see
“Creating an Interplay Transcode Service Profile” on page 110.
Production Services v2.5 and later includes two letters to use for mapping surround-sound audio:
• Use the letter O to specify surround sound 5.1
• Use the letter Q to specify surround sound 7.1
You use an Avid editing system to configure audio tracks for the surround sound mix. By default,
the Avid editing system arranges the surround sound mix as follows. Tracks are relative to the
output starting track number.
V1
A1
A2
A1
A2
V1
Clip 1 Clip 2 Clip 1.new
Transcode
Mixdown
Track 5:1 7:1
First Left Front Left Front
Second Center Center
Third Right Front Right Front
Fourth Left Rear Left Center
Fifth Right Rear Right Center

Creating an Interplay Transcode Service Profile
121
For additional information on surround sound, see the What’s New guide for your Avid editing
application.
You can create a Transcode profile that specifies which tracks to use in the mixdown. The
surround sound mix is preserved in the mixdown. The following table shows several examples of
what to type in the TargetAudioTrackMapping text box.
Limitation
Interplay Assist cannot play sequences created in an Avid editing system that contain surround
sound clips if the Audio Monitoring Mix Mode is set to Direct Out. Workaround: Set the Audio
Monitoring Mix Mode to Mono or Stereo.
nInterplay Assist can play surround sound clips as Direct Out, and can create and play shotlists
that contain surround sound clips.
Sixth Low Frequency Left Rear
Seventh Right Rear
Eighth Low Frequency
Track 5:1 7:1
Format Result
O1=0;
All source tracks are included in a 5.1 mix and are mixed down to tracks
1through 6.
Q1=0;
All source tracks are included in a 7.1 mix and are mixed down to tracks 1
through 8.
O1=3+4+5+6+7+8;
Tracks 3 through 8 are included in a 5.1 mix and are mixed down to tracks 3
through 8. Use this if there are tracks that are not included in the surround
sound mix. In this example tracks 1 and 2 are not included.
Q1=2+3+4+5+6+7+8+9;
Tracks 2 through 9 are included in a 7.1 mix and are mixed down to tracks 2
through 9. Use this if there are tracks that are not included in the surround
sound mix. In this example, track 1 is not included.
Understanding the Transcode Services Modes
122
Understanding the Transcode Services Modes
The Transcode profile lets you select various modes to perform different types of transcodes.
• WHOLE — The transcode process creates new media for an entire clip. For sequences or
subclips, the complete source clips that make up the sequence or subclip are transcoded. All
audio tracks and video track V1 are transcoded. Effects are not transcoded. No new clip is
created.
• CONSOLIDATE — For subclips, the transcode process creates new media only for the
portion of the clip that makes up the subclip. For sequences, the transcode process creates
new media only for the portion of the clips that are contained in the sequence. This process
creates partially online media for the related clips. Relevant portions of all audio tracks and
video track V1 are transcoded. Effects are not transcoded. No new clip is created.
• MIXDOWN — The transcode process mixes down the audio and video of a sequence to
create new media and a new master clip. Profile settings let you control if the audio and
video are included in the mixed-down master clip. See “Understanding MIXDOWN Mode”
on page 123.
The new master clip is named clipname,xcode mix,n, where n is the number of Transcode
jobs run since the last start of the service (for example, MyClip,xcode mix,2). It is created in
the same folder as the source sequence.
• DUALMIXDOWN — The transcode process mixes down the audio and video of a sequence
to create two sets of new media and a new master clip associated with both sets of media.
Profile settings let you control if audio and video are included in the mixed-down master clip
and if resolutions are stored in separate workspaces. See “Understanding DUALMIXDOWN
Mode” on page 125 and “Understanding DUALMIXDOWN Mode with Two Workspaces”
on page 126.
The new master clip is named clipname,xcode mix,n, where n is the number of Transcode
jobs run since the last start of the service (for example, MyClip,xcode mix,2). It is created in
the same folder as the source sequence.
• CROSSRATE — The transcode process creates new media and a new master clip in a
project format different from the project format of the original clip. See “Understanding
CROSSRATE Mode” on page 127.
The new master clip is named clipname,crossrate,n, where n is the number of Transcode jobs
run since the last start of the service (for example, MyClip,transcode,3). It is created in the
same folder as the source master clip.
• DATAEXTRACT — The transcode process extracts the D1 track as a separate MXF file
when you transcode DNxHD media that contains embedded ancillary data. See
“Understanding DATAEXTRACT Mode” on page 101.
Understanding the Transcode Services Modes
123
Understanding MIXDOWN Mode
The Interplay Transcode service can mix down the audio and video during the transcode process
of sequences. You can set up an Interplay Transcode profile in the Production Services and
Transfer Status window for the type of mixdown you want to perform. Then you can use
Interplay Access or an Avid editing system to select the items to transcode and select the profile
to use for the transcode and mixdown.
When performing a mixdown the following items are preserved in the mixed-down master clips,
if they are available in the original sequence:
• Locators and column property values
• Restrictions on any portion of the sequence
• Headframes are generated if the source sequence contained them
The metadata of the newly created mixed-down master clip contains a reference to the original
sequence.
Video mixdown supports all target resolutions available in the TargetVideoQuality list in the
Transcode profile tab. Audio mixdown supports all target formats in the TargetAudioQuality list.
See “Creating an Interplay Transcode Service Profile” on page 110.
You can set up the Interplay Transcode profile to map the source audio tracks to various target
audio tracks. For information about mapping the audio tracks, see “Mapping Audio Tracks in
MIXDOWN, DUALMIXDOWN, and CROSSRATE Modes” on page 116.
nAn Interplay Transcode profile that is set up for audio mixdown can be used with sequences or
clips that do not contain audio. Therefore, you do not need a specific profile for video-only
mixdowns. This is also true for video mixdowns: a profile set for video mixdown can be used with
sequences that do not contain video. In both cases, the mixdown finishes as expected.
Effects Support
If the sequence you send to the Transcode Mixdown service contains Avid real-time effects
(including RTAS audio effects), the effects are rendered as part of the Transcode Mixdown
process.
If the sequence you send to the Transcode Mixdown service includes any of the following
effects, you need to render them in your Avid editing application before starting the Transcode
Mixdown process:
• Non-real-time effects (blue-dot effects)
• Third-party 3D effects

Understanding the Transcode Services Modes
124
• AudioSuite plug-in effects
• Third-party audio plug-in effects
If you revise the sequence after transcoding, you might need to render the effects again.
To make sure all effects are transcoded and mixed down correctly, consider rendering all effects
before starting the Transcode Mixdown process.
Interplay Transcode Mixdown and Avid Editing Mixdown
The Mixdown mode in the Interplay Transcode service functions differently from the Avid
editing application’s mixdown features. The following table lists the differences between the
Interplay Transcode Mixdown mode and an Avid editing application’s mixdown feature.
nWhen selecting the target audio quality in the profile, Uncompressed PCM is for 16 bits/sample
rate.
Interplay Transcode
Mixdown Mode
Avid Editing Application Mixdown
Feature
Mixdown type Mixes down a sequence to audio only,
video only, or can include both audio
and video in the mixdown.
Mixes down a sequence to audio only or
video only. Cannot mix down both audio
and video in the sequence.
Effects Limited effect support:
Avid real-time effects (including RTAS
effects) are supported for rendering.
Other audio plug-in effects are not
supported for rendering.
Non-real-time effects (blue-dot
effects), third-party 3D effects,
AudioSuite and third-party audio
plug-in effects must be rendered before
the mixdown.
Mixdown supports full effects.
Video support Additional target resolutions are
available, including proxy resolutions.
Limited target resolutions, cannot create
proxy resolutions.
Audio support MP2 audio support. You can select
48 kHz sample rate and 16 bits.
PCM audio support. You can select
48 kHz sample rate and 16 or 24 bits.
MP2 audio not supported.
PCM audio support. You can select sample
rates (32, 44.1 or 48 kHz) and 16 or 24 bits.
Understanding the Transcode Services Modes
125
Understanding DUALMIXDOWN Mode
The Interplay Transcode service uses the DUALMIXDOWN mode to create one master clip with
two resolutions. For example, you can use DUALMIXDOWN mode to create a master clip that
contains both low-resolution and high-resolution media files of a selected asset. The
low-resolution proxy files are available for use while the high-resolution is being generated. You
can use profile settings to determine if the video and audio are included in the mixed-down
master clip.
nFor information about the Interplay Transcode profile settings used for mixing down the audio
and video in DUALMIXDOWN mode, see “Transcode Profile Parameters” on page 112.
Transcoding with DUALMIXDOWN mode is useful in workflows that include streaming
playback of assets in Interplay Access.
When performing a dual mixdown the following items are preserved in the mixed-down master
clip, if they are available in the original sequence:
• Locators and column property values
• Restrictions on any portion of the sequence
• Headframes are generated if the source sequence contained them
The metadata of the newly created mixed-down master clip contains a reference to the original
sequence.
Video mixdown supports all target resolutions available in the TargetVideoQuality lists in the
Transcode profile tab. Audio mixdown supports all target formats in the TargetAudioQuality
lists. See “Creating an Interplay Transcode Service Profile” on page 110.
You can set up the Interplay Transcode profile to map the source audio tracks to various target
audio tracks. For information about mapping the audio tracks, see “Mapping Audio Tracks in
MIXDOWN, DUALMIXDOWN, and CROSSRATE Modes” on page 116.
nAn Interplay Transcode profile that is set up for audio mixdown can be used with sequences or
clips that do not contain audio. Therefore, you do not need a specific profile for video only
mixdowns. This is also true for video mixdowns: a profile set for video mixdown can be used with
sequences that do not contain video. In both cases, the mixdown finishes as expected.
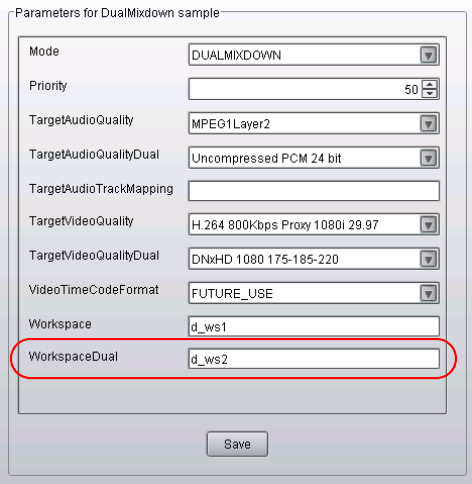
Understanding the Transcode Services Modes
126
Understanding DUALMIXDOWN Mode with Two Workspaces
If you use the DUALMIXDOWN mode in the Interplay Transcode service to create two
resolutions for a single sequence or clip, you can save the media files in two different
workspaces. For example, if you mix down a sequence to a low-resolution version and a
high-resolution version, you can save the low-resolution media files in one workspace and store
the high-resolution media files in another. Using two workspaces can help you manage
shared-storage disk space and deletion workflows.
For Interplay v2.4, a Transcode profile now includes an option labeled WorkspaceDual. In the
following illustration, the result of the Transcode operation will be low-resolution media
(MPEG1Layer2 audio and H.264 video) created in workspace d_ws1 and high-resolution media
(Uncompressed PCM and DNxHD 1080) created in workspace d_ws2.
Note the following:
• The WorkspaceDual field is ignored unless the profile mode is set for DUALMIXDOWN.
• If the profile mode is set for DUALMIXDOWN:
- If either of the workspace fields is empty, the workspace in the other field will be used to
store media for both mixdowns.
- If the workspace fields are the same, the workspace listed will be used to store media for
both mixdowns.
Understanding the Transcode Services Modes
127
- If the workspace fields are different and a secondary video or audio target is specified
without a corresponding primary target, the following error is displayed in the Details
window:
“Dual video selected without a primary selected” or “Dual audio selected without a
primary selected.”
- If the workspace fields are different and a primary video or audio target is specified
without a corresponding secondary target, the mixdown is performed as usual and the
media is stored in the primary workspace.
- If there is a problem storing the media in one of the workspaces (for example, the
workspace is full), the mixdown job fails.
Understanding CROSSRATE Mode
You can use the Interplay Transcode service to transcode master clips and subclips from one
project type to another, even if the frame rate does not match. Previously, you could use
Transcode only for rate-compatible project types, such as NTSC 30i to 1080i/60. Now you can
use Transcode for project types that have different frame sizes or rates, such as transcoding a
720p/60 clip to a 1080i/60 clip, or a 25i PAL clip to a 30i NTSC clip.
Transcoding a clip from one project type to another creates a new clip and media. Transcoding a
subclip creates a new master clip associated only with the media used in the subclip.
Starting with Interplay v2.4, a Transcode profile includes the following options:
• From the Mode list, select CROSSRATE.
• From the TargetProjectType list, select the project type to which you want to transcode. This
parameter is ignored for other Transcode modes.
This parameter is ignored for CROSSRATE mode when you select a DNxHR resolution as
the TargetVideoQuality. The frame rate and frame dimensions in the TargetVideoQuality are
used instead.
CROSSRATE mode uses the same audio processing as MIXDOWN mode. By default, a new
clip is created with a stereo pair of audio tracks. If you want a different result, specify the audio
track mapping in the TargetAudioTrackMapping field of the CROSSRATE profile. For example,
A0=0; specifies mono mode in which all available source audio tracks are mapped to an equal
number of target audio tracks. For more information, see “Mapping Audio Tracks in
MIXDOWN, DUALMIXDOWN, and CROSSRATE Modes” on page 116.
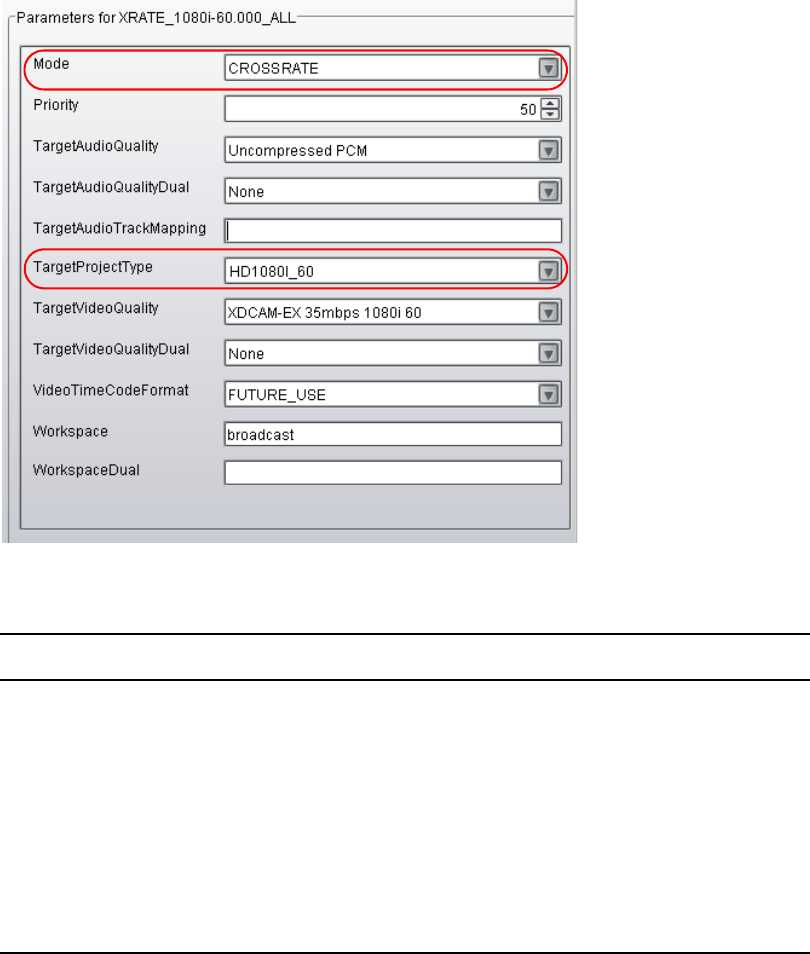
Understanding the Transcode Services Modes
128
The following illustration shows specific CROSSRATE options. The result of a Transcode
operation using this profile is a 1080i/60 clip with XDCAM-EX media and uncompressed PCM
audio.
The following project types are qualified as targets:
Frame Rate Project Type
25 PAL 25i, 1080i/50
29.97 NTSC 30i, 1080i/60
23.976 720p/23.976
50 720p/50
59.94 720p/60
23.976 1080p/23.976
24 1080p/24
Understanding the Transcode Services Modes
129
Note the following:
• You need to install a v2.4 or later service description file (TranscodeService.zip) and
Interplay Access v2.4 or later to use the new profile options. See “Registering a Service
Manually” on page 83.
•Sequences are not supported for transcoding across project types.
• Ancillary data tracks (D tracks) in source clips are not preserved in transcoded clips.
• Transcoding a clip from one project type to another creates a new clip with the additional
text “crossrate.” For example, transcoding a clip named “Clip1” produces a new clip named
“Clip1,crossrate,n” where n is the number of Transcode jobs run since the last start of the
service.
• Because transcoding a clip from one project type to another creates a new clip, you cannot
dynamically relink the original clip to the media created with the new clip. If you select
“Allow Mixed Frame Rate Media” in the Dynamic Relink settings, you can replace the
original clip with the new clip.
• Transcoding to two target resolutions is not supported. Any entry in
TargetAudioQualityDual or TargetVideoQualityDual is ignored.
• Audio-only clips are not supported for CROSSRATE mode.
• CROSSRATE mode uses the default Motion Adapter settings that are used by Avid editing
applications during editing transcode operations.
Understanding DATAEXTRACT Mode
DATAEXTRACT mode allows you to extract the D1 track as a separate MXF file when you
transcode DNxHD media that contains embedded ancillary data.
This mode is specific to the Legacy method of handling ancillary data that uses DNxHD media
with the ancillary data embedded in it. It does not apply to the Data Track method where a
master clip contains an accompanying data (D1) track. If you attempt to process a master clip
with an accompanying D1 track, the Transcode operation fails.
nThis mode is used in a workflow that exports a simplified AAF file using XDCAM HD media.
When you activate DATAEXTRACT mode in a profile, the resulting transcode operation
performs the following tasks:
• Creates new transcoded video and audio .mxf files in the specified resolutions.
• Isolates the embedded ancillary data in a separate .mxf file data track.
• Creates a new clip that references the audio and video tracks plus the new data (D1) track.
The system appends the
,extract
extension to the clip or sequence name to designate that
the media file set now contains an extracted D1 track.
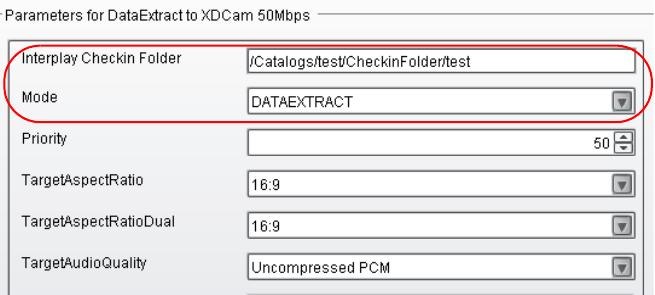
Understanding the Transcode Services Modes
130
The following illustration shows the Transcode profile Parameters area with DATAEXTRACT
mode selected. The illustration also shows an Interplay Checkin Folder field.
The following illustration shows the clip created in this example in Interplay Access.
• The clip appears in the specified check-in folder. The system creates the folder if it does not
exist.
• The clip name contains the added text
,extract,2
.
• A new .mxf file is created for the data track.
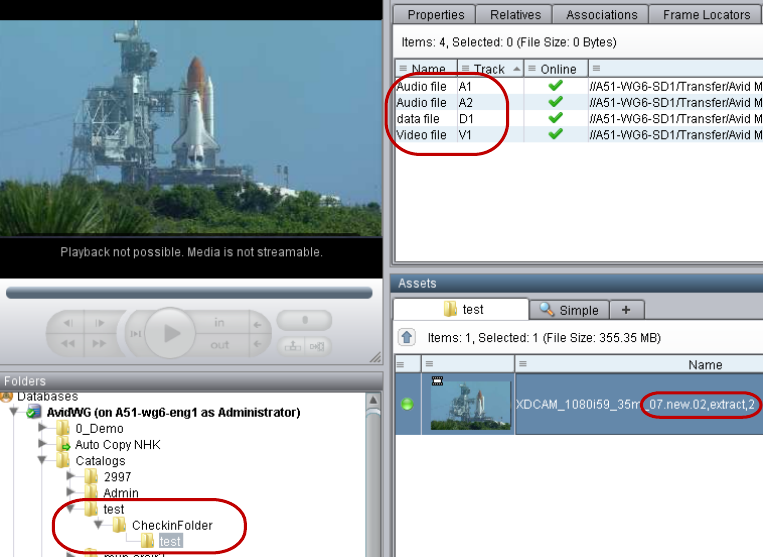
Understanding the Transcode Services Modes
131
Limitations for DATAEXTRACT Mode
DATAEXTRACT mode is new for releases later than Interplay Transcode v3.0.5. If you send a
profile specifying DATAEXTRACT mode to an Interplay Transcode v3.0.5 or earlier system,
Interplay Transcode defaults to WHOLE mode, which performs an ordinary transcode based on
the video and audio targets in the profile. The system does not create a D track and does not
report any D track-related errors.
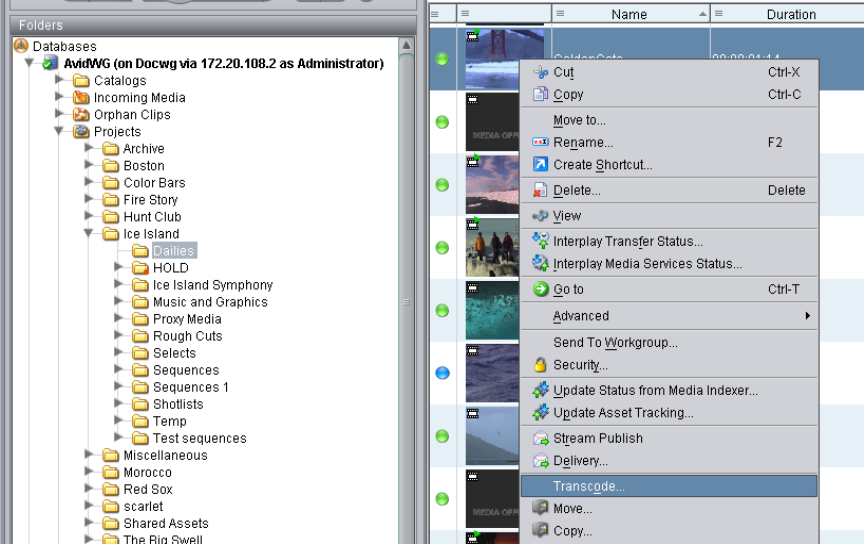
Transcoding an Asset from Interplay | Access
132
Transcoding an Asset from Interplay | Access
This section describes how to manually transcode an asset. For information on automatically
transcoding an asset, see “Working with an Auto Transcode Folder” on page 137.
To transcode an asset from Interplay Access:
1. Make sure the Production Services Engine and Interplay Transcode service are running.
2. Click Start and select All Programs > Avid > Avid Interplay Access.
3. Locate the asset that you want to transcode.
4. Right-click the asset and select Transcode.
The Transcode dialog box opens.
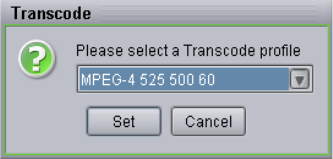
Transcoding an Asset from an Avid Editing Application
133
5. Select a profile from the menu and click Set.
The system performs the transcode operation.
6. (Option) To view the progress of the Transcode job, select View > Interplay Production
Services Status.
After the transcode is complete, the new resolution comes online on the asset selected for
transcoding.
nIf media is already available in the target resolution, the Interplay Transcode job displays a
warning (green with a question mark icon) in the Production Services and Transfer Status tool.
Transcoding an Asset from an Avid Editing
Application
To transcode an asset from an Avid editing application, first connect to the Production Services
Engine, then perform the transcode.
To connect to the Production Services Engine:
1. In the Avid editing application, select Production Services from the Settings list.
The Production Services Settings dialog box opens.

Transcoding an Asset from an Avid Editing Application
134
2. Fill in the following sections:
- Select the “Production Services are Available” option.
- Hostname — Type the computer name of the system running the Production Services
Engine.
- Type your user name and password. This user name can be one set up explicitly in
Production Services Engine by the Production Services administrator. It can also be any
valid Avid Interplay user name. For example, you can use the same user name and
password that you use to connect to the Interplay Window.
- Shared Storage — Leave this field blank. This setting is no longer used
- Notification and Email address — You can use this option if your Production Services
Engine is set up for e-mail notification. See “Configuring the Production Services
Engine” on page 31.
3. Click OK.
To transcode a clip or sequence:
1. Make sure the Production Services Engine and Interplay Transcode service are running.
2. Select the clip or sequence in the bin or select the asset in the Interplay Window.
3. Select File > Production Services > Avid Interplay Transcode Service > profile name, where
profile name is a profile set up for the Transcode service.
The system performs the transcode operation according to the rules in the profile that you
select. See “Creating an Interplay Transcode Service Profile” on page 110.
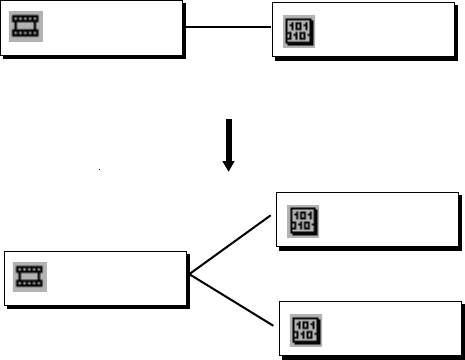
Transcoding OMF Clips
135
4. (Option) If you have the Interplay Access application installed on your system, start the
application and select View > Interplay Production Services Status to view the job progress.
If you have the standalone Production Services and Transfer Status tool installed, click Start
and select Programs > Avid > Avid Production Services and Transfer Status.
nIf media is already available in the target resolution, the Interplay Transcode job displays a
warning (green with a question mark icon) in the Production Services and Transfer Status tool.
Transcoding OMF Clips
You can use the Interplay Transcode service to transcode OMF clips to AAF/MXF clips while
maintaining the same resolution or by transcoding them to a different resolution.
Maintaining the same resolution is especially useful for facilities that have a large number of
OMF clips (a format used by earlier versions of Avid products) and want to transcode them to the
current AAF/MXF format.
The following illustration shows how the transcoding takes place:
• Clip 1 includes OMF metadata that is associated with DV 25 OMF media.
• Interplay Transcode uses a profile that specifies DV 25 as the target resolution to transcode
Clip 1 and its associated media.
• Clip 1 retains its Source ID but now includes AAF metadata. The clip retains its association
with the DV 25 OMF media, but it is also associated with the new DV 25 MXF media.
Clip 1 (OMF)
Source ID: 12345
Media (OMF)
DV 25
Media (MXF)
DV 25
Clip 1 (AAF)
Source ID: 12345
Media (OMF)
DV 25
Transcode
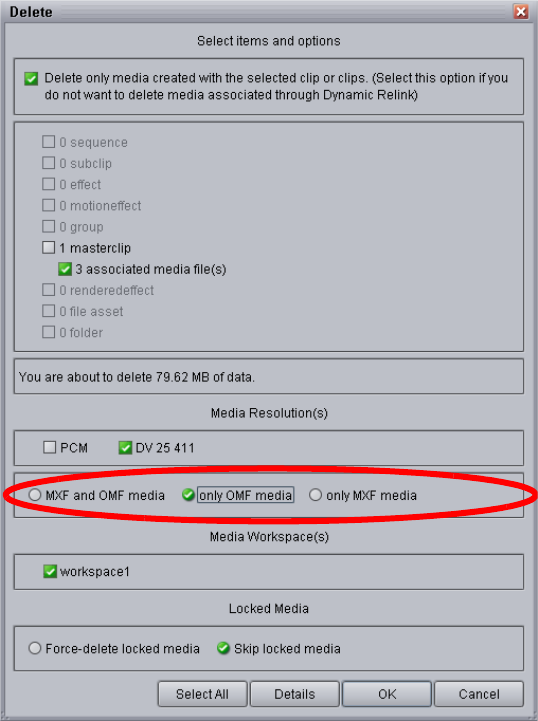
Transcoding OMF Clips
136
After you transcode the clip, you have the option of deleting the OMF media. Use the Delete
function in Interplay Access, and select “only OMF media,” as shown in the following
illustration:
If the “only OMF media” option is not displayed, use the Delete Behavior view in the Site
Settings of the Interplay Administrator and select the option “Allow user choice for deleting
OMF/MXF media.”
nIf you transcode an OMF clip to an AAF/MXF clip with a different resolution (introduced in
Interplay v2.2.1), the transcoded clip will be associated with both the original OMF media and
the new MXF media.
Working with an Auto Transcode Folder
137
nAfter you transcode an OMF clip once to any AAF/MXF resolution, you cannot transcode it to
the same resolution. The job will fail with a warning.
Working with an Auto Transcode Folder
You can identify a folder or subfolder as an Auto Transcode folder. When you move a clip or
sequence asset to the Auto Transcode folder, the Interplay Auto Transcode Service automatically
submits the clip to the Interplay Transcode service for transcoding.
nThe system does not create a new asset when you perform the transcode. You have one asset with
two resolutions associated with the asset. You can view the resolutions in Interplay Access or the
Interplay window.
The Auto Transcode service processes files according to the date and time, using a first-in,
first-out (FIFO) rule. The date and time used depends on when an asset was copied to the auto
folder.
You should create only the minimum number of Auto Transcode folders that you need. The Auto
Transcode service regularly scans all auto folders, so if there are a lot of folders to scan, there can
be an impact on the performance of the Interplay Engine.
The following topics describe working with an Auto Transcode folder:
•Preparing the Workgroup for Auto Transcode
•Identifying an Auto Transcode Folder
•Transcoding Avid Assets Using an Auto Transcode Folder
•Location of Automatically Transcoded Files
Preparing the Workgroup for Auto Transcode
For information on setting up your workgroup for transcoding, see “Check List for Transcoding
Assets” on page 103.
In addition to the Transcode Service application, you must also install the Interplay Auto
Production Services, which includes the Auto Transcode service. These services are installed
with the Auto Archive installation. For details on installing the software, see the
Interplay | Production Software Installation and Configuration Guide.
For details on configuring the Interplay Auto Transcode service, see “Configuring the Auto
Transcode Service” on page 138.
To verify that the Auto Transcode service is running, see “Verifying that the Auto Transcode
Service is Running” on page 140.
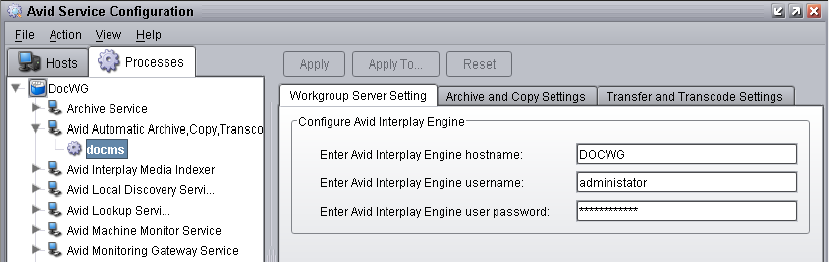
Working with an Auto Transcode Folder
138
Configuring the Auto Transcode Service
You use the Avid Service Configuration tool (a component of Avid Service Framework) to
configure the Auto Transcode service. The Avid Service Configuration tool is an application that
lets you set and change parameters for each of the different Avid services and applications in
your workgroup environment. For more information about using Avid Service Framework, see
the Avid Service Framework User’s Guide.
To configure the Avid Auto Transcode service using Avid Service Configuration tool:
1. Click the Start button, and select All Programs > Avid > Avid Service Framework > Avid
Service Configuration.
The system displays the Workgroup Server Setting tab for the Avid Automatic Archive,
Transcode, Transfer, and Copy services.
2. Type the Interplay Engine hostname, user name, and password.
3. Click the Transfer and Transcode Settings tab.
The system displays the settings for the AutoTransfer and AutoTranscode.
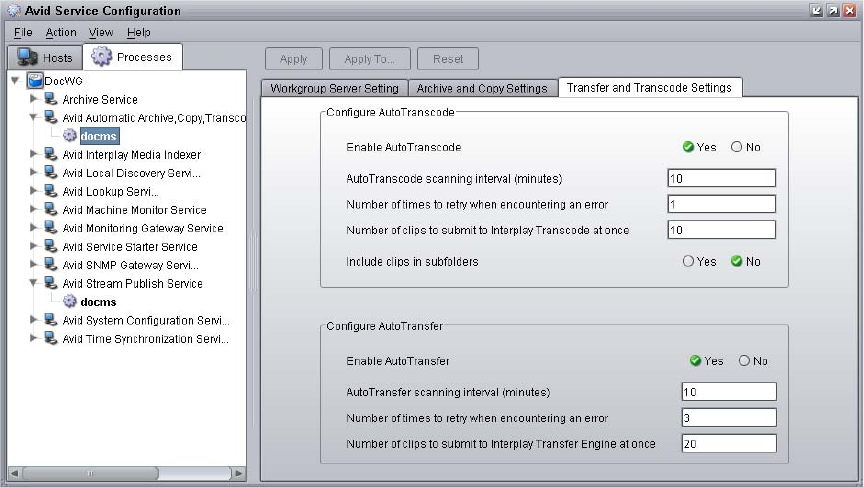
Working with an Auto Transcode Folder
139
4. In the Configure AutoTranscode area, do the following:
a. Enable AutoTranscode—Select Yes.
b. AutoTranscode scanning interval—Type the number of minutes between scans,
minimum allowed is 3 minutes.
c. Number of times to retry when encountering an error—Type the number of times you
want the system to retry after an error occurs.
d. Number of clips to submit to Interplay Transcode at once—Type the number of clips
you want sent for transcode at one time.
The system can better manage the job-processing task when the jobs are processed in
small batches. The default number is 10 clips submitted for processing at one time. For
example, when the system is transcoding 1,000 clips to the Auto Transcode folder, the
first 10 clips are transcoded, then the next 10 clips are transcoded, and so on until all
1,000 clips are transcoded.
You can verify that the Auto Transcode service is running. See “Verifying that the Auto
Transcode Service is Running” on page 140.
e. Include clips in subfolders—Select Yes if you want to transcode the clips in subfolders.
5. Click Apply.
6. Close the Avid Service Configuration window.
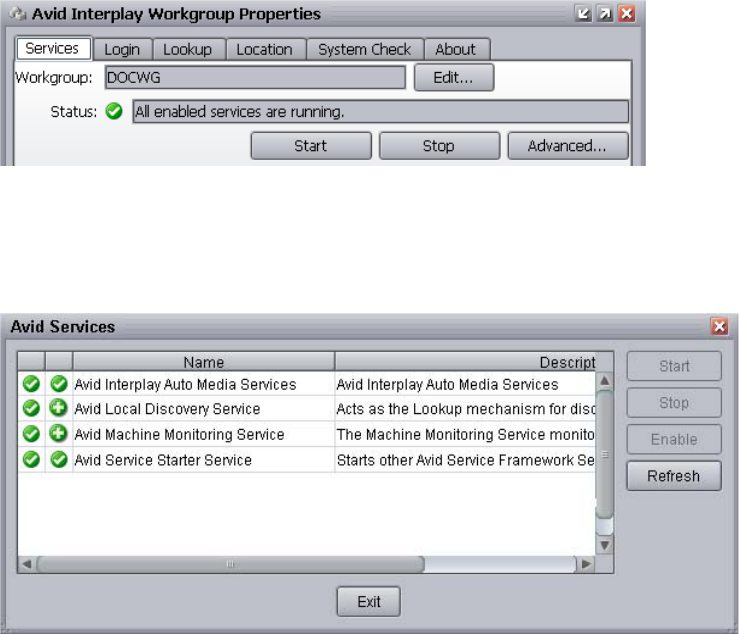
Working with an Auto Transcode Folder
140
nFor information about configuring the Auto Transfer service, see the Interplay | Transfer Setup
and User’s Guide.
Verifying that the Auto Transcode Service is Running
You use the Interplay Workgroup Properties (a component of Avid Service Framework) to verify
that an Auto service is running. For more information about using Avid Service Framework, see
the Avid Service Framework User’s Guide.
To verify that the Auto Transcode service is running:
1. On any server in the workgroup, click the Start button, and then select All Programs > Avid
> Avid Service Framework > Avid Workgroup Properties.
The Avid Workgroup Properties window opens.
If there is a green check mark next to the “Status” field, all services are running.
2. To view the services, click the Advanced button.
The Avid Services dialog box opens.
This dialog box lets you view all services that are monitored by the Service Framework. The
Auto Transcode service is managed by the Interplay Auto Production Services service
(formerly called Interplay Auto Production Services service).
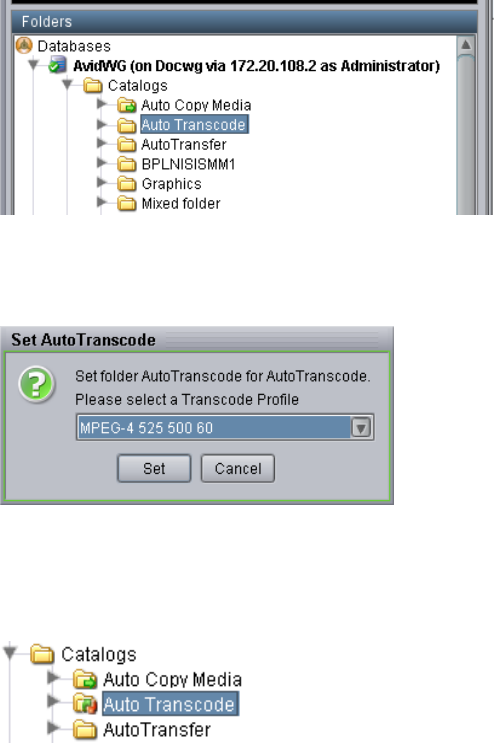
Working with an Auto Transcode Folder
141
3. If necessary, select a service and click Start.
Identifying an Auto Transcode Folder
You must be logged in as an Administrator on Interplay Access to create an Auto Transcode
folder in the Interplay database.
To set up an Auto Transcode folder:
1. Create a folder (or select an existing folder) in the Interplay database, using Interplay
Access.
The following illustration shows a folder named Auto Transcode. You can use any name that
fits your workflow.
2. Right-click the folder and select Set AutoTranscode.
The Set AutoTranscode dialog box opens.
3. Select a Transcode profile for the folder and click Set. For information about profiles, see
“Creating an Interplay Transcode Service Profile” on page 110.
The system adds an Auto Transcode icon to the folder.
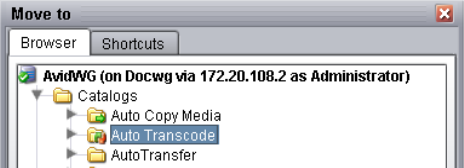
Working with an Auto Transcode Folder
142
Transcoding Avid Assets Using an Auto Transcode Folder
To transcode Avid assets using an Auto Transcode folder:
1. Make sure a folder is configured for Auto Transcoding. See “Identifying an Auto Transcode
Folder” on page 141.
2. (Option) Ensure that the Production Services Engine and the Interplay Transcode Service
are connected. See “Verifying That a Service Provider Is Connected” on page 89.
3. Open Interplay Access and log in.
4. Locate a clip that you want to transcode, right-click the file, and select Move To.
The Move To dialog box opens.
5. Navigate to your Auto Transcode folder and click OK.
The system starts the Transcode job as a background task.
6. (Option) To view the progress of the Transcode job, select View > Interplay Production
Services Status.
Location of Automatically Transcoded Files
The workspace for the new media files associated with the asset is specified by the profile
associated with the Auto Transcode folder. See “Identifying an Auto Transcode Folder” on
page 141.
The system does not create a new asset in the Interplay database when you perform an Auto
Transcode operation. The asset that you selected for transcode now has an additional resolution
associated with it. You can view the associated resolutions in Interplay Access or in the Interplay
Window.
To view the new resolution in Interplay Access:
1. Open Interplay Access and log in.
2. From the View Presets menu, select Resolutions.
The Resolutions window opens.
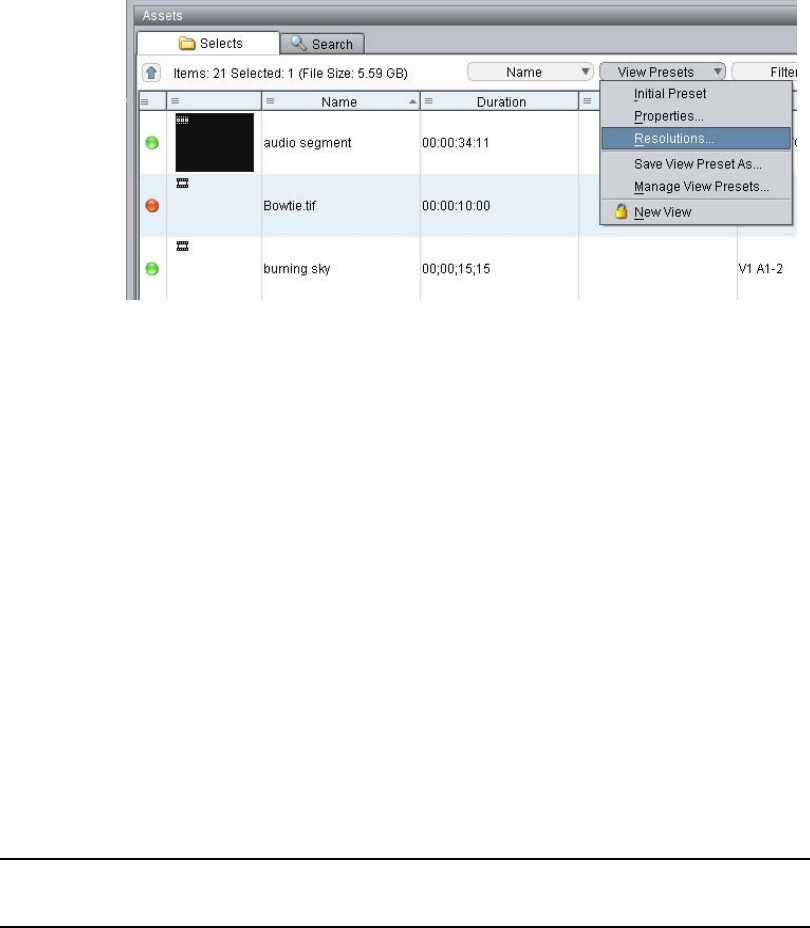
Stereoscopic 3D Support in Interplay Transcode
143
3. Select a new resolution for displaying in the Content area.
4. Click OK.
Columns appear for each resolution you selected.
Stereoscopic 3D Support in Interplay Transcode
Interplay Transcode v2.6 and later includes the following stereoscopic 3D support:
• Transcoding of stereoscopic clips, stereoscopic subclips, and sequences containing
stereoscopic clips and subclips, in WHOLE and CONSOLIDATE modes.
• Mixdown of sequences containing only stereoscopic clips, stereoscopic subclips, or both.
Metadata properties (column data) and DRM (restrictions) are preserved.
You can use MIXDOWN mode to change the stereoscopic project type of the sequence when
creating a mixed-down clip. Options for creating a MIXDOWN profile now include an option
labeled TargetStereoScopicProjectType.
The following table lists the stereoscopic project types you can select and the resulting
mixed-down clips.
Stereoscopic
Project Type Master Clips Created
Stereoscopic
Clip Created?
Monoscopic One master clip No
Leading Eye One master clip for the Leading Eye footage only No
Left eye only One master clip for the Left Eye footage only No
Right Eye only One master clip for the Right Eye footage only No

Stereoscopic 3D Support in Interplay Transcode
144
The following project types and resolutions are supported as sources and targets:
• 1080p 23.976
- DNxHD 36, 115, 175, 175x, 444
- AVC-Intra 50 and 100
- 8-bit HD Uncompressed (1:1 MXF in Avid editing systems)
• 1080i 60
- DNxHD 145. 220, 220x
- AVC-Intra 50 and 100
- 8-bit HD Uncompressed (1:1 MXF in Avid editing systems)
• 1080i 50
- DNxHD 120, 185, 185x
- AVC-Intra 50 and 100
- 8-bit HD Uncompressed (1:1 MXF in Avid editing systems)
Note the following limitations:
• DUALMIXDOWN mode is not supported for sequences containing stereoscopic clips,
stereoscopic subclips, or both.
• CROSSRATE mode is not supported for stereoscopic clips or subclips.
• Frame locators (markers) are not preserved during mixdowns.
• H.263 and H.264 resolutions are not supported as target resolutions for transcoding.
nFor information about working with stereoscopic project types on an Avid editing system, see the
Avid Stereoscopic 3D Editing Workflow Guide, which is available on the Customer Support
Knowledge Base.
nFor information about creating a Transcode profile, see “Creating an Interplay Transcode
Service Profile” on page 110.
Side by side One master clip with Left and Right images side by side Yes
Over / Under One master clip with the Left image above the Right image Yes
Full One master clip for the Left eye, one master clip for the Right eye Yes
Stereoscopic
Project Type Master Clips Created
Stereoscopic
Clip Created?

7Working with the Archive and Restore
Services
The following topics explain how to set up and use the Interplay Archive service and Interplay
Restore service to archive and restore assets:
•Understanding Archive and Restore Services
•Check List for Archiving and Restoring Assets
•Archive Configuration and Setup
•Registering the Archive or Restore Service with the Production Services Engine
•Configuring an Archive Provider or Restore Provider for the Production Services Engine
•Configuring the Archive Service
•Connecting to the Archive Database and Creating Folders in Interplay Access
•Working with Interplay Archive and Interplay Restore Profiles
•Archiving Assets from an Avid Editing Application
•Archiving Assets Using Interplay Access
•Working with an Auto Archive Folder
•Searching the Archive Database
•Restoring Assets from the Archive Database
•Working with Partial Restore
•Configuring a Workgroup to Use Multiple Archive Engines
Understanding Archive and Restore Services
Interplay supports two types of databases:
• An online database maintained by the Interplay Engine. The name of the database must be
AvidWG.
• An offline database maintained the Interplay Archive Engine. The name of the database
must be AvidAM. The Interplay Archive Engine requires its own server.
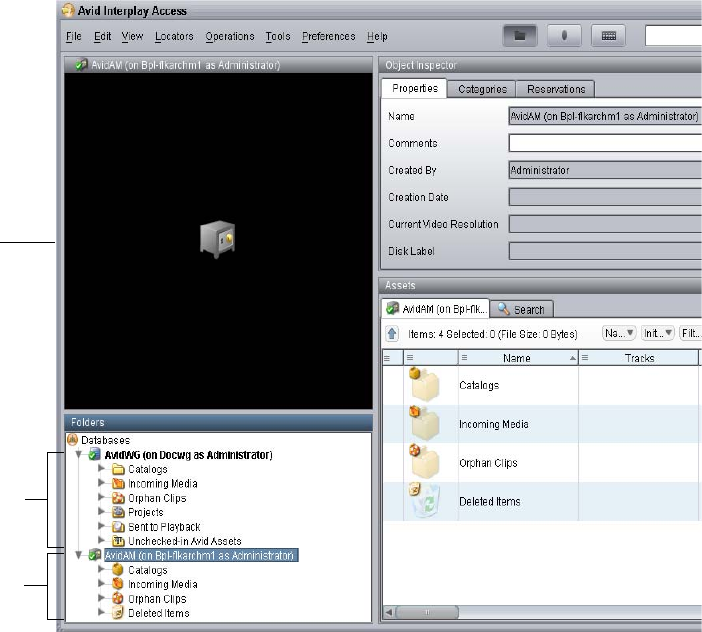
Understanding Archive and Restore Services
146
The following illustration shows an Interplay (online) database and an Interplay Archive (offline)
database in Interplay Access. When the Interplay Archive is selected in the database tree view,
the Monitor displays a the icon of a safe.
Archiving allows permanent archiving of important material and also allows you to locate and
restore archived material.
The Interplay Archive solution integrates the Interplay Archive Engine with FlashNet™ from
Software Generation Limited (SGL) to perform archival and retrieval operations. Archiving is
performed from a central Windows server to mass storage devices for subsequent retrieval back
to disk. FlashNet provides the interface between the Archive Engine and the storage devices. For
more information on SGL software and to download copies of the latest FlashNet
documentation, see the SGL Web page at www.sgluk.com.
The Archive database keeps track of the files that you store on the external storage device and
lets you restore the files to your online system when they are needed. For example, you might
have high resolution and low resolution versions of a clip. To save disk space, you can archive
Interplay
database
Interplay
Archive
database
Safe icon

Check List for Archiving and Restoring Assets
147
the high resolution version and edit with the low resolution version. When your sequence is
finished, you can restore the high resolution version from the archive and relink your sequence to
the high resolution version.
nThe Archive process archives rendered effects as part of a sequence, not as separate assets. If
you restore a sequence in the online database, and the sequence is different from the archived
sequence, you need to render the effects again.
The Interplay Auto Archive service lets you create Auto Archive folders. Any assets placed in an
Auto Archive folder are archived according to the Archive settings. For example, you can create
an Auto Archive folder for a media server (such as an AirSpeed®). Any assets ingested by the
media server are placed in the associated Auto Archive folder and are automatically archived
after the capture is complete.
nReference clips and rendered effects in the AutoArchive folder are not archived.
Check List for Archiving and Restoring Assets
For the archiving process, the following table provides a check list of steps for installing and
configuring the Production Services system in an Avid shared-storage environment and on an
Avid editing system. The check list also provides references for where to find more information
about each step.
For information on configuring for multiple Archive Engines, see “Configuring a Workgroup to
Use Multiple Archive Engines” on page 193.
Archiving and Restoring Assets Check List
Task Section Reference
Set up and configure an Interplay Archive
Engine and associated external storage library
for archiving.
See “Archive Configuration and Setup” on
page 149.
Make sure the Production Services Engine
software and the supporting software are
installed and configured in the workgroup.
See the Interplay | Production Software
Installation and Configuration Guide and
“Production Services Engine Installation and
Configuration” on page 28.
Install the Interplay Archive provider software,
which includes the Archive service and
Restore service. If needed, install the Auto
Archive service.
See the Interplay | Production Software
Installation and Configuration Guide.

Check List for Archiving and Restoring Assets
148
For troubleshooting information, see ““Archive and Restore Troubleshooting” on page 323” on
page 313.
Activate the Interplay Archive license by
connecting the application key (dongle) to a
USB port or by installing a software license.
See Interplay | Production Software Installation
and Configuration Guide.
Install Avid shared-storage client software. See the Avid shared-storage client documentation.
Make sure the Interplay Archive service and
Interplay Restore service are registered.
See “Registering the Archive or Restore Service
with the Production Services Engine” on
page 150.
Start the Archive provider and the Restore
provider and connect them to the Production
Services Engine.
See “Configuring an Archive Provider or Restore
Provider for the Production Services Engine” on
page 151.
Verify that the services are connected. See “Verifying That a Service Provider Is
Connected” on page 89.
Connect the Avid shared-storage client to the
Avid shared-storage system and mount the
required workspaces.
See “Mounting Workspaces for Interplay
Transcode and Other Production Services” on
page 26
Configure the Interplay Archive services See “Configuring the Archive Service” on
page 153.
Create Archive and Restore profiles. See “Working with Interplay Archive and
Interplay Restore Profiles” on page 160.
Connect to the Interplay Archive database and
create folders.
See “Connecting to the Archive Database and
Creating Folders in Interplay Access” on
page 157.
Configure the Avid editing system. See “Archiving Assets from an Avid Editing
Application” on page 166.
Perform an archive operation. See “Archiving Assets from an Avid Editing
Application” on page 166, “Archiving Assets
Using Interplay Access” on page 170 and
“Working with an Auto Archive Folder” on
page 174.
Perform a restore operation. See “Restoring Assets from the Archive
Database” on page 185.
Archiving and Restoring Assets Check List (Continued)
Task Section Reference
Archive Configuration and Setup
149
Archive Configuration and Setup
You typically set up four servers for archiving:
• The Archive Engine server (includes the FlashNet client software)
• The SGL FlashNet server
• The Production Services Engine server
• The Archive Provider server (includes the FlashNet client software)
You can also set up a Cluster configuration for your Archive Engine.
Interplay Archive Engine
The Archive Engine installation is very similar to the Interplay Engine installation. The
following are the main differences:
• It is not necessary to split the database because it is not possible to archive file assets.
• The database is called AvidAM.
• There is no temporary license key. On the Interplay Engine it is possible to connect one
Access client to the engine when no permanent license is loaded. This is not possible on the
Archive Engine. It is necessary to load a license before you are able to connect with Access.
It is also necessary to load the license before you create the database.
• The AvidAM database has fewer pre-defined folders than the AvidWG database.
For information on installing the Interplay Archive Engine and Interplay Access, see the
Interplay | Production Software Installation and Configuration Guide and the
Interplay | Production ReadMe for the current release.
You use the Interplay Administrator and Interplay Access to configure, manage, and
communicate with the Archive Engine. See the following documents:
•Interplay | Production Engine and Avid Archive Engine Administration Guide describes how
to configure and administer the database. You use the same techniques to administer the
Interplay Archive Engine database and the Interplay Engine database.
•Interplay Access User’s Guide describes how to use Interplay Access to work with assets in
the database.
SGL FlashNet
Your SGL representative installs and configures the FlashNet client software on the Archive
Engine server and the Archive Provider. The FlashNet software provides the interface between
the Archive Provider and the archival hardware. Your SGL representative also sets up and
configures the FlashNet server.
Registering the Archive or Restore Service with the Production Services Engine
150
Typically, your SGL representative installs and configures the FlashNet client software when he
or she configures the archiving system. For information on using the FlashNet client, see the
documentation provided by your SGL representative.
For more information, see “Installing the FlashNet Client Software” in the
Interplay | Production Software Installation and Configuration Guide.
Production Services Engine
For installation and configuration information, see “Production Services Engine Installation and
Configuration” on page 28.
Archive and Restore Providers
For installation and configuration information, see “Check List for Archiving and Restoring
Assets” on page 147.
Registering the Archive or Restore Service with the
Production Services Engine
After installing the Archive or Restore software, you need to make sure that the current Archive
or Restore service is registered with the Production Services Engine. The service should be listed
on the Services tab of the Production Services and Transfer Status tool. Registration is automatic
but takes place only after you restart the Production Services Engine. See “Registering Services”
on page 82.
nThe Archive and Restore services require a third-party vendor dll. By default the services run
under the Local System account. If the third-party vendor dll needs more privileges than Local
System, the vendor must change the services to use the appropriate credentials.
Configuring an Archive Provider or Restore Provider for the Production Services Engine
151
Configuring an Archive Provider or Restore Provider
for the Production Services Engine
Prior to Production Services v3.1, you used a dialog box to connect an Archive or a Restore
provider to the Production Services Engine. Starting with Production Services v3.1, you edit an
.ini file.
Following is an example of an Archive provider .ini file (DMSArchive.ini) file. The file includes
the default hostname “localhost” and a default provider name:
#Mon May 05 11:34:54 EDT 2014
@5%?MaxJobs=3
@2%tMedia_Services_Engine_Hostname=localhost
@1%tProvider_Name=a51-dev_Archive_4080
Note the following:
• If you are upgrading from a previous version, the existing .ini file is copied to the
appropriate new folder. If the associated Production Services Engine remains the same, no
further configuration is needed.
• If you are performing a new installation, you need to edit the .ini file. The installed .ini file
uses “localhost” as the name of the associated Production Services Engine. This is
appropriate if you are installing the service on the same system as the Production Services
Engine. If you are installing the service on a different system, you need to change the default
hostname by editing the .ini file.
• The .ini file includes an automatically generated provider name that uses the following
syntax:
<hostname>_<servicename>_<unique#>
You can change the provider name by editing the .ini file. This name is displayed in the
Production Services and Transfer Status tool.
nFor information about the line @5%?MaxJobs=3, see “Defining the Maximum Number of
Simultaneous Jobs for Archive and Restore” on page 156.
n.ini files from earlier versions include the line @3%yAutomatically_Connect=TRUE. This line is
no longer applicable, because all services are now automatically connected.
To configure an Archive provider or Restore provider for the Production Services Engine:
1. Locate the .ini file and open it in a text editor, such as Windows Notepad.
The default installation paths are:
C:\ProgramData\Avid\Archive Service\DMSArchive.ini
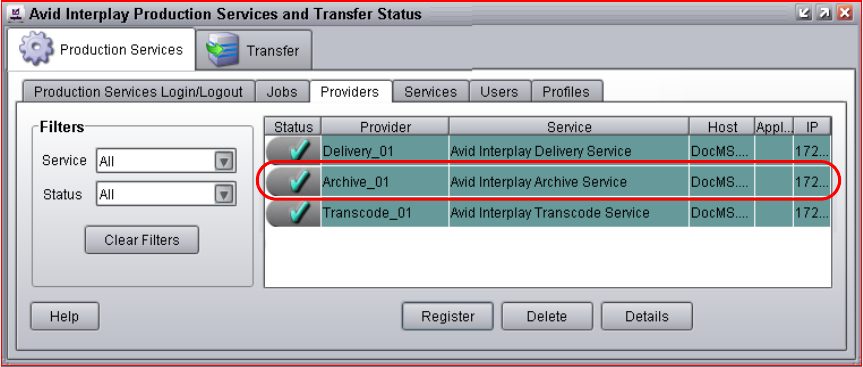
Configuring an Archive Provider or Restore Provider for the Production Services Engine
152
C:\ProgramData\Avid\Restore Service\DMSRestore.ini
2. (Optional) Edit the .ini file to use the Production Services Engine hostname.
Following is the example DMSArchive.ini file, edited to use the hostname “a51-ms_engine.”
#Mon May 05 11:34:54 EDT 2014
@5%?MaxJobs=1
@2%tMedia_Services_Engine_Hostname=a51-ms_engine
@1%tProvider_Name=a51-dev_Archive_4080
3. (Optional) Edit the .ini file to use a different provider name.
Following is the example DMSArchive.ini file, edited to use the provider name
“Archive_01.”
#Mon May 05 11:34:54 EDT 2014
@5%?MaxJobs=1
@2%tMedia_Services_Engine_Hostname=a51-ms_engine
@1%tProvider_Name=Archive_01
4. Save and close the .ini file.
The service automatically reads the .ini file and tries to connect to the Production Services
Engine. If the service fails to connect, it continues to try to connect every thirty seconds.
The Provider page in the Production Services and Transfer Status tool shows that the service
is connected, indicated by a check mark in the Status column.
Configuring the Archive Service
153
Configuring the Archive Service
Before you can create and manage an offline copies of assets, you must configure the Archive
service in the Interplay Administrator.
When you log in to an Interplay Engine database (AvidWG) and open the Asset
Tracking/Archive Settings view, the system displays a different set of options than when you are
logged into an Archive Engine database (AvidAM). The following topic refers to options that
you set on the Interplay Engine:
•Specifying the Archive Server, Segment Size, and Restore Process
The following topics refer to options that you set on the Archive Engine:
•Specifying the Archive Server, Segment Size, and Restore Process
•Archiving Duplicate Versions of Media
•Adding AAF Metadata to an Archive
The following topic refers to an option you set on the Archive or Restore provider:
•Defining the Maximum Number of Simultaneous Jobs for Archive and Restore
The following topic refers to an option you set on Interplay Access:
•Overriding Metadata When You Archive an Asset
Specifying the Archive Server, Segment Size, and Restore Process
These settings appear when you log in to an Interplay Engine online database (AvidWG). You
must set the name of the Archive Engine server. You might need to set the other options,
depending on your workflow.
To specify Archive settings for an online database:
1. Open the Interplay Administrator and log into the system running the Interplay Engine.
2. In the Site Settings section of the Interplay Administrator window, click the
Asset Tracking/Archive Settings icon.
The Asset Tracking/Archive Settings view opens.
3. Select the AvidWG database from the database list.
The Archive Settings area displays these options.

Configuring the Archive Service
154
4. In the Archive Settings area, do the following:
tIn the Archive server name text box, type the name of the computer running the
Interplay Archive Engine.
tIn the Archive Segment size (frames) text box, type the segment size used for partial
restore operations, in frames. The default value is 1800 frames. .
nIf you later change the Archive Segment size, the new size applies only to new archives. Partial
restores of media that is already archived use the original segment size.
tUse best effort restore - if you select this option, a restore process restores as many files
as it can without returning errors. This option requires special implementation by
supported third-party vendors to ignore any missing files that are no longer in the
archive storage. If you do not select this option, then the restore process fails when there
are any missing files (the default).
cThe “Use best effort restore” option is not supported by all third-party archive vendors. If
you select this option and your archive vendor supports it, then a restore process restores as
many files as it can without returning errors.
5. Click Apply Changes at the bottom of the window.
Archiving Duplicate Versions of Media
By default, the Archive Provider does not archive duplicate versions of media, however, you can
choose to have it do so.
When you archive a master clip, subclip, or sequence for the first time, the Archive Provider
automatically archives all the associated media. If you are archiving another subclip or sequence
that refers to the original master clip, the Archive Provider does not automatically archive a
duplicate version of the associated media. The Archive Provider archives all of the metadata
associated with the new subclip or sequence but it does not archive duplicate versions of the
media. Selecting “Allow duplicate media file(s)” tells the Archive Provider to create multiple
versions of the media files.
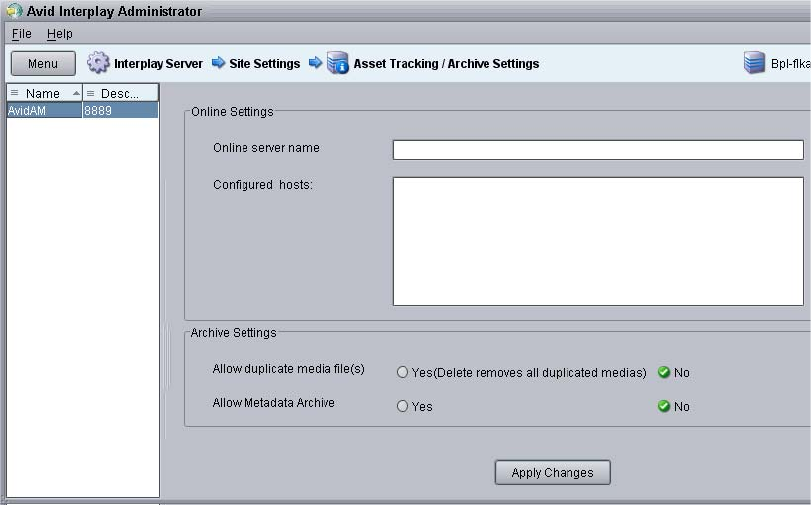
Configuring the Archive Service
155
The Interplay Archive Engine avoids duplication by default. If you prefer to have the Archive
Engine archive duplicate media files, you can use the Interplay Administrator to change the
setting.
This setting appears only when you log in to an Archive Engine database.
To change whether archive operations create duplicate media:
1. Open the Interplay Administrator and log into the system running the Archive Engine.
2. In the Site Settings section of the Interplay Administrator window, click the Asset
Tracking/Archive Settings icon.
The Asset Tracking/Archive Settings view opens.
3. Select the Archive database AvidAM from the database list.
The system displays the Asset Tracking/Archive Settings window for the Interplay Archive
Engine.
4. Select one of the following settings for “Allow duplicated media files” option:
- No — When you archive an Avid asset the first time, the Archive Provider archives all
associated media. If you archive other assets that reference the same media, the Archive
Provider archives the metadata but does not archive duplicate versions of the associated
media (default setting).
Configuring the Archive Service
156
- Yes — The Archive Provider archives the associated media each time you archive an
asset. If you delete an asset that references the duplicated media, the system asks if you
want to delete the associated media files. If you choose the delete the media, the system
deletes all copies of the media.
5. Click Apply Changes.
Adding AAF Metadata to an Archive
The Asset Tracking/Archive Settings view on the Interplay Archive Engine includes an option
labeled “Allow Metadata Archive.” If you select Yes, AAF metadata for Avid assets is sent to the
tape archive along with the media. This option requires special implementation by the tape
archive vendor. If you select No, only media is sent to tape (the default). This option is supported
for the SGL FlashNet™ solution. Consult with your archive solution provider to determine if your
installation supports this feature.
This setting appears only when you log in to an Archive Engine database.
Defining the Maximum Number of Simultaneous Jobs for Archive and
Restore
By default, Archive and Restore providers are configured to run a maximum of three
simultaneous jobs. You can change this maximum value by editing an .ini file.
cEach type of provider can handle a different maximum number of simultaneous jobs. Do
not change this value unless specifically instructed by Avid Professional Services or
Customer Success. For more information, see “Maximum Number of Simultaneous Jobs”
on page 343.
To change the maximum value for the Archive provider:
1. Open the following file in an application such as Notepad:
C:\ProgramData\Avid\Archive Service\DMSArchive.ini
2. Edit the following line to specify the maximum number of simultaneous jobs:
@5%?MaxJobs=n
3. Save and close the file.
To change the maximum value for the Restore provider:
1. Open the following file in an application such as Notepad:
C:\ProgramData\Avid\Restore Service\DMSRestore.ini
2. Edit the following line to specify the maximum number of simultaneous jobs:
@5%?MaxJobs=n
Connecting to the Archive Database and Creating Folders in Interplay Access
157
3. Save and close the file.
To apply the changes:
tQuit and restart the Archive and Restore services.
Overriding Metadata When You Archive an Asset
By default, the Archive provider overrides the metadata for an Avid asset each time you archive
the asset. You can use the Metadata Override feature to change the behavior for the assets in a
particular folder.Whatever you set for a folder is inherited by any subfolders.
nThere is currently no way in Interplay Access to display the metadata override status for a folder.
You can view the status in the Metadata Override Settings view in the Interplay Administrator.
For more information, see the Interplay Engine and Interplay Archive Engine Administration
Guide. If you change the status on a folder in the archive database, you might want to change the
name of the folder to reflect the status.
To change whether the Archive Provider automatically overrides metadata during an
archive operation:
1. Open Interplay Access and log on to the Archive database.
2. Right click a folder and choose Metadata Override.
Interplay Access displays a dialog box that allows you to select the Metadata Override
option for the folder. The options presented depend on the current status of the folder.
- If the folder is enabled for metadata override (the default), the dialog box asks if you
want to disable metadata override.
- If metadata override is disabled for the folder, the dialog box asks if you want to enable
metadata override.
3. Select Yes or No in the dialog box.
Connecting to the Archive Database and Creating
Folders in Interplay Access
After you connect to the Archive database, you can create folders in an Interplay Archive
database to match your workflow. For example, you can create folders that match those in your
Interplay online database.
You do not have to create folders before you archive assets, because the profile that you use will
create a folder if it does not exist in the Archive database.

Connecting to the Archive Database and Creating Folders in Interplay Access
158
To connect to an existing Archive database and create folders:
1. Open Interplay Access and log in as an administrator to the Archive database.
2. If you are already logged into Interplay Access, and the Archive database is already listed in
the database tree view, double-click it and log in as an administrator.
3. If you are already logged into Interplay Access, and the Archive database is not listed in the
database tree view:
a. In the database tree, right-click the Databases icon and select Connect to Database.
The Connect to Database dialog box opens.
b. Select the Interplay Archive server from the Server menu and then select the Archive
database.
The name of the Archive database is always AvidAM.
c. Click OK.
d. Log in to the Archive database as an administrator.
Databases
icon
Interplay Archive
server name
Interplay Archive
database
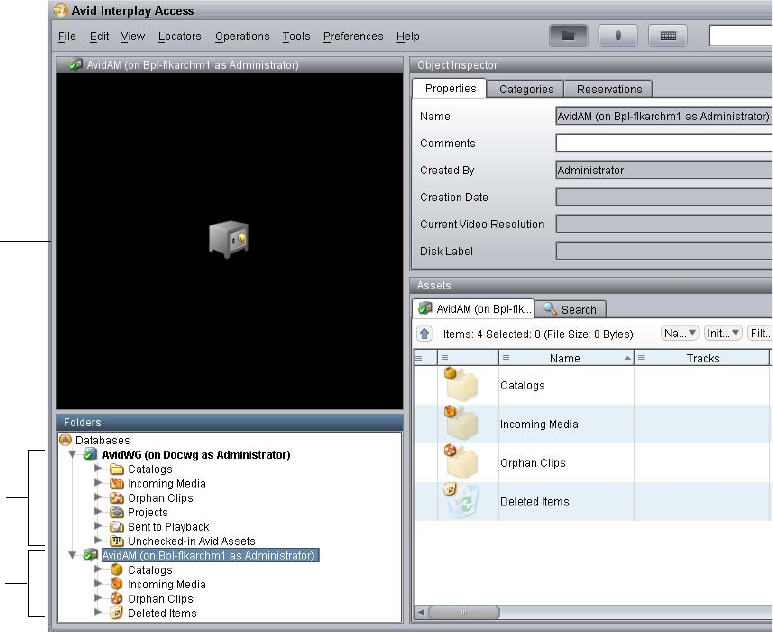
Connecting to the Archive Database and Creating Folders in Interplay Access
159
The Archive database appears in the Tree view. The following illustration shows both
databases connected.
If you click the database name, an icon of a safe is displayed in the Monitor. Folder
icons are displayed as brown boxes to indicate that they are part of the Archive database,
and icons for assets are colored brown.
4. Create folders in the Archive database to match the needs of your archive workflow. To
create a folder, in the database tree, right-click the Archive database icon or a folder and
select New Folder.
Interplay
database
Interplay
Archive
database
Safe icon
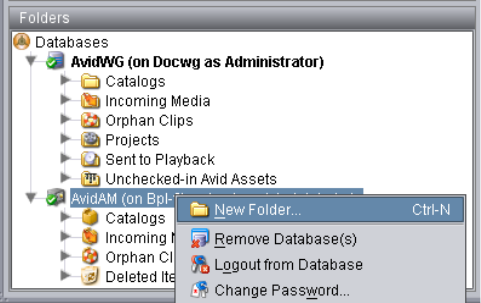
Working with Interplay Archive and Interplay Restore Profiles
160
You can also create a folder by using a profile. See “Working with Interplay Archive and
Interplay Restore Profiles” on page 160.
Working with Interplay Archive and Interplay Restore
Profiles
Profiles let you define settings for archive and restore operations. The following topics provide
information creating profiles:
•“Creating an Interplay Archive or Interplay Restore Profile” on page 161
•“Interplay Archive Profile and Interplay Restore Profile Options” on page 162
•“Locating the Partition Value for an Archive Profile” on page 164
You use the Production Services Engine interface to create profiles. If an Avid editing
application is open when you create a profile, you must restart the editing application before the
profiles are available in the editor. A restart is not needed for Interplay Access and Interplay
Assist.
Profiles are required when archiving or restoring from an Avid editing application.
cAvid recommends that you use profiles for archiving, because profiles define many key
settings such as target folders and archive partitions. For example, if you do not use a
profile with a SGL archive implementation, the system uses the default SGL archive
volume name. If this volume is not defined on the SGL system, the archive operation will
fail.
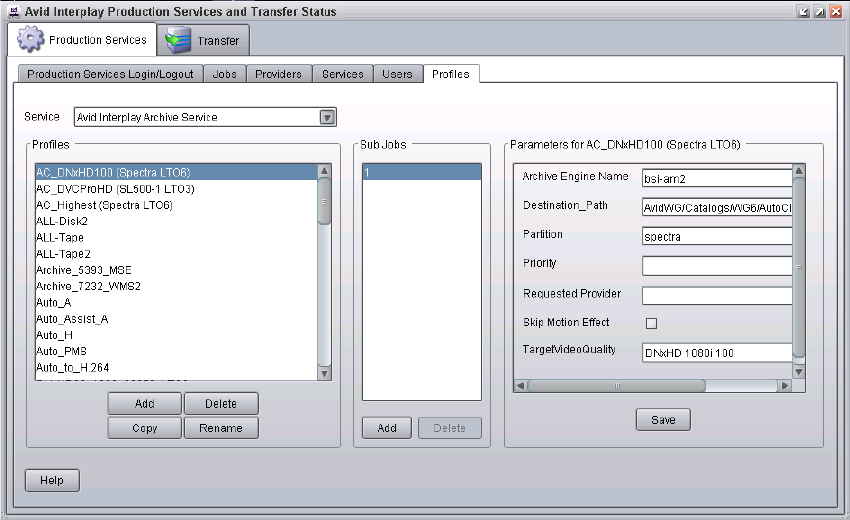
Working with Interplay Archive and Interplay Restore Profiles
161
Creating an Interplay Archive or Interplay Restore Profile
To create an Interplay Archive or Interplay Restore profile:
1. Open and log in to the Production Services and Transfer Status tool, as described in
“Opening the Production Services and Transfer Status Tool” on page 56.
2. Click the Profiles tab.
3. In the Service menu, select one of the following:
- Interplay Archive Service to create an archive profile
- Interplay Restore Service to create a restore profile
4. Click Add in the Profiles area.
The Add Profiles dialog box opens.
5. Type a name for the profile and click OK.
The name appears in the Profiles list and an empty template appears in the Parameters area.
The following illustration shows an Archive profile.
6. In the Parameters area, define the values you want for the profile.
See “Interplay Archive Profile and Interplay Restore Profile Options” on page 162.

Working with Interplay Archive and Interplay Restore Profiles
162
7. Click Save in the Parameters area.
The next time you archive or restore an asset, you can select the profile.
nInterplay Archive and Interplay Restore support only one subjob.
Interplay Archive Profile and Interplay Restore Profile Options
Option Description
Archive Engine Name Archive profile only — The Archive Engine to use for this profile.
• If your workgroup is configured for multiple Archive Engines, specify
the Archive Engine to use for this profile. See “Creating Profiles for
Multiple Archive Engines” on page 195.
•If your workgroup is configured for one Archive Engine, this field is
optional. If this field is blank, the profile uses the Archive Engine
defined in the Interplay Administrator (the primary Archive Engine).
Archive Engine-Primary
Archive Engine-Secondary
Archive Engine-Tertiary
Restore profile only — In a multiple Archive Engine configuration, the
Archive Engine or Engines to use for this profile.
• If you specify more than one Archive Engine, during a restore process,
the system checks each Archive Engine in turn.
• If the fields are blank, the profile uses the primary Archive Engine.
See “Creating Profiles for Multiple Archive Engines” on page 195.
Destination_Path Archive profile — Indicates the folder in the Archive database that will
contain the archived media. This folder is created automatically when
archive operation is executed. The path must include the Archive database:
AvidAM/
Restore profile — Indicates the folder in the asset database that will contain
the restored asset. The path must include the Interplay database and a
subfolder, for example: AvidWG/Catalogs/Project1.
nWhen you set the destination path, select a subfolder, not a top-level
folder, and use forward slashes (/), for example,
AvidWG/Catalogs/Project1 or AvidWG/Projects/Project1.
Destination_Server Restore profile only — Specifies the name of the Interplay Engine server to
restore to.

Working with Interplay Archive and Interplay Restore Profiles
163
Destination_Workspace Restore profile only — Specifies the Avid shared-storage workspace where
you want to place the restored asset.
If the workspace is part of a multiple-ISIS workgroup: Existing profiles will
work correctly with the workspaces as currently defined, but new or edited
profiles that specify a workspace on a remote ISIS system must include the
hostname of the ISIS System Director.
\\hostname\workspace_name
Partial Restore profile only — Indicates a partial restore is performed. See
“Working with Partial Restore” on page 188.
Partition Archive profile only — Specifies the group for the archive. The group is set
by the SGL FlashNet software. See “Locating the Partition Value for an
Archive Profile” on page 164.
Priority Sets the priority for the job submitted by this profile. Priority numbers range
from 1 (highest priority) through 100 (lowest priority). The default priority
number assigned to each job is 50.
Requested Provider The name of the Archive or Restore provider that you want to use to send a
job. This must be the name of the provider as it is registered with the
Production Services Engine, not the host name. Supply this name only if
you have more then one Archive or Restore provider and want to use this
profile for a particular provider.
Skip Motion Effect Archive Profile only — When using Media Composer v3.5.4.7 or later,
Symphony v3.5.4.7 or later, or NewsCutter v7.5.4.7 or later, if a motion
effect refers to a consolidated master clip, the Interplay Archive Provider
archives both the original master clip and the consolidated master clip. This
behavior can take extra time and extra storage space. Select this option if
you want the Archive Provider to skip the original master clip and archive
only the consolidated master clip.
Option Description

Working with Interplay Archive and Interplay Restore Profiles
164
Locating the Partition Value for an Archive Profile
The Partition value in the Archive profile corresponds to a group name in the SGL FlashNet
software. The Interplay Archive Engine uses FlashNet as the interface between the Archive
provider and the archive hardware.
In SGL terminology for tapes and groups, a group refers to a set of volumes. Each group has a
number of associated tapes and each tape is referred to as a Volume.
The Archive administrator typically sets up and maintains the SGL server and the associated
hardware. For information on setting up the system, see the SGL documentation.
When you create an archive profile in the Production Services Engine interface, you specify a
group name in the Partition field. For example, the following illustration shows a group named
“spectra.”
TargetVideoQuality Indicates the video resolution for the archive or restore. You can select All,
Highest, Lowest, or a specific resolution. If you select All, media for all
associated resolutions must be online. By default, if any media is offline the
job will fail.
• “Highest” archives or restores the highest video resolution and PCM
audio.
• “Lowest” archives or restores the lowest video resolution and
low-resolution audio.
• “Specific Resolution” archives or restores the specified resolution and
all audio.
You can override the default failure reporting setting using the Avid Service
Configuration tool. See “Customizing the Reporting of Service Job Status”
on page 62.
Option Description
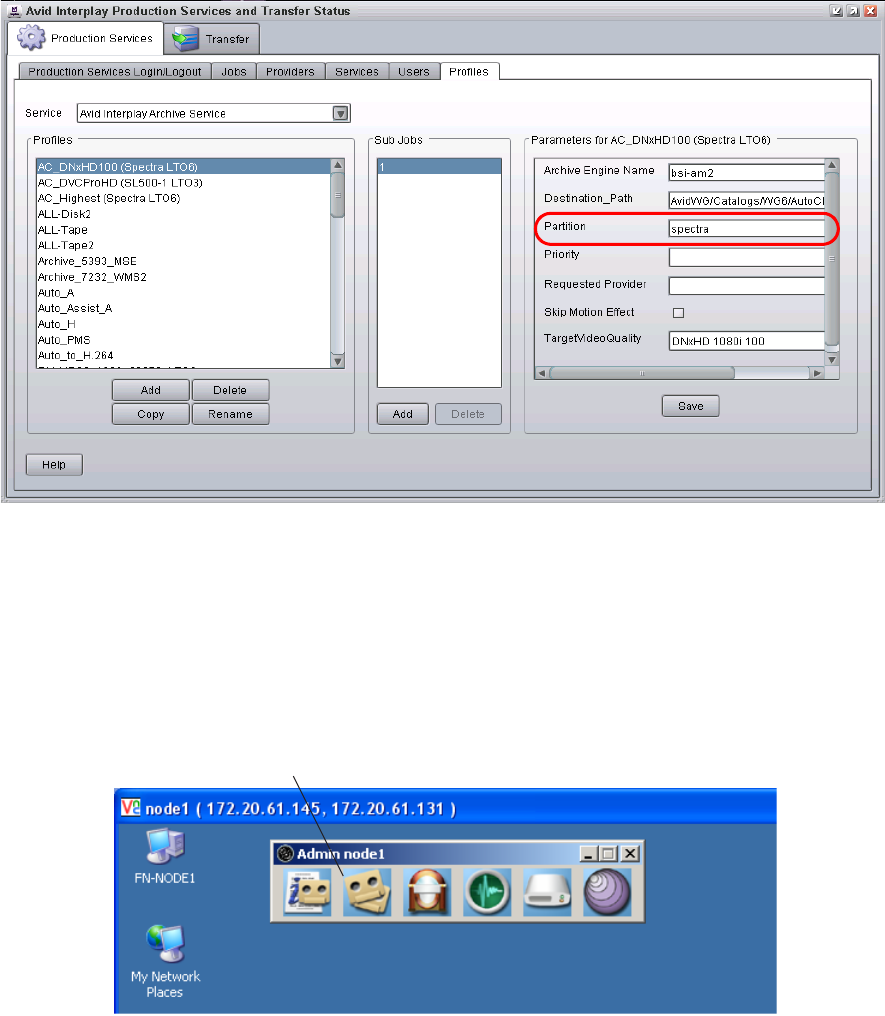
Working with Interplay Archive and Interplay Restore Profiles
165
You can log on to the FlashNet server to determine the group names that you should use in the
partition field in your Production Services archive profile.
To determine the available FlashNet group names:
1. Log on to the FlashNet server and double-click the FlashNet Administration icon on the
desktop.
The FlashNet Administration tool opens.
2. Click the Group button.
Group button

Archiving Assets from an Avid Editing Application
166
The FlashNet Group Management window opens.
The names in the GroupList column are the names you use when you define an Archive
profile in the Production Services Engine. For information on creating groups, see the SGL
FlashNet documentation.
Archiving Assets from an Avid Editing Application
To archive assets from an Avid editing application, first make sure the Production Services
Engine is configured in the Production Services setting. Then perform the archive operation. The
clips or sequences you select for archiving are automatically checked into the Interplay database
during the archive operation.
You can archive assets in a similar way from Interplay Assist. For more details, see the Interplay
Assist User’s Guide.
Consolidating clips before archiving can conserve space in the archive database. See
“Consolidating Clips and Sequences Before an Archive Operation” on page 168.
After you archive media files, you can delete the online media from the Interplay Engine. See
“Deleting Online Media After an Archive Operation” on page 170.
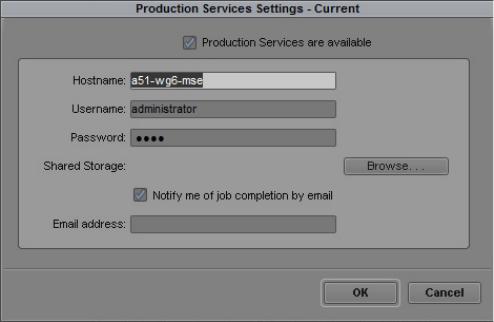
Archiving Assets from an Avid Editing Application
167
To configure the Avid editing application for Production Services:
1. In the Avid editing application, log in to Interplay.
2. Select Production Services from the Settings list.
The Production Services Settings dialog box opens.
3. Select the options as follows:
a. Select the “Production Services are available” option.
b. Type the name of the system running the Production Services Engine in the Hostname
text box.
c. Type your user name and password. If Interplay validation has been configured for the
Production Services Engine, the user name must be a valid Interplay user name. For
example, you can use the same user name and password that you use to log in to
Interplay. If Interplay validation has not been configured, the user name must match a
valid Interplay user name. See “Using the Users Page” on page 77. Make sure the user
has access to the Archive engine.
d. Shared Storage — Leave this field blank. This setting is no longer used.
e. Notification and Email address — You can use this option if your Production Services
Engine is set up for e-mail notification. See “Configuring the Production Services
Engine” on page 31.
4. Click OK.
After you configure this setting, connection to the Production Services Engine is automatic.
Archiving Assets from an Avid Editing Application
168
To archive a clip or sequence:
1. Make sure that the Interplay Archive provider is connected to the Production Services
Engine. See “Verifying That a Service Provider Is Connected” on page 89.
2. Select the clip or sequence in the bin or select the asset in the Interplay Window.
3. Select File > Production Services > Avid Interplay Archive Service > profile name, where
profile name is a profile set up for the Archive service.
The system performs the archive operation according to the rules in the profile that you
select. See “Working with Production Services Profiles” on page 92.
4. (Option) If you have the Interplay Access application installed on your system you can run
the application and select View > Interplay Production Services Status to view the job
progress. If you have the standalone Production Services and Transfer Status tool installed,
click Start and select Programs > Avid > Avid Production Services and Transfer Status. For
more information, see “Using the Jobs Page” on page 58 and “How the Production Services
Status Tool Reports Archive and Restore Operations” on page 325.
For troubleshooting information, see “Archive and Restore Troubleshooting” on page 323.
5. (Option) Delete the archived media from the Interplay online database. You can restore it
when needed. See “Deleting Online Media After an Archive Operation” on page 170 and
“Restoring Assets from the Archive Database” on page 185.
Consolidating Clips and Sequences Before an Archive Operation
Consolidating can conserve space in the archive database. Consolidating creates new media from
an existing master clip. The new media is a new master clip that does not have a link to the
original master clip.
nIf you do not consolidate before archiving, you can perform partial restores and only restore the
portions of the material that you need. See “Working with Partial Restore” on page 188.
Archiving Assets from an Avid Editing Application
169
You have two basic choices for consolidating before you archive:
• If you have a sequence that references long master clips, you can consolidate the sequence
before you archive it. This creates new media files for each clip in the sequence. Then, when
you archive the new consolidated sequence, the system only archives the new, shorter master
clips. Archiving is relatively fast using this method because you only archive the media that
is used in the sequence.
The main drawback to this method is that you cannot specify handles on an individual clip
basis. You only have the option of setting one handle length for all the clips in the sequence.
So you might not archive enough of the original clips to perform edits at a later time.
• You can consolidate before you edit. This is a more efficient method because you can
determine the length of each clip as you work with it. In this workflow, you would use the
following general procedure:
1. Create subclips from the original long master clip.
2. Consolidate the subclips. This operation creates new subclips and new master clips.
3. Store the consolidated subclips or master clips on a predetermined folder in the Interplay
database.
4. Work with the consolidated subclips or master clips.
If you use this method, any archiving operations that the editors perform is relatively fast
because they are archiving only the material that is directly associated with the sequence or
master clip.
Archiving Assets Using Interplay Access
170
Deleting Online Media After an Archive Operation
After you archive media files, you can delete the online media. Use the following guidelines to
ensure that you do not delete the online material before the archive operation is complete.
• Place a reservation on material that you are going to archive to make sure you don’t delete
your online media before it is archived:
• Do not delete the material until the archival process has finished completely. You can use the
Production Services and Transfer Status tool to check the progress of an archive operation
(see “Using the Jobs Page” on page 58).
•If you are deleting media from online storage and want to follow up immediately with a
restore operation, wait until the Media Indexer finishes indexing the storage before you
perform the restore. This ensures that Media Indexer knows that the files are offline. If
Media Indexer assumes the files are already online, it will not restore them.
You can also use Interplay Access to check the archive database to make sure the archive
operation has completed
• Consider creating a folder in the Interplay database with a name such as “7 Day Hold and
then Delete,” “Delete in 48 hours,” “Delete after Archive,” or “Aired Stories.” The media in
that folder can be deleted either on a regular basis or after a particular archive operation is
completed.
Archiving Assets Using Interplay Access
You can manually archive assets from Interplay Access. For information on automatically
archiving assets, see “Working with an Auto Archive Folder” on page 174.
To archive an asset:
1. Make sure that the Interplay Archive provider is connected to the Production Services
Engine. See “Verifying That a Service Provider Is Connected” on page 89.
2. Start Interplay Access and log in to the database that includes the assets you want to archive.
Make sure that the account that you use is a valid Production Services account and has
access to the Archive Engine database. See “Using the Users Page” on page 77.
You do not need to connect to and log in to the Archive database.
3. Select the asset in the Interplay database that you want to archive.
The following illustration shows the clip named “divers” selected. The File Locations tab
shows that there are two resolutions for this clip: a high resolution (DNxHD 1080 and PCM
audio) and a low resolution (MPEG-4 and MPEG1 audio).
You can also archive a clip that uses a single resolution.
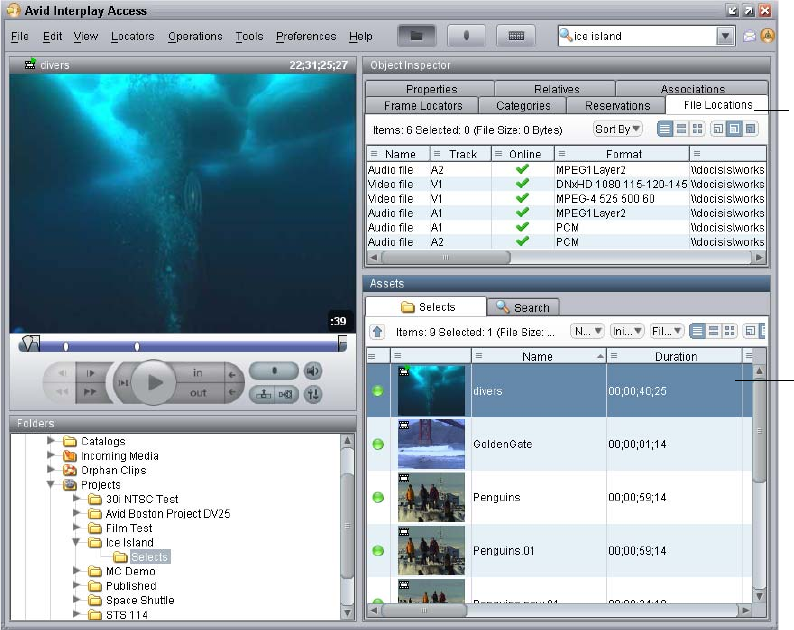
Archiving Assets Using Interplay Access
171
4. Select Tools > Archive or right-click and select Archive.
The Archive dialog box opens.
Selected
asset
File
Locations
tab
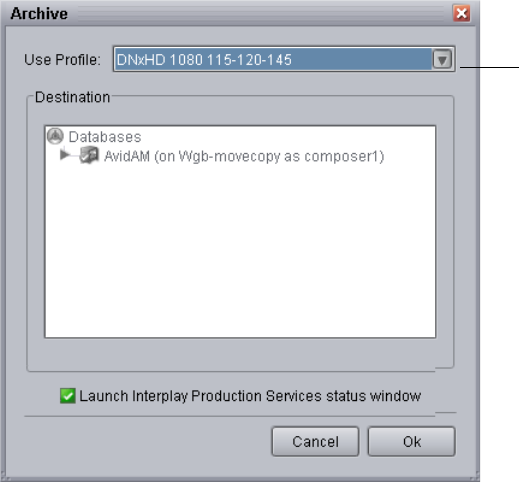
Archiving Assets Using Interplay Access
172
5. Do one of the following:
tSelect a profile from the Use Profile menu.
In this example, a profile for archiving high-resolution media is selected. For
information about profiles, see “Working with Production Services Profiles” on
page 92.
The Destination area is not available when you are using a profile.
tSelect None from the Use Profile menu, then use the Destination area to select a
destination folder in the Archive database.
If you do not use a profile, and a clip includes more than one resolution, the version with
the highest resolution is archived.
cAvid recommends that you use profiles for archiving, because profiles define many key
settings such as target folders and archive partitions. For example, if you do not use a
profile with a SGL archive implementation, the system uses the default SGL archive
volume name. If this volume is not defined on the SGL system, the archive operation will
fail.
6. (Option) Select “Launch Interplay Production Services Status window.”
7. Click OK.
Selected profile
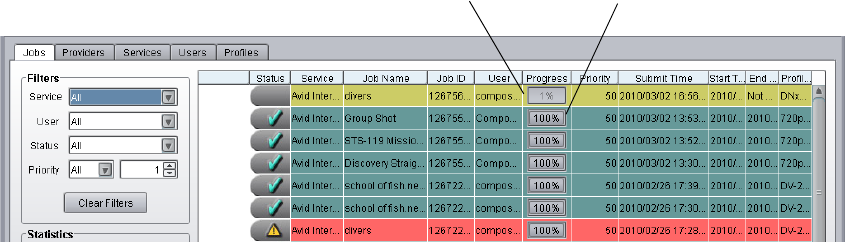
Archiving Assets Using Interplay Access
173
The system starts the Archive operation. The following illustration shows the Production
Services and Transfer Status tool with the archive operation in progress.
A check mark indicates a successfully completed job. The metadata is copied to the Archive
database and the media is copied to the archive storage.
8. (Option) For details about the job, select the job and click the Details button, or right-click
and select Details.
9. (Option) Navigate to the destination folder in the Archive database and verify that your file
has been archived.
The following illustration shows the “divers clip” in the Archive database, with the
high-resolution media files listed in the File Locations tab.
Archive job in process Archive job completed

Working with an Auto Archive Folder
174
10. (Option) Delete the archived media from the Interplay online database. You can restore it
when needed. See “Restoring Assets from the Archive Database” on page 185.
Working with an Auto Archive Folder
You can identify a folder as an Auto Archive folder and create a profile for the type of archive
you want to perform through the Auto Archive folder. When you move a clip or sequence to an
Auto Archive folder, the system automatically uses the Interplay Archive service to archive the
asset. For example, you can create an Auto Archive folder for a media server (such as an
AirSpeed). Any assets ingested by the media server are placed in the associated Auto Archive
folder and are automatically archived after the ingest is complete.
nYou do not have to connect to the Archive database before you perform an Auto Archive
operation. The Production Services Engine uses its own connection to the database.
Archived
asset
File
Locations
tab
Working with an Auto Archive Folder
175
The Auto Archive service processes files according to the date and time, using a first-in, first-out
(FIFO) rule. The date and time used depends on when an asset was copied to the auto folder.
You should create only the minimum number of Auto Archive folders that you need. The Auto
Archive service regularly scans all auto folders, so if there are a lot of folders to scan, there can
be an impact on the performance of the Interplay Engine.
For details on Auto Archiving, see the following topics:
•Preparing the Workgroup for Auto Archive
•Configuring Auto Archive Using Avid Service Configuration
•Verifying That the Auto Archive Service is Running
•Setting Up an Auto Archive Folder
•Archiving Assets Using an Auto Archive Folder
•Location of Automatically Archived Files
nReference clips and rendered effects in the AutoArchive folder are not archived.
Preparing the Workgroup for Auto Archive
For information on setting up your workgroup for auto archiving, see “Production Services
Engine Installation and Configuration” on page 28, and “Configuring the Archive Service” on
page 153.
Configuring Auto Archive Using Avid Service Configuration
You use the Avid Service Configuration tool (a component of Avid Service Framework) to
configure Auto Archive. Avid Service Configuration is an application that lets you set and
change parameters for each of the different Avid services and applications in your workgroup
environment.
For more information about Avid Service Framework, see the Avid Service Framework User’s
Guide.
To configure the Interplay Auto Archive service using the Avid Service Framework:
1. Click the Start button, and select Programs > Avid > Avid Service Framework > Avid
Service Configuration.
The Select Workgroup dialog box opens.
nThe Select Workgroup dialog box does not open if the check box specifying to always select and
use this workgroup option was previously selected. When you select this option, the Select
Workgroup dialog box no longer opens when you start the application. The default workgroup is

Working with an Auto Archive Folder
176
selected, and the Avid Service Configuration window opens. To change this option and display
the Select Workgroup dialog box, click the Login tab of the Avid Framework Workgroup
Properties application and clear the checkbox for the option.
2. (Option) If the Select Workgroup dialog box opens, select the workgroup you want to
connect to and click Select.
The Avid Service Configuration window opens.
3. In the Directory pane, click the Processes tab and verify that the Avid Automatic Archive,
Transcode, Transfer, and Copy service is running.
nIf the Avid Automatic Archive, Transcode, Transfer, and Copy service does not appear in the Avid
Service Configuration window, the service is not running or the system it runs on is not properly
connected to the workgroup. Click the Hosts tab and make sure that the Avid Service
Configuration displays the name of the system that the Avid Automatic Archive, Copy, Transcode,
and Transfer service is running on.
4. Expand the Avid Automatic Archive, Transcode, Transfer, and Copy service entry on the
Processes tab of the Directory pane.
The system displays the name of the computer running the Avid Automatic Archive, Copy,
Transcode, and Transfer service.
5. Click the computer name.
The Administrator Password Needed dialog box opens.
6. Type the Avid Service Framework Administrator password and click OK.
nBy default, Avid Service Framework does not require a password. When a password is used, it is
set through the System Configuration Service. Check with your system administrator for the
correct password.
The system displays the Workgroup Server Setting tab for the Avid Automatic Archive,
Transcode, and Transfer service.

Working with an Auto Archive Folder
177
7. Type the Interplay Engine hostname, user name, and password.
Use an Interplay account with administration privileges.
8. Click the Archive and Copy Settings tab.
The system displays the configuration settings for the AutoArchive and AutoCopy.
9. In the Configure AutoArchive area, do the following:
- Enable AutoArchive — Select Yes.
- AutoArchive scanning interval — Type the number of minutes between scans, minimum
allowed is 3 minutes.
- Number of times to retry when encountering an error — type the number of times you
want the system to retry after an error occurs.
- Number of clips to submit to Interplay Archive at once — type the number of clips you
want sent for archive at one time. The system can better manage the job processing task
when the jobs are processed in small batches. The default number is 10 clips submitted
for processing at one time. For example, when you are moving 1,000 clips to the
AutoArchive folder, the first 10 clips are archived, then the next 10 clips are archived,
and so on until all 1,000 clips are archived.
- Keep original asset in the Auto Archive folder — select Yes if you want to keep assets in
this folder after an Auto Archive operation. Both successfully archived and
unsuccessfully archived assets are kept in the folder. If you select No (the default),
assets are moved from the Auto Archive folder to one of the following Interplay folders:
- Catalogs\Auto\Archived Clips
- Catalogs\Auto\Failed to Archive Clips
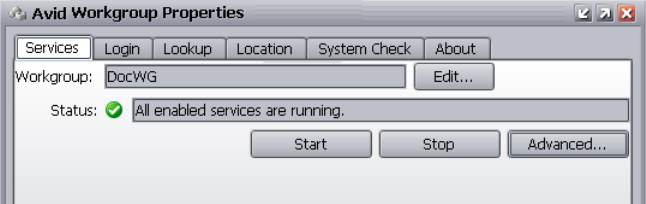
Working with an Auto Archive Folder
178
10. Click Apply.
11. Close the Avid Service Configuration window.
nWhen you make configuration changes and you do not click the Apply button or the Reset button
prior to changing a selection or closing the window, a dialog box opens reminding you to Apply
or Reset the configuration.
nFor information about Auto-Copy configuration, see “Configuring the Auto-Copy Service” on
page 231.
Verifying That the Auto Archive Service is Running
The Services page in the Interplay Production Services and Transfer Status tool shows whether
the Archive and Restore services are running. The Interplay Auto Archive service is not
monitored on the Services page. You can use the Avid Service Framework services or the
Microsoft Windows Computer Management tool to check whether the Interplay Auto Archive
service is running.
nSoftware for the Auto Transcode, Auto Transfer, and Auto Copy services is also installed during
the installation of the Interplay Auto Archive service. These services are all included in the
service named Interplay Auto Production Services.
For more information about Avid Service Framework, see the Avid Service Framework User’s
Guide.
To verify that the Interplay Auto Archive service is running using Avid Service Framework:
1. On any server in the workgroup, click Start and select Programs > Avid > Avid Service
Framework > Avid Workgroup Properties.
The Avid Workgroup Properties dialog box opens. The Status area indicates whether all the
Avid Service Framework services are running.
2. Click Advanced.
The Avid Services dialog box opens.

Working with an Auto Archive Folder
179
3. If necessary, select the Avid Interplay Auto Production Services (formerly named Avid
Interplay Auto Production Services) service and click Start.
nIf the Interplay Auto Production Services does not appear, check the Production Services Engine
to make sure that the Archive service is running. Auto Archive requires the Archive service.
To verify that the Interplay Auto Archive service is running using the Computer
Management window:
1. On the system running the Production Services Engine software, right-click the My
Computer icon and select Manage.
2. Double-click the Services and Applications icon, then double-click Services.
3. In the Status column, verify the Interplay Auto Production Services are running.
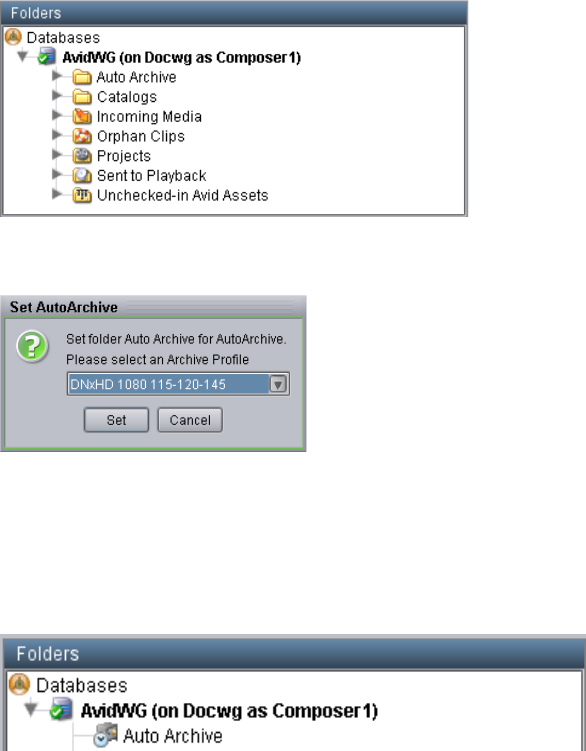
Working with an Auto Archive Folder
180
Setting Up an Auto Archive Folder
To set up an Auto Archive folder:
1. Log into Interplay Access as an administrator and create a folder.
The following illustration shows a folder named Auto Archive in the database tree. You can
use any name that fits your workflow.
2. Right-click the folder and select Set AutoArchive.
3. Select an Archive Profile from the Set Auto Archive dialog box.
For information about profiles, see “Working with Production Services Profiles” on page 92.
4. Click Set.
The system adds an Auto Archive icon to the folder.
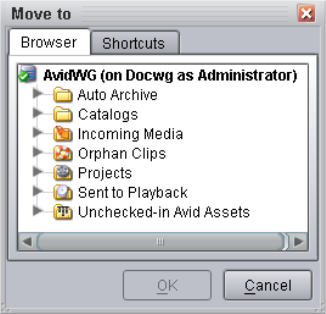
Working with an Auto Archive Folder
181
Archiving Assets Using an Auto Archive Folder
To archive assets using an Auto Archive folder:
1. Make sure a folder is configured for Auto Archiving. See “Setting Up an Auto Archive
Folder” on page 180.
2. Make sure that the Production Services Engine and the Interplay Archive service are
connected. See “Verifying That a Service Provider Is Connected” on page 89. Make sure the
Auto Archive service is running. See “Verifying That the Auto Archive Service is Running”
on page 178.
3. Start Interplay Access and log in to the database that includes the assets you want to archive.
When the Auto Archive service performs an archive operation, it uses the account that you
set in the Avid Service Configuration tool, not the account you used to log in to Interplay
Access. See “Configuring Auto Archive Using Avid Service Configuration” on page 175.
4. Locate an asset that you want to archive and do one of the following:
tDrag the asset to the Auto Archive folder.
tRight-click the file, and select Move To.
The Move To dialog box opens.
Navigate to your Auto Archive folder and click OK.
A copy of the clip is moved to the Auto Archive folder. The Auto Archive job might not
start for several minutes, depending on your Auto Archive settings. See “Configuring
the Archive Service” on page 153
5. (Option) To view the Interplay Production Services Status window while the Auto Archive
operation is in process, select View > Interplay Production Services Status.

Working with an Auto Archive Folder
182
The system displays the job status during the archive operation. After the operation is
complete, the status entry is deleted. The system deletes the line to avoid collecting too
many entries in the status window.
For more information on job status, see “How the Production Services Status Tool Reports
Archive and Restore Operations” on page 325. For troubleshooting information, see
“Archive and Restore Troubleshooting” on page 323.
Location of Automatically Archived Files
When working with Auto Archive, the system creates a folder named Auto in the Catalogs
folder, that contains two folders:
• Archived Clips
• Failed to Archive Clips
The system moves a copy of your original clip to one of these folders, depending on the result of
the job.
A separate copy of the archived file exists in the Archive database in a destination folder
specified in the profile. The following illustration shows the folders and the archived file.
Auto Archive folder
Archived Clips folder
Destination folder
Source folder
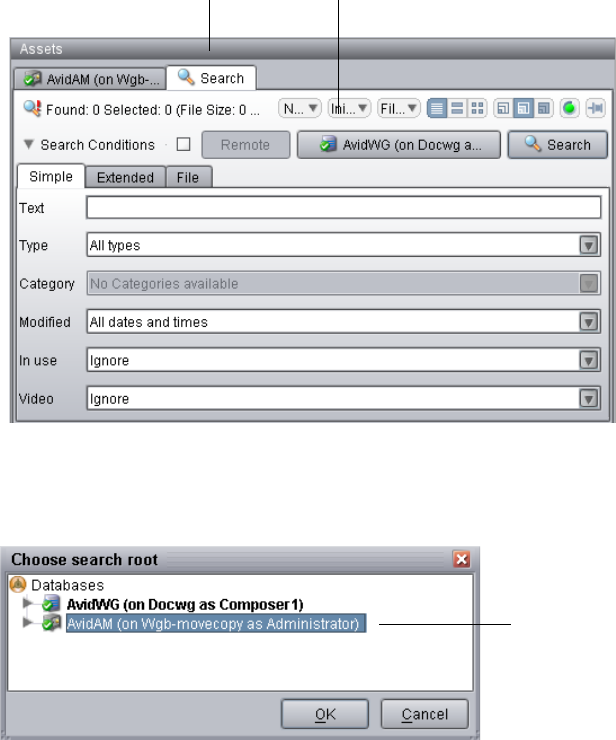
Searching the Archive Database
183
Searching the Archive Database
You use the Search tab in Interplay Access to locate assets in a database. You can select only the
Archive database, or you can search across multiple databases. This topic describes how to locate
a clip in the Archive database. For complete information on searching, see the Interplay Access
User’s Guide.
To search for a clip in the Archive database:
1. Open Interplay Access and connect to the Archive database. See “Connecting to the Archive
Database and Creating Folders in Interplay Access” on page 157.
2. Click the Search tab in Assets pane.
3. Click the Search Root button
The Choose Search Root dialog box opens.
Search tab Search Root button
Archive database
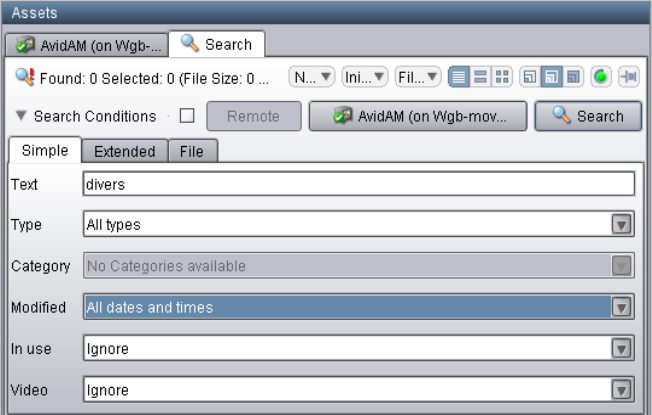
Searching the Archive Database
184
4. Select the Archive database and click OK.
In a large database, you can speed up your search by selecting a folder within the database as
the root.
5. Type the name (or a portion of the name) of the clip you want to search for and select the
appropriate search criteria.
The following example uses the text “divers” and the All Dates and Times option in order to
locate all versions of the file.
6. Click the Search button.
The system displays the search results in the Search Results area. (If necessary, expand the
bottom of the window to display the Search Results area.) In this example, one clip in the
Archive database has the text “divers” in its name.
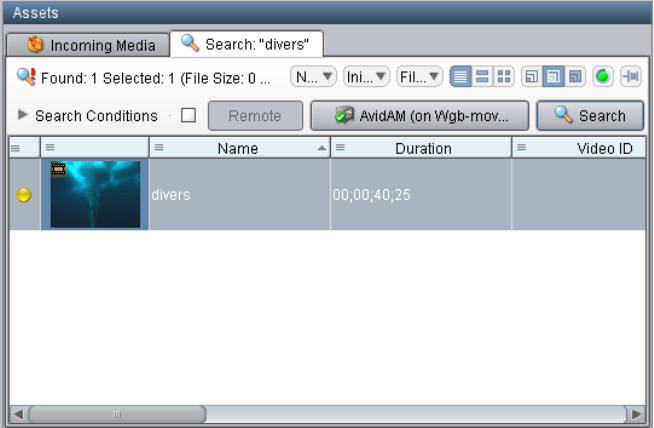
Restoring Assets from the Archive Database
185
Restoring Assets from the Archive Database
When you restore an asset, you use the Restore service to copy archived metadata to an Interplay
online database and copy media to workgroup shared storage. You can start a Restore job in two
different ways:
• If metadata for an asset is not stored in the online database, you must start a Restore job
when connected to the Archive database.
• If metadata for an asset is stored in the online database, but the media is archived (offline or
partially online in the database), you can start a Restore job when connected to either the
Interplay online database or the Archive database.
You can restore assets through Interplay Access or Media Composer.
nThe Archive process archives rendered effects as part of a sequence, not as separate assets. If
you restore a sequence in the online database, and the sequence is different from the archived
sequence, you need to render the effects again.
To restore an asset through Interplay Access:
1. Make sure the Production Services Engine application and the Restore service are
connected. See “Verifying That a Service Provider Is Connected” on page 89.
2. Open Interplay Access and log in to the Archive database or the online database.
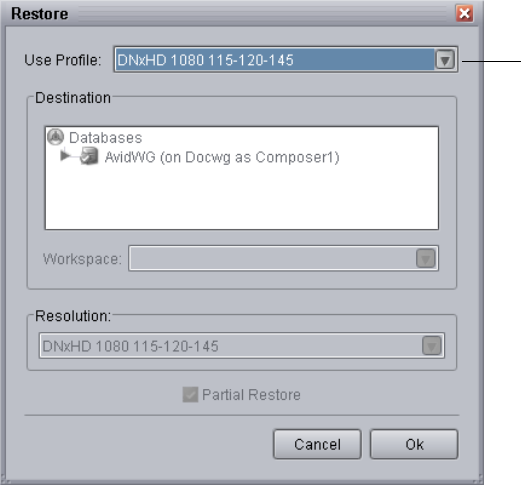
Restoring Assets from the Archive Database
186
Make sure that the account that you use is a valid Production Services account and has
access to the Interplay Engine database. See “Using the Users Page” on page 77.
3. Locate the clip you want to restore by browsing or performing a search.
4. Select the clip or clips you want to restore.
5. Do one of the following:
- Select Tools > Restore.
- Right-click and select Restore.
The Restore dialog box opens.
6. Do one of the following:
- Select a profile from the Use Profile menu. For information about profiles, see
“Working with Production Services Profiles” on page 92.
nThe Destination area, Resolutions, and Partial Restore are not available when using a profile,
because the profile provides these settings. When you perform a restore from an Avid editing
application you must select a profile.
- Select None from the Use Profile menu, and do the following:
Selected profile
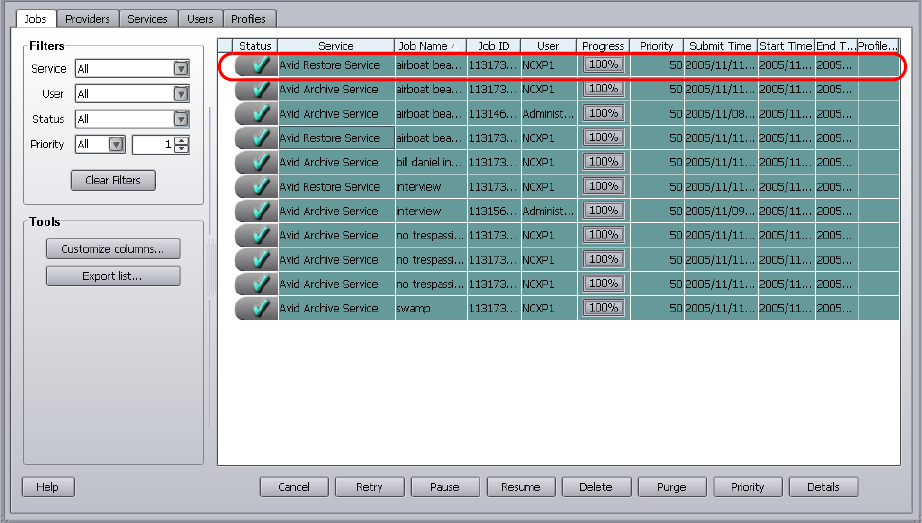
Restoring Assets from the Archive Database
187
- In the Destination area, select a destination folder where you want to place the
restored asset. See “Interplay Archive Profile and Interplay Restore Profile
Options” on page 162.
-In the Workspace area, select the Avid shared-storage workspace where you want to
place the restored media.
- Select a resolution from the Resolution menu.
- (Option) Select Partial Restore. For more information, see “Working with Partial
Restore” on page 188.
-(Option) Select “Launch Interplay Production Services Status window.”
7. Click OK.
The system performs the restore operation.
8. Select View > Interplay Production Services Status to open the Production Services and
Transfer Status tool.
The following illustration shows the Production Services Status window after the job is
complete.
Working with Partial Restore
188
For more information on job status, see “Using the Jobs Page” on page 58 and “How the
Production Services Status Tool Reports Archive and Restore Operations” on page 325. For
troubleshooting information, see “Archive and Restore Troubleshooting” on page 323.
9. (Option) Navigate to the destination folder in the Interplay Access window and verify that
the clip was restored.
To restore an asset through Media Composer:
1. Make sure the Production Services Engine application and the Restore service are
connected. See “Verifying That a Service Provider Is Connected” on page 89.
2. Open Media Composer and log in to the Archive database or the online database.
See “Archiving Assets from an Avid Editing Application” on page 166.
3. Select the clip or sequence in the bin or select the asset in the Interplay Window.
4. Select File > Production Services > Avid Interplay Restore Service > profile name, where
profile name is a profile created for the Restore service.
The system performs the restore operation according to the rules in the profile that you
select. See “Working with Production Services Profiles” on page 92.
5. (Option) If you have the Interplay Access application installed on your system, you can run
the application and select View > Interplay Production Services Status to view the job
progress. If you have the standalone Production Services and Transfer Status tool installed,
click Start and select Programs > Avid > Avid Production Services and Transfer Status. For
more information, see “Using the Jobs Page” on page 58 and “How the Production Services
Status Tool Reports Archive and Restore Operations” on page 325.
For troubleshooting information, see “Archive and Restore Troubleshooting” on page 323.
6. (Option) Navigate to the destination folder in the Interplay Window and verify that the clip
was restored.
Working with Partial Restore
Using partial restore can save time and disk space when restoring files from the archive. The
concept of partial restore refers to the ability to restore just the necessary portion of a large
master clip. The following are two examples:
• Restoring a subclip — If you perform a partial restore, you restore only the media that
makes up the subclip. Otherwise you restore the entire masterclip associated with the
subclip.
• Restoring a sequence — You can restore only the portions of the clips that are used by the
sequence.
Working with Partial Restore
189
When creating a Restore profile, select the Partial Restore option. When you perform a restore
operation using that Restore profile, a partial restore is performed.
For details on performing a partial restore, see the following topics:
•Performing a Partial Restore
•Relinking Partially Restored Assets
•Viewing Partially Restored Reference Tracks in Interplay Access
•How the System Defines the Size of a Partially Restored File
nFor information about Archive settings that set the segment size used for partial restore
operations, see “Configuring the Archive Service” on page 153.
Performing a Partial Restore
This topic describes the basic workflow when you perform a partial restore operation from an
Avid editing application when using multiple resolutions. For a more detailed workflow, see
Interplay | Production Best Practices Guide.
You can also perform a partial restore as described in “Restoring Assets from the Archive
Database” on page 185. Use a profile with the Partial Restore option selected, or select Partial
Restore in the Restore dialog box.
To perform a partial restore from the Archive:
1. On an Avid editing system, assume you have a 10-minute master clip and you have both
15:1s and DV 25 versions of the media.
2. Archive the DV 25 version of the media, as described in “Archiving Assets from an Avid
Editing Application” on page 166.
3. Delete the online DV 25 media and keep the low-resolution, 15:1s media online.
4. Edit one minute of the low-resolution version of the clip into a sequence.
5. Select the sequence in the bin and use Interplay Restore to restore the DV 25 version of the
clip from the archive. Use a profile that is set up to perform partial restores. The application
restores only the portion of the clip that is in the sequence, along with extra media that you
can use for handles (see “How the System Defines the Size of a Partially Restored File” on
page 192).
6. Make sure that options for Dynamic Relink are selected so that you can view the clip with
the restored media.
The following illustration shows an example of a bin containing a clip with high-resolution
media that has been partially restored. The Penguins clip is partially online for DV 25
(half-circle) and completely online for 15:1s (full circle).
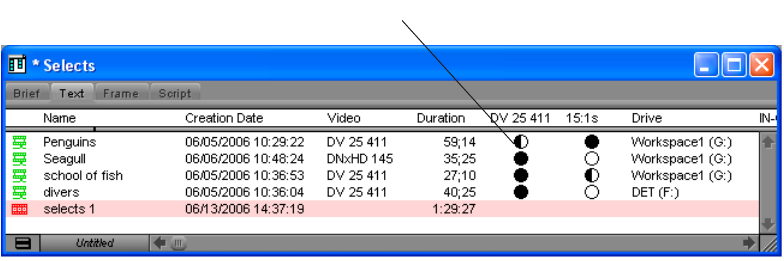
Working with Partial Restore
190
Relinking Partially Restored Assets
Interplay Restore in partial mode lets you restore from archive only portions of the media that is
used in a subclip, sequence, or shotlist. When you partially restore media to your Interplay
workgroup, you need to use dynamic relink to link the restored assets to the restored media.
The restored assets preserve the links to the original location of the media and do not
automatically link them to the location of the restored media. As a result, they might display as
offline when you open them in an Avid editing application or when you view them in Interplay
Access.
In the Avid editing application, you need to enable and use dynamic relink to resolve the links
between the assets and the restored media, and then check the assets into the Interplay database.
nThis requirement also applies to partially delivered assets.
To dynamically relink partially restored assets:
1. On an Avid editing system, enable dynamic relink in the Dynamic Relink Settings dialog
box. Set the appropriate target and working settings for your project so that assets you want
to use correctly link to the restored or delivered media.
2. Open a clip, subclip, or sequence in the Avid editing application.
The asset is linked to the restored media.
3. Check the clip, subclip, or sequence in to Interplay.
4. Update the file paths in Avid Access by doing one of the following:
tIn the Avid editing application, right-click the clips in your bins and select Update from
Interplay.
tIn Interplay Access, right-click your master clips and select Update Status from Media
Indexer.
Partially online for DV 25
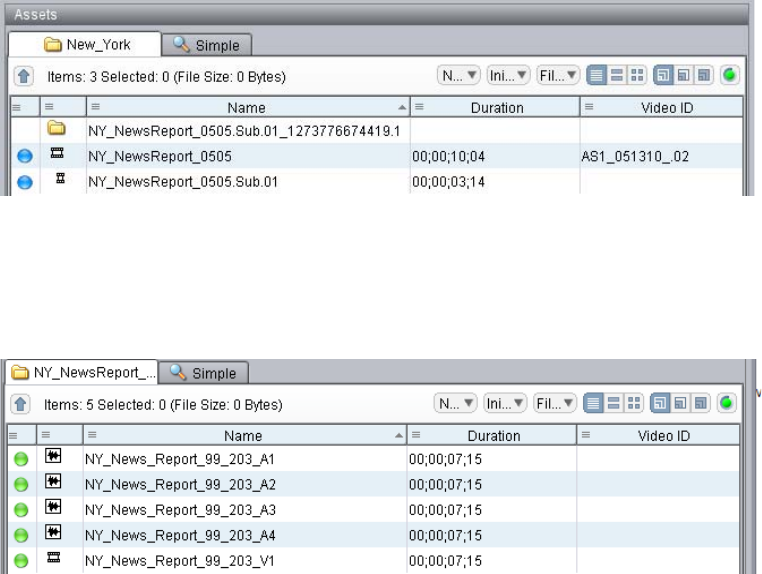
Working with Partial Restore
191
Viewing Partially Restored Reference Tracks in Interplay Access
When you perform a partial restore, the restore process creates new media files for the restored
clip or subclip. These media files are displayed as reference tracks in a separate subfolder within
the target folder.
cDo not use the partially restored reference tracks for editing. Use the restored clip or
subclip instead.
The following illustration shows a subclip named NY_NewsReport_0505.Sub.01, which was
restored to the folder named New_York. (The master clip from which the subclip was created
was also partially restored.) Both the subclip and master clip are shown as partially online (blue
icon). (The icons could also be yellow, indicating that the media is also available on a remote
workgroup or archive.)
The New_York folder includes a subfolder that contains the reference tracks for the new media.
(The name of this subfolder includes the Production Services job number.) If you open this
folder, you can view the reference tracks. In this example, there are four audio files and one
video file. All the media files are fully online (green icon).
The restore process adds the following information to the end of the reference file name:
clipname_segment-start-frame_segment- duration_media-type

Working with Partial Restore
192
where segment-duration is a multiple of the segment size. The system restores the media in
segments so you always restore slightly more than you requested. For a description of the
segment size and how to define it, see “Specifying the Archive Server, Segment Size, and
Restore Process” on page 153.
Reference tracks are also included when you perform a partial delivery. See “Understanding the
Delivery Service and Delivery Receiver Service” on page 261.
Partially Restored Clips Not Archived
Archiving the new media files created with partial restore is not necessary because the original
media is already archived. To save time and storage space, Interplay Archive v2.7 and later does
not archive these reference tracks. If a sequence that uses the restored media is selected for
archiving, the Interplay Archive service skips any reference tracks that are used in the sequence.
How the System Defines the Size of a Partially Restored File
When the Production Services system restores a clip, it restores it in segments (also known as
chunks) and then combines the segments into a single media file. As a result, slightly more
media is restored than is used in the clip. You can configure the size of this segment in the
Interplay Administrator (see “Specifying the Archive Server, Segment Size, and Restore
Process” on page 153).
If the portion you want to restore is within a segment boundary, the system restores the entire
segment rather than breaking up the segment. If the portion you want to restore spans two or
more segments, all segments are restored.
The following illustration shows a subclip used for a partial restore. The boundaries of the
subclip lie within two segments, so both segments are restored. This means that slightly more
media is restored than was requested.
System restores media in segments.
Subclip used for restore operation
Restored media is longer than requested
Requested media
Media file

Configuring a Workgroup to Use Multiple Archive Engines
193
Configuring a Workgroup to Use Multiple Archive
Engines
Interplay v3.0 and later lets you configure a workgroup to use more than one Interplay Archive
Engine. A workgroup can be configured to archive to and restore from a maximum of three
Archive Engines.
The following topics provide more information:
•“Check List for Archiving and Restoring Assets” on page 147
•“Required Software for Multiple Archive Engines” on page 194
•“Terminology for Multiple Archive Engines” on page 194
•“Creating Profiles for Multiple Archive Engines” on page 195
•“Configuring Asset Tracking for Multiple Archive Engines” on page 198
Check List for Configuring and Using Multiple Archive Engines
The following table provides a check list of steps for configuring a workgroup to use multiple
Interplay Archive Engines, along with cross-references for where to find more information about
each step.
Configuring a Workgroup for Multiple Archives Check List
Task Section Reference
Review the required software and new
terminology.
See “Required Software for Multiple Archive
Engines” on page 194 and “Terminology for
Multiple Archive Engines” on page 194
Install the Interplay Archive and Auto Archive
software (includes Interplay Restore)
See the Interplay | Production Software
Installation and Configuration Guide and “Check
List for Archiving and Restoring Assets” on
page 147.
Use the new profile options to create archive
and restore profiles.
See “Creating Profiles for Multiple Archive
Engines” on page 195
Set up asset tracking. See “Configuring Asset Tracking for Multiple
Archive Engines” on page 198
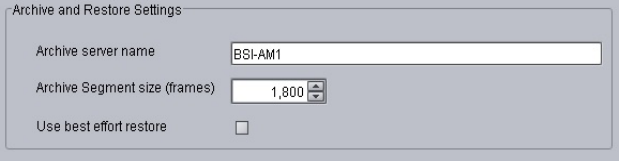
Configuring a Workgroup to Use Multiple Archive Engines
194
Required Software for Multiple Archive Engines
The following Interplay Production software is required for using multiple Archive Engines:
• Access v3.0 or later
This release is required on any workstation that initiates archive or restore operations in a
multiple-archive workgroup.
• Interplay Archive 3.0, Interplay Restore 3.0, or later.
Install these services from the Interplay Servers installer.
nFor Interplay V3.0 and later, service description files and providers are automatically registered.
Terminology for Multiple Archive Engines
The following terms are used in the Restore profile:
• Primary Archive Engine: The Archive Engine that you specify in the “Archive and Restore
Settings” section of the Interplay Administrator Asset Tracking/Archive Settings view. This
is the standard way to set an Archive Engine for a workgroup and it might already be set for
your workgroup.
• Secondary Archive Engine: An additional Archive Engine that you specify in an Archive
profile and a Restore profile. You also specify it in the in the “Archive Settings for Asset
Tracking” section of the Interplay Administrator Asset Tracking/Archive Settings view (see
“Configuring Asset Tracking for Multiple Archive Engines” on page 198.
•Tertiary Archive Engine: An additional Archive Engine that you configure in the same way
as a secondary Archive Engine.
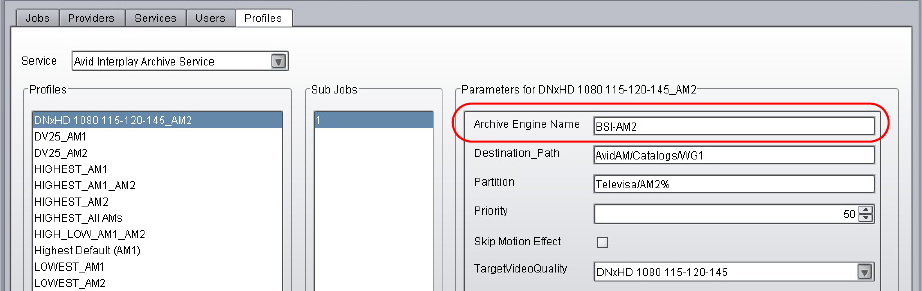
Configuring a Workgroup to Use Multiple Archive Engines
195
Creating Profiles for Multiple Archive Engines
After you install the software, you can create profiles as described in “Creating an Interplay
Archive or Interplay Restore Profile” on page 161. The Interplay Archive and Interplay Restore
services include the following profile settings:
• Interplay Archive Service profile: An Archive profile includes one new setting: Archive
Engine Name, which lets you specify which Archive Engine you want to use for the profile.
If this field is blank, the profile uses the primary Archive Engine.
• Interplay Restore Service profile: A Restore profile includes three new settings: Archive
Engine-Primary, Archive Engine-Secondary, and Archive Engine-Tertiary. You can specify
one or more Archive Engines. If you specify more than one Archive Engine, during a restore
process, the system checks each Archive Engine in turn. If the fields are blank, the system
uses the primary Archive Engine.
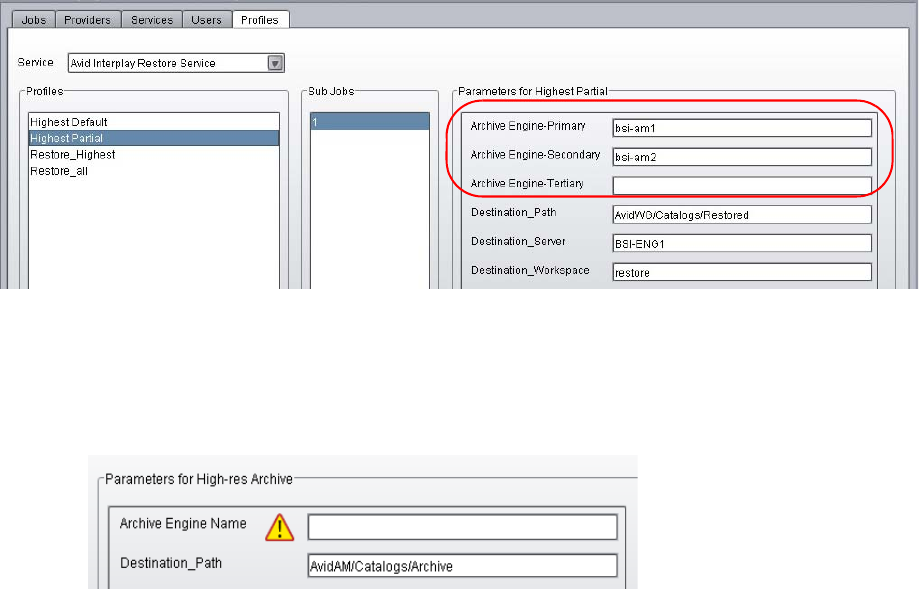
Configuring a Workgroup to Use Multiple Archive Engines
196
cRestore profiles are required in a workgroup that is configured for multiple Archive
Engines.
nWhen upgrading the services, all existing profiles are saved. The new settings are added to all
existing profiles and are marked with a caution (exclamation point) icon, as shown in the
following illustration. This icon indicates that the profile might require information for the new
settings.
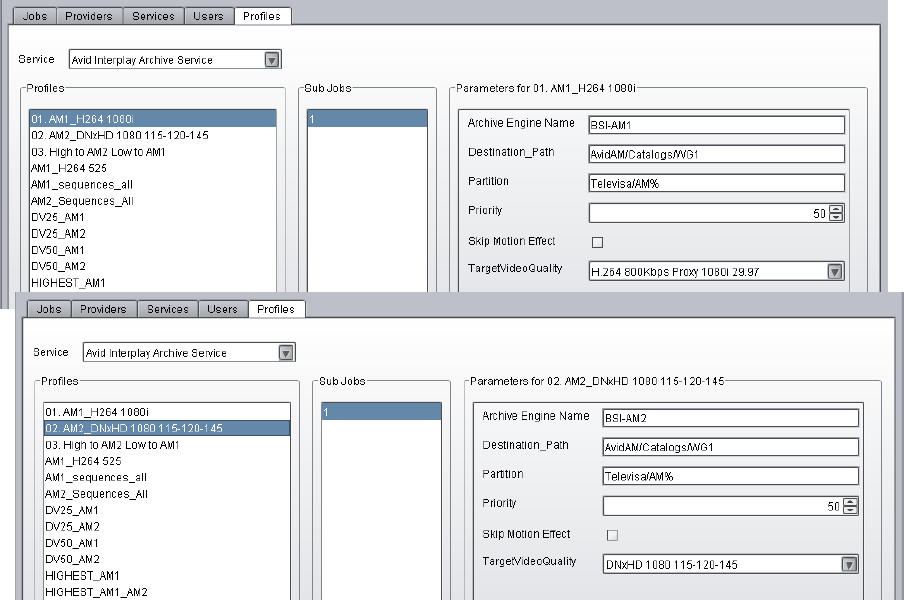
Configuring a Workgroup to Use Multiple Archive Engines
197
Examples
The profiles in the following examples use BSI-AM1 as the Archive Engine for low-res media,
and BSI-AM2 as the Archive Engine for high-res media.
Two Profiles: One for Low Res, One for High Res
In the first profile, low-res H.264 1080i proxy media is archived to BSI-AM1. In the second
profile, high-res HD 1080i media is archived to BSI-AM2.
One Profile: Subjob for Low Res, Subjob for High-Res
The following profile is an example of using subjobs to archive low-res and high-res versions of
the same clip. The first illustration shows subjob 1, in which the lowest available resolution is
archived to BSI-AM1. The second illustration shows subjob 2, in which the highest available
resolution is archived to BSI-AM2.
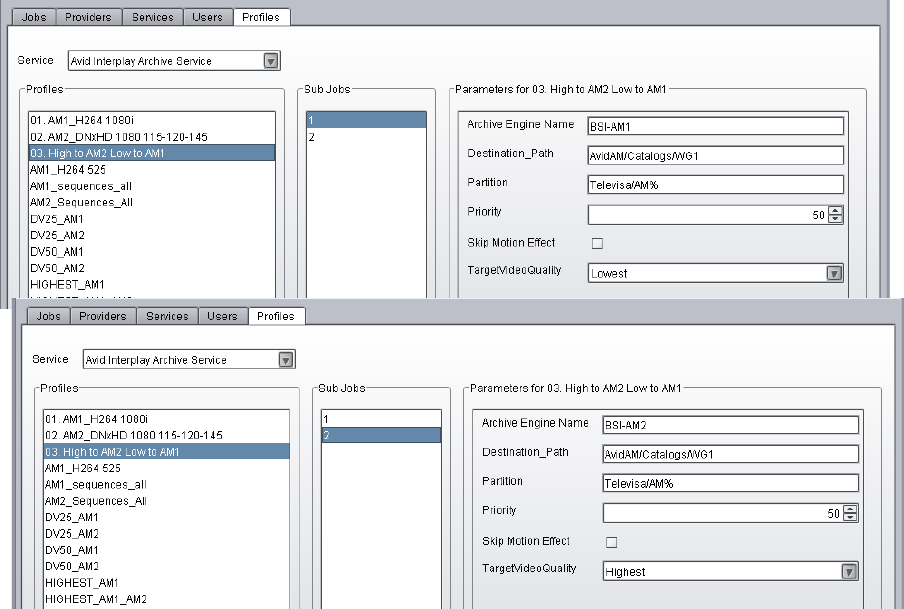
Configuring a Workgroup to Use Multiple Archive Engines
198
Configuring Asset Tracking for Multiple Archive Engines
Asset tracking is a feature in Interplay Access that lets you display information for assets that are
shared by different workgroups. You can use asset tracking to determine if assets that are stored
in one workgroup are correctly archived in an archive workgroup. Information is displayed in the
Tracking column and the Tracking Details tab.
The following illustration shows three workgroups in the Tracking column: one Interplay Engine
workgroup, and two Archive Engine workgroups. Red icons indicate that media is offline on the
Interplay Engine, and green icons indicate media is online on both Archive Engines. If you hover
the mouse pointer over an icon, a tool tip displays the name of the server and the status of the
object on that server.
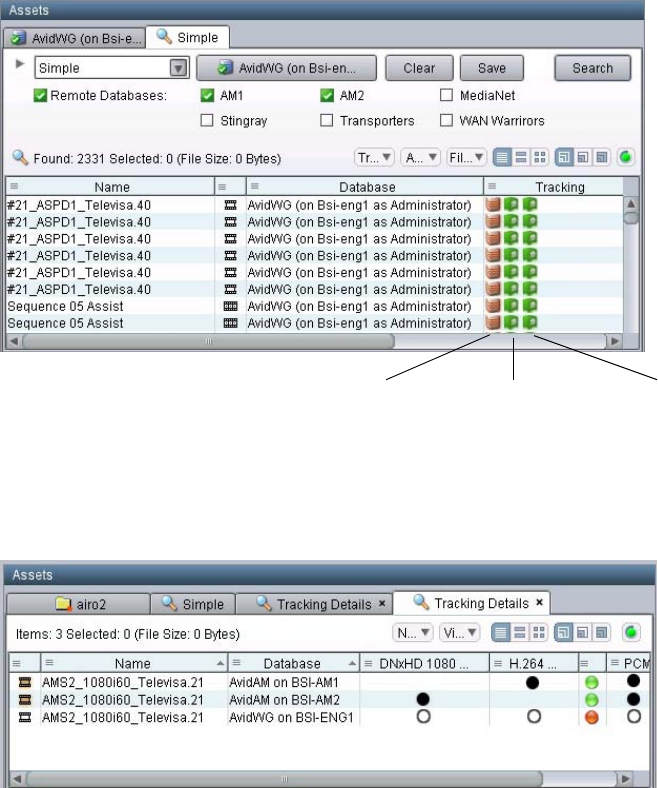
Configuring a Workgroup to Use Multiple Archive Engines
199
The following illustration shows the Tracking Details tab. It shows the low-res media archived
and online on BSI-AM1 and the high-res media archived and online on BSI-AM2. Media is
offline on BSI-ENG1, the Interplay Engine.
The following topics describe the procedures required to set up asset tracking:
•“Adding Multiple Archive Engines for Asset Tracking” on page 200
•“Adding and Displaying the Tracking Column” on page 202
For complete information on asset tracking, see “Viewing the Status of Assets Across
Workgroups (Asset Tracking)” in the Interplay Access User’s Guide or the Interplay Help..
Interplay Engine
workgroup
Archive Engine 1
workgroup
Archive Engine 2
workgroup
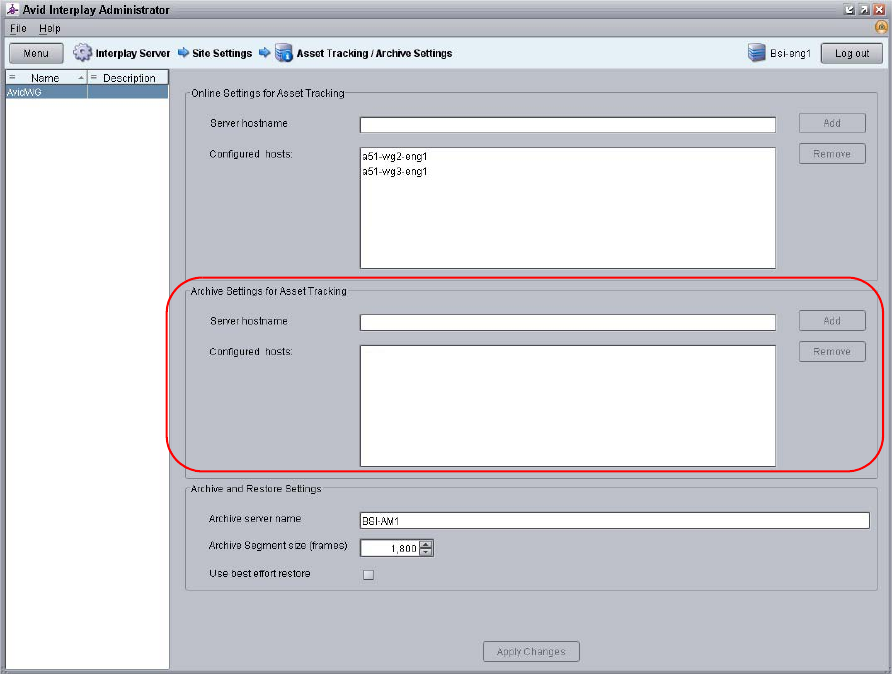
Configuring a Workgroup to Use Multiple Archive Engines
200
Adding Multiple Archive Engines for Asset Tracking
To add multiple Archive Engines for asset tracking:
1. Start or restart the Interplay Administrator and log in to the workgroup that includes multiple
archives.
2. In the Site Settings area, click the Asset Tracking/Archive Settings icon.
The view includes a new section called Archive Settings for Asset Tracking.
3. Type the hostname for the secondary Archive Engine in the Configured hosts field, then
click Add.
The hostname is displayed in the Configure Hosts text box.
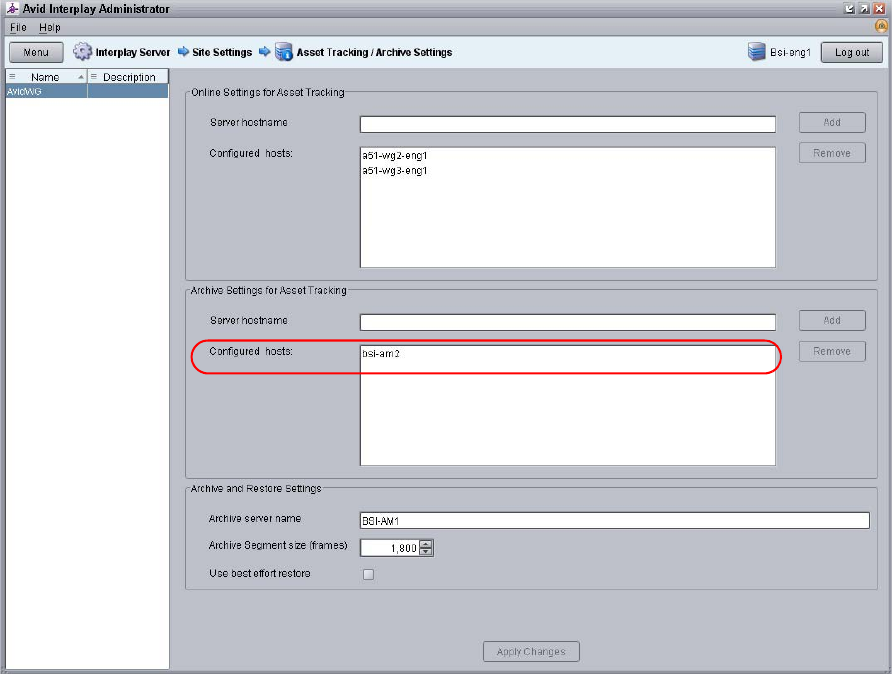
Configuring a Workgroup to Use Multiple Archive Engines
201
You do not need to add the hostname for the primary Archive Engine. It is already specified
in the Archive and Restore Settings section.
4. (Optional) Repeat this action for the tertiary Archive Engine, if you are using one.
5. Click Apply Changes.
nTo track a remote workgroup, you need to specify the remote workgroup and its Lookup Locator
in the Avid Interplay Workgroup Properties. However, because Archive Engines are associated
with an Interplay Engine workgroup, you do not need to specify the workgroups for your Archive
Engines. For more information, see “Viewing the Status of Assets Across Workgroups (Asset
Tracking)” in the Interplay Access User’s Guide or the Interplay Help..
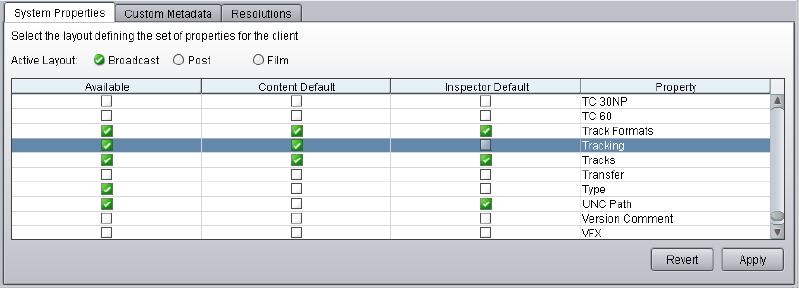
Configuring a Workgroup to Use Multiple Archive Engines
202
Adding and Displaying the Tracking Column
If you want to display the Tracking column, you need to make it available in the Interplay
Administrator.
To add the Tracking column to the Assets pane:
1. In the Site Sections section of the Interplay Administrator window, click the Property Layout
icon.
2. From the Active Layout options, select one of the following layouts:
- Broadcast
-Post
-Film
This option determines which set of properties is displayed in the client applications.
3. Locate the Tracking Property and select the following:
- Available: Select this option to make the property available for users to add into
Interplay Access displays on their own, and to use these fields in an Extended Search.
- Content Default: Select this option to display the property by default in the Content tab.
Do not select Inspector Default, because the Tracking display is not designed to display this
information.
4. Click Apply to save the settings.
The next time you log in to Interplay Access, the Tracking column is displayed.
Before you display tracking details, make sure you update the status of the assets you want
to track.
Configuring a Workgroup to Use Multiple Archive Engines
203
To update the status of selected assets:
1. In Interplay Access, connect to the servers for which you want to view assets.
2. Select an asset, a folder, or multiple assets and folders
3. Select Tools > Update Asset Tracking.
The status of the selected assets is updated.
To display tracking details:
1. In Interplay Access, select an asset or multiple assets.
2. Do one of the following:
tRight-click and select “Tracking Details.”
tSelect View > Tracking Details.
The Tracking Details tab is displayed.

8Working with the Copy Service
The following topics explain how to the set up and use the Copy feature:
•Understanding the Copy Service
•Workflow for Copying Metadata and Media Files
•Check List for Copying Assets to Another Workgroup
•Registering the Copy Service with the Production Services Engine
•Configuring a Copy Provider for the Production Services Engine
•Using an Interplay Copy Service Profile
•Copying Assets and Media to Another Workgroup Using Interplay Access
•Copying Assets and Media to Another Workgroup Using an Avid Editing Application
•Copying Assets During Ingest
•Defining the Maximum Number of Simultaneous Jobs for Copy
Understanding the Copy Service
You can use the Copy feature to copy assets (metadata) and their media files from one
workgroup to another. For example, if your facility uses a specified workgroup for
low-resolution media, you might need to copy clips and their low-resolution media files to the
low-resolution workgroup and copy them back again.
nThe Copy service system requires an application key for any Copy services that are not run on
the Production Services Engine server.
The Copy feature is available from Interplay Access and from an Avid editing application.
Copying Media and Copying Metadata
Copying media: Interplay Copy copies media if the media does not already exist in any
workspace in the target workgroup. Interplay Copy does not create duplicate media or overwrite
media that already exists in the target workgroup. If the media already exists, the job displays the
message “All files are already at the specified destination.”
Workflow for Copying Metadata and Media Files
205
Copying metadata: Interplay Copy copies metadata from the source folder to the destination
folder. If a clip already exists in the target folder, Interplay Copy overwrites the clip's metadata,
and any new properties are merged. For example, you are copying clips from WG1 to WG2 and
the same master exists in both workgroups. There is a custom property called Director for this
master clip in WG1 but not in WG2. After copying from WG1 to WG2, the master clip in WG2
will have the property Director. If the Director property exists on the same clip in both
workgroups, the value for the clip in the source folder overwrites the value of the clip in the
target folder.
Differences Between the Copy Service and the Move Service
The Copy service and the Move service are two different Production Services. They are installed
and configured separately.
• The Copy service copies assets (metadata) and their media files from one workgroup to
another. You can think of this as the “Copy to Workgroup” service. It requires two Copy
providers (one in each workgroup). Each copy provider must be directly connected to both
ISIS systems using either a 10 Gb Ethernet connection (recommended) or the onboard
network interface cards.
• The Move service moves media files from one Avid ISIS workspace to another. You can
think of this as the “Move Media” service. Because it moves media within the same
workgroup, it only requires one provider. It does not copy media or assets.
cDo not use the Copy service to copy assets and media within the same workgroup. Not all
Interplay operations work consistently when there are multiple copies of the same media
files.
Workflow for Copying Metadata and Media Files
Copying to a workgroup uses the Production Services Copy service and its related provider. As
with other services, you can create a profile for automating workflows. You can also use the
Auto-Copy feature and profiles to set a folder for automatically copying the assets placed in it or
to replicate an entire database for backup. For more information about the Auto-Copy feature,
see “Automatically Copying Assets to Another Workgroup” on page 228.
The following illustration shows the basic workflow for copying metadata and media files from
one workgroup to another workgroup. The Copy Provider copies metadata from one Interplay
Engine to another, and copies media files from one ISIS shared storage system to another. This
example shows a configuration that is used for copying media in either direction (from
Workgroup 1 to Workgroup 2, or from Workgroup 2 to Workgroup 1). An Interplay Production
Services Engine and Copy Provider are required in each workgroup.
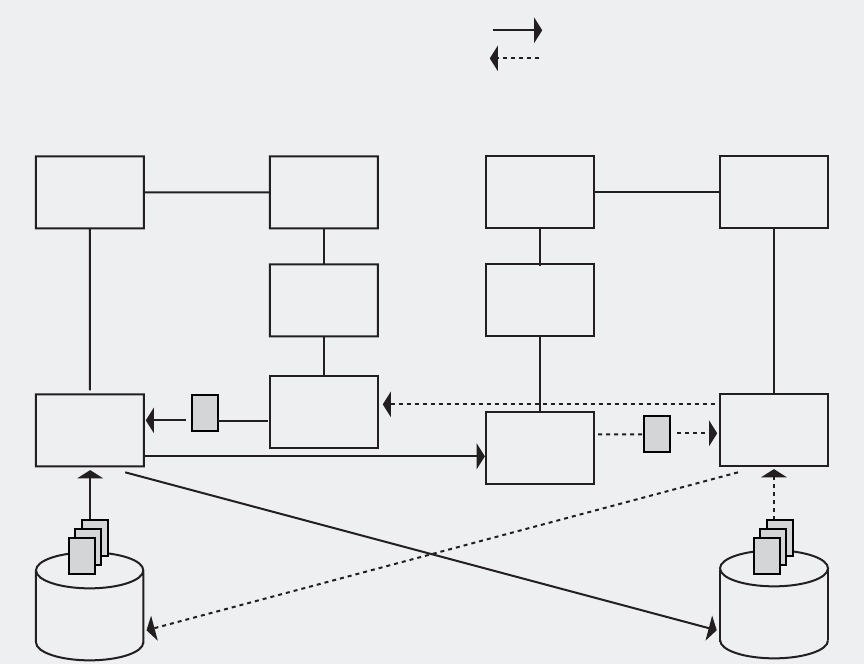
Workflow for Copying Metadata and Media Files
206
The Interplay Engine and Interplay Production Services Engine support multiple Interplay Copy
providers in a workgroup. When you copy two different assets that point to the same media, the
media is copied twice, once for each asset. However, the media is copied to the same location, so
the end result is that only one copy of the media file exists in the destination workgroup database.
This process eliminates an issue with the simultaneous manipulation of media files.
When you use Interplay Copy to copy a sequence with rendered effects, the rendered effect’s
metadata is copied but not the media files.
You can also copy metadata and media files during the ingest process, so that assets are
accessible in the destination workgroup as they become available during the ingest process. See
“Copying Assets During Ingest” on page 222.
Avid
Editing
System
Interplay
Access
Interplay
Engine
Avid
Editing
System
Interplay
Access
Interplay
Engine
Production
Services
Engine
Copy
Provider
ISIS
Storage
Interplay Workgroup 1 Interplay Workgroup 2
Media
Metadata
The Copy Provider copies
metadata to the Interplay Engine
and media files to ISIS storage.
Production
Services
Engine
Copy
Provider
ISIS
Storage
From Workgroup 1 to Workgroup 2
From Workgroup 2 to Workgroup 1
Metadata
Media

Workflow for Copying Metadata and Media Files
207
Copy Requirements
The workgroups must share the following configuration:
- One Production Services Engine and one Copy Provider: required to copy media in only
one direction (for example, copying media from Workgroup 1 to Workgroup 2). In this
case, Workgroup 1 requires a Production Services Engine and a Copy Provider.
- Two Production Services Engines and two Copy Providers: required to copy media in
two directions (for example, from Workgroup 1 to Workgroup 2 or from Workgroup 2 to
Workgroup 1). In this case, both workgroups require a Production Services Engine and a
Copy Provider.
The following table provides more information about these configurations:
• Avid recommends that you install the Copy Provider on a separate server. For more
information, see the Interplay | Production Software Installation and Configuration Guide.
• Each Copy Provider must be directly connected to both ISIS systems, using a 10 Gb
Ethernet connection or the onboard network interface cards (NIC). For more information,
see the Interplay | Production Software Installation and Configuration Guide.
• Both ISIS systems and both Interplay workgroups must include matching user accounts. The
username and password for these accounts must match exactly. You must connect the Copy
Provider to both ISIS systems through the same account.
For more information, see the Interplay | Production Software Installation and
Configuration Guide.
The workspaces on the Copy Provider can be mounted as UNC (letterless) drive mappings
or as lettered drives. See “Mounting Workspaces for Interplay Transcode and Other
Production Services” on page 26.
Configuration Workgroup Required Components
One direction Workgroup 1 Interplay Engine, Media Indexer, Production
Services Engine, Copy Provider, ISIS
Workgroup 2 Interplay Engine, Media Indexer, ISIS
Two directions Workgroup 1
requirements
Interplay Engine, Media Indexer, Production
Services Engine, Copy Provider, ISIS
Workgroup 2
requirements
Interplay Engine, Media Indexer, Production
Services Engine, Copy Provider, ISIS

Workflow for Copying Metadata and Media Files
208
• To use the Copy service to copy clips while they are being ingested, both workgroups need
to be running the same version of Interplay applications. For example, if your workgroup is
running Interplay version v2.3, you can copy assets and media only to another workgroup
running Interplay v2.3.
• The ISIS systems must be running compatible versions of ISIS software. For compatibility
information, see the Interplay ReadMe.
Copy Options
• You can specify which resolutions you want to copy: all, lowest, highest, or a specific
resolution. If you select All, media for all associated resolutions must be online. If any
media is offline, the job will fail. Multiple resolutions are supported as subjobs within a
Production Services profile.
• You can copy assets and media for one asset, multiple assets, a folder, or multiple folders. If
you are copying one or more folders, the Copy process preserves the complete folder
structure on the destination workgroup.
• You can copy metadata and media for file assets, either alone or with metadata and media for
Avid assets.
• You can specify whether to include audio media. Audio files are copied only with their
accompanying video, except in the case of audio-only clips. The following table explains
how the Copy feature works with the selected video resolution and the selected Include
Audio option.
• If you want to copy a sequence that contains a video-only or audio-only segment, you must
select All or None for the appropriate target quality in the Copy profile. If you select a
specific format, the job fails. For example, if a sequence includes a video-only segment,
select All as the AudioQuality. If a sequence includes an audio-only segment, select All as
the TargetVideoQuality.
Clip Type
Resolution
Selected
Include Audio
Option Result
DV 25 with two audio files DV 50 Selected No media is copied to the destination.
Audio remains with the video media.
DV 25 with two audio files DV 25 Selected DV 25 media and accompanying
audio is copied to the destination.
DV 25 with two audio files DV 25 Not selected DV 25 media is copied to the
destination. The audio files are not
copied.
Audio-only clip DV 25 Selected Audio-only media is copied to the
destination.

Check List for Copying Assets to Another Workgroup
209
Check List for Copying Assets to Another
Workgroup
For the copy process, the following table provides a check list of steps for installing and
configuring the Interplay Copy service provider in an Avid shared-storage environment. The
check list assumes the Interplay Production Services Engine and the supporting software are set
up and configured in the workgroup. The check list provides references where to find more
information about each step.
You can also setup an Auto-Copy folder to automatically transfer assets to a pre-defined
location. For more information, see “Automatically Copying Assets to Another Workgroup” on
page 228.
nIf the Copy provider is not running on the Interplay Production Services system, you must attach
an application key to a USB port on the Copy provider system.
Copying Assets to Another Workgroup Check List
Task Section Reference
Add two 10 Gb adapter boards to the Copy
provider and configure it to communicate
with both Interplay workgroups.
See Interplay | Production Software
Installation and Configuration Guide.
Make sure a Production Services
administrator account is set up on Avid
shared-storage.
See Interplay | Production Software
Installation and Configuration Guide.
Make sure the Production Services
application key is connected. If the Copy
provider is not running on the Interplay
Production Services system, you must also
connect an application key to the Copy
provider system.

Check List for Copying Assets to Another Workgroup
210
Make sure the Production Services Engine
software and the supporting software are
installed and configured in the workgroup.
• Avid Service Framework for Client
• Interplay Access
• Interplay Production Services Engine
• Interplay Copy service (install this on
each server used as a provider)
See Interplay | Production Software
Installation and Configuration Guide and
“Production Services Engine Installation and
Configuration” on page 28.
(Option) Install the Interplay Auto
Production Services service, which includes
the Interplay Auto Copy service software.
See “Automatically Copying Assets to Another
Workgroup” on page 228 and “Installing the
Interplay Auto-Copy Service” on page 231.
Activate the Interplay Copy license by
connecting the application key (dongle) to a
USB port or by installing a software license.
See Interplay | Production Software
Installation and Configuration Guide.
Make sure the Copy service is registered. See “Registering the Copy Service with the
Production Services Engine” on page 211.
Connect the Copy service provider to the
Production Services Engine.
See “Configuring a Copy Provider for the
Production Services Engine” on page 211.
Mount workspaces. See “Mounting Workspaces for Interplay
Transcode and Other Production Services” on
page 26.
Create a Copy profile. Required for
performing a copy process from an editing
system, Auto-Copy, and Auto-Copy
replication. Optional for performing a copy
process from Interplay Access.
See “Creating an Interplay Copy Service
Profile” on page 214.
(Option) Configure how errors are handled
and reported in the Production Services
Status tool using the Avid Services
Configuration tool.
See “Customizing the Reporting of Service Job
Status” on page 62.
Configure the Avid editing system. See “Starting the Production Services Engine”
on page 35.
Copying Assets to Another Workgroup Check List (Continued)
Task Section Reference

Registering the Copy Service with the Production Services Engine
211
Registering the Copy Service with the Production
Services Engine
After installing the Copy provider software, you need to make sure that the current Copy service
is registered with the Production Services Engine. The service should be listed on the Services
tab of the Production Services and Transfer Status tool. Registration is automatic but takes place
only after you restart the Production Services Engine. See “Registering Services” on page 82.
Configuring a Copy Provider for the Production
Services Engine
Prior to Production Services v3.1, you used a dialog box to connect a provider to the Production
Services Engine. Starting with Production Services v3.1, you edit an .ini file.
Note the following:
• If you are upgrading from a previous version, the existing .ini file is copied to the
appropriate new folder. If the associated Production Services Engine remains the same, no
further configuration is needed.
• If you are performing a new installation, the installed .ini file uses “localhost” as the name of
the associated Production Services Engine. This is appropriate if you are installing the
service on the same system as the Production Services Engine. If you are installing the
service on a different system, you need to change the default hostname by editing the .ini
file.
• The .ini file includes an automatically generated provider name. You can change the
provider name if you want.
nThe Production Services and Transfer Status tool includes a Register button, which opens the
Register Provider dialog box. This dialog box is no longer needed.
Perform a Copy process. • See “Copying Assets and Media to Another
Workgroup Using Interplay Access” on
page 218.
•See “Copying Assets and Media to Another
Workgroup Using an Avid Editing
Application” on page 221.
Copying Assets to Another Workgroup Check List (Continued)
Task Section Reference
Configuring a Copy Provider for the Production Services Engine
212
To configure a Copy provider for the Production Services Engine:
1. Locate the DMSCopyMedia.ini file and open it in a text editor, such as Windows Notepad.
The default installation path is C:\ProgramData\Avid\Copy Service\DMSCopyMedia.ini
2. Substitute the hostname of the Production Services Engine.
Following is an example of a DMSCopyMedia.ini file with the default hostname
“localhost”:
#Mon May 05 11:34:54 EDT 2014
@5%?MaxJobs=1
@2%tMedia_Services_Engine_Hostname=localhost
@1%tProvider_Name=a51-dev_Copy_4080
Following is the same .ini file, edited to use the hostname “a51-ms_engine.”
#Mon May 05 11:34:54 EDT 2014
@5%?MaxJobs=1
@2%tMedia_Services_Engine_Hostname=a51-ms_engine
@1%tProvider_Name=a51-dev_Copy_4080
nExisting .ini files include the line @3%yAutomatically_Connect=TRUE. This line is no longer
applicable, because all services are now automatically connected.
3. A default name for the provider is automatically created by the provider software using the
following syntax:
<hostname>_<servicename>_<unique#>
The provider name in the previous example is a51-dev_Copy_4080.
Accept the default name or type a new name. This name appears in the Production Services
and Transfer Status tool.
4. Save and close the .ini file.
The service automatically reads the .ini file and tries to connect to the Production Services
Engine. If the service fails to connect, it continues to try to connect. The re-connect interval
grows from 5 seconds to 10 minutes, depending on the amount of time that the service tries
to connect.
The Provider page in the Production Services and Transfer Status tool shows that the service
is connected, indicated by a check mark in the Status column.
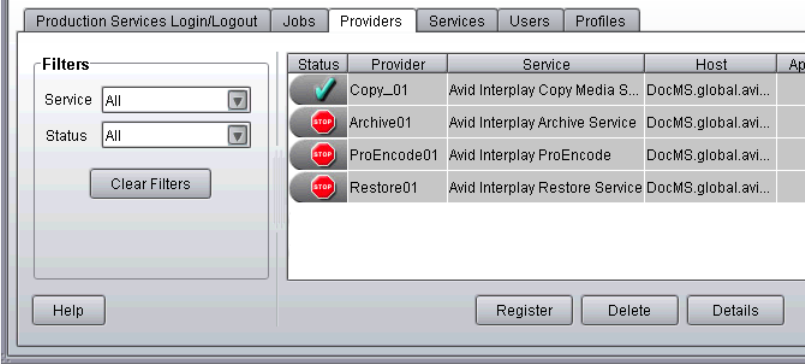
Using an Interplay Copy Service Profile
213
Using an Interplay Copy Service Profile
You can create a profile to use when performing an Interplay Copy or an Auto-Copy operation.
However, the function of the profile’s Destination_Path setting varies depending on the
operation.
• For an Interplay Copy operation or an Auto-Copy operation, the Destination_Path value
defines the folder location in the destination database for the copied metadata.
• For an Auto-Copy replication, the Destination_Path value only defines the destination
database. The source folder path is automatically duplicated in the destination database.
Interplay Copy Service profiles let you define the following:
• Destination folder (Interplay Copy only), database, server, and workspace for the copied
media
• Whether to include subclips, rendered effects (precomputes), file assets, or audio when
copying the media files
• A priority for the job
• Video resolution and format of the copied media
• Whether to use a source workspace name in the destination workgroup (Auto-Copy only)
For details on creating an Interplay Copy profile, see the following topics:
•Creating an Interplay Copy Service Profile
•Interplay Copy Service Profile Definitions
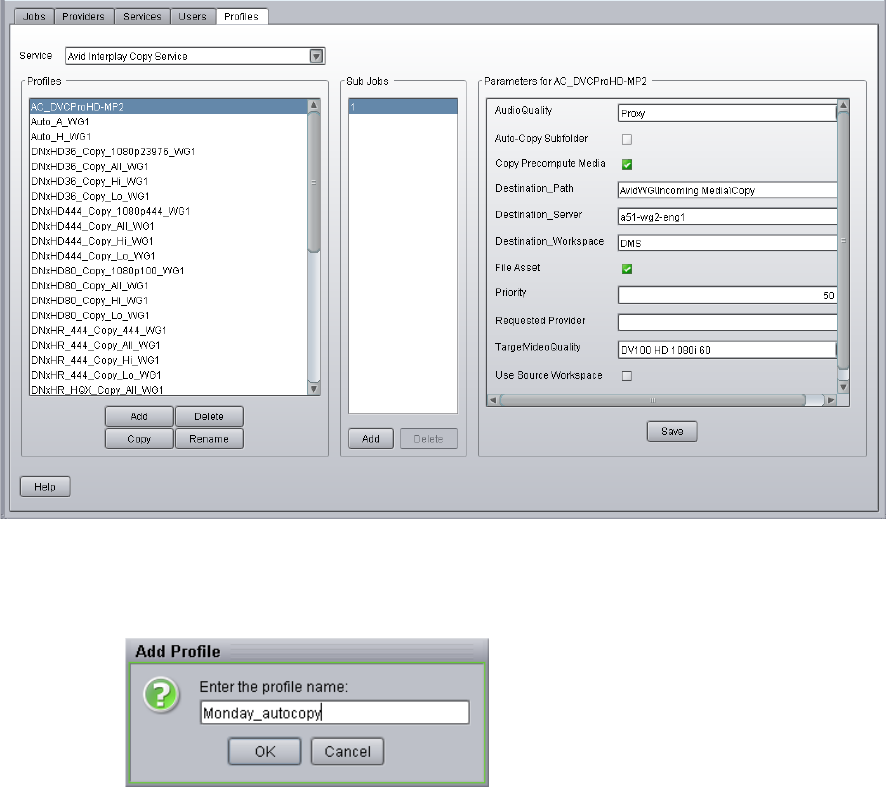
Using an Interplay Copy Service Profile
214
Creating an Interplay Copy Service Profile
To create an Interplay Copy Service profile:
1. Open and log in to the Production Services and Transfer Status tool as described in
“Opening the Production Services and Transfer Status Tool” on page 56.
2. Click the Profiles tab.
3. In the Service menu, select Avid Interplay Copy Service.
4. Click Add in the Profiles area.
The Add Profiles dialog box opens.

Using an Interplay Copy Service Profile
215
5. Type a descriptive name for the new profile in the Add Profile dialog box. This is the name
that you will see when you right-click an asset and select Copy or when you setup an
Auto-Copy operation.
cDepending on whether the profile is used with Interplay Copy, Auto-Copy, or Auto-Copy
replication, the function of the profile’s Destination Path setting varies. If you plan to use
this profile with the Auto-Copy operation, you should name the profile to identify its use
with Auto-Copy. For information about the Interplay Copy and Auto-Copy functions, see
“Automatically Copying Assets to Another Workgroup” on page 228.
6. Click OK.
The name appears in the Profiles list and an empty template appears in the Parameters area.
7. In the Parameters area, define the values you want for the Interplay Copy profile.
See “Interplay Copy Service Profile Definitions” on page 215.
8. Click Save in the Parameters area.
The next time you use the Interplay Copy service or setup an Auto-Copy folder, you can
select the profile.
9. (Option) Click Add in the Sub Jobs area, to define several copy media operations under one
main profile name. For example, you can add subjobs to copy several resolutions using one
profile. The system processes each subjob in turn.
Interplay Copy Service Profile Definitions
Copy Service Profile Definitions
Option Description
Auto-Copy Subfolder Specifies that subfolders should be copied to the target folder and the folder
organization preserved. For more information, see “Auto-Copying of Subfolders” on
page 237.
nThe Copy process automatically includes subfolders and preserves the folder
organization.

Using an Interplay Copy Service Profile
216
AudioQuality Select this option to determine which audio formats to include with the clips whose
video media you are copying. Selecting this option also copies any audio-only clips.
• All: All audio formats associated with the selected asset or assets.
• None: No audio included with the selected asset or assets.
• Uncompressed: Only high-quality audio formats associated with the selected asset
or assets, for example, PCM or WAV.
• Proxy: Only proxy-quality audio formats associated with the selected asset or
assets, for example, MPEG1 Layer 2.
This option replaces the Include Audio check box. For more information, see
“Selecting Audio Formats for Copy, Move, and Deliver” on page 95.
To copy a sequence that contains a video-only segment, you must select All or None as
the AudioQuality.
Copy Precompute Media Select this option if you want to copy rendered effects (precomputes) to the target
folder. This option applies to Auto-Copy and Auto-Copy replication.
Destination_Path The function of the Destination_Path setting varies, depending on whether the profile
is used with Interplay Copy, Auto-Copy, or Auto-Copy replication.
For Interplay Copy and Auto-Copy: This setting identifies the folder in the destination
database that will contain the copied metadata. This folder is created automatically
when Interplay Copy is executed.
nWhen you set the destination path, select a subfolder, not a top-level folder, and
use forward slashes (/). For example, AvidWG/Catalogs or AvidWG/Projects.
For Auto-Copy replication: This setting identifies the destination database, AvidWG,
that will contain the copied metadata. Do not add a folder path when using Auto-Copy
replication, because the Auto-Copy replication operation uses the same folder path as
the source database. A duplicate folder structure is automatically created in the
destination database.
nFor Auto-Copy replication only, make sure the target (destination) database
allows for the adding and removing of items. See “Automatically Backing Up
the Complete Database and Media” on page 240.
Destination_Server Specifies the name of the Interplay Engine computer of the workgroup to which you
will copy the metadata to.
Copy Service Profile Definitions (Continued)
Option Description

Using an Interplay Copy Service Profile
217
Destination_Workspace Type the name of the Avid shared-storage workspace where you want to place the
copied media files. For an Auto-Copy replication operation, select the Use Source
Workspace setting, which overrides the Destination_Workspace setting.
If the workspace is part of a multiple-ISIS works group: Existing profiles will work
correctly with the workspaces as currently defined, but new or edited profiles that
specify a workspace on a remote ISIS system must include the hostname of the ISIS
System Director.
\\hostname\workspace_name
File Asset Select this option if you want to copy file assets (non-Avid assets such as graphics
files) to the target folder.
Priority Sets the priority for the job submitted by this profile. Priority numbers range from
1 (highest priority) through 100 (lowest priority). The default priority number assigned
to each job is 50.
Requested Provider The name of the Copy provider that you want to use to send an Copy job. This must be
the name of the Copy provider as it is registered with the Interplay Production Services
Engine, not the host name. Supply this name only if you have more then one Copy
provider and want to use this profile for a particular Copy provider.
TargetVideoQuality Indicates the video resolution for the copied media. You can select All, Highest,
Lowest, or a specific resolution. If you select All, media for all associated resolutions
must be online. By default, if any media is offline the job will fail. You can override the
default failure reporting setting using the Avid Service Configuration tool. See
“Customizing the Reporting of Service Job Status” on page 62.
To copy a sequence that contains an audio-only segment, you must select All or None
as the TargetVideoQuality.
Use Source Workspace (Auto-Copy replication only) Select this option so that the Auto-Copy replication
operation copies media from a source workspace to a target workspace that has the
same name in the destination workgroup. This setting overrides the
Destination_Workspace setting.
Copy Service Profile Definitions (Continued)
Option Description

Copying Assets and Media to Another Workgroup Using Interplay Access
218
Copying Assets and Media to Another Workgroup
Using Interplay Access
Before you copy assets and media files to another workgroup, make sure that your installation
meets the requirements described in “Working with the Copy Service” on page 204.
To copy assets and media files to another workgroup using Interplay Access:
1. Start Interplay Access and log in to a workgroup and database (for example, AvidWG on
Docwg as Composer1).
2. Connect to another workgroup and database, using the same user name and password (for
example, AvidWG on Bplnisis as Composer1).
The following illustration shows these two databases in the directory tree.
3. Select the assets whose files you want to copy.
You can copy assets from any workgroup to which you are connected (for example, from
either Docwg or Bplnisis). Any workgroup that you copy from must include a Production
Services Engine and Copy Provider in its Interplay environment).
You can select one asset, multiple assets, a folder, or multiple folders.
4. Do one of the following:
tSelect Tools > Copy...
tRight-click and select Copy... from the sixth group of commands. (Do not select Copy
from the second group of commands, which copies metadata to the clipboard.)
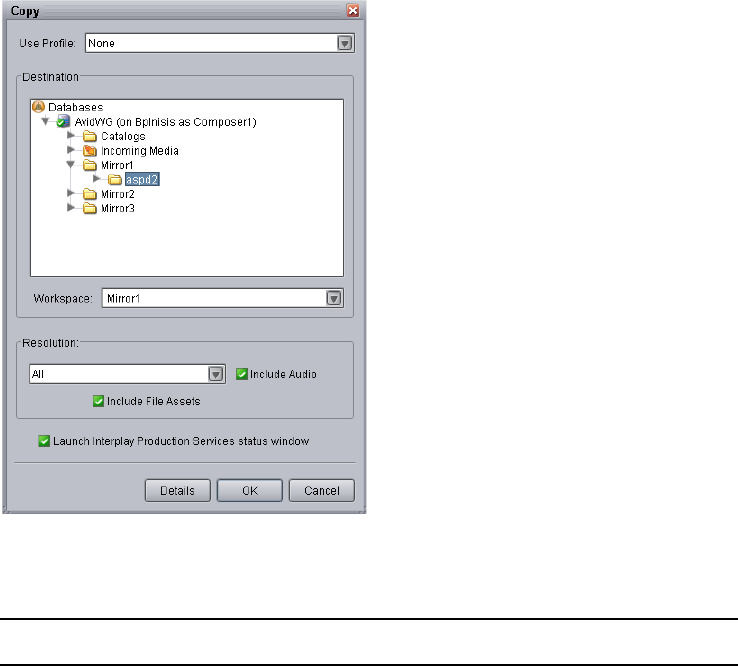
Copying Assets and Media to Another Workgroup Using Interplay Access
219
The Copy dialog box opens and displays the workgroups to which you can copy assets and
media.
5. Select a profile from the Use Profile menu. If there are no profiles available, or you do not
want to use a profile, select the following options:
Option Description
Use Profile None
Destination Select the folder into which you want to copy the metadata.
nMake sure you select a folder and not just the database. If a
folder is not selected, the job is submitted but fails.
Workspace Select the workspace into which you want to copy the media.
Resolution Select which video resolution you want to copy. You can select All,
Highest, Lowest, or a specific resolution. If you select All, media for all
associated resolutions must be online. If any media is offline, the job
will fail.
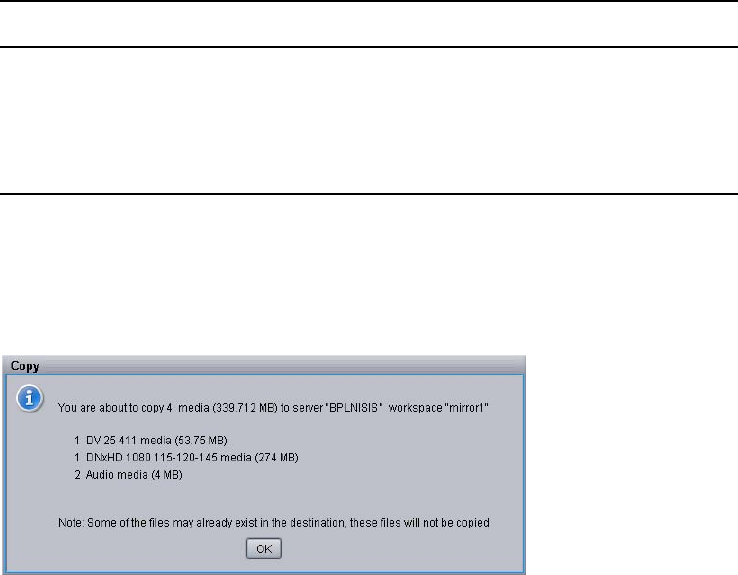
Copying Assets and Media to Another Workgroup Using Interplay Access
220
6. (Option) Select “Launch Interplay Production Services status window” to view the status of
the operation after it begins.
7. (Option) Click the Details button to view the number of files and their size. Their size
indicates the size of the media that will be copied.
8. Click OK.
The system starts the Copy operation. If you selected the option “Launch Interplay
Production Services status window” the window opens and shows you the progress of the
job, as well as other information about it. For information about the status window, click the
Help button.
9. (Option) When the operation is complete, check if the asset was correctly copied by opening
the destination in the remote workgroup.
After a Copy operation is complete, the copied media files are stored in the following folder:
workspace_name:\Avid MediaFiles\mxf\CopyServer.1
nIn Interplay 2.0 and earlier, the media files were stored in a folder that used the computer name
of the server running the Copy provider. If you upgraded to Interplay 2.1 or later, copied media
files are stored in CopyServer.1. Previously copied files remain in the existing folder or folders.
Include Audio Select this option if you want to copy audio that is associated with the
clips whose video media you are copying. Selecting this option also
copies any audio-only clips.
Include File Assets Select this option if you want to copy file assets (non-Avid assets such
as graphics files) to the target folder.
Option Description
Copying Assets and Media to Another Workgroup Using an Avid Editing Application
221
Copying Assets and Media to Another Workgroup
Using an Avid Editing Application
Copying media using an Avid editing application requires a Copy Provider profile. If a profile is
renamed, deleted, or added while the editor is open, you might not see the profile. In this case,
you need to disconnect and then reconnect to the Interplay Production Services Engine, using the
Production Services project setting in the Avid editing application. For information on creating a
profile, see “Using an Interplay Copy Service Profile” on page 213.
Before you copy assets and media files to another workgroup, make sure that your installation
meets the requirements described in “Working with the Copy Service” on page 204.
To copy assets and media files to another workgroup using an Avid editing application:
1. Ensure that you are connected to the workgroup’s Production Services Engine through the
Production Services setting in the editor’s Settings list. See “Archiving Assets from an Avid
Editing Application” on page 166.
2. In the Avid editing application bin, select the asset or assets whose media files you want to
copy.
3. Do one of the following:
tSelect File > Production Services > Avid Interplay Copy Service > profile name.
tRight-click and select Production Services > Avid Interplay Copy Service > profile
name.
The system immediately starts the Copy operation. If Interplay Access is installed on the
editing system, you can track the status of the job by opening Interplay Access, selecting
View > Interplay Production Services Status, and clicking the Jobs tab.
4. (Option) When the operation is complete, check if the asset was correctly copied in Interplay
Access by connecting to the remote workgroup.
After a Copy operation is complete, the copied media files are stored in the following folder:
workspace_name:\Avid MediaFiles\mxf\CopyServer.1
nIn Interplay 2.0 and earlier, the media files were stored in a folder that used the computer name
of the server running the Copy provider. If you upgraded to Interplay 2.1 or later, copied media
files are stored in CopyServer.1. Previously copied files remain in the existing folder or folders.
Copying Assets During Ingest
222
Copying Assets During Ingest
You can use the Interplay Copy feature to copy metadata and media files during the ingest
process, so that assets are accessible in the destination workgroup as they become available
during the ingest process. You can also set up an Auto-Copy process for the ingesting clips.
An editor can open and edit a clip in an Avid editing application while it is being copied. For
more information, see “Using Frame Chase Editing” in the Interplay Transfer Setup and User’s
Guide. Copying clips during ingest so that they are available for editing is sometimes referred to
as “chained ingest” or “edit while copy.”
To use the Copy service to copy clips while they are being ingested, both workgroups need to be
running the same version of Interplay applications. For example, if your workgroup is running
Interplay version v2.3, you can copy assets and media only to another workgroup running
Interplay v2.3.
When copying between workgroups, the Interplay Production Services Status window (Jobs
tab), displays the status of the copy process, not the status of the ingest process. As the amount of
ingested media grows, the status percentage will fluctuate up and down. When the ingest is
complete the clip’s thumbnail in the Interplay Access Assets pane (both workgroups) changes
from a blue dot (partially online) to a green dot (online).
To copy assets and media files to another workgroup during ingest:
1. Start Interplay Access and log in to a workgroup and database (for example, AvidWG on
Docwg as Composer1).
2. Connect to another workgroup and database, using the same user name and password (for
example, AvidWG on Bplnisis as Composer1).
The following illustration shows these two databases in the directory tree.
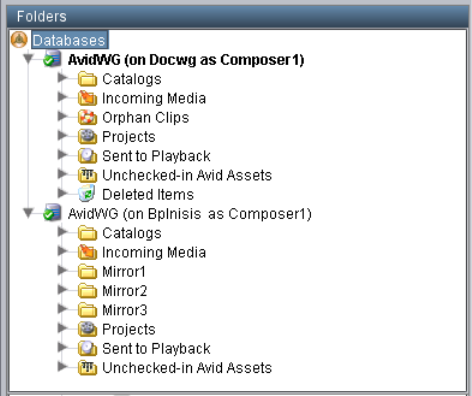
Copying Assets During Ingest
223
3. Select the ingesting assets whose files you want to copy.
You can copy assets from any workgroup to which you are connected (for example, from
either Docwg or Bplnisis). Any workgroup that you copy from must include a Production
Services Engine and Copy Provider in its Interplay environment.
4. Do one of the following:
tSelect Tools > Copy...
tRight-click and select Copy... from the sixth group of commands. (Do not select Copy
from the second group of commands, which copies metadata to the clipboard.)
The Copy dialog box opens and displays the workgroups to which you can copy assets and
media.
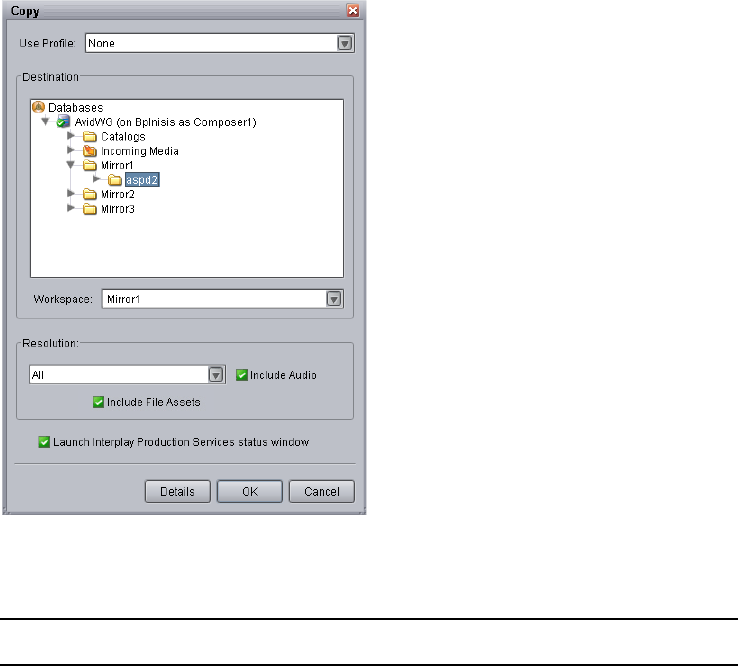
Copying Assets During Ingest
224
5. Select a profile from the Use Profile menu. If there are no profiles available, or you do not
want to use a profile, select the following options:
Option Description
Use Profile None
Destination Select the folder into which you want to copy the metadata.
nMake sure you select a folder and not just the database. If a
folder is not selected, the job is submitted but fails.
Workspace Select the workspace into which you want to copy the media.
Resolution Select which video resolution you want to copy. You can select All,
Highest, Lowest, or a specific resolution. If you select All, media for all
associated resolutions must be online. If any media is offline, the job
will fail.
Include Audio Select this option if you want to copy audio that is associated with the
clips whose video media you are copying. Selecting this option also
copies any audio-only clips.
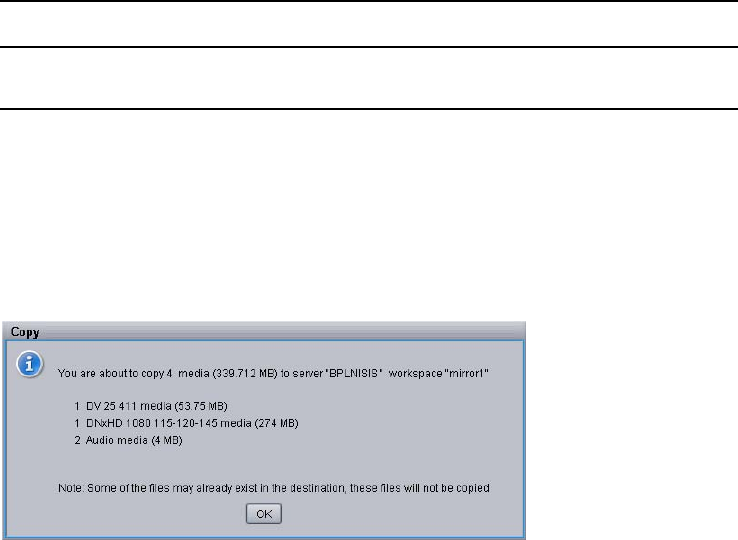
Copying Assets During Ingest
225
6. (Option) Select “Launch Interplay Production Services status window” to view the status of
the operation after it begins.
7. (Option) Click the Details button to view the number of files and their size. The size value is
an estimate based on the source’s default clip length and the specified audio and video
resolutions. The size value is usually not accurate unless the clip length matches the source’s
default clip length.
8. Click OK.
The system starts the Copy operation. If you selected the option “Launch Interplay
Production Services status window” the window opens and shows you the progress of the
copy job. For information about the status window, click the Help button.
9. (Option) You can open the master clip on the remote workgroup and begin working with it
as portions of the file become available during the copy operation.
10. (Option) When the operation is complete, check if the asset was correctly copied by
right-clicking the asset in Interplay Access in the remote workgroup and selecting Update
Status from Media Indexer.
Include File Assets Select this option if you want to copy file assets (non-Avid assets such
as graphics files) to the target folder.
Option Description
Copying Assets During Ingest
226
Setting Registry Keys for Copying During Ingest
Copy Timeout Period and Checking Interval
If necessary, you can add a registry key to configure the Copy service for the following
parameters:
• Copy Timeout Period: The Copy Timeout Period is the amount of time, in seconds, the
service should wait when watching the ingesting material to determine if the ingest is done.
The default value used if this registry value is not configured is 300 seconds.
• Checking interval: The Checking Interval is the time in seconds between checking the
ingesting material for additional material to copy. The default value for this is 2 seconds.
To make these parameters configurable, you need to add a registry key with two new string
values.If the key or either value is not present, the DLL uses default values of 300 seconds for
timeout and 2 seconds for interval.
Name of new key:
•EwcCopyTimeout
Location of new key:
• (32-bit OS) HKEY_LOCAL_MACHINE\SOFTWARE\Avid Technology\EwcCopyTimeout
• (64-bit OS) HKEY_LOCAL_MACHINE\SOFTWARE\Wow6432Node\Avid
Technology\EwcCopyTimeout
Value n am es :
• Timeout (string)
• Interval (string)
To use this functionality, create the new key using regedit, then add the two name/value pairs
with the desired values. Both values are in seconds.
There is a new log in the CopyService folder (DETRefImplV2.log) that will indicate the values
to be used after looking in the registry:
• DETControlEWC::GetRegistryTimeout Timeout: <registry timeout value / default>
Interval: < registry interval value / default>
This log file is not visible to the customer through the LogViewer application.
Defining the Maximum Number of Simultaneous Jobs for Copy
227
Additional Audio Formats
By default, the copy-while-ingesting process recognizes the PCM and Mpeg1Layer2 formats. If
your workflow uses additional audio formats, you need to add a registry key that adds the
formats as a semicolon-separated list. (By default, this registry key does not exist).
Name of new key:
•AudioFormats
Location of new key:
• (32-bit OS) HKEY_LOCAL_MACHINE\SOFTWARE\Avid Technology\EwcCopyTimeout
• (64-bit OS) HKEY_LOCAL_MACHINE\SOFTWARE\Wow6432Node\Avid
Technology\EwcCopyTimeout
Possible values: Wave;AIFC;
Defining the Maximum Number of Simultaneous
Jobs for Copy
By default, a Copy provider is configured to run one job at a time. You can change this value by
editing an .ini file.
cEach type of provider can handle a different maximum number of simultaneous jobs. Do
not change this value unless specifically instructed by Avid Professional Services or
Customer Success. For more information, see “Maximum Number of Simultaneous Jobs”
on page 343.
To change the maximum value for the Copy provider:
1. Open the following file in an application such as Notepad:
C:\Documents and Settings\username\Copy Service\DMSCopyMedia.ini
2. Edit the following line to specify the maximum number of simultaneous jobs:
@5%?MaxJobs=n
3. Save and close the file.
To apply the changes:
tQuit and restart the Copy service.

9Automatically Copying Assets to Another
Workgroup
The following topics describe how to set up and use the Auto-Copy service:
•Understanding the Auto-Copy Service
•Check List for the Auto-Copy Process
•Installing the Interplay Auto-Copy Service
•Understanding the Auto-Copy Folder Process
•Automatically Copying Assets To Another Workgroup Using an Auto-Copy Folder
•Automatically Backing Up the Complete Database and Media
Understanding the Auto-Copy Service
The Production Services Auto-Copy service provides two workflows for automatically copying
assets to another workgroup:
• You can place assets in an Auto-Copy folder to automatically copy the assets (metadata) and
their media files to another workgroup. See “Understanding the Auto-Copy Folder Process”
on page 235.
•You can automatically replicate a complete database and its media files to another
workgroup to create a backup using the Auto-Copy replication process. See “Automatically
Backing Up the Complete Database and Media” on page 240.
The Auto-Copy process keeps the source folder path when copying the assets to the destination
workgroup. Therefore, when a clip is copied to the destination workgroup it has the same folder
path as the source workgroup. After the Auto-Copy process is complete, the assets remain in
their source folders. The assets are not move to a success or fail folder like the auto archive
service.
The ISIS connection requirements for the Auto-Copy feature are the same as for the Interplay
Copy service. For more information on requirements, see the Interplay | Production Software
Installation and Configuration Guide and “Workflow for Copying Metadata and Media Files” on
page 205.
Understanding the Auto-Copy Service
229
nIf you want to copy media to another workgroup that is located beyond the maximum cable
length, you must use Interplay Transfer Engine.
The Auto-Copy service processes files according to the date and time, using a first-in, first-out
(FIFO) rule. The date and time used depends on when an asset was copied to the Auto-Copy
folder.
You should create only the minimum number of Auto-Copy folders that you need. The
Auto-Copy service regularly scans all auto folders, so if there are a lot of folders to scan, there
can be an impact on the performance of the Interplay Engine.
The Avid Service Framework provides the following tools for the Auto-Copy service:
• Avid Workgroup Properties tool starts and stops the service. The Auto-Copy service is
included in the installation of the Interplay Auto Archive service. The Avid Service
Framework displays these services as Auto Production Services, includes the Auto-Archive,
Auto-Transcode, Auto-Transfer, and Auto-Copy services.
• Avid Service Configuration tool:
- Requires initial setup for setting the source Interplay Engine server and setting a user
name for the service and a password for the login user name.
- Lets you set and change parameters for each of the different Avid services and
applications in your workgroup environment.
- Lets you set a profile for the Auto-Copy replication operation.
• Avid Health Viewer tool monitors the status of the service.
• Avid Diagnostic Log Viewer checks details about errors of the service.
For more information about Avid Service Framework, see the Avid Service Framework User’s
Guide.

Check List for the Auto-Copy Process
230
Check List for the Auto-Copy Process
The following table provides a check list for the Auto-Copy process, when used either with an
Auto-Copy folder or to automatically replicate the complete database to another workgroup.
Auto Copying Assets to Another Workgroup Check List
Task Section Reference
Make sure the Interplay Copy
service provider is installed and
configured.
See “Check List for Copying Assets to Another
Workgroup” on page 209.
Install the Auto-Copy service, which
is included in the installation of the
Auto Production Services.
See Interplay | Production Software Installation and
Configuration Guide.
Configure the Auto-Copy service
settings.
See “Configuring the Auto-Copy Service” on page 231.
Verify the service is running. See “Verifying the Auto-Copy Service is Running” on
page 234.
Create an Interplay Copy Service
profile.
See “Using an Interplay Copy Service Profile” on
page 213.
(Auto-Copy folder only) Identify a
folder as an Auto-Copy folder.
See “Identifying an Auto-Copy Folder” on page 236.
(Auto-Copy folder only) Copy assets
using an Auto-Copy folder.
See “Automatically Copying Assets To Another
Workgroup Using an Auto-Copy Folder” on page 239.
(Auto-Copy replication only) Make
sure you add a profile to the Avid
Service Configuration tool.
See “Configuring the Auto-Copy Service” on page 231.
(Auto-Copy replication only) Make
sure the security setting for the target
(destination) database allows the
adding and moving of items.
See “Automatically Backing Up the Complete Database
and Media” on page 240.
(Auto-Copy replication only)
Continuously copy all assets
(metadata and media) from one
workgroup to another for backing up
the files.
See “Automatically Backing Up the Complete Database
and Media” on page 240.
Installing the Interplay Auto-Copy Service
231
Installing the Interplay Auto-Copy Service
If your workflow requires the auto copying of assets, you need to install the Auto Production
Services that includes the Auto-Copy service. You can install the Interplay Auto Archive service
on any system in the workgroup. However, it is usually installed on the system with the
Production Services Engine. The Interplay Auto Copy service automatically runs in the
background.
For details on installing the software, see the Interplay | Production Software Installation and
Configuration Guide.
After you install the Auto-Copy service, see the following:
• For information about configuration settings for the Auto-Copy service, see “Configuring
the Auto-Copy Service” on page 231.
•For a procedure to verify the service is running, see “Verifying the Auto-Copy Service is
Running” on page 234.
Configuring the Auto-Copy Service
You need to use the Avid Service Configuration tool to configure the Auto-Copy service. For
more information about Avid Service Framework, see the Avid Service Framework User’s Guide.
To configure the Auto-Copy service:
1. On any system running the Avid Service Framework services, click Start and select
Programs > Avid > Avid Service Framework > Avid Service Configuration.
The Select Workgroup dialog box opens.
nThe Select Workgroup dialog box does not open if the check box specifying to always select and
use this workgroup option was previously selected. When you select this option, the Select
Workgroup dialog box no longer opens when you start the application. The default workgroup is
selected, and the Avid Service Configuration window opens. To change this option and display
the Select Workgroup dialog box, click the Login tab of the Avid Framework Workgroup
Properties application and clear the check box for the option.
2. (Option) If the Select Workgroup dialog box opens, select the workgroup you want to
connect to and click Select.
The Avid Service Configuration window opens.
3. In the Directory pane, click the Processes tab and verify that the Avid Automatic Archive,
Copy, Transcode, and Transfer service is running.

Installing the Interplay Auto-Copy Service
232
nIf the Avid Automatic Archive, Copy, Transcode, and Transfer service does not appear in the Avid
Service Configuration window, the service is not running or the system it runs on is not properly
connected to the workgroup. Click the Hosts tab and make sure that the Avid Service Framework
services displays the name of the system that the Avid Automatic Archive, Copy, Transcode, and
Transfer service is running on.
4. Expand the Avid Automatic Archive, Copy, Transcode, and Transfer service entry on the
Processes tab of the Directory pane.
The system displays the name of the computer running the Avid Automatic Archive, Copy,
Transcode, and Transfer service.
5. Click the computer name.
The Administrator Password Needed dialog box opens.
6. Type the Avid Service Framework Administrator password and click OK.
nBy default, Avid Service Framework does not require a password. When a password is used, it is
set through the System Configuration Service. Check with your system administrator for the
correct password.
The system displays the Workgroup Server Setting tab for the Avid Automatic Archive,
Copy, Transcode, and Transfer service.
7. Type the Interplay Engine hostname, user name, and password.
If the Administrator user is not used, then the user name must exist as an Interplay user. The
Administrator account is not a requirement You can use any user name with Admin
privileges.
8. Click the Archive and Copy Settings tab.

Installing the Interplay Auto-Copy Service
233
The system displays the configuration settings for AutoArchive and AutoCopy.
9. In the Configure AutoCopy area, do the following:
- Enable AutoCopy — Select Yes.
- AutoCopy scanning interval — Type the number of minutes between scans, minimum
allowed is 3 minutes.
- Number of times to retry when encountering an error — type the number of times you
want the system to retry after an error occurs.
- Number of clips to submit to Interplay Copy at once — type the number of clips you
want sent for copying at one time. The system can better manage the job processing task
when the jobs are processed in small batches. The default number is 10 clips submitted
for processing at one time. For example, when you are copying 1,000 clips to an
Auto-Copy folder, the first 10 clips are copied, then the next 10 clips are copied, and so
on until all 1,000 clips are copied.
- (Auto-Copy replication only) Start automatic copy clips under this database using
profile — Type the name of the Interplay Copy Service profile that you want to use
during the automatic database and media replication process. See “Automatically
Backing Up the Complete Database and Media” on page 240.
10. Click Apply.
11. Close the Avid Service Configuration window.
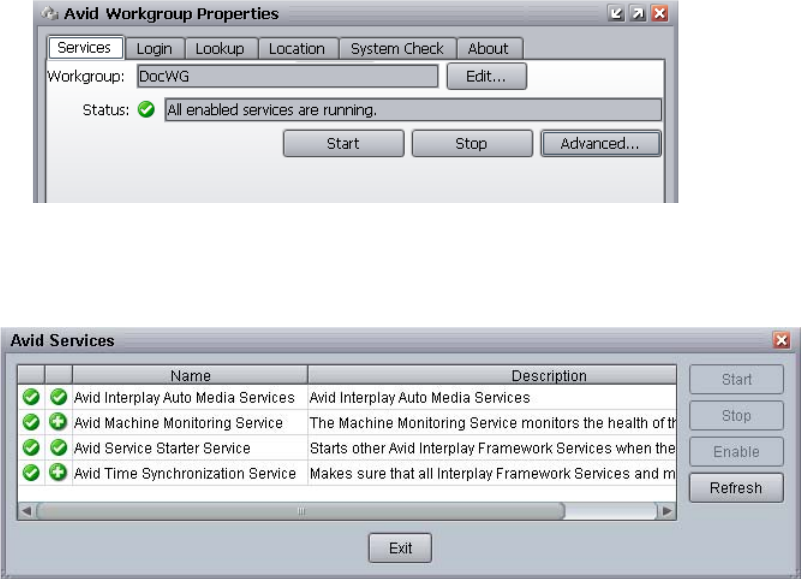
Installing the Interplay Auto-Copy Service
234
Verifying the Auto-Copy Service is Running
The Interplay Auto Production Services are not monitored in the Services page in the Production
Services and Transfer Status tool. You can use the Avid Service Framework services or the
Microsoft Windows Computer Management tool to check whether the Interplay Auto Production
Services are running.
The Auto Copy, Auto Archive, Auto Transcode, and Auto Transfer services are all installed
during the installation of Interplay Auto Archive. These services are all included in the service
named Interplay Auto Production Services.
nInterplay Auto Production Services is named Avid Automatic Archive, Copy, Transcode, and
Transfer Service in the Avid Service Configuration tool.
To verify that the Interplay Auto Production Services are running:
1. On any server in the workgroup, click Start and select Programs > Avid > Avid Service
Framework > Avid Workgroup Properties.
The Avid Workgroup Properties dialog box opens. The Status area indicates whether all the
Avid Service Framework services are running.
2. Click Advanced.
The Avid Services dialog box opens.
Understanding the Auto-Copy Folder Process
235
3. If necessary, select the Avid Interplay Auto Production Services service (formerly named
Avid Interplay Auto Production Services) and click Start.
nIf Avid Interplay Auto Production Services does not appear, check the Production Services
Engine to make sure that the Engine is running.
Understanding the Auto-Copy Folder Process
The Auto-Copy service lets an administrator or user with administrator privileges identify a
folder as an Auto-Copy folder, in Interplay Access. The Auto-Copy service automatically
submits assets placed in an Auto-Copy folder to another workgroup. When setting up an
Auto-Copy folder, you select an Interplay Copy Service profile that defines the destination
workgroup, a destination Interplay database for the metadata, and a workspace for the media
files.
For a list of steps you need to perform to use the Auto-Copy service, see “Check List for the
Auto-Copy Process” on page 230.
For details on the Auto-Copy folder feature, see the following topics:
•“Rules of Auto-Copy Service” on page 235
•“Identifying an Auto-Copy Folder” on page 236
•“Auto-Copying of Subfolders” on page 237
•“Automatically Copying Assets To Another Workgroup Using an Auto-Copy Folder” on
page 239
Rules of Auto-Copy Service
To determine if the clips are ready for copy, a set of rules is applied to each clip found in an
Auto-Copy folder.
The following rules apply after the Auto-Copy service starts:
• Verifies that clips are inside an Auto-Copy folder.
• Verifies that clips are not already pending for a copy in Production Services Engine.
• Verifies that clips have not already been successfully copied.
• Verifies that clips have been modified since the last successful Auto-Copy operation—if the
clips were modified after a successful Auto-Copy operation, the clips will be automatically
copied again.
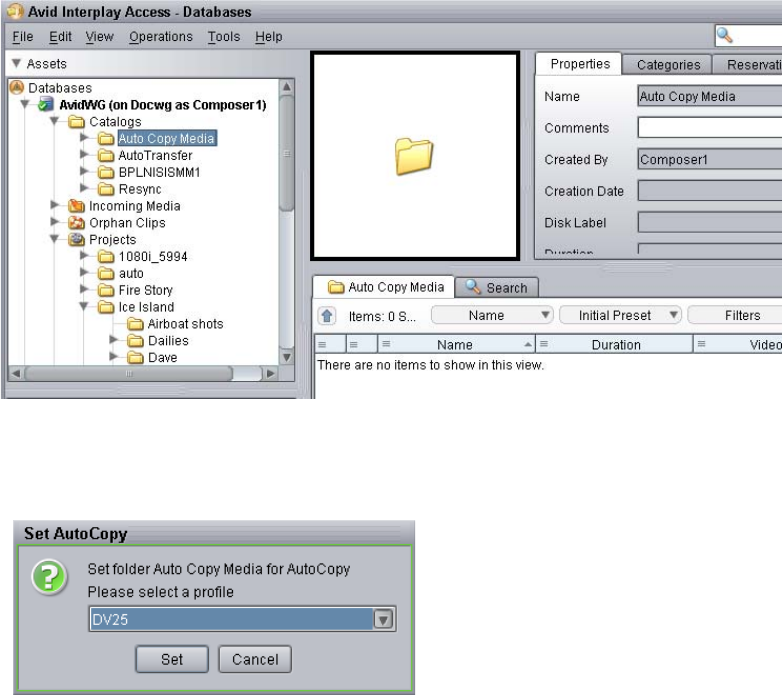
Understanding the Auto-Copy Folder Process
236
Identifying an Auto-Copy Folder
Before you can set up an Auto-Copy folder, an Interplay Copy Service profile must already exist.
For information on creating an Interplay Copy Service profile, see “Using an Interplay Copy
Service Profile” on page 213.
To set up an Auto-Copy folder:
1. Log on to Interplay Access as an administrator or as a user with administrator privileges.
2. Create a folder (or select an existing folder) in the Interplay database using Interplay Access.
The following illustration shows a folder named Auto Copy Media. You can use any name
that fits your workflow.
3. Right-click the folder and select Set AutoCopy.
4. Select an Interplay Copy Service profile from the Set AutoCopy dialog box.
For information about profiles, see “Using an Interplay Copy Service Profile” on page 213.
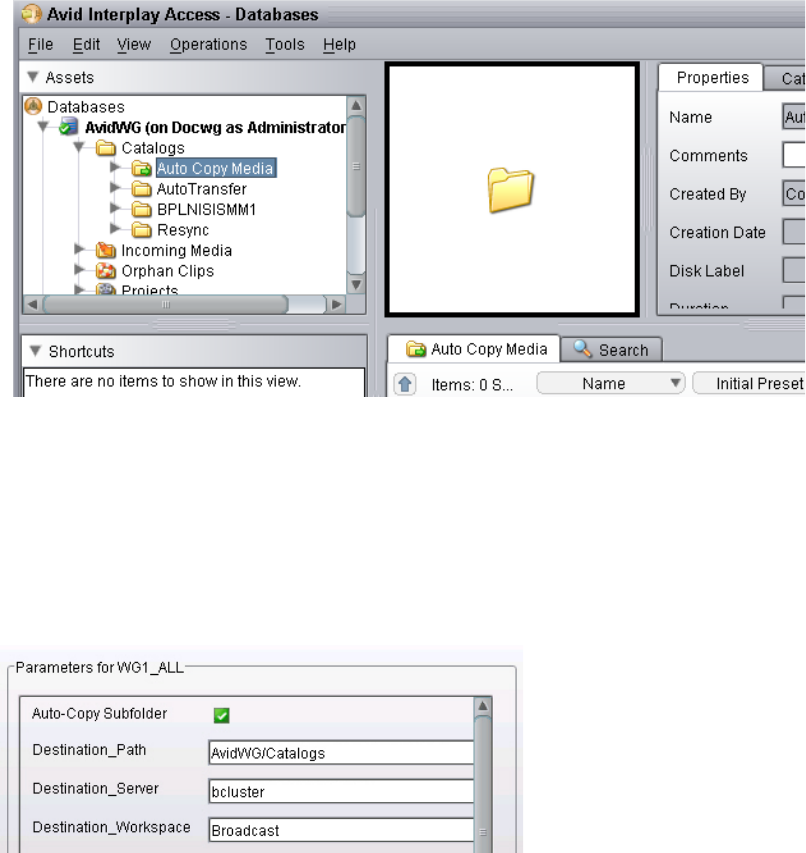
Understanding the Auto-Copy Folder Process
237
5. Click Set.
The system adds an Auto-Copy icon to the folder.
Auto-Copying of Subfolders
Production Services version 2.5 and later includes the option “Auto-Copy Subfolder” in the
profile settings for an Interplay Copy Service profile. If you select this option for a Copy Service
profile, and then use that profile for an Auto-Copy operation, any subfolders in the source folder
are copied to the target folder and the folder organization is preserved. In earlier versions, the
Auto-Copy process copied the contents of subfolders as individual items in the main folder.
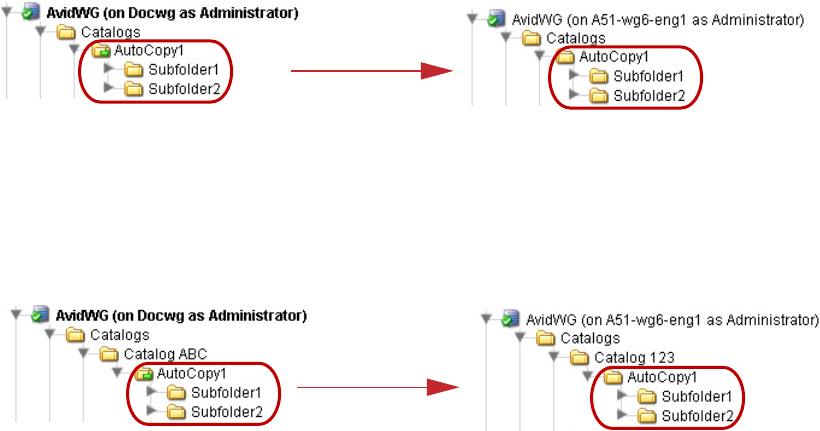
Understanding the Auto-Copy Folder Process
238
Note the following:
• By default the Auto-Copy Subfolder option is not selected.
• If you installed a patch release that supported Auto-Copy of subfolders, profiles that include
the Auto-Copy option are not automatically configured when you upgrade. You must select
the Auto_Copy Subfolder option for these profiles.
• You can copy and paste items from one subfolder to another within the Auto-Copy folder,
which initiates a new Auto-Copy process. Moving items does not initiate a new Auto-Copy
process.
The following illustration shows the Auto-Copy process for an Auto-Copy folder named
AutoCopy1. The process uses a Copy profile with the Auto-Copy Subfolder option selected and
AvidWG/Catalogs as the Destination_Path. This process creates a mirror image of the source
Auto-Copy folder in the database tree.
The following illustration shows how you can specify a destination in a structure that does not
mirror the structure of the source data tree. In this case, the Destination_Path is
AvidWG/Catalogs/Catalog 123.
The copy and Auto-Copy processes copy only the selected folder and subfolders. The processes
does not include parent folders. For example, the following illustration shows the Auto-Copy
process using AvidWG as the Destination_Path. AutoCopy1 and its subfolders are copied to the
root of the destination database, which is different from the organization of the source database
tree.
Source: AutoCopy1 Folder Destination: AvidWG/Catalogs
Source: AutoCopy1 Folder Destination: AvidWG/Catalogs/Catalog 123

Automatically Copying Assets To Another Workgroup Using an Auto-Copy Folder
239
nFor Auto-Copy replication, use AvidWG as the Destination_Path. For more information, see
“Interplay Copy Service Profile Definitions” on page 215.
Automatically Copying Assets To Another
Workgroup Using an Auto-Copy Folder
To copy assets using an Auto-Copy folder:
1. Make sure a folder is configured for automatically copying media. See “Identifying an
Auto-Copy Folder” on page 236.
2. Ensure that the Production Services Engine and the Copy Service are connected and
running.
3. In Interplay Access, locate one or more assets that you want to copy, and drag them to an
Auto-Copy folder.
The system starts copying the assets to the destinations set in the Interplay Copy Service
profile, as a background task.
nThe Auto-Copy job might not start for several minutes, depending on your Auto-Copy settings.
See “Configuring the Auto-Copy Service” on page 231.
4. (Option) You can set the Access user property “AutoCopyStatus” to view the results of the
auto copy process in the Content view (Text view).
5. (Option) You can view the Production Services Status window while the Auto-Copy
operation is in process. The system displays the job status during the copy. After the copy
completes the status entry is deleted. The system deletes the line to avoid collecting too
many entries in the status window.
tSelect View > Interplay Production Services Status.
nYou can also use Avid Diagnostics to troubleshoot jobs. For information, see “Checking
Production Services Log Files” on page 319.
Source: AutoCopy1 Folder Destination: AvidWG
Automatically Backing Up the Complete Database and Media
240
Automatically Backing Up the Complete Database
and Media
You can use the Auto-Copy replication operation to automatically and continuously copy all
clips (both metadata and media) from one workgroup to another. This is useful if you have two
workgroups, one of which serves as a backup for the other.
You use the Avid Service Configuration tool to specify a profile to use for the Auto-Copy
replication operation. When the Auto-Copy starts, the provider begins to copy all clips in a
specified database, starting with the file with the earliest check-in date. As clips are added to the
specified database, they are copied to the backup workgroup.
The Auto-Copy replication feature has the following limitation:
• Files deleted in the source database are not automatically deleted in the target database.
For a list of steps you need to perform to use the Auto-Copy replication operation, see “Check
List for the Auto-Copy Process” on page 230.
nYou can reset when you want the Auto-Copy replication process to begin scanning for assets. See
“Resetting the Auto-Copy Replication Scan” on page 242.
To configure the Auto-Copy service for copying all clips from one workgroup to another
(replication operation):
1. Make sure the workspace or workspaces in the target (destination) workgroup have enough
space for the assets.
To better replicate the source workgroup, create workspaces in the target (destination)
workgroup that match the names of the workspaces in the source workgroup.
2. Make sure the security for the target (destination) database is set to allow for adding and
removing of items.
a. Right-click the target (destination) database and select Security.
b. In the Security of AvidWG dialog box, select “Allow adding and removing of items
directly in this folder.”
c. Click Apply.
3. Create a profile, as described in “Using an Interplay Copy Service Profile” on page 213.
The Auto-Copy replication process duplicates the source folder structure on the target
workgroup database when it copies metadata. You only include the database name in the
Destination_Path setting, for example, AvidWG.
Automatically Backing Up the Complete Database and Media
241
To better replicate the source workgroup, select the Use Source Workspace option. This
option causes the Auto-Copy replication process to copy media from a source workspace to
a target workspace that has the same name. It overrides the Destination_Workspace setting.
If you want to include rendered effects media, select the option “Copy Precompute Media.”
4. Open the Avid Service Configuration window, as described in “Configuring the Auto-Copy
Service” on page 231.
5. In the Archive and Copy Settings tab, type the name of the profile you created in the “Start
automatic copy clips under this database using profile:” option. Click Apply, then close the
window.
To stop the Auto-Copy replication process from copying all clips from one workgroup to
another:
1. Open the Avid Service Configuration window.
2. In the Archive and Copy Settings tab, delete the profile name from the “Start automatic copy
clips under this database using profile:” text box.
3. Click Apply, then close the window.
Changing the Number of Auto-Copy Replication Jobs Submitted
You can change the default setting for the number of Auto-Copy replication jobs submitted
within a specified period of time. The default is 30 jobs in 3 minutes.
To change the default setting, do the following:
tOn the machine with the Interplay Auto Production Services service (includes the
Auto-Copy service), edit the registry keys to change the setting.
For example, to set the number of jobs to 60, use the following text:
[HKEY_LOCAL_MACHINE\SOFTWARE\JavaSoft\Prefs\avid\workgroups\
avid technology incorporated\autoarchive\default\autoarchivesettings\
replicationmumberofjobs]
"name"="replication/Number/Of/Jobs"
"type"="string"
"value"="60"
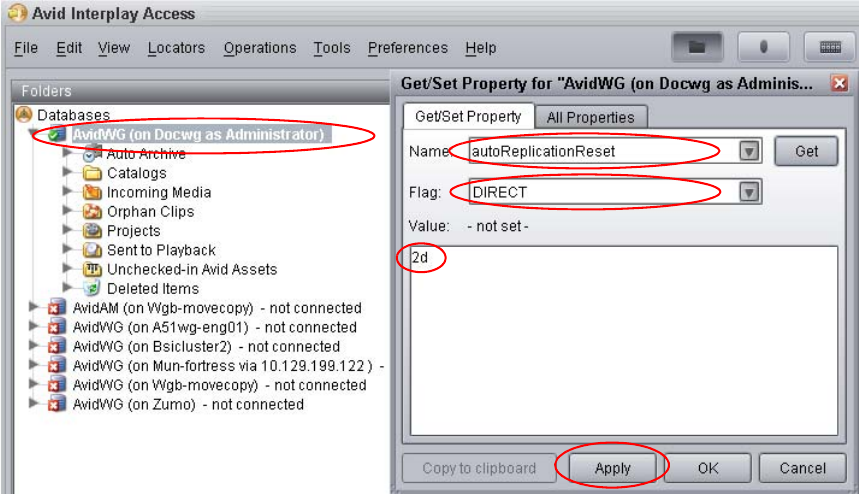
Automatically Backing Up the Complete Database and Media
242
Resetting the Auto-Copy Replication Scan
By default, the Auto-Copy replication process begins to scan for assets from the creation of the
database. The process continues to periodically scan for changes to the database. Your workflow
might require you to rescan from a prior time other than the creation date of the database. For
example, you might want to start a rescan a set number of hours or days prior to the current time.
You can set a scan time that will start to scan when you restart the Interplay Auto Production
Services service.
To reset the start time of the Auto-Copy replication scan:
1. In Interplay Access, right-click the database name and select Advanced > Get/Set Property.
The Get/Set Property for “AvidWG” dialog box opens.
2. In the Name text box, type autoReplicationReset.
3. From the Flag menu, select DIRECT.

Automatically Backing Up the Complete Database and Media
243
4. In the Value text box, type a prior time period for the rescan to begin. You can specify the
number of hours, number of days, or when the database was created.
5. Click Apply.
6. Restart the Interplay Auto Production Services service.
The scan begins at the period in time defined in the Value text box.
Value Description
xh Scan begins the x number of hours prior to the current time. For example, if you
type 2h, then the scan begins 2 hours prior to the current time.
xd Scan begins the x number of days prior to the current time. For example, if you
type 5d, then the scan begins 5 days prior to the current time.
all Scan begins at the creation time of the database.

10 Working with the Move Service
The following topics explain the setup and how to use the Move feature.
•Understanding the Move Service
•Workflow for Moving Media to Another Workspace
•Check List for Moving Assets to Another Workspace
•Registering the Move Service with the Production Services Engine
•Configuring a Move Provider for the Production Services Engine
•Creating a Interplay Move Service Profile
•Moving Media to Another Workspace Using Interplay Access
Understanding the Move Service
You can use the Move feature to move media files from one Avid ISIS® workspace to another.
For example, if one of your workspaces is getting close to capacity, you can use the Move feature
to move selected media files to a workspace that has more free space. You can also move low res
media from a mirrored workspace to a RAID workspace that requires less bandwidth.
The Move feature can move media for Avid assets (both .mxf and .omf files).
To use the Move feature to move media to another workspace requires a Production Service (the
Move service) and the Production Services Engine. As with other Production Services, you can
create a profile for streamlining workflows. For example, if you want to regularly move
low-resolution media files to a specific workspace, you can use Production Services to create a
profile especially for that workflow.
nThe Move service requires an application key.
The Move feature is available from Interplay Access. It is not available on Avid editing systems,
Interplay Assist, or Interplay Instinct.
nThe Move service does not move media for rendered effects (precomputes). If you attempt to
move a folder with only rendered effects, you might receive an error message “Could not find
any Avid clip for Move.”
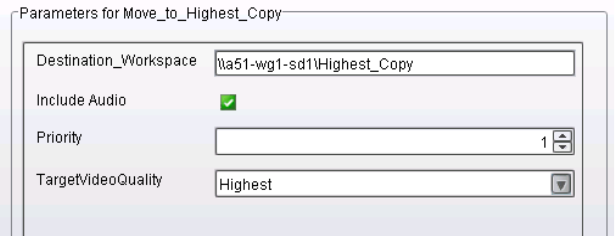
Understanding the Move Service
245
Differences Between the Copy Service and the Move Service
The Copy service and the Move service are two different Production Services. They are installed
and configured separately.
• The Copy service copies assets (metadata) and their media files from one workgroup to
another. You can think of this as the “Copy to Workgroup” service. It requires two Copy
providers (one in each workgroup). Each copy provider must be directly connected to both
ISIS systems using either a 10 Gb Ethernet connection (recommended) or the onboard
network interface cards.
• The Move service moves media files from one Avid ISIS workspace to another. You can
think of this as the “Move Media” service. Because it moves media within the same
workgroup, it only requires one provider. It does not copy media or assets.
cDo not use the Copy service to copy assets and media within the same workgroup. Not all
Interplay operations work consistently when there are multiple copies of the same media
files.
Using Move in a Multiple ISIS Workgroup
Interplay Move v2.6 and later supports high-speed transfer of media between multiple ISIS
systems configured in the same workgroup. A 10-GB network is recommended. For more
information, see “Workgroups with Multiple ISIS Systems” in the Interplay | Production
Software Installation and Configuration Guide.
Profiles created in earlier versions of Interplay will work correctly with the workspaces as
currently defined. For a new or edited profile that specifies a workspace on a remote ISIS system,
the workspace path must include the hostname of the ISIS System Director and the name of the
workspace, in the standard UNC format:
\\hostname\workspace_name
The following illustration shows an example, in which a51-wg1-sd1 is the System Director for
the target ISIS system, and Highest_Copy is the target workspace.
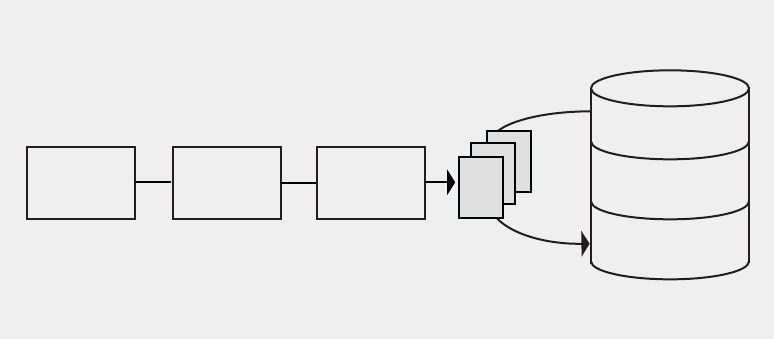
Workflow for Moving Media to Another Workspace
246
If you are working in a multiple ISIS environment, you must mount at least one workspace for
each ISIS system to which you are connected. You can mount the workspace as a UNC drive or a
lettered drive.
Workflow for Moving Media to Another Workspace
The following illustration shows the basic workflow for moving media files, in this case from
“workspace 1” to “workspace 3.”
Interplay Move v2.6 and later supports high-speed transfer of media between multiple ISIS
systems configured in the same workgroup. A 10-GB network is recommended. For more
information, see “Understanding the Move Service” on page 244.
nThe Move feature works only within a single workgroup. To copy assets and media to a different
workgroup, use the Copy service (see “Working with the Copy Service” on page 204).
Move Requirements
For hardware configuration procedures, see the Interplay | Production Software Configuration
and Installation Guide.
• The ISIS system must be running Avid ISIS v2.0.1 or greater.
Starting at ISIS v2.1.1, workspaces can use either mirrored or RAID protection, and you can
move files from one type of workspace to any other (mirrored-to-mirrored,
mirrored-to-RAID, RAID-to-RAID, RAID-to-mirrored).
Avid Unity ISIS
Shared Storage
Use the Move Service
feature to move media files
from one workspace to another.
workspace 1
workspace 2
workspace 3
Interplay
Access
Production
Services
Engine
Media
Files
Move Service
Provider
Workflow for Moving Media to Another Workspace
247
nYou must name the workspaces appropriately to guarantee that you select the correct protection
type for the Move operation. The Move provider does not have an automatic method for
differentiating between RAID or mirrored drives.
• The Production Services Engine and the Move service provider must both be running.
•The provider must be connected to the ISIS system through an account with read/write
privileges on the workspaces you want to move from and move to. The workspaces can be
mounted as UNC (letterless) drive mappings or as lettered drives. See “Mounting
Workspaces for Interplay Transcode and Other Production Services” on page 26.
•A 10-GB network is recommended when using Move v2.6 or later for high-speed transfer of
media between multiple ISIS systems configured in the same workgroup.
• You cannot use Interplay Move to move a clip that is in use (opened for playback in an Avid
editing application). If you try to move a clip that is in use, the job fails with an error
message: “The file is in use, please checkin to Interplay from editor or try again later.”
Move Options
• You can specify which resolutions you want to move: all, highest, lowest, or a specific
resolution. If you select All, only the associated resolutions that have online media are
moved as requested. In a Interplay Move Service profile, you can specify multiple
resolutions as subjobs.
• You can specify whether to include audio media. Audio files are moved only with their
accompanying video files, except in the case of audio-only clips. The following table
explains how the Move feature works with the selected video resolution and the selected
Include Audio option.

Check List for Moving Assets to Another Workspace
248
• If you want to move a sequence that contains a video-only or audio-only segment, you must
select All or None for the appropriate target quality in the Move profile. If you select a
specific format, the job fails. For example, if a sequence includes a video-only segment,
select All as the AudioQuality. If a sequence includes an audio-only segment, select All as
the TargetVideoQuality.
Moving Between Workspaces with RAID or Mirrored Protection
Staring with ISIS v2.1.1, workspaces can use either mirrored or RAID protection, and you can
move files from one type of workspace to any other (mirrored-to-mirrored, mirrored-to-RAID,
RAID-to-RAID, RAID-to-mirrored.
The Move service does not have an automatic way to differentiate between RAID or mirrored
storage. In order to guarantee that you move to the correct protection type you should name
workspaces appropriately in the ISIS Administrator.
Check List for Moving Assets to Another Workspace
For the move process, the following table provides a check list of steps for installing and
configuring the Interplay Move service provider in an Avid shared-storage environment. The
check list assumes the Production Services Engine and the supporting software are setup and
configured in the workgroup. The check list provides references where to find more information
about each step.
nIf the Move service provider is not running on the Production Services Engine system, you must
connect an application key to a USB port on the Move provider system.
Clip Type
Resolution
Selected
Include Audio
Option Result
DV 25 with two audio files DV 50 Selected No media is moved to the destination.
Audio remains with the video media.
DV 25 with two audio files DV 25 Selected DV 25 media and accompanying
audio is moved to the destination.
DV 25 with two audio files DV 25 Not selected DV 25 media is moved to the
destination. The audio files are not
moved.
Audio-only clip DV 25 Selected Audio-only files are moved to the
destination.
Audio-only clip DV 25 Not selected The audio files are not moved.

Check List for Moving Assets to Another Workspace
249
Moving Assets to Another Workspace Check List
Task Section Reference
Check the Move feature requirements to make
sure your workgroup supports the Move
feature.
See “Move Requirements” on page 246.
Configure the Move provider server. See the Interplay | Production Software
Installation and Configuration Guide.
Make sure a Production Services administrator
account is set up on Avid shared-storage.
See the Interplay | Production Software
Installation and Configuration Guide.
Make sure the Production Services Engine
software and all the supporting software are
setup and configured.
• Avid Service Framework for Client
• Interplay Access
• Production Services Engine
• Interplay Move Service (install this on
each server used as a provider)
See Interplay | Production Software Installation
and Configuration Guide and “Production
Services Engine Installation and Configuration”
on page 28.
Activate the Interplay Move license by
connecting the application key (dongle) to a
USB port or by installing a software license.
See Interplay | Production Software Installation
and Configuration Guide.
Make sure the Interplay Move service is
registered.
See “Registering the Move Service with the
Production Services Engine” on page 250.
Connect the Move service provider to the
Production Services Engine.
See “Configuring a Move Provider for the
Production Services Engine” on page 250.
Mount workspaces. See “Mounting Workspaces for Interplay
Transcode and Other Production Services” on
page 26.
(Option) Create a profile. See “Creating a Interplay Move Service Profile”
on page 252.
Perform a move operation using Interplay
Access.
See “Moving Media to Another Workspace
Using Interplay Access” on page 255.
Registering the Move Service with the Production Services Engine
250
Registering the Move Service with the Production
Services Engine
After installing the Move provider software, you need to make sure that the current Move service
is registered with the Production Services Engine. The service should be listed on the Services
tab of the Production Services and Transfer Status tool. Registration is automatic but takes place
only after you restart the Production Services Engine. See “Registering Services” on page 82.
Configuring a Move Provider for the Production
Services Engine
Prior to Production Services v3.1, you used a dialog box to connect a provider to the Production
Services Engine. Starting with Production Services v3.1, you edit an .ini file.
Note the following:
• If you are upgrading from a previous version, the existing .ini file is copied to the
appropriate new folder. If the associated Production Services Engine remains the same, no
further configuration is needed.
• If you are performing a new installation, the installed .ini file uses “localhost” as the name of
the associated Production Services Engine. This is appropriate if you are installing the
service on the same system as the Production Services Engine. If you are installing the
service on a different system, you need to change the default hostname by editing the .ini
file.
• The .ini file includes an automatically generated provider name. You can change the
provider name if you want.
nThe Production Services and Transfer Status tool includes a Register button, which opens the
Register Provider dialog box. This dialog box is no longer needed.
To configure a Move provider for the Production Services Engine:
1. Locate the DMSMoveMedia.ini file and open it in a text editor, such as Windows Notepad.
The default installation path is C:\ProgramData\Avid\Move Service\DMSMoveMedia.ini
2. Substitute the hostname of the Production Services Engine.
Configuring a Move Provider for the Production Services Engine
251
Following is an example of a DMSMoveMedia.ini file with the default hostname
“localhost”:
#Mon May 05 11:34:54 EDT 2014
@5%?MaxJobs=1
@2%tMedia_Services_Engine_Hostname=localhost
@1%tProvider_Name=a51-dev_Move_4080
Following is the same .ini file, edited to use the hostname “a51-ms_engine.”
#Mon May 05 11:34:54 EDT 2014
@5%?MaxJobs=1
@2%tMedia_Services_Engine_Hostname=a51-ms_engine
@1%tProvider_Name=a51-dev_Move_4080
nExisting .ini files include the line @3%yAutomatically_Connect=TRUE. This line is no longer
applicable, because all services are now automatically connected.
3. A default name for the provider is automatically created by the provider software using the
following syntax:
<hostname>_<servicename>_<unique#>
The provider name in the previous example is a51-dev_Move_4080.
Accept the default name or type a new name. This name appears in the Production Services
and Transfer Status tool.
4. Save and close the .ini file.
The service automatically reads the .ini file and tries to connect to the Production Services
Engine. If the service fails to connect, it continues to try to connect. The re-connect interval
grows from 5 seconds to 10 minutes, depending on the amount of time that the service tries
to connect.
The Provider page in the Production Services and Transfer Status tool shows that the service
is connected, indicated by a check mark in the Status column.
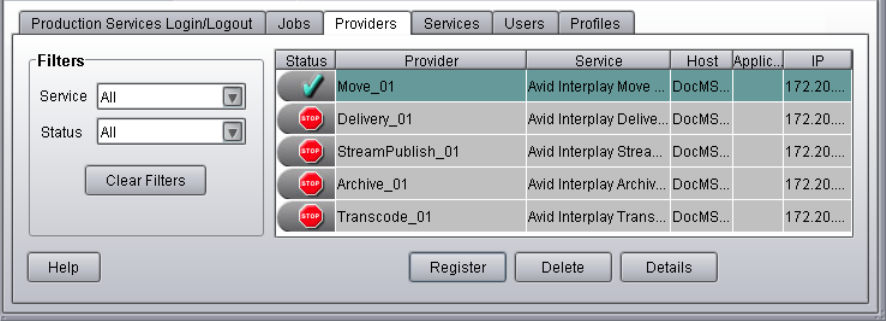
Creating a Interplay Move Service Profile
252
Creating a Interplay Move Service Profile
You can create a profile to use when performing a Move operation.
Interplay Move service profiles let you define the following:
• Destination workspace for the moved media files
• Whether to include audio when moving the media file
• A priority for the job
• Resolution of the moved media
To create an Interplay Move profile:
1. Open and log in to the Production Services and Transfer Status tool as described in
“Opening the Production Services and Transfer Status Tool” on page 56.
2. Click the Profiles tab.
3. In the Service menu, select Avid Interplay Move Service.
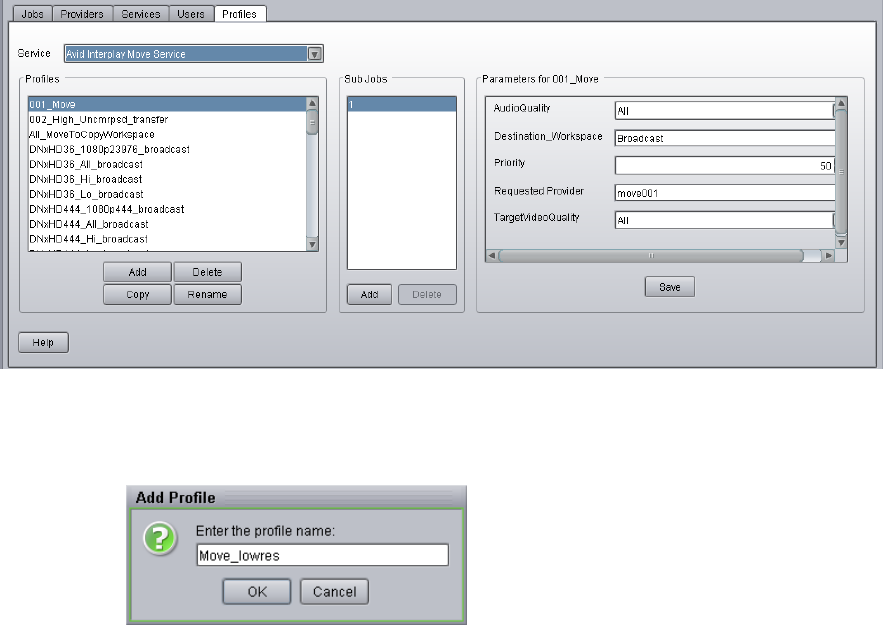
Creating a Interplay Move Service Profile
253
4. Click Add in the Profiles area.
The Add Profiles dialog box opens.
5. Type a descriptive name for the new profile in the Add Profile dialog box. This is the name
that you see when you right-click an asset and select Move.
6. Click OK.
The name appears in the Profiles list and an empty template appears in the Parameters area.

Creating a Interplay Move Service Profile
254
7. In the Parameters area, set the values you want for the profile:
Option Description
AudioQuality Select this option to determine which audio formats to include with the clips
whose video media you are copying. Selecting this option also copies any
audio-only clips.
• All: All audio formats associated with the selected asset or assets.
• None: No audio included with the selected asset or assets.
• Uncompressed: Only high-quality audio formats associated with the
selected asset or assets, for example, PCM or WAV.
• Proxy: Only proxy-quality audio formats associated with the selected
asset or assets, for example, MPEG1 Layer 2.
This option replaces the Include Audio check box. For more information, see
“Selecting Audio Formats for Copy, Move, and Deliver” on page 95.
To move a sequence that contains a video-only segment, you must select All
or None as the AudioQuality.
Destination_Workspace Type the name of the Avid shared-storage workspace where you want to
move the media files. In a multiple-ISIS workgroup, if you are specifying a
workspace on a remote ISIS system, the workspace path must include the
hostname of the ISIS System Director and the name of the workspace, in the
standard UNC format:
\\hostname\workspace_name
Priority This value lets you assign job priorities to different profiles. Priority numbers
range from 1 (highest priority) through 100 (lowest priority). The default
priority number assigned to each job is 50.
Requested Provider The name of the Move provider that you want to use to send an Move job.
This must be the name of the Move provider as it is registered with the
Production Services Engine, not the host name. Supply this name only if you
have more then one Move provider and want to use this profile for a
particular Move provider.
TargetVideoQuality Select the video resolution you want to move.
You can select All, Highest, Lowest, or a specific resolution. If you select All,
only the associated resolutions that have online media are moved as
requested. By default, if any media is offline the job will fail. You can
override the default failure reporting setting using the Avid Service
Configuration tool. See “Customizing the Reporting of Service Job Status”
on page 62.
To deliver a sequence that contains a video-only segment, you must select All
or None as the TargetVideoQuality.
Moving Media to Another Workspace Using Interplay Access
255
8. Click Save in the Parameters area.
The Save Profiles dialog box opens.
9. Click Yes to save your changes.
The next time you use Move, you can select the profile.
10. (Option) Click Add in the Sub Jobs area, to define several move media operations under one
main profile name. For example, you can add subjobs to move several resolutions using one
profile. The system processes each subjob in turn.
Moving Media to Another Workspace Using Interplay
Access
To move media files to another workspace using Interplay Access:
1. Make sure your workgroup meets the requirements described in “Workflow for Moving
Media to Another Workspace” on page 246.
2. In Interplay Access, select the assets whose media files you want to move.
You can select one asset, multiple assets, a subfolder, or multiple subfolders. The following
illustration shows the clip “divers” selected. The File Locations tab in the Object Inspector
shows that the clip is associated with two video media files and four audio media files (two
different sets of resolutions), all on workspace1.
nWhen selecting a folder, do not select a top-level folder, such as AvidWG/Catalogs or
AvidWG/Projects, you can only select subfolders, such as AvidWG/Catalogs/subfolder. All media
files contained in the selected subfolder and its subfolders are moved to the destination
workspace.
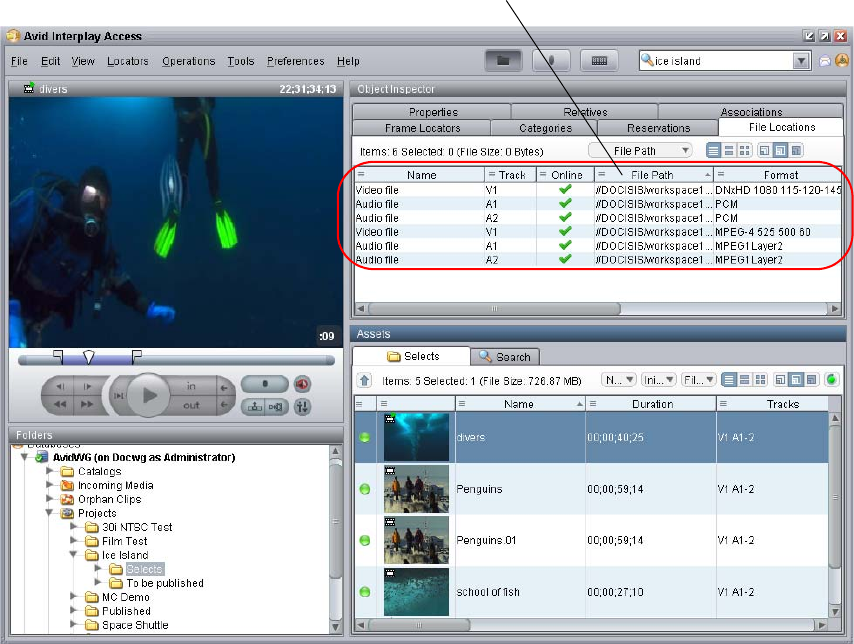
Moving Media to Another Workspace Using Interplay Access
256
3. Do one of the following:
tSelect Tools > Move...
tRight-click and select Move...(Do not select Move to, which moves metadata from one
folder to another.)
The Move dialog box opens.
The selected clip has two video files
and four audio files on workspace1.

Moving Media to Another Workspace Using Interplay Access
257
4. Select a profile from the Use Profile menu. If there are no profiles available, or you do not
want to use a profile, select the following options:
a. Use Profile: None.
b. Destination: Select the workspace to which you want to move the media.
c. Resolution: Select which video resolution you want to move. You can select All,
Highest, Lowest, or a specific resolution. If you select All, only the associated
resolutions that have online media are moved as requested. You can override the default
failure reporting setting using the Avid Service Configuration tool. See “Customizing
the Reporting of Service Job Status” on page 62
d. Include Audio: Select this option if you want to move audio that is associated with the
clips whose video media you are moving. Selecting this option also moves any
audio-only clips. For more information, see the table in “Workflow for Moving Media to
Another Workspace” on page 246.
5. (Option) Select “Launch Interplay Production Services status window” to view the status of
the operation after it begins.
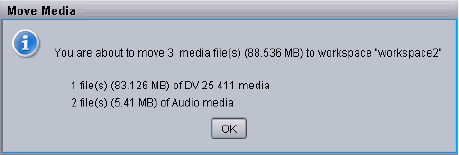
Moving Media to Another Workspace Using Interplay Access
258
6. (Option) Click the Details button to view the number of files and their size. Their size
indicates how much disk space will be freed up after the move.
7. Click OK.
The system starts the Move operation. If you selected the option “Launch Interplay
Production Services status window,” the window opens and shows you the progress of the
job, as well as other information about it. For information about the status window, click the
Help button.
8. (Option) When the operation is complete, select the clip and click the File Locations tab in
the Object Inspector to view the new workspace location.
The following illustration shows one video file and two audio files are now stored on
workspace2, while one video file and two audio files remain on workspace1.
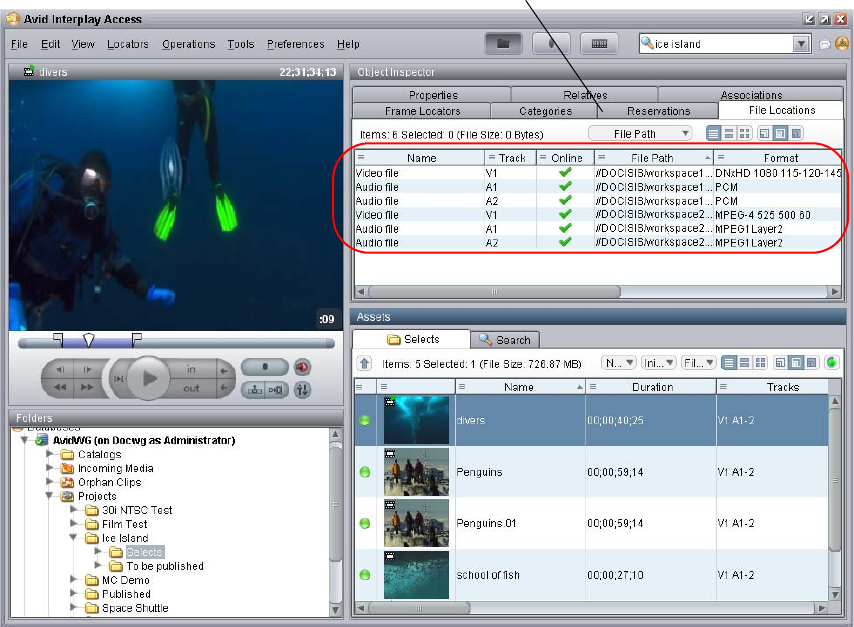
Moving Media to Another Workspace Using Interplay Access
259
One video file and two audio files remain on
workspace1. One video file and two audio files
were moved to workspace2.
Defining the Maximum Number of Simultaneous Jobs for Move
260
Defining the Maximum Number of Simultaneous
Jobs for Move
By default, a Move provider is configured to run one job at a time. You can change this value by
editing an .ini file.
cEach type of provider can handle a different maximum number of simultaneous jobs. Do
not change this value unless specifically instructed by Avid Professional Services or
Customer Success. For more information, see “Maximum Number of Simultaneous Jobs”
on page 343.
To change the maximum value for the Copy provider:
1. Open the following file in an application such as Notepad:
C:\Documents and Settings\username\Move Service\DMSMoveMedia.ini
2. Edit the following line to specify the maximum number of simultaneous jobs:
@5%?MaxJobs=n
3. Save and close the file.
To apply the changes:
tQuit and restart the Move service.

11 Working with the Delivery Service
The following topics provide information about working with the Interplay Delivery Service:
•Understanding the Delivery Service and Delivery Receiver Service
•Check List for the Delivery Service
•Registering the Delivery Receiver in an Interplay Production Workgroup
•Registering the Delivery Service with the Production Services Engine
•Configuring a Delivery Provider for the Production Services Engine
•Creating an Interplay | Delivery Profile
•Transferring Assets Through Interplay Access
•Transferring Assets through an Avid Editing System
•Viewing the Transfer Status
•Relinking Partially Delivered Assets
•Verifying the Delivery Receiver Service is Running Using Avid Service Framework
•Monitoring the Health of the Interplay Delivery Receiver Service
•Overriding Delivery of Already Existing Media Files
•Allowing Third-Party Providers to Directly Connect to the Interplay Delivery Service
•Defining the Maximum Number of Simultaneous Jobs for Delivery
Understanding the Delivery Service and Delivery
Receiver Service
Interplay Delivery is a service that is part of Interplay Production Services. You install the
service description file and register the provider like other Production Services. The Delivery
service lets you perform workgroup-to-workgroup transfers of sequences, master clips, subclips,
and their media files. You can use a Delivery profile to transfer only the portion of the media that
is used in a sequence or subclip.
nPartially delivered assets need to be dynamically relinked on the editing system. See “Relinking
Partially Delivered Assets” on page 279.
Understanding the Delivery Service and Delivery Receiver Service
262
Interplay Delivery Receiver is also a service that is part of Production Services. However, it runs
as a Windows service and you do not install a service description or register it as a provider. You
install the Delivery Receiver service on a server in the workgroup to which you are delivering the
assets and media.
You can configure more than one Delivery provider and more than one Delivery Receiver in a
workgroup if needed. You can then create profiles that use specific providers. For more
information, see “Creating Profiles for Specific Delivery Providers and Specific Delivery
Receivers” on page 272.
Note the following:
• Interplay Delivery supports one job for every Delivery provider on the sending system. The
receiving system has a limit of 1000 jobs running simultaneously. However, the actual
number of jobs allowed depends on the system’s hardware.
• Interplay Delivery uses FTP, which has a separation of the command port and data port.
There is one command port that defaults to 33321, and up to 1000 data ports (you can
configure the number of data ports). There are no in/out ports. The sending side uses only
the “out” ports and the receiving side uses only the “in” ports.
• Interplay Delivery only supports Avid assets. File assets (non-Avid assets) are not supported.
• Interplay Delivery has two modes: partial and full.
- Partial Delivery: Delivers only the portion of the media that is used in a subclip,
sequence, or shotlist. Partial delivery requires a temporary workspace for the partial
media files. These partial media files are removed when the job ends or when the service
is stopped and restarted. However, certain conditions, such as a power outage, cause the
temporary folder to remain. You can manually delete this folder if it is over a day old.
Temporary folder location:
\\<SharedStorageServer>\<TempWorkspace>\Avid MediaFiles\MXF\
<DeliveryServiceHostname>.1\Creating\<jobid>
- Full Delivery: Delivers all media that is used in a clip and the full source media for
subclips, sequences, or shotlists. Full delivery does not create temporary files.
• Interplay Delivery is used for delivery operations initiated from MediaCentral UX. For more
information, see “Production Services Used By MediaCentral | UX” on page 23.
•Interplay Delivery and Interplay Delivery Receiver are supported only when the same
version of both services is used (for example, Delivery v3.3 and Delivery Receiver v3.3).
• If you want to deliver a sequence that contains a video-only or audio-only segment, you
must select All or None for the appropriate target quality in the Delivery profile. If you
select a specific format, the job fails. For example, if a sequence includes a video-only
segment, select All as the AudioQuality. If a sequence includes an audio-only segment,
select All as the TargetVideoQuality.

Check List for the Delivery Service
263
Check List for the Delivery Service
The following table provides a check list of steps for installing, configuring, and using the
Interplay Delivery service and the Interplay Delivery Receiver service in an Avid shared-storage
environment. The check list also provides references where to find more information about each
step.
Delivery Service Check List
Task Section Reference
Make sure the Production Services Engine
software and the supporting software are
installed and configured in the workgroup.
• Avid Service Framework for Client
• Interplay Access
• Production Services
• Interplay Delivery service
See the Interplay | Production Software Installation
and Configuration Guide and “Production Services
Engine Installation and Configuration” on page 28.
Install the Interplay Delivery Receiver
service on one or more computers in the
receiving workgroup.
See the Interplay | Production Software Installation
and Configuration Guide.
Register the default Interplay Delivery
Receiver computer in the Interplay
Administrator.
See “Registering the Delivery Receiver in an
Interplay Production Workgroup” on page 264.
Install the Interplay Delivery service on one
or more computers in the sending
workgroup.
See the Interplay | Production Software Installation
and Configuration Guide.
Activate the Interplay Delivery license by
connecting the application key (dongle) to a
USB port or by installing a software license.
See Interplay | Production Software Installation
and Configuration Guide.
Make sure the Interplay Delivery service is
registered.
See “Registering the Delivery Receiver in an
Interplay Production Workgroup” on page 264.
Connect the Interplay Delivery service
provider to the Production Services Engine.
See “Registering the Delivery Receiver in an
Interplay Production Workgroup” on page 264.
Mount workspaces. See “Mounting Workspaces for Interplay
Transcode and Other Production Services” on
page 26.

Registering the Delivery Receiver in an Interplay Production Workgroup
264
Registering the Delivery Receiver in an
Interplay Production Workgroup
The Delivery workflow requires you to register one Delivery Receiver service system with the
receiving Interplay workgroup. This system will be used as the default Delivery Receiver. The
Interplay Administrator site setting, Server Hostname Settings, contains the settings for
registering the default provider. You can use a profile to specify additional Delivery Receivers.
The Delivery workflow uses FTP (File Transfer Protocol), specifically, passive FTP mode.
You need to enter the hostname and port number of the system where the Delivery Receiver
service is installed. The port number in this view is the command port number.
Verify the Interplay Delivery service is
connected.
See “Verifying That a Service Provider Is
Connected” on page 89.
Create one or more Interplay Delivery
profiles.
See “Creating an Interplay | Delivery Profile” on
page 268.
Transfer assets through Interplay Access. See “Transferring Assets Through Interplay
Access” on page 275.
Transfer assets through an Avid editing
system.
See “Transferring Assets through an Avid Editing
System” on page 276.
View the status of the transfers. See “Viewing the Transfer Status” on page 276.
Verify the Delivery Receiver service is
running.
See “Verifying the Delivery Receiver Service is
Running Using Avid Service Framework” on
page 279.
Monitor the health of the Avid system. See “Monitoring the Health of the Interplay
Delivery Receiver Service” on page 281.
Delivery Service Check List (Continued)
Task Section Reference
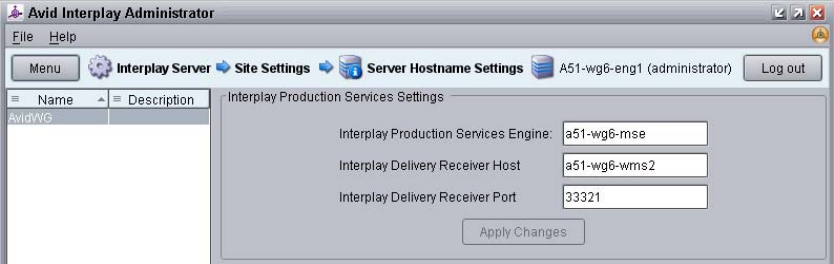
Registering the Delivery Receiver in an Interplay Production Workgroup
265
To register the default Delivery Receiver:
1. Click Start and select Programs > Avid > Avid Interplay Access Utilities > Avid Interplay
Administrator.
2. Log in to the server for the workgroup in which you want to register the default Delivery
Receiver.
3. In the Site Settings area, click Server Hostname Settings.
4. In the Interplay Production Services Settings area, type the computer name of the system
that you want to register as the default Delivery Receiver.
By default, the command port number is 33321. To change the default port number, you
need to update the configuration file
ftpd.xml
on the Delivery Receiver service system (see
the following procedure).
5. Click Apply Changes
To change the Delivery Receiver port numbers in the receiving Interplay workgroup:
1. Open the following folder on the system where you installed the Interplay Delivery Receiver
service software.
C:\Program Files\Avid\Interplay Delivery Receiver\res\conf
2. Open the
ftpd.xml
file in Notepad.
3. To replace the command port number, search for
nio-listener name
and replace the
corresponding port number. The default command port number is 33321.
4. To replace the data port number, search for
passive ports
and replace the corresponding
port numbers. The default data port numbers are 20020-21020.
5. Save the file and close Notepad.
6. Restart the services using the Avid Services dialog box in the Avid Workgroup Properties,
see “Verifying the Delivery Receiver Service is Running Using Avid Service Framework” on
page 279.
Registering the Delivery Service with the Production Services Engine
266
The
ftpd.xml
file also includes one or more data port numbers, which are defined by
default as follows:
<passive ports=”20020-21020”/>
If you want to lock down the ports for the firewall of the system on which the Delivery
Receiver service is installed, you need to leave at least one passive port listed as open. The
number of ports listed must correspond to the maximum number of concurrent delivery jobs
that will be sent to this receiver. The system starts at the lowest available port number (20020
by default) when acquiring ports.
Registering the Delivery Service with the Production
Services Engine
After installing the Delivery provider software, you need to make sure that the current Delivery
service is registered with the Production Services Engine. The service should be listed on the
Services tab of the Production Services and Transfer Status tool. Registration is automatic but
takes place only after you restart the Production Services Engine. See “Registering Services” on
page 82.
Configuring a Delivery Provider for the Production
Services Engine
Prior to Production Services v3.1, you used a dialog box to connect a provider to the Production
Services Engine. Starting with Production Services v3.1, you edit an .ini file.
Note the following:
• If you are upgrading from a previous version, the existing .ini file is copied to the
appropriate new folder. If the associated Production Services Engine remains the same, no
further configuration is needed.
• If you are performing a new installation, the installed .ini file uses “localhost” as the name of
the associated Production Services Engine. This is appropriate if you are installing the
service on the same system as the Production Services Engine. If you are installing the
service on a different system, you need to change the default hostname by editing the .ini
file.
• The .ini file includes an automatically generated provider name. You can change the
provider name if you want.
nThe Production Services and Transfer Status tool includes a Register button, which opens the
Register Provider dialog box. This dialog box is no longer needed.
Configuring a Delivery Provider for the Production Services Engine
267
To configure a Delivery provider for the Production Services Engine:
1. Locate the DMSIDService.ini file and open it in a text editor, such as Windows Notepad.
The default installation path is C:\ProgramData\Avid\Delivery Service\DMSIDServiceini
2. Substitute the hostname of the Production Services Engine.
Following is an example of a DMSIDService.ini file with the default hostname “localhost”:
#Mon May 05 11:34:54 EDT 2014
@5%?MaxJobs=1
@2%tMedia_Services_Engine_Hostname=localhost
@1%tProvider_Name=a51-dev_Delivery_4080
Following is the same .ini file, edited to use the hostname “a51-ms_engine.”
#Mon May 05 11:34:54 EDT 2014
@5%?MaxJobs=1
@2%tMedia_Services_Engine_Hostname=a51-ms_engine
@1%tProvider_Name=a51-dev_Delivery_4080
nExisting .ini files include the line @3%yAutomatically_Connect=TRUE. This line is no longer
applicable, because all services are now automatically connected.
3. A default name for the provider is automatically created by the provider software using the
following syntax:
<hostname>_<servicename>_<unique#>
The provider name in the previous example is a51-dev_Delivery_4080.
Accept the default name or type a new name. This name appears in the Production Services
and Transfer Status tool.
4. Save and close the .ini file.
The service automatically reads the .ini file and tries to connect to the Production Services
Engine. If the service fails to connect, it continues to try to connect every thirty seconds.
The Provider page in the Production Services and Transfer Status tool shows that the service
is connected, indicated by a check mark in the Status column.

Creating an Interplay | Delivery Profile
268
Creating an Interplay | Delivery Profile
You must create a profile to perform a transfer operation that uses the Delivery service. You
select a profile after you select a master clip, subclip, or sequence in Interplay Access or in an
Avid editing application.
You can create a profile that designates a specific Delivery provider, a specific Delivery Receiver
system, or both. For more information, see “Creating Profiles for Specific Delivery Providers
and Specific Delivery Receivers” on page 272. You can also specify a user name in the target
workgroup. See “Specifying User Credentials in a Delivery Profile” on page 274
To create a Delivery profile:
1. Open and log in to the Production Services and Transfer Status tool as described in
“Opening the Production Services and Transfer Status Tool” on page 56.
2. Click the Profiles tab.
3. Select Service > Avid Interplay Delivery Service.
4. Click Add in the Profiles area.
The Add Profile dialog box opens.
5. Type a descriptive name for the new profile in the Add Profile dialog box. This is the name
that users see when they right-click an asset and select Delivery Service.
For example,
- If you want to create a profile to transfer all media for IMX 30 clips, name the profile
“Full IMX 30.”
- If you want to create a profile to transfer partial media for IMX 30 clips, name the
profile “Partial IMX 30.”
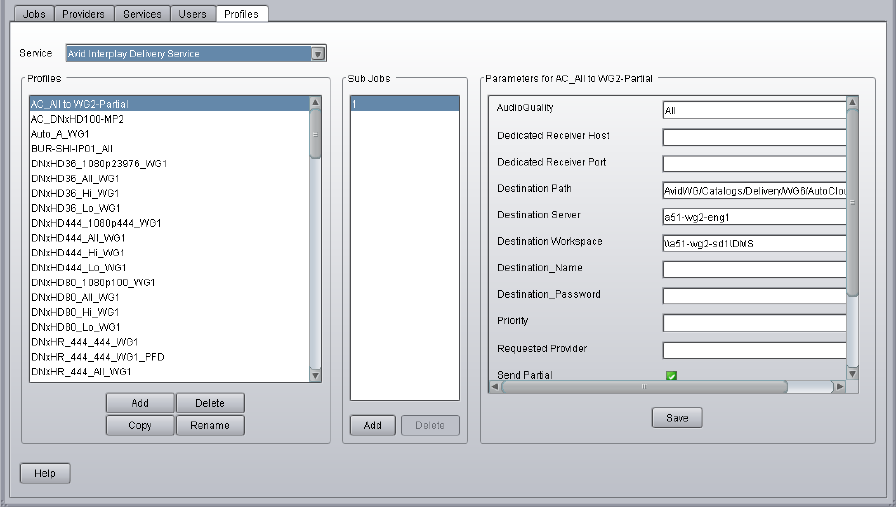
Creating an Interplay | Delivery Profile
269
6. Click OK.
The name appears in the Profiles list and an empty template appears in the Parameters area.
7. In the Parameters area, specify the following:
- (Option) AudioQuality: Select this option to determine which audio formats to include
with the clips whose video media you are copying. Selecting this option also copies any
audio-only clips.
- All: All audio formats associated with the selected asset or assets.
- None: No audio included with the selected asset or assets.
- Uncompressed: Only high-quality audio formats associated with the selected asset
or assets, for example, PCM or WAV.
- Proxy: Only proxy-quality audio formats associated with the selected asset or
assets, for example, MPEG1 Layer 2.
This option replaces the Include Audio check box. For more information, see “Selecting
Audio Formats for Copy, Move, and Deliver” on page 95.
To deliver a sequence that contains a video-only segment, you must select All or None
as the AudioQuality.
Creating an Interplay | Delivery Profile
270
- (Option) Dedicated Receiver Host: The host name of the Delivery Receiver computer to
which you want to deliver. Use this setting if you want to specify a particular Delivery
Receiver in a workgroup. This setting overrides the setting in the Server Hostnames
view in the Interplay Administrator. If you do not specify a host name, the Delivery
service uses the setting in the Server Hostnames view.
For more information, see “Creating Profiles for Specific Delivery Providers and
Specific Delivery Receivers” on page 272.
-(Option) Dedicated Receiver Port: The port number for the Delivery Receiver system.
By default, the command port number is 33321. For instructions for changing the
default port number, see “Registering the Delivery Receiver in an Interplay Production
Workgroup” on page 264.”
-Destination Path: Type the name of the Interplay database folder in the target workgroup
that will hold the transferred files, for example, AvidWG/Catalogs/A51/Partial2.
- Destination Server: Type the server name of the Interplay Engine in the target
workgroup.
- Destination Workspace: Type the name of the Avid shared-storage workspace on the
target workgroup that will hold the transferred files.
If the workspace is part of a multiple-ISIS workgroup: Existing profiles will work
correctly with the workspaces as currently defined, but new or edited profiles that
specify a workspace on a remote ISIS system must include the hostname of the ISIS
System Director.
\\hostname\workspace_name
- (Option) Destination_Name: Type the user name of a user in the target workgroup. If
you do not use this field, the credentials of the user sending the delivery must match the
credentials of a user in the target workgroup. See “Specifying User Credentials in a
Delivery Profile” on page 274.
-(Option) Destination_Password: Type the password of a user in the target workgroup. If
you do not use this field, the credentials of the user sending the delivery must match the
credentials of a user in the target workgroup.
- (Option) Priority: Select a value to assign job priorities to different profiles. Priority
numbers range from 1 (highest priority) through 100 (lowest priority). The default
priority number assigned to each job is 50.
- (Option) Requested Provider: The name of the Delivery Service provider that you want
to use to send a Delivery job. This must be the name of the Delivery Service provider as
it is registered with the Production Services Engine, not the host name. Supply this
name only if you have more then one Delivery Service provider and want to use this
profile for a particular Delivery Service provider.
Creating an Interplay | Delivery Profile
271
- (Option) Send Partial: Select this check box to send a partial transfer. For subclips, the
provider transfers only the portion of the clip that makes up the subclip. For sequences,
the provider transfers just the portion of the clips that are contained in the sequence. The
setting applies only to subclips and sequences. It does not affect clips.
- (Option) Send Partial - Handle Size: Type the number of additional frames you want to
include on both ends of a subclip or a cut within a sequence. If the handle length
exceeds either end of the master clip, then the handle is truncated to the end of the
master clip.
- TargetVideoQuality: Select a resolution for the transfer. You can select All, Highest,
Lowest, or a specific resolution. If you select All, media for all associated resolutions
must be online. By default, if any media is offline the job will fail. You can override the
default failure reporting setting using the Avid Service Configuration tool. See
“Customizing the Reporting of Service Job Status” on page 62.
To deliver a sequence that contains a video-only segment, you must select All or None
as the TargetVideoQuality.
- Temporary Workspace On Sender: Type the name of the Avid shared-storage workspace
on the source workgroup that will hold the temporary media files that are created during
the transfer process. The Delivery provider deletes the temporary files after the transfer
is complete.
8. Click Save in the Profiles area.
The Save Profile dialog box opens.
9. Click Yes to save your changes.
You can define several transfer operations under one main profile name. For example, you
can add subjobs to transfer several resolutions using one profile. The system processes each
subjob in turn.
To add subjobs:
tClick Add in the Sub Jobs area.

Creating an Interplay | Delivery Profile
272
Creating Profiles for Specific Delivery Providers and Specific Delivery
Receivers
You can create a profile that designates a specific Delivery provider, a specific Delivery Receiver
system, or both.
In previous releases, the only available configuration was one in which the Production Services
Engine used the first available provider to send the job to the Delivery Receiver system specified
in the Interplay Administrator. This configuration is still the default, but now you have additional
options:
• Create a profile that uses a specific Delivery provider. Using a specific Delivery provider can
make your workflow more efficient. For example, you can dedicate one Delivery provider to
sending jobs to one workgroup and one Delivery provider to send jobs to another
workgroup.
• Create additional Delivery Receivers in a workgroup, and then create a profile that sends
jobs to a specific Delivery Receiver in the workgroup. Using additional Delivery Receivers
in a workgroup increases the number of jobs you can send and provides backup systems in
case of a failure.
• Create a profile that uses both a specific Delivery provider and a specific Delivery Receiver.
The following diagram illustrates two profiles:
• One profile that sends a job from a specific Delivery provider in Workgroup A
(Delivery_Provider_1) to Workgroup B. No specific Delivery Receiver is set, so the job will
go to the default system, as specified in the Interplay Administrator.
• One profile that sends a job from a specific Delivery provider in Workgroup A
(Delivery_Provider_2) to a specific Delivery Receiver in Workgroup B
(Delivery_Receiver_2).
Workgroup A Workgroup B
Delivery_Provider_1
Delivery_Provider_2
Delivery_Receiver_1
(default)
Delivery_Receiver_2
Profile that sends a job
to the default receiver
Profile that sends job
to a specific receiver.
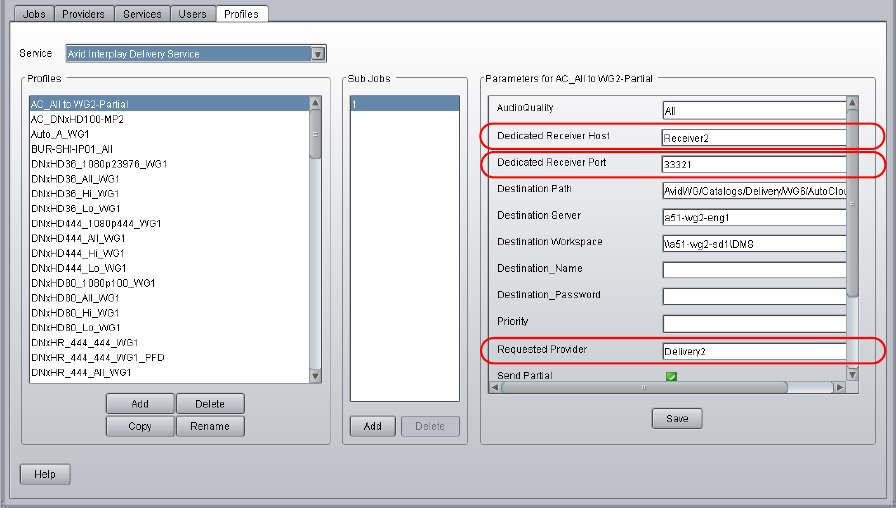
Creating an Interplay | Delivery Profile
273
An Interplay Delivery Service profile includes the following new parameters:
• Dedicated Receiver Host: The host name of the Delivery Receiver computer to which you
want to deliver. This setting overrides the default setting in the Server Hostnames view in the
Interplay Administrator when you use a profile that specifies a different host name in this
setting.
• Dedicated Receiver Port: The port number for the receiver. By default, the command port
number is 33321. For instructions for changing the default port number, see “Registering the
Delivery Receiver in an Interplay Production Workgroup” on page 264.
•Requested Provider: The name of the Delivery Service provider that you want to use to send
a Delivery job. This must be the name of the Delivery Service provider as it is registered
with the Production Services Engine, not the host name
The following illustration shows a profile that uses a specific Delivery Provider (Delivery1) to
send jobs to a specific Delivery Receiver host (Receiver2) in a workgroup whose Interplay
Engine hostname is a51-wg2-eng1.
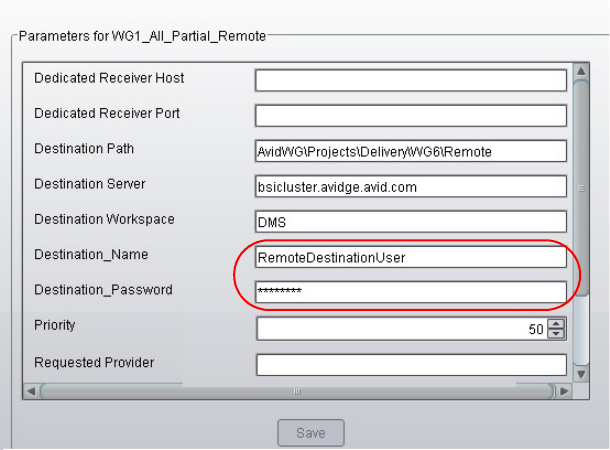
Creating an Interplay | Delivery Profile
274
Specifying User Credentials in a Delivery Profile
The profile settings for Interplay Delivery v3.0 and later include optional settings in which you
can specify the credentials (user name and password) of a user in the target workgroup. If you do
not use these fields, the credentials of the user sending the delivery must match the credentials of
a user in the target workgroup.
The following illustration shows a profile that uses a specific user name
(RemoteDestinationUser) and password (displayed in asterisks) in a workgroup whose Interplay
Engine hostname is bsicluster.
When you type the password, asterisks are displayed in place of the password.
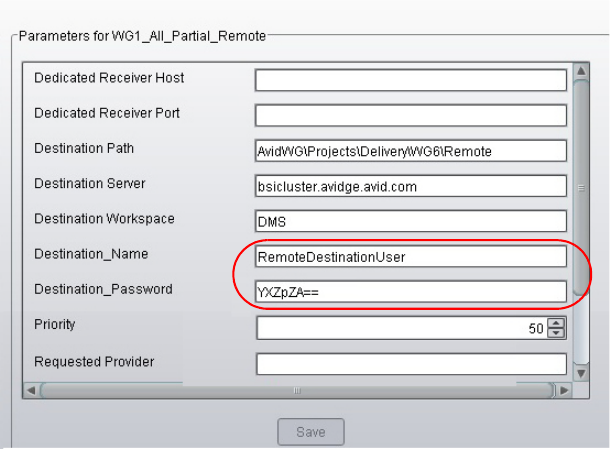
Transferring Assets Through Interplay Access
275
If you use an Interplay Production Services and Transfer Status (PSTS) tool earlier than v3.0 to
open a profile that was created with a PSTS v3.0 tool, the password is displayed in encoded
letters, as shown in the following illustration:
cDo not create or modify a Delivery profile that uses the new fields with a Production
Services and Transfer Status tool earlier than v3.0. The profile could become corrupted.
Transferring Assets Through Interplay Access
You can transfer assets from one workgroup to another by using the Delivery service through
Interplay Access. The supported assets that you can transfer are shotlist, subclips, and master
clips.
To transfer one or more assets through Interplay Access:
1. Click Start and select All Programs > Avid > Avid Interplay Access.
2. Select the asset or assets that you want to transfer.
3. Right-click the selected assets and select Delivery.
The Delivery dialog box opens.
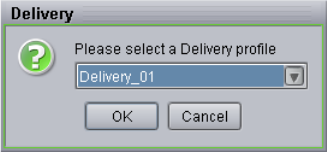
Transferring Assets through an Avid Editing System
276
4. Select a profile from the menu and click OK.
The system performs the transfer operation.
5. (Option) To view the progress of the transfer job, select View > Interplay Production
Services Status.
Transferring Assets through an Avid Editing System
You can transfer assets from one workgroup to another by using the Delivery service through an
Avid editing system. The supported assets that you can transfer are cut only sequences, subclips,
and master clips.
To transfer one or more assets through an Avid editing system:
1. In a bin, select a clip, subclip, or sequence.
2. Right-click the selected items and select Production Services > Avid Interplay Delivery
Service > profile_name.
The system performs the transfer operation.
3. (Option) If Interplay Access is installed on the editing system, you can track the status of the
job by opening Interplay Access and selecting Interplay Production Services Status. After
the Avid Interplay Production Services window opens, click the Jobs tab. See “Using the
Production Services and Transfer Status Tool” on page 56.
Viewing the Transfer Status
You can view the status of a transfer job in the Production Services and Transfer Status tool. You
can access it through the Production Services Engine, Interplay Access, or the Interplay
Administrator. For complete information, see “Using the Production Services and Transfer
Status Tool” on page 56.
nYou can also monitor job status from any system on the network, by using the standalone
Production Services and Transfer Status tool. For information, see the Avid Interplay Transfer
Setup and User’s Guide.

Viewing the Transfer Status
277
To view the transfer status in the Production Services and Transfer Status tool:
1. Do one of the following:
tFrom the Production Services window, click Admin Tool. The Production Services and
Transfer Status tool login window opens.
tFrom the Interplay Access application, select Interplay Production Services Status.
tFrom the Interplay Administrator, in the Site Settings area, click the Interplay
Production Services icon. When you open the Production Services and Transfer Status
tool from the Interplay Administrator, the name is “Interplay Production Services.”
The Production Services and Transfer Status tool opens with Jobs page displayed.
2. Type your username and password.
3. In the Production Services Host text box, type the host name of the system on which the
Production Services Engine resides.
You can find the host name in the Name field of the Avid Interplay Production Services
window. Previously typed host names are available from the Production Services Host
menu.
4. Click the Login button.
If the username and password are accepted, the Jobs page opens.
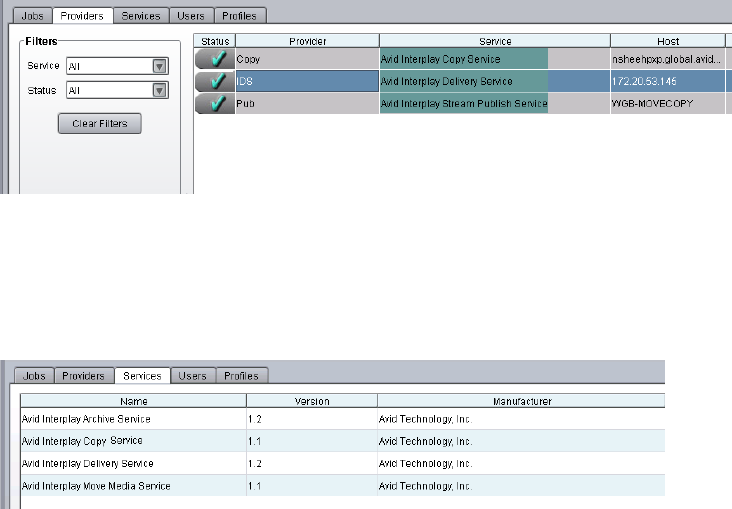
Viewing the Transfer Status
278
The illustration shows a transfer job in progress. The Jobs page displays the status and other
information about jobs submitted to the Production Services Engine. The dialog box also
lets you cancel or retry jobs, depending on your level of privilege.
5. (Option) Click the Providers tab.
The Providers tab displays information about systems that are running Production Services
provider software. It also lets you register and delete providers, depending on your level of
privilege. The following illustration shows an Interplay Delivery provider that is registered
on the system.
6. (Option) Click the Services tab.
The Services tab displays a list of services and service information. It also lets you install
and delete services. The following illustration shows an Interplay Delivery service that is
registered on the system.
Relinking Partially Delivered Assets
279
Relinking Partially Delivered Assets
Interplay Delivery in partial mode lets you deliver only portions of the media used in a subclip,
sequence, or shotlist. When you partially deliver media to a remote workgroup, you need to use
dynamic relink to link the delivered assets to the delivered media.
The delivered assets preserve the links to the original location of the media and do not
automatically link them to the location of the delivered media. As a result, they might display as
offline when you open them in an Avid editing application or when you view them in Interplay
Access.
In the Avid editing application, you need to enable and use dynamic relink to resolve the links
between the assets and the delivered media, and then check the assets into the Interplay database.
nThis requirement also applies to partially restored assets.
To dynamically relink partially delivered assets:
1. On an Avid editing system, enable dynamic relink in the Dynamic Relink Settings dialog
box. Set the appropriate target and working settings for your project so that assets you want
to use correctly link to the restored or delivered media.
2. Open a clip, subclip, or sequence in the Avid editing application.
The asset is linked to the delivered media.
3. Check the clip, subclip, or sequence in to Interplay.
4. Update the file paths in Avid Access by doing one of the following:
tIn the Avid editing application, right-click the clips in your bins and select Update from
Interplay.
tIn Interplay Access, right-click your master clips and select Update Status from Media
Indexer.
Verifying the Delivery Receiver Service is Running
Using Avid Service Framework
You can use the Avid Service Framework services to check whether the Delivery Receiver
service is running and the health of the service.
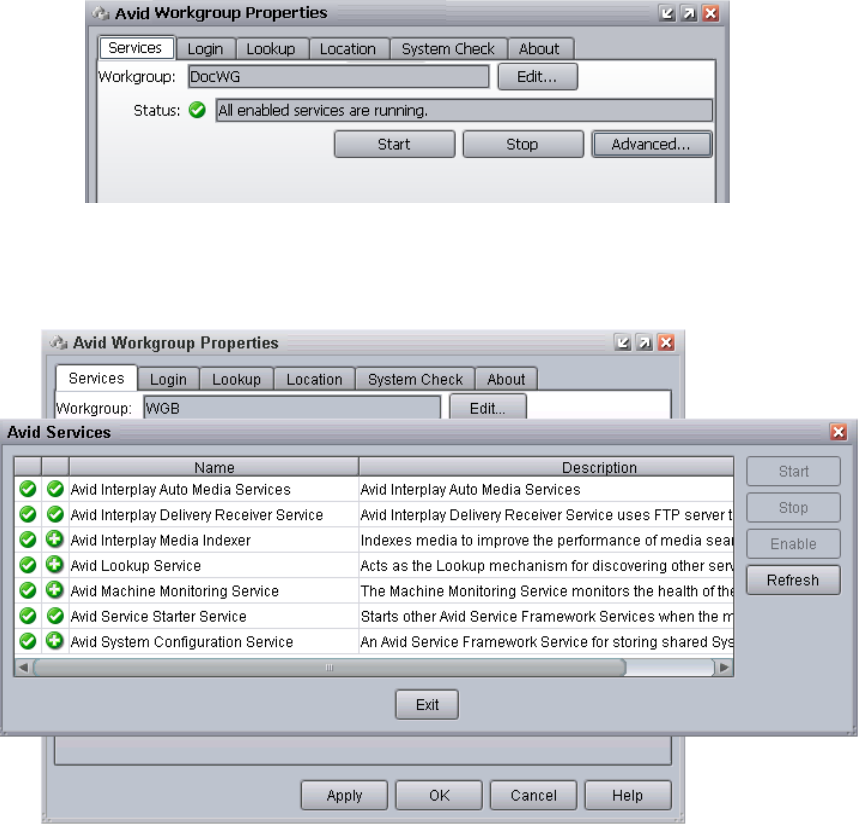
Verifying the Delivery Receiver Service is Running Using Avid Service Framework
280
To verify that the Delivery Receiver service is running:
1. On any server in the workgroup, click Start and select Programs > Avid > Avid Service
Framework > Avid Workgroup Properties.
The Avid Workgroup Properties dialog box opens. The Status area indicates whether all the
Avid Service Framework services are running.
2. Click Advanced.
The Avid Services dialog box opens.
3. If necessary, select Interplay Delivery Receiver Service and click Start.
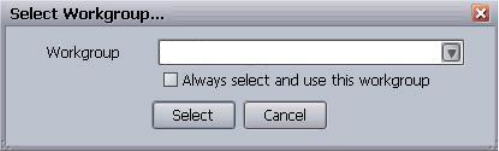
Monitoring the Health of the Interplay Delivery Receiver Service
281
Monitoring the Health of the Interplay Delivery
Receiver Service
The Avid Health Monitor is an application that lets you view the health of your Avid system at a
glance. Health Monitor displays a variety of information provided by each of the registered Avid
components on your network and notifies you with a warning or critical indication if a
component goes beyond its normal operating range. Different Avid services can supply custom
health information tailored to their specific functions. For information about the Avid Health
Monitor, see the Avid Services Framework User’s Guide.
To monitor the Delivery Receiver service:
1. Click the Start button and select All Programs > Avid > Avid Service Framework > Avid
Health Monitor.
The Select Workgroup dialog box opens.
2. Select a workgroup.
3. (Option) Select “Always select and use this workgroup.”
From now on, the Select Workgroup dialog box no longer opens when the application starts.
4. Click Select.
The Avid Health Monitor window opens.
5. In the Directory pane, click Avid IDReceiver Service.
The Health View pane displays the system and health information for the selected Avid
IDReceiver Service.

Overriding Delivery of Already Existing Media Files
282
Overriding Delivery of Already Existing Media Files
The default behavior of the Interplay Delivery service is not to deliver media files if they already
exist in the destination database. This applies to all resolution choices: highest, lowest, all, and
specific resolution. In the Production Services and Transfer Status tool, the job is marked as
completed, and the Job Details window displays a message that the media files exist in the
database.
An administrator can override this behavior by creating a database property.
To override the default behavior for delivery of existing media files:
1. Log in to Interplay Access as an administrator.
2. In the Assets browser, right-click the root database node (AvidWG or AvidAM) and select
Advanced > Get/Set Property.
3. On the Get/Set Property tab, in the Name text box, type:
alwaysDeliver
4. In the Flag text box, select DIRECT.
5. In the Value text box, type:
1
Allowing Third-Party Providers to Directly Connect to the Interplay Delivery Service
283
6. Click Apply.
Allowing Third-Party Providers to Directly Connect
to the Interplay Delivery Service
Starting with Interplay v2.4, Avid exposed the file transfer protocol interfaces for the Interplay
Delivery Service. This allows third-party developers to implement their own transfer protocol
stacks instead of using the default FTP transfer protocol provided with Interplay Delivery. For
more information, see your Avid representative.
Defining the Maximum Number of Simultaneous
Jobs for Delivery
By default, a Delivery provider is configured to run one job at a time. You can change this value
by editing an .ini file.
cEach type of provider can handle a different maximum number of simultaneous jobs. Do
not change this value unless specifically instructed by Avid Professional Services or
Customer Success. For more information, see “Maximum Number of Simultaneous Jobs”
on page 343.
To change the maximum value for the Delivery provider:
1. Open the following file in an application such as Notepad:
C:\Documents and Settings\username\Interplay Delivery Service\DMSIDService.ini
2. Edit the following line to specify the maximum number of simultaneous jobs:
@5%?MaxJobs=n
3. Save and close the file.
To apply the changes:
tQuit and restart the Delivery service.

12 Working with the STP Encode Service
The following topics describe how to set up and use the Interplay STP Encode service to export
and transfer Long GOP OP1a media:
•Understanding Long GOP OP1a and STP Encode
•Workflow for Background Processing of Long GOP Splicing and Transferring of Long GOP
OP1a Media
•Check List for Transferring Long GOP OP1a Media in the Background
•Registering the STP Encode Service with the Production Services Engine
•Connecting the STP Encode Provider to the Production Services Engine
•Starting the STP Encode Provider
•Connecting to the Production Services Engine From Interplay Assist or an Avid Editing
Application
•Performing Send-to-Playback as a Background Process from Interplay Assist
•Performing Send-to-Playback as a Background Process from an Avid Editing Application
Understanding Long GOP OP1a and STP Encode
To perform background Long GOP splicing and transfers of Long GOP OP1a media, you need
the Interplay Transfer Engine and the Interplay Production Services applications. This document
provides a workflow and check list to help you set up your workgroup for transferring Long
GOP OP1a media as a background process.
The Interplay STP Encode service lets you offload time-consuming processing involved in
exporting and transferring of Long GOP OP1a media during a send-to-playback request from the
Avid editing application or Interplay Assist.
The Interplay STP Encode service is only available in a workgroup environment.
You install and access the Interplay STP Encode service the same way as you do with other
services available with the Interplay Production Services Engine.
Understanding Long GOP OP1a and STP Encode
285
XDCAM HD Send to Playback Acceleration
You can initiate the play while transfer (PWT) of an XDCAM HD clip or sequence to AirSpeed
Multi Stream shortly after you begin the Send to Playback (STP) operation. Previously, you had
to wait until the system exported the clip before you could begin playback.
This feature requires the following:
• Specific versions of the following applications:
- Media Composer v5.5.1, Symphony v5.5.1, or NewsCutter v9.5.1, or later.
- Interplay Assist v2.3 or later
- Avid Instinct v3.5 or later
• Airspeed Multi Stream v1.7 or later
• XDCAM HD material
You can use the play while transfer feature with the STP Encode background processing service.
If the correct versions of the editors or AirSpeed Multi Stream are not available, the system uses
the older STP method where the clip is exported before playback begins.
• To perform a Play While Transfer operation from an Avid editing application, you must
select the PWT option when you perform the Send to Playback operation. See “Performing
Send-to-Playback as a Background Process from an Avid Editing Application” on page 299.
•To perform a Play While Transfer operation from Interplay Assist, you must select the High
Priority option when you perform the Send to Playback operation. You can select the Use
STP Encode option, if available. See “Performing Send-to-Playback as a Background
Process from Interplay Assist” on page 297.
MediaCentral | UX Send to Playback
STP Encode is used during a send-to-playback operation from MediaCentral UX. For more
information, see “Production Services Used By MediaCentral | UX” on page 23.
Workflow for Background Processing of Long GOP Splicing and Transferring of Long GOP OP1a Media
286
Workflow for Background Processing of Long GOP
Splicing and Transferring of Long GOP OP1a Media
The Interplay | Production Best Practices guide describes the Sony XDCAM HD and
XDCAM EX end-to-end workflow. This topic describes the portion of that workflow that can be
handled by the Interplay STP Encode service instead of the Avid editing application.
The Interplay STP Encode service lets you offload time-consuming processing involved in
exporting and transferring of Long GOP OP1a media during a send-to-playback request from the
Avid editing application or Interplay Assist.
Before you can use the STP Encode service, the workgroup needs an FTP Server profile and the
STP Encode provider must be registered with the Interplay Production Services Engine. For a list
of setup requirements, see “Check List for Transferring Long GOP OP1a Media in the
Background” on page 289.
nIf an STP Encode service is not available, a send to playback request is handled in the
foreground by the Avid editing application or Interplay Assist.
The following are best practices for when to use the STP Encode service:
•Use foreground send-to-playback processing (no STP Encode service) when sending short
or urgent sequences to a playback device.
• Use STP Encode service for background processing when sending long or non-urgent
sequences to a playback device.
nProcessing the Long GOP splicing in the background might not improve on the time it takes to
run the process in the foreground. However, by using the background process, you can continue
to work with the Avid editing application for other tasks.
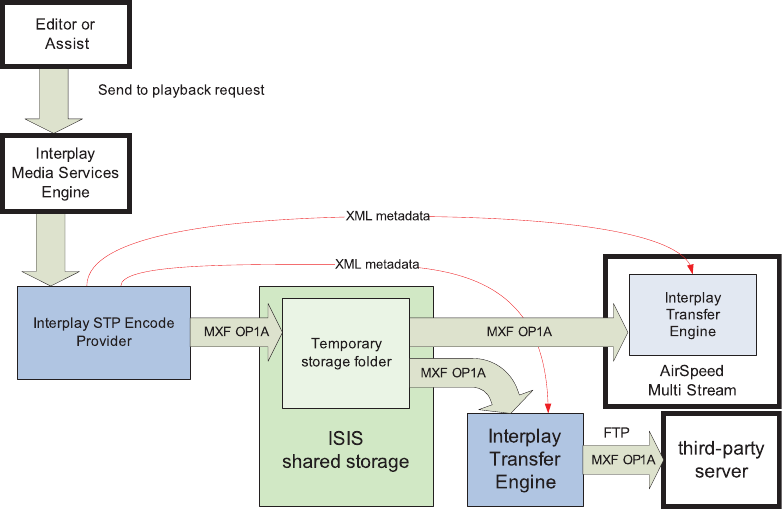
Workflow for Background Processing of Long GOP Splicing and Transferring of Long GOP OP1a Media
287
The following steps describe the workflow for playout through AirSpeed Multi Stream or a
supported third-party server:
• The editor selects a sequence in a bin and chooses the Send To Playback command.
• The editing application performs the following operations:
- If necessary, performs an audio mixdown.
- If the sequence contains any mixed resolutions, performs a transcode operation.
- Exports the metadata for the sequence composition as AAF file to shared storage in a
Temp folder.
- Submits an STP Encode service job for the sequence composition. The STP Encode
service exports the MXF OP1a media and sends the appropriate system request to
transfer it to the target playback device.
- All audio effects are pre-rendered by the Avid editing application before the sequence is
exported and transferred using the STP Encode service. The Interplay STP Encode
service can render real-time video effects. However, you have to pre-render any static
video effects before exporting the sequence as an STP Encode job.
Workflow for Background Processing of Long GOP Splicing and Transferring of Long GOP OP1a Media
288
• The Interplay STP Encode provider performs the following operations:
- Generates a temporary MXF OP1A clip and writes it to a Temp folder on shared
storage. The application automatically selects a Temp folder on the top level of the
workspace with the most free space.
- Sends an XML file describing the clip to an Interplay Transfer Engine. The XML file
contains the shared storage location and the target location.
• The Interplay Transfer Engine performs the following operations:
- Initiates an FTP transfer of the clip to the target location.
- Deletes the temporary clip from the shared storage system after the transfer is complete.
For AirSpeed Multi Stream transfers, the Transfer Engine runs as a separate process on the
AirSpeed Multi Stream server. For third-party servers, a separate Transfer Engine server is
required.
The STP Encode provider writes the temporary file to a Temp folder at the top level of the
workspace with the most free storage space. Since the Interplay Administrator typically
configures Media Indexers to monitor only the Avid MediaFiles folder on a workspace, the
Media Indexer is not aware of the files in the Temp folder.
nIn general, you should make sure that your Media Indexers do not monitor entire workspaces.
They should point to the specific Avid MediaFiles folders that you want to monitor.
After the Transfer Engine has finished the transfer, it deletes the clip from the Temp folder
on shared storage. In an AirSpeed Multi Stream Studio configuration, several servers might
need to transfer the same clip. In this case, the deletion of clips from the temporary folder is
coordinated between the servers in the configuration.
If the export operation fails, the applications delete the file from the Temp folder as follows:
- If the operation fails during the export from the STP Encode provider, the STP Encode
provider deletes the file from the Temp folder.
- If the operation fails during the FTP transfer, the Interplay Transfer application deletes
the file from the Temp folder and displays the status in the Interplay Transfer Status
window.
For additional information, see the Interplay | Production Transfer Setup and User’s Guide.
nLong GOP OP1a sequences that are sent to playback are not copied to the Interplay Access Sent
to Playback folder. Interplay Transfer, which performs the send to playback, requires AAF
metadata to perform checkins to Interplay Access. In an OP1a transfer, Interplay Transfer does
not receive AAF metadata. Instead, it receives the path to an OP1a media file.

Check List for Transferring Long GOP OP1a Media in the Background
289
Check List for Transferring Long GOP OP1a Media in
the Background
The following table provides a check list of steps for setting up a workgroup to perform
background processing of Long GOP OP1a media during a send to playback operation. The
check list provides references where to find more information about each step.
nYou must connect an application key to a USB port on the system where you install the Interplay
STP Encode service.
Transferring Long GOP OP1a Media in the Background Check List
Task Section Reference
Check your workgroup configuration. See Interplay | Production Best Practices.
Make sure the workgroup is configured with an
Avid shared-storage account with write access to at
least one shared-storage workspace.
See the Interplay | Production Software
Installation and Configuration Guide.
Make sure the Interplay Transfer Engine software
is installed and configured to support the transfer
of Long GOP OP1a media.
See the Interplay | Production Transfer
Setup and User’s Guide.
Create an Interplay Transfer Engine Long GOP
OP1a media profile using Server Type
OP1A_EXPORT or OP1A_EXPORT_K2.
See the Interplay | Production Transfer
Setup and User’s Guide.
Make sure the Production Services Engine
software and the supporting software are installed
and configured in the workgroup.
• Avid Service Framework for Client
• Interplay Access
• Interplay Production Services
See the Interplay | Production Software
Installation and Configuration Guide a.
Make sure the supported client software is installed
on the Interplay STP Encode provider server.
• Interplay STP Encode service (this installation
includes the Interplay Transfer Client)
• Avid Service Framework for Client
• Interplay Access
See the Interplay | Production Software
Installation and Configuration Guide a.

Registering the STP Encode Service with the Production Services Engine
290
Registering the STP Encode Service with the
Production Services Engine
After installing the STP Encode provider software, you need to make sure that the current STP
Encode service is registered with the Production Services Engine. The service should be listed
on the Services tab of the Production Services and Transfer Status tool. Registration is automatic
but takes place only after you restart the Production Services Engine. See “Registering Services”
on page 82.
Make sure the Interplay STP Encode service is
registered.
nYou do not need to create a Production
Services profile for the STP Encode service.
The service requests profile information
directly from the Transfer Engine during the
STP Encode workflow.
See “Registering the STP Encode Service
with the Production Services Engine” on
page 290.
Connect the Interplay STP Encode provider to the
Production Services Engine.
See “Connecting the STP Encode Provider
to the Production Services Engine” on
page 291.
Mount workspaces. See “Mounting Workspaces for Interplay
Transcode and Other Production Services”
on page 26.
Start the Interplay STP Encode service software
and verify it is connected.
See “Starting the STP Encode Provider” on
page 294.
Enable the Production Services Engine in Interplay
Assist and in the Avid editing application.
See “Connecting to the Production Services
Engine From Interplay Assist or an Avid
Editing Application” on page 295.
Perform a send to playback from Interplay Assist. See “Performing Send-to-Playback as a
Background Process from Interplay Assist”
on page 297.
Perform a send to playback from an Avid editing
application.
See “Performing Send-to-Playback as a
Background Process from an Avid Editing
Application” on page 299.
Transferring Long GOP OP1a Media in the Background Check List (Continued)
Task Section Reference
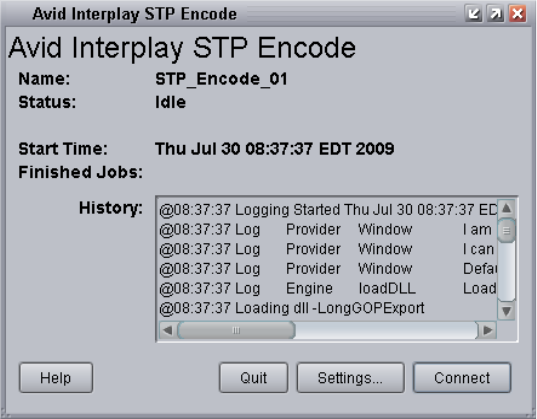
Connecting the STP Encode Provider to the Production Services Engine
291
Connecting the STP Encode Provider to the
Production Services Engine
After making sure the service is registered, register the provider by connecting to the Production
Services Engine.
nIf you try to connect to the Production Services Engine before the latest service is registered, the
Status line in the Transcode Service dialog box reads:
Error From Broker! UNKNOWN_SERVICE.
If necessary, you can manually register the provider. See “Registering a Service Manually” on
page 83.
To connect the STP Encode Provider to the Production Services Engine:
1. Click Start and select Programs > Avid > Avid Interplay STP Encode.
The Avid Interplay STP Encode service provider dialog box opens.
2. Click Settings.
The Provider Settings dialog box opens.
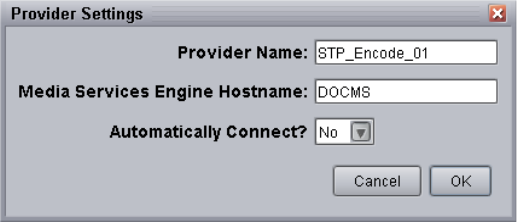
Connecting the STP Encode Provider to the Production Services Engine
292
3. Do the following:
a. Provider Name — A default name for the provider is automatically supplied. Accept the
default name or type a new name.In this example, the name is STP_Encode_01.
b. Production Services Engine Host Name — Type the name of the system running the
Production Services Engine application.
c. Automatically Connect — Select Yes to automatically connect the provider to the
Production Services Engine when the application starts. To prevent automatic
connection, select No.
The following illustration shows an example of the Provider Settings dialog box with the
values filled in for the STP Encode provider service.
4. Click OK.
5. Click Connect in the Avid Interplay STP Encode dialog box.
The Avid Interplay STP Encode dialog box now shows that the service is connected and
shows the provider you selected to connect to. This example shows STP_ Encode_01 as the
provider.

Connecting the STP Encode Provider to the Production Services Engine
293
The Provider page in the Production Services and Transfer Status tool now shows that the
service is connected, indicated by a check mark in the Status column.
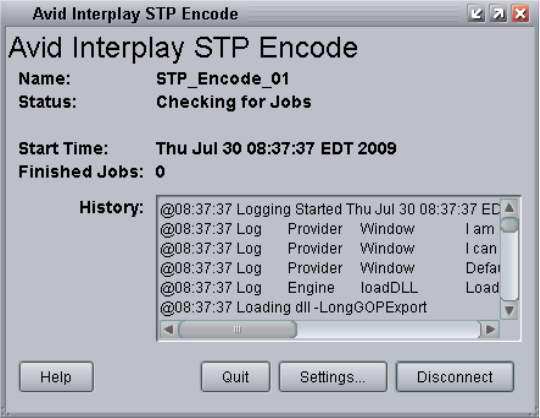
Starting the STP Encode Provider
294
Starting the STP Encode Provider
Make sure you have mounted at least one drive before you start the provider. See “Mounting
Workspaces for Interplay Transcode and Other Production Services” on page 26.
To start the STP Encode service provider:
1. Click Start and select Programs > Avid > Avid Interplay STP Encode.
Depending on the service settings, one of the following happens:
- Automatically Connect—Yes, the service dialog box opens for the service you selected
and is connected to the service.
- Automatically Connect—No, the service dialog box opens for the service you selected
and displays Idle. Click the Connect button to connect to the service.
nThe service provider dialog box displays the start date and start time of the providers based on
the Microsoft Windows time.
After the connection is made, the Status line in the service dialog box reads “Checking for
Jobs,” and the History window displays the message “Connection Established.” The Connect
button changes to a Disconnect button.
The following example shows the Interplay STP Encode provider dialog box as connected.
Connecting to the Production Services Engine From Interplay Assist or an Avid Editing Application
295
nIf the provider cannot connect to the Production Services Engine, the Status line reads
“Connection Error.” Ensure the Production Services Engine is running, the service description
is installed, the provider is properly registered, and then click Connect again.
nStarting with Interplay 3.0.5, all Production Services (STP Encode, Transcode, and so on) are
displayed as two processes in the Processes tab of the Windows Task Manager of the provider
system. This is as designed. The tool that creates the services automatically creates a second
process for each service to ensure that the service shuts down smoothly. This change is visible
only in Task Manager.
Each service is listed only once in the Services tab.
Connecting to the Production Services Engine From
Interplay Assist or an Avid Editing Application
You can enable and specify your Interplay Production Services settings and whether you want to
send a confirmation e-mail message after the clip is successfully sent to the playback device.
•Connecting to the Production Services Engine from Interplay Assist
•Connecting to the Production Services Engine from an Avid Editing Application
Connecting to the Production Services Engine from Interplay Assist
To enable Production Services in Interplay Assist:
1. In the Interplay Assist, click File > Production Services Settings.
The Production Services Settings dialog box opens.
2. Select Enable Production Services.
3. In the Broker text box, type the host name of the Production Services engine server.
4. To receive a confirmation e-mail, select Email Notification, and then type your complete
e-mail address.
You can specify only one e-mail address.
5. Click OK.
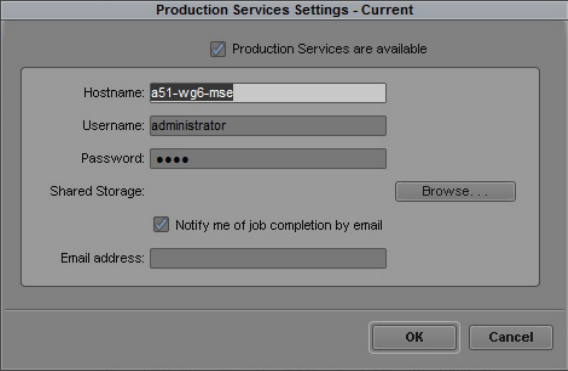
Connecting to the Production Services Engine From Interplay Assist or an Avid Editing Application
296
Connecting to the Production Services Engine from an Avid Editing
Application
To connect to the Production Services Engine:
1. In the Avid editing application, select Production Services from the Settings list.
The Production Services Settings dialog box opens.
2. Fill in the following sections:
- Select the “Production Services are Available” option.
- Hostname — Type the name of the system running the Production Services Engine.
- Type your user name and password. This user name can be one set up explicitly in
Production Services Engine by the Production Services administrator. It can also be any
valid Avid Interplay user name. For example, you can use the same user name and
password that you use to connect to the Interplay Window.
- Shared Storage — Leave this field blank. This setting is no longer used.
- Notification and Email address — You can use this option if your Production Services
Engine is set up for e-mail notification. See “Configuring the Production Services
Engine” on page 31.
3. Click OK.
Performing Send-to-Playback as a Background Process from Interplay Assist
297
Performing Send-to-Playback as a Background
Process from Interplay Assist
Workgroups configured with the Interplay STP Encode provider can use the provider to perform
send to playback operations of Long GOP OP1a media in the background. The procedure in this
section covers performing a send to playback from Interplay Assist. Before you start the send to
playback operation, make sure that your installation meets the requirements described in “Check
List for Transferring Long GOP OP1a Media in the Background” on page 289.
To send assets and media files for playback using Interplay Assist:
1. Make sure the Production Services engine is running.
2. Make sure Interplay Assist is configured with the Production Services engine. See
“Connecting to the Production Services Engine from Interplay Assist” on page 295.
3. Select the asset or assets whose media files you want to send to the playback server.
4. Do one of the following:
tSelect File > Interplay Transfer > Send Shotlist to Playback > playback_server
tSelect File > Interplay Transfer > Send Source to Playback > playback_server
The Send to Playback dialog box opens.
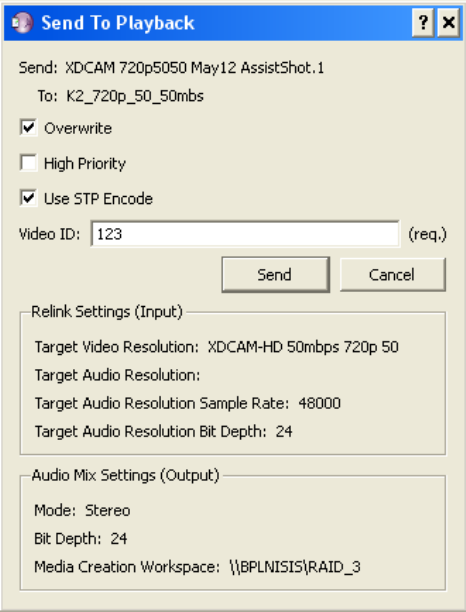
Performing Send-to-Playback as a Background Process from Interplay Assist
298
5. Do the following:
t(Option) Select Overwrite if you want to overwrite any sequence with the same Video
ID already sent to the playback device.
t(Option) Select High Priority if you want to send the sequence as high priority and if
you want the asset to play before the transfer to the playback device is finished. (This
option is referred to as PWT in Avid editing applications.)
tSelect Use STP Encode to use the STP Encode provider for processing the send to
playback operation.
nFor the Use STP Encode option to display in the Send to Playback dialog box, you must select a
LongGOP OP1A profile, the Production Services engine must be running, and the Production
Services configuration set in Assist.
tType a Video ID name.
6. Click Send.

Performing Send-to-Playback as a Background Process from an Avid Editing Application
299
The system immediately starts the send to playback operation. If Interplay Access is
installed on the editing system, you can track the status of the job by opening Interplay
Access, selecting View > Interplay Production Services Status, and clicking the Jobs tab.
Performing Send-to-Playback as a Background
Process from an Avid Editing Application
Depending on your workgroup configuration, the send-to-playback operation of Long GOP
OP1a media can run in the background, allowing the Avid editing system to perform other tasks.
The workgroup must have an Interplay STP Encode service installed. For information about
setting up a workgroup for background processing of send-to-playback requests, see “Check List
for Transferring Long GOP OP1a Media in the Background” on page 289.
To send assets and media files for playback using an Avid editing application:
1. Make sure the Production Services Engine and Interplay STP Encode service are running.
See “Connecting to the Production Services Engine from an Avid Editing Application” on
page 296.
2. In the Avid editing application bin, select the asset or assets whose media files you want to
send to the playback server.
3. Select Transfer > Send To Playback, and select the profile for the server to which you want
to send the sequence.
The Send to Playback dialog box opens.
Performing Send-to-Playback as a Background Process from an Avid Editing Application
300
4. Do the following:
tType a tape ID name.
t(Option) Select PWT if you want to send the sequence as high priority and if you want
the asset to play before the transfer to the playback device is finished. (This option is
referred to as High Priority in Interplay Assist.)
t(Option) Select Overwrite if you want to overwrite any sequence with the same Tape ID
already sent to the playback device.
tSelect Use STP Encode to use the STP Encode provider for processing the send to
playback operation.
The system immediately starts the send to playback operation. If Interplay Access is
installed on the Avid editing system, you can track the status of the job by opening Interplay
Access, selecting View > Interplay Production Services Status, and clicking the Jobs tab.
5. Click OK.

13 Installing and Configuring Production
Services for MediaCentral Delivery
The Production Automation service and the Interplay Consolidate service are used for the
MediaCentral Delivery feature. The following topics describe installation and configuration of
these services:
•Understanding Production Services for MediaCentral Delivery
•Check List for Installing and Configuring Automation and Consolidate Services
•Prerequisites for Installing and Configuring Automation and Consolidate Services
•Installing the Automation and Consolidate Services
•Registering the Automation and Consolidate Services
•Registering a Provider with the Production Services Engine
•Creating a Consolidate Profile
MediaCentral Delivery requires an Interplay Delivery provider. For information about
MediaCentral Delivery, see the Avid MediaCentral | UX User’s Guide. For information about
Interplay Delivery, see the Interplay | Production Services Setup and User’s Guide.
Understanding Production Services for
MediaCentral Delivery
A Production Services Engine and three Interplay Production Services are needed for delivering
media and assets between Interplay Production workgroups or MediaCentral zones:
• Interplay Production Services Automation: This service handles the logic of chaining a
consolidate job and a delivery job. It triggers a consolidate job and monitors its status. If the
consolidate job is successful, it triggers a delivery job.
• Interplay Consolidate: This service uses the In and Out marks specified for a loaded clip or
subclip to create a new media and asset. This service is used if a user selects “Deliver from
Mark In to Mark Out” in either the Deliver To dialog box or the Deliver To Me dialog box.
• Interplay Delivery: This service executes the delivery job.
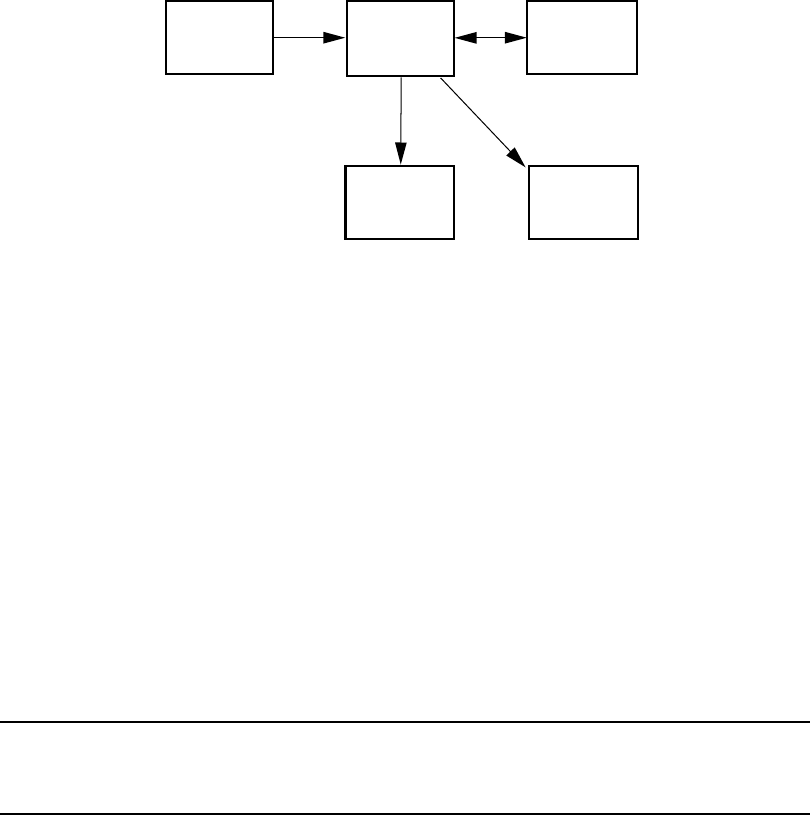
Check List for Installing and Configuring Automation and Consolidate Services
302
The following illustration shows the Production Services components and a Delivery workflow.
1. The user initiates a Delivery request.
2. The Production Services Engine forwards the request to the Production Services Automation
service, which determines the next step.
3. If the request includes In to Out marks, the Automation service tells the Production Services
Engine to send the request to the Consolidate service. The Consolidate service creates a new
asset and new media.
4. The Automation Service tells the Production Services Engine to initiate a Delivery job.
Check List for Installing and Configuring Automation
and Consolidate Services
The following table provides a check list of steps for installing and configuring the Interplay
Production Services that support MediaCentral UX Delivery. The check list also provides
references where to find more information about each step.
MediaCentral
Client (Browser)
we
qqew
Interplay
Consolidate
Production
Services
Engine
Media Services
Automation
wr
Interplay
Delivery
Production Services Check List
Task Section Reference
Check the prerequisites “Prerequisites for Installing and Configuring
Automation and Consolidate Services” on
page 303.
Install the Production Services Automation service,
the Interplay Consolidate service, and Interplay
Access.
“Installing the Automation and Consolidate
Services” on page 304.

Prerequisites for Installing and Configuring Automation and Consolidate Services
303
Prerequisites for Installing and Configuring
Automation and Consolidate Services
Where to install: Production Services Automation and Interplay Consolidate can be installed on
any server currently configured in an Interplay Production workgroup except for the servers
hosting the following components:
• Interplay Engine
• Interplay Archive Engine
Avid recommends installing Production Services Automation on the same server as the
Production Services Engine. In a high-workload facility, Avid recommends installing Interplay
Consolidate on a separate server. Do not install Interplay Consolidate on the same server as
Interplay Transcode.
Hardware requirements: Production Services Automation and Interplay Consolidate share the
same hardware requirements:
• Minimum 512 MB RAM
• Approximately 380 MB of hard drive space.
• Port 1099 for communication with the Production Services Engine.
Verify that each service is running. “Installing the Automation and Consolidate
Services” on page 304.
Register each service. “Registering the Automation and
Consolidate Services” on page 305.
Configure each service to communicate with the
Production Services Engine.
“Registering a Provider with the Production
Services Engine” on page 307
Verify that each service is connected. “Registering a Provider with the Production
Services Engine” on page 307
Connect the Avid ISIS client to the ISIS System
Director and mount the required workspaces.
Avid ISIS client documentation.
Create at least one Interplay Consolidate profile.
No profile is needed for Production Services
Automation.
“Creating a Consolidate Profile” on page 313
Production Services Check List (Continued)
Task Section Reference
Installing the Automation and Consolidate Services
304
nA license is not required for these services.
Software requirements: Production Services Automation and Interplay Consolidate share the
same hardware requirements:
• Windows 7 or Windows Server 2012 Standard R2
• Avid Service Framework (ASF)
• ISIS client software
Production Services Engine: Production Services Automation and Interplay Consolidate
require network access to an installed and configured Production Services Engine. For more
information about installing and configuring a Production Services Engine, see the
Interplay | Production Services Setup and Installation Guide.
Interplay Delivery Service: The Delivery service is configured to work with the Production
Services Engine and provides the profile for transferring the assets. For more information about
Interplay Delivery, see the Interplay | Production Services Setup and Installation Guide.
cWhen you create a Delivery profile for MediaCentral, use a network path to an ISIS share
for the Temporary Workspace on Sender parameter. For example, use
\\isis_server\Delivery_temp. This storage space is used for temporary media files created by
the Interplay Consolidate service. If you use a local folder, the large amount of media
created can cause system problems for the Delivery server. The files will automatically be
deleted when the Delivery job is completed.
Installing the Automation and Consolidate Services
You install both services from the Interplay Production Servers installer. You need to install
Interplay Access on the same system on which you install Interplay Consolidate.
To install the Production Services Automation service:
1. Select the following from the Interplay Server Installer Main Menu:
Servers > Production Services > Install Media | Index Support
The Install Media | Index support window opens.
2. Click Production Services Automation.
The Production Services Automation installer window opens.
3. Click Next.
4. Accept the license agreement and click Next.
5. Follow the prompts to install the service.
The service is started automatically by the installer after the installation is complete.
Registering the Automation and Consolidate Services
305
To install the Interplay Consolidate service:
1. Select the following from the Interplay Server Installer Main Menu:
Servers > Production Services > Install Media | Index Support
The Install Media | Index support window opens.
2. Click Consolidate.
The Interplay Consolidate installer window opens.
3. Install the Sentinel USB Driver (if prompted).
4. Install the PACE Interlok Driver (if prompted)
5. Accept the license agreement and click Next.
6. Follow the prompts to install the service.
The service is started automatically by the installer after the installation is complete.
To install Interplay Access:
1. Select the following from the Interplay Server Installer Main Menu:
Servers > Production Services > Production Services
The Install Production Services window opens.
2. Click Access.
The Interplay Access installer window opens.
3. Click Next. Install the Sentinel USB Driver (if prompted).
4. Accept the license agreement and click Next.
5. Follow the prompts to install Access.
Registering the Automation and Consolidate
Services
To register the Automation and Consolidate services, you need to open the Production Services
and Transfer Status tool and install the service description. You only need to install a service
description once, even if you configure multiple providers.
nRegistration of other Production Services is automatic.
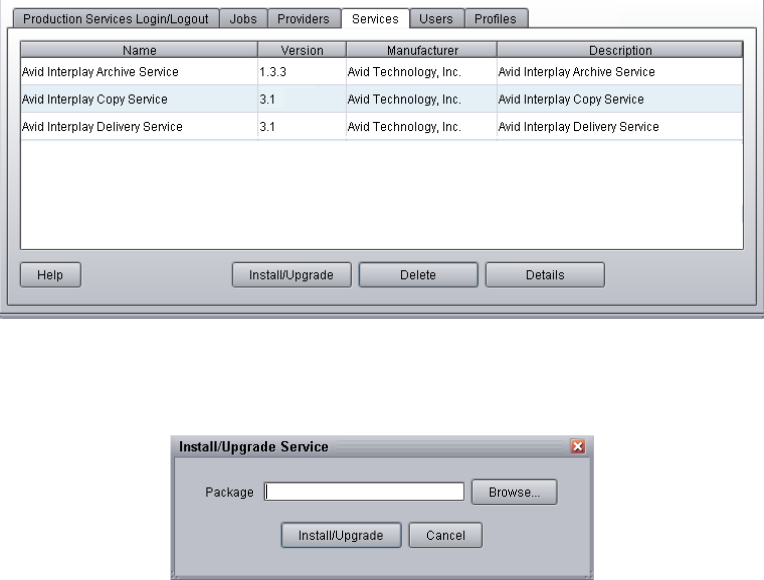
Registering the Automation and Consolidate Services
306
To install service descriptions:
1. Start the Production Services Engine and log in as administrator.
2. Click the Admin Tool button.
The Interplay Production Services and Transfer Status tool opens.
3. Click the Services tab.
The Services page displays the currently configured services.
4. Click Install/Upgrade.
The Install/Upgrade Service dialog box opens.
5. Click the Browse button and navigate to the folder containing the service package (.zip file).
Make sure you have access to the folder.
The following are the default locations of the service packages:
- C:\Program Files\Avid\Interplay Consolidate\TranscodeService\ConsolidateService.zip
- C:\Program Files\Avid\Interplay Production Services
Automation\MediaServicesAutomation.zip
6. In the folder, select the service.zip file.
7. Click Save.
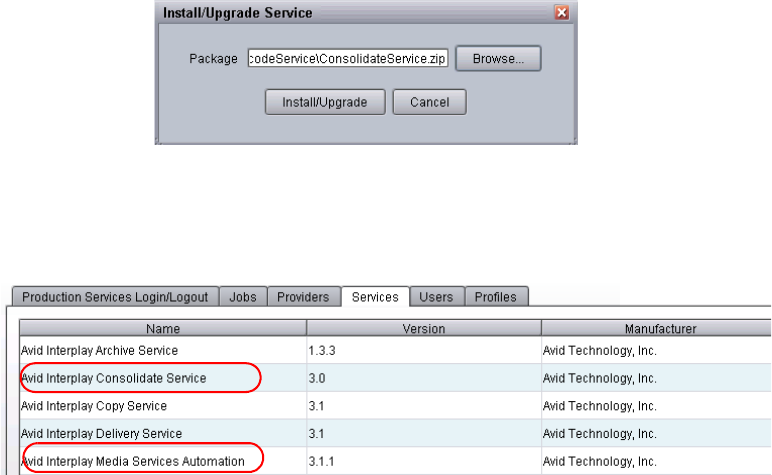
Registering a Provider with the Production Services Engine
307
The path to the file appears in the Install/Upgrade Service dialog box.
8. Click Install/Upgrade.
The service and its description appear on the Services page. The following illustration shows
both services after they are registered.
Registering a Provider with the Production Services
Engine
A service that is installed and registered is referred to as a provider. Starting with Interplay
Production Services v3.1, some service providers operate as Windows services, and others
operate as Windows applications.
• Interplay Production Services Automation operates as a Windows service. See “Registering
a Production Services Automation Provider” on page 308
• Interplay Consolidate operates as a Windows application. See “Registering and Connecting
a Consolidate Provider” on page 310

Registering a Provider with the Production Services Engine
308
Registering a Production Services Automation Provider
Production Services Automation runs as a Windows service. Information about the service is
included in an .ini file.
• If you are performing a new installation, the installed .ini file uses “localhost” as the name of
the associated Production Services Engine. This is appropriate if you are installing the
service on the same system as the Production Services Engine. If you are installing the
service on a different system, you need to change the default hostname by editing the .ini
file.
• If you are upgrading from a previous version, the existing .ini file is copied to the
appropriate new folder. If the associated Production Services Engine remains the same, no
further configuration is needed.
To register a Production Services Automation provider with the Production Services
Engine:
1. Locate the .ini file and open it in a text editor, such as Windows Notepad.
The following table lists the services with the folder that holds the .ini file and the log files.
2. Substitute the hostname of the Production Services Engine.
Following is an example of an Automation service .ini file with the default hostname
“localhost”:
#Mon May 05 11:34:54 EDT 2014
@5%?MaxJobs=1
@2%tMedia_Services_Engine_Hostname=localhost
@1%tProvider_Name=a51-WG6_Consolidate_0123
Following is the same .ini file, edited to use the hostname “a51-MSE.”
#Mon May 05 11:34:54 EDT 2014
@5%?MaxJobs=1
@2%tMedia_Services_Engine_Hostname=a51-MSE
@1%tProvider_Name=a51-WG6_Consolidate_0123
The provider name is automatically created by adding a number string to the local hostname.
You can change this name if you want.
Service Name Folder for .ini File and Log Files
Interplay | Production Services
Automation
C:\ProgramData\Avid\Media Services
Automation\DMSCMService.ini
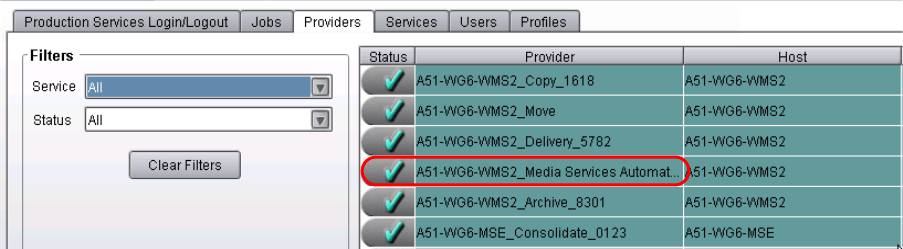
Registering a Provider with the Production Services Engine
309
3. A default name for the provider is automatically created by the provider software using the
following syntax:
<hostname>_<servicename>_<unique#>
The provider name in the previous example is a51-WG6_Consolidate_0123
Accept the default name or type a new name. This name appears in the Production Services
and Transfer Status tool.
4. Save and close the .ini file.
The service automatically reads the .ini file and tries to connect to the Production Services
Engine. If the service fails to connect, it continues to try to connect every thirty seconds.
To verify that the Production Services Automation service provider is running and
connected:
1. Start the Production Services Engine.
2. Click the Admin Tool button.
The Interplay Production Services and Transfer Status tool opens.
3. Click the Providers tab.
The system displays the status of the Production Services providers. In the following
illustration, all services are connected, indicated by a check mark in the Status column.
Production Services Automation is circled.
You can also view the services in the Services tab of the Computer Management window.
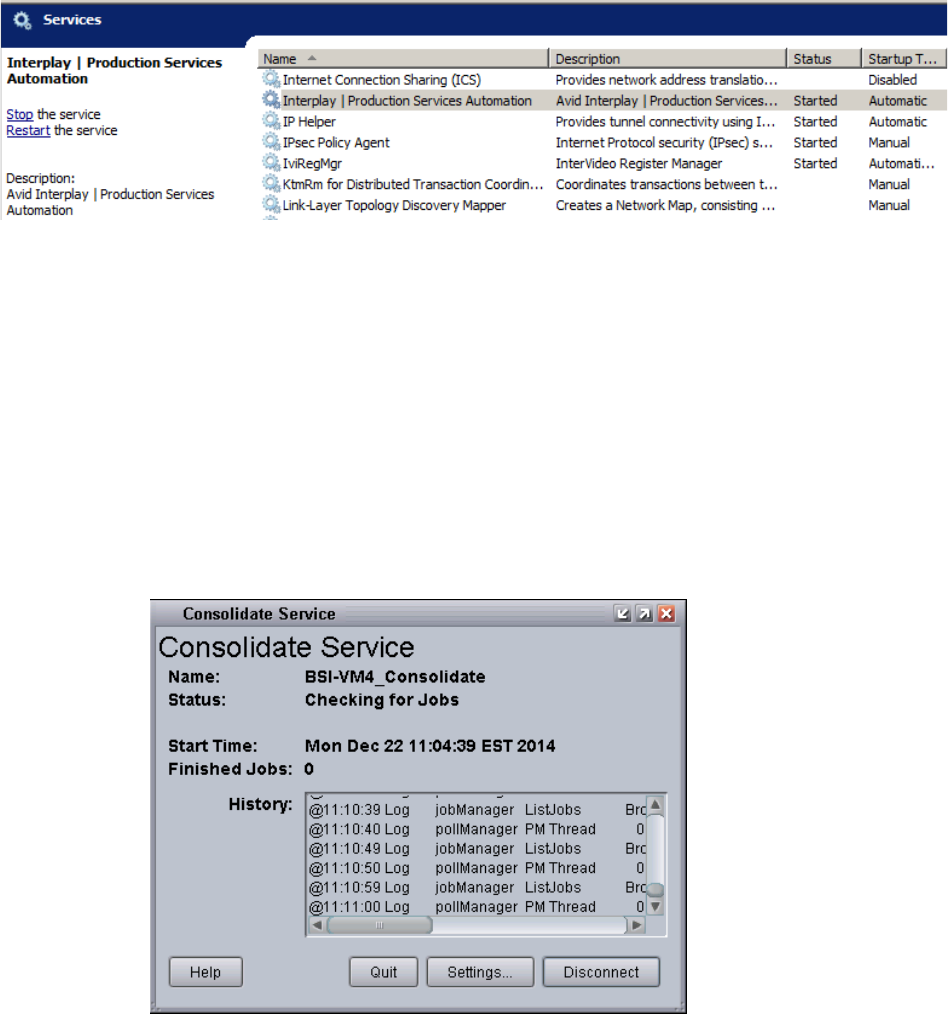
Registering a Provider with the Production Services Engine
310
Registering and Connecting a Consolidate Provider
Interplay Consolidate runs as a Windows application. You need to register the provider by
connecting to the Production Services Engine.
nIf you try to connect to the Production Services Engine before the latest service is registered, the
Status line in the Transcode Service dialog box reads:
Error From Broker! UNKNOWN_SERVICE.
To connect the Consolidate provider to the Production Services Engine:
1. Click Start and select Programs > Avid > Avid Interplay Consolidate.
The Consolidate Service dialog box opens.
2. Click Settings.

Registering a Provider with the Production Services Engine
311
The Provider Settings dialog box opens.
3. Do the following:
a. Provider Name — A default name for the provider is automatically supplied. Accept the
default name or type a new name. In this example, the name is Consolidate_01.
b. Production Services Engine Host Name — Type the name of the system running the
Production Services Engine application.
c. Automatically Connect — Select Yes to automatically connect the provider to the
Production Services Engine when the application starts. To prevent automatic
connection, select No.
4. Click OK.
5. Click Connect in the Service window.
The Consolidate Service dialog box now shows that the service is connected and shows the
name of the provider you connected.
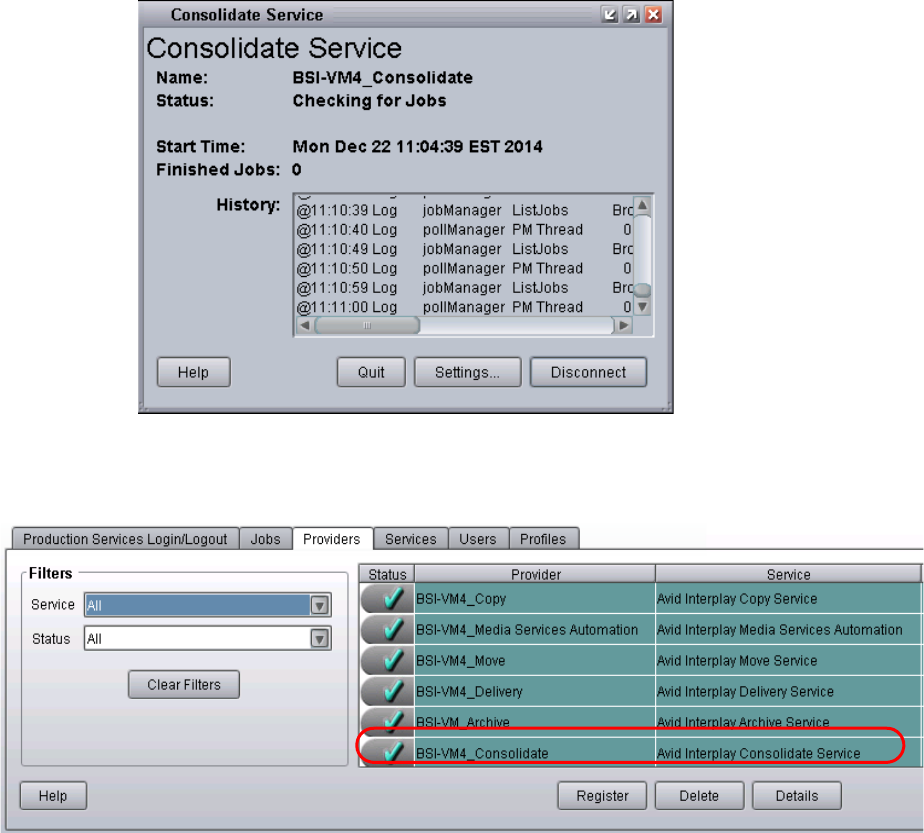
Registering a Provider with the Production Services Engine
312
The Provider page in the Media Services and Transfer Status tool now shows that the
Consolidate service is connected, indicated by a check mark in the Status column.
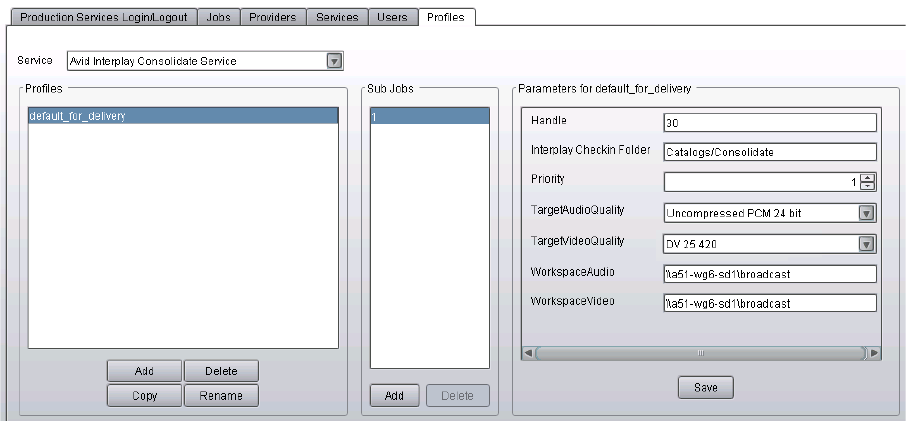
Creating a Consolidate Profile
313
Creating a Consolidate Profile
If users in your MediaCentral zone are going to perform MediaCentral Delivery operations that
use “Deliver from Mark In to Mark Out,” an administrator must create at least one Consolidate
profile. This default profile must be named “default_for_delivery.” The target video quality for
this profile is displayed in the Deliver or Deliver To dialog box, and is used if the user selects
“Deliver from Mark In to Mark Out.” and the Delivery profile does not include a specific Target
Video Quality.
The following illustration shows a profile with DV 25 420 as the TargetVideoQuality.
The following illustration shows the Deliver To dialog box, with Deliver from Mark In to Mark
Out selected, and the Target Video Quality as DV 25 420. The Target Video Quality is taken from
the Consolidate profile. This resolution will be used for the new media, because the Target Video
Quality specified in the Delivery profile is “highest” rather than a specific resolution.
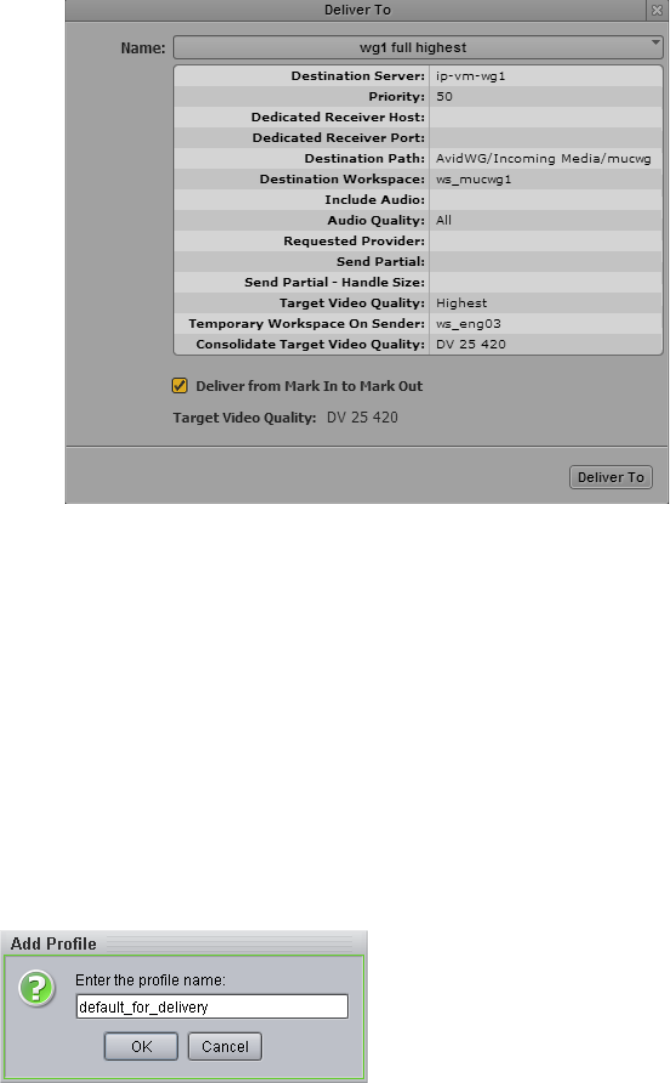
Creating a Consolidate Profile
314
Other options in the Consolidate profile, such as Handle and Interplay Checkin Folder, are also
used for Deliver from Mark In to Mark Out operations. However, they are not shown in the
Deliver To or Deliver to Me dialog box.
To create a Consolidate profile:
1. Start the Production Services Engine.
2. Click the Admin Tool button.
The Interplay Production Services and Transfer Status tool opens.
3. Click the Profiles tab.
4. In the Service menu, select Avid Interplay Consolidate Service.
5. Click Add in the Profiles area.
The Add Profile dialog box opens.

Creating a Consolidate Profile
315
6. Type “default_for_delivery” in the Add Profile dialog box.
7. Click OK.
The name appears in the Profiles list and an empty template appears in the Parameters area.
8. In the Parameters area, define the values you want in the profile.
The following table describes the parameters for a Consolidate profile.
Consolidate Profile Settings
Parameter Description
Handle The number of additional frames you want to include on
both ends of a subclip or a cut within a sequence. If the
handle length exceeds either end of the master clip, then
the handle is truncated to the amount of source media
available.
Interplay Checkin Folder The folder in the database that will contain the
consolidated asset (metadata). For example,
Catalogs/Consolidated.
Priority A value allows you to assign job priorities to different
profiles. Priority numbers range from 1 (highest priority)
through 100 (lowest priority). The default priority number
assigned to each job is 50.
TargetAudioQuality Select an audio resolution for the consolidate operation:
• None
• MPEG1 Layer 2: Digital audio compressed to the
MPEG1 Layer 2 specification at 96 Kb/s.
• Uncompressed PCM: 16-bit 48-kHz digital audio
• Uncompressed PCM 24-bit: 24-bit 48-kHz digital
audio
TargetVideoQuality Select a video resolution for the consolidate operation.
Select None if you do not want the transcoded clip to
include a video track.
WorkspaceAudio The name of the Avid shared-storage workspace that will
hold the new audio media files. Use the following syntax:
\\hostname\workspace_name
WorkspaceVideo The name of the Avid shared-storage workspace that will
hold the new video media files.
Creating a Consolidate Profile
316
9. Click Save in the Parameters area.
The Save Profile dialog box opens.
10. Click Yes to save your changes.
For information about using MediaCentral Delivery, see the Avid MediaCentral | UX User’s
Guide.

14 Troubleshooting Interplay | Production
Services
This appendix covers some common problems and solutions for the Production Services Engine
and for some of the Production Services.
The following topics provide troubleshooting information:
•General Troubleshooting for Production Services
•Checking Production Services Log Files
•Troubleshooting Using Avid Diagnostics
•Archive and Restore Troubleshooting
•Using a HOSTS File for Production Services
General Troubleshooting for Production Services
This topic includes information about problems that can affect the Production Services Engine or
any provider. For problems with specific services, see
•“Archive and Restore Troubleshooting” on page 323
As regular maintenance of Production Services Engine, do not let the number of jobs exceed the
3000 jobs. If the jobs exceed the limit, you should purge the jobs list of completed, failed, or
canceled jobs, and restart the Interplay Transcode provider.
nYou can automatically purge Production Services jobs to improve the performance of Production
Services and the Production Services and Transfer Status tool.

General Troubleshooting for Production Services
318
The following table lists problems, probable causes, and solutions.
Troubleshooting General Production Services Problems
Problem Probable Cause Solution
Production Services Engine
Problems
When installing the
Production Services Engine,
the following error might be
displayed: “dmsdb.sql can't
be exec'ed further than line
25 create database. "Some
file names listed could not be
created. Check related errors.
(1802)”
Problem with path name. Rename any files using the
following path: C:\Program
Files\Microsoft SQL
Server\MSSQL11.MSSQLSER
VER\MSSQL\data\dmsdb.* to
something else. Then re-run the
installer.
You have forgotten the
Administrator account
password.
Uninstall Production Services
software and delete the SQL
database, then reinstall
Production Services software.
If Production Services is
configured with the Interplay
Engine, then Production
Services is authenticating with
the Interplay Engine. See “Using
the Users Page” on page 77.
Provider Problems
The provider cannot contact
the Production Services
Engine. The error message
“Connection Error -
Unknown Provider” appears.
The provider has not been registered. Register the provider (see
“Configuring a Provider for the
Production Services Engine” on
page 87).
The Production Services Engine is not
running.
Start the Production Services
Engine. See “Starting the
Production Services Engine” on
page 35.
The provider settings have an incorrect
name for provider, Production Services
Engine, or both.
Register the provider (see
“Configuring a Provider for the
Production Services Engine” on
page 87).

Checking Production Services Log Files
319
Checking Production Services Log Files
Log files might help when troubleshooting problems. There are two different log files for
Production Services.
Avid Service Framework Diagnostics Log File
Each Production Service writes a diagnostics log file. The location of the log file depends on the
location chosen during the software installation. The default location is:
%LOCALAPPDATA%\Avid\service_name\log
For example, on a Windows XP system, files are written in the following paths:
In the Add Jobs dialog box, a
provider does not appear.
The provider is not running or not
available.
Start the provider.
The provider is not registered. Register the provider (see
“Registering Services” on
page 82).
Production Services and
Transfer Status tool
You can’t see newly
submitted jobs on the
Production Services and
Transfer Status tool Jobs
page.
You need to refresh the view. In the Production Services and
Transfer Status tool, click the
Refresh button.
Troubleshooting General Production Services Problems (Continued)
Problem Probable Cause Solution
Production
Service Windows XP Path
Archive C:\Documents and Settings\Administrator\Local Settings\Application Data\Avid\ArchiveService\log
Restore C:\Documents and Settings\Administrator\Local Settings\Application Data\Avid\RestoreService\log
Copy C:\Documents and Settings\Administrator\Local Settings\Application Data\Avid\CopyService\log
Move C:\Documents and Settings\Administrator\Local Settings\Application Data\Avid\MoveService\log
Delivery C:\Documents and Settings\Administrator\Local Settings\Application Data\Avid\DeliveryService\log

Checking Production Services Log Files
320
On a Windows 7 system, files are written in the following paths:
This log file uses the extension .alf. Double-click a log file to open it in Avid Diagnostics. See
“Troubleshooting Using Avid Diagnostics” on page 321.
C++ Log File
The following Production Services write a log file that records activities for the C++ component:
Archive, Restore, Copy, Move, and Delivery. The log file is written in the following path:
%APPDATA%\Avid\application name\application name.log
For example, on a Windows XP system, files are written in the following paths:
Production Service Windows 7 Path
Interplay | Archive C:\ProgramData\Avid\Archive Service\log
Interplay | Consolidate C:\ProgramData\Avid\Consolidate Service \log
Interplay | Copy C:\ProgramData\Avid\Copy Service\log
Interplay | Delivery C:\ProgramData\Avid\Delivery Service\log
Interplay | Production
Services Automation
C:\ProgramData\Avid\Media Services Automation\log
Interplay | Move C:\ProgramData\Avid\Move Service\log
Interplay | Restore C:\ProgramData\Avid\Restore Service\log
Interplay | STP Encode C:\ProgramData\Avid\Avid Interplay STP Encode\log
C:\ProgramData\Avid\Temp
Interplay | Transcode C:\ProgramData\Avid\Transcode Service\log
C:\ProgramData\Avid\Avid Interplay Transcode
Production
Service Windows XP Path
Archive C:\Documents and Settings\Administrator\Local Settings\Application
Data\Avid\DMSArchive\DMSArchive.log
Restore C:\Documents and Settings\Administrator\Local Settings\Application
Data\Avid\DMSRestore\DMSRestore.log
Copy C:\Documents and Settings\Administrator\Local Settings\Application
Data\Avid\DMSCopyMedia\ DMSCopyMedia.log

Troubleshooting Using Avid Diagnostics
321
On a Windows 7 system, files are written in the following paths:
A maximum of 10 files are written in a folder. If there are 10 files, the oldest file is replaced by
the newest, so there is no need to manually clean up old files.
Troubleshooting Using Avid Diagnostics
Avid Diagnostics is an Avid Service Framework application that lets you view log information
stored on either a local or remote computer. You can view log information streaming in real time,
open logs stored on a remote computer, package remote logs and specify a storage location for
them, filter logs by severity, and override the logging levels of remote services. For more
information, see the Avid Service Framework User’s Guide.
You can use the Avid Diagnostics application to troubleshoot the progress of jobs.
To troubleshoot the progress of jobs using Avid Diagnostics:
1. Click Start and select Programs > Avid > Avid Service Framework > Avid Diagnostics.
The Select Workgroup dialog box opens.
nThe Select Workgroup dialog box does not open if you previously selected the option to “Always
select and use this workgroup.” When you select this option, the Select Workgroup dialog box no
longer opens when you start the application. The default workgroup is selected, and the Avid
Move C:\Documents and Settings\Administrator\Local Settings\Application
Data\Avid\DMSMoveMedia\ DMSMoveMedia.log
Delivery C:\Documents and Settings\Administrator\Local Settings\Application
Data\Avid\PartialTransfer\ PartialTransfer.log
Production
Service Windows XP Path
Production
Service Windows 7 Path
Archive C:\Users\Administrator\AppData\Local\Avid\DMSArchive\DMSArchive.log
Restore C:\Users\Administrator\AppData\Local\Avid\DMSRestore\DMSRestore.log
Copy C:\Users\Administrator\AppData\Local\Avid\DMSCopyMedia\ DMSCopyMedia.log
Move C:\Users\Administrator\AppData\Local\Avid\DMSMoveMedia\ DMSMoveMedia.log
Delivery C:\Users\Administrator\AppData\Local\Avid\PartialTransfer\ PartialTransfer.log
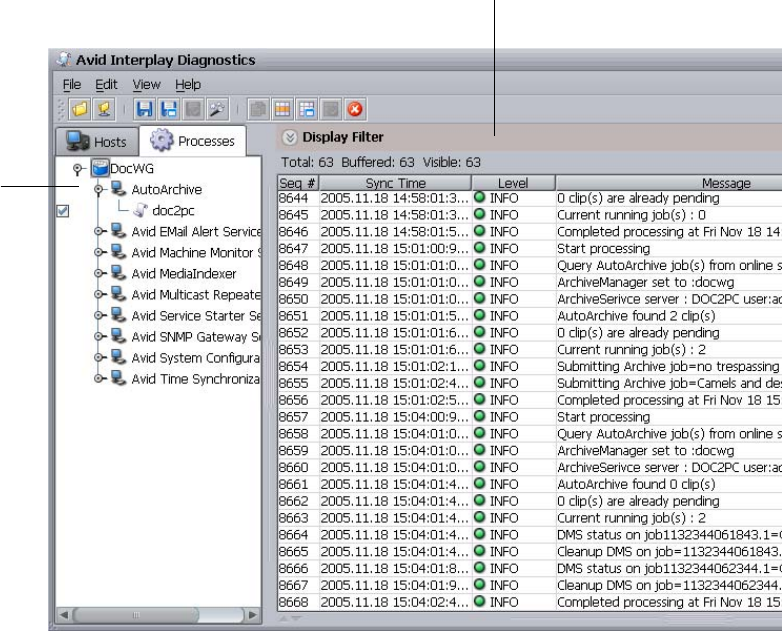
Troubleshooting Using Avid Diagnostics
322
Diagnostics window opens. To change this option and display the Select Workgroup dialog box,
click the Login tab of the Avid Framework Workgroup Properties application and clear the check
box for the option.
2. (Option) If the Select Workgroup dialog box opens, select the workgroup you want to
connect to and click Select.
The Avid Diagnostics window opens.
3. Click the Processes tab.
4. From the Tree view pane, open the process you want to view, and select the computer
running the service. A logging listener is added to the process and the details about the
process are logged in the Log View pane in real-time.
The following illustration shows the Avid Diagnostics with a completed archive job.
Log View pane
Tree View
pane

Archive and Restore Troubleshooting
323
Archive and Restore Troubleshooting
When you need to analyze and fix problems with archiving and restoring, begin by referring to
the table in “Finding Solutions to Specific Archive and Restore Problems” on page 323.
The following are basic steps for troubleshooting archive and restore problems:
1. Setup: Make sure the version of Interplay Archive is compatible with the third-party
software. See “Compatibility of Archive and Restore Services and Third-Party Software” on
page 324.
2. Job information: Check the Production Services and Transfer Status tool and log file. See
“Getting Information About an Archive or Restore Job from the Jobs Page” on page 325 and
“Getting Information About an Archive or Restore Job from a Log File” on page 325.
3. Error messages: Refer to the table in “Archive and Restore Error Messages” on page 326.
4. Stage: Check at what stage of the process the error occurred. See “How the Production
Services Status Tool Reports Archive and Restore Operations” on page 325.
Finding Solutions to Specific Archive and Restore Problems
The following table lists problems, probable causes, and solutions for archive and restore
operations.
Troubleshooting Archive and Restore Services
Problem Probable Cause Solution
An archive or restore job
failed.
Various Check the Jobs page of the Production Services
and Transfer Status tool. See “Getting
Information About an Archive or Restore Job
from the Jobs Page” on page 325. Check the
error message in the table in “Archive and
Restore Error Messages” on page 326.
The restore succeeded but
the media won’t play
Media Indexer did not index
the media.
See “Manually Updating the Status of Media
Files” on page 329.
The restore succeeded. V1 is
present but A1 and A2 are
missing.
Limitation that was fixed in
Interplay Archive patch
version 2.1.0.4.
In the client editing application, set the Dynamic
Relink setting to “Relink to Offline” with
specific resolutions selected. Then resend the job
from the editing application.

Archive and Restore Troubleshooting
324
Compatibility of Archive and Restore Services and Third-Party Software
It is critical that the version of the Archive and Restore Provider software is compatible with the
third-party archive software. Check with your Avid representative for the correct versions.
An archive or restore job
hangs
Avid Service Framework
configuration issue
Check the status of the job on the Jobs page of
the Production Services and Transfer Status tool.
• If the job is hung at 0% or 99%, make sure
that Avid Service Framework is running
correctly. Open a component such as the
Avid Service Configuration, and make sure
all hosts show up within 10 seconds. If not,
check the Framework installation.
• If the job is hung at greater than 0% but less
than 99%, check the third-party software.
Crash or vaporization Incorrect installation or extra
DLLs
• Make sure the provider software is
compatible with the third-arty software (see
“Compatibility of Archive and Restore
Services and Third-Party Software” on
page 324)
•Make sure the correct version of the software
is installed and there are no old components
left over.
• Check the windows/system32 directory for
the following files:
- GenericHelperVC7.dll
- GenericHelper.dll
If either file is present, delete it.
Troubleshooting Archive and Restore Services (Continued)
Problem Probable Cause Solution

Archive and Restore Troubleshooting
325
Getting Information About an Archive or Restore Job from the Jobs Page
The Jobs page of the Production Services and Transfer Status tool provides detailed information
about the jobs being processed by the Production Services Engine. The following information is
useful for troubleshooting:
•Job Name
•Job ID
• Which provider the job went through
• Error message
For complete information about the tool, see “Using the Production Services and Transfer Status
Tool” on page 56. For information about error messages, see “Archive and Restore Error
Messages” on page 326.
Getting Information About an Archive or Restore Job from a Log File
The Archive service and the Restore service generate log files that can help in troubleshooting.
For more information, see “Checking Production Services Log Files” on page 319.
How the Production Services Status Tool Reports Archive and Restore
Operations
During an archive or restore operation, the progress display in the Production Services Transfer
and Status tool changes from 0% to 100%, in the following stages:
• Initialization (from 0% to 1%): Status is reported from the provider.
• Processing (from 1% to 98%): Status is reported from the third-party vendor
• Finalization (from 99% to 100%): Status is reported by the provider.
The following list describes the major stages of the status, with notes for troubleshooting:
0% gray The job is pending and not processed yet.
0% yellow The job is being processed by the Archive or Restore provider (media files
are analyzed, assets are checked in and out, and so on).
If the job is hung at this point, make sure that Avid Service Framework is
running correctly on the Archive Provider. Open a component such as the
Avid Service Configuration, and make sure all hosts show up within 10
seconds. If not, check the Framework installation. Also, make sure that the
third-party vendor API is installed properly.
1% The job has been submitted to the third-party vendor.

Archive and Restore Troubleshooting
326
Archive and Restore Error Messages
The following table provides descriptions and solutions for archive and restore error messages.
98% The job is being processed by the third-party vendor. (This could be reported
as 100% in the third-party vendor.)
99% The job is finished by the third-party vendor. The provider performs the final
checkin and media file re-wrapping for partial restore. Partial restore shows
99% when it is re-creating MXF media files from the raw video frames
retrieved from third-party software.
If this process is taking longer than usual, make sure to restore only the parts
of media files that are required. The longer the requested portions of the
media files are the longer it takes to perform a partial restore.
100% The job is complete.
Archive and Restore Error Messages
Error Name Explanation Recommended Solution
Failed to find master clip
ProviderException: Failed to find
master clip inside aaf file in
c:/temp/xxxx
1. When multiple jobs are
running for restore, some jobs
might fail with this error.
2. An archive appears to
complete successfully,
however the restore fails.
Retry one of the failed jobs. If the error
continues, upgrade the software to a version
higher than v1.5.
Failed to Create Folder The destination folder for this
particular profile is specified
incorrectly.
Check the destination folder for this profile
and make sure it is set to the correct value.
To view an example of the destination
folder values, move the mouse pointer to
the entry and read the Tool Tip.
Media files cannot be found.
ClipName: clip.psd: clean
Not all media files exist on
shared-storage for the specified
resolution.
Re-digitize the clip to make all media files
available at the time you perform an archive
operation. Or make sure you perform an
archive operation before any deletions.
net.nxn.JXDK.CommandFailedEx
ception: Destination Folder is not
selected and is empty
The destination folder is not
selected and typically it is left at
the root level, for example,
AvidWG.
When not using a profile, make sure you
select a destination folder that is writable
by the currently logged in user, such as
AvidWG/Catalogs/xxx.

Archive and Restore Troubleshooting
327
net.nxn.JKDX.ServerCommandFai
ledException: Error message from
server: ‘Failed to open the database
(The database is not active).
Contact your administrator.’
(0x89990028).
Restore provider failed to find the
Interplay Engine database.
The name of the database is retrieved from
the profile, in particular, this property:
“DestinationPath”
AvidWG/Catalogs/Restore
Make sure the “AvidWG” exists.
net.nxn.JXDK.ServerCommandFai
ledException: Error message from
the server: 'user rights do not allow
this operation'
The user who is doing the archive
(or restore) does not have
permission to write to the
specified folder on the destination
server.
Log in as a user who has permission to
write to the specified folder on the
destination server. Then search for the same
asset and re-submit the archive (or restore)
job.
No resolution was archived
or
“No resolutions were found for
selected asset from server{0}”
This particular resolution was not
archived. When restoring from
Interplay Engine, the clip is
matched in the Archive Engine
using the mob id. Therefore, even
though the name of the clip is the
same in both Interplay Engine and
Archive Engine, you might get this
error if the clip was duplicated.
1. This error might occur when the version
of the Archive Engine is not compatible
with the version of Interplay Access.
You must immediately apply the current
Interplay Engine and Archive Engine
patch for the release, to avoid wrong
information being written back to
Archive Engine.
2. Check if this particular resolution for
the desired clip is online in Archive
Engine. If so, restore it from the
AvidAM database.
Third party software returns [error
message]
An error is returned from the
third-party software
Refer to the third-party documentation or
contact the third-party vendor.
Archive and Restore Error Messages (Continued)
Error Name Explanation Recommended Solution

Archive and Restore Troubleshooting
328
Unable to start the job
[com.avid.utils.provider.ProviderE
xception:-1:Provider
Error:net.nxn.JXDK.CommandFail
edException:
The selected node is null at
com.avid.dms.archivemgr.A
(Known Source) at
com.avid.dms.archivelmpl.Start(U
nknown source) at
com.avid.dms.providerlib.Generic
Engine.Startjob(Unknown Source)
at
com.avid.dms.providerlib.job.Proc
essor.Runjob(Unknown source) at
com.avid.dms.providerlib.pollMan
ager.run(UN...]
When the archive provider picks
up the job, the selected asset (clip
or sequence) is no longer in the
folder where the archive was
requested. The asset might have
been moved or deleted.
nThis limitation was fixed in
Interplay version 2.2 and in
the following products:
Media Composer v5.0
Symphony v5.0
NewsCutter v9.0
Interplay Assist v2.2
Do not delete or move the asset after
sending the asset to archive. Wait until the
archive is finished. Depending on the
volume of the archiving process, it might
take awhile before the archive provider
starts processing the job.
Unable to start job
[com.avid.utils.ProviderException:
-1:Provider Error:
net.nxn.JXDK.CommandFailedEx
ception:
Archiving an empty subclip,
sequence or shotlist is not allowed
at
com.avid.dms.archivemgr.archive.
ArchiveAvidAssetlmpl.B
(Unknown Source) at
com.avid.dms.arcive.ArchiveAvid
Assetlmpl.execute(Unknown
source) at
com.avid.dms.archivemgr.archive.
Archivelmpl.]
The asset that is being archived is
a subclip, sequence, or a shotlist
and it does not contain any clips.
Ensure there is at least one clip inside the
subclip, sequence, or shotlist.
Archive and Restore Error Messages (Continued)
Error Name Explanation Recommended Solution

Archive and Restore Troubleshooting
329
Manually Updating the Status of Media Files
If a restore operation is reported as successful on the Jobs page of the Production Services and
Transfer Status tool, but media does not play, the files might not be indexed by Media Indexer.
Ordinarily this indexing takes place automatically, but under some circumstances you need to
force Media Indexer to index the files. The problem could be with the Media Indexer monitoring
shared storage (in the High-Availability Group) or with a local Media Indexer.
First determine if the media files exist on shared storage. Then determine if they are online. If
they are offline, the problem could be with the Media Indexer that is monitoring shared storage.
If they are online, the problem might be with the local Media Indexer.
To determine if the a media file is on shared storage:
1. Open Interplay Access and log in to the database.
2. Select View > Object Inspector.
3. Select the clip or clips that you want to check.
4. Right-click a file path and select Copy File Locations.
Unable to start the job
[com.avid.utils.ProviderException:
-3:
net.nxn.JXDK.CommandFailedEx
ception: No Items on archive
manager at
com.avid.dms.archivemgr.restore.R
estoreAvidassetlmpl.B(unknown
Source) at
comm.avid.dms.archivemgr.restore
.RestoreAvidAssetlmpl.A(Unknow
n source) at
com.avid.dms.archivemgr.restore.R
estoreAvidAssetlmpl.execute(Unkn
own Source) at
com.avid.dms.archivemgr.restore.R
estorelmpl.E (Unknown Source) at
com.avid.dms.archivemgr...]
You are trying to restore an asset
that is not in the Archive Engine.
Only restore the assets that were archived.
Archive and Restore Error Messages (Continued)
Error Name Explanation Recommended Solution
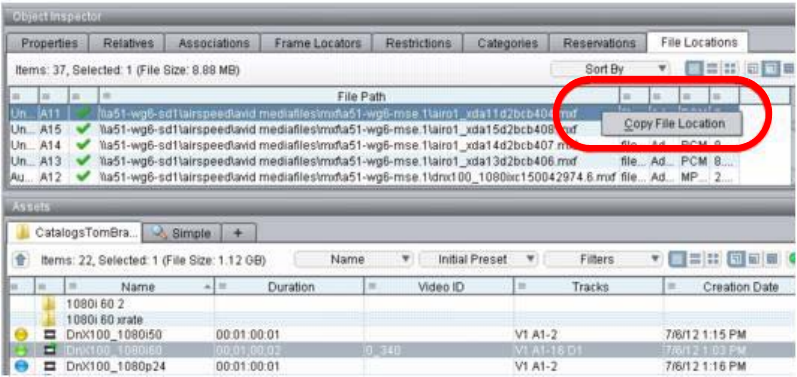
Archive and Restore Troubleshooting
330
5. Open a command prompt and type:
> dir
then paste the file path and press Enter.
You might need to right-click and select Paste.
nMake sure the logged-in user has access to the shared-storage workspace.
6. If the file is not in this directory, you might need to copy it to the directory or re-capture the
media. If the file is in this directory, determine if it is online, as described in the following
procedure.
To determine if the media files are online:
1. In Interplay Access, select View > Object Inspector.
2. Select the clip or clips that you want to check. and click the File Locations tab.
Media files should be listed and marked with a green check mark (media is online). If the
files are marked with a red x (offline), follow the procedure for updating the Media Indexer
that is monitoring shared storage. If the files are online, follow the procedure for updating
the local Media Indexer.
To manually update the Media Indexer that is monitoring shared storage:
tIn Interplay Access, select the clip or clips, right-click, and select Update Status from Media
Indexer. Then check if the media files are online. If they are, try to play the media again.
If the files are still offline, check to make sure the files are correctly indexed by Media
Indexer. For more information, see “Working with Interplay | Production Media Indexers” in
the Interplay | Production Best Practices Guide.
Using a HOSTS File for Production Services
331
To manually update the local Media Indexer:
1. Delete the local Media Indexer cache file. By default, this file is located in one of the
following folders:
Media Indexer V2.6 and later: \ProgramData\Avid\AvidMI\adapters.cache
Media Indexer V2.5 and earlier: \Program Files\Avid\AvidMI\state\ummds.cache
2. Restart Media Indexer:
a. Open Workgroup Properties (All Programs > Avid > Service Framework > Workgroup
Properties).
b. Click the Services tab and click Advanced.
c. Select Avid Interplay Media Indexer and click Restart.
3. Restart the editing application.
Try to play the media again.
Using a HOSTS File for Production Services
The following topics describe how to use a HOSTS files, particularly if there is no Domain
Name System (DNS) on your network.
Understanding the HOSTS File (Windows)
A Domain Name System (DNS) maps machine names to Internet addresses. Use the HOSTS file
or create a HOSTS file if there is no DNS on your network. It is also convenient to place
frequently used name-to-address mappings in this file.
nEach host on your network that uses HOSTS file services must have the file resident on the disk.
Each client and server should be added to the HOSTS file so that every computer can see every
other computer by name.
Using a HOSTS File for Production Services
332
The syntax of the HOSTS file is:
<name> <type> <data> [<comment>]
•name is the name assigned to a host or domain on the Internet.
nIf you do not have a valid domain name, type a fake domain name.
•type is A (address) or CNAME (canonical name).
•data is determined by the type specified:
- If type = A, the data field contains an Internet address.
- If type = CNAME, the data field contains the alias name for an Internet address.
•comment lets you add a comment to the entry.
nAny combination of tabs and spaces can be used as a delimiter between each item in a line. Lines
end with the return and linefeed characters.
CNAME entries are not required. They might make it easier to access an Internet address by
using more common names.
Example Entries in a HOSTS File (Windows)
<IP Address> <name1> <name2> <nameN> [# <comment>]
The IP Address is in the period-delimited format, and spaces separate the name fields as in the
following example:
192.102.73.6 mycomputer1.xco.com mycomputer1 fred #system in the front
office
Updating the HOSTS File (Windows)
Microsoft TCP/IP can be configured to search the local host table file, HOSTS, for mappings of
remote host names to IP addresses. For example, the entry for a computer with an address of
192.102.73.6 and a host name of mycomputer1.xco.com looks similar to this:
192.102.73.6 mycomputer1.xco.com
You can edit the sample HOSTS file that is created when you install TCP/IP to include remote
host names and their IP addresses for each computer with which you will communicate. This
sample file also explains the syntax of the HOSTS file.
A host name always corresponds to an IP address that is stored in a HOSTS file or a name
service such as Production Services. A host name can be used in place of an IP address when
using ping or other TCP/IP utilities.
Using a HOSTS File for Production Services
333
A single entry consists of an IP address corresponding to one or more host names.
nYou should perform this procedure only if you do not have a DNS on your network.
To access the HOSTS file:
1. Double-click the WINNT folder.
2. Double-click the SYSTEM32 folder.
3. Double-click the DRIVERS folder.
4. Double-click the ETC folder.
5. Double-click the HOSTS file.
6. Make the necessary changes to the HOSTS file.
For example, to connect to the mycomputer1.xco.com at the IP address 192.102.73.6, make
the entry in the HOSTS file:
192.102.73.6 mycomputer1.xco.com
nYou can edit the HOSTS file with any word processor as long as you save it as Text Only without
formatting commands. Make sure the HOSTS file does not have a file name extension (such as
.txt). The HOSTS file will not work if there is a file name extension.

AMedia Supported by Partial Restore and
Partial Delivery, Version 3.4
This appendix lists media supported by Interplay Restore and Interplay Delivery version 3.4.
Earlier versions do not support all resolutions.
Partial Restore and Partial Delivery supports the following Avid-created media:
• All Avid DNxHD®
• DNxHD 100
• DNxHR (see the Interplay Production Best Practices Guide for supported resolutions)
• Avid JFIF
• AVC-Intra
• XAVC-Intra HD
• IMX (MPEG) 30, 40, 50
• Uncompressed SD and HD
• DV 25, DV 50, DV 100
• XDCAM, XDCAM HD
• JPEG 2000 resolutions
• All imported files. Partial restore of imported clips applies only to clips that were archived
using Interplay Archive 2.4 or later. Clips archived with earlier version are fully restored.
Partial Restore and Partial Delivery does not support the following Avid-created media:
•MPEG-2 (IPV)
•MPEG-4
•H.264
• MPEG-1 Layer 2 audio
•HDV
• All Long GOP resolutions (except the resolutions listed in the above supported list)
• AVCIBP-BLL (720p proxy)
335
•Apple ProRes
• All media that includes ancillary data
• All rendered effects
• Stereoscopic 3D media
• All master clips with chunked media files
•All OMF media
nPartial restoring or partial delivery of unsupported media should produce a full restore or
delivery.

BAVC-Intra Resolutions Supported by
Interplay | Production Services
AVC-Intra is an intra-frame, H.264 (MPEG-4)-compliant compression codec expressly designed
for professional HD production. Interplay version 2.2 and later supports an end-to-end workflow
for AVC-Intra resolutions. This means that you can ingest AVC-Intra material, work with it in an
Avid editing application, check it in and out of the Interplay database, and use the Production
Services and Interplay Transfer services.
The Interplay Transfer DHM SDK is supported for AVC-Intra, so third party vendors can write
plug-ins that perform ingest and playout of the supported resolutions.
The following table lists the resolutions supported by Production Services and Avid editing
systems.
Project Edit Rate Resolution Name MBit/Sec Raster Size
720p 25 AVC-Intra 50 720p 25 50 MBit 960x720
25 AVC-Intra 100 720p 25 100 MBit 1280x720
29.97 AVC-Intra 100 720p 29.97 100 MBit 1280x720
50 AVC-Intra 50 720p 50 50 MBit 960x720
50 AVC-Intra 100 720p 50 100MBit 1280x720
59.94 AVC-Intra 50 720p 60 50 MBit 960x720
59.94 AVC-Intra 100 720p 60 100 MBit 1280x720
1080i 50 AVC-Intra 50 1080i 50 50 MBit 1440x1080
50 AVC-Intra 100 1080i 50 100 MBit 1920x1080
59.94 AVC-Intra 50 1080i 60 50 MBit 1440x1080
59.94 AVC-Intra 100 1080i 60 100 MBit 1920x1080
1080p 25 AVC-Intra 100 1080p 25 100 MBit 1920x1080
29.97 AVC-Intra 100 1080p 29.97 100 MBit 1920x1080
337
The following resolutions are also supported by Production Services, however, the media needs
to be acquired in its native format:
• AVC-Intra 50 720p 23.976
• AVC-Intra 100 720p 23.976
• AVC-Intra 50 1080p 23.976
• AVC-Intra 100 1080p 23.976
nPerformance is limited when you transcode or mix down a sequence to an AVC-Intra resolution.
These operations can take up to four times real time to complete (up to four minutes for a
one-minute sequence).

CTarget Resolutions for
Interplay | Transcode, Version 3.4
The following table lists the resolutions supported as targets when you create an Interplay
Transcode profile. Groups of resolutions are listed in the same order as the TargetVideoQuality
list.
This list includes target resolutions that are supported in Production Services Transcode version
3.4. Earlier versions do not support all resolutions.
nResolutions supported by Avid editing applications can be used as sources for a transcode
operation, with the exception of resolutions to which pulldown has been added.This statement is
subject to ongoing quality assurance testing.
JFIF
1:1MXF
1:1MXF 10bit 1080i
1:1MXF 10bit 1080p
1:1MXF 10bit 720p
1:1MXF 10bit NTSC i
1:1MXF 10bit NTSC p *
1:1MXF 10bit PAL i
1:1MXF 10bit PAL p *
1:1MXF Progressive
10:1
10:1m
14:1
15:1s
2:1
2:1s
20:1
28:1
3:1
3:1 Progressive *
3:1m
35:1
4:1m
4:1s
8:1
8:1m
8bit HD Uncompressed 1080i
8bit HD Uncompressed 1080p
8bit HD Uncompressed 720p
(1:1 MXF in Avid editing systems)
* Frame rates of 23.976 fps and 24 fps are not supported.
n1:1 10-bit HD RGB is supported for check in, check out, and deletion. It is not supported for
Production Services operations

339
Apple ProRes
Apple ProRes HQ NTSC
Apple ProRes HQ PAL
Apple ProRes HQ 720p
Apple ProRes HQ 1080i
Apple ProRes HQ 1080p
Apple ProRes NTSC
Apple ProRes PAL
Apple ProRes 720p
Apple ProRes 1080i
Apple ProRes 1080p
Apple ProRes Proxy NTSC
Apple ProRes Proxy PAL
Apple ProRes Proxy 720p
Apple ProRes Proxy 1080i
Apple ProRes Proxy 1080p
Apple ProRes LT NTSC
Apple ProRes LT PAL
Apple ProRes LT 720p
Apple ProRes LT 1080i
Apple ProRes LT 1080p
Apple ProRes 4444 1080i
Apple ProRes 4444 1080p
AVC-Intra
AVC-Intra 50 720p 23.976
AVC-Intra 50 720p 25
AVC-Intra 50 720p 50
AVC-Intra 50 720p 60
AVC-Intra 100 720p 23.976
AVC-Intra 100 720p 25
AVC-Intra 100 720p 29.97
AVC-Intra 100 720p 50
AVC-Intra 100 720p 60
AVC-Intra 100 1080i 50
AVC-Intra 100 1080i 60
AVC-Intra 100 1080p 23.976
AVC-Intra 100 1080p 25
AVC-Intra 100 1080p 29.97
AVC-Intra 50 1080i 50
AVC-Intra 50 1080i 60
AVC-Intra 50 1080p 23.976
AVCIBP (720p Proxy)
AVCIBP-BLL3.0 50 AVCIBP-BLL3.0 60
DNxHD
DNxHD 1080 115-120-145
DNxHD 1080 115-120-145 1 Field
DNxHD 1080 1440
DNxHD 1080 175-185-220
DNxHD 1080 175-185-220 1 Field
DNxHD 1080 175X-185X-220X
DNxHD 1080 175X-185X-220X 1 Field
DNxHD 1080 36
DNxHD 1080p 444
DNxHD 1080i 100
DNxHD 1080p 100
DNxHD 720p 100
DNxHD 720 60-75-145
DNxHD 720 90-110-220
DNxHD 720 90X-110X-220X
340
DNxHR*
DNxHR LB 23.976
DNxHR SQ 23.976
DNxHR HQ 23.976
DNxHR HQX 23.976
DNxHR 444 23.976
DNxHR LB 25
DNxHR SQ 25
DNxHR HQ 25
DNxHR HQX 25
DNxHR 444 25
DNxHR LB 50
DNxHR SQ 50
DNxHR HQ 50
DNxHR HQX 50
DNxHR 444 50
DNxHR LB 24
DNxHR SQ 24
DNxHR HQ 24
DNxHR HQX 24
DNxHR 444 24
DNxHR LB 29.97
DNxHR SQ 29.97
DNxHR HQ 29.97
DNxHR HQX 29.97
DNxHR 444 29.97
DNxHR LB 59.94
DNxHR SQ 59.94
DNxHR HQ 59.94
DNxHR HQX 59.94
DNxHR 444 59.94
* In a profile for CROSSRATE mode, the TargetProjectType selection is not needed for DNxHR
resolutions. The frame rate and frame dimensions in the TargetVideoQuality list are used instead.
DV and HDV
DV 25 411
DV 25 420
DV 50
DV25P 411 *
DV25P 420 *
DV50P *
HDV 1080i 50
HDV 1080i 60
HDV 720p 50
HDV 720p 60
DV100 HD 1080i 50 (DVCPro HD)
DV100 HD 1080i 60 (DVCPro HD)
DV100 HD 720p 50 (DVCPro HD)
DV100 HD 720p 60 (DVCPro HD)
* Frame rates of 23.976 fps and 24 fps are not supported.
H.264
H.264 800Kbps Proxy 525
H.264 800Kbps Proxy 625
H.264 800Kbps Proxy 1080p 23.976
H.264 800Kbps Proxy 1080p 24
H.264 800Kbps Proxy 1080p 25
H.264 800Kbps Proxy 1080p 29.97
H.264 2.0Mbps Proxy 1080i 25
H.264 2.0Mbps Proxy 1080i 29.97
H.264 800Kbps Proxy 720p 23.976
H.264 800Kbps Proxy 720p 25
H.264 800Kbps Proxy 720p 29.97
H.264 800Kbps Proxy 720p 50
H.264 800Kbps Proxy 720p 59.94
H.264 1500Kbps Proxy 525
H.264 1500Kbps Proxy 625
H.264 2.0Mbps Proxy 720p 50
H.264 2.0Mbps Proxy 720p 59.94
341
H.264 800Kbps Proxy 1080i 25
H.264 800Kbps Proxy 1080i 29.97
JPEG 2000
J2K 1080i 50
J2K 1080i 59.94
J2K 720p 23.976
J2K 720p 50
J2K 720p 59.94
J2K NTSCi 29.97
J2K PALi 25
J2K 1080p 23.976
J2K 1080p 24
MPEG
MPEG-4 525 500 60
MPEG-4 625 500 50
MPEG 30
MPEG 40
MPEG 50
MPEG2 MPL 352 25i
MPEG2 MPL 352 30i
XAVC-Intra
XAVC Intra 50 1080i 50
XAVC Intra 50 1080i 60
XAVC Intra 100 1080i 50
XAVC Intra 100 1080i 60
XAVC Intra 100 1080p 23.976
XAVC Intra 50 1080p 23.976
XDCAM-EX
XDCAM-EX 35mbps 1080i 50
XDCAM-EX 35mbps 1080i 60
XDCAM-EX 35mbps 1080p 23.976
XDCAM-EX 35mbps 1080p 25
XDCAM-EX 35mbps 1080p 29.97
XDCAM-EX 35mbps 720p 23.976
XDCAM-EX 35mbps 720p 25
XDCAM-EX 35mbps 720p 29.97
XDCAM-EX 35mbps 720p 50
XDCAM-EX 35mbps 720p 60
H.264

342
XDCAM-HD
XDCAM-HD 17.5 50i
XDCAM-HD 17.5 60i
XDCAM-HD 50mbps 1080i 50
XDCAM-HD 50mbps 1080i 60
XDCAM-HD 50mbps 720p 50
XDCAM-HD 50mbps 720p 60
XDCAM-HD 35 50i
XDCAM-HD 35 60i
XDCAM-HD 50mbps 1080p 25
XDCAM-HD 50mbps 1080p 23.976
XDCAM-HD 50mbps 1080p 29.97

DMaximum Number of Simultaneous Jobs
The following table lists the default number of simultaneous jobs that can be performed by each
Production Services provider. It also lists which services you can modify to change the default
setting and the files in which to modify it.
cEach type of provider can handle a different maximum number of simultaneous jobs. Do
not change this value unless specifically instructed by Avid Professional Services or
Customer Success. For more information, see “Maximum Number of Simultaneous Jobs”
on page 343.
To modify the maximum number of simultaneous jobs:
1. Locate the appropriate .ini file in Notepad of another text editor.
For example, open the following file to modify the number of archive jobs:
Documents and Settings\username\Avid Archive Service\DMSArchive.ini
2. Edit the following line to specify the maximum number of simultaneous jobs:
@5%?MaxJobs=n
3. Save and close the file.
Production
Services
Provider
Default Number
of
Simultaneous
Jobs
Supported for
Change?
File to Change
Documents and Settings\username
Archive 3 Yes \Avid Archive Service\DMSArchive.ini
Copy 1 Yes \Copy Service\DMSCopyMedia.ini
Delivery 1 Yes \Interplay Delivery
Service\DMSIDService.ini
Move 1 Yes \Move Service\DMSMoveMedia.ini
Restore 3 Yes \Avid Restore Service\DMSRestore.ini
STP Encode 1 No Not applicable
Transcode 1 No Not applicable

A B C D E F G H I J K L M N O P Q R S T U V W X Y Z
A
AAF metadata
adding to tape archive 156
Administration tools
overview 19
Production Services and Transfer Status 19
Application key (dongle)
for Production Services 24
Archive database
connecting to 157
creating folders 157
searching 183
Archive Engine
configuring for multiple Archive Engines 193
described 149
setting computer name 153
Archive profile
creating 161
options 162
Archive service 150
compatibility with third-party software 324
configuration 153
configuration settings 153
configuring for multiple Archive Engines 193
described 145
error messages 326
information on Jobs page 325
log file 325
registering service 150
stages of an operation 325
status reporting 62
troubleshooting 321, 323
troubleshooting table 323
Archive settings
adding AAF metadata 156
allow duplicate media files 153
allow metadata archive 153
archive segment 153
archive server name 153
best effort restore 153
configuration 153
duplicate versions 154
maximum number of jobs 156
online database 153
overriding metadata 157
segment size 153
server name 153
use best effort 153
Archiving
check list 147
check list, multiple Archive Engines 193
configuration 149
consolidating before archive 168
deleting after 170
from the Avid editing application 166
overview 145
partial restore 188
profile partition value 164
restoring a clip 185
servers 149
using an Auto Archive folder 181
using an Avid editing system 166
using Interplay Access 170
Asset tracking
multiple Archive Engines 198
Audio formats
for Copy, Move, and Deliver 95
Auto Archive folder
setting up 180
working with 174
Auto Archiving
configuration 175
described 145
Index

Index A B C D E F G H I J K L M N O P Q R S T U V W X Y Z
345
enabling 175
limit clips submitted 175
location of files 182
preparing workgroup 175
scan interval setting 175
verify service is running 178
Auto Copy
checklist 230
configuration 231
copying complete database and media 240
limit clips submitted 231
replication jobs 241
replication scan 242
rules 235
scan interval setting 231
verify running 234
Auto Copy folder
copying assets 239
identifying 236
overview 228
Auto Copy Media
transferring assets 239, 240
Auto Copy service
enable 231
installing 231
overview 228
requirements 228
Auto Production Service
changing hostname 27
installing 231
overview 21
Auto purge jobs
settings 31
Auto Transcode 137
creating a folder 141
enable setting 137
identify folder 141
limit setting 137
location of files 142
preparing workgroup 137
set retry time 137
set scan interval 137
transcoding assets 142
AutoTransfer service
configuration 138
AVC-Intra
supported resolutions 336
Avid
online support 15
training services 16
Avid Automatic Archive, Copy, Transcode, and
Transfer Service
changing hostname 27
Avid Diagnostics
described 321
troubleshooting progress of jobs 321
Avid editing application
archive process 166
settings 166
Avid Service Configuration
Auto Copy service 228
configure Auto Archive 175
configure Auto Copy 231
Avid Service Framework
Auto Copy service 228, 234
configure Auto Archive 175
configure Auto Copy 231
B
backups
automatically connecting to Production Services 36
Production Services 36
Production Services database 43
Best effort restore
setting 153
Broker
described 18
C
Cancel
jobs 69
Caution icon
for changed or new profile option 98
cold spare (Production Services Engine) 42
Copy service 211
check list 209
copying during ingest 222
maximum number of jobs 227
registering service 211
status reporting 62
Copy service profile
creating 213

A B C D E F G H I J K L M N O P Q R S T U V W X Y Z Index
346
Copying
to another workgroup during ingest 222
to another workgroup using Access 218
to another workgroup using an editor 221
Copying assets
complete database and media 240
using an Auto Copy folder 239
D
DATAEXTRACT mode 129
Delete
jobs 70
providers 74
services 76
user accounts 80
Delivery Receiver
register hostname 29
Delivery Receiver service
described 261
registering receiver 264
Delivery service 266
check list 263
creating a profile 268
described 261
from Access 275
from Avid editing system 276
maximum number of jobs 283
registering service 266
third-party development 283
verify if running 279
DNS (Domain Name System)
and machine names 331
Dongle
for Production Services 24
F
FlashNet
partition value 164
software 145
G
Group clips
support in Production Services and Transfer 25
H
Hostname
registering 29
HOSTS file
adding entries 331
updating 332
I
Interplay Access
archiving from 170
Interplay Administrator
Archive settings 153
Interplay Assist
archiving from 166
Interplay Consolidate
creating a profile 313
installation check list 302
installing 304
prerequisites for installing and configuring 303
registering a provider 310
registering the service 305
Interplay Framework
Delivery service 279
Interplay Media Services 13
Interplay Portal
viewing 15
Interplay Workgroup
registering Production Services Engine 29
J
Job Details window 66
Job information 66
Job status
display definitions 62
reporting 62
Jobs
Archive maximum jobs 156
canceling 69
Copy maximum jobs 227
Delivery maximum jobs 283
Move maximum jobs 260
Restore maximum jobs 156

Index A B C D E F G H I J K L M N O P Q R S T U V W X Y Z
347
Jobs page
canceling a job 69
customizing the display 64
deleting a job 70
information table 60
opening 58
purging the jobs list 68
retrying a job 70
viewing details 65
L
Licenses
for Production Services 24
Log files
Production Services providers 319
Long GOP OP1a Transfer
understanding 284
M
Maximum simultaneous Production Services jobs 343
Media
moving to another workspace 244
Media files
manually updating status 329
Media Indexer
manually updating status 329
workgroup name 31
Media Services 13
MediaCentral UX
required Production Services 23
Mounting workspaces
Production Services 26
Move service 250
check list 248
creating a profile 252
maximum number of jobs 260
moving media using Access 255
overview 244
registering service 250
status reporting 62
Multiple Archive Engines
asset tracking for 198
configuring for 193
profiles 195
required software 194
terminology 194
MultiRez
partially online clips, restoring 189
O
OMF files
transcoding 135
Online support 15
Overview
Production Services and Transfer Status tool 19
Production Services Engine 18
Production Services service providers 21
Production Services system 17
P
Partial Delivery
described 261
relinking assets 279
Partial Restore
performing 189
performing from archive 188
relinking assets 190
segment size 192
supported media 334
viewing media files 191
Partially online clips
restoring from an archive 189
Partition
SGL FlashNet 164
Password
reassigning 79
Port number
Delivery Receiver setting 264
Procedures
configuring Avid services 138
starting Health Monitor 281
Production Services
Archive and Restore services 150
Auto Transcode 137
automatically connecting to backup 36
backing up database 43
Copy service 211
creating profiles 92
deleting a registered service 76

A B C D E F G H I J K L M N O P Q R S T U V W X Y Z Index
348
Delivery service 266
installing for Delivery 301
installing service description 83
major components 18
Move service 250
restoring database 49
services overview 21
setting up backup 36
STP Encode 290
Transcode service 105
troubleshooting 317
Production Services and Transfer Status tool
functional modes table 58
Jobs page overview 58
opening 56, 276
overview 19
pages 58
user interface 58
Production Services Automation
installation check list 302
installing 304
prerequisites for installing and configuring 303
registering a provider 308
registering the service 305
Production Services Engine
configuring spare 42
connecting from an Avid editing application 133,
166, 296
connecting from Assist 295
identifying in the Interplay Engine 29
opening 35
overview 18
registering 29
settings 31
troubleshooting 317
Production Services providers
check lists for setting up 23
log files 319
maximum number of simultaneous jobs 343
troubleshooting 317
Production Services settings
Avid editing application 166
Profile
creating Archive or Restore 161
creating Copy service 213
creating for specific Delivery Providers and
Receivers 272
creating provider 93
Delivery service 268
icon for changed or new option 98
modifying multiple profiles 96
partition value 164
selecting audio formats 95
specifying user credentials for Delivery 274
Transcode creating 110
Transcode modes 112
using to transcode 132, 132
Profiles
multi-select mode 96
Profiles page
information 92, 228
Provider
configuring for backup connection 39
described 17
Providers page
customizing the display 72
deleting a provider 74
opening 71
overview 71
viewing details 73
R
Register
Delivery Receiver hostname 29
Registering
Delivery Receiver provider 264
Production Services Engine 29
Relinking
partially delivered assets 279
partially restored assets 190
Restore profile
creating 161
options 162
Restore service
compatibility with third-party software 324
error messages 326, 326
information on Jobs page 325
maximum number of jobs 156
registering service 150
stages of an operation 325
status reporting 62
troubleshooting 321, 323
troubleshooting table 323

Index A B C D E F G H I J K L M N O P Q R S T U V W X Y Z
349
Restore serviceServices
installing and registering Archive and Restore 150
Restoring
from the Archive database 185
restoring
Production Services database 49
Restrictions
support in Production Services and Transfer 24
S
Send to Playback
from an Avid editing system 299
from Assist 297
Server hostname
settings 29
Server Hostname Settings
Media Indexer 31
Service
connecting provider overview 87, 151
Service Framework
verify services are running 140
Service provider
described 17
Services
configuring Copy provider 211
configuring Move provider 250, 266
connecting providers 87, 151
connecting Transcode provider 82, 105, 106, 150,
211, 250, 266, 290, 310
installing and registering Copy 211
installing and registering Delivery 266
installing and registering Move 250
installing and registering STP Encode 290
installing and registering Transcode 105
status definitions 62
verify connection 89
Services Job status
settings 62
Services page
display information 75
opening 74
overview 74
SGL FlashNet
partition value 164
server configuration 149
software 145
Starting
Avid Health Viewer 281
Stereoscopic 3D support
in Interplay Transcode 143
STP Encode service 290
check list 289
connecting the provider 291
overview 284
registering service 290
starting 294
workflow 286
Surround sound
support for 120
System
overview 13
T
Training services 16
Transcode
check list 103
location of files 142
overview 102
supported resolutions 338
Transcode service 105
Auto Transcode folder 137
connecting provider 82, 106
installing the service 83
profile creating 110
registering service 105
starting 109
using a profile 132
Transcoding assets
Auto Transcode 142
from Avid editing application 133
OMF clips 135
Transferring files
Auto Copy checklist 230
using Auto Copy 240
using Auto Copy folder 239
Troubleshooting 15
archive and restore 323
archive and restore table 323
Production Services 317
Production Services Engine 317
Production Services providers 317

A B C D E F G H I J K L M N O P Q R S T U V W X Y Z Index
350
U
User accounts
administrator tasks 19
managing 77, 80
rights 19
User page
creating and managing user accounts 77
deleting a user account
80
deleting and re-creating all accounts 80
opening 78
reassigning a user password 79
setting up a user accounts 79
W
warm spare (Production Services Engine) 42
Workgroup name
Server Hostname Settings 31
Workgroups
copying between workgroups using Access 218
copying between workgroups using an editor 221
Workspaces
mounting for Production Services 26


Avid
75 Network Drive
Burlington, MA 01803-2756 USA
Technical Support (USA)
Visit the Online Support Center at
www.avid.com/support
Product Information
For company and product information,
visit us on the web at www.avid.com
